

Page 1
2-CHANNEL UHF MICROPHONE SYSTEM
SYSTEME DE MICROPHONE UHF
UHF FUNKMIKROFONSYSTEM
DRAADLOOS UHF MICROFOON SYSTEEM
2-KANALNI UHF MIKROFONSKI SISTEM
SISTEMA DE MICROFONO UHF
SISTEMA MICROFONICO UHF
Imported from China by
PARTY-200UHF
GB - INSTRUCTION MANUAL
F - MANUEL D’UTILISATION
D - BEDIENUNGSANLEITUNG
NL – HANDLEIDING
SL-NAVODILA ZA UPORABO
ES – MANUAL DE INSTRUCCIONES
IT - MANUALE DI ISTRUZIONI
LOTRONIC SA
Avenue Zénobe Gramme 9
B-1480 Saintes
©Copyright Lotronic 2019 PARTY--200UHF 1
Page 2

GB
OPERATING INSTRUCTIONS
Important Safety instructions and danger warnings
• Please read the manual carefully and keep it for future reference.
• All safety instructions and warnings must be adhered to. They are part of the manual and must be kept with the
manual.
• Any guarantee claims are rendered invalid if damage occurs due to non-observance of these operating instructions.
We assume no liability for any consequent damage.
• We assume no liability for personal injury or damage to property caused by incorrect handling or nonobservance of
the safety instructions. Any guarantee claims expire in such cases.
• Unauthorized conversions and/or modifications of the appliance are not permitted for safety and licensing reasons
(CE).
• The appliance is approved for operation in dry, closed rooms only. Do not operate the device nearby water, such as
in bathrooms or nearby swimming pools.
• The appliance may not be exposed to extreme temperatures (< +5°C / > +35°C) in operation.
• The appliance may not be subjected to strong vibrations or heavy mechanical strain.
• Do not place any recipients filled with liquids, such as glasses or vases, on top of or directly next to the appliance.
They could fall over, causing water to enter the appliance. Never pour out liquids above the appliance. Do not place
any small objects, such as coins or paper clips, on the appliance since they could fall inside the appliance. You run a
high risk of causing a fire or life-threatening electrocution! If any liquid or objects enter the appliance nevertheless,
pull the mains plug out of the socket immediately and contact a specialist.
• The appliance has been constructed according to protection class ll (only for double insulated units without earth
terminal).
• Only pull the mains plug out of the socket by the intended gripping surface. Do not pull it by the cable.
• Never plug the mains plug in or out with damp or wet hands.
• Always pull the mains plug out of the mains socket:
Before cleaning the appliance
If there is a thunderstorm
If you will not be using the appliance for a long period of time (>1 week)
• Electrical appliances must be kept out of the reach of children. Be particularly careful if children are present.
Children are not aware of the hazards involved in handing electrical appliances improperly. Children could attempt
to poke objects into the appliance. There is a life-threatening danger of electrocution.
• Do not leave the appliance unattended while operating it.
• Never place the appliance on an unstable or movable surface. Persons could be injured or the appliance damaged
by it falling down.
• Live components can be exposed by opening covers or removing components (unless this can be done without
tools). Contact points can also be live. If the appliance has to be opened in order to calibrate, service, repair or
replace components or assemblies, all of its poles must be disconnected from all sources of voltage first. If the
appliance has to be kept open and under voltage during maintenance or repairs, this work may only be carried out
by a specialist who is familiar with the risks involved and the relevant regulations.
• Never connect the appliance directly after transferring it from a cold to a warm room. The condensation water that
forms could destroy the appliance or result in an electric shock. Allow the device to reach room temperature
before connecting it. Wait until the condensation water has evaporated. This can take some hours.
• Do not place any naked flames such as those of burning candles on or next to the appliance.
©Copyright Lotronic 2019 PARTY--200UHF 2
Page 3
• Do not place the appliance on soft surfaces such as carpets or beds. Do not cover the air vents of the appliance. Do
not obstruct the air circulation with objects such as magazines, table cloths or curtains. This prevents the
dissipation of heat from the appliance and can result in overheating.
• Only use the appliance in a moderate climate, not in tropical environments.
• Defective mains cables may only be replaced by specialists. Danger of shock hazard!
• If you are not sure about the correct connection or if questions arise which are not answered by the operating
instructions, please do not hesitate to contact support or a specialist of your choice. Consult a specialist if you are
in doubt the operating principle or the safety of the product.
SYSTEM FEATURES
1. Simultaneous output use: Unbalanced 6.35mm jack plug and balanced XLR output connectors may be used
simultaneously to different external devices.
2. Range: UHF series transmitters will work at a distance of up to 30m from the receiver.
3. Noise squelch: Squelch circuit analyzes signal strength and quality to avoid interference due to environmental RF
noise.
4. Low battery warning light: A red light on the microphone(s) warns the user that there is less than one hour of
battery life left.
DUAL CHANNEL RECEIVER
Front panel
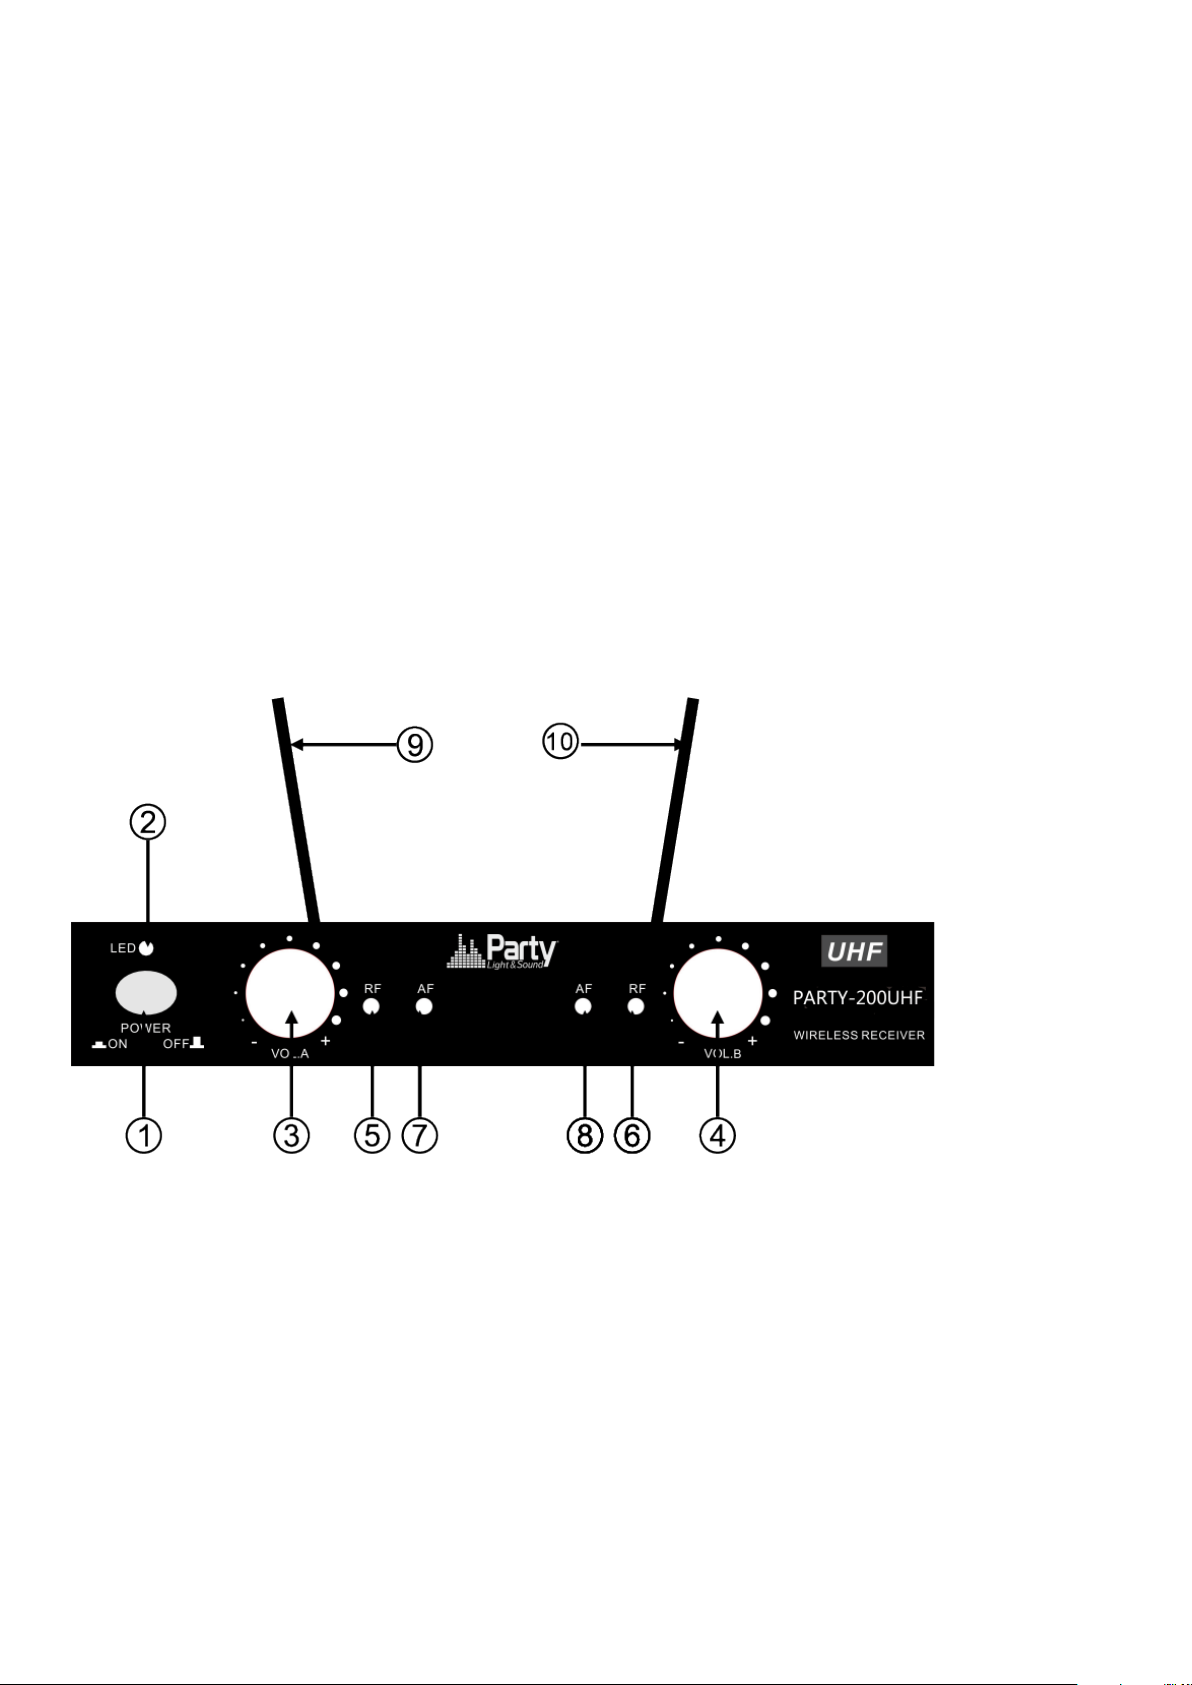
1. Power Button: Power ON/OFF the receiver.
2. Power Indicator: Indicate the power ON/OFF.
3. Volume Knob channel 1.
4. Volume knob channel 2
5 & 6."RF" signal Indicator: It glows when the Receiver receives an RF signal from mic 1 & mic2.
7 & 8."AF"Audio Level Indicator: Indicate the wireless system audio signal level of channel 1 & 2.
9 & 10. Antenna channel 1 & 2
Rear panel.
11. 5Vdc Power Jack: Connect the AC/DC adapter to receiver
12. Audio Output Jack 6.35mm: Connect the audio cable from this jack to the input port of amplifier, mixer.
13. XLR Balanced Output Jack: Connect the audio cable from this jack to the input port of amplifier, mixer.
©Copyright Lotronic 2019 PARTY--200UHF 3
Page 4
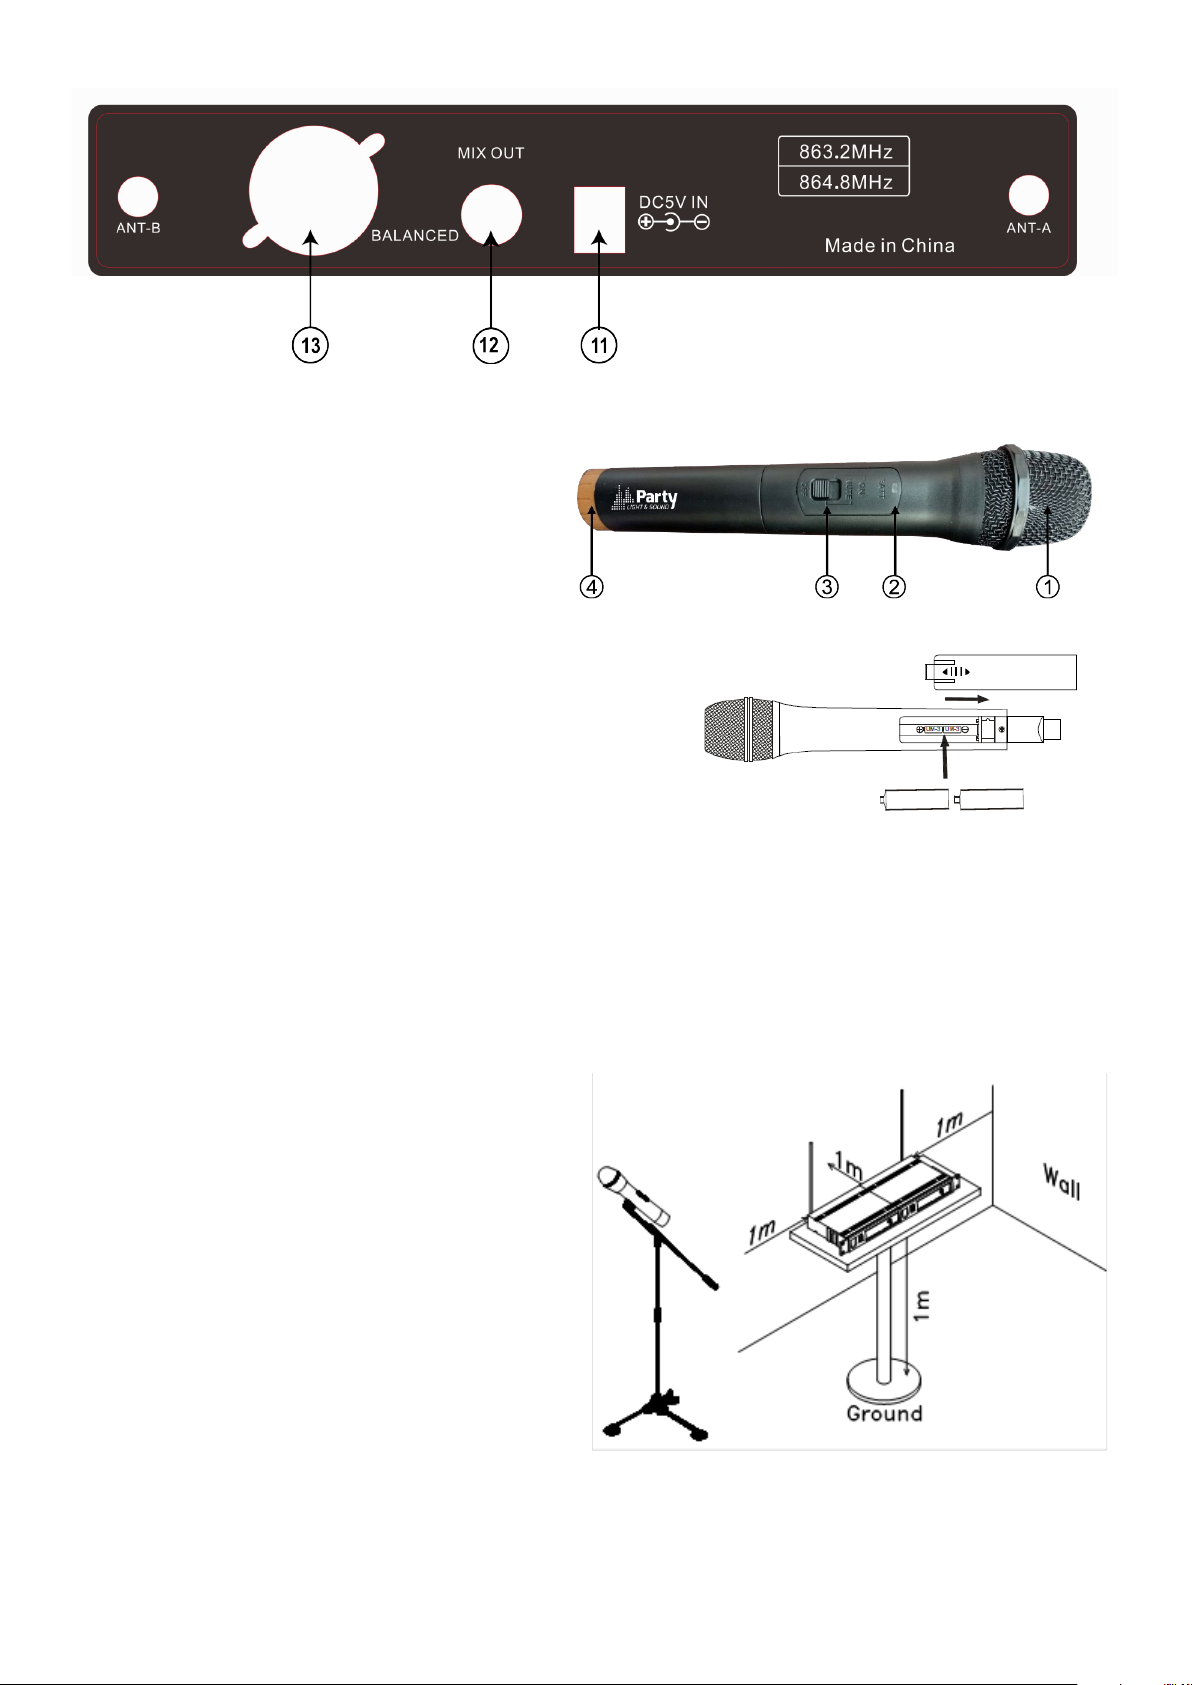
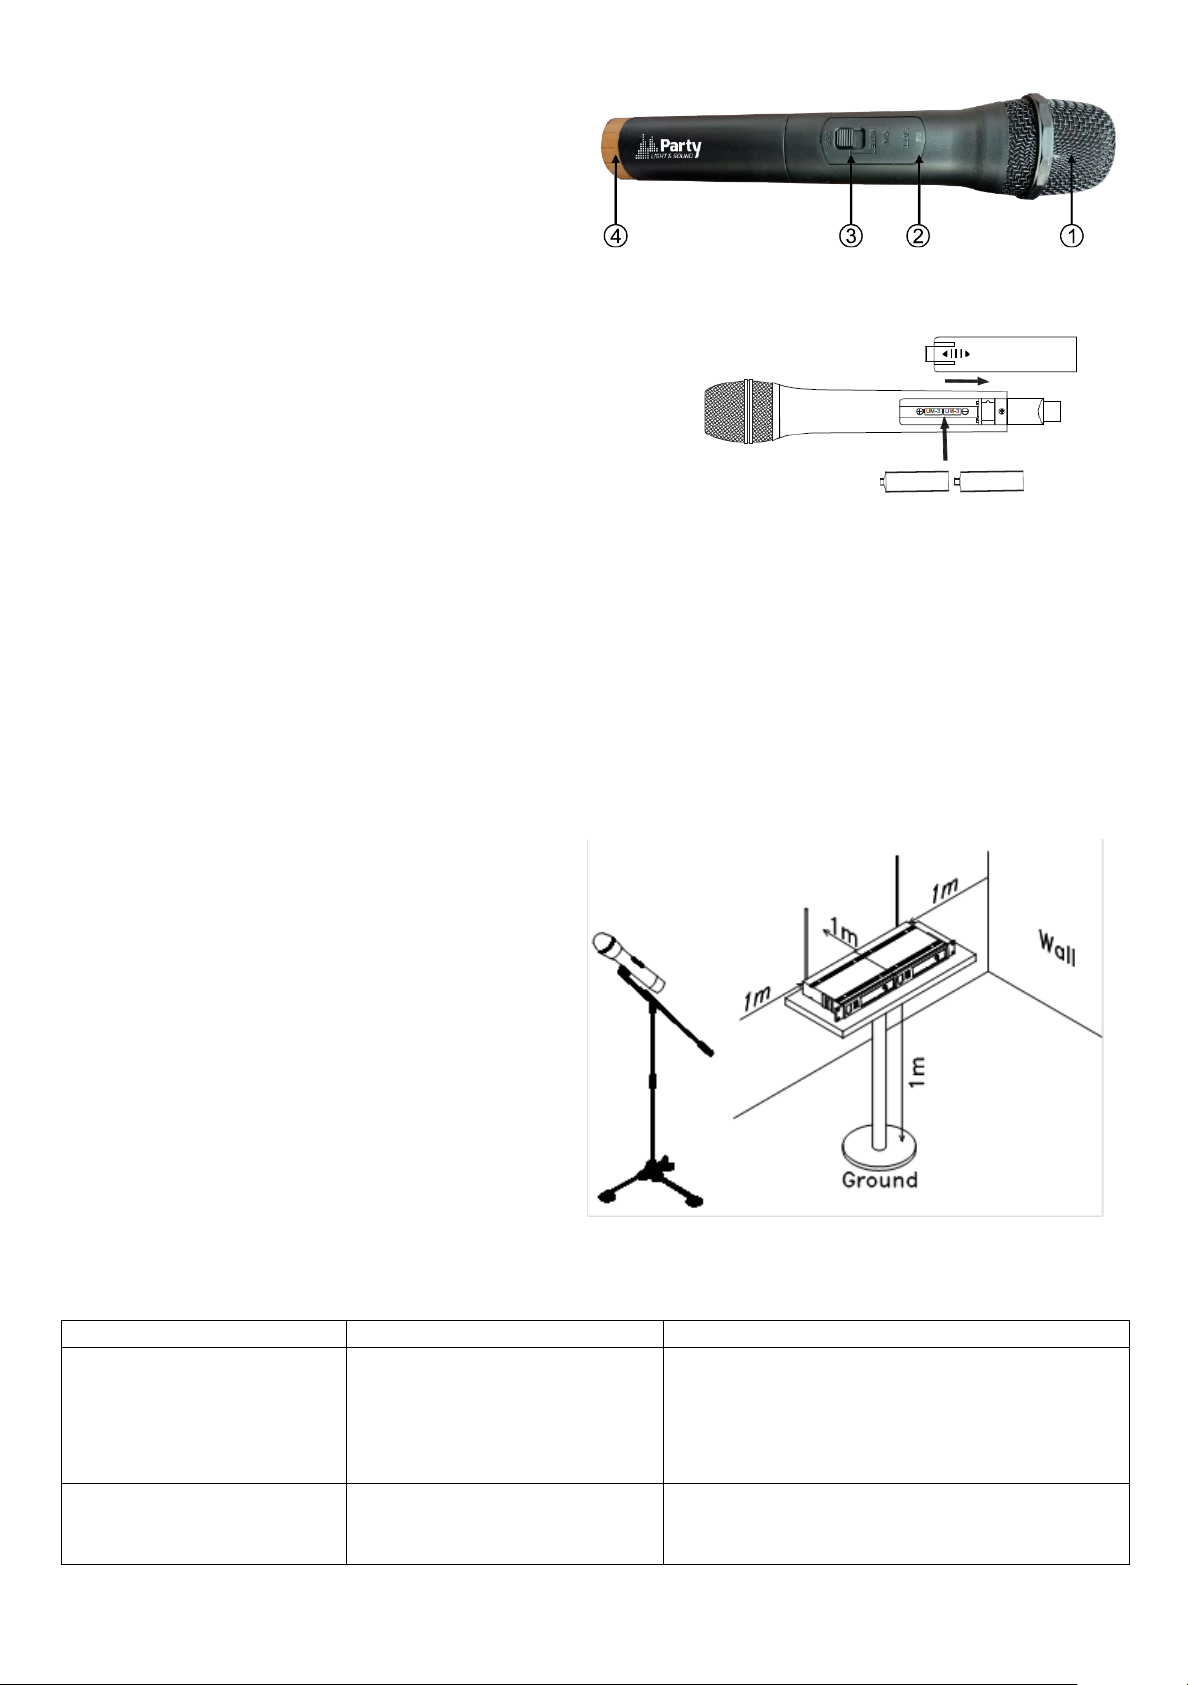
MICROPHONE TRANSMITTER FEATURES
1. Grille: Protects the cartridge and helps reducing the
breath sounds and wind noise.
2. Power indicator
3. ON/OFF switch
4. Tail-hood to identify the mic
TRANSMITTER BATTERY INSTALLATION
Push the battery cover open. Insert 2x AA batteries into the
battery compartment with the correct polarity. Close the battery
cover.
SYSTEM CONNECTION
1. Receiver power connection: Connect the DC connector of the supplied AC/DC adaptor to the DC input socket on
the receiver. Plug the AC connector into an appropriate mains outlet.
2. Antenna: Keep the position of the antenna at an angle of 90°.
3. Audio connection: Connect the corresponding output of the receiver via a 6.35mm Jack lead or an XLR lead to the
input of a power amplifier, mixer, etc.
TIPS TO ACHIEVE MAXIMUM PERFORMANCE
Make sure you can always see the receiver antenna
from the transmitter position.
Keep the distance from transmitter to receiver antenna
as short as possible.
Avoid placing the receiver antennae near metal surfaces
and obstruction.
Monitor battery power and replace the battery as soon
as the red light goes on.
If stacking or rack mounting receivers in a multiple
system, do not allow antennae to touch or cross.
Perform a walk-through before performance or
presentation. If dead spots are found, adjust location of
the receiver. If dead spots remain, mark them and avoid
them during performance.
For a good operation, don’t place the receiver near to sources of interference. Place the receiver in 1m distance from
the ground and let at least 1m free space around the receiver.
©Copyright Lotronic 2019 PARTY--200UHF 4
Page 5

TROUBLESHOOTING
Problem
Indicator status
Solution
No sound
Red transmitter indicator doesn’t
Slide the POWER ON/OFF switch on the transmitter
ones.
No sound
The red POWER indicator on the
Check if the mains adaptor is plugged correctly into
the mains outlet supplies the proper voltage
No sound
The signal indicators A/B on the
Increase the volume on the receiver. Check the
equipment
No sound
The signal indicators A/B on the
receiver are glowing
Make sure that the frequencies of the receiver and
Distortion level increases
The signal indicators A/B on the
glowing
Replace transmitter battery
Bursts of noise or other
present
Signal indicators A/B are on
Identify potential sources of interference (other RF
system operating on a different frequency
Momentary loss of sound
area
Signal indicators A/B on the
Reposition receiver and perform walk-through test
gradually
audible radio signals are
flash
receiver is OFF
receiver are glowing
receiver are off. The POWER
indicators on the transmitter and
receiver and LOW BATTERY
indicator on the transmitter are
to ON. Make sure that the batteries are properly
inserted with the correct polarity (+/-). If the
batteries are correctly inserted, replace them by new
the mains outlet and the DC socket. Make sure that
output connections from the receiver to the external
the transmitter match.
Move the transmitter closer to the receiver
sources) and turn off, remove or use a wireless
as transmitter is moved
around the performing
receiver are off when the sound
is lost
again. If audio dropouts persist, mark “dead” spots
and avid them during performance
SYSTEM SPECIFICATIONS
RF Carrier frequency range ........................................................................... 863.2MHz & 864.8MHzMHz
Max. RF emission ......................................................................................................................... 4.29wW
Operating range ...................................................................................................................... 30m typical
Audio frequency response ........................................................................................... 40-15,000Hz ±3dB
THD ................................................................................................................................................... <0.5%
RECEIVER SPECIFICATIONS
Input power ............................................................................................ 5Vdc via supplied mains adaptor
Signal/noise ratio ............................................................................................................................. >80dB
Border upon channel rejection ........................................................................................................ >80dB
Image & spurious rejection .............................................................................................................. >80dB
Receiving sensitivity ......................................................................................................................... >5dBu
MICROPHONE SPECIFICATIONS
Power requirements ....................................................................................................2 x 1.5AA batteries
Modulation type .................................................................................................................................. F3E
RF output...................................................................................................................................... >10dBm
Max. deviation ............................................................................................................................... ±25kHz
Electric products must not be put into household waste. Please bring them to a recycling centre. Ask your
local authorities or your dealer about the way to proceed.
©Copyright Lotronic 2019 PARTY--200UHF 5
Page 6

F
INSTRUCTIONS D’UTILISATION
Consignes de sécurité
• Nous déclinons toute responsabilité pour des dommages aux biens et aux personnes dus à une mauvaise
manipulation ou le non-respect des consignes de sécurité. Le droit de garantie ne s’applique pas.
• Des modifications non-autorisées de l’appareil sont interdites pour des raisons de sécurité et de licence (CE).
• Utiliser uniquement à l’intérieur dans une pièce sèche et fermée. Ne pas utiliser à proximité d’eau tel que dans
une salle de bains ou à proximité d’une piscine.
• Ne pas exposer l’appareil à des températures extrêmes (<+5°C / >+35°C)pendant le fonctionnement.
• Tenir à l’abri des vibrations fortes et des contraintes mécaniques.
• Ne pas poser de récipients remplis de liquides tels que des verres ou des vases, sur ou à proximité immédiate de
l’appareil. Ils risquent de tomber et de déverser le liquide dans l’appareil. Ne jamais verser de liquides au-dessus
de l’appareil.
• Ne pas placer de petits objets tels que des pièces ou des trombones sur l’appareil car ils risquent de tomber à
l’intérieur de l’appareil. Vous risquez de provoquer un incendie ou une électrocution. Si un liquide ou un objet
pénètre dans l’appareil, débranchez immédiatement la prise secteur et contactez votre revendeur.
• Pour débrancher la fiche secteur, tirez toujours sur la fiche, jamais sur le cordon.
• Ne jamais brancher ou débrancher la fiche secteur avec des mains mouillées.
• Débranchez toujours l’appareil du secteur:
o avant de le nettoyer
o pendant un orage
o en cas de non-utilisation prolongée (>1 semaine)
• Tenir des appareils électriques hors de la portée des enfants. Soyez particulièrement vigilants en présence
d’enfants. Les enfants ne sont pas conscients du danger d’un appareil électrique. Ils pourraient essayer d’insérer
un objet à l’intérieur de l’appareil ce qui représente un grave danger d’électrocution.
• Ne pas laisser l’appareil sans surveillance pendant son fonctionnement
• Ne jamais placer l’appareil sur une surface instable ou mobile. L’appareil risque de blesser une personne ou de
s’abîmer en tombant.
• En ouvrant le boîtier, vous accédez à des composants sous tension (sauf si vous pouvez y accéder sans outils). Des
points de contacts peuvent également être sous tension. S’il faut ouvrir l’appareil pour le calibrer, l’entretenir, le
réparer ou remplacer des composants, toutes les bornes doivent d’abord être débranchées des sources de
tension. S’il faut garder l’appareil ouvert et sous tension pendant la maintenance ou la réparation, ce travail ne
doit être effectué que par un spécialiste qui connait les risques encourus et la règlementation en vigueur.
• Ne jamais brancher l’appareil immédiatement après un passage d’un endroit froid dans un endroit chaud. L’eau de
condensation qui se forme, risque d’endommager l’appareil ou provoquer un choc électrique. Attendez que
l’appareil ait atteint la température ambiante avant de le brancher. Attendez que l’eau de condensation se soit
évaporée ce qui peut prendre quelques heures.
• Ne pas placer de flamme ouverte telle qu’une bougie sur ou à côté de l’appareil.
• Ne pas placer l’appareil sur une surface molle telle qu’un tapis ou un lit. Ne pas obstruer les orifices de ventilation.
Ne pas empêcher la circulation d’air par des objets tels que des magazines, nappes ou rideaux. Ceci empêche la
dissipation de la chaleur et peut entraîner une surchauffe.
• Utiliser l’appareil uniquement à un environnement modéré. Ne pas utiliser dans un environnement tropical.
• Remplacer les câbles secteur défectueux uniquement par un spécialiste. Risque d’électrocution!
©Copyright Lotronic 2019 PARTY--200UHF 6
Page 7
• Si vous n’êtes pas sûr de la bonne connexion ou si vous avez des questions auxquelles le mode d’emploi ne répond
pas, n’hésitez pas à demander conseil à un spécialiste ou votre revendeur.
CARACTERISTIQUES
1. Utilisation simultanée des sorties : La fiche jack 6.35mm asymétrique et la fiche XLR symétrique peuvent être
branchées en même temps sur des appareils externes.
2. Portée : Les transmetteurs UHF ont une portée allant jusqu’à 30m du récepteur.
3. Réducteur de bruit : Le circuit squelch analyse la force et la qualité du signal afin d’éviter des interférences
provenant de fréquences radio environnantes.
4. Indicateur de faible batterie : Un voyant rouge sur le(s) microphone(s) prévient l’utilisateur qu’il ne reste plus
qu’une heure de batterie.
CARACTERISTIQUES DU RECEPTEUR
1. Interrupteur M/A du récepteur.
2. Voyant d’alimentation
3 & 4 : réglage de volume des canaux 1 & 2
5 & 6 : S’allument lorsque les canaux 1 & 2 reçoivent un signal UHF
7 & 8 : S’allume en présence d’un son
9 & 10 : Antennes canal 1 & 2
Arrière
11. Fiche d’alimentation: Branchez l’adaptateur AC/DC sur cette fiche.
12. Jack de sortie audio 6.35mm: Branchez le cordon audio de cette fiche sur l’entrée d’un amplificateur, d’une table
de mixage, etc.
13. Sortie XLR symétrique : Branchez le cordon audio de cette fiche sur l’entrée d’un amplificateur, d’une table de
mixage, etc.
©Copyright Lotronic 2019 PARTY--200UHF 7
Page 8
CARACTERISTIQUES DU TRANSMETTEUR DE
Problème
Etat du voyant
Solution
Pas de son
Le voyant rouge sur le
Poussez l’interrupteur M/A sur le microphone sur
remplacez-les par des neuves.
Pas de son
Le voyant rouge sur le récepteur
Vérifiez si l’adaptateur secteur est correctement
Assurez-vous que la prise secteur fournit la
MICROPHONE
1. Grille: Protège l’élément et aide à réduire les bruits de
respiration et du vent.
2. Indicateur de faible pile
3. Commutateur M/A
4. Capot de couleur pour faciliter l’identification du
micro
MISE EN PLACE DES PILES DANS LE MICROPHONE
Poussez le couvercle du compartiment pour l’ouvrir. Insérez deux
piles LR6 dans le compartiment en respectant la polarité. Fermez
le compartiment.
BRANCHEMENT DU SYSTEME
1. Branchez la fiche DC de l’adaptateur secteur fourni sur la fiche d’entrée DC au dos du récepteur. Branchez la fiche
AC sur une prise secteur appropriée.
2. Antenne : Positionnez les antennes à un angle de 90°.
3. Branchements audio : Branchez la sortie appropriée du récepteur au moyen d’un cordon Jack ou d’un cordon XLR
sur l’entrée d’un amplificateur, d’une table de mixage, etc.
CONSEILS POUR OBTENIR LA MEILLEUR PERFORMANCE
L’antenne du récepteur doit toujours être en vue du microphone.
Le récepteur et le transmetteur doivent être le plus près possible.
Ne pas placer le récepteur à proximité de surfaces métalliques et d’autres obstacles.
Surveillez la tension des piles et remplacez-les dès que
le voyant l’allume.
Si vous superposez plusieurs récepteurs ou si vous les
installez dans un rack, veillez à ce que les antennes ne
se croisent ni se touchent.
Faites un test de marche avant la présentation. Si vous
trouvez des zones non couvertes, corrigez
l’emplacement du récepteur. Si le phénomène persiste,
marquez ces zones et évitez-les pendant la
présentation.
Pour un bon fonctionnement ne placez pas le récepteur
à proximité de sources de perturbations. Placer le
récepteur à un mètre du sol et de toute source de
perturbations. Veillez à laisser libre la place autour des
antennes sur une distance de un mètre.
DIAGNOSTIC DE DEFAILLANCE
transmetteur ne clignote pas
est éteint
©Copyright Lotronic 2019 PARTY--200UHF 8
ON. Assurez-vous que les piles ont été insérées
correctement en respectant la bonne polarité (+/). Si les piles sont correctement places,
branché sur la fiche DC et la prise secteur.
Page 9

bonne tension.
Pas de son
Les indicateurs de signal A/B sur
le récepteur sont allumés
Augmentez le volume sur le récepteur. Vérifiez les
l’équipement externe.
Pas de son
Les indicateurs de signal A/B sur
allumés.
Assurez-vous que le récepteur et le transmetteur
Le seuil de distorsion
Les indicateurs de signal A/B sur
sont allumés
Remplacez les piles du microphone
Présence de bruits parasites
Les indicateurs de signal A/B
Identifiez des sources potentielles d’interférences
fréquence différente.
Pertes de son temporaires
présentation
Les indicateurs de signal A/B sur
Repositionnez le récepteur et effectuez un
évitez-les pendant la présentation.
connexions de sortie du récepteur vers
augmente progressivement
et autres interférences
lorsque le transmetteur se
déplace dans la zone de
le récepteur sont éteints. Les
voyants de tension sur le
récepteur et le microphone sont
le récepteur et le voyant de
faible pile sur le transmetteur
sont allumés
le récepteur sont éteints
pendant la perte du son
sont réglés sur la même fréquence.
Rapprochez le transmetteur du récepteur
(autres sources HF) et éteignez, déplacez ou
utilisez un système sans fil qui travaille sur une
nouveau test de marche. Si les pertes de son
persistent, marquez les zones non couvertes et
CARACTERISTIQUES TECHNIQUES DU SYSTEME
Fréquence HF porteuse ........................................................................................ 863.2MHz & 864.8MHz
Puissance RF max. ........................................................................................................................ 4,29mW
Portée .................................................................................................................................... typique 30m
Bande passante audio ................................................................................................... 40-15000Hz ±3dB
THD ................................................................................................................................................... <0,5%
CARACTERISTIQUES TECHNIQUES DU RECEPTEUR
Alimentation.......................................................................... 220-240Vac par l’adaptateur secteur fourni
Adaptateur secteur .......................................................................................................... 5Vdc nom. 10W
Rapport signal/bruit ......................................................................................................................... >80dB
Limite de réjection du canal adjacent .............................................................................................. >80dB
Réjection d’image fantôme .............................................................................................................. >80dB
Sensibilité de réception ................................................................................................................... >5dBu
CARACTERISTIQUES TECHNIQUES DU MICROPHONE
Alimentation.......................................................................................................................... 2 piles 1.5AA
Type de modulation ............................................................................................................................. F3E
NOTE IMPORTANTE : Les produits électriques ne doivent pas être mis au rebut avec les ordures ménagères.
Veuillez les faire recycler à un point de collecte spécialisé. Consultez les autorités locales ou votre
revendeur sur la façon de les recycler.
©Copyright Lotronic 2019 PARTY--200UHF 9
Page 10

D
BEDIENUNGSANLEITUNG
Sicherheitshinweise
- Die Garantie gilt nicht, wenn die Schäden durch Nichtbeachtung dieser Bedienungsanleitung entstanden
sind. Wir übernehmen für den daraus entstandenen Schaden keine Haftung.
- Aus Sicherheitsgründen darf das Gerät nicht verändert oder umgebaut werden.
- Das Gerät darf nur in trockenen, geschlossenen Räumen benutzt werden. Nicht in Wassernähe wie
Badezimmern oder am Swimmingpool benutzen.
- Das Gerät vor extremen Temperaturen schützen (< +5°C / > +35°C)
- Das Gerät vor starken Erschütterungen und schwerer mechanischer Belastung schützen.
- Keine mit Flüssigkeit gefüllten Behälter wie Gläser oder Vasen auf oder direkt neben das Gerät stellen. Sie
können umfallen und Wasser kann ins Gerät dringen. Niemals Flüssigkeiten über dem Gerät einschenken.
Keine Kleinteile wie Münzen oder Briefklammern aufs Gerät legen. Sie können ins Gehäuse dringen. Es
besteht Feuer- und Stromschlaggefahr! Falls doch einmal Flüssigkeiten oder Gegenstände ins Gerät dringen
sollten, ziehen Sie sofort den Netzstecker ab und benachrichtigen Sie einen Fachmann
- Beim Abziehen des Netzsteckers immer an der dafür vorgesehenen Stelle anfassen. Niemals am Kabel ziehen.
- Niemals den Netzstecker mit nassen oder feuchten Händen anfassen.
- In folgenden Fällen immer sofort den Netzstecker abziehen:
• Vor dem Reinigen des Geräts
• Bei Gewitter
• Bei längerem Nichtgebrauch (>1 Woche)
- Elektrogeräte außerhalb der Reichweite von Kindern aufbewahren. In Anwesenheit von Kindern besonders
vorsichtig sein. Kinder sind sich der Gefahren bei falscher Handhabung von Elektrogeräten nicht bewusst. Sie
könnten versuchen, Gegenstände ins Gerät zu stecken und einen Stromschlag erleiden.
- Das Gerät während des Betriebs nicht unbeaufsichtigt lassen.
- Niemals auf eine unstabile oder bewegliche Fläche stellen. Das Gerät kann beim Fallen Personen verletzen
und schweren Schaden nehmen.
- Spannungsführende Teile können beim Öffnen des Gehäuses oder beim Herausnehmen von Teilen (außer
Teilen, die ohne Werkzeug ausgewechselt werden können) freigelegt werden. Auch Kontaktpunkte können
unter Spannung stehen. Wenn das Gehäuse zum Eichen, Reparieren oder Ersetzen von Teilen oder Modulen
geöffnet werden muss, müssen zuerst alle Anschlussstellen von der Spannungsquelle getrennt werden.
Wenn das Gerät während der Wartung oder Reparatur offen und unter Spannung stehen muss, darf dies nur
von einem Fachmann vorgenommen werden, der die Gefahren und die entsprechenden
Sicherheitsvorschriften kennt.
- Niemals das Gerät sofort einschalten, wenn es von einer kalten Umgebung in einen warmen Raum kommt.
Das Kondenswasser, das sich bildet, kann das Gerät zerstören oder zu Stromschlag führen. Lassen Sie das
Gerät erst auf Raumtemperatur kommen, bevor Sie es anschließen. Warten Sie, bis das Kondenswasser
verdampft ist. Das kann einige Stunden dauern.
- Kein offenes Feuer wie brennende Kerzen auf oder neben das Gerät stellen.
- Das Gerät nicht auf eine weiche Fläche wie Teppiche oder Betten stellen. Nicht die Belüftungsschlitze
verstopfen. Nicht die Luftzirkulation mit Gegenständen wie Zeitschriften, Tischtüchern oder Gardinen
behindern. Dies verhindert die Wärmeabfuhr des Geräts und führt zu Überhitzung.
- Das Gerät nur in gemäßigten Klimazonen, nicht in tropischer Umgebung benutzen.
- Defekte Kabel nur von einem Fachmann ersetzen lassen. Stromschlaggefahr!
- Wenn Sie sich über den richtigen Anschluss nicht im Klaren sind oder wenn Fragen auftreten, die nicht von
der Anleitung beantwortet wurden, wenden Sie sich bitte an einen Fachmann.
©Copyright Lotronic 2019 PARTY--200UHF 10
Page 11

FEATURES
1. Gleichzeitiger Anschluss der Ausgänge: Die asymmetrische 6,35mm Klinkenbuchse und die symmetrischen
XLR Ausgänge können gleichzeitig an verschiedene Fremdgeräte angeschlossen werden.
2. Reichweite: UHF Sender können bis zu 30m Entfernung zum Empfänger arbeiten.
3. Geräuschunterdrückung: Der Squelch-Schaltkreis analysiert die Signalstärke und –qualität, um Störungen
durch Hochfrequenzen aus der Umgebung zu vermeiden.
4. Batterieanzeige: Eine rote Leuchte auf dem Mikrofon warnt den Benutzer, wenn nur noch weniger als 1
Stunde Batteriespannung bleibt.
EMPFÄNGER
Frontansicht
1. Betriebsschalter: Zum Ein- und Ausschalten des Empfängers.
2. Betriebsanzeige: Leuchtet, wenn das Gerät eingeschaltet ist.
3 & 4. Lautstärkeregler von Kanal 1 und 2
5 & 6. “RF” Pegelanzeige: Leuchtet beim Empfang eines RF Signals vom Sender
7 & 8. “AF” Pegelanzeiger: Zeigt den Pegel des drahtlosen Audiosignals an.
9 & 10. Antenne von Kanal 1 & 2
Rückansicht
11. DC Eingangsbuchse: Zum Anschluss des DC Steckers vom Netzteil an den Empfänger.
12. 6.35mm Klinkenausgangsverbinder: Audiokabel von dieser Buchse an den Eingang eines Verstärkers, Mischpults
u.ä. anschließen.
13. Symmetrischer XLR Ausgang: Audiokabel von dieser Buchse an den Eingang eines Verstärkers, Mischpults u.ä.
anschließen.
©Copyright Lotronic 2019 PARTY--200UHF 11
Page 12

MIKROFONSENDER
Problem
Anzeige
Lösung
Kei n To n
Rote Anzeige auf dem Sender
Den Ein/Aus Schalter des Mikrofons auf ON
eingesetzt sind, Batterien durch neue ersetzen.
Kei n To n
Rote Betriebsanzeige auf dem
Prüfen, ob das Netzteil richtig an den
Spannung liefert.
Kei n To n
Die Signalanzeigen A/B auf dem
Empfänger leuchten
Lautstärke auf dem Empfänger erhöhen.
Ausgangsverbindungen vom Empfänger zu
1. Gitter: Schützt die Kapsel und reduziert Atemund Windgeräusche.
2. Batterieanzeige: Die Anzeige leuchtet, wenn die
Batterien ersetzt werden müssen.
3. Ein/Aus Schalter
4. Farbkappe zur besseren Erkennung des Mikrofons
EINSETZEN DER BATTERIEN INS MIKROFON
Batteriefach durch Schieben des Deckels öffnen. Zwei AA
Batterien polungsrichtig ins Fach legen und Deckel wieder
schließen.
ANSCHLUSS DER ANLAGE
1. Anschluss der Stromversorgung: Den DC Stecker des Netzteils in die DC Buchse auf der Rückseite des Empfängers
stecken. Den AC Stecker in eine geeignete Netzsteckdose stecken.
2. Antenne: Die Antennen in einem Winkel von 90° ausrichten.
3. Audioverbindung: Den entsprechenden Ausgang des Empfängers über ein 6,35mm Klinkenkabel oder ein XLR Kabel
an den Eingang eines Verstärkers, Mischpult o.ä. anschließen.
OPTIMIERUNG DES EMPFANGS
Das Mikrofon muss immer in Sichtweite von den Empfangsantennen sein.
Den Abstand zwischen Sender und Empfänger so kurz wie möglich halten.
Die Empfangsantennen nicht in der Nähe von
Metallflächen und Hindernissen platzieren.
Batteriespannung überwachen und Batterien
auswechseln sobald die Anzeige leuchtet.
Wenn mehrere Empfänger gestapelt oder in ein
Geräterack eingebaut werden, dürfen sich die Antennen
weder berühren noch kreuzen.
Vor dem Einsatz der Anlage einen Gehtest im
Betriebsbereich durchführen, um „tote“ Punkte zu
identifizieren. Falls tote Punkte gefunden werden, den
Standort des Empfängers wechseln. Wenn die toten
Punkte weiterhin bestehen, markieren sie diese und
vermeiden Sie sie während der Vorführung.
Den Empfänger in 1m Entfernung vom Boden aufstellen
und mindestens 1m Freiraum um den Empfänger lassen.
FEHLERDIAGNOSE
blinkt nicht
Empfänger ist aus
©Copyright Lotronic 2019 PARTY--200UHF 12
stellen. Prüfen, ob die Batterien polungsrichtig
eingelegt sind. Wenn die Batterien richtig
Netzstecker und den DC Eingang angeschlossen
wurde.
Prüfen, ob die Netzsteckdose die richtige
Page 13

Fremdgeräten prüfen.
Kei n To n
Die Signalanzeigen A/B auf dem
Empfänger sind aus. Die
Sender und Empfänger leuchten
Prüfen, ob die Frequenz auf Sender und
vermindern
Verzerrschwelle steigt
Die Signalanzeigen A/B auf dem
auf dem Sender leuchten
Batterien des Mikrofons wechseln
Störgeräusche
Signalanzeigen A/B leuchten
Potentielle Störquellen suchen und ausschalten,
anderen Sendefrequenz benutzen.
Vorübergehende
bewegt wird
Signalanzeigen A/B auf dem
Standort des Empfängers wechseln und einen
während der Vorführung vermeiden.
Betriebsleuchten auf dem
Empfänger dieselbe ist.
Entfernung zwischen Sender und Empfänger
allmählich
Empfänger und Batterieanzeige
entfernen oder ein Funksystem mit einer
Tonunterbrechung, wenn der
Sender im Sendebereich
Empfänger sind während des
Tonausfalls aus
Gehtest durchführen. Wenn die Tonausfälle
weiterhin bestehen, Stellen markieren und
TECHNISCHE DATEN DER ANLAGE
Trägerfrequenzbereich ......................................................................................... 863.2 & 864.8MHzMHz
Max. RF Leistung .......................................................................................................................... 4,29mW
Reichweite .............................................................................................................................. 30m typisch
Audiofrequenzbereich.................................................................................................. 40-15.000Hz ±3dB
THD ................................................................................................................................................... <0,5%
TECHNISCHE DATEN DES EMPFÄNGERS
Versorgung ................................................................................. 220-240Vac über mitgeliefertes Netzteil
Netzteil ............................................................................................................................. 5Vdc nom. 10W
Signal/Rauschverhältnis ................................................................................................................... >80dB
Nachbarkanalunterdrückung ........................................................................................................... >80dB
Spiegel- & Nebenempfangsdämpfung ............................................................................................. >80dB
Empfangsempfindlichkeit ................................................................................................................. >5dBu
TECHNISCHE DATEN DES MIKROFONS
Versorgung .................................................................................................................. 2 x 1.5AA Batterien
Modulation .......................................................................................................................................... F3E
WICHTIGER HINWEIS: Elektrogeräte gehören nicht in den Hausmüll. Sie müssen in speziellen Betrieben recycelt
werden. Wenden Sie sich hierzu an die örtlichen Behörden oder Ihren Fachhändler!
©Copyright Lotronic 2019 PARTY--200UHF 13
Page 14

NL
HANDLEIDING
Belangrijke veiligheids en risico waarschuwingen
• Aandachtig de handleiding lezen en bewaren.
• Alle veiligheidsinstructies en waarschuwingen moeten worden nageleefd. Ze maken deel uit van de handleiding
en moet worden bewaard met de handleiding.
• Aanspraak op garantie vervalt als er schade optreedt als gevolg van niet-naleving van deze gebruiksaanwijzing.
Wij zijn niet aansprakelijk voor eventuele daaruit voortvloeiende schade.
• Onbevoegde conversies en / of wijzigingen van het apparaat zijn niet toegestaan voor reden van veiligheid en
vergunningen (CE)..
• Het apparaat is goedgekeurd voor gebruik in droge, gesloten ruimtes alleen. Niet het apparaat in de buurt van
water, zoals in de badkamer of zwembaden gebruiken.
• Het toestel tijdens de werking niet aan extreme temperaturen blootstellen (< +5°C / > °35°C).
• Het apparaat mag niet worden blootgesteld aan sterke trillingen of zware mechanische belasting.
• Plaats geen ontvangers gevuld met vloeistoffen, zoals glazen of vazen, op of direct naast het apparaat. Ze kunnen
omvallen, waardoor water in het apparaat binnendringt. Giet nooit vloeistoffen uit boven het toestel. Plaats geen
kleine voorwerpen, zoals munten of paperclips, op het toestel, aangezien zij zou kunnen vallen in het apparaat. Zij
kunnen brand of stroomslag veroorzaken! Als er vloeistof of voorwerpen in het apparaat dringen, trek dan
onmiddellijk de stekker uit het stopcontact en raadpleeg een deskundige.
• Trek de stekker alleen uit het stopcontact via het ervoor bepaalde oppervlak. Niet aan het kabel trekken.
• Nooit de stekker met vochtige of natte handen aanraken.
• Altijd de stekker uit het stopcontact trekken
- Alvorens u het toestel schoonmaakt
- in geval van onweer
- Indien u het toestel over een langere tijd niet gebruikt (>1 week)
• Elektrische apparaten buiten het bereik van kinderen houden. Wees vooral voorzichtig wanneer er kinderen
aanwezig zijn. Kinderen zijn zich niet bewust van de gevaren die betrokken zijn bij elektrische apparaten.
Kinderen kunnen proberen voorwerpen in het apparaat te stekken. Er is een levensbedreigend gevaar van
stroomslag.
• Laat het apparaat niet onbeheerd tijdens het gebruik.
• Plaats het apparaat nooit op een instabiele of beweegbare ondergrond. Mensen kunnen gewond raken of het
apparaat wordt beschadigd door het vallen.
• Onder spanning staande delen kunnen worden blootgesteld door het openen van deksels of het verwijderen van
onderdelen (tenzij dit kan worden gedaan zonder gereedschap). Contactpunten kunnen ook onder spanning
staan. Als het apparaat moet worden geopend om te kalibreren, repareren of vervangen van onderdelen of
componenten, moet eerst al haar polen worden losgekoppeld van alle spanningsbronnen. Als het apparaat moet
worden gehouden open en onder spanning tijdens onderhoud of reparaties, kan dit werk alleen worden
uitgevoerd door een vakman die vertrouwd is met de risico's en de relevante regelgeving.
• Sluit nooit het apparaat direct na de overdracht van een koude naar een warme kamer. Het condenswater dat
hierbij gevormd wordt kan een elektrische schok veroorzaken. Laat het apparaat eerst op kamertemperatuur
komen voordat u het aansluit. Wacht tot het condenswater verdampt is. Dit kan enkele uren duren.
• Plaats het apparaat nooit op zachte oppervlakken zoals tapijten of bedden. Niet de ventilatieopeningen van het
apparaat afdekken. Niet de luchtcirculatie met voorwerpen zoals tijdschriften, tafellaken en gordijnen
verstoppen. Dit voorkomt de afvoer van warmte uit het apparaat en kan leiden tot oververhitting.
• Gebruik het apparaat alleen in een gematigd klimaat, niet in een tropische omgeving.
• Alle personen die dit apparaat gebruiken, installeren of onderhouden moeten gekwalificeerd zijn en deze
gebruiksaanwijzing naleven.
• Als u niet zeker bent over de correcte aansluiting of als er vragen zijn die niet worden beantwoord door de
gebruiksaanwijzing, contacteer een specialist. Raadpleeg een specialist indien u twijfel heeft aan het
werkingsprincipe of de veiligheid van het product
©Copyright Lotronic 2019 PARTY--200UHF 14
Page 15

SYSTEEM KENMERKEN
1. Gebruik van alle uitgangen: De ongebalanceerede 6.35mm jack plug en gebalanceerde XLR uitgangen
kunnen tegelijkertijd op externe devices worden aangesloten.
2. Reikwijdte: UHF zenders werken op een afstand tot 30m van de ontvanger.
3. Noise squelch: De squelch circuit analyseert de signaal sterkte en kwaliteit om storingen door hoge
frequenties in de omgeving te vermijden.
4. Waarschuwing bij lage batterijspanning: Een rode led op de microfoon waarschuwt de gebruiker dat minder
dan een uur batterij tijd blijft.
ONTVANGER
Front panel
1. Aan/uit schakelaar.
2. Werkingsindicatie.
3 & 4. Volume regelaar van de microfoons 1 & 2
5 & 6. “RF” signaal indicatie: Licht op wanneer de ontvanger een RF signaal van de microfoons 1 & 2 ontvangt.
7 & 8. “AF” audio niveau indicatie: Licht op als een geluid van de micros 1 of 2 komt.
9 & 10. Antenne van kanaal 1 & 2.
Achterpaneel
11. DC connector: Sluit de DC plug van de lichtnetadapter hier aan.
12. 6.35mm audio uitgang: Sluit de audiokabel van deze jack op de ingang van een versterker, mengpaneel enz. aan.
13. Gebalanceerde XLR uitgang: Sluit de audiokabel van deze jack op de ingang van een versterker, mengpaneel enz.
aan.
©Copyright Lotronic 2019 PARTY--200UHF 15
Page 16

MICROFOON KERMERKEN
Probleem
Indicatie
Oplossing
Geen geluid
De rode led op de zender
Schuif de aan/uit schakelaar op de zender naar ON.
geplaatst zijn, vervang ze door nieuwe.
Geen geluid
De rode POWER led op de
Controleer of the lichtnetadapter correct op de
is.
Geen geluid
De signaal led’s A/B op de
Verhoog het volume op de ontvanger. Controleer
externe units.
Geen geluid
De signaal led’s A/B op de
POWER led’s op de zender
Wees zeker dat de ontvanger en de zender op
Minder de afstand tussen zender en ontvanger
1. Grid: Beschermt het element en mindert adem en
wind geluiden.
2. Lage batterij indicatie: Licht op indien de
batterijspanning laag wordt en de batterijen moeten
worden vervangt.
3. Aan/uit schakelaar.
4. Kleurkap om de micro beter te herkennen
PLAATSEN VAN DE BATTERIJEN
Schuif het batterij vak open en plaats twee AA batterijen met de
juiste polariteit in het vak. Sluit het vak.
SYSTEEM AANSLUITING
1. Aansluiting van het lichtnet: Sluit de DC connector van de
meegeleverde lichtnetadapter op de DC ingang van de
ontvanger aan. Sluit de AC connector op een geschikte stopcontactdoos aan.
2. Antenne: Plaats de antenne in een hoek van 90° .
3. Audio aansluiting: Sluit de juiste uitgang van de ontvanger via een jack kabel of een XLR kabel op de ingang van
een versterker, mengpaneel enz. aan.
AANBEVELINGEN VOOR OPTIMALE PRESTATIES
De ontvangantenne moet altijd van de microfoon positie zichtbaar zijn.
De afstand tussen zender en ontvanger moet zo kort als
mogelijk zijn.
Stel de ontvangantennes niet in de buurt van metalen
oppervlakten en obstakels.
Controleer regelmatig de batterijspanning en vervang de
batterij zodra de rode led oplicht.
Wanneer U meerdere ontvangers opeen stapelt of in een
rack inbouwt, laat de antennes niet elkaar aanraken of
kruizen.
Maak een test voor de prestatie. Wanneer U “dode
punten” vindt, verplaats de ontvanger. Als de dode
punten blijven, markeer deze en vermijdt ze tijdens de
prestatie.
Plaats de ontvanger in 1m afstand van de grond en laat
tenminste 1m vrije ruimte om de ontvanger.
IN GEVAL VAN PROBLEMEN
flitst niet.
ontvanger is uit
ontvanger lichten
ontvanger zijn uit. De
©Copyright Lotronic 2019 PARTY--200UHF 16
Wees zeker dat de batterijen juist geplaatst zijn met
de juiste polariteit (+/-). Als de batterijen juist
stopcontactdoos en de DC connector aangesloten
de uitgangsverbindingen van de ontvanger naar de
dezelfde frequenties ingesteld zijn.
Page 17

en ontvanger lichten.
Vervormingsniveau stijgt
geleidelijk
De signaal led’s A/B op de
op de zender lichten
Vervang de batterijen in de microfoon
Storingen door andere hoge
Signaal led’s A/B lichten
Identificeer mogelijke storingsbronnen (andere RF
werkt.
Tijdelijke geluidsonderbreking
Signaal led’s A/B op de
Verplaats de ontvanger en maak een nieuwe
de prestatie.
ontvanger en de batterij led
frequenties
bronnen) en schakel uit, verplaats of gebruik een
draadloos systeem dat op een andere frequentie
als de zender binnen het
ontvang bereik wordt verplaatst
ontvanger zijn uit als het
geluid onderbroken is
walktest. Als de onderbrekingen bestaan blijven,
markeer de “dode” punten en vermijdt ze tijdens
SYSTEEM SPECIFICATIES
RF draag frequentie bereik........................................................................................... 863.2 & 864.8MHz
Max. RF vermogen ....................................................................................................................... 4,29mW
Reikwijdte............................................................................................................................... 30m typisch
Audio frequentie bereik ............................................................................................. 40 – 15,000Hz ±3dB
THD ................................................................................................................................................... <0.5%
ONTVANGER SPECIFICATIES
Voeding ........................................................................... 220-240Vac via meegeleverde lichtnet adapter
Lichtnet adapter ............................................................................................................... 5Vdc nom. 10W
Signaal/ruis verhouding ................................................................................................................... >80dB
Kanaal afwijzing ................................................................................................................................ >80dB
Image & spurious rejection .............................................................................................................. >80dB
Ontvangst gevoeligheid .................................................................................................................... >5dBu
MICROFOON SPECIFICATIES
Voeding ...................................................................................................................... 2 x 1.5AA batterijen
Modulatie ............................................................................................................................................ F3E
RF uitgang ........................................................................................................................................ 10mW
Max. afwijking ................................................................................................................................ ±25kHz
Spurious emission ............................................................................................................................ <40dB
BELANGRIJK: De elektrische producten mogen niet bij het huisvuil gegooid worden. Gelieve deze te
laten recycleren daar waar er centra’s hiervoor voorzien is. Raadpleeg de plaatselijke autoriteiten of
uw verkoper ivm de manier van recycleren
©Copyright Lotronic 2019 PARTY--200UHF 17
Page 18

SL
NAVODILA ZA UPORABO
Pomembna varnostna navodila in opozorila za nevarnost
• Pozorno preberite navodila in jih shranite za poznejšo uporabo.
• Vsa varnostna navodila in opozorila je treba upoštevati. So del priročnika in se hranijo s priročnikom.
• Vsi garancijski zahtevki postanejo neveljavni, če pride do poškodb zaradi neupoštevanja navodil za uporabo. Ne
prevzemamo nobene odgovornosti za posledično škodo.
• Ne prevzemamo nobene odgovornosti za telesne poškodbe ali škodo na lastnini zaradi nepravilnega ravnanja ali
neupoštevanja varnostnih navodil. Morebitni garancijski zahtevki so nični v takšnih primerih.
• Nepooblaščena predelava in / ali spremembe naprave niso dovoljene zaradi varnostnih in licenčnih razlogov (CE).
• Naprava je odobrena za delovanje na suhem, samo zaprtim prostorima. Ne uporabljajte naprave v bližini vode, kot
na primer v kopalnici ali v bližini bazenov.
• Naprava ne sme biti izpostavljen ekstremnim temperaturam (<+ 5 ° C /> + 35 ° C) pri delovanju.
• Naprava ne sme biti izpostavljena močnim vibracijam ali težkim mehanskim obremenitvam.
• Ne postavljajte predmetov, napolnjenih z vodo, kot so kozarci ali vaze, na vrhu ali neposredno ob napravi. Lahko
se prevrnejo, zaradi česar voda vstopi v aparat. Nikoli ne izlivajte tekočin nad napravo. Ne postavljajte majhnih
predmetov, kot so kovanci, sponke za papir, na aparatu, saj lahko padejo v notranjosti aparata. Zaženete visoko
tveganje za nastanek požara ali življenjsko nevarne električnega toka! Če je tekočina ali predmeti kljub temu
pridejo v notranjost aparata, takoj potegnite vtikač iz vtičnice in se obrnite na strokovnjaka.
• Naprava je bila izdelana glede na razred zaščite ll (samo za dvojno izolirane enote brez terminal zemlje).
• Potegnite samo omrežni vtikač iz vtičnice. Ne vlecite za kabel.
• Nikoli ne priključujte ali odklapajte omrežni vtikač z vlažnimi ali mokrimi rokami.
• Vedno izvlecite omrežni vtikač iz vtičnice:
Pred čiščenjem
Če je nevihta
Če napravo ne boste uporabljali dlje časa (>1 teden)
• Električne naprave morajo biti izven dosega otrok. Bodite posebej previdni, če so otroci prisotni. Otroci se ne
zavedajo nevarnosti, ko sodelujejo pri predaji električnih naprav. Otroci bodo poskušala suniti predmete v
napravo. Je smrtno nevarna nevarnost električnega udara.
• Ne puščajte naprave brez nadzora, medtem ko deluje.
• Napravo ne postavljajte na nestabilno ali premično površino. Osebe, se lahko poškodujejo ali naprava če pade.
• Aktivne komponente so lahko izpostavljene z odpiranjem pokrovov ali odstranitvi delov (razen, če je to možno
storiti brez orodja). Kontaktne točke so lahko tudi žive žice. Če ima naprava, ki bo odprt za umerjanje, servis,
popravilo ali zamenjavo delov ali sklopov, vsi njeni polovi morajo biti ločeni od vseh virov napetosti prvo. Če
napravo treba pustiti odprto in pod napetostjo med vzdrževanjem ali popravili, lahko to delo opravi samo
strokovnjak, ki je seznanjen s tem povezanih tveganjih in ustreznih predpisih.
• Naprave nikoli ne priključite neposredno po njenem prenosu iz mrzlega v topel prostor. Kondenz, ki se ustvari
lahko uniči napravo ali pride do električnega šoka. Pustite, da se naprava segreje na sobno temperaturo, preden
jo priključite. Počakajte da kondenz izpari. To lahko traja nekaj ur.
• Ne postavljajte odprtega ognja, kot sogoreče sveče na ali ob napravi.
• Ne postavljajte naprave na mehkih površinah, kot so preproge in postelje. Ne prekrivajte zračnikov naprave. Ne
ovirajte kroženje zraka s predmetima, kot so revije, namizni prti in zavese. To preprečuje razpršitev toplote iz
naprave in lahko povzroči pregrevanje.
• Napravo uporabljajte samo v zmernem podnebju, ne v tropskih okoljih.
©Copyright Lotronic 2019 PARTY--200UHF 18
Page 19

• Poškodovan omrežni kabel lahko nadomesti le strokovnjaki. Nevarnost udara!
• Če niste prepričani o pravilni povezavi ali če se porajajo vprašanja, na katera ni odgovorov v the navodilih,
prosimo, ne oklevajte in se obrnite na podporo ali strokovnjaka po vaši izbiri. Posvetujte se s strokovnjakom, če
ste v dvomih, glede delovanja ali varnosti izdelka.
LASTNOSTI SISTEMA
1. Simultano uporaba izhodov: Nebalnasirani 6.35mm vtikač in balansirani izhodni XLR priključki se lahko
uporabljajo hkrati za različne zunanje naprave.
2. Razpon: UHF serija oddajnikov deluje na razdalji do 30m od sprejemnika.
3. Noise squelch: Squelch krog analize moč in kakovost signala za preprečevanje motenj zaradi hrupa okolja RF.
4. Svetlobno opozorilo o nizkem nivoju baterije: Rdeča luč na mikrofon (e) opozori uporabnika, da je manj kot
eno uro baterije za uporabo.
DVOKANALNI SPREJEMNIK
Sprednja plošča
1. Power gumb: VKLOP/IZKLOP sprejemnika.
2. Indikator napajanja: Pokaže ON/OFF.
3. Gumb za glasnost kanala 1.
4. Gumb za glasnost kanala 2
5 in 6."RF" indicator signala: Zasveti ko sprejemnik dobi RF signal iz mic 1 in mic 2.
7 in 8."AF"indicator Audio nivoja: Pokaže nivo audio signala brezžičneg asistema kanalov 1 in 2.
9 in 10. Antena kanalov 1 in 2
Zadnja plošča.
11. 5V DC vtičnica napajanja: Priključite AC/DC adapter za sprejemnik
12. Audio Jack 6.35mm izhod: Priključite avdio kabel iz te vtičnice na vhod ojačevalnika, mixerja.
13. XLR balansirani izhod: Priključite avdio kabel iz te vtičnice na vhod ojačevalnika, mixerja.
©Copyright Lotronic 2019 PARTY--200UHF 19
Page 20

LASTNOSTI MIKROFONA ODDAJNIKA
1. Mrežica: Ščiti kartušo in pomaga zmanjšati zvok
sape in hrup vetra.
2. Indikator napajanja
3. ON/OFF stikalo
4. Pokrov za identifikacijo mikrofona
NAMESTITEV BATERIJ V ODDAJNIK
Potisnite da odprete pokrov baterije. Vstavite 2 × AA baterije v
predalček za baterije s pravilno polarnostjo. Zaprite pokrov
baterije.
POVEZAVA SISTEMA
1. Priključitev napajanja sprejemnika: Priključite DC priključek priloženega AC / DC adapter na vhodni priključek DC na
sprejemniku. Vtikač priključite v ustrezno omrežno vtičnico.
2. Antena: Imejte položaj antene pod kotom 90°.
3. Audio povezava: Povežite ustrezen izhod sprejemnika preko 6.35mm Jack ali XLR kabla na vhod ojačevalnika,
mixerja, itd.
NASVETI ZA DOSEGANJE NAJBOLJŠE
UČINKOVITOSTI
Poskrbite, da boste vedno videli antene sprejemnika s
položaja oddajnika.
Imejte razdaljo od oddajnika do antene sprejemnika čim
krajšo.
Izogibajte se antenam sprejemnika v bližini kovinskih
površin in zapor.
Spremljajte baterijo in takoj, ko rdeča lučka zasveti
zamenjajte baterijo.
Če uporabljate stojalo ali rack system za namestitev
sprejemnik, ne dovolite dotikanja anten ali križanje.
Izvedite sprehod skozi pred predstavo ali predstavitve.
Če ugotovite, mrtve točke, prilagodite lokacijo
sprejemnika. Če ostanejo mrtve točke, jih označite in se
jim izogniti med izvajanjem.
Za dobro delovanje, ne postavljajte blizu virov motenj. Postavite sprejemnik na razdalji 1m od tal in pustite vsaj 1m
prostora okoli sprejemnika.
©Copyright Lotronic 2019 PARTY--200UHF 20
Page 21

ODPRAVLJANJE TEŽAV
Težava
Indikator statusa
Rešitev
Ni zvoka
Rdeči indicator oddajnika ne sveti
Potisnite POWER ON / OFF stikalo na oddajniku na
vstavljene, jih zamenjajte z novimi.
Ni zvoka
Rdeči POWER indikator na
Preverite, ali je omrežni napajalnik pravilno
vtičnica omrežje dovaja ustrezno napetost
Ni zvoka
Indikatorj signala A/B na
sprejemniku je sijoč
Povečajte glasnost sprejemnika. Preverite izhodne
povezave iz sprejemnika na zunanjo opremo
Ni zvoka
Indikator signala A/B na
sprejemniku je sijoč
Prepričajte se, da frekvence sprejemnika in oddajnika
Nivo popačenja se
Indikatorji signala A/B na
indicator na oddajniku so sijoči
Zamenjajte baterije oddajnika
Izbruhi hrupa ali drugih
signalov so prisotni
Indikatorji signala A/B so
Identificirajte potencialne vire motenj (drugi RF viri)
sistem, ki deluje na drugi frekvenci
Trenutna izguba zvoka
iz območja delovanja
Indikatorji signala A/B na
zvok izgubi
Prestavite sprejemnik in ponovite sprehod skozi test.
se jim izogibajte med izvajanjem
ON. Poskrbite, da so baterije pravilno vstavljen s
pravilno polariteto (+/-). Če so baterije pravilno
povečuje postopoma
zvočnih radijskih
kot se oddajnik prestavi
sprejemniku je OFF
sprejemniku je izklopljen. POWER
indicator na oddajniku in
sprejemniku in LOW BATTERY
vklopljeni
sprejemniku so izklopljeni ko se
priključen v vtičnico in DC vtičnico. Prepričajte se, da
ujemajo.
Premaknite oddajnik bližje sprejemniku
in izklopite, odstranite ali pa uporabite brezžični
Če avdio osipniki vztrajajo, označite "mrtve" kote in
TEHNIČNI PODATKI SISTEMA
RF nosilni frekvenčni razpon ................................................................................ 863.2MHz in 864.8MHz
Max. RF emission ......................................................................................................................... 4.29mW
Razdalja delovanja ................................................................................................................... 30m tipično
Audio frekvenčni razpon .............................................................................................40 - 15,000Hz ±3dB
Popačenje ......................................................................................................................................... <0.5%
TEHNIČNI PODATKI SPREJEMNIKA
Vhodno napajanje ........................................................... 5V DC preko priloženega omrežnega adapterja
Razmerje Signal / Šum ..................................................................................................................... >80dB
Meja po zavrnitvi kanala .................................................................................................................. >80dB
Slika in neželena zavrnitev ............................................................................................................... >80dB
Sprejemna občutljivost .................................................................................................................... >5dBu
TEHNIČNI PODATKI MIKROFONA
Zahtevano napajanje ..................................................................................................... 2 × 1.5AA baterije
Vrsta modulacije .................................................................................................................................. F3E
RF izhod ........................................................................................................................................ >10dBm
Max. odmik .................................................................................................................................... ±25kHz
Električni izdelki se ne smejo odlagati v gospodinjske odpadke. Prosimo, da jih pripeljete do centra za recikliranje.
Vprašajte svoje lokalne oblasti ali svojega prodajalca o tem kako se nadaljuje.
Za Slovenijo
©Copyright Lotronic 2019 PARTY--200UHF 21
Page 22

ES
INSTRUCCIONES DE USO
• CONSIGNAS DE SEGURIDAD
• Declinamos toda responsabilidad por los daños materiales o las personas, por una mala manipulación del equipo y
no respetar las consignas de seguridad. En caso de mala utilización, la garantía no se aplicara.
• Las modificaciones no autorizadas del equipo están prohibidas por razones de seguridad y de licencia (CE).
• Utilizar únicamente en interiores. No utilizar cerca del agua o en lugares con mucha humedad, tal como lavabos,
piscinas…
• No exponer el equipo a temperaturas extremas (< 5ºC / > + 35ºC), durante el funcionamiento.
• Proteger el equipo de vibraciones fuertes tensiones mecánicas.
• Proteger el equipo de la humedad extrema tal como el agua pulverizada, humedad ambiente…
• No coloque recipientes con líquidos encima o en las proximidades del equipo, ya que se puede verter el contenido
dentro del equipo y producir daños materiales y con riesgo de descarga eléctrica a personas.
• No coloque pequeños objetos encima o cerca del equipo. Corre el riesgo de que se introduzcan dentro del equipo
y puede producir daños al equipo y riego de descarga eléctrica a personas.
• Si un objeto penetra dentro del equipo, desenchúfelo y apáguelo inmediatamente y contacte con su vendedor.
• Para desconectar el enchufe, estire siempre de la clavija, jamás del cable.
• Jamás enchufe o desenchufe el conector de corriente con las manos húmedas.
• Desenchufe SIEMPRE el equipo de la corriente:
• Durante el proceso de limpieza del equipo.
• Durante una tormenta.
• En caso de no utilización prolongada.
• Mantener los equipos eléctricos como este fuera del alcance de los niños. Sea particularmente atento en presencia
de niños, ya que estos no son conscientes de los peligros de un aparato eléctrico y puede intentar introducir
objetos en el interior con el consecuente peligro de electrocución, por ejemplo.
• No dejar de vigilar el equipo durante su funcionamiento.
• Jamás coloque el equipo en una superficie inestable o móvil. El equipo sufre riego de caerse y dañar a una
persona o/y al propio equipo.
• Una parada brusca durante el transporte, puede tumbar el equipo.
• Si se abre el equipo, usted accederá a componentes con tensiones muy altas.
• Si ha de intervenirse el equipo, desenchufar ANTES de manipularlo y SOLO ha de ser manipulado por un técnico
autorizado que conozca los riesgos y reglamentación en vigor.
• Este producto contiene un láser de clase 1. Jamás abra el equipo. Solamente un técnico autorizado conoce los
riesgos de las radiaciones láser peligrosas.
• Una placa de advertencia indica donde está el láser. No quitar esta etiqueta del equipo.
• No abrir el equipo ni intentar acceder al interior. Jamás mire directamente el rayo láser.
• La radiación del láser, puede dañar al os ojos.
• Jamás enchufe el equipo cunado pase de un lugar frío a uno caliente. El agua de la condensación que se forma,
puede provocar daños al equipo y descargas eléctricas.
• Esperar que el equipo se adapte a la nueva temperatura ambiente antes de enchufarlo.
• Espere a que el agua de la condenación se evapore, esto puede tardar varias horas.
• No colocar una llama, como por ejemplo una vela, cerca del equipo.
• No colocar el aparato en un lugar blando, tal como una alfombra o colchón.
• No obstruir los orificios de ventilación, ya que puede producir un sobrecalentamiento del equipo.
• Utilice el equipo en ambientes moderados, no lo utilice en ambientes tropicales.
• Todo usuario del equipo ha de conocer todas estas normas de seguridad del equipo y respetarlas.
• Para cambiar los cables de corriente defectuoso, solo lo puede hacer un especialista ya que tiene riesgo de
electrocución.
• NO deje a los niños jugar con el material de embalaje, constituye un peligro potencial para ellos.
• El lector CD, puede provocar interferencias en los televisores o radios. Mantenga el equipo lo suficientemente
alejado de estos.
©Copyright Lotronic 2019 PARTY--200UHF 22
Page 23

• En lugares públicos, es conveniente respetar la reglamentación concerniente a la prevención de accidentes y el
código de los seguros concernientes a la responsabilidad civil.
• Si usted no sabe conectarlo o hacerlo funcionar, pida ayuda a un profesional.
CARACTERISTICAS
1. Utilización simultanea de las salidas: La clavija jack 6.35mm asimétrica y la clavija XLR simétrica pueden ser
conectadas a la vez a equipos externos.
2. Alcance: Los transmisores UHF tienen un alcance de unos 30 Metros del receptor.
3. Reductor de ruido: El circuito « squelch » analiza la fuerza y la calidad de la señal con el fin de evitar las
interferencias que provienen de frecuencias de radio cercanas.
4. Indicador de batería baja: Un indicador Rojo en el(los) micrófono (s), advierten al usuario que queda una hora
de batería aproximadamente.
CARACTERISTICAS DEL RECEPTOR
1. Interruptor ON/OFF del receptor.
2. Indicador de alimentación
3 y 4: Ajuste del volumen de los canales 1 & 2
5 y 6: Se enciende cuándo los canales 1 y 2 reciben una señal UHF
7 y 8: Se ilumina en presencia de un sonido
9 y 10: Antenas canal 1 & 2
Trasera
11. Clavija de alimentación: Conecte el adaptador AC/DC en esta clavija.
12. Jack de salida audio 6.35mm: Conecte el cable audio de esta clavija en la entrada del amplificador, de un
mezclador, etc.
13. Salida XLR simétrica: Conecte el cable audio de esta clavija en la entrada del amplificador, de un mezclador, etc.
©Copyright Lotronic 2019 PARTY--200UHF 23
Page 24

CARACTERISTICAS DEL MICROFONO EMISOR
Problema
Estado del indicador
Solución
No hay sonido
El indicador Rojo del emisor no
Coloque el interruptor ON/OFF del micrófono en
reemplácelas por nuevas.
No hay sonido
El indicador Rojo del emisor está
Verifique si el adaptador de corriente está
corriente es de la tensión adecuada.
No hay sonido
Los indicadores de señal A/B en el
receptor están encendidos
Aumente el volumen del receptor. Verifique as
conexiones de la salida del receptor hacía el
1. Rejilla: Protege el elemento y ayuda a reducir los rudos
de la respiración y del viento.
2. Indicador de pila baja
3. Conmutador ON/OFF
4. Capot de color para facilitar la identificación del micro.
COLOCACION DE LAS PILAS EN EL MICROFONO
Empuje la tapa del compartimento para abrir. Inserte dos pilas
LR6 dentro del compartimento respetando la polaridad. Cierre el
compartimento.
CONEXIONADO DEL SISTEMA
1. Conecte la clavija DC del adaptador de corriente incluido en la clavija DC en la parte trasera del receptor. Conecte
la clavija AC en una toma de corriente adecuada.
2. Antena: Posicione las antenas en un ángulo de 90°.
3. Conexionado audio: Conecte la salida adecuada del receptor por medio de un cable Jack o de un cable XLR en la
entrada de un amplificador, de una mesa de mezclas, etc.
CONSEJOS PARA OBTENER LAS MEJORES PRESTACIONES
La antena del receptor siempre ha de estar orientada hacia el micrófono.
El receptor y el transmisor deben estar lo más cerca posible.
No coloque el receptor próximo a superficies metálicas y otros obstáculos.
Vigile la tensión de las pilas y cámbielas cuándo el
indicador se ilumine.
Si superpone diferentes unidades de receptores dentro
de un rack, vigile que las antenas no se crucen ni se
toquen entre ellas.
Haga pruebas de funcionamiento antes de la
presentación. Si encuentra zonas no cubiertas, corrija el
emplazamiento del receptor. Si aun así persiste, evite
pasar por esta zona durante la presentación.
Para un buen funcionamiento no coloque el receptor
cerca de fuentes de perturbaciones. Colocar el
interruptor a un metro del suelo y de cualquier fuente
de perturbaciones. Asegúrese de dejar libre la zona de
obstáculos alrededor de una distancia de un metro de
las antenas.
DIAGNOSTICO DE FALLO
parpadea
apagado
©Copyright Lotronic 2019 PARTY--200UHF 24
ON. Asegúrese de que las pilas están insertadas
correctamente respetando la polaridad (+/-). Si
las pilas están correctamente colocadas,
correctamente conectado en la clavija DC y la
toma de corriente. Asegúrese que la toma de
Page 25

equipo externo.
No hay sonido
Los indicadores de señal A/B en el
receptor están apagados. Los
encendidos.
Asegúrese que el receptor y el emisor están
El umbral de la distorsión
Los indicadores de señal A/B en el
encendidos
Cambie las pilas del micrófono
Presencia de ruidos
Los indicadores de señal A/B están
Identifique las fuentes potenciales de
trabaje en una frecuencia diferente.
Perdidas de sonido
cierta zona de presentación
Los indicadores de señal A/B en el
Recoloque el receptor y efectúe una nueva
la presentación.
indicadores de tensión en el
receptor y los micrófonos, están
ajustados en la misma frecuencia.
Acerque el emisor al receptor
aumenta gradualmente
receptor y el indicador de pila
baja en el emisor están
parásitos y otras
interferencias
temporales cuándo el
emisor se desplaza a una
encendidos
receptor están apagados durante
la perdida de sonido
interferencias (Otras fuentes HF) y apáguelas,
desplace o utilice un sistema inalámbrico que
prueba de sonido. Si las pérdidas persisten,
marque las zonas no cubiertas y evítelas durante
CARACTERISTICAS TECNICAS DEL SISTEMA
Frecuencia portadora del sistema ........................................................................ 863.2MHz & 864.8MHz
Max. RF emission ......................................................................................................................... 4.29mW
Alcance ...................................................................................................................................... típica 30m
Banda pasante de audio ................................................................................................ 40-15000Hz ±3dB
THD ................................................................................................................................................... <0,5%
CARACTERISTICAS TECNICAS DEL RECEPTOR
Alimentación .................................................................220-240Vac por adaptador de corriente incluido
Adaptador de corriente .................................................................................................... 5Vdc nom. 10W
Relación señal/ruido ........................................................................................................................ >80dB
Límite de rechazo del canal adyacente ............................................................................................ >80dB
Rechazo de imagen fantasma........................................................................................................... >80dB
Sensibilidad de la recepción ............................................................................................................. >5dBu
CARACTERISTICAS TECNICAS DEL MICROFONO
Alimentación ......................................................................................................................... 2 piles 1.5AA
Tipo de modulación ............................................................................................................................. F3E
NOTA IMPORTANTE : Los productos eléctricos no deben ser tirados a la basura dómestica. Hágalos reciclar en un lugar
destinado a ello. Pregunte a las autoridades locales por el punto más cercano a su domicilio.
©Copyright Lotronic 2019 PARTY--200UHF 25
Page 26

IT
MANUALE DI ISTRUZIONI
• Si prega di leggere attentamente il manuale e conservarlo per riferimenti futuri.
• Tutte le istruzioni e le avvertenze di sicurezza devono essere rispettate. Fanno parte del manuale e devono essere
conservati con il manuale.
• Le conversioni e / o le modifiche non autorizzate dell'apparecchio non sono consentite per motivi di sicurezza e di
licenza (CE).
• L'apparecchio è approvato per il funzionamento solo in ambienti chiusi e asciutti. Non utilizzare il dispositivo vicino
all'acqua, ad esempio nei bagni o nelle piscine vicine.
• L'apparecchio non deve essere esposto a temperature estreme (<+ 5 ° C /> + 35 ° C) durante il funzionamento.
• L'apparecchio non deve essere soggetto a forti vibrazioni o a forti sollecitazioni meccaniche.
• Non posizionare recipienti pieni di liquidi, come bicchieri o vasi, sopra o direttamente accanto all'apparecchio.
Potrebbero cadere, causando l'ingresso di acqua nell'apparecchio. Non versare mai liquidi sopra l'apparecchio. Non
posizionare oggetti piccoli, come monete o graffette, sull'apparecchio poiché potrebbero cadere all'interno
dell'apparecchio. Rischiate di causare un incendio o una elettrocuzione potenzialmente letale! Se tuttavia liquidi o
oggetti penetrano nell'apparecchio, staccare immediatamente la spina dalla presa e contattare uno specialista.
• Estrarre la spina dalla presa solo dalla superficie di presa prevista. Non tirarlo per il cavo.
• Non collegare mai la spina di alimentazione con mani umide o bagnate.
• Estrarre sempre la spina dalla presa di corrente:
-Prima di pulire l'apparecchio
- Se c'è un temporale
- Se non si utilizza l'apparecchio per un lungo periodo di tempo (> 1 settimana)
• Gli apparecchi elettrici devono essere tenuti fuori dalla portata dei bambini. Prestare particolare attenzione se i
bambini sono presenti. I bambini non sono consapevoli dei rischi legati alla consegna impropria di apparecchi
elettrici. I bambini potrebbero tentare di colpire oggetti nell'apparecchio. Vi è un pericolo di morte per folgorazione.
• Non lasciare l'apparecchio incustodito mentre lo si usa.
• Non posizionare mai l'apparecchio su una superficie instabile o mobile. Le persone potrebbero essere ferite o
l'apparecchio danneggiato a causa della caduta.
• I componenti attivi possono essere esposti aprendo i coperchi o rimuovendo i componenti (a meno che ciò non
possa essere fatto senza strumenti). I punti di contatto possono anche essere in diretta. Se l'apparecchio deve essere
aperto per calibrare, riparare, riparare o sostituire componenti o gruppi, tutti i suoi poli devono essere prima
scollegati da tutte le fonti di tensione. Se l'apparecchio deve essere tenuto aperto e sotto tensione durante la
manutenzione o le riparazioni, questo lavoro deve essere eseguito solo da uno specialista che abbia familiarità con i
rischi e le normative pertinenti.
• Non collegare mai l'apparecchio direttamente dopo averlo trasferito da una stanza fredda a una calda. L'acqua di
condensa che si forma potrebbe distruggere l'apparecchio o provocare una scarica elettrica. Consentire al dispositivo
di raggiungere la temperatura ambiente prima di collegarlo. Attendere fino a quando l'acqua di condensa è
evaporata. Questo può richiedere alcune ore.
©Copyright Lotronic 2019 PARTY--200UHF 26
Page 27

• Non posizionare fiamme libere come quelle delle candele accese sopra o accanto all'apparecchio.
• Non posizionare l'apparecchio su superfici morbide come tappeti o letti. Non coprire le prese d'aria
dell'apparecchio. Non ostruire la circolazione dell'aria con oggetti quali riviste, tovaglie o tende. Ciò impedisce la
dissipazione di calore dall'apparecchio e può causare surriscaldamento.
• Utilizzare l'apparecchio solo in un clima moderato, non in ambienti tropicali.
• I cavi di alimentazione difettosi possono essere sostituiti solo da specialisti. Pericolo di scossa elettrica!
• Se non si è sicuri della connessione corretta o se sorgono problemi a cui le istruzioni per l'uso non rispondono, non
esitate a contattare l'assistenza o uno specialista di vostra scelta. Consultare uno specialista se si è in dubbio il
principio di funzionamento o la sicurezza del prodotto.
Importanti istruzioni di sicurezza e avvertenze sui pericoli
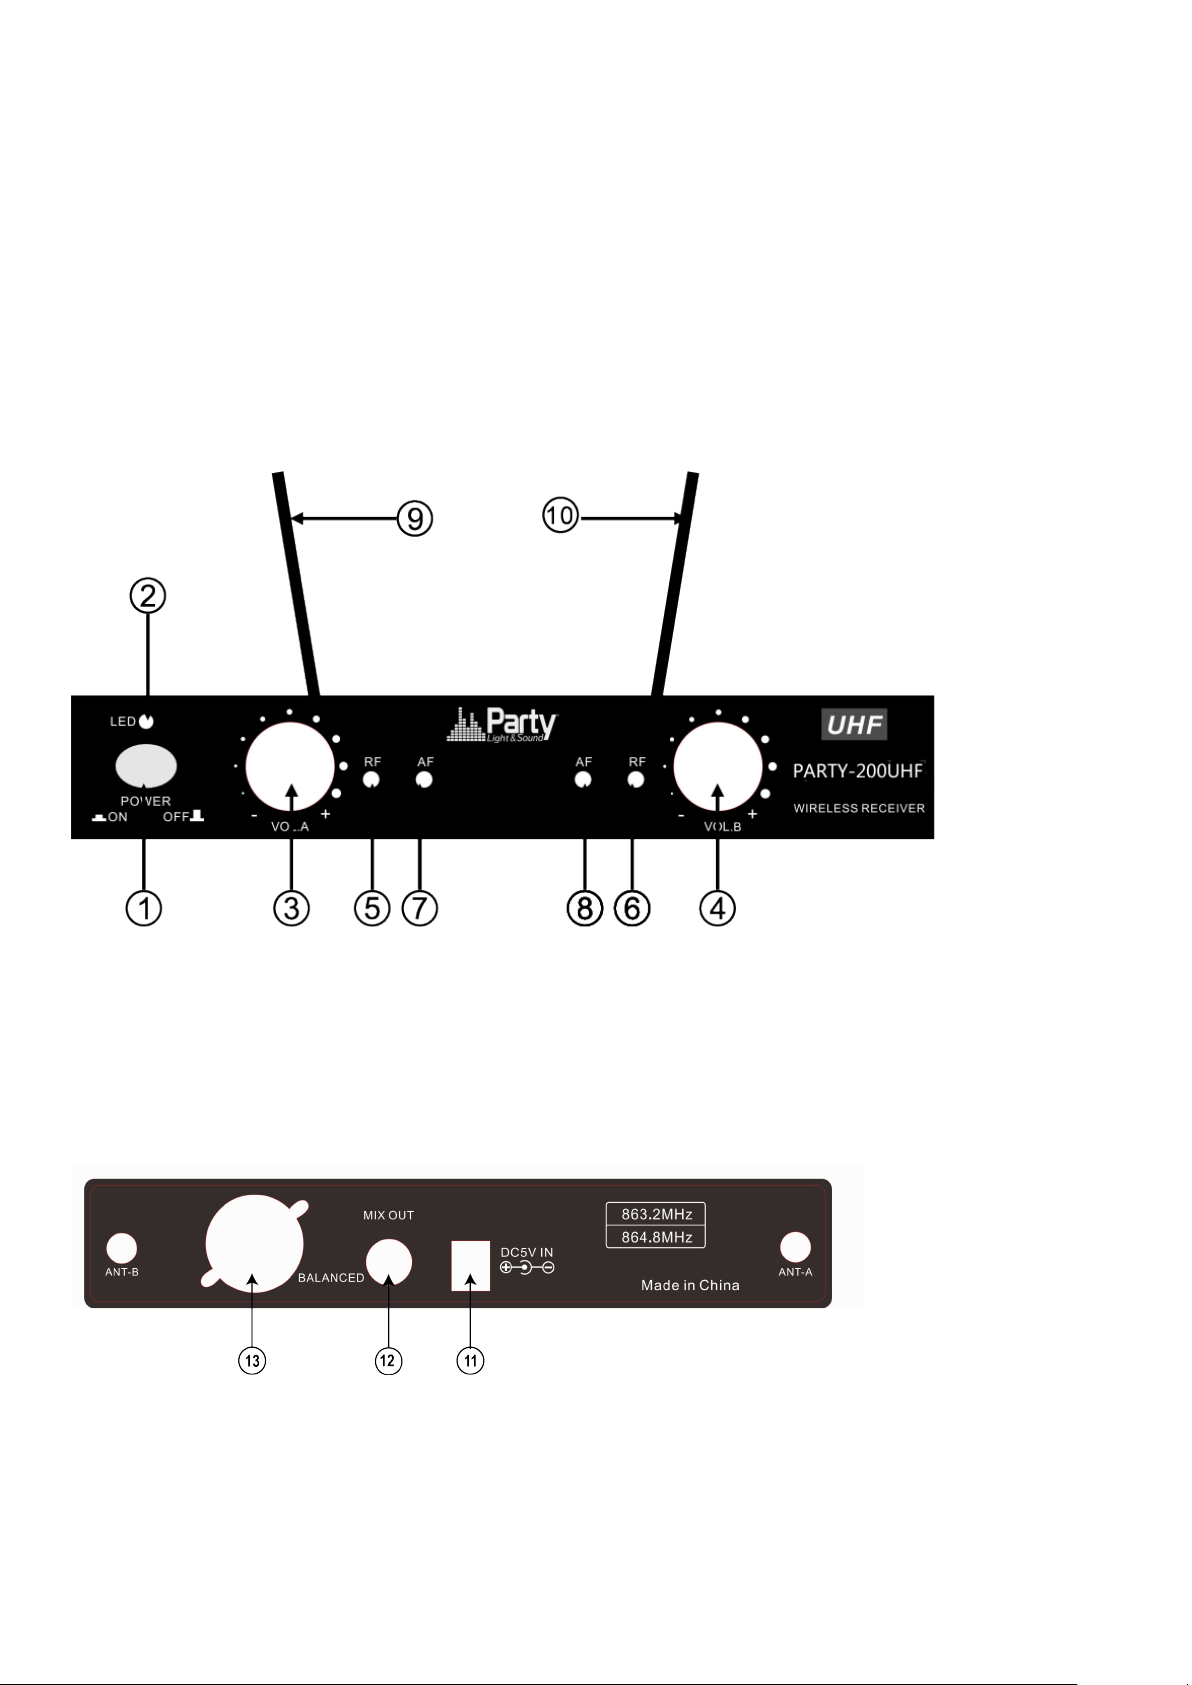
DUAL CHANNEL RECEIVER
Front panel
1. Power Button: Power ON/OFF the receiver.
2. Power Indicator: Indicate the power ON/OFF.
3. Volume Knob channel 1.
4. Volume knob channel 2
5 & 6."RF" signal Indicator: It glows when the Receiver receives an RF signal from mic 1 & mic2.
7 & 8."AF"Audio Level Indicator: Indicate the wireless system audio signal level of channel 1 & 2.
9 & 10. Antenna channel 1 & 2
Rear panel.
11. 5Vdc Power Jack: Connect the AC/DC adapter to receiver
12. Audio Output Jack 6.35mm: Connect the audio cable from this jack to the input port of amplifier, mixer.
13. XLR Balanced Output Jack: Connect the audio cable from this jack to the input port of amplifier, mixer.
©Copyright Lotronic 2019 PARTY--200UHF 27
Page 28

MICROPHONE TRANSMITTER FEATURES
1. Grille: Protects the cartridge and helps reducing the
breath sounds and wind noise.
2. Power indicator
3. ON/OFF switch
4. Tail-hood to identify the mic
TRANSMITTER BATTERY INSTALLATION
Push the battery cover open. Insert 2x AA batteries into the
battery compartment with the correct polarity. Close the battery
cover.
COLLEGAMENTO DEL SISTEMA
1. Collegamento all'alimentazione del ricevitore: collegare il connettore CC dell'adattatore CA / CC in dotazione alla
presa di ingresso CC sul ricevitore. Collegare il connettore CA a una presa di corrente appropriata.
2. Antenna: mantenere la posizione dell'antenna ad un angolo di 90 °.
3. Connessione audio: collegare l'uscita corrispondente del ricevitore tramite un cavo Jack da 6,35 mm o un cavo XLR
all'ingresso di un amplificatore di potenza, mixer, ecc.
SUGGERIMENTI PER RAGGIUNGERE LE MASSIME
PRESTAZIONI
Assicurati di poter sempre vedere l'antenna del
ricevitore dalla posizione del trasmettitore.
Mantenere la distanza dal trasmettitore all'antenna del
ricevitore il più breve possibile.
Evitare di posizionare le antenne del ricevitore vicino a
superfici metalliche e ostruzioni.
Monitora la carica della batteria e sostituisci la batteria
non appena si accende la luce rossa.
Se si impilano o si montano i ricevitori in un sistema
multiplo, evitare che le antenne tocchino o si incrocino.
Esegui un percorso completo prima della performance
o della presentazione. Se vengono trovati punti morti,
regolare la posizione del ricevitore. Se rimangono punti
morti, contrassegnali ed evitali durante l'esecuzione.
©Copyright Lotronic 2019 PARTY--200UHF 28
Page 29

Per un buon funzionamento, non posizionare il ricevitore vicino a fonti di interferenza. Posiziona il ricevitore a 1 m di
Problem
Indicator status
Solution
No sound
Red transmitter indicator doesn’t
Slide the POWER ON/OFF switch on the transmitter
ones.
No sound
The red POWER indicator on the
Check if the mains adaptor is plugged correctly into
the mains outlet supplies the proper voltage
No sound
The signal indicators A/B on the
Increase the volume on the receiver. Check the
equipment
No sound
The signal indicators A/B on the
receiver are glowing
Make sure that the frequencies of the receiver and
Distortion level increases
The signal indicators A/B on the
glowing
Replace transmitter battery
Bursts of noise or other
present
Signal indicators A/B are on
Identify potential sources of interference (other RF
system operating on a different frequency
Momentary loss of sound
area
Signal indicators A/B on the
Reposition receiver and perform walk-through test
distanza da terra e lascia almeno 1 m di spazio libero attorno al ricevitore.
TROUBLESHOOTING
gradually
audible radio signals are
flash
receiver is OFF
receiver are glowing
receiver are off. The POWER
indicators on the transmitter and
receiver and LOW BATTERY
indicator on the transmitter are
to ON. Make sure that the batteries are properly
inserted with the correct polarity (+/-). If the
batteries are correctly inserted, replace them by new
the mains outlet and the DC socket. Make sure that
output connections from the receiver to the external
the transmitter match.
Move the transmitter closer to the receiver
sources) and turn off, remove or use a wireless
as transmitter is moved
around the performing
receiver are off when the sound
is lost
SYSTEM SPECIFICATIONS
RF Carrier frequency range ........................................................................... 863.2MHz & 864.8MHzMHz
Max. RF emission ......................................................................................................................... 4.29mW
Operating range ...................................................................................................................... 30m typical
Audio frequency response ........................................................................................... 40-15,000Hz ±3dB
THD ................................................................................................................................................... <0.5%
RECEIVER SPECIFICATIONS
Input power ............................................................................................ 5Vdc via supplied mains adaptor
Signal/noise ratio ............................................................................................................................. >80dB
Border upon channel rejection ........................................................................................................ >80dB
Image & spurious rejection .............................................................................................................. >80dB
Receiving sensitivity ......................................................................................................................... >5dBu
MICROPHONE SPECIFICATIONS
Power requirements ....................................................................................................2 x 1.5AA batteries
Modulation type .................................................................................................................................. F3E
RF output...................................................................................................................................... >10dBm
Max. deviation ............................................................................................................................... ±25kHz
I prodotti elettrici non devono essere gettati nei rifiuti domestici. Per favore portali in un centro di riciclaggio.
Chiedete alle autorità locali o al vostro rivenditore come procedere.
©Copyright Lotronic 2019 PARTY--200UHF 29
again. If audio dropouts persist, mark “dead” spots
and avid them during performance
Page 30

EC Declaration of Conformity
We, LOTRONIC SA
Avenue Zénobe Gramme, 9
1480 SAINTES
Belgium
+32.2.390.91.91
certify and declare under our sole responsibility that the following product:
Trade name: PARTY LIGHT & SOUND
Product name: 2-CHANNEL UHF MICROPHONE
Type or model: PARTY-200UHF
conforms with the essential requirements of:
RED directive 2014/53/EU
based on the following standards applied:
EN60065 : 2014
EN62479 :2010
Draft ETSI EN 301 489-1 V2.2.0
Final Draft EN 301 489-9 V2.1.1
ETSI EN 301 357-1 V1.4.1
ETSI EN 301 357-2 V1.4.1
EN 55022 : 2010
EN 61000-3-2 : 2014
EN 61000-3-3 : 2013
EN 55024 : 2010+A1 : 2015
Place and date of issue: Saintes (Belgium), on 08/05/2018
Manuel De Sousa
Quality Manager
Page 31

Déclaration CE de Conformité
Nous, LOTRONIC SA
Avenue Zénobe Gramme, 9
1480 SAINTES
Belgique
+32.2.390.91.91
Certifions et déclarons sous notre seule responsabilité que les produits suivants:
Marque: PARTY LIGHT & SOUND
Désignation commerciale: Système de Microphone UHF à 2 Canaux
Type ou modèle: PARTY-200UHF
Auxquels se réfère cette déclaration sont conformes aux exigences essentielles et de :
Directive RED 2014/53/EU
Basés sur les standards appliqués
EN60065: 2014
EN62479 :2010
Draft ETSI EN 301 489-1 V2.2.0
Final Draft EN 301 489-9 V2.1.1
ETSI EN 301 357-1 V1.4.1
ETSI EN 301 357-2 V1.4.1
EN 55022 : 2010
EN 61000-3-2 : 2014
EN 61000-3-3 : 2013
EN 55024 : 2010+A1 : 2015
Fait à Saintes (Belgique), le 08/05/2018
Manuel De Sousa
Responsable Qualité
 Loading...