

Page 1

Operations Manual for RF Series
Data Loggers
MadgeTech, Inc.
Revised February 27, 2009
Page 2

TABLE OF CONTENTS
INTRODUCTION ....................................................................................................... 3
TRANSMITTER CHARACTERISTICS .............................................................................. 3
TRANSMISSION DISTANCE ........................................................................................ 4
SYSTEM COMPONENTS AND SETUP ............................................................................ 4
WIRELESS CONFIGURATION DIALOG .......................................................................... 5
Transmitter Output Modes ...................................................................................... 6
Transmitter Options ............................................................................................... 6
Custom Transmit Interval ....................................................................................... 7
Indicator Mode ...................................................................................................... 9
REGISTERING THE DEVICE ON A SYSTEM.................................................................... 9
STARTING THE DEVICE AND SYNCHRONIZING THE TRANSMITTER ................................ 10
USING MULTIPLE DEVICES ...................................................................................... 12
PREVENTING COLLISIONS WITH PRIME NUMBERS ...................................................... 13
Prime Number Examples ...................................................................................... 15
AUTOSAVE OF WIRELESS DATA ............................................................................... 15
REAL TIME WIRELESS ALARMING ............................................................................. 17
SAVING ALARM SETUP TO XML FILE ......................................................................... 23
LOADING ALARM SETUP .......................................................................................... 23
INCREASING RANGE WITH THE RFEXTENDER ............................................................ 23
Simple RFExtender System ................................................................................... 24
Complex RFExtender System ................................................................................ 25
Module Address and Receiver Address Mask ............................................................ 25
Receiver Address Mask Example ............................................................................ 26
BATTERY LIFE ....................................................................................................... 28
OPERATING ENVIRONMENT ..................................................................................... 29
SYSTEM PERFORMANCE AND RELIABILITY ................................................................. 29
FCC COMPLIANCE AND REQUIREMENTS .................................................................... 31
FEDERAL COMMUNICATIONS COMMISSION (FCC) NOTICE ........................................... 31
INDUSTRY CANADA (IC) NOTICE .............................................................................. 32
CONTACT INFORMATION ......................................................................................... 32
TABLE OF FIGURES
Figure 1. Connecting the IFC110 interface cable ........................................................... 4
Figure 2. Connecting the RFC101A wireless receiver ...................................................... 5
Figure 3. The Wireless Configuration dialog .................................................................. 5
Figure 4. Start Device dialog ...................................................................................... 9
Figure 5. Delay Start Feature ................................................................................... 12
Figure 6. The Configure Wireless Data dialog ............................................................. 17
Figure 7. The Wireless Alarm Setup dialog ................................................................. 20
Figure 8. The Wireless Alarm Settings dialog – Notification and Channel tab ................... 21
Figure 9. The Wireless Alarm Settings dialog – Email tab ............................................. 22
Figure 10. The multi-alarm Wireless Alarm Notification dialog ....................................... 23
Figure 11. RFExtender as a wireless repeater ............................................................. 24
Figure 12. RFExtender as a wireless communication interface ....................................... 24
Figure 13. A complex RFExtender system .................................................................. 27
Operations Manual for RF Series Data Loggers MadgeTech, Inc.
Revised 2/27/2009 Page 2 of 32
Page 3

MadgeTech, Inc.
Operations Manual for RF Series Data Loggers
INTRODUCTION
MadgeTech’s RF series line of wireless-enabled data loggers provides a simple, low-cost
wireless solution for short-range data collection applications. These products are powered
by a user-replaceable internal battery and can be configured for up to ten years of battery
life. They are designed for one-way, low data-rate applications, and transmit real-time data
directly to a PC for monitoring. Like MadgeTech’s standard series of data loggers, they are
simple to use and their versatile configuration options allow for easy integration into a wide
variety of applications. The product line includes models for all the most popular commercial
and industrial measurements, as shown in this table:
PRODUCT DESCRIPTION
RFTemp101A Temperature Recorder and Wireless Transmitter
RFRHTemp101A Humidity / Temperature Recorder and Wireless Transmitter
RFTC4000A Thermocouple Temperature Recorder and Wireless Transmitter
RFRTDTemp101A RTD Temperature Recorder and Wireless Transmitter
RFpHTemp101A pH / Temperature Recorder and Wireless Transmitter
RFVolt101A DC Voltage Recorder and Wireless Transmitter
RFProcess101A DC Current Recorder and Wireless Transmitter
RFPulse101A
RFOT
These products have onboard memory in addition to the wireless transmitter, so they
can completely replace existing data loggers and strip chart recorders while providing an
added wireless data link. This memory can also serve as a failsafe backup, in the event of
interference in the wireless channel or interruption of service to the monitoring computer.
TRANSMITTER CHARACTERISTICS
Pulse Recorder and Wireless Transmitter
Temperature Recorder and Wireless Transmitter
The transmitter used in the RF series products is a carrier present-carrier absent (CPCA)
amplitude-modulated (AM) signal operating at a carrier frequency of 418 MHz. The data
being transmitted is encoded similarly to standard RS232 serial data at a bit rate of 4,800
baud. This signal is detected by the RFC101A receiver module and converted to RS232
signals, which are passed to the COM port of the monitoring PC.
The transmitter type and encoding method permit the device to use the maximum
allowable output power specified by the FCC, and also minimizes the amount of battery
power required for the transmission. This gives the user the best possible range, and also
ensures a long battery life.
To conform to FCC Part 15.21 rules, the data transmission takes less than one second
and the minimum periodic transmission rate allowed by the device is 30 seconds. The low
duty cycle permits several devices to use the same communication band and receiver
without excessive interference caused by “talking over” each other.
Operations Manual for RF Series Data Loggers MadgeTech, Inc.
Revised 2/27/2009 Page 3 of 32
Page 4
TRANSMISSION DISTANCE
The transmission distance achievable with any wireless system is dependent on many
factors. The only consistent measurement of transmission distance that can be used with
these devices is called the “line-of-sight” transmission distance. The transmitter and
receiver are set up in a large open area, free of obstacles and interference, and are aligned
so their antennas are oriented in the same direction. Under these circumstances, the RF
series products can achieve up to 120 feet (36 m) transmission range.
SYSTEM COMPONENTS AND SETUP
The following components are required to successfully set up and use the RF series
products:
▪ A personal computer running the Windows operating system (Windows 95 or higher)
▪ One of the RF series wireless-enabled data loggers
▪ An RFC101A wireless receiver module and power supply, for receiving wireless
transmissions from the data logger
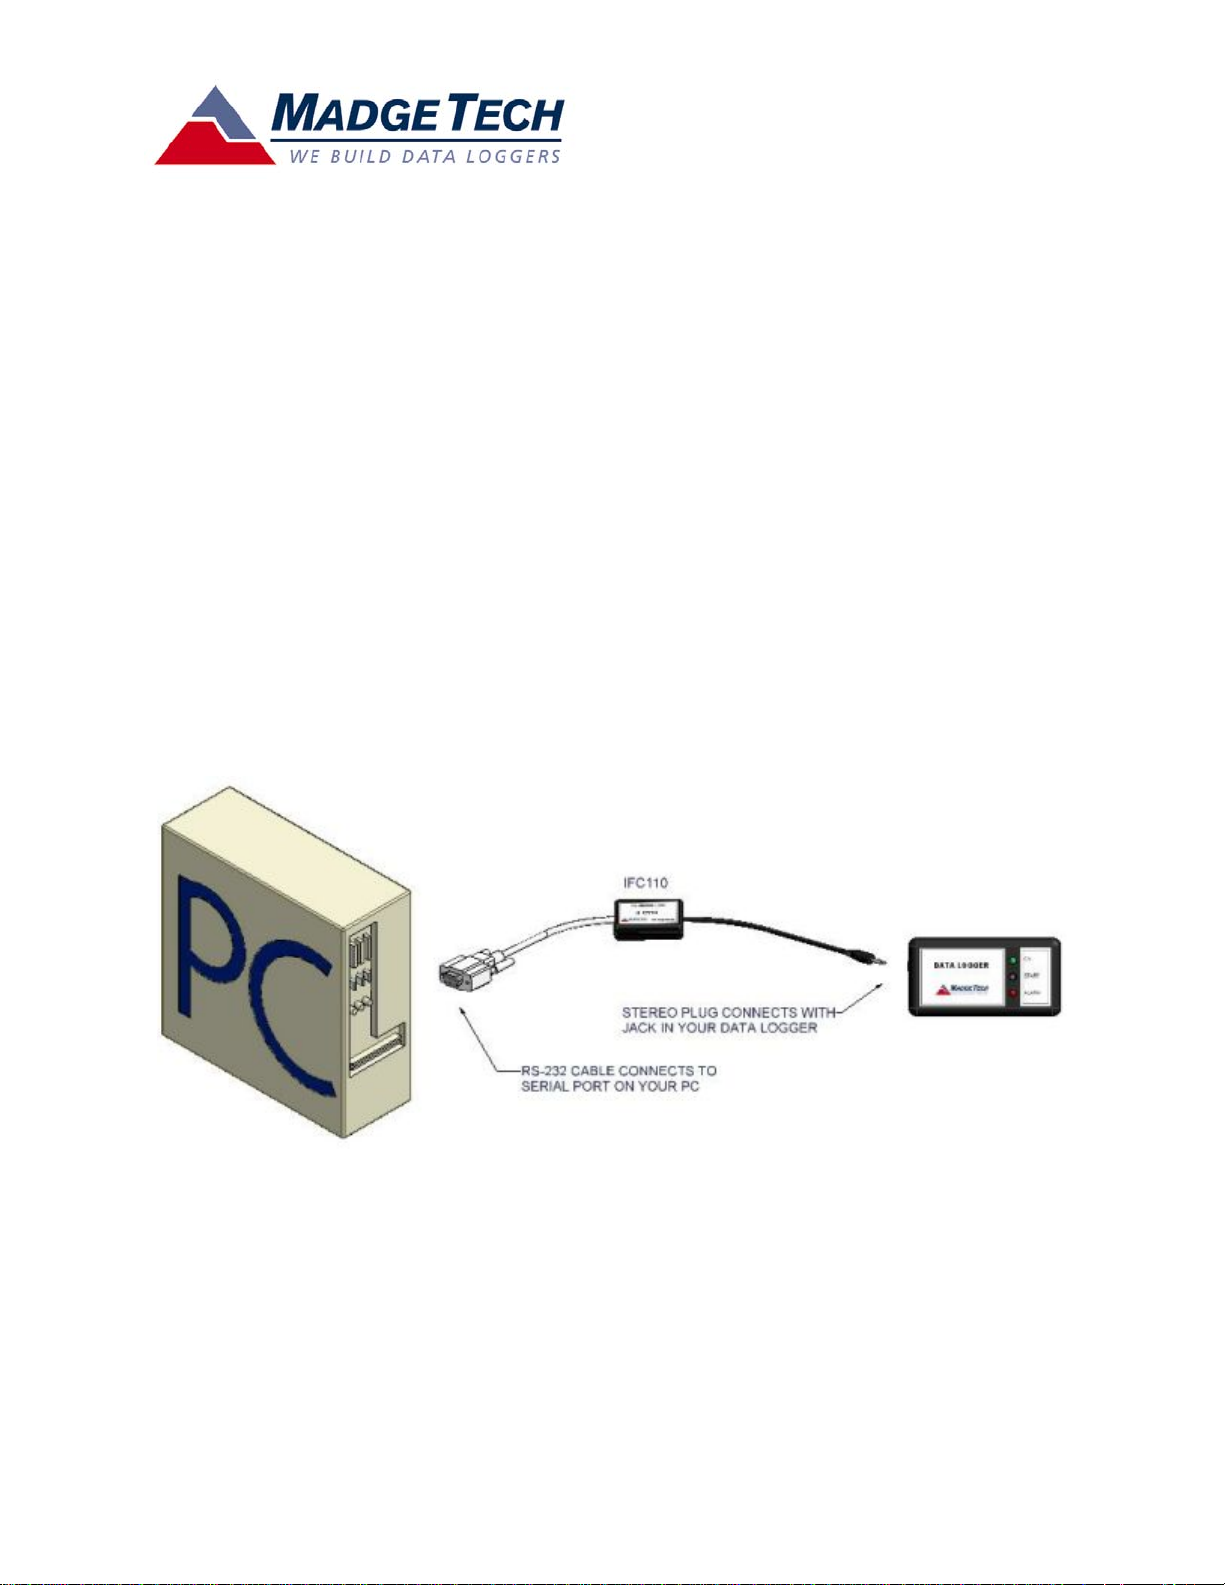
▪ An IFC110 interface cable, for communicating with the wireless data logger
▪ MadgeTech Data Recorder software, included with the RFC101A or IFC110
To configure the data logger, and register it on the PC for data reception, connect it to
the PC through the IFC110 serial interface cable as shown in Figure 1 below.
Figure 1. Connecting the IFC110 interface cable
To set up the system for receiving wireless data, connect the RFC101A to the PC and
plug in the power supply to a 110VAC outlet (as shown in Figure 2). In most cases, the
IFC110 will need to be removed from the PC to connect the RFC101A. If there are multiple
COM ports available on the PC, the RFC101A may be connected to a different COM port than
the IFC110, thus leaving IFC110 connected. To switch between using the IFC110 and
RFC101A, simply change to the appropriate COM port under the “Communications” menu.
Operations Manual for RF Series Data Loggers MadgeTech, Inc.
Revised 2/27/2009 Page 4 of 32
Page 5
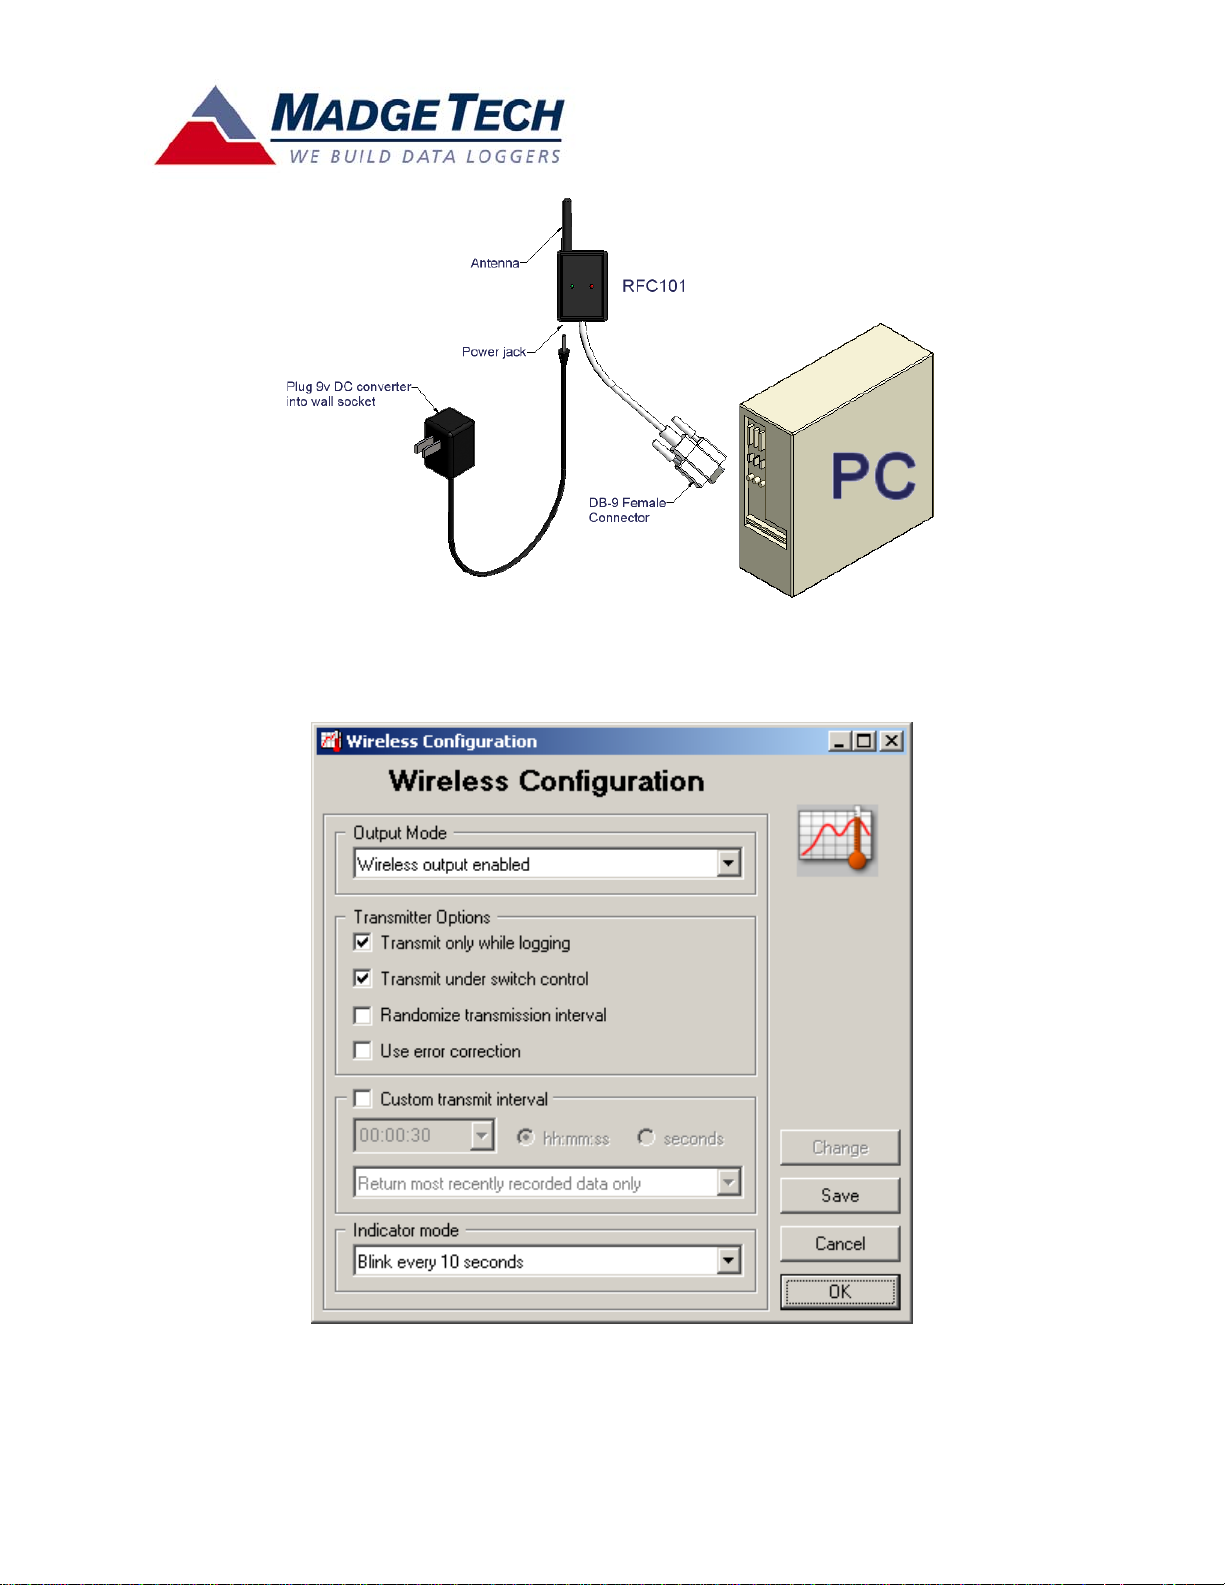
Figure 2. Connecting the RFC101A wireless receiver
WIRELESS CONFIGURATION DIALOG
Figure 3. The Wireless Configuration dialog
Operations Manual for RF Series Data Loggers MadgeTech, Inc.
Revised 2/27/2009 Page 5 of 32
Page 6

The Wireless Configuration dialog (shown in Figure 3) allows the user to select from a
variety of operating modes to meet the requirements of different monitoring systems. To
access this dialog, identify the device using the Device -> Identify Device and Read Status
menu item, switch to the “Device Detail” tab, and click the “Wireless Configuration” button.
To edit the configuration, press the “Change” button in the dialog, make the appropriate
changes, then press the “Save” button to commit the changes to the device. Note: Closing
the dialog or exiting with the “OK” button will not store the changes in the device.
To comply with FCC regulations, saving a configuration change may cause the device to
inhibit output from the transmitter while the internal timers synchronize to the new
configuration (this may be the longer of the reading interval or custom transmit interval).
To force synchronization of the timers and enable output before the aforementioned interval
has passed; restart the device from the software.
Transmitter Output Modes
Real-time data transmissions may be sent through the RF antenna, the device’s serial
port, both or neither. If both the serial and RF transmitters are disabled, the device will
function strictly as a standard data logger. The typical user will configure the device for
wireless transmission only thus transmitting data from the device to the RFC101A receiver.
However, serial transmission may be desirable for some systems where the built-in
transmitter is not powerful enough to maintain a reliable link, the signal must be brought
outside of an environment that blocks RF, or when a hardwired connection to an alternate
transmitter is required. Additionally, both modes may be enabled for combined local and
long-distance monitoring of the signal. See “Increasing Range with the RFExtender” later in
this manual.
Transmitter Options
The transmitter module has four configuration options. Two of these options pertain to
enabling and disabling the transmitter under different operating conditions and two pertain
to the timing and format of the transmitted signal. These options are summarized below.
1. Transmit only while logging – If this option is selected, the transmitter will only
output data when the logger is recording data to memory. When memory is filled
and the device stops logging, the transmitter will stop as well to indicate the logger
needs to be offloaded and restarted. If the memory wrap-around mode of the logger
is enabled, the device will continue to overwrite the oldest internal data and continue
transmitting data wirelessly. If this transmitter option is not selected, the transmitter
will continue to operate regardless of whether the device is recording data.
2. Transmit under switch control – If this option is selected, the on/off switch may
be used to inhibit the transmitter output. This allows the user to manually stop the
transmitter without affecting the logger operation or transmission timing. This may
be useful for transporting the device through an area where other devices are
operating on the same frequency band, disabling the transmitter until the device is
placed in-system, or disabling individual devices to evaluate system performance and
troubleshoot interference or collisions. In systems where a manual override is not
desirable, this option may be left unchecked, and the transmitter will not be affected
by the position of the switch.
Note: The above two transmitter options function as such: if either one of the
modes would disable the transmitter under given conditions, the transmitter will be
Operations Manual for RF Series Data Loggers MadgeTech, Inc.
Revised 2/27/2009 Page 6 of 32
Page 7

disabled. For the transmitter to be enabled, the required conditions must be met for
both options to allow the transmission.
3. Randomize transmit interval – If this option is selected, the transmitter will wait a
short random delay of up to 5 seconds before it transmits each data packet. This can
decrease the chances of lost packets due to devices “talking over” each other
because of long-term timer drift. Devices that are initially synchronized to transmit
10 seconds apart can drift in their timekeeping by up to 2 seconds per day, meaning
that they could potentially interfere with each other after a few days of sustained
operation. Because the transmission lasts less than a second, a random delay of up
to 5 seconds can allow the majority of the transmissions to escape interference. If
this transmitter option is not selected, the device will transmit at the interval set by
its timer to within a few milliseconds. It is then up to the user to make any necessary
accommodations for the timer drift. See “Using Multiple Devices” later in this
manual.
4. Use error correction – If this option is selected, the transmitter output format will
be modified to include a simple forward error correction scheme known as a
Hamming code. This method of error correction allows the receiver in a one-way
transmission to correct any single bit error in each block of eight data bits being
received. This option may help to increase system reliability in some environments.
Note: System reliability will most commonly be degraded by loss of signal or by burst
noise longer than a single bit, thus this option may not substantially improve
performance for the typical user. Additionally, if this option is not selected, the
device may be able to transmit two complete copies of the data packet, increasing
the likelihood that one of the copies will be received even when the other is lost due
to interference. (Each packet always contains error detection, to ensure that invalid
data is not displayed.)
Custom Transmit Interval
By default, the transmitter module will transmit a data packet with each internally
recorded data point, or if it is not recording, at the reading rate specified for the data
logger. This option allows the user to specify a custom transmit interval that will be used
only by the transmitter. Like the data logger reading rate, this interval is limited to a
minimum of 30 seconds and a maximum of 12 hours, but unlike the reading rate it may be
set to any multiple of 10 seconds. Additionally, the device can be configured to return new
data every interval, or to repeatedly send the data from the most recent internally recorded
reading. This option can be useful for the following reasons:
1. Real-time monitoring – Some applications may require relatively quick feedback of
trend data to the user, but only need to be recorded at longer intervals. With this
option, for example, an operator could check the trend of a system every 10 minutes
and make necessary adjustments to keep the system within specifications, but the
official logger record of the data only needs to indicate the value on an hourly basis.
2. Increasing system reliability – In applications where the operating environment is
unfriendly to RF, this option can be used to repeat the same data multiple times to
increase the probability of successful reception. If the logger is recording every 5
minutes, the transmitter can be configured to send the data from the last reading
every 30 seconds, allowing for 10 transmissions per logger reading. If the
Operations Manual for RF Series Data Loggers MadgeTech, Inc.
Revised 2/27/2009 Page 7 of 32
Page 8

environment sees a burst of RF interference a few times per minute, it is highly
probable that one or more transmissions will be received properly.
3. Staggering transmissions from multiple devices – If several devices need to
record data at the same time while transmitting the output in real time, this option
can be used to ensure that at least one transmission from each device is sent
without interference from the other devices. This is similar to the randomization
option provided above, but is better suited to some applications. See “Using Multiple
Devices” later in this manual. In the screenshot below, this particular wireless data
logger is set to “delay start” at 1:00PM; since the sample interval is 30 seconds, the
next data logger should be started at 1:00:30, and the next logger should be started
at 1:01:00, and so on.
To prevent confusion, it’s helpful to set a delay start time for the first logger that is on the
hour, half hour, quarter hour, 10 minutes of, and 5 minutes of. For example:
On the hour: 2:00PM, 3PM, etc.
On the half hour: 2:30PM, 3:30PM, etc.
On the quarter hour: 2:15PM, 3:15PM, etc.
10 minutes of: 2:50, 3:50, etc.
5 minutes of: 2:55, 3:55, etc.
To find the ideal delay start interval, use the following calculation:
To determine the reading rate, you must perform a simple calculation: X/Y=Z. To solve for
the ideal reading rate (Z), divide X by Y.
Desired Reading Rate(X)
# Of Loggers(Y) = Ideal delay between loggers (Z)
Example: 15 minutes X 60 seconds
25 = 36. It is best to use the closest odd number, so a
37 second delay start interval will be used.
Note. Rounding up is not encouraged because it can increase the chances of data overlap.
X= Desired reading rate (in seconds)
Y= # of loggers
Z=?
Example 1:
If X= 15 minutes, and Y= 25 loggers, then Z= 0.6 minutes X 60 seconds = 36.
In this example, 36 is rounded to an odd number, such as 37; 37 seconds is the ideal delay
start interval.
Example 2:
If X= 60 minutes, and Y = 75 loggers, then Z= 0.8 minutes X 60 seconds = 48.
In this example, 48 is rounded to the nearest odd number, such as 49; 49 seconds is the
ideal delay start interval.
Note. If Z results in < 30 seconds, change X and/or Y.
Operations Manual for RF Series Data Loggers MadgeTech, Inc.
Revised 2/27/2009 Page 8 of 32
Page 9
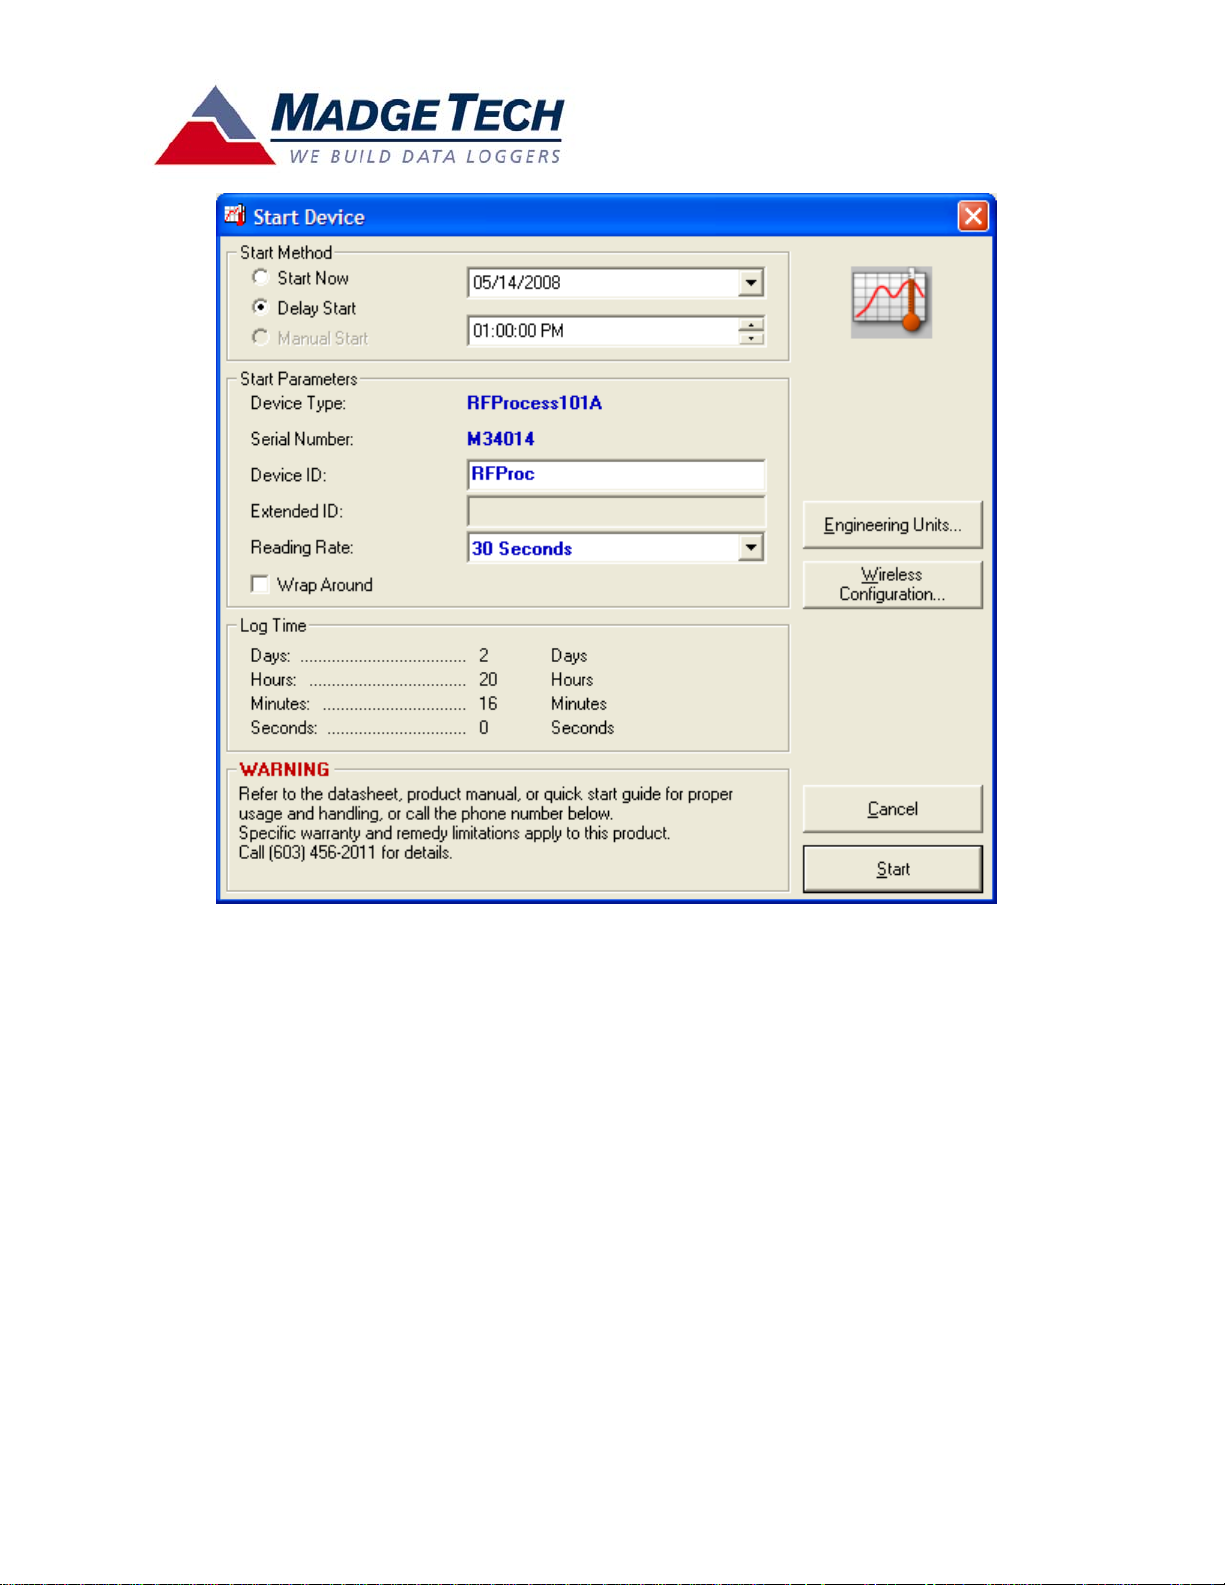
Figure 4. Start Device dialog
Indicator Mode (not applicable to the RFOT)
The device may be configured to blink the LED activity indicator every 10 seconds (the
factory default setting) or only when a scheduled reading is taken. The green LED indicator
will blink to indicate that the device is configured properly to allow a wireless transmission
to occur. If the wireless transmitter is disabled by any of the available configuration options
(by setting the transmitter output mode to disable the wireless output, or by selecting either
of the related transmitter control options), the indicator will not blink. When a wireless
transmission is about to be sent, both the green and the red LED indicators will blink.
The primary reason to turn off the 10-second indicator is to conserve battery capacity.
See “Battery Life” later in this manual. The 10-second mode is forced “on” if the custom
transmit interval discussed above is enabled.
REGISTERING THE DEVICE ON A SYSTEM
Before the MadgeTech software will receive data from an RF-series transmitter, the
device must be properly registered on the system. When the device is identified or
configured, the PC software will store an image of the device for future reference. This
image is stored on the PC’s hard disk so it is retained even when the software or PC is shut
down. The software then refers to the device image when receiving a transmission to “fill in”
Operations Manual for RF Series Data Loggers MadgeTech, Inc.
Revised 2/27/2009 Page 9 of 32
Page 10

the information that is not transmitted in the data packet. This information includes the
device ID, calibration date, and measurement variables such as a thermocouple type or
engineering units. The data packet contains a checksum of critical settings to ensure invalid
data is not displayed. For this reason, the device must be re-registered if it is calibrated or
the measurement data is changed on another PC.
Note that re-registering a device after a configuration change will not allow the PC to
receive data from the transmitter if there is already data from the device in the wireless
graph. If no data has been received since the software was launched, or the software is
closed and launched again, the software will receive the transmissions as expected. This
behavior is caused by the fact the data that has already been received is only valid with the
previous image. Adding new data to the old dataset with different calibration constants or
thermocouple type would result in invalid data.
STARTING THE DEVICE AND SYNCHRONIZING THE TRANSMITTER
Like other MadgeTech data loggers, the RF series devices must be configured through a
PC. The wireless transmitter is primarily set up through the “Wireless Configuration” dialog
discussed previously, but synchronization of the transmitter to the desired starting time is
accomplished through the “Start Device” dialog when launching the data logger. When
launching, choose the start time, and set the logger parameters (device ID and reading
rate) for the run. When the device is started, both the logger and transmitter time base will
be set for the selected start time. They will remain inactive until the selected time, and then
begin to operate as configured in the “Start Device” and “Wireless Configuration” dialogs.
When the delay-start time arrives, the logger will take readings (if enabled) at the
programmed reading rate, and wireless transmissions (if enabled) will be made at the
reading rate or custom interval, depending on how the device is configured.
If a delayed start is specified, the device will remain completely inactive during the start
delay period. The indicators will not blink, no readings will be taken and no transmissions
will be sent. It will continue to communicate normally, and may be queried, stopped, or
restarted. If the application only requires the wireless transmitter without data logging
capability, the device may be stopped immediately (when the “Transmit only while logging”
option is not selected) after launching without affecting the scheduled start of the wireless
transmissions. This will marginally improve the battery life when data logging capability is
not required.
If immediate start is specified, the device will begin logging immediately, but it will
inhibit transmitter output for the first reading to comply with FCC regulations. To ensure the
first transmission is sent, use the delayed start mode with a 1-2 minute delay (minimum
allowed by software).
Operations Manual for RF Series Data Loggers MadgeTech, Inc.
Revised 2/27/2009 Page 10 of 32
Page 11

Once the device is started, the wireless transmissions can be viewed by performing the
following steps:
1. Connect the RFC101A wireless receiver to a COM port (as shown in Figure 2)
2. Go to the Communications -> Select COM Port menu and select the COM Port
matching the port that the RFC101A is attached to (usually COM1)
3. Go to the Communications -> Select Baud Rate menu and select 4,800 Baud
4. Go to the Communications menu and ensure that Accept Real Time Wireless Input
has a check mark next to it. If it does not, click on it and go back to the
Communications menu to confirm it is now checked.
5. Go to the Device Menu and choose “Display Real Time Wireless Data”
6. Wait for the first data point to be received.
7. For multiple data loggers, choose the “Composite Graph” tab to view all of the
wireless data sets in one graph. This helps the speed in refreshing the graph and is
useful when comparing data from multiple data loggers, and looking for data trends.
The LED’s on the RFC101A indicate power (green) and data (red). The Red LED light up
briefly every time a new data point is received. The Green LED should be on steady. If not,
ensure that the wall power adapter is plugged in properly.
Operations Manual for RF Series Data Loggers MadgeTech, Inc.
Revised 2/27/2009 Page 11 of 32
Page 12

USING MULTIPLE DEVICES
When using more than one RF transmitter, should transmissions overlap, it is certain
that one or both of the transmissions will be lost. There are several methods, described
below in order of complexity (least to most), to circumvent this issue:
1. Use Delay Start to Stagger the Reading / Transmit intervals – By choosing a
reading rate (see Prime Number scheme below, or Step# 3 under Custom Transmit
Interval) and delay between start times on multiple loggers, you can ensure that the
computer never receives more than one wireless signal in a 30 second window.
Figure 5. Delay Start Feature
2. Rely on the logged data - The RF transmitters can be configured to log all data to
non-volatile memory. If a data point is lost, it may be fully recovered by a later offload.
3. Provide a direct connection - If it is possible to have a PC always connected to the
RF series logger (while monitoring via RF elsewhere), then using the serial output
transmitter mode or the real-time chart recording feature of the software will avoid
RF interference.
Operations Manual for RF Series Data Loggers MadgeTech, Inc.
Revised 2/27/2009 Page 12 of 32
Page 13

4. Randomize the transmission interval – This option is selected from the wireless
configuration menu. Selecting this option will cause the transmitter to wait a short
random delay of up to 5 seconds before it transmits each data packet. Should two
transmitters drift to within 5 seconds of each other, this feature will reduce the
dropped points by about 80% until the transmitter clocks drift apart again. This will
also decrease the chances of sequential lost packets.
5. Staggering of scheduled transmissions – By starting the RF transmitters at
different times, the transmissions will not overlap until the time drift between the
transmitter clocks causes transmission collisions. At room temperature, the typical
clock will drift no more than 1-2 seconds per day. Higher or lower temperatures will
cause more drift. For example: if you use delay start to start one transmitter at
11:00:00 and a second transmitter at 11:00:30 (at 1 minute sample rates), then
typically they would run for about 30 days (at similar temperatures) before there
was a possibility of a collision. However, temperature fluctuations that deviate up or
down from room temperature will generally cause the clock to run slower. Thus,
potential collisions depend the time between samples, relative clock accuracy and
relative ambient temperatures.
6. Prime number scheduled transmissions – This method utilizes prime numbers to
help prevent transmission collisions. See the next section for further detail on this
method.
PREVENTING COLLISIONS WITH PRIME NUMBERS
As mentioned in the previous section, prime numbers can be helpful in preventing
collisions, allowing the maximum amount of data to be received from every transmitter.
This section will outline the steps to follow to select the best transmission intervals, and
provide a worked example.
Using prime numbers is advantageous because the common multiples of two prime
numbers are farther apart than the multiples of two nearby non-primes. (For example, the
numbers 8 and 12 have a common multiple at 24, 48, 72, etc., while 7 and 11 have their
first common multiple at 77.) So, if two transmitters were set up to transmit at 8 and 12
minutes respectively, a collision (and a lost transmission) would occur every 24 minutes,
much more often than if they were set up to transmit at 7 and 11 minutes. When expanding
to 3 or more transmitters, this property is even more pronounced.
The size of the prime number matters as well. For larger prime numbers, fewer collisions
will occur in a given amount of time.
Finally, to minimize the impact of the collisions that do occur, the transmitter should be
configured to transmit the same data at least twice for every reading. This can be
accomplished using the “Return most recently recorded data only” option in the Wireless
Configuration dialog. For two transmitter systems, this ensures that every reading will have
at least one clear window for transmission. If two transmitters collide during the first
transmission attempt, they cannot possibly collide during the second (they are scheduled to
select different windows for the second attempt). For three or more transmitters, it is
possible to collide with one transmitter on the first attempt and another on the second
attempt, but the number of these “sequential collisions” is very small.
Operations Manual for RF Series Data Loggers MadgeTech, Inc.
Revised 2/27/2009 Page 13 of 32
Page 14

The general procedure for selecting transmission intervals follows below. It assumes that
all the transmitters will be recording data at the same rate.
1. Determine the number of transmitters – Determine the number of points that
need to be monitored, and select the transmitters that will cover those points most
efficiently.
2. Determine the reading interval – The reading interval selected for the devices
should be the longest interval that will provide the data needed for the application.
3. Select the prime numbers – The transmission intervals must always be a multiple
of 10 seconds. So, divide the reading interval (in seconds) by 20, and pick the
largest prime numbers that are less than this value. This ensures that there will
always be at least two transmission slots per reading for each transmitter. Prime
numbers in the necessary range are listed in Table 1.
4. Assign the transmission intervals – Multiply the prime numbers selected in step 3
by 10, and assign them to the transmitters. If some transmitters are monitoring
more critical data than others, they may be assigned the smaller or larger numbers
depending on the application. If the smallest numbers are substantially less than half
the reading interval (e.g. 130 seconds for a 10 minute reading interval), assign them
to the more critical transmitters to increase the number of transmissions per
reading. If the smaller numbers are close to half the reading interval, assign the
larger numbers to the critical transmitters, as the larger numbers will experience
slightly fewer collisions.
5. Configure and launch the devices – In the Wireless Configuration dialog, enable
the custom transmit interval, and select the “Return most recently recorded data
only” option for each device. Enter the proper transmission interval in seconds (be
careful not to enter the number incorrectly as hours/minutes/seconds), and save the
configuration before exiting the dialog. When launching the devices, use delayed
start mode to begin the transmission schedules at the same time, and select the
reading interval determined in step 2.
Table 1. Prime numbers from 3 to 2160
-- 3 5 7 11 13 17 19 23 29
31 37 41 43 47 53 59 61 67 71
73 79 83 89 97 101 103 107 109 113
127 131 137 139 149 151 157 163 167 173
179 181 191 193 197 199 211 223 227 229
233 239 241 251 257 263 269 271 277 281
283 293 307 311 313 317 331 337 347 349
353 359 367 373 379 383 389 397 401 409
419 421 431 433 439 443 449 457 461 463
467 479 487 491 499 503 509 521 523 541
547 557 563 569 571 577 587 593 599 601
607 613 617 619 631 641 643 647 653 659
661 673 677 683 691 701 709 719 727 733
739 743 751 757 761 769 773 787 797 809
811 821 823 827 829 839 853 857 859 863
Operations Manual for RF Series Data Loggers MadgeTech, Inc.
Revised 2/27/2009 Page 14 of 32
Page 15

877 881 883 887 907 911 919 929 937 941
947 953 967 971 977 983 991 997 1009 1013
1019 1021 1031 1033 1039 1049 1051 1061 1063 1069
1087 1091 1093 1097 1103 1109 1117 1123 1129 1151
1153 1163 1171 1181 1187 1193 1201 1213 1217 1223
1229 1231 1237 1249 1259 1277 1279 1283 1289 1291
1297 1301 1303 1307 1319 1321 1327 1361 1367 1373
1381 1399 1409 1423 1427 1429 1433 1439 1447 1451
1453 1459 1471 1481 1483 1487 1489 1493 1499 1511
1523 1531 1543 1549 1553 1559 1567 1571 1579 1583
1597 1601 1607 1609 1613 1619 1621 1627 1637 1657
1663 1667 1669 1693 1697 1699 1709 1721 1723 1733
1741 1747 1753 1759 1777 1783 1787 1789 1801 1811
1823 1831 1847 1861 1867 1871 1873 1877 1879 1889
1901 1907 1913 1931 1933 1949 1951 1973 1979 1987
1993 1997 1999 2003 2011 2017 2027 2029 2039 2053
2063 2069 2081 2083 2087 2089 2099 2111 2113 2129
2131 2137 2141 2143 2153 -- -- -- -- --
Prime Number Examples
Two examples are provided in Table 2 below to illustrate the procedure. Notice that
increasing the reading interval by a factor of 6 (1 hour instead of 10 minutes) results in an
increase by a factor of 540 in the time before data is lost (45 days instead of 2 hours)!
Table 2. Prime number examples
Example 1 Example 2
Number of Transmitters 5 5
Reading Interval 10 minutes (600 seconds) 1 hour (3600 seconds)
Max Transmission Interval 300 seconds (= 600/2) 1800 seconds (= 3600/2)
Max Prime Number 30 (= 300/10) 180 (= 1800/10)
Selected Prime Numbers 29, 23, 19, 17, 13 179, 173, 167, 163, 157
Transmission Intervals
* More critical devices
290 seconds
230 seconds
190 seconds*
170 seconds*
130 seconds*
1790 seconds*
1730 seconds*
1670 seconds
1630 seconds
1570 seconds
First Lost Reading After > 2 hours > 45 days
AUTOSAVE OF WIRELESS DATA
A convenient feature of the Wireless Real Time Chart Recording mode of the
MadgeTech software is the ability to automatically save the data to all supported data file
formats such as (.CSV files); software version 2.00.70 or higher is required. Data can also
be saved manually using “File/Save As” in the software or the “Save As” button in the
“Configure Wireless Data” dialog.
Note. While the Auto Save feature is enabled, system memory consumption will go up. To
avoid excessive PC memory consumption, MadgeTech recommends setting the amount of
Operations Manual for RF Series Data Loggers MadgeTech, Inc.
Revised 2/27/2009 Page 15 of 32
Page 16

readings that are saved to the highest value (e.g. every 1000 Readings) that is possible.
For operations with 1-2 data loggers, it is OK to set “200” as the reading count. To select
where a file is automatically saved/archived to, simply click the “Browse” button and specify
a directory where the files will be automatically saved.
Note. Initially, the default directory is the same as that set in your software preferences
under the “Data” tab.
To setup the autosave feature, ensure your wireless data logger has been started by
using a standard interface cable, and that the RFC101A wireless receiver is now attached to
the target PC. Precisely, follow the steps:
1. Start the logger as in the section “Starting the Device and Synchronizing the
Transmitter” on page 10.
2. Under the “Communications” menu, ensure that “Accept Real Time Wireless Input”
is checked.
3. Choose the “Composite Graph” tab to view all of the wireless data set.
4. Click “Device” and note the following menu additions/changes pertaining to
wireless transmissions:
a. “Configure Wireless Data”
b. “Wireless Statistics”
c. “Wireless Alarm Setup”
5. Click “Device” then “Configure Wireless Data”. The “Configure Wireless Data”
window below will appear and list the loggers whose wireless data have been
received.
6. The following checkboxes are:
a. “Accept Data From Device” – allows the user to set whether the software
accepts wireless data from each device in the list. This is useful if it is
necessary to isolate data reception to certain transmitters in certain locations.
b. “Display Data on Wireless Graph” – allows the user to set whether the
software displays wireless data from each device in the list. This is useful if it
is desirable to only view data from certain devices.
c. “Automatically Save Data” – allows the user to set whether the software
will automatically save data from each device in the list. This is useful if you
want to archive data from some devices, but not all of them.
d. “Browse” button - allows the user to program the directory where saved
data is archived.
e. The drop down menu allows users to program the data to automatically
save after a certain amount of data has been received.
7. Careful use of Autosave – It is recommended that Manual save be used in most
cases. If Autosave of wireless data is needed for record keeping purposes, use a
Operations Manual for RF Series Data Loggers MadgeTech, Inc.
Revised 2/27/2009 Page 16 of 32
Page 17

longer autosave interval as the number of received data loggers increases. Autosave
interval is set as default at every 500 readings. When using 1-2 loggers, 200
reading interval will be OK; while when using 10 loggers, 1000 reading interval is
recommended. Autosave feature will be improved when MadgeTech implements XML
file format for autosave in the future release.
Figure 6. The Configure Wireless Data dialog
REAL TIME WIRELESS ALARMING
This feature is useful when alarm notifications (screen, email, cell phone text
message) are critical. To set up real time wireless alarming, ensure the transmitter(s) in
use have been started and the RFC101A receiver is installed on the system and has been
configured properly (e.g. change baud rate to 4800). To access the real time wireless
alarming functions, follow these steps:
1. Start the logger as in the section “Starting the Device and Synchronizing the
Transmitter” on page 10.
2. Ensure that “Display Real Time Wireless Data” from the “Device” menu is selected.
3. Choose the “Composite Graph” tab to view all of the wireless data set.
4. Click “Device” then “Wireless Alarm Setup”.
5. The “Wireless Alarm Setup” window below will appear and list the loggers whose
wireless data have been received.
Operations Manual for RF Series Data Loggers MadgeTech, Inc.
Revised 2/27/2009 Page 17 of 32
Page 18

6. Highlight an RF data logger and click the button “Create New or Modify”. A
“Wireless Alarm Settings” window will appear. The “Serial Number” and “Device
Name (ID)” will be listed.
7. Ensure that “Notification and Channel” tab is selected. There are two notification
types:
a. Screen Alarm – will notify the user with a window indicating an alarm has
been activated.
b. Email Alarm – will notify the user with an email or cell phone text message
that an alarm has been activated. If you check the “Email Alarm” checkbox
then please remember to go to “Email” tab to enter the required information.
Note. For email notification, please contact your IT Department for
information on your mail server/network settings. For cell phone text
messaging, please contact your cell phone company to activate your cellular
phone to receive emails in the form of text message alarms. The feature to
mention to the cellular phone company’s is “SMS messaging to email”, or
email to cellular text message function. In order to use the cellular phone
text messaging option, this must be completed. For convenience, MadgeTech
is providing this web site for customers to look up the section titled “Email to
SMS / Web to SMS”:
http://en.wikipedia.org/wiki/SMS_gateways
c. Notify on every reading out of range – will notify the user at the
programmed sample interval when an alarm condition has occurred.
d. Notify only on initial out of range reading – will notify the user as soon as
the first alarm condition occurred, but will not continue to alert the user
thereafter.
e. Notify on every [H] [M] [S] while reading is out of range – will notify the
user after a specified length of time that an alarm condition has occurred.
This is useful if a parameter is allowed to stay in an alarm condition for a
certain amount of time, and if the alarm continues, it is of concern to be
alerted.
f. Channel Settings – Allows the user to set the channel in which they want an
alarm to be associated with. The user can also specify the respective units
for the measurement channel.
g. Low Alarm – allows the user to specify that if a value measured is lower
than what the user specified, then either a screen and/or email/text message
alarm will appear.
h. High Alarm - allows the user to specify that if a value measured is higher
than what the user specified, then either a screen and/or email/text message
alarm will appear.
Operations Manual for RF Series Data Loggers MadgeTech, Inc.
Revised 2/27/2009 Page 18 of 32
Page 19

i. Add/Modify – allows the user to add the created alarm to the alarm list. To
save the alarm settings, click “OK” to save the settings and close the
“Wireless Alarm Settings” window and return to “Wireless Alarm Setup”
window.
8. In the "Wireless Alarm Setup" window the data grid will show the added alarms.
Click the "Save and Exit" button to save the settings and close the "Wireless Alarm
Setup" window. If the user clicks the “Cancel” button, the window will close without
saving settings/changes.
9. In the "Wireless Alarm Setup" window, highlight an alarm in the data grid and this
will enable the "Delete" button. Use the "Delete" button to delete an alarm. Click the
"Save and Exit" button to save the changes or click "Cancel" to ignore the changes.
10. In "Wireless Alarm Setup" window, if there are entries in the data grid, then the
feature "Notifying no reading received for a period of TIME" will be enabled. This
feature allows the user to be notified if no wireless data has been received for a
period of TIME either in terms of Screen Alarm or Email Alarm (as checked in the
“Wireless Alarm Settings” window).
11. The “Load Alarm Setup” and “Save Setup to File” buttons are described in the
following sections. These features are to allow users to load alarm setup from, and
save alarm setup to an XML file, respectively.
Operations Manual for RF Series Data Loggers MadgeTech, Inc.
Revised 2/27/2009 Page 19 of 32
Page 20

Figure 7. The Wireless Alarm Setup dialog
Operations Manual for RF Series Data Loggers MadgeTech, Inc.
Revised 2/27/2009 Page 20 of 32
Page 21

Figure 8. The Wireless Alarm Settings dialog – Notification and Channel tab
Operations Manual for RF Series Data Loggers MadgeTech, Inc.
Revised 2/27/2009 Page 21 of 32
Page 22
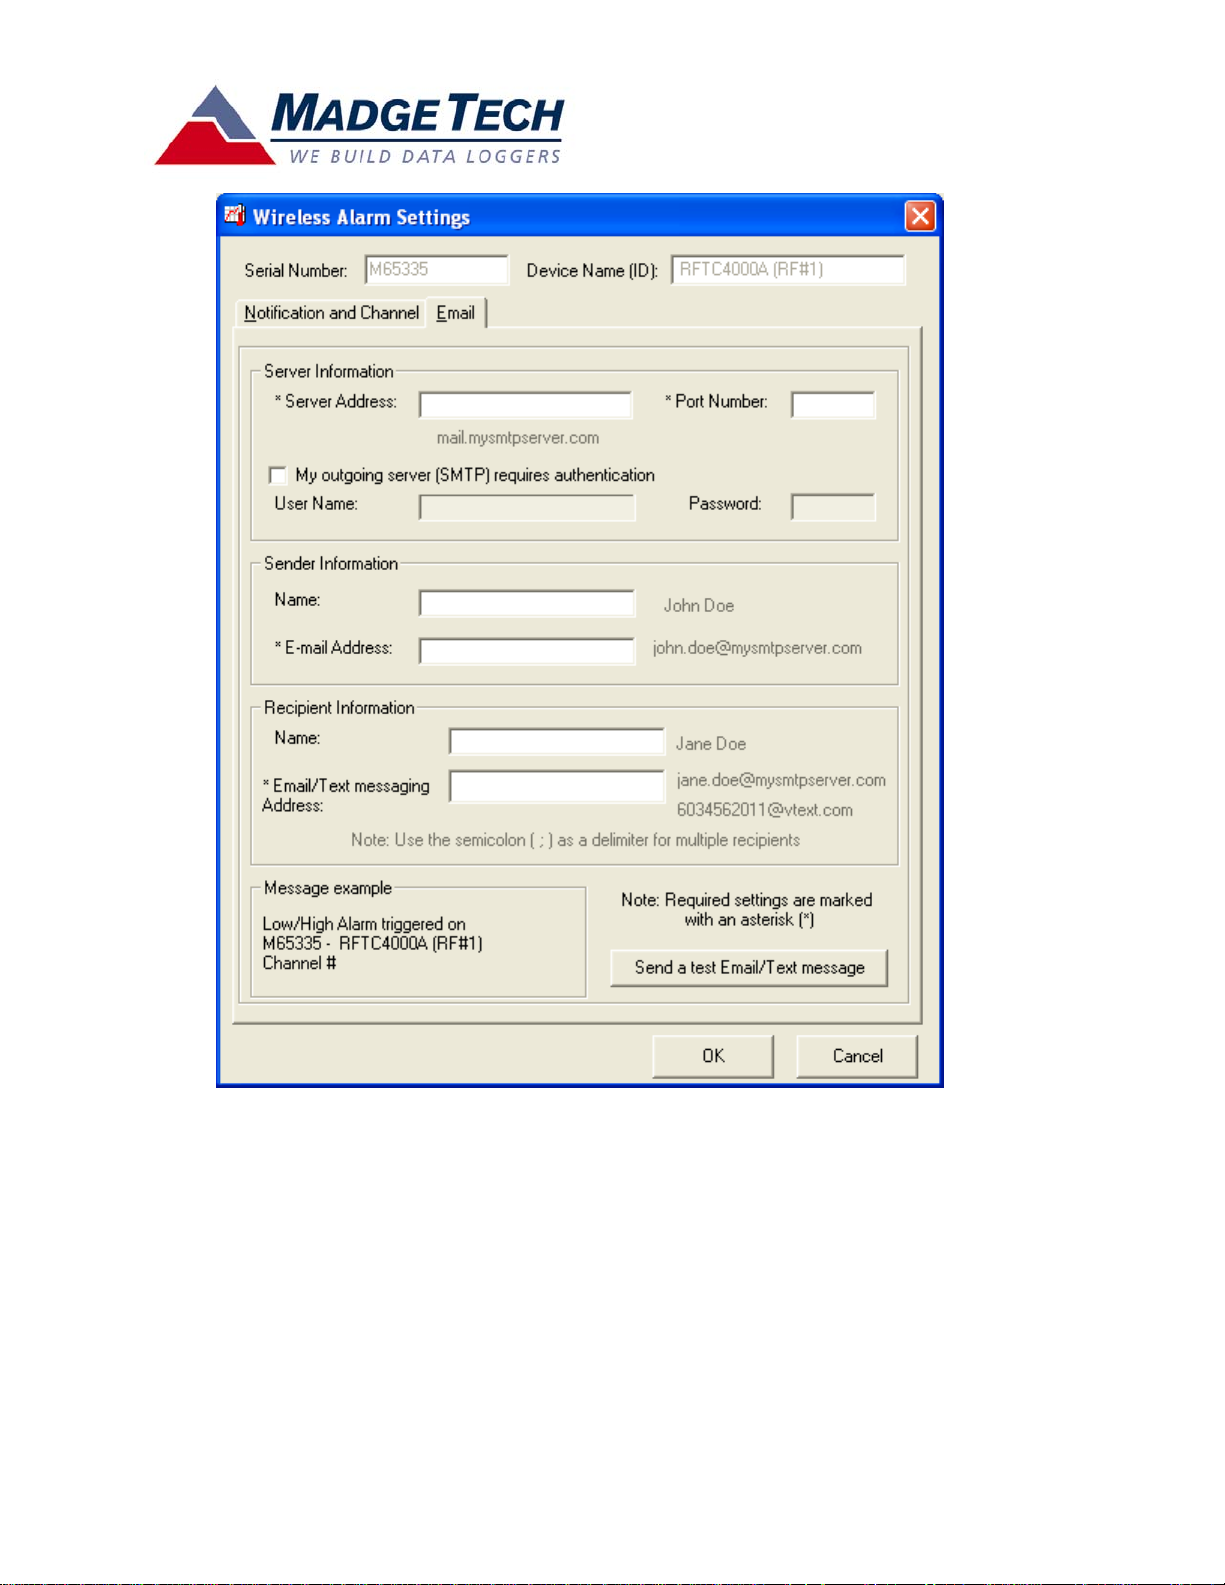
Figure 9. The Wireless Alarm Settings dialog – Email tab
Operations Manual for RF Series Data Loggers MadgeTech, Inc.
Revised 2/27/2009 Page 22 of 32
Page 23

Figure 10. The multi-alarm Wireless Alarm Notification dialog
SAVING ALARM SETUP TO XML FILE
Follow the steps in the Real Time Wireless Alarming section, page 17, to set up alarms.
When there are one or more entries in the grid in the Wireless Alarm Setup dialog, the
“Save Setup to File” button will become enabled. Click “Save Setup to File” and enter a file
name to save all the alarms in the grid.
LOADING ALARM SETUP
Start up MadgeTech software and click menu item “Device” then “Wireless Alarm
Setup” to bring out the Wireless Alarm Setup dialog. If the device to be set up for wireless
alarming is listed then their previously saved alarm setup can be loaded. Click “Load Alarm
Setup” button and select the XML file to load. If the selected XML file contains alarm setup
for the active devices shown on the list then a message will show up to ask for confirm.
Click Yes to load the alarm setup
INCREASING RANGE WITH THE RFEXTENDER
The RFExtender products can extend the transmission distance of MadgeTech’s RF series
products for up to 1 mile (1.6 km) under ideal conditions. Typical ranges are 1000 to 2000
feet (300 to 600 m) outdoors, and up to 300 feet (100 m) indoors. An RFExtender system
requires a minimum of two RFExtender transceivers, one at each node of the wireless link.
The RFExtender transceivers require AC power.
Operations Manual for RF Series Data Loggers MadgeTech, Inc.
Revised 2/27/2009 Page 23 of 32
Page 24

Simple RFExtender System
A basic set-up might be one of the two configurations below:
Figure 11. RFExtender as a wireless repeater
Figure 12. RFExtender as a wireless communication interface
In either configuration, the RFExtender functions like an extension cable between the
logger interface and the PC. The primary difference between the two setups is the logger
interface that is connected to the RFExtender. Figure 11 uses an RFC101A, and is therefore
limited by the one-way communication between the RF data logger and the RFC101A. Just
like using the RFC101A by itself, this setup requires that the logger be brought back to the
PC and connected to an IFC110 interface cable to launch, download, or configure the logger.
Figure 12 allows two-way communication through the IFC110 and thus can allow full use of
the data logger features.
Operations Manual for RF Series Data Loggers MadgeTech, Inc.
Revised 2/27/2009 Page 24 of 32
Page 25

The setup in Figure 11 is necessary when several transmitters must send their data to
the same RFExtender. The data is received by the RFC101A, and retransmitted or
“repeated” to the PC. Figure 12 is appropriate when only one data logger needs to be used
with a particular RFExtender, at a particular time. The data logger is configured to transmit
data packets over the serial cable instead of through the wireless transmitter, and the
RFExtender transmits the serial data back to the PC. This setup has two advantages: the
logger can be launched, downloaded, and configured without bringing it back to the PC, and
the IFC110 interface cable is less expensive than the RFC101A.
Complex RFExtender System
It is possible to use more than two RFExtenders in a system with more than two nodes.
This type of setup will be an extension of the two simple setups demonstrated above. Refer
to Figure 12 for an example of a complex system.
The setup in Figure 13 shows an RFExtender connected to a PC that can receive data
from 8 other transceivers. Each of the remote transceivers can either communicate serially
with one logger via an IFC110 or receive wireless data from multiple RF series transmitters
through an RFC101A. For this system to function properly, each transceiver must be set up
to receive data only from the proper location. This is accomplished by assigning each
transceiver a unique module address to identify itself, and a receiver address mask to
identify the module addresses from which it will receive data.
Module Address and Receiver Address Mask
The module address provides a unique identification of the individual transceivers. It
consists of 4 hexadecimal digits, which can be divided between a “system number” and a
node address within that system. Most applications will us a module address of the format
XXYY, where XX is the system number and YY is the node address. A system is comprised of
a PC connected to an RFExtender transceiver (the “Local Node”) and several other
transceivers (“Remote Nodes”) setup within the transmission range. Using the system
number is not strictly necessary, but it allows several groups of transceivers to be located
within transmission distance of each other without allowing data from one group to be
received by the other.
The receiver address mask is also 4 digits and will usually be configured in one of two
ways: to receive data from all the modules within a system, or to receive data only from
another module with the same module address. Only the local node at the PC will be
configured to receive data from multiple modules, as only the PC is capable of receiving and
processing the data being transmitted by all the modules. The remote nodes will be
assigned individual addresses, and configured only to accept transmissions from a module
with the same address as their own. To allow two-way communication with a remote node,
the local node module address and receiver address mask will be changed temporarily to
match that of the remote node.
Assigning module addresses should begin with the determination of the system number.
The system numbers used may be sequential, starting with one, as the zero address has
special significance. The local node should be assigned node address zero, and the remote
nodes may be sequential starting with one. Note that this is how the module addresses in
Figure 13 were generated.
Operations Manual for RF Series Data Loggers MadgeTech, Inc.
Revised 2/27/2009 Page 25 of 32
Page 26

The receiver address mask instructs the transceiver which data to receive by indicating
what part of the incoming module address should be compared to its own module address.
The remote nodes should be assigned receiver address masks of “FFFF”. In general terms, a
hexadecimal digit “F” in the receiver address mask means “compare this digit”. So a
receiver address mask of “FFFF” means “compare all the digits”, and if all the digits do not
match, ignore the incoming data. In technical terms, the comparison is performed as a
logical “AND” operation, which is a common function in computers and digital circuits.
The local node in Figure 13 is assigned an address mask of “FF00”. This can be
interpreted as “compare the system number, but not the node number”. (Technically, the
“AND” function will always result in a node address of “00”.) This way, the PC will receive
data from all the transceivers in its system. As a general note, to communicate between
one transceiver to the next, it is important that when configuring each transceiver, the
“Network Address” and “Module Address” are set as the same.
Receiver Address Mask Example
The local node in Figure 12 has a module address of “0100” and a receiver address mask
of “FF00”. Suppose that it receives data from module address “0104”. The incoming address
is processed through the mask as “0104” AND “FF00” = “0100”. The result matches the
local node address of “0100”, so the transceiver passes the data through.
Likewise, suppose that module address “0104” receives data from module address
“0108”. The incoming address is processed through the mask as “0108” AND “FFFF” =
“0108”. The result does not match the receiver’s module address of “0104”, so the receiver
ignores the data.
For further information on uses of the module address and receiver address mask,
contact MadgeTech Technical Support.
Operations Manual for RF Series Data Loggers MadgeTech, Inc.
Revised 2/27/2009 Page 26 of 32
Page 27

L
F
0
2
F
0
F
0
1
F
0
3
8
F
0
4
5
g
Node
7
0107
FFFF
0106
FFFF
Node
6
0108
FFFF
0105
FFFF
Node
Node
100
F00
ocal
Node
Node
Node
Node
101
FFF
102
FFF
103
FFF
Node
104
FFF
ADDRESS
MASK
RFEXTENDER
TRANSCIEVER
RF SERIES
DATA LOGGER
RFC101A
WIRELESS
RECEIVER
IFC110
INTERFACE
CABLE
WIRELESS LINK
CABLE LINK
ure 13. A complex RFExtender system
Fi
Operations Manual for RF Series Data Loggers MadgeTech, Inc.
Revised 2/27/2009 Page 27 of 32
Page 28

BATTERY LIFE
There are many variables that affect the battery lifetime. These variables include (but are
not limited to) sample rate, transmit rate, LED settings, transmission settings, ambient
temperature and battery self-discharge.
For the purposes of approximating battery life, please consult Tables 3 and 4 below.
These numbers should not be used as an absolute guarantee, but as an approximate guide
for deciding when the battery will need replacement. This table is useful because the lithium
batteries used in the RF products do not show a strong correlation between voltage and
remaining capacity, which makes it very difficult to measure their remaining life. In lithium
batteries, the voltage stays very nearly constant for the entire life of the battery until it
drops sharply and suddenly when depleted.
There are variables that are not accounted for in the tables. The table assumes a pattern
of continuous use, in which both the logger and transmitter features are used such that
both the transmitter and logger are active at approximately the indicated “activity rate” (for
cases where the logger and transmitter operate at different rates, use the faster rate for
estimation). The calculations assume that the device is configured and deployed, then
downloaded and redeployed when the logger memory is nearly full.
Table 3. Estimated battery life
ACTIVITY RATE WORST CASE FACTORY DEFAULT BEST CASE
30 seconds 3 months 6 months 6 months
1 minute 6 months 12 months 12 months
2 minutes 12 months 20 months 24 months
3 minutes 15 months 27 months 3 years
4 minutes 21 months 33 months 3.5 years
5 minutes 24 months 3 years 4 years
6 minutes 27 months 3.5 years 5 years
8 minutes 33 months 4 years 6 years
10 minutes 3 years 4.5 years 7 years
15 minutes 4 years 5 years 8.5 years
30 minutes 5 years 6 years 10+ years
1 hour 6 years 6.5 years 10+ years
2 hours 6.5 years 7 years 10+ years
4 hours 7 years 7+ years 10+ years
The transmitter settings used to calculate the best, worst and factory default cases are
indicated in Table 4.
Table 4. Transmitter settings for battery life estimation
WORST CASE FACTORY DEFAULT BEST CASE
Wireless Output Enabled Enabled Enabled
Serial Output Not Significant Not Significant Not Significant
Logging Option Not Significant Not Significant Not Significant
Switch Option Not Significant Not Significant Not Significant
Randomization Enabled Disabled Disabled
Operations Manual for RF Series Data Loggers MadgeTech, Inc.
Revised 2/27/2009 Page 28 of 32
Page 29

Error Correction Enabled Disabled Enabled
Custom Interval Enabled Disabled Disabled
Sampling Option Not Significant Not Applicable Not Applicable
Indicator Mode 10 seconds 10 seconds Reading only
Even longer battery life can be achieved by disabling the wireless output in favor of
serial-only or no transmission. Battery life is not calculated for these unusual cases.
OPERATING ENVIRONMENT
The RF series data loggers are rated for –30 to +70 °C (-5 to +50 °C for the
RFpHTemp101A, and -20 to +100 °C for the RFOT) and up to 95 %RH (non-condensing).
Although the devices are fully functional over this range, the strength of the wireless output
signal may vary with changes in environment. In particular, the signal strength may be
reduced at the temperature extremes, in high humidity, or if humidity condenses inside the
device.
SYSTEM PERFORMANCE AND RELIABILITY
To achieve maximum distance for the wireless transmission, there are a number of
guidelines that should be followed. Consider these points when setting up the system:
Transmitter location – Keep the transmitter as close to the receiver as possible. If
either the transmitter or receiver must be in an enclosed area, keep the other inside the
same area. This is especially important if there would be metal walls, conduit, or wires
between the units. In particular, attempting to transmit from inside of a freezer or
refrigerator is not likely to be successful.
Line of sight – Keep the transmitting and receiving antennas along a direct line of sight
from one to the other. In addition, keep the number of corners or obstacles in between
them to a minimum.
Nearby objects – Try to keep the transmitting and receiving antennas away from any
foreign objects, especially those made of metal. Performance may be improved by moving
the antenna away from the ground, ceiling, or nearby objects.
Antenna orientation – Keeping the transmitting and receiving antennae parallel with
one another may improve performance.
Composite Graph – Keep the Wireless Realtime Chart Recording selected on the
Composite Graph tab when receiving readings from multiple recorders.
Minimize interference – Keep external sources of radio frequency noise to a minimum.
Locate the antenna and receiver as far from any other electrical or wireless devices as
possible. If multiple transmitters are being used, set up the system to minimize interference
between transmitters.
Minimum delay between readings – Keep the transmit intervals to no less than 30
seconds between readings on ALL devices. This can be accomplished using the Delay Start
Operations Manual for RF Series Data Loggers MadgeTech, Inc.
Revised 2/27/2009 Page 29 of 32
Page 30

method and specifying start times at least 30 seconds apart from each other, and a reading
rate that will not result in overlapping transmissions.
Recommended Maximum number of transmitters per system – See Table 5 for
recommendations based on reading rate used.
Careful use of Autosave - It is recommended that Manual save be used in most cases.
If Autosave of wireless data is needed for record keeping purposes, use a longer autosave
interval as the number of received data loggers increases. Autosave interval is set as
default at every 500 readings. When using 1-3 loggers, 200 reading interval will be OK;
while when using 10 loggers, 1000 reading interval is recommended. Autosave feature will
be improved when MadgeTech implements XML file format for autosave in the future.
Table 5. Maximum Recommended transmitters per system
DATA FREQUENCY TRANSMITTERS TIME SEPARATION
2 minutes 8 30 seconds
3 minutes 6 30 seconds
4 minutes 8 30 seconds
5 minutes 10 30 seconds
6 minutes 12 30 seconds
8 minutes 16 30 seconds
10 minutes 10 1 minute
15 minutes 15 1 minute
30 minutes 30 1 minute
1 hour 30 2 minutes
2 hours 40 3 minutes
4 hours 48 5 minutes
8 hours 60 8 minutes
12 hours 72 10 minutes
Computer Specifications and Maintenance – As with any software application, a
computer with a fast CPU and plenty of available memory (RAM) is a key factor in achieving
the best performance. A windows disk cleanup such as Disk Defragmenter and Scandisk will
help improve system performance greatly. System reliability can also be improved using the
“File” then “Save” command to archive wireless data every x amount of readings. For
example, reliability will be increased if data is being archived every 200 readings, than if it
was being archived ever 2000 readings.
Periodically Restart the MadgeTech Software – For long-term wireless reception of
multiple RF-series data loggers, MadgeTech recommends that the data be manually saved
and the software restarted as often as every few days, depending on how often new data is
received. Memory usage of the MadgeTech2.exe program can be tracked in the Processes
tab of the Windows Task Manager. When a wireless data logger is configured and launched
at the target PC, a unique *.DVC (device file) is stored in the MadgeTech program directory.
This *.DVC file contains information about the wireless transmitter, which can be loaded on
to other PC’s so those computers can accept real time wireless data. Of course it is
necessary that the PC on which the DVC file was loaded is setup with an RFC101A receiver,
the baud rate is set to 4800, “Accept Real Time Wireless Input” is checked from the
“Communications” menu, and “Display Real Time Wireless Data” is checked from the
“Device” menu.
Operations Manual for RF Series Data Loggers MadgeTech, Inc.
Revised 2/27/2009 Page 30 of 32
Page 31

Page 32

INDUSTRY CANADA (IC) NOTICE
The following IC identification numbers are associated with the devices covered by this
manual. These certifications/registrant numbers are displayed on the labels of the products.
Removal or defacement of these numbers will void the IC certification.
PRODUCT IC # TRADE NAME
RFTemp101A 4953A-BOARDRF MadgeTech, Inc.
RFRHTemp101A 4953A-BOARDRF MadgeTech, Inc.
RFTC4000A 4953A-BOARDRF MadgeTech, Inc.
RFRTDTemp101A 4953A-BOARDRF MadgeTech, Inc.
RFpHTemp101A 4953A-RFPHTEMP MadgeTech, Inc.
RFVolt101A 4953A-BOARDRF MadgeTech, Inc.
RFProcess101A 4953A-BOARDRF MadgeTech, Inc.
RFPulse101A
RFOT
4953A-BOARDRF
4953A-BOARDJ
MadgeTech, Inc.
MadgeTech, Inc.
CONTACT INFORMATION
For further information on the products described in this manual, contact:
MadgeTech, Inc.
879 Maple Street,
Contoocook, NH 03229
P.O. Box 50
Warner, NH 03278
Phone: (603)-456-2011
Fax: (603)-456-2012
Email: support@madgetech.com
Web: http://www.madgetech.com/
Operations Manual for RF Series Data Loggers MadgeTech, Inc.
Revised 2/27/2009 Page 32 of 32
 Loading...