

Page 1
User Guide
Page 2

Page 3

All rights reserved. No part of this publication and the hardware or software
described in it may be reproduced in whole or in part. This User Guide may
contain samples of names and other identication to describe the features
and capabilities of Tracker Pro and should not be construed as endorsing any
product or individual but simply to illustrate the application.
Tracker 2000, Telepathic 2000 and ScreenDoors 2000, WISP and Magic
Cursor 2000 are all trademarks of Madentec Limited. Windows 95, Windows
98, Windows NT, Windows 2000, Windows ME and Windows XP, are trademarks
of Microsoft Corporation. Apple and Macintosh are registered trademarks of
Apple Computer, Inc. All other product names are trademarks or registered
trademarks of their respective companies.
Madentec Limited
www.madentec.com
Phone: 780-450-8926
Fax: 780-988-6182
1104
Page 4

United States Radio and TV Interference Regulations
The device complies with Part 15 of the FCC Rules. Operation is subject to the following two conditions:
(1) this device may not cause harmful interference, and (2) this device must accept any interference received,
including interference that may cause undesired operation.
Your Madentec Tracker Pro has been tested and found to comply with the limits for a Class B digital device,
pursuant to part 15 of the FCC Rules. These limits are designed to provide reasonable protection against
harmful interference in a residential installation.
Tracker Pro generates, uses and can radiate radio frequency energy and, if not installed and used in accordance
with the instructions, may cause harmful interference to radio communications. However, there is no guarantee
that interference will not occur in a particular installation. If this equipment does cause harmful interference
to radio or television reception, which can be determined by turning the equipment o and on, the user is
encouraged to try to correct the interference by one or more of the following measures:
- Reorient or relocate the receiving antenna.
- Increase the separation between the equipment and receiver.
- Connect the equipment into an outlet on a circuit dierent from that to which the
receiver is connected.
- Consult the dealer or an experienced radio/TV technician for help.
NOTE: Any change or modications not expressly approved by Madentec Ltd. could void the user’s authority
to operate this device
Canadian Interference-Causing Equipment Regulations
This Class B digital apparatus complies with Canadian ICES-003.
iv
Page 5

Table of Contents
1. Introducing Tracker Pro
Introduction 7
What’s in the box? 9
Registering Tracker 9
2. Installing Tracker Pro
Introduction 11
Connecting Tracker Pro 13
Mounting Tracker Pro 15
USB Hubs 17
Using Alternate Clicking Devices 17
3. Setting up Tracker Pro
Introduction 19
The Sensor and Dot 19
Tracking Range 21
Conguration 21
Table of Contents v
Page 6

Accelerated Cursor Speed 21
Using IntelliPoint 23
Tracker and Mouse Driver Settings 23
4. Tips & Tricks
Quick Start for Tracker Pro on a Computer: 25
vi
Page 7

1. Introducing Tracker Pro
Introduction
Tracker Pro is a hands-free mouse that translates your movements into direct
movements of the computer’s mouse cursor. It imitates a standard desktop mouse
or trackball allowing hands-free control of the computer.
Tracker Pro uses a sensor that tracks a tiny, reusable reective dot that is placed
on either your forehead or glasses. When your head moves, the cursor moves.
Tracker Pro provides wireless access to your Macintosh or PC computer using the
USB port. Precise tasks such as drawing or computer drafting are accomplished
easily. Pointing actions for games, surng the net and general computer
maintenance are also easily accomplished with Tracker Pro.
Tracker Pro allows three different options to accomplish the clicking functions
of a mouse. Clicks are accomplished by using any of the following methods: Single
switch access using any standard ability switch; WISP 2000* is Madentec’s wireless
switch using either a sip/puff headset or cheek switch: or a Dwell selection
program such as Madentec’s Magic Cursor 2000 for Windows or similar software
for Macintosh.
*Sip/Puff or Cheek activation using Wisp 2000.
If you are new to Tracker, please refer to the Tips & Tricks on page 25 rst.
Introducing Tracker Pro 7
Page 8
8 Tracker Pro User Guide
1. 2. 3. 4.
5. 6. 7. 8.
Illustration A.
Page 9

What’s in the box?
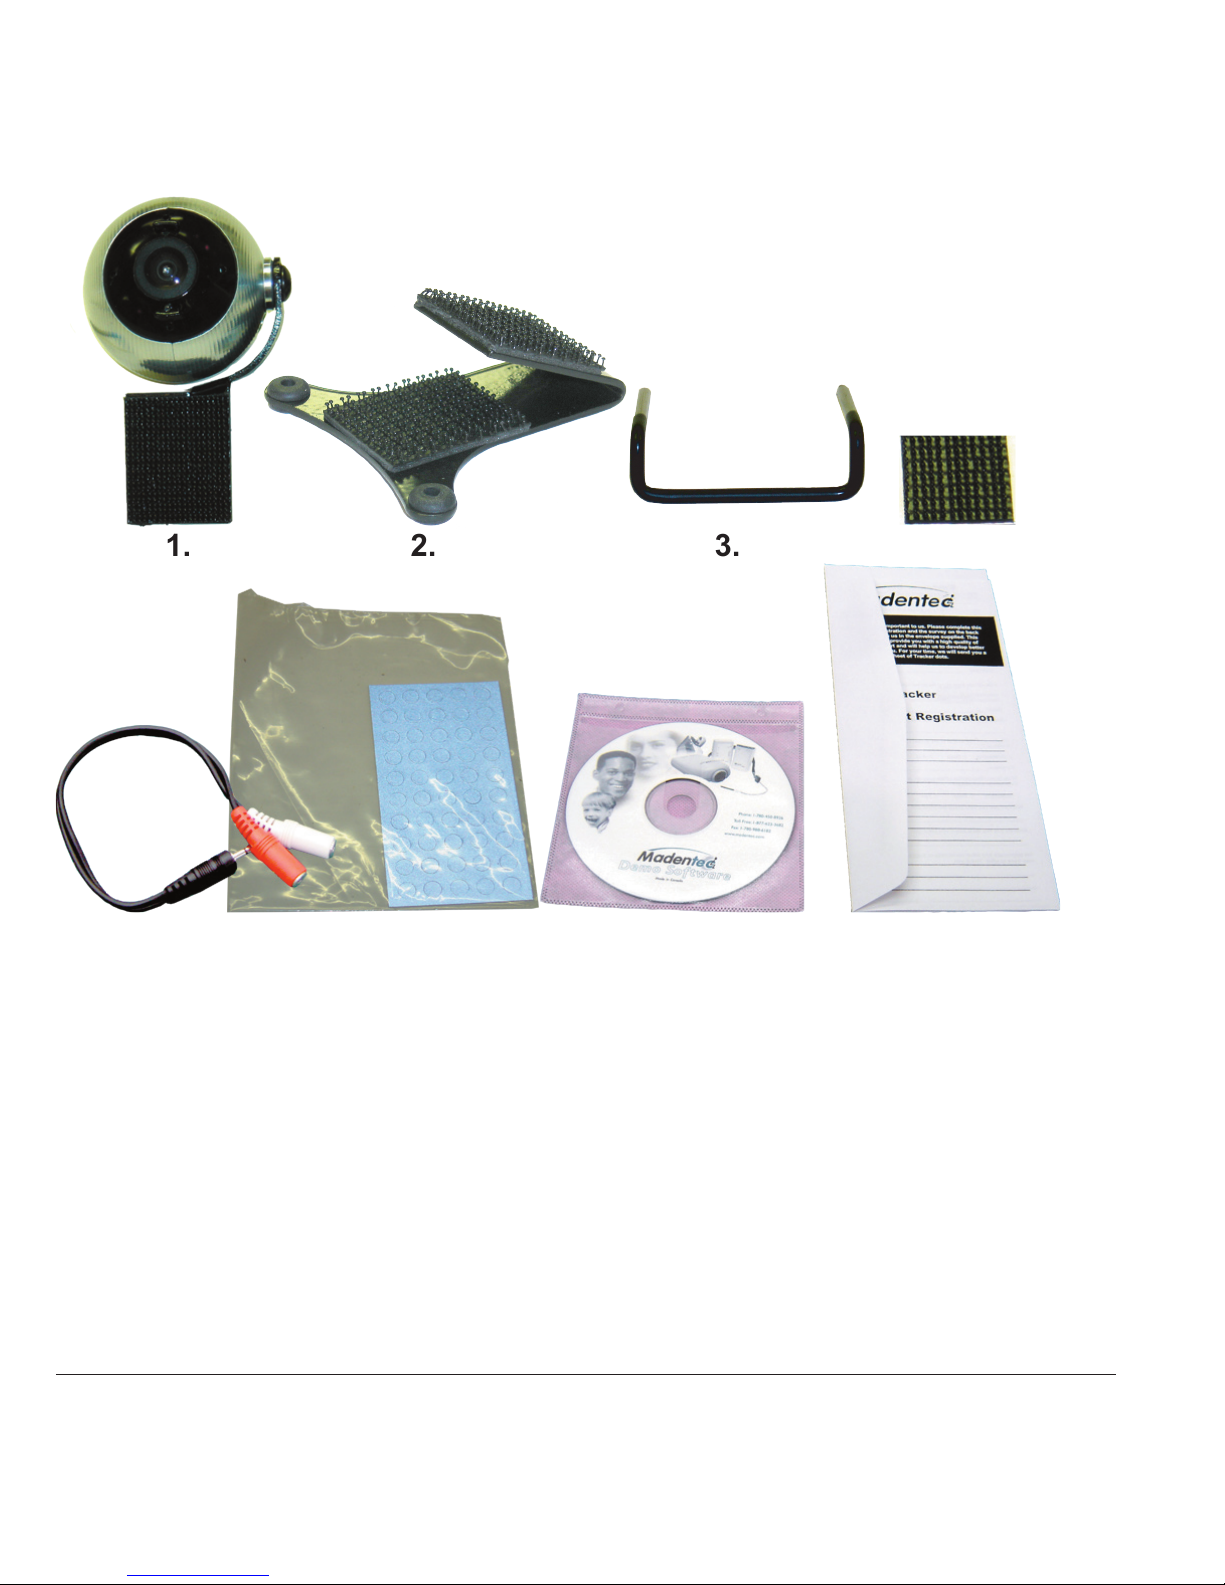
Illustration A. shows the contents of what is included in the Tracker Pro box.
1. Tracker Pro with attached cable 6. Stereo cable adapter
2. Universal Mounting bracket 7. Demo software CD
3. Standard Hook 8. Registration card
4. Extra Dual Lock for mounting 9. User guide
5. Tracker Dots
Registering Tracker
It is important to register your new Tracker Pro. Please complete the registration
card included with Tracker Pro and mail it as soon as possible. Registration entitles
you to two years free warranty support from the date of purchase.
Note In the event that you return your Tracker Pro for warranty support it is imperative
that you keep the original shipping box. This box has been designed to protect
Tracker Pro during shipping. Any damage done to Tracker Pro if returned in a box
other than the original is not covered by warranty.
Introducing Tracker Pro 9
Page 10

10 Tracker Pro User Guide
Illustration B.
Page 11

2. Installing Tracker Pro
Introduction
Tracker Pro is ready for installation on any PC or Macintosh computer using
an available USB port. With the new compact size, you will nd installation and
operation very easy.
Positioning the Tracker Unit
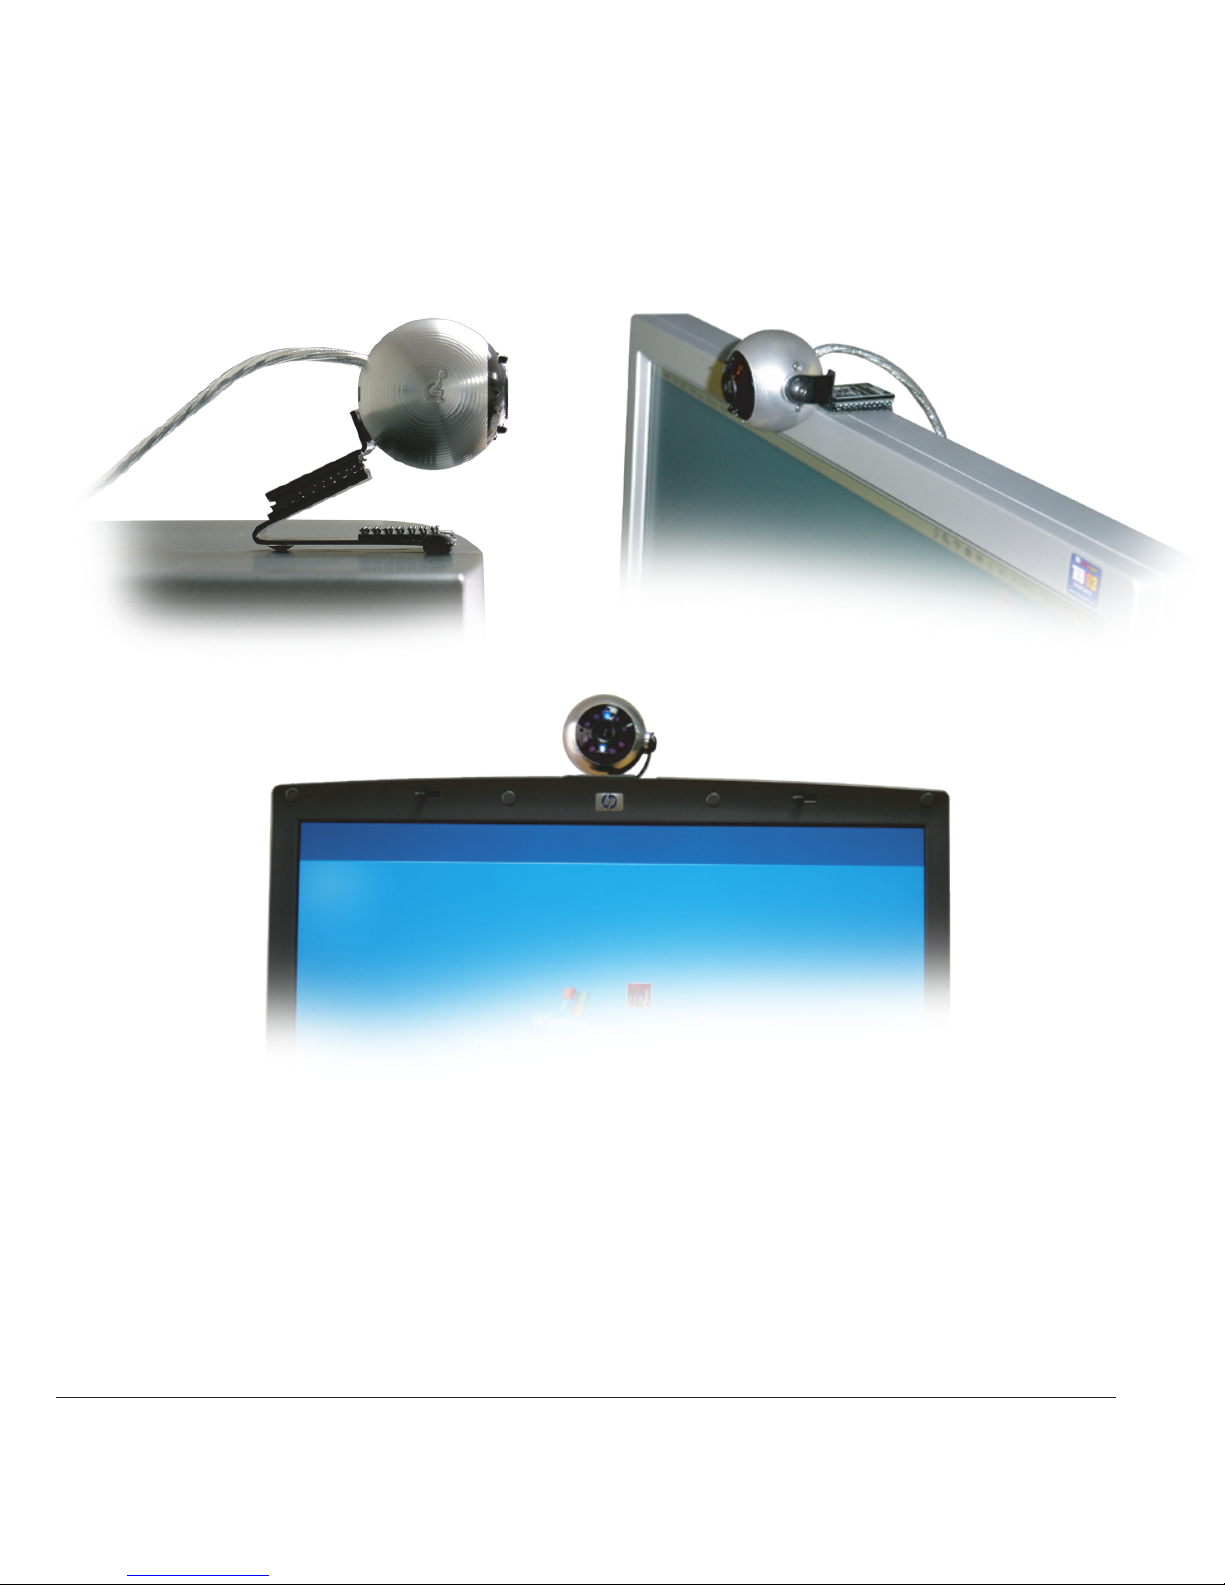
Tracker Pro can be mounted on either a desktop or laptop computer as well
as AAC devices which support USB connectivity. The round ball of Tracker Pro
contains a sensor which detects reective light from the reusable dot and
translates it to cursor movement. This sensor must be positioned so that it points
towards the dot. See page 15 for more information on mounting.
Illustration B.- Tracker Pro on the Universal Mount
Installing Tracker Pro 11
Page 12
12 Tracker Pro User Guide
Illustration C.
Page 13

Connecting Tracker Pro
Any computer with a USB port will support Tracker Pro. Madentec will support
Tracker on computers with the following operating systems: Macintosh computers
running Mac OS9, or Mac OSX, and Windows platform computers running Win98SE
to WinXP. If you are using Tracker Pro on an AAC product, please see the device
manufacturer for questions regarding setup for head pointing.
Illustration C
1. Place Tracker Pro on your computer or laptop in the desired location.
2. Plug the USB cable attached to Tracker Pro into a free USB port on your computer. The
attached cable should be long enough for most laptops and AAC devices. A 6-foot
extension cable can also be used to connect the Tracker Pro to a desktop computer.
3. Once Tracker Pro has been connected, your computer’s operating system will detect
new hardware and load the appropriate driver automatically.
4. If you want to use another USB mouse you may either plug it into the second USB port
on your computer (if equipped) or purchase a powered USB hub that will allow more
than one USB device to be operated from a single USB port.
Note Not all Windows operating systems support USB. Please check with your
computer hardware specialist to see if your computer will support USB.
Installing Tracker Pro 13
Page 14
14 Tracker Pro User Guide
Illustration D.
1.
2.
3a.
4.
3b.
Page 15

Mounting Tracker Pro
The Tracker Pro includes several mounting options. One of which includes a
product similar to Velcro, called Dual Lock™. Dual Lock has been positioned on the
bracket which is attached to the Tracker, as well as two points on the “Universal
Mount”.
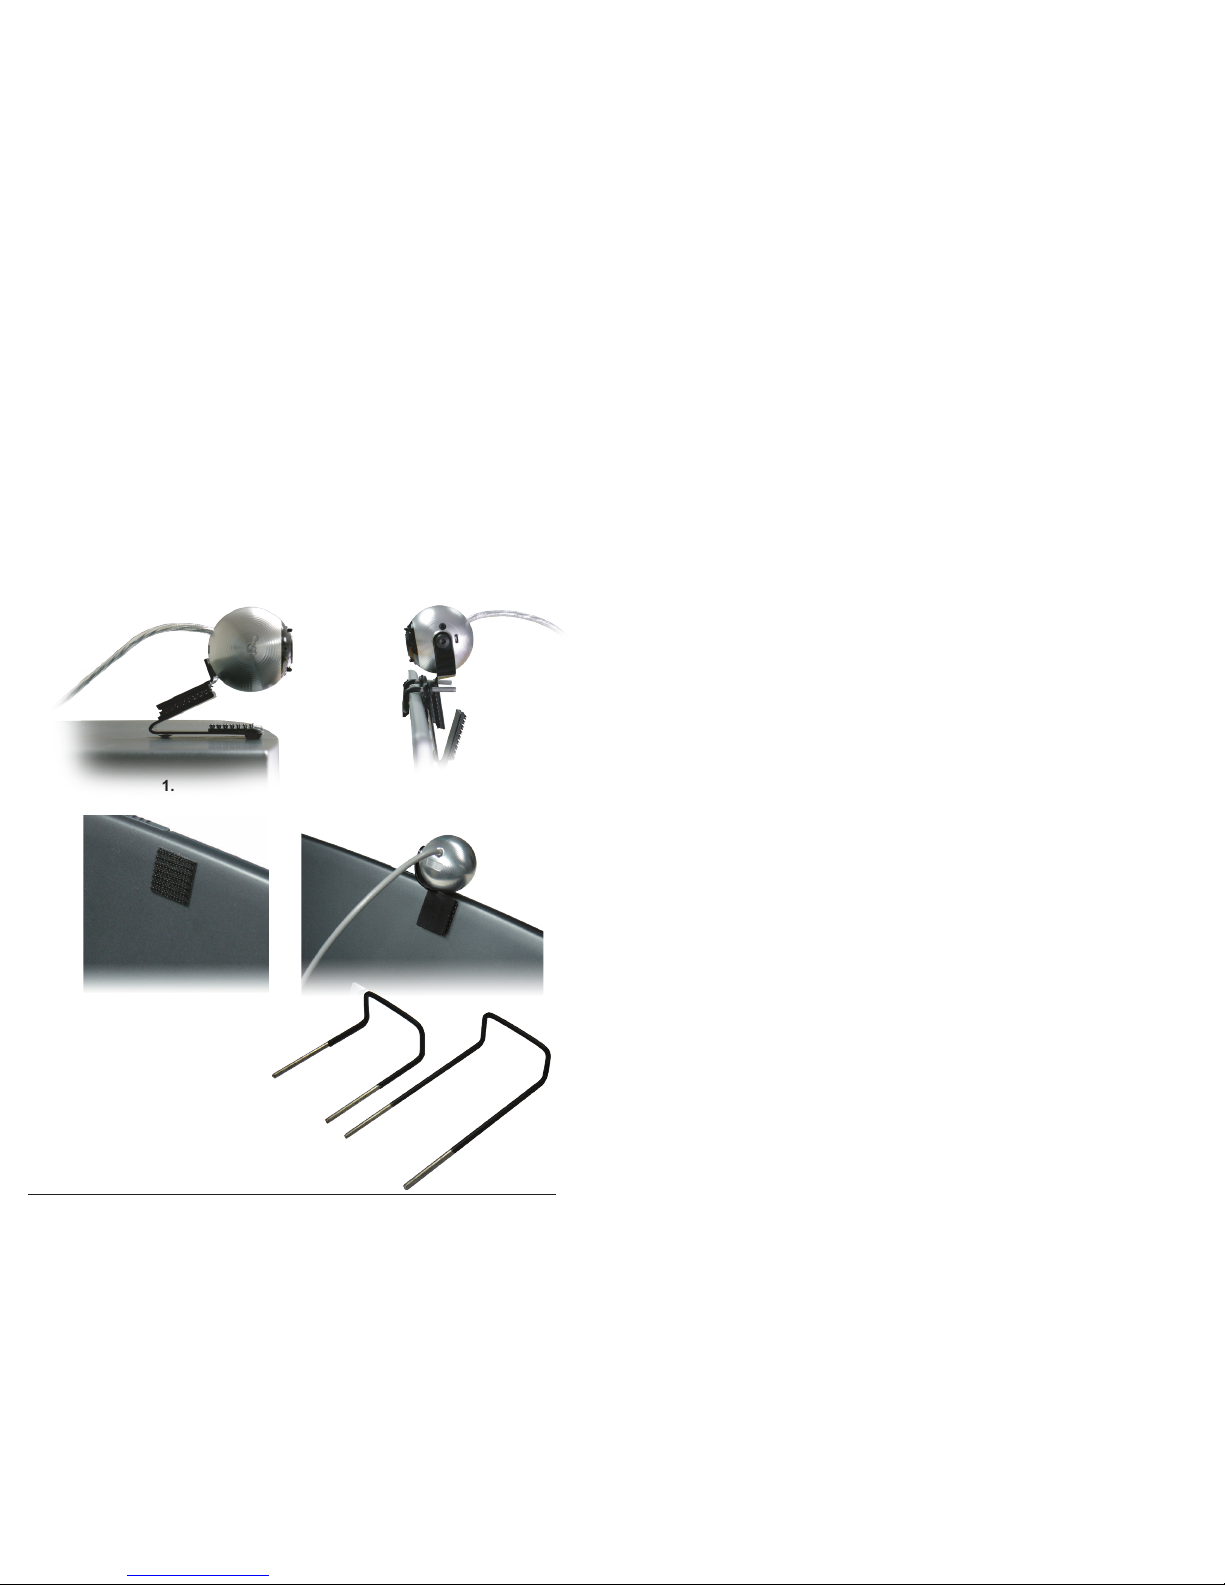
Please see Illustration D.
1. Standard desktop monitor mounting using the supplied Universal Mount.
2. Standard mounting on a laptop using the Universal Mount, and the supplied “hook”.
3. Mounting on other devices, such as an AAC product. Please use the extra Dual Lock
product (supplied) (3a.) and the Tracker removed from the Universal Mount (3b.).
4. When necessary, longer hooks may be ordered separately for mounting on larger or
thicker devices. The hook provided cannot be substituted with a longer hook at time
of purchase. If required, the additional hooks would have to be ordered separately.
Note The rubber-based adhesive is ideal for better contact on device surfaces that are
textured or have surface irregularities. The surface on which you wish to apply
the Dual Lock should be at room temperature, and be dry, and free of oils or dust.
Recommended time to achieve maximum bond strength is 24 hours.
Installing Tracker Pro 15
Page 16
16 Tracker Pro User Guide
Illustration E.
Page 17

USB Hubs
A USB hub may plug into an existing USB port which will expand the port from a
single USB connection to as many as four connections. If using Tracker Pro with a
USB hub, you must ensure that the hub is externally (self ) powered.
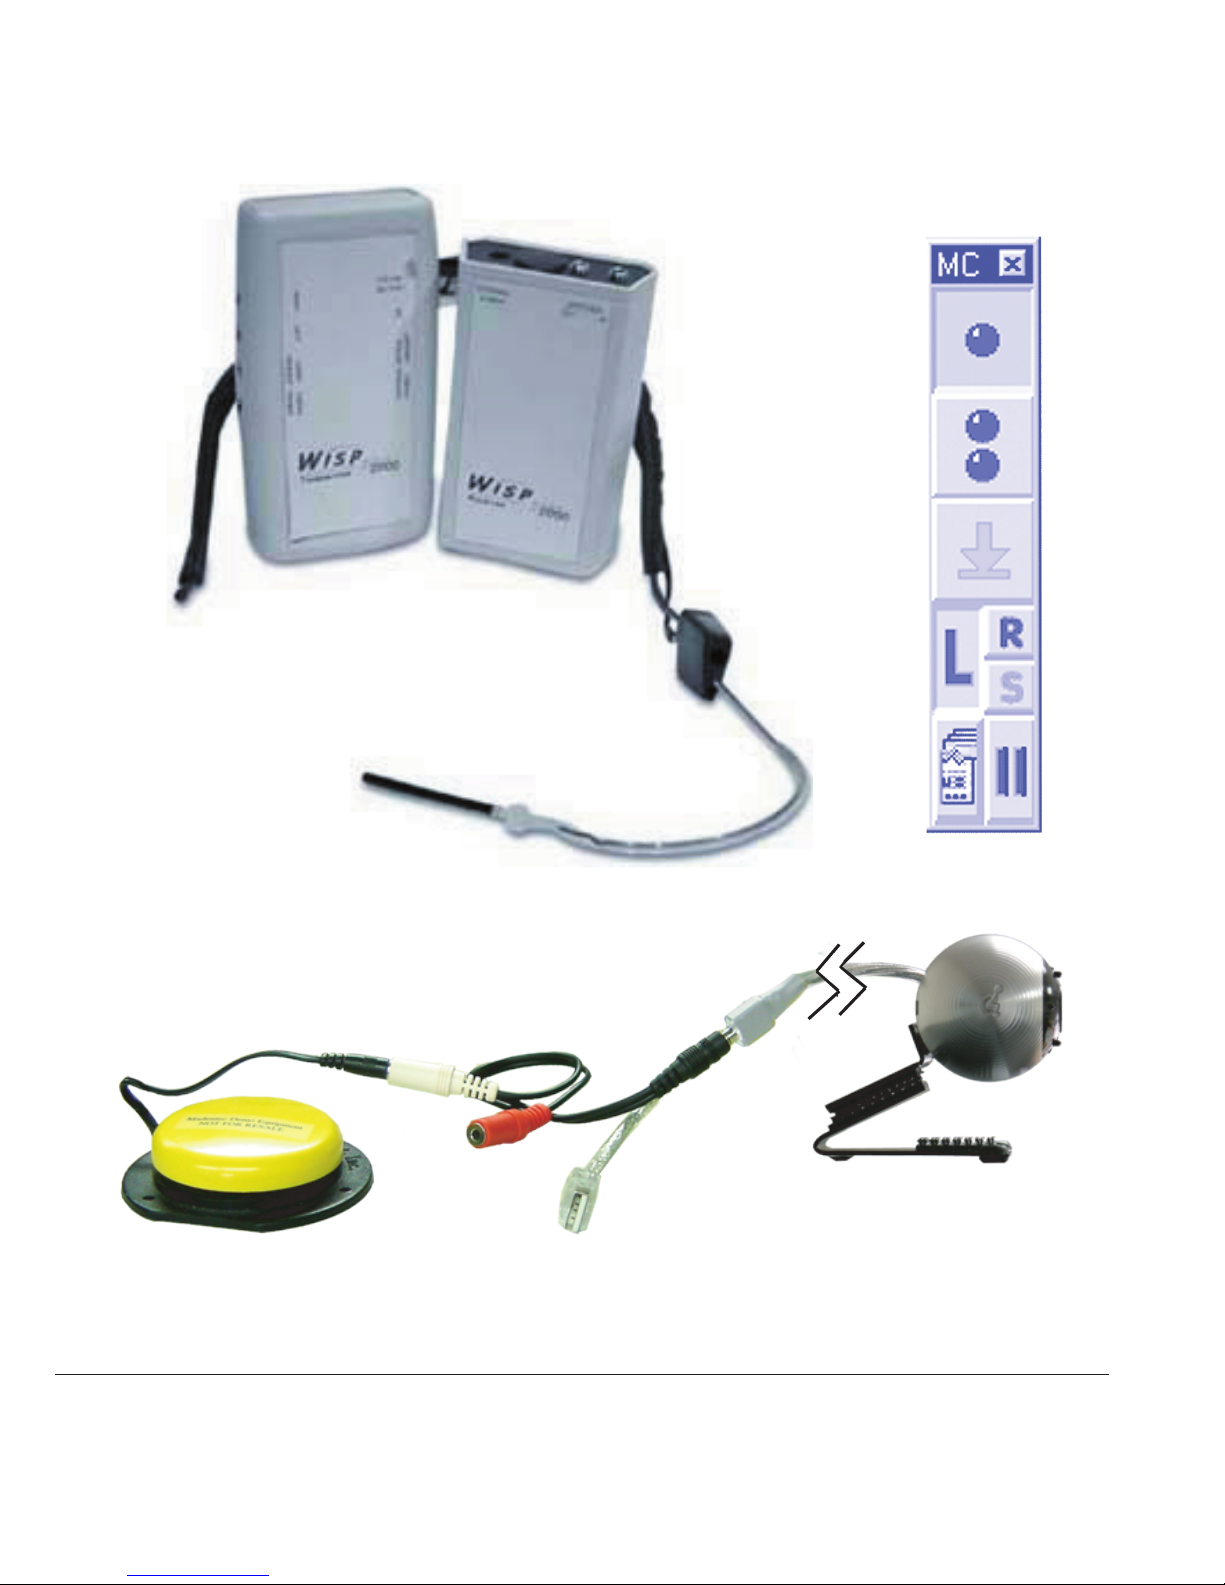
Using Alternate Clicking Devices
Tracker Pro may be used with any clicking device. For those clients with
extremely limited mobility you may want to consider either WISP 2000, Madentec’s
wireless integrated switch platform or Magic Cursor 2000, an on-screen dwell
program. Information about WISP 2000 and Magic Cursor 2000 is available on our
web site at www.madentec.com.
You may also want to use some form of ability switch such as a Jelly Bean™, from
AbleNet. When using an alternate switch, plug the stereo adapter provided into
the integrated switch jack on the USB cable of Tracker Pro. An alternate switch or
switches may then be plugged into the connections on the stereo adapter. The
stereo adapter will allow for left and right clicking ability.
See Illustration E.
Note Please use the stereo adapter even if you only require one switch. This will
properly convert the stereo output of both left and right mouse button functions
to the single switch used on Macintosh.
Installing Tracker Pro 17
Page 18
18 Tracker Pro User Guide
Illustration F.
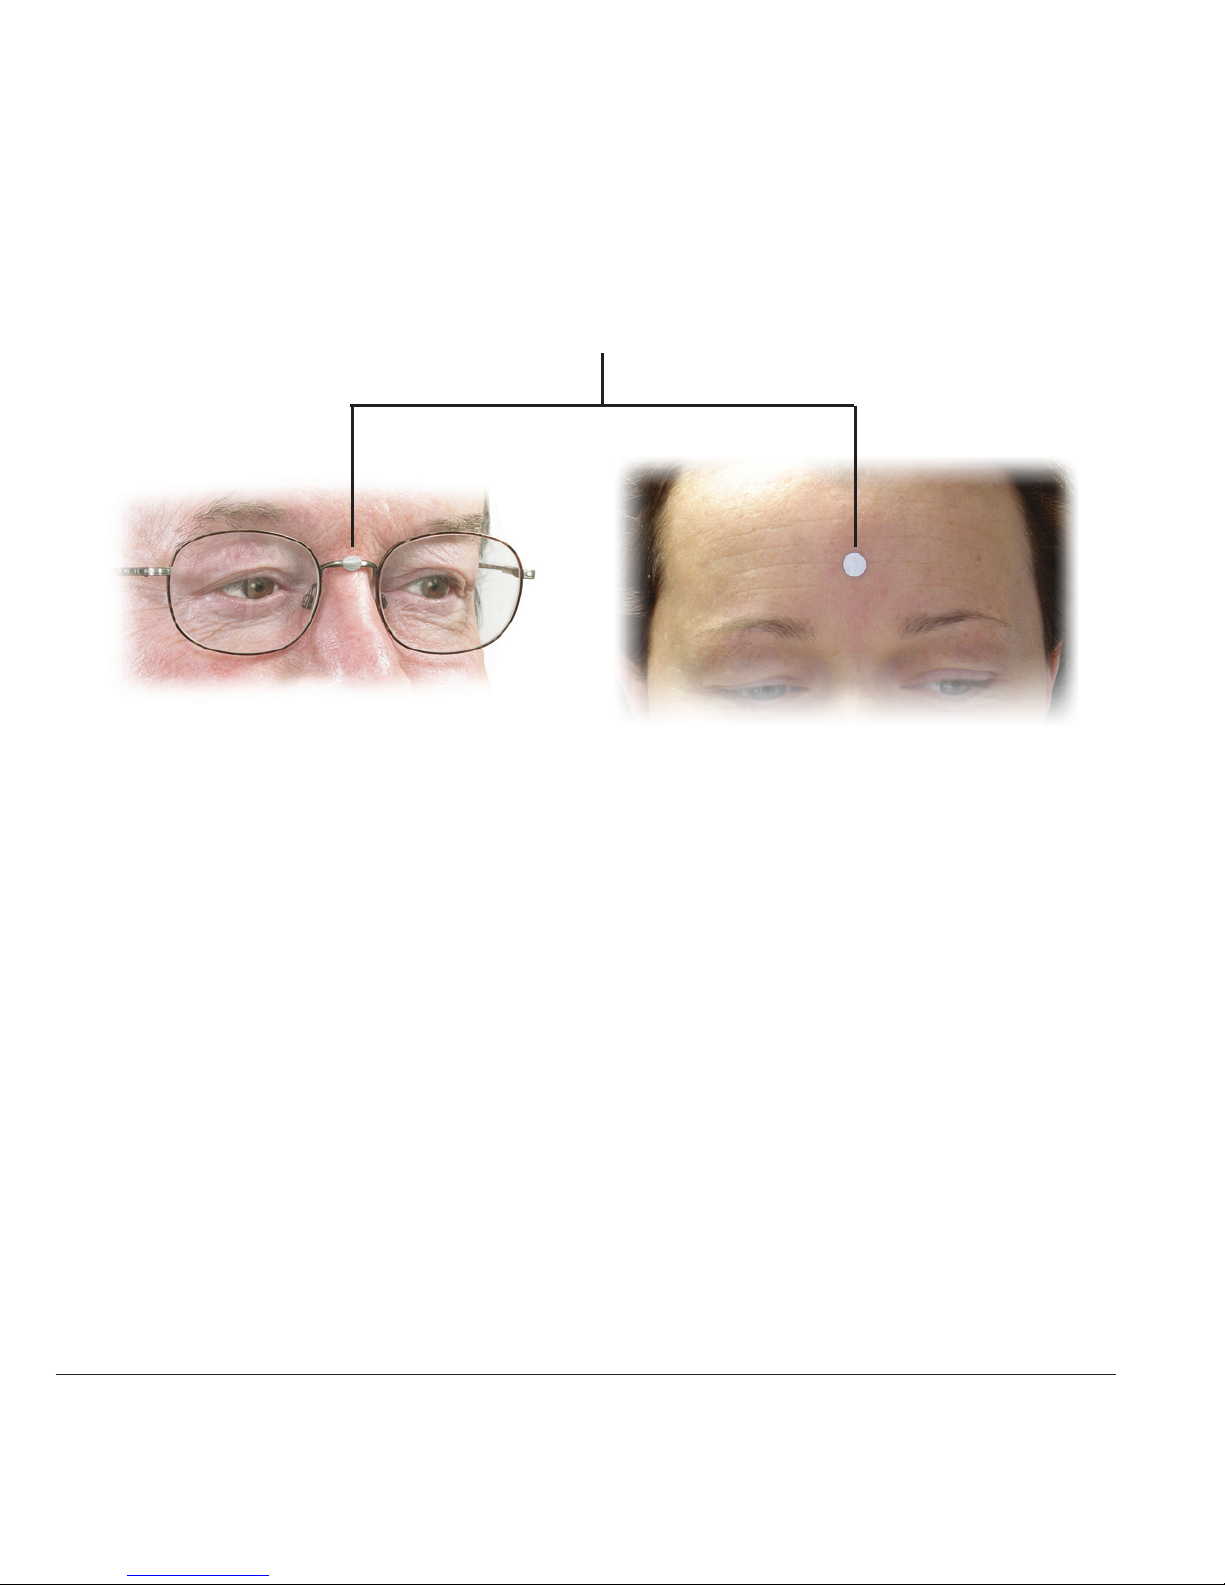
Typical dot placement
Page 19

3. Setting up Tracker Pro
Introduction
Tracker Pro works on a very simple principle: the position of light reected from
the reective dot is translated into mouse movements. This chapter reviews the
placement of the reective dot and the different ways of working with Tracker Pro.
The Sensor and Dot
Think of the front of Tracker Pro as a camera lens. As Tracker Pro detects
reected light from the reusable dot it will automatically adjust itself to block out
extraneous light sources such as sunlight, uorescent or other ambient light.
Place the reective dot on your forehead, the bridge of your glasses, or any other
moveable location on your body. Tracker’s sensor shines out infrared light and the
reective dot reects this light directly back to the sensor. The sensor detects the
motion of the dot and translates this motion into cursor movements.
Note Some users may not have good head control, but good control of other parts of their body,
such as the foot.The dot may be placed on any moveable part of the body. Try different
locations, such as the cheek, or the lip for someone who may not sit straight in front of the
computer. (There is no wrong way for placement of the dot. Use whatever works for the
user.) Illustration F.
Setting up Tracker Pro 19
Page 20
20 Tracker Pro User Guide
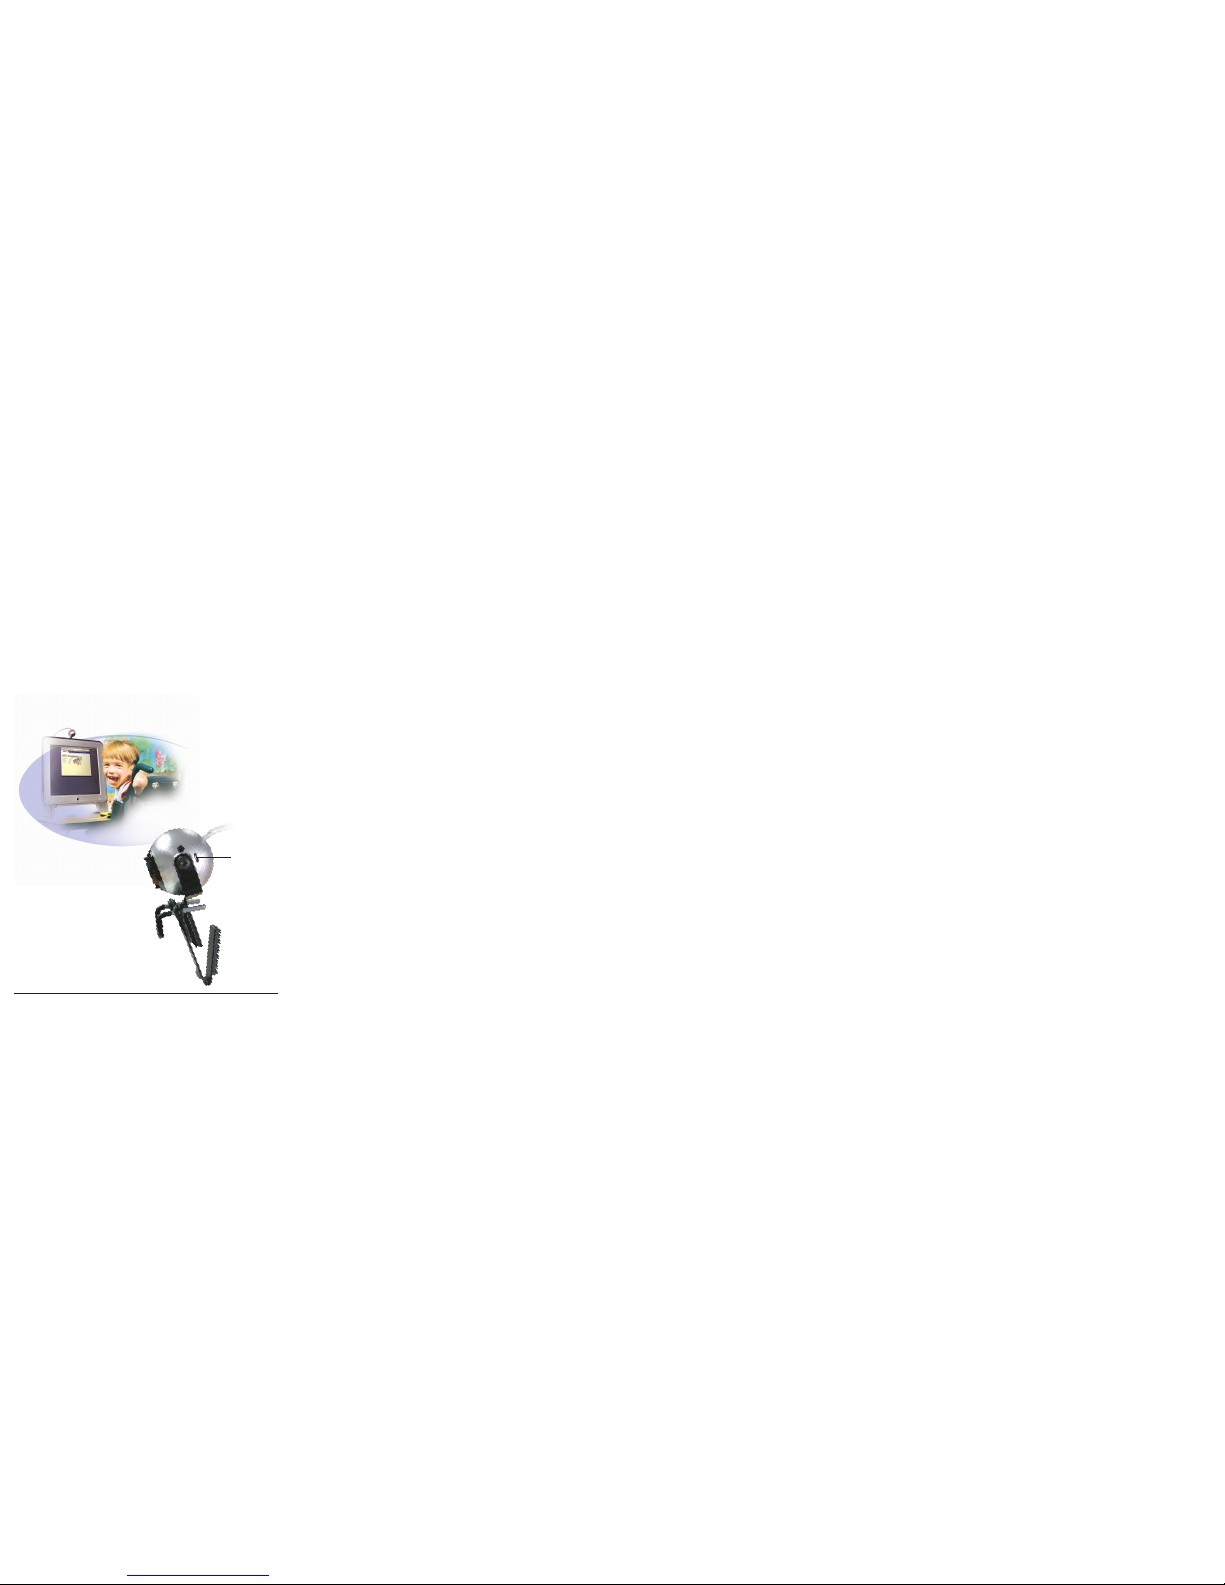
Speed slide
Switch
Illustration G.
Page 21

Tracking Range
Tracker Pro will detect the reective dot to a maximum of ve feet from the
sensor. The ideal distance is to be about three feet. You will notice Tracker Pro
has detected and is ready to track your movements by the color on the front of
the sensor. If you see a blue light at the top portion of the ball, Tracker Pro has
detected the dot and is in the best position to convert your movements into
cursor movements.
Conguration
Tracker Pro comes with a built-in switch which controls the mouse speed.
This speed control is in addition to the standard mouse driver settings on the
computer. The switch can be found directly behind the mounting point on the
right side of the Tracker Pro. (See Illustration G.)
Note Change the switch position by using the end of a paper clip. Illustration G.
Accelerated Cursor Speed
The default setting is with the slide switch in the down, or “off” position. This
standard setting provides smooth movement, which is preferred by most users. By
placing the switch in the “up” or “on” position, the mouse movement is accelerated.
Try both settings to determine a personal preference. These settings can be used
on any system to add acceleration or to slow down the movement for increased
pointer control. The standard conguration of Tracker is for normal mouse
movement with IntelliPoint (Windows OS only) features always on.
Setting up Tracker Pro 21
Page 22
22 Tracker Pro User Guide
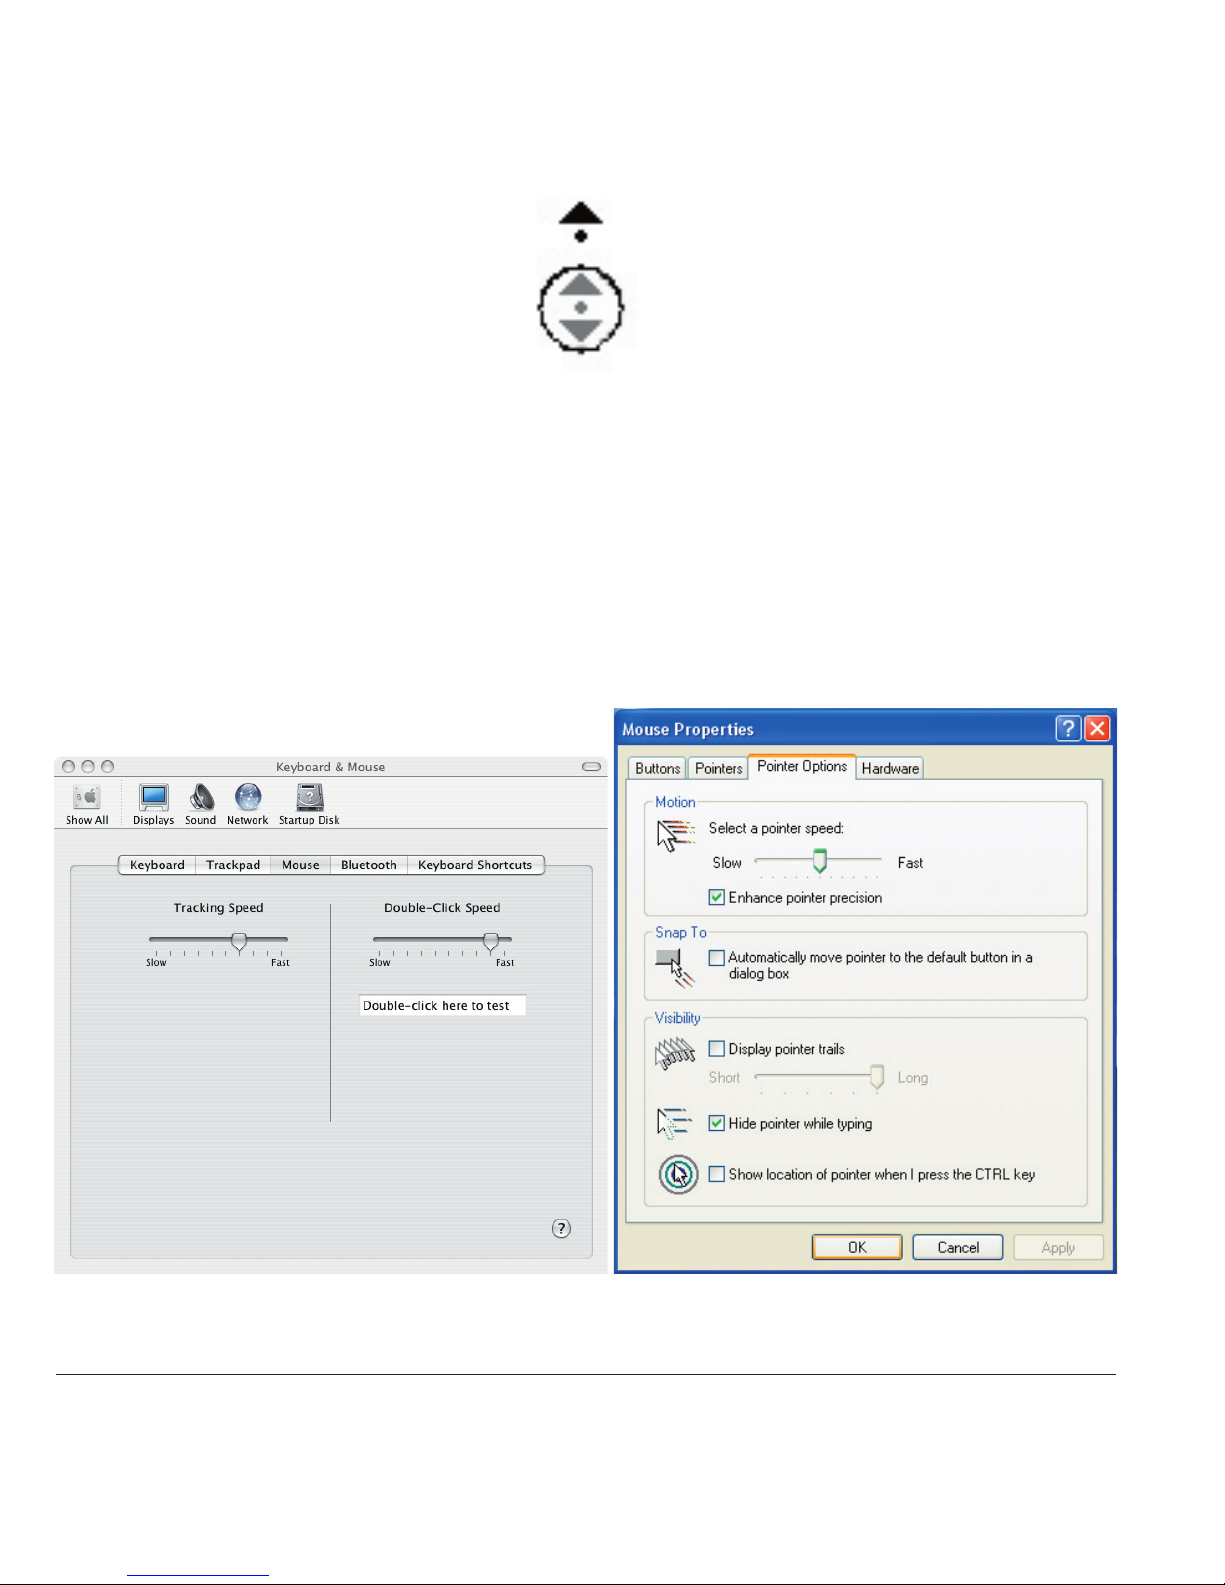
Illustration I.
Illustration H.
Mac OSX WinXP
Page 23

Using IntelliPoint
IntelliPoint (from Microsoft) enables you to perform a wheel button click. This
feature is always on. A right button click that is held between one and two seconds
will initiate a wheel click, which will then allow you to “scroll” the window simply
by moving the cursor up or down.
See Illustration H.
Tracker and Mouse Driver Settings
Tracker Pro settings work with the mouse driver settings on your computer. For
instance, if you have set Tracker Pro for accelerated cursor movement and your
mouse is also set for higher tracking speeds, this will provide for even faster cursor
movement. It is important for you to remember that cursor speeds are dependent
on both the Tracker Pro switch settings (hardware) and the settings used for your
specic mouse driver (software).
See Illustration I.
Setting up Tracker Pro 23
Page 24

24 Tracker Pro User Guide
Page 25

4. Tips & Tricks
Quick Start for Tracker Pro on a Computer:
Your Tracker can be placed directly on the top of your desktop computer
horizontally or vertically on a laptop by using the enclosed clip and the universal
mount. You can further secure it by using Velcro, or the supplied Dual Lock. It is
a good idea if you are going to be moving about in a wheelchair to secure it with
more than just the hook.
Once it has been placed on the device you will adjust the camera ball so that it
points toward the reusable dot. Remember, as with anything new, practice will be
needed. Over time you will become adept at using the Tracker Pro. Do not expect
to be an expert the very rst time that you try it. (Users tend to ‘tense’ up the rst
time they try the Tracker. This will make it more difcult to be accurate. Once you
relax, you will nd that it will be much easier to use.)
Note Remember if your Tracker falls off your computer and cracks the camera it is not
covered by warranty.
Tips & Tricks 25
Page 26

26 Tracker Pro User Guide
Plugging in the Tracker Pro
1. Insert the USB plug into an available USB port on the device you will be using.
Your computer should automatically recognize the new hardware. (Windows) For
Macintosh, it will just work like any other mouse.
The Tracker is a standard mouse device
2. The Tracker works exactly the same as a hand mouse however you are using your
head or other body part to control it. When you place the dot on your head or glasses
and move your head, then the Tracker Pro will follow the dot. The Tracker provides
mouse movement, but not the click. If you have Magic Cursor 2000 software installed
and you rest or dwell on the object for a certain amount of time, it will perform the
clicking action for you. You may also click by using a sip/puff switch such as Wisp
2000 or another standard ability switch to perform this action.
First time users
3. If you are setting Tracker Pro up for a new user, rst make the adjustments to suit your
preference. Once you are personally comfortable with the mouse movement, then let
the new user try using the Tracker Pro with the same settings.
Dot placement
4. It is NOT good practice to simply place a dot on the end of your nger and wave it
in front of the Tracker. It is best to sit in front of the Tracker, and place a dot on your
forehead when testing or demonstrating headpointing. The Tracker searches for an
individual dot, so waving the entire sheet of dots in front of the Tracker will not work.
Page 27

Speed settings
5. Sometimes when you use your head to control the cursor, the speed may seem too
fast. Go into the “Control Panel” of your computer and look for the heading “Mouse”
or “Mouse Properties”. Here you will nd the Pointer Speed or Pointer options. Try
adjusting the speed down. In order to nd the right speed you may have to make
adjustments in these settings. (When using Mac OSX, mouse speed is adjusted in the
System Preferences under “Keyboard & Mouse”. Acceleration may also be tunred on or
off by using the built in “Speed Switch”. See page 21 for more information.
Pointer size
6. Under “Mouse” you will also nd something called pointers. You may adjust the size,
type and color of pointer you want to use. You may want to make your pointer larger
and easier to see when you are starting out. ( Not available on MAC computers).
Increase display size
7. You may also increase your display size within the Control Panel. This will make the
targets on your computer appear larger and easier to see and control. On MAC you
will nd this option under either “Monitors” or “Displays”.
Games with large targets
8. Start with games or large targets. Then, work your way down towards hitting smaller
targets, or typing with an on-screen keyboard, such as ScreenDoors 2000 from
Madentec. It is difcult to hit small targets when you are rst learning so start with
large and work your way down to smaller items. Solitaire is a good adult game, and
any child’s game (ie: Jumpstart series) will help develop the necessary skills.
Tips & Tricks 27
Page 28

28 Tracker Pro User Guide
Maintain your settings
9. It is important to not change the settings just because you think they are not working.
Allow time for the user to try Tracker with the mouse settings you have made for
long enough before you make additional adjustments. Changing settings you have
made every 30 minutes is too soon. Sometimes, leaving the computer and coming
back, may be required to make an accurate assessment of the settings. When making
adjustments, it is preferred to make them in small increments.
Trust your Therapist
10. Work with your Occupational Therapist for optimal seating and positioning of the
client, as well as the Tracker and dot placement.
Adjust the Tracker ball
11. You may have to adjust the camera ball from time to time. If you want to make
adjustments on the computer with the hand mouse, simply point the Tracker up and
away from the dot.
Bumping to center
12. A process called “Bumping” accomplishes centering of the pointer. If the cursor is not
centered in the screen, but the user is, simply move the cursor to edge of the screen
until it “bumps” against the edge. Continue moving your head beyond that point,
effectively catching up on the cursor. Continue in this fashion with simple up-anddown or side-to-side movements. As you practice, it will quickly become apparent
what you must do to center the cursor.
Page 29

Index
A
AAC devices 11
AAC product 13, 15
ability switch 17, 26
Accelerated 21
accurate 25
Adjust the Tracker ball 28
Alternate Clicking Devices 17
B
blue light 21
Bumping 28
C
camera ball 25
camera lens 19
centering 28
cheek switch 7
click 26
clicking 7
ability switch 17
clicking device 17
left clicking 17
Magic Cursor 2000 17
right button click 23
right clicking 17
sip/puff switch 26
switch jack 17
wheel button click 23
WISP 2000 17
Conguration 21
Connecting 13
Control Panel 27
cursor 7, 23, 28
cursor movement 11, 19
Cursor Speed 21
D
Demo software CD 9
desktop computer 13, 25
desktop 11
detected 21
display size 27
distance 21
Dots 9
dot 7
placement 19
reective dot 7, 19, 21
reusable dot 11, 25
Dot placement 26
driver 13
Dual Lock 9, 15, 25
dwell 17
Index 29
Page 30

30 Tracker Pro User Guide
Dwell selection 7
E
extension cable 13
F
faster cursor movement 23
forehead 19, 26
G
glasses 19
H
hardware 23
hook 9, 15, 25
longer hooks 15
horizontally 25
I
infrared light 19
Installing 11
IntelliPoint 21, 23
Introduction 7
J
Jelly Bean™ 17
L
laptop 11, 13, 15
large targets 27
light 19
light sources 19
ambient light 19
uorescent 19
sunlight 19
longer hooks 15
M
Macintosh 7, 11, 13, 17, 26
Mac OS9 13
Mac OSX 13, 22, 27
Magic Cursor 2000 7, 17
Maintain your settings 28
Microsoft 23
monitor 15
motion 19
Mounting 11, 15
mounted 11
Mouse 27
mouse 13, 26
Mouse Driver 23
speed 23
Page 31

Mouse Properties 27
mouse settings 28
mouse speed 21
N
new hardware 13
O
Occupational Therapist 28
on-screen keyboard 27
operating system 13
P
PC 7, 11
Pointer size 27
Pointer Speed 27
positioning 11, 28
practice 25
Q
Quick Start 25
Adjust the Tracker ball 28
Bumping to center 28
Dot placement 26
First time users 26
Games with large targets 27
Increase display size 27
Maintain your settings 28
Plugging in the Tracker Pro 26
Pointer size 27
Speed settings 27
standard mouse device 26
Trust your Therapist 28
R
Range 21
reective dot 19, 21
reected light 19
reective light 11
Registering 9
register 9
Registration card 9
reusable dot 11, 19, 25
right button click 23
S
ScreenDoors 2000 27
sensor 7, 11, 19
sip/puff 7, 26
skills 27
slow 21
smaller targets 27
software 23
Solitaire 27
speed 23
speed control 21
Index 31
Page 32

32 Tracker Pro User Guide
Speed settings 27
Speed slide Switch 20
Speed Switch 27
Standard Hook 9
Stereo cable adapter 9
stereo adapter 17
switch 7, 21
switch jack 17
System Preferences 27
T
Table of Contents v
Therapist 28
Tips & Tricks 25
Tracker Dots 9
Tracker Pro 7
U
Universal Mounting bracket 9
Universal Mount 11, 15
USB 11
USB cable 13, 17
extension cable 13
USB hub 13, 17
USB plug 26
USB port 7, 11, 13
User guide 9
V
Velcro 15, 25
vertically 25
W
warranty 9, 25
web site 17
wheelchair 25
wheel button click 23
Win98SE 13
Windows 7, 13, 26
WinXP 13, 22
wireless switch 7
WISP 2000 7, 17, 26
 Loading...