


Computer Access
Computer Access
Solutions
Solutions
User Guide
Rev 1.4


All rights reserved. No part of this publication and the hardware or software described in
it may be reproduced in whole or in part. This User Guide may contain samples of names
and other identication to describe the features and capabilities of IntelliSwitch and
should not be construed as endorsing any product or individual but simply to illustrate the
application.
IntelliSwitch is a trademark of IntelliTools, licensed by Madentec Limited. Windows 95, Windows
98, Windows NT, Windows 2000, Windows ME and Windows XP, are trademarks of Microsoft
Corporation. Apple and Macintosh, OS 9 and OSX are registered trademarks of Apple Computer,
Inc. All other product names are trademarks or registered trademarks of their respective companies.
Discover and Tracker are registered trademarks of Madentec. DiscoverPro, Envoy, and the Madentec
logo are trademarks of Madentec.
Madentec Limited
www.madentec.com
Phone: 780-450-8926
Fax: 780-988-6182
© 2006 Copyright Madentec Limited

United States Radio and TV Interference Regulations
The device complies with Part 15 of the FCC Rules. Operation is subject to the following two
conditions: (1) this device may not cause harmful interference, and (2) this device must accept any
interference received, including interference that may cause undesired operation.
Your IntelliSwitch has been tested and found to comply with the limits for a Class B digital device,
pursuant to part 15 of the FCC Rules. These limits are designed to provide reasonable protection
against harmful interference in a residential installation.
IntelliSwitch generates, uses and can radiate radio frequency energy and, if not installed and used in
accordance with the instructions, may cause harmful interference to radio communications. However,
there is no guarantee that interference will not occur in a particular installation. If this equipment does
cause harmful interference to radio or television reception, which can be determined by turning the
equipment off and on, the user is encouraged to try to correct the interference by one or more of the
following measures:
- Reorient or relocate the receiving antenna.
- Increase the separation between the equipment and receiver.
- Connect the equipment into an outlet on a circuit different from that to which the
receiver is connected.
- Consult the dealer or an experienced radio/TV technician for help.
Warning: Changes or modifications to this unit not expressly approved by Madentec Limited could
void the user’s authority to operate the equipment.

Contents
Introducing IntelliSwitch 7
Wireless Switch Access 7
How does it work? 7
What’s in the box? 9
Registering IntelliSwitch 9
Appendix A: Using the IntelliSwitch
Control Panel Software 35
Introduction 35
The Control Panel Icon 35
The Control Panel Tool Tray Menu
37
The Control Panel Software 37
Installing IntelliSwitch 11
Get Started 11
Installing the Control Panel 11
Windows 13
Mac OSX 13
Connecting IntelliSwitch 15
Wired Mode 15
Wireless Mode 17
Pairing 19
Pairing one Transmitter to one
Receiver 19
Pairing multiple Transmitters to the
same Receiver 21
Clearing a Channel Pairing 23
General Information 25
Built-in Switches 25
Care & Maintenance 25
USB Hubs 25
Mounting 27
Specifications 33
Appendix B: Using IntelliSwitch with
IntelliTools Overlays 39
Appendix C: Using IntelliSwitch with
DiscoverPro Setups 41
Appendix D: Using IntelliSwitch with
3rd-Party Switch Software 43
Index 45


Introducing IntelliSwitch
Wireless Switch Access
IntelliSwitch is a USB switch interface for personal computers. When combined
with assistive technology software, it can enable people with disabilities to control
their computer using nothing more than a single (or multiple) switch. IntelliSwitch
is compatible with both Macintosh & PC computers.
IntelliSwitch can be connected to the computer in one of two ways: by
plugging it directly into the computer via the supplied USB cable, or wirelessly
through the supplied wireless USB receiver.
How does it work?
IntelliSwitch ships with special control panel software that allows you to
configure it for use with many different software programs. The Control Panel
software provides 25 preset switch configurations that allow IntelliSwitch
to control dozens of software titles that already have switch access built-in.
Additionally, IntelliSwitch is fully compatible with all IntelliTools software as well
as DiscoverPro and Discover Envoy software from Madentec. Both OverlayMaker
software from IntelliTools, and the Discover software products from Madentec
allow you to further customize the functions of IntelliSwitch.
IntelliSwitch User Guide 7
1. 2. 3. 4.
5. 6. 7.
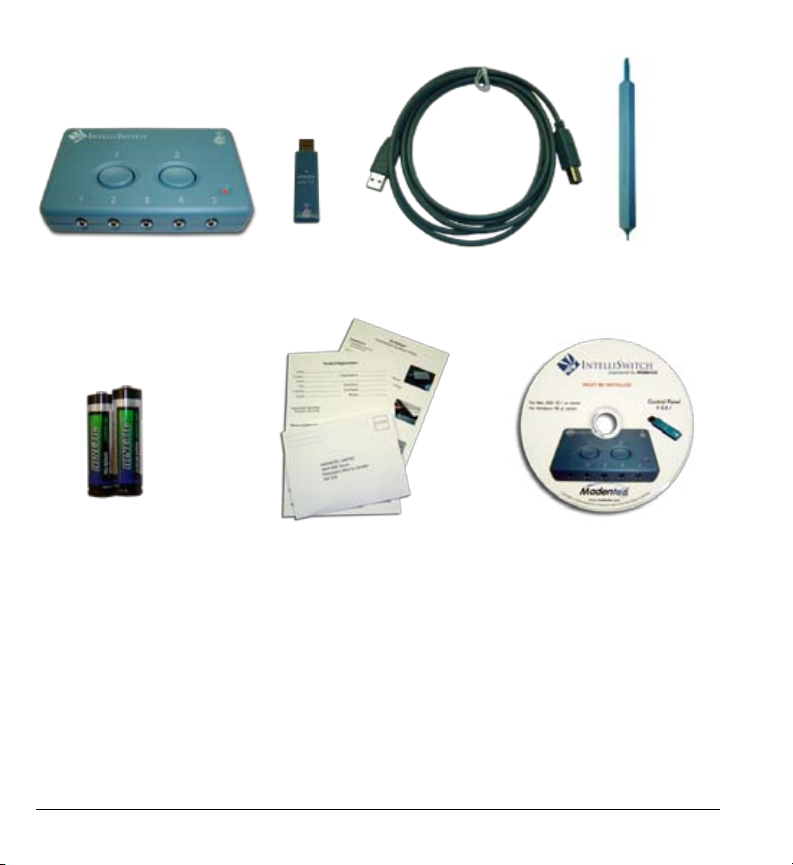
Illustration A. - Box Contents
8 IntelliSwitch User Guide

What’s in the box?
Illustration A. shows the contents of what is included in the IntelliSwitch box.
1. IntelliSwitch Transmitter 5. 2 x “AA” Batteries
2. IntelliSwitch Wireless Receiver 6. Quickstart Guide/Registration Card
3. USB Cable 7. Control Panel CD
4. Pairing Tool
Registering IntelliSwitch
It is important to register your new IntelliSwitch. Please complete the registration
card included and mail it as soon as possible. Registration entitles you to one year
free warranty support from the date of purchase. Filling out the questionnaire
on the registration card also entitles you to a free IntelliSwitch Pairing Tool,
compliments of Madentec.
Note In the event that you return your IntelliSwitch for warranty support it is imperative
that you keep the original shipping box. This box has been designed to protect
IntelliSwitch during shipping. Any damage to IntelliSwitch caused by returning it
in a box other than the original is not covered by warranty.
IntelliSwitch User Guide 9
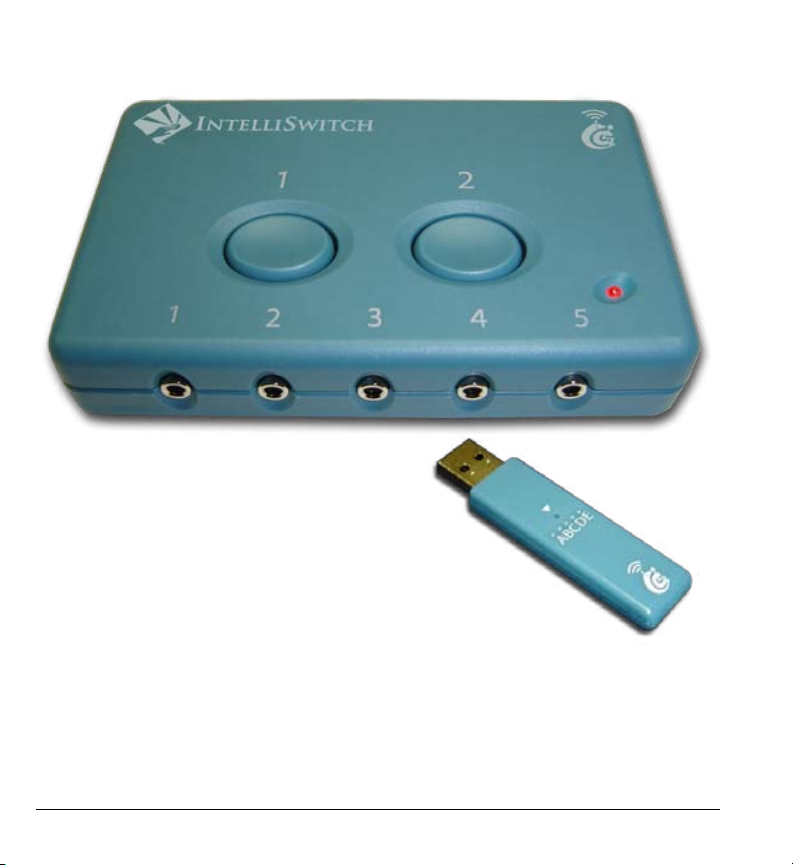
Illustration B. -
IntelliSwitch Transmitter & Receiver
10 IntelliSwitch User Guide

Installing IntelliSwitch
Get Started
IntelliSwitch may be installed on any PC or Macintosh computer with an
available USB port. First, you must install the IntelliSwitch control panel software,
then connect IntelliSwitch to the computer in either the wired or wireless
configuration.
Installing the Control Panel
The IntelliTools control panel can be found on the IntelliSwitch Control Panel CD.
The CD contains the installer for both Mac OSX and Windows computers. When
the CD is placed in a Windows computer, you will only see the Windows installer.
Likewise, when placed in a Macintosh computer, you will only see the Mac installer.
Illustration B. showing the IntelliSwitch Transmitter and Receiver
(continued on Page 13)
IntelliSwitch User Guide 11
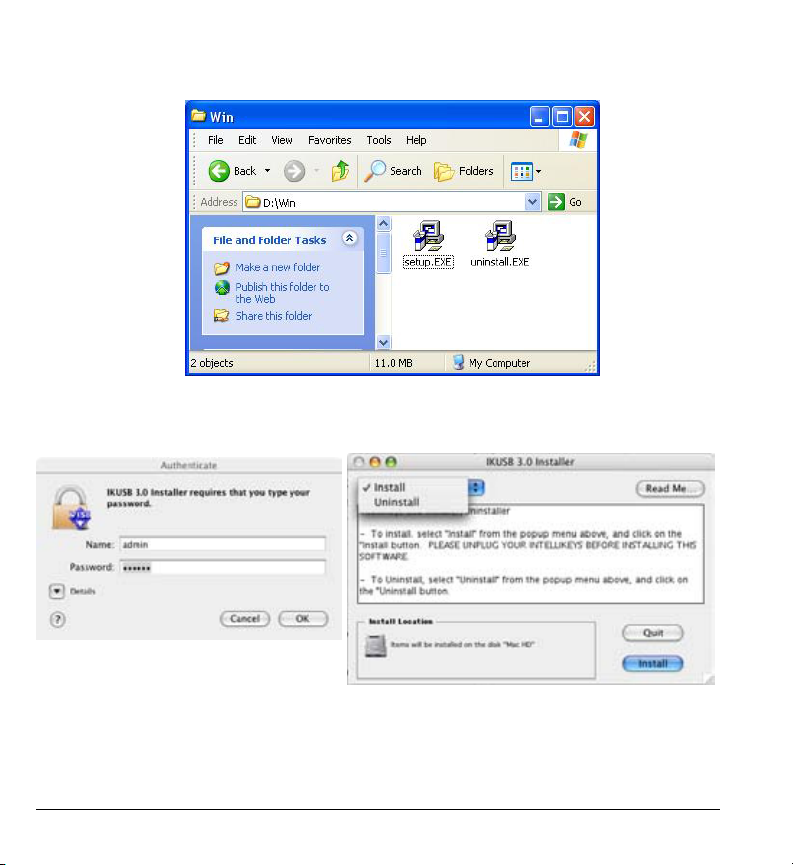
Windows Installers
Mac OSX Install Screens
Illustration C. - Windows & Mac Installers
12 IntelliSwitch User Guide

Windows
1. Insert the CD-ROM into your CD drive. Browse to your CD drive (D: Drive), under
My Computer. The disk is titled “IntelliSwitch CP3.1”. Double click on the disk to
open it. Make sure that you do not have the IntelliSwitch or the Receiver plugged
in during the installation.
2. There are two installer files. The one titled “setup.exe” is for installing, and the
other, “uninstall.exe” is for removing the control panel software. Double click on
setup.exe. Follow the on-screen prompts.
Mac OSX
1. Insert the CD-ROM into your CD drive. The disk is titled “IntelliSwitch CP3.1”.
Double click on the disk to open it, once it mounts onto your desktop.
2. Double click on “IntelliSwitch Installer/Uninstaller”, and follow the directions on
screen.
3. The installer may require that you enter an administrator password to complete
the installation. (This may be your own name and password.)
4. For up to date information read the “Read Me” section in the installer.
5. Illustration C shows how you can choose to either install or uninstall from this
window.
Illustration C.-Windows installers & Mac OSX install windows
IntelliSwitch User Guide 13

Illustration D. - Wired Mode
14 IntelliSwitch User Guide

Connecting IntelliSwitch
You may connect IntelliSwitch to any Windows or Mac computer that has
an available USB port. Once the control panel software has been installed, you
may connect IntelliSwitch in either wired or wireless mode. Madentec supports
IntelliSwitch on computers with the following operating systems: Macintosh
computers running Mac OSX, and Windows platform computers running Win98SE
to Win XP. If you are using IntelliSwitch on an AAC product, please see the device
manufacturer for questions regarding setup for switch access. (The equipment is to be
supplied from an indentified USB port complying with the requirement of Limited Power Source.)
Wired Mode
1. After installing the control panel, plug the USB cable into the IntelliSwitch, and
the other end into an available USB port on your computer.
2. Plug your desired switches into the IntelliSwitch. If you are using one switch,
plug it into switch jack #1. If you are using two switches, plug them into #1 & #2,
and so on.
3. Turn on IntelliSwitch using the On/Off button found on its right hand side.
Depending on your computer, you may see or hear feedback that new hardware
has been found.
4. Open the Control Panel software and select your desired configuration (see the
Control Panel software help file and appendix A on page 33 for more information
on using IntelliSwitch with a variety of software).
Illustration D. showing IntelliSwitch “wired mode” with a switch plugged into jack #1.
IntelliSwitch User Guide 15

Battery
Installation
Note the symbol for “positive”
Illustration F. - Wireless Mode
16 IntelliSwitch User Guide

Wireless Mode
1. Install the Control Panel (See page 11-13)
2. Install the provided 2 “AA” batteries. Remove the battery cover door located on
the bottom of IntelliSwitch. You may use the provided tool to remove the small
“Phillips” head screw that keeps the cover securely in place. Insert the batteries in
the direction indicated inside the battery compartment. Replace the cover and
screw. (Take care as the Pairing Tool is made from plastic).
3. Plug your desired switches into the IntelliSwitch. If you’re using one switch, plug
it into switch jack #1. If you are using two switches, plug them into #1 & #2, and
so on. Turn on the IntelliSwitch using the On/Off button located on its right hand
side.
4. Plug the USB receiver into an available USB port on your computer. Depending
on your computer, you may see or hear feedback that new hardware has been
found.
5. Press any button on the transmitter – a green LED on the receiver should flash. (If
it does not, go to the section titled “Pairing” on page 19).
6. Open the Control Panel software and select your desired configuration (see the
Control Panel software help file and the appendix for more information on using
IntelliSwitch with a variety of software).
Illustration F. showing battery installation & receiver plugged into USB port.
IntelliSwitch User Guide 17

18 IntelliSwitch User Guide

Note IntelliSwitch is a USB (“Universal Serial Bus”) device, and may only be used
on computers that support USB. Please check with your computer hardware
specialist to ensure that is the case.
Pairing
Pairing is a simple process of setting an IntelliSwitch transmitter and a
USB receiver to communicate with one another. First, follow the installation
procedures described on page 17 for Wireless Mode. (The pairing procedure can
be performed on any computer with a USB port, even if the control panel software
has not been installed.)
Note IntelliSwitch transmitters and receivers with matching serial numbers are pre-
paired at the factory and should not need re-pairing. It should only be necessary
if you wish to change the pairing, or if the two do not seem to be communicating.
Pairing one Transmitter to one Receiver
1. Using the provided “Pairing Tool”, or an unfolded paper clip, press the pairing button
through the hole found on the top of the USB receiver. The LED will blink on channel
A, two times per second. (See Illustration G. on page 20)
2. Within 10 seconds, press the pairing button through the hole found on the bottom
IntelliSwitch User Guide 19

20 IntelliSwitch User Guide
Illustration G. - Pairing

of the Transmitter, using the same tools. The LED on the Receiver will turn on solid for
2 seconds, and then turn off. The Transmitter and Receiver are now uniquely paired.
Even if another IntelliSwitch is within range and transmitting on the same channel, it
will not interfere; both devices may be used independently.
Pairing multiple Transmitters to the same Receiver
It is possible to pair up to five separate IntelliSwitch Transmitters to the same
Receiver. For example, you may wish to do this in a classroom where several
students may need to access the same computer at different times, but who all
have their own IntelliSwitch mounted to their wheelchair.
Follow the installation procedures described on Page 17 for Wireless Mode, then
perform the following steps:
1. Using the provided “Pairing Tool”, or an unfolded paper clip, press the pairing button
found on the top of the Receiver once for channel A, twice for channel B, and so on up
to channel E. A green LED will flash two times per second to indicate which channel is
selected. (You may press the button six times to wrap back around to channel A).
2. Within 10 seconds, press the pairing button found on the bottom of the Transmitter,
using the same tools. The LED on the Receiver will turn on solid for 2 seconds, and
then turn off. The two devices are now “paired” on the selected channel. You can test
this by pressing a switch connected to the IntelliSwitch, and look to see that the LED
blinks on your chosen channel on the Receiver.
3. Repeat this process up to four additional times, using a different channel for each
time, for a total of five transmitters.
IntelliSwitch User Guide 21
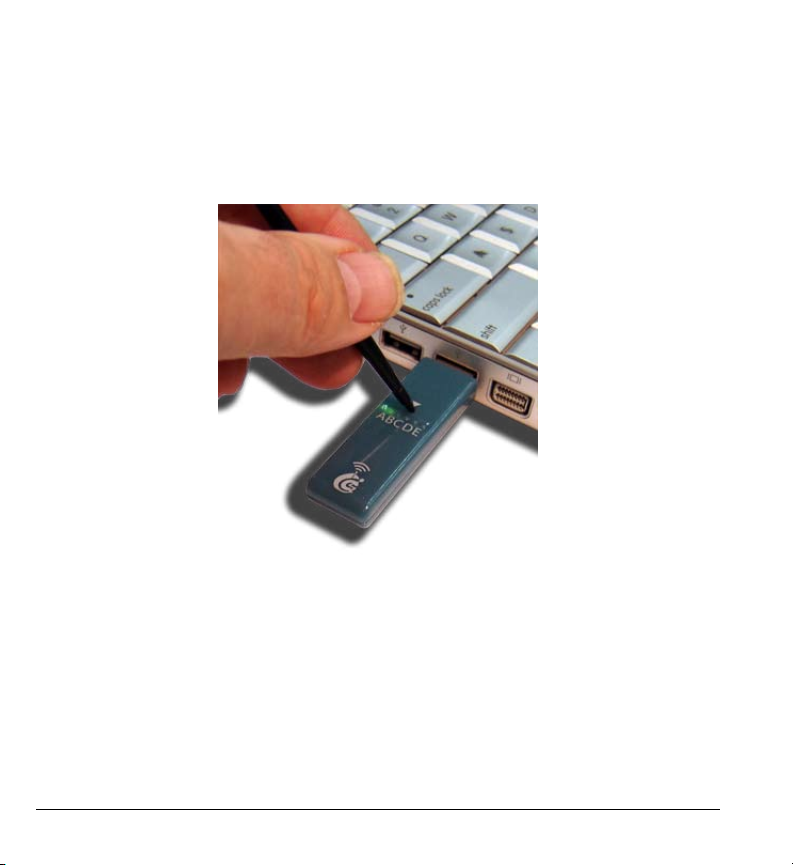
Illustration H. - Clearing
22 IntelliSwitch User Guide

Note If two Transmitters are paired on the same channel of a Receiver, only the most
recently paired Transmitter will operate. Also, if a Transmitter has been previously
paired to a lower channel than what you are trying to pair it to, you will need to
clear the lower channel first. Refer to next section.
Clearing a Channel Pairing
It is important to note that the Transmitter will always transmit on the lowest
channel that it has been paired to. What this means is, from the factory the two
devices will be paired on Channel A. If you decide to pair the Transmitter to
Channel E for instance, the original channel A should first be cleared, and then a
new pairing be done on the new channel.
To clear a channel, do the following:
1. Using the provided “Pairing Tool”, or an unfolded paper clip, press the pairing button
through the hole found on the top of the Receiver as many times as needed until you
reach the channel you wish to clear. The green LED will blink 2 times per second as you
reach each channel.
2. Once you are on the desired channel, press and hold the Receiver pairing button
again for 5 seconds. The green LED will turn on steady for two seconds, and then turn
off. The channel has now been cleared.
Illustration H. shows using the Pairing Tool to set which channel you wish to clear on the
receiver.
IntelliSwitch User Guide 23

Functionally the same.
Illustration I.
24 IntelliSwitch User Guide

General Information
Built-in Switches
There are two built-in switches on each Transmitter. These switches are
functionally the same as the external switches 1 and 2 respectively. These builtin switches can be used by anyone, and are often convenient for the therapist or
teacher to use. They have been recessed to reduce accidental switch closures.
Care & Maintenance
Clean the IntelliSwitch case using a damp cloth & warm water. If necessary, a
cotton swab with isopropyl alcohol may also be used, but take care when cleaning
with alcohol around the painted logos, as the alcohol may remove the paint.
If you intend to store IntelliSwitch for a long period of time unused, we
recommend you remove the batteries from the transmitter. Even with the On/Off
switch turned to the Off position, a small electrical current still exists and will
eventually drain the batteries.
IntelliSwitch User Guide 25
Mounting points
Illustration J.
26 IntelliSwitch User Guide

USB Hubs
A USB hub may plug into an existing USB port which will expand the port from a
single USB connection to as many as four connections.
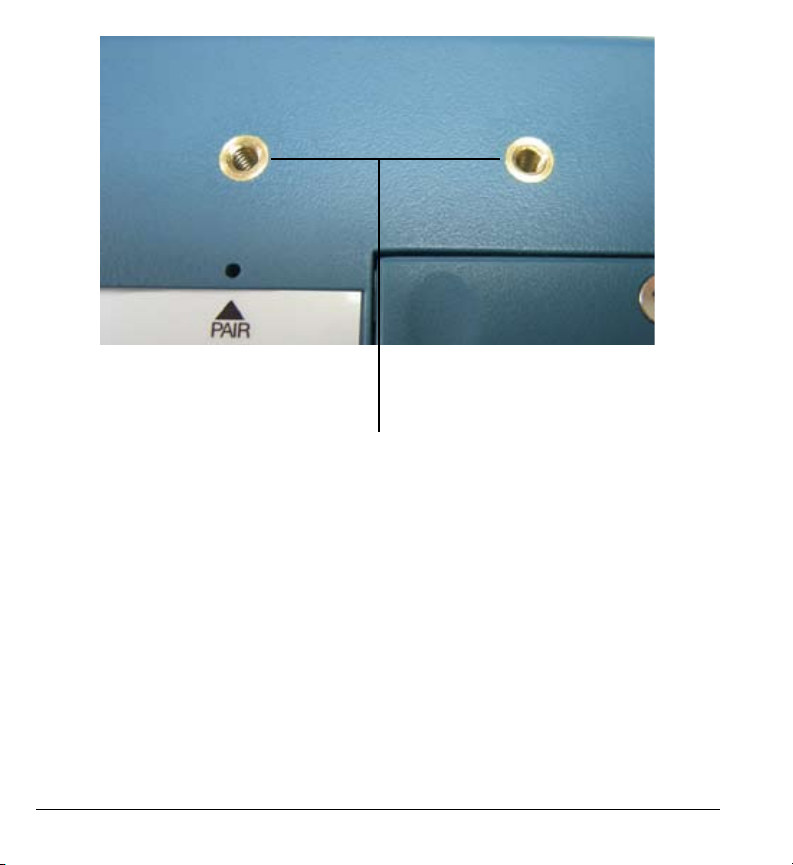
Mounting
The IntelliSwitch includes two, 2.5”-spaced, 6-32 female brass inserts. (See
illustration J.). These are used for mounting the device with 6-32 screws of
appropriate length that you can pick up at your local hardware store. (6-32 thread)
Illustration J. showing Brass mounting points.
Alternatively, you could also use Velcro or “Dual Loc”. Insure the mounting is
secure so that the IntelliSwitch is not damaged from a fall.
Note Please note that any damage due to a fall from improper mounting, will not be
covered by warranty.
IntelliSwitch User Guide 27

28 IntelliSwitch User Guide

FAQ
1. Does IntelliSwitch work with Ablenet’s wireless JellyBeamer switches?
a. You can connect a JellyBeamer to the computer using IntelliSwitch, by
plugging the JellyBeamer’s receiver into one of IntelliSwitch’s switch jacks
(particularly useful when IntelliSwitch is being used in wired mode). However,
IntelliSwitch and JellyBeamers cannot communicate wirelessly with each other.
2. How far apart can the Transmitter and Receiver be in wireless mode?
a. Over 100 feet in an open-air environment. Over 40 feet in a space with walls.
3. How long does a set of AA batteries last?
a. More than 3 months of typical use.
4. What signal does an IntelliSwitch send to the computer?
a. IntelliSwitch communicates directly with the IntelliTools Control Panel through
the USB port, using a proprietary signal.
5. What kind of switch can be plugged into IntelliSwitch?
a. Any ability switch with a standard 3.5mm plug.
6. What software can be used with IntelliSwitch?
a. IntelliSwitch has built-in compatibility with all of Madentec’s Discover
software as well as IntelliTool’s software. Through settings in the Control Panel,
IntelliSwitch may also be used with most software that accepts switch input.
IntelliSwitch User Guide 29

30 IntelliSwitch User Guide

7. How can I “mount” the IntelliSwitch transmitter?
The IntelliSwitch includes two, 2.5”-spaced, 6-32 female brass inserts. (See
illustration J. on page 26). These are used for mounting the device with screws that
you can pick up at your local hardware store. (See page 27 for more information
on mounting.)
IntelliSwitch User Guide 31

32 IntelliSwitch User Guide

Specifications
Feature IntelliSwitch
Wireless Frequency & Type
No. of Switch Inputs
Switch Input Type
Battery Operated
Transmission Distance
Transmitter Size (lxwxh)
Transmitter Weight
Receiver size (lxwxh)
Receiver Weight
No. of transmitters per receiver
Transmitter Enclosure
Computer Interface
Built-in Switch Actuation Force
Built-in Switch Lifetime
Mounting
Transmitter Operating Voltage
Transmitter Operating Current
Receiver Operating Voltage
Receiver Operating Current
2.4Ghz, Zigbee
5
3.5mm mono
2 AA Batteries
100 ft+
4.9” x 2.9” x 1”
140 Grams
2.25” x 0.625” x 0.25”
9 grams
5
Molded High Impact ABS
USB
1.6 Newtons
3 Million actuations
<2.5”-spaced 6-32 female brass inserts>
3.5V
60mA (nominal)
5 V (USB-powered)
80mA
IntelliSwitch User Guide 33

Windows Tray location of Control Panel icon
Icons turns RED when no
IntelliSwitch is connected
Illustration K. - Control Panel icon
34 IntelliSwitch User Guide

Appendix A: Using the IntelliSwitch
Control Panel Software
Introduction
This section provides an overview of how to use the Control Panel software to
configure and use IntelliSwitch. An electronic help file provided with the Control
Panel provides additional information and an explanation of all the software’s
features.
Note The Control Panel software serves both IntelliSwitch and IntelliKeys hardware
products.
The Control Panel Icon
When installed, the Control Panel software displays a small icon in the System
Tool tray on Windows computers, and the top right menu bar on Mac computers.
A red icon indicates no hardware is presently connected or being used. Once
IntelliSwitch is plugged in and recognized by the computer, the icon will turn blue.
(You may need to press a switch, or toggle the side On/Off switch once before the
Control Panel recognizes IntelliSwitch as present.)
IntelliSwitch User Guide 35
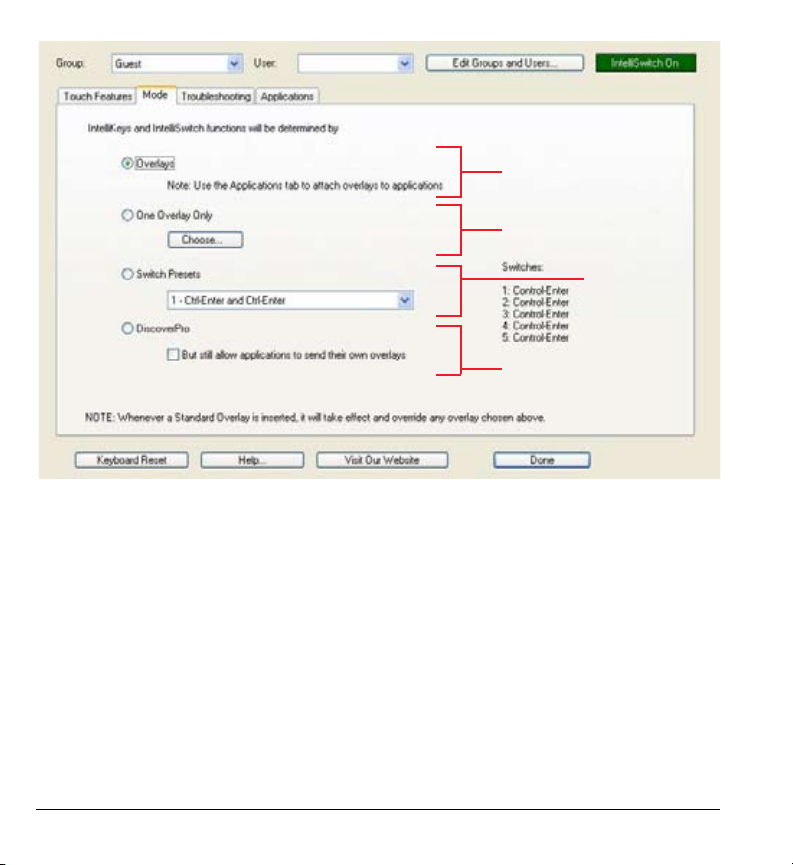
Illustration L. - The IntelliSwitch
Control Panel V 3.1
For use with several
different overlays only.
For use with one overlay
only. (See Help...)
For using
IntelliSwitch
by itself.
For use with Discover Pro
software or overlays.
36 IntelliSwitch User Guide

The Control Panel Tool Tray Menu
Click on the Control Panel icon to display the Control Panel menu. From here, you
may open the actual Control Panel, attach a specific overlay to the currently active
application, or select from a number of “shortcut” commands defining what the
Control Panel will do.
The Control Panel Software
The Control Panel allows you to define the behavior of IntelliSwitch. It can
be used with IntelliTools software such as Classroom Suite and OverlayMaker,
Madentec’s Discover software, or many other 3rd-party switch accessible software
products. You may choose to have the same configuration all the time or use
different configurations depending on what application is running on the
computer at any given time. You can even mix configurations and use IntelliTools
Overlays for one software application and Discover Setups for another, for
example.
There are 3 ways to map a function to a switch plugged into IntelliSwitch: with
an Overlay, with one of 26 Presets provided in the Control Panel software, or with
a DiscoverPro Setup. These choices may be made from the Control Panel menu,
or customized using the “Mode” tab of the Control panel software. Each of these
methods are described in detail in subsequent appendix.
Other functional aspects of IntelliSwitch may be defined using the Control Panel
software. Click on the appropriate tabs and follow the on-line help to make your
desired changes to how IntelliSwitch behaves.
(Help... button at lower section of the window.)
IntelliSwitch User Guide 37

Illustration M.
Choose either of these
options to use IntelliSwitch
with IntelliTools overlays.
38 IntelliSwitch User Guide

Appendix B: Using IntelliSwitch with
IntelliTools Overlays
If you are already familiar with how to define and use Overlays with IntelliKeys,
the process is identical for IntelliSwitch. In fact, switch inputs #1 and #2 on
IntelliSwitch behave exactly the same as the two switch inputs on IntelliKeys USB.
If you are not already familiar with the concept of Overlays, please refer to the
Control Panel software on-line help and additional documentation on overlays
available from IntelliTools.
Overlays already defined and attached to an application can be selected directly
from the Control Panel tool tray menu. Alternatively, you can open the Control
Panel and configure IntelliSwitch to use an Overlay by selecting the Advanced
tab and choosing either the first or second radio button. If you wish to make the
overlay choice application-specific, choose the top radio button on the Advanced
tab page, and then click on the Applications tab. From there, you may attach
specific Overlays to specific applications.
(See the on-line help for the Control Panel software, for more details. This is the
Help... button at the lower section of the window).
IntelliSwitch User Guide 39

Illustration N.
40 IntelliSwitch User Guide
Choose this setting for use
with DiscoverPro for Windows or
Discover Envoy for Mac OS X.

Appendix C: Using IntelliSwitch with
DiscoverPro Setups
Perform the following steps:
1. Install the DiscoverPro software. (The IntelliSwitch Control Panel will automatically
make the DiscoverPro options active, once DiscoverPro is installed).
2. Open the IntelliSwitch Control Panel and select the tab named “Mode”.
3. Choose the third radio button indicating “DiscoverPro”/”Envoy”. This will allow Discover
to have control of the IntelliSwitch or IntelliKeys, and allow it to be used as the switch
interface or as a keyboard.
4. If you wish to allow IntelliTools overlays to still be sent to the IntelliSwitch, even when
using Discover, select the check bock below labeled “But still allow applications
to send their own overlays”. By clicking on the applications tab, you can assign an
Overlay to be sent to each application.
5. Turn on the DiscoverPro software and begin using it.
6. You may quick-select between DiscoverPro Setups and attached IntelliTools Overlays in
the Control Panel pop-up menu.
Note Use the IntelliSwitch Control Panel only to define whether or not DiscoverPro will
be used with a given application. Use the DiscoverPro software itself (as usual)
to define which specific DiscoverPro Setup will be used with a specific software
application.
IntelliSwitch User Guide 41

Use this
setting for built
in presets.
42 IntelliSwitch User Guide
Illustration O.

Appendix D: Using IntelliSwitch with
3rd-Party Switch Software
There are dozens of software titles that have some form of switch access builtin. Unfortunately, there is no common standard defined for how a switch should
communicate with the software. As a result, most manufacturers have defined
their own switch input convention and they are all different.
To accommodate this, the IntelliSwitch Control Panel has 26 preset
configurations that will accommodate all the 3rd-party switch-accessible
software that we are aware of. Consult the user guide of the 3rd-party software
to determine what switch input signal it supports. Then find the corresponding
preset in the Control Panel.
The Presets may be selected by performing the following:
1. Open the IntelliSwitch Control Panel.
2. Select the tab labelled “Mode”
3. Select the third radio button titled “Switch Presets”
4. Select the appropriate preset from the pop-up menu located below the third radio
button, or from the USB control panel menu pop up. (See Illustration O).
Note The selected preset definitions will appear to the immediate right of the radio
button to serve as a visual reminder.
IntelliSwitch User Guide 43

44 IntelliSwitch User Guide

Index
Symbols
3rd-Party Switch Software 43
A
AAC product 15
“AA” Batteries 9
ability switch 29
Ablenet 29
administrator password 13
assistive technology software 7
Control Panel software 7, 15, 17, 35,
37, 39
control panel software 7, 11, 13, 15, 19
customize 7
D
DiscoverPro 7, 40, 41
Discover Envoy 7, 40
Dual Loc 27
F
FAQ 29
G
B
batteries 17, 25, 29
Battery Installation 16
Box Contents 8
Built-in Switches 25
C
Care & Maintenance 25
CD drive 13
Clearing 22, 23
Clearing a Channel Pairing 23
Connecting IntelliSwitch 15
Control Panel 7, 9, 11, 15, 17, 29, 34,
35, 36, 37, 39, 41, 43
Control Panel CD 9, 11
green LED 17, 21, 23
H
help le 15, 17, 35
I
Install 17
Mac installer 11
Windows installer 11
Installing IntelliSwitch 11
Installing the Control Panel 11
IntelliSwitch Control Panel CD 11
IntelliSwitch control panel software 11
IntelliSwitch CP3.1 13
IntelliSwitch Installer/Uninstaller 13
IntelliSwitch User Guide 45

IntelliSwitch Transmitter 9, 10, 11
IntelliSwitch Wireless Receiver 9
IntelliTools 7, 11, 29, 37, 38, 39, 41
IntelliTools software 7, 37
J
JellyBeamer 29
L
LED 17, 19, 21, 23
M
Macintosh 7, 11, 15
Mac installer 11
Mac OSX 11, 12, 13, 15, 40
Mac OSX Install Screens 12
Madentec 7, 9
Mounting 26, 27, 33
Mounting points 26
My Computer 13
O
On/Off button 15, 17
one switch 15, 17
OSX 11, 12, 13, 15, 40
OverlayMaker 7, 37
P
Pairing Tool 9, 17, 19, 21, 23
PC 7, 11
personal computers 7
preset switch congurations 7
Q
Quickstart Guide 9
R
Read Me 13
receiver 7, 17, 19, 23, 29, 33
register 9
Registering IntelliSwitch 9
Registation Card 9
S
setup.exe 13
shipping box 9
Specications 33
Switch Software 43
T
Tool Tray Menu 37
Transmitters 21
two switches 15, 17
U
uninstall 13
uninstall.exe 13
USB Cable 9
46 IntelliSwitch User Guide

USB cable 7, 15
USB Hubs 25
USB port 11, 15, 17, 19, 25, 29
USB receiver 7, 17, 19
USB switch interface 7
V
Velcro 27
W
warranty 9, 27
warranty support 9
Win98SE 15
Windows 11, 12, 13, 15, 34, 35, 40
Windows computers 11, 35
Win XP 15
Wired Mode 14, 15
wireless 7, 11, 15, 29
wireless conguration 11
Wireless Mode 15, 16, 17, 19, 21, 29
Wireless Switch Access 7
IntelliSwitch User Guide 47
 Loading...