

Page 1

OPUS 2
Aroma Diffuser with Digital Alarm
Clock and Mood Lighting
Awaken the senses with a cool, scented mist
Page 2

Congratulations on purchasing the
madebyzen™ Opus 2 Aroma Diuser.
Please keep this manual for further
reference and maintenance.
TABLE OF CONTENTS:
A. ABOUT THE OPUS 2
B. FEATURES
C. TECHNICAL SPECIFICATION
D. OPERATING INSTRUCTIONS
E. MAINTENANCE
F. TROUBLESHOOTING
Page 3

Allow yourself to embark on your day in a calm and relaxed frame
of mind and experience a sense of general well-being as a result of a gentle
awakening.
Imagine waking up steeped in your favourite fragrance, surrounded by soft
mood lighting. What better way to start your day. The Opus 2 Aroma Diuser
does just this and much more. It fuses innovative technology with the
ancient practice of aromatherapy, mimicking a more natural wake-up
pattern, incorporating mood lighting and touch button technology.
This elegantly shaped Aroma Diuser with built in Digital Clock is beautifully
presented with easy to use features. The refraction of the mood light changes
through the spectrum of colours which are stylishly projected from the top.
Another invaluable feature of the Opus 2 Diuser is the ability to control the
misting with a 30, 60, 120 and 180 minute setting, ideal for use with stronger
scents, during meditation, aromatherapy treatments or even drifting o to
sleep!
The Opus 2 Aroma Diuser may be used at night with or without the light, a
dream bedside companion which will also awaken your senses and
consciousness in the gentlest of manners when you need to start the day.
Simply add tap water and a few drops of your favourite fragrance or essential
oil into the Opus 2 Diuser, and it will, with the press of a button, instantly
release a cool ne mist of scented vapour into the atmosphere to stimulate
your senses and enable you to sink into a relaxed world of healing and
self-balance. This is believed to be the best way to diuse any fragrance into
the atmosphere, as without direct heat, essential oils are not degraded.
The Opus 2 Aroma Diuser automatically shuts-o when the water falls
below a certain level, eecting complete safety and ideal for use around
children or pets.
madebyzen™ is a British brand with inspired designers who are constantly
rening and creating new products, which meet the highest quality
standards and are globally coveted.
Thank you for purchasing the madebyzen™ Opus 2 Aroma Diuser.
A
ABOUT THE OPUS 2
Page 4

ACCESSORIES
B
FEATURES
Touch Button Technology – As soon as you power up the Opus 2
Aroma Diuser, the panel will light up with LED indicators, which operate
through advanced touch button activation.
Aroma Diuser – Enjoy the ultimate aromatherapy experience from this
little sleek device using your favorite Fragrance or Essential Oil. The Opus
2 uses advanced Ultrasonic technology which produces vibrations at high
frequency turning the water and oil into a ne mist, creating a soothing
and therapeutic atmosphere, without a heat source.
Humidier – used with or without fragrance or essential oils, you can
still enjoy the health benets of the humidifying mist, which is ideal for
counteracting some of the dryness created by today’s central heating and
air conditioning systems.
Mood Lighting – The soft color changing LED lighting creates a
wonderful ambience in your living space. The LED’s will softly emit a
symphony of colour changing lights from the top of the diuser to
enhance your mood.
Time Display – The Digital Clock LED time display above the touch
control panel, brings convenience and eciency to your life.
Alarm Clock – Awaken to your favourite scent and Mood Lighting with
the Alarm Clock feature. A soft beep will be heard during Alarm activation.
Scent Timer – The Timer can be set to 30/60/120/180 minutes. The Opus
2 will stop automatically at the end of the time cycle. This function allows
you to select a timed cycle for diusing scent when required.
Page 5
C
TECHNICAL SPECIFICATION
Product name: Opus 2 Ultrasonic Aroma Diuser with Alarm
Clock
Model No: EW9970
Input voltage:AC: 110-240V, 50/60Hz DC: 24V
Water tank volume:150ml
Rated power:12W
Dimension:138x138x162mm
Net weight:0.46KG
Coverage Area:15㎡ (approx.)
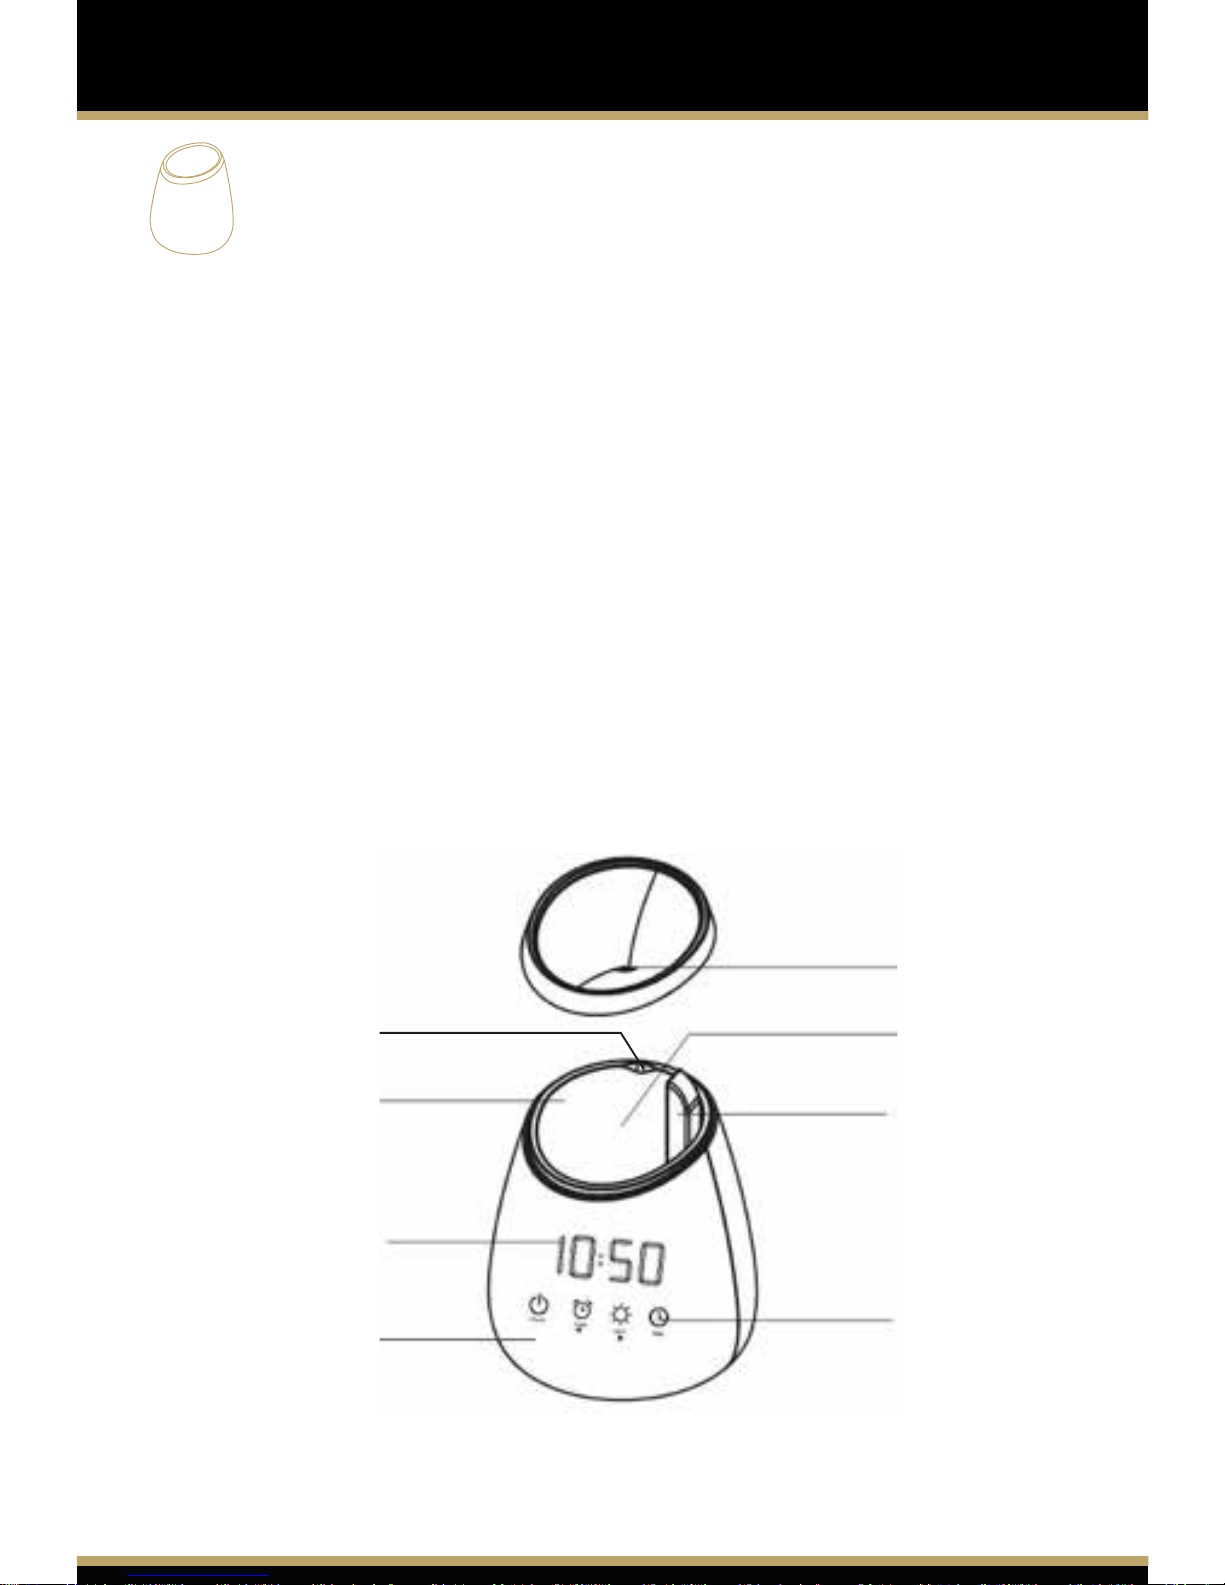
Water tank
Drainage Groove
LED time display
Main Body
Mist Outlet
LED light
Air outlet
Control panel
Page 6

1. Place the Aroma Diuser on a at surface, at least 60cm away from the oor and at
least 10cm away from the wall. DO NOT place the Aroma Diuser on wooden or
polished furniture that may be damaged by water moisture.
2. Always unplug the Aroma Diuser from the mains electrical supply when cleaning
or lling with water. Always use the power adaptor supplied. Ensure the cable is
secure to avoid tripping or knocking over the Aroma Diuser. If the power adaptor is
damaged, it must be replaced with a suitable adaptor provided by the manufacturer
or its Agent. Alternatively, a new adaptor can be purchased from your retailer.
3. Use a suitable measuring cup to ll water into the water tank. Never attempt to ll
water under a running tap or whilst plugged in. Do not ll the water beyond the MAX
level mark of the Water Tank. The Aroma Diuser will not work if lled beyond the
MAX level mark. Carefully remove the excess water from the tank, if overlled from
the Drainage Groove – away from the Air Outlet.
4. The Aroma Diuser must be kept out of reach from children and pets to avoid risk
of injury. Children should be supervised at all times to ensure they do not play with
the appliance.
5. The Aroma Diuser is not intended for use by persons (including Children) with
reduced physical, sensory or mental capabilities or lack of experience and knowledge,
unless they have been given supervision or instruction concerning use of the
appliance by a person responsible for their safety.
6. Keep the diuser in clear space to allow the mist to freely spread and away from
appliances especially those sensitive to water to avoid unnecessary accidents.
7. The Aroma Diuser must be kept clean and dry when not in use. Never leave
stagnant oil and water in the tank for prolonged periods.
8. Never attempt to disassemble your Aroma Diuser or repair the product, as this will
void your warranty and create a shock hazard. Contact your retailer if an internal
inspection is required.
9. In case of abnormal observations such as smoke, peculiar smells or noise, stop
using the Aroma Diuser immediately to avoid the risk of an accident such as re or
electric shock. Unplug the Aroma Diuser immediately and contact the retailer from
where you purchased the Aroma Diuser. Never wrap the adaptor with cloth or paper
as blocking ventilation could increase the risk of re.
10. Always handle the Aroma Diuser with care – accidental damage is not covered
under the warranty.
11. Always use water at room temperature and use only fresh, clean water from a
reliable source.
12. Always plug the adaptor into the DC Jack before plugging into the mains.
IMPORTANT NOTES BEFORE USE:
Page 7
D
OPERATING INSTRUCTIONS
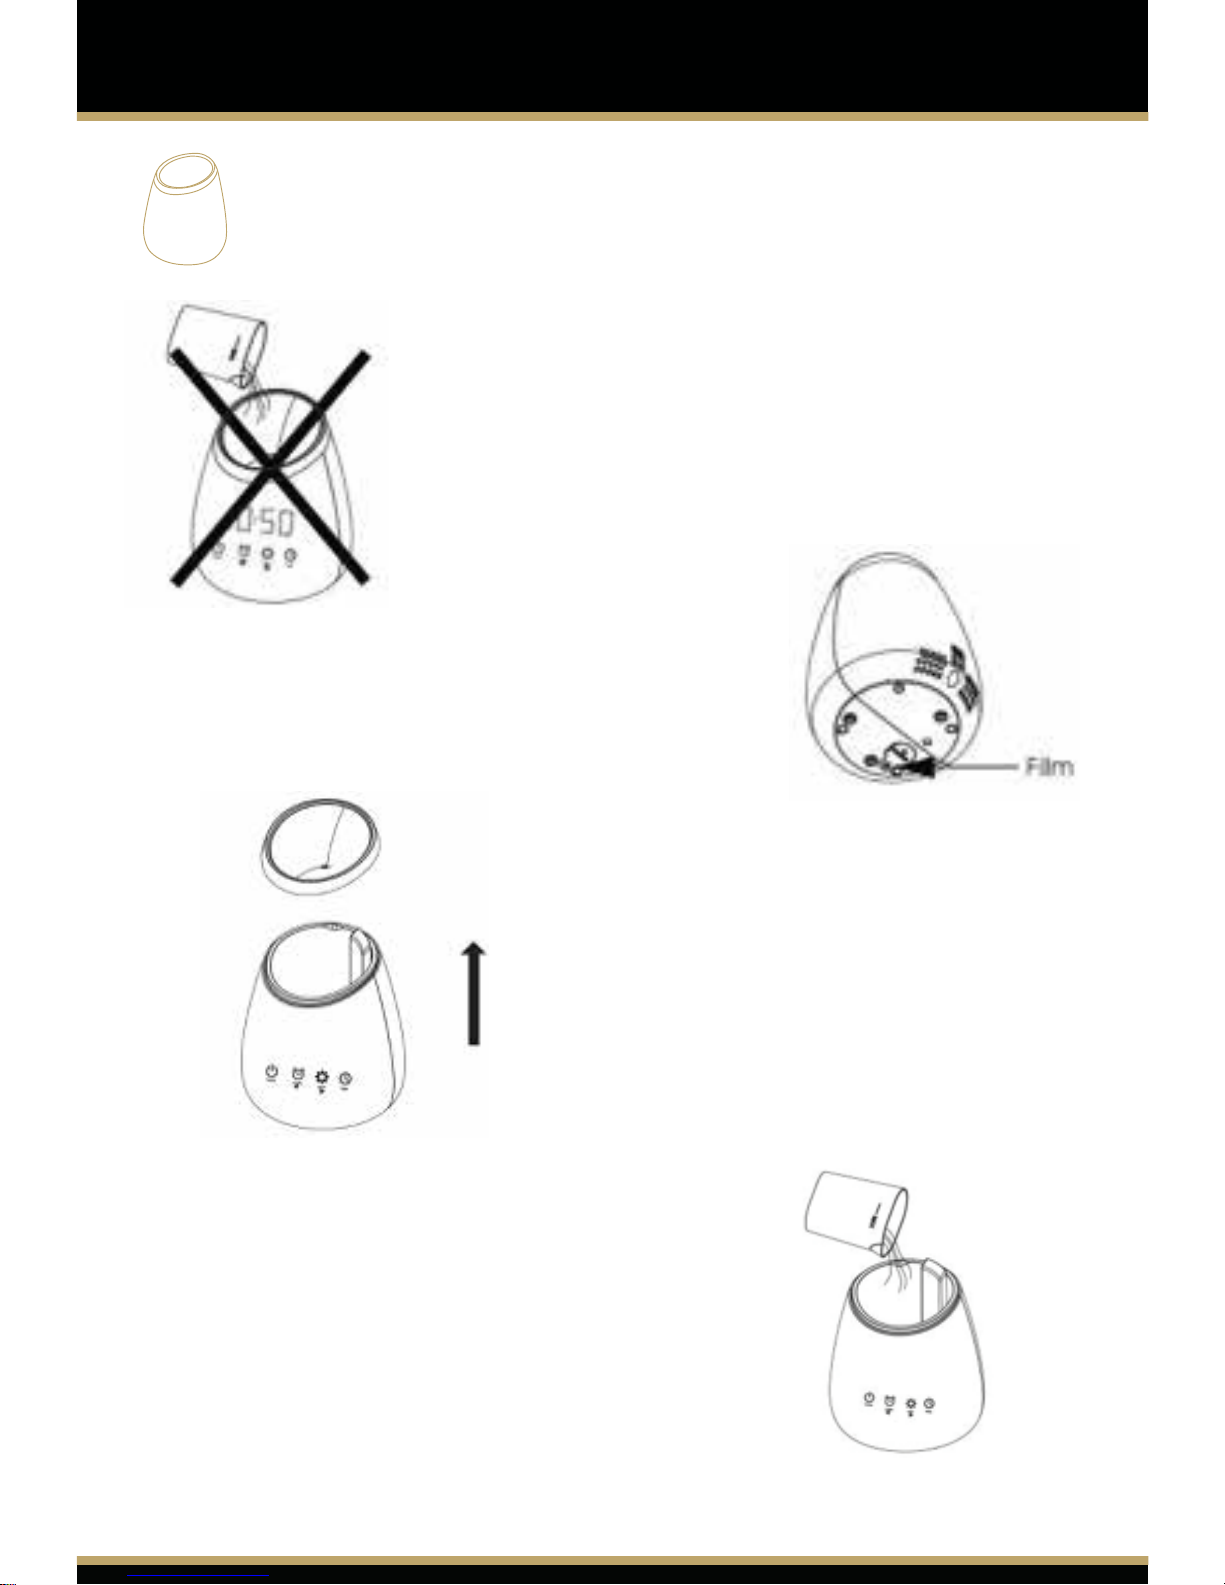
DO NOT attempt to ll water into the diuser
from the top opening. Always remove the
cover before lling the Water Tank.
Remove the lm before operating.
1. Take o the cover
2. Use a suitable measuring cup to add
water into the water tank. DO NOT ll
the water beyond the MAX level mark.
The Diuser will not work properly if
water is lled beyond the MAX level.
Page 8

3. Add 3-5 drops of your
essential or fragrance oil
5. Connect the power with
plug.Insert the DC Jack into the
Aroma Diuser before plugging
into the mains.
4.Replace the top cover.
Page 9

POWER: Press the to Turn ON and Turn OFF the Aroma Diuser.
The LED light will turn from Red to Green to indicate when the
Aroma Diuser is ON.
ALARM CLOCK: To turn ON the Alarm Mode – Press the once.
The LED light will turn from Red to Green to indicate the Alarm
Function is ON.
Press the once again to deactivate the Alarm function. The LED
light is Red when the Alarm function is OFF.
SETTING THE ALARM TIME: Hold down the button for a couple
of seconds to enter the Setting Mode for the Clock. You will hear a
short beep to indicate when the Setting Mode is on and the LED
Time panel will start to ash.
Use the to set the Minutes and use the to set the Hours,
whilst the LED display is ashing.
Once you have selected the correct Alarm Time – the LED display
will continue to ash for a few seconds and will automatically
revert back to the Time display.
Or press the for a couple of seconds to conrm the Alarm Time.
Once the Alarm Time selected has been reached, the Opus 2 will
beep softly for around 60 seconds and the Aroma Diuser and
Mood Light will be simultaneously activated.
After 60 seconds the beep sound will stop and the Aroma Diuser
and Mood Light will continue until switched o or until the water
level runs low.
If there is no water inside the Aroma Diuser, it will automatically
enter into standby mode. NOTE: Even if there is insucient water
inside the Water Tank, once the Alarm time is reached the Alarm
will be activated and a soft beep will be heard for around 60
seconds. The Aroma Diuser and Mood Lighting will not activate
unless there is sucient water inside the Water Tank.
SETTINGS
Page 10

MOOD LIGHT MODE: Press the to turn ON and OFF the LED
Mood light. The Lamp Button will turn from Red to Green to
indicate when the Mood Light function is ON.
The Mood Light will only operate with the Aroma Diuser and
when there is sucient water inside the Water Tank. This is a safety
feature and is normal.
Press the again to switch o the Mood Light.
When the Mood Light function is ON, the LED lights inside the
water tank will gradually change through a spectrum of colours.
SCENT TIMER: Touch the to set the Scent Timer. Touch the
button repeatedly to change the Scent Timer setting or to turn it
OFF. The timer order is: 30, 60, 120, 180 Minutes and OFF.
Note: This function will not operate without sucient water inside
the Water Tank, as the Aroma Diuser will enter Standby mode
once the water level runs low.
SETTING THE TIME ON THE CLOCK: Hold down the for a
couple of seconds to enter the Time Setting Mode for the Clock.
You will hear a short beep to indicate when the Setting Mode is on
and the LED Time panel will start to ash.
Use the to set the Minutes and use the to set the Hours,
whilst the LED display is ashing.
Once you have selected the correct Time – the LED display will
continue to ash for a few seconds and will automatically revert
back to the Time display.
Or press the for a couple of seconds to conrm the Time.
NOTE: Times are set using the 24 hour clock system. For example
1pm will display as 13;00hrs
Page 11
E
MAINTENANCE
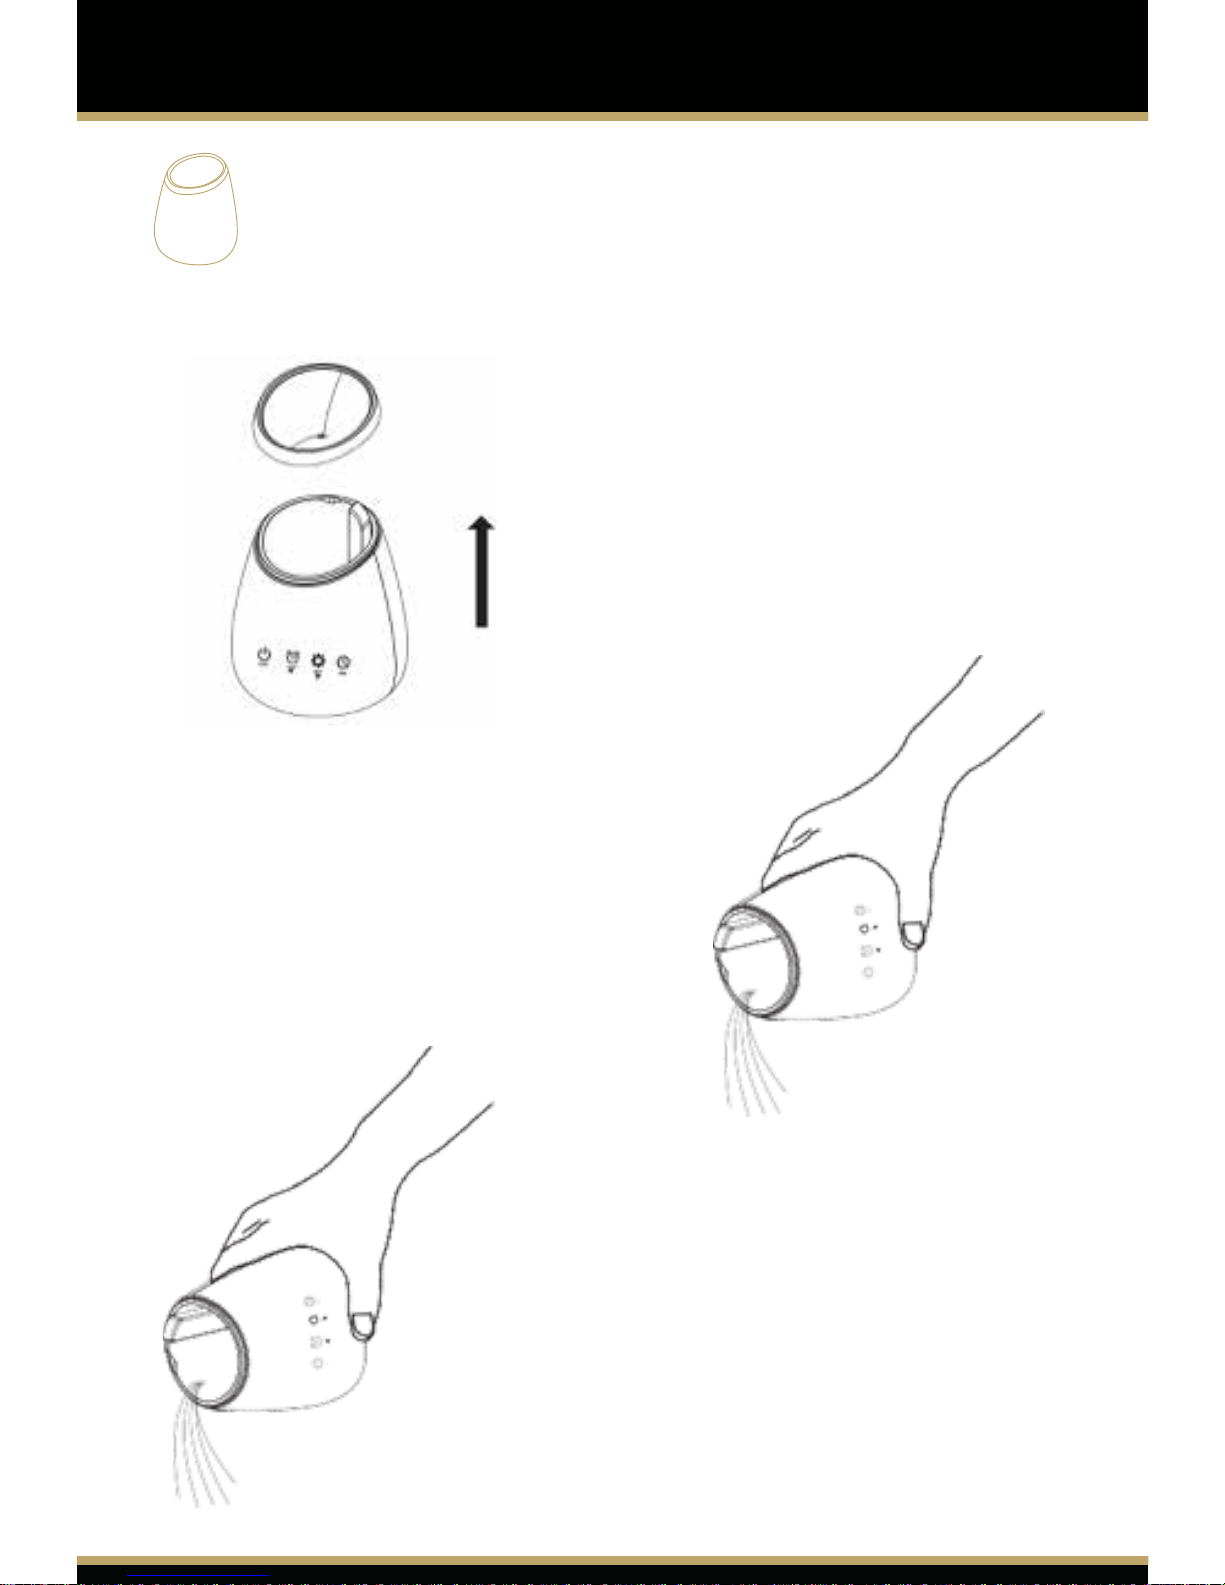
1. Turn the device OFF and unplug
the unit from the electrical outlet.
Then lift o the top cover.
2. Drain and rinse the water tank
thoroughly to remove any sediment
and dirt. Wipe clean and dry with a
clean soft cloth or paper towel.
3. Using a soft clean cloth, thoroughly
clean the inside of the Water Tank. Use
a swab to clean the surface of the disc
area. Always keep the Aroma Diuser
clean and dry when not in use.
Page 12
F
TROUBLESHOOTING
IMPORTANT!
In accordance to WEEE Directive (Waste from Electrical and
Electronic Equipment Directive) 2002/96/EC this equipment
should not be disposed of in the normal waste stream.
Corrosive oils such as Citronella may cause damage to the unit if left
in the reservoir. This type of damage is not covered under the
warranty.
The intensity and amount of mist produced may vary, but this is not
unusual and should not be considered as a fault. Factors that aect this
include water type, humidity, temperature, air currents etc.
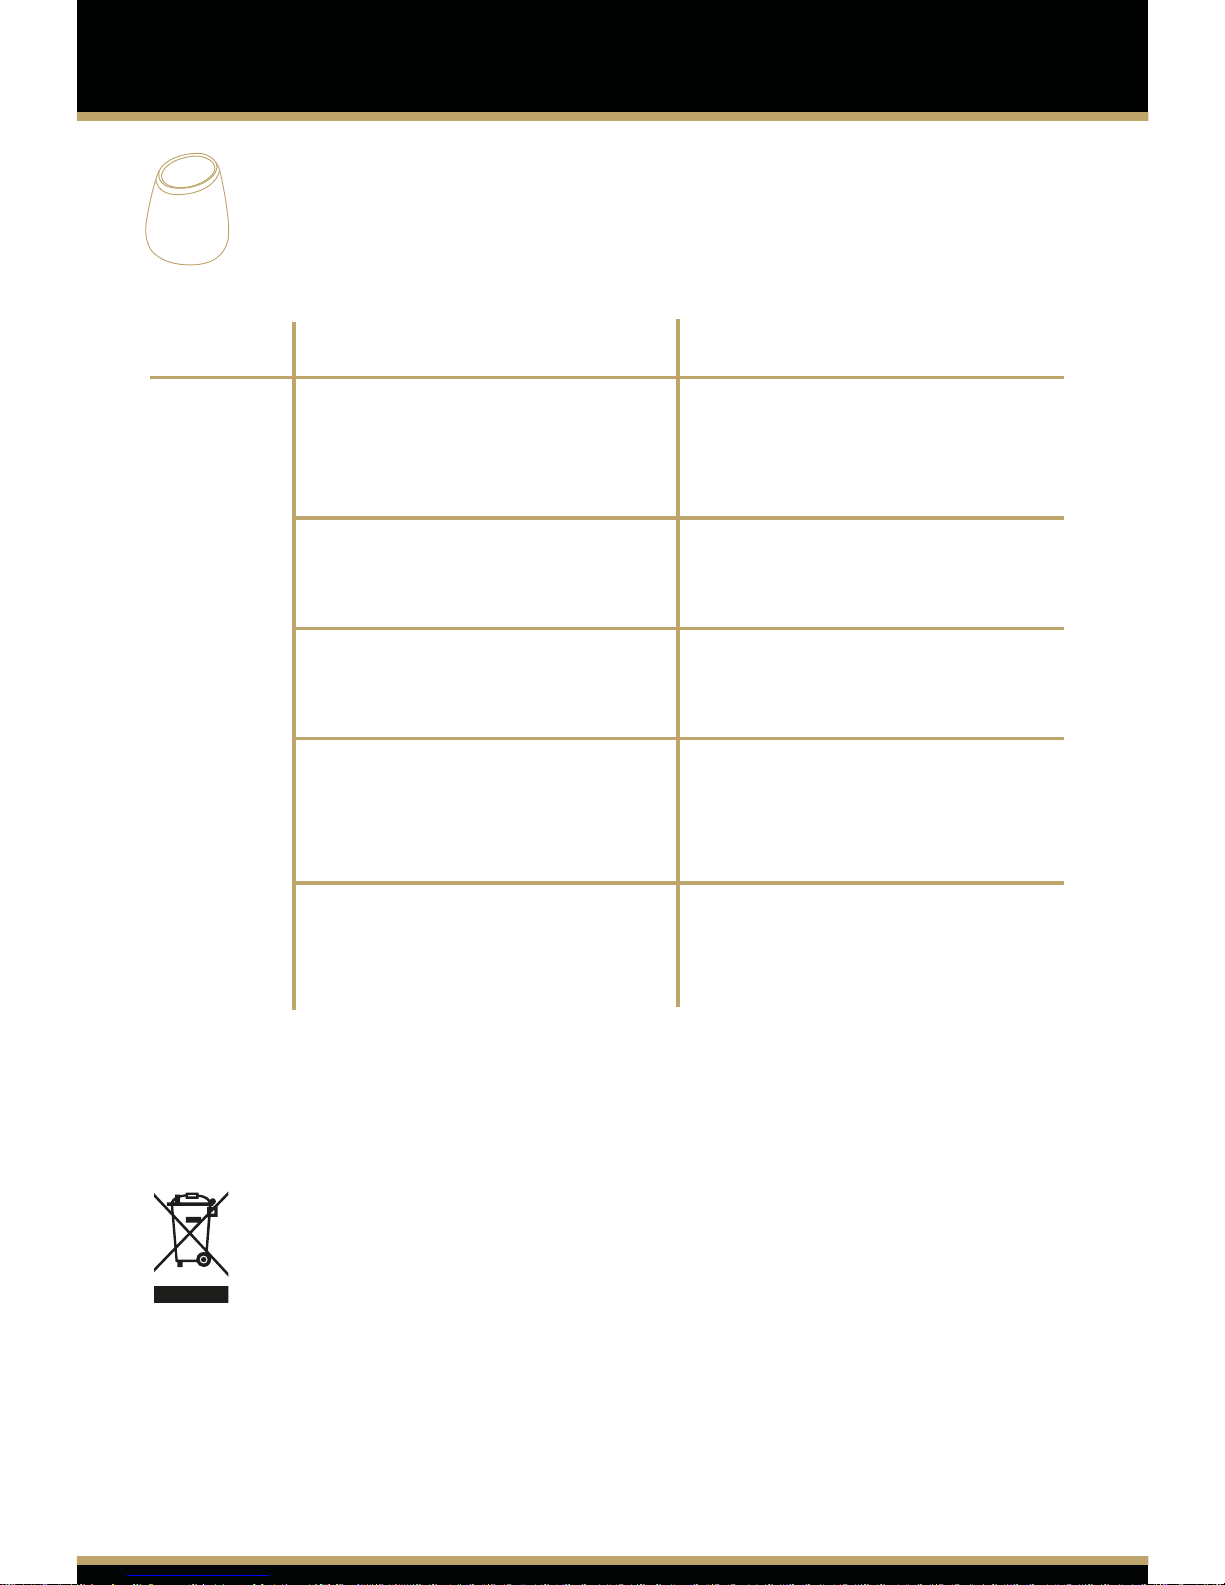
Symptom Possible Cause Solution
No mist
or mist
volume
reduced
Power supply is not
connected
Insucient water
Water is exceeding the
max. water level line
There is a build-up of oil
on the ceramic disc.
Cover is not positioned
properly
Plug the power
adaptor in and press the
Power Button.
Rell the tank with
ordinary tap water.
Carefully pour out the
excess water.
Please refer to the
instruction manual on how
to clean the unit.
Ensure the cover is
positioned properly on top
of the Aroma Diuser.
 Loading...