

Page 1
Important: Read this manual carefully before using the Smart Bark Control
Collar for the safety of you and your dog.
Smart bark
control
collar BC-2
User manual
Page 2

Thank you for choosing made4.pet! We at made4.pet are dog
owners just like you and bark collars just like yours helps us train
our beloved pets quickly and safely. We want your new collar
to help you enjoy every minute you and your family have with
your dog. To ensure you get the best experience we recommend
carefully reading this instruction manual before training begins.
Sincerely, made4.pet team
Welcome to the Family!
2
Page 3

Table of Contents
Introduction 4
Major features 4
Warning/Safety precautions 5
Package Content 6
Controls and settings 7
Getting Started 8
Installing the battery 8
Test #1 (ON/OFF) 8
Test #2 (functional) 8
Strap length and collar placement 9
Adjusting the sensitivity level 9
Before you start training 9
How do the training programs work 10
FAQ and troubleshooting 12
3
Page 4

Smart Bark Control Collar stops your dog from barking by detecting its
bark and delivering progressively increasing shock you control. There are 2
training programs:
• GREEN training program delivers progressively increasing beeping
sounds and vibrations in 4 stages. It is recommended to start training
with this program; it’s enough for most dogs.
• RED training program delivers progressively increasing beeping
sounds, vibration and electric shock in 6 stages. We strongly
recommend only using the RED training program if the GREEN
training program does not deliver the desired effect.
Major features
9 Super versatile for all dogs weighing at least 10 lbs
9 Smart bark detection technology based on microprocessor
9 9 Levels of Sensitivity indicated on LCD display
9 Protection mode for 90 seconds in RED training program
9 Uses one 6-volt alkaline battery 4LR44
Introduction
4
Page 5

Warning/Safety precautions
1. The attached printed instruction manual is out of date, please use this
PDF copy to operate the device properly.
2. Do not allow your dog to chew on this collar. You should also attempt
to minimize scratching or clawing at the casing of the unit.
3. This device is made of plastic and electronic components that are not
digestible. Consult your local vet if your dog swallows any part of this
product.
4. The bark collar is not intended for use as a restraining collar. If you
are using a leash, use it with a separate restraining collar.
5. Always use the soft silicone protective caps over the metal electrodes
(prongs) to protect your dog’s skin from pressure necrosis.
6. If the electrodes with silicone caps on directly touch the skin of your
dog (it’s necessary if you use RED training program) do not leave
the collar on your dog for more than 10 hours.
7. It is very important to make sure the collar is adjusted properly on
your dog’s neck. Refer to Strap length and collar placement section.
8. LCD will automatically turn off after 10 seconds to save power.
9. LED will blink slowly when the system is running.
10. LED will blink quickly when the battery voltage is low. Please replace
the battery.
11. If LCD indicates ashing “L”, the battery is low. Please replace the
battery.
5
Page 6
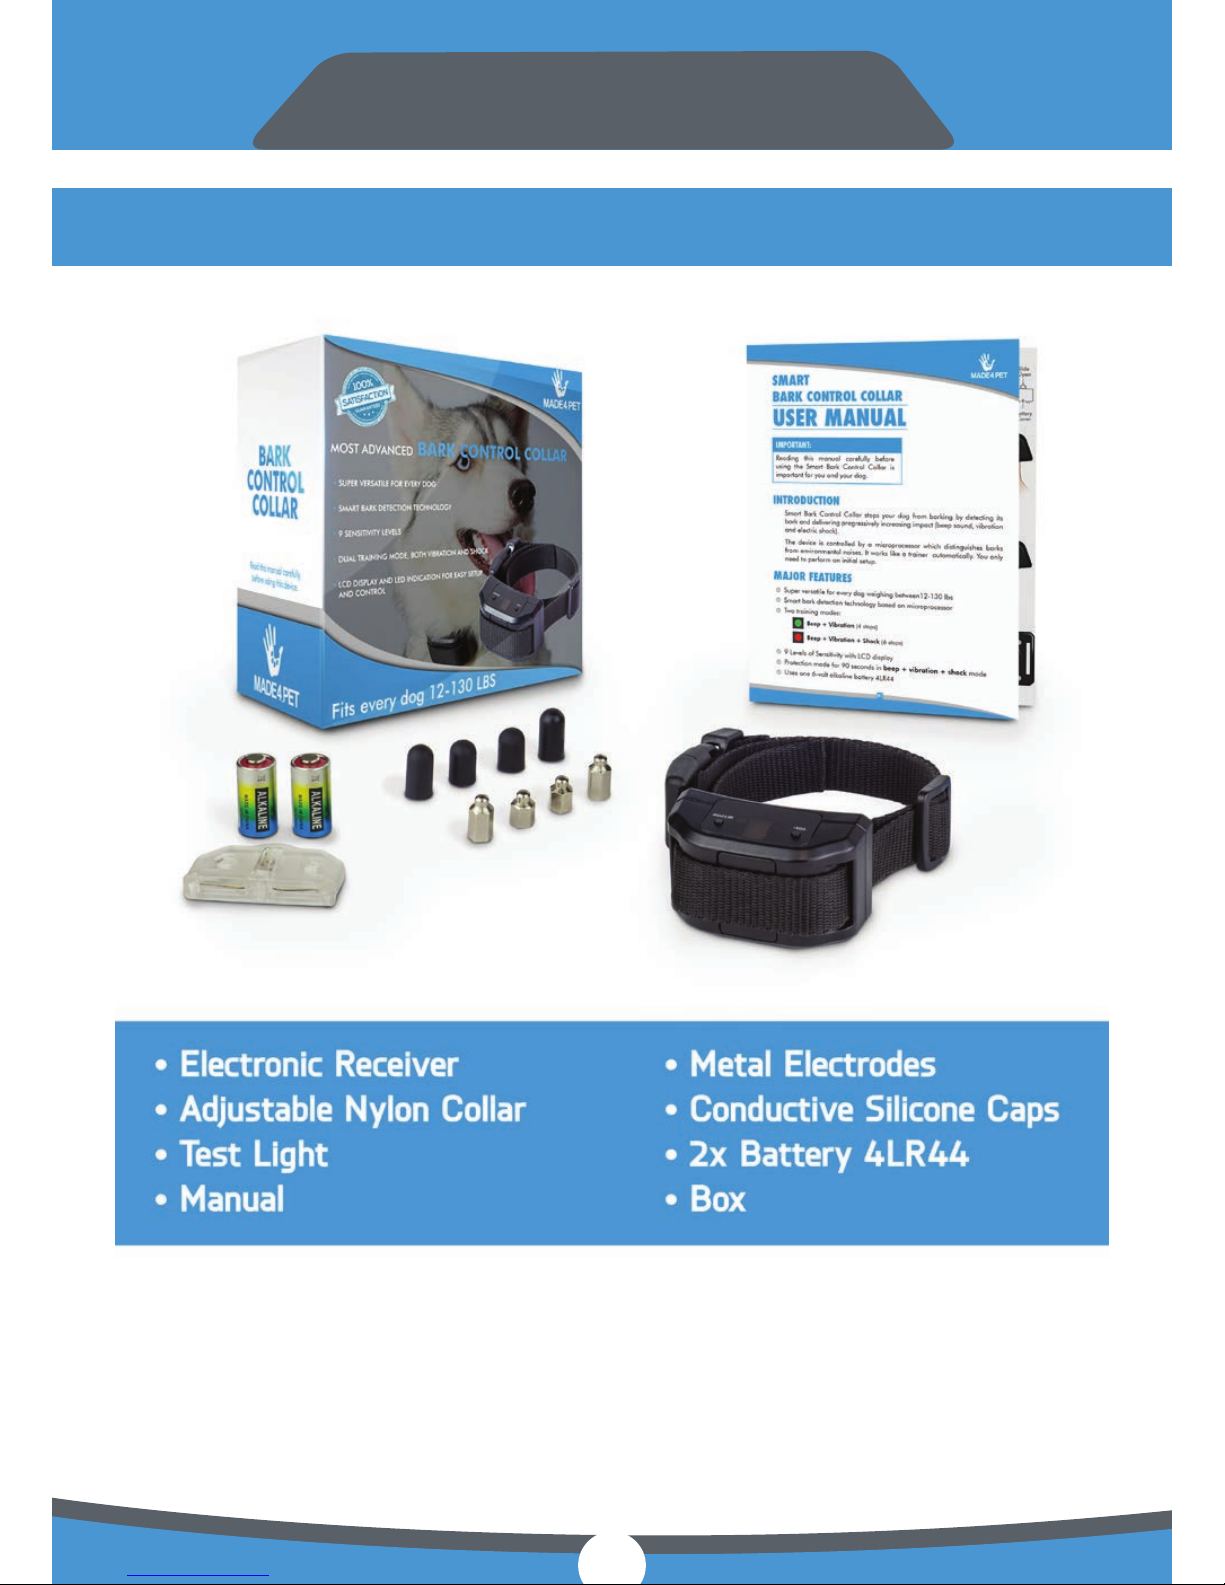
The printed paper instruction manual found in the
package is out of date. Please use this PDF copy for
updated instructions.
Package Content
Check it right after you’ve received the package!
6
Page 7
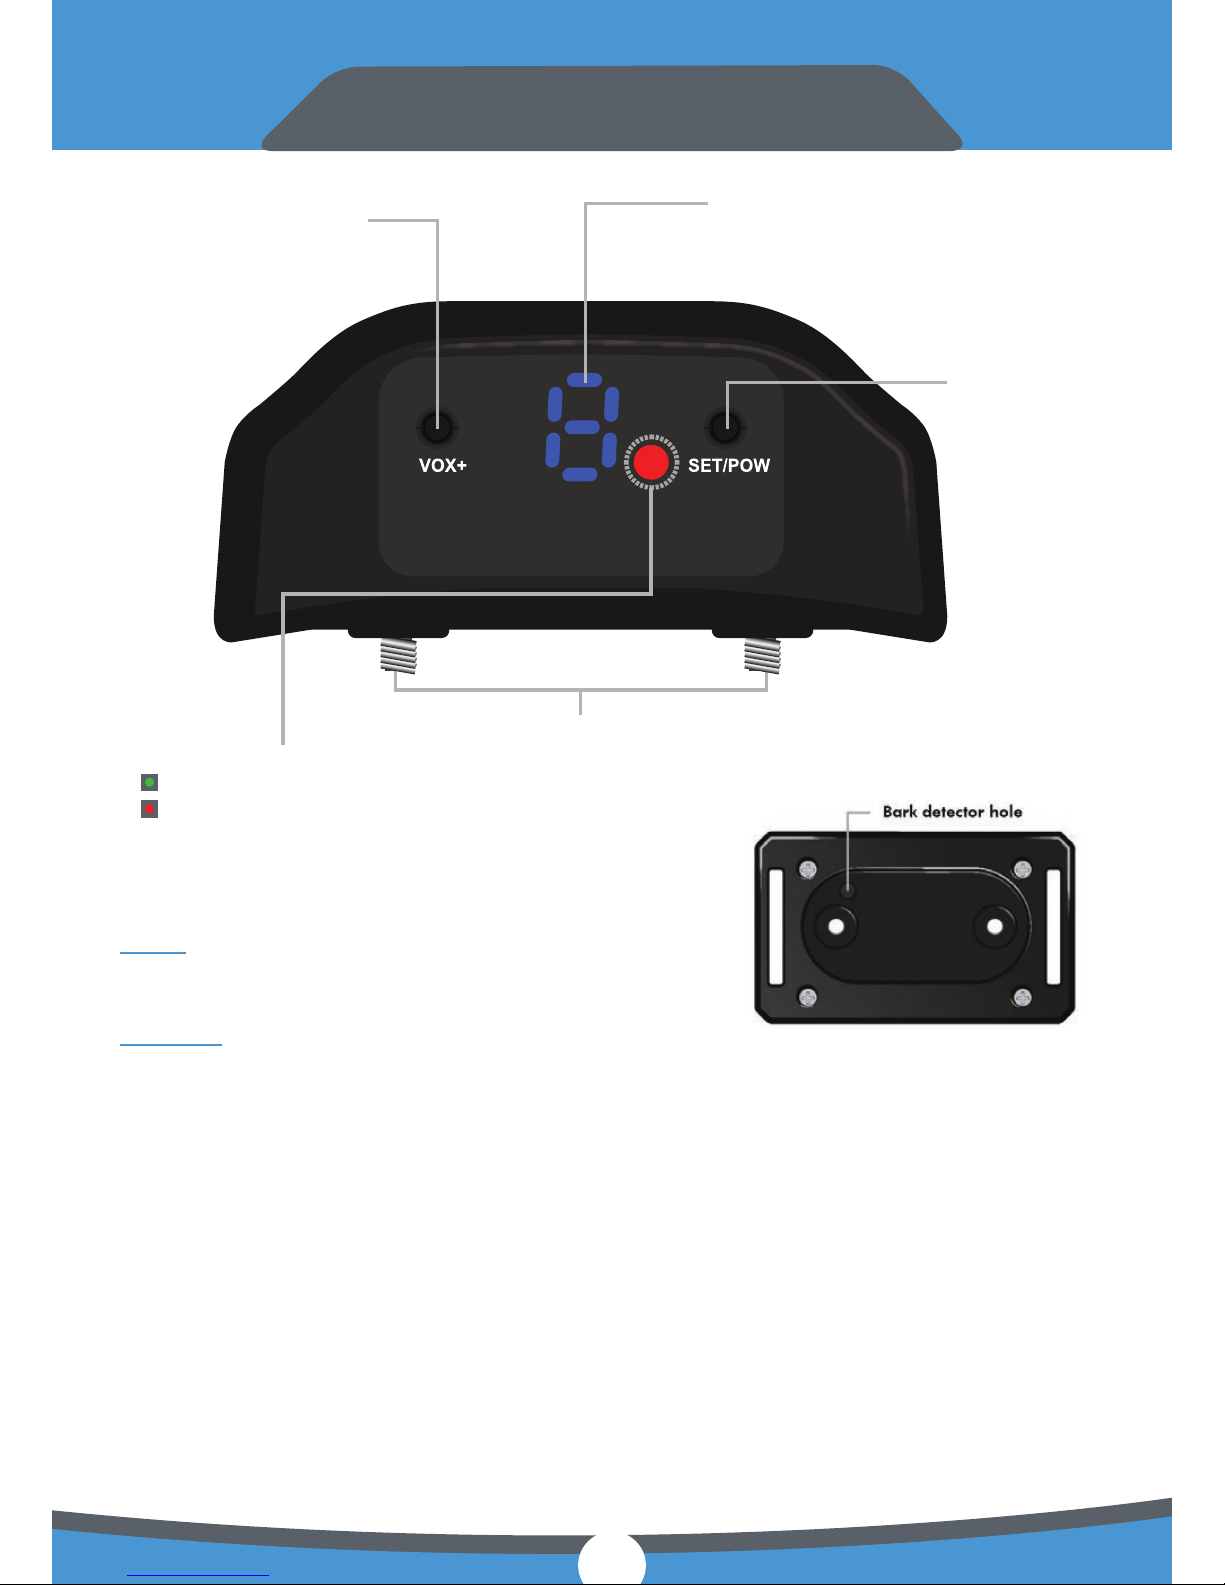
Controls and settings
VOX+ This button allows you to cycle through the sensitivity
levels from 1 to 9. The higher the number, the higher the
sensitivity.
SET/POW Multiple function button:
Power on/off button
- Press and hold this button for 2 seconds to power on this device. The device will vibrate
once it is turned on.
- Press and hold this button for 2 seconds to power off the device with a tone
Training Programs switch button
- Press this button to switch between training programs:
LED blinks in GREEN. Beep + Vibration
We suggest using this training program in the beginning. If your dog does not
respond and continues barking, you may switch to RED.
LED blinks in RED
Beep + Vibration + Shock mode
LCD indicates the current sensitivity level.
LCD will automatically turn off after 10
seconds to save power.
LCD will indicate flashing “L” if the battery
is low. Please install a fresh one.
VOX+
button
SET/POW
button
Put electrodes and the appropriately sized
silicone protective caps on the prongs before
you start using the device
LED indicates the current training program:
Beep + Vibration
Beep + Vibration + Shock mode
LED will blink once every 2 seconds in working mode.
LED will blink twice every second when the battery voltage is low.
Please replace the battery.
RED
program
GREEN
program
7
Page 8
Getting Started
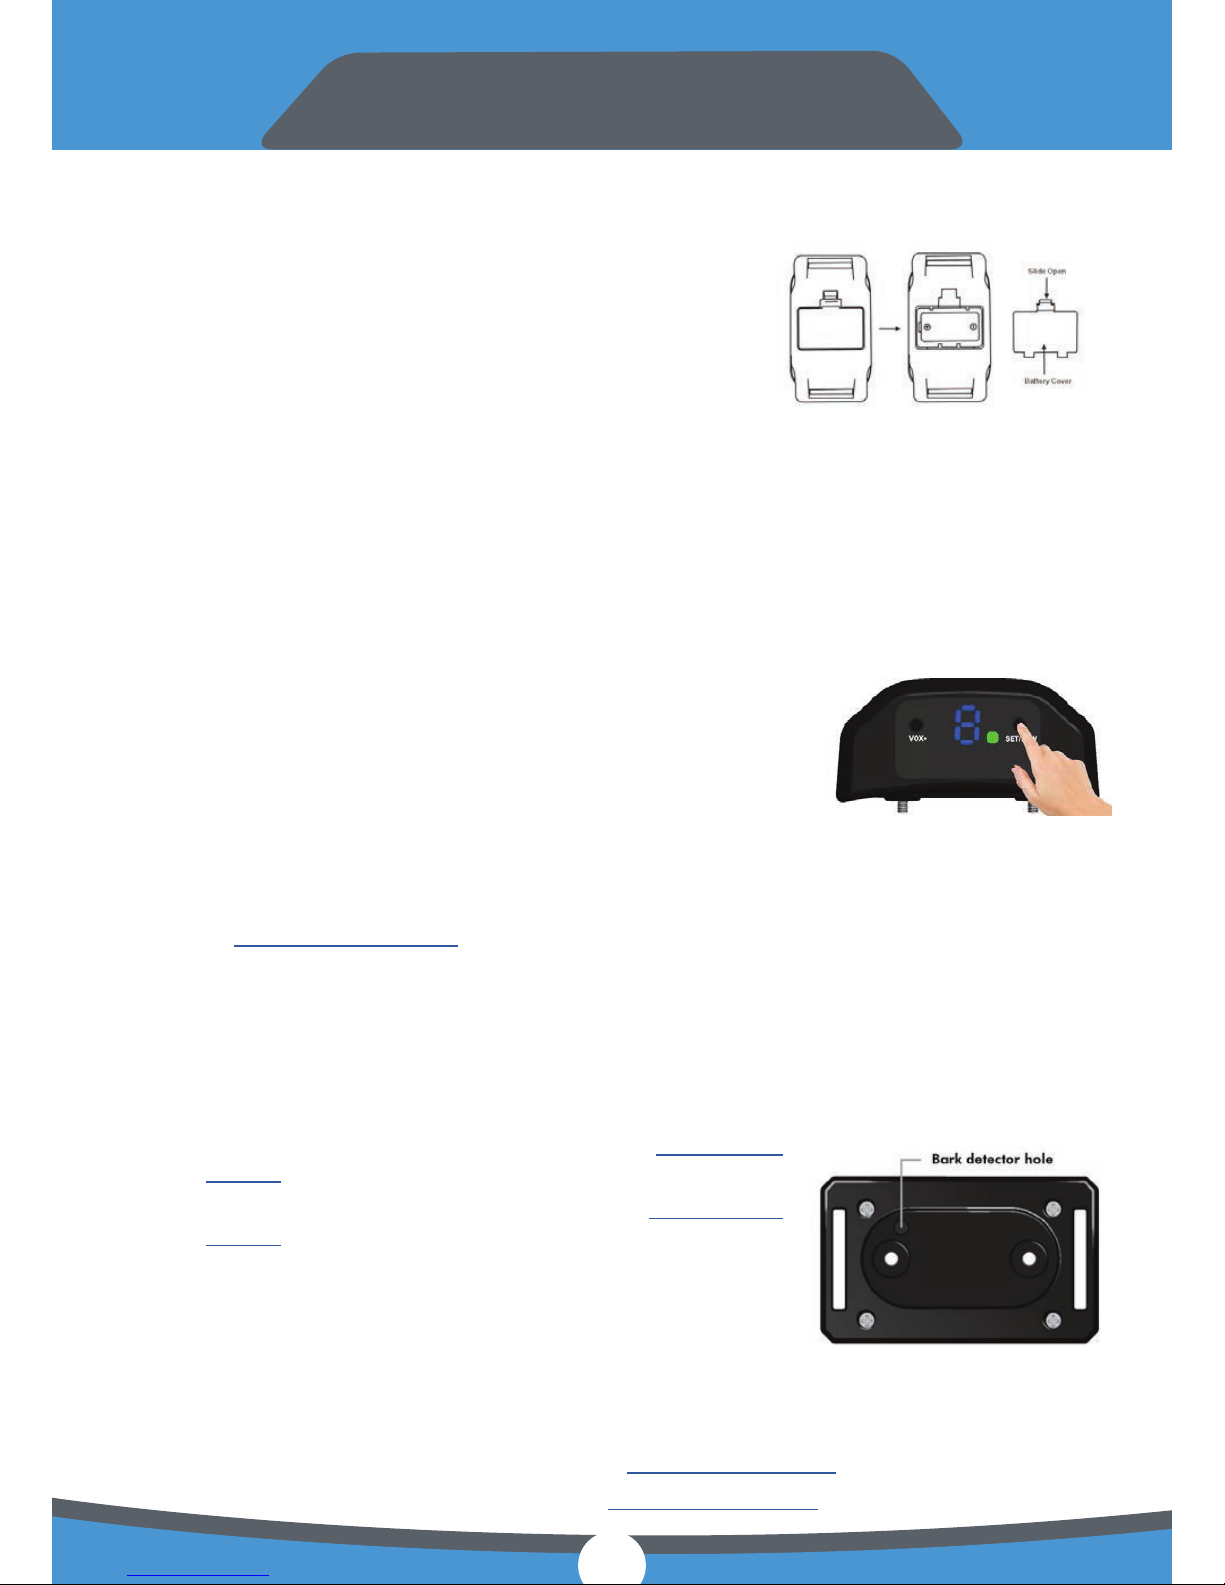
Installing and removing the battery
(type Alkaline 4LR44 6V)
1. Open the battery door located on the front side of the unit.
2. Place the negative end of the battery against the coil (spring)
in the device. Push the battery towards the coil to insert the
battery then push the positive end downward to the clip
to fully insert the battery. This is the only way to install the
battery. Otherwise, you may damage to coil.
3. To remove the battery, use a at head screwdriver or a knife
and place it in the gap between the battery and the device
on the positive end. Carefully pull the battery out. Do not start with negative end in order
to avoid negative coil damage.
4. If LED blinks quickly (faster than twice per second) and/or LCD indicates flashing “L”,
please replace the battery with a fresh one.
Test #1 (ON/OFF)
(make sure the device is OFF before the test)
1. Turn on the device by long pressing the right SET/POW button. It
will vibrate and show blue digits on the LCD screen indicating the
sensitivity level.
2. Long press the right button SET/POW to switch the device off. It
will beep before powering down.
Perform this test to ensure the beeper and vibrator work correctly. If the test fails at any step please
refer to the Troubleshooting Guide at the end of this manual.
Test #2 (functional)
(must be performed each time you are going to use it)
1. Turn on the device (refer to Controls and Settings section for details)
2. If you want to use GREEN training program:
a. Switch to GREEN training program (refer to Controls and
Settings section for details).
b. Switch the sensitivity level to “9” (refer to Controls and
Settings section for details).
c. Imitate “barking” by shouting “HOW” or “WOW” right into
the bark detector hole. Do it loudly and do not hesitate.
Repeat several times in case the collar does not go off the
rst time.
d. The collar goes off by beeping and vibrating the rst time it detects barking.
3. If you want to use RED training program:
a. Switch to RED training program (refer to Controls and Settings section for details)
b. Switch the sensitivity level to “9” (refer to Controls and Settings section for details)
8
Page 9

c. Imitate “barking” by shouting “HOW” or “WOW” right into the
bark detector hole. Do it loudly and do not hesitate. Repeat
several times in case the collar does not go off the rst time.
d. The collar goes off by beeping and vibrating the rst time it
detects barking.
e. Repeat Step “c” within 30 seconds after the collar goes off and
immediately place the plastic tester over the metal prongs.
Ensure the wires inside the tester are in consistent contact with
the prongs of the collar.
f. The collar goes off by beeping, vibrating and distributing electric shock. During the shock
stage, the LED inside the tester will glow for one second.
If the test fails at any step please refer to the Troubleshooting Guide at the end of this manual.
Strap length and collar placement
Your bark collar comes pre-assembled making it easy to get started. Adjust the length of the woven
strap to your dog by placing it in a comfortable place on your dog’s neck.
Make sure the device is OFF before putting the collar on your dog.
9 The collar must t snugly enough so that it does not move around on your dog’s neck.
9 The electronic unit must be placed right on the windpipe (vocal cord). Do not shift it to either
side of the neck.
9 The prongs with metal electrodes and silicone caps on should have consistent contact with your
dog’s skin if you use the RED training program. Thin or shave the hair in the contact area if
necessary.
Remember: Proper strap length and placement will provide the best results for your bark
collar.
Adjusting the sensitivity level
The default sensitivity level is “5”. Adjust the sensitivity based on the needs of your dog. If you notice
the collar goes off too often even when the dog does not bark, lower the sensitivity for better results
(refer to Controls and Settings section for details).
Conversely, if the device does not go off when your dog does bark adjust the sensitivity gradually to
a higher level.
Before you start training
1. Make sure you’ve put the protective silicone caps on the metal electrodes.
2. Choose your training program. We recommend starting with the GREEN training program.
If you do not achieve the desired results, you can always switch to the RED training program.
3. Make sure you’ve performed all of the testing procedures.
4. Make sure you’ve adjusted the strap length and put the collar on your dog’s neck properly.
5. Start using the device by turning it ON and adjusting the sensitivity level if necessary.
Getting Started
9
Page 10
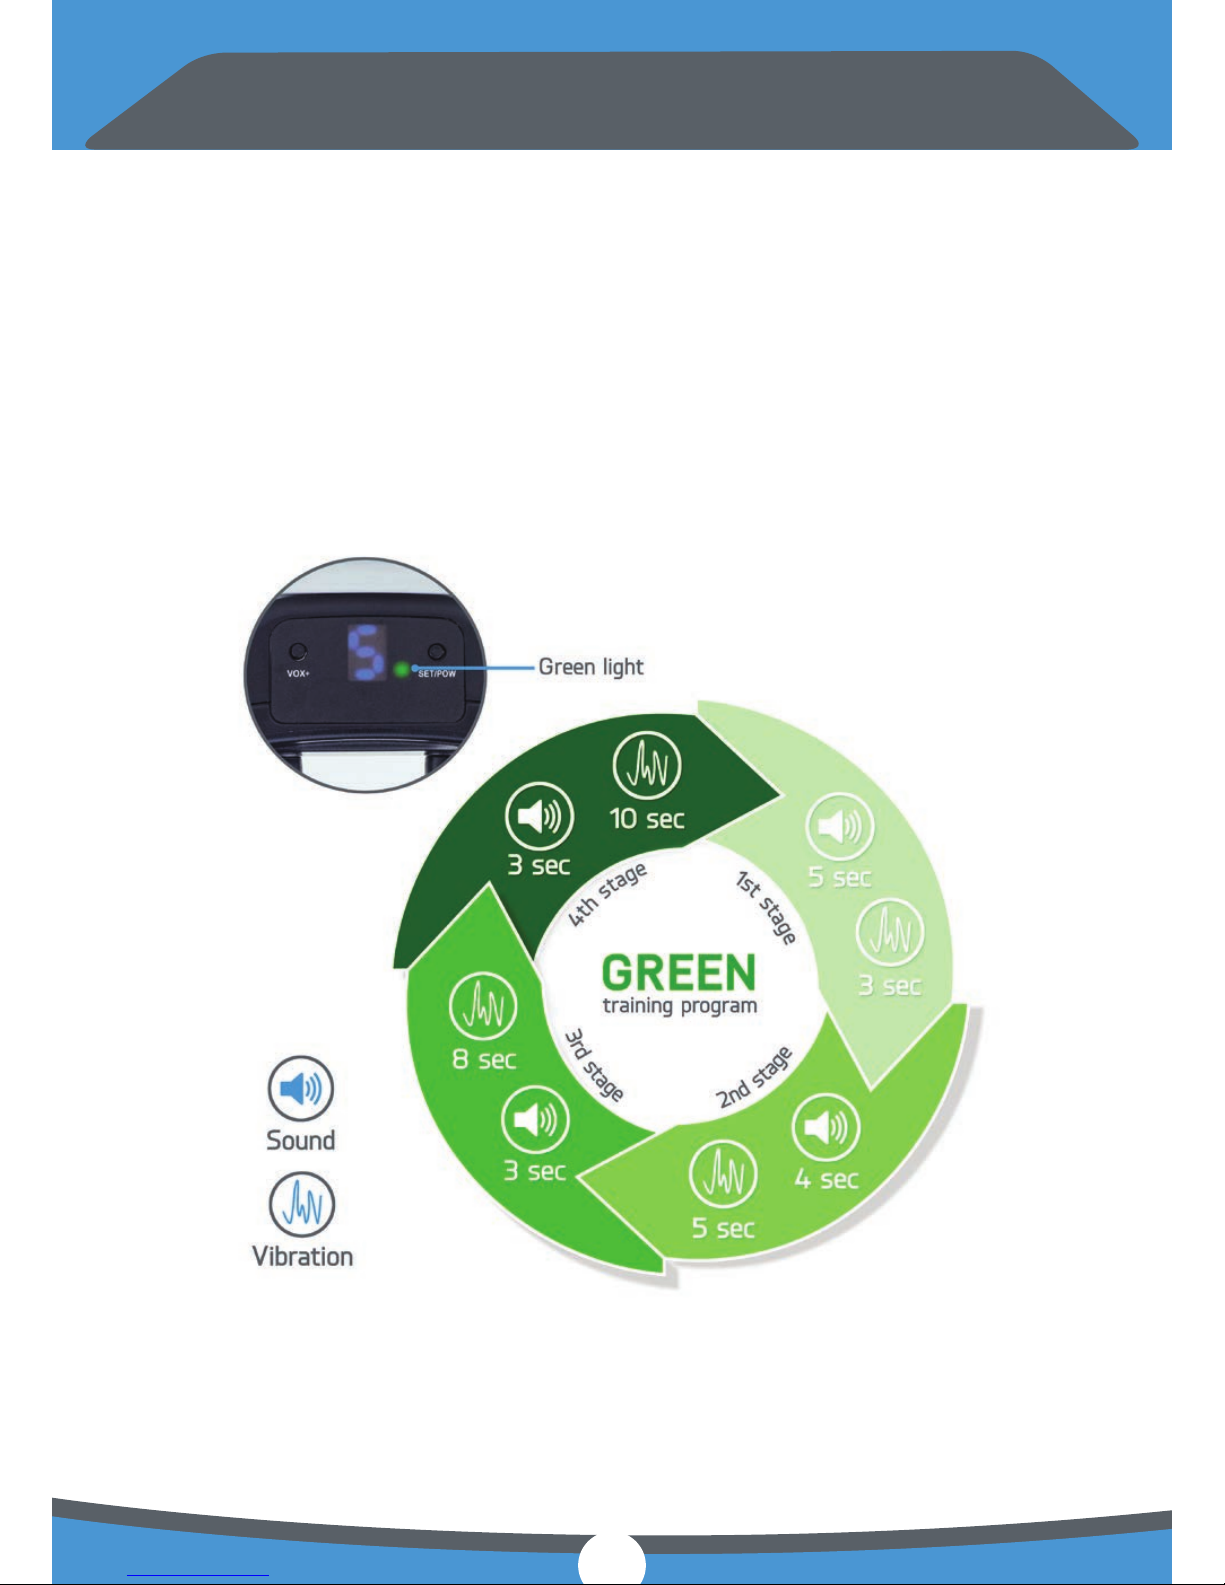
How do the training programs work
General notes
9 The collar starts the training program each time it detects barking.
9 Each training program consists of sequential stages, meaning a new stage starts immediately
after the previous one has completed.
9 A new stage will begin after the previous one if your dog continues barking. If your dog does
not continue to bark, the program will not advance to the next stage.
9 During each stage, the collar may deliver a beep sound, vibration, and a shock pulse
according to the chosen program and stage number.
9 If the dog does not bark for more than a 30 second period, the program resets to the rst
stage and will remain idle until the dog starts barking again.
GREEN training program consists of 4 stages:
# 1: Beeps for 5 seconds then vibrates for 3 seconds
# 2: Beeps for 4 seconds then vibrates for 5 seconds
# 3: Beeps for 3 seconds then vibrates for 8 seconds
# 4: Beeps for 3 seconds and vibrates for 10 seconds at the same time
10
Page 11
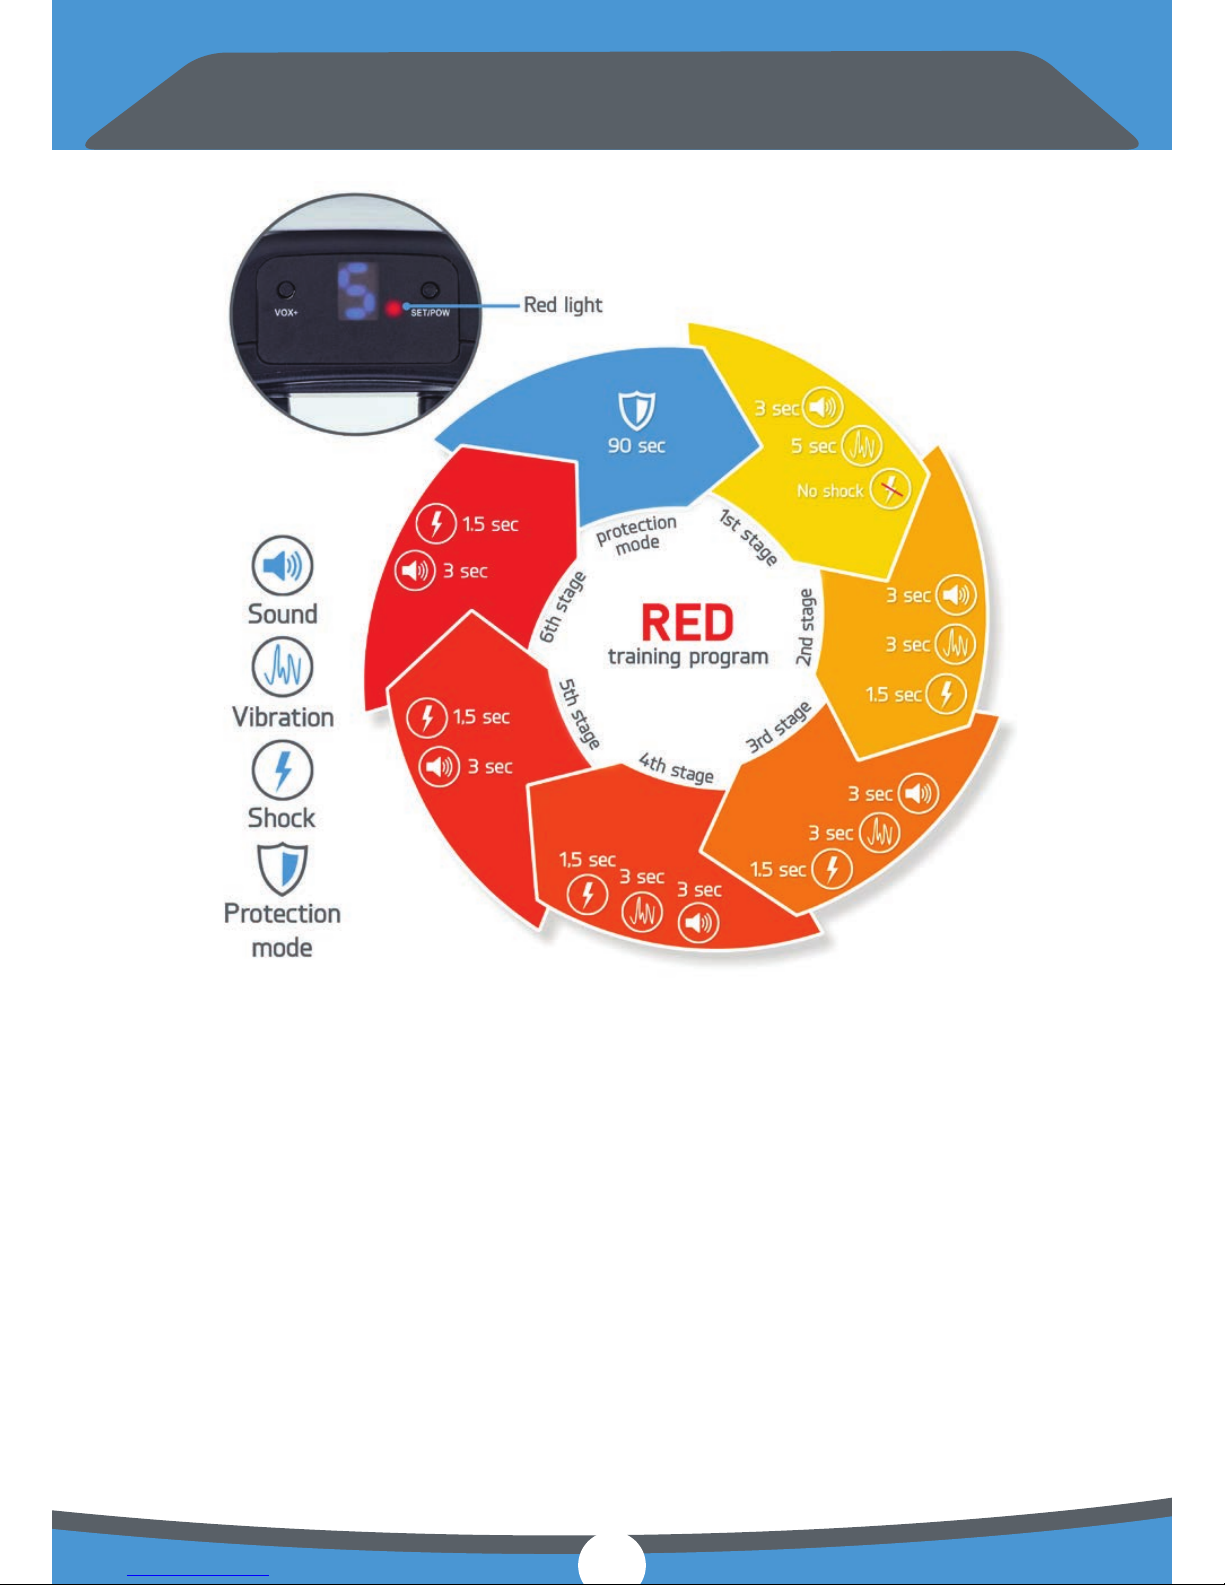
How do the training programs work
RED training program consists of 6 stages:
# 1: Beeps for 3 seconds then vibrates for 5 seconds. No Shock
# 2: Beeps for 3 seconds, vibrates for 3 seconds and then delivers shock for 1.5
seconds (weak shock)
# 3: Beeps for 3 seconds, vibrates for 3 seconds and then delivers shock for 1.5
seconds (stronger shock)
# 4: Beeps for 3 seconds, vibrates for 3 seconds and then delivers shock for 1.5
seconds (stronger shock)
# 5: Beeps for 3 seconds then shocks for 1.5 seconds (high shock)
# 6: Beeps for 3 seconds then shocks for 1.5 seconds (highest shock)
Protection mode: After step #6, the system will go into protection mode for 90 seconds
to protect your dog from getting hurt. In protection mode, the red LED will glow for
the full 90 seconds.
11
Page 12

FAQ and troubleshooting
Is there a battery indicator?
Yes, if the LED (either red or green according to the chosen training program) blinks faster than usual
(appx. twice per second to indicate low battery) please replace the battery.
If Test #1 Fails…
9 Make sure the battery is inserted properly: the negative end of the battery to the end of the
coil (spring), the positive end of the battery to the end of the clip.
9 Install a new battery.
9 If the device was exposed to water, remove the battery as soon as possible. Completely
submerge the electronic unit in pure alcohol for 1 hour and let the unit air dry for 24 hours.
Repeat the rst two steps if necessary.
9 If the problem persists, contact our support team and describe which exact step of the test
you’re having trouble with. If possible, provide close, detailed pictures of the battery slot and
the unit. This may help resolve the issue faster so you can get back to training ASAP!
If Test #2 Fails…
9 Make sure you’ve successfully performed Test #1
9 Make sure the sensitivity level is set to “9”
9 Perform the shouting test louder
9 Bring your face as close as possible to the bark detector hole so your lips slightly touch the
unit and try the shouting test again.
9 If the problem persists, contact our support team and describe which exact step of the test
you’re having trouble with. If possible, provide a short video showing the problem. This may
help resolve the issue faster so you can get back to training ASAP!
My package is missing some parts. No batteries/electrodes/silicone caps etc.
Unfortunately, there are times where Amazon may reintroduce a returned collar that may be missing
parts to new inventory where they may mistakenly ship it out again. In the unlikely event one of our
collars is returned, Amazon does not allow made4.pet to run a quality check which may result in
missing parts. For this reason, we ask you to check the package content in the very beginning and
make sure everything is there. If you a recipient of one of these packages contact us as soon as
possible.
I need a new battery but don’t know which to buy.
The battery type used by the collar is 4LR44 6V Alkaline. This battery also goes by other common
names like PX28A, A544, K28A, and V34PX.
How long does one battery last?
Battery life depends on how frequently your dog barks. The bark collar can last up to a few weeks
or more if your dog is not a frequent barker. The collar also comes with two batteries in the package
that will last a long time for dogs that bark infrequently. If you nd that your battery may be partially
depleted or defective, contact our support team.
12
Page 13

FAQ and troubleshooting
Is the collar waterproof?
While the bark collar is not waterproof, it is rainproof and light rain should not cause any problems. We
strongly recommend avoiding excessive water exposure in order to preserve the proper functionality
of the unit. If water exposure occurs take out the battery as soon as possible, completely submerge the
electronic unit in pure alcohol for 1 hour and let the collar air dry for 24 hours.
My dog does not respond to the collar.
9 Make sure the collar goes off when your dog barks.
9 If your dog has thick hair use longer prongs and the appropriate silicone conductive caps for
the prongs. Thin or shave long hair in the contact spot if necessary to achieve better results.
Use the RED training program if necessary and make sure there is a consistent contact
between electrodes and dog’s skin.
9 Older dogs might have poorer hearing and may not react to the beeps.
9 Older dogs may be so set in their habits that the collar’s correction alone may not be enough.
In cases like these, you may need to assist with the training to achieve desired results.
The collar does not go off when my dog barks
9 Make sure you’ve successfully performed Test #2 before putting the collar on your dog.
9 Make sure the collar is ON (LED must blink once every 2 seconds).
9 Make sure you’ve made the right adjustments and placement for the collar. Refer to Strap
length and collar placement section for help and instructions.
9 Switch to higher sensitivity level.
The collar goes off even if my dog doesn’t bark
9 Make sure you’ve made the right adjustments and placement for the collar. Refer to the
Strap length and collar placement section section for help and instructions.If the collar
moves around the neck it may trigger the device.
9 Switch to lower sensitivity level.
If you’ve followed all of the instructions and performed all of the
recommendations and still run into issues please do not hesitate to
contact our support team at [email protected]. Provide as much
information as possible (including photo and video) so we can help
you as soon as possible!
13
Page 14

If for any reason you’re not satised let us know so we
can make it right! We want to do our best to meet your
expectations now that you’re part of the made4.pet family.
Send us an e-mail at [email protected] if you have any
questions or concerns about your made4.pet purchase.
We’d really appreciate it if you could nd few minutes
to share your share your 5-star experience with the bark
collar! Help other savvy Amazon users make the best choice
for a bark collar.
www.made4.pet
Activate your free guarantee at
 Loading...