

Made BIKCWN001BLA-UK, BIKCWN003BLA-UK, BIKCWN004BLA-UK, BIKCWN002BLA-UK, BIKMLW001COP-UK User Manual
...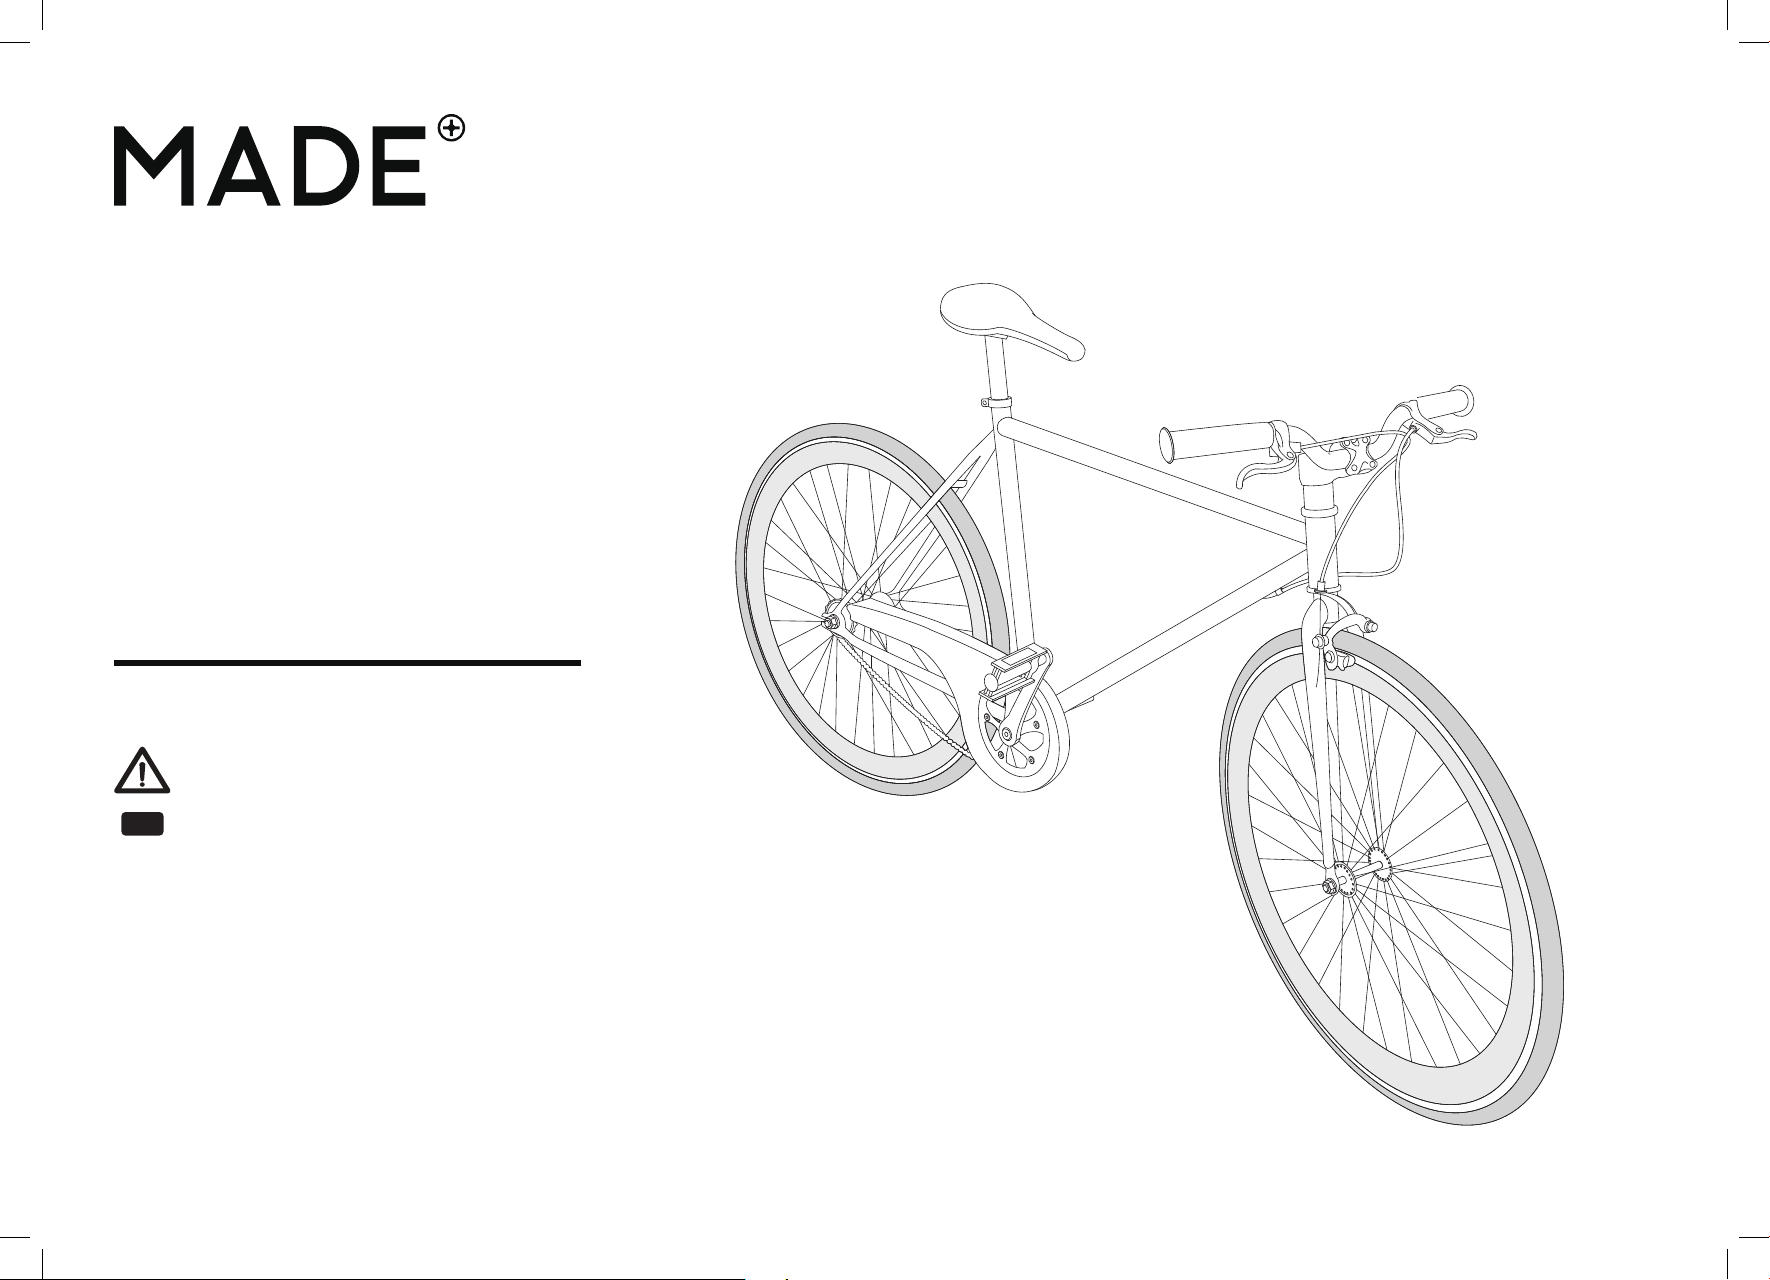
Colwyn Single Speed City Bike
BIKCWN001BLA-UK
BIKCWN003BLA-UK
BIKCWN004BLA-UK
BIKCWN002BLA-UK
Mallow Single Speed City Bike
BIKMLW001COP-UK
BIKMLW002COP-UK
BIKMLW003COP-UK
BIKMLW004COP-UK
Made in China
Recommendations for the continual
safe use of this product are stated
throughout this manual. Please retain
for future reference.
GB

Model number Product description, color, size
BIKCWN001BLA-UK Colwyn Single Speed City Bike, Matt Black and Copper, S/M
BIKCWN003BLA-UK Colwyn Single Speed City Bike, Matt Black and Copper, M/L
BIKCWN002BLA-UK Colwyn Single Speed City Bike, Matt Black and Gold, S/M
BIKMLW001COP-UK Mallow Single Speed City Bike, Copper and White, S/M
BIKMLW002COP-UK Mallow Single Speed City Bike, Copper and White, M/L
BIKMLW003COP-UK Mallow Single Speed City Bike, Copper and Black, S/M
BIKMLW004COP-UK Mallow Single Speed City Bike, Copper and Black, M/L
1
Congratulations on the purchase of your new bicycle!
With proper assembly and maintenance, this bicycle will offer you years of enjoyable riding.
IMPORTANT:
Carefully read this manual and follow all instructions. Your bicycle may come with additional instruction sheets.
Please ensure that you read and become familiar with their contents. Keep this manual for future use. If this
bicycle was purchased for a child, it is the responsibility of the purchaser to verify the bicycle has been properly
assembled, and that the user has been properly trained and instructed on the use of this bicycle.
This manual is provided to assist you and is not intended to be a comprehensive manual covering all aspects
of maintaining and repairing a bicycle. The bicycle purchased is a complex piece of equipment that must
be properly assembled and maintained in order to be ridden safely. If there are any doubts about the proper
assembly and maintenance of the bicycle, have it assembled and maintained by a professional bicycle
mechanic.
RECORD YOUR SERIAL NUMBER
Your bicycle has a unique serial number stamped into
the bottom of the frame shown in the figure. Record this
number HERE for future reference. This number is helpful
in reclaiming your bicycle if ever lost or stolen.
THIS INFORMATION IS ONLY AVAILABLE ON
THE BICYCLE ITSELF.
There is no record of your serial number where purchased
or with our company. It is your responsibility as owner to
record this information.
Serial number: _______________________________________
2

Safety warnings
In the interest of safe cycling, make sure you read and
understand this bicycle owner’s manual.
The above safety alert symbol is important, along
with words such as DANGER, WARNING, CAUTION,
IMPORTANT, and NOTE or NOTICE. Pay close attention
to the information following these words and/or symbol
because it involves rider safety.
• DANGER and WARNING: Pay special attention to
these. Failure to do so could result in serious injury or
death to the rider or others.
• CAUTION: If not followed these instructions could
result in injury or mechanical failure or damage to the
bicycle.
• NOTE or IMPORTANT: These specify something that
is of special interest.
Owner’s responsibility
IMPORTANT: Reading and following the information
and instructions in this manual are essential to the
rider’s ability to ride safely.
1. It is the responsibility of the owner—or in the case
of a younger rider—the parents or guardian of the
rider to ensure all assembly instructions have been
followed. Even if the bicycle has been assembled by
the seller or a professional assembly company.
2. Brakes are essential to safety. Check and make
sure that the brakes are working properly before
riding the bicycle. Remember any mechanical
system changes condition during use and must be
maintained and checked before every use.
3. Bicycle laws may vary depending on location. Know
and understand the rules and laws that apply in the
riding area.
4. Know how to operate the bicycle and all related
equipment before the first ride. Ensure that other
individuals allowed to use the bicycle know how to
properly and safely use the bicycle.
3

5. There are many different types of bicycles and often
these types are designed for different uses. Know
the type of bicycle, including proper bicycle sizing
for the rider, which ensures good control during
use.
6. Any major service or adjustments on the bicycle
should be carried out by a competent adult or
a professional bicycle mechanic. If you wish to
make adjustments yourself, this manual contains
important tips on how.
CAUTION: Any adjustments made are entirely at the
owner’s risk. If in doubt, have adjustments and/or
repairs done by a qualified bicycle mechanic.
7. Check the bicycle regularly and do any required
maintenance.
WARNING:
• As with all mechanical components, the bicycle is
subject to wear and high stresses. Different materials
and components might react to wear or stress fatigue
in different ways. If the design life of a component has
been exceeded, it may suddenly fail, possibly causing
injuries to the rider. Any form of crack, scratches, or
change of colouring in highly stressed areas indicate
that the life of the component has been reached and
it should be replaced.
NOTE: Only use original parts for replacement. Original
replacement parts can be obtained from authorised
retailers. Only authorised retailers will be able to supply
you with a tested part appropriate for your bicycle’s
purpose.
Intended use
• This bicycle is classified under Condition 1 of the industry use conditions. Condition 1 bicycles are for
riding on a paved surface where the tires do not lose
ground contact. These bicycles are intended for use
only on public roads, paths, and tracks that are in
good condition. These bicycles are NOT intended for
off road use.
• This bicycle is not compatible with luggage holders or
child seats.
• The maximum weight limit of this bicycle is 125 kg
(max weight of rider + bicycle). DO NOT OVERLOAD.
4
WARNING: Do NOT use your bicycle for freestyle and stunt riding, jumping or competitive
events. Even if you are riding a mountain bicycle, you should know that off-road use or any
similar activities can be dangerous, and you are warned that you assume the risk for personal
injury, damages or losses incurred from such use. Do not ride your bicycle when any part is
damaged or not working properly. If you are unsure how to carry out repairs or maintenance on
your bicycle, consult a local bicycle mechanic for professional assistance and support.
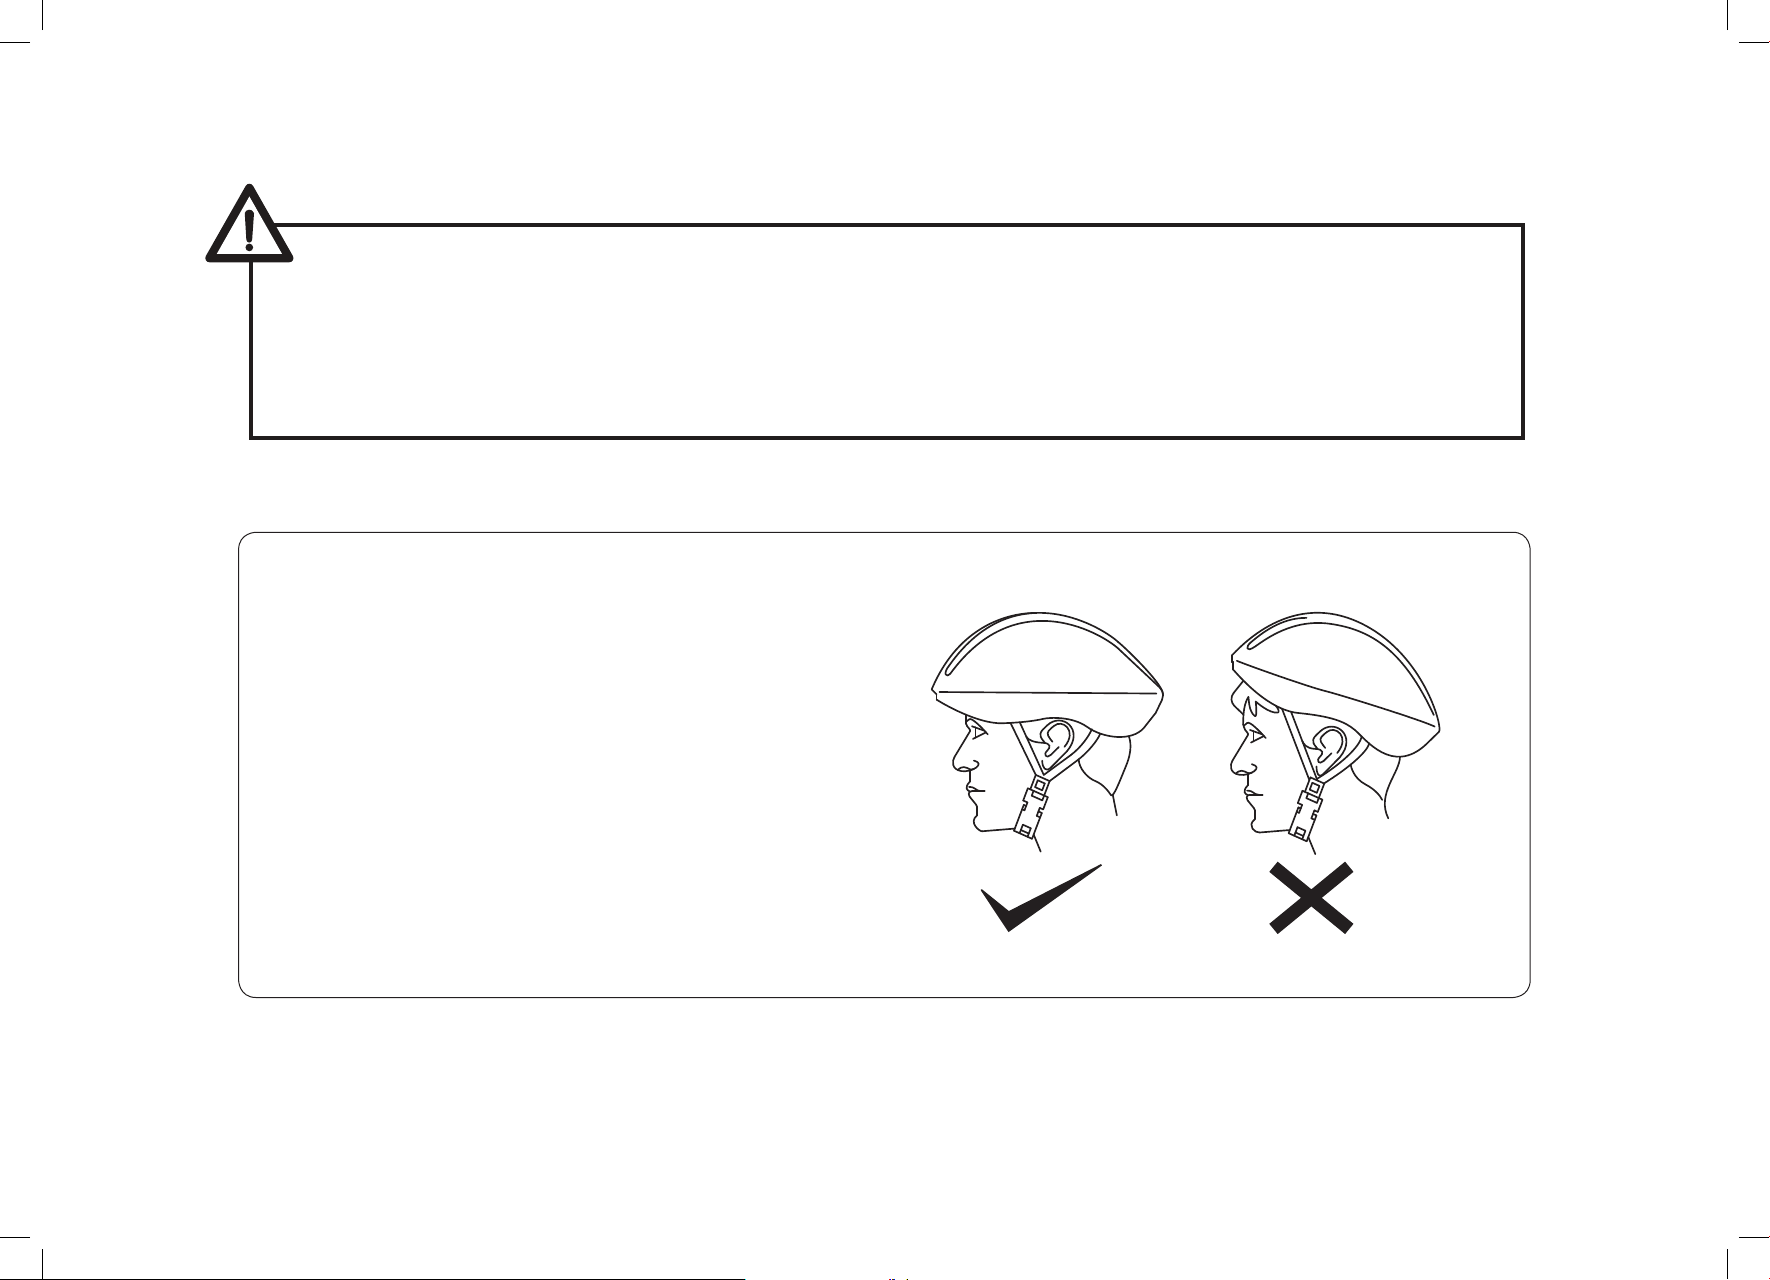
ALWAYS WEAR A HELMET — IT COULD
SAVE YOUR LIFE!
A properly fitting bicycle helmet fully compliant with
EN 1078 should be worn at all times when riding your
bicycle.
The correct helmet should:
• be comfortable
• be lightweight
• have good ventilation
• fit correctly
• cover the forehead
• be securely fastened on the rider.
5

Rules of the road
CAUTION: Before riding your bicycle, check the brakes
and other parts of the bicycle. Make sure all parts are
tightened, assembled correctly, and working properly.
The first ride should be taken in a large, open, level
area. If you have a problem, check the assembly
instructions and follow the maintenance procedures in
this book.
1. CAUTION: WET AND ICY WEATHER WARNING:
Check your brakes frequently. The ability to stop is
critical. Roads are slippery in wet weather so avoid
sharp turns and allow more distance for stopping.
Brakes may become less efficient when wet.
Leaves, loose gravel, and other debris on the road
can also affect stopping distance. If at all possible,
do not ride in wet weather—vision and control may
be impaired, creating a greater risk of accidents
and injury.
2. WARNING: NIGHT TIME OPERATION: It is NOT
recommended to ride your bicycle at night. If you
have an emergency that requires you to ride at
night you must have proper lights and reflectors.
NEVER ride at night without a helmet, taillight,
white front reflector, red rear reflector, pedal
reflectors, and white wheel reflectors. You must be
able to clearly see the surface where you are riding
and be seen by others.
3. Always wear shoes when riding a bicycle. Avoid
loose fitting clothes. Wear a cuff band or a trouser
clip to keep trousers from getting caught in the
chain wheel. Long sleeves, long trousers, gloves, eye
protection, a good helmet, elbow and knee pads
are recommended. Wearing a helmet is required by
law in many countries and is always a good idea.
4. Obey all traffic regulations. Most traffic regulations
apply to bicycle riders as well as automobile
operators. Observe all county and local traffic
regulations, signs, and signals. Check with your
local police station on bicycle licensing and
inspection, and where it is legal to ride your bicycle.
5. NOTE: Some countries and local laws may require
that your bicycle be equipped with a warning
device such as a horn or a bell.
6. Cover the bicycle’s stem, handlebar, and top tube
with safety pads for additional protection.
7. Do not ride your bicycle if the chain cover is not
attached, or if any of the bicycle’s mechanical
systems are not functioning properly. Doing so
could result in personal injury or damage to the
bicycle.
8. If any components becomes loose while riding,
STOP immediately and re-tighten or contact a
mechanic for repair.
6

Before riding
A minute spent checking your bicycle before each ride
significantly improves your safety and the enjoyment
of your ride. Each time before you ride make a habit of
performing the following safety checks:
1. Stand in front of the bicycle facing rearward and
hold the front wheel securely between your legs.
Try to twist the handlebar and verify that they do
not move. Then pull the handlebars up, trying to lift
the bicycle. There should be no movement.
2. Try and push the front wheel from side to side and
confirm that it feels tight and will not wobble. Lift
the front wheel up by the handlebars and strike
the wheel downwards with the heel of your hand.
Confirm that it is securely attached to the fork.
Spin the front wheel and confirm that it does not
wobble or contact the fork or brake pads.
3. Try to lift, push down, and twist the seat to confirm
that it’s tight.
4. Check the connection of the pedals to the crank
arms. You should see no pedal screw threads and
the pedal should feel firm and positioned parallel to
the ground.
6. Check and make sure that the fenders and accessories are firmly attached and will not contact any
moving parts. Make sure all reflectors are in position and not broken.
7. Lastly, put on your bicycle safety helmet and mount
your bicycle. Your safety is well worth just a minute.
Be sure to read and follow the warnings and instructions in the Assembly, Maintenance and other
sections of this manual.
WARNING: This bicycle must be properly
assembled before use. It is strongly recommended that you review the complete
Assembly guide and perform checks specified in this manual before riding. Failure to
properly assemble and maintain your bicycle could result in serious injury or death.
5. Apply your brake(s) and make sure they feel firm to
the touch. Spin the wheel(s) and apply the brakes.
The brakes should effectively stop the wheel(s).
7
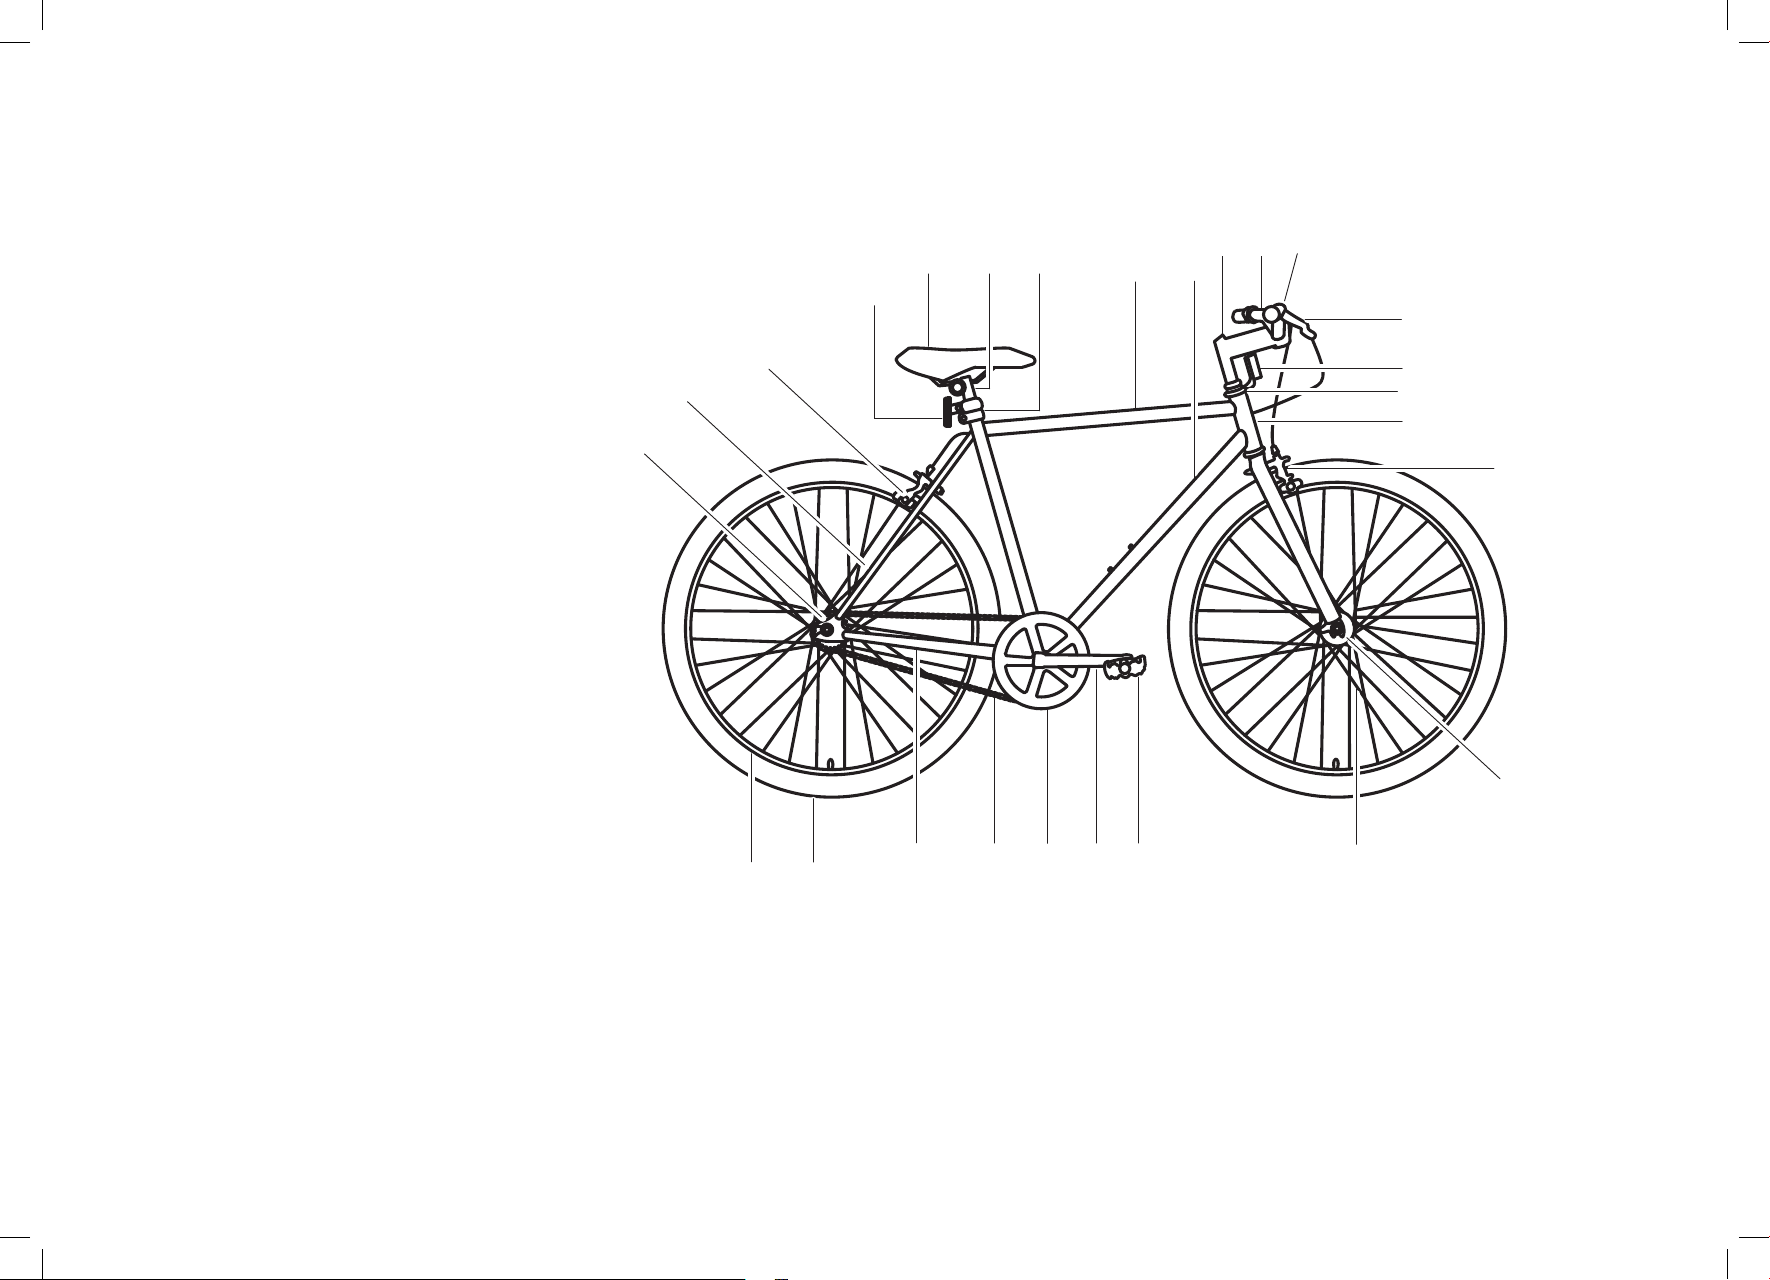
Configuration of a bicycle
NOTE: This is a typical bicycle. Your bicycle
may have other or different parts, and in some
cases, may not have all parts shown here.
20
21
22
23
24
25
26
3
1
2
4
5
6
7
8
9
10
11
8
1. Top tube
2. Down tube
3. Stem
4. Handlebar
5. Grips
6. Brake lever
7. Front reflector
8. Headset
1819
9. Headtube
10. Front brake
11. Front hub
12. Spokes
13. Pedal
14. Crank arm
15. Chain wheel
16. Chain
17. Chain stay
18. Tyre
19. Rim
20. Rear hub
21. Seat stay
121314151617
22. Rear brake
23. Rear reflector
24. Seat
25. Seat post
26. Seat post
clamp
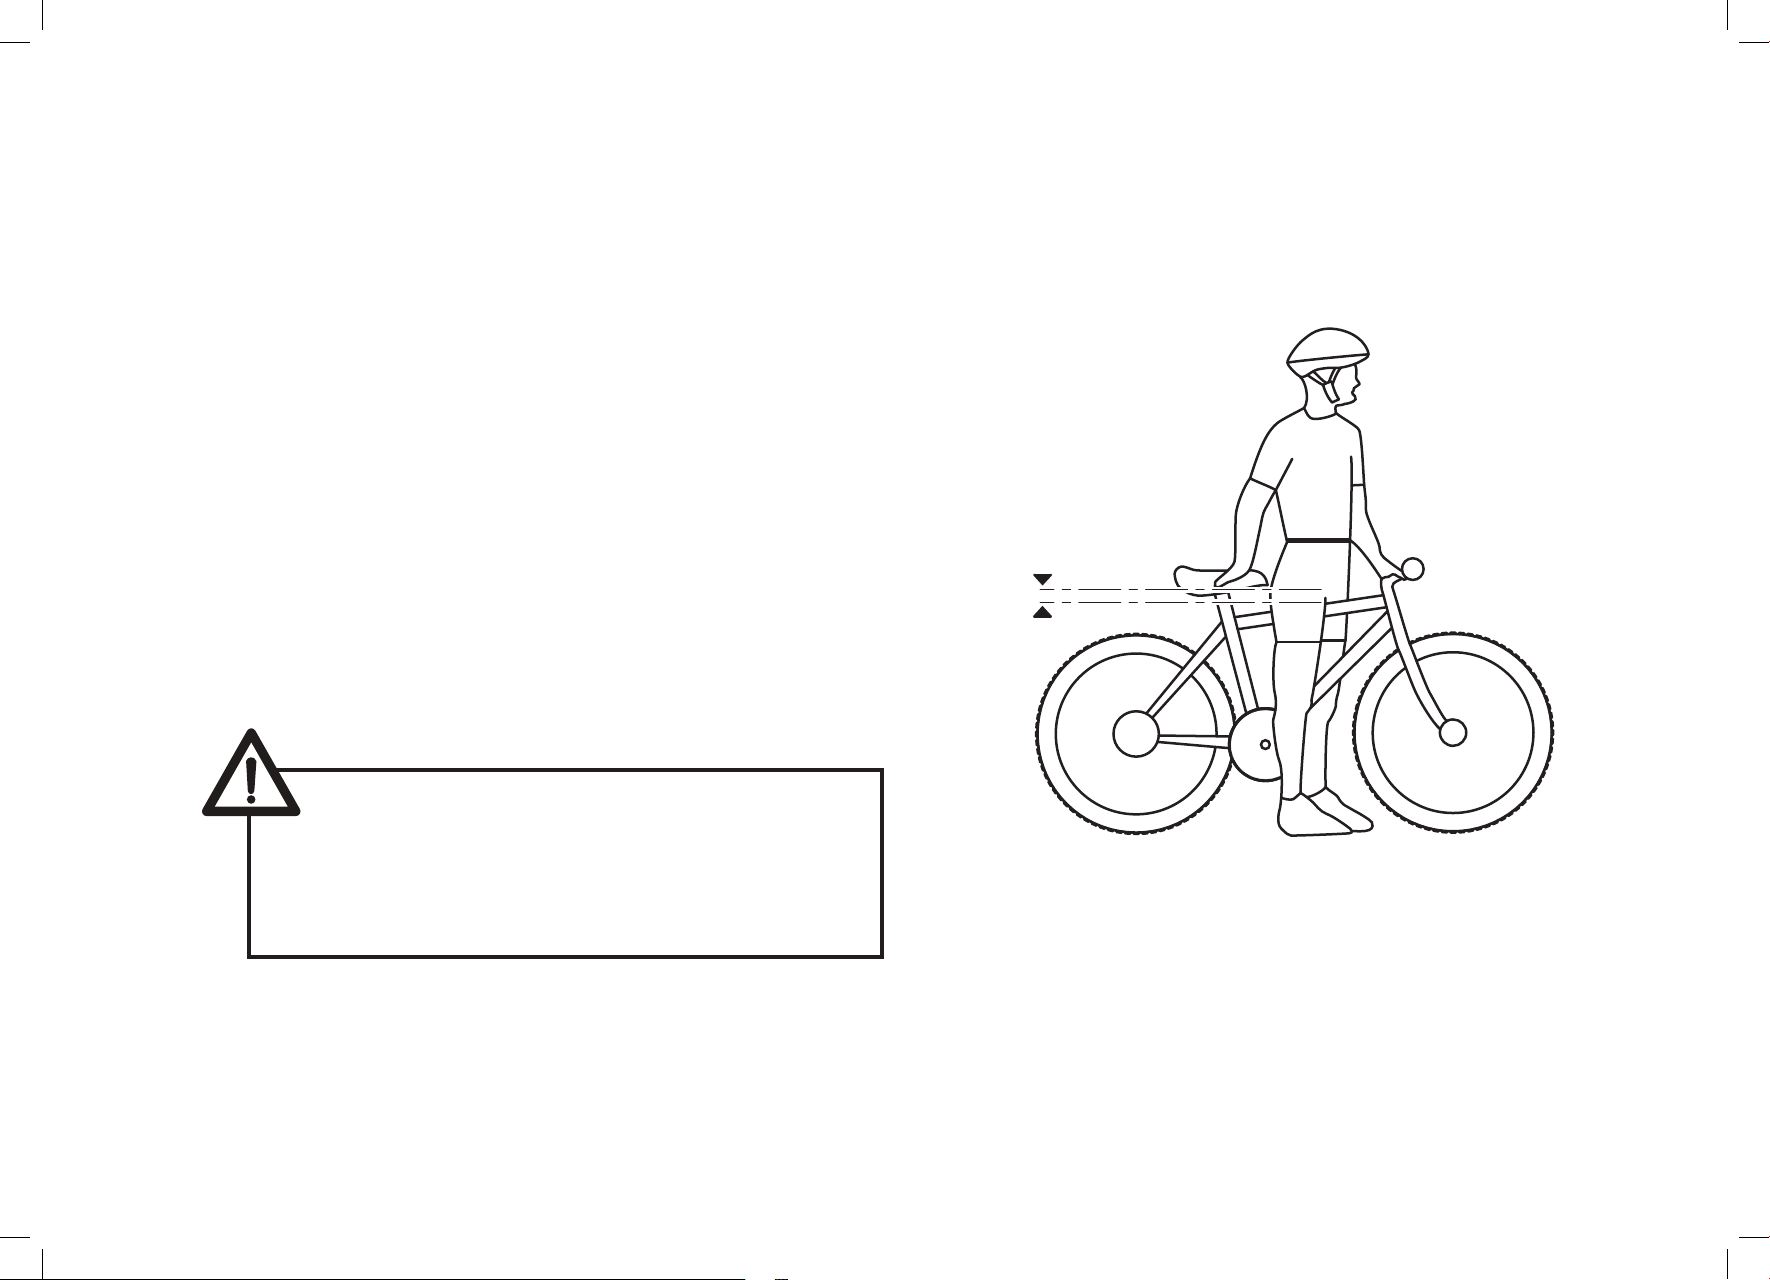
Bicycle size and fit
Correct frame size
When selecting a new bicycle, the correct choice of
frame size is a very important safety consideration. The
ideal clearance will vary between types of bicycles and
rider preference. Correct frame size makes straddling
the frame, when off the seat, easier and safer in
situations such as sudden traffic stops.
3–5 cm
WARNING: There should be a clearance of
no less than 3–5 cm between the groin area
of the rider and the top tube of the bicycle
while the rider straddles the bicycle with
both feet flat on the ground.
9
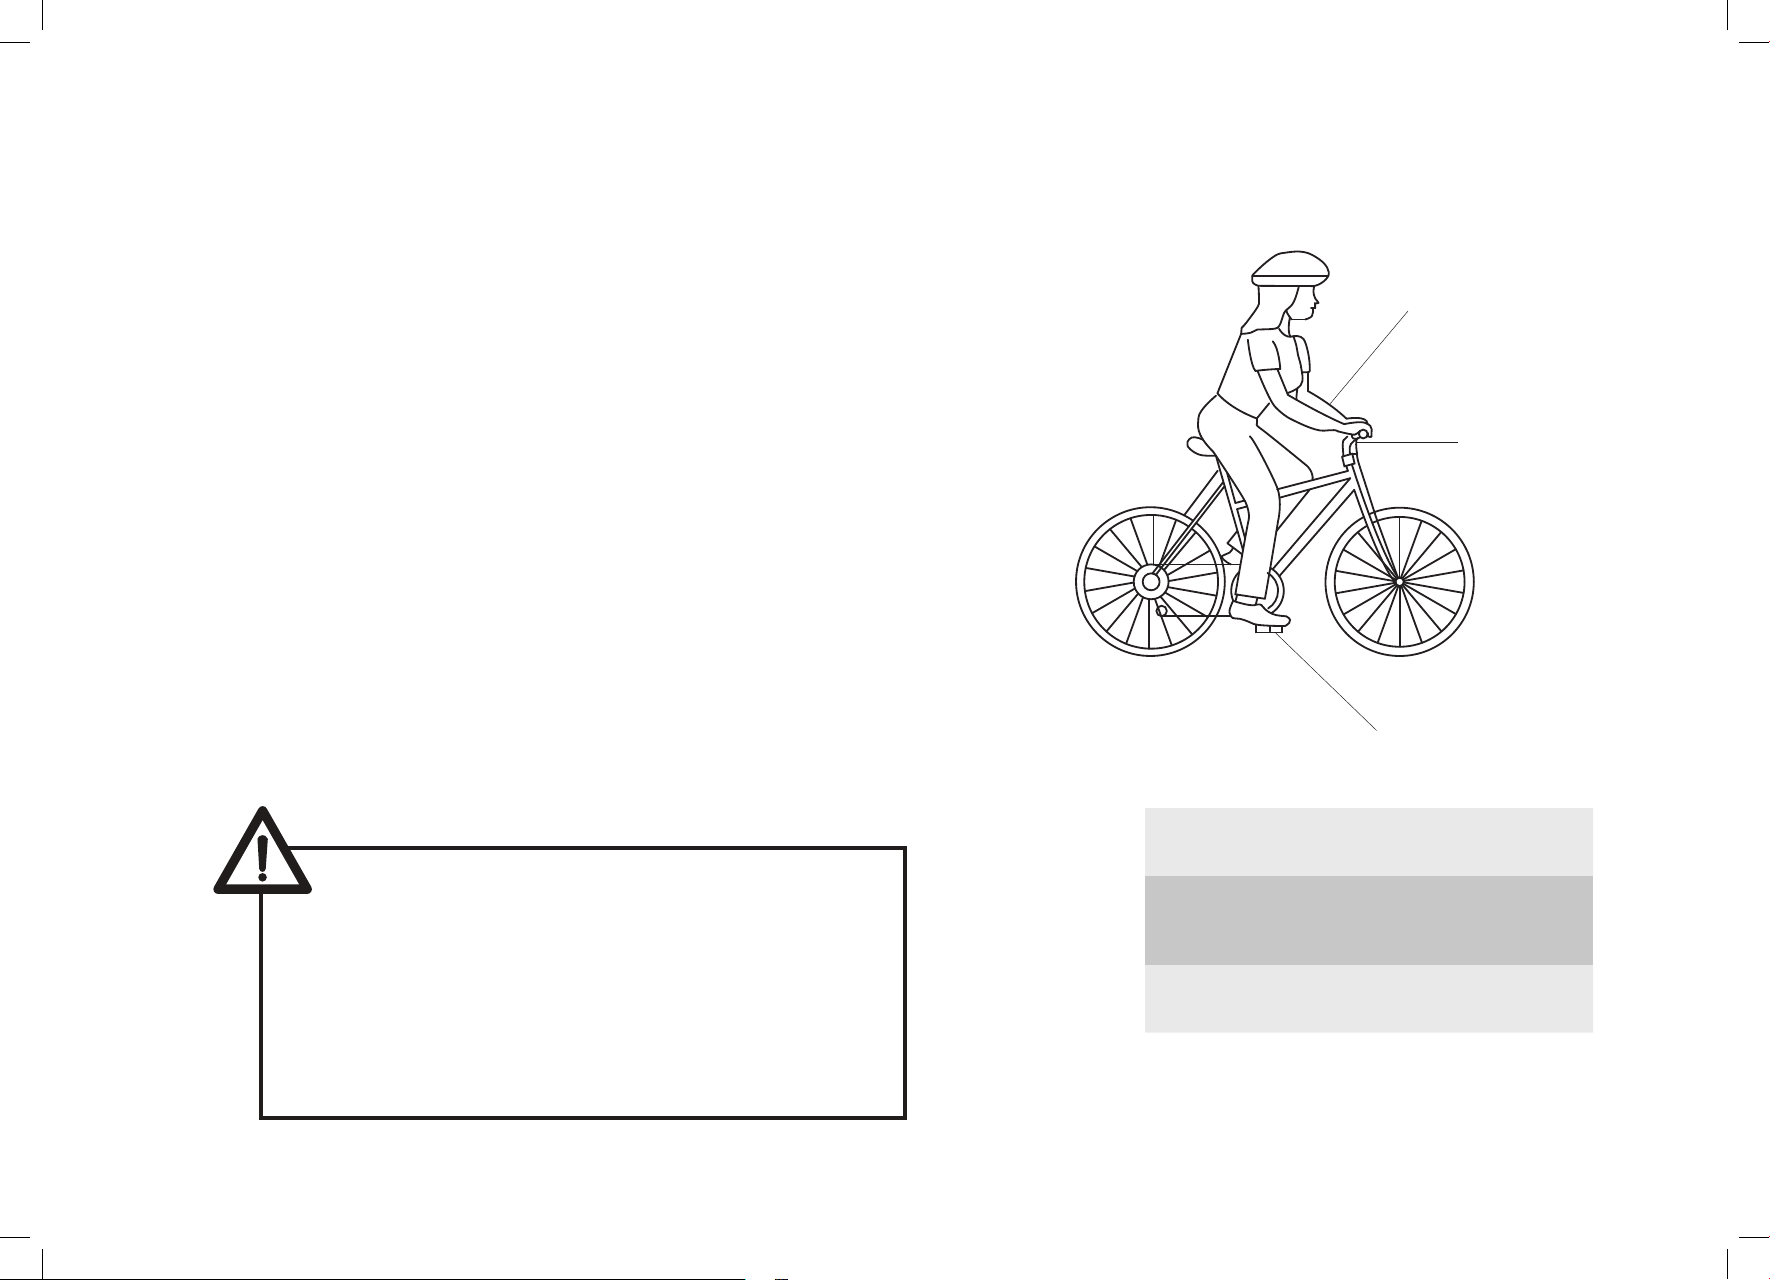
Seat height
In order to obtain the most comfortable riding position
and offer the best possible pedalling efficiency, the seat
height should be set correctly in relation to the rider’s
leg length. The correct seat height should not allow
leg strain from over-extension, and the hips should not
rock from side to side when pedalling.
1
While sitting on the bicycle with one pedal at its lowest
point, place the ball of your foot on the pedal. The
correct seat height will allow the knee to be slightly
bent in this position.
Arm reach
To obtain maximum comfort, the rider should not over
extend his or her reach when riding. There should be a
slight bend in the rider’s elbows. Refer to the Assembly
section to learn how to adjust the seat height and arm
reach.
WARNING: The seat’s “minimum insertion”
mark should not be visible when the seat is
inserted into the seat mast of the bicycle. Do
not raise the seat beyond this mark. The seat
post or frame may break causing you to lose
control and fall. Always check and make sure
that the seat post clamp is tightened securely
before riding.
2
3
1. Arms not over-extended
2. Handlebar and stem about the
same height as the seat
3. Pedal in bottom position
10
Assembly
Your new bicycle was assembled and tuned in at the factory and then partially disassembled for shipping. The
following assembly instructions will enable you to prepare your bicycle for your first ride. For more details on
inspection, lubrication, maintenance, and adjustment of any area please refer to the relevant sections in this
manual. Consult a professional bicycle mechanic if you have ANY doubts or concerns about properly as-
sembling, repairing, or maintaining your bicycle.
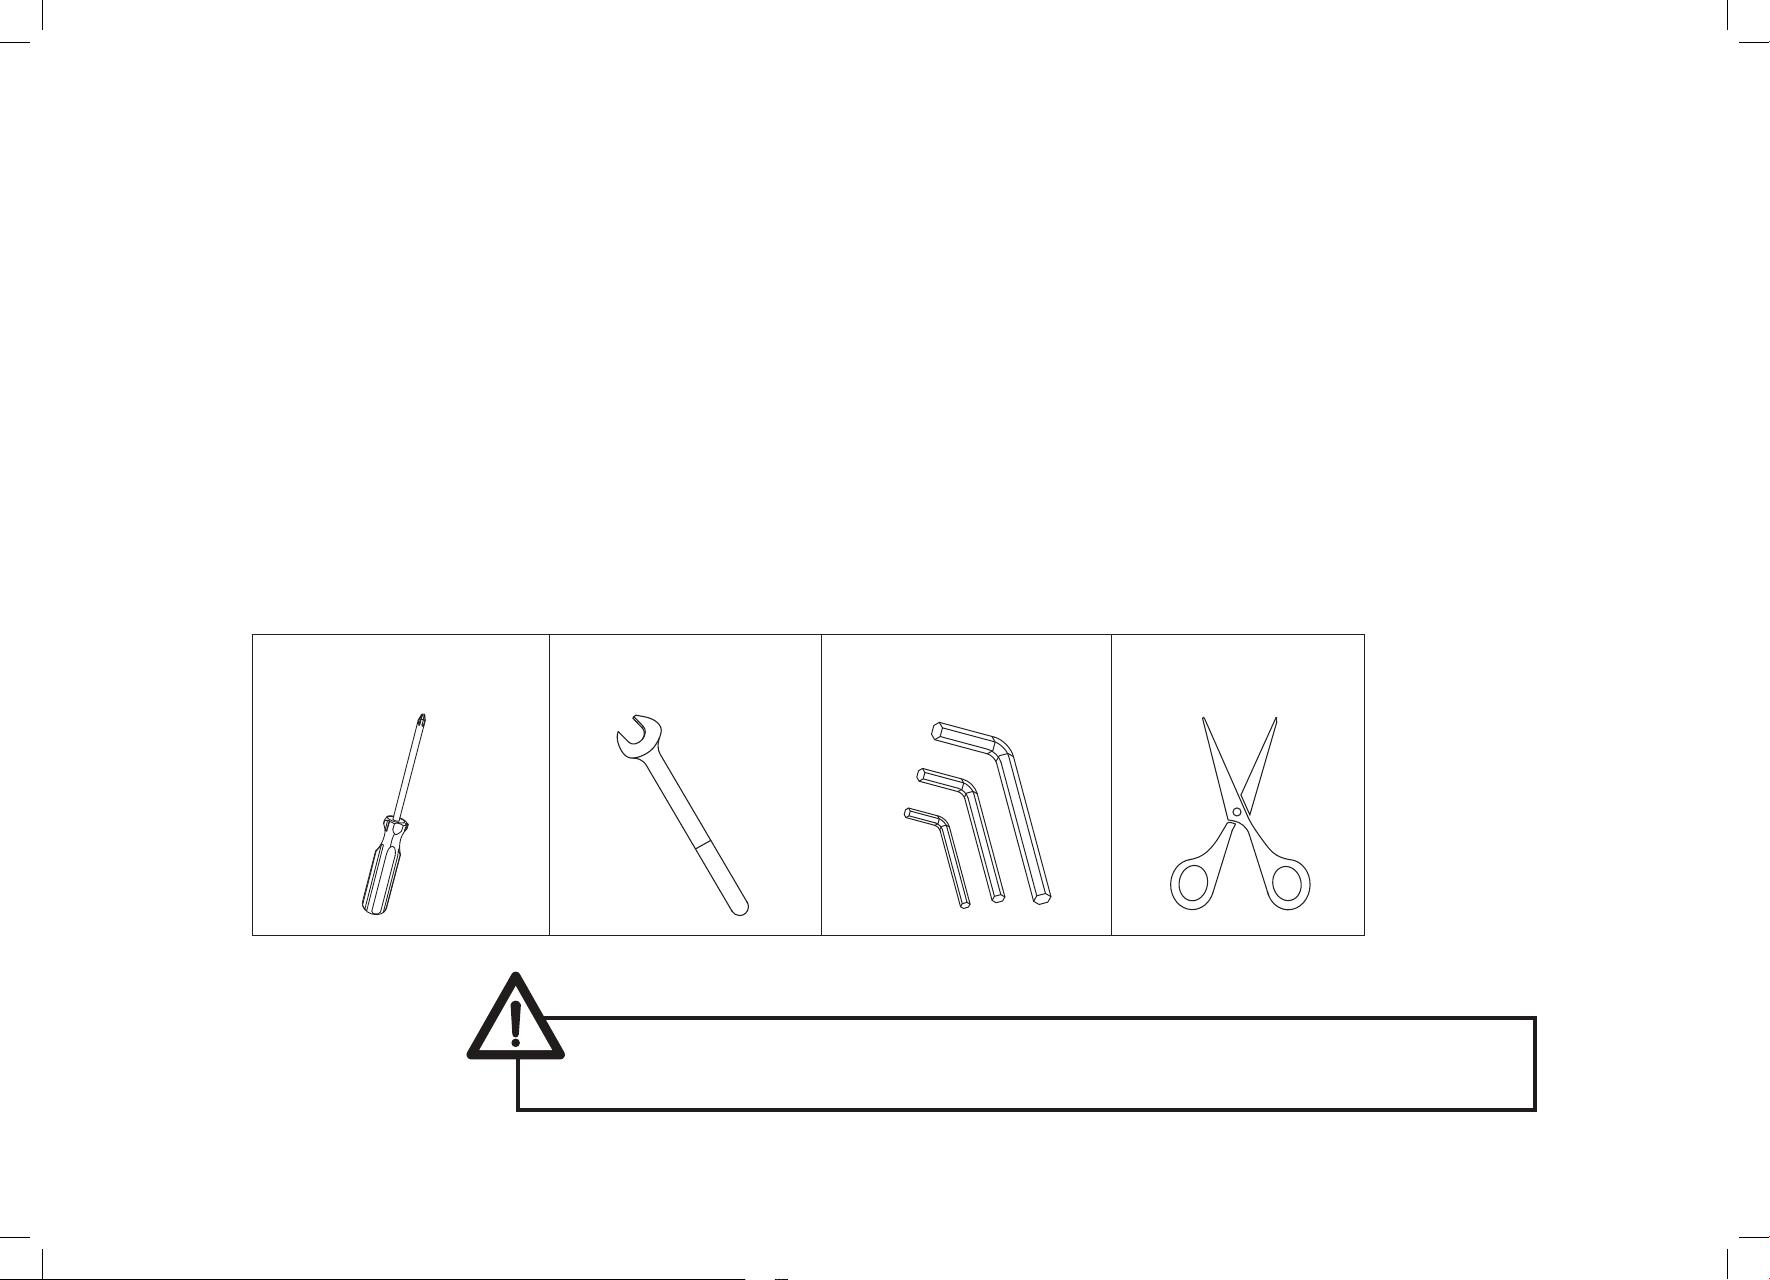
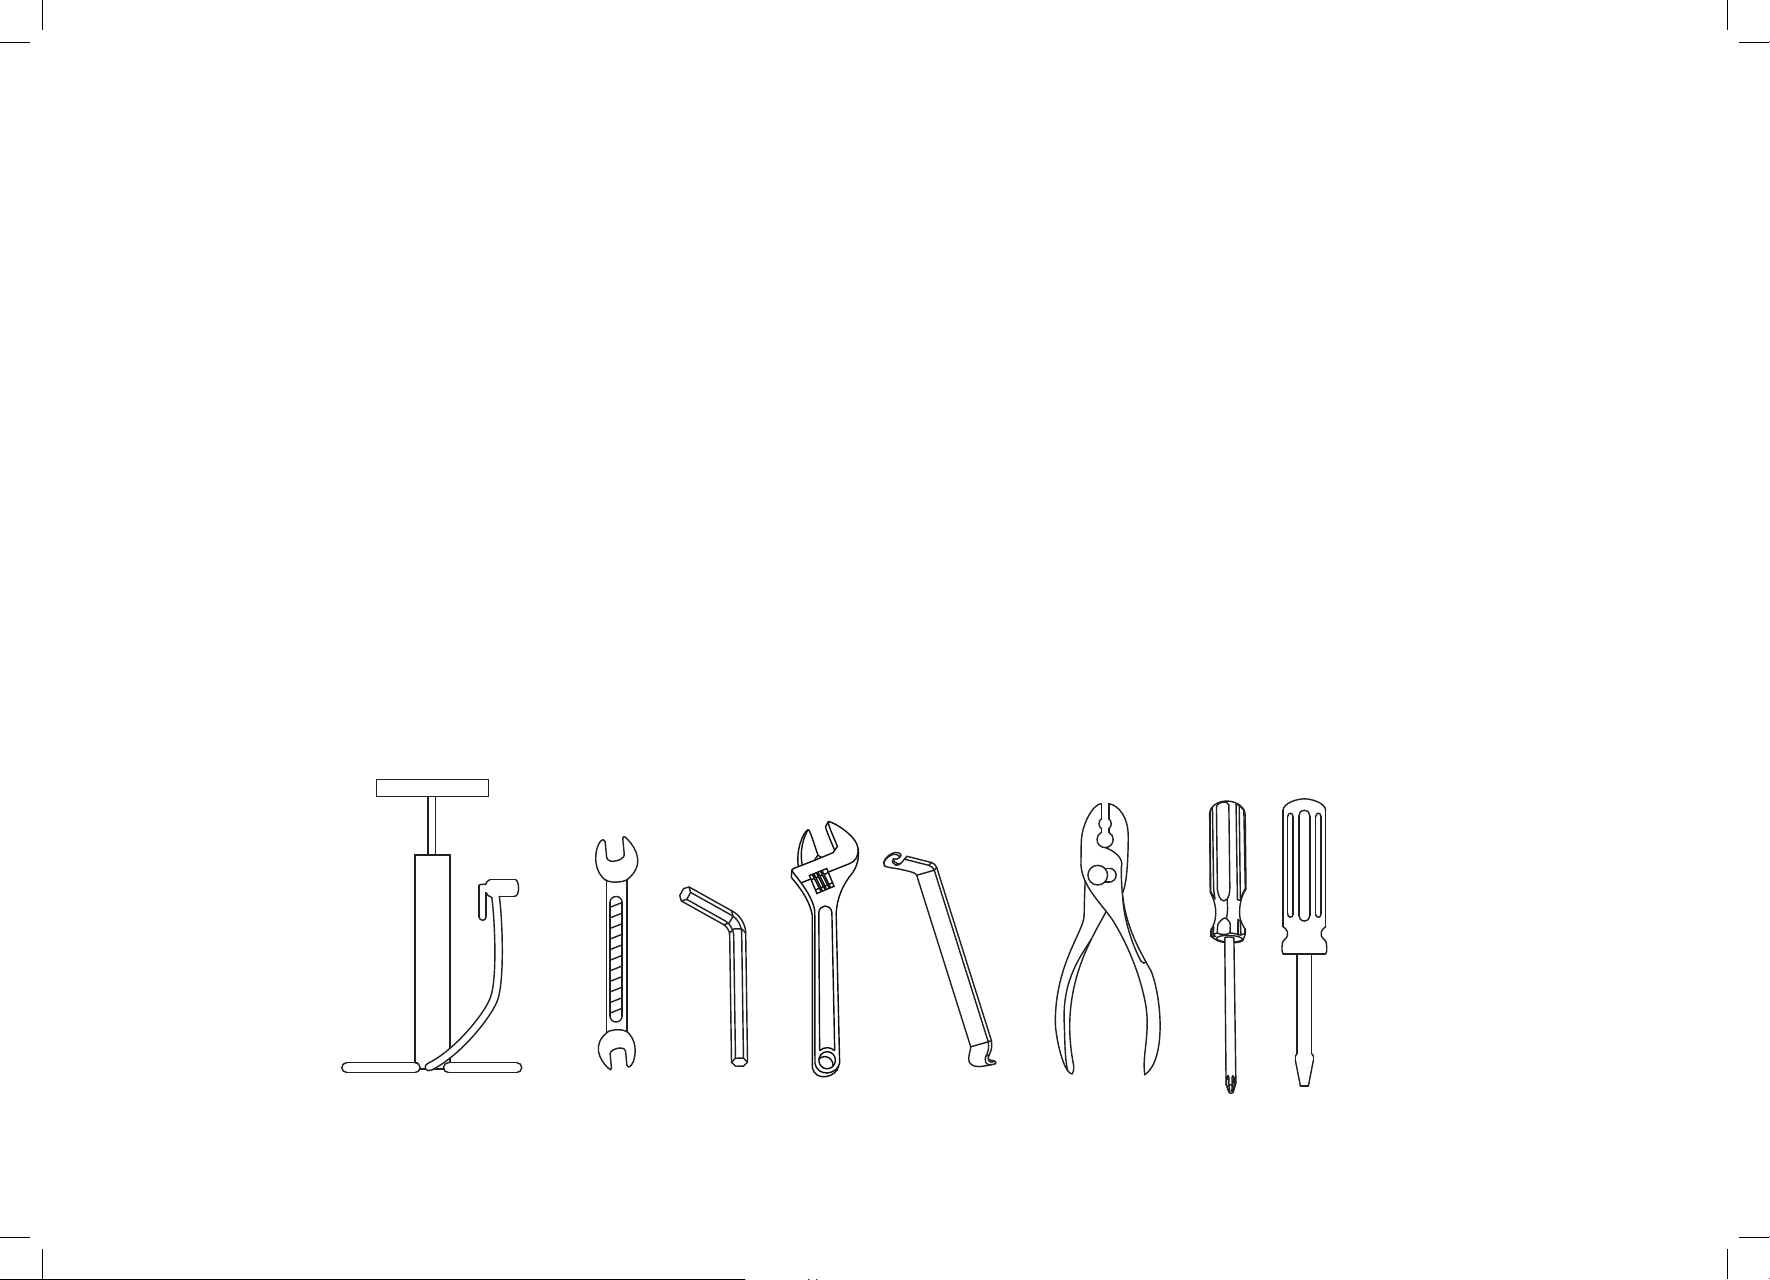
Tools needed
The following tools are needed to assemble your purchased bicycle.
Cross screwdriver Spanner
#5
DANGER! Failure to properly assemble and maintain your bicycle could
result in serious injury or death.
Allen wrenches
#4, #5, #6
Scissors
11
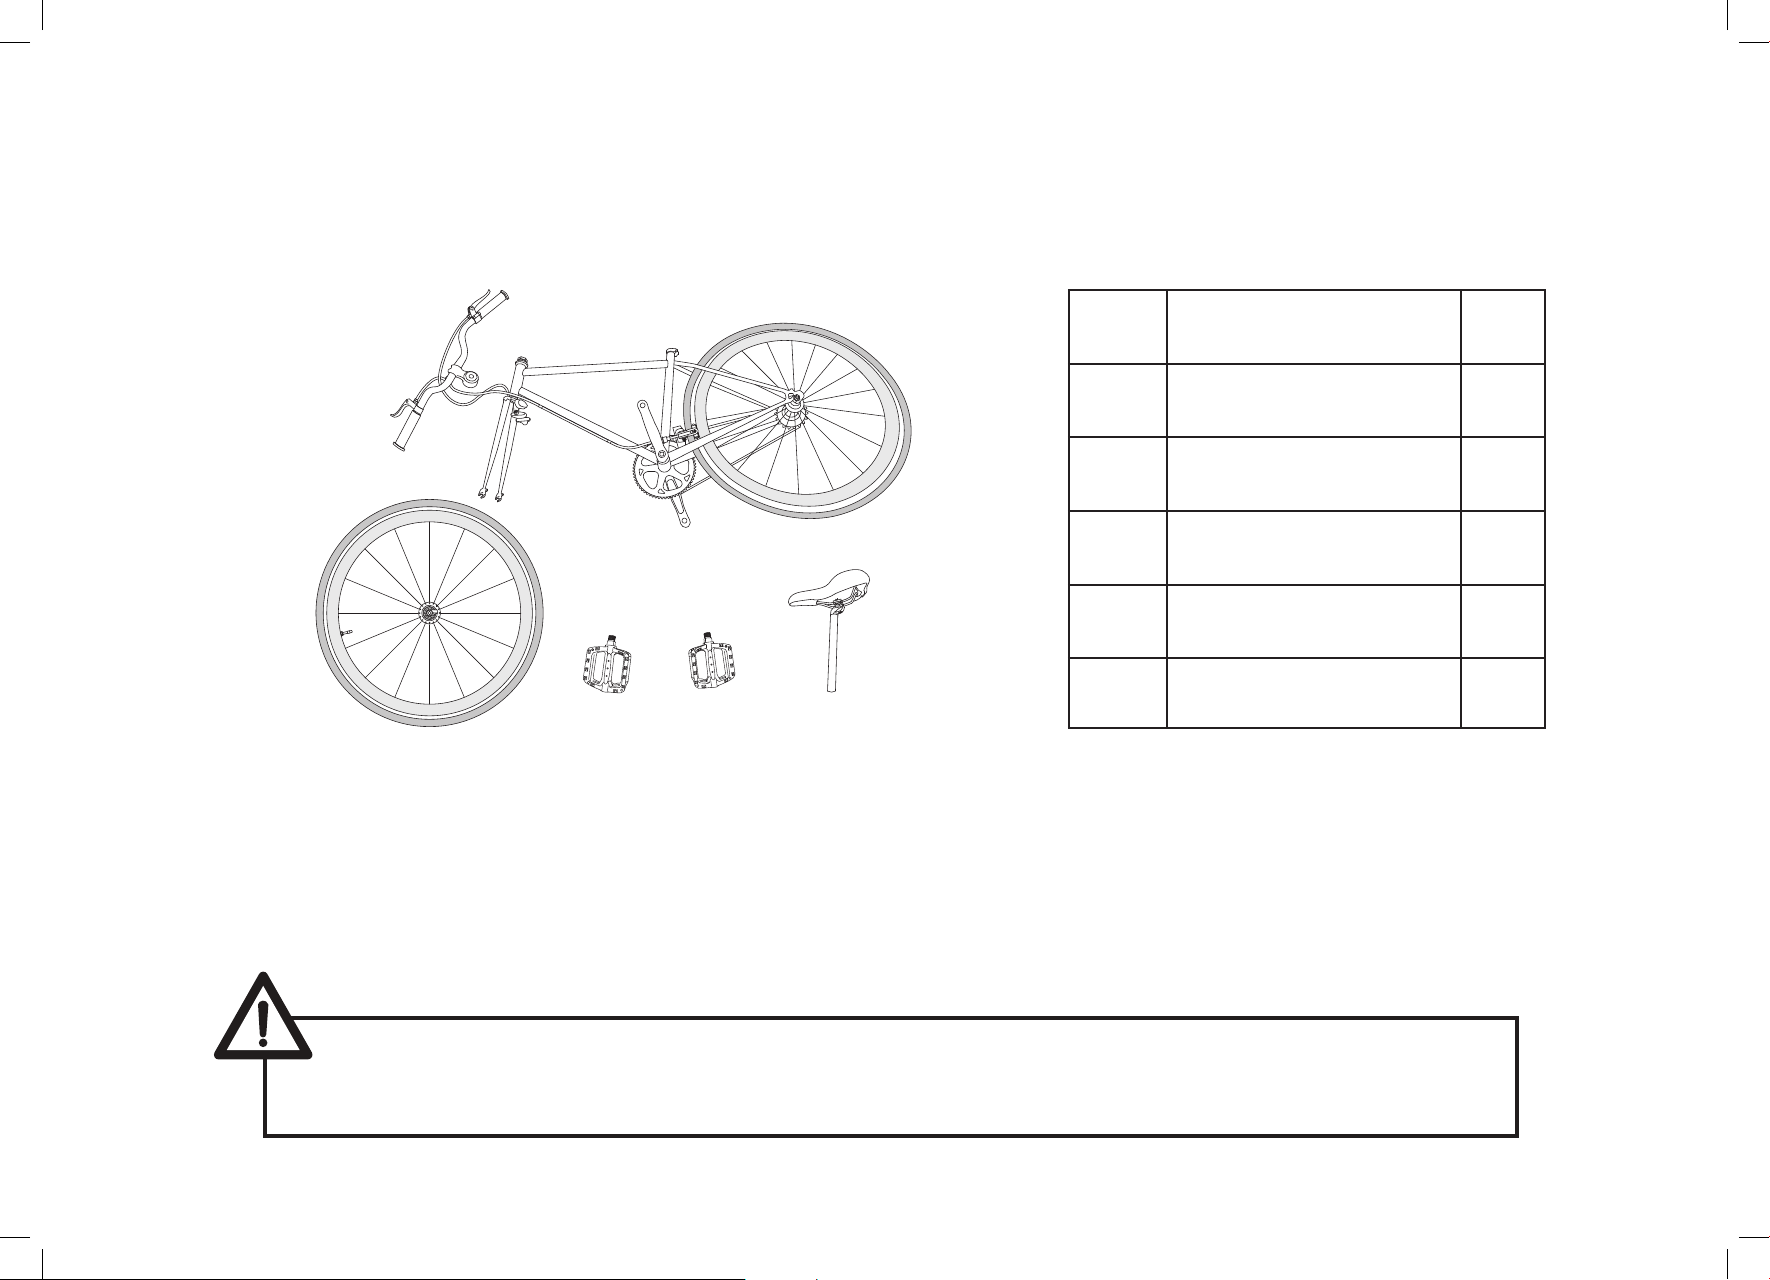
Unpacking
Code Component Qty
A
A Pre-assembled bicycle 1
B Front wheel 1
C Left pedal 1
B C D E
R
1. Remove all bicycle components inside the box.
2. Check and make sure no parts are loose or damaged.
3. Carefully remove the front wheel which is attached to the side of the bicycle for shipping.
4. Carefully remove all other packaging material from the bicycle. This includes zip ties, axle caps, and
materials protecting the frame.
R
D Right pedal 1
E Seat 1
12
CAUTION: The pre-assembled bicycle comes with the brakes already installed. Carefully
position the handlebar and the brake cables to avoid damaging the cables during assembly.
Do not disassemble the brakes or remove the brake cables.
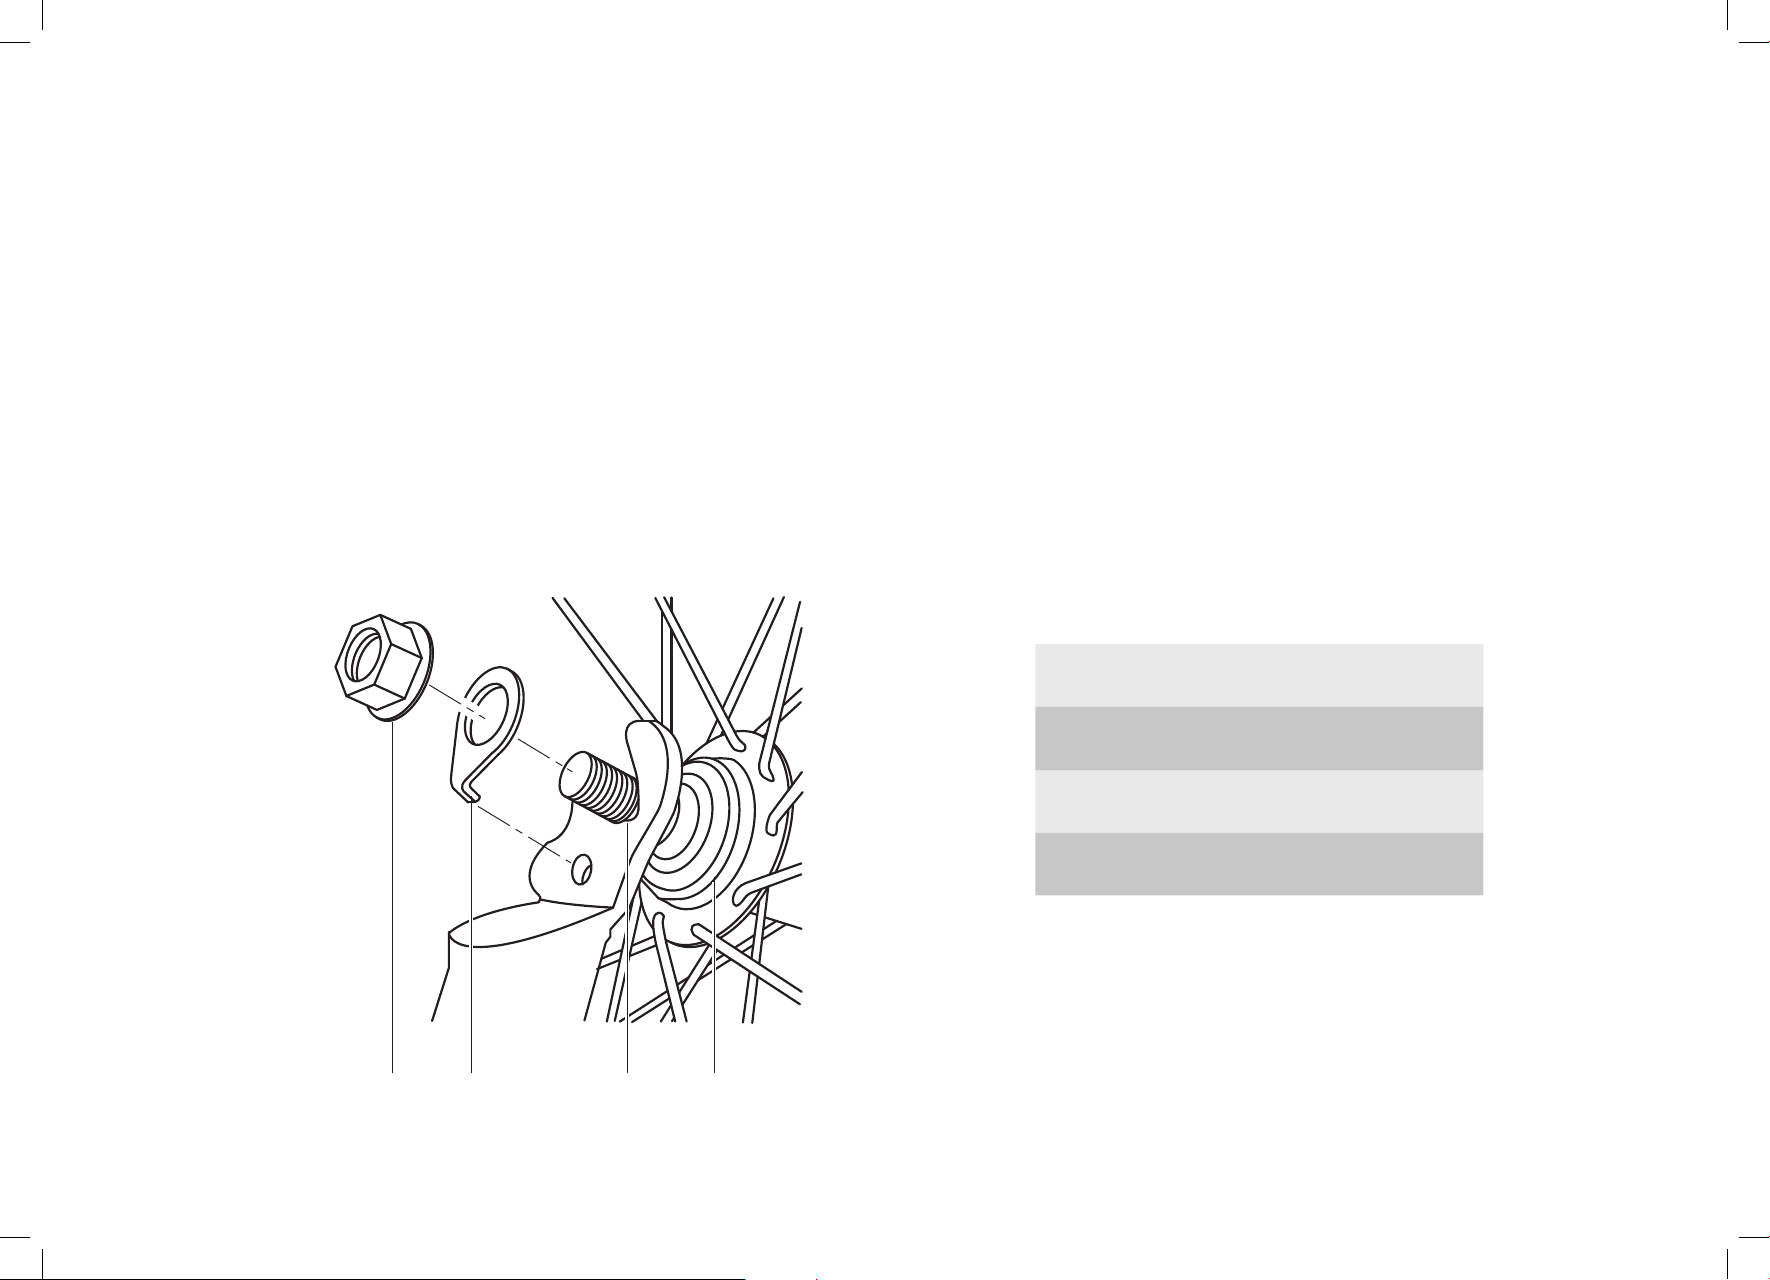
I. Installing the front wheel
1. Loosen the front wheel head nut / axle nut (1).
2. Place the bicycle in a position where the front fork
is facing upwards. Place the front wheel between
the fork allowing both wheel axles (3) to rest on the
fork.
3. Slide the L-shaped washer retainer (2) onto the
wheel axle and into the hold on the fork as shown
in the figure.
4. Centre the wheel (4) in the fork. Alternating between
sides, securely tighten the head nut / axle nut with a
spanner.
5. Spin the wheel (4) to check if the wheel is properly
centred and does not wobble. If the wheel is not
properly centred or if it wobbles, loosen the nuts and
realign.
Torque for the head nut / axle nut: 24–28 Nm
1. Head nut / axle nut
2. Washer retainer
3. Wheel axle
1 2
3
4. Front wheel
4
13

II. Installing the pedals
1. Take the pedal (1) marked “R” and position its axle into the
right crank arm. NOTE: The mark is found on the front face
of the axle.
2. Thread the pedal (1) onto the right crank arm (3) by turning
the pedal clockwise.
3. Once the axle is threaded all the way in, use a spanner to
securely tighten the nut (2) locking the pedal into place.
4. Take the pedal (4) marked “L” and position its axle into the
left crank arm (5).
5. Thread the pedal (4) into the left crank arm (5) by turning
the pedal counterclockwise.
6. Once the axle is threaded all the way in, use a spanner to
securely tighten the nut (2) locking the pedal into place.
NOTE: Pedals cannot be assembled into the wrong crank.
Ensure that each pedal goes into the correct crank by checking
the letter markings thoroughly before assembling. DO NOT
force a pedal into the wrong crank arm.
Torque for the pedal lock nut: 30 Nm
R
3
1
2
L
5
4
1. Right pedal
2. Nut
14
CAUTION: Make sure that you do not cross-thread the
pedals. Cross-threading will damage the threads in
the crank arm. If the pedal does not turn easily, do not
force it. Back the spindle out and start over.
3. Right crank arm
4. Left pedal
5. Left crank arm
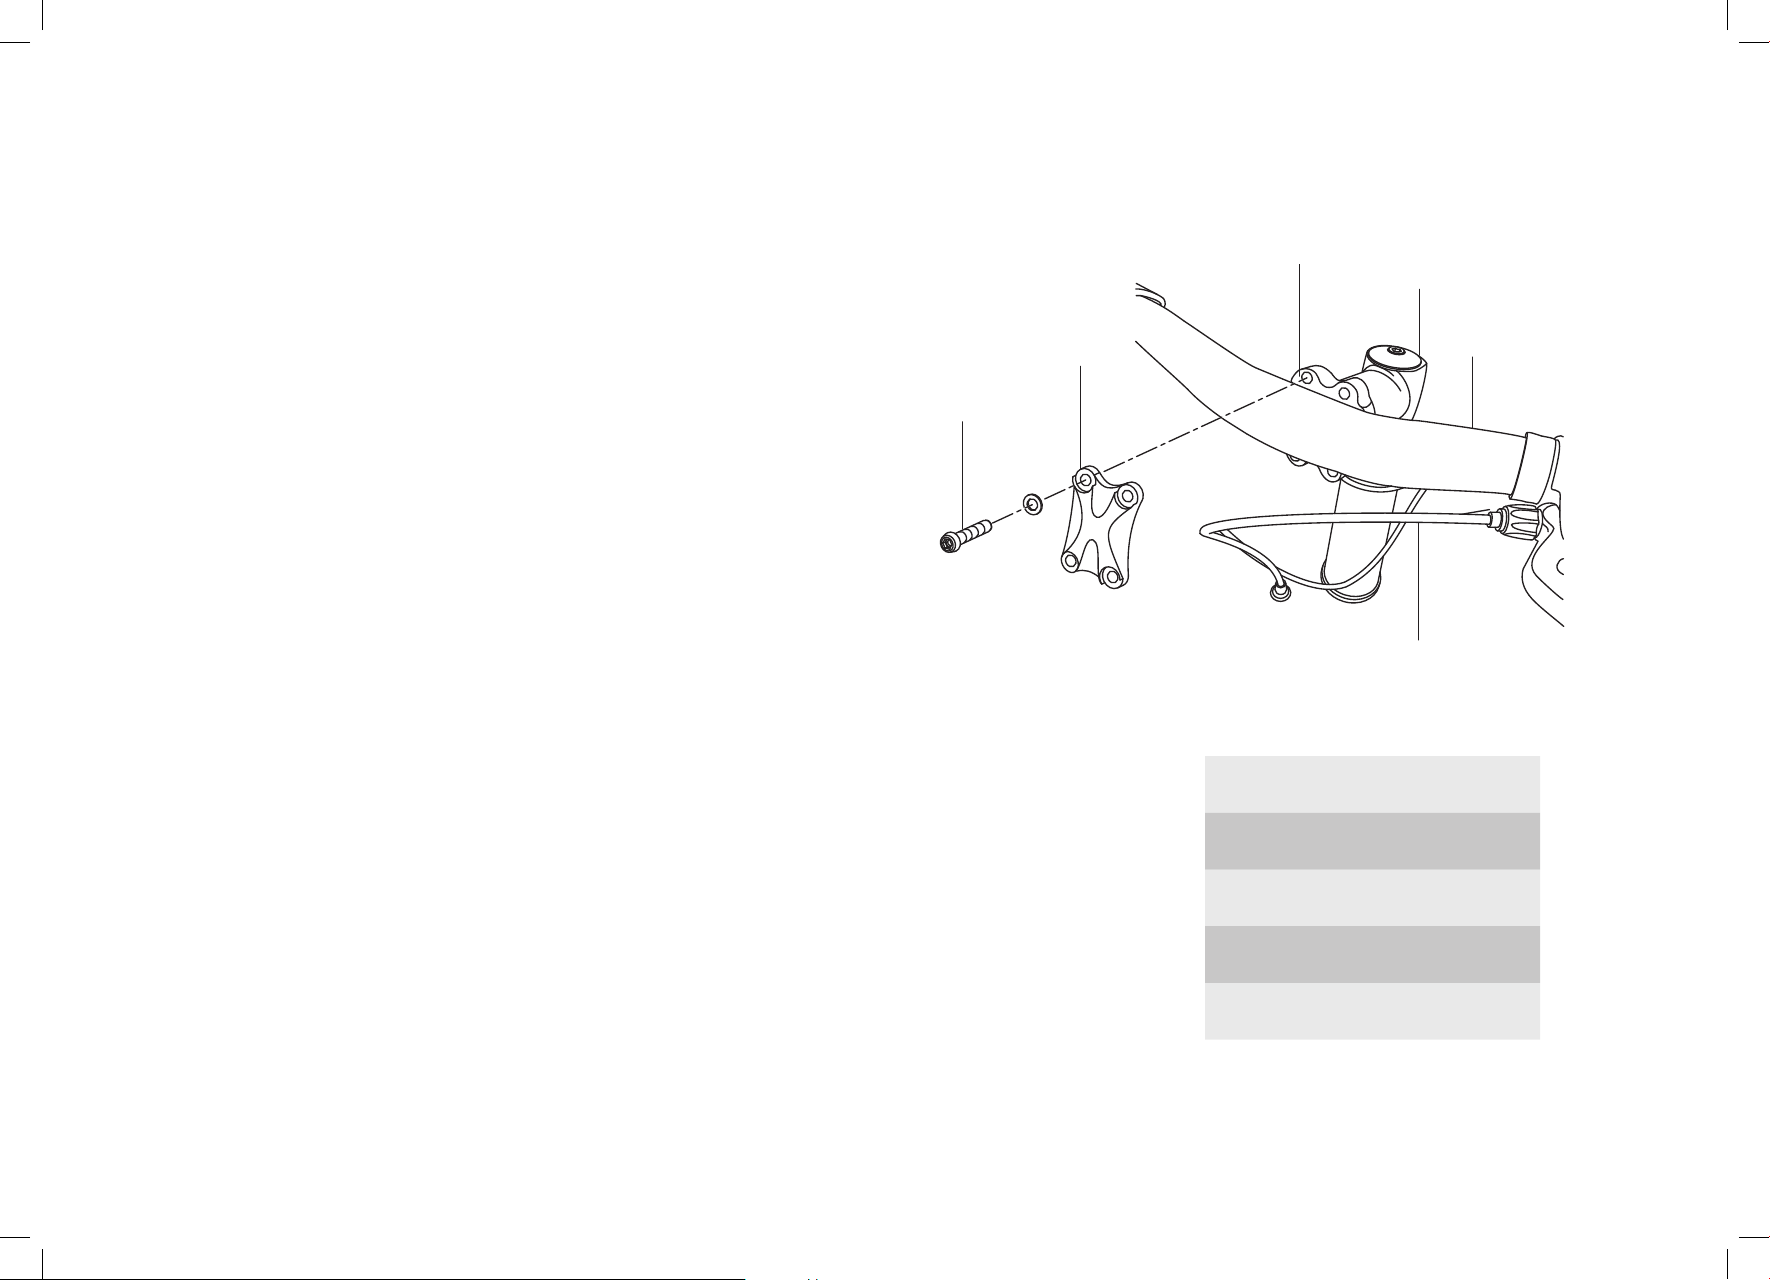
III. Installing the handlebar
1. Stand the bicycle upright with two wheels on the
ground. The front forks should be facing forward.
2. Use an allen wrench to loosen the 4 bolts (1) from
the handlebar clamp (2) on the stem (3).
3. Remove the bolts and washers (1) and the front half
of the clamp (2). Set them aside for later use.
4. Place the handlebar (4) onto the holder (2).
5. Rotate the handlebar (4) up or down so that the
brake levers are in line with your hand and arm for
easy use. Arrange the brake cables (5) in a way as to
not to interfere with the installation or steering of
the bicycle.
2
3
2
4
1
6. Reinstall the front half of the handlebar clamp (2)
and reinsert the bolts and washers (1).
7. Tighten the bolts (1) securely using an allen wrench.
Torque for the handlebar clamp bolts: 8 Nm
NOTE: Your bicycle comes with the front and rear brakes
already pre-assembled. Be familiar with the use of hand
brakes:
• Left lever for rear brake, right lever for front brake (UK)
• Right lever for rear brake, left lever for front brake (Europe)
A greater force is required to activate the rear brake due to
longer cable length.
5
1. Bolt and washer
2. Handlebar clamp
3. Stem
4. Handlebar
5. Brake cable
15
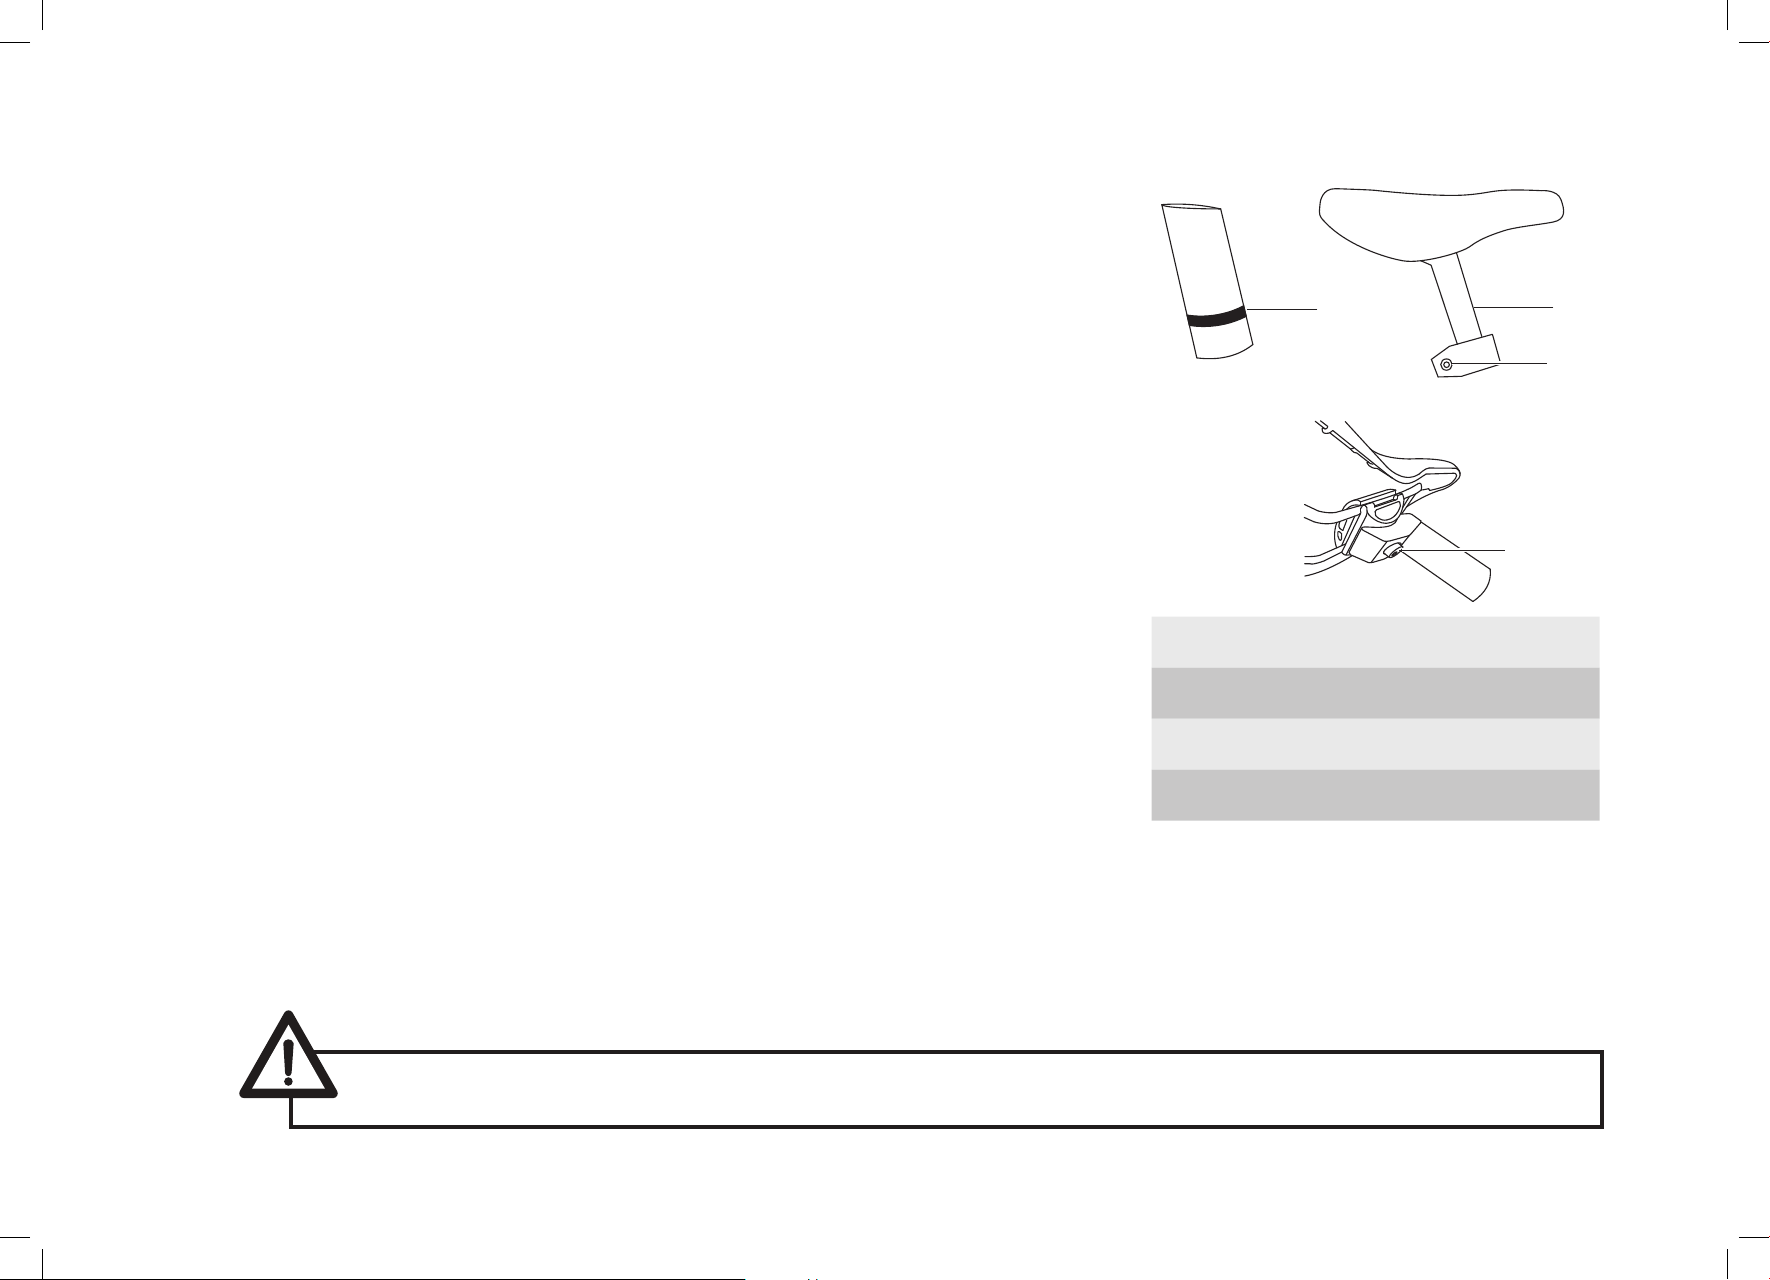
IV. Installing the seat
1. Insert the seat post (1) into the bicycle tube past the
minimum insertion line (4) indicated on the seat post. Loosen
the seat post clamp (2) using an allen wrench if necessary.
2. Tighten the seat post clamp (2) just enough to hold the seat
and follow the instructions for adjusting the seat height. See
“Bicycle size and fit” section for recommendations.
Adjusting the seat height
4
1
2
1. Pull the seat up or push the seat down to adjust the seat
height to your preference.
2. Using an allen wrench, tighten the seat post clamp securely
after adjustments are made.
Adjusting the arm reach
1. Loosen the adjusting bolt (3) underneath the seat.
2. Tilt the seat upward or downward to adjust the angle of the
seat to your preference. Push the seat forward or backward
to adjust the distance of the seat from the handlebar. Refer
to the calibrated line found on the seat’s bottom rails to fine
tune the angle and position of the seat.
3. After adjustments are made, tighten the adjusting bolt
securely with an allen wrench.
WARNING: Ensure that the seat is inserted past the minimum insertion line indicated in the seat
post. Failure to do so may cause the seat post or frame to break causing you to lose control and fall.
3
1. Seat post
2. Seat post clamp
3. Adjusting bolt
4. Minimum insertion line
Torque for the seat post clamp: 10 Nm
Torque for the saddle adjusting bolt: 17 Nm
16

(Optional) Flipping the rear wheel
This bicycle is equipped with a “flip-flop” or doublesided rear hub. A flip flop has sprockets or chain rings
on either side of the hub: a fixed gear on one side, and
a single freewheel on the other side.
By default, your bicycle uses the freewheel instead
of the fixed gear in order to make it easier to climb
hills and let you coast on descents. Should your needs
require you to use the fixed gear, perform the following
procedures to flip the wheel.
How to flip the rear wheel:
See figure on next page.
1. Loosen and remove the axle nuts (7) on both sides
of the rear hub (5).
2. Remove the rear wheel. Slide the wheel forward in
order to dislodge its axles (8) from the frame dropouts (2).
3. Slip the chain (3) off the freewheel (4).
6. Reinstall the rear wheel by sliding its axles into the
frame drop-outs (6). Ensure that the chain (2) is
tight.
7. Reinstall the axle nuts (7) and tighten securely.
WARNING: Be sure to use the front and rear
brakes of the bicycle when the freewheel
is being used.
See the “Chain and chain wheel” section under “Maintenance” for information on proper adjustment of the
chain after installment.
4. Flip the rear wheel 180° degrees relative to the rear
hub so that the fixed gear ring (6) is now on the
right (chain) side.
5. Slip the chain (3) on the fixed gear ring (6).
17
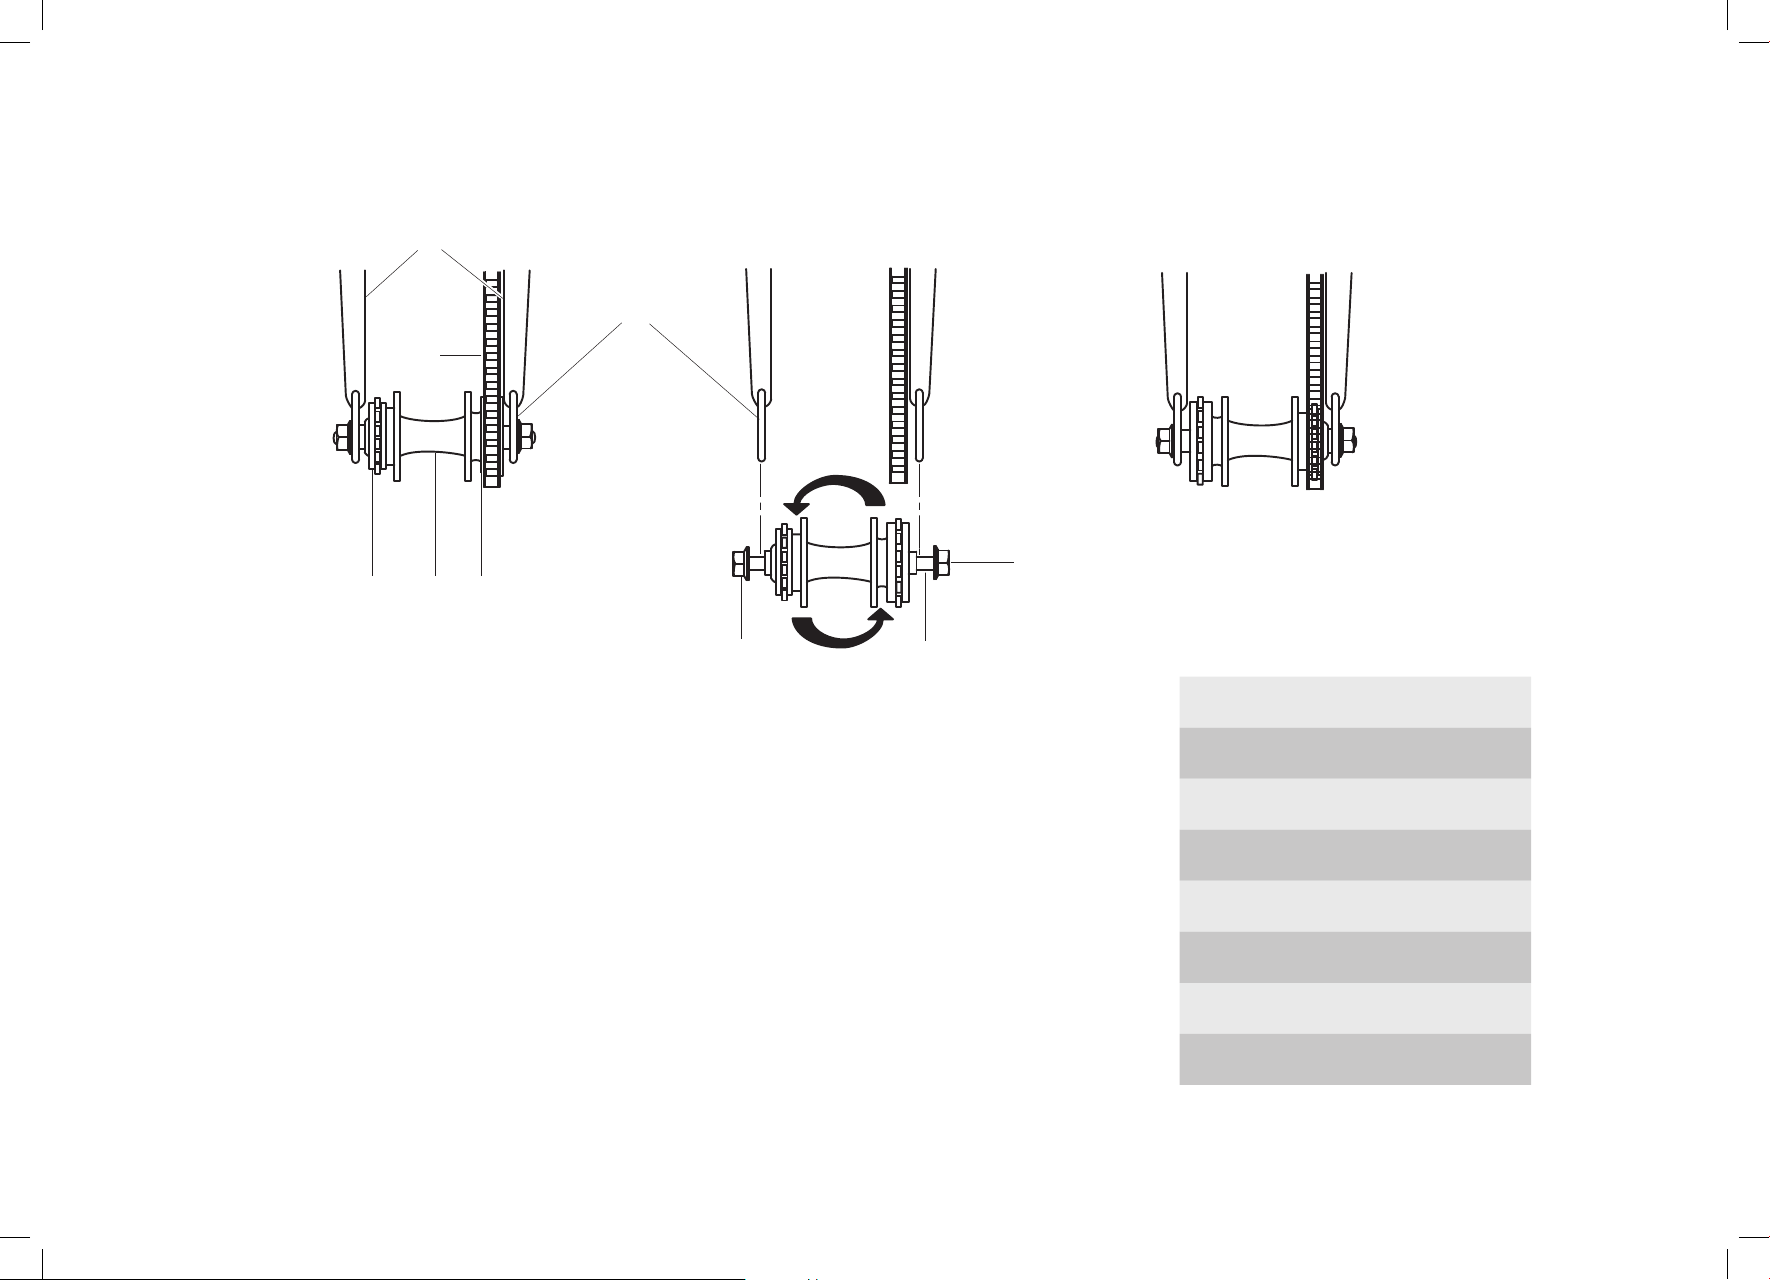
3
1
2
7
4
56
18
7
8
1. Seat stays
2. Drop-outs
3. Chain
4. Freewheel
5. Rear hub
6. Fixed gear ring
7. Axle nut
8. Axle
Reflectors
Your bicycle may be supplied with one front (white), one rear (red), two wheel (white) reflectors,
and four pedal (orange) reflectors.
Reflectors are an important safety and legal requirement and should be securely attached and in
good condition at all times. Periodically inspect all reflectors, brackets, and mounting hardware
for signs of wear or damage. Immediately replace anything damaged.
Some bicycles will require you to install reflectors onto the bicycle. Refer to the following sections
for instructions on installing bicycle reflectors.
WARNING: Reflectors are important safety devices which are designed as an integral
part of your bicycle. Regulations require every bicycle to be equipped with front, rear,
wheel, and pedal reflectors. These reflectors are designed to pick up and reflect street
lights and car lights in a way that helps you to be seen and recognized as a moving
bicyclist. Check reflectors and their mounting brackets regularly to make sure they are
clean, straight, unbroken, and securely mounted. Have your dealer replace damaged
reflectors and straighten or tighten any that are bent or loose.
19
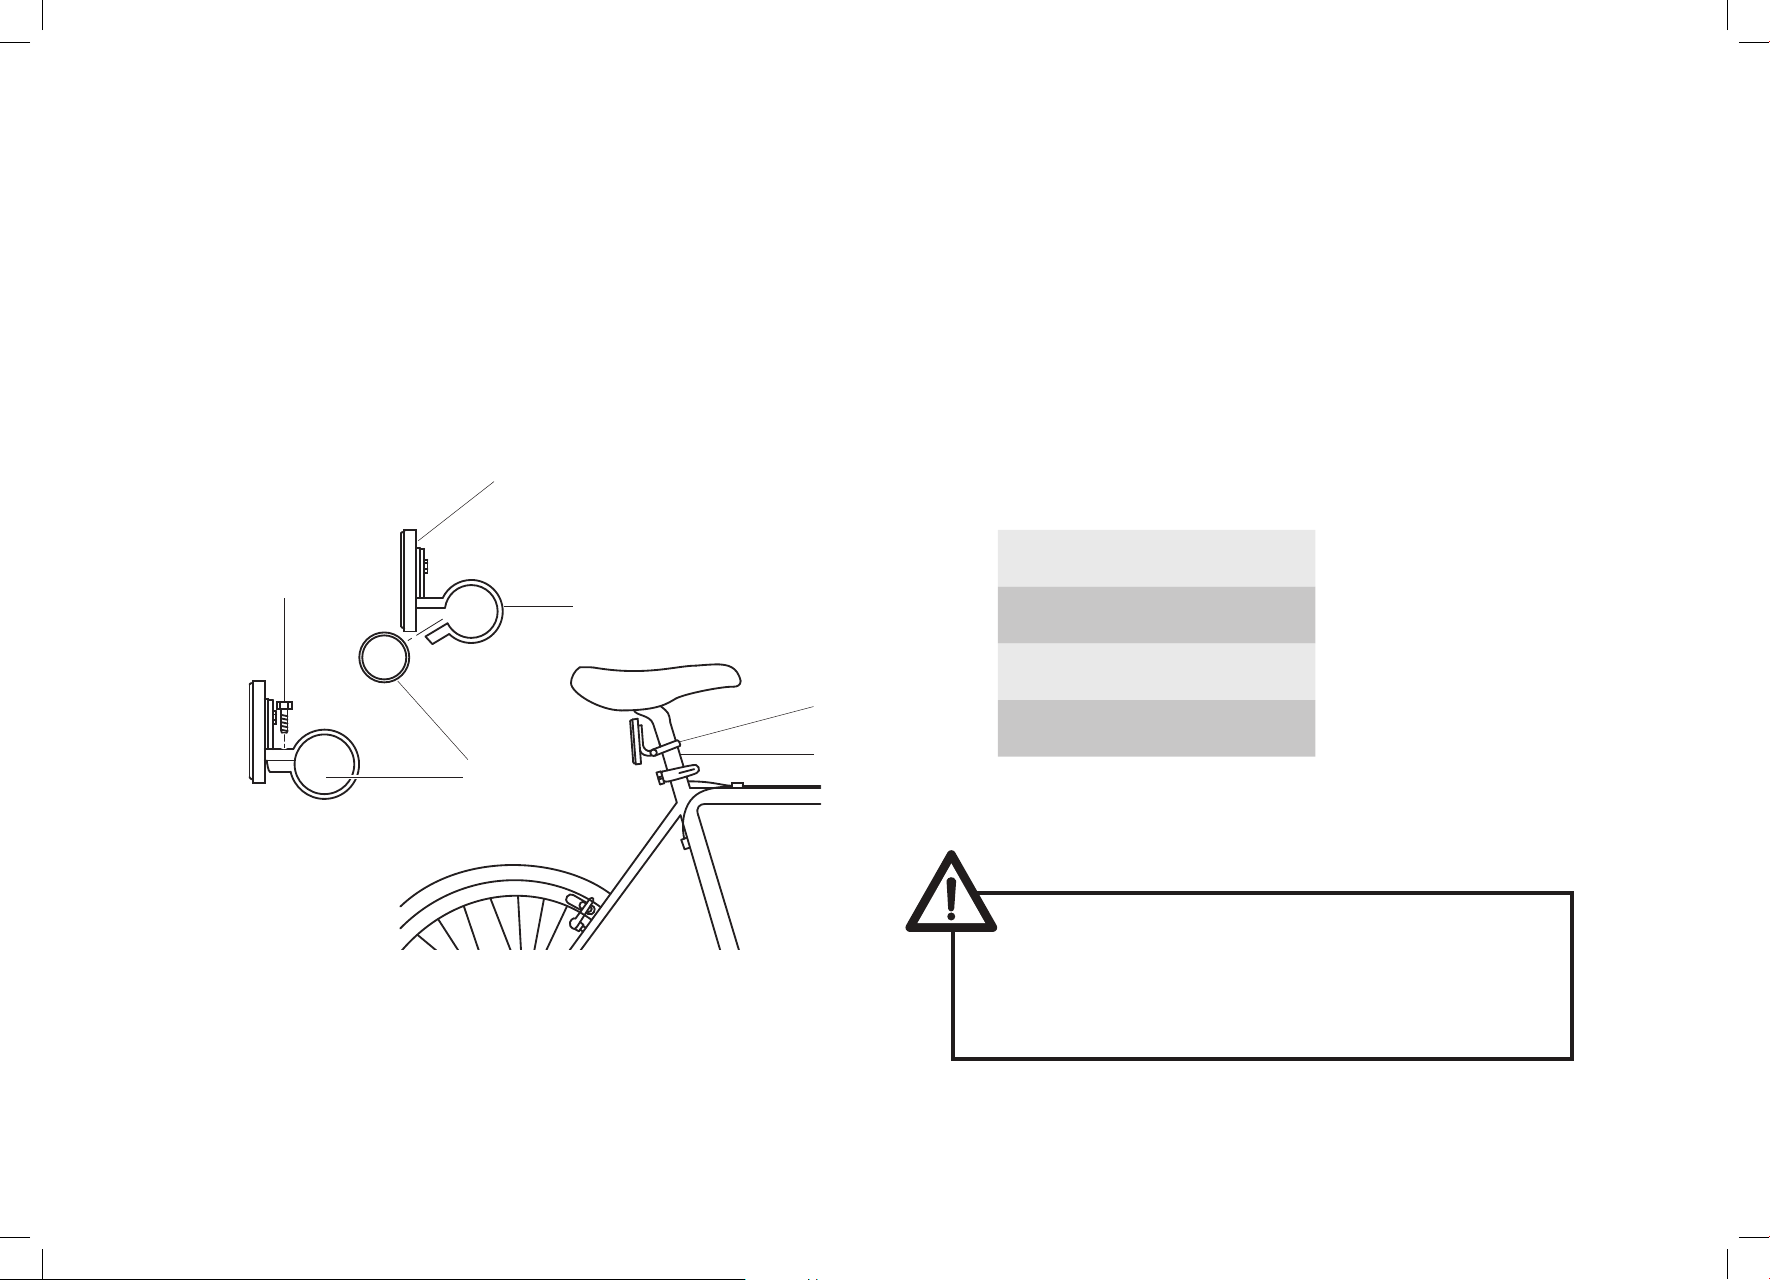
Installing a front mount reflector on the handlebar
1. Loosen and remove the bracket screw (2) from the plastic bracket (4).
2. Install the plastic bracket loop (4) onto the handlebar tube.
3. Position the plastic bracket (4) on the handlebar (3) between the grip and the crossbar, about 12.7 cm
from the end of the handlebar.
4. Tighten the bracket screw (2) securely. If the bracket is still loose, insert a shim inside to make it tight.
4
3
1
2
1. Reflector
2. Bracket screw
3. Handlebar
4. Plastic bracket
CAUTION: Ensure that the reflector is
vertical to the ground and facing straight
forward. If the reflector is aimed up or
down, incoming headlights may not
reflect properly on the reflector.
20
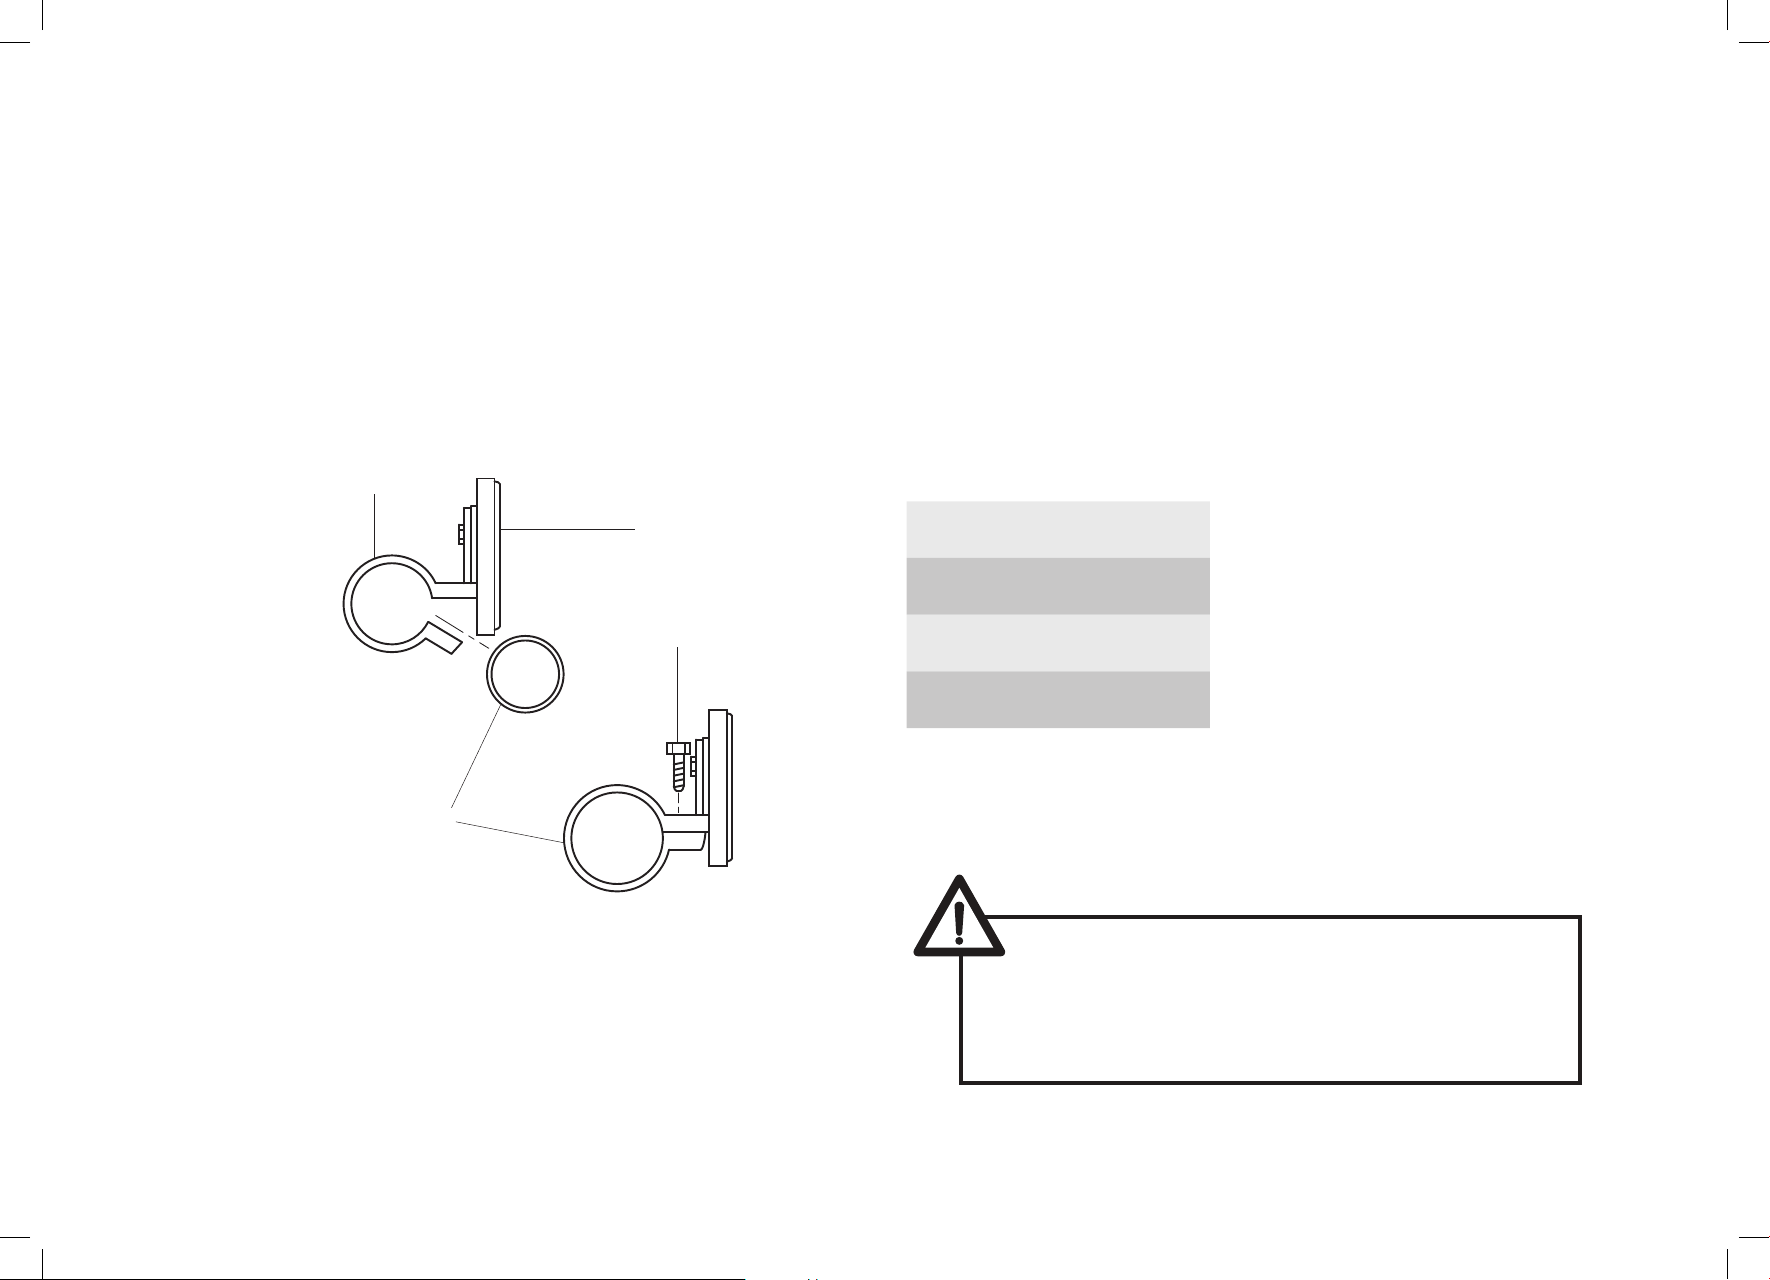
Installing a rear reflector on the seat post
1. Loosen and remove the bracket screw (1) from the plastic bracket (3).
2. Loop the plastic bracket (3) around the seat post (4).
3. Begin to tighten the bracket screw (1) just enough to hold the reflector (2) in place. Adjust the reflector so that it
is in an upright position. Make sure the reflector is facing away from the bicycle.
4. Tighten the bracket screw (1) securely. If the bracket (3) is still loose, insert a shim inside to make it tight.
2
1
1. Bracket screw
3
2. Reflector
3. Plastic bracket
3
4. Seat post
4
4
CAUTION: Ensure that the reflector is
vertical to the ground and facing straight
forward. If the reflector is aimed up or
down, incoming headlights may not
reflect properly on the reflector.
21
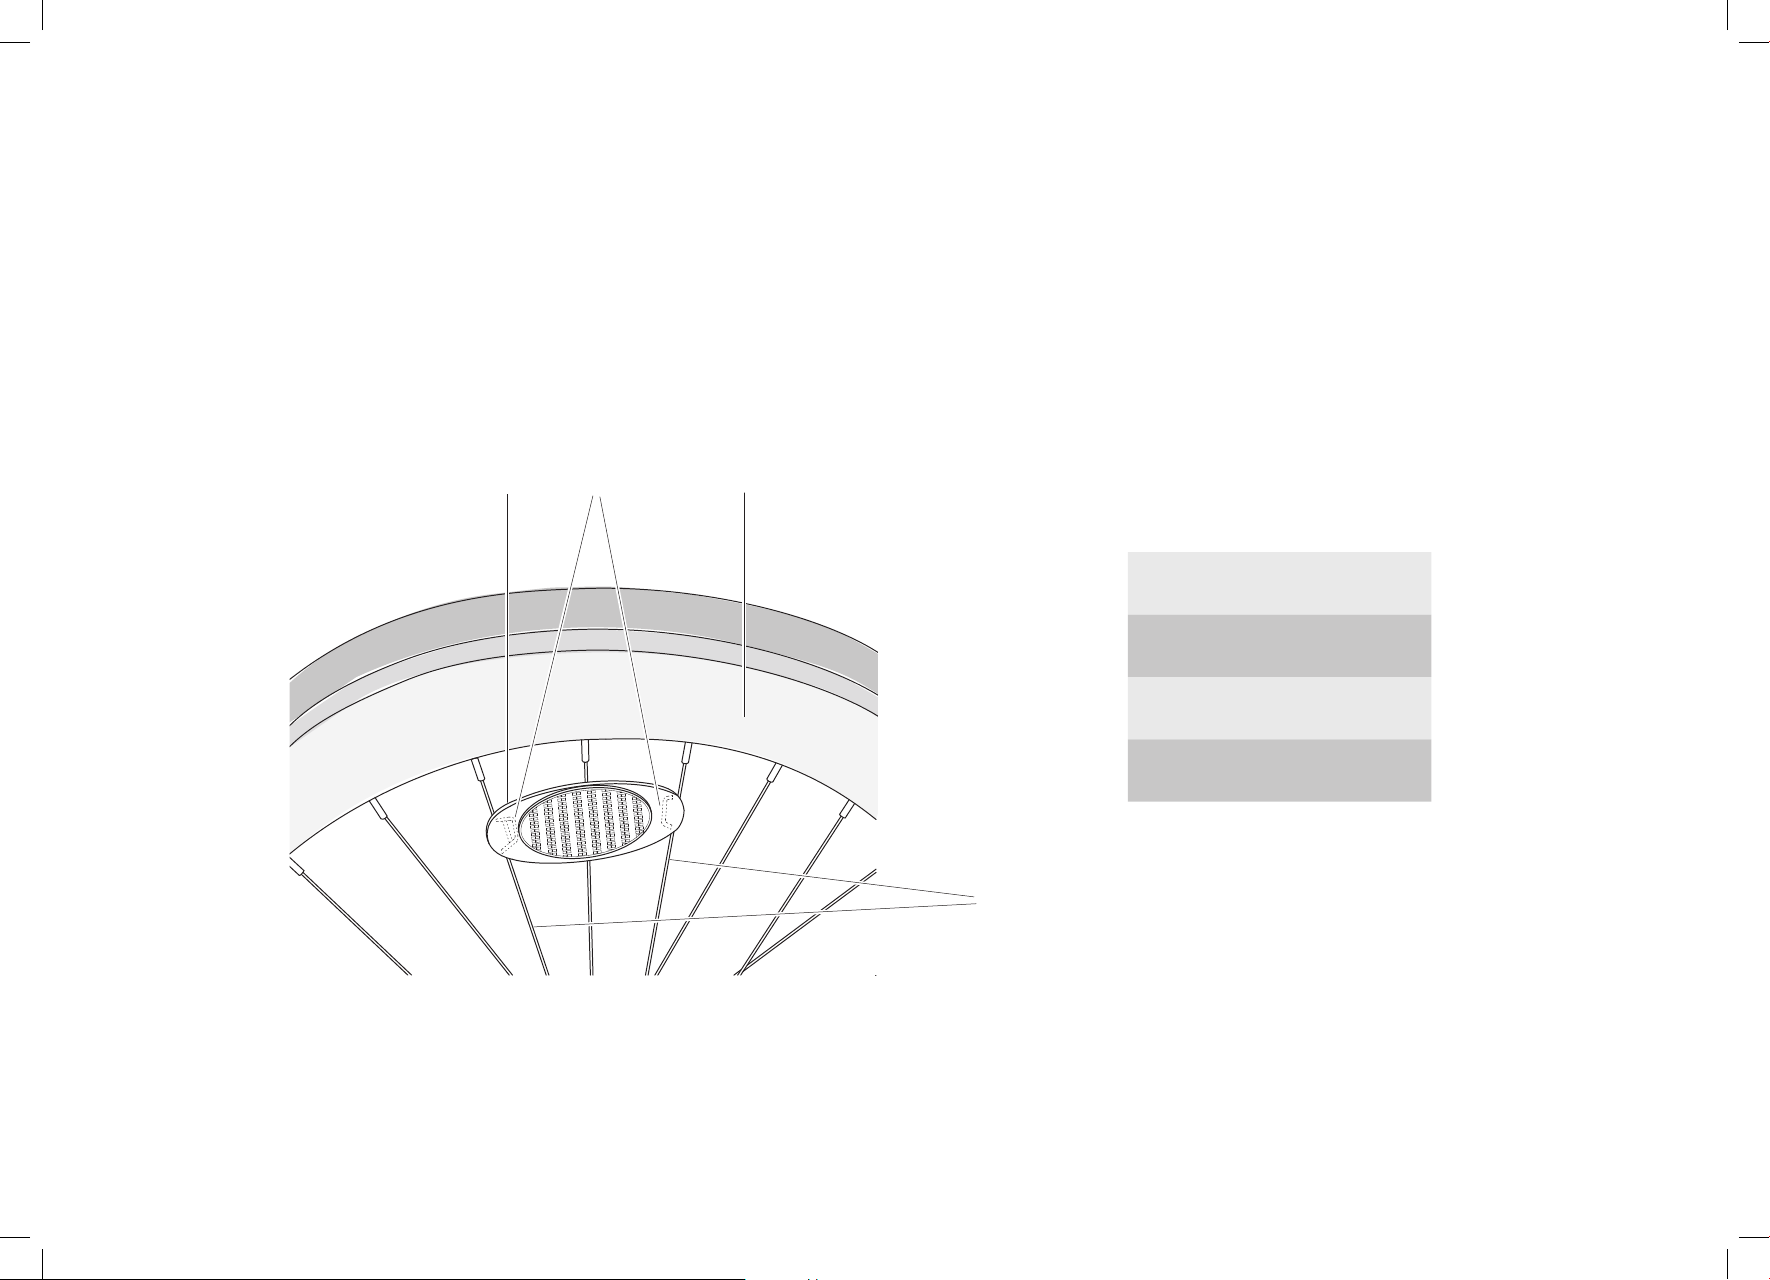
Installing spoke mount wheel reflectors
1. Position the reflector (1) near the hub of the wheel and align both ends of the reflector to the
spokes (4). Make sure that the spokes clip into the brackets (2) located on both ends of the reflector.
2. Gradually push the reflector (1) towards the rim (3) until the reflector is firmly held in place by the
tension from the spokes (4) at either side of the reflector.
3. Repeat steps 1 and 2 when installing a spoke mount wheel reflector on the other wheel.
1
32
1. Reflector
2. Brackets
3. Rim
4. Spokes
4
22

Maintenance
General care
• For painted frames, dust the surface and remove any
loose dirt with a dry cloth. To clean, wipe the bicycle
with a damp cloth soaked in water and mild detergent.
Dry with a cloth and polish using car or furniture wax.
• Use an anti-rust fluid to wipe chrome plated bicycles
and/or parts.
• Use soap and water to clean plastic parts and rubber
tyres.
• Wash your bicycle frequently and wipe or spray all
unpainted parts with anti-rust fluid. Make sure that the
wheels dry completely so that braking performance is
not affected.
• If exposed to rain, dry your bicycle completely and
apply anti-rust treatment to prevent accelerated
deterioration of the bearings.
• Use touch up paint or clear nail polish on scratched or
chipped paint to prevent rust.
• Regularly clean and lubricate all moving parts, tighten
components and make adjustments as required.
• To minimize rust, use BED, SATIN, or TITANIUM surface
treatments.
• Components will wear out eventually and will need
replacing. This is normal and is not covered by any
guarantee or warranty.
substitute presents a great risk to your safety and can
shorten the life of the bicycle.
Storage
• Keep your bicycle in a dry location away from inclement
weather and direct sun exposure. Ultraviolet rays may
cause the paint to fade, and rubber and plastic parts to
crack.
• Before storing your bicycle for a long period of time,
clean and lubricate all components and wax the frame.
Deflate the tyres to half pressure and hang the bicycle
off the ground.
• Do not store the bicycle near electric motors. Ozone
emissions may affect the rubber and paint.
• Do not cover the bicycle with plastic and other material.
Moisture can accumulate and cause rusting.
Security
• Keep a record of the bicycle’s serial number located
on the frame underneath the bottom bracket. See the
beginning of this manual for more information.
• Register the bicycle with the local police.
• Invest in a high quality bicycle lock that can resist
hacksaws and bolt cutters. Always lock your bicycle to
an immovable object when it is left unattended.
• When replacing components, use only original
components for the bicycle. The use of any other
23
Component maintenance
Tools needed for maintenance:
1. Spanner or ring spanner set: 8 mm, 9 mm, 10 mm,
12 mm, 13 mm, 14 mm, 15 mm
2. Pedal spanner 15 mm
3. Allen key wrenches: 4 mm, 5 mm, 6 mm, 8 mm
4. Adjustable spanner
5. Standard flat head screwdriver
6. Standard Phillips head screwdriver
7. Standard slip joint pliers
8. Tyre pump
9. Tube repair kit
10. Tyre levers
Suggested travel tools
The following items should be useful when going on a
long bicycle ride:
1. Spare tube
2. Patch kit
3. Pump
4. Tyre levers
5. Multi-tool
6. Cell phone or change for a pay phone
24
Hand brakes
Maintenance for brakes:
• Keep the wheel rims and the brake pads clean and
free of wax, lubricant, and dirt at all times.
• Keep brakes properly adjusted and in good working
condition at all times.
4. If one pad is closer to the rim than the other, loosen
the lock nut (3) at the back of the brake. Squeeze
the brake lever to hold it centred, and then re-tighten the lock nut (3).
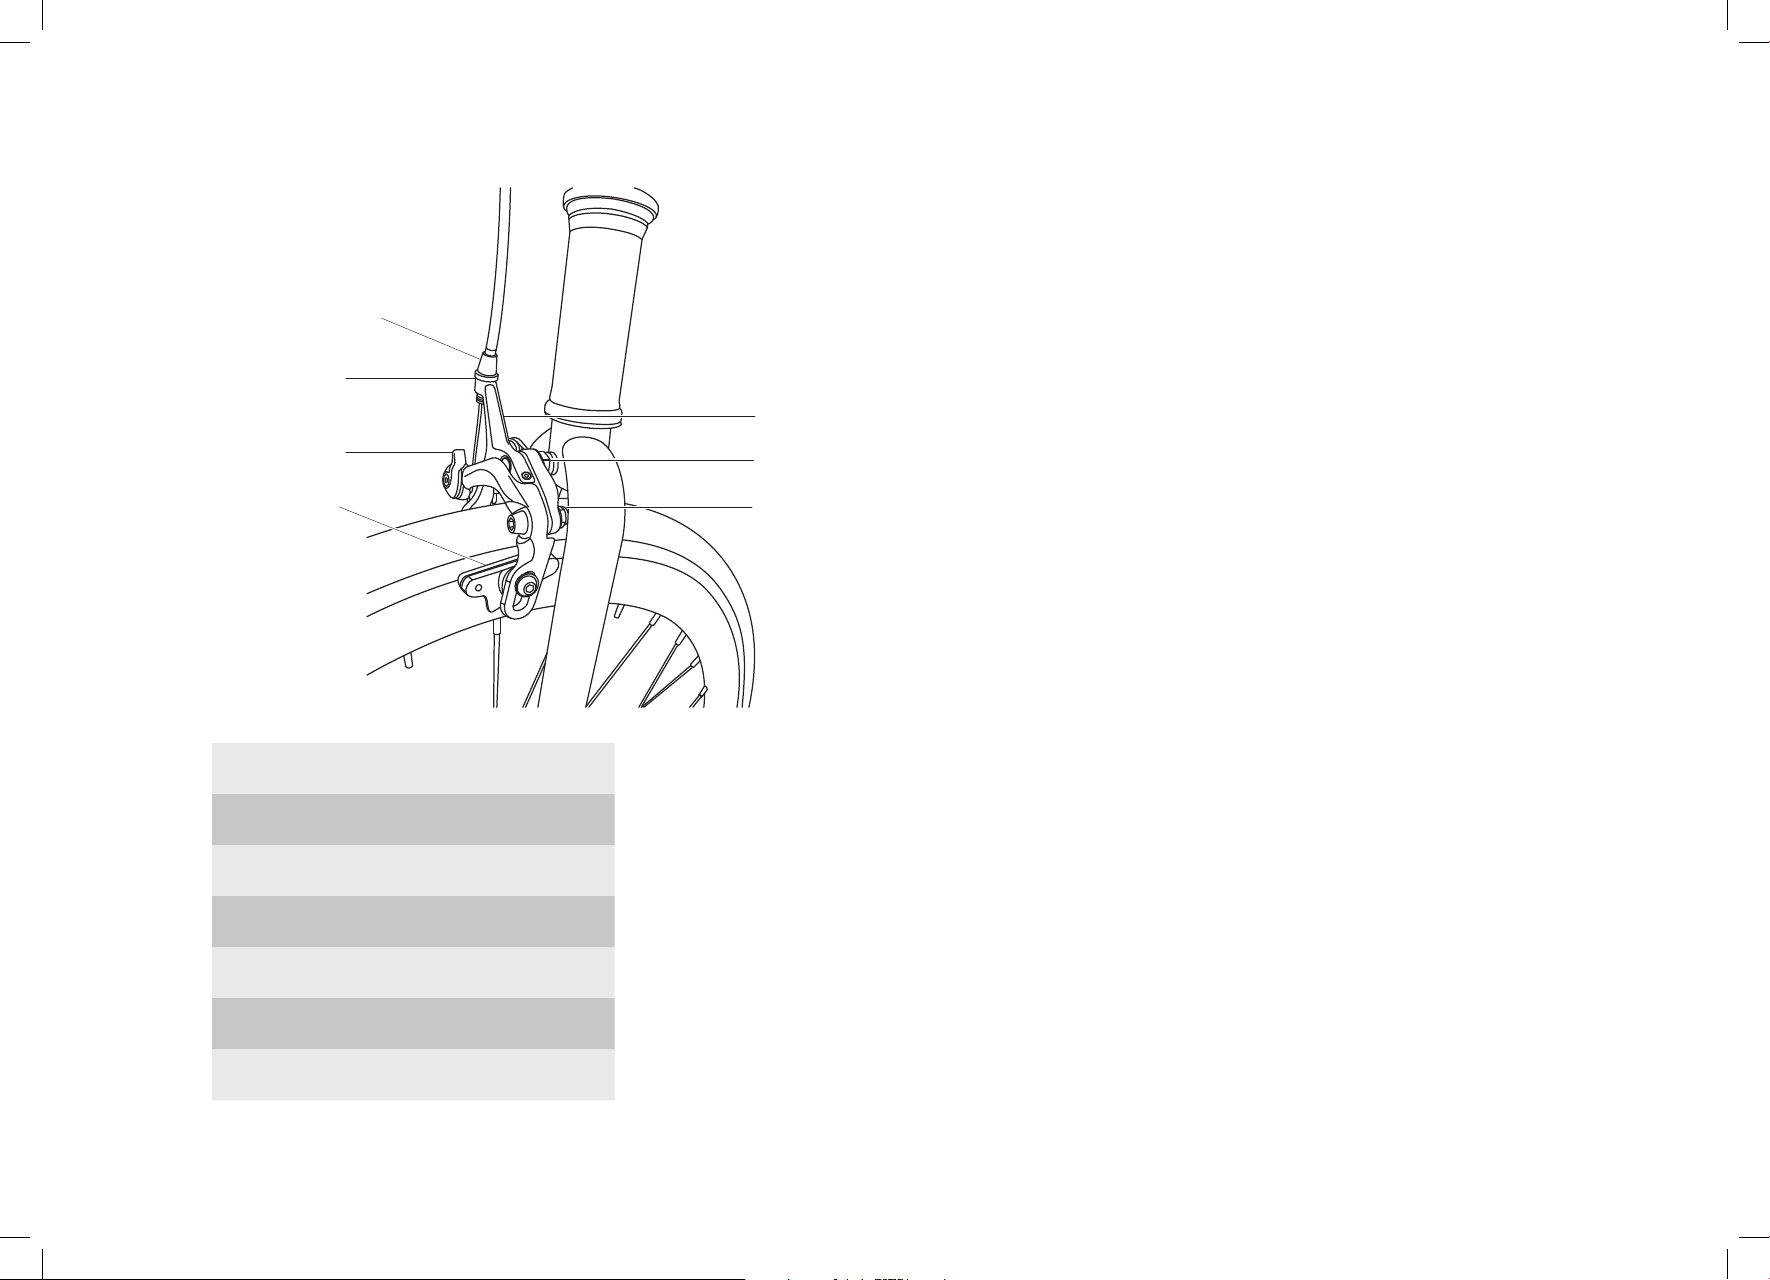
Caliper brakes
You can do some minor brake adjustments using the
cable adjusting barrel. To adjust the front and rear
brake calipers, follow these steps:
1. Squeeze the brake pads (5) against the rim.
2. Loosen the lock nut (7) and then turn the cable adjusting barrel (1) shown in the figure.
3. Check the brake pad (5) clearance. It should be
maximum of 2 mm from the rim.
4. Re-tighten the lock nut (7).
If it is not possible to set the brake pads close enough
to the rim, you may have to adjust the cable length. Do
the following procedure.
1. Screw the cable adjusting barrel 3/4 of the way in.
2. Squeeze the pads against the rim, open the quick
release lever (6) and then pull the brake cable
through using pliers.
WARNING: Ensure the brake fixing nut is
properly tightened. Failure to do this may
cause the brake assembly to dislodge from
the fork.
Most side-pull calipers also have a centring adjustment
bolt (4) that enables you to properly centre the caliper
over the rim. Make sure that there is an equal distance
between the brake pad and the rim on both sides of
the wheel. Also make sure that the brake pads themselves are properly adjusted. The pads should contact
the rim so that it is centred from top to bottom on the
rim surface. The distance between the top of the pad
and the top of rim should be no less than 1 mm to ensure that the brake pad does not contact the tyre in
any way.
3. Close the quick release lever (6) and the squeeze
the corresponding brake lever on the handlebar to
test. Fine tune using the cable adjusting barrel (1).
WARNING: Do not ride a bicycle that is not
operating properly.
25
Wheels
Wheel inspection:
1
7
6
1. Cable adjusting barrel
2. Brake arm
The wheels of the bicycle should be kept in top
condition. Properly maintaining your bicycle’s wheels
ensures good braking performance and stability when
riding. Be aware of the following potential issues:
2
3
45
• Dirty or greasy rims
CAUTION: Dirt and/or grease can render your brakes
ineffective. Do not clean rims with oily or greasy materials. When cleaning, use a clean rag or wash with soapy
water, and then rinse and air dry. Avoid riding when the
rims are wet. When lubricating your bicycle, don’t get
oil on the rim surfaces.
• Cracked or thinning rims
Traditional rim brake systems work by creating friction
between the rim and the brake pad when the rider
applies the brakes. This friction, plus the introduction of
dirt, grease, sand and other contaminants between the
rim and brake pad, will eventually cause the outer wall
of the rim (braking surface) to wear thin.
26
3. Brake assembly lock nut
4. Centring adjustment bolt
5. Brake pad
6. Quick release lever
7. Lock nut
WARNING: In extreme conditions, the thin outer wall
can crack and fail, resulting in possible injury to the rider. Inspect the outer walls of the rims regularly. Contact
a professional bicycle mechanic if cracks or other damages are found.
• Wheels not straight
Lift each wheel off the ground and spin them to see if
they are crooked or out of alignment. If the wheels are
not straight, contact a professional bicycle mechanic
for repair and/or adjustment.
• Broken or loose spokes
Check for missing or damaged spokes. Make sure that
all the spokes are tight.
CAUTION: Damaged or missing spokes render the
bicycle unstable and can result to an accident if not
corrected. Contact a professional bicycle mechanic for
repair immediately.
• Loose hub bearings
Inflating the tyre to near maximum recommended
pressure gives the lowest rolling resistance; but produces the harshest ride. High pressures work best on
smooth, dry pavement. Low pressures, the minimum of
the recommended pressure range, give the best performance on smooth, slick terrain such as hard-packed
clay, and on deep, loose surfaces such as deep, dry
sand.
Tyre pressure that is too low for your weight and the
riding conditions can cause tube puncture by allowing
the tyre to deform sufficiently so that the inner tube is
pinched between the rim and the riding surface.
Lift each wheel off the ground and move the wheel
from side to side. CAUTION: If there is movement be-
tween the axle and the hub, do not ride the bicycle.
Adjustment is required.
Tyres and tubes
Tyre pressure
Bicycle tyres loose pressure over time. For this reason it
is important to check your tyre pressure before riding
your bicycle. It is recommended to inflate the tyres
using a manual bicycle pump.
CAUTION: Pencil type automotive tyre gauges can
be inaccurate and should not be relied upon for
consistent, accurate pressure readings. Use a high
quality dial gauge instead.
Tyre pressure is given either as a maximum pressure or
as a pressure range. How a tyre performs under different terrain or weather conditions depends largely on
the tyre pressure.
Recommended PSI rating for tyres:
See side wall of tyre
WARNING: Never inflate a tyre beyond its
recommended maximum pressure. Exceeding the recommended maximum pressure
may blow the tyre off the rim which could
cause damage to the bicycle and injury to
the rider and others. The best way to inflate
a bicycle tyre to the correct pressure is with
a bicycle pump. Never use a service station
air hose to inflate a bicycle tyre. Service station air hoses are designed for larger tyres
and therefore can easily exceed the recommended maximum pressure of a bicycle
causing the tyre to blow off the rim.
27
Tyre treads
Some special high-performance tyres have unidirectional treads: their tread pattern is designed to work
better in one direction than in the other. The sidewall
marking of a unidirectional tyre will have an arrow
showing the correct rotation direction. If your bicycle
has unidirectional tyres, be sure that they are mounted
to rotate in the correct direction.
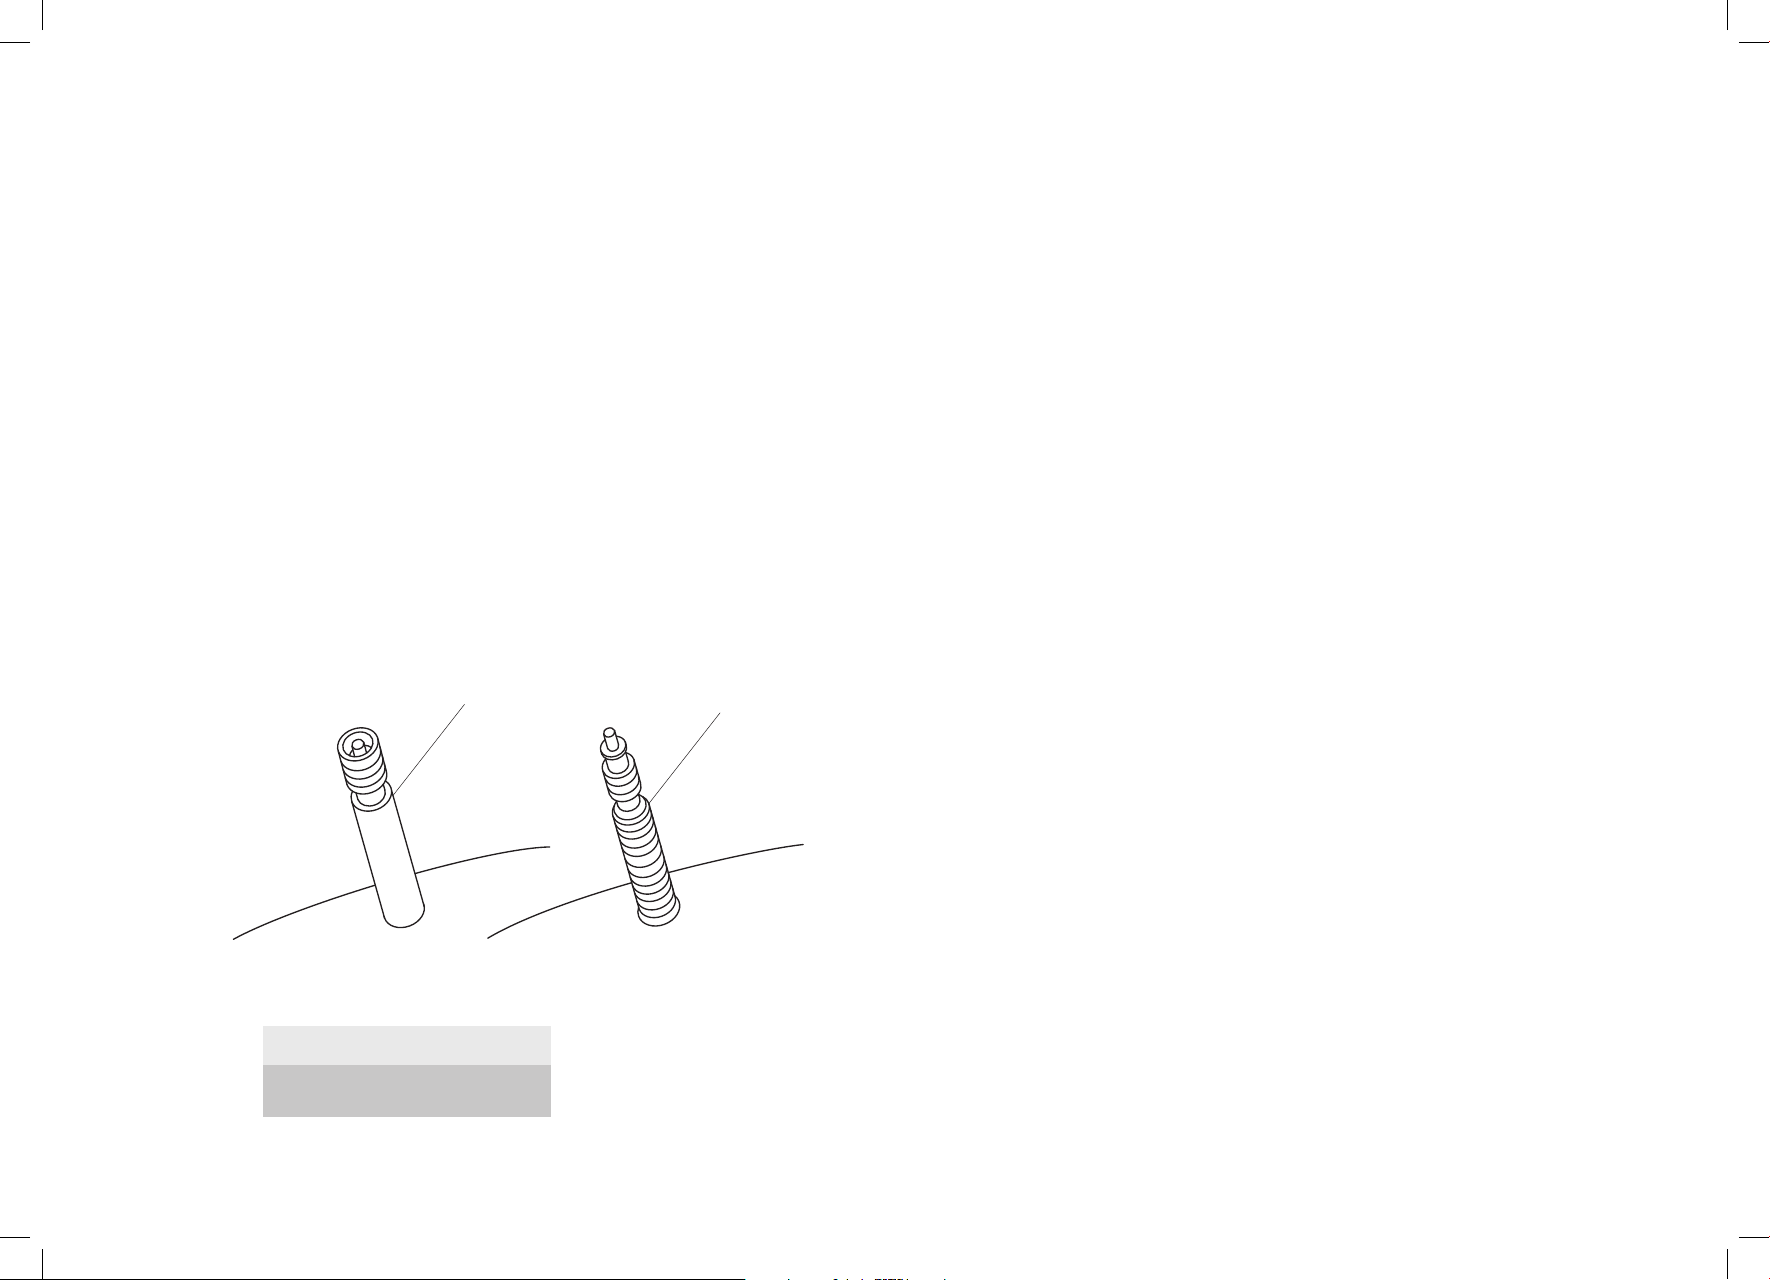
Tyre valves
The tyre valve allows air to enter the tyre’s inner tube
under pressure, but doesn’t let it back out unless you
want it to.
There are primarily two kinds of bicycle tube valves:
The Schrader Valve and the Presta Valve (see figure).
1
2
The Schrader valve is similar to the valve on a car tyre.
This is the type of valve stem you should have on your
bicycle. To inflate a tyre with a Schrader valve, remove
the valve cap and push the air hose or pump onto the
end of the valve stem. To let air out of a Schrader valve,
depress the pin in the end of the valve stem using a key
or other appropriate object.
Your bicycle pump should match the tyre valve on your
bicycle.
Fixing a flat tyre:
In an event of a flat tyre and you need to repair the tyre,
follow the steps below.
1. Remove the wheel.
2. Deflate the tyre completely via the valve. Loosen
the tyre bead by pushing it inward all around.
3. Press one side of the tyre bead up over the edge
of the rim to unset the bead. CAUTION: In order to
avoid damaging the rim, use tyre levers and not a
screwdriver.
28
1. Schrader valve
2. Presta Valve
4. Remove the tube, leave the tyre on the rim.
5. Locate and patch the leaks using a tube repair kit
or replace the tube entirely. NOTE: Use a replacement tube with a size and valve that is the correct
type for your bicycle.
6. Locate the possible cause of the leak by matching
the position of the leak in the tube with the tyre.
7. Remove the tyre completely and inspect for a nail,
glass, thorn, etc., and remove them. Also inspect
the inside of the rim to ensure there are no protruding spokes, rust or other potential causes. If needed,
replace the rim tape which covers the spoke ends.
8. Remount one side of the tyre into the rim.
9. Using a hand pump, slightly inflate the tube to give it
some shape.
10. Insert the valve stem through the hole in the rim,
and work the tube into the tyre. NOTE: Make sure
that the valve stem is not twisted or deformed.
11. Remount the other side of the tyre by pushing the
edge toward the centre of the rim using only your
hands. Start on either side of the valve and work your
way around the rim.
12. Before the tyre is completely mounted, push the
valve up the rim to make sure that the tyre can sit
squarely in position.
13. Remount the rest of the tyre, rolling the last, most
difficult part using your thumbs. CAUTION: Avoid using tyre leavers as these can easily puncture the tube
or damage the tyre.
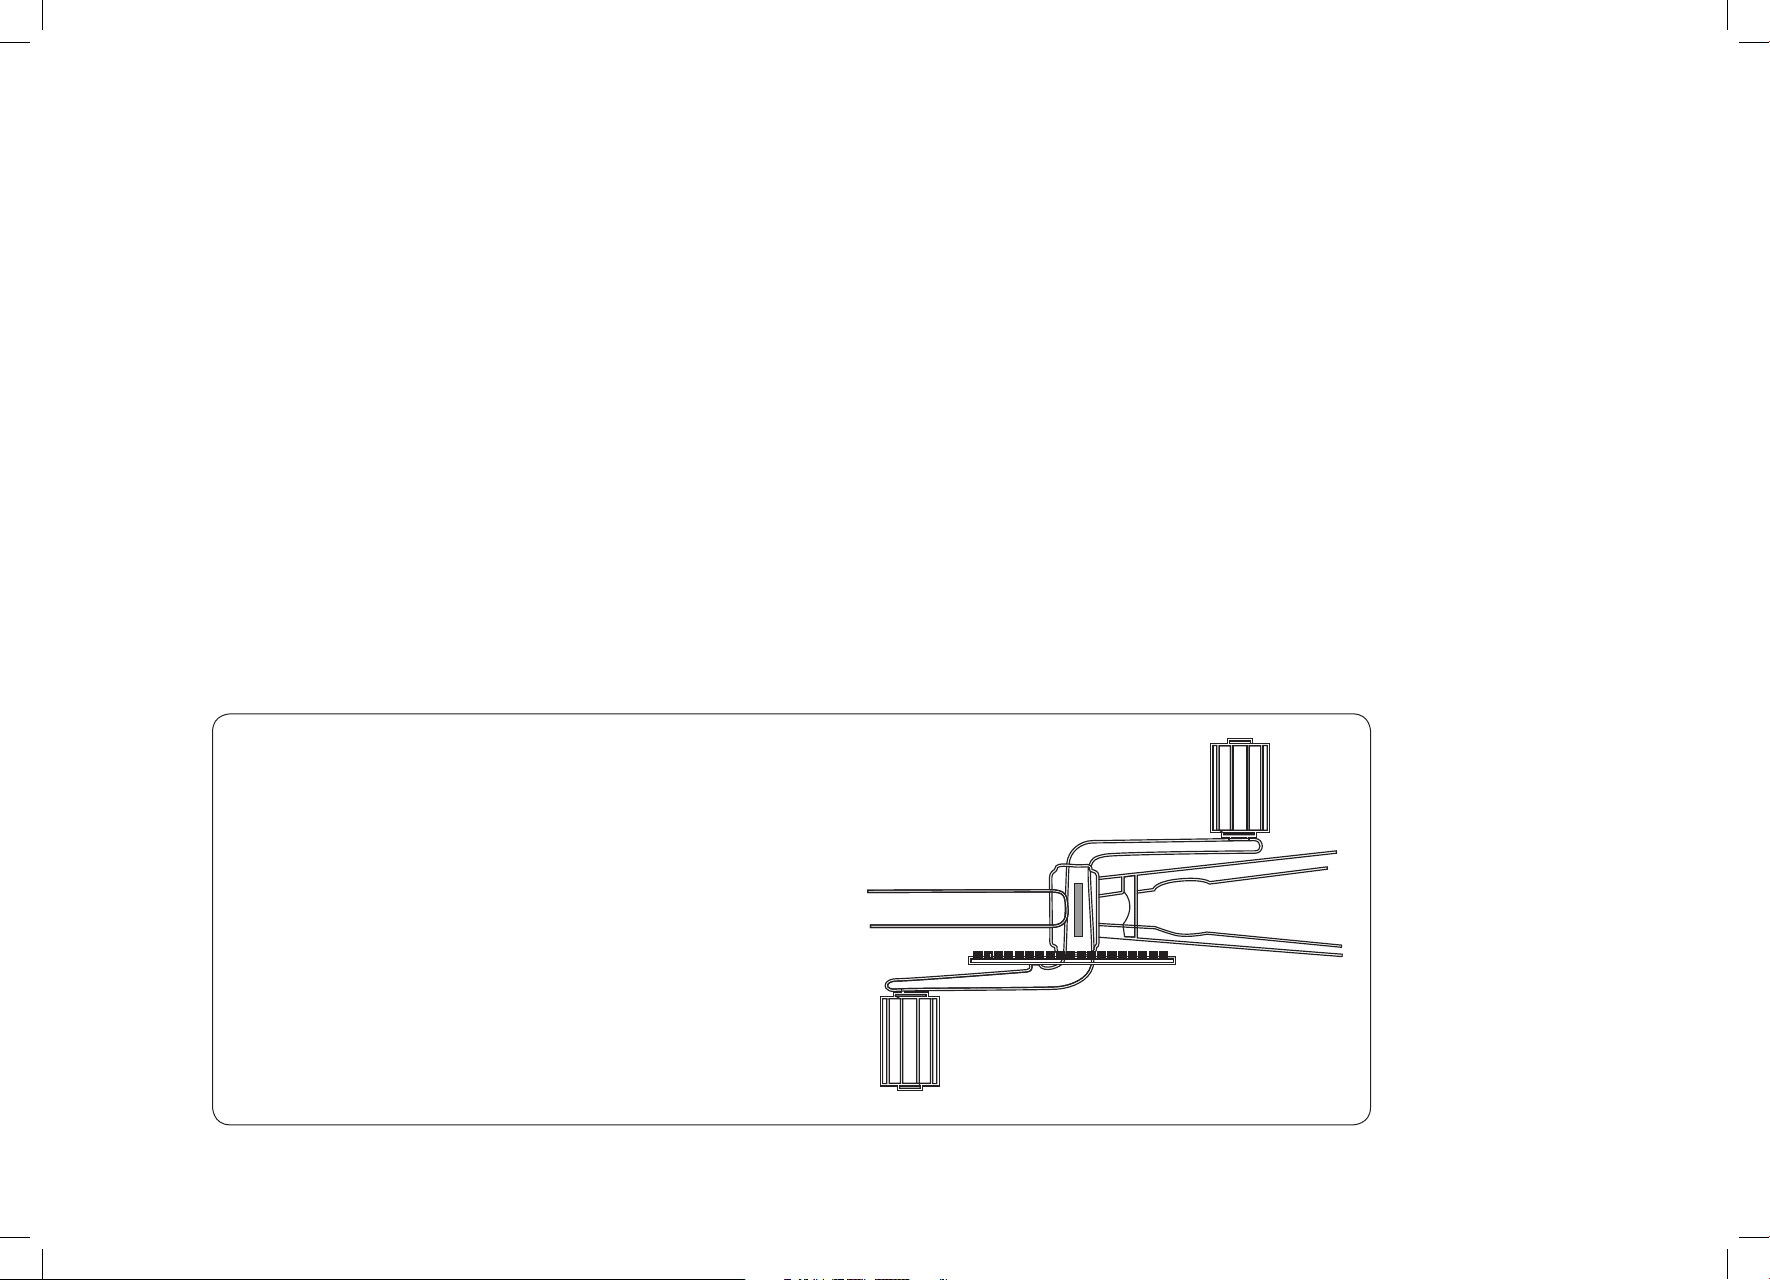
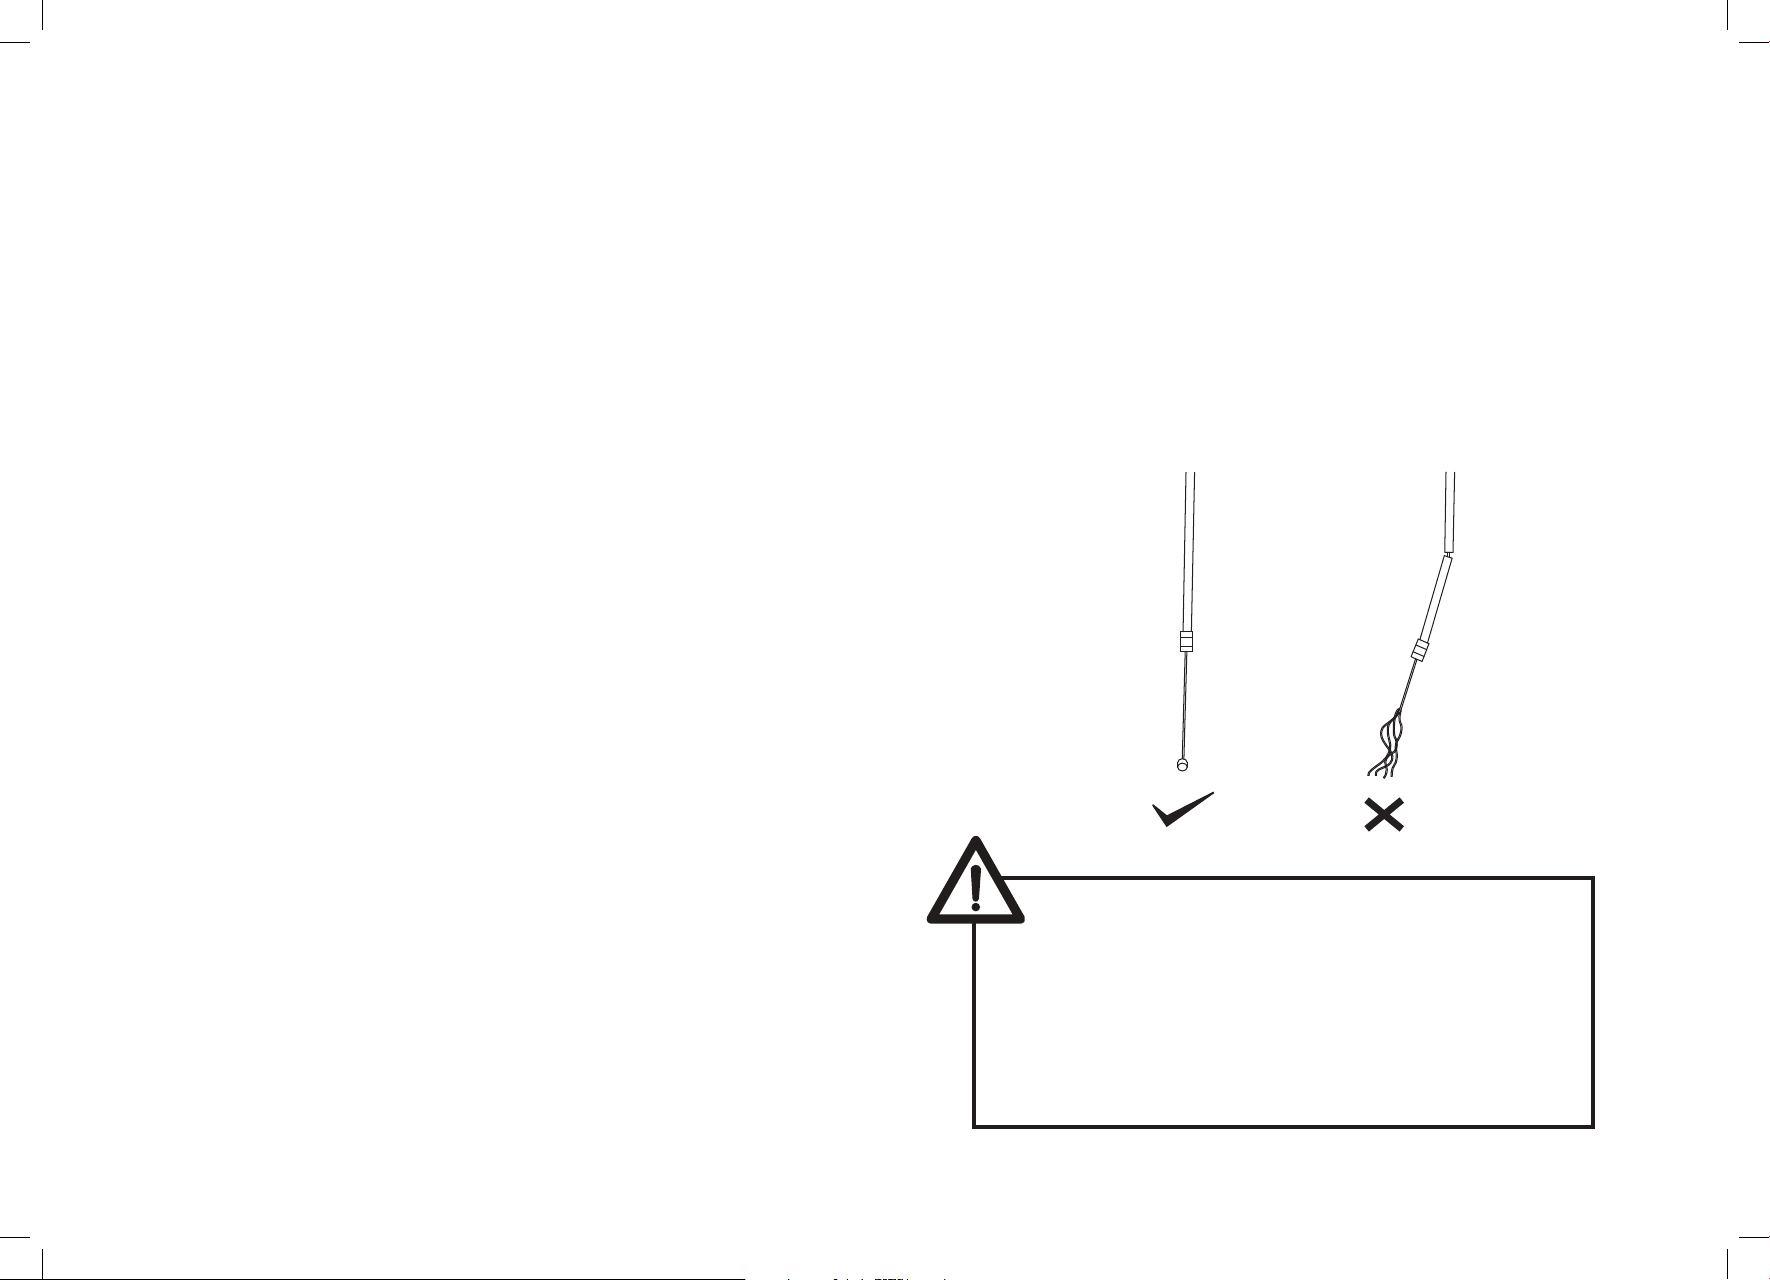
Cables and cable housing
Cables and their housing are one of the most overlooked parts on the bicycle. The first indication that
your cables and housing need to be replaced is an
increased amount of pressure needed to operate the
brakes.
Before every ride, check that there are no kinks or frays
in the cables and housing (see figure).
14. Check that the tube is not caught between the rim
and the tyre bead at any point.
15. Using a hand pump, inflate the tube until the tyre
begins to take shape. Check that the tyre bead is
evenly seated all the way around the rim. When
properly seated, fully inflate the tyre to the recommended pressure.
16. Replace the wheel into the frame checking that all
brakes and quick release levers are properly adjusted.
WARNING: Always check the brake
cable routing to ensure smooth and free
application of the brakes. Cables that are
kinked, frayed or otherwise damaged, or
cables that are wrapped around the stem
or frame may affect braking power or
cause unintended sudden stops and loss of
control.
29
 Loading...