

Page 1
USER MANUAL
BEDIENUNGSANLEITUNG
GUIDE D’UTILISATION
MANUALE D’USO
MANUAL DEL USUARIO
www.madcatz.com
Page 2

MAD CATZ F.L.Y. 5
Congratulations on buying your Mad Catz F.L.Y. 5 - the world's most adjustable PC joystick.
Features
• Revolutionary stick base opens to create ultra-stable platform
• Handle length increases to fit hand
• Button positions adjust for greater flexibility
• Head and stick handle tilts for even greater comfort
• Includes scroll wheel, perfect for flap or trim control
• Twin throttle levers for greater control and flexibility
• Adjustment tool stores securely in base compartment
• Handle locks to base with secure screw collar
Please note: Do not overtighten the precision adjustment screws when adjusting your Mad
Catz F.L.Y. 5 Flight Stick
Setting up your Mad Catz F.L.Y. 5
2
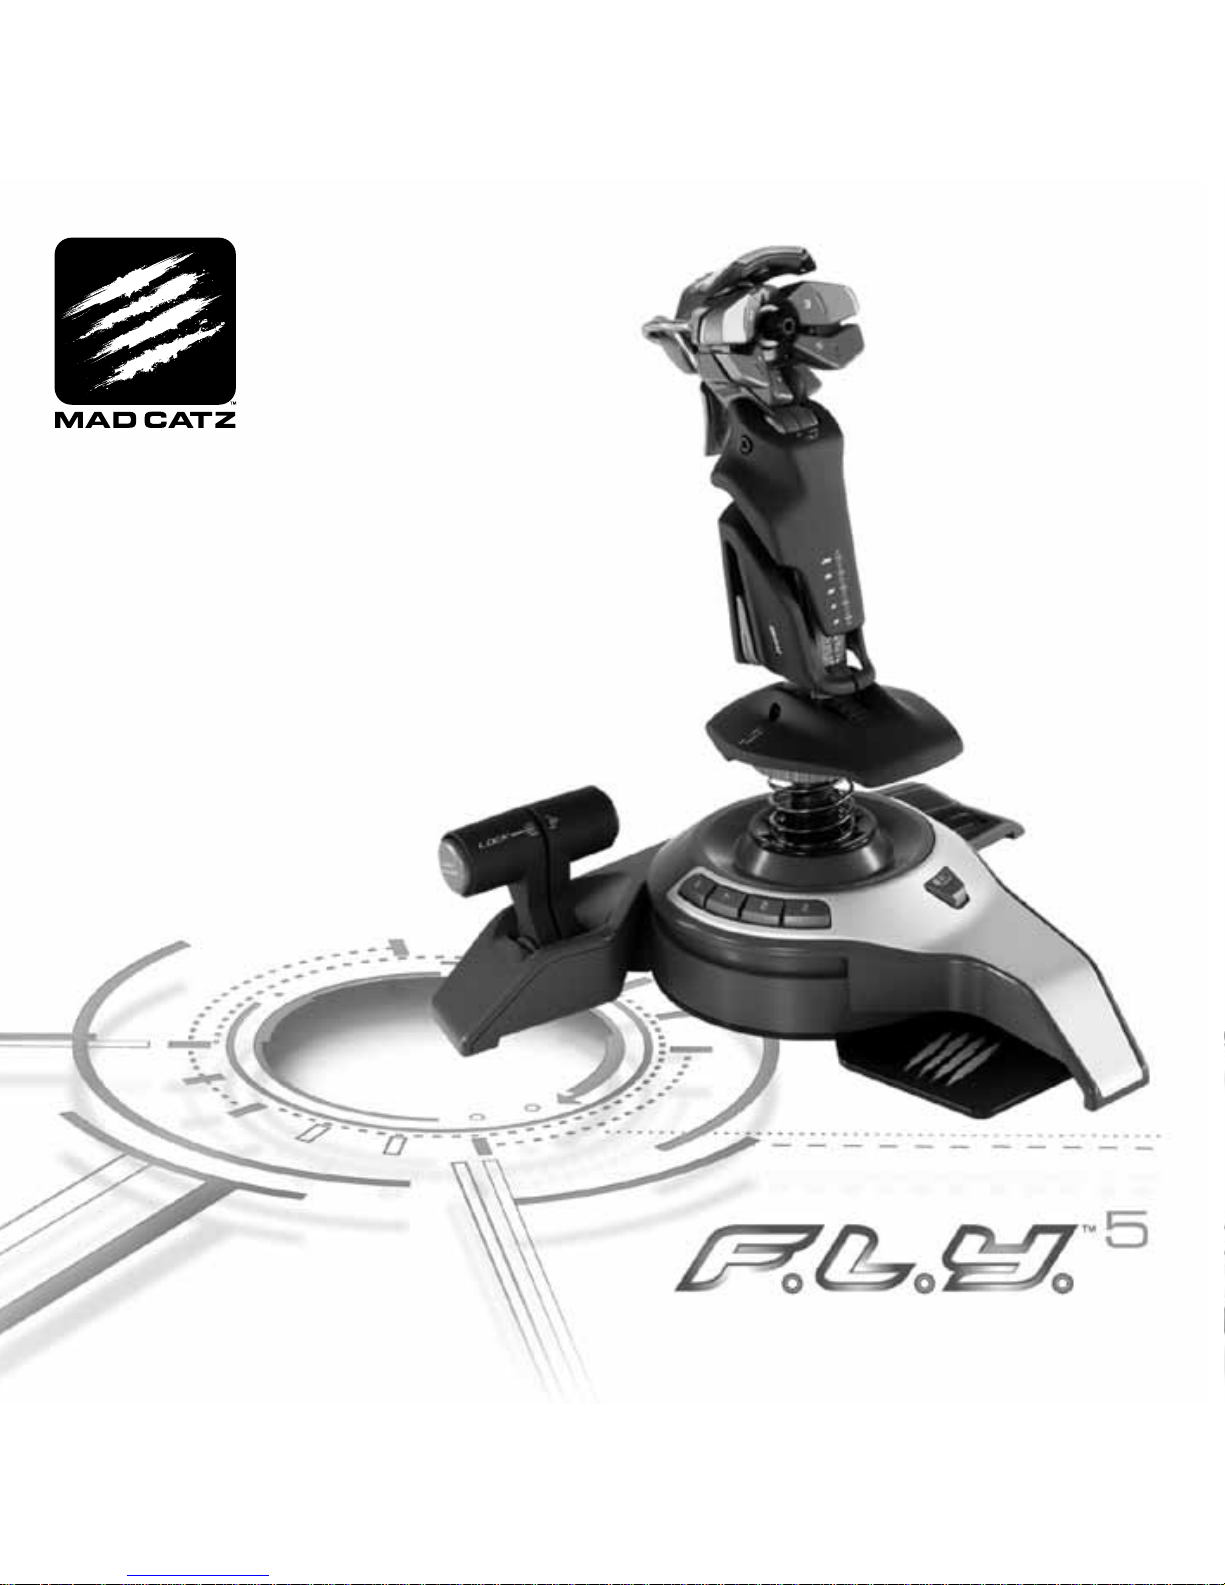
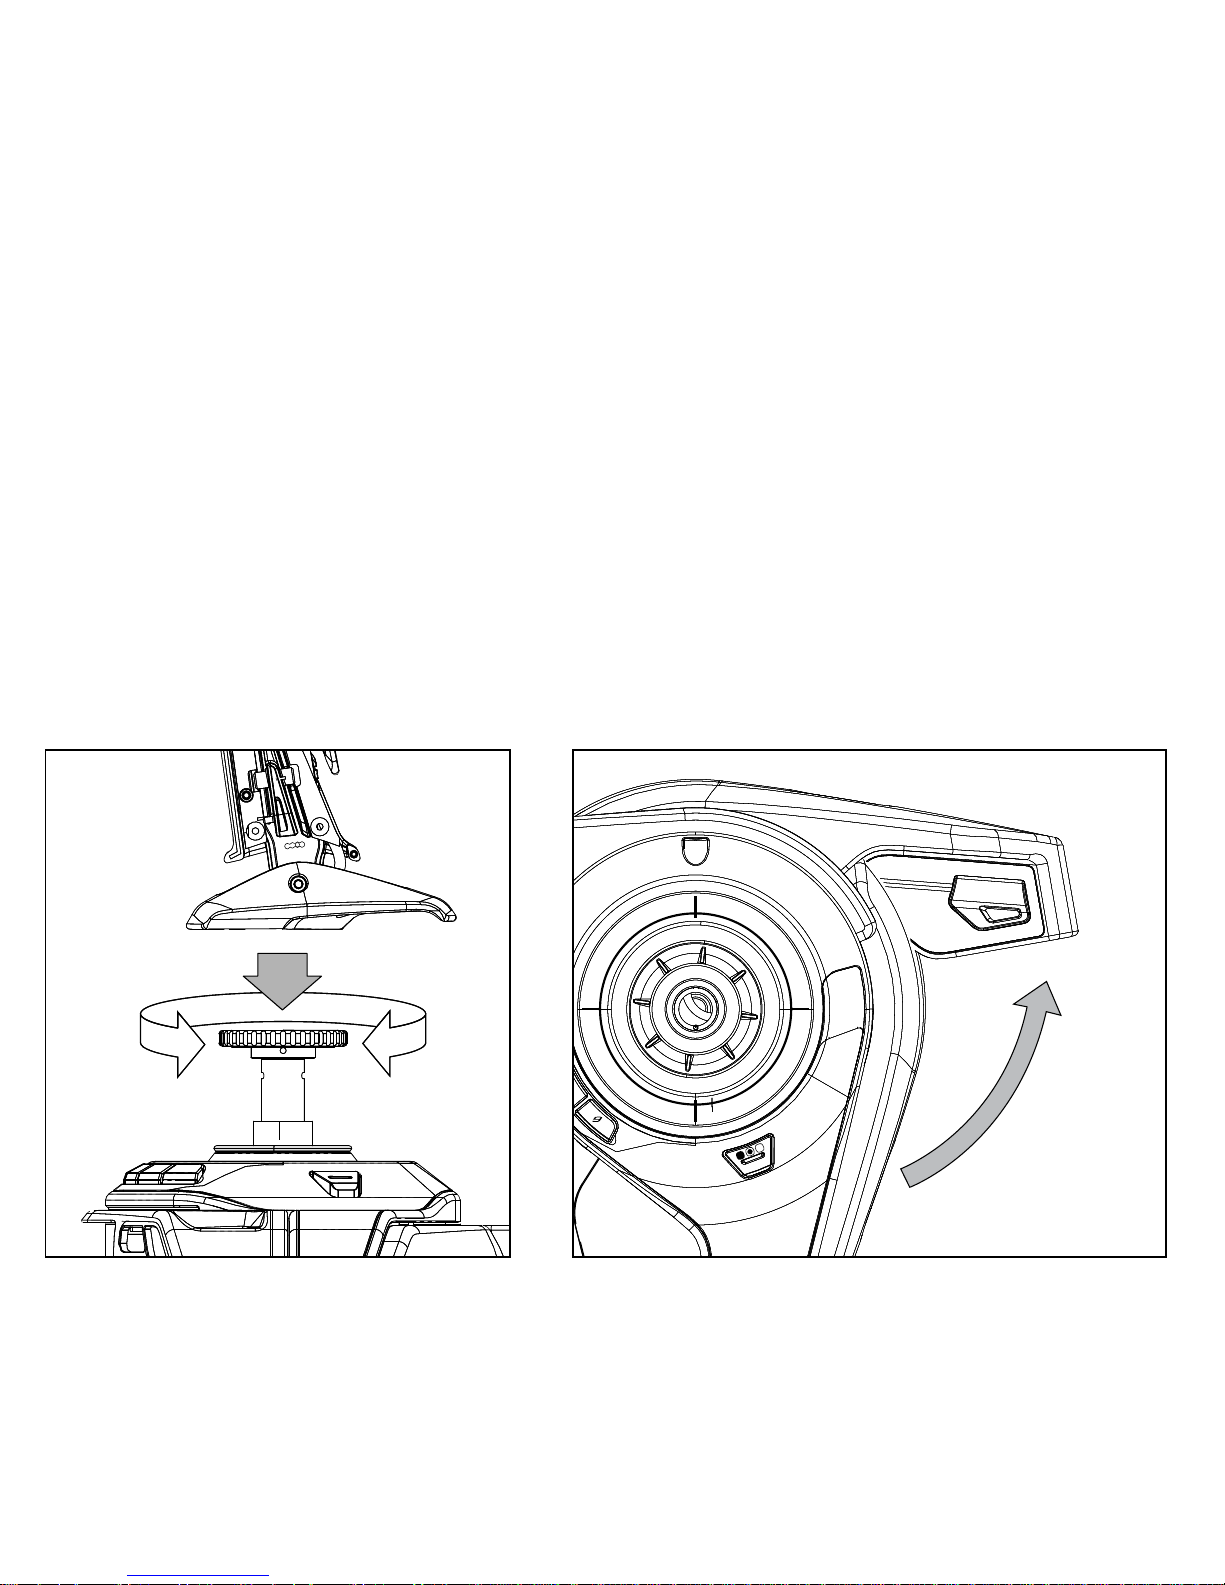
Attach the stick handle to the base by
inserting it into the base collar and
tightening the securing screw.
Extend the stick’s legs outwards until they click into
place.
Page 3

3
Remove the adjustment tool from the
compartment on the stick base.
Press the locking switch (a) and move the
stick up or down to adjust the height.
a
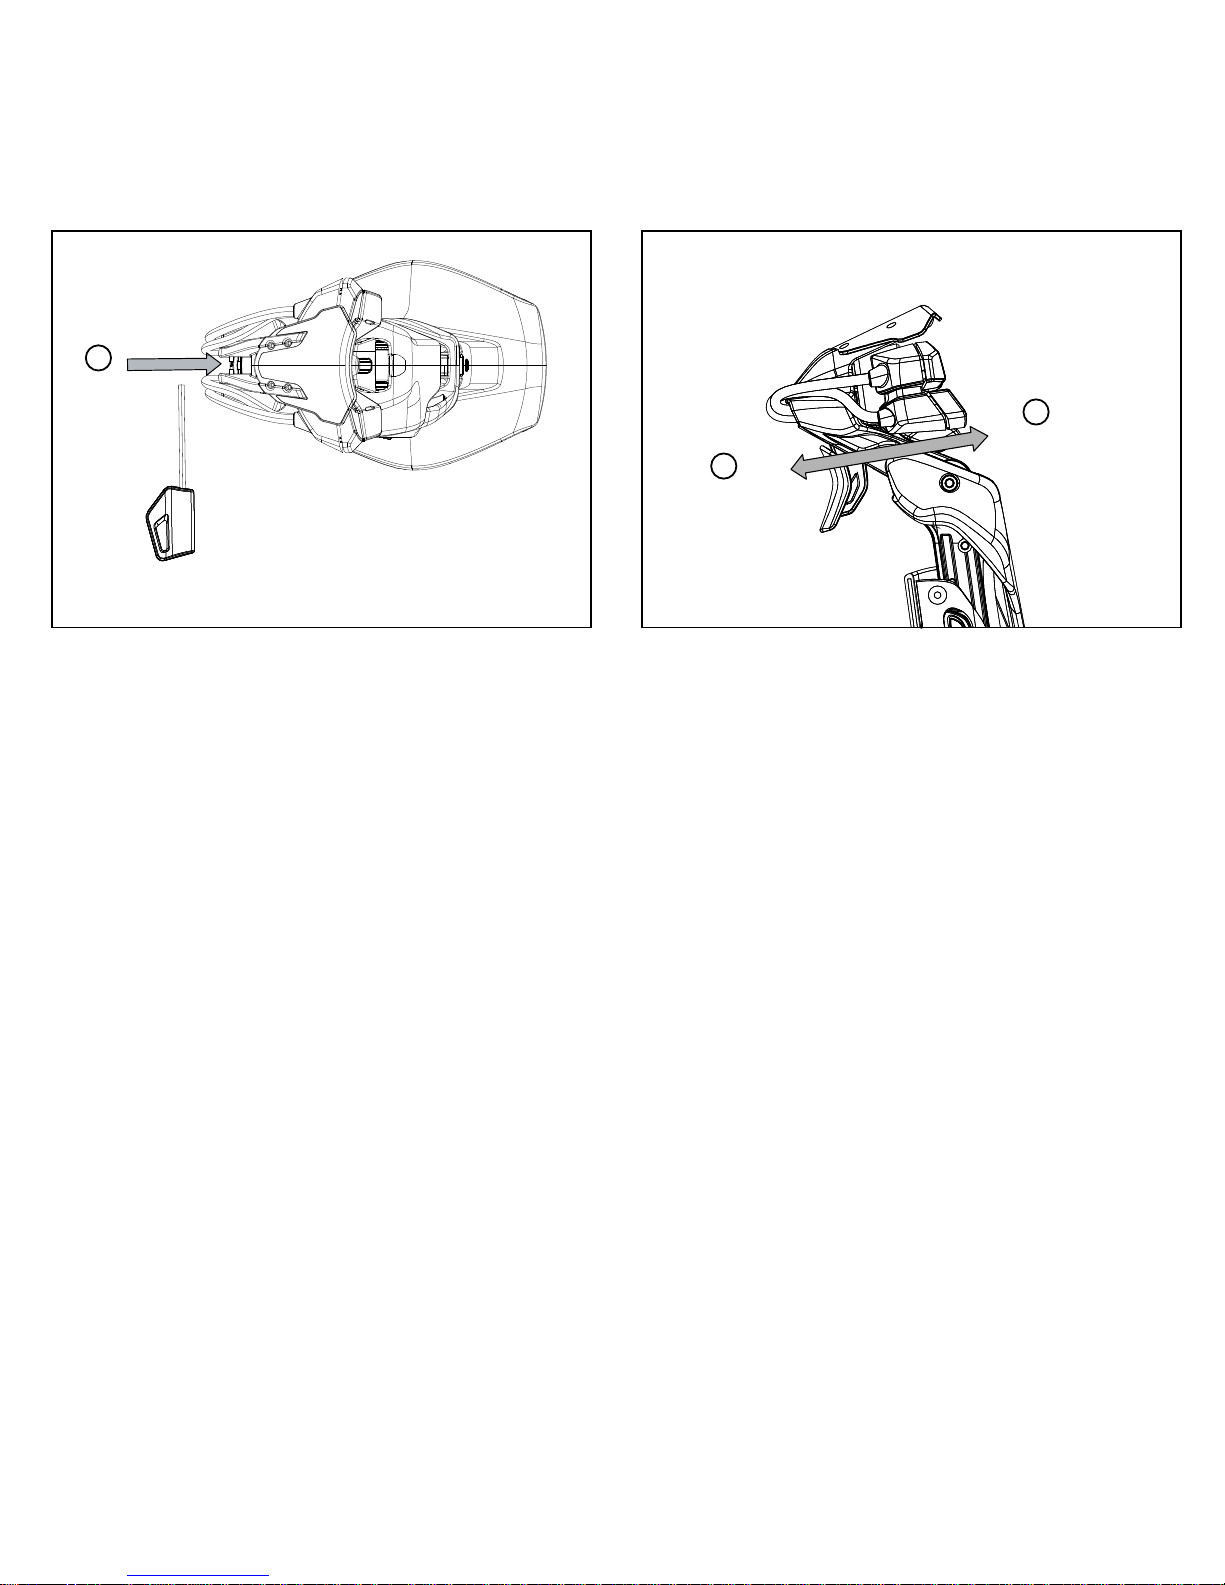
Insert the adjustment tool into the locking nut
(b) and turn counter-clockwise. Press the
locking pin (c) in and move the stick forward or
backwards to the required angle. Lock by
turning locking nut (b) clockwise.
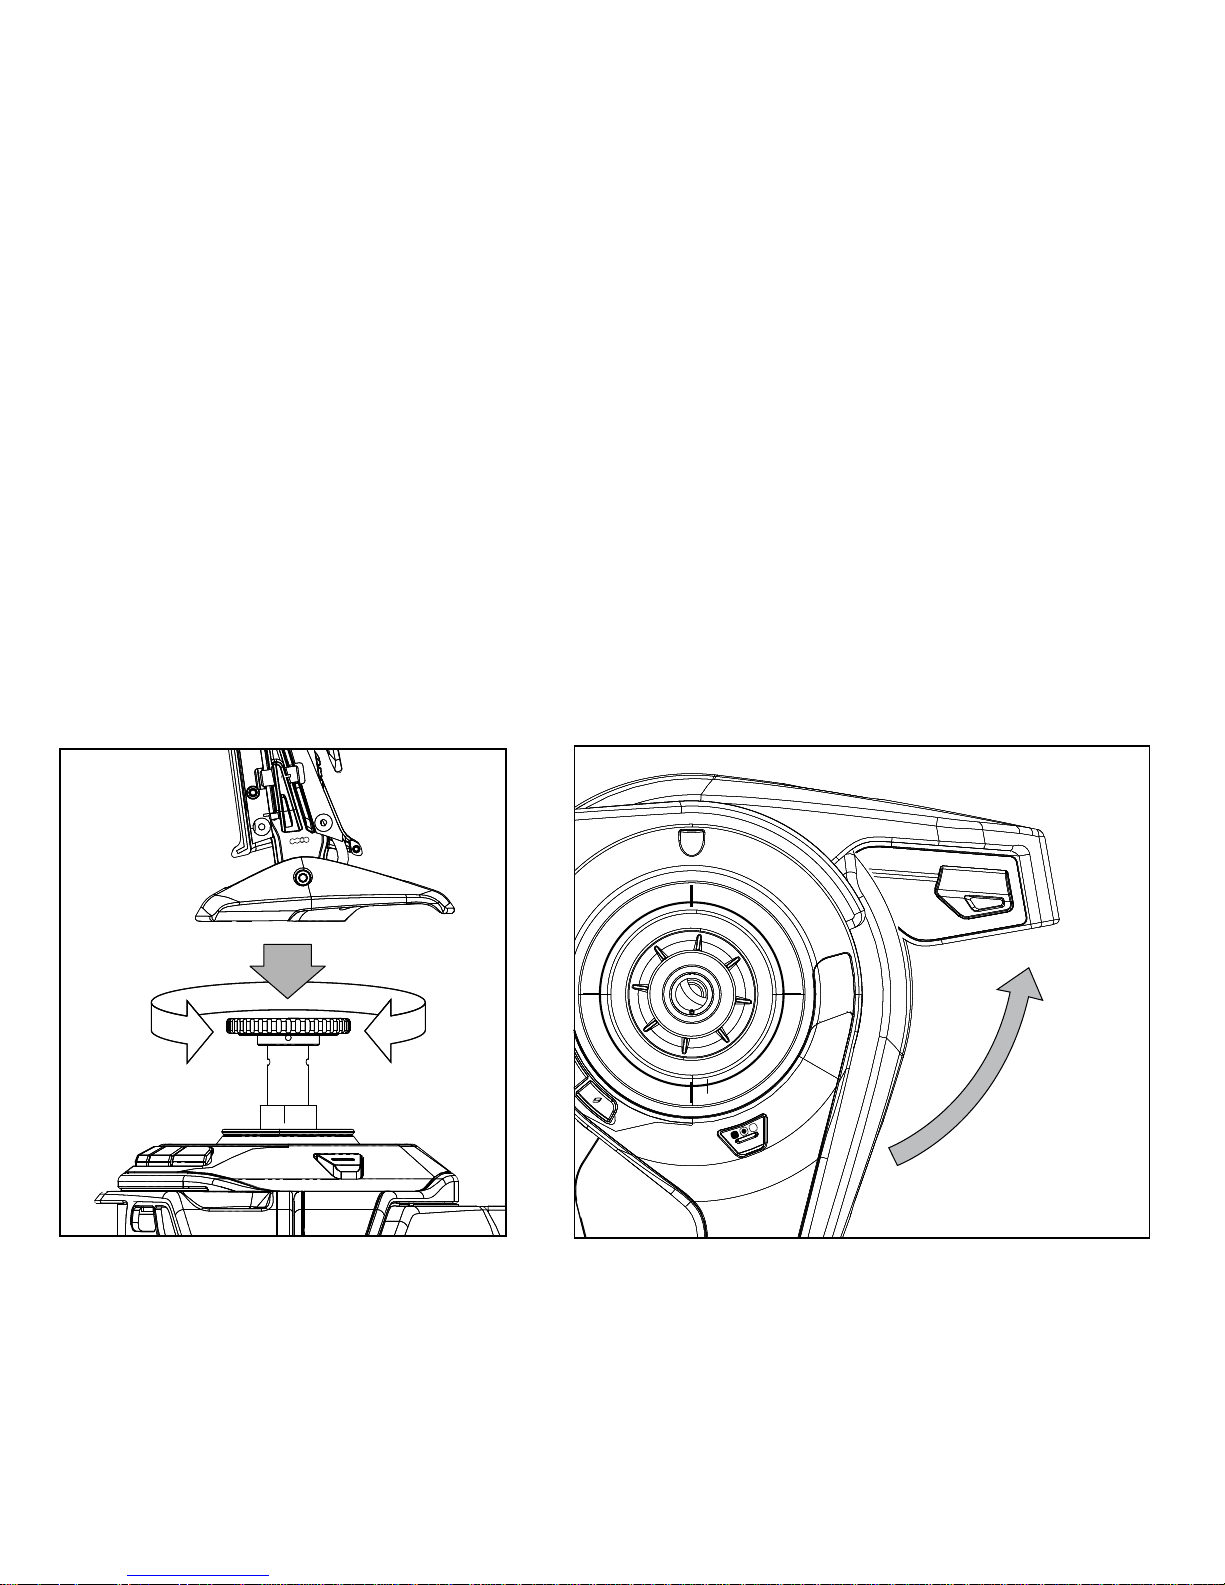
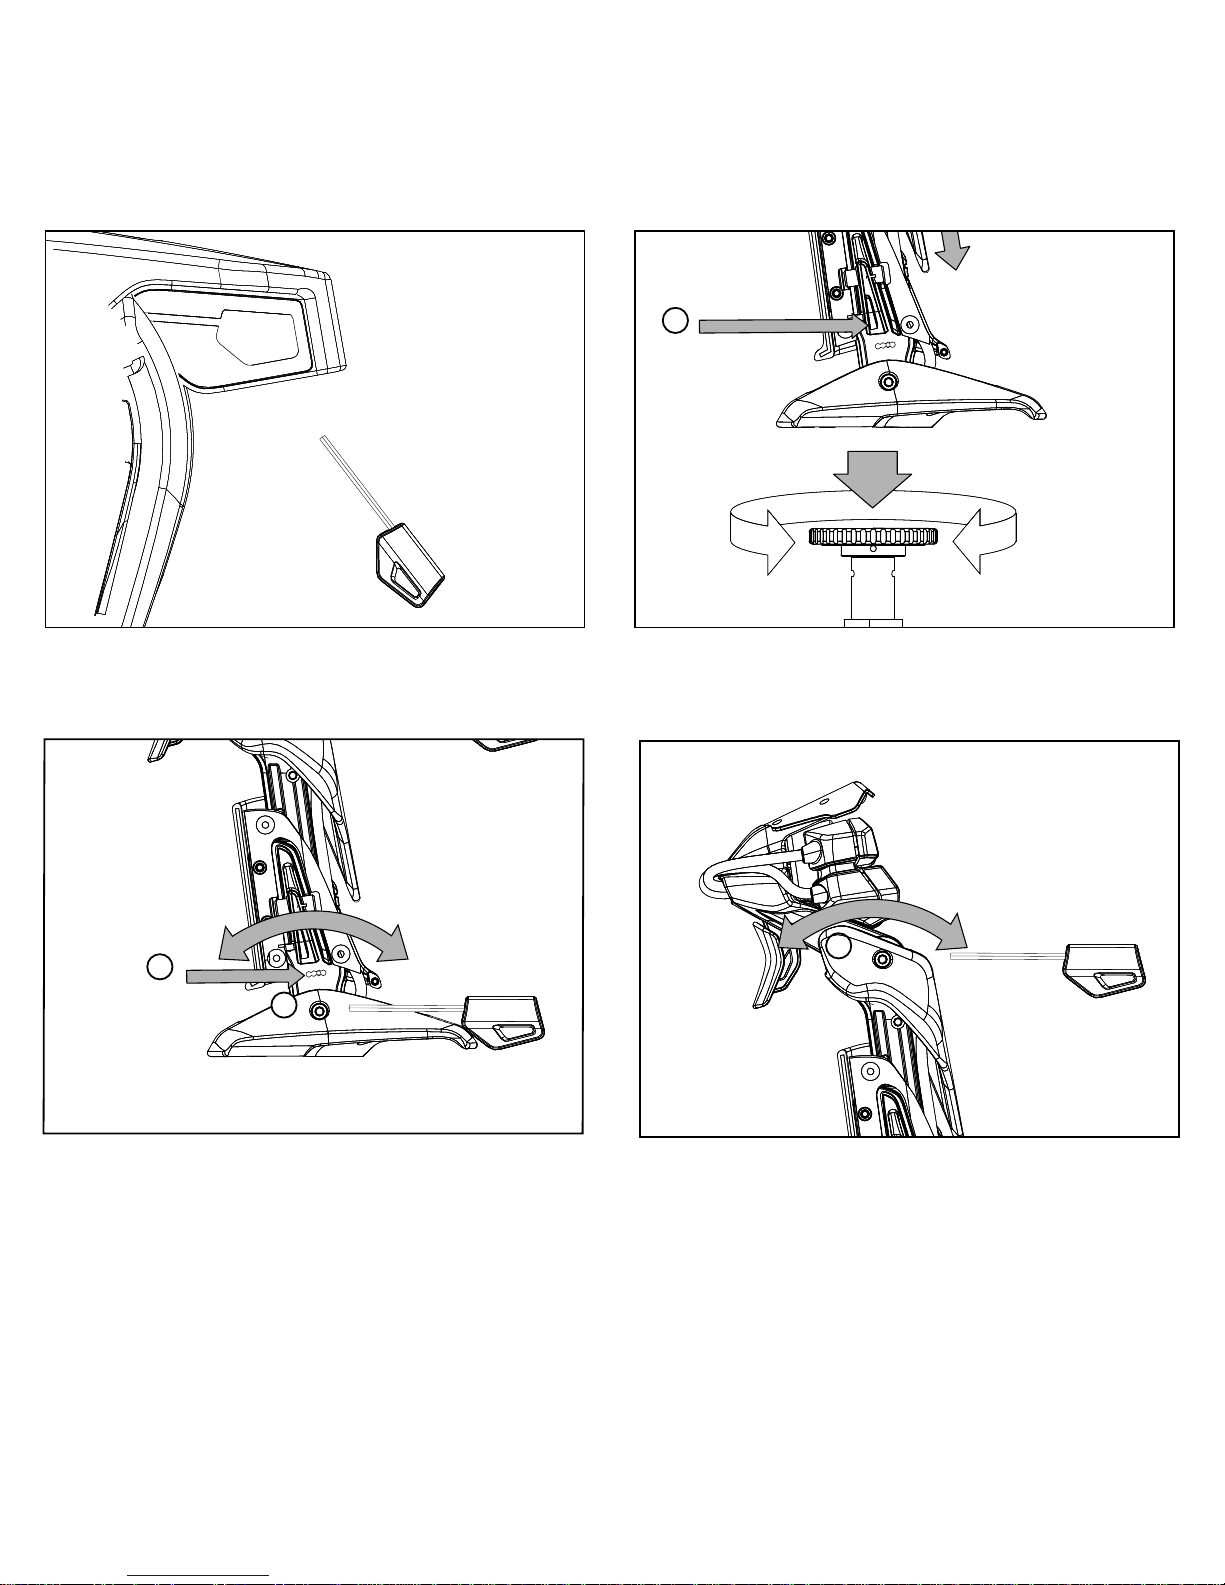
Insert the adjustment tool into the locking nut
(d) and turn counter-clockwise to unlock the
head mechanism. Move to the required angle
and lock by turning the locking nut clockwise.
c
d
b
Page 4
Installation for users of Windows® 7, Vista, XP and XP 64-bit
Insert the F.L.Y. 5 stick's USB cable into one of your PC's USB ports. Follow the device
installation wizard to complete the installation of the new USB device to the system. You can test
the controller at any time by clicking on Windows Start, Settings, Control Panel, Games Controllers.
Programming your Mad Catz F.L.Y. 5
The buttons and axes of your stick are all programmable using programming software. To
download the software, go to www.madcatz.com/downloads.
Important Information
Driver updates
From time to time there may be updates to the driver and programming software for this product.
You can check for the latest software updates by visiting www.madcatz.com/downloads.
4
Insert the adjustment tool into the button
adjustment nut (e) and turn clockwise or
counter-clockwise.
Turn the adjustment nut clockwise to move the
buttons in direction (f) and counter-clockwise
to move the buttons in direction (g).
e
g
f
Page 5
5
MAD CATZ F.L.Y. 5
Herzlichen Glückwunsch zum Kauf Ihres Mad Catz F.L.Y. 5, dem anpassungsfähigsten PC-Joystick
der Welt.
Eigenschaften
• Die revolutionäre Basis des Stick entfaltet sich, um eine extrem stabile Plattform anzubieten
• Die Grifflänge lässt sich zur besseren Anpassung an die Hand vergrößern
• Die Knopfpositionen lassen sich für eine größere Flexibilität anpassen
• Kopf und Griff des Stick kippen für besseren Komfort
• Schließt Scroll-Rad ein, ideal für Klappen- oder Trimmsteuerung
• Doppel-Fahrtregler für bessere Kontrolle und Flexibilität
• Einstellwerkzeug lässt sich sicher in einem Fach in der Basis verstauen
• Griff wird mittels sicherer Schraubmanschette mit der Basis verriegelt
Bitte beachten Sie, dass Sie bei der Feinabstimmung des Mad Catz F.L.Y. 5 Flight Sticks die
Einstellschrauben nicht überdrehen.
Einrichtung Ihres Mad Catz F.L.Y. 5 Stick
Verbinden Sie den Griff des Stick mit der
Basis, indem Sie ihn in die Manschette der
Basis einführen und die Sicherungsschraube
anziehen.
Ziehen Sie die Beine des Mad Catz Stick nach
außen, bis sie einrasten.
Page 6
6
Nehmen Sie das Einstellwerkzeug aus dem
Fach der Basis des Stick.
Drücken Sie den Verriegelungsschalter (a) und
bewegen Sie den Stick auf- oder abwärts, um
die Höhe einzustellen.
Setzen Sie das Einstellwerkzeug in die
Sperrmutter (b) und drehen entgegen dem
Uhrzeigersinn. Drücken Sie den Sperrstift (c) ein
und bewegen den Stick in den gewünschten
Winkel vor oder zurück. Verriegeln Sie ihn durch
Drehen der Sperrmutter (b) im Uhrzeigersinn.
Setzen Sie das Einstellwerkzeug in die
Sperrmutter (d) und drehen sie entgegen dem
Uhrzeigersinn, um den Kopfmechanismus zu
lösen. Bewegen Sie ihn in den gewünschten
Winkel und verriegeln ihn, indem Sie die
Sperrmutter im Uhrzeigersinn drehen.
a
c
d
b
Page 7

7
Installation unter Windows® 7, Vista, XP und XP 64-bit
Das USB-Kabel des F.L.Y. 5 Flightsticks in einen der USB-Anschlüsse Ihres PCs stecken.
Das neue USB-Gerät gemäß dem Installationsassistenten installieren. Sie können den Controller
jederzeit testen: Klicken Sie auf Windows Start, Einstellungen, Systemsteuerung, Gamecontroller.
Programmieren des F.L.Y. 5 Flightsticks
Alle Tasten und Achsen Ihres Flightsticks können mit der Programmiersoftware programmiert
werden. Sie finden die Software unter www.madcatz.com/downloads.
Setzen Sie das Einstellwerkzeug in die
Einstellmutter des Knopfs (e) und drehen sie
im oder entgegen dem Uhrzeigersinn.
Drehen Sie die Einstellmutter im
Uhrzeigersinn, um die Knöpfe in Richtung (f)
und entgegen dem Uhrzeigersinn, um die
Knöpfe in Richtung (g) zu bewegen.
e
g
f
Page 8

8
MAD CATZ F.L.Y. 5
Félicitations pour votre achat du Mad Catz F.L.Y. 5 - le joystick PC le plus ajustable au monde.
Caractéristiques
• Une base révolutionnaire détachable pour une plateform ultra-stable
• Longueur du manche ajustable à sa main
• Positions des boutons adaptables pour plus de flexibilité
• Inclinaison de la tête et de la poignée du stick pour un confort maximal
• Molette de défilement incluse, idéale pour le contrôle des volets ou du compensateur
• Double manette des gaz pour plus de précision et de flexibilité
• Outil d'ajustement à la base du stick
• Fixation du manche à sa base via une vis de sécurité
Attention : Prenez garde à ne pas serrer les vis d'ajustement trop fort en réglant votre
joystick Mad Catz F.L.Y. 5 Flight Stick.
Installation de votre Mad Catz F.L.Y. 5
Attachez la poignée du stick à la base
en l'insérant dans l'emplacement prévu
à cet effet sur la base et en serrant la
vis de sécurité.
Ecartez les pieds du stick jusqu'à ce qu'ils cliquent
une fois en place
Page 9

9
Retirez l'outil d'ajustement du compartiment
situé à la base du stick.
Pressez le bouton de sécurité (a) et réglez la
hauteur du stick.
Insérez l'outil d'ajustement dans l'écrou (b) et
tournez dans le sens inverse des aiguilles
d'une montre. Appuyez sur le point de réglage
(c) et inclinez le stick à l'angle souhaité. Fixez
en tournant la vis (b) dans le sens des
aiguilles d'une montre.
Insérez l'outil d'ajustement dans le point de
réglage (d) et tournez en sens inverse des
aiguilles d'une montre pour ouvrir le
mécanisme principal. Réglez l'angle à votre
guise et fixez en tournant dans le sens des
aiguilles d'une montre.
a
c
d
b
Page 10

10
Installation pour les utilisateurs de Windows® 7, Vista, XP et XP 64-bit
Insérez le câble USB du joystick F.L.Y. 5 dans un des ports USB de votre PC. Suivez les
instructions de l'assistant d'installation pour terminer l'installation de votre nouveau périphérique
USB sur votre système. Vous pouvez tester votre contrôleur n'importe quand en cliquant sur
Démarrer, Panneau de Configuration, Contrôleurs de jeu.
Programmer votre Contrôleur de Vol Mad Catz F.L.Y. 5
Les boutons et les axes de votre contrôleur sont tous programmables en utilisant le logiciel de
programmationST de chez. Pour télécharger le logiciel, rendez-vous sur www.madcatz.com/
downloads.
Insérez l'outil d'ajustement dans le bouton
d'ajustement (e) et tournez dans le sens des
aiguilles d'une montre ou dans le sens inverse.
Tournez la vis d'ajustement dans le sens des
aiguilles d'une montre pour déplacer les
boutons dans la direction (f) et en sens inverse
des aiguilles d'une montre pour déplacer les
boutons dans la direction (g).
e
g
f
Page 11

MAD CATZ F.L.Y. 5
Congratulazioni per avere acquistato la vostra Mad Catz F.L.Y. 5 - il joystick per PC più regolabile
al mondo.
Caratteristiche
• Larivoluzionariabasedellaclochesiaprepercreareunapiattaformaultrastabile
• Lalunghezzadell'impugnaturapuòessereaumentataperadattarsiallamano
• Laposizionedeibottonièregolabileperunamaggioreflessibilità
• Latestael'impugnaturadellalevasiinclinanoperuncomfortancoramaggiore
• Includeunarotellaascorrimento,perfettaperilcontrollodiflapotrim
• Levedelgasdoppieperibimotori,perunmaggiorecontrolloeflessibilità
• L'attrezzoperlaregolazionealloggiainmodosicuronelcompartimentodellabase
• L'impugnaturasifissaallabaseconunsicurocollareavite
Nota:non stringete troppo le viti di regolazione di precisione quando regolate il vostro
joystick Mad Catz F.L.Y. 5
Impostazione del vostro joystick Mad Catz F.L.Y. 5
Fissate l'impugnatura del joystick alla
base inserendolo nel collare della base
e stringendo la vite di fermo.
Estendete le zampe del all'infuori fino a quando si
agganciano in posizione.
11
Page 12

Estraete l'attrezzo per le regolazioni dal
compartimento nella base del joystick.
Premete il dispositivo di blocco (a) e muovete
la leva in su o in giù per regolare l'altezza.
Inserite l'attrezzo per le regolazioni nel dado di
bloccaggio (b) e ruotate in senso antiorario.
Premete il perno di bloccaggio (c) e muovete
la leva avanti o indietro fino all'angolo
desiderato. Bloccate ruotando il dado di
bloccaggio (b) in senso orario.
Inserite l'attrezzo per le regolazioni nel dado di
bloccaggio (d) e ruotate in senso antiorario per
sbloccare il meccanismo della testa. Muovete
fino all'angolo desiderato e bloccate ruotando
il dado di bloccaggio in senso orario.
a
c
d
b
12
Page 13

Installazione per gli utenti di Windows® 7, Vista, XP e XP 64-bit
Inserite il cavo USB del joystick F.L.Y. 5 in una porta USB del vostro PC. Seguite l'assistente
all'installazione del dispositivo per completare l'installazione del nuovo dispositivo USB nel sistema.
Potete testare in ogni momento il controller in Windows facendo click su Start, Impostazioni,
Panello di Controllo, Periferiche di gioco.
Programmazione della vostra cloche Mad Catz F.L.Y. 5
I bottoni e gli assi del vostro joystick sono tutti programmabili usando il software di
programmazione. Per scaricare il software, andate all'indirizzo Internet www.madcatz.com/
downloads.
Inserite l'attrezzo per le regolazioni nel dado di
regolazione dei bottoni (e) e girate in senso
orario o antiorario.
Girate il dado di bloccaggio in senso orario per
muovere i bottoni in una direzione (f) e in senso
antiorario per muovere i bottoni nell'altra
direzione (g).
e
g
f
13
Page 14
14
CONTROLADOR DE VUELO MAD CATZ F.L.Y. 5
Enhorabuena por la compra del controlador de vuelo Mad Catz F.L.Y. 5, el joystick para PC más
ajustable del mundo.
Características
• La revolucionaria base se abre para crear una plataforma superestable
• La longitud del mango se adapta a la mano
• Posiciones de los botones ajustables para mayor flexibilidad
• Inclinación del mango y del cabezal para mayor confort
• Incluye rueda de desplazamiento, perfecta para control de ala o de trim
• Palancas dobles de throttle para mayor control y flexibilidad
• La herramienta de ajuste se guarda en el compartimento de la base
• El mango queda inmovilizado en la base con una rosca segura
Tome nota: no sobre-apreter los tornillos de ajuste de precisión al ajustar su palanca de
vuelo de Mad Catz F.L.Y. 5.
Cómo instalar el controlador Mad Catz F.L.Y. 5
Acople el mango del controlador a la
base insertándolo en el cuello de ésta y
apretando la rosca de fijación.
Abra las patas del controlador hasta que queden
fijadas con un clic.
Page 15

15
Saque la herramienta de ajuste del
compartimento situado en la base del
controlador.
Pulse el interruptor de fijación (a) y desplace
el controlador hacia arriba o hacia abajo para
ajustar su altura.
Introduzca la herramienta de ajuste en la tuerca
de fijación (b) y gírela en el sentido contrario a
las agujas del reloj. Presione la clavija de
fijación (c) y mueva el controlador hacia delante
o hacia atrás hasta lograr el ángulo deseado.
Bloquéelo girando la tuerca de fijación (b) en el
sentido de las agujas del reloj.
Introduzca la herramienta de ajuste en la
tuerca de fijación (d) y gire en el sentido
contrario a las agujas del reloj para
desbloquear el mecanismo del cabezal.
Muévalo hasta lograr el ángulo deseado y
bloquéelo girando la tuerca de fijación en el
sentido de las agujas del reloj.
a
c
d
b
Page 16

16
Instalación para usuarios de Windows® 7, Vista, XP y XP 64-bit
Inserte el cable USB de F.L.Y. 5 en uno de sus puertos USB de su ordenador. Siga el
asistente de instalación del dispositivo para completar la instalación del nuevo dispositivo USB en
el sistema. Para probar el controlador siempre que lo desee, haga clic en Inicio, Configuración,
Panel de control, Dispositivos de juegos en Windows.
Programación de su joystick de vuelo F.L.Y. 5
Los botones y ejes de su joystick se pueden programar con el software de programación ST. Para
descargar el software, vaya a www.madcatz.com/downloads.
Introduzca la herramienta de ajuste en la
tuerca de ajuste de botones (e) y gire en el
sentido de las agujas del reloj o en el sentido
contrario.
Gire la tuerca de ajuste en el sentido de las
agujas del reloj para mover los botones en la
dirección (f), y en el sentido contrario a las
agujas del reloj para mover los botones en la
dirección (g).
e
g
f
Page 17

©2016 Mad Catz, Inc. 10680 Treena Street, Suite 500, San Diego, CA 92131 U.S.A. Mad Catz, F.L.Y. and the Mad
Catz logo are trademarks or registered trademarks of Mad Catz Interactive, Inc., its subsidiaries and afliates. The
shape and design of this product are a trade dress of Mad Catz Interactive, Inc., its subsidiaries and afliates.
Microsoft, Windows, and the Windows logos are trademarks of the Microsoft group of companies. This product is
not sponsored, endorsed or approved by Microsoft. All other trademarks or registered trademarks are the property
of their respective owners. Made in China. All rights reserved. Product features, appearance and specications
may be subject to change without notice. Please retain this information for future reference.
©2016 Mad Catz Europe, Ltd. 1-2 Shenley Pavilions, Chalkdell Drive. Shenley Wood, Milton Keynes,
Buckinghamshire MK5 6LB, Royaume-Uni (UK). Mad Catz, F.L.Y. et le logo Mad Catz sont des marques de
commerce ou des marques déposées de Mad Catz Interactive, Inc., de ses liales et sociétés afliées. La
forme et le design de ce produit sont caractéristiques de la marque Mad Catz Interactive, Inc., de ses liales et
sociétés afliées. Microsoft, Windows, et les logos Windows sont des marques de commerce du groupe Microsoft.
Ce produit n’est ni garanti, ni homologué, ni approuvé par Microsoft. Toutes les autres marques ou marques
déposées sont la propriété de leurs propriétaires respectifs. Fabriqué en Chine. Tous droits réservés. L’aspect, les
fonctionnalités et les spécications du produit peuvent changer sans préavis. Veuillez conserver cette notice pour
référence ultérieure.
Mad Catz is a publicly traded company on the TSX/NYSE MKT, symbol MCZ.
Mad Catz ist ein börsennotiertes Unternehmen (TSX, NYSE MKT: MCZ).
Les actions de Mad Catz sont cotées en bourse sur le TSX/NYSE MKT sous le symbole MCZ.
R22-MCB43302
 Loading...