

Page 1

eclipsetouch.com
User guide | Bedienungsanleitung | Guide d’utilisation | Manuale d’uso | Manual del usario
Page 2

Page 3

contents:
Before you start...........................................................................................................................
Vor der Inbetriebnahme | Avant de commencer | Prima di cominciare | Antes de empezar
Set up and pairing.......................................................................................................................
Einrichten und Verbinden | Installation et connexion | Impostazione & Sintonizzazione | Conguración y pareado
Power saving.............................................................................................................................
Stromsparfunktion | Economie d’énergie | Risparmio di energia | Ahorro de energía
Scroll function............................................................................................................................
Scroll-Funktion | Fonction de délement | Funzione di scorrimento |
Función de desplazamiento
Gesture Commands...................................................................................................................
Befehle mit Handbewegung | Commandes spéciales | Comandi aggiuntivi | Comandos
adicionales
Troubleshooting..........................................................................................................................
Fehlerbehebung | Dépannage | Risoluzione dei problemi | Solución de problemas
4
5
10
12
14
16
Page 4
4
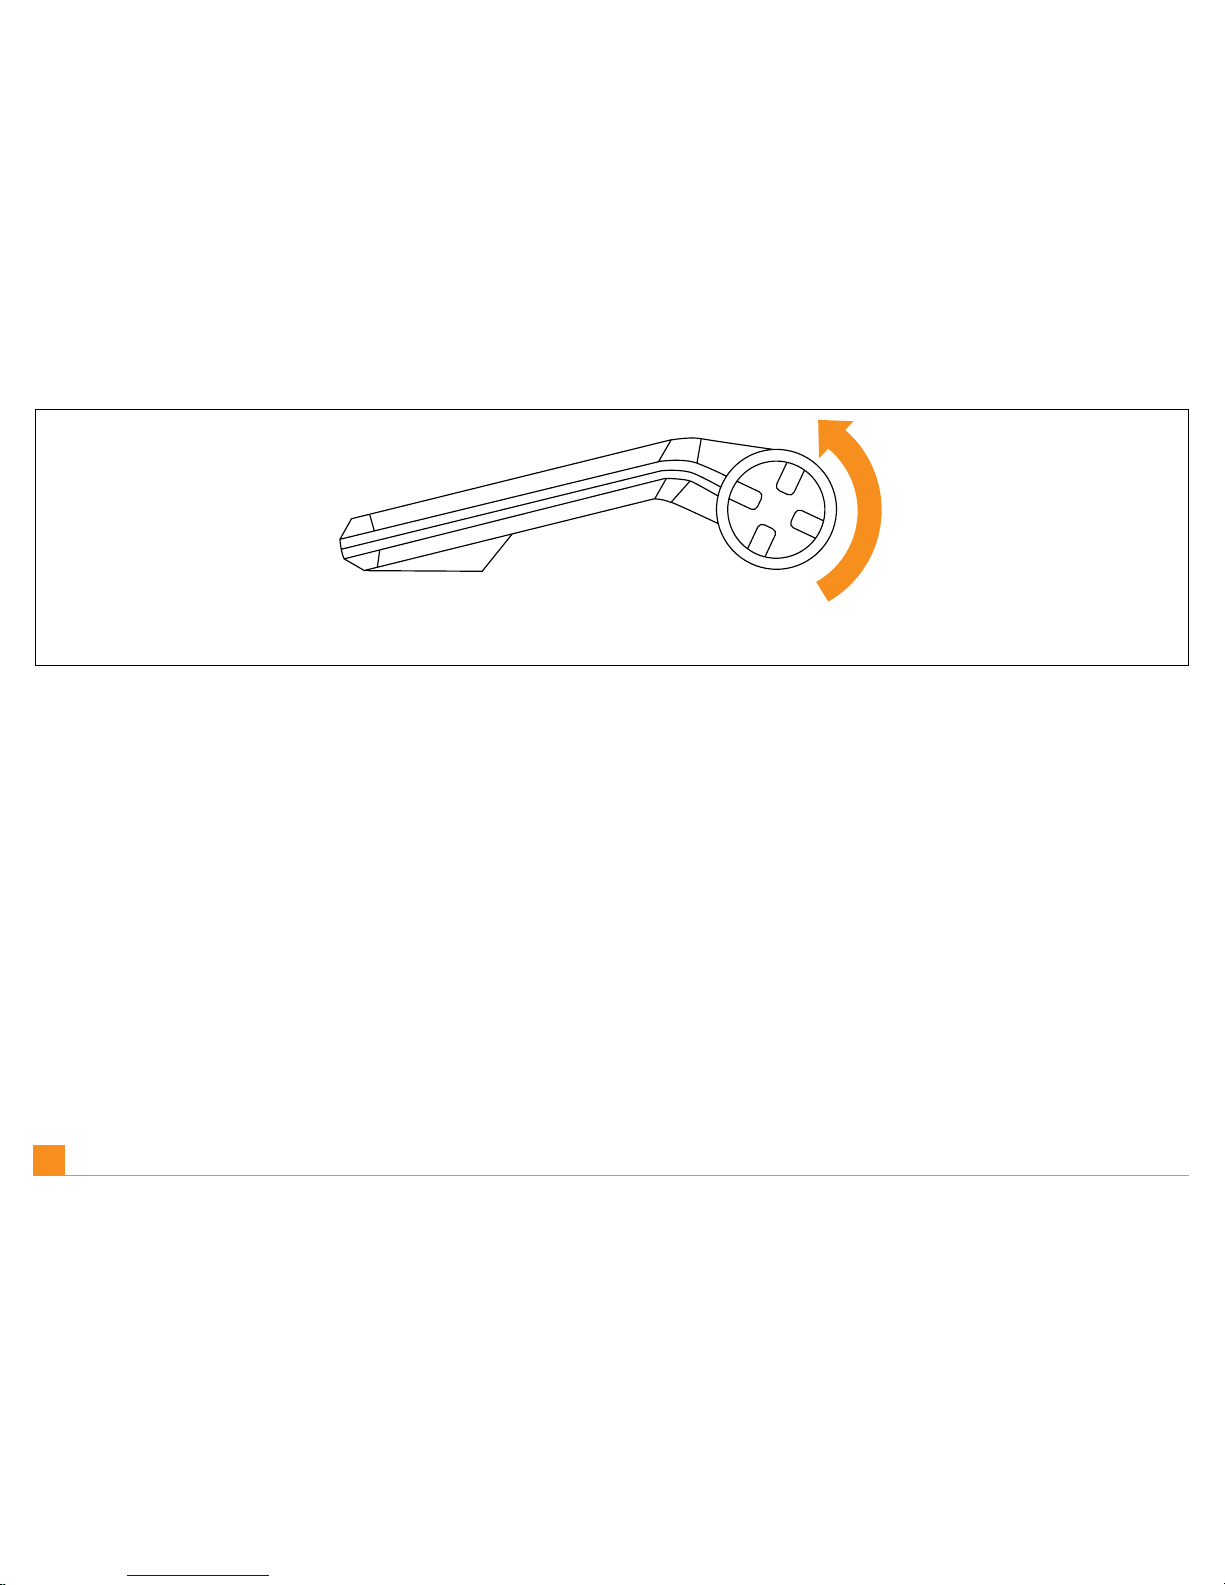
Before you start | Unscrew the battery cover at the back of the mouse. Insert the battery in
the direction shown and replace the battery cover.
Vor der Inbetriebnahme | Schrauben Sie die Batterieabdeckung auf der Rückseite der Maus
ab. Legen Sie die Batterie in der angezeigten Richtung ein und setzen Sie die Batterieabdeckung wieder auf.
Avant de commencer | Dévissez le couvercle du compartiment à pile, situé à l’arrière de la
souris. Insérez la pile dans le sens indiqué, puis replacez le couvercle.
Prima di cominciare | Svitare il coperchio della batteria nella parte posteriore del mouse.
Inserire la batteria nella direzione indicata, quindi riavvitare il coperchio.
Cuestiones preliminares | Desenrosque la tapa de la pila situada en la parte trasera del
ratón. Inserte la pila en la dirección indicada y vuelva a enroscar la tapa de la pila.
EN |
DE |
FR |
IT |
ES |
Page 5
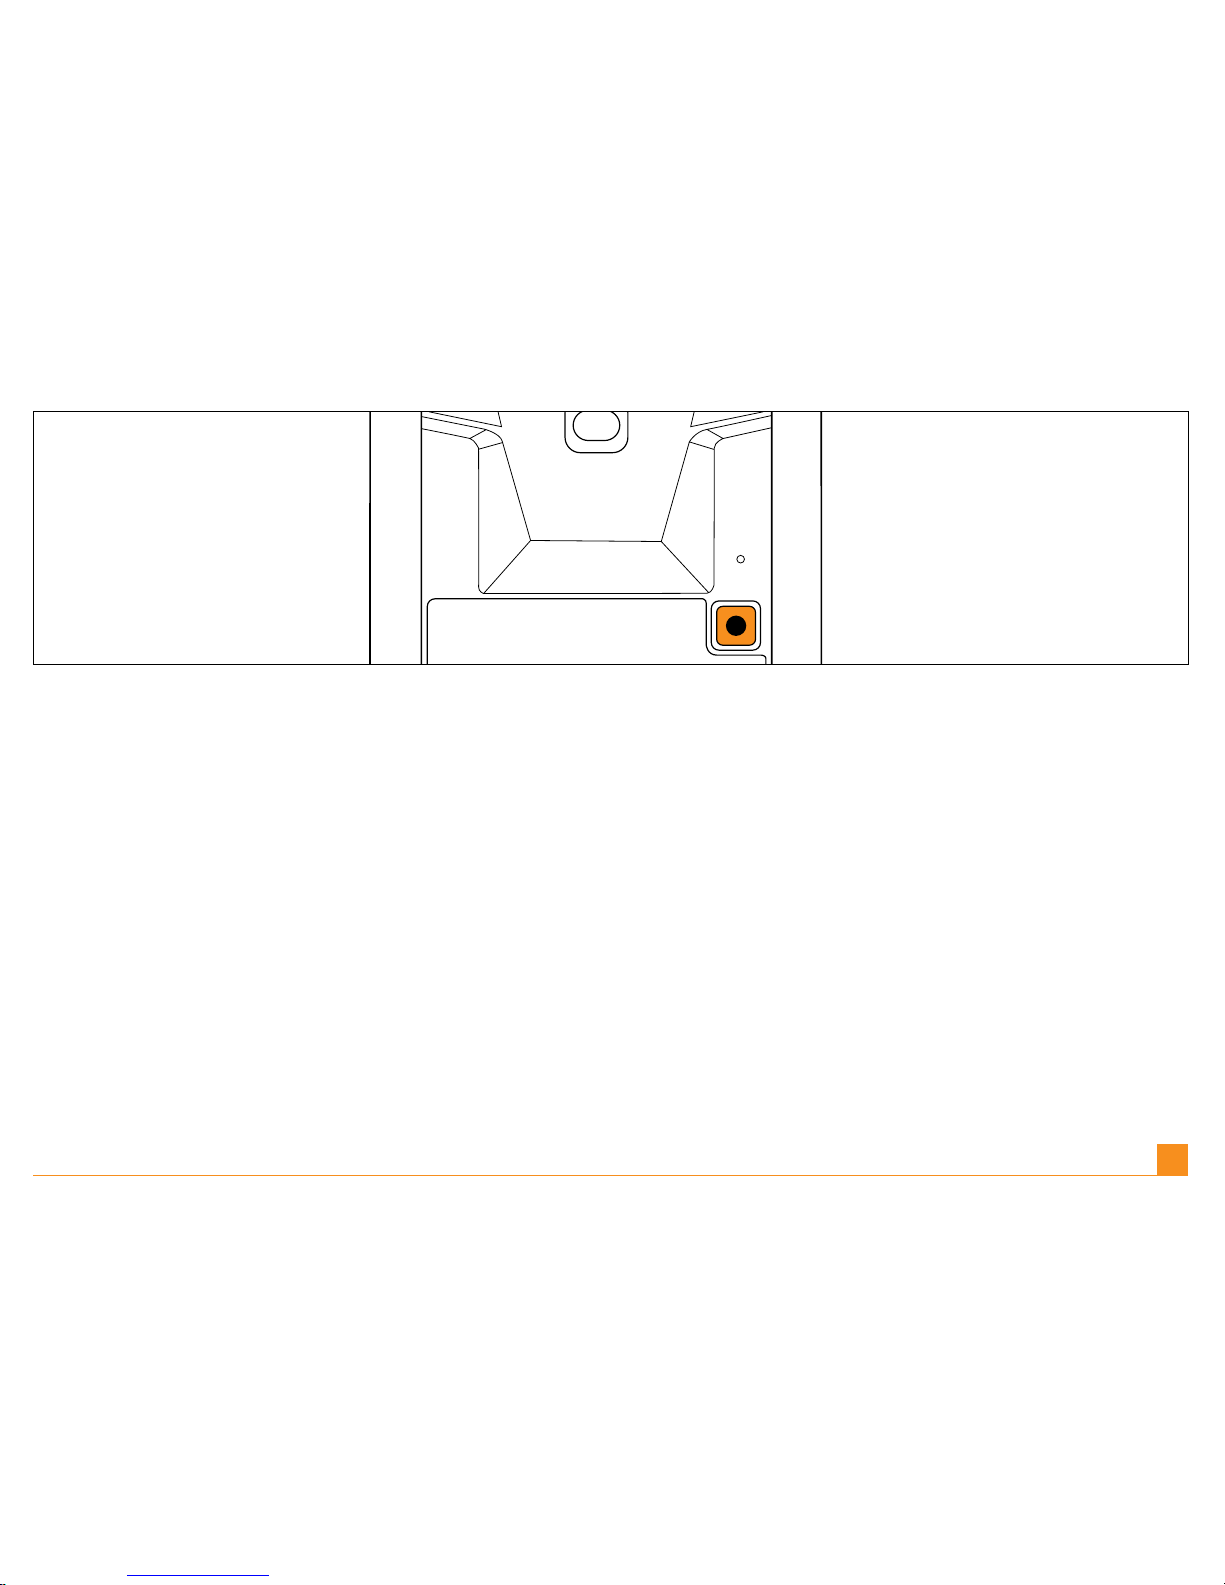
Setup & Pairing | Turn on the touchmouse™ by pressing the connection button on the
underside of the mouse once. The LED will light up green to show the mouse is on.
Einrichten und Verbinden | Schalten Sie die touchmouse™ durch einmaliges Drücken der
Verbindungstaste auf der Mausunterseite ein. Die LED leuchtet grün auf und zeigt an, dass
die Maus eingeschaltet ist.
Installation et connexion | Allumez la touchmouse™ en appuyant une fois sur le bouton de
connexion, situé sous la souris. Le voyant LED passera au vert pour indiquer que la souris est
allumée.
Impostazione & Sintonizzazione | Accendere il touchmouse™ premendo il tasto di connessione nella parte inferiore del mouse una volta. La LED si accenderà e sarà verde, per indicare
che il mouse è acceso.
Conguración y pareado | Encienda el ratón táctil; para ello, pulse una vez el botón de conexión que hay en la parte inferior del ratón. El diodo luminiscente (DEL) se iluminará en verde
para indicar que el ratón está en funcionamiento.
EN |
DE |
FR |
IT |
ES |
5
Page 6

Go to Windows Start, Settings, Control Panel, Bluetooth Devices. Click on the Devices tab
and click Add to open the Add Bluetooth Device Wizard. Select “my Device is set up and
ready to be found” and click Next. Your PC will now search for the mouse.
Gehen Sie auf Windows Start, Einstellungen, Systemsteuerung und Bluetooth-Geräte.
Klicken Sie auf die Leiste Geräte und danach auf Hinzufügen, um den „Bluetooth-Gerät
hinzufügen”-Assistenten zu öffnen. Wählen Sie „Mein Gerät ist eingestellt und kann gefunden
werden“ und klicken Sie auf „Weiter“. Ihr PC sucht nun nach der Maus.
Allez dans Windows Démarrer, Panneau de conguration, Périphériques Bluetooth.
Cliquez sur l’onglet Périphériques, puis sur Ajouter pour lancer l’assistant d’installation de
périphérique Bluetooth. Cochez « Mon périphérique est préparé et prêt à être détecté », puis
cliquez sur Suivant. Votre PC lancera alors la recherche de la souris.
Andare su Windows Start, Impostazioni, Pannello di controllo, e Strumenti Bluetooth. Cliccare sull’opzione Strumenti e cliccare Aggiungi per aprire lo strumento Bluetooth Device
Wizard. Selezionare “il mio Strumento è impostato e pronto per essere individuato” e cliccare
su Avanti. In questo modo il PC inizierà la ricerca del mouse.
Vaya a Windows Inicio (Start), Conguraciones (Settings), Panel de Control (Control Panel),
Dispositivos Bluetooth (Bluetooth Devices). Haga clic en el tabulador Dispositivos (Devices)
y haga clic en Añadir (Add) para abrir el Asistente de Dispositivos Bluetooth. Seleccione “mi
Dispositivo está congurado y listo para encontrarlo” (“my Device is set up and ready to be
found”) y haga clic en Siguiente (Next). Ahora su PC buscará el ratón.
EN |
DE |
FR |
IT |
ES |
6
Page 7

7
Press and hold the connection button for three seconds. The LED blinks red and green to
show that the mouse is looking for a connection.
Halten Sie die Verbindungstaste drei Sekunden lang gedrückt. Die LED blinkt rot und grün,
um zu zeigen, dass die Maus nach einer Verbindung sucht.
Appuyez et maintenez enfoncé le bouton de connexion pendant trois secondes. Le voyant
LED clignote alors en rouge et vert pour indiquer que la souris est en train de rechercher une
connexion.
Tenere premuto il tasto di connessione per tre secondi. La LED sarà rossa e verde e lampeggiante, per indicare che il Mouse sta ricercando una connessione.
Mantenga pulsado el botón de conexión durante 3 segundos. El DEL parpadeará en rojo y
verde para indicar que el ratón está intentando establecer una conexión.
EN |
DE |
FR |
IT |
ES |
Page 8

When the mouse is found, click on the mouse icon and then click on Next. At the next
screen, select “Don’t use a Passkey” and, when prompted, click Finish.
Sobald die Maus gefunden wurde, klicken Sie auf das Maussymbol und danach auf Weiter.
In der nächsten Ansicht wählen Sie „Keinen Pass-Key verwenden“ und drücken Sie nach
der Aufforderung auf Fertigstellen.
Lorsque la souris a été détectée, cliquez sur l’icône représentant la souris, puis sur Suivant.
Sur l’écran suivant, sélectionnez « Ne pas utiliser de passe », puis sur Terminer lorsque vous
y êtes invité.
Quando il mouse viene individuato, cliccare sull’icona del mouse e quindi cliccare su Avanti.
Nella schermata successiva, selezionare “Non utilizzare una Passkey” e, quando richiesto,
cliccare su Fine
Una vez el ordenador haya encontrado al ratón, haga clic en el icono del ratón y, seguidamente, en Siguiente. En la pantalla siguiente, seleccione “Don’t use a Passkey” (“No usar
una contraseña de paso”) y, cuando se le indique, pulse en Finalizar.
EN |
DE |
FR |
IT |
ES |
8
Page 9

9
If you do not have the option to select “Don’t use a Passkey” and are requested for one
please enter the code 0000.
Wenn die Option „Keinen Pass-Key verwenden“ nicht zur Auswahl steht und ein Schlüssel
verlangt wird, geben Sie bitte den Code „0000“ ein.
Si l’option « Ne pas utiliser de passe » ne vous est pas proposée et qu’il vous est demandé
d’entrer un code, entrez « 0000 »
Se non si ha l’opzione per selezionare “Non utilizzare una Passkey” e viene richiesta una
Passkey, inserire il codice “0000”.
Si no puede seleccionar “Don’t use a Passkey” y se le solicita que introduzca un código,
escriba “0000”.
EN |
DE |
FR |
IT |
ES |
Page 10

Power saving | To save battery life when not using the touchmouse™, press the connection
button on the underside of the mouse once to switch it off.
Stromsparfunktion | Wenn Sie die touchmouse™ nicht verwenden, drücken Sie zur Verlängerung der Batterielebensdauer die Verbindungstaste auf der Mausunterseite einmal, um
diese abzuschalten.
Economie d’énergie | Pour économiser sur la durée de vie de la pile lorsque vous n’utilisez
pas la touchmouse™, appuyez une fois sur le bouton de connexion, situé sous la souris,
pour l’éteindre.
Risparmio di energia | Per risparmiare l’energia della batteria quando non si utilizza il
touchmouse™, premere una volta il tasto di connessione nella parte inferiore del mouse per
spegnerlo.
Ahorro de energía | Para ahorrar energía cuando no use el touchmouse™, pulse una vez el
botón de conexión, situado en la parte inferior del ratón para apagarlo.
EN |
DE |
FR |
IT |
ES |
10
Page 11

11
Software installation | Insert the CD to install the software and follow the on screen instruc-
tions. Once installed Horizontal scrolling will be enabled. Speed can be adjusted via the
Windows mouse applet.
Installation der Software | Zur Installation der Software legen Sie die CD ein und befolgen
Sie die Anweisungen auf der Anzeige. Nach der Installation ist die horizontale Scrollingfunktion aktiviert. Die Geschwindigkeit dafür kann über das Windows Maus-Applet angepasst
werden.
Installation du logiciel | Insérez le CD pour installer le logiciel, puis suivez les instructions.
Une fois l’installation effectuée, le délement horizontal sera activé. La vitesse de délement
peut être ajustée avec l’applet « souris » de Windows.
Installazione del software | Inserire il CD per installare il software e seguire le istruzioni riportate sullo schermo. Una volta installato il software sarà possibile effettuare lo scorrimento
orizzontale. La velocità può essere regolata attraverso l’applet del mouse di Windows.
Instalación del software | Inserte el CD para instalar el software y siga las instrucciones que
aparezcan en la pantalla. Una vez instalado el CD, podrá desplazarse en horizontal. Puede
ajustar la velocidad en la miniaplicación para ratón por defecto de Windows.
EN |
DE |
FR |
IT |
ES |
Page 12

Scroll function | Slide your ngertip on the scroll area to activate the scroll function. Slide
your nger quickly to activate the fast scroll function. Tap your nger once on the scroll area
to stop the function. Slide your nger up or down to scroll upwards or downwards through a
document or left and right to scroll to the left or right of the document.
Scroll-Funktion | Gleiten Sie mit Ihrer Fingerspitze über den Scrollbereich, um die Scrollingfunktion zu aktivieren. Mit einer schnellen Fingerbewegung aktivieren Sie die schnelle
Scrollingfunktion. Klopfen Sie mit Ihrem Finger einmal auf den Scrollbereich, um die Funktion
zu deaktivieren. Gleiten Sie mit dem Finger nach oben und unten, um nach oben oder unten
durch ein Dokument zu scrollen, oder von links nach rechts, um nach links oder rechts in
einem Dokument zu scrollen.
Fonction de délement | Passez le doigt sur le pavé tactile pour activer la fonction de délement. Effectuez un mouvement rapide du doigt pour activer la fonction de délement rapide.
Tapez une fois sur le pavé tactile pour mettre n au délement rapide. Déplacez votre doigt
vers le haut, le bas, la gauche ou la droite pour faire déler un document dans la direction
souhaitée.
Funzione di scorrimento | Per attivare la funzione di scorrimento, passare la punta del dito
sulla zona dello scorrimento. Per attivare la funzione di scorrimento rapida, scorrere rapidamente con il dito. Per interrompere la funzione premere brevemente con il dito una volta.
Spingere in su e in giù con il dito per scorrere un documento verso il basso o verso l’alto, o a
destra e a sinistra per scorrere un documento da destra verso sinistra e viceversa.
EN |
DE |
FR |
IT |
12
Page 13

13
Función de desplazamiento | Deslice la yema del dedo por el área de desplazamiento para
activar esta función. Deslice su dedo con rapidez para activar la función de desplazamiento
rápido. Dé un toque con el dedo en el área de desplazamiento para detener la función.
Deslice su dedo hacia arriba o abajo para desplazarse en esas direcciones por el documento, o hacia la izquierda o la derecha del documento.
ES |
Page 14

Gesture commands
You can perform a range of additional mouse commands by pressing and holding the
middle mouse button and moving the mouse.
Befehle mit Handbewegung | Sie können die folgenden zusätzlichen Mausbefehle ausführen, indem Sie die mittlere Maustaste gedrückt halten und die Maus bewegen.
Commandes spéciales | Vous pouvez également effectuer les commandes spéciales
suivantes si vous appuyez et maintenez enfoncé le bouton central lorsque vous déplacez la
souris.
Comandi aggiuntivi | È possibile eseguire la seguente serie aggiuntiva di comandi del
mouse tenendo premuto il tasto centrale del mouse e muovendo il mouse.
Comandos adicionales | Puede realizar la siguiente serie de comandos adicionales del
ratón si mantiene pulsado el botón central del ratón al tiempo que mueve el ratón.
EN |
DE |
FR |
IT |
ES |
14
Page 15

Internet Next page
Internet Nächste Seite�
Page Internet Suivante
Pagina Web successiva
Siguiente página de Internet
Internet home page
Internet Startseite�
Page dh’accueil Internet
Home page Web
Página de inicio de Internet
Internet refresh
Internet Aktualisieren�
Actualiser Internet
Aggiornamento pagina Web�
Actualización de Internet
Internet Previous page
Internet Vorherige Seite�
Page Internet Précédente
Pagina Web precedente
Página previa de Internet
15
Page 16

Troubleshooting | If the mouse does not work:
1 Check the batteries have not expired and are inserted properly.
2 Make sure the mouse is switched on by pressing the button on the underside.
Re-establish a Bluetooth connection between mouse and computer by following the installation instructions above.
Fehlerbehebung | Wenn die Maus nicht funktioniert:
1 Überprüfen Sie, ob die Batterie aufgeladen und richtig eingelegt ist.
2 Stellen Sie sicher, dass die Maus eingeschaltet ist, indem Sie die Taste auf der Unterseite
drücken.
Stellen Sie erneut eine Bluetooth-Verbindung zwischen der Maus und dem Computer her,
indem Sie die Installationsanweisungen oben befolgen.
Dépannage | Si la souris ne fonctionne pas :
1 Vériez que la pile n’est pas déchargée et qu’elle est correctement insérée.
2 Assurez-vous que la souris est bien allumée en appuyant sur le bouton situé en dessous.
Rétablissez une connexion Bluetooth entre la souris et votre ordinateur en suivant les
instructions d’installation ci-dessus.
Risoluzione dei problemi | Se il mouse non funziona:
1 Controllare che la batteria non sia scaduta e che sia inserita correttamente.
2 Assicurarsi che il mouse sia acceso premendo il tasto nella parte inferiore del mouse.
Ristabilire una connessione bluetooth fra il mouse e il computer seguendo le istruzioni per
l’installazione riportate sopra.
EN |
DE |
FR |
IT |
16
Page 17

Solución de problemas | En caso de que el ratón deje de funcionar, haga lo siguiente:
1 Asegúrese de que la pila no esté caducada y de que esté insertada correctamente.
2 Asegúrese de que el ratón esté encendido; para ello, pulse el botón que hay en la parte
inferior.
Restablezca la conexión Bluetooth entre el ratón y el ordenador siguiendo las instrucciones
de instalación descritas anteriormente.
ES |
17
Page 18

Further information
For further product information, updated drivers and FAQ’s visit www.eclipsetouch.com
Zusätzliche Informationen
Für weitere Produktinformationen, aktualisierte Treiber und Häug gestellte Fragen besuchen
Sie www.eclipsetouch.com
Informations complémentaires
Pour plus d’informations sur le produit, pour les mises à jour de pilote et pour consulter
notre Foire aux questions, visitez notre site à l’adresse www.eclipsetouch.com
Ulteriori informazioni
Per ulteriori informazioni sul prodotto, sui driver aggiornati e per trovare le risposte alle
domande più frequenti, visitare il sito web www.eclipsetouch.com
Más información
Si desea más información acerca del producto, controladores actualizados y preguntas más
frecuentes (FAQ), visite el sitio web www.eclipsetouch.com
EN |
DE |
FR |
IT |
ES |
18
Page 19

Page 20

© 2010 Mad Catz Interactive Asia Limited (MCIA). Eclipse, touchmouse™, the Eclipse logo, Mad Catz and the Mad Catz logo are trademarks or registered
trademarks of Mad Catz, Inc and/or its afliated companies. The shape and design of this product are a trade dress of Mad Catz and/or MCIA. All other trademarks
or registered trademarks are the property of their respective owners. Made in China. All rights reserved. Product features, appearance and specications may be
subject to change without notice. Please retain this information for future reference.
© 2010 Mad Catz Interactive Asia Limited (MCIA). Eclipse, touchmouse™, le logo Eclipse, Mad Catz et le logo Mad Catz sont des marques decommerce ou des
marques déposées de Mad Catz, Inc., et/ou ses sociétés afliées. . La forme et le design de ce produit sont caractéristiques de la marque Mad Catz et/ou MCIA.
Toutes les autres marques ou marques déposées sont la propriété de leurs propriétaires respectifs. Fabriqué en Chine. Tous droits réservés. L’aspect, les fonctionnalités et les spécications du produit peuvent changer sans préavis. Veuillez conserver cette notice pour référence ultérieure.
© 2010 Mad Catz Interactive Asia Limited (MCIA). Eclipse, touchmouse™ y el logotipo de Eclipse, Mad Catz y el logotipo de Mad Catz son marcas comerciales
o marcas comerciales registradas de Mad Catz, Inc., y/o sus compañías aliadas. La forma y el diseño de este producto es la imagen de marca de Mad Catz y/o
MCIA. Todas las demás marcas o marcas registradas son propiedad de sus respectivos propietarios. Fabricado en China. Reservados todos los derechos. Las
características, el aspecto y las especicaciones del producto pueden ser objeto de modicación sin previo aviso. Por favor guarde esta información para su
consulta en el futuro.
Mad Catz is a publicly traded company on the TSX/AMEX, symbol MCZ.
Les actions de Mad Catz sont cotées en bourse sur le TSX/AMEX sous le symbole MCZ.
www.madcatz.com
 Loading...