

Mad Catz 900MHz DUAL FORCE 2, 8256 User Manual
ENGLISH
900MHz DUAL FORCE 2™ CONTROLLER
PLAYSTATION®2, PSONE™ and PLAYSTATION
®
Thank you for purchasing the Mad Catz 900MHz Dual Force 2 controller for
use with the PlayStation 2/PlayStation/PS one video game system. The 900
MHz Wireless Dual Force 2 controller puts you in control of your game system
with all the comfort of a remote controller combined with the reliability of
cutting-edge wireless technology. With its ‘unblockable” RF signal transceivers,
the 900MHz Dual Force 2 lets you comfortably play from up to 40’ from your
PlayStation 2/PlayStation/PS one while maintaining complete control over your
gaming experience. This user guide will help you understand how to use your
900MHz Dual Force 2 controller and get the most from the features it has to offer.
The 900MHz Dual Force 2 controller is one of the most durable and reliable
accessories you can buy. Be sure to visit www.madcatz.com to register your
product and check out our full line of other quality video game accessories.
TABLE OF CONTENTS
SET-UP 2
LAYOUT 2
CONTROL MODES 4
MULTIPLE CONTROLLERS 5
RESETTING THE CONTROLLER 5
PROGRAMMING MACROS 6
CAUTIONS 9
TROUBLESHOOTING 9
TECHNICAL SUPPORT 9
WARRANTY 10
SET-UP
1. Plug-in the Charge Dock.
2. Place the controller in the Charge Dock. Allow the controller to charge for ten
hours before initial use. The Mode Button will slowly flash amber while charging.
Additionally, while you are using the controller and the battery life is low, the Mode
Button will flash amber at a quicker rate – this indicates the battery has 10 minutes
of life remaining.
3. Turn off the power to your game console.
4. Insert the Antenna Receiver into the controller port on the game console.
5. Turn on the power to your game console and begin play.
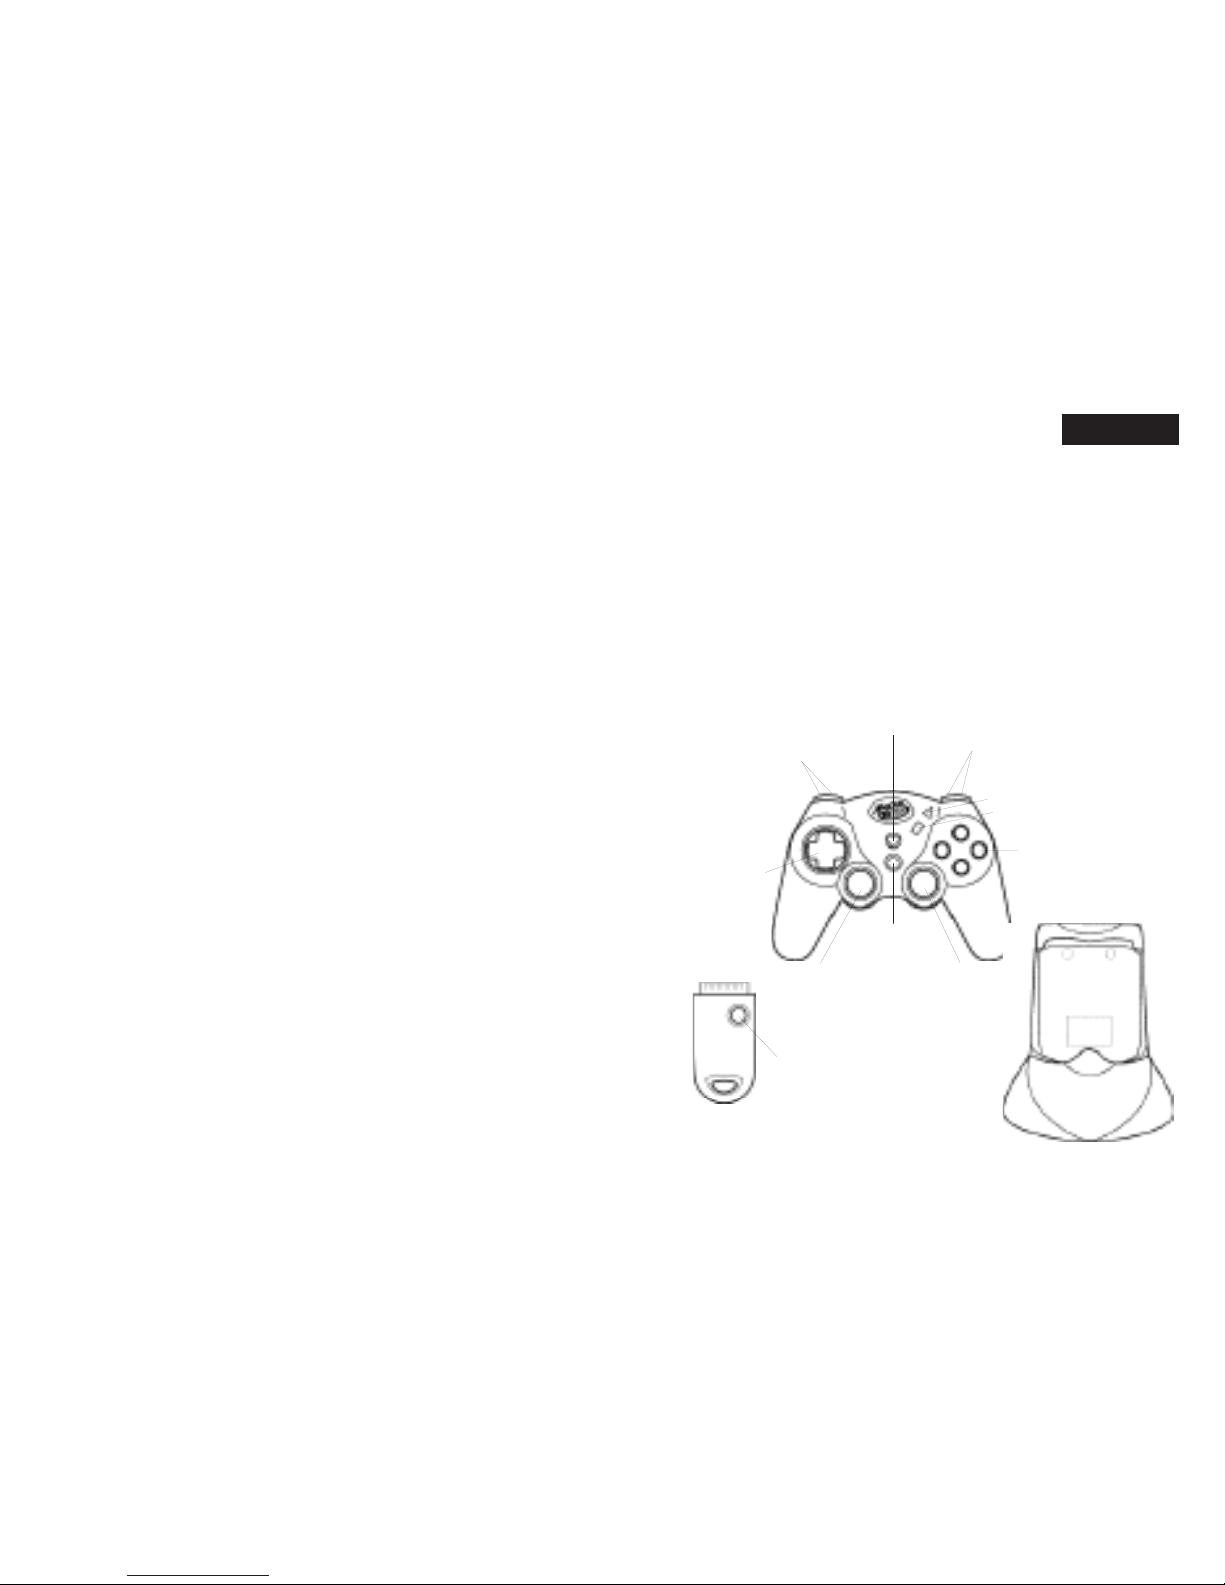
LAYOUT
1 2
Reciever
L1 (above)
L2 (below)
R1 (above)
R2 (below)
Directional
Pad
Controller
L3
(press down)
Macro
Mode
Start
Action
Buttons
Select
R3
(press down)
Charge Dock
Reset
Charge Dock: Used to recharge the 900MHz Dual Force 2 controller. While
recharging, the [MODE] Button will flash amber. If the [MODE] Button is not
flashing, the controller is not making proper contact with the Charge Dock. A fully
charged battery should last up to five hours. To fully charge a battery, leave the
controller in the Charge Dock for 10 hours for the first time. For maximum battery
life, run the controller battery all the way down before recharging. When the
controller is fully charged, the MODE LED will turn amber.
Antenna Receiver: Used to transmit and receive data from the controller
to the game console.
Directional Pad: The D-pad controls the direction in which the character
moves. This is the primary directional control while in Digital Mode.
Analog Sticks: The two analog sticks each control two axes (X-and Y-axis).
Different software titles will allow you to modify the way that the analog sticks
react in the games. While in Analog Mode, any software title that is Vibration
Function Compatible will cause the 900MHz Dual Force 2 controller to vibrate at
different levels, depending on actions taking place from within the game (e.g.,
being hit, crashing, or shooting).
NOTE : NOT ALL GAMES ARE VIBRATION FUNCTION COMPATIBLE. LOOK
FOR THE “VIBRATION FUNCTION COMPATIBLE” ICON ON THE BACK OF THE
PACKAGE OR INSTRUCTION MANUAL FOR THE GAME THAT YOU ARE PLAYING.
Shoulder Buttons (L1, L2, R1, and R2): These are action buttons and
their specific functions depend on the software being used.
Action Buttons ( ) : These buttons are used to perform
various actions, depending on the software. For more details, see the software
instruction manual.
Start Button: This button is generally used to make selections in the menus
and for pausing the game. For more details, see the software instruction manual.
Select Button: This is a standard button that allows you to do various things,
depending on the software. For more details, see the software instruction manual.
ENGLISH
ENGLISH
Mode Button: The 900MHz Dual Force 2 controller has three different modes;
Analog Controller Mode, Steering Wheel Mode and Digital Mode. The current
mode is indicated by the color of the [MODE] Button on the faceplate of the
controller:
Green Light - STEERING WHEEL MODE
Red Light - ANALOG MODE
Light Off - DIGITAL MODE
(Refer to “CONTROL MODES” for instructions on this feature.)
Macro Button: Used for recording a series of commands to a single button.
(Refer to “PROGRAMMING MACROS” for instructions on this feature.)
Reset Button: The Antenna Receiver unit features a [RESET] button. The
[RESET] button will tell the Antenna Receiver to find a new clear transmission
channel if interference is experienced. Refer to “RESETTING THE CONTROLLER”
for instructions on this feature.
CONTROL MODES
There are three different control modes from which you can choose, depending on
your style of play. Change control modes by pressing the Mode button. The color of
the lighted Mode button tells you which mode you are in:
Analog Controller Mode - RED light
This is the standard “Dual Shock™” mode. Some games will only vibrate if the
controller is in Analog Controller mode.
Steering Wheel Mode - GREEN light
This mode is best for driving games that use Steering Wheel (or NeGcon™)
protocols. Some games will allow you to calibrate from within the software. This
will allow the user to adjust the sensitivity from within the game. This sensitivity and
adjustment feature is only available in Steering Wheel mode.
Digital Mode - Light OFF
This is the original PlayStation controller mode. This is the default control mode.
3 4

ENGLISH ENGLISH
MULTIPLE CONTROLLERS
If you want to use two or more 900MHz Dual Force 2 controllers at the same
time (as in multi-player games or with the Mad Catz PS2 Multi-Tap™), simply
plug the controllers into the game system as you normally would and begin play.
You don’t need to set any buttons or switches. The Mad Catz Wireless Dual
Force 2 controller uses AUTOMATIC CHANNEL RECOGNITION and AUTOMATIC ID
RECOGNITION to automatically avoid most controller interference conflicts.
When you play in the multi-player mode
WITHOUT a Multi-Tap:
1. Insert the game disk and turn on your console.
2. Insert the Antenna Receiver for the first controller into the Player-1 Controller
port on the game console.
3. Confirm the link between first Antenna Receiver and first Wireless Dual Force 2
controller by using the controller to see if it works in the game or game menu.
(If the controller will not respond, refer to “RESETTING THE CONTROLLER”.)
4. Insert the Antenna Receiver for the second Wireless Dual Force 2 controller into
the Player-2 Controller port on the game console.
5. Confirm the link between second Antenna Receiver and second Wireless
Dual Force 2 controller by using the controller to see if it works in the game
or game menu. (If the controller will not respond, refer to “RESETTING THE
CONTROLLER”.)
When you play in the multi-player mode WITH a Multi-Tap:
If you want to play with the Multi-Tap, you should set each controller in the same
way as listed above – Plug in and confirm each controller one by one.
RESETTING THE CONTROLLER
On a rare occasion, two or more controllers may be set to the same ID and
may interfere with each other, preventing each controller from working properly.
Additionally, another RF source (such as a 900 MHz wireless phone) may cause
interference. If this should happen, reset the controller as follows:
1. Disconnect the Antenna Receiver from the game console.
2. Press [SELECT] and [MODE] and [MACRO] buttons on the Wireless Dual Force 2
controller at the same time and hold for two seconds – then release the [SELECT]
and [MODE] and [MACRO] buttons – the [MODE] and [MACRO] buttons should
begin to flash.
3. Press and hold the [RESET] button on the Antenna Receiver – While holding the
[RESET] button, insert Antenna Receiver into the game console – Release the
[RESET] button on the Antenna Receiver when the [MODE] and [MACRO] buttons
stop flashing on the Wireless Dual Force 2 controller (allow several seconds for
the Wireless Dual Force 2 controller and Antenna Receiver to establish a link.)
PROGRAMMING MACROS
The 900MHz Dual Force 2 controller features a powerful macro function. When
playing certain games, especially fighting games, a combination of directional pad
and action button presses executes special moves for more intricate attacks. The
macro function allows that series of button presses to be easily programmed and
executed from a single button press. Being able to program these commands
to a single button will allow you to perform the special moves on demand and
without failure.
Recording Macros
Macros can be recorded to four different buttons for playback: L2, L3, R2, and R3
(see “Layout”). One macro will allow up to 10 button presses. Pressing multiple
buttons simultaneously counts as a single command. In other words, pressing X, O,
and Triangle at the same time is one command, not three. A delay also counts as a
command. Your commands must be able to be executed within 1.5 seconds to take
advantage of the macro function.
Delay:
In some combos, it may be necessary to have a delay between commands. To
record a delay, press the [SELECT] button. If a longer delay is necessary, press
the [SELECT] button as many times as needed. You may need to experiment with
your particular game.
5 6
 Loading...