

Page 1
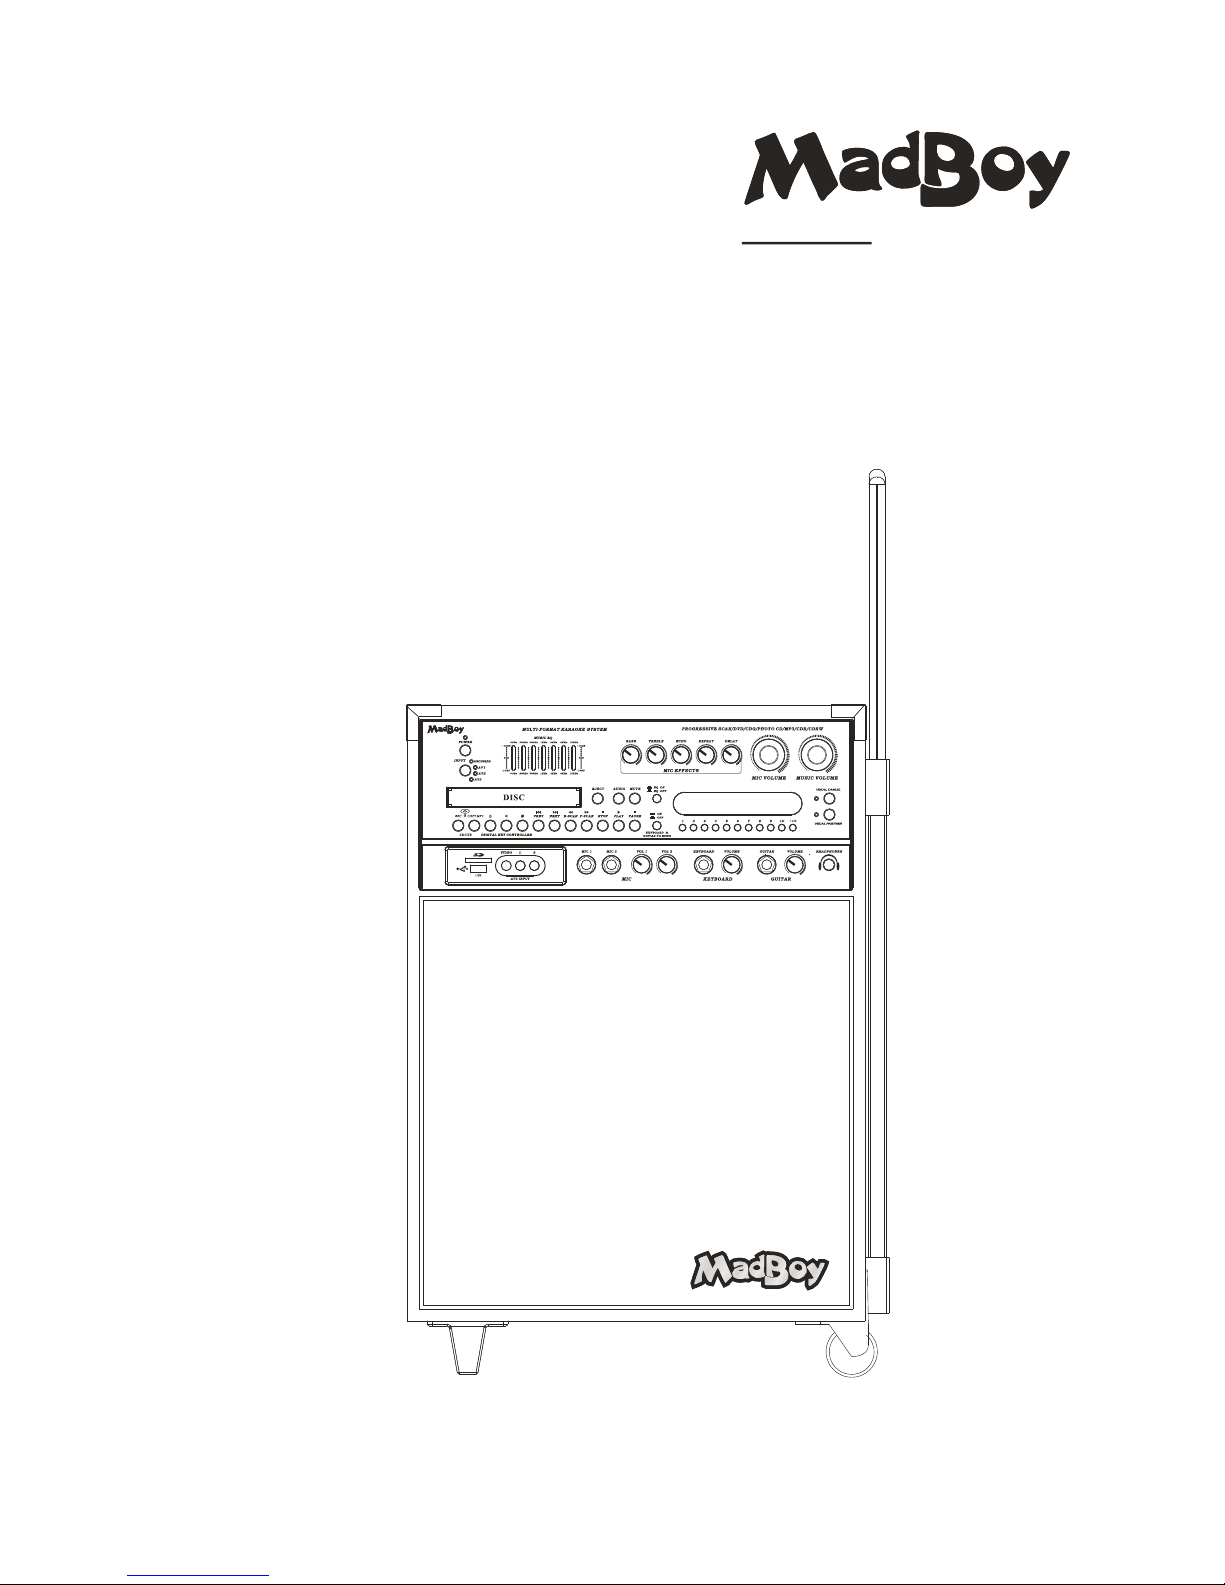
MULTI-FORMAT KARAOKE SYSTEM
THUNDER
USER MANUAL
THUNDER
Page 2

Safety nstructions ..................................................................................................Ι
Features .................................................................................................................
Specifications .........................................................................................................
Package contents....................................................................................................
Getting Connected:
●Connecting Power ...............................................................................................
●Connecting to a TV Video Monitor with an RCA input/ .............................................
●Connecting to an Audio Mixer or TV with RCA Audio Inputs ......................................
●Balanced audio output connections.......................................................................
●Connecting effects using the effect insert...............................................................
●Connecting to a Dolby Pro Logic Amplifier..............................................................
●Connecting to a TV with Component Video.............................................................
●Connecting to a DTS Receiver Decoder/ .................................................................
General :
● ............................................................................................
● .....................................................................................
● .............................................................
General Operations:
●Turning the On, Off and to Standby .........................................................
●Input Channels ....................................................................................................
●Adjusting the master Music Volume .......................................................................
●Adjusting the master Microphone Volume ...............................................................
●Adjusting the master MUSIC EQ ............................................................................
●Changing the Video Mode PAL NTSC( / ) .................................................................
Operations (Disc Mode):
●Loading a Disc .....................................................................................................
●Playing a Disc ......................................................................................................
● ...................................................................................................
● ....................................................................................................
●Skipping Tracks Chapters/ ....................................................................................
●Searching Through a Track Chapter/ ......................................................................
●Subtitles .............................................................................................................
●Viewing Multiple Angles ........................................................................................
● .......................................................
●Viewing One Frame at a Time Using the STEP Button ..............................................
●Selecting Repeat Options .....................................................................................
●Creating a Loop Using the A B Button- ....................................................................
●Canceling Vocals Using the L R button/ ...................................................................
●Zooming in and Out ..............................................................................................
●Jumping to Specific Time on a Disc ........................................................................
●Viewing and Setting the On Screen Display OSD( ) ..................................................
●Last Memory Function...........................................................................................
DVD Output Connections:
Connections
Av input connections
Headphones connections
Microphone/Instrument input Connections
THUNDER
Stopping a Disc
Pausing a Disc
Slow-motion Playback using the SLOW button
1
3
4
4
5
5
6
6
6
7
7
8
8
9
9
10
10
10
10
11
11
11
11
11
11
11
11
11
11
11
12
12
12
12
12
12
13
13
Table of Contents
WWW.MADBOY-AUDIO.COM
Page 3

Operations (Mp3 and AVI / DivX):
●To play a file .........................................................................................................
●Direct track access ...............................................................................................
●Repeat Options ...................................................................................................
USB AND SD CARD Operations (Disc Mode)
●Using the USB Input .............................................................................................
●Using the SD Card Slot .........................................................................................
Microphone Operations :
●Turning on the Microphones ..................................................................................
●Adjusting the master Microphone Volume ...............................................................
●Adjusting the Individual Microphone Volume controls ..............................................
●Adjusting the Microphone Tone ..............................................................................
●Using Digital Echo ................................................................................................
●Adjusting the KEYBOARD Volume .........................................................................
●Adjusting the GUITAR Volume ...............................................................................
Descriptions and Functions:
●Front Panel ..........................................................................................................
●Rear Panel ..........................................................................................................
●Remote Control ....................................................................................................
DVD System Setup Menu:
●System Setup ......................................................................................................
●Language Setup.. ................................................................................................
●Audio Setup........ .................................................................................................
●Video Setup....... ..................................................................................................
●Speaker Setup .....................................................................................................
●Digital Setup .......................................................................................................
Troubleshooting ....................................................................................................
13
13
14
14
14
15
15
15
15
16
16
16
17
20
22
25
26
26
26
27
27
28
Table of Contents
WWW.MADBOY-AUDIO.COM
Page 4
* TO PREVENT FIRE OR SHOCK HAZARD. DO NOT EXPOSE THIS APPLIANCE TO RAINOR MOISTURE.
*THIS APPLIANCE SHALL NOT BE EXPOSED TO DRIPPING OR SPLASHING WATER AND THAT NO
OBJECT FILLED WITH LIQUIDS SUCH AS VASES SHALL BE PLACED ON APPARATUS.
IMPORTANT SAFETY INSTRUCTIONS
1) Read these instructions.
2) Keep these instructions.
3) Heed all warnings.
4) Follow all instructions.
5) Do not use this apparatus near water.
6) Clean only with dry cloth.
7) Do not block any ventilation openings. Install in accordance with the manufacturer's instructions.
8) Do not install near any heat sources such as radiators, heat registers, stoves, or other apparatus
(including amplifiers) that produce heat.
9) Do not defeat the safety purpose of the polarized or grounding-type plug. A polarized plug has two
blades with one wider than the other. A grounding type plug has two blades and a third grounding
prong. The wide blade or the third prong are provided for your safety. If the provided plug does not
fit into your outlet, consult an electrician for replacement of the obsolete outlet.
10) Protect the power cord from being walked on or pinched particularly at plugs, convenience
receptacles, and the point where they exit from the apparatus.
11) Only use attachments/accessories specified by the manufacturer.
12) Use only with the cart, stand, tripod, bracket, or table specified by the manufacturer, or sold with the
apparatus. When a cart is used, use caution when moving the cart/apparatus combination to avoid
injury from tip-over.
WARNING
S3125A
Safety instructions
1
WWW.MADBOY-AUDIO.COM
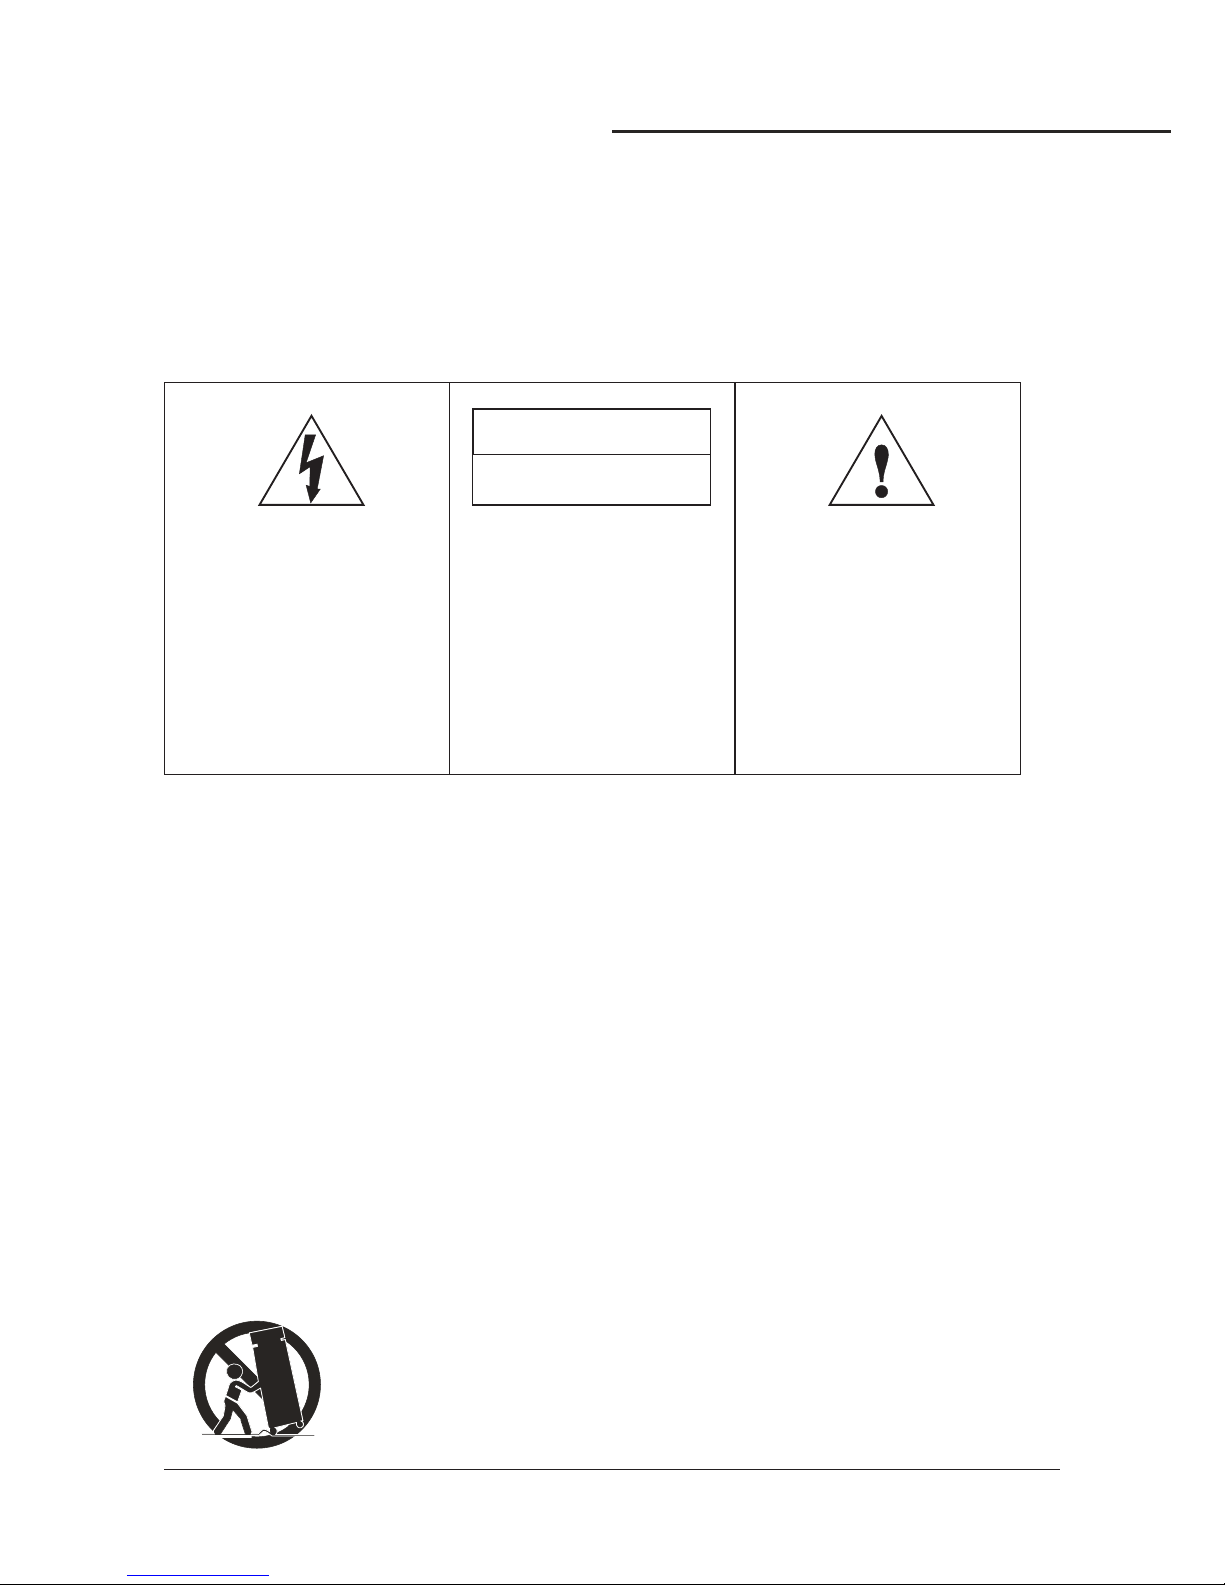
This lightning flash with
arrowhead symbol, within an
eq u i l a t e r a l t r i an g l e , is
intended to alert the user to
the presence of uninsulated
”dangerous voltage” within
the product’s enclosure that
m a y b e o f s uf f i c ie n t
magnitude to constitute a risk
of electric shock to persons.
Warning: To reduce the risk of
electric shock, do not remove
cover (or back) no userserviceable parts inside. Refer
servicing to qualified service
personnel.
The exclamati on point
wi t h i n a n eq u i l a ter a l
triangle is intended to alert
the user to the presence of
important operating and
maintenance (servicing)
i n s t r u c t i o n s i n t h e
literature accompanying
the appliance.
CAUTION
RISK OF ELECTRIC SHOCK
DO NOT OPEN
Page 5
Class 1 Laser Product
CAUTION: USE OF ANY CONTROLS, ADJUSTMENTS, OR PROCEDURES OTHER THAN
THOSE SPECIFIED HEREIN MAY RESULT IN HAZARDOUS RADIATION EXPOSURE.
PRODUCT COMPLIES WITH DHHS RULE 21 CFR SUBCHAPTER J IN EFFECT AT DATE
OF MANUFACTURE.
CAUTION: Invisible laser radiation when open. Do not stare into beam.
13 ) Unplug this apparatus during lightning storms or when unused for long periods of time.
14 ) Refer all servicing to qualified service personnel. Servicing is required when the apparatus has been
damaged in any way, such as power-supply cord or plug is damaged, liquid has been spilled or objects
have fallen into the apparatus, the apparatus has been exposed to rain or moisture, does not operate
normally, or has been dropped.
15) Grounding or Polarization This product may be equipped with a polarized alternatingcurrent line plug
(a plug having one blade wider than the other). This plug will fit into the power outlet only one way.
This is a safety feature. If you are unable to insert the plug fully into the outlet, try reversing the plug.
If the plug should still fail to fit, contact your electrician to replace your obsolete outlet. Do not defeat
the safety purpose of the polarized plug.
16) Ventilation Slots and openings in the cabinet are provided for ventilation and to ensure reliable
operation of the product and to protect it from overheating, and these openings must not be blocked
or covered. The openings should never be blocked by placing the product on a bed, sofa, rug, or other
similar surface. This product should not be placed in a built-in installation such as a bookcase or rack
unless proper ventilation is provided or the manufacturer's instructions have been adhered to.
17) The MAINS plug or an appliance coupler is used as the disconnect device, the disconnect device shall
remain readily operable.
Class II equipment symbol
This symbol indicates that the unit has
a double insulation system
Safety instructions
2
WWW.MADBOY-AUDIO.COM
Page 6

Features:
1
1.6-speaker cabinet design to fit every party or event include in-home ,classroom, church and other
public address etc, which pumps 80W total power(peak to peak)
2. Multi format player supports DVD,DVD-R,DVD-RW,VCD, CDG,MP3,MP4,DIVX, Photo-CD, CD,
CD-R, and CD-RW Formats
3. Support USB/SD card MP3 record function to let you record your own vocal to the USB/SD card.
4. Built-In USB and SD Card reader to play your DVD,VCD. MP3, WMA, AVI, MP4, DAT, MPG and JPG files.;
5. 1/4 inch Guitar and Keyboard Inputs with Individual Volume Controls
6. One 6.35mm stereo headphone output.
7. Digital Key Control
8. Vocal Cancel and Partner Modes for Canceling Vocals from Multiplexed Media
9. 7-Band Equalizer for Precise Audio Adjustments and Room Tuning
10. Two wired microphone input with volume controls(two unbalanced 1/4” microphone inputs at the front
panel and two balanced microphone inputs at the rear panel);
11. Digital Echo with Repeat and Delay Controls;
12. Inputs/Outputs: 3 RCA A/V (AV1,AV2 and AV3) inputs and 2 RCA A/V / One Balanced Audio outputs;
13. One stereo 1/4 inch audio pre-out,and DVD 5.1 AV outputs.
14. Remote Control for Easy Operation.
15. 115V/230V and NTSC-PAL Compatible for Worldwide Use.
Features
3
WWW.MADBOY-AUDIO.COM
Page 7
Specifications
●AC input voltage AC 115V 60HZ AC 230V 50HZ............................................................. /
●Audio output power 250W peak to peak THD 10......................................................... = %
●AV1 audio input sensitivity 500mV...............................................
●Video input sensitivity 1V Peak to Peak.................................................... ( )
●Mic input sensitivity 8 mV........................................................
●KEYBOARD GUITAR input sensitivity 8mV/ ...............................
●Video output level 1V Peak to Peak.......................................................... ( )
●Audio output level 1000mV...........................................................
●S N Ratio 90dB/ .......................................................................
●
●W ...........................................................................
Dimension......................................................................
eight
AAA Batteries(2)
A/V RCA Cable(1)
AC Power Cord(1)
Remote Control(1)
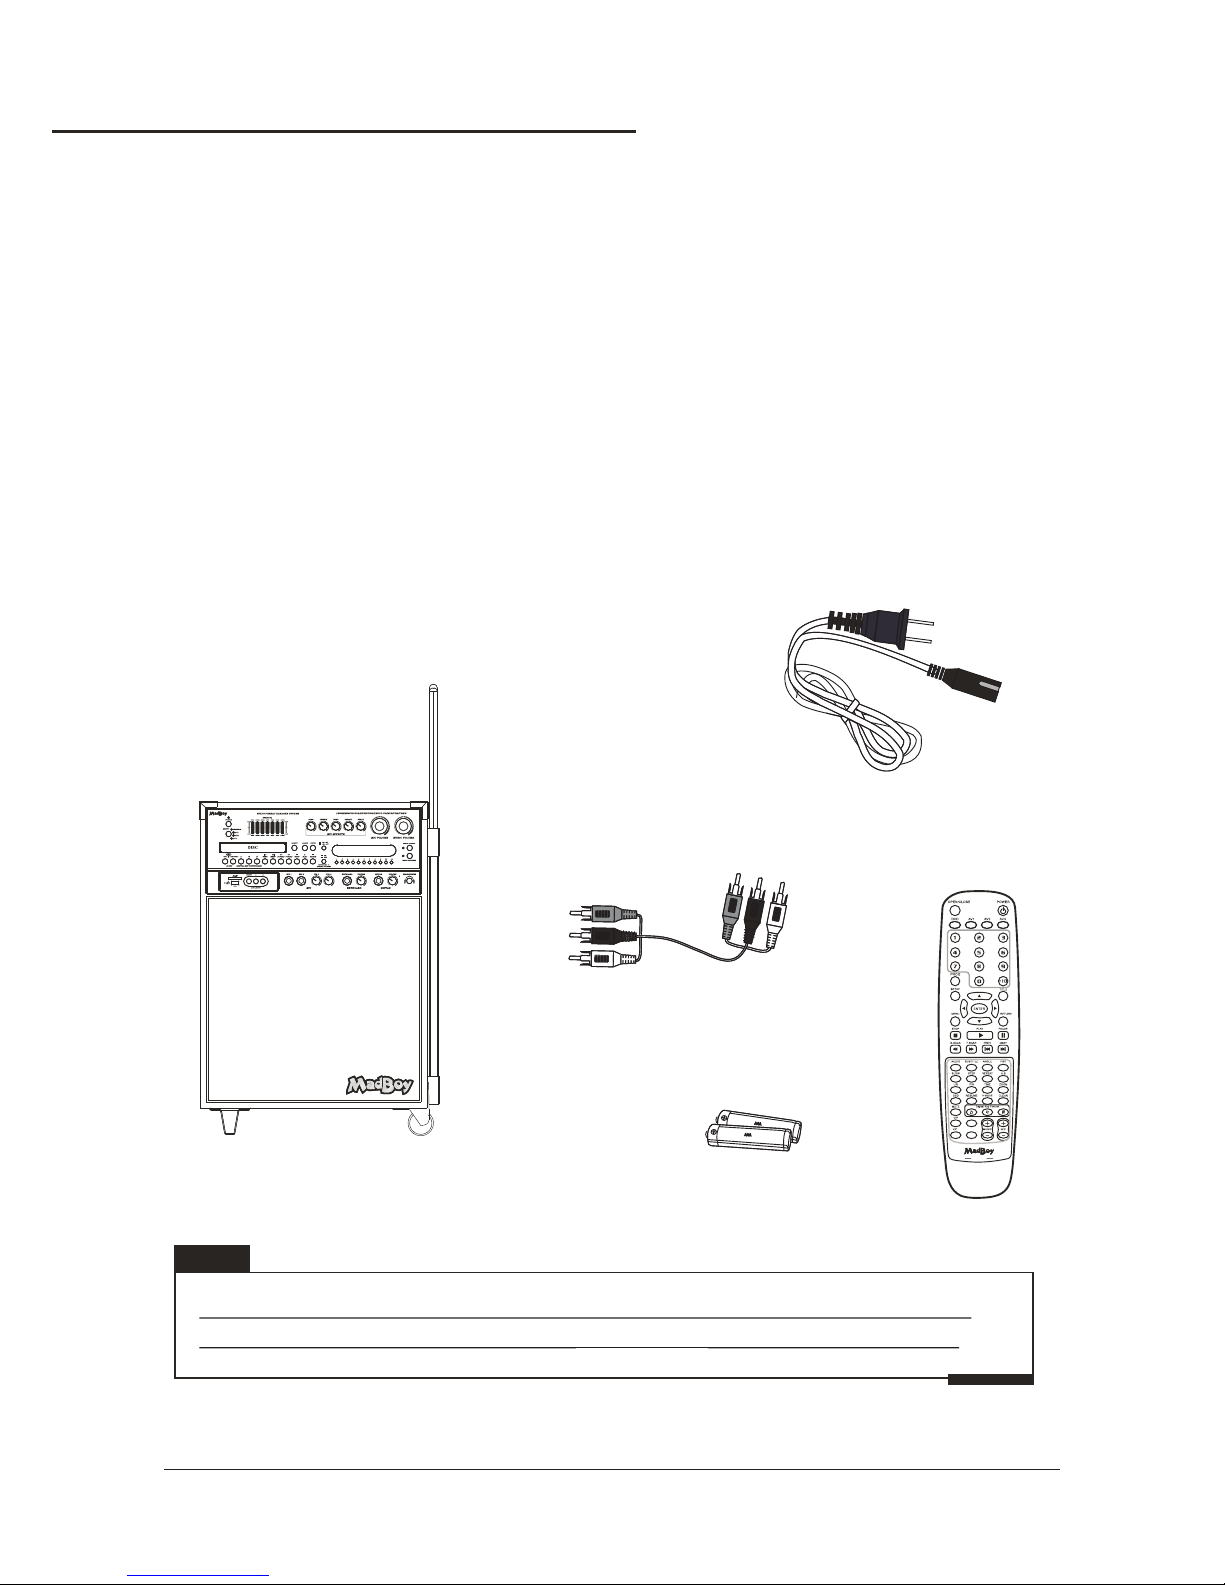
Package contents
Items Quantity
Unit (1)
RCA Cables (1)
Remote Control (1)
Power cord (1)
AAA Batteries (2)
THUNDER
If you find that any of the items mentioned above are missing
from the box, please contact before proceeding.MADBOY
Note
THUNDER Unit(1)
19.30" x 12.60" x 27.60" (L.W.H)
56.6Lbs
Package contents
4
COPYMP3
REC
THUNDER
THUNDER
WWW.MADBOY-AUDIO.COM
Page 8
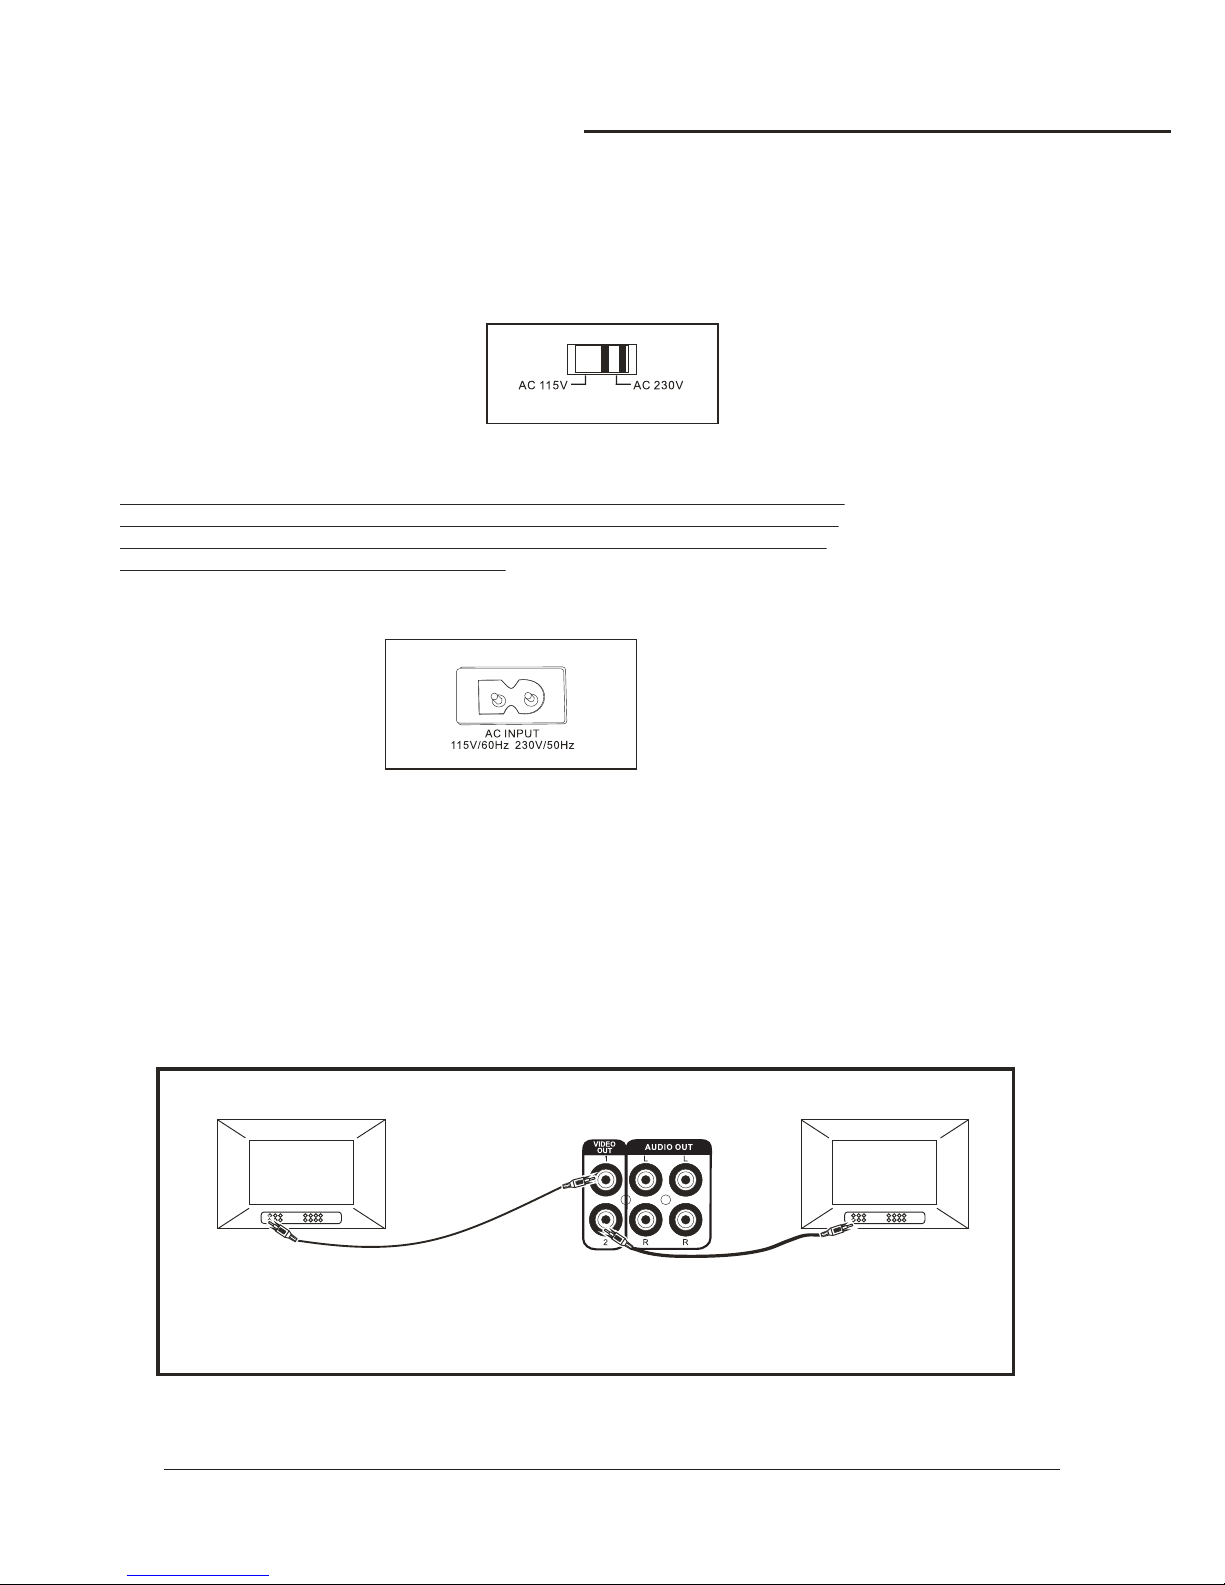
Connecting Power
To power the
What you will need
1 AC power cord (included)
Surge-protector (recommended) or a power outlet
NOTE: Before turning on the power make sure the red voltage selector [Fig. A] under
the AC INPUT is set to the proper voltage. It should be set to 115V for North America
and 230V for most European countries. Make sure you know the proper voltage for
your region before turning on the .
1.Connect the AC end of the power cord into the AC INPUT on the rear panel of the
2.Connect the other end to a surge-protector or available power outlet
Connecting to a TV / Video Monitor with an RCA input
What you will need
●1 RCA style video cable included- ( )
●TV video monitor with an RCA video input/
1.Connect one end of the RCA video cable to the yellow Video Out on the rear panel of the .
2.The has two RCA-type VIDEO OUTPUT jacks for connecting to TVs or monitor devices.
Both VIDEO OUTPUTS can be connected simultaneously.
3.Connect the other end of the RCA video cable to the Video Input on a TV / video monitor
Since the contains built-in power amplifiers, speakers, DVD/CDG/CD player, USB player, and SDTHUNDER
card player, the can be used as a self-contained sound system. However, the containsTHUNDER THUNDER
various audio video outputs to allow the to be connected to multiple TV sets, external soundTHUNDER
systems, and/or multiple sound effect devices. The following content demonstrates the procedures for
connecting the to the AC outlet and other audio video devices.THUNDER
THUNDER
THUNDER
THUNDER
THUNDER
THUNDER
TVTV
230
VOLTAGE SELECTOR
[Fig. A]
Getting Connected
5
WWW.MADBOY-AUDIO.COM
Page 9
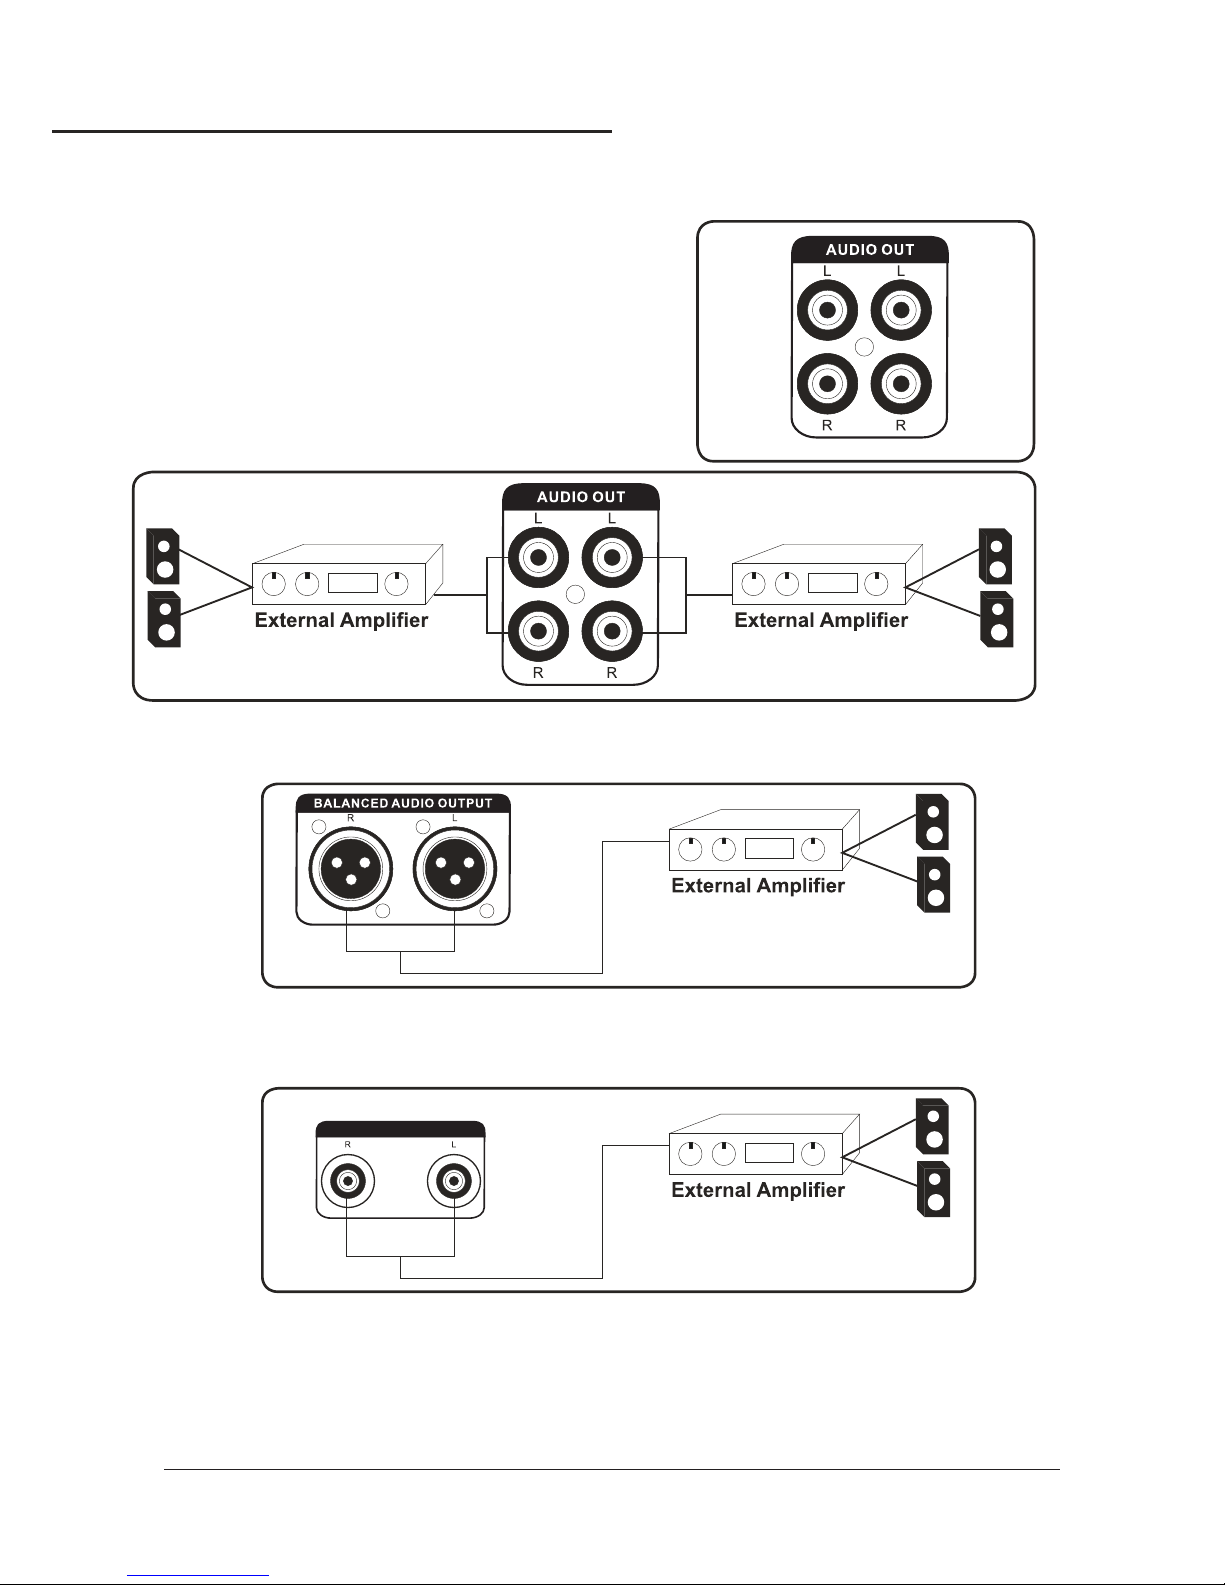
Getting Connected
6
PRE-OUT
2.BALANCED AUDIO OUTPUT CONNECTIONS:
●
Connect one end of the XLR cables to the left and right BALANCED AUDIO OUTPUT jacks on the THUNDER.
● .Connect one end of the XLR cables to the left and right AUDIO/LINE/AUX INPUT jacks on the external device
4. :CONNECTING EFFECTS USING THE EFFECT INSERT
Connecting to an audio mixer or TV with RCA audio inputs
What you will need
●Using 1 RCA L R red white stereo RCA cable included/ ( & ) ( )
●Using two XLR type audio cables not included- ( )
●
●
●
●
●Using 1 audio mixer or TV with RCA audio inputs
1.AUDIO OUTPUT 1 & 2 CONNECTIONS:
●Connect one end of the L R red white RCA cable to the/ ( & )
red and white audio outputs labeled AUDIO OUTPUT 1 & 2
on the rear panel of the .
●Connect the other end of the L R red white RCA cable to/ ( & )
the audio input on an audio mixer or TV.
Using two ¼-inch audio cables (not included).
Using three ¼-inch stereo audio cables (not included).
Using one audio amplifier with XLR audio inputs.
Using one audio amplifier with ¼-inch audio inputs.
THUNDER
1.
2.
3.By using the built-in EFFECT INSERT you can add external effects to vocals and/or guitar or keyboard or
microphone without compromising the quality of the original signal.
Connect one end of the ¼ inch stereo audio cables to the GUITAR EFFECT, KEYBOARD EFFECT, or
MIC EFFECT inserts on the rear panel of the THUNDER.
Connect the other end of the ¼ inch stereo audio cables to the sound effect device.
3.¼ INCH PRE-OUT CONNECTIONS:
Connect one end of the ¼ inch audio cables to the left and right PRE-OUT jacks on the THUNDER.
Connect one end of the ¼ inch audio cables to the left and right AUDIO/LINE/AUX INPUT jacks on
the external device.
●
●
WWW.MADBOY-AUDIO.COM
Page 10
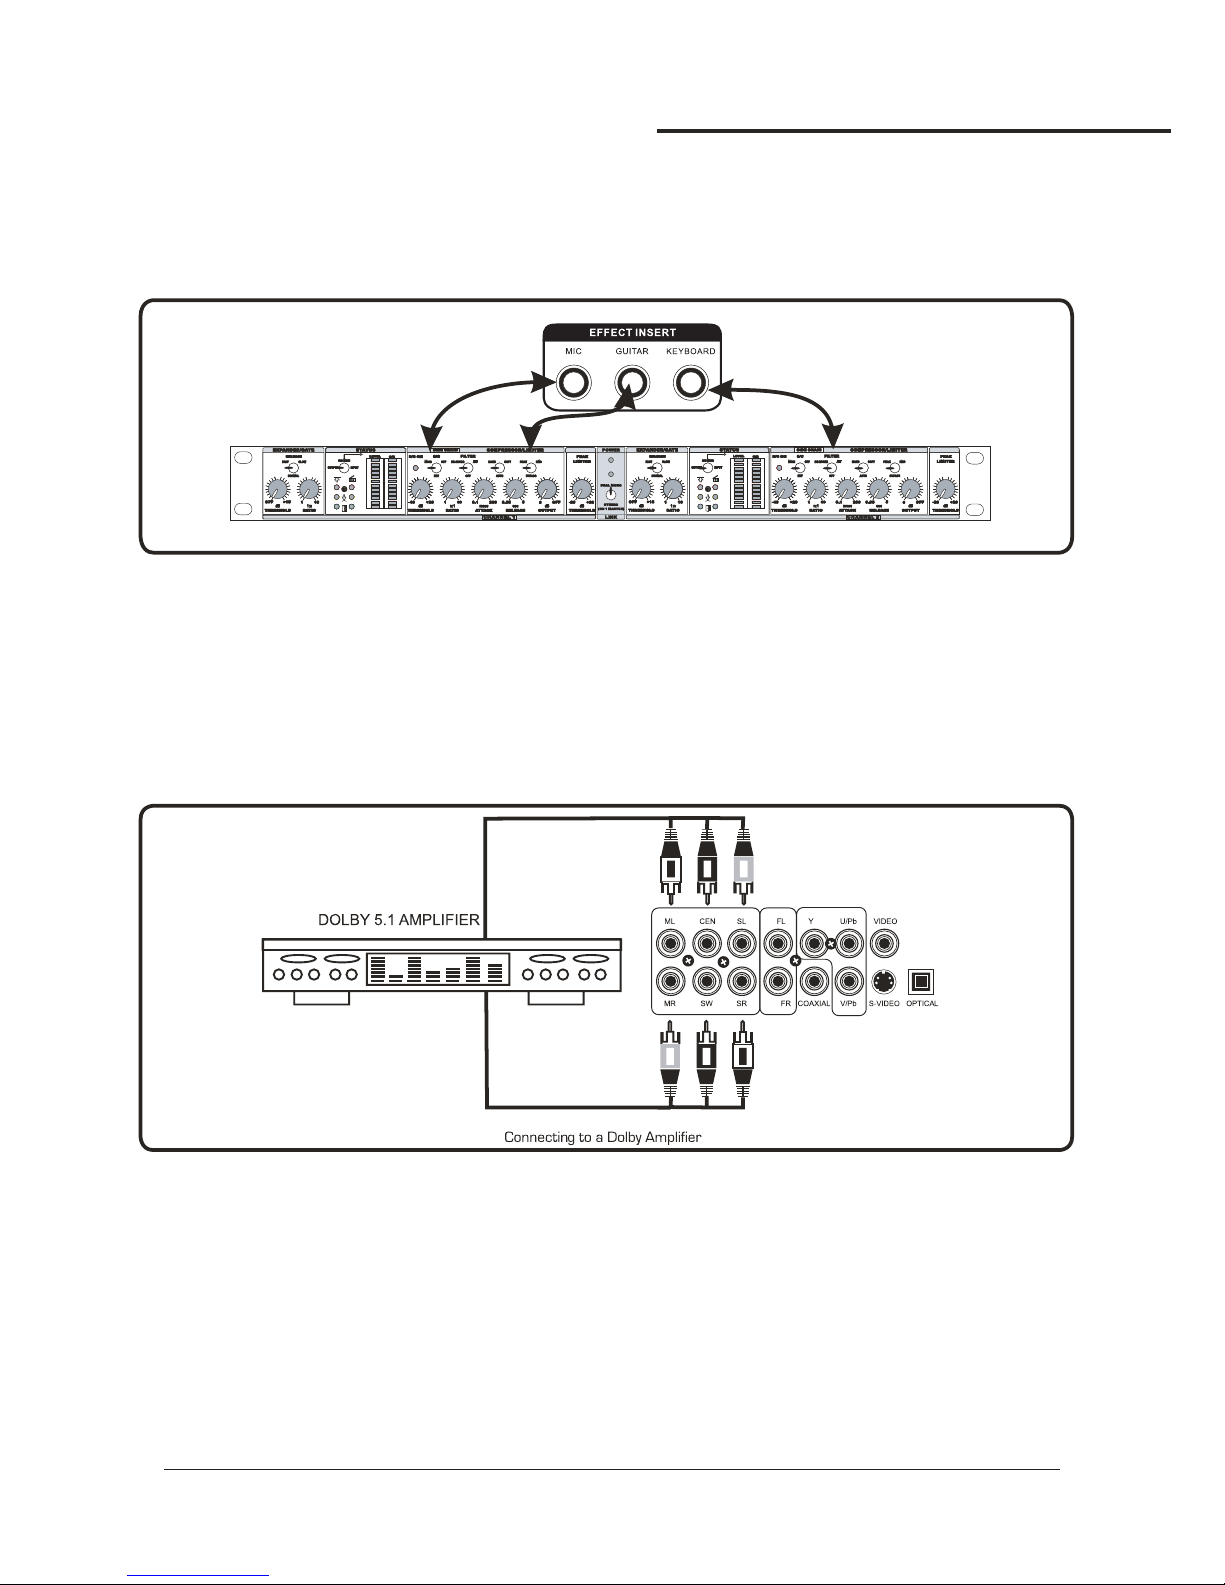
The insert is a break point in the input channel signal path, It allows the signal to be taken out from this ,
through an external equipment such as a Limiter,Compressor,Equalizer, Effector,and then back to the ,
the input jack can be used with phone jack,the signal will be send out through TIP of the phone
jack and back to the through RING of the phone jack.
THUNDER
THUNDER
THUNDER
¼ inch ¼ inch
¼ inch
DVD OUTPUT CONNECTIONS
1.Connecting to a Dolby Pro Logic Amplifier
The allows DVD audio output for 5.1 or 7.1 configurations.
With a 5.1 Amplifier, you will need six RCA patch cables. Connect the plug from one side of each cable to the
ML, CEN, SL, MR, SW and SR outputs on the . Connect the plug from the other side of each cable to
the corresponding ML, CEN, SL, MR, SW and SR inputs on your 5.1 Amplifier.
A 7.1 Pro Logic configuration requires 2 additional RCA cables to be connected from the FL and FR outputs of
the to your 7.1 Amplifier.
THUNDER
THUNDER
THUNDER
2.Connecting to a TV with Component Video
Using 3 appropriate Component Video cables (usually color coded red, blue and green), connect a set of
plugs to the COMPONENT VIDEO OUT jacks (Y-U/Pb-V/Pr) on the and plug the other set of
plugs to the COMPONENT VIDEO IN jacks (Y-U/Pb-V/Pr) on your television. On some TVs, the component
video input jacks may be labeled differently (i.e. Pr/Pb/Y or Cr/Cb/Y or R-Y/B-Y/Y etc.).
You will need to press the MODE button on the remote control to toggle between YUV for Component Video,
and S-Video. You can only use the MODE button when there is no disc inserted in the disc tray.
THUNDER
General Connections
7
WWW.MADBOY-AUDIO.COM
Page 11
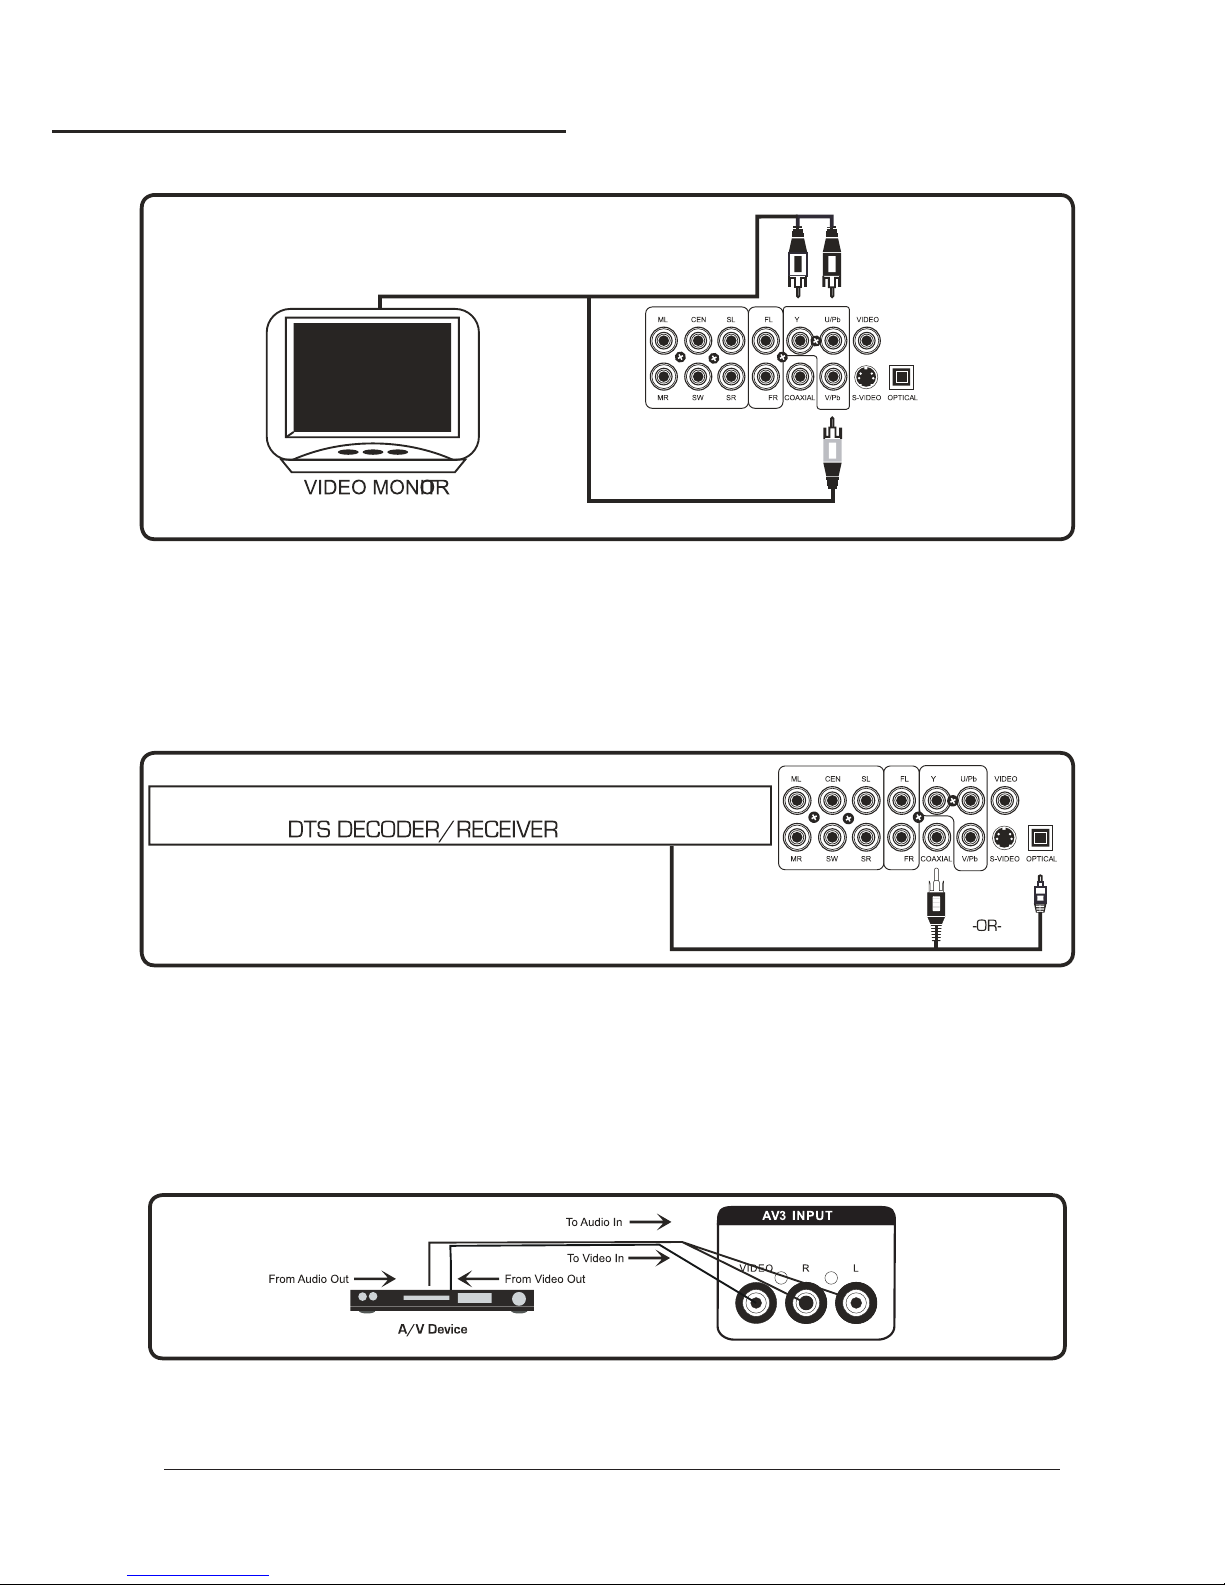
3.Connecting to a DTS Receiver/Decoder
Using either an RCA-ended COAXIAL cable suited for digital audio use or an OPTICAL cable, connect one
end to the appropriate jack on the (COAXIAL or OPTICAL) and the other end to the appropriate jack
(COAXIAL or OPTICAL). If you have both coaxial and optical inputs on your DTS decoder/receiver, it is
recommended to use an optical connection as those cables eliminate the possibility of EMI (electromagnetic
interference). has 5.1 or 7.1 channel RCA inputs, you can use the 5.1 or 7.1 channel output jacks on
the .
THUNDER
THUNDER
AV INPUT CONNECTIONS
What you will need
●3 RCA style A V cable included- / ( )
●2 A V output Device/
1.Connect one end of the 3 RCA-style A/V cable to the A/V VIDEO/L/R input labeled AV3 on the front
panel of the .
2.Connect the other end of the 3 RCA-style A/V cable to the A/V VIDEO/L/R output on an A/V output Device.
THUNDER
General Connections
8
WWW.MADBOY-AUDIO.COM
Page 12
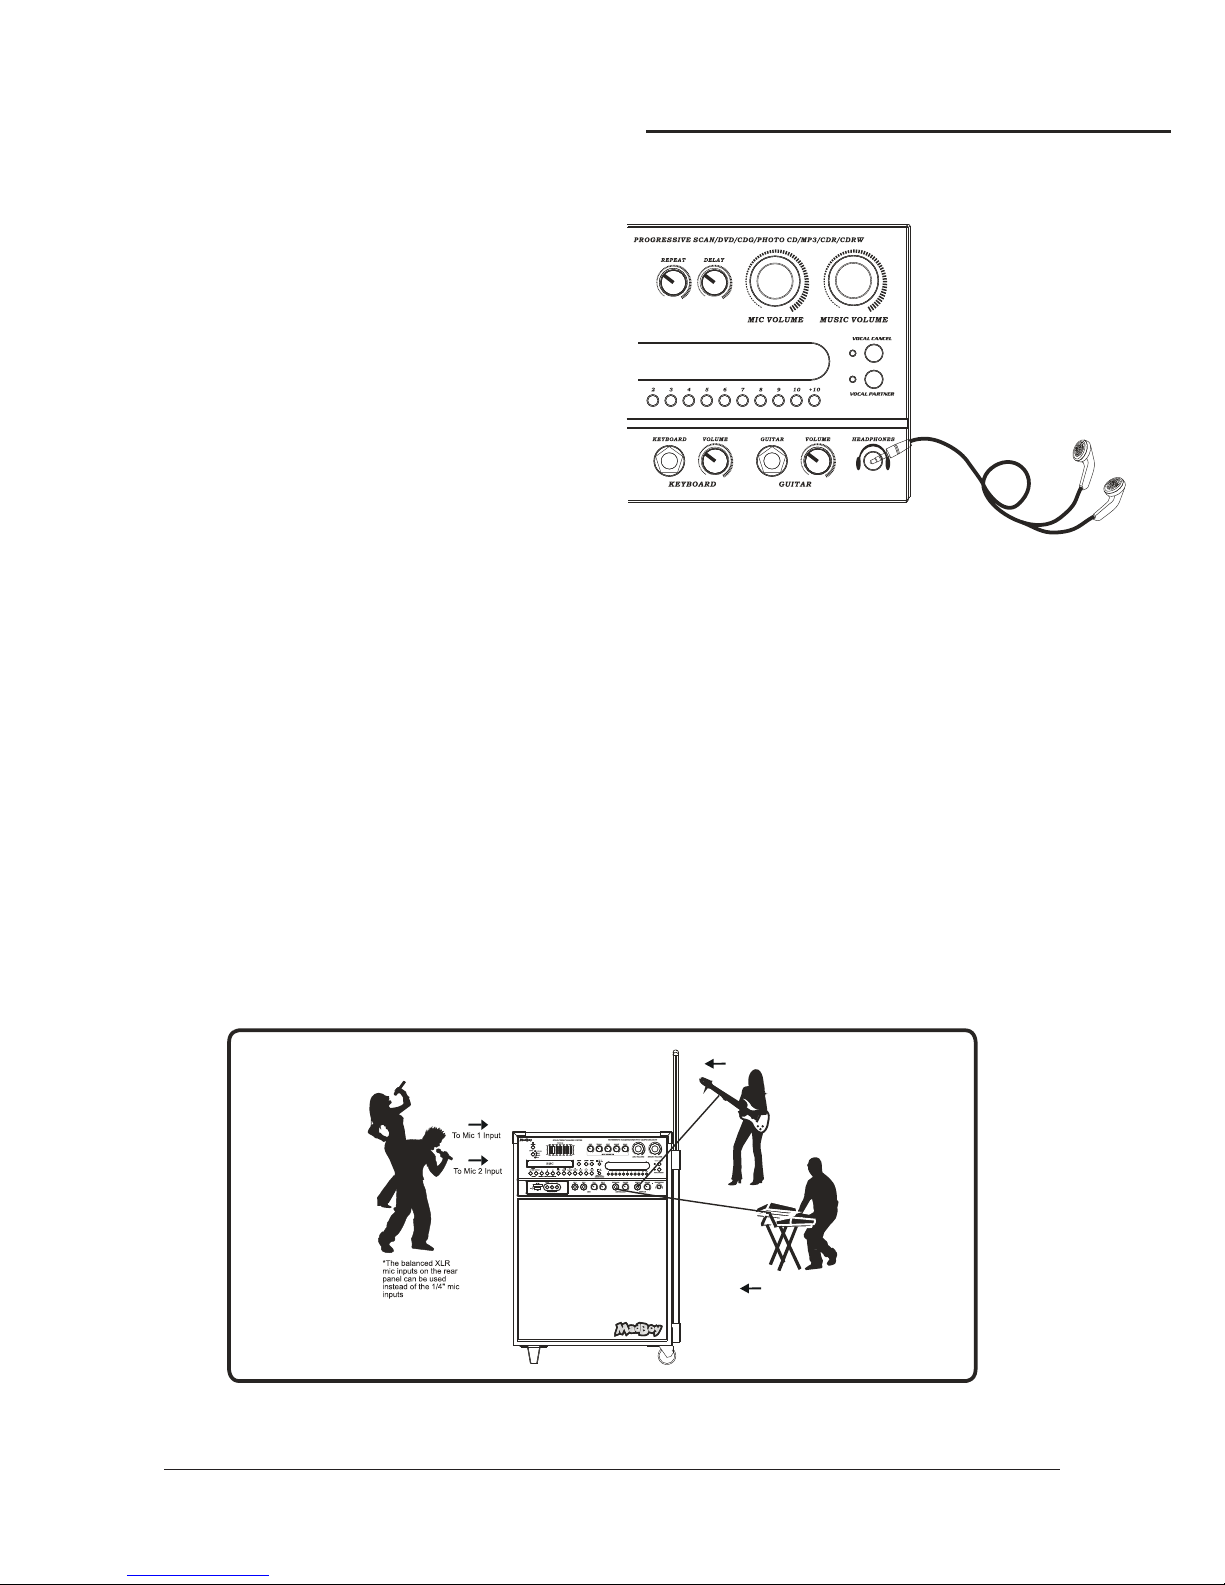
HEADPHONES CONNECTIONS
What you will need
● Ф1 6 35MM. (¼ ) jack cable of HEADPHONES
1.Connect one end of the 6.35MM(¼Ф ) jack
cable to the output labeledHEADPHONE jack
on the front panel ofHEADPHONES jack
the
MICROPHONE/INSTRUMENT INPUT CONNECTIONS
After completing your main system connections, it is time to get your microphones and instruments connected
and ready for performing. Before you get started with your connections we recommend that you take the
following tips into consideration:
●When connecting instruments refrain from using low quality or worn cables as they can cause significant,
noise and loud pops, posing a threat to the system's speakers.
●Use caution when connecting a chain of multiple effects pedals as the output voltage may change and,
possibly overload the input channel.
The has one guitar (¼ ), one keyboard (¼ ) and two microphone (¼ /XLR) inputs.
1.To connect MICROPHONES via ¼ mic cables, connect the XLR-end of the cable into the MICROPHONE
until it locks into place and connect the ¼ plug into either the MIC 1 or 2 jack on the .
2.To connect MICROPHONES via XLR mic cables, attach the XLR “female” end of the cable into the
“male” three prong jack located at the base of your handheld MICROPHONE until it locks into place.
Then connect the XLR “male” jack at the other end of the cable into either of the BALANCED MIC 1 or 2
inputs on the rear panel. It should be obvious which sides of your XLR cable are male and
female as there is only one possible connection.
3.To connect a GUITAR, connect a ¼ instrument cable from the GUITAR's ¼ output to the
¼ GUITAR input.
4.To connect a KEYBOARD, connect a ¼ instrument cable from the KEYBOARD's ¼ output to the
¼ KEYBOARD input.
¼
inch
inch
inch inch inch
inch
inch
inch inch
inch
inch inch
inch
THUNDER
THUNDER
THUNDER
THUNDER
THUNDER
THUNDER
THUNDER
To KEYBOARD
To GUITAR
General Connections
9
THUNDER
WWW.MADBOY-AUDIO.COM
Page 13
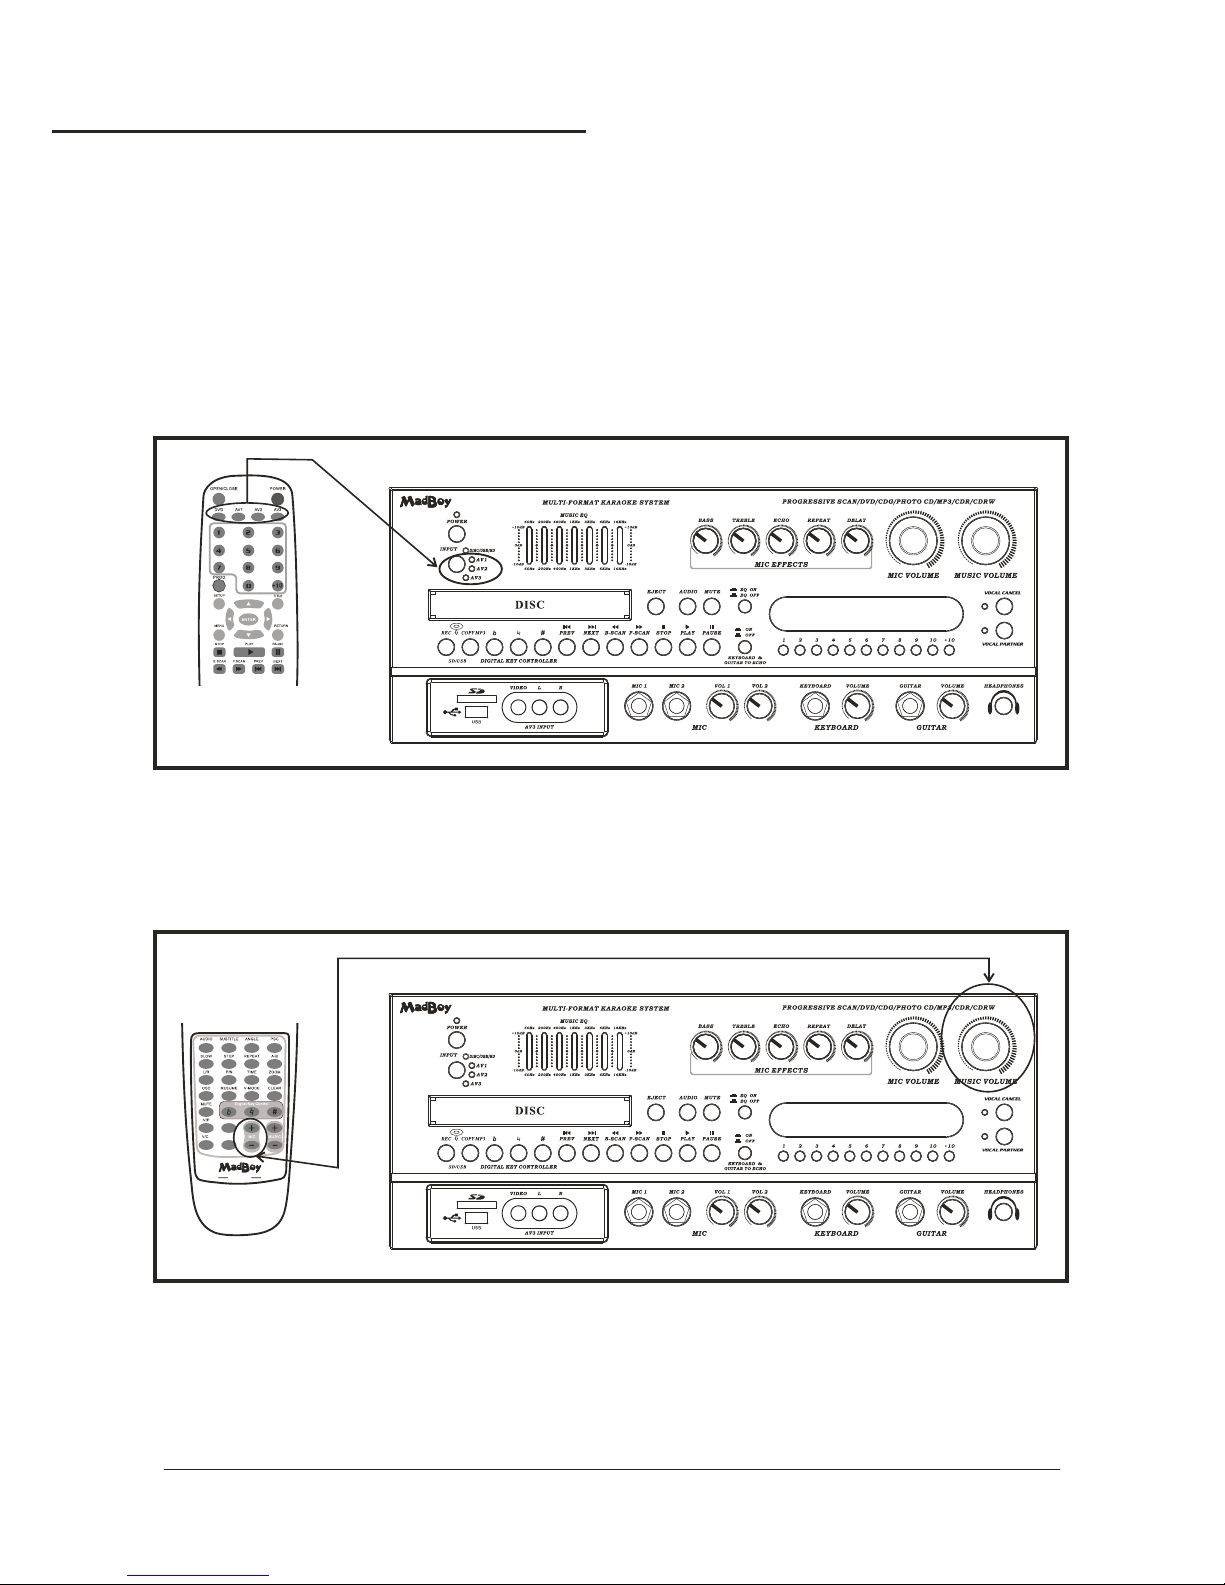
Turning the On, Off and to Standby
Turning the switch to ON,MAIN POWER
Input Channels
The has 4 available input channels:
●Disc USB SD Turns on the/ / : ’s disc player for playing DVD, CD, CD+G, Mp3 and other discs
●AV1 AV2 AV3 For playing a device that is connected to the AV1 AV2 AV3 RCA audio video inputs/ / : / / /
on the front panel
THUNDER
THUNDER
THUNDER
THUNDER
Adjusting the master Music Volume
The master Music Volume for the disc player, and AV input channels can be adjusted using either
the front panel control or the remote control.
●Front Panel:Turn the MUSIC VOLUME control clockwise to raise the volume and counter clockwise-
to lower the volume.
●Remote Control:Press the MUSIC button to raise the volume and the MUSIC button to lower the volume+ --
Adjusting the master Microphone Volume
The master Microphone Volume can be adjusted using either the front panel control or the remote control
●Front Panel:Turn the MIC VOLUME control clockwise to raise the volume and
counter-clockwise to lower the volume
●Remote Control:Press the MIC button to raise the volume and the MIC button to lower the volume+ --
Selecting an Input Channel
1. Use the input select buttons on the remote control (DVD, AV1, AV2 and AV3) to directly select the
desired input channel or use the SELECT button on the front panel to cycle through the input channels
2. Once the desired input channel is selected, playback can begin
General Operations
10
COPYMP3
REC
THUNDER
THUNDER
THUNDER
WWW.MADBOY-AUDIO.COM
Page 14
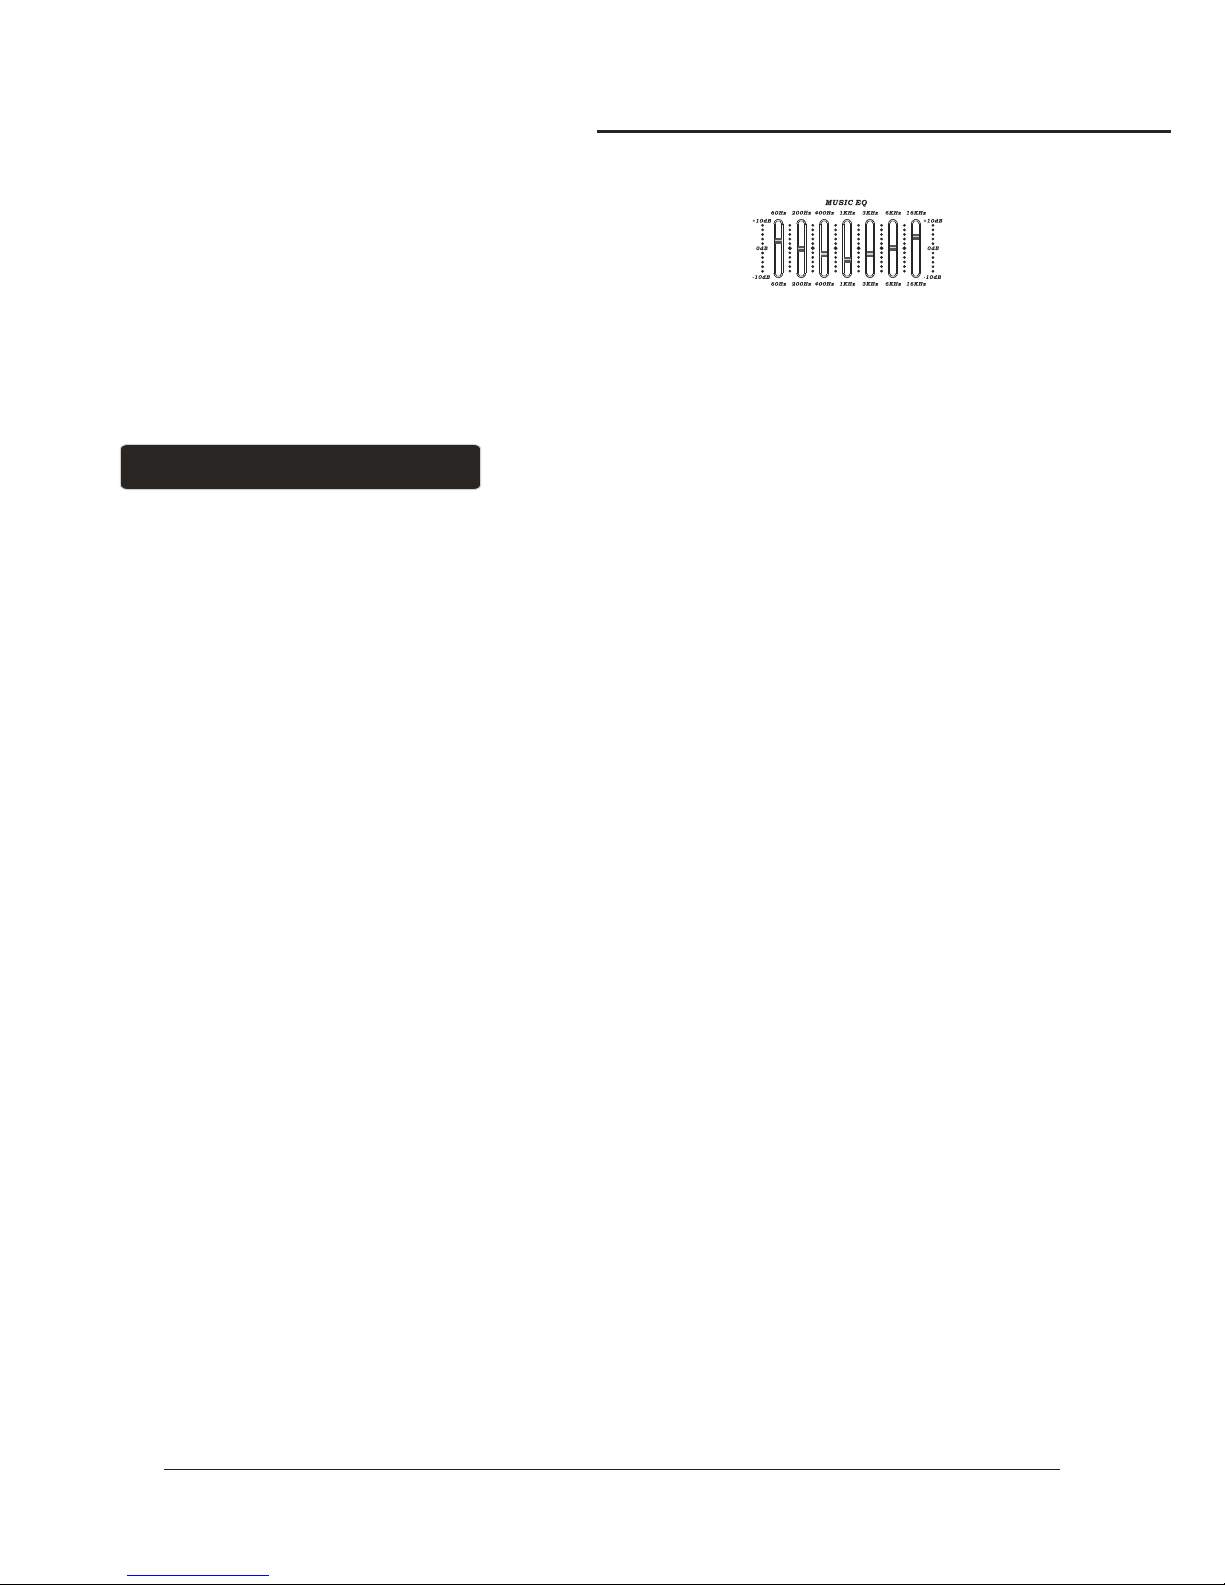
Adjusting the master Music EQ
The master MUSIC EQ for the disc player, AV1/AV2/AV3
input channels can be adjusted using the front panel control
Front Panel
Turn the MUSIC EQ control upgrade to raise the EQ for
10dB and down to lower the EQ for 10dB.
Changing the Video Mode (PAL / NTSC)
Use the P/N button on the remote control to switch between the regional PAL and NTSC video modes.
Access DISC mode by either pressing DVD on the remote control or by pressing the DISC/USB/SD
button on the front panel until the display screen says disc.
Loading a Disc
1.Press the OPEN/CLOSE button on the remote control or the EJECT button on the front panel of
the to open the disc tray
2.Insert a disc
3.Press the OPEN/CLOSE button on the remote control or the EJECT button on the front panel of
the to close the disc tray
Playing a Disc
1.Load a disc
2.Press PLAY on the remote control or on the front panel
Stopping a Disc
1.Press the STOP button on the remote control or front panel once to enter pause mode
2.Press the STOP button again to completely stop the disc
Pausing a Disc
1.Press the PAUSE button on the remote control or front panel
Skipping Tracks/Chapters
1. Use the PREV and NEXT buttons on the remote control or front panel to skip tracks/chapters
2. Press the PREV button to skip to the previous track/chapter
3. Press the NEXT button to skip to the next track/chapter
Searching Through a Track/Chapter
1. Use the B.SCAN and F.SCAN buttons on the remote control or front panel to search through tracks/chapters
2. Press the B.SCAN button to search forwards through the current track/chapter
3. Press the F.SCAN button to search backwards through the current track/chapter
Note:It will not work while playing CD+G format disc
Subtitles
Some DVDs have subtitles available and some also include multiple languages. If you are using a DVD with
subtitles available, simply press the SUBTITLE button on the remote control to cycle through the available
subtitles
Viewing Multiple Angles
Some DVDs have multiple viewing angles available. Press the ANGLE button on the remote control to
change the viewing angle and cycle through the available angles.
Slow-motion Playback using the SLOW button
Use the SLOW button on the remote control to cycle between 4 slow-forward modes :
●SLOW 1 2 Forwards at 1 2 the actual time/ - /
●SLOW 1 4 Forwards at 1 4 the actual time/ - /
●SLOW 1 8 Forwards at 1 8 the actual time/ - /
●SLOW 1 16 Forwards at 1 16 the actual time/ - / .
THUNDER
THUNDER
Operations (Disc Mode)
General Operations
11
WWW.MADBOY-AUDIO.COM
Page 15

Viewing One Frame at a Time Using the STEP Button
1.Press the STEP button on the remote control to enter Step mode
2.Every time the STEP button is pressed, when in Step mode, the movie will advance one frame
3.Press the PLAY button on the remote control or front panel to exit Step mode and return to normal playback
Selecting Repeat Options
Press the REPEAT button on the remote control to cycle through the available repeat modes:
1.Track - Repeats the current track
2.Chapter - Repeats the current chapter on a DVD
3.Title - Repeats the current title on a DVD
4.All - Repeats the entire disc once it has played through
5.Repeat off- Repeats the entire off
Creating a Loop Using the A-B Button
The A-B feature allows you to loop a certain part of a disc.
While the disc is playing:
1.Press the A-B button once at the desired starting point for the loop
2.Press it again at the desired ending point for the loop
3.Press it a third time to end the loop and return to normal playback
NOTE:It will not work while playing CD+G format disc
Canceling Vocals using the L/R button
Multiplex CD+G discs are designed to have vocals on one side and music on the other. The L/R button
allows you to play only one of these sides and cancel out the other in order to have music-only or
vocals-only.Press the L/R button to cycle through the available settings:
●Mono Left Left channel only no vocals- ( )
●Mono Right Right channel only no music- ( )
●Mix Mono Virtual stereo- -
●Stereo Left and Right in true stereo-
NOTE: This feature is only for use with specifically Multiplex formatted CD+G discs.
Zooming in and Out
The -10 lets you zoom in and out on the video screen.ΑΙΟ
Press the ZOOM button on the remote control to cycle through the available zoom settings.
Zoom in
●2X Zooms in 2X the original size-
●3X Zooms in 3X the original size-
●4X Zooms in 4X the original size-
Zoom out
●1 2X Zooms out at 1 2X the original size/ - /
●1 3X Zooms out at 1 3X the original size/ - /
●1 4X Zooms out at 1 4X the original size/ - /
NOTE:when you try to play MPG and JPG file(include the MPG and JPG file on DISC,USB,SD):
1. Press the ZOOM button on the remote control to enter ZOOM mode;
2. Use the F.SCAN and B.SCAN button to control zoom in and zoom out function;
Jumping to Specific Time on a Disc
Press the TIME button on the remote control to cycle through the available jump-to options:
CD/CD+G disc
●Disc Go To CD CD G only Jump to a specific time on the current disc( / + ) -
●Track Go To CD CD G only Jump to a specific time on the current track( / + ) -
●Select Track CD CD G only Jump directly to a specific track( / + ) -
NOTE:It will not work while playing CD+G format disc
Example:
Jumping to 1:35 in the current track
1.Press the TIME button until “TRACK GO TO - - | - -” appears on the TV screen
2.Press 0, 1, 3, 5
3.Playback will begin at 1:35 on the current track
DVD disc
NOTE: Not all discs have multiple titles. A title refers to the different sections including the movie,
special features,etc.
●Title Chapter DVD only Select the title and then jump to a chapter within that title/ ( ) -
●Title Time DVD only Select a title and then jump to a specific time within that title/ ( ) -
●Chapter Time DVD only Select a chapter and then jump to a specific time within that chapter/ ( ) -
Programming a Playback Sequence
Press the PROGRAM button to enter PROGRAM mode. When in PROGRAM mode the screen will display a list of
the tracks on the disc. Next to each track number there is a space to enter the order in which you want each track
to play. This allows you to customize the order in which the tracks on the disc will be played back. For example: if
you want Track 1 to play second, you would navigate to track 1 using the DIRECTIONAL buttons (< ^ > v) and when
track 1 is highlighted, press the ENTER button. Then you would enter “2” using the number buttons (0-9, +10) and
then press enter again. Press the PLAY button to begin playback of the programmed sequence.
NOTE: Program mode cannot be entered while a disc is playing
Operations(Disc Mode)
12
WWW.MADBOY-AUDIO.COM
Page 16
Example:
Selecting a Title and Chapter
Jumping to title 2 and chapter 2
1.Press the TIME button until TITLE “__ / __ CHAPTER __ / __ “ appears on the top of the TV screen
2.Press 2 on the number pad to select Title 1. Now chapter will be highlighted
3.Press 2 on the number pad to select Chapter 2
4.Playback will begin at that on Title 2 and Chapter 2
Viewing and Setting the On Screen Display (OSD)
Press the OSD button on the remote control to cycle through the available OSD viewing options.
CD/CD+G discs
●Single Remain The time remaining on the current track-
●Single Elapsed The time elapsed on the current track-
●Total Remain The time remaining on the entire disc-
●Total Elapsed The time elapsed on the entire disc-
●Display Off Turns the OSD off-
DVD discs
●Title Remain The time remaining on the current title-
●Title Elapsed The time elapsed on the current title-
●Chapter Remain The time remaining on current chapter-
●Chapter Elapsed The time elapsed on the entire chapter-
Turning on the Last Memory function:
1.Press SETUP on the remote control. The General Setup page will show.
2.Use the down arrow button on the remote control to scroll down to Last Memory
3.If Last Memory is set to off, press enter when Last Memory is highlighted and press up so that On is
highlighted
4.Press ENTER on the remote control to confirm the selection
5.Press SETUP again on the remote control to close the Setup menu
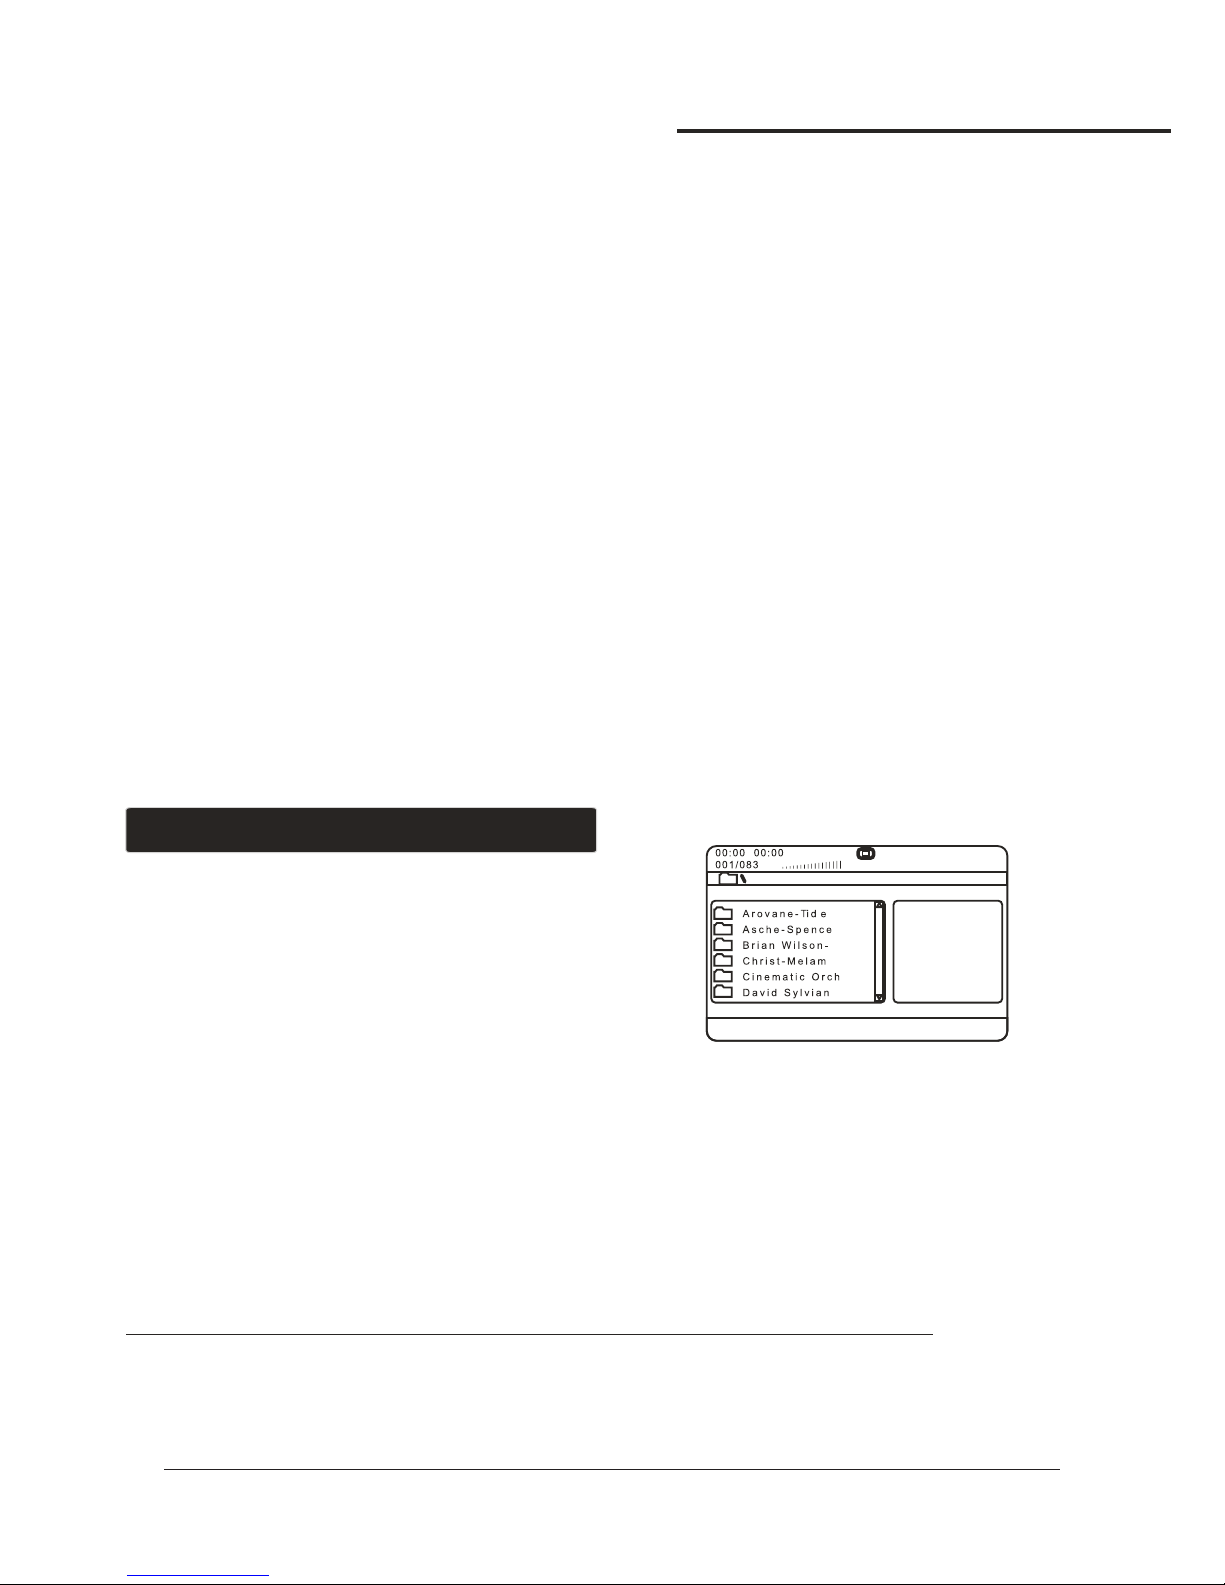
When playing Mp3 and DivX files, the must be
connected to a TV in order to see and navigate through the
file menu. Use the arrow buttons on the remote control to
navigate through the file menu and the ENTER button to
select a file to play.
To play a file
1.Use the arrow buttons on the remote control to scroll to the
desired file
2.Press ENTER on the remote control to begin playing the file
3.The file will begin playing
or
1.Use the number buttons on the remote control and enter the file number
2.Press ENTER
3.The file will begin playing
THUNDER
Direct track access:
When playing MP3 or AVI/DIVX files,to skip to the desired track directly using the number buttons,
see the following operations section for detailed instruction:
1.For example:to go directly to track 142 of MP3/AVI/DIVX:you would press 1 and 4 and 2,then press
ENTER button on remote control for playing your desired track.
2.For example:to go directly to track 36 of MP3/AVI/DIVX,you would press 0 and 3 and 6, then press
ENTER button on remote control for playing your desired track.
NOTE:The desired track you selected must be less than the total tracks on the MP3/AVI/DIVX;
Operations (MP3 and AVI / DivX)
Operations(Disc Mode)
13
WWW.MADBOY-AUDIO.COM
Page 17
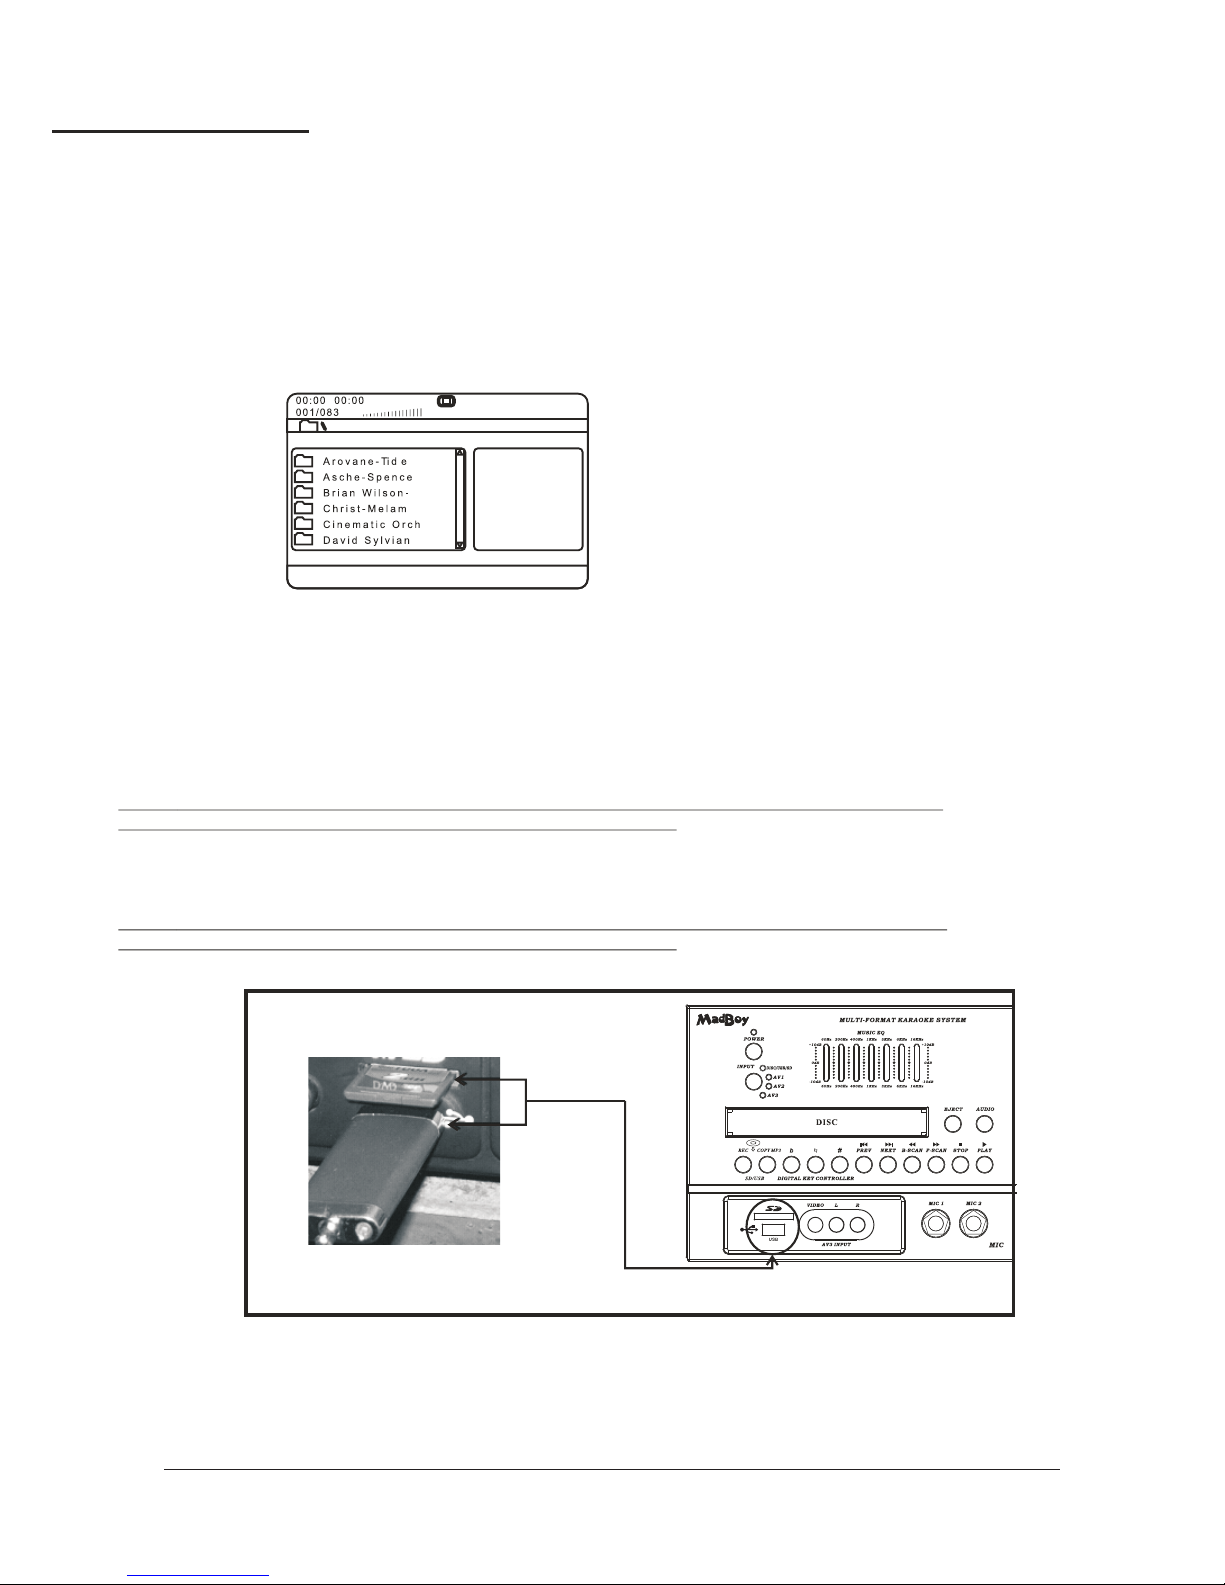
Repeat Options
There are six repeat options when playing Mp3 and Divx Files. Use the REPEAT button on the
remote control to cycle through these repeat options:
●Random Plays songs randomly from the entire disc-
●Single Playback stops after a single track finishes playing-
●Repeat One Repeats the current song continuously-
●Repeat Folder Repeats the entire folder after it has played through-
●Folder Playback stops after all of the songs in the current folder have played-
●Shuffle Plays songs randomly within the current folder-
USB AND SD CARD Operations (Disc Mode)
Use the DISC select button on the front panel or DVD select button on the remote control to
directly select the desired DISC MODE,do not put DISC into the tray,when the graphic display
on the front panel display”NO DISC”,and then insert USB and SD CARD to the USB and SD CARD
jacks,then begin to load the media sources from USB or SD CARD.
1.Using the USB Input
●Plug a USBthumb drive into the USB Input.
●Use the to select videos, music, or images. Press the to play aDirectional Buttons Enter Button
selected video, music, or image.
NOTE:The unit will play . The differentyour VCD, MP3, WMA, AVI, MP4, DAT, MPG and JPG files
file types must be separated into folders for the unit to read them.
2.Using the SD Card Slot
Plug an SD card into the● SD Memory Card Slot.
Use the Directional Buttons to select videos music or images Press the Enter Button to play a● , , .
selected video, music, or image.
NOTE: The unit will play . The differentyour VCD, MP3, WMA, AVI, MP4, DAT, MPG and JPG files
file types must be separated into folders for the unit to read them.
USB and SD Card Operations (Disc Mode)
14
THUNDER
WWW.MADBOY-AUDIO.COM
Page 18
Microphone Operations
Turning on the Microphones
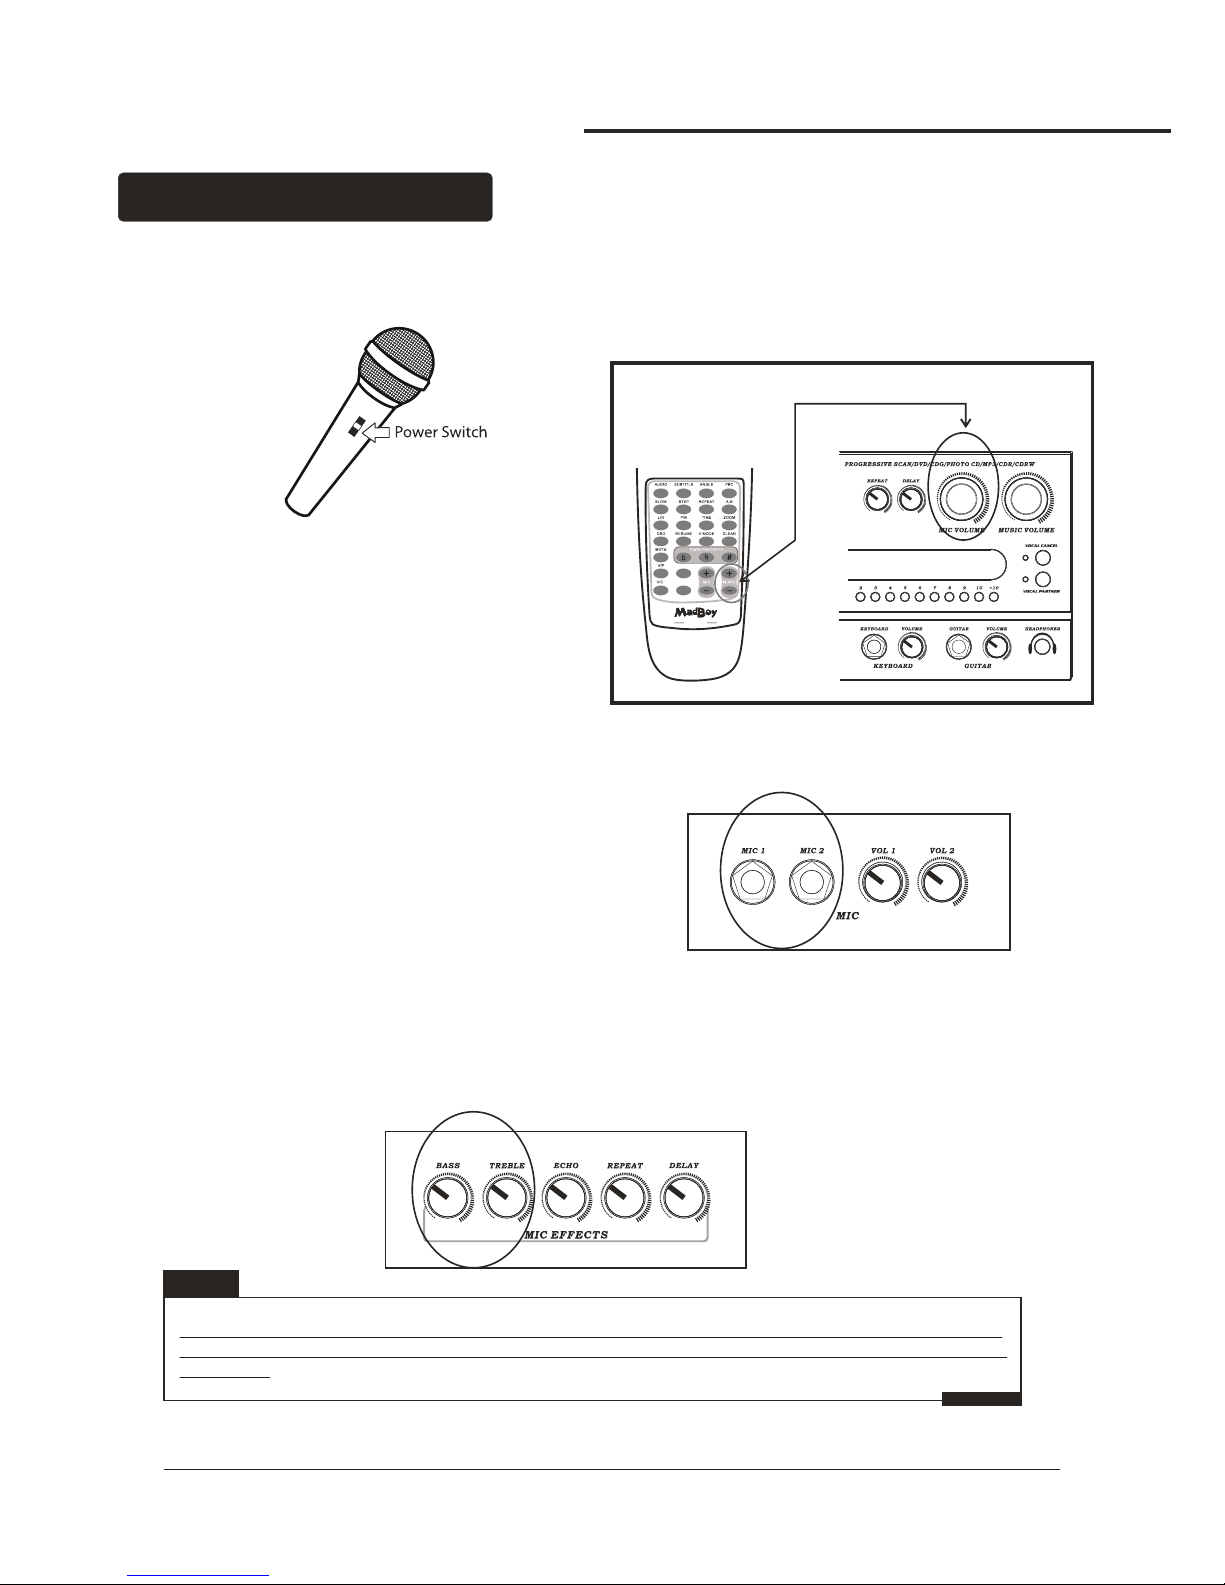
Each microphone has a power switch on it.
1.Flip the microphone's power switch UP to turn the microphone ON
2.Flip the microphone's power switch DOWN to turn the microphone OFF
Adjusting the master Microphone Volume
The master Microphone Volume can be adjusted using
either the front panel control or the remote control
Front Panel
Turn the MIC VOLUME control clockwise to raise the
volume and counter-clockwise to lower the volume
Remote Control
●Press the MIC button to raise the volume+
●and the MIC button to lower the volume--
NOTE: There is no correct tone setting. There are many factors that affect the tone including the
singer's own vocal tone, the room, etc. Adjust the HI and LOW controls until you are pleased with
the sound.
Note
Adjusting the Individual Microphone Volume controls
1.Each microphone channel has its own volume control
located on the front panel of the . Each one
can be adjusted separately, providing a great sounding
vocal mix.
2.Turn the MIC 1 VOL and/or MIC 2 VOL control clockwise
to raise the volume and counter-clockwise to lower
the volume.
THUNDER
Adjusting the Microphone Tone
The has microphone tone controls on the front panel,
allowing you to create clearer and more professional vocals.
●MIC TREBLE Try increasing the TREBLE tone if the sound is tobassy or muddy and decreasing itif it is too hi-pitched or if there is a lot of feedback.
●MIC BASS Try increasing the BASS if the sound is not deep enough and decreasing it if thesound is too muddy or muffled.
THUNDER
Microphone Operations
15
REC
COPYMP3
THUNDER
WWW.MADBOY-AUDIO.COM
Page 19
Using Digital Echo
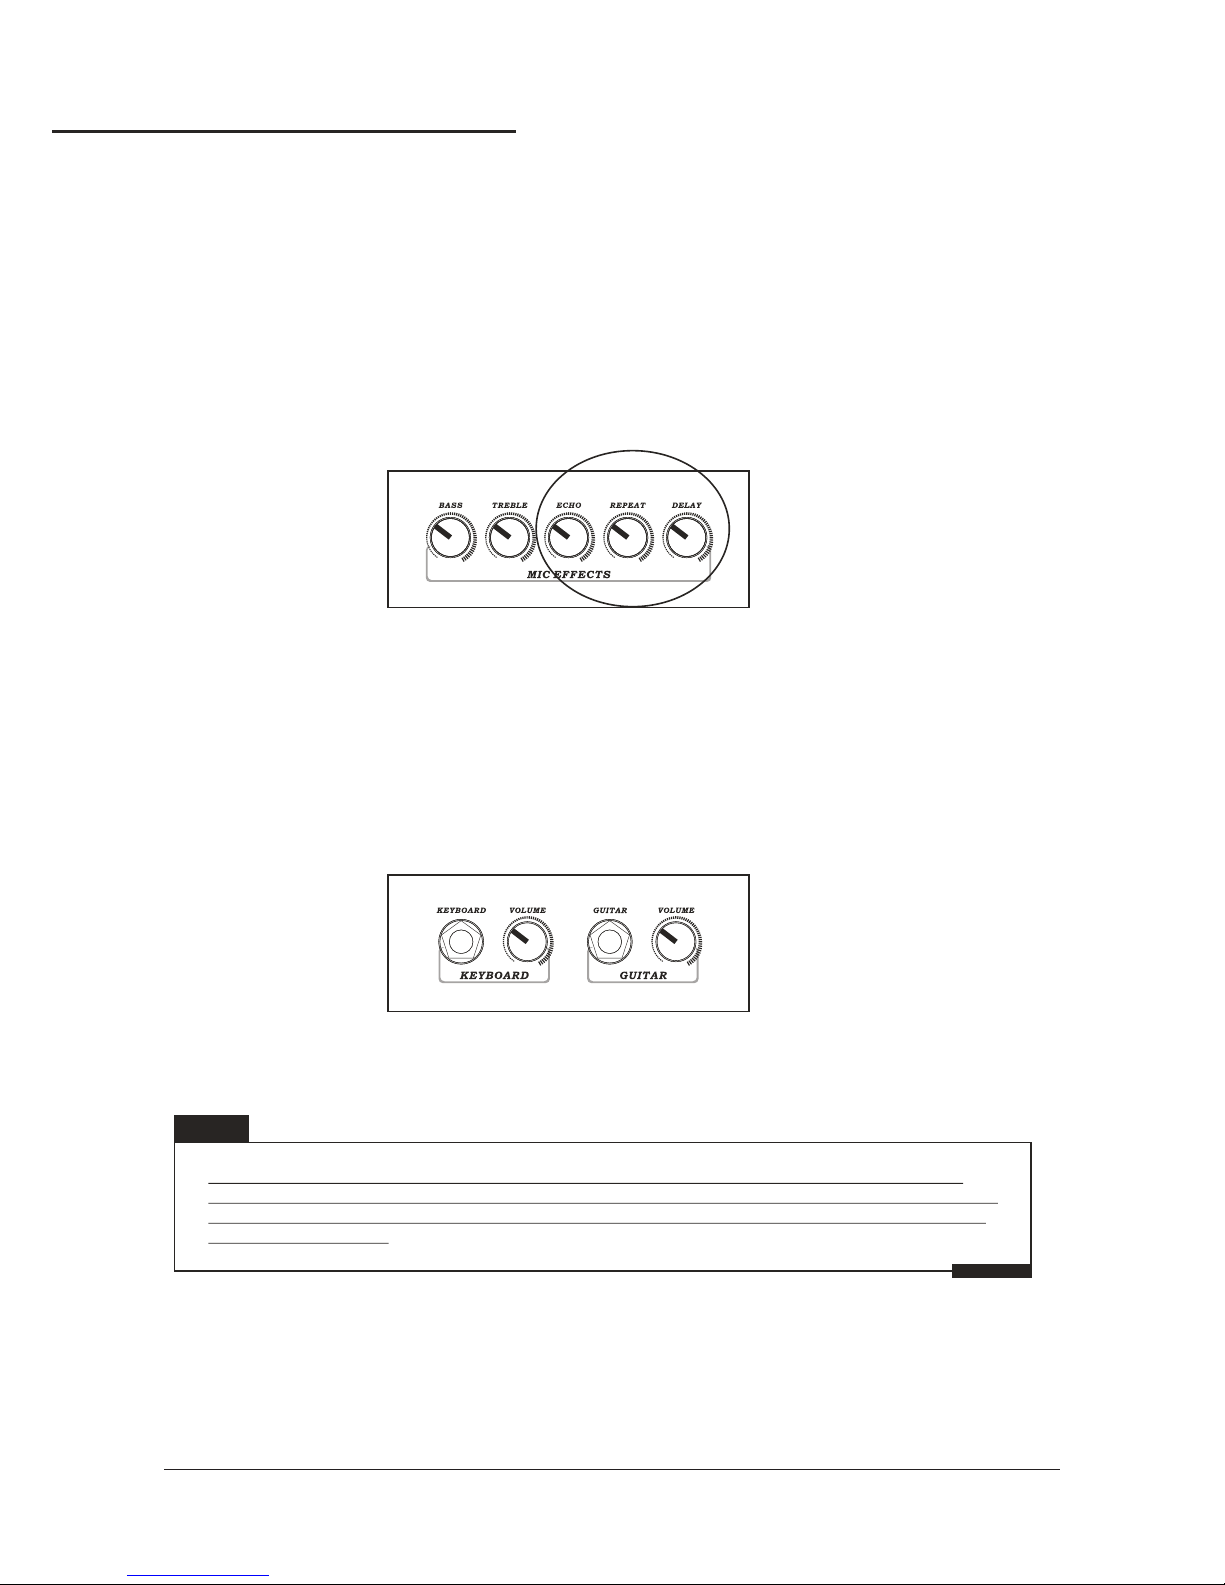
Digital Echo gives vocals a more professional, studio-produced sound and is a great way to make any singer
sound like a seasoned professional. There are three controls, located on the front panel, for adjusting the
Echo effect:
●ECHO This controls the amount of Echo effect that will be heard Turn clockwise to increase the amount- .
of echo and counter-clockwise to decrease it. Turn the ECHO control fully counter-clockwise to turn the
echo effect off.
●REPEAT Use this control to adjust the REPEAT setting of the ECHO effect As REPEAT adjusts the total- .
number of echo intervals prior to fade-out, the more REPEAT that is applied, the more ECHO intervals will
occur prior to fade-out. Turn control clockwise to INCREASE and counter-clockwise to DECREASE level.
●DELAY This control adjusts the amount of time between each echo repeat Turn clockwise to make the- .
time shorter and counter-clockwise to make the time longer
Adjusting the KEYBOARD Volume
1.The master KEYBOARD Volume can be adjusted using the front panel control
2.Turn the KEYBOARD VOLUME control clockwise to raise the volume and counter-clockwise to lower the
volume
Adjusting the GUITAR Volume
1.The master GUITAR Volume can be adjusted using the front panel control
2.Turn the GUITAR VOLUME control clockwise to raise the volume and counter-clockwise to lower the
volume
NOTE: KEYBOARD & GUITAR TO ECHO ON/OFF switch- This switch is used to turn the
keyboard & guitar to Digital ECHO ON and OFF. Press the KEYBOARD & GUITAR TO ECHO
ON/OFF switch in to activate the Digital ECHO. In the out position, the keyboard & guitar to
Digital ECHO is OFF.
Note
Microphone Operations
16
WWW.MADBOY-AUDIO.COM
Page 20
Front Panel
1
2
3
12
9
6
4
7 8
11
10
5
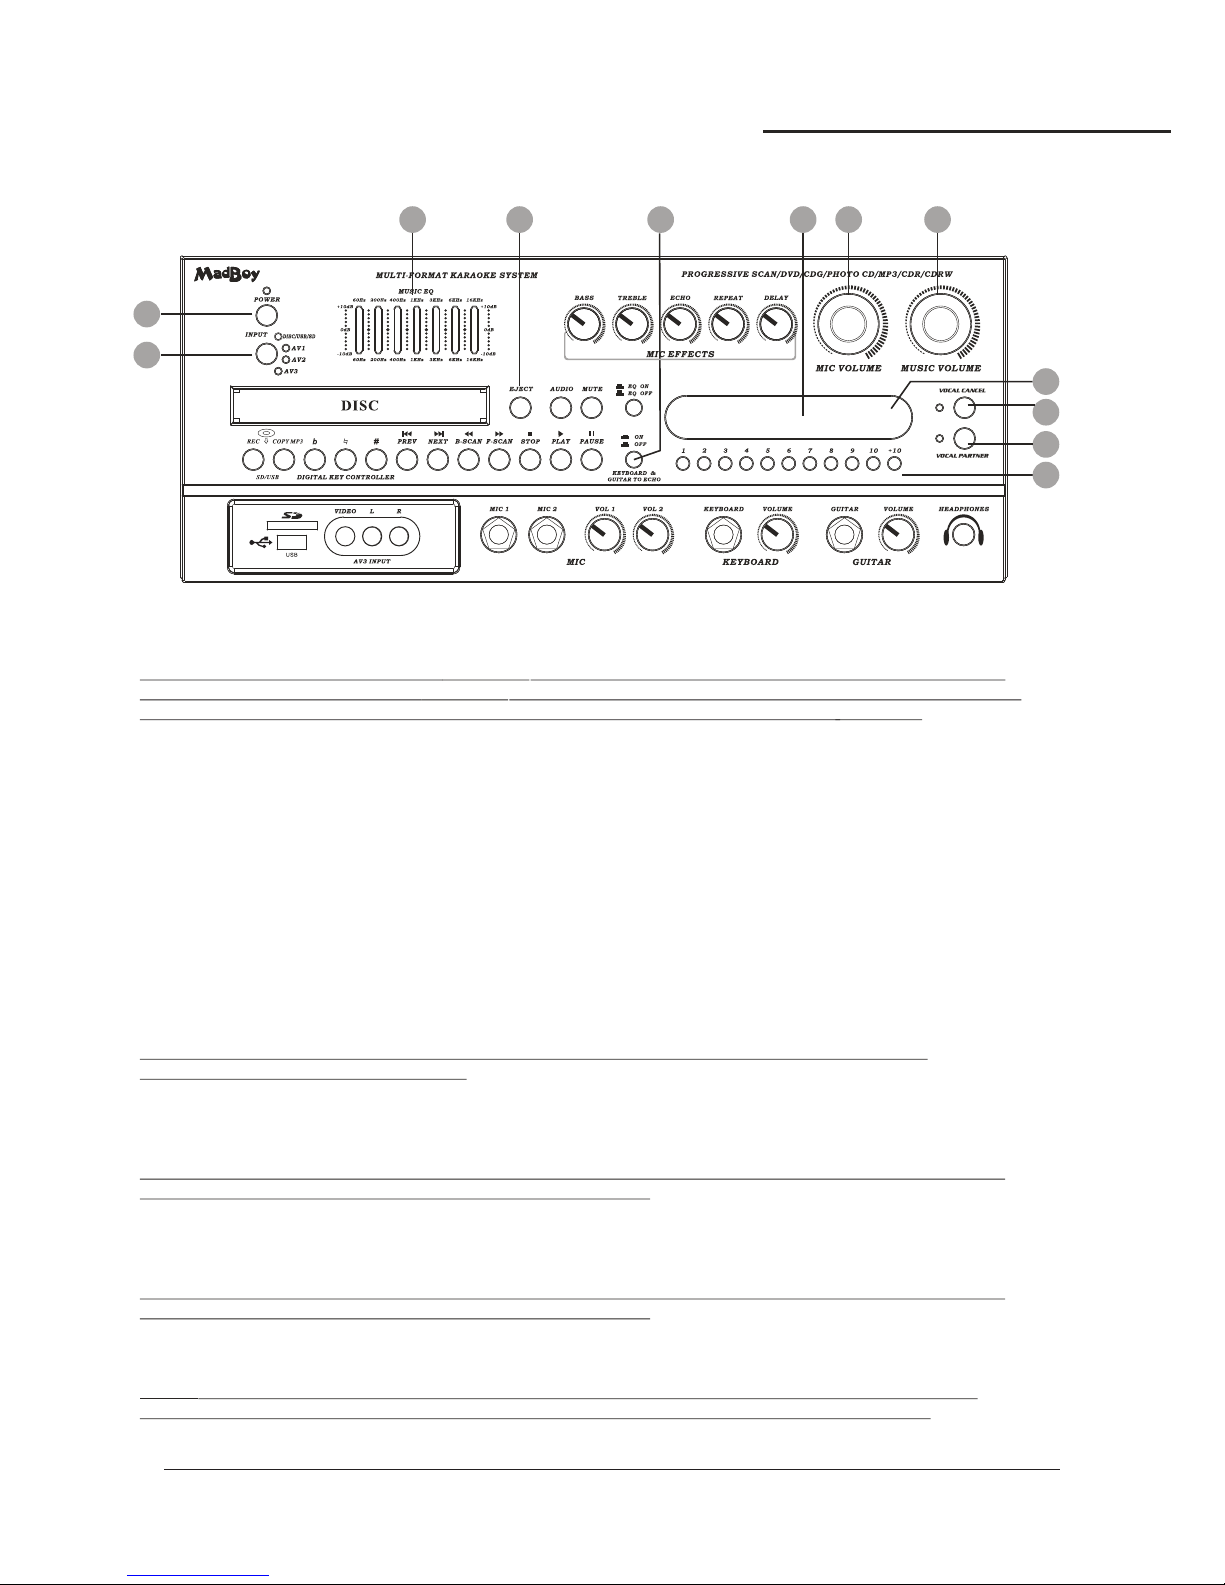
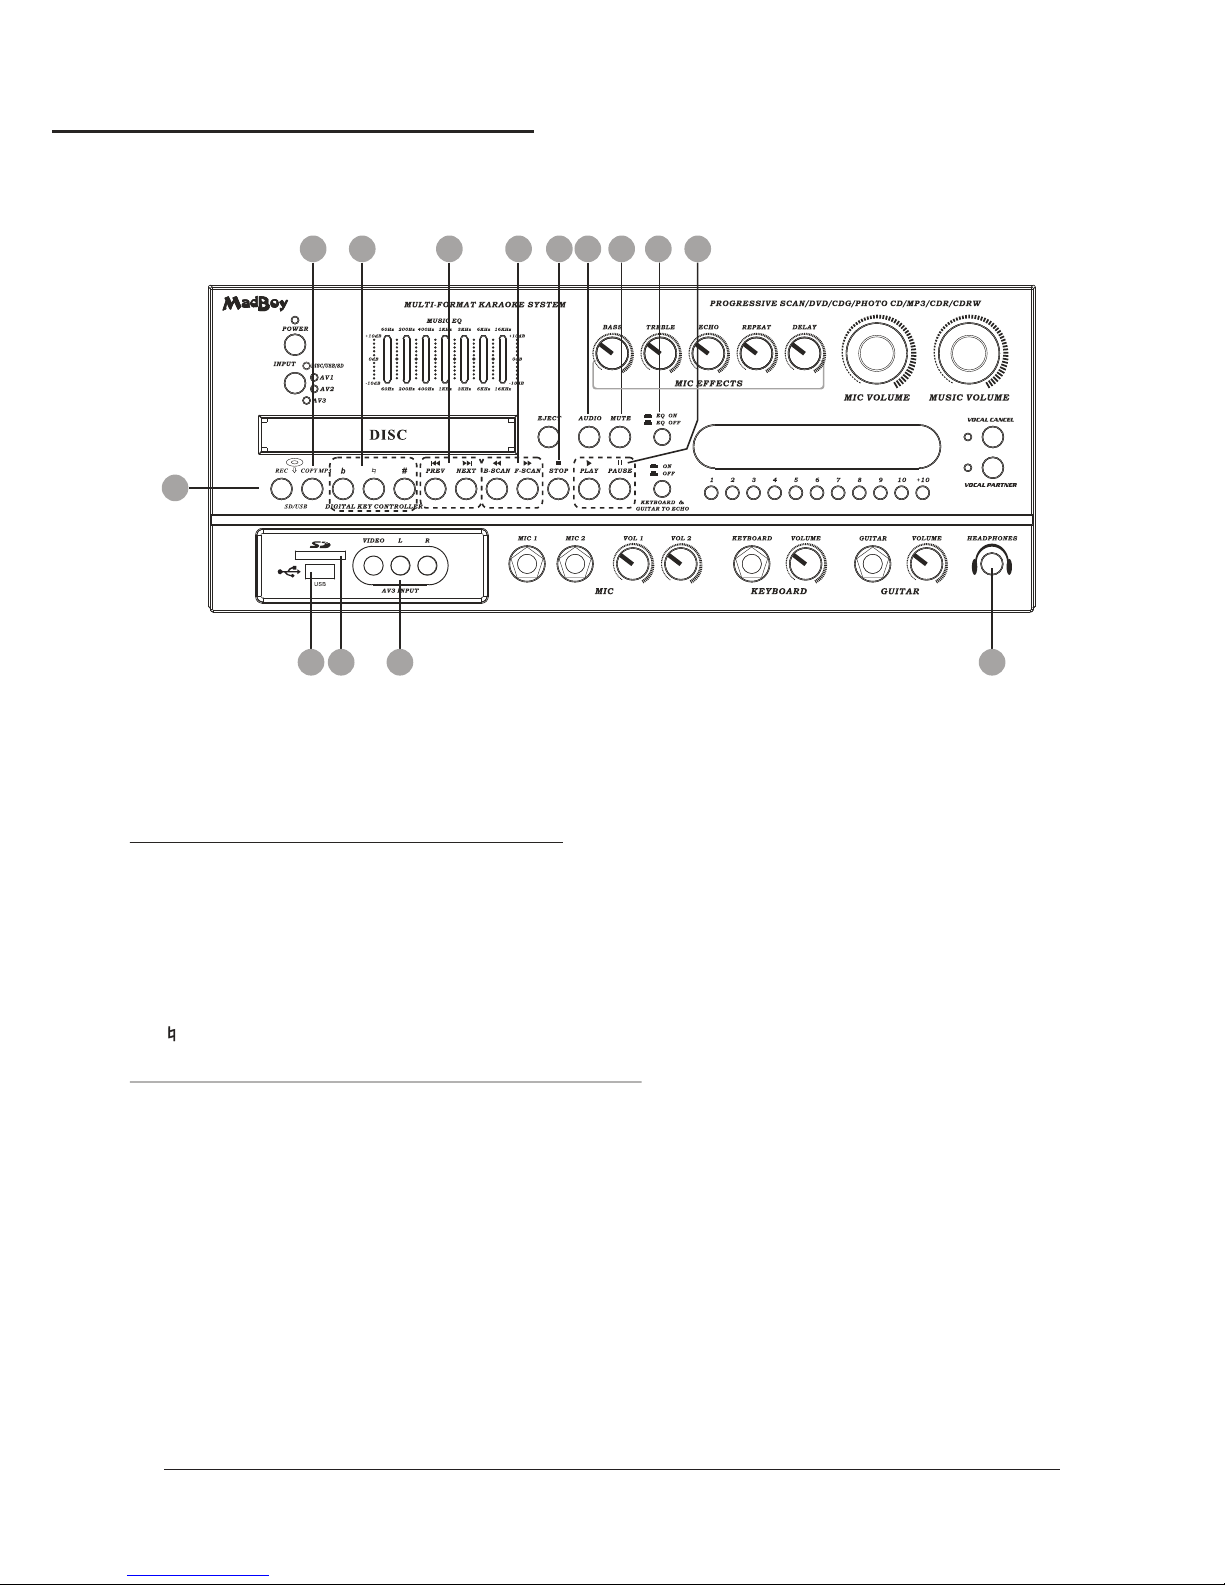
1.INPUT - This button toggles through all the INPUT channels (Disc/USB/SD, AV 1/2/3) for available
INPUT SOURCES.
2.POWER/STANDBY - This button is used to turn the 'ON' or place it in STANDBY mode.
NOTE: When in STANDBY mode, the is not completely powered down and still contains residual
power. This button will not turn the on if the MAIN POWER switch on the rear panel is switched off.
To completely turn the power off, use the MAIN POWER switch on the rear panel of the
3
THUNDER
THUNDER
THUNDER
THUNDER
.MUSIC EQ -This GRAPHIC EQ is used to BOOST and/or CUT particular frequencies from SOURCE
MUSIC output. Each slide fader processes a particular frequency range indicated by the number above it.
Frequencies from 30Hz - 120Hz constitute the very low to low range. Frequencies from 120Hz to 1KHz
are the mid-range and frequencies from 1KHz to 16KHz make up the high to very high range. To adjust,
slide the fader up to boost the frequency presence or down to cut the frequency.
4.EJECT button - This button is used to OPEN/CLOSE the DISC tray.
5.KEYBOARD & GUITAR TO ECHO ON/OFF &switch- This switch is used to turn the keyboard
Digital ECHO ON and OFF. Press the switch in toguitar to KEYBOARD & GUITAR TO ECHO ON/OFF
activate the Digital ECHO. In the out position, the keyboard Digital ECHO is OFF.& guitar to
6.GRAPHIC DISPLAY - This panel displays all graphical information regarding system operations,
settings and performance.
7 MIC VOLUME. control - This control increases/decreases the MIC VOLUME level. Turn clockwise to
increase MIC VOLUME and counter-clockwise to decrease the MIC VOLUME.
8 MUSIC VOLUME. control - This control increases/decreases the MUSIC VOLUME level. Turn clockwise
to increase MUSIC VOLUME and counter-clockwise to decrease the MUSIC VOLUME.
9.REMOTE SENSOR - This sensor receives infrared signals transmitted by the REMOTE CONTROL transmitter.
NOTE: Obstacles located between the remote control and remote sensor should be avoided
as they can prevent signal recognition
10 VOCAL CANCEL. button - This feature is used to cancel out the lead vocal layer on a multiplex format
CD+G or VCD disc. In order for this feature to work, the disc must be multiplex formatted. To activate,
press the VOCAL CANCEL button once to remove the lead vocal layer. Press a second time, and the
lead vocal layer will be reestablished.
NOTE: If you try to utilize this feature while a standard or non-multiplex disc is playing, it will not work
as this feature is designed to work with multiplex discs only.
11. VOCAL PARTNER button - When you enable the VOCAL PARTNER feature by pressing this button,
the lead vocal layer will be removed only while you are singing into the microphone. When you stop
singing into the microphone, the lead vocal layer will automatically be added back into the music.
To activateVOCAL PARTNER, press button once. To remove VOCAL PARTNER, press it again.
NOTE: If you try to utilize this feature while a standard or non-multiplex disc is playing, it will not work
as this feature is designed to work with multiplex discs only.
12.DIRECT TRACK ACCESS -buttons - These buttons allow for DIRECT TRACK selection. For tracks
10 and up, press the +10 button. For example, to go directly to track 13, you would press +10 and 3,
and for track 22, you would press +10, +10 and 2.
NOTE: When playing MP3 or AVI/DIVX files,to skip to the desired track directlyy using the number
buttons,refer to the Direct track access for MP3/AVI/DIVX operations section of this manual;
Descriptions and Functions
17
THUNDER
WWW.MADBOY-AUDIO.COM
Page 21
Front Panel
13
20
1914 15 16 17 18
22
232526
21
24
13.REC button - Under the disc play mode,Insert USB/SD card,press REC button change to record mode,
the unit will automatically start record from the begining of the disired tracks, At this time, the record
scheduel will be displayed in the TV,when it start record,input the microphone and singing simultaneously,
then the unit will compress the mic vocal and music to MP3 format and storage it to USB/SD card, When
the unit record,it will automatically set-up a “MUSIC” folder in the USB/SD card, All of the record file will be
storaged in this folder in the future,When you want to play the track you recorded,select the “MUSIC” folder.
and then press play button to play it.
NOTES:The record function not support DVD disc.
14.MP3 COPY button - It can be used as MP3 copy and download,when it used as COPY function, insert MP3
disc,select your desired tracks then press MP3 COPY button,then the unit start copy the tracks to USB/SD
card, it will automatically set-up a “CDROM” folder when MP3 COPY,the copy files will be in this folder.
When it used as Download function,Insert CD or CDG disc, select your desired tracks then press MP3 COPY
button,then the unit start download the desired tracks to USB/SD card, it will automatically set-up a
“UNKNO” folder when download,the download files will be in this folder.
15.DIGITAL KEY CONTROL buttons - These buttons direct the DIGITAL KEY CONTROLLER to either raise,
lower or reset the musical key of audio from the disc player.
Raises the musical key a half-step each time it is pressed.●# -
● - Resets the musical key to its original key.
b - Lowers the musical key a half-step each time it is pressed.●
NOTE:Key controller will not work on playing AV1/AV2/AV3.
16.Prev and Next buttons - Skip tracks when in DISC mode .jumps to the previous track and skips
ahead to the next track.
17.B-Scan and F-Scan B-Scanbuttons - Scans through a track when in DISC mode. scans backwards
through the current track and scans forwards through the current track.F-Scan
18.Stop button - Stops disc playback in standby mode when pressed once and completely stops
disc playback when pressed twice.
19.Audio button - Cycle through caption languages on a disc with multiple caption languages available.
20.Mute button - Mutes the sound from Disc/USB/SD,AV1 ,AV2and AV3 input channels.
21.EQ ON/OFF switch - This switch is used to turn the 7-band Graphic Equalizer ON and OFF. Press the
EQ switch in to activate the equalizer. In the out position, the equalizer is bypassed.
22.PLAY/PAUSE button - Plays a disc that is stopped or paused .
23.HEADPHONES jack- This jack is used to connect HEADPHONES equipped with a 1/8inch(0.35CM) plug.
24.AV3 INPUT jacks - These jacks are for connecting AUDIO/VIDEO OUTPUT from an external AV
SOURCE. Connect RCA-style AV cables from these jacks to the AV OUTPUT jacks on your external AV device.
25. SD Memory Card Slot- The SD Memory Card Slot accepts SD memory card formats. Media stored
on a loaded memory card can be played.
26.USB Input - Use the USB Input to connect a USB Thumb Drive to the unit. Media stored on the USB
Thumb Drive can be played.
Descriptions and Functions
18
THUNDER
WWW.MADBOY-AUDIO.COM
Page 22
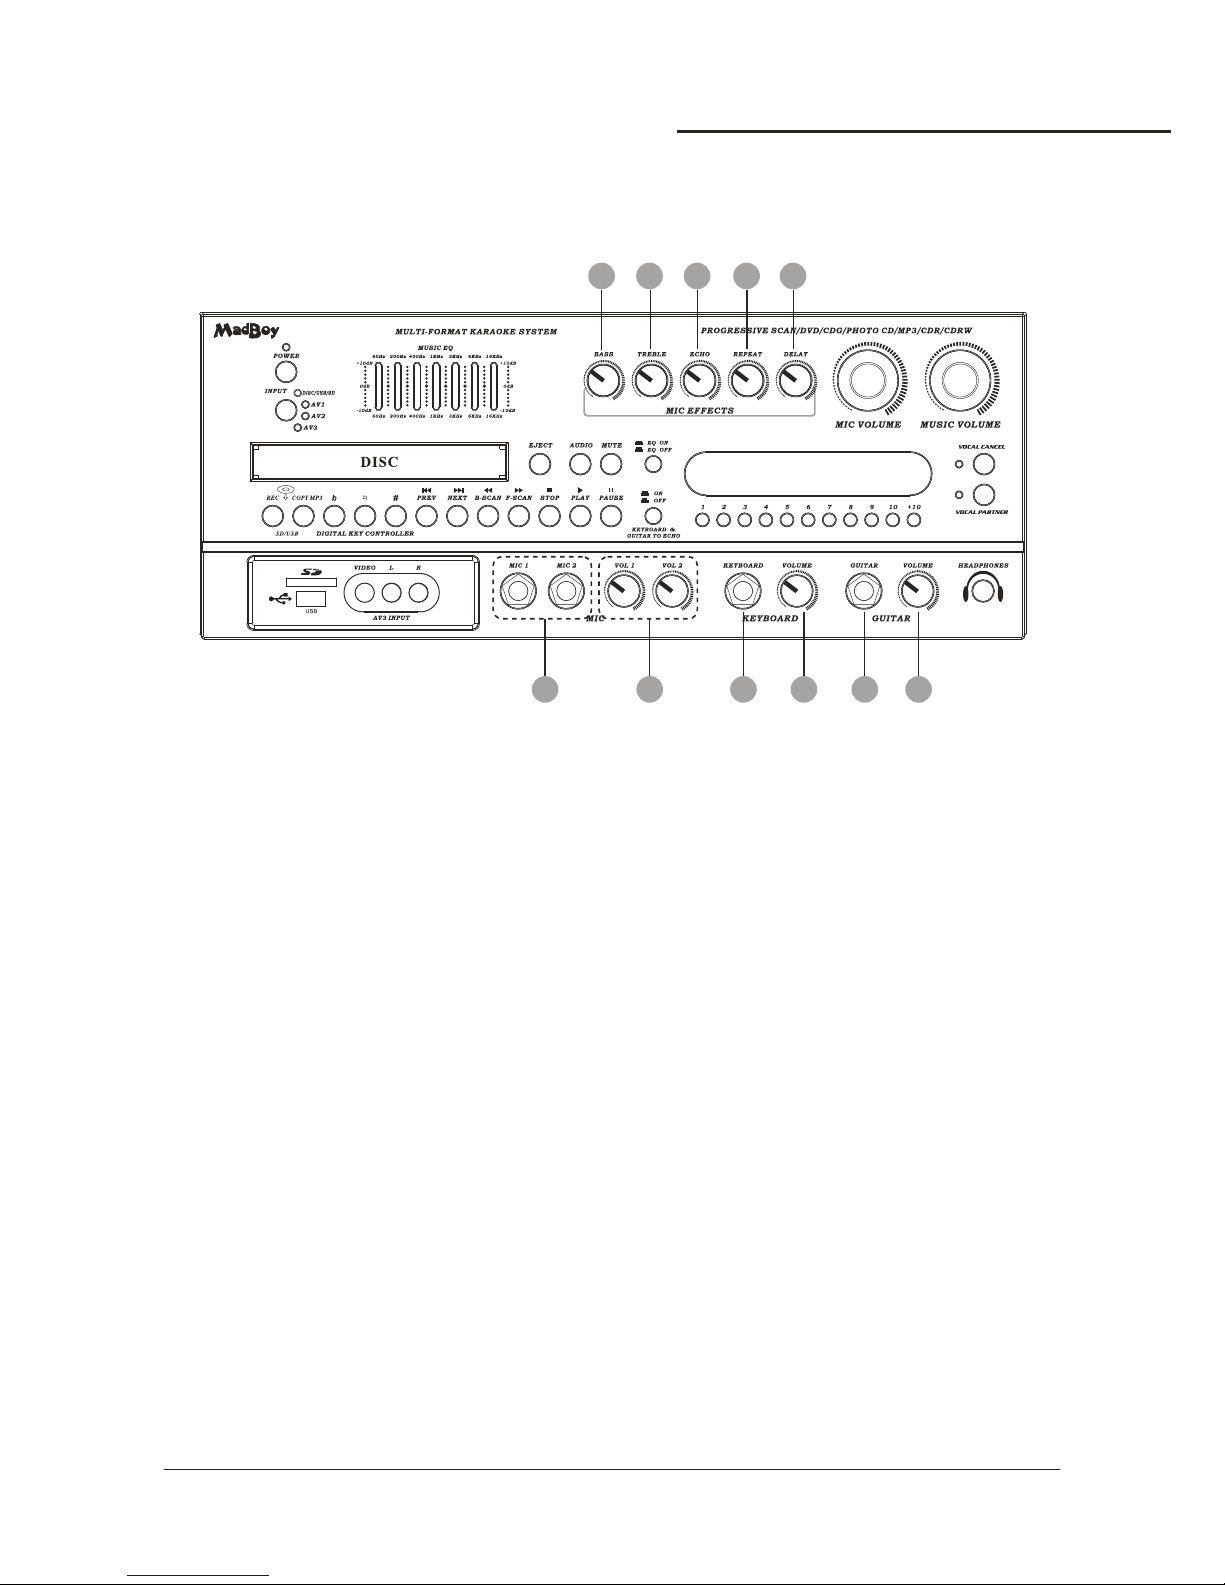
27. MIC BASS - This control increases/decreases the amount of LOW frequency response applied to the
MASTER VOLUME output.
28.MIC TREBLE- This control increases/decreases the amount of HI frequency response applied to the
MASTER VOLUME output.
29.MIC ECHO - This control adjusts the level of ECHO applied to the MIC channels. Turn control clockwise
to INCREASE and counter-clockwise to DECREASE the level of ECHO.
30.MIC REPEAT - Use this control to adjust the REPEAT setting of the ECHO effect. As REPEAT adjusts
the total number of echo intervals prior to fade-out, the more REPEAT that is applied, the more ECHO
intervals will occur prior to fade-out. Turn control clockwise to INCREASE and counter-clockwise to
DECREASE level.
31.MIC DELAY - Use this control to adjust the DELAY setting of the ECHO effect. As DELAY adjusts the
total begin-to-end length of each echo interval, the more DELAY that is applied, the longer each ECHO
interval will take to complete. Turn control clockwise to INCREASE and counter-clockwise to
DECREASE level.
32. MIC INPUTS 1, 2 - These inputs are for connecting MICROPHONES with a ¼ inch (0.635CM) plug.
33.MIC 1 / 2 VOLUME - These controls adjust the VOLUME levels of MIC channels
individually.Turn controls clockwise to INCREASE and counter-clockwise to DECREASE.
34.KEYBOARD INPUT - This input is used to connect a KEYBOARD device via a ¼ inch instrument cable.
35.KEYBOARD VOLUME - This control is used to set the VOLUME level for a KEYBOARD connected to the
KEYBOARD INPUT JACK.
36.GUITAR INPUT - This input is used to connect a GUITAR via a ¼ inch instrument cable.
37.GUITAR VOLUME - This control is used to set the VOLUME level for a GUITAR connected to the
GUITAR INPUT.
Front Panel
27 29
34
28 30 31
373332 35 36
Descriptions and Functions
19
THUNDER
WWW.MADBOY-AUDIO.COM
Page 23
Rear Panel
2
3
4
5
9
1
7 86
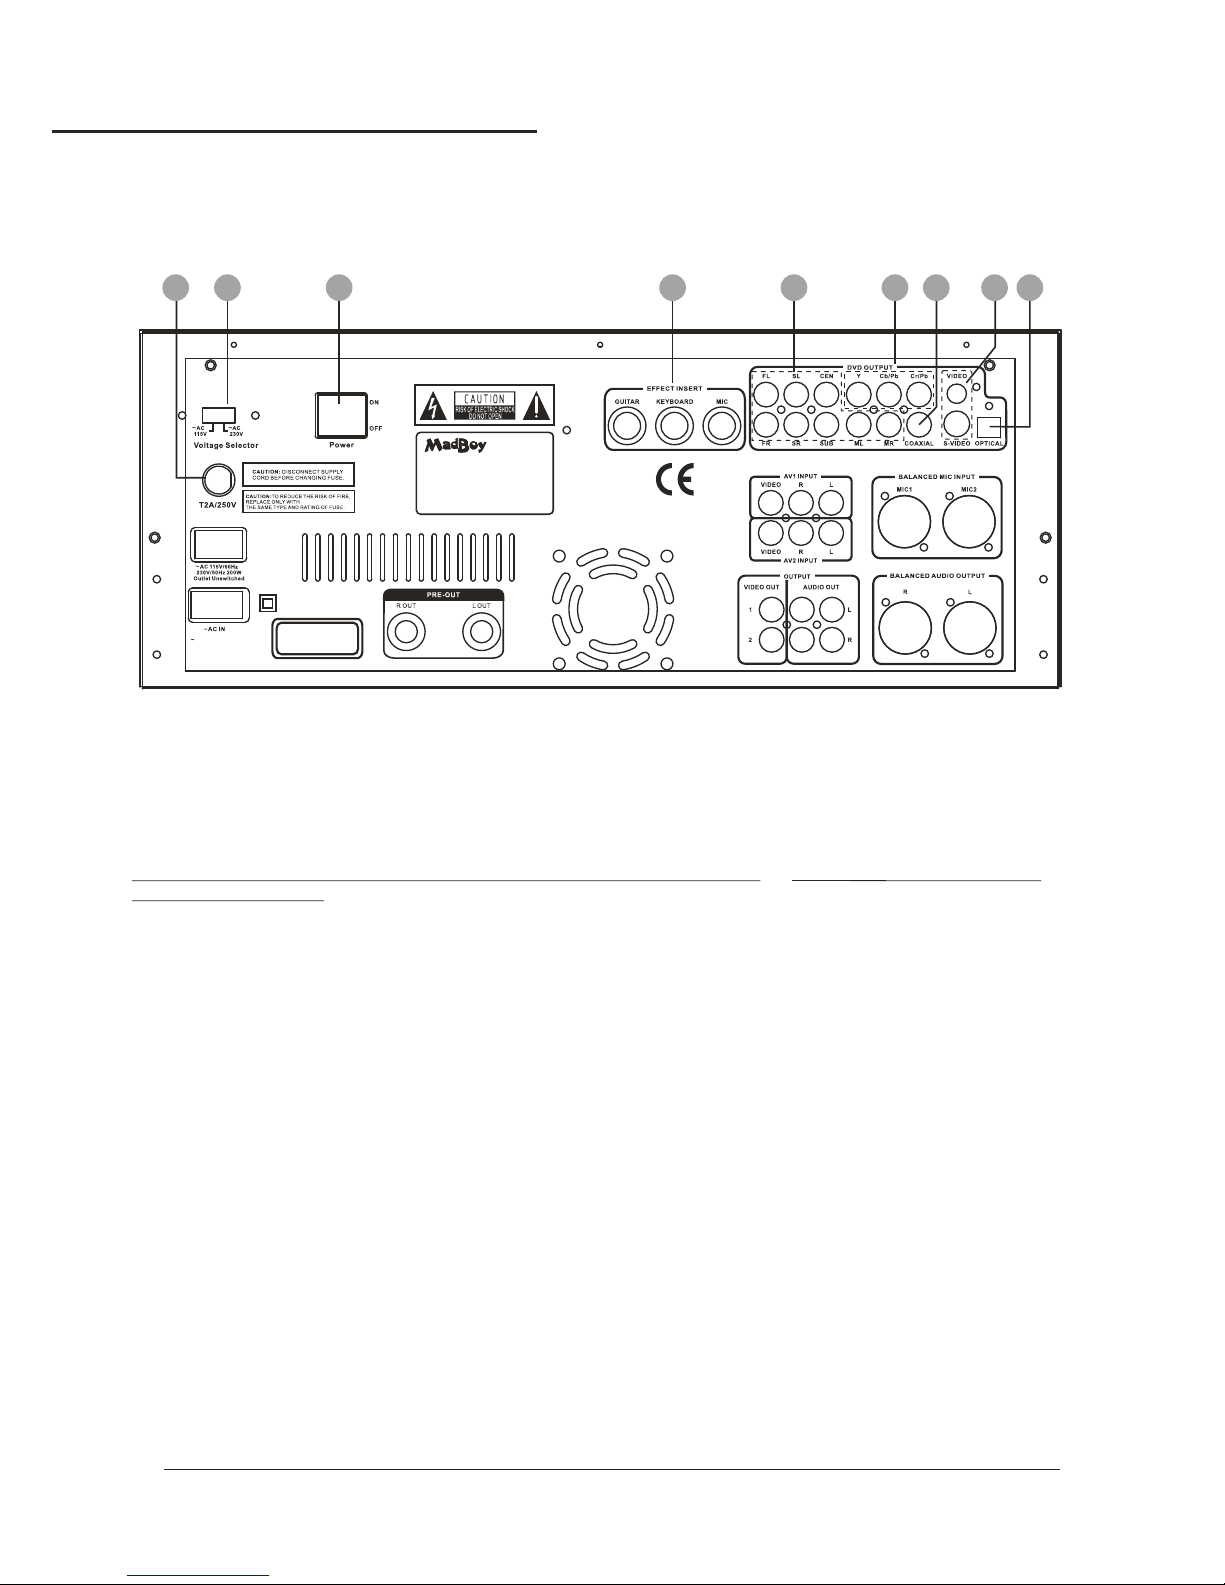
1.FUSE terminal - This terminal houses the main system FUSE.
2.VOLTAGE SELECTOR - This selector toggles between 110-120V and 220-240V power settings. Please
make sure this toggle is set to the correct position, matching the receiving AC outlet's power supply before
plugging it in and operating it. Doing so may cause severe damage to the unit and void your product warranty.
3 MAIN POWER switch. - This switch turns the ’s MAIN POWER On and Off.
NOTE: The red POWER /STANDBY button on the front panel will not turn the on if the MAIN POWER
switch is switched OFF.
4.EFFECTS INSERT jacks - The effects inserts allows you to add external effects to the audio signal without
compromising the original signal. Use the MIC IN/OUT when adding effects to the vocal signal ,use the
IN/OUT when adding effects to the Music and use the IN/OUT when adding effectsKEYBOARD GUITAR
to the music.
5
THUNDER
THUNDER
THUNDER
. 5.1/7.1 CHANNEL AUDIO OUTPUT jacks - These jacks are for connecting to 5.1 or 7.1 channel ready
amplifiers/recievers. The labels on each jack specify which speaker in your surround sound system output
is sent to: ML-middle left, MR- middle right, CENT- center, SW- subwoofer, SL- side left, SR- side right,
FL- front left, FR- front right.
6.COMPONENT VIDEO OUTPUT - These jacks output VIDEO to a TV monitor via COMPONENT VIDEO cables.
COMPONENT VIDEO outputs the different color signals (U/Pb and V/Pr) and luminance signal (Y) separately
for high-fidelity in reproducing colors. The description of the component video output connectors may differ
depending on the TV set or monitor i.e. Pr/Pb/Y or Cr/Cb/Y or R-Y/B-Y/Y. Component video cables only transmit
the video signal, separate cables are needed for audio signals. Please refer to the operating instructions of the
TV set or monitor for details.
7.COAXIAL OUTPUT - This digital output is for connecting devices with a COAXIAL cable.
8.VIDEO (RCA) and S-VIDEO OUT jacks - These jacks output video to a display device (TV, TFT, etc.). The
VIDEO jack outputs video using an RCA video cable. The S-VIDEO jack uses an S-VIDEO cable. S-VIDEO
provides better color separation and better resolution by separating the color and picture signals of a
composite-video signal.
9.OPTICAL OUTPUT - This digital out is for connecting devices with an OPTICAL cable. Please make sure to
remove the protective cover from this jack prior to connecting an OPTICAL cable. When not using this input,
keep the protective cover on to protect it from dust and foreign material.
Descriptions and Functions
20
MODEL:THUNDER
Power Supply:
~115V/60Hz,230V/50Hz,<70W
SERIAL NUMBER:
MULTI FORMAT KARAOKE SYSTEM
CLASS 1 LASER PRODUCT
KLASSE 1 LASER PRODUCT
LUOKAN 1 LASER LAITE
KLASS 1 LASERAPARTA
AC 115V/60Hz
230V/50Hz 70W
WWW.MADBOY-AUDIO.COM
Page 24
Rear Panel
11
10
12
13
15 16
17
14
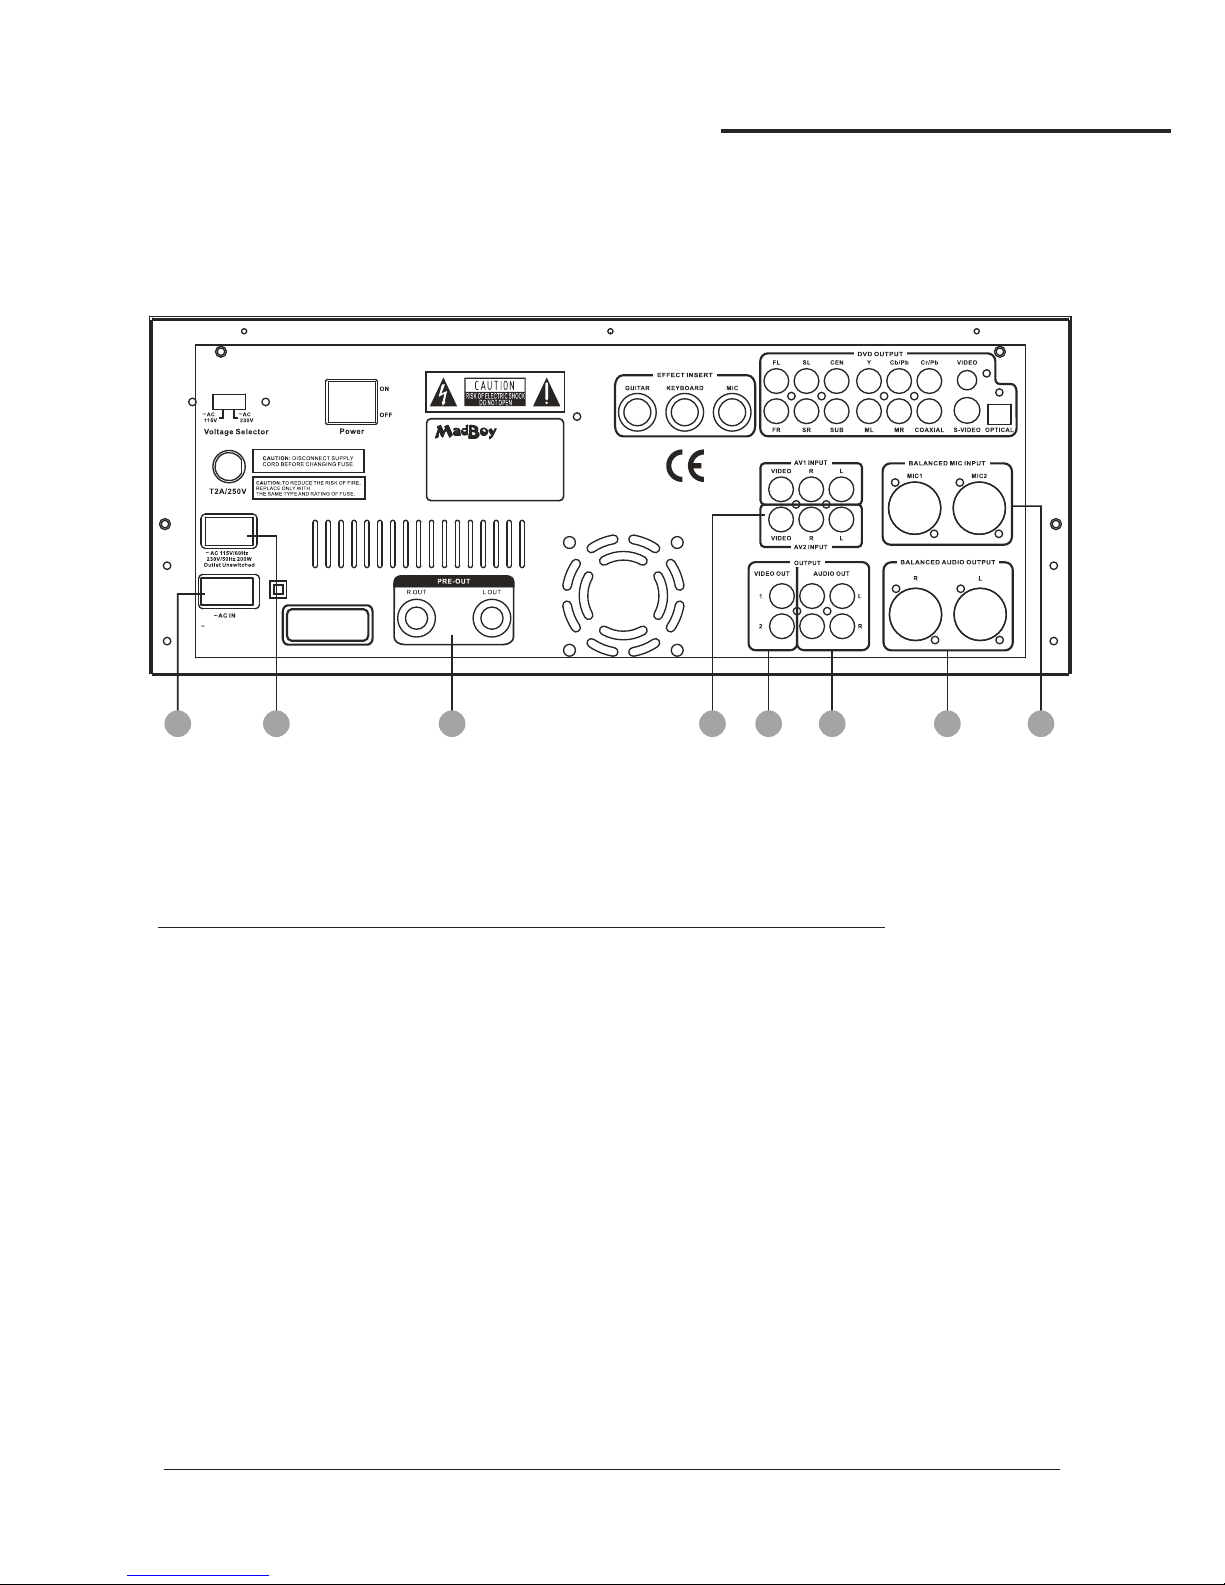
10.AC~IN terminal - Connect AC MAIN POWER CORD from the wall outlet to this terminal.
11.
12.PRE-OUT
13.AV 1 / 2 INPUT jacks - These jacks are for connecting AUDIO/VIDEO OUTPUT from external AV
SOURCES. Connect RCA-style AV cables (R, W, Y) from these jacks to the AV OUTPUT jacks
on your external AV devices.
14.VIDEO OUT 1-2 jacks (RCA) - These jacks are for connecting the 's VIDEO OUTPUT to TV
or DISPLAY devices. Connect RCA-type patch cables from these jacks to the VIDEO INPUT jacks
on the connecting TV or display devices.
15.AUDIO OUT 1-2 jacks (RCA) - These jacks are for connecting the AUDIO OUTPUT to an amplifier,
recording or mixing devices. Connect paired RCA-type patch cables from these jacks to the appropriate
INPUT jacks on external audio devices.
16.BALANCED AUDIO OUTPUT jacks - These XLR jacks are for connecting MASTER output to an
external device with balanced cables.
17.BALANCED MIC 1-2 INPUT (XLR) - These jacks are for connecting microphones via BALANCED
XLR-type microphone cables.
AC POWER outlet - This outlet provides AC POWER to an external device.
NOTE: Do not connect any device with a power consumption level higher than 200W.
THUNDER
THUNDER
jacks-Connect one end of ¼-inch cables to the left and right PRE-OUT jacks on the THUNDER.
Connect one end of the ¼-inch cables to the left and right AUDIO/LINE/AUX INPUT jacks on the
external device.
Descriptions and Functions
21
MODEL:THUNDER
Power Supply:
~115V/60Hz,230V/50Hz,<70W
SERIAL NUMBER:
MULTI FORMAT KARAOKE SYSTEM
CLASS 1 LASER PRODUCT
KLASSE 1 LASER PRODUCT
LUOKAN 1 LASER LAITE
KLASS 1 LASERAPARTA
AC 115V/60Hz
230V/50Hz 70W
WWW.MADBOY-AUDIO.COM
Page 25
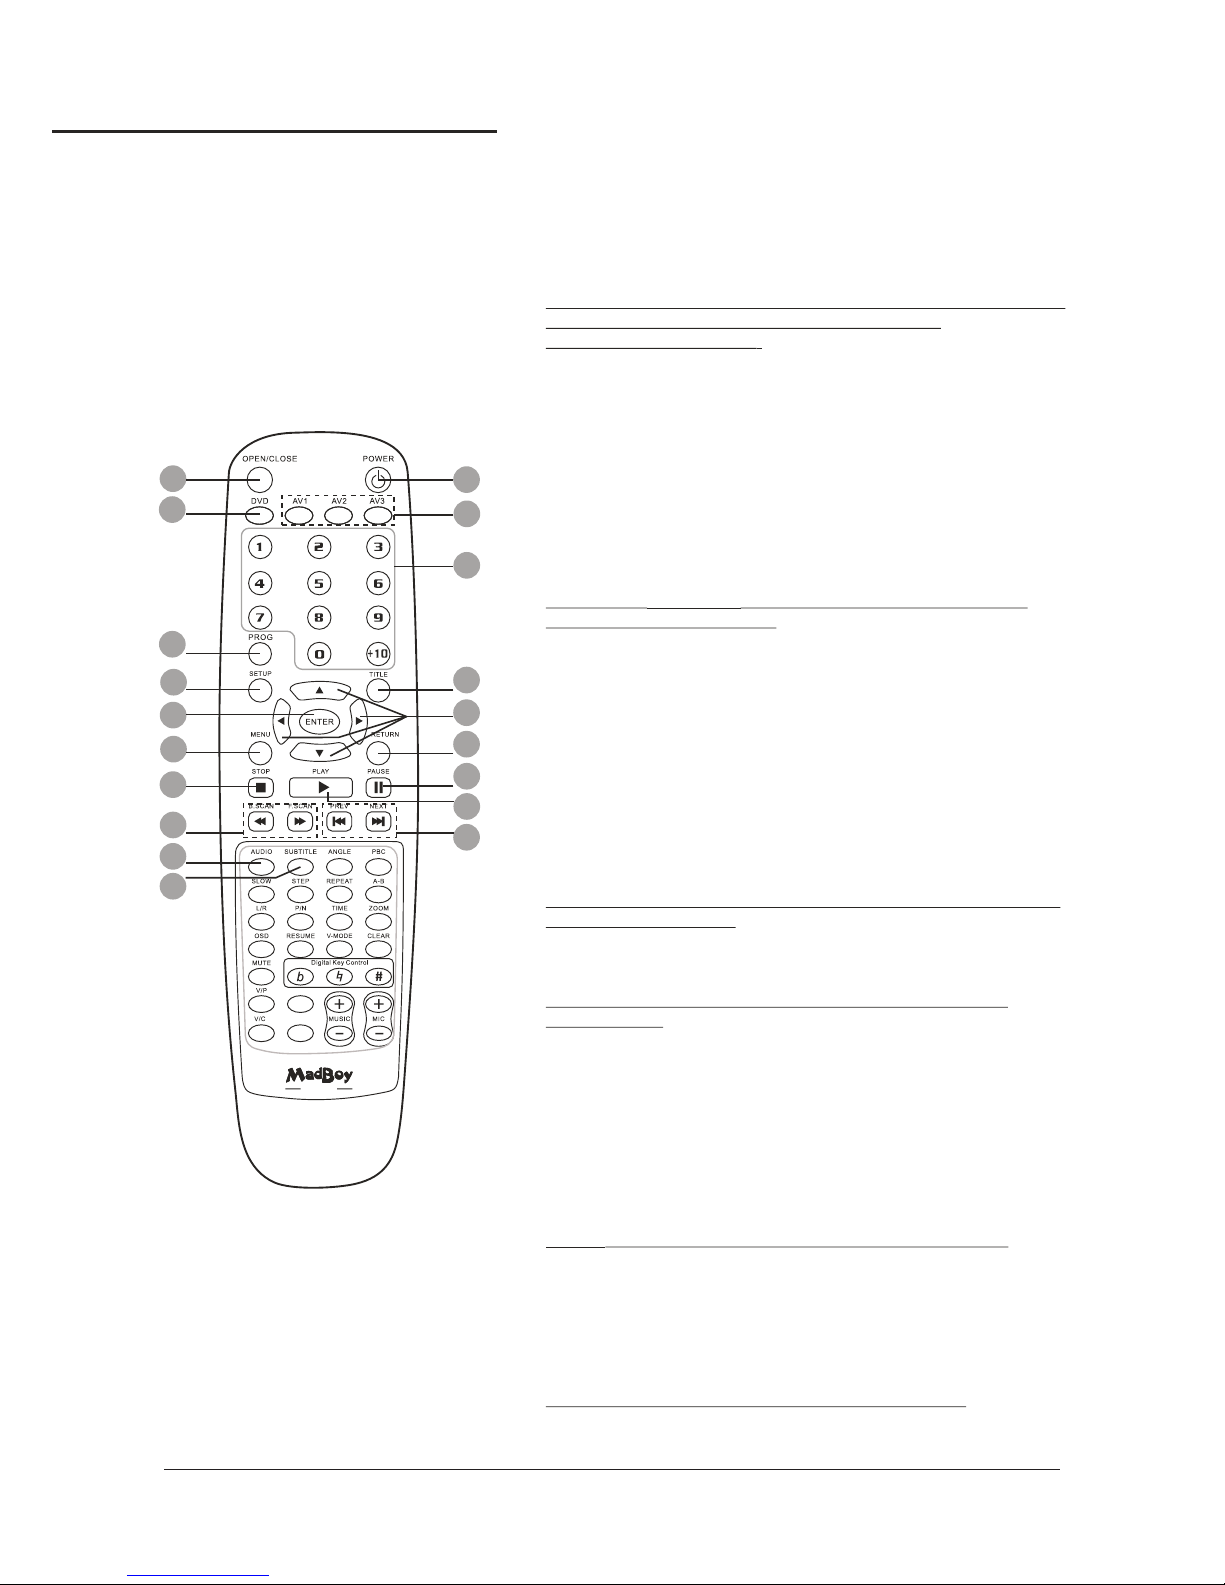
1.OPEN/CLOSE button - This button is used to OPEN/CLOSE
the DISC tray.
2.Power button - Turns the On or to Standby mode.
To turn the completely off, use the power button on
the front panel.
NOTE: The main power must be on in order to use this power
button. Turn on the main power with the power
button on the front panel.
3.DVD button- This button selects the DVD/USB/SD player
as the input to be used.
4.AV1/AV2/AV3 button - This button selects the AV1/AV2/AV3 as
the input to be used.
5.Number/Preset buttons - Use these buttons to jump
directly to a track in Disc mode. See the Disc and Tuner
Operations sections of this manual for detailed instructions
on using the Number/Preset buttons.
6.Program button - Opens the program menu. The
can program the playback order of up to 20 tracks
on a disc. See the Operations section of this manual for
detailed instructions on programming a custom track order.
NOTE: The must be in DISC mode in order to
access the Program menu.
7.SETUP button - Use this button to access the ’s
setup page on the video screen. You can navigate between
the General Setup Page, Audio Setup Page, Video Setup
Page, preference page and the Password
Setup page using the DIRECTIONAL buttons (< ^ > v) on your
remote. Select options and make changes using the ENTER
button on the remote.
8.DIRECTIONAL buttons (< ^ > v)- - These buttons allow you
to navigate through the DVD menu screens, Setup Pages, and
Mp3 menus.
9.ENTER button- This button is used to make selections in
DVD menus and the OSD when an entry is highlighted.
10 Title button. - Accesses the title screen on a DVD.
NOTE: For use on DVDs with title screens. Some DVDs may
not have a title screen.
11 Menu button. - Accesses the main menu on a DVD and other
discs with main menus.
12.Return button - Accesses the main menu on a VCD 2.0 disc.
NOTE: PBC must be turned on and the VCD must be a
VCD 2.0 disc.
13. Stop button - Stops disc playback in standby mode when
pressed once and completely stops disc playback
when pressed twice.
14. Play button - Plays a disc that is stopped or paused. See
the Operations section in this manual for detailed
instructions on auto-scanning.
15 Pause button. - Pause a disc that is playing.
16.B-Scan and F-Scan buttons - Scans through a track when
in DISC mode: scans backwards through the currentB-Scan
track and scans forwards through the current trackF-Scan
NOTE:It will not work while playing CD+G format disc.
17.Prev and Next buttons - Skip tracks when in DISC mode:
jumps to the previous track and skips ahead toprev Next
the next track.
18.Audio button - Cycle through caption languages on a disc
with multiple caption languages available.
19.Subtitle button - Cycles through the available subtitle
languages on a DVD with subtitles available.
NOTE: Not all DVDs will have subtitles available.
THUNDER
THUNDER
THUNDER
THUNDER
THUNDER
1
3
6
7
9
11
13
16
18
19
2
4
5
10
8
12
15
14
17
Remote Control
Descriptions and Functions
22
COPY MP3
REC
THUNDER
WWW.MADBOY-AUDIO.COM
Page 26
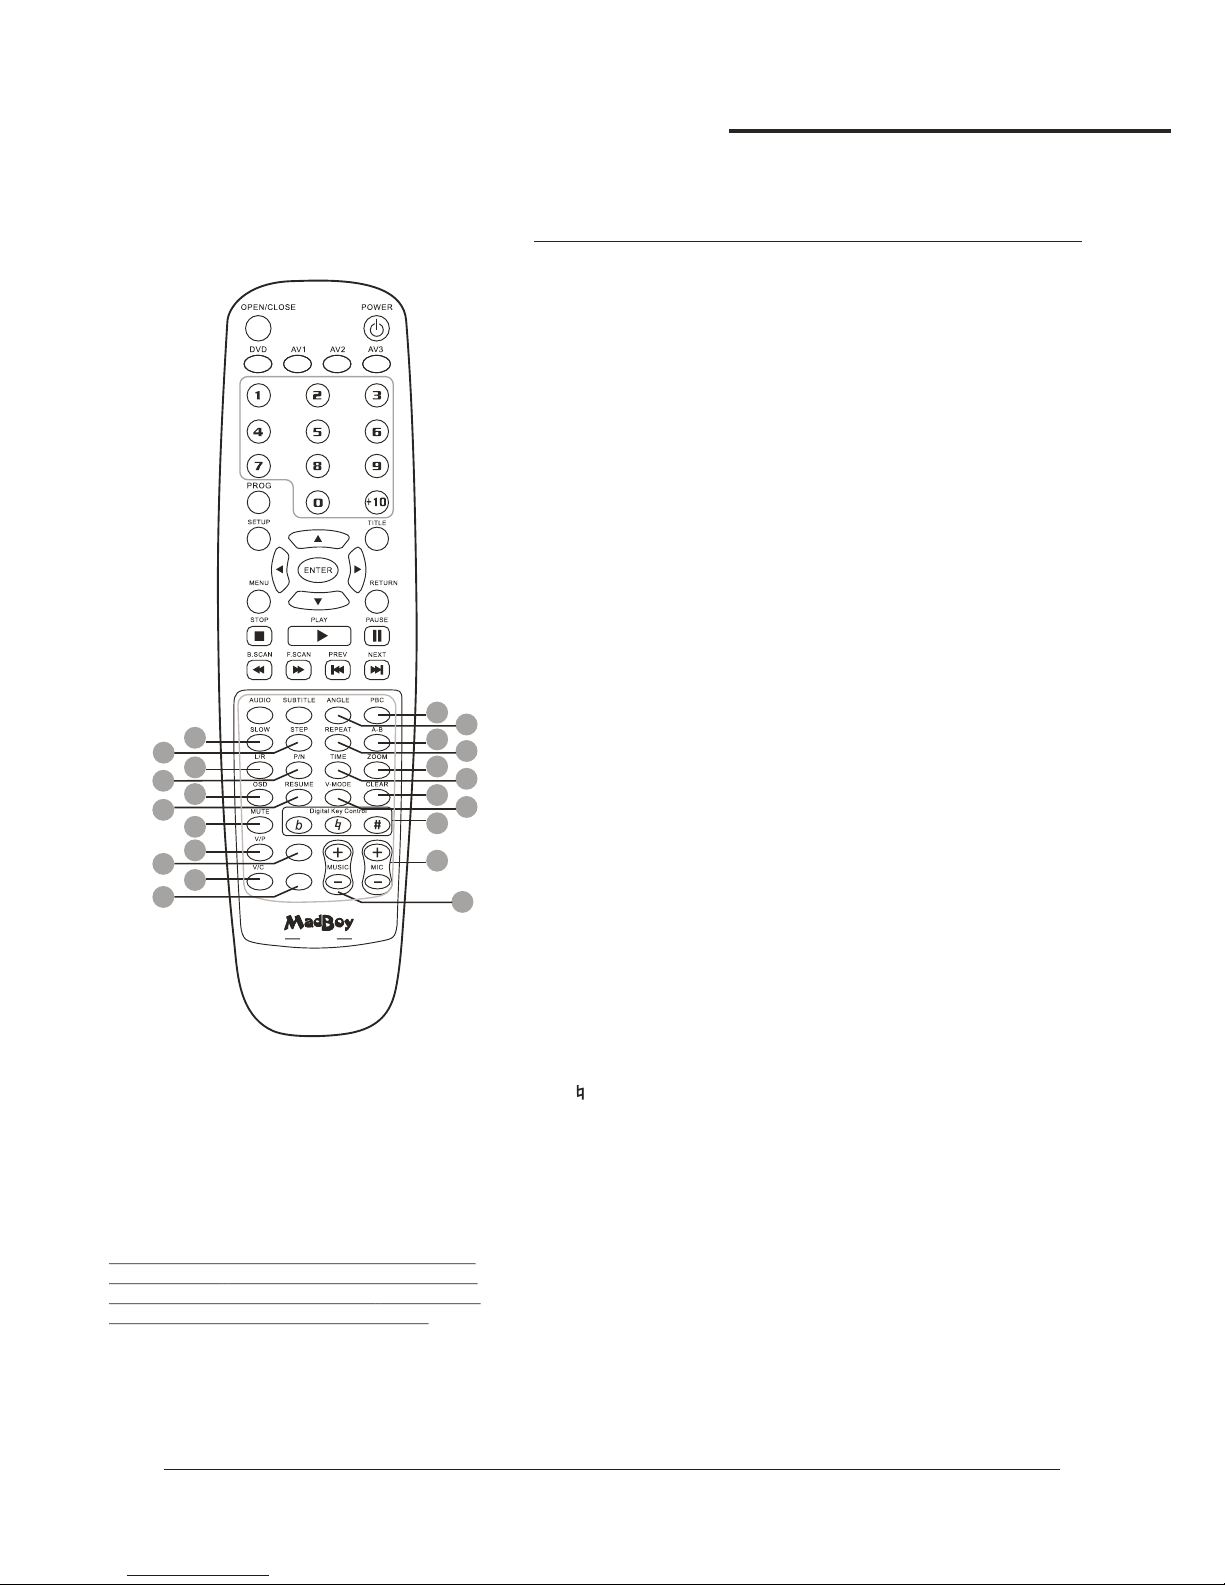
21.Angle button - Cycles through the available viewing
angles on DVDs with multiple viewing angles available.
NOTE: Not all DVDs will have multiple viewing angles available.
22.PBC button - Turns on Playback Control (PBC). For use
with VCD 2.0 discs, PBC allows you to navigate more
conveniently through VCD 2.0 discs.
23.Slow button - Cycles through the different slow motion
options while in DISC mode. See the Operations section in
this manual for detailed instructions on using slow motion.
24.Step button - Allows you to view a disc step-by-step, one
frame at a time. See the Operations section in this manual
for detailed instructions on using the Step feature.
25.Repeat button - Cycles through the available repeat options.
Repeat options vary from type of disc so see the Operations
section of this manual for detailed instructions on using the
repeat function for every kind of disc.
26.A-B (loop) button - Allows you to set a section on a disc
for continuous looping. See the Operations section in this
manual for detailed instructions on using the A-B loop feature.
27.L/R button - Cycles through the different multiplex CD+G
output modes for canceling the vocals: MONO-LEFT,MONORIGHT, MIX-MONO and STEREO. See the Operations section
in this manual for detailed instructions on canceling vocals on
multiplex CD+G discs.
28. P/N button - Switches between PAL and NTSC video modes.
29.Time button - Accesses the Time menu which allows you
to jump directly to a specific time on a disc. See the Operations
section in this manual for detailed instructions on jumping to a
specific time on a disc.
30.Zoom button - Allows you to zoom in 2X, 3X and 4X and
zoom out 1/2X, 1/3X and 1/4X on the video during disc playback.
31.OSD button - Cycles through the different On Screen Display
options. See the Operations section in this manual for detailed
instructions on selecting OSD options.
32.Resume button - Resumes playback from exact spot where
a disc has been stopped in standby mode.
33.V-MODE - This button toggles between the different variants of
component video, YUV (US), and S- Video.
34.Clear button - Clears any numbers typed into a menu before
a selection has been made.
35.Mute button - Mutes the sound from disc, ipod and AV input
channels.
36.DIGITAL KEY CONTROL - These buttons direct the DIGITAL
KEY CONTROLLER
Raises the musical key a half-step each time it is pressed.! # -
- Resets the musical key to it's original key.
b - Lowers the musical key a half-step each time it is pressed!
37.Mic + and -- Master Volume buttons to control the MIC
volume, The (+) button increases the MIC volume and the (-)
button decreases the MIC volume.
38.Music + and -- Master Volume buttons to control the
MUSIC volume. The (+) button increases the MUSIC volume
and the (-) button decreases the MUSIC volume.
39.V/P button(Vocal Partner) - To activate VOCAL PARTNER,
press button once. To remove VOCAL
PARTNER, press a second time.NOTE: If you try to utilize this
feature while a standard or non-multiplex disc is playing, it will
not work as this feature is designed to work on multiplex format
discs only.
!
23
24
27
28
31
32
35
39
40
22
26
30
34
36
37
38
21
25
29
Remote Control
40.V/C button(Vocal Cancel) - In order for
this feature to work properly, the disc
must be multiplex formatted. Press the
VOCAL CANCEL button once to remove
the lead vocal layer. Press a second
time, and the lead vocal layer will be
reestablished.
NOTE: If you try to utilize this feature while
a standard or non-multiplex disc is playing,
it will not work as this feature is designed to
work with multiplex format discs only.
33
Descriptions and Functions
23
COPY MP3
REC
41
42
41.MP3 COPY button - Please refer to
the 18 page.
41.REC button - Please refer to
the 18 page.
THUNDER
WWW.MADBOY-AUDIO.COM
Page 27
Using the Remote Control
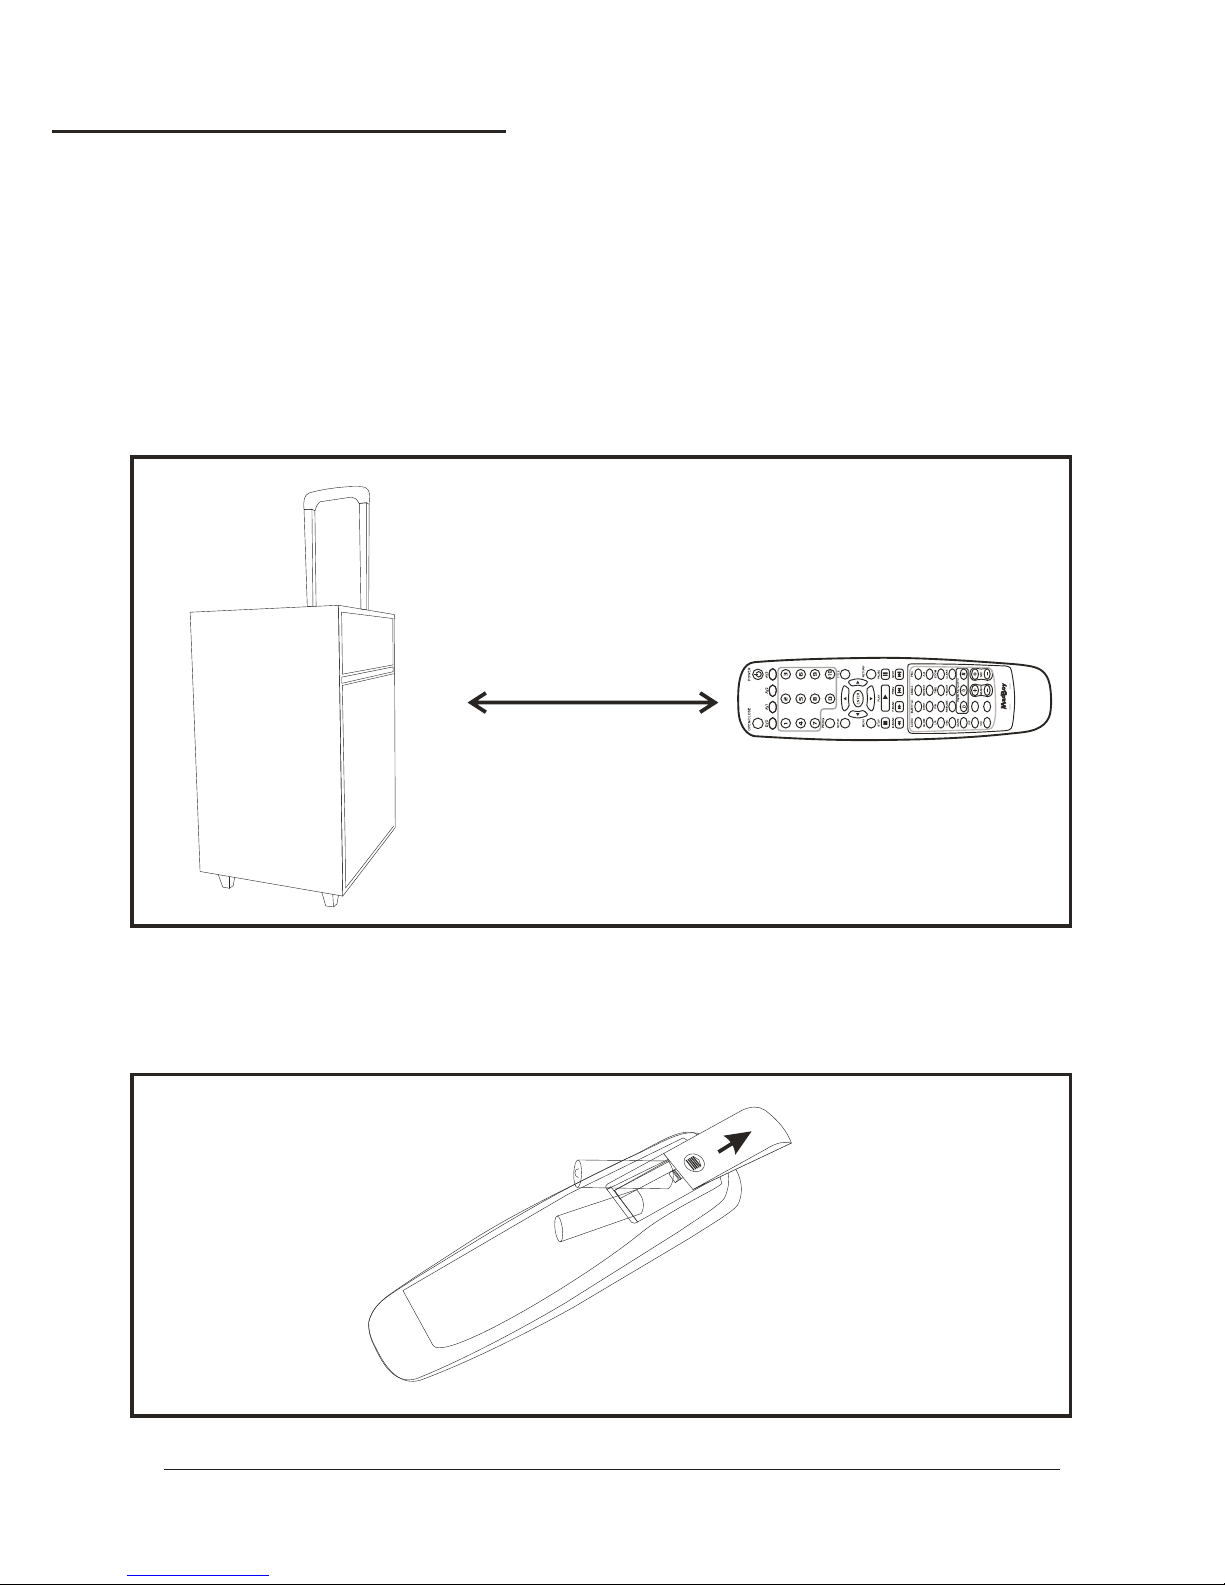
When operating the remote control, point the top of the remote control toward
the 's remote sensor on the front panel and ensure that there is a clear line of sight between the
remote control and void of obstacles in order to prevent signal deflection.
THUNDER
THUNDER
When to replace the batteries
The maximum operational distance between the remote control and the sensor is approximately 35 feet.
If the remote only operates at shorter distances, it is time to replace the batteries.
Installing the batteries
To install the batteries, first remove the battery compartment lid from the back of the remote control.
Insert two AAA batteries, ensuring that the polarities are aligned correctly.
Approximately 35 feet
Remote Control
Descriptions and Functions
24
COPYMp3
REC
THUNDER
WWW.MADBOY-AUDIO.COM
Page 28
DVD System Setup Menu
25
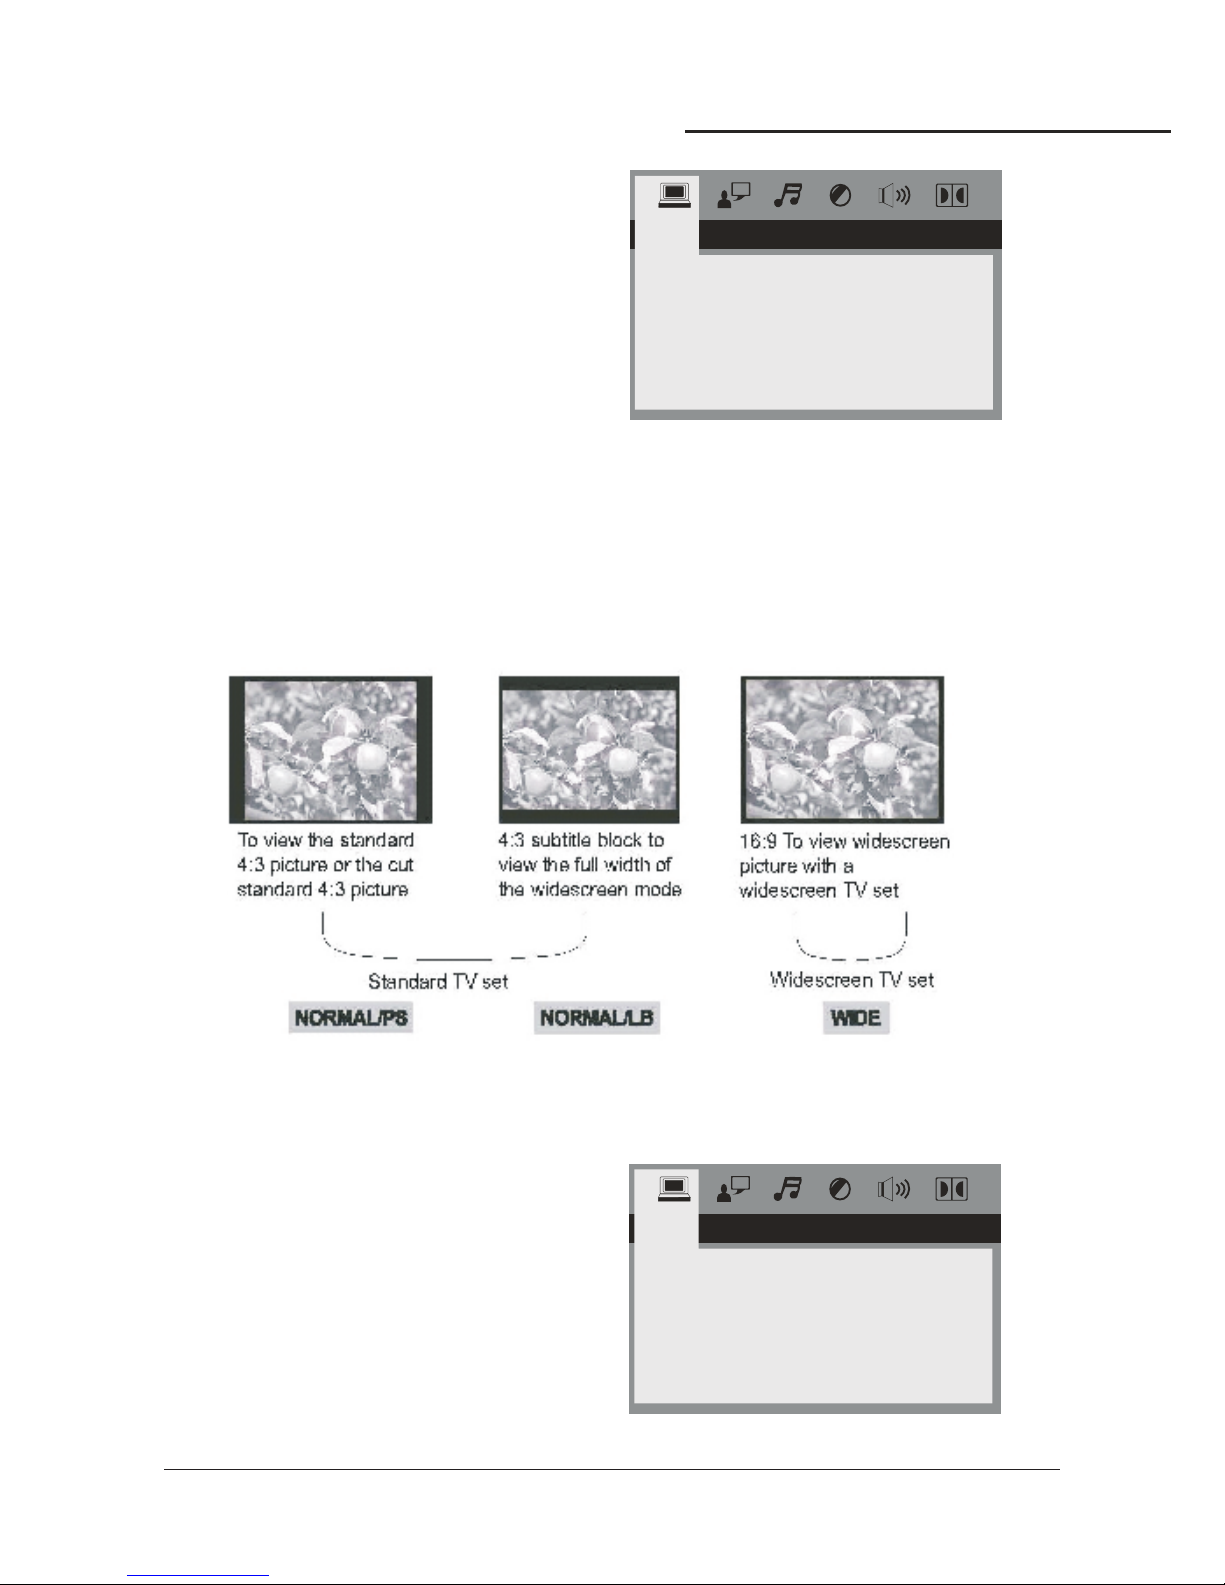
SYSTEM SETUP
TV SYSTEM
SCREEN SAVER
VIDEO
TV TYPE
PASSWORD
RATING
NEXT PAGE
SYSTEM SETUP MENU
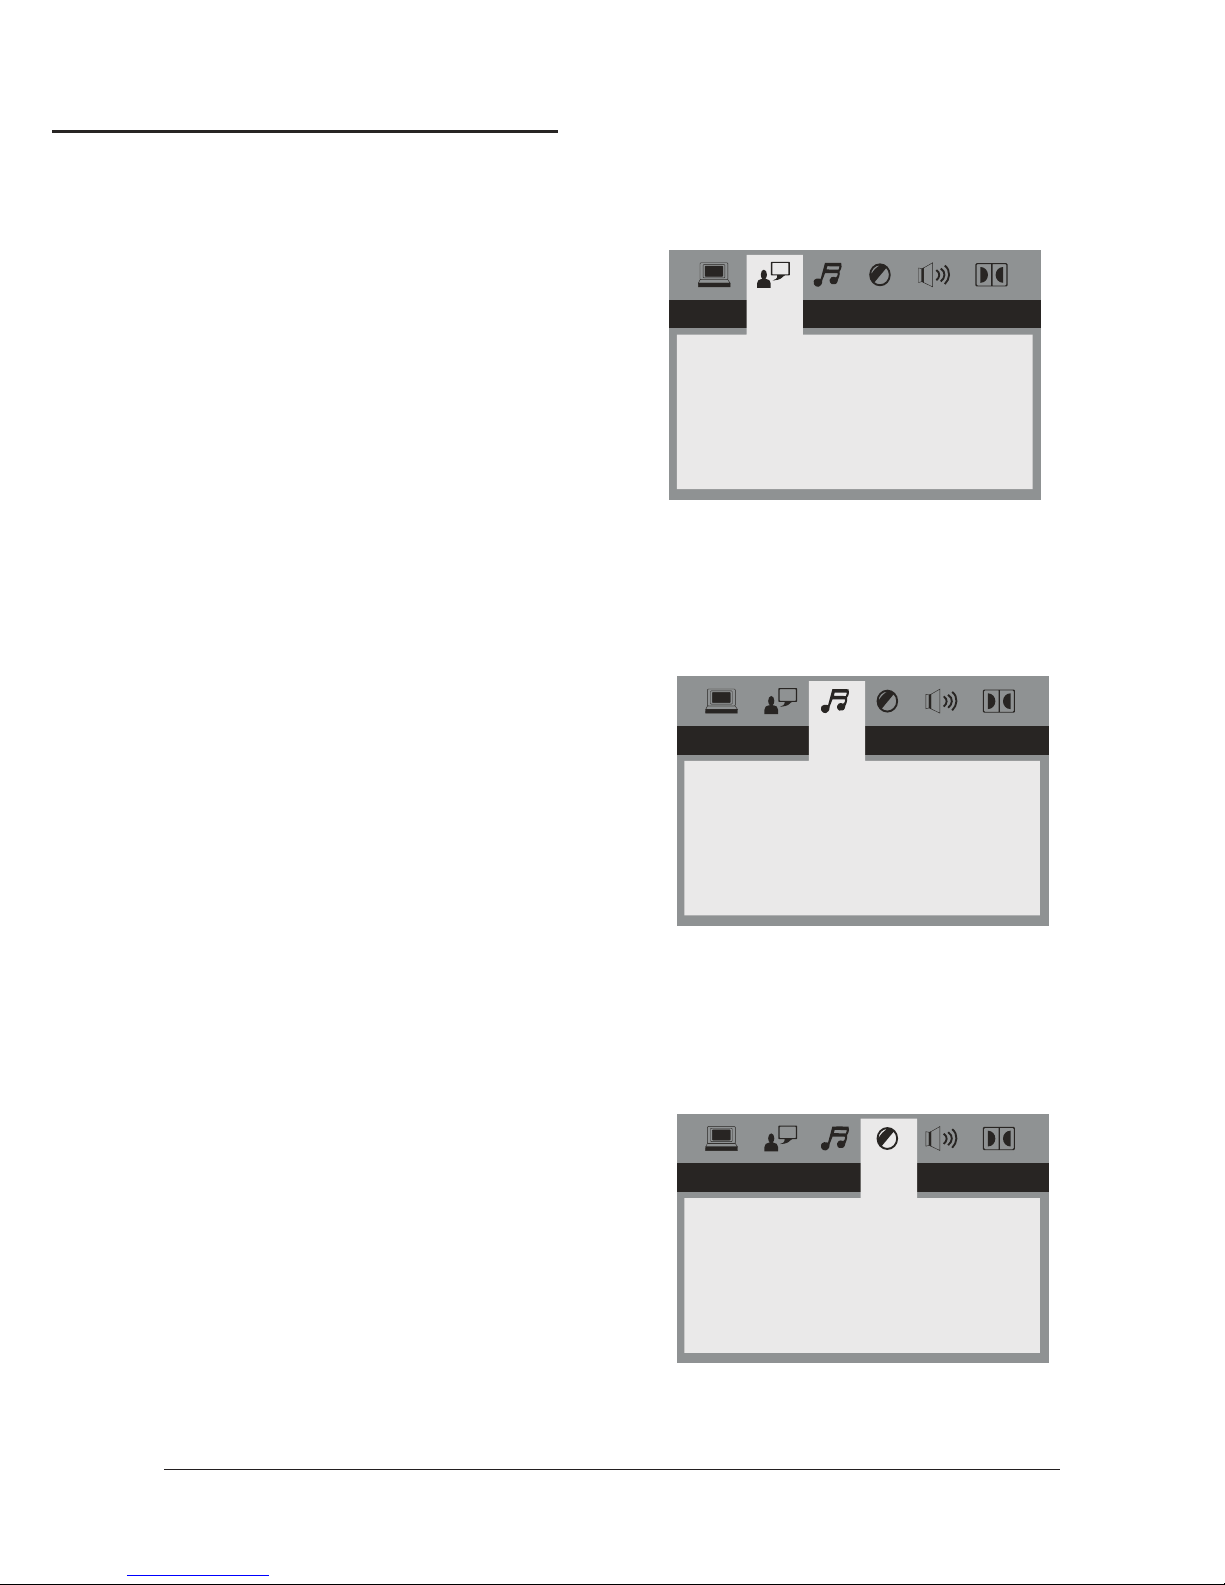
To access your preferences settings, use the
SETUP button on your remote. Use the
DIRECTION keys to navigate within this menu
for the specific subdirectory desired and press
ENTER. The icon file tabs at the top of the
screen indicate which menu is highlighted.
1. TV SYSTEM
Use this menu to set your system preferences for regional TV system types NTSC, PAL60, PAL, or AUTO
to have your THUNDER automatically find any compatible TV system.
2. SCREEN SAVER
The DVD screen saver can be toggled ON/OFF to suit your preference for display during extended periods
of player inactivity when power remains on. Use DIRECTION keys to make your selection.
3. VIDEO
Refer to your TV manual to determine which type of video it supports. You can choose between
INTERLACE-YUV, P-SCAN YPBPR or S-VIDEO.
4. TV TYPE
This menu actually refers to TV display mode. Choose between 4:3PS for Panoramic Screen, 4:3LB for
Letterbox, or 16:9 based on your viewing preference.
5. PASSWORD
The password to lock or unlock RATING setting is 0000. If you are a parent and want to limit the types of
DVDs viewed with the THUNDER,type this password using the NUMBER keys on the remote, and press
ENTER. You will see the padlock icon either open or close, affecting the ability of the user to make a
selection in the RATING section.
6. RATING
Set the parental safety settings
7. NEXT PAGE
SYSTEM SETUP
DEFAULT
RESUME
PREV PAGE
7.1. DEFAULT
Select this mode if you choose to return to all system
preferences DEFAULT settings
7 2. RESUME.
! ON: RESUME the last spot played on a disc and
returns to it when the Sonic Station is turned back
on from Standby mode.
! OFF: RESUME is off
7 3. PREV PAGE.
RESTORE
WWW.MADBOY-AUDIO.COM
Page 29
DVD System Setup Menu
26
LANGUAGE SETUP
OSD LANGUAGE
AUDIO LANG
SUBTITLE LANG
MENU LANG
ENGLISH
CHINESE
GERMAN
SPANISH
FRENCH
RORTUGUESE
AUDIO OUT
KEY
SPDIF/OFF
SPDIF/RAW
SPDIF/PCM
AUDIO SETUP
Use this menu to set language preferences for each of
these functions. Use the DIRECTION keys to make a
selection and press ENTER to confirm your choice.
1. OSD (On Screen Display) LANGUAGE for remote
functions, etc. Choose between English , Chinese,
GERMAN,SPANISH, FRENCH, FORTUGUESE
2. AUDIO LANGUAGE.
This feature is dependent on the options included with
each individual disc. Choose from the list provided.
3. SUBTITLE LANGUAGE.
This feature is dependent on the option included with
each individual disc. Choose from the list provided.
4. MENU LANGUAGE.
This feature is dependent on the options included with
each individual disc. Choose from the list provided
LANGUAGE SETUP
1. AUDIO OUT
With the THUNDER, you can output standard analog
audio simultaneous with digital output by using the
RCA L/R outputs and Coaxial output. When connecting
the THUNDER to an external sound system with digital
inputs, choose between a) SPDIF/OFF to completely
bypass digital audio, SPDIF/RAW for Dolby 5.1 or
SPDIF/PCM for digital, high fidelity stereo (2-channel)
output depending on your external audio components
and connections.
2. KEY CONTROL
This feature functions exactly the same as the KEY
CONTROL buttons on the remote control, but with a
virtual vertical “fader” instead of a left-right display.
Use the DIRECTION keys to locate the fader bar,
raise (#/sharp) or lower (b/flat) the output of the
disc in half-step increments.
AUDIO SETUP
BR I GHTNESS
CONTRAST
HUE
SATURATION
VIDEO SETUP
Use the DIRECTION keys to locate the virtual fader and
raise/lower the fader bar for each of the following video
preference settings:
VIDEO SETUP
1.BRIGHTNESS Adjust the brightness of the picture,
2. CONTRAST Adjust the contrast of the picture,
3. HUE Adjust the hue of the picture,
4. SATURATION Adjust the saturation of the picture,
WWW.MADBOY-AUDIO.COM
Page 30
DVD System Setup Menu
27
DOWNMIX
SUBWOOFER
CENTER DELAY
REAR DELAY
FRONT
LT/RT
STEREO
VSS
5.1CH
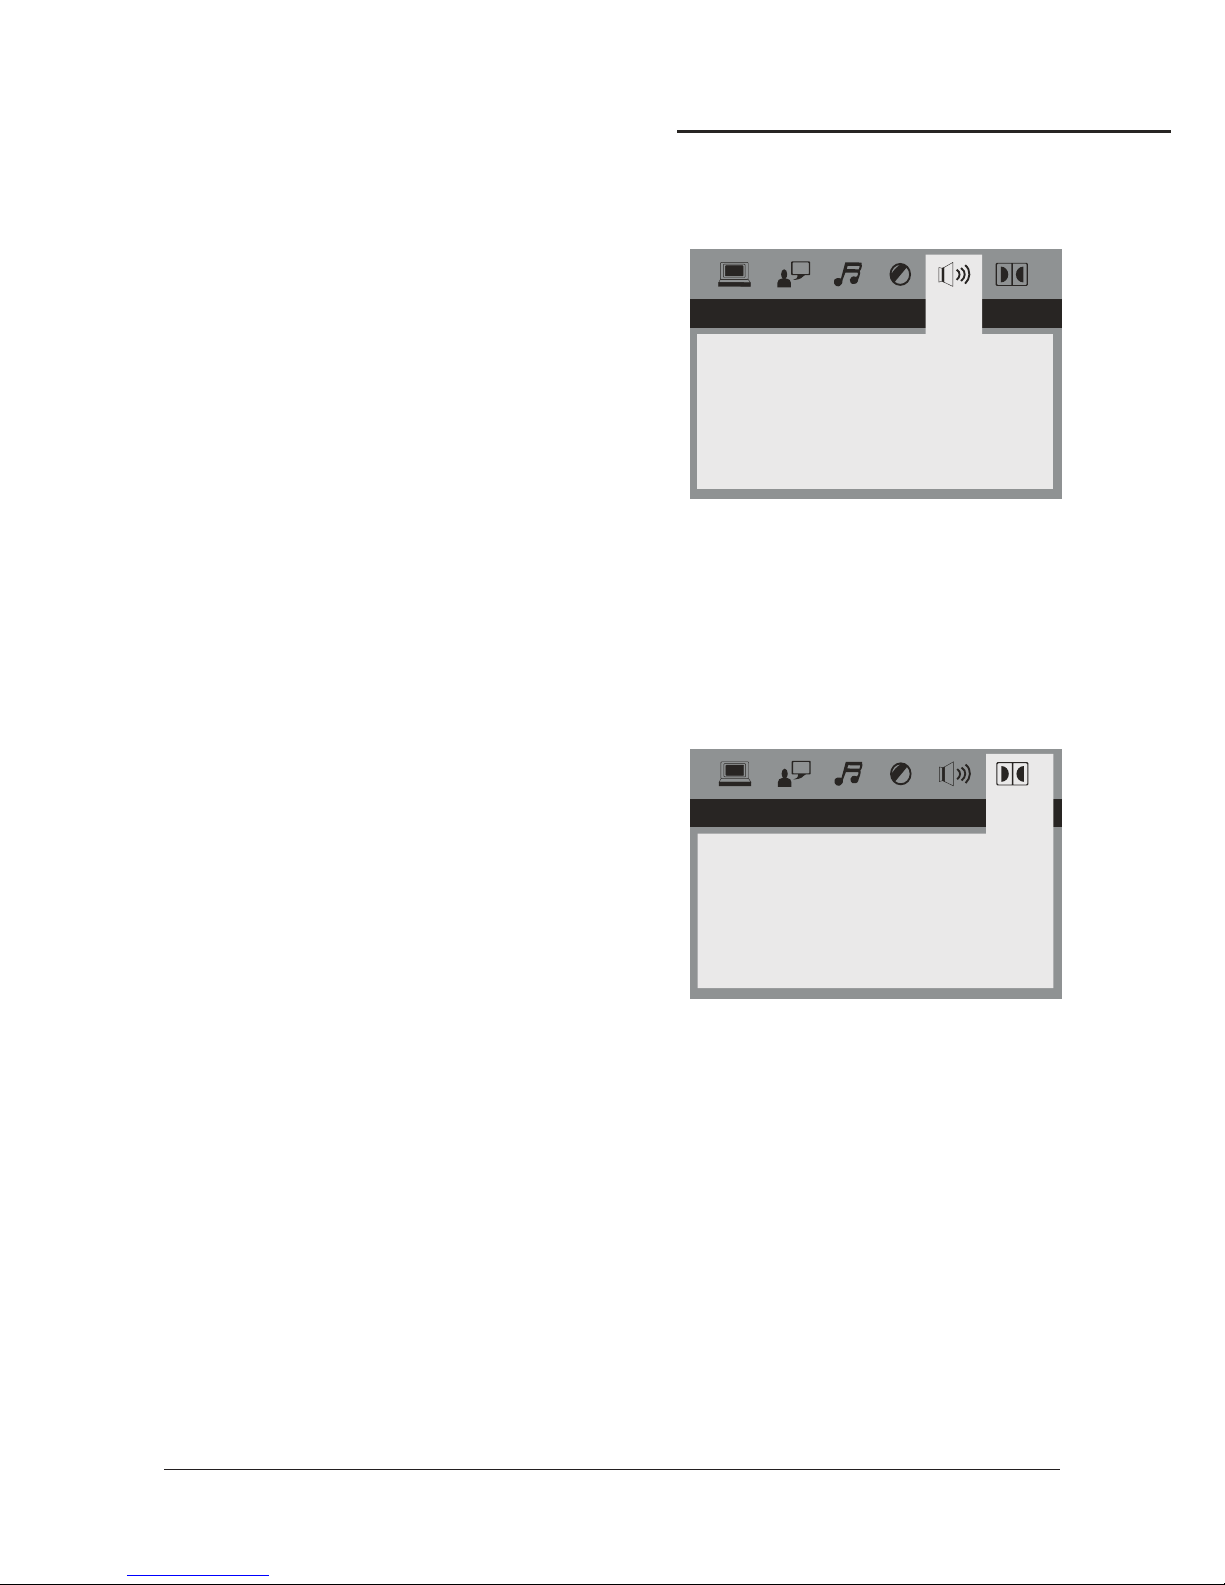
SPEAKER SETUP
OP MODE
DYNAMIC RANGE
DUAL MONO
DIGITAL SETUP
LINE OUT
RF REMOD
SPEAKER SETUP
1. DOWNMIX
! LT/RT - Sound output is divided with the Left coming
! out of the Left speaker and the Right coming out of the
Right speaker.
! STEREO - Sound output is in Stereo Mode.
! V SURR - Virtual Surround Sound
! 5.1 CH - For 5.1 Channel surround sound
2. SUBWOOFER
! ON: If you have a subwoofer
! OFF: If you do not have a subwoofer
3.CENTER DELAY
4. REAR DELAY
5.FRONT Set this based on the size of your front speaker
! LARGE
! SMALL
DIGITAL SETUP
1. OP MODE
LINE OUT: Compresses the input signal and lowers the
volume for use in quieter settings, for example at night
time.RF REMOD: Increases the volume for regular usage.
2. DYNAMIC RANGE
When the OP MODE is set to LINE OUT, use this to select
the ratio of signal compression. Select FULL for the lowest
maximum signal an OFF for the highest maximum signal.
3. DUAL MONO
STEREO: Plays the disc audio in stereo mode.
MONO L: Only plays the left audio channel. NOTE: For use
only on Multiplex CD+G discs.
MONO R: Only plays the right audio channel. NOTE: For
use only on Multiplex CD+G discs.
MIX MONO: Plays the left and right audio channels out
of both sides.
WWW.MADBOY-AUDIO.COM
Page 31

Troubleshooting
1.There is no power
Make sure the power cord is firmly connected to the back of the● and to the power outlet
If using a power strip/surge-protector, make sure that it is plugged in and switched on●
Make sure the Power button on the front panel is pushed in to the on position●
2.There is no sound
Make sure everything is connected firmly and properly●
Make sure all of your components are turned on●
Make sure the● is set to the right input
Make sure the proper volume controls are turned up high enough●
3.No picture
Make sure everything is connected firmly and properly●
Make sure there are no defective cables●
Make sure all of your components are turned on●
Make sure the● is set to the right input
Make sure the TV or monitor is working correctly●
4.The disc does not play
Make sure the disc is inserted correctly (label-side up)●
Make sure the disc is clean and not scratched●
If using a CD/DVD R/RW, try using a different brand as some brands might not be compatible●
Clean the CD lens using a CD lens cleaner●
5.Remote control does not work
Make sure the batteries are inserted, inserted correctly, and not out of power●
Point the remote control directly at the remote sensor on the machine●
Move closer to the machine●
6.The picture is unclear
Make sure the disc is not dirty or damaged●
Make sure that the TV TYPE (P/N button on the remote) is set correctly:●
NTSC: In North America, Japan and many other Asian countries
PAL: In Europe
Try restarting the●
7.The Music from an Mp3 player or CD sounds hollow or very reverby
Make sure the surround sound quality, using the SURROUND button on the remote control or front●
panel, is set to MUSIC
THUNDER
THUNDER
THUNDER
THUNDER
Troubleshooting
28
WWW.MADBOY-AUDIO.COM
 Loading...