

Page 1

User Manual
AeroPad Mini
AeroPad Mini — 802.11g Ethernet Adapter for Mac/PC
Revised: 04/27/2005
Copyright
Copyright © 2005 by Xsense Connectivity, Inc. (dba Macsense Connectivity). All rights reserved. No part
of this documentation may be reproduced in any form or by any means or used to make any directive
work (such as translation or transformation) without permission from Xsense Connectivity, Inc. Xsense
Connectivity, Inc. reserves the right to revise this documentation and to make changes in content without
obligation among Xsense Connectivity, Inc. to provide notification of such revision or change. All
products and their associated features are subject to change or upgrade at the time of the shipment or of
the sales.
FCC Notice
This equipment has been tested and found to be FCC Rules certified. These restrictions are designed to
provide protection against harmful interference from residential installations. This equipment generates
radio frequencies that may cause interference with radio communications if not used in accordance with
the instructions. Interference may even occur during proper installation. If this equipment causes
interference, the user is suggested to correct it by one or more of the following:
• Reorient or relocate the receiving antenna.
• Increase the separation between the equipment and receiver.
• Connect the equipment into an outlet on a circuit that is separate from the one to which the
receiver is connected.
• Consult the dealer or an experienced radio/television technician for help.
CE Declaration of Conformity
The equipment complies with the requirements relating to electromagnetic compatibility, the essential
protection requirement of Council Directive/EEC on the approximation of the Member States relating to
Electromagnetic compatibility.
Trademarks
All products and brand names are trademarks and/or registe red trademarks of their respective
companies.
Safety Precautions
• Follow all warnings and instructions marked on the product.
• Slots and openings on the device are provided for ventilation. To protect it from overheating, these
openings must not be blocked or covered.
• Do not use or store this product in the environment that exceeds temperature and humidity
specifications. Do not place this product near a radiator or heat register, or in a built-in installation
unless adequate ventilation is provided.
• Before cleaning, unplug this product from wall outlet. Do not use liquid cleansers or aerosol
cleansers. Use a damp cloth for cleaning.
• Do not place cords or cables where they may be walked on or tripped over.
• Be sure to comply with any applicable local safety standards or regulations.
• General-purpose cables are provided with this product. The use of any other cables or
requirements mandated by local authority is user’s responsibility.
• Cables attached to devices in different locations with different power sources and grounding may
cause hazardous voltage. Consult a qualified electronic consultant before installing the product to
check if this phenomenon exists and, if necessary, take corrective action.
• Never touch un-insulated telephone wires or terminals unless the line has been disconnected.
• Avoid using telephone equipment or installing the product during an electrical storm.
• Never install this product, or any kind of telephone jacks, lines, network cables, or power
connections in wet locations.
• Never spill liquid of any kind on this product
Page 2

Page 3

TABLE OF CONTENTS
1.0 INTRODUCTION ........................................................................................3
1.1 Benefits ...................................................................................................3
1.2 Features..................................................................................................3
1.3 Ideal Applications....................................................................................4
1.4 Wireless Network Planning ..................................................................... 6
2.0 BEFORE YOU START................................................................................9
2.1 Package Contents...................................................................................9
2.2 System and Other Requirements............................................................ 9
3.0 GETTING TO KNOW YOUR AEROPAD MINI......................................... 11
3.1 Front LED’s and Back Panel ................................................................. 11
3.2 Installation............................................................................................. 12
3.3 Hardware Reset .................................................................................... 12
4.0 Basic Configuration................................................................................13
4.1 Manually setting TCP/IP Values ............................................................13
4.1.1 Mac OS X 10.x............................................................................14
4.1.2 Mac OS 8/9................................................................................. 15
4.1.3 Windows 2000/XP.......................................................................15
4.1.4 Windows 95/98/ME .....................................................................17
4.2 Access the Web-Config Pages..............................................................18
4.2.1 Configure using the included Setup Wizard ................................ 19
4.3 Activating AeroPad Mini.........................................................................22
5.0 WEB-CONFIG PAGES............................................................................. 23
5.1 Status.................................................................................................... 23
5.2 Basic Setting .........................................................................................24
5.3 IP Setting............................................................................................... 25
5.5 Advanced Setting ..................................................................................27
5.6 Security .................................................................................................28
5.7 Tools......................................................................................................28
6.0 TROUBLESHOOTING ............................................................................. 31
6.1 Common Problems and Solutions......................................................... 31
6.2 Glossary................................................................................................ 33
APPENDIX ..................................................................................................... 37
Specifications.............................................................................................. 37
Page 4

Page 5

1.0 INTRODUCTION
Congratulations on your purchase of the Macsense AeroPad Mini, the 802.11g
Ethernet Adapter for Mac/PC. Welcome to the Macsense/Xsense Product
Family.
A fast growing trend today is wireless networking. By going wireless you reduce
the hassle of cable clutter, the expensive need to run cabling in the home or
office and the aggravation altogether to crawl under that desk for the last time to
see if that Ethernet cable is connected. The convenience of where and when you
want to connect to your network or Internet is now yours! Situate your computer
in the most convenient location without regards to whether there is an access
point or router nearby.
AeroPad Mini follows a WLAN standard called IEEE. The 802.11g standard has
emerged delivering speeds of up to 54Mbps and the ability to take the power of
the Internet with you. Imagine the ease and speed of which you can connect to
your wireless network and to the Internet.
The AeroPad Mini is a perfect solution for those older computers, such as the
iMac and iBook, without a wireless solution, the AeroPad Mini gives them the
wireless capability they deserve.
AeroPad Mini (WUA-800) is an improvement on its predecessor, the AeroPad
Plus (WUA-700).
AeroPad Mini is specifically designed for Small Office and Home Office needs. It
provides a complete SOHO solution for Internet surfing, and is easy to configure
and operate even for non-technical users. Instructions for installing and
configuring AeroPad Mini can be found in this manual. Before you install and use
AeroPad Mini, please read this manual carefully to take full advantage of
AeroPad Mini.
1.1 Benefits
• Eliminates the clutter, hassle, and cost of cabling.
• Longer operating range gives you more room to move around.
• Supports any desktop or laptop, Mac or PC with an Ethernet port and USB
port.
• WEP/WPA-PKS encryption provides the highest security.
• Compatible with Apple AirPort Base Station and all 802.11g/b-compliant
access points.
1.2 Features
• Interoperable with IEEE 802.11g/b 2.4GHz-compliant devices.
• Low power consumption <less than 460 mA>, and supports power over USB
which provides the best mobility.
• High-speed data transfer rate of 54,48,36,24,18,12,11,9,6, 5.5, 2 and 1
3
Page 6

Mbps
• Auto-fallback to lower data rate in noisy environments.
• Achieving data rate up to 54Mbps for 802.11g and 11Mps for 802.11b with
wide range coverage.
• AeroPad Mini supports and Mac OS 7, 8, 9 and OS X, Windows 98, Me,
2000, XP.
• No driver or software installation required.
• Supports computer-to-computer (ad-hoc) connection without an access
point.
• Works with all standard Internet applications.
Note: Maximum wireless signal rate based on IEEE Standard 802.11g specifications.
Actual data throughput will vary. Network conditions and environmental factors
lower actual data throughput rate.
1.3 Ideal Applications
There are basically two types of wireless networks: Infrastructure and Ad-hoc. An
Infrastructure network uses one or more access points (such as the Macsense
XRouter Aero, or Apple AirPort Base Station) as a gateway, linking the wireless
network to a wired LAN. As a result, computers on your wireless network have
access to all the features of your wired LAN including email, Internet access,
network printers and file servers.
4
Page 7

This is in contrast with another related wireless topology, called Ad-hoc network,
in which each wireless workstation communicates with one another without the
existence of an access point.
Although Ad-hoc allows for wireless connection between computers without an
access point, it is Infrastructure with its central wireless access point that will be
the most common.
Other Applications
The AeroPad Mini is the perfect wireless 802.11b/g solution for computers that
are not wireless ready. But since no drivers are required for the AeroPad Mini, it
can be extended beyond computers, for use with ANY device with an Ethernet
port. These Ethernet devices include game consoles like Xbox and PlayStation 2,
and DVRs such as Tivo.
These Ethernet devices no longer are restricted by long Ethernet cable clutter to
connect to the internet. With AeroPad Mini, now these devices can be placed
anywhere in the house.
The AeroPad Mini unwires game console by connecting two cons oles together
wirelessly. Configure the AeroPad Mini in ad-hoc mode for peer-to-peer data
transmission, or configure it to infrastructure mode to connect to the internet and
5
Page 8

join multiple-player games.
TiVo has a built in Ethernet port which can connected to the AeroPad Mini. This
will allow the TiVo to connect wirelessly to the local network, allowing it to access
media content (music, photos, and video) on your computer or on the Internet.
AeroPad Mini simplifies connection by eliminating long cable clutter.
1.4 Wireless Network Planning
Although the arrival of affordable wireless technologies has provided a great deal
of flexibility in how you connect to the Internet, there still is some needed
planning in setting up a WLAN network.
A WLAN can in some respects be considered much like a wired network with the
exception that wireless adapters will transmit the data over radio frequency
waves instead of within a shielded Ethernet cable. Because of this, the initial
location of the Access Point or wireless router is extremely important. Situating
the AeroPad Mini so that it has the least amount of obstruction is highly
advisable.
The setup of all wireless devices involved is quite important, as they should
share the same radio channel and ESSID. Without these common settings, they
will not be able to communicate with one another. Any additional encryption
settings for security measures must be configured identically on all devices to
accept the data transfer.
One of the greatest advantages is the adaptability of a wireless network. You can
easily move a desktop computer within a room or to an entirely different room or
floor without restrictions of an Ethernet cable. This, however, does take proper
and precise planning of where to locate your access point(s) and ho w to overlap
them so as to provide full wireless range.
Some others points to follow when planning a wireless network:
1. Minimize obstructions of the 802.11g/b RF waves
a. Centrally locate the Wireless Router or access point. All obstructions
will weaken the signal to some degree.
b. Certain building materials (metals, concrete, etc.) should be avoided by
the signal.
2. Situate the wireless devices so as to maximize signal output and reception
a. Situate the WLAN devices so the signal is going straight through the
walls instead of at an angle.
b. Stay clear (3 – 5ft.) of devices that introduce “noise” to the reception,
such as microwaves, monitors, etc.
c. Position the antenna to maximize RF signal output. If the antenna is
internal, position the unit in different directions to maximize reception.
d. Additional access points can be placed in areas of low or no signal
reception.
Note: The new 802.11g/b wireless protocol has limitations as to how far the wireless
6
Page 9

range can reach. Take your time to plan your wireless network properly to help
provide the best range. Each obstruction can and will dimin ish the signal strength.
So bare this in mind when planning and implementing your wireless network.
7
Page 10

Page 11

2.0 BEFORE YOU START
Before you start using the AeroPad Mini, check for package contents and make
sure you have the system requirements to use the AeroPad Mini.
2.1 Package Contents
• One AeroPad Mini 802.11g Ethernet Adapter
• One RJ-45 Ethernet cables
• One USB Power Cable
• One CD containing the User Manual
• Quick Start Guide
2.2 System and Other Requirements
• Windows 95/98/Me/2000/XP or that of later versions
• Mac OS 7.5.3 or later versions including OS X (including 10.4 Tiger)
• Computer with 10/100Mbps Ethernet port to support TCP/IP protocol
• One available USB port
• Apple Safari, Microsoft Internet Explorer, Netscape Navigator web browsers
with JavaScript enabled
Note: If you have access points installed on your network, you will need the
following information to configure your WUA-800 AeroPad Mini: SSID (Service Set
Identifier), the name of the access point in use, and Encryption, any passwords or
keys used by your access point for Wireless Encryption (WEP).
9
Page 12

Page 13
3.0 GETTING TO KNOW YOUR AEROPAD MINI
This chapter first gives a description of the LED indicators and ports of the
AeroPad Mini. Then it outlines the steps in connecting the unit to your computer.
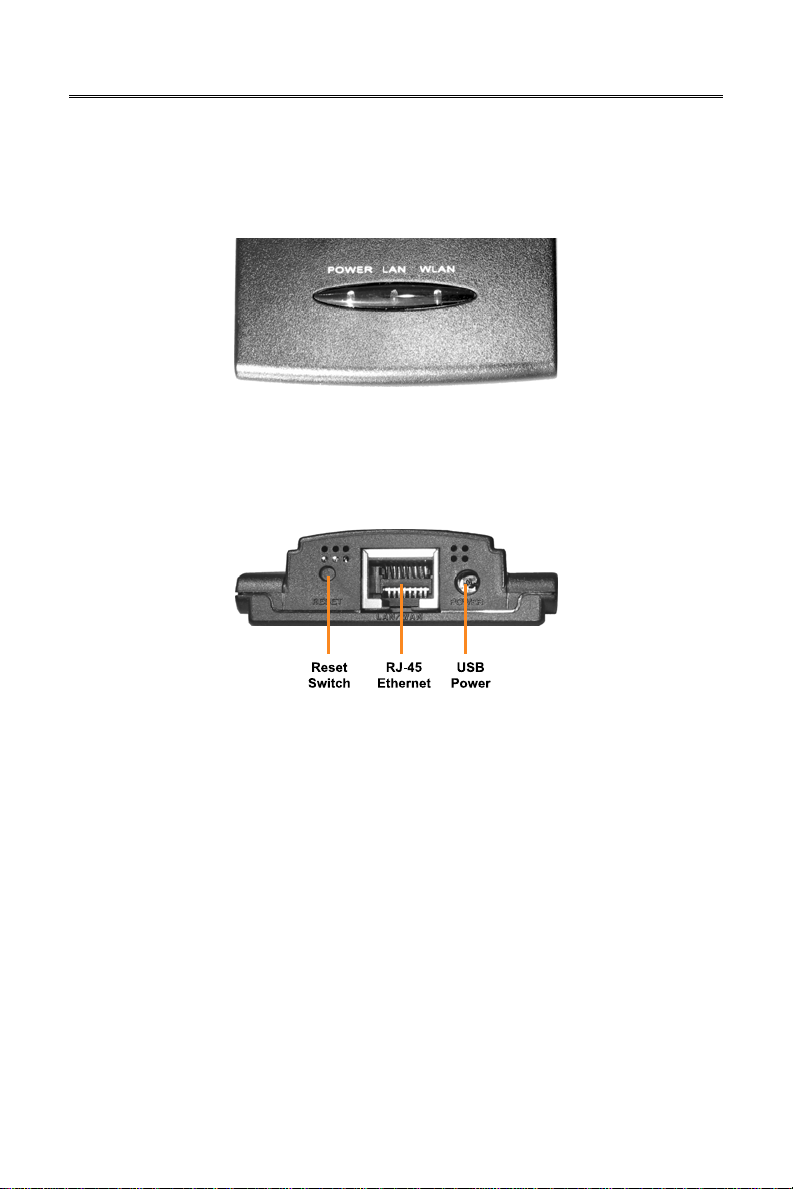
3.1 Front LED’s and Back Panel
LED’s:
• Power LED: ON when the unit is powered up
• LAN LED: ON indicates LAN connection; BLINK indicates LAN activity
• WLAN LED: ON indicates WLAN is working; BLINK indicates wireless
activity.
Ports:
• USB Power Jack: Obtain power from the host computer's USB port.
• Reset Switch: Use to reset the AeroPad Mini back to factory default settings.
• RJ-45 Ethernet Port: Connects to the Ethernet port of the host computer.
11
Page 14

3.2 Installation
To connect AeroPad Mini to your computer, following the step below:
1. Plug one RJ-45 connector of the enclosed Ethernet cable to the Ethernet
port on your computer; plug the other RJ-45 connector to AeroPad Mini's
Ethernet port.
2. Take out the USB Power cable. Plug the USB connector into a USB port on
the computer, and then plug the other end into the AeroPad Mini’s power
port. This will provide the AeroPad Mini with the required power to operate.
3. Make sure the switch on the base of the AeroPad Mini is set to "Client" mode
(default position). AeroPad Mini would not work if it is set in any other
position.
3.3 Hardware Reset
There may come a time when AeroPad Mini needs to do a hardware reset to
return all settings to factory defaults. Note that all users settings will be replaced
in a hardware reset. To do hardware reset,
1. While AeroPad Mini is powered, use a pin to poke into the Reset Switch.
Push and hold for 4 seconds then release.
2. After release, the LAN and WLAN LEDs should go off and begin a reset
process. Wait for all LEDs to settle as solid green. It may take up to 10
seconds for the process to complete.
3. Reset is now complete. There is no need to re-power the AeroPad Mini or
your computer afterwards.
12
Page 15

4.0 Basic Configuration
AeroPad Mini does not require drivers to be installed into your system. AeroPad
Mini is configured by using any web browser (e.g. Safari, Internet Explorer, and
Netscape) from your computer and accessing AeroPad Mini's internal
configuration web pages (hereafter referred to as "web-config pages").
As with any wireless adapter, you will need to configure the AeroPad Mini before
it can connect to your wireless network. Mainly, AeroPad needs to know what the
Network Name (SSID) and the WEP Key (if your network is encrypted) are.
A typical network diagram for a wireless network is pictured below. AeroPad Mini
is connected to a computer, giving it wireless capability. A wireless router or
access point is connected to the DSL/Cable modem, and accessing the Internet.
The AeroPad Mini is constantly communicating with the access point wirelessly,
thereby accessing the local network resources or the Internet.
Note: Wireless Router is an Access Point plus a Router. Access Point is sometimes
also referred to as Base Station.
To access and configure AeroPad Mini's web-config pages, following the steps
below.
1. Set your computer's TCP/IP values manually to "192.168.1.2", Subnet Mask
"255.255.255.0", and Gateway and DNS to "0.0.0.0". Refer to Section 4.1 on
how to do this for each OS.
2. Use a web browser to access and configure the AeroPad Mini using the built
in Setup Wizard that is included in the web-config pages. The Setup Wizard
will ask for your basic wireless network information so AeroPad Mini can
connect your computer to the access point. Refer to Section 4.2 for detail
instructions.
3. Chang your computer's TCP/IP settings back to "Acquire IP automatically"
will activate AeroPad Mini and bring your computer online wirelessly. Refer
to Section 4.3 for detail instructions.
4.1 Manually setting TCP/IP Values
The default IP address of the AeroPad Mini is "192.168.1.50". In order to access
the AeroPad Mini web-config pages, you will need to first set your computer to
have a fixed IP of "192.168.1.2", a Subnet of "255.255.255.0", and no Gateway
13
Page 16

or DNS. Follow the instructions below for each OS.
4.1.1 Mac OS X 10.x
1. In the Finder click on the Apple menu and select System Preferences.
2. Under the Internet and Network section, click the Network icon.
3. Select the TCP/IP tab.
4. Click on the Location menu and select "Automatic"
5. Click on the Show menu and select "Built-in Ethernet".
14
Page 17

6. Click on the Configure menu and select "Manually" (If "Manually" is not
available, click on the PPPoE tab and uncheck "Connect using PPPoE"),
click Apply Now, now select the TCP/IP tab. Click on the Configure menu
and select "Manually".
a. In the IP Address field, enter "192.168.1.2".
b. In the Subnet Mask field, enter "255.255.255.0". (If the Subnet Mask
field is not available click on the PPPoE tab and uncheck Connect using
PPPoE, click Apply Now, now select the TCP/IP tab.)
c. Click Apply Now button at the bottom right hand corner of the System
Preferences.
7. Close System Preferences windo w.
4.1.2 Mac OS 8/9
1. Select and open TCP/IP from Control Panels under the Apple menu.
2. In the Connect via menu, select the Ethernet Interface installed in your
computer.
3. In the Configure menu, select "Manually".
a. In the IP Address field, enter the IP address of "192.168.1.2".
b. In the Subnet Mask field enter "255.255.255.0".
c. Close the TCP/IP win d ow and save the changes.
4.1.3 Windows 2000/XP
1. Click the Start button, open the Control Panel. Click the Network
Connections icon to open the "Network Connections" window.
2. Double click on the Local Area Connection icon for the applicable Ethernet
adapter (usually it is the first Local Area Connection listed). The "Local Area
15
Page 18

Connection Properties" windows will open.
3. Select "Internet Protocol (TCP/IP)" item and click the Properties button.
4. Select "Use the following IP address" option.
a. In the IP Address field, enter “192.168.1.2”
b. In the Subnet Mask field, enter "255.255.255.0"
c. Leave Default gateway, DNS fields empty.
16
Page 19

6. Click the OK button in the Internet Protocol (TCP/IP) Properties windo w.
7. Click the OK button in the Local Area Connection Properties window.
4.1.4 Windows 95/98/ME
1. Double-click the Control Panel icon in My Computer folder or locate it in the
Start Menu. The sub-folder Control Panel is located under Settings.
2. In the Control Panel, double-click the Network icon. The network interface
card (installed on your computer) appears along with the network protocol on
the Configuration list.
3. Double-click TCP/IP protocol on the list. If TCP/IP does not appear on the
list, install the TCP/IP protocol first as illustrated in step 4. Clients with
TCP/IP already installed may skip to step 5.
4. To install the TCP/IP protocol:
a. Keep your copy of Windows 95/98/Me CD-ROM on hand. (You will need
it for this installation.)
b. Click the Add button from the Configuration list of the Network window.
A new window will appear.
c. Double-click Protocol. Then, in the Select Network Protocol window,
choose Microsoft on the Manufacturers list, and select TCP/IP on the
right side of the list.
5. Follow the instructions on the screen to complete the installation process. It
should prompt for a restart and then follow on with step 6, as you will now
find a TCP/IP Protocol in your Network control panel.
6. After double-clicking the installed TCP/IP protocol, the TCP/IP Properties
window appears. To have the XRouter Aero Plus automatically assign
computers a correct TCP/IP configuration please follow the steps:
17
Page 20

a. Click the IP Address tab from the TCP/IP Properties window.
b. Select the item Specify an IP address to manually input unique IP
address and Subnet Mask. In the IP Address field enter “192.168.1.2”
where x is any variable of your choice ranging from 1 - 253. (We
suggest assigning “1”)
7. After specifying the settings of TCP/IP click OK and restart Windows to allow
the settings to take effect.
4.2 Access the Web-Config Pages
Note: Before we continue please refer to the previous Section and make sure that
you have completed the manual TCP/IP settings on your computer.
After your computer has been set to a manual IP Address, we can now access
the AeroPad Mini's web-config pages.
Accessing and configuring the AeroPad Mini is done using any web browser
(such as Apple Safari, Microsoft Internet Explorer, or Netscape Navigator).
1. Launch your web browser of choice.
2. In the URL field, type "
http://192.168.1.50" and press the Enter key.
"192.168.1.50" is the default fixed IP of AeroPad Mini.
3. When prompted for a username and password, type “admin” for both the
username and password. "admin" is the default username and password to
access AeroPad Mini's web-config pages, and it can be changed after login.
18
Page 21

Note: Password is case sensitive so verify that Caps Lock is off.
4. After successful logon, an AeroPad Mini Status window will appear below.
5. If the window does not appear, check your cable connections and TCP/IP
settings. Also, see the Troubleshooting Section.
4.2.1 Configure using the included Setup Wizard
The AeroPad Mini contains a simple Setup Wizard that is provided as part of the
web configuration utility. You can simply follow the step-by-step process to allow
the AeroPad Mini to connect to your wireless network there are 4 easy setup
19
Page 22

steps that you can access using the built in Wizard.
1. Click the “Wizard” button in the function menu. The following screen will
appear: Click “Next” to continue.
2. Set Password – Here you can change the Admin account password of the
AeroPad Mini, this is referring to the admin password that was used to log in.
After you do you this please click “Next” to continue.
3. Set Wireless LAN Connection – Enter the SSID/Network Name of your
wireless network here, the default ESSID is “default”. Also you can change
the channel if you have your access point/base station on a different
channel. Please click “Next” to continue.
20
Page 23

4. Set WEP Encryption – If the wireless network has WEP enabled then you
will have to enable WEP on the AeroPad Mini, please click “Enabled”. Then,
select ether 64 or 128-bit WEP encryption and enter the network HEX key
value in the key text box. Click “Next” to continue.
21
Page 24

5. Restart - The Setup wizard is now completed. The new settings will take
effect after the AeroPad Mini is restarted. Please click “Restart” to reboot the
AeroPad Mini. If you wish to exit the Setup wizard without making/saving any
changes click the “Exit” button. Also you can go back to modify any
previous entries by clicking the “Back” button.
4.3 Activating AeroPad Mini
After AeroPad Mini is configured, the next step is to activate AeroPad Mini and
get your computer online.
1. Return your computer's TCP/IP settings to "Obtain IP Automatically".
2. Reboot your computer.
22
Page 25

5.0 WEB-CONFIG PAGES
From the last chapter, you have learned how to access the web-config pages and
how to use the Setup Wizard to perform basic configuration on the AeroPad Mini.
For most users, that's all that is required to access the wireless network
successfully.
We will now explain all the other features of the AeroPad Mini. These web-config
pages are a little more in-depth and provide the user with more information and
control.
5.1 Status
The Status page provides read-only information on the working status of the
AeroPad Mini. It displays information about the Ethernet connection between the
computer and AeroPad Mini and it also shows the wireless connection going to
the wireless network.
Firmware Version: Shows the current firmware version of AeroPad Mini.
LAN: Shows the MAC Address, IP Address (default: 192.168.1.50), Subnet
Mask, and Gateway Address. The current LAN traffic calculated in terms of
23
Page 26

number of packets sent and received by AeroPad Mini through the wired
connection is also displayed.
Wireless: Shows the MAC address, current ESSID, the status of Encryption
Function (Enable or Disable), the current channel that is being used. The current
wireless traffic that is being sent and received by the AeroPad Mini is also
displayed.
View Log: When clicked, a log page is displayed. The log page records every
event and the time that it happens. The entries can be cleared by clicking the
“Clear Log” button, or to refresh the screen and see the latest log entries click the
“Refresh” button.
5.2 Basic Setting
The Basic Setting page is the most important, initial setup page for the wireless
function of AeroPad Mini. Most of the settings will already be configured by the
Setup Wizard you used from the last Chapter. But you are also able to review
and set all the values manually here in this page.
AP Name: The name of the AeroPad Mini, as it is recognized by the wireless
network. The default name is "Wireless LAN Ethernet Adapter". If you have
multiple computers each using an AeroPad Mini, then you can set each AeroPad
Mini to have a unique name.
SSID: Also referred to as the "Network Name", it is a unique name that identifies
the wireless network. Each clients and nodes in the same wireless network must
have the same SSID. Default is "POCKET_AP".
24
Page 27

Channel: This is the channel that AeroPad Mini will operate on. The channel
selection can range from1 to 11 for North America (FCC) domain, 1 to 13 for
European (ETSI) domain and 1 to 14 for Japanese domain.
Wireless Mode: The topology of your wireless network. If your wireless network
has an access point, then set the Wireless Mode to "Infrastructure". If you are
connecting computer-to-computer, without the existence of an access point, then
set the Wireless Mode to "Ad-Hoc". Default is "Infrastructure".
Authentication Type: If your wireless network is protected with encryption, then
the authentication type must be selected here. There are three options for
authentication type: “Open System”, “Shared Key”, and “WPA-PKS”. Default is
"Open System".
Note: The AeroPad Mini must use the same authentication type and WEP Key as the
access point is configured for, otherwise the AeroPad Mini will fail to connect to the
wireless network.
For both the "Open System" and "Shared Key" authentication, a WEP Key is
required. The key can be 64 or 128-bits.
Using WEP encryption on a wireless network can protect your data while it is
transferred from AeroPad Mini to the access point. However, network
performance is lower because the access point must decode and encode each
piece of data moving from and to your AeroPad Mini.
Mode: There are two types of methods for entering the WEP encryption key,
“HEX” and “ASCII”.
A Hexadecimal WEP key is comprised of any number 0 through 9 and/or letter A
through F. A 64-bit key requires 10 hex digits, or a 64-bit key requires a 26 hex
digit. Example of a 64-bit and 128-bit hex keys are "AB843E72DF" and
"ABCDEF12345678901234567890", respectively.
An ASCII WEP key is made up of any number 0 through 9 and/or letters A
through Z.
1, 2, 3 and 4: WEP key is entered in either one of the four the key slots. The slot
number has to match the WEP key slot defined in the access point.
If WPA-PSK is enabled, user needs to set the key in the Passphrase field. The
key length should be 8 characters at least. Once WPA-PSK function enables, it
will take some time to make the setting active.
Apply: Click the “Apply” button to save any of the changes that were done to the
AeroPad Mini. The changes have been saved and will be effective once the
AeroPad Mini is restarted.
Cancel: Click the “Cancel” button to clear any changes.
5.3 IP Setting
This page configures the IP Address of the AeroPad Mini. This is also the IP
Address by which you use a web browser to access the web-config pages of the
AeroPad Mini. It is very important that you know the IP Address of the AeroPad
Mini, because otherwise, you won't be able to configure AeroPad Mini a ny more.
25
Page 28

Default AeroPad Mini Fixed IP Address
By default, the AeroPad Mini is set to a Fixed IP address. The default IP
Address is "192.168.1.50" (Subnet Mask "255.255.255.0", and Gateway
"0.0.0.0"). For most home users, there is no need to change its value.
Changing AeroPad Mini's Fixed IP Address
But you may wish to change the default fixed IP Address of AeroPad Mini for the
following reasons:
• Your local wireless network is in an IP domain other than "192.168.1.x" (x
being any number from 1 to 255). If your local wireless network has an IP
domain of "192.168.2.x" or "10.0.1.x", you may wish to change the default IP
Address of AeroPad Mini to "192.168.2.50" or "10.0.1.50", respectively, so
you can have access to the web-config pages of AeroPad Mini from your
computer while your wireless network is active.
• Your local wireless network already has "192.168.1.50" assi gned to an
important resource, and you require AeroPad Mini to use another Fixed IP.
Obtain AeroPad Mini IP Address Automatically
The AeroPad Mini can also be set to obtain an IP Address from your access
point (or a DHCP server) automatically. This setting is not recommended usually,
as you will not be able to know the IP Address of the AeroPad Mini easily, and
you will have no way of getting back to its web-config pages. But this setting may
be desirable if you have multiple AeroPad Minis to manage (e.g. in a lab or
classroom where multiple computers are each using an AeroPad Mini) and you
prefer to let a centralized DHCP server to assign IPs, and you can refer to the
DHCP Client List in the DHCP server to find out the IP of each AeroPad Minis.
26
Page 29

5.5 Advanced Setting
This page contains configurations for advanced users. Most users will not need
to change the settings. These changes affect the wireless performance and
operating modes of the AeroPad Mini. Items on this page may help increase
wireless performance if set correctly.
Beacon Interval: Sets the period of time in milliseconds that the AeroPad Mini
sends out a beacon. The default is 100 milliseconds.
RTS Threshold: This is the size of RTS/CTS packet size. The default is 2432
bytes.
Fragmentation Threshold: Number of bytes used for the fragmentation
boundary for directed messages. The default is 2436 bytes.
DTIM Interval: This indicates the interval of the Delivery Traffic Indication
Message (DTIM). A DTIM field is a countdown field informing clients of the next
window for listening to broadcast and multicast messages. When the access
point has buffered broadcast or multicast messages for associated clients, it
sends the next DTIM with a DTIM interval value. Access point clients hear the
beacons and awaken to receive the broadcast and multicast messages.
Preamble: Select either a Long or Short Preamble type. The preamble is a
sequence of bits transmitted at 1Mbps that allows the PHY circuitry to reach
steady-state demodulation and synchronization of bit clock and frame start. Two
different preambles and headers are defined: the mandatory supported Long
Preamble and header, which interoperates with the 1 Mbit/s and 2 Mbit/s DSSS
specification (as described in IEEE Standard 802.11), and a n optional Short
Preamble and header (as described in IEEE Standard 802.11b). At the receiver,
the Preamble and header are processed to aid in demodulation and delivery of
the PSDU. The Short Preamble and header may be used to minimize overhead
and, thus, maximize the network data throughput. However, the Short Preamble
is supported only from the IEEE 802.11b (High- Rate) standard and not from the
original IEEE 802.11. That means that stations using Short-Preamble cannot
communicate with stations implementing the original version of the protocol.
27
Page 30

TX Rates: User also can fix the transmission at specific data rate, if choose
“Auto” data rate, the Wireless Ethernet Adapter will change the data rate to have
the best receive or transmit quality.
5.6 Security
This page sets the administrative username and password that are required to
access the AeroPad Mini web-config pages. The default administrative username
and password are both "admin". You can ch ange them so no one can change
your AeroPad Mini settings without your knowledge.
To change the administrator's username and passwords, follow the instructions
below:
1. Enter the value in each field.
2. Repeat the same password the “Confirm” field.
3. Click “Apply”
5.7 Tools
The Tools page provides functions to maintain your current settings and perform
firmware upgrade.
28
Page 31

Backup Settings: To save the AeroPad Mini’s current configuration to a file on
your computer, click the “Backup” button.
Restore settings: To restore the AeroPad Mini to a previously saved
configuration, click the “Choose File” button and select the file that was created
when you backed up your settings. Select the saved file, click the “Restore”
button. After the AeroPad Mini restarts the restore process is complete.
Restore to default settings: To restore the AeroPad Mini to factory defaults
click the “Default” button.
Note: Restore to default settings will clear all information that you have entered.
Firmware Upgrade: This allows you to update your AeroPad Mini’s firmware as
they become available. Firmware updates may be release periodically to fix
bugs or improve performance. Click on the “Browse” button to select the latest
firmware file which you downloaded. After selecting the firmware file, click
“Upgrade” and complete the firmware upgrade process. Once the AeroPad Mini
restarts then the Firmware Upgrade process is complete.
29
Page 32

Page 33

6.0 TROUBLESHOOTING
This chapter provides solutions to problems that may occur during the installation
and operation of the AeroPad Mini. Check the following symptoms and their
possible causes before contacting Macsense Tech Support. Read the descr iption
below to solve your problems. If you can’t find an answer here, check the
Macsense website at www.macsense.com.
6.1 Common Problems and Solutions
My wireless network uses IP domain of "10.0.1.x", do I need to change
AeroPad Mini's fixed IP to "10.0.1.50" in order to work?
No, AeroPad Mini's default fixed IP of "192.168.1.50" is an IP for you to access
its internal config-page from your computer. It does not need to be changed to
the range of your wireless network in order for your computer to get online. Your
computer will acquire an IP from the DHCP server (usually in the wireless router
or access point) in the range of "10.0.1.x" normally, even though the AeroPad
Mini continues to have a default fixed IP of "192.168.1.50".
I change AeroPad Mini to acquire its IP automatically and now I can not
access its web-config pages.
It is not recommended to change AeroPad Mini's default fixed IP for this exact
reason. If AeroPad Mini is to acquire its IP automatically, then the IP will no
longer be its default fixed IP of "192.168.1.50" and you would have no clue what
its new IP is. Without knowing new IP, you can not access its internal web-config
pages any longer.
It is recommended only for advance users who have access to the DHCP Client
List on your DHCP Server (usually on the wireless router or access point) to use
this setting. From the DHCP Client List, you can check what IP the AeroPad Mini
was assigned last, and be able to access its internal web-config pages using it.
If you have no access to the DHCP Client List, then your only option is to do a
hardware reset of your AeroPad Mini, to return all settings to factory defaults.
And as a result, your AeroPad Mini will be accessible again on the default fixed
IP of "192.168.1.50".
Why can I not access AeroPad Mini's web-config pages while I'm
connected to the wireless network?
You can not access the AeroPad Mini's web-config pages if your computer is not
in the same IP domain as the AeroPad Mini. AeroPad Mini's default fixed IP is
"192.168.1.50", so your computer will also need to be in the "192.168.1.x"
domain in order to access AeroPad Mini's web-config pages.
When you're connected to the wireless network, your computer's IP is given by
the DHCP Server (usually your wireless router or access point). If your
computer's given IP is not in the range of "192.168.1.x" then you can not access
AeroPad Mini's web-config pages. If you want to access AeroPad Mini's webconfig pages while you're on the wireless network, you will need to change the
AeroPad Mini to have the same IP domain as the wireless network. For example,
31
Page 34

if your wireless router has an IP of "10.0.1.1", and your computer was given an IP
of "10.0.1.101", then setting AeroPad Mini's fixed IP to "10.0.1.50" will make it
accessible while your computer is online. You will just use a web browser and
enter "
http://10.0.1.50/" to access AeroPad Mini's web-config pages.
If I have multiple AeroPad Minis in my wireless network, do I need to define
each AeroPad Mini a unique fixed IP?
No, AeroPad Mini has a default fixed IP of "192.168.1.50". This is the IP by which
you use your browser to access its internal web-config pages. It is OK that each
AeroPad Minis continues to have the same default fixed IP, even though multiple
AeroPad Minis are being used in the same wireless network.
Why my computer can not connect to the Internet?
Access AeroPad Mini's web-config page and make sure that the correct SSID
has been entered. If WEP is used, make sure the WEP key types (Open/Shared,
64/128-bit, Hex/ASCII, slots) are properly selected and entered. Both the SSID
and WEP values should match the same in the access point of your wireless
network.
Make sure that you have changed your PC's TCP/IP setting back to “Obtain an IP
Address Automatically” after you completed configuration of the AeroPad Mini. If
you are using a Mac, make sure it is set back to “Using DHCP".
32
Page 35

6.2 Glossary
Access Point
An internetworking device that seamlessly connects wired and wireless net works.
Access points combined with a distributed system support the creation of multiple
radio cells that enable roaming throughout a facility. In Macintosh terms, Access
Point is also referred to as Base Station.
Ad-hoc
An ad-hoc network is a local area network or other small network, such as
wireless, in which some of the network devices are part of the network only for
the duration of a communications session. In the case of mobile and portable
devices, they can be a part of the network when in close proximity to the rest of
the network.
Cable Modem
A device that connects your PC to a local TV line and receives data at 1.5Mpbs.
One of its connections is connected to your PC and the other one is to the cable
wall outlet. It attaches a standard 10BASE-T Ethernet card to a computer and
modulates between digital and analog signals.
Cell
Cell is the radio coverage area for a wireless device to communicate with an
access point. The size of the cell can depend on the antenna, the speed of
transmission, and the physical area.
Channel
Each channel refers to a different frequency level allowing for multiple
communication paths through one device, much the same way a radio operates.
Dynamic IP address
A dynamic IP address is an IP address that is given out automatically from a
DHCP Server to client computers or routers on a LAN or WAN.
Gateway
An entrance to a network. It associates with both router and switch whereas the
router gives direction as data arrives at the gateway and the switch, on the other
hand, furnishes its actual path in and out of the gateway.
IEEE
Abbreviation of Institute of Electrical and Electronics Engineers. Founded in
1884, the IEEE is an organization composed of engineers, scientists, and
students. The IEEE is best known for developing standards for the computer and
electronics industry. In particular, the IEEE 802 standards for local area networks
are widely adopted.
IEEE 802.11 Standard
In WLAN technology, 802.11 refers to standards set by the Institute of Electrical
and Electronics Engineers. There are three specifications in the family, 802.11,
802.11a and 802.11b. 802.11 and 802.11b refer to wireless Ethernet LANs and
33
Page 36

operate at frequencies around the 2.4 GHz range. 802.11 generally have data
speeds of 1 or 2 Mbps while 802.11b can have speeds of 5.5 or 11 Mbps.
802.11b can also realize speeds up to 20 Mbps. 802.11a refers to wireless ATM
systems and operates at frequencies between 5 to 6 GHz.
Infrastructure
This type of network is a wireless or other type of small network where the
wireless network devices are made a part of the network through the use of an
access point. The access point connects the device to the rest of the network.
IP Address
An identifier for a computer or device on a TCP/IP network. Networks using the
TCP/IP protocol route messages base on the IP address of the destination. The
format of an IP address is a 32-bit numeric address written as four numbers
separated by periods. Each ranges from 0 to 255. For example, 157.124.10.1
could be a valid IP address.
ISM band
The FCC and their counterparts outside of the U.S. have set aside bandwidth for
unlicensed use in the ISM (Industrial, Scientific and Medical) band. Spectrum in
the vicinity of 2.4 GHz, in particular, is being made available worldwide. This
presents a truly revolutionary opportunity to place convenie nt high-speed
wireless capabilities in the hands of users around the globe.
ISP (Internet Service Provider)
An organization that provides access to the Internet. Small ISPs provide service
via modem and ISDN while the larger ones also offer private line hookups (T1,
fractional T1, etc.).
LAN (Local Area Network)
A computer network that spans a relatively small area. Most LANs are confined
to a single building or a group of buildings. However, one LAN can be connected
to other LANs over any distance via telephone lines and radio waves. A system
of LANs connected this way is called a wide-area network (WAN)
MAC A ddre ss (Media Access Control Address)
On a network, it is a unique 48-bit number used in Ethernet data packets to
uniquely identify an Ethernet device, such as an Ethernet adapter.
Protocol
A set of rules that end points in a telecommunication use as they communicate.
These end points must recognize and observe the protocol in the
communication.
Radio Frequency
Terms: GHz, MHz, Hz —The international unit for measurin g frequency is Hertz
(Hz), equivalent to the older unit of cycles per second. One megahertz (MHz) is
one Million-Hertz. One gigahertz (GHz) is one Billion-Hertz. The standard U.S.
electrical power frequency is 60 Hz, the AM broadcast radio frequency band is
0.55–1.6 MHz, the FM broadcast radio frequency band is 88–108 MHz, and
34
Page 37

wireless 802.11 LANs operate at 2.4GHz.
Roaming
The ability to use a wireless device and move from one access point’s range to
another access point without a drop or loss of connection.
Shared Key Algorithm
In encryption, both the sender and the recipient use the same secret key to both
encode and decode a message.
Sprea d Spectr um
Spread Spectrum technology is a wideband radio frequency technique developed
by the military for use in reliable, secure, mission-critical communications
systems. It is designed to trade off bandwidth efficiency for reliability, integrity,
and security. In other words, more bandwidth is consumed than in the case of
narrowband transmission, but the trade off produces a signal that is, in effect,
louder and thus easier to detect, provided that the receiver knows the parameters
of the spread-spectrum signal being broadcast. If a receiver is not tuned to the
right frequency, a spread-spectrum signal looks like background noise.
SSID (Service Set ID)
A group name shared by every member of a wireless network. Only client PCs
with the same SSID are allowed to establish a connection.
Static IP address
A static IP address is an IP address that does not change and is manually set in
client computer or router in a LAN or WAN.
TCP/IP
Acronym for Transmission Control Protocol/Internet Protocol, the basic protocol
of the Internet, which can be used as a communications protocol in a private
network. Every computer that has direct access to the Internet has a copy of the
TCP/IP program. TCP/IP uses the client/server model in which the user is the
client that requests and is provided service by another computer, which is the
server on a network. HTTP, FTP, Telnet, SMTP and other protocols are often
packaged with TCP/IP as a “suite” in order to get to the Internet.
URL
A URL (Uniform Resource Locator) is the address of a file (resource) accessible
on the Internet. The URL contains the name of the protocol required to access
the resource, a domain name that identifies a specific computer on the Internet,
and a hierarchical description of a file location on the computer.
WLAN
A WLAN in which a user can connect to a network using a wireless connection.
IEEE 802.11 specifies the technology for WLANs, as well as the Wired
Equivalent Privacy algorithm encryption method.
WEP (Wired Equivalent Privacy)
A data privacy encryption method based on a 64-bit shared key algorithm.
35
Page 38

WEP Key
A form of security and encryption used for WEP. It is a special sequence of
characters used to restrict access to a wireless network.
36
Page 39

APPENDIX
Specifications
Model: WUA-800
Standards: IEEE 802.11b, IEEE 802.11g, IEEE 802.3, IEEE 802.3u
Device Management: Web-Based Host Interface Ethernet RJ-45
Signal Rate:
(802.11g) 54, 48, 36, 24, 18, 12, 9 and 6Mbps
(802.11b) 11, 5.5, 2, and 1Mbps Security 64/128-bit WEP
WPA –PSK
MAC Address Filtering
SSID Broadcast Disable
Wireless Frequency Range: 2.412GHz to 2.462GHz
Wireless Operating Range:
802.11g (Full Power with internal antenna)
Outdoors:
164ft (50m) @ 54Mbps
492ft (150m) @ 11Mbps
656ft (200m) @ 6Mbps
Power: Power over USB port
Radio and Modulation Type:
(For 802.11g OFDM)
BPSK @ 6 and 9Mbps
QPSK @ 12 and 18Mbps
16QAM @ 24 and 36Mbps
64QAM @ 48 and 54Mbps
(DSSS)
DBPSK @ 1Mbps
DQPSK @ 2Mbps
CCK @ 5.5 and 11Mbps
(802.11b DSSS)
DBPSK @ 1Mbps
DQPSK @ 2Mbps
CCK @ 5.5 and 11Mbps
Wireless Transmit Power:
(For 802.11g)
31mW (15dBm) @ 54Mbps
40mW (16dBm) @ 48Mbps
40mW (16dBm) @ 36, 24, 18, 12, 9, and 6Mbps
(For 802.11b)
50mW (17dBm) @ 11, 5.5, 2, and 1Mbps
Receiver Sensitivity:
(For 802.11g)
6Mbps: -87dBm
37
Page 40

9Mbps: -85dBm
12Mbps: -82dBm
18Mbps: -81dBm
24Mbps: -80dBm
36Mbps: -79dBm
48Mbps: -71dBm
54Mbps: -69dBm
(For 802.11b)
1Mbps: -90dBm
2Mbps: -90dBm
5.5Mbps: -86dBm
11Mbps: -85dBm
LEDs: Power, LAN, WLAN
Temperature:
Operating: 32ºF to 131ºF (0ºC to 55ºC)
Storing: -4ºF to 149ºF (-20ºC to 65ºC)
Humidity:
Operating: 10%~90% (non-condensing)
Storing: 5%~95% (non-condensing)
Certifications: FCC, CE
Dimensions: 3 2/16" x 2 3/8" x 3/4" (8cm x 6cm x 1.7cm)
Weight: 2oz (50g)
Warranty: 1 Year
Specifications subject to change without prior notice.
38
Page 41

MACSENSE STANDARD LIMITED WARRANTY
Macsense warrants this product against any defects in manufacturing for the
warranty period of one year. If you require warranty service, be sure to have your
proof of purchase and a barcode from the product packaging on hand when
calling. Warranty service cannot be processed without proof of purchase.
Macsense cannot offer direct refunds for any product purchased in the retail
channel. Proper refund must be done through the retail channel where the
product was purchased. In no event shall Macsense’s liability exceed the price
paid for the product from direct, indirect, special, incidental, or consequential
damages resulting from the use of the product, its accompanying software, or its
documentation.
Macsense offers cross shipments, a faster process for processing and receiving
your replacement. Macsense pays for UPS Ground only. All customers located
outside of the United States and Canada shall be held responsible for shipping,
custom duties, and handling charges. Please call Macsense Tech Support for
more details.
To get tech support:
By knowledgebase:
http://www.macsense.com/knowledgebase/
By Email: support@macsense.com
To register the product:
http://www.macsense.com/registration/
39
 Loading...