

Page 1

For Casablanca Bogart & B4W
| Page1
Page 2

1. Welcome to Quick Photo . . . . . . . . . . 3
2. Requirements . . . . . . . . . . . . . . . . . . . 3
3. Installation . . . . . . . . . . . . . . . . . . . . . .3
4. Start Quick Photo . . . . . . . . . . . . . . . . 5
5. Read images . . . . . . . . . . . . . . . . . . . . 6
6. Size of thumbnails . . . . . . . . . . . . . . . 8
7. Photo editing . . . . . . . . . . . . . . . . . . . 9
8. Settings . . . . . . . . . . . . . . . . . . . . . . . 11
9. Image Processing effects . . . . . . . . 13
10. Transition effects . . . . . . . . . . . . . . . 14
11. Finish . . . . . . . . . . . . . . . . . . . . . . . . . 17
12. Quick Photo Pan . . . . . . . . . . . . . . . . 19
13. Dubbing, titling . . . . . . . . . . . . . . . . . 20
| Page2
Page 3

1 Welcome to Quick Photo
Thank you for choosing Quick Photo!
Quick Photo is a purchasable add on program that allows the editing of still scenes, the
first frame of a video scenes or high quality digital photos. A complete slide show can be
created quickly and efficiently ready for writing to DVD.
2 Requirements
From Bogart v5.9, v6.3 and v7.1(or newer) high resolution pictures can be imported
directly into the Bogart scene bin. The Casablanca-3 models (Karat / Topaz, S-Series,
Ultra models) up to 1920 x 1080 50p and with the Casablanca-4 and Bogart Windows up
to 4096 x 2160 50p resolution depending on the project settings, the Bogart used and
version.
4 Installation
It is loaded into Bogart machines via a CD/DVD in Install Products. For B4W PC users you
can download the file via the internet, unzip it, and run the file. This will install the product
into B4W. If B4W is running you will have to close it and re-launch to see Quick Photo. If
B4W wasn’t running Quick Photo will be there next time you start it. It can be run in demo
form on both platforms but the rendering of your finished slide show is, of course, disabled.
Quick Photo benefits from Bogart v5.9, v6.3 & 7.1’s newly introduced technique of photoimporting as it not only creates a scene in the selected project format but also stores the
photo in its original resolution and as such photos can be worked on without quality loss
when zooming, cropping and panning etc.
With Quick Photo you can import, in a very short time, a large amount of photos, edit them,
add effects and then create a slide show in a Story Board. After that it is like editing a
normal film so you could add narration, music and titles before it is output as DVD, Blu-ray
or as a file to USB etc.
| Page3
Page 4

Quick Photo also has another effect/package called "Quick Photo Pan”. You can apply,
quickly either a slight ‘push’ of a photo (or any other video scene) or a combination of
zoom with pan in four selectable directions. This is intended for individual scenes that you
might want these effects on without having to run the main Quick Photo program – which
is primerily designed for multiple photo’s.
Note: All functions described below are for Casablanca- and PC systems which are pretty
much identical. So for simplicity we refer in the following text only of Casablanca.
Have fun when you edit your photo collections with Quick Photo!
For further questions and suggestions please do not hesitate to contact us.
Latest information about Macro System products can be found on the internet at:
www.dalco.co.uk or www.macrosystem.de
For specific technical questions please contact our technical support. If when making an
enquiry if you could indicate the serial number of your device and the Bogart/B4W version
that would be useful.
In addition you can use Support Forums on the Internet;
http://casablancaforum.us/index.php or www.macrosystem.de/forum
| Page4
Page 5

4 Start Quick Photo.
You start / launch Quick Photo in the “Edit" menu. It is in the "Special" menu - Picture 1.
!
Picture 01
If you haven’t used Quick Photo before it will ask whether the entire scene bin (or rather,
still images of the entire scene bin) should be imported - Picture 2.
!
Picture 02
Click "Yes" to import the complete scene bin into Quick Photo. This can be useful if you
have already, in the Scene Bin, imported your high resolution photos and now want to
process these with Quick Photo to a slide show with effects and is probably the best way
to use Quick Photo.
Bear in mind that Quick Photo can also take the first frame of any video clip in the Scene
Bin too so you can, if you want, trim the video clips to present a ‘better’ frame for Quick
Photo to use and add.
However, anyone who has a mix of moving scenes and high-resolution digital photos in
the Scene Bin should not necessarily indiscriminately import everything, because the first
frame of each “video” scene are, quality wise, different from the high-resolution photos you
might have already imported. It will make a difference when zooming, and with pans, on a
1920 x 1080 pixels against a digital photo of a 10, 12 or 16-megapixel camera image. You
can always deselect these later if the quality is high enough for that project.
| Page5
Page 6

5 Read Images
If you click "No" you can enter the Quick Photo menu as an empty project - Picture 3.
!
Picture 03
In the right part of the menu you will find the common settings and in the left half the
imported photos will be shown and can be edited there quickly with very simple commands
!
Quick Photo Edit Window
| Page6
Page 7

As mentioned earlier to use Quick Photo on launch you should “Read images” with (1) to
import all photos and / or stills from the Scene Bin that you want to edit with.
If you want to pre-determine the new scene / photo’s run “time” use Stand time (13) so that
each individual image appears later with this length when rendered. This can be adjusted
(individually or en- mass) later if required.
If you clicked “no” earlier you can use “Read image” and in the window displayed you will
see the entire scene bin – Picture 4.
! Picture 04
Here you can see the high-resolution photos marked with little white crosses seen in
Picture 04 (Scene DSCN3843 ) or IMG_1667 enlarged (one red arrow) - Picture 5.
Scenes that have no cross are the first frame from a video clip as in Scene 00021.1 in
Picture 4. You can see if it has already been “trimmed” by the little white triangles to the
left/right (trim from beginning or trimmed from the end) shown in the enlarged section (two
red arrows) - Picture 5.
You can play individual scenes or still images as necessary and select Ok to add to Quick
Photo. To add “more at a time” you can select the scenes you want (Dashed box) and click
on “mark”. In this way, you can select a number of images that then all have a white
square at the top and add them to the Quick Photo project area with the ok button.
! Picture 5
| Page7
Page 8

If you have the Power Key program you can use the arrow keys to navigate and then
press “m” on the keyboard at the screen which “marks” it for import which makes working
through images considerably faster. After confirming with ok, then all the selected images
in Quick Photo are read and are shown in the left side of the program window (2) .
6 Size of thumbnails
Here, depending on the setting of screen size in Bogart, you can adjust the icon size of
your photo’s in Quick Photo and therefore have a different number of images visible at any
given time. At this point you should be selecting between a good balance of clarity and
the amount of photo’s visible. This also depends on the size and resolution of the work
screen. The image size (3) in Quick Photo is adjustable in five steps - Picture 6.
!
Picture 6
It can range from "very small” resolution with very large images - Picture 7 . . . .
! !
Picture 7 Picture 8
. . . up to “very big” resolution but with very small images - Picture 8.
| Page8
Page 9

7 Photo Editing
Once the photos are imported, you can start editing in Quick Photo. Select the photo you
want to edit in the window (2) and this image will appear enlarged at the top of that screen
(4). This photo can then spun with the arrows (5) rotated counter or clockwise (each click
rotated 90 degrees) and can be flipped horizontally and with the "Mirror” button (6).
Use button (7) to open a menu, Picture 09, with which you can crop the image. This cut is
remembered by the program for the photo show but at the same time it retains the original
image in the background. Therefore you can alter or undo this at a later time if necessary.
!
Picture 09
The button (8) opens the "Edit Image” in the menu, Picture 10, in which the brightness,
contrast, saturation and gamma of the photo can be set. The change of each value will be
immediately displayed in the preview window, and the settings made in this menu can
subsequently be changed again, because the original image is always retained in the
background should you change your mind.
! Picture 10
| Page9
Page 10

With the “preview” button (9) you can display an enlarged version of the photo - Picture 11.
In the large preview window you also have access to the main edit buttons and can
navigate through the entire selection of photos (within this window) and then perform each
processing step as needed and then click the little arrow to move on to the next image to
process. Power Key works well here too.
! Picture 11
With the raised and lowered thumb for “Use Image” and "Don’t use image"(10) you can
click through the images to deselect (thumb down) pictures from the photo bin. You can reselect images (thumb up) to undo this action to include the image in the final slide show.
The images that are sorted not to be included have a “greying” over them and the thumbs
down sign too - Picture 12.
Picture 12 !
Any images that you definitely no longer want to include in Quick Photo can be sent to the
Recycle Bin (11) and are deleted only from Quick Photo. You can retrieve images from the
recycle bin with the un-delete button (12) or add them again from Bogart with Read image.
| Page10
Page 11

8 Settings
!
Quick Photo Edit Window
The Stand Time (or length) button (13) can be used to set the time displayed for all photo
as a global command (this can be adjusted at a later point). These are 1 , 2 , 3 , 4 , 5 , 7 ,
10 , 15 , 20 and 30 seconds - Picture 13.
! Picture 13
| Page11
Page 12

Each photo can be provided with its own time (even if a default has been applied to the
rest) by first selecting the photo (shown with a surrounding dotted mark) and then set
another time in Stand time (13).
If you would like to change “all” the photos with a single new time just go to Settings (14)
and change it globally there - Picture 14.
!
Picture 14
If various different times have been set previously when you click OK a query box appears,
Picture 15, which offers two options :
(1) The choice of a new time for all scenes – which applies the new time to all scenes.
(2) The choice of a new time only for photos which have the old default set – so you can,
in this case, change all 10 second clips only to a new length.
!
Picture 15
Depending on the selection then the entire Quick Photo project is rebuilt with the new time
settings. There is also, in Settings (14) “Quick - Photo Project Delete“. Here you can empty
the entire project. The data stored in Bogart is not affected by this delete action.
| Page12
Page 13

9 Image Processing effects
This is the Quick part of Quick Photo. With button (16) you can apply a very simple but
effective Gentle Zoom or Pan to all your slide show. - Picture 17.
!
Picture 17
So with Add Effect you select the effect (or effects) you require and click ok to add them –
Picture 18. You can have just zoom on its own or pan or both in which case you’ll need to
add (ok) them both.
!
Picture 18
| Page13
Page 14
You can then use “sorted” which means it will go through them one at a time in the order
you have selected (if you have more than one) or just pick “random” . . .
!
. . . which allows changes at every photo, or every 2nd, 3rd, 5th, 10th or 20th photo to use
the effect(s) giving the slideshow a more random feel.
!
You can also remove an effect from the list with “Remove Entry”.
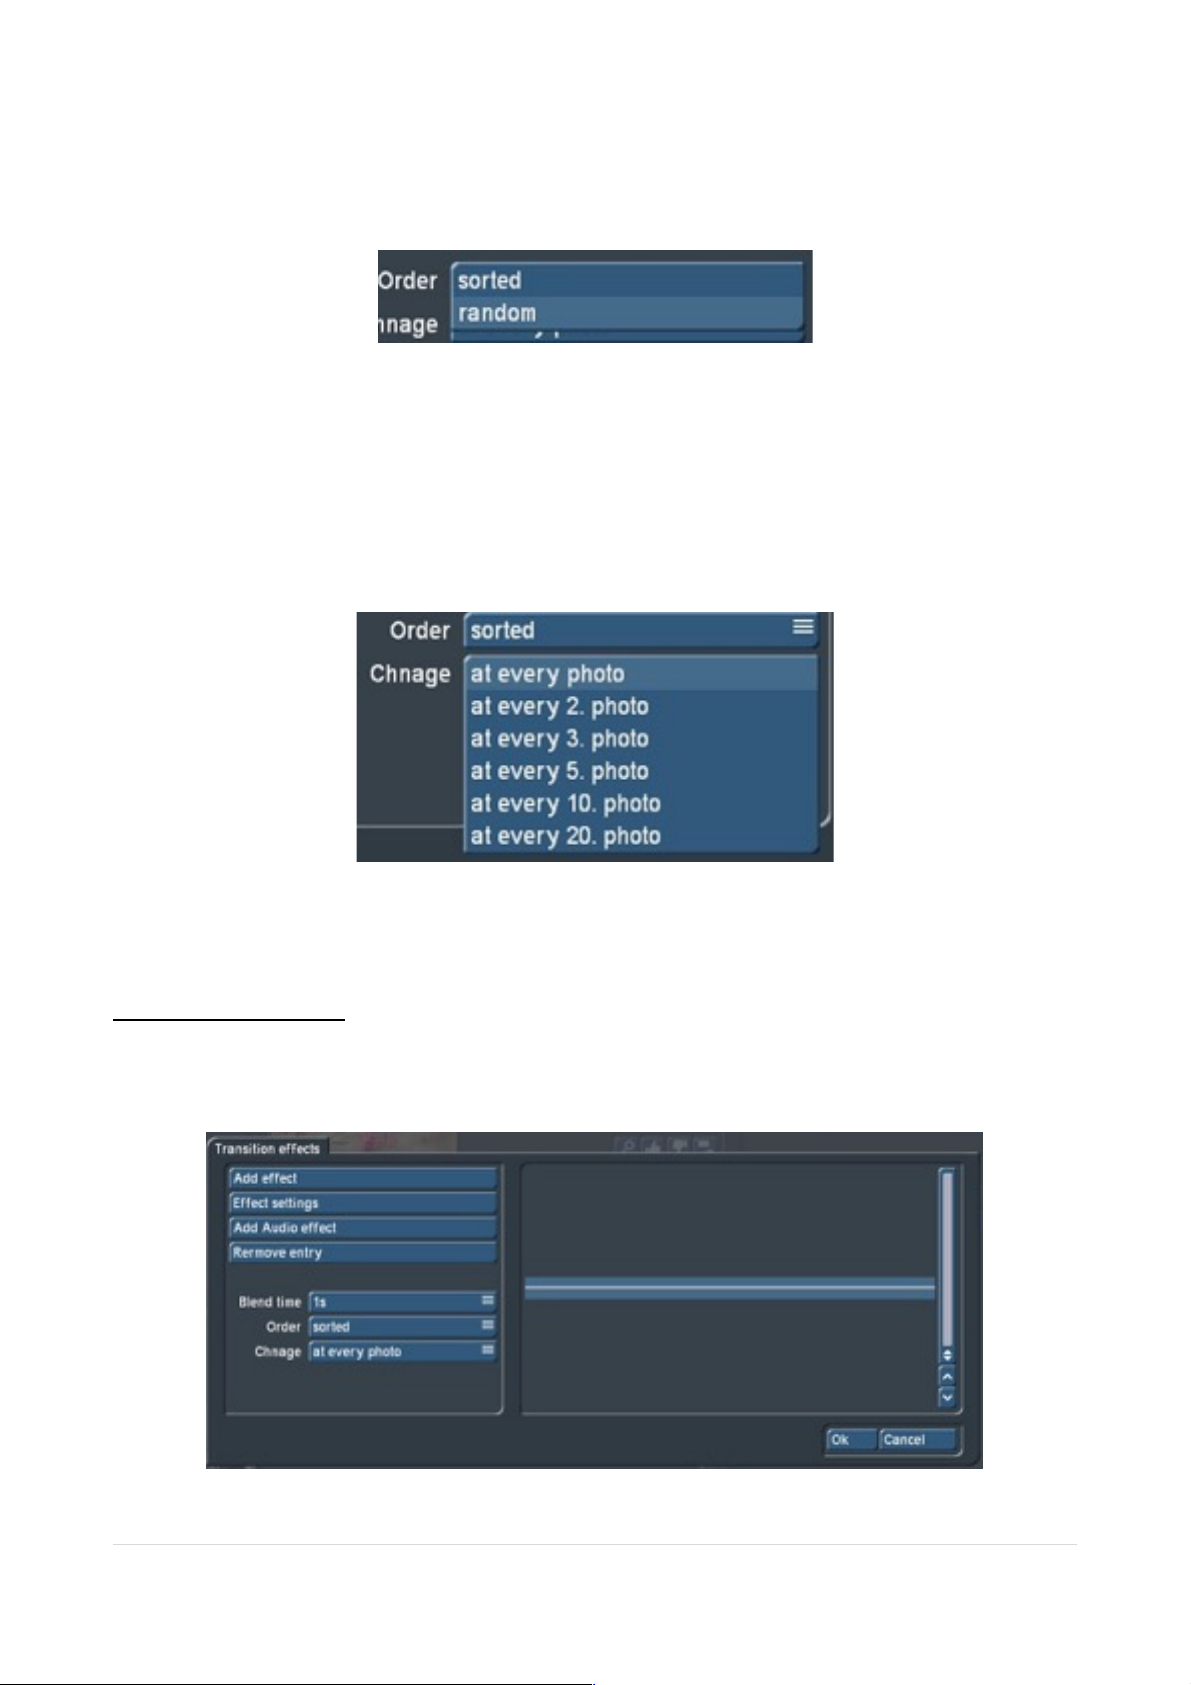
10 Transition effects
Button (17) Transition Effects can be used so that transitions can be added between the
image processing effects on your still images Picture 19, below.
!
Picture 19
| Page14
Page 15

After selecting the option “Add Effect " you will see all your installed Bogart transition
effects listed and you can then select (with a tick on the left “-“ sign) which effect or select
a multiple of them to apply between your photo’s in the finished slide show – Picture 20.
!
Picture 20
With the effects selected each effect can also be defined more precisely if it has that ability
or has various ‘extra’ settings that may need to be defined. Shown here are the Effect
setting options in the example of the settings of the “Colour Fade" - Picture 21.
! Picture 21
| Page15
Page 16

" Add audio effect " will also allow you to add audio samples to the transitions too. There
are several included in Bogart or if you have any of the Effect Jingles packs installed these
can be added here too - Picture 22 .
!
Picture 22
Also in this menu you can “Remove Entry which will remove individual effects etc.
“Blend time“ is used to set times between 0.2 and 10 seconds for the transitions.
!
Order allows the audio samples to be applied in order of your list . . .
!
Or (as in the image processing effects ) random where the audio effect changes each
time, every 2nd, 3rd, 5th,10, or 20 photo is to take place.
| Page16
Page 17

!
The indicator to show that ANY effect settings has been used will be a tick next to the
catogory used.
!
11 Finish
When all the settings are made use the “Finish" button (18). First you can chose whether
the slide show is inserted AT THE END of the current storyboard, or the storyboard should
be cleared – DELETING everything in it and replacing it with this new slide show.
Please be careful as slide shows often, but not always, go at the end of a long
session of video. So the default to add it to the end is fine (you can always make a
scene of it, Gold software, and move it later) but if you clear the story board you
may remove 100’s of scenes by mistake and the new v7 undo buttons do not
reverse this action!
Then there is a pre-calculation of the Photo Show before your previous selection is applied
– Pictures 23.
! !
Pictures 23
| Page17
Page 18

This is followed by the actual calculation - all long-term and transition effects with
corresponding preview – e.g. Picture 24.
!
Picture 24
The calculation time can vary depending on how many effects or transitions have been
added, how long the scenes are or by picture / project quality. However the full process is
automatic from this point so you can just leave it to finish the calculations.
After it has finished the program returns to the “Edit" menu, where you will see the slide
show added with the Quick Photo Image Processing effects on the Photo scenes and the
transition effects (including any added notes for audio) between the scenes - Picture 25.
!
Picture 25
| Page18
Page 19

Now you can view the rendered results full screen and see the gentle pans and transitions
bring life into the otherwise rather rigid photos and maybe benefit from the high resolution
of the hi-res imported photo’s.
With “Stop” (19) you can leave Quick Photo anytime and return to the “Edit" menu. The
settings made in Quick Photo are retained.
A rendered Slide Show shows in Quick Photo as a green check mark beside "Finish”. Any
change in Quick Photo brings the yellow “photo gallery un-rendered” circle again.
!
!
12 Quick Photo Pan
Quick Photo is not only a standalone program but provides another useful resource
"Quick Photo Pan” . This can be applied to single images or video clip and provides a
gentle pan - depending how long the scene / photo is dictates the speed of movement.
!
It can be found in the Special menu in Edit (you will need to scroll down to Q) so that the
effect can be created in the Scene Bin or you can find it in Image Processing to apply the
effect to the Story Board.
Select “Quick Photo Pan” and to the left select the direction arrow you require.
!
The arrows are self-explanatory. For a slight push in the desired direction, select the
appropriate arrow.
| Page19
Page 20
You can tell where Quick Photo Pan has been applied as you’ll see a box with “QP” on the
scene itself in blue if rendered and red if not.
! … (Blue) Calculated ... ! ... to (Red) un-calculated.
If you add the Quick Photo Pan effect then Bogart may have to re-render other effects
around the scene, as normal. However if you want a title on that scene you will need to
add your text first, render and then create a scene (Gold edition) of that if you want the title
to pan too or add the Quick Photo Pan effect, render it and make a scene and then add
the title on to that if you don’t want the text to pan.
13 Dubbing, titling
You can add audio to the slide show like any normal video. The original sounds are as to
be expected, mute as they are all now still images. Added sound effects in Quick Photo
are shown on track 5 or FX1 - Picture 26.
! Picture 26
The remaining tracks can be used as desired for background music or even commentary.
© DVS 2015
| Page20
 Loading...