

Page 1

Using Director MX
Macromedia Director MX
Page 2

Trademarks
Afterburner, AppletAce, Attain, Attain Enterprise Learning System, Attain Essentials, Attain Objects for Dreamweaver,
Authorware, Authorware Attain, Authorware Interactive Studio, Authorware Star, Authorware Synergy, Backstage, Backstage
Designer, Backstage Desktop Studio, Backstage Enterprise Studio, Backstage Internet Studio, Contribute, Design in Motion,
Director, Director Multimedia Studio, Doc Around the Clock, Dreamweaver, Dreamweaver Attain, Drumbeat, Drumbeat 2000,
Extreme 3D, Fireworks, Flash, Fontographer, FreeHand, FreeHand Graphics Studio, Generator, Generator Developer’s Studio,
Generator Dynamic Graphics Server, Knowledge Objects, Knowledge Stream, Knowledge Track, Lingo, Live Effects,
Macromedia, Macromedia Contribute, Macromedia M Logo & Design, Macromedia Flash, Macromedia Xres, Macromind,
Macromind Action, MAGIC, Mediamaker, Object Authoring, Power Applets, Priority Access, Roundtrip HTML, Scriptlets,
SoundEdit, ShockRave, Shockmachine, Shockwave, Shockwave Remote, Shockwave Internet Studio, Showcase, Tools to Power
Your Ideas, Universal Media, Virtuoso, Web Design 101, Whirlwind and Xtra are trademarks of Macromedia, Inc. and may be
registered in the United States or in other jurisdictions including internationally. Other product names, logos, designs, titles,
words or phrases mentioned within this publication may be trademarks, servicemarks, or tradenames of Macromedia, Inc. or
other entities and may be registered in certain jurisdictions including internationally.
This guide contains links to third-party Web sites that are not under the control of Macromedia, and Macromedia is not
responsible for the content on any linked site. If you access a third-party Web site mentioned in this guide, then you do so at your
own risk. Macromedia provides these links only as a convenience, and the inclusion of the link does not imply that Macromedia
endorses or accepts any responsibility for the content on those third-party sites.
Apple Disclaimer
APPLE COMPUTER, INC. MAKES NO WARRANTIES, EITHER EXPRESS OR IMPLIED, REGARDING THE
ENCLOSED COMPUTER SOFTWARE PACKAGE, ITS MERCHANTABILITY OR ITS FITNESS FOR ANY
PARTICULAR PURPOSE. THE EXCLUSION OF IMPLIED WARRANTIES IS NOT PERMITTED BY SOME
STATES. THE ABOVE EXCLUSION MAY NOT APPLY TO YOU. THIS WARRANTY PROVIDES YOU WITH
SPECIFIC LEGAL RIGHTS. THERE MAY BE OTHER RIGHTS THAT YOU MAY HAVE WHICH VARY FROM
STAT E TO S TATE.
Copyright © 2002 Macromedia, Inc. All rights reserved. This manual may not be copied, photocopied, reproduced,
translated, or converted to any electronic or machine-readable form in whole or in part without prior written approval of
Macromedia, Inc.
Third Party Software Notices and/or Additional Terms and Conditions can be found at http://www.macromedia.com/go/
thirdparty/.
Part Number ZDR90M100
Acknowledgments
Writing: Jay Armstrong, George Brown, Stephanie Gowin, and, Tim Statler
Editing: Rosana Francescato, Mary Ferguson, Mary Kraemer, and Noreen Maher
Project Management: Stuart Manning
Production: Chris Basmajian, Caroline Branch, John Francis, and Patrice O’Neill
Multimedia: Aaron Begley and Benjamin Salles
First Edition: December 2002
Macromedia, Inc.
600 Townsend St.
San Francisco, CA 94103
Page 3

CONTENTS
INTRODUCTION
Getting Started
. . . . . . . . . . . . . . . . . . . . . . . . . . . . . . . . . . . . . . . . . . . . . . . . . . . . 13
System requirements . . . . . . . . . . . . . . . . . . . . . . . . . . . . . . . . . . . . . . . . . . . . . . . . . . . 13
Installing Director . . . . . . . . . . . . . . . . . . . . . . . . . . . . . . . . . . . . . . . . . . . . . . . . . . . . . 14
What’s new in Director MX . . . . . . . . . . . . . . . . . . . . . . . . . . . . . . . . . . . . . . . . . . . . . 14
Resources for learning Director . . . . . . . . . . . . . . . . . . . . . . . . . . . . . . . . . . . . . . . . . . . 16
Conventions used in Director Help and printed books . . . . . . . . . . . . . . . . . . . . . . . . . 18
CHAPTER 1
Director Basics
. . . . . . . . . . . . . . . . . . . . . . . . . . . . . . . . . . . . . . . . . . . . . . . . . . . . 19
Creating a new movie . . . . . . . . . . . . . . . . . . . . . . . . . . . . . . . . . . . . . . . . . . . . . . . . . . 19
Introducing the Director workspace . . . . . . . . . . . . . . . . . . . . . . . . . . . . . . . . . . . . . . . 20
Managing the workspace in Director MX . . . . . . . . . . . . . . . . . . . . . . . . . . . . . . . . . . . 34
Using multiple Score windows. . . . . . . . . . . . . . . . . . . . . . . . . . . . . . . . . . . . . . . . . . . . 41
Changing Score settings . . . . . . . . . . . . . . . . . . . . . . . . . . . . . . . . . . . . . . . . . . . . . . . . 41
Using markers . . . . . . . . . . . . . . . . . . . . . . . . . . . . . . . . . . . . . . . . . . . . . . . . . . . . . . . . 42
Selecting and editing frames in the Score. . . . . . . . . . . . . . . . . . . . . . . . . . . . . . . . . . . . 43
About adding interactivity with Lingo. . . . . . . . . . . . . . . . . . . . . . . . . . . . . . . . . . . . . . 44
Converting movies created in previous versions of Director. . . . . . . . . . . . . . . . . . . . . . 45
Managing the Director authoring environment . . . . . . . . . . . . . . . . . . . . . . . . . . . . . . . 45
About using Xtra extensions to extend Director functionality . . . . . . . . . . . . . . . . . . . . 50
About distributing movies . . . . . . . . . . . . . . . . . . . . . . . . . . . . . . . . . . . . . . . . . . . . . . . 51
Answers panel . . . . . . . . . . . . . . . . . . . . . . . . . . . . . . . . . . . . . . . . . . . . . . . . . . . . . . . . 52
CHAPTER 2
Director MX Basics Tutorial
. . . . . . . . . . . . . . . . . . . . . . . . . . . . . . . . . . . . . . . . . 53
What you’ll learn. . . . . . . . . . . . . . . . . . . . . . . . . . . . . . . . . . . . . . . . . . . . . . . . . . . . . . 53
About the Director metaphor . . . . . . . . . . . . . . . . . . . . . . . . . . . . . . . . . . . . . . . . . . . . 54
View the completed movie . . . . . . . . . . . . . . . . . . . . . . . . . . . . . . . . . . . . . . . . . . . . . . 55
Open the tutorial movie . . . . . . . . . . . . . . . . . . . . . . . . . . . . . . . . . . . . . . . . . . . . . . . . 55
Set up the movie . . . . . . . . . . . . . . . . . . . . . . . . . . . . . . . . . . . . . . . . . . . . . . . . . . . . . . 56
View your cast members . . . . . . . . . . . . . . . . . . . . . . . . . . . . . . . . . . . . . . . . . . . . . . . . 58
Edit a text cast member . . . . . . . . . . . . . . . . . . . . . . . . . . . . . . . . . . . . . . . . . . . . . . . . . 59
Build the first scene . . . . . . . . . . . . . . . . . . . . . . . . . . . . . . . . . . . . . . . . . . . . . . . . . . . . 60
Edit sprites in the Score window . . . . . . . . . . . . . . . . . . . . . . . . . . . . . . . . . . . . . . . . . . 64
Create an animation . . . . . . . . . . . . . . . . . . . . . . . . . . . . . . . . . . . . . . . . . . . . . . . . . . . 66
Change the tempo of an animation . . . . . . . . . . . . . . . . . . . . . . . . . . . . . . . . . . . . . . . . 75
Create a sunset animation . . . . . . . . . . . . . . . . . . . . . . . . . . . . . . . . . . . . . . . . . . . . . . . 75
3
Page 4

Add navigation buttons to the animation scene . . . . . . . . . . . . . . . . . . . . . . . . . . . . . . . 77
Build the sound and video scene . . . . . . . . . . . . . . . . . . . . . . . . . . . . . . . . . . . . . . . . . . 79
Write Lingo scripts to control movie playback. . . . . . . . . . . . . . . . . . . . . . . . . . . . . . . . 88
Add Lingo to navigation buttons. . . . . . . . . . . . . . . . . . . . . . . . . . . . . . . . . . . . . . . . . . 92
Write Lingo that refers to scenes . . . . . . . . . . . . . . . . . . . . . . . . . . . . . . . . . . . . . . . . . . 93
About controlling video in Director . . . . . . . . . . . . . . . . . . . . . . . . . . . . . . . . . . . . . . . 94
Add scripts for video control . . . . . . . . . . . . . . . . . . . . . . . . . . . . . . . . . . . . . . . . . . . . . 95
Control sound with Lingo. . . . . . . . . . . . . . . . . . . . . . . . . . . . . . . . . . . . . . . . . . . . . . . 97
Add sounds to buttons . . . . . . . . . . . . . . . . . . . . . . . . . . . . . . . . . . . . . . . . . . . . . . . . . 98
Publish your movie for the web. . . . . . . . . . . . . . . . . . . . . . . . . . . . . . . . . . . . . . . . . . . 99
Continue learning about Director . . . . . . . . . . . . . . . . . . . . . . . . . . . . . . . . . . . . . . . . 102
CHAPTER 3
Director MX 3D Tutorial
. . . . . . . . . . . . . . . . . . . . . . . . . . . . . . . . . . . . . . . . . . . 103
What you’ll learn. . . . . . . . . . . . . . . . . . . . . . . . . . . . . . . . . . . . . . . . . . . . . . . . . . . . . 103
What you should know . . . . . . . . . . . . . . . . . . . . . . . . . . . . . . . . . . . . . . . . . . . . . . . . 103
View the completed movie . . . . . . . . . . . . . . . . . . . . . . . . . . . . . . . . . . . . . . . . . . . . . 104
Open the tutorial movie . . . . . . . . . . . . . . . . . . . . . . . . . . . . . . . . . . . . . . . . . . . . . . . 104
Create 3D text. . . . . . . . . . . . . . . . . . . . . . . . . . . . . . . . . . . . . . . . . . . . . . . . . . . . . . . 104
Modify behaviors. . . . . . . . . . . . . . . . . . . . . . . . . . . . . . . . . . . . . . . . . . . . . . . . . . . . . 111
View a 3D world. . . . . . . . . . . . . . . . . . . . . . . . . . . . . . . . . . . . . . . . . . . . . . . . . . . . . 112
Use the camera . . . . . . . . . . . . . . . . . . . . . . . . . . . . . . . . . . . . . . . . . . . . . . . . . . . . . . 112
Set model rollover cursors . . . . . . . . . . . . . . . . . . . . . . . . . . . . . . . . . . . . . . . . . . . . . . 121
Use 3D behaviors for navigation . . . . . . . . . . . . . . . . . . . . . . . . . . . . . . . . . . . . . . . . . 122
Play your completed movie . . . . . . . . . . . . . . . . . . . . . . . . . . . . . . . . . . . . . . . . . . . . . 125
To learn more . . . . . . . . . . . . . . . . . . . . . . . . . . . . . . . . . . . . . . . . . . . . . . . . . . . . . . . 126
CHAPTER 4
Cast Members and Cast Windows
. . . . . . . . . . . . . . . . . . . . . . . . . . . . . . . . . . 127
Creating new casts. . . . . . . . . . . . . . . . . . . . . . . . . . . . . . . . . . . . . . . . . . . . . . . . . . . . 128
Creating cast members . . . . . . . . . . . . . . . . . . . . . . . . . . . . . . . . . . . . . . . . . . . . . . . . 130
Using the Cast window . . . . . . . . . . . . . . . . . . . . . . . . . . . . . . . . . . . . . . . . . . . . . . . 131
Naming cast members . . . . . . . . . . . . . . . . . . . . . . . . . . . . . . . . . . . . . . . . . . . . . . . . . 136
Using Cast List view . . . . . . . . . . . . . . . . . . . . . . . . . . . . . . . . . . . . . . . . . . . . . . . . . . 136
Using Cast Thumbnail view . . . . . . . . . . . . . . . . . . . . . . . . . . . . . . . . . . . . . . . . . . . . 137
Moving cast members within the Cast window . . . . . . . . . . . . . . . . . . . . . . . . . . . . . . 139
Organizing cast members within the Cast window . . . . . . . . . . . . . . . . . . . . . . . . . . . 139
Setting Cast window preferences . . . . . . . . . . . . . . . . . . . . . . . . . . . . . . . . . . . . . . . . . 140
Changing Cast properties . . . . . . . . . . . . . . . . . . . . . . . . . . . . . . . . . . . . . . . . . . . . . . 142
Viewing and setting cast member properties . . . . . . . . . . . . . . . . . . . . . . . . . . . . . . . . 142
Finding cast members . . . . . . . . . . . . . . . . . . . . . . . . . . . . . . . . . . . . . . . . . . . . . . . . . 144
Importing cast members . . . . . . . . . . . . . . . . . . . . . . . . . . . . . . . . . . . . . . . . . . . . . . . 146
Launching external editors . . . . . . . . . . . . . . . . . . . . . . . . . . . . . . . . . . . . . . . . . . . . . 151
Managing external casts. . . . . . . . . . . . . . . . . . . . . . . . . . . . . . . . . . . . . . . . . . . . . . . . 153
Creating libraries . . . . . . . . . . . . . . . . . . . . . . . . . . . . . . . . . . . . . . . . . . . . . . . . . . . . . 154
Setting cast member properties using Lingo. . . . . . . . . . . . . . . . . . . . . . . . . . . . . . . . . 154
Setting Xtra cast member properties . . . . . . . . . . . . . . . . . . . . . . . . . . . . . . . . . . . . . . 155
Contents4
Page 5

CHAPTER 5
Sprites
. . . . . . . . . . . . . . . . . . . . . . . . . . . . . . . . . . . . . . . . . . . . . . . . . . . . . . . . . . . 157
Creating sprites . . . . . . . . . . . . . . . . . . . . . . . . . . . . . . . . . . . . . . . . . . . . . . . . . . . . . . 157
Changing sprite preferences. . . . . . . . . . . . . . . . . . . . . . . . . . . . . . . . . . . . . . . . . . . . . 158
Selecting sprites. . . . . . . . . . . . . . . . . . . . . . . . . . . . . . . . . . . . . . . . . . . . . . . . . . . . . . 158
Layering sprites . . . . . . . . . . . . . . . . . . . . . . . . . . . . . . . . . . . . . . . . . . . . . . . . . . . . . . 161
Displaying and editing sprite properties. . . . . . . . . . . . . . . . . . . . . . . . . . . . . . . . . . . . 161
Locking and unlocking sprites. . . . . . . . . . . . . . . . . . . . . . . . . . . . . . . . . . . . . . . . . . . 167
Positioning sprites . . . . . . . . . . . . . . . . . . . . . . . . . . . . . . . . . . . . . . . . . . . . . . . . . . . . 167
Changing the appearance of sprites . . . . . . . . . . . . . . . . . . . . . . . . . . . . . . . . . . . . . . . 175
Using sprite inks . . . . . . . . . . . . . . . . . . . . . . . . . . . . . . . . . . . . . . . . . . . . . . . . . . . . . 180
Assigning a cast member to a sprite with Lingo. . . . . . . . . . . . . . . . . . . . . . . . . . . . . . 184
CHAPTER 6
Animation
. . . . . . . . . . . . . . . . . . . . . . . . . . . . . . . . . . . . . . . . . . . . . . . . . . . . . . . . 185
About tweening in Director. . . . . . . . . . . . . . . . . . . . . . . . . . . . . . . . . . . . . . . . . . . . . 186
Tweening the path of a sprite. . . . . . . . . . . . . . . . . . . . . . . . . . . . . . . . . . . . . . . . . . . . 186
Accelerating and decelerating sprites . . . . . . . . . . . . . . . . . . . . . . . . . . . . . . . . . . . . . . 188
Tweening other sprite properties . . . . . . . . . . . . . . . . . . . . . . . . . . . . . . . . . . . . . . . . . 188
Suggestions and shortcuts for tweening . . . . . . . . . . . . . . . . . . . . . . . . . . . . . . . . . . . . 190
Changing tweening settings. . . . . . . . . . . . . . . . . . . . . . . . . . . . . . . . . . . . . . . . . . . . . 190
Switching a sprite’s cast members. . . . . . . . . . . . . . . . . . . . . . . . . . . . . . . . . . . . . . . . . 191
Editing sprite frames . . . . . . . . . . . . . . . . . . . . . . . . . . . . . . . . . . . . . . . . . . . . . . . . . . 192
Frame-by-frame animation . . . . . . . . . . . . . . . . . . . . . . . . . . . . . . . . . . . . . . . . . . . . . 193
Shortcuts for animating with multiple cast members. . . . . . . . . . . . . . . . . . . . . . . . . . 195
Using film loops . . . . . . . . . . . . . . . . . . . . . . . . . . . . . . . . . . . . . . . . . . . . . . . . . . . . . 197
Setting film loop properties . . . . . . . . . . . . . . . . . . . . . . . . . . . . . . . . . . . . . . . . . . . . . 198
Step-recording animation . . . . . . . . . . . . . . . . . . . . . . . . . . . . . . . . . . . . . . . . . . . . . . 199
Real-time recording animation . . . . . . . . . . . . . . . . . . . . . . . . . . . . . . . . . . . . . . . . . . 200
Linking a sequence with Paste Relative . . . . . . . . . . . . . . . . . . . . . . . . . . . . . . . . . . . . 201
Animating sprites with Lingo . . . . . . . . . . . . . . . . . . . . . . . . . . . . . . . . . . . . . . . . . . . 201
CHAPTER 7
Bitmaps
. . . . . . . . . . . . . . . . . . . . . . . . . . . . . . . . . . . . . . . . . . . . . . . . . . . . . . . . . . 203
About importing bitmaps . . . . . . . . . . . . . . . . . . . . . . . . . . . . . . . . . . . . . . . . . . . . . . 204
Using animated GIFs . . . . . . . . . . . . . . . . . . . . . . . . . . . . . . . . . . . . . . . . . . . . . . . . . 205
Using the Paint window . . . . . . . . . . . . . . . . . . . . . . . . . . . . . . . . . . . . . . . . . . . . . . . 206
Changing selected areas of a bitmap . . . . . . . . . . . . . . . . . . . . . . . . . . . . . . . . . . . . . . 214
Flipping, rotating, and applying effects to bitmaps . . . . . . . . . . . . . . . . . . . . . . . . . . . 215
Using Auto Distort . . . . . . . . . . . . . . . . . . . . . . . . . . . . . . . . . . . . . . . . . . . . . . . . . . . 218
Changing registration points . . . . . . . . . . . . . . . . . . . . . . . . . . . . . . . . . . . . . . . . . . . . 219
Changing size, color depth, and color palette for bitmaps . . . . . . . . . . . . . . . . . . . . . . 220
Controlling bitmap images with Lingo . . . . . . . . . . . . . . . . . . . . . . . . . . . . . . . . . . . . 222
Using gradients . . . . . . . . . . . . . . . . . . . . . . . . . . . . . . . . . . . . . . . . . . . . . . . . . . . . . . 224
Using patterns . . . . . . . . . . . . . . . . . . . . . . . . . . . . . . . . . . . . . . . . . . . . . . . . . . . . . . . 228
Creating a custom tile . . . . . . . . . . . . . . . . . . . . . . . . . . . . . . . . . . . . . . . . . . . . . . . . . 229
Using Paint window inks. . . . . . . . . . . . . . . . . . . . . . . . . . . . . . . . . . . . . . . . . . . . . . . 229
Using bitmap filters. . . . . . . . . . . . . . . . . . . . . . . . . . . . . . . . . . . . . . . . . . . . . . . . . . . 232
Using onion skinning . . . . . . . . . . . . . . . . . . . . . . . . . . . . . . . . . . . . . . . . . . . . . . . . . 234
About the Paste as Pict option. . . . . . . . . . . . . . . . . . . . . . . . . . . . . . . . . . . . . . . . . . . 236
Contents 5
Page 6

Setting bitmap cast member properties . . . . . . . . . . . . . . . . . . . . . . . . . . . . . . . . . . . . 237
Setting PICT cast member properties . . . . . . . . . . . . . . . . . . . . . . . . . . . . . . . . . . . . . 238
Setting Paint window preferences . . . . . . . . . . . . . . . . . . . . . . . . . . . . . . . . . . . . . . . . 238
Compressing bitmaps . . . . . . . . . . . . . . . . . . . . . . . . . . . . . . . . . . . . . . . . . . . . . . . . . 239
Working with Macromedia Fireworks . . . . . . . . . . . . . . . . . . . . . . . . . . . . . . . . . . . . . 240
CHAPTER 8
Vector Shapes
. . . . . . . . . . . . . . . . . . . . . . . . . . . . . . . . . . . . . . . . . . . . . . . . . . . . 245
Drawing vector shapes. . . . . . . . . . . . . . . . . . . . . . . . . . . . . . . . . . . . . . . . . . . . . . . . . 245
Editing vector shapes. . . . . . . . . . . . . . . . . . . . . . . . . . . . . . . . . . . . . . . . . . . . . . . . . . 249
Defining gradients for vector shapes . . . . . . . . . . . . . . . . . . . . . . . . . . . . . . . . . . . . . . 251
Controlling vector shapes with Lingo . . . . . . . . . . . . . . . . . . . . . . . . . . . . . . . . . . . . . 252
Setting vector shape properties . . . . . . . . . . . . . . . . . . . . . . . . . . . . . . . . . . . . . . . . . . 252
Using shapes . . . . . . . . . . . . . . . . . . . . . . . . . . . . . . . . . . . . . . . . . . . . . . . . . . . . . . . . 253
Setting shape cast member properties . . . . . . . . . . . . . . . . . . . . . . . . . . . . . . . . . . . . . 254
CHAPTER 9
Color, Tempo, and Transitions
. . . . . . . . . . . . . . . . . . . . . . . . . . . . . . . . . . . . . . 255
Controlling color. . . . . . . . . . . . . . . . . . . . . . . . . . . . . . . . . . . . . . . . . . . . . . . . . . . . . 255
Setting palette cast member properties. . . . . . . . . . . . . . . . . . . . . . . . . . . . . . . . . . . . . 266
About tempo. . . . . . . . . . . . . . . . . . . . . . . . . . . . . . . . . . . . . . . . . . . . . . . . . . . . . . . . 267
Using transitions . . . . . . . . . . . . . . . . . . . . . . . . . . . . . . . . . . . . . . . . . . . . . . . . . . . . . 270
CHAPTER 10
. . . . . . . . . . . . . . . . . . . . . . . . . . . . . . . . . . . . . . . . . . . . . . . . . . . . . . . . . . . . . . 273
Text
Embedding fonts in movies. . . . . . . . . . . . . . . . . . . . . . . . . . . . . . . . . . . . . . . . . . . . . 274
Creating text cast members . . . . . . . . . . . . . . . . . . . . . . . . . . . . . . . . . . . . . . . . . . . . . 275
Editing and formatting text . . . . . . . . . . . . . . . . . . . . . . . . . . . . . . . . . . . . . . . . . . . . 276
Creating a hypertext link . . . . . . . . . . . . . . . . . . . . . . . . . . . . . . . . . . . . . . . . . . . . . . . 282
Working with fields. . . . . . . . . . . . . . . . . . . . . . . . . . . . . . . . . . . . . . . . . . . . . . . . . . . 282
Using editable text. . . . . . . . . . . . . . . . . . . . . . . . . . . . . . . . . . . . . . . . . . . . . . . . . . . . 283
Converting text to a bitmap . . . . . . . . . . . . . . . . . . . . . . . . . . . . . . . . . . . . . . . . . . . . 284
Mapping fonts between platforms for field cast members . . . . . . . . . . . . . . . . . . . . . . 284
Setting text or field cast member properties. . . . . . . . . . . . . . . . . . . . . . . . . . . . . . . . . 285
Formatting chunks of text with Lingo . . . . . . . . . . . . . . . . . . . . . . . . . . . . . . . . . . . . . 288
Formatting text or field cast members with Lingo . . . . . . . . . . . . . . . . . . . . . . . . . . . . 289
Controlling scrolling text with Lingo. . . . . . . . . . . . . . . . . . . . . . . . . . . . . . . . . . . . . . 290
Checking for specific text with Lingo . . . . . . . . . . . . . . . . . . . . . . . . . . . . . . . . . . . . . 290
Modifying strings with Lingo . . . . . . . . . . . . . . . . . . . . . . . . . . . . . . . . . . . . . . . . . . . 291
Contents6
Page 7

CHAPTER 11
Using Flash and Other Interactive Media Types
. . . . . . . . . . . . . . . . . . . . . . 293
Using Flash Movies . . . . . . . . . . . . . . . . . . . . . . . . . . . . . . . . . . . . . . . . . . . . . . . . . . . 293
Editing a Flash cast member . . . . . . . . . . . . . . . . . . . . . . . . . . . . . . . . . . . . . . . . . . . . 296
Controlling a Flash movie with Lingo . . . . . . . . . . . . . . . . . . . . . . . . . . . . . . . . . . . . . 297
Controlling a Flash movie’s appearance with Lingo . . . . . . . . . . . . . . . . . . . . . . . . . . . 297
Streaming Flash movies with Lingo . . . . . . . . . . . . . . . . . . . . . . . . . . . . . . . . . . . . . . . 300
Playing back Flash movies with Lingo. . . . . . . . . . . . . . . . . . . . . . . . . . . . . . . . . . . . . 300
Using Lingo to set and test Flash variables. . . . . . . . . . . . . . . . . . . . . . . . . . . . . . . . . . 301
Sending Lingo instructions from Flash movies. . . . . . . . . . . . . . . . . . . . . . . . . . . . . . . 302
Using Flash objects in Lingo . . . . . . . . . . . . . . . . . . . . . . . . . . . . . . . . . . . . . . . . . . . . 304
Using the Flash local connection object . . . . . . . . . . . . . . . . . . . . . . . . . . . . . . . . . . . 306
Using Flash Communication Server MX . . . . . . . . . . . . . . . . . . . . . . . . . . . . . . . . . 309
Using the Flash Settings panel . . . . . . . . . . . . . . . . . . . . . . . . . . . . . . . . . . . . . . . . . . 311
Playback performance tips for Flash movies. . . . . . . . . . . . . . . . . . . . . . . . . . . . . . . . . 312
Using Director movies within Director movies . . . . . . . . . . . . . . . . . . . . . . . . . . . . . . 313
Setting linked Director movie properties. . . . . . . . . . . . . . . . . . . . . . . . . . . . . . . . . . . 314
Using ActiveX controls . . . . . . . . . . . . . . . . . . . . . . . . . . . . . . . . . . . . . . . . . . . . . . . . 316
CHAPTER 12
Sound and Synchronization
. . . . . . . . . . . . . . . . . . . . . . . . . . . . . . . . . . . . . . . . 319
Importing internal and linked sounds . . . . . . . . . . . . . . . . . . . . . . . . . . . . . . . . . . . . . 320
Setting sound cast member properties . . . . . . . . . . . . . . . . . . . . . . . . . . . . . . . . . . . . . 321
Controlling sound in the Score . . . . . . . . . . . . . . . . . . . . . . . . . . . . . . . . . . . . . . . . . . 321
Looping a sound . . . . . . . . . . . . . . . . . . . . . . . . . . . . . . . . . . . . . . . . . . . . . . . . . . . . . 322
Using sound in Windows . . . . . . . . . . . . . . . . . . . . . . . . . . . . . . . . . . . . . . . . . . . . . . 323
Playing sounds with Lingo . . . . . . . . . . . . . . . . . . . . . . . . . . . . . . . . . . . . . . . . . . . . . 323
About Shockwave Audio . . . . . . . . . . . . . . . . . . . . . . . . . . . . . . . . . . . . . . . . . . . . . . . 325
Compressing internal sounds with Shockwave Audio . . . . . . . . . . . . . . . . . . . . . . . . . 326
Streaming linked Shockwave Audio and MP3 audio files. . . . . . . . . . . . . . . . . . . . . . . 326
Playing Shockwave Audio and MP3 audio with Lingo . . . . . . . . . . . . . . . . . . . . . . . . 327
Synchronizing media. . . . . . . . . . . . . . . . . . . . . . . . . . . . . . . . . . . . . . . . . . . . . . . . . . 328
Synchronizing sound with Lingo. . . . . . . . . . . . . . . . . . . . . . . . . . . . . . . . . . . . . . . . . 329
Accessibility. . . . . . . . . . . . . . . . . . . . . . . . . . . . . . . . . . . . . . . . . . . . . . . . . . . . . . . . . 329
CHAPTER 13
Using Video
. . . . . . . . . . . . . . . . . . . . . . . . . . . . . . . . . . . . . . . . . . . . . . . . . . . . . . 331
Importing digital video . . . . . . . . . . . . . . . . . . . . . . . . . . . . . . . . . . . . . . . . . . . . . . . . 332
Using the Video window. . . . . . . . . . . . . . . . . . . . . . . . . . . . . . . . . . . . . . . . . . . . . . . 332
Setting digital video cast member properties . . . . . . . . . . . . . . . . . . . . . . . . . . . . . . . . 333
Playing digital video direct-to-Stage. . . . . . . . . . . . . . . . . . . . . . . . . . . . . . . . . . . . . . . 334
Controlling digital video in the Score . . . . . . . . . . . . . . . . . . . . . . . . . . . . . . . . . . . . . 335
Playing digital video with Lingo . . . . . . . . . . . . . . . . . . . . . . . . . . . . . . . . . . . . . . . . . 336
Controlling QuickTime with Lingo . . . . . . . . . . . . . . . . . . . . . . . . . . . . . . . . . . . . . . 337
Cropping digital video. . . . . . . . . . . . . . . . . . . . . . . . . . . . . . . . . . . . . . . . . . . . . . . . . 339
About using digital video on the Internet . . . . . . . . . . . . . . . . . . . . . . . . . . . . . . . . . . 340
Preloading AVI digital video . . . . . . . . . . . . . . . . . . . . . . . . . . . . . . . . . . . . . . . . . . . . 341
Synchronizing video and animation. . . . . . . . . . . . . . . . . . . . . . . . . . . . . . . . . . . . . . . 341
Using RealMedia content in Director . . . . . . . . . . . . . . . . . . . . . . . . . . . . . . . . . . . . . 341
Using Lingo sound elements with RealMedia . . . . . . . . . . . . . . . . . . . . . . . . . . . . . . . 354
Contents 7
Page 8

CHAPTER 14
Behaviors
. . . . . . . . . . . . . . . . . . . . . . . . . . . . . . . . . . . . . . . . . . . . . . . . . . . . . . . . 357
Attaching behaviors. . . . . . . . . . . . . . . . . . . . . . . . . . . . . . . . . . . . . . . . . . . . . . . . . . . 357
Changing the order of attached behaviors . . . . . . . . . . . . . . . . . . . . . . . . . . . . . . . . . . 360
Getting information about behaviors. . . . . . . . . . . . . . . . . . . . . . . . . . . . . . . . . . . . . . 361
Creating and modifying behaviors. . . . . . . . . . . . . . . . . . . . . . . . . . . . . . . . . . . . . . . . 361
Writing behaviors with Lingo . . . . . . . . . . . . . . . . . . . . . . . . . . . . . . . . . . . . . . . . . . . 365
Setting up a Parameters dialog box . . . . . . . . . . . . . . . . . . . . . . . . . . . . . . . . . . . . . . . 365
Setting behavior properties with Lingo . . . . . . . . . . . . . . . . . . . . . . . . . . . . . . . . . . . . 366
Customizing a behavior’s property. . . . . . . . . . . . . . . . . . . . . . . . . . . . . . . . . . . . . . . . 366
Creating an on getPropertyDescriptionList handler. . . . . . . . . . . . . . . . . . . . . . . . . . . 367
Including a description for the Behavior inspector. . . . . . . . . . . . . . . . . . . . . . . . . . . . 368
Example of a complete behavior . . . . . . . . . . . . . . . . . . . . . . . . . . . . . . . . . . . . . . . . . 369
Sending messages to behaviors attached to sprites . . . . . . . . . . . . . . . . . . . . . . . . . . . . 369
Using inheritance in behaviors. . . . . . . . . . . . . . . . . . . . . . . . . . . . . . . . . . . . . . . . . . . 371
CHAPTER 15
Navigation and User Interaction
. . . . . . . . . . . . . . . . . . . . . . . . . . . . . . . . . . . . 373
Creating basic navigation controls with behaviors . . . . . . . . . . . . . . . . . . . . . . . . . . . . 374
Adding push buttons, radio buttons, and check boxes . . . . . . . . . . . . . . . . . . . . . . . . . 374
Jumping to locations with Lingo . . . . . . . . . . . . . . . . . . . . . . . . . . . . . . . . . . . . . . . . . 375
Detecting mouse clicks with Lingo . . . . . . . . . . . . . . . . . . . . . . . . . . . . . . . . . . . . . . . 377
Making sprites editable and draggable . . . . . . . . . . . . . . . . . . . . . . . . . . . . . . . . . . . . . 377
Making sprites editable or moveable with Lingo . . . . . . . . . . . . . . . . . . . . . . . . . . . . . 378
Checking which text is under the pointer with Lingo . . . . . . . . . . . . . . . . . . . . . . . . . 379
Responding to rollovers with Lingo. . . . . . . . . . . . . . . . . . . . . . . . . . . . . . . . . . . . . . . 379
Finding mouse pointer locations with Lingo . . . . . . . . . . . . . . . . . . . . . . . . . . . . . . . . 380
Checking keys with Lingo . . . . . . . . . . . . . . . . . . . . . . . . . . . . . . . . . . . . . . . . . . . . . . 380
Equivalent cross-platform keys . . . . . . . . . . . . . . . . . . . . . . . . . . . . . . . . . . . . . . . . . . 380
Identifying keys on different keyboards . . . . . . . . . . . . . . . . . . . . . . . . . . . . . . . . . . . . 381
About animated color cursors . . . . . . . . . . . . . . . . . . . . . . . . . . . . . . . . . . . . . . . . . . . 381
Creating an animated color cursor cast member . . . . . . . . . . . . . . . . . . . . . . . . . . . . . 382
Using an animated color cursor in a movie . . . . . . . . . . . . . . . . . . . . . . . . . . . . . . . . . 384
CHAPTER 16
Writing Scripts with Lingo
. . . . . . . . . . . . . . . . . . . . . . . . . . . . . . . . . . . . . . . . . 385
Scripting basics . . . . . . . . . . . . . . . . . . . . . . . . . . . . . . . . . . . . . . . . . . . . . . . . . . . . . . 385
Lingo terminology. . . . . . . . . . . . . . . . . . . . . . . . . . . . . . . . . . . . . . . . . . . . . . . . . . . . 389
Lingo syntax . . . . . . . . . . . . . . . . . . . . . . . . . . . . . . . . . . . . . . . . . . . . . . . . . . . . . . . . 390
Writing Lingo statements . . . . . . . . . . . . . . . . . . . . . . . . . . . . . . . . . . . . . . . . . . . . . . 392
Using handlers. . . . . . . . . . . . . . . . . . . . . . . . . . . . . . . . . . . . . . . . . . . . . . . . . . . . . . . 396
Using lists . . . . . . . . . . . . . . . . . . . . . . . . . . . . . . . . . . . . . . . . . . . . . . . . . . . . . . . . . . 398
Expressing literal values . . . . . . . . . . . . . . . . . . . . . . . . . . . . . . . . . . . . . . . . . . . . . . . . 404
Using operators to manipulate values. . . . . . . . . . . . . . . . . . . . . . . . . . . . . . . . . . . . . . 408
Controlling flow in scripts. . . . . . . . . . . . . . . . . . . . . . . . . . . . . . . . . . . . . . . . . . . . . . 410
Creating and attaching scripts with the Script window . . . . . . . . . . . . . . . . . . . . . . . . 412
Using linked scripts . . . . . . . . . . . . . . . . . . . . . . . . . . . . . . . . . . . . . . . . . . . . . . . . . . . 416
Using parent scripts and child objects . . . . . . . . . . . . . . . . . . . . . . . . . . . . . . . . . . . . . 417
Troubleshooting Lingo . . . . . . . . . . . . . . . . . . . . . . . . . . . . . . . . . . . . . . . . . . . . . . . . 426
Contents8
Page 9

CHAPTER 17
3D Basics
. . . . . . . . . . . . . . . . . . . . . . . . . . . . . . . . . . . . . . . . . . . . . . . . . . . . . . . . 443
What you need to know . . . . . . . . . . . . . . . . . . . . . . . . . . . . . . . . . . . . . . . . . . . . . . . 443
From 2D to 3D. . . . . . . . . . . . . . . . . . . . . . . . . . . . . . . . . . . . . . . . . . . . . . . . . . . . . . 444
The 3D Xtra . . . . . . . . . . . . . . . . . . . . . . . . . . . . . . . . . . . . . . . . . . . . . . . . . . . . . . . . 446
Using the Shockwave 3D window . . . . . . . . . . . . . . . . . . . . . . . . . . . . . . . . . . . . . . . . 446
Using the Property inspector for 3D . . . . . . . . . . . . . . . . . . . . . . . . . . . . . . . . . . . . . . 448
Using rendering methods . . . . . . . . . . . . . . . . . . . . . . . . . . . . . . . . . . . . . . . . . . . . . . 449
Using 3D Anti-aliasing . . . . . . . . . . . . . . . . . . . . . . . . . . . . . . . . . . . . . . . . . . . . . . . . 450
3D behaviors. . . . . . . . . . . . . . . . . . . . . . . . . . . . . . . . . . . . . . . . . . . . . . . . . . . . . . . . 452
3D text . . . . . . . . . . . . . . . . . . . . . . . . . . . . . . . . . . . . . . . . . . . . . . . . . . . . . . . . . . . . 452
The 3D world . . . . . . . . . . . . . . . . . . . . . . . . . . . . . . . . . . . . . . . . . . . . . . . . . . . . . . . 452
CHAPTER 18
The 3D Cast Member, 3D Text, and 3D Behaviors
. . . . . . . . . . . . . . . . . . 455
About the 3D cast member . . . . . . . . . . . . . . . . . . . . . . . . . . . . . . . . . . . . . . . . . . . . . 455
Model resources. . . . . . . . . . . . . . . . . . . . . . . . . . . . . . . . . . . . . . . . . . . . . . . . . . . . . . 456
Models . . . . . . . . . . . . . . . . . . . . . . . . . . . . . . . . . . . . . . . . . . . . . . . . . . . . . . . . . . . . 458
Shaders . . . . . . . . . . . . . . . . . . . . . . . . . . . . . . . . . . . . . . . . . . . . . . . . . . . . . . . . . . . . 458
Textures. . . . . . . . . . . . . . . . . . . . . . . . . . . . . . . . . . . . . . . . . . . . . . . . . . . . . . . . . . . . 459
Motions. . . . . . . . . . . . . . . . . . . . . . . . . . . . . . . . . . . . . . . . . . . . . . . . . . . . . . . . . . . . 460
Lights . . . . . . . . . . . . . . . . . . . . . . . . . . . . . . . . . . . . . . . . . . . . . . . . . . . . . . . . . . . . . 460
Cameras . . . . . . . . . . . . . . . . . . . . . . . . . . . . . . . . . . . . . . . . . . . . . . . . . . . . . . . . . . . 461
Groups . . . . . . . . . . . . . . . . . . . . . . . . . . . . . . . . . . . . . . . . . . . . . . . . . . . . . . . . . . . . 462
Creating 3D text . . . . . . . . . . . . . . . . . . . . . . . . . . . . . . . . . . . . . . . . . . . . . . . . . . . . . 462
Modifying 3D text . . . . . . . . . . . . . . . . . . . . . . . . . . . . . . . . . . . . . . . . . . . . . . . . . . . 463
Lingo for 3D text . . . . . . . . . . . . . . . . . . . . . . . . . . . . . . . . . . . . . . . . . . . . . . . . . . . . 464
Using 3D behaviors. . . . . . . . . . . . . . . . . . . . . . . . . . . . . . . . . . . . . . . . . . . . . . . . . . . 466
CHAPTER 19
Working with Models and Model Resources
. . . . . . . . . . . . . . . . . . . . . . . . . 473
About models and model resources . . . . . . . . . . . . . . . . . . . . . . . . . . . . . . . . . . . . . . . 473
Model resources. . . . . . . . . . . . . . . . . . . . . . . . . . . . . . . . . . . . . . . . . . . . . . . . . . . . . . 473
Primitives . . . . . . . . . . . . . . . . . . . . . . . . . . . . . . . . . . . . . . . . . . . . . . . . . . . . . . . . . . 474
Cast member commands. . . . . . . . . . . . . . . . . . . . . . . . . . . . . . . . . . . . . . . . . . . . . . . 481
Models . . . . . . . . . . . . . . . . . . . . . . . . . . . . . . . . . . . . . . . . . . . . . . . . . . . . . . . . . . . . 482
Shaders . . . . . . . . . . . . . . . . . . . . . . . . . . . . . . . . . . . . . . . . . . . . . . . . . . . . . . . . . . . . 487
Textures. . . . . . . . . . . . . . . . . . . . . . . . . . . . . . . . . . . . . . . . . . . . . . . . . . . . . . . . . . . . 494
Groups . . . . . . . . . . . . . . . . . . . . . . . . . . . . . . . . . . . . . . . . . . . . . . . . . . . . . . . . . . . . 496
Modifiers. . . . . . . . . . . . . . . . . . . . . . . . . . . . . . . . . . . . . . . . . . . . . . . . . . . . . . . . . . . 498
Animation modifiers . . . . . . . . . . . . . . . . . . . . . . . . . . . . . . . . . . . . . . . . . . . . . . . . . . 502
Motions. . . . . . . . . . . . . . . . . . . . . . . . . . . . . . . . . . . . . . . . . . . . . . . . . . . . . . . . . . . . 510
About lights and cameras. . . . . . . . . . . . . . . . . . . . . . . . . . . . . . . . . . . . . . . . . . . . . . . 511
Light properties. . . . . . . . . . . . . . . . . . . . . . . . . . . . . . . . . . . . . . . . . . . . . . . . . . . . . . 512
Light commands . . . . . . . . . . . . . . . . . . . . . . . . . . . . . . . . . . . . . . . . . . . . . . . . . . . . . 513
Cameras . . . . . . . . . . . . . . . . . . . . . . . . . . . . . . . . . . . . . . . . . . . . . . . . . . . . . . . . . . . 515
Contents 9
Page 10

CHAPTER 20
Controlling the 3D World
. . . . . . . . . . . . . . . . . . . . . . . . . . . . . . . . . . . . . . . . . . 521
3D Lingo events . . . . . . . . . . . . . . . . . . . . . . . . . . . . . . . . . . . . . . . . . . . . . . . . . . . . . 521
Collisions . . . . . . . . . . . . . . . . . . . . . . . . . . . . . . . . . . . . . . . . . . . . . . . . . . . . . . . . . . 522
Vector math. . . . . . . . . . . . . . . . . . . . . . . . . . . . . . . . . . . . . . . . . . . . . . . . . . . . . . . . . 524
Transforms . . . . . . . . . . . . . . . . . . . . . . . . . . . . . . . . . . . . . . . . . . . . . . . . . . . . . . . . . 526
Rendering functionality. . . . . . . . . . . . . . . . . . . . . . . . . . . . . . . . . . . . . . . . . . . . . . . . 530
CHAPTER 21
Movies in a Window
. . . . . . . . . . . . . . . . . . . . . . . . . . . . . . . . . . . . . . . . . . . . . . . 537
Creating a MIAW using Lingo . . . . . . . . . . . . . . . . . . . . . . . . . . . . . . . . . . . . . . . . . . 538
Opening and closing a MIAW. . . . . . . . . . . . . . . . . . . . . . . . . . . . . . . . . . . . . . . . . . . 538
Setting the window type for a MIAW . . . . . . . . . . . . . . . . . . . . . . . . . . . . . . . . . . . . . 539
Setting the window size and location for a MIAW. . . . . . . . . . . . . . . . . . . . . . . . . . . . 540
Cropping and scaling a MIAW . . . . . . . . . . . . . . . . . . . . . . . . . . . . . . . . . . . . . . . . . . 540
Controlling the appearance of a MIAW. . . . . . . . . . . . . . . . . . . . . . . . . . . . . . . . . . . . 541
Listing the current movies in windows. . . . . . . . . . . . . . . . . . . . . . . . . . . . . . . . . . . . . 541
Controlling interaction between MIAWs. . . . . . . . . . . . . . . . . . . . . . . . . . . . . . . . . . . 542
Controlling events involving MIAWs . . . . . . . . . . . . . . . . . . . . . . . . . . . . . . . . . . . . . 542
CHAPTER 22
Using the XML Parser Xtra
. . . . . . . . . . . . . . . . . . . . . . . . . . . . . . . . . . . . . . . . . 543
About XML . . . . . . . . . . . . . . . . . . . . . . . . . . . . . . . . . . . . . . . . . . . . . . . . . . . . . . . . 543
Using XML parser objects . . . . . . . . . . . . . . . . . . . . . . . . . . . . . . . . . . . . . . . . . . . . . . 544
Using XML document nodes. . . . . . . . . . . . . . . . . . . . . . . . . . . . . . . . . . . . . . . . . . . . 545
Accessing attributes . . . . . . . . . . . . . . . . . . . . . . . . . . . . . . . . . . . . . . . . . . . . . . . . . . . 548
Parser objects and XML nodes. . . . . . . . . . . . . . . . . . . . . . . . . . . . . . . . . . . . . . . . . . . 548
Treating white space . . . . . . . . . . . . . . . . . . . . . . . . . . . . . . . . . . . . . . . . . . . . . . . . . . 549
XML and character sets. . . . . . . . . . . . . . . . . . . . . . . . . . . . . . . . . . . . . . . . . . . . . . . . 549
CHAPTER 23
Making Director Movies Accessible
. . . . . . . . . . . . . . . . . . . . . . . . . . . . . . . . 551
About government requirements . . . . . . . . . . . . . . . . . . . . . . . . . . . . . . . . . . . . . . . . . 551
Making Director movies accessible . . . . . . . . . . . . . . . . . . . . . . . . . . . . . . . . . . . . . . . 551
Using the Accessibility behavior library . . . . . . . . . . . . . . . . . . . . . . . . . . . . . . . . . . . . 552
Using accessibility Lingo . . . . . . . . . . . . . . . . . . . . . . . . . . . . . . . . . . . . . . . . . . . . . . . 559
Deploying accessible movies . . . . . . . . . . . . . . . . . . . . . . . . . . . . . . . . . . . . . . . . . . . . 560
CHAPTER 24
Managing Memory
. . . . . . . . . . . . . . . . . . . . . . . . . . . . . . . . . . . . . . . . . . . . . . . . 563
How Director unloads items from memory. . . . . . . . . . . . . . . . . . . . . . . . . . . . . . . . . 563
Loading and unloading individual cast members. . . . . . . . . . . . . . . . . . . . . . . . . . . . . 564
Preloading digital video . . . . . . . . . . . . . . . . . . . . . . . . . . . . . . . . . . . . . . . . . . . . . . . . 565
CHAPTER 25
Managing and Testing Director Projects
. . . . . . . . . . . . . . . . . . . . . . . . . . . . 567
Managing Director projects . . . . . . . . . . . . . . . . . . . . . . . . . . . . . . . . . . . . . . . . . . . . 567
About testing movies to avoid problems . . . . . . . . . . . . . . . . . . . . . . . . . . . . . . . . . . . 568
Contents10
Page 11

CHAPTER 26
Packaging Movies for Distribution
. . . . . . . . . . . . . . . . . . . . . . . . . . . . . . . . . . 571
Shockwave browser compatibility . . . . . . . . . . . . . . . . . . . . . . . . . . . . . . . . . . . . . . . . 571
Previewing a movie in a browser . . . . . . . . . . . . . . . . . . . . . . . . . . . . . . . . . . . . . . . . . 572
About Xtra extensions . . . . . . . . . . . . . . . . . . . . . . . . . . . . . . . . . . . . . . . . . . . . . . . . . 572
Managing Xtra extensions for distributed movies . . . . . . . . . . . . . . . . . . . . . . . . . . . . 574
About distribution formats . . . . . . . . . . . . . . . . . . . . . . . . . . . . . . . . . . . . . . . . . . . . . 574
Creating Shockwave movies. . . . . . . . . . . . . . . . . . . . . . . . . . . . . . . . . . . . . . . . . . . . . 576
Setting movie options for browser resizing. . . . . . . . . . . . . . . . . . . . . . . . . . . . . . . . . . 580
About projectors . . . . . . . . . . . . . . . . . . . . . . . . . . . . . . . . . . . . . . . . . . . . . . . . . . . . . 582
Creating projectors . . . . . . . . . . . . . . . . . . . . . . . . . . . . . . . . . . . . . . . . . . . . . . . . . . . 582
Processing movies with Update Movies . . . . . . . . . . . . . . . . . . . . . . . . . . . . . . . . . . . . 585
Exporting digital video and frame-by-frame bitmaps. . . . . . . . . . . . . . . . . . . . . . . . . . 586
Setting QuickTime export options . . . . . . . . . . . . . . . . . . . . . . . . . . . . . . . . . . . . . . . 588
About organizing movie files . . . . . . . . . . . . . . . . . . . . . . . . . . . . . . . . . . . . . . . . . . . . 590
CHAPTER 27
Using Shockwave Player
. . . . . . . . . . . . . . . . . . . . . . . . . . . . . . . . . . . . . . . . . . 591
About streaming movies . . . . . . . . . . . . . . . . . . . . . . . . . . . . . . . . . . . . . . . . . . . . . . . 591
About network operations . . . . . . . . . . . . . . . . . . . . . . . . . . . . . . . . . . . . . . . . . . . . . . 592
Setting movie playback options . . . . . . . . . . . . . . . . . . . . . . . . . . . . . . . . . . . . . . . . . . 592
Setting Shockwave playback options . . . . . . . . . . . . . . . . . . . . . . . . . . . . . . . . . . . . . . 593
About creating multiuser applications . . . . . . . . . . . . . . . . . . . . . . . . . . . . . . . . . . . . . 594
About streaming with the Score and behaviors . . . . . . . . . . . . . . . . . . . . . . . . . . . . . . 594
Checking whether media elements are loaded with Lingo . . . . . . . . . . . . . . . . . . . . . . 595
Downloading files from the Internet with Lingo . . . . . . . . . . . . . . . . . . . . . . . . . . . . . 596
Retrieving network operation results with Lingo . . . . . . . . . . . . . . . . . . . . . . . . . . . . . 597
Using Lingo in different Internet environments. . . . . . . . . . . . . . . . . . . . . . . . . . . . . . 598
Testing your movie . . . . . . . . . . . . . . . . . . . . . . . . . . . . . . . . . . . . . . . . . . . . . . . . . . . 601
About downloading speed . . . . . . . . . . . . . . . . . . . . . . . . . . . . . . . . . . . . . . . . . . . . . . 601
INDEX. . . . . . . . . . . . . . . . . . . . . . . . . . . . . . . . . . . . . . . . . . . . . . . . . . . . . . . . . . . . . 603
Contents 11
Page 12

Contents12
Page 13

INTRODUCTION
Getting Started
Macromedia Director MX is the world’s foremost authoring tool for creating interactive
multimedia. Developers rely on Director to create attention-grabbing business presentations,
advertising kiosks, interactive entertainment, and educational products. To see some of the
exciting and varied ways in which developers use Director, visit the Director showcase at
www.macromedia.com/software/director/special/inspiration/. You can also see great examples of
Shockwave at www.shockwave.com.
Your users can view your completed Director movie over the Internet, either in a web browser or
independent of a browser,or in a stand-alone projector suitable for LANs and distribution
through CD-ROM and DVD-ROM.
System requirements
The following hardware and software are the minimum required to author Director movies:
• For Microsoft Windows: An Intel Pentium II 200 processor running Windows 98, 2000, or
XP; 128 MB of available RAM plus 100 MB of available disk space; a color monitor; and a
CD-ROM drive
• For the Macintosh: A Power Macintosh G3 running System 10.1 or later; 128 MB of available
RAM plus 100 MB of available disk space; a color monitor; and a CD-ROM drive
The following hardware and software are the minimum required to play back Director movies:
• For Microsoft Windows: An Intel Pentium II 200 processor running Windows 95/98, 2000,
XP, or NT version 4.0 or later; 32 MB of installed RAM; Netscape Navigator 4.0 or later,
Microsoft Internet Explorer 4.0 or later, or America Online 4.0 or later web browser; and a
color monitor
• For the Macintosh OS X: A Power Macintosh G3 running System 10.1 or later; 128 MB of
available RAM; Microsoft Internet Explorer 5.1 or later; and a color monitor
• For the Macintosh Classic operating system: A Power Macintosh 180 (G3 recommended)
running System 8.6 or later; 32 MB of installed RAM; Netscape 4.0 or later, Microsoft
Internet Explorer 4.5 or later, or America Online 4.0 or later web browser; and a color monitor
13
Page 14

Installing Director
Follow these steps to install Director on either a Windows or a Macintosh computer.
To install Director on a Windows or a Macintosh computer:
1 Insert the Director CD into the computer’s CD-ROM drive and do one of the following:
• In Windows, if the installation program doesn’t start automatically, choose Run from the
Windows Start menu, type d:\setup.exe (where d is your CD-ROM drive letter), and
click OK.
• On the Macintosh, double-click the Director Installer icon.
2 Follow the onscreen instructions.
3 If prompted, restart your computer.
What’s new in Director MX
New features in Director MX build on a proven development environment to make Director
more powerful, more tightly integrated with the Macromedia MX product family, and better
suited to create content that is accessible to everyone, even those with disabilities.
Developers can deliver rich multimedia content that integrates interactive audio, video, bitmaps,
vectors, text, fonts, and more. Director MX lets you work more effectively with the shared
Macromedia MX user interface, take advantage of unprecedented Macromedia Flash MX
integration, and deliver content to a broader audience.
Integration with other Macromedia MX products
Director MX is truly a part of the Macromedia MX family; this is evident in the workspace,
which matches those of other Macromedia MX products, as well as in other aspects of the
application’s strong integration with Macromedia Flash MX, ColdFusion MX, Flash
Communications Server MX, and other Macromedia MX products.
The Macromedia MX workspace lets you organize and customize an environment that’s shared
among Dreamweaver MX, Fireworks MX, and Macromedia Flash MX. The familiar and flexible
working environment helps you maximize productivity. Dockable panels can be grouped and
collapsed or expanded as needed for a smooth workflow.
Enhanced control of Macromedia Flash media through Lingo gives you complete access to all
properties and methods of Flash MX ActionScript objects. Greatly reduce your development time
by directly controlling all elements within your content that were authored in Flash MX.
Access to the Flash MX launch-and-edit feature lets you simply double-click a SWF file to
automatically launch Flash MX. Once you edit the file, it’s automatically saved and reimported
into Director MX. This roundtrip editing significantly streamlines your workflow.
Macromedia Flash Communication Server MX support allows you to use all the functional
capabilities provided by Flash Communication Server MX, including the ability to access
installed USB or FireWire cameras as well as installed microphones. You can combine the power
of the Flash Communication Server MX with Director MX to create multiuser games, distancelearning applications, and real-time collaboration forums. Previous users of the Shockwave
Multiuser Server are encouraged to use Flash Communication Server MX. However, the
Shockwave Multiuser Server is available on the Director installation CD.
Introduction14
Page 15

Macromedia Flash MX importing
lets you take advantage of the power of Flash MX and its
lightweight vector graphics by importing Flash files into Director MX content. Director
developers can use this powerful combination to create the most effective multimedia content.
Macromedia Flash Remoting MX provides a secure, high-performance connection between
Macromedia ColdFusion MX and Shockwave Player. When used with Director MX, Flash
Remoting MX lets you easily pass data to ColdFusion MX and back.
Macromedia Fireworks MX integration gives Director MX developers access to the robust design
and production environment of Fireworks MX, allowing developers to create graphics for
presentations or Shockwave content. In addition, the tight integration between Fireworks MX
and Director MX offers a roundtrip workflow between these graphic and multimedia
environments. Integration features include launching and editing, Fireworks MX importing,
launching and optimizing, and the Fireworks MX Import Xtra.
Accessible content
Director MX allows you to create content that meets internationally recommended guidelines
and government accessibility requirements—including Section 508 guidelines. Director MX lets
you add text-to-speech, captioning, and tab-navigation features to web-based Shockwave content
or stand-alone applications on both Microsoft Windows and Apple Macintosh systems.
The cross-platform Speech Xtra makes Director MX applications “self-voicing”—that is, text is
converted to speech without a screen reader. The user’s operating system provides voices at the
system level. You can create completely customizable, accessible content that doesn’t rely on
screen readers. Any user with Shockwave Player and an installed speech engine (which ships with
current operating systems) can then use your accessible content.
Drag-and-drop accessibility behaviors in Director MX let you easily control speech and tab
ordering, as well as synchronize text with spoken words, in order to repurpose existing Director
applications to adhere to accessibility guidelines.
Enhanced power of Director
Director MX introduces many new features that improve on the renowned power of Director to
create rich media multimedia content that can be deployed on CDs, DVDs, or corporate
intranets—or to more than 300 million web users with Shockwave Player.
Advanced debugging capabilities enhance the power of Lingo, the object-oriented Director
programming language. Director MX offers a streamlined professional debugging layout, with
everything you need in one convenient place.
The unified Script and Debugger windows let you debug, browse, and edit scripts all in the same
window. The Script window switches to debugging mode when a Lingo error or a breakpoint is
encountered. You can edit scripts while in debugging mode.
New Script window buttons save you development time when you’re working in Lingo. Among
the buttons are a button that lets you inspect and debug code faster and realize better input
responses when editing large files, a button that pinpoints debugging issues more quickly when
working with others, and a button that organizes 3D Lingo commands separately from other
Lingo commands for faster 3D debugging.
The Scripting Xtras window helps you organize your third-party scripting Xtra extensions more
efficiently. The window detects all installed scripting Xtra extensions, gets their methods and
properties, and organizes them in a convenient pop-up menu.
Getting Started 15
Page 16

An Object inspector with data browser functionality
lets you inspect all properties of script
instances, and examine the hierarchy of elements inside 3D cast members and Flash MX sprites.
The ability to quickly examine and modify all your movie components reduces both debugging
and development time.
Color-coding of recently changed variables makes tracking changes quick and easy with
immediate visual feedback. As you step through your code, the Debugger window displays the
variables whose values have changed in red.
The split-paned Message window shows you the results of your code changes immediately. Now
movies can execute and display information in the Output pane while you enter and execute
Lingo commands in the Input pane.
QuickTime 6 support allows you to take advantage of QuickTime 6 features, including support
for streaming MPEG4 video and MP3 audio.
Macintosh OS X support lets you create Director MX content using Mac OS X, the modern Apple
operating system. You can author in Mac OS X and create Shockwave applications and
executables that can be viewed on Mac OS X as well as pre–Mac OS X systems.
Resources for learning Director
The Director package contains a variety of media to help you learn the program quickly and
become proficient in creating multimedia—including the printed books Using Director MX and
Director MX Lingo Dictionary, both of which are also available as online help. Using Director MX
contains two tutorials. The Director MX workspace contains tooltips and context-sensitive help,
and additional help is available on the Director MX website at www.macromedia.com/support/
director. The new Answers panel in the Director workspace gives you a quick and easy way to find
out about the latest Director materials available on the web.
Director Help
Director Help is the comprehensive information source for all Director features. The help system
includes complete conceptual overviews of all features, animated examples, descriptions of all
interface elements, and a reference of all Lingo commands and elements. Topics are extensively
cross-referenced and indexed to make finding information and jumping to related topics quick
and easy.
You can access Director Help from the Help menu. To access context-sensitive help, select
Help from the Options menu for any panel, palette, or inspector, or click the Help button in
any dialog box.
Director MX tutorials
When you’re ready to start working in Director, begin with Chapter 2, “Director MX Basics
Tutorial,” on page 53. The tutorial shows you how to create a basic movie using some of the most
useful and powerful features of Director.
If you want to produce 3D content, see Chapter 3, “Director MX 3D Tutorial,” on page 103.
Using Director MX manual
This printed manual contains all the information found in Director Help.
Introduction16
Page 17
Director MX Lingo Dictionary
The Director MX Lingo Dictionary is a printed version of all the Lingo topics in Director Help.
Answers panel
The Answers panel provides quick access to information that helps you work effectively with
Director. This includes tutorials, TechNotes, and other useful content.
You can get the latest Director information from macromedia.com by simply clicking the Update
button in the Answers panel.
Tooltips
When you place the pointer over a Director tool or other workspace feature for a few seconds, a
small tooltip appears that explains the function of the item.
Keyboard shortcuts
Many commands that are available from Director menus are also accessible through keyboard
shortcuts. When you display a menu or submenu, the appropriate key combinations are shown
next to the commands for which keyboard shortcuts are available.
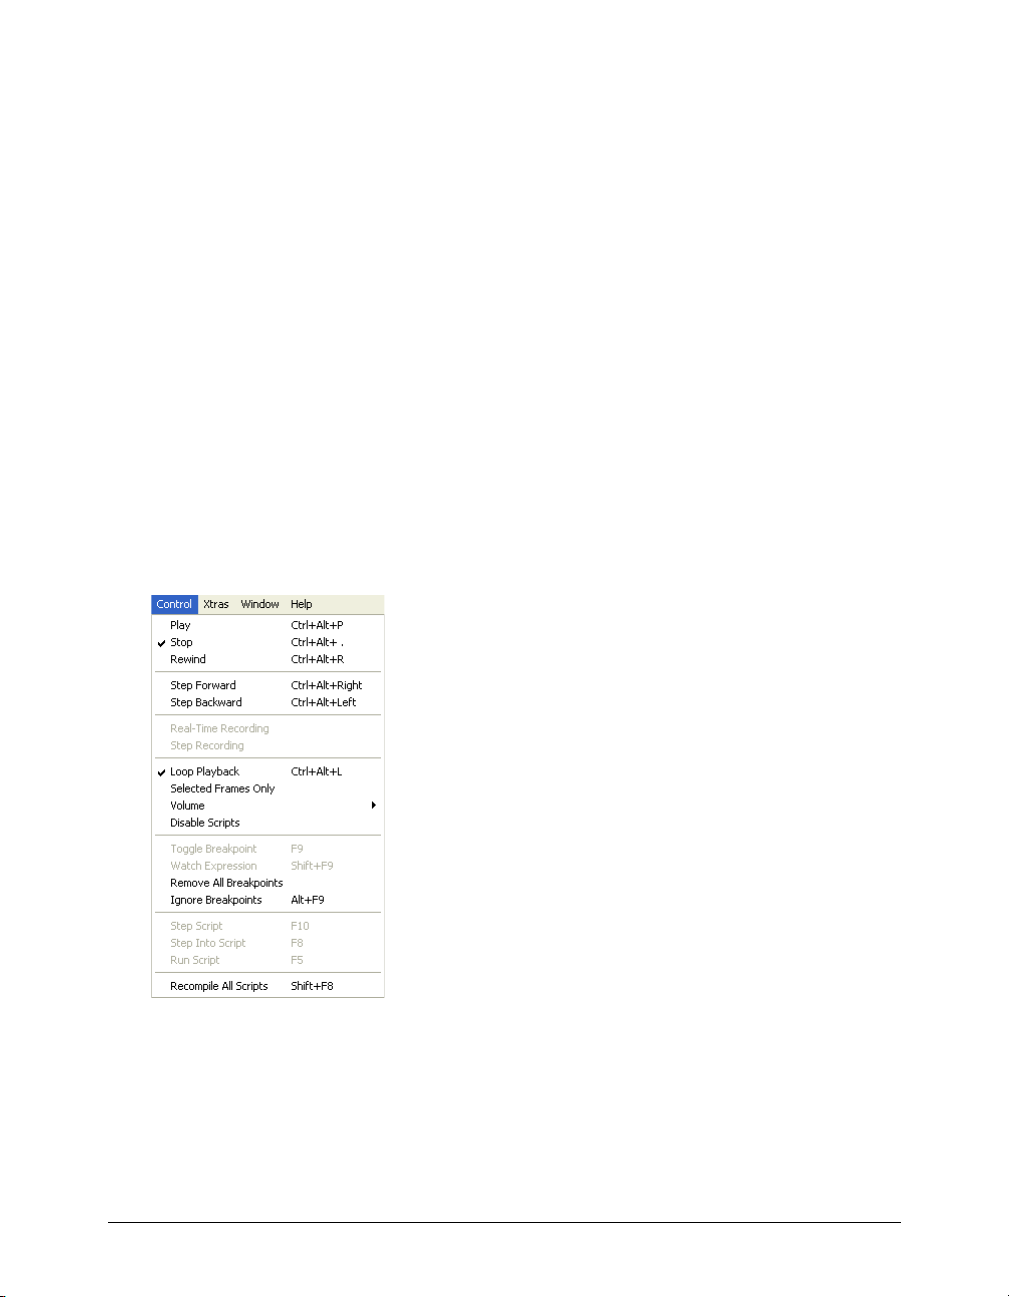
The following illustration shows key board shortcuts for a variety of commands on the Control
menu. (The illustration shows Director running on Windows. When Director is running on a
Macintosh, the keyboard shortcuts reflect Macintosh keys.)
Director Support Center
The Director Support Center website (www.macromedia.com/support/director/) contains the
latest information on Director, plus additional topics, examples, tips, and updates. Check the
website often for the latest news on Director and how to get the most out of the program.
Getting Started 17
Page 18

Conventions used in Director Help and printed books
The help system and printed books use the following conventions:
• The terms Lingo and Director refer to Director MX.
• Within the text and in Lingo examples, Lingo elements and parts of actual code are shown in
this font. For example, set answer = 2 + 2 is a sample Lingo statement.
• Quotation marks that are part of Lingo statements are shown in the text and Lingo code
examples as straight quotation marks (") rather than as curly quotation marks (”).
• The continuation symbol (¬), which you enter by pressing Alt+Enter (Windows) or
Option+Return (Macintosh), indicates that a long line of Lingo has been broken onto two or
more lines. Lines of Lingo that are broken this way are not separate lines of code. When you
see the continuation symbol in this book, type the lines as one line when you enter them in the
Script window.
• Variables used to represent parameters in Lingo appear in italics. For example,
whichCastMember is commonly used to indicate where you insert the name of a cast member
in Lingo.
• Text that you should type is shown in this font.
Introduction18
Page 19

CHAPTER 1
Director Basics
Macromedia Director MX is the tool of choice for legions of web and multimedia developers.
With Director, you can create movies for websites, kiosks, and presentations as well as movies for
education and entertainment. Movies can be as small and simple as an animated logo or as
complex as an online chat room or game. Director movies can include a variety of media, such as
sound, text, graphics, animation, and digital video. A Director movie can link to external media
or be one of a series of movies that refer to one another.
Your users view completed Director movies in one of the following ways:
• In the Macromedia Shockwave movie format, which plays in Shockwave-enabled web
browsers. Millions of web users already have the Shockwave Player on their computers,
browsers, or system software. Others have downloaded Shockwave Player, which is free, from
Macromedia’s website at www.macromedia.com/shockwave/download/.
• In a projector, which plays on your user’s computer as a stand-alone application.
Creating a new movie
Director is organized around a movie metaphor.
To create a new movie:
• Select File > New > Movie.
19
Page 20

Introducing the Director workspace
When you first launch Director, there are several windows in the default layout, including the
Stage, the Score, the Cast, and the Property inspector.
Tools
Stage
Property inspector
ScoreCast
Default Director MX window layout (Windows platform)
When creating and editing a movie, you typically work in four of these windows: the Stage, the
Score, the Cast, and the Property inspector.
The Stage
If the Stage is not open, select Window > Stage.
The Stage is the visible portion of a movie on which you determine where your media
elements appear.
During authoring, you have the ability to define the properties of your Stage, such as its size and
color. As you work on your movie, you can use zooming to make the Stage either larger or smaller
than the original movie, while also scaling the coordinates for the Stage objects. To align objects
on the Stage, you can select to display guides and grids or use the Align window.
Chapter 120
Page 21
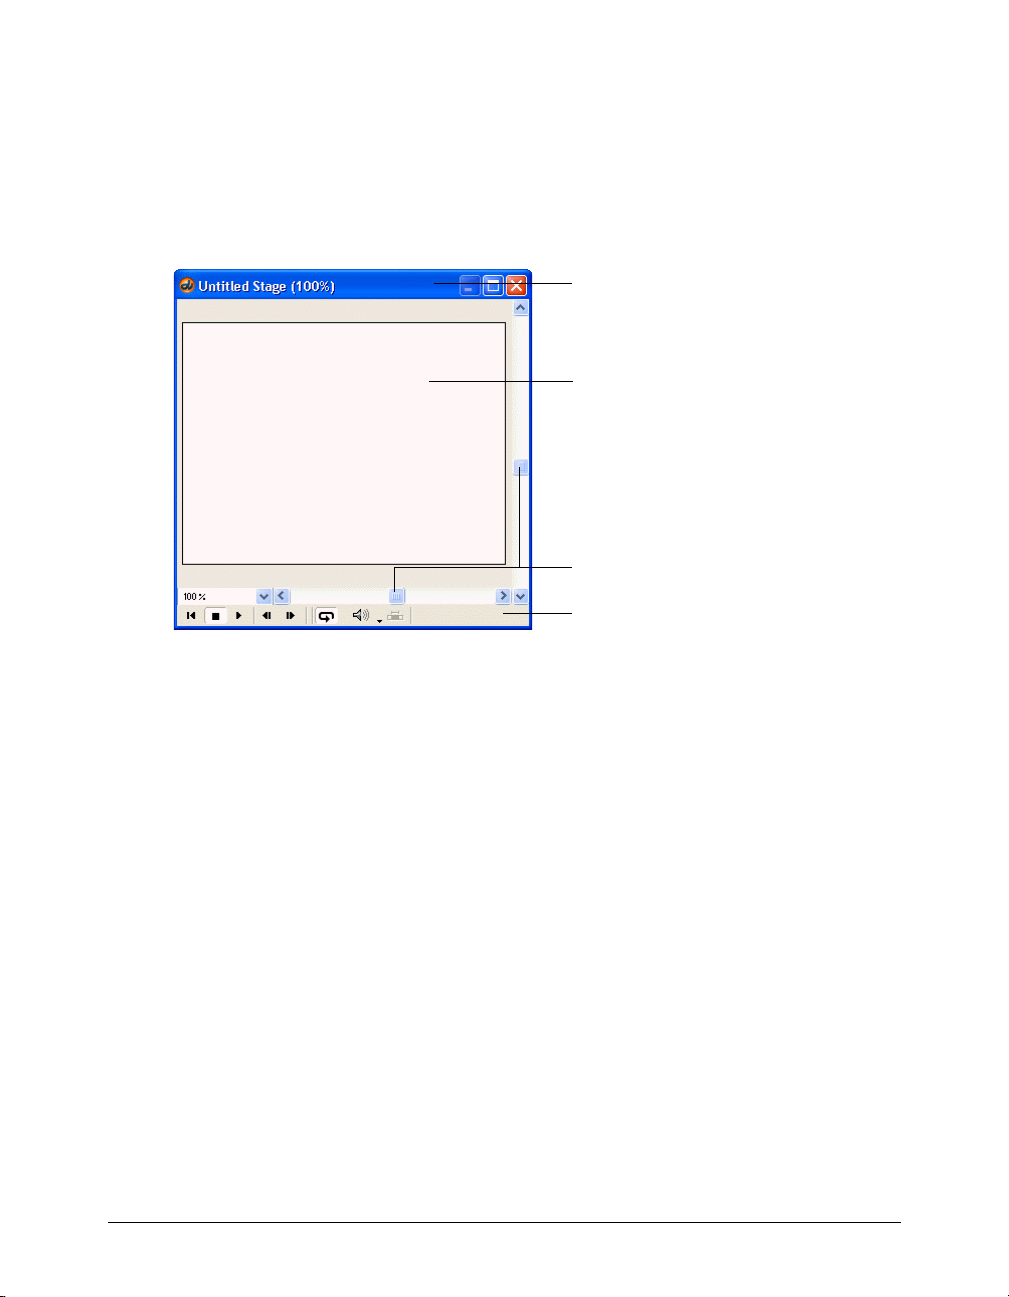
To scroll around the Stage, do one of the following:
• Use the scroll bars. (To show or hide Stage scroll bars, select Edit > Preferences > General and
select or deselect Show Stage Scrollbars.)
• Select the Hand tool from the Tool palette and drag inside the Stage to reposition the
visible portion.
• Bring the Stage to the front, hold down the Spacebar to temporarily switch to the Hand tool,
and then drag inside the Stage to reposition the visible portion.
Title bar
Canvas area
Scroll bars
Control panel
The Control panel
The Control panel governs how movies play back in the authoring environment. To go to a
specific frame number in a movie, enter the number in the frame counter, and press Enter
(Windows) or Return (Macintosh). You can also use the toolbar buttons or keyboard shortcuts
to play a movie.
By default, the Control panel is attached to the bottom of the Stage. You can turn it into a
floating panel by detaching it.
To detach the Control panel from the Stage, do one of the following:
• Right-click (Windows) or Control-click (Macintosh) the Control panel. In the context menu,
select Detach Control Panel.
• Right-click (Windows) or Control-click (Macintosh) the Property inspector or Tool palette. In
the context menu, select Detach Control Panel.
Director Basics 21
Page 22

The floating (detached) Control panel displays tempo information that does not appear when the
Control panel is attached to the Stage. For more information about tempo, see “About tempo”
on page 267.
Actual tempo
Tempo Setting
The floating Control panel
To close the floating Control panel, do one of the following:
• Select Window > Control Panel.
• Press Control+2 (Windows) or Command+2 (Macintosh).
Note: After you close the floating Control panel, you can use these same instructions to reopen it. However, you
cannot close a Control panel when it is attached to the Stage; you can only detach it.
To reattach the floating Control panel to the Stage, do one of the following:
• Right-click (Windows) or Control-click (Macintosh) the Control panel. In the context menu,
select Attach Control Panel.
• Right-click (Windows) or Control-click (Macintosh) the Property inspector or Tool palette. In
the context menu, select Attach Control Panel.
The Score
If the Score is not visible, select Window > Score.
The Score organizes and controls a movie’s content over time in rows that contain the media,
called channels. The Score includes special channels that control the movie’s tempo, sound,
and color palettes. The Score also includes frames and the playhead. You use the Score to assign
scripts—Lingo instructions that specify what the movie does when certain events occur in
the movie.
Chapter 122
Page 23
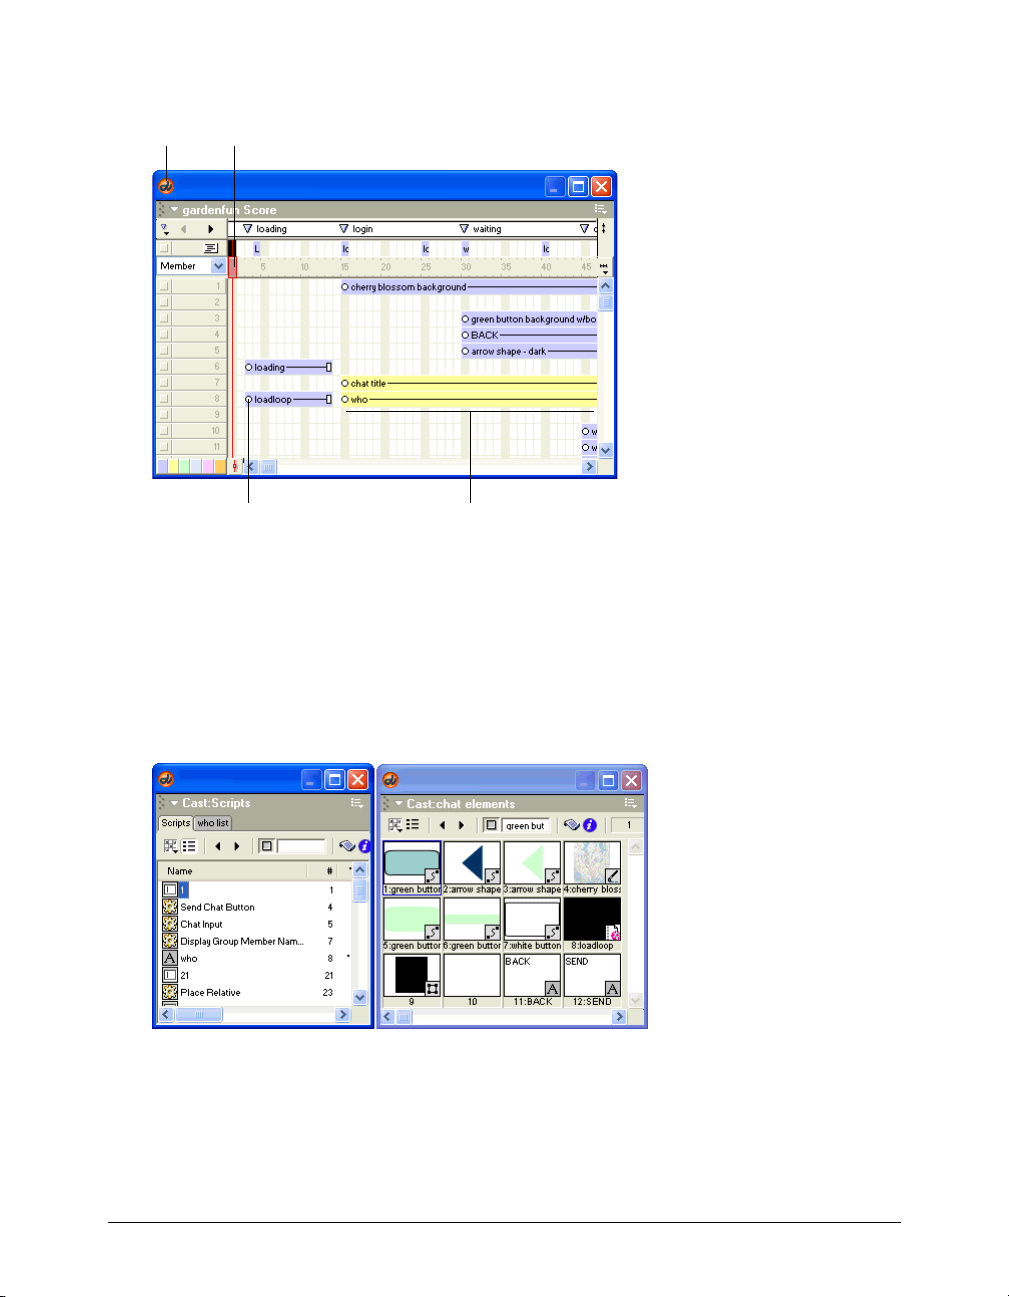
You can control the Score by zooming to reduce or magnify your view and by displaying multiple
Score windows. You can also control the Score’s appearance by selecting Edit > Preferences > Score.
Score Playhead
Keyframe Sprite in Score
The Cast window
If the Cast window is not visible, select Window > Cast.
In the Cast window, you can view your cast members, which are the media in your movie, such as
sounds, text, graphics, and other movies. Cast members can also include assets that you use in
your Score but not on the Stage, such as scripts, palettes, fonts, and transitions. You can create
cast members in Director, and you can import existing media to include in your cast. The Cast
window lets you view your cast members as a list or as thumbnails, depending on your preference.
Chapter 123
Page 24
The Property inspector
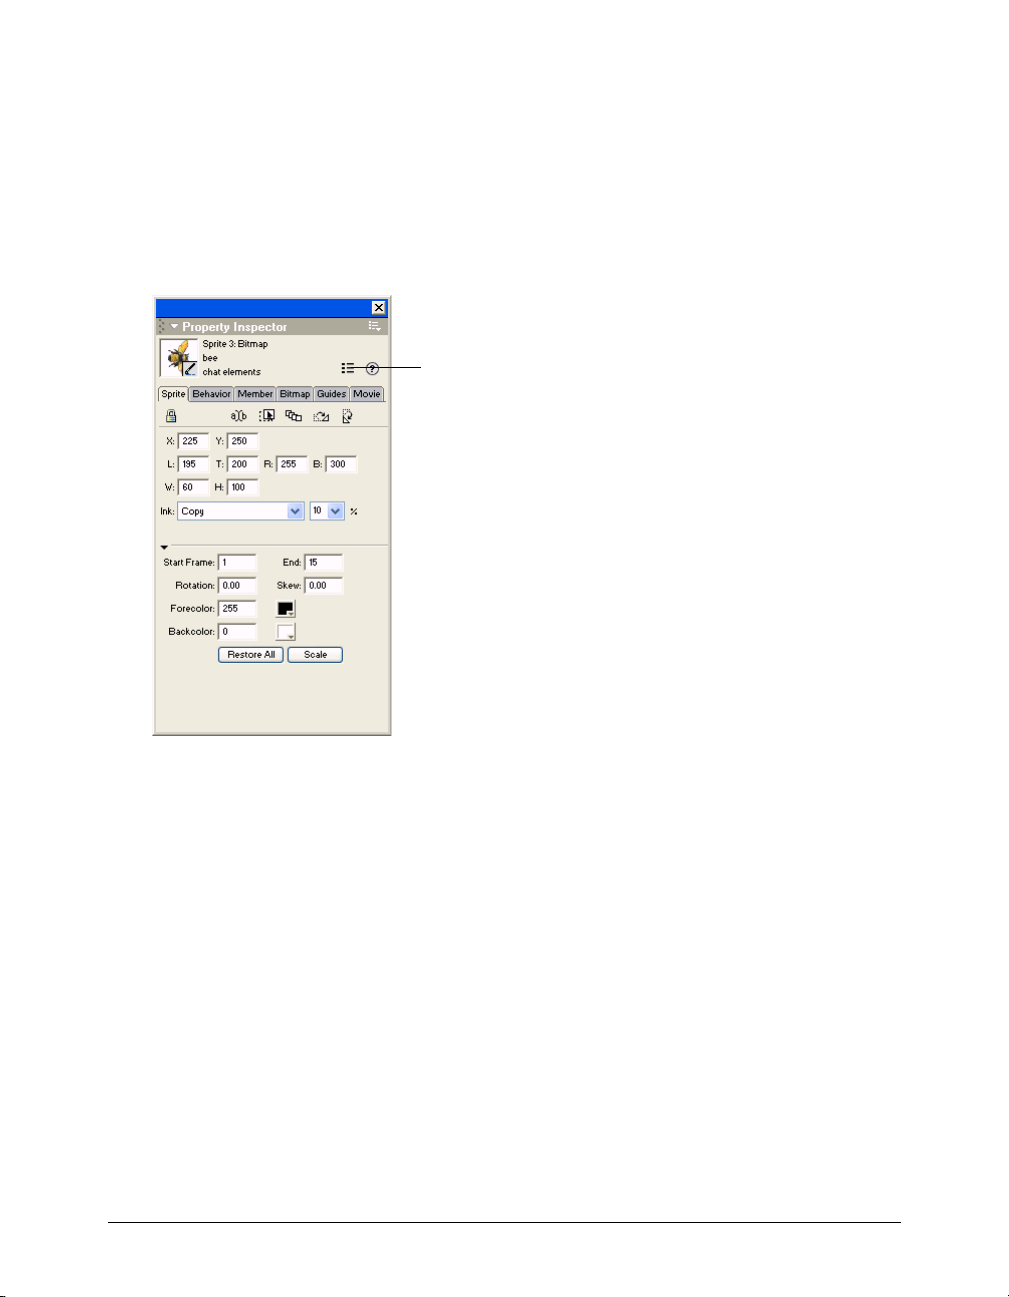
If the Property inspector is not visible, select Window > Property Inspector.
The Property inspector provides a convenient way to view and change attributes of any selected
object, or multiple objects, in your movie. After you select an object, relevant category tabs and
associated fields appear in the Property inspector. If you select multiple objects, only the
information that is common to all the selected objects appears.
The List View Mode icon in the Property inspector lets you toggle between a List and a
Graphical view.
List View Mode icon
Chapter 124
Page 25
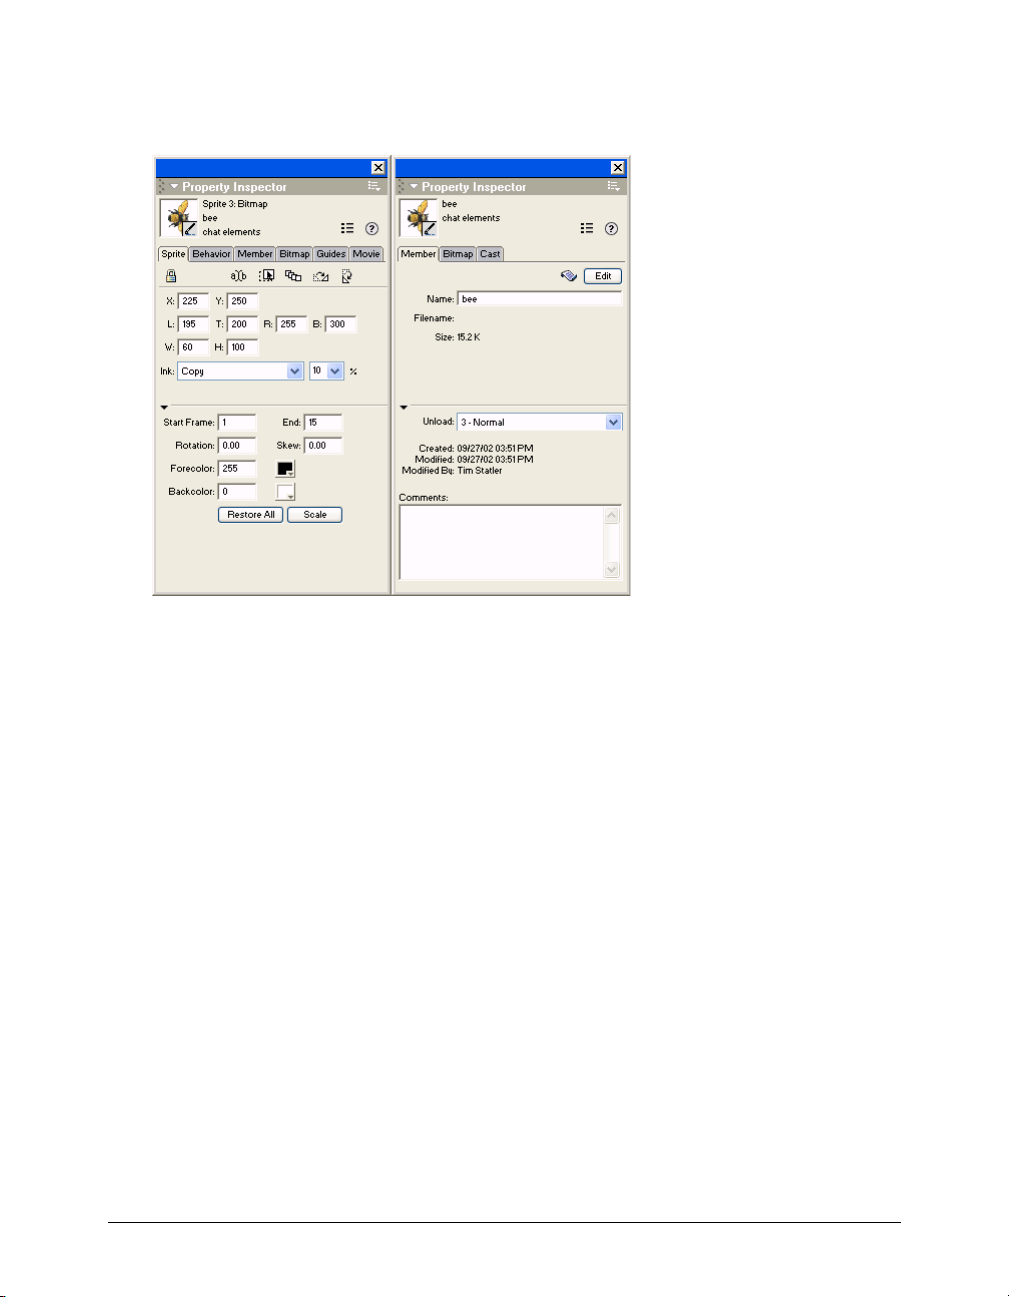
The following illustrations show different information that appears in the Property inspector,
depending on what is selected. In the first illustration, a sprite is selected. In the second
illustration, a cast member is selected.
To show more or less information in the Property inspector:
• Click the expander arrow in the Property inspector.
Director Basics 25
Page 26
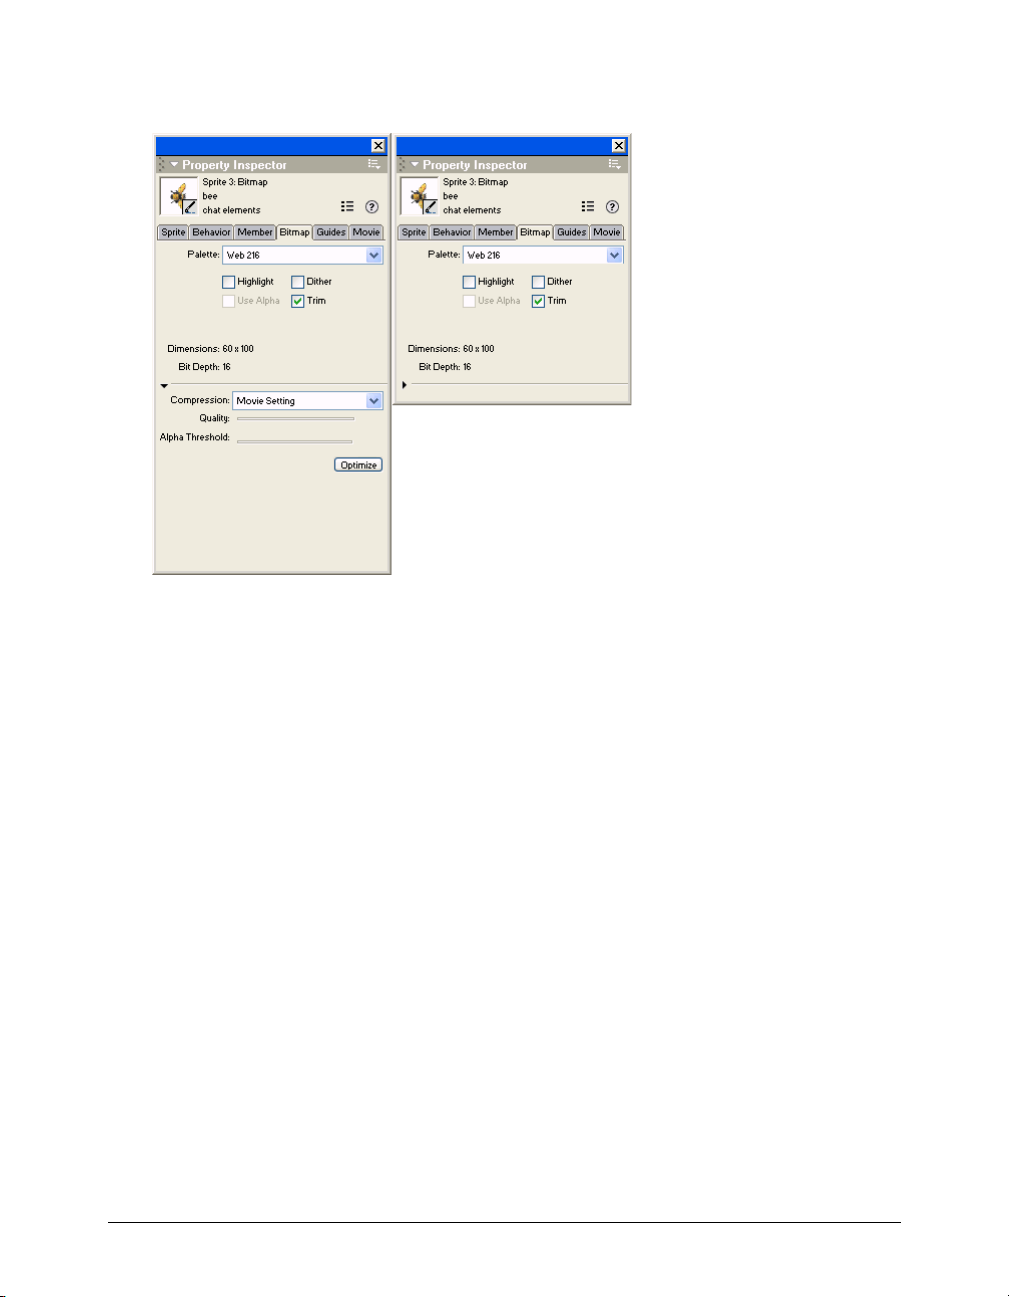
The following illustrations show different information appearing in the Property inspector
depending on whether the expanded information is hidden or shown.
Chapter 126
Page 27
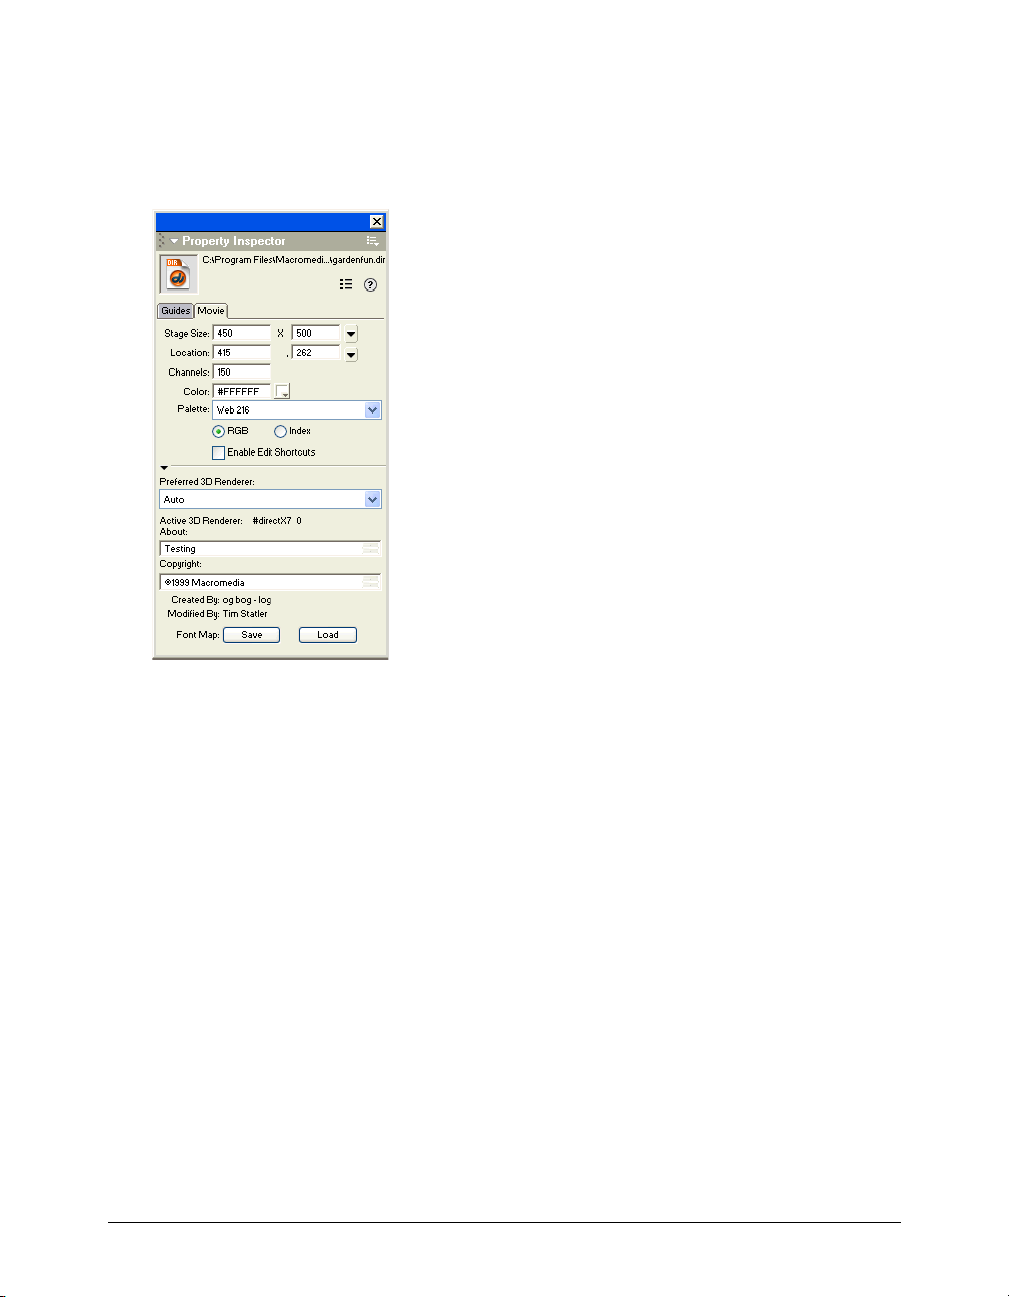
Setting Stage and movie properties
You use the Property inspector’s Movie tab to specify settings that affect the entire movie, such as
how colors are defined, the size and location of the Stage, the number of channels in the Score,
copyright information, and font mapping. These settings apply only to the current movie,
whereas the settings you select from Edit > Preferences apply to every movie.
To set Stage and movie properties:
1 Click the Movie tab in the Property inspector in Graphical view.
2 To define the size of the Stage, select a preset value from the Stage Size pop-up menu or enter
values in the Width and Height fields.
3 To specify the location of the Stage during playback if the movie does not take up the full
screen, select an option from the Location pop-up menu or enter values for Left and Top; these
values specify the number of pixels the Stage is placed from the upper left corner of the screen,
and they apply only if the Stage is smaller than the current monitor’s screen size.
Centered places the Stage window in the center of your monitor. This option is useful if you
play a movie that was created for a 13-inch screen on a larger screen or if you’re creating a
movie on a large screen that will be seen on smaller screens.
Upper Left places the Stage in the upper left corner of the screen.
4 To specify the number of channels in the Score, enter a value for Channels.
5 To set the color of the Stage for the movie, click the color box next to Color and select a color,
or enter an RGB value in the text box on the right.
Director Basics 27
Page 28

6 To select a color palette for the movie, select a palette from the Palette pop-up menu. This
palette remains selected until Director encounters a different palette setting in the Palette
channel.
For a complete discussion of color palettes and using color in Director, see “Controlling color”
on page 255.
7 To determine how the movie assigns colors, select either RGB or Palette Index.
RGB makes the movie assign all color values as absolute RGB values.
Palette Index makes the movie assign color according to its position in the current palette.
8 To let users cut, copy, and paste editable fields while a movie is playing, select Enable Edit
Shortcuts.
9 To select a default renderer used to draw 3D sprites within the movie, if that renderer is
available on the client computer, select one of the following options from the Preferred 3D
Renderer pop-up menu:
OpenGL specifies the openGL drivers for hardware acceleration that work with Macintosh and
Windows platforms.
DirectX 7.0 specifies the DirectX 7 drivers for hardware acceleration that work only with
Windows platforms.
DirectX 5.2 specifies the DirectX 5.2 drivers for hardware acceleration that work only with
Windows platforms.
Software specifies Director’s built-in software renderer that works with Macintosh and
Windows platforms.
Auto specifies that the most suitable renderer should be selected. This option is the default
value for this property.
Note: If the preferred renderer is not available on the client computer, the movie selects the most suitable
available renderer.
10 To enter copyright and other information about the movie, enter text in the About and
Copyright text boxes.
This information is important if your movie will be downloaded from the Internet and saved
on a user’s system.
11 To save the current font map settings in a text file named Fontmap.txt, click Save. To load the
font mapping assignments specified in the selected font map file, click Load. See “Mapping
fonts between platforms for field cast members” on page 284.
Increasing or decreasing your view of the Stage
You can author in Director on a zoomed Stage—one that is either larger or smaller than the
normal size of the movie. Additionally, the Stage includes an offstage canvas area within the Stage
window but outside of the active movie area. This canvas area is useful for assembling your media
either before or after they appear on the Stage.
The offstage canvas is also useful as a way to preload media in projectors. For example, sprites in a
frame, but offstage, are loaded into memory so they are ready to play in the subsequent frame.
Chapter 128
Page 29
When you change the size of the Stage, any guides or grids you use to assist you with alignment
will also scale to the zoomed size, and you can manipulate Stage objects in the same way that you
would on a Stage that is not zoomed.
To zoom the Stage, do one of the following:
• Press Control+the Plus (+) key (Windows) or Command+the Plus (+) key (Macintosh) to
zoom in and increase the Stage size. Press Control+the Minus (-) key (Windows) or
Command+the Minus (-) key (Macintosh) to zoom out and decrease the Stage size. (In
Windows, if you want to use the keys on the numeric keypad, NumLock must be off.)
You can press the keys repeatedly until the Stage is the desired size.
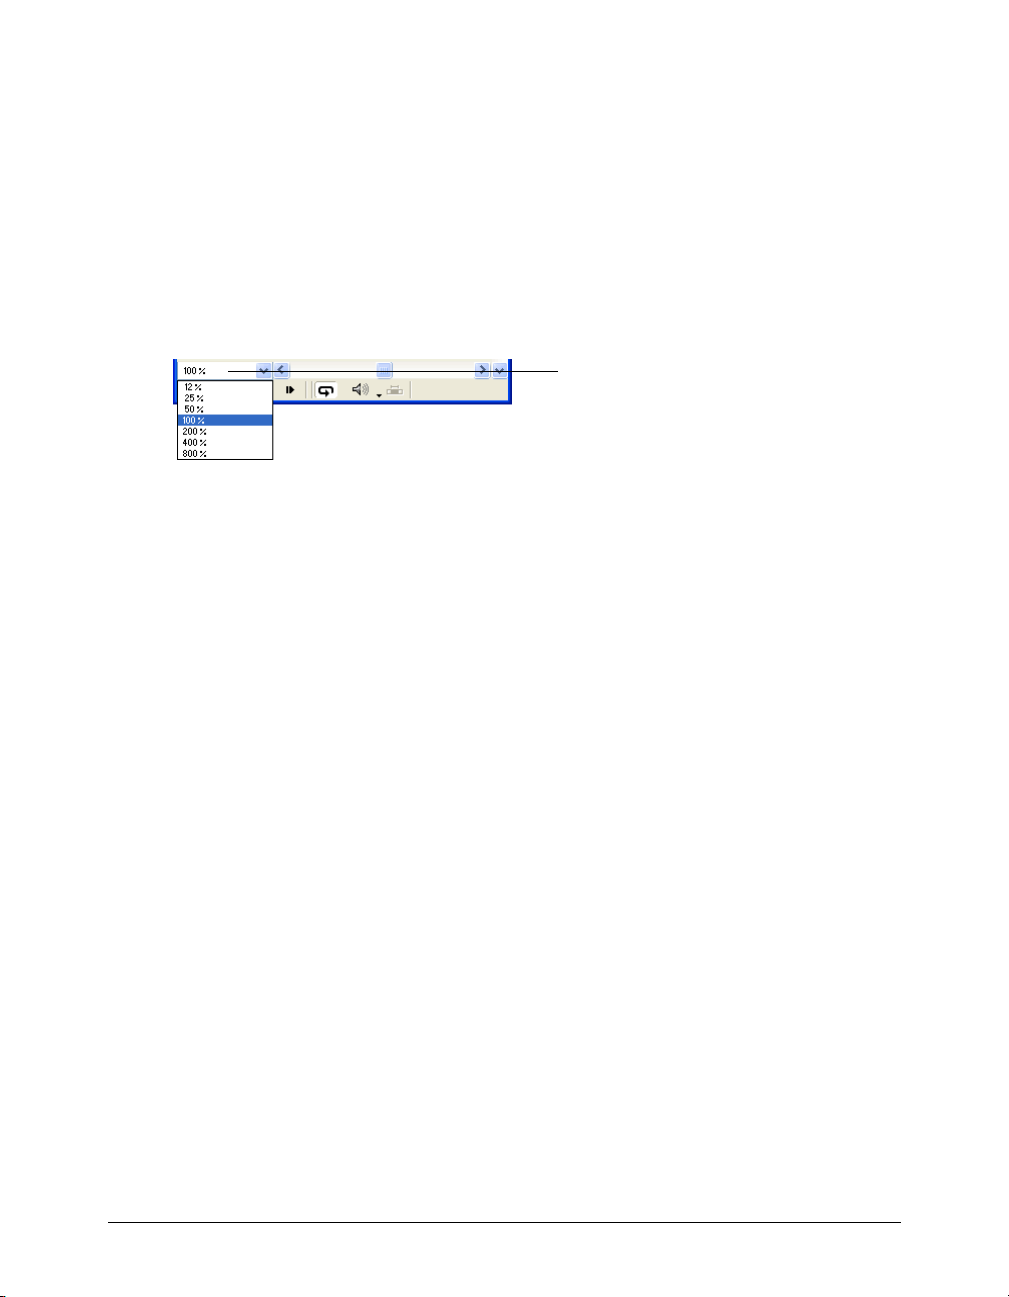
• Select a zoom amount from the Zoom menu in the lower left corner of the Stage.
Zoom menu
Note: If you don’t see the Zoom menu, select Edit > Preferences > General, check Show Stage Scrollbars, and
then click OK.
• Select View > Zoom, and select Zoom Stage In to increase the size of the Stage in increments,
Zoom Stage Out to decrease Stage size, or a percentage to select a specific Stage size.
• To zoom in while selecting an area of the Stage to center within the zoomed window, select the
Magnifying Glass tool from the Tool palette. Click a point on the Stage to zoom and center.
• To zoom out while selecting an area of the Stage to center within the zoomed window, select
the Magnifying Glass tool from the Tool palette. Press Alt (Windows) or Option (Macintosh)
while clicking a point on the Stage to zoom and center.
The Stage’s title bar indicates the zoom Stage size expressed as a percentage of the normal
Stage size.
About Sprites
A sprite is an object that controls when, where, and how cast members appear in a movie. You
create sprites by placing cast members on the Stage or in the Score. Creating a Director movie
consists largely of defining sprites’ properties, where they appear, when they appear in the movie,
and how they behave. Different sprites can be created from a single cast member. Each sprite can
have its own values for different properties, and most changes to these properties do not affect the
cast member. Most changes to a cast member, however, will change the sprites created from that
cast member.
For information on creating and changing sprites, see “Creating sprites” on page 157.
Director Basics 29
Page 30
About channels in the Score
Channels are the rows in the Score that control your media. The Score contains sprite channels
and special effects channels.
Sprite channels are numbered and contain sprites that control all visible media in the movie.
Effects channels at the top of the Score contain behaviors as well as controls for the tempo,
palettes, transitions, and sounds. The Score displays channels in the order shown in the
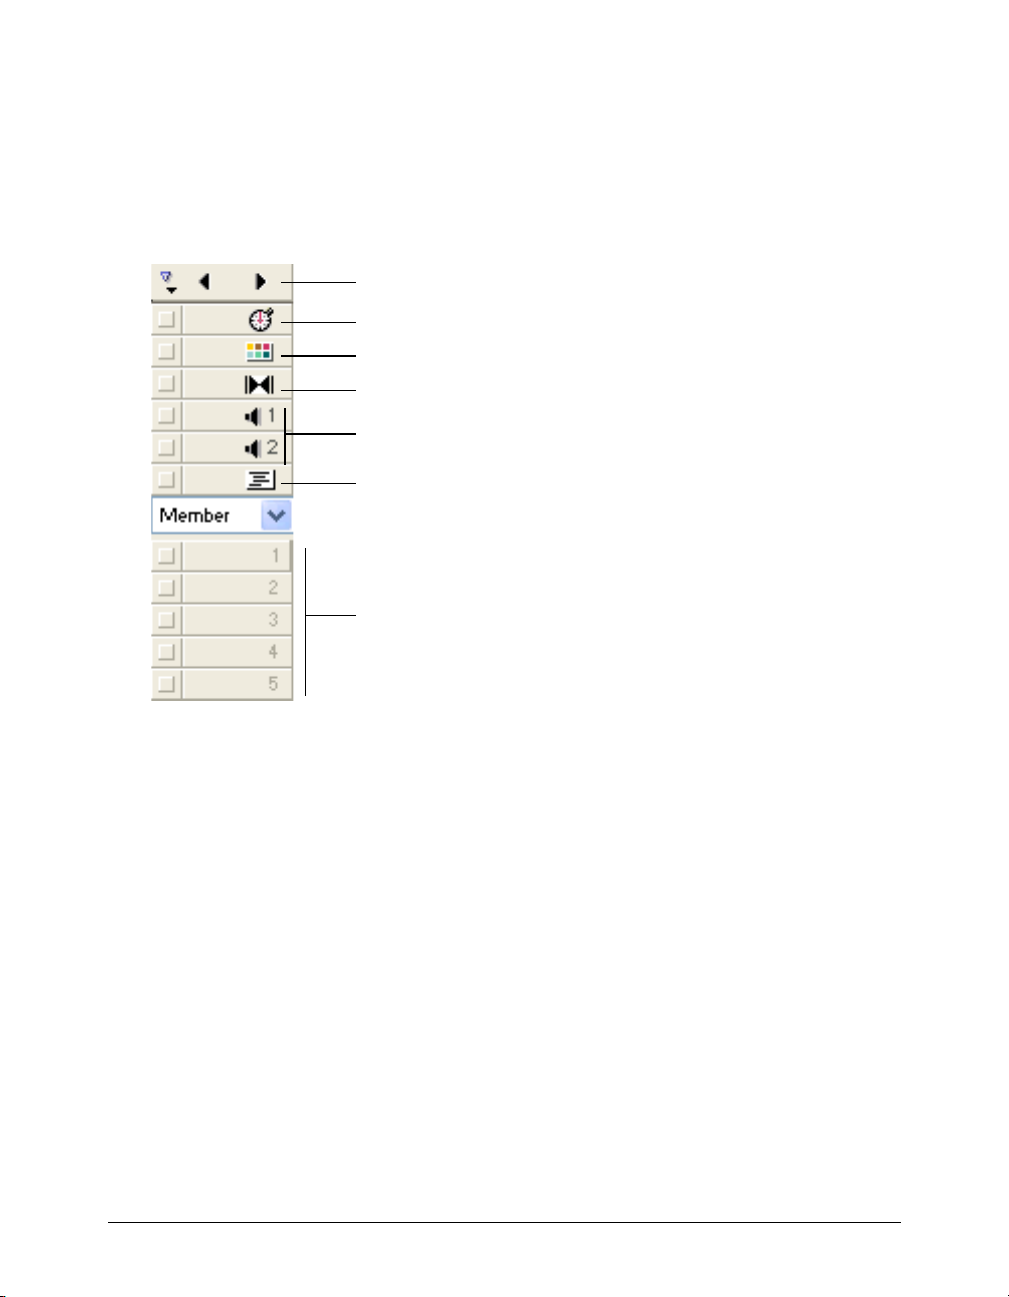
following figure.
Markers channel
Tempo channel
Palette channel
Transition channel
Sound channels
Behavior channel
Sprite channels
The first channel in the Score contains markers that identify places in the Score, such as the
beginning of a new scene. Markers are useful for making quick jumps to specific locations in a
movie. See “Using markers” on page 42.
Although the Score can include as many as 1000 channels, most movies use as few channels as
possible to improve performance in the authoring environment and during playback. Sprites in
higher channels appear on the Stage in front of sprites in lower channels. Use the Property
inspector’s Movie tab to control the number of channels in the Score for the current movie. See
“Setting Stage and movie properties” on page 27.
Turning channels on and off
To hide the contents of any channel on the Stage, or to disable the contents if they are not visible
sprites, you use the button to the left of the channel. When you turn off a special effects channel,
the channel’s data has no effect on the movie. You should turn off Score channels when testing
performance or working on complex overlapping animations. Turning off a channel has no effect
on projectors or Shockwave.
Chapter 130
Page 31

To turn off a Score channel:
• Click the gray button to the left of the channel. A darkened button indicates that the
channel is off.
This channel is on
This channel is off
To turn multiple Score channels off and on:
• Press Alt (Windows) or Option (Macintosh), and click a channel that is on to turn all the other
channels off, or click a channel that is off to turn the other channels on.
To show or hide the special effects channels:
• Click the Hide/Show Effects Channels button in the upper right corner of the Score to change
the display.
Click here to show or hide
the effects channels
Effects channels
About Frames
A frame in a movie represents a single point in time, which is similar in theory to a frame in a
celluloid film. Numbers are listed horizontally in the sprite and special effects channels represent
frames. Setting the number of frames displayed per second sets the movie’s playback speed.
Director Basics 31
Page 32

About the playhead
The playhead moves through the Score to show the frame currently appearing on the Stage. As
you play your movie, the playhead automatically moves through your Score. You can also click
any frame in the Score to move the playhead to that frame, and you can drag the playhead
backward or forward through frames.
Frame numbers
Playhead
Changing your view of the Score
To narrow or widen the Score, you change the zoom percentage. Zooming in widens each frame,
which lets you see more data in a frame. Zooming out shows more frames in less space and is
useful when moving large blocks of Score data.
To change the zoom setting:
• Select View > Zoom, and then select an option.
Chapter 132
Page 33
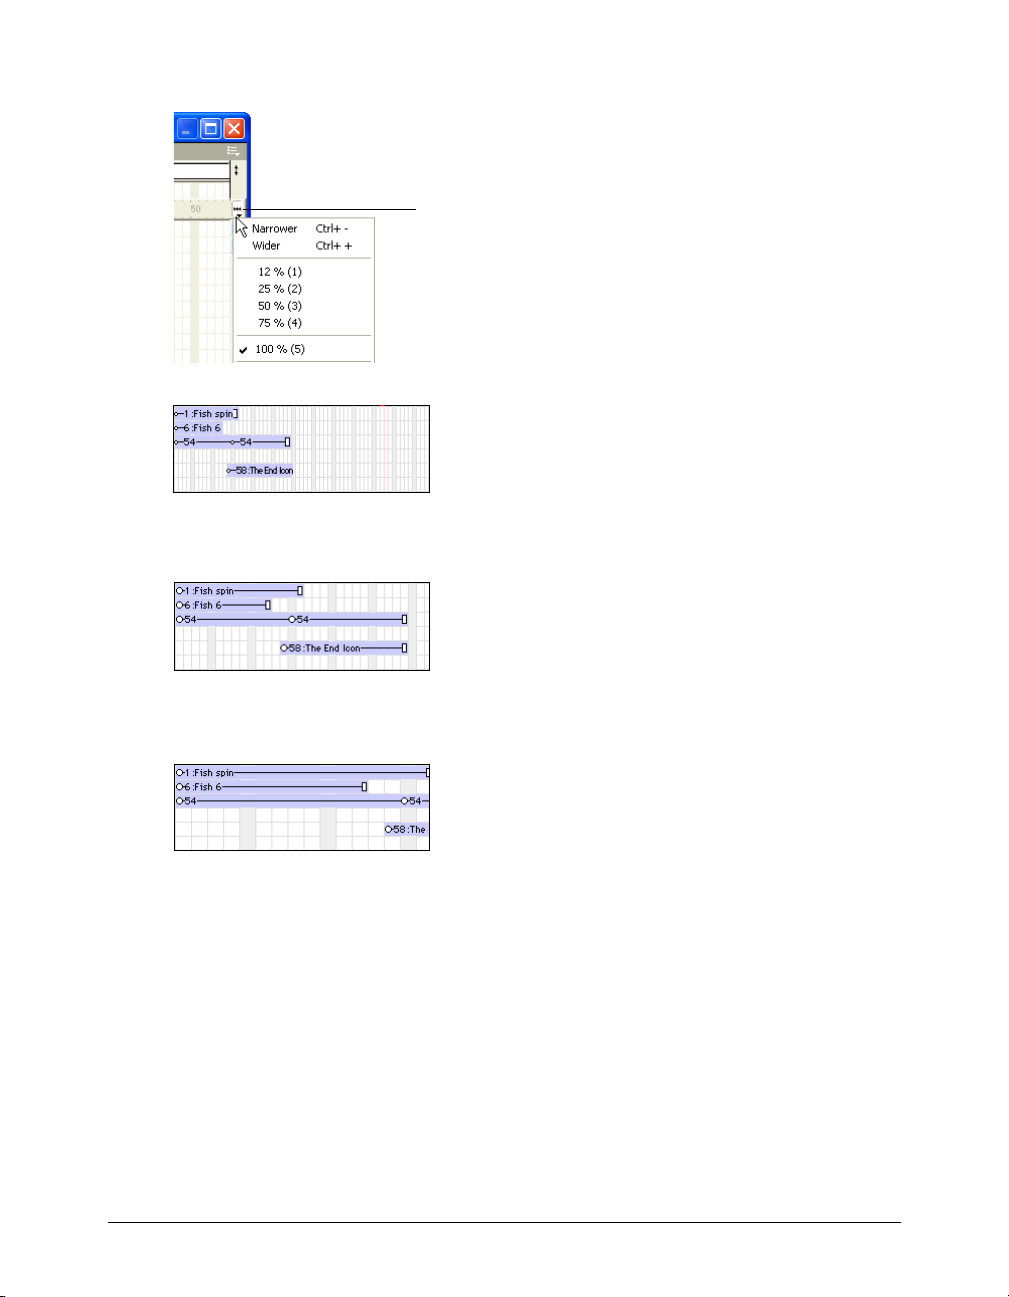
• Select an option on the Zoom pop-up menu to the right of the Score.
Zoom pop-up menu
Score zoomed out to 50%
Score at 100%
Score zoomed in to 200%
You can also display more frames in a Score without changing the zoom setting. To do so, place a
sprite in the rightmost frame of the Score. Director automatically displays additional frames in
the current view of the Score.
Director Basics 33
Page 34

Using context menus
To let you quickly access certain commands, Director provides context menus that display
commands that are relevant to a particular element. These menus are called context menus
because the commands on the menu vary, depending on the context in which the menu appears.
In the following illustration, Director shows the context menu for a sprite.
To display a context menu:
• Position your mouse pointer over an element and then right-click (Windows) or Control-click
(Macintosh).
Managing the workspace in Director MX
In Director MX, you can customize your workspace to maximize your productivity. You can
group panels together in a tabbed view to form a panel group, expand and collapse panels and
panel groups, and dock panels or panel groups to each other or to the Director application
window (Windows only). You can dock panels to each other in the Macintosh and Windows
versions of Director MX.
Window types
There are two types of windows in Director MX: document windows and tool windows. You
typically use document windows to create or edit content, and tool windows to view or modify
properties of that content. For example, the Paint window is a document window, and the
Property inspector is a tool window.
The distinction between the two windows types is important for understanding panel docking
and panel grouping. For more information see “Docking panels” on page 37 and “Working with
panel groups”.
Chapter 134
Page 35

The following is a list of document windows in Director MX.
• Stage
• Score
• Cast
• Script
• Message
• Media editors (Paint, Vector Shape, Text, Field, QuickTime, Shockwave 3D, RealMedia,
AVI Vi de o)
The following is a list of tool windows.
• Property inspector
• Too l p al et te
• Object inspector
• Library palette
• Behavior inspector
• Tex t i ns p ec to r
• Memory inspector
• Control panel
• Onion Skin
• Align
• Color palettes
• Markers
• Tw e a k
Managing panels and panel groups
A panel is a window that you can group with other panels to form a panel group, dock to other
panels or (Windows only) to docking channels in the application window itself, and collapse and
expand panels to save work space.
Director Basics 35
Page 36

Panels have the following features: a header bar that displays the name of the panel, a title bar, an
expander arrow to collapse and expand panels, a panel gripper to dock and undock panels, and an
Options menu for managing panels.
Title bar
Expander arrow
Panel gripper
Note: The Stage and Control panel do not have header bars, and the Stage, Control panel and Tool palette do not
have Options menus.
To open a panel or panel group, do one of the following:
Header bar
Options menu
• Select the window name from the Window menu.
• Use the keyboard shortcut for the window.
To close a panel or panel group, do one of the following:
• Select Close Panel Group from the panel’s Options menu. For more information on using the
Options menu see “Using panel Options menus” on page 40.
• Right-click (Windows) or Control-click (Macintosh) on the panel group’s header bar, and
select Close Panel Group.
• Select the window name from the Window menu, or use the keyboard shortcut for the window
(undocked panels only).
Docked panels will collapse rather than close if you perform this last option. For more
information on docking, see “Docking panels” on page 37.
To collapse or expand a panel or panel group, do one of the following:
• Click the expander arrow or the panel’s title in the header bar.
• Select the window name from the Window menu, or use the keyboard shortcut for the window
(docked panels only).
Note: Floating panels will close rather than collapse. For more information on docked and floating panels see
“Docking panels” on page 37.
Chapter 136
Page 37

To hide all panels:
• Select Window > Hide Panels, or press the F4 key on your keyboard. Repeat this command to
show all panels.
Note: The Hide Panels menu command hides all floating (non-docked) tool windows and all docking channels
(Windows only). Document windows (such as the Stage, Score, and Script windows) are unaffected. For more
information on the difference between document and tool windows see “Window types” on page 34. For more
information on docked and floating panels see “Docking panels” on page 37.
Docking panels
You can dock panels in two ways: to each other and (Windows only) to the docking channels
contained by the application window. In Windows, the docking channels run along the left
and right sides of the application window. The area between these docking channels is called
the View Port.
To collapse or expand a docking channel:
• Click the Drawer button located in the center of the docking channel’s separator bar.
Collapsing a docking channel increases the space allocated to the View Port.
To resize a docking channel:
• Drag the docking channel’s separator bar.
Panel docking is restricted by window type. On both Macintosh and Windows versions of
Director MX, document windows can be docked together (for example, the Score window with
the Cast window), and utility windows can be docked together (for example, the Property
inspector with the Behavior inspector). A document window cannot be docked with a utility
window, however.
In Windows, document window types cannot be docked; utility-type windows can be
docked only in the right and left docking channels. Macintosh versions of Director do not
have docking channels.
Note: Both the Stage and the Tool palette are exceptions to these docking rules. Neither the Stage nor the Tool
palette can be docked to any other panel, and the Stage cannot be docked to a docking channel. However, the Tool
palette can dock to the left or right docking channels.
You use the panel gripper to dock panels to each other or to a docking channel.
Director Basics 37
Page 38

To dock a panel or panel group:
• Drag the panel or panel group by its gripper over another panel or panel group, or (in
Windows only) over a docking channel.
Panel gripper
As you drag the panel over a docking area, a placement preview line or rectangle shows where it
will be placed among the panel groups.
To undock a panel group:
• Drag the panel group by its gripper until its outline indicates that it’s no longer docked.
Document windows float over the View Port when the docking channels are open. You can
maximize a document window so that it completely fills the View Port (Windows only).
To fill the View Port with a floating document window, do one of the following:
• Double-click the Title bar of the document window (Windows only).
• Click the Maximize button (Windows only).
Note: To return the document window to its original state, double-click the Title bar again or click the Restore Down
button (Windows only).
Working with panel groups
You can combine individual panels to form a panel group or tabbed panels. Windows that you
can combine in a panel group are restricted by window type and functionality.
The following types of panel groupings are allowed:
• Casts with other casts
• Media editor windows with other media editors (for example, Vector Shape with
Shockwave 3D)
• Script windows with media editors (for example, Script with Paint)
• Utility windows with other utility windows (for example, Text inspector and Memory
inspector windows)
You can use a panel or panel group’s Options menu to add or remove members of a panel group,
rename the panel or panel group, or rearrange the order of tabs in a panel group.
You cannot group or rename the Property inspector, Tool palette, or Stage.
Chapter 138
Page 39

To group a panel with another panel or panel group:
1 Select a panel or tab within a panel group.
2 From the panel’s Options menu, select Group [panel name] With, and then select a panel or
panel group name from the submenu that appears.
To remove a panel (tab) from a panel group:
1 Select a tab within a panel group.
2 From the panel group’s Options menu, select Group [panel name] With, and then select New
Panel Group from the submenu that appears.
The selected panel opens in its own floating panel.
Note: The New Panel Group submenu option is dimmed if the panel group only contains a single panel.
To rename a panel group:
1 Select Rename Panel Group from the panel’s Options menu.
2 In the Rename Panel Group dialog box, enter a new name for the panel in the Panel Group
Name text box, and click OK.
To rearrange the order of tabs within a panel group:
1 Select a tab within a panel group.
2 Select Group [Panel Name] With from the panel group’s Options menu. Then select the name
of the panel group that contains the selected panel.
The tab is moved to the last (right-most) position in the panel group.
Note: Whenever you make changes to your panels, it’s a good idea to save your panel layout. See “Saving panel
layouts” on page 40.
Managing Casts
When casts are grouped with other casts, they appear as tabs in the Cast panel group.
To save the configuration of your Cast panel tabs, you must save the panel layout before closing
your file. When you open the file again, restore the tab configuration by opening the panel layout
you created. See “Saving panel layouts” on page 40.
For more information about Cast panel management, see Chapter 4, “Cast Members and Cast
Windows,” on page 127.
Director Basics 39
Page 40

Using panel Options menus
Each panel and panel group has an Options menu located in its upper right corner. The Options
menu contains items for grouping, closing, and renaming panels.
To use a panel’s Options menu:
1 Expand the panel, if necessary, by clicking the panel’s expander arrow or the title next to the
expander arrow.
2 Click the Options menu control in the upper right of the panel, and select the desired
menu item.
Help launches the page in the help system that is relevant to the current panel.
Maximize Panel Group maximizes the panel to occupy the entire height of the docking
channel.
Group [panel name] With lets you group the currently selected tab in a panel group with
another panel or panel group.
This menu item is not available for all windows. For more information on panel grouping
restrictions, see “Working with panel groups” on page 38.
Rename Panel Group opens the Rename Panel Group dialog where you can rename the panel
or panel group. If the current window cannot be renamed, this item is dimmed. For more
information, see “Working with panel groups” on page 38.
Close Panel Group closes the panel group.
Saving panel layouts
You can save the current panel layout as well as open or remove a layout you have previously
saved. You can save as many panel layouts as you want. You can also restore the default panel
layout used by Director.
To save a panel layout:
1 Select Window > Panel Sets > Save Panel Layout.
2 Name the panel layout, and click OK.
To open a saved panel layout:
• Select Window > Panel Sets, and select a saved panel layout from the submenu.
Select Default from the Panel Sets submenu to open the default panel layout.
To remove a panel layout:
1 Select Window > Panel Sets, and select a panel layout from the submenu.
2 In the Remove Panel Set dialog box, click Remove.
You cannot remove the Default panel set.
Chapter 140
Page 41

Using multiple Score windows
You can view and work in different parts of a movie at the same time by opening additional Score
windows. If your sprite bars occupy many frames in the Score, for example, you can open a
second Score window to work on another place in the movie without scrolling. You can also drag
sprites from one Score window to another.
To open a new Score window:
1 Activate the current Score window.
2 Select Window > New Score Window.
You can scroll in this window to a different location in the Score.
Changing Score settings
To control the appearance of the Score and the information that appears in numbered sprite
channels, you set preferences for the Score. By doing so, you can display a script preview and cast
member information.
To change Score settings:
1 Select Edit > Preferences > Score.
2 The Extended display option lets you display information within sprites in the Score. See
“Displaying sprite labels in the Score” on page 165. To specify what cast member information
appears in numbered sprite channels when Extended display is on, select from the following
options:
Cast Member displays the cast member number, name, or both.
Behaviors displays the behaviors attached to the sprite.
Ink Mode displays the type of ink applied to the sprite.
Blend displays the blend percentage applied to the sprite.
Location shows the sprite’s x and y screen coordinates.
Change in Location shows the change in x and y coordinates relative to the previous cast
member in that channel.
3 To display the first few lines of the selected script in a box at the top of the Score, select
Script Preview.
4 To display the cast member’s name and number when the pointer is over a sprite for a few
seconds, select Show Data Tips.
Director Basics 41
Page 42
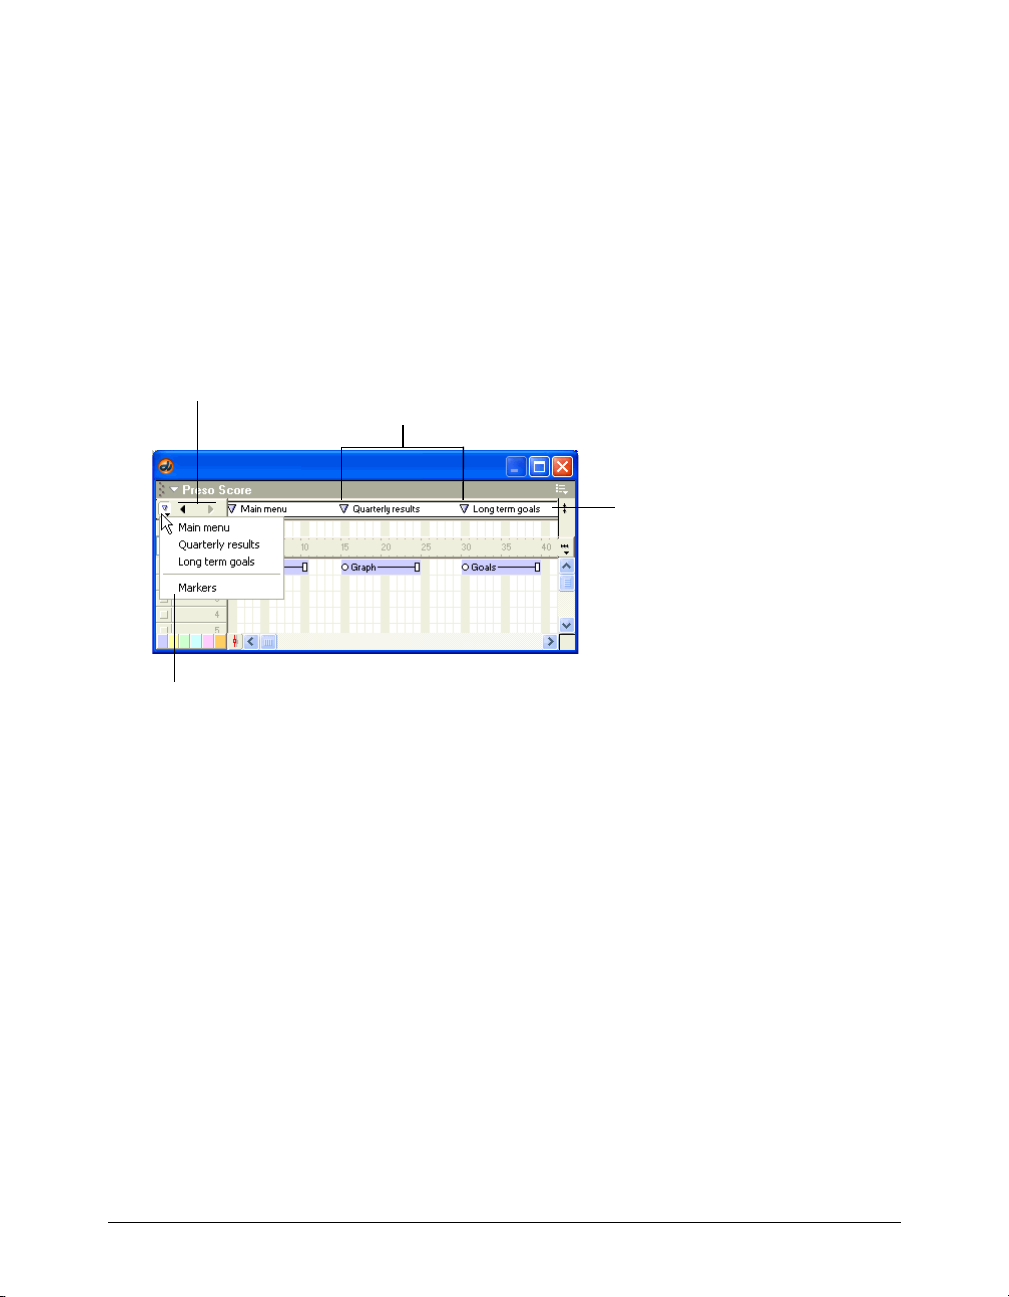
Using markers
Markers identify fixed locations at a particular frame in a movie. You use markers when you’re
defining navigation. Using Lingo or draggable behaviors, you can instantly move the playhead to
any marker frame. This is useful when jumping to new scenes from a menu or looping while cast
members download from the web. You can also use markers while authoring to advance quickly
to the next scene.
After you mark a frame in the Score, you can use the marker name in your behaviors or scripts to
refer to exact frames. Marker names remain constant, no matter how you edit the Score. They are
more reliable to use as navigation references than frame numbers, which can change if you insert
or delete frames in the Score.
You can use the Markers window to write comments that are associated with markers you set in
the Score and to move the playhead to a particular marker.
Next/Previous Marker buttons
Markers
Markers channel
Markers menu
To create a marker:
1 Click the markers channel.
A text insertion point appears to the right of the marker.
2 Type a short name for the marker.
To delete a marker:
• Drag the marker up or down and out of the markers channel.
To jump to markers while authoring, do any of the following:
• Click the Next Marker and Previous Marker buttons on the left side of the markers channel.
• Press the 4 and 6 keys on the numeric keypad to cycle backward and forward through markers.
• Select the name of a marker from the Markers menu
Chapter 142
Page 43

To enter marker comments:
1 Move the playback head to a marker, and select Window > Markers.
The Markers window opens and displays comments associated with that frame.
Comments
Marker names
Comments associated with markers appear in the right column. By default, the marker name
appears as the first line of text in the comments column and should not be removed.
Note: Use Control+Left Arrow or Control+Right Arrow (Windows) or Command+Left Arrow or
Command+Right Arrow (Macintosh) to move to the previous or next marker.
2
To enter comments, click to the right of the marker name that appears in the comments
column. When the insertion point appears, click again to deselect the marker name, and press
Control-Enter (Windows) or Control-Return (Macintosh) to start a new line. Then, start
typing your comments.
Selecting and editing frames in the Score
You can select a range of frames in the Score and then copy, delete, or paste all the contents of the
selected frames.
To move, copy, or delete all the contents of a range of frames:
1 Double-click in the frame channel to select frames.
Double-click here to select all sprites in a frame, including markers, special
effects, and sounds. Double-click and drag to select a range of frames.
2 If you want to move or copy frames, select Edit > Cut Sprites or Edit > Copy Sprites.
Director Basics 43
Page 44

3 If you want to delete frames, select Edit > Clear Sprites, or press the Delete key on your
keyboard.
If you cut, clear, or delete the selected frames, Director removes the frames and closes up the
empty space.
Note: To delete a single frame, you can also select Insert > Remove Frame.
4 To paste frames that you have cut or copied, select any frame or sprite, and select
Edit > Paste Sprites.
If there aren’t enough empty frames available for the entire sprite to be pasted, the Paste
Options dialog box appears, so you can decide how you want the frames to be pasted.
Overwrite Existing Sprites copies the entire sprite over the frames of any existing sprites
Truncate Sprites Being Pasted pastes the sprite into the number of available empty frames by
shortening its frame span.
Insert Blank Frames to Make Room inserts frames into the Score so the entire sprite can fit
without being truncated or overwriting other sprites
To add new frames:
1 Select a frame in the Score.
2 Select Insert > Frames.
3 Enter the number of frames to insert.
The new frames appear to the right of the selected frame. Sprites in the frames you select are
extended or tweened. For more information about tweening, see Chapter 6, “Animation,”
on page 185.
About adding interactivity with Lingo
Lingo, the scripting language of Director, adds interactivity to a movie. Lingo can accomplish
many of the same tasks—such as moving sprites on the Stage or playing sounds—that you can
accomplish using the Director interface.
Much of Lingo’s usefulness, however, is in the flexibility it brings to a movie. Instead of playing a
series of frames exactly as the Score dictates, Lingo can control the movie in response to specific
conditions and events. For example, whether a sprite moves can depend on whether the user
clicks a specific button; when a sound plays can depend on how much of the sound has already
streamed from the Internet.
Chapter 144
Page 45

Director includes a set of prepackaged Lingo instructions, called behaviors, that you can simply
drag to sprites and frames. Behaviors let you add Lingo’s interactivity without writing Lingo
scripts. You can modify behaviors or create your own. For more information about the behaviors
included with Director, see “Using Director Behaviors” in the Director Support Center at
www.macromedia.com/support/director/lingo/d8/d8behaviors.html.
If you prefer writing scripts to using the Director interface and behaviors, Lingo provides an
alternative way to implement common Director features. For example, you can use Lingo to
create animation, stream movies from the web, perform navigation, format text, and respond to
user actions with the keyboard and mouse.
Writing Lingo also lets you do some things that the Score alone cannot do. For example, Lingo’s
lists let you create and manage data arrays, and Lingo operators let you perform mathematical
operations and combine strings of text.
For more general information about Lingo, see Chapter 16, “Writing Scripts with Lingo,”
on page 385.
Converting movies created in previous versions of Director
Director MX can convert movies from Director 7 and later. It’s not necessary to update movies
created in Director 8 or Director 8.5 for use in Director MX.
You can also update movies to Director MX by simply opening and saving them, but the Update
Movies command is faster for converting large projects. It’s also more effective for preserving links
to external media. See “Processing movies with Update Movies” on page 585.
Note: Macromedia Shockwave Player 8.5 can play Shockwave movies created with Director 5, 6, 7, 8, and
Director MX.
When you open a Director 7 movie in Director MX or convert it to the new format with Update
Movies, the following changes occur to the movie:
• The data structure is changed to the latest file format.
• Shapes are not converted to the new Bézier shapes.
• Ink functionality is not updated unless you turn off Maintain Outdated Ink Mode Limitations
in the Movie Properties dialog box.
• Old Score data, from versions of Director before Director 5, is converted to the new Score,
combining adjacent frames in the old Score containing the same cast members into single
sprites in the new Score. You might want to split or join sprites to make working in the Score
more convenient.
Managing the Director authoring environment
While you work on a movie, you can use several optional controls and features to increase your
productivity. You can change preferences for Director interface functions and Internet connection
features, and you can print movies to see your work on paper. You can also monitor memory use
with the Memory inspector (Windows only).
Director Basics 45
Page 46

Setting general preferences
To control some of the Director default settings for the Stage and the user interface, you can use
the General Preferences dialog box. These settings control the appearance of movies only in the
authoring environment, not during playback.
To set Director default values:
1 Select Edit > Preferences > General.
2 To specify the default size and location of the Stage and the way it animates when deactivated,
select Stage options.
The Stage location settings affect the location of the Stage only in the authoring environment.
To set the location of the Stage during playback, see “Setting Stage and movie properties”
on page 27.
Use Movie Settings sets the Stage size to the movie’s Stage size and location.
Match Current Movie opens a new movie in the Stage size of the movie that’s currently open.
Center positions the Stage in the center of the screen by default, which is useful if the Stage size
is smaller than the screen size. Otherwise, the movie plays using its original Stage position.
Reset Monitor to Movie’s Color Depth (Macintosh only) automatically changes the color depth
of your monitor to the color depth of a movie when it is open in the authoring environment.
See “Changing the color depth of a movie” on page 256.
Animate in Background runs animation in the background while you work with other
applications. When you are running animation in the background, the Stage remains on the
screen, and the active application window appears in front of the Stage.
3 To set defaults for the Director user interface, select User Interface options:
Dialogs Appear at Mouse Position displays dialog boxes at the mouse pointer position. If this
option is not selected, dialog boxes are centered on the monitor that contains the menu bar.
Save Window Positions on Exit saves the positions of all open windows every time you quit so
they reappear in the same location when you start again.
Message Window Recompiles Scripts makes Director recompile all scripts when you press
Enter (Windows) or Return (Macintosh) in the Message window. With this option off,
Director recompiles scripts only when you select Control > Recompile All Scripts.
Show Tooltips controls the definitions that appear when the pointer is over tools and buttons.
Turn off this option to stop definitions from appearing.
Show Stage Scrollbars makes scroll bars appear in the Stage window.
4 To specify the unit of measure to use in the text ruler, select inches, centimeters, or pixels from
the Text Units pop-up menu. See “Formatting paragraphs” on page 278.
5 (Macintosh only) To let Director use available memory beyond its allocation, turn on Use
System Temporary Memory.
Chapter 146
Page 47

Choosing Internet connection settings
Director can connect to the Internet to import cast members and retrieve data. Use settings in
the Network Preferences dialog box to control how the connection works and to define a
preferred browser.
To select Internet connection settings:
1 Select Edit > Preferences > Network.
2 To specify the browser to launch when a movie running in the authoring environment
encounters the
gotoNetPage Lingo command, enter the path to the browser in the Preferred
Browser text box.
To locate the browser, click the Browse button.
3 To enable or disable browser launching, select Launch When Needed.
4 To specify the amount of space that Director can use to cache data from the Internet on your
hard disk, enter a value in the Disk Cache Size field.
5 To immediately empty the cache, click Clear.
6 To specify how often cached data is compared with the same data on the server, select one of
the following Check Documents options:
Once Per Session checks for data revisions only once from the time you start to the time you
quit the application. This option improves performance but might not always display the most
current version of a page.
Every Time checks for changes whenever you request a page. This option slows performance
but ensures you are always viewing the most current version of a page.
7 To specify the configuration of your system’s proxy server, select one of the following
Proxies options:
No Proxies specifies that you have a direct connection to the Internet.
Manual Configuration controls proxy settings for your system. Enter the HTTP or FTP URL
and port number.
Browsers usually don’t require proxy servers to interact with the network services of external
sources, but in some network configurations where a firewall blocks the connection between
the browser software and a remote server, interaction with a proxy might be required.
A firewall protects information in internal computer networks from external access, and in
doing so, it can limit the ability to exchange information. To overcome this limitation, browser
software can interact with proxy software. A proxy server interacts with the firewall and acts as
a conduit, providing a specific connection for each network service protocol. If you are
running browser software on an internal network from behind a firewall, you need the name
and associated port number for the server running proxy software for each network service.
Director Basics 47
Page 48

Printing movies
You can print movie content to review it and mark changes, to distribute edits to a team, to make
handouts from a presentation, or to see your work on paper. You can print a movie while in
authoring mode in several ways. You can print an image of the Stage in standard or storyboard
format, the Score, the cast member number and contents of text cast members in the Cast
window, all scripts or a range of scripts (movie, cast, Score, and sprite scripts), the comments in
the Markers window, the Cast window artwork, or the entire Cast window.
Note: Using Cast Text on the Print pop-up menu, you can print a table of text cast members at the resolution of
your printer.
You can also use Lingo to control printing. See printFrom in the Lingo Dictionary.
To print part of a movie:
1 Select File > Print.
2 To specify what part of the movie to print, select an option from the Print pop-up menu.
You can print an image of the Stage, the Score, all scripts or a range of scripts (movie, cast,
Score, and sprite scripts), cast text, cast art, cast thumbnails, and the comments in the
Markers window.
The Scripts, Cast Text, Cast Art, and Cast Thumbnails print options specify a range of casts
and cast members—internal or external. Information that appears in the Print dialog box
depends on the selection to be printed.
3 To specify which frames of your movie are printed, select one of the following Frames options:
Current Frame prints the frame that is currently on the Stage.
Selected Frames prints the frames that are selected in the Score.
All prints all the frames in your movie.
Range prints the range of frames specified in the Begin and End boxes.
4 To specify which frames in the defined range to print, select one of the following Include
options:
Every Frame is the default setting and prints every frame that is specified in Range.
One in Every [number] Frames prints frames at the interval you specify in the text box. For
example, if you enter 10, Director prints every tenth frame.
Frames with Markers prints only the frames that have markers in the Score window.
Frames with Artwork Changes in Channel [number] prints the frames in which cast members
move or in which new cast members are introduced in the Score. Specify the channel number
in the text box.
Chapter 148
Page 49

5 To determine the layout of the items to print, click Options and select from the following:
Scale provides options to print at 100%, 50%, or 25% of the original size.
Frame Borders creates a border around each frame.
Frame Numbers prints the frame number with each frame.
Registration Marks places marks on every page to align the page for reproduction.
Storyboard Format is available only when you select 50% or 25% images to print. This option
places marker comments next to the frame image.
Date and Filename in Header prints a header on each page. The header consists of the name of
the Director movie and the current date.
Custom Footer prints a footer on each page. Type the footer in the field.
The image at the left of the dialog box previews the layout options.
Monitoring memory use
The Memory inspector displays information about how much memory is available to Director for
your movie and indicates how much memory different parts of the current movie use and the
total disk space the movie occupies. It also can purge all removable items from RAM if you are
about to perform a memory-intensive operation.
Note: The Memory inspector is not available on Macintosh.
To use the Memory inspector:
1 Select Window > Memory Inspector.
2 Observe the following memory use indicators:
Total Memory displays the total system memory available, including the amount of RAM
installed on your computer and any available virtual memory.
Physical Memory shows the amount of actual RAM installed in the system.
Total Used indicates how much RAM is being used for a movie.
Free Memory indicates how much more memory is currently available in your system.
Other Memory indicates the amount of memory used by other applications.
Used by Program indicates the amount of memory used by Director (excluding the amount of
memory used by the Director application file).
Cast and Score indicates the amount of memory used by the cast members in the Cast window
and the notation in the Score window. Cast members include all the artwork in the Paint
window, all the text in the Text windows, cast members that use the Matte ink in the Score,
thumbnail images in the Cast window, and any sounds, palettes, buttons, digital video movies,
or linked files that are imported into the cast and are currently loaded into memory.
Screen Buffer shows how much memory Director reserves for a working area while executing
animation on the Stage.
Director Basics 49
Page 50

3 To remove all purgeable items from RAM, including all thumbnail images in the Cast window,
click Purge.
All cast members that have Unload (purge priority) set to a priority other than 0–Never (as
specified in the Property inspector’s Member tab) are removed from memory. This procedure is
useful for gaining as much memory as possible before importing a large file. Edited cast
members are not purged.
About using Xtra extensions to extend Director functionality
Xtra extensions are software components that extend Director functionality; some Xtra extensions
are installed with Director and others are available through third-party developers. Xtra
extensions provide capabilities such as importing filters and connecting to the Internet. You can
use preexisting Xtra extensions and, if you know the C programming language, you can create
custom Xtra extensions.
For information on creating Xtra extensions, download the Xtras Developer’s Kit from the
Director Support Center at www.macromedia.com/support/xtras/.
You must distribute any Xtra that a movie requires along with the movie. Xtra extensions can be
packaged with projectors, or your user can download your required Xtra extensions from the
Internet. See “Managing Xtra extensions for distributed movies” on page 574.
If your user is missing an Xtra that Director requires, an alert appears when the movie opens. For
missing Xtra transition cast members, the movie performs a simple cut transition instead. For
other missing Xtra cast members, Director displays a red X as a placeholder.
Types of Xtra extensions
The following types of Xtra extensions are supplied with Director:
• Cast member Xtra extensions provide new media types to Director. They create or control a
wide range of objects for use as cast members.
Some of the cast member types built into Director, such as Shockwave Flash, Vector Shape,
and Animated GIF, are provided as Xtra extensions. Xtra extensions from third-party
developers can include databases, 3D graphics processors, special types of graphics, and so on.
Cast member Xtra extensions that are built into Director appear on the Insert > Media
Element menu. Other cast member Xtra extensions might not appear on this menu and might
require Lingo implementation.
When setting properties for an Xtra cast member, use the Property inspector, which provides
settings standard to all types of Xtra cast members. If there are settings that are unique to the
current Xtra, you must click Option to open a second Properties dialog box that lets you
change those settings.
Some cast member Xtra extensions have separate authoring and playback components. You
should include only the playback components when distributing movies.
• Importing Xtra extensions provide the code that is required to import various types of media
into Director. When you link a movie to an external file, Director uses the importing Xtra to
import the media every time the movie runs. To distribute a movie with external linked media,
you must also include the Xtra that is required to import that type of media.
• Scripting Xtra extensions add Lingo elements to predefined Lingo scripts. The NetLingo Xtra,
for example, provides special Lingo elements for controlling Internet functions.
Chapter 150
Page 51

• Transition Xtra extensions supply transitions in addition to the predefined transitions that are
available in the Frame Properties: Transition dialog box.
• Too l X tr a e xt en si on s provide useful functions in the authoring environment, but they don’t do
anything while a movie runs. They do not have to be distributed with movies.
About installing Xtra extensions
To make custom Xtra extensions available to Director, place them in the Xtras folder located in
the same folder as the Director application. You must do this before you launch Director.
An Xtra can be stored in a folder up to five folders below the Xtras folder.
When you launch Director, you can use the
extensions that are located in any folder. If you open an Xtra this way, you must use the
closeXlib command to close it when Director finishes with it.
Copies of the same Xtra can have different filenames or have the same filename but reside in
different folders. If duplicate Xtra extensions are available when Director launches, Director
displays an alert. Delete any duplicate Xtra extensions.
Director automatically closes Xtra extensions when the application quits.
To make any Director movie appear on the Xtras menu and open as a movie in a window during
authoring, place it in the Xtras folder.
openXlib command to open Scripting Xtra
About distributing movies
When you finish creating a movie, you have several choices about how to distribute it to users.
You can distribute the movie as a Shockwave movie that plays within a web page or as a projector
that downloads to the user’s computer or that you distribute on a disk.
• A Shockwave movie is a compressed version of the movie data only.
• A projector is a stand-alone version of a movie. You can include several movies in a single
projector. Projectors appear on the system desktop as applications.
For more information about distributing movies, see Chapter 26, “Packaging Movies for
Distribution,” on page 571.
Movies that are distributed from the Internet can begin playing as soon as the content for the first
frame is downloaded. This process is called streaming. You can control streaming with behaviors
that make the movie wait for media at certain frames, or you can specify that a movie download
completely before it begins playing. See “Setting movie playback options” on page 592.
To create a Shockwave movie that can play in a web page, you use the Publish command. Director
leaves your original movie in its .DIR format. Director also creates a Shockwave movie in the
.DCR format.
If you use the default Publish settings, Director creates an HTML page that is completely
configured with
default, Director saves all these new files in the same folder as your original Director movie. For
more information about putting your Director movie on the web, see “Creating Shockwave
movies” on page 576.
For information on how to distribute Xtra extensions with projectors, refer to TechNote 13965 in
the Director Support Center. Although the note might refer to Director 7, the information is the
same for Director MX.
EMBED tags and everything else you need to run your movie in a browser. By
Director Basics 51
Page 52

Answers panel
The Answers panel provides quick access to information that helps you work effectively with
Director, including TechNotes, articles, and other useful content.
To open the Answers panel:
• Select Window > Answers.
To get the latest Director information from macromedia.com:
• Click the Update button.
Chapter 152
Page 53

CHAPTER 2
Director MX Basics Tutorial
The Director Basics chapter of Using Director introduces you to the Macromedia Director MX
user interface and basic Director concepts; you’ll gain a greater understanding of the material
presented in this tutorial if you’ve first read Chapter 1, “Director Basics,” on page 19. This
tutorial reiterates and expands on much of that information while it guides you through the
process of creating a simple interactive movie with animation, sound, and video. The movie you’ll
create is designed to suggest what is possible with Director rather than simulate a fully developed
Director project.
What you’ll learn
This tutorial introduces you to the basic skills needed to build a Director movie. These include
the following:
• Becoming familiar with Director windows
• Specifying movie properties
• Creating cast members within Director and from imported files
• Placing cast members on the Stage and in the Score to create sprites, which are copies of cast
members
• Animating sprites
• Creating buttons
• Using behaviors and Lingo to create user interactivity
• Controlling digital video and audio
• Publishing the movie on the web
53
Page 54

About the Director metaphor
The Director user interface is designed around a movie metaphor. Each project you create can be
thought of as a movie, with a cast of characters, a score, a stage where the action takes place, and a
director (you, the author). Each media element that appears in your movie (sound, video, images,
text, buttons, and so on.) can be thought of as a member of the movie’s cast. In Director, the Cast
window is where you view the list of media elements that appear in your movie.
Score
Cast window
Stage
As with a real movie, each Director movie has a score. However, the score of a Director movie
contains more than just music. The Score window in Director contains information about when
and where each of the cast members will appear on the Stage. The Score describes the action that
will happen in the movie.
The action in a Director movie takes place in a window called the Stage. To create a Director
movie, you add cast members (media elements) by creating them in Director or importing them.
Next, you place them on the Stage as sprites. A sprite is simply a copy of a cast member that
appears on the Stage. Then, you refine the actions of the sprites by editing them on the Stage
or in the Score.
In this tutorial, you will practice each of these steps to create your own Director movie.
Chapter 254
Page 55

View the completed movie
You can view a completed version of the tutorial movie to become familiar with how your
finished movie will appear.
1 Launch Director and select File > Open. Within your Director MX application folder, browse
to Tutorials/Basics/Finished and double-click the Basic_finished.dir file.
2 If windows obscure the Stage, drag them out of the way.
3 To play the movie, click Play along the bottom of the Stage, or select Control > Play.
Play
Stop
Rewind
Note: The group of controls along the bottom of the Stage is called the Control panel. By default, the Control
panel is attached to the bottom of the Stage. You can turn it into a floating panel by detaching it from the Stage.
For more information about the Control panel, see “The Control panel” on page 21.
4 Use the buttons in the movie to navigate from one scene to another and control the playback
Volume
of the video clip.
The movie consists of three scenes. The first is a title scene that contains buttons for navigating
to the other two scenes. The second scene is an animation of a sunset. The third scene
contains a digital video and buttons that control it. Each of these scenes also contains
navigation buttons.
5 When you finish viewing the movie, either click the Stop button on the Control panel, or
select Control > Stop.
Open the tutorial movie
To begin the tutorial, you’ll open a partially completed Director (DIR) file.
1 Select File > Open and browse to your Director MX application folder. Open the Tutorials/
Basics/Start/Basic_start.dir file.
Note: When you open this file, Director will close the Basic_finished.dir file you explored in the previous section.
If you made any changes to that file, do not save them.
2 Select File > Save As and name the file My_Basic_start.dir. Save the movie in the Start folder.
Making a copy of the file lets you or another user complete the tutorial again with the
Basic_start.dir file.
Director MX Basics Tutorial 55
Page 56
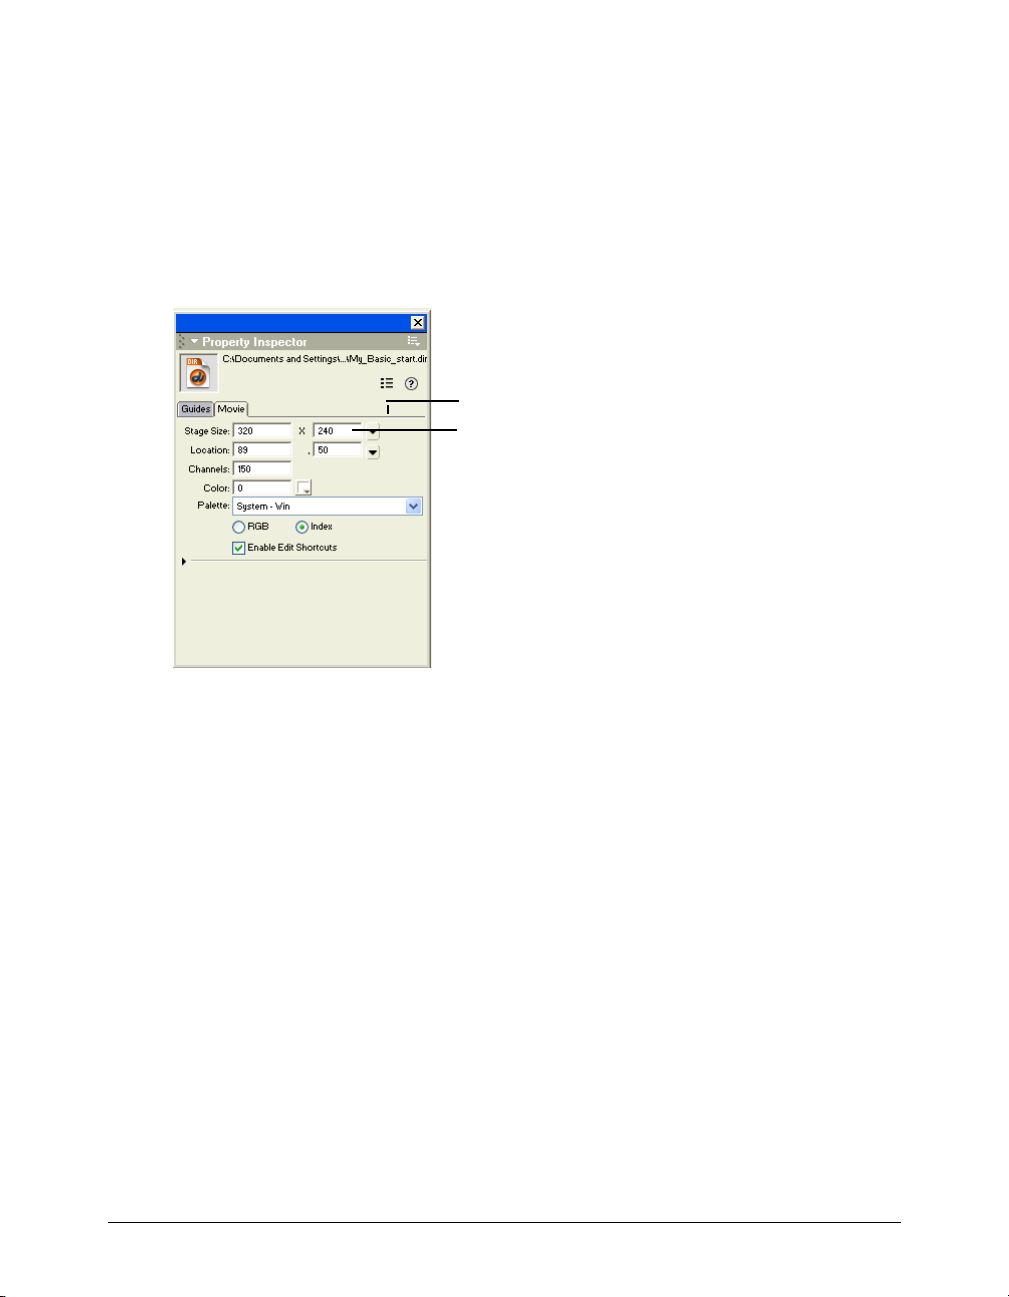
Set up the movie
You can now arrange your workspace and set properties for your movie, such as the Stage size and
color, and the number of channels in your Score.
During the authoring process, you view Director movies on the Stage window. You can set up the
size and color of the Stage window.
1 In the Property inspector (Window > Property Inspector), click the Movie tab.
If the Property inspector is not in graphical mode, as shown in the following illustration, click
the List View Mode icon to deselect it.
List View Mode
Stage Size
The Property inspector lets you change attributes of a selected object.
2 In the Stage Size pop-up menu, select 500 x 330.
Note: You can view tooltips for pop-up menus and text boxes by moving the pointer over the icon next
to the menu.
3 If the Score is not open, select Window > Score. In the Property inspector, type 50 in the
Channels text box and press Enter (Windows) or Return (Macintosh), and then click OK in
the dialog box that appears.
Note: In Windows, the Enter key on the numeric keypad plays the movie. Be sure to use the Enter key on the
alphanumeric section of the keyboard when entering information in Director.
Chapter 256
Page 57

4 In the Property inspector, select a dark orange color from the Stage Fill color picker.
Stage Fill color picker
5 Save your movie by selecting File > Save or clicking the Save button in the toolbar
(Window > Toolbar).
Director MX Basics Tutorial 57
Page 58

View your cast members
To create a Director movie, you need cast members. Cast members are the objects that appear on
the Stage and in the Score. Some of these elements might be text, graphics, sound, video, or Lingo
scripting behaviors.
The movie you create in this tutorial consists of three scenes. Some cast members appear in more
than one scene, and some appear in one scene only. First, use the Cast window to view your
current set of media. Next, you’ll begin adding new cast members. You add cast members to a
Director movie by creating them in Director or by importing files made in other applications.
1 If the Cast window is not already open, select Window > Cast.
Cast View Style button
You can view the Cast window in two modes: List view and Thumbnail. In List view, you can
sort cast members by name, number, date modified, type, and other criteria. Thumbnail view
lets you see a thumbnail image of each cast member. In Thumbnail view, cast members are
always shown in numerical order. For this tutorial, you will use the Thumbnail view. If your
Cast window is in List view, you need to switch to Thumbnail view.
2 To toggle from List view to Thumbnail view, click the Cast View Style button in the upper left
corner of the Cast window.
The Cast window contains cast members that you can use in your movie. The first is a text cast
member. It contains the text “Director Basics.” The text cast member thumbnail image that
appears in the Cast window contains a small A icon in the lower right corner. This is the cast
member type icon and the A indicates that it is a text cast member.
The second cast member is a button. Button cast members have special functionality built into
them, such as changing color when clicked, so that they behave in the way most users expect
buttons to behave. This button contains the text “Go to Animation.” Its cast member type icon is
a small square button shape.
The third cast member slot is empty. You will add a cast member to that slot later. The fourth cast
member is a bitmap image of mountains. Its cast member type icon is a paintbrush.
The ninth, tenth, and eleventh cast member slots contain bitmaps that you’ll use as custom
buttons. Using a bitmap image lets you control the appearance of the button, but it does not
provide the built-in functions of the Director button cast member type. However, you can add
those functions with Lingo, the Director scripting language.
Chapter 258
Page 59

Edit a text cast member
The first cast member you will use in your movie is the text cast member containing the words
“Director Basics.” You’ll edit the text to give it a more appealing graphic design.
1 Double-click the text cast member in the first slot of the Cast window.
The Text window opens.
Cast Member Name
Size
Italic
Bold
You use the Text window to edit text cast members. You’ll find that most Director cast member
types have associated windows that you can use to view and edit the cast member.
2 If the text is not already selected, select it, then select 36 point from the Size pop-up menu in
the tool bar near the top of the window.
Note: While completing the tutorial, you might find it useful to undo a change you’ve made. To undo, select
Edit > Undo, or press Control+Z (Windows) or Command+Z (Macintosh). Conversely, you can redo what you’ve
undone by selecting Edit > Repeat, or pressing Control+Y (Windows) or Command+Y (Macintosh).
3 Click the Bold button and the Italic button. The style of the selected text changes from plain
to bold, italic.
Director MX Basics Tutorial 59
Page 60
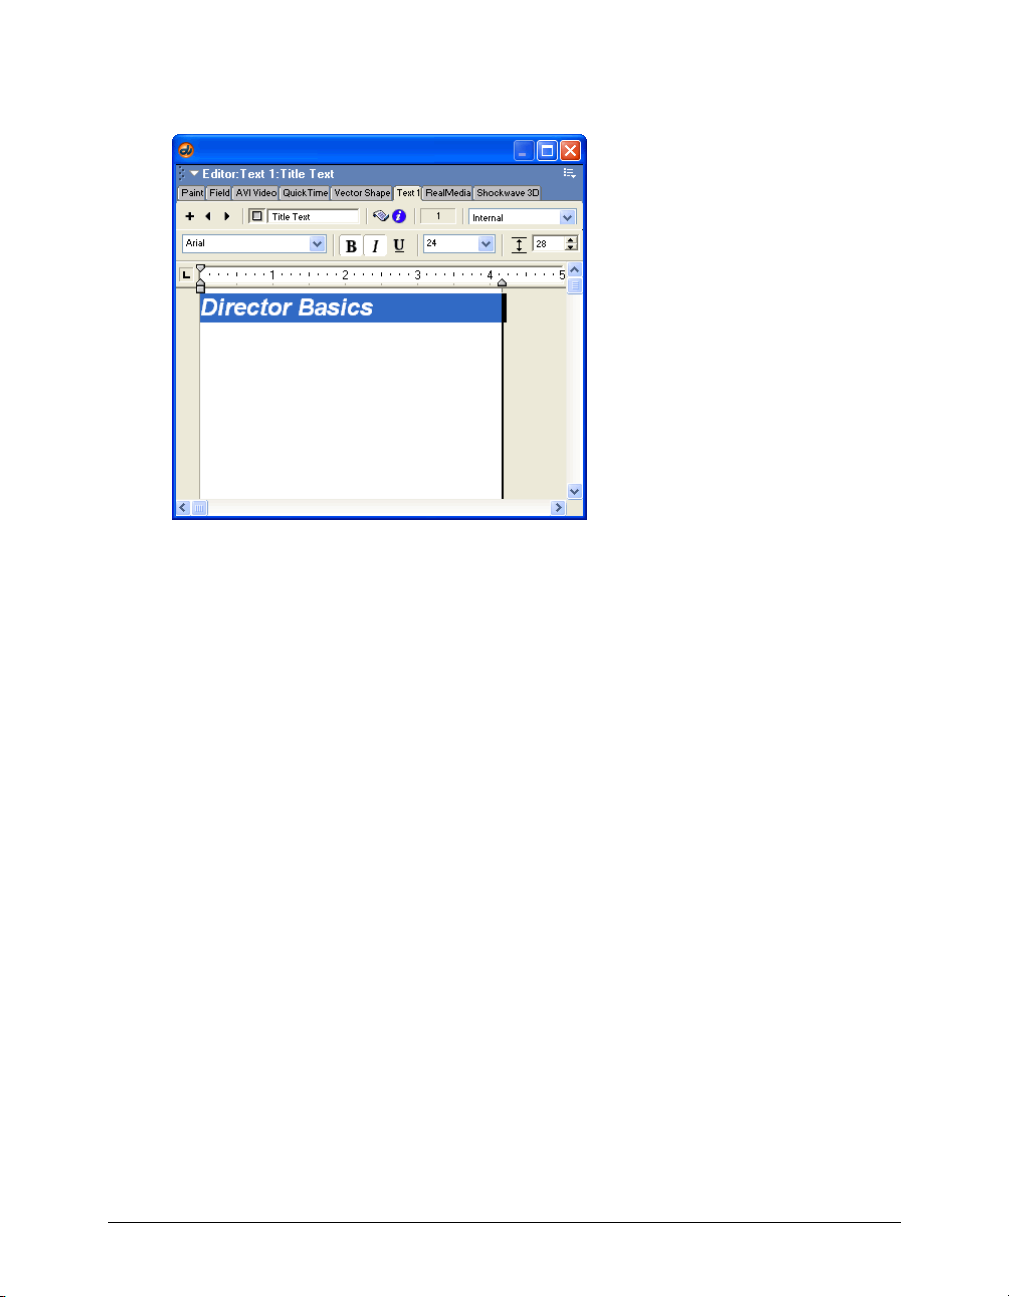
4 Give the text cast member a name by clicking in the Cast Member Name text box at the top of
the window and typing TitleText. Press Enter (Windows) or Return (Macintosh).
5 Close the Text window, and save your movie.
The next section guides you through the process of building the first scene of your movie and
creating a new cast member for the scene.
Build the first scene
Building a scene in Director requires creating or importing the cast members for the scene, and
placing sprites on the Stage. As you learned in Chapter 1, “Director Basics,” on page 19, a sprite is
an object that controls when, where, and how cast members appear in a movie. You create sprites
by placing cast members on the Stage or in the Score. To build the first scene of the movie, you
place sprites of the TitleText cast member and two buttons on the Stage. One of the buttons is
already in the cast; you’ll create the other button.
Add sprites to the Stage
To begin building the scene, you drag the TitleText and button cast members from the Cast
window to the Stage. Because the first scene should occur at the beginning of the movie, you
put the cast members at the beginning of the Score. The Score is discussed in detail later in
this tutorial.
1 Click the Rewind button on the Control panel. This ensures that the cast members you place
on the Stage are in the first frame of the Score, the beginning of your movie.
Chapter 260
Page 61
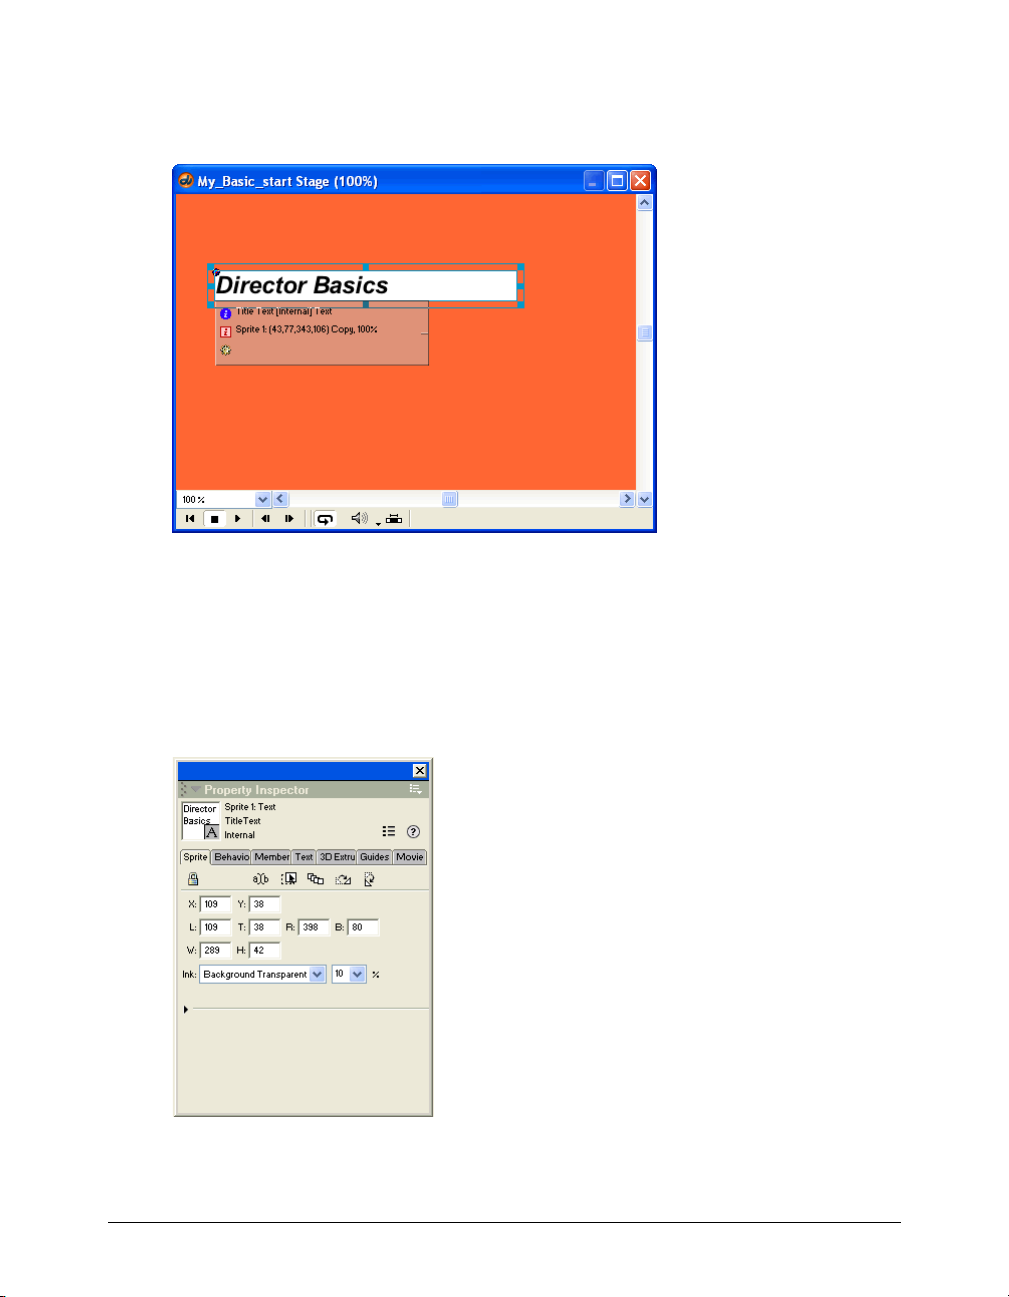
2 In the Cast window, click the TitleText cast member and drag it anywhere on the Stage to
create a sprite from the TitleText cast member.
The background of the new text sprite is white.
3 Click the new text sprite on the Stage to select it. On the Sprite tab in the Property inspector,
select Background Transparent from the Ink pop-up menu.
Inks control the way a sprite color appears on the Stage. Background Transparent ink makes
the white background of the sprite appear transparent.
4 To place the text precisely on the Stage, in the Property inspector type 109 in the X text
box and 38 in the Y text box to specify the Stage coordinates, and press Enter (Windows) or
Return (Macintosh).
Director MX Basics Tutorial 61
Page 62

Add buttons to the Stage
In addition to the title text, the first scene of your movie will contain two buttons. You’ll add the
first button to the Stage, then you’ll create a new button on the Stage to complete the scene.
You begin by giving the button cast member in the second slot of the Cast window a name.
Earlier, you named the TitleText cast member by entering a name in the Text window. You can
also give cast members names directly in the Cast window.
1 Click the button cast member in cast slot two.
2 Click the Cast Member Name text box at the top of the Cast window, and type Animation.
Press Enter (Windows) or Return (Macintosh).
Cast Member Name text box
3 Drag the Animation button cast member from the Cast window to the Stage. Place it on the
left side of the Stage, below the title text.
4 Select the button sprite on the Stage. In the Property inspector, type 110 in the X text box
and 161 in the Y text box to position the button, and then press Enter (Windows) or
Return (Macintosh).
Note: As you complete the tutorial, remember to save your work frequently.
Create a new button cast member
Now you’re ready to create the second button.
Chapter 262
Page 63

Remember that button cast members contain special functionality to automatically highlight
when clicked. Creating button cast members in Director is different from creating most other
cast members. Cast members are often created in separate windows and then dragged from the
Cast window to the Stage. You create a button cast member directly on the Stage using the
To o l p a le t t e .
You’ll use the Button tool to create a new button.
1 On the Tool palette (Window > Tool Palette), click the Push Button tool.
Push Button tool
2 Drag a horizontal rectangle toward the right side of the Stage, as shown in the following
illustration:
Director MX Basics Tutorial 63
Page 64

3 When you release the mouse button, the rectangle you created becomes an editable text box in
which you enter the text that you want to appear on your button. Type Go to Sound and
Video in the text box.
4 To place the button precisely, in the Property inspector, type 242 in the X text box and type
161 in the Y text box. Press Enter (Windows) or Return (Macintosh).
5 Click the Stage outside the button.
The editable text box changes to a completed button sprite. In the Cast window, the new
button cast member took the next available slot and appears in slot 3.
Note: If the text is too long for your button, you can enlarge the button. Click the button with the Arrow tool
selected, and then drag the sizing handles on the right edge of the button to the right.
6 Select the new button in the Cast window, and type SoundVideo in the Cast Member Name
text box at the top of the Cast window. Press Enter (Windows) or Return (Macintosh).
You have now created a new button cast member and added all the graphic sprites for scene 1 of
your movie.
Edit sprites in the Score window
As you learned earlier in this tutorial, when you drag cast members onto the Stage, you create
sprites. Sprites are instances of cast members that appear on the Stage and in the Score window.
The Score window displays the sprites on the Stage in each frame of your movie. You can use the
Score window to view information about sprites and edit them.
Sprites versus cast members
Several sprites can refer to the same cast member and can appear on the Stage simultaneously. To
understand the difference between cast members and sprites, do the following:
1 Drag the TitleText cast member from the Cast window to the Stage a second time.
Two instances of the TitleText cast member appear on the Stage but only one TitleText cast
member appears in the Cast window.
2 Click the extra TitleText sprite in the Score (the sprite span in channel 4, frames 1 to 28 of the
Score) and press Backspace or Delete.
Edit sprites in scene 1
In the Score window, you should now have three sprites in frames 1 through 28. By default, each
sprite that you drag onto the Stage or into the Score has a length of 28 frames. You can shorten or
lengthen sprites as needed. In order to make the Score information for your entire movie easier to
read on the screen without scrolling, you will shorten the sprites for scene 1.
Chapter 264
Page 65

1 In the Score window, click the end of the TitleText sprite in frame 28, and drag it to the left
to frame 10.
Note: You can also lengthen sprites by dragging their end frames to the right to higher-numbered frames, and
you can edit more than one sprite at the same time by selecting multiple sprite end frames.
2 Click the Animation button sprite in channel 2 of the Score.
3 Shift-click the SoundVideo sprite in channel 3.
4 Click frame 10 in the frame number bar above channel 1. The playhead moves to frame 10.
5 Select Modify > Extend Sprite.
The sprites shorten in length so they occupy only frames 1 through 10. You can use the Extend
Sprite command to either lengthen or shorten sprites.
Change the default length of sprites
You can change the default length of sprites that you drag to the Stage and Score by editing the
Sprite Preferences. You’ll now change the default sprite length to 10 frames, which makes it easier
to compose a movie consisting of a series of scenes 10 frames long.
1 Select Edit > Preferences > Sprite to open the Sprite Preferences dialog box.
2 In the Span Duration text box, type 10 and click OK.
Scene 1 of your movie is almost complete. Later, you will return to this scene to add Lingo
commands to the navigation buttons. Now you’ll start building scene 2.
Director MX Basics Tutorial 65
Page 66

Create an animation
The second scene of your movie will contain a simple animation of a sunset. The sun will set
behind a mountain range, and a cloud will move across the sky. You’ll make three of the cast
members for this scene, arrange their sprites in the Score, and create the animation of the sun.
This scene will also include a new button that returns users to the first scene.
Place the mountain bitmap on the Stage
A bitmap, also known as a raster image, is comprised of colored pixels arranged to form a graphic.
The fourth cast member in the cast is a bitmap of a brown-colored mountain range. This is the
mountain range that the sun will set behind in your animated scene. Because the animated scene
will start in frame 15, you’ll place a sprite of the mountain range on the Stage in frame 15.
1 Open the Stage if it is not already open by selecting Window > Stage.
2 Open the Score if necessary, and click frame 15 in the frame number bar above channel 1.
The playhead moves to frame 15. Because there are no sprites in frame 15, the Stage
appears empty.
3 Drag the mountain cast member from slot 4 of the Cast window to the bottom of the Stage
window. Place the sprite so it fills the Stage from left to right and is aligned with the bottom of
the Stage. The left and right edges of the mountain range will extend beyond the Stage.
Because you placed the playhead in frame 15 of the Score, the Mountain sprite appears in
frame 15 of the Score. The end of the new sprite is in frame 24.
4 With the Mountain sprite on the Stage selected, select Background Transparent from the Ink
menu on the Property inspector’s Sprite tab, and save your movie.
Chapter 266
Page 67

When you place new sprites on the Stage, Director puts them into the first available channel
in the Score. Because there were no other sprites in frame 15, the Mountain sprite appeared
in channel 1. Later you will make changes to the order in which the sprites appear in the
Score channels.
Name a cast member
The mountain cast member has not yet been named. Naming cast members makes it easier to
identify the sprites in the Score.
• In the Cast window, select the mountain cast member in cast slot 4. Click the Name text
box at the top of the Cast window and type Mountain. Press Enter (Windows) or
Return (Macintosh).
Draw using the Paint window
The animation of the sunset will also include an animated cloud. You’ll create the cloud in the
Paint window, which you can use to create and edit bitmap graphic cast members.
1 To open the Paint window, select Window > Paint.
The Paint window opens with the Mountain cast member.
The Paint window contains tools along the left and top edges that you use to edit graphics. To
create the cloud cast member, you need to draw a cloud shape with the Pencil tool.
2 Click the New Cast member button in the upper left corner of the Paint window.
Director MX Basics Tutorial 67
Page 68
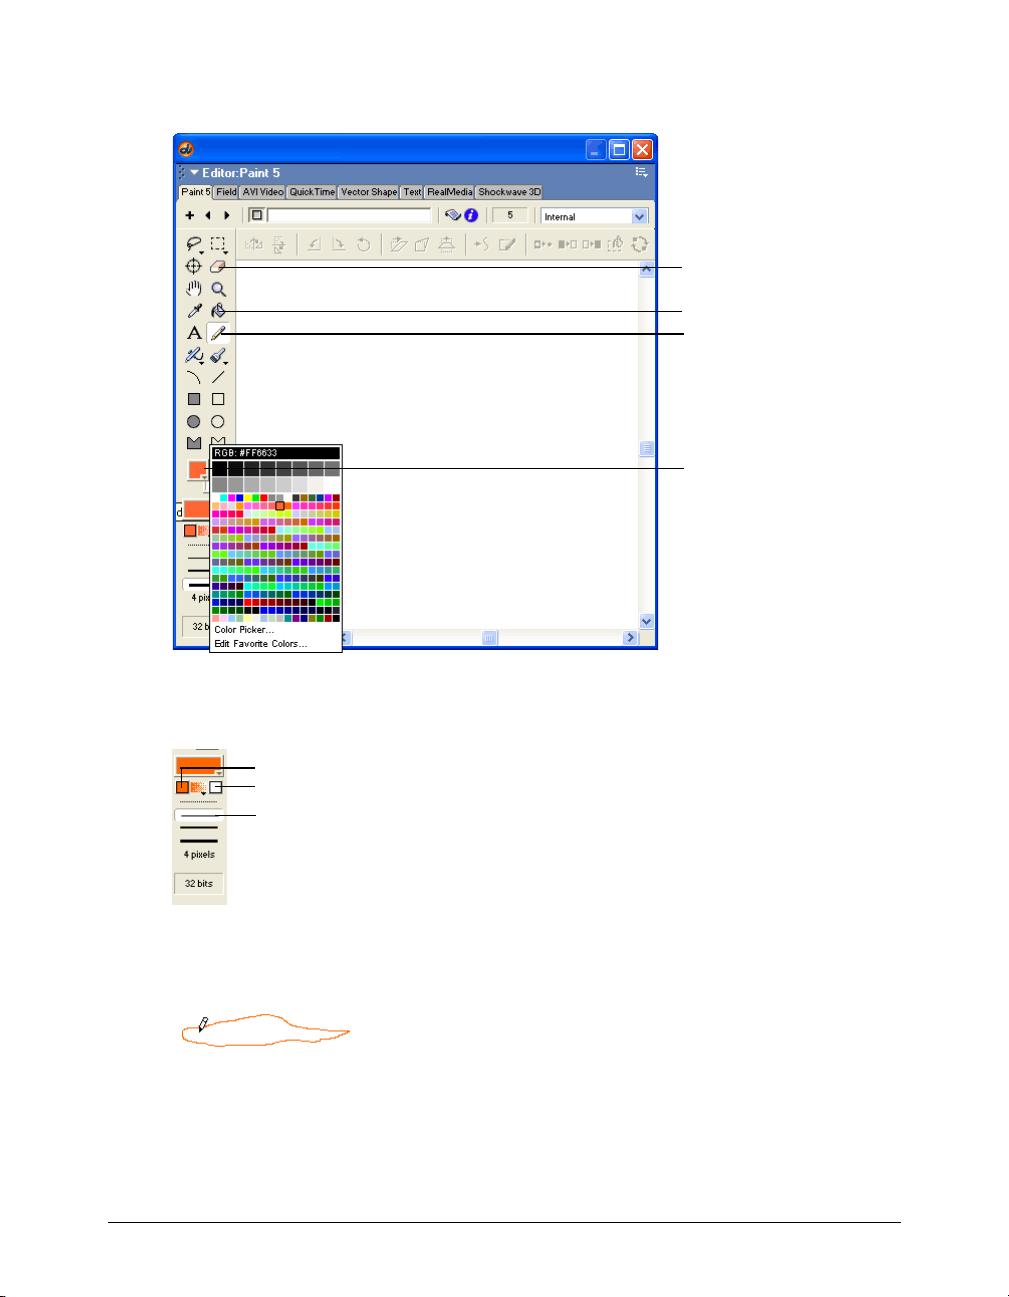
3 In the Paint window toolbar, select the Pencil tool. Select an orange color from the Foreground
Color pop-up menu.
Eraser tool
Paint Bucket tool
Pencil tool
Foreground Color
pop-up menu
4 Select the one-pixel line width from the list of line widths at the bottom of the left-side Paint
window toolbar.
Gradient start color
Gradient end color
One-pixel line
5 In the Paint window, draw a small, flat cloud with the pencil tool. Be sure that the cloud has no
gaps in the outline. Use the Eraser tool, if necessary, to erase lines drawn in error.
Chapter 268
Page 69

Fill the shape with color
After you’ve drawn the cloud outline, you can fill it with color. Because this is an animation of
a sunset, the cloud will have an orange gradient. A gradient is a smooth blending of one color
into another.
To create the gradient, you use the Paint Bucket tool and the Gradient ink.
1 Select the Paint Bucket tool from the toolbar in the Paint window.
You use this tool to fill enclosed lines.
2 Select an orange color from the Gradient Start color box. This will be the starting color of your
gradient. Your cloud will look best if you select the same orange you used for the cloud outline.
Gradient start color
Gradient end color
3 Select a darker orange or a red from the Gradient End color box. This will be the ending color
of your gradient.
4 Select the Gradient ink from the Ink pop-up menu at the bottom of the Paint window. This
causes the Paint Bucket tool to paint a gradient with the specified colors rather than simply
filling the area with the current foreground color.
Ink pop-up menu
Director MX Basics Tutorial 69
Page 70

5 With the Paint Bucket tool still selected, click inside the outline of the cloud. The cloud fills
with an orange gradient.
Cast Member Name
text box
6 Click the Cast Member Name text box at the top of the Paint window, type Cloud in the text
box, and then press Enter (Windows) or Return (Macintosh).
7 Close the Paint window.
Next you’ll create a different kind of cast member for the Sun in your animation scene.
Create a vector shape cast member
Vector graphics are another kind of graphic cast member you can use. Although bitmap images
contain long lists of data for each pixel in a graphic, vector cast members store graphic
information as mathematical descriptions of an image. Because of this difference, vector cast
members generally use less memory than comparable bitmap cast members. There are some
differences in the kinds of effects you can achieve and the methods used to create various shapes
and fills for each of these cast member types. By experimenting with both types of images, you
can determine if your art is better suited as a vector shape or bitmap image.
For the Sun cast member in the animation scene, you’ll use a vector shape. The sun is a circle,
which uses little memory. You’ll create it using the Vector Shape window. As with the Text
and Paint windows, the Vector Shape window provides special tools for creating and editing
cast members.
You’ll create a circle for the sun and fill it with a yellow gradient.
Chapter 270
Page 71
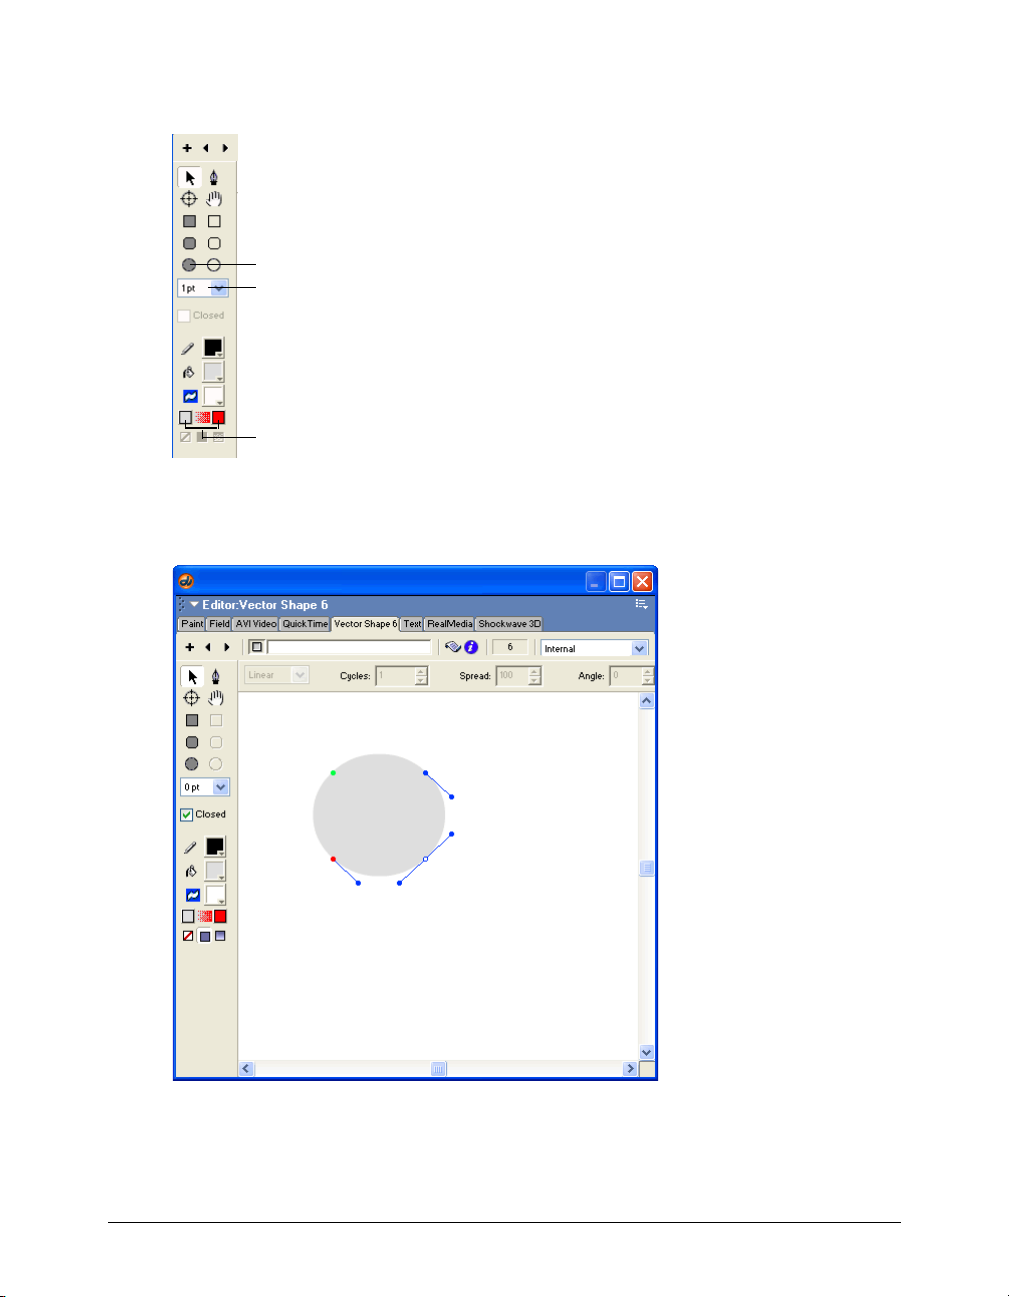
1 Select Window > Vector Shape, and select the Filled Ellipse tool in the toolbar on the left side
of the window
Filled Ellipse tool
Stroke Width pop-up menu
Gradient color boxes
2 Select 0 point from the Stroke Width pop-up menu.
3 Drag the pointer in the window to make a circle.
4 Click the first Gradient Color box, on the left, and select a bright shade of yellow. This will be
the beginning color of the gradient on the sun.
Director MX Basics Tutorial 71
Page 72
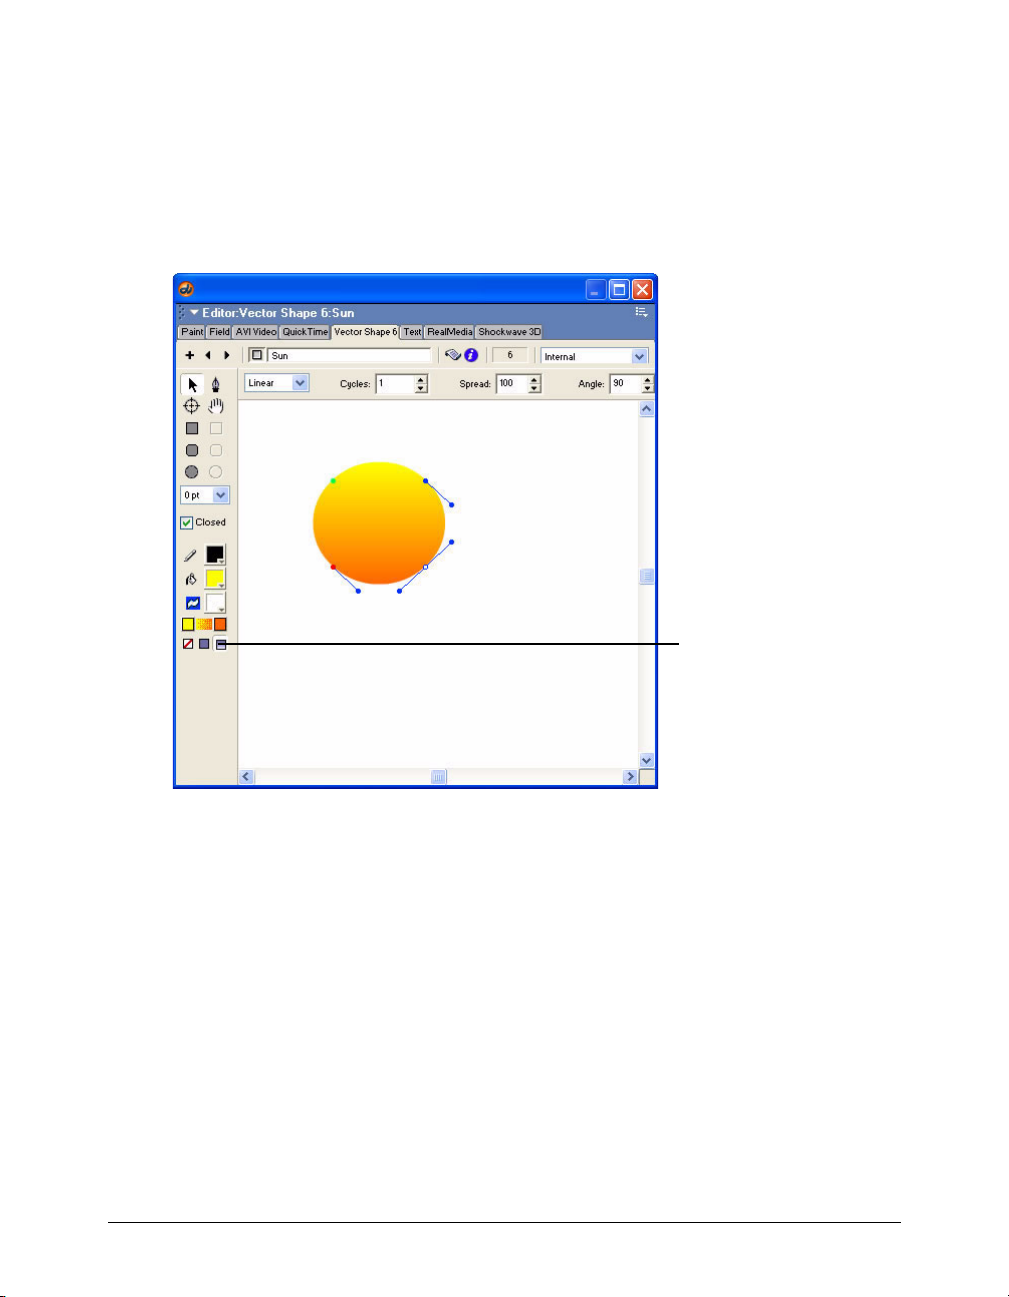
5 Select a very light orange from the second Gradient Color box. This will be the ending color
of the gradient.
6 Click Gradient, below the Gradient Color boxes.
7 The gradient fill in the circle changes color from left to right. To rotate the gradient so it
changes from top to bottom, enter 90 in the Angle text box at the top of the window.
8 Click the Cast Member Name text box at the top of the window and type Sun. Press Enter
Windows) or Return (Macintosh).
Gradient
9 Save your movie, and close the Vector Shape window.
Chapter 272
Page 73

Animate the cloud
You are now ready to add the cloud to the scene and create an animation of it moving across the
sky. You can do this by placing a sprite of the Cloud cast member on the Stage, and then using a
technique called tweening.
1 If the playhead is not already on frame 15, the beginning of the second scene, click frame 15 in
the frame number bar at the top of the Score.
2 Make sure the Cast and Stage windows are open. Drag the Cloud cast member from the
Cast window to the Stage window. Place it near the top of the Stage window, slightly to the
right of center.
3 Select the Cloud sprite on the Stage. In the Property inspector (Window > Property Inspector),
go to the Sprite tab, and select Background Transparent from the Ink pop-up menu.
Director MX Basics Tutorial 73
Page 74

4 The new Cloud sprite has a bounding box around it and a round dot in the middle. Click and
drag the round dot in the middle of the cloud to the right edge of the Stage.
A line connects the original location of the cloud to the new location of the dot. There is still a
dot in the middle of the Cloud sprite, but it is a different color from the dot that you dragged.
You have performed your first tweening operation. Tweening is a technique in which you specify
values for certain properties of a sprite at certain times and then let Director calculate the values
for those properties for all the times in between. The term tween comes from the word between.
In this case, you dragged the dot on the sprite to a new location. These dots on sprites represent
points in the sprite’s animation path. When you first drop a sprite on the Stage, there is no
animation, so there’s only one dot. The line on the Stage that connects the dots represents the
animation path of the Cloud. By dragging the dots, you are specifying the sprite’s location on the
Stage at the beginning and at the end of its sprite span in the Score. The blue dot that remains in
the middle of the Cloud sprite represents its starting location. The red dot at the other end of the
line represents its end location.
Scrub the playhead to view your animation
You can move the playhead to see your animation.
• Drag the playhead back and forth from frame 15 to frame 24 in the Score. This is called
“scrubbing the playhead.”
The cloud moves rather quickly across the Stage. To make the animation look more realistic,
you can lengthen the Cloud sprite’s duration in the Score. This way, the cloud will move the
same distance on the Stage during a longer period of time.
Chapter 274
Page 75

Change the tempo of an animation
To create a slower tempo for the sprite, you can extend the sprite in the Score.
1 Click the end frame of the Cloud sprite in frame 24 of the Score, and drag it to frame 50.
2 To see the slower animation this creates, drag the playhead back and forth from frame 15 to
frame 50 in the Score. The cloud moves more slowly across the Stage.
The Mountain sprite disappears from the Stage when you drag the playhead to frames 25
through 50. This is because the Mountain sprite exists only in frames 15 to 24 of the
Score. You need to lengthen the Mountain sprite to extend the duration of the entire
animation scene.
3 Click the end frame of the Mountain sprite in frame 24 of the Score, and drag the end frame to
frame 50.
The next step in building this scene is to add the Sun sprite and animate the sunset.
Create a sunset animation
To create the sunset animation, you will use tweening animation again.
1 Click frame 15 in the frame number bar at the top of the Score to move the playhead to
that frame.
2 Drag the Sun cast member from the Cast window to the Stage window. Place it near the
middle and top of the Stage window, and it can overlap the Cloud sprite.
3 Click the Sun sprite on the Stage to select it. On the Sprite tab in the Property inspector, select
Background Transparent from the Ink pop-up menu.
Director MX Basics Tutorial 75
Page 76

4 Drag the dot in the middle of the Sun sprite downward, in a slight diagonal toward the left, to
the bottom of the Stage. A line appears, connecting the dots. This line is the sun’s tweened
animation path.
5 Click the end frame of the Sun sprite in frame 24 of the Score, and drag the end frame from
frame 24 to frame 50.
6 Drag the playhead back and forth from frame 15 to frame 50. The sun and the cloud animate,
but the animation requires modification.
Change the stacking order of sprites in the Score
In your animation, the sun appears on top of the cloud and mountains because the stacking order
of sprites on the Stage is from the lowest numbered Score channel to the highest numbered
channel. The sprites in lower numbered channels appear below sprites in higher numbered
channels. The solution is to move the sprites in the Score so the Sun sprite is in the lowest
numbered channel. This lets it appear beneath the other sprites in the scene.
To change the stacking order of a sprite in the Score, you drag it to a new location.
1 Select the Mountain, Cloud, and Sun sprites in the Score by Shift-clicking them.
2 Drag the three sprites down in the Score so they occupy channels 2 through 4 instead of 1
through 3. Be sure the three sprites remain in frames 15 through 50.
3 Click an empty cell in the Score to deselect the three sprites.
Chapter 276
Page 77
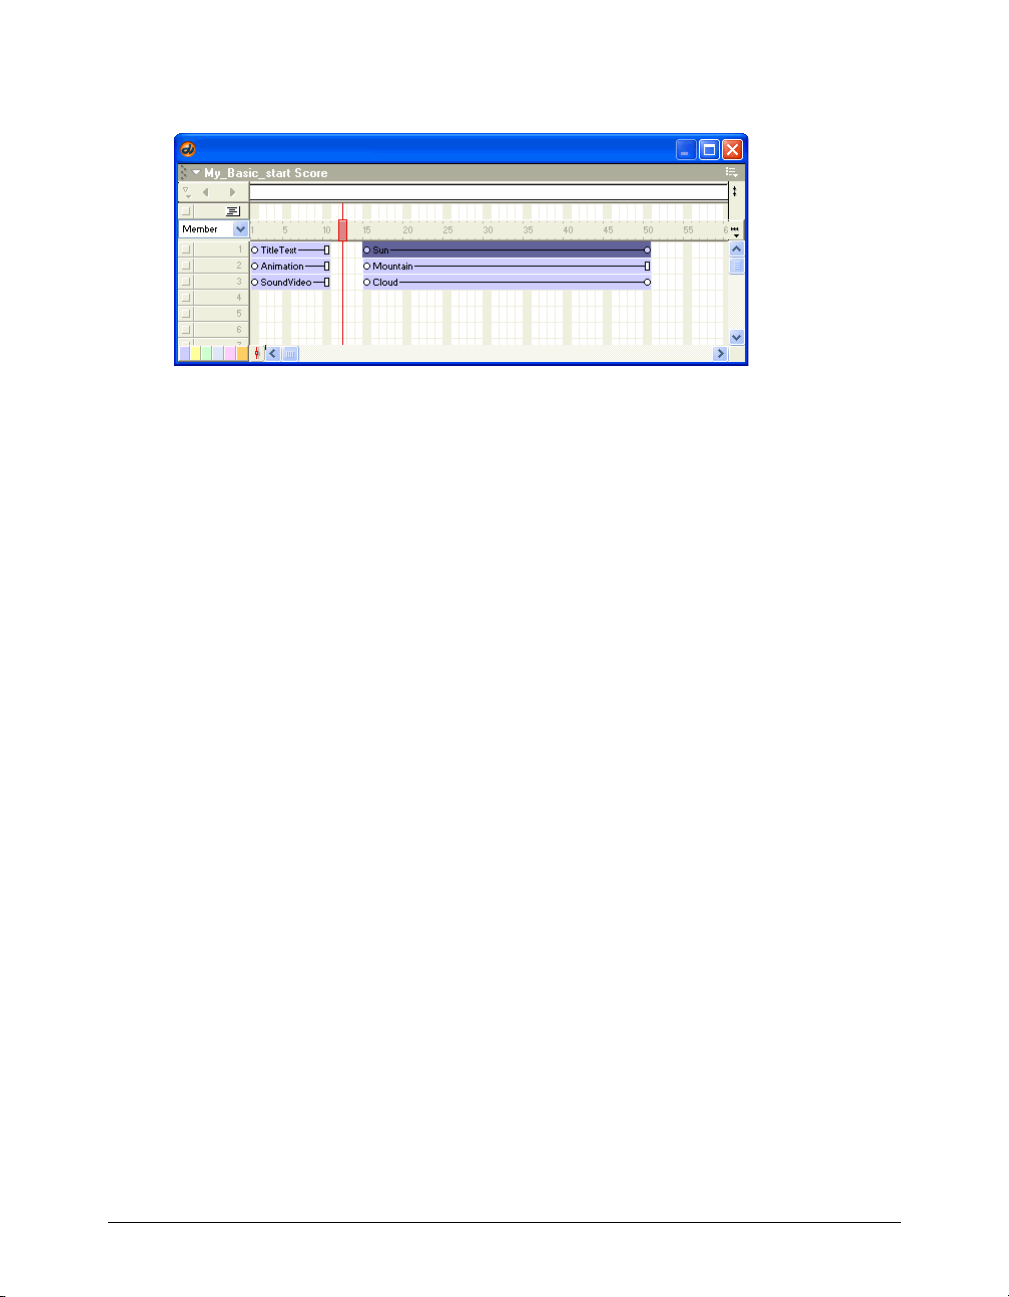
4 Click and drag the Sun sprite from channel 4 to channel 1, but make sure it remains in frames
15 through 50.
5 Scrub or drag the playhead from frame 15 to 50 to see the modified animation.
The Sun sprite now appears behind the mountains and cloud.
Add navigation buttons to the animation scene
You’ve successfully completed your first animation. To complete the animation scene, you’ll add
navigation buttons. You’ll use the Go to Sound and Video button created earlier and create a
new button that returns users to the first scene. Later you’ll add Lingo to these buttons to make
them function.
Add an existing button
First, you add the Go to Sound and Video button that you created earlier for scene 1.
1 Click frame 15 in the frame number bar in the Score.
2 Drag the SoundVideo button cast member from the Cast window to the lower right side of the
Stage window. A new sprite appears in the Score beginning in channel 4, frame 15.
3 In the Score, click and drag the end of the new SoundVideo sprite from frame 24 to frame 50.
4 Click the SoundVideo button on the Stage. On the Sprite tab in the Property inspector, type
258 in the X text box and 298 in the Y text box, and press Enter (Windows) or Return
(Macintosh) to place the button precisely.
Director MX Basics Tutorial 77
Page 78
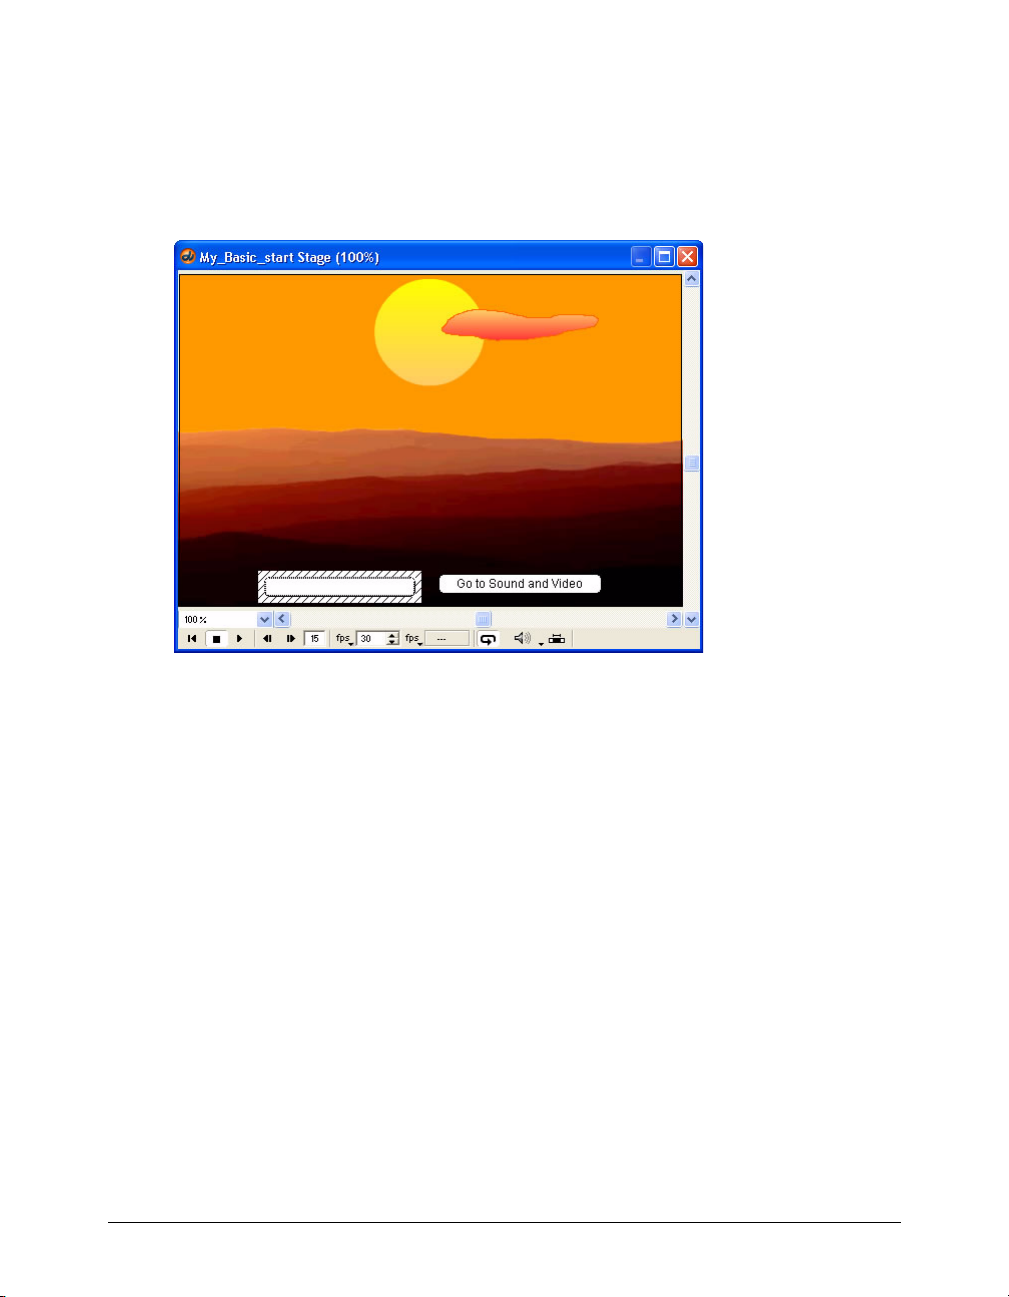
Add a new button
Next, you create a new button that returns users to the first scene.
1 Click frame 15 in the frame number bar in the Score to move the playhead to that frame.
2 In the Tool palette (Window > Tool Palette), click the Push Button tool.
3 Drag a horizontal rectangle to the lower left area of the Stage, and release the mouse button.
4 In the button text box, type Go to Start, and then click the Stage outside the button.
5 In the Cast window, select the new button cast member, and type GoStart in the Cast Member
Name text box at the top of the Cast window. Press Enter (Windows) or Return (Macintosh).
6 Drag the end of the new button sprite in channel 5 from frame 24 to frame 50.
7 Select the GoStart button on the Stage. On the Sprite tab in the Property inspector, type 35 in
the X text box and 298 in the Y text box, and press Enter (Windows) or Return (Macintosh) to
place the button precisely.
Chapter 278
Page 79
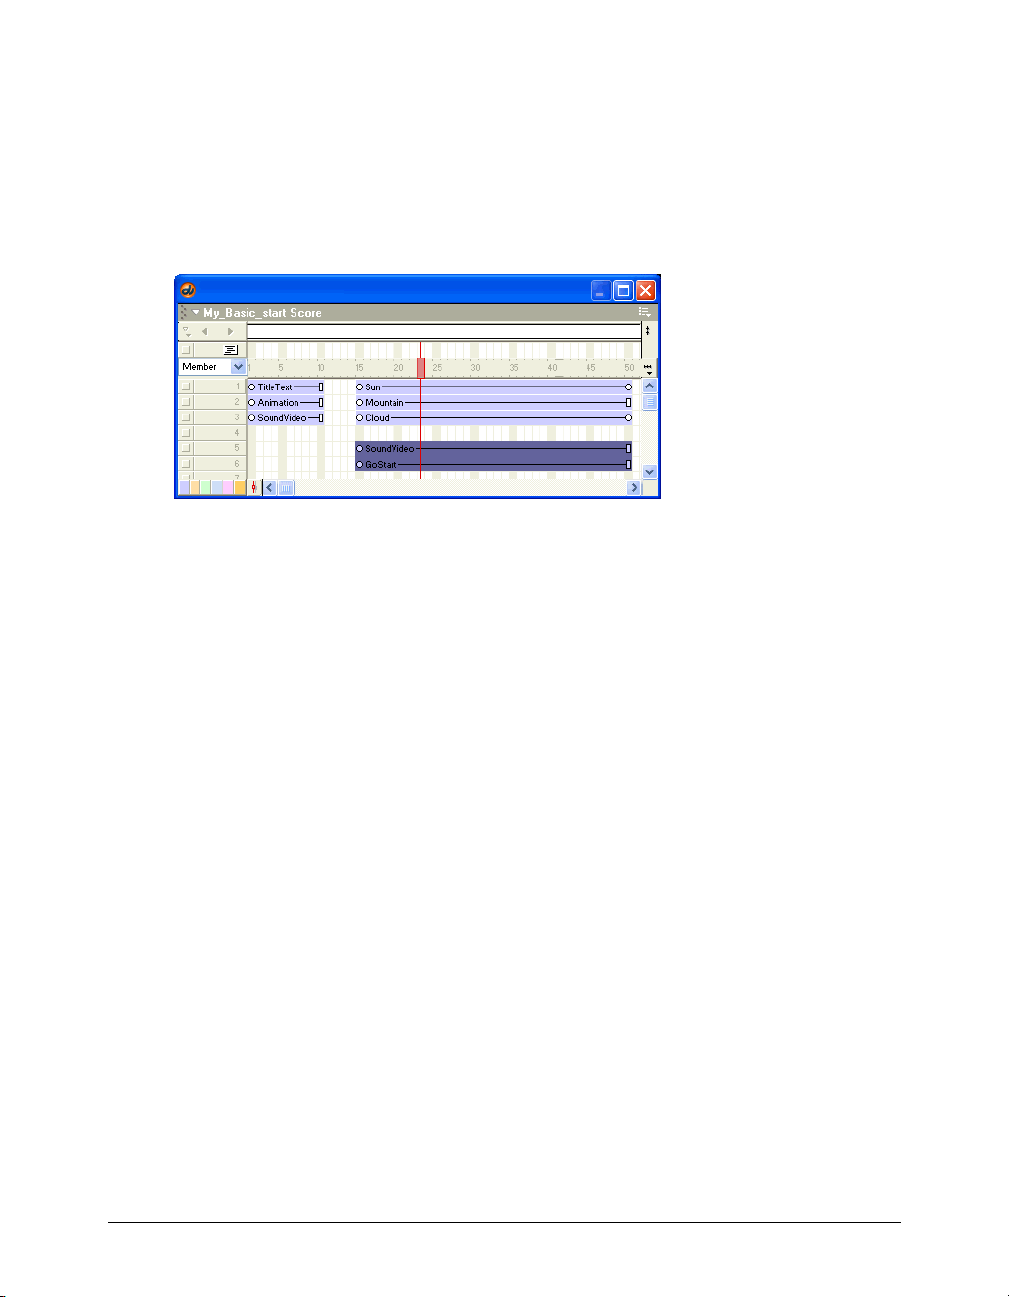
Arrange sprites in the Score
To make the Score easier to read, arrange the sprites of the animation scene in the Score so there is
an empty channel between the graphic sprites and the button sprites.
1 Select both the SoundVideo and GoStart sprites, which begin in frame 15, in the Score by
Shift-clicking them.
2 Drag the two sprites down one channel so they occupy channels 5 and 6. Be sure not to move
them left or right. The sprites should still occupy frames 15 through 50.
3 Click the Rewind button on the Control panel, and then click the Play button.
The movie plays from beginning to end, flashing scene 1 briefly on the Stage and playing the
sunset animation once before returning to frame 1 and playing again.
4 If your movie plays only once, turn on looping by clicking the Loop Playback icon on the
Control panel or by selecting Control > Loop Playback.
5 When you finish viewing the movie, either click the Stop button on the Control panel or select
Control > Stop.
Later in this tutorial, you’ll add Lingo scripts to make the buttons function and prevent the
playhead from moving from one scene to the next without navigation.
Build the sound and video scene
The sound and video scene will introduce you to importing cast members from outside Director
and using sound and video in your movies. You can include sound and video with or without
Lingo, depending on the complexity of the effect you want to achieve. In this scene, you’ll add
video to the Stage, add a sound effect, and add buttons that control the sound and video.
Director MX Basics Tutorial 79
Page 80

Import a cast digital video member
So far, all the cast members you’ve used have been created and stored within your Director movie
file. The buttons, graphics, and text are part of the Director file. It is common to import files
from outside Director, too. When you import files into Director, you can import the entire file
into your Director movie file or leave it as a separate file, creating only a reference to the external
file in your Director movie. If you import a file by reference, it’s crucial not to move it from the
location where it’s referenced. If you move it, Director will not be able to find it the next time you
open your Director file, and the movie will not play as intended. Advantages of importing by
reference include the following:
• The file size of your Director movie is smaller when you reference, rather than fully import,
your media.
• Referencing media offers greater flexibility in terms of how you manage and where you locate
your media assets.
When the referenced file is edited using the Launch and Edit feature of Director, there’s no need
to import the edited file again.
The first cast member you’ll use in the sound and video scene is a QuickTime digital video file.
Digital video files are always imported by reference, leaving the digital video file separate from the
Director file.
1 Select File > Import. In the Import dialog box that appears, navigate within your Director MX
folder to Tutorials/Basics/BasicsMedia and select the file named Ouch!.
2 Click the Import button. The new digital video cast member appears in the Cast window in
slot 8. It’s named after the imported file.
Play the digital video
You can view the QuickTime cast member by opening the QuickTime window. This window
contains controls for playing the video file but not for editing the video; you cannot edit digital
video files in Director.
Chapter 280
Page 81

1 Double-click the digital video cast member in the Cast window. The QuickTime
window opens.
Playhead
2 Play the video using the controls at the bottom of the QuickTime window:
Fast forward
RewindPlay
• Click the Play button in the lower left corner of the window. The video begins playing, and the
Play button changes to a Pause button.
• To pause the video, click the Pause button in the lower left corner of the window. The video
pauses, and the Pause button reverts to a Play button.
The QuickTime window has its own playhead that moves to the right as the video plays. You
can use the playhead to jump to a specific point in the video or to scrub through the video.
• To jump to a specific point in the video, click in the bar to the right or left of the playhead.
The playhead moves to the point that you clicked in the bar, and the window displays the
corresponding frame of video.
• To scrub through the video, drag the playhead to the right to scrub forward and to the left to
scrub in reverse.
3 When you finish playing the video, close the QuickTime window.
Director MX Basics Tutorial 81
Page 82

Create a QuickTime sprite
You are now ready to place the QuickTime sprite on the Stage. The sound and video scene should
start in frame 55.
1 Click frame 55 in the frame number bar in the Score. The playhead moves to frame 55.
2 Drag the Ouch! QuickTime cast member to the upper left corner of the Stage. The new sprite
appears on the Stage and in the Score in channel 1, frames 55 through 64.
Specify direct-to-Stage playback
Director can play QuickTime video using the Direct to Stage option, which lets the video play at
the fastest possible speed. However, when Direct to Stage is selected for digital video, the video
appears in front of all other sprites, regardless of the channel that contains the sprite. To verify
that Direct to Stage is selected for the Ouch! sprite, complete the following steps:
1 Select the Ouch! cast member in the Cast window (not on the Stage).
2 In the Property inspector, select the QuickTime tab, and verify that DTS (Direct to Stage)
is selected.
Video, Audio, and Streaming should also be selected, by default.
Note: For additional information about QuickTime settings in the Property inspector, see “Playing digital video
direct-to-Stage” on page 334.
Chapter 282
Page 83

Add buttons to the Stage
Next, you’ll add buttons that control playback of the QuickTime sprite. These buttons are already
included in the Cast window in cast slots 9, 10, and 11. Unlike the Director Button cast
members, these cast members are bitmap graphics that don’t include automatic button
functionality. Later you’ll add Lingo to the buttons to make them control the QuickTime sprite.
You’ll put the buttons near the bottom of the QuickTime sprite, allowing room on the Stage for
the scene navigation buttons as well.
1 To place the Play button on the Stage, click frame 55 in the frame number bar in the Score if
the frame is not already selected.
2 Drag the Play button from the Cast window to the left side of the Stage, directly beneath the
QuickTime sprite. Because you’ll align all three buttons soon, don’t worry about precise
placement yet.
The Play button’s sprite appears on the Stage and in channel 2, frames 55 through 64,
of the Score.
Director MX Basics Tutorial 83
Page 84

3 To place the Pause button on the Stage, verify that frame 55 is selected, and drag the Pause
button from the Cast window to the left side of the Stage window, directly beneath the
QuickTime sprite and to the right of the Play button. Again, precise placement isn’t
necessary yet.
The Pause button’s sprite appears on the Stage and in channel 3, frames 55 through 64,
of the Score.
4 Verify that frame 55 is selected, and drag the Rewind button from the Cast window to directly
beneath the QuickTime sprite and to the right of the Pause button. The Rewind button’s sprite
appears on the Stage and in channel 4, frames 55 through 64 of the Score.
Now all three QuickTime playback buttons are in place on the Stage. Each has a white
bounding box around it. You can change the ink for all three sprites at once by selecting them
all in the Score or on the Stage and selecting the new ink in the Property inspector.
5 In the Score or on the Stage, Shift-click the three buttons.
6 Select Background Transparent from the Ink pop-up menu on the Property inspector Sprite
tab. The white bounding boxes of the sprites become transparent.
7 To place the buttons precisely, select a button on the Stage and use the Sprite tab of the
Property inspector to give the buttons the following x- and y- coordinates:
• For the Play button, type 54 in the X text box and 269 in the Y text box, and press Enter
(Windows) or Return (Macintosh).
• For the Pause button, type 142 in the X text box and 269 in the Y text box, and press Enter
(Windows) or Return (Macintosh).
• For the Rewind button, type 230 in the X text box and 269 in the Y text box, and press Enter
(Windows) or Return (Macintosh).
Note: As you complete the tutorial, remember to save your movie frequently.
Later in this tutorial, you’ll add Lingo to the buttons to make them functional.
Chapter 284
Page 85

Import a sound
The QuickTime movie has no soundtrack. You can make the scene more interesting by adding
sound to accompany the video. The easiest way to add sound to a Director movie is to import a
sound cast member and place it in one of the sound channels in the Score. Whenever the
playhead plays frames that include sound sprites, the sound plays. You can also play sounds by
using Lingo instead of the sound channels, which you’ll learn in the Lingo section of this tutorial.
1 Select File > Import. In the Import dialog box, navigate within your Director MX application
folder to Tutorials/Basics/BasicsMedia folder, and open the Sounds folder.
2 Select the sound file named drumloop, and click Add. The drumloop file appears in the
file list.
3 Select Link to External File from the Media pop-up menu at the bottom of the dialog box.
This tells Director to import only a reference to the file, leaving the sound file separate from
the Director movie file.
4 Click Import. The sound file is imported into the Cast window.
Add a sound to the Score
Now you can add the sound to the Score. Because sounds are heard and not seen, they do not
appear on the Stage. You place sound sprites directly in the Score.
Director MX Basics Tutorial 85
Page 86

1 If the effects channels that appear above the frame number bar in the Score are not visible, click
the Hide/Show Effects Channels button in the upper right corner of the Score.
The effects channels appear.
Sound channels
Click frame 55 in the frame number bar in the Score. With the Cast window and Score open,
drag the drumloop cast member from the Cast window to frame 55 in sound channel 1.
The sound is now ready to play when frames 55 to 64 of your movie play.
2 Rewind and play your movie.
The playhead moves through all the frames of your movie quickly. Notice that there isn’t
enough time for the QuickTime sprite or the drumloop sound to play through before the
playhead reaches frame 64. Later you’ll add Lingo to solve this problem.
3 When you finish viewing the movie, either click the Stop button on the Control panel or select
Control > Stop.
Chapter 286
Page 87

Add navigation buttons
The last sprites that you’ll add to the sound and video scene are the navigation buttons. You’ll
then be ready to add simple Lingo, the Director scripting language, to all the buttons.
The sound and video scene needs a button that returns users to the start scene and a button that’s
linked to the animation scene. You already have each of these buttons in the Cast window and in
the Score. You’ll use two slightly different techniques to place these buttons in the sound and
video scene.
You used the GoStart button in the animation scene and placed it at the very bottom left corner
of the Stage. Since it is appropriate for that button to be in the same location on the Stage in the
sound and video scene, you can use the same sprite for both scenes. By simply lengthening the
GoStart button sprite from the animation scene, you can extend it in the Score to the sound and
video scene. When you do this, the button occupies the same space on the Stage in both scenes.
1 Drag the end frame of the GoStart button sprite in frame 50, channel 6, to frame 64,
channel 6.
The sprite lengthens in the Score and appears at the lower left corner of the Stage in the sound
and video scene.
Now you need to add the button that navigates to the animation scene. Because the button
will occupy a different location on the Stage than it did in the start scene, you’ll make a new
sprite for it in the sound and video scene.
2 Click frame 55 of channel 7 in the Score and drag the Animation button cast member from
the Cast window to the Stage, placing it to the right of the GoStart button.
The new Animation button sprite appears on the Stage and in frames 55 through 64 in
channel 7 of the Score. Because you already selected frame 55 of channel 7, the sprite
appears in that location when you drag it to the Stage. If you don’t preselect a cell in the
Score, the sprite appears in the first available channel of the Score in the frame where the
playhead is located.
Director MX Basics Tutorial 87
Page 88

3 On the Stage, click the Animation button to select it. Use the Sprite tab in the Property
inspector (Windows > Property Inspector), as you did earlier, to give the button x- and y-
coordinates of 220 and 298, respectively.
Note: As you complete the tutorial, remember to save your work frequently.
Each scene of your movie is graphically complete. You are now ready to add Lingo to the buttons,
to let users navigate through the movie.
Write Lingo scripts to control movie playback
With the Lingo scripting language, you can implement almost any kind of user interaction and
multimedia effect that you can imagine. You can use Lingo to make simple buttons function, as
you will soon do in this tutorial. You can also use Lingo for more complex tasks, including
controlling every aspect of a movie’s content without using the Score.
Lingo is designed to be easy to learn, so don’t be intimidated. After you know the basic concepts,
you can use the extensive Lingo vocabulary to control anything in your movie. For a detailed
introduction to Lingo, see Chapter 16, “Writing Scripts with Lingo,” on page 385.
You’ll now add Lingo to a special script channel in the Score and to your button sprites. You’ll
start with scripts that control the playhead.
Loop the playhead with Lingo
The scenes of your movie aren’t much good as scenes if the playhead simply races through them
without stopping to let the user absorb their content. The playhead needs to stay in one scene
until the user makes a decision to go to a different scene.
To make the playhead stay in one scene, you loop it in a single frame or a series of frames. For the
start scene and the sound and video scene, the playhead can loop in one frame. For the animation
scene, where the animation occurs over a series of frames, the playhead should loop over the same
series of frames.
To control the movement of the playhead without using buttons, you use the script channel in
the Score. As with the sound channels, the script channel is one of the effects channels that appear
above the frame number bar in the Score.
Script channel
The start scene is the first one that needs a script to loop the playhead. Each time the playhead
leaves one frame to go to the next, an event, called an
word event refers to an action executed in Director. Your first script will use the
exitFrame event, occurs. In this case, the
exitFrame event
as its trigger.
When you need to enter or edit scripts in Director, you use the Script window. Each script
becomes a cast member the same as all the other elements that play a role in your movie. The
Script window contains tools for editing scripts easily.
Chapter 288
Page 89

Each script you write is composed of handlers. A handler is a set of Lingo commands that handle
a specific event, such as the
exitFrame event. Some scripts have only one handler and some have
multiple handlers. Each handler begins with the name of the triggering event, such as exitFrame,
and ends with the word
end.
Write a handler
In this section, you’ll write a simple handler. The following discussion describes the script.
1 Open the Score (Window > Score) if it is not already open.
2 In the script channel, double-click frame 10, the last frame of the start scene. The Script
window opens, and it already includes a default handler:
on exitFrame me
end
In between these two lines of text, enter:
3
go to the frame
The result is a handler that appears as shown in the following figure:
4 Close the Script window. The new script cast member appears in the Cast window in slot 13. A
sprite for the script also appears in the script channel in frame 10.
5 In the Cast window, select the new script and type Loop in the Cast Member Name text box at
the top of the window. Press Enter (Windows) or Return (Macintosh).
6 Rewind and play your movie. The movie plays to frame 10 and stops. The movie still plays,
even though it stops at frame 10. Stop the movie.
The handler you’ve written has three parts. The first line,
on exitFrame me, tells Director to run
this script when the playhead leaves the frame where the script is located. This is frame 10. You
don’t need to worry about the word
me that appears on this line. You’ll only edit it when writing
advanced Lingo scripts.
The second line contains the
playhead back to the current frame. The phrase
go to the frame command, which tells Director to send the
the frame always refers to the frame number
where the playhead is currently located. Again, this is frame 10.
The last line of any handler contains the word
end. This simply signals to Director the end of the
script. The result is that the playhead continually loops in frame 10 as it is sent back to frame 10
each time it tries to go to frame 11. This way your Director movie plays to frame 10 and loops
there until the user clicks a button to go to a different scene.
Director MX Basics Tutorial 89
Page 90

Reuse the handler
You’ll use the same script cast member in the last frame of your movie, frame 64.
With the Cast window and Score open, drag the Loop script from cast slot 13 to frame 64 in the
script channel of the Score. A new sprite for the script appears in frame 64.
Notice that the default length of script sprites is one frame.
Now the same looping effect takes place in frame 64 so that the movie keeps playing until the user
clicks a button in the sound and video scene.
In the animation scene, you constructed an animation that takes place from frame 15 to frame
50. If you loop the playhead only in frame 50, the animation does not play while the movie is
waiting for the user to click a button. In this case, you should loop the playhead over the entire
range of frames that contain the animation.
To do this, you can use a script that is similar to the one you just wrote and place it in the last
frame of the animation scene. However, this new script will send the playhead to the first frame of
the animation rather than to the frame where the script is located.
Because the first frame of the animation scene is frame 15, you can simply write a script that says:
go to frame 15
The problem with this script is that it’s not too flexible. If you decide to move the animation
scene to a different range of frames in the Score, the script would be incorrect. To make the script
more flexible, you can place markers in the Score and send the playhead to a marker rather than a
specific frame number.
Add a marker to the Score
Markers are a way of giving a name to a specific frame in the Score. If you name the first frame of
the animation scene and then decide to move the scene, you can simply move the marker in the
Score along with the rest of the scene.
1 Because you won’t be using the effects channels in this section, click the Hide/Show Effects
Channels button in the upper right corner of the Score.
All the effects channels, except the script channel, are hidden. This makes the Score
easier to read.
Chapter 290
Page 91

2 In the markers channel to the right of the marker menu in the Score, click frame 15.
Marker menu Markers channel
A new marker appears in the marker bar in frame 15.
3 Ty p e Animation in the text box next to the new marker, and press Enter (Windows) or Return
(Macintosh) to name the marker.
Note: As you complete the tutorial, remember to save your work frequently.
Create navigation in Lingo using marker names
You can write a script that loops the playhead in frames 15 through 50 using the name of
the marker.
1 Double-click the script channel in frame 50, the last frame of the animation scene. The script
window opens with the default
2 Inside the default script, on line 2, type the following:
go to frame "Animation"
3
In the Name text box at the top of the window, type AnimLoop, and close the Script window.
on exitFrame script already entered.
The new script cast member appears in slot 14 of the Cast window, and the new sprite appears
in frame 50 of the script channel in the Score.
4 Click frame 15 in the frame number bar in the Score, and click the Play button on the
Control panel.
The animation scene plays, and the playhead loops back to frame 15 when it reaches frame 50.
The animation of the sunset repeats continuously.
5 Click the Stop button on the Control panel.
Each of the three scenes in your movie has a script that prevents the playhead from moving to
a different scene. Now you’ll add scripts to the navigation buttons so the user can move from
scene to scene.
Director MX Basics Tutorial 91
Page 92

Add Lingo to navigation buttons
To make the navigation buttons function, you need to add scripts to the buttons. You’ll write
scripts attached to the button sprites, rather than to frames in the script channel. Your frame
scripts respond to
You start by adding scripts to the buttons in the start scene.
1 In the Score, right-click (Windows) or Control-click (Macintosh) the Animation button sprite
in channel 2, frames 1 through 10.
2 In the context menu, select Script. The Script window opens with a default handler entered:
on mouseUp me
end
On the second line of the script, type:
3
go to frame "Animation"
You see the following result:
on mouseUp me
go to frame "Animation"
end
4
In the name text box at the top of the window, type GoAnim, close the Script window, and
save your movie.
This handler has three parts. The first line tells Director to trigger this handler when the user
clicks on the button sprite to which the script is attached. Specifically, the
the action of releasing the mouse button after it has been pressed. This way the script is not run
until the user releases the mouse button when clicking.
The second line of the handler contains the same code as the previous script you wrote. It
sends the playhead to the frame that contains the marker named Animation. The difference
between these two scripts is that this one performs its action based on a mouse click, not on
an
exitFrame event.
Again, the word end on the last line tells Director that the script is over.
exitFrame events. Your button scripts will respond to mouse clicks.
mouseUp event refers to
Test your script
You’re ready to try out your new button script.
1 If necessary, bring the Stage window to the foreground by clicking in its title bar, and then
rewind and play your movie.
The movie plays, and the start scene remains on the screen. The playhead does not move to
another scene until you click your newly scripted button.
2 Click the Animation button on the Stage.
Notice that the button automatically provides feedback by changing color when it’s clicked.
The playhead moves to the first frame of the animation scene, and the sunset animation plays.
3 Stop your movie.
Chapter 292
Page 93
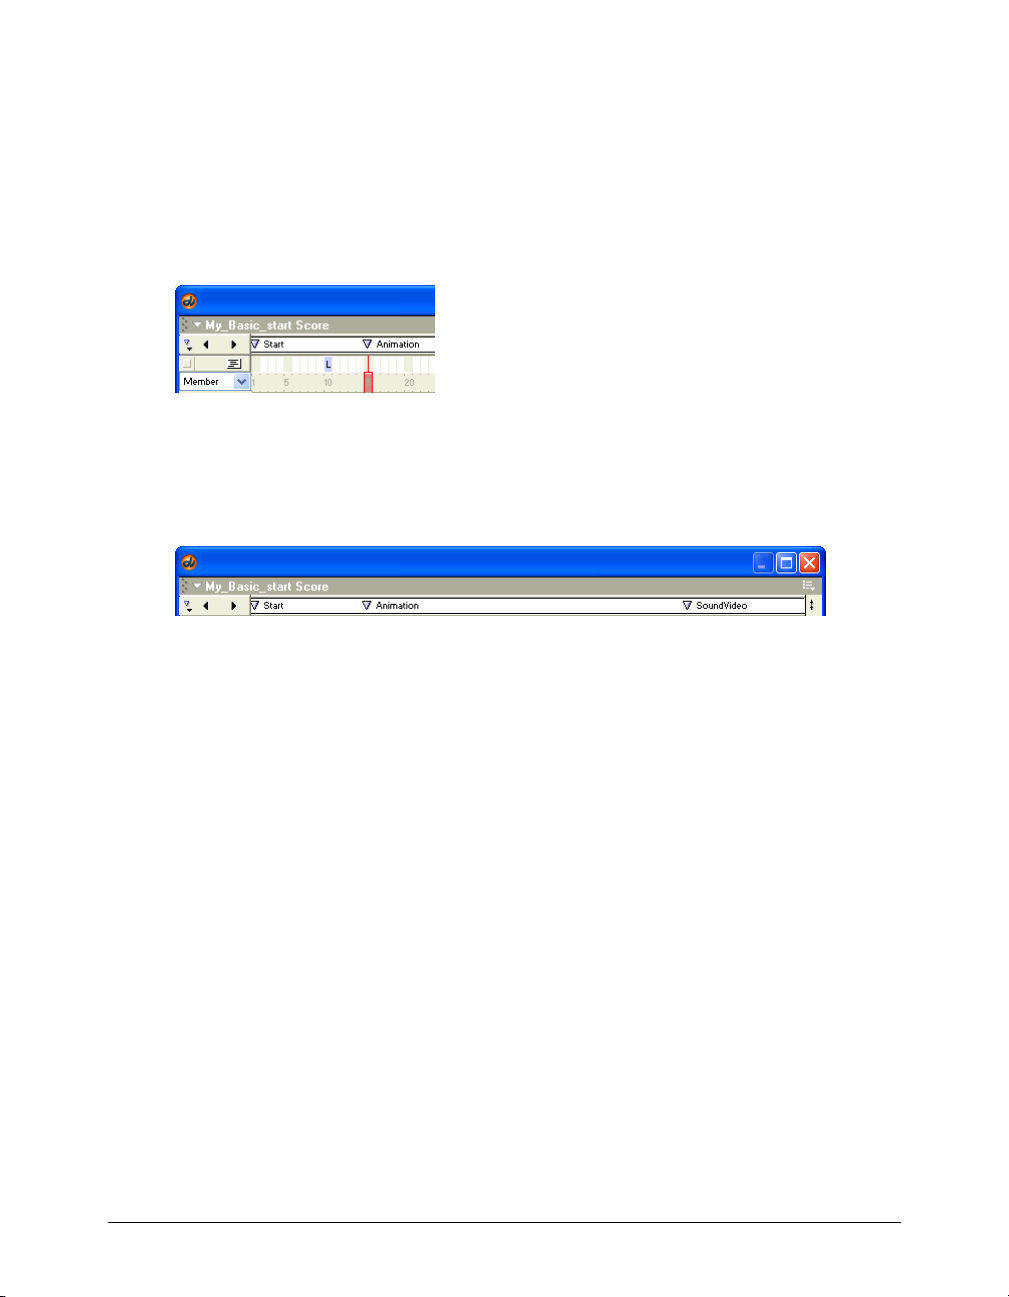
Add markers to two additional scenes
Your first button is complete. To use similar scripts on the remaining navigation buttons, you can
add markers to the start scene as well as the sound and video scene.
1 In the Score, click the marker bar in frame 1, the first frame of the start scene.
A new marker appears.
2 In the text box next to the new marker, type Start, and press Enter (Windows) or Return
(Macintosh).
3 Click the marker bar in frame 55, the first frame of the sound and video scene, to create a
new marker.
4 In the text box next to the new marker, type SoundVideo, and press Enter (Windows) or
Return (Macintosh). Save your movie.
Write Lingo that refers to scenes
You can write scripts that refer to any of the three scenes by name. You’ll now add a script to the
Go to Sound and Video button in the start scene.
1 In the Score, right-click (Windows) or Control-click (Macintosh) the SoundVideo sprite in
channel 3, frames 1 through 10. In the context menu, select Script.
The Script window opens with the default
2 On the second line of the handler, type:
go to frame "SoundVideo"
3
Click the name text box at the top of the window, and type GoSndVid, close the Script
window, and save your movie.
4 To test the script, rewind and play your movie, and then click the Go to Sound and
Video button.
The movie jumps to the sound and video scene, and the QuickTime sprite plays.
on mouseUp handler.
Director MX Basics Tutorial 93
Page 94

Add scripts to the animation scene
The animation scene contains two buttons: the Go to Start button and the Go to Sound and
Video button. Because you’ve already written a script for the Go to Sound and Video button, you
can reuse it. For the Go to Start button, you need to write another new script.
1 With the Cast window and the Score open, drag the GoSndVid script cast member from
the Cast window onto the SoundVideo button sprite in channel 5, frames 15 through 50,
of the Score.
The script is now attached to this sprite in the same way it is attached to the SoundVideo
button sprite in scene 1.
2 To write a new script for the Go to Start button, right-click (Windows) or Control-click
(Macintosh) the GoStart button sprite in channel 6, frames 15 through 64, of the Score.
3 Select Script from the context menu. The Script window opens with the default on mouseUp
handler. On the second line of the handler, type:
go to frame "Start"
4
Click the Name text box at the top of the Script window and type GoToStart, then press Enter
(Windows) or Return (Macintosh). Close the Script window and save your movie.
Because this Go to Start button sprite extends all the way into the sound and video scene, you
don’t need to do anything else to enable the button in that scene. The last step to enable all the
navigation buttons is to add the GoAnim script you’ve already written to the Go to Animation
button in the sound and video scene.
Add scripts to the sound and video scene
You’ve already added the navigation script to the Go to Start button in the sound and video scene.
To complete the navigation buttons, you only need to add a script to the Go to Animation
button. After that, you’ll use Lingo commands to control the digital video sprite and play sounds.
1 With the Cast and Score windows open, drag the GoAnim script from the Cast window onto
the Animation button sprite in channel 7, frames 55 through 64, of the Score to attach the
script to the button. Save your movie.
Your movie’s navigation functionality is now complete. You can now move among all three
scenes of your movie.
2 Rewind and play your movie.
3 Use each of the navigation buttons in all three scenes. Verify that each button sends the
playhead to the correct scene.
About controlling video in Director
Although Director movies and digital video movies share some similarities, differences also exist
between the two types of movies. Both Director movies and digital videos comprise a sequence of
frames that display on the screen. Director plays its movies by moving the playhead through the
Score and displaying each frame the playhead comes to. If the computer the movie plays on is
slow and takes a long time to display each frame, the Director movie plays slowly. The way in
which Director plays movies is called frame-based animation.
Chapter 294
Page 95

Digital video movies use a timeline instead of a Score. The timing of the video playback is tied
closer to the soundtrack of the video. For example, if the video has a soundtrack, the timing of the
video and sound must remain synchronized during the entire playback of the video. For this
reason, digital videos will skip frames if necessary to keep up with the soundtrack. On slower
computers, several frames might be skipped during video playback. This kind of animation is
called time-based. These differences are the reason you navigate a Director movie by jumping to
different frames in the movie, and you navigate a digital video by jumping to different times
within the video.
Add scripts for video control
Now you’re ready to add scripts to the bitmap graphic buttons for controlling the digital video
playback. For these buttons, you’ll use some new Lingo terms. There is a Play button, a Pause
button, and a Rewind button. They will use the
QuickTime sprite. By changing the values of these properties with Lingo, you change the way the
video plays on the Stage.
When the user navigates to the sound and video scene from a different scene, the digital video
plays from start to finish once. To play the video again without first leaving the scene, you need to
rewind it. You rewind the video by setting its
movieTime property indicates the time, within the digital video, that currently appears on
The
the screen. The movieTime is measured in ticks, or 60ths of a second. For example, when the
movie displays the very first frame of video, the
played, the
movieTime equals 60. When 3 seconds of the video has played, the movieTime equals
180. By setting the movieTime to a number of you select, you can make the video jump to a
different frame.
movieRate and movieTime properties of the
movieTime property.
movieTime is 0. When 1 second of the video has
Rewind the QuickTime sprite
You can rewind the QuickTime sprite by setting its
1 In the Score, right-click (Windows) or Control-click (Macintosh) the Rewind button sprite in
movieTime to 0.
channel 4, frames 55 through 64.
2 Select Script from the context menu.
The Script window opens with a default
3 On the second line of the handler, type the following Lingo to rewind the QuickTime sprite:
sprite(1).movieTime = 0
4
Press Enter (Windows) or Return (Macintosh).
5 On the third line of the handler, type the following Lingo:
sprite(1).movieRate = 0
on mouseUp handler already entered.
The movieRate property indicates the speed at which the QuickTime sprite is playing. When
the video is stopped, the
movieRate is 0.
The result looks like this:
On mouseUp me
sprite(1).movieTime = 0
sprite(1).movieRate = 0
end
Director MX Basics Tutorial 95
Page 96

6 In the name text box at the top of the script window, type RewindScript. Close the Script
window, and save your movie.
The Lingo you typed in this handler uses a different syntax than the scripts you wrote earlier.
When you write Lingo that manipulates properties of objects such as sprites or cast members,
you use dot syntax. Dot syntax is a way of writing Lingo that separates properties from their
objects with dots instead of words such as the and of.
By using dot syntax, you can write a short script like this:
sprite(1).movieTime = 0
Without using dot syntax, you would have to write a more verbose script like this:
set the movieTime of sprite 1 to 0
Using dot syntax is much faster when you are authoring your movie.
This example illustrates the basic requirements of dot syntax:
• You refer to sprites with the word sprite followed by the sprite’s channel number in
parentheses.
• You refer to a property of the specified sprite by separating it from the word sprite() with a
dot or period.
• The equal sign (=) is sufficient to indicate that the property should be set to the specified value,
as in sprite(1).movieTime = 0.
Close the Script window. Rewind and play your movie. Click the Go to Sound and Video
7
button in the start scene.
The movie jumps to the sound and video scene, and the QuickTime sprite begins to play.
8 When the QuickTime sprite finishes playing, click the Rewind button. The QuickTime sprite
rewinds to the beginning of the video.
Add a script that plays the QuickTime sprite
When the video is playing normally, the movieRate is 1. You can now add the movieRate
property to the Play button. This time, the Lingo ensures that the QuickTime sprite plays when
the user clicks the Play button.
1 In the Score, right-click (Windows) or Control-click (Macintosh) the Play button sprite in
channel 2, frames 55 through 64.
2 Select Script from the context menu. On the second line of the handler in the Script window,
type the following Lingo:
sprite(1).movieRate = 1
This Lingo starts the QuickTime sprite playing at normal speed.
3 In the name text box at the top of the script window, type PlayScript, close the Script window,
and save your movie.
Chapter 296
Page 97

Add a script that pauses the QuickTime sprite
When the video is paused, the
movieRate is 0. You can play a video at faster than normal speed
by using numbers greater than 1 and at slow speed by using numbers less than 1.
1 In the Score, right-click (Windows) or Control-click (Macintosh) the Pause button sprite in
channel 3, frames 55 through 64, and select Script from the context menu.
2 On the second line of the handler in the Script window, type the following Lingo:
sprite(1).movieRate = 0
This Lingo pauses the QuickTime sprite.
3 In the name text box at the top of the script window, type PauseScript, close the Script
window, and save your movie.
Now all your video control buttons work. Rewind and play your movie to test the buttons.
The sound and video scene plays the sound file you placed in the Score, but only the first time
you go to the scene. You can add Lingo to make the music play each time you play the video. You
can also add Lingo to make a short sound effect play when the video control buttons are clicked.
Control sound with Lingo
To control sound with Lingo, you use commands that are specifically intended for use with
sounds. The first step is to add Lingo to play the drumloop sound when the video plays a second
time. For this task, add the play command to the PlayScript Lingo you’ve already written.
1 In the Cast window, select the PlayScript and click the Cast Member Script button at the
upper right of the window. The Script window opens with the PlayScript visible.
2 Place the insertion point at the end of the second line of the handler that reads:
sprite(1).movieRate = 1
3
Press Enter (Windows) or Return (Macintosh), and type the following on the new line:
sound(1).play(member("drumLoop"))
This Lingo tells Director to play the sound cast member named drumloop in sound channel 1.
In the Score, there are two sound channels. When you use Lingo, you can use as many as eight
sound channels.
4 Close the Script window, and save your movie.
5 Rewind and play your movie. The drumloop sound now plays each time you press the Play
button in the sound and video scene.
Director MX Basics Tutorial 97
Page 98

Modify the script for the Pause button
Now you need to modify the PauseScript Lingo so that the sound pauses when the user clicks the
Pause button to pause the video.
1 In the Cast window, select the PauseScript cast member, and click the Cast Member Script
button at the upper right of the window. The Script window opens with the PauseScript
displayed.
2 Place the insertion point at the end of the second line of the handler that reads:
sprite(1).movieRate = 0
3
Press Enter (Windows) or Return (Macintosh). On the new line, type the following:
sound(1).pause()
This Lingo tells Director to pause the sound in sound channel 1.
4 Close the Script window and save your movie.
Now when you click the Pause button in the sound and video scene, the sound and video pause
at the same time. When you click the Play button again, the video will resume and the sound
plays again.
Modify the script for the Rewind button
You can modify the RewindScript Lingo so that the sound stops when the user clicks the Rewind
button.
1 In the Cast window, select the RewindScript cast member and click the Cast Member Script
button at the upper right of the window.
2 In the Script window, place the insertion point at the end of the third line of the handler that
reads as follows:
sprite(1).movieRate = 0
3
Press Enter (Windows) or Return (Macintosh). On the new line, type the following:
sound(1).stop()
This Lingo tells Director to stop the sound in sound channel 1.
4 Close the Script window, and save your movie.
Now when you click the Rewind button in the sound and video scene, the video rewinds and
the the sound stops playing. When you click the Play button, the video restarts and the sound
plays again.
Add sounds to buttons
The final effect you’ll add to your movie is to make a short sound play when users click any of the
video control buttons in the sound and video scene.
Chapter 298
Page 99

Import the new sound cast member
This sound file is small; there is no compelling reason not to import the file directly into your
Director file.
1 In the Cast window, select the first empty cast member slot, which should be slot 21, and select
File > Import.
2 In the Import dialog box, navigate to the Sounds folder on the same level as your Director file.
Select the button.wav file in the Sounds folder, and click Add.
3 Select Standard Import from the Import mode menu at the bottom of the dialog box, and
click Import.
The new sound cast member appears in the Cast window in slot 21.
Modify the video control button scripts to play the new sound
You’ll add a play command to each of the scripts that are attached to the video control buttons.
This command plays the new sound cast member in the second sound channel.
1 In the Cast window, select the RewindScript cast member, and click the Cast Member Script
button at the upper right of the window.
2 In the Script window, create a new line after the first line of the handler that contains the
me.
word
3 On the new line, type the following Lingo:
sound(2).play(member("button"))
The (2) specifies the second sound channel.
4 Close the Script window, and save your movie.
5 Repeat steps 1 through 4 for the PlayScript and PauseScript cast members.
Play your completed Director movie
You’ve now completed authoring your Director movie. You can play the movie and move from
scene to scene with the navigation buttons you created. You can control the playback of the
digital video with the bitmap graphic buttons you added. Next, you’ll publish the movie to play
on the web.
Publish your movie for the web
In general, you can publish your movie for the web by simply selecting File > Publish. Using
default Publish settings, Director will create a Macromedia Shockwave version of your movie,
with the Director movie (DCR) extension, in the same directory as your original movie. An
HTML page includes the necessary tags to embed the movie. Your browser window opens, and
your Shockwave movie plays within the browser.
When you use QuickTime video, you must complete a few additional steps to ensure that your
movie plays correctly. These steps involve specifying that a QuickTime Xtra downloads to your
user’s system, if necessary, and placing your files in a specific folder if you’re publishing your
movie on a local computer.
Director MX Basics Tutorial 99
Page 100

Use a QuickTime Xtra
Xtra extensions are software components that extend the functionality of Shockwave movies and
projectors. A QuickTime Xtra is necessary to ensure your QuickTime movie plays correctly when
published. When you imported the Ouch! QuickTime movie, Director automatically added the
QT3 Asset Xtra to the Xtra extensions list for your movie. You’ll now select the Xtra from the list
to make it available to your users.
1 Select Modify > Movie > Xtras.
2 In the Movie Xtras dialog box, select the following Xtra, according to your operating system:
• Windows users should select QT6Asset.x32.
• Macintosh users should select QuickTime Asset.
Note: Both versions of the QuickTime Xtra are cross-platform.
3 Select Download if Needed, click OK, and save your movie.
The Xtra will now download transparently to the user’s computer, from a Macromedia secure
server, if the user doesn’t have the Xtra. For additional information about Xtra extensions, see
TechNote 14888 Using Xtras in Director: An Overview at www.macromedia.com/support/
director/ts/documents/xtras.htm.
About Shockwave Player access to linked media on your local computer
The Shockwave Player plays DCRs in safe mode on your local computer to avoid security
breeches, such as a movie accessing data on your hard drive. For the Shockwave Player to access
the linked media in your tutorial (the QuickTime movie and drumloop.aif sound) in safe mode,
the files must be in a folder named dswmedia. This is the only folder name that lets the Player
access linked local files. The file naming convention applies only to DCR movies that you play on
your local computer; if you upload your files to an Internet server, your linked media does not
need to reside in a folder named dswmedia.
Complete the following steps to create a copy of your movie within a dswmedia folder:
1 Save your movie and exit Director (File > Exit).
2 On your desktop, create a new folder and name it dswmedia.
3 Use one of the following techniques to copy your project to the dswmedia folder:
• For Windows operating systems, within your Director MX application folder, browse to
Tutorials/Basics. Right-click the Start folder, and select Copy from the context menu. Then,
right-click the dswmedia folder and select Paste from the context menu. Repeat this step to
copy the BasicsMedia folder, within the Basics folder, to the dswmedia folder. When you
finish, you should have two folders, Start and BasicsMedia, at the same hierarchical level,
copied into your dswmedia folder.
• For Macintosh operating systems, within your Director MX application folder, browse to
Tutorials/Basics. Option-click the Start folder, and drag it to the dswmedia folder. Repeat this
step to copy the BasicsMedia folder, within the Basics folder, to the dswmedia folder. When
you finish, you should have two folders, Start and Basics/Media, at the same hierarchical level,
copied into your dswmedia folder.
Note: The Start and BasicsMedia folders must be at the same level within the dswmedia folder for the linked media
to play correctly.
Chapter 2100
 Loading...