

Page 1

Using Contribute
Macromedia Contribute
™
Page 2

Trademarks
Afterburner, AppletAce, Attain, Attain Enterprise Learning System, Attain Essentials, Attain Objects for Dreamweaver, Authorware,
Authorware Attain, Authorware Interactive Studio, Authorware Star, Authorware Synergy, Backstage, Backstage Designer, Backstage
Desktop Studio, Backstage Enterprise Studio, Backstage Internet Studio, Contribute, Design in Motion, Director, Director Multimedia
Studio, Doc Around the Clock, Dreamweaver, Dreamweaver Attain, Drumbeat, Drumbeat 2000, Extreme 3D, Fireworks, Flash,
Fontographer, FreeHand, FreeHand Graphics Studio, Generator, Generator Developer’s Studio, Generator Dynamic Graphics Server,
Knowledge Objects, Knowledge Stream, Knowledge Track, Lingo, Live Effects, Macromedia, Macromedia M Logo & Design,
Macromedia Contribute, Macromedia Flash, Macromedia Xres, Macromind, Macromind Action, MAGIC, Mediamaker, Object
Authoring, Power Applets, Priority Access, Roundtrip HTML, Scriptlets, SoundEdit, ShockRave, Shockmachine, Shockwave,
Shockwave Remote, Shockwave Internet Studio, Showcase, Tools to Power Your Ideas, Universal Media, Virtuoso, Web Design 101,
Whirlwind and Xtra are trademarks of Macromedia, Inc. and may be registered in the United States or in other jurisdictions including
internationally. Other product names, logos, designs, titles, words or phrases mentioned within this publication may be trademarks,
servicemarks, or tradenames of Macromedia, Inc. or other entities and may be registered in certain jurisdictions including internationally.
This guide contains links to third-party websites that are not under the control of Macromedia, and Macromedia is not responsible for
the content on any linked site. If you access a third-party website mentioned in this guide, then you do so at your own risk. Macromedia
provides these links only as a convenience, and the inclusion of the link does not imply that Macromedia endorses or accepts any
responsibility for the content on those third-party sites.
Apple Disclaimer
APPLE COMPUTER, INC. MAKES NO WARRANTIES, EITHER EXPRESS OR IMPLIED, REGARDING THE ENCLOSED
COMPUTER SOFTWARE PACKAGE, ITS MERCHANTABILITY OR ITS FITNESS FOR ANY PARTICULAR PURPOSE.
THE EXCLUSION OF IMPLIED WARRANTIES IS NOT PERMITTED BY SOME STATES. THE ABOVE EXCLUSION MAY
NOT APPLY TO YOU. THIS WARRANTY PROVIDES YOU WITH SPECIFIC LEGAL RIGHTS. THERE MAY BE OTHER
RIGHTS THAT YOU MAY HAVE WHICH VARY FROM STATE TO STATE.
Copyright © 2002 Macromedia, Inc. All rights reserved. This manual may not be copied, photocopied, reproduced, translated, or
converted to any electronic or machine-readable form in whole or in part without prior written approval of Macromedia, Inc.
Third Party Software Notices and/or Additional Terms and Conditions can be found at http://www.macromedia.com/go/thirdparty/.
Part Number ZCT10M200
Acknowledgments
Project Management: Kim Diezel
Writing: Chris Bedford, Jed Hartman, Jennifer Rowe
Managing Editor: Rosana Francescato
Editing: Lisa Stanziano, Rebecca Godbois
Production Management: Patrice O’Neill
Multimedia Design and Production: Aaron Begley, Benjamin Salles
Print and Help Design and Production: Christopher Basmajian, John Francis
Special thanks to Luciano Arruda, Don Booth, Darrick Brown, Ian Chase, Kristin Conradi, Mary Ferguson, Deb Galdes,
Noah Hoffman, Joel Huff, Narciso (nj) Jaramillo, Brady Kroupa, Sho Kuwamoto, Erik Larson, Eric Lerner, David Lessard, Bonnie Loo,
Josh Margulis, Charles McBrian, Sheila McGinn, Charles Nadeau, Masayo Noda, Kimberly Oslob, Emilio Passi, Dina Pinza,
Scott Richards, Ken Sundermeyer, Paola Uscher, Kaori Wolff, Mitsuko Yoneyama, and the Contribute engineering and QA teams.
First Edition: November 2002
Macromedia, Inc.
600 Townsend St.
San Francisco, CA 94103
2
Page 3

Part I
Using Contribute
CONTENTS
CHAPTER 1
Welcome to Macromedia Contribute
Website development and maintenance overview . . . . . . . . . . . . . . . . . . . . . . . . . . . . . 13
The Contribute workflow . . . . . . . . . . . . . . . . . . . . . . . . . . . . . . . . . . . . . . . . . . . . . . . 14
Learning Macromedia Contribute . . . . . . . . . . . . . . . . . . . . . . . . . . . . . . . . . . . . . . . . . 14
Where to start. . . . . . . . . . . . . . . . . . . . . . . . . . . . . . . . . . . . . . . . . . . . . . . . . . . . . . 14
Contribute resources. . . . . . . . . . . . . . . . . . . . . . . . . . . . . . . . . . . . . . . . . . . . . . . . . 15
Typographical conventions in the Contribute resources . . . . . . . . . . . . . . . . . . . . . . 16
CHAPTER 2
Getting Started
Setup requirements . . . . . . . . . . . . . . . . . . . . . . . . . . . . . . . . . . . . . . . . . . . . . . . . . . . . 17
Installing and launching Contribute . . . . . . . . . . . . . . . . . . . . . . . . . . . . . . . . . . . . . . . 18
Connecting to a website . . . . . . . . . . . . . . . . . . . . . . . . . . . . . . . . . . . . . . . . . . . . . . . . 18
Importing a website connection key . . . . . . . . . . . . . . . . . . . . . . . . . . . . . . . . . . . . . 18
Launching Contribute without a network connection . . . . . . . . . . . . . . . . . . . . . . . . . . 19
Disabling your website at startup . . . . . . . . . . . . . . . . . . . . . . . . . . . . . . . . . . . . . . . 20
CHAPTER 3
Exploring the Contribute Workspace
The Contribute workspace . . . . . . . . . . . . . . . . . . . . . . . . . . . . . . . . . . . . . . . . . . . . . . 22
The Contribute browser/editor. . . . . . . . . . . . . . . . . . . . . . . . . . . . . . . . . . . . . . . . . 22
The Contribute toolbars. . . . . . . . . . . . . . . . . . . . . . . . . . . . . . . . . . . . . . . . . . . . . . 23
The Contribute sidebar . . . . . . . . . . . . . . . . . . . . . . . . . . . . . . . . . . . . . . . . . . . . . . 23
Browsing and editing pages . . . . . . . . . . . . . . . . . . . . . . . . . . . . . . . . . . . . . . . . . . . . . . 24
Navigating to web pages . . . . . . . . . . . . . . . . . . . . . . . . . . . . . . . . . . . . . . . . . . . . . . . . 25
Viewing drafts and new pages. . . . . . . . . . . . . . . . . . . . . . . . . . . . . . . . . . . . . . . . . . 26
Viewing home pages for your websites . . . . . . . . . . . . . . . . . . . . . . . . . . . . . . . . . . . 26
Viewing recently published pages . . . . . . . . . . . . . . . . . . . . . . . . . . . . . . . . . . . . . . . 26
Viewing pages and files that you can’t browse to . . . . . . . . . . . . . . . . . . . . . . . . . . . . 26
Setting up access to commonly used pages . . . . . . . . . . . . . . . . . . . . . . . . . . . . . . . . 27
. . . . . . . . . . . . . . . . . . . . . . . . . . . . . . . . . . . . . . . . . . . . . . . . . . . . 17
. . . . . . . . . . . . . . . . . . . . . . . . . . . . . . . . 13
. . . . . . . . . . . . . . . . . . . . . . . . . . . . . . . . 21
3
Page 4

Setting Contribute preferences . . . . . . . . . . . . . . . . . . . . . . . . . . . . . . . . . . . . . . . . . . . 28
Setting general preferences . . . . . . . . . . . . . . . . . . . . . . . . . . . . . . . . . . . . . . . . . . . . 29
Setting file editor preferences . . . . . . . . . . . . . . . . . . . . . . . . . . . . . . . . . . . . . . . . . . 29
Setting firewall preferences . . . . . . . . . . . . . . . . . . . . . . . . . . . . . . . . . . . . . . . . . . . . 30
Setting invisible element preferences. . . . . . . . . . . . . . . . . . . . . . . . . . . . . . . . . . . . . 30
Setting browser encoding. . . . . . . . . . . . . . . . . . . . . . . . . . . . . . . . . . . . . . . . . . . . . . . . 31
Using Contribute accessibility features . . . . . . . . . . . . . . . . . . . . . . . . . . . . . . . . . . . . . 31
Using screen readers with Contribute . . . . . . . . . . . . . . . . . . . . . . . . . . . . . . . . . . . . 31
Using operating system accessibility features . . . . . . . . . . . . . . . . . . . . . . . . . . . . . . . 31
Using the keyboard to navigate Contribute. . . . . . . . . . . . . . . . . . . . . . . . . . . . . . . . 32
Authoring for accessibility . . . . . . . . . . . . . . . . . . . . . . . . . . . . . . . . . . . . . . . . . . . . 33
CHAPTER 4
Working with Pages
. . . . . . . . . . . . . . . . . . . . . . . . . . . . . . . . . . . . . . . . . . . . . . . . 35
Editing existing web pages. . . . . . . . . . . . . . . . . . . . . . . . . . . . . . . . . . . . . . . . . . . . . . . 36
About editing . . . . . . . . . . . . . . . . . . . . . . . . . . . . . . . . . . . . . . . . . . . . . . . . . . . . . . 36
Opening a page for editing . . . . . . . . . . . . . . . . . . . . . . . . . . . . . . . . . . . . . . . . . . . . 36
Undoing mistakes. . . . . . . . . . . . . . . . . . . . . . . . . . . . . . . . . . . . . . . . . . . . . . . . . . . 37
Saving drafts . . . . . . . . . . . . . . . . . . . . . . . . . . . . . . . . . . . . . . . . . . . . . . . . . . . . . . . . . 37
Saving a draft while you work. . . . . . . . . . . . . . . . . . . . . . . . . . . . . . . . . . . . . . . . . . 37
Saving a draft until later . . . . . . . . . . . . . . . . . . . . . . . . . . . . . . . . . . . . . . . . . . . . . . 37
Working with pages based on Dreamweaver templates . . . . . . . . . . . . . . . . . . . . . . . . . 38
About templates . . . . . . . . . . . . . . . . . . . . . . . . . . . . . . . . . . . . . . . . . . . . . . . . . . . . 38
Editing a template-based page . . . . . . . . . . . . . . . . . . . . . . . . . . . . . . . . . . . . . . . . . 39
Setting template properties . . . . . . . . . . . . . . . . . . . . . . . . . . . . . . . . . . . . . . . . . . . . 40
Using Contribute to work offline . . . . . . . . . . . . . . . . . . . . . . . . . . . . . . . . . . . . . . . . . 40
Working offline in the Contribute editor . . . . . . . . . . . . . . . . . . . . . . . . . . . . . . . . . 41
Switching between working online and working offline . . . . . . . . . . . . . . . . . . . . . . 41
Editing content in an external application. . . . . . . . . . . . . . . . . . . . . . . . . . . . . . . . . . . 42
Canceling a draft or new page . . . . . . . . . . . . . . . . . . . . . . . . . . . . . . . . . . . . . . . . . . . . 43
Deleting a web page . . . . . . . . . . . . . . . . . . . . . . . . . . . . . . . . . . . . . . . . . . . . . . . . . . . 43
Exporting a Page . . . . . . . . . . . . . . . . . . . . . . . . . . . . . . . . . . . . . . . . . . . . . . . . . . . . . . 44
Printing a page . . . . . . . . . . . . . . . . . . . . . . . . . . . . . . . . . . . . . . . . . . . . . . . . . . . . . . . 44
CHAPTER 5
Adding Pages and Documents
. . . . . . . . . . . . . . . . . . . . . . . . . . . . . . . . . . . . . . 45
Creating or copying a page on your website. . . . . . . . . . . . . . . . . . . . . . . . . . . . . . . . . . 45
Copying a page on your website . . . . . . . . . . . . . . . . . . . . . . . . . . . . . . . . . . . . . . . . 46
Creating a blank web page . . . . . . . . . . . . . . . . . . . . . . . . . . . . . . . . . . . . . . . . . . . . 46
Copying a sample web page . . . . . . . . . . . . . . . . . . . . . . . . . . . . . . . . . . . . . . . . . . . 46
Creating a page based on a template . . . . . . . . . . . . . . . . . . . . . . . . . . . . . . . . . . . . . 46
Creating a new page and a link to the page. . . . . . . . . . . . . . . . . . . . . . . . . . . . . . . . 47
Creating a new page without linking to it. . . . . . . . . . . . . . . . . . . . . . . . . . . . . . . . . 49
Setting page properties . . . . . . . . . . . . . . . . . . . . . . . . . . . . . . . . . . . . . . . . . . . . . . . . . 51
Adding keywords and a description for a page . . . . . . . . . . . . . . . . . . . . . . . . . . . . . . . . 53
Adding Word and Excel documents to a website . . . . . . . . . . . . . . . . . . . . . . . . . . . . . . 53
Adding Word or Excel content to a page. . . . . . . . . . . . . . . . . . . . . . . . . . . . . . . . . . 54
Inserting a link to a Word or Excel document. . . . . . . . . . . . . . . . . . . . . . . . . . . . . . 54
Contents4
Page 5

CHAPTER 6
Working with Text
. . . . . . . . . . . . . . . . . . . . . . . . . . . . . . . . . . . . . . . . . . . . . . . . . . 57
Adding text to a web page . . . . . . . . . . . . . . . . . . . . . . . . . . . . . . . . . . . . . . . . . . . . . . . 57
Adding the current date to a page. . . . . . . . . . . . . . . . . . . . . . . . . . . . . . . . . . . . . . . 58
Adding special characters to a page . . . . . . . . . . . . . . . . . . . . . . . . . . . . . . . . . . . . . . 59
Formatting text . . . . . . . . . . . . . . . . . . . . . . . . . . . . . . . . . . . . . . . . . . . . . . . . . . . . . . . 60
Changing text font and size . . . . . . . . . . . . . . . . . . . . . . . . . . . . . . . . . . . . . . . . . . . 60
Changing text style. . . . . . . . . . . . . . . . . . . . . . . . . . . . . . . . . . . . . . . . . . . . . . . . . . 62
Changing text color . . . . . . . . . . . . . . . . . . . . . . . . . . . . . . . . . . . . . . . . . . . . . . . . . 63
Applying styles to text. . . . . . . . . . . . . . . . . . . . . . . . . . . . . . . . . . . . . . . . . . . . . . . . 63
Changing text alignment . . . . . . . . . . . . . . . . . . . . . . . . . . . . . . . . . . . . . . . . . . . . . 64
Indenting text . . . . . . . . . . . . . . . . . . . . . . . . . . . . . . . . . . . . . . . . . . . . . . . . . . . . . 64
Creating lists . . . . . . . . . . . . . . . . . . . . . . . . . . . . . . . . . . . . . . . . . . . . . . . . . . . . . . . . . 65
Creating numbered lists . . . . . . . . . . . . . . . . . . . . . . . . . . . . . . . . . . . . . . . . . . . . . . 65
Creating bulleted lists . . . . . . . . . . . . . . . . . . . . . . . . . . . . . . . . . . . . . . . . . . . . . . . . 65
Creating definition lists . . . . . . . . . . . . . . . . . . . . . . . . . . . . . . . . . . . . . . . . . . . . . . 66
Creating sublists. . . . . . . . . . . . . . . . . . . . . . . . . . . . . . . . . . . . . . . . . . . . . . . . . . . . 67
Setting List property options . . . . . . . . . . . . . . . . . . . . . . . . . . . . . . . . . . . . . . . . . . 68
Checking spelling . . . . . . . . . . . . . . . . . . . . . . . . . . . . . . . . . . . . . . . . . . . . . . . . . . . . . 69
Finding and replacing text. . . . . . . . . . . . . . . . . . . . . . . . . . . . . . . . . . . . . . . . . . . . . . . 70
CHAPTER 7
Working with Images and Graphical Elements
. . . . . . . . . . . . . . . . . . . . . . . . 71
Adding an image to a page . . . . . . . . . . . . . . . . . . . . . . . . . . . . . . . . . . . . . . . . . . . . . . 71
About inserting images. . . . . . . . . . . . . . . . . . . . . . . . . . . . . . . . . . . . . . . . . . . . . . . 72
Using the Insert menu or Image button to add images to a page. . . . . . . . . . . . . . . . 72
Dragging images to a page . . . . . . . . . . . . . . . . . . . . . . . . . . . . . . . . . . . . . . . . . . . . 73
Copying and pasting images . . . . . . . . . . . . . . . . . . . . . . . . . . . . . . . . . . . . . . . . . . . 73
Changing image properties . . . . . . . . . . . . . . . . . . . . . . . . . . . . . . . . . . . . . . . . . . . . 74
Editing an image. . . . . . . . . . . . . . . . . . . . . . . . . . . . . . . . . . . . . . . . . . . . . . . . . . . . . . 75
Resizing an image . . . . . . . . . . . . . . . . . . . . . . . . . . . . . . . . . . . . . . . . . . . . . . . . . . . . . 76
Moving and aligning images . . . . . . . . . . . . . . . . . . . . . . . . . . . . . . . . . . . . . . . . . . . . . 76
Inserting Flash movies. . . . . . . . . . . . . . . . . . . . . . . . . . . . . . . . . . . . . . . . . . . . . . . . . . 77
Setting Flash movie properties . . . . . . . . . . . . . . . . . . . . . . . . . . . . . . . . . . . . . . . . . 77
Adding and deleting a horizontal rule . . . . . . . . . . . . . . . . . . . . . . . . . . . . . . . . . . . . . . 78
Changing properties for a horizontal rule . . . . . . . . . . . . . . . . . . . . . . . . . . . . . . . . . 79
CHAPTER 8
Working with Tables
. . . . . . . . . . . . . . . . . . . . . . . . . . . . . . . . . . . . . . . . . . . . . . . . 81
Inserting a table on a page . . . . . . . . . . . . . . . . . . . . . . . . . . . . . . . . . . . . . . . . . . . . . . . 81
Inserting a table within a table . . . . . . . . . . . . . . . . . . . . . . . . . . . . . . . . . . . . . . . . . 83
Selecting table elements. . . . . . . . . . . . . . . . . . . . . . . . . . . . . . . . . . . . . . . . . . . . . . . . . 83
Selecting an entire table, row, or column . . . . . . . . . . . . . . . . . . . . . . . . . . . . . . . . . 84
Selecting a cell, block of cells, or nonadjacent cells . . . . . . . . . . . . . . . . . . . . . . . . . . 84
Resizing tables, rows, and columns . . . . . . . . . . . . . . . . . . . . . . . . . . . . . . . . . . . . . . . . 85
Aligning tables. . . . . . . . . . . . . . . . . . . . . . . . . . . . . . . . . . . . . . . . . . . . . . . . . . . . . . . . 86
Cutting, copying, and pasting cells . . . . . . . . . . . . . . . . . . . . . . . . . . . . . . . . . . . . . . . . 87
Cutting and copying table cells. . . . . . . . . . . . . . . . . . . . . . . . . . . . . . . . . . . . . . . . . 87
Pasting table cells . . . . . . . . . . . . . . . . . . . . . . . . . . . . . . . . . . . . . . . . . . . . . . . . . . . 88
Contents 5
Page 6

Adding, deleting, and merging table rows and columns. . . . . . . . . . . . . . . . . . . . . . . . . 89
Adding rows and columns . . . . . . . . . . . . . . . . . . . . . . . . . . . . . . . . . . . . . . . . . . . . 89
Deleting rows and columns . . . . . . . . . . . . . . . . . . . . . . . . . . . . . . . . . . . . . . . . . . . 90
Merging and splitting cells . . . . . . . . . . . . . . . . . . . . . . . . . . . . . . . . . . . . . . . . . . . . 91
Modifying table appearance. . . . . . . . . . . . . . . . . . . . . . . . . . . . . . . . . . . . . . . . . . . . . . 91
About conflicts in table formatting . . . . . . . . . . . . . . . . . . . . . . . . . . . . . . . . . . . . . . 92
Modifying table properties . . . . . . . . . . . . . . . . . . . . . . . . . . . . . . . . . . . . . . . . . . . . 92
Modifying row or column properties . . . . . . . . . . . . . . . . . . . . . . . . . . . . . . . . . . . . 94
Modifying cell properties . . . . . . . . . . . . . . . . . . . . . . . . . . . . . . . . . . . . . . . . . . . . . 95
Using a preset table format . . . . . . . . . . . . . . . . . . . . . . . . . . . . . . . . . . . . . . . . . . . . 97
Sorting tabular data. . . . . . . . . . . . . . . . . . . . . . . . . . . . . . . . . . . . . . . . . . . . . . . . . . . . 98
CHAPTER 9
Working with Links
. . . . . . . . . . . . . . . . . . . . . . . . . . . . . . . . . . . . . . . . . . . . . . . . 101
Creating text and image links . . . . . . . . . . . . . . . . . . . . . . . . . . . . . . . . . . . . . . . . . . . 101
Linking to a draft or recently published page on your website. . . . . . . . . . . . . . . . . 102
Linking to a new page. . . . . . . . . . . . . . . . . . . . . . . . . . . . . . . . . . . . . . . . . . . . . . . 103
Linking to a page on your website or on another website . . . . . . . . . . . . . . . . . . . . 105
Linking to an e-mail address. . . . . . . . . . . . . . . . . . . . . . . . . . . . . . . . . . . . . . . . . . 107
Linking to a file on your computer . . . . . . . . . . . . . . . . . . . . . . . . . . . . . . . . . . . . . 108
Setting the advanced linking options. . . . . . . . . . . . . . . . . . . . . . . . . . . . . . . . . . . . . . 110
Editing the URL for a link . . . . . . . . . . . . . . . . . . . . . . . . . . . . . . . . . . . . . . . . . . . 110
Setting a target for your page . . . . . . . . . . . . . . . . . . . . . . . . . . . . . . . . . . . . . . . . . 111
Linking to a specific place in a page . . . . . . . . . . . . . . . . . . . . . . . . . . . . . . . . . . . . 112
Editing links . . . . . . . . . . . . . . . . . . . . . . . . . . . . . . . . . . . . . . . . . . . . . . . . . . . . . . . . 115
Changing link text and destination. . . . . . . . . . . . . . . . . . . . . . . . . . . . . . . . . . . . . 115
Removing a link . . . . . . . . . . . . . . . . . . . . . . . . . . . . . . . . . . . . . . . . . . . . . . . . . . . 116
Changing link properties . . . . . . . . . . . . . . . . . . . . . . . . . . . . . . . . . . . . . . . . . . . . 116
Testing links . . . . . . . . . . . . . . . . . . . . . . . . . . . . . . . . . . . . . . . . . . . . . . . . . . . . . . . . 117
CHAPTER 10
Working with Pages with Frames
. . . . . . . . . . . . . . . . . . . . . . . . . . . . . . . . . . . 119
About frames. . . . . . . . . . . . . . . . . . . . . . . . . . . . . . . . . . . . . . . . . . . . . . . . . . . . . . . . 119
Editing frame content . . . . . . . . . . . . . . . . . . . . . . . . . . . . . . . . . . . . . . . . . . . . . . . . . 121
Saving and publishing a page with frames . . . . . . . . . . . . . . . . . . . . . . . . . . . . . . . . . . 122
Targeting frame content . . . . . . . . . . . . . . . . . . . . . . . . . . . . . . . . . . . . . . . . . . . . . . . 122
About targeting a frame . . . . . . . . . . . . . . . . . . . . . . . . . . . . . . . . . . . . . . . . . . . . . 122
Specifying a target frame for a link . . . . . . . . . . . . . . . . . . . . . . . . . . . . . . . . . . . . . 123
CHAPTER 11
Publishing Your Page
. . . . . . . . . . . . . . . . . . . . . . . . . . . . . . . . . . . . . . . . . . . . . . 125
Previewing a page in your default browser . . . . . . . . . . . . . . . . . . . . . . . . . . . . . . . . . . 125
Using the e-mail review process for drafts . . . . . . . . . . . . . . . . . . . . . . . . . . . . . . . . . . 126
Understanding the e-mail review process . . . . . . . . . . . . . . . . . . . . . . . . . . . . . . . . 126
Making your draft available for review . . . . . . . . . . . . . . . . . . . . . . . . . . . . . . . . . . 127
Publishing a page to your website . . . . . . . . . . . . . . . . . . . . . . . . . . . . . . . . . . . . . . . . 127
Publishing updates to an existing page . . . . . . . . . . . . . . . . . . . . . . . . . . . . . . . . . . 127
Publishing a new page . . . . . . . . . . . . . . . . . . . . . . . . . . . . . . . . . . . . . . . . . . . . . . 128
Publishing an existing page as a new page . . . . . . . . . . . . . . . . . . . . . . . . . . . . . . . . 130
Contents6
Page 7

Rolling back to a previous version of a page. . . . . . . . . . . . . . . . . . . . . . . . . . . . . . . . . 131
About rollbacks . . . . . . . . . . . . . . . . . . . . . . . . . . . . . . . . . . . . . . . . . . . . . . . . . . . 131
Using the page Rollback feature . . . . . . . . . . . . . . . . . . . . . . . . . . . . . . . . . . . . . . . 132
Part II
Administering Contribute
CHAPTER 12
Learning to Administer Contribute
. . . . . . . . . . . . . . . . . . . . . . . . . . . . . . . . . . 135
Intended audience . . . . . . . . . . . . . . . . . . . . . . . . . . . . . . . . . . . . . . . . . . . . . . . . . . . . 135
Typographical conventions . . . . . . . . . . . . . . . . . . . . . . . . . . . . . . . . . . . . . . . . . . . . . 135
Learning to administer Macromedia Contribute . . . . . . . . . . . . . . . . . . . . . . . . . . . . . 136
Contribute Quick Start . . . . . . . . . . . . . . . . . . . . . . . . . . . . . . . . . . . . . . . . . . . . . 136
Contribute How Do I panel . . . . . . . . . . . . . . . . . . . . . . . . . . . . . . . . . . . . . . . . . . 136
Contribute Tutorial . . . . . . . . . . . . . . . . . . . . . . . . . . . . . . . . . . . . . . . . . . . . . . . . 136
Contribute Help. . . . . . . . . . . . . . . . . . . . . . . . . . . . . . . . . . . . . . . . . . . . . . . . . . . 137
Contribute Support Center . . . . . . . . . . . . . . . . . . . . . . . . . . . . . . . . . . . . . . . . . . 137
CHAPTER 13
Contribute Administration Overview
. . . . . . . . . . . . . . . . . . . . . . . . . . . . . . . . 139
About the Contribute website-editing model. . . . . . . . . . . . . . . . . . . . . . . . . . . . . . . . 139
Setting up Contribute . . . . . . . . . . . . . . . . . . . . . . . . . . . . . . . . . . . . . . . . . . . . . . . . . 139
About the shared settings file. . . . . . . . . . . . . . . . . . . . . . . . . . . . . . . . . . . . . . . . . . . . 140
Modifying shared settings. . . . . . . . . . . . . . . . . . . . . . . . . . . . . . . . . . . . . . . . . . . . 140
Website security . . . . . . . . . . . . . . . . . . . . . . . . . . . . . . . . . . . . . . . . . . . . . . . . . . . 140
Rollback files . . . . . . . . . . . . . . . . . . . . . . . . . . . . . . . . . . . . . . . . . . . . . . . . . . . . . 141
CHAPTER 14
Creating and Managing Website Connections
. . . . . . . . . . . . . . . . . . . . . . . 143
Creating a Contribute website connection. . . . . . . . . . . . . . . . . . . . . . . . . . . . . . . . . . 143
Creating a connection with the Connection Wizard . . . . . . . . . . . . . . . . . . . . . . . . 145
Providing your name and e-mail address. . . . . . . . . . . . . . . . . . . . . . . . . . . . . . . . . 146
Providing your website’s URL. . . . . . . . . . . . . . . . . . . . . . . . . . . . . . . . . . . . . . . . . 146
Selecting a connection method . . . . . . . . . . . . . . . . . . . . . . . . . . . . . . . . . . . . . . . . 147
Providing FTP information . . . . . . . . . . . . . . . . . . . . . . . . . . . . . . . . . . . . . . . . . . 148
Setting advanced connection settings . . . . . . . . . . . . . . . . . . . . . . . . . . . . . . . . . . . 149
Becoming a website administrator . . . . . . . . . . . . . . . . . . . . . . . . . . . . . . . . . . . . . 150
Selecting a permission group. . . . . . . . . . . . . . . . . . . . . . . . . . . . . . . . . . . . . . . . . . 151
Reviewing the connection summary . . . . . . . . . . . . . . . . . . . . . . . . . . . . . . . . . . . . 151
Becoming an administrator of an existing Contribute website . . . . . . . . . . . . . . . . . . . 151
Configuring sitewide settings. . . . . . . . . . . . . . . . . . . . . . . . . . . . . . . . . . . . . . . . . . . . 153
Changing the website administrator . . . . . . . . . . . . . . . . . . . . . . . . . . . . . . . . . . . . 153
Changing the administrator’s password. . . . . . . . . . . . . . . . . . . . . . . . . . . . . . . . . . 154
Enabling and disabling rollbacks. . . . . . . . . . . . . . . . . . . . . . . . . . . . . . . . . . . . . . . 155
Specifying the number of rollback pages. . . . . . . . . . . . . . . . . . . . . . . . . . . . . . . . . 155
Contents 7
Page 8

About advanced sitewide settings. . . . . . . . . . . . . . . . . . . . . . . . . . . . . . . . . . . . . . . . . 156
About web server index pages . . . . . . . . . . . . . . . . . . . . . . . . . . . . . . . . . . . . . . . . . 156
Adding index page filenames . . . . . . . . . . . . . . . . . . . . . . . . . . . . . . . . . . . . . . . . . 157
Removing index page filenames . . . . . . . . . . . . . . . . . . . . . . . . . . . . . . . . . . . . . . . 158
About alternate website addresses . . . . . . . . . . . . . . . . . . . . . . . . . . . . . . . . . . . . . . 159
Specifying alternate web addresses . . . . . . . . . . . . . . . . . . . . . . . . . . . . . . . . . . . . . 160
Managing website connections . . . . . . . . . . . . . . . . . . . . . . . . . . . . . . . . . . . . . . . . . . 161
Removing website connections . . . . . . . . . . . . . . . . . . . . . . . . . . . . . . . . . . . . . . . . 161
Editing website connections . . . . . . . . . . . . . . . . . . . . . . . . . . . . . . . . . . . . . . . . . . 162
Renaming a website . . . . . . . . . . . . . . . . . . . . . . . . . . . . . . . . . . . . . . . . . . . . . . . . 162
Disabling a website connection. . . . . . . . . . . . . . . . . . . . . . . . . . . . . . . . . . . . . . . . 163
Enabling a website connection . . . . . . . . . . . . . . . . . . . . . . . . . . . . . . . . . . . . . . . . 163
Managing Contribute sites using Dreamweaver MX . . . . . . . . . . . . . . . . . . . . . . . . . . 164
CHAPTER 15
Managing User Settings and Permissions
. . . . . . . . . . . . . . . . . . . . . . . . . . . 165
Creating Contribute permission groups. . . . . . . . . . . . . . . . . . . . . . . . . . . . . . . . . . . . 165
Understanding group permissions . . . . . . . . . . . . . . . . . . . . . . . . . . . . . . . . . . . . . . . . 167
Managing settings and permissions. . . . . . . . . . . . . . . . . . . . . . . . . . . . . . . . . . . . . 167
Accessing the Permission Group dialog box. . . . . . . . . . . . . . . . . . . . . . . . . . . . . . . . . 168
Setting general website permissions. . . . . . . . . . . . . . . . . . . . . . . . . . . . . . . . . . . . . 169
Setting folder and file access permissions . . . . . . . . . . . . . . . . . . . . . . . . . . . . . . . . 170
Setting page editing and paragraph permissions . . . . . . . . . . . . . . . . . . . . . . . . . . . 173
Setting style and font permissions. . . . . . . . . . . . . . . . . . . . . . . . . . . . . . . . . . . . . . 175
Setting permissions for new web pages . . . . . . . . . . . . . . . . . . . . . . . . . . . . . . . . . . 177
New Images . . . . . . . . . . . . . . . . . . . . . . . . . . . . . . . . . . . . . . . . . . . . . . . . . . . . . . 179
CHAPTER 16
Sharing Website Connections
. . . . . . . . . . . . . . . . . . . . . . . . . . . . . . . . . . . . . . 181
Creating a connection key . . . . . . . . . . . . . . . . . . . . . . . . . . . . . . . . . . . . . . . . . . . . . . 181
Choosing the connection key settings. . . . . . . . . . . . . . . . . . . . . . . . . . . . . . . . . . . 183
Choosing a connection method . . . . . . . . . . . . . . . . . . . . . . . . . . . . . . . . . . . . . . . 183
Selecting a permission group. . . . . . . . . . . . . . . . . . . . . . . . . . . . . . . . . . . . . . . . . . 186
Choosing an export method for the connection key . . . . . . . . . . . . . . . . . . . . . . . . 186
Reviewing the connection summary . . . . . . . . . . . . . . . . . . . . . . . . . . . . . . . . . . . . 187
CHAPTER 17
Troubleshooting
. . . . . . . . . . . . . . . . . . . . . . . . . . . . . . . . . . . . . . . . . . . . . . . . . . . 189
Problems installing Contribute . . . . . . . . . . . . . . . . . . . . . . . . . . . . . . . . . . . . . . . . . . 189
Problems launching Contribute. . . . . . . . . . . . . . . . . . . . . . . . . . . . . . . . . . . . . . . . . . 190
Startup is slow or the application appears to freeze . . . . . . . . . . . . . . . . . . . . . . . . . 190
The Connection Failure dialog box appears when connected to a network . . . . . . . 190
Contribute doesn’t detect that it is disconnected from the network. . . . . . . . . . . . . 190
The Dial-up dialog box is displayed when connected to the network . . . . . . . . . . . 191
Contribute reports that the user is not in a valid permission group. . . . . . . . . . . . . 191
Contents8
Page 9

Problems creating a connection . . . . . . . . . . . . . . . . . . . . . . . . . . . . . . . . . . . . . . . . . . 191
Unable to view the My Connections dialog box . . . . . . . . . . . . . . . . . . . . . . . . . . . 191
Can’t move to the next panel in the Connection Wizard. . . . . . . . . . . . . . . . . . . . . 192
Connection Wizard can’t locate the remote folder. . . . . . . . . . . . . . . . . . . . . . . . . . 192
Network connection cannot locate the remote folder . . . . . . . . . . . . . . . . . . . . . . . 192
FTP dialog box fails to accept your user name and password . . . . . . . . . . . . . . . . . 193
Problems editing a page. . . . . . . . . . . . . . . . . . . . . . . . . . . . . . . . . . . . . . . . . . . . . . . . 193
Edit Page button is not visible . . . . . . . . . . . . . . . . . . . . . . . . . . . . . . . . . . . . . . . . 193
The Edit button is disabled . . . . . . . . . . . . . . . . . . . . . . . . . . . . . . . . . . . . . . . . . . 194
Clicking the Edit button displays an error message. . . . . . . . . . . . . . . . . . . . . . . . . 194
Clicking Edit Page displays a different page . . . . . . . . . . . . . . . . . . . . . . . . . . . . . . 195
Problems canceling pages. . . . . . . . . . . . . . . . . . . . . . . . . . . . . . . . . . . . . . . . . . . . . . . 195
The Cancel button isn’t visible . . . . . . . . . . . . . . . . . . . . . . . . . . . . . . . . . . . . . . . . 195
Clicking the Cancel button reports an error . . . . . . . . . . . . . . . . . . . . . . . . . . . . . . 195
Problems sending e-mail reviews . . . . . . . . . . . . . . . . . . . . . . . . . . . . . . . . . . . . . . . . . 195
Problems publishing a page . . . . . . . . . . . . . . . . . . . . . . . . . . . . . . . . . . . . . . . . . . . . . 195
Publish button isn’t visible . . . . . . . . . . . . . . . . . . . . . . . . . . . . . . . . . . . . . . . . . . . 196
Clicking the Publish button reports errors . . . . . . . . . . . . . . . . . . . . . . . . . . . . . . . 196
Problems creating new documents from templates . . . . . . . . . . . . . . . . . . . . . . . . . . . 196
Page templates don’t appear in Contribute . . . . . . . . . . . . . . . . . . . . . . . . . . . . . . . 196
A new page has broken images or other missing elements . . . . . . . . . . . . . . . . . . . . 197
Problems administrating Contribute . . . . . . . . . . . . . . . . . . . . . . . . . . . . . . . . . . . . . . 197
The Administer Websites menu is deactivated . . . . . . . . . . . . . . . . . . . . . . . . . . . . 197
I forgot the administrative password. . . . . . . . . . . . . . . . . . . . . . . . . . . . . . . . . . . . 198
Can’t complete the Connection Wizard . . . . . . . . . . . . . . . . . . . . . . . . . . . . . . . . . 198
Contribute freezes when sending a connection key . . . . . . . . . . . . . . . . . . . . . . . . . 198
Clicking Done in the Administer Website dialog box results in errors. . . . . . . . . . . 198
Replacing a deleted web page . . . . . . . . . . . . . . . . . . . . . . . . . . . . . . . . . . . . . . . . . 199
Users don’t see enough rollback copies of pages. . . . . . . . . . . . . . . . . . . . . . . . . . . . 199
Improving application performance by disabling websites. . . . . . . . . . . . . . . . . . . . 199
Removing a single user from a permission group . . . . . . . . . . . . . . . . . . . . . . . . . . 200
Overriding a file checkout in Contribute . . . . . . . . . . . . . . . . . . . . . . . . . . . . . . . . 200
Using Contribute with dynamic pages. . . . . . . . . . . . . . . . . . . . . . . . . . . . . . . . . . . . . 201
Preventing users from editing dynamic pages . . . . . . . . . . . . . . . . . . . . . . . . . . . . . 201
Editing static content in dynamic pages . . . . . . . . . . . . . . . . . . . . . . . . . . . . . . . . . 202
APPENDIX
Keyboard shortcuts
. . . . . . . . . . . . . . . . . . . . . . . . . . . . . . . . . . . . . . . . . . . . . . . 203
Contents 9
Page 10

Contents10
Page 11

Part I Using Contribute
Learn how to use Contribute to update and publish web
pages within your website.
This part contains the following chapters:
• Chapter 1, “Welcome to Macromedia Contribute”
• Chapter 2, “Getting Started”
• Chapter 3, “Exploring the Contribute Workspace”
• Chapter 4, “Working with Pages”
• Chapter 5, “Adding Pages and Documents”
• Chapter 6, “Working with Text”
• Chapter 7, “Working with Images and Graphical
Elements”
• Chapter 8, “Working with Tables”
• Chapter 9, “Working with Links”
• Chapter 10, “Working with Pages with Frames”
• Chapter 11, “Publishing Your Page”
• Appendix, “Keyboard shortcuts”
Part I
Page 12

Page 13

CHAPTER 1
Welcome to Macromedia Contribute
Macromedia Contribute enables users to easily create and edit web pages on existing websites.
Whether you’re the one using Contribute to edit web pages or the one managing the website, you’ll
find Contribute a very useful tool for browsing, editing, and publishing content to a website.
The chapter contains the following sections:
• “Website development and maintenance overview” on page 13
• “The Contribute workflow” on page 14
• “Learning Macromedia Contribute” on page 14
Website development and maintenance overview
Contribute works with your existing website, whether it’s an intranet or a public website. It often
takes a team of people to get a website up and running and to keep the content current.
These are the people you’ll interact with when you use Contribute:
Web developers create the website. This person (or design team) uses a website creation
application, such as Macromedia Dreamweaver, to build the website. The designer is responsible
for website planning, design, development, testing, and publishing. For some websites, the
designer might use templates to maintain a consistent look and feel across the website.
Dreamweaver web developers should see Dreamweaver Help for more information.
Contribute users maintain the website. These are the marketers and managers, educators and
students, small business owners, administrative assistants and project managers, and so on, who
use Macromedia Contribute to keep their websites up-to-date. The user needs no experience in
HTML or web design. Contribute works like a word processor, so it should be familiar to users.
Users can add or update text, images, tables, links, and Microsoft Word and Excel documents.
This guide is designed for Contribute users.
Contribute website administrator sets up Contribute users and assists them in using Contribute to
maintain the website. The administrator is also responsible for determining which users can edit what
content on the website, by setting folder and user permissions. There can be only one website
administrator named for each website in Contribute. However, more than one person can administer
the website if the website administrator shares the administration password for the website.
Contribute website administrators should see “Administering Contribute” for more information.
13
Page 14

The Contribute workflow
Contribute uses a browse-edit-publish workflow to help you easily find the page you want to edit,
make changes to the page, and then update the page on your website.
Note: You must connect to a website before you can edit and publish pages on that website. For more information,
see “Connecting to a website” on page 18.
Here’s an overview of the Contribute workflow:
1. Browse to a page. Use the Contribute browser to find the web page you want to edit. The
browser functions as other web browsers, such as Internet Explorer, and has a familiar look and
feel. The browser toolbar has the normal navigation buttons, plus a Choose button to help you
navigate to files that aren’t linked on your website. You can create bookmarks in Contribute and
view your Microsoft Internet Explorer bookmarks. You can also use shortcuts in the Pages panel
in the sidebar to quickly access any current drafts.
2. Edit your content. When you find the page you want to edit, you click the Edit Page button to
open the page in the Contribute editor. Contribute copies the file from your web server and locks
it on the server so that no one else can edit the page while you’re working on it.
You use the Contribute editor as you use a word processor to edit text, images, tables, and links in
the page. You can even add a Word or Excel document to your website. The toolbar contains
familiar editing buttons, plus buttons for you to save your edits until later, cancel your edits, or
publish your edits to the website.
3. Publish the changes. When you finish editing your page, you are ready to publish the page to
your website. All you have to do is click the Publish button and Contribute replaces the existing
page on your web server with your edited version so that it is live on your website. Contribute also
unlocks the file on the server so that other users can edit the page if necessary.
Learning Macromedia Contribute
Contribute includes a variety of media resources to help you learn the program quickly. These
resources include an online help system, a tutorial, a printed Quick Start guide, and the How Do
I reference panel.
For information about all of these resources, see “Contribute resources” on page 15. If you’re
wondering which resource to start with, see “Where to start” on page 14.
Where to start
The Contribute resources you start with and use regularly depend on what your role is in
using Contribute.
Contribute website administrators should start with the Quick Start guide to install Contribute
and help users get connected. As you use Contribute, refer to the How Do I panel for quick steps
to complete common administration tasks, and refer to the online help to get more detailed
information about Contribute administration tasks and features.
Contribute users should start with the Quick Start guide to understand how to use Contribute to
complete basic tasks. Then, complete the tutorial to update some sample web pages and learn
more about Contribute. As you use Contribute, refer to the How Do I panel for quick steps to
complete common tasks, and refer to the online help to get more detailed and complete
information about Contribute tasks and features.
For more information about all the resources, see “Contribute resources” on page 15.
Chapter 114
Page 15

Contribute resources
The Contribute resources will help you learn to use Contribute. These resources include a printed
Quick Start guide, a How Do I reference panel, a tutorial, and an online help system.
In addition to these resources you can find regularly updated tips, TechNotes, examples, and
information at the Contribute Support Center on the Macromedia website.
For information about where to start with the resources, see “Where to start” on page 14. For
information about typographical conventions in the resources, see “Typographical conventions in
the Contribute resources” on page 16.
Contribute Quick Start
The Contribute Quick Start guide helps you quickly get started with Contribute. The guide
provides information about installing Contribute and connecting to your website, as well as
instructions on how to complete common Contribute tasks. Use this guide to learn the basics.
The Quick Start is a printed guide included with Contribute. You can also select Help > Quick
Start Guide to access the guide.
Contribute How Do I panel
The Contribute How Do I panel in the sidebar provides quick step-by-step instructions to help
you complete some common Contribute tasks. If the task you’re looking for is not in the How
Do I panel, or is there but you need more information, use Contribute Help to get more detailed
information.
Contribute Tutorial
The Contribute tutorial provides step-by-step instructions to complete particular Contribute
tasks. As you complete the tutorial, you’ll update the web pages of a sample website and quickly
become familiar with Contribute features.
A link to information about the tutorial appears on the Welcome page when you first launch
Contribute. The tutorial is available in the How Do I panel in the sidebar; click the Contribute
Tutorial link to start the tutorial.
When you install Contribute, the sample website for the tutorial is copied to your computer at:
c:\\documents and settings\yourname\Application
Data\Macromedia\Contribute\Configuration\Content\Tutorial.
Contribute Support Center
The Contribute Support Center website is updated regularly with the latest information on
Contribute, plus examples, tips, TechNotes, and other updates. Check the website often for the
latest news on Contribute and how to get the most out of the program.
Check the website often for the latest news on Contribute and how to get the most out of the
program at www.macromedia.com/support/contribute/.
Welcome to Macromedia Contribute 15
Page 16

Contribute Help
The Contribute online help system includes information for Contribute users in Using Contribute
and for Contribute website administrators in Administering Contribute.
Contribute Help provides comprehensive information about all of the Contribute features,
optimized for online reading. Contribute Help appears in the help viewer provided by your
operating system (Microsoft HTML Help).
To use Contribute Help:
1 Select Help > Macromedia Contribute Help or click the Help button in any dialog box for
information about the dialog box.
Note: A PDF version of the Contribute Help is included on your Contribute CD.
2 Use any of these features to find information in the help system:
• The table of contents enables you to see all of the information organized by subject, and then
click top-level entries to view subtopics.
• The index, like a traditional printed index, enables you to look up specific terms or concepts.
• Search enables you to type any character string in the Search text box to find that text
anywhere in the help system.
• The Previous and Next arrows enable you to move through the topics within a section.
Typographical conventions in the Contribute resources
The following typographical conventions are used in this guide:
• Menu items are shown in this format: Menu name > Menu item name. Items in submenus are
shown in this format: Menu name > Submenu name > Menu item name.
• Code font indicates HTML tag and attribute names as well as literal text used in examples.
• Italic code font indicates replaceable items (sometimes called metasymbols)incode.
• Bold roman text indicates menu selections, option names, button and icon names, and text for
you to enter verbatim.
Chapter 116
Page 17

CHAPTER 2
Getting Started
You need to install Macromedia Contribute, if it is not already installed. Before you install, be
sure that your computer meets the minimum setup requirements.
Before you can use Macromedia Contribute to edit and update your website’s content, you must
create a connection to the website—actually, to the web server that stores your website. By
creating a connection, you enable Contribute to access the web pages on your website, and you
can then edit pages and publish any changes you make.
In most cases, your Contribute website administrator will set up Contribute for you, or provide
the information for you to connect to your website. Your website administrator is the first person
you should contact if you have questions about connecting to your website.
This chapter contains the following sections:
• “Setup requirements” on page 17
• “Installing and launching Contribute” on page 18
• “Connecting to a website” on page 18
• “Launching Contribute without a network connection” on page 19
Setup requirements
Before you install Contribute, make sure your computer meets the minimum hardware and
software requirements.
Your computer must be connected to the Internet. If you are connecting to the Internet from a
business location, you may be connecting through a local area network (LAN). Many home or
small business computers connect to the Internet through an Internet Service Provider (ISP),
such as Earthlink or America Online. If you can read e-mail or browse the web, you probably
have an Internet connection.
In addition to having an Internet connection, you need to meet the following system
requirements:
• A computer running Microsoft Windows 98, ME, NT (Service Pack 3 or later), 2000, or XP
• A Pentium II Processor or equivalent, 300 MHz or faster
• Microsoft Internet Explorer, Version 5.0 or later
• 64 MB of Random Access Memory (RAM), plus 40 MB of available disk space
• A 256-color monitor capable of 800 x 600 resolution or better
17
Page 18

Installing and launching Contribute
Before you install Contribute, make sure your computer meets the minimum system requirements
(see “Setup requirements” on page 17). Then you are ready to install and launch Contribute.
To install and launch Contribute:
1 Insert the Contribute CD into your computer’s CD drive.
The Contribute installer launches.
2 Follow the onscreen instructions to install the application.
3 When the installation is complete, double-click the Contribute icon on your desktop, or
choose Start > Programs > Macromedia > Macromedia Contribute to launch Contribute.
4 The first time you launch Contribute you’ll see the registration screen. Click Register Now to
register Contribute.
Now you’re ready to start using Contribute.
Connecting to a website
Contribute enables you to connect to your website quickly and easily. Your Contribute website
administrator will likely do one of the following to help set up a connection for you:
• Send you an e-mail with a website connection key, or a link or network location for you to
download the connection key (see “Importing a website connection key” on page 18)
The connection key contains all of the network information Contribute needs to connect to
your website.
• Provide you with the necessary connection information and have you enter the information in
the Connection Wizard (see “Creating a Contribute website connection” on page 143)
Importing a website connection key
Your website administrator might provide a connection key, which you import to establish a
connection to your website. The connection key contains all of the network information
Contribute needs to connect to your website.
The website administrator will send an e-mail with the key attached, or give you the network
location for you to download the key.
Note: Your website administrator should communicate the connection key password to you. If you do not know the
password, contact your website administrator.
Chapter 218
Page 19
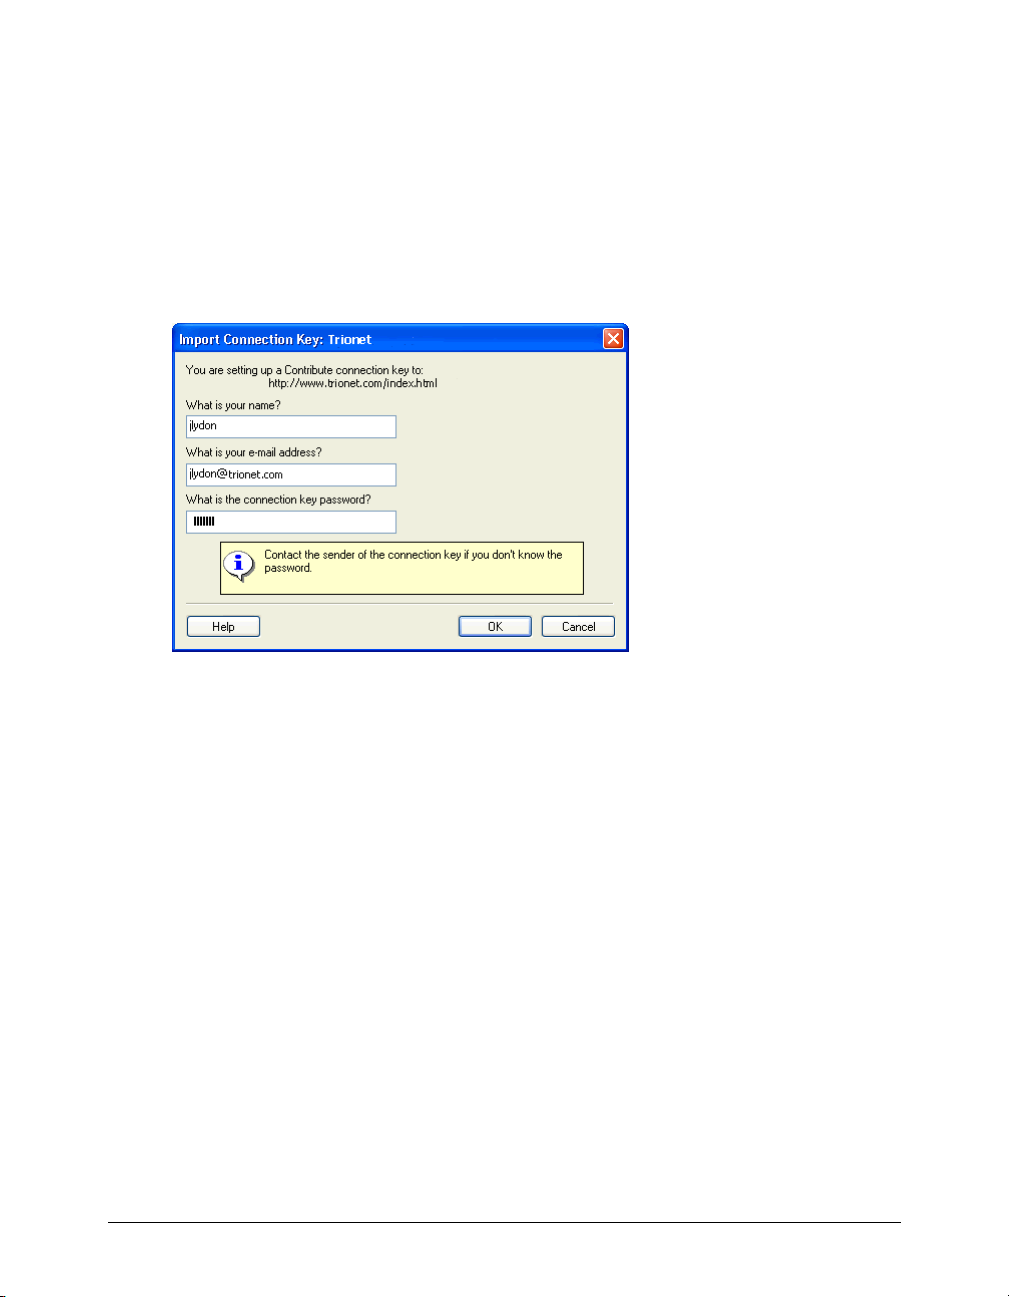
To import a website connection key:
1 Open the e-mail containing the connection key.
If the connection key is not attached to an e-mail, navigate to the network location of the key,
then copy it to your computer. You can also select Edit > My Connections, then click the
Import button to navigate to the connection key.
2 Double-click the connection key. (The connection key has an .stc extension, as in
myConnection.stc.)
Contribute launches (if it is not already running) and the Import Connection Key dialog
box appears.
3 Enter your name, e-mail address, and the password for the connection key.
Note: If you don’t have a password, contact the website administrator who sent you the connection key.
The website’s home page appears in the Contribute browser.
Launching Contribute without a network connection
When you launch Contribute, it checks your network connection so that it can connect to your
website. Contribute alerts you if it does not detect a connection.
If you launch Contribute without a network connection and receive the Connection Failure alert,
you have two choices:
• Select Work Offline if you know that you’re not connected to the network and you want to
use the Contribute work offline feature. For more information, see “Using Contribute to work
offline” on page 40.
• Select Try to Connect Anyway if you aren’t sure what the problem is and you want Contribute
to try to connect again. If Contribute still cannot connect, you can choose to disable the
website and continue checking your other website connections, if any. For more information,
see “Disabling your website at startup” on page 20 .
For more information about solving connection problems, see Chapter 17,
“Troubleshooting,” on page 189.
Getting Started 19
Page 20

Disabling your website at startup
Contribute alerts you if it detects a problem with any of your website connections when it
launches. Contribute displays the alert after the first website connection problem it encounters.
You can have Contribute try to connect again. If Contribute still can’t connect, you can choose to
disable the website connection and try to connect to your other websites, if any. If you disable a
website, you can enable it when you resolve your network connection problem.
Note: You can choose to disable a website at any time, not just at startup when there’s a problem. If you have
multiple websites, you might choose to disable websites that you aren’t currently working on so that Contribute does
not maintain the connection for an extended period of time. For more information, see “Disabling a website
connection” on page 163.
To disable a website when your network connection fails:
1 Start Contribute.
The Connection Failure dialog box appears.
2 Select Try to Connect Anyway to force Contribute to continue checking for a
network connection.
3 If Contribute still fails to connect, Contribute displays an error message with two options:
• Click Yes to continue trying to connect to other websites.
• Click No to disable the rest of your websites.
4 Click OK.
To enable a disabled website:
1 Select Edit > My Connections.
The My Connections dialog box appears.
2 Select a disabled website from the list, then click the Enable button.
3 Click Close.
Chapter 220
Page 21

CHAPTER 3
Exploring the Contribute Workspace
You can use Macromedia Contribute as both a web browser and a web page editor. You can easily
switch between browsing web pages and editing web pages. The Contribute workspace makes it
easy for you to access pages, whether you’re browsing or editing.
You can navigate the Contribute dialog boxes and workspace without using your mouse. You can
also set preferences to customize Contribute.
This chapter includes the following sections:
• “The Contribute workspace” on page 22
• “Browsing and editing pages” on page 24
• “Navigating to web pages” on page 25
• “Setting Contribute preferences” on page 28
• “Setting browser encoding” on page 31
• “Using Contribute accessibility features” on page 31
21
Page 22
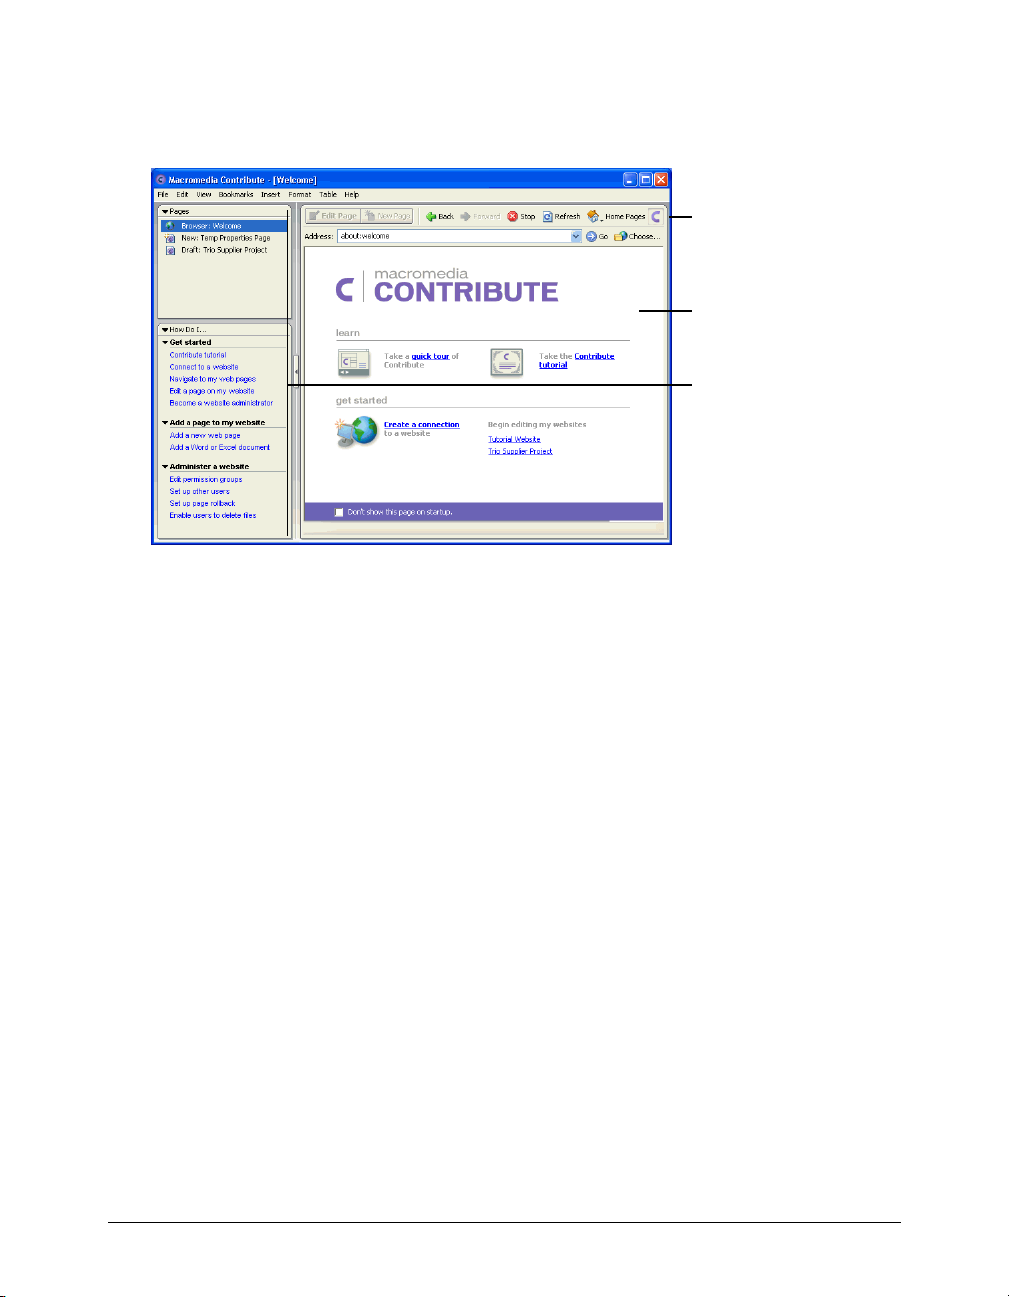
The Contribute workspace
The Contribute workspace is made up of the following main areas: the Contribute browser/
editor, toolbar, and sidebar.
Toolbar
Welcome page in the
browser/editor
Sidebar
This section covers the following topics:
• “The Contribute browser/editor” on page 22
• “The Contribute toolbars” on page 23
• “The Contribute sidebar” on page 23
The Contribute browser/editor
In the Contribute browser, you can browse to any web page—not just pages on your website. The
Contribute browser functions as a true web browser; simply click links in web pages to browse to
the page you want to edit. You can also create bookmarks to pages that you visit frequently.
In the Contribute editor, you can edit pages in websites you’ve connected to. You can edit text,
images, tables, links, and even pages with frames. Then, you can publish your changes to make
the updated web page live on your website.
It’s easy to browse and edit in Contribute, and to switch between browsing and editing. For more
information, see “Browsing and editing pages” on page 24.
Chapter 322
Page 23
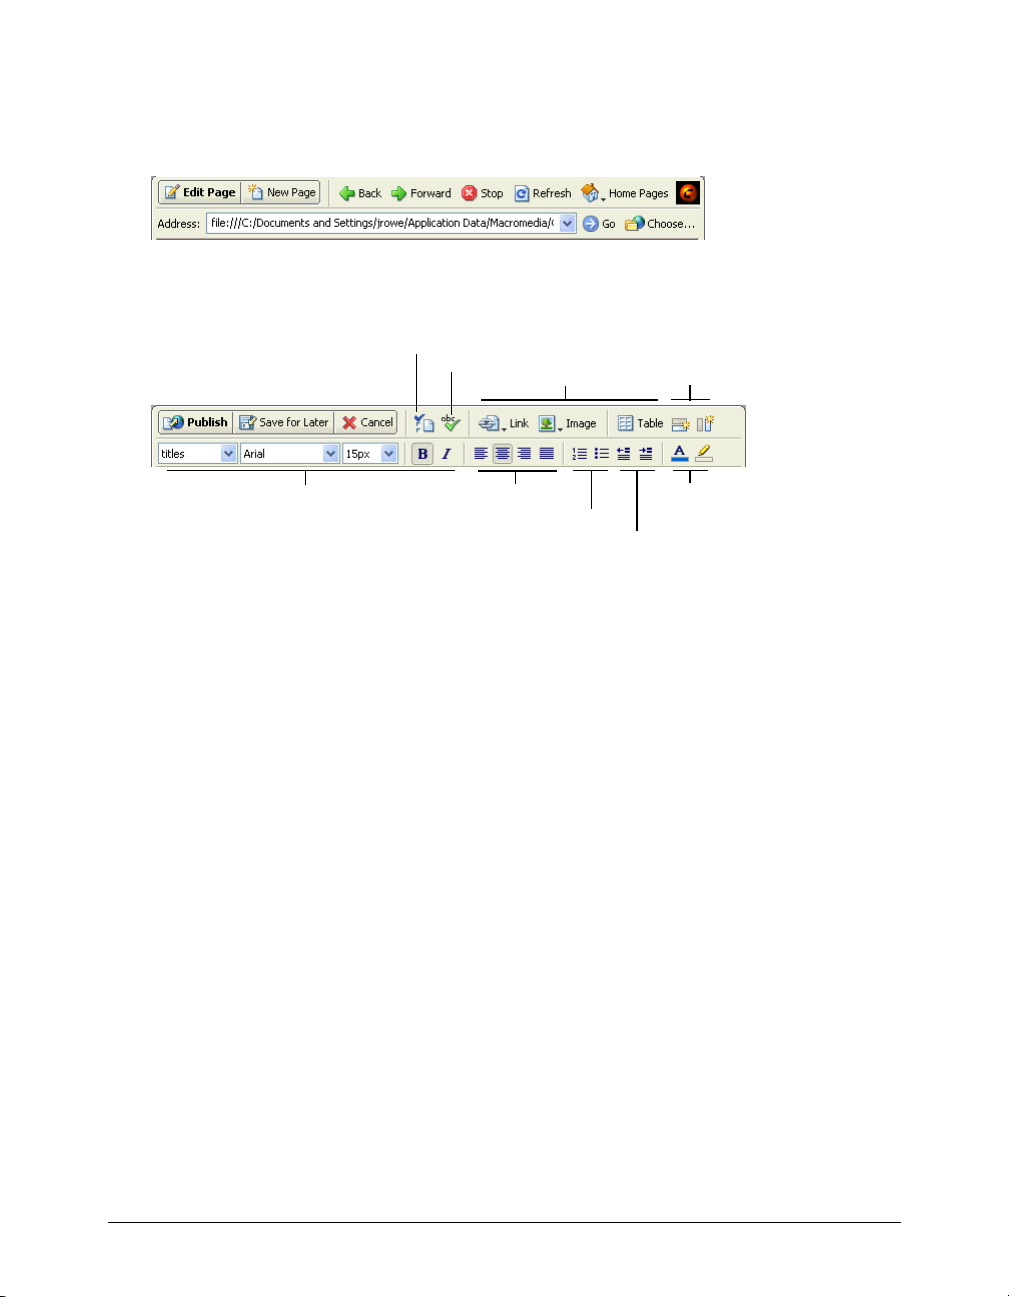
The Contribute toolbars
The Contribute toolbar changes, depending on whether you are browsing or editing a page.
The browser toolbar contains buttons for navigating your website or creating a new page.
The editor toolbar contains buttons for editing and common operations from the File, Insert,
Format, and Table menus.
Page properties
Text styling
Spell check
Text alignment
Insert content
Lists
Indentation
Add row/column
Color
The Contribute sidebar
The Contribute sidebar makes it easy to switch between editing and browsing, and makes it easy
to access your drafts and newly created pages. You can also use the sidebar to get quick
instructions for performing tasks in Contribute.
The sidebar has two parts:
• The Pages panel includes access to the web browser and all drafts and new pages you’re
currently editing.
• The How Do I panel provides quick step-by-step instructions to help you complete some
common Contribute tasks. The list of tasks changes, depending on whether you’re browsing or
editing.
Click any link in the How Do I panel in the sidebar to get more information on that task. If
the task you’re looking for is not in the list, see Contribute Help (Help > Macromedia
Contribute Help to get detailed information.
Note: For more information about using Contribute resources to get help, see “Contribute resources” on
page 15.
You can expand or collapse the panels and the sidebar.
To expand or collapse the sidebar:
• Select View > Sidebar or click the arrow on the splitter bar between the sidebar and the
Contribute browser/editor.
To resize the sidebar:
• Drag the splitter bar between the sidebar and the Contribute browser/editor.
Exploring the Contribute Workspace 23
Page 24

To expand or collapse the panels in the sidebar:
• Click the arrow in the panel title bar.
To resize panels vertically in the sidebar:
• Drag the title bar in the How Do I panel.
Browsing and editing pages
You can use Contribute to browse or edit web pages.
When you are browsing, you’ll see the browser toolbar, with the Edit Page button. Use the
Contribute browser like any web browser—enter web addresses, click links to navigate pages, use
the Back and Forward buttons, or select recently viewed pages.
Note: If you use Internet Explorer as your primary web browser, the Contribute web browser inherits preferences
from Internet Explorer. To change basic settings, such as fonts, cookies, or plug-ins, change your preferences in
Internet Explorer, then launch Contribute again.
You can browse to any website with Contribute—not just pages in your websites—but you can
only edit pages in your websites; that is, websites that you’ve created connections to (see
“Connecting to a website” on page 18). When you browse to a page that is in your website and
that you have permission to edit, the Edit Page button is enabled in the toolbar.
Note: If there is a Create Connection button in the toolbar, then you cannot edit that page (unless you connect to
the website).
When you edit a page, the editor toolbar appears and the page becomes a draft you can edit. The
draft’s title appears in the Pages panel. You can switch between browsing and editing at any time.
When you leave a draft you’re editing, Contribute saves your changes so that you can return to
the draft later and continue editing where you left off.
When you finish editing your draft, you can publish it so that it is live on you website (see
“Publishing Your Page” on page 125).
To switch from browsing to editing, do one of the following:
• Click the Edit Page button in the toolbar.
Note: Edit Page is only enabled for pages in a website you’ve connected to and you have permission to edit.
• Click a draft or new page title in the Pages panel in the sidebar.
To switch from editing to browsing, do one of the following:
• Click Browser in the Pages panel in the sidebar.
• Click the Save for Later button in the toolbar.
• Select View > Browser.
Note: These options do not publish your draft. When you finish editing, and publish the draft, the page appears in
the Contribute browser.
Chapter 324
Page 25
Navigating to web pages
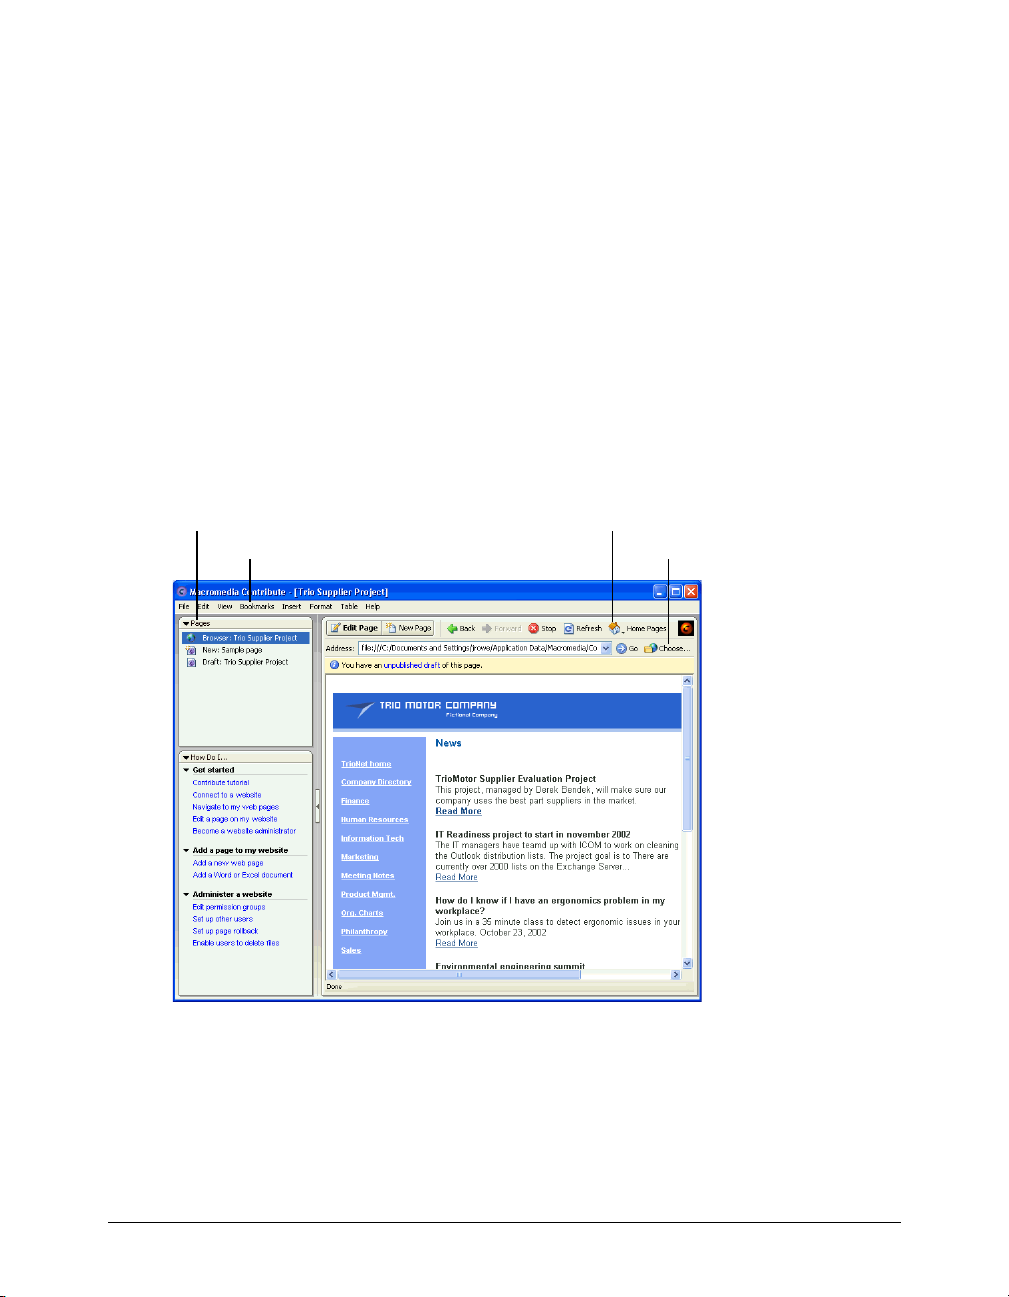
The easiest way to find a web page you want to edit, is to browse to the page in Contribute, just
as you would browse to a page in any web browser. For information about editing pages, see
“Editing existing web pages” on page 36.
To browse to a web page in Contribute, do one of the following:
• Click links in web pages to navigate to other pages.
• Type the web address (URL) of the page in the Address text box, then press Enter or click Go.
• Select View > Go to Web Address, enter the web address (URL), then click OK.
Contribute enables you to quickly access the following pages:
• Current drafts or new pages
• Home pages for the websites you’ve connected to
• Recently published pages
• Pages or files that aren’t linked from another page on your website
• Bookmarks for frequently accessed pages
Drafts and new pages
Bookmarks
Home pages for your websites
Pages that aren’t linked
Exploring the Contribute Workspace 25
Page 26

Viewing drafts and new pages
Drafts you are currently editing, and new pages you’ve created but haven’t published yet, appear
in the Pages panel. You can also access these pages using the File menu.
To view a draft or new page, do one of the following:
• Click the draft or new page title in the Pages panel in the sidebar.
• Select File > Drafts, then select a page from the pop-up menu.
Viewing home pages for your websites
You can use the toolbar to access home pages for websites you’ve connected to. You can also
access these pages using the View menu.
To view the home page for a website you’ve connected to, do one of the following:
• Click the Home Pages button on the toolbar, then select a home page.
• Select View > Home Pages, then select a home page from the pop-up menu.
Viewing recently published pages
You can use the View menu to quickly access pages you’ve recently published.
To view a recently published page:
• Select View > Recently Published Pages, then select a page from the pop-up menu.
Viewing pages and files that you can’t browse to
Contribute enables you to access pages and files associated with your website that you can’t
browse to. Use the Choose button in the toolbar to access pages and files that are saved in a
website folder, but aren’t linked from any page on your website.
To view a page or file that is not linked from another page:
1 In the Contribute browser or editor, select View > Choose File on Website or click the
Choose button in the browser toolbar.
The Choose File on Website dialog box appears.
2 Select a file by doing one of the following:
• If the file is in a folder on the website you are currently browsing, then select a file.
• If the file is not in a folder on the current website, use the Look In pop-up menu to navigate to
the correct website folder, then select a file.
When you select a file, depending on the file type, a preview might appear so that you can be
sure you’re selecting the correct file.
3 Click OK.
The page or file appears in the Contribute web browser.
Note: If you select a file type that the Contribute browser can’t display, you’ll see the File Placeholder page.
Chapter 326
Page 27

Setting up access to commonly used pages
Contribute enables you to keep a list of bookmarks for pages that you frequently visit. You can
add a bookmark for any page—not just pages in websites you’ve connected to.
When you add a page as a bookmark in Contribute, it appears in your list of bookmarks (up to
1000 bookmarks). Contribute also includes your Internet Explorer bookmarks (up to 2000
bookmarks) in the Other Bookmarks list under your Contribute bookmarks.
This section covers the following topics:
• “Viewing pages in your bookmarks list” on page 27
• “Adding a page to your bookmarks” on page 27
• “Deleting a page from your bookmarks” on page 28
Viewing pages in your bookmarks list
You can select pages in your list of bookmarks to quickly access those pages.
To add a page to your bookmarks, see “Adding a page to your bookmarks” on page 27. To delete
a page from your bookmarks, see “Deleting a page from your bookmarks” on page 28.
To view a page in your list of bookmarks, do one of the following:
• To view a Contribute bookmark, select Bookmarks, then select a bookmark from the list.
• To view an Internet Explorer bookmark, select Bookmarks > Other Bookmarks, then select a
bookmark from the list.
Adding a page to your bookmarks
You can add any web page—not just pages in websites you’ve connected to—to your
bookmarks list.
To view bookmarks, see “Viewing pages in your bookmarks list” on page 27. To delete a page
from your bookmarks, see “Deleting a page from your bookmarks” on page 28.
To add a page to your list of bookmarks:
1 Browse to the page you want to add to your bookmarks list.
2 Select Bookmarks > Add Bookmark from the menu.
The Add Bookmark dialog box appears.
3 If you want to change the name of the bookmark, enter a new name in the Name text box.
This is the name that appears in your bookmarks list.
4 If you want to add the page to a folder, click an existing folder name or click New Folder to
add a folder.
5 Click OK.
Contribute adds the page to your bookmarks list in the Bookmarks menu.
Exploring the Contribute Workspace 27
Page 28
Deleting a page from your bookmarks
You can delete any page from your bookmarks list, or you can delete a bookmarks folder.
To view bookmarks, see “Viewing pages in your bookmarks list” on page 27; to add a page to
your bookmarks, see “Adding a page to your bookmarks” on page 27.
To delete a bookmark:
1 Select Bookmarks > Delete Bookmark.
The Delete Bookmark dialog box appears.
2 Select the name of the bookmark or the folder you want to delete.
3 Click Delete.
Contribute removes the page from your bookmarks list in the Bookmarks menu.
4 If you want to delete another bookmark or folder, select it, then click Delete again.
5 Click Close when you finish deleting bookmarks.
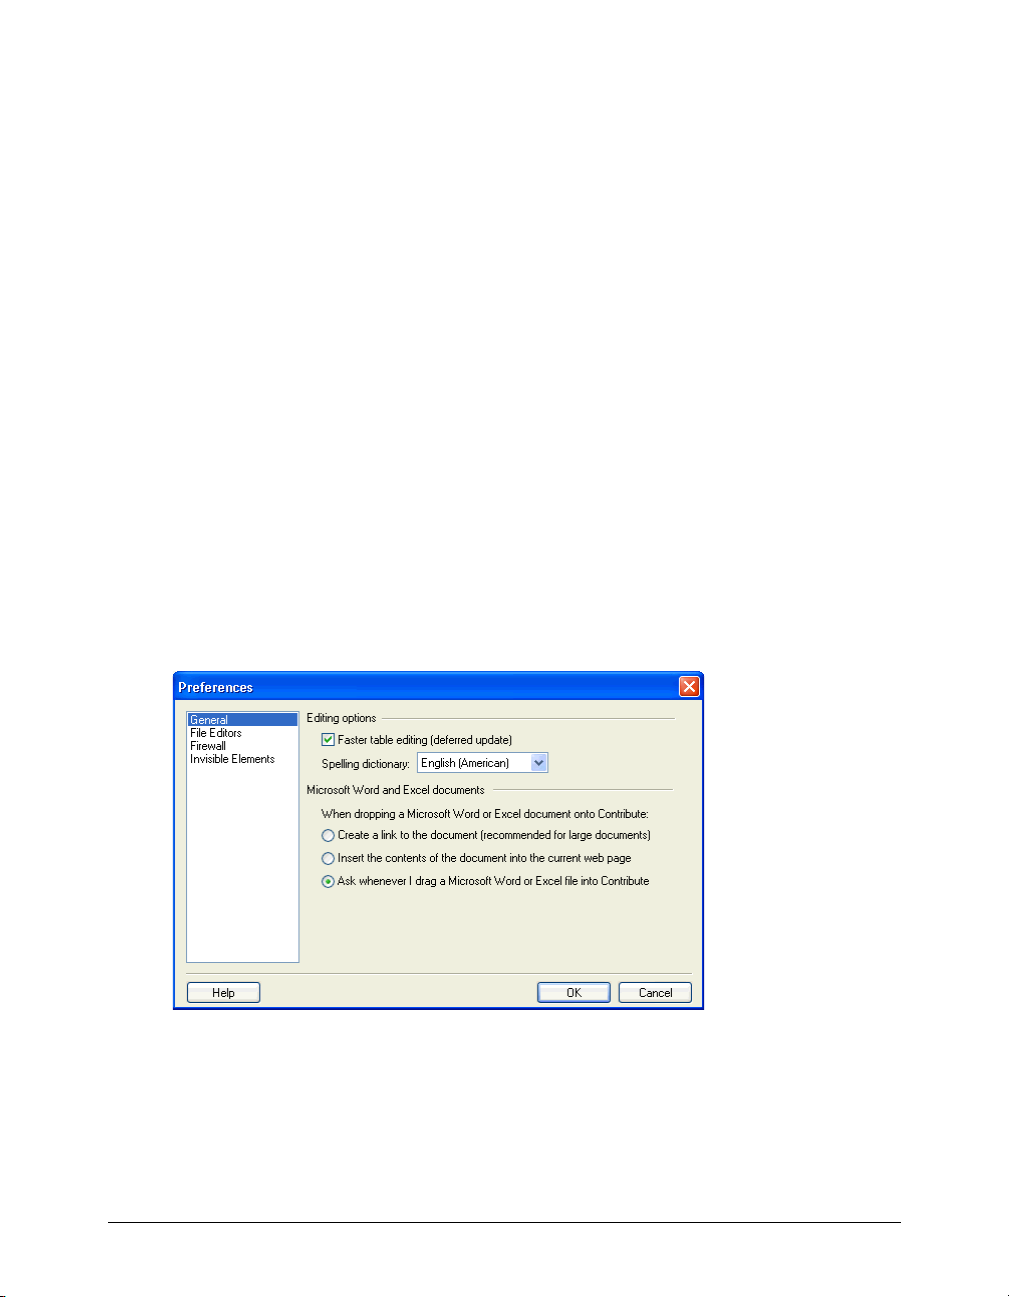
Setting Contribute preferences
Use the Preferences dialog box to set your user preferences for Contribute. You can set
preferences for general editing, file editors, your firewall, and invisible elements.
To edit user preferences:
1 Select Edit > Preferences.
The Preferences dialog box appears.
2 Select a category from the list on the left:
• Select General to set editing options or options for inserting Word and Excel documents (see
“Setting general preferences” on page 29).
• Select File Editors to select primary application editors by file type (see“Setting file editor
preferences” on page 29).
Chapter 328
Page 29

• Select Firewall to add or change settings for your firewall (see “Setting firewall preferences” on
page 30).
• Select Invisible Elements to hide or show invisible elements (see “Setting invisible element
preferences” on page 30).
Setting general preferences
You can set editing options, and determine how Contribute handles Microsoft Word and Excel
documents when you insert them in a page, in the Preferences dialog box.
To set the General preferences:
1 Select Edit > Preferences, then select General from the category list on the left.
2 In the Editing options section, change either of the following options:
• Select or deselect Faster table editing.
When this option is enabled, Contribute does not always redraw a table as you edit it.
Selecting this option might improve performance when you edit large tables. When you want
Contribute to redraw the table, click outside of the table, switch to another draft or the
browser, or publish the draft.
• Select a dictionary from the Spelling dictionary pop-up menu.
3 In the Microsoft Word or Excel documents section, select an option to indicate what action
Contribute performs when you insert a Word or Excel document in a draft.
4 Click OK.
Setting file editor preferences
When you need to edit web page content, such as an image, in an external application,
Contribute launches the application for you. You can select or change your primary editing
applications for each file type you edit in the Preferences dialog box.
To change the editor for a file type:
1 Select Edit > Preferences, then select File Editors from the category list on the left.
2 Select a file type in the left pane.
Associated editors appear in the right pane. If the application you want to select is in the pane,
then skip to step 5.
3 Click the Plus (+) button above the right pane.
The Select External Editor dialog box appears.
4 Navigate to the application you want to add, then click Open.
The application name appears in the right pane.
5 Select the application you want Contribute to launch for the selected file type, then click the
Make Primary button.
The word Primary appears beside the application name.
6 Click OK.
Exploring the Contribute Workspace 29
Page 30

To add a file type and associate an editor:
1 Select Edit > Preferences, then select File Editors from the category list on the left.
2 Click the Plus (+) button above the left pane, then type the file type.
3 Click the Plus (+) button above the right pane.
The Select External Editor dialog box appears.
4 Navigate to the application you want to associate with the new file type, then click Open.
The application appears name appears in the right pane.
5 Click OK.
To delete a file type or associated editor:
1 Select Edit > Preferences, then select File Editors from the category list on the left.
2 Select a file type in the left pane or an application in the right pane.
3 Click the Minus (-) button above the pane.
The file type or application name disappears from the pane.
4 Click OK.
Setting firewall preferences
If you use a firewall, use the Preferences dialog box to enter or change your host and port.
To set firewall preferences:
1 Select Edit > Preferences, then select Firewall from the category list on the left.
2 In the Firewall host text box, enter the name of the firewall host.
3 In the Firewall port text box, enter the network port number through which FTP access is
enabled.
4 Click OK.
Setting invisible element preferences
You can turn invisible elements, such as section anchors, on or off in the Preferences dialog box.
For more information about section anchors, see “Linking to a specific place in a page” on
page 112.
To make section anchors visible or invisible:
1 Select Edit > Preferences, then select Invisible Elements from the category list on the left.
2 Select or deselect the Show section anchors when editing a page check box.
3 Click OK.
Chapter 330
Page 31

Setting browser encoding
You can set the browser encoding for a page, to determine how the page appears in the
Contribute browser. You might need to set encoding if characters aren’t displaying properly in
the Contribute browser.
To change browser encoding:
1 In the Contribute browser, right-click in the page.
2 Do one of the following:
• Select a browser encoding from the pop-up menu.
• Select More from the pop-up menu, then select a browser encoding.
Using Contribute accessibility features
Accessibility refers to making websites and web products usable for people with visual, auditory,
motor, and other disabilities. Contribute provides features that make it accessible to users with
disabilities.
This section covers the following topics:
• “Using screen readers with Contribute” on page 31
• “Using operating system accessibility features” on page 31
• “Using the keyboard to navigate Contribute” on page 32
• “Authoring for accessibility” on page 33
Using screen readers with Contribute
A screen reader recites text that appears on the computer screen. It also reads non-textual
information, such as button labels or image descriptions, in the application.
As a Contribute user, you can use a screen reader to assist you in editing your web pages. The
screen reader starts reading in the top left corner of the application.
Contribute supports the following screen readers:
• JAWS for Windows, from Freedom Scientific (www.freedomscientific.com)
• Window Eyes screen readers, from GW Micro (www.gwmicro.com)
Using operating system accessibility features
Contribute supports the Windows operating system high contrast setting. You activate this
option through the Windows control panel.
When high contrast is on, it affects Contribute as follows:
• Dialog boxes and panels use system color settings.
For example, if you set the color to White on Black, then all Contribute dialog boxes and
panels appear with a white foreground color and black background.
• The Contribute editor uses the background and text colors you set in Format > Page Properties
so that pages you design render colors as a website visitor’s browser will render them.
Exploring the Contribute Workspace 31
Page 32

Using the keyboard to navigate Contribute
While you are editing, you can use the keyboard to navigate the Contribute workspace, dialog
boxes, and tables without a mouse.
You can also use keyboard shortcuts to open some dialog boxes and perform some commands.
For a list of shortcuts, see “Keyboard shortcuts” on page 203.
This section covers the following topics:
• “Navigating the workspace” on page 32
• “Navigating dialog boxes” on page 32
• “Navigating tables” on page 33
Navigating the workspace
You can use keyboard shortcuts to navigate the Contribute workspace—that is, to access the
menus and to switch between the Contribute browser and editor. For a complete list of
Contribute keyboard shortcuts, see “Keyboard shortcuts” on page 203.
All of the items in the Pages panel and toolbar are accessible through the menus. To access
information about the tasks covered in the How Do I panel, use Contribute Help (Help >
Macromedia Contribute Help).
To use the keyboard to navigate dialog boxes and tables, see “Navigating dialog boxes” on
page 32 and “Navigating tables” on page 33.
To use the keyboard to switch from Contribute the browser to the editor, do one of the following:
• Press Control+Shift+E, to edit the current page.
Note: This works the same as clicking the Edit Page button in the toolbar.
• Press Alt+F, press Alt+F again, then use the arrow keys to select a current draft or new page
from the pop-up menu.
The drafts and new pages listed in the Pages panel appear in this list.
To use the keyboard to switch from the Contribute editor to the browser:
• Press Control+Shift+B.
Note: This works the same as clicking Browser in the Pages panel.
Navigating dialog boxes
You can use the keyboard to navigate dialog boxes.
To navigate the workspace, see “Navigating the workspace” on page 32. To navigate tables, see
“Navigating tables” on page 33.
To navigate a dialog box:
• To move through dialog box options, press Tab.
• To move through choices for an option, use the arrow keys.
For example, if an option has a pop-up menu, move focus to that option, then use the Down
Arrow key to move through the choices.
Chapter 332
Page 33

• To move through a category list, press Control+Tab to shift focus to the category list, then use
the arrow keys to move up or down the list.
To see an example of a category list, select Edit > Preferences.
• To shift to the options for a category in a category list, press Control+Tab.
• To accept a choice and exit the dialog box, press Enter.
• To close the dialog box without making any changes, press Esc+Alt+F4.
Navigating tables
After you select a table, you can use the keyboard to navigate through it.
To navigate the workspace, see “Navigating the workspace” on page 32. To navigate dialog boxes,
see “Navigating dialog boxes” on page 32.
To navigate a table:
1 In the Contribute editor, do one of the following to select the table:
• If the insertion point is to the left of the cell, press Shift+Right Arrow.
• If the insertion point is to the right of the cell, press Shift+Left Arrow.
2 Press the Down Arrow key to position the insertion point in the first cell.
3 Use the arrow keys or press Tab to move to other cells as necessary.
Tip: Pressing Tab in a right-most cell adds another row to the table.
4 To select a cell, press Control+A while the insertion point is in the cell.
5 To exit the table, use the Select All command (Control+A), then press the Up, Left, or Right
arrow key.
Authoring for accessibility
As you edit your web pages, it’s important to keep accessibility in mind for your website visitors.
The U.S. government and other organizations have established accessibility legislation and
guidelines. For more information about two significant initiatives, see the World Wide Web
Consortium Web Accessibility Initiative (www.w3.org/wai) and Section 508 of the Federal
Rehabilitation Act (www.section508.gov).
Also, be sure to keep screen readers in mind as you edit your pages. Contribute helps you make
your images and tables more accessible in the following ways:
• You can add descriptive text for screen readers to describe images in your pages. Your website
administrator can enable Contribute to prompt you for a description whenever you insert an
image. For more information, talk to you website administrator or see “Setting page editing
and paragraph permissions” on page 173.
• You can apply headings to your tables for screen readers. To insert tables with headings, see
“Inserting a table on a page” on page 81.
Note: Screen readers do not read headings that you create by making text bold and centered in a row or column.
Exploring the Contribute Workspace 33
Page 34

Chapter 334
Page 35

CHAPTER 4
Working with Pages
Macromedia Contribute enables you to edit existing pages on your website, including pages based
on templates. You can cancel your edits or cancel a new page if you need to. If you have
permission, you can delete pages and file types on your website. You can also export a page to an
HTML file.
Note: For information about creating new pages, see “Creating or copying a page on your website” on page 45.
If you need to edit content such as an image or other file type on a web page, you can use
Contribute to open the file in an external editing application.
You can also use Contribute without a network connection to edit pages. Using the work offline
feature, you can work on an airplane, at home, or wherever, and publish your pages when you
reestablish your network connection.
Contribute updates the existing page on your website with your edited page when you publish the
draft (see “Publishing Your Page” on page 125).
This chapter contains the following sections:
• “Editing existing web pages” on page 36
• “Saving drafts” on page 37
• “Working with pages based on Dreamweaver templates” on page 38
• “Using Contribute to work offline” on page 40
• “Editing content in an external application” on page 42
• “Canceling a draft or new page” on page 43
• “Deleting a web page” on page 43
• “Exporting a Page” on page 44
• “Printing a page” on page 44
35
Page 36

Editing existing web pages
You can edit any pages on your website, as long as you have permission and as long as someone
else is not currently editing the page.
This section covers the following topics:
• “About editing” on page 36
• “Opening a page for editing” on page 36
• “Undoing mistakes” on page 37
For information about changing properties for an existing page, see “Setting page properties” on
page 51. For information about adding keywords or a description for an existing page, see
“Adding keywords and a description for a page” on page 53.
About editing
You can edit pages on websites that you’ve connected to (see “Connecting to a website” on page
18) and have permission to edit. You cannot edit a page if the page is locked—that is, if someone
else is currently editing it. When you browse to a page, the message area under the toolbar
indicates whether you can edit that page.
While you edit a page, Contribute saves it as a draft, and the draft title appears in the Pages panel
in the sidebar. For information about opening a page for editing, see “Opening a page for
editing” on page 36. For information about working with drafts, see “Saving drafts” on page 37.
Note: If you want to edit a Microsoft document that you’ve linked to on your website, see “Editing content in an
external application” on page 42.
There might be restrictions on which parts of a draft you can edit. Your website administrator can
create a template with locked regions or can set up editing constraints that restrict editing to
text only.
Note: If you do not have permission to edit a page or part of a page that you need to edit, talk to your website
administrator or see “Managing User Settings and Permissions” on page 165.
Opening a page for editing
To open a page for editing, simply browse to the page or use the Contribute workspace to quickly
access special pages (see “Navigating to web pages” on page 25). For information about drafts, see
“Saving drafts” on page 37.
To edit a page:
1 Browse to a page you want to edit.
2 Do one of the following:
• Click the Edit Page button in the toolbar.
• Select File > Edit Page.
The page appears in the Contribute editor as a draft, and the draft title appears in the Pages
panel.
Chapter 436
Page 37

Undoing mistakes
In Contribute, as in most applications, you can undo individual mistakes as you make them. You
can also redo an edit if you decide that you don’t want to undo it.
Note: In Contribute, you can also discard changes, after you publish your draft, by reverting to a previously
published version of a page if you need to. For more information, see “Rolling back to a previous version of a page”
on page 131.
To undo an edit:
• Select Edit > Undo.
To redo an edit:
• Select Edit > Redo.
Saving drafts
You can save a draft while you work (see “Saving a draft while you work” on page 37), or you can
save a draft and switch to another draft or to the browser (“Saving a draft until later” on page 37).
Saving a draft while you work
When you edit a page (see “Editing existing web pages” on page 36), Contribute automatically
saves the page as a draft, and the draft title appears in the Pages panel in the sidebar. Contribute
continues to save your draft as you work on it, but you can also periodically save your work if
you want.
To save a draft and continue working:
• Select File > Save.
Note: When you save a new page for the first time, you do not give it a filename; you select a filename when you
publish the new page.
Saving a draft until later
You can save a draft you’re editing and work on another draft, switch to browsing, or close
Contribute. Contribute saves your draft anytime you leave it, and keeps the draft in the Pages
panel until you publish (see “Publishing Your Page” on page 125) or cancel (see “Canceling a
draft or new page” on page 43) it.
To save a draft until later:
1 Do one of the following to leave your draft:
• Click Browser in the sidebar to switch to the browser.
• Select View > Browser to switch to the browser.
• Click the Save for Later button in the toolbar to close the draft and switch to the browser.
• Click another draft or new page in the Pages panel to edit that page.
• Close Contribute.
Working with Pages 37
Page 38

2 If you closed Contribute, restart the application.
3 Click the draft title in the Pages panel to return to the draft you were previously editing.
The draft appears in the Contribute editor for you to continue editing.
Working with pages based on Dreamweaver templates
A Macromedia Dreamweaver template is a special type of page that contains a preset page layout,
and includes elements, such as text and images. In Contribute, you can create a page based on a
template. You can also edit a page based on a template or edit template properties for a page based
on a template.
This section covers the following topics:
• “About templates” on page 38
• “Editing a template-based page” on page 39
• “Setting template properties” on page 40
For information about creating a page based on a template, see “Creating a page based on a
template” on page 46.
About templates
A Dreamweaver template contains a preset page layout, and includes elements, such as text and
images. A template gives you a starting point for new website pages and can ensure that your
website has a consistent look when you create pages based on a template (a template- based page).
For example, the company employee template might contain basic elements and provide sections
for employee information. Suppose the template has the company logo and address, and blank
sections for the employee’s name, department, phone number, and picture. Any new employee
page based on the company employee template would inherit the same page layout.
Chapter 438
Page 39

In a template, the designer creates regions to control which elements on a template-based page
you can edit. There are editable regions in a template, which you can edit, and locked regions,
which you can’t edit. In the employee template example, the company logo and address might be
in a locked region. The employee information sections would be editable regions.
Locked region
Editable region
Editing a template-based page
In a page based on a Dreamweaver template (a template-based page), there are editable regions,
where you can add or edit content, and there are locked regions, where you cannot add or
edit content.
Note: If you try to edit a locked region in a document based on a template, the pointer changes to indicate that you
can’t click in a locked region.
When you view a template-based page, you see outlines around the editable regions. The editable
regions each have a tab at the upper left giving the name of that content area. The tabs show you
where you can add or update content on the page.
For example, a product template-based page might have a Title region, for the product title, and a
Description region, for a product description. You add content to the appropriate sections.
You can edit the editable regions of a template-based page as you would edit any other web page.
To edit a template-based page:
1 Browse to the template-based page you want to edit.
2 Do one of the following:
• Click the Edit Page button in the toolbar.
• Select File > Edit Page.
The page appears as a draft in the Contribute editor. You can make edits in the editable
regions.
Working with Pages 39
Page 40

Setting template properties
The Dreamweaver template designer might enable you to show or hide parts of the page. You
control this content in the Template Properties dialog box. In pages based on a template, there
might also be editable attributes of the page, such as background color, which you can edit in
template properties.
To modify template properties:
1 Browse to a template-based page, then click the Edit Page button in the toolbar.
2 Select Format > Template Properties.
The Template Properties dialog box opens.
3 In the Name list, select a property.
The bottom of the dialog box updates to show the selected property’s label and its assigned value.
4 In the field to the right of the property label, edit the value to modify the property.
5 Click OK.
Using Contribute to work offline
Contribute gives you the freedom to edit web pages without a network connection. Using the
work offline feature of Contribute, you can work on an airplane, at home, or anywhere.
While you are working offline, you can edit drafts, but you cannot use the Contribute browser
(see “Working offline in the Contribute editor” on page 41). Contribute remains offline—even if
you establish a network connection—until you switch to working online (see “Switching between
working online and working offline” on page 41).
Chapter 440
Page 41

To launch Contribute to work offline:
1 Start Contribute without a network connection.
The Connection Failure dialog box appears.
2 Select Work Offline.
3 Click OK.
The Contribute browser displays the Working offline page. Click a draft title in the Pages
panel to start editing.
Working offline in the Contribute editor
When you’re working offline, the Contribute browser displays information about what you can
do offline. You cannot browse to other pages or websites when you are offline.
You can edit current drafts in the Pages panel or create new pages while you’re offline. Not all of
the Contribute editor functions are available when you’re offline. For example, you can’t publish
pages until you are online again.
Tip: Before you work offline, be sure to save any pages you need as drafts. You cannot access home pages or
recently published pages while you are offline.
To edit a draft while working offline:
• Click a draft or new page title in the Pages panel of the sidebar.
The draft opens in the Contribute editor.
To create a new page while working offline:
• Select File > New Page.
The new page opens in the Contribute editor and its title appears in the Pages panel.
To delete a new page while working offline
1 Open any new page that you created while working offline.
Note: You can only delete pages that you created while working offline. You cannot cancel changes to a draft
while working offline.
2 Click the Cancel button in the toolbar or select File > Cancel Draft.
Contribute removes the new page from the Pages panel and opens the Contribute Working
offline page.
Switching between working online and working offline
If you start Contribute offline without a server connection, or switch from online to offline while
you are using Contribute, then you can switch to working online whenever you establish a server
connection.
Note: Contribute does not reestablish the connection to your web server. You must connect to the server before
you switch to working online in Contribute.
Working with Pages 41
Page 42

To switch from working online to working offline:
• Select File > Work Offline.
Note: Switching to work offline does not disconnect your network connection.
To switch to working online after working offline:
1 Restore your network connection, if necessary.
2 Do one of the following:
• Deselect File > Work Offline.
• Click the Work Onl ine button in the toolbar.
Editing content in an external application
If you have images, Microsoft Word documents, Macromedia Flash content, or other file types on
your website that you want to edit, you need to edit that content in the application in which it
was created. Use Contribute to edit the file in the appropriate application.
Note: You need to use Contribute to edit the file; changes you make to the local, original source file will not appear
on your website.
Before you can use Contribute to launch an external application editor, you might need to
associate an editor with the file type you intend to edit (see “Setting file editor preferences” on
page 29). Contribute has preassigned editors for common file types.
To edit content in an external application:
1 To find the content you want to edit, do one of the following:
• Browse to the page or file that contains the content you want to edit.
• Click the Choose button in the toolbar, navigate to the file you want to edit, then click OK.
• Enter the path for the file you want to edit in the Address text box, then click Go.
2 If the Contribute browser cannot display the page or file you’ve selected, you’ll see the File
Placeholder page.
To edit the page or file, you need to associate a file editor with this file type (see “Setting file
editor preferences” on page 29).
3 Select the content you want to edit, if necessary.
For example, if you want to edit an image on a page, select the image. If you want to edit the
page, a Word page for example, you do not need to select content.
4 Click the Edit button in the toolbar or select File > Edit.
Note: To edit an image on a draft, select File > Edit Image or right-click the image, then select Edit Image.
Contribute displays the External Application Editing page and launches an external editing
application.
Note: To change your default editor, see “Setting file editor preferences” on page 29.
5 If you are editing an image in Macromedia Fireworks, click No in the Find Source dialog box
to indicate that you do not want to edit the source file for this image; you want to edit the
image for your website only.
Chapter 442
Page 43

6 In the external application, make changes as necessary, then save your changes and close
the application.
Note: If you are editing in Fireworks, click the Done button in the editing window.
7 In Contribute, click the Publish button in the toolbar to publish your changes to the website.
Note: If you need to make additional edits before you publish, click the Launch button on the External
Application Editing page to open the content in the external editor.
The updated content appears in Contribute.
Canceling a draft or new page
When you are editing a draft of an existing page, you can decide to discard all changes and retain
the currently published version of the page. When you are editing a new page that you created,
you can discard the new page.
Also, if your administrator has given you permission, you can delete pages that are published on
your website. For more information, see “Deleting a web page” on page 43.
To cancel changes to a draft of a published page:
• In your draft, click the Cancel button in the toolbar.
The published version of the page appears in the Contribute browser, without any edits.
To cancel a new page:
• In the new page you’re editing, click the Cancel button in the toolbar.
Contribute discards the new page.
Deleting a web page
You can delete pages from your website if your website administrator has given you permission. In
addition to deleting pages, you can delete any file type on your website, including image files.
Note: If you do not have permission to delete a page that you need to delete, talk to your website administrator or
see “Setting folder and file access permissions” on page 170
You do not need special permission to delete a new page that you created and haven’t published
yet. For more information, see “Canceling a draft or new page” on page 43.
To delete a page or file:
1 Do one of the following to find the page or file:
• Browse to the page or file you want to delete.
• Click the Choose button in the toolbar, then select a file and click OK.
Note: If Contribute cannot display the page or file you browse to, you’ll see the File Placeholder page. You can
still delete the page or file, even though you can’t view it.
Working with Pages 43
Page 44

2 Select File > Delete Page.
Note: This menu item is disabled if you do not have permission to delete pages on your website.
An alert appears.
3 Click Yes to confirm that you want to delete the file.
Contribute deletes the page and displays the last page you viewed in the browser.
Exporting a Page
Contribute enables you to export a page from Contribute to an external HTML file. You can save
the file anywhere you choose on your computer or network.
If you export a new page with images—that is, a page you haven’t published yet—you’ll see the
images in your exported page. If you edit an existing page—a previously published page—you
might not see all of the images in your exported page. This is because the new page references local
versions of the images, and the existing page references images that are saved on your website.
To export a page:
1 Browse to the page you want to export, then click the Edit Page button in the toolbar.
2 Select File > Export.
The Export dialog box appears.
3 Select a location to save the exported file.
4 Enter a filename.
5 Click Save.
The exported file appears in the folder you selected.
Printing a page
You can browse to a page and print it, or you can print a page you are editing to check your
changes.
To preview a page:
1 Select File > Print Preview.
The page appears in a browser window.
2 If you want to print the page, click Print.
3 Click Close to close the preview when you finish viewing it.
To print a page:
1 Select File > Print.
Note: In the Contribute browser you can also right-click, then select Print.
The Print dialog box appears.
2 Click Print or OK.
Your default printer prints the page.
Chapter 444
Page 45

CHAPTER 5
Adding Pages and Documents
With Macromedia Contribute you can add pages to your website. You can create a copy of a page,
create a blank page, create a copy of a sample page, or create a page based on a template. After you
create a page, you can change its properties, or even add keywords or a description for the page so
that website visitors can use a search engine to find the page.
You can also add Microsoft Word or Excel documents to your website. You can either add the
contents of the document to a page on your website, or you can create a link from a web page to
the document.
Contribute makes the new page or document live on your website when you publish it (see
“Publishing Your Page” on page 125).
This chapter contains the following sections:
• “Creating or copying a page on your website” on page 45
• “Setting page properties” on page 51
• “Adding keywords and a description for a page” on page 53
• “Adding Word and Excel documents to a website” on page 53
Creating or copying a page on your website
You can create or copy any of the following types of pages:
• Copy of Current Page
• Blank Web Page
• Sample Web Page
• Te m p l a te
Note: If your website administrator has restricted the types of new pages you can create, you won’t see all of these
options when you create or copy a page (see your website administrator or “Setting permissions for new web
pages” on page 177).
Tip: You can also add a Word or Excel document to your website (see “Adding Word and Excel documents to a
website” on page 53).
45
Page 46

Copying a page on your website
You can create a copy of the page you are currently viewing on your website. You must be viewing
the page in the Contribute browser; you cannot create a copy of a page that is a draft in the
Contribute editor. Also, you cannot copy a page from one website to another website.
Note: You cannot create a copy of a page that contains frames.
You m ust create the new page first, then link it later. You cannot create the copy and add a link to
it at the same time.
Creating a blank web page
You can create a blank web page. There are two ways to add a blank page to your website:
• Create a new page and a link to the page at the same time. (Recommended)
For example, suppose you are updating your home page, and you want to add a link to a
contact information page that you haven’t created yet. From the home page, you can insert a
link and create the contact page at the same time.
• Create the new page first, then link it later.
For example, suppose you create a page for a new product. After you create the page, you can
go to the Products Overview page, and add a link to the new product page.
Copying a sample web page
Contribute comes with built-in sample web pages that you can copy and use on your website. Use
any of these pages as a starting point for your web page. Samples include a Meeting Note, Contact
Page, Home Page, Favorite Links Page, and sample pages for text and images.
There are two ways you can copy a sample web page to your website:
• Create a new page and a link to the page at the same time. (Recommended)
For example, suppose you are updating your home page, and you want to add a link to a
contact information page that you haven’t created yet. From the home page, you can insert a
link and create the contact page at the same time.
• Create the new page first, then link it later.
For example, suppose you create a page for a new product. After you create the page, you can
go to the Products Overview page, and add a link to the new product page.
Creating a page based on a template
You can create a new page based on a template. In Contribute there are two types of templates:
• A template created in Macromedia Dreamweaver (see Dreamweaver Help > Using
Dreamweaver). A Dreamweaver template is a template that a designer creates for you with
editable and locked regions.
• A template that the website administrator for your website designated as a template. Your
website administrator can designate any page on your website as a template.
Chapter 546
Page 47

Both types of templates enable you to create a copy of an existing template so that you can
maintain a consistent look on your website, and give you a starting point for your new page. The
only difference is that a Dreamweaver template has editable and locked regions (see “Working
with pages based on Dreamweaver templates” on page 38), and a page designated as a template by
your website administrator might not.
There are two ways you can add a page based on a template to your website:
• Create a new page and a link to the page at the same time. (Recommended)
For example, suppose you are updating your home page, and you want to add a link to a
contact information page that you haven’t created yet. From the home page, you can insert a
link and create the contact page at the same time.
• Create the new page first, then link it later.
For example, suppose you create a page for a new product. After you create the page, you can
go to the Products Overview page, and add a link to the new product page.
Creating a new page and a link to the page
It’s a good idea to create a link to a new page when you create the new page. This way, you don’t
have to remember to link to the page later, and you ensure that users will be able to navigate to
your page when you publish it.
From an existing page, you can insert a link to a new page, which Contribute creates at the same
time it inserts the link.
After you create your page, you can set page properties (see “Setting page properties” on page 51)
or add search keywords and a description for the page (see “Adding keywords and a description
for a page” on page 53).
To create a new page and a link:
1 Browse to an existing page where you want to insert a link to a new page, then click the Edit
Page button in the toolbar.
2 Do one of the following to indicate where the link will appear:
• Place the insertion point in the draft.
• Select text in the draft.
• Select an image in the draft.
3 Do one of the following to open the Insert Link dialog box:
• Click the Link button in the toolbar, then select Create New Page.
• Select Insert > Link > Create New Page.
Adding Pages and Documents 47
Page 48

• Right-click, then select Insert Link.
The Insert Link dialog box appears.
4 Click the Create New Page button at the top of the dialog box, if it is not already selected.
5 Enter link text in the Link text text box, if you did not select text or an image in your draft.
This is the text a website visitor will click to go to the new page.
Note: This text box is not available if you selected text or an image in the draft.
6 If you have multiple websites, and want to create the new page in a website other than the
current one, select another website in the Create new page from section.
Note: If you don’t have permission to edit files in the folder you select, then Contribute saves the new page in the
first folder you can edit for that website. If you cannot edit any folders in the website, then you cannot create a
new page for that website.
7 In the Create new page from section, select the type of page you want to create:
• Select Blank Web Page to create a blank page.
• Select a page in the Sample Web Pages folder to create a copy of a built-in sample page
provided with Contribute.
• Select a page in the Tem p l a t e s folder to create a new page based on a Dreamweaver template,
or based on a page within your website that the website administrator designated as a template.
When you select a page type, a preview and a description appear.
Note: If your website administrator has restricted the types of new pages that you can create, or you do not have
permission to edit this website, you won’t see all of these options (see your website administrator or “Setting
permissions for new web pages” on page 177).
8 Enter a title for the new page in the New Page title text box.
This title appears in the browser title bar when a website visitor views the page; it does not
appear on the page itself.
Chapter 548
Page 49

9 Click the Advanced button to expand the dialog box, then set the advanced options as desired.
Note: For information about the advanced settings, see “Setting the advanced linking options” on page 110.
10 Click OK.
Contribute adds the link to the draft, and then opens the new page in the Contribute editor.
To return to the draft where you added the link, click the draft title in the Pages panel.
Note: Contribute creates the new page in the same folder as the page that links to it (unless you selected
another website in Step 6). When you publish your draft, Contribute also publishes the new page; you can
change its folder location then if you need to.
Creating a new page without linking to it
You might want to create your new page and add content before you create the link to it. If so,
remember to add a link to the page before you publish; otherwise, website visitors will not be able
to navigate to the page.
Note: It’s a good idea to create the new page and the link at the same time (see “Creating a new page and a link to
the page” on page 47).
After you create your page, you can set page properties (see “Setting page properties” on page 51)
or add keywords and a description for the page (see “Adding keywords and a description for a
page” on page 53).
Adding Pages and Documents 49
Page 50

To create a new page:
1 In the Contribute browser, click the New Page button in the toolbar or, in the browser or
editor, select File > New Page.
The New Page dialog box opens.
2 If you have multiple websites, and want to create the new page in a website other than the
current one, select another website in the Create new page from section.
Note: If you don’t have permission to edit files in the folder you select, then Contribute saves the new page in the
first folder you can edit for that website. If you cannot edit any folders in the website, then you cannot create a
new page for that website.
3 In the Create new page from section, select the type of page you want to create:
• Select Blank Web Page to create a blank page.
• Select Copy of Current Page to create a copy of the page on your website that you are currently
viewing.
Note: You cannot create a copy of the current page if the page contains frames or if the page is a draft in the
Contribute editor. You cannot copy a page from one website to another website.
• Select a page in the Sample Web Pages folder to create a copy of a built-in sample page
provided with Contribute.
• Select a page in the Tem p l a t e s folder to create a new page based on a Dreamweaver template,
or based on a page within your website that the website administrator designated as a template.
When you select a page type, a preview and description appear.
Chapter 550
Page 51

Note: If your website administrator has restricted the types of new pages that you can create, or you do not have
permission to edit this website, then you won’t see all of these options when you create a page (see your website
administrator or “Setting permissions for new web pages” on page 177).
4 Click the Refresh Templates button to update your list of templates, if necessary.
5 Enter a page title in the Page title text box.
This title appears in the browser title bar when a website visitor views the page; it does not
appear on the page itself.
6 Click OK.
The new page opens in Contribute, ready for you to add content. Be sure to add a link to your
new page before you publish it (see “Creating text and image links” on page 101
Note: Contribute creates the new page in the same folder as the page you were viewing when you created the
page (unless you selected another website in Step 2). You can change the folder location when you publish the
new page, if you need to.
).
Setting page properties
You can change the following basic page properties: page title, margins, color (for the
background, text, and links), background image, and document encoding method.
Note: If you are editing a draft based on a template, or if you are restricted to text-only editing by your website
administrator, then you can only change the page title. For more information, contact your website administrator or
see “Setting page editing and paragraph permissions” on page 173.
To set page properties:
1 Browse to the page you want to edit properties for, then click the Edit Page button in the
toolbar.
2 Click the Page Properties button in the toolbar or select Format > Page Properties.
The Page Properties dialog box appears.
Adding Pages and Documents 51
Page 52

3 Make changes to any of the following options:
• Title specifies the page title that appears in the title bar of the website visitor’s browser; the title
does not appear on the page itself.
Giving a page a title is not the same as giving it a filename. For information about filenames,
see “Publishing a page to your website” on page 127.
• Background image enables you to browse to select a background image for the page.
Click the Browse button, then select Images on My Computer or Images on Website, to
select an image.
• Left margin, To p m ar g in , Right margin, and Bottom margin determine the size of page
margins. If you do not want margins on the page, enter 0 for each margin.
Tip: Margins are measured in pixels; there are approximately 72 pixels per inch.
• Background color sets the background color of the page. If you also select a background image
for the page, website visitors will not see the background color (unless the image is transparent).
• Tex t co l or defines a color for text on the page.
• Document encoding specifies the encoding used for characters on the page. Select Wes te rn for
English and Western European languages.
Additional options include Central European, Cyrillic, Greek, Icelandic, Japanese, Traditional
Chinese, Simplified Chinese, and Korean. If an option for the encoding you want is not
available, select Other to create a page with the encoding your operating system is using. All
Asian languages use double-byte encoding.
Note: Only click the Reload button if Contribute opened the page for editing with the wrong encoding. Select
the correct encoding for the page, then click Reload to reload the last saved version of the page with the correct
encoding.
• Link color defines a default color for links on the page.
• Active links defines a default color for links as a user clicks the link.
• Visited links defines a default color for links to pages that a website visitor has viewed.
4 Click Apply to see changes without closing the dialog box or click OK to apply changes and
close the dialog box.
Chapter 552
Page 53

Adding keywords and a description for a page
You can associate keywords and a description with your web page. Adding keywords can enable
visitors to type those words in a search engine and find the page.
To add or change keywords and a description for a page:
1 Browse to the page you want to add keywords and a description for, then click the Edit Page
button in the toolbar.
2 Select Format > Keywords and Description.
The Page Keywords and Description dialog box appears.
3 Enter or change keywords in the Keywords pane.
Separate each keyword with a single space (for example, meeting minutes planning committee
holiday party).
4 Enter or change the page description in the Description pane.
5 Click OK.
Adding Word and Excel documents to a website
With Contribute you can easily add Microsoft Word and Microsoft Excel documents or content
to your website.
For example, suppose you have a Word document with a table that contains contact information
for all of your sales representatives in North America. You don’t have to recreate the table on your
web page—you can use Contribute to add it to your website.
There are two ways to add Word or Excel content to a web page:
• Add the contents of a Word or Excel document to a new or existing web page (recommended
for smaller documents, under 300K when converted to HTML)
• Insert a link to Word or Excel document on an existing web page (recommended for larger
documents, over 300K when converted to HTML)
Tip: You can set a user preference so that Contribute will always either add the contents of the document or insert a
link to the document when you add a Word or Excel document. For more information, see “Setting general
preferences” on page 29.
Adding Pages and Documents 53
Page 54

Adding Word or Excel content to a page
You can add the contents of a Word or Excel document to a new or existing web page.
Note: The file size, after Contribute converts it to HTML, must be less than 300K.
When you add content to a page, Contribute converts the content to HTML and copies it to
your web page. You can edit the content in Contribute; changes you make to the original file on
your computer will not appear on your website.
Note: If you use Microsoft Office 97, you cannot add the contents of a Word or Excel document; you must insert a
link to the document. For information, see “Inserting a link to a Word or Excel document” on page 54.
To add the contents of a Word or Excel document to a new or existing web page:
1 Do one of the following to select the page where you want the content to appear:
• Browse to an existing web page, click the Edit Page button, then place the insertion point in
the draft where you want to add the content.
• Create a new page (see “Creating or copying a page on your website” on page 45).
2 Do one of the following to select the file:
• Drag the file from its current location to your Contribute draft where you want the content to
appear. If the Insert Microsoft Word or Excel Document dialog box appears, click Insert the
contents of the document into this page, then click OK.
• Select Insert > Microsoft Word Document or Insert > Microsoft Excel Document. In the
Open dialog box, browse to the file you want to add, then click Open.
The contents of the Word or Excel document appears in your draft.
Inserting a link to a Word or Excel document
You can insert a link to a Microsoft Word or Excel document in an existing page.
When you publish the page with the link, Contribute copies the Word or Excel document into
your website, and then links to that copy (not to the original file on your computer).
Note: To edit content in the linked page after you publish, see “Editing content in an external application” on page
42. Changes you make to the original file will not appear on your website.
To create a link to a Word or Excel document:
1 Browse to an existing page where you want the link to appear, then click the Edit Page button
in the toolbar.
2 Do one of the following to select the file:
• Drag the file from its current location to your Contribute draft where you want the link to
appear. If the Insert Microsoft Word or Excel Document dialog box appears, click Create a
link to the document, then click OK.
Note: The link text will be the name of the file you link to. To change link text after you create the link, see
“Changing link text and destination” on page 115.
Chapter 554
Page 55

• Place the insertion point in your draft where you want the link to appear, or select text or an
image on the draft, then click the Link button in the toolbar and select File on My Computer.
Enter link text, browse to the file you want to link to, then click OK.
A link to the Word or Excel document appears in your draft.
Adding Pages and Documents 55
Page 56

Chapter 556
Page 57

CHAPTER 6
Working with Text
Macromedia Contribute enables you to add and format text, much like a basic word processor.
You’ll find a few differences in working with text in Contribute and a word processing program,
such as Microsoft Word, because Contribute formats your text using HTML behind the scenes.
This chapter contains the following sections:
• “Adding text to a web page” on page 57
• “Formatting text” on page 60
• “Creating lists” on page 65
• “Checking spelling” on page 69
• “Finding and replacing text” on page 70
For information about working with text in tables, see Chapter 8, “Working with Tables,” on
page 81. For information about aligning text around images, see Chapter 7, “Working with
Images and Graphical Elements,” on page 71. For information about editing link text, see
“Working with Links” on page 101.
Adding text to a web page
You can add text to a web page by typing the text, by copying and pasting text, or by dragging text
from another application to your Contribute draft.
Note: You can also add the entire contents of a Microsoft Word or Excel document to a web page. For more
information, see “Adding Word and Excel documents to a website” on page 53.
Tip: Your website administrator can determine the amount of space that pressing Enter adds between paragraphs.
For more information, talk to your administrator or see “Setting page editing and paragraph permissions” on
page 173.
To add the current date to your page, see “Adding the current date to a page” on page 58; to add
special characters to a page, see “Adding special characters to a page” on page 59.
57
Page 58

To add text to a draft, do one of the following:
• Place the insertion point in the draft, then type text directly into your draft.
• Select text in another application, then select Edit > Copy. Place the insertion point in your
Contribute draft, then select Edit > Paste.
Tip: Leave Microsoft Excel running when you copy and paste Excel content to Contribute so that the pasted
content retains its formatting.
• Drag text from another application to your Contribute draft.
Note: Contribute might preserve text formatting applied in the other application.
Adding the current date to a page
You can add the current date to a page. The date can also include the day of the week and the time.
To add the date to a draft:
1 Place the insertion point in your draft where you want the date to appear.
2 Select Insert > Date.
The Insert Date dialog box appears.
3 In the Day format pop-up menu, select the format in which you want the day of the week
to appear.
Select No Day if you do not want to include the day in the date.
4 In the Date format pop-up menu, select the format in which you want the date to appear.
5 In the Time format pop-up menu, select standard or military time.
Select No Time if you do not want to include the time with the date.
6 Select Update automatically on save if you want Contribute to update the date with the
current date each time the draft is saved.
7 Click OK.
Contribute adds the current date to your draft.
Chapter 658
Page 59

Adding special characters to a page
You can add special characters, such as a copyright symbol or a pound sign, to your page.
Note: You can only add special characters to pages that use Western (Latin 1) encoding. For more information
about setting page encoding, see “Setting page properties” on page 51.
To add a special character to a draft:
1 Place the insertion point in your draft where you want the character to appear.
2 Do one of the following:
• Select Insert > Special Characters, then select a character from the pop-up menu.
• Select Insert > Special Characters, then select Other. In the Insert Other Character dialog box,
click the character you want to insert, then click OK.
The character appears in your draft.
Working with Text 59
Page 60

Formatting text
Contribute enables you to format text—characters and entire paragraphs—quickly and easily.
You can use menu options or use the toolbar to change text with one click.
Align left
Style menu
Font menu
Font size menu
Center
Align right
Justify
Text color
Highlight color
Italic
Bold
Numbered list
Note: If your website administrator has restricted editing to text only, not all of the formatting options are available.
Also, options might be disabled if a text selection has a CSS style applied.
Indent
Outdent
Bulleted list
The section covers the following topics:
• “Changing text font and size” on page 60
• “Changing text style” on page 62
• “Changing text color” on page 63
• “Applying styles to text” on page 63
• “Changing text alignment” on page 64
• “Indenting text” on page 64
Changing text font and size
You can change the appearance of text by changing its font or size. Select a font or size from the
available options; you cannot enter a custom size.
The Contribute font list contains fonts that most browsers are capable of rendering. It’s good web
design practice to use fonts that will be available to most of your website visitors.
Each font in the list actually represents a font combination list. To edit your list of available fonts,
see “Editing the font list” on page 61.
To change text size:
1 In your draft, select the text you want to change.
2 Do one of the following:
• Select a size from the Font Size pop-up menu in the toolbar.
• Right-click, select Size, then select a size from the pop-up menu.
Note: This option is not available if you are working in a table.
• Select Format > Size, then select a size from the pop-up menu.
Chapter 660
Page 61

To change text font:
1 In your draft, select the text you want to change
2 Do one of the following:
• Select a font from the Font pop-up menu in the toolbar.
• Right-click, select Font, then select a font from the pop-up menu.
Note: This option is not available if you are working in a table.
• Select Format > Font, then select a font from the pop-up menu.
Editing the font list
Font combinations in the Contribute font list determine how a browser displays text in your web
page. Each font you see in the Font menu represents the first font in that font combination. You
can edit the font combinations in Contribute.
A browser uses the first font in a font combination that is installed on the website visitor’s
computer; if none of the fonts in the combination are installed, the browser displays the text as
specified by the visitor’s browser preferences.
To edit the font list:
1 In your draft, select Format > Font > Edit Font List, or select Edit Font List from the Style
pop-up menu in the toolbar.
The Edit Font List dialog box appears.
2 Select a font combination in the Font list section.
The fonts in the selected combination appear in the Chosen fonts section. The Available fonts
section lists fonts that are installed on your computer.
3 Choose from the following options:
• To add or remove a font combination, click the Plus (+) and Minus (–) buttons above the Font
list.
• To move a font combination up or down in the list, click the arrow buttons above the Font list.
• To add or remove fonts from a font combination, click the arrows button (<< or >>) between
the Chosen fonts and the Available fonts.
Working with Text 61
Page 62

• To add a font that is not installed on your system, type the font name in the text field below
the Available fonts, then click the add arrows << button to add it to the combination.
Adding a font that is not installed on your computer is useful, for example, for specifying a
Windows-only font when you are developing pages on a Macintosh.
4 Click OK when you finish editing the font list.
Changing text style
You can change text style to bold, italic, or underlined. Other text styles include strikethrough,
emphasis, strong, and fixed width.
Note: Emphasis and Strong apply the same style as Italic and Bold, but use different HTML tags. Your website
administrator determines which tag Contribute actually inserts.
To make text bold, italic, or underlined:
1 In your draft, select the text you want to change.
2 Do one of the following:
• Click the Bold or Italic button in the toolbar.
• Right-click, then select Bold, Italic, or Underline.
Note: This option is not available if you are working in a table.
• Select Format > Bold, Format > Italic, or Format > Underline.
Tip: It is not good practice to use underline in web pages because website visitors might mistake underlined text for
link text. You should use a style other than underline if you need to emphasize text.
To make text strikethrough, emphasized, strong, or fixed width:
1 In your draft, select the text you want to change.
2 Do one of the following:
• Right-click, select Other, then select one of the options from the pop-up menu.
Note: This option is not available if you are working in a table.
• Select Format > Other, then select one of the options from the pop-up menu.
Chapter 662
Page 63

Changing text color
You can change the color of text or you can highlight text.
To change text color:
1 In your draft, select the text you want to change.
2 Do one of the following:
• Click the Tex t C olo r button in the toolbar.
• Right click, select Color from the pop-up menu.
Note: This option is not available if you are working in a table.
• Select Format > Text Color.
The color selector or the Text C ol o r dialog box appears.
3 Do one of the following:
• If you clicked the Te x t Co lo r button, select a color, and the color selector closes.
• If you selected Format > Text Color or right-clicked and used the context menu, select a color,
then click OK to close the dialog box.
The text color changes in your draft.
To highlight text:
1 In your draft, select the text you want to highlight.
2 Click the Highlight button in the toolbar or select Format > Highlight Color.
The color selector or the Highlight Color dialog box appears.
3 Do one of the following:
• If you clicked the Highlight Color button, select a color, and the color selector closes.
• If you selected Format > Highlight Color, select a color, then click OK to close the dialog box.
The text is highlighted in your draft.
Applying styles to text
Contribute has a few built-in HTML styles in the Styles menu that enable you to apply a
paragraph or heading style to your text. For example, you might apply a preset heading style to
text to differentiate it from other content.
Note: You will not see HTML styles if your website administrator has disabled them.
In addition to the Contribute styles, you might see style options, called CSS styles, that your
website administrator or designer added. If these styles are available, you should use them instead
of the built-in styles provided by Contribute.
Note: You cannot attach a CSS style sheet to a page in Contribute to add more styles; use Macromedia
Dreamweaver to attach a style sheet. To enable or disable CSS styles in Contribute, talk to your website
administrator or see “Setting style and font permissions” on page 175.
When you press Enter after text that has a style applied, the next line of text applies the same style
as the previous line, unless it is a heading style. When you press Enter after a heading, the next
line of text is paragraph style.
Working with Text 63
Page 64

To change the text style:
1 In your draft, select the text you want to change or place the insertion point within the text.
2 Do one of the following:
• Select a style from the Style pop-up menu in the toolbar.
• Select Format > Style, then select a style from the pop-up menu.
The text you selected, or the entire paragraph where the insertion point is, changes to the
new style.
Note: If you select a built-in heading style, then the entire paragraph changes to that style, even if you selected
specific text in the paragraph.
To clear the current text style:
1 In your draft, select the text you want to change, or place the insertion point within the text.
2 Select Normal from the Styles pop-up menu in the toolbar.
Note: You can also select Format > Style, then select Remove Paragraph Breaks. This option clears the style
and removes any paragraph tags around the selection.
Changing text alignment
You can choose any of four text alignment options: Left, Center, Right, and Justify.
To change text alignment:
1 In your draft, select the text you want to change or place the insertion point within the text.
Note: Contribute applies alignment to the entire paragraph, even if you select specific text in the paragraph.
2 Do one of the following:
• Click one of the alignment buttons in the toolbar.
• Select Format > Align, then select an alignment from the pop-up menu.
The text alignment changes in your draft.
Indenting text
In Contribute you can use the toolbar to indent or outdent text. You can indent or outdent text
multiple times to create more or less space at the beginning of the text. This feature indents or
outdents the entire paragraph—not just the first line of the paragraph.
To indent or outdent text:
1 In your draft, select the text you want to change or place the insertion point within the text.
2 Do one of the following:
• Click the Indent or Outdent button in the toolbar.
• Select Format > Indent or Format > Outdent.
The text indention changes in your draft.
Chapter 664
Page 65

Creating lists
You can create numbered lists, bulleted lists, and definition lists in Contribute. You can also create
sublists within your lists.
This section covers the following topics:
• “Creating numbered lists” on page 65
• “Creating bulleted lists” on page 65
• “Creating definition lists” on page 66
• “Creating sublists” on page 67
• “Setting List property options” on page 68
Creating numbered lists
You can use numbered lists to organize information that needs to be in order. You can apply
numbering as you create the list, or you can add numbering to an existing list.
To create a numbered list:
1 Place the insertion point in your draft where you want to add the list, then do one of the
following:
• Click the Numbered List button in the toolbar.
• Select Format > List > Numbered List.
2 Type the first list item.
3 Press Enter to type another item, then repeat for each item.
4 When you finish typing the list, do one of the following to turn off numbering:
• Press Enter twice.
• Press Enter, then click the Numbered List button in the toolbar.
To create a numbered list from existing text:
1 In your draft, select multiple lines of existing text.
2 Do one of the following:
• Click the Numbered List button in the toolbar.
• Select Format > List > Numbered List.
Creating bulleted lists
Use bulleted lists to organize information that does not need to be in order. You can apply bullets
as you create the list, or you can add bullets to an existing list.
To create a bulleted list:
1 Place the insertion point in your draft where you want to add the list, then do one of the
following:
• Click the Bulleted List button in the toolbar.
• Select Format > List > Bulleted List.
Working with Text 65
Page 66

2 Type the first list item.
3 Press Enter to type another item, then repeat for each item.
4 When you finish typing the list, do one of the following to turn off the bullets:
• Press Enter twice.
• Press Enter, then click the Bulleted List button in the toolbar.
To create a bulleted list from existing text:
1 In your draft, select multiple lines of existing text.
2 Do one of the following:
• Click the Bulleted List button in the toolbar.
• Select Format > List > Bulleted List.
Creating definition lists
A definition list is a series of items, each with an indented sub-item.
To create a definition list:
1 Place the insertion point in your draft where you want to create the list.
2 Select Format > List > Definition List.
3 Type the first list item.
4 Press Enter to type the indented definition.
5 Press Enter to type the next list item, then repeat as necessary.
6 When you finish typing the list, do one of the following to turn off the indenting:
• Press Enter twice.
• Press Enter, then select Format > List > Definition List.
To create a definition list from existing text:
1 In your draft, select multiple lines of existing text.
2 Select Format > List > Bulleted List.
Chapter 666
Page 67

Creating sublists
You can change the level of a numbered or bulleted list item to create a nested list. For example,
you might have a bulleted list where one of the bullets has a sublist of bullets.
The nested list does not have to be the same type as the parent list; you can have a numbered list
with a nested bulleted list. You can have multiple nested lists within your list.
To create a sublist:
1 In your draft, place the insertion point at the end of the line within an existing list where you
want to create the sublist.
2 Press Enter.
3 Do one of the following:
• Click the Indent button in the toolbar.
• Press Tab.
Note: This option is not available for template-based pages or in tables.
• Select Format > Indent.
The number or bullet indents for the new line.
Note: If you have a bulleted list, the bullet image changes to indicate that it is a sub-bullet.
Working with Text 67
Page 68

4 If you want the sublist to be a different type of list than the parent list, click the Numbered
List or Bulleted List button in the toolbar as appropriate.
5 Type the list item, then press Enter to enter more items in the sublist.
6 To leave the sublist, press Enter twice or click the Outdent button in the toolbar.
Setting List property options
You can change the appearance of an entire list, or change the look of an individual list item in a
bulleted or numbered list.
To set list properties for an entire list:
1 In your draft, place the insertion point in the list you want to change.
Note: If you select an entire list, the list properties option isn’t available.
2 Do one of the following:
• Select Format > List > Properties.
• Right-click, select List, then select Properties.
Note: This option is not available for template-based pages or in tables.
The List Properties dialog box appears.
3 In the List properties section, change options for the list:
• List type specifies whether the list is a bulleted, numbered, directory, or menu list.
Depending on the list type you select, different options are enabled or disabled in the dialog
box.
• Style determines the style of numbers or bullets used for a numbered or bulleted list.
All items in the list will have this style unless you specify a new style for individual items in
the list.
• Start at number sets the value for the first item in a numbered list.
4 Click OK.
Contribute applies your changes to the list. The new style automatically applies to additional
items you add to the list.
Chapter 668
Page 69

To set list properties for a list item:
1 In your draft, place the insertion point in the bulleted or numbered list item you want to change.
Note: If you select multiple items, the list properties option isn’t available.
2 Do one of the following:
• Select Format > List > Properties.
• Right-click, select List, then select Properties.
Note: This option is not available for template-based pages or in tables.
The List Properties dialog box appears.
3 In the Selected item section, change options for the list:
• Style specifies a style for the selected list item.
Options in the pop-up menu are specific to the list type, either bulleted or numbered.
• Reset to number sets a specific number from which to number list item entries.
4 Click OK.
Contribute applies your changes to the list item.
Checking spelling
It’s a good idea to use the Check Spelling command to check the spelling in your draft after you
add or edit text.
To check and correct spelling in your draft:
1 Click the Check Spelling button in the toolbar or select Format > Check Spelling.
If Contribute encounters an unrecognized word, the Check Spelling dialog box appears.
2 Select the appropriate option based on how you want Contribute to handle the discrepancy:
• Click Add to Personal to add the unrecognized word to your personal dictionary. You can add
any word, and Contribute will ignore it in the future.
• Click Ignore to ignore this instance of the unrecognized word.
• Click Change to replace this instance of the unrecognized word with text that you type in the
Change to text box or with the selection in the Suggestions list.
• Click Ignore All to ignore all instances of the unrecognized word.
• Click Change All to replace all instances of the unrecognized word in the same manner.
3 When you finish checking spelling, click the Close button in the Check Spelling dialog box, or
click OK in the Spelling Check Completed message box.
Working with Text 69
Page 70

Finding and replacing text
You can search the draft you’re editing for specific text. You can also search for and replace text
in drafts.
Note: You can search for text in a page in the browser, but the Search and Replace dialog box depends on your
default web browser.
To search for text:
1 In your draft, select Edit > Find.
The Find and Replace dialog box appears.
2 In the Search for text box, type the text you want to find.
3 Select Match case to limit the search to text that exactly matches the case of the text you type in
the Search for text box.
For example, if you type the brown derby in the text box, you will not find The Brown Derby.
4 Click Find next, then repeat until you finish searching the draft.
5 When you finish, click Close.
To search and replace text:
1 In your draft, select Edit > Find.
The Find and Replace dialog box appears.
2 In the Search for text box, type the text you want to find.
3 In the Replace with text box, type the replacement text.
4 Select the Match case option to limit the search to text that exactly matches the case of the text
you type in the Search for text box.
For example, if you type the brown derby in the text box, you will not find The Brown Derby.
5 Click Find Next.
6 For each occurrence, select one of the following:
• Replace replaces the current instance with the replacement text.
• Replace All replaces all instances with the replacement text.
• Find Next finds the next instance without changing the current instance.
7 When you finish, click Close.
Chapter 670
Page 71

CHAPTER 7
Working with Images and Graphical Elements
Macromedia Contribute makes it easy for you to edit, add, or delete images on your web pages.
You can also add Macromedia Flash movies to a page.
This chapter contains the following sections:
• “Adding an image to a page” on page 71
• “Editing an image” on page 75
• “Resizing an image” on page 76
• “Moving and aligning images” on page 76
• “Inserting Flash movies”
• “Adding and deleting a horizontal rule” on page 78
For information about making an image a hyperlink (also know as a link), see “Creating text and
image links” on page 101.
Adding an image to a page
There are three ways you can add an image to your web page:
• Use the Insert menu or the Image button to add an image from your computer or website.
• Drag an image from another source to your Contribute draft.
• Copy and paste an image from another source on your Contribute draft.
For more information about inserting images, see “About inserting images” on page 72. For
information about changing image properties, such as alignment, see “Changing image
properties” on page 74. For information about editing an image, see “Editing an image” on
page 75.
71
Page 72

About inserting images
You can add images from several different sources, including your computer, website, e-mail,
Microsoft Internet Explorer web browser, or another application, such as Microsoft Word or Excel.
Note: Images that you add to your page should be in one of the following web-ready formats: JPG, GIF, or PNG
(16). If the image you want to add is in another format, you can use an image editing tool, such as Macromedia
Fireworks, to convert the image to a web-ready format.
When you add an image to a page, it’s a good idea to add descriptive text about the image so that
the image is accessible to people with disabilities. Your website administrator can enforce the
image accessibility option so that a dialog box prompts you for an image description whenever
you add an image.
Note: For more information, talk to your website administrator or see “Setting page editing and paragraph
permissions” on page 173.
Using the Insert menu or Image button to add images to a page
You can use the Insert menu or Image button in the toolbar to add an image from your computer
or website to a page.
You can add images from other sources by dragging them to the page (see “Dragging images to a
page” on page 73) or copying and pasting them on the page (see “Copying and pasting images”
on page 73).
To add an image using the Insert menu or Image button:
1 Place the insertion point in your draft where you want the image to appear.
2 Do one of the following:
• Click the Image button in the toolbar.
• Select Insert > Image.
3 Select From My Computer or From Website from the pop-up menu.
The Select Image or Choose Image from Website dialog box appears.
4 Browse to and select the image, then click the Select or OK button.
5 If the Image Description dialog box appears, enter text to describe the image for people with
disabilities or for people with their browsers set to display text only, then click OK.
The image appears on your draft.
If the image is from your computer, Contribute copies the image to an images folder on your
website when you publish the draft. You cannot edit the image in Contribute until you publish
the draft. If the image is from your website, you can edit the image in Contribute before you
publish. For more information, see “Editing an image” on page 75.
Tip: After you insert the image, select the image, then click the Image button and select either option from the pop-
up menu to change image properties. For more information, see “Changing image properties” on page 74.
Chapter 772
Page 73

Dragging images to a page
You can drag an image from another source to your Contribute page.
You can also add images by using the Insert menu or Image button (see “Using the Insert menu
or Image button to add images to a page” on page 72) or by copying and pasting them on the
page (see “Copying and pasting images” on page 73).
To add an image by dragging:
1 Reduce the size of the Contribute application window so that you can also see the application
that contains the image you plan to drag.
2 In the other application, select the image.
3 Drag the image to your Contribute draft where you want the image to appear.
Tip: You can’t drag an image from a web browser if the image has a link attached to it. Save the image to your
computer first, then drag the image to your Contribute draft.
4 If the Image Description dialog box appears, enter text to describe the image for people with
disabilities or for people with their browsers set to display text only, then click OK.
The image appears on your draft, and Contribute copies the image to an images folder on your
website, if it’s not already there.
If the image is from your website, you can edit the image in Contribute before you publish the
draft. If the image is from another source, you cannot edit the image in Contribute until you
publish. For more information, see “Editing an image” on page 75.
Copying and pasting images
You can copy an image from another source, then paste it on your Contribute page.
You can also add images by using the Insert menu or Image button (see “Using the Insert menu
or Image button to add images to a page” on page 72) or by dragging them to the page (see
“Dragging images to a page” on page 73).
To add an image by copying and pasting:
1 In the application that contains the image you want to copy, select the image.
2 Select Edit > Copy.
3 Place the insertion point in your Contribute draft where you want the image to appear.
4 Select Edit > Paste.
5 If the Image Description dialog box appears, enter text to describe the image for people with
disabilities or for people with their browsers set to display text only, then click OK.
The image appears on your draft, and Contribute copies the image to an images folder on your
website, if it’s not already there.
If the image is from your website, you can edit the image in Contribute before you publish the
draft. If the image is from another source, you cannot edit the image in Contribute until you
publish. For more information, see “Editing an image” on page 75.
Working with Images and Graphical Elements 73
Page 74

Changing image properties
After you add an image to a page (see “Adding an image to a page” on page 71), you can change
its properties. Image properties include image source, size, padding, alignment, border, and
alternate text.
To change image properties:
1 In your draft, select the image you want to modify, then do one of the following:
• Double-click the image.
• Click the Image button in the toolbar, then select either option from the pop-up menu.
• Select Format > Image Properties.
• Right-click the image, then select Image Properties from the pop-up menu.
The Image Properties dialog box appears.
2 Make changes as necessary to the following options:
• Image file is the location of the image source file.
Click the Browse button, then select Images on My Computer or Images on Website, to
change the image source.
• Width is the width of the image.
You can enter size in pixels or as a percentage of the original image size.
• Height is the height of the image.
You can enter size in pixels or as a percentage of the original image size.
• Reset size returns the image to its original height and width.
This option acts like an undo button for changes to image size.
Chapter 774
Page 75

• Constrain proportions keeps the proportions of height and width constant.
For example, if you double the height with this option enabled, then Contribute also doubles
the width.
Note: If possible, do not change the width and height of your image or you might reduce the quality of the image.
If you must resize the image, it is a good idea to use an image editing program such as Fireworks.
• Horizontal padding is the amount of empty space, in pixels, on the right and left of the image.
The number you enter represents the amount of space on each side of the image. For example,
if you select 4 pixels for Horizontal padding, then 4 pixels of empty space appears on the right
of the image, and 4 pixels of space appears on the left of the image.
• Vertical padding is the amount of empty space on the top and bottom of the image.
The number you enter represents the amount of space above and below the image. For
example, if you select 4 pixels for Vertical padding, then 4 pixels of empty space appears on top
of the image, and 4 pixels of space appears below the image.
• Alignment refers to the location of the image on the page in relation to any text that appears
around the image.
When you select an alignment option, a graphic indicates how the image will align in relation
to elements around the image.
• Border is the width, in pixels, of the border around the image.
• Description (ALT text) describes the image for people with disabilities or for people with their
browsers set to display text only.
3 Click OK.
Contribute applies your changes to the image.
Editing an image
You can use Contribute to launch an external image editing application. This enables you to edit
images that you’ve added to your web pages. The image should be on a published page on your
website or in one of your website folders.
Note: You should not edit an original image file on your computer for an image you’ve added to a web page;
changes you make to the file will not appear on your website.
To edit an image in Contribute:
1 In the Contribute browser, do one of the following:
• Browse to the page with the image you want to edit, then click the Edit Page button. Select the
image, then select File > Edit Image or right-click the image and select Edit Image.
• Click the Choose button in the toolbar, then select the image you want to edit (it must be an
image that is published on your website) and close the dialog box.
Contribute launches an external editing application.
Note: To change your default external image editor, see “Setting file editor preferences” on page 29.
2 If you are editing an image in Fireworks, click No in the Find Source dialog box to indicate
that you do not want to edit the source file for this image.
By clicking No, you will edit the image for the website only.
Working with Images and Graphical Elements 75
Page 76

3 In the external application, make changes as necessary, then save your changes and close the
application.
Note: If you are editing in Fireworks, click the Done button in the editing window, then close the application.
4 In Contribute, click Publish to publish your changes to the website.
Note: If you need to make additional changes to the image before you publish, in Contribute click Launch to
open the content in the external editor again.
The updated content appears in Contribute.
Resizing an image
You can change the size of an image by dragging the selection handles or by entering a specific
height or width in the Image Properties dialog box.
To avoid distorting your image, you can constrain proportions when you resize an image. This
means that you change the height and width of the image by the same percentage.
To change the size of an image in a draft, do one of the following:
• Select the image, then drag one of the selection handles to the desired image size.
Selection handles
Tip: Hold the Shift key, then drag the corner selection handle to constrain proportions so that the image is not
distorted as you drag.
• Double-click the image, then change the height or width in the Image Properties dialog box.
Tip: Select Constrain proportions in the dialog box to maintain the image aspect ratio, so that the image is
not distorted.
• Right-click the image, then select Image Properties (or Reset Size if you’ve previously changed
the image’s size) from the pop-up menu. Enter a new height and width in the Image Properties
dialog box, then click OK.
Tip: Select Constrain proportions in the dialog box to maintain the image aspect ratio, so that the image is
not distorted.
Moving and aligning images
You can easily move an image to a new location on a web page. If there is text (or other elements)
around the image, you can change how the image aligns with surrounding elements.
To move an image on a draft, do one of the following:
• Drag the image to a new location.
• Select the image, then copy (or cut) and paste the image in a new location.
Chapter 776
Page 77

To change alignment of an image on a draft, do one of the following:
• Double-click the image, then select an alignment from the Alignment pop-up menu in the
Image Properties dialog box.
• Right-click the image, then select an alignment from the Alignment pop-up menu.
Note: For more information about alignment options, see “Changing image properties” on page 74.
Contribute aligns the image in relation to surrounding elements, such as text.
Inserting Flash movies
You can insert Macromedia Flash movies in your web pages.
To insert a Flash movie:
1 Place the insertion point in your draft where you want the movie to appear.
2 Select Insert > Flash Movie.
The Select File dialog box appears.
3 In the Files of type pop-up menu, select All Files.
4 Navigate to the Flash movie file (.swf) you want to insert, then click Select.
The Flash movie object appears in your draft.
Setting Flash movie properties
You can set properties for Flash movies that you insert in your web pages.
To set Flash movie properties:
1 In your draft, select the Flash movie object, then do one of the following:
• Double-click the object.
• Right-click, then select Flash Movie Properties from the pop-up menu.
Working with Images and Graphical Elements 77
Page 78

• Select Format > Flash Movie Properties.
The Flash Movie Properties dialog box appears.
2 Select Start playing the movie when the page loads if you want the Flash movie to
automatically begin playing when the page appears in a website visitor’s browser.
3 Select Loop the movie continuously if you want the Flash movie to automatically start playing
again each time it ends.
4 Click OK.
Adding and deleting a horizontal rule
You can add horizontal rules to your pages to help organize content. For example, you can visually
separate text and other elements into topic areas with one or more rules.
For information about changing the look of a horizontal rule, see “Changing properties for a
horizontal rule” on page 79.
To insert a horizontal rule:
1 Place the insertion point in your draft where you want the horizontal rule to appear.
2 Select Insert > Horizontal Rule.
Contribute inserts the horizontal rule. Content before the insertion point appears above the
line, and content after the insertion point appears below the line.
Chapter 778
Page 79
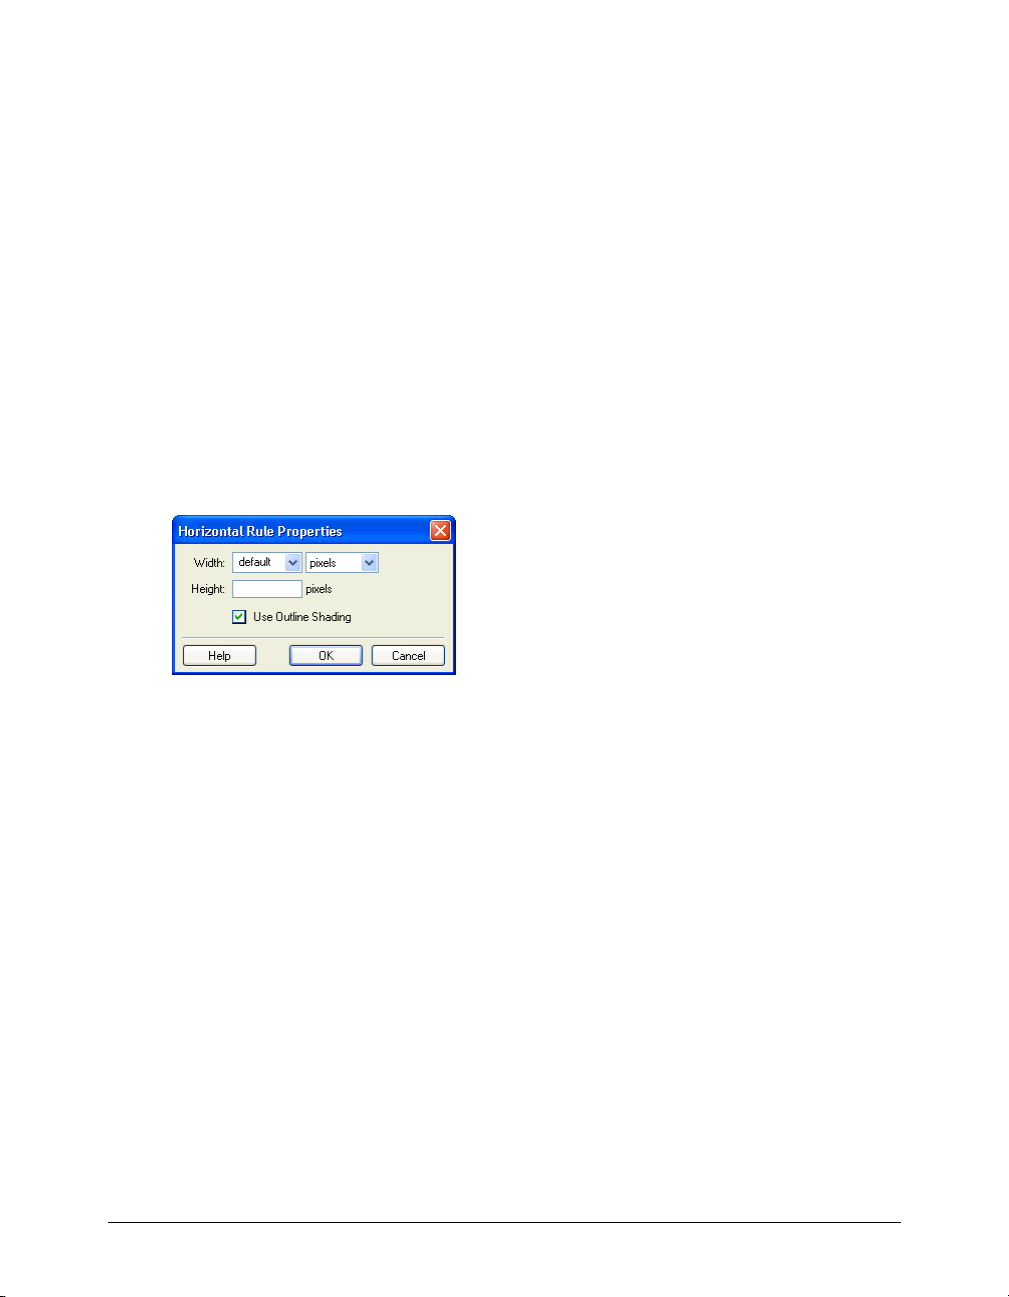
To delete a horizontal rule:
1 In your draft, click the horizontal rule to select it.
2 Press Delete.
Changing properties for a horizontal rule
You can customize the height, width, and shading applied to a horizontal rule on a page. By
default, a horizontal rule in Contribute is 1 pixel high, expands to the width of the page or table
cell in which it is inserted, and has a small drop shadow (or shading) applied.
For information about adding and deleting horizontal rules to a page, see “Adding and deleting a
horizontal rule” on page 78.
To set horizontal rule properties:
1 In your draft, click the horizontal rule to select it, then do one of the following:
• Right-click the horizontal rule, then select Properties.
• Select Format > Horizontal Rule Properties.
The Horizontal Rule Properties dialog box appears.
2 Change any of the following options:
• Width indicates the length of the line.
To set a specific line width for a horizontal rule, enter a number in the Width text box, then
select Pixels. To set a line width that expands or contracts depending on the width of a viewer’s
browser window, enter a number between 1 and 100 in the Width text box, then select
Percentage.
• Height indicates the height of the line.
• Use Outline Shading indicates that the line appears as an outline, not a solid line.
3 Click OK.
Contribute changes the horizontal rule properties.
Working with Images and Graphical Elements 79
Page 80

Chapter 780
Page 81

CHAPTER 8
Working with Tables
A table is a powerful tool for presenting tabular data. For example, you might add a table to a web
page that lists all your sales reps in one column, with their contact information in another column.
In Macromedia Contribute, you can add text and images to table cells the same way that you add
text and images to a page (see “Working with Text” on page 57 and “Working with Images and
Graphical Elements” on page 71). After you create a table you can easily modify both its
appearance and structure.
This chapter contains the following sections:
• “Inserting a table on a page” on page 81
• “Selecting table elements” on page 83
• “Resizing tables, rows, and columns” on page 85
• “Aligning tables” on page 86
• “Cutting and copying table cells” on page 87
• “Adding, deleting, and merging table rows and columns” on page 89
• “Modifying table appearance” on page 91
• “Sorting tabular data” on page 98
Inserting a table on a page
You can insert a table anywhere on a page, including within another table (see “Inserting a table
within a table” on page 83). You can quickly insert a standard table with three rows and three
columns, or you can modify options to insert a custom table.
When you insert an table, it’s a good idea to apply headings, if you need them. Using headings
makes the table more accessible to people with disabilities. Do not create headings for rows or
columns by making text in the first row or column bold and centered. Screen readers only read
headings that you apply as a table property.
Tip: After you insert a table and start adding content to it, use the Preview in Browser feature to see exactly how the
table will render in website visitors’ browsers (see “Previewing a page in your default browser” on page 125).
81
Page 82

To insert a table:
1 Place the insertion point in your draft where you want the table to appear.
2 Do one of the following to open the Insert Table dialog box:
• Click the Insert Table button in the toolbar.
• Select Insert > Table.
• Select Table > Insert > Table.
The Insert Table dialog box appears.
3 Enter the number of rows and columns you want, or accept the defaults for a table with three
rows and three columns.
4 Change table properties as desired:
• Tab l e w i dt h indicates how wide the table is.
Select Default width for a table with columns that resize as you add content. Select Specific
width if you want to enter a number for a fixed table width. Use the pop-up menu to indicate
whether the number you enter is in pixels, or is a percent of the page you want the table to be.
• Border thickness is the thickness of the border around the table and between cells.
Tip: Enter 0 if you do not want a table border.
• Cell padding indicates the amount of space, in pixels, between the edge of the table cell and
the content of the cell.
Note: If you do not enter a value, Contribute sets cell padding to the default value, which is 1 pixel.
• Cell spacing indicates the amount of space, in pixels, between each table cell.
Note: If you do not enter a value, Contribute sets cell spacing to the default value, which is 3 pixels.
Chapter 882
Page 83

5 Click a button in the Header section to indicate whether you want a header; select from the
following options:
• None indicates no header.
• Left indicates a header column.
• To p indicates a header row.
• Both indicates a header column and a header row.
Tip: Screen readers read headings for rows or columns that have one of these header types applied; they do not
read headings that you create by making text bold and centered.
6 Click OK.
The table appears in your draft.
Tip: After you insert the table, select it, then click the Table button again to change table properties. Also, see
“Setting general preferences” on page 29 for information about a table rendering option which might improve
performance when you’re editing large tables.
Inserting a table within a table
You can insert a table within an existing table on a page.
To insert a table within a table:
1 In your draft, place the insertion point in the table cell where you want the table to appear.
2 Do one of the following to open the Insert Table dialog box:
• Click the Insert Table button in the toolbar.
• Select Insert > Table.
• Select Table > Insert > Table.
The Insert Table dialog box appears.
3 Change options as necessary.
4 Click OK.
The table appears in the table cell where you placed the insertion point.
Selecting table elements
You can select an entire table, row, or column, or you can select a contiguous block of cells within
a table:
• To select an entire table, row, or column, see “Selecting an entire table, row, or column” on
page 84.
• To select a cell, block of cells, or nonadjacent cells, see “Selecting a cell, block of cells, or
nonadjacent cells” on page 84.
After you’ve selected a table or cells, you can modify the appearance of the selection (see
“Modifying table appearance” on page 91) or of the text contained in the selection (see “Cutting
and copying table cells” on page 87).
Working with Tables 83
Page 84

Selecting an entire table, row, or column
You might want to select an entire table, row, or column to copy and paste into another page (see
“Cutting and copying table cells” on page 87) or to modify the background of all of the cells in
the selection at once (see “Modifying table appearance” on page 91).
To select an entire table, do one of the following:
• Click the upper left corner of the table or click anywhere on the right or bottom edge.
• Click in a table cell, then select Table > Se lect Tab le .
Selection handles appear on the selected table’s lower and right edges.
To select rows or columns:
1 Position the pointer to point at the left edge of a row or the top edge of a column.
2 When the pointer changes to a selection arrow, click to select the row or column, or drag to
select multiple rows or columns.
Selecting a cell, block of cells, or nonadjacent cells
You might want to select a cell or group of cells to copy and paste into another page (see “Cutting
and copying table cells” on page 87) or to modify the background of all of the cells in the
selection at once (see “Modifying table appearance” on page 91).
When you select a block of cells, the block must form a rectangle. When you select multiple
nonadjacent cells in a table, you can modify the properties of those cells, but you cannot copy or
paste sets of nonadjacent cells.
To select a single cell, do one of the following:
• Click in the cell, then drag to select the cell.
• Click in the cell, then select Edit > Select All.
Tip: Select Edit > Select All again to select the entire table.
Chapter 884
Page 85

To select a line or a rectangular block of cells, do one of the following:
• Drag from one cell to another cell.
• Click in one cell, then Shift-click another cell.
All of the cells within the linear or rectangular region defined by the two cells are selected.
To select nonadjacent cells:
• Control-click the cells, rows, or columns you want to select.
Note: If each cell, row, or column you Control-click isn’t already selected, it’s added to the selection. If it is already
selected, it’s removed from the selection.
Resizing tables, rows, and columns
You can resize an entire table or individual rows and columns. When you resize an entire table, all
of the cells in the table resize proportionately.
To resize a table:
1 In your draft, select the table you want to resize (see “Selecting table elements” on page 83).
2 Do one of the following:
• To resize the table horizontally, drag the selection handle on the right.
• To resize the table vertically, drag the selection handle on the bottom.
• To resize in both dimensions, drag the selection handle at the lower right corner.
To resize a column’s width, do one of the following in your draft:
• Select the column, then drag the right border of the column.
• Select the column, then click the Ta b l e button in the toolbar.
In the Table Column Properties dialog box, change the number in the Column width text box,
then select Pixels or Percent for the width, or select Fit to Contents to clear the set width so
that columns resize to fit the content you add.
Note: If the column is not the rightmost column of the table, the adjacent column’s width also changes, keeping the
same overall table width. If the column is the rightmost column, the entire table’s width changes, and all of the
columns grow wider or narrow proportionately.
To resize a row’s height, do one of the following in your draft:
• Select the row, then drag the lower border of the row.
• Select the row, click the Tab le button in the toolbar.
In the Table Row Properties dialog box, change the number in the Row height text box, then
select Pixels or Percent for the height, or select Fit to Contents to clear the set height so that
rows resize to fit the content you add.
Working with Tables 85
Page 86

Aligning tables
You can indicate how a table aligns on the web page in relation to elements, such as text or
images, around it on the page.
You cannot select an alignment option when you create a table. You must insert the table (see
“Inserting a table on a page” on page 81), then change the alignment option in table properties.
To change alignment for a table:
1 In your draft, select the table you want to change alignment for (see “Selecting table elements”
on page 83).
2 Do one of the following to open the Table Properties dialog box:
• Click the Ta bl e button in the toolbar.
• Right-click, then select Table Properties from the pop-up menu.
• Select Table > Table Properties.
The Table Properties dialog box appears.
3 Select an alignment option from the Table alignment pop-up menu:
• Default aligns the table to the left of the page, and does not flow text or images around the
table.
• Left aligns the table to the left side of the page, and flows text or images to the right of the
table.
• Center aligns the table in the center of the page.
• Right aligns the table to the right side of the page, and flows text or images to the left of the
table.
4 Click Apply to see changes without closing the dialog box, or click OK to apply changes and
close the dialog box.
The table alignment changes in your draft.
Chapter 886
Page 87

Cutting, copying, and pasting cells
You can cut, copy, or paste a single table cell or multiple cells at once, preserving the cells’
formatting (see “Cutting and copying table cells” on page 87). You can paste cells at the insertion
point or in place of a selection in an existing table (see “Pasting table cells” on page 88).
The cells you select must be contiguous and in the shape of a rectangle. For example, the selection
in this illustration is a rectangle of cells, so the cells can be cut or copied.
The selection in this illustration is not a rectangle, so the cells can’t be cut or copied.
Cutting and copying table cells
You can copy a single cell or multiple cells, then cut the cells, or just the cells’ content, from the
table. You can copy a single cell or multiple cells, then paste the cells in the same table or in
another table (see “Pasting table cells” on page 88).
To copy table cells, rows, or columns:
1 In your draft, select one or more cells, rows, or columns in the table (see “Selecting table
elements” on page 83).
2 Do one of the following:
• Select Edit > Copy.
• Right-click, then select Copy.
Contribute copies the selection to the Clipboard.
To cut table cells, rows, or columns:
1 In your draft, select one or more cells, rows, or columns in the table (see “Selecting table
elements” on page 83).
2 Do one of the following:
• Select Edit > Cut.
• Right-click, then select Cut.
Contribute cuts the selection from the table and copies it to the Clipboard.
Working with Tables 87
Page 88

To remove a row or column from a table:
1 In your draft, select a row or column (see “Selecting table elements” on page 83).
2 Do one of the following:
• Select Table > Delete > Row or Table > Delete > Column.
• Press Delete.
Contribute removes the row or column from the table.
To remove cell content but leave the cells intact:
1 In your draft, select one or more cells.
Note: Do not select an entire row or column. If you do, then when you select Edit > Clear or press Delete,
Contribute removes the entire row or column—not just their contents—from the table.
2 Select Edit > Clear or press Delete.
Contribute removes the contents of the cells you selected, but leaves the empty cells in the table.
Pasting table cells
You can copy cells (see “Cutting and copying table cells” on page 87), then paste them at the
insertion point in a table or in place of a selection in an existing table.
To paste multiple table cells, the contents of the Clipboard must be compatible with the structure
of the table or the selection in the table in which you paste the cells. For example, if you copy a
block that is two cells by two cells, you must select a block that is the same size in which to paste
the cells.
To paste table cells:
1 In your draft, do one of the following to indicate where you want to paste the cells:
• To replace existing cells with the cells you are pasting, select a set of existing cells with the same
layout as the cells you copied.
For example, if you’ve copied or cut a three by two cell block, select another three by two cell
block to replace with the block you copied or cut.
• To paste a full row of cells above a particular cell, click in that cell.
• To paste a full column of cells to the left of a particular cell, click in that cell.
• To create a new table with the pasted cells, place the insertion point outside of the table.
Note: If you have less than a full row or column of cells in the Clipboard, and you click in a cell and then paste the
cells from the Clipboard, the cell you clicked in and its neighbors (depending on its location in the table) might be
replaced with the cells you are pasting.
2 Do one of the following:
• Select Edit > Paste.
• Right-click, then select Paste.
Contribute pastes the cells from the Clipboard.
Chapter 888
Page 89

Adding, deleting, and merging table rows and columns
You can modify an existing table by adding or deleting rows or columns. You can also merge cells
to accommodate data.
This section covers the following topics:
• “Adding rows and columns” on page 89
• “Deleting rows and columns” on page 90
• “Merging and splitting cells” on page 91
Adding rows and columns
You can add a single row or column (see “Adding a single row or column” on page 89), or you
can add multiple rows or columns at the same time (see “Adding multiple rows or columns” on
page 90).
Adding a single row or column
You can add a single row or column to a table. To add multiple rows or columns, see “Adding
multiple rows or columns” on page 90.
To add a single row in a table:
1 In your draft, place the insertion point in a table cell, or select an entire row.
2 Do one of the following:
• Click the Insert Row button in the toolbar.
A new row appears below the insertion point or selection.
• Select Table > Insert > Insert Row Above or Table > Insert > Insert Row Below.
• Right-click, then select Insert Row Above or Insert Row Below.
To add a single column in a table:
1 In your draft, place the insertion point in a table cell, or select an entire column.
2 Do one of the following:
• Click the Insert Column button in the toolbar.
A new column appears to the right of the insertion point or selection.
• Select Table > Insert > Insert Column to the Left or Table > Insert > Insert Column to
the Right.
• Right-click, then select Insert Column to the Left or Insert Column to the Right.
Working with Tables 89
Page 90

Adding multiple rows or columns
You can add multiple rows or columns to a table at the same time.
To add multiple rows or columns to a table:
1 In your draft, place the insertion point in a table cell.
2 Do one of the following:
• Select Table > Insert > Multiple Rows or Columns.
• Right-click, then select Insert Multiple Rows or Columns.
The Insert Rows or Columns dialog box appears.
3 Select a radio button to indicate whether to insert rows or columns.
4 Enter the number of rows or columns to insert.
5 Select whether to insert new rows above or below the insertion point in the table or new
columns to the left or right of the insertion point in the table.
Deleting rows and columns
You can delete a single row or column, or you can delete multiple rows or columns at the
same time.
To delete rows or columns from a table in your draft, do one of the following:
• Select entire rows or columns, then press Delete or Backspace.
• Select entire rows or columns or place the insertion point in a single row or column, right-
click, then select Delete Row or Delete Column.
• Select entire rows or columns, then select Table > Delete > Row or Table > Delete > Column.
Chapter 890
Page 91

Merging and splitting cells
You can merge any number of adjacent cells—as long as the entire selection is a line or a rectangle
of cells—to produce a single cell that spans several columns or rows. You can split a cell into any
number of rows or columns, regardless of whether it was previously merged.
To merge table cells:
1 In your draft, select the cells you want to merge.
Note: You must select at least two cells.
2 Select Table > Merge Cells or right-click, then select Merge Cells.
Contribute merges any content in the cells into the single cell.
To split table cells:
1 In your draft, place the insertion point in the cell you want to split.
Note: Contribute only splits one cell at a time, even if you select multiple cells.
2 Select Ta b le > Sp l it C e ll or right-click, then select Split Cell.
The Split Cell dialog box appears.
3 Select a radio button to indicate whether to split the cell into rows or columns.
4 Enter the number of new rows or columns in which to divide the cell.
5 Click OK.
Contribute splits the cell into multiple rows or columns.
Modifying table appearance
You can modify a table’s appearance by doing any of the following:
• Changing properties for an entire table (see “Modifying table properties” on page 92)
• Changing properties for individual cells, rows, or columns in a table (see “Modifying row or
column properties” on page 94 and “Modifying cell properties” on page 95)
Note: Before you start changing properties, it’s a good idea to understand how Contribute resolves formatting
conflicts for cells, rows, and tables (see “About conflicts in table formatting” on page 92).
• Applying a preset design scheme to a table (see “Using a preset table format” on page 97)
Working with Tables 91
Page 92

About conflicts in table formatting
When formatting tables, you can set properties for the entire table or for selected cells, rows, or
columns in the table (see “Modifying table appearance” on page 91).
When a table property, such as background color or alignment, is set to one value for the entire
table and another value for individual cells, cell formatting takes precedence over row formatting,
which in turn takes precedence over table formatting.
The order of precedence for table formatting is as follows:
1 Cells
2 Rows
3 Ta b le
For example, if you set the background color for a single cell to blue, then set the background
color of the entire table to yellow, the blue cell does not change to yellow because cell formatting
takes precedence over table formatting.
Note: When you set properties for a column, Contribute changes the attributes of the td tag corresponding to each
cell in the column.
Modifying table properties
You can modify alignment, width, border width and color, and background color for a selected
table.
To modify table properties:
1 In your draft, select the table you want to modify (see “Selecting table elements” on page 83).
2 Do one of the following to open the Table Properties dialog box:
• Click the Ta bl e button in the toolbar.
• Right-click, then select Table Properties from the pop-up menu.
Chapter 892
Page 93

• Select Table > Table Properties.
The Table Properties dialog box appears.
3 Make changes to any of the following options:
• Table alignment refers to the location of the table in relation to any elements (such as text or
images) that appear around the table. Select from the following options:
Default aligns the table to the left side of the page, and does not flow text or images around
the table.
Left aligns the table to the left side of the page, and flows text or images to the right of
the table.
Center aligns the table in the center of the page.
Right aligns the table to the right side of the page, and flows text or images to the left of
the table.
• Table width specifies how wide the table is.
From the pop-up menu, select Percent to indicate table width as a percentage of the total
browser window, or Pixel to indicate table width as a specific number of pixels (between 1
and 800).
Note: You can enter percentages that are greater than 100. For example, if you enter 150, then the table is one
and a half times the size of the browser window. When the percentage is greater than 100, a scrollbar appears
for the web page. You can enter a value up to 1000.
• Border thickness specifies how thick the border around the table and between the cells is.
Tip: Enter 0 if you do not want a table border.
• Cell padding indicates the amount of space, in pixels, between the edge of the table cell and
the contents of the cell.
Note: If you do not enter a value, Contribute sets cell padding to the default value, which is 1 pixel.
• Cell spacing indicates the amount of space, in pixels, between each table cell.
Note: If you do not enter a value, Contribute sets cell spacing to the default value, which is 3 pixels.
Working with Tables 93
Page 94

• Border color indicates the color of the table border around the table and between cells.
Note: The border color does not show if the table’s border thickness is set to 0 for no border.
• Background color indicates the background color of all the cells in the table.
If you do not select a color, the default background is transparent. This means that the table
background appears as white on a white page, green on a green page, and so on.
4 Click Apply to apply changes without closing the dialog box, or click OK to apply changes and
close the dialog box.
Your table property changes appear in your draft.
Modifying row or column properties
You can modify horizontal and vertical alignment, background color, height or width, and text
wrap for a selected row or column.
Note: To understand how Contribute resolves formatting conflicts for cells, rows, and tables, see “About conflicts in
table formatting” on page 92.
To modify table row or column properties:
1 In your draft, select the row or column you want to modify (see “Selecting an entire table, row,
or column” on page 84).
2 Do one of the following to open the Table Properties dialog box:
• Click the Ta bl e button in the toolbar.
• Right-click, then select Table Properties from the pop-up menu.
• Select Table > Table Properties.
The Table Properties dialog box appears with the appropriate tab selected.
Chapter 894
Page 95

3 Make changes to any of the following options:
• Horizontal alignment indicates horizontal placement for content in the row or column.
Options are Left, Center, and Right.
• Vertical alignment indicates vertical placement for content in the row or column. Options are
To p, Middle, and Bottom.
• Background color indicates the background color for the selected row or column.
Note: You can also click the Highlight Color button in the toolbar to change the color of the selected row or
column.
• Row height specifies how tall the row is, while Column width specifies how wide the
column is.
For a selected row or column, you can change the number in the Row height or Column
width text box, then select pixels or a percentage for the width, or you can select Fit to
Contents to clear the set height or width so that rows or columns resize to fit the content
you add.
• Wrap te xt indicates, when selected, that text wraps to a new line when it reaches the end of the
cell. When not selected, text does not wrap, but the cell expands to accommodate the text.
• Header Row indicates that the selection is a header.
4 Click Apply to preview your changes, or click OK to apply changes and close the dialog box.
Modifying cell properties
You can modify horizontal and vertical alignment, background color, and text wrap for a
selected cell.
Note: To understand how Contribute resolves formatting conflicts for cells, rows, and tables, see “About conflicts in
table formatting” on page 92.
To modify table cell properties:
1 In your draft, select the cell or cells you want to modify (see “Selecting an entire table, row, or
column” on page 84).
2 Do one of the following to open the Table Properties dialog box:
• Right-click, then select Table Cell Properties from the pop-up menu.
• Select Table > Table Cell Properties.
Working with Tables 95
Page 96

• Click the Ta bl e button in the toolbar.
The Table Properties dialog box appears with the appropriate tab selected.
3 Make changes to any of the following options:
• Horizontal alignment indicates horizontal placement for content in the cell, row, or column.
Options are Left, Center, and Right.
• Vertical alignment indicates vertical placement for content in the cell. Options are Top ,
Middle, and Bottom.
• Background color indicates the background color of the cell.
Note: You can also click the Highlight Color button in the toolbar to change the color of the selected cell.
• Wrap te xt indicates, when selected, that text wraps to a new line when it reaches the end of the
cell. When not selected, text does not wrap, but the cell expands to accommodate the text.
4 Click Apply to preview your changes, or click OK to apply changes and close the Table
Properties dialog box.
Chapter 896
Page 97

Using a preset table format
You can apply a preset design to a table and select options to further customize the design.
Note: You can apply preset table designs to simple tables only. You can’t use these designs to format tables that
contain merged cells or other unusual formatting that keeps the table from being a simple rectangular grid of cells.
To use a preset table design:
1 In your draft, select a table to modify or place the insertion point in any cell in the table.
2 Select Ta b le > Fo r ma t Ta bl e .
The Format Table dialog box appears with the Basic tab selected.
3 Select a design scheme from the list on the left.
The sample table displays an example of the design you select.
4 Click the Advanced tab.
5 In the Table properties section, enter a border width for the table.
Tip: If you do not want a table border, enter 0 for the border.
6 In the Left column section, select a text alignment and a text style for the left column of the
table, which might contain row headings.
7 In the Header row section, select a background color and a text color, then select a text
alignment and a text style for the top row of the table, which might contain column headings.
Working with Tables 97
Page 98

8 In the Other rows section, select a color to apply to rows, then indicate how frequently you
want the colors to alternate. Click Color to select a second row color, if you choose to alternate
row color.
9 Click OK.
Contribute formats your table with the design you selected.
Sorting tabular data
You can sort the rows of a table based on the contents of a single column. For example, if you
have a Names column in a table, you can sort items in that column alphabetically.
You can also perform a more complicated table sort based on the contents of two columns. You
cannot sort tables that contain merged cells.
To sort a table:
1 In your draft, select the table to sort or place the insertion point in any cell in the table.
2 Select Ta b le > S or t Tab l e.
The Sort Table dialog box appears.
3 From the Sort by pop-up menu, select which column’s values you want to sort.
4 From the Order pop-up menu, select whether to sort the column alphabetically or numerically,
then select whether to sort it in ascending order (A to Z, lower numbers to higher numbers) or
descending order.
Tip: When the contents of a column are numbers, select Numerically. An alphabetic sort applied to a list of
one- and two-digit numbers results in the numbers being sorted as if they were words (resulting in ordering such
as 1, 10, 2, 20, 3, 30) rather than being sorted as numbers (resulting in ordering such as 1, 2, 3, 10, 20, 30).
5 From the Sort by pop-up menu, select which column’s values you want to sort.
6 From the Order pop-up menu, select whether to sort the column alphabetically or numerically,
then select whether to sort it in ascending order (A to Z, lower numbers to higher numbers) or
descending order.
7 From the Then by pop-up menu, select a secondary column to sort on a different column.
Chapter 898
Page 99

8 From the Order pop-up menu, select whether to sort the secondary sort column alphabetically
or numerically, and whether to sort it in ascending order (A to Z, lower numbers to higher
numbers) or descending order.
9 In the Options section, select any of the following additional options:
• Sort includes first row specifies that the first row of the table is included in the sort. If the table
has a header row, the header is the first row of the table.
• Sort header rows specifies to sort header rows using the same criteria as the body rows.
• Sort footer rows specifies to sort table footer rows using the same criteria as the body rows.
• Leave row colors in original positions specifies that any table row colors should remain
associated with the same content after the sort.
For example, if your table rows are formatted with two alternating colors, leave this option
unselected to ensure that the sorted table still has alternating-colored rows. If the row color is
specific to the content of each row, then select this option to ensure that color remains
associated with the sorted rows.
10 Click OK.
Contribute reorders the table.
Working with Tables 99
Page 100

Chapter 8100
 Loading...