

Page 1

Adobe Sign
Admin Guide
Last Updated: March 10, 2017
©2017 Adobe Systems Incorporated. All rights reserved
Page 2

Table of Contents
Welcome to Adobe Sign! ..................................................................................................................................... 4
Account Setup ......................................................................................................................................................... 5
External Archive .................................................................................................................................................................... 5
How to set it up ....................................................................................................................................................................................................... 5
Branding your account .......................................................................................................................................................6
Company name and URL hostname ...................................................................................................................................................... 6
Upload your logo ................................................................................................................................................................................................... 8
Add an email header and footer .................................................................................................................................................................9
Security Settings ................................................................................................................................................................... 15
User Access Security - SAML ........................................................................................................................................................................ 15
User Access Security
Transaction Security .......................................................................................................................................................................................... 18
Post-Transaction Security ............................................................................................................................................................................. 20
Account Sharing
Advanced Account Sharing (Enterprise only) ................................................................................................................................ 22
Agreement Settings .............................................................................................................................................. 23
Recipients
Recipient Roles ..................................................................................................................................................................................................... 23
Recipient Groups
Recipient Authentication
Setting message templates (Business and Enterprise) ....................................................................................... 26
Message Templates .......................................................................................................................................................................................... 27
How users can attach or choose documents ............................................................................................................ 27
Attaching Documents ...................................................................................................................................................................................... 28
Setting default reminders ............................................................................................................................................... 29
Reminders ................................................................................................................................................................................................................ 29
Setting a default document expiration ...................................................................................................................... 29
Document Expiration ....................................................................................................................................................................................... 30
............................................................................................................................................................................ 23
........................................................................................................................................................................................ 16
................................................................................................................................................................................................. 22
............................................................................................................................................................................................... 24
............................................................................................................................................................................ 24
Users and Groups ................................................................................................................................................... 31
Users ........................................................................................................................................................................................ 31
User page features .............................................................................................................................................................................................. 31
How to Create a User ....................................................................................................................................................................................... 32
How to Deactivate/Reactivate a user ................................................................................................................................................... 34
How to promote a user to admin ........................................................................................................................................................... 37
Creating Users in Bulk ..................................................................................................................................................................................... 39
Groups (Business and Enterprise) ............................................................................................................................... 42
How to Create a Group ................................................................................................................................................................................... 42
How to Add Users to a Group .................................................................................................................................................................... 43
Adobe Sign – Admin Guide 2
Page 3

Moving a single User via the User profile .......................................................................................................................................... 43
Moving multiple Users using Bulk User Edit ................................................................................................................................... 44
Assign Users to Group from within the Group Settings .......................................................................................................... 46
Group level Admin authority controls ................................................................................................................................................. 49
Adjusting Group level settings ................................................................................................................................................................... 50
Library Templates ................................................................................................................................................ 52
Creating a Reusable Document .................................................................................................................................... 53
Editing Template Permissions ...................................................................................................................................... 56
Reports (Adobe Sign – Business and Enterprise) ..................................................................................... 58
Report Parameters ............................................................................................................................................................ 60
Report Results ..................................................................................................................................................................... 63
Adobe Sign – Admin Guide 3
Page 4

Welcome to Adobe Sign!
Before you begin using your Adobe Sign account, we’ve got some suggested steps to getting
your account setup and customized for your company’s use. The purpose of this guide is to
get you up and running with branding, security settings, users and templates.
This guide is outlined in such a way that as you move through the “chapters”, you’ll cover
all the important features and settings. By the end, your account will be up and ready to go.
Keep in mind, there are plenty of other options and settings to explore that aren’t covered in
this guide. Our knowledge base is an excellent resource for getting information on the other
settings that can be found in Adobe Sign.
Now sit back, login and let’s get you e-Signing!
Adobe Sign – Admin Guide 4
Page 5
Account Setup
This section will go over the suggested steps for initially setting up your account.
External Archive
Like backing up your computer or phone, it’s a good idea to keep copies of your signed
agreements. Instead of downloading the agreements one by one from the Manage page, the
External Archive can send a copy of signed agreements to an alternate email address, an
Evernote account or a Box account.
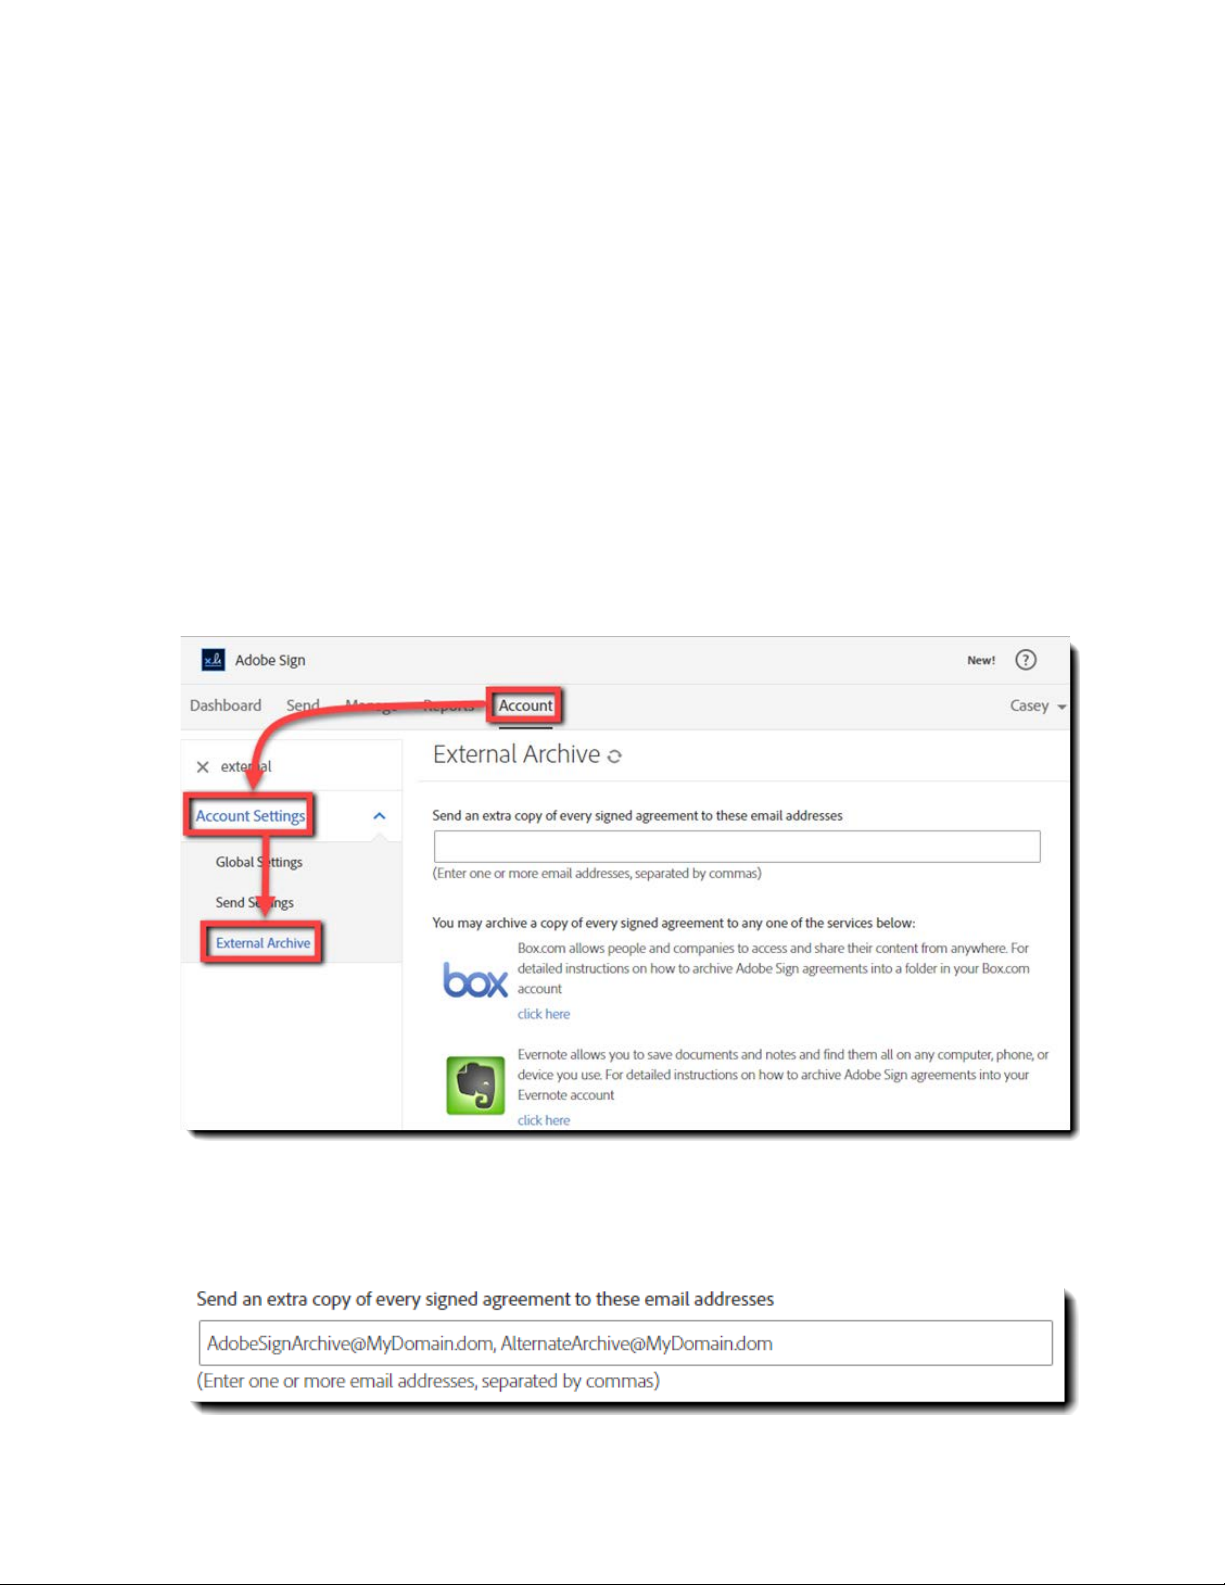
How to set it up
Log in as an Account Admin, and navigate to:
Archive
Account > Account Settings > External
To have copies of your account’s agreements send to an alternate email address, enter
that email address into the
Send an extra copy…
field and click the
Save Changes
Adobe Sign – Admin Guide 5
button.
Page 6
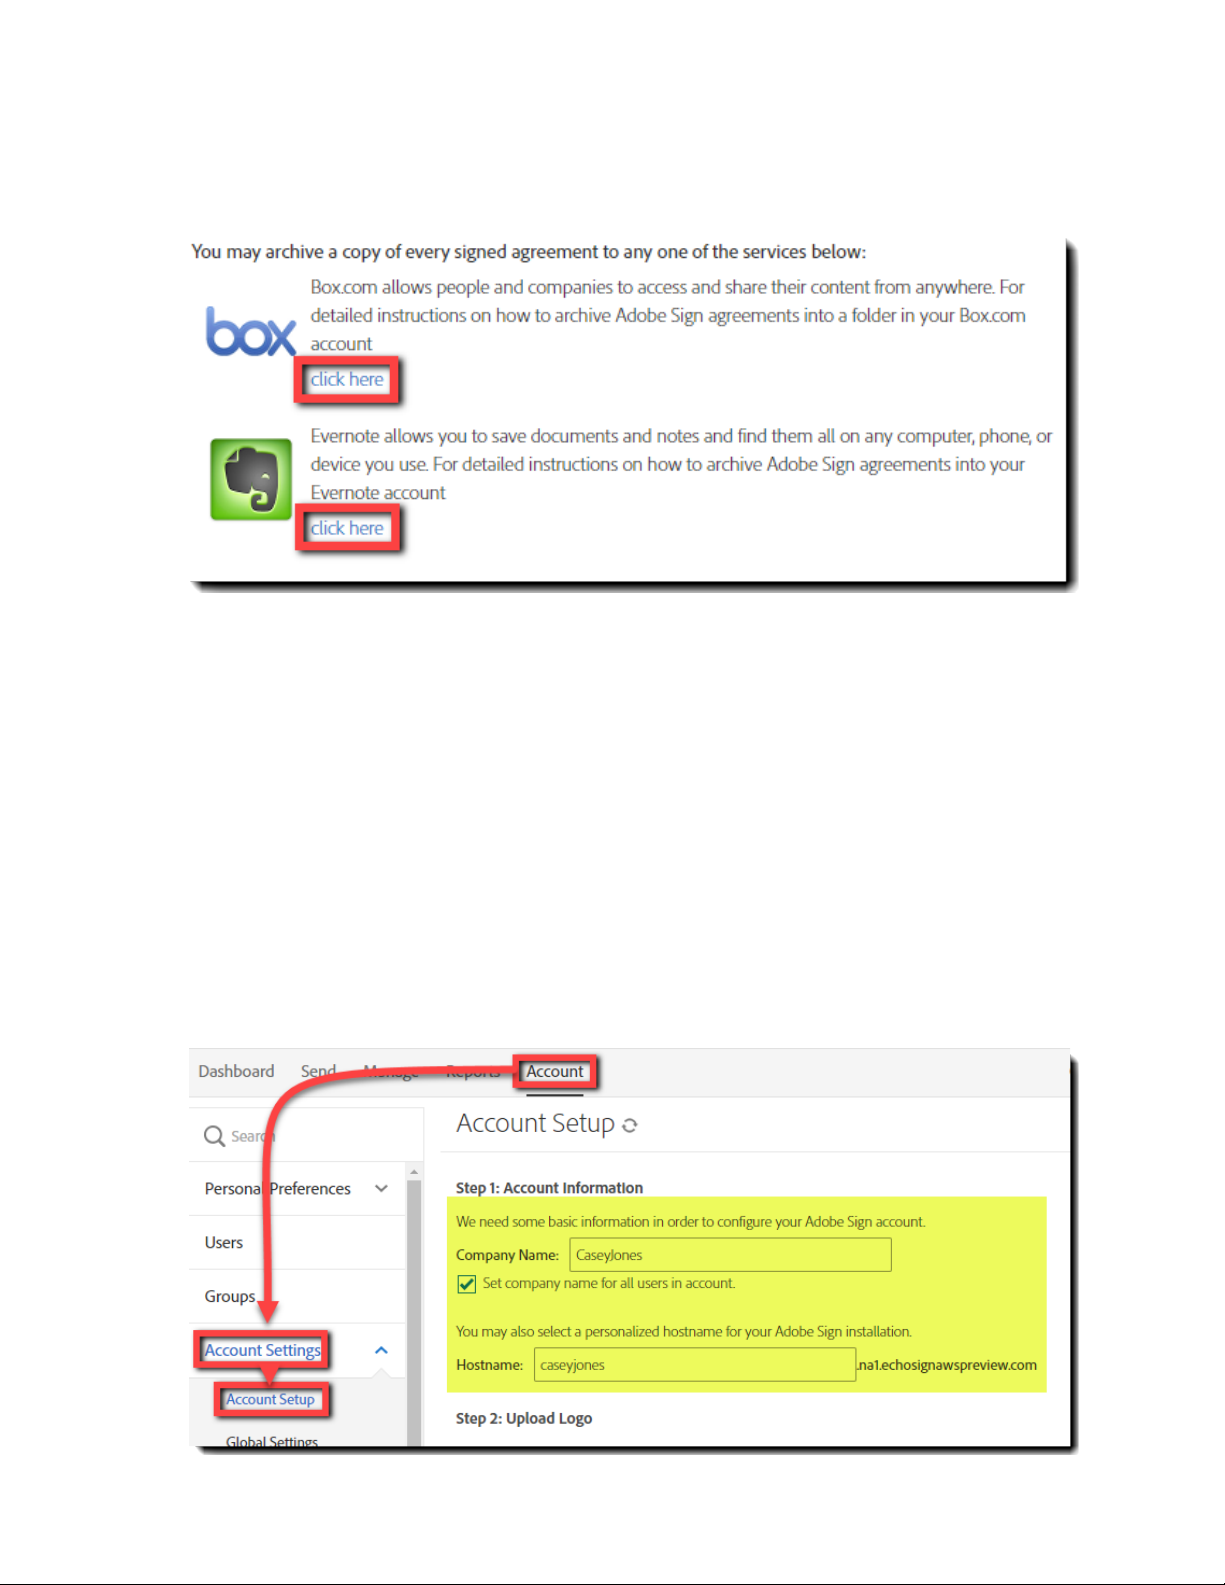
To have a copy sent to either Evernote or Box, click the corresponding
click here
link and
specific instructions will pop-up in a new window.
Branding your account
Adding your company branding is an excellent way to customize Adobe Sign for the users in
your account, as well as your signers.
Company name and URL hostname
In this section, you will set the company name and a hostname for your account. These
may seem basic, but they will personalize your account.
These two settings are Account wide and cannot be adjusted at the Group level
Log in as an Account Admin and navigate to:
Account
>
Account Settings > Account Setup
Adobe Sign – Admin Guide 6
Page 7
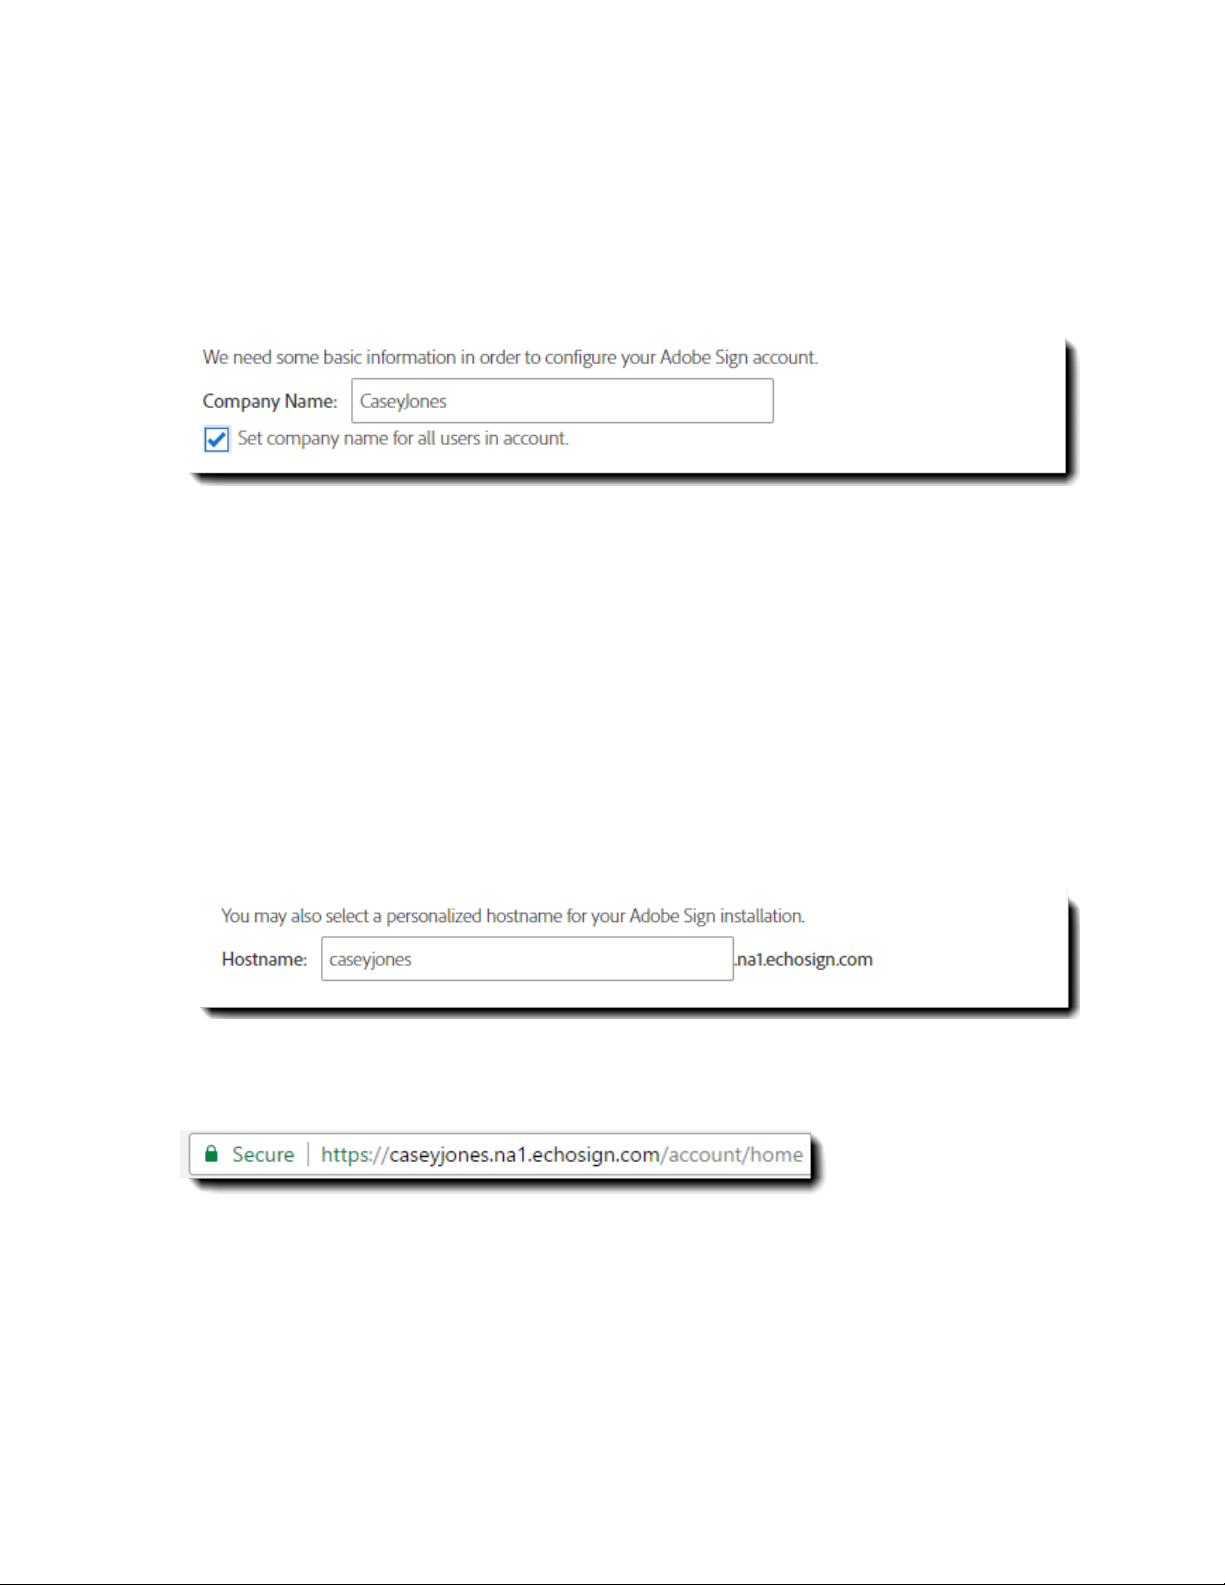
Company Name
The value you enter into this field will be displayed in all email correspondence from
Adobe Sign. This is also automatically populated into Company Name fields for your users
when they need to sign a document.
By default, Adobe Sign permits users to edit their personal settings, and this includes the
Company Name value for their individual user. If you would prefer to install one
immutable Company name to all users, you can check the
users in account
box.
Set company name for all
Hostname
Setting the hostname for your account changes the URL your users log in to and the URL
where agreements are hosted for your signers.
The result is a customized URL with your hostname.
Adobe Sign – Admin Guide 7
Page 8
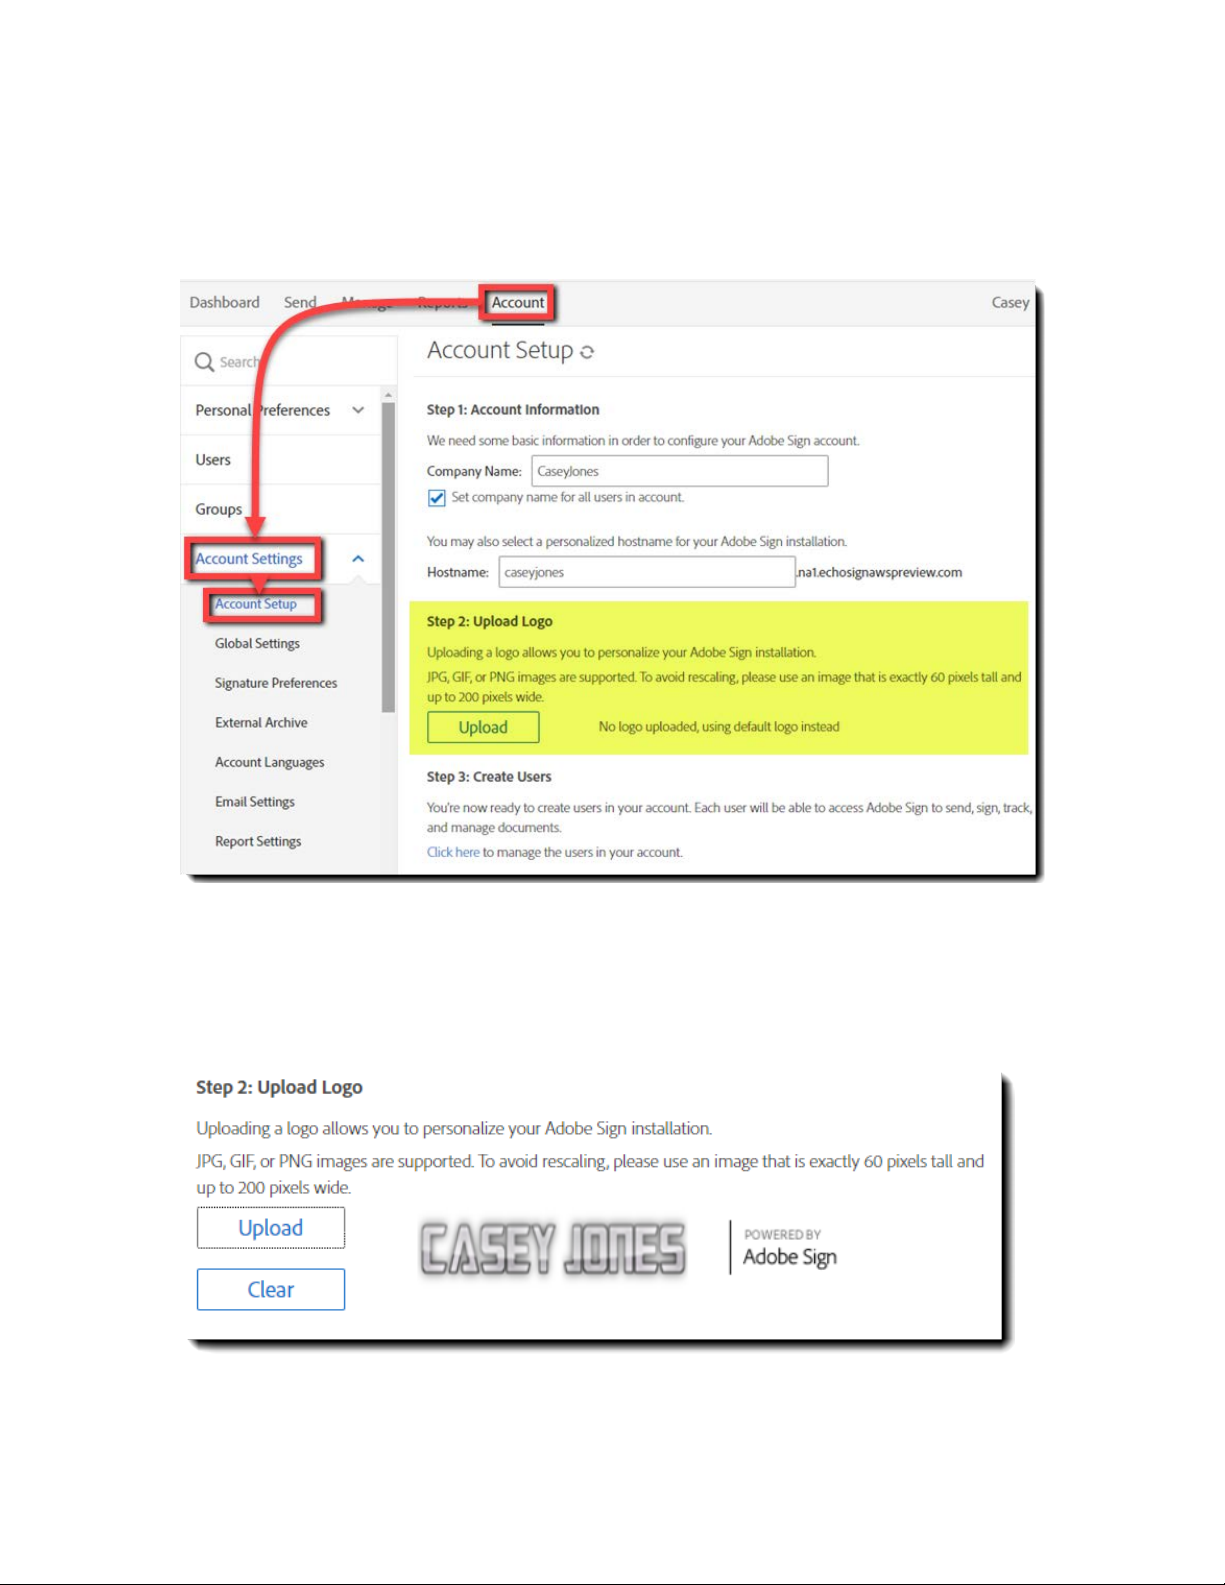
Upload your logo
Log in as an Account Admin and navigate to:
Setup > Upload Logo
.
Account > Account Settings > Account
Click the
Upload
button and navigate to the image you want to use. Keep in mind,
images of the stated dimensions (60 pixels tall and 200 pixels wide) work the best.
Once you’ve chosen an image, the logo will be displayed to the right of the
Upload
button:
If you need to change the logo at any time, click the Clear button and the logo will be
removed.
Adobe Sign – Admin Guide 8
Page 9
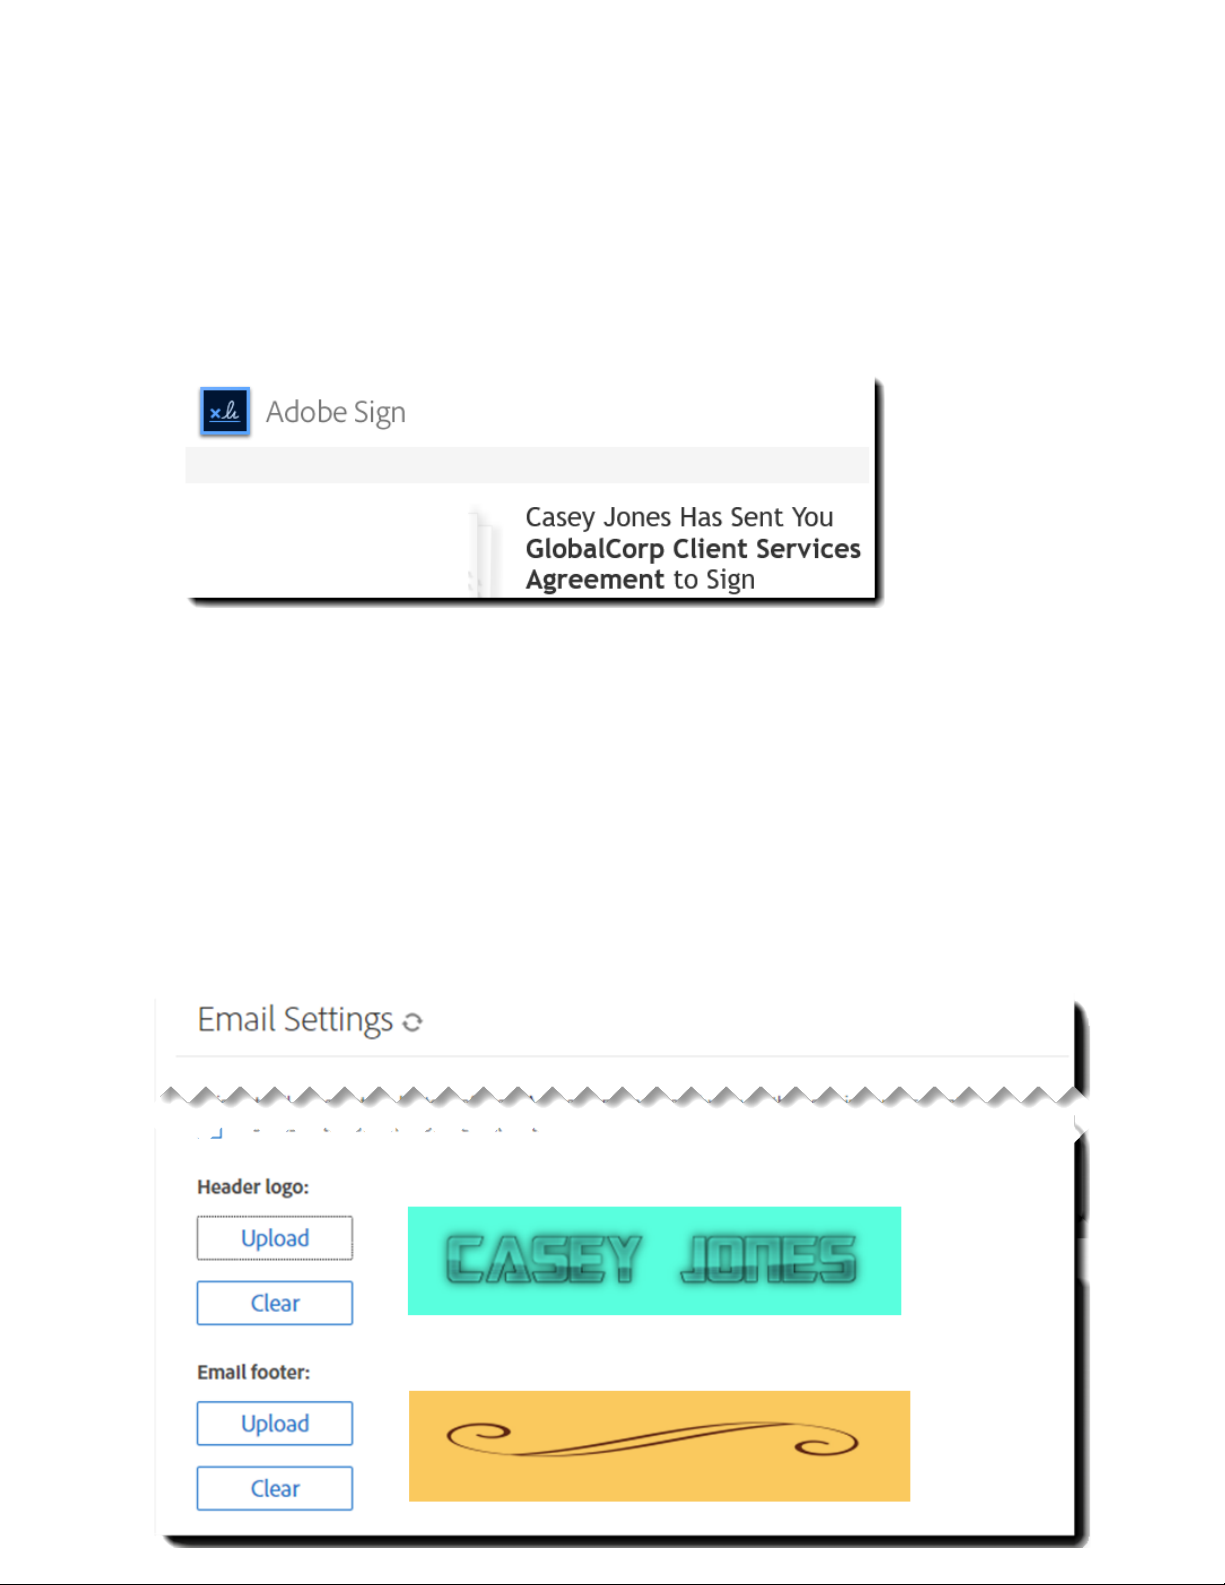
Add an email header and footer
Get your branding into your Agreement emails by setting a custom image for the header
and/or footer of the email template.
Additionally, you can provide an optional Account wide plain text footer for marketing,
legal information or any other content you want distributed with your Agreement
notifications.
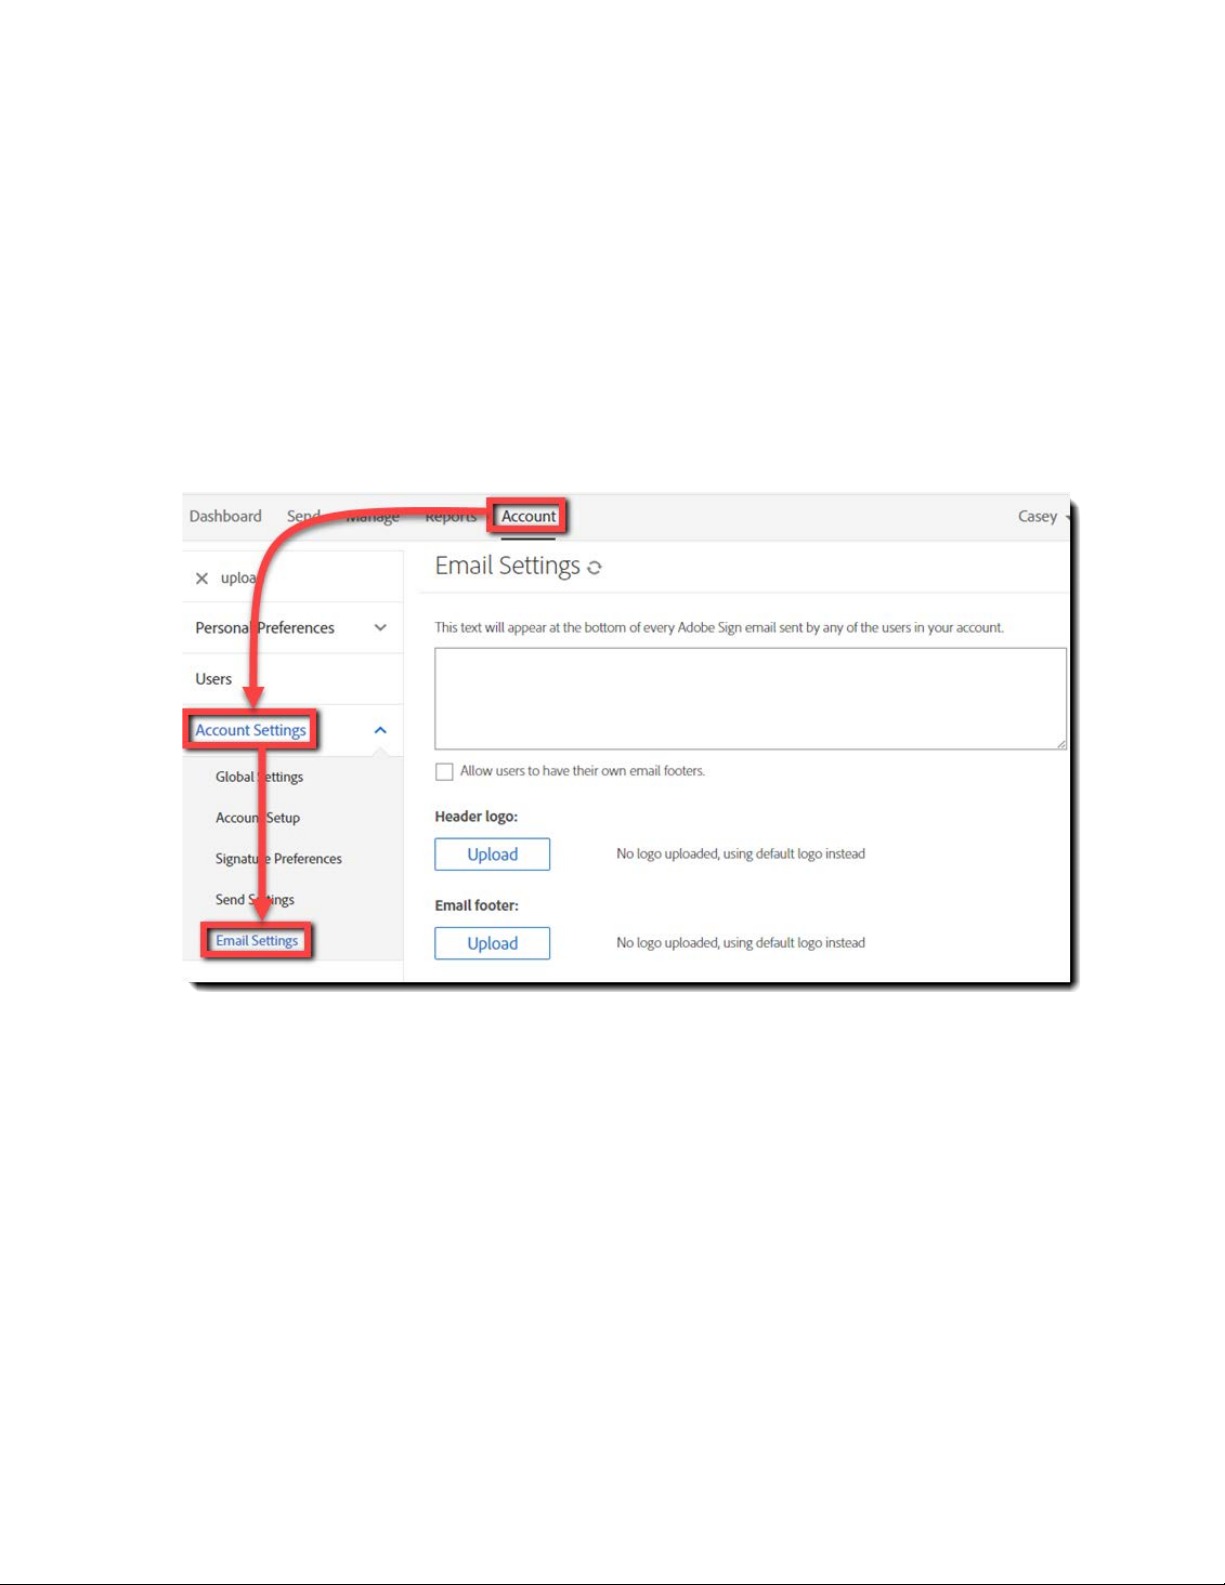
To add or edit your existing header/footers:
Navigate to:
Account
>
Email Settings
then
Header & Footer Images
Adobe Sign – Admin Guide 9
Page 10
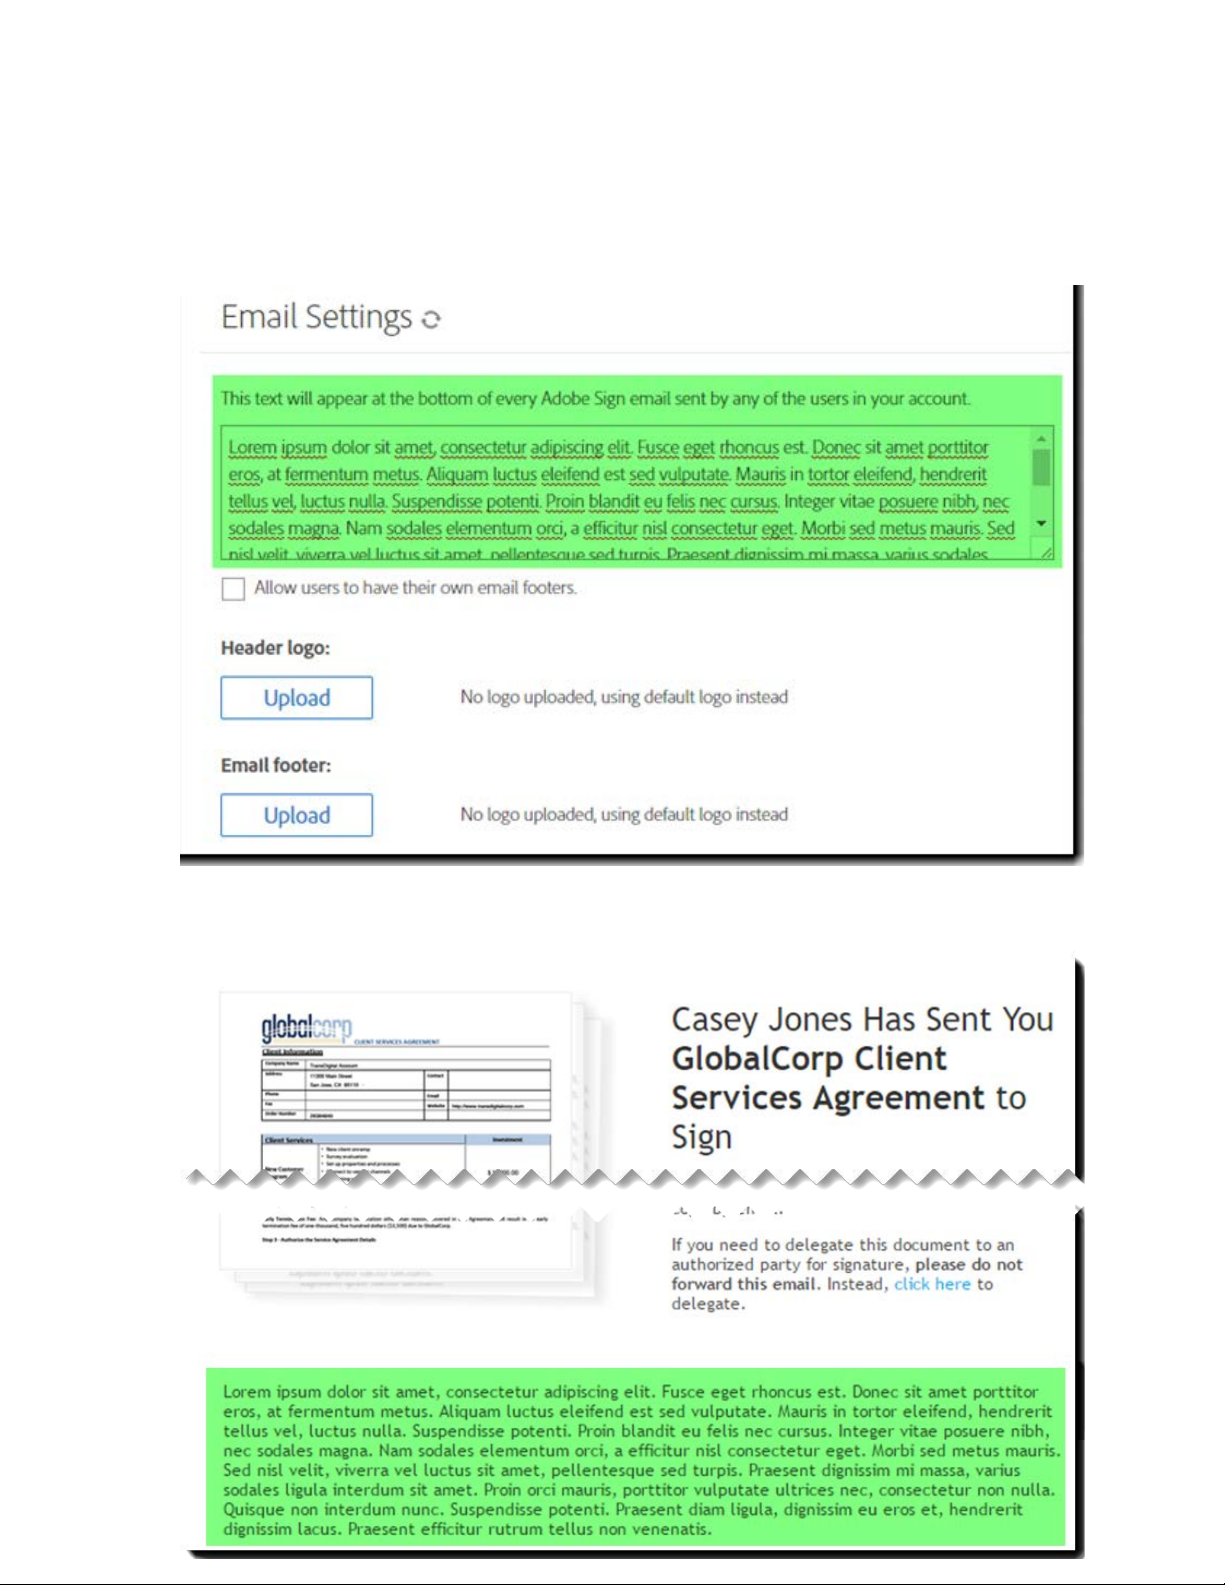
Plain Text Footer
At the top of the page is the plain text footer. This footer is Account wide, and cannot
be overridden at the Group level.
This text will be displayed below the page thumbnail and message content of the
Agreement
Adobe Sign – Admin Guide 10
Page 11
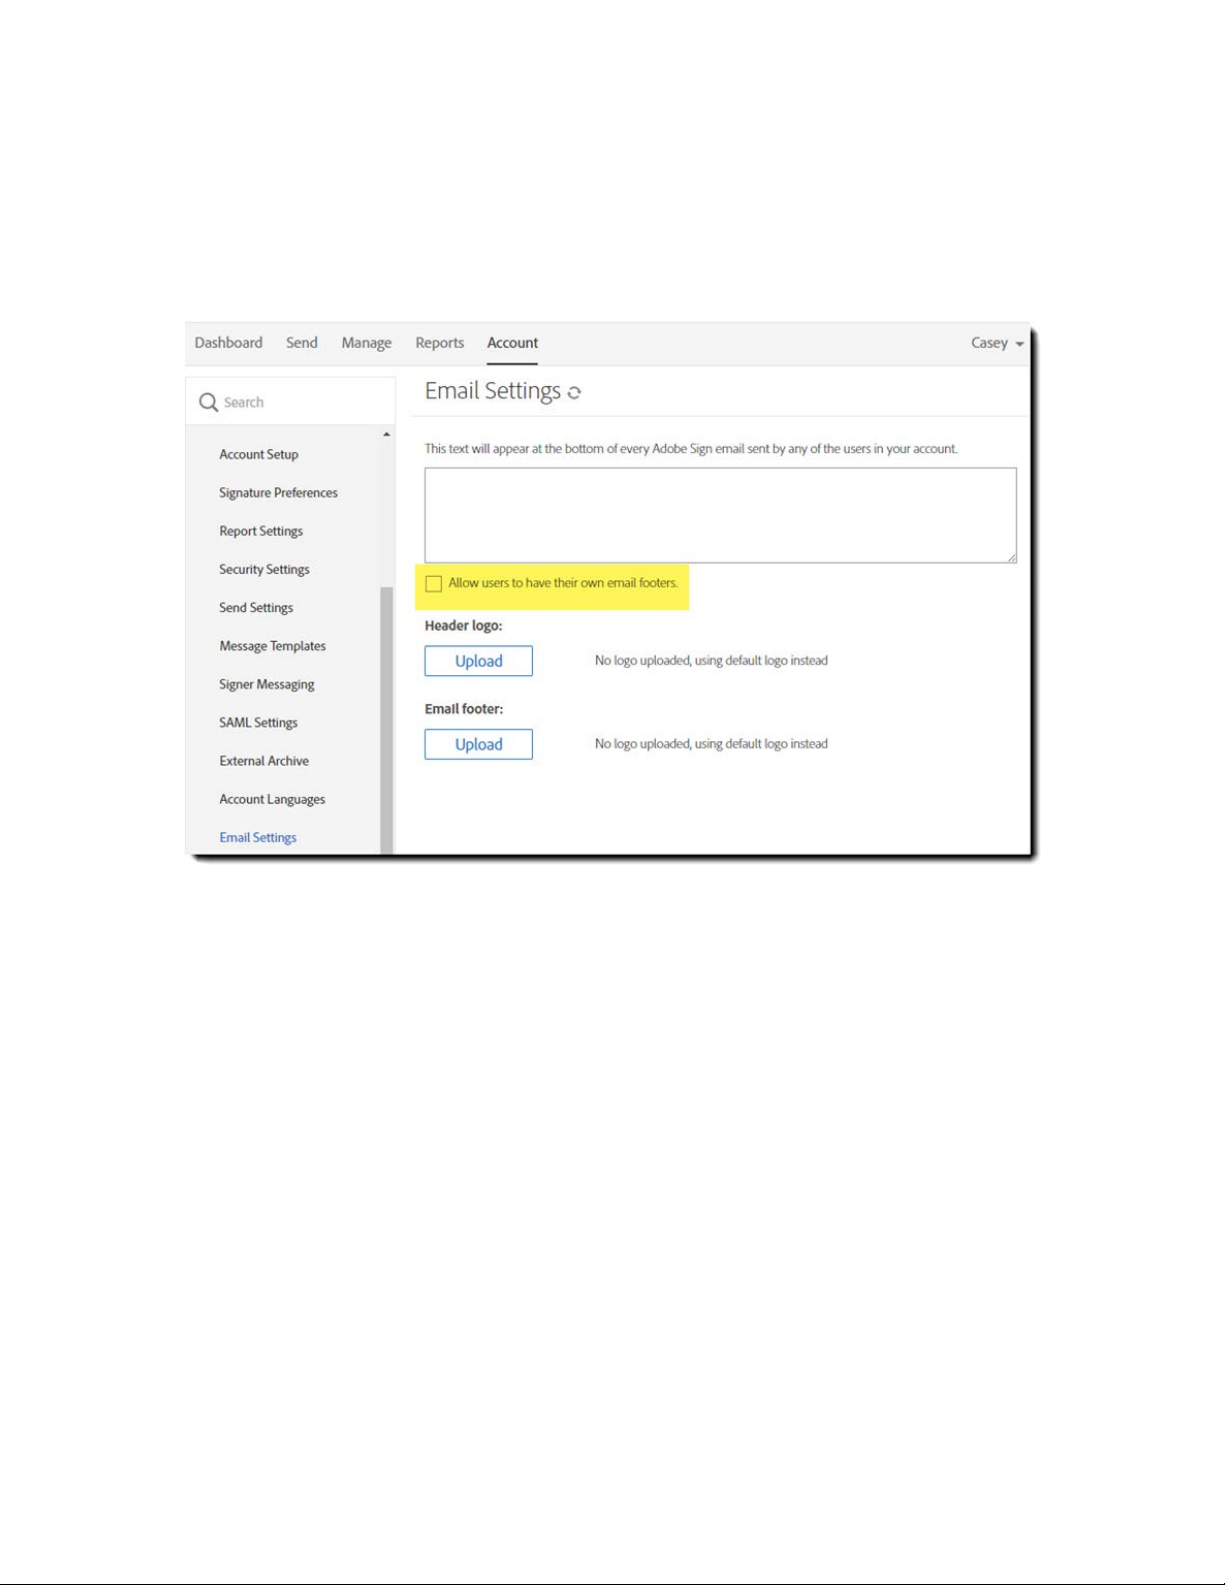
User Level Footers (Signature Files)
By checking the
Allow users to have their own email footers
box, you allow each
user to optionally include their own personalized footer, much like a signature file in
email.
This footer is in
addition
to the Account wide footer, and any image footer that may
be applied.
Users can set their individual footers by:
• Mouse over the user name in the upper-right corner of the screen to open the
menu, and select
o
The page will refresh and display the User menu with
My Profile
Personal Preferences
already expanded
• Select
Note
: This option is only visible after the Account admin enables the setting
My Email Footer
to open the page
Adobe Sign – Admin Guide 11
Page 12
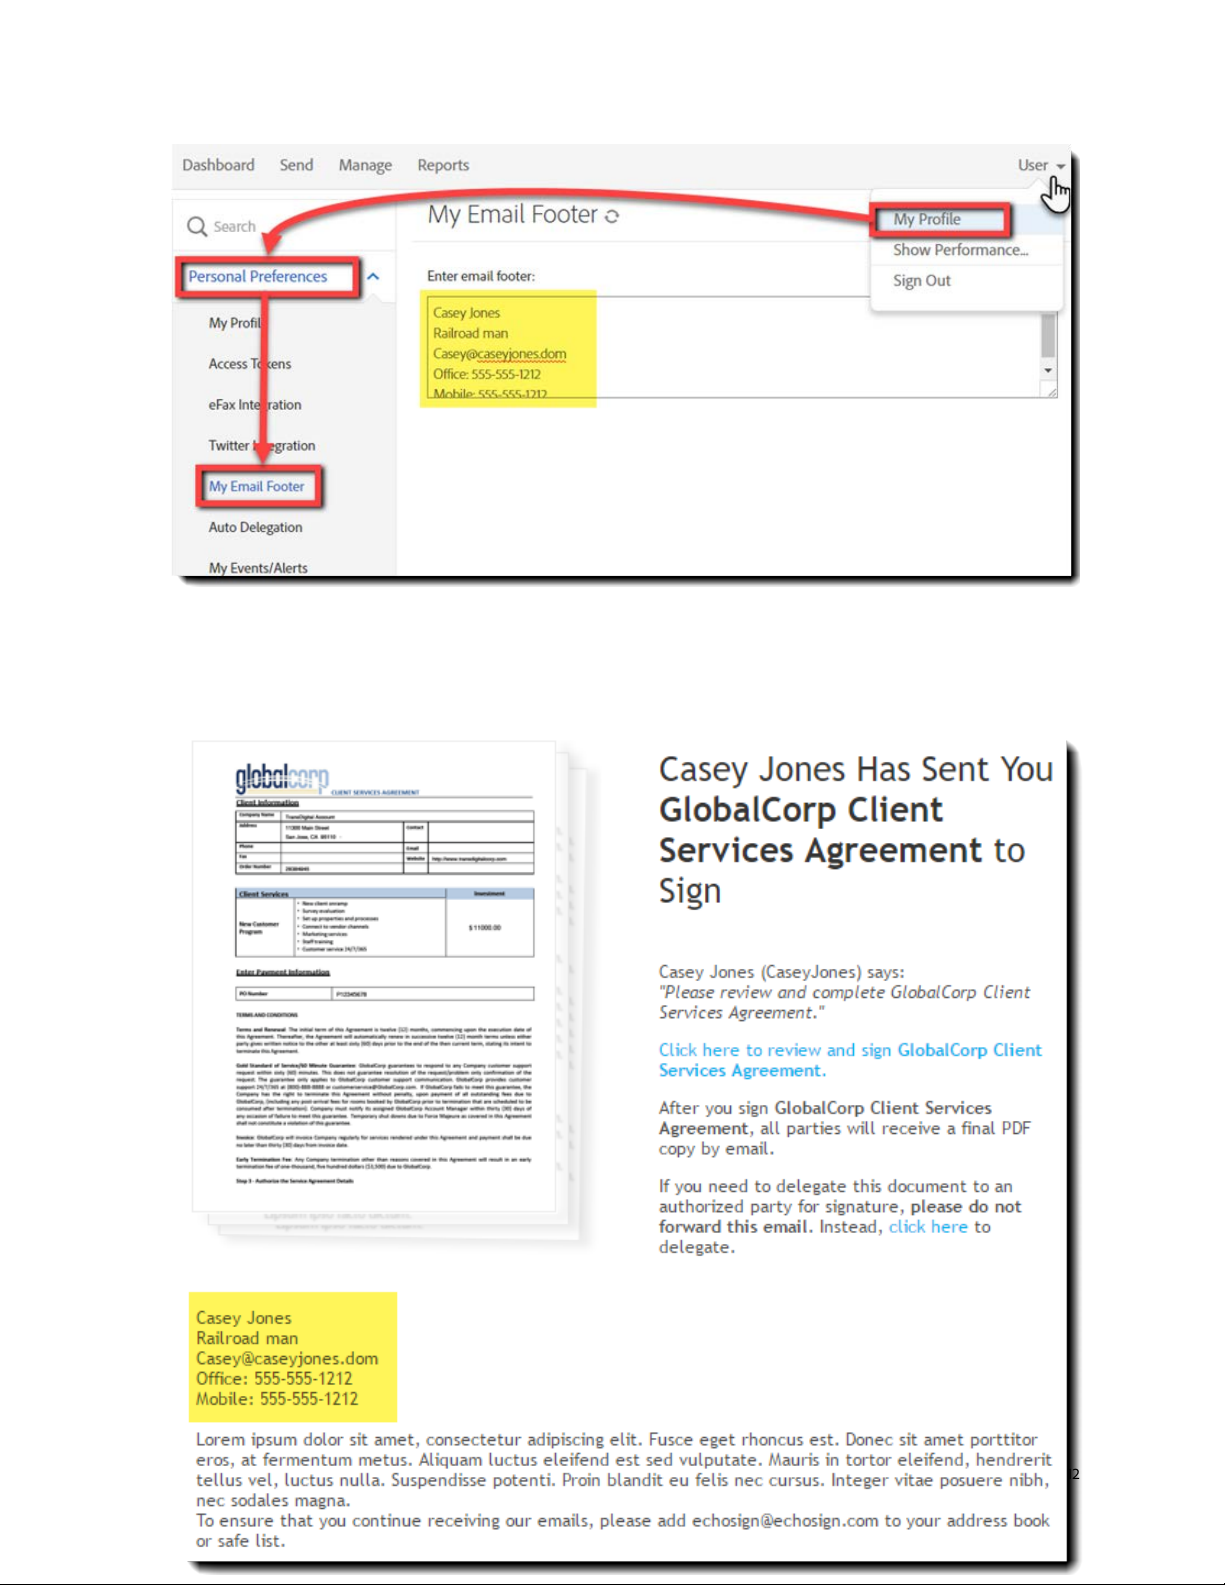
The user footer is inserted between the thumbnail image and the Account level text
footer:
Adobe Sign – Admin Guide 12
Page 13
Header and Footer Images
The default email header mirrors the header you see if you log into your Adobe Sign
account. It will contain either the default Adobe Sign logo, or the logo you have
uploaded for your account/group.
The email image header will always be at the very top of the email content.
The default footer image is empty. If you insert a footer image, it will display at the
bottom of the email (with only the safe listing message below it).
Both the email header and footer images need to be 600x200px graphics (png, jpg or
gif).
To install either image:
Click on
Upload
button, navigate to the image you want to upload and select it.
Once uploaded, the graphic will appear to the right of the button.
Adobe Sign – Admin Guide 13
Page 14
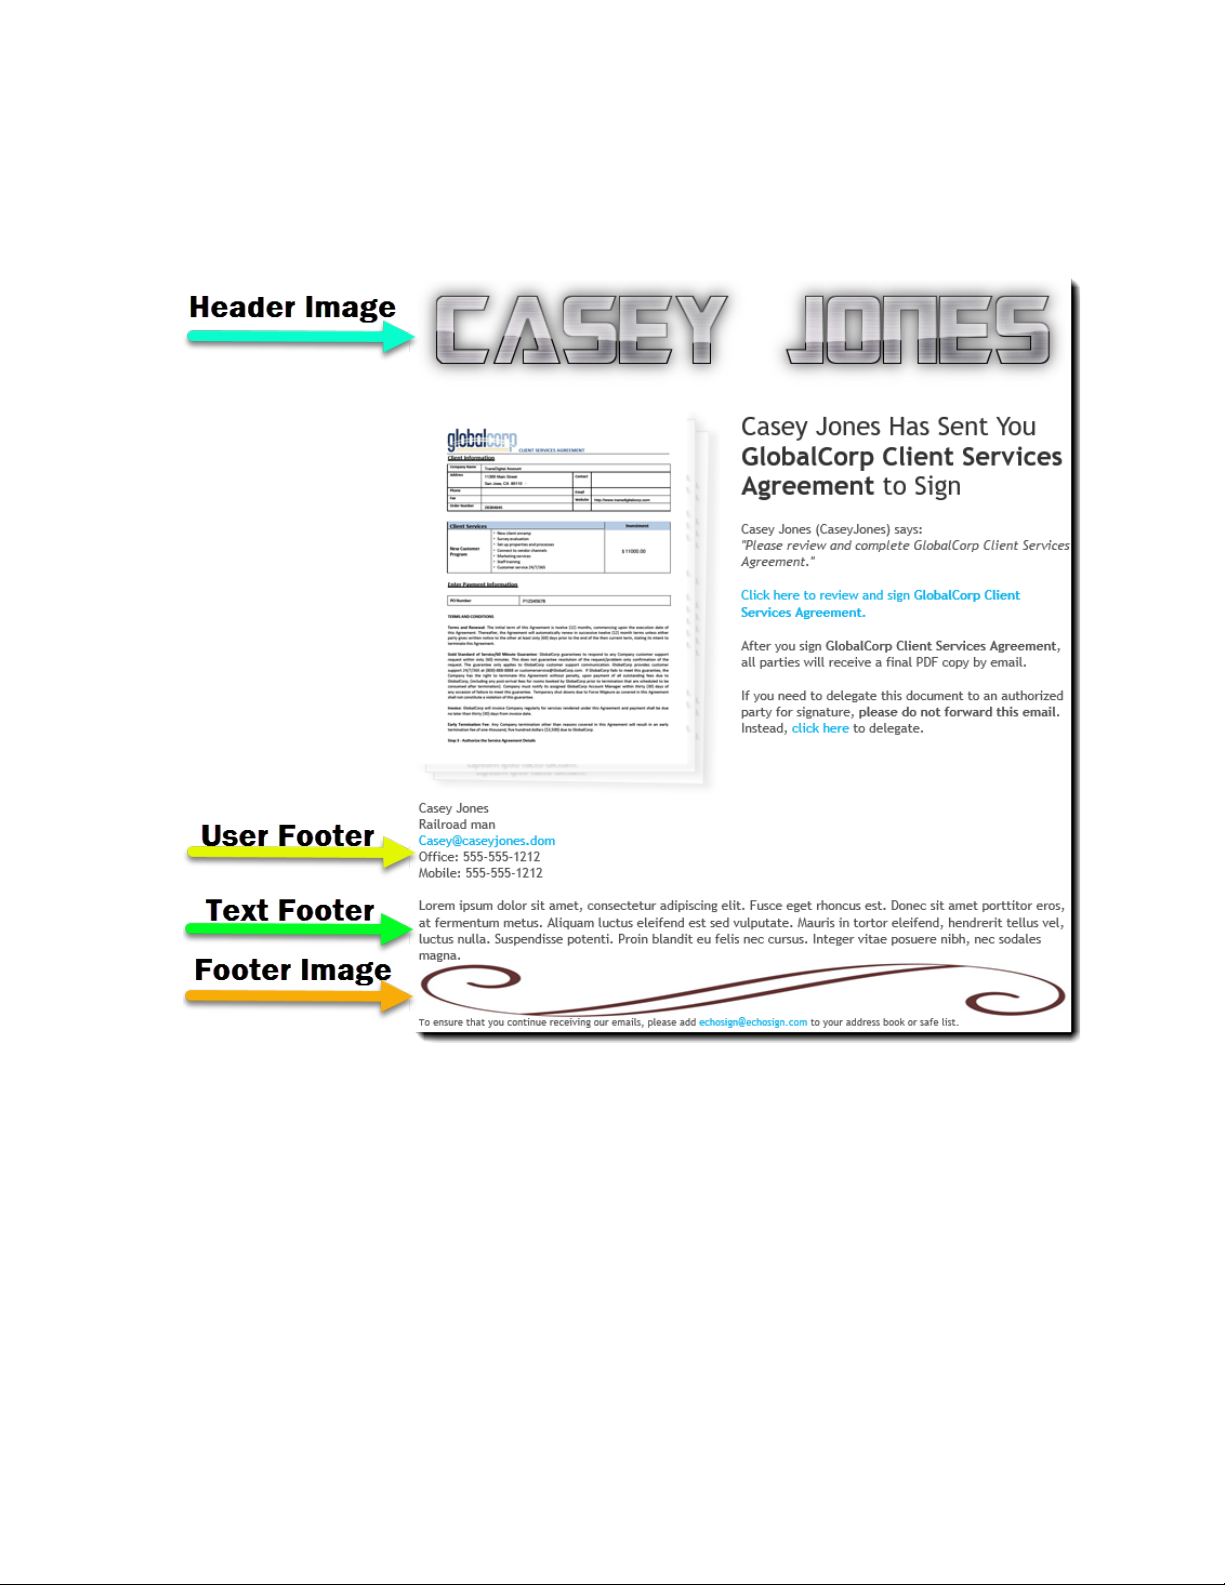
You can remove the image by clicking the
Below is an example of a fully branded email:
Clear
button at any time.
Email header and footer images can also be set at the Group level (which will override
the Account image).
Adobe Sign – Admin Guide 14
Page 15
Security Settings
Account, user and document security is Adobe Sign’s number one concern. Therefore, we
provide several security options at the account level. We suggest reviewing the settings in
this section and decide which will work the best for your use case.
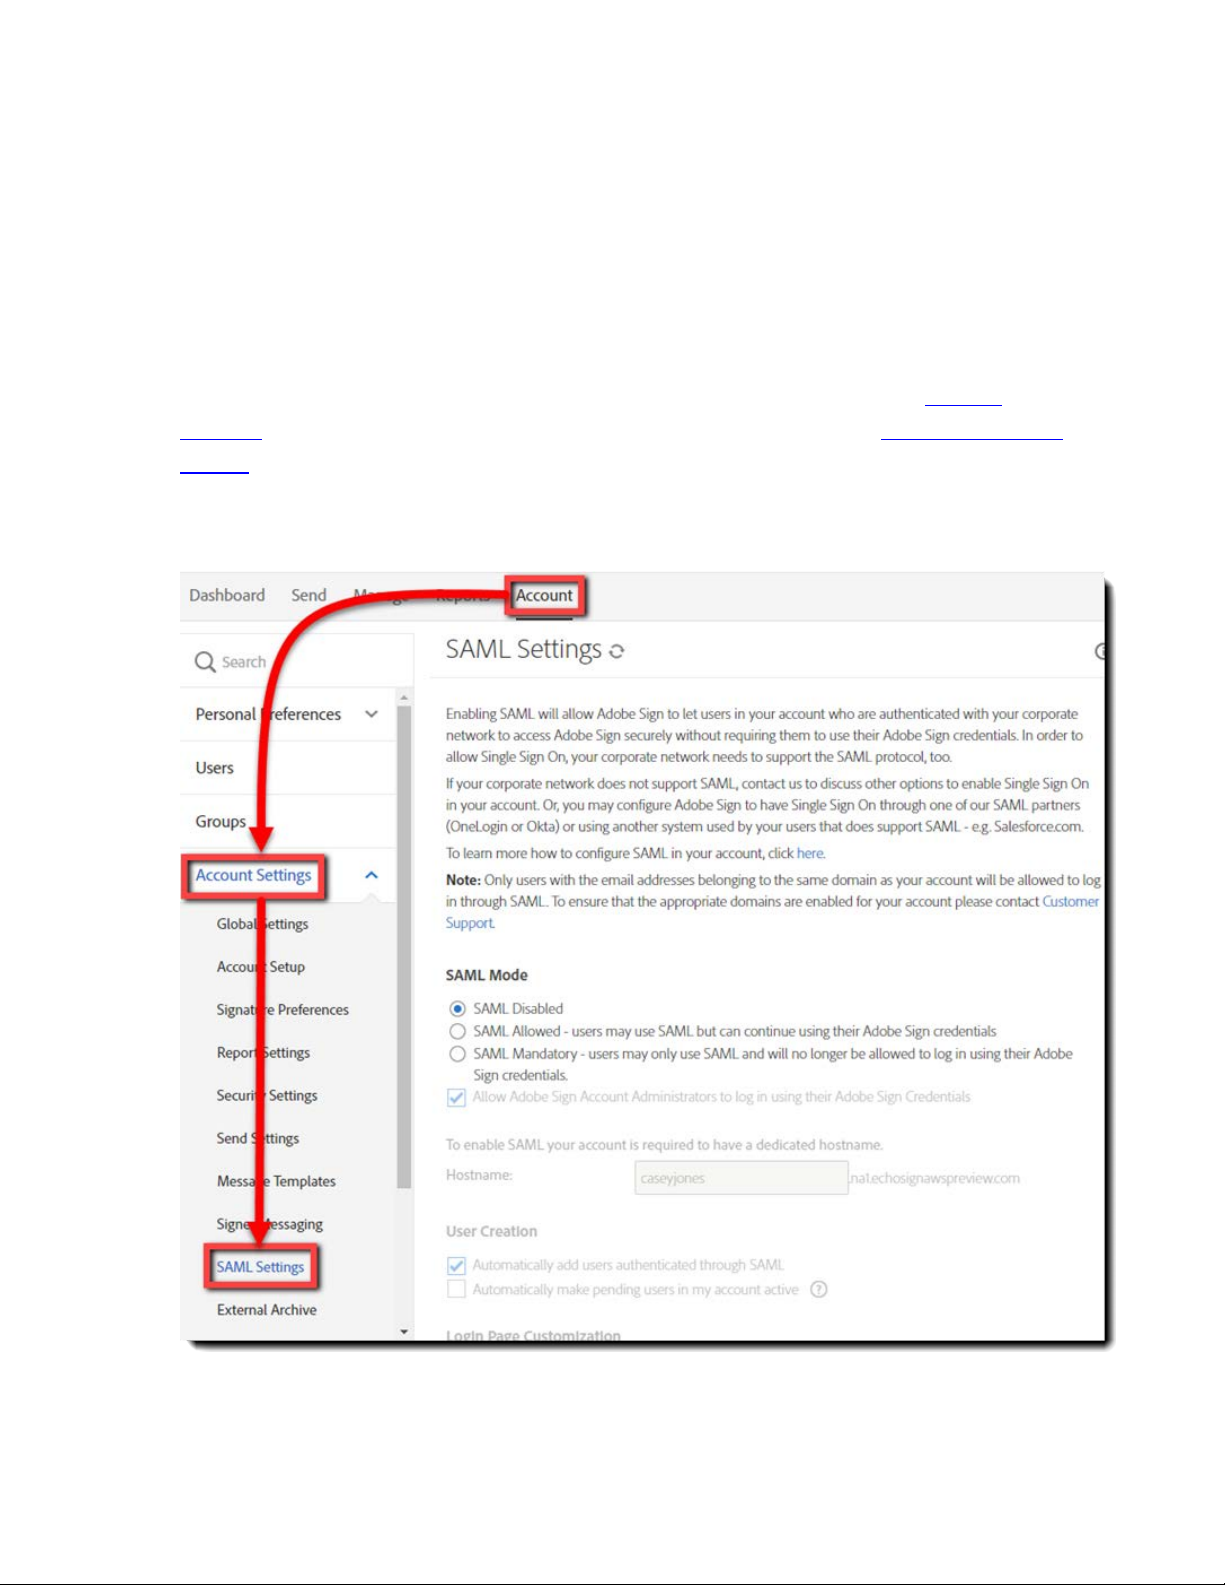
User Access Security - SAML
If your company has a federated log in solution, Adobe Sign does provide SAML 2
options for user authentication.
names.
Adobe Sing SAML settings can be found by navigating to:
SAML Settings
Configuring SAML will require that you claim your domain
Account > Account Settings >
Adobe Sign – Admin Guide 15
Page 16
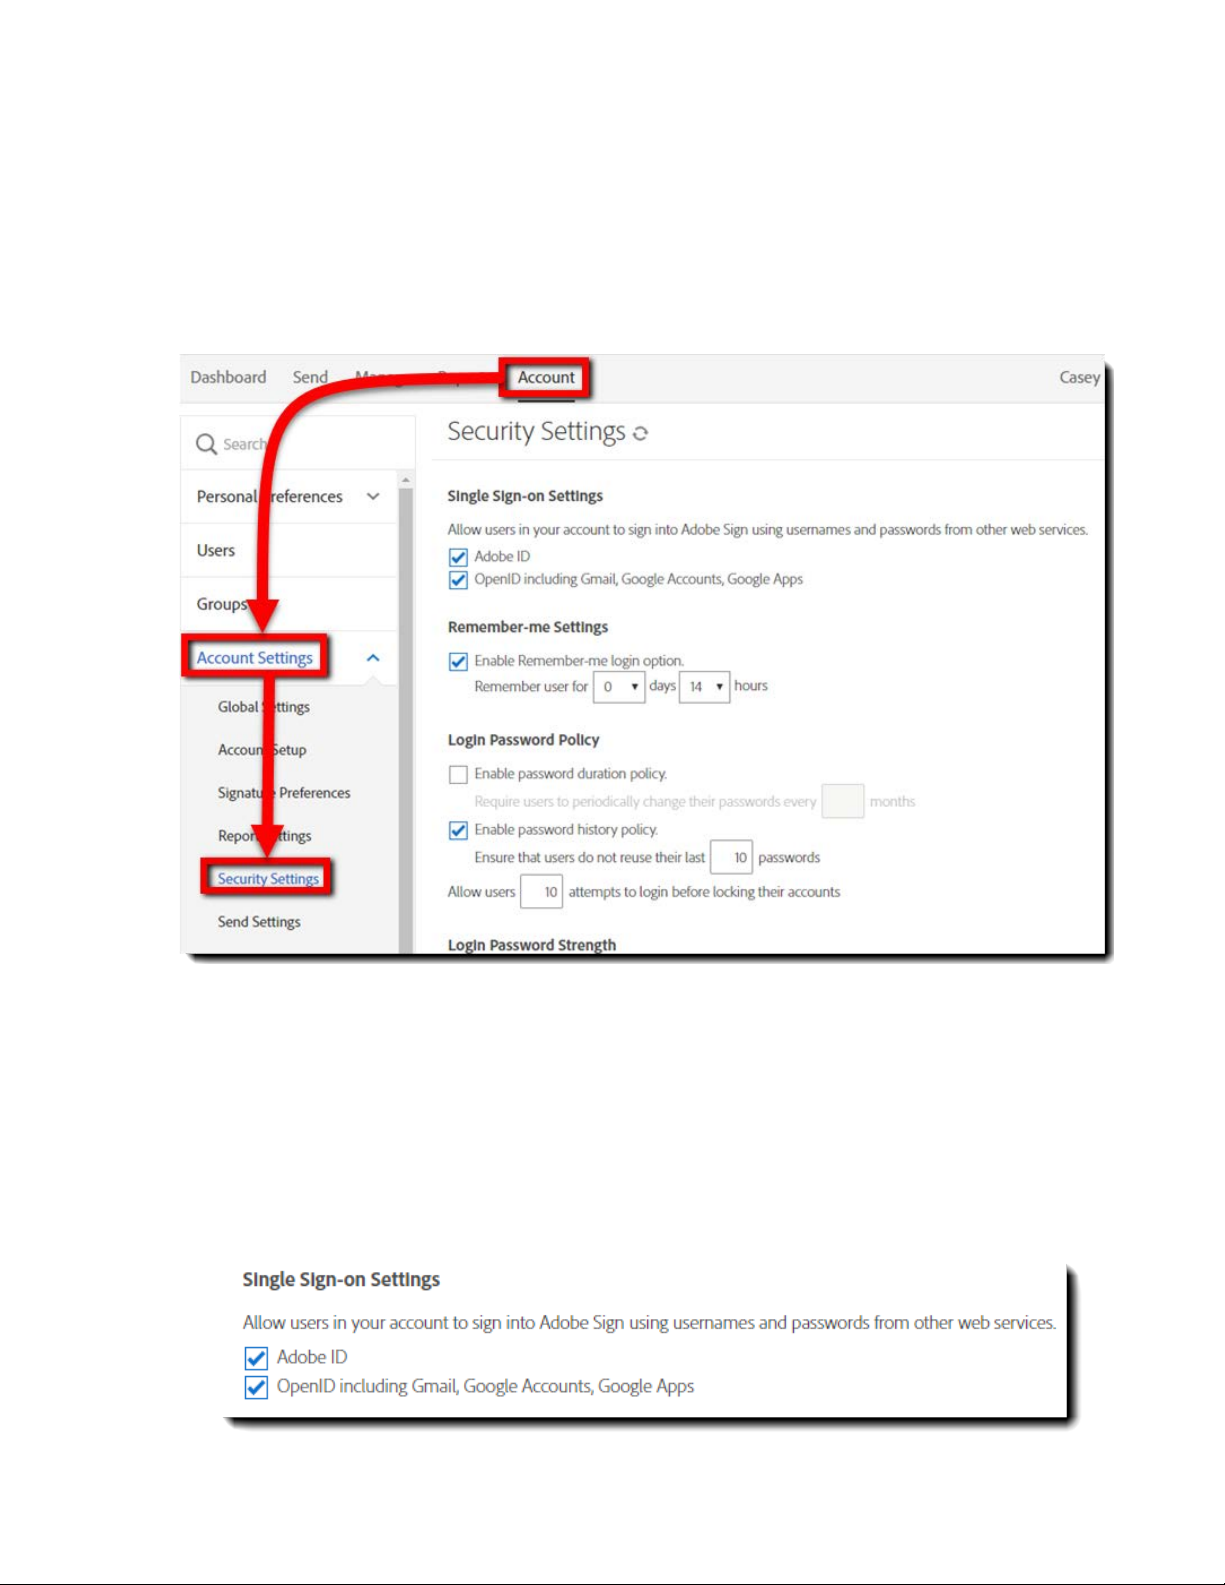
User Access Security
Authentication to the Adobe Sign app has multiple settings available so you can configure
the security criteria to match your company policy regarding access.
User access security settings can be configured by navigating to: Account > Account Settings
> Security Settings
Single Sign-on Settings
You can either allow or deny users in your account the ability to log in to Adobe Sign
by authenticating through other services. It is recommended that you disable either
(or both) of these settings if they are not used to keep the log in process to a single
simple option for users.
Adobe Sign – Admin Guide 16
Page 17
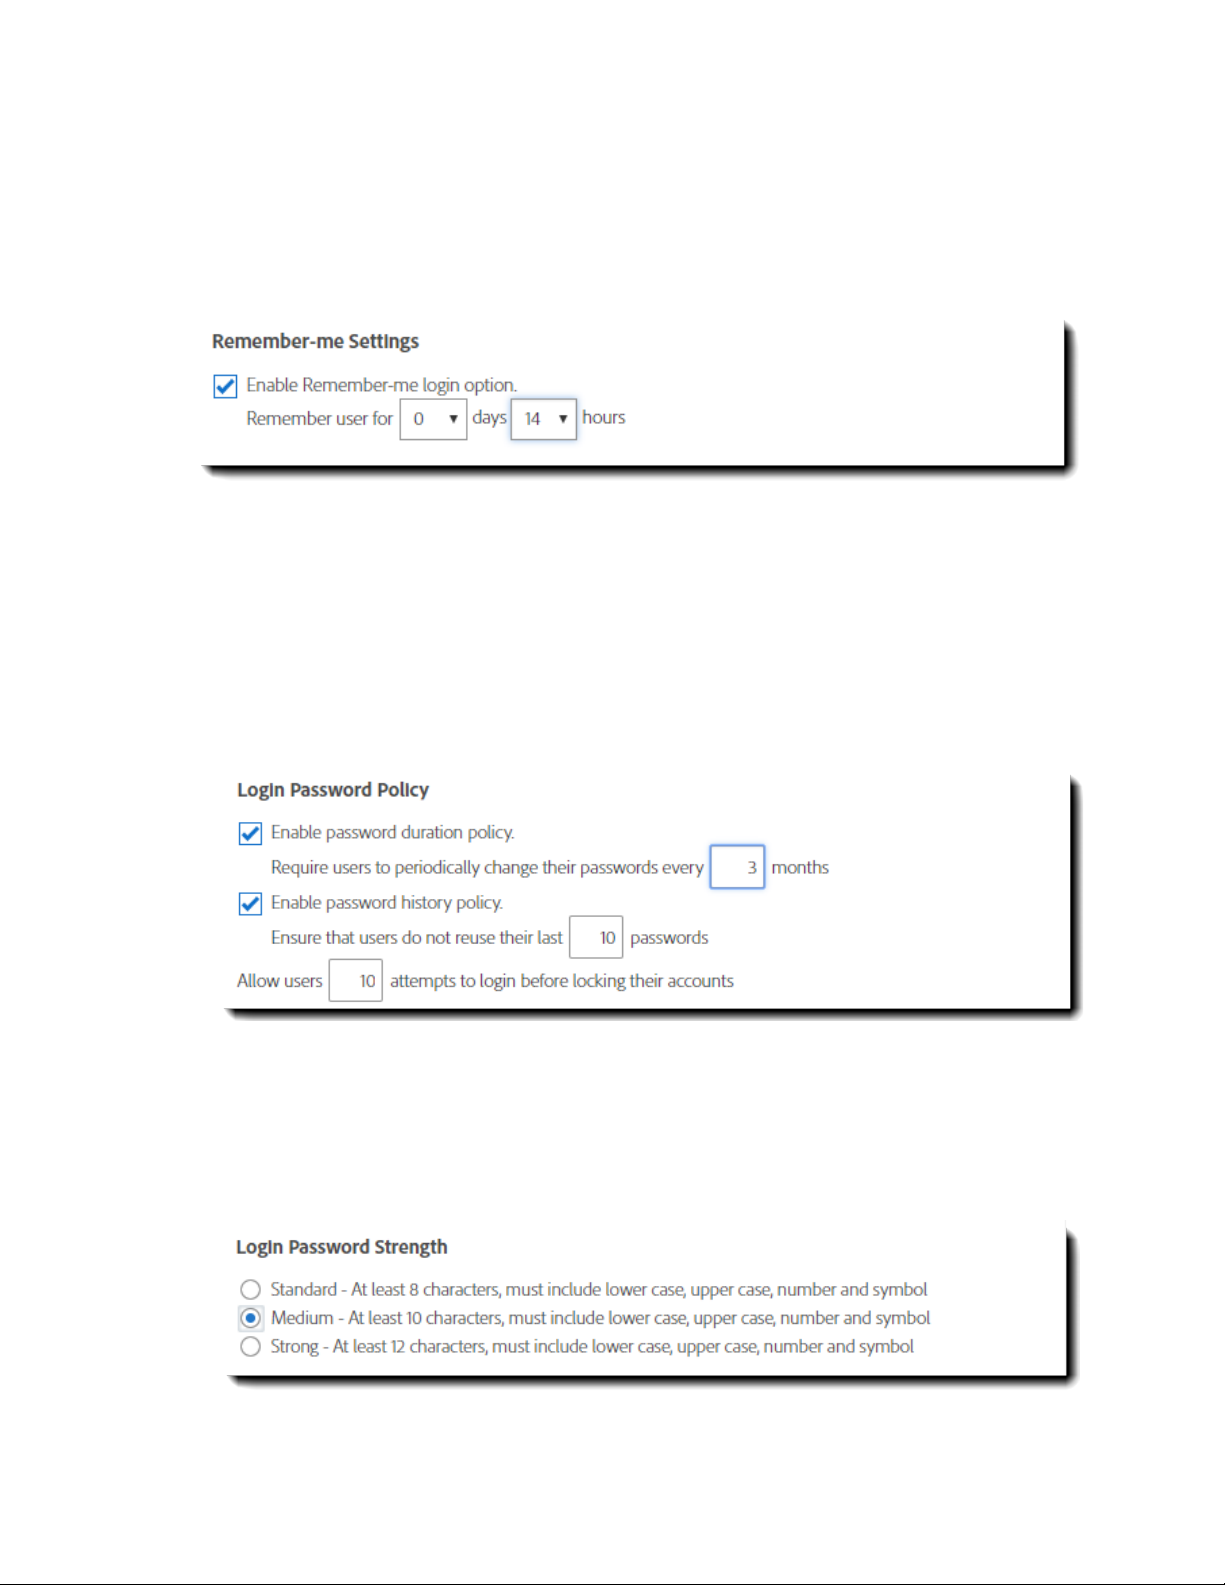
Remember-me Settings
Enable this setting to enable the
Remember Me
setting when authentication to Adobe
Sign. This setting remembers the authentication to the service (on the local system)
for the time frame selected.
Login Password Policy
The options under
Login Password Policy
set whether users should be required to
change their password after a number of months, whether a previous password can
be used as their new password, and how many log in attempts can be made before
their userID is locked.
Login Password Strength
This setting allows you to adjust the strength or difficulty of the password set by users
in your account.
Adobe Sign – Admin Guide 17
Page 18
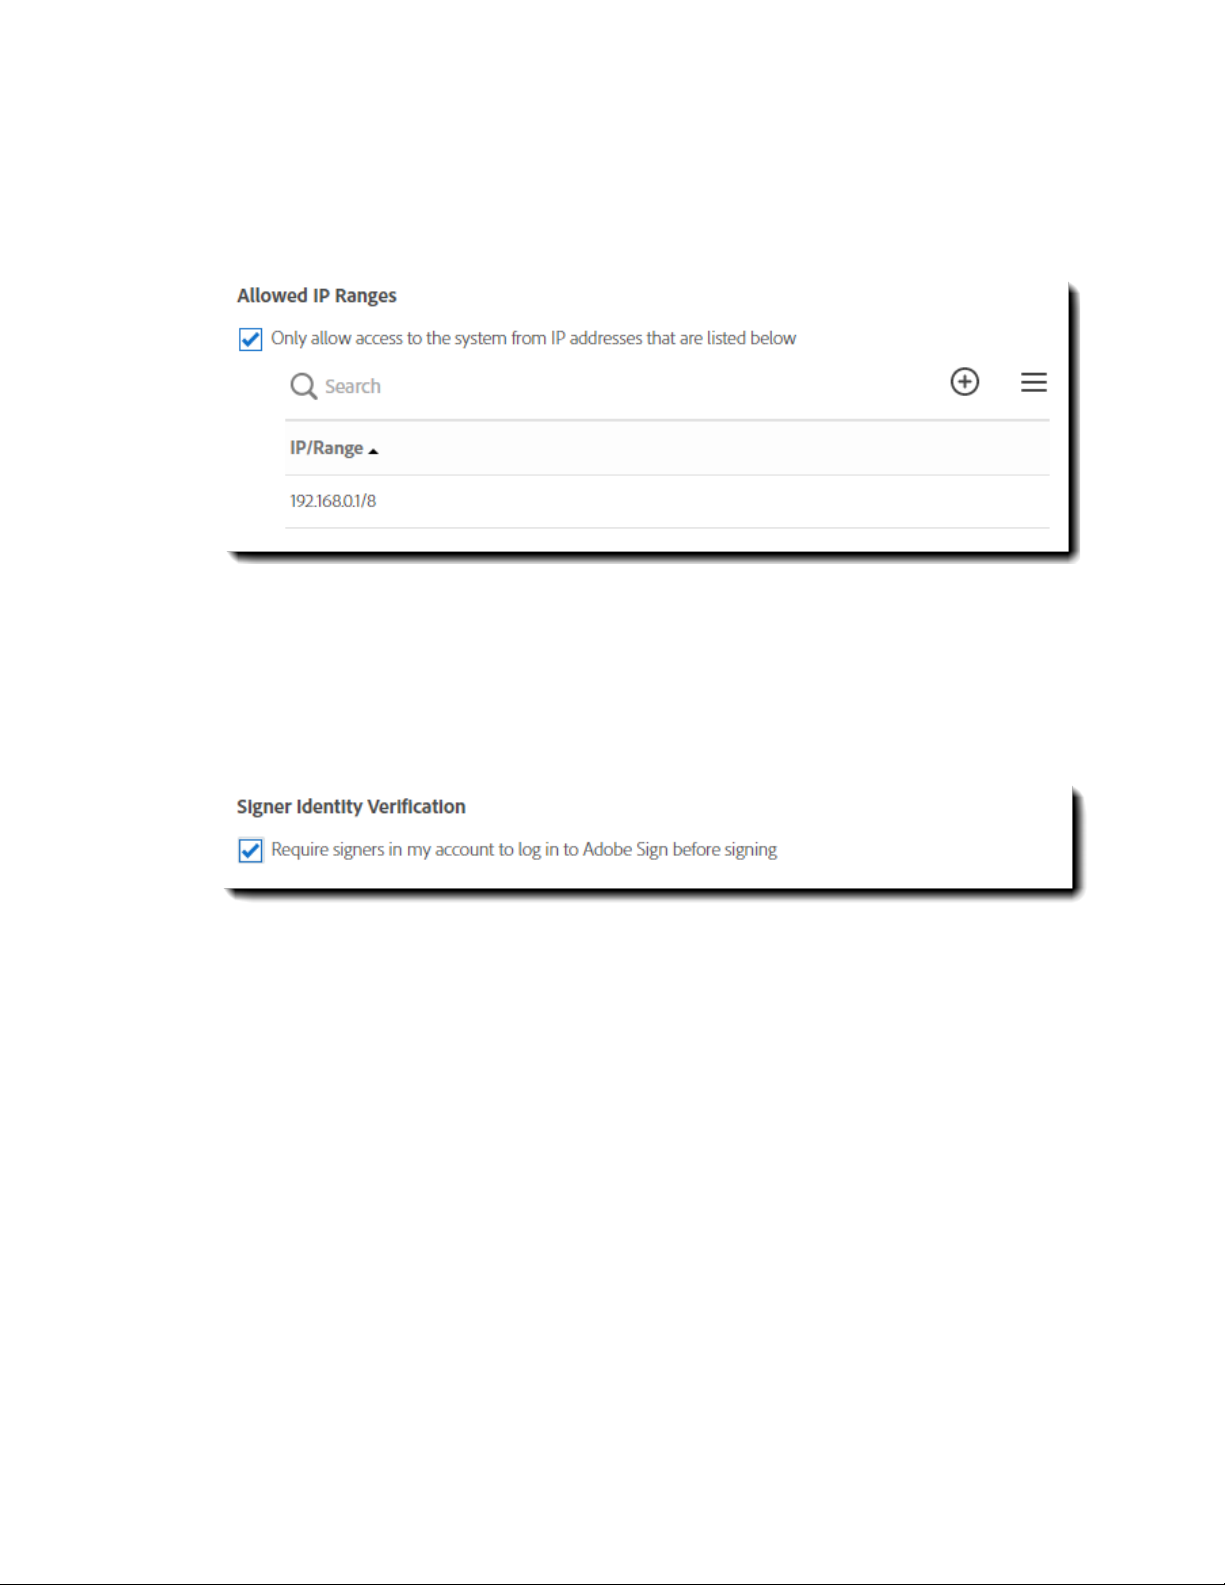
Allowed IP Ranges
This option will only allow authentication to the Adobe Sign application when the
request is coming from the specified IP address ranges.
Signer Identity Verification
If your users will be signing documents, this option will require them to log in
to Adobe Sign before they can apply their signature. This ensures the individual
signing is either the user or someone with the user’s credentials.
Transaction Security
This section pertains to the security controls that are in effect while an Agreement is going
through the signature process. These settings can be found by navigating to: Account >
Account Settings > Security Settings
PDF Encryption Type
This setting defines the type of encryption applied to the document once it has been
sent through Adobe Sign. This encryption ensures the document can be opened but
cannot be edited. Each version of the encryption is compatible with different versions
of Acrobat. The recommended option is
128-bit AES
to ensure the document can be
opened on most systems.
Adobe Sign – Admin Guide 18
Page 19
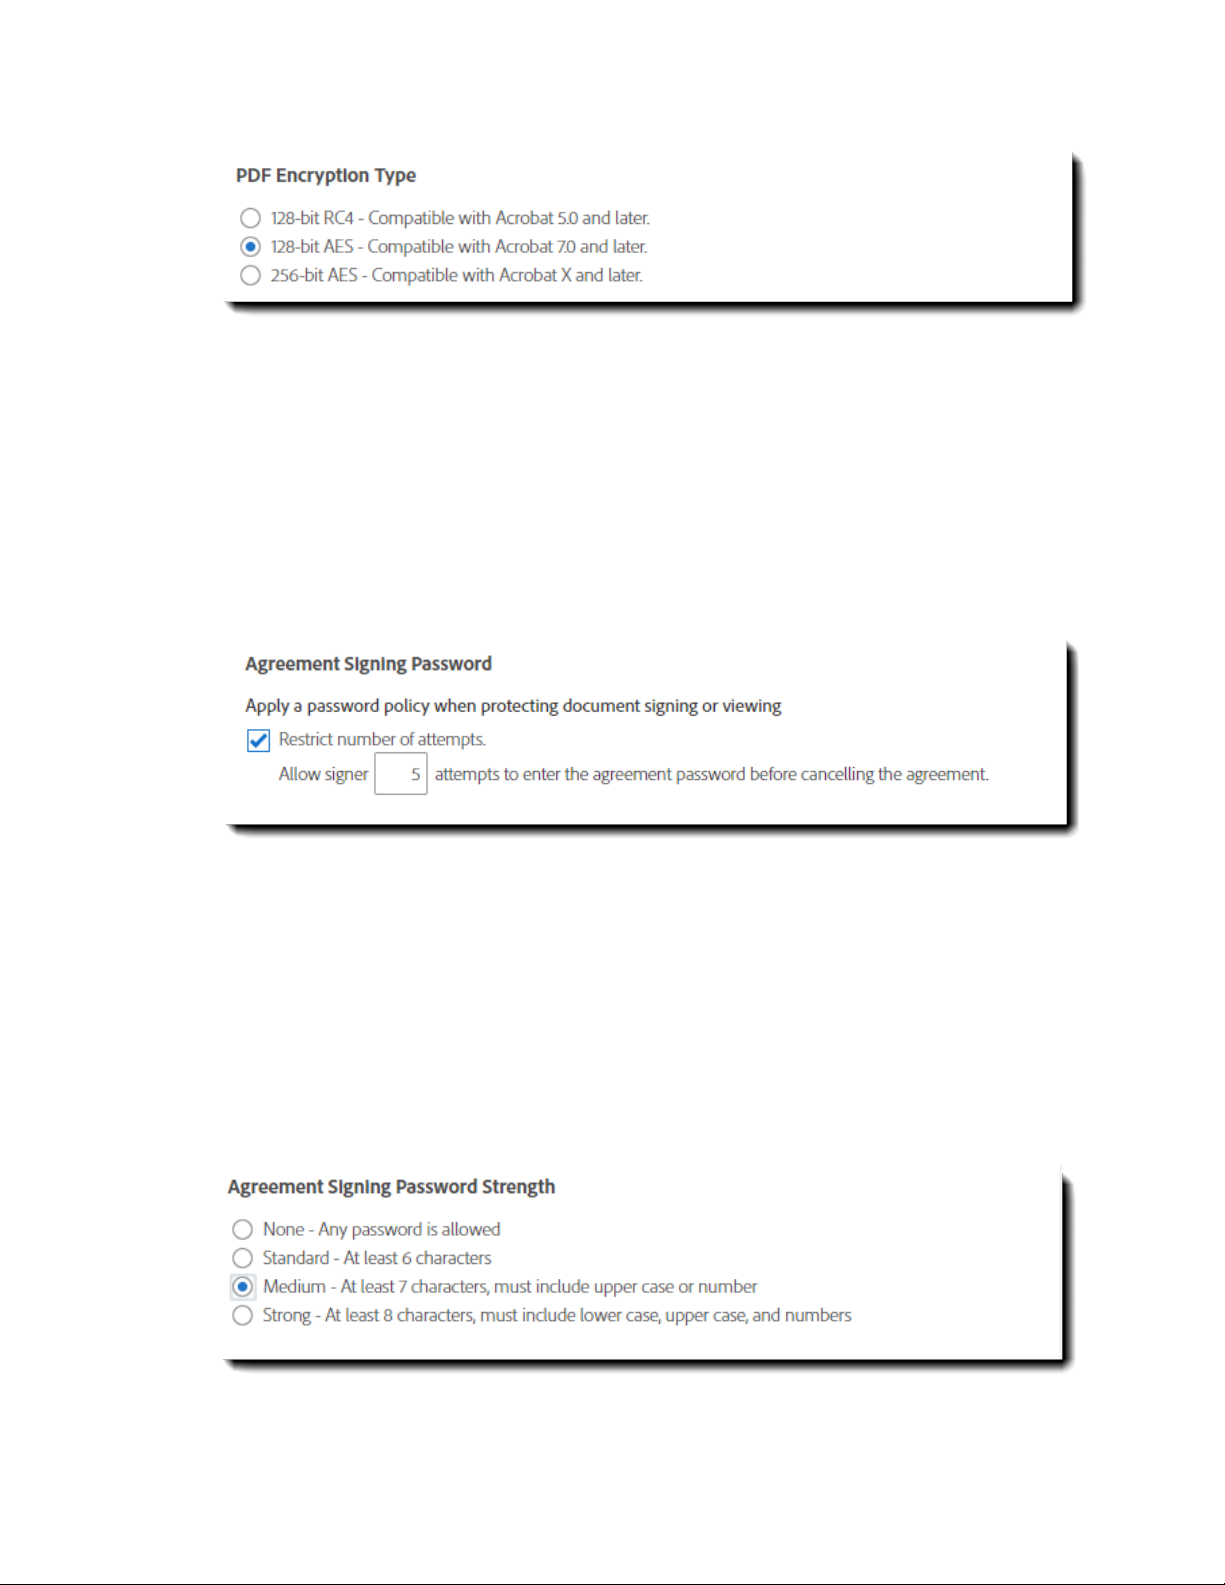
Agreement Signing Password
This setting applies to the Password Authentication option for recipients to access
the document during the signature cycle. (Configured on the Send page when
initially sending the agreement)
The setting limits how many attempts the recipient has to enter the correct
password. Once this limit is exceeded, the Agreement is irrevocably
canceled
.
Agreement Signing Password Strength
This setting also applies to the Password Authentication option for recipients.
The feature allows you to adjust the strength or difficulty of the password your Senders
need to enter.
Note
: The password this setting governs is embedded in the PDF, and not stored in
the Adobe Sign system. If it is lost, there is no option to recover it.
Adobe Sign – Admin Guide 19
Page 20
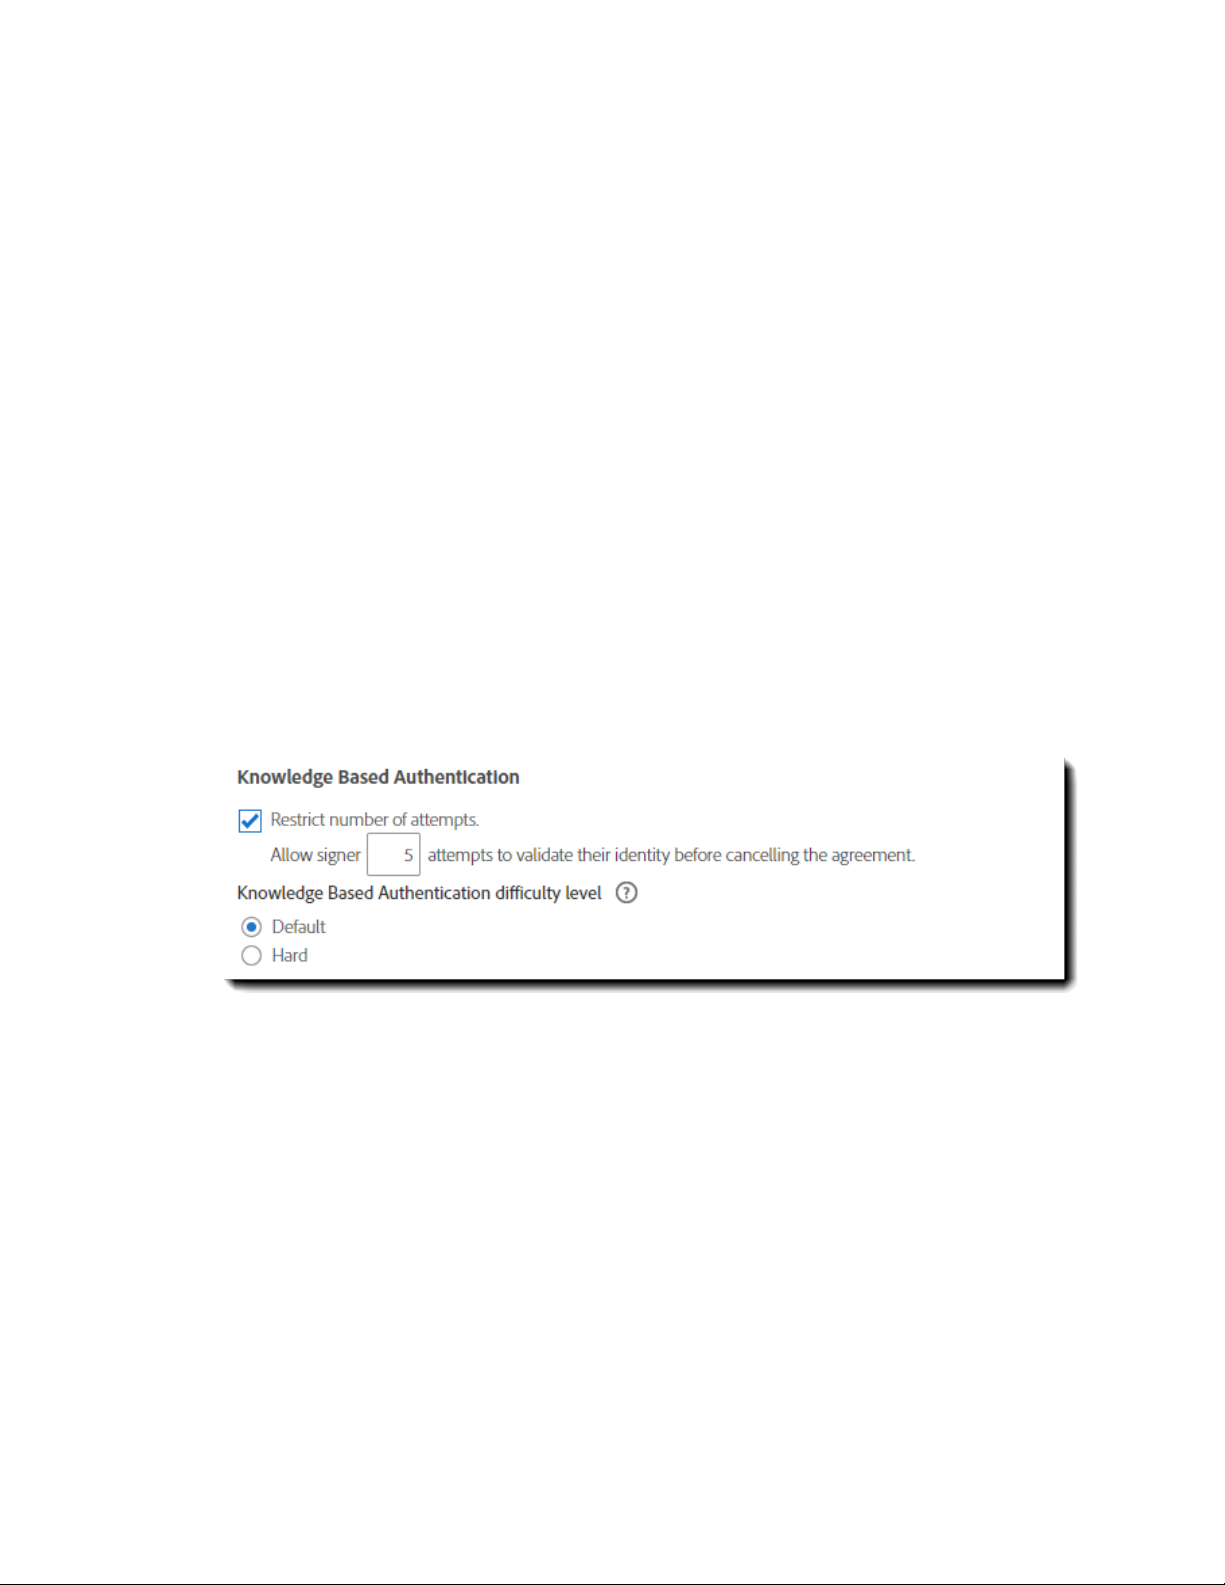
Knowledge Based Authentication
This option controls the Knowledge Based Authentication (KBA) option for recipients
on the Send page.
This limit dictates how many attempts the signer has to pass the KBA in order to
access the document. Once the limit is exceeded the agreement is canceled. The
difficulty of the KBA is also set here.
• Default
- Signers will be presented with 3 questions and will be required to
answer them all correctly. If they only answer 2 correctly, they will be
presented with 2 more questions and will be required to answer them both
correctly.
• Hard
- Signers will be presented with 4 questions and will be required to
answer them all correctly. If they only answer 3 correctly, they will be
presented with 2 more questions and will be required to answer them both
correctly.
KBA requires a social security number, so is only viable for recipients in the US.
Post-Transaction Security
These settings govern the PDF security of Agreements that have completed the signature
cycle, and are fully executed.
Certify copy of the documents for
Find this setting by navigating to: Account > Account Settings > Global Settings
Adobe Sign will apply a Certificate (CDS) to any downloaded PDF for a completed
transaction based on this setting. Certified PDFs readily show that the document has not
been tampered with since being downloaded.
CDS will prevent any attempt to manipulate the PDF after download.
Adobe Sign – Admin Guide 20
Page 21

It is recommended that you enforce CDS at least for external recipients.
Signed Document Password Protection
Find this setting by navigating to: Account > Account Settings > Send Settings
This setting allows, forces or denies Senders the ability to set a password for the
signed
Agreement
document. (This is different from the optional password to access an
during
the signing process)
If allowed or enforced, the Sender needs to supply the password, and communicate
that password to any party that needs to review signed documents.
Note
: This password is embedded in the PDF, and not visible anywhere in the Adobe
Sign system. If you choose to use a password to lock access to the signed document,
ensure you have a method in place to understand what those passwords are and
retrieve them as needed.
Adobe Sign – Admin Guide 21
Page 22

Account Sharing
You can enable or disable the option for a userID to share the content of their user
account to another userID.
Account Sharing
Find this setting by navigating to: Account > Account Settings > Security Settings
Account sharing allows one user to view (only) all the Agreement content of
another user. This is great for managers that need to review the progress of
their direct reports.
All shares that are created are one direction, there is no assumed reverse
direction share that takes place.
If Account Sharing is enabled, the recommended option is to allow a user to
ask to view another user’s account.
Advanced Account Sharing (Enterprise only)
For Enterprise customers that need to have a more “hands on” type of sharing that allows
direct manipulation of agreements and library templates, Technical Support can enable
Advanced Sharing.
Advanced Sharing is a one-way door. Once it is enabled, it changes the relationships of the
shared objects in a way that cannot be reversed. For this reason, if you feel Advanced
Sharing is important to your organization, it is recommended that you contact your Success
Manager and have a trial account set up for you to test the functionality and verify it permits
everything that you want to accomplish.
Adobe Sign – Admin Guide 22
Page 23

Agreement Settings
The settings in this section define the options available to a Sender when configuring an
Agreement, and what the default value for those options will be.
In general, the recommendation is to reduce the number of options for the Sender to
choose from or configure. Where possible, set a strong default value, and remove the
option to edit that value.
This chapter will be broken into sections related to their effect on a transaction.
These settings can be found by navigating to:
Note:
can customize their sending experience and defaults as needed.
These settings can be configured at the Group level to assure that each business unit
Account > Account Settings > Send Settings.
Recipients
“Recipients” is a generic term that refers to any userID included in the signature cycle, regardless
to the assigned role. The following settings will define what types of roles those recipients can
have, and what level of identity authentication you want to employ
Recipient Roles
Depending on the level of service you have, you will have access to various "roles" that define
what type of actions your recipients can perform in the Agreement. More details on the
various role authorities can be found in the knowledge base.
Allowed Recipient Roles
It is recommended that you only enable the roles you know you will need to better
streamline the Senders experience.
Adobe Sign – Admin Guide 23
Page 24

Recipient Groups
Recipient Groups function as one signer, but that signer is a group of identified individuals.
All members are notified at one time, and once one of the group members applies their
signature, the Agreement moves to the next signer.
Recipient Groups
Enable this option if you have a need to define a group of signers for one signing event.
Recipient Authentication
Various methods of signer verification can be enabled for your users, with this setting.
These methods are configured on the Send page as an element of the recipient record.
Identity Authentication Methods
It is recommended that you only enable the verification methods(s) that your
internal policy demands.
•
Signing password
– Requires the signer to enter a predetermined password to
sign the document. The password must be passed to the signer separate from the
transaction. If this password is lost or forgotten, it cannot be recovered.
•
Knowledge based authentication
– Requires the signer to enter their Social
Security Number and random identity questions will be generated by a third-party
provider.
•
Social identity
services: Facebook, LinkedIn, Google, Twitter, Yahoo!, or Windows Live ID.
• Phone (SMS) - Requires the sender to provide a phone number for the recipient. The
– Requires signer to authenticate with one of the following
recipient will then get an 8-digit code they will enter and authenticate.
Adobe Sign – Admin Guide 24
Page 25

Note: KBA and Phone authentication are metered authentication methods that incur an
additional cost. It is advised that you only enable the authentication method(s) you have
high confidence you will use.
By default, use the following method
This setting will define the default external recipient authentication method. Only
options that have been enabled will be selectable in the drop-down list.
Sender settings
This option either allows or denies the Sender’s ability to change the default
authentication method defined. Enable this option only if there are known situations
where the Sender has need to elevate the verification process from the default.
Internal Recipient Identity Authentication
Checking this setting allows Senders to set a different method of verification for
recipients that are internal to your Adobe Sign account.
The general recommendation is to leave the internal signatures as email verification,
providing less authentication friction to your employees that may need to countersign a large number of Agreements per day. By also enabling the
Signer Identity
Verification
feature (Security Settings), you can passively gain password verification
without the signer having to explicitly authenticate multiple times.
Adobe Sign – Admin Guide 25
Page 26

Setting message templates (Business and Enterprise)
Enabling Message Templates for your account, allows the user to choose one of the email
messages, predefined by you. This can ensure the correct message and information gets to
your signers.
To enable message templates, navigate to
Templates
Account > Account Settings > Message
Adobe Sign – Admin Guide 26
Page 27

Message Templates
Enable message templates
Check the option to
Enable message templates
.
A link will be inserted at the top right of the message field (on the Send page) to
allow selection of the template:
Note
: For Enterprise customers, templates are linked to the
Recipients Language
option on the Send page. This limits the number of templates to scroll through for
multi-language business units, and ensures that a message in the correct language is
included.
Allow senders to edit message content
Either allow or deny users the ability to change the message template delivered to
the Send page message field.
Enable this if you permit customizing Message content situationally.
How users can attach or choose documents
There is a lot of variability in how customers attach files to their agreements, and that is rooted in
how the documents are created, managed and version controlled.
Customers that have “ad-hoc” files, content customized for each transaction, will likely need the
ability to upload files from their local system. However, boilerplate templates that rarely change
should ideally be served from one controlled source.
Adobe Sign – Admin Guide 27
Page 28

Attaching Documents
Allow senders to attach documents from their computers
Unchecking this option removes the
on the Send page.
My Computer
link from the
Allow senders to attach documents from their document library
Unchecking this option removes the
pop-up.
Library Documents
Include documents from the Adobe Sign shared library
Select Files
link from the
pop-up
Select Files
Unchecking this option removes the I-9, W-4 and W-9 documents provided by Adobe
Sign.
Allow senders to attach documents from Google Drive
Unchecking this option removes the
up.
Google Drive
Allow senders to attach documents from Dropbox
link from the
Select Files
pop-
Unchecking this option removes the
Allow senders to attach documents from Box.com
Unchecking this option removes the
Dropbox
Box.com
link from the
link from the
Select Files
Select Files
Adobe Sign – Admin Guide 28
pop-up.
pop-up.
Page 29

Setting default reminders
Reminders are emails sent to the recipients of documents when it is their turn to act. On
a Daily or Weekly cycle, a reminder email is sent to the recipient, letting them know the
agreement is still waiting for them.
Reminders
Set a default reminder for agreements created by users in this account
Check the option to set a default reminder
Choose the frequency in which you would like the reminder email sent
The note entered will show in the reminder email sent to each recipient in turn
Note: Enabling default reminders will remove the option on the Send page for Senders to
configure their own reminder, but still permits reminders to be configured on the Manage
page.
Setting a default document expiration
In certain cases, you may want to expire or cancel documents that aren’t signed after a
certain number of days.
Once an agreement has expired, it cannot be restarted or retrieved and will show up under
the Canceled/Declined section of the Manage page.
Adobe Sign – Admin Guide 29
Page 30

Document Expiration
Enable document expiration
Check the option to enable document expiration. This will reveal the options you can
set for document expiration.
Allow sender to set or modify expiration settings per document
This opens the expiration option on the Send page, to all users in the account.
Additionally, they can then adjust the default expiration set.
Allow modification of expiration settings after document is sent
Checking this option will allow users to adjust, extend or remove an expiration for an
agreement after it has been sent.
Limit number of days signers will have to sign documents to:
This sets the number of days until the document expires.
Include internal signers when applying document expiration deadlines
If users in your account will be signing or counter-signing agreements, this option will
make the expiration apply to them as well as external signers.
Include expiration information in email sent to signers
This adds the expiration date of the transaction in the email sent to the signers.
Adobe Sign – Admin Guide 30
Page 31

Users and Groups
Users
Users are generally added to an account because they will either be sending out agreements
or be group or account level admins. Users that will be signing agreements do not need to
be added, unless you want to control their ability to sign with account level settings.
User page features
To review or manipulate the users in your account, log in as an Account admin and navigate
to: Account > Users
At the top of the User page, you will see a short summation of the number of licenses your
account allows, and the number of active users consuming those licenses.
If this statement is missing, you have a site license, and can add an unlimited number of
users.
The User page has three controls:
Adobe Sign – Admin Guide 31
Page 32

1. Create a new user – Opens a pop-up form that will permit you to create a single user, or
upload a CSV to create multiple users at one time.
2. Export user list – Clicking the Export icon will generate a CSV file that lists all uses in the
account, regardless to their status (Active, Created, Inactive or Pending), as well as their
personal (account) values (Name, Email, Title, Company, etc.)
3. Options – The options list filters what is displayed on the page. By default, only Active
users are displayed. You have the option to show All users, or only Inactive users. Further,
there are three options for how many users should be shown per page (15, 30 or 50)
How to Create a User
To create a single user:
• Log in as an Account Admin, and navigate to Account > User
• Click the “plus” icon to create a new user. The Create pop-up will open.
• Enter the email address, first name and last name for the user you want to create.
Make sure all this information is correct, especially the email address. Once the user is
created the email address cannot be changed until the email entered is verified. If
there’s an error in the email, it can’t be verified.
Adobe Sign – Admin Guide 32
Page 33

Check the View Their Agreements option if you want to setup a share for this user to yours.
This will give you visibility of all the user’s agreements.
Once you’re done and all the information is correct, click the Save button.
You will be returned to the User page.
Click the Options icon and select Show All Users
By showing All Users (vs Only Active Users) you will see the new userID with a Created status.
Once the user sets their password, the userID will convert to an Active status.
Adobe Sign – Admin Guide 33
Page 34

Note: Adobe Sign users exist in one of five statuses:
• Active – A fully enabled userID consuming one license.
• Inactive – A fully disabled userID. Inactive users cannot access the Adobe Sign
application for any reason, including being a recipient to other agreements.
• Created – A userID that has been created by an Admin, but has not yet set their
password and activated the userID. Created users do not consume a license.
• Unverified - A user that has changed their email address, but has not yet clicked the
verification link that was sent to affirm the email change. The account is technically
still Active, just locked until the email change is confirmed, so Unverified users
consume a license and display in the Show Only Active Users filter
• Pending – Pending userIDs are recipients. They have not been created by an admin,
do not have passwords, and so they cannot log in. Pending users do not consume a
license.
At any time, a Pending userID can be registered and converted to an Active status,
and will have a full history of all the Agreements they have ever been party to.
How to Deactivate/Reactivate a user
Deactivating a userID
Sometimes the need to deactivate a user may arise. The individual could have left the
company and you want to keep that user and related documents secure. As
mentioned above, making a user inactive keeps anyone from logging in, sending or
signing documents with that userID.
To convert a userID to Inactive:
• Log in as an Admin and navigate to
• Single click the userID you want to inactivate. The possible actions for the user
will appear at the top of the user list
Account > Users
Adobe Sign – Admin Guide 34
Page 35

• Click the
Deactivate User
link. This will open the Deactivate User pop-up window
Within the Deactivate User pop-up, you have the option to force a share of all agreements
to yourself. This is useful if the user being deactivated has content that you may need to
recover at a future date.
To complete the deactivation process, click the Yes button.
The userID will convert to the Inactive status and the password for the userID will be
voided, making the userID completely inaccessible.
Adobe Sign – Admin Guide 35
Page 36

Reactivating a single userID
Reactivating a userID follows the same process as deactivation:
• Log in as an Admin and navigate to Account > Users
• Click the Options icon and select Show Only Inactive Users
• Find the userID you need to reactivate and single click it to expose the links at the
top of the user list
• Click the Reactivate User link
Adobe Sign – Admin Guide 36
Page 37

A green banner should appear indicating you have successfully reactivated the userID.
The reactivated userID converts to an Active status, but the password is still expired for
the user.
An email will automatically be sent to the user requesting that a new password be
installed. Once the password is reset, the user will have full access to all the historic
content of the userID.
The user can also use the I forgot my password link on the log in page to reset the
password.
How to promote a user to admin
There are three levels of authority in Adobe Sign:
• Users
• Group Administrators
• Account Administrators
All users created individually will be basic Users.
If you need to elevate the authority of any userID, you can do so by:
• Log in to Adobe Sign as an Account admin
• Navigate to Account > Users
• Find the userID you want to promote, and select that user to expose the action links at the
top of the user list.
• Click the Edit user link. This will open the Edit pop-up
Adobe Sign – Admin Guide 37
Page 38

• Within the Edit pop-up window, you have the option to enable the userID as a Group
Admin, Account Admin or both. Check the appropriate authority option for the userID
o Account Admins have full authority within Adobe Sign to edit settings or add users at
either the Group or Account level.
o Group level Admins only have authority within the group they belong to.
• Click Save when done.
Note: Adobe Sign does not limit the number of Admins (Account or Group) that can exist
within an account. It's possible (but not generally recommended) to promote all userIDs
within your account to the Account Admin level.
Adobe Sign – Admin Guide 38
Page 39

Creating Users in Bulk
Creating Users in bulk is a process of defining all users in a CSV file, and then uploading that
file to Adobe Sign.
Adobe Sign creates all users and immediately sends them emails to set passwords and
activate the userIDs.
Note: It's worth pointing out that this process can also be used to edit the profile values for all
the users in your account.
For example, if you have changed your company name, you could export your full user list,
edit the value in the Company column, save it, and then upload that CSV back to Adobe Sign.
All the userIDs on your CSV will update their Company name values without having to
involve the various users.
To create users in Bulk:
• Log in as an Account Admin, and navigate to Account > User
• Click the “plus” icon to create a new user. The Create pop-up will open
• Click the Create users in bulk tab
Adobe Sign – Admin Guide 39
Page 40

Note: Three options exist:
Allow Create Users - Deselecting this option only allows you to update existing users.
If an e-mail address that is not in your account is provided, no user is created.
Allow Update Users - Deselecting this option only allows you to create users. If an e-
mail address of an existing user in your account is provided, the user is not changed.
Allow Create Groups - Deselecting this option keeps you from creating groups. If a
nonexistent group name is provided for a user, the group is not created, and the user
is put in the Default group instead.
• Click the download sample CSV file link. A CSV file will download to your system.
• Open the sample CSV
• Delete the three rows of example data. Leave the first (header) row
• Enter the values needed for the new userIDs you want to create.
o When creating new users, the required columns are:
Email Address
First Name
Last Name
• Delete any columns you are not using
• Save the CSV (make sure the saved file is still a CSV and not some other format)
• Click the Browse button, and select your CSV
• Click Import to upload the file
Adobe Sign – Admin Guide 40
Page 41

Once the file is imported, Adobe Sign will generate all the userIDs, and a green banner will
appear informing you of the number of users created.
Adobe Sign – Admin Guide 41
Page 42

Groups (Business and Enterprise)
Groups allow you to set specific settings for the users inside that group. This means, for example,
your sales team can use Adobe Sign differently than your accounting department.
How to Create a Group
To create a new Group:
• Log in as an Account Admin and navigate to Account > Groups
Note: The Groups page has two controls:
1. Add a new group - Opens the window to create a new group.
2. Options - Controls how many records (15, 30 or 50) are displayed on the page at any
time.
• Click the Add a new group icon, and the Create window will pop-up requesting the name
of the group.
Adobe Sign – Admin Guide 42
Page 43

• Enter the name of the Group
• Click Save
Once the Save button is clicked, the Group is created and will display in the Group list.
How to Add Users to a Group
Once your new group is created, the next step would be to add users to it. Adobe Sign
provides three methods, depending on how many users need to be moved:
• Move a single User via the User profile
• Move multiple Users using the Bulk Create/Edit Users CSV
• Move multiple Users using the Assign Users to Group tool
Moving a single User via the User profile
To assign a single User to a Group:
• Log in as an Admin and navigate to Account > Users
• Double click the specific userID you want to edit. This opens the User info panel
• Click the User Group drop-down box to expose the options
• Select the group the User is to be assigned to
• Click Save
Adobe Sign – Admin Guide 43
Page 44

Moving multiple Users using Bulk User Edit
The Create Users in Bulk feature can also be used to edit existing users.
This method tends to be better when you have multiple values you need to change in
addition to just the Group setting, but if you are fully restructuring, bulk update may be the
way to go.
To update your User Groups via Bulk Update:
Adobe Sign – Admin Guide 44
Page 45

• Log in as an Admin, and navigate to Account > Users
• Click the Export user list icon. A CSV will download to your system with the full list of users
in your account
• Open the downloaded CSV, and delete any columns you are not going to use
o In the case of simply assigning users to groups, you only need:
Email Address
First Name
Last Name
Group Name
• Delete any rows of Users that you do not need to update
• Save the CSV (Make sure that the format remains CSV)
• Click the “plus” icon to create a new user. The Create pop-up will open
• Click the Create users in bulk tab
• Browse to select the CSV file you just saved
• Click Import
Adobe Sign – Admin Guide 45
Page 46

Once the Import button is clicked, the users will be updated in the system with the new
values on the CSV. A green banner will appear at the top of the page to indicate how many
users were updated.
Assign Users to Group from within the Group Settings
When you need to move multiple users to a new group, but the scope of the move isn't large
enough to warrant using Bulk User Edit, the best option is to use the Assign Users to Group
option within the Group settings.
To access the Assign Users to Group feature:
• Log in as an Account Admin and navigate to Account > Groups
• Double-click the group you want to move users into. This opens the Group level
settings
o You can also single click the group to select it, and then click the Group Settings link
Adobe Sign – Admin Guide 46
Page 47

• Click the Users in Group option on the left rail
• Click the Add users to group icon
The Assign Users to this Group window will open, showing all the Active Users that are not
currently assigned to this group.
• Click the Options icon, and select Show All Users
Adobe Sign – Admin Guide 47
Page 48

• Double click any User you want to move to the Group. The selected users will populate
in the Selected Users field at the bottom of the window.
o To remove a user from the Selected Users field, click the X next to the email
• Once all users are selected, click the Assign button
Adobe Sign – Admin Guide 48
Page 49

Group level Admin authority controls
Account level Administrators can define the scope of the Group Administrators authority via
three settings:
• Group Administrators can add new users to their groups.
• Group Administrators can edit settings for their groups.
• What report data can group admins see?
These settings are ubiquitous for all group admins, and offer no deeper granularity. If you
disable the ability for Group Admins to add users, that will apply to all Group Admins within
the Account.
To adjust the first two settings:
Log in as an Account Admin and navigate to Account > Account Settings > Global Settings
> Group Admin Related Settings
Enabling Group Administrators can add new users to their groups will grant any Group
Admin the authority to add any user to their group with all normal restrictions applied.
Normal restrictions include situations like:
• The user is in another Group/Account
• The user's email domain is not an approved domain for the account
Enabling Group Administrators can edit settings for their groups allows the Group admin
to over-ride the Account level settings for their group.
Adobe Sign – Admin Guide 49
Page 50

To edit the What report data can group admins see? setting, navigate to Account > Account
Settings > Report Settings
Adjusting Group level settings
All groups will inherit the account level settings by default. However, it is possible to override most of the account level settings at the group level. This is particularly valuable if you
have select users in need of special recipient roles, recipient validation methods, or even
unique branding.
Account admins will navigate to Account > Groups, and then double click the Group to open
the group level settings, or single click the group and select Group Settings from the link
options at the top of the list.
Adobe Sign – Admin Guide 50
Page 51

If Group level admins have been given the authority to change Group level settings, they only
need to click the Group link at the top of the page to open the settings.
All of the settings presented to group admins are the same as the account level settings and
function in the same way.
Adobe Sign – Admin Guide 51
Page 52

52
Library Templates
A library template is a reusable document object. Adobe Sign supports two types of library
templates: document templates and form field templates.
• Document Templates—A document template is a reusable document. Document
templates can be shared with other users in your account, allowing multiple users to send
out the same document without needing to make any changes.
• Form Field Templates—A form field template is a reusable field layer that can be
applied to any document. Form field templates can also be shared with other users in
your account. Form field templates are ideal in the following situations:
o You have one field layout that works for multiple documents.
o You have a document that can be sent several different ways.
o You need to revise document’s content, but the fields remain in the same place.
Instead of creating a new library document every time a document is updated, the same
form field layer can be applied. Form field templates can be edited to facilitate changes in
the arrangement of fields or field properties. Again, all the tools in the authoring
environment are available when creating a form field template.
As a best practice, a single user (Document Administrator) should be responsible for creating and
maintaining templates. Creating a Doc Admin userID eliminates confusion as to what templates
to use and provides version control for your reusable documents.
We recommend using a distribution list or functional email for the Doc Admin user login. This
allows you to control access to this Doc Admin login while at the same time allowing the
responsibility to be shared as needed.
Adobe Sign Admin Guide
Page 53

53
Creating a Reusable Document
1. Click the Dashboard tab. Then, in the Additional Functions panel, click Add Template to
Library.
The Create a Library Template page displays:
Adobe Sign Admin Guide
Page 54

54
2. In the Template Name field, enter a name for your template. This can be changed later if
necessary.
3. Click the Browse button to navigate to the file on your local system to be used to create
your reusable template. If you are creating a reusable document, this file and its content
will be used. If you are creating a reusable form field layer, the content of the file will not
be included in the template.
4. Select the appropriate Template Option, either Create as reusable document, Create as a
reusable form field layer, or both.
5. Select the appropriate permissions option for sharing the template. When building and
testing a new template, it is recommended that you set the permissions to just yourself,
and then expand access once you are satisfied the document is working as intended.
Note: Group permissions can only be granted to the group you are currently in. You cannot
grant permissions to other groups.
6. Click the Preview or Add Fields button. The Authoring experience displays.
Adobe Sign Admin Guide
Page 55

55
7. Place the required fields that are for the intended participants by dragging them from the
form fields tabs and dropping them onto the document.
8. When you're done adding fields, click the Save button.
The template will now display under the Library Templates section of your Manage page. If
you have shared the template with users in your group or in your organization by granting
permission, the template now also displays in the Library Templates section of their Manage
pages, and they can use it to send as often as they like.
Note: Only the user who created the library template can edit it or delete it.
Adobe Sign Admin Guide
Page 56

56
Editing Template Permissions
The access permissions for any template can be edited by the creator of the template. To do so:
• Log in as the template owner
• Navigating to the Manage page
• Find the template to be edited and clicking the edit link
This will open the template in the Authoring environment.
At the top of the right rail, you will see Template Properties.
Adobe Sign Admin Guide
Page 57

57
Click the Template Properties header to expand the section and you will see the available
options:
• Template Name – You can readily change the template name at any time.
• Template Type – At any time you can convert the available template to make it available
as a document, form field overlay, or both
• Who can use – This setting dictates which users will have access to the template.
Note: You can only share a document to the Group your userID is a member of. If you are
authenticated as an Account admin, make sure to move your userID to the correct group
before changing the template properties from “Only Me” to “Any user in my group”.
Adobe Sign Admin Guide
Page 58

58
Reports (Adobe Sign – Business and Enterprise)
The report feature lets you check on how your account is using Adobe Sign. Build your own
reports and gain complete visibility into your document signing process, while seeing how
individual groups or users are doing.
To create a new report, navigate to the Reports page by clicking the Reports tab, then click on the
Create a new report link.
Adobe Sign Admin Guide
Page 59

59
The Create a New Report page displays:
Adobe Sign Admin Guide
Page 60

60
Report Parameters
When setting up a report, multiple parameters can be set to customize the results. All the
parameters described below are available.
Creation Date
The creation date is the time frame you want the report to encompass. This can be one of
the four predetermined time frames (this week, last week, this month, last month) or
enter a custom date range.
Users & Groups
This parameter lets you run the report on specific users or groups. One or more can be
chosen for either, or you can run the report against all users in the account.
Adobe Sign Admin Guide
Page 61

61
Documents & Workflows
Specific documents can be chosen to include in the report with this option. The
documents listed in this field are the library documents used throughout the account.
Individual, one-off documents will not be listed here.
Document Name
This parameter is used to include or exclude documents that contain or do not contain a
given variable. You can choose to include or not include the string entered.
Mega Sign
Enabling this parameter includes Mega Sign agreements in the resulting report
Performance Goals
You can set thresholds for performance, using the Performance Goal view. The gauges
reflecting performance are displayed in the resulting report.
Adobe Sign Admin Guide
Page 62

62
Benchmark
By default, the benchmark parameter is disabled for reports. Click the report settings link
to enable it.
Benchmarking provides an expanded method for keeping track of agreement progress
and signing rates.
Graph Agreements By
Each enabled option (by Date, Sender, Group, Form, Workflow, and Signature Type)
provide a different type of graph on the report.
Et Cetera
The parameters in this section are for altering the graphics on the resulting report.
Changing these from the default parameters can speed up the report process.
Adobe Sign Admin Guide
Page 63

63
Report Results
Once you click the Run Report button, the report will be generated based on your parameters.
There are multiple actions you can take with your report.
Update Report with Current Data
Clicking this link is like refreshing the page. The new report will include recent
transactions and activity.
Save Report
Saving the report allows you to run this report again in the future.
Adobe Sign Admin Guide
Page 64

64
Share Report
Sharing allows you to send the report results to someone else. You just need to enter
their email address and a message.
Schedule Report
Setting a schedule for this report will run it with the same parameters at the frequency
you define.
Adobe Sign Admin Guide
Page 65

65
Export Report Data
Clicking this link will prompt you to open or save a .CSV file. CSV files can be opened in
Excel and all transaction information for the agreements in the report, will be categorized
in the various columns.
Printer-Friendly Version
Clicking this link will open a printer-friendly version of the report.
Edit Settings
This link will open and permit editing of the configured parameters for the report.
Adobe Sign Admin Guide
 Loading...