

Page 1

Using
ADOBE® ROBOHELP® HTML 9
Page 2

Copyright
© 2011 Adobe Systems Incorporated and its licensors. All rights reserved.
Using Adobe® RoboHelp® HTML 9 for Windows®
This user guide is protected under copyright law, furnished for informational use only, is subject to change without notice, and should not be construed as a
commitment by Adobe Systems Incorporated. Adobe Systems Incorporated assumes no responsibility or liability for any errors or inaccuracies that may appear
in the informational content contained in this guide.
This user guide is licensed for use under the terms of the Creative Commons Attribution Non-Commercial 3.0 License. This License allows users to copy,
distribute, and transmit the user guide for noncommercial purposes only so long as (1) proper attribution to Adobe is given as the owner of the user guide; and
(2) any reuse or distribution of the user guide contains a notice that use of the user guide is governed by these terms. The best way to provide notice is to include
the following link. To view a copy of this license, visit
http://creativecommons.org/licenses/by-nc/3.0/us/
Adobe, the Adobe logo, Adobe AIR, Adobe Captivate, Acrobat, AIR, Dreamweaver, FlashHelp, FrameMaker, Reader, RoboHelp are either registered trademarks
or trademarks of Adobe Systems Incorporated in the United States and/or other countries.
Microsoft, Windows, Windows Vista, and ActiveX are either registered trademarks or trademarks of Microsoft Corporation in the United States and/or other
countries. Apple and Mac OS are trademarks of Apple Inc., registered in the United States and other countries. Java and Sun Microsystems are trademarks or
registered trademarks of Sun Microsystems, Inc. in the Unites States and/or other countries. Linux is the registered trademark of Linus Torvalds in the United
States and other countries. UNIX is a registered trademark of The Open Group in the United States and other countries. Arial is a trademark of The Monotype
Corporation registered in the U.S. Patent and Trademark Office and certain other jurisdictions. All other trademarks are the property of their respective owners.
Updated Information/Additional Third Party Code Information available at http://www.adobe.com/go/thirdparty.
Portions include software under the following terms:
This product includes software developed by the Apache Software Foundation (http://www.apache.org/).
MPEG Layer-3 audio compression technology licensed by Fraunhofer IIS and THOMSON multimedia (http://www.iis.fhg.de/amm).
Portions utilize code licensed from Nellymoser (www.nellymoser.com)
Adobe Flash Player 10 video compression and decompression is powered by On2 TrueMotion video technology. © 1992-2005 On2 Technologies, Inc. All Rights
http://www.on2.com.
Reserved.
This product includes software developed by the OpenSymphony Group (http://www.opensymphony.com/).
Certain trademarks are owned by The Proximity Division of Franklin Electronic Publishers, Inc., and are used by permission. Merriam-Webster is a trademark
of Merriam-Webster, Inc.
This product contains either BESAFE and/or TIPEM software by RSA Data Security, Inc.
Sorenson Spark™ video compression and decompression technology licensed from Sorenson Media, Inc.
Adobe Systems Incorporated, 345 Park Avenue, San Jose, California 95110, USA.
Notice to U.S. Government End Users. The Software and Documentation are “Commercial Items,” as that term is defined at 48 C.F.R. §2.101, consisting of
“Commercial Computer Software” and “Commercial Computer Software Documentation,” as such terms are used in 48 C.F.R. §12.212 or 48 C.F.R. §227.7202,
as applicable. Consistent with 48 C.F.R. §12.212 or 48 C.F.R. §§227.7202-1 through 227.7202-4, as applicable, the Commercial Computer Software and
Commercial Computer Software Documentation are being licensed to U.S. Government end users (a) only as Commercial Items and (b) with only those rights
as are granted to all other end users pursuant to the terms and conditions herein. Unpublished-rights reserved under the copyright laws of the United States.
Adobe Systems Incorporated, 345 Park Avenue, San Jose, CA 95110-2704, USA. For U.S. Government End Users, Adobe agrees to comply with all applicable
equal opportunity laws including, if appropriate, the provisions of Executive Order 11246, as amended, Section 402 of the Vietnam Era Veterans Readjustment
Assistance Act of 1974 (38 USC 4212), and Section 503 of the Rehabilitation Act of 1973, as amended, and the regulations at 41 CFR Parts 60-1 through 60-60,
60-250, and 60-741. The affirmative action clause and regulations contained in the preceding sentence shall be incorporated by reference.
Last updated 12/14/2011
Page 3

Contents
Chapter 1: Getting started
Activation and registration . . . . . . . . . . . . . . . . . . . . . . . . . . . . . . . . . . . . . . . . . . . . . . . . . . . . . . . . . . . . . . . . . . . . . . . . . . . . . . . . . . . . . . . . . . . . 1
Help and support . . . . . . . . . . . . . . . . . . . . . . . . . . . . . . . . . . . . . . . . . . . . . . . . . . . . . . . . . . . . . . . . . . . . . . . . . . . . . . . . . . . . . . . . . . . . . . . . . . . . . . 2
What’s new in RoboHelp 9 . . . . . . . . . . . . . . . . . . . . . . . . . . . . . . . . . . . . . . . . . . . . . . . . . . . . . . . . . . . . . . . . . . . . . . . . . . . . . . . . . . . . . . . . . . . . . 4
What’s new in RoboHelp Server 9 . . . . . . . . . . . . . . . . . . . . . . . . . . . . . . . . . . . . . . . . . . . . . . . . . . . . . . . . . . . . . . . . . . . . . . . . . . . . . . . . . . . . . 13
Chapter 2: Exploring the workspace
Workspace overview . . . . . . . . . . . . . . . . . . . . . . . . . . . . . . . . . . . . . . . . . . . . . . . . . . . . . . . . . . . . . . . . . . . . . . . . . . . . . . . . . . . . . . . . . . . . . . . . . 16
Working with pods . . . . . . . . . . . . . . . . . . . . . . . . . . . . . . . . . . . . . . . . . . . . . . . . . . . . . . . . . . . . . . . . . . . . . . . . . . . . . . . . . . . . . . . . . . . . . . . . . . . 17
Environments . . . . . . . . . . . . . . . . . . . . . . . . . . . . . . . . . . . . . . . . . . . . . . . . . . . . . . . . . . . . . . . . . . . . . . . . . . . . . . . . . . . . . . . . . . . . . . . . . . . . . . . . 20
Menus and toolbars . . . . . . . . . . . . . . . . . . . . . . . . . . . . . . . . . . . . . . . . . . . . . . . . . . . . . . . . . . . . . . . . . . . . . . . . . . . . . . . . . . . . . . . . . . . . . . . . . . 21
Create or remove keyboard shortcuts . . . . . . . . . . . . . . . . . . . . . . . . . . . . . . . . . . . . . . . . . . . . . . . . . . . . . . . . . . . . . . . . . . . . . . . . . . . . . . . . . 22
Configure general settings . . . . . . . . . . . . . . . . . . . . . . . . . . . . . . . . . . . . . . . . . . . . . . . . . . . . . . . . . . . . . . . . . . . . . . . . . . . . . . . . . . . . . . . . . . . . 23
Chapter 3: Projects
Project basics . . . . . . . . . . . . . . . . . . . . . . . . . . . . . . . . . . . . . . . . . . . . . . . . . . . . . . . . . . . . . . . . . . . . . . . . . . . . . . . . . . . . . . . . . . . . . . . . . . . . . . . . 25
Create and manage projects . . . . . . . . . . . . . . . . . . . . . . . . . . . . . . . . . . . . . . . . . . . . . . . . . . . . . . . . . . . . . . . . . . . . . . . . . . . . . . . . . . . . . . . . . . 29
Authoring content in multiple languages . . . . . . . . . . . . . . . . . . . . . . . . . . . . . . . . . . . . . . . . . . . . . . . . . . . . . . . . . . . . . . . . . . . . . . . . . . . . . 42
Import PDF files . . . . . . . . . . . . . . . . . . . . . . . . . . . . . . . . . . . . . . . . . . . . . . . . . . . . . . . . . . . . . . . . . . . . . . . . . . . . . . . . . . . . . . . . . . . . . . . . . . . . . . 48
Importing and linking Microsoft Word documents . . . . . . . . . . . . . . . . . . . . . . . . . . . . . . . . . . . . . . . . . . . . . . . . . . . . . . . . . . . . . . . . . . . . . 50
Import FrameMaker documents . . . . . . . . . . . . . . . . . . . . . . . . . . . . . . . . . . . . . . . . . . . . . . . . . . . . . . . . . . . . . . . . . . . . . . . . . . . . . . . . . . . . . . 65
Import a DITA map file . . . . . . . . . . . . . . . . . . . . . . . . . . . . . . . . . . . . . . . . . . . . . . . . . . . . . . . . . . . . . . . . . . . . . . . . . . . . . . . . . . . . . . . . . . . . . . . . 82
Import XML files . . . . . . . . . . . . . . . . . . . . . . . . . . . . . . . . . . . . . . . . . . . . . . . . . . . . . . . . . . . . . . . . . . . . . . . . . . . . . . . . . . . . . . . . . . . . . . . . . . . . . . 83
Import Microsoft HTML Help projects . . . . . . . . . . . . . . . . . . . . . . . . . . . . . . . . . . . . . . . . . . . . . . . . . . . . . . . . . . . . . . . . . . . . . . . . . . . . . . . . . 85
Import WinHelp projects . . . . . . . . . . . . . . . . . . . . . . . . . . . . . . . . . . . . . . . . . . . . . . . . . . . . . . . . . . . . . . . . . . . . . . . . . . . . . . . . . . . . . . . . . . . . . . 85
Adding projects to version control . . . . . . . . . . . . . . . . . . . . . . . . . . . . . . . . . . . . . . . . . . . . . . . . . . . . . . . . . . . . . . . . . . . . . . . . . . . . . . . . . . . . 92
Merging Help projects . . . . . . . . . . . . . . . . . . . . . . . . . . . . . . . . . . . . . . . . . . . . . . . . . . . . . . . . . . . . . . . . . . . . . . . . . . . . . . . . . . . . . . . . . . . . . . . . 96
Reports . . . . . . . . . . . . . . . . . . . . . . . . . . . . . . . . . . . . . . . . . . . . . . . . . . . . . . . . . . . . . . . . . . . . . . . . . . . . . . . . . . . . . . . . . . . . . . . . . . . . . . . . . . . . . 102
Reference . . . . . . . . . . . . . . . . . . . . . . . . . . . . . . . . . . . . . . . . . . . . . . . . . . . . . . . . . . . . . . . . . . . . . . . . . . . . . . . . . . . . . . . . . . . . . . . . . . . . . . . . . . . 108
iii
Chapter 4: Working with topics
Create, save, and open topics . . . . . . . . . . . . . . . . . . . . . . . . . . . . . . . . . . . . . . . . . . . . . . . . . . . . . . . . . . . . . . . . . . . . . . . . . . . . . . . . . . . . . . . . 110
Author in XHTML . . . . . . . . . . . . . . . . . . . . . . . . . . . . . . . . . . . . . . . . . . . . . . . . . . . . . . . . . . . . . . . . . . . . . . . . . . . . . . . . . . . . . . . . . . . . . . . . . . . . 112
Import and copy topics . . . . . . . . . . . . . . . . . . . . . . . . . . . . . . . . . . . . . . . . . . . . . . . . . . . . . . . . . . . . . . . . . . . . . . . . . . . . . . . . . . . . . . . . . . . . . . 113
View topics and design elements . . . . . . . . . . . . . . . . . . . . . . . . . . . . . . . . . . . . . . . . . . . . . . . . . . . . . . . . . . . . . . . . . . . . . . . . . . . . . . . . . . . . 114
Master pages . . . . . . . . . . . . . . . . . . . . . . . . . . . . . . . . . . . . . . . . . . . . . . . . . . . . . . . . . . . . . . . . . . . . . . . . . . . . . . . . . . . . . . . . . . . . . . . . . . . . . . . . 115
Manage topics . . . . . . . . . . . . . . . . . . . . . . . . . . . . . . . . . . . . . . . . . . . . . . . . . . . . . . . . . . . . . . . . . . . . . . . . . . . . . . . . . . . . . . . . . . . . . . . . . . . . . . 119
Managing resources . . . . . . . . . . . . . . . . . . . . . . . . . . . . . . . . . . . . . . . . . . . . . . . . . . . . . . . . . . . . . . . . . . . . . . . . . . . . . . . . . . . . . . . . . . . . . . . . . 123
Check spelling and find and replace . . . . . . . . . . . . . . . . . . . . . . . . . . . . . . . . . . . . . . . . . . . . . . . . . . . . . . . . . . . . . . . . . . . . . . . . . . . . . . . . . . 127
W3C compliance . . . . . . . . . . . . . . . . . . . . . . . . . . . . . . . . . . . . . . . . . . . . . . . . . . . . . . . . . . . . . . . . . . . . . . . . . . . . . . . . . . . . . . . . . . . . . . . . . . . . 131
Reference . . . . . . . . . . . . . . . . . . . . . . . . . . . . . . . . . . . . . . . . . . . . . . . . . . . . . . . . . . . . . . . . . . . . . . . . . . . . . . . . . . . . . . . . . . . . . . . . . . . . . . . . . . . 132
Last updated 12/14/2011
Page 4

USING ROBOHELP HTML 9
Contents
Chapter 5: Editing and formatting
RoboHelp editors . . . . . . . . . . . . . . . . . . . . . . . . . . . . . . . . . . . . . . . . . . . . . . . . . . . . . . . . . . . . . . . . . . . . . . . . . . . . . . . . . . . . . . . . . . . . . . . . . . . . 133
Character formatting and fonts . . . . . . . . . . . . . . . . . . . . . . . . . . . . . . . . . . . . . . . . . . . . . . . . . . . . . . . . . . . . . . . . . . . . . . . . . . . . . . . . . . . . . . 136
Format paragraphs . . . . . . . . . . . . . . . . . . . . . . . . . . . . . . . . . . . . . . . . . . . . . . . . . . . . . . . . . . . . . . . . . . . . . . . . . . . . . . . . . . . . . . . . . . . . . . . . . . 138
Borders, backgrounds, color, and sound . . . . . . . . . . . . . . . . . . . . . . . . . . . . . . . . . . . . . . . . . . . . . . . . . . . . . . . . . . . . . . . . . . . . . . . . . . . . . . 140
Tables . . . . . . . . . . . . . . . . . . . . . . . . . . . . . . . . . . . . . . . . . . . . . . . . . . . . . . . . . . . . . . . . . . . . . . . . . . . . . . . . . . . . . . . . . . . . . . . . . . . . . . . . . . . . . . . 142
Lists . . . . . . . . . . . . . . . . . . . . . . . . . . . . . . . . . . . . . . . . . . . . . . . . . . . . . . . . . . . . . . . . . . . . . . . . . . . . . . . . . . . . . . . . . . . . . . . . . . . . . . . . . . . . . . . . . 145
Headers, footers, and page breaks . . . . . . . . . . . . . . . . . . . . . . . . . . . . . . . . . . . . . . . . . . . . . . . . . . . . . . . . . . . . . . . . . . . . . . . . . . . . . . . . . . . 147
Text boxes . . . . . . . . . . . . . . . . . . . . . . . . . . . . . . . . . . . . . . . . . . . . . . . . . . . . . . . . . . . . . . . . . . . . . . . . . . . . . . . . . . . . . . . . . . . . . . . . . . . . . . . . . . 148
User-defined variables . . . . . . . . . . . . . . . . . . . . . . . . . . . . . . . . . . . . . . . . . . . . . . . . . . . . . . . . . . . . . . . . . . . . . . . . . . . . . . . . . . . . . . . . . . . . . . . 149
Single-source with snippets . . . . . . . . . . . . . . . . . . . . . . . . . . . . . . . . . . . . . . . . . . . . . . . . . . . . . . . . . . . . . . . . . . . . . . . . . . . . . . . . . . . . . . . . . . 152
Reference . . . . . . . . . . . . . . . . . . . . . . . . . . . . . . . . . . . . . . . . . . . . . . . . . . . . . . . . . . . . . . . . . . . . . . . . . . . . . . . . . . . . . . . . . . . . . . . . . . . . . . . . . . . 154
Chapter 6: Styles and style sheets
Style types . . . . . . . . . . . . . . . . . . . . . . . . . . . . . . . . . . . . . . . . . . . . . . . . . . . . . . . . . . . . . . . . . . . . . . . . . . . . . . . . . . . . . . . . . . . . . . . . . . . . . . . . . . 155
Manage style sheets . . . . . . . . . . . . . . . . . . . . . . . . . . . . . . . . . . . . . . . . . . . . . . . . . . . . . . . . . . . . . . . . . . . . . . . . . . . . . . . . . . . . . . . . . . . . . . . . . 155
Create styles for style sheets . . . . . . . . . . . . . . . . . . . . . . . . . . . . . . . . . . . . . . . . . . . . . . . . . . . . . . . . . . . . . . . . . . . . . . . . . . . . . . . . . . . . . . . . . 157
Table styles . . . . . . . . . . . . . . . . . . . . . . . . . . . . . . . . . . . . . . . . . . . . . . . . . . . . . . . . . . . . . . . . . . . . . . . . . . . . . . . . . . . . . . . . . . . . . . . . . . . . . . . . . 158
List styles . . . . . . . . . . . . . . . . . . . . . . . . . . . . . . . . . . . . . . . . . . . . . . . . . . . . . . . . . . . . . . . . . . . . . . . . . . . . . . . . . . . . . . . . . . . . . . . . . . . . . . . . . . . 159
Apply styles . . . . . . . . . . . . . . . . . . . . . . . . . . . . . . . . . . . . . . . . . . . . . . . . . . . . . . . . . . . . . . . . . . . . . . . . . . . . . . . . . . . . . . . . . . . . . . . . . . . . . . . . . 161
Edit styles in CSS files . . . . . . . . . . . . . . . . . . . . . . . . . . . . . . . . . . . . . . . . . . . . . . . . . . . . . . . . . . . . . . . . . . . . . . . . . . . . . . . . . . . . . . . . . . . . . . . . 162
Delete styles from style sheets . . . . . . . . . . . . . . . . . . . . . . . . . . . . . . . . . . . . . . . . . . . . . . . . . . . . . . . . . . . . . . . . . . . . . . . . . . . . . . . . . . . . . . . 162
Use color and images . . . . . . . . . . . . . . . . . . . . . . . . . . . . . . . . . . . . . . . . . . . . . . . . . . . . . . . . . . . . . . . . . . . . . . . . . . . . . . . . . . . . . . . . . . . . . . . . 163
Inline styles . . . . . . . . . . . . . . . . . . . . . . . . . . . . . . . . . . . . . . . . . . . . . . . . . . . . . . . . . . . . . . . . . . . . . . . . . . . . . . . . . . . . . . . . . . . . . . . . . . . . . . . . . 164
iv
Chapter 7: TOCs, indexes, glossaries
TOCs . . . . . . . . . . . . . . . . . . . . . . . . . . . . . . . . . . . . . . . . . . . . . . . . . . . . . . . . . . . . . . . . . . . . . . . . . . . . . . . . . . . . . . . . . . . . . . . . . . . . . . . . . . . . . . . . 165
Indexes . . . . . . . . . . . . . . . . . . . . . . . . . . . . . . . . . . . . . . . . . . . . . . . . . . . . . . . . . . . . . . . . . . . . . . . . . . . . . . . . . . . . . . . . . . . . . . . . . . . . . . . . . . . . . 170
TOCs and indexes in Microsoft HTML Help . . . . . . . . . . . . . . . . . . . . . . . . . . . . . . . . . . . . . . . . . . . . . . . . . . . . . . . . . . . . . . . . . . . . . . . . . . . . 180
Glossaries . . . . . . . . . . . . . . . . . . . . . . . . . . . . . . . . . . . . . . . . . . . . . . . . . . . . . . . . . . . . . . . . . . . . . . . . . . . . . . . . . . . . . . . . . . . . . . . . . . . . . . . . . . . 184
Glossary hotspots . . . . . . . . . . . . . . . . . . . . . . . . . . . . . . . . . . . . . . . . . . . . . . . . . . . . . . . . . . . . . . . . . . . . . . . . . . . . . . . . . . . . . . . . . . . . . . . . . . . 187
Chapter 8: Linking and navigation
Navigation basics . . . . . . . . . . . . . . . . . . . . . . . . . . . . . . . . . . . . . . . . . . . . . . . . . . . . . . . . . . . . . . . . . . . . . . . . . . . . . . . . . . . . . . . . . . . . . . . . . . . . 189
Create text links . . . . . . . . . . . . . . . . . . . . . . . . . . . . . . . . . . . . . . . . . . . . . . . . . . . . . . . . . . . . . . . . . . . . . . . . . . . . . . . . . . . . . . . . . . . . . . . . . . . . . 191
Link to a pop-up . . . . . . . . . . . . . . . . . . . . . . . . . . . . . . . . . . . . . . . . . . . . . . . . . . . . . . . . . . . . . . . . . . . . . . . . . . . . . . . . . . . . . . . . . . . . . . . . . . . . . 192
Bookmarks . . . . . . . . . . . . . . . . . . . . . . . . . . . . . . . . . . . . . . . . . . . . . . . . . . . . . . . . . . . . . . . . . . . . . . . . . . . . . . . . . . . . . . . . . . . . . . . . . . . . . . . . . . 192
Link images and multimedia . . . . . . . . . . . . . . . . . . . . . . . . . . . . . . . . . . . . . . . . . . . . . . . . . . . . . . . . . . . . . . . . . . . . . . . . . . . . . . . . . . . . . . . . . 193
External links . . . . . . . . . . . . . . . . . . . . . . . . . . . . . . . . . . . . . . . . . . . . . . . . . . . . . . . . . . . . . . . . . . . . . . . . . . . . . . . . . . . . . . . . . . . . . . . . . . . . . . . . 194
Link View . . . . . . . . . . . . . . . . . . . . . . . . . . . . . . . . . . . . . . . . . . . . . . . . . . . . . . . . . . . . . . . . . . . . . . . . . . . . . . . . . . . . . . . . . . . . . . . . . . . . . . . . . . . 195
Link maintenance and repair . . . . . . . . . . . . . . . . . . . . . . . . . . . . . . . . . . . . . . . . . . . . . . . . . . . . . . . . . . . . . . . . . . . . . . . . . . . . . . . . . . . . . . . . . 196
Link controls . . . . . . . . . . . . . . . . . . . . . . . . . . . . . . . . . . . . . . . . . . . . . . . . . . . . . . . . . . . . . . . . . . . . . . . . . . . . . . . . . . . . . . . . . . . . . . . . . . . . . . . . 198
Text-only pop-ups . . . . . . . . . . . . . . . . . . . . . . . . . . . . . . . . . . . . . . . . . . . . . . . . . . . . . . . . . . . . . . . . . . . . . . . . . . . . . . . . . . . . . . . . . . . . . . . . . . . 202
RoboHelp search basics . . . . . . . . . . . . . . . . . . . . . . . . . . . . . . . . . . . . . . . . . . . . . . . . . . . . . . . . . . . . . . . . . . . . . . . . . . . . . . . . . . . . . . . . . . . . . . 203
External content search . . . . . . . . . . . . . . . . . . . . . . . . . . . . . . . . . . . . . . . . . . . . . . . . . . . . . . . . . . . . . . . . . . . . . . . . . . . . . . . . . . . . . . . . . . . . . . 204
Browse sequences . . . . . . . . . . . . . . . . . . . . . . . . . . . . . . . . . . . . . . . . . . . . . . . . . . . . . . . . . . . . . . . . . . . . . . . . . . . . . . . . . . . . . . . . . . . . . . . . . . . 205
Last updated 12/14/2011
Page 5

USING ROBOHELP HTML 9
Contents
Chapter 9: Multimedia and special effects
Images . . . . . . . . . . . . . . . . . . . . . . . . . . . . . . . . . . . . . . . . . . . . . . . . . . . . . . . . . . . . . . . . . . . . . . . . . . . . . . . . . . . . . . . . . . . . . . . . . . . . . . . . . . . . . . 208
Adobe Captivate demos . . . . . . . . . . . . . . . . . . . . . . . . . . . . . . . . . . . . . . . . . . . . . . . . . . . . . . . . . . . . . . . . . . . . . . . . . . . . . . . . . . . . . . . . . . . . . 211
Multimedia . . . . . . . . . . . . . . . . . . . . . . . . . . . . . . . . . . . . . . . . . . . . . . . . . . . . . . . . . . . . . . . . . . . . . . . . . . . . . . . . . . . . . . . . . . . . . . . . . . . . . . . . . . 212
Dynamic HTML and special effects . . . . . . . . . . . . . . . . . . . . . . . . . . . . . . . . . . . . . . . . . . . . . . . . . . . . . . . . . . . . . . . . . . . . . . . . . . . . . . . . . . . 213
Marquees . . . . . . . . . . . . . . . . . . . . . . . . . . . . . . . . . . . . . . . . . . . . . . . . . . . . . . . . . . . . . . . . . . . . . . . . . . . . . . . . . . . . . . . . . . . . . . . . . . . . . . . . . . . 217
HTML comments in topics . . . . . . . . . . . . . . . . . . . . . . . . . . . . . . . . . . . . . . . . . . . . . . . . . . . . . . . . . . . . . . . . . . . . . . . . . . . . . . . . . . . . . . . . . . . 218
Iframes . . . . . . . . . . . . . . . . . . . . . . . . . . . . . . . . . . . . . . . . . . . . . . . . . . . . . . . . . . . . . . . . . . . . . . . . . . . . . . . . . . . . . . . . . . . . . . . . . . . . . . . . . . . . . . 218
Chapter 10: Conditional text
Conditional text basics . . . . . . . . . . . . . . . . . . . . . . . . . . . . . . . . . . . . . . . . . . . . . . . . . . . . . . . . . . . . . . . . . . . . . . . . . . . . . . . . . . . . . . . . . . . . . . 219
Conditional build tags . . . . . . . . . . . . . . . . . . . . . . . . . . . . . . . . . . . . . . . . . . . . . . . . . . . . . . . . . . . . . . . . . . . . . . . . . . . . . . . . . . . . . . . . . . . . . . . 220
Conditional build tag expressions . . . . . . . . . . . . . . . . . . . . . . . . . . . . . . . . . . . . . . . . . . . . . . . . . . . . . . . . . . . . . . . . . . . . . . . . . . . . . . . . . . . . 223
Chapter 11: Context-sensitive Help
About context-sensitive Help . . . . . . . . . . . . . . . . . . . . . . . . . . . . . . . . . . . . . . . . . . . . . . . . . . . . . . . . . . . . . . . . . . . . . . . . . . . . . . . . . . . . . . . . 225
Author and developer roles in creating context-sensitive Help . . . . . . . . . . . . . . . . . . . . . . . . . . . . . . . . . . . . . . . . . . . . . . . . . . . . . . . . 226
Map files and map IDs . . . . . . . . . . . . . . . . . . . . . . . . . . . . . . . . . . . . . . . . . . . . . . . . . . . . . . . . . . . . . . . . . . . . . . . . . . . . . . . . . . . . . . . . . . . . . . . 226
Dynamic editing of context-sensitive topics . . . . . . . . . . . . . . . . . . . . . . . . . . . . . . . . . . . . . . . . . . . . . . . . . . . . . . . . . . . . . . . . . . . . . . . . . . 232
Information for developers . . . . . . . . . . . . . . . . . . . . . . . . . . . . . . . . . . . . . . . . . . . . . . . . . . . . . . . . . . . . . . . . . . . . . . . . . . . . . . . . . . . . . . . . . . 232
What’s This? Help . . . . . . . . . . . . . . . . . . . . . . . . . . . . . . . . . . . . . . . . . . . . . . . . . . . . . . . . . . . . . . . . . . . . . . . . . . . . . . . . . . . . . . . . . . . . . . . . . . . . 259
Maintaining text-only topics (Microsoft HTML Help projects) . . . . . . . . . . . . . . . . . . . . . . . . . . . . . . . . . . . . . . . . . . . . . . . . . . . . . . . . . . 263
Working with text-only topics . . . . . . . . . . . . . . . . . . . . . . . . . . . . . . . . . . . . . . . . . . . . . . . . . . . . . . . . . . . . . . . . . . . . . . . . . . . . . . . . . . . . . . . . 264
Testing context-sensitive Help . . . . . . . . . . . . . . . . . . . . . . . . . . . . . . . . . . . . . . . . . . . . . . . . . . . . . . . . . . . . . . . . . . . . . . . . . . . . . . . . . . . . . . . 266
Context-sensitive Help terms . . . . . . . . . . . . . . . . . . . . . . . . . . . . . . . . . . . . . . . . . . . . . . . . . . . . . . . . . . . . . . . . . . . . . . . . . . . . . . . . . . . . . . . . 268
Reference . . . . . . . . . . . . . . . . . . . . . . . . . . . . . . . . . . . . . . . . . . . . . . . . . . . . . . . . . . . . . . . . . . . . . . . . . . . . . . . . . . . . . . . . . . . . . . . . . . . . . . . . . . . 269
v
Chapter 12: Generating Help and printed documents
Single sourcing basics . . . . . . . . . . . . . . . . . . . . . . . . . . . . . . . . . . . . . . . . . . . . . . . . . . . . . . . . . . . . . . . . . . . . . . . . . . . . . . . . . . . . . . . . . . . . . . . 270
Work with layout types . . . . . . . . . . . . . . . . . . . . . . . . . . . . . . . . . . . . . . . . . . . . . . . . . . . . . . . . . . . . . . . . . . . . . . . . . . . . . . . . . . . . . . . . . . . . . . 272
Generate, view, and publish output . . . . . . . . . . . . . . . . . . . . . . . . . . . . . . . . . . . . . . . . . . . . . . . . . . . . . . . . . . . . . . . . . . . . . . . . . . . . . . . . . . 291
Distribute the project output . . . . . . . . . . . . . . . . . . . . . . . . . . . . . . . . . . . . . . . . . . . . . . . . . . . . . . . . . . . . . . . . . . . . . . . . . . . . . . . . . . . . . . . . 312
Printed documents . . . . . . . . . . . . . . . . . . . . . . . . . . . . . . . . . . . . . . . . . . . . . . . . . . . . . . . . . . . . . . . . . . . . . . . . . . . . . . . . . . . . . . . . . . . . . . . . . . 323
Skins . . . . . . . . . . . . . . . . . . . . . . . . . . . . . . . . . . . . . . . . . . . . . . . . . . . . . . . . . . . . . . . . . . . . . . . . . . . . . . . . . . . . . . . . . . . . . . . . . . . . . . . . . . . . . . . . 334
Windows . . . . . . . . . . . . . . . . . . . . . . . . . . . . . . . . . . . . . . . . . . . . . . . . . . . . . . . . . . . . . . . . . . . . . . . . . . . . . . . . . . . . . . . . . . . . . . . . . . . . . . . . . . . . 341
Chapter 13: Review and collaboration
Review in Design Editor . . . . . . . . . . . . . . . . . . . . . . . . . . . . . . . . . . . . . . . . . . . . . . . . . . . . . . . . . . . . . . . . . . . . . . . . . . . . . . . . . . . . . . . . . . . . . 347
PDF review . . . . . . . . . . . . . . . . . . . . . . . . . . . . . . . . . . . . . . . . . . . . . . . . . . . . . . . . . . . . . . . . . . . . . . . . . . . . . . . . . . . . . . . . . . . . . . . . . . . . . . . . . . 348
Manage comments and changes . . . . . . . . . . . . . . . . . . . . . . . . . . . . . . . . . . . . . . . . . . . . . . . . . . . . . . . . . . . . . . . . . . . . . . . . . . . . . . . . . . . . . 350
Review and collaboration in AIR Help . . . . . . . . . . . . . . . . . . . . . . . . . . . . . . . . . . . . . . . . . . . . . . . . . . . . . . . . . . . . . . . . . . . . . . . . . . . . . . . . 352
Chapter 14: Advanced program features
ActiveX controls . . . . . . . . . . . . . . . . . . . . . . . . . . . . . . . . . . . . . . . . . . . . . . . . . . . . . . . . . . . . . . . . . . . . . . . . . . . . . . . . . . . . . . . . . . . . . . . . . . . . . 355
Applets . . . . . . . . . . . . . . . . . . . . . . . . . . . . . . . . . . . . . . . . . . . . . . . . . . . . . . . . . . . . . . . . . . . . . . . . . . . . . . . . . . . . . . . . . . . . . . . . . . . . . . . . . . . . . 357
Forms . . . . . . . . . . . . . . . . . . . . . . . . . . . . . . . . . . . . . . . . . . . . . . . . . . . . . . . . . . . . . . . . . . . . . . . . . . . . . . . . . . . . . . . . . . . . . . . . . . . . . . . . . . . . . . . 358
Frames . . . . . . . . . . . . . . . . . . . . . . . . . . . . . . . . . . . . . . . . . . . . . . . . . . . . . . . . . . . . . . . . . . . . . . . . . . . . . . . . . . . . . . . . . . . . . . . . . . . . . . . . . . . . . . 361
HTML Help controls . . . . . . . . . . . . . . . . . . . . . . . . . . . . . . . . . . . . . . . . . . . . . . . . . . . . . . . . . . . . . . . . . . . . . . . . . . . . . . . . . . . . . . . . . . . . . . . . . 364
Last updated 12/14/2011
Page 6

USING ROBOHELP HTML 9
Contents
Information types (for HTML Help) . . . . . . . . . . . . . . . . . . . . . . . . . . . . . . . . . . . . . . . . . . . . . . . . . . . . . . . . . . . . . . . . . . . . . . . . . . . . . . . . . . . 367
Scripts . . . . . . . . . . . . . . . . . . . . . . . . . . . . . . . . . . . . . . . . . . . . . . . . . . . . . . . . . . . . . . . . . . . . . . . . . . . . . . . . . . . . . . . . . . . . . . . . . . . . . . . . . . . . . . 369
About ExtendScript Toolkit support . . . . . . . . . . . . . . . . . . . . . . . . . . . . . . . . . . . . . . . . . . . . . . . . . . . . . . . . . . . . . . . . . . . . . . . . . . . . . . . . . . 370
Twisties . . . . . . . . . . . . . . . . . . . . . . . . . . . . . . . . . . . . . . . . . . . . . . . . . . . . . . . . . . . . . . . . . . . . . . . . . . . . . . . . . . . . . . . . . . . . . . . . . . . . . . . . . . . . . 372
Chapter 15: Default keyboard shortcuts
vi
Last updated 12/14/2011
Page 7

Chapter 1: Getting started
Adobe RoboHelp software is designed for developing Help systems, e-learning content, policies and procedures, and
knowledgebases. Its enhanced editing and layout capabilities enable you to create professional looking content. You
can publish this content to multiple channels, including Adobe AIR for an integrated online and offline user
experience. With the support for the ePub format, you can now take your content authored in RoboHelp,
FrameMaker, or Microsoft® Word to mobile devices, e-book readers, and tablets.
Worldwide, Adobe RoboHelp is a leader of online Help authoring tools through innovation. New features create a
more productive experience for technical communicators and their audiences.
For latest information about Adobe RoboHelp, visit www.adobe.com/go/learn_robohelp_product_en
Before you begin working with your software, take a few moments to read an overview of activation and the many
resources available to you. You have access to instructional videos, plug-ins, templates, user communities, seminars,
tutorials, RSS feeds, and much more.
1
Activation and registration
To review complete system requirements and recommendations for your Adobe® RoboHelp® 9 software, see the
ReadMe file on the installation disc.
Install the software
1 Close any other Adobe applications open on your computer.
2 Insert the installation disc into your hard drive, and follow the onscreen instructions.
Note: For more information, see the ReadMe file on the installation disc.
Help with installation
For Help with installation issues, see the Installation Support Center at www.adobe.com/support/robohelp.
License activation
During the installation process, your Adobe software contacts an Adobe server to complete the license activation
process. No personal data is transmitted. For more information on product activation, visit the Adobe website at
www.adobe.com/go/activation.
Register
Register your product to receive complimentary installation support, notifications of updates, and other services.
Note: Register only once for RoboHelp 9.
❖ To register, follow the onscreen instructions in the Registration dialog box, which appears after you install the
software.
If you postpone registration, you can register at any time by choosing Help > Registration.
Last updated 12/14/2011
Page 8

USING ROBOHELP HTML 9
Getting started
Adobe Product Improvement Program
After you have used your Adobe software a certain number of times, a dialog box appears, asking whether you want
to participate in Adobe Product Improvement Program.
If you choose to participate, data about your use of Adobe software is sent to Adobe. No personal information is
recorded or sent. The Adobe Product Improvement Program only collects information about the features and tools
that you use in the software and how often you use them.
You can opt in to or opt out of the program at any time:
• To participate, choose Help > Adobe Product Improvement Program and click Yes, Participate.
• To stop participating, choose Help > Adobe Product Improvement Program and click No, Thank You.
Adobe provides more information about the Adobe Product Improvement Program in a frequently asked questions
(FAQ) list on the
Adobe website.
ReadMe
A ReadMe file for your software is available online and on the installation disc. Open the file to read important
information about topics such as the following:
• System requirements
• Installation (including removing the software)
• Activation and registration
• Troubleshooting
• Customer support
2
Help and support
Community Help
Community Help is an integrated environment on Adobe.com that gives you access to community-generated content
moderated by Adobe and industry experts. Comments from users help guide you to an answer. Search Community
Help to find the best content on the web about Adobe products and technologies, including these resources:
• Videos, tutorials, tips and techniques, blogs, articles, and examples for designers and developers.
• Complete online Help, which is updated regularly and is more complete than the Help delivered with your product.
If you are connected to the Internet when you access Help, you automatically see the latest online Help rather than
the set delivered with your product. Online Help also includes a link to the complete, updated PDF version of Help.
• All other content on Adobe.com, including knowledgebase articles, downloads and updates, Adobe Developer
Connection, and more.
Use the Help search field in your product user interface to access Community Help. You can search for content within
the Adobe.com site and also in websites that have useful information about your product. Moderators continue to
identify the most relevant web content for your product. You can add comments to online Help and view comments
added by other users.
Note: To restrict search within the product documentation, expand Search Options and select Local. Filter results by
selecting the documentation from the drop-down list. You can use Ctrl + F to search within the contents displayed in the
right pane.
Last updated 12/14/2011
Page 9

USING ROBOHELP HTML 9
Getting started
Services, downloads, and extras
You can enhance your product by integrating various services, plug-ins, and extensions in your product. You can also
download samples and other assets and see various resources to get your work done.
Adobe Exchange
Visit the Adobe Exchange at www.adobe.com/go/exchange to download samples as well as plug-ins and extensions
from Adobe and third-party developers. The plug-ins and extensions can help you automate tasks, customize
workflows, create specialized professional effects, and more.
Adobe downloads
Visit www.adobe.com/go/downloads to find free updates, trials, and other useful software.
Adobe Labs
Adobe Labs at www.adobe.com/go/labs gives you the opportunity to experience and evaluate new and emerging
technologies and products from Adobe. At Adobe Labs, you have access to resources such as these:
• Prerelease software and technologies
• Code samples and best practices to accelerate your learning
• Early versions of product and technical documentation
• Forums, wiki-based content, and other collaborative resources to help you interact with like-minded users
Adobe Labs fosters a collaborative software development process. In this environment, customers quickly become
productive with new products and technologies. Adobe Labs is also a forum for early feedback. The Adobe
development teams use this feedback to create software that meets the needs and expectations of the community.
3
Adobe forums
To reach out to experts in the Adobe RoboHelp community, visit www.adobe.com/go/learn_robohelp_forum_en.
Adobe TV
Visit Adobe TV at http://tv.adobe.com to view instructional and inspirational videos. The Technical Communications
channel features videos relevant for technical communicators.
RoboHelp sample projects and output
Visit the RoboHelp resourcespage and download sample projects created with RoboHelp and other resources, such as
workspaces and applications configured for implementing context-sensitive Help.
RoboHelp Developer Center
Visit RoboHelp Developer Center for articles written by internal and external RoboHelp users on various user-
requested topics.
RoboHelp Help and Support page
Visit the Adobe Support website at www.adobe.com/support/robohelp to learn about free and paid technical support
options.
Previous RoboHelp Help
Download the documentation of older versions of RoboHelp from www.adobe.com/go/learn_rh_previous_docs_en.
Last updated 12/14/2011
Page 10
USING ROBOHELP HTML 9
Getting started
Troubleshooting tips
Before you call Customer Support, try the tips collated on www.adobe.com/go/learn_robohelp_forum_tips_en to
troubleshoot RoboHelp problems.
Problem Solution
RoboHelp X5 activation does not work. Run RoboHelp X5 without activation.
For more information, see ts_kb403696_en-us
4
Some of the third-level TOC entries are missing when
publishing a project to RoboHelp Server.
The Adobe RoboHelp 9 uninstaller exits with an error and does
not uninstall Adobe RoboHelp 9.
Follow the steps listed in ts_cpsid_90498_en-us
Manually uninstall (remove) Adobe RoboHelp 9.
For more information, see ts_cpsid_88189_en-us
What’s new in RoboHelp 9
Authoring enhancements
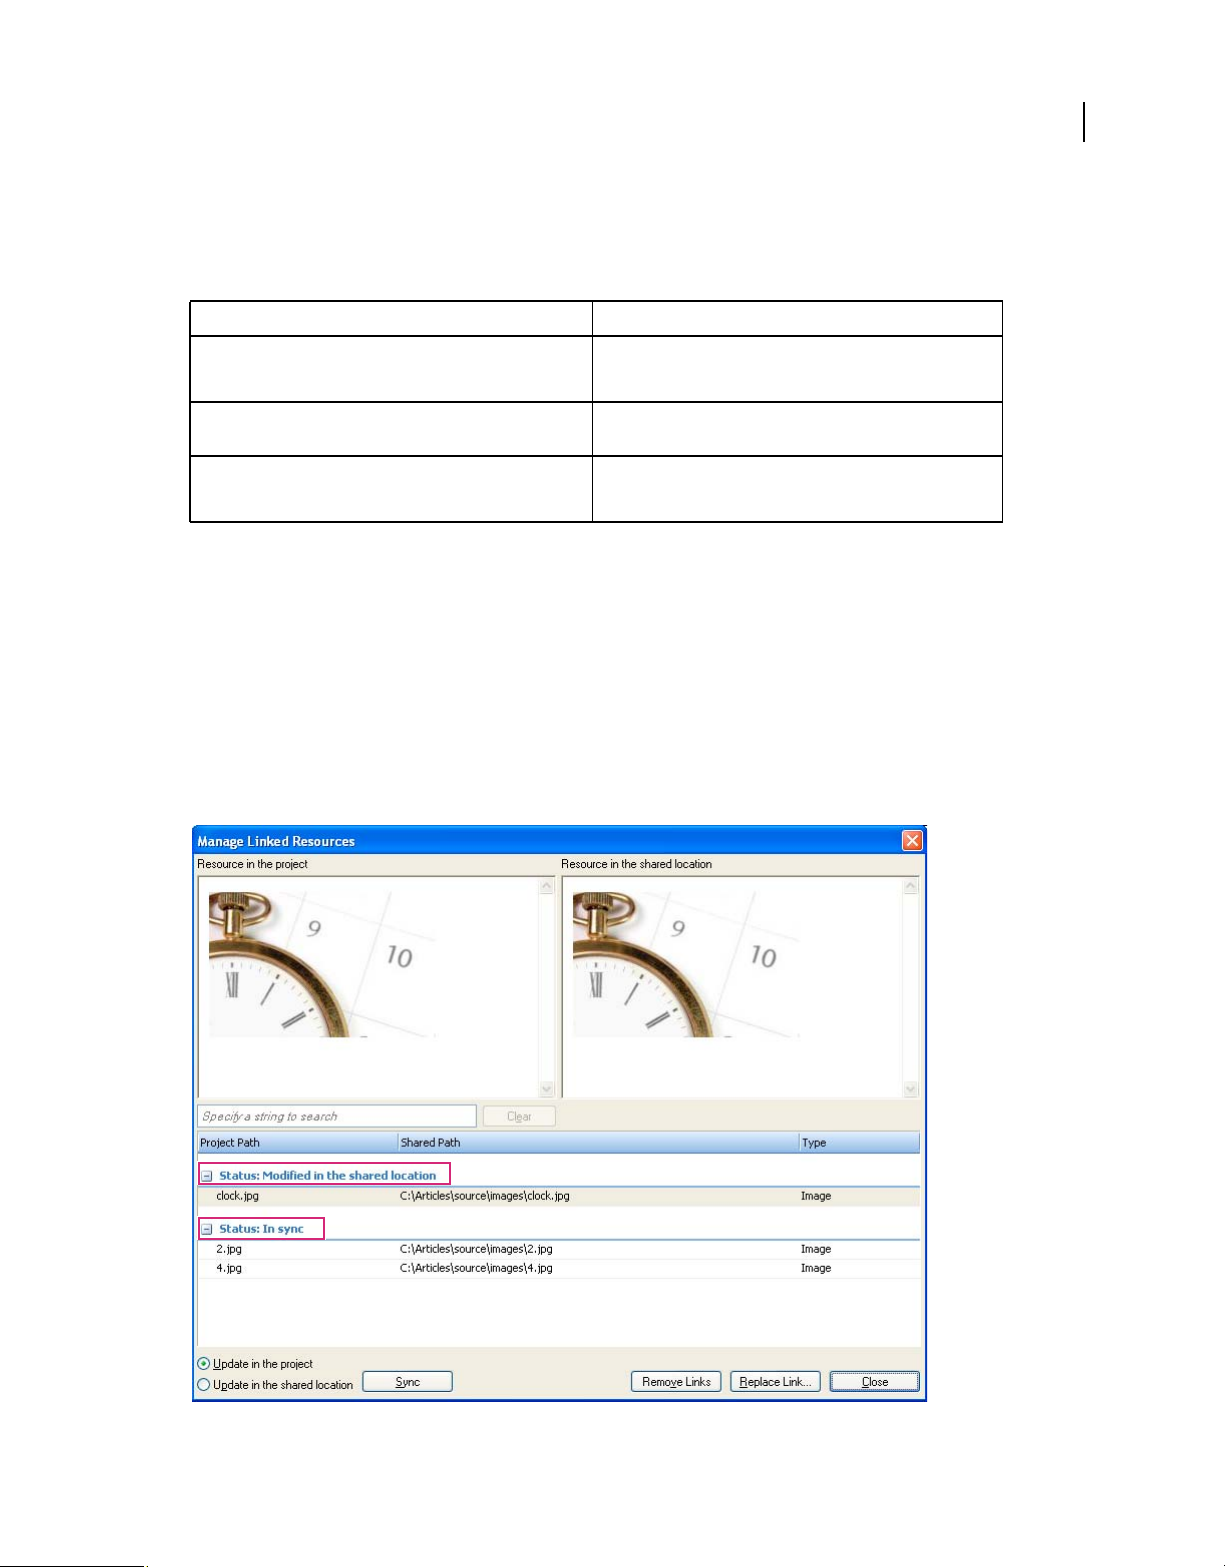
Shared and linked resources Save time and boost productivity by reusing assets across authors and projects. The
enhanced Resource Manager in RoboHelp 9 lets you add shared resources in Copy or Linked mode. RoboHelp
supports the auto-update of linked resources if the resources are modified in the shared location. Using linked
resources helps you maintain consistency and conform to organizational and industry standards. See
resources” on page 123.
“Managing
Statuses of linked resources help identify need for update
Last updated 12/14/2011
Page 11
USING ROBOHELP HTML 9
Getting started
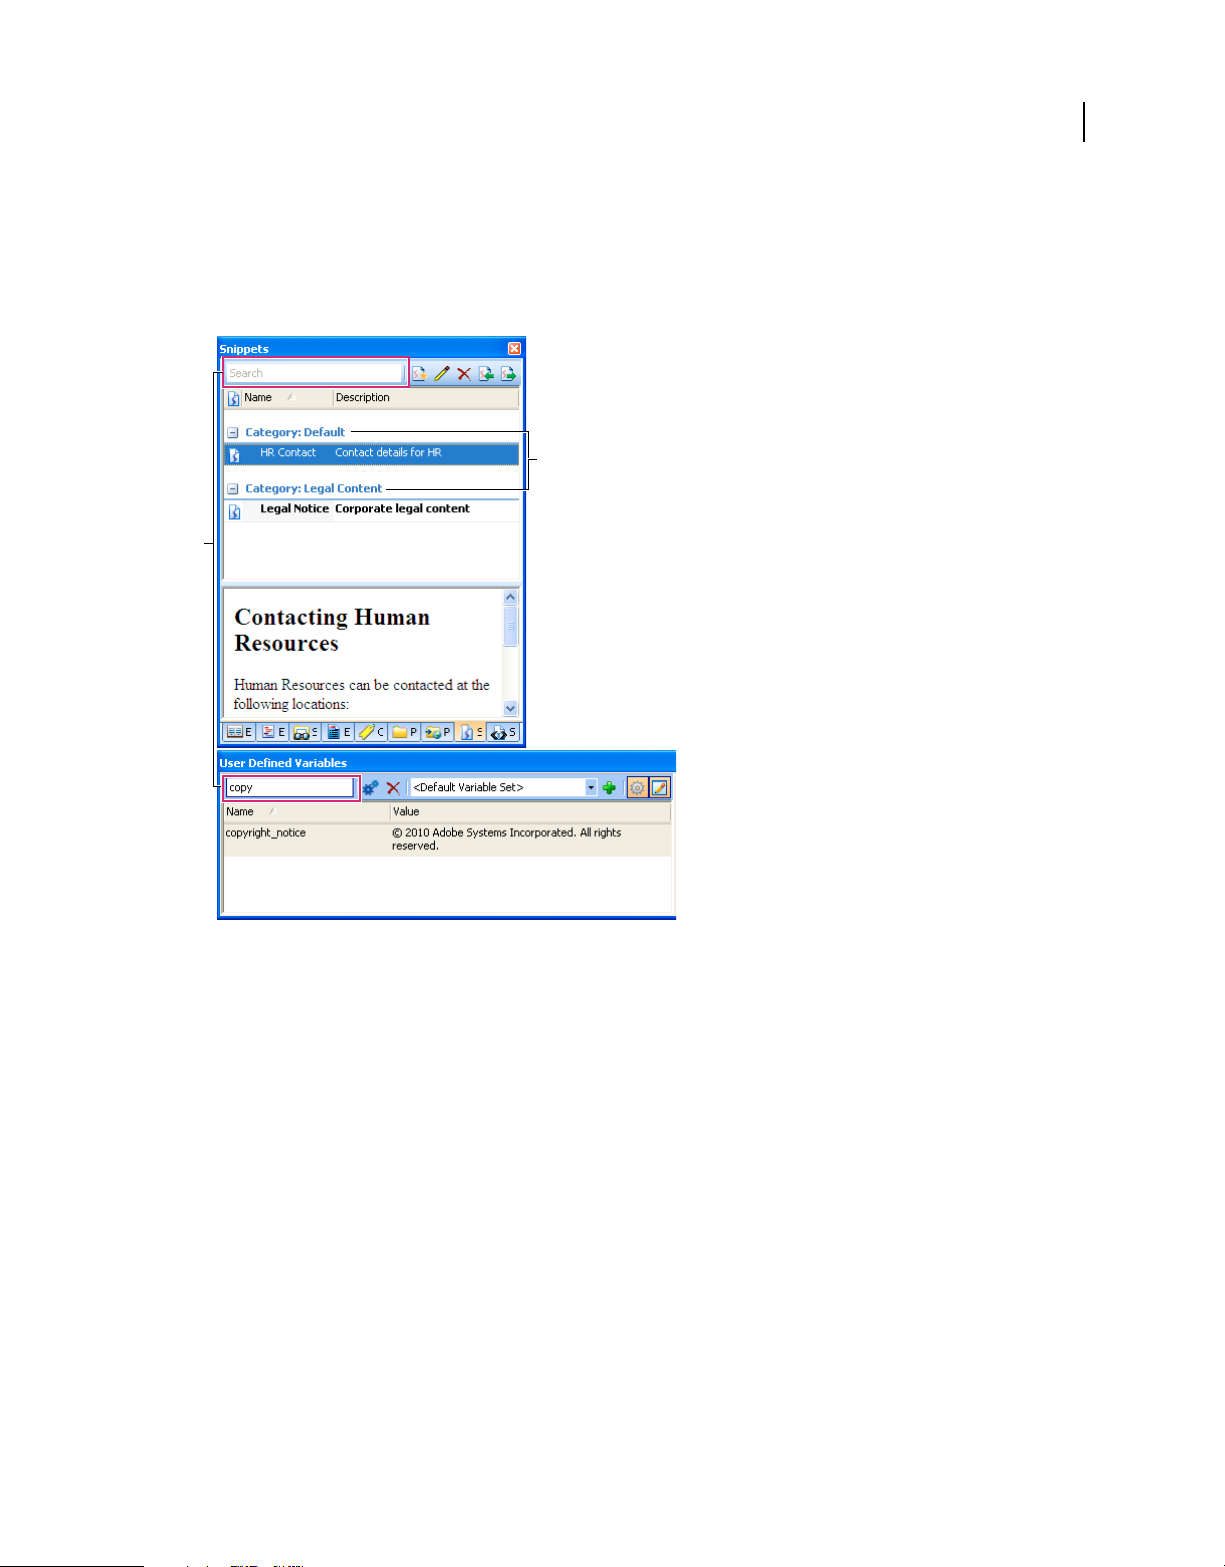
Enhanced User Defined Variables and Snippets pods The User Defined Variables pod and the Snippets pod include
many usability enhancements in RoboHelp 9. Both pods are now search-enabled. You can now organize snippets in
categories and expand and collapse each category. Support for sorting, and enhanced preview helps you insert, edit,
and manage UDVs and snippets with greater ease. Capabilities such as organizing snippets into categories and
converting them to text provide you with flexibility and speed.
B
A
5
A. Search-enabled User Defined Variables and Snippets pods B. Snippets organized in categories
Paste rich HTML content Copy and paste tables from Microsoft Word, Microsoft® Excel, and browsers. RoboHelp
pastes rich HTML content with text formatting, tables, lists, hyperlinks, and images intact.
Automated CSH authoring From within RoboHelp, open the application for which you want to provide context-
sensitive Help and map dialog boxes with new or existing topics. Dependency on developers is minimal because
RoboHelp extracts the context-sensitive Help IDs automatically. Updating or remapping topics is also easy because of
the seamless integration of RoboHelp and the application. See
“Dynamic editing of context-sensitive topics” on
page 232.
Note: The application needs to implement context-sensitive Help using the RoboHelp 9 CSH API. Currently, only C++
APIs on Windows are supported.
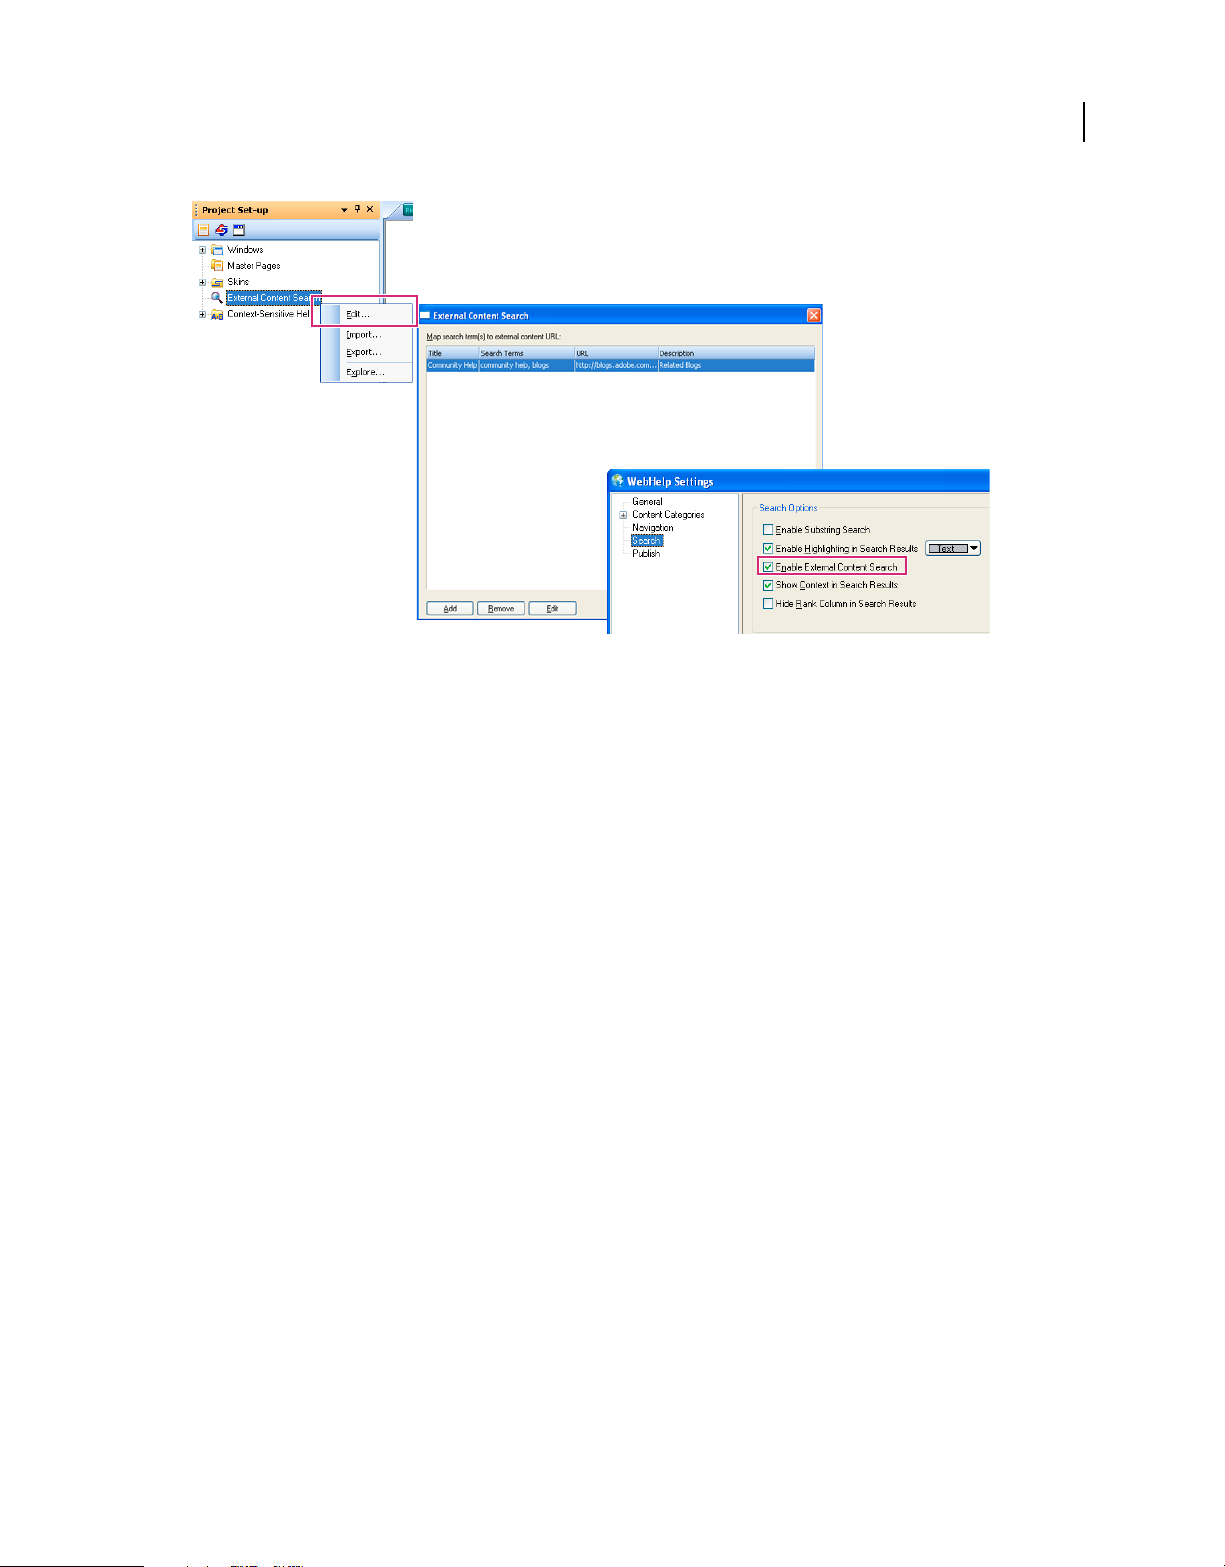
Include external content in search Specify URLs for content available outside the Help system (for example, in blogs)
and map them to terms that users are likely to search for. By curating relevant content in this way, you can optimize
the search experience for users and provide easy access to user-generated content. See
“External content search” on
page 204.
Last updated 12/14/2011
Page 12
USING ROBOHELP HTML 9
Getting started
Implementing external content search
6
A
B
C
Preview Web output in multiple browsers Preview a topic or the WebHelp, WebHelp Pro, FlashHelp, and FlashHelp
Pro output of a project with different browsers. Multibrowser support for previewing topics and project output helps
you ensure that the content appears correctly in commonly used browsers. See
“Preview topics” on page 114 and “View
output” on page 307.
Support for latest devices, products, and browsers Stay up-to-date with support for the latest platforms, browsers,
and devices (eBook readers, mobile devices, tablet PCs, and more). You can now import or link content from and
publish output to Microsoft Word 2010 (.docx and .doc). End users can view content generated from RoboHelp in the
latest version of Internet Explorer, Mozilla Firefox, and Google Chrome.
Integration with FrameMaker 10, Adobe Captivate 5, and Acrobat 10 RoboHelp 9 supports the latest version of Adobe
products such as FrameMaker 10, Adobe Captivate 5, and Acrobat 10. Leverage the latest enhancements in these
products, such as support for setting a text background color at both character and paragraph levels in FrameMaker.
RoboHelp Server reports to optimize content RoboHelp Server provides a host of reports to understand how users
consume the content. Take advantage of these usage analytics to optimize the content according to user needs. Now
that you can include external content in search, you can even map content that’s already available outside the Help
system and help users find the information they need.
For more information, see Reports in RoboHelp Server Help.
Import and linking enhancements
General import and linking enhancements In RoboHelp 9, the following enhancements apply to import and linking
of both Microsoft Word and FrameMaker documents:
• Saves the relative path of the linked document RoboHelp 9 saves the relative path, instead of the absolute path, of
linked documents. As a result, the links work even when the RoboHelp project and the linked Microsoft Word or
FrameMaker documents are moved.
Note: Earlier versions of RoboHelp projects that contain absolute paths of linked documents open normally in RoboHelp
9. While saving these projects, RoboHelp 9 saves the relative path.
Last updated 12/14/2011
Page 13

USING ROBOHELP HTML 9
Getting started
• Modify character and paragraph source styles While importing or linking a document, you can modify the
character and paragraph styles defined in the document. In the case of linked documents, style properties modified
from within Microsoft Word or FrameMaker and modified from within RoboHelp can now co-exist. In other words,
you can modify the style properties that you want to override in RoboHelp and allow other style properties to be
modified in Microsoft Word or FrameMaker.
RoboHelp 9 maintains two styles sheets to manage the styles of a linked document. A [topic].css file stores the styles
defined in the source document. The global CSS file, by default named RHStyleMapping.css, stores the details of
modifications and mapped RoboHelp styles.
RoboHelp stores each modified style with the style name WD_[original_style_name] (in the case of Microsoft Word)
or FM_[original_style_name] (in the case of FrameMaker) in RHStyleMapping.css.
Note: RoboHelp hides the [topic].css files from the workspace to ensure that source styles are preserved in this file.
• Edit style sheets from within Project Settings While specifying the import settings in the Project Settings dialog
box, you can now edit the CSS file you want to use for style mapping. The Edit With option lets you select an editor
from a predefined list, which includes RoboHelp CSS Editor and other registered CSS editors.
• Import and export of settings from an ISF file You can now import settings from a saved ISF file or export them
while importing Microsoft Word and FrameMaker documents. Any changes you make to the settings after importing
the ISF file are not saved; the modified settings are used only in the current import process.
7
Enhanced FrameMaker import and linking In RoboHelp 9, FrameMaker document import and linking includes the
following additional enhancements:
• Support for importing or linking DITA maps and DITA topics You can now import or link DITA maps (.ditamap,
.dita, and .xml) and DITA topics (.dita and .xml). For RoboHelp, a DITA map is similar to a FrameMaker book and a
Dita topic is similar to a FrameMaker .fm file. RoboHelp 9 also supports Ditaval, which means that you can now create
output based on conditions specified in the Ditaval file. See
“Apply conditions from a Ditaval file” on page 71.
• Enhanced list import in FrameMaker import and linking In RoboHelp 9, list symbols used in unordered lists
convert without any distortion. If you select Convert Autonumber To Text, RoboHelp retains the list indentation style
of the FrameMaker source document.
• Enhanced table import in FrameMaker import and linking Enhancements include the import of table titles as
captions, caption style mapping, import of table headers <th> tags when the table style is mapped to [source], and the
ability to configure table height and width, row height, and column width.
Note: RoboHelp CSS Editor does not support caption editing. However, if you create a caption style with another editor,
you can duplicate the caption with RoboHelp CSS Editor to create additional captions.
• Better conversion of Math equations, text frames, and freehand curves in FrameMaker import and linking
RoboHelp 9 uses Acrobat Distiller to convert FrameMaker Math equations, text frames, and freehand curves to
images. Select the Use PDF To Generate Images option in the Conversion Settings dialog box to use this enhancement.
“Image conversion settings” on page 80.
See
Review and collaboration features
With RoboHelp 9, collaborate in multiple ways with other authors, SMEs, and end users.
Review in Design Editor RoboHelp 9 lets you enable Track Changes in Design Editor and insert comments and
changes directly in the project. Take advantage of this capability to implement peer reviews. Multiple reviewers can
work sequentially and provide their feedback on the project. After the review ends, you can view and manage the
feedback from Review Pane. For step-by-step instructions, see
comments and changes” on page 350.
“Review in Design Editor” on page 347 and “Manage
Last updated 12/14/2011
Page 14

USING ROBOHELP HTML 9
Getting started
PDF review Create a PDF from an entire RoboHelp project or from parts of it, including topics, master pages, and
snippets, and send it for review (Reviewers only need the free Adobe Reader to add comments to the PDF). After the
review ends, import the comments into the project and view and manage the feedback from Review Pane. For stepby-step instructions, see
Rate topics and add comments in AIR Help Gather end-user feedback by enabling topic rating and commenting in AIR
“PDF review” on page 348 and “Manage comments and changes” on page 350.
Help (Adobe AIR Application output type). You can implement a trust-based setup on an internal server or a secure
setup on a server running RoboHelp Server for users outside your corporate network. In both scenarios, RoboHelp
supports comment moderation. See
“Review and collaboration in AIR Help” on page 352.
Publishing features
Multidevice publishing with ePub output With RoboHelp 9, generate project output for mobile devices, eBook
readers, tablets, and other devices that support the ePub format. The output includes metadata conforming to ePub
specifications. See
“Generate output in the ePub format” on page 305.
B
8
C
A
Access the ePub Generator script from A. File menu B. Tools menu C. Script Explorer
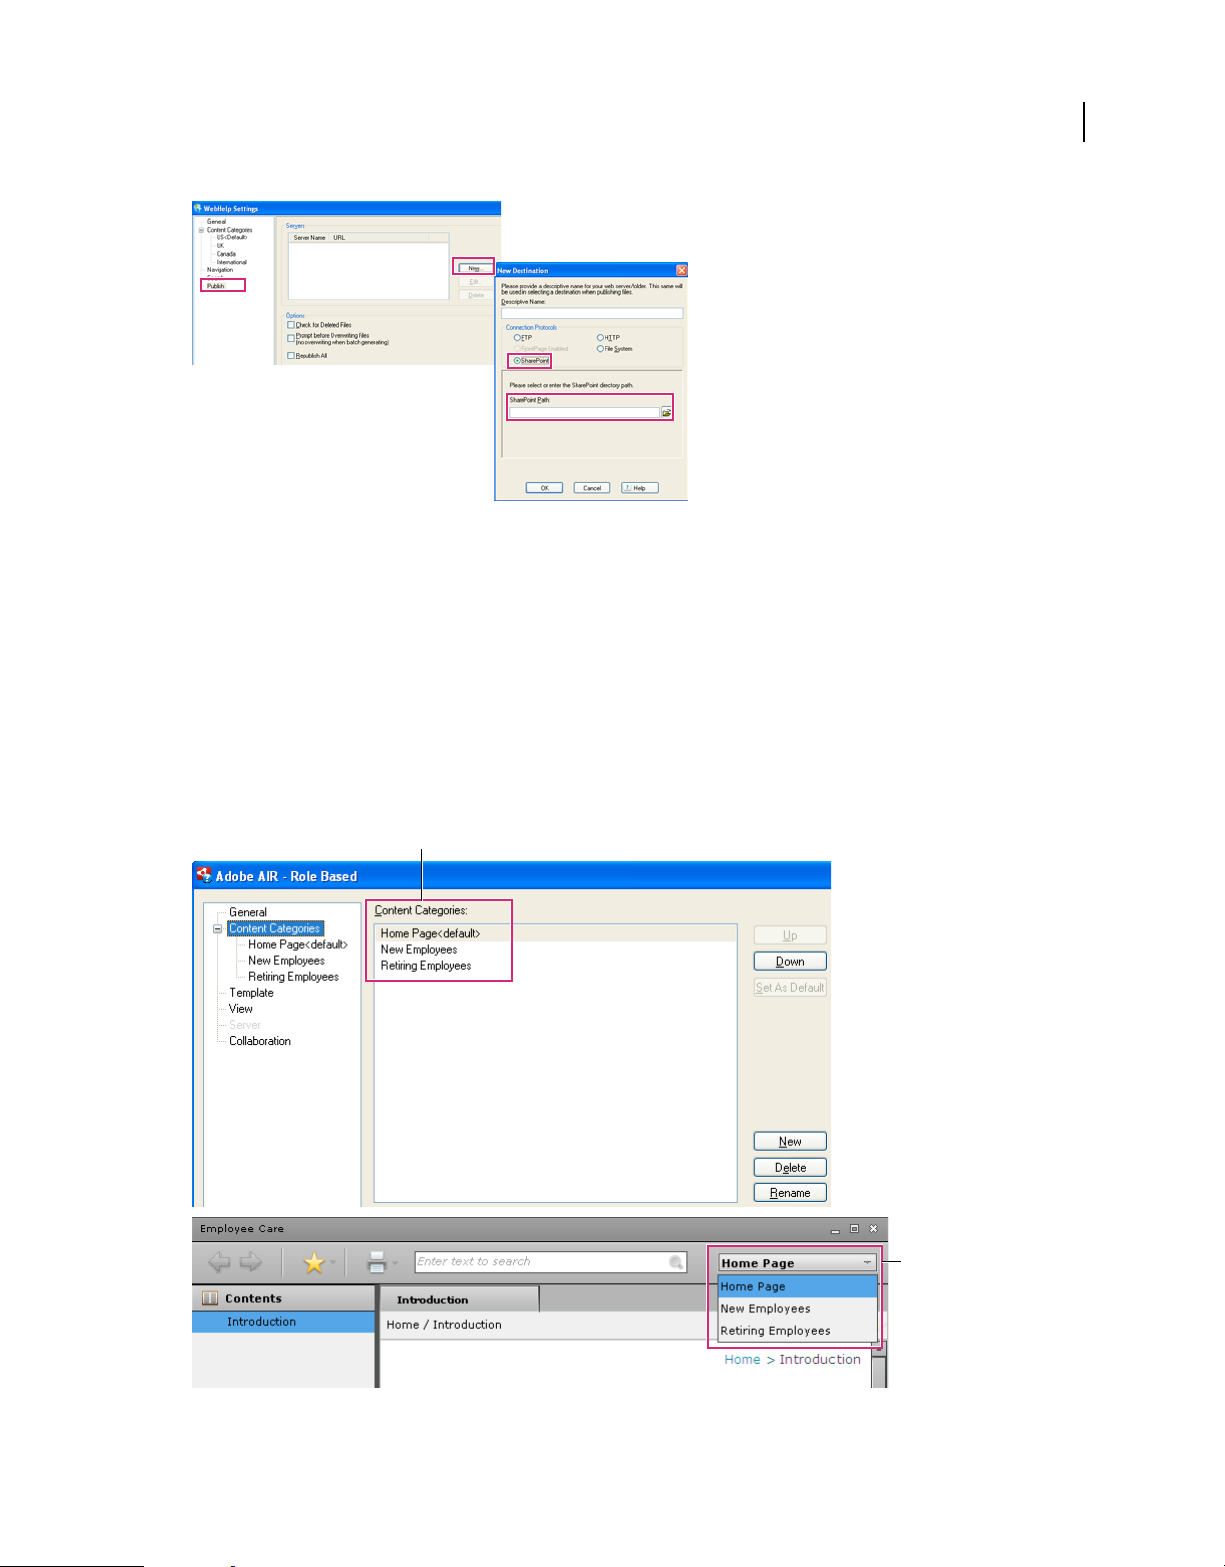
Publish to SharePoint RoboHelp 9 supports publishing WebHelp, FlashHelp, and Browser based Help (Adobe AIR
SSL) output to a SharePoint site using Universal Naming Convention (UNC) path. See
“Set options for generating
WebHelp” on page 292, “Set options for generating FlashHelp” on page 296, and “Configure a server to host browser-
based Help” on page 290.
Last updated 12/14/2011
Page 15
USING ROBOHELP HTML 9
Getting started
Define SharePoint settings in layout properties
Dynamic user-centric content Publish Adobe® AIR® and WebHelp projects as integrated Help systems with different
content categories. Users select the content category that's relevant for them and navigate and search within the
content category. Each content category has its own TOC, index, and glossary. Creating dynamic user-centric content
is useful if end users have to quickly toggle between the content for different roles, products, or variants. For example,
queries that a call center agent handles sometimes pertain to different areas of system administration (for example,
user administration, site administration, and content administration). The ability to view and search the system
administration content as a set of modular content categories accessible from the same interface works as a time-saver
where you handle queries in real time.
9
For information about how to create content categories, see “Configure the Adobe AIR layout” on page 284 and “Set
options for generating WebHelp” on page 292.
A
B
A. Content category definition in SSL B. Content category selection in the output
Last updated 12/14/2011
Page 16
USING ROBOHELP HTML 9
Getting started
Merged AIR Help The capability to merge the output of multiple projects is now extended to output generated using
the Adobe AIR SSL. Both Adobe AIR output types—Adobe AIR Application and Browser based Help—support
merging. See
Enhanced search experience RoboHelp 9 ensures improved user experience by excluding unreferenced topics from
“Merging Help projects” on page 96.
the output and unreferenced baggage files from search. For a definition of unreferenced topics and unreferenced
baggage file, see
“RoboHelp search basics” on page 203. For the steps to exclude unreferenced topics and baggage files,
see the relevant topic in “Generate output” on page 292.
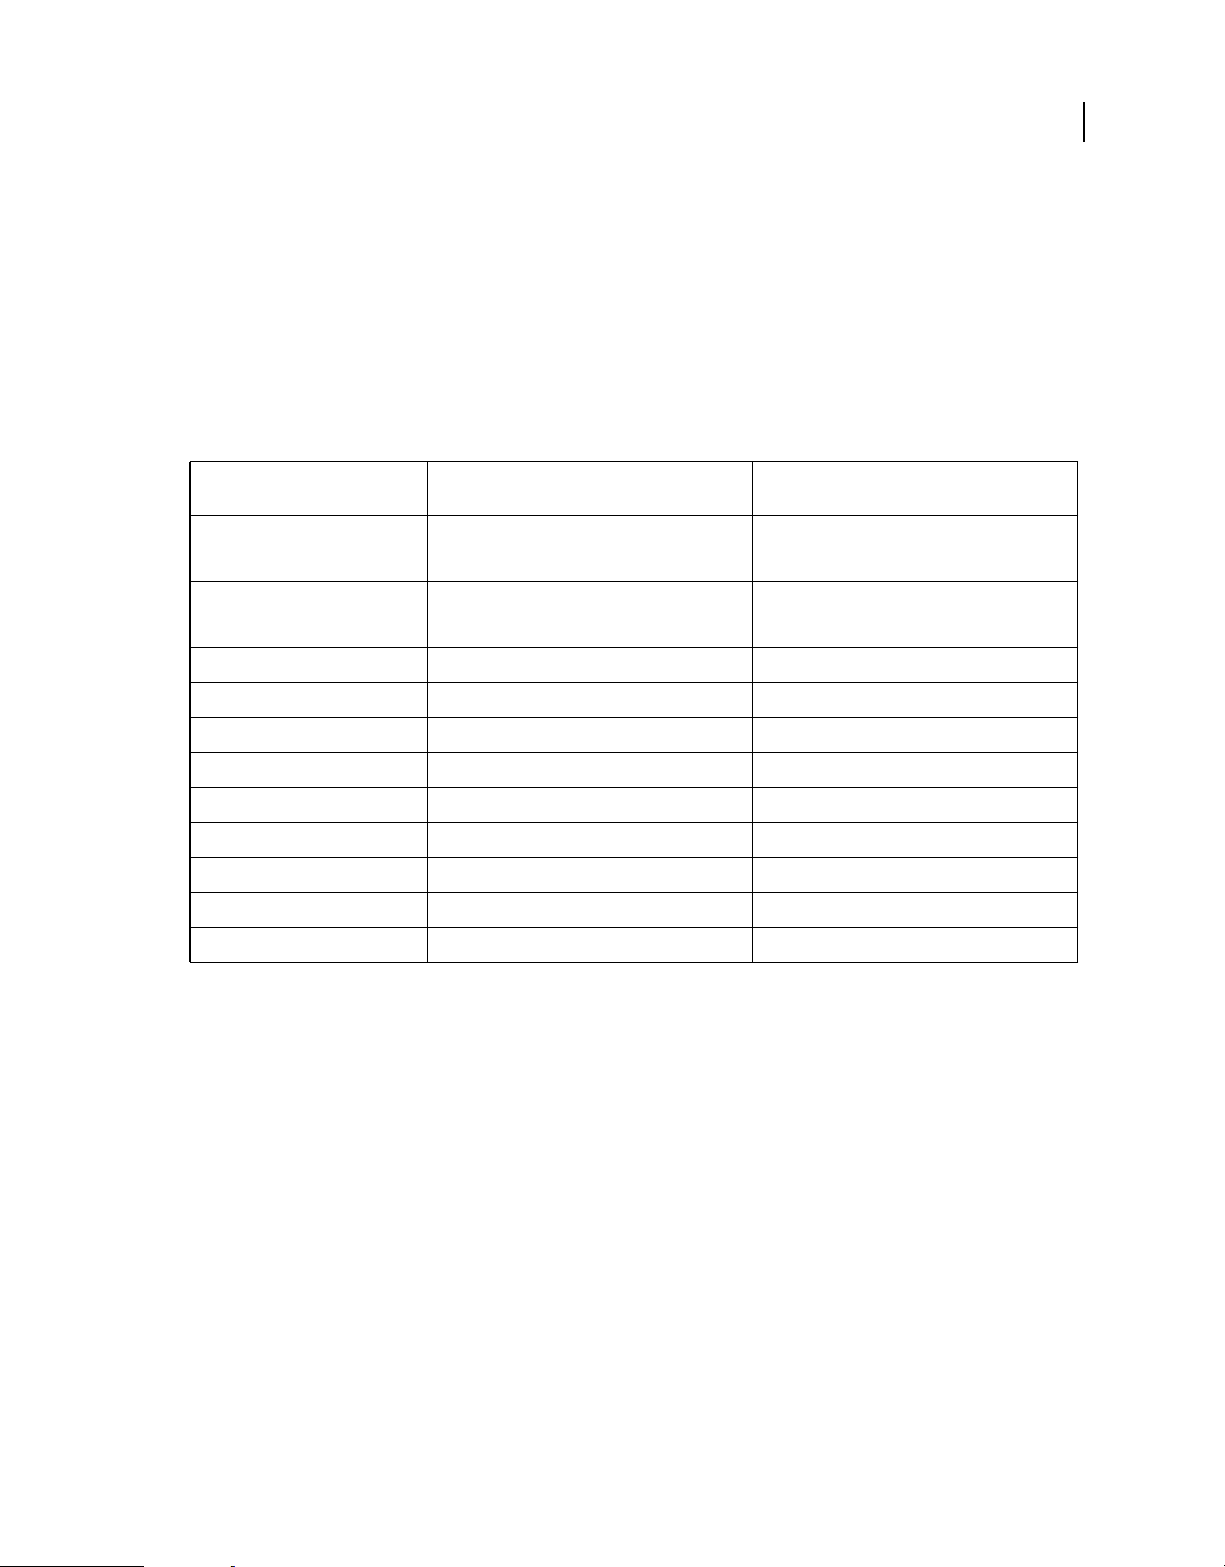
See the following table to find the layouts that support the Exclude Unreferenced Topics From Output and Exclude
Unreferenced Baggage Files From Search options:
10
SSL Exclude Unreferenced Topics From Output
Adobe AIR
Output type: Adobe AIR Application
Adobe AIR
Output type: Browser based Help
WebHelp Yes Yes
WebHelp Pro Yes Yes
FlashHelp Yes Yes
FlashHelp Pro Yes Yes
Microsoft HTML Help Yes No
Printed Documentation No No
XML Output Yes No
Oracle Help Yes No
JavaHelp Yes No
Personalize or brand output Change colors, styles, icons, and fonts to match company branding and other
option
Yes Yes
Yes Yes
specifications with the brand new Adobe AIR Help Skin Editor. See
Exclude Unreferenced Baggage Files From
Search option
“Create custom skins for Adobe AIR projects” on
page 336.
Support for character encoding in SSL Enables you to set character encoding at an SSL level when the web server to
which you’re publishing has a character encoding different from UTF-8. For information about how to set character
encoding for an SSL, see the relevant topic in
“Generate output” on page 292.
Note: Character encoding in SSL is not supported for Printed Documentation and Microsoft HTML Help layouts.
Set a language for SSL Override the language setting of the project by setting a language for the relevant single-source
layout. RoboHelp uses the SSL language setting for the user interface (UI) strings and language-related UI elements in
the preview and generated output. For information about how to set a language for an SSL, see the relevant topic in
“Generate output” on page 292.
Note: Language setting in SSL is not supported for Printed Documentation and XML layouts.
Support for selection of browse sequences In WebHelp and Adobe AIR layouts, you can now select the browse
sequences that you want to display. If the layout defines content categories, you can select browse sequences for each
content category. Further, in WebHelp layouts, you can enable or disable browse sequences at a project level. For
Last updated 12/14/2011
Page 17
USING ROBOHELP HTML 9
Getting started
information about how to enable or disable browse sequences and select them for content categories, see “Configure
the Adobe AIR layout” on page 284 and “Set options for generating WebHelp” on page 292.
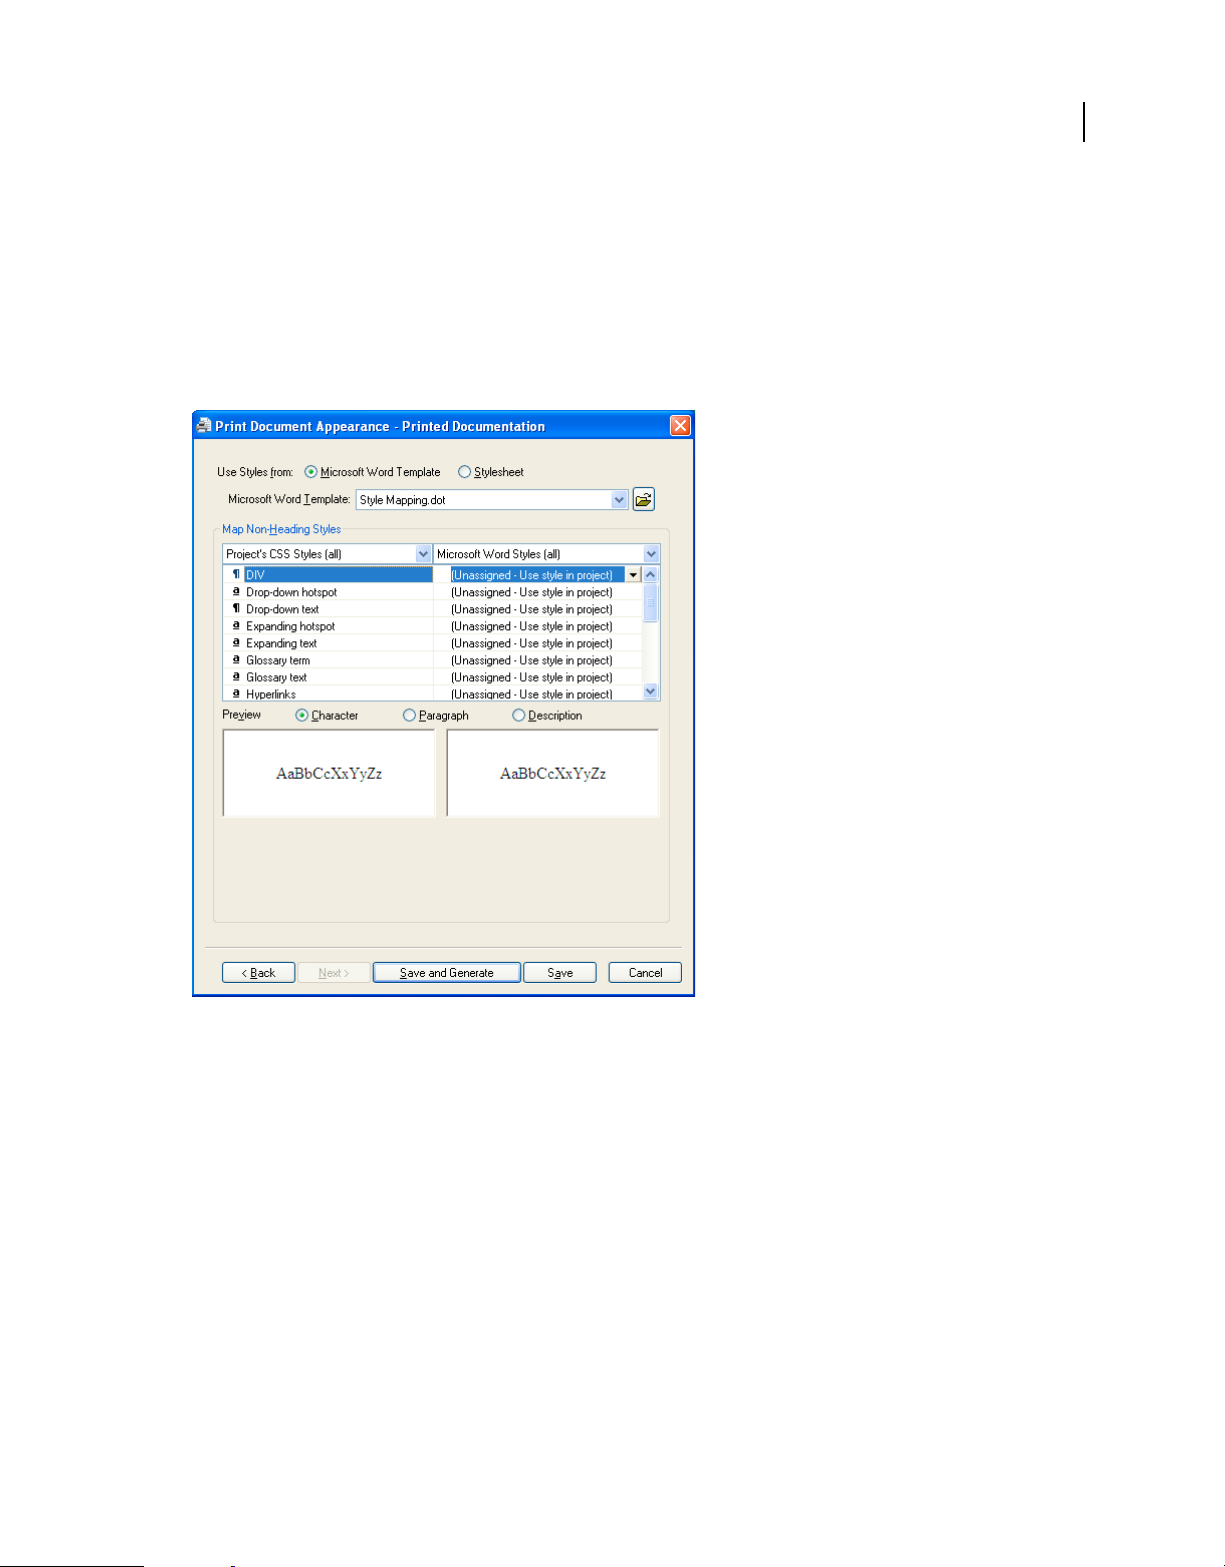
Enhanced Printed Documentation output Take advantage of enhanced style mapping options to generate better PDF
output and printed documentation. In addition to mapping character and paragraph styles, you can now map
multilevel list and table styles to the corresponding styles in Microsoft Word.
Important: By default, list and tables styles in Microsoft Word do not have names. Create new styles in Microsoft Word
and name them so the style names are available in the drop-down list in Printed Documentation layout properties.
11
Unnamed styles appear in the Microsoft Word styles (All) drop-down list as Unassigned
In the generated Microsoft Word document, the mapped styles retain the Microsoft Word style properties. For
example, if you add a row to a table with shaded alternate rows, the newly added row has the expected shade. See
“Mapping styles” on page 330.
With the new Insert > Page Break option, you can add page breaks in topics. RoboHelp honors the page breaks to add
new pages in the Printed Documentation output.
Hide the Rank column in search results For WebHelp and WebHelp Pro output, you can hide the Rank column in
search results to allocate more space for displaying search results. The Hide Rank Column In Search Results option is
available in the Search tab of WebHelp layout properties. See
“Set options for generating WebHelp” on page 292 and
“Set options for generating WebHelp Pro or FlashHelp Pro” on page 298.
Last updated 12/14/2011
Page 18

USING ROBOHELP HTML 9
Getting started
User customization features
In RoboHelp 9, organizations deploying Adobe AIR Application output (AIR Help) can configure features such as
auto-update, commenting, and moderation settings through the configuration file and
Customization through configuration file In RoboHelp 9, an author can specify a configuration file path at the time of
generating AIR Help (General settings in the Adobe AIR SSL properties). When the AIR application is distributed,
users can copy the default configuration file from the SSL folder to the location specified in the configuration file path
and modify the default settings according to their preferences.
Users can modify the following author-specified settings in the [configuration_filename].xml file:
• Add the company logo and name Personalize and brand the Help by specifying the company logo and name in the
configuration file.
• Enable or disable auto-update Specify the preference for auto-update and override the author-specified auto-
update setting.
• Change the location of the auto-update XML file Specify a location to store the auto-update XML file.
• Change the location for storing comments Specify a central location of choice for storing and syncing comments.
• Change the status of new comments Specify whether new comments are to be accepted without moderation.
• Enable or disable topic rating Allow or disallow users to rate topics.
settings.xml files.
12
For more information, see “Configure the Adobe AIR layout” on page 284 and “Distribute Adobe AIR output” on
page 321.
Customization through settings.xml Users can override the moderation setting defined in the SSL by configuring the
moderation state setting in the settings.xml file.
For more information, see “Distribute Adobe AIR output” on page 321 and “Comment moderation” on page 354.
Usability and productivity features
Sample applications with layouts configured for multichannel publishing RoboHelp 9 installation comes with two
sample projects, Salesbuilder-Help and EmployeeCare. The Salesbuilder-Help project is designed to help you
understand the new features offered by RoboHelp 9. The EmployeeCare project is designed to show how a
knowledgebase can be created using RoboHelp 9. The layouts are set up ready for you to generate them when you have
read the topics in the About folder. Both projects include the About Adobe RoboHelp 9 topic, which outlines the new
features of RoboHelp 9. If a particular feature is used in the sample project you have opened, the
the feature name.
Workspace enhancements In RoboHelp 9, you’ll find a host of workspace enhancements that give you flexibility and
speed. Some of the key changes are as follows:
• Easy-to-arrange pods From the context-sensitive menu of the title bar of a pod, access options such as Dockable,
Floating, and Tabbed Document to arrange pods in various ways. The menu also includes options to hide and close
the pod.
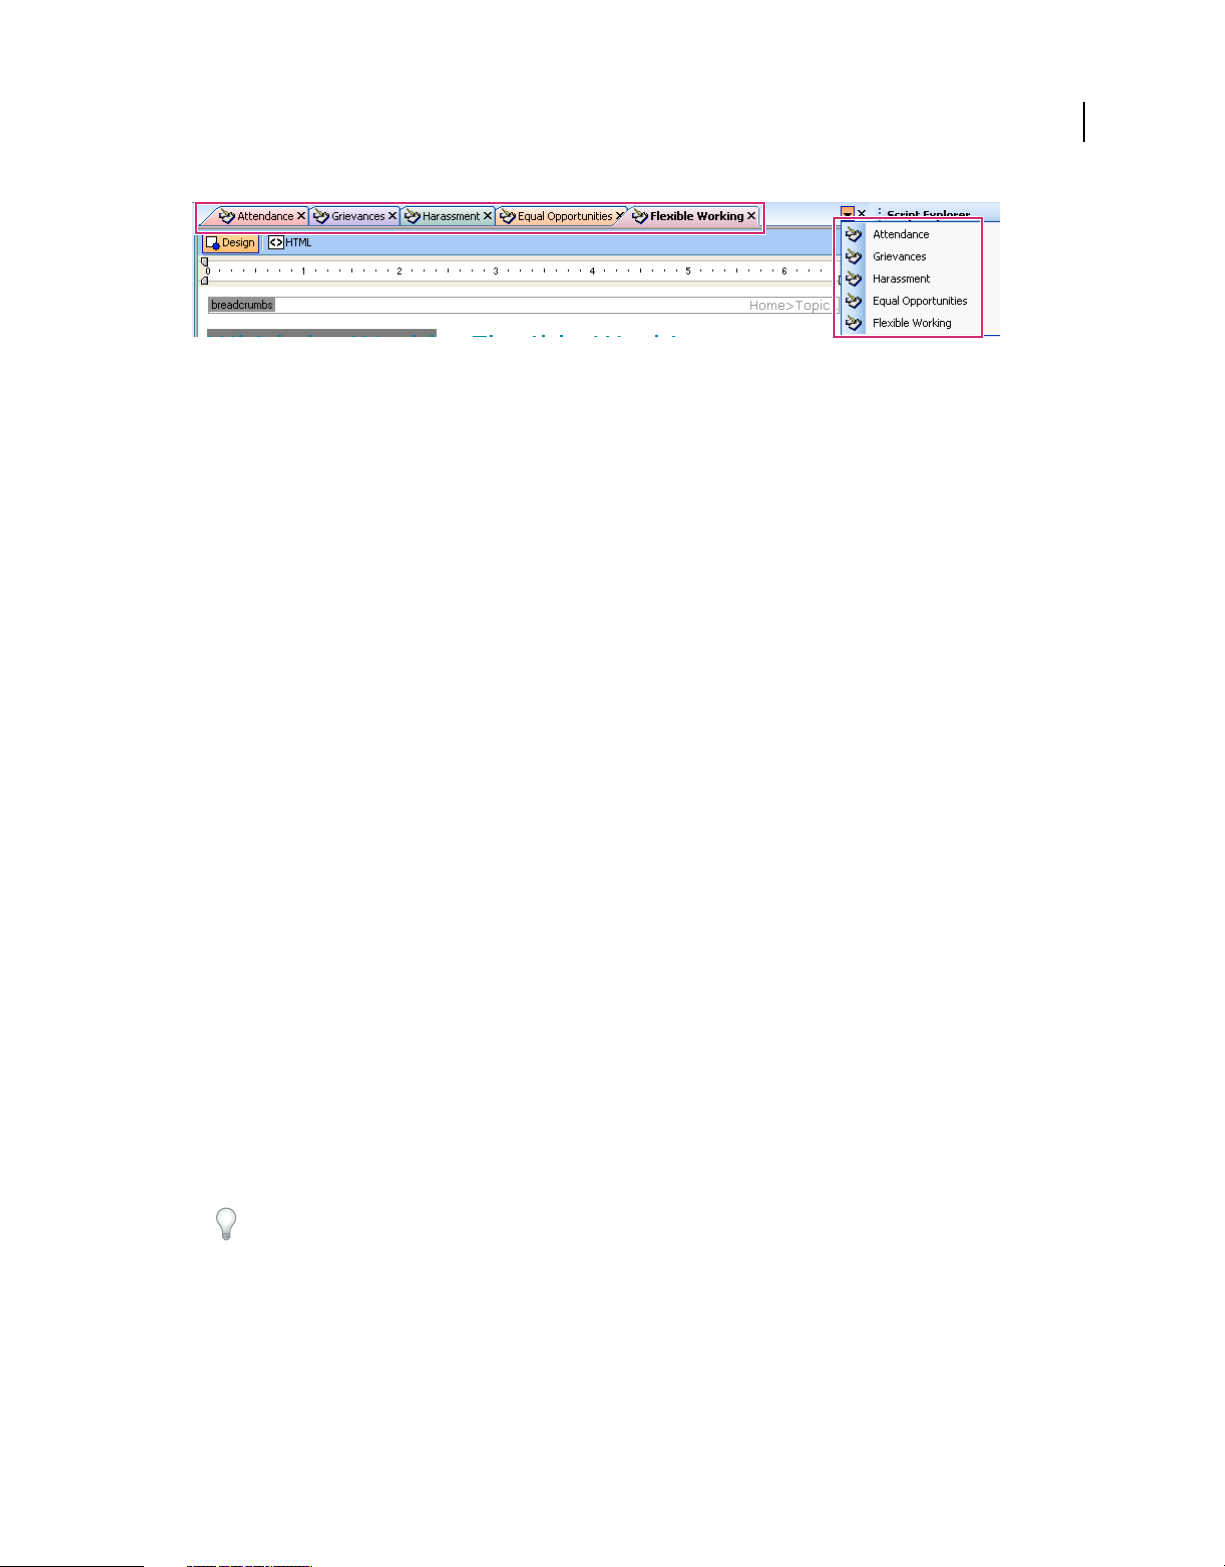
• Buttons in the Tabbed Document pane to open and close topics Take advantage of fixed buttons in the Tabbed
document pane to open and close topics quickly.
icon appears below
• Topic drop-down list When multiple topics are open, access an open topic quickly from the Topic drop-down list.
Last updated 12/14/2011
Page 19
USING ROBOHELP HTML 9
Getting started
Names of open topics appear in the drop-down list
• Single-topic mode Deselect the Allow Editing Of Multiple Topics option in Tools > Options > General to open and
edit one topic at a time.
Uncluttered Tools > Options dialog box The tabs in the Options dialog box are now displayed in a tree view in the left
pane of the dialog box.
Save And Generate button for each layout The properties dialog box for each SSL now has a Save and Generate
button, enabling you to save modified properties and generate output with a single click.
Suppress messages while running scripts in TCS workflows FrameMaker Server uses RoboHelp scripting APIs, and
any message or alert in RoboHelp blocks the server. So RoboHelp 9 does not display unnecessary dialog boxes while
running any script, especially in TCS workflows.
Read this articleto find out how Tech Pub departments are using RoboHelp Server to stay ahead of the competition
and enabling information collection and publication.
13
What’s new in RoboHelp Server 9
User interface enhancements
RoboHelp Server 9 features a fresh, aesthetically appealing user interface.
Enhanced platform support
• Support for Microsoft Access 2010
• Support for Apache Tomcat 7.x. Tomcat 7.x is currently in the beta stage.
Technical enhancements
• RoboHelp Server logs are now created in a consolidated log file (robohelpserver.log) under the
<Tomcat
This new log file is generated using the Apache log4j logging framework.
• You can now host RoboHelp Server over HTTP Secure (HTTPS) to ensure secure communications between the
server and clients.
• Authors can publish their RoboHelp HTML projects using HTTPS
• End users can view projects on the server over HTTPS
• The RoboHelp Server Web Administrator and reports can be viewed over HTTPS as well
Home>/logs folder. All RoboHelp Server-related exceptions and warnings are logged in this file.
If you want to tweak the size, backup limit, or format of the logs, modify the value of the relevant properties in the
<RoboHelp Server Home>/Web-INF/classes/log4j.properties file.
Last updated 12/14/2011
Page 20

USING ROBOHELP HTML 9
Getting started
Moderation settings for Adobe AIR Help comments
Using the Web Administrator, you can now specify the following moderation settings for comments on Adobe® AIR®
Help output:
• Allow Post Anonymous
• Mark Comments As Pending
Search-related enhancements
RoboHelp Server 9 features many search-related enhancements:
Project stop list for server-side indexing Unlike RoboHelp 8, the stop list specified in a RoboHelp HTML project is
now used for server-side indexing.
Project synonym list for server-side indexing Unlike RoboHelp 8, the synonym list specified in a RoboHelp HTML
project is now used for server-side indexing.
Synonym highlighting Synonyms for a keyword being searched for are highlighted in the search result list. This
enhancement is available only for WebHelp Pro output published using RoboHelp HTML 9.
Dynamic context in search results for server-side indexing RoboHelp Server now displays dynamic context along with
search results. Apache Lucene, the text search engine library powering search in RoboHelp Server, displays the relevant
words around a keyword as context in the search result list. This feature is available only for WebHelp Pro and
FlashHelp Pro projects published to RoboHelp Server with server-side indexing enabled.
14
• For keywords within topics, words in the immediate vicinity of the keyword in the topic are displayed as context.
• The static context of the topic is displayed for user-specified keywords. The first few words of the topic include
static context.
• In the case of external resources for keywords, the URL description of the external resource is displayed as the
dynamic context.
Note: For WebHelp Pro projects, dynamic context is displayed beneath a topic in the search result list, with the
relevant matched text highlighted in bold. For FlashHelp Pro projects, dynamic context is displayed as a tooltip when
the user hovers the pointer over any topic in the search result list.
Reporting enhancements
RoboHelp Server 9 delivers several reporting improvements that help you better optimize the value of your Help
content:
• Functionality to filter reports by area
• New, intuitive names for the reports
• Improvements to the graphical representation of reports
• Functionality to export report data to the CSV format
• Flexibility to customize reports by showing/hiding columns. Column layouts can be saved across sessions.
• Fine-tuned numerical data in reports
Configuration Manager enhancements
You can now perform the following additional tasks using the RoboHelp Server Configuration Manager:
• Migrate context data from RoboHelp Server 8 to RoboHelp Server 9
Last updated 12/14/2011
Page 21

USING ROBOHELP HTML 9
Getting started
• Deploy a context in the root context
• Delete contexts
• Set up an admin account for RoboHelp Server using LDAP authentication or database authentication
• Configure LDAP settings
• Configure search indexing settings
The little things
• The Web Administrator now provides functionalities to edit and delete users. Only RoboHelp Server
administrators are allowed to edit or delete users.
Note: These functionalities are useful for setting a new password if a user has lost or forgotten the earlier password.
• New Sign Out link in the Web Administrator
15
Last updated 12/14/2011
Page 22

Chapter 2: Exploring the workspace
Workspace overview
You create and manipulate your projects using various elements, such as pods, panes, bars, and windows. Any
arrangement of these elements is called a workspace. The RoboHelp workspace includes pods, panes, and
customizable toolbars and menus. Expanding menus track commands you frequently use and display them on a
shortened version of each menu. You can also customize keyboard shortcuts and add new toolbars.
DE
16
A
B
C
RoboHelp workspace
A. Menu bar B. Toolbars C. Clubbed pods D. Tabbed Document pane E. Design Editor F. Workspace switcher
F
• The menu bar across the top contains the commands to display various menus and a workspace switcher.
• Various toolbars appear below the menu bar. Select View > Toolbars to show or hide toolbars that you require.
• The topic window or the Tabbed Document pane displays the topic(s) that you are editing currently. Select Tools
> Options > Allow Editing Of Multiple Topics to edit multiple topics concurrently. You can paste objects and
selections across multiple topics. You can select horizontal or vertical tiling of topics.
The Design and HTML buttons in the topic window let you switch between Design Editor and HTML Editor.
When multiple topics are open, click the down arrow button in the upper-right corner of the Tabbed Document
pane to display the list of open topics and navigate to any topic.
Right-click a tab to find options to save the active topic, close the active topic, close all topics, close all but the active
topic, and create horizontal or vertical tab groups.
Last updated 12/14/2011
Page 23

USING ROBOHELP HTML 9
Exploring the workspace
• Various pods, such as Project Manager, Project Set-up, Resource Manager, and Single Source Layouts, help you
complete the different steps to create the project and generate the required output. Select View > Pods to show or
hide pods that you require.
Working with pods
Pods are workflow panes that you can float or dock anywhere in the application window. They provide quick access to
logically grouped features from one location. For example, you can select and generate various layouts from the Single
Source Layouts pod.
RoboHelp provides access to your most frequently used pods and projects, with flexible options. You can move a pod
anywhere on the screen or to a different monitor. Use the auto-hide feature of pods to show or hide them on the
desktop.
View a pod
❖ Select View > Pods > [pod name].
17
Arrange pods
• Click the title bar of a pod and drag-and-drop it on the required part of the screen.
• Change the display of the pod.
1 Do one of the following:
• Click the down arrow button in the upper-right corner of a pod.
• Right-click in the titlebar of the pod.
2 Select one of the following options:
Dockable Docks the pod if it’s in the Tabbed Document state or in the Floating state
Close Closes the pod
Floating Floats the pod if it’s in the Tabbed Document state or in the docked state
Auto Hide Pins or unpins the pod if it’s not in the Tabbed Document state.
Tabbed Document Opens the pod in a new tab in the topic window.
Types of pods
Starter pod
The Starter pod provides links to common commands and product information.
Recent Projects Open recently used projects (up to ten recent projects are listed) and other projects.
Create New Select the Help type you want to generate.
Import Import a Help project, such as an HTML Help project, Word document, and all other available types.
Resources Access forums, developer centers, knowledgebase articles, and other online content.
News Announcements Access information about Adobe products.
Last updated 12/14/2011
Page 24

USING ROBOHELP HTML 9
Exploring the workspace
View Online Help Access the complete online Help.
Quick Tour Of RoboHelp Access a set of videos for a quick tour of RoboHelp features.
Project Manager pod
The Project Manager pod contains various folders where you create and delete project files, or edit their properties. It
also has folders for various key project components, such as the table of contents, the index, and the glossary.
If the project has many topics, collapse the Project Files folder first to view the other folders.
More Help topics
“Project Manager folders” on page 39
Project Set-up pod
The Project Set-up pod contains the following folders:
Windows folder Containers for output. Custom windows for projects are stored in this folder. Modify window
properties by double-clicking a window icon.
Master Pages folder Use master pages to reuse information and create a standard appearance across topics.
18
Skins folder Use skins with WebHelp or FlashHelp projects to change the appearance of the Help system. You can
match the appearance of a company website or add interest and style to the output. Use skins to customize colors,
buttons, text, fonts, icons, backgrounds, multimedia (FlashHelp projects), images for TOC icons and navigation
buttons, and more.
External Content Search Map URLs and search terms to enable users find related content outside the Help system.
Context-Sensitive Help folder Container for the Map Files folder and the What’s This Help Files folder.
• Use the Map Files folder to access map files and perform most window-level context-sensitive Help tasks.
• Use the What's This Help Files folder for field-level context-sensitive Help in HTML Help projects.
More Help topics
“Windows” on page 341
“Master pages” on page 115
“Skins” on page 334
“External content search” on page 204
“About context-sensitive Help” on page 225
“Map files and map IDs” on page 226
Snippets pod
Add custom HTML code snippets to a project for insertion later into desired topics. When you modify a code snippet
shared by different topics, the changes are reflected in all the associated topics.
Last updated 12/14/2011
Page 25

USING ROBOHELP HTML 9
Exploring the workspace
Snippets are stored in a Snippet library as separate files with the .hts extension. In the Snippets pod, you can organize
them in categories, expanding or collapsing the categories for easy viewing. The category names appear in a sorted
order in the Snippets pod and in the Insert dialog box. You can drag snippets to desired locations in a topic. You can
also select snippets and then copy, duplicate, or delete them. Select the Preview option from the context menu to
preview a snippet.
More Help topics
“Single-source with snippets” on page 152
Styles And Formatting pod
Use the Styles And Formatting pod to apply styles quickly. Select a style in the pod and apply it to the selected text in
the topic. You can create and edit a style directly from the pod. Right-click the name of a style to rename, delete, or
preview that style.
Note: Select Format > Styles to view the Styles And Formatting pod. You must open a topic to view the Styles And
Formatting pod.
More Help topics
“Create a style using the Styles And Formatting pod” on page 157
19
User Defined Variables pod
From the User Defined Variables pod, you can accomplish these tasks:
• Create, edit, or delete variables.
• Create, edit, or delete variable sets.
• Provide and modify runtime values uniquely for different variable sets while generating the output.
• Format variable values.
More Help topics
“User-defined variables” on page 149
Error List pod
The Error List pod shows buttons for errors, warnings, and messages that are displayed when you try to validate a topic
or a master page. You can click these buttons to display the relevant information in the Error list. The caption of
buttons shows the number of errors, warnings, and messages. You can click all of these buttons to display the relevant
information.
Output View pod
The Output View pod displays important errors, warnings, and messages that RoboHelp captures while importing
content or generating project output. You can use the toolbar and the right-click options to save, copy, select, or clear
the log.
Toolbox pod
The Toolbox pod provides shortcut icons to access various tools that come with RoboHelp. You can also add tools.
Graphics Locator, HTML Help Studio, and Resize are some of the default tools.
Last updated 12/14/2011
Page 26

USING ROBOHELP HTML 9
Exploring the workspace
Resource Manager pod
Resource Manager stores all the common resources to use across projects and allows for quick access and management
of common resource files.
Shared Locations Specify the various shared folders that store resource files to use across projects. While a shared
location can contain files of any type, Resource Manager displays only those that match defined file types (Add/Edit
Categories).
Categories Specify categories to organize resources according to file types. For example, you can add a category called
Video and associate .flv, .swf, and .avi file types with it.
File Types List the extensions associated with a category. For example, for the Images category, list all the file types that
you want Resource Manager to consider as images.
Linked Resources Manage linked resources (resources used in the project with links to the original versions in the
shared locations). Synchronize the original version and the copy, remove links to stop automatic tracking of updates,
or replace links to point to another resource of the same file type.
More Help topics
“Managing resources” on page 123
20
RoboHelp Server pod
The RoboHelp Server pod enables you to connect to RoboHelp Server. You can configure the setup for the server by
selecting WebHelp Pro or FlashHelp Pro as the primary layout.
You can enter Servername:port/context-name/server and connect to it to publish your projects.
Note: By default, RoboHelp uses the http protocol. To specify that the https protocol should be used, enter
https://Servername:port/context-name/server.
Environments
A RoboHelp environment refers to the arrangement of various workspace components, such as pods, in the main
application window. By saving the current workspace as a named environment, you can restore that workspace even if
you move or close a pod. The names of saved environments appear in the Workspace menu on the right of the menu bar.
Create and save an environment
You can create multiple environments for a project. Only one environment is loaded at a time.
1 Arrange pods.
2 Click the down arrow button in the workspace switcher and select Save Environment.
3 Type a filename, including the .rhs extension.
4 Specify a location for the environment. The default location is C:\Documents and Settings\[user name]\My
Documents\My RoboHelp Projects.
Note: You can exchange an RHS file with other authors.
Load an environment
1 Click the down arrow button in the workspace switcher and select Load Environment.
Last updated 12/14/2011
Page 27

USING ROBOHELP HTML 9
Exploring the workspace
2 Browse to an RHS file and select it.
3 Click Open.
Note: The last environment you used before closing RoboHelp is used the next time you open RoboHelp.
Restore the default environment
❖ Click the down arrow button in the workspace switcher and select Default Environment.
Delete an environment
❖ Do one of the following:
• Delete the RHS file from the location where it was stored.
• Click Start > Run. In the Open box, type regedit and click OK. Locate the MRUENVFile[n] variable in
HKEY_CURRENT_USER > Software > Adobe > RoboHelp > 9.00 > Common and delete the string assigned to
the variable.
Menus and toolbars
21
Customize menus
1 Right-click a toolbar and choose Customize.
2 Click the Commands tab.
3 Choose New Menu from the Categories list.
4 In the Commands section, click New Menu and drag it to the location where you want it to appear on the menu bar.
5 Right-click the New Menu item on the menu bar and click inside the Name field.
6 Type the desired menu name and press Enter.
7 Choose different categories and drag the desired commands to the menu.
8 Click Close.
9 Restart RoboHelp HTML to preserve changes.
Customize toolbars
1 Select View > Toolbars > Customize.
Note: You can also right-click a toolbar and choose Customize.
2 Do any of the following:
• To create a toolbar, click the Toolbar tab. Click New, type a name, and click OK.
• To add an item to a toolbar, click the Commands tab. Select a category, and drag a command to the toolbar.
• To edit a newly added toolbar item, right-click its icon in the toolbar and select options, such as Delete and
Name. The Begin Group option inserts a separator bar to the left of the item.
You can use an ampersand (&) in the name to add keyboard shortcuts. For example, for the Format menu, an
ampersand precedes the letter "o" in “Format”. To access the Format menu using the keyboard shortcut, press
Alt + O.
Last updated 12/14/2011
Page 28

USING ROBOHELP HTML 9
Exploring the workspace
• To edit a button image, right-click the button and select Edit Button Image. Use the Button Editor tools and
modify the image. Check the preview and click OK.
• To edit menus and toolbar items, click the Options tab. Set the following options as needed:
Always Show Full Menus Select this option to show all the available menus. See “Enable and disable smart
menus” on page 22.
Show Full Menus After A Short Delay Select this option to show few menus on starting the application and few
after a short delay.
Reset Menu And Toolbar Usage Data Click this button to delete the records of all the new or modified
commands you have used and restore the default settings.
Large Icons Select this option to show large icons for the menus.
Show Screen Tips On toolbars Select this option to show Screen Tips on the toolbars.
Show Shortcut Keys In Screen Tips Select this option to show keyboard shortcuts in Screen Tips.
Menu Animations Select an animation type from the pop-up menu.
More Help topics
“Create keyboard shortcuts” on page 22
22
“Customize menus” on page 21
Enable and disable smart menus
Smart menus display only the most frequently used commands. To access the hidden commands, click the down arrow
at the end of the command menu.
1 Right-click a toolbar.
2 Select Customize.
3 Click the Options tab.
4 Select or deselect Always Show Full Menus under Personalized Menus And Toolbars.
Create or remove keyboard shortcuts
Create keyboard shortcuts
1 Select View > Toolbars > Customize.
2 Click the Keyboard tab.
3 Select a command category.
4 Select a command to assign to a keyboard shortcut.
5 Type the keyboard shortcut in the Press New Shortcut Key box.
6 Click Assign.
Last updated 12/14/2011
Page 29

USING ROBOHELP HTML 9
Exploring the workspace
Remove or reset keyboard shortcuts
1 Select View > Toolbars > Customize.
2 Click the Keyboard tab.
3 Do one of the following:
• To remove a keyboard shortcut, select the category and command for the shortcut to remove. Select the shortcut
in Key Assignments, and click Remove.
• To restore all shortcuts to their default settings, click Reset All.
Configure general settings
❖ Select Tools > Options. Click General and set the following options to configure options for using the program and
working with project files.
Set the default language and other preferences
Default Language Allows you to change the default language for every project that is created using the RoboHelp
application.
23
Use Underscores In File Names Saves topic filenames with underscores between words (for example,
My_Help_Topic.htm). For HTML Help projects, topic filenames require underscores rather than spaces. This
convention enables the book or page to synchronize with the topic content displayed at the right side of the viewer.
Automatically Check For Updates The program checks for updates when you quit the program. You can also enable
this option by selecting Help > Check For Updates.
Allow Editing Of Multiple Topics Opens topics in different tabs in Design Editor and allows editing. Deselect this
option to work in single-topic mode.
Clear Project Cache (.cpd File) Before Opening Any Project Controls whether the old <ProjectName>.cpd file will be
deleted each time while opening a project and a new <ProjectName>
Auto-Compile Outdated Files When you view or publish your project, the program automatically generates your
primary layout when the output files are out of date. If this option is disabled, the program prompts you to generate
the primary layout if the output files are out of date.
Auto-display Output View Shows the Output View at the bottom of the program window when a project is generating.
Convert RoboHelp-edited Topics To HTML Converts XHTML topics created or edited in RoboHelp into HTML in the
output. Topics created or edited with third-party editors are not converted.
.cpd will be created from the project files.
Enable or disable confirmation
Prompt when a file is saved The A File Is Saved option is disabled by default. Changes to the current topic are saved
when you open another topic or close the project without saving. You can disable this setting here if necessary. For
example, if you change a topic and want to restore the content, you can temporarily disable the automatic save.
Prompt when auto-generated topics from linked documents are modified Allows you to enable or disable the message
displayed when you modify a topic generated from the contents of a linked Word or FrameMaker document.
Last updated 12/14/2011
Page 30

USING ROBOHELP HTML 9
Exploring the workspace
Enable, disable, or reset notifications
By default, notifications are enabled. Some notifications include an option (Don’t Ask Me Again) to suppress their
display.
• To enable or disable all notifications, deselect or select Tools > Options > General > Do Not Show Notifications.
• To restore all notifications to their default settings, click Reset All.
24
Last updated 12/14/2011
Page 31

Chapter 3: Projects
Project basics
Basic workflow
1. Create a project.
Every Help system has at least one project. The basic element of the project is the topic.
2. Author the content.
Create topics. You can add multimedia now, or later when you customize the output. Work with the application
developer to start planning which topics to also use for context-sensitive Help. Context-sensitive topics appear when
the user clicks a Help button in the user interface or presses F1.
3. Import files.
You can import HTML files, Microsoft Word files (.doc, .docx, .docm, .rtf), FrameMaker books and documents (.book,
.bk, .fm, .frm, .mif), XML files (.xml), and Adobe PDF files (.pdf).
25
4. Develop the navigation.
Based on the hierarchy, or organization scheme, of the content, create links among topics and to external content if
necessary. You can also link text or images to other content. Create a table of contents that reflects the content
hierarchy, and include an index that users can browse. You can also create browse sequences, paths a user can follow
through Help topics. For example, if a user must read several related topics to understand a feature completely, you
can link them in a browse sequence.
5. Customize the output.
You can apply layouts (which determine behavior and appearance) and formatting. You can also use conditional text
to show or hide content, depending on user interest, application being used, skill level, and other factors. Add
multimedia to make your Help more compelling and richer.
6. Create, test, and distribute the Help package.
Create the output so you can view the Help and check links, formatting, and so on. Test every output you intend to
distribute, including printed documentation.
About projects
Projects contain the source files that become the final Help system. Help authors work with the project files, and Help
users view the output. For CHM output, the project contains the content you create and the properties you set up, such
as what the output window looks like. The developer determines the window for WebHelp and FlashHelp output
formats, or leaves them to run in your browser window. Create folders in the Project Manager to organize topics and
structure the Help system.
Last updated 12/14/2011
Page 32

USING ROBOHELP HTML 9
Projects
Projects are collections of files. The project file (XPJ file) contains information about the content and properties of the
project. Whenever you change the project, this file (and any other affected file) is updated automatically. Project files
consist of the following:
Content Project files contain topics with content and information about the location of topics, images, index, TOC,
and other files.
Properties Projects contain setting information, such as project title, language, and windows. When you first create a
project, the basic (default) settings are used. Modify these settings according to your design needs.
Navigation Projects include a table of contents, index, and full-text search.
You can view the elements that make up a project in several places, including the Project Manager, Single-Source
Layouts pod, and Project Settings dialog box. You can also generate various reports (Tools > Reports) that identify
project status, duplicate topics, files distributed with Help, and so on.
Help project components
Help systems are made up of different components that vary according to the Help format you deliver.
Projects RoboHelp HTML creates a main project file (with the extension .xpj) that contains the information about
your topics, images, and other files. (Open this file to open a project.) Project files also contain the settings that affect
the appearance and functionality of a Help system.
26
Topics The basic unit of a Help system is the topic. Topics communicate the message of the Help system, mainly
through text and images. You decide the content, format, and organization of your topics.
Table of contents If a table of contents is included, users see a Contents tab or button when they open the Help system.
The table of contents presents a hierarchical outline of what the Help project contains. Users can browse and select
topics to view from the Contents tab.
Indexes If an index is included, users see an Index tab or button when they open the Help system. The index displays
a multilevel list of topics and keywords or phrases that you’ve specified.
Full-text search Full-text search allows users to find specific words and phrases that occur in the content.
Links and navigation Users navigate a Help system by clicking links. You design the strategy that connects your topics
together. The most common links are from one topic to another. Links can also go to topics in different Help systems,
different output formats, and even to a website or an application.
Styles You format topics using styles. Styles are named formats that you design and apply to control the layout and
appearance of text.
Image and multimedia files Images and multimedia files enhance Help by adding graphics, sound, video, animation,
and more.
Windows Windows are the frames that display topics. In certain output formats, you can customize the appearance
and attributes of windows. You can also design new windows to suit your content. You can open multiple windows
and from the Windows dialog box, select a window and click Activate to bring it to focus. Click Save to save the
displayed window in focus. Using the Windows feature, you can rename the project title to display in the output.
Compilers The Help compiler isn’t part of the final Help file, but you sometimes need a compiler to create the Help
file. For example, in Microsoft HTML Help projects, the compiler aggregates the source files and other project
components. The compiler then creates one Help system file that you distribute to end users. (WebHelp and FlashHelp
projects are not compiled.)
Viewers and browsers Users access the Help system from within a viewer or browser.
Last updated 12/14/2011
Page 33

USING ROBOHELP HTML 9
Projects
Files in a project
Main project file (XPJ)
The project file (.xpj) is XML-based. You can open project files with the .mpj extension, the format for older versions
of RoboHelp, but they convert to XPJ files.
Folder files (FPJ)
Each project folder has an FPJ file that lists the folder contents. RoboHelp displays only those subfolders and topics
that are listed in the FPJ file of a folder.
All the subfolders have their respective FPJ files. The name of an FPJ file except the FPJ file for the project folder is
same as that of the folder.
The name of the FPJ file for the project folder is root.fpj. The root.fpj file is modified if you add, delete, or rename a
topic or subfolder inside the respective folder. The root.fpj file is also modified if the order of topics or subfolders is
changed in Project Manager.
Single-source layout files (SSL)
A single-source layout file (SSL) is used for each single-source layout. An SSL file stores the properties of the respective
single-source layout and is modified when you edit the properties. An SSL file does not get modified on generating,
viewing, or publishing a single-source layout.
27
Auxiliary project files (APJ)
The following components have corresponding APJ files, which get modified when you edit the components:
• Baggage files
• Colors
• Conditional build tags
• Font sets
• Information types
• Map files
• Pop-up note topics
• See Also keywords
• Skins (when adding or removing skins only)
• Single-source layouts (when adding or removing single-source layouts only)
• Topic keywords
• Topic templates (when adding or removing single-source layouts only)
• Windows
Other types of files
When you modify the following components, the respective file gets modified:
• Browse sequences (BRS)
• Topics (HTM)
• TOC (HHC)
Last updated 12/14/2011
Page 34

USING ROBOHELP HTML 9
Projects
• Index (HHK)
• Glossary (GLO)
• Image and multimedia files (filename extension varies)
• Style sheets (CSS)
About output types
RoboHelp can generate the following output types. These types have common basic characteristics but different
features and viewing and platform requirements.
WebHelp Adobe WebHelp format works with virtually any combination of browser and platform for web-based or
desktop applications, online Help, and online books. WebHelp also provides customizable navigation panes and quick
downloads.
WebHelp Pro WebHelp Pro is used for web-based applications, with features available only in server-based Help.
WebHelp Pro provides feedback on the use of your Help system. Authors can work on separate projects and publish
anytime, and projects are merged on the server at run time. RoboHelp Server is required to generate WebHelp Pro.
FlashHelp Adobe FlashHelp® uses Adobe Flash® to provide an interactive navigation pane, customizable navigation
controls, Flash animation, streaming video, audio, and graphics. Users need Flash Player.
28
FlashHelp Pro FlashHelp Pro is used for web-based applications, with features available only in server-based Help.
Authors can work on separate projects and publish anytime, and projects are merged on the server at run time.
RoboHelp Server is required to generate FlashHelp Pro.
Microsoft HTML Help Microsoft HTML Help is used as application and stand-alone Help for Windows 98 and later,
using Internet Explorer 4.x or later, and provides unique features.
Note: Due to Microsoft security changes, Microsoft HTML Help is now used where the Help has to be run on the users
PC; it cannot be installed on a server without registry changes. WebHelp and FlashHelp are used where the Help is to be
run from a server. WebHelp and FlashHelp can be run locally, but it is not recommended.
XML XML output exports to Extensible Markup Language (XML) format, used to structure, store, and send
information. XML files use style sheets, as well as handler files. Handler files determine how RoboHelp imports or
generates the XML files, associated style sheets, and related components.
JavaHelp JavaHelp, from Sun Microsystems™, works with Java applications and is a delivery system, not an authoring
tool. JavaHelp features (TOC, index, searches, controls, global search and replace, pop-ups) are created automatically,
along with HTML features (links, Related Topics buttons, and image files).
Oracle Help Oracle Help for Java™ is used with applications written in any language. Oracle Help and the ICE 5
browser provide TOC, index, full-text searches, pop-ups, context sensitivity, and customizable windows, through the
Oracle Help viewer.
Printed documentation RoboHelp enhanced printed documentation provides control over structure, content, and
appearance of printed documents. You can organize the content as needed, format using CSS or Word template styles,
and produce formatted and structured Word documents or PDF files.
Adobe AIR The Adobe AIR output type allows you to generate Help in Adobe AIR format. Generate your content in
the cross-platform Adobe AIR Help format that brings a host of enhancements, such as these:
• Easy navigability through breadcrumbs, and more
• New templates and skins
• A rich branding experience, and the ability to insert corporate logos and an About box in Help
Last updated 12/14/2011
Page 35

USING ROBOHELP HTML 9
Projects
• Rich commenting and auto-updates
• Browser-based Help, with both offline and online content.
• Ability to add and access RSS feeds
• Enhanced search
End-user viewer requirements
29
End-user system WebHelp/Pro FlashHelp/Pro Microsoft HTML
Windows XP SP4
or later, XP, Vista
Mac OS, Linux®
Web browser Web browser with
Flash Player 8.0 or
9.0
Web browser Web browser with
Flash Player 8.0 or
9.0
Help
Built-in viewer JavaHelp viewer Oracle Help
Not available JavaHelp viewer Not available AIR Help Runtime
JavaHelp* Oracle Help AIR Help
AIR Help Runtime
viewer
* Requires JavaHelp viewer, Sun Java 2 JDK or later, and JavaHelp 1.0 or later components.
Create and manage projects
Create a project
1 Do one of the following:
• Select File > New > Project.
• In the Starter pod, click More under Create New.
2 On the New pane in the New Project dialog box, double-click a project type. You can change the project type after
your project is created.
Blank Project Customize and publish a project in any output. You can modify the window settings for WebHelp,
FlashHelp, and HTML Help outputs.
Application Help Create a Help system that you can install locally. The Application Help project has sample topics
with notes on how you can customize and modify the information. For example, you can create a Help system to
document information about a company product.
Note: By default, the Application Help does not use master pages or snippets but you can always add them.
e-Handbook Create a project for an electronic handbook, such as an employee handbook for a company. The e-
Handbook project template provides the relevant folders and topics for you to place company-specific information.
e-Learning Integrate and organize Captivate demos into a project. Using the layout and recommendations
provided, you can create computer-based and web-based training.
Knowledge Base Create a knowledgebase that has an interface similar to a wiki page. The knowledgebase project
template contains master pages that you can customize. You can also create self-updating pages.
Web Application Help Create a Help system that you can publish on a server. The Web Application Help project
has sample topics with notes on creating online Help for a software application.
Last updated 12/14/2011
Page 36

USING ROBOHELP HTML 9
Projects
Department Guidelines Create a Help system to outline guidelines for a department in a company. For example,
you can create Help for a human resources department, outlining guidelines on recruitment and selection, flexible
working hours, and so on.
Disaster Recovery Plan Create a Help system with samples on how to write a disaster recovery plan.
Online Manual Create an online manual for a company product or software application.
Policies And Procedures Create a handbook or a document listing policies and procedures specific to an
organization.
Custom Customize a Help project template.
3 Specify options in the New Project Wizard dialog box:
• Leave Language as English or select another language to localize the project. Spell checking, indexing with the
Smart Index Wizard, and parts of the user interface are localized.
• If you select Save As Default, the selected language is used for all new projects.
4 Click Finish.
The first topic opens in the Design Editor on the right. On the left, the Project Manager opens. The first topic is selected
in the HTML Files (Topics) folder.
30
More Help topics
“Change project settings” on page 33
Create a project by importing documents
1 Do one of the following:
• From the Starter pod, select a new project type from the Import list.
• Select File > New > Project. Click the Import tab and select a new project type.
2 Follow the prompts. The new project opens in RoboHelp.
Create a project using FrameMaker or Word documents
You can create new projects by importing FrameMaker or Word documents. While importing, you can map the styles
of these documents to styles in RoboHelp.
1 Select File > New > Project and click Import.
2 Select FrameMaker or Word documents and click OK.
3 Select from .book, .mif, .fm, .bk, and .frm files for FrameMaker and .doc, .docx, .rtf, and .docm files for Word. You
can import multiple FrameMaker or Word documents at the same time. You can import .book and .bk files one at
a time.
Note: For any FrameMaker format other than MIF, FrameMaker 8 or later is required. If the correct version is not
installed, you cannot import the file.
4 Enter the project title, filename, and location of the project.
5 Click Finish.
A new project wizard prompts you to select options to map the TOC, index, or glossary.
6 Select the required options, and click Next.
7 Click Edit.
Last updated 12/14/2011
Page 37

USING ROBOHELP HTML 9
Projects
8 Select styles to map to the RoboHelp styles.
For information about different conversion options for FrameMaker documents, see “Conversion basics” on
page 70.
For information about different conversion options for Word documents, see “Converting Word styles to
RoboHelp styles” on page 55.
9 Click OK.
Note: If you click Cancel in the wizard, no files are imported and the empty project remains open.
10 Click Finish.
Create a project using a DITA map file
Important: For expert users only.
Before you import a DITA map file, Java JDK and the DITA Open Toolkit must be installed and running properly.
Experience with DITA and the DITA Open Toolkit is also required.
1 Select File > New > Project.
2 Click the Import tab.
3 Select DITA Map File.
4 Click OK.
5 Enter the following information in the New Project wizard:
DITA Map File To Import Specify path to a valid DITA map file that you want to import and create a project. Click
the Browse button
to select the file.
31
Location Of The Project Specify path to the location of the new project.
6 Click Next.
7 Specify the input required on the Open DITA Toolkit Processing Options dialog box.
8 Click Finish.
More Help topics
“Import a DITA map file” on page 82
“Converting Word styles to RoboHelp styles” on page 55
Save projects
Save frequently while you work.
• To save individual files, select File > Save [item].
• To save all files, click the Save All button .
Disable auto-save
By default, RoboHelp saves changes when you close the project. If you prefer, you can disable the auto-save feature.
1 From the Tools menu, select Options.
2 Click the General tab.
Last updated 12/14/2011
Page 38

USING ROBOHELP HTML 9
Projects
3 Under Options, deselect Save Without Prompt.
Opening a project
Open a project when starting RoboHelp
❖ From the Starter pod listing recently opened projects, click the project name. If you don’t see the project you want,
click Open.
You can use the following controls to locate the project you want to open:
My Places bar Find documents by using the shortcuts to the left of the Folder and Files list.
Desktop The Desktop folder lists all folders on your desktop.
My Computer The My Computer folder lists the hard drives configured on your computer.
My RoboHelp Projects The My RoboHelp Projects folder is the default working folder where RoboHelp stores all
projects. This folder is placed in the My Documents folder when Adobe RoboHelp is installed. When you start
Adobe RoboHelp, projects stored in the My RoboHelp Projects folder are automatically listed in the Starter pod
under the Recent Projects list. All RoboHelp projects use the .xpj filename extension.
Look in list By default, this list displays the My RoboHelp Projects folder. Alternatively, if you have accessed other
folders, the last folder you accessed, is selected in this list. This list includes the My Computer, My Network Places,
and My Documents folders under the Desktop folder.
32
Go To Last Folder Visited icon Displays the last folder you accessed. Click the arrowhead to view a list of the most
recent folders you visited. This icon is disabled if you do not access a folder in the dialog box.
Up one level icon Enables you to move to the parent folder of the current folder displayed in the Look in list.
Delete icon Enables you to delete a selected folder or file. The deleted folder or file is sent to the Recycle Bin.
Create New Folder icon Enables you to create a folder under the parent folder selected in the Look in list.
View Menu icon The arrowhead enables you to choose the view in which the folder and file list must be displayed.
You can view the folders and files as thumbnails, tiles, icons, a simple list, or a list with details of the folders or files.
Tools icon Enables you to delete or rename a folder or file, add a folder or file to the My Places bar, or map a hard
drive to a computer or folder on your network. You can also view properties of a folder or file.
File Namebox Enables you to specify the name of the file to access (to open, to import, and so on.)
Files Of Type menu Enables you to select the type of files to list in the folder and file list.
Open a project after starting RoboHelp
1 Select File > Open. The Open Project dialog box appears.
Note: You can also select the last ten projects opened from the bottom of the File menu.
2 Select RoboHelp HTML Help Project (.xpj) from the Files Of Type menu.
3 Locate the project file, and double-click it.
Upgrading a project
If you open a project created in a previous version of RoboHelp, you are asked whether to convert it before opening it.
Important: Make a copy of your project before converting it into the new format.
Last updated 12/14/2011
Page 39

USING ROBOHELP HTML 9
Projects
More Help topics
“Add a RoboHelp project to version control” on page 95
Pin a project to the list of recently opened projects
By default, the list of recent projects that appears in the Starter pod and in the File menu displays up to the last ten
projects opened. Pin a recently opened project so that it always appears in the recent projects’ list. The list displays the
pinned projects and recently used projects up to the number of projects set in the Max Projects field.
1 Select Tools > Options.
2 On the Recent Projects tab, select a project from the Recently Opened Projects list.
3 Click Pin. Click OK.
Note: Click Unpin to remove a pinned project from the recent projects’ list.
Change project settings
1 Choose File > Project Settings.
2 On the general tab, change settings as needed:
Project Title Enter a project title. This title appears in the window bar of the output.
33
Primary Output/Layout Select a primary layout.
Language Select the default project language.
Advanced Click to create or edit lists for localization. Set options in each pane.
To Do List Click Manage to manage the To Do list for your project. For more information, see “Using the To Do
list” on page 36.
Index Select an option for saving keywords:
• Index File (HHK) saves new index keywords in the project index file (HHK).
• Topics saves new index keywords in individual topic files (HTM).
• Binary Index uses a binary index in Microsoft HTML Help projects.
Set options on the Stop List pane
Use the Stop List tab to modify words contained in the Stop List file ProjectName.stp. A Stop List contains common
words (for example, “a” or “the”) that the search ignores for an accurate result.
Edit Select a word, click Edit. Type the new name. Press Enter. Right-click the word to display a drop-down box with
the Undo, Cut, Copy, Paste, Delete, and Select All options.
Reset To Default Removes the new entries and restores the default list.
New Adds a word. Click New. Type the word. Press Enter.
Delete Deletes a selected word.
Note: In Microsoft HTML Help projects, the stop list file can’t be larger than 512 K. If the file is larger, words at the end
of the file are not included in the CHM file.
Last updated 12/14/2011
Page 40

USING ROBOHELP HTML 9
Projects
Set options on the Phrases pane
Modify words in the Phrases file ProjectName.phr. This tab contains a phrase list the Smart Index Wizard includes in
keyword searches. For example, make project settings one phrase, not two words. You can add, rename, and delete
words.
Edit Select a word, click Edit. Type the new name. Press Enter. Right-click the word to display a drop-down box with
the Undo, Cut, Copy, Paste, Delete, and Select All options.
Reset To Default Removes the new entries and restores the default list.
New Click New. Type the new word. Press Enter.
Set options on the Always Ignore Words pane
Modify words in the Always Ignore Words file ProjectName.ign. This list contains “noise” words such “as,” “the,” or
“a.” The Smart Index wizard uses the list to keep the noise words out of the index.
Edit Select a word, click Edit. Type the new name. Press Enter. Right-click the word to display a drop-down box with
the Undo, Cut, Copy, Paste, Delete, and Select All options.
Reset To Default Removes the new entries and restores the default list.
New Click New. Type the new word. Press Enter.
34
Set options on the LNG File pane
Change text elements in the user interface for WebHelp, WebHelp Pro, FlashHelp, FlashHelp Pro, AIR Help, printed
documentation, or HTML Help output.
See the complete list of available changes you can make in the LNG file tab.
When you edit the LNG file, your changes supersede settings made in Project Settings in other locations.
❖ Select an element, and click either of the following:
Edit Modify LNG file text for each user interface element listed. In Edit mode, you can also right-click on the edited
line to undo the edits, cut, copy, paste, delete, or select all.
Note: You can change the string to show expanding or collapsing mini TOCs in settings for master pages. For more
information, see
Reset To Default Erases the new entries and restores the default list.
“Master pages” on page 115.
Set options on the Synonyms pane
Define words as synonyms. For example, you can define “find” and “locate” as synonyms for “search.” In the generated
output, when a user searches for “search,” results for “find” and “locate” are also displayed.
Reset To Default Removes the new entries and restores the default list.
Edit Select a word, click Edit. Type the new name. Press Enter. Right-click the word to display a drop-down box with
the Undo, Cut, Copy, Paste, Delete, and Select All options.
New Click to add a new word in the Synonym table and specify a synonym for it.
Delete Click to delete the Word and its synonyms.
More Help topics
“RoboHelp search basics” on page 203
“Upgrade localized projects” on page 48
Last updated 12/14/2011
Page 41

USING ROBOHELP HTML 9
Projects
Rename a project
When you rename a project, the main project file (.xpj) and all other project files are renamed.
Note: The TOC, index, and glossary files are not renamed.
When you rename a project, the project closes and reopens. Any changes made since last saving are saved.
Note: You cannot rename projects under version control.
1 Open the project.
2 Select File > Rename Project.
3 In the Project Name box, enter the new project name (do not enter a filename extension).
4 Click OK. To make the changes take effect, the program closes and then reopens the project.
Note: If you are creating Microsoft HTML Help, the name of the compiled HTML Help file (CHM file) is based on the
project filename. If you change the project name, the name of the CHM file changes as well. You can rename the CHM
file to restore the old name.
Viewing projects
Help systems are displayed in a browser or viewer, depending on the output type, the application platform, and the
platforms of your end users. Help systems are displayed in a main window. Users can view topics in the right pane and
navigate with tabs, buttons, and toolbars in the left pane and along the top.
35
View your project often to test links and make sure that styles appear properly. View each single-source in the viewer
required for the specified output type.
More Help topics
“View output” on page 307
Define chapter layout
You can define a chapter layout for a project to order topics and folders logically in the Project Manager pod. The
default order is alphanumerical. You can drag folders and topics to customize the sequence. RoboHelp uses the
customized order to auto-create a TOC.
Notes:
• If you rename a folder or a topic, the topics and folders retain their order.
• If you delete a topic or a folder, the remaining topics retain their order.
• If you add a new topic or a folder, it is added at the top inside the parent folder.
• If you drop a topic or a folder on a non-topic/folder item (such as CSS, image, or baggage), it moves to the last
position inside the parent folder of the target.
• When you upgrade a project from an older version of RoboHelp, all the topics appear randomly. You can customize
the order of topics later.
• You can right-click a folder or topic in the Project Manager pod and select Explore to open the topic or the folder
in Windows Explorer.
• You can drag folders from the Project Manager pod to the TOC pod. The dragged folders convert to TOC books,
and all the topics change to pages.
Last updated 12/14/2011
Page 42

USING ROBOHELP HTML 9
Projects
• The TOC items don’t change dynamically as you change them in the Project Manager or in a topic.
Drag folders
• Drag a topic or a folder above or below another topic or folder. For linked documents, you can drag only above the
linked documents.
• You cannot drag topics into or out of a linked document.
More Help topics
“Create TOCs” on page 165
Manage files
List topics by title or filename
1 In the Project Manager pod, open the Project Files folder.
2 Select View > By Topic Title or By File Name.
Using the To Do list
The To Do list helps you track project tasks. You can customize the list by adding, deleting, or modifying the existing
To Do tasks.
36
Note: To Do settings are retained when you upgrade a project from an older version of RoboHelp to a newer version.
You can generate a report on the customized To Do list.
Edit items on the To Do list
1 Select File > Project Settings.
2 Click the General tab.
3 Click Manage.
4 Do either of the following:
• To add a task to the list, click Add. Type the name of the task item.
• To edit or remove a task, select the task and click Edit or Delete.
Note: From the Project Settings dialog box, you cannot see the Ran Smart Index item in the default To Do list. This
precaution ensures that you do not delete this item by mistake. By default, RoboHelp sets the option Ran Smart Index for
all the topics on which you run the Smart Index wizard.
Update the To Do list for a topic
1 Right-click a topic in the Project Manager pod and select Properties. Click the Status tab.
2 Select or deselect items on the To Do list.
Generate a status report
You can generate a Project Status report to view the number of topics using the To Do list.
❖ Select Tools > Reports > Project Status.
Last updated 12/14/2011
Page 43

USING ROBOHELP HTML 9
Projects
Edit the list of recently opened projects
Recently opened projects are listed in the RoboHelp Starter pod.
1 Select Tools > Options.
2 Click the Recent Projects tab.
• To change the number of files listed, specify a number in the Max Projects box.
• To remove a file from the list, select it and click Remove.
More Help topics
“Pin a project to the list of recently opened projects” on page 33
Add files to the Baggage folder
RoboHelp sometimes doesn’t automatically add references to external elements to the Baggage Files folder. If needed,
add files to the Baggage Files folder so the external elements appear correctly in the output:
1 Select View > Pods > Project Manager.
2 Right-click the Baggage Files folder. Select New > Baggage File.
Note: If the Baggage Files folder isn’t listed, click the Toggle Project Manager View button .
37
3 Double-click the source file for any of the following:
• Bitmaps and icons used with HTML Help controls
• Image files used in style sheets, topic backgrounds, and scripts
• The JavaScript file that supports Dynamic HTML effects, such as pop-ups and drop-down hotspots
4 Click Yes.
Note: You can create a link to a baggage file by pressing the SHFT key while dragging and dropping it into a topic.
Remove files from the Baggage folder
To remove a file from the Baggage folder:
❖ Select the file and click Delete.
Map file types
Map file types to associate them with the applications used for editing them.
Associate a file extension with an application
1 Select Tools > Options.
2 Click File Association tab.
3 For associated programs, click Add.
4 Enter a filename extension.
5 Select an editor to edit documents with the specified filename extension.
When you select a program, its location appears in the Edit With box. The programs appear alphabetically.
Note: Only those programs appear in the list whose registry entry is set to “NoOpenWith.”
6 Select a program to view the file.
Last updated 12/14/2011
Page 44

USING ROBOHELP HTML 9
Projects
You can also browse to a program not listed in the program list.
Add an HTML editor mapping
1 Select Tools > Options.
2 Click File Association tab.
3 For HTML editors, click Add.
4 Select from the recommended or other programs registered to edit or view .html or .htm files.
Note: When you select a program, its name and location appear in the Name and Location box. You can also browse
for a program that does not appear in the program list.
5 Click OK. The selected program appears in the list of HTML editors.
Note: To change the HTML editor, browse and select a new program.
Remove topics from projects
Before you remove files, back up all project files and view and print reports if your project is not under version control.
To avoid broken links, don’t remove files in Windows Explorer or version control software.
1 Select one or more files:
• To remove a topic, use the Project Manager pod.
• To remove multiple topics, use the Topic List pod.
2 Press Delete. If prompted, do NOT remove references to removed topics.
Note: You can choose to remove the references, but if you do that, you do not get to review the effect of the removal in
other topics. Electing NOT to remove the references, forces the links to display in Broken Links, from which you can
review each topic to see if any editing is required.
38
More Help topics
“Broken links report” on page 103
“Unused files report” on page 107
Manage folders
Create folders
The Project Manager contains default folders for project organization. You can create folders and subfolders only in
these folders: HTML Files (Topics), Images, Multimedia, Style Sheets, and Baggage Files.
Note: Do not use Windows Explorer to create subfolders to add, move, or rename files. RoboHelp does not recognize these
changes.
1 Select the Project Files folder in the Project Manager pod.
Note: If the Project Files folder isn’t listed, click the Toggle Project Manager View button .
2 Right-click the folder, and select New > Folder.
3 Enter a name for the folder. Avoid special characters and spaces.
4 Press Enter.
Last updated 12/14/2011
Page 45

USING ROBOHELP HTML 9
Projects
Tips:
• Move files and folders in Project Manger by dragging.
• You can drag topics from the Topic List into multiple folders in the Project Manager.
Project Manager folders
In the Project Manager pod, you edit, delete, and create project files. Two views are available in Project Manager. Both
views include a set of commonly used options for authoring. One view displays all the project files gathered together
in a single folder called Project Files; the other view groups the project files into various virtual folders based on file
type. Click the Toggle Project Manager View button
The Project Manager view that displays project files in various virtual folders contains the following folders:
HTML Files (Topics) Stores the topics of a project. Files are sorted alpha numerically (A-Z, 0-9). You can add folders
within this folder. You can use the structure to generate a TOC automatically and create browse sequences.
Images Images used in your project are stored in this folder. Image maps and their associated links (hotspots) are also
listed. You can drag an image from this folder into the Design Editor to add images to topics. You can also rename
images in this folder by selecting the image and pressing F2.
Multimedia All sound and video files used in your project are saved in this folder. Adobe Captivate demos (SWF files)
are also stored here. You can drag sound or video files into the Design Editor to add multimedia to topics. You can
also find out where the files are referenced in your project.
or , to change views.
39
Style sheets Style sheets control the formatting of topics. When you change a style sheet, all topics associated with it
are updated. The RoboHelp default style sheets (CSS files) and any others you add to your project are stored in this
folder. Edit a style sheet by double-clicking its icon.
Baggage Files Certain files are automatically added to the Baggage Files folder in the Project Manager to display the
following correctly in the generated project:
• Bitmap and icon files used with HTML Help controls
• Image files used in topic backgrounds and scripts
• The JavaScript file (ehlpdhtm.js) that supports Dynamic HTML effects such as related topics pop-ups, smart pop-
ups, and drop-down hotspots.
• The support file for skins and the navigation pane in browser-based outputs (TOC, index, glossary, and full-text
search.
You can drag files from the Baggage Files folder into topics to create links to the files.
Broken Links Stores links to files that are not present in the project. To restore or remove a broken link, double-click it.
URLs Stores links to web addresses, FTP sites, newsgroups, e-mail addresses, and HTML topics in external CHM files.
From this folder, you can add a URL to an index. You can drag a URL into the Design Editor.
Table Of Contents Stores the default TOC and all other TOCs created in the project.
Index Stores the default index and all other indexes created in the project.
Glossary Stores the default glossary and all other glossaries created in the project.
See Also Double-click the See Also folder to display the See Also pod. You can add the See Also keywords in the See
Also pod.
Last updated 12/14/2011
Page 46
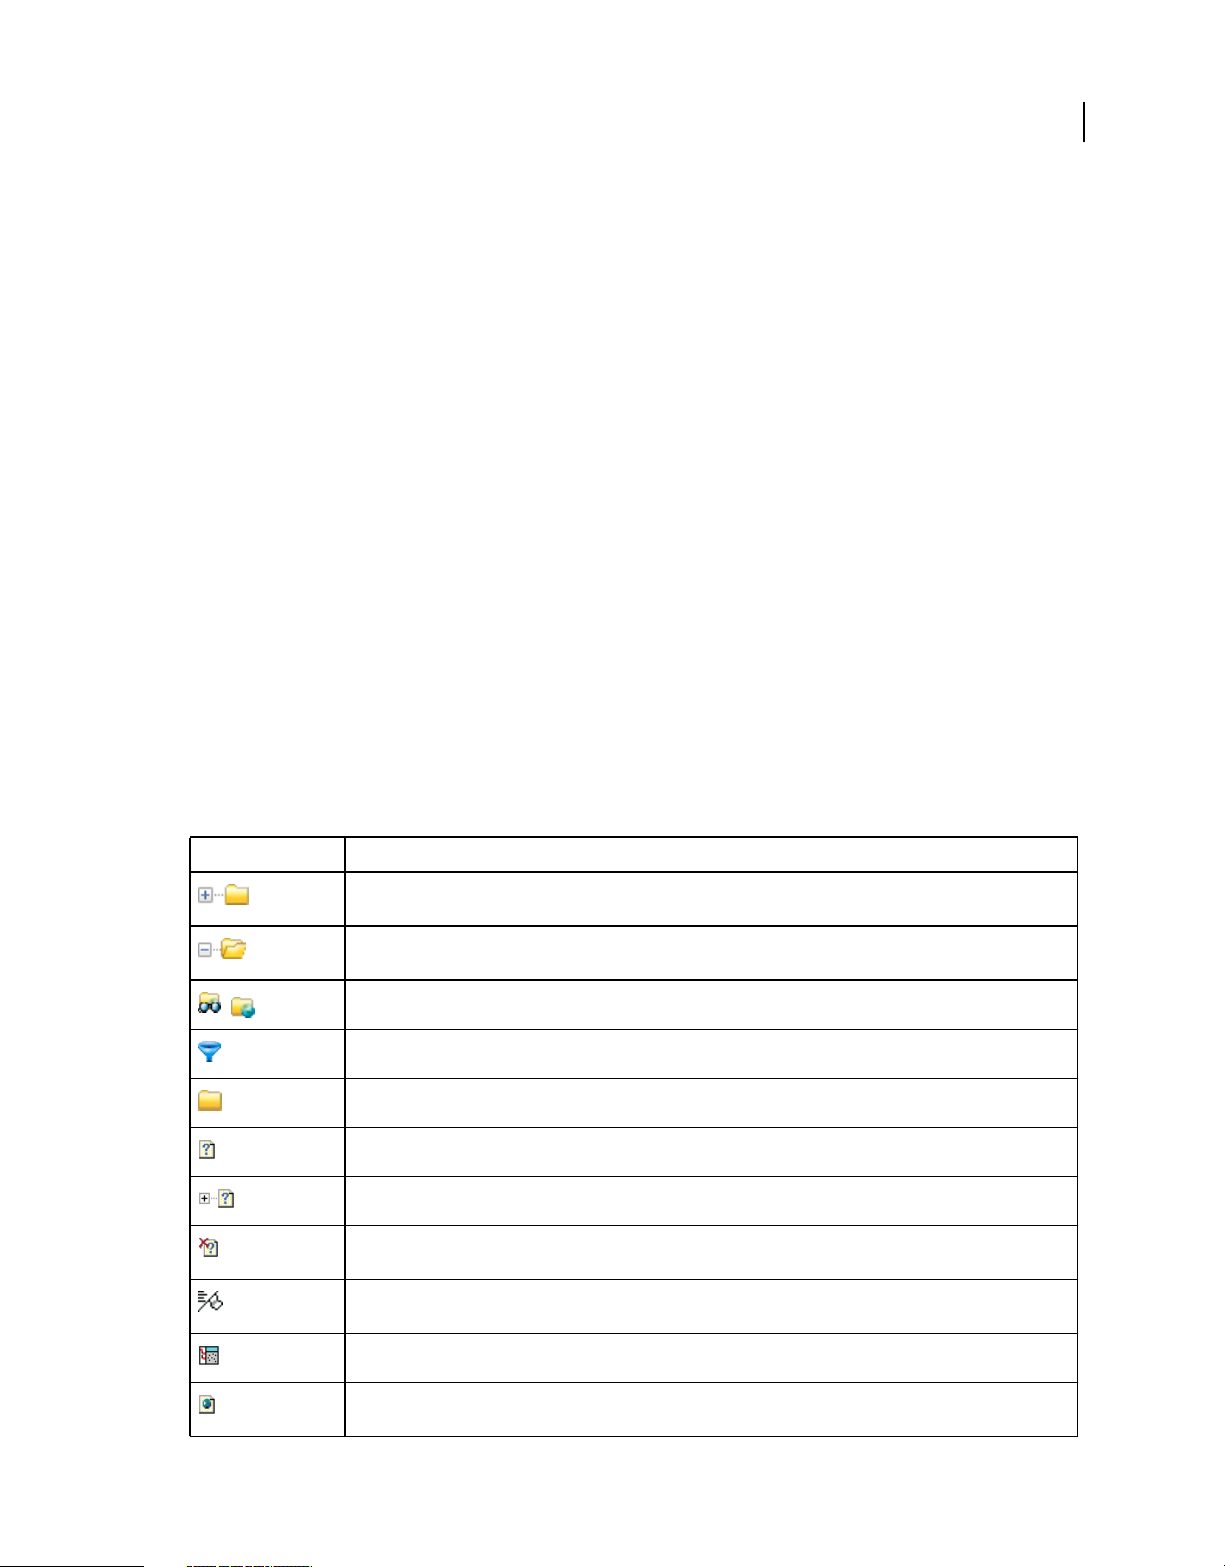
USING ROBOHELP HTML 9
Projects
Rename folders
Use the Project Manager to rename folders.
1 Select the Project Files folder in the Project Manager pod.
2 Right-click the folder. Select Rename.
3 Type the new name. Don’t include special characters, and avoid spaces, especially for WebHelp and FlashHelp.
4 Press Enter.
Move folders
Use the Project Manager pod to move folders.
1 Select Project Files in the Project Manager pod.
2 Drag the subfolder to its new location.
Remove custom folders
Before you remove the folder, move any items in it that you want to keep.
1 Select the custom folder in the Project Manager pod.
2 In the toolbar, click Delete.
40
File and folder icons
The Project Manager icons indicate the components and files included in your project.
Note: Icons with a red check mark indicate that the file is checked out (applicable only to topics under version control).
Icon Description
Closed folders. Closed folders that contain files display a plus sign. Click the plus sign to show the folder contents.
Right-click for more options.
Open folders. Open folders display a minus sign with the contents shown below. Click the minus sign to collapse the
folder.
,
Toggle view. Click to switch between a simplified view with fewer folders or one showing all folders.
Show/hide files. Click to select the files you want to show in the Project Manager.
Empty folders. Empty folders display no signs.
HTML files (Topics). Double-click page icons to open a Design editor. Right-click for more options.
HTML topics with bookmarks. Topics with bookmarks have a plus sign. Click the plus sign to show all bookmarks.
Missing files. A red X indicates files that the program cannot locate. These files are not in the project path. Either they
have been deleted, or they are saved in a different folder of the project.
Bookmarks. Bookmarks appear alphabetically below their respective topics. Double-click to open a topic. Drag
bookmarks into topics in Design Editor to create links.
Framesets. Double-click to open a dialog box for changing frame attributes.
URLs, web addresses, FTP sites, newsgroups, e-mail addresses, or HTML topics in external CHM files. Double-click to
open a dialog box for adding keywords to a link. Drag URLs into topics open in Design Editor to create links.
Last updated 12/14/2011
Page 47

USING ROBOHELP HTML 9
Projects
Icon Description
Images (GIF, JPEG, and JPG formats). Double-click to preview the image, identify topics that use it, and view file
information. Drag images into topics in Design Editor to add them.
Image maps. Images with clickable links or hotspots. Click the plus sign to display links. Double-click to preview the
image, identify topics that use it, and view file information. Drag the image maps into topics in Design editor to add
them.
Image map links (hotspots). Double-click to identify topics that use image maps.
Sound files (AU, MID, RMI, and WAV formats). Double-click to identify topics that use them and view file information.
Drag sound files into topics in Design Editor to add them.
Video files (AVI and MOV formats). Double-click to identify topics that use them and view file information. Drag video
files into topics in Design Editor to add them.
Adobe Captivate files (SWF files). Double-click to identify topics that use them and view file information. Drag Adobe
Captivate files into topics in Design Editor to add them.
Custom windows. Double-click to modify window properties.
Style sheets (CSS). Double-click to modify styles.
Text-only files For What's This? Help (.TXT format). Double-click to create or modify text-only topics files.
41
Map Files For Context-Sensitive Help (.HH) Includes imported map files or automatically generated files.
All map IDs. Links map IDs to HTML topics for context-sensitive Help. Double-click to work with map IDs and map files.
Table of contents folder. Shows the default and other table of contents in the project.
Table of contents folder. Expand to view the table of contents listed.
Table of contents. Double-click to open the selected table of contents pane.
Index folder. Shows the default and other indexes (if any) listed.
Index folder. Expand to view the indexes listed.
Index. Double-click to open the selected index pane.
Glossary folder. Shows the default and other glossaries (if any) listed.
Glossary folder. Expand to view the glossaries listed.
Glossary. Double-click to open the selected glossary pane.
See also. Double-click to open the See Also pane and add to See also keywords.
Baggage files (BMP, ICO, XML, JS, other image files). Files such as bitmaps and icons used with HTML Help controls,
including custom buttons for link controls and startup screens. If your project includes Dynamic HTML, the file
EHLPDHTMJS is included in your Baggage Files folder. Other image files are included as well, such as topic
backgrounds and scripts.
Last updated 12/14/2011
Page 48

USING ROBOHELP HTML 9
Projects
You can map filename extensions to applications. For example, map GIF files to Adobe Photoshop®. When you rightclick a GIF file from the Images folder and select Edit, the file opens in Photoshop.
More Help topics
“Define chapter layout” on page 35
Authoring content in multiple languages
You can change the language of an existing project or a new project. The language affects the window text, as well as
the dictionary for the spell checker and the automatic indexing (Smart Index Wizard) customized settings.
You can also customize the display text, such as the text in browse sequence buttons, previous and next buttons,
show/hide buttons, some messages, and more. The text can be anything you specify. For example, the default text
“Search” on the Search tab can be changed to “Find” in the language of your choice.
When delivering the project to translators, always provide the source files and not the output files.
Note: In HTML Help systems, the end user’s operating system must be in the same language as the one used in your
project. Otherwise, the end user’s operating system overrides the language specified in your project. The dictionary and
index sorting are not affected in the end user’s system.
42
Support for multiple languages
RoboHelp provides multiple language support at the paragraph, topic, and project level. You can set the language at
the paragraph level and topic level through the RoboHelp user interface. Language defined at the paragraph level takes
precedence over language defined at a topic level. Language set at the topic level takes precedence over language
defined at a project level. Language defined at the project level can never take precedence over language defined at
paragraph level. You can think of the prioritized language as the effective language. Effective language is used in
spelling checks, in a dictionary or a thesaurus, in generating a smart index, and in preparing a full-text search.
The project language is defined at the project level. You can apply different language settings using File > Project
Settings.
You define the topic language using the Topic Properties dialog box.
You define the paragraph language using the Paragraph dialog box. Select any paragraph in the Design view and
choose Paragraph from the context menu.
RoboHelp supports the following languages:
Languages Spell Check User Dictionary Thesaurus Auto correct
Danish (Denmark) Yes Yes Yes Yes
German (Germany) Yes Yes Yes Yes
English (US) Yes Yes Yes Yes
English (UK) Yes Yes Yes Yes
Spanish (Spain) Yes Yes Yes Yes
French (France) Yes Yes Yes Yes
Italian (Italy) Yes Yes Yes Yes
Last updated 12/14/2011
Page 49

USING ROBOHELP HTML 9
Projects
Languages Spell Check User Dictionary Thesaurus Auto correct
Dutch (The Netherlands) Yes Yes Yes Yes
Norwegian Bokmâl (Norway) Yes Yes Yes Yes
Norwegian Nynorsk (Norway) Yes Yes No Yes
Portuguese (Brazil) Yes Yes No Yes
Swedish (Sweden) Yes Yes Yes Yes
Croatian (Croatia) Yes Yes No Yes
Portuguese (Portugal) Yes Yes No Yes
French (Canada) Yes Yes Yes Yes
Finnish (Finland) Yes Yes No Yes
Catalan (Spain) Yes Yes No Yes
Russian (Russia) Yes Yes No Yes
Bulgarian (Bulgaria) Yes Yes No Yes
Czech (Czech Republic) Yes Yes No Yes
43
Polish (Poland) Yes Yes No Yes
Romanian (Romania) Yes Yes No Yes
Hungarian (Hungary) Yes Yes No Yes
Greek (Greece) Yes Yes No Yes
Turkish (Turkey) Yes Yes No Yes
Estonian (Estonia) Yes Yes No Yes
Latvian (Latvia) Yes Yes No Yes
Lithuanian (Lithuania) Yes Yes No Yes
Slovenian (Slovenia) Yes Yes No Yes
German (Switzerland) Yes Yes Yes Yes
Japanese (Japan) No No No No
Korean (Korea) No No No No
Traditional Chinese (Taiwan) No No No No
Simplified Chinese (China) No No No No
Thai (Thailand) No No No No
Vietnamese (Vietnam) No No No No
More Help topics
“Define a language for a paragraph” on page 139
“Create a topic” on page 110
Last updated 12/14/2011
Page 50

USING ROBOHELP HTML 9
Projects
Translation workflows
You can create content for multiple languages in a single RoboHelp HTML project by translating the English content
in the same project. You can then create tables of contents, indexes, glossaries, and conditional build tags in the project
for the desired languages. Finally, you can apply conditional build tags to content authored in the various languages,
and generate conditional output.
Follow the steps in this workflow, which uses translation from English to French and Japanese as an example:
1 Apply French language project settings by selecting French Language.
2 Open an English topic, create a topic for the French language, and translate the content, including the topic title
from English to French. (Do not translate topic filenames.)
3 Create French tables of contents, indexes, and glossaries.
4 Create a conditional build tag, such as FrenchContent.
5 Apply the FrenchContent conditional build tag to French content and topics.
6 Generate output for the French language.
7 Apply Japanese language project settings by selecting the Japanese Language.
8 Open an English topic, create a topic for the Japanese language, and translate the content from English to Japanese.
9 Create Japanese tables of contents, indexes, and glossaries.
10 Create a conditional build tag called JapaneseContent.
11 Apply the JapaneseContent conditional build tag to the Japanese content.
12 Generate output for the Japanese language.
Note: To view the Japanese output, you must change your PC’s language to Japanese.
44
Note: To translate a webhelp project, first make a copy of the project, open that copy in Robohelp and author in your
desired language.
Compare content in different languages
1 Open topics created in different languages.
2 In Design Editor, position the topics side by side: Drag a topic tab slightly down or to the right, and release the
mouse when the page icon
appears. Choose New Horizontal Tab Group or New Vertical Tab Group.
Select a different language for translating a project file
1 Select File > Project Settings.
2 Select the desired language.
3 Click Advanced, and then use the following tabs:
Stop List Click New to add words that must be ignored during a text search.
Phrases Click New to add a phrase for the Smart Index Wizard to include when searching topic content for
keywords.
LNG File Click Edit to modify the text for each user interface element listed.
"Always Ignore" Words Click New to add a word or phrase that the Smart Index Wizard ignores when generating
the index.
Synonyms Click New to add a synonym for a word. This option enables you to search for words and their
synonyms. The results are always returned for the searched words.
Last updated 12/14/2011
Page 51

USING ROBOHELP HTML 9
Projects
Create a project with a different language
1 Select File > New > Project.
2 In the New tab, double-click Project Type. The New Project Wizard appears.
Note: To create a JavaHelp or Oracle Help project, first create a Microsoft HTML Help project, and then add a new
layout to that project.
3 Enter project information.
4 From the Language menu, select the language. Click Save As Default to keep the language as the default.
5 Click Finish.
The first topic opens in the Design Editor. Generate and view your project to view the results.
More Help topics
“Create and edit single-source layouts” on page 270
Customizing text for localization
You can customize certain text in the user interface for WebHelp, WebHelp Pro, FlashHelp, FlashHelp Pro, and
HTML Help outputs. Here is what you can change for each format:
45
WebHelp, WebHelp Pro, FlashHelp and FlashHelp Pro
• With a skin Customize text in the Skin Editor. If you do not change the default text (such as “Contents” for the
Contents button), the text is automatically translated using the project language setting.). If you customize text in
a skin, the skin text overrides any customizations you make in the LNG file. For FlashHelp, the Flash developer uses
the Skin Development Kit to customize the text.
WebHelp only
• Without a skin Edit the language file. You can localize browse sequence button text; text on the Glossary tab,
Previous button, and Next button; certain messages; and the Contents, Index, and Search tabs. For example, you
can change the text on the Search tab from “Search” to “Find.”
HTML Help
You can customize browse sequence button text and all text on the Glossary tab. Change window titles in the Windows
Properties dialog box.
Edit the LNG (language) file
1 Create or open a project.
2 Select File > Project Settings.
3 Click the General tab. Click Advanced.
4 Click the LNG File tab.
5 Select the interface text. Click Edit.
6 Type the edits. Press Enter.
Notes:
• If RoboHHRE.LNG is already in your user's Windows folder, it overrides the file in the Baggage Files folder.
Last updated 12/14/2011
Page 52

USING ROBOHELP HTML 9
Projects
• If you do not include the RoboHHRE.LNG file, or omit some values, your project defaults to the English values
shown in the example.
• If you are using a skin, the default text is translated to the default language. If you customized the text in a skin, the
skin text overrides customizations in the LNG file.
Change the default project language
1 Open the project.
2 Select File > Project Settings.
3 Click the General tab and select the language.
4 Click OK.
5 Generate and view your project.
Notes:
• If you use a skin, the default text uses the language setting of the project. Customized skin text overrides text settings
in the LNG file.
• Localize window captions in the Windows Properties dialog (not applicable to WebHelp projects).
46
Language support for associated dictionaries
If your project contains content authored for multiple languages, define RoboHelp language settings in the project,
topic, and paragraph separately. The effective language is used for dictionary or thesaurus association and for spell
checking. For example, suppose you set the project language to UK English and the paragraph language to French for
several paragraphs. The French spelling checker is activated for French paragraphs while the UK English spelling
checker is used for the rest of the content.
Note: Updated language settings for each language are stored at a common location in the project folder. You can access
the language settings information in the Projects\ !Language! folder.
Index localized text
Use the Smart Index wizard to index your localized project. You can assign keywords for each topic based on the topic
content. The index is generated based on language and search criteria you define in the Smart Index wizard. The Smart
Index Wizard suggests keywords based on topic content.
1 Select a language for a new or existing project.
2 Follow the steps for automatically creating your index.
Universal character sets
RoboHelp enables you to create content in multiple languages. However, authoring content in a multilingual
environment can be challenging when the languages span multiple Microsoft Windows code pages. Support for the
Unicode character encoding standard in RoboHelp overcomes many of these challenges.
Last updated 12/14/2011
Page 53

USING ROBOHELP HTML 9
Projects
Without Unicode, operating systems use a code-page-based environment, in which each language script has its own
table of characters. Content based on the code page of one operating system seldom translates correctly on an
operating system that uses another code page. For example, suppose you are running the English version of the
Microsoft Windows® XP/Vista operating system with the German code page. Then suppose you open a plain text file
created in the Japanese version of Windows XP/Vista. In this case, the code points of the Japanese code page are
mapped to unexpected or nonexistent characters in the Western script. The resulting text is unintelligible.
The universal character set provided by Unicode and supported in RoboHelp overcomes this problem.
Support for Unicode text encoding standards
RoboHelp HTML supports Unicode text encoding. You can create a topic in multiple languages, regardless of the
language used by the operating system running RoboHelp.
You can perform the following tasks related to Unicode:
• Author documents containing multilingual paragraphs and words. For example, you can have a set of Greek
characters followed by Russian characters, and then by French text in the same paragraph.
• Use the relevant language spelling checker to check Unicode content.
• Create, open, or edit Unicode-encoded HTML and text files (UTF-8 and UTF-16 encoded files).
• Enter Unicode characters in input forms and dialog boxes.
• Generate TOC, index, and glossary by using Unicode strings.
• Convert and import text of non-Unicode encoded file types (HTML, XML, MIGF, and so on).
• Publish content to a non-English server by adding multibyte characters in the complete path name.
• Create, open, or edit Unicode-encoded HTM files (UTF-8 and UTF-16 encoded files).
• Provide Unicode-encoded input and view Unicode content in fields, dialog boxes, wizards, and forms.
47
Set up input languages on Windows
Before you start typing non-English text or Unicode characters in the HTML files, ensure that RoboHelp HTML 8 is
running on a UTF-8 locale. Configure the regional language or locale settings on your computer to add additional
languages for keyboard input, across operating systems.
Use the Windows® XP regional and language settings to add additional languages for keyboard input. These languages
and speech settings appear in the Language bar on the desktop. After you select a language from the bar and a localized
keyboard, you can start typing the required text in the document. Microsoft® defines the keyboard layouts.
1 Open the Control Panel and double-click the Regional And Language Options icon. The Regional And Language
Options dialog box appears.
2 Click the Languages tab.
3 Click the Details button. The Text Services And Input Languages dialog box appears.
4 In the Settings tab, click the Add button.
5 Select a language from the Input Language list.
6 Click OK. The selected language is included in the Installed Services list.
7 Select the desired language in the Default Input Language list.
8 Click Apply and click OK to save the settings and close the Text Services And Input Languages dialog box.
9 Click the Regional Options tab, and choose the language you selected in the Default Input Language list.
Last updated 12/14/2011
Page 54

USING ROBOHELP HTML 9
Projects
10 Click Apply and click OK to save the settings and close the Regional And Language Options dialog box. The
Language bar appears on the desktop of your computer.
11 Open RoboHelp, and type the content. The text appears in the selected language.
You can change the language in the Default Input Language list and the Regional Options tab. The language selected
in the Language bar is updated automatically to reflect your new choice.
Upgrade localized projects
If you customized a phrase, stop list, always-ignore-words list, or an LNG file in RoboHelp 6 or earlier, move the list
to RoboHelp 8 or later, which uses a different file structure and extensions.
Product-level customization is moved to [install_folder]\Language in RoboHelp. For example, English is renamed as
en_US and en_UK, and French is renamed as fr_FR.
The project-level customization is moved to [project folder]\!Language!\[language folder].
Minor customizations
1 Open Notepad.
2 Open the file to modify. These files reside in C:\Program Files\Adobe\Adobe RoboHelp
[version]\RoboHTML\!Language!\en_US.
3 Open the project. Do the following:
• Edit the LNG file.
• Edit the custom word lists.
48
Major customizations
1 Open Notepad.
2 Open the old file in C:\Program Files\Adobe\Adobe RoboHelp [version]\RoboHTML\Language.
3 Open the new file in a separate window in Project folder\Language.
4 Copy the customizations from the old file to the new file. See the table for filenames.
File description Pre-7 filenames 7 Filenames
Phrase list Phrases.wlf ProjectName.phr
Always Ignore list AlwaysIgn.wlf ProjectName.ign
Stop list *.stp ProjectName.stp
Language file *.lng ProjectName.lng
Note: The above procedure is NOT the recommended way. The recommended way is described in “Change project
settings” on page 33
Import PDF files
You can convert an Adobe PDF file (version 1.4 or later) into a single topic or multiple topics for a new or existing
project.
• You cannot import SWFs, PDF portfolios, and encrypted PDF files (files that require a password).
Last updated 12/14/2011
Page 55

USING ROBOHELP HTML 9
Projects
• If the PDF contains 3D images, save the PDF in version 5 to import the images.
• TOCs or index field codes convert to PDF.
• Adobe Reader® or Adobe Acrobat® is not required to import PDF files.
• Sometimes fonts in PDF files do not convert correctly when imported into HTML.
Create a project by importing a PDF file
Note: You cannot import encrypted PDF files (files that require a password).
1 Select File > New > Project.
2 Click the Import tab. Select PDF Document and click OK.
3 Click the browse button to select one or more PDF files from a single folder. Click Open, and then click Next.
4 Enter the project information. Click Next.
5 Select options in the Conversion Options dialog box.
Topic Select how to split the PDF into topics.
Create New Topic(s) Based On Style(s) Activates the Next button. Click to select styles.
Create A Single Topic Creates one topic from the entire PDF.
49
Create A Topic For Each PDF Page Choose additional options.
Convert As HTML Creates a topic for each PDF page.
Convert As Image Renders each PDF page as a separate image.
Convert As Absolutely Positioned HTML (Advanced) Creates a topic for each PDF page. Positioning the content can
require advanced HTML and subsequent editing can be difficult. Use this option if the other options don’t produce
the results you want. This option is not recommended for printed documentation.
Image (JPG/GIF/PNG) Select the format for images converted from the PDF. To exclude images, select None.
Page Range
By default, all PDF pages are converted. Alternatively, enter the page numbers on which to start and end.
Create new topics based on styles
Styles are converted based on the following:
• The most common style becomes the Normal style, which cannot be used to split topics.
• The remaining styles are ranked from largest point size to smallest. Style ranking also considers boldness (highest
precedence), italics, and normal (lowest precedence).
• Styles are ordered and numbered using “Heading 1” for the dominant heading style and “PdfParaStyle01” through
“PdfParaStyleX” for all other styles. Rename these styles using this dialog.
Create New Topics Based On Lists the styles used in the PDF document.
Description Displays a description of the selected style.
Paragraph Preview Displays a preview of the selected style.
Rename Style Renames the selected style in your project.
Finish Completes the import process.
Back Returns to the Conversion Options dialog box.
Last updated 12/14/2011
Page 56

USING ROBOHELP HTML 9
Projects
Import PDF files into a project
1 In the Project Manager pod, right-click Project Files.
2 Select the file to import into.
3 Select File > Import > PDF Document.
4 Select one or more PDF files. Click Open.
5 Select options in the Conversion Options dialog box.
6 If Create New Topic(s) Based On Style(s) was selected, click Next to select styles.
7 Click Finish.
Importing and linking Microsoft Word documents
In RoboHelp, you can import or link Microsoft Word documents (files with .docx, .docm, .doc, or .rtf extensions after
the filename). You can create new projects by importing or linking Word documents. Or, you can use the Word
documents as source files for an existing RoboHelp project. You can use this workflow to integrate content created by
different authors in Word.
50
The settings for importing and linking Word documents are applied at the project level. For this reason, you have
consistent settings for all documents that you import or link to RoboHelp projects. You can also export the conversion
settings that you define and reuse them across multiple projects. Defining a set of standard settings for conversion
ensures consistency across projects. See
“Word conversion settings” on page 64.
Steps to import a Word document into RoboHelp
1 Locate your Word document.
2 Optimize the Word document for import. See “Optimizing Word documents for online output” on page 51.
3 Read through the differences between linking and importing the Word document. See “Linking versus importing
Word documents” on page 51.
4 Open RoboHelp, and either create a project or use an existing project to import the Word document.
5 Import the Word document. See “Import a Word document into a RoboHelp project” on page 53.
6 Export your conversion settings and reuse it when you import another Word document. See “Export conversion
settings” on page 64.
Steps to link a Word document from RoboHelp
1 Locate your Word document.
2 Optimize the Word document for linking. See “Optimizing Word documents for online output” on page 51.
3 Read through the differences between linking and importing the Word document. See “Linking versus importing
Word documents” on page 51.
4 Read through the options for linking Word documents. See “Linking options for Word documents” on page 52.
5 Open RoboHelp, and either create a project or use an existing project to link the Word document.
6 Link the Word document. See “Link a Word document to a RoboHelp project” on page 53.
7 Synchronize your linked Word document with RoboHelp when you edit your Word document. See “Synchronizing
linked Word documents with RoboHelp projects” on page 61.
Last updated 12/14/2011
Page 57

USING ROBOHELP HTML 9
Projects
8 Export your conversion settings and reuse it when you link another Word document. See “Export conversion
settings” on page 64.
Linking versus importing Word documents
You have two options for integrating content from Word documents into RoboHelp projects: linking and importing.
The following table lists the differences between the two methods:
Option Linking Importing Remarks
51
Ability to update generated
topics
Ability to automatically update
TOC, index, and glossary changes
from the source document
Ability to regenerate deleted
topics
Ability to preserve changes in
generated topics
Yes. You can update the
generated topics whenever the
source document or your
RoboHelp project settings
change.
Yes. When you link a document,
separate TOC, index, and glossary
files are created and associated
with the linked Word document.
When the linked Word document
is updated, the linked TOC, index,
and glossary files are also
updated.
Yes. You can delete a topic that is
generated from an imported
Word document, and then
regenerate the same topic when
you update the Word document.
Yes. You can mark topics
generated from a linked Word
document to ensure that the
marked topics are not updated
when the linked document is
updated. In this way, you can
preserve any changes you made
in RoboHelp.
No. When you import a Word
document into a RoboHelp
project, RoboHelp copies the
contents of the Word document
into RoboHelp project. RoboHelp
generates topics based on
conversion settings. If the source
document changes, delete the
generated topics and reimport
the Word document.
No. When you import a Word
document, the generated TOC is
appended and index and glossary
are merged into the selected TOC,
index, and glossary file.
No. Import the source document
again to generate the deleted
topic.
No. When you re-import a Word
document, all topics previously
generated from the imported
document are recreated,
overwriting any changes you
made in RoboHelp.
Use the link option when the
source Word document can
change. Typically, if multiple
projects share the Word
document, you link the Word
document.
If, however, you are bringing in
content as a one-time activity,
you can use the import option.
Use the link option if you want to
automatically update the TOC,
index, and glossary whenever
these components are updated in
the Word document.
Use the linking option when you
share the source document across
multiple projects.
Use the link option if you need to
retain updates made to both the
linked Word document and the
generated topics.
Ability to change the filenames
and topic titles of generated files
from Project Manager
No. When you link a Word
document, you cannot change
the filenames or topic titles of
generated files from Project
Manager.
Yes. When you import a Word
document, you can change the
filenames or topic titles of
generated files.
Use the import option if you want
to customize the filenames
andtopic titles from Project
Manager.
Optimizing Word documents for online output
If you are importing Word documents that have been published in printed or online format, consider the following
before linking or importing them into RoboHelp projects.
Heading hierarchies Determine the best mapping of Word heading styles to RoboHelp styles so that you can achieve
automatic pagination (splitting the document into topics) based on heading styles. If your document does not employ
hierarchical heading styles, apply them before conversion. For example, you can apply Heading 1 style to standalone
articles in your Word document. Then map this style to a similar RoboHelp style and define pagination to create an
HTML topic for each Heading 1 style. See
“Pagination and topic naming in converted Word files” on page 58.
Last updated 12/14/2011
Page 58

USING ROBOHELP HTML 9
Projects
Inline styles and style overrides You can convert inline styles to CSS styles in RoboHelp. However, converting inline
styles to CSS styles can lead to numerous styles that share the same formatting. See
“Converting Word styles to
RoboHelp styles” on page 55.
Header and footer information RoboHelp can convert headers and footers. However, to ensure consistency across
your topics, you can define a master page that contains the required header and footer information. By using master
pages, you can also suppress page numbers in headers and footers.
“Convert headers and footers in Word documents”
on page 55.
Chapter versus topic In printed documentation, the chapter is the logical and physical unit for grouping content. In
online Help, the organizational unit is the topic, and users see topics one at a time. Although you can group the content
into folders that expand when the user navigates the table of contents, only one topic appears on the screen at a time.
Try to provide comprehensive information without adding redundancy by grouping related topics. See
“Pagination
and topic naming in converted Word files” on page 58.
TOCs As you import Word documents, you can also import the Word TOC into the RoboHelp TOC. You can define
the topic hierarchy and represent that hierarchy in the RoboHelp TOC. See “Importing a Word TOC, index, and
glossary” on page 54.
Context sensitivity In online Help formats, you can link specific topics to dialog boxes and other elements that users
encounter in the application workflow. You can assign map IDs to topics in RoboHelp. However, you can also assign
context-sensitive Help markers in Word documents using custom footnote entries. RoboHelp reads these footnote
entries and assigns the map IDs to the generated topics. Ensure that topics in the source Word document are not overly
fragmented. A topic must contain sufficient information to make sense as a standalone unit.
52
For example, if a short task doesn’t make sense without some introductory conceptual information, don’t display that
task as a standalone topic. To avoid overly fragmented content, assign context-sensitive Help markers to topics at a
higher level. In this way, the generated Help topic can contain the concept, the task, and any relevant graphics. See
“Convert context-sensitive Help markers in Word to map IDs” on page 59.
Linking options for Word documents
For linking Word documents to a RoboHelp project, you can specify one of the following options in the Import tab of
project settings (File > Project Settings):
Create A Reference You create a reference to an external Word document. In this case, the source Word document is
not copied into the RoboHelp project folder. It remains outside the project. You can edit and update the Word
document independently in Word. Later, in RoboHelp, you can update the topics generated from the linked
document.
Use the linking by reference option to bring in content that is shared across multiple projects. Because only a single
copy of the document exists, any change in the source document is reflected in all projects to which this document is
linked.
Create A Copy And Link You create a copy of the source document and link to the RoboHelp project. In this case, a
copy of the source document is copied into the RoboHelp project and is visible in the Project Manager pod. You can
edit and update the Word copy without affecting the source document. You update the topics generated from the
copied Word document whenever you edit the document.
Use the Create A Copy And Link option to maintain the Word document in RoboHelp, and restrict access to the
source document and allow editing only in the copy available in the RoboHelp project. For example, if you want to
bring in content from a static Word document, link the document by copying it to the RoboHelp project.
Note: This option is available only when you link Word documents. When you import a Word document, RoboHelp does
not keep any link to the source Word document.
Last updated 12/14/2011
Page 59

USING ROBOHELP HTML 9
Projects
Link and import Word documents
• Create a RoboHelp project by linking to or importing a Word document. You can import DOCX, DOC, DOCM,
or RTF files.
• Link or import Word documents into a RoboHelp project.
• (For linked documents) Update the generated topics whenever any of the conversion settings or the source
documents changes.
HTML files are not created until you define the conversion settings and generate the Help topics. The source Word
documents are unaffected by linking and subsequent editing. RoboHelp creates a copy of the linked or imported Word
documents before applying the conversion settings.
Create a project by importing a Word document
You can create a RoboHelp project by importing a Word document. To import Word files, you must have Microsoft
Word installed on your computer.
Note: DOCX and DOCM formats are not supported by versions earlier than Microsoft Word 2007. See Microsoft Word
Help for more information.
1 In the Starter pod, click Word Document under Import.
2 Select Word Documents from the Files Of Type pop-up menu, select the Word document, and click Open.
3 Enter relevant details in the New Project wizard and click Finish.
53
Link a Word document to a RoboHelp project
1 Create a project in RoboHelp.
2 Select File > Link > Word Document.
3 Click Browse to select one or more Word documents and click Open.
Note: To import multiple documents with separate TOCs, select them in the order they should appear in the master TOC.
4 Right-click the linked file in Project Manager, and select Properties.
5 In the Word Document Settings dialog box, do the following:
• To generate a TOC from the source document, select the Convert Table of Contents option, and specify a
filename.
• To generate an index from the source document, select the Convert Index option, and specify a filename.
• To generate a glossary from the source document, select the Convert Glossary option, and specify a filename.
Note: You can define the paragraph styles for a glossary term and definition in the project settings. See “Convert
Word paragraph styles to RoboHelp styles” on page 56.
Note: RoboHelp associates the generated TOC, index, and glossary files with the source Word document. So when the
source document is updated, the TOC, index, and glossary files are also updated.
6 Click OK.
Import a Word document into a RoboHelp project
1 Create a project in RoboHelp.
2 Select File > Import > Word Document.
3 Click Browse to select one or more Word documents and click Open.
Last updated 12/14/2011
Page 60

USING ROBOHELP HTML 9
Projects
Note: To import multiple documents with separate TOCs, select them in the order they should appear in the master TOC.
4 In the Content Settings dialog box, set conversion options for the TOC, index, and glossary, and click Next.
For information about various conversion options, see “Importing a Word TOC, index, and glossary” on page 54.
5 (Optional) To edit the conversion settings, click Edit.
6 Modify conversion settings according to your requirements, and click OK.
For information about converting headers and footers, see “Convert headers and footers in Word documents” on
page 55
For information about converting paragraph, character, and other styles, see “Converting Word styles to RoboHelp
styles” on page 55.
7 Click Finish.
Importing a Word TOC, index, and glossary
When you import a Word document into a RoboHelp project, you can also import the table of contents (TOC). Import
the TOC into the RoboHelp project to retain, in Help, the navigation structure you defined in your Word document.
If you import a Word-generated TOC, the first heading becomes a book. Lower-level headings become pages (unless
a book exists at a lower level).
54
To import multiple documents with separate TOCs, select the Word documents in the Open dialog box in the order
that they should appear in the master TOC. The converted TOC is based on the {TOC} field codes of the Word
document. Ensure that:
• Headings for main books have lower-level headings.
• Headings for sub-books appear under main headings and have lower-level headings.
• Headings for pages do not have lower-level headings.
For example, suppose you import a document with more styles than the TOC contains: The document contains
heading levels 1 through 3, but the TOC contains only heading 1 and 2 entries. To ensure that heading 3 styles appear
in the TOC, either include heading 3 in the Word TOC or auto-create the TOC in RoboHelp.
Import a Word TOC
1 Select File > Import > Word Document.
2 In the Content Settings dialog box, select Convert Table Of Contents.
3 Select one of the following options:
Add To Existing TOC Appends the TOC entries to any existing RoboHelp TOC present in the project. Select an
existing RoboHelp TOC from the list.
Create New Associated TOC Enter a name for a new associated TOC that is added to the RoboHelp project.
Import Word index entries
RoboHelp creates an index based on the index markers in the document you are importing.
1 Select File > Import > Word Document.
2 Select Convert Index in the Content Settings dialog box, and select one of the following options:
Add To Existing Index Add the Word index entries to the existing RoboHelp index of the project.
Create New Associated Index Enter a name for a new associated index that is added to the RoboHelp project.
Last updated 12/14/2011
Page 61

USING ROBOHELP HTML 9
Projects
Add To Topic Add the Word index entries to individual topics in which they appear.
Import Word glossary entries
RoboHelp creates a glossary from the Word document you are importing, based on the paragraph styles defined for
the glossary terms and definitions in project settings.
Note: RoboHelp creates a glossary entry by finding a term and a definition in the specified styles in the Word document.
Consecutive instances of term styles or definition styles are rejected.
1 Select File > Import > Word Document.
2 Select Convert Glossary in the Content Settings dialog box, and select one of the following options:
Add To Existing Glossary Add the Word glossary entries to the existing RoboHelp glossary of the project.
Create New Associated Glossary Enter a name for a new associated glossary that is added to the RoboHelp project.
Convert headers and footers in Word documents
You can convert the header and footer text in your Word documents to headers and footers in the generated HTML
topics.
Note: Don’t use this procedure if your projects have topics natively created in RoboHelp and imported or linked from
other sources as well. Instead, use the master page feature in RoboHelp. Using master pages, you can define consistent
layouts and consistent headers and footers.
55
1 Select File > Project Settings.
2 In the Import tab of the Project Settings dialog box, click Edit under Word Document.
3 In the Conversion Settings dialog box, select Other Settings and then do the following:
• To convert the header in Word documents, select Convert Header.
• To convert the footer in Word documents, select Convert Footer.
Converting Word styles to RoboHelp styles
You can select the cascading style sheet (CSS) that RoboHelp uses to map Word styles to RoboHelp styles. RoboHelp
saves all the style conversion settings in this CSS file. By default, RoboHelp uses the RHStyleMapping.css file for your
project.
You can also use a custom CSS for your project. You can later edit the styles either in RoboHelp or in an external CSS
editing application, such as Adobe Dreamweaver®. You can define how the Word styles convert to RoboHelp styles at
the project level. All Word style definitions in the Word document appear in the mapping dialog box, irrespective of
whether they are used in the document.
Select CSS for style mapping
1 Do one of the following:
• Select File > Import > Word Document.
• Select File > Link > Word Document.
• Select File > Project Settings.
2 In the Import tab of the Project Settings dialog box, do one of the following:
• Select the CSS file from the CSS For Style Mapping menu. RoboHelp lists CSS files in the root folder of your
project, from which you can select a CSS file.
Last updated 12/14/2011
Page 62

USING ROBOHELP HTML 9
Projects
• Click Add next to the CSS For Style Mapping menu, and select the CSS file that you want to use. Use this option
to specify a custom CSS for your project. When you select this option, RoboHelp copies the selected CSS file into
the root folder of your project, and uses the selected CSS for style mapping.
Convert Word paragraph styles to RoboHelp styles
By default, RoboHelp converts all Word styles to CSS, thus retaining the appearance and behavior of the Word styles
in the RoboHelp project. If you want to ensure consistency of your online Help projects, you can map the Word styles
to RoboHelp styles and edit them.
1 Do one of the following:
• Select File > Import > Word Document.
• Select File > Link > Word Document.
• Select File > Project Settings.
2 In the Import tab of the Project Settings dialog box, click Edit under Word Document.
3 In the Conversion Settings dialog box, select the Word style from the Paragraph group.
4 From the RoboHelp Style pop-up menu, select the RoboHelp style that you want to map to the Word style. To retain
the appearance of Word text in your online Help format, select [Source].
5 Select the properties for the selected Word style. To edit the selected RoboHelp style, click Edit Style.
To mark a style for glossary
56
• Select Glossary Definition Style to mark the style to consider for the glossary definition.
• Select Glossary Term to mark the style to consider for the glossary term.
Note: Follow Glossary Definition Style with Glossary Term Style for a complete a Glossary Term Definition pair.
RoboHelp uses the terms marked with the selected styles, to create a Glossary.
• To set up pagination: Select Pagination (Split into topics based on this style) to create a Help topic at each
occurrence of the selected Word paragraph style. For example, if you select Heading 1 and Pagination (Split into
topics based on this style), RoboHelp starts a new topic at every instance of Heading 1. For more information
on Pagination, see
“Set pagination for online Help topics” on page 59
• Using a user-defined HTML tag: Select or enter a user-defined HTML tag for the selected paragraph style.
For example:
A paragraph with style ParaStyleOne is imported in RoboHelp as <p class=ParaStyleOne> Paragraph
Text </p>.
Specifying this string as Pre for the style ParaStyleOne causes RoboHelp to import the paragraphs with the style
ParaStyleOne as
<pre> Paragraph Text </pre>.
Convert Word character styles to RoboHelp styles
You can map the Word character formats to character styles in RoboHelp. You can also edit the styles in RoboHelp.
1 Do one of the following:
• Select File > Import > Word Document.
• Select File > Link > Word Document.
• Select File > Project Settings.
2 In the Import tab of the Project Settings dialog box, click Edit under Word Document.
Last updated 12/14/2011
Page 63

USING ROBOHELP HTML 9
Projects
3 In the Conversion Settings dialog box, select the Character group.
4 Select the Word character style from the left pane of the Conversion Settings dialog box.
5 Select the RoboHelp character style from the pop-up menu. Optionally, you can do the following:
• To import the Word character style, select [Source] from the pop-up menu.
• To edit the character style in RoboHelp, click Edit Style.
List mapping
You can map Word lists to RoboHelp lists (multilevel lists) or HTML lists (basic ordered and unordered lists) in
RoboHelp. If you have defined lists as paragraph styles in RoboHelp, you can map these list styles in RoboHelp. If you
do not select a style mapping option for a list, it is converted to text without list properties.
1 Do one of the following:
• Select File > Import > Word Document.
• Select File > Link > Word Document.
• Select File > Project Settings.
2 In the Import tab, click Edit under Word Document.
3 In the Conversion Settings dialog box, select the Other Settings group.
4 Do one of the following:
• To convert the Word list styles to RoboHelp lists, select RoboHelp List from the Convert Word List To pop-up menu.
• To convert the Word list styles to HTML lists, select HTML List from the Convert Word List To pop-up menu.
57
Create custom HTML tags
You can define or apply a custom HTML tag instead of the standard <p> tag for paragraph styles in the HTML output
for the formats that you import from a Word document. You can define separate HTML tags for each format in the
Word document.
1 Do one of the following:
• Select File > Import > Word Document.
• Select File > Link > Word Document.
• Select File > Project Settings.
2 In the Import tab, click Edit under Word Document.
3 In the Conversion Settings dialog box, select a Word paragraph style, and then select User Defined HTML Tag
option.
4 Type the name of the custom HTML tag or select an existing tag to use instead of the default HTML tag.
Convert Word table styles to RoboHelp table styles
You can map Word table styles to RoboHelp table styles. Alternatively, you can import the table styles as inline
formatting from the Word document. Optionally, you can edit the converted table styles in RoboHelp.
1 Do one of the following:
• Select File > Import > Word Document.
• Select File > Link > Word Document.
• Select File > Project Settings.
Last updated 12/14/2011
Page 64

USING ROBOHELP HTML 9
Projects
2 In the Import tab, click Edit under Word Document.
3 Select the Word table style from the left pane of the Conversion Settings dialog box.
4 Select the RoboHelp table style from the pop-up menu. Optionally, to edit the table style in RoboHelp, click Edit
Style.
Convert Word references to hyperlinks
RoboHelp can convert the references such as foot notes, end notes, captions, bookmarks, and cross-references in the
Word documents. These references appear as hyperlinks in the generated Help topics.
1 Do one of the following:
• Select File > Import > Word Document.
• Select File > Link > Word Document.
• Select File > Project Settings.
2 In the Import tab, click Edit under Word Document.
3 In the Conversion Settings group, select Other Settings, and then select Convert References To Hyperlinks.
Create RoboHelp styles from inline formatting
Even though it’s best to avoid inline formatting in your Word documents, and apply defined paragraph and character
styles, you can link and import Word documents to RoboHelp. You can also create RoboHelp styles from inline
formatting in your Word documents. Such styles are added to the project CSS.
58
1 Select File > Project Settings.
2 In the Import tab, click Edit under Word Document.
3 In the Conversion Settings dialog box, select Other Settings and then select Auto-Create CSS Styles From Inline
Formatting.
Pagination and topic naming in converted Word files
In addition to splitting the document into topics and defining topic naming settings, you can do the following:
Convert header and footer Header and footer text in your word documents is converted and used in the Help topics.
“Convert headers and footers in Word documents” on page 55.
See
Convert TOC and index entries TOC and index entries in the Word document are converted in your RoboHelp
project. See
Map Word list styles to RoboHelp styles You can convert the list styles in Word to either RoboHelp list styles or
HTML list styles. See
Convert references to hyperlinks You can convert the references to hyperlinks in RoboHelp topics. See “Convert
Word references to hyperlinks” on page 58.
Automatically create CSS styles from inline formatting See “Create RoboHelp styles from inline formatting” on
page 58.
“Importing a Word TOC, index, and glossary” on page 54.
“List mapping” on page 57.
Last updated 12/14/2011
Page 65

USING ROBOHELP HTML 9
Projects
Set pagination for online Help topics
When you import a Word document, you define how the contents of the Word file appear as topics in RoboHelp. For
example, suppose your Word file contains ten topics. If each topic contains subtopics, definition lists, tasks, and tables,
you can have each topic appear as a separate HTML file. If each of these topic headings is in Heading 1 style, you can
have each Heading 1 topic created as a separate HTML topic. If, however, you set the pagination at Heading 2, separate
HTML files are created for each Heading 2 topic.
You can select multiple paragraph styles for pagination. For example, selecting Heading 1 and Heading 2 for
pagination, causes RoboHelp to start a new topic at every instance of Heading 1 as well as Heading 2.
Note: Pagination is based on the Word paragraph styles and not on RoboHelp styles.
Even though you can set pagination for any Word paragraph style, the topic generated must contain relevant, complete
information for the reader. For example, if you set pagination for Heading 3, you run the risk of creating topics with
only task-level instructions. In this case, the required contextual information required to complete the task is isolated
in another Heading 3 level topic. To avoid such disjointed, incomplete topics, set the pagination at a higher level.
1 Do one of the following:
• Select File > Import > Word Document.
• Select File > Link > Word Document.
• Select File > Project Settings.
2 Click Edit under Word Document.
3 In the Conversion Settings dialog box, in the Paragraph group, select the paragraph style on which to base
pagination.
4 Select the option marked Pagination (Split into topics based on this style) and click OK.
RoboHelp splits the documents into topics using the specified pagination styles.
59
Convert context-sensitive Help markers in Word to map IDs
You can convert the context-sensitive Help markers that you insert in your Microsoft Word documents and reuse
them as map IDs. You insert the context-sensitive markers using the Custom Footnote option in Word. You insert
context-sensitive Help markers using the Insert Footnotes And Endnotes dialog box in Word. To insert contextsensitive Help markers, enter a custom string such as TopicAlias and then insert the map ID as the marker text. The
custom string must not contain spaces or any other invalid characters. See Microsoft Word Help for more information
about inserting custom footnote markers.
Sometimes Word documents that you are linking to or importing have context-sensitive Help markers. If so, you can
incorporate them in the map ID header file that you generate. In the project header file, add the map IDs that you
assigned to topics in your Word documents. The context-sensitive marker string is a project-wide parameter. Ensure
that all Word documents that you link to or import contain the same string as the context-sensitive marker text.
1 Do one of the following:
• Select File > Import > Word Document.
• Select File > Link > Word Document.
• Select File > Project Settings.
2 Click Edit under Word Document.
3 In the Conversion Settings dialog box, in the Other Settings group, enter the context-sensitive Help marker string
and click OK.
Last updated 12/14/2011
Page 66

USING ROBOHELP HTML 9
Projects
Define the topic name pattern for generated topics
When you set heading styles for pagination, the heading text is included by default in the filename of the topic file
created in RoboHelp. For example, suppose you define Heading 2 for pagination. If the Word document has two
Heading 2 topics, “Introduction” and “Beyond basics,” the topics are created as files named introduction.htm and
beyond_basics.htm. The result is intuitively named HTML files that indicate the topic title. In addition to this default
scheme, you can define more naming conventions. If, however, the Help system uses sequentially numbered files, such
as helptopic001.html, helptopic002.html, and so on, you can define the pattern to support that convention.
1 Do one of the following:
• Select File > Import > Word Document.
• Select File > Link > Word Document.
• Select File > Project Settings.
2 In the Conversion Settings dialog box, select Other Settings.
3 In the Other Settings tab, set the topic name pattern.
Topics are named according to the selected pattern. You can select one of the following or create a topic name
pattern.
Default Uses the topic title text as the topic filename.
60
<$filename_no_ext>-<$paratext> The name of the converted HTML topic contains the following:
• The name of the Word source file without its extension
• Hyphen as the separator
• Paragraph text used to demarcate HTML topics
For example, a Word file named “Chapter.doc” with “1-Introduction” as paragraph text is converted
to an HTML topic named “Chapter-1-Introduction.”
<$filename_no_ext>-<n> The name of the converted HTML topic contains the following:
• The name of the Word source file without its extension
• Hyphen as the separator
• A sequential number
For example, “Chapter.doc” is converted to an HTML topic named “Chapter-1.”
<$paratext_no_num> The name of the converted HTML topic contains the paragraph text used to demarcate the HTML
<$paratext> The name of the converted HTML topic contains the paragraph text used to demarcate the HTML
topic, without numbering. For example, paragraph text “1.Introduction” is converted to an HTML
topic named “Introduction.”.
topic. For example, paragraph text “Introduction” is converted into an HTML topic named
“Introduction.”
Last updated 12/14/2011
Page 67

USING ROBOHELP HTML 9
Projects
Synchronizing linked Word documents with RoboHelp projects
After you import or link Word documents to your RoboHelp project, you generate Help topics based on the project
settings. When you import a Word document into a RoboHelp project, the topics are generated immediately and
appear in the Project Manager pod. However, when you link a Word document to a RoboHelp project, the topics are
not generated until you explicitly generate them. Because RoboHelp maintains a live link with the linked Word
document, you can update a linked Word document if the source document or conversion settings in the RoboHelp
project change. Icons of the project files in the Project Manager pod indicate whether the documents are in sync with
the RoboHelp topics.
Update the topics generated from linked Word documents in the following scenarios:
• Source Word documents changed after you added or linked them to the RoboHelp project.
• You changed the pagination settings in the RoboHelp project.
• You changed the styles in the RoboHelp project and want to revert them to as in the FrameMaker document.
• You updated the CSS in the RoboHelp project.
If you imported documents into the project, the Project Manager pod does not indicate the synchronization status. If
either the Word documents or the conversion settings change, reimport the Word documents and overwrite the
RoboHelp topics already generated. When you update the documents, RoboHelp updates the converted HTML topics,
TOC, index, and glossary.
61
Word document synchronization status indicators
The following table shows the different status indicators that appear on the Project Manager pod in RoboHelp for all
linked Word documents.
Icon Description
Source Word document that was linked by reference missing. The source document that you have linked to the
RoboHelp project is moved to another folder, renamed, or deleted. Locate the source document and link to the new
location.
Source Word document that was linked by copy into the project is missing, renamed, or moved to another folder. Locate
the source document and link to the new location.
Source Word document that was linked by reference is out of sync because of changes in the source document. Update
the document.
Source Word document that was linked by copy into the project is out of sync because of changes in the source
document. Update the document.
Source Word document linked by reference is out of sync because of changes in the RoboHelp conversion settings.
Update the document.
Source Word document linked by copy into the project is out of sync because of changes in the RoboHelp conversion
settings. Update the document.
Source Word document linked by reference and generated topics are in sync.
Source Word document linked by copy into the project and generated topics are in sync.
Generate topics from linked Word documents
Generating Help topics from linked Word documents is a one-time activity. After you generate Help topics, you can
update them whenever the source document or conversion settings change.
❖ Right-click the linked Word document in the Project Manager pod, and select Update > Generate.
Last updated 12/14/2011
Page 68

USING ROBOHELP HTML 9
Projects
Update topics generated from linked Word documents
RoboHelp does not update linked documents automatically when you link Word documents to a RoboHelp project.
You define the conversion settings, including style mapping and pagination, and then generate the topics. Select
options to update a linked document manually.
❖ From the Project Manager pod, right-click a Word document, select Update, and select one of the following:
Generate Generates HTML topics from the linked Word document for the first time. After the topics are
generated, the option changes to Update.
Update Updates topics generated from the selected Word document. Only the topics that have changed are
updated.
Update All Updates all topics generated from all linked documents including all Word and FrameMaker
documents. Because all documents are updated, including those that you edited in RoboHelp, exercise caution
when you use the Update All option.
Force Update Overwrites the current set of topics generated from the selected Word document. Use this option to
force an update of the topics generated from the linked Word document after you edit the source in Microsoft
Word. This option updates all topics including those that haven’t changed.
Force Update All Updates all linked documents, including Word and FrameMaker documents, and overwrites all
generated topics.
62
Preserve changes to a topic during an update
Normally, when you update a linked document, all topics generated from it are updated, overwriting any other
changes you made in the generated topics. However, you can selectively preserve changes in generated topics and
retain your edits.
1 Right-click the linked document in the Project Manager pod and select Properties.
2 In the Word Document Settings dialog box, select File Update Settings tab.
3 On the left column, select the files in which you want to preserve changes during update and click OK.
Set alert when editing generated topics
You can set RoboHelp to alert you when you make changes to topics generated from linked documents. When you
save the changes to such topics, RoboHelp alerts you that the changes would be lost when the linked documents are
updated.
1 Select Tools > Options.
2 In the General tab, select Show Alert On Modification Of Auto Generated Topics From Linked Documents and
click OK.
Mark topic edits for preservation
If you enabled the alerts when saving changes to generated topics, you can mark the topic edits for preservation during
an update. Topics marked for preservation during updates are automatically added to the list of preserved topics in the
File Update Settings dialog box.
1 Edit a generated topic and save the changes.
2 In the alert message that appears, select Preserve Modifications To This File and click OK.
Last updated 12/14/2011
Page 69

USING ROBOHELP HTML 9
Projects
Delete a generated topic
When you delete a generated topic, you have two options. You can regenerate the deleted topic when you update the
linked Word document or completely remove the deleted topic from your project. By default, RoboHelp regenerates
the deleted topic when you update the Word document.
1 In the Project Manager pod, expand the linked Word document to display the topics generated from it.
2 Right-click the topic that you want to delete, and select Delete.
3 Do one of the following:
• Click OK to delete the topic from the project permanently. The deleted topic is not regenerated when you update
the Word document.
• Select Generate This File On Next Update and click OK to delete the topic. When you update the Word
document, the deleted topic is generated again.
Regenerate a deleted topic
If you delete a topic generated from a linked Word document, the topic is removed from the project. However, you
can regenerate topics deleted from a linked document.
1 Right-click the linked Word document in the Project Manager pod and select Properties.
2 In the Word Document Settings dialog box, select File Update Settings tab.
3 On the right column, select the deleted files that you want to retrieve and click OK.
4 Update the Word document.
63
Edit a linked Word document
You can edit linked Word documents directly in Microsoft Word.
1 Right-click a document and select Edit.
2 Edit the Word document in Microsoft Word.
3 Click Save. The modified Word document now appears in the Project Manager pod with a different icon. This icon
indicates that the source content is now out of sync with the topics generated from the linked Word document.
Note: Force an update of the document after you edit the source in Microsoft Word.
Delete a linked Word document
You can directly delete documents linked by copy from the Project Files folder, and you can delete the references of
the documents linked by reference.
❖ Right-click a document and select Delete.
When you delete a linked file, all its associated documents, such as CSS, images, baggage files, and multimedia files,
are also deleted.
Notes:
• If a referenced file is moved to a different location, its icon changes. You can restore the link to the Word document
by pointing to its new location.
• Do not rename files generated after linking a Word document.
• You cannot drag the generated topics outside the parent Microsoft Word document folder to some other location
in the Project Manager pod.
Last updated 12/14/2011
Page 70

USING ROBOHELP HTML 9
Projects
Restore a link to a missing or renamed Word document
If any of the linked Word documents are moved or renamed, RoboHelp displays a missing link icon for the linked
document in the Project Manager pod. You can restore the link to a moved or renamed file and have all the topics
already generated from the document retained in the project.
1 In the Project Manager pod, right-click the Word document that has the missing link icon.
2 Select Restore Link To Word File, and browse to select the new location of the missing file.
Word conversion settings
You can create a standard set of conversion settings for importing Word content into RoboHelp projects and then use
these settings consistently across multiple projects.
You define these settings once. For subsequent projects, import these settings to the project. In this way, you can
quickly set up the project environment and publish Word content in several online formats.
These settings include:
• Cascading style sheets (CSS) for RoboHelp projects
• Style mapping between Word styles and RoboHelp styles
• Style conversion and other settings
64
Export conversion settings
1 Select File > Project Settings.
2 On the Import tab of the Project Settings dialog box, click Export.
3 Specify a name for the RoboHelp Import Settings file (ISF) and click Save.
Import conversion settings to a project
1 Select File > Project Settings.
2 On the Import tab of the Project Settings dialog box, click Browse.
3 Select a RoboHelp Import Settings File (ISF). Click Open.
Word document components converted to RoboHelp
RoboHelp converts most of the Word components when you link or import Word documents. The following tables
list the major Word document components and show how they are converted in RoboHelp.
Word document component
TOC Converted, if selected. See “Importing a Word TOC, index, and glossary” on page 54.
Index Converted, if selected. See “Importing a Word TOC, index, and glossary” on page 54.
Glossary You can create a Glossary in RoboHelp from selected paragraph styles in Word. See “Importing a Word TOC,
index, and glossary” on page 54.
Equations
Equations Ignored when importing the document into RoboHelp.
Last updated 12/14/2011
Page 71

USING ROBOHELP HTML 9
Projects
Markers
65
Cross-references, hypertext,
URLs
Context-sensitive Help markers Converted into map IDs in RoboHelp. See “Convert context-sensitive Help markers in Word to map IDs” on
Formats
Paragraph formats Converted. You can map Microsoft Word paragraph formats to RoboHelp styles or import the source
Character formats Converted. You can map Microsoft Word character formats to RoboHelp styles or import the source
Table formats Converted. You can map Microsoft Word table formats to RoboHelp styles or import the source formatting.
Lists Converted according to the settings you define. See “List mapping” on page 57.
Page layouts
Page layout, size, and Word
pagination
Headers/footers Converted. See “Convert headers and footers in Word documents” on page 55.
Cross References are converted to hypertext links if the Convert References to hyperlinks option is enabled
in RoboHelp when importing a Word document. Else, the Cross References are imported as plain
text.Unresolved cross-references and hypertext entries appear as text in online Help.
URLs become live hypertext links in the online Help output.
See “Convert Word references to hyperlinks” on page 58.
page 59.
formatting. See
formatting. See
“Convert Word table styles to RoboHelp table styles” on page 57.
See
Ignored. These elements are not applicable to online Help.
“Convert Word paragraph styles to RoboHelp styles” on page 56.
“Convert Word character styles to RoboHelp styles” on page 56.
Images
Images Converted. PNG images are imported as is if the Allow PNG as a graphicsformat option is selected in
Drawings Converted to images.
Microsoft Word Web Options. All other images are converted to gif or jpg.
Import FrameMaker documents
FrameMaker and RoboHelp together provide an end-to-end authoring and publishing workflow. This integration lets
you exchange content and publish a variety of output formats such as PDF, online Help, and Help based on Adobe AIR.
Note: If you are using Adobe Technical Communication Suite, you can link FrameMaker documents to your RoboHelp
projects. For more information, see Using FrameMaker with RoboHelp.
Optimizing for online output before conversion
If your authoring process in FrameMaker is optimized for print output, consider the following before linking or
importing FrameMaker documents into RoboHelp projects.
Heading formats Determine the best mapping of FrameMaker heading formats to RoboHelp styles. FrameMaker
documents define various heading formats specifically for print documentation. Among these formats are side heads
and heading styles that start on a new page. These formats don’t apply to online formats. You generally map these
heading styles to a few standard styles in the RoboHelp project.
Last updated 12/14/2011
Page 72

USING ROBOHELP HTML 9
Projects
Page layout settings Often FrameMaker chapter templates specify an even number of pages so that new chapters
begin on a recto (right) page. For online Help, ignore these pagination considerations.
Headers and footers RoboHelp ignores headers and footers during conversion, including legal text such as
“Confidential” and copyright lines. Include such text in the headers and footers in a separate step, after conversion.
Similarly, in RoboHelp, re-create watermark text or images that you used in the printed documentation. Use the
master page feature in RoboHelp to make these changes.
Navigation In print, cross-references specify page numbers which are irrelevant in Help. You can map cross-reference
formats in FrameMaker to a format without the chapter and page number. Converting to online Help removes chapter
and section titles in headers and footers. You can enhance navigability by using breadcrumbs, back and next buttons,
and a defined browse sequence instead.
Redundant content To provide context in different sections of a printed document, writers generally add redundant
information such as brief summaries of concepts covered previously. Because online Help is a random-access,
nonlinear medium, it requires less redundant content. Use cross-references and conditional text options to minimize
redundant content in your outputs.
Chapter versus topic Printed documentation requires you to segregate content into self-contained chapters, which
allow readers to logically and physically separate content. Online Help segregates content at topic level, accessed one
topic at a time. Although you can group the content within chapters into folders that expand when a user navigates the
table of contents, only one topic appears at a time. In this case, try to provide comprehensive information without
adding redundancy by chunking related topics together.
66
Context sensitivity Online Help formats allow you to link specific topics to related content within the application
workflow. Although you can assign map IDs to topics in RoboHelp, you can also assign context-sensitive Help markers
in FrameMaker documents. RoboHelp reads these markers and assigns the map IDs to the generated topics. Ensure
that sufficient information is contained in the topics that are created from FrameMaker.
For example, a short procedure as a stand-alone topic does not provide the conceptual information for the reader. To
avoid creating topics with incomplete information, assign context-sensitive Help markers to topics at a higher level, so
that the generated Help topic contains the concept, procedure, and any relevant graphics.
Preparing FrameMaker documents for conversion to Help
If the FrameMaker document that you are importing is an unstructured FrameMaker book, you can define a single
FrameMaker template for the conversion. You can then specify this template as the project template that overrides the
formats of individual documents at the RoboHelp project level. You can also reuse the conversion settings across other
projects by exporting the conversion settings.
Carefully examine the FrameMaker templates before importing the documents into RoboHelp, such as when you use
a general-purpose FrameMaker template. If this template contains formats that aren’t used in the book, omit those
formats in the template you use for the conversion.
1 Create a FrameMaker template that contains the formats you need in Help. Alternatively, customize the
FrameMaker template. You don’t have to apply the template manually. You can set RoboHelp to apply a selected
template to FrameMaker files before they are linked or imported to RoboHelp.
In Structured FrameMaker, the element definition document (EDD) or the DTD used in the structured
FrameMaker template automatically controls formatting. Because structured FrameMaker enforces a valid
structure and format, structured documents do not contain format overrides.
2 Apply context-sensitive Help markers to the required topics. See “Convert context-sensitive Help markers from
FrameMaker documents” on page 76.
Last updated 12/14/2011
Page 73

USING ROBOHELP HTML 9
Projects
3 Enclose graphics, callouts, and graphic or text frames you created with FrameMaker graphic tools into anchored
frames. RoboHelp imports only those FrameMaker graphics that are enclosed in anchored frames. By default, when
you import graphics and multimedia files into a FrameMaker document, these are placed in anchored frames. On
the other hand, if your FrameMaker document contains graphics that are placed in graphic frames, you should
place these into anchored frames before linking or importing the FrameMaker files into RoboHelp.
Note: If the offset for an image in the FrameMaker file is set to a negative value, the image can be partly hidden in the
HTML. Change the value before importing.
4 To maintain the original quality of images, insert them in FrameMaker documents by Reference. RoboHelp copies
the referenced images directly from the source if the complete image is visible inside the anchored frame. Similarly,
if the images are large, insert them in the source document by reference.
5 Fix any issues in the document such as unresolved cross-references, missing fonts, and irregular numbering issues.
See FrameMaker Help for more information.
6 Set up alternate text or captions for the images and graphics to create accessible online content. See “Create
alternate text for images” on page 82.
7 Apply conditional text settings in FrameMaker documents. See FrameMaker Help.
8 Edit the FrameMaker TOC reference pages to have indented hierarchical headings with different styles. See
“Convert a FrameMaker TOC” on page 70.
67
Importing FrameMaker documents
The RoboHelp workflow for linking or importing FrameMaker documents allows you to do the following:
• Create a RoboHelp project by importing a FrameMaker book. You can import BOOK or BK files.
• Import FrameMaker documents into a RoboHelp project. You can import FM files, or MIF files that are authored
in FrameMaker. XML files that are part of a FrameMaker book can be imported.
Before you import FrameMaker documents, check them in FrameMaker for errors such as unresolved cross-references
and format overrides. See Prepare FrameMaker documents for conversion to Help.
Create a RoboHelp project by importing FrameMaker books or documents
You can create a RoboHelp project by importing FrameMaker books or documents. Importing these files requires that
FrameMaker 8 or later installed is in your computer.
1 On the RoboHelp Starter page, click More under Import or select File > New > Project.
2 On the Import tab of the New Project dialog box, select FrameMaker Document and click OK.
3 Select the FrameMaker book or document (BOOK, BK, FM, MIF, FRM) from the Files Of Type pop-up menu,
browse to select the FrameMaker book, and click Open.
Note: Use the above procedure to create a new project from scratch and import FrameMaker content in the new project.
However, linking of FrameMaker documents is not allowed in this case.
Import a FrameMaker book into a new RoboHelp project
1 Create a project in RoboHelp.
2 Select File > Import > FrameMaker Document.
3 Select FrameMaker book (BOOK) from the Files Of Type pop-up menu.
4 Browse to select the FrameMaker book file and click Open.
Last updated 12/14/2011
Page 74

USING ROBOHELP HTML 9
Projects
If you are importing a FrameMaker document, you can select the components that you want to import from the
Import Wizard that appears. You can select the TOC, index, and glossary, and specify the conversion settings.
Note: Use the above procedure if you already have a project with some content, and wish to import FrameMaker content.
Linking of FrameMaker document is allowed in this case.
Import FrameMaker documents into an existing RoboHelp project
1 Select File > Import > FrameMaker document.
2 Select the FrameMaker document type that you want to import.
3 Select the documents and click Open.
FrameMaker document components converted to RoboHelp
RoboHelp converts most of the FrameMaker components when you link or import FrameMaker documents. The
following tables list the major FrameMaker document components and show how they are converted in RoboHelp.
FrameMaker files
68
Book files Documents contained within the book are converted (FM, XML, MIF, HTM, and HTML files). XHTML files that
TOC Converted, if selected. See “Convert a FrameMaker TOC” on page 70.
Text insets Text insets in the FrameMaker documents are considered part of the FrameMaker document itself and are
Index and glossary Index and glossary files generated in the FrameMaker book are not converted. Instead, the index markers
Variables and conditional
text
Variables Converted. User-defined variables in FrameMaker are converted as such in RoboHelp and can be redefined.
Conditional tags Converted as RoboHelp conditional build tags. See “Conditional text” on page 219.
Equations Convert equations to images and insert them in the RoboHelp topics after conversion.
Markers
are included in the FrameMaker book must be valid XHTML. Validate the XHTML in FrameMaker itself. All
other files in the FrameMaker book are ignored. Child books, folders, and groups in FrameMaker 9 books are
converted and appear as folders in the RoboHelp projects. See
book” on page 73.
inserted as text in the RoboHelp topic. Once inserted, the content cannot be edited as a text inset in
FrameMaker but can only be edited as text within Robohelp.
and glossary markers in the imported FrameMaker documents are converted if selected. See
FrameMaker index entries” on page 71 and “Import glossary definitions” on page 71.
Apply relevant conditional text tags to suppress variables that shouldn’t appear in online format. For
example, you can suppress the Table Continuation variable in table headers for tables that break across
pages in the FrameMaker documents.
“Hierarchical structure in a FrameMaker 9
“Import
Cross-references, hypertext,
URLs
Index and glossary markers Converted to an index and glossary when creating project. See “Import FrameMaker index entries” on
Topic name markers Converted if you select this option in the project conversion settings. Use topic name markers to create topic
Converted to hypertext links. You can map the cross-reference formats in RoboHelp so that you can remove
the volume, chapter, and page references that are not relevant in online format. Unresolved cross-references
and hypertext entries appear as text in online Help. URLs become live hypertext links in the online Help
output. See
page 71 and “Import glossary definitions” on page 71.
titles and topic filenames from the marker text. See
“Convert FrameMaker cross-reference formats to RoboHelp styles” on page 74.
“Pagination for Help” on page 75.
Last updated 12/14/2011
Page 75

USING ROBOHELP HTML 9
Projects
69
Context-sensitive Help markers Converted if you select this option in the project conversion settings. Use Context Sensitive Help Makers in
Custom markers Converted. You can use these markers for delineating topics from FrameMaker source, or to pass processing
Formats
Paragraph formats Converted. You can map FrameMaker paragraph formats to RoboHelp styles or import the source
Character formats Converted. You can map FrameMaker character formats to RoboHelp styles or import the source formatting.
Table formats Converted. You can map FrameMaker table formats to RoboHelp styles or import the source formatting. See
Footnote properties and table
footnotes
Lists Converted according to the settings you define. See “List-mapping scenarios” on page 79
Page layouts
Master pages FrameMaker master pages are ignored. Master pages are used for layout, borders, and page numbers in
FrameMaker to specify text in FrameMaker document for generating Context Sensitive Help. See
for Help” on page 75.
instructions to RoboHelp for images and tables.
formatting. See
“Convert FrameMaker character formats to RoboHelp styles” on page 77.
See
“Convert FrameMaker table formats to RoboHelp table styles” on page 80.
Converted. Because table title and table footnotes are paragraph formats in FrameMaker, you specify
conversion settings for these paragraph formats separately.
FrameMaker, so they are not applicable to online Help. RoboHelp provides master page support for
breadcrumbs, mini-TOCs, and headers and footers that can be selected when you publish a single source
layout.
“Convert FrameMaker paragraph formats to RoboHelp styles” on page 77
“Pagination
Reference pages Ignored. However, you can use the advanced scripting support in RoboHelp to convert images and graphics
Page layout, size, and
pagination
Headers/footers Ignored. Headers and footers in FrameMaker usually contain chapter names, chapter numbers, and page
Rotated text Converted to text, such as in table cells. (Rotated text is not supported in HTML).
Images and anchored frames
Images Only converted if they are inside anchored frames. If the images are not in anchored frames, reinsert them
Drawings Drawings created within anchored frames are converted to images. You can define the image conversion
Anchored frames Converted to images. See “Image conversion settings” on page 80.
ALT text on images and
anchored frames
Text frames, graphic frames,
and images inside anchored
frames
placed in the reference pages that are associated with paragraph formats.
Ignored. These elements are not applicable to online Help. See “Pagination for Help” on page 75.
numbers, which are not applicable in online formats. After you generate topics in RoboHelp, you can create
headers and footers in RoboHelp that allow you to place information at the top and bottom of topics.
after you have imported the FrameMaker files. By default, FrameMaker places the imported and linked
images in anchored frames, so they are converted. However, images placed in graphic frames are not
converted. If images contained in anchored frames are missing, RoboHelp creates blank images with the
filename in a sequential manner. See
settings. See
Converted. If no ALT text is provided in the FrameMaker document for images RoboHelp applies the
filename of the converted images as the ALT text. See
Anchored frames and their content convert to images. All content within an anchored frame, including text
frames, multiple images, and callouts convert to a single image. RoboHelp inserts the filename of the created
image as the ALT text if no ALT text is defined for the anchored frame.
“Image conversion settings” on page 80.
“Image conversion settings” on page 80.
“Create alternate text for images” on page 82.
Equations Enclose equations in anchored frames so that they are converted to images when RoboHelp converts them.
See FrameMaker Help.
Last updated 12/14/2011
Page 76
USING ROBOHELP HTML 9
Projects
Structured FrameMaker
components
XML files in book Converted like FrameMaker documents.
XHTML files in book Converted like FrameMaker documents.
70
Content references Text or files inserted into FrameMaker documents as content references appear as part of the topics where
they appear. They do not appear as references in the online Help outputs. See
page 74.
“Content reference” on
Conversion basics
Convert a FrameMaker TOC
When you import a FrameMaker book to a RoboHelp project, you can also import the table of contents (TOC). Import
the TOC into the RoboHelp project to retain the navigation structure you defined in the FrameMaker book.
1 Select File > Import > FrameMaker Document.
2 In the Content Settings dialog box, select Convert FrameMaker Table Of Contents, and browse to select the
FrameMaker TOC file.
3 Select one of the following options:
Add To Existing TOC Appends the TOC entries to any existing RoboHelp TOC in the project. Select an existing
RoboHelp TOC from the list.
Create New Associated TOC Enter a name for a new associated TOC that is added to the RoboHelp project.
Styles in the FrameMaker TOC determine which TOC items become books, sub-books, or pages. The most important
element in determining the level is the leftmost indent, followed by the font size and font weight. TOC entries that have
indented items under them become books in the RoboHelp TOC. If all the TOC entries have the same indention, font
size, and weight, the TOC in RoboHelp appears flat.
• To make a heading a main book, include indented heading levels beneath that heading, or use smaller fonts or no
bold for the subsumed headings.
• To make a heading a sub-book, place the heading under a main heading. Then include indented heading levels
beneath the sub-book heading, or use smaller fonts or no bold for the subsumed headings.
• To make a heading a page, don’t include any heading levels beneath that heading. Indent the page heading, or use
smaller fonts or no bold.
Differences between FrameMaker and RoboHelp TOCs
You can either import the FrameMaker TOC or automatically create a TOC in RoboHelp from generated topics.
• In FrameMaker, the TOC is generated according to the heading styles that you include in the TOC. In RoboHelp,
the TOC is generated according to the topic titles. If you use topic name markers in FrameMaker to name the topics
when you import FrameMaker documents, filenames in RoboHelp differ from the topic titles.
• Autocreating a TOC for a FrameMaker 9 book can create multiple layers of content because of the folder structure
in a FrameMaker 9 book.
• In RoboHelp, you can place a TOC placeholder in another TOC, thus allowing you to create nested TOCs.
Last updated 12/14/2011
Page 77

USING ROBOHELP HTML 9
Projects
Import FrameMaker index entries
RoboHelp creates an index based on the index markers in the document you are importing. However, the index file
generated in the FrameMaker book is not imported into the RoboHelp project.
1 Select File > Import > FrameMaker Document and select the FrameMaker book or document.
2 Select Convert Index in the Content Settings dialog box, and select one of the following options:
Add To Existing Index Add the FrameMaker index entries to the existing RoboHelp index of the project.
Create New Associated Index Enter a name for a new associated index that is added to the RoboHelp project.
Add To Topic Add the FrameMaker index entries to individual topics in which they appear.
Note: RoboHelp does not have any Project Level setting related to Index type. Index entries can be present in a Project
Index or Topic. FrameMaker linking allows you to select the Index type from the various possible options related to
Indexing. When output is generated from RoboHelp, the index entries present in the topic and the index entries present
in the selected (in SSL layout) Index are placed in the output.
Import glossary definitions
RoboHelp creates a glossary based on glossary markers in the document you are importing. The text inside the glossary
marker is the glossary term, and the paragraph text that contains the marker is the definition.
71
1 Select File > Import > FrameMaker Document and select the FrameMaker book or document.
2 Select Convert Glossary in the Content Settings dialog box, and select one of the following options:
Add To Existing Glossary Add the FrameMaker glossary to the RoboHelp glossary of the project. You can select the
glossary from the list.
Create New Associated Glossary Enter a name for a new associated glossary in the RoboHelp project.
Apply conditions from a Ditaval file
While importing a FrameMaker DITA map, you can apply a Ditaval file. RoboHelp processes the conditions specified
in the Ditaval file to filter content for import.
1 Select File > Import > FrameMaker Document and select the FrameMaker DITA map.
2 Select the .ditaval file to apply and click Open.
Converting FrameMaker formats to RoboHelp styles
You can define how the FrameMaker formats are converted to RoboHelp styles at the project level. All FrameMaker
format definitions in the FrameMaker document appear in the Conversion Settings dialog box, even if they aren’t used.
You specify the following:
• FrameMaker template used for conversion. This step is optional.
• RoboHelp style sheet for style mapping.
Select a FrameMaker template for conversion
If the FrameMaker document that you are importing is an unstructured FrameMaker book, you can define a single
FrameMaker template for conversion. For example, suppose the documentation set contains a Getting Started Guide,
Installation Guide, User Guide, and an Administration Guide. These documents can have different page layouts and
formats in print, none of which is relevant for online output. In such cases, you can define one template that contains
format definitions for all documents you want to convert.
Last updated 12/14/2011
Page 78

USING ROBOHELP HTML 9
Projects
You can then specify this template as the project template, which overrides the formats of individual documents at the
RoboHelp project level. You can also reuse the conversion settings across other projects by exporting the conversion
settings.
1 Select File > Project Settings.
2 Click the Import tab of the Project Settings dialog box. Select Apply FrameMaker Template Before Import.
3 Click Browse to select the FrameMaker template you want to use for the project.
Select the CSS for style mapping
You can select the cascading style sheet (CSS) that RoboHelp uses to map the FrameMaker formats to RoboHelp styles.
By default, RoboHelp uses the RHStyleMapping.css file for the project. You can also use a custom CSS. You can later
edit the styles either in RoboHelp or in an external CSS editing application such as Adobe® Dreamweaver®.
1 Select File > Project Settings.
2 Click the Import tab of the Project Settings dialog box. Do one of the following:
• Select the CSS file from the CSS For Style Mapping menu.
• Click Add next to the CSS for Style Mapping pop-up menu, and select a CSS file.
Use this option to specify a custom CSS for the project. When you select this option, RoboHelp copies the
selected CSS file into the root folder of the project, and uses the selected CSS for style mapping.
72
Upgrading from RoboHelp 7 to RoboHelp 9
RoboHelp 7 allowed document-level conversion settings for the FrameMaker documents that you added to a
RoboHelp project. With RoboHelp 8, the conversion settings are applied project-wide, allowing you to have a
consistent set of conversion parameters. If you are opening a RoboHelp 7 project that had FrameMaker documents
added by reference or by copy, you can retain the document-specific settings defined in the RoboHelp 7 project.
When you upgrade a RoboHelp 7 project to RoboHelp 9, you can either retain the earlier document-level settings or
convert to the project-level settings supported in RoboHelp 9. After you upgrade your project, you cannot open the
project in RoboHelp 7.
You can add or remove documents to an upgraded project with the document-level conversion settings. You can
define document-level conversion settings for the newly added FrameMaker documents also. This option allows you
to retain the RoboHelp 7 behavior for your upgraded project. However, to take advantage of the enhanced features of
RoboHelp 9 and its integration with FrameMaker, you should upgrade the project completely. For example, RoboHelp
7 provided limited mapping options for autonumbering and list styles. On the other hand, RoboHelp 8 allows you to
map complex autonumber formats and multilevel list styles to RoboHelp styles or HTML lists. In RoboHelp 9, list and
table import is further enhanced.
Note: You can discard the document-level settings any time, even if you choose to retain them at the time of upgrading.
However, discarding the document-level settings is irreversible.
Retain or discard RoboHelp 7 settings when upgrading
To retain the document-level settings for converting FrameMaker content into your RoboHelp project, you override
the project-level settings of the converted project with the document-level settings inherited from the RoboHelp 7
project. By default, RoboHelp allows you to retain the document-level settings by overriding the project-level settings.
1 Open the RoboHelp 7 project in RoboHelp 9.
2 Select File > Project Settings.
Last updated 12/14/2011
Page 79

USING ROBOHELP HTML 9
Projects
3 In the Import tab of the Project Settings dialog box, do one of the following:
• To retain the document-level settings in the upgraded project, select the Override Project Settings At Document
Level option. This is the default behavior.
• To discard the document-level settings and use project-level settings, deselect the Override Project Settings At
Document Level option.
Edit document-level conversion settings
If you retain the document-level settings that override the project-level settings for a project converted from an earlier
version of RoboHelp, you can edit these settings.
1 In the Project Manager pod, right-click the added FrameMaker document and select Properties.
2 In the FrameMaker Document Settings dialog box, select the Conversion Settings tab, and set the following.
Apply FrameMaker Conditional Text Build Expression Select to apply conditional text settings before converting
the added FrameMaker document.
Convert AutoNumber To HTML List Select to convert the FrameMaker autonumbering to HTML lists in the
converted HTML topics.
Context-Sensitive Help Marker Specify the context-sensitive Help marker that RoboHelp should use for generating
context-sensitive Help.
73
User-Defined HTML Tag Select the user-defined HTML tag that you want to use instead of the standard <p> tags in
the generated topics.
Note: To select FrameMaker formats on which the user-defined tag must be applied, select the FrameMaker formats
from the Project Settings dialog box.
Topic Name Pattern Specify the topic name pattern for topics generated from the added FrameMaker document.
FrameMaker Styles For Pagination Specify the list of FrameMaker paragraph formats on which pagination for
online Help topics should be done. You specify the FrameMaker paragraph formats separated by commas.
Note: Pagination is based on FrameMaker paragraph formats.
Hierarchical structure in a FrameMaker 9 book
With FrameMaker 9, you can enforce a hierarchical structure and grouping within the book. You can also include child
books within a book, and create folders and groups within a book.
When you link or import a FrameMaker 9 book, the Project Manager pod in RoboHelp shows the FrameMaker book’s
hierarchy. When linked or imported into RoboHelp, child books inherit the TOC, index, and glossary from the parent
book. See FrameMaker 9 Help for more information.
Last updated 12/14/2011
Page 80

USING ROBOHELP HTML 9
Projects
Hierarchy of FrameMaker book reflected in the Project Manager pod when you link a FrameMaker book into RoboHelp
Convert FrameMaker cross-reference formats to RoboHelp styles
By default, all cross-reference styles in the source document are used in the generated topics without mapping. Define
the mapping of these formats because FrameMaker documents can contain page and volume references in crossreferences that are not relevant to Help formats.
74
1 Select File > Project Settings.
2 In the Import tab of the Project Settings dialog box, click Edit under FrameMaker Document.
3 Select a cross-reference format from the Cross Reference group in the Conversion Settings dialog box.
4 Select a RoboHelp style to map to it, or type the RoboHelp style field to redefine the cross-references in the
FrameMaker document.
5 Double-click a building block to append it to the RoboHelp cross-reference definition.
Content reference
Text or files that you have inserted into the FrameMaker documents as content references appear as part of the topics
where they are referenced. They do not appear as references in the online Help outputs. See FrameMaker Help for more
information.
Conversion settings
RoboHelp allows you to define project-wide settings for each source type. For all FrameMaker documents, you define
the conversion settings only once. Similarly, the conversion settings of Microsoft Word documents remain the same
for imported Word documents.
Project-wide conversion settings promote consistency not just in your project but across multiple projects. You can
quickly set up a RoboHelp project without having to define individual conversion settings for paragraphs, tables,
images, and so on.
These settings include:
• Defining a FrameMaker template
• Cascading style sheets (CSS) for RoboHelp projects
• Style mapping between FrameMaker formats and RoboHelp styles
Last updated 12/14/2011
Page 81

USING ROBOHELP HTML 9
Projects
• Format conversion settings, image conversion settings, and other settings
Export conversion settings
1 Select File > Project Settings.
2 On the Import tab, click Export.
3 Specify a name for the RoboHelp Import Settings file (ISF file) and click Save.
Import conversion settings to a project
1 Select File > Project Settings.
2 On the Import tab, click Browse.
3 Select a RoboHelp Import Settings File (ISF file) and click Open.
Pagination for Help
When you link or import a FrameMaker document, you define how the contents of the FrameMaker file are presented
as topics in RoboHelp. For example, if the FrameMaker file contains ten topics, with each topic containing subtopics,
tasks, and tables, you can set each topic to appear as separate HTML files. If each of these topic headings is at Heading
1 format, you can set each Heading 1 topic to be created as a separate HTML topic. On the other hand, if you set the
pagination at Heading 2, separate HTML files are created for each Heading 2 topic.
75
Even though you can set pagination for any FrameMaker paragraph format, follow these guidelines:
Completeness of content in the topic Ensure that the topic generated contains relevant and complete information for
the reader. For example, if you set pagination for Heading 3 level paragraph, it is possible that the topic contains only
the task information, without the required contextual information that is covered in another Heading 3 level topic. To
avoid such disconnected topics, set the pagination at a higher level so that complete information is available in a single
Help topic.
Drop-down text Ensure that the paragraph format for the drop-down text body is not set for pagination. The
paragraphs applied with this format must accompany the drop-down text caption paragraph format. See
“Optimizing
for online output before conversion” on page 65.
Topic name pattern
When you set heading styles for pagination, the heading text becomes the default filename for the topic file created in
RoboHelp. For example, suppose you define Heading 2 for pagination, and the FrameMaker document has two
Heading 2 topics, “Introduction” and “Beyond basics.” In this case, RoboHelp creates the topics introduction.htm and
beyond_basics.htm. Thus, you get intuitively named HTML files that indicate the topic title. In addition to this default
scheme, you can define other naming conventions. If the filenames use sequential numbering, such as
helptopic001.html and helptopic002.html, you can define the pattern for such conventions.
1 Select File > Project Settings.
2 In the Import tab of the Project Settings dialog box, click Edit under FrameMaker document.
3 In the Other Settings tab, select one of the following:
Topic Name Pattern Topics are named according to the selected pattern. You can select one of the following or
create a topic name pattern using the Topic Name Pattern building blocks provided by RoboHelp. In addition, you
can add standard static text, such as “HelpTopic,” followed by sequential number as the topic name pattern.
Last updated 12/14/2011
Page 82

USING ROBOHELP HTML 9
Projects
Building block Converted topic name pattern
default HTML topic generated has the filename consisting of the paragraph text.
76
<$filename_no_ext>-<$paratext> HTML topic generated has the filename consisting of the filename of the FrameMaker
<$filename_no_ext>-<n> HTML topic generated has the filename consisting of the filename of the FrameMaker
<$paratext_no_num> HTML topic generated has the filename consisting of the paragraph text of the paragraph
<$paratext> HTML topic generated has the filename consisting of the paragraph text of the paragraph
Topic Name Marker Topics are named after the marker applied in the FrameMaker document. Ideally, you specify
document without the .fm extension and the topic title, separated by a hyphen. For
example, the FrameMaker document named “Chapter.fm” with "1-Introduction" as
paragraph text is converted to an HTML topic with the filename "Chapter-1Introduction.htm”
document without the .fm extension and the paragraph number separated by a hyphen.
For example, the FrameMaker document "Chapter.fm" is converted to an HTML topic with
the filename "Chapter-1.htm"
format at which pagination is set, without the paragraph number. For example, a heading
1 paragraph "1. Introduction" is converted to an HTML topic with the filename
"Introduction.htm"
format on which pagination is set. For example, a heading 1 paragraph "Introduction" is
converted to an HTML topic with the filename "Introduction.htm"
the topic name as the marker text, so that topic names reflect their content. If you select this option, the pagination
settings applied on the Paragraph Styles pane are ignored. Use this option to precisely control the creation of
separate Help topics from the FrameMaker documents.
For example, suppose you define the topic name marker "OnlineHelp" in FrameMaker. You can apply this marker
to all paragraphs that begin a new Help topic. To gain maximum flexibility in defining topic titles and topic file
names, you can enter the file name and the topic title separate by the pipe symbol (|) as the marker text for each
entry in FrameMaker.
Convert context-sensitive Help markers from FrameMaker documents
You can convert the context-sensitive Help markers that you insert in your FrameMaker documents and reuse them
as map IDs. You specify the context-sensitive Help marker in the Project Settings dialog box before linking
FrameMaker documents. You can also specify this setting when you import FrameMaker documents. You can work
with context-sensitive Help markers in FrameMaker documents in two ways:
Automatic conversion of map IDs from FrameMaker documents You apply context-sensitive Help markers in your
FrameMaker documents, and specify the marker type in the conversion settings. RoboHelp imports the markers from
FrameMaker documents and adds the map IDs from the strings contained in the context-sensitive Help markers.
Manually adding a map ID file If you received map IDs from your development team, you use these map IDs as the
context-sensitive Help marker text strings for the marker to be used as context-sensitive Help marker in your
FrameMaker documents. Later, you create a map ID file by associating the map IDs from the development team and
the context-sensitive Help marker text you inserted in the FrameMaker documents. You then add this file to the
project. When you link or import the FrameMaker documents, you specify the context-sensitive Help marker in the
conversion settings.
1 Select File > Project Settings.
2 In the Import tab of the Project Settings dialog box, click Edit under FrameMaker Document.
3 In the Other Settings group of the Conversion Settings dialog box, enter the Context-Sensitive Help Marker.
Last updated 12/14/2011
Page 83

USING ROBOHELP HTML 9
Projects
Apply FrameMaker conditional text build expressions
You can apply the Show/Hide settings of the conditional text build expressions to the content in your FrameMaker
documents imported into RoboHelp projects. RoboHelp imports the content after applying the Show/Hide settings to
the FrameMaker content. Any text that is hidden is not brought into RoboHelp project.
1 Select File > Project Settings.
2 In the Import tab of the Project Settings dialog box, click Edit under FrameMaker Document.
3 In the Other Settings group of the Conversion Settings dialog box, select Apply FrameMaker Conditional Text
Build Expression.
Converting FrameMaker content
Convert FrameMaker paragraph formats to RoboHelp styles
By default, RoboHelp converts all paragraph formats from FrameMaker to RoboHelp CSS styles, thus retaining the
appearance and behavior of the FrameMaker formats in the RoboHelp project. To ensure consistency of the online
Help projects, map the FrameMaker formats to RoboHelp styles and edit them.
1 Select File > Project Settings.
2 In the Import tab of the Project Settings dialog box, click Edit under FrameMaker Document.
3 On the Conversion Settings panel, select the FrameMaker format from the Paragraph group.
4 From the RoboHelp Style menu, select the RoboHelp style that you want to map to the FrameMaker format. To
retain the appearance of FrameMaker text in the online Help format, select [Source].
To edit the selected RoboHelp style, click Edit Style. See “Styles and style sheets” on page 155.
77
5 Select the properties for the mapped RoboHelp style:
Exclude From Output Select to discard the content in FrameMaker document that is applied with the selected
FrameMaker paragraph format.
Pagination (Split into topics based on this style) Select to create a Help topic at each occurrence for the selected
FrameMaker paragraph format. For example, if you select Heading 1 and Pagination (Split into topics based on this
style), RoboHelp starts a new topic at every instance of Heading 1.
User Defined HTML Tag Select or enter a user-defined HTML tag for the selected paragraph format.
If the selected FrameMaker format has auto numbering properties defined, specify how auto numbering is
converted.
More Help topics
“Custom HTML tags” on page 78
“Autonumber style mapping” on page 78
Convert FrameMaker character formats to RoboHelp styles
You can map the FrameMaker character formats to character styles in RoboHelp.
You can also edit the styles in RoboHelp.
1 Select File > Project Settings.
2 In the Import tab of the Project Settings dialog box, click Edit under FrameMaker Document.
Last updated 12/14/2011
Page 84

USING ROBOHELP HTML 9
Projects
3 Select the FrameMaker character format from the left pane of the Conversion Settings dialog box.
4 Select the RoboHelp character style from the pop-up menu. Optionally, you can do the following:
• To import the FrameMaker character format, select [Source] from the pop-up menu.;
• To edit the selected RoboHelp style, click Edit Style.
• To exclude the text in the FrameMaker document applied with the selected character format, select Exclude
From Output.
• To apply a user-defined HTML tag to the imported text in HTML output, select User Defined HTML Tag, and
select the tag from the pop-up menu. You can also enter a new HTML tag. The custom HTML tag for the
character format replaces the <span> tag in the generated HTML file.
Exclude a FrameMaker paragraph format from Help topics
You can exclude the content in FrameMaker documents that has a specified paragraph format from the converted
output. Use this option to remove content such as special notices that are not required in online output.
1 Select File > Project Settings.
2 In the Import tab of the Project Settings dialog box, click Edit under FrameMaker Document.
3 In the project settings, select a FrameMaker paragraph format in the left pane.
4 Click Exclude From Output.
78
Custom HTML tags
You can define or apply a custom HTML tag instead of the standard <p> tag for paragraph styles and <span> tag for
character styles in the HTML output for the formats that you import from FrameMaker. You can define separate
HTML tags for each format in the FrameMaker document.
1 Select File > Project Settings.
2 In the Import tab of the Project Settings dialog box, click Edit under FrameMaker Document.
3 In the Conversion Settings dialog box, select the user-defined HTML tag option.
4 Type the name of the custom HTML tag or select an existing tag to use instead of the default HTML tag.
Autonumber style mapping
Choose the conversion setting for converting autonumber formats in the FrameMaker document to the Help format.
If the FrameMaker document contains hierarchical numbered lists, you can choose one of the following:
Ignore Autonumber Choose this option if the autonumber text is relevant only in print format. The converted
paragraph does not contain autonumbering. For example, suppose you ignore autonumbering for the FrameMaker
paragraph format "Section2 Level." In this case, "Section 1.1: System Requirements" in the source appears as "System
Requirements" in the RoboHelp topic generated.
Convert Autonumber To Text Choose this option to retain the appearance of the FrameMaker numbered lists. The
autonumber part loses its sequencing properties and appears as part of the paragraph text in RoboHelp topic.
Convert Autonumber To HTML List Choose this option to convert the autonumber to HTML lists using HTML tags
such as <ol>, <ul>, and <li>.
Convert Autonumber To RoboHelp List Choose this option if you want to edit the generated HTML topics in
RoboHelp or use the RoboHelp styles to control the numbering properties.
Last updated 12/14/2011
Page 85

USING ROBOHELP HTML 9
Projects
List-mapping scenarios
RoboHelp allows you to convert list properties of FrameMaker paragraph formats in several ways. Consider the
following scenarios:
FrameMaker numbered list mapped to [Source]
The FrameMaker paragraph format autonumber property converts to a list according the autonumber conversion
settings you define for that FrameMaker paragraph format.
Ignore Autonumber The autonumber part of the FrameMaker paragraph format is ignored. The converted paragraph
style in the RoboHelp topic doesn't contain the list part.
Convert Autonumber To Text The autonumber part of the FrameMaker paragraph converts to text and appears as
paragraph text in the RoboHelp topic.
Convert Autonumber To HTML List Autonumber format converts to list items using HTML tags such as <ol>, <ul>,
and <li>.
Converted Autonumber To RoboHelp List Autonumber properties of the paragraph style convert to a RoboHelp list.
Example:
• Create a paragraph style "FM_Para1" in FrameMaker with autonumbering defined as <a+> and apply it to
paragraphs. The resulting paragraphs are ordered as "a, b, c, ...."
• Map the FrameMaker paragraph format "FM_Para1" to [Source].
Generated paragraphs in RoboHelp topics have the list style applied to them, where the list has properties similar to
those in the source document.
79
FrameMaker numbered list mapped to RoboHelp unnumbered style
You can map a FrameMaker paragraph format with autonumbering properties to a RoboHelp paragraph style that is
not linked to any list style. In this case, the autonumber is converted to a list according to the autonumber conversion
settings you define for the paragraph format.
Ignore Autonumber The FrameMaker paragraph autonumber is ignored and doesn't appear in the RoboHelp topic.
However, the paragraph style is mapped.
Convert Autonumber To Text The FrameMaker autonumber part is converted to text and appears as a part of
paragraph text in RoboHelp topic. The paragraph style is mapped.
Convert Autonumber To HTML List The FrameMaker paragraph format is converted to HTML list items using HTML
tags such as <ol>, <ul>, and <li>.
Convert Autonumber To RoboHelp List The autonumber properties of the FrameMaker paragraph format are
ignored. The paragraph style is mapped.
FrameMaker unnumbered format mapped to RoboHelp numbered style
In this case, the converted paragraph has the RoboHelp paragraph style and inherits the RoboHelp list style. The
Autonumber conversion options do not affect the paragraph behavior in the RoboHelp topic.
For example:
• In the FrameMaker document, create a paragraph format "FM_Para 1" without autonumber properties.
• Define a RoboHelp list style "RH_List1" in the RH style mapping CSS.
• Create a paragraph style "RH_Para1" and link the first level of list style "RH_List1" to the paragraph style
"RH_Para1".
Last updated 12/14/2011
Page 86

USING ROBOHELP HTML 9
Projects
• Map the FrameMaker paragraph style "FM_Para1" to RoboHelp paragraph style "RH_Para1".
The generated paragraph in the RoboHelp topic inherits the properties of the list style "RH_List1".
FrameMaker numbered list mapped to RoboHelp numbered list
The converted paragraph style has the RoboHelp paragraph style and inherits the RoboHelp list style. The
Autonumber conversion options do not affect the paragraph behavior in the RoboHelp topic.
For example:
• In FrameMaker, create a paragraph format "FM_Para1" with autonumbering defined as <a+> and apply it to a
paragraph so that the paragraph has an ordered list such as "a, b, c, …."
• Define a numeric list style "RH_List1" in the RoboHelp style mapping CSS with the first level definition as <x>.
• In RoboHelp, define a paragraph style "RH_Para1" and link the first level of list style "RH_List1" to the paragraph
style "RH_Para1".
• Map the FrameMaker paragraph format "FM_Para1" to the RoboHelp paragraph style "RH_Para1".
The generated paragraph in the RoboHelp topic inherits the properties of list style "RH_List1" and displays a list of
type "1, 2, 3, ...."
Convert FrameMaker table formats to RoboHelp table styles
You can map FrameMaker table formats to RoboHelp table styles. Alternatively, you can import the table formats from
the FrameMaker document. You can also edit the table formats in RoboHelp. Cells in the FrameMaker document that
are merged (straddled) cannot be unmerged (unstraddled); however, the straddled cells appear merged in the
RoboHelp topic.
80
If the FrameMaker table formats contained table titles and table footnotes, convert these paragraph formats in
FrameMaker to RoboHelp paragraph styles separately. Decide whether you want to retain automatic numbering in the
table title styles and specify the autonumbering properties for the mapped RoboHelp paragraph style. For example, if
the table title formats in the FrameMaker documents included the chapter number, such as “Table 2-3: Quarterly
Results”, you can choose to ignore the autonumbering part and have only “Quarterly Results” appear as the table title.
“List-mapping scenarios” on page 79.
See
1 Select File > Project Settings.
2 In the Import tab of the Project Settings dialog box, click Edit under FrameMaker Document.
3 Select the FrameMaker table format from the left pane of the Conversion Settings dialog box.
4 Select the RoboHelp table style from the pop-up menu and click OK. Optionally, to edit the table style in RoboHelp,
click Edit Style.
Image conversion settings
Some FrameMaker documents, especially those optimized for high-quality printing through PDF, contain images in
EPS format. Convert EPS images to web-supported image formats such as JPEG, GIF, or PNG for online Help.
You specify the following image conversion settings in the Conversion Settings dialog box:
Use PDF To Generate Images Select this option to generate web-friendly image formats from graphics linked and
inserted in FrameMaker documents. You should use this option especially if you have vector graphics formats, such
as EPS or AI, or graphics with text content in them.
Preserve 3D Images Select this option to convert the 3D graphics as a PDF file, with the 3D rendering intact within the
PDF file. To ensure that the 3D image retains its rendering, enable embedding in FrameMaker.
Last updated 12/14/2011
Page 87

USING ROBOHELP HTML 9
Projects
Preferred Dimensions Specify the dimensions for the images. Select one of the following:
• Scale Scale images as a percentage of the existing size. The aspect ratio of the images is maintained.
• Width and Height Specify the absolute image size as Height and Width, in points. Select Maintain Aspect Ratio to
ensure that the images are not skewed.
Note: To convert the images in FrameMaker documents to the actual dimensions of the images, specify the height and
width as 0pt. The <img> tag for such images in the generated HTML does not have the height and width values. This
conversion is irrespective of the dimensions of the anchored frames that contained the images.
• Maximum Dimensions Set the maximum dimensions for images in online format. Images that exceed the
maximum dimensions you specify are automatically scaled down to fit the maximum size you specify. If you scale the
images and specify an aspect ratio, RoboHelp scales the images within the maximum dimensions specified and
maintains the aspect ratio.
Use this option to avoid large images causing the browser window to scroll horizontally or vertically. For example, if
you specify the window size to be 800 x 600 pixels, you can specify the maximum dimensions to be 640 x 480, so that
the images do not exceed the window size.
Margins Set the margins for the images:
• Set equal margins on all sides by setting the margin in All Sides.
• To set margins on individual sides, set the margins on each side.
Borders Set a border for the images:
81
• To set a uniform border on all sides, select All from the Border pop-up menu. Alternatively, you can specify the side
on which you want the border to appear from the pop-up menu.
• To set the border style, select the style from the Style pop-up menu.
• To set the border color, select the color from the Color pop-up menu.
• To set the border width, select it in, in points, from the Width menu.
Format Define the image format, color depth, and quality settings for the web-supported images that are converted
from the images in the FrameMaker document:
• As Is Select this option for retaining the images in the current web-supported format.
• JPG Select this option for multicolor images such as screenshots or photographs. JPG format with a high color
depth provides the best online quality, but increases the file size. Select this option for photographs.
• GIF Select this option if the FrameMaker document contains only line art, such as schematic diagrams.
• BMP Select this option for screenshots and other images. BMP files provide good quality at an increased file size.
• PNG Select this option for screenshots.
JPEG Quality Set the quality percentage for JPG images.
Color Bit Depth Set the color bit depth for bitmap images. JPG and PNG formats can have either 8- or 24-bit color
depth, while BMP images can be have color bit depths of 1, 4, 8, 16, 24, or 32. GIF images can have only 8-bit color
depth.
Grayscale Select this option if you want monochrome images.
Last updated 12/14/2011
Page 88

USING ROBOHELP HTML 9
Projects
Preserve converted images
RoboHelp converts the images and anchored frames in the FrameMaker documents each time the topics are updated
or generated. You can skip updating the images if the corresponding images or SWF files from the corresponding
anchored frames are already present in the RoboHelp project. Use this option in the following cases:
• You want to avoid regenerating the images each time the FrameMaker document is updated
• You have edited the images in the RoboHelp project using another image-editing tool, and want to prevent
overwriting of the edited images
• You want to preserve the earlier generated image in the RoboHelp project even though the image in the
FrameMaker document has changed
If the order in which the images appear in the document or the image name has changed, you should clear this option
and allow RoboHelp to update the images.
❖ In the Image tab of the Conversion Settings dialog box, select Do Not Re-Generate Images.
Create alternate text for images
To create accessible content, create alternate text (ALT text) for images so that visually impaired users can access the
content through screen readers. If you link or import completed FrameMaker books into RoboHelp for publication,
add alternate text to graphics used in the FrameMaker documents. These entries are not visible in PDF files, but they
appear in online content when the mouse hovers over the images. See FrameMaker Help to learn about setting
alternate text for graphics and images.
82
Import a DITA map file
You can import DITA map files or topics in RoboHelp to generate XHTML output. The DITA Open Toolkit processes
the information in the DITA map file and provides the XHTML output. RoboHelp reads the XHTML output to
generate the XHTML topics, TOC, and index. RoboHelp shows processing information of the DITA Open Toolkit in
the Output View pod.
Note: RoboHelp depends on the DITA Open Toolkit to process the DITA map content. RoboHelp does not correct any
errors generated by the DITA Open Toolkit. For example, if the DITA Open Toolkit does not generate XHTML 1.0
transitional compliant files, RoboHelp does not generate errors. Therefore, the XHTML topics generated from the import
of DITA map file do not contain the meta tag
www.adobe.com" />
Note: The XHTML file must have well-formed XML.
1 Do one of the following:
• Select File > Import > DITA Map.
• Right-click the Project Files folder in the Project Manager pod. Select Import, and then select DITA Map as the
file type.
2 Select a DITA map file. Click Open.
3 In the DITA Open Tool Kit Processing Options dialog box, specify the following options:
Replace Default XSLT File For Conversion Select an XSL file to use for transforming the DITA files to XHTML
instead of the default XSL file used by the DITA Open Toolkit. The equivalent parameter for the Ant processing of
the DITA Open Toolkit file is args.xsl.
<meta name="generator" content="Adobe RoboHelp -
Last updated 12/14/2011
Page 89

USING ROBOHELP HTML 9
Projects
Use DITA Val For Conditional Processing Specify a DITA Val file to use for conditional processing of the DITA files.
The XHTML is generated based on the Val file. A DITA Val file contains filter, flagging, and revision information.
The equivalent parameter for the Ant processing of the DITA Open Toolkit file is args.filter.
Show Index Entries In The Topics Select to show index entries (marked by <indexterm> in DITA topics) in
RoboHelp topics. The equivalent parameter for the Ant processing of the DITA Open Toolkit file is
args.indexshow.
Show Image Filename In Annotation Select to add annotations to images showing the filename of the image or the
full path to include in the topics. The equivalent parameter for the Ant processing of the DITA Open Toolkit file is
args.artlbl.
Include Draft And Cleanup Content Select to include draft and required cleanup content (items identified as left to
do before publishing). The equivalent parameter for the Ant processing of the DITA Open Toolkit file is args.draft.
Select XHTML File To Be Placed In The Header Area (hdf) Select the location of the file containing XHTML to place
in the header area of the output file. The equivalent parameter for the Ant processing of DITA Open Toolkit file is
args.hdf.
Select XHTML File To Be Placed In The Body Running-header Area (hdr) Select the location of the file containing the
XHTML to place in the body running-header area of the output file. The equivalent parameter for the Ant
processing of the DITA Open Toolkit file is args.hdr.
83
Select XHTML File To Be Placed In The Body Running-footer Area (ftr) Select the location of the file containing
XHTML to place in the body running-footer area of the output file. The equivalent parameter for the Ant
processing of the DITA Open Toolkit file is args.ftr.
DITA Open Tool Kit Home Directory Select the absolute location of the home folder of the DITA Open Toolkit.
Specify the valid DITA Open Toolkit home folder. You specify this location only once. It is stored in the registry.
You can change the location.
4 Click Finish.
Note: RoboHelp verifies the location of the selected files but does not validate the files as the DITA Open Toolkit processes
all the information.
Import XML files
When you import an XML file into an existing project, RoboHelp creates a topic for the XML file.
1 In the Project Manager pod, select the file to import into.
2 Select File > Import > XML File.
3 Select one or more XML files. Click Open.
4 Select options in the Select XML Import Handler dialog box.
5 (Optional) To set advanced options, select Import XML (CSS/XSL).
6 Click Advanced.
7 Select an option:
Treat As Text Flow Import the XML file as HTML text without formatting.
Treat As XML Tree View Import the XML file in HTML tree view. HTML imports as code.
Use Customized CSS/XSL File Select a file from the pop-up menu.
Last updated 12/14/2011
Page 90

USING ROBOHELP HTML 9
Projects
8 Click OK.
Note: If multiple imported topics have the same topic name, this error is due to the XSL file used during the import
process. The XSL file used to transform the XML to HTML contains the <title> specified field. Edit the XSL file and
reimport the XML file.
Select XML Import Handler
Handler Name The following are predefined handlers:
• Import DocBook As Topics A DocBook file is imported as an HTML topic.
• Import XML (CSS/XSL) If the XML file has an associated style sheet (CSS or XSL file), the file is imported as an
HTML topic. Otherwise, the file is imported as an HTML file without any display control.
Advanced Active if you select Import XML (CSS/XSL). Click for more import options.
Automatically Replace Topic(s) Imported From Previous Session Overwrites old data.
Validate XML Before Import RoboHelp validates the XML file before importing it.
Advanced XML Import Options dialog box
These options are available for importing XML with this handler only if no associated XML style sheet exists.
Treat As Text Flow Imports the XML file as HTML text without formatting.
84
Treat As XML Tree View Imports the XML file in HTML tree view. HTML imports as code.
Use Customized CSS/XSL File Select the customized file.
Note: You can create and edit customized handler files using the XML Handler Manager and the Handler Description
File (HDF) Editor.
About the XML Handler Manager
Handlers determine how XML is imported. Select one of the predefined handlers or create a custom handler to meet
your requirements. You can select a handler when you import an XML file into a project or when you generate XML
output.
The XML Handler Manager lists all Handler Description files (HDF files) that have been exported from the HDF
Editor.
Handler Description files (HDF files) Contain individual handlers and the files necessary to perform the XML
transformation. The predefined HDF files are organized by type (XHMTL, for example) and contain all related
handlers:
DocBook This handler type includes: Import DocBook As Topics, Export Project To DocBook, Export Topics To
DocBook.
XHTML This handler type includes: Import XHMTL (XML), Import XHTML (XHTML), Export Topics To XHTML,
Export Project To XHMTL.
XML/CSS This handler type includes: Import XML (CSS/XSL).
To open an HDF file and view the handlers in it, click the plus box to the left of an HDF file.
Edit After selecting an HDF file (XHTML, for example) or a specific handler, click to open the HDF Editor and edit a
handler.
Delete After selecting an HDF file (XHTML, for example), click to delete all handlers in it.
Last updated 12/14/2011
Page 91

USING ROBOHELP HTML 9
Projects
Import Import an existing handler.
Note: Initially a handler is an HDF file with a subfolder of support files. To bring a handler file from the HDF Editor into
this program, export the HDF file as a ZDF file. Use the HDF Editor for this task.
Import Microsoft HTML Help projects
When you import an HHP file, a new RoboHelp project file (XPJ) is created.
1 Select File > Open.
2 Select HTML Help Project (*HHP) from the Files Of Type menu.
3 Navigate to the HHP file and open it.
You can also import FrameMaker (.fm, .book, and .mif) files, Word files (.doc, .docx), PDF files, and XML files.
Note: If you use an HTML editor other than Design Editor to author your content, you can still use RoboHelp for the
project.
85
More Help topics
“Create a project” on page 29
“Third-party HTML editors” on page 134
Import WinHelp projects
You can import compiled WinHelp 4.0 (HLP) or the WinHelp project file (HPJ) into a project.
The HPJ file is the main organizational file, containing all the source files. When generating WinHelp, RoboHelp
creates an HLP file and a CNT file. The HLP file doesn’t contain topics excluded by a conditional build expression, so
the new project might not mirror the original.
You can import HLP files to HTML-based projects, but the process is easier if you have the HPJ file.
You can’t output a WinHelp file from RoboHelp HTML.
Import WinHelp Project settings
Pop-ups
Smart Popups Create links that display pop-ups that resize to accommodate content. All HTML formatting is
supported.
Regular Hyperlinks Create links that open in the window in which the link appears.
What’s This Help
Text-Only Topic Files Create and save topics in text-only format (TXT). Use this option for What's This? Help topics.
Individual HTML Files Create and save topics as regular HTML topics for window-level context-sensitive Help.
Last updated 12/14/2011
Page 92

USING ROBOHELP HTML 9
Projects
External topics
Links To External HTML Help Topic Convert external WinHelp topic links to HTML topic links in external CHM files.
Retain Keep External WinHelp Topic Links HTML topics include WinHelp Topic controls. Use this option when
linking HTML topics to WinHelp topics.
Images
Converts BMP images into GIFs or JPEGs.
Bullets/Numbering
HHTML Bullets And Numbering (Recommended setting) Convert numbered lists and bulleted lists into their HTML
equivalents using Pure HTML tags (<ol>, <ul>, <li>). These lists are auto-numbered or bulleted. Special paragraph
formatting used in RTF files is not carried over.
Formatted Text Retain indents, line spacing, and other paragraph formats from RTF files. Convert numbered lists into
hard-coded numbered lists. Convert bulleted-list items into hard-coded symbol characters.
Tips:
• Remove hard-coded numbers and bullets and replace with auto-numbered lists and bulleted lists in the Design
Editor.
• Create special bulleted and numbered list styles and apply them to paragraphs after they are converted.
86
WinHelp folder import options
Folder for HTML files
Do Not Create Subfolder Save all HTML topics at the root of the project folder.
Create Subfolder Save all HTML topics in a subfolder.
Create Folders Based On Source Document Names Create and save HTML topics in subfolders based on the DOC
files.
Create Subfolders Based On TOC Structure Create and save HTML topics in subfolders, based on the WinHelp table
of contents. Books within books are created as subfolders within folders. All topics not used in the WinHelp table of
contents are saved at the root of the project folder.
Folders for images
Do Not Create Subfolder Save all image files at the root of the project folder
Create Subfolder Save all image files in a subfolder
File options
HTML File Extension Save all HTML topics using the extension selected.
Always Use Lowercase Save filename extensions in lowercase letters. Select this option for UNIX® servers.
Last updated 12/14/2011
Page 93

USING ROBOHELP HTML 9
Projects
WinHelp formatting import options
Work with or without style sheets. Without style sheets, topics format using inline styles. For external style sheets,
create new style sheets based on the formatting in WinHelp documents or select a style sheet already in use.
Inline Styles (No External Style Sheets) Convert all formatting into HTML inline styles. This option does not create or
apply styles or style sheets to the topics. Formatting is handled on a paragraph-by-paragraph and character-bycharacter basis. Apply styles after importing the project. Manually apply character and paragraph attributes to new
topics.
External Style Sheets (One For Each Source Document) Create one style sheet for each DOC file imported.
External Style Sheet Based On One Source Document Create a single external style sheet based on one DOC file. The
style sheet uses the same names and formatting as the styles in the WinHelp documents. The HTML topic text is
formatted using these styles.
External Style Sheet Based On Existing Style Sheet Link an existing style sheet to all topics. Styles in the DOC files
must have a one-to-one relationship to styles in the style sheet, including style names. Apply styles to the paragraphs
and characters that use them. With a one-to-one style relationship, styles in HTML topics use the same names and
formatting as the styles in WinHelp documents.
WinHelp general import options
87
Navigation pane
TOC Contents displays books and pages in the table of contents. The index displays keywords.
Glossary Provide definitions for the Help system.
Favorites Create a personalized list of favorite topics.
History See topics viewed previously. Sets options for the navigation pane.
Search:
No Search Select this feature to disable full-text searching.
Regular View a list of topics by title.
Advanced Provide advanced full-text search capabilities including Boolean, wildcard, and nested expressions. Limit
the search to previous results, match similar words, or search topic titles only.
Tab Position Select Top, Left, or Bottom.
Default pane
Set options for Help projects.
Websearch Quickly find topics on the web. A WebSearch button is added to the Help viewer.
Create Browse Sequences Transfer WinHelp browse sequences into HTML-based Help.
Ignore Secondary windows Format jumps to display the HTML topics in the viewer.
Note: Display pages from the WinHelp CNT in custom windows. HTML supports jumps from TOC pages to custom
windows.
Add Keywords To Selects the location for saving keywords:
Index File (HHK) Save all keywords in a single index file.
Each Topic Save all keywords in the HTML topic files referencing them.
Last updated 12/14/2011
Page 94

USING ROBOHELP HTML 9
Projects
Note: The project compiles a binary index when keywords are added to HTML topics. Topic keywords are automatically
sorted in the index and cannot be cross-referenced. They can link only to local HTML topics. The destination topics can
be displayed only in the default Help window.
Advanced
Open the HTML Help Advanced Settings dialog to further customize the viewer.
HLP and HPJ files
When you import compiled WinHelp 4.0 files, RoboHelp does the following:
• Creates an HTML-based project. Information in the HLP or HPJ file is used to create the project file (HHP) and a
RoboHelp project file (XPJ).
• Creates HTML topics. Information in the HPJ file is used to create an HTML Help file and a RoboHelp project file
(XPJ). Open the project to open the XPJ file. A separate HTML topic is created for each WinHelp topic. These files
are saved in the HTML Files (Topics) folder.
• Converts WinHelp graphics to HTML images. WinHelp bitmap files (BMP, MRB) and metafiles (WMF) convert
into Graphic Interchange Format files (GIF). Images that are right-aligned are left-aligned in the HTML topics.
Modify the size and placement of these images in the Design Editor.
• Converts hotspot images into image maps. WinHelp hotspot images (SHG files) convert to HTML image maps
(GIF).
• Converts WinHelp navigation to HTML navigation. WinHelp jumps convert into HTML hyperlinks. WinHelp
pop-alls convert to smart ups. Browse sequences also convert. Mid-topic jumps are maintained.
• Maintains authorable buttons. Authorable text buttons, mini buttons, and graphic buttons all convert and work in
the HTML topics. Modify authorable buttons in the Design Editor. Authorable buttons are known as Link Controls
and HTML Help controls.
• Creates an HTML table of contents. An HTML Help table of contents (HHC file) is created from the WinHelp
contents file (CNT). Modify the table of contents in the TOC Composer.
• Creates an HTML index. An HTML Help index (HHK file) is created that includes the same keywords as in
WinHelp. A new index includes keywords that match jumps in the topic.
The RTF files are used to create an HTML index that includes the same keywords. Modify keywords in the Index
Designer and use the Smart Index wizard to automate indexing tasks.
88
Note: This information doesn’t apply to every HLP or HPJ project.
HTML projects from WinHelp: Frequently asked questions
Will WinHelp macros work in the HTML project?
All WinHelp macros with HTML counterparts are converted and included in the HTML project. Non-standard
WinHelp macros with no HTML equivalent are not converted.
Can HTML topics open in custom windows as in WinHelp?
You can format books and pages in the TOC to display destination topics in custom windows or frames. Microsoft
HTML Help does not support links to custom windows, though you can format these links to use pop-up note
windows and frames.
Last updated 12/14/2011
Page 95

USING ROBOHELP HTML 9
Projects
Can I use tabs in HTML topics?
HTML does not support tabs and converts them to spaces. Use tables instead to position text in HTML.
How can I add spaces to position text in HTML topics?
You can edit topics in the RoboHelp HTML Editor and add non-breaking spaces to position text. However, display
issues can occur if the Help window is resized. Consider using tables instead to position text in HTML.
Tables convert into HTML topics, but the columns do not resize properly and a horizontal scroll bar appears.
Use the Design Editor to resize cells and tables.
How can I fix incorrectly formatted bullet lists?
You can remove broken bitmap references from topics and use HTML bulleted styles, and adjust hanging indents. You
can also use the Formatted Text option to import paragraph formatting from Word documents.
My WinHelp topics use manually numbered lists with {SEQ} fields. What happens to these fields?
HTML does not support {SEQ} fields, but recognizes number sequences and converts the lists into numbered
paragraphs. You can delete these numbers and apply an HTML numbered style to the list.
What happens to nonscrolling regions?
HTML projects do not support nonscrolling regions, and the tri-pane output window does not need them.
89
The background in the Design Editor is gray, but in the preview window is white. How can I make the background
always white?
The style sheets use a gray background (the HTML default), while the preview window uses a background specified by
your browser. To change the style sheet background, see
“Use color and images” on page 163.
When I click a hyperlink, an error says the system cannot open the site or find the path. What does this mean?
The link is to a non-existent file or a topic in a DOC or WinHelp Help file not included in the project.
After I create the HTML project, is it ready to distribute?
Open the HTML project in RoboHelp, review the topics, TOC, index, and so forth. Preview the topics and test the
links.
Will context-sensitive topics transfer into an HTML project?
What's This? topics in RoboHelp for Word can convert into text-only topics. Dialog box level topics can convert into
individual HTML topics for use as window-level Help in RoboHelp.
Import a WinHelp HLP file into an HTML project
1 In the Starter pod, click More under Import.
2 Select WinHelp (*.hlp) and click OK.
3 In the Help-To-HTML wizard, define options for your HTML project.
4 Click Browse, navigate to the HLP file, and open it.
5 Click Next. Set up File options:
Last updated 12/14/2011
Page 96

USING ROBOHELP HTML 9
Projects
Desired Result Actions
90
Specify a hard drive and folder for saving the HTML project and
image (GIF) files (use the same folder for both).
Limit the length of the HTML files to eight characters. Select Short Filenames. (Enter the first three characters in Prefix if
Distribute the HTML project as uncompiled HTML Help (not using
Adobe WebHelp)
Distribute the project as compiled Microsoft HTML Help or crossplatform Help using Adobe WebHelp, JavaHelp, or Oracle Help
output.
Click Browse and navigate to the drive/folder to select it. Or
enter the name of the folder in the text box.
you want the filenames to use similar naming conventions.)
Enter the name of the start page in Start Page Name.
Do not enter information in Start Page Name.
6 Click Next. Set up Style options:
Desired Result Actions
Format HTML topics without attaching style sheets to them. Select <No Stylesheet>. All topics use default HTML styles, gray
Format HTML topics to look exactly like the WinHelp topics. Select <Embedded>. Style sheets are not attached to topics. All
Attach a custom style sheet to all HTML topics. Click Browse and navigate to the drive/folder where the style
background, black serif font.
formatting is embedded in individual topics. The topic title is
Heading 1 style. All other text (regardless of the styles used in
WinHelp) is in Normal style.
sheet file (CSS) is located to select it.
7 Click Next. Set up HTML Help options:
Desired results Actions
Specify where the Contents, Index, and Search tabs are displayed
in the viewer.
Convert your WinHelp pop-up windows into standard HTML links. Deselect Display Popups In An Active pop-up window.
Select Top, Side, or Bottom.
8 Click Finish.
Version-control projects may have more options.
Tips:
• If you link a style sheet to your HTML topics, a generic style sheet file called StylesCSS is created and added into
your project folder. You can modify the styles in this style sheet at any time.
• If you select Convert Numbered lists, all WinHelp topics that use numbered lists retain the numbered list
formatting in the HTML topics.
HTML limitations with HLP files
Bullets Make sure that the WinHelp topics do not use bitmap references as bullets. You can select an option to keep
bulleted lists. This option applies only to topics that use bullet characters and not images. If you use images, the HTML
output might not include hanging indents.
HTML jumps Jumps to HTML pages are not converted. You can easily re-create the links in the Design Editor after the
HTML topics are created.
Jumps to external WinHelp topics
using WinHelp projects (especially master projects) that include external jumps, use the HPJ file instead of the HLP file.
Jumps to external WinHelp topics are stripped out of the HTML topics. If you are
Last updated 12/14/2011
Page 97

USING ROBOHELP HTML 9
Projects
Macros, buttons, and shortcuts These macros convert: Jump Context, JumpId, and PopupId. Other macros are not
converted. Jump Context macros that send output to a window do not convert because links that send output to
custom windows are not supported. Only buttons convert for Popup Context macros. Graphic buttons retain their
images, but the button is not included.
Microsoft Word HTML styles Microsoft Word HTML styles are not used to format the HTML topics.
Microsoft Word templates Word templates that are used to format RTF files in WinHelp are not converted to HTML
style sheets.
91
Mid-Topic jumps
Mid-topic jumps are converted to bookmarks. The bookmark name does not use the mid-topic jump
topic ID that was created in WinHelp. Instead, it is assigned a sequence of numbers so that it can be read in the HLP file.
Multimedia files (AVI and WAV) These files cannot be converted with HLP files. You can add sound and video to
HTML topics in the Design Editor. HTML topics can use AVI, AU, MID, RMI, WAV, and other files.
Non-scrolling regions HTML-based output does not support non-scrolling regions.
Numbered lists Numbered lists use a 12-point serif font by default. You can create a numbered list style and use it to
reformat numbered lists.
Related Topics buttons Related Topics keywords are translated into Related Topics terms. You see customizable
buttons when you view the topics.
Secondary windows WinHelp secondary windows are not translated. Unlike WinHelp topics, HTML topics do not
support links that display information in secondary windows. You can design custom windows in RoboHelp and use
them to display topics selected from Related Topics buttons, Keyword Link controls, See Also controls, the table of
contents, and the index.
Table of contents The HTML TOC file (HHC) does not support WinHelp pages that link to external WinHelp topics
or reference macros or that contain link statements. You can link HTML TOC items to HTML topics, web and e-mail
addresses, FTP sites, newsgroups, and multimedia.
What's This? Help Context-sensitive Help is not converted. What's This? Help-style topics or dialog topics are
converted into regular HTML Help topics. You can import map files and assign map IDs for the window-level Help
topics. For What's This? Help, you can re-enter the text from these HTML Help topics into a text-only dialog box and
create text-only topics. You can also import context-sensitive Help created with the What's This? Help Composer into
your HTML Help projects. If you use the HPJ file, you can transfer the context-sensitive Help topics into HTML Help.
Microsoft Word formatting Formatting that is not converted in the HTML topics includes underlining, paragraph
spacing, indents, alignments, table borders, spreadsheets, background colors, and watermarks.
Tips for creating HTML projects with HLP files
• Help files for Windows 3.x and 95 and later are supported.
• HTML topics cannot use styles and formatting from the WinHelp project. All topic titles are formatted to the
Heading 1 style and the rest of the topic is formatted to the Normal style.
• Embed the formatting when selecting style options. Instead of attaching a style sheet, the HTML topics are
formatted to closely resemble the formatting used in the WinHelp topics.
• A style sheet is not required. It can be created after generation.
• If the entire WinHelp project is available, create the HTML project using the HPJ file rather than the HLP file.
Import a WinHelp HPJ file into an HTML project
1 Select File > New > Project.
Last updated 12/14/2011
Page 98

USING ROBOHELP HTML 9
Projects
2 Click the Import tab.
3 Select WinHelp Project. Click OK.
4 Click the browse button, and select the HPJ file to import. Click Next.
5 Specify the output folder and filename.
6 Under Choose Source Document(s), select the Word documents you want to import.
7 Click Finish or click Next to step through the remaining steps in the wizard.
Tips for creating HTML projects with HPJ files
• To ensure that the HTML project suits your preferences, review the steps before you start.
• All files referenced by the WinHelp project (HPJ) must be in the locations you specify before you generate the
project files.
• You can create a single style sheet and apply it to all topics or use different style sheets for different topics.
• WinHelp topics can use a combination of defined styles and manual character and paragraph formatting. If so,
create style sheets that use the same styles from the WinHelp topics to retain the special formats.
• You can select an existing style sheet that you use with other HTML projects. Make the style names in the WinHelp
topics identical to the style names in the style sheet. Also, format the paragraphs in the WinHelp topics to use these
styles. Otherwise, you'll have to apply styles from the style sheet to paragraphs in the HTML topics after the project
is generated.
• You do not have to use a style sheet at all. The HTML topics include the formatting from the DOC files (as inline
styles which are individually formatted paragraphs and characters). You can always create styles and apply them to
topics after the HTML project is created. (If your project is large, do use style sheets to create the HTML topics.
When you revise the styles, the topics are automatically updated.)
• Run a small test project to become familiar with the options. Experiment with different options until you get the
HTML output you want.
• If you are generating a large project, decide how you want to organize it beforehand. In HTML, you have one
HTML topic file for each WinHelp topic. You have several options for organizing these files. You can save them at
the root of the project folder or in a subfolder. You can create subfolders based on the DOC filenames and save the
corresponding topics in them. Finally, you can save topics based on their use as pages in the table of contents.
(Folders are created for each book and subfolders are created for sub-books in your CNT file.)
• Often a project is used in combination with several other WinHelp projects (for example, as a master project). If
so, create HTML projects with each HPJ file separately so that all the links work.
• After the project is generated, you often want to make a few changes to the style sheet. By default, it uses a gray
background. You can change it to white by changing the document properties for the style sheet.
92
Adding projects to version control
Note: Authors must use the "Add to Version Control" command from within the RoboHelp authoring client app itself
when adding a new project to version control. Do not add the folders and files within the RoboSource Control Explorer
interface, as this might cause file corruption.
Last updated 12/14/2011
Page 99

USING ROBOHELP HTML 9
Projects
About version control
RoboHelp works with version control software to check out files automatically (if already not in use) when you begin
editing and tracks their use. You can also view files by opening them from version control without checking them out.
To work with RoboHelp, your version control software must support the Microsoft SCC API. You can use Adobe
RoboSource Control (installed with RoboHelp) or a third-party package. Either way, you perform version control
tasks from within RoboHelp.
Read the following articles if you plan to integrate RoboHelp projects with Microsoft Team Foundation Server or
Subversion:
• Integrating RoboHelp projects with Team Foundation Server
• Integrating RoboHelp projects with Subversion
When you finish with a file, you can check it into version control, or let the program check in all files when you close
the project. Once your changes are checked in, other authors can access them. You can also set RoboHelp to
automatically check in files when you close the project.
Note: If you cannot check out a file, check if one or more files is checked out by another user. Or, check if the file is not in
version control.
Many topics are linked to other topics, or part of the TOC, index, and browse sequences. When you modify a file or
change the project structure, RoboHelp automatically checks out all affected, dependent files (if available). When you
move a file, the author is prompted to check out the source and destination folders.
93
To turn off prompts when performing version control tasks manually, deselect the option on the Version Control tab
(Select Tools > Options). Files are then checked out automatically. Files not selected in the list cannot be checked out.
RoboHelp shows which files you must check out and whether they are already checked out.
Note: RoboHelp checks out all the dependent files automatically.
To undo any changes in the checked out copy of a version-controlled file, undo the checkout of the file listed. Then
return to the latest copy from version control. This Undo Check Out command discards changes to the local file copy.
Version control safeguards files as you work, provides revision tracking, makes backups, and can provide file sharing
and organization. All files added to a project under version control are automatically added to version control and
checked out. All files removed from a project are automatically removed from version control, though file history is
retained.
You can perform version control tasks from project panes: Right-click the file, select a command, select the file, and
click a Version Control toolbar button. Or, select the file and then select an option from File > Version Control.
Apply version control
1 Install version control software that supports the Microsoft SCC API.
2 Work with your network administrator to address user access. See your version control software documentation.
3 Add the project to version control.
Access version control options in pods
File status pod Select View > Pods > File Status. Shows the list of files for file status and version control tasks. The
Version Control toolbar provides access to version control tasks.
Topic list pod Select View > Pods > Topic List. Use to open, view, and sort topics.
Last updated 12/14/2011
Page 100

USING ROBOHELP HTML 9
Projects
Project Manager pod Select View > Pods > Project Manager. Displays file icons. A red check mark indicates that a file
is checked out.
Note: The RoboHelp user interface is optimized for RoboSource Control, Microsoft Team Foundation Server 2005, and
Microsoft Visual SourceSafe.
Version control FAQs
How does version control work?
A Help project includes topics, graphics, style sheets, TOC, windows, and other components, each with its own file so
authors can work on components independently.
How can multiple authors use version control?
• Edit project components while authors edit other components.
• View project components even while they are being worked on.
• Get the latest changes (after authors check in files).
• Configure and use version control from RoboHelp. (Using version control on your project outside RoboHelp is not
recommended.)
94
Can single-user projects use version control?
Yes, to use revision tracking, and to centralize projects onto a network for backup.
Are multiuser checkouts OK?
Multiuser checkouts are not recommended.
Where can I set version control options for RoboHelp?
Click Tools > Options > Version Control.
Will I need my version control program outside RoboHelp?
When removing files or folders from your project, remove them from version control also. Also use your version
control software to create user accounts or set program properties. You can open version control from RoboHelp.
Should I check out the project file (XPJ) to edit the project?
You don’t have to check out the XPJ file when editing. You check out the XPJ file only if you edit project settings.
Are items added to the project also added to version control?
Yes. New topics are added immediately; new folders are added when you save the project. When you rename a file or
folder, it is not renamed in version control. The new item is added, but the original item remains with its old name.
Remove the item by going into version control.
Save your project whenever you add files, but be sure to check files back in to add changes to version control. Changes
saved to your local hard drive aren’t added.
Are items removed from the project removed from version control?
Files are removed from version control as you delete them. Renamed items are added under their new name, but the
old version remains under its old name.
Last updated 12/14/2011
 Loading...