

Page 1
Reviewer’s Guide
ADOBE®ROBOHELP® 8
Innovative new features for online authors and their audiences
Adobe® RoboHelp® 8 software is a professional authoring tool for developing help systems, eLearning
content, policies and procedures and knowledge bases.
• Enhanced editing and layout
Contents
What you can create with Adobe
RoboHelp 8 ......................................... 2
What’s New in Adobe RoboHelp 8..... 3
Existing features authors have come to
expect .................................................. 7
Publishing Features – special
enhancements for the end-user............ 9
Single Sourcing Features - write once,
distribute to many audiences............. 40
Productivity Features - Work quicker,
smarter, more efficiently ................... 46
Usability Features - making the work
environment easier ............................ 49
Adobe RoboHelp Server 8 - robust search,
easier to administer ........................... 52
Major Online Help Enhancements with
Adobe AIR ........................................ 55
Additional resources and links .......... 58
System Requirements........................ 60
capabilities - An easy to use visual
editing environment makes it easy
for authors to create standardsbased, validated XHTML code.
• Scalable Single Sourcing - From
one single project, you can publish
to multiple channels and
audiences. Use batch processing to
publish many formats including
WebHelp, Adobe FlashHelp®,
Compiled HTML Help, JavaHelp,
Oracle Help for Java™ and
WinHelp. Now, you can also
publish as an Adobe AIR™ application.
• Automation with built-in Scripting - Choose from provided
scripts or create your own scripts with Adobe ExtendScript
Toolkit CS4 software (included in this release). For example, you
can now add a dialog (User Interface) and add features and
functions to the product which are customized to your workflow.
• Multimedia eLearning platform - Include engaging interactive
content such as PDF documents, FLV files, Adobe Captivate®
show-me demos, and 3D models.
• Robust end-user search functionality - Custom search keywords,
synonyms, search context provided in results, exclude topics from
search, search term highlighting, search rank, and ability to
search text of MS® Office, Adobe PDF documents.
Page 2
Part of the Adobe®
Technical
Communication
Suite 2
It’s all part of the Adobe® Technical Communication Suite 2, a total authoring
solution that combines the power of Adobe RoboHelp®, 8, Adobe FrameMaker®,
9, Adobe Captivate®, 4, Adobe Acrobat 9 Pro Extended and now includes Adobe
Photoshop®, CS4 software!
Now with support for Adobe AIR™ output format that has excited the help
authoring community at international conferences such as the Society for
Technical Communication, WritersUA and DocTrain as well as Tekom and the UA
Conference in Europe and AOCD in Australia.
Adobe RoboHelp software’s product line includes Adobe RoboHelp 8 and Adobe
RoboHelp Server 8 software (sold separately). Adobe RoboHelp 8 comes with
these applications:
• Adobe RoboHelp 8 HTML
• Adobe RoboHelp 8 for Microsoft® Word
• Adobe RoboSource Control 3.1
• Adobe RoboScreenCapture 2.0
•Adobe PDF Creator Add-on 9
• Adobe ExtendScript Toolkit CS4
What you can create with Adobe RoboHelp 8
Use this best-of-breed application to create single-sourced output for multiple
channels:
Online help for
applications
Knowledge bases Easy lookup of information by a growing number of contact center professionals
Policies and
procedures
manuals
Many companies have used Adobe RoboHelp to create the online help that is
provided with their desktop and browser-based applications to provide online user
assistance.
who handle email, chat and phone support. All of this is powered by the best in
class Search features.
Employees can quickly find accurate up to date information that keeps an
organization running smoothly. Technical writers, content developers, and subject
matter experts can write structured, searchable documents that can be easily
accessed by anyone in an organization.
Adobe RoboHelp 8 Reviewer’s Guide 2
Page 3

An eLearning
launch pad
When combined with Adobe Captivate 4 demonstrations, interactive simulations
and quizzes, Adobe RoboHelp 8 output becomes a powerful repository for
eLearning courses, lessons and virtual classrooms. The author or instructional
designer can use popular Adobe Captivate (v2, 3, 4), which utilizes learning
animations with text and FLV files playable in Adobe Flash® Player. Instructional
Designers around the world use Adobe RoboHelp to create Performance Support
Systems. From the published online project, learning objects can communicate
with Learning Management Systems such as Adobe Connect™ Professional
software and other open standards-based SCORM or AICC compliant programs.
Adobe AIR help
applications
Easy-to-generate Adobe AIR help applications to keep your information base up
to date with a single file that combines the best of the Web with speed of the
desktop.
What’s New in Adobe RoboHelp 8
Publishing Features – special enhancements for the end-user
Adobe AIR™ technology provides a revolutionary new help application that
provides many new ways for users to find information, add and share
comments, in a system that is always up to date. It combines the best of the
Web as well as the desktop, whether the user is online or not. Authors can
generate this exciting new Adobe AIR help application and package it for easy
deployment and management of automatic updates. See “Ad ob e A IR -
revolutionary Web 2.0 features for the end-user” on page 9.
Powerful Search
engine
Search results are ranked by relevance with the initial text of the topic for context,
search highlighting, a synonym editor and a brand new Keyword Search that can
be defined to help the user find what they are looking for. Also added is a way to
define search Phrases as well as Substrings. Another major feature is that text in
Adobe PDF and MS Office documents can be searched. See “Powerful Search
engine” on page 17.
Enhanced Printed
Documentation
options
Breadcrumbs /
Mini TOC
Improved Glossary Glossary definitions which are edited are automatically updated in glossary
Adobe RoboHelp 8 Reviewer’s Guide 3
More flexibility in mapping your online output styles to the printed version in
Microsoft® Word or Adobe PDF. See “Enhanced Printed Documentation options”
on page 20.
Breadcrumb navigation and/or a Mini TOC can be added with placeholders on a
topic basis or with Master Pages. If preferred, breadcrumbs can be added globally
with a single checkmark when generating output. See “Breadcrumbs” on page 21.
hotspot links. See “Improved Glossary” on page 24.
Page 4

Merged Help
implementation
Twisties Twisties provide both expanded and dropdown hotspots and can now have
Merged project enhancements provide a visually intuitive way to merge child
projects which become part of a master TOC. See “Merged Help Implementation”
on page 24.
configurable images which provide a visual cue to the user. See “Twisties -
expanded hotspots with graphic cues” on page 24.
More author-friendly enhancements
Adobe RoboHelp 8 is now an XHTML Authoring Tool
• Clean XHTML code editing in RoboHelp software’s popular visual editing
environment. See “A new XHTML Editor produces clean, standards-
compliant code” on page 26.
• Code validation to assure World Wide Web Consortium compliance. See
“Code validation is easy with a simple command” on page 28.
A new Styles and
Formatting pod
World class Table,
List and
Autonumbering
Easier import of
MS® Word and
Adobe
FrameMaker files
Linking MS® Word
files
Import DITA Topic-based content into a RoboHelp HTML project. This allows the DITA author
Quickly apply, create or edit CSS styles. See “Styles and Formatting Pod” on
page 41.
Table designs (with many new prepared templates) can now be created or
modified in the Styles editor using a graphical preview and exposed formatting
tools. List support now includes enhanced handling of standard HTML Lists,
MultiLevel lists and customizable autonumbering. See “World-class Table,
Standard HTML List, MultiLevel List and Autonumbering support” on page 28.
Define common Import and Conversion Settings for consistent use of CSS and
Style Mapping across all projects. See “Set Import choices for easier import of MS®
Word and Adobe FrameMaker files” on page 36.
By linking to MS® Word files you can keep your content updated to the original
source MS® Word document without re-importing each time. See “Linking MS®
Wor d f il es” on page 38.
to take advantage of RoboHelp software’s rich feature set of TOC, Index, Glossary
and advanced publishing options. See “Import DITA topic-based content” on
page 39.
Enhanced Unicode
and Language
Support
Adobe RoboHelp 8 Reviewer’s Guide 4
There is now Unicode and language support at the topic and paragraph level. See
“New multiple language support at paragraph, topic, and project level.” on
page 35.
Page 5

FLV format now
supported
IFrame support Include an external HTML or PDF inside a topic. See “IFrame support” on
For compelling eLearning and video presentations. See “FLV format now
supported” on page 35.
page 35.
Single Sourcing Features - write once, distribute to many audiences
Brand new CSS
Editor
Master Pages
(formerly
Tem pl at es )
Resource Manager Allows you to manage and reuse assets (including Images, Topics, Stylesheets,
Formatted Userdefined Variables
(UDV)
Provides a graphical way to define Table Styles, and complex List Styles. See
“Brand new CSS Editor” on page 40.
Help separate layout and styling from content. There are new placeholders for
breadcrumbs and a “mini” Table of Contents and the Body section of each topic.
See “Master Pages provide consistency and add navigational enhancements” on
page 42.
Multimedia and Snippets) across multiple Robohelp projects. See “Resource
Manager - Storing and Sharing common resources” on page 44.
Provide a robust way to make global changes to common blocks of content
throughout many topics. A major new enhancement is the addition of formatting
and the inclusion of such things as images and links which are easily created in a
Design and HTML editor. See “Formatted User Defined Variables - and Variable
Sets for single sourcing” on page 45.
Productivity Features - Work quicker, smarter, more efficiently
Scripting Automate with built-in scripts or create your own. The entire Adobe Extended
Scripting Toolkit CS4 is included with Adobe RoboHelp 8, including many readymade scripts to get you started. See “Robust new built-in Scripting allows you to
automate many tasks” on page 46.
Integration with
other Adobe
applications
Custom To Do List This popular RoboHelp favorite now allows you to edit the supplied tasks and add
Adobe Captivate 4, RoboScreenCapture and RoboSource Control are separate
applications that are integrated into the Adobe RoboHelp 8 interface. See “Ad o b e
Captivate 4 - used by instructional designers throughout the world” on page 48.
your own items depending on your own workflows. See “Customized To-Do List”
on page 49.
Usability Features - making the work environment easier
Project Manager
Enhancements
Adobe RoboHelp 8 Reviewer’s Guide 5
RoboHelp software’s strength has been its ability to help the author keep track of
the many assets in a given project. Now, you can drag and drop topics and folders
Page 6

to create the same hierarchy used in the TOC. There is a choice to customize the
list of files shown or switch to the traditional view with its virtual folders.
See
“Project Manager Enhancements” on page 49.
UI Enhancements Color-coding to show pods with focus, easy close of topics in Design Editor, more
tooltips on Navigation buttons and more robust right-click Context Menu support
are some of the user-friendly changes to the interface. See “UI Enhancements” on
page 50.
Option to install
RoboHelp for
Word
Custom File Type
mapping dialog
More functionality
added to existing
features
You can now choose whether or not to install this application and create desktop
icons. according to your preference. See “Option to install RoboHelp for MS®
Wo r d” on page 51.
In addition to choosing your preferred HTML editor, there is an enhanced dialog
to associate file extensions with your choice of applications. See “Custom File Type
mapping dialog” on page 51.
Snippets can now be added to Popups and Drop-down hotspots and DHTML
effects in non-IE browsers. Because of improved HHActiveX support, Glossaries
and Browse Sequences can be included in the HTML Help (.chm) format in
Chinese, Japanese and Korean (CJK) multibyte languages. Improvements have
been also been made to Multiple TOC, Index and Glossary editing (including the
ability to update Glossary definitions automatically.)
Adobe RoboHelp Server 8 - Now with versatile authentication and restricted access
Adobe RoboHelp Server 8 software (Optional purchase) - A completely rewritten
and redesigned Java-based server is cross platform compatible and easy for the
author to generate feedback reports for continuous improvement of the help
system. Here are the highlights followed by the details below. See “Ad o b e
RoboHelp Server 8 - robust search, easier to administer” on page 52.
• Search results are more responsive.
• Generate User Feedback reports.
• Supports the open source (free) Tomcat Servlet Container.
• Supports both Apache as well as Windows® Internet Information Services
(IIS) Web servers.
• The new Java-based server is much easier to install and maintain than
previous versions.
• Create restricted areas with different access permissions for different user
groups.
• Authentication enabled and includes LDAP integration.
Adobe RoboHelp 8 Reviewer’s Guide 6
Page 7

• Now supports REST Web services, instead of SOAP in previous version.
Existing features authors have come to expect
While this Reviewer's Guide focuses on new features, here is a recap of features
introduced in previous versions:
• Single Sourcing - Adobe RoboHelp software continues its innovative history
of helping authors publish to multiple channels with more output formats, all
within one single project.
• Snippets - Reusable blocks of content can be placed throughout a project
making it easy to swap out the content quick updating.
• Conditional Build Tags - Authors can assign tags to content which can be
excluded when the output is generated. One single source project can be
customized for many audiences.
• Multiple TOCs, Indexes and Glossaries - Versatile workflow for multiple
audiences
• Multiple Document Interface (MDI) - Have more than one topic open at a
time for quick switching.
• Environments - Create author defined workspaces called Environments which
can be customized and saved.
• Custom toolbars and menus - Provide the most comfortable workspace for
the author.
Before you begin your tour of Adobe RoboHelp 8
There are sample files for the hands-on “Try it” exercises included with this
Reviewer’s Guide.
There are also Adobe Captivate software “Show me” videos to visually guide you
through many of the exercises. Links to these videos will be found at the end of this
guide.
Installation of
Adobe RoboHelp 8
If you do not already have Adobe RoboHelp 8, a trial version may be downloaded
at www.adobe.com/go/try/robohelp. For system requirements, see “System
Requirements” on page 60.
When the installation dialog appears, select radio buttons for Adobe RoboHelp 8,
Adobe PDF Creator Add-on (deselect if you have a different compatible product)
and the Adobe ExtendScript Toolkit. After the installation, refer to the ReadMe file
that is installed by default along this path for more information.
Adobe RoboHelp 8 Reviewer’s Guide 7
Page 8

C:\Program Files\Adobe\Adobe RoboHelp 8\Readme.htm (or readme.pdf).
Opening a project and converting it to Adobe RoboHelp 8 will make it
incompatible with previous versions. Therefore, it is best practice to install trial
versions on test machines.
Install TryItExercises
Also accompanying the Reviewer’s Guide, are the Tr y It - E xe r ci s e -F i l es . Copy and
unzip this file to your local hard drive. This contains a special edition of the Web
Graphics Sample project. This is similar to the sample project that accompanies
RoboHelp, but has been modified for the exercises that follow. After copying the
files, start RoboHelp and open the project with these steps.
1. Do one of the following:
Open RoboHelp by double-clicking the desktop icon named “Adobe RoboHelp 8 HTML”.
Or,
Click Start > Run > type “robohtml” and click OK.
2. RoboHelp will open to its start page.
3. On the start page, click the Open folder icon.
4. From the Open Project dialog click the Sample icon in the lower left panel.
5. Open the WebGraphics folder (sample project).
6. Double-click on the We bG r a ph i c s .x p j (RoboHelp's project file).
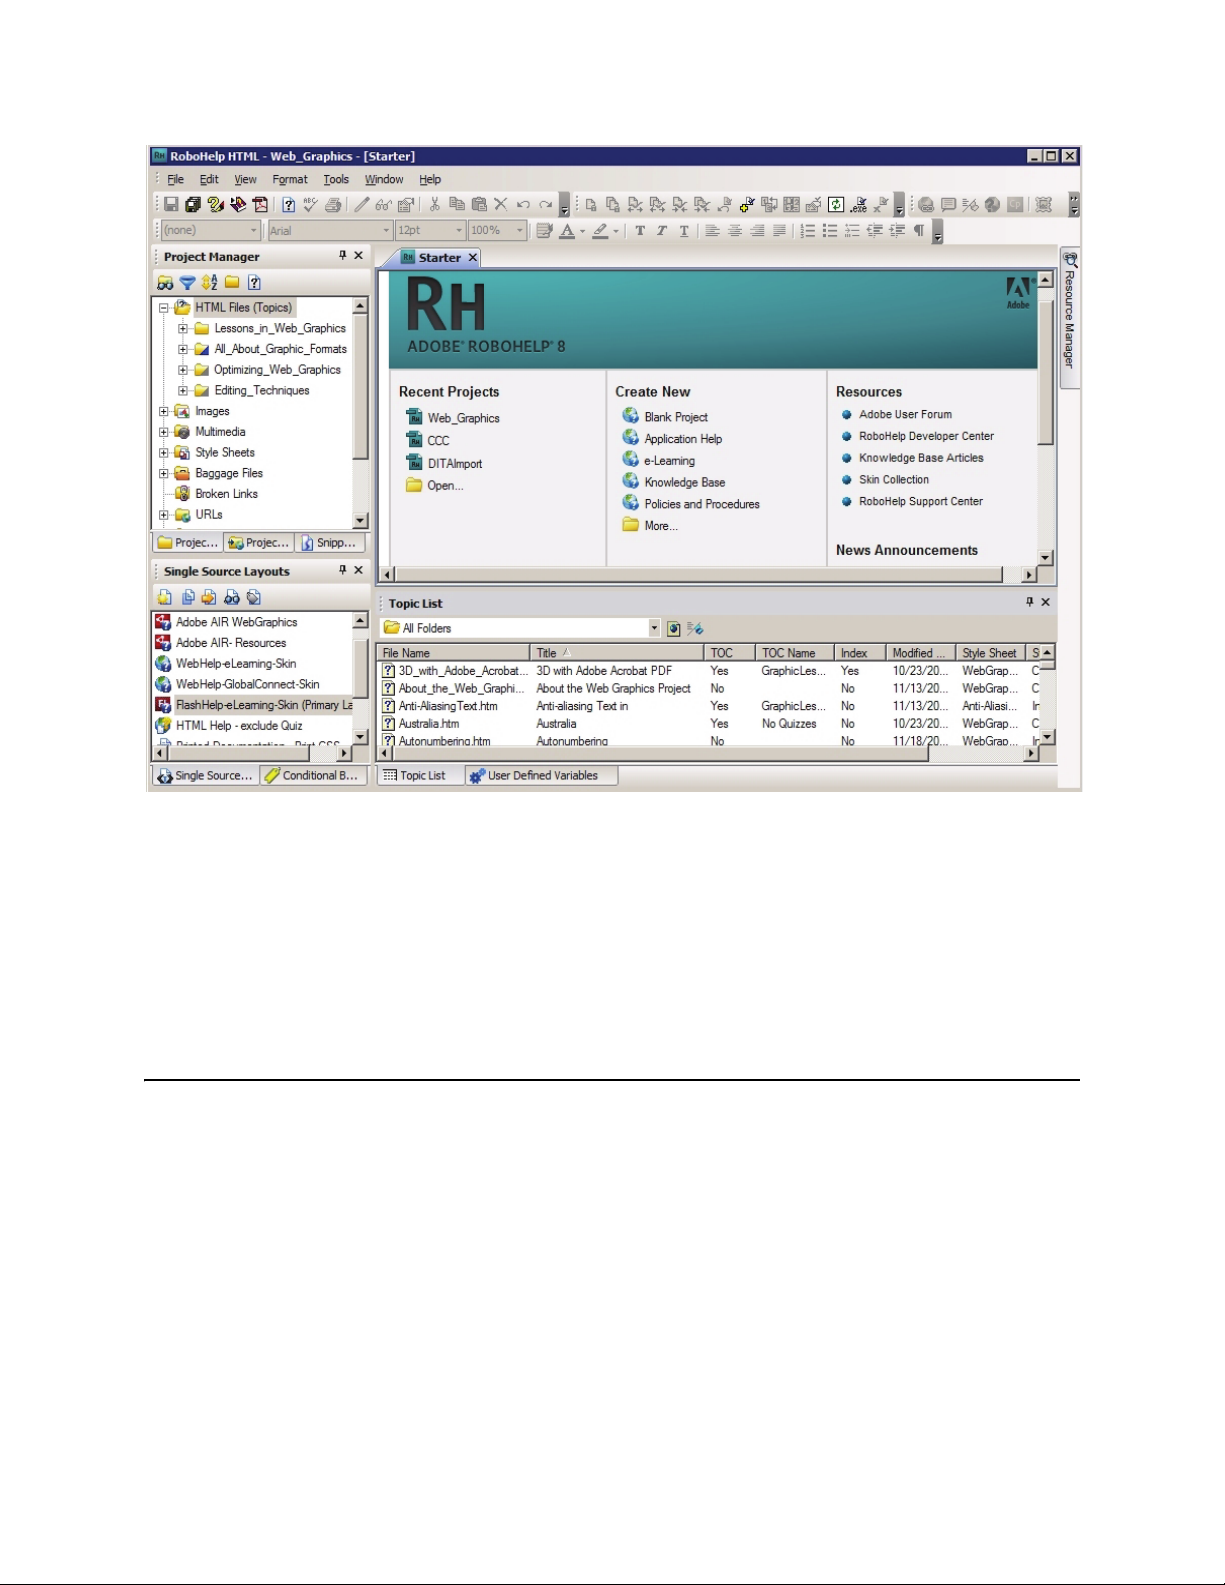
After the project opens, maximize the RoboHelp application window. You will
see the project open in a view similar to this screenshot.
Adobe RoboHelp 8 Reviewer’s Guide 8
Page 9
Explore the
interface.
The workspace is made up of pods. You can close any pod by clicking the X in the
top right corner. As you rearrange the pods, you may want to restore them to the
original layout. This can be done by clicking File > Environments > Load Default
Environment.
For guided demonstrations of the main features, see the Adobe Captivate demos at
the end of this Reviewer’s Guide.
Publishing Features – special enhancements for the end-user
Adobe AIR - revolutionary Web 2.0 features for the end-user
Adobe AIR technology makes it possible to distribute help as an application that is
automatically updated. It offers many new ways for end-users to find information
and exchange comments. It combines the best of the Web as well as the desktop
and enables you to create rich, branded customer experiences.
Authors can easily generate this exciting new Adobe AIR help application and
package it as a single file (.air) for easy deployment. See below for a summary of
Adobe RoboHelp 8 Reviewer’s Guide 9
Page 10

benefits followed by graphic examples of this new Single Source Layout for
generating an Adobe AIR file. (Options may vary depending on output type
selected)
Main Benefits • A convenient installation file (.air) that has everything packed inside (content,
viewer and installer.)
• Contemporary templates and skins with branding opportunities.
• Enhanced Search with ranking and context.
• Consistent look and feel across all operating systems.
• Seamless use whether online or offline.
Advanced User
Experience
features
Breakout of Adobe
AIR help features
• Multi Tab browsing.
•Breadcrumb navigation.
• Mini TOC - helps users navigate to places within a single topic.
• Security provided by digital signatures.
• End users can show or hide features.
• Create “Favorites” for quick shortcuts.
• Customize outside resources and subscribe to RSS Feeds.
• Auto Update of content.
• Commenting - for individual end users and for review among groups.
The screen capture below, illustrates many of the features that are part of an Adobe
AIR help application generated by Adobe RoboHelp 8. The author can create a
custom design from a number of color schemes, skins and other features. This
example uses the Classic Help Template with the Ocean Blue skin.
Adobe RoboHelp 8 Reviewer’s Guide 10
Page 11
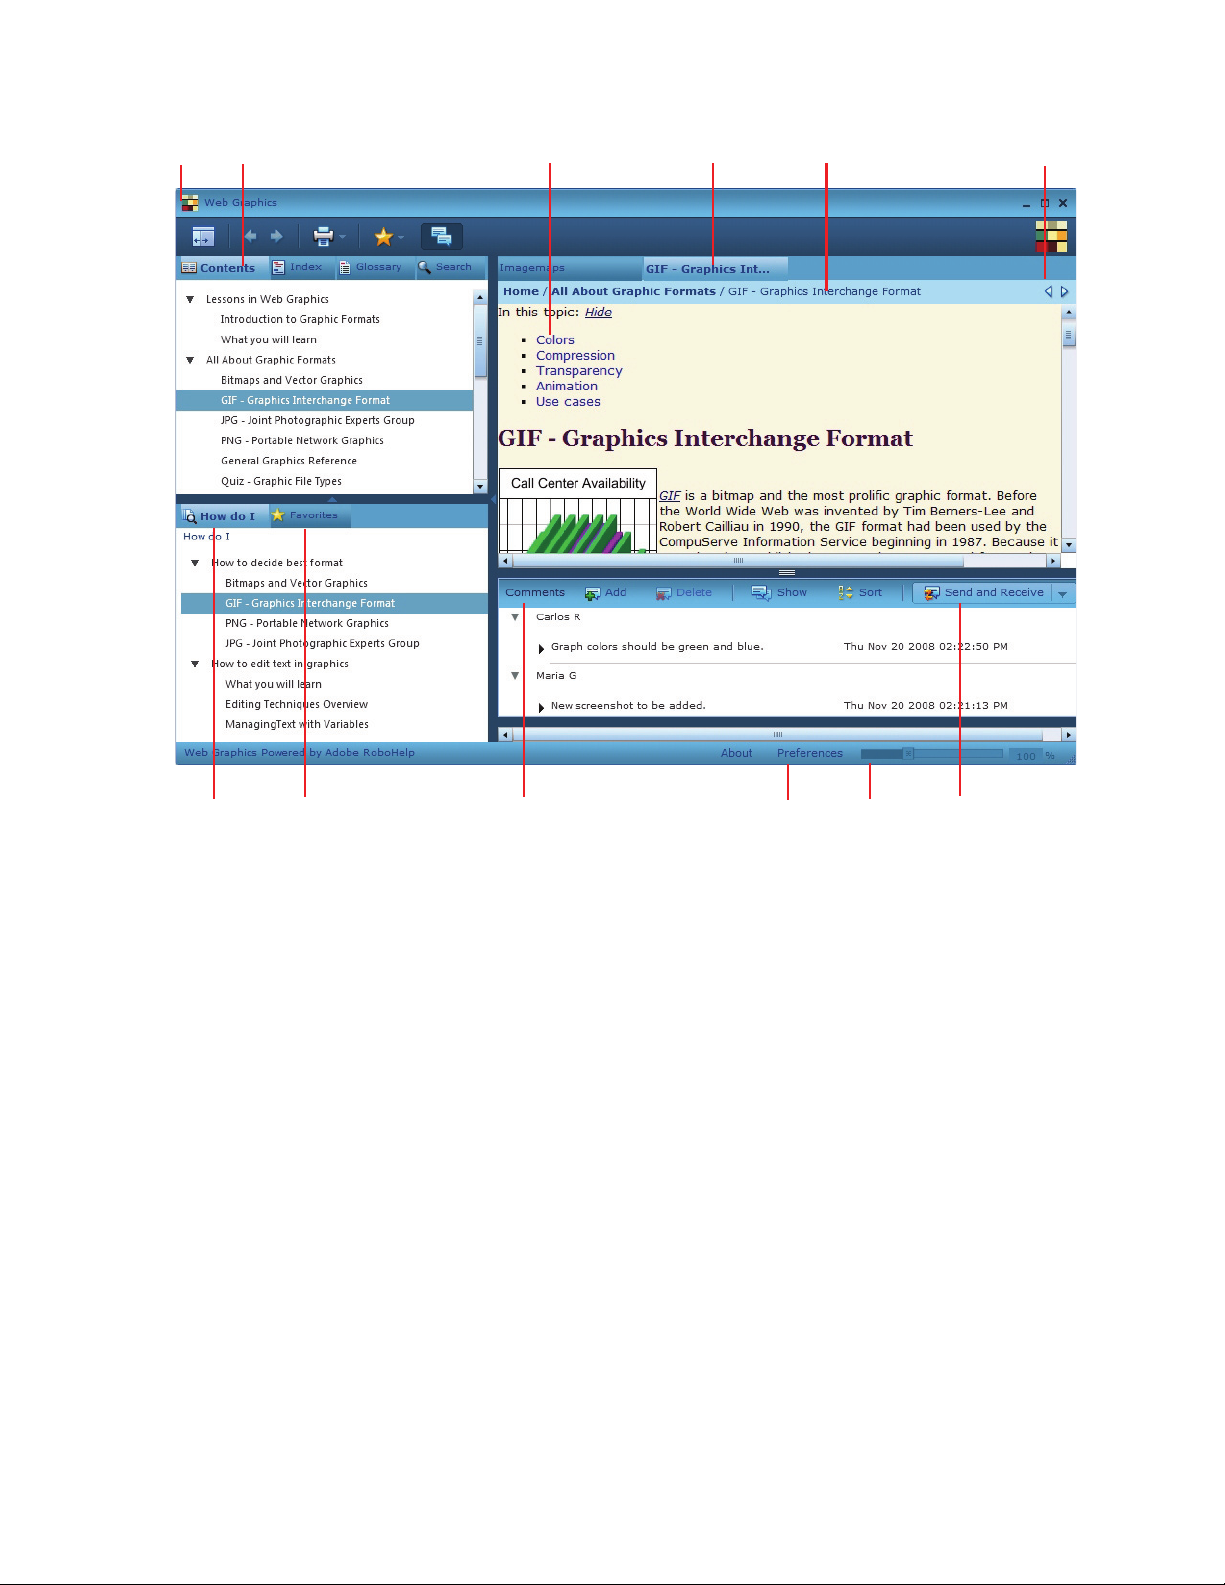
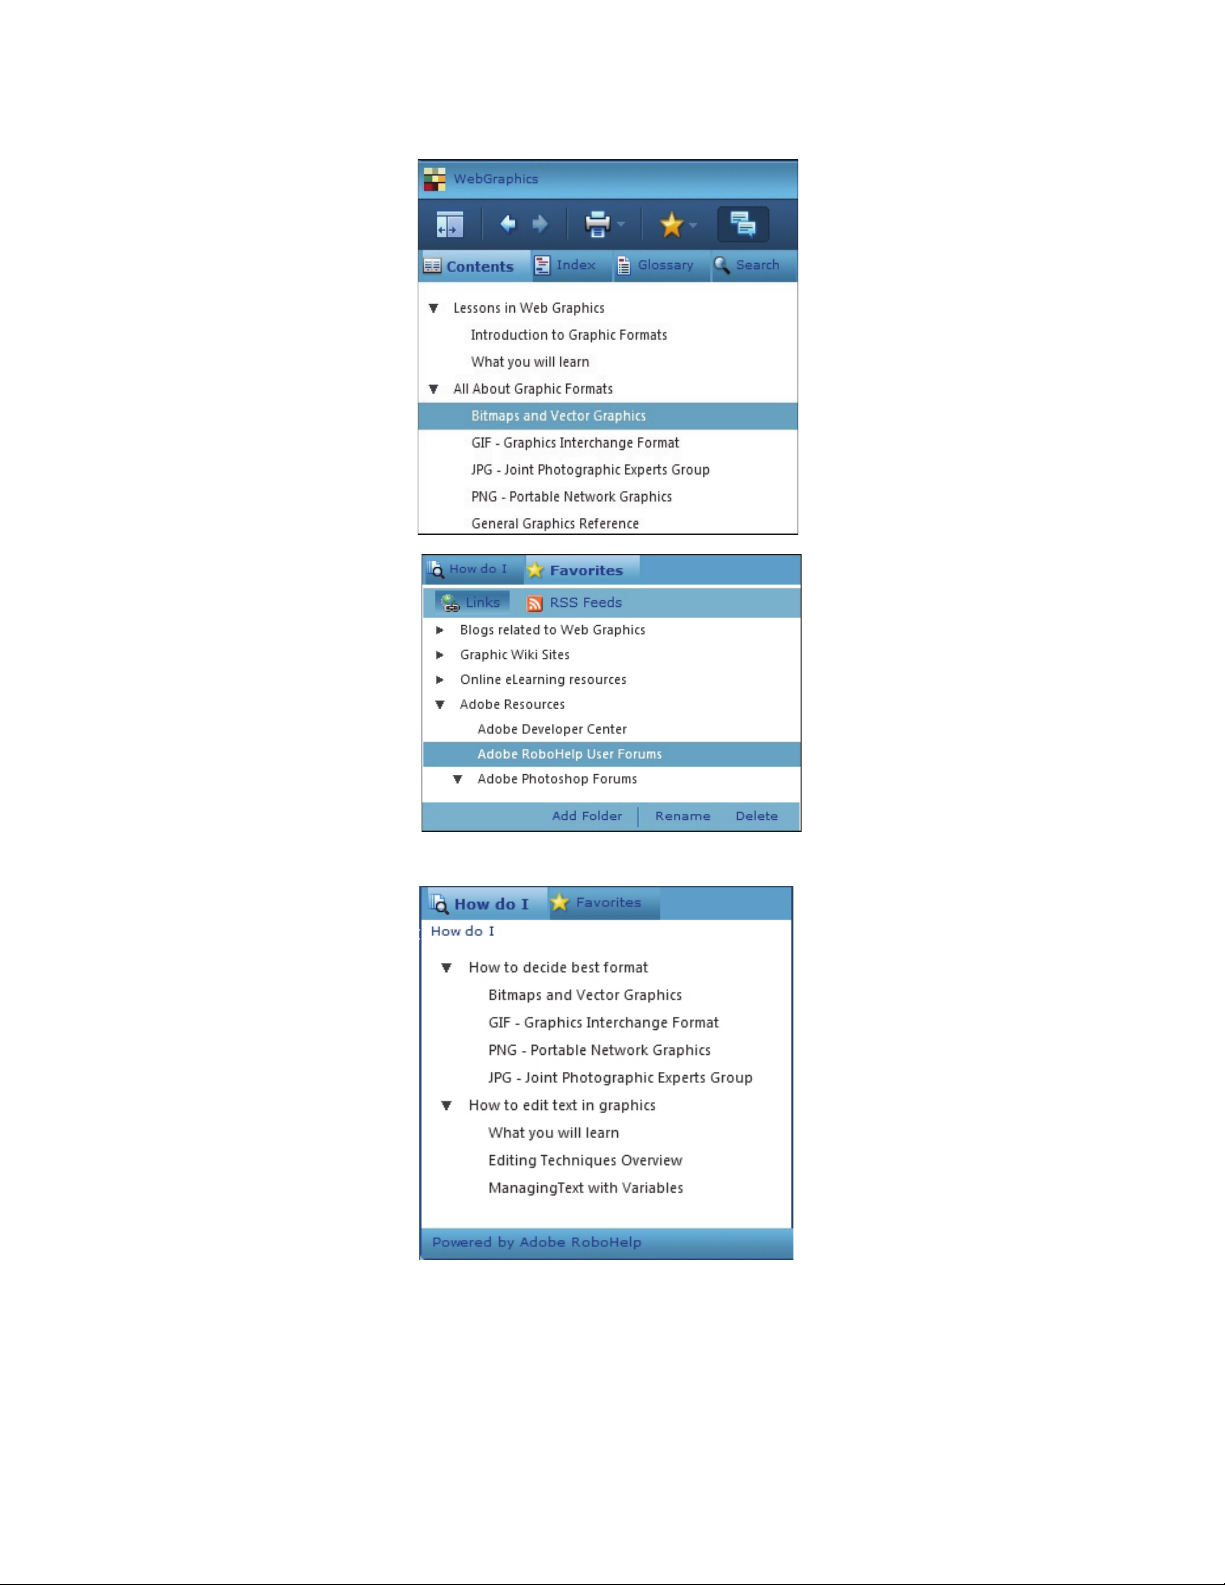
A The branding logo and title across the top.
AB C D E F
GH JKL
I
B Contents, Index, Glossary and Search tabs of the navigation pane.
C Mini TOC shown expanded to jump to a location in the topic.
D Tabs showing multiple topics open at the same time.
E Breadcrumb trail showing path where topic is located.
F Arrows to navigate a Browse Sequence defined by the author.
G “How do I?” tab for showing steps in procedures.
H Favorites tab to user-defined topic shortcuts, Resources to external blogs,
Wikis and Websites or for RSS Feeds.
I Comments tab to show user's notes along with others in a shared review.
J Preferences link allows a user to customize the items they prefer to view
and to configure Comments.
K A zoom tool for users who may prefer larger text.
L Send and Receive button for sending and receiving comments from
other users or reviewers.
Adobe RoboHelp 8 Reviewer’s Guide 11
Page 12
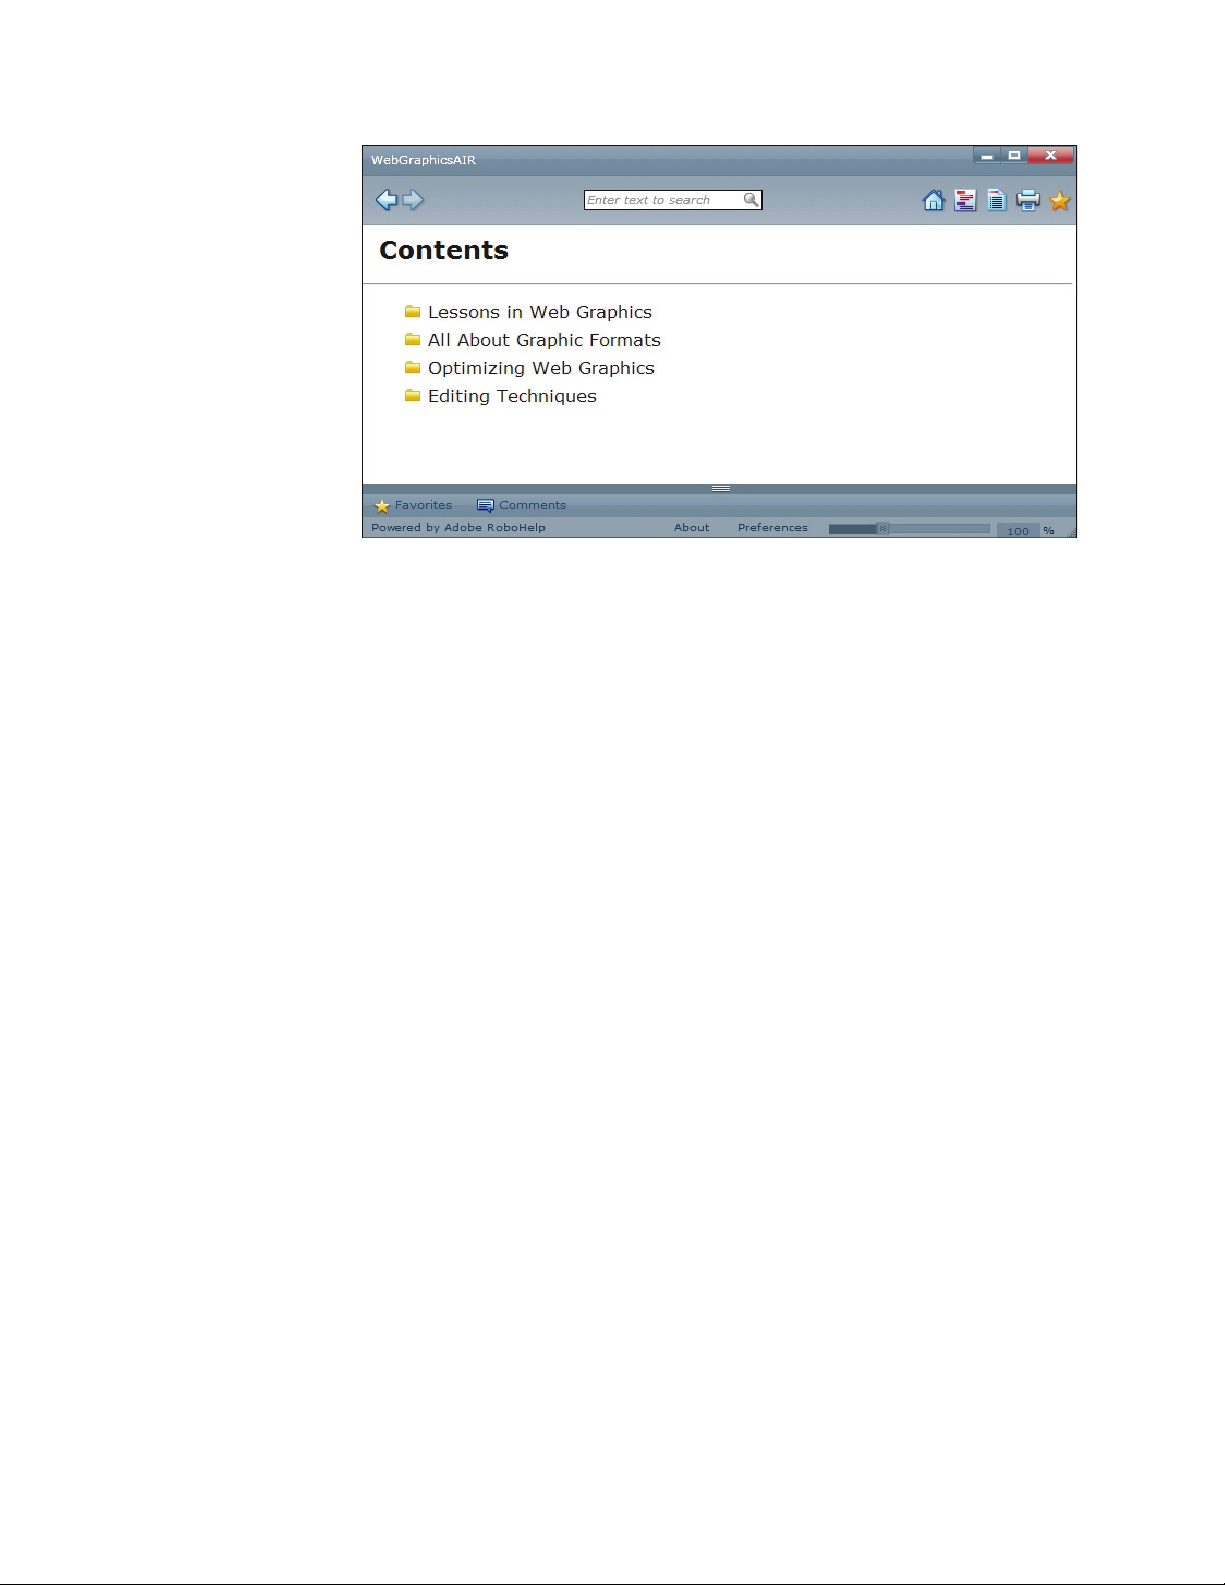
Contents pane
This example uses the
Classic Help template
with the Ocean Blue skin.
Note the branding icon in
the upper left.
Favorites pane
In this view, the end user can
add and organize many
internal and external links to
resources such as Blogs,
Wikis, Websites and message
forums and RSS feeds.
How do I? pane
A custom-made list of steps in a
task can be created for the user
who has a certain process they
want to work through.
The author creates these “How
do I?” lists in the Adobe
RoboHelp 8 Browse Sequence
Editor. These sequences can use
the order found in the TOC or
specially organized in a very
specific sequence the author
defines.
Multi-Tab
Accordion
Template with the
Midnight Black
skin
Adobe RoboHelp 8 Reviewer’s Guide 12
Shown below are results of a search which includes the topic title, the first
paragraph of text and the ranking of the topic among the results. This will help the
user focus on the most likely target. In the lower panel is the Comment section
along with several comments from a team of reviewers.
Page 13
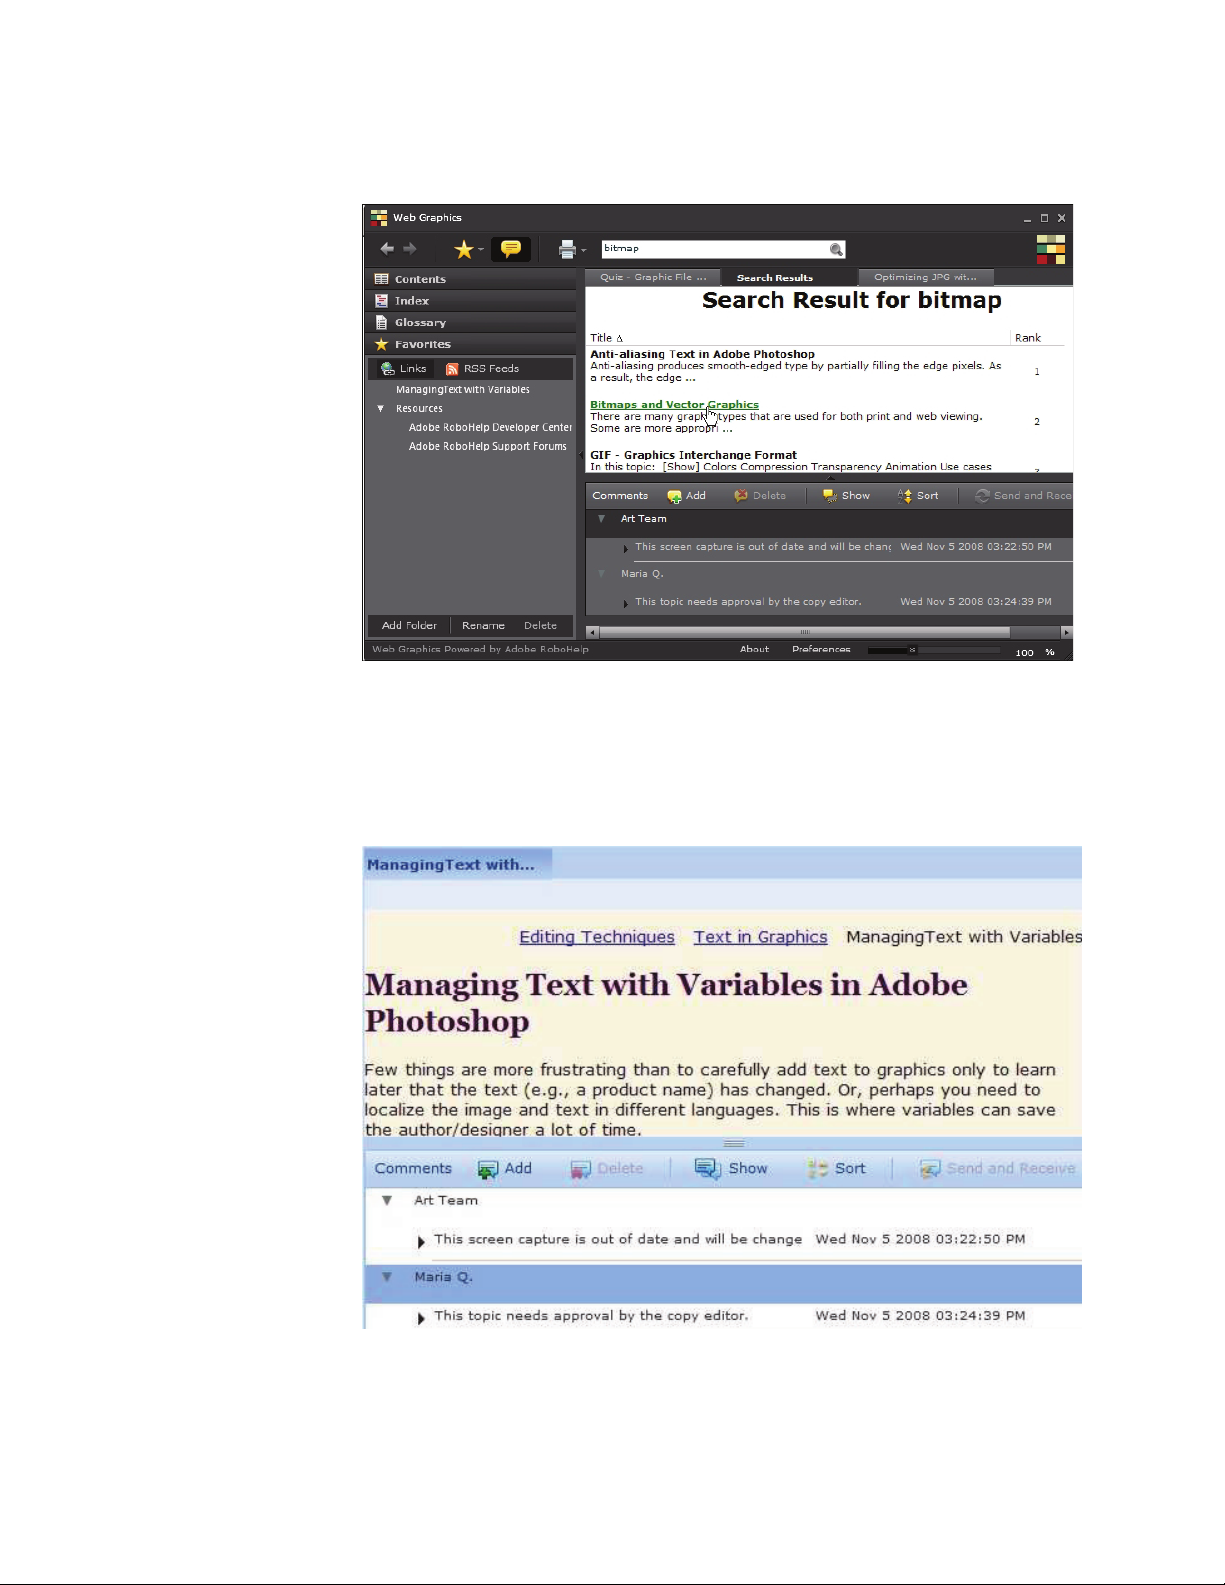
All comments are time-stamped. They can be shared and kept in sync with the
team.
Classic Template
with Icy Blue skin
A partial view of the Classic Template with Icy Blue skin is presented below. It
shows the Topic and Comments panes. Notice that multiple users are able to add
comments which can be shared among a designated group. These comments can
be kept in sync according to the settings established by the author.
There is also a
UniPane Template
Adobe RoboHelp 8 Reviewer’s Guide 13
The template below is designed for compatibility with Windows Vista®-style Help
as shown below.
Page 14
Creating an Adobe AIR Help Application
Adobe AIR runtime applications contain a lot of code and technology. However
Adobe RoboHelp 8 software makes it very easy for the author to create Adobe AIR
files.
Generate Adobe
AIR Help
Tr y it:
To see the process of generating an Adobe AIR layout, open the Web Graphics
sample project:
1. Open the Single Source Layout pod.
2. Right-click on the Single Source Layout titled, “Adobe AIR Multi Tab Black.”
3. Select Properties.
4. Take a look at each of the Settings: General, Content, Template and View
items.
5. Examine the different items and then take a look at similar screenshots below.
(Your paths may be different, but the settings are generally the same.)
Adobe RoboHelp 8 Reviewer’s Guide 14
Page 15
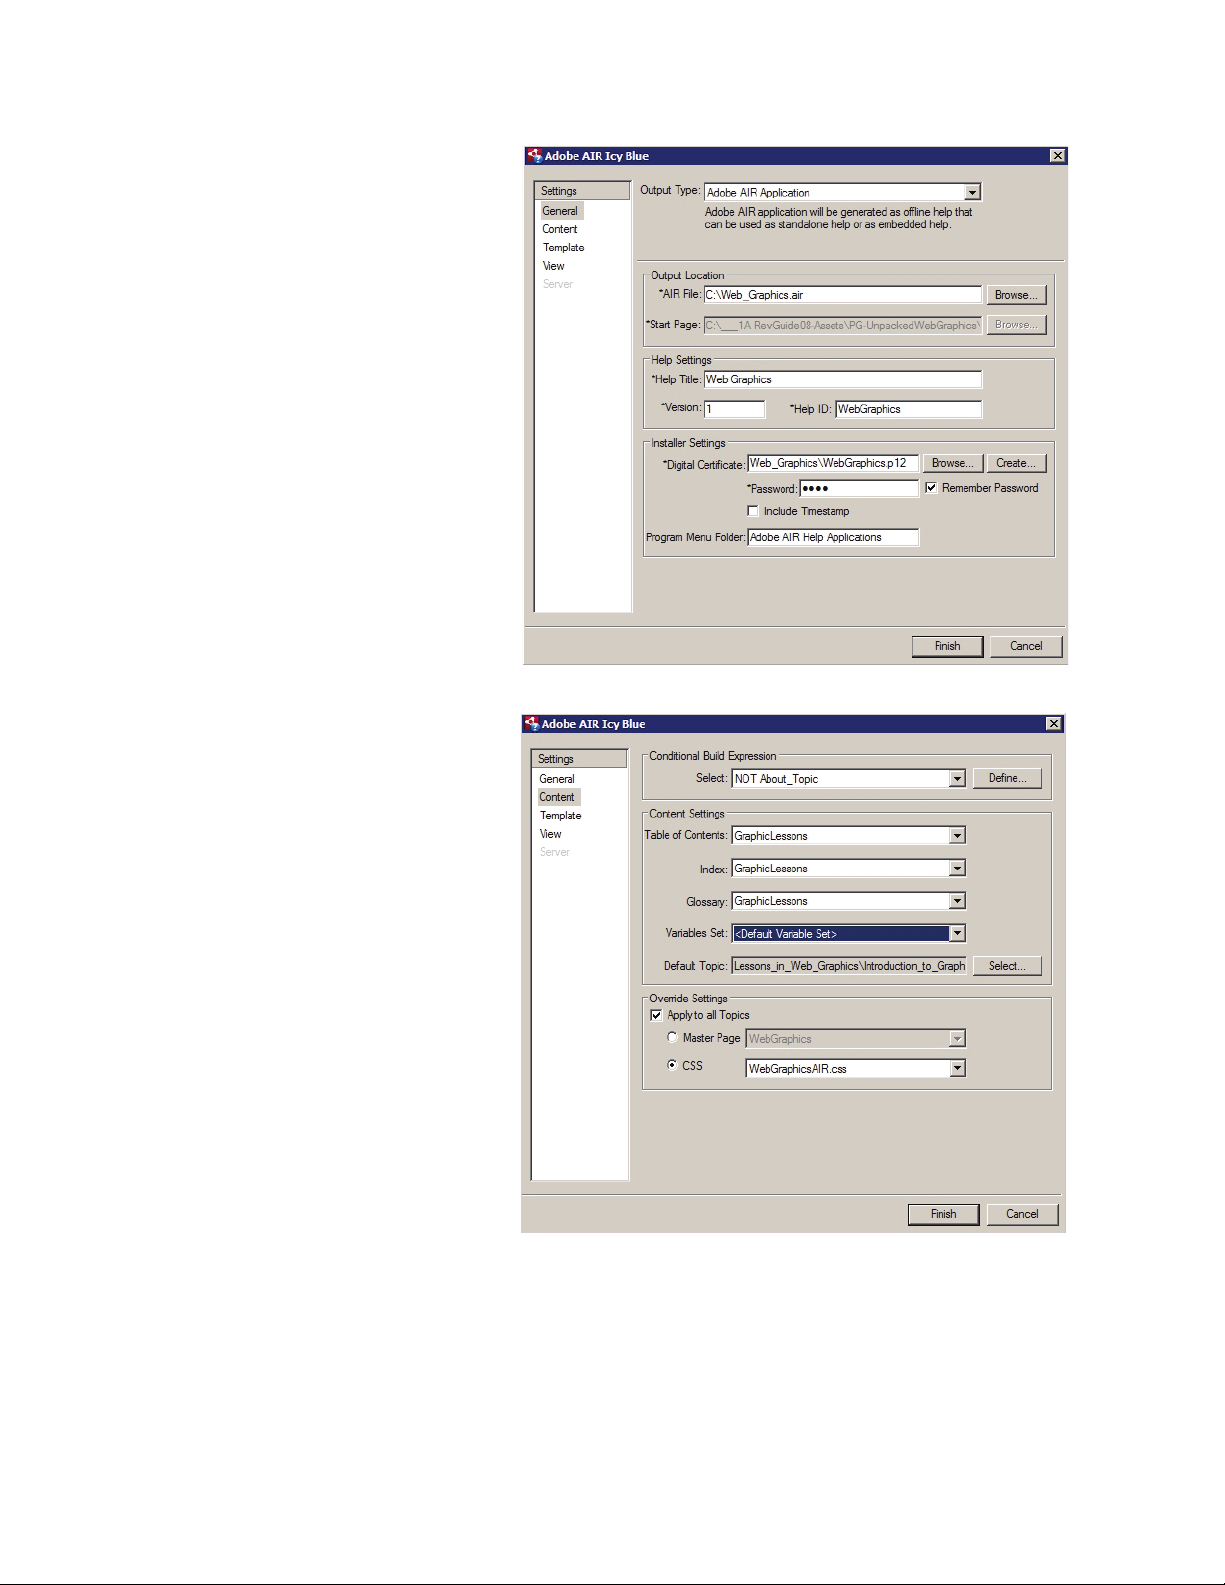
The General settings provide four Output
Types (see below for descriptions). This one
shows the Adobe AIR Application. The folder
location for the .air file is defined. A Help Title,
version number and Help ID used for context
sensitive help is also assigned in the Help
Settings section.
Under Installer Settings, you can either use
your own Digital Certificate for security or
create your own for local viewing. The
Program Menu Folder is defined to guide the
installer to create a folder according to the
author’s preference.
The Content settings provide a way to
conditionally exclude topics and select the
preferred Table of Contents, Index, Glossary
and User Defined Variable set as well as the
default topic. A Master Page or Cascading Style
Sheet (CSS) can be overridden and substituted
here.
Adobe RoboHelp 8 Reviewer’s Guide 15
Page 16
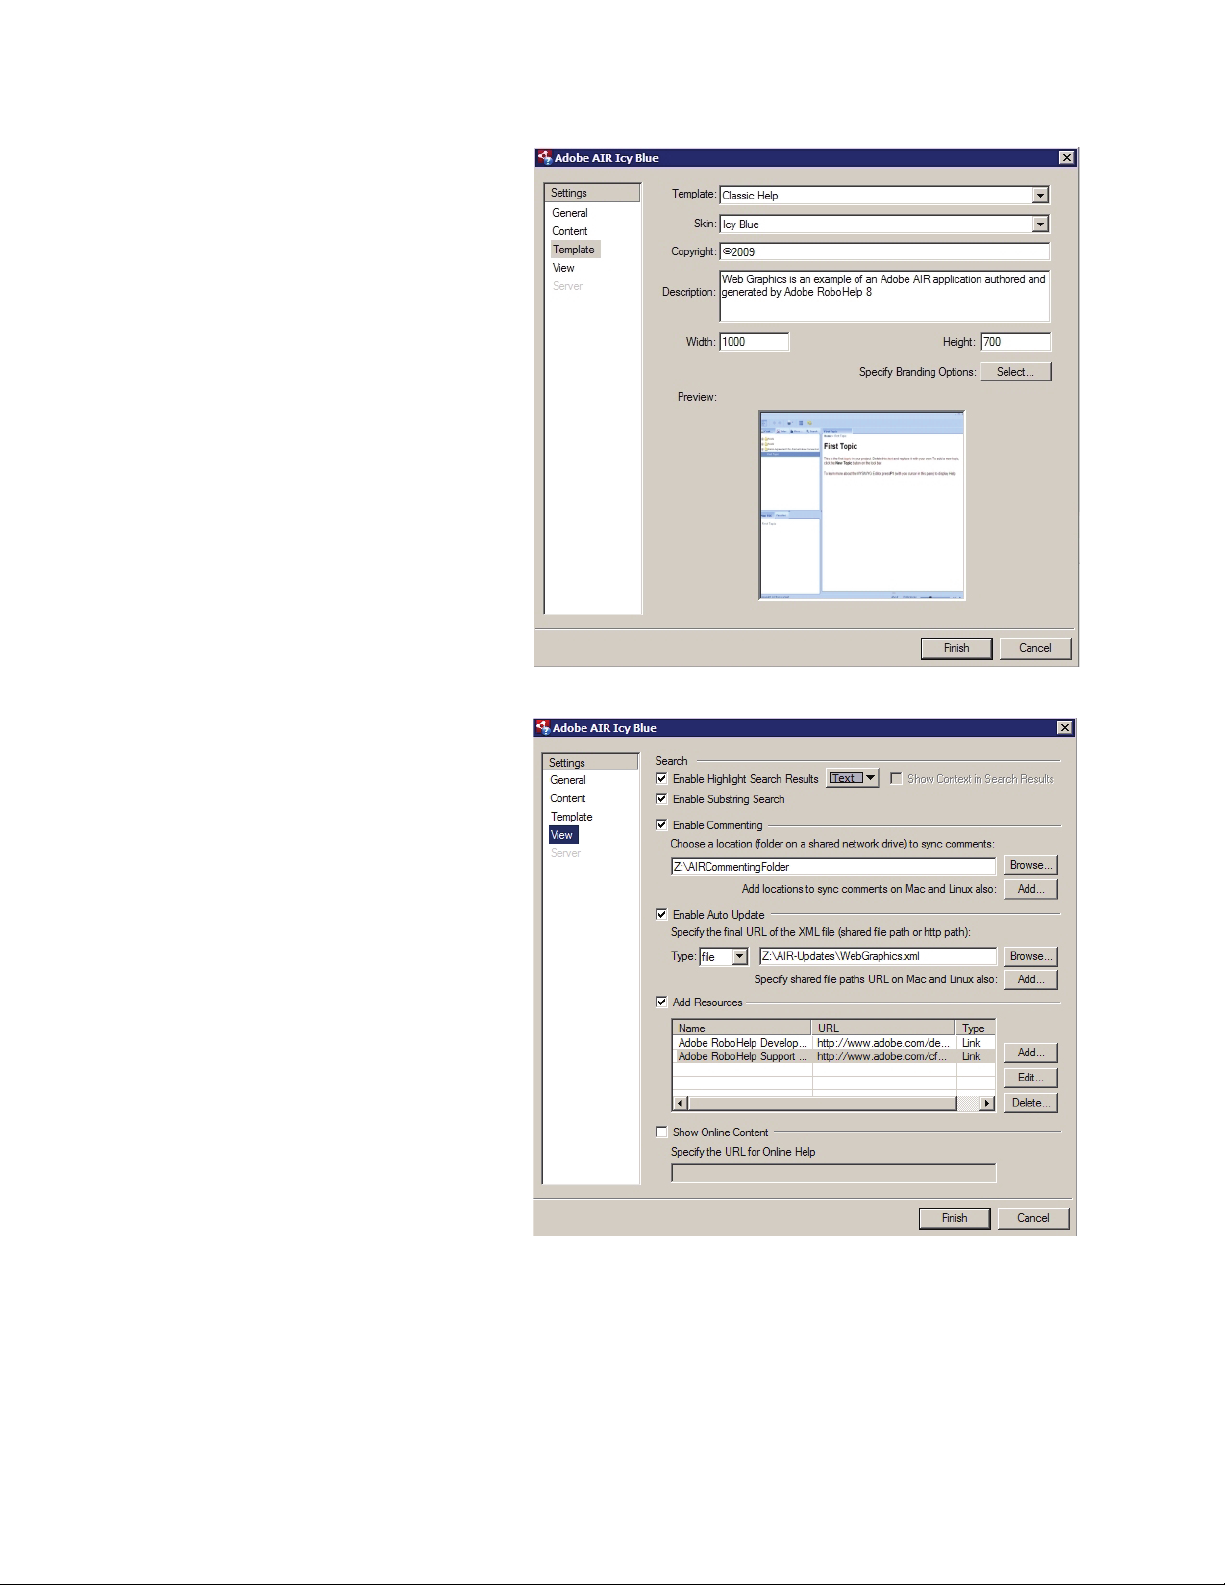
The Template settings dialog. Here you can
select from 3 Templates and 2 skins, add a
copyright notice, description and define the
width and height you would like the initial
window to be.
The View settings dialog. Here you can select
the Search, Auto Update, Commenting,
Resources and a URL for the online help
location. The Server setting (shown in grey)
lights up if you choose either the Browserbased Help or Help Content Only Output Type
on the General Setting dialog. It provides a way
to set up the path to the Web server or network
share where the help will reside if this output
type is selected.
Adobe RoboHelp 8 Reviewer’s Guide 16
Use a completely new Single Source Layout - Adobe AIR
Four output types - Using the Single Source Layout in RoboHelp 8, you can
generate the Adobe AIR runtime application. The Single Source Layout offers
options to generate four different types of help systems:
Page 17

Adobe AIR as an
output
The .air file output can be installed as a stand-alone application or as context
sensitive help using CSH APIs. Note: You need to install the Java Runtime
Environment (JRE) 1.6 or higher before generating the Adobe AIR application.
However the JRE is not necessary for installing the application to end users.
Browser Based
Help as an output
AIR Application
and Browser Based
Help as an output
Only Help Content
in a zipped format
(.rha)
Generate Browser based Help as an Adobe Flex® application and you can use it as
online help or embedded help. You can publish this output on the server with
specific configurations. You can view this Help using Web browsers with Adobe
Flash® plug-in 9.0 or above installed. (Consult online help for some limitations
and more details.)
This option generates both the Adobe AIR application and the Browser based Help
simultaneously. You can view the AIR application after installing it on your
machine and the Browser based Help by linking it to the server. View as:
•Browser based Help.
• An online version in a new Help Viewer (which the author can create with the
new Help Viewer Wizard.
• As an AIR application which shows offline data.
You may have need to distribute many different help systems to a single desktop.
To help with consistency in presentation and single sourcing, you can package the
Help content into data files (.rha). Then, using the Help Viewer Wizard, you can
create a single, branded viewer and install that once so the user can display any
number of help data files in the same viewer.
Summary: The Adobe AIR help application has a very rich feature set. To learn
more, you can read an article on the Adobe Developer Network or consult
Community Help, a major new online assistance feature. See “Community Help -
a new Web 2.0 way of providing user assistance” on page 56.
Powerful Search engine
The author works hard to create thorough documentation, but the information
may as well not exist if the user can't find it. A totally new search engine helps
direct users to the most relevant information. Here is a quick summary followed
by more detail.
Summary of
Search features
Adobe RoboHelp 8 Reviewer’s Guide 17
• Search results can now be ranked.
• Search highlighting draws attention to the relevant term.
• Topic context in the search results list provides a quick glance summary.
• Topic Keyword search lets the author include metadata to guide users to what
they want.
•Synonym search.
Page 18
• Excluded topic search.
• Multiple-language search.
• Substring search (“Log” will return log, catalog and logarithm).
• Phrase search - place a phrase in quotes to filter better results.
• Baggage file search (search text of MS Office and PDF files).
The red highlight boxes below point to the search highlight, search ranking and
search context features.
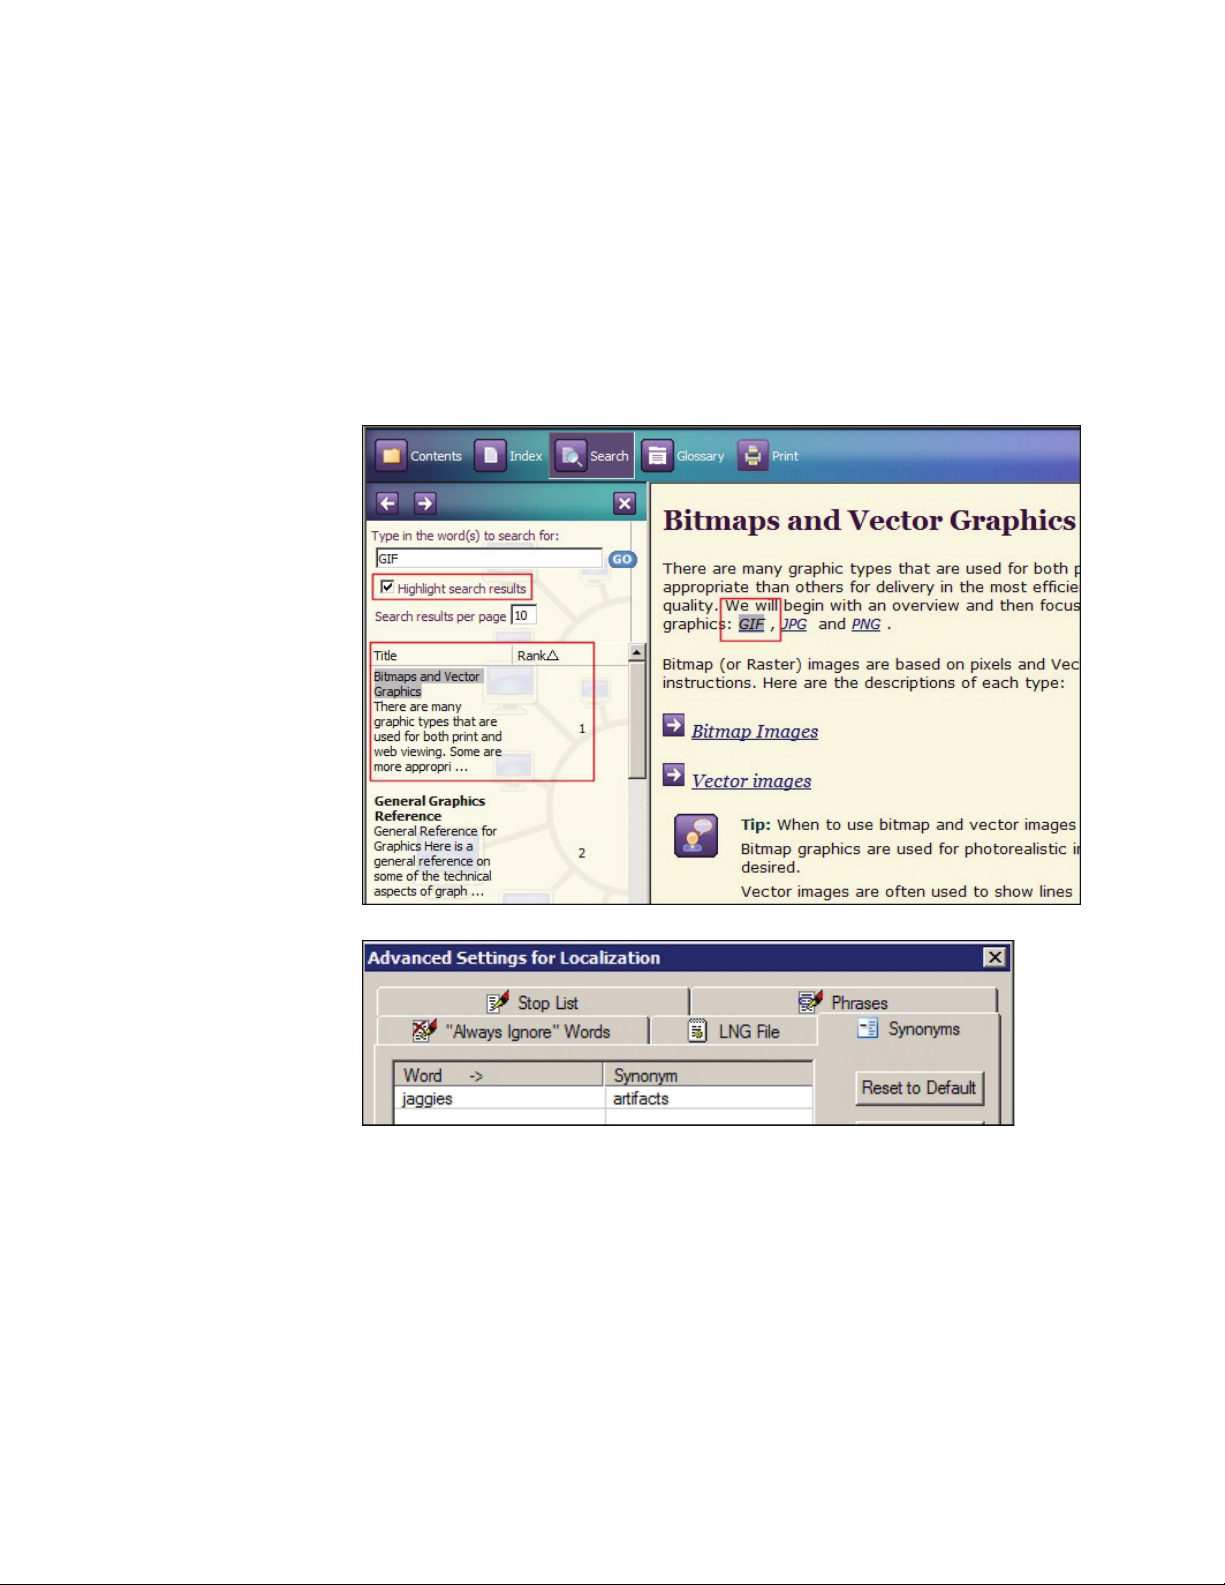
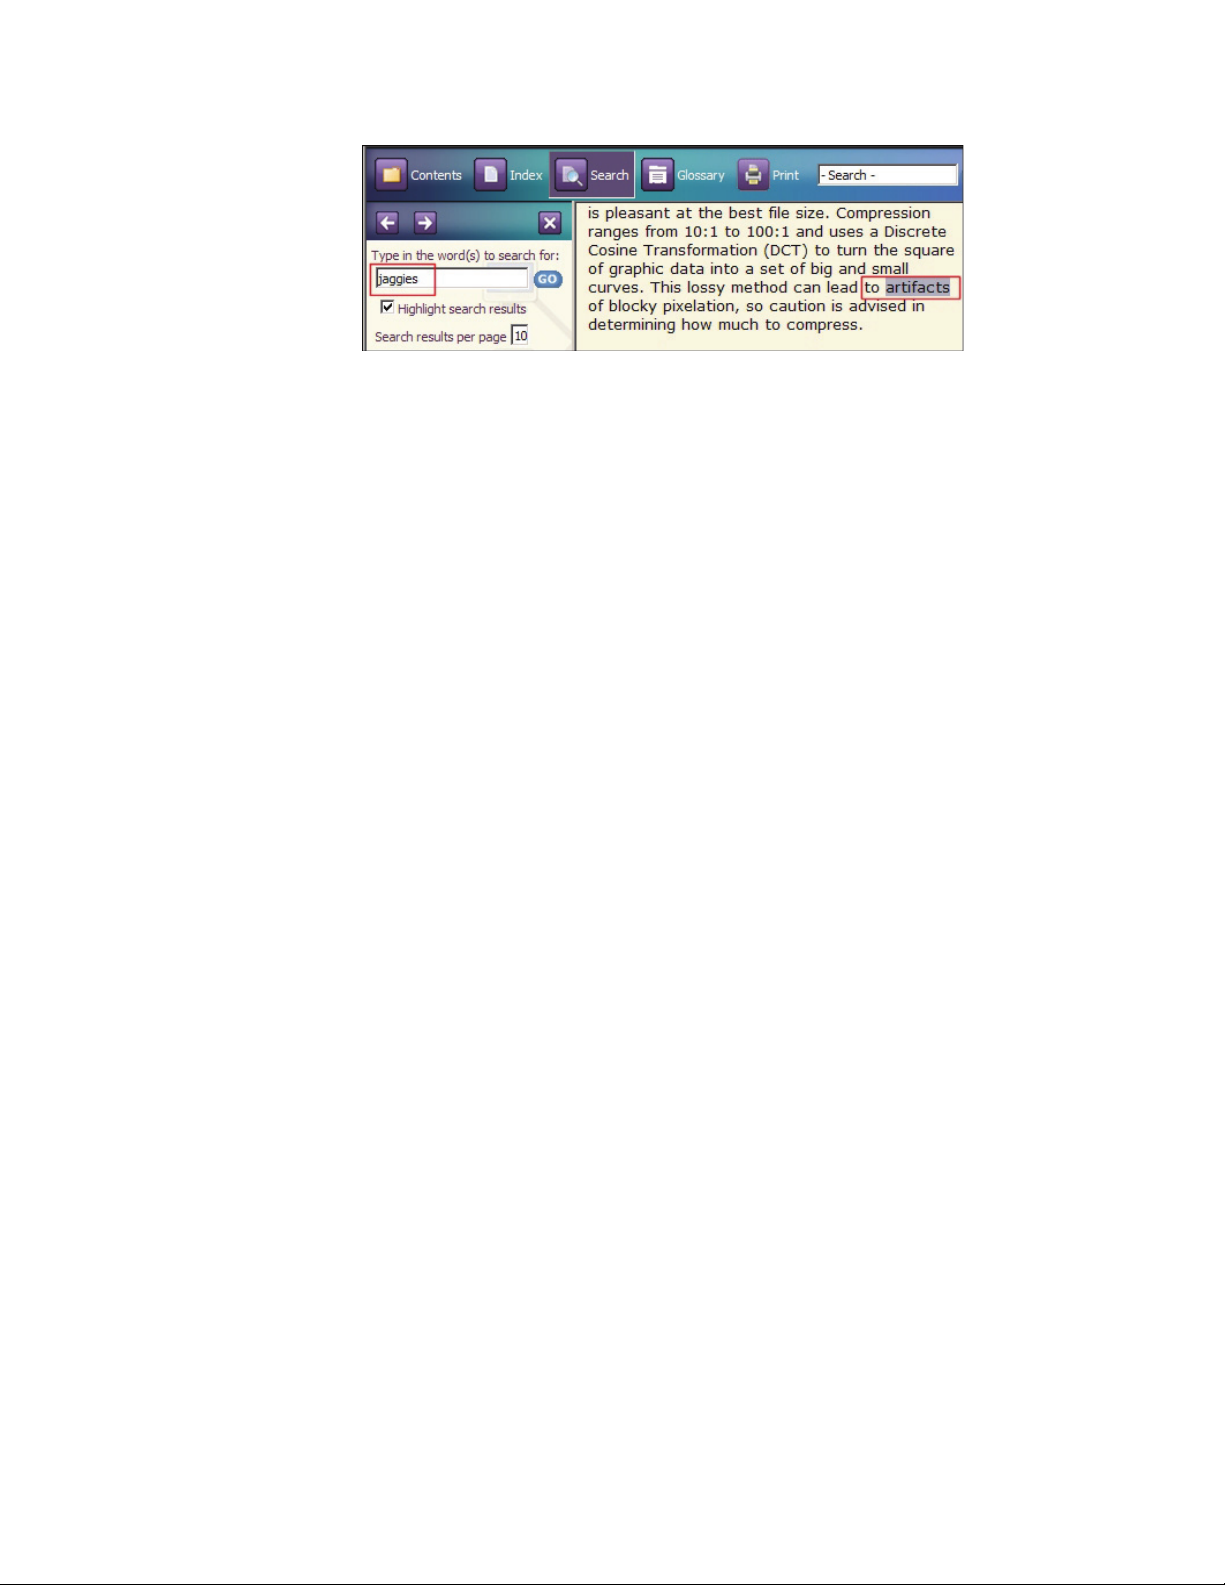
Synonym Highlighting
When the author creates a synonym for a word and the user searches for the
synonym, the corresponding word is now highlighted in the topic. For example, if
you look at the WebHelp output of the Web Graphics sample and search for the
term “jaggies,” the results will return topics with the keyword, “artifacts.”
Adobe RoboHelp 8 Reviewer’s Guide 18
Page 19
Search MS Office and Adobe PDF files
If you hyperlink within a topic to MS Office and Adobe PDFs, these files are added
to the project’s Baggage. As a major new feature, the published output will include
those files (even though they were not converted to HTML) and bring them up in
the search results.
Searchable Topic-specific Keywords created by the Author
Often a user may search for a word where the subject matter is covered but the
word itself is not actually in the topic text. Now the author can anticipate words
the user may be looking for and force the topic to come up in search results.
These special search keywords (think of them as synonyms for a single topic) are
authored at the topic level for very specific control. For example, you can assign
the keyword “formatting” to a topic about fonts, styles, and point sizes. If you
enter “formatting” as a search term in the generated help, RoboHelp displays that
topic even though it doesn't contain the word “formatting.”
Topic-specific
Try I t : To see the power of Search Keywords, here is how to create them.
Search Keyword
Try It
1. Open the Web Graphics sample project.
2. In the Project Manager, open the “All_About_Graphic_Formats” folder.
3. Double click on the topic, “Bitmaps and Vector Graphics” to open it in the
Design Editor.
If you read the topic, you will notice the word “drawing” does not appear even
though Vector graphics are typically edited by drawing applications. You
would like your users to be able to bring this topic up in search results if they
type in the word, drawing. To do this:
4. Right-click on the topic in the Design Editor and Select Topic Properties.
5. You will notice on the General tab in the Keyword field there are already two
keywords (lossy, lossless). To add your new Keyword, type in the word
“drawing” (without quotes) in the Keywords field. A comma to separate the
Keywords may be used but is not necessary.
6. Click OK and Save the topic.
Adobe RoboHelp 8 Reviewer’s Guide 19
Page 20

7. From the Single Source Layout pod, double-click on the WebHelp eLearning
Skin layout.
8. After the WebHelp General dialog opens, click the Finish button.
9. When the layout has been generated, click the View Results button.
10. After the browser opens with the new content, enter the Search term, drawing.
11. Notice that the topic “Bitmaps and Vector Graphics” appears first in the
results even though the work “drawing” does not exist in the topic.
Substring search
For more flexible searching, the author can enable substring search at the
publishing stage. Then, the end user can search for a term such as “Log” and it will
return topics for log, catalog and logarithm.
Phrase search
If the end user places a phrase in quotes (e.g., “graphic formats,” then that
complete phrase comes up in the search results
Exclude from search
Sometimes certain topics (e.g., popups or short context sensitive help topics) need
to be suppressed when search results are delivered. Now the author can exclude
certain topics from the search results.
Multiple language search
Adobe RoboHelp 8 software search supports multiple languages at the project,
topic, and paragraph level. For example, your user searches for a Chinese word in
an English topic with an embedded Chinese paragraph. If RoboHelp finds the
Chinese word, it displays the English topic with the Chinese word highlighted.
Enhanced Printed Documentation options
There is more flexibility in mapping your online output styles to the printed
version in MS® Word or Adobe PDF. Styling can be done with two main methods:
Adobe RoboHelp 8 Reviewer’s Guide 20
Page 21

Breadcrumbs
CSS - You can select any of the
CSS files used for topics or you
can select a CSS that has been
designed and is used only for
printed output.
MS® Word Template - Map
CSS styles to the desired Word
template or use the option to
import a Word template.
Adobe RoboHelp 8 Reviewer’s Guide 21
The Breadcrumb Options dialog offers a preview which makes it easy to customize
the home page name, separators, add a label and choose the style or format. In this
new version, the Microsoft® HTML Help (.chm) format is supported and
breadcrumbs can appear in topics that are not in the main TOC.
Page 22

Mini TOC Placeholder
A Mini TOC is a dropdown list of links to heading levels within the same topic.
You can see an example of a Mini TOC if you view the Web Graphics sample
project and navigate to the topic “GIF - Graphics Interchange Format” in the
generated WebHelp output. Note the “Hide” link is in the expanded dropdown
state which reveals the links of headings. By clicking on the Hide link, the Mini
TOC list collapses to a compact single line.
Mini TOCs are great for long topics where users do not like to scroll. Formerly,
authors had to create bookmarks and then links to them from the top of the topic.
Adobe RoboHelp 8 Reviewer’s Guide 22
Page 23

The Mini TOC is created automatically. By default these are from Heading 2
through Heading 6 but can be configured by the author (see below).
After inserting the Mini TOC placeholder, an author can modify the formatting by
checking its properties.
Here is a view of the Mini TOC Options dialog showing the flexibility of
formatting that gives control to the author for its appearance. (For an example in
the Design Editor, see the See “Master Pages provide consistency and add
navigational enhancements” on page 42.)
Adding
You can add Breadcrumbs and/or Mini TOC placeholders in two ways.
Breadcrumbs and
Mini TOC
placeholders
• Add a placeholder to a custom Master Page.
• Add a placeholder in an individual topic.
• Select Breadcrumbs from a Single Source Layout and check the option to add
them globally to every topic in the project.
• You can have multiple occurrences of these placeholders.
• The link content is added automatically and saves the author time having to
code bookmarks and links for each item. There is no maintenance required as
they are created automatically according to the heading styles you choose.
Adobe RoboHelp 8 Reviewer’s Guide 23
Page 24

Improved Glossary
Glossaries have always been a favorite feature for Adobe RoboHelp authors and
their users because “alphabet soup” and complex terms and definitions are
common to all organizations.
In the Web Graphics sample project you can see a glossary in action in the topic
“Bitmap and Vector Graphics.” The underlined GIF, JPG, and PNG in this screen
capture represent links which expand or contract as the user clicks on them to
reveal a term's definition:
Note in the above screen capture that the terms GIF and JPG have been expanded
by the user to show definitions while the PNG term remains collapsed.
Glossary coding now follows standards similar to a field item. Example:
<?rh-glo_start>term<?rh-glo_end?>
This method results in glossary definitions that are updated when the Single
Source Layout is generated saving time for the author.
Merged Help Implementation
Merged Help is a powerful way for authors to break up content into logical subsets
as individual RoboHelp projects. Then at runtime the individual projects are
automatically merged into a single Contents/Index/Search experience that is
seamless to the end user.
The Merged project feature provides a visually intuitive way to merge child
projects which become part of a master TOC. Child projects auto sync with the
merged TOC and you can see the merged TOC in the child projects.
Twisties - expanded hotspots with graphic cues
To layer information and help the user avoid scrolling in long topics, authors can
now add graphical cues to alert the user that a dropdown hotspot may be
expanded to reveal more information.
• Choose any image.
• Use the Style editor to configure an image for the Twisty symbol.
Adobe RoboHelp 8 Reviewer’s Guide 24
Page 25

Here is an example showing the collapsed and expanded view of a Twisty with a
custom image:
Twisty Try It: See how Twisty images are defined in the Drop-down hotspot Character Style and
how to edit them in the Styles editor.
1. Open the Web Graphics sample project.
2. In the Project Manager, open the “All_About_Graphic_Formats” folder.
3. Double click on the topic, “Bitmaps and Vector Graphics” to open it in the
Design Editor.
4. Notice that the text “Bitmap Images” does not show a graphic in the Design
Editor. However, if you click the Viewer icon (Ctrl + W), you will see the
“twisty” expand/collapse images as you click on the Drop-down hotspot link.
To examine how the images are defined, open the CSS.
5. From the Project Manager, open the Style Sheets folder.
6. Double-click on the “twistywebgraphics.css” style sheet.
7. The Styles editor opens.
8. Click the plus next to Character to reveal the styles.
9. Click on Drop-down Hotspot and look in the Character Preview window.
10. To change the image, you can click the bold arrow icon for “Select Twisties
Images” in the Formatting section as shown in this screen capture.
11. To change an image, use the Select Twisties Images dialog to select Close and
Open images.
Adobe RoboHelp 8 Reviewer’s Guide 25
Page 26

More author-friendly enhancements
A new XHTML Editor produces clean, standards-compliant code
A totally new XHTML editor complements Adobe RoboHelp 8 software's popular
visual editing environment. The author does not have to learn this code because it
is created “behind the scenes” in an all-new XHTML Editor. On the other hand,
for those authors who prefer to edit the actual code, the XHTML Editor provides
an efficient way to work.
No proprietary
code
Conforming to
standards has
many benefits.
Adobe RoboHelp 8 Reviewer’s Guide 26
There is no proprietary code (no more infamous <kadov> tags!) and no custom
schemas. RoboHelp now generates W3C compliant XHTML code. Any RoboHelp
specific information is stored in XML standard Processing Instructions (PIs). See
the W3C site for more details http://www.w3.org/TR/xhtml1/
• By creating code that is structured properly, the author can more accurately
create cascading style sheets which separate presentation from structure.
• XHTML increases compatibility with more modern Web browsers such as
Firefox, Internet Explorer, Opera, Safari and Netscape and Google’s Chrome.
Page 27

• Moving to XML-based code builds a bridge to more portability that can be
viewed on mobile wireless devices and Braille screen readers.
• XHTML documents can be used in applications that depend on either the
HTML Document Object Model or the XML Document Object Model
(DOM).
• Clean, well-formed code also enables more single source alternatives for print
and online formats.
Well-formed XML The RoboHelp project files such as the TOC, index and glossary are generated in
well-formed XML.
When importing a project created in a previous version, HTML files are
automatically upgraded to be compatible with the new XHTML editor.
The new XHTML editor also make it easy to add HTML comments as well.
XHTML is much more strict than HTML. To be valid XHTML, topics must abide
by rules such as these:
• Attributes must have double-quoted values (e.g., <p align="center")
The XHTML editor
is easy on the
author's eyes.
• All tags must be nested correctly and closed (such as <p> closed by a </p>
tag.)
• New topics are automatically linked to the XHTML 1.0 Transitional DTD.
This example of a two column table shows both the Design View followed by the
HTML Editor view:
Adobe RoboHelp 8 Reviewer’s Guide 27
Page 28

Note how the clean code is well organized in an interface that uses color-coding
and line numbering to help the author locate specific parts of the code.
Code validation is easy with a simple command
Authors can assure World Wide Web Consortium (W3C) compliance. The
XHTML-based Editor has strict observance to Extensible Markup Language
(XML) standards.
Try code validation
Try i t: Use the code validation command to look for warnings and errors:
1. Open the topic “Introduction to Resizing Images.”
2. Select the HTML Editor view.
3. Click File > W3C Compliance > Validate.
4. Look at the results in the Output View tab.
5. You will notice that there are 0 errors. If you select the Error List tab, you can
double-click on any warning or error and you will be quickly taken right to its
position in the topic code which makes it easy to correct if necessary.
World-class Table, Standard HTML List, MultiLevel List and Autonumbering support
A host of new features and enhancements have been made to the management of
tables, lists and autonumbering.
First, there is enhanced table support in the Design Editor which allows for greater
control.
• Insert columns and rows (above, below and to the sides).
• Cut, copy and paste columns, rows and cells.
• Merge and split cells.
• Insert a table within a table.
• Easily apply table styles defined in your CSS.
More versatility
with Tables
Adobe RoboHelp 8 Reviewer’s Guide 28
You can import tables from Adobe FrameMaker software and MS® Word
documents and map their table styles to RoboHelp table styles or retain the
original styles from other formats.
Cross-references, images, hypertext links are easily added to the content in a table.
You can even apply conditional build tags to rows or columns to hide or show
them in certain outputs.
Page 29

Second, a completely revamped CSS Style Editor allows the author to visually
preview and create:
•Standard HTML lists
• MultiLevel lists
• Autonumbering.
Table Style Editor
A completely new WYSIWYG table Style editor is now included in the new visual
CSS Styles editor. Ready-made table templates are also provided from the Table
command. You can have tables within tables and use custom or template-based
tables that are pre-defined. Insert multiple rows or columns, select multiple cells as
well as copy, cut, and paste selections.
• Styles can define the formatting of header rows and columns, first or last rows,
repeatable groups of rows or columns, margins within cells, and so on. Using
Table properties, you can set margins in a table, define width and height of
various cells and select different table styles.
CSS Style Editor
Dialog for Table
design
Here is an example of the CSS Style Editor Dialog showing how easy it is to design
each row or column in a Table Template. The style commands and a Table Preview
make it visually clear to the author what is happening.
Further, because it is based upon a CSS Table Style, changing it on the fly is as easy
as right-clicking on the table in the Design Editor and the style changes
immediately:
Adobe RoboHelp 8 Reviewer’s Guide 29
Page 30

Ready-made
template styles
Choose from many ready-made table template styles or create your own from
scratch from the Table Editor dialog box.
There are many pre-built Table Templates to choose from. Examples:
• Top Row with Alternating Rows.
•Shaded Alternating Rows.
•Shaded Alternating Columns.
•Top Row Left Column.
Try Table
Tem pl at es
Try i t: Adobe RoboHelp 8 now comes with many pre-built Table Templates. You
can easily modify the colors, borders and shading in the CSS Styles editor. To go
through the process, open the WebGraphics Sample Project:
1. Table > Insert > Table.
2. Choose the TopRowAlternatingRows Table Template.
3. Select 4 Rows and 4 Columns and click OK to insert the table.
4. The green shading from the template is still showing in the Table Preview.
Adobe RoboHelp 8 Reviewer’s Guide 30
Page 31

5. To change the style to yellow, open the WebGraphics.css from the Sample
Project.
6. Open the Table Styles section.
7. Select the TopRowAlternatingRows Style.
8. To apply the green shading to yellow, first click the Odd Rows in the field,
Apply Formatting to.
9. Change the Light Green to Pale Yellow by using the Change Highlight Color
icon. (Red box in the screenshot below).
10. Click Apply and OK to close the dialog.
Automatically
updated
From now on, tables can be automatically updated throughout the project simply
by modifying styles.
Enhanced Standard HTML Lists
The completely new WYSIWYG Style editor now has two “list” sections. The first
List section is for standard HTML list styles and the second is titled MultiLevel List
which can be used for virtually any kind of complex list an author may require.
Creating a new List
style.
Here is a view of the List section of the Styles editor. Note a new style has been
created called “SubHeadNumbered” and formatted with the Georgia font and
maroon color
Adobe RoboHelp 8 Reviewer’s Guide 31
Page 32

Applying the new
List style.
Note that the Styles and Formatting Style box shows “List Styles”. This reveals the
List styles that are available. To apply the style, the author selects the paragraph of
text in the Design Editor and double-clicks on the “SubHeadNumbered” style in
the Styles and Formatting pod.
This HTML code view shows the list is standard without any inline styling.
New MultiLevel list styles - for providing complex lists
Basic HTML “out of the box” does not provide for some of the more complex lists
that technical writers require. There are now prepared List Templates to use, or
you can create your own custom hierarchical or outline MultiLevel lists within the
CSS Style editor. This is handy for complex nested steps and sub-steps. Like simple
numbered lists, hierarchical numbered lists and the accompanying paragraph
styles share the same formatting
There is even a Sequence Editor to create custom list sequences the author may
need.
See an example of
MultiLevel lists
Adobe RoboHelp 8 Reviewer’s Guide 32
To see an example, open the Web Graphics sample project, open the topic,
“General Graphics Reference” and you will see an example of a MultiLevel list.
Page 33

New Visual Style
Editor
The visual Style editor makes it easy to create a complex list. Below is the Style
dialog box showing a list preview window to help the author visually design the
styles. The guesswork is eliminated by checking the styles in the preview window.
Prefixed and postfixed MultiLevel lists
It is now possible and easy to create List Styles in CSS. Here is an example that
shows such a list. The author does not have to type in To p i c - Concept - Ta s k and
steps as these prefixes are all pre-defined and automatically generated.
Adobe RoboHelp 8 Reviewer’s Guide 33
Page 34

Autonumbering
Visual aids to create
Autonumbering
paragraph style.
In the CSS Styles editor we have
created a new Paragraph style
called, "FigureAutoNumber" and
clicked the Autonumber icon (far
right).
The List for Autonumbering
dialog shows how easy it is to
design a Figure format,
determine the kind of
numbering and assign a prefix
style if you like.
Autonumbering is a major new enhancement and is as simple as creating a
paragraph style. To number figures or tables sequentially, define a paragraph style
with Autonumbering, such as Figure Number or Table Number. In simple
numbered lists, the paragraph style and numbering styles share the same font, font
size, font weight, and font color.
• Autonumbering functionality is defined in a paragraph style.
• To autonumber a paragraph, you apply autonumbering to it.
Adobe RoboHelp 8 Reviewer’s Guide 34
Page 35

Autonumber paragraph
styles are then applied in
the Design Editor.
The new autonumber paragraph
style is applied and the Figure
numbering appears sequentially,
automatically.
New multiple language support at paragraph, topic, and project level.
Multiple language support can be set at three levels: For the overall project use
Project Settings, for the topic or paragraph levels use the respective properties
dialogs. The specified language at the designated level determines the dictionary or
thesaurus used. For more information, see the online help topic, “Authoring
content in multiple languages.”
Note: The previous release introduced Unicode and support for 35 languages. For
more information, see the Adobe RoboHelp 7 Reviewer’s Guide here: http://
www.adobe.com/products/robohelp/pdfs/robohelp_7_reviewers_guide.pdf
FLV format now supported
High quality video is very compelling and a real aid to the Instructional Designer
in creating compelling eLearning objects. High-speed bandwidth has become
commonplace and the delivery of video is really spreading. The FLV format offers
the highest quality delivery and is bandwidth-friendly. Most of the prominent
news organizations use the FLV format for Web delivery.
IFrame support
Adobe RoboHelp 8 Reviewer’s Guide 35
External HTML or Adobe PDFs can be displayed by embedding them in a topic
with the IFrame command.
IFrame - You can display live content from one topic or document inside an
existing topic. An example would be an animated 3D model shown inside an
Adobe PDF.
Page 36

IFrame Try it
exercise
In the Web Graphics sample project, create a new topic called “3D with Adobe
PDF.” In the Design Editor, put the insertion point in a paragraph of your choice
and then:
1. Insert > HTML > IFrame.
2. In the IFrame dialog box, fill in a name for the IFrame and browse to the
WebGraphics sample projects folder to locate the file
DiskBrakeAssembly_RH7.pdf
(e.g., Web_Graphics/DiskBrakeAssembly_RH7.pdf)
3. From the Borders tab assign a border of Solid.
4. Generate WebHelp and navigate to the topic.
5. In the Web browser, click the IFrame to activate it.
6. Manipulate the model or watch the animation of the brake assembly.
Set Import choices for easier import of MS
®
Word and Adobe FrameMaker files
MS® Word and Adobe FrameMaker each have different methods of handling their
own styles and the Web uses yet a third way - cascading style sheets (CSS). These
differences must be resolved when importing these documents and converting
them to XHTML. To make the process easier for authors, Adobe RoboHelp 8
introduces a completely new Import dialog to define common settings. This
means there is a single place where both file types can be made ready for import.
Adobe RoboHelp 8 Reviewer’s Guide 36
Page 37

Creating these one-time settings avoid the repetitive process for each document,
save a lot of time and assure consistency of the import and conversion process.
Shown below is the Import tab of Project Settings. It allows for a choice between
adding documents by Reference or by Copy and Link.
Project-based
common import
settings
The settings shown below include specifying a Adobe FrameMaker or a Word
template; cascading style sheets (CSS) for RoboHelp project; style mapping
between FrameMaker formats or Word styles and RoboHelp styles; and all other
settings specified in the Conversion Settings dialog box. You can also import tables
from FrameMaker and Word documents and map their table styles to RoboHelp
table styles or retain the original styles from other formats.
Separate mapping is done for Word and FrameMaker documents. These common
settings are then exported to a file (.isf) so that they can be reused from project to
project.
Conversion
Settings
Adobe RoboHelp 8 Reviewer’s Guide 37
The author merely clicks the Edit Style button to gain access to a graphical Style
editor for modifying styles as they come across from Word to RoboHelp.
Page 38

Linking MS® Word files
Often, MS® Word original source documents change over time. Or, perhaps a
subject matter expert “owns” a document and is in charge of making changes.
Previously it was necessary to re-import the MS® Word document to make sure
the RoboHelp project was up to date. Now, the documents can be linked and
updated on the fly. The source document remains at the same location (e.g., a
network share)
The RoboHelp workflow for linking or importing MS® Word documents also
allows you to create a RoboHelp project by importing a MS® Word document. You
can import .docx, *.doc, *.docm or .rtf files.
Link or import MS®
Word documents
into a RoboHelp
project.
Linking by
reference
Adobe RoboHelp 8 Reviewer’s Guide 38
You can link one or many MS® Word documents as source documents in the
Project Manager pod. The link can be by copy or by reference as determined in the
Project Settings > Import tab.
• Create a Reference - You can select this option when the source document is
located outside the project. By default, all the documents are linked by
reference.
• Create a Copy and Link - Select this option to add source documents in the
project. This option enables you to move your source files to a version control
system and update them when required.
When you link a MS® Word document by reference, HTML topics are generated
and saved in the parent MS® Word document folder. All the related files such as
CSS, multimedia, images, baggage files are generated and saved in the appropriate
folders in the Project Manager pod. The MS® Word document added by reference
Page 39

is linked and remains in its original location. The MS® Word document linked by
copy is copied to the project.
After linking a MS® Word document, there is a clear way to be notified of a change
in the source. For example, if the source of a MS® Word document has changed, its
Project Manager icon changes color. This alerts the author who can use the update
command without having to re-import the documents.
The Green icon shows the status as Updated, the Yellow icon needs updating, the
Red icon means the MS® Word document is not found in the expected location
and you need to restore the link.
Shown below is an example of the command to Link a MS® Word Document
Import DITA topic-based content
Many technical writers are moving to a topic-based standard called Darwin
Information Typing Architecture (DITA). Adobe RoboHelp 8 software assists
these authors with the import of a DITA Map File or a DITA topic into an existing
RoboHelp project. You can also import a DITA Map file to create a RoboHelp
project and publish the desired output.
DITA Map Import You can either import DITA content from Adobe FrameMaker 8 or from other
authoring tools that conform to the DITA Map standard.
You can import DITA Map files or topics in RoboHelp to generate XHTML
output. For example, you can choose File > Import and select a *.ditamap file or
DITA topics (e.g, *.xml, *.dita) into the RoboHelp project.
Adobe RoboHelp 8 Reviewer’s Guide 39
Page 40

DITA Open tool kit After importing the DITA Map or DITA topics, the DITA Open tool kit (installed
separately) then processes the information and provides and XHTML output.
RoboHelp reads the XHTML output to generate XHTML topics, TOC, and index.
The DITA Open tool kit shows processing information in the Output View pod.
Shown below are the Processing Options for the DITA Open Toolkit.
Single Sourcing Features - write once, distribute to many audiences
Brand new CSS Editor
Manage styles in a “real time preview.” There is a new graphical way to create and
edit styles with a completely new Cascading Style Sheet editing interface.
All of the common formatting items are exposed along with a clear preview to see
what you are creating. This new dialog also makes it easy to define
• Table Styles
Adobe RoboHelp 8 Reviewer’s Guide 40
Page 41

•Standard HTML Lists
•Complex List Styles
• MultiLevel lists
• Autonumbering
Visual CSS Style
editor
The visual Style editor makes modifications easy because common formatting
icons are exposed and there is a Preview area.
Styles and Formatting Pod
A new Styles and Formatting Pod makes applying, creating or editing styles close
at hand. Use the Styles And Formatting pod to apply styles quickly.
Try it: In the Web Graphics sample:
1. Open the “Introduction to Graphic Formats” topic.
2. Enter a new line at the end of the first paragraph.
3. Type Lessons Provided (as shown below).
4. Open the Styles and Formatting pod by clicking Format > Styles.
5. Select Lessons Provided and double-click the Heading 2 item in the Styles and
Formatting pod.
Adobe RoboHelp 8 Reviewer’s Guide 41
Page 42

You can create and edit a style directly from the pod. Right-click the name of a
style to rename, delete, or preview that style.
6. To access this pod, you must have a topic open first. Then, select Format >
Styles to view the Styles and Formatting pod.
Master Pages provide consistency and add navigational enhancements
Use new Master Pages to provide a consistent look and feel to your topics and help
the user navigate with Breadcrumb and Mini TOC links. Master Pages are an
enhancement of what were called templates in previous releases.
Master Pages can
have a CSS
attached
Mini TOC and breadcrumb links are now easy to insert by including placeholders.
These, as well as headers and footers, snippets and user-defined variables can be
added. You can also associate a CSS so that every topic that is created with the
Master Page has the CSS automatically attached.
• You can create a topic using a Master Page or associate an existing topic. When
you create a topic from a master page, the topic includes its content. An
example would be copyright information.
• The Mini TOC placeholder links display automatically at the time the project
is published or the topic is previewed. This allows the user to navigate within
the topic to heading levels without the author having the create bookmark
links. By default, links are created automatically from heading 2 to heading 6
or they can be set to author’s preferred configuration.
• The Breadcrumb placeholder shows the automatically generated hierarchical
topic links at the time of generation or preview of Help topic. Placeholder
values appear in previews of the topic.
Adobe RoboHelp 8 Reviewer’s Guide 42
Page 43

Access Master
Pages from Project
Set-up pod
The Master Pages are accessed from the Project Set-up pod and have a file
extension of .htt. These files can be imported from other projects and shared easily
with other authors using the Resource Manager (shown in the next section).
You can define the exact location and format of the Mini TOC in the Design Editor
(see below).
Body Placeholder
saves time when
creating new
topics
This helps create a convenient ready-made page layout when combined with
headers, footers, and other placeholders mentioned above.
Try i t: In the WebGraphics sample project:
1. Open the Project Set-up pod
2. Open the Master Pages folder
3. Double-click on the WebGraphics.htt file
4. In the Design Editor examine the Body placeholder area
5. Notice the text that has been entered.
6. Click File > New Topic
7. In the New Topic dialog give the Topic the name, Master Page Example
8. Select Master Pages dropdown field, select WebGraphics and click OK
9. Notice how the Body placeholder text appears in the new topic, ready to make
further changes
Adobe RoboHelp 8 Reviewer’s Guide 43
Page 44

Body of new topic
created with
Master Page
Here is how the Body of the new topic appears:
Resource Manager - Storing and Sharing common resources
Typical projects contain many hundreds of files and assets. You may not need to
include something in a project at the moment. But it is good to have the item
identified and located. If it is close at hand you can import it into the project
without breaking your train of thought. The Resource Manager is the answer.
Resource Manager
examples
• The new Resource Manager is a repository for global assets such as Snippets,
Images, HTML and XML Files and Multimedia.
• Files can be located locally or on a network share making it possible for other
authors to share a pool of items.
Here are examples of using the Resource Manager:
• You can drag and drop snippets from the Snippet pod to the Resource
Manager to export them to the target folder.
• The exported snippet exists at a global level and is then visible to every author.
Adobe RoboHelp 8 Reviewer’s Guide 44
Page 45

• Drag and drop a snippet from the Resource Manager pod to the Snippet pod
and RoboHelp imports the selected snippet file (.hts) and its associated files to
the project.
• From the Project Manager and Topic List pods you can drag any file and drop
it into the Resource Manager.
• Master Pages can be dragged from the Project Setup Pod to the Resource
Manager and vice versa.
• Similarly files from the Images and Multimedia, etc. folders of Project
Manager can also be added.
• CSS and Snippets can be directly applied on open topics in the editor from the
Resource Manager. (This imports them into the project.)
Formatted User Defined Variables - and Variable Sets for single sourcing
A major new enhancement to User Defined Variables allows you to add
formatting, images, links and HTML formatting in a new editor that provides
both a Design and HTML view.
This allows for changing something like a company or product name “on the fly”
for every instance where the variable has been inserted in the project.
Variable sets
enable more
flexibility for
single sourcing.
• Formatting and even hyperlinks can be now be included for easy content
reuse. An example of the new feature can be found in the Web Graphics
sample project in the User Defined Variables pod (View > Pods > User
Defined Variables).
• You can also import documents with variables into a project.
• UDVs are similar to Snippets in functionality except that Snippets work at the
block level and UDVs work inline.
Variable sets allow you to modify values of various user-defined variables and use
them in different outputs. In this example, a Formatted UDV, “AdobeCopyright”,
shows that in addition to text, images and live hyperlinks can be added also.
Authors also have access to both a Design view and HTML editor.
Adobe RoboHelp 8 Reviewer’s Guide 45
Page 46

Productivity Features - Work quicker, smarter, more efficiently
Robust new built-in Scripting allows you to automate many tasks
Use automated Scripts by running built-in scripts or create your own to extend
RoboHelp functionality. Ready-made scripts are found in the Script Explorer
which provides easy access to running and editing. You can create your own scripts
with the provided Adobe ExtendScript Toolkit CS4 software.
Pre-built scripts
are included
• Converting text strings to User Defined Variables and one with a UI to enter
name and values.
• The ability to save your project as a Master Project.
• Link converter that will find a replace text strings and create URLs.
• Create an Eclipse compatible help system with a script to convert your project
for use with the Eclipse IDE, an open development platform comprised of
extensible frameworks, tools and runtimes for building, deploying and
managing software.
• In the screenshot below, the Word Count script results show in the Output
View.
User-friendly
graphical dialogs
Adobe RoboHelp 8 Reviewer’s Guide 46
You can add user input with dialogs in your scripts and extend the functionality of
RoboHelp using the scripting engine. The next exercise shows an example using
the script called, “UDV Converter with UI.jsx.” This script automatically inserts a
new User Defined Variable throughout your project by running a built-in script
that has a dialog to input the values and names.
Page 47

Automatically
insert a user
defined variable
Try i t: Let’s say your project has several places where a product version is
mentioned, such as “Adobe Photoshop CS4”. Of course, new releases occur and
this is a perfect use case for variables. By creating and inserting a variable called,
“CSVersion” you can then have the flexibility of changing its value on the fly.
To automatically insert a variable named, “CSVersion” with an initial value of
“CS4,” do the following:
1. Open the WebGraphics sample project.
2. Open the Introduction to Graphic Formats topic.
3. At the end of the first paragraph type, “Adobe Photoshop CS4 is a good
application for optimizing graphics.”
4. Click View > Pods > Script Explorer.
5. Open the Sample Scripts folder.
6. Select the “UDV Converter with UI” script.
7. Click on the, Run Selected Script File icon.
8. You will see the UDV Converter dialog (shown below).
9. Type in the UDV name - CSVersion - and values - CS4 - as shown in the
dialog.
10. Click the Convert button.
11. When you see the Output View, bring the UDV dialog box into view and click
the Cancel button to dismiss it.
12. Now, if you hover over the text “CS4” in your Design Editor, the tooltip will
indicate that it is now a variable.
Adobe RoboHelp 8 Reviewer’s Guide 47
Page 48

Though the ExtendScript Toolkit CS4 is not necessary to run the scripts shown in
the Script Explorer, it is available to install as an option for those who want to
modify or create their own. Below is an example of the ExtendScript Toolkit CS4
showing the code for the “Word Count” script.
ExtendScript
Toolkit (ESTK) CS4
The ESTK is a development and debugging tool for JavaScript scripts included
with Adobe® CS4 Suites as well as Adobe RoboHelp 8. The ESTK has many
features that make it easier to use than a text editor, including a built-in syntax
checker that identifies where the problems are in your script and tries to explain
how to fix them, and the ability to run your scripts right from the ESTK without
saving the file. More information is available at http://www.adobe.com/devnet/
scripting/
The ESTK also includes a JavaScript debugger that allows you to:
• Single-step through JavaScript scripts (JS or JSX files) inside an application.
• Inspect all data for a running script.
• Set and execute breakpoints.
Adobe Captivate 4 - used by instructional designers throughout the world
Adobe Captivate 4 is a popular eLearning tool for Instructional Designers who
want to create: (Optional purchase, or supplied with the Adobe Technical
Communication Suite 2)
• Animated tutorials.
• Software simulations.
Adobe RoboHelp 8 Reviewer’s Guide 48
Page 49

• Product demonstrations.
• Learning objects that communicate with Learning Management Systems
(LMS).
• Lessons, courses or a whole curriculum for online delivery.
You can easily launch Adobe Captivate 4 (or versions 2 and 3) from within the
Adobe RoboHelp 8 interface. You can even create an animated tutorial “on the fly.”
Just click on File > New >
Examples of
Adobe Captivate
movies
For examples of movies created with Adobe Captivate software, open the Web
Graphics samples project. You will see in the Project Manager a number of
examples, including the topic, “Optimizing Demonstration,” “Scale with
RoboScreenCapture” or any topic title that begins with “Quiz.” Try the quizzes and
find out your score at the end!
Customized To-Do List
The Status tab of Topic Properties includes a To-Do list that can now be
customized. This helps the author and the team keep track of important
milestones. These can also be circulated or printed in a Topic Properties report.
Usability Features - making the work environment easier
Project Manager Enhancements
One of the big strengths of Adobe RoboHelp software has always been its ability to
help the author keep track of the many assets in a given project. Now authors can
drag and drop topics and folders to create the same hierarchy they use in the Table
of Contents. (Formerly, the Project Manager view was restricted to an
alphanumeric positioning of the folders and files.)
In the screen capture below, note that the Folder Structure in the Project Manager
view that matches the list of books and topic pages shown in the Table of Contents
editor. This makes it especially easy to create an automatic TOC.
Adobe RoboHelp 8 Reviewer’s Guide 49
Page 50

The author can see a “minimalist” view of HTML topics only, or toggle to a full
range of rich information that is parallel to the information found in the Windows
Explorer.
Other
enhancements
UI Enhancements
Also these enhancements have been added:
• The order of bookmarks is based on location in the topic.
• Chapter order is preserved in an Adobe FrameMaker book.
• The older view can be restored by selecting the “Sort by Name” icon.
When many pods are open at the same time it can be helpful to the author to
locate the active pod with color coding to show the pod with focus. Also the
Design Editor and HTML Editor views are more visible with tabs placed at the top
of the Doc Pad.
• To close a topic, simply click the new “X” at the top right of the topic tab.
• More tooltips on Navigation buttons.
• Better right-click Context Menu support.
• Tools are now listed in the Windows Program Menu.
Adobe RoboHelp 8 Reviewer’s Guide 50
Page 51

• Right-click on a topic, choose Explore and open Windows Explorer at the
location of that topic file.
• Every topic can be right-clicked to open in an HTML view.
Option to install RoboHelp for MS
There is now a completely separate installer for RoboHelp for MS® Word which
avoids taking up hard drive space if the author is not going to use it. The installer
also provides an option to create a desktop icon.
®
Word
Custom File Type mapping dialog
There is a new intuitive dialog to define custom file associations between
document types and applications that may be different from the default Windows
associations. Select Tools > Options, then the Associations tab. You can add file
extensions and associate them with applications of your choice. You can also
choose the HTML editor you prefer or add to the list.
RoboScreenCapture - easy launch from the toolbar
RoboScreenCapture is a full-featured tool for making screen captures. It is
integrated into the RoboHelp interface and built right into the top toolbar for easy
launching. It is automatically installed at no extra cost and can be accessed from
the Toolbar.
Many capture
options
Editing and
drawing tools
RoboScreenCapture can be configured to capture many screen parts even down to
individual windows, buttons or discrete areas.
In addition, it has a full complement of image editing and drawing tools. You can
add callouts, image stamps as well as drop shadow effects and the ability to fine
tune graphics in as many as 25 popular graphic formats.
Adobe RoboSource Control 3.1 integration
Adobe RoboSource Control 3.1 is an application that ships with Adobe RoboHelp
8 at no extra cost, but is optional to install. It enables you to store all the files from
a RoboHelp project in a server-based database. These project files may then be
copied to one or more other client PCs allowing members of an authoring team to
view and work on the same project simultaneously.
Check in and check
out files
It manages all the changes to the files by enforcing a system of “checking out” and
“checking in” files. An author must check out a file from the database before being
able to make any changes to the file in RoboHelp —the process of checking out
retrieves the latest version of the file from the database and flags the file as being
Adobe RoboHelp 8 Reviewer’s Guide 51
Page 52

checked out. The check out system has the advantage of enabling you to prevent
two members of the team from making changes to the same file simultaneously.
RoboHelp HTML handles the check in and check out operations for you
automatically.
Adobe
RoboSource
Control 3.1 client and server
Integrates with
Microsoft Visual
SourceSafe as
option
Client: this provides the software that enables RoboHelp to get, check out, and
check in the project files in the server-based RoboSource Control database. It also
includes RoboSource Control Explorer, a separate application that enables you to
manage the database files, create users, and assign access rights.
Server: this is the central server software that stores and manages files in a
database. It supports checking files in and out, viewing the history of files, setting
up users and associated access rights, and many other useful version control
operations. Unlike previous versions, RoboSource Control 3 Server is based on
SQL Server.
Adobe RoboHelp 8 also integrates with Microsoft Visual SourceSafe or any other
third-party version control package that supports the Microsoft Source Code
Control API (sometimes called the SCC API). Therefore you may be able to use
Adobe RoboHelp 8 with your existing version control package as an alternative to
installing RoboSource Control 3.1.
Support for Visual Studio Team Foundation Server, an integrated collaboration
server, is also included. This allows everyone on the team to collaborate more
effectively and deliver better quality software.
Adobe RoboHelp Server 8 - robust search, easier to administer
Adobe RoboHelp Server 8 software is a completely rewritten and redesigned Javabased server application and is cross platform compatible. This makes it easy for
the author to generate feedback reports for continuous improvement of the help
system. When publishing to Adobe RoboHelp Server 8, the author chooses a single
source layout of WebHelp Pro or Adobe FlashHelp Pro software.
Adobe RoboHelp
Server 8 Highlights
Adobe RoboHelp 8 Reviewer’s Guide 52
Here are highlights followed by details below:
• Many new Search features and results are as much as 10 times faster than
former versions.
• Generate User Feedback reports.
• Uses the open source (free) Tomcat Servlet Container.
• Supports both Apache as well as Windows Internet Information Services (IIS)
Web servers.
Page 53

• Much easier to install and maintain than previous versions.
• Create restricted areas with different permissions for different user groups.
• Authentication enabled and includes LDAP integration.
• Now supports REST Web services, instead of SOAP in the previous version.
Here are those features in more detail:
Authenticating
users to limit
access
Create protected and public areas - This can be helpful in organizations where it is
important to limit access to authenticated users only and yet have much of the
content public as well. The author can designate certain Help content for viewing
by separate audiences by hosting certain projects in protected or public areas. (For
example, this would allow Human Resources procedures to be accessible only to
HR employees.)
Further, specific content can be defined as protected with different groups of users
being given different rights to access. These rights include view only, publish and
report. Use Web Admin pages in Adobe RoboHelp Server 8 to manage the groups
and set these rights. To aid in this process, Adobe RoboHelp Server 8 provides user
authentication through both database and LDAP. To recap authentication:
• In Adobe RoboHelp Server 8, the Help content can be separated into protected
and public areas. This separation is done to ensure that only authenticated
users can access content which is either private or protected. Protected areas
contain the content which is only viewed by authenticated users and content
in public areas is viewed by anyone. Areas represent a logical collection of
projects and these areas can host projects from different departments of a
company or projects in different languages.
• To make areas protected you can add groups to them. A group is a set of
permissions, and you can create any number of groups. To assign permissions
to groups such as viewing rights, publishing rights and report viewing rights,
you can select the option on the Web Admin interface.
• To make areas protected, use the check box provided in the Web admin
interface. You can assign project viewing, report viewing, publishing rights for
areas to groups.
Simplified
Installation in an
extremely robust
environment
Adobe RoboHelp Server 8 runs in a Servlet container under the Apache Tomcat
Server. You can configure Tomcat to run with Apache or IIS as the Web server.
There is a convenient authenticated Web interface for Web administration so the
Web admin can work from remote machines. This means the Web admin can go to
any Web browser and login to the server. Once logged into the Web admin page
you can open and delete projects, manage users, areas, projects, view reports and
schedule databases and search from any Web browser.
Adobe RoboHelp 8 Reviewer’s Guide 53
Page 54

Multiple Website
support
Adobe RoboHelp Server 8 provides more versatility in hosting multiple Websites.
You can host different help systems by creating multiple contexts (a virtual host
container) in Tomcat. You can configure different instances of RoboHelp Server
(with a single installation) to run on each of these contexts. Contexts run on the
same IP Address and port number but have a different context name. This feature
is supported on all the supported Operating Systems.
Adobe RoboHelp
Server 8 search
features
Search for text in
PPT, DOC, XLS, and
PDF files
• Search results can now be ranked
• Keyword Search provides metadata a new way for authors to guide users to
what they want.
•Synonym search.
• The author can elect to exclude certain topics from search results.
• Multiple-language search.
• Substring search (“Log” will return log, catalog and logarithm.).
• Phrase search - place a phrase in quotes to filter better results.
• Topic context in search list.
• Improved Baggage file search.
• Robust search versatility is provided by the Apache Lucene Search Engine
In RoboHelp Server 8, for all the WebHelp Pro and Adobe FlashHelp Pro projects,
you can search for any topics and baggage files in a project including (PPT, DOC,
XLS, and PDF). These documents are displayed in search results. These documents
can be either linked from topics or simply kept in a project folder on the server.
Search indexing on the server can be scheduled for scanning by the Web admin.
Generate User Feedback Reports
The best way to continue improving your help content is with feedback reports
from users. Adobe RoboHelp Server 8 provides seven such reports which also aid
in administration. The author has a choice of viewing reports within the
RoboHelp application, or from a Web interface. Here is a view of the
administrative area and of one of the reports on “Unanswered Questions.”
Adobe RoboHelp 8 Reviewer’s Guide 54
Page 55

Support for SQL Server 2005 Express Edition
RoboHelp Server 8 can store server statistics and generates reports from SQL
Server 2005 Express Edition.
Support for REST Web services
REST stands for Representational State Transfer. It can improve response time and
reduce server load. Developers can use REST Web services in their code to perform
searches on content and return results when used for the context-sensitive help.
REST services return results in the XML format.
Major Online Help Enhancements with Adobe AIR
The online help system in Adobe RoboHelp 8 has been completely rewritten and is
displayed using the Adobe AIR format. This provides many alternatives to finding
the information authors need quickly.
Adobe RoboHelp 8 Reviewer’s Guide 55
Page 56

Community Help - a new Web 2.0 way of providing user assistance
Illustration of new
Adobe AIR
interface
New Community
Help, reaches out
to the world
From the screenshot above you will see that online help for Adobe RoboHelp
software is delivered by a Help Viewer created as an Adobe AIR application. A
major new feature is the ability to annotate with comments and a more robust
search engine. For a description of many more features, see “Ado be A I R -
revolutionary Web 2.0 features for the end-user” on page 9.
Community Help is an integrated environment on adobe.com that gives you
access to community-generated content moderated by Adobe and industry
experts. Comments from users help guide you to the best answer.
When you put a search term into Community Help, you aren’t just searching a
“local” help file. You can reach out to a vast community of Adobe support,
industry experts, power users, blogs, wikis and Websites that provide the most
likely answer to your question. These kinds of resources are available:
• Use the help search field in the Adobe RoboHelp 8 online help application to
access Community Help. Moderators continue to identify most relevant Web
content for RoboHelp authors. You can add comments to online help and
view comments added by other users.
• Videos, tutorials, tips and techniques, blogs, articles, and examples for
designers and developers.
Adobe RoboHelp 8 Reviewer’s Guide 56
Page 57

• Complete Online Help, which is updated regularly and is more complete than
A B C D E F
the Help delivered with your product.
• All other content on Adobe.com, including knowledge base articles,
downloads and updates, Developer Connection, and more.
A
B
Users can add and customize favorite links and RSS feeds
"Include Community results" directs the search to include not just
the Adobe RoboHelp 8 online help, but results from the broad
community of resources.
C
"This Help system only" directs the search to include results only
from the Adobe RoboHelp 8 online help.
D
E
Here is a result from the basic online help
Here is a result from the Adobe Developer Center with special
articles have been submitted by users of RoboHelp around the
world.
F
Here is a result pointing to the Adobe Technical Communications
Blog containing frequent updates submitted by members Adobe
Product Team.
Adobe RoboHelp 8 Reviewer’s Guide 57
Page 58

Option to include
Community Help
results
The annotated screenshot above is a visual breakdown of the main features
provided in Search Results when you select the option “Include
Community.”
Additional resources and links
Animated Adobe Captivate 4 movies demonstrate the main features of Adobe RoboHelp 8
Best way to view Adobe Captivate 4 movies:
1. Click on a thumbnail view to activate the movie. It will open in a larger
window. At the end, right-click on the movie and select Close Floating
Window.
2. If you would like to replay the movie, right-click on the thumbnail view and
select View in Floating Window.
Adobe RoboHelp 8 Reviewer’s Guide 58
Page 59

Resources and
Links to additional
• Adobe RoboHelp main product Website
• Adobe RoboHelp User Forums
information
•Adobe Developer Connection
• Adobe Technical Communications Blog
Adobe RoboHelp 8 Reviewer’s Guide 59
Page 60

System Requirements
Internet or phone connection required for product activation.
Adobe RoboHelp 8
• Operating System • Microsoft® Windows® XP with
Service Pack 2 (Service Pack 3
recommended) or
• Windows Vista® with Service Pack
1 (certified for 32-bit editions
only)
•Hard Disk/RAM/
DVD
• Display resolution • 1,024x768 display (1,280x800
• MS Office Support • MS Word 2007, 2003, XP, 2000 • MS Access 2007, 2003, XP, 2000
• Editor Support • MS Word (2000, XP, 2003, 2007)
• 1,200 MB available hard disk
space/
• 512 MB (1GB recommended)
• DVD-ROM drive required
recommended) with 16-bit video
card
• Adobe DreamWeaver® CS3, CS4
*
Adobe RoboHelp Server 8*
• Apache and Tomcat Server
(recommended)
• Windows XP with IIS 5.0/6.0
• Windows 2003 Server with IIS
• Windows 2008 Server with IIS
• Windows Vista with default IIS
• 250 MB available disk space
• 256 MB
•N.A.
• MS FrontPage 2003 and above
•Adobe HomeSite® 5.5
•Adobe Flash®
Player Support
• PDF Version • Adobe PDF Creator Add-On and
Browser Support:
•Windows
•Mac
•Linux/Unix
• Languages
Supported
•(content, editing,
spell check, search)
Adobe RoboHelp 8 Reviewer’s Guide 60
• Versions 8/9/10
full versions of Adobe Acrobat®
• IE6, IE7, Firefox 2.0/3.0, Safari 2.0,
3.1
• Firefox 2.0/3.0, Safari 2.0, 3.1
• Firefox 2.0/3.0
• English, French, German, Roman
languages, Eastern European,
Chinese, Taiwanese, Japanese,
Korean (CCJK)
• IE6, IE7, Firefox 2.0/3.0, Safari
2.0, 3.1
• Firefox 2.0/3.0, Safari 2.0, 3.1
• Firefox 2.0/3.0
• English, French, German,
Roman languages, Eastern
European, Chinese, Taiwanese,
Japanese, Korean (CCJK)
Page 61

Adobe RoboHelp 8
About Adobe Systems Incorporated
Adobe revolutionizes how the world engages
with ideas and information—anytime,
anywhere and through any medium. For more
information, visit www.adobe.com.
Better by Adobe.™
This document was created and published
exclusively with Adobe Technical
Communication Suite.
*
Adobe RoboHelp Server 8*
• Source Control • RoboSource Control 3.1, Visual
•N.A.
SourceSafe (VSS) 6, 7
• Database Support • N.A. • Oracle 9i, 10g, SQL Server 9.0,
•SQL Express
* This product may allow you to access certain features that are hosted online
(“online services”), provided you have a high-speed Internet connection. The
online services, and some features thereof, may not be available in all countries,
languages, and/or currencies and may be discontinued in whole or in part without
notice. Use of the online services is governed by separate terms of use and by the
Adobe Online Privacy Policy, and access to these services may require user
registration. Some online services, including services that are initially offered at no
charge, may be subject to additional fees. For more details and to review the terms
of use and Online Privacy Policy, visit www.adobe.com.
For updates to system requirements, visit www.adobe.com.
Copyright and Legal Information
© 2009 Adobe Systems Incorporated. All rights reserved.
Adobe RoboHelp 8 Reviewer’s Guide for Windows®
Adobe RoboHelp 8 Reviewer’s Guide 61
This guide, as well as the software described in it, is furnished under an end user license agreement
accompanying such software and may be used or copied only in accordance with the terms of such
license. Except as permitted by any such license, no part of this guide may be reproduced, stored in a
retrieval system, or transmitted, in any form or by any means, electronic, mechanical, recording, or
otherwise, without the prior written permission of Adobe Systems Incorporated. Please note that the
Page 62

content in this guide is protected under copyright law even if it is not distributed with software that
includes an end user license agreement.
The content of this guide is furnished for informational use only, is subject to change without notice,
and should not be construed as a commitment by Adobe Systems Incorporated. Adobe Systems
Incorporated assumes no responsibility or liability for any errors or inaccuracies that may appear in
the informational content contained in this guide.
Any references to company names in sample templates are for demonstration purposes only and are
not intended to refer to any actual organization.
Adobe, the Adobe logo, Adobe AIR, the Adobe AIR logo, the Adobe PDF logo, Acrobat, Captivate,
Connect, Dreamweaver, Flash, FlashHelp, Flex, FrameMaker, Homesite, Photoshop, RoboHelp, and
"Better By Adobe" are either registered trademarks or trademarks of Adobe Systems Incorporated in
the United States and/or other countries.
Microsoft, MS, Windows, and Windows Vista are trademarks of Microsoft Corporation. Java is a
trademark or registered trademark of Sun Microsystems, Inc. in the United States and other
countries. All other trademarks are the property of their respective owners.
Software included in this program may contain an implementation of the LZW algorithm licensed
under U.S. Patent 4,558,302.
Adobe Systems Incorporated, 345 Park Avenue, San Jose, California 95110, USA.
Notice to U.S. Government End Users. The Software and Documentation are "Commercial Items," as
that term is defined at 48 C.F.R. §2.101, consisting of "Commercial Computer Software" and
"Commercial Computer Software Documentation," as such terms are used in 48 C.F.R. §12.212 or 48
C.F.R. §227.7202, as applicable. Consistent with 48 C.F.R. §12.212 or 48 C.F.R. §§227.7202-1 through
227.7202-4, as applicable, the Commercial Computer Software and Commercial Computer Software
Documentation are being licensed to U.S. Government end users (a) only as Commercial Items and
(b) with only those rights as are granted to all other end users pursuant to the terms and conditions
herein. Unpublished-rights reserved under the copyright laws of the United States. Adobe Systems
Incorporated, 345 Park Avenue, San Jose, CA 95110-2704, USA. For U.S. Government End Users,
Adobe agrees to comply with all applicable equal opportunity laws including, if appropriate, the
provisions of Executive Order 11246, as amended, Section 402 of the Vietnam Era Veterans
Readjustment Assistance Act of 1974 (38 USC 4212), and Section 503 of the Rehabilitation Act of
1973, as amended, and the regulations at 41 CFR Parts 60-1 through 60-60, 60-250, and 60-741. The
affirmative action clause and regulations contained in the preceding sentence shall be incorporated
by reference.
Adobe Systems Incorporated, 345 Park Avenue, San Jose, CA 95110-2704 USA,
www.adobe.com
Adobe RoboHelp 8 Reviewer’s Guide 62
 Loading...