

Page 1

Page 2

Using Help
About the built-in help features
Using Help for vision- and motor-impaired users
Opening the Help documentation
Using the How To pages
Page 3

About the built-in help features
Adobe® Reader® 7.0 offers many built-in features to assist you while you work, including
the Help window you're using right now:
● Help documentation.
● How To pages. (See Using the How To pages.)
● Tool tips, which identify the various buttons, tools, and controls in the work area by name.
These labels appear when you place the pointer over the item you want to identify. Tool
tips are also available in some dialog boxes.
● Help buttons in some dialog boxes. When you click these Help buttons, the Help window
opens with the related topic.
You can also consult online resources. Choosing Help > Online Support leads to links for
software downloads, product information, support documents, and more. The Help menu
also contains links to various online resources and references.
Note: There is no printed user manual for this product. Overviews, explanations,
descriptions, and procedures are included in Help.
Page 4
Using Help for vision- and motor-impaired users
Vision- and motor-impaired users can use the Accessibility Setup Assistant to change how
PDF documents appear on-screen and are handled by a screen reader, screen magnifier, or
other assistive technology. The first time you start Adobe Reader, the Accessibility Setup
Assistant starts if Adobe Reader detects that assistive technology is running on your
system. (See Setting accessibility preferences.)
Single-key accelerators and keyboard shortcuts make document navigation simpler. Some
of the more common keyboard shortcuts are described here. For a complete list of
keyboard shortcuts, see About keyboard shortcuts. For additional information on how
Adobe products enhance electronic document accessibility, visit the Adobe website at
http://access.adobe.com.
To activate single-key accelerators:
1. Choose Edit > Preferences (Windows®) or Adobe Reader > Preferences (Mac OS), and
click General on the left.
2. Select Use Single-Key Accelerators To Access Tools.
3. Click OK to apply the change.
To open the How To window:
Press Shift+F4.
To close the How To window:
Do one of the following:
● (Windows) Press Shift+F4 or Esc.
● (Mac OS) Click the Close button.
To open or close Adobe Reader Help:
Do one of the following:
● To open Help, press F1. In Mac OS, you can also press Command+?.
● To close Help, press Ctrl+W or Alt+F4 (Windows), or click the Close button.
Click the Search or Index tab to use that feature. In Windows, press Ctrl+Tab to cycle
forward through the tabs, or press Shift+Ctrl+Tab to cycle backward through the tabs.
Press F6 to move between the document pane and the navigation pane. In the Index tab,
you can type an entry into the Select Index Entry text box. The list scrolls to the first
match to the text string you type. Click a link to go to that topic.
Page 5
Opening the Help documentation
Adobe Reader 7.0 includes complete, built-in documentation in a fully accessible Help system. The
Help documentation provides explanations about the tools, commands, concepts, processes, and
keyboard shortcuts. You can print individual Help topics as needed. (See Printing Help topics.)
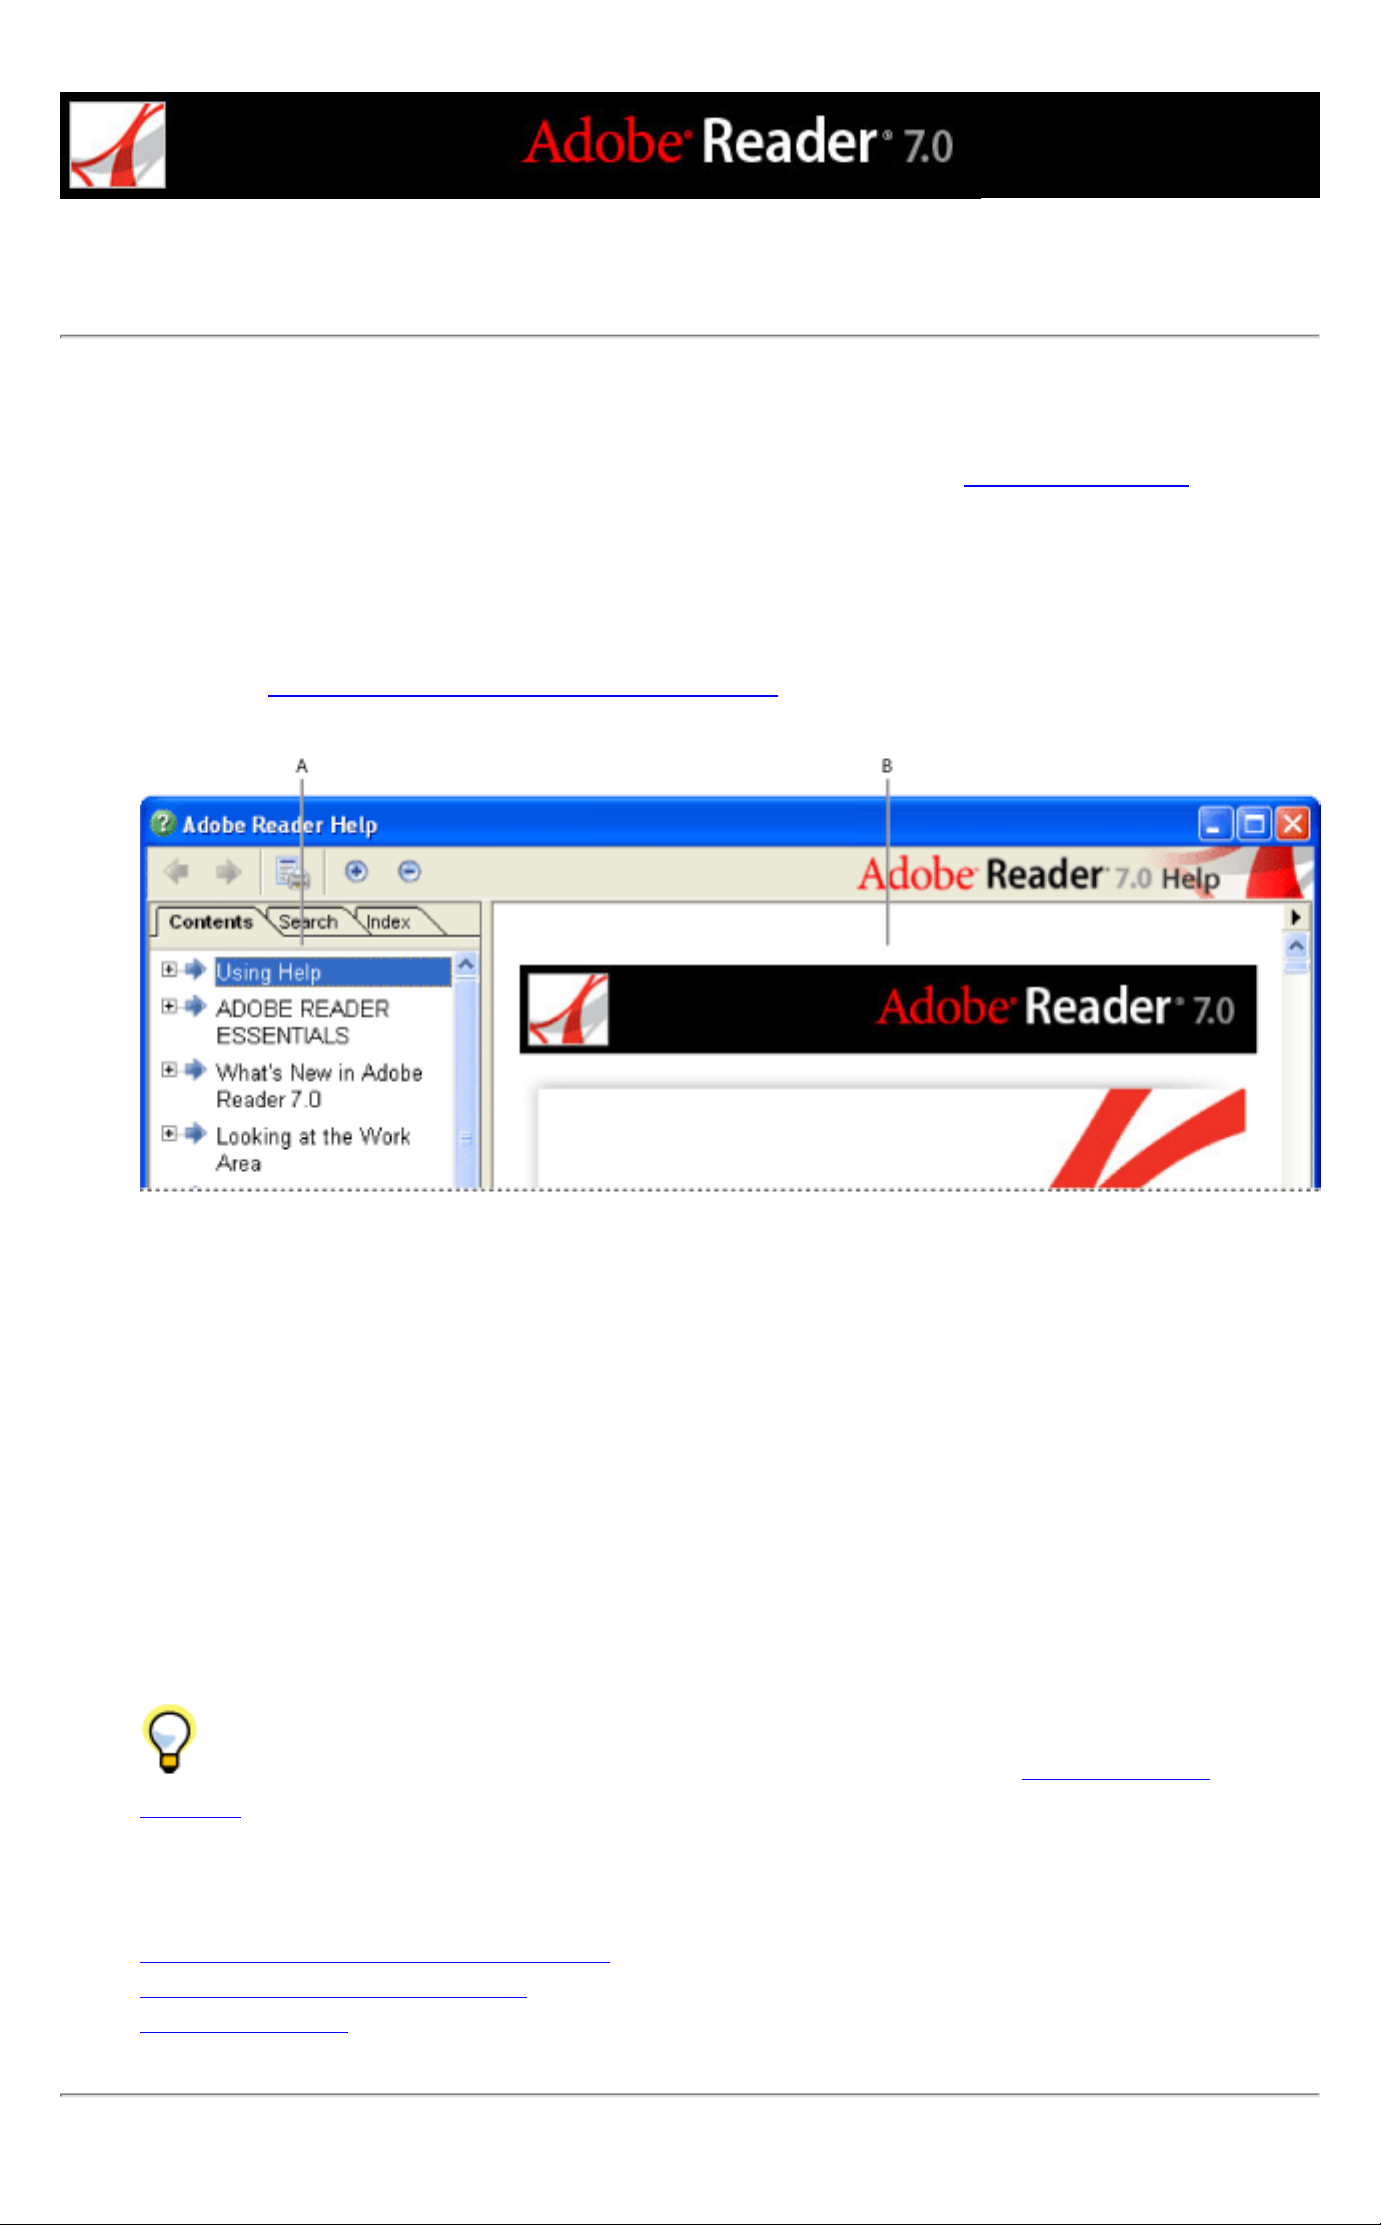
Adobe Reader 7.0 Help opens in a separate window with two panes: a navigation pane on the left and a
topic pane on the right. You use the tabs in the navigation pane to find the topics you want to read. For
example, you click the Contents tab to show the list of topics available in Help. You click a title in the
list to open that topic in the topic pane. For more information on using the Contents, Search, and Index
panels, see Using the Help navigation pane to find topics.
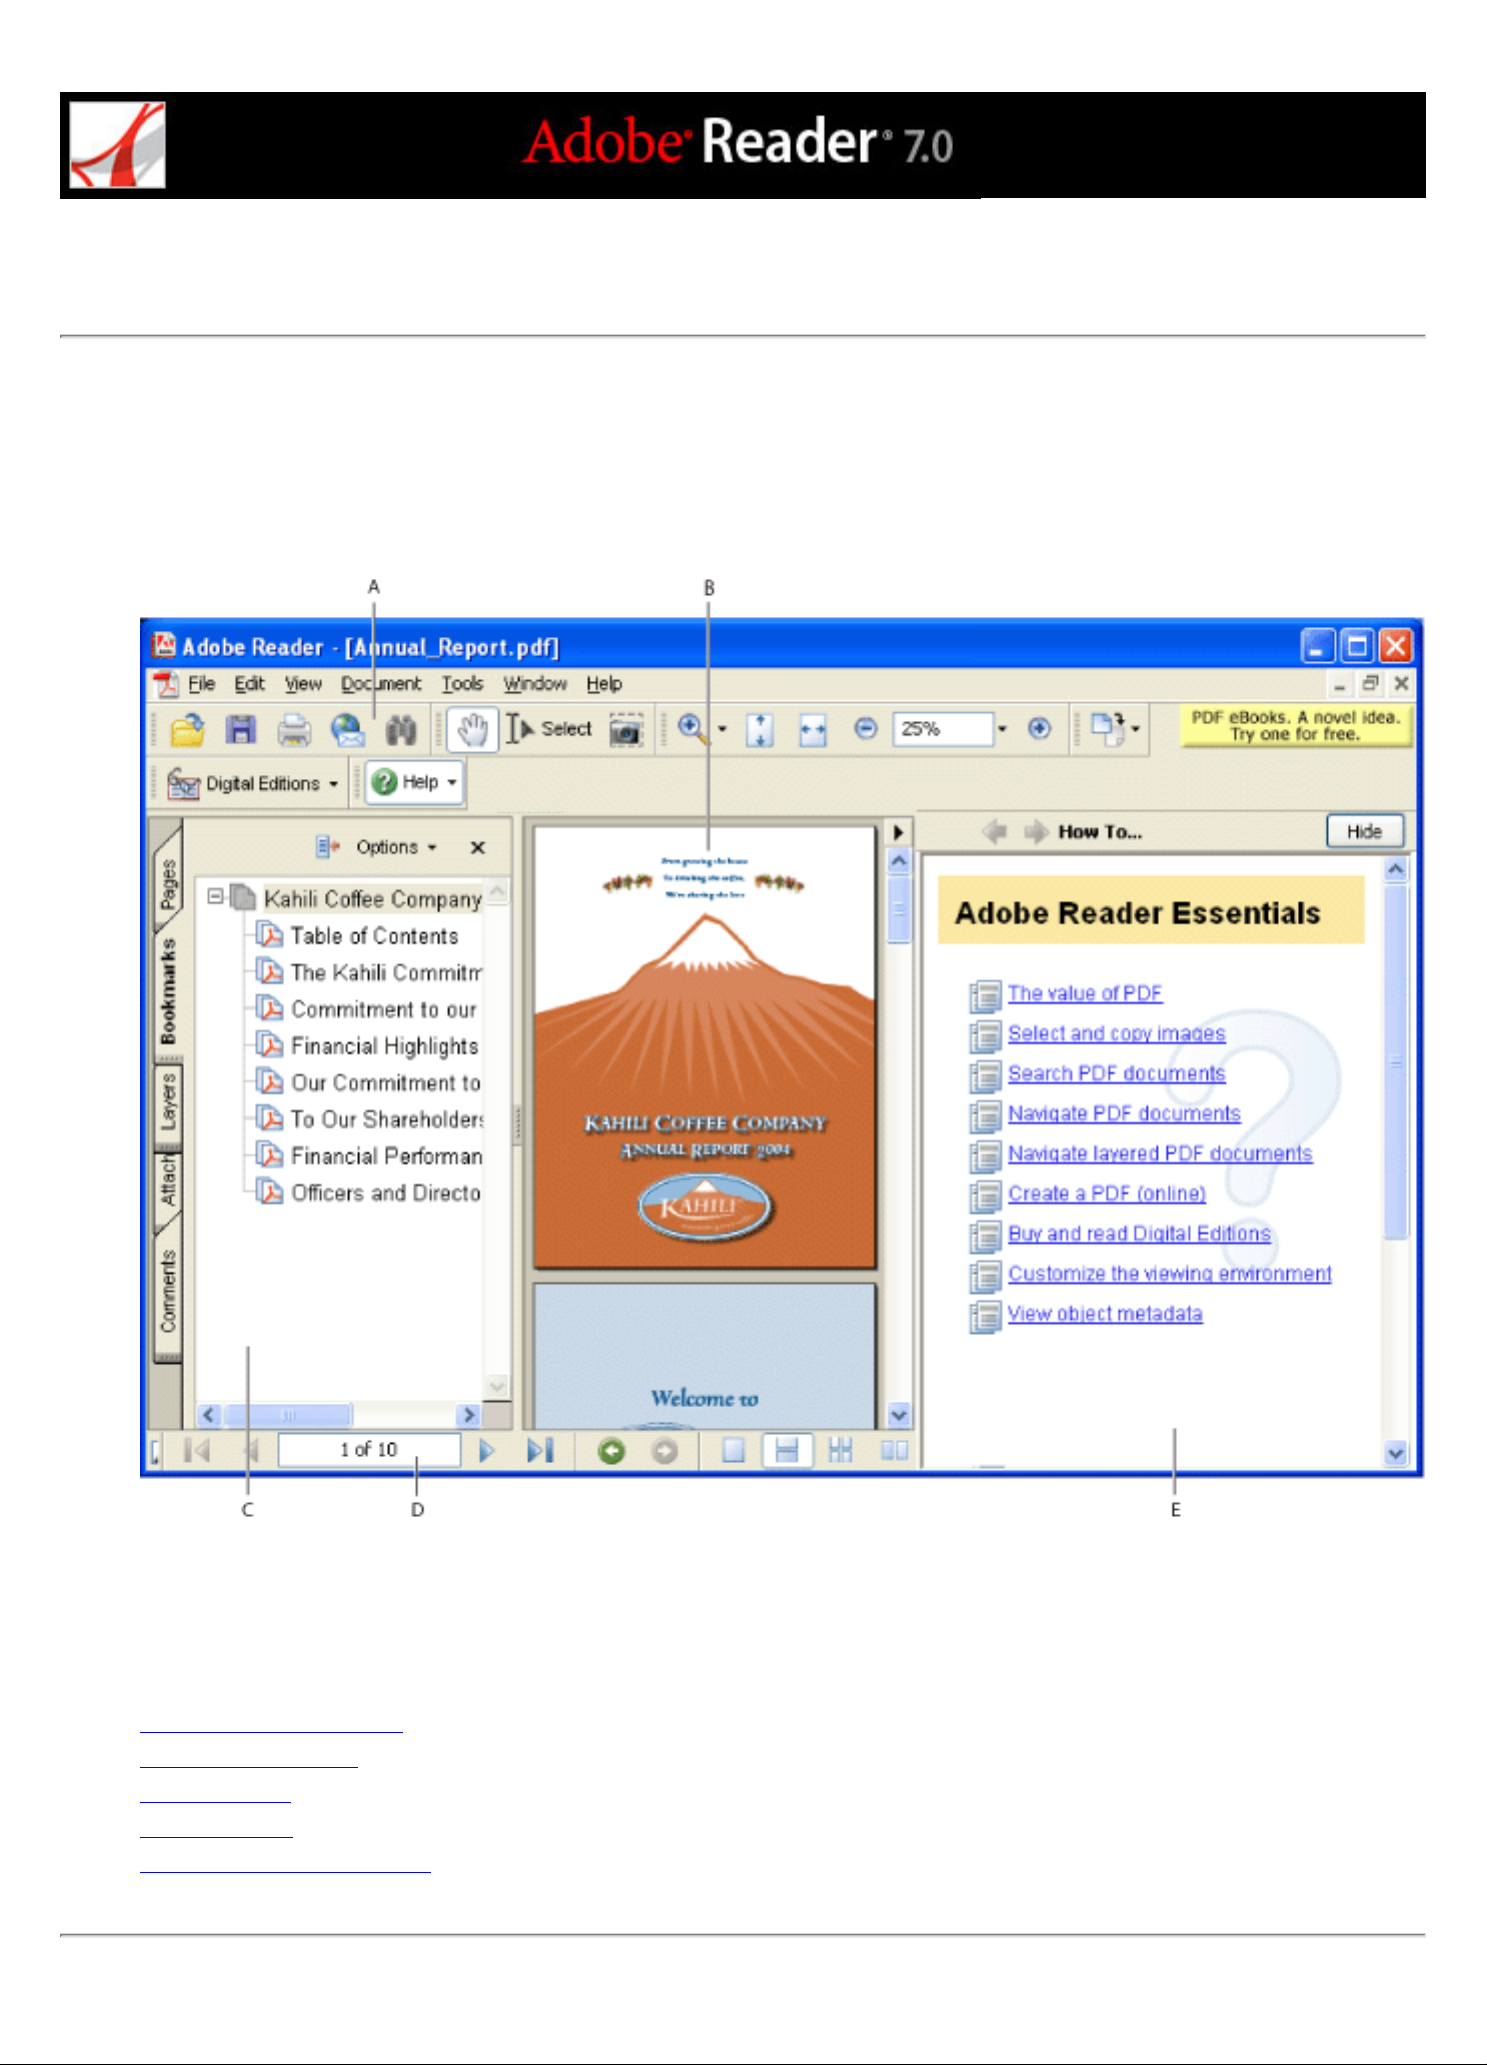
Adobe Reader 7.0 Help A. Contents, Search, and Index tabs in the Help navigation pane B. Help topic pane
You can drag the vertical bar between the navigation pane and the topic pane to change their widths.
You can drag the lower right corner to resize the entire window. The Help window remains visible until
you close it.
To open Help:
Choose Help > Adobe Reader Help.
To close Help:
Click the Close button.
There are many keyboard shortcuts to help you navigate the Help. (See About keyboard
shortcuts.)
Related Subtopics:
Using the Help navigation pane to find topics
Navigating your Help-session history
Printing Help topics
Page 6

Using the Help navigation pane to find topics
The Help window opens with the Contents tab selected in the navigation pane.
● Click the Contents tab to view the Help topics organized by subject matter, as in the table
of contents of a book. You can click the icons to the left of the topics to collapse or
expand the outline. Click a topic name to that topic in the topic pane.
● Click the Search tab to find a specific word in Help. Type the word in the text box, and
click Search. The results list shows the titles of all topics in which the search word
appears. Topics are listed in the order that they appear on the Contents tab.
Note: You cannot use Boolean operators (such as AND, OR, NOT, or quotation marks) to
limit or refine your search. If you type more than one word, the search results include
every topic in which at least one of the words appears.
● Click the Index tab to find a linked, alphabetical list of terms for various functions,
features, and concepts. You can browse the index in two ways. You can click the controls
(+ or -) to expand or collapse the entries under a letter of the alphabet, scroll to the term
you want, and click a link. Or you can type an entry into the Select Index Entry text box.
The list scrolls to the first match to the text string you type. Click a link to go to that topic.
Page 7
Navigating your Help-session history
The Help system maintains a history of your Help session so that you can go back and
forth quickly among the topics you open.
Click the Previous Topic button on the Help toolbar to return to topics you opened
earlier in your Help session. Click the Next Topic button
When you close Help, you end your Help session and delete your Help history.
to move forward again.
Page 8
Printing Help topics
You can print any individual topic from the Help documentation.
Each topic must be printed individually. You can't print multiple topics at a time or entire
sections of Help.
To print a Help topic:
1. Open the Help topic.
2. Click the Print Topic button on the Help toolbar.
Page 9
Using the How To pages
The How To pages supplement Adobe Reader Help by presenting overviews of some
topics. The How To window appears on the right side of the document pane and never
blocks the view of your open document.
There are many keyboard shortcuts to help you navigate the How To pages. (See
About keyboard shortcuts.)
To open the How To window:
Do one of the following:
● Choose Help > How To > [topic].
● Choose a topic from a How To menu in the toolbar.
To close the How To window:
Do one of the following:
● (Windows) Click the Hide button.
● (Mac OS) Click the Close button.
● (Mac OS) Control-click the How To toolbar (under the title bar), and choose Hide.
To reposition the How To window:
In Windows, right-click the How To title bar, and choose either Docked Left or Docked
Right.
In Mac OS, do any of the following:
● Control-click the How To toolbar (under the title bar), and choose either Docked Left or
Docked Right.
● Drag the title bar of the How To window to the opposite side of the Adobe Reader
window.
You can change the width of the How To window by dragging the separator bar. The
vertical dimension adjusts to match any changes you make to the document pane.
To navigate through the How To pages:
Use the Back button and the Forward button in the How To window to navigate
among the pages you've viewed in your current session.
Page 10
ADOBE READER ESSENTIALS
What's the difference between Adobe Acrobat and Adobe Reader?
About Adobe PDF documents with additional usage rights
Viewing document properties
Updating Adobe Reader
Page 11
What's the difference between Adobe Acrobat and Adobe Reader?
Adobe® Acrobat® and Adobe Reader are separate applications that let you open and view
documents created in Adobe Portable Document Format (PDF). However, Adobe Acrobat
lets you create PDF documents, add bookmarks and comments, change security settings,
and edit PDF documents in other ways. Adobe Reader is free software that lets you open
and view any PDF document.
There are two versions of Adobe Reader. The basic version contains a smaller set of
features to allow for fast downloading, while the full version of Adobe Reader includes a
broader version set, including the ability to search PDF files, play back embedded media
clips, and support Digital Editions. Both versions of Adobe Reader are available from the
Adobe web site (www.adobe.com) at no cost.
Related Subtopics:
Viewing PDF documents on the desktop or in a browser
Page 12

Viewing PDF documents on the desktop or in a browser
You can open PDF documents in two different ways. One way is to open the PDF
documents directly in the Adobe Reader application on your desktop. Another way is to
open a PDF document that is posted on the Internet in your web browser. When you open
a PDF document in your web browser, Adobe Reader tools appear within the web
browser. You can change preference settings to determine whether PDF documents on the
web are opened in Adobe Reader on your desktop or in a web browser. (See Viewing
Adobe PDF documents in a web browser.)
To determine whether web-based PDF documents are opened within a browser:
1. Choose Edit > Preferences (Windows) or Adobe Reader > Preferences (Mac OS), and
then click Internet.
2. Select Display PDF In Browser to open PDF documents on the web within the browser.
Deselect this option if you want web-based PDF documents to open in Adobe Reader, not
the browser.
Page 13

About Adobe PDF documents with additional usage rights
Adobe Reader is free software that lets you open and view Adobe PDF documents. In
most PDF documents, adding review comments requires Adobe Acrobat. However, you
can add review comments in Adobe Reader if the PDF document includes additional
usage rights. The Document Status dialog box indicates whether Comment & Markup
features are enabled. The author of the PDF document determines whether the document
includes additional usage rights.
To view additional usage rights in a PDF document:
Open a PDF document with additional usage rights, and do one of the following:
● View the rights in the yellow Document Message Bar just below the toolbars.
● Choose Document Status from the document pane pop-up menu in the upper right corner.
To hide or show the Document Message Bar:
Open a PDF document with additional usage rights, and do one of the following:
● To hide the Document Message Bar, move the pointer over the horizontal bar that
separates the Document Message Bar from the document pane. Drag the bar up to the
toolbar when the pointer icon changes to the Double Arrow icon.
● To show the Document Message Bar, move the pointer over the horizontal bar that
separates the toolbar from the document pane. Drag the bar down when the pointer icon
changes to the Double Arrow icon.
Page 14
Viewing document properties
When you view a PDF document, you can get information on the file, such as the title, the
fonts used, and security settings. Some of this information is generated when the PDF
document is created, and some can added by the person who created the document. In
Adobe Reader, you can view, but not edit, document properties.
To get information on the current document:
1. Choose File > Document Properties, or choose Document Properties from the document
pane menu, which is located just above the vertical scroll bar.
2. Select a tab in the Document Properties dialog box:
● Description. (See Description document property settings.)
● Security. The Security panel describes what activities, if any, are not allowed. (See
Viewing the security settings of PDF documents.)
● Fonts. The Fonts panel lists the fonts and the font types used in the original document, and
the fonts, font types, and encoding used to display the original fonts. If substitute fonts are
used and you aren't satisfied with their appearance, you may want to install the original
fonts on your system or ask the document creator to re-create the document with the
original fonts embedded in it.
● Advanced. (See Advanced document property settings.)
Related Subtopics:
Description document property settings
Advanced document property settings
Page 15

Description document property settings
The Description panel shows basic information about the document. The title, author,
subject, and keywords may have been set by the person who created the document in the
source application, such as Microsoft Word or Adobe InDesign®, or by the person who
created the PDF document. In Adobe Reader, you cannot add to or edit this document
information.
You can search for these description items in Adobe Reader to find particular documents.
The Keywords section can be particularly useful for narrowing searches. (See About
searching text.) Note that many search engines use the title to describe the document in
their search results list. If a PDF file does not have a title, the file name appears in the
results list instead. A file's title is not necessarily the same as its file name.
The Advanced group box shows which PDF version the document is created in, the page
size, number of pages, and whether the document is tagged. This information is generated
automatically and cannot be modified.
Page 16

Advanced document property settings
The Advanced panel shows PDF settings and reading options:
● Base URL displays the base Uniform Resource Locator (URL) set for web links in the
document. The base URL is not used if a link contains a complete URL address.
● Search Index displays the name of the autoindex associated with the file. (The autoindex
is created in Acrobat.) Opening the file adds the associated index to the list of indexes that
can be searched. (See Searching across multiple Adobe PDF documents.)
● The Trapped menu indicates whether trapping is applied to the file. Prepress software uses
this information to determine whether to apply trapping at print time.
● Binding affects how the pages are arranged side by side when you view them using the
Continuous - Facing page layout. (See Setting the page layout and orientation.) This is for
matching the reading direction (left to right or right to left) of text in the document. Right
Edge binding is useful for viewing Arabic or Hebrew text or vertical Japanese text.
● Language specifies the default language used in the document. (See Using a screen
reader.)
Page 17
Updating Adobe Reader
Adobe Reader files and components can be updated in a variety of ways. Some updates
are available if you open an Adobe PDF document that triggers the updating process. For
example, if you open a form that uses Asian-language fonts, Adobe Reader asks if you
want to download the fonts. Other updates are available only from the Help menu, where
you must manually install them. Some updates are available using either method.
You can also use the Updates panel in the Preferences dialog box to determine how to
handle updates. Adobe Reader can automatically check for critical updates and
notifications once a month. Depending on your preference settings, Adobe Reader can
download updates in the background when other web transactions, such as email, are
inactive. In Windows, you can minimize the download dialog box to a status bar icon.
When all the components have been downloaded, a Summary Install Now dialog box lets
you choose which updates to install.
To set updating preference options:
1. Choose Edit > Preferences (Windows) or Adobe Reader > Preferences (Mac OS), and
then select Updates on the left side of the dialog box.
2. Select an option to determine how to handle updates. If you select Do Not Automatically
Check For Critical Updates, you should periodically check for updates manually by
choosing Help > Check For Updates Now.
3. Click View Notifications to preview any notifications before deciding whether to update.
Click OK to close the dialog box.
4. Click Installed Updates to view the names and descriptions of installed updates. If several
versions of an update have been installed, only the latest version appears in the Installed
Updates dialog box.
5. Deselect Display Notification Dialog At Startup if you don't want to be advised about
available updates when you start Adobe Reader.
6. Deselect Display Installation Complete Dialog if you don't want to be advised when
updates are successfully installed.
To manually update components:
1. Choose Help > Check For Updates Now.
2. Select updates from the column on the left, and click Add or Reinstall to move them to the
column on the right. Only the updates and components appropriate for your platform and
product are listed.
3. Click Update.
Page 18
What's New in Adobe Reader 7.0
New features overview
Additional language support
Filling in forms
Reviewing and approving
Document security and digital signatures
File attachments
Additional new features
Page 19

New features overview
As with earlier versions of Adobe Reader, the free Adobe Reader 7.0 software allows you
to open and read any PDF document and fill in PDF forms. But Adobe Reader 7.0 also
offers significant new features and enhancements that greatly extend the flexibility of
Adobe PDF documents. If the creator of an Adobe PDF document has assigned it
additional usage rights, more tools and features are available to users of Adobe Reader,
allowing you to save form data, sign documents, participate in email and browser-based
document reviews, and attach PDF and non-PDF files to a PDF document. If you open a
document that has these additional usage rights, a Document Message Bar displays the
additional tools required to work with the document.
Language support has been extended, a new autosave feature guards against losing your
work in case of a power failure, and new accessibility features make Reader even easier to
use for motor- and vision-impaired users. Depending on your preference settings, Adobe
Reader can automatically download updates in the background, even while other web
transactions are occurring.
Page 20

Additional language support
The extended language support in Adobe Reader 7.0 allows you to view, search, and print
PDF documents that contain Central and Eastern European languages. Forms entry,
comments, and digital signatures are also supported in these languages. If you open a
document that requires the installation of additional fonts, you are prompted to install the
appropriate language font kit using the Check For Updates Now command.
Page 21

Filling in forms
If a PDF form contains interactive form fields, you can fill in the form electronically and
submit the form by email or over the web. Reader also lets you spellcheck your entries. If
the form author added special usage rights to the PDF document, you can also save the
form data.
PDF forms may contain bar code form fields that typically appear as a series of vertical
bars with a unique set of characters underneath the bars. You can't manually enter data
into the bar code form field, but the bars and characters of these interactive barcode fields
change to encrypt the data that you've entered into other form fields in the PDF.
Page 22

Reviewing and approving
If the creator of the PDF document assigned additional usage rights, you can review PDF
documents via email or the web. (In Mac OS, browser-based reviews are supported
through Safari.) You're provided with a Commenting toolbar and--if you're part of a
tracked review--specific instructions for opening the document, adding comments, and
returning the document to the review initiator.
You can add your comments as a file attachment, or record an audio comment if there's a
microphone connected to the computer. A new Callout tool lets you create text box
markups that point to specific areas of a PDF document. And you can group markups so
that your comments behave as a single comment. A comments tab gives you easy access
to your own and other reviewers' comments.
In the Asian (Traditional Chinese, Simplified Chinese, Japanese, and Korean) version of
Adobe Reader 7.0, you may also be invited to participate in a workflow that requires
approval from multiple branches of an organization. In this type of workflow, PDF
documents are sent to participants in sequential order. (Only users of Acrobat 7.0
Professional can organize a tracked review.)
Page 23

Document security and digital signatures
With Adobe Reader 7.0, you may receive an Adobe PDF document with attachments that
are bundled into a secure electronic envelope (eEnvelope) designed to protect documents
during transit. When you open the eEnvelope, you can extract the file attachments and
save them to disk. The saved files are identical to the original file attachments and are no
longer encrypted when saved.
Acrobat 7.0 users can create Adobe PDF documents using security policies that can expire
and revoke documents, as well as maintain accountability by keeping track of who opens
protected documents. You can only open these secure PDF documents if you have the
necessary passwords or are on the list of approved recipients.
You can sign a PDF document only if the document includes additional usage rights
assigned by the creator of the document.
Page 24

File attachments
Acrobat 7.0 users can attach non-PDF and PDF files or pages from files to their Adobe
PDF documents. If you move one of these PDF documents, the attached files or pages
automatically move with the document. If the creator of the PDF file has assigned
additional usage rights, you can attach files, edit attached files, and save your edits. A
description of each attached file appears in the Attachments tab of the navigation pane.
Page 25

Additional new features
Adobe Reader 7.0 includes many other new and enhanced features to improve how you
work.
Updates
Depending on your Updates preferences, Adobe Reader can automatically check for
critical updates and notifications. If you disable this feature, you can manually check for
updates by choosing Help > Check For Updates Now.
Find toolbar
The Find toolbar provides a basic set of options for searching for text in the active Adobe
PDF document. You can locate a word, series of words, or partial word.
Recover your work
The Autosave feature guards against losing your work in case of a power failure by
incrementally saving file changes to a specified location. The original file is not modified.
(Autosave is available only for documents that have additional usage rights.)
View 3D content
The 3D plug-in allows you to view and navigate embedded 3D content in PDF files. Now,
you can experience high-quality 3D environments with realistic lighting and motion.
Acrobat 7.0 Professional is required to embed 3D content.
Set up for accessibility
For vision- and motor-impaired users, a new Accessibility Setup Assistant makes it easy
to change how PDF documents appear on-screen and how they're read by a screen reader,
screen magnifier, or other assistive technology. In Windows, this wizard starts
automatically the first time Adobe Reader detects assistive technology on your system. In
Mac OS, you can start the wizard from a menu.
Read Out Loud
You can use the Read Out Loud feature to read form fields out loud as you tab through
them.
Improved Help
The Help system has been improved for vision- and motion-impaired users.
Subscribe to digital periodicals and journals
Periodicals can be obtained in the same way as Digital Editions. When you subscribe to a
digital periodical and download the first issue, Adobe Reader asks you how often to check
for the availability of subsequent issues.
Overprint preview
The Overprint Preview mode lets you see (on-screen) the effects of ink aliasing in the
printed output. A prepress service provider may create an ink alias if a document contains
two similar spot colors and only one is required, for example. Spot colors aliased to other
spot colors or to process colors are reflected directly in the open document.
View PDF documents in the browser (Mac OS)
Adobe Reader works automatically with Safari to make viewing Adobe PDF documents
on the web easy. The first time you open Adobe Reader, your system automatically is
configured to use Adobe Reader to open PDF files in your browser.
Page 26

Looking at the Work Area
About the work area
Opening documents
Navigating in documents
Adjusting the view of documents
Customizing the work area
Setting preferences
Viewing Adobe PDF documents in a web browser
Working with non-English languages in Adobe PDF files
Page 27
About the work area
The Adobe Reader window includes a document pane that displays Adobe PDF documents. On the left side is a
navigation pane that helps you browse through the current PDF document. Toolbars at the top of the window and
the status bar at the bottom of the window provide other controls that you can use to work with PDF documents.
You can also open a How To window on the right side with an overview of common tasks.
Reader work area A. Toolbars B. Document pane C. Navigation pane (Bookmarks tab displayed) D. Status bar E. How To
window
Related Subtopics:
Using the navigation tabs
Using context menus
Using toolbars
Selecting tools
Using the Properties toolbar
Page 28
Using the navigation tabs
Tabs display such items as a document's bookmarks, page thumbnails, and articles. Tabs
are displayed in the navigation pane on the left side of the work area or in floating panels.
To show or hide tabs in the navigation pane:
Do one of the following:
● Move the pointer over the vertical bar that separates the document pane from the
navigation pane. Click the bar when the pointer icon changes to the Double Arrow icon .
● Choose View > Navigation Tabs, and then choose the desired tab from the menu.
● Click the tab name on the left side of the document pane.
Note: The creator of the Adobe PDF document may set the contents of the navigation
tabs. In some cases, a tab may not contain any content.
To choose a command from a tab Options menu:
1. Click a tab to open the navigation pane.
2. At the top of the tab, click Options to open the menu, and choose the command you want.
The commands vary, depending on which tab is displayed. To close the menu without
choosing a command, click anywhere outside the menu or press Esc.
Click the triangle next to Options to open the menu.
You can also choose commands from the document pane menu. Click the triangle
just above the scroll up arrow on the right to open the menu, and then choose a command.
Page 29

Using context menus
Adobe Reader provides context-sensitive menus that display commands for the particular
item under the pointer. For example, you can right-click (Windows) or Control-click
(Mac OS) the toolbar area to display a context menu that contains toolbar options and the
most commonly used toolbars.
To choose a command from a context menu:
1. Position the pointer over an item in the work area, such as a comment, toolbar, bookmark,
or document page.
2. Right-click (Windows) or Control-click (Mac OS) to open the context menu, and then
choose the command you want.
Page 30

Using toolbars
The Adobe Reader toolbar area includes a set of toolbars, some of which appear by default and some of
which are hidden.
Toolbars open by default A. File toolbar B. Basic toolbar C. Zoom toolbar D. Rotate View toolbar E. Tasks
toolbar
Hold the pointer over the tool to see the name of the tool. Hold the pointer over the gripper bar
on the left edge of a toolbar to see the name of the toolbar.
To show or hide toolbars:
Do any of the following:
● Choose View > Toolbars, and then select the toolbar you want to show or hide. A check mark next to the
toolbar name indicates that the toolbar is displayed.
● Choose Tools, select the appropriate topic, and choose Show [toolbar name] Toolbar.
● Right-click (Windows) or Control-click (Mac OS) the toolbar area, and then select the toolbar you want
to show or hide.
● To hide all toolbars, choose View > Toolbars > Hide Toolbars. Choose Show Toolbars to display them
again.
● Choose View > Toolbars > Reset Toolbars to display the default set of toolbars.
For information on changing the appearance and position of toolbars, see Customizing the work area.
Page 31

Selecting tools
As a general rule, you should use the Hand tool when browsing through PDF
documents. However, you can select a number of other helpful tools from the toolbars.
Note: You may notice that certain tools, such as commenting tools, are available in some
documents but not in others. When you open a document with additional usage rights, the
tools that you need to work with the document are added to the work area. (See About
Adobe PDF documents with additional usage rights.)
To select a tool:
Do one of the following:
● From the Tools menu, choose the toolbar name, and then choose the tool.
● To select a visible tool in a toolbar, click the tool, or press the appropriate keystroke. (See
Keys for selecting tools.)
● To select the Hand tool temporarily, without deselecting the current tool, hold down the
spacebar.
● To select the Zoom In tool temporarily, press Ctrl (Windows) or Command (Mac OS) and
hold down the spacebar.
● To select a hidden tool, hold down the mouse button on either the related tool or the
triangle next to the related tool until the additional tools appear, and then drag to the tool
you want.
● To replace a visible tool with a hidden tool, click the related tool or the triangle next to it
until the additional tools appear, and click the name of the hidden tool.
● To display hidden tools alongside the other tools, click the related tool or the triangle next
to it and choose Expand This Button. To collapse the hidden tools, click the left-pointing
arrow to the right of the expanded button.
Click the triangle next to a tool to open a hidden group of tools.
Page 32

Using the Properties toolbar
The Properties toolbar is especially useful when you open a document with additional
usage rights. The item selected in the document pane determines the contents of the
Properties toolbar. For example, if you select a note comment, the Properties bar displays
the properties of the note.
When the Properties toolbar is displayed, it appears by default as a floating toolbar. If you
prefer, you can dock it next to the other toolbars by dragging it into the toolbar area.
To show or hide the Properties toolbar:
1. Select the object, such as a note comment, that contains the properties you want to edit.
2. Do one of the following:
● Choose View > Toolbars > Properties Bar.
● Right-click (Windows) or Control-click (Mac OS) the toolbar area, and choose Properties
Bar from the context menu.
If you want to change properties other than those listed on the Properties toolbar,
right-click (Windows) or Control-click (Mac OS) the object, and choose Properties.
Page 33

Opening documents
You can open an Adobe PDF document from your email application, from your file
system, from within a web browser, or by choosing File > Open in Adobe Reader. The
initial view of the PDF document depends on how its creator set the document properties.
For example, a document might open to a particular page or at a particular magnification.
The creator of the PDF document may have enabled additional usage rights that let you
participate in a document review, create comments, fill in forms, and sign documents.
(See About Adobe PDF documents with additional usage rights.)
When someone sends you a restricted PDF document, you may need to enter a password
to open it. If a document is encrypted, you may not be able to open it without permission
from the person who created the document. In addition, restricted or certified documents
may prevent you from printing a file or copying information to another application. If
you're having trouble opening a PDF document, or if you're restricted from using certain
features, contact the author of the PDF document. For information on opening documents
to which security has been applied, see About security.
If a document is set to open in Full Screen view, the toolbar, command bar, menu bar, and
window controls are not visible. You can exit Full Screen view by pressing the Esc key, if
your preferences are set this way, or by pressing Ctrl+L (Windows) or Command+L
(Mac OS). (See Reading documents in Full Screen view.)
To open a PDF document from within Adobe Reader:
1. Do one of the following:
● Choose File > Open, or click the Open button in the toolbar. In the Open dialog box,
select one or more file names, and click Open. PDF documents usually have the extension .
pdf.
● Drag the PDF file into the Adobe Reader window.
● (Windows) From the File menu, choose a previously opened document's file name.
● (Mac OS) Choose File > Open Recent File, and then choose the document's file name.
2. If the Document Message Bar appears when a PDF document is opened, the document has
a special status or special features. For example, it may be certified or signed, or it may
include additional usage rights. The bottom left corner of the status bar displays icons that
represent the special status. You can click any of these to view the document status.
If more than one document is open, you can switch between documents by choosing
the document name from the Window menu. In Windows, Adobe Reader places a button
for each open window on the Windows taskbar. You can click this button to move
between open documents.
To open a PDF document from outside Adobe Reader:
Do one of the following:
● Open the PDF attachment from within an email application. In most email applications,
you can double-click the attachment icon to open the document.
● Click the PDF file link in your web browser. The PDF document may open within your
web browser. In this case, use the Adobe Reader toolbars to print, search, and work on
your PDF documents, because the menu commands may apply to the browser and not to
the PDF document. (See Viewing Adobe PDF documents in a web browser.)
● Double-click the PDF file icon in your file system.
Note: In Mac OS, you might not be able to open a PDF document created in Windows by
double-clicking the icon. If double-clicking the icon in Mac OS does not open the
document, use File > Open in Adobe Reader, or drag the PDF file icon into the Adobe
Reader window.
Related Subtopics:
Saving Adobe PDF documents
Page 34

Saving Adobe PDF documents
You can save a copy of an Adobe PDF document, or if the creator of the document
enabled additional usage rights, you can save comments, entries in form fields, or digital
signatures that you have added to a document. If a document contains additional usage
rights, you are advised what privileges have been assigned when you open the document.
(See About Adobe PDF documents with additional usage rights.)
If the file permissions allow it, you can also save the contents of a PDF document in text
format. This allows you to easily reuse the text from a PDF document and to use the
content with a screen reader, screen magnifier, or other assistive technology.
To save a copy of an Adobe PDF document:
1. Choose File > Save A Copy.
2. In the Save A Copy dialog box, enter the file name and location, and click Save.
You can save the file only in PDF format.
To save comments, form field entries, and digital signatures:
Do one of the following:
● Choose File > Save to save changes to the current file.
● Choose File > Save As to save changes to a new file.
Note: If you are viewing a document with additional usage rights in a browser, you can
only use the Save A Copy command.
To save an Adobe PDF document as a text file:
1. Choose File > Save As Text.
2. In the Save As Text dialog box, enter the file name and location, and click Save.
Your file is saved with the .txt extension.
Note: This command appears only in the full version of Adobe Reader.
When you are working on a document to which additional usage rights have been
assigned, Adobe Reader automatically saves your work every 5 minutes. You change how
often Adobe Reader saves your work in the General Preferences.
Page 35

Navigating in documents
You can navigate in Adobe PDF documents by paging through them or by using
navigational tools such as bookmarks, thumbnail pages, and links. You can also retrace
your steps through documents to return to where you started.
Related Subtopics:
Paging through documents
Retracing your viewing path
Navigating with bookmarks
Viewing layers
Navigating with page thumbnails
Navigating with reviewer comments
Navigating with links
Navigating documents with file attachments
Reading article threads
Page 36

Paging through documents
The navigation controls in the status bar at the bottom of the window provide a quick way
to navigate through documents. In addition, you can use menu commands, the Navigation
toolbar, and keyboard shortcuts for paging through a PDF document.
Navigation controls A. First Page button B. Previous Page button C. Current page D. Next Page button E. Last Page button F. Go To Previous View button G. Go To Next View button
To go to another page:
Do one of the following:
● To go to the first or last page, click the First Page button or the Last Page button in
the status bar, or choose View > Go To > First Page or Last Page.
● To go to the next or previous page, click the Next Page button or the Previous Page
button
● To retrace your viewing path, click the Go To Previous View button or the Go To
Next View button
● If you are in Fit Page view and the page layout is set to single page, press the Up Arrow or
on the status bar, or choose View > Go To > Next Page or Previous Page.
.
Down Arrow key to move up or down a page. (See Setting the page layout and
orientation.)
To learn shortcut keystrokes for paging through documents, see About keyboard
shortcuts.
To use the Navigation toolbar:
1. If the Navigation toolbar isn't open, either choose View > Toolbars > Navigation or rightclick (Windows) or Control-click (Mac OS) the toolbar area, and then choose Navigation.
2. Click the buttons to move forward or backward through your document.
To jump to a page by its number:
Do one of the following:
● Choose View > Go To > Page, type the page number, and click OK.
● Drag the vertical scroll bar until the number of the page you want to jump to appears.
● Select the current page number in the status bar, type the page number to jump to, and
press Enter or Return.
Note: If your document's page numbers are different from the actual page position in the
PDF file, the page position may appear in parentheses in the status bar. For example, if the
first page of an 18-page chapter begins numbering at 223, the numbering might appear as
223 (1 of 18). You can double-click inside the parentheses, change the page-position
number, and press Enter or Return to go to that page. For information on turning on and
off logical page numbers, see Page Display preferences.
To automatically scroll through a document:
1. Choose View > Automatically Scroll.
2. Press Esc to stop scrolling.
Page 37
Retracing your viewing path
After you have navigated through documents, you can retrace your path back to where
you started.
To retrace your viewing path:
Do one of the following:
● To retrace your path within an Adobe PDF document, choose View > Go To > Previous
View or Next View. The Next View command is available only if you have chosen
Previous View.
● If you're viewing the PDF document in a browser, use options on the Navigation toolbar
to move between views. Right-click (Windows) or Control-click (Mac OS) the toolbar
area, and then choose Navigation. Click the Go To Previous View button
Next View button
● To retrace your viewing path through other PDF documents, choose View > Go To >
.
or the Go To
Previous Document or Next Document. These commands open the other PDF documents
if the documents are closed.
Page 38

Navigating with bookmarks
Bookmarks provide a table of contents and usually represent the chapters and sections in a
document. Bookmarks appear in the navigation pane. The creator of the Adobe PDF
document determines which bookmarks appear.
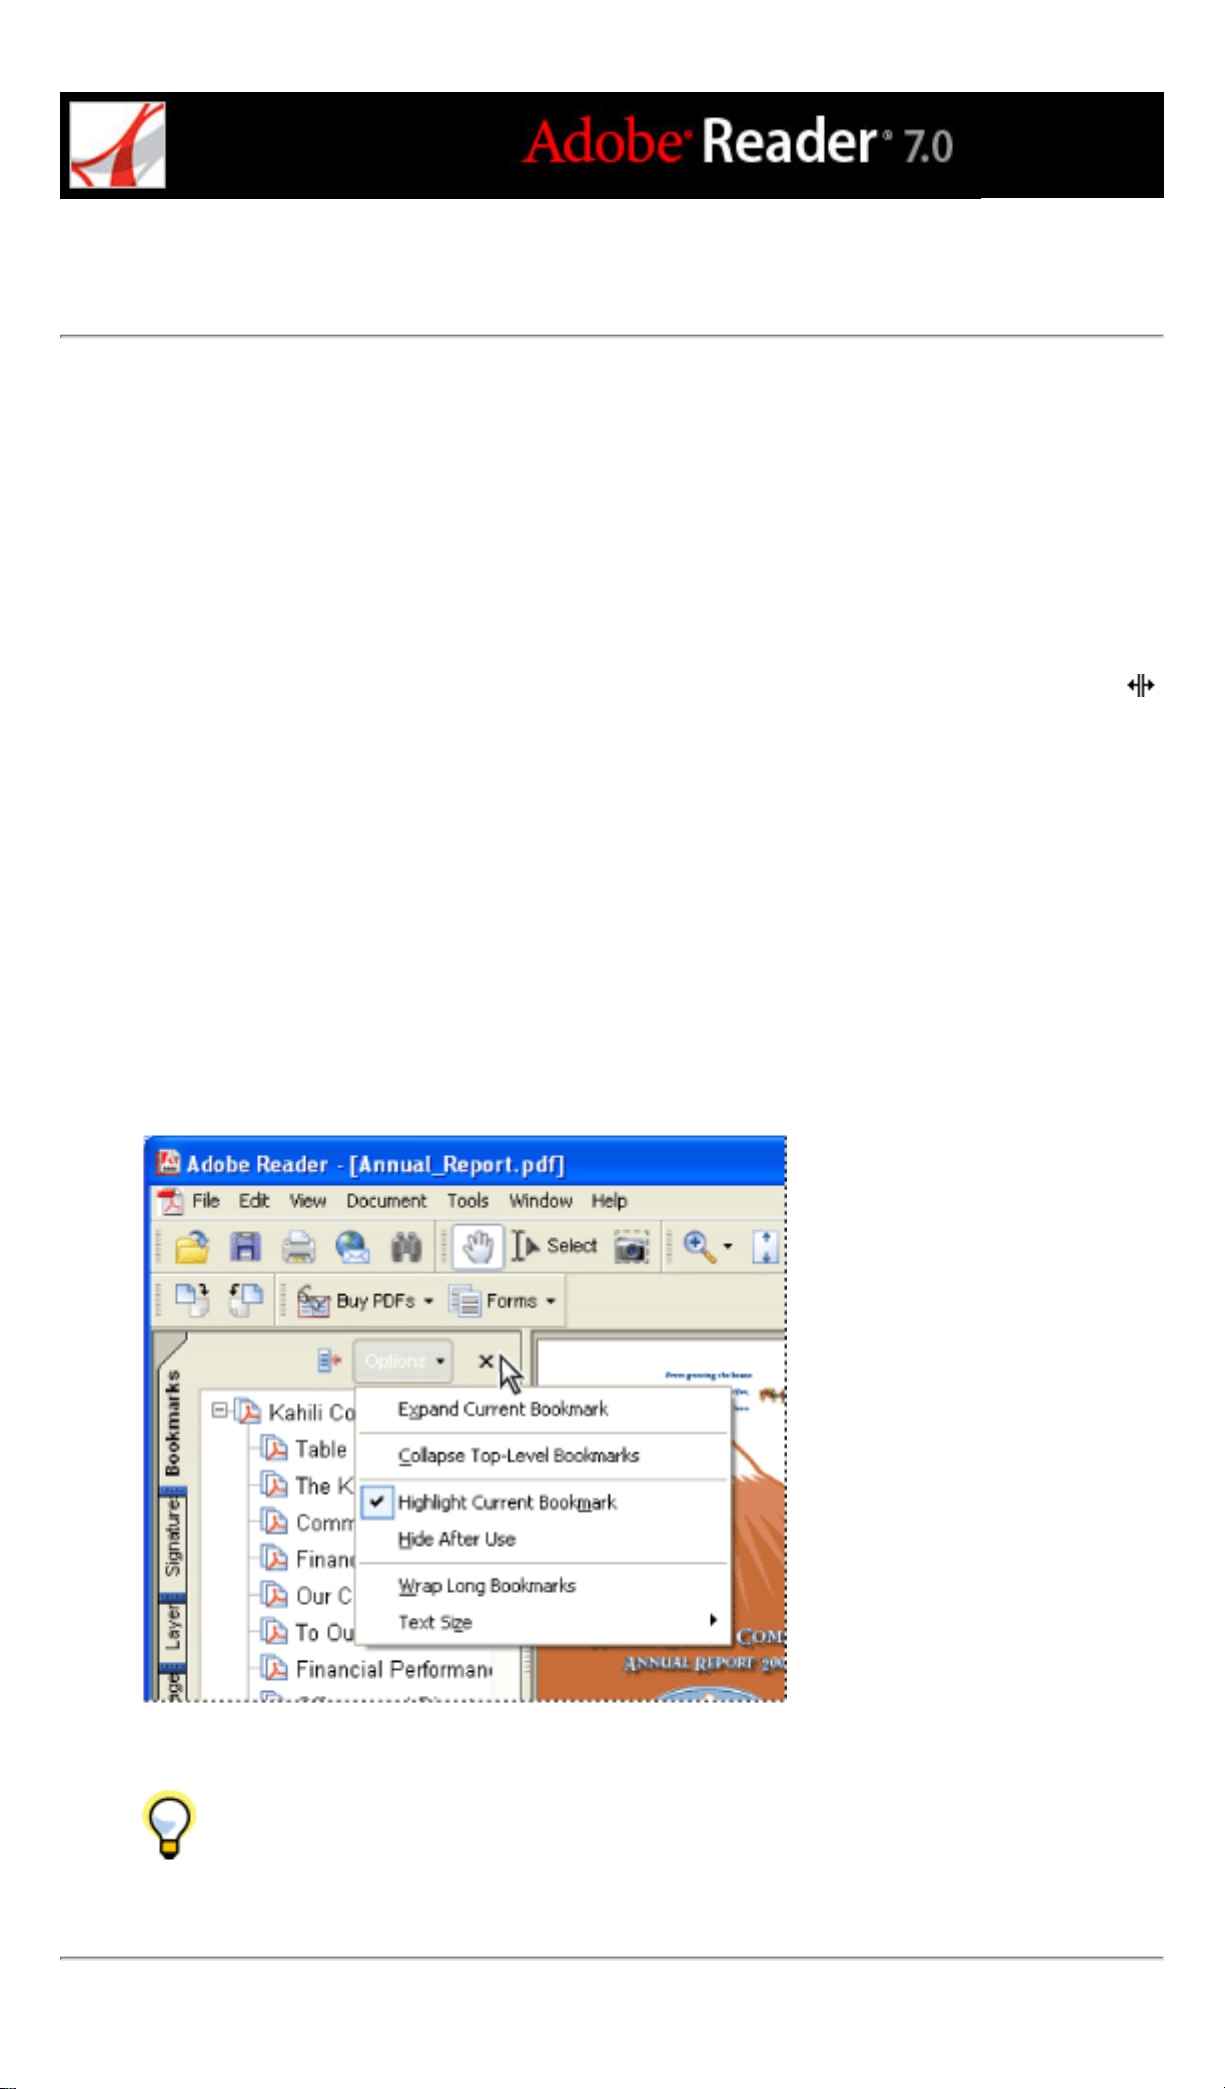
Bookmarks tab A. Bookmarks tab B. Expanded bookmark C. Click to display bookmark Options menu.
To browse using a bookmark:
1. Click the Bookmarks tab on the left side of the window, or choose View > Navigation
Tabs > Bookmarks to display bookmarks.
2. To jump to a topic using its bookmark, click the bookmark. Click the plus sign (+) next to
a parent bookmark to expand it. Click the minus sign (-) next to a bookmark to hide its
children.
Note: Clicking a bookmark might perform an action instead of taking you to another
location. It depends on how the bookmark was defined.
If the list of bookmarks disappears when you click a bookmark, click the Bookmarks tab
to display the list again. If you want the Bookmarks tab to always remain open after you
click a bookmark, click the Options menu at the top of the Bookmarks tab, and make sure
that Hide After Use is not selected.
Page 39

Viewing layers
Some applications, such as Adobe InDesign, AutoCAD, and Visio, allow layers to be
added to documents. When such documents are exported to Adobe PDF, these layers
appear in the Layers tab. You cannot create layers in Adobe Reader. However, you can
examine layers and show or hide the content associated with each layer by using the
Layers tab in the navigation pane.
Layers tab A. Eye icon indicates a displayed layer. B. Hidden layer
You can select or copy content in a layered Adobe PDF document using the Select tool or
the Snapshot tool.
A Lock icon in the Layers tab indicates that a layer is for information only. The layer's
visibility cannot be changed.
To view layers:
1. Click the Layers tab on the left side of the window, or choose View > Navigation Tabs >
Layers.
2. Click the eye icon to hide a layer's content. Click the empty box to show a hidden
layer's content. A layer is visible when the eye icon is present, and hidden when the eye
icon is absent. This setting temporarily overrides the settings in the Layer Properties
dialog box.
3. From the Options menu in the Layers tab, do any of the following:
● Choose List Layers For All pages to show every layer across every page of the document.
● Choose List Layers For Current Page to show layers only on the currently visible page.
● Choose Reset To Initial Visibility to reset layers to their default state.
● Choose Apply Layer Overrides to display all layers. This option affects all optional
content in the PDF document, even layers that are not listed in the layers tab. All layers
are visible, regardless of the settings in the Layers Properties dialog box. You cannot
change layer visibility using the eye icon until you toggle this command off.
Page 40

Navigating with page thumbnails
Page thumbnails provide miniature previews of document pages. You can use thumbnails
in the Pages tab to change the display of pages and to go to other pages. The red pageview box in the page thumbnail indicates which area of the page appears. You can resize
this box to change the zoom percentage. (See Magnifying and reducing the view.)
To browse using page thumbnails:
1. Click the Pages tab on the left side of the window, or choose View > Navigation Tabs >
Pages to display the Pages tab.
2. To jump to another page, click the page's thumbnail.
Page 41

Navigating with reviewer comments
To view a list of comments in a PDF document, click the Comments tab on the left side of
the document window. To browse through the comments, click a comment in the list, or
click the Next button
comment. (These buttons are unavailable if no comment is selected.) The page on which
the selected comment is located appears in the document pane, and the selected comment
scrolls into view. To go to the page where another comment is located, simply click the
comment in the list.
or the Previous button to go to the next or previous
Page 42

Navigating with links
Clicking a link in a PDF document is like clicking a link on a website. Links take you to
another location in the current document, to other documents, or to websites. The PDF
document creator determines what links look like in the PDF document.
Clicking a link can also open file attachments, and play 3D content, movies, and sound
clips. To play these media clips, you must have the appropriate hardware and software
installed. For information on changing multimedia preferences, see Setting Multimedia
preferences.
Note: If you have not downloaded the full version of Adobe Reader, you cannot play
media clips.
To follow a link:
1. Select the Hand tool .
2. Position the pointer over the linked area on the page until the pointer changes to the hand
with a pointing finger. (The hand has a "W" if the link points to the web.) Then click the
link.
Note: Some links work correctly only if the Automatically Detect URLs From Text option
is selected in the General preferences.
Page 43

Navigating documents with file attachments
The creator of a PDF document can attach PDF and non-PDF files to the document. If you
open a PDF document that has files attached, the Attachment icon
status bar at the bottom of the Adobe Reader window. Attached files are listed in the
Attachments tab in the navigation pane. You can open these files for viewing, edit the file
attachments and save your changes to the file attachment. (See Opening and saving
attachments.)
appears in the
Page 44

Reading article threads
Articles are electronic threads created by the PDF creator that lead you through a
document. An article typically begins on one page and continues on a different page later
in the document, in the same way as articles skip pages in traditional newspapers and
magazines. When you read an article, the page view zooms in or out so that the current
part of the article fills the screen.
To read an article:
1. Do one of the following:
● Choose View > Navigation Tabs > Articles to open the Articles tab. Then double-click the
article's icon to start reading the article.
Note: You cannot open the Articles tab if you are viewing the PDF document inside a
browser.
● Select the Hand tool , and then click anywhere in the article to start reading it at that
point.
2. The pointer changes to the follow-article pointer . Do any of the following to navigate
through the article:
● To go to the next page in the article, press Enter or Return or click.
● To go backwards through the document, one page at a time, Shift-click in the article, or
press Shift+Return.
● To go to the beginning of the article, Ctrl-click (Windows) or Option-click (Mac OS) in
the article.
3. When you reach the end of the article, the pointer changes to the end-article pointer .
Press Return, or click to return to the view displayed before you started reading the article.
Page 45

Adjusting the view of documents
Adobe Reader provides tools that help you adjust the view of your Adobe PDF
documents, including simple tools, such as Zoom In and Zoom Out, and more advanced
tools. You can also adjust the view by rotating pages and determining whether you'll see
one page at a time or a continuous flow of pages.
Related Subtopics:
Adjusting the page position
Magnifying and reducing the view
Setting the page layout and orientation
Reading documents in Full Screen view
Reading documents in read mode
Page 46

Adjusting the page position
Use the Hand tool to move around the page so that you can view all the areas of it.
Moving an Adobe PDF page with the Hand tool is like moving a piece of paper on a desk
with your hand.
To adjust the page position:
1. Select the Hand tool.
2. Do either of the following:
● Drag the page up or down.
● If the page is zoomed in to a high magnification, drag the page left or right to view a
different area.
Page 47

Magnifying and reducing the view
The toolbar and status bar offer several methods for magnifying the view of PDF documents.
● The Zoom In and Zoom Out tools let you change the document's magnification.
● The Dynamic Zoom tool lets you zoom in or out by dragging the mouse or mouse wheel up or down.
Magnification options on toolbar A. Zoom In tools B. Fit Width button C. Zoom menu D. Zoom In button
To increase or decrease magnification:
Do one of the following:
● Click the Zoom In button or the Zoom Out button in the toolbar, or select a magnification
percentage from the toolbar menu.
● From the Zoom menu in the toolbar, choose the Zoom In tool or the Zoom Out tool , and then
click the page. To zoom in on a specific area, use the Zoom In tool to draw a rectangle. When you're
finished zooming, you may want to select the Hand tool.
● Click the magnification percentage area in the toolbar, type a new percentage, and press Enter or Return.
● From the Zoom menu in the toolbar, select the Dynamic Zoom tool , and then drag up to zoom in to
the area where you begin dragging, or drag down to zoom out from that location. If your mouse has a
mouse wheel, you can roll it forward to zoom in or backward to zoom out.
When the Zoom In tool is selected, you can hold down Ctrl (Windows) or Option (Mac OS) while
clicking or dragging to zoom out. When the Zoom Out tool is selected, hold down Ctrl or Command to
zoom in. With either zoom tool, hold down Shift to use the Dynamic Zoom tool.
To change the magnification level using a page thumbnail:
1. Click the Pages tab on the left side of the window to view the page thumbnails. Each thumbnail represents
a page.
2. Locate the thumbnail for the current page, and then position the pointer over the lower right corner of the
page-view box until the pointer changes.
3. Drag the corner of the box to reduce or expand the view of the page.
A page-view box in a page thumbnail indicates the area of the page currently showing in the document pane.
To resize a page to fit the window:
Do one of the following:
● To resize the page to fit entirely in the window, choose View > Fit Page, or click the Fit Page button
on the toolbar.
● To resize the page to fit the width of the window, choose View > Fit Width, or click the Fit Width
button
● To resize the page so that its text and images fit the width of the window, choose View > Fit Visible. Part
on the toolbar. Part of the page may be out of view.
of the page may be out of view.
To see keyboard shortcuts for resizing the document, open the View menu and notice the shortcuts
for each command.
To return a page to its actual size:
Choose View > Actual Size, or click the Actual Size button on the toolbar. The actual size for a PDF
page is typically 100%, but the document may have been set to another magnification level when it was
created.
Page 48

Setting the page layout and orientation
Changing the page layout is especially useful when you want to zoom out to get an overview of the document
layout. You can use the following page layouts when viewing Adobe PDF documents:
● Single Page displays one page in the document pane at a time.
● Continuous arranges the pages in a continuous vertical column.
● Facing arranges the pages side by side, displaying only one or two pages at a time.
● Continuous - Facing arranges the pages side by side in a continuous vertical column. If a document has more than
two pages, the first page appears on the right to ensure proper display of two-page spreads.
Single Page, Continuous, Continuous - Facing, and Facing layouts compared
For information on determining how pages are arranged when you use Continuous - Facing layout, see Viewing
document properties.
To set page layout:
1. Do one of the following:
● Choose View > Page Layout, and then choose Single Page, Continuous, Facing, or Continuous - Facing.
● Click the Single Page button , the Continuous button , the Continuous - Facing button , or the Facing
button in the status bar.
2. If necessary, choose View > Fit Page to display the document in the current page layout.
In Single Page layout, choosing Edit > Select All selects all text on the current page. In other layouts, Select
All selects all text in the PDF document.
To rotate the page view:
Choose View > Rotate View > Clockwise or Counterclockwise. You can change the view of a page in 90-degree
increments. This changes the view of the page, not its actual orientation, and the change in view cannot be saved.
Page 49

Reading documents in Full Screen view
In Full Screen view, Adobe PDF pages fill the entire screen; the menu bar, command bar,
toolbar, status bar, and window controls are hidden. A document creator can set a PDF
document to open in Full Screen view, or you can set the view for yourself. Full Screen
view is often used for presentations, sometimes with automatic page advancement and
transitions.
The pointer remains active in Full Screen view so that you can click links and open notes.
You can use keyboard shortcuts for navigational and magnification commands and the
Full Screen preferences let you display a navigation bar in Full Screen view. (See Full
Screen preferences.)
To read a document in Full Screen view:
Click the Full Screen View icon on the status bar at the bottom left of the Adobe
Reader window. Press Enter or Return or the Down Arrow or Right Arrow key to page
through the document. Press Shift+Return or the Up Arrow or Left Arrow key to page
backward through the document.
Note: If you have two monitors installed, the Full Screen view of a page may appear on
only one of the monitors. To page through the document, click the screen displaying the
page in Full Screen view.
To exit Full Screen view:
Press Esc, if Escape Key Exits is selected in the Full Screen preferences, or press Ctrl+L
(Windows) or Command+L (Mac OS). If the full screen navigation bar appears, you can
also click the Exit Full Screen button
.
Page 50

Reading documents in read mode
The read mode is designed to give you a clean work area for when you're simply reading
PDF documents. Click the Hide Toolbars button
navigation pane and move a limited selection of tools to the status bar at the bottom of the
work area. After you click the Hide Toolbars button, a tools menu and zooming features
appear to the right of the Hide Toolbars button. Click the tools menu to select a tool. For
information on using the Hand tool, see Adjusting the page position; for the zoom tools,
Magnifying and reducing the view; for the Select tool, see Copying text, tables, and
see
images.
To exit Read Mode, click the Show Toolbars button.
to retain the menu bar and the
Page 51

Customizing the work area
You can change the appearance of the work area to better suit your working style. For
example, you can change the appearance and location of toolbars and the navigation pane
and lock their position on the desktop. The work area that you create becomes the default
work area on your system until you change it.
To show or hide the menu bar:
To hide the menu bar, choose View > Menu Bar. To show it again, press F9.
To change the display of a navigation tab:
Do one of the following:
● To change the width of the navigation pane, drag its right border.
● To move a tab to its own floating panel, drag the tab from the navigation pane to the
document pane.
● To move a tab to an existing floating panel or to the navigation pane, drag the tab to the
floating panel or the navigation pane.
● To collapse a floating panel to show only the tabs, click the tab name at the top of the
window. Click the tab name again to return the panel to its full size.
To show or hide tool labels:
Do one of the following:
● Choose View > Toolbars > Show Button Labels > [option].
● Choose Edit > Preferences (Windows) or Adobe Reader > Preferences (Mac OS), and
select General. For Show Tool And Property Button Labels, select Default Labels, All
Labels, or No Labels. Click OK.
Note: Tool labels are turned off selectively, regardless of preference settings, when space
in the toolbar area becomes limited.
To move a toolbar:
Do one of the following:
● To move a toolbar in the toolbar area, drag the toolbar by the separator bar, which is
located at the left edge of a toolbar.You can move the toolbar within the toolbar area, or
you can drag the toolbar into the document pane to create a floating toolbar. You can drag
the bar back to its original location.
● To move a floating toolbar to any other location, drag the toolbar by its title bar.
Moving a section of tools from the toolbar area
To lock or unlock the position of toolbars:
Choose View > Toolbars > Lock Toolbars.
The separator bars disappear when toolbars are locked.
Note: Lock Toolbars only locks the position of toolbars in the toolbar area. Floating
toolbars are not locked in position.
To dock toolbars:
Choose View > Toolbars > Dock All Toolbars to expand and dock all floating toolbars in
their default location in the toolbar area. If necessary, the toolbar area expands to three
lines, and toolbar labels are hidden selectively to save space.
To return toolbars to their default configuration:
Choose View > Toolbars > Reset Toolbars.
Page 52
Setting preferences
You can use the Preferences dialog box in Adobe Reader to define a default page layout
and customize your application in many other ways. These preferences control the
application on your system; they are not associated with a particular Adobe PDF
document.
To set preferences:
1. Do one of the following:
● Choose Edit > Preferences (Windows) or Adobe Reader > Preferences (Mac OS).
● Choose Preferences from the document pane menu.
2. In the Preferences dialog box, select one of the preference categories from the list at the
left.
3. Select preference options for that feature, and then click OK. Click Cancel to leave the
settings unchanged.
Related Subtopics:
Setting preferences for visually impaired users
Preference categories
Startup preferences
Page Display preferences
General preferences
Full Screen preferences
Setting Multimedia preferences
Page 53

Setting preferences for visually impaired users
Vision- and motor-impaired users can use the Accessibility Setup Assistant to change the
way that PDF documents appear on-screen and how they're read by assistive technology.
(See Setting accessibility preferences.) Single-key accelerators and keyboard shortcuts
make document navigation simpler. For common keyboard shortcuts, see
shortcuts.
About keyboard
Page 54

Preference categories
You set the preference options by category.
3D
Sets preferences for viewing 3D files. This preference is available in full version of Adobe
Reader.
Accessibility
Sets preferences for making Adobe PDF documents easier to access for vision- and
motion-challenged users. (See Setting accessibility preferences.)
Forms
Sets preferences for the appearance and functionality of forms. (See Setting Forms
preferences.)
Full Screen
Sets preferences for navigation, transitions, and mouse behavior when documents are
viewed in full screen mode. (See Full Screen preferences.)
General
Sets miscellaneous preferences, including display and text and image selection
preferences. (See General preferences.)
Identity
Sets preferences for personal information used for authorship and digital signatures.
International
Sets the language used in Adobe Reader or lets you choose the language each time you
start Adobe Reader. You can control the default paragraph direction and turn on options
for right-to-left languages.
Internet
Sets web browser and Internet connection options. You can set preferences to check your
default browser settings for compatibility with the application each time the application
starts, and you can choose a connection speed that is used by the multimedia plug-in. This
is also where you set your Internet connection setting. (For more information on setting up
Adobe Reader as a helper application in Windows, see Viewing Adobe PDF documents in
a web browser.)
JavaScript
Sets preferences for enabling JavaScript. To access the JavaScript Reference Guide, go to
http://partners.adobe.com/ans/developer/acrosdk/main.html (English only) on the Adobe
website.
Multimedia
Sets the preferred media player to play 3D content, movies, and sound clips, as well as
other multimedia options. (See Setting Multimedia preferences.)
Page Display
Sets options that define the page display, including smoothing text, line art, and images, as
well as determining whether CoolType is used. Smoothing the edges of text and
monochrome images minimizes the contrast between the background and the text or
image, which sometimes improves the quality of the display on-screen, especially with
larger text sizes. CoolType lets you adjust text display to work optimally with your
monitor. (See Page Display preferences.)
Reading
Sets read-out-loud options, such as pitch, volume, and speed, for speech used in voice
delivery, as well as reading order and screen reader options. (See Setting Reading
preferences.)
Search
Sets preferences for index-based searches and fast find. (See Setting Search preferences.)
Security
Sets the preferred security handler and the preferences for creating and managing digital
signatures and their appearance. (See Setting Digital Signature preferences.)
Spelling
Sets preferences for the spell checker and determines whether spelling is checked during
typing. (See Setting Spelling preferences.)
Startup
Sets preferences for opening the application and opening documents. (See Startup
preferences.)
Trust Manager
Sets permissions for trusted entities. (See Setting Trust Manager preferences.).
Units
Sets the page units.
Updates
Defines how to check for software updates. (See Additional new features.)
Page 55

Startup preferences
The Startup panel of the Preferences dialog box defines how documents open and how the
application starts. It includes the following options:
Maximum Documents In Most-Recently Used List
Sets the maximum number of documents listed in the File menu (Windows) or when you
choose File > Open Recent File (Mac OS). The default is five for Windows and nine for
Mac OS.
Reopen Documents To Last Viewed Page
Determines whether documents open automatically to the last viewed page within a work
session.
Use Page Cache
Places the next page in a buffer even before the current page is viewed to reduce the
amount of time required to page through a document.
Allow Layer State To Be Set By User Information
Allows the author of a layered PDF document to specify layer visibility based on user
information.
Display The Document Status Dialog When These Status Items Appear
Determines which documents automatically show a status dialog box when they are
opened.
Display Splash Screen
Determines whether the application splash screen appears each time the application starts.
Use Only Certified Plug-ins
Ensures that only Adobe-certified third-party plug-ins are loaded.
Show Messages And Automatically Update
Relates to the message bar at the top right of the Adobe Reader window.
Page 56

Page Display preferences
The Page Display panel of the Preferences dialog box includes the following options for
the appearance of pages:
Default Page Layout
Sets the page layout used for scrolling when you first open a document. Automatic uses
the document setting.
Display Large Images
Displays large images. If your system is slow to display image-intensive pages, you may
want to make sure that this option is not selected.
Display Page To Edge
Eliminates the thin white border that appears around the edge of Adobe PDF pages
created by some applications. If you do not select this option, pages print with a white
border, as defined by the printer driver.
Display Transparency Grid
Displays a grid behind transparent objects.
Use Logical Page Numbers
Enables you to use the Number Pages command to display Adobe PDF page numbering
that matches the numbering printed on the pages. A page's number, followed by the page
position in parentheses, appears in the status bar and in the Go To Page and Print dialog
boxes. For example, if the first page in a document is numbered "i", it might appear as "i
(1 of 10)". If this option is not selected, page numbering information in documents is
ignored and pages are numbered using arabic numbers starting at 1. Selecting this option
should alleviate most cases of unexpected Go Back behavior in your web browser.
Use CoolType
Adjusts text display to work optimally with your monitor.
Overprint Preview
Turns overprint preview on or off. The Overprint Preview mode lets you preview (onscreen) the effects of ink aliasing in the printed output. A printer or service provider may
create an ink alias if a document contains two similar spot colors and only one is required,
for example.
Smooth Text, Line Art, and Images
Select whether to smooth text, line art, or images. The default is to smooth both text and
images.
Use Greek Text Below
Displays text below the designated point size as gray lines (or greeked text) to speed
display time.
Use System Setting
Uses the system settings for monitor resolution.
Custom Resolution
Sets the monitor resolution.
Default Zoom
Sets the magnification level for PDF documents when they are first opened. This value
overrides document settings. Automatic uses the setting of the PDF document.
Max Fit Visible Zoom
Sets the maximum magnification level for the fit visible view and for viewing articles.
Page 57

General preferences
The General panel of the Preferences dialog box provides the following preference
options:
Automatically Save Document Changes To Temporary File Every
Determines how often Reader automatically saves changes to an open document. This
option is available only for documents with additional usage rights.
Automatically Detect URLs From Text
Specifies whether web links that weren't created with Acrobat are automatically identified
in the PDF document and become clickable links.
Open Cross-Document Links In Same Window
Closes the current document and opens the document being linked to in the same window,
minimizing the number of windows open. If the document being linked to is already open
in another window, the current document is not closed when you click a link to the open
document. If you do not select this option, a new window opens each time you click a link
to a different document.
Note: To override this setting, whether selected or deselected, press Ctrl (Windows) or
Option (Mac OS) when clicking a link.
Save As Optimizes For Fast Web View
Restructures a PDF document for page-at-a-time downloading from web servers.
Emit Passthrough PostScript When Printing
Enables PostScript XObjects in the PDF file to be emitted when that PDF file is printed to
PostScript® printer.
Enable Print Preview
Controls the display window in the Print dialog box that shows how the PDF will print.
Turning this off speeds up the Print dialog box display.
Use Single Key Accelerators To Access Tools
Enables you to select tools with a single keystroke. This is off by default.
Enable Text Selection For The Hand Tool
Enables the Hand tool to automatically function as the Select tool when it hovers over text
in an Adobe PDF document.
Disable Edit Warnings
Disables warning boxes that would normally open when you delete items in a PDF
document.
Show Documents in Taskbar
Turns on or off the feature that adds a button to the Windows taskbar for each document
open in Adobe Reader. You can click this button to move between open documents.
Select Tool Options
Determines the selection order of text and images.
Text Selection Margin Size
Sets the distance, in pixels, that the Select tool has to be from text before it changes to a
text selection pointer. You can set the value from zero to thirty pixels.
Column Selection Margin Size
Sets the distance, in pixels, that the Select tool has to be from the text selection margin
before it switches from text selection to column selection.You can set the value from zero
to thirty pixels. If you set the value at 0 pixels, you cannot select columns.
Use Fixed Resolution For Snapshots
Sets the resolution used to copy the image captured with the Snapshot tool.
Page 58

Full Screen preferences
The Full Screen panel of the Preferences dialog box provides the following navigation and
appearance options when an Adobe PDF document is being viewed in Full Screen view.
Advance Every
Specifies whether to advance automatically from page to page every set number of
seconds. You can page through a document using mouse or keyboard commands even if
automatic paging is selected.
Loop After Last Page
Lets you page through a PDF document continuously, returning to the first page after the
last. This option is typically used for setting up kiosk displays.
Escape Key Exits
Lets you exit Full Screen view by pressing the Escape key. If this option is not selected,
you can exit by pressing Ctrl+L (Windows) or Command+L (Mac OS).
Left Click To Go Forward One Page; Right Click To Go Back One Page
Lets you page through an Adobe PDF document by clicking. You can also page through a
document by pressing Return, Shift+Return (to go backward), or the arrow keys.
Show Navigation Bar
Shows a minimal navigation toolbar whenever Adobe Reader is running in Full Screen
view.
Ignore All Transitions
Removes transition effects from presentations that you view in Full Screen view.
Default Transition
Specifies the transition effect to display when you switch pages in Full Screen view and
no transition effect has been set for the document being viewed.
Mouse Cursor
Specifies whether to show or hide the pointer.
Background Color
Specifies the window's background color in Full Screen view. If you choose Custom, you
can select a color from the system color palette.
Page 59

Setting Multimedia preferences
You can select the preferred media player to play sound and movie clips, determine
whether the Player Finder dialog box appears, and set multimedia accessibility options for
visually impaired users. For example, some movie clips include subtitles, dubbed audio,
or supplemental text captions. You can determine whether these items appear when the
movie is played in your Adobe PDF document.
To change multimedia preferences:
1. Choose Edit > Preferences (Windows) or Adobe Reader > Preferences (Mac OS), and
then select Multimedia on the left side of the dialog box.
2. From the Preferred Media Player menu, select an option to determine the player that will
play the media clip. The menu displays currently installed players.
3. Under Accessibility Options, select which special features are allowed to be played,
specify the preferred language for the media in case multiple languages are available, and
then click OK.
For information on setting multimedia preferences for trusted documents, see Setting
Trust Manager preferences.)
Page 60

Viewing Adobe PDF documents in a web browser
Adobe Reader makes viewing Adobe PDF documents on the web easy. You can view
PDF documents in your browser, or you can set up Adobe Reader to work separately as a
helper application so that when you open or download PDF documents from the web they
open in a separate Adobe Reader window. If you set your preferences to start Adobe
Reader as a separate application outside your browser and automatically open linked PDF
documents in Adobe Reader, you cannot use Fast Web Viewing, form submittal in a
browser, or search highlighting on the web.
To use Adobe Reader as a helper application:
1. Choose Edit > Preference (Windows) or Adobe Reader > Preferences (Mac OS), and
select Internet.
2. Deselect Display PDF In Browser, and click OK.
To set browser and Internet preferences:
Choose Edit > Preferences (Windows) or Adobe Reader > Preferences (Mac OS), and
select Internet in the left pane. Set the following options, and then click OK.
Display PDF In Browser
Displays any PDF document opened from the web inside the browser window. If this
optionis not selected, PDF documents open in a separate Adobe Reader window.
Allow Fast Web View
Downloads PDF documents for viewing on the web one page at a time. If this option is
not selected, the entire PDF file downloads before it appears. If you want the entire PDF
document to continue downloading in the background while you view the first page of
requested information, also select Allow Speculative Downloading In The Background.
Allow Speculative Downloading In The Background
Allows a PDF document to continue downloading from the web, even after the first
requested page appears. Downloading in the background stops when any other task, such
as paging through the document, is initiated in Adobe Reader.
Connection Speed
Choose a connection speed from the menu. This setting is also used by the multimedia
plug-in.
Internet Settings
Click to set up your Internet connection. Follow the prompts, or consult your ISP provider
if you need help.
Related Subtopics:
Viewing in a browser in Windows
Viewing in a browser in Mac OS
Page 61

Viewing in a browser in Windows
You can view the PDF document in the web browser if you are using Internet Explorer 5.5
or later, Netscape Navigator 7.1 or later, or America Online 9.0 or later. Because keyboard
commands may be mapped to the web browser, some Adobe Reader shortcuts may not be
available. Similarly, you may need to use the tools and commands in the Adobe Reader
toolbar rather than the browser toolbar or menu bar. For example, to print a PDF
document, you need to use the Print button in the Adobe Reader toolbar rather than
choosing File > Print in the browser. (In Internet Explorer, you can choose File > Print,
Edit > Copy, and Edit > Find on the Internet Explorer toolbar.)
Page 62

Viewing in a browser in Mac OS
Adobe Reader works automatically with Safari version 1.2.3 or later and Mac OS 10.3 or
later to make viewing Adobe PDF documents on the web easy. The first time you open
Adobe Reader, your system automatically is configured to use Adobe Reader to open PDF
files in your browser. Adobe Reader does not add any tools or menus to the Safari toolbar
and menu bar.
Note: Be sure that Safari is not running the first time you start Adobe Reader.
When you view PDF documents in your browser, some keyboard commands may not be
available because they are mapped to the web browser. Similarly, you may need to use the
tools and commands in the Adobe Reader toolbar rather than the browser toolbar or menu
bar. For example, to print a PDF document, you need to use the Print button in the Adobe
Reader toolbar rather than the Print command in the browser.
Page 63

Working with non-English languages in Adobe PDF files
Adobe Reader lets you view, search, and print PDF documents that contain Asian
(Traditional and Simplified Chinese, Japanese, and Korean), Central and Eastern
European, and Cyrillic text. You can also use these languages when you fill in forms, add
comments, and apply digital signatures.
Related Subtopics:
About Asian-language Adobe PDF files
About Central- and Eastern European-language Adobe PDF files
Page 64

About Asian-language Adobe PDF files
This section covers managing Asian-language PDF files on a non-Asian-language system.
Almost all of the Adobe Reader features are supported for Traditional and Simplified
Chinese, Japanese, and Korean text.
On Mac OS, application and system support for Asian text is automatic.
In Windows, you need to have language font kits for both the application and your system.
If you try to open a PDF file for which you don't have the correct language font kits
installed, you are automatically prompted to download and install the required language
font kits using the Updates command.
Page 65

About Central- and Eastern European-language Adobe PDF files
You can work with Adobe PDF files that contain Cyrillic text (including Bulgarian and
Russian), Central European text, and Eastern European text (including Czech, Hungarian,
and Polish), if the fonts are embedded in the PDF files. If the fonts are embedded, you can
view and print the files on any system. Fonts do not need to be embedded to use the
Search feature.
Note: If you open a PDF file in which form fields or text boxes contain these languages
but the fonts are not embedded and are not installed on your system, the Updates
command automatically prompts you to download and install the necessary language font
kits.
Page 66

Printing
Printing Adobe PDF documents
About downloading language-specific fonts
Previewing how colors overprint
Printing over the Internet
Page 67

Printing Adobe PDF documents
Most of the options in the Adobe Reader Print dialog box are the same as for other
applications. For basic office printing, you start by selecting the printer, page size, page
orientation, and other general printing options in the Print Setup (Windows) or Page Setup
(Mac OS) dialog box.
You can also print an Adobe PDF document to a mobile device over the Internet. (See
Printing over the Internet.)
To print an Adobe PDF document:
1. If necessary, do one of the following:
● To select pages to print, select thumbnails in the Pages tab. You can Ctrl-click (Windows)
or Command-click (Mac OS) thumbnails to select noncontiguous pages, or Shift-click to
select a contiguous range of pages. You can also select a contiguous page range in the
Print dialog box.
● To select an area on a page to print, use the Snapshot tool and drag around the area
you want to print. Adobe Reader copies the selected area to the Clipboard and displays a
message; click OK to close the message box.
2. Choose File > Print Setup (Windows) or File > Page Setup (Mac OS) to set general
printing options. The available options vary with different printers and drivers. See your
printer driver documentation for details.
3. Click the Print button , or choose File > Print.
4. Choose a printer from the list at the top of the Print dialog box.
5. (Mac OS) Choose an option from the Presets pop-up menu.
6. In Windows, click Properties to set printer driver options. In Mac OS, set printer driver
options in the Print Center.
7. In the Adobe Reader Print dialog box, in the Comments And Forms pop-up menu, specify
which visible content prints. The Document option prints document contents and form
fields. Document And Markups prints document contents, form fields, and comments.
Document And Stamps (the default) prints the document, form fields, and stamps, but no
other markups, such as note comments and pencil lines.
8. Select any of the following options, and then click OK (Windows) or Print (Mac OS).
Available options may vary. For example, the Page Order option is available only if you
choose Multiple Pages Per Sheet for Page Scaling.
Current View/Selected Graphic
Prints the page area (including text, comments, and so on) that is visible in the current
view. The option name changes depending on whether you have a page selected (Current
View) or an area on a page selected using the Snapshot tool (Selected Graphic).
Current Page
Prints the page that is visible in the current view.
Pages From/To
Prints a range of pages. In Windows, if the Use Logical Page Numbers option is selected
in Page Display Preferences, you can enter numbers that match the numbering printed on
the pages using roman numerals or actual page numbers. For example, if the first page of
a document is numbered iii, you can enter iii or 1 to print that page.
Page Scaling
Reduces, enlarges, or divides pages when printing. Adobe Reader supports page sizes up
to 15,000,000 inches (38,100,000cm) by 15,000,000 inches (38,100,000cm).
● None prints the upper left or center of a page (if auto-rotated and centered) without
scaling. Pages or selections that don't fit on the paper are cropped.
● Fit To Printer Margins reduces or enlarges each page to fit the imageable (or printable)
area of the currently selected paper size. The printer driver determines the imageable area
of the paper.
● Reduce To Printer Margins shrinks large pages to fit the currently selected paper size but
does not enlarge small pages. If an area selected is larger than the imageable area of the
currently selected paper, it is scaled to fit the imageable area.
● Multiple Pages Per Sheet prints multiple pages on the same sheet of paper. Page rendering
is properly adjusted to the actual paper size, and all rendering is done at the actual
resolution of the output device. When Multiple Pages Per Sheet is selected, you can
specify settings for Pages Per Sheet, Page Order, Print Page Border, and Auto-Rotate
Pages.
Note: Adobe Reader N-up (Multiple Pages Per Sheet) printing works independently from
the N-up printing features of printer drivers. The Adobe Reader print settings do not
reflect the N-up settings of the printer drivers. If the N-up printing features are enabled in
both Adobe Reader and the printer driver, the output is generated by two nested N-up
processes.
Pages Per Sheet
Prints a predefined number of pages, or a custom number (up to 99) horizontally and
vertically during Multiple Pages Per Sheet printing. If you select a predefined number
from the menu, Adobe Reader automatically selects the best paper orientation. Drag the
slider below the Preview to view the individual pages.
Page Order
Defines how the pages are ordered on paper during Multiple Pages Per Sheet printing.
Horizontal places pages from left to right, top to bottom. Horizontal Reversed places
pages from right to left, top to bottom. This page order is suitable for Asian-language
documents. Vertical places pages top to bottom, left to right. Vertical Reversed places top
to bottom, right to left. This page order is suitable for Asian-language documents.
Print Page Border
Draws the crop box (the page boundary of PDF pages) during Multiple Pages Per Sheet
printing.
Auto-Rotate Pages
Adjusts the PDF document's orientation to match the orientation specified in the printer
properties.
Note: The Shrink Large Pages option is always active for Multiple Pages Per Sheet
printing. Therefore, the pages are always resized to fit the available imaging area
regardless of how the Auto-Rotate And Center option is set.
Auto-Rotate And Center
Adjusts the PDF document's orientation to match the orientation specified in the printer
properties and centers the page in the imaging area.
Print To File (Windows)
Creates a device-dependent PostScript file of the document.
Choose Paper Source By PDF Page Size
(Windows) Uses the PDF page size to determine the output tray rather than the page setup
option. This is useful for printing PDF files that contain multiple page sizes on printers
that have different-sized output trays.
Printing Tips
If you are connected to the Internet, this option connects to the Adobe website for
information on how to troubleshoot printing problems.
Advanced
Opens a panel for setting additional printing options. (See Setting advanced print options.)
Related Subtopics:
Setting advanced print options
Page 68

Setting advanced print options
All of the options in the Advanced Print Setup dialog box are available for PostScript
printers only, except for Print As Image.
To set options in the Advanced Print Setup dialog box:
1. In the Print dialog box, click Advanced. (See Printing Adobe PDF documents.)
2. For Language, specify which level of PostScript to generate for the pages. Choose the
level of PostScript appropriate for your printer.
3. For Font And Resource Policy, specify how fonts and resources in the document are sent
to a printer when those fonts and resources are not present on the printer.
● Send At Start downloads all fonts and resources at the start of the print job. The fonts and
resources remain on the printer until the job has finished printing. This option is the fastest
but uses the most printer memory.
● Send By Range downloads fonts and resources before printing the first page that uses
them, and then discards them when they are no longer needed. This option uses less
printer memory. However, if a PostScript processor reorders the pages later in the
workflow, it might not reorder the font downloading correctly, resulting in missing fonts.
● Send For Each Page downloads all fonts and resources for a given page before the page
prints, and then discards the fonts when the page has finished printing. This option uses
the least printer memory.
4. Do any of the following, and then click OK:
● Select Download Asian Fonts to print documents with Asian fonts that are not installed on
the printer or embedded in the Adobe PDF document. The Asian fonts must be present on
the system in use. (See About downloading language-specific fonts.)
● Select Emit CIDFontType2 As CIDFontType2 (PS Version 2015 And Greater) to preserve
the hinting information in the original font when printing. If this option is not chosen,
CIDFontType2 fonts are converted to CIDFontType0 fonts, which are compatible with a
wider range of printers. This option is available for PostScript 3 and PostScript Level 2
(PostScript version 2015 and later) output devices.
● Select Discolored Background Correction to correct severe discoloration during printing,
such as white backgrounds printing as yellow.
● If normal printing doesn't produce the desired results, select Print As Image to print pages
as bitmap images. Print As Image resolves many problems associated with printing to
desktop printers.This option is not available for QuickDraw (Mac OS) printing.
Page 69

About downloading language-specific fonts
Select the Download Asian fonts option in the Advanced Print Setup dialog box if you
want to print an Adobe PDF document with Asian fonts, but the fonts are not installed on
the printer or embedded in the document. (Embedded fonts are downloaded whether or
not this option is selected.) You can use this option with a PostScript Level 2 or higher
printer. In Adobe Reader, Asian fonts are installed on demand if you open a PDF
document containing them.
If Download Asian Fonts is not selected, the PDF document prints correctly only if the
referenced fonts are installed on the printer. If the printer has similar fonts, the printer
substitutes those. If there are no suitable fonts on the printer, Courier is used for the text.
If Download Asian Fonts does not produce the results you want, print the PDF document
as a bitmap image. Printing a document as an image may take longer than using a
substituted printer font.
Note: Some fonts cannot be downloaded to a printer, either because the font is a bitmap or
because font embedding is restricted in that document. In these cases, a substitute font is
used for printing, and the printed output may not match the screen display.
Page 70

Previewing how colors overprint
Overprint Preview mode lets you see (on-screen) the effects of ink aliasing in the printed
output. Spot colors aliased to other spot colors or to process colors are reflected directly in
the open document.
To preview how colors will overprint and blend:
1. With the PDF file open, choose Edit > Preferences (Windows) or Adobe Reader >
Preferences (Mac OS) and select Page Display on the left.
2. Select Overprint Preview.
Page 71

Printing over the Internet
You can send open Adobe PDF documents to printers and fax machines in the PrintMe
network or securely store PDF files online for on-demand printing.
To print over the Internet:
1. Save the document, and then choose File > PrintMe Internet Printing.
2. Follow the instructions in the URL provided.
Page 72

FORMS
About Adobe PDF forms
Page 73

About Adobe PDF forms
An Adobe PDF form is an electronic-based document that can collect data from a user and
then send that data via email or the web. A PDF form can contain static or interactive
form fields; interactive form fields let the user fill in the form using their computer, while
static form fields must be printed and filled in by hand. Users who fill in a PDF form that
contains interactive form fields using Adobe Acrobat Professional or Adobe Acrobat
Standard can save their form data along with the PDF form; Adobe Reader users can save
only a blank copy of the PDF form, unless the form author added special usage rights.
It's easy to create electronic PDF forms using Adobe Designer or Adobe Acrobat
Professional. You can design and create an entirely new form, or you can quickly convert
your existing paper and electronic forms to PDF and then add PDF form fields.
There are three types of Adobe PDF forms:
● Fill-and-print PDF forms are typically digital presentations of paper forms. Fill-and-print
forms may contain interactive form fields or static form fields; either way, the user must
manually deliver the form, such as via postal mail or fax machine.
● Submit-by-email PDF forms contain a button that either extracts the form data from the
PDF form and attaches that data to an email message or attaches the complete PDF
document.
● Submit on-line PDF forms contain a button that sends the form data to an on-line
repository, such as a database.
Related Subtopics:
Elements of an Adobe Acrobat PDF form
Setting Forms preferences
Page 74

Elements of an Adobe Acrobat PDF form
A PDF form created by Acrobat Professional can contain the following form elements:
Button
Can specify an action, such as opening a file, playing a sound, or submitting data to a web
server.
Check boxes
Presents a group of choices from which you can typically select one or more items.
Combo box
Presents a list of items in a pop-up menu for you to choose from or lets you enter your
own values.
Document Message Bar
Displays information about the PDF form and displays tools.
List box
Displays an entire list of options that you can scroll through and from which you may be
able to select more than one item.
Radio buttons
Present a group of choices from which you can typically only select one item.
Text field
Lets you fill in text such as name, address, and phone number.
Digital signature field
Lets you electronically sign a PDF document with a digital signature.
Adobe Acrobat PDF form A. Combo box B. Digital Signature field C. Text boxes D. Forms
Document Message Bar E. Check boxes F. Radio buttons G. List box H. Buttons
Page 75

Setting Forms preferences
To control various aspects of your interaction with form fields, use the Forms preferences.
To set Forms preferences:
1. Choose Edit > Preferences (Windows) or Adobe Reader > Preferences (Mac OS), and
select Forms on the left.
2. To set the General forms preferences, select any of the following:
● To automatically perform all field calculations upon user entry, select Automatically
Calculate Field Values.
● To display which form field currently has the focus, select Show Focus Rectangle.
● To retain forms data in the Internet browser, select Keep Forms Data Temporarily
Available On Disk.
● To display a plus sign (+) indicating when text fields exceed the bounds specified when
the fields were created, select Show Text Field Overflow Indicator.
● To hide the forms document message bar by default whenever a PDF form is opened in
Reader, select that option.
3. To set the Highlight Color forms preferences, do any of the following:
● To display a black outline around a form field when you place the pointer over that form
field, select Show Border Hover Color For Fields.
● If you want to change the color that appears in the background of all form fields when you
select Highlight Fields in a PDF form's Document Message Bar, click the Fields Highlight
Color button to select a color.
● To display a particular color border around form fields that the form creator has made
required, click the button next to Required Fields Highlight Color, and select a color. The
color appears in required form fields only after you attempt to submit the form.
For information on using the Auto-Complete preferences, see Completing fields
automatically.
Page 76

Filling in Adobe PDF Forms
About completing Adobe PDF forms
Completing Adobe PDF forms
Importing and exporting form data
Emailing completed forms
Page 77

About completing Adobe PDF forms
Adobe PDF forms can be noninteractive or interactive. Noninteractive PDF forms must be
printed in order to be filled in, while interactive PDF forms contain form fields you can
fill in on-screen. A PDF form is made interactive if the creator of the PDF form set up the
document with appropriate form fields and properties in Adobe Designer, Adobe Acrobat
Professional, Acrobat Content Server, or even Adobe® GoLive® CS.
You can print a PDF form but you can't save the data that you enter into the PDF form,
unless the form author included additional usage rights in the PDF file. Instead, you can
submit the form data via email or the web if the PDF author provided these options.
Page 78

Completing Adobe PDF forms
If a PDF form contains interactive form fields, you can fill in the form with the Basic
toolbar's Hand tool. When you place the Hand tool pointer over an interactive form field,
the pointer icon changes from the Hand icon
Pointing Hand Plus icon
aren't interactive, the Hand tool's pointer icon
noninteractive PDF form and fill it out by hand.
Note: Data you enter into a fillable form isn't saved with the PDF form, unless the PDF
document contains special usage rights. Instead, you can print the form you've filled in or
use the form's submit button if one is provided by the form creator.
Some text fields are dynamic, which means they automatically resize to
accommodate the amount of data you enter and can span across pages. (See About form
fields that span multiple pages and About typing in forms with barcodes.)
To fill out an interactive form:
to the Pointing Hand icon , the
, the Arrow icon , or an I-beam icon . If the form fields
doesn't change; instead, you can print a
1. Select the Hand tool .
2. If you want to make form fields easier to identify in the PDF file, do any of the following
in the Document Message Bar if the option appears:
● To display a light blue color in the background of all form fields, select Highlight Fields.
● To display a red outline around all form fields that you're required to fill, select Highlight
Required Fields. (This option appears only if the PDF form contains required fields.)
3. Click inside a form field. The I-beam pointer allows you to type text; the Arrow icon
lets you select an item in a list box; the Pointing Finger icon
icon
, lets you select a button, a check box, a radio button, or an item from a list.
or the Pointing Hand Plus
4. After entering text or making a selection, do any of the following:
● Press Tab or Shift+Tab to accept the form field change and go to the next or previous field.
● Press Enter (Windows) or Return (Mac OS) to accept the text form field change and
deselect the current field. If the current field is a check box, pressing Enter or Return turns
the check box on or off. In a multiline text form field, pressing Enter or Return creates a
paragraph return in the same form field. You can use Enter on the keypad to accept the
change.
● Press the Up or Left Arrow key to select the previous radio button in a group of radio
buttons, or press the Down or Right Arrow key to select the next radio button.
● Press Esc to reject the form field change and deselect the current form field. If you are in
Full Screen mode, pressing Esc a second time causes you to exit Full Screen mode.
5. Once you have filled in the appropriate form fields, do one of the following:
● Click the submit form button, if one exists. Clicking this button sends the form data to a
database across the web or over your company intranet.
● Choose File > Save As, and rename the file to save the form without the data you entered.
● Print the form. (See Printing Adobe PDF documents.)
For information about how to fill in a digital signature form field, see About signing PDF
documents.
To clear a form in a browser:
Do one of the following:
● Select the reset form button, if one exists. You cannot undo this action.
● Quit the browser, and start again.
Clicking the web browser's Reload or Refresh button or the Go Back button, or following
a link in a browser window, may not clear a form.
Related Subtopics:
Completing fields automatically
About form fields that span multiple pages
About typing in forms with barcodes
Spell-checking text in forms
Page 79

Completing fields automatically
You can use the Auto-Complete Forms preferences to save time when filling in forms. If
the first few characters you type in a form field match something you've typed in a
previous form field, the Auto-Complete feature either displays a list of the most probable
matches or automatically enters a very probable match for you.
To set Auto-Complete preferences:
1. Choose Edit > Preferences (Windows) or Adobe Reader > Preferences (Mac OS), and
select Forms on the left.
2. Choose an option from the Auto-Complete pop-up menu. When you choose an option, the
box below the option describes the effect of the selected option.
3. If you want to include numerical characters in the auto-complete memory, select
Remember Numerical Data.
To delete one or more Auto-Complete entries from storage:
1. Choose Edit > Preferences (Windows) or Adobe Reader > Preferences (Mac OS), and
select Forms from the list.
2. Click Edit Entry List.
3. In the Auto-Complete Entry List dialog box, do one of the following, and click Yes in the
confirmation dialog box:
● To remove all of the entries, click Remove All.
● To remove only some of the entries, select the entries and click Remove. Shift-click to
select multiple adjacent entries, or Ctrl-click (Windows) or Command-click (Mac OS) to
select multiple nonadjacent entries.
Page 80

About form fields that span multiple pages
Dynamic PDF forms can contain a dynamic text field that grows in size to accommodate
the data you've entered into it; if necessary, the field may span onto the next page. A scroll
bar appears in dynamic text fields when the data you enter exceeds the current size of the
field; when you're finished entering data and the field is deactivated, the text field expands
to display all of the entered data. If you want to continue editing a dynamic text field that
spans across more than one page, you can begin editing the field on either page; you'll
have access to all of the text in the box, no matter which page the text appears on.
Entering text in a form field that spans across two pages
Page 81

About typing in forms with barcodes
PDF forms can contain barcode form fields that the creator of the PDF document added
for various identification purposes, such as for an inventory of products. Barcode fields
are either static or interactive. Interactive barcode fields that are created in Adobe
Designer automatically encode the data that's entered into the form fields. The process of
filling in an interactive PDF form that contains a static or interactive barcode is no
different from filling in any other interactive PDF form.
Static barcode (left) and interactive barcode (right) created in Adobe Designer
Page 82
Spell-checking text in forms
You can spell-check the text you typed in form fields. However, you cannot check the
spelling of text in the underlying Adobe PDF document. (To do that, use the source
application to spell-check the document before you create the PDF document.)
Unrecognized words appear underlined after you type them. You can edit these words in
context, or you can open the Check Spelling dialog box.
To change a single misspelled word:
Right-click (Windows) or Control-click (Mac OS) the word in the form field, and then
choose the correct word from the list of alternatives.
To spell-check text in forms:
1. Do one of the following to open the Check Spelling dialog box:
● In Reader, choose Edit > Check Spelling > In Comments and Form Fields.
● In a web browser or in Reader, click the Spell Check Comments And Form Fields
button
in the Edit toolbar.
2. Click Start to begin the spell check.
When a word that may be misspelled is found, it appears under Word Not Found.
Suggested corrections appear under Suggestions.
3. Do one of the following. The next unrecognized word (if any) is highlighted. Repeat this
step until the Restart button appears.
● Edit the unrecognized word in the Word Not Found box. To undo your change, click
Undo Edit. To accept your change, click Change.
● Double-click a word from the Suggestions box to select a correction, or select the word,
and click Change to replace the unrecognized word. Click Change All to replace every
instance of the unrecognized word with the selected suggestion.
● Click Ignore if you don't want to change that instance of the word, or click Ignore All to
ignore every instance of the word.
● Click Add if you want to add the word to your personal dictionary.
4. Click Done when you are finished with the spell check.
To specify and edit a language dictionary:
1. Choose Edit > Check Spelling > Edit Dictionary.
2. From the Dictionary menu, choose the language dictionary you want to use.
3. If you want to edit the dictionary, do any of the following:
● To remove words you've added to the dictionary, select the word from the Entry list, and
click Delete.
● To add words to the dictionary, enter a word in the Entry box, and click Add.
● To change a word, select the word in the Entry list, edit the word in the Entry box, and
then click Change.
4. Click Done.
Page 83

Importing and exporting form data
If the author of the Adobe PDF document enabled special usage rights, you can export the
form data that you entered to a separate file. Exporting form data lets you save the existing
data separate from the PDF file, which you can then send via email or the Internet. You
can save the form data as a tab-separated text file, Forms Data Format (FDF), or in XFDF
(XML-based FDF files). The exported file will be considerably smaller than the original
PDF file. A smaller file is preferable for archiving or sharing data electronically. You can
also import data from the exported file into another form if that form has fields with the
same names.
You can also import file data from a text file. Each row in the text file must be tabdelimited to create columns, as in a table. When a row of data is imported, each cell
becomes the value of the form field that corresponds to the column name.
Note: You cannot export or import data in Adobe Reader unless the Adobe PDF file has
special usage rights assigned.
To export form data to a file:
1. Open the Adobe PDF form and fill it out.
2. Choose File > Form Data > Export Data From Form.
3. Specify a location and filename, and then click Save.
To import form data from a file:
1. Open the Adobe PDF form.
2. Choose File > Form Data > Import Data To Form.
3. Select a file, and click Select.
Note: If you import form data from a form that does not match the form you are importing
into, only the form fields that match are updated, and those that do not match are ignored.
Existing text in text form fields is replaced if you import data to those fields.
Page 84

Emailing completed forms
PDF forms can contain an email-based submit button that exports the information that you
entered into the PDF form, which you must then email with your own email application.
You have the option to email the PDF with a desktop or web-based email application, or
you can submit the form data at a later time.
Note: If the PDF form doesn't contain an email-based submit button, it may have a submit
button that sends the form data via the web or some other service.
To submit an email-based PDF form:
1. After you've filled in the PDF form, click the Submit button on the PDF form.
2. In the Select Email Client dialog box, select the option that best describes how you send
email; then click OK:
● Desktop Email Application, such as Microsoft Outlook or Eudora. For next steps, see
Submitting PDF forms with a desktop email application.
● Internet Email for web browser-based services, such as Microsoft Hotmail or Yahoo mail.
For next steps, see Submitting PDF forms with a web-based email service.
● Other if your email application or service isn't available or you don't know which option
to choose. For next steps, see Submitting a PDF form at a different time.
Related Subtopics:
Submitting PDF forms with a desktop email application
Submitting PDF forms with a web-based email service
Submitting a PDF form at a different time
Page 85

Submitting PDF forms with a desktop email application
When you click an email-based submit button in a PDF form, you have the option to
submit the form data with your preferred desktop email application.
To submit a PDF form with a desktop email application:
1. Click the submit or return form button on the PDF form.
2. In the Select Email Client dialog box, select Desktop Email Application; then click OK.
3. In the Send Data File dialog box, click Print Form if you want a copy of the filled-in form;
then click Send Data File.
Your default email application displays a new email message with the To, Subject, Body,
and Attachment fields automatically filled in.
4. Use your email application to send the email.
5. Click Close in the Email Confirmation dialog box.
Page 86

Submitting PDF forms with a web-based email service
When you click an email-based submit button in a PDF form, you have the option to
submit the form data with a web-based email service.
To submit a PDF form with a web-based email service:
1. Click the submit or return form button on the PDF form. If the form fields are blank, the
Email A Blank Copy Of This Form dialog box appears; click Email A Blank Copy.
2. In the Select Email Client dialog box, select Internet Email; then click OK.
3. In the Sending The Data File dialog box, click Save Data File.
4. In the Save Data File dialog box, choose a location on your computer to save the file; then
click Save.
5. Open a new browser window, log in to your web-based email service, and use your
service to create a new blank email.
6. In the Sending The Data File dialog box in Adobe Reader, select the value in the To field;
then right-click (Windows) or Control-click (Mac OS), and choose Copy.
7. In your blank email message in your Internet email service, click in the To field and paste
the data you copied. Repeat steps 6 and 7 for the Subject and Message Text fields.
8. Use your Internet email service to attach the data file (that you saved in step 4) to your
email message.
9. If you want a copy of the filled-in form, click Print Form in the Sending The Data File
dialog box in Adobe Reader.
10. Click Close in the Sending The Data File dialog box.
Page 87
Submitting a PDF form at a different time
When you click an email-based submit button in a PDF form, you have the option to not
submit the form data and instead to save the form data on your computer to send at a
different time.
To submit a PDF form at a different time:
1. Click the Submit or Return Form button on the PDF form. If the form fields are blank, the
Email A Blank Copy Of This Form dialog box appears; click Email A Blank Copy.
2. In the Select Email Client dialog box, select Other, and then click OK.
3. In the Sending The Data File dialog box, click Save Data File.
4. In the Save Data File dialog box, choose a location on your computer to save the file; then
click Save.
5. Write down the values that appear in the To, Subject, and Message Text fields so you can
use them later when you want to email the form data.
6. If you want a copy of the filled-in form, click Print Form in the Sending The Data File
dialog box in Adobe Reader.
7. Click Close in the Sending The Data File dialog box.
8. When you want to submit the PDF form, create a new email message in your email
application. Enter the To, Subject, and Message Text values that you wrote down in step
5. Use your email application to attach the data file that you saved in step 4; then send the
email.
Page 88
REVIEW AND MARKUP
Types of review workflows
Reviewing documents with additional usage rights
Tool operation basics
Using email in a review
Using the Tracker
Page 89

Types of review workflows
In Adobe Reader 7.0, you can review and add comments to PDF documents that contain
additional usage rights. You may receive an email attachment for review in one of the
following types of workflows:
● Tracked email-based reviews.
● Tracked browser-based reviews. You must have access to a shared server to participate in
this type of review.
In both review workflows, you add your comments to the PDF document using tools in
the Commenting toolbar. However, during an email-based review, you send the document
with comments back to the review initiator via email. In a browser-based review, you
upload your comments to a server.
Page 90

Reviewing documents with additional usage rights
If the initiator includes additional usage rights to a PDF document, you can participate in
an email-based or browser-based review, provided that you use the full version of Adobe
Reader 7.0. When you open a PDF document with commenting rights in Adobe Reader,
the Save command and Commenting tools are available, and a Document Message Bar
appears in the document's heading. (See About Adobe PDF documents with additional
usage rights.)
Page 91

Tool operation basics
Adobe Reader provides all the tools you need to participate in a PDF document review.
When you open a PDF document in a review, it includes a Document Message Bar with
instructions for you to complete the review. The Commenting toolbar appears with a
number of tools and menus that you can use to add comments. If the review initiator
specified markup tools while setting up the review, the Drawing Markup toolbar may also
appear. (See About adding comments.) The Commenting toolbar includes a button for you
to send your comments back to the initiator, and to other reviewers, if you wish, when
you're finished. The How To window provides additional information to help you add
your comments and return your feedback to the initiator. (See
Note: When you open a PDF document in a browser-based review, the commenting tools
and Document Message Bar do not appear until the PDF document is authenticated. This
process may require several seconds, during which the PDF document itself can be
viewed.
Using the How To pages.)
Page 92

Using email in a review
To participate in reviews, you must have an email application and mail server connection.
Adobe Reader works with most email applications. Although you can't initiate reviews in
Adobe Reader, you can send an email message from Adobe Reader with an Adobe PDF
document as an attachment.
If more than one email application is installed on your system, Adobe Reader may try to
start the application you don't normally use when sending a PDF document as an
attachment. If this occurs, do one of the following:
● (Windows) Double-click Internet Options in the Windows Control Panel. In the Internet
Properties dialog box, select the Programs tab, and then select your email application of
choice.
● (Windows) Change the MAPI settings in your email application. In Windows, Adobe
Reader uses the Messaging Application Program Interface (MAPI) to communicate with
your email application. Most email applications come with MAPI settings to handle this
communication. For more information on configuring your email applications, see the
email application's online Help.
● (Mac OS) In Mail (the email application that's included with Mac OS), choose File >
Preferences, select General, and then choose the email application you want to use from
the Default Email Reader pop-up menu. Restart Adobe Reader for the changes to take
effect. If your application is not listed, choose Select from the menu, and browse to the
location. (Be aware that if you select an application that is not listed in the Default Email
Reader menu, Adobe Reader may not support your application.)
● Contact the person who administers your email account for help.
Once you've verified that Adobe Reader works with your email application, you can send
your comments as a PDF attachment.
Page 93

Using the Tracker
The Tracker window keeps a list of all the document reviews that you participate in,
including the email addresses of the initiator and other reviewers, and the date you
received the review invitation. You can use the Tracker to open PDF documents currently
in review, and to keep a record of reviews you've completed and review documents that
you've taken offline.
To open the Tracker window:
Choose View > Tracker.
Page 94

Using Commenting Tools
About adding comments
Selecting tools to add comments
Adding note comments
Indicating text edits
Highlighting, crossing out, and underlining text
Adding stamps
Marking up documents using drawing tools
Adding comments in a text box
Using the Callout tool
Using the Pencil tool
Using the Dimensioning tool
Adding attachments as comments
Spell-checking comments
Changing the appearance of comments
Page 95

About adding comments
A comment refers to a note, highlighting, stamps, and any other markup that you've added
to an Adobe PDF document using the commenting tools. A note is the most commonly
used comment. In Adobe Reader, you can add comments only if additional usage rights
that enable commenting are added to the PDF document by Adobe Acrobat 7.0
Professional or Acrobat server products. Otherwise, commenting tools aren't available.
(See About Adobe PDF documents with additional usage rights.) If commenting is
enabled, you can place comments anywhere in the document, and you can determine the
style and format of the comment.
Note: If commenting is enabled in a PDF document that is not part of a review workflow,
you must save the PDF document to your local hard drive to add comments; commenting
tools won't be available in the browser window.
The tools you use to create comments are located on the Commenting and Drawing
Markups toolbars. These toolbars are listed under the Tools menu and the Comment &
Markup pop-up menu. The Note tool lets you add the equivalent of a sticky note to your
Adobe PDF document. Other tools let you add stamps, drawing markups, or text-edit
comments that indicate where you want text to be added or deleted. You can paste copied
text and images into a PDF document, or attach a separate file or audio clip. Note,
however, that only files that are attached by using the Commenting toolbar are tracked
with other comments in a document review. You can change the default appearance of
comments before or after you add them. (See Changing the appearance of comments.)
Commenting and Drawing Markups toolbars A. Note tool B. Text Edit tools C. Stamp tools D.
Highlighter, Cross-Out Text, and Underline Text tools E. Attach A File As A Comment tools F.
Callout tool G. Cloud tool H. Arrow tool I. Dimensioning tool J. Text Box tool
Page 96

Selecting tools to add comments
If commenting is enabled, one or more toolbars appear over the document pane when you
open the PDF document. The tool you want may appear on the toolbar or may be available
by expanding a pop-up menu on the toolbar. After you make an initial comment, the tool
changes to the Hand tool so that you can move, resize or edit your comment. (The
exceptions are the Pencil, Highlighting, and Line tools, which stay selected.) To add
multiple comments without reselecting the tool, change the tool properties to keep the tool
selected.
To select a tool to add a comment:
1. If the Commenting toolbar is hidden, do one of the following:
● Click the Comment & Markup button. The button is unavailable when the Commenting
toolbar is open.
● Choose View > Toolbars > Commenting.
● Choose Tools > Commenting > Show Commenting Toolbar.
2. In the Commenting toolbar, click the tool or choose a tool from the tool's pop-up menu.
Note: If the menu selection has a checkmark beside it, or if the menu option is Hide
Commenting Toolbar, the toolbar is already open.
To keep a commenting tool selected for repeated use:
1. Select the tool you want to use. (Don't use it yet to add a comment.)
2. Choose View > Toolbars > Properties Bar. (The Properties toolbar name changes with
each tool selection.)
3. In the Properties toolbar, select Keep Tool Selected.
To select a tool to add a markup:
1. If the Drawing Markups toolbar is hidden, do one of the following:
● Choose Show Drawing Markups Toolbar from the Comment & Markup pop-up menu.
● Choose View > Toolbars > Drawing Markups.
● Choose Tools > Drawing Markups > Show Drawing Markups Toolbar.
2. Click the tool on the Drawing Markups toolbar or choose a tool from the tool's pop-up
menu.
Page 97

Adding note comments
If commenting is enabled in a PDF document, you can use the Note tool to add notes on
any page in the document, and position them anywhere on the page. (See Reviewing
documents with additional usage rights.) A note comment is the most frequently used
comment. When you add a note comment, a note icon and a pop-up window appear. You
can add bold, italics, and other attributes to text in a pop-up window, similar to formatting
text in a word-processing application. If you enter more text than is visible in the pop-up
window, the text scrolls. You can also resize the window, if desired, or change the icon
and color by editing the note properties.
Note comments include two parts: A. Note icon, or markup B. Pop-up window
To add a note comment:
1. Do one of the following:
● Select the Note tool in the Commenting toolbar, and click where you want to place
the note, or drag to create a custom-sized window.
● Choose Add A Note from the Comment & Markup menu.
2. Type the text for the note in the pop-up window. You can also use the Select tool to
copy and paste text from a PDF document into the note.
3. (Optional) Click the close box in the upper right corner of the pop-up window to close the
note. Closing the pop-up window does not delete your text.
To edit a note comment:
1. Click or double-click the note icon to open the pop-up window.
2. Do any of the following:
● Edit the text as needed. When you are finished, click the close box in the upper right
corner of the pop-up window, or click outside the pop-up window.
● Choose Properties from the Options menu to change text formatting, note color, and other
note properties. (See Changing the appearance of comments.)
To resize a pop-up window, drag the lower right corner of the window to the
appropriate size.
To delete a note comment:
1. Select the Note tool , or the Hand tool .
2. Do one of the following:
● Select the note icon, and then press Delete.
● Double-click the note icon to open the pop-up window, and choose Delete from the
Options menu.
Page 98

Indicating text edits
If commenting is enabled in an Adobe PDF document, you can use text edit comments to
indicate where text should be edited in the source file. (See Reviewing documents with
additional usage rights.) These text edit comments do not change the actual text in the
PDF document. Instead, they indicate which text should be deleted, inserted, or replaced
in the source file from which the Adobe PDF document was created. Text in the document
marked to be deleted appears crossed out. Text to be inserted appears in a pop-up window,
and a caret indicates where the text is to be inserted. You can also highlight or underline
selected text.
To indicate where text should be inserted:
1. On the Commenting toolbar, choose the Indicate Text Edits tool from the Text Edits
pop-up menu.
2. Click between the words or characters where you want to insert text.
3. Do any of the following:
● Choose Insert Text At Cursor from the Text Edits pop-up menu.
● Type the text you want to insert, or choose Insert Text At Cursor from the Text Edits pop-
up menu and then, in the pop-up window that appears, type the text to be inserted.
● To indicate that a new paragraph should be added, press Enter or Return, and then close
the pop-up window without adding text. The paragraph insertion caret
● To indicate that a space should be added, press the spacebar, and then close the pop-up
window without adding text. The space insertion caret
appears.
appears.
You can also indicate text edits by using the Select tool to select text or place
the pointer, and then choose the Insert Text At Cursor command
from the Text Edits
pop-up menu on the Commenting toolbar. You can also right-click (Windows) or Controlclick (Mac OS) selected text, and then choose Replace Text (Comment).
To indicate where text should be replaced:
1. On the Commenting toolbar, choose the Indicate Text Edits tool from the Text Edits
pop-up menu.
2. Select the text you want to replace.
3. Press Enter or Return, or choose Replace Selected Text from the Text Edits pop-up menu,
and then do one of the following:
● Type the text to be inserted or added. This text appears in a pop-up window. Any selected
text is crossed out. The insertion caret
● To indicate that a new paragraph should be added, close the pop-up window without
adding text. The paragraph insertion caret
appears.
appears.
To indicate which text should be deleted:
1. On the Commenting toolbar, choose the Indicate Text Edits tool from the Text Edits
pop-up menu.
2. Select the text, and then press Backspace or Delete, or choose the Cross Out Text For
Deletion command
from the Text Edits pop-up menu.
To associate a note with a text edit:
Using the Indicate Text Edits tool , select the text, and then choose Add Note To
Selected Text from the Text Edits pop-up menu on the Commenting toolbar.
To delete text edit markups:
Do one of the following:
● Right-click (Windows) or Control-click (Mac OS) the markup, such as the highlighting or
cross-out, and then choose Delete.
● Select the Hand tool , click the markup, and then press Delete.
If markup comments are stacked, use the Comments List to delete the markups. (See
Using the Comments List.)
Page 99

Highlighting, crossing out, and underlining text
If commenting is enabled in an Adobe PDF document, you can use the Highlight Text
tool, the Cross-Out Text tool, and the Underline Text tool to add comments. Select these
tools from the Commenting toolbar or from the Highlighting toolbar. You can use these
comments by themselves or in conjunction with notes. For example, you may want to
highlight a section of text and then double-click the markup to add text in a pop-up
window.
To highlight, cross out, or underline text:
1. On the Commenting toolbar, select the Highlight Text tool , the Cross-Out Text
tool
, or the Underline Text tool .
2. Drag from the beginning of the text you want to mark up. Ctrl-drag (Windows) or Optiondrag (Mac OS) to mark up a rectangular area of text. This is especially useful to mark up
text in a column.
To delete a highlight, cross out, or underline markup:
Do one of the following:
● Right-click (Windows) or Control-click (Mac OS) the markup, such as a highlight or
cross-out, and then choose Delete.
● With the Highlight Text, Cross-Out Text, or Underline Text tool still selected, click the
markup, and then press Delete.
● Select the Hand tool , click the markup, and then press Delete.
If markup comments are placed on top of one another, use the Comments List to delete the
markups. (See Using the Comments List.)
You can view the author and text of a highlight comment without opening the popup window: Pass the pointer over the comment while the highlighting tool or Hand tool is
selected.
Page 100

Adding stamps
If commenting is enabled in an Adobe PDF document, you can use the Stamp tool to
apply a stamp to a document in much the same way you use a rubber stamp on a paper
document. You can choose from a list of stamps or create your own custom stamp.
Dynamic stamps obtain information from your system and from the Identity panel of the
Preferences dialog box, allowing you to indicate name, date, and time information on the
stamp.
To stamp a document:
1. From the Stamp Tool menu on the Commenting toolbar, select the stamp you want to
add to your document.
Note: Clicking the Stamp tool selects the stamp that was most recently used.
2. Click the document page where you want to place the stamp at its default size, or drag a
rectangle to define the size and placement of the stamp.
To edit a stamp:
1. Select the Hand tool .
2. Do any of the following:
● To move a stamp, drag it to a new location.
● To resize the stamp, click it, and then drag a corner handle.
● To delete a stamp, right-click (Windows) or Control-click (Mac OS) the stamp, and then
choose Delete.
● To change the stamp's opacity or the color of its pop-up window, right-click (Windows) or
Control-click (Mac OS) the stamp, and choose Properties. Use the Appearance tab to
change the opacity or color.
To move a stamp to the favorites list:
1. Using the Hand tool, select the stamp.
2. Choose Favorites > Add Current Stamp To Favorites from the Stamp Tool menu on the
Commenting toolbar.
Related Subtopics:
Creating custom stamps
Deleting custom stamps
 Loading...