

Page 1

Adobe® Premiere® Pro CC
Help
Page 2

Legal notices
Legal notices
For legal notices, see http://help.adobe.com/en_US/legalnotices/index.html.
Last updated 6/9/2015
Page 3

Contents
Chapter 1: What's New
New features summary . . . . . . . . . . . . . . . . . . . . . . . . . . . . . . . . . . . . . . . . . . . . . . . . . . . . . . . . . . . . . . . . . . . . . . . . . . . . . . . . . . . . . . . . . . . . . . . . .1
Chapter 2:
What is Adobe Anywhere? . . . . . . . . . . . . . . . . . . . . . . . . . . . . . . . . . . . . . . . . . . . . . . . . . . . . . . . . . . . . . . . . . . . . . . . . . . . . . . . . . . . . . . . . . . . . 11
Chapter 3: Workspace and workflows
Workspaces . . . . . . . . . . . . . . . . . . . . . . . . . . . . . . . . . . . . . . . . . . . . . . . . . . . . . . . . . . . . . . . . . . . . . . . . . . . . . . . . . . . . . . . . . . . . . . . . . . . . . . . . . . 12
Work ing with Panels . . . . . . . . . . . . . . . . . . . . . . . . . . . . . . . . . . . . . . . . . . . . . . . . . . . . . . . . . . . . . . . . . . . . . . . . . . . . . . . . . . . . . . . . . . . . . . . . . . 19
Sync settings using Adobe Creative Cloud . . . . . . . . . . . . . . . . . . . . . . . . . . . . . . . . . . . . . . . . . . . . . . . . . . . . . . . . . . . . . . . . . . . . . . . . . . . . . 23
Creative Cloud Libraries in Premiere Pro . . . . . . . . . . . . . . . . . . . . . . . . . . . . . . . . . . . . . . . . . . . . . . . . . . . . . . . . . . . . . . . . . . . . . . . . . . . . . . . 27
Basic workflow . . . . . . . . . . . . . . . . . . . . . . . . . . . . . . . . . . . . . . . . . . . . . . . . . . . . . . . . . . . . . . . . . . . . . . . . . . . . . . . . . . . . . . . . . . . . . . . . . . . . . . . 30
Using the Source Monitor and Program Monitor . . . . . . . . . . . . . . . . . . . . . . . . . . . . . . . . . . . . . . . . . . . . . . . . . . . . . . . . . . . . . . . . . . . . . . . 34
Adobe Dynamic Link . . . . . . . . . . . . . . . . . . . . . . . . . . . . . . . . . . . . . . . . . . . . . . . . . . . . . . . . . . . . . . . . . . . . . . . . . . . . . . . . . . . . . . . . . . . . . . . . . 42
. . . . . . . . . . . . . . . . . . . . . . . . . . . . . . . . . . . . . . . . . . . . . . . . . . . . . . . . . . . . . . . . . . . . . . . . . . . . . . . . . . . . . . . . . . . . . . . . . . . . . . . . . . . . . . . . . . . . . . 45
Direct-Link workflow between Premiere Pro and SpeedGrade . . . . . . . . . . . . . . . . . . . . . . . . . . . . . . . . . . . . . . . . . . . . . . . . . . . . . . . . . . 55
Cross-application workflows . . . . . . . . . . . . . . . . . . . . . . . . . . . . . . . . . . . . . . . . . . . . . . . . . . . . . . . . . . . . . . . . . . . . . . . . . . . . . . . . . . . . . . . . . . 60
Cross-platform workflow . . . . . . . . . . . . . . . . . . . . . . . . . . . . . . . . . . . . . . . . . . . . . . . . . . . . . . . . . . . . . . . . . . . . . . . . . . . . . . . . . . . . . . . . . . . . . 67
Keyboard shortcuts in Premiere Pro CC . . . . . . . . . . . . . . . . . . . . . . . . . . . . . . . . . . . . . . . . . . . . . . . . . . . . . . . . . . . . . . . . . . . . . . . . . . . . . . . . 68
Preferences . . . . . . . . . . . . . . . . . . . . . . . . . . . . . . . . . . . . . . . . . . . . . . . . . . . . . . . . . . . . . . . . . . . . . . . . . . . . . . . . . . . . . . . . . . . . . . . . . . . . . . . . . . 82
iii
Chapter 4: Project setup
Creating and changing projects . . . . . . . . . . . . . . . . . . . . . . . . . . . . . . . . . . . . . . . . . . . . . . . . . . . . . . . . . . . . . . . . . . . . . . . . . . . . . . . . . . . . . . . 91
Consolidate, transcode, and archive projects . . . . . . . . . . . . . . . . . . . . . . . . . . . . . . . . . . . . . . . . . . . . . . . . . . . . . . . . . . . . . . . . . . . . . . . . . . 94
Chapter 5: Importing footage
Supported file formats . . . . . . . . . . . . . . . . . . . . . . . . . . . . . . . . . . . . . . . . . . . . . . . . . . . . . . . . . . . . . . . . . . . . . . . . . . . . . . . . . . . . . . . . . . . . . . . . 97
Transferring and importing files . . . . . . . . . . . . . . . . . . . . . . . . . . . . . . . . . . . . . . . . . . . . . . . . . . . . . . . . . . . . . . . . . . . . . . . . . . . . . . . . . . . . . . 101
Importing sequences, clip lists, and compositions . . . . . . . . . . . . . . . . . . . . . . . . . . . . . . . . . . . . . . . . . . . . . . . . . . . . . . . . . . . . . . . . . . . . 105
Importing still images . . . . . . . . . . . . . . . . . . . . . . . . . . . . . . . . . . . . . . . . . . . . . . . . . . . . . . . . . . . . . . . . . . . . . . . . . . . . . . . . . . . . . . . . . . . . . . . 107
Importing digital audio . . . . . . . . . . . . . . . . . . . . . . . . . . . . . . . . . . . . . . . . . . . . . . . . . . . . . . . . . . . . . . . . . . . . . . . . . . . . . . . . . . . . . . . . . . . . . . 110
Importing assets from tapeless formats . . . . . . . . . . . . . . . . . . . . . . . . . . . . . . . . . . . . . . . . . . . . . . . . . . . . . . . . . . . . . . . . . . . . . . . . . . . . . . 111
Importing XML project files from Final Cut Pro . . . . . . . . . . . . . . . . . . . . . . . . . . . . . . . . . . . . . . . . . . . . . . . . . . . . . . . . . . . . . . . . . . . . . . . . 114
Capturing and digitizing footage . . . . . . . . . . . . . . . . . . . . . . . . . . . . . . . . . . . . . . . . . . . . . . . . . . . . . . . . . . . . . . . . . . . . . . . . . . . . . . . . . . . . 117
Batch capturing and recapturing . . . . . . . . . . . . . . . . . . . . . . . . . . . . . . . . . . . . . . . . . . . . . . . . . . . . . . . . . . . . . . . . . . . . . . . . . . . . . . . . . . . . . 127
Working with timecode . . . . . . . . . . . . . . . . . . . . . . . . . . . . . . . . . . . . . . . . . . . . . . . . . . . . . . . . . . . . . . . . . . . . . . . . . . . . . . . . . . . . . . . . . . . . . . 131
Setting up your system for HD, DV, or HDV capture . . . . . . . . . . . . . . . . . . . . . . . . . . . . . . . . . . . . . . . . . . . . . . . . . . . . . . . . . . . . . . . . . . . 136
Capture HD, DV, or HDV video . . . . . . . . . . . . . . . . . . . . . . . . . . . . . . . . . . . . . . . . . . . . . . . . . . . . . . . . . . . . . . . . . . . . . . . . . . . . . . . . . . . . . . . . 144
Support for growing files . . . . . . . . . . . . . . . . . . . . . . . . . . . . . . . . . . . . . . . . . . . . . . . . . . . . . . . . . . . . . . . . . . . . . . . . . . . . . . . . . . . . . . . . . . . . 145
Digitizing analog video . . . . . . . . . . . . . . . . . . . . . . . . . . . . . . . . . . . . . . . . . . . . . . . . . . . . . . . . . . . . . . . . . . . . . . . . . . . . . . . . . . . . . . . . . . . . . . 146
Create clips for offline editing . . . . . . . . . . . . . . . . . . . . . . . . . . . . . . . . . . . . . . . . . . . . . . . . . . . . . . . . . . . . . . . . . . . . . . . . . . . . . . . . . . . . . . . . 147
Last updated 6/9/2015
Page 4

PREMIERE PRO
Content s
Chapter 6: Managing assets
Organize assets in the Project panel . . . . . . . . . . . . . . . . . . . . . . . . . . . . . . . . . . . . . . . . . . . . . . . . . . . . . . . . . . . . . . . . . . . . . . . . . . . . . . . . . . 149
Customizing the Project panel . . . . . . . . . . . . . . . . . . . . . . . . . . . . . . . . . . . . . . . . . . . . . . . . . . . . . . . . . . . . . . . . . . . . . . . . . . . . . . . . . . . . . . . 155
Managing metadata . . . . . . . . . . . . . . . . . . . . . . . . . . . . . . . . . . . . . . . . . . . . . . . . . . . . . . . . . . . . . . . . . . . . . . . . . . . . . . . . . . . . . . . . . . . . . . . . . 161
Working with aspect ratios . . . . . . . . . . . . . . . . . . . . . . . . . . . . . . . . . . . . . . . . . . . . . . . . . . . . . . . . . . . . . . . . . . . . . . . . . . . . . . . . . . . . . . . . . . . 166
Find assets . . . . . . . . . . . . . . . . . . . . . . . . . . . . . . . . . . . . . . . . . . . . . . . . . . . . . . . . . . . . . . . . . . . . . . . . . . . . . . . . . . . . . . . . . . . . . . . . . . . . . . . . . . 170
Render and replace media . . . . . . . . . . . . . . . . . . . . . . . . . . . . . . . . . . . . . . . . . . . . . . . . . . . . . . . . . . . . . . . . . . . . . . . . . . . . . . . . . . . . . . . . . . . 174
Monitor overlays . . . . . . . . . . . . . . . . . . . . . . . . . . . . . . . . . . . . . . . . . . . . . . . . . . . . . . . . . . . . . . . . . . . . . . . . . . . . . . . . . . . . . . . . . . . . . . . . . . . . 176
Chapter 7: Monitoring assets
Using the Reference Monitor . . . . . . . . . . . . . . . . . . . . . . . . . . . . . . . . . . . . . . . . . . . . . . . . . . . . . . . . . . . . . . . . . . . . . . . . . . . . . . . . . . . . . . . . . 181
Playing assets . . . . . . . . . . . . . . . . . . . . . . . . . . . . . . . . . . . . . . . . . . . . . . . . . . . . . . . . . . . . . . . . . . . . . . . . . . . . . . . . . . . . . . . . . . . . . . . . . . . . . . . 182
Waveform monitors and vectorscope . . . . . . . . . . . . . . . . . . . . . . . . . . . . . . . . . . . . . . . . . . . . . . . . . . . . . . . . . . . . . . . . . . . . . . . . . . . . . . . . 185
Chapter 8: Editing
Create and change sequences . . . . . . . . . . . . . . . . . . . . . . . . . . . . . . . . . . . . . . . . . . . . . . . . . . . . . . . . . . . . . . . . . . . . . . . . . . . . . . . . . . . . . . . 190
Add clips to sequences . . . . . . . . . . . . . . . . . . . . . . . . . . . . . . . . . . . . . . . . . . . . . . . . . . . . . . . . . . . . . . . . . . . . . . . . . . . . . . . . . . . . . . . . . . . . . . 209
Edit from sequences loaded into the Source monitor . . . . . . . . . . . . . . . . . . . . . . . . . . . . . . . . . . . . . . . . . . . . . . . . . . . . . . . . . . . . . . . . . 218
Rearrange clips in a sequence . . . . . . . . . . . . . . . . . . . . . . . . . . . . . . . . . . . . . . . . . . . . . . . . . . . . . . . . . . . . . . . . . . . . . . . . . . . . . . . . . . . . . . . . 219
Find, select, and group clips in a sequence . . . . . . . . . . . . . . . . . . . . . . . . . . . . . . . . . . . . . . . . . . . . . . . . . . . . . . . . . . . . . . . . . . . . . . . . . . . 224
Rendering and previewing sequences . . . . . . . . . . . . . . . . . . . . . . . . . . . . . . . . . . . . . . . . . . . . . . . . . . . . . . . . . . . . . . . . . . . . . . . . . . . . . . . . 226
Multi-camera editing workflow . . . . . . . . . . . . . . . . . . . . . . . . . . . . . . . . . . . . . . . . . . . . . . . . . . . . . . . . . . . . . . . . . . . . . . . . . . . . . . . . . . . . . . 230
Working with markers . . . . . . . . . . . . . . . . . . . . . . . . . . . . . . . . . . . . . . . . . . . . . . . . . . . . . . . . . . . . . . . . . . . . . . . . . . . . . . . . . . . . . . . . . . . . . . . 236
Create and play clips . . . . . . . . . . . . . . . . . . . . . . . . . . . . . . . . . . . . . . . . . . . . . . . . . . . . . . . . . . . . . . . . . . . . . . . . . . . . . . . . . . . . . . . . . . . . . . . . 240
Trimming clips . . . . . . . . . . . . . . . . . . . . . . . . . . . . . . . . . . . . . . . . . . . . . . . . . . . . . . . . . . . . . . . . . . . . . . . . . . . . . . . . . . . . . . . . . . . . . . . . . . . . . . 243
Create special clips (synthetics) . . . . . . . . . . . . . . . . . . . . . . . . . . . . . . . . . . . . . . . . . . . . . . . . . . . . . . . . . . . . . . . . . . . . . . . . . . . . . . . . . . . . . . 265
Working with offline clips . . . . . . . . . . . . . . . . . . . . . . . . . . . . . . . . . . . . . . . . . . . . . . . . . . . . . . . . . . . . . . . . . . . . . . . . . . . . . . . . . . . . . . . . . . . . 267
Relinking offline media . . . . . . . . . . . . . . . . . . . . . . . . . . . . . . . . . . . . . . . . . . . . . . . . . . . . . . . . . . . . . . . . . . . . . . . . . . . . . . . . . . . . . . . . . . . . . . 269
Working with captions . . . . . . . . . . . . . . . . . . . . . . . . . . . . . . . . . . . . . . . . . . . . . . . . . . . . . . . . . . . . . . . . . . . . . . . . . . . . . . . . . . . . . . . . . . . . . . . 273
Source patching and track targeting . . . . . . . . . . . . . . . . . . . . . . . . . . . . . . . . . . . . . . . . . . . . . . . . . . . . . . . . . . . . . . . . . . . . . . . . . . . . . . . . . 279
Synchronizing audio and video with Merge Clips . . . . . . . . . . . . . . . . . . . . . . . . . . . . . . . . . . . . . . . . . . . . . . . . . . . . . . . . . . . . . . . . . . . . . 279
Modifying clip properties with Interpret Footage . . . . . . . . . . . . . . . . . . . . . . . . . . . . . . . . . . . . . . . . . . . . . . . . . . . . . . . . . . . . . . . . . . . . . 283
Remove alerts with the Events panel . . . . . . . . . . . . . . . . . . . . . . . . . . . . . . . . . . . . . . . . . . . . . . . . . . . . . . . . . . . . . . . . . . . . . . . . . . . . . . . . . 283
Undo, history, and events . . . . . . . . . . . . . . . . . . . . . . . . . . . . . . . . . . . . . . . . . . . . . . . . . . . . . . . . . . . . . . . . . . . . . . . . . . . . . . . . . . . . . . . . . . . . 283
Freeze and hold frames . . . . . . . . . . . . . . . . . . . . . . . . . . . . . . . . . . . . . . . . . . . . . . . . . . . . . . . . . . . . . . . . . . . . . . . . . . . . . . . . . . . . . . . . . . . . . . 285
iv
Chapter 9: Audio
Overview of audio and the Audio Track Mixer . . . . . . . . . . . . . . . . . . . . . . . . . . . . . . . . . . . . . . . . . . . . . . . . . . . . . . . . . . . . . . . . . . . . . . . . 288
Working with clips, channels, and tracks . . . . . . . . . . . . . . . . . . . . . . . . . . . . . . . . . . . . . . . . . . . . . . . . . . . . . . . . . . . . . . . . . . . . . . . . . . . . . . 299
Editing audio in a Timeline panel . . . . . . . . . . . . . . . . . . . . . . . . . . . . . . . . . . . . . . . . . . . . . . . . . . . . . . . . . . . . . . . . . . . . . . . . . . . . . . . . . . . . 307
Adjusting volume levels . . . . . . . . . . . . . . . . . . . . . . . . . . . . . . . . . . . . . . . . . . . . . . . . . . . . . . . . . . . . . . . . . . . . . . . . . . . . . . . . . . . . . . . . . . . . . 310
Monitor clip volume and pan using Audio Clip Mixer . . . . . . . . . . . . . . . . . . . . . . . . . . . . . . . . . . . . . . . . . . . . . . . . . . . . . . . . . . . . . . . . . 314
Panning and balancing . . . . . . . . . . . . . . . . . . . . . . . . . . . . . . . . . . . . . . . . . . . . . . . . . . . . . . . . . . . . . . . . . . . . . . . . . . . . . . . . . . . . . . . . . . . . . . 317
Recording audio . . . . . . . . . . . . . . . . . . . . . . . . . . . . . . . . . . . . . . . . . . . . . . . . . . . . . . . . . . . . . . . . . . . . . . . . . . . . . . . . . . . . . . . . . . . . . . . . . . . . . 322
Recording audio mixes . . . . . . . . . . . . . . . . . . . . . . . . . . . . . . . . . . . . . . . . . . . . . . . . . . . . . . . . . . . . . . . . . . . . . . . . . . . . . . . . . . . . . . . . . . . . . . 326
Multiple stereo assignments for tracks to multichannel masters . . . . . . . . . . . . . . . . . . . . . . . . . . . . . . . . . . . . . . . . . . . . . . . . . . . . . . . 328
Control surface support . . . . . . . . . . . . . . . . . . . . . . . . . . . . . . . . . . . . . . . . . . . . . . . . . . . . . . . . . . . . . . . . . . . . . . . . . . . . . . . . . . . . . . . . . . . . . 329
Last updated 6/9/2015
Page 5

PREMIERE PRO
Content s
Editing audio in Adobe Audition . . . . . . . . . . . . . . . . . . . . . . . . . . . . . . . . . . . . . . . . . . . . . . . . . . . . . . . . . . . . . . . . . . . . . . . . . . . . . . . . . . . . 331
Advanced mixing . . . . . . . . . . . . . . . . . . . . . . . . . . . . . . . . . . . . . . . . . . . . . . . . . . . . . . . . . . . . . . . . . . . . . . . . . . . . . . . . . . . . . . . . . . . . . . . . . . . . 332
Chapter 10: Titles
Creating and editing titles . . . . . . . . . . . . . . . . . . . . . . . . . . . . . . . . . . . . . . . . . . . . . . . . . . . . . . . . . . . . . . . . . . . . . . . . . . . . . . . . . . . . . . . . . . . 335
Creating and formatting text in titles . . . . . . . . . . . . . . . . . . . . . . . . . . . . . . . . . . . . . . . . . . . . . . . . . . . . . . . . . . . . . . . . . . . . . . . . . . . . . . . . . 338
Live Text templates . . . . . . . . . . . . . . . . . . . . . . . . . . . . . . . . . . . . . . . . . . . . . . . . . . . . . . . . . . . . . . . . . . . . . . . . . . . . . . . . . . . . . . . . . . . . . . . . . . 343
Titler text styles . . . . . . . . . . . . . . . . . . . . . . . . . . . . . . . . . . . . . . . . . . . . . . . . . . . . . . . . . . . . . . . . . . . . . . . . . . . . . . . . . . . . . . . . . . . . . . . . . . . . . 345
Working with text and objects in titles . . . . . . . . . . . . . . . . . . . . . . . . . . . . . . . . . . . . . . . . . . . . . . . . . . . . . . . . . . . . . . . . . . . . . . . . . . . . . . . 347
Add images to titles . . . . . . . . . . . . . . . . . . . . . . . . . . . . . . . . . . . . . . . . . . . . . . . . . . . . . . . . . . . . . . . . . . . . . . . . . . . . . . . . . . . . . . . . . . . . . . . . . 349
Drawing shapes in titles . . . . . . . . . . . . . . . . . . . . . . . . . . . . . . . . . . . . . . . . . . . . . . . . . . . . . . . . . . . . . . . . . . . . . . . . . . . . . . . . . . . . . . . . . . . . . 350
Fills, strokes, and shadows in titles . . . . . . . . . . . . . . . . . . . . . . . . . . . . . . . . . . . . . . . . . . . . . . . . . . . . . . . . . . . . . . . . . . . . . . . . . . . . . . . . . . . 355
Rolling and crawling titles . . . . . . . . . . . . . . . . . . . . . . . . . . . . . . . . . . . . . . . . . . . . . . . . . . . . . . . . . . . . . . . . . . . . . . . . . . . . . . . . . . . . . . . . . . . 358
Chapter 11: Effects and transitions
About effects . . . . . . . . . . . . . . . . . . . . . . . . . . . . . . . . . . . . . . . . . . . . . . . . . . . . . . . . . . . . . . . . . . . . . . . . . . . . . . . . . . . . . . . . . . . . . . . . . . . . . . . . 360
Applying, removing, finding, and organizing effects . . . . . . . . . . . . . . . . . . . . . . . . . . . . . . . . . . . . . . . . . . . . . . . . . . . . . . . . . . . . . . . . . . 364
Viewing and adjusting effects and keyframes . . . . . . . . . . . . . . . . . . . . . . . . . . . . . . . . . . . . . . . . . . . . . . . . . . . . . . . . . . . . . . . . . . . . . . . . . 367
Effect presets . . . . . . . . . . . . . . . . . . . . . . . . . . . . . . . . . . . . . . . . . . . . . . . . . . . . . . . . . . . . . . . . . . . . . . . . . . . . . . . . . . . . . . . . . . . . . . . . . . . . . . . . 370
Master Clip Effects . . . . . . . . . . . . . . . . . . . . . . . . . . . . . . . . . . . . . . . . . . . . . . . . . . . . . . . . . . . . . . . . . . . . . . . . . . . . . . . . . . . . . . . . . . . . . . . . . . . 372
Masking and Tracking . . . . . . . . . . . . . . . . . . . . . . . . . . . . . . . . . . . . . . . . . . . . . . . . . . . . . . . . . . . . . . . . . . . . . . . . . . . . . . . . . . . . . . . . . . . . . . . 375
Stabilize motion with the Warp Stabilizer effect . . . . . . . . . . . . . . . . . . . . . . . . . . . . . . . . . . . . . . . . . . . . . . . . . . . . . . . . . . . . . . . . . . . . . . . 382
Transition overview: applying transitions . . . . . . . . . . . . . . . . . . . . . . . . . . . . . . . . . . . . . . . . . . . . . . . . . . . . . . . . . . . . . . . . . . . . . . . . . . . . . 385
Modifying and customizing transitions . . . . . . . . . . . . . . . . . . . . . . . . . . . . . . . . . . . . . . . . . . . . . . . . . . . . . . . . . . . . . . . . . . . . . . . . . . . . . . . 390
Change duration and speed of clips . . . . . . . . . . . . . . . . . . . . . . . . . . . . . . . . . . . . . . . . . . . . . . . . . . . . . . . . . . . . . . . . . . . . . . . . . . . . . . . . . . 394
Motion: position, scale, and rotate clips . . . . . . . . . . . . . . . . . . . . . . . . . . . . . . . . . . . . . . . . . . . . . . . . . . . . . . . . . . . . . . . . . . . . . . . . . . . . . . 401
Adjustment layers . . . . . . . . . . . . . . . . . . . . . . . . . . . . . . . . . . . . . . . . . . . . . . . . . . . . . . . . . . . . . . . . . . . . . . . . . . . . . . . . . . . . . . . . . . . . . . . . . . . 406
Color correction effects . . . . . . . . . . . . . . . . . . . . . . . . . . . . . . . . . . . . . . . . . . . . . . . . . . . . . . . . . . . . . . . . . . . . . . . . . . . . . . . . . . . . . . . . . . . . . . 407
Three-Way Color Corrector . . . . . . . . . . . . . . . . . . . . . . . . . . . . . . . . . . . . . . . . . . . . . . . . . . . . . . . . . . . . . . . . . . . . . . . . . . . . . . . . . . . . . . . . . . . 422
Audio effects and transitions . . . . . . . . . . . . . . . . . . . . . . . . . . . . . . . . . . . . . . . . . . . . . . . . . . . . . . . . . . . . . . . . . . . . . . . . . . . . . . . . . . . . . . . . . 424
Working with audio transitions . . . . . . . . . . . . . . . . . . . . . . . . . . . . . . . . . . . . . . . . . . . . . . . . . . . . . . . . . . . . . . . . . . . . . . . . . . . . . . . . . . . . . . 433
Applying effects to audio . . . . . . . . . . . . . . . . . . . . . . . . . . . . . . . . . . . . . . . . . . . . . . . . . . . . . . . . . . . . . . . . . . . . . . . . . . . . . . . . . . . . . . . . . . . . 434
The rolling shutter repair effect . . . . . . . . . . . . . . . . . . . . . . . . . . . . . . . . . . . . . . . . . . . . . . . . . . . . . . . . . . . . . . . . . . . . . . . . . . . . . . . . . . . . . . 437
Interlacing and field order . . . . . . . . . . . . . . . . . . . . . . . . . . . . . . . . . . . . . . . . . . . . . . . . . . . . . . . . . . . . . . . . . . . . . . . . . . . . . . . . . . . . . . . . . . . 438
Eliminate flicker . . . . . . . . . . . . . . . . . . . . . . . . . . . . . . . . . . . . . . . . . . . . . . . . . . . . . . . . . . . . . . . . . . . . . . . . . . . . . . . . . . . . . . . . . . . . . . . . . . . . . 440
Creating common results . . . . . . . . . . . . . . . . . . . . . . . . . . . . . . . . . . . . . . . . . . . . . . . . . . . . . . . . . . . . . . . . . . . . . . . . . . . . . . . . . . . . . . . . . . . . 441
v
Chapter 12: Animation and keyframes
Animating effects . . . . . . . . . . . . . . . . . . . . . . . . . . . . . . . . . . . . . . . . . . . . . . . . . . . . . . . . . . . . . . . . . . . . . . . . . . . . . . . . . . . . . . . . . . . . . . . . . . . 443
Adding, navigating, and setting keyframes . . . . . . . . . . . . . . . . . . . . . . . . . . . . . . . . . . . . . . . . . . . . . . . . . . . . . . . . . . . . . . . . . . . . . . . . . . . 444
Moving and copying keyframes . . . . . . . . . . . . . . . . . . . . . . . . . . . . . . . . . . . . . . . . . . . . . . . . . . . . . . . . . . . . . . . . . . . . . . . . . . . . . . . . . . . . . . 449
Optimize keyframe automation . . . . . . . . . . . . . . . . . . . . . . . . . . . . . . . . . . . . . . . . . . . . . . . . . . . . . . . . . . . . . . . . . . . . . . . . . . . . . . . . . . . . . . 451
Controlling effect changes using keyframe interpolation . . . . . . . . . . . . . . . . . . . . . . . . . . . . . . . . . . . . . . . . . . . . . . . . . . . . . . . . . . . . . . 451
Chapter 13: Compositing
Compositing, alpha channels, and adjusting clip opacity . . . . . . . . . . . . . . . . . . . . . . . . . . . . . . . . . . . . . . . . . . . . . . . . . . . . . . . . . . . . . . 455
Blending modes . . . . . . . . . . . . . . . . . . . . . . . . . . . . . . . . . . . . . . . . . . . . . . . . . . . . . . . . . . . . . . . . . . . . . . . . . . . . . . . . . . . . . . . . . . . . . . . . . . . . . 457
Last updated 6/9/2015
Page 6

PREMIERE PRO
Content s
Chapter 14: Exporting
Workflow and overview for exporting . . . . . . . . . . . . . . . . . . . . . . . . . . . . . . . . . . . . . . . . . . . . . . . . . . . . . . . . . . . . . . . . . . . . . . . . . . . . . . . . 461
Exporting projects for other applications . . . . . . . . . . . . . . . . . . . . . . . . . . . . . . . . . . . . . . . . . . . . . . . . . . . . . . . . . . . . . . . . . . . . . . . . . . . . . 463
Export a still image . . . . . . . . . . . . . . . . . . . . . . . . . . . . . . . . . . . . . . . . . . . . . . . . . . . . . . . . . . . . . . . . . . . . . . . . . . . . . . . . . . . . . . . . . . . . . . . . . . 465
Export to Panasonic P2 format . . . . . . . . . . . . . . . . . . . . . . . . . . . . . . . . . . . . . . . . . . . . . . . . . . . . . . . . . . . . . . . . . . . . . . . . . . . . . . . . . . . . . . . 466
Exporting to DVD or Blu-ray Disc . . . . . . . . . . . . . . . . . . . . . . . . . . . . . . . . . . . . . . . . . . . . . . . . . . . . . . . . . . . . . . . . . . . . . . . . . . . . . . . . . . . . . 467
Exporting to videotape . . . . . . . . . . . . . . . . . . . . . . . . . . . . . . . . . . . . . . . . . . . . . . . . . . . . . . . . . . . . . . . . . . . . . . . . . . . . . . . . . . . . . . . . . . . . . . 468
Exporting for the Web and mobile devices . . . . . . . . . . . . . . . . . . . . . . . . . . . . . . . . . . . . . . . . . . . . . . . . . . . . . . . . . . . . . . . . . . . . . . . . . . . 471
Exporting OMF files for Pro Tools . . . . . . . . . . . . . . . . . . . . . . . . . . . . . . . . . . . . . . . . . . . . . . . . . . . . . . . . . . . . . . . . . . . . . . . . . . . . . . . . . . . . . 473
Smart rendering . . . . . . . . . . . . . . . . . . . . . . . . . . . . . . . . . . . . . . . . . . . . . . . . . . . . . . . . . . . . . . . . . . . . . . . . . . . . . . . . . . . . . . . . . . . . . . . . . . . . . 475
Working with Adobe SpeedGrade . . . . . . . . . . . . . . . . . . . . . . . . . . . . . . . . . . . . . . . . . . . . . . . . . . . . . . . . . . . . . . . . . . . . . . . . . . . . . . . . . . . . 475
Working with Adobe Prelude . . . . . . . . . . . . . . . . . . . . . . . . . . . . . . . . . . . . . . . . . . . . . . . . . . . . . . . . . . . . . . . . . . . . . . . . . . . . . . . . . . . . . . . . 476
Chapter 15: System Requirements
System requirements for Premiere Pro . . . . . . . . . . . . . . . . . . . . . . . . . . . . . . . . . . . . . . . . . . . . . . . . . . . . . . . . . . . . . . . . . . . . . . . . . . . . . . . 478
vi
Last updated 6/9/2015
Page 7
Chapter 1: What's New
New features summary
The June 2015 release of Premiere Pro CC brings you fast new color workflows, a powerful Morph Cut transition,
expanded collaboration capabilities, easier asset sharing, and several new features that help you edit with finesse, and
deliver amazing content.
Explore the new features
1
COLOR
USER INTERFACE
MORPH CUT
NG
EDITI
COLLABORATION
OTHER FEATURES
AUD IO
Last updated 6/9/2015
Page 8
What's New
C
OLOR
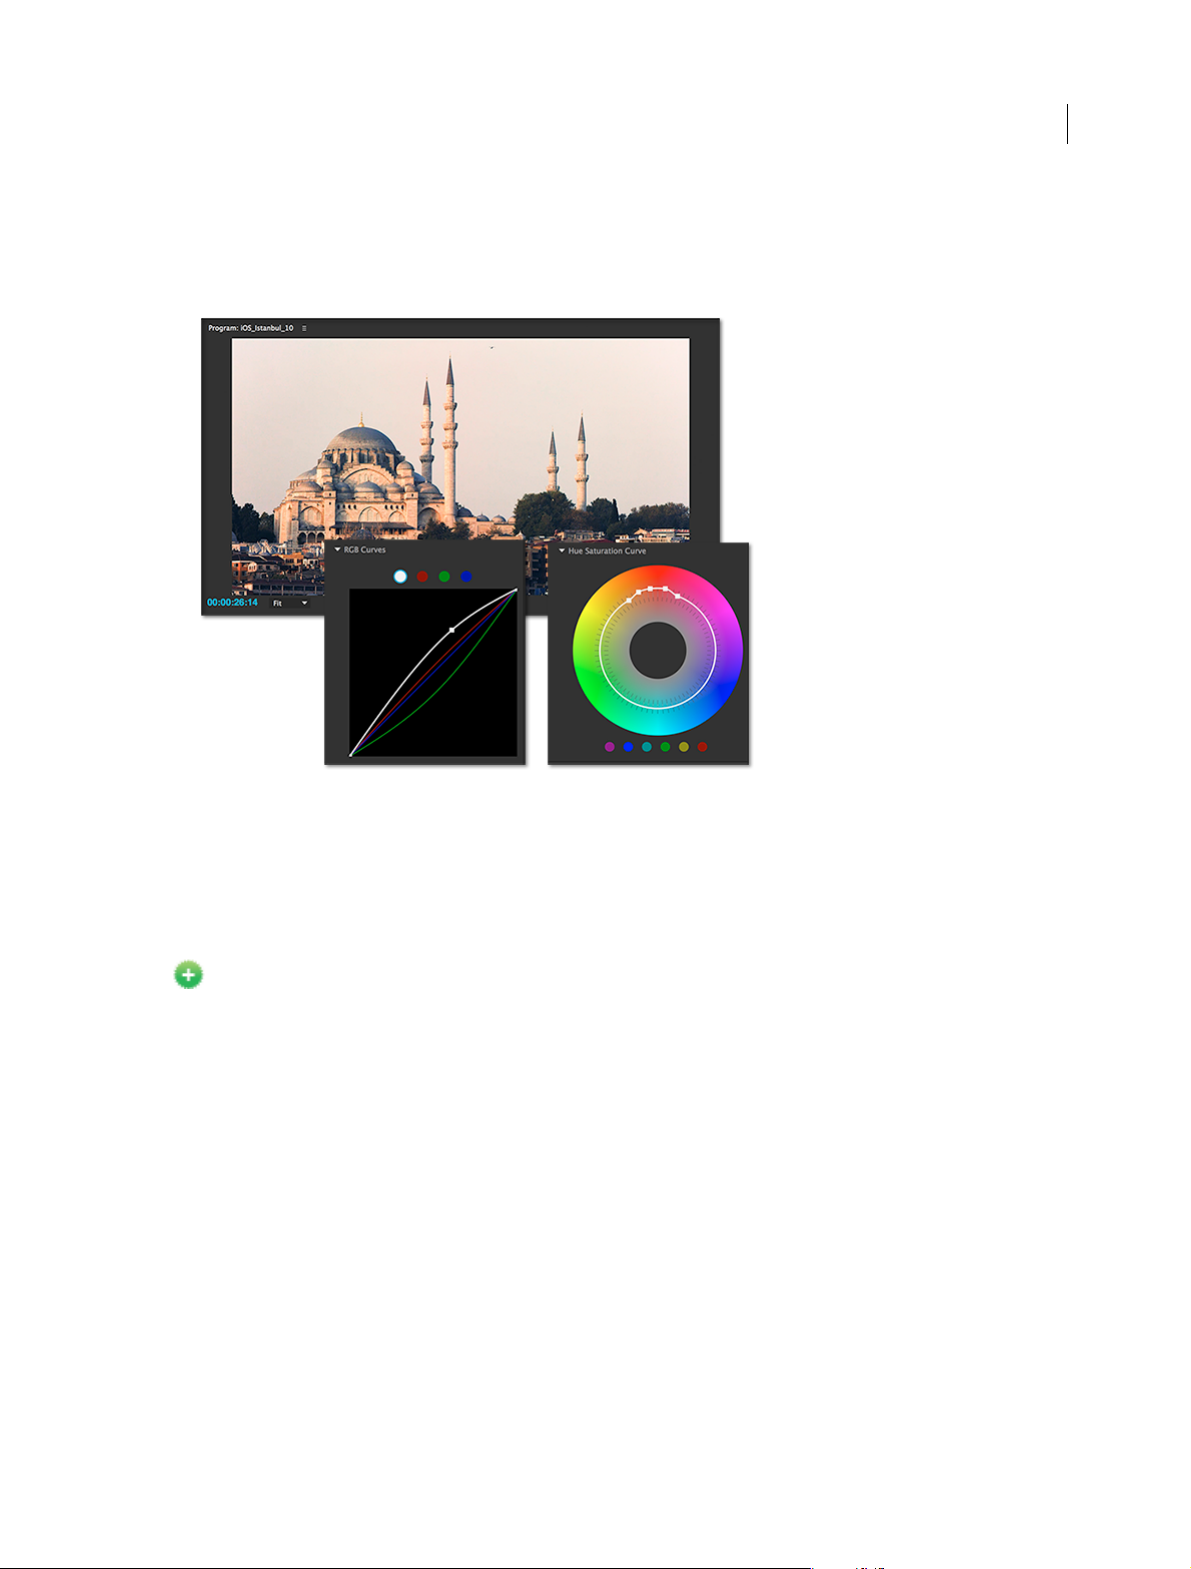
Premiere Pro CC introduces brand new color tools that combine the best of Adobe SpeedGrade and Adobe
Lightroom technologies. Editing and color grading now work hand in hand, more closely than ever before.
3
The new Lumetri Color workspace in Premiere Pro provides editors the complete toolbox for professional color
grading. You can grade your footage using professional color tools directly on your editing timeline.
Apply simple color corrections or complex Lumetri Looks using intuitive sliders and controls. Easily adjust cuts or finetune grades using advanced color correction tools. And if you want to do more, bring your project into SpeedGrade via
Direct Link to make more refinements.
To le a r n m ore, s e e Color workflows .
MORPH CUT
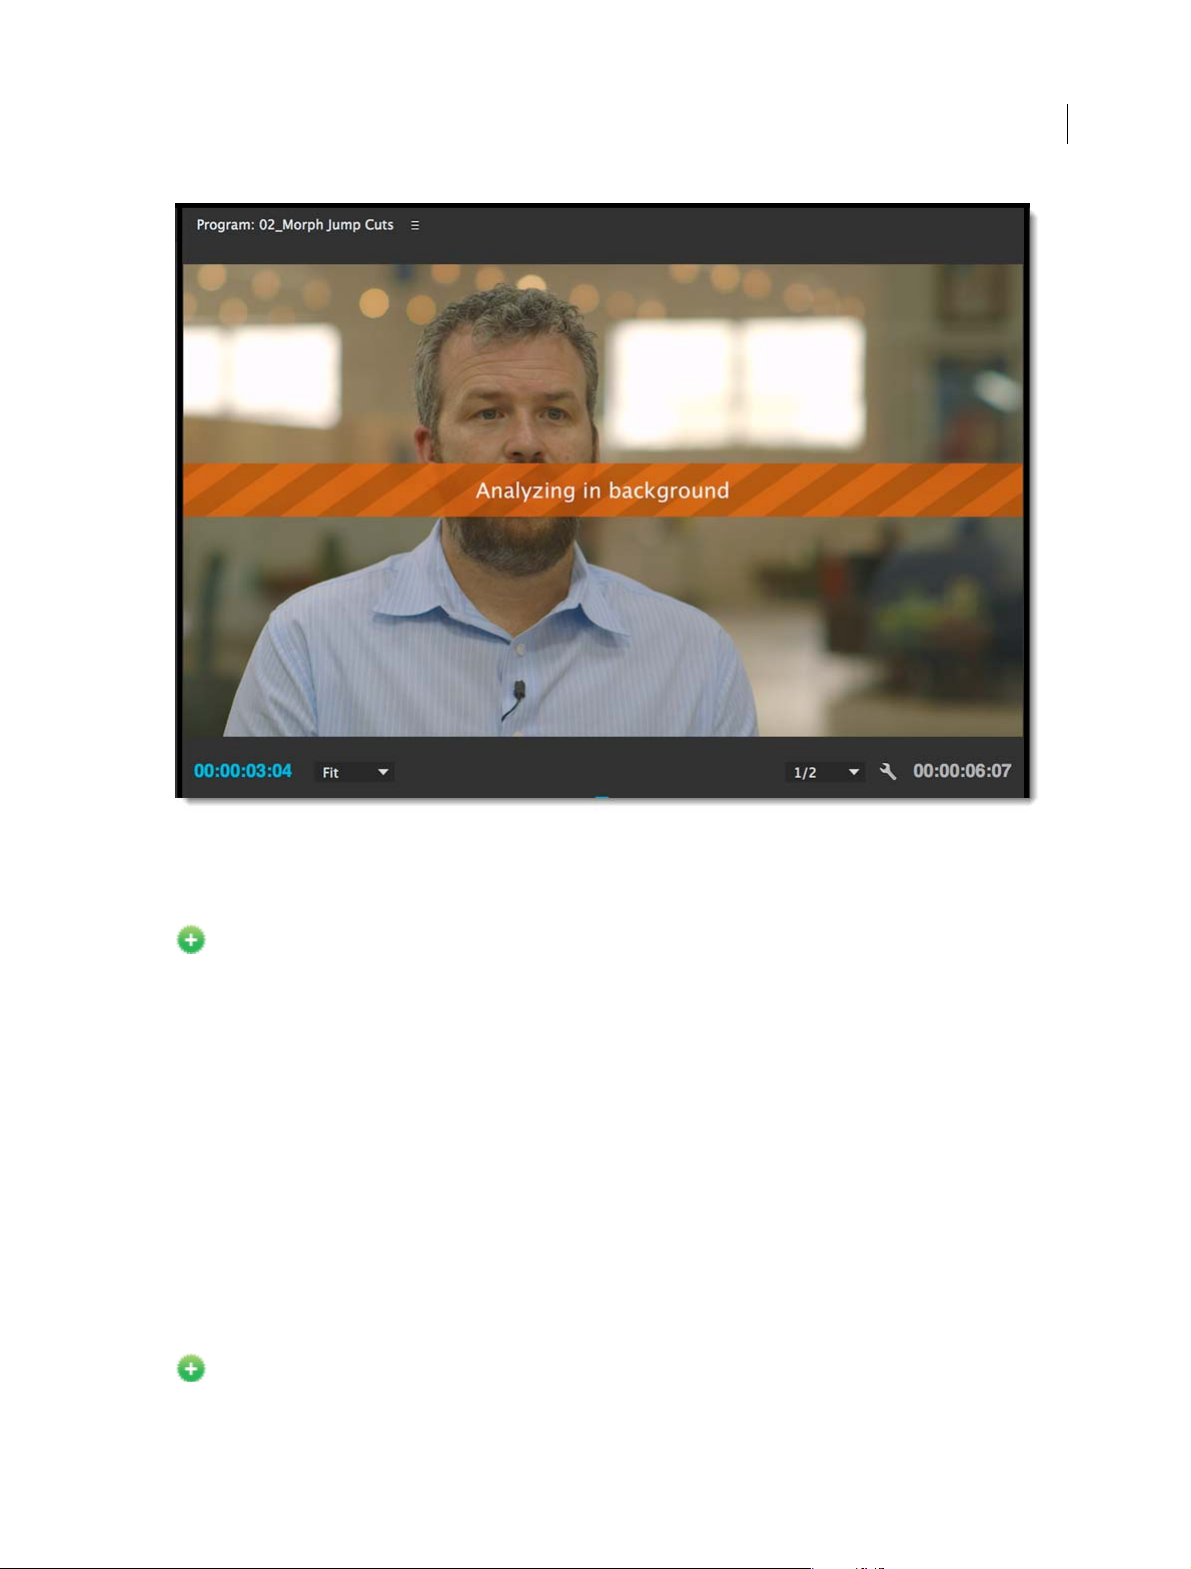
Morph Cut is a powerful new transition in Premiere Pro that lets you create more polished interviews by smoothing
out distracting jump cuts without having to cross-dissolve or cut away.
Last updated 6/9/2015
Page 9
What's New
4
Morph Cut uses an advanced combination of face tracking and optical flow interpolation to create a seamless transition
between clips.
To le a r n m ore, s e e Morph Cut .
COLLABORATION
Creative Cloud Libraries
Creative Cloud Libraries are now available in Premiere Pro. All your favorite assets can be accessed from a single
Library panel in Premiere Pro.
Capture a Look in Adobe Look mobile app, create a graphic in Photoshop, or save an Adobe Stock image and access
them directly in Premiere Pro. You can save, access, and reuse assets stored in Libraries across Adobe's desktop and
mobile apps.
You can share Libraries with anyone with a Creative Cloud account. Library sharing makes it easy to collaborate with
teams and maintain consistency across projects with common assets like graphics, colors, Looks, or type styles.
Select Window > Library to open the Library panel in Premiere Pro.
To le a r n m ore, s e e Creative Cloud Libraries in Premiere Pro.
Last updated 6/9/2015
Page 10

What's New
Tighter integration with Premiere Clip
Adobe Premiere Clip makes the creation of amazing videos with your iPhone and iPad easy and fast. Premiere Clip's
tighter integration with Premiere Pro steps up your creative power to the next level by leveraging the power of Creative
Cloud to seamlessly transfer assets from your mobile to desktop and take them through some professional-grade
editing.
You can now open your Premiere Clip projects directly from the Welcome screen in Premiere Pro.
Edits, music cues, and Looks applied in Premiere Clip translate directly into a Premiere Pro timeline. This integration
allows you to seamlessly transition from quick mobile editing to the more professional desktop non-linear editing with
just a couple of easy steps.
To le a r n m ore, s e e Edit Premiere Clip videos in Premiere Pro .
Seamless Integration with Adobe Stock
Adobe Stock is a new service that sells millions of high-quality, royalty-free photos, illustrations, and graphics.
You can search for Adobe Stock content directly from within Premiere Pro through the Libraries panel (Win d o w >
Libraries) by clicking the Search Adobe Stock button in the panel. You can then purchase a license for an asset you want
to use and include it in your Premiere Pro Library. Or, you can add an unlicensed preview (watermarked) copy to your
Library and purchase a license for it later.
5
To le a r n m ore, s e e Using Adobe Stock and Creative Cloud Libraries in Premiere Pro.
Deeper collaboration with Adobe Anywhere
Adobe Anywhere is a collaborative workflow platform that enables teams using Premiere Pro and Prelude to work with
centralized media and assets across standard networks.
To le a r n m ore, s e e Premiere Pro and Adobe Anywhere .
AUDIO
Audio workflow improvements
This release of Premiere Pro comes integrated with the powerful audio engine from Adobe Audition, ensuring a more
seamless and robust audio editing experience.
Other new features include a faster voice-over recording configuration, improved multi-channel audio export, and a
more intuitive user interface for audio routing. The new audio routing interface gives you more control over visually
assigning the output channels for standard, mono, 5.1, and adaptive tracks. The audio channels in the Modify Clip
workflow come with a matrix to match the available channels in the source file to the channels and track items in the
clip.
In addition, Premiere Pro now allows plug-and-play with a wide range of audio hardware, including ASIO and MME
(Windows) and CoreAudio (Mac) with pre-loaded setup for these device types.
Dynamic Link video streaming
When you send Premiere Pro projects to Audition using the Dynamic Link video streaming video option, you can view
video in its native resolution within Audition.
1 In a Project panel, select a sequence containing audio.
2 Select Edit > Edit In Adobe Audition and then select Sequence from the submenu.
Last updated 6/9/2015
Page 11

What's New
3 In the Edit In Adobe Audition dialog, under Video, choose Send Through Dynamic Link.
4 Select Open In Adobe Audition to open the selected clip in its native format in Audition.
USER INTERFACE
Task-oriented workspaces and stacked panels
Premiere Pro now offers a more dynamic user interface with task-oriented workspaces that display the required toolsets
for a task at hand.
Each workspace focuses on a specific task of the post-production workflow and includes panels that contain options
and controls for working on that task.
The workspaces are designed such that they not only reduce clutter but also guide you through the tasks in a logical
workflow. If you are using a touch-based device, you can switch workspaces with a tap of the finger.
To le a r n m ore, s e e Wor k sp a c es .
New Welcome experience
The 2015 release of Premiere Pro CC has a new Welcome experience to help you discover, learn, and use features in
Premiere Pro.
6
Each time you start Premiere Pro or when you click Help > Welcome, a tab-based Welcome screen helps you easily
discover new features, getting started tutorials, and tips and techniques.
The content that is displayed is personalized and relevant to your subscription and use of Premiere Pro.
Note: The new Welcome screen is currently available only in the English version of Premiere Pro.
Last updated 6/9/2015
Page 12

What's New
EDITING
Time Tuner
Time Tuner is a new feature in Adobe Media Encoder that enables you to deliver content that is the right duration
without time-consuming micro-editing. Time Tuner adjusts the length of video by automatically adding or removing
frames at scene changes or sections of low visual activity.
This feature is especially useful for editors working in broadcast to meet specific delivery requirements.
To le a r n m ore, watch this video tutorial .
Caption burn-in
Premiere Pro lets you burn in permanent captions into your video for both closed captions and open caption file
formats.
When you import open caption files, Premiere Pro automatically converts the open captions to closed captions. You
can then edit and burn the captions into the export using Premiere Pro or Adobe Media Encoder.
To le a r n m ore, s e e Work i n g wit h c a p t ions .
7
Editing experience refinements
Clip markers displayed on minimized Timeline tracks
Earlier, clip markers were not displayed when tracks were collapsed to their minimum height. Now, you can always
display clip markers. To turn them off, click
in the Timeline panel, and deselect Show Clip Markers.
Improved four-point editing
When the In and Out points on the source are shorter than the In and Out points on the sequence, the Ignore Source
In Point and Ignore Source Out Point options are no longer disabled. Earlier, these options were disabled even if the
source has available frames to move the In and Out points and accommodate the edit.
Note: Select Always Use this Choice to ensure that the Fit Clip dialog does not appear every time there is a mismatch.
However, if there isn't enough media beyond the In or Out pints in the source to make the edit, an Insufficient Content for
Edit warning dialog appears.
Logarithmic waveform scaling in the Timeline
Premiere Pro now offers a new Logarithmic Waveform Scaling feature that scales up the peaks and valleys of a
waveform to make them easier to read, especially at low noise levels. This feature is turned on by default, and applies
to both rectified and non-rectified waveform settings.
To turn this feature off, select the pop-up menu from the Timeline, and deselect Logarithmic Waveform Setting.
Hide items in the Project panel
Premiere Pro lets you selectively hide items in the Project panel, letting you easily focus on only the visible items.
To hide a project item, select the item in the Project panel, and select Hide from the context menu. You can hide not
only single project items but also a group of project items including bin folders, sequences, and nested sequences.
Last updated 6/9/2015
Page 13

What's New
At any point, you can view the hidden items by selecting View Hidden from the context menu. The View Hidden option
works on all project items and media types, including bins, sequences, and titles.
Important notes
• You can use the Hide and View Hidden options while using the Search Bins feature in Premiere Pro. For example,
you can create a single location where you can search for clips that have been hidden among all the other bins.
• When you use the Reveal In Project feature on a sequence item whose master clip is hidden, the "View Hidden"
s
ettings are toggled off. Premiere Pro then displays all hidden items including the master clip that
was hidden.
Sort on XMP metadata in the Project panel
Sorting on XMP metadata columns in the project panel is re-enabled.
Click an XMP column header to sort metadata by this column. After the XMP loading is complete, the progress dialog
sappears and the project panel is sorted.
di
At any point, you can cancel sort operations that are running long due to XMP loading.
Composite preview during trim
The new Composite Preview During Trim feature lets you trim clips more accurately.
8
When you drag trim an edit point in a Timeline panel, you can see a preview of what the final composited frames look
l
ike in the Program Monitor. You can preview what the composited frames look like on either side of the edit point, and
not just the frames on the track that you are trimming.
To access this feature, click the Wrench icon in a Timeline panel, and select Composite Preview During Trim.
Create a subsequence from a sequence segment
You can now mark a portion of a sequence in the Source monitor with an In/Out range and create a new sequence that
contains just that In/Out range with the original clip content and track layout. For example, you can divide a long
sequence into segments that can be used as sources for other sequences.
With a sequence open in the Timeline panel or in the Source
Subsequence from the Sequence menu. A new sequence is created in the Project panel, using the name of the original
sequence, and appended with _Sub_01 and auto-incremented for the next subsequence.
monitor, mark an In and Out range, then choose Make
Disable Master Clip Effects for project items
You can quickly disable Master Clip Effects by selecting one or more project items and choosing Disable Master Clip
Effect from the context menu.
In the Effect Controls panel, use the FX button to toggle Master Clip Effects off and on.
AAF Export and reference video track
You can export AAF files directly from Premiere Pro. Select File> Export > AAF to export the selected project.
In the AAF Export Settings dialog, select Mixdown Video to include a reference video clip when exporting. A reference
vi
deo clip can help with efficient editing and syncing.
When you open the AAF file, the reference video clip is automatically linked.
Sequential Field playback in Source and Program Monitors
The Display Both Fields option in the Source Monitor and Program Monitor now plays clips sequentially, instead of
one after the other. Playing clips one after the other is sometimes found to have combing effects.
Last updated 6/9/2015
Page 14

What's New
The Display Both Fields option applies only to playback, and not to scrubbing or pausing.
Improved event notifications
In previous versions of Premiere Pro, a warning icon was displayed in the lower right corner of the Status Bar when an
event occurred that would be displayed in the Events panel. Since the warning icon is small, it often went unnoticed.
Now, in addition to the warning icon, a notification pop-up dialog appears in the lower right corner of the application.
Clic
k the pop-up notification to open the Events Panel that contains more details.
To turn off this pop-up notification, deselect Show Event Notifications in the Preferences dialog under the General
ca
tegory.
Improvements to Consolidate and Transcode
• Increased handle frame limit When consolidating and transcoding a project, or rendering and replacing, you can
specify up to 999 additional frames before the In point and after the Out point of each transcoded clip.
• Preserved alpha channel graphics Premiere Pro preserves alpha channels in clips during transcoding. When this
option is selected (default setting), Premiere Pro detects clips with an alpha channel. If the selected preset does no
ontain an alpha channel, Premiere Pro copies the alpha channel without transcoding. If the selected preset contains
c
an alpha channel, then the clip is transcoded. Clips without alpha channels are transcoded following the normal
rules of transcoding.
9
t
Export movies at a specific timecode
Previously, you could only set the start time code of a movie to zero in the Export Settings dialog. Now, you can have
an exported movie start at a specified timecode, other than zero. For example, you can specify that an exported movie
should start at a timecode of 00:09:32:27.
To specify a timecode, select Set Start Timecode in the Export Settings dialog box, and enter the timecode value.
New frame hold option
You can now freeze a video frame based on a clip's source timecode.
In the Frame Hold options dialog box, a Source Timecode opt
Frame field changes to the clip's timecode. Modify the clip timecode value as required.
In addition, the Time option is now renamed to Sequence Timecode.
To learn more about the Frame Hold options, see Freeze and hold frames.
ion is added. When you select Source Timecode, the
New Appearance preferences
The Appearance pane of the Preferences dialog box provides new preferences that let you control the brightness and
saturation of the blue highlight color, interactive controls, and focus indicators.
OTHER FEATURES
Expanded format support
Premiere Pro continues to expand its native format support by supporting the following formats:
• DNxHD with compressed alpha
• Canon XF-AVC
Last updated 6/9/2015
Page 15

What's New
• ProRes 4444XQ
• Panasonic 4K_HS
Premiere Pro also supports DNxHD growing files.
Soft subclip support through XML
Premiere Pro now supports subclips with soft edits in Final Cut Pro project XML files.
New and changed keyboard shortcuts
Contextual keyboard shortcuts for Trim and Nudge
You can now use the same shortcuts for Trim and Nudge commands without having to use a different key combination
for each shortcut. The correct shortcut combination works depending on the action you perform in the Timeline - for
example, editing a clip versus moving a clip.
In the Keyboard Shortcuts dialog, when you specify a shortcut that has already been used, Premiere Pro displays a
warning that the shortcut has already been assigned. However, you can go ahead and assign the shortcut to another
command. For example, you can assign the same shortcut to the Trim Forward and Nudge Forward commands.
10
New keyboard shortcuts to play In to Out
You can assign keyboard shortcuts for the following commands using the Keyboard Shortcuts dialog:
• Play Video In to Out
• Play Audio In to Out
• Play from Playhead to Audio Out Point
• Play from Playhead to Video Out Point
Last updated 6/9/2015
Page 16

Chapter 2:
What is Adobe Anywhere?
What is Adobe Anywhere?
11
Last updated 6/9/2015
Page 17
Chapter 3: Workspace and workflows
Workspaces
Note: Premiere Pro CC now provides an enhanced, dynamic user interface with a new task-oriented workspaces layout,
tabbed panels, and other improvements. If you are using a version earlier than the 2015 release of Premiere Pro CC, you
might not find some of the panels and tools as described in this article.
About workspaces
Adobe video and audio applications provide a consistent, customizable workspace. Although each application has its
own set of panels (such as Project, Metadata, and Timeline), you move and group panels in the same way across
products.
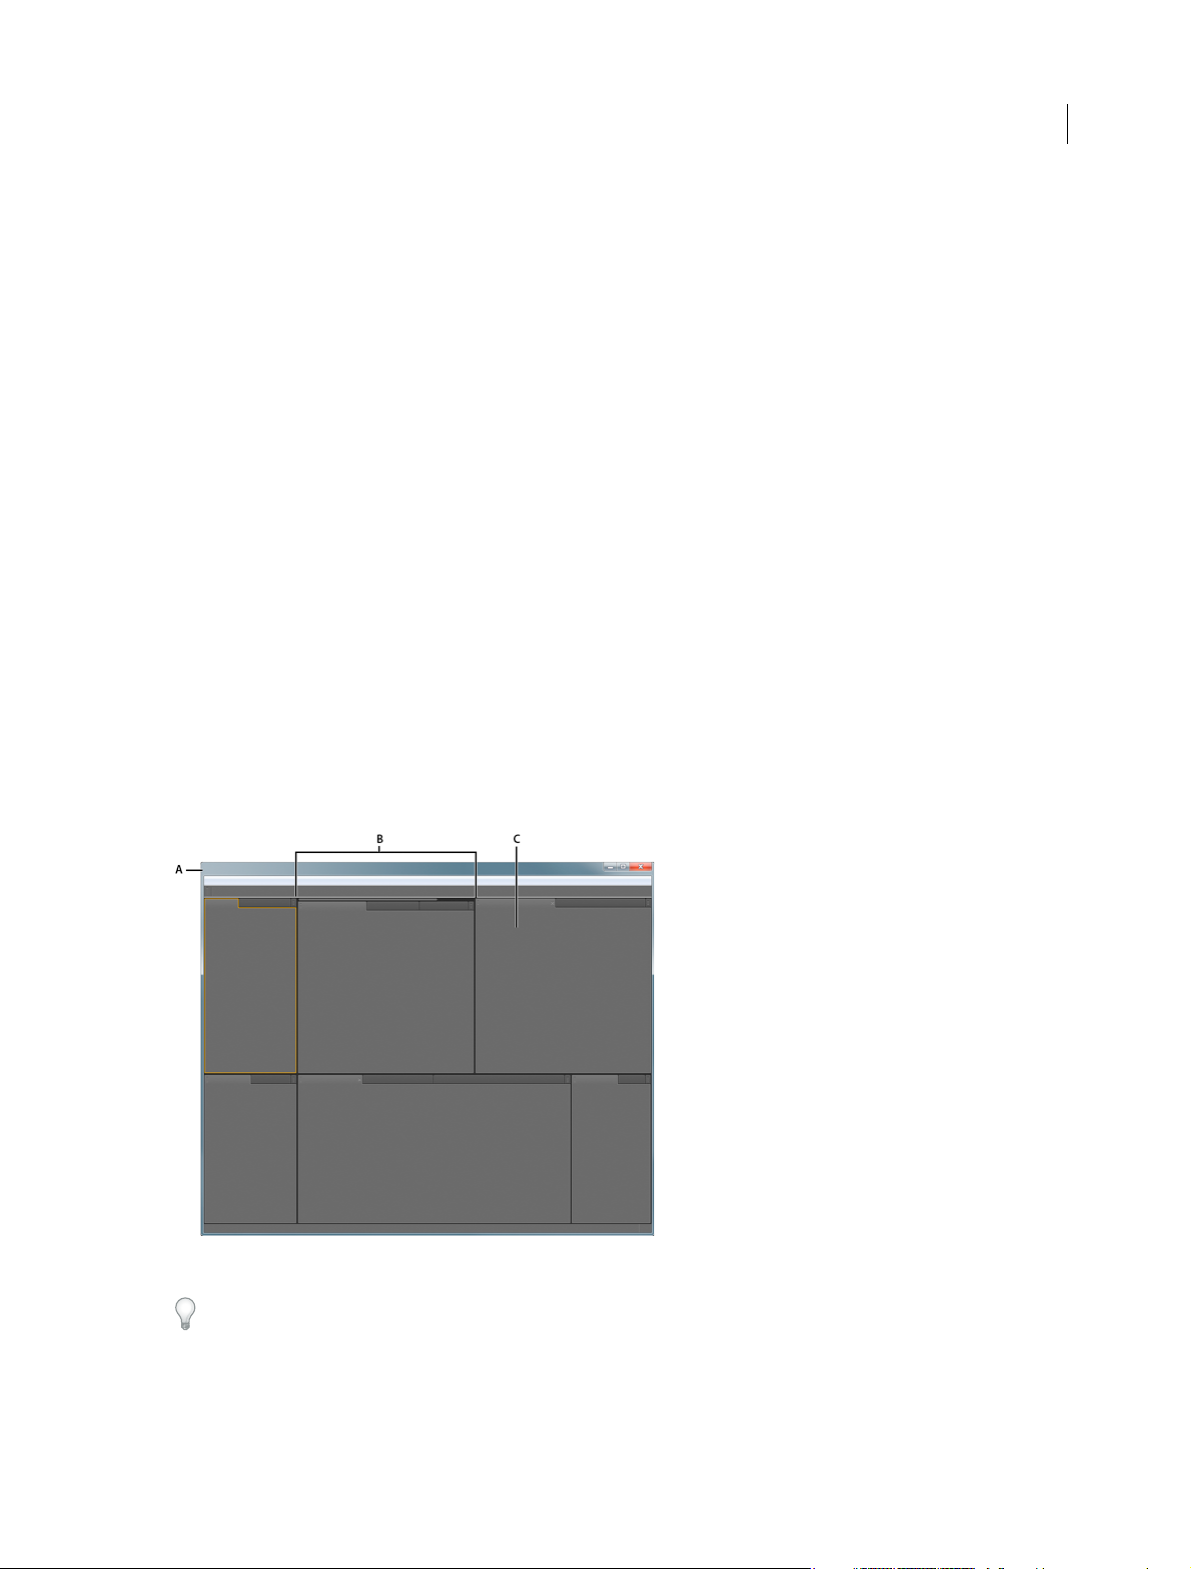
The main window of a program is the application window. Panels are organized in this window in an arrangement
called a workspace. The default workspace contains groups of panels as well as panels that stand alone.
12
You customize a workspace by arranging panels in the layout that best suits your working style. As you rearrange panels,
the other panels resize automatically to fit the window. You can create and save several custom workspaces for different
tasks—for example, one for editing and one for previewing.
A Application window B Grouped panels C Individual panel
You can use floating windows to create a workspace more like workspaces in previous versions of Adobe applications,
or to place panels on multiple monitors.
Last updated 6/9/2015
Page 18

Workspace and workflows
Import a workspace with a project
Workspace selections and customizations made in a project are saved in the project file. By default, Premiere Pro opens
projects in the current workspace. However, you can instead open a project in the workspace last used with it. This
option is particularly helpful if you often rearrange the workspace for each project.
If you import a project and the workspace is empty, close the project. Deselect Import Workspace From Projects. Import
the project again, and select an existing workspace for the project.
❖ Before opening a project, select Window > Workspace > Import Workspace From Projects.
Customizing workspaces
Choose a workspace
Each Adobe video and audio application includes several predefined workspaces that optimize the layout of panels for
specific tasks. When you choose one of these workspaces, or any custom workspaces you’ve saved, the current
workspace is redrawn accordingly.
13
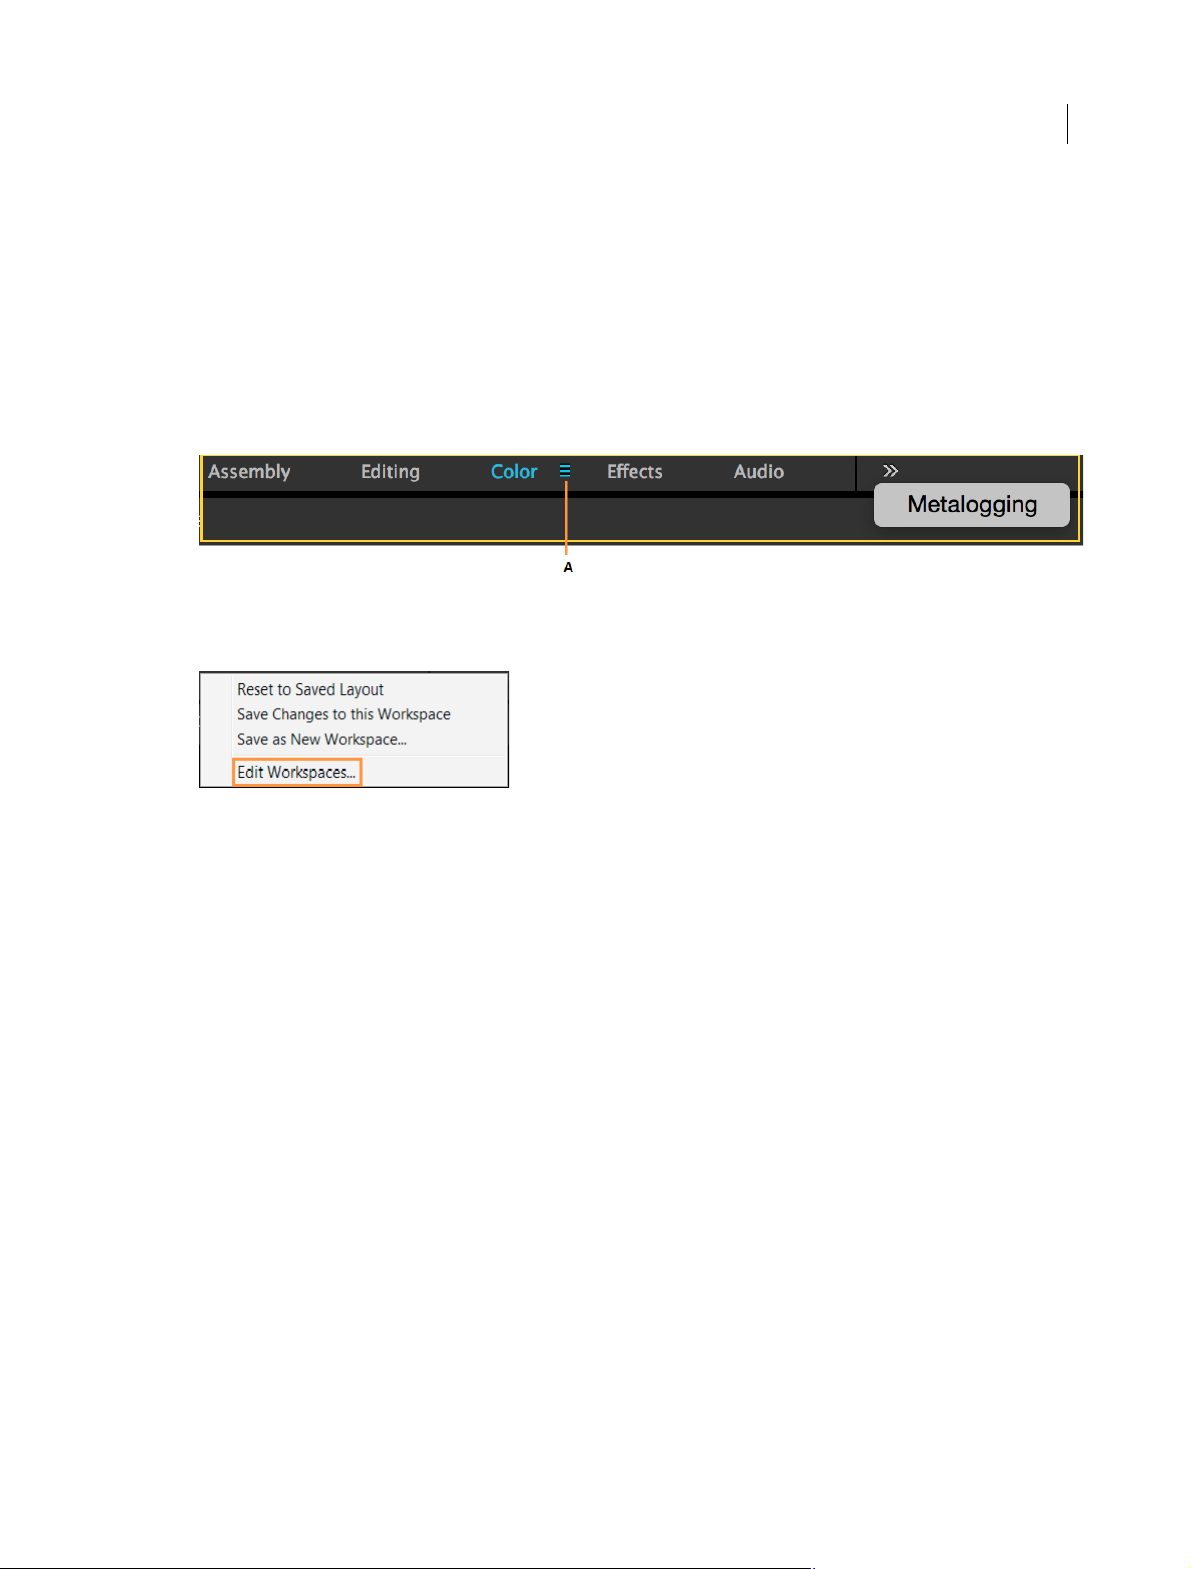
In Premiere Pro, Workspace buttons in the Workspaces panel provide you one-click access to default or custom
workspaces.
• Switch to the different layouts by clicking the names at the top of the workspace
• Click on the Chevron icon (>>) to open the Overflow menu. The Overflow menu includes workspace layouts that
are not displayed in the Workspace panel.
• Drag the vertical divider next to the Chevron icon to control whether a workspace is displayed or hidden in the
overflow menu.
Note: Older custom workspaces might not have the Workspaces panel open at the top of the workspace. You can open the
Workspaces panel, dock it at the top and save the change into the workspace.
Last updated 6/9/2015
Page 19
Workspace and workflows
You can also open a Workspace from the Window menu:
❖ Open the project you want to work on, choose Window > Workspace, and select the desired workspace.
Modify the order of workspaces or delete workspaces
You can change the order in which workspaces are displayed, move a workspace to the Overflow menu, or hide a
workspace so that it is not displayed in the Workspaces panel. You can also delete a workspace from the panel.
Note:
1 Click the Workspace menu icon, which appears next to the currently active workspace.
A Work spac e menu icon
2 In the Workspace menu that is displayed, click Edit Workspaces.
14
Note: You can also access the Edit Workspaces dialog through Window > Workspaces > Edit Workspaces.
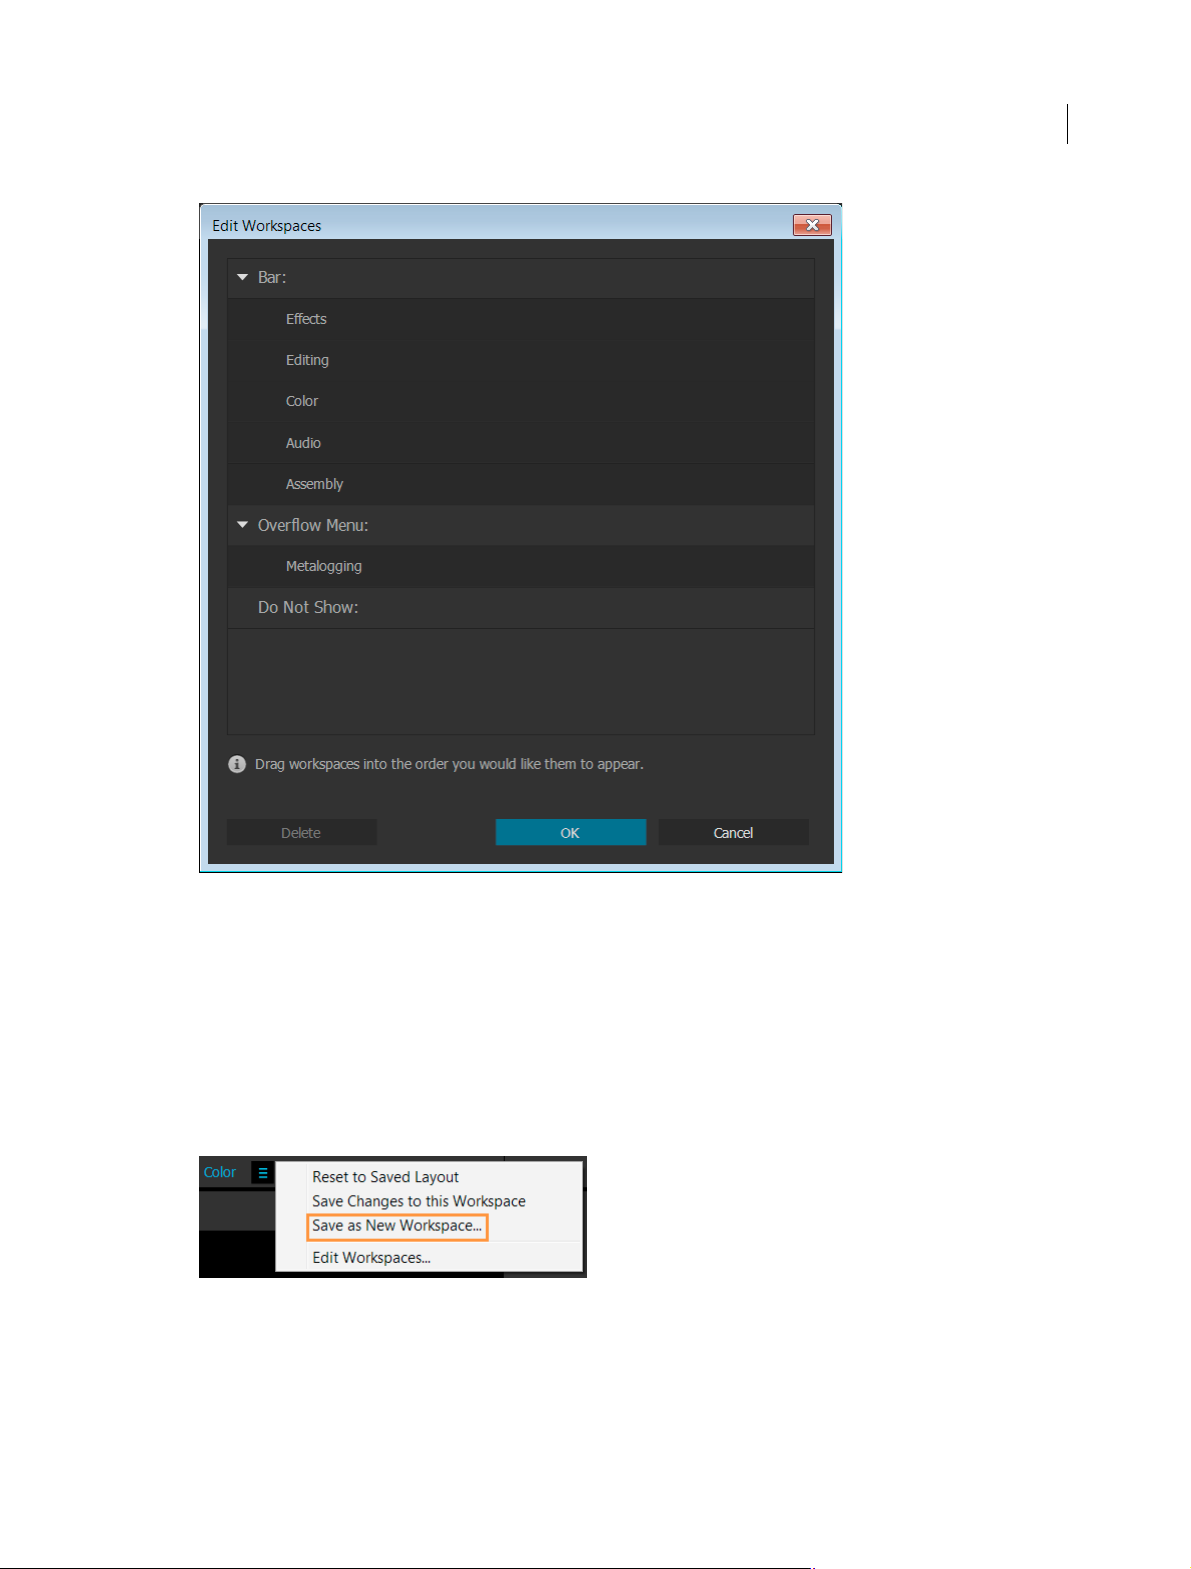
3 The Edit Workspaces dialog is displayed. Here you can reorder workspaces, move them into the Overflow menu or
hide them. You can also delete a workspace.
To revert any change that you made, click Cancel.
Last updated 6/9/2015
Page 20
Workspace and workflows
15
Save or reset workspaces
Save a custom workspace
As you customize a workspace, the application tracks your changes, storing the most recent layout. To store a specific
layout more permanently, save a custom workspace. Saved custom workspaces appear in the Workspace menu, where
you can return to and reset them.
❖ Arrange the frames and panels as desired, and then do one of the following:
• Click the Workspace menu icon and select Save as New Workspace.
• Or, choose Window > Workspace > Save as New Workspace.
Last updated 6/9/2015
Page 21
Workspace and workflows
Save changes to default workspaces
Note: Once changes to the original default layouts are saved, the only way to recover them is to delete the workspace config
file from your Layouts folder
To save the changes made to default workspaces, do one of the following:
• Click the Workspace menu icon and select Save Changes to this Workspace
• Select Window > Workspaces > Save Changes to this Workspace
Reset a workspace
Reset the current workspace to return to its original, saved layout of panels.
❖ Do one of the following:
• Click the Workspace menu icon and select Reset to Saved Layout.
• Choose Window > Workspace > Reset to Saved Layout.
Dock, group, or float panels
You can dock panels together, move them into or out of groups, and undock them so they float above the application
window. As you drag a panel, drop zones—areas onto which you can move the panel—become highlighted. The drop
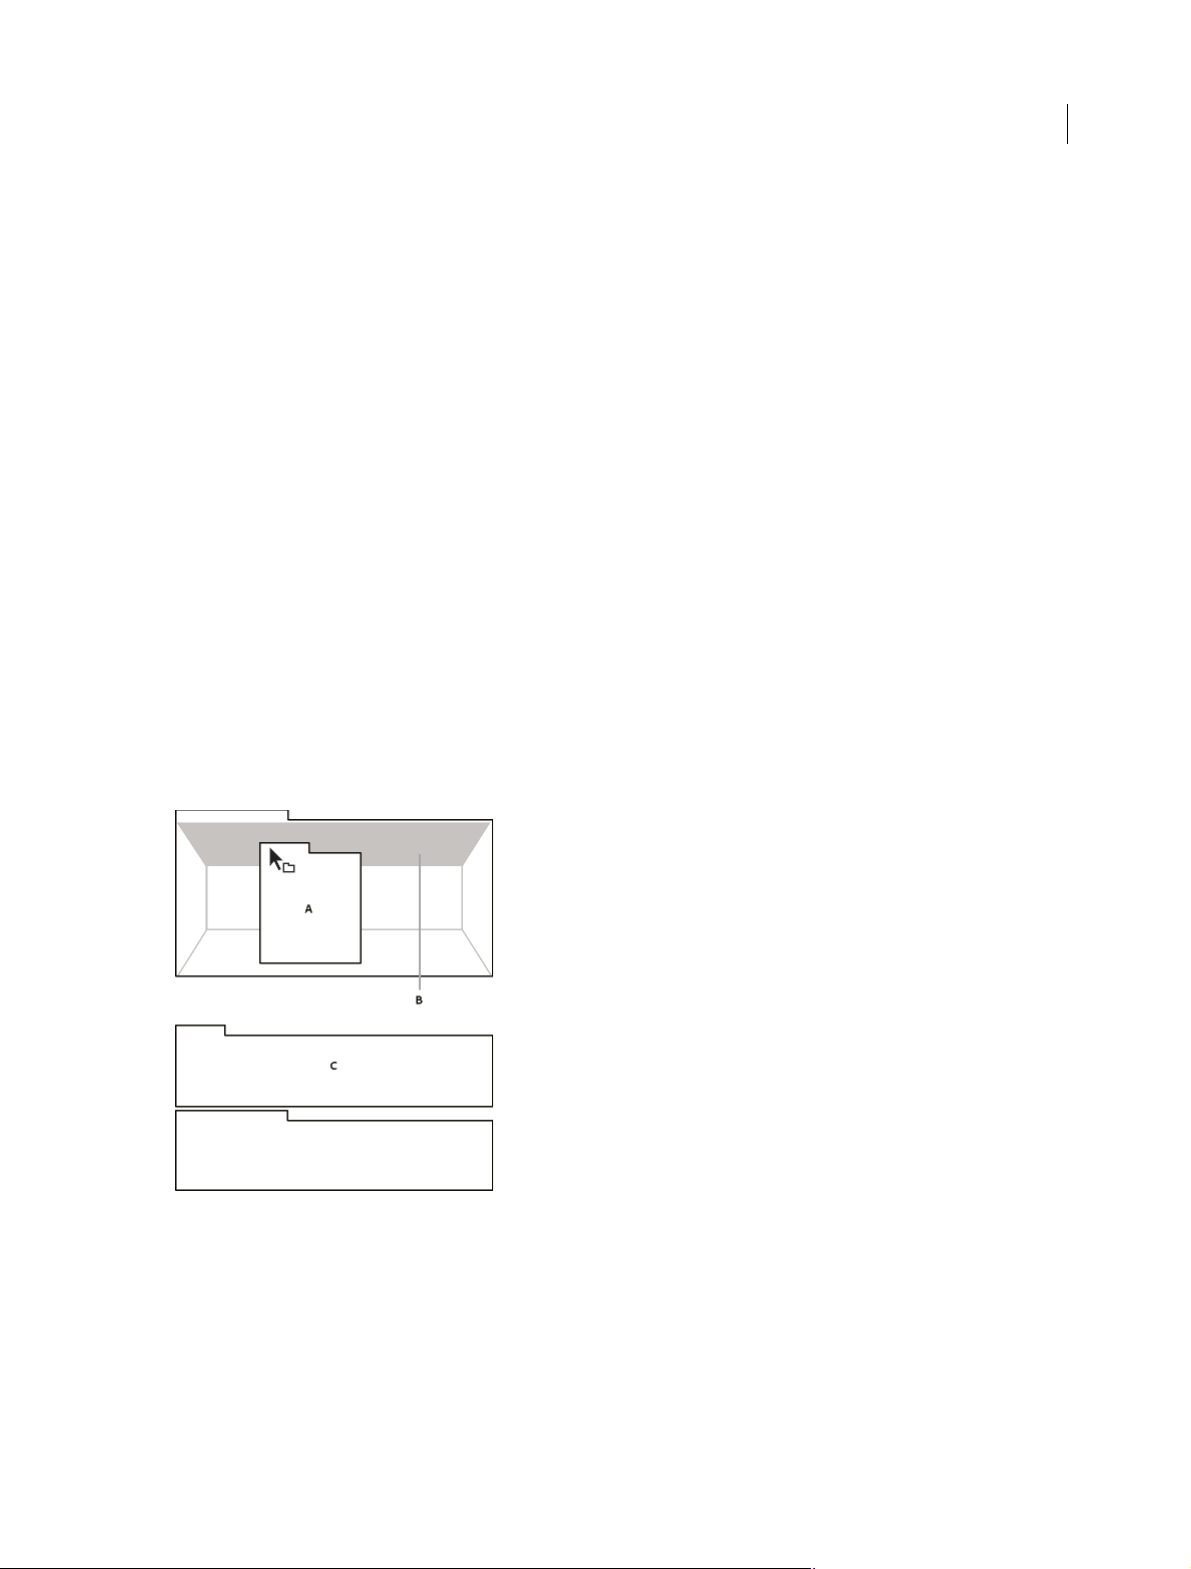
zone you choose determines where the panel is inserted, and whether it docks or groups with other panels.
16
Docking zones
Docking zones exist along the edges of a panel, group, or window. Docking a panel places it adjacent to the existing
group, resizing all groups to accommodate the new panel.
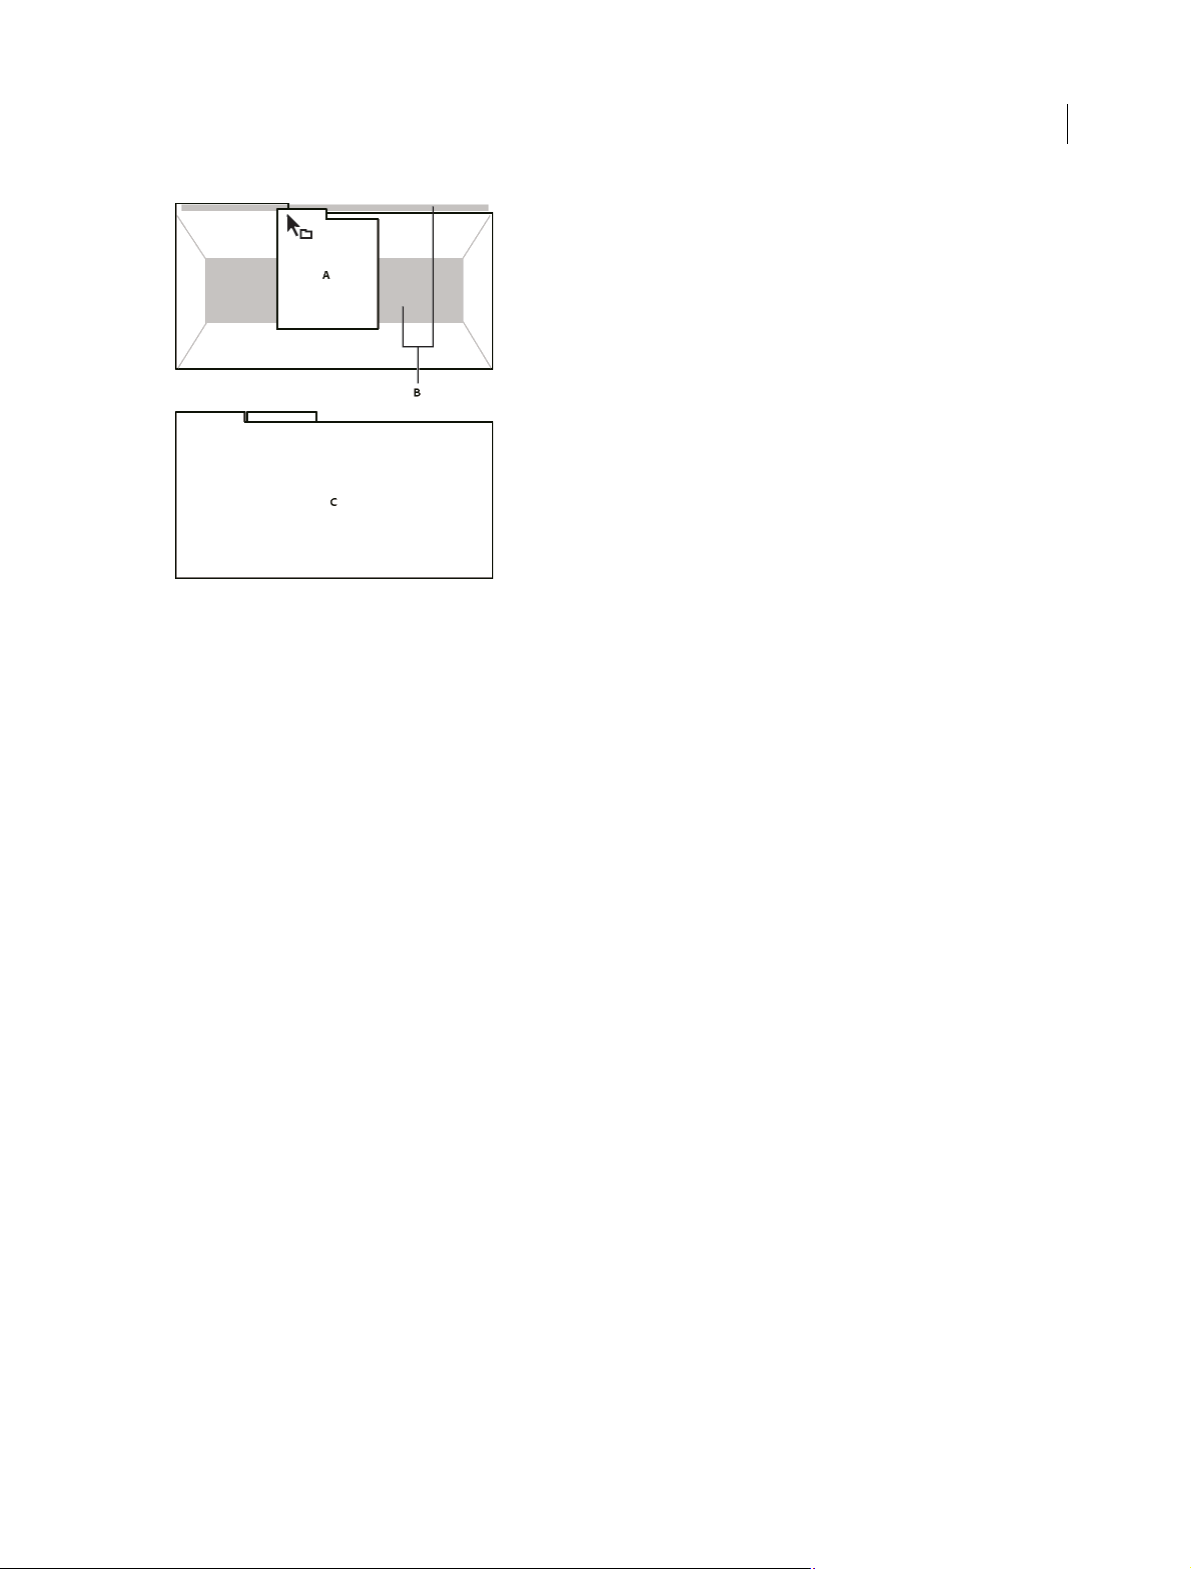
Grouping zones
Grouping zones exist in the middle of a panel or group, and along the tab area of panels. Dropping a panel on a grouping
zone stacks it with other panels.
Last updated 6/9/2015
Page 22
Workspace and workflows
Dock or group panels
1 If the panel you want to dock or group is not visible, choose it from the Window menu.
17
2 Drag the required panel onto the desired drop zone. The application docks or groups according to the type of drop
zone.
Press the Ctrl key while dragging the panel to make the panel free-floating.
Undock a panel in a floating window
When you undock a panel in a floating window, you can add panels to the window and modify it similarly to the
application window. You can use floating windows to use a secondary monitor, or to create workspaces like the
workspaces in earlier versions of Adobe applications.
❖ Select the panel you want to undock (if it’s not visible, choose it from the Window menu), and then do one of the
following:
• Choose Undock Panel or Undock Frame from the panel menu. Undock Frame undocks the panel group.
• Hold down Ctrl (Windows®) or Command (Mac OS®), and drag the panel or group from its current location.
When you release the mouse button, the panel or group appears in a new floating window.
• Drag the panel or group outside the application window. (If the application window is maximized, drag the panel
to the Windows taskbar.)
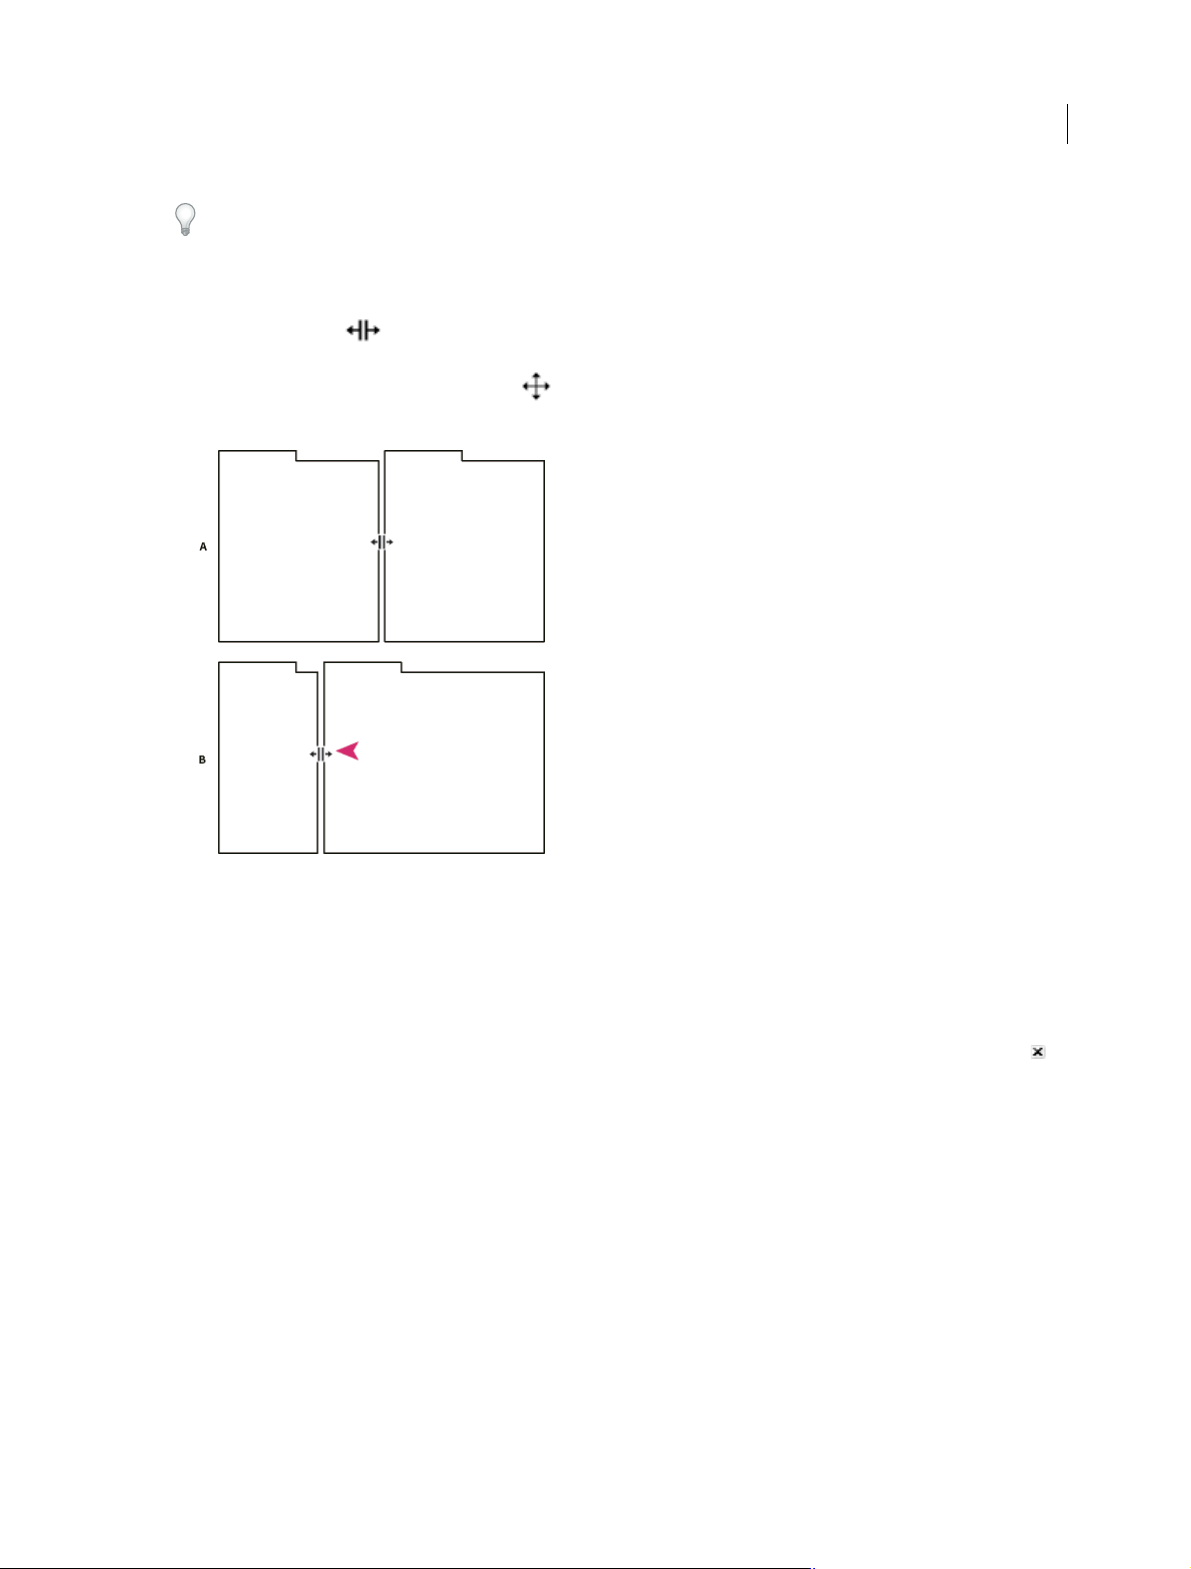
Resize panel groups
When you position the pointer over dividers between panel groups, resize icons appear. When you drag these icons, all
groups that share the divider are resized. For example, suppose that your workspace contains three panel groups stacked
vertically. If you drag the divider between the bottom two groups, they are resized, but the topmost group doesn’t
change.
Last updated 6/9/2015
Page 23
Workspace and workflows
To quickly maximize a panel beneath the pointer, press the accent key. (Do not press Shift.) Press the accent key again
to return the panel to its original size.
1 Do either of the following:
• To resize either horizontally or vertically, position the pointer between two panel groups. The pointer becomes
a double-arrow
.
• To resize in both directions at once, position the pointer at the intersection between three or more panel groups.
The pointer becomes a four-way arrow
2 Hold down the mouse button, and drag to resize the panel groups.
.
18
A Original group with resize icon B Resized groups
Open, close, and scroll to panels
When you close a panel group in the application window, the other groups resize to use the newly available space. When
you close a floating window, the panels within it close, too.
• To open a panel, choose it from the Window menu.
• To close a panel or window, press Control-W (Windows) or Command-W (Mac OS), or click its Close button .
• To see all the panel tabs in a narrow panel group, drag the horizontal scroll bar.
• To bring a panel to the front of a group of panels, do one of the following:
• Click the tab of the panel you want in front.
• Hover the cursor above the tab area, and turn the mouse scroll wheel. Scrolling brings each panel to the front,
one after another.
• Drag tabs horizontally to change their order.
• To reveal panels hidden in a narrow panel group, drag the scroll bar above the panel group.
Last updated 6/9/2015
Page 24

Workspace and workflows
Working with multiple monitors
To increase the available screen space, use multiple monitors. When you work with multiple monitors, the application
window appears on one monitor, and you place floating windows on the second monitor. Monitor configurations are
stored in the workspace.
Brighten or darken the interface
You can lower the brightness, as when working in a darkened editing suite or when making color corrections. Changing
the brightness affects panels, windows, and dialog boxes but does not affect scroll bars, title bars, and menus that aren’t
inside panels. In addition, the change doesn’t affect the application background on Windows.
19
1 Choose Edit > Preferences > Appearance (Windows) or Premiere Pro > Preferences > Appearance (Mac OS).
2 Drag the User Interface Brightness slider to the left or right. Click Default to restore the default brightness level.
Video tutorial - Premiere Pro CC (2014)
Overview of the interface
Learn how to use Premiere Pro panels and tools in your video editing workflow.
Working with Panels
Navigate the panels
You can use keyboard shortcuts to activate panels in rotation.
❖ Do one of the following:
• To activate panels in rotation to the right, press Ctrl+Shift+. (period) (Windows), or Control+Shift+. (period)
(Mac OS).
• To activate panels in rotation to the left, press Ctrl+Shift+, (comma) (Windows), or Control+Shift+, (comma)
(Mac OS).
Kevin Monahan provides instructions and keyboard shortcuts for activating panels in this blog post.
Last updated 6/9/2015
Page 25

Workspace and workflows
Display any panel full-screen
You can expand any panel to display it in full-screen mode, and toggle back to normal view. You can do so with the
current panel in focus or the panel you are hovering over with your mouse.
1 Hover your mouse over the panel you want to maximize.
2 Press the accent key (`). Typically, this key lies just to the left of the numeral one (1) key. Some see this key as the
back quote key, or the tilde key. Press the accent key once more to restore the panel size.
You can also maximize a selected panel by choosing Window > Maximize Frame. To restore the panel size, choose
Window > Restore Frame Size. You can also press Shift+accent to maximize the panel size of a selected panel. Press
the accent key to toggle the panel size of a panel you are hovering over with the mouse.
Note: When Adobe Premiere Pro is installed on a computer with a non-U.S. keyboard, the Maximize Or Restore Frame
Under Cursor command might be mapped to a key other than the accent key. The key for Maximize Or Restore Frame
Under Cursor (and its counterpart, Maximize or Restore Active Frame) is listed in the Keyboard Shortcuts dialog box.
To find it, select the Adobe Premiere Pro Defaults set. Then, select Application from the menu. Scroll down past the Help
heading to Maximize or Restore Frame Under Cursor and set the most appropriate keyboard shortcut.
Display panel options
❖ Click the panel menu icon in the upper-right corner of the panel.
You can open a panel menu even when the panel is minimized.
20
In Photoshop, you can change the font size of the text in panels and tool tips. In the Interface preferences, choose a
size from the UI Font Size menu.
Display context and panel menus
In addition to choosing from the menus at the top of your screen, you can choose from context menus, which display
commands relative to the active tool or selected item. Panel menus display commands relative to the active panel.
• To display panel menus, click the button in the upper-right corner of the panel.
• To display context menus, right-click a panel.
Tools panel and Options panel
When you open the Options panel, it opens by default in the horizontal docking area running just under the menu bar,
forming the Options bar. You can undock, move, and redock the Options panel like any other panel. By default, the
Options panel contains a menu of workspaces and a link to CS Services. You can also dock the Tools panel to the
Options panel.
Tools
When you select a tool, the pointer changes shape according to the selection. For example, when you select the Razor
tool and position the pointer over a clip in a Timeline panel, the icon changes to a razor
tool icon can change to reflect the task currently being performed. In some cases, pressing a modifier key (such as
Shift) as you use a tool changes its function, and its icon changes accordingly. Select tools from the Tools panel, or use
a keyboard shortcut. You can resize the Tools panel and orient it vertically or horizontally.
. However, the Selection
Note: The Selection tool is the default tool. It’s used for everything other than specialized functions. If the program isn’t
responding as you expect, make sure that the Selection tool is selected.
Last updated 6/9/2015
Page 26

Workspace and workflows
A Selection tool B Ripple Edit tool C Rate Stretch tool D Slip tool E Pen tool F Hand tool G Track Select tool H Rolling Edit tool I Razor tool
J
Slide tool K Zoom tool
Select any tool to activate it for use in a Timeline panel by clicking it or pressing its keyboard shortcut. Let the cursor
hover over a tool to see its name and keyboard shortcut.
Selection Tool The standard tool for selecting clips, menu items, and other objects in the user interface. It’s generally a
good practice to select the Selection Tool as soon as you are done using any of the other, more specialized, tools. For
more information about using the Selection Tool, see
Track Selection Tool Select this tool to select all the clips to the right of the cursor in a sequence. To select a clip and all
Select one or more clips .
clips to the right in its own track, click the clip. To select a clip and all clips to its right in all tracks, Shift-click the clip.
Pressing Shift changes the Track Selection Tool into the Multi-track Selection Tool. For more information about using
the Track Selection Tool, see
Select one or more clips and Delete all clips on one track.
21
Ripple Edit Tool Select this tool to trim the In or Out point of a clip in a Timeline. The Ripple Edit Tool closes gaps
caused by the edit and preserves all edits to the left or right of the trimmed clip. For more information about using the
Ripple Edit tool, see
Rolling Edit Tool Select this tool to roll the edit point between two clips in a Timeline. The Rolling Edit Tool trims the
Making rolling and ripple edits or this video tutorial about the Ripple Edit Tool by Andrew Devis
In point of one and the Out point of the other, while leaving the combined duration of the two clips unchanged. For
more information about using the Rolling Edit tool, see
Making rolling and ripple edits or this video tutorial about the
Rolling Edit Tool by Andrew Devis.
Rate Stretch Tool Sel ect th is tool to shorten a clip in a Timeli ne by speed ing up its playb ack, or to len gthen it by slowin g
it down. The Rate Stretch Tool changes speed and duration, but leaves the In and Out points of the clip unchanged. For
more information about using the Rate Stretch Tool, see
Change clip speed and duration with the Rate Stretch tool or
this video about the Rate Stretch Tool by Andrew Devis..
Razor Tool Select this tool to make one or more incisions in clips in a Timeline. Click a point in a clip to split it at that
precise location. To split clips in all tracks at that location, Shift-click the spot in any of the clips. For more information
about using the Razor Tool, see
Split or cut one or more clips with the Razor toolor this video about the Razor Tool by
Andrew Devis.
Slip Tool Select this tool to simultaneously change the In and Out points of a clip in a Timeline, while keeping the time
span between them constant. For example, if you have trimmed a 10-second clip to 5 seconds in a Timeline, you can
use the Slip Tool to determine which 5 seconds of the clip appear in the Timeline. For more information about using
the Slip Tool, see
Slide Tool Select this tool to move a clip to the left or right in a Timeline while simultaneously trimming the two clips
Make slip and slide edits or this video about the Slip Tool by Andrew Devis.
that surround it. The combined duration of the three clips, and the location of the group in the Timeline, remain
unchanged. For more information about using the Slide Tool, see
Make slip and slide edits or this video about the Slide
To o l by Andrew Devis.
Pen Tool Select this tool to set or select keyframes, or to adjust connector lines in a Timeline. Drag a connector line
vertically to adjust it. Ctrl-click (Windows) or Command-click (Mac OS) on a connector line to set a keyframe. Shiftclick noncontiguous keyframes to select them. Drag a marquee over contiguous keyframes to select them. For more
information about using the Pen Tool, see
Select keyframes.
Last updated 6/9/2015
Page 27

Workspace and workflows
Hand Tool Select this tool to move the viewing area of a Timeline to the right or left. Drag left or right anywhere in the
viewing area.
Zoom Tool Select this tool to zoom in or out in a Timeline viewing area. Click in the viewing area to zoom in by one
increment. Alt-click (Windows) or Option-click (Mac OS) to zoom out by one increment. For more information about
using the Zoom Tool, see
Navigate in a sequence.
Open the Options panel
• Select Window > Options.
Dock the Tools panel to the Options panel
1 In the Tools panel, click the panel menu icon.
2 Select Dock In Options Panel.
Undock the Tools panel from the Options panel
❖ In the Options panel, click the dotted area to the left of Selection Tool.
Premiere Pro removes the Tools panel from the Options panel, and returns the Tools panel to the location it had
before docking to the Options panel.
22
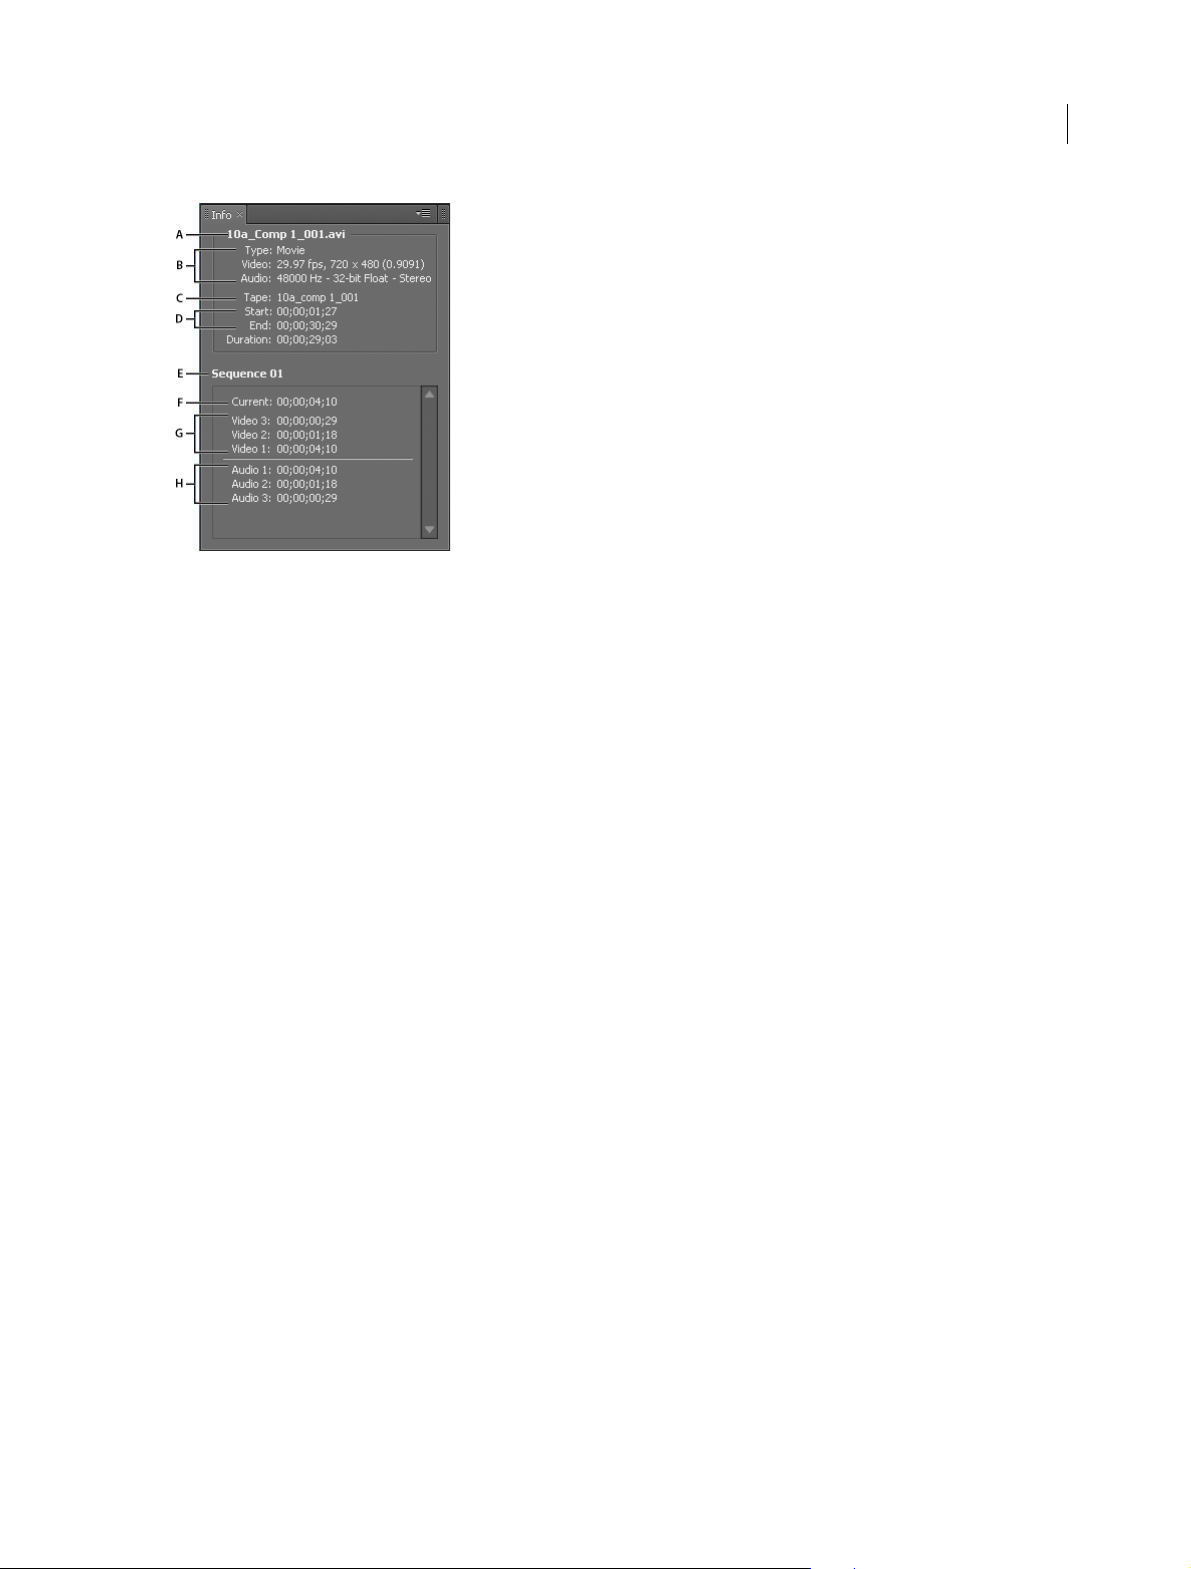
Clip details in the Info panel
The Info panel displays several data about a selected item, and timecode information for clips under the current-time
indicator in the Timeline.
At the top of the panel, information is displayed for the current selection. This information varies depending on its
media type, the active panel, and so on. For example, the Info panel displays information unique to an empty space in
a Timeline panel, or a clip in the Project panel.VideoIndicates frame rate, frame size, and pixel aspect ratio, in that
order.AudioIndicates sample rate, bit depth, and channels, in that order.Tap e Indicates the name of the tape.InIndicates
the In point timecode of the selected clip.OutIndicates the Out point timecode of the selected clip.DurationIndicates
the duration of the selected clip.
The section below the current selection data contains the timecode values for the active sequence and for clips in each
of its video and audio tracks. These values are displayed in a stacking order that matches the Timeline for easy visual
correlation. Video track timecodes are displayed with the highest track number on top, and audio tracks are displayed
with the highest track number on the bottom. The only time this section is blank is when all sequences are closed.
When a track is added to or deleted from the current sequence, the Info panel updates to accurately display the number
of tracks in the sequence. There is no limit on the number of tracks displayed. Similarly, when the user switches to a
different sequence, the Info panel updates to display the correct number of tracks in that sequence.
The Info panel displays timecode for the current selection and for all track items under the current-time indicator.
When the playhead crosses a blank area in the timeline, no timecode value is displayed for that track, but the track label
remains visible and undimmed. The vertical stack layout of the timecodes is easily correlated with the physical layout
of the tracks in the sequence.
Last updated 6/9/2015
Page 28
Workspace and workflows
A Name of selected clip B Data for selected clip C Tape na me D Sequence timecode locations of clip Start and End points E Name of active
sequence F
indicator H
Source timecode location in selected clip of current-time indicator G Source timecode location in clips on video tracks of current-time
Source timecode location in clips on audio tracks of current-time indicator
Note: You can change the default behavior of some of the panels in the Preferences dialog box. See Preferences.
23
Sync settings using Adobe Creative Cloud
When you work with Adobe® Premiere® Pro on multiple machines, managing and syncing preferences, presets, and
libraries between them can be time-consuming, complex, and error-prone.
The new Sync Settings feature lets you sync your general preferences, keyboard shortcuts, presets, and libraries to the
Creative Cloud. For example, if you use more than one computer, the Sync Settings feature helps keep settings
synchronized across machines.
You can also download and use settings on a computer that contains a copy of the software licensed to a different user.
This feature lets multiple users work with their own personal settings on the same computer. For example, freelance
editors working during different shifts in a post-production facility.
Syncing happens through your Adobe Creative Cloud account. The settings are uploaded to your Creative Cloud
account and then downloaded and applied on the other computer. You must initiate the sync manually. It does not
happen automatically, and it cannot be scheduled.
Last updated 6/9/2015
Page 29

Workspace and workflows
Initiating Sync
On first launch, you can initiate the sync by selecting Sync Settings Now from the Welcome screen. Or you can select
File > [your Adobe ID] > Sync Settings Now.
The Adobe ID associated with the product's license is used to identify the user. If you haven't already created and
uploaded settings for this application, the local settings are uploaded to the cloud by default.
24
Sync settings from a different account
You can choose to sync the settings from a different Adobe ID instead of the Adobe ID associated with the product
license used on the computer you're working on.
To use a different Adobe ID to sync the settings, select Use Settings From a Different Account from the Welcome screen.
Or select File > [your Adobe ID] > Use Settings From a Different Account.
Enter the Adobe ID and password. The settings for that Creative Cloud account are downloaded and applied, and the
user name appears in the Welcome Screen.
Managing Sync
Clear Settings
You can clear all settings and revert to default settings. Select Edit > [your Adobe ID] > Clear Settings.
Note: If you select Clear Settings while a project is open, Premiere Pro saves and closes the current project to proceed.
Last updated 6/9/2015
Page 30
Workspace and workflows
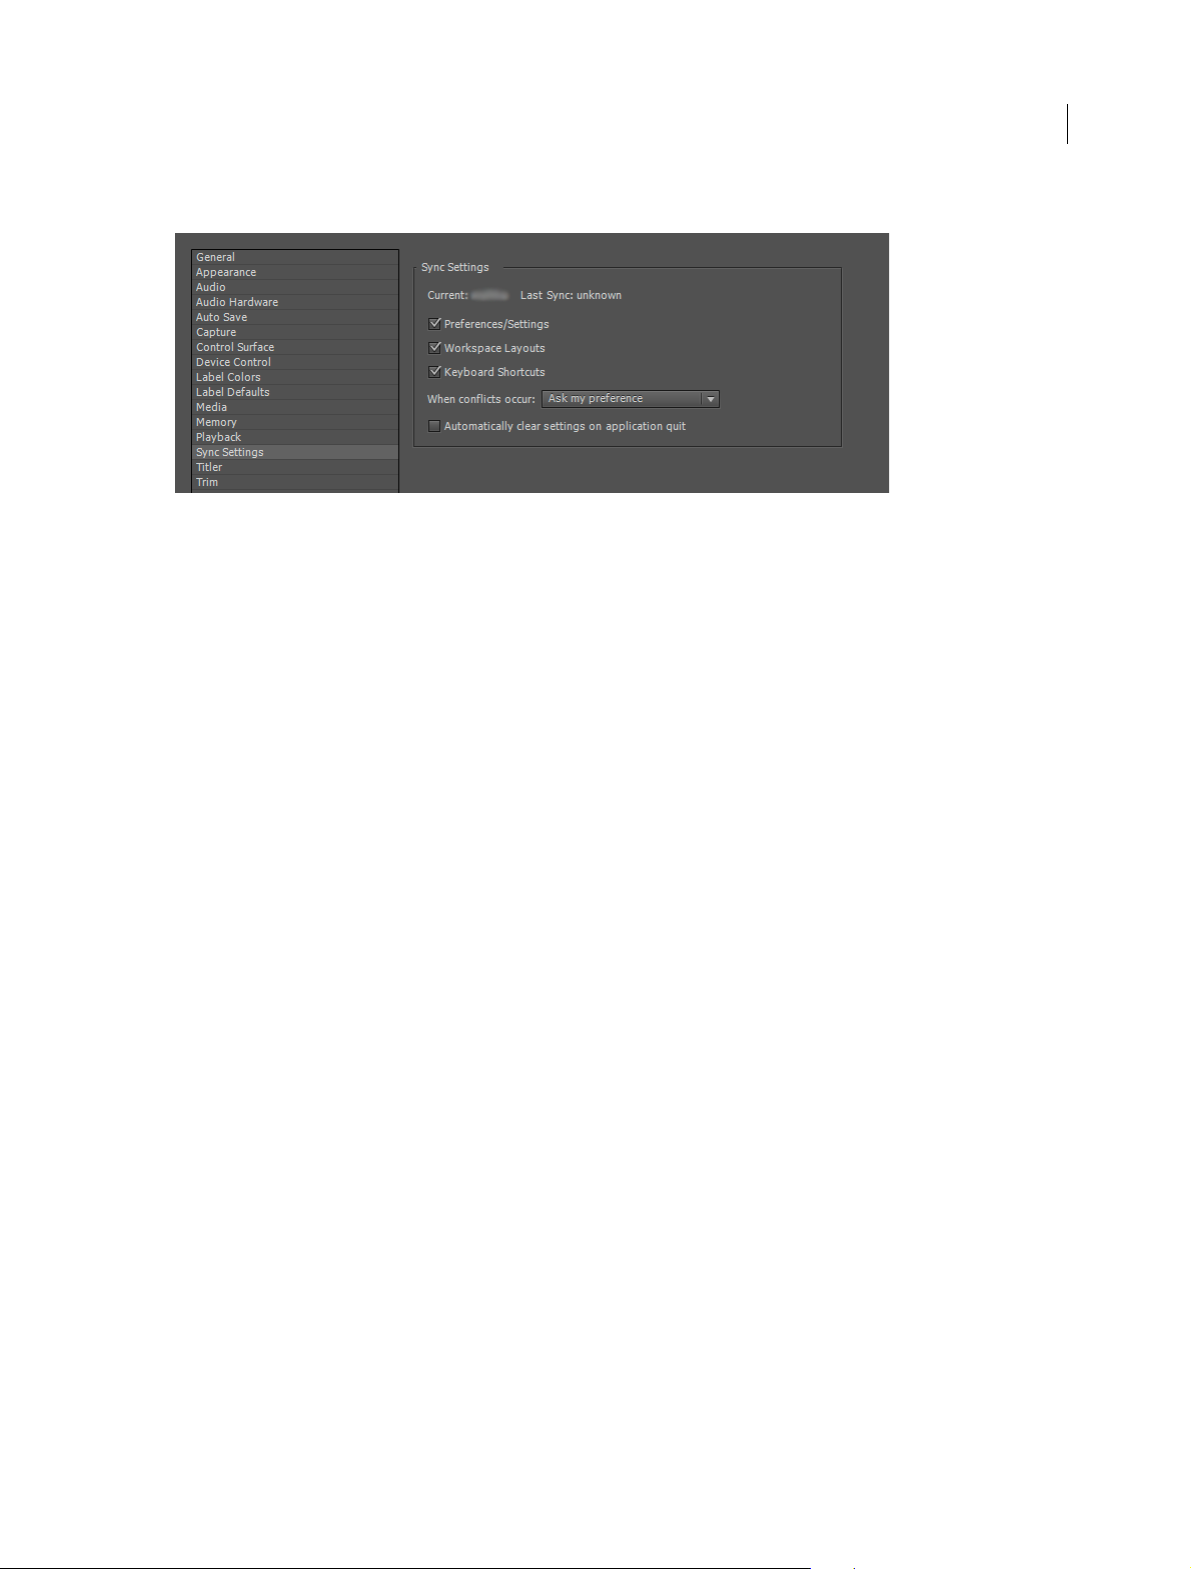
Specify Sync preferences, and manage sync conflicts
The Preference dialog box lets you specify the sync setting options. For example, you can choose to have only keyboard
shortcuts stored in the Creative Cloud, and not sync the other preferences and settings on a computer.
The Preference dialog box also lets you choose what to do when a sync conflict occurs.
Sync settings To specify what gets synchronized, Select File > [your Adobe ID] > Manage Sync Settings. Or open Sync
Settings in the Preferences dialog box (Edit > Preferences > Sync Settings).
25
Note: To sync your settings successfully, change the settings only from within the application. The sync settings feature does
not sync files manually placed in the preferences folder location.
Select the options to sync preferences and settings. Synchronizable preferences are not dependent on computer or
hardware settings.
• Preferences/Settings
• Wo r k sp a c e La y o u t s
• Keyboard Shortcuts
Note: Keyboard shortcuts created for Windows only sync with a Windows computer. Mac OS keyboard shortcuts only sync
with a Mac OS computer.
When Syncing When you initiate a sync, the modification date between the local settings and the settings stored in the
Creative Cloud is compared. If modification dates do not match, a sync conflict is detected.
You can specify what action to take when a sync conflict occurs by selecting from the following:
• Ask My Preference
• Always Upload Settings
• Always Download Settings
When you select Ask My Preference, the Sync Settings dialog opens, prompting you to upload or download your
settings.
Last updated 6/9/2015
Page 31

Workspace and workflows
Upload Settings: Syncs settings from your computer to Creative Cloud.
Download Settings: Syncs settings from Creative Cloud to your computer, overwriting the local version with the
Creative Cloud version of settings.
Automatically clear settings on application quit Select this preference option to clear the sync settings every time you
quit Premiere Pro. On next launch, the default settings are used.
Auto-save projects to Creative Cloud
Your Adobe Creative Cloud account comes with online storage that make your files available to you anywhere and on
any device or computer.
26
Premiere Pro lets you auto-save your projects directly to your Creative Cloud-based storage, letting you save backups
of your projects to a secure and accessible storage environment.
Choose Auto Save in the Preferences dialog, and select Save Backup Project To Creative Cloud.
When Premiere Pro auto-saves a project, a directory named "auto-save" is created in your Creative Cloud online
storage. All the backed up projects are stored in the "auto-save" directory.
You can access your backed up projects from the Files tab of your Creative Cloud desktop application. Or you can access
the files from your
Creative Cloud account on the Web.
Migrate Sync Settings
Each major version of Premiere Pro CC has its own copy of settings files. For example, Premiere Pro CC 7.x uses a "7.0"
directory to store the settings file while the 2014 version of Premiere Pro CC uses a "8.0" directory.
When you upgrade to the latest version from a 7.x version of Premiere Pro CC, your sync settings are automatically
migrated to the new version.
Select Sync Settings or Use Settings From A Different Account from the Welcome screen or the File > Sync Settings
menu. All the settings files from the "7.0" directory are automatically copied to the "8.0" directory.
Important notes:
• The "8.0" directory is created on the Creative Cloud server only after you sync settings for the first time. When you
sync settings for the first time, you may notice a delay in syncing because all the settings from the “7.0’ directory are
copied to the “8.0” directory.
• Before you customize any local settings like adding new keyboard shortcuts or workspaces, sync your settings at
least once on one of your computers. Doing so ensures that you don’t lose any changes to your settings during automigration of settings from the previous version.
Last updated 6/9/2015
Page 32

Workspace and workflows
Creative Cloud Libraries in Premiere Pro
About Creative Cloud Libraries
Creative Cloud Libraries let you capture inspiration on the go! You can capture assets from various Creative Cloud
desktop apps, mobile apps, or download assets from Creative Cloud Market or Adobe Stock to use in your projects.
27
To le a r n m ore, s e e Creative Cloud Libraries.
Video : Use Creative Cloud Libraries in post-production
Learn how to use Creative Cloud Libraries to organize, reuse and share creative assets in your post-production
workflow. (Watch, 2 min)
The Libraries panel
Creative Cloud Libraries are displayed in the Libraries panel in Premiere Pro.
To open the Creative Cloud Library (Libraries panel), click Window > Libraries.
You can access libraries in the following ways:
Across projects Whatever you save in the Libraries panel becomes available for use across Premiere Pro projects that
you are working on.
Across computers Libraries are synced to Creative Cloud. Your Library becomes available on any computer that you
are signed into using your Creative Cloud ID.
Across apps Whatever you save in the Libraries panel becomes automatically available across desktop and mobile apps
that support Creative Cloud Libraries.
For example, you can access Libraries from desktop apps such as, After Effects CC, Photoshop CC, and mobile apps,
such as, Adobe Hue and Premiere Clip.
Add a Creative Cloud library
You can create any number of libraries to organize your assets. The libraries that you create are displayed in the Library
panel in Premiere Pro.
Last updated 6/9/2015
Page 33

Workspace and workflows
To create a library, do the following:
1 Click the drop-down in the Libraries panel, and select Create New Library, or, click the pop-up panel, and select
Create New Library.
2 Type a name for the library, and click Create.
Add Looks to a library
You can save color grading information that you applied to a clip as a Look. To upload a Look to your library, follow
these steps:
1 Select a clip or a track item in a sequence in the Timeline panel.
2 Ensure that the Lumetri Color panel is in focus and a Lumetri effect is applied to the clip.
3 Click the Add Look icon at the bottom of the Libraries panel.
A .look file is created with the same name as the selected clip. The uploaded Look is displayed as a thumbnail in the
Libraries panel.
28
Upload Looks using Adobe mobile apps
Last updated 6/9/2015
Page 34

Workspace and workflows
Color inspiration can strike anywhere. You can capture color and light from things that you see around you using the
Adobe Hue CC mobile app.
To learn more about Adobe Hue CC, see this FAQ .
The captured Look is automatically synced to your library, and available for use in Premiere Pro to color grade your
clips.
To learn more about color-grading clips in Premiere Pro, see Color workflows .
Add assets from Adobe Stock
Adobe Stock is a service that sells millions of high-quality, royalty-free photos, illustrations, and graphics.
You can search for Adobe Stock assets directly from within Premiere Pro:
1 Select Window > Library to open the Library panel in Premiere Pro.
2 Click the Search Adobe Stock button at the bottom of the Libraries panel.
3 In the page that is displayed, search the Stock library for the asset you want to use.
Once you locate an asset that you want to use, you can purchase a license immediately and add the asset to your Library
in Premiere Pro. Or, you can add an unlicensed preview (watermarked) version of the asset to your Library.
29
Note: If Adobe Stock images don’t show up automatically in your Library, click the Sync button in the lower right corner of
the panel (the Creative Cloud icon) to perform a manual sync. Your images should now appear in the Library.
If you add a preview version of an asset to your Library, you can license it later. To license the asset, click/right-click it,
and from the context menu select "License this image".
Note: If you use a preview (watermarked) image in Premiere Pro and license it later, the unlicensed preview version in your
Libraries panel is replaced with a licensed version with no watermark. However, you’ll have to manually replace the
preview version of any clip that was already used in a sequence.
Use assets in a library
Graphic element You can use a graphic saved in your library by dragging the graphic element from the Libraries panel
into the Project panel or Timeline. Premiere Pro imports the graphic element as a project item, and creates a default
duration still-image clip in the Timeline.
Look You can apply a Look saved in your Library by dragging the Look from the Libraries panel onto an item in the
Project panel or Timeline.
Drag a Look to Timeline
• When you drag a Look from the Libraries panel onto a clip in the Timeline, a new Lumetri Color effect is added to
the Timeline. If a Lumetri Color effect exists on that track, the existing Lumetri Color effect is updated with the new
Look.
• If the track item is visible in the Program Monitor, the effect is rendered.
• A Lumetri Color effect is added to the Effect Controls panel.
Alternatively, you can also select a clip in the sequence, right-click the look in the Library, and choose Apply Look.
Last updated 6/9/2015
Page 35

Workspace and workflows
Drag a Look to Project panel
• When you drag a Look from the Libraries panel to a project item in the Project panel, a Lumetri Color effect is
applied to the master clip.
• If the track item is visible in the Source Monitor, the effect is rendered.
• A Lumetri Color effect is added to the master clip in the Effect Controls panel.
When you drag a Look that has a .cube filename extension, the Input LUT field under the Basic Correction section in
the Lumetri Color panel is set to that Look.When you drag a Look that has a .look filename extension, the Look field
under the Creative section in the Lumetri Color panel is set to that Look.
Collaborate with Creative Cloud users
You can share your libraries with other Creative Cloud users to view, edit, or use the contents of a shared library.
30
If a Creative Cloud subscriber has shared a library with you, you can further share it with other Creative Cloud users.
Share a library
1 In the Libraries panel, click the pop-up menu, and choose Collaborate.
2 In the browser page that appears, provide an e-mail address and optional message for the person that you would like
to share the library with.
Join a shared library
1 Launch the Adobe Creative Cloud for Desktop app, and log in with your Adobe ID credentials.
2 If a library has been shared with you, you see a notification in the Home panel.
3 Click the Accept button available for each library collaboration invitation.
Basic workflow
The steps you take in editing video, from import or capture through final output, make up your workflow. The basic
workflow describes the most general steps you would take with most projects. Specific types of workflows, such as the
P2 workflow or the cross-platform workflow, explain the noteworthy settings, variations, or issues specific to each type.
Reviewing the entire workflow for a production before creating a project and first sequence can help you optimize
Adobe Premiere Pro for the needs of that production. It can also help you plan for the special needs your production
has at any particular step. For example, if you learn, before you begin, the parameters of your footage, you can select
the best sequence presets for your production.
For resources relating to optimizing your computer system, your workflow, and Premiere Pro so that you can get the
most done in the least time
Whether you use Adobe Premiere Pro to edit video for broadcast, DVD, or the web, you’re likely to follow a workflow
like the one outlined below. For Adobe recommended tutorials on basic workflow, scroll to the bottom of this page.
see this blog post on the After Effects Region of Interest.
Before you begin editing
Before you begin editing in Premiere Pro, you will need footage to work with. You can either shoot your own footage,
or work with footage that other people have shot. You can also work with graphics, audio files, and more.
Last updated 6/9/2015
Page 36

Workspace and workflows
Many projects you work on do not need a script. However, sometimes you work from or write a script, especially for
dramatic projects. You can write your script and organize your production details with
While you shoot, organize your shots and take log notes. You can also adjust and monitor footage as you shoot,
capturing directly to a drive.
It is important to note that using Adobe Story is not necessary for editing with Adobe Premiere Pro. Writing a script,
and making notes on the set are optional steps to help organize a project before you get started.
Adobe Story.
Get started editing
After you have acquired footage, follow the steps to get started editing with Premiere Pro.
1.Start or open a project
Open an existing project, or start a new one from the Premiere Pro Welcome screen.
If you are starting a new project, the New Project dialog launches. From the New Project dialog, you can specify the
name and location of the project file, the video capture format, and other settings for your project. (See
changing projects .) After you have chosen settings in the New Project dialog, click OK.
After you have exited the New Project dialog, the New Sequence dialog will appear. Choose the sequence preset in the
dialog that matches the settings of your footage. First, open the camera type folder, then the frame rate folder (if
necessary), and then clicking a preset. Name the sequence at the bottom of the dialog, and then click OK.
Creating and
31
If you need help choosing a sequence preset, see this FAQ entry: “How do I choose the right sequence settings.”
To open an existing project, click on a link under Open A Recent Item in the Premiere Pro Welcome screen. After
clicking a link, the project will launch.
2.Capture and import video and audio
For file-based assets, using the Media Browser you can import files from computer sources in any of the leading media
formats. Each file you capture or import automatically becomes a clip in the Project panel.
Alternatively, using the Capture panel, capture footage directly from a camcorder or VTR. With the proper hardware,
you can digitize and capture other formats, from VHS to HDTV.
You can also import various digital media, including video, audio, and still images. Premiere Pro also imports Adobe®
Illustrator® artwork or Photoshop® layered files, and it translates After Effects® projects for a seamless, integrated
workflow. You can create synthetic media, such as standard color bars, color backgrounds, and a countdown. (See
About capturing and digitizing.)
You can also use Adobe® Bridge to organize and find your media files. Then use the Place command in Adobe Bridge
to place the files directly into Premiere Pro.
In the Project panel, you can label, categorize, and group footage into bins to keep a complex project organized. You
can open multiple bins simultaneously, each in its own panel, or you can nest bins, one inside another. Using the Project
panel Icon view, you can arrange clips in storyboard fashion to visualize or quickly assemble a sequence.
Note: Before capturing or importing audio, ensure that Preferences>Audio>Default Track Format is set to match the
desired channel format.
3.Assemble and refine a sequence
Using the Source Monitor, you can view clips, set edit points, and mark other important frames before adding clips to
a sequence. For convenience, you can break a master clip into any number of subclips, each with its own In and Out
points. You can view audio as a detailed waveform and edit it with sample-based precision. (See
Program Monitor overview .)
Source Monitor and
Last updated 6/9/2015
Page 37

Workspace and workflows
32
You add clips to a sequence in a Timeline panel by dragging them there or by using the Insert or Overwrite buttons in
the Source Monitor. You can automatically assemble clips into a sequence that reflects their order in the Project panel.
You can view the edited sequence in the Program Monitor or watch the full-screen, full-quality video on an attached
television monitor. (See
Timeline panelsand Add a clip to a sequence.)
Refine the sequence by manipulating clips in a Timeline panel, with either context-sensitive tools or tools in the Tools
panel. Use the specialized Trim Monitor to fine-tune the cut point between clips. By nesting sequences—using a
sequence as a clip within another sequence—you can create effects you couldn’t achieve otherwise.
4.Add titles
Using the Premiere Pro full-featured Titler, create stylish still titles, title rolls, or title crawls that you can easily
superimpose over video. If you prefer, you can modify any of a wide range of provided title templates. As with any clip,
you can edit, fade, animate, or add effects to the titles in a sequence. (See
Creating and editing titles.)
Last updated 6/9/2015
Page 38

Workspace and workflows
33
5.Add transitions and effects
The Effects panel includes an extensive list of transitions and effects you can apply to clips in a sequence. You can adjust
these effects, as well as a clip’s motion, opacity, and Variable Rate Stretch using the Effect Controls panel. The Effect
Controls panel also lets you animate a clip’s properties using traditional keyframing techniques. As you adjust
transitions, the Effect Controls panel displays controls designed especially for that task. Alternatively, you can view and
adjust transitions and a clip’s effect keyframes in a Timeline panel. (See
Transition overview: applying transitionsand
Apply effects to clips.)
6.Mix audio
For track-based audio adjustments, the Audio Track Mixer faithfully emulates a full-featured audio mixing board,
complete with fade and pan sliders, sends, and effects. Premiere Pro saves your adjustments in real time. With a
supported sound card, you can record audio through the sound mixer, or mix audio for 5.1 surround sound. For more
information, see
Mixing audio tracks and clips.
7.Export
Deliver your edited sequence in the medium of your choice: tape, DVD, Blu-ray Disc, or movie file. Using Adobe Media
Encoder, you can customize the settings for MPEG-2, MPEG-4, FLV, and other codecs and formats, to the needs of your
viewing audience. For more information, see
Types of exporting.
Working across platforms
You can work on a project across computer platforms. For example, you can start on Windows and continue on Mac
OS. A few functions change, however, as the project moves from one platform to the other.
Sequence settings You can create a project on one platform and then move it to another. Premiere Pro sets the
equivalent sequence settings for the second platform, if there is an equivalent. For example, you can create a DV project
containing DV capture and device control settings on Windows. When you open the project on Mac OS, Premiere Pro
sets the appropriate Mac DV capture and device control settings. Saving the project saves these Mac OS settings.
Premiere Pro translates these settings to Windows settings if the project is later opened on Windows.
Last updated 6/9/2015
Page 39

Workspace and workflows
Effects All video effects available on Mac OS are available in Windows. Windows effects not available on the Mac
appear as offline effects if the project is opened on the Mac. These effects are designated “Windows only” in Premiere
Pro Help. All audio effects are available on both platforms. Effect presets work on both platforms (unless the preset
applies to an effect not available on a given platform).
Adobe Media Encoder presets Presets created on one platform are not available on the other.
Preview files Preview files made on one platform are not available on the other. When a project is opened on a different
platform, Premiere Pro rerenders the preview files. When that project is then opened on its original platform, Premiere
Pro renders the preview files yet again.
High-bit-depth files Windows AVI files containing either 10-bit 4:2:2 uncompressed video (v210), or 8-bit 4:2:2
uncompressed video (UYVU) are not supported on Mac OS.
Preview rendering The playback quality of unrendered non-native files is not as high as playback quality of these files
on their native platforms. For example, AVI files do not play back as well on Mac OS as they do on Windows. Premiere
Pro renders preview files for non-native files on the current platform. Premiere Pro always renders preview files in a
native format. A red bar in the timeline indicates which sections contain files needing rendering.
Using the Source Monitor and Program Monitor
34
Source Monitor and Program Monitor overview
The Source Monitor plays back individual clips. In the Source Monitor, you prepare clips that you want to add to a
sequence. You set In points and Out points, and specify the clip’s source tracks (audio or video). You can also insert clip
markers and add clips to a sequence in a Timeline panel.
The Program Monitor plays back the sequence of clips that you are assembling. It’s your view of the active sequence in
a Timeline panel. You can set sequence markers and specify sequence In points and Out points. Sequence In points and
Out points define where frames are added or removed from the sequence.
Each monitor contains both a time ruler and controls to play back and cue the current frame of a source clip or
sequence. Set In and Out points, go to In and Out points, and set markers. Insert and Overwrite buttons are available
in the Source Monitor, and Lift and Extract buttons are available in the Program Mon itor, by default. Each monitor also
contains an Export Frame button for creating a still from a single frame of video.
Last updated 6/9/2015
Page 40

Workspace and workflows
35
A Playhead B TimeCode C Scaling options D Zoom scroll bar E Drag video F Drag audio G Settings button H In/Out Duration
Last updated 6/9/2015
Page 41

Workspace and workflows
36
A Timecode B Scaling options C Playhead D Zoom scroll bar E Resolution F Settings button G Button editor
Customizing the monitor panel button bar
By default, the most useful buttons are displayed along the bottom of the Source and Program Monitors. However, you
can add more. Click "+" at the lower right of a monitor to open the button editor. Add buttons to the button bar by
dragging them from the button editor. Up to 2 rows of buttons can be added. Spaces to separate groups of buttons can
also be dragged to the button bar. To remove a button, drag it away from the button bar. To turn off all buttons, go to
the panel menu and deselect "Show Transport Controls."
Roll over any button with the mouse to see its keyboard shortcut.
Setting display quality for the Source and Program Monitors
Some formats are difficult to display in full-motion playback, due to their high compression or high data rate. A lower
resolution permits faster motion playback, but at the expense of display image quality. This tradeoff is most visible
when viewing AVCHD and other H.264 -codec based media. Below full resolution, these formats have error correction
turned off, and artifacts are common during playback. These artifacts, however, do not show up in exported media.
Prov idi ng s epara te pla yba ck a nd p ause r eso lutions giv es you more c ontrol ove r your monit ori ng exp erie nce. With hig hresolution footage, you can set playback resolution to a lower value (for example, 1/4) for smooth playback, and set the
pause resolution to Full. These settings allow you to check the quality of focus or edge details when playback is paused.
Scrubbing puts the monitor in playback resolution, not pause resolution.
Not all resolutions are available for all sequence types. For Standard Definition sequences, such as DV, only Full and
1/2 are available. For many HD sequences up to 1080 frame size, Full, 1/2, and 1/4 are available. For sequences with
frame sizes larger than 1080, such as RED, more fractional resolutions are available.
Last updated 6/9/2015
Page 42

Workspace and workflows
Note: If your previews are rendered at a resolution below the sequence resolution, the playback resolution is actually a
fraction of the preview resolution. For example, you can set your preview files to render at 1/2 the sequence frame size (1/2
resolution) and your playback resolution to 1/2 resolution. The rendered previews play back at 1/4 of original resolution
(assuming that the resolution of the original media matched the sequence resolution).
Set the display quality for the Source Monitor and Program Monitor
Note: You can assign keyboard shortcuts to playback resolutions.
1 Do one of the following:
• Right click the image in the Source Monitor or Program Monitor.
• Click the Panel Menu icon in the Source Monitor or Program Monitor.
• Click the Settings button in the Source Monitor or Program Monitor.
2 Do one of the following:
• To set playback resolution, select Playback Resolution.
• To set paused resolution, select Paused Resolution.
3 From the menu, select the resolution desired.
For an explanation and tips on speeding up previews in Premiere Pro, see this video on the video2brain website.
37
Change magnification
The Source Monitor and Program Monitor scale video to fit into the available area. You can increase the magnification
setting for each view to see the video in more detail. You can also descrease the magnification setting to see more of the
pasteboard area around the image (to adjust motion effects more easily, for example).
1 Choose a magnification setting from the Select Zoom Level menu (to the right of the current time display) in the
Source Monitor or Program Monitor.
In the Source Monitor, percentage values refer to the size of the source media. In the Program Monitor, percentage
values refer to the image size specified by the sequence settings. Fit scales the video to fit in the monitor’s available
viewing area.
2 To change the visible area of a monitor, use the monitor’s scroll bars to change the visible area of the video image.
Scroll bars appear when the current size of the monitor can’t contain the entire image.
Dropped frame indicator
Both the Source and the Program Monitor have the option to display an icon (resembling a "Stop Light") that indicates
whether frames are being dropped during playback. The light should start green and change to yellow when dropped
frames occur and reset on each playback. A tooltip will indicate the dropped frame count.
To enable the dropped Frame indicator for the Source or Program Monitor, enable Show Dropped Frame Indicator in
the panel menu, or the Settings menu.
Last updated 6/9/2015
Page 43
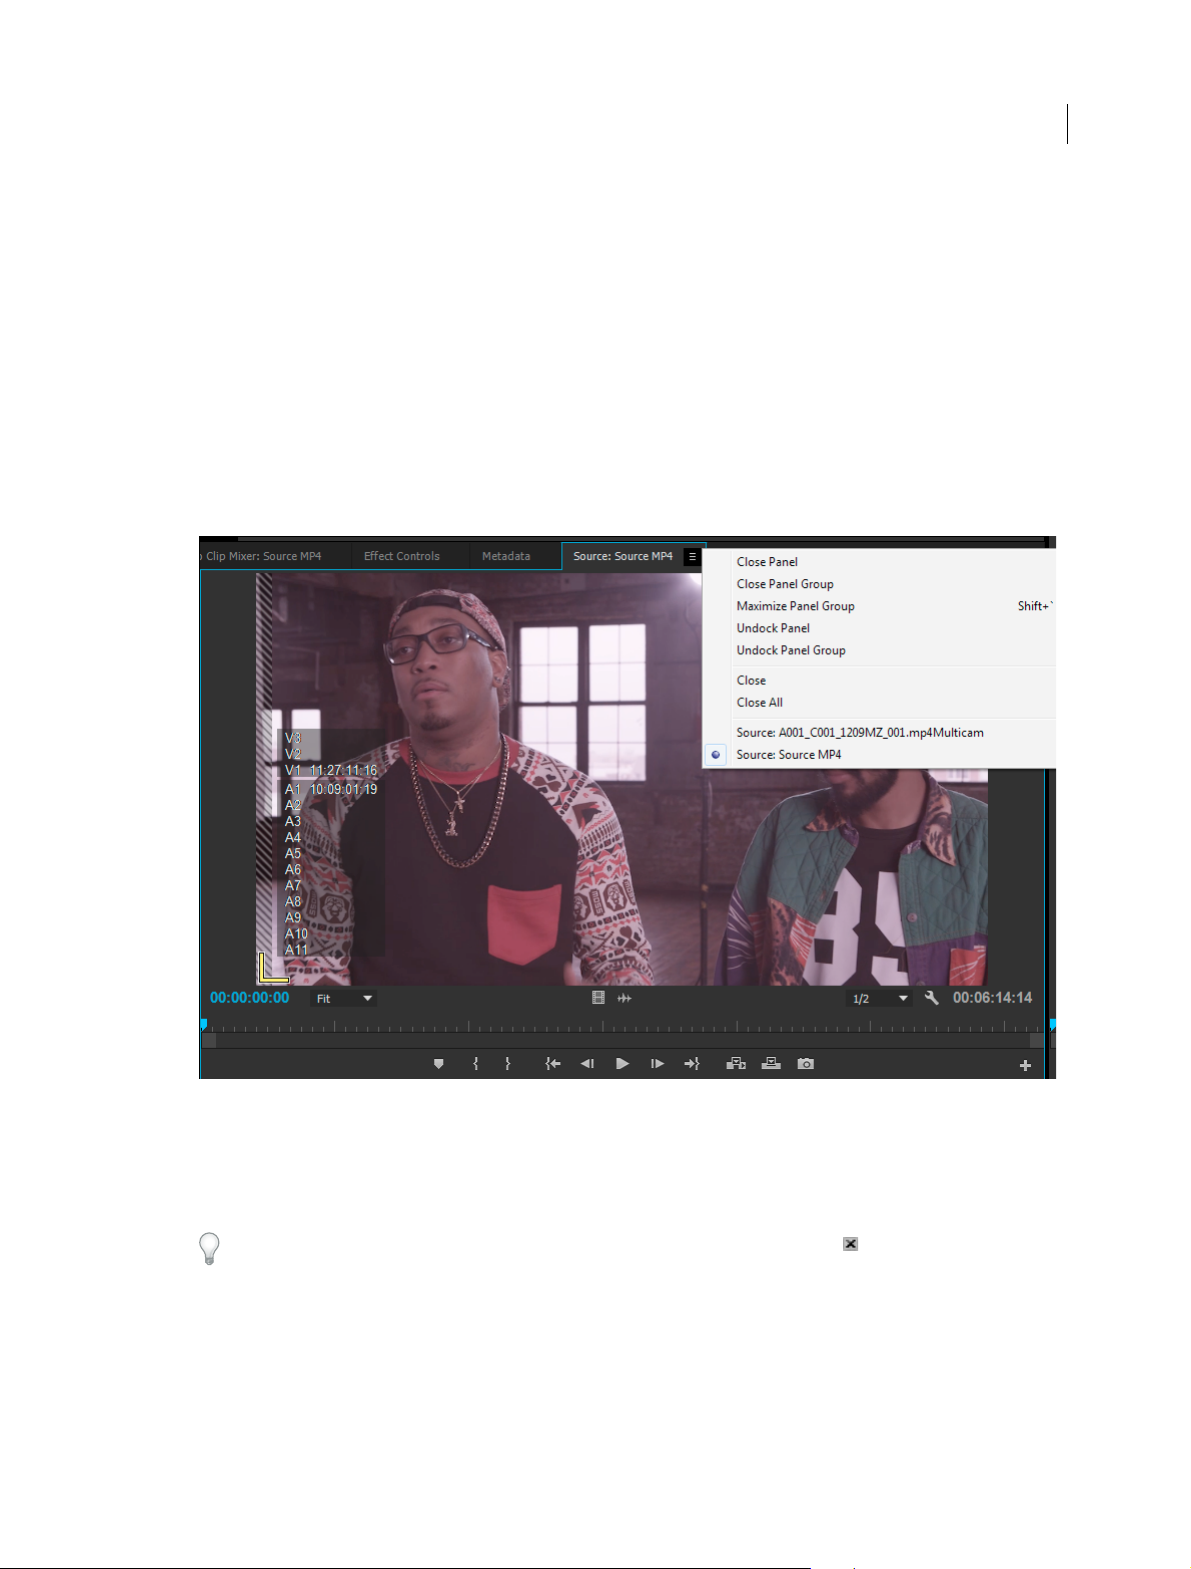
Workspace and workflows
Open or clear a clip in the Source Monitor
To view and edit source clips listed in the Project panel or individual clip instances in a sequence, open the clips in the
Source Monitor. The Source menu, accessed from the Source Monitor tab, lists open clips.
1 To open a clip, do any of the following:
• D oub le- click the cli p in the Proje ct o r Timeline pa nel , or dr ag a clip f rom the Proj ect p ane l to th e Sourc e Mon itor.
The clip appears in the Source Monitor and its name is added to the Source menu.
• Drag multiple clips or an entire bin from the Project panel into the SourceMonitor, or select multiple clips in the
Project panel and double-click them. Clips are added to the Source menu in the order in which they were
selected, and the last clip selected appears in the Source Monitor.
• Choose the name of the clip you want to see from the Source menu (click the triangle to the right of the current
clip’s name on the Source tab to make the menu appear).
38
• The Source menu lists master clips by name. Clips opened from a sequence are listed by their sequence name,
clip name, and starting time in the sequence.
2 To clear a clip from the Source Monitor, in the Source menu, choose Close to clear or Close All to clear all clips.
You can also close all clips and the Source Monitor itself by clicking the Close button in the Source Monitor tab.
Last updated 6/9/2015
Page 44

Workspace and workflows
Navigate clips in the Source menu in the Source Monitor
You can set keyboard shortcuts for navigating multiple clips loaded into the Source Monitor. Keyboard shortcuts can
speed toggling of clips, skipping to the first or last clip, or closing one or all the clips in the Source Monitor popup menu.
1 Select Edit > Keyboard Shortcuts (Windows) or Premiere Pro > Keyboard Shortcuts (Mac OS).
The Keyboard Shortcuts dialog box opens.
2 In the dialog box, click the triangle next to Panels, and then click the triangle next to Source MonitorPanel to reveal
the keyboard shortcuts for that panel.
3 Set keyboard shortcuts for any of the following commands:
• Source Clip: Close
• Source Clip: Close All
• Source Clip: First
• Source Clip: Last
• Source Clip: Next
• Source Clip: Previous
4 Click OK.
39
Using the Source Monitor and Program Monitor time controls
The Source Monitor has several controls for moving through time (or frames) in a clip. The Program Monitor contains
similar controls for moving through a sequence.
A Current time display B Playhead C Zoom scroll bar D Time Ruler E Duration display
Time rulers Display the duration of a clip in the Source Monitor and sequence in the Program Monitor. Tick marks
measure time using the video display format specified in the Project Settings dialog box. You can toggle the time rulers
to display timecode in other formats. Each ruler also displays icons for its corresponding monitor’s markers and In and
Out points. You can adjust the playhead, markers, and the In and Out points by dragging their icons in a time ruler.
Time ruler numbers are off by default. You can turn the time ruler numbers on by selecting Time Ruler Numbers in the
panel menu of the Source or Program Monitors.
Playhead Shows the location of the current frame in each monitor’s time ruler.
Note: The playhead was formerly called the "current-time indicator" (CTI).
Current time displays Show the timecode for the current frame. The current time displays are at the lower left of each
monitor’s video. The Source Monitor shows the current time for the open clip. The Program Monitor shows the
sequence’s current time. To move to a different time. Alternatively, click in the display and enter a new time, or place
the pointer over the time display and drag left or right. To toggle display between full timecode and a frame count, Ctrlclick (Windows) or Command-click (Mac OS) the current time in either monitor or a Timeline panel.
Last updated 6/9/2015
Page 45

Workspace and workflows
Duration display Show the duration of the open clip or sequence. The duration is the time difference between the In
point and the Out point for the clip or sequence. When no In point is set, the starting time of the clip or of the sequence
is substituted. When no Out point is set, the Source Monitor uses the ending time of the clip to calculate duration. The
Program Monitor uses the ending time of the last clip in the sequence to calculate duration.
Zoom scroll bars Zoom scroll bars correspond with the visible area of the time ruler in each monitor. You can drag the
handles to change the width of the bar and change the scale of the time ruler below. Expanding the bar to its maximum
width reveals the entire duration of the time ruler. Contracting the bar zooms in for a more detailed view of the ruler.
Expanding and contracting the bar is centered on the playhead. By positioning the the mouse over the bar, you can use
the mouse wheel to contract and expand the bar. You can also scroll the mouse wheel in the areas outside of the bars
for the same expanding and contracting behavior. By dragging the center of the bar, you can scroll the visible part of a
time ruler without changing its scale. When you drag bar, you are not moving the playhead, however, you can move the
bar and then click in the time ruler to move the playhead to the same area as the bar. A zoom scroll bar is also available
in the Timeline.
Note: Changing the Program Monitor’s time ruler or zoom scroll bar does not affect the time ruler or viewing area in a
Timeline panel.
Viewing Source and Program Monitor controls
You can show or hide controls from the panel menus of the Source and Program Monitors. For example, you may wish
to hide transport controls if you know the J-K-L keyboard shortcuts for playback to gain more space to view your
media.
40
Select or deslect the option in the panel menu to show or hide the following:
• Transport controls
• Markers
• Ti m e ruler nu mb ers
• Dropped frames indicator
Access to many of the same commands for showing and hiding controls can also be found in the Settings button on
each monitor.
Last updated 6/9/2015
Page 46
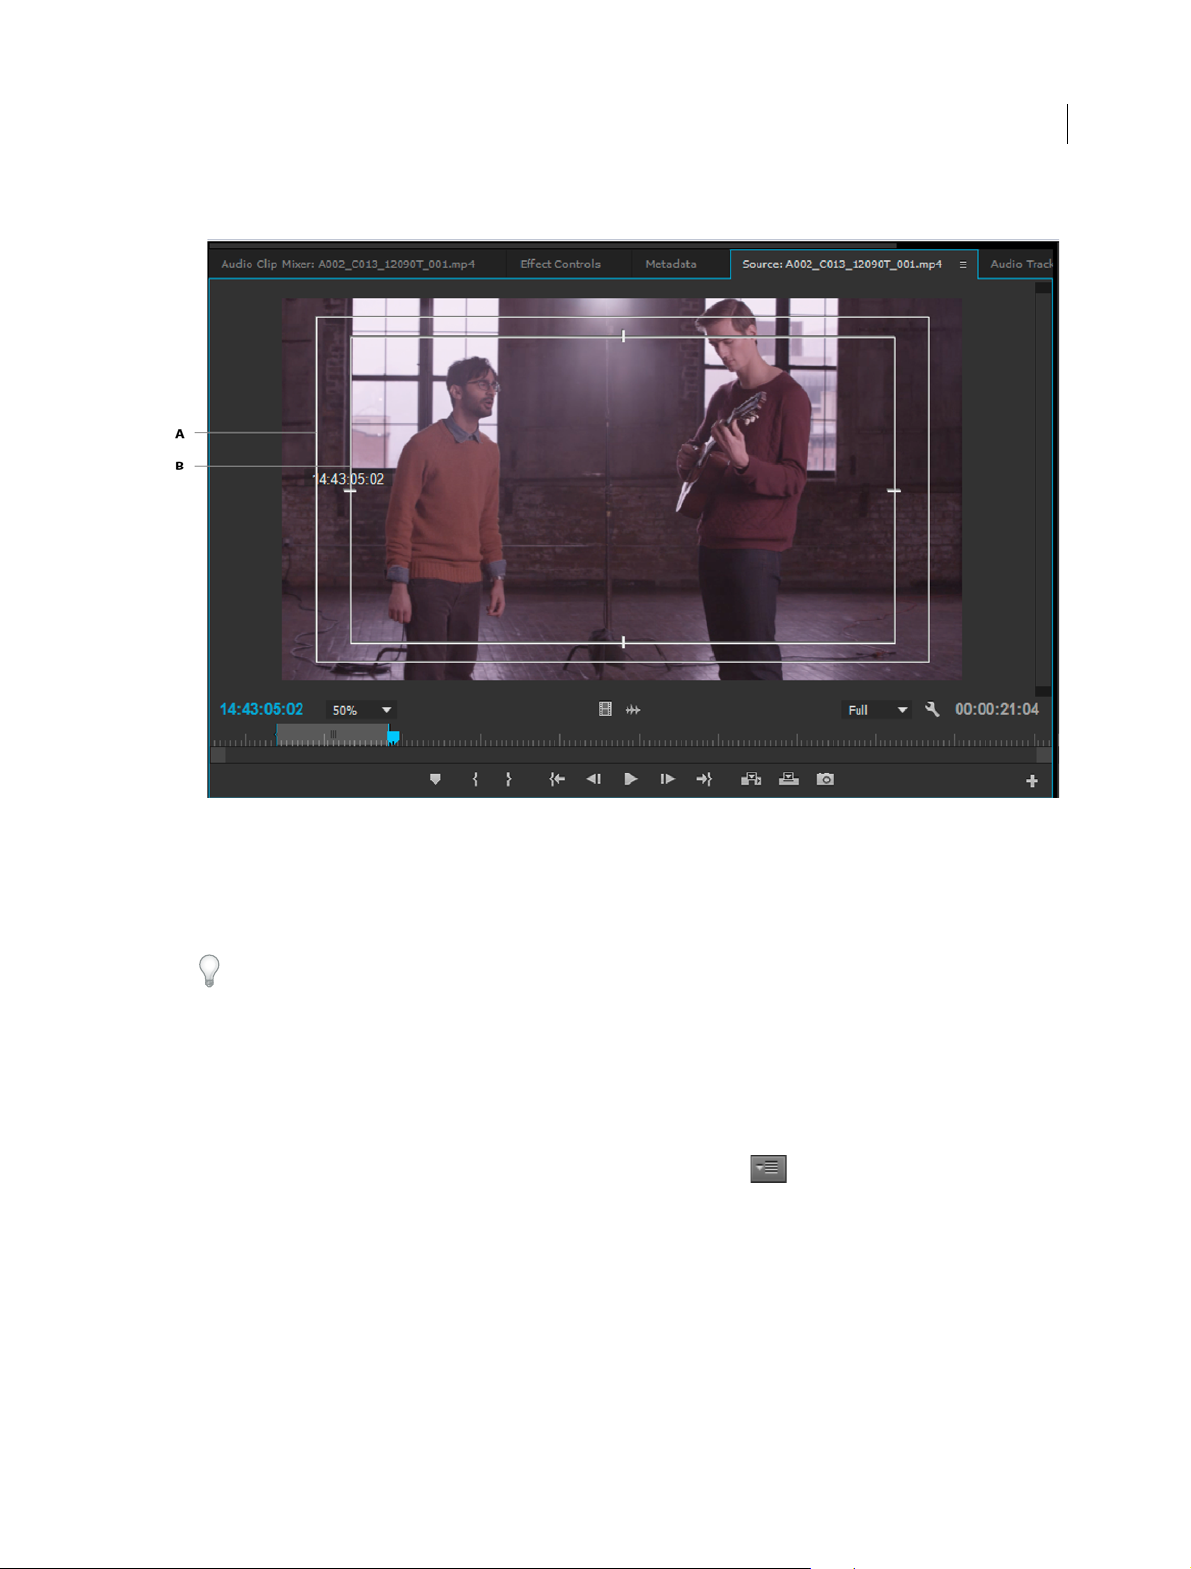
Workspace and workflows
View safe zones in the monitors
41
A Action safe zone B Title safe z one
Safe zone guides are for your reference and are not included in previews or export.
❖ Click the Settings button below the Source Monitor or Program Monitor and choose Safe Margins. You can also
choose Safe Margins from the panel meu of the Source Monitor or Program Monitor.
The standard action- and title-safe margins are 10% and 20%, respectively. However, you can change the dimensions
of the safe zones in the Project Settings dialog box. (See Project Settings dialog box.)
Choose fields in the Source and Program Monitors
You can set the Source Monitor and Program Monitor to display the first field, second field, or both fields for interlaced
footage. The settings in the Source Monitor are disabled when a progressive clip is opened in it. The settings in the
Program Monitor are disabled when the active sequence uses a progressive sequence preset.
1 In the Source Monitor or Program Monitor, click the panel menu button .
2 Select Display First Field, Display Second Field, or Display Both Fields according to your need.
Choose a display mode
You can display normal video, the video’s alpha channel, or one of several measurement tools.
❖ In the Source Monitor or Program Monitor, click the Settings button, or click the panel menu and choose a display
mode setting:
Composite Video Displays the normal video.
Alpha Displays transparency as a grayscale image.
Last updated 6/9/2015
Page 47
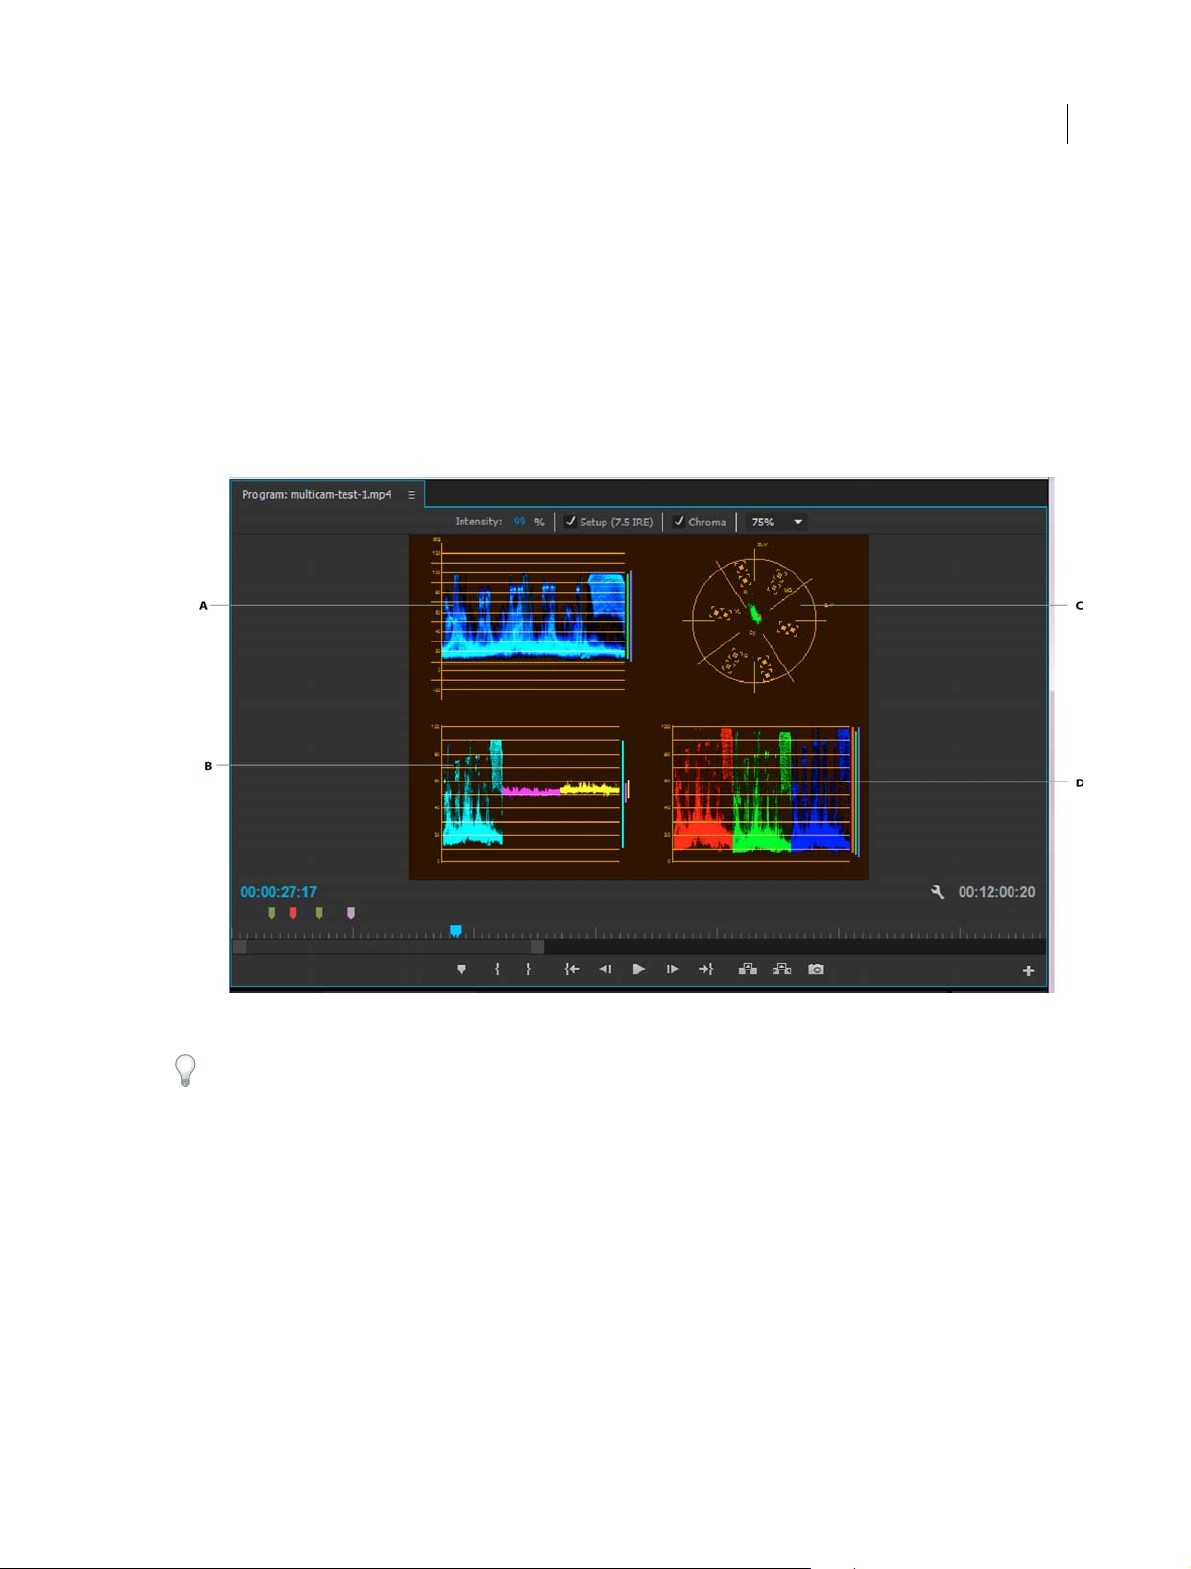
Workspace and workflows
All Scopes Displays a waveform monitor, vectorscope, YCbCr Parade, and RGB Parade.
Vec tors cope Displays a vectorscope that measures the video’s chrominance, which includes hue and saturation.
YC Waveform Displays a standard waveform monitor, which measures the video’s luminance in IRE.
YCbCr Para de Displays a waveform monitor that measures the Y, Cb, and Cr components of the video separately, in
IRE.
RGB Parade D isplays a waveform m onitor that measures t he R, G , and B components of th e video s eparately, in IRE.
Vect/YC Wave/YCbCr Parade Displays a waveform monitor, vectorscope, and YCbCr Parade.
Vect/YC Wave/RGB Parade Displays a waveform monitor, vectorscope, and RGB Parade.
42
A Wav eform moni tor B YCbCr Parade C Vectorscope D YC Waveform
To use the waveform monitor and vectorscope displays most effectively, view them with the Reference Monitor ganged
to the Program Monitor. See Reference Monitor .
Adobe Dynamic Link
About Dynamic Link
In the past, sharing media assets among post-production applications required you to render and export your work
from one application before importing it into another. This workflow was inefficient and time-consuming. If you
wanted to change the original asset, you rendered and exported the asset again. Multiple rendered and exported
versions of an asset consume disk space, and they can lead to file-management challenges.
Last updated 6/9/2015
Page 48

Workspace and workflows
Dynamic Link offers an alternative to this workflow. You can create dynamic links between After Effects and Premiere
Pro. Creating a dynamic link is as simple as importing any other type of asset. Dynamically linked assets appear with
unique icons and label colors to help you identify them. Dynamic links are saved in projects generated by these
applications.
Dynamic Link performance
A linked clip can refer to a complex source composition. Actions you perform on the complex source composition
require additional processing time. After Effects takes time to apply the actions and make the final data available to
Adobe Premiere Pro. In some cases, the additional processing time delays preview or playback.
To reduce playback delays, do one of the following:
• take the linked composition offline
• disable a linked clip to temporarily stop referencing a composition
• render the composition and replace the dynamically linked composition with the rendered file
If you commonly work with complex source compositions, try adding RAM or a faster processor.
Note: A linked After Effects composition will not support Render Multiple Frames Simultaneously multiprocessing. See
Improve performance by optimizing memory, cache, and multiprocessing settings .
43
Create and link to After Effects compositions with Dynamic Link
You can create After Effects compositions, and dynamically link to them, from Adobe Premiere Pro. You can also
dynamically link to existing After Effects compositions from Adobe Premiere Pro.
Create a composition from clips in Adobe Premiere Pro
You can replace selected clips in Adobe Premiere Pro with a dynamically linked After Effects composition based on
those clips. The new composition inherits the sequence settings from Adobe Premiere Pro.
1 In a sequence, select the clips you want in the composition.
2 Right-click any of the selected clips.
3 Select Replace With After Effects Composition.
Create a dynamically linked composition from Adobe Premiere Pro
Creating a new dynamically linked composition from Adobe Premiere Pro launches After Effects. After Effects then
creates a project and composition with the dimensions, pixel aspect ratio, frame rate, and audio sample rate of the
originating project. (If After Effects is already running, it creates a composition in the current project.) The new
composition name is based on theAdobe Premiere Pro or Encore project name, followed by Linked Comp [x].
1 In Adobe Premiere Pro, choose File > Adobe Dynamic Link > New After Effects Composition.
2 If the After Effects > Save As dialog box appears, enter a name and location for the After Effects project, and click
Save.
When you create a dynamically linked After Effects composition, the composition duration is set to 30 seconds. To
change the duration, select the composition in After Effects, choose Composition > Composition Settings. Click the
Basic tab, and specify a new value for Duration.
Last updated 6/9/2015
Page 49

Workspace and workflows
Link to an existing composition
For best results, match composition settings (such as dimensions, pixel aspect ratio, and frame rate) to the settings in
the Adobe Premiere Pro project.
❖ Do one of the following:
• In Adobe Premiere Pro, choose File > Adobe Dynamic Link > Import After Effects Composition. Choose an
After Effects project file (.aep), and then choose one or more compositions.
• In Adobe Premiere Pro, choose an After Effects project file and click Open. Then choose a composition in the
displayed dialog box and click OK.
• Drag one or more compositions from the After Effects Project panel to the Adobe Premiere Pro Project panel or
the Encore Project panel.
• Drag an After Effects project file into the Adobe Premiere Pro Project panel. If the After Effects project file
contains multiple compositions, the Import Composition dialog box opens.
Note: You can link to a single After Effects composition multiple times in a single Adobe Premiere Pro project.
Delete a dynamically linked composition or clip
You can delete a linked composition from an Adobe Premiere Pro project at any time, even if the composition is used
in a project. You can also delete linked clips from the timeline of an Adobe Premiere Pro sequence at any time.
44
❖ In Adobe Premiere Pro, select the linked composition or clip and press the Delete key.
Modify a dynamically linked composition in After Effects
Use the Edit Original command in Adobe Premiere Pro to modify a linked After Effects composition. Once the
composition is open in After Effects, you can change the composition without having to use the Edit Original
command again.
1 Select the After Effects composition in the Adobe Premiere Pro Project panel, or choose a linked clip in the Timeline,
and choose Edit > Edit Original.
2 Change the composition in After Effects. Then, switch back to Adobe Premiere Pro to view your changes.
The changes made in After Effects appear in Adobe Premiere Pro. Adobe Premiere Pro stops using any preview files
rendered for the clip before the changes.
Note: You can change the name of the composition in After Effects after creating a dynamic link to it from Adobe Premiere
Pro. Adobe Premiere Pro does not update the linked composition name in the Project panel. Adobe Premiere Pro does retain
the dynamic link, however.
Create an After Effects composition from clips in Premiere Pro
You can replace a selection of clips in a sequence in Premiere Pro with an After Effects composition based on those
clips. The composition inherits the sequence settings from Premiere Pro and maintains a dynamic link to After Effects.
You can edit the composition in Premiere Pro or in After Effects.
1 In a sequence, select the clips you want in the composition.
2 Right-click any of the selected clips.
3 Select Replace With After Effects Composition.
Last updated 6/9/2015
Page 50

Workspace and workflows
Offline compositions and Dynamic Link
Adobe Premiere Pro display dynamically linked compositions as offline in any of the following circumstances:
• You’ve renamed, moved, or deleted the After Effects project that contains the composition.
• You’ve purposely taken the composition offline.
• You’re working with a project trimmed by the Adobe Premiere Pro Project Manager. Project Manager does not move
the After Effects source compositions to the trimmed project folder. Move the composition manually.
Offline compositions appear with an Offline icon in the Adobe Premiere Pro Project panel. If you’re working with an
offline composition, you can relink it to the original After Effects composition. You can also choose to relink a linked
composition to a different source composition.
Take a dynamically linked composition offline
If you are experiencing jerky playback, you can take a dynamically linked composition offline. When you take a
composition offline, you sever the dynamic link with After Effects. The linked composition is replaced in the Project
panel with an offline composition.
You can temporarily suppress a linked clip in Adobe Premiere Pro by selecting the clip and choosing Clip > Enable. To
relink the clip, choose Clip > Enable again (a check mark next to the command indicates that the clip is enabled).
1 In Premiere Pro, select the composition in the Project panel.
45
2 Choose Project > Make Offline.
Relink a dynamically linked composition
In Adobe Premiere Pro, right-click the composition and choose Link Media. In the displayed dialog box, select an After
Effects project. Adobe Premiere Pro automatically relinks the composition.
Color grading in Premiere Pro
Premiere Pro provides you professional-quality color grading and color correction tools that let you grade your footage
directly on your editing timeline.
These Color tools are available within a Lumetri Color workspace in Premiere Pro. Using these tools, you can adjust
color, contrast, and light in your sequences in new and innovative ways. With editing and color grading working hand
in hand, you can freely move between editing and grading tasks without the need to export or launch a separate grading
application.
The Color workspace is designed not just for experienced colorists but also for editors who are new to color grading.
You can apply simple color corrections or complex Lumetri Looks using intuitive sliders and controls. Or you can easily
adjust cuts or fine-tune grades using advanced color correction tools like curves and color wheels.
If you want to handoff your project to a color specialist, SpeedGrade continues to be available as a dedicated color
grading application. You can send your project for grading to SpeedGrade by using the quick and easy Direct Link to
SpeedGrade workflow. For more information, see
Direct Link workflow .
Last updated 6/9/2015
Page 51

Workspace and workflows
Set up a Color workspace
Premiere Pro provides a preset Color workspace that makes your task of color grading quicker and more efficient.
Select Window > Workspace > Color, or choose Color from the workspace switcher. The Color workspace opens a
Lumetri Color panel to the right of the Program Monitor and a Lumetri Scopes panel to the left of the Program Monitor.
Video : L u metri C olor ov e r v i e w
Learn the power of the Lumetri Color panel within the Color workspace. (Watch, 3 min)
46
A Lumetri Scopes panel B Lumetri Color panel with curves, color wheels, and slider adjustments
The Lumetri Color panel offers powerful and easy-to-use color tools, like curves, color wheels, and slider arrangements,
arranged in different sections. Each section of the Lumetri Color panel focuses on a specific task of the color workflow.
To see a before and after comparison of your color adjustments, you can display the master clip in the Source Monitor
for comparison with the Program Monitor.
The Lumetri Scopes panel displays different analyses of luma and chroma as waveforms based on your adjustments,
letting you evaluate as you grade your clips.
General color correction workflow
1 Ensure that you have set up the Color workspace.
2 Place the playhead on the required clip in your sequence.
When the Lumetri Color panel is open, Premiere Pro automatically selects the Selection Follows Playhead option
from the Sequence menu. The auto-selection of the clip ensures that any color adjustments you make are applied to
the selected clip.
Note: Automatic clip selection is applied even for the linked audio clips in the audio tracks. To focus your color
adjustments only to video clips, turn off audio track targeting.
3 Start making color adjustments using the Basic Correction section.
The controls in the Basic Correction section guide you through applying a LUT (Lookup Table), and making other
technical corrections to exposure and light through easy-to-use controls. For more information, see
correction .
Basic color
4 Use the Creative section to apply Looks. You can then make further adjustments using the Adjustments sliders.
For more information, see Apply Looks .
Last updated 6/9/2015
Page 52

Workspace and workflows
5 Use the Curves section to further refine the look using RGB Curves and the Hue Saturation Curve.
For more information, see Curve adjustments .
6 Adjust shadows, midtones, and highlights using color wheels for more precise color adjustments.
For more information, see Color wheel adjustments .
7 After making all the color adjustments, create a high-quality vignette to make your video stand out.
For more information, see Apply Vignette .
Apply basic color correction
Using controls in the Basic Correction section, you can correct video that’s too dark or too light, and adjust both the
hue (color or chroma) and luminance (exposure and contrast) in your clip.
To adjust a control, drag the slider until you achieve the desired result. Or, you can set a specific value in the box next
to the sliders. Click the current value to select the box and type a new value.
47
• Input LUT
You can use a LUT (Look Up Table) as a starting point for grading your footage, and then use the other color controls
for further grading.
Premiere Pro provides several preset LUTs that you can apply to your footage, or you can select a custom LUT that
you saved.
• White Balance
The white balance in a video reflects the lighting conditions under which the video was shot. Adjusting the white
balance can effectively improve the ambient color of your video.
Adjust the white balance in your clip by changing the Temperature and Tint properties. Use the slider controls to
fine-tune the values until you achieve the desired color balance.
Te mp e ra tu r e Fine-tunes the white balance using a color temperature scale. Move the slider to the left to make the
video appear cooler, and to the right for warmer colors.
Tint Fine-tunes the white balance to compensate for a green or magenta tint. Move the slider to the left (negative
values) to add green to the video, and move it to the right (positive values) to add magenta.
• To n e
Last updated 6/9/2015
Page 53

Workspace and workflows
Adjust the tonal scale of the video clip using the different tone controls.
Exposure Sets the brightness of the video clip. Moving the Exposure slider to the right increases tonal values and
expands highlights, and moving the slider to the left decreases tonal values and expands shadows. Adjust the slider
until the video looks good with the desired brightness.
Contrast Increases or decreases contrast. Adjusting the contrast mainly affects the midtones of color in your video.
When you increase contrast, the middle-to-dark areas become darker. Similarly, decreasing the contrast makes the
middle-to-light areas lighter.
Highlights Adjusts bright areas. Drag the slider to the left to darken highlights. Drag to the right to brighten
highlights while minimizing clipping.
Shadows Adjusts dark areas. Drag the slider to the left to darken shadows while minimizing clipping. Drag to the
right to brighten shadows and recover shadow details.
Whites Adjusts white clipping. Drag the slider to the left to reduce clipping in highlights. Drag to the right to
increase highlight clipping.
Blacks Adjusts black clipping. Drag the slider to the left to increase black clipping, making more shadows pure
black. Drag to the right to reduce shadow clipping.
Reset Reverts all Tone controls to the original settings.
48
Auto Click Auto to set the overall tonal scale. When you select Auto, Premiere Pro sets the sliders to maximize the
tonal scale and minimize highlight and shadow clipping.
Saturation Adjusts the saturation of all colors in the video equally. Drag the slider to the left to decrease the overall
saturation. Drag to the right to increase the overall saturation.
Apply Looks
The Creative section lets you further expand your creative range when adjusting color. You can easily apply complex
Lumetri looks and adjust other parameters like vibrance and saturation using intuitive sliders and controls.
The Lumetri Color panel provides a Looks Preset Thumbnail viewer that lets you click through the Looks presets before
application. If you like what you see in the preview, you can apply that look to your clip.
Last updated 6/9/2015
Page 54

Workspace and workflows
• Look
Apply looks to make your video look like a professionally shot film. You can use a look by itself or apply a look before
or after a custom grade.
You can also choose a look available in your Creative Cloud Library, or apply looks captured in the mobile capture
app - Adobe Hue CC. For more information about Adobe Hue CC,
see this FAQ page.
49
Premiere Pro also provides preset film stock and camera looks under Lumetri Presets in the Effects panel.
Intensity Adjusts the intensity of the applied look. Drag the slider to the right to increase the effect of the applied
look, and drag to the right to decrease the effect.
• Adjustments
Faded Film Applies a faded film effect to your video. Drag the sliders to the right or left until you achieve the desired
vintage look that you want.
Sharpen Adjusts edge definition to create a sharper-looking video. Drag the slider to the right to increase the edge
definition, and drag to the left to decrease the edge definition. An increased edge definition makes the details in the
video more pronounced. So, make sure that you don't sharpen the edges too much that it looks unnatural.
To turn off sharpening, set the slider to zero (0).
Vibra nce Adjusts the saturation so that clipping is minimized as colors approach full saturation. This setting
changes the saturation of all lower-saturated colors with less effect on the higher-saturated colors. Vibrance also
prevents skin tones from becoming oversaturated.
Saturation Adjusts the saturation of all colors in the clip equally from 0 (monochrome) to 200 (double the
saturation).
Tint wheels Adjust the tint values in the shadows and highlights using the Shadow Tint and Highlight Tint wheels.
Wheels with empty centers indicate that nothing has been applied. To apply the tint, click in the middle of the wheel
and drag the cursor to fill in the wheels.
Last updated 6/9/2015
Page 55

Workspace and workflows
Tint Balance Balances out any excess magenta or green in the clip.
Adjust RGB and Hue-Saturation curves
50
• RGB Curves
Last updated 6/9/2015
Page 56

Workspace and workflows
A Select to adjust Red, Green, or Blue channels B Master curve that controls Luma C Click to add a control point
RGB Curves let you adjust luma and tonal ranges across the clip using curves.
• The master curve controls the Luma. Initially, the master curve is represented as a straight white diagonal line.
The upper-right area of the line represents highlights and the lower-left area represents shadows.
• Adjusting the master curve adjusts the values of all three RGB channels simultaneously. You can also choose to
selectively adjust tonal value only for Red, Green, or Blue channels. To adjust different tonal areas, add control
points directly to the curve.
• Click directly on the curve line and then drag the control point to adjust a tonal area. Dragging a control point
up or down lightens or darkens the tonal area you’re adjusting. Dragging a control point left or right increases or
decreases the contrast.
• To delete a control point, press Ctrl (Win) or Cmd (Mac) and click the control point.
• Hue Saturation Curve
51
A Click to add control points manually B Drag the white circle inward or outward to adjust saturation C Use Quick Color Selecto to add
control points automatically
The Hue Saturation Curve wheel lets you saturate or desaturate specific hues.
• Drag the white circle in the wheel outward to increase saturation. Drag it inwards toward the center to decrease
saturation.
• P ressi ng Ctr l (Win) or C md (Ma c) and dra ggi ng a control poi nt con strai ns m ovement suc h that the control poi nt
is always aligned at a straight line from the center to the outside edge of the wheel.
• You can isolate a specific color in your clip and saturate or desaturate only that color. For example, if you want to
desaturate all green colors in your clip. Click the white circle to add control points in the green area of the wheel.
Or, a quicker way is to select the green color dot in the Quick Color selector. Three control points are added in
the green area of the wheel.
Last updated 6/9/2015
Page 57

Workspace and workflows
Adjust midtones, shadows, and highlights
Use the color wheels to adjust intensity levels of shadows, midtones, and highlights. You can also use the accompanying
sliders instead of the wheels to make these adjustments.
52
You can adjust the shadow or highlight detail to brighten or darken areas in an otherwise well-lit clip. You can isolate
the regions that need correction and apply these adjustments. Use the Midtone color wheel fo adjust the overall contrast
of the clip.
• Wheels with empty centers indicate that no adjustments have been made. Click in the middle of the wheel and drag
the cursor to fill in the wheels and make adjustments as required.
• If you use the slider control, drag the slider up to increase the value or drag the slider down to decrease the value.
For example, drag the Shadow slider up to lighten shadows, and drag the Highlights shadow down to darken
highlights.
Apply Vignette
Apply a vignette to achieve a look that is faded out at the edges, and bright at the center.
The Vignette controls let you control the size, shape, and amount of lightening or darkening of the edges.
Amount Sets the amount of lightening or darkening along the edges of an image. Type a number in the box, or move
the slider to gradually shade the clip.
Midpoint Specifies the width of area affected by the Amount slider. Move the slider, or type a lower number to affect
more of the image. Type a higher number to restrict the effect to the edges of the image.
Last updated 6/9/2015
Page 58
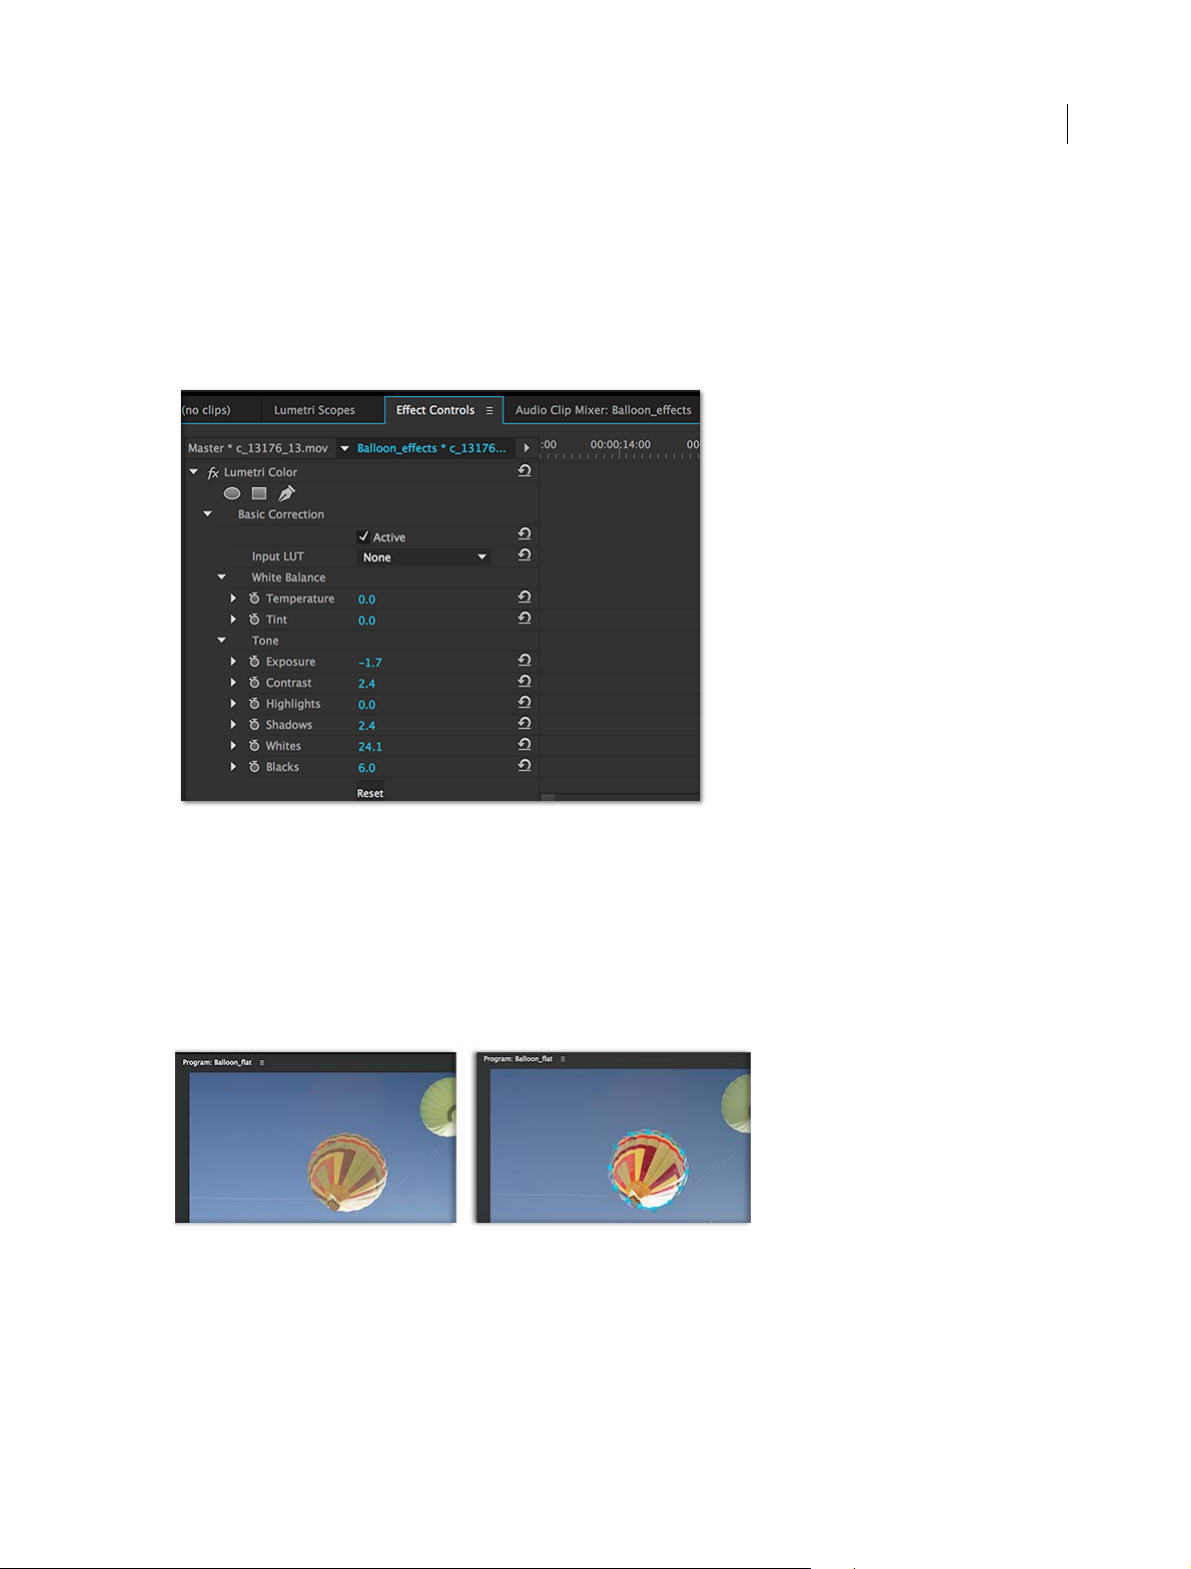
Workspace and workflows
Roundness Specifies the size (roundness) of the vignette. Negative values cause an exaggerated vignette effect, and
positive values cause a less visible vignette.
Feather Defines the edge of the vignette. A smaller value creates a harder, sharper edge, whereas, a larger value
indicates a softer, thicker edge.
Refine and reset using Effect Controls panel
53
Apart from adjusting color settings in the Lumetri Color panel, you can reset and adjust settings from the Lumetri
Color section in the Effect Controls panel.
In addition, you can use the Mask tools in the Effect Controls panel to draw free-form masks and shape masks. You can
draw a mask to correct a specific area in your clip using the Basic Correction color tools. Or, you can use an inverse
mask selection to exclude the masked area from color corrections applied to the rest of the clip. In addition, you can
add multiple shape masks with different color adjustments applied to different areas of a clip.
Last updated 6/9/2015
Page 59

Workspace and workflows
Export Looks, LUTs, and save presets
Premiere Pro lets you easily save and reuse your color adjustments in different projects or applications. You can export
all color grading information as a .Look file or a LUT file to use in Adobe Premiere Pro or a third-party application.
Select the Lumetri Color pop-up menu, and choose:
Export .look Exports color adjustments as a Lumetri Look preset file in .look format.
54
Export .cube Exports Lookup tables in .cube format for import into other color grading applications.
You can also customize individual color effect settings and save them as presets.
Select the Lumetri Color pop-up menu, and select Save Preset. In the Save Preset dialog box, specify a name for your
preset. If desired, enter a description. For more details,
Create and save an effect preset.
View Lumetri scopes
The Lumetri Scopes panel (Window > Lumetri Scopes) displays a set of resizeable in-built video scopes: Vectorscopes,
Histogram, Parade, and Waveform. These scopes help you accurately evaluate and color-correct your clips. At any given
point, you can display all five scopes in the Lumetri Scopes panel.
Last updated 6/9/2015
Page 60
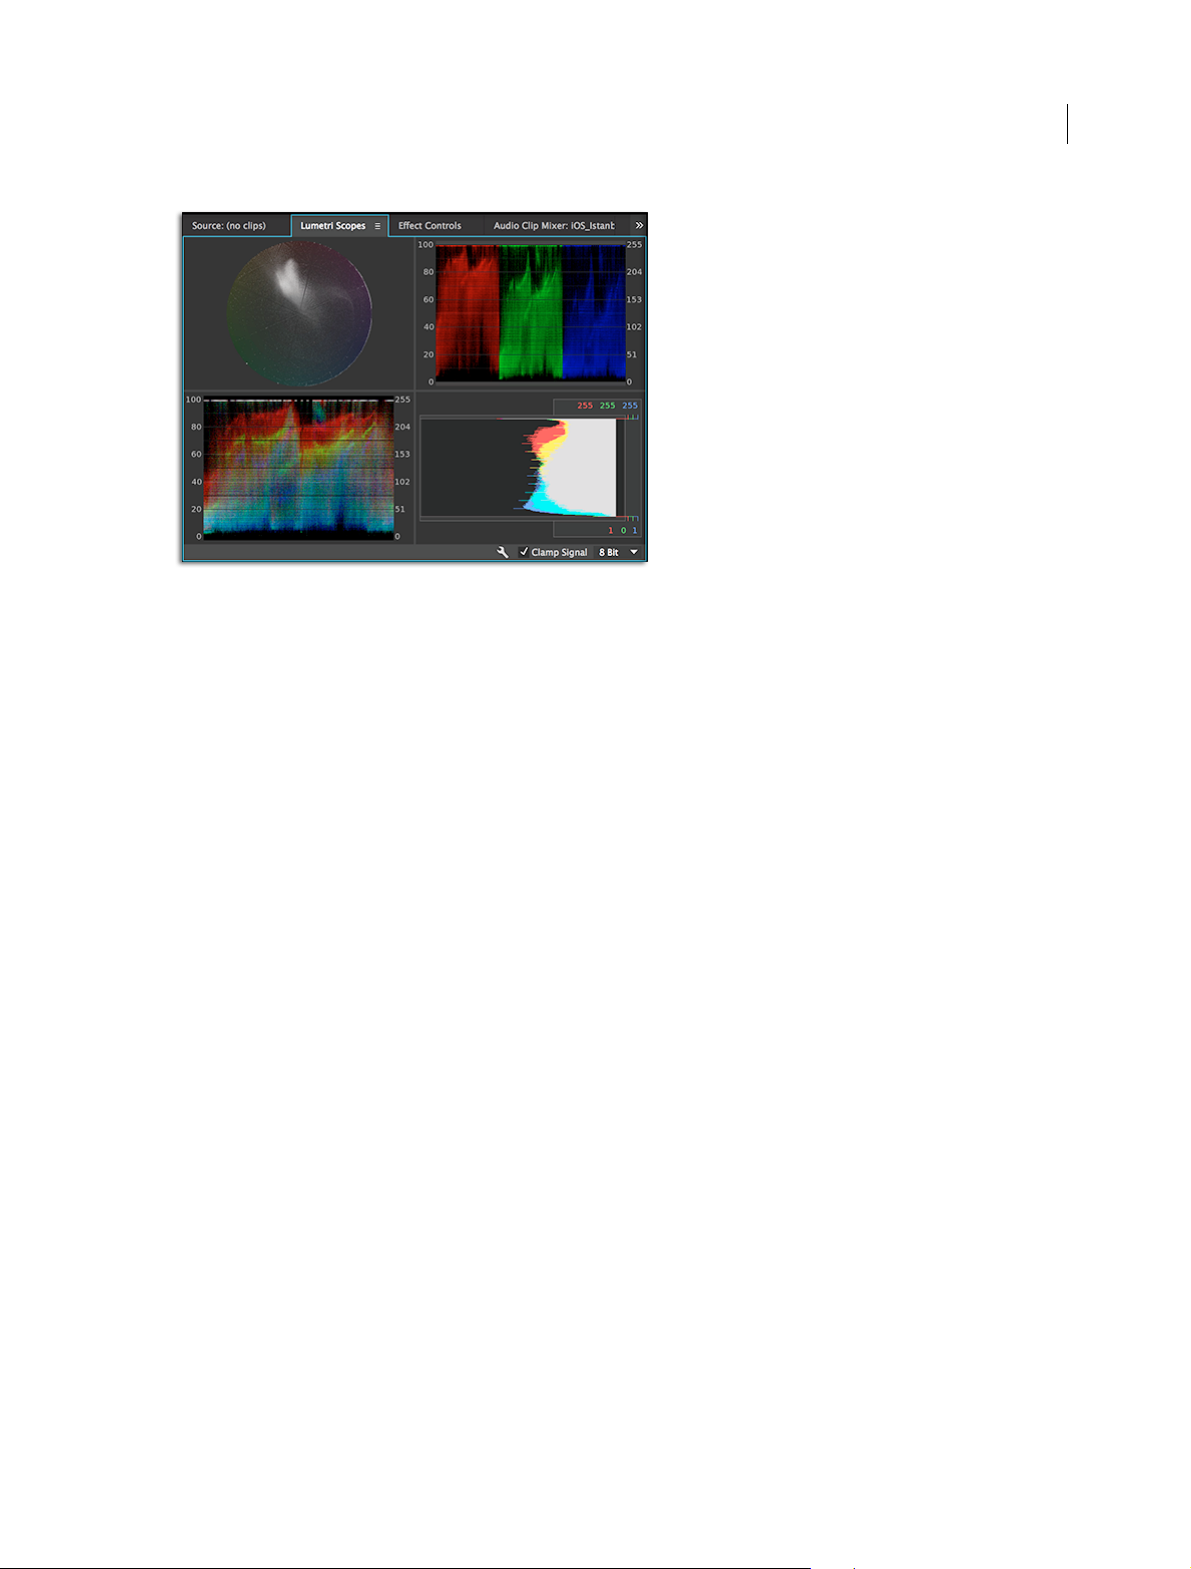
Workspace and workflows
Vec tors cope s You can select from two available vectorscopes:
• Vectorscope HLS: Displays hue, saturation, lightness, and signal information in a glance
• Vectorscope YUV: Displays a circular chart, similar to a color wheel, that shows the video’s chrominance
information
Wave form You can select from the following available waveform scopes:
55
• RGB waveform: Displays the RGB signals overlaid to give a snapshot view of the signal level of all the color channels
• Luma waveform: Displays the IRE values from –20 to 120, allowing you to effectively analyze the brightness of shots
and measure the contrast ratio
• YC waveform: Displays the luminance (represented as green in the waveform) and chrominance (represented as
blue) values in your clip
• YC no Chroma waveform: Displays only the luminance values in your clip
Parade Displays waveforms representing levels of the luminance and color difference channels in the digital video
signal. You can choose from RGB, YUV, RGB-White, and YUV-White parade types.
For example, if you are comfortable with viewing YUV waveforms, you can use the YUV Parade scope when making
color and luminance adjustments. On the other hand, if you want to compare the relationship between the red, green,
and blue channels, use the RGB Parade scope that displays waveforms representing the levels of the red, green, and blue
channels in a clip.
Histogram Displays a statistical analysis of the pixel density at each color intensity level.
Histograms can help you accurately evaluate shadows, midtones, and highlights, and adjust the overall image tonal
scale.
Direct-Link workflow between Premiere Pro and
SpeedGrade
Last updated 6/9/2015
Page 61
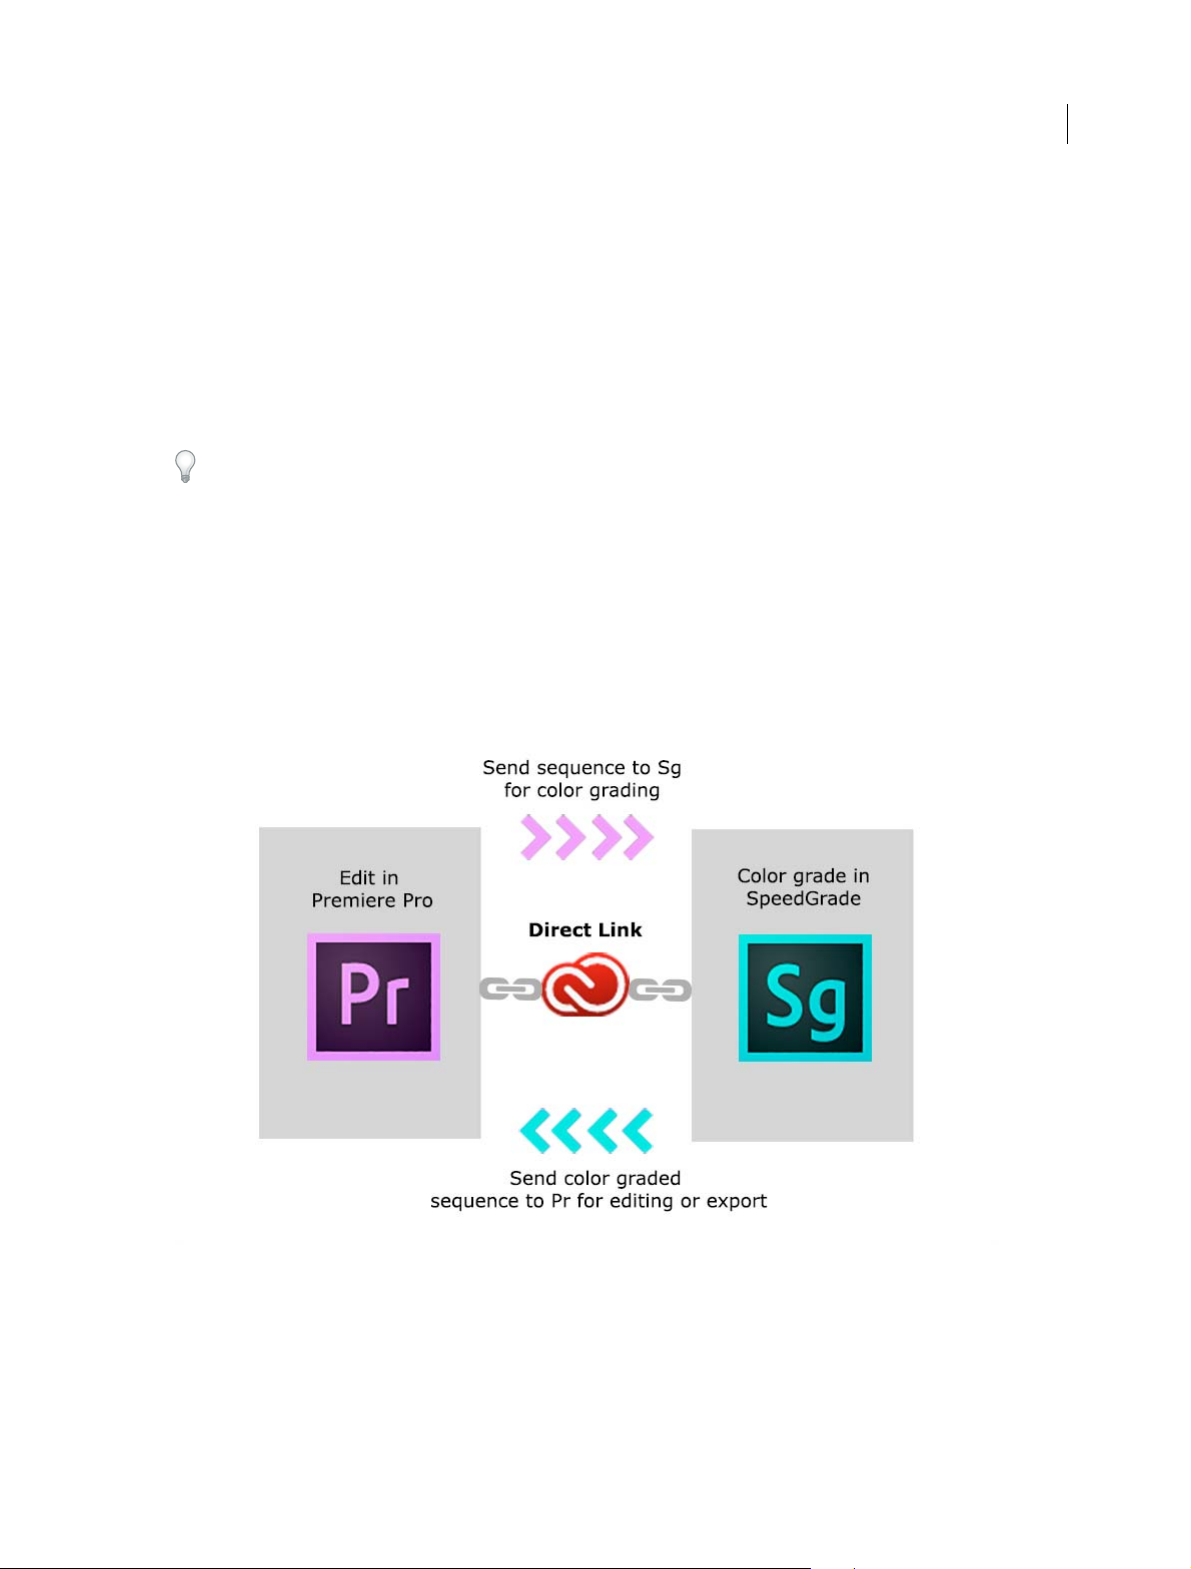
Workspace and workflows
About Direct Link
The Direct-Link workflow is an integrated edit-and-grade workflow between Premiere Pro CC and SpeedGrade CC.
Earlier, to use SpeedGrade to color grade your footage from Premiere Pro, you rendered and exported your sequences
to SpeedGrade either as DPX still image sequences or edit decision lists (EDLs). After completing color grading in
SpeedGrade, you exported the projects as stand-alone video files back into Premiere Pro for more editing.
Direct Link offers a fast and efficient alternative to this workflow. Leveraging the power of the Mercury Playback
Engine, Direct Link lets you send or open Premiere Pro projects directly in SpeedGrade. You can color grade Premiere
Pro sequences in SpeedGrade and send it back to Premiere Pro in a few clicks.
To achieve optimal performance when using Direct Link, use a NVIDIA CUDA graphics card with GPU acceleration
on Windows. For more information about Adobe-certified NVIDIA graphics cards, see the Tech s p e c s .
Edit and grade Premiere Pro sequences with Direct Link
The Direct-Link workflow lets you roundtrip Premiere Pro projects between editing and grading without timeconsuming or complex tasks like rendering and conforming.
When you send a project, which you had color-corrected using Premiere Pro, to Speedgrade using Direct Link,
Speedgrade presents you with the custom Lumetri Color layer. This layer reflects all the color changes that you had
made to your project in one layer without any custom controls. You can toggle on/off this feature as needed.
56
Step 1: Select Premiere Pro sequence
Select the Premiere Pro sequence that you want to color grade.
Note: Ensure that you have selected the sequence in the Timeline or Project panel.
Step 2: Send sequence to SpeedGrade using Direct Link
Last updated 6/9/2015
Page 62
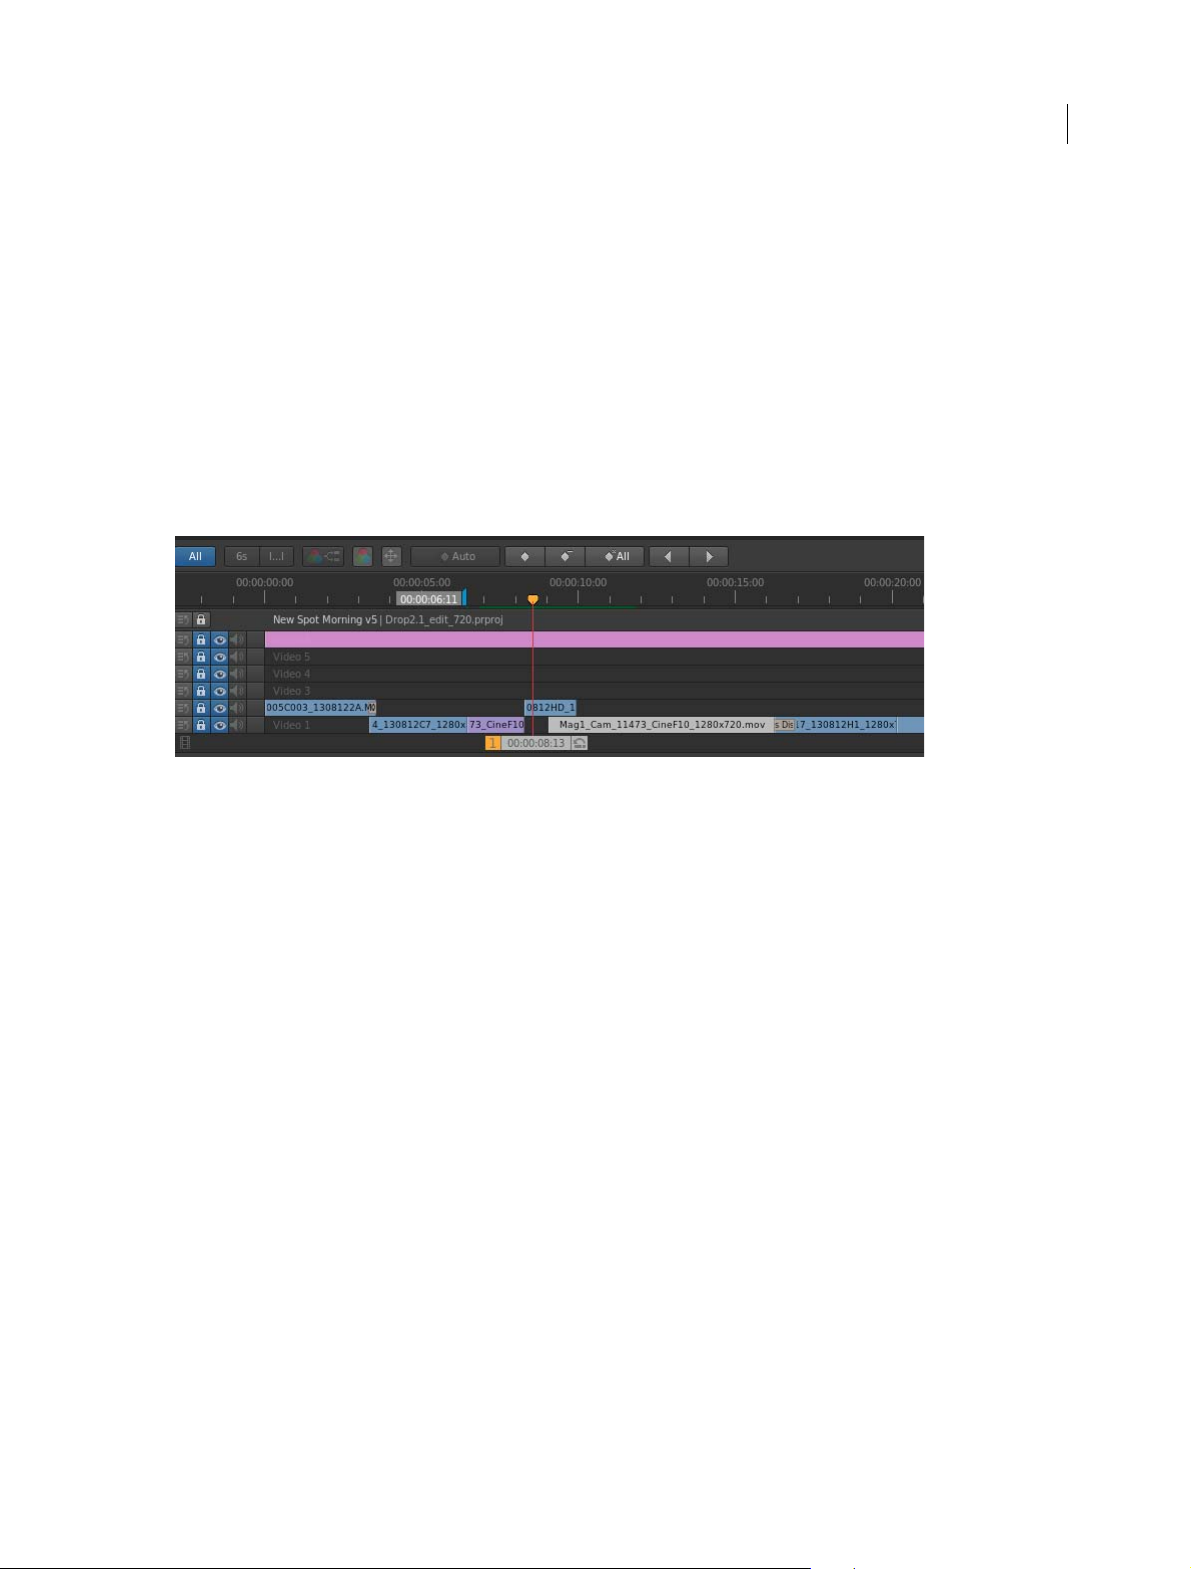
Workspace and workflows
Using Direct Link, you can send a sequence from an open Premiere Pro project directly to SpeedGrade without
exporting the project.
To use Direct Link, select File > Direct Link To Adobe SpeedGrade.
Step 3: Choose to open sequence in SpeedGrade
When you select the Direct-Link workflow, Premiere Pro prompts you to save changes to the project in Premiere Pro
and open it in SpeedGrade. Click Yes.
Step 4: Selected sequence opens in SpeedGrade
Premiere Pro closes, and SpeedGrade opens the sequence in its Timeline, which uses the same familiar track layout as
Premiere Pro.
In the SpeedGrade Timeline, you can see all the clip edit points, transitions, and layers.
57
Step 5: Color grade the sequence using grading and mask tools
Within SpeedGrade, you can color grade the sequence using Looks and Masks. The Looks that you apply in SpeedGrade
appear as Lumetri presets when you reopen the sequence in Premiere Pro.
If a Lumetri Look has already been applied in Premiere Pro, it's available in the SpeedGrade Timeline, where you can
adjust its parameters.
Last updated 6/9/2015
Page 63
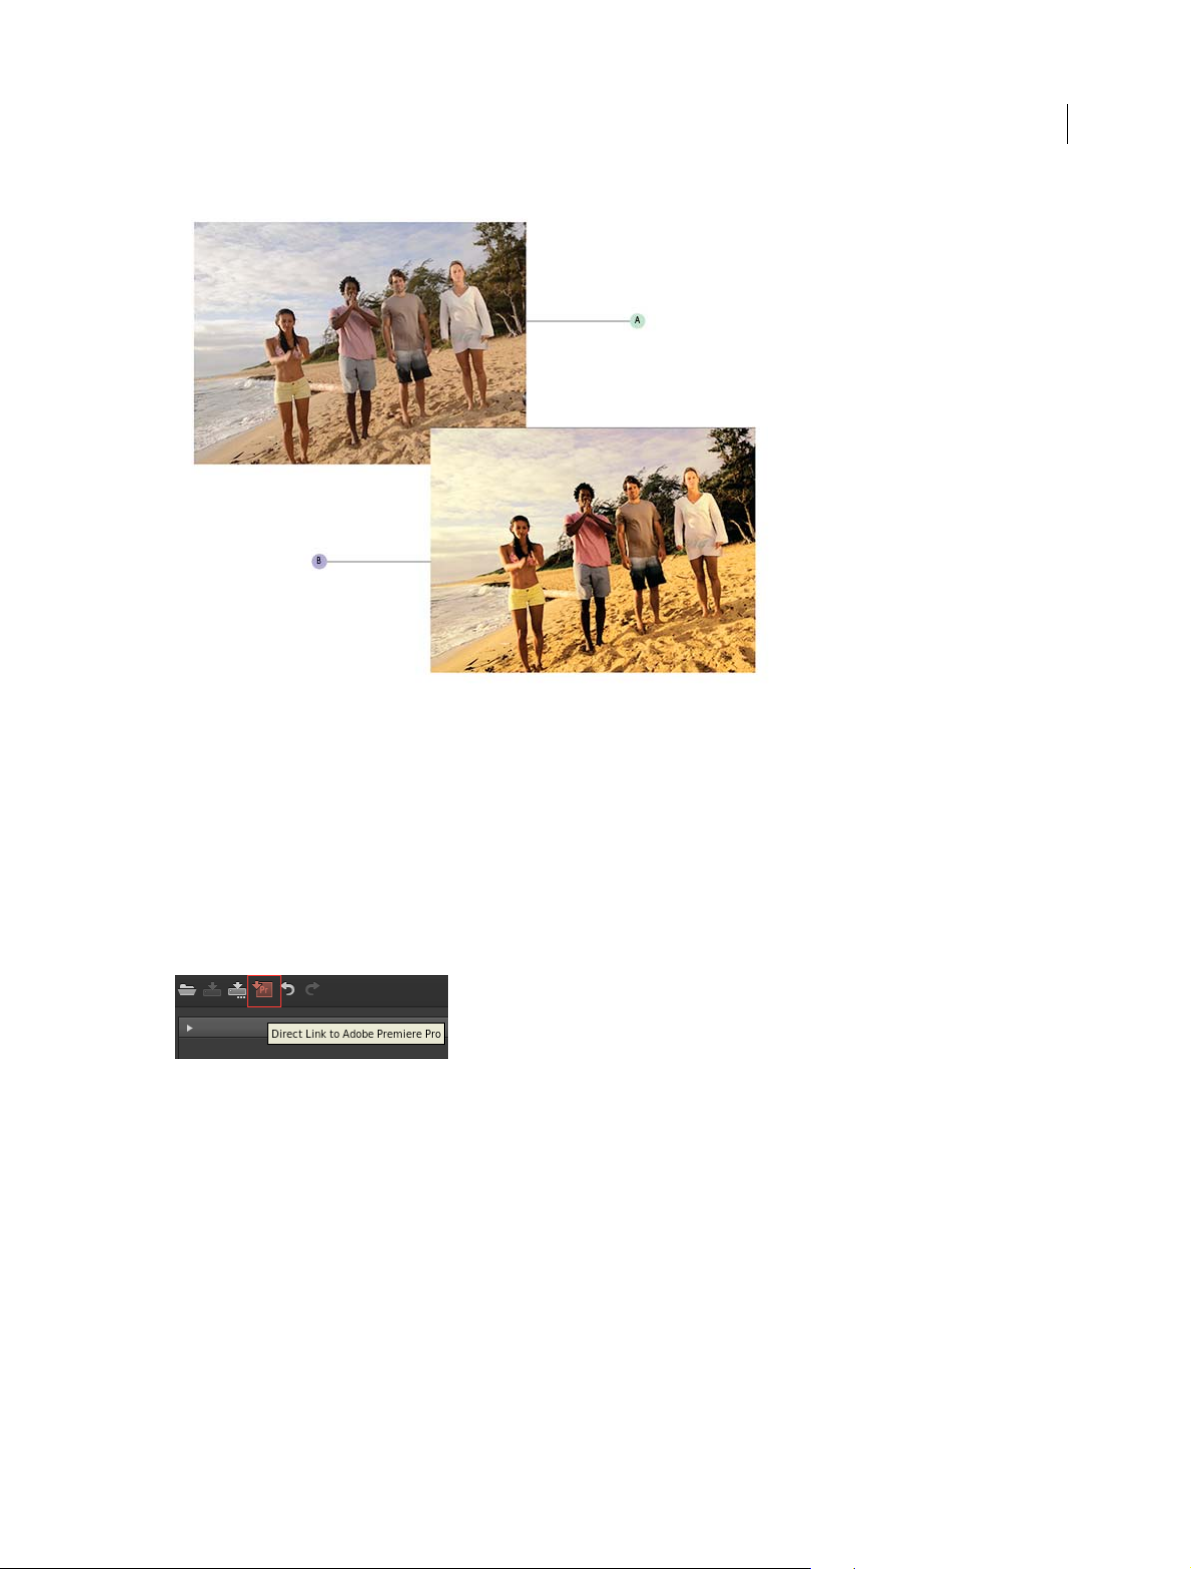
Workspace and workflows
58
A Premiere Pro project sequence B Premiere Pro sequence color graded in SpeedGrade
The Direct-Link workflow has been designed to let you focus on the color correction and grading tasks when you are
in SpeedGrade. Because of this focus, only the Color and Look tabs in SpeedGrade are available in the Direct-Link
mode. For more details, see
Direct-Link workflow limitations .
Step 6: Send the color graded sequence to Premiere Pro for editing
When you finish color grading your sequence in SpeedGrade, save and reopen the sequence in Premiere Pro for final
output or further editing.
Click the Direct Link to Adobe Premiere Pro icon in the upper left of the SpeedGrade user interface.
The color graded sequence opens in Premiere Pro with all color grading fully intact.
Color grading and masks applied in SpeedGrade are visible in Premiere Pro as Lumetri effects. In Premiere Pro, you
can turn these Lumetri effects on or off for each clip and for each adjustment layer individually using the Effects
Controls panel.
You continue editing or export your sequence for final output in Premiere Pro.
Open Premiere Pro projects directly in SpeedGrade
You can open native Premiere Pro projects directly in SpeedGrade, apply color grading changes, and reopen the project
in Premiere Pro.
Last updated 6/9/2015
Page 64

Workspace and workflows
The SpeedGrade Welcome screen lets you:
• Open a recently accessed Premiere Pro project (.pproj)
• Open a Premiere Pro project (.pproj)
• Create a SpeedGrade project (.IRCP)
When you open a Premiere Pro project, the Sequence Importer dialog opens showing all the sequences contained in
the project. Select a sequence to open.
Note: SpeedGrade cannot open more than one Premiere Pro sequence at the same time.
59
Within SpeedGrade, you can apply primary and secondary color correction, apply Looks and Masks, and do all the
required color grading.
Note: You cannot send SpeedGrade (.IRCP) projects back to Premiere Pro. To use Direct Link, start with a Premiere Pro
project (.pproj).
Some important points:
• From within SpeedGrade, you can view and adjust Premiere Pro adjustment layers, and also view any transitions
applied to the sequence.
• All the color grading that you apply in SpeedGrade is available automatically in Premiere Pro. There is no need to
export the .look files.
Working with offline media
When you open a Premiere Pro project with missing media files in SpeedGrade, you cannot link and locate the offline
media like you would in Premiere Pro.
To relink the offline media, you must bring the project back to Premiere Pro.
Working with After Effects Compositions
There are several ways to use After Effects Compositions in your Premiere Pro project:
• Replace a clip in Premiere Pro with an After Effects Composition
• Link to an After Effects Composition using Adobe Dynamic Link
• Import an After Effects Composition (AEP file) into a Premiere Pro project
Irrespective of which method you use, you can open a Premiere Pro sequence containing After Effects Compositions
directly in SpeedGrade. SpeedGrade opens the sequence in Direct-Link mode, from where you can color grade the
compositions just as you would color grade any Premiere Pro sequence.
Last updated 6/9/2015
Page 65

Workspace and workflows
Limitations in Direct-Link mode
The Direct-Link workflow has been designed such that you focus only on the color correction and grading workflows
within SpeedGrade.
Given this focus, there are specific things to consider while using SpeedGrade in the Direct-Link mode:
• The auto-save feature is turned off while using the Direct-Link mode.
• To use Direct Link, you start with a Premiere Pro project (.pproj). You cannot send SpeedGrade projects (.IRCP) to
Premiere Pro in the Direct-Link mode.
• In the Direct-Link mode, you cannot render your Premiere Pro projects within SpeedGrade. You send the projects
back to Premiere Pro for rendering. So, the Render and Results tabs are unavailable when using Direct Link.
• SpeedGrade can open only one Premiere Pro sequence at a time, and not multiple sequences at once. To open a
different sequence in the project, open the Sequence Importer dialog by clicking
• You cannot launch the Media Browser to browse through media, so the Media tab is unavailable when using Direct
Link.
• You cannot add clips to the Premiere Pro sequence within SpeedGrade. Bring the project back to Premiere Pro to
edit the sequence.
• You cannot adjust audio or use the Pan & Scan functions. So, Stereo 3D, Audio, and Pan And Scan tabs are
unavailable when using Direct Link.
• If you apply the Warp Stabilizer effect on a Premiere Pro sequence, ensure that the analysis is complete before
sending the sequence to SpeedGrade using Direct Link. Otherwise, an error message appears.
in the SpeedGrade Timeline.
60
Video tutorial
How to make your video look like film
Learn how to use Direct Link to roundtrip your projects to SpeedGrade for comprehensive color grading and applying
preset film stock and camera looks.
Cross-application workflows
You can us e various other Adobe applic ations to enhance or modify the assets used in a Premiere Pro project. Also, you
can use Premiere Pro to edit projects begun in other applications.
Edit a clip in its original application
In Premiere Pro, the Edit Original command opens clips in the applications associated with their file types. You can
edit clips in the associated applications. Premiere Pro automatically incorporates the changes into the current project
without replacing files. Similarly, Premiere Pro sequences placed in other applications, such as Adobe After Effects can
be opened with the host product’s Edit Original command.
1 Select a clip in either the Project panel or Timeline panel.
2 Choose Edit > Edit Original.
You can export a movie from Premiere Pro with the data necessary for the Edit Original command. In the Export
Movie Settings dialog box, choose Project from the Embedding options menu.
Last updated 6/9/2015
Page 66

Workspace and workflows
Copy between After Effects and Premiere Pro
• From the After Effects Timeline panel, you can copy layers based on audio or video footage items (including solids)
and paste them into the Adobe Premiere Pro Timeline panel.
• From the Adobe Premiere Pro Timeline panel, you can copy assets (any items in a track) and paste them into the
After Effects Timeline panel.
• From either After Effects or Adobe Premiere Pro, you can copy and paste footage items to the other’s Project panel.
note: You can’t, however, paste footage items from the After Effects Project panel into the Adobe Premiere Pro Timeline
panel.
If you want to work with all clips or a single sequence from an Adobe Premiere Pro project, use the Import command
instead to import the project into After Effects.
Use Adobe Dynamic Link to create dynamic links, without rendering, between new or existing compositions in After
Effects and Adobe Premiere Pro. For more information, see Adobe Dynamic Link.
Copy from After Effects to Adobe Premiere Pro
You can copy a layer based on a footage item from an After Effects composition and paste it into an Adobe Premiere
Pro sequence. Adobe Premiere Pro converts these layers to clips in the sequence and copies the source footage item to
its Project panel. If the layer contains an effect that is also used by Adobe Premiere Pro, Adobe Premiere Pro converts
the effect and all of its settings and keyframes.
61
You can also copy nested compositions, Photoshop layers, solid-color layers, and audio layers. Adobe Premiere Pro
converts nested compositions to nested sequences, and solid-color layers to color mattes. You cannot copy shape, text,
camera, light, or adjustment layers to Adobe Premiere Pro.
1 Start Adobe Premiere Pro (you must start Adobe Premiere Pro before you copy the layer in After Effects).
2 Select a layer (or layers) from the After Effects Timeline panel.
Note: If you select multiple layers and the layers don’t overlap in After Effects, they’re placed on the same track in Adobe
Premiere Pro. On the other hand, if the layers overlap in After Effects, the order in which you select them determines
the order of their track placement in Adobe Premiere Pro. Each layer is placed on a separate track, and the last selected
layer appears on Track 1. For example, if you select layers from top to bottom, the layers appear in the reverse order in
Adobe Premiere Pro, with the bottom-most layer on Track 1.
3 Choose Edit > Copy.
4 In Adobe Premiere Pro, open a sequence in the Timeline panel.
5 Move the current-time indicator to the desired location, and choose either Edit > Paste or Edit > Paste Insert.
Results of pasting into Premiere Pro
When you paste a layer into an Adobe Premiere Pro sequence, keyframes, effects, and other properties in the copied
layer are converted as follows:
Last updated 6/9/2015
Page 67

Workspace and workflows
After Effects item Converted to in Adobe Premiere Pro Notes
Audio volume property Channel Volume filter
62
Blending modes Blending modes supported by Adobe
Effect properties and keyframes Effect properties and keyframes, if the effect
Expressions Not converted
Layer markers Clip markers
Masks and mattes Not converted
Stereo Mixer effect Channel Volume filter
Time Remap property Time Remapping effect
Time Stretch property Speed property Speed and time stretch have an inverse
Transform property values and keyframes Motion or Opacity values and keyframes The keyframe type—Bezier, Auto Bezier,
Source settings for R3D source files Source settings for R3D source files
Premiere Pro are converted
also exists in Adobe Premiere Pro
Adobe Premiere Pro lists unsupported effects
as offline in the Effect Controls panel. Some
After Effects effects have the same names as
those in Adobe Premiere Pro, but since they’re
actually different effects, they aren’t
converted.
relationship. For example, 200% stretch in
After Effects converts to 50% speed in Adobe
Premiere Pro.
Continuous Bezier, or Hold—is retained.
Copy from Adobe Premiere Pro to After Effects
You can copy a video or audio asset from an Adobe Premiere Pro sequence and paste it into an After Effects
composition. After Effects converts assets to layers and copies the source footage items into its Project panel. If the asset
contains an effect that is also used by After Effects, After Effects converts the effect and all of its settings and keyframes.
You can copy color mattes, stills, nested sequences, and offline files, too. After Effects converts color mattes into solidcolor layers and converts nested sequences into nested compositions. When you copy a Photoshop still image into After
Effects, After Effects retains the Photoshop layer information. You cannot paste Adobe Premiere Pro titles into After
Effects, but you can paste text with attributes from the Adobe Premiere Titler into After Effects.
1 Select an asset from the Adobe Premiere Pro Timeline panel.
2 Choose Edit > Copy.
3 In After Effects, open a composition in the Timeline panel.
4 With the Timeline panel active, choose Edit > Paste. The asset appears as the topmost layer in the Timeline panel.
Note: To paste the asset at the current-time indicator, place the current-time indicator and press Ctrl+Alt+V (Windows)
or Command+Option+V (Mac OS).
Results of pasting into After Effects
When you paste an asset into an After Effects composition, keyframes, effects, and other properties in a copied asset
are converted as follows:
Last updated 6/9/2015
Page 68

Workspace and workflows
Adobe Premiere Pro asset Converted to in After Effects Notes
63
Audio track Audio layers Audio tracks that are either 5.1 surround or
Bars and tone Not converted
Blending modes Converted
Clip marker Layer marker
Color mattes Solid-color layers
Crop filter Mask layer
Frame Hold Time Remap property
Motion or Opacity values and keyframes Transform property values and keyframes Keyframe type—Bezier, Auto Bezier,
Sequence marker Markers on a new solid-color layer To copy sequence markers, you must either
Speed property Time Stretch property Speed and time stretch have an inverse
Time Remapping effect Time Remap property
Titles Not converted
greater than 16-bit aren’t supported. Mono
and stereo audio tracks are imported as one or
two layers.
Continuous Bezier, or Hold—is retained.
copy the sequence itself or import the entire
Adobe Premiere Pro project as a composition.
relationship. For example, 50% speed in
Adobe Premiere Pro is converted to 200%
stretch in After Effects.
Universal counting leaders Not converted
Video and audio transitions Opacity keyframes (Cross dissolve only) or
Video effect properties and keyframes Effect properties and keyframes, if the effect
Volume and Channel Volume audio filters Stereo mixer effect Other audio filters are not converted.
Source settings for R3D source files Source settings for R3D source files
solid-color layers
also exists in After Effects
After Effects doesn’t display unsupported
effects in the Effect Controls panel.
Note: When you import a Premiere Pro project into After Effects, features are converted in the same manner as they are
converted when copying from Premiere Pro to After Effects.
Working with Photoshop and Premiere Pro
If you use Photoshop to create still images, you can use Premiere Pro to make them move and change. You can animate
an entire image or any of its layers.
You can edit individual frames of video and image sequence files in Photoshop. In addition to using any Photoshop tool
to edit and paint on video, you can also apply filters, masks, transformations, layers styles, and blending modes. You
can paint using the Clone Stamp, Pattern Stamp, Healing Brush, or Spot Healing Brush. You can also edit video frames
using the Patch tool.
In Photoshop, with the Clone Stamp, you can sample a frame from a video layer and paint with the sampled source onto
another video frame. As you move to different target frames, the source frame changes relative to the frame from which
you initially sampled.
Last updated 6/9/2015
Page 69

Workspace and workflows
After making edits, you can save the video as a PSD file, or you can render it as a QuickTime movie or image sequence.
You can import any of these back into Premiere Pro for further editing.
If you use Premiere Pro to create movies, you can use Photoshop to refine the individual frames of those movies. In
Photoshop, you can do any of the following:
• Remove unwanted visual elements.
• Draw on individual frames.
• Use the superior selection and masking tools to divide a frame into elements for animation or compositing.
Video tutorials for Premiere Pro and Photoshop workflow
• Learn how Photoshop makes it super-easy to produce graphic and photographic content for video editing in this
tutorial .
• Wa t ch this tutorial to learn how to work with unflattened Photoshop files in your video projects.
• This video tutorial explains how to import a Photoshop file into Premiere Pro and access individual layers to work
on selective animation and effects.
Comparative advantages for specific tasks
The strengths of Premiere Pro lie in its numerous video editing features. You can use it to combine Photoshop files with
video clips, audio clips, and other assets. You can use the Photoshop files, for example, as titles, graphics, and masks.
64
In contrast, Photoshop has excellent tools for painting, drawing, and selecting portions of an image. The Photoshop
Quick Selection tool and Magnetic Lasso tool make it easy to create a mask from a complex shape. Rather than handdrawing a mask in Premiere Pro, consider doing this work in Photoshop. Similarly, if you are applying several paint
strokes by hand to get rid of dust, consider using the Photoshop paint tools.
The animation and video features in Photoshop Extended include simple keyframe-based animation. Premiere Pro,
however, provides quite a bit more keyframe control over various properties.
Exchanging still images
Premiere Pro can import and export still images in many formats. For greatest versatility, however, use the native
Photoshop PSD format when transferring individual frames or still image sequences from Photoshop to Premiere Pro.
When you import a PSD file into Premiere Pro, you can choose whether to import it as a flattened image, or with its
layers separate and intact.
It is often a good idea to prepare a still image in Photoshop before importing it into Premiere Pro. Examples of such
preparation include correcting color, scaling, and cropping. It is often better to change a source image in Photoshop
than to have Premiere Pro perform the same operation many times per second as it renders each frame for previews or
final output.
In Photoshop, you can create a PSD document that is set up correctly for a specific video output type. From the New
File dialog box, select a Film & Video preset. In Premiere Pro, you can create a PSD document that matches your
composition and sequence settings. Choose File > New > Photoshop File.
Exchanging movies
You can no longer exchange PSD video files with Photoshop, however, you can render a movie directly from Photoshop
and then import it back into Premiere Pro. For example, you can create a QuickTime movie from Photoshop that can
then be imported into Premiere Pro.
Color
Last updated 6/9/2015
Page 70

Workspace and workflows
Premiere Pro works internally with colors in an RGB (red, green, blue) color space. If you want to edit video clips you
create in Photoshop in Premiere Pro, create the clips in RGB.
If you want to broadcast the final movie it is best to ensure, in Photoshop, that the colors in your image are broadcastsafe. Assign the appropriate destination color space—for example, SDTV (Rec. 601)—to the document in Photoshop.
Create and edit Photoshop files
You can create a still Photoshop file that automatically inherits the pixel and frame aspect ratio settings of your Premiere
Pro project. You can also edit any still image file in a Premiere Pro project in Photoshop.
Create a Photoshop file in a project
❖ Choose File > New > Photoshop File.
Photoshop opens with a new blank still image. The pixel dimensions match the project’s video frame size, and image
guides show the title-safe and action-safe areas for the project.
Edit a still image file in Photoshop
From within a project, you can open an image file in most formats that Adobe Photoshop supports. Premiere Pro does
not import files in CMYK or LAB color formats.
1 Select a still-image clip in either the Project panel or Timeline panel.
65
2 Choose Edit > Edit In Adobe Photoshop.
The file opens in Photoshop. When you save the file, changes are available in the Premiere Pro project.
Working with SpeedGrade and Premiere Pro
Adobe SpeedGrade is a color grading application that brings advanced color-grading capabilities to your footage.
You can color grade a Premiere Pro project directly in SpeedGrade using the Direct-Link feature. Or you can use a
roundtrip workflow to send your video sequences from Premiere Pro to SpeedGrade for color grading, and bring them
back to Premiere Pro.
For more information, see Direct Link workflow between Premiere Pro and SpeedGrade .
Working with Adobe Story and Premiere Pro
The Adobe Story panel in Premiere Pro CC lets you import scripts created in Adobe Story, along with associated
metadata to guide your editing.
From within the Adobe Story panel, you can access all the scripts you have in your Story account.
To open the Adobe Story panel from within Premiere Pro, select Window > Adobe Story.
You can quickly navigate to specific scenes, locations, dialogue, and characters as you work. You can also attach an
Adobe Story scene directly to clips in Premiere Pro by following these steps:
1 Select Window > Adobe Story to open the Adobe Story panel from within Premiere Pro.
2 Drag the scene that you want to attach from the Adobe Story panel and drop it on the required clip in the Project
panel.
For an overview of all the features in Adobe Story, see this video.
Last updated 6/9/2015
Page 71

Workspace and workflows
Working with Encore and Premiere Pro
Using Adobe Encore CS6 and Adobe Premiere Pro, you can burn a single sequence to DVD or Blu-ray Disc. You can
burn each sequence in your project to a separate DVD or Blu-ray Disc. First, add all the content you want to include on
a disc into a sequence. After you edit the sequence, perform the following tasks:
Note: To use Encore CS6 with Premiere Pro CC, see the following resources:
• Installing Premiere Pro CC and Encore CS6
• Using Encore CS6 with Premiere Pro CC
• Encore CS6 not installed with Creative Cloud
Add Encore chapter markers
You can add Encore chapter markers in a Adobe Premiere Pro sequence. You can send the Encore chapter markers,
along with the sequence to Encore.
In Encore, if you create an AutoPlay DVD, the Encore chapter markers become scene markers. When viewing the DVD,
pressing the Previous button or Next button on the remote control skips backward or forward to the next of these
markers. If you create a DVD or Blu-ray Disc with menus, you can link scene buttons on the menus to the Encore
chapter markers.
66
Send to Encore or to an MPEG-2 file
You can send a whole sequence, or any portion of a sequence, from Adobe Premiere Pro to Encore. From Encore, you
can burn the sequence directly to a DVD without menus, or add menus and buttons before burning. From Encore, you
can export the project in any of the following forms:
• you can burn the project to disc,
• you can save the project to a DVD image file,
• you can save the project to a set of DVD folders,
• you can save the project to DVD master files on DLT tape.
• you can export the project to a SWF file for posting on the web.
Alternatively, using the MPEG2-DVD format, you can export a DVD-compliant MPEG-2 file from Adobe Premiere
Pro. You can use the MPEG-2 file in most DVD-authoring applications.
Choose a menu template
Encore templates are predesigned menus that come in several styles. Buttons on the templates automatically link to
chapter markers placed in the sequence. Encore creates additional submenus as necessary to accommodate all the
chapter markers in a sequence.
Note: AutoPlay DVDs do not have menus. Do not choose a template for AutoPlay DVDs.
Customize the menu template
Edit titles, change graphics, or add video for background in Encore. You can also use video in button thumbnails by
specifying a section of a clip to play in the button.
Preview the disc
Check the functionality and the look of your DVD or Blu-ray Disc menus in the Preview DVD window.
Last updated 6/9/2015
Page 72

Workspace and workflows
Burn the disc
With a DVD or Blu-ray Disc burner installed or connected, you can burn your content to disc. You can save the
compressed files to a folder for playback from a computer hard drive. You can also save an ISO image to distribute or
burn to a DVD.
Note: Encore creates DVDs that conform to DVD-video format. It does not create data or audio DVDs.
Working with Apple Final Cut Pro and Adobe Premiere Pro
You can import Final Cut Pro project XML files into Premiere Pro. For more information, see Importing XML project
files from Final Cut Pro . You can export Premiere Pro project files as Final Cut Pro XML files.
For more information, see Export a Final Cut Pro project XML file.
For more information about workflows possible between Final Cut Pro and Premiere Pro, see Open workflows with
Final Cut Pro and Avid software.
Joost van der Hoeven provides a video tutorial on the Adobe website that demonstrates exchanging information
between Final Cut Pro and Premiere Pro using XML projects.
Premiere Pro and Final Cut Pro 7 (and earlier) can share Final Cut Pro XML files for data exchange. To exchange
information between Final Cut Pro X and Premiere Pro, you can use a third party tool called "Xto7." For more
information on using this tool, see
here.
67
See this page for several documents that make the transition from Final Cut Pro to Premiere Pro easier.
Note: An exported XML file from Premiere Pro can be imported into some versions of Final Cut Express, as well.
Working with Avid Media Composer and Adobe Premiere Pro
For information about the workflows possible between Premiere Pro and Avid Media Composer, see Open workflows
with Final Cut Pro and Avid software.
In this video tutorial, Maxim Jago presents the round-tripping workflow with Avid Media Composer.
More Help topics
Export a still image
Transferring and importing files
Capturing content for DVD
Importing assets from tapeless formats
Exporting to DVD or Blu-ray Disc
Cross-platform workflow
You can work on a project across computer platforms. For example, you can start on Windows and continue on Mac
OS. A few functions change, however, as the project moves from one platform to the other.
Sequence settings You can create a project on one platform and then move it to another. Premiere Pro sets the
equivalent sequence settings for the second platform, if there is an equivalent. For example, you can create a DV project
containing DV capture and device control settings on Windows. When you open the project on Mac OS, Premiere Pro
Last updated 6/9/2015
Page 73

Workspace and workflows
sets the appropriate Mac DV capture and device control settings. Saving the project saves these Mac OS settings.
Premiere Pro translates these settings to Windows settings if the project is later opened on Windows.
Effects All video effects available on Mac OS are available in Windows. Windows effects not available on the Mac
appear as offline effects if the project is opened on the Mac. These effects are designated “Windows only” in Premiere
Pro Help. All audio effects are available on both platforms. Effect presets work on both platforms (unless the preset
applies to an effect not available on a given platform).
Adobe Media Encoder presets Presets created on one platform are not available on the other.
Preview files Preview files made on one platform are not available on the other. When a project is opened on a different
platform, Premiere Pro rerenders the preview files. When that project is then opened on its original platform, Premiere
Pro renders the preview files yet again.
High-bit-depth files Windows AVI files containing either 10-bit 4:2:2 uncompressed video (v210), or 8-bit 4:2:2
uncompressed video (UYVU) are not supported on Mac OS.
Preview rendering The playback quality of unrendered non-native files is not as high as playback quality of these files
on their native platforms. For example, AVI files do not play back as well on Mac OS as they do on Windows. Premiere
Pro renders preview files for non-native files on the current platform. Premiere Pro always renders preview files in a
native format. A red bar in the timeline indicates which sections contain files needing rendering.
68
Keyboard shortcuts in Premiere Pro CC
Many commands have keyboard shortcut equivalents, so you can complete tasks with minimal use of the mouse. You
can also create or edit keyboard shortcuts.
Premiere Pro CC default keyboard shortcuts
Results Windows Mac OS
File
Project/Production... Ctrl+Alt+N Opt+Cmd+N
Sequence... Ctrl+N Cmd+N
Bin Cmd+/
Title... Ctrl+T Cmd+T
Open Project/Production... Ctrl+O Cmd+O
Browse in Adobe Bridge... Ctrl+Alt+O Opt+Cmd+O
Close Project Ctrl+Shift+W Shift+Cmd+W
Close Ctrl+W Cmd+W
Save Ctrl+S Cmd+S
Save As... Ctrl+Shift+S Shift+Cmd+S
Save a Copy... Ctrl+Alt+S Opt+Cmd+S
Capture... F5 F5
Batch Capture... F6 F6
Last updated 6/9/2015
Page 74

Workspace and workflows
Import from Media Browser Ctrl+Alt+I Opt+Cmd+I
Import... Ctrl+I Cmd+I
Export
Media... Ctrl+M Cmd+M
Get Properties for
Selection... Ctrl+Shift+H Shift+Cmd+H
Exit Ctrl+Q
Edit
Undo Ctrl+Z Cmd+Z
Redo Ctrl+Shift+Z Shift+Cmd+Z
Cut Ctrl+X Cmd+X
Copy Ctrl+C Cmd+C
Paste Ctrl+V Cmd+V
Paste Insert Ctrl+Shift+V Shift+Cmd+V
69
Paste Attributes Ctrl+Alt+V Opt+Cmd+V
Clear Delete For ward Delete
Ripple Delete Shift+Delete Shift+Forward Delete
Duplicate Ctrl+Shift+/ Shift+Cmd+/
Select All Ctrl+A Cmd+A
Deselect All Ctrl+Shift+A Shift+Cmd+A
Find... Ctrl+F Cmd+F
Edit Original Ctrl+E Cmd+E
Keyboard Shortcuts Ctrl+Alt+K Cmd+Opt+K
Clip
Make Subclip... Ctrl+U Cmd+U
Audio Channels... Shift+G Shift+G
Speed/Duration... Ctrl+R Cmd+R
Insert , ,
Overwrite . .
Enable Shift+E Shift+Cmd+E
Link Ctrl+l Cmd+l
Group Ctrl+G Cmd+G
Ungroup Ctrl+Shift+G Shift+Cmd+G
Sequence
Render Effects in Work Area/In to Out Enter Return
Last updated 6/9/2015
Page 75

Workspace and workflows
Match Frame F F
Reverse Match Frame Shift+R Shift+R
Add Edit Ctrl+K Cmd+K
Add Edit to All Tracks Ctrl+Shift+K Shift+Cmd+K
Trim Edit T T
Extend Selected Edit to Playhead E E
Apply Video Transition Ctrl+D Cmd+D
Apply Audio Transition Ctrl+Shift+D Shift+Cmd+D
Apply Default Transitions to Selection Shift+D Shift+D
Lift ; ;
Extract ' '
Zoom In = =
Zoom Out - -
Go to Gap
70
Next in Sequence Shift+; Shift+;
Previous in Sequence Ctrl+Shift+; Opt+;
Snap S S
Marker
Mark In I I
Mark Out O O
Mark Clip X X
Mark Selection / /
Go to In Shift+I Shift+I
Go to Out Shift+O Shift+O
Clear In Ctrl+Shift+I Opt+I
Clear Out Ctrl+Shift+O Opt+O
Clear In and Out Ctrl+Shift+X Opt+X
Add Marker M M
Go to Next Marker Shift+M Shift+M
Go to Previous Marker Ctrl+Shift+M Shift+Cmd+M
Clear Current Marker Ctrl+Alt+M Opt+M
Clear All Markers Ctrl+Alt+Shift+M Opt+Cmd+M
Type Alignment
Left Ctrl+Shift+L Shift+Cmd+L
Center Ctrl+Shift+C Shift+Cmd+C
Last updated 6/9/2015
Page 76

Workspace and workflows
Right Ctrl+Shift+R Shift+Cmd+R
Tab Stops... Ctrl+Shift+T Shift+Cmd+T
Templates... Ctrl+J Cmd+J
Select
Next Object Above Ctrl+Alt+] Opt+Cmd+]
Next Object Below Ctrl+Alt+[ Opt+Cmd+[
Arrange
Bring to Front Ctrl+Shift+] Shift+Cmd+]
Bring Forward Ctrl+] Cmd+]
Send to Back Ctrl+Shift+[ Shift+Cmd+[
Send Backward Ctrl+[ Cmd+[
Wind ow
Workspace
Reset Current Workspace... Alt+Shift +0 Opt+Shift +0
71
Audio Clip Mixer Shift+9 Shift+9
Audio Track Mixer Shift+6 Shift+6
Effect Controls Shift+5 Shift+5
Effects Shift+7 Shift+7
Media Browser Shift+8 Shift+8
Program Monitor Shift+4 Shift+4
Project Shift+1 Shift+1
Source Monitor Shift+2 Shift+2
Timelines Shift+3 Shift+3
Help
Adobe Premiere Pro Help... F1 F1
Keyboard...
Add Tracks to Match Source
Clear Poster Frame Ctrl+Shift+P Opt+P
Cut to Camera 1 Ctrl+1 Ctrl+1
Cut to Camera 2 Ctrl+2 Ctrl+2
Cut to Camera 3 Ctrl+3 Ctrl+3
Cut to Camera 4 Ctrl+4 Ctrl+4
Cut to Camera 5 Ctrl+5 Ctrl+5
Cut to Camera 6 Ctrl+6 Ctrl+6
Cut to Camera 7 Ctrl+7 Ctrl+7
Last updated 6/9/2015
Page 77

Workspace and workflows
Cut to Camera 8 Ctrl+8 Ctrl+8
Cut to Camera 9 Ctrl+9
Decrease Clip Volume [ [
Decrease Clip Volume Many Shift+[ Shift+[
Expand All Tracks Shift+= Shift+=
Export Frame Ctrl+Shift+E Shift+E
Extend Next Edit To Playhead Shift+W Shift+W
Extend Previous Edit To Playhead Shift+Q Shift+Q
Panels
Audio Mixer Panel Menu
Show/Hide Tracks... Ctrl+Alt+T Opt+Cmd+T
Loop Ctrl+L Cmd+L
Meter Input(s) Only Ctrl+Shift+I Ctrl+Shift+I
Capture Panel
72
Record Video V V
Record Audio A A
Eject E E
Fast Forward F F
Go to In point Q Q
Go to Out point W W
Record G G
Rewind R R
Step Back Left Left
Step Forward Right Right
Stop S S
Effect Controls Panel Menu
Remove Selected Effect Backspace Delete
Effects Panel Menu
New Custom Bin Ctrl+/ Cmd+/
Delete Custom Item Backspace Delete
History Panel Menu
Step Backward Left Left
Step Forward Right Right
Delete Backspace Delete
Open in Source Monitor Shift+O Shift+O
Last updated 6/9/2015
Page 78

Workspace and workflows
Parent Directory Ctrl+Up Cmd+Up
Select Directory List Shift+Left Shift+Left
Select Media List Shift+Right Shift+Right
Loop Ctrl+L Cmd+L
Play Space Space
Go to Next Edit Point Down Down
Go to Previous Edit Point Up Up
Play/Stop Toggle Space Space
Record On/Off Toggle 0 0
Step Back Left Left
Step Forward Right Right
Loop Ctrl+L Cmd+L
To ol s
Selection Tool V V
73
Track Select Tool A A
Ripple Edit Tool B B
Rolling Edit Tool N N
Rate Stretch Tool R R
Razor Tool C C
Slip Tool Y Y
Slide Tool U U
Pen Tool P P
Hand Tool H H
Zoom Tool Z Z
Multi-camera
Result Windows Mac OS
Go to Next Edit Point Down Down
Go to Next Edit Point on Any Track Shift+Down Shift+Down
Go to Previous Edit Point Up Up
Go to Previous Edit Point on Any Track Shift+Up Shift+Up
Go to Selected Clip End Shift+End Shift+End
Go to Selected Clip Start Shift+Home Shift+Home
Go to Sequence-Clip End End End
Go to Sequence-Clip Start Home Home
Last updated 6/9/2015
Page 79

Workspace and workflows
Increase Clip Volume ] ]
Increase Clip Volume Many Shift+] Shift+]
Maximize or Restore Active Frame Shift+` Shift+`
Maximize or Restore Frame Under Cursor ` `
Minimize All Tracks Shift+- Shift+-
Play Around Shift+K Shift+K
Play In to Out Ctrl+Shift+Space Opt+K
Play In to Out with Preroll/Postroll Shift+Space Shift+Space
Play from Playhead to Out Point Ctrl+Space Ctrl+Space
Play-Stop Toggle Space SpaceRecord Voiceover
Reveal Nested Sequence Ctrl+Shift+F Shift+T
Ripple Trim Next Edit To Playhead W W
Ripple Trim Previous Edit To Playhead Q Q
Select Camera 1 1 1
74
Select Camera 2 2 2
Select Camera 3 3 3
Select Camera 4 4 4
Select Camera 5 5 5
Select Camera 6 6 6
Select Camera 7 7 7
Select Camera 8 8 8
Select Camera 9 9 9
Select Find Box Shift+F Shift+F
Select Clip at Playhead D D
Select Next Clip Ctrl+Down Cmd+Down
Select Next Panel Ctrl+Shift+. Ctrl+Shift+.
Select Previous Clip Ctrl+Up Cmd+Up
Select Previous Panel Ctrl+Shift+, Ctrl+Shift+,
Set Poster Frame Shift+P Cmd+P
Shuttle Left J J
Shuttle Right L L
Shuttle Slow Left Shift+J Shift+J
Shuttle Slow Right Shift+L Shift+L
Shuttle Stop K K
Step Back Left Left
Last updated 6/9/2015
Page 80

Workspace and workflows
Step Back Five Frames - Units Shift+Left Shift+Left
Step Forward Right Right
Step Forward Five Frames - Units Shift+Right Shift+Right
Toggle All Audio Targets Ctrl+9 Cmd+9
Toggle All Source Audio Ctrl+Alt+9 Opt+Cmd+9
Toggle All Source Video Ctrl+Alt+0 Opt+Cmd+0
Toggle All Video Targets Ctrl+0 Cmd+0
Toggle Audio During Scrubbing Shift+S Shift+S
Toggle Control Surface Clip Mixer Mode
Toggle Full Screen Ctrl+` Ctrl+`
Toggle Multi-Camera View Shift+0 Shift+0
Toggle Trim Ty pe Shift+T Ctrl+T
Trim Backward Ctrl+Left Opt+Left
Trim Backward Many Ctrl+Shift+Left Opt+Shift+Left
75
Trim Forward Ctrl+Right Opt+Right
Trim Forward Many Ctrl+Shift+Right Opt+Shift+Right
Trim Next Edit to Playhead Ctrl+Alt+W Opt+W
Trim Previous Edit to Playhead Ctrl+Alt+Q Opt+Q
Project panel
Result Windows Mac OS
Workspace 1 Alt+Shift+1 Opt+Shift+1
Work space 2 Alt+Shift+2 Opt+Shift+2
Work space 3 Alt+Shift+3 Opt+Shift+3
Work space 4 Alt+Shift+4 Opt+Shift+4
Work space 5 Alt+Shift+5 Opt+Shift+5
Work space 6 Alt+Shift+6 Opt+Shift+6
Work space 7 Alt+Shift+7 Opt+Shift+7
Work space 8 Alt+Shift+8 Opt+Shift+8
Work space 9 Alt+Shift+9 Opt+Shift+9
Zoom to Sequence \ \
Extend Selection Up Shift+Up Shift+Up
Move Selection Down Down Down
Move Selection End End End
Move Selection Home Home Home
Last updated 6/9/2015
Page 81

Workspace and workflows
Move Selection Left Left Left
Move Selection Page Down Page D own Page Down
Move Selection Page Up Pa ge Up Page Up
Move Selection Right Right Right
Move Selection Up Up Up
Next Column Field Ta b Ta b
Next Row Field Enter Return
Open in Source Monitor Shift+O Shift+O
Previous Column Field Shift+Tab Shift+Tab
Previous Row Field Shift+Enter Shift+Return
Thumbnail Size Next Shift+] Shift+]
Thumbnail Size Previous Shift+[ Shift+[
Toggle View Shift+\ Shift+\
76
Timeline panel
Result Windows Mac OS
Add Clip Marker Ctrl+1
Clear Selection Backspace Delete
Decrease Audio Tracks Height Alt+- Opt+-
Decrease Video Tracks Height Ctrl+- Cmd+-
Increase Audio Tracks Height Alt+= Opt+=
Increase Video Tracks Height Ctrl+= Cmd+=
Nudge Clip Selection Left Five Frames Alt+Shift+Left Shift+Cmd+Left
Nudge Clip Selection Left One Frame Alt+Left Cmd+Left
Nudge Clip Selection Right Five Frames Alt+Shift+Right Shift+Cmd+Right
Nudge Clip Selection Right One Frame Alt+Right Cmd+Right
Ripple Delete Alt+Backspace Opt+Delete
Set Work Area Bar In Point Alt+[ Opt+[
Set Work Area Bar Out Point Alt+] Opt+]
Show Next Screen Page Down Page Down
Show Previous Screen Page Up Page Up
Slide Clip Selection Left Five Frames Alt+Shift+, Opt+Shift+,
Slide Clip Selection Left One Frame Alt+, Opt+,
Slide Clip Selection Right Five Frames Alt+Shift+. Opt+Shift+.
Slide Clip Selection Right One Frame Alt+. Opt+.
Last updated 6/9/2015
Page 82

Workspace and workflows
Slip Clip Selection Left Five Frames Ctrl+Alt+Shift+Left Opt+Shift+Cmd+Left
Slip Clip Selection Left One Frame Ctrl+Alt+Left Opt+Cmd+Left
Slip Clip Selection Right Five Frames Ctrl+Alt+Shift+Right Opt+Shift+Cmd+Right
Slip Clip Selection Right One Frame Ctrl+Alt+Right Opt+Cmd+Right
Titler
Result Windows Mac OS
Arc Tool A A
Bold Ctrl+B Cmd+B
Decrease Kerning by Five Units Alt+Shift+Left Opt+Shift+Left
Decrease Kerning by One Unit Alt+Left Opt+Left
Decrease Leading by Five Units Alt+Shift+Down Opt+Shift+Down
Decrease Leading by One Unit Alt+Down Opt+Down
Decrease Text Size by Five Points Ctrl+Alt+Shift+Left Opt+Shift+Cmd+Left
77
Decrease Text Size by One Point Ctrl+Alt+Left Opt+Cmd+Left
Ellipse Tool E E
Increase Kerning by Five Units Alt+Shift+Right Opt+Shift+Right
Increase Kerning by One Unit Alt+Right Opt+Right
Increase Leading by Five Units Alt+Shift+Up Opt+Shift+Up
Increase Leading by One Unit Alt+Up Opt+Up
Increase Text Size by Five Points Ctrl+Alt+Shift+Right Opt+Shift+Cmd+Right
Increase Text Size by One Point Ctrl+Alt+Right Opt+Cmd+Right
Insert Copyright Symbol Ctrl+Alt+Shift+C Opt+Shift+Cmd+C
Insert Registered Symbol Ctrl+Alt+Shift+R Opt+Shift+Cmd+R
Italic Ctrl+I Cmd+I
Line Tool L L
Nudge Selected Object Down by Five Pixels Shift+Down Shift+Down
Nudge Selected Object Down by One Pixel Down Down
Nudge Selected Object Left by Five Pixels Shift+Left Shift+Left
Nudge Selected Object Left by One Pixel Left Left
Nudge Selected Object Right by Five Pixels Shift+Right Shift+Right
Nudge Selected Object Right by One Pixel Right Right
Nudge Selected Object Up by Five Pixels Shift+Up Shift+Up
Nudge Selected Object Up by One Pixel Up Up
Path Type Tool
Last updated 6/9/2015
Page 83

Workspace and workflows
Pen Tool P P
Position Object(s) to Bottom Title Safe Margin Ctrl+Shift+D Shift+Cmd+D
Position Object(s) to Left Title Safe Margin Ctrl+Shift+F Shift+Cmd+F
Position Object(s) to Top Title Safe Margin Ctrl+Shift+O Shift+Cmd+O
Rectangle Tool R R
Rotation Tool O O
Selection Tool V V
Type Tool T T
Underline Ctrl+U Cmd+U
Vertical Type Tool C C
Wedge Tool W W
Trim Monitor panel
Result Windows Mac OS
78
Focus Both Outgoing and Incoming Alt+1 Opt+1
Focus on Incoming Side Alt+3 Opt+3
Focus on Outgoing Side Alt+2 Opt+2
Loop Ctrl+L Cmd+L
Trim Backward by Large Trim Offset Alt+Shift+Left Opt+Shift+Left
Trim Backward by One Frame Alt+Left Opt+Left
Trim Forward by Large Trim Offset Alt+Shift+Right Opt+Shift+Right
Trim Forward by One Frame Alt+Right Opt+Right
Find keyboard shortcuts
Find the keyboard shortcuts for a tool, button, or menu command by doing any of the following:
• For a tool or button, hold the pointer over the tool or button until its tool tip appears. If available, the keyboard
shortcut appears in the tool tip after the tool description.
• For menu commands, look for the keyboard shortcut at the right of the command.
• For the most-used keyboard shortcuts not shown in tool tips or on menus, see the tables in this article. For a
complete list of default and current shortcuts, choose Edit > Keyboard Shortcuts (Windows) or Premiere Pro >
Keyboard Shortcuts (Mac OS)
• Use the search field in the Keyboard Customization dialog box to find specific commands quickly.
For information about using Apple Final Cut Pro or Avid Media Composer keyboard shortcuts in Adobe Premiere Pro,
customizing keyboard shortcuts, and to move custom keyboard shortcuts to a different system,
see this video by Kevin
Monahan and Karl Soule on AdobeTV.
Last updated 6/9/2015
Page 84

Workspace and workflows
Customize or load keyboard shortcuts
You can set shortcuts to match shortcuts in other software you use. If other sets are available, you can choose them from
the Set menu in the Keyboard Customization dialog box.
1 For customizing keyboard shortcuts, choose one of the following:
• In Windows, choose Edit > Keyboard Shortcuts
• In Mac OS, choose Premiere Pro > Keyboard Shortcuts
2 In the Keyboard Customization dialog box, choose an option from the menu:
Application Displays commands found in the menu bar, organized by category.
Panels Displays commands associated with panels and menus.
Tools Displays a list of tool icons.
3 In the Command column, view the command for which you want to create or change a shortcut. If necessary, click
the triangle next to the name of a category to reveal the commands it includes.
4 Click in the item’s shortcut field to select it.
5 Type the shortcut you want to use for the item. The Keyboard Customization dialog box displays an alert if the
shortcut you choose is already in use.
6 Do one of the following:
• To erase a shortcut and return it to the command that originally had it, click Undo.
79
• To jump to the command that previously had the shortcut, click Go To.
• To simply delete the shortcut you typed, click Clear.
• To re-enter the shortcut you typed previously, click Redo.
7 Repeat the procedure to enter as many shortcuts as you want. When you’re finished, click Save As, type a name for
your Key Set, and click Save.
Note: The operating system reserves some commands. You cannot reassign those commands to Premiere Pro. Also, you
cannot assign the plus (+) and minus (-) keys on the numeric keypad because they are necessary for entering relative
timecode values. You can assign the minus (–) key on the main keyboard, however.
Copy keyboard shortcuts from one computer to another
Sync keyboard shortcuts using Creative Cloud
Premiere Pro CC lets you quickly and easily sync keyboard shortcuts between computers using the Sync Settings
fe atu re. Using Sync Sett ing s, yo u ca n up load the c usto miz ed key bo ard sho rtcu ts f rom y our com put er t o Cre ati ve C loud .
Then, you can sync the keyboard shortcuts from Creative Cloud to any other computer.
For more information, see .
Note: Keyboard shortcuts are synchronized for the same platform only, and not between Windows and Mac platforms.
That is, keyboard shortcuts created for Windows only sync with a Windows computer. Mac OS keyboard shortcuts only
sync with a Mac OS computer.
Last updated 6/9/2015
Page 85

Workspace and workflows
Manually copy keyboard shortcuts
You can copy your customized keyboard shortcuts from one computer to another computer, or to another location on
your computer.
1 Locate the keyboard shortcuts file (.kys) that you want to copy to another computer.
The location of the customized keyboard shortcuts file depends on whether you've signed in to Creative Cloud Sync
Settings in Premiere Pro CC or not.
Signed into Creative Cloud Sync Settings
• Win: Users\[user name]\Documents\Adobe\Premiere Pro\[version]\Profile-CreativeCloud-\Win\
• Mac: Users/[user name]/Documents/Adobe/Premiere Pro/[version]/Profile-CreativeCloud-/Mac/
Signed out of Creative Cloud Sync Settings
• Win: Users\[user name]\Documents\Adobe\Premiere Pro\[version]\Profile-username\Win\
• Mac: Users/[user name]/Documents/Adobe/Premiere Pro/[version]/Profile-username/Mac/
[version] can be 7.0 or 8.0
2 Copy the keyboard shortcuts file (.kys) and paste into the required file location.
To copy the keyboard shortcuts file to a location on a different computer, copy the .kys file to a removable drive, like
a USB thumb drive. Then, copy the .kys file from the removable drive to the appropriate location in the new
computer.
80
Assign multiple keyboard shortcuts to a command
You can assign multiple keyboard shortcuts for a single command.
The Keyboard Shortcuts dialog displays the keyboard shortcut as an editable button, which lets you change, add
multiple shortcuts, or delete shortcuts.
Add additional shortcuts
To add an additional shortcut to a command, click to the right of an existing shortcut. If there is no existing shortcut,
click anywhere in the Shortcut column. A new shortcut button is created in which you can type the shortcut.
Edit a shortcut
To edit a shortcut, click the shor tcut text in the Shortcuts column. The text is replaced with an edit able button. Type the
shortcut that you want to use. If the shortcut you type is already in use, an alert appears.
Last updated 6/9/2015
Page 86

Workspace and workflows
Delete a shortcut
To delete a shortcut, click 'x' in the editable shortcut button.
Remove shortcuts
1 Do one of the following:
• In Windows, choose Edit > Keyboard Shortcuts
• In Mac OS, choose Premiere Pro > Keyboard Shortcuts
2 Do one of the following:
• To remove a shortcut, select the shortcut you want to remove, and click Clear.
• To remove a set of shortcuts, choose the key set from the Set menu and click Delete. When prompted in the
warning dialog box, click Delete to confirm your choice.
Print keyboard shortcuts
Many editors like to have a keyboard shortcuts document they can search and refer to. Premiere Pro offers a way to
copy and paste keyboard shortcuts into a document, and then print. There are also pages in Help documentation that
you can print, or save as a PDF.
81
Whether you are copy and pasting into a document, printing a PDF, or inspecting the Keyboard Shortcuts dialog box,
it is important to note the available commands that are mappable to the keyboard. You can engage in a much more
keyboard driven workflow by adding new keyboard shortcuts.
Print a spreadsheet of the keyboard shortcuts
You can paste the lists of keyboard shortcuts from the Keyboard Customization dialog box into a text document, like a
spreadsheet, from which you can print. The advantage of the copy and pasting method is that you can view your
customized keyboard shortcuts, as well. If you select Final Cut Pro, Avid Media Composer, or Custom keyboard
shortcuts, then those keyboard shortcuts are the ones that are printed.
• Do one of the following:
• Press Ctrl+Shift, and then choose Edit > Keyboard Shortcuts (Windows).
• Press Command+Shift, and then choose Premiere Pro > Keyboard Shortcuts (Mac OS).
• Click the Clipboard button.
• Start a new document in a text editor, or spreadsheet program.
• Paste the contents of the clipboard into the document.
• Save the document and then print it out.
Print a PDF of the keyboard shortcuts
You can print a PDF of the existing keyboard shortcuts in the following Help articles:
Premiere Pro CC (Windows) Premiere Pro CC (Mac)
Open the keyboard shortcuts article in a web browser and print it out.
Last updated 6/9/2015
Page 87

Workspace and workflows
Preferences
Change preferences
You can customize the look and behavior of Premiere Pro, from determining the default length of transitions to setting
the brightness of the user interface. Most of these preferences remain in effect until you change them. The preferences
you set for scratch disks, however, are saved with your projects. Whenever you open a project, it automatically defaults
to the scratch disks you selected for it when you set up that project.
• To open the Preferences dialog box, choose Edit > Preferences (Windows) or Premiere Pro > Preferences (Mac OS),
and select the category of preferences you want to change.
• To restore default preference settings, hold down Alt (Windows) or Option (Mac OS) while the application is
starting. You can release the Alt key or Option key when the splash screen appears.
• To restore default preference settings and plug-in cache at the same time, hold down Shift-Alt (Windows) or Shift-
Option (Mac OS) while the application is starting. Release the Shift-Alt keys or Shift-Option key when the splash
screen appears.
Preferences are stored in the following location:
82
• For Windows: <drive>\Users\<username>\AppData\Roaming\Adobe\Adobe Premiere Pro
• For Mac OS: <drive>/Users/<username>Library/Preferences/com.adobe.AdobePremierePro.plist
This excerpt from the Adobe Premiere Pro Classroom in a Book explains how to set up projects, sequences, and
preferences when getting started with Premiere Pro. See
in Adobe Premiere Pro.
Selecting Settings, Adjusting Preferences, and Managing Assets
General preferences
In the General pane of the Preferences dialog box, you can customize settings for several things from transition
duration to tool tips, like the following:
At Startup You can choose to display Premiere Pro's Welcome screen or display the files that you most recently opened.
Video and Audio Transition defaults Specify the default duration for audio and video transitions
Still Image Default Duration Specify the default duration to display still images
Timeline Playback Auto-Scrolling When a sequence is longer than the visible Timeline, you can select from different
options to auto-scroll the Timeline during playback.
Page Scroll moves the Timeline automatically to a new view after the playhead moves offscreen. Selecting this option
ensures that playback is continuous and doesn't stop.
Selecting Smooth Scroll keeps the playhead in the middle of the screen, while the clips and time ruler move by.
Timeline Mouse Scrolling You can choose vertical or horizontal scrolling. By default, mouse scrolling is horizontal for
Windows and vertical for Mac OS. For Windows, press the Ctrl key to switch to vertical scrolling.
Set Focus On The Timeline When Performing Insert/Overwrite Edits Select this preference if you want the Timeline to
be active, not the Source Monitor, after you make an edit.
Snap Playhead In Timeline When Snap Is Enabled Select this preference to turn on snapping.
Last updated 6/9/2015
Page 88

Workspace and workflows
With snapping turned on, moving the playhead in the Timeline, makes the playhead snap or jump to an edit directly.
For example, you can align the playhead to a specific marker with snapping enabled.
Toggle snapping on and off by pressing S on the keyboard.
Display Out Of Sync Indicators For Unlinked Clips Displays out-of-sync indicators for audio and video when they are
unlinked and moved out of sync.
Default Scale To Frame Size Select this preference to automatically scale imported assets to the project’s default frame
size.
Bins Bin behavior when double-clicking a bin, or double-clicking with the Shift or Option keys can be controlled in
the Bins preference.
Render Audio When Rendering Video Select this preference to let Premiere Pro automatically renders audio previews
whenever it renders video previews. For more information, see
Show Clip Mismatch Warning Dialog When you drag a clip into a sequence, Premiere Pro detects if the attributes of the
Render audio when rendering video.
clip match the sequence settings. If the attributes do not match, the Show Clip Mismatch Warning dialog box appears.
Show Event Indicator
Deselect this preference to turn off the event notification pop-up window that appears in the lower right-corner of the
user interface. For more information, see
Event notification .
83
Fit Clip Dialog Opens For Edit Range Mismatches When you have different In and Out points set in the Source Monitor
and Program Monitor, a Fit Clip dialog box appears. The Fit Clip dialog lets you choose the In and Out points to use.
Select this preference to let Premiere Pro remember your choice and not display the Fit Clip dialog box every time.
Show Tool Tips Lets you turn tool tips on or off.
Appearance preferences
In the Appearance pane of the Preferences dialog box, you can set the overall brightness of the user interface.
You can also control the brightness and saturation of the blue highlight color, interactive controls, and focus indicators.
Audio Preferences
Automatch Time The Automatch Time preference specifies the time, in the Audio Mixer, for any control that has been
ad juste d to retur n to it s prev iou s se tti ng. Affect ed c ontrols are Volu me, Pan, Eff ect and Sen d pa ram eter k nob s in Audio,
Submix and (except sends) Master track. Automatch Time preference affects properties in Touch mode, and in Read
mode for effects with keyframes.
5.1 Mixdown Type Specifies how Premiere Pro mixes source channels to 5.1 audio tracks.
Play Audio While Scrubbing Enables audio scrubbing. You can create a keyboard shortcut called “Toggle Audio During
Scrubbing” to toggle audio scrubbing on or off while scrubbing. Using a keyboard shortcut is preferable to returning
to the Preferences dialog box each time you want to turn audio scrubbing on or off.
Maintain Pitch While Shuttling Lets you maintain the audio pitch during scrubbing and playback while using the J,K,L
keys. Selecting this preference helps improve the clarity of speech when playback is at a higher or slower than normal
speed.
Mute Input During Timeline Recording Check this box to prevent monitoring of the audio inputs while recording the
timeline.
Automatic Peak File Generation Select this preference to let Premiere Pro automatically generate peak files for
waveform display when importing audio. If you don't need to show audio waveforms, deselect this preference.
Last updated 6/9/2015
Page 89

Workspace and workflows
Default Audio Tracks Defines the type of track in which the clip audio channels are presented when a clip is added to
a sequence—Mono, Stereo, 5.1, or Multichannel Mono. Premiere Pro imports and renders each of these track types in
the source format (if you select the Use File option) or converted to another track format (if you select one of the track
types other than Use File). The following list describes the compatibility between tracks and clip types:
• Mono tracks can hold mono and stereo clips
• Stereo tracks can hold mono and stereo clips
• 5.1 tracks can hold only 5.1 clips
• Adaptive tracks can hold mono, stereo, and adaptive (multichannel) clips (but not 5.1)
The following definitions describe how each track type is interpreted in Premiere Pro and presented when dropped into
a sequence:
Mono Media Lets you specify how mono files must be interpreted inside Premiere Pro. The mapping works as follows:
• Use File imports the file in the same format, mono.
• Mono imports the file as mono, as what happens when you select Use File as the source file and your preference
being mono.
• Stereo imports the mono media file as stereo. The mono channel in the file is assigned to one channel in stereo and
the other channel is left as silent for the media to be interpreted as stereo.
84
• 5.1 imports the mono file as a 5.1 surround clip. The mono channel in the file is mapped to one channel in 5.1 format
along with 5 silent channels to interpret the file as 5.1 surround media.
• Adaptive imports the file as an N (Max N is 32) channel clip with the mono channel as the first channel.
Stereo Media Lets you specify how files that are inherently stereo must be interpreted in Premiere Pro. Here are the
possibilities:
• Use File imports the file as in the source format, in this case, stereo.
• Mono imports the file as mono. The L-R channels in the stereo are interpreted as 2 mono channels.
• Stereo imports the file as stereo with the channel mapping exactly as the source format.
• 5.1 imports the file as 5.1 surround clip. The stereo channels in the file along with the 4 silent channels are
interpreted as 5.1 surround media.
• Adaptive imports the file as an N (Max N is 32) channel clip with the stereo channels as the first 2 channels.
5.1 Media Lets you specify how Premiere Pro must treat 5.1 media files. The options are:
• Use File imports the file in the source format, in this case, as 5.1 channel surround media.
• Mono imports file as mono, which results in 6 mono channels
• Stereo imports file as stereo, mapping the 6 channels to 3 stereo pairs.
• 5.1 imports the file as 5.1 media, with the mapping kept exactly as in the source file. In this case, it works the same
as the Use File option.
• Adaptive imports the file as an N (Max N is 32) channel clip with the first 6 channels and the rest of them as silent.
Multichannel Mono Media Lets you specify how files that have N discrete channels are interpreted inside PPro. The
options are:
• Use File Imports the file in the source format, in this case, as multichannel mono media with the same number of
channels as in the source.
• Mono Same as Use File, that is, all N channels are kept as N mono tracks.
Last updated 6/9/2015
Page 90

Workspace and workflows
• Stereo The N mono channels in the source are grouped into (N/2) stereo pairs.
• 5.1 Imports a multichannel mono file as sets of one or more 5.1 tracks by adding extra silent channels (if needed) to
complete sets of 5.1 configuration.
• Adaptive Imports the file as an N (Max N is 32) channel clip with the channels mapped to the same number of mono
channels in the source media.
Automation Keyframe Optimization Defines the linear keyframe thinning and minimum time interval thinning.
Linear Keyframe Thinning Creates keyframes only at points that don’t have a linear relationship to the start and end
keyframes. For example, if you are automating a fade from 0 dB to –12 dB. With this option selected, Premiere Pro
creates keyframes only at the points that represent an increase in value from the beginning (0 dB) and ending (–12 dB)
keyframes. If you don’t select this option, Premiere Pro may create several incremental keyframes of identical values
between those two points, depending on the speed at which you change the value. This option is selected by default.
Minimum Time Interval Thinning Creates keyframes only at intervals larger than the value you specify. Enter a value
from 1 through 2000 milliseconds.
Large Volume Adjustment This preference lets you set the number of decibels to increase when using the Increase Clip
Volume Many command.
Audio Plug-in Manager Launches the Audio Plug-in Manager dialog box to let you work with third-party VST3 plug-
ins, and Audio Units (AU) plug-ins on Mac.
85
Audio Hardware preferences
In the Audio Hardware pane of the Preferences dialog box (Edit > Preferences > Audio Hardware), you can specify the
computer audio device and settings, including the ASIO and MME settings (Windows only), or CoreAudio setting
(Mac OS only) that Premiere Pro uses for audio playback and recording. When you connect an audio hardware device,
the hardware settings for that device type, such as default input, default output, master clock, latency, and sample rate
are loaded in this dialog box. For example, the following screen shows the settings for a connected MME device
(Windows) in which you can modify the default selections in properties:
Last updated 6/9/2015
Page 91

Workspace and workflows
86
The following image shows the preferences for low-latency CoreAudio devices that can support input-only, outputonly, and full-duplex modes. You can change the properties such as Master Clock (MOTU, SPDIF, and ADAT) and I/O
Buffer Size (low latency, 32 samples).
Last updated 6/9/2015
Page 92
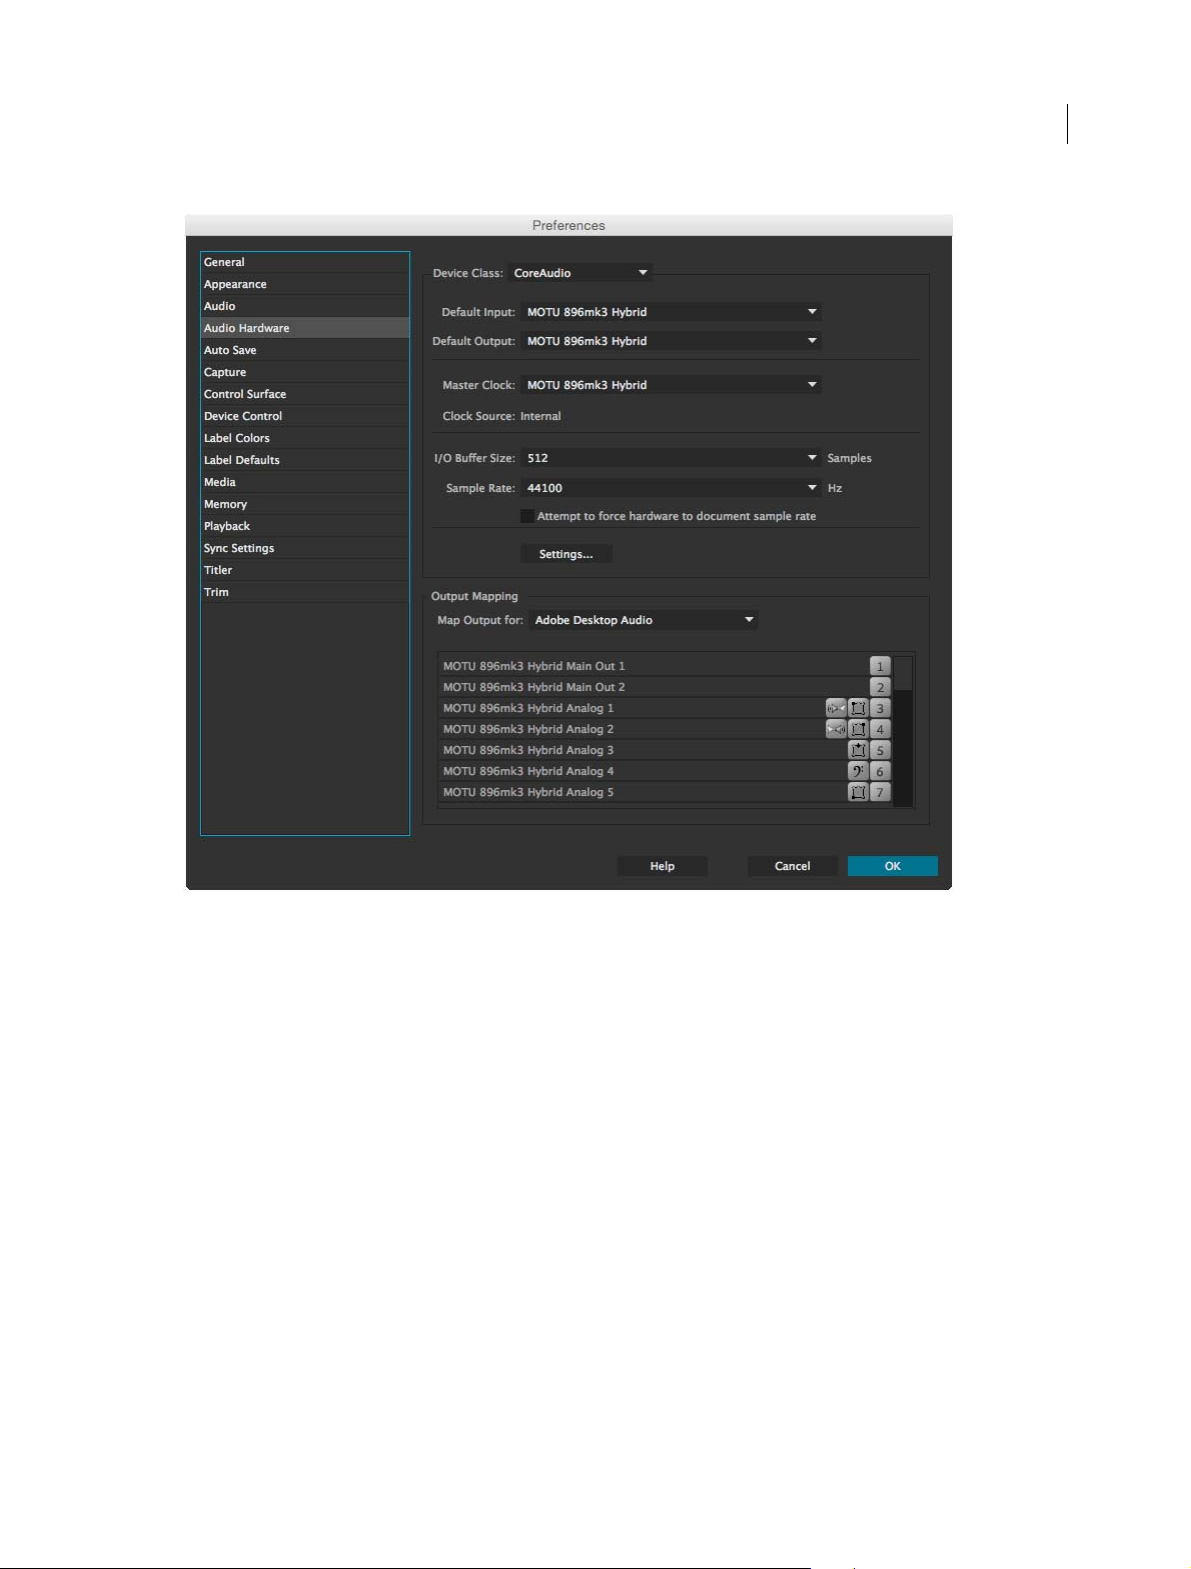
Workspace and workflows
87
Configure audio inputs and outputs
When you configure inputs and outputs for recording and playback, Adobe Premiere Pro can use these kinds of sound
card drivers:
In Windows, ASIO drivers support professional cards and MME drivers typically support standard cards.
In Mac OS, CoreAudio drivers support both professional and standard cards.
ASIO and CoreAudio drivers are preferable because they provide better performance and lower latency. You can also
monitor audio as you record it and instantly hear volume, pan, and effects changes during playback.
1 Choose Edit > Preferences > Audio Hardware (Windows) or Preferences > Audio Hardware (Mac OS).
2 From the Device Class menu, choose the driver for the sound card you want to use.
3 Choose a Default Input and Output from the card. See Assign audio inputs and outputs to tracks in Adobe Audition
Help.
4 (MME and CoreAudio) For Master Clock, choose the input or output to which you want other digital audio
hardware to synchronize (ensuring accurate alignment of samples).
5 For I/O Buffer Size (ASIO and CoreAudio) or Latency (MME), specify the lowest setting possible without audio
dropouts. The ideal setting depends on the speed of your system, so some experimentation may be necessary.
Last updated 6/9/2015
Page 93

Workspace and workflows
6 Choose a Sample Rate for the audio hardware. (For common rates for different output mediums, see Understanding
sample rate in Adobe Audition Help.)
7 (Optional) To optimize the performance of ASIO and CoreAudio cards, click Settings. For more information,
consult the documentation for the sound card.
8 Under Output Mapping, you can specify the target speaker in your computer sound system for each supported audio
channel.
Auto Save preferences
Automatically Save Projects By default, Premiere Pro automatically saves your project every 15 minutes and retains the
last five versions of the project file on the hard disk.
You can revert to a previously saved version at any time. Archiving many iterations of a project consumes relatively little
disk space because project files are much smaller than source video files. It’s best to save project files to the same drive
as your application. Archived files are saved in the Premiere Pro Auto-Save folder.
Automatically Save Every Automatically save Projects, and type the number of minutes you would like between saves.
Maximum Project Versions Enter the number of versions of a project file you want to save. For example, if you type 10,
Premiere Pro saves the ten most recent versions.
88
Note: When you specify auto-save to occur at regular intervals, Premiere Pro auto-saves a project on detecting changes to
the project file.The auto-save occurs irrespective of whether you manually save the changes to the project or not. Earlier,
Premiere Pro would not execute auto-save if you manually saved within the interval setting. If the system goes idle for a
period beyond the interval setting, Premiere Pro forces an auto-save.
Save Backup Project To Creative Cloud Select this preference to let Premiere Pro auto-save your projects directly to
your Creative Cloud-based storage.
When Premiere Pro auto-saves a project, a directory named "auto-save" is created in your Creative Cloud online
storage. All the backed-up projects are stored in the "auto-save" directory.
You can access your backed-up projects from the Files tab of your Creative Cloud desktop application. Or you can
access the files from your
Creative Cloud account on the Web.
Capture preferences
Controls how Premiere Pro transfers video and audio directly from a deck or camera. (None of the other project
settings options affect capturing.) The contents of this panel depend on the editing mode. If you’re capturing DV
footage, use the default DV capture settings. When DV/IEEE 1394 Capture is the selected capture format, no options
are available because the options are automatically set to the IEEE 1394 standard. Additional capture formats and
options appear if you install other software, such as software included with a capture card certified to be compatible
with Premiere Pro.
Note: For P2 DVCPRO 50 and P2 DVCPRO HD projects, the Capture Format setting is not relevant, because the assets
are captured and recorded directly to the P2 card as digital files by the camera.
Control Surface preferences
In the Control Surface panel of the Preferences dialog, you can configure your hardware control device.
The Edit, Add, and Remove buttons let you add, edit, or remove control surfaces in your configuration.
Under Device Class, click Add to select the device. You can add either EUCON or Mackie. Or you can add both.
Last updated 6/9/2015
Page 94

Workspace and workflows
Click Edit to specify configure settings like MIDI Input Device and MIDI Output Device for the selected control
surface.
For more information on using control surface controls with Premiere Pro, see Control surface support.
Device Control preferences
In the Device Control pane of the Preferences dialog box, you specify the settings Premiere Pro uses to control a
playback/recording device, such as a VTR or camcorder.
Label Colors preferences
In the Label Colors pane of the Preferences dialog box, you can change the default colors and color names. You can label
assets with these colors and color names in the Project panels.
Label Defaults preferences
In the Label Defaults pane of the Preferences dialog box, you can change the default colors assigned to bins, sequences,
and different types of media.
89
Media preferences
Indeterminate Media Timebase Specifies the frame rate for imported still-image sequences.
Timecode Specifies whether Premiere Pro shows the original timecode imported clips, or assigns new timecode to
them, starting at 00:00:00.
Frame Count Specifies whether Premiere Pro assigns a 0, or a 1 to the first frame of an imported clip, or assigns a
number by timecode conversion.
Write XMP ID To Files On Import Select this check box to write ID information into XMP metadata fields.
Enable Clip And XMP Metadata Linking Select this check box to link clip metadata to XMP metadata, so that changing
one changes the other.
Include Captions On Import Select this check box to detect and automatically import embedded closed caption data in
an embedded closed caption file. Deselect this check box to not import embedded captions, which helps save time while
importing.
Growing Files Premiere Pro supports growing files for OP1A MXF files. The preference allows users to opt whether
Premiere automatically refreshes as they grow, and if so, how frequently. This preference allows you to edit with these
files in your project immediately.
Memory preferences
In the Memory pane of the Preferences dialog box, you can specify the amount of RAM reserved for other applications,
and for Premiere Pro. For example, as you reduce the amount of RAM reserved for other applications, the amount of
RAM left available for Premiere Pro increases.
Some sequences, such as those containing high-resolution source video or still images, require large amounts of
memory for the simultaneous rendering of multiple frames. These assets can force Premiere Pro to cancel rendering
and to give a Low Memory Warning alert. In these cases, you can maximize the available memory by changing the
Optimize Rendering For preference from Performance to Memory. Change this preference back to Performance when
rendering no longer requires memory optimization.
Last updated 6/9/2015
Page 95

Workspace and workflows
Playback preferences
In the Playback pane of the Preferences dialog box, you can select the default player for audio or video, and set preroll
and postroll preferences. You can also access device settings for third-party capture cards.
Premiere Pro uses the player to play media from clips and sequences for the following:
• Source Monitor
• Program Monitor
• the preview area at the top of the Project panel
• Tr i m mode
• Tr i m Moni tor
• Multi-Camera Monitor
• the video transition preview in the Effect Controls panel.
You can choose the default player for your computer, or a third-party plug-in player for Premiere Pro. Third-party
players are installed with some capture cards.
Preroll The number of seconds before an edit point when playing back footage for a number of editing functions.
Postroll The number of seconds after an edit point when playing back footage for a number of editing functions.
90
Step Forward/Back Many Specifies the number of frames to move when you use the keyboard shortcut Shift+Left or
Right arrow. The default is set to ten frames.
Audio Device Choose an audio device in the Audio Device menu.
Video Device Set up DV and t hird-party de vices for output by clicking t he S ettings button. If a third- party capture c ard
is installed, click the Settings button to access the Mercury Transmit dialog box for video formats, and pixel formats.
A check box is available for disabling video output when in the background.
Sync Settings preferences
When you work with Premiere Pro on multiple machines, managing and syncing preferences, presets, and libraries
between them can be time-consuming, complex, and error prone. The new Sync Settings feature lets you sync your
general preferences, keyboard shortcuts, presets, and libraries to the Creative Cloud. For more information, see
Settings in Premiere Pro CC.
Sync
Titler preferences
In the Titler pane of the Preferences dialog box, you can change the letters Premiere Pro shows in the Titler Style
Swatches panel and in the font browser.
Trim preferences
The Trim Monitor includes Large Trim Offset buttons. Clicking one of these buttons moves a trim point earlier or later.
In the Trim pane of the Preferences dialog box, you can specify the number of frames that the Large Trim Offset buttons
move trim points.
Last updated 6/9/2015
Page 96

Chapter 4: Project setup
Creating and changing projects
A project file stores information about sequences and assets, such as settings for capture, transitions, and audio mixing.
Also, the project file contains the data from all of your editing decisions, such as the In and Out points for trimmed
clips and the parameters for each effect. Premiere Pro creates a folder on your hard disk at the start of each new project.
By default, this is where it stores the files it captures, the preview and conformed audio files it creates, and the project
file itself.
For every project you create, Premiere Pro creates a project file. This file contains the settings you select for each
sequence in the project, as well as crucial data about the assets, edit decisions, and effects used in the project.
Premiere Pro doesn’t store video, audio, or still image files in the project file—it stores only a reference to each of these
files, a clip, which is based on the filename and location of the file at the time you imported it. If you later move, rename,
or delete a source file, Premiere Pro can’t find it automatically the next time you open the project. In this case, Premiere
Pro displays the Where Is The File dialog box.
91
By default, every project includes a single Project panel. This acts as a storage area for all clips used in the project. You
can organize a project’s media and sequences using bins in the Project panel.
A project may contain multiple sequences, and the sequences within a project may differ from one another in their
settings. Within a single project, you can edit individual segments as separate sequences, and then combine the
segments into a finished program by nesting them into a longer sequence. Similarly, you can store multiple variations
of a sequence, as separate sequences, in the same project.
Note: There’s no need to save copies of a project when creating different segments or versions of the same video program.
Simply create new or duplicate sequences within a single project file.
Learn tutorial
Wa tc h this tutorial to learn how to create a project and specify options and general project settings in Premiere Pro.
Create a project
Projects may contain more than one sequence, and the settings for one sequence may differ from that of another.
Premiere Pro will prompt you for settings for the first sequence every time you create a new project. However, you can
cancel this step to create a project containing no sequences.
1 (Optional) If you plan to capture video from a device, connect the device to your computer using an IEEE 1394 or
SDI connection. Then turn the device on, and do one of the following:
• If the device is a camera, set it to the playback mode, which may be labeled VTR or VCR.
• If the device is a deck, make sure that its output is set properly.
Note: Don’t set a camera to any of the recording modes, which may be labeled Camera or Movie.
2 Either choose New Project on the Welcome screen that appears when Premiere Pro starts up or, after the application
is open, choose File > New > Project.
Last updated 6/9/2015
Page 97

Project setup
3 Browse to a location where you want to save the project file, name the project, and click OK.
Note: Whenever possible, specify a location and name that you won’t have to change later. By default, Premiere Pro
stores rendered previews, conformed audio files, and captured audio and video in the folder where you store the project.
Moving a project file later may require moving its associated files as well.
4 Do one of the following:
• Select a preset, or customize settings, for the first sequence of the project. For more information, see Create a
sequence. Then, click OK.
• To create a project without a sequence, click Cancel.
5 (Optional) If you want to change where Premiere Pro stores various types of files, specify the scratch disk locations.
Specify scratch disks to improve system performance.
See
Note: Premiere Pro supports high bit-depth (greater than 8 bits per channel) video necessary for editing standard and
high definition footage.
Review project settings
All project settings apply to the whole project, and most can’t be changed after a project is created.
After you begin working in a project, you can review project settings, but you can change only a few of them. You can
access these settings through the Project Settings dialog box.
92
1 Choose Project > Project Settings > General, or Project > Project Settings > Scratch Disks.
2 View or change settings as needed.
3 Click OK.
Project Settings dialog box
General
Video Rendering and Playback Specifies whether the software or hardware function of the Mercury Playback Engine
is enabled or not. If a qualified CUDA card is installed, the choice for hardware rendering and playback with the
Me rcu ry Pla ybac k Eng ine w ill b e ena ble d. For m ore info rma tion abo ut C UDA , Me rcu ry Play back Eng ine a nd P rem iere
see this post on the Premiere Pro Work Area blog.
Pro,
Title Safe Area Specifies how much of the frame edge to mark as a safe zone for titles, so that titles aren’t cut off by
television set overscan. A rectangle with cross hairs marks the title-safe zone when you click the Safe Margins button
in the Source Monitor or Program Monitor. Titles are usually assumed to require a wider safe zone than action.
Action Safe Area Specifies how much of the frame edge to mark as a safe zone for action so that action isn’t cut off by
television set overscan. A rectangle marks the action-safe zone when you click the Safe Margins button in the Source
Monitor or Program Monitor.
Display Format (Video and Audio) For information about video and audio display formats, see their entries under
General Settings in
Capture Format For information about setting the capture format, see Set capture format, preferences, and tracks.
Sequence presets and settings.
Scratch Disks
For information about designating scratch disks, see Specify scratch disks to improve system performance.
Last updated 6/9/2015
Page 98

Project setup
Open a project
Premiere Pro for Windows can open project files created with earlier versions of Premiere Pro or Adobe Premiere 6.x.
You can open only one project at a time. To transfer the contents of one project into another, use the Import command.
Use the Auto Save command to automatically save copies of your projects in the Premiere Pro Auto-Save folder.
You may encounter missing files as you work on a project. You can continue working by substituting offline files as
placeholders for the missing files. You can edit using offline files, but you must bring the originals back online before
rendering your movie.
To bring a file back online after the project is open, use the Link Media command. You can continue working without
having to close and reopen the project.
1 Choose File > Open Project.
2 Browse to the project file and select it.
3 Select Open.
4 If the Where Is The File dialog box opens, locate the file using the Look In field, or choose one of the following in
the Where Is The File dialog box:
Find Launches the Windows Explorer (Windows) or Finder (Mac OS) search feature.
When moving a project and assets to a different machine, you can edit the file path in the project file so that
Premiere Pro finds the files associated with the project automatically. Open the PRPROJ file in a text editor, or in an
XML editor like Dreamweaver. Search for the file path that was used when the project was on the previous machine.
Replace it with the file path on the new machine.
93
Skip Replaces a missing file with a temporary offline clip for the duration of a session. When you close your project
and then reopen it, you see a dialog box that asks you to locate the file or allows you to skip it again.
Skip All Like Skip, Skip All replaces all missing files with temporary offline files.
Note: Select Skip or Skip All only when you are certain that you want to rework all the instances where the file is used
in the project. If you want to keep the file in the project but can’t locate it at the moment, use Offline instead.
Skip Previews Stops Premiere Pro from searching for any preview files already rendered for the project. This allows
the project to load faster, but you may need to render parts of its sequences for best playback performance.
Offline Replaces a missing file with an offline clip, a placeholder that preserves all references to the missing file
everywhere in the project. Unlike the temporary offline clip created by Skip, the one generated by Offline persists
between sessions, so you won’t have to locate missing files every time the project is opened.
Offline All Like Offline, Offline All replaces all missing files with persistent offline files.
Note: Do not delete source files while you are using them as clips in a Premiere Pro project unless they were captured using
device control, and you plan to recapture them. After you deliver the final movie, you can delete source files.
Delete a project file
1 In Windows Explorer (Windows) or Finder (Mac OS), browse to the Premiere Pro project file, and select it. Project
files have a .prproj filename extension.
2 Press Delete.
Last updated 6/9/2015
Page 99

Project setup
Moving a project to another computer
To move a project to another computer where you want to continue editing, you must move copies of all the assets for
the project to the second computer, as well as the project file. The assets should retain their file names and folder
locations so that Premiere Pro can find them and relink them to their clips in the project automatically.
Make certain, also that the same codecs you used for the project on the first computer are also installed on the second
computer. For more information about moving a project and its assets to another computer, see
archive your project .
More Help topics
Sequence presets and settings
Create a sequence
Importing earlier Premiere Pro projects
Importing sequences, clip lists, libraries, and compositions
Cross-platform workflow
Copy, transcode, or archive your project
Copy, transcode, or
94
Consolidate, transcode, and archive projects
The Premiere Pro Project Manager helps facilitate an efficient archiving or transcoding workflow by performing two
functions:
• Collecting or copying the current project and all of its associated media files to a single location for sharing
• Consolidating files associated with a project for transcoding into a single codec for easy archiving
Copying projects to a new location
The Project Manager can help you collect a project to a new location. Collecting files copies the current project and all
of its associated media files to a single storage location. There is no conversion of files when the files are copied.
When collecting a project, you can specify whether the new project retains any of the unused clips from the original
project. You also reduce storage requirements by using only the media required to create and export the sequences in
the project.
You can use this workflow to gather and copy a project’s source media files stored in various locations into a single
location for easy sharing.
Consolidating and archiving projects
The Project Manager lets you effectively manage media and projects, especially large projects with many clips and
different media formats.
You can easily archive large projects by transcoding all relevant files in projects and sequences into an intermediate or
mezzanine codec.
The Project Manager provides several options to consolidate relevant files into a mezzanine codec based on userdefined preferences. While consolidating the files, the Project Manager copies only portions of source footage used in
sequences and automatically creates a trimmed project.
Last updated 6/9/2015
Page 100

Project setup
You can easily archive this single codec, or share with other teams and systems. At any point, you can re-edit the
archived projects in Premiere Pro.
Note: The functionality of the Create New Trimmed Project option, available in previous versions of Premiere Pro, is
included the Consolidate And Transcode option. That is, you can choose to trim your media while archiving a project.
How to copy, transcode, or archive a project
1 Choose File > Project Manager.
2 In the Project Manager window, under Sequence, select the check box next to each sequence that you want to select.
To check all boxes, Shift-click any one box.
Note: Nested sequences are not automatically selected. If the sequences you are selecting contain nested sequences,
ensure that you include these nested sequences in your selection.
3 You can copy or transcode your project by selecting one of the following options:
Collect Files and Copy to New Location To collect and copy the footage you used in the selected sequences to a single
storage location.
Note: Project Manager does not collect and copy After Effects compositions that are dynamically linked to an Adobe
Premiere Pro project. Project Manager does save the Dynamic Link clip in the trimmed project as an offline clip,
however.
95
Consolidate and Transcode To consolidate the footage you used in the selected sequences and transcode into a
single codec for archiving.
• Match: Match the settings of the newly created media with the sequence settings, individual clip settings, or
presets.
Sequence Uses the frame size, frame rate, field type, and pixel aspect ratio of the selected sequence, and transcodes
the matching clips to these settings.
Clips that don't match these settings are only copied and not transcoded.
Individual Clips Uses the frame size, frame rate, field type, and pixel aspect ratio of each individual clip in the
sequence, and transcodes them using their individual settings.
When the source cannot be matched, the clip is only copied and not transcoded. For example, if the clip contains an
attribute that the chosen format or preset does not support.
Preset Uses the frame size, frame rate, field type, and pixel aspect ratio of the chosen preset and transcodes all clips
to these settings.
When the sources cannot be matched, the clips are only copied and not transcoded.
• Format: You can choose from MXF OP1a files, MXF OP1a files in DNXHD format, or QuickTime format.
• Preset: Based on the selected format, the applicable preset options appear.
Note: The only preset that supports alpha is the GoPro CineForm With Alpha preset. All other presets flatten any alpha
channel.
4 Premiere Pro creates a new project file that links to the selected media based on the following options.
Note: The options that are available depend on the option you choose in the previous step.
Exclude Unused Clips Specifies that Project Manager will not include, or copy, media you did not use in the original
project.
Last updated 6/9/2015
 Loading...