

Page 1

User Guide
Page 2

© 2000 Adobe Systems Incorporated. All Rights Reserved. Patent pending.
All PhotoDisc images: © 1997 PhotoDisc, Inc.
This manual, as well as the software described in it, is furnished under license and may only be used or copied in accordance
with the terms of such license. The information in this manual is furnished for informational use only, is subject to change
without notice, and should not be construed as a commitment by Adobe Systems Incorporated. Adobe Systems Incorporated
assumes no responsibility or liability for any errors or inaccuracies that may appear in this book.
Except as permitted by such license, no part of this publication may be reproduced, stored in a retrieval system, or transmitted, in any form or by any means, electronic, mechanical, recording, or otherwise, without the prior written permission of
Adobe Systems Incorporated.
Please remember that existing movies, sounds, or images that you may want to use in your project may be protected under
copyright law. The unauthorized incorporation of such material into your new work could be a violation of the rights of the
copyright owner. Please be sure to obtain any permission required from such authors.
Adobe, the Adobe Logo, Adobe Premiere, After Effects, Classroom in a Book, Illustrator, PageMaker, Photoshop, and PostScript are trademarks of Adobe Systems Incorporated, registered in certain jurisdictions. Apple, Macintosh, Power Macintosh, Mac OS, FireWire, and QuickTime are registered trademarks of Apple Computer, Inc., registered in the U.S. and other
countries. QuickTime and the QuickTime logo are trademarks used under license. PowerPC is a trademark of International
Business Machines Corporation. DirectShow is a trademark of and DirectX, Microsoft, MS-DOS, Video for Windows,
Windows, and Windows NT are registered trademarks of Microsoft Corporation in the U.S. and/or other countries. All other
trademarks are the property of their respective owners.
Contains implementation of the LZW algorithm licensed under U.S. Patent No. 4,558,302.
QuickHelp™ is licensed from Altura Software, Inc. End-User is prohibited from taking any action to derive a source code
equivalent of QuickHelp, including reverse assembly or reverse compilation.
Written and designed at Adobe Systems Incorporated, 345 Park Avenue, San Jose, CA 95110-2704, USA
Adobe Systems Europe Limited, Adobe House, 5 Mid New Cultins, Edinburgh EH11 4DU, Scotland, United Kingdom
Adobe Systems Co., Ltd., Yebisu Garden Place Tower, 4-20-3 Ebisu, Shibuya-ku, Tokyo 150, Japan
For defense agencies: Restricted Rights Legend. Use, reproduction or disclosure is subject to restrictions set forth in subparagraph (c)(1)(ii) of the Rights in Technical Data and Computer Software clause at 252.227-7013.
For Civilian agencies: Restricted Rights Legend. Use, reproduction or disclosure is subject to restrictions set forth in subparagraphs (a) through (d) of the commercial Computer Software Restricted Rights clause at 52.227-19 and the limitations set
forth in Adobe’s standard commercial agreement for this software. Unpublished rights reserved under the copyright laws of
the United States.
Printed in the USA.
Part number: 90012291 (12/00)
Page 3

Contents
iii
Introduction
An Overview of Adobe
Premiere
Registration . . . . . . . . . . . . . . . . . . . . . . . . . . . . . . . . . . . . . . . . 1
Installing Adobe Premiere . . . . . . . . . . . . . . . . . . . . . . . . . . . . . . 1
Learning Premiere . . . . . . . . . . . . . . . . . . . . . . . . . . . . . . . . . . . 1
Using Web resources . . . . . . . . . . . . . . . . . . . . . . . . . . . . . . . . . 3
Other learning resources . . . . . . . . . . . . . . . . . . . . . . . . . . . . . . 5
Customer support . . . . . . . . . . . . . . . . . . . . . . . . . . . . . . . . . . . 5
Setting up your workspace . . . . . . . . . . . . . . . . . . . . . . . . . . . . . 8
Starting a project . . . . . . . . . . . . . . . . . . . . . . . . . . . . . . . . . . . 10
Work area overview . . . . . . . . . . . . . . . . . . . . . . . . . . . . . . . . . 12
Using tools and palettes . . . . . . . . . . . . . . . . . . . . . . . . . . . . . . 13
Looking at the Project window . . . . . . . . . . . . . . . . . . . . . . . . . 14
Looking at the Timeline window . . . . . . . . . . . . . . . . . . . . . . . . 16
Looking at the Monitor window . . . . . . . . . . . . . . . . . . . . . . . . 18
Acquiring source material . . . . . . . . . . . . . . . . . . . . . . . . . . . . . 21
Adding clips to the Timeline . . . . . . . . . . . . . . . . . . . . . . . . . . . 23
Trimming clips . . . . . . . . . . . . . . . . . . . . . . . . . . . . . . . . . . . . . 26
Editing clips in the Timeline . . . . . . . . . . . . . . . . . . . . . . . . . . . 28
Applying transitions . . . . . . . . . . . . . . . . . . . . . . . . . . . . . . . . . 30
Previewing a clip or a video program . . . . . . . . . . . . . . . . . . . . 32
Adjusting audio levels . . . . . . . . . . . . . . . . . . . . . . . . . . . . . . . 34
Panning or balancing audio . . . . . . . . . . . . . . . . . . . . . . . . . . . 36
Applying effects . . . . . . . . . . . . . . . . . . . . . . . . . . . . . . . . . . . . 38
Using the Title window . . . . . . . . . . . . . . . . . . . . . . . . . . . . . . . 41
Creating composites . . . . . . . . . . . . . . . . . . . . . . . . . . . . . . . . 42
Animating a still image . . . . . . . . . . . . . . . . . . . . . . . . . . . . . . 44
An overview of output options . . . . . . . . . . . . . . . . . . . . . . . . . 46
Exporting to the Web . . . . . . . . . . . . . . . . . . . . . . . . . . . . . . . . 47
Page 4

iv
CONTENTS
What’s New in
Premiere 6.0
Working with Projects
DV functionality . . . . . . . . . . . . . . . . . . . . . . . . . . . . . . . . . . . . 50
Built-in Web export for one-step Web output . . . . . . . . . . . . . . 53
Enhanced Monitor and Timeline windows . . . . . . . . . . . . . . . . . 55
Audio Mixer . . . . . . . . . . . . . . . . . . . . . . . . . . . . . . . . . . . . . . . 58
Improved project management . . . . . . . . . . . . . . . . . . . . . . . . . 60
Visualization tools . . . . . . . . . . . . . . . . . . . . . . . . . . . . . . . . . . 63
Enhanced effect support . . . . . . . . . . . . . . . . . . . . . . . . . . . . . . 65
Customizable workspace . . . . . . . . . . . . . . . . . . . . . . . . . . . . . 67
New tools and a more familiar interface . . . . . . . . . . . . . . . . . . 69
Chapter 1
Selecting an initial workspace . . . . . . . . . . . . . . . . . . . . . . . . . 73
Starting a project . . . . . . . . . . . . . . . . . . . . . . . . . . . . . . . . . . . 73
Specifying project settings . . . . . . . . . . . . . . . . . . . . . . . . . . . . 74
Comparing settings using the Settings Viewer . . . . . . . . . . . . . . 82
Saving and autosaving a project . . . . . . . . . . . . . . . . . . . . . . . . 83
Opening a project . . . . . . . . . . . . . . . . . . . . . . . . . . . . . . . . . . 85
Removing unused frames from source clips . . . . . . . . . . . . . . . . 86
Using a Premiere project on another platform . . . . . . . . . . . . . . 87
Setting up Premiere’s scratch disks . . . . . . . . . . . . . . . . . . . . . . 88
Correcting mistakes . . . . . . . . . . . . . . . . . . . . . . . . . . . . . . . . . 89
Working with windows in Premiere . . . . . . . . . . . . . . . . . . . . . 90
Using the Project window’s bin view . . . . . . . . . . . . . . . . . . . . . 92
Customizing a Project or Bin window display . . . . . . . . . . . . . . 94
Naming, finding, and deleting items . . . . . . . . . . . . . . . . . . . . . 97
Printing window contents . . . . . . . . . . . . . . . . . . . . . . . . . . . . . 98
Creating a text list of project files . . . . . . . . . . . . . . . . . . . . . . . 99
Changing the startup window . . . . . . . . . . . . . . . . . . . . . . . . 100
Working with palettes . . . . . . . . . . . . . . . . . . . . . . . . . . . . . . 100
Using other palettes . . . . . . . . . . . . . . . . . . . . . . . . . . . . . . . . 105
Capturing and Importing
Source Clips
Chapter 2
Capture checklist . . . . . . . . . . . . . . . . . . . . . . . . . . . . . . . . . . 110
Understanding offline and online editing . . . . . . . . . . . . . . . . 111
Connecting the analog video source . . . . . . . . . . . . . . . . . . . . 112
Connecting the DV video source . . . . . . . . . . . . . . . . . . . . . . . 112
Digitizing analog video as DV . . . . . . . . . . . . . . . . . . . . . . . . . 113
Page 5

CONTENTS
v
Editing Video
Recording or replacing timecode (DV only) . . . . . . . . . . . . . . . 114
File-size limitations . . . . . . . . . . . . . . . . . . . . . . . . . . . . . . . . 116
Preparing for analog capture . . . . . . . . . . . . . . . . . . . . . . . . . 117
Preparing for DV video capture . . . . . . . . . . . . . . . . . . . . . . . . 120
Using the Movie Capture window . . . . . . . . . . . . . . . . . . . . . . 125
Capturing clips without device control . . . . . . . . . . . . . . . . . . 126
Capturing clips with device control . . . . . . . . . . . . . . . . . . . . . 127
Batch-capturing video . . . . . . . . . . . . . . . . . . . . . . . . . . . . . . 130
Capturing stop-motion animation . . . . . . . . . . . . . . . . . . . . . . 139
Reading timecode from source video . . . . . . . . . . . . . . . . . . . 142
Capturing analog audio . . . . . . . . . . . . . . . . . . . . . . . . . . . . . 144
Importing digital audio . . . . . . . . . . . . . . . . . . . . . . . . . . . . . . 145
About D1, DV, and various pixel aspect ratios . . . . . . . . . . . . . 147
Importing clips . . . . . . . . . . . . . . . . . . . . . . . . . . . . . . . . . . . . 151
Importing another project . . . . . . . . . . . . . . . . . . . . . . . . . . . . 156
Analyzing clip properties and data rate . . . . . . . . . . . . . . . . . . 157
Using offline files . . . . . . . . . . . . . . . . . . . . . . . . . . . . . . . . . . 158
Chapter 3
Using the Monitor window . . . . . . . . . . . . . . . . . . . . . . . . . . . 163
Selecting an editing workspace . . . . . . . . . . . . . . . . . . . . . . . 169
Using the Timeline window . . . . . . . . . . . . . . . . . . . . . . . . . . . 171
Editing In and Out points . . . . . . . . . . . . . . . . . . . . . . . . . . . . 180
Using named duplicate clips and unnamed instances of clips . 184
Using markers . . . . . . . . . . . . . . . . . . . . . . . . . . . . . . . . . . . . 185
Editing clips . . . . . . . . . . . . . . . . . . . . . . . . . . . . . . . . . . . . . . 189
Editing a video program . . . . . . . . . . . . . . . . . . . . . . . . . . . . . 198
Creating a counting leader . . . . . . . . . . . . . . . . . . . . . . . . . . . 227
Creating color bars and a 1-kHz tone . . . . . . . . . . . . . . . . . . . 227
Creating black video . . . . . . . . . . . . . . . . . . . . . . . . . . . . . . . 228
Previewing a video program . . . . . . . . . . . . . . . . . . . . . . . . . . 228
Page 6

vi
CONTENTS
Adding Transitions
Mixing Audio
Chapter 4
About transitions . . . . . . . . . . . . . . . . . . . . . . . . . . . . . . . . . . 239
Using the Transitions palette . . . . . . . . . . . . . . . . . . . . . . . . . . 239
Creating transitions . . . . . . . . . . . . . . . . . . . . . . . . . . . . . . . . 241
Replacing a transition . . . . . . . . . . . . . . . . . . . . . . . . . . . . . . 247
Changing transition settings . . . . . . . . . . . . . . . . . . . . . . . . . . 248
Chapter 5
Understanding how Premiere processes audio . . . . . . . . . . . . 255
Adjusting gain . . . . . . . . . . . . . . . . . . . . . . . . . . . . . . . . . . . . 256
Adjusting audio levels in the Timeline . . . . . . . . . . . . . . . . . . . 257
Cross-fading clips linked to video . . . . . . . . . . . . . . . . . . . . . . 260
Panning or balancing a clip . . . . . . . . . . . . . . . . . . . . . . . . . . 262
Working with the Audio Mixer window . . . . . . . . . . . . . . . . . . 263
Adjusting audio levels in the Audio Mixer window
using automation . . . . . . . . . . . . . . . . . . . . . . . . . . . . . . . . . . 266
Understanding nonlinear volume changes . . . . . . . . . . . . . . . 268
Panning or balancing in the Audio Mixer window
using automation . . . . . . . . . . . . . . . . . . . . . . . . . . . . . . . . . . 269
Using a clip’s left or right stereo channel only . . . . . . . . . . . . . 270
Muting one channel of a stereo clip . . . . . . . . . . . . . . . . . . . . 270
Swapping channels in a stereo clip . . . . . . . . . . . . . . . . . . . . . 271
Viewing audio clips . . . . . . . . . . . . . . . . . . . . . . . . . . . . . . . . 271
Creating Titles
Chapter 6
Creating and setting up a new title . . . . . . . . . . . . . . . . . . . . . 275
Creating text objects . . . . . . . . . . . . . . . . . . . . . . . . . . . . . . . 279
Creating rolling and crawling text . . . . . . . . . . . . . . . . . . . . . . 282
Creating graphic objects . . . . . . . . . . . . . . . . . . . . . . . . . . . . . 284
Adding a shadow . . . . . . . . . . . . . . . . . . . . . . . . . . . . . . . . . . 286
Using color, transparency, and gradients . . . . . . . . . . . . . . . . . 287
Using the color picker . . . . . . . . . . . . . . . . . . . . . . . . . . . . . . . 290
Arranging text and graphic objects . . . . . . . . . . . . . . . . . . . . . 290
Adding a title to a project . . . . . . . . . . . . . . . . . . . . . . . . . . . 291
Page 7

vii
CONTENTS
Superimposing and
Compositing
Animating a Clip
Applying Effects
Chapter 7
About transparency . . . . . . . . . . . . . . . . . . . . . . . . . . . . . . . . 295
Using the Video Opacity rubberband . . . . . . . . . . . . . . . . . . . . 296
Using keys to superimpose and create composites . . . . . . . . . 298
Superimposing two or more clips . . . . . . . . . . . . . . . . . . . . . . 306
Adding a background matte . . . . . . . . . . . . . . . . . . . . . . . . . . 306
Creating garbage mattes . . . . . . . . . . . . . . . . . . . . . . . . . . . . 307
Creating split screens . . . . . . . . . . . . . . . . . . . . . . . . . . . . . . . 308
Chapter 8
Animating a clip’s motion . . . . . . . . . . . . . . . . . . . . . . . . . . . . 311
Rotating, zooming, delaying, and distorting . . . . . . . . . . . . . . 316
Specifying an exact time for motion . . . . . . . . . . . . . . . . . . . . 317
Specifying alpha channel and color options . . . . . . . . . . . . . . . 318
Saving, loading, and deleting motion settings . . . . . . . . . . . . . 319
Chapter 9
Understanding keyframes . . . . . . . . . . . . . . . . . . . . . . . . . . . . 323
Working with keyframes . . . . . . . . . . . . . . . . . . . . . . . . . . . . . 324
Working with effects . . . . . . . . . . . . . . . . . . . . . . . . . . . . . . . 326
Using After Effects effects . . . . . . . . . . . . . . . . . . . . . . . . . . . . 332
Obsolete effects . . . . . . . . . . . . . . . . . . . . . . . . . . . . . . . . . . . 332
Producing Final Video
Chapter 10
About exporting video from Premiere . . . . . . . . . . . . . . . . . . . 337
File types available for export . . . . . . . . . . . . . . . . . . . . . . . . . 337
Exporting to videotape . . . . . . . . . . . . . . . . . . . . . . . . . . . . . . 338
About creating Internet media . . . . . . . . . . . . . . . . . . . . . . . . 343
About creating a video file for CD-ROM playback . . . . . . . . . . 345
About creating a video file for use in other software . . . . . . . . 346
Page 8

viii
CONTENTS
Exporting a video . . . . . . . . . . . . . . . . . . . . . . . . . . . . . . . . . . 347
Exporting a still image . . . . . . . . . . . . . . . . . . . . . . . . . . . . . . 348
Exporting a sequence of still images . . . . . . . . . . . . . . . . . . . . 348
Exporting a filmstrip file for editing in Adobe Photoshop . . . . . 349
Exporting a project for use in Adobe After Effects . . . . . . . . . . 350
Processing a batch of projects . . . . . . . . . . . . . . . . . . . . . . . . 351
About export settings . . . . . . . . . . . . . . . . . . . . . . . . . . . . . . . 352
Choosing export settings . . . . . . . . . . . . . . . . . . . . . . . . . . . . 355
About creating motion-picture film . . . . . . . . . . . . . . . . . . . . . 361
Exporting an edit decision list . . . . . . . . . . . . . . . . . . . . . . . . . 362
Index
. . . . . . . . . . . . . . . . . . . . . . . . . . . . . . . . . . . . . . . . . . 371
Page 9

Introduction
elcome to Adobe® Premiere®—software that brings the world of digital video editing to the
®
Windows
W
cards, hardware systems, and many input/output formats.
Registration
So that Adobe can continue to provide you with the highest quality software, offer technical support, and
inform you about new Premiere software developments, please register your application.
When you first start the application, you’re prompted to register online. You can choose to submit the form
directly or fax a printed copy. You can also register by filling out and returning the warranty registration
card included with your software package.
Installing Adobe Premiere
You must install Premiere from the Adobe Premiere CD onto your hard drive; you cannot run the program
from the CD.
or Macintosh desktop. Premiere also provides extensive support for video capture
1
Follow the on-screen installation instructions after inserting the CD. For more detailed information, see
the How_to_Install file on the CD.
Learning Premiere
Adobe provides a variety of options for you to learn Premiere, including printed guides, online Help, and
tool tips. Using the Adobe Online feature, you can easily access a host of continually updated Web
resources for learning Premiere, from tips and tutorials to technical support information.
®
Adobe Acrobat
or Adobe Acrobat is required to view many documents included on this CD.
Using the printed documentation
Two printed documents are included with Adobe Premiere 6.0.
Reader™ software, included on the Premiere CD, lets you view PDF files. Acrobat Reader
Page 10

2
Introduction
Adobe Premiere 6.0 User Guide
Contains information on using all Premiere commands and features.
The User Guide also indicates when further information on a topic is available in online Help.
The guide assumes you have a working knowledge of your computer and its operating conventions,
including how to use a mouse and standard menus and commands. It also assumes you know how to open,
®
save, and close files. For help with any of these techniques, please see your Microsoft
Windows or Mac OS
documentation.
Adobe Premiere Quick Reference Card
Contains basic information about the Adobe Premiere tools and
palettes, and shortcuts for using them. Shortcuts are also included in the online Help.
Using online Help
Adobe Premiere also includes complete documentation in an HTML-based help system. The Premiere
help system includes all of the information in the
Adobe Premiere 6.0 User Guide
full-color illustrations, and more detailed information about some procedures.
Online Help provides three ways of locating information. Use the Contents and Index tabs to find general
information, and use the Search tab to look up specific words or phrases.
For more detailed information about using online Help, click the Help on Help button next to the
Content, Index, and Search tabs.
To properly view online Help topics, you need Netscape Communicator 4.0 (or later) or Microsoft
Internet Explorer 4.0 (or later). You must also have Javascript active.
To start online Help:
Choose Help > Help Topics, or press F1 (Windows).
plus keyboard shortcuts,
Using tool tips
With the tool tips feature, you can display the name of tools, or buttons and controls in palettes.
To identify a tool or control:
Activate the window in which the tool or control appears, position the pointer over it, and pause. A tool
tip appears showing the name and keyboard shortcut (if any) for the item.
If tool tips don’t appear, the preference for displaying them may be turned off.
Page 11

ADOBE PREMIERE 6.0
To display tool tips:
Choose Edit > Preferences > General.
1
2
Select Show Tool Tips, and click OK.
Note:
Tool tips are not available in most dialog boxes.
Using Web resources
If you have an Internet connection and a Web browser installed on your system, you can use the Adobe
Online feature to access additional resources for learning Premiere located on the Adobe Systems home
page on the World Wide Web. These resources are continually updated and include the following:
User Guide
3
“How To”s and Backgrounders
Provide access to procedures for performing tasks in Premiere and to
detailed reference information on a variety of topics. This information provides help on everything from
common processes to the complex interapplication tasks necessary to prepare projects for the Web.
Tutorials and Techniques
Provide step-by-step instructions on using Premiere’s features or help on
performing advanced techniques. These tutorials can help you go beyond the reference information
contained in the User Guide and show you how to use Premiere with other applications.
Quick Tips
Provide short, time-saving procedures to help you use Premiere more effectively. Tips can be
shortcuts for using new features, or instructions on using existing features more effectively.
Troubleshooting
Provides access to solutions to problems you may encounter using Premiere. Check the
troubleshooting information available through Adobe Online and the Adobe Web site before you call
customer support.
To access Adobe’s home page for your region:
1
Open Adobe’s worldwide home page at www.adobe.com.
2
Click the Adobe Worldwide link and choose your geographical region. Adobe’s home page is
customized for 20 different geographical regions.
About Adobe Online
Adobe Online provides access to the latest tutorials, quick tips, and other Web content for Premiere and
other Adobe products. Using Adobe Online, you can also download and view the current version of the
Premiere Top Issues document containing the latest Premiere technical support solutions. Bookmarks are
also included to take you quickly to noteworthy Adobe and Premiere-related sites.
Page 12

4
Introduction
Using Adobe Online
Adobe Online is constantly updated with new content. When you set up Adobe Online to connect to your
Web browser, each time you lauch Premiere, the program checks Adobe Online and downloads any new
content automatically. You can also view tech support documents and new files using the Help menu.
To use Adobe Online:
1
In Premiere, choose Help > Adobe Online.
Note:
You must have an Internet connection and an Internet browser installed. Adobe Online will launch your
browser using your default Internet configuration.
Do any of the following:
2
•
Click Preferences to specify connection options. General preferences affect how Adobe Online interacts
with all Adobe products installed on your system, and Application preferences affect how Adobe Online
interacts with Premiere. To see an explanation of each preference option, click Setup and follow the
prompts. You also can set up an automatic refresh using the Update Options.
Note:
You can also set Adobe Online preferences by choosing Edit > Preferences > Online Settings.
Click any button in the Adobe Online window to open the Web page to which the button is linked.
•
•
Click the bookmark button( ) to view Adobe-suggested Web sites related to Premiere and Adobe.
These bookmarks are automatically updated as new Web sites become available.
•
Click Close to return to Premiere.
Accessing Adobe Online through the Help menu
The Help menu includes options to view and download information from Adobe’s Web site.
To view updated articles or documents:
Click Help and choose the topic you want to view.
Page 13

Other learning resources
Other learning resources are available but are not included with your application.
ADOBE PREMIERE 6.0
User Guide
5
Classroom in a Book
developed by experts at Adobe and published by Adobe Press. The
includes lessons about using Premiere. For information on purchasing
, visit the Adobe Web site at www.adobe.com, or contact your local book distributor.
Book
The Adobe Certification program
The official training series for Adobe graphics and publishing software. This book is
Adobe Premiere Classroom in a Book
Adobe Premiere Classroom in a
Offers users, instructors, and training centers the opportunity to demonstrate their product proficiency and promote their software skills as Adobe Certified Experts, Adobe
Certified Instructors, or Adobe Authorized Learning Providers. Certification is available for several
different geographical regions. Visit the Partnering with Adobe Web site at www.partners.adobe.com to
learn how you can become certified.
See www.adobe.com/premiere for updated information on additional learning resources.
Customer support
When you register your product, you may be entitled to technical support for up to 90 days from the date
of your first call. Terms may vary depending on the country of residence. For more information, refer to
the technical support card provided with the Premiere documentation.
Customer support on Adobe Online
Adobe Online provides access to FAQs (Frequently Asked Questions) and troubleshooting information
that provides solutions to common problems.
Additional customer support resources
Adobe Systems provides several forms of automated technical support:
See the ReadMe and ReadMe First! files installed with the program for information that became available
•
after this guide went to press.
•
Explore the extensive customer support information on Adobe’s World Wide Web site
(www.adobe.com). To access Adobe’s Web site from Premiere, choose Help > Adobe Online or click the
icon at the top of the toolbox. See “Using Web resources” on page 3.
•
Read the Top Issues PDF that is available from the Help menu.
Page 14

Page 15

An Overview of Adobe Premiere
With Adobe Premiere 6.0, you can capture, import, assemble, and edit video, audio, and still images.
Premiere provides highly intuitive windows and palettes, allowing you to master every creative aspect in
the development of your video project. New export modules provide an exceptional variety of options for
exporting to the Web, as well as the option to export to tape, CD-ROM, or videotape.
This interactive overview of Adobe Premiere contains a number of brief lesson modules designed to
provide introductions to key features of the program. You can complete the lesson modules in ordered
sequence, or choose individual modules to tailor your introduction to specific topics. Once you learn the
basics of using the program, you’ll be ready to explore the extensive editing, compositing, and exporting
features of Premiere. If you need video clips to practice with while stepping through this overview, use the
included sample clips, which are located in the Sample folder on the Premiere CD.
Page 16

8
An Overview of Adobe Premiere
Starting Premiere
Setting up your workspace
The workspace is the arrangement of windows, window features, and palettes in Premiere. Premiere includes
four prearranged workspace options: A/B Editing, Single-Track Editing, Effects, and Audio. You can also
customize the workspace to suit your editing style and save it as a file for use in other projects.
Choosing a workspace
dialog box appears, in which you choose your initial workspace:
environment and is recommended for those who are new to video editing, or
uses a professional editing environment in which the Video 1 A and B tracks are collapsed into one track.
Single-Track Editing is recommended for those who have experience working with video-editing software.
If you are unsure of which option to select, select A/B Editing.
The initial workspace dialog box only appears the first time you start the application. If you want to change
the workspace at any other time, choose Window > Workspace. Adobe recommends you do not switch
between A/B Editing and Single-Track Editing after you’ve begun editing a project, as this may cause
unpredictable behavior. However, you can use A/B Editing for one project and Single-Track Editing for
another, or switch back and forth if you have not yet begun working with the clips in your project.
Premiere also includes an
most often used when performing audio or effect edits. You can switch to the Audio or Effects workspace
at any time during your editing process. You can also change individual components of the windows and
palettes to create your own custom workspace. For more information, see “Selecting an editing
workspace” on page 169.
•
To select a new workspace, choose Window > Workspace, and then select a workspace option.
To save changes you’ve made to the workspace, choose Window > Workspace > Save Workspace. Once
•
you save a workspace, it appears as an option in the Workspace menu and you can choose it from within
any project.
When you start Adobe Premiere for the first time, the Select Initial Workspace
Audio
workspace and an
A/B Editing
Effects
workspace that display the windows and palettes
, which uses a simple A/B roll
Single-Track Editing
, which
Page 17
ADOBE PREMIERE 6.0
User Guide
9
Looking at the A/B Editing workspace
If you plan to perform only simple cuts and edits, and prefer to
work with a separate transition track, you may want to use the A/B Editing workspace. This workspace
displays Premiere’s windows in their most basic format, so that they are easy to understand and use (it
most resembles Premiere 4.2). The primary workflow for A/B editing is dragging clips from the Project
window to the Timeline window, and from there trimming, editing, and rearranging clips. When you use
the A/B Editing workspace, clips open in individual Clip windows, the Monitor window is in Single View,
and the Timeline displays three separate Video 1 tracks: Video 1A, Transition track, and Video 1B track.
In the A/B Editing workspace, you drag clips from the Project window to the Timeline window.
Page 18

10
An Overview of Adobe Premiere
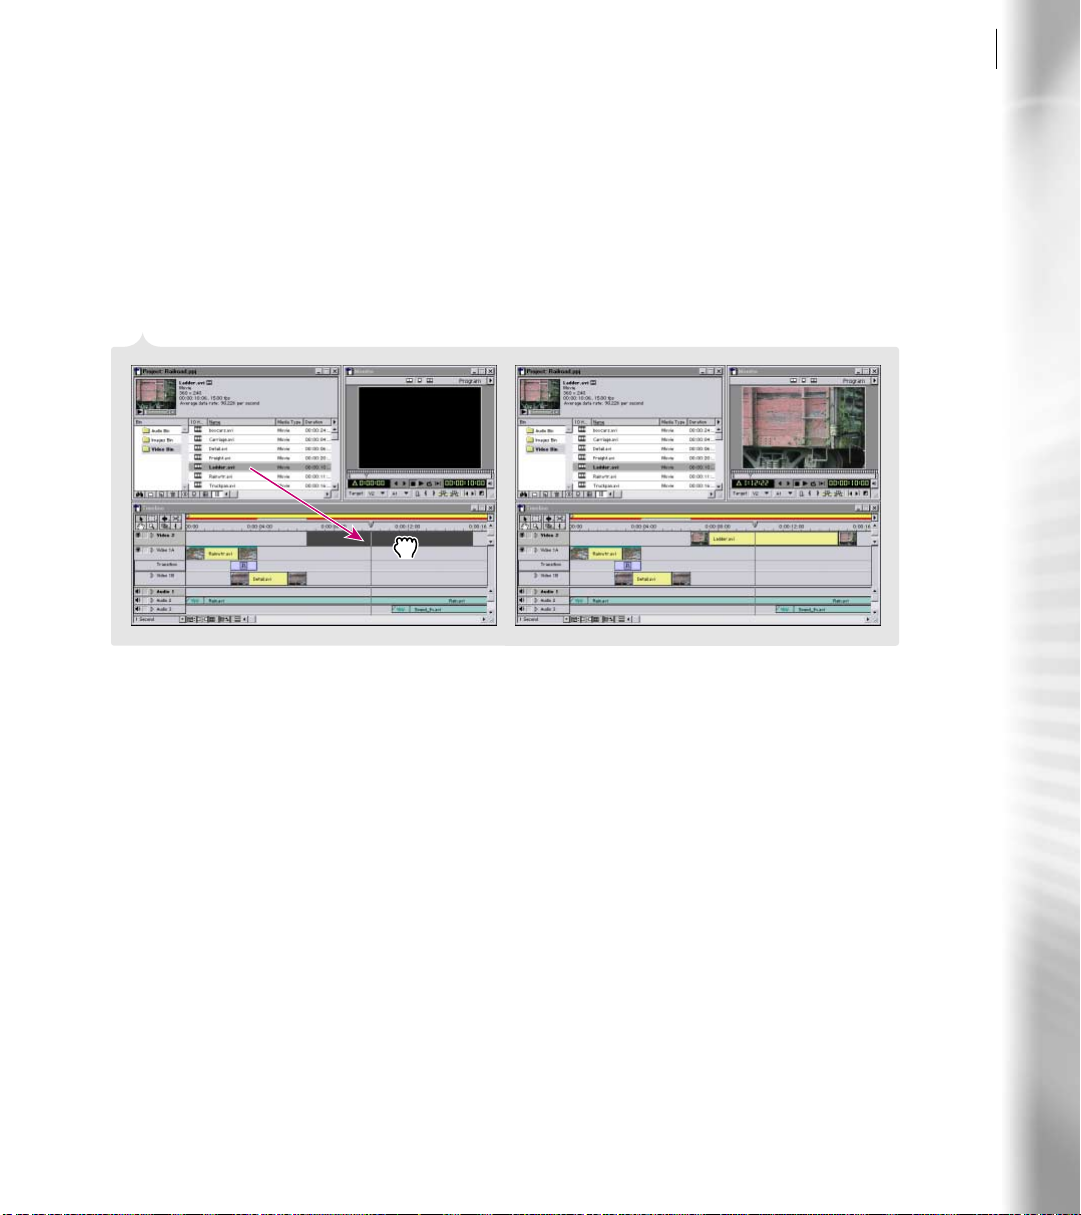
Looking at the Single-Track Editing workspace
Most professional video editors use a single-track editing
system for precise placement of clips in the Timeline. In this workspace, video clips and transitions are
on the same track—though you can expand the track to display a transition track between two Video 1
tracks. However, the two Video 1 tracks are synchronized and behave as one track. The primary
workflow used in the Single-Track Editing workspace is dragging clips from the Project window to the
Source view of the Monitor window, setting In and Out points, and inserting or overlaying the clip in
the Timeline at a precise location.
In the Single-Track Editing workspace, you drag clips to the Source view of the Monitor window (left), where you edit them before
placing them in the Timeline window (right).
Starting a project
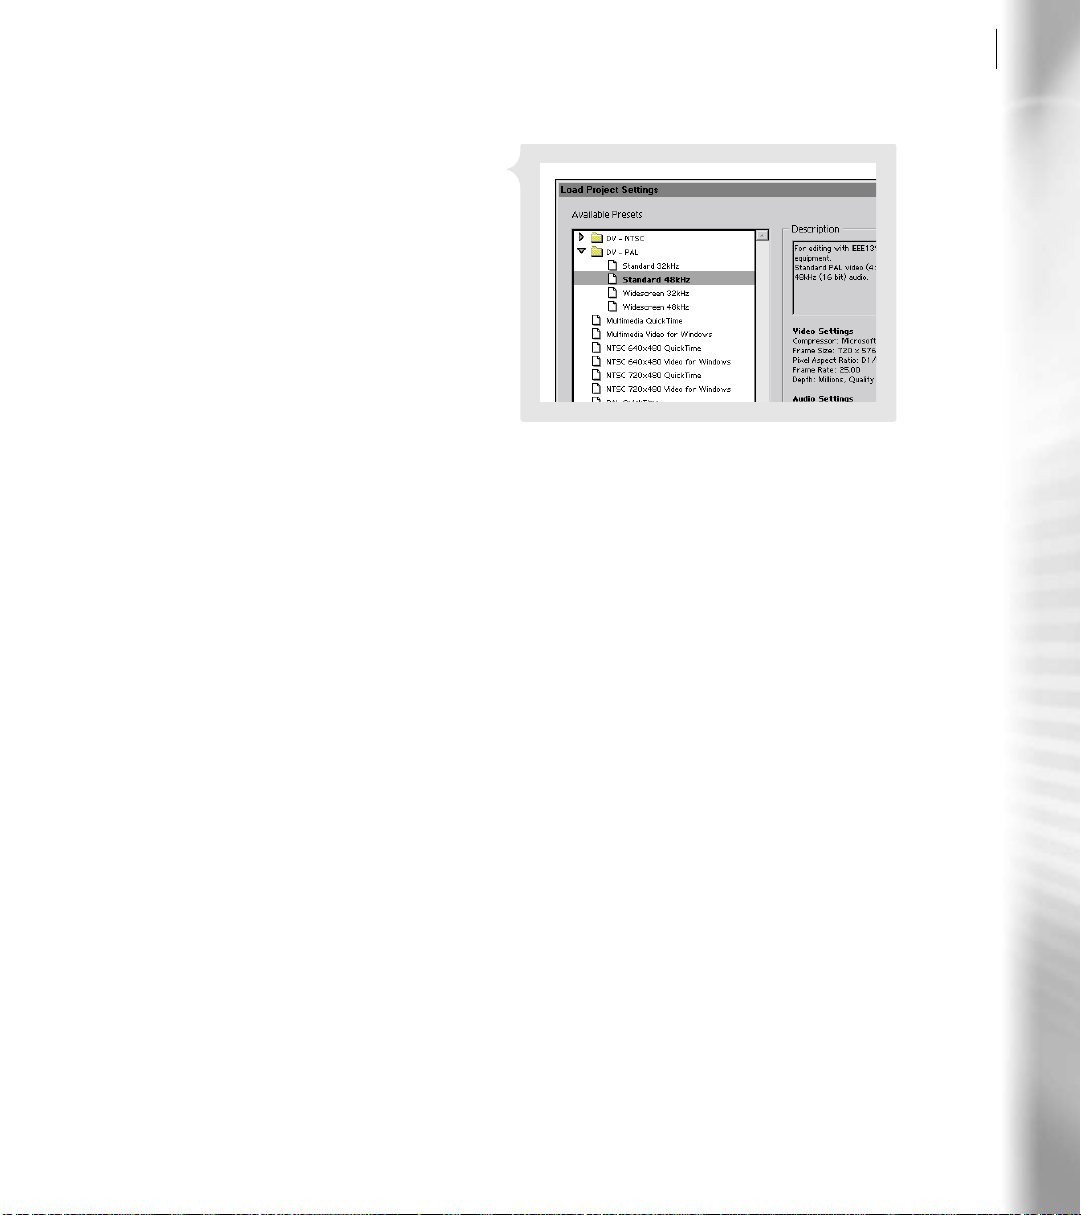
After you start Premiere and select your initial workspace, the Load Project Settings dialog box opens. Here
you can choose a preset group of project settings for a particular editing environment such as DV, QuickTime,
or Video for Windows. If you prefer to choose your settings individually, select the preset that most closely
matches your editing environment, and then click Custom and choose specific settings in the Project Settings
dialog box. If you want to open an existing project, click Open.
Create a new project or open an existing one
choosing a project preset from the Load Project Settings dialog box. If you want to start a new project after
Premiere is already open, choose File > New Project. The Load Project Settings dialog box opens.
(To change the window that opens at startup, see “Changing the startup window” on page 100.)
You can start a new project by simply starting Premiere and
Page 19
ADOBE PREMIERE 6.0
User Guide
11
Determine your project settings
The best way to
ensure that Premiere handles your video clips
correctly is to use the preset included with your
capture card software or the appropriate preset
included with Premiere. If none of the available
presets meet your needs, choose project settings
that are identical or at least compatible with your
capture settings (see your capture card or DV
camcorder documentation) and your clip settings.
For example, if you capture DV video at 720 x 480
frame size, use that same frame size for your
project. For a complete description of project
settings, see “Specifying project settings” on page 74.
If your capture card manufacturer did not provide presets, or if you are not using their presets for a specific
project, keep the following in mind when choosing project settings:
If you don’t see a preset that matches your video, select the closest match, and then click Custom and
•
choose the settings from the New Project Settings dialog box. Once you have selected all the appropriate
custom settings, click Save to create a preset for use in other projects.
You can open the Project Settings dialog box at any time by choosing Project > Project Settings.
•
However, making changes to settings once you have begun editing is not recommended, as it may cause
unwelcome changes to the clips in the project.
•
Be sure to review and compare all of the settings in your project using the Settings Viewer: choose
Project > Settings Viewer. In most cases, it is important that the capture, project, and individual clip
settings are the same in any given project. Discrepancies between these settings can cause unexpected
behavior in your previews and final output. By default, your export settings match your project settings.
However, they do not have to match any other project settings, so you can change them if you want
without affecting the project. For more information, see “Comparing settings using the Settings
Viewer” on page 82.
Page 20
12
An Overview of Adobe Premiere
Getting to know the work area
Work area overview
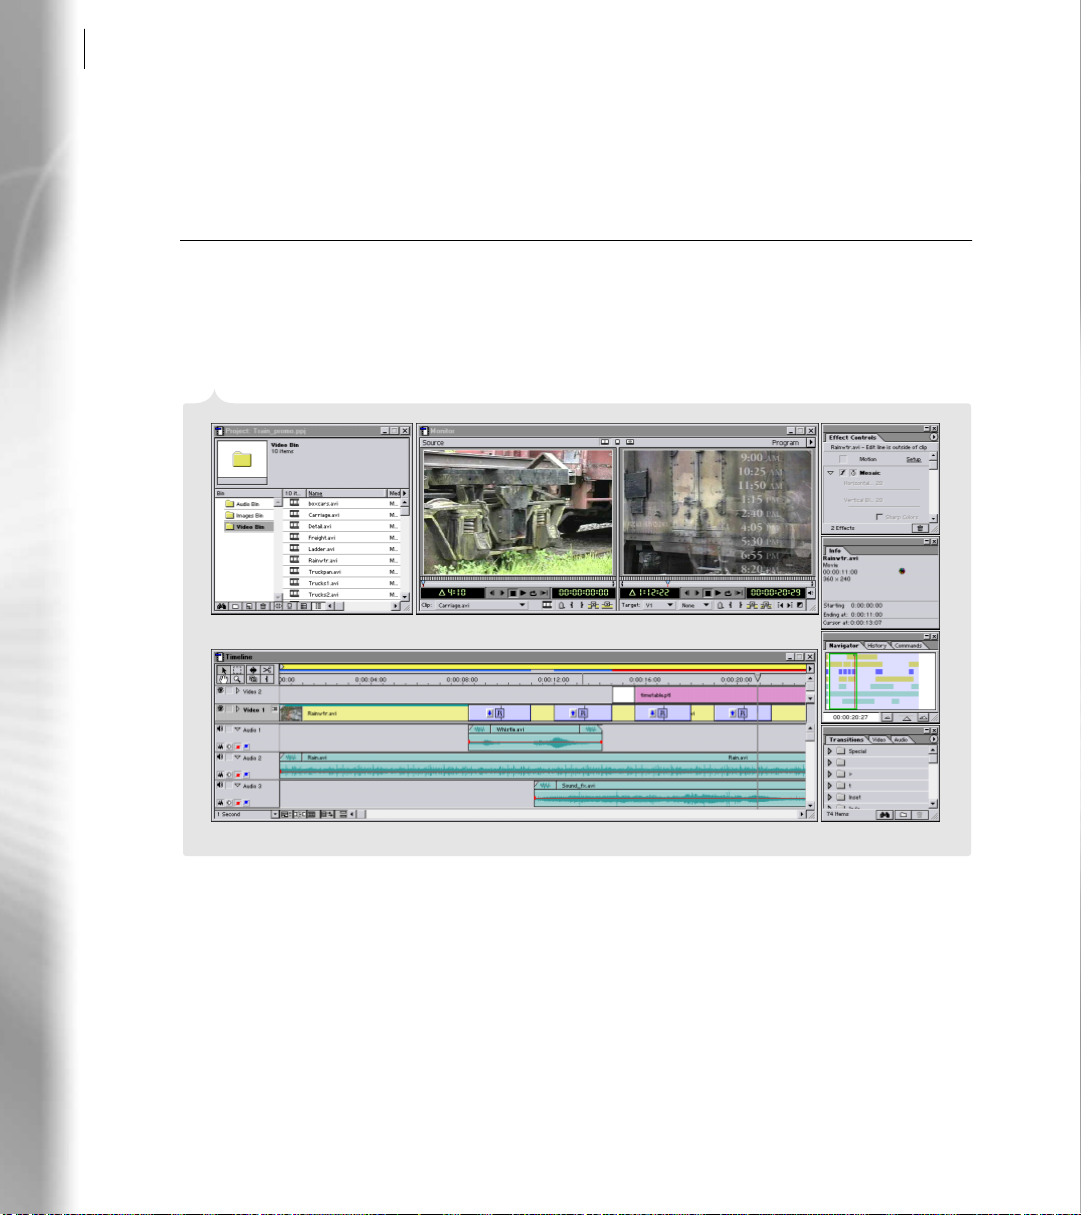
Once you open a project, the Premiere work area appears. If you’ve worked with other Adobe applications, the
Premiere work area will look familiar, with the command menus at the top of the screen, windows to perform your
assembling and editing, the toolbox, and the floating palettes.
AB
Premiere’s Single-Track Editing workspace: A.
on the right)C. Timeline windowD. floating palettes
Project windowB. Monitor window (Source view on the left and Program view
CD
Page 21
ADOBE PREMIERE 6.0
Using tools and palettes
The Premiere toolbox contains tools for selecting, editing, and viewing your clips. The Adobe floating palettes
contain additional features that help you monitor, modify, and enhance your work. You can hide and
rearrange the palettes to organize your work area as needed. For more information on palettes, see “Working
with palettes” on page 100. For more information on tools, see individual tool names in the index.
User Guide
13
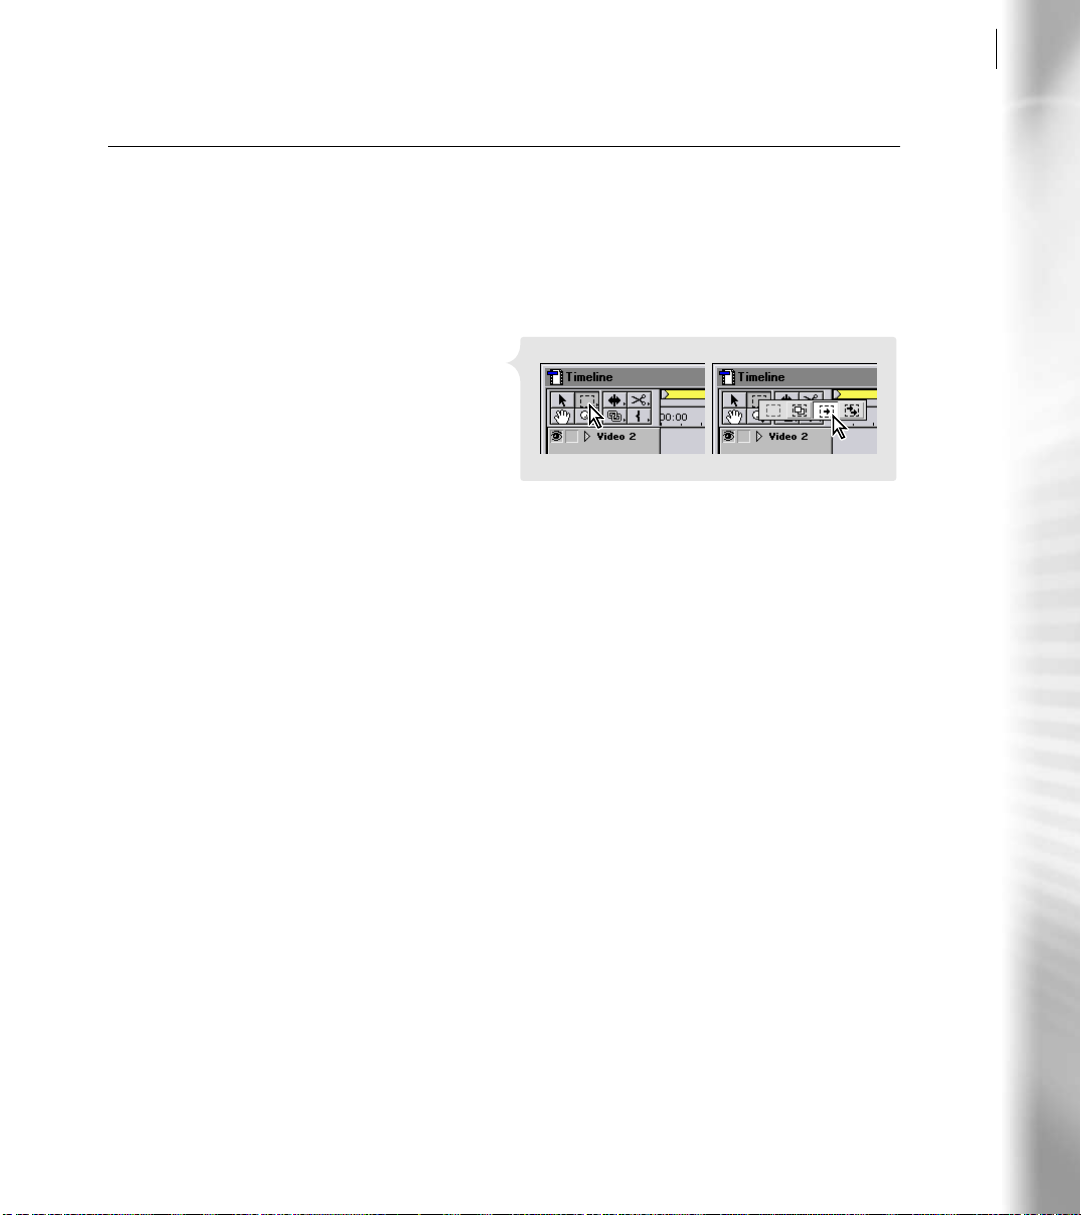
Select a tool
The toolbox is located at the top left
of the Timeline window. Some tools in the toolbox
have pop-out panels (represented by a small
triangle on the right side of the panel) that contain
additional hidden tools.
To select a tool, click its icon in the toolbox.
•
•
To select a hidden tool, click the current tool in
Selecting a hidden tool
the toolbox and select the tool you want from the
pop-out panel.
Display the palettes
When you first start Adobe Premiere, floating palettes appear stacked in default
groups. Use the following techniques to show and hide palettes:
•
To bring a palette to the front of its group, click the palette’s tab.
To show or hide a palette as you work, choose the appropriate Window > Show or Window > Hide
•
command.
To minimize or expand a palette in Windows, click the left-most button at the top right of the palette
•
group.
•
To minimize or expand a palette in Mac OS, click the small square at the top right of the palette group.
•
To hide or display all open palettes, press Tab.
Page 22

14
An Overview of Adobe Premiere
Arrange the palettes
Depending on your available
screen area and work preferences, you may want to
reposition and regroup the palettes into more
efficient arrangements.
To move an entire palette group, drag the group’s
•
title bar.
•
To rearrange or separate a palette group, drag a
Drag a palette tab to separate the palette from the group.
palette’s tab. You can drag a palette to another
group or to its own separate group. Palette positions are saved with the workspace.
Display a palette or window menu
Most palettes and windows have pop-out menus containing
commands and options that add to their functionality.
To display a palette or window menu, position
•
the pointer over the black triangle at the top
right of the palette or window, and hold down
the mouse.
Displaying a palette menu
Looking at the Project window
All of the clips you import into your project—video, still image, sequence, and audio—are listed in the Project
window. Every project has only one Project window; if you close this window, you close the project. The Project
window is customizable, so you can sort and view your clips using the options most appropriate for your
editing style. For more information on the Project window, see “Using the Project window’s bin view” on
page 92 and “Customizing a Project or Bin window display” on page 94.
Page 23
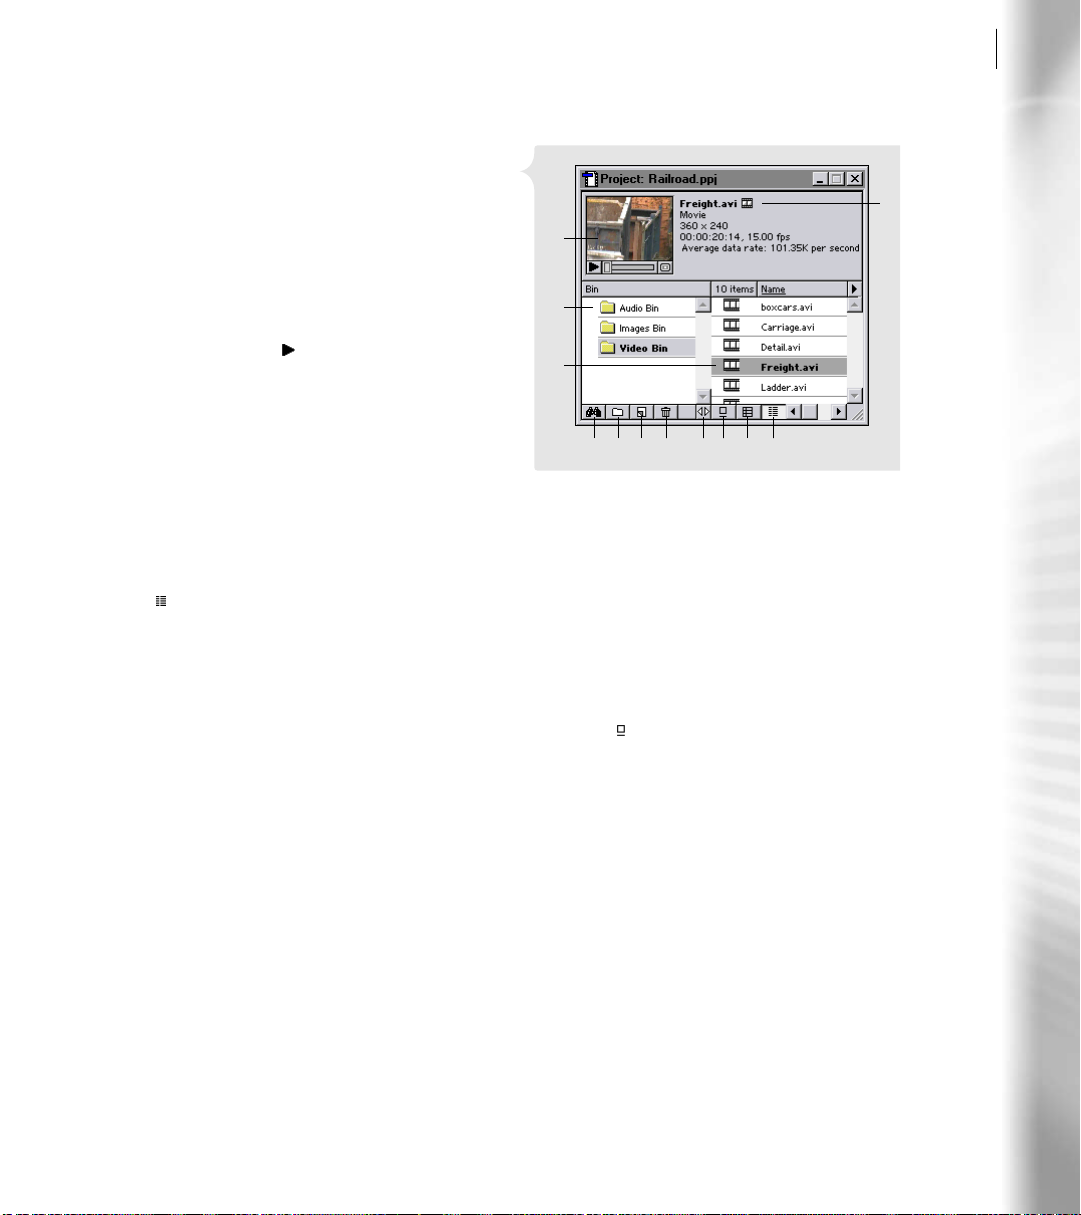
View clips in the Project window You can view and
add information for every clip in your project.
When you select a clip in the Project window, the
thumbnail viewer displaying the poster frame (the
frame used for icon view and as a sample frame for
titles), along with the clip name, media type, video
information, duration, and data rate, appears in the
top left corner of the window. If the clip is a video,
click the Play button ( ) to preview it in this
window.
You can expand the size of the Project window to
view and enter clip information for every clip in the
window.
• To expand the window, drag any corner
(Windows) or the lower right corner (Mac OS).
Organize clips By default, Premiere uses the List
view ( ) and displays clips alphabetically by name.
ADOBE PREMIERE 6.0
A
B
C
EFG
A. Thumbnail viewer and poster frame B. Bins C. Clip
D. Clip information E. Search F. New Bin G. Create
Item H. Delete Selected Item I. Resize Bin Area J. Icon
view K. Thumbnail view L. List view
H I J LK
User Guide
15
D
• To sort clips by a heading, click the heading. For example, if you’ve captured a series of clips from tape
and want to list them in order by timecode, click the Timecode heading.
• To reverse the order of clips under a heading, click the heading again.
• To arrange clips freely in the Project window, use the Icon view ( ) and drag the clip icons into the
positions you want.
Bins, which resemble folders, are located in the left panel of the Project window; use them to organize your
clips into groups. When you import clips, they are added to the currently selected bin. You can reuse bins
in multiple projects by saving and exporting a bin as a separate file.
• To view the contents of a bin, click the bin name—the contents appear on the right side of the Project
window.
• To save and export a bin as a file, select the bin and choose Project > Export Bin from Project.
• To import a saved bin, choose File > Import > File, locate and select the bin file, and choose Open.
Page 24
16
An Overview of Adobe Premiere
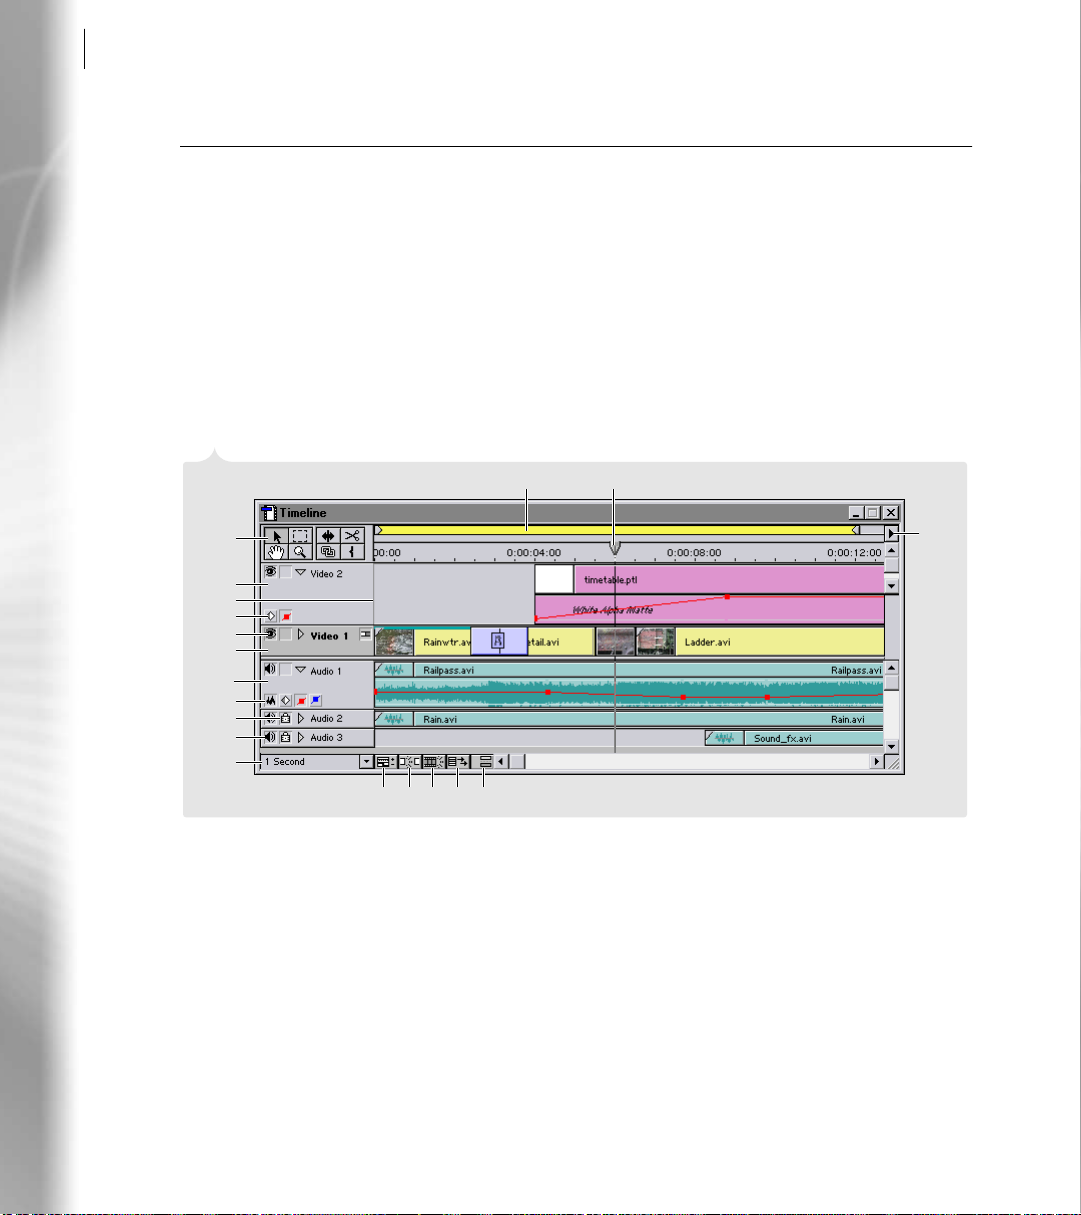
Looking at the Timeline window
Once you’ve captured or imported clips into your project, use the Timeline window to organize your clips
sequentially, make changes to a clip’s duration and location, add transitions, superimpose clips, and apply
effects, opacity, and motion. Once you’ve completed all your editing, export the Timeline contents to any
variety of file formats or directly to videotape.
Explore the Timeline window Premiere’s Timeline window provides an overview of all the clips in your
video program, as well as their durations, locations, effects, opacity, fades, waveforms, and other features.
You can add transitions between clips on the Video 1 track, and superimpose clips that are on the Video 2
or higher tracks.
A
C
D
E
F
G
H
I
J
K
L
M
P Q R S
O
B
N
Timeline window in the Single-Track Editing workspace: A. Work area bar B. Edit line C. To ols D. Superimpose track
E. Adjustable track header border F. Keyframe and Opacity icons G. Shy Video track icon H. Video track I. Audio track
J. Waveform, Keyframe, Volume, and Pan icons K. Lock track icon L. Shy Audio track icon M. Time Zoom Level N. Timeline
window menu button O. Track Options Dialog button P. Toggle Snap to Edges button Q. Toggle Edge Viewing button R. Toggle
Shift Tracks Options button S. Toggle Sync Mode button
Page 25
ADOBE PREMIERE 6.0
Expand the tracks You can expand each track in the Timeline to display more controls.
• Click the triangle next to the Video 2 track name; then click the Keyframe ( ) icon to set and view effect
keyframes, and click the red Display Opacity Rubberbands ( ) icon to set and view handles on the
Opacity rubberband. (The Video 1 track does not include an Opacity rubberband; clicking the triangle
next to the Video 1 track name displays the keyframe area only.)
• Click the triangle next to the Audio track name; then click the Keyframe ( ) icon to set and view effect
keyframes, click the red Display Volume Rubberbands ( ) icon to set and view handles on the Volume
rubberband, click the blue Display Pan Rubberbands ( ) icon to set and view handles on the Pan
rubberband, and click the Waveform ( ) icon to view the audio clip’s waveform. See “Adjusting audio
levels” on page 34 and “Panning or balancing audio” on page 36 for information on using the audio
track rubberbands.
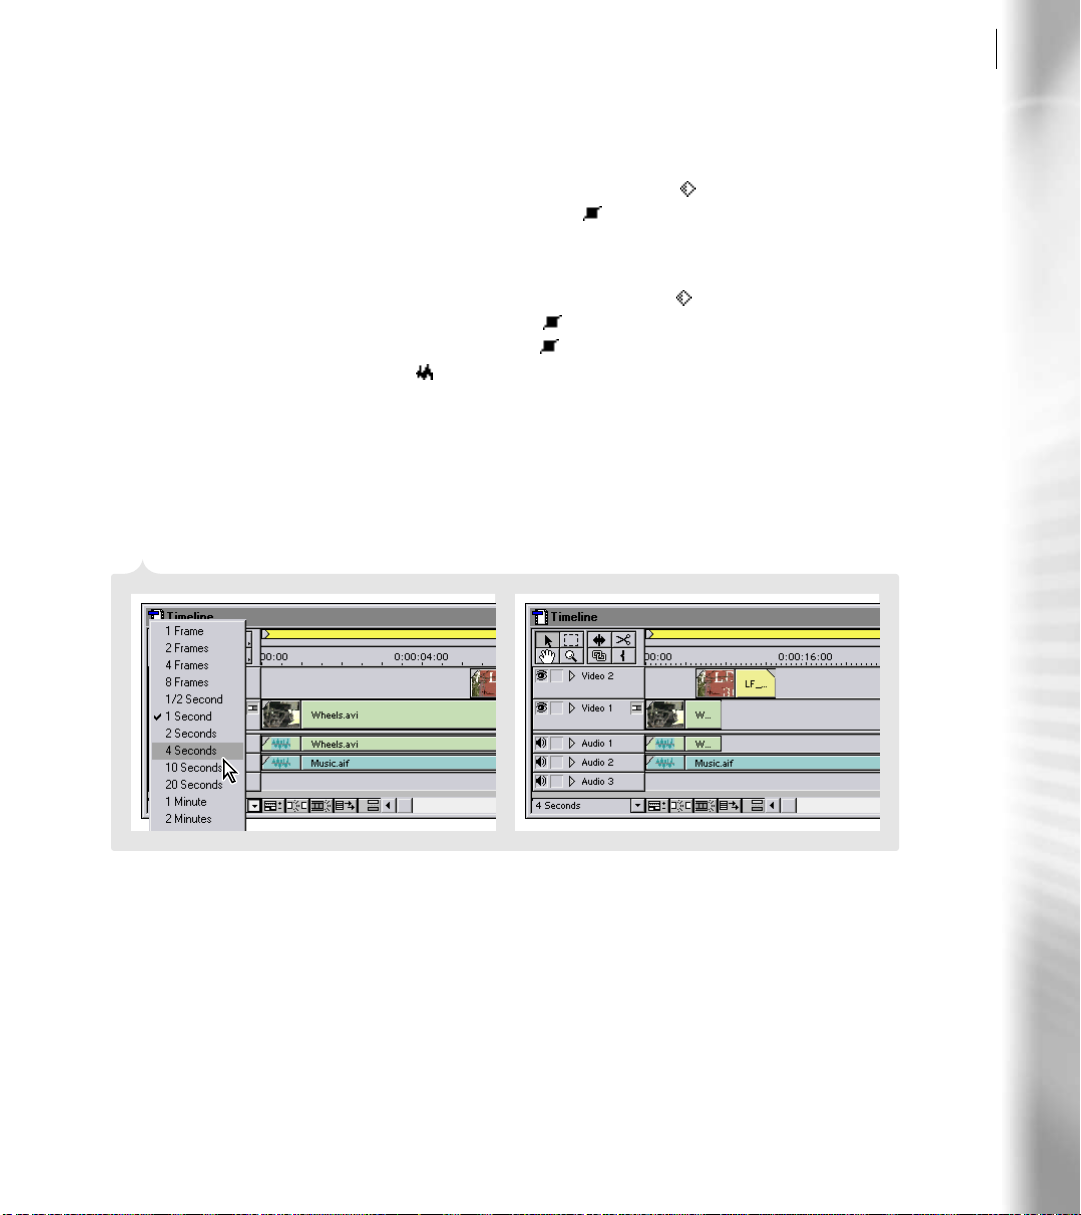
• Click the Time Zoom Level menu at the bottom left corner of the window to select a new frame range
to view. Select a shorter duration (such as 4 Frames) to zoom into the project, or a longer duration (such
as 20 Seconds) to see more of the project in the window. To fit the entire Timeline contents in the
viewable area, press the backslash key (\) on your keyboard.
User Guide
17
Choosing a value from the Time Zoom Level menu expands or compresses your view of the footage in the Timeline.
Page 26

18
An Overview of Adobe Premiere
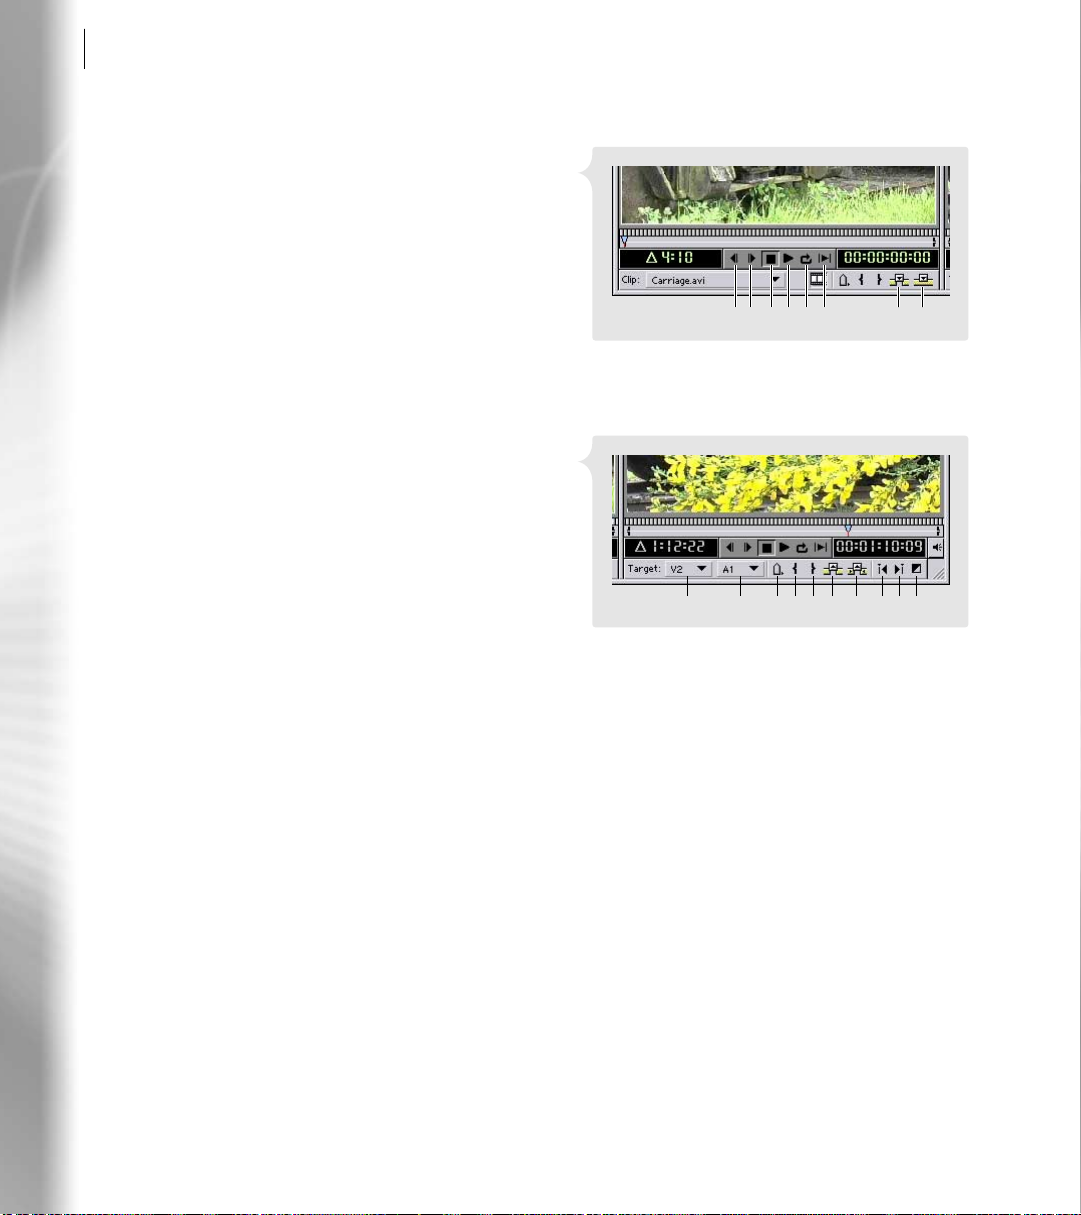
Looking at the Monitor window
Use the Monitor window to view individual clips, preview the Timeline, set In and Out points, set markers,
add and remove clips from the Timeline, and trim clips. When you use the Single-Track Editing workspace,
the Monitor window includes the Source view (left side of window) and the Program view (right side of
window). When you use the A/B Editing workspace, the Monitor window displays only the Program view and
uses individual Clip windows instead of the Source view (you can change this default at any time by choosing
a new Monitor window view). The Source view (or Clip window) displays a single clip as it appears on your
hard disk (project settings do not affect playback from this view). Use the Source view (or Clip window) to
prepare a clip for inclusion in the Timeline or to edit a clip you’ve opened from the Timeline. The Program
view displays the current state of the Timeline—when you preview the Timeline, it plays in the Program view.
Switch among Monitor window views You can display the Monitor window in any of three different
modes to suit your needs and work style:
• ( ) Dual View mode displays both the Source
and Program views. Video editors experienced
in using high-end video editing systems may be
able to edit faster and more precisely using both
the Source and Program view controllers. This is
the default window display for the Single-Track
Editing workspace.
• ( ) Single View mode displays only the
Program view. Individual clips open in
individual Clip windows. If you’re learning how
to edit video, you may find it faster and easier to
work in Single View mode. This is the default
window display for the A/B Editing workspace.
Monitor window in Dual View
Monitor window in Single View
Page 27

ADOBE PREMIERE 6.0
• ( ) Trim mode is a “zoomed-in” view of a
particular edit on the Timeline. When you select
Trim mode, the edit line automatically jumps to
the next edit in the Timeline, and the clips at
that edit point appear in the Monitor window.
Use the controls in the Trim window to adjust
the In and Out points of those clips. For more
information on trimming using Trim mode, see
“Using the Trim view” on page 219.
Monitor window in Trim View
To change views, click the view buttons ( ) at the top of the Monitor window or choose a mode
from the Monitor window menu.
Look at the playback controls The playback
controls are the same for all windows. You can access
these controls from a Clip window, or the Source
view or Program view of the Monitor window.
User Guide
19
DCBA E F
Preview controls: A. Frame Back B. Frame Forward
C. Stop D. Play E. Loop F. Play In to Out
Look at the Source view controller The Source view controller (lower left side of the Monitor window)
appears only when the Monitor window is in Dual View mode. To use this controller, drag a clip from the
Project window to the Source view window, and then use the controller to preview, set In and Out points,
add markers, specify whether to take audio or video, and insert or overlay a clip onto the target track in
the Timeline.
Page 28
20
An Overview of Adobe Premiere
Individual Clip windows contain the same
controllers as the Source view. However, if you
want to perform L-cuts, J-cuts, or six-point edits,
you must use the Source view in the Monitor
window. For more information, see “Editing In
and Out points” on page 180.
Look at the Program view controller Use the
controller under the Program view (lower right
side of the Monitor window) to remove clips or
portions of clips from the Timeline, add transitions, set Timeline markers, and preview the
Timeline.
BA C D E F G H
A. Frame Back B. Frame Forward C. Stop D. Play
E. Loop F. Play In to Out G. Insert H. Overlay
The Marker menu and the Mark In and Out
controls apply to the entire Timeline. All other
Program view controls affect only the clips in the
Target tracks. Target tracks indicate which Timeline
A. Target video track B. Target audio track C. Marker menu
D. Mark In E. Mark Out F. Lift G. Extract H. Previous
Edit I. Next Edit J. Add Default Transition
video or audio track is set to receive the video or
audio from the Source view (or Clip window) or be
affected by the Lift, Extract, Insert, or Overlay command.
DCBA E F G H I J
Page 29
ADOBE PREMIERE 6.0
Assembling and editing video
Acquiring source material
The video, audio, and still image clips you use in your project can come from a variety of sources. You can
capture DV video and audio directly from a DV camcorder using IEEE 1394 (FireWire/i.Link) or capture
analog video and audio using a supported video capture card (see http://www.adobe.com/premiere for a list
of supported cards). You can import stills from other applications such as Adobe Photoshop and Adobe Illustrator, import audio that you’ve transferred to your hard disk from a CD, or import a folder containing a
variety of files in different formats.
Import one or more clips Premiere supports a variety of file formats, including .MOV, .AVI, .AIF., TIF,
.JPEG, .BMP, and .PSD. For more information, see “Importing clips” on page 151.
• To import a clip, choose File > Import File, locate and select a clip, and then click Open.
• To import multiple clips in Windows, choose File > Import File, locate the clips and press Control as
you select multiple individual clips or press Shift and select a range of clips, and then click Open.
• To import multiple clips in Mac OS, choose File > Import File, locate the clips and press Shift as you
select each clip, and then click Open.
User Guide
21
When you create still images for use in Premiere, always create them at the same aspect ratio as the other
files in your project; otherwise, they may distort when you preview or output the project (see “About D1,
DV, and various pixel aspect ratios” on page 147). If a file contains an alpha channel, you can use the alpha
channel to create transparency in Premiere. For more information on using alpha channels, see “Using the
Alpha Channel key” on page 302 and “Specifying alpha channel and color options” on page 318.
Import a folder of mixed media You can import
folders containing any variety of video, audio, and
still clips.
• To import a folder into a project, choose File >
Import > Folder, locate and select a folder, and
then click OK.
Page 30
22
An Overview of Adobe Premiere
Capture video Premiere supports the direct capture of DV and analog video. For detailed information on
capturing from Premiere, see Chapter 2, “Capturing and Importing Source Clips.” To capture DV audio
and video, do the following:
1 Plug one end of your IEEE 1394 (FireWire/i.Link) cable into the Video Out port of your DV camcorder
or deck, and then plug the other end into the IEEE 1394 (FireWire/i.Link) port on your computer.
2 Open Premiere and select the appropriate preset from the Load Project Settings dialog box. Use the
preset included with your camera or capture card software, or one of Premiere’s DV presets. Click OK.
3 If your camcorder or deck supports device
control, choose Edit > Preferences > Scratch
Disks/Device Control (or click Edit in the
Capture window). Select a device from the
Device menu, click Options, and select the
options that match your DV device (camcorder
or deck). See your DV device documentation
for more information. Click OK.
4 Choose File > Capture > Movie Capture. When
using device control, use the controls in the
Movie Capture window to play and record the
video. When not using device control, use the
controls on your device to play the video and
use the controls in the Movie Capture window
to record the video. Captured clips are automatically added to the open Project window.
A
B
C
D
E
F
G
JIH
K L M N O P
A. Preview window B. Slow Play C. Reverse Slow Play
D. Play E. Stop F. Frame Forward G. Frame Forward
H. Take Video I. Take Audio J. Shuttle Slider K. Rewind
L. Fast Forward M. Pause N. Record O. Set In P. Set Out
Page 31

ADOBE PREMIERE 6.0
Adding clips to the Timeline
The Timeline is where you create and edit your video program. After you capture or import your clips, the
next step is adding them to and arranging them in the Timeline. You can add clips to the Timeline using
several different methods.
Methods for adding clips Choose the method that works best with your editing style. You can use any of
the following methods for assembling footage, regardless of whether your workspace is set up for A/B or
Single-Track Editing:
• Drag clips from the Project window, Source view, or Clip window to the Timeline.
• Arrange clips in a Project window bin or a Storyboard window and then transfer them to the Timeline
using the Automate to Timeline command.
• Drag a clip from the Project window to the Source window (or double-click it in the Project window to
open it in a Clip window), set In and Out points, and then use the Insert or Overlay options to add the
clip to the selected target track on the Timeline.
Dragging clips to the Timeline When you want to assemble a series of clips quickly with little or no
trimming (usually called a rough cut), drag clips from the Project window directly to the Timeline.
User Guide
23
Drag clips directly from the Project window to the Timeline.
Page 32

24
An Overview of Adobe Premiere
Use the Automate to Timeline command When you want to experiment with the layout of your clips
before final placement on the Timeline, use the Icon view in the Project window or create a storyboard to
visually organize them; then transfer them automatically to the Timeline. You can save a bin or a storyboard and open it in other projects. For more information, see “Organizing clips using bins” on page 93
or “Creating a storyboard” on page 203. To create a storyboard, do the following:
1 Choose File > New > Storyboard.
2 Drag clips from the Project window to the Storyboard window in the order in which you want them
aligned in the Timeline. Notice the arrows that appear between the clips to show the arrangement.
3 Rearrange the clips by dragging them to new
locations.
4 If you want, double-click any clip and set new In
and Out points or markers. Premiere automatically updates clips in the storyboard to reflect
any changes.
To automatically transfer contents of a bin or
storyboard to the Timeline, do the following:
5 Choose Project > Automate to Timeline.
6 In the Automate to Timeline dialog box, select the placement options and click OK. Premiere automat-
ically transfers the clips to the Timeline. For more information, see “Adding multiple clips using an
automated process” on page 201.
Choose Automate to Timeline to transfer your bin or storyboard (shown) clips, in order, to the Timeline window.
Page 33

ADOBE PREMIERE 6.0
Insert/Overlay from the Monitor window Source view Use the Source view (or the Clip window) to set In
and Out points for your video clips and then insert or overlay them on the Timeline:
1 Drag a clip from the Project window to the Source view. If you’re using A/B Editing, double-click a clip
in the Project window to open it in a Clip window.
2 Click the Play button ( ) under the Source view (or Clip window) to preview the clip. As you preview,
determine which portions you want to use and which you don’t.
3 In the Jog Tread, drag the Mark In ( ) point to the frame you want to set as the first frame for your clip.
If your clip contains both audio and video, you can set different In and Out points for each by pressing
Alt (Windows) or Option (Mac OS) as you drag the In or Out point.
User Guide
25
4 Drag the Mark Out ( ) point to the frame you want to set as the last frame for your clip.
Page 34

26
An Overview of Adobe Premiere
5 To add the trimmed clip to the Timeline, either drag it from the Source view (or Clip window) to the
Timeline, or use the Insert ( ) or Overlay ( ) buttons. For more information, see “Adding a clip to
the Timeline” on page 198.
In the Single-Track Editing workspace, you drag clips into the Source view of the Monitor window, where you edit them before placing them in the Timeline window.
Page 35

ADOBE PREMIERE 6.0
Trimming clips
Video clips often contain more footage than you need or want to use in your video program. To create scenes,
cuts, and transitions, you’ll need to trim your clips, removing the parts that you don’t need. Trimming clips is
an essential part of creating a video program, something you’ll do many times. Premiere provides a number of
different ways to trim clips, including quick rough-cut tools and more precise frame-by-frame views. You can
trim clips in the Source view (or Clip window) before you add them to the Timeline, as described in “Adding
clips to the Timeline” on page 23, or you can trim them directly in the Timeline window.
Trimming In and Out points in the Timeline You can easily remove unwanted portions of your video or
audio clips in the Timeline using the selection tool ( ). To determine where you want to make an edit,
preview the Timeline clip in the Program view. To trim In and Out points, do the following:
1 Watch the Program view as you drag the edit line in the time ruler of the Timeline. Stop when you see
the frame that you want to set as the clip’s new In point.
2 In the Timeline, position the selection tool at the left end of the clip. The cursor turns into a trim tool,
which is a double-sided arrow with a red bracket ( ). The direction of the bracket, open left ([ ] or
open right [ ]), indicates which clip the tool will modify.
3 To edit the In point, drag to the right until the cursor snaps to the edit line (make sure that Snap to
Edges ( ) is on).
4 Using the Program view to preview, drag the edit line in the time ruler of the Timeline again until you
see the frame you want to set as the clip’s new Out point.
5 Position the selection tool at the right end of the clip; when it turns into the trim tool, drag to the left
until it snaps to the edit line.
User Guide
27
Using the selection tool, drag the edge of a clip (left) to get a new In or Out point (right).
Page 36

28
An Overview of Adobe Premiere
Editing clips in the Timeline
Once you’ve assembled clips in the Timeline, you may want to make adjustments to a clip’s location or the In
point of one clip in relation to the Out point of the next. Premiere includes several tools to help you do this.
Perform a ripple edit A ripple edit trims the specified clip but keeps the duration of all other clips the
same. The trim, however, ripples through the project: other clips are pulled or pushed depending on
whether you shorten or lengthen the clip. Therefore, the duration of the entire video program changes.
A
B
C
A. Before performing a ripple edit B. Performing a ripple edit C. Result of a ripple edit
To perform a ripple edit, do the following:
1 Select the ripple edit tool ( ) from the toolbox.
2 Position the cursor between the clip you want to trim and the adjacent clip. The cursor becomes a
double-sided arrow with a red bracket. The direction of the bracket (open left ] or open right [)
indicates which clip the tool will modify.
Page 37

ADOBE PREMIERE 6.0
3 Drag the ripple edit tool to trim the clip; then release the mouse button.
Using the ripple edit tool, drag the edge of a clip (left). The edit ripples through the Timeline (right).
Perform a rolling edit A rolling edit trims the specified clip and the adjacent clip but keeps the duration
of all other clips and the project the same. When you use the rolling edit tool to subtract frames from a
clip, the adjacent clip must contain additional frames that can be added to fill the gap.
User Guide
29
A
B
C
A. Before performing a rolling edit B. Performing a rolling edit C. Result of a rolling edit
Page 38

30
An Overview of Adobe Premiere
To perform a rolling edit, do the following:
1 Select the rolling edit tool ( ) from the toolbox.
2 Position the cursor between the clip you want to trim and the adjacent clip. The cursor becomes two
double-sided arrows. The tool modifies both clips.
3 Drag the rolling edit tool to trim the clip; then release the mouse button.
Using the rolling edit tool, drag the edge of a clip (left). The edit affects only the adjacent clip (right).
Applying transitions
Use transitions between clips in your video program to create a visually pleasing, creative transition from one
clip to the next. Premiere provides a variety of transitions, including blends, wipes, and doors. Other transitions, such as QuickTime transitions, are also available.
Add a transition in the A/B Editing workspace Transitions overlap the ends of two clips on the Video 1
track. The A/B Editing workspace displays the Video 1 track expanded into three separate tracks so you
can visually determine the amount of overlap to use with the transition. For information on applying
transitions in the Single-Track Editing workspace, see “Working in the Single-Track Editing workspace”
on page 243. To add a transition, do the following:
1 In the Timeline, position one clip in the Video 1A track and another in the Video 1B track, making sure
to overlap them by at least a few frames.
Page 39

ADOBE PREMIERE 6.0
2 If necessary, choose Window > Show Transitions. Premiere stores all of its transitions in the Transitions
palette, sorted in folders by type. You can arrange them any way you want or even create new folders
for your favorite transitions to enhance your workflow.
3 In the Transitions palette, click the triangle next to a folder name and locate the transition you want.
4 Drag the transition’s icon from the Transitions palette to the Transition track, at the point where the
two clips overlap. Premiere automatically expands the transition to fill the overlap.
User Guide
31
Drag a transition to the transition track (left). The transition fills the overlapping space (right).
Apply a default transition If you frequently use one transition in a project, you can set it as the default
transition and apply it using a Monitor window control. Premiere automatically uses Cross Dissolve as the
default transition. You can use the default transition in any workspace. To add a default transition when
using the A/B workspace, do the following:
1 Position two clips in the Video 1 track in the Timeline so that they meet.
2 In the Timeline, press Ctrl+Alt+Shift (Windows) or Command+Option+Shift (Mac OS) and click in
the overlap between the two clips.
3 To change the default transition, select a transition in the Transitions palette, and then choose Set
Selected as Default from the Transitions palette menu. For more information on default transitions, see
“Specifying and adding a default transition” on page 246.
Page 40

32
An Overview of Adobe Premiere
Previewing a clip or a video program
Premiere provides a number of playback and preview options to choose from, depending on what you want to
view and at what quality. Using different options, you can play or preview individual clips or the entire
contents of the Timeline.
Play a single clip To play back a single clip, do any of the following:
• Select a clip in the Project window and click the Play button ( ) under the thumbnail viewer that
appears at the top of the window.
• Double-click a clip in the Project window and click the Play button ( ) in the Clip window controller.
• Drag a clip from the Project window to the Source view of the Monitor window, and then click the Play
button ( ) in the controller under the Source view.
Play the video program Play back the contents of the Timeline in the Program view of the Monitor
window. If you are using the DV editing mode, or if your analog capture card supports it, you can play
your program on your DV device or connected television monitor. For more information, see “Previewing
on another monitor” on page 232.
You can play your video program using any of the following techniques:
• To play back the program without effects, click
the Play button ( ) under the Program view, or
select the Timeline and press the spacebar. To
stop the playback, click the Stop button ( ) in
the Program view or press the spacebar again.
Drag the yellow work area bar over the area you want to preview.
Page 41

ADOBE PREMIERE 6.0
• To play back the program with effects, drag the yellow work area bar over the portion of the program
you want to preview, and then press Enter (Windows) or Return (Mac OS). If prompted, name and
save the project. Premiere builds (renders) a preview file of the selected area, and then plays it in the
Program view.
• To render-scrub (manually scrub through the program viewing effects), press Alt (Windows) or Option
(Mac OS) as you drag the edit line in the Timeline’s time ruler.
• To manually scrub through the program without viewing any effects, drag the edit line in the Timeline’s
time ruler or drag the shuttle slider under the Program view.
User Guide
33
Page 42

34
An Overview of Adobe Premiere
Mixing audio
Adjusting audio levels
You can adjust the level (also called gain or volume) of an audio clip at precise locations in your video
program using either the Volume rubberbands in the Timeline or the volume faders in the Audio Mixer.
Adjusting volume in the Timeline Under each audio clip in the Timeline is a Volume rubberband on
which you can create and adjust handles to adjust the volume in an audio clip.
• To see the Volume rubberband in the Timeline, click the triangle to the left of the audio track name, and
then click the red Display Volume Rubberbands ( ) icon.
• To add volume handles, click anywhere along the Volume rubberband. Premiere includes a default
handle at the beginning and end of every clip. To fade volume in from the beginning of a clip, click to
create a handle where you want the audio to fade in, and then drag the first default handle (located at
the beginning of the clip) down to the bottom of the track. The clip’s volume will fade in from the first
to the second handle. For more information, see “Adjusting audio levels in the Timeline” on page 257.
Click the Volume rubberband to create handles (left), and then drag the handles up or down to fade the volume in or out (right).
Adjusting volume with the Audio Mixer Using Audio Mixer controls, you can adjust and record the
volume levels for each audio track in your video program in real time, all while listening to and watching
the video program. For more information, see “Adjusting audio levels in the Audio Mixer window using
automation” on page 266. To adjust gain, do the following:
1 In the Timeline, position the edit line where you want to start adjusting the volume.
Page 43

ADOBE PREMIERE 6.0
2 Do one of the following:
• Choose Window > Workspace > Audio to change your workspace to one optimized for editing Audio.
• Choose Window > Audio Mixer to leave your workspace as is and just display the Audio Mixer window.
3 In the Audio Mixer, click the Automation Write ( ) button above the track you want to edit. When
Automation Write is activated, Premiere records all of your settings. For more information on
automation, see “Working with the Audio Mixer window” on page 263.
4 To gang tracks together so that when you move one volume fader ( ), the other tracks’ faders keep
their relative relationship, right-click (Windows) or Control-click (Mac OS) the volume fader and
choose a gang option. For example, right-click the Volume Fader for track 1 and choose Gang 1 from
the menu that appears; then right-click the volume fader for track 2 and choose Gang 1 from the menu
to gang together the volume faders for tracks 1 and 2.
5 Press the spacebar to play the audio and then drag the volume fader ( ) up to increase volume or down
to decrease volume.
6 When you’re done, expand the audio track in the Timeline, click the red Display Volume Rubberbands
( ) icon, and see how Premiere automatically added handles to the Volume rubberband.
User Guide
35
When you choose Automation Write, changes you make in the Audio Mixer (left) appear in the corresponding audio track in the
Timeline (right).
Page 44

36
An Overview of Adobe Premiere
Panning or balancing audio
Panning an audio clip shifts the sound from a single (monophonic) channel to either the left or right stereo
channel; balancing adjusts the balance of sound between both channels in a stereo clip. In Premiere, you can
use the pan controls to pan or balance audio in the Timeline or the Audio Mixer. To use pan controls, your
project must use stereo audio settings. To determine your project’s audio settings, choose Project > Project
Settings > Audio and look at the Format setting.
Panning or balancing audio in the Timeline In
addition to the Volume rubberband, Premiere
includes a Pan rubberband under each audio clip
in the Timeline. You can create handles to pan or
balance your audio clips using this rubberband.
For more information, see “Panning or balancing
clips in the Timeline” on page 262. To pan audio,
do the following:
1 If necessary, click the triangle to the left of the
AB
audio track name to expand the track, and
then click the blue Display Pan Rubberbands
icon ( ).
2 Click the Pan rubberband to add handles. Then
A. Panning audio to the left channel B. Panning audio to the
right channel
drag a handle up to shift volume to the left channel or drag down to shift volume to the right channel.
Panning or balancing audio in the Audio Mixer Use the Pan control in the Audio Mixer to precisely
position audio in a stereo channel. For more information, see “Panning or balancing in the Audio Mixer
window using automation” on page 269.
1 In the Timeline, position the edit line where you want to begin editing.
2 Do one of the following:
• Choose Window > Workspace > Audio to change your workspace to one optimized for editing Audio.
• Choose Window > Audio Mixer to leave your workspace as is and just display the Audio Mixer window.
Page 45

ADOBE PREMIERE 6.0
3 Click the Automation Write ( ) button above the track you want to pan. When Automation Write is
activated, Premiere records all of your adjustments. For more information on automation, see
“Working with the Audio Mixer window” on page 263.
4 Press the spacebar to play the audio and then drag the Pan control ( ) to the left or right.
As you drag, handles are added to the Pan rubberband in the Timeline.
User Guide
37
Adjustments you make to the Pan control in the Audio Mixer (left) appear in the corresponding audio track in the Timeline (right).
Page 46

38
An Overview of Adobe Premiere
Using effects, transparency, and motion
Applying effects
Premiere includes numerous audio and video effects—with many new video effects from Adobe After Effects!
Apply an effect by dragging it from the Video or Audio effect palette to a clip in the Timeline. Once applied, all
effects are stored in the Effect Controls palette, where you can access effect settings, turn effects on or off,
enable keyframes, or delete effects.
Apply an effect Using palettes, it is easy to apply and control both video and audio effects in Premiere. For
more information, see “Working with effects” on page 326. To apply an effect, do the following:
1 To set your workspace to one optimized for editing effects, choose Window > Workspace > Effects.
2 To see the effects available in Premiere, click the Video or Audio tab in the effects palette group. Then
click the triangle next to a folder name to view the effects in that folder.
3 To apply an effect to a clip, drag it from the palette to a clip in the Timeline. A blue line appears across
the top of the clip, indicating that the effect has been applied.
Page 47

ADOBE PREMIERE 6.0
4 If the effect has adjustable settings, adjust them in a Settings dialog box or the Effect Controls palette.
To apply an effect, drag it from the Video palette to a clip in the Timeline (left). A blue line appears at the top of the clip (right).
Use keyframes to animate an effect When you
apply an effect with adjustable settings, you can
animate the effect by changing its settings over time
using keyframes. A keyframe contains information
about the following:
User Guide
39
• Which effect is changing
• The point in time when the change occurs
• The settings for the effect at the keyframe’s point
in time
For more information on keyframes, see “Understanding keyframes” on page 323.
Set effect keyframes You can use keyframes only with effects that have adjustable settings.
1 In the Timeline window, click the triangle ( ) next to the track name to expand the track containing
the clip with the effect.
2 Click the keyframe icon ( ) to display the keyframe line.
3 If a clip has more than one effect applied, click the triangle next to the effect name (under the clip’s
name in the Timeline) and select the effect from the menu that appears, or select the effect in the Effect
Controls palette.
Page 48

40
An Overview of Adobe Premiere
4 Position the edit line at the point where you want to create a keyframe and do one of the following:
• Click the Keyframe Navigator’s Add/Delete Keyframe box ( ) to set a new keyframe and then, if you
want, adjust the settings in the Effect Controls palette or click Setup in the Effect Controls palette and
adjust the settings in the dialog box that appears.
• Adjust the settings in the Effect Controls palette or click Setup in the Effect Controls palette and adjust
the settings in the dialog box that appears. Premiere automatically adds a keyframe at that location.
Click Setup (left) to view the Settings dialog box for an effect (right).
5 To select an existing keyframe, click the Keyframe Navigator’s Previous Keyframe ( ) arrow or Next
Keyframe ( ) arrow.
Use the Effect Controls palette to manage effects
Once you’ve applied an effect to a clip, use the
Effect Controls palette to adjust settings, hide the
effect during previews, or delete the effect. For
more information, see “Applying and controlling
effects” on page 327.
• If necessary, choose Window > Show Effect
Controls.
• To see all of a clip’s effects, select the clip in the
Timeline. Video or audio effects appear in the
Effect Controls palette in the order they were applied.
Page 49

ADOBE PREMIERE 6.0
• To adjust an effect’s settings when no keyframes are set, adjust the controls under the effect name in the
Effect Controls palettes, or click Setup and adjust the settings in the Settings dialog box.
• To adjust an effect’s settings when keyframes are present or when you want to set a keyframe, first
position the edit line over the clip; then adjust the controls under the effect name in the Effect Controls
palettes, or click Setup and adjust the settings in the Settings dialog box.
• To temporarily turn an effect on or off, click the Effect Enabled button ( ).
• To remove all keyframes from an applied effect, click the Keyframing Enabled button ( ). A stopwatch
icon appears in this button only when a keyframe has been added to the effect.
Using the Title window
Use the Title window to create titles, rolling credits, symbols, or simple drawings. When you save a title,
Premiere automatically adds it to the open Project window and applies the appropriate transparency key for
easy superimpositions. For detailed information on creating titles, see Chapter 6, “Creating Titles.”
Creating a title When you use Premiere’s Title window, you can type text and draw images directly in the
window.
User Guide
41
1 Choose File > New > Title.
2 In the Title window, select the type tool and
then click to make an insertion point.
3 Type your text, and then close the window.
Click Yes to save the file, type a filename, and
click Save. Once you save the title, Premiere
automatically adds the title file to your Project
window.
Page 50

42
An Overview of Adobe Premiere
Creating composites
Premiere makes it easy to create composites, also known as superimpositions. Using different types of transparency keys such as alpha channels or blue screens, you can superimpose two or more clips on top of one
another and create composites containing selected portions of each clip. Superimposing is commonly used to
add titles and credits to a movie, to add a logo to an advertisement, and to change the background behind a
person or figure in a video clip.
Preparing for transparency If you plan to use transparency in your video program, take the time to
prepare your footage for transparency effects. For example, shoot your video in front of a solid-colored
screen that contrasts with the subject you are taping, or save still images with an alpha channel. For more
information, see “About transparency” on page 295. (A clip containing an alpha channel is included in the
sample clips.)
Add a clip to a superimpose track When a clip is in a superimpose track (Video 2 or higher), you can use
transparency settings to create transparent areas in which the clips in lower tracks can display through.
• To superimpose a clip over another clip, place two or more clips on top of one another in the Timeline,
with at least one clip in a superimpose track.
• To add additional superimpose tracks to the Timeline, drag a clip from the Project window or Source view
to the time ruler, or click the Track Options button ( ) at the bottom of the Timeline and click Add.
Drag a clip to the time ruler (left) to automatically create a new superimpose track (right).
Page 51

ADOBE PREMIERE 6.0
Apply transparency Use the Transparency Settings
dialog box to apply transparency to clips. For more
information, see “Using keys to superimpose and
create composites” on page 298. To apply transparency, do the following:
1 Select a clip in the superimpose track, and
choose Clip > Video Options > Transparency,
or click the Transparency box in the Effect
Controls palette.
2 Select a transparency key from the Key menu.
For example, if the selected clip contains an
alpha channel, use the Alpha Channel key. If the clip was filmed with a colored background, choose the
appropriate color key, such as Blue Screen, Green Screen, or Chroma.
3 Click the page peel icon ( ) under the Sample window to preview the effect of the transparency setting
on your footage.
4 Click OK to set the transparency and return to
the project.
User Guide
43
Before (left) and after (right) transparency
Page 52

44
An Overview of Adobe Premiere
Animating a still image
Using the controls in Premiere’s Motion dialog box, you can move, resize, rotate, or distort any video or still
image clip in your project. You can also use the Transform effect to animate, resize, rotate, or distort a clip. See
online Help for more information on the Transform effect.
Creating a motion path All motion effects are
located in the Motion Settings dialog box. For
more information, see “Animating a clip’s motion”
on page 311. To create a motion path for a clip, do
the following:
1 Select the clip in the Timeline, and then choose
Clip > Video Options > Motion or click the
Motion box in the Effect Controls palette. Premiere’s default motion path is the straight horizontal line
through the center of the frame.
2 To modify this path, click the path to add motion keyframes, and then drag them in any direction.
3 To adjust the time between motion keyframes, move the keyframes on the motion timeline directly
below the motion path.
Page 53

ADOBE PREMIERE 6.0
4 To delay motion at any point in time, select a
keyframe and set Delay to the time you want.
A blue bar in the motion timeline represents
the length of the delay from one keyframe to
the next.
Rotating and resizing an image The Delay and
Motion options, located at the bottom center of the
dialog box, provide more control over the time
between keyframes and let you create numerous
visual effects.
For example, if you simply want to resize and rotate an image without moving it at all, set the Delay for
the first keyframe on the path to 100%. Then, move the image thumbnail on the motion path to position
the clip in the frame, and adjust the Zoom, Rotation, or Distortion settings. For more information, see
“Rotating, zooming, delaying, and distorting” on page 316.
User Guide
45
Page 54

46
An Overview of Adobe Premiere
Creating final video
An overview of output options
You can output a video program using a variety of output settings and export to any number of formats. You
can also take one program and create a variety of different files. For example, you can record a video program
to tape, export it as a RealVideo file, export it as a DV stream, and then export it as a QuickTime streaming or
hinted video. For more information, see Chapter 10, “Producing Final Video.”
Use Premiere to capture digital video directly from the camera to the computer (left) and then export a completed video piece to
CD, video tape, the Web, or back to your DV camera.
Page 55

ADOBE PREMIERE 6.0
Exporting to the Web
In addition to its movie export feature, Premiere includes three built-in export options that provide unique
solutions for creating Web-based media: Save for Web, Advanced Windows Media (Windows only), and
Advanced RealMedia Export. For detailed information on each of these options, see the online Help within
each plug-in’s dialog box.
Export to a Web-ready file format You can take any
video program in Premiere and export it as a file
optimized for viewing on the Web. Do this by
choosing one of the three Web export options in the
File > Export Timeline menu or the File > Export
Clip menu. For information on any of these plug-in
export options, see the plug-in’s online Help.
• Use the Save for Web option (a Terran Media
Cleaner plug-in) to export a video program to
one of a variety of Web-optimized file formats.
This is a one-stop Web output option that includes presets for exporting as QuickTime hinted and
streaming video, RealMedia SureStream video, ASF Intelligent Streaming video, MPEG-1 video, and
MP3 audio, as well as other video and audio formats.
• Use the Advanced Windows Media option (Windows only) to export a video and audio (audio
required) program as a Windows Media file (.WM). Windows Media files can be played back within
Premiere or over the Web using the Windows Media Player, which is available as a free downloadable
file from Microsoft’s Web site (http://microsoft.com).
• Use the Advanced RealMedia Export option to export a video program as a RealMedia file (.RM).
RealMedia is a streaming media file format that can be played back within Premiere or over the Web
using the RealPlayer application, which is available as a free downloadable file from Real Networks’ Web
site (http://real.com).
User Guide
47
Page 56

Page 57
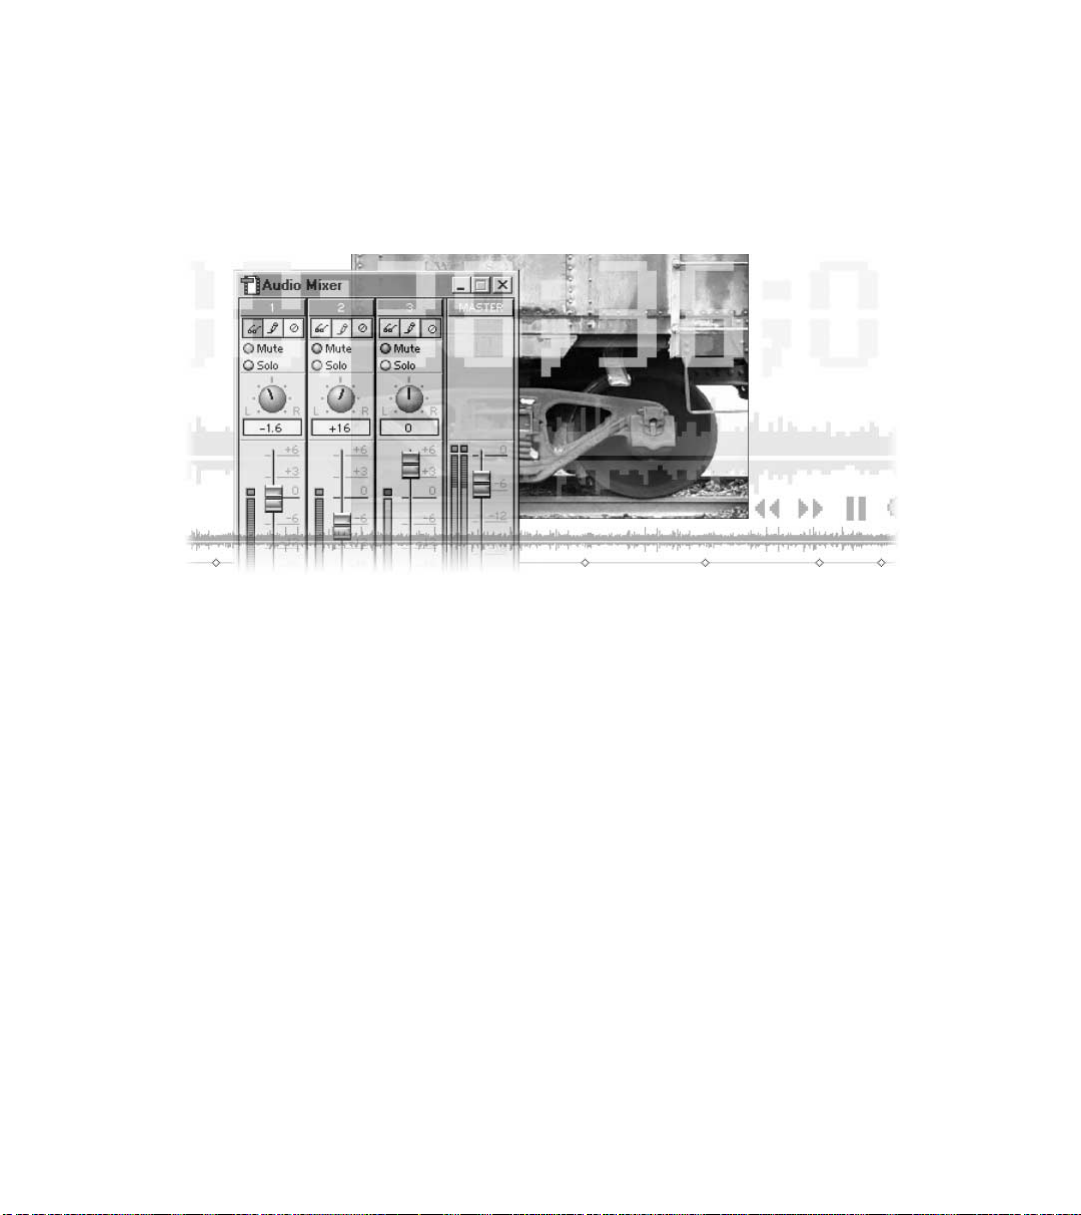
What’s New in Premiere 6.0
With the release of version 6.0, Adobe Premiere continues to lead the way in professional desktop video
editing, introducing many new features and enhancements. Taking your video from the video camera to
the Web is a clean and simple process now that Premiere directly supports IEEE 1394 (FireWire/i.Link)
for both Windows and Mac OS, and includes Web-optimized export options from Terran Interactive,
Microsoft, and RealNetworks. Premiere also includes over 30 After Effects plug-ins so that you can easily
create visually compelling, one-of-a-kind video, and a new Audio Mixer window so that you can precisely mix your audio clips in real time!
Premiere 6.0 also provides new and improved organization tools, including Project window bins to organize your clips; the storyboard, in which you can assemble clips before adding them to the Timeline; the
Automate to Timeline command, which automatically places the contents of a storyboard or bin on the
Timeline; and the Settings Viewer, which you can use to compare settings for all the different elements of
your project.
Page 58

50
What’s New in Premiere 6.0
Robust DV support
DV functionality
Premiere 6.0 provides direct support for IEEE 1394 (FireWire/i.Link) on both Windows and Mac OS. Using
only the DV port on your computer, an IEEE 1394 connection, and your DV camcorder, you get perfect digital
video in Premiere. When you capture DV video, Premiere displays it at the appropriate aspect ratio so that
your images won’t appear distorted on your computer screen, and provides a DV editing mode so that you can
preview your DV video at full quality on your DV device. Premiere also includes specific DV presets and DV
device control for flawless capture from and export to your DV device.
DV presets Premiere stores groups of project settings in files called presets, which include settings for
compressor, frame size, pixel aspect ratio, frame rate, color depth, audio, and fields. When you first start a
project, Premiere prompts you to select a default preset or a previously saved custom preset from the Load
Project Settings dialog box. If the available presets are not appropriate for your project, click Custom and
select individual settings.
Now that DV is widely used by video editors, Premiere 6.0 includes DV-specific presets for NTSC and PAL
that you can use with your DV equipment.
The DV-specific presets differ only in the following ways:
• NTSC or PAL
• Standard 4:3 or Widescreen (Cinema) 16:9 aspect ratio
• 32 kHz (12-bit) or 48 kHz (16-bit) audio sample rate
The presets can be customized for the following variations:
• Video rendering: standard interlaced or progressive scan
• NTSC time display: drop-frame timecode (default) or non–drop-frame timecode
• Sample rates: 32 kHz, 48 kHz, or 44.1 kHz. (Because many DV devices do not support 44.1 kHz audio,
it is not included in a default preset, but it is an option under Audio Settings in the Project Settings
dialog box.)
Page 59

DV device control With device control you can
control the videotape from within Premiere’s
capture window. When you select device control,
you can also batch-capture video, capture from an
In point to an Out point, and automatically begin
recording from the tape. Premiere now includes
DV device options that optimize performance and
reliability for your camera or deck. Device control
options are located in the Scratch Disk and Device
Control preferences dialog box. For more information, see “Capturing clips with device control” on page 127.
Support for nonsquare pixels Premiere now
provides support for a variety of nonsquare pixel
aspect ratios, including DV’s Widescreen (Cinema)
pixel aspect ratio of 16:9 (1.2) and the Anamorphic
pixel aspect ratio of 2:1 (2.0).
ADOBE PREMIERE 6.0
User Guide
51
When you preview on your computer screen,
Premiere displays nonsquare video with a
corrected aspect ratio on the computer monitor so
that the image is correct. Motion and transparency
settings, as well as geometric effects, also use the
proper aspect ratio, so you don’t have to worry
about distortions appearing after editing or rendering your video.
DV editing mode When you use the new DV Editing Mode, Premiere sends the captured or rendered
video out through the IEEE 1394 connection to the DV device for previewing at full quality. Use this
feature while previewing or scrubbing in any Window or while render-scrubbing (pressing Alt [Windows]
or Option [Mac OS] while scrubbing) the Timeline to preview effects!
DV file interchange options Premiere now imports and exports native DV files in a variety of formats
including QuickTime, Type 1 or Type 2 AVI files, and DV stream files. (DV stream refers to the bit-by-bit
copy of the digital data on a DV tape, not Internet streaming.) When you print to video or export to tape,
Premiere sends the DV information to your IEEE 1394 connection so you can record it on your DV device.
Page 60

52
What’s New in Premiere 6.0
Capture window The Capture window has been
A B
enhanced to include all of the necessary capture
tools right in the window. For more information,
see “Logging clips to a batch list” on page 132.
Some of the enhancements include:
• A control panel under the preview window to
control the connected playback device.
• A Settings palette that displays your current
capture settings as defined in the Project
Settings dialog box. If you want to change these
settings, click Edit to open the Capture section
of the Project Settings dialog box, and make
A. Log settings B. Capture settings C. Device
Control controls
C
your changes. Any changes are automatically
reflected in the Settings palette.
• A Logging palette for entering In and Out points for clips to be batch-captured later. Click the Set In or
Set Out buttons to set the time for In or Out at the current position of the tape in the device.
Page 61

ADOBE PREMIERE 6.0
Web output
Built-in Web export for one-step Web output
Premiere 6.0 includes three options for exporting an individual clip, a segment of the Timeline, or the entire
program to a Web-optimized file format. When you have finished editing your video program, choose File >
Export Clip or File > Export Timeline and select one of the following Web export options: Save for Web,
Advanced Windows Media, or Advanced RealMedia Export. Choosing one of these options opens the
respective plug-in dialog box in which you can specify your exported file format information. Also included in
this release is the ability to embed Web markers in your video files.
Save for Web The Save for Web export option from Terran offers several different Web output options.
Now you can export any Premiere project to a Web-optimized file format by simply choosing File > Export
Timeline > Save for Web. When using this option, you select a preset from the Save for Web dialog box to
export to a variety of formats, including any of the following: QuickTime, RealMedia, ASF, MPEG-1, MP3,
DV stream, and QuickTime DV. These formats can be played back over the Web, from your hard disk, or
from a CD-ROM using a variety of player applications such as QuickTime, RealPlayer, and Premiere. For
more information, see the plug-in’s Online Help.
User Guide
53
Advanced Windows Media (Windows only) Use the Windows Media option from Microsoft Corporation
to export Timeline content to the Windows Media (.WM) streaming-media file format. Using the
Advanced Windows Media plug-in, you can generate high-quality and high-bandwidth video that can be
played over the Web, or downloaded and played back from within Premiere, Windows Media Player, or a
variety of other playback applications. For more information, see the plug-in’s Online Help.
Page 62

54
What’s New in Premiere 6.0
Advanced RealMedia Export Use the Advanced
RealMedia Export plug-in from RealNetworks to
export directly to the RealMedia (.RM) streaming
format or Web download format. RealMedia files
(containing both RealVideo and RealAudio) can be
played from the Web or downloaded to a hard disk
and played over the Web using the RealPlayer application, which is available as a free downloadable file
from real.com. For more information, see the plugin’s Online Help.
Web and chapter markers You can set Timeline
markers that include links to HTML pages or to
chapters in a QuickTime movie or DVD. During
playback, these markers automatically open the
linked Web content or chapter. For more information, see “Using markers” on page 185.
To create a Web or chapter marker, set a Timeline
marker and then either double-click it or choose
Timeline > Edit Timeline Marker to open the
Marker dialog box.
Within this dialog box, do any of the following:
• In the Comments field, type text that you want to appear in your video program, in the Monitor
window preview. Comments are visible only when your project is set to QuickTime editing mode. They
are not exported with the project.
• In the Duration field, type the amount of time you want the comment to appear.
• In the Marker Options section, type a chapter number, such as Chapter 1, to create a jump from the
project to the specified chapter in a QuickTime movie.
In the Web Links section, type a URL, such as http://www.adobe.com/premiere, to initiate a jump to the
specified URL in your Web browser. To target a specific frame on the Web site, type an HTML target name
in the Frame Target field.
Page 63
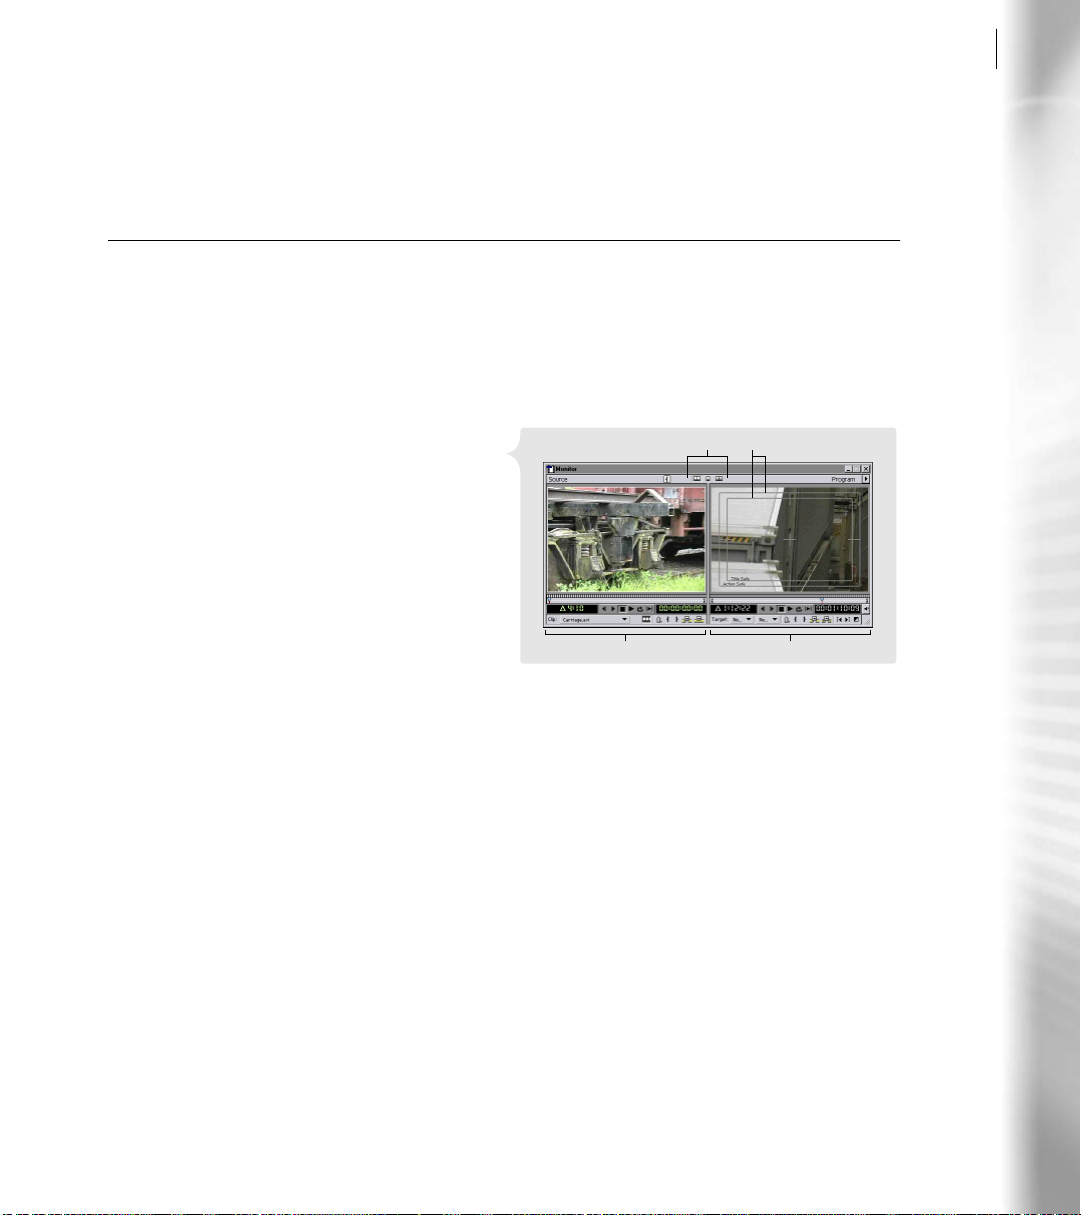
ADOBE PREMIERE 6.0
Enhanced professional tools
Enhanced Monitor and Timeline windows
The enhanced Monitor window provides more efficient editing control with three-point, four-point, and sixpoint editing (L-cut) capabilities when using a combination of the Source and Program views. The streamlined Timeline window offers precise editing capabilities for piecing together video projects. In this window
you can directly adjust opacity, add transitions or effects, and modify keyframes.
User Guide
55
Monitor window The Monitor window retains all
A B
of its power but is much more intuitive in Premiere
6.0. For more information, see “Using the Monitor
window” on page 163.
Some of the enhancements to this window include:
• Clearly defined Source and Program View
windows, with separate controllers.
• Buttons at the top for toggling between Dual
View, Single View, and Trim Mode.
• Customizable Title-Safe and Action-Safe
A. View buttons B. Safe Zones C. Source View controllers
D. Program View controllers
C D
margins for both the Source and Program view
windows.
• Marker buttons for both the Source and Program View windows. You no longer need to go to the Clip
menu to set a marker!
• Enhanced Trim mode window that includes Set Focus buttons, which let you focus on the Clip Out,
the Clip In, or both; new shuttle controls to help you set Out points for the Clip Out and In points for
the Clip In; Target menus in which to choose the tracks you want to trim; and new Out Shift and In
Shift menus showing the number of frames that have changed between the original In or Out points
and the newly marked In and Out points.
Page 64

56
What’s New in Premiere 6.0
Timeline window The Timeline window has added
tools and buttons to increase efficiency. For more
information, see “Using the Timeline window” on
page 171.
Some of the enhancements to this window include:
• All of the tools have been improved and now
• The lower left corner contains new buttons for
• The new Toggle Shift Tracks Options button ( ) along the bottom of the window lets you decide
• The Toggle Sync Mode button ( ) along the bottom of the window lets you toggle between moving
• Adding new tracks is as simple as dragging a clip to the time ruler or the blank space at the bottom of
• The preview area (area directly under the yellow work area bar) now displays colored preview bars: no
• You can replace transitions simply by dropping a new one on top of an existing one. If a transition
A
B
C
provide more intuitive visual feedback.
D
quick access to new and frequently used Timeline
features such as Track Options Dialog, Toggle
Snap to Edges, Toggle Edge Viewing, Toggle Shift
A. Preview bar B. Keyframe icon C. Video and Audio tracks
D. Timeline quick access buttons
Tracks Options, and Toggle Sync Mode.
whether a specific edit, such as a rolling edit, a ripple delete, or an insert, shifts clips on all tracks or only
on the edited track.
linked (synched) audio and video clips independently of each other, and moving them in unison.
the window. You can also use the Track Options Dialog button ( ) at the bottom of the window to
open the Track Options dialog box and quickly add one or more video or audio tracks.
bar indicates a cuts-only segment that can play in real time, a red bar indicates that you need to build
a preview file for the segment, and a green bar indicates that a preview file exists on disk for the segment
(light green represents audio previews and dark green represents video previews).
doesn’t fit in the designated area, the new Fix Transitions dialog box appears, providing clear and easy
options to fix the problem.
Page 65

ADOBE PREMIERE 6.0
• By default, the work area grows with your project: as you add clips to your program, the yellow work
area bar expands to cover all clips.
• Linked audio and video clips are green.
• New keyframe lines exist within each video and audio track. Once you expand a track, you can click an
icon to display the Keyframe area, the Waveform, or the Opacity, Volume, and Pan rubberbands.
Clip window The Clip window includes all the
features of the Source View. It includes controllers
for setting In and Out points and Markers. If you
open the Clip window by double-clicking a clip in
the Timeline, and then make changes to the In or
Out points or create new markers, an Apply button
appears at the top of the window. Click Apply to
apply the changes to the clip in the Timeline. For
more information, see “Importing clips” on
page 151.
New Timeline menu The menus have been reorga-
nized and a new Timeline menu has been added. Now you can find any command under its associated
menu. For example, under the Timeline menu are commands such as Preview, Render Work Area, Add
Video Track, and Set Timeline Marker.
User Guide
57
Expanded context menus The context menus for each window in Premiere 6.0 have been expanded to
include many more commands and functions. For example, the context menu for the Source View in the
Monitor window includes commands such as online Help, Properties, Speed, Open Master Clip, and Set
Clip Marker.
Page 66

58
What’s New in Premiere 6.0
Audio Mixer
Now you can process audio within Premiere using a professional-level mixing tool: the Audio Mixer. This tool
resembles a traditional multichannel mixer, featuring gain and pan adjustment for up to 99 audio tracks. The
Audio Mixer works in conjunction with the Monitor window, so you can make adjustments as you play the
audio and watch the synchronized video in the Monitor window. For more information on the Audio Mixer,
see “Working with the Audio Mixer window” on page 263.
Audio tracks Each audio track in the Audio Mixer
is numbered or named the same as its corresponding track in the Timeline. A Master fader
track is displayed along the right side of the Audio
Mixer window. The Master fader represents the
final mix of the combined audio tracks. The
volume for this track is computed after mixing all
the audio tracks together and applying the output
gain value. The mono/stereo format for the Master fader is determined by your project settings: if your
project is set up for mono, the Audio Mixer provides a mono VU meter; if your project is set up for stereo,
the Audio Mixer provides a stereo VU meter.
The following controls are available when mixing audio tracks:
• Select Mute to temporarily turn off a track. You cannot modify the parameters for a track when it is set
to Mute.
• Select Solo to temporarily mute other tracks. Multiple tracks can be set to Solo at one time.
• Right-click (Windows) or Control-click (Mac
OS) a track’s volume fader and select a Gang
option from the context menu that appears.
Then select the same gang option for another
track. When tracks are ganged, the relative
volume fader positions between them are
preserved—when you move one ganged
track’s volume fader, the other track’s fader
moves as well.
Page 67

ADOBE PREMIERE 6.0
Automating the mixing process Use the automation buttons to control how Premiere handles your
adjustments for each track (for more information, see “Working with the Audio Mixer window” on
page 263):
• Click Automation Read ( ) to have Premiere read the previously stored volume and pan values.
• Click Automation Write ( ) to have Premiere read the stored volume and pan values, and write
(record) the changes you make in the mixer.
• Click Automation Off ( ) to ignore any stored values and read only those you set in the mixer.
Use the options in the Audio Mixer Options dialog box (Window > Window Options > Audio Mixer
Window Options) to determine how the Mixer handles the Automation Write process (for more information, see “Adjusting audio levels in the Audio Mixer window using automation” on page 266):
• Select Touch to write (record) changes only when you are dragging or holding the control in the Mixer.
• Select Latch to write (record) changes during and after you move the control in the Mixer.
• Select Write to always write (record). This option begins writing (recording) from the playback start
location of the fader.
• Select Write/Touch when you want to use the Write option until you stop the playback, at which point
you write (record) only when you move the fader.
User Guide
59
VU meters Each track has a separate VU Meter.
When the audio is clipping, the Clip Indicator at
the top of the meter lights up. (Clipping occurs
when the volume reaches or exceeds 0 db for 3
consecutive seconds. If you don’t lower the volume
so it is within the clipping threshold, data will be
lost.) Click the Clip Indicator light to turn it off.
Volume faders Each track has a separate volume
fader. Drag the fader up to increase volume; drag
down to decrease volume. When you select
Automation Write, changes you make to the
volume fader are reflected by handles on the clip’s
Volume rubberband in the Timeline.
Page 68

60
What’s New in Premiere 6.0
Pan controls Each track also has a separate Pan
control. Panning is available only when your
project’s Audio setting is Stereo. To pan audio, turn
the Pan control to position sound to any degree
between 100% to the left or 100% to the right. If a
clip is mono, pan to shift the position of the sound
within the project’s stereo field. If a clip is stereo,
pan to balance the amount of sound in the left and
right channels.
When Automation Write is selected, changes you make to the Pan control are reflected by handles along
the Pan rubberband in the Timeline.
Improved project management
Manage all of a project’s media using the flexible Project window. Create multiple bins for organizing clips in
a split-view project window; set the poster frame for a video clip; even preview the clip in a project thumbnail
preview window. The new Project Settings dialog box offers presets for common video formats. The new
Settings Viewer displays all settings (including capture, project, and export) in one screen and compares them
to the clips in the project so that you can easily spot problems.
Project window The Project window now includes
a Preview area; when you select a clip in the Project
window, Premiere displays the clip’s thumbnail
along with file information. To play the thumbnail
preview, click the play button ( ) under the
preview to play a video clip, and click it again to
stop. If you want to change a clip’s poster frame
(the frame Premiere uses as an icon to represent the
clip), scrub through the video preview until you
find the frame you want to use and then click the
poster frame button ( ).
A
B
C
A. Thumbnail preview B. Play button C. Poster frame
button
Page 69

ADOBE PREMIERE 6.0
Premiere’s new Bin area provides a hierarchical
presentation of files in your project. Click a bin to
see its contents. Every project uses at least one bin.
You can create new bins, nest bins within one
another, and save bins to your hard disk as files for
A
use in other projects. For more information, see
“Customizing a Project or Bin window display” on
page 94.
B C D E F
A. Bin B. Find C. New Bin D. Create Item E. Delete
Selected Items F. Resize Bin Area
The Project window also includes several new
command buttons at the bottom left of the
window:
• Click the new Find button ( ) to search for
files in the open project. You can search by any
number of parameters.
• Click the New Bin button ( ) to create a new
bin. You can then drag files to the bin or import
directly to the bin.
• Click the Create Item button ( ) to create a new title, offline file, color matte, black video, bars and
tone, or universal counting leader.
• Click the Delete Selected Items button ( ) to delete the selected bin or file.
• Drag the Resize Bin Area button to increase or decrease the size of the Bin area.
User Guide
61
Load Project Settings dialog box at startup When you launch Premiere 6.0, the first dialog box you see is
Load Project Settings. This dialog box contains presets for the most commonly used default project
settings, including eight DV-specific sets. If you have a capture card installed that includes its own preset,
that preset will be listed as well. If you choose not to use a default preset, click Custom and select your own
settings. You can save your customized settings for use as a preset. For more information, see “Specifying
project settings” on page 74.
Page 70

62
What’s New in Premiere 6.0
Settings Viewer Because matched settings are such
an important part of your video project, the
Settings Viewer clearly displays all settings in one
window. Settings that do not match appear red. To
open this window, choose Project > Settings
Viewer.
Use this window to ensure that your capture,
project, and clip settings are the same throughout
your project. Discrepancies between capture,
project, and clip settings can cause unexpected
behavior in your previews and final output. It’s best to use the project and capture settings recommended
or supplied by your capture card manufacturer. Export settings will always match your project settings
until you change them, and you can change them to anything you want. For example, your capture,
project, and clip settings may use a frame size of 720 x 480, but you can export the project as a RealVideo
file with a 320 x 240 frame size.
If a setting appears red, double-click it and make the appropriate changes in the settings dialog box that
appears. For more information, see “Comparing settings using the Settings Viewer” on page 82.
Page 71

ADOBE PREMIERE 6.0
Visualization tools
Premiere offers a number of new and enhanced features to help increase your productivity. With the new
Storyboard window and its Automate to Timeline command, you can quickly visualize and implement the
layout of clips in your project. The Automate to Timeline provides a quick and easy way to transfer all the clips
in a Project window bin or storyboard to the Timeline. The Commands palette has been updated and
enhanced with increased functionality and organization features.
Storyboard Use the storyboard to arrange clips
before adding them into the Timeline. Doubleclick a file in the storyboard to change its In or Out
points, add markers, or include audio or video.
Once you have your clips in order, automatically
transfer them to the Timeline using the Automate
to Timeline command, adding transitions between
the clips if desired, or print the storyboard directly
to the selected video output device.
With the context menu for the Storyboard window,
you can locate the source clip, add the clip to the
project, and change the speed of a video clip or the
duration of a still clip. To access the context menu,
right-click (Windows) or Control-click (Mac OS)
the clip icon in the Storyboard window. For more
information, see “Creating a storyboard” on
page 203.
D
A. Sequence direction marker B. Clip information
C. End of sequence marker D. Automate to Timeline
button E. Print to Video button
A
B
C
E
User Guide
63
Page 72

64
What’s New in Premiere 6.0
Automate to Timeline command Use this
command to automatically transfer the contents of
a storyboard or a Project window bin to the
Timeline. The Automate to Timeline dialog box
offers several options for placing the clips in the
Timeline, including selection of contents to place
and the sorting order of the contents; the
placement preference (sequentially or at unnumbered markers); insertion location; and the use of
transitions between clips.
To place clips at unnumbered markers, create a
series of unnumbered Timeline markers (see
“Using markers” on page 185), positioning them at
the exact location where you want the clips to
appear. You can choose to stretch clips to fill the space between markers or leave gaps between clips; clips
that are longer than the duration between markers are automatically shortened.
To transfer a storyboard, click the Automate to Timeline button ( ) in the Storyboard window or choose
Automate to Timeline from the Storyboard window menu, the Project menu, or the Storyboard window’s
context menu.
To transfer a sequence from a bin, choose Automate to Timeline from the Project window menu or the
Project menu. For more information, see “Adding multiple clips using an automated process” on page 201.
Commands palette This palette has been updated
and enhanced with increased functionality and
organization features. When you select Button
Mode in the palette menu, the commands appear
in the colors you’ve designated. When you deselect
Button Mode, you can add, delete, and change
commands. When you are adding or changing a
A B C
command, the new Function Key menu provides a
list of all available keys. New buttons at the bottom
of the palette provide quick access for playing a
Button Mode selected (left) and deselected (right).
A. Play Command B. Add Command C. Delete Command
command ( ), adding a command ( ), and
deleting a command ( ). For more information,
see “Using the Commands palette” on page 102.
Page 73

ADOBE PREMIERE 6.0
Enhanced effect support
Premiere 6.0 has changed the way you add effects and transitions to video and audio. The new palettes
provide easy access to all effects and transitions, and better organization. With the Effect Controls palette, you
can manage all your effects from one location, and the Timeline window’s new keyframe track provides you
with a visual representation of where effect keyframes are in the clips.
Video, Audio, and Transition palettes The Video
Effects, Audio Effects, and Transitions palettes are
now organized by folders, which you can rename,
reorganize, hide, or delete. For more information,
see “Working with effects” on page 326.
To hide folders or files, select a folder or file and
choose Hide Selected from the palette menu; to
reorganize the content within a folder, drag files
from one folder to another; and to remove folders,
select the folder and choose Delete Folder from the
palette menu. If you forget where you’ve moved an
effect, locate it using the Find button ( ) at the
bottom of the palette.
User Guide
65
Applying effects and transitions To apply an effect
or transition, drag the effect or transition from the
palette to the clip in the Timeline. To delete an effect, select it in the Effect Controls palette and click the
Delete button ( ). To delete a transition, select it and press the Delete key.
Page 74
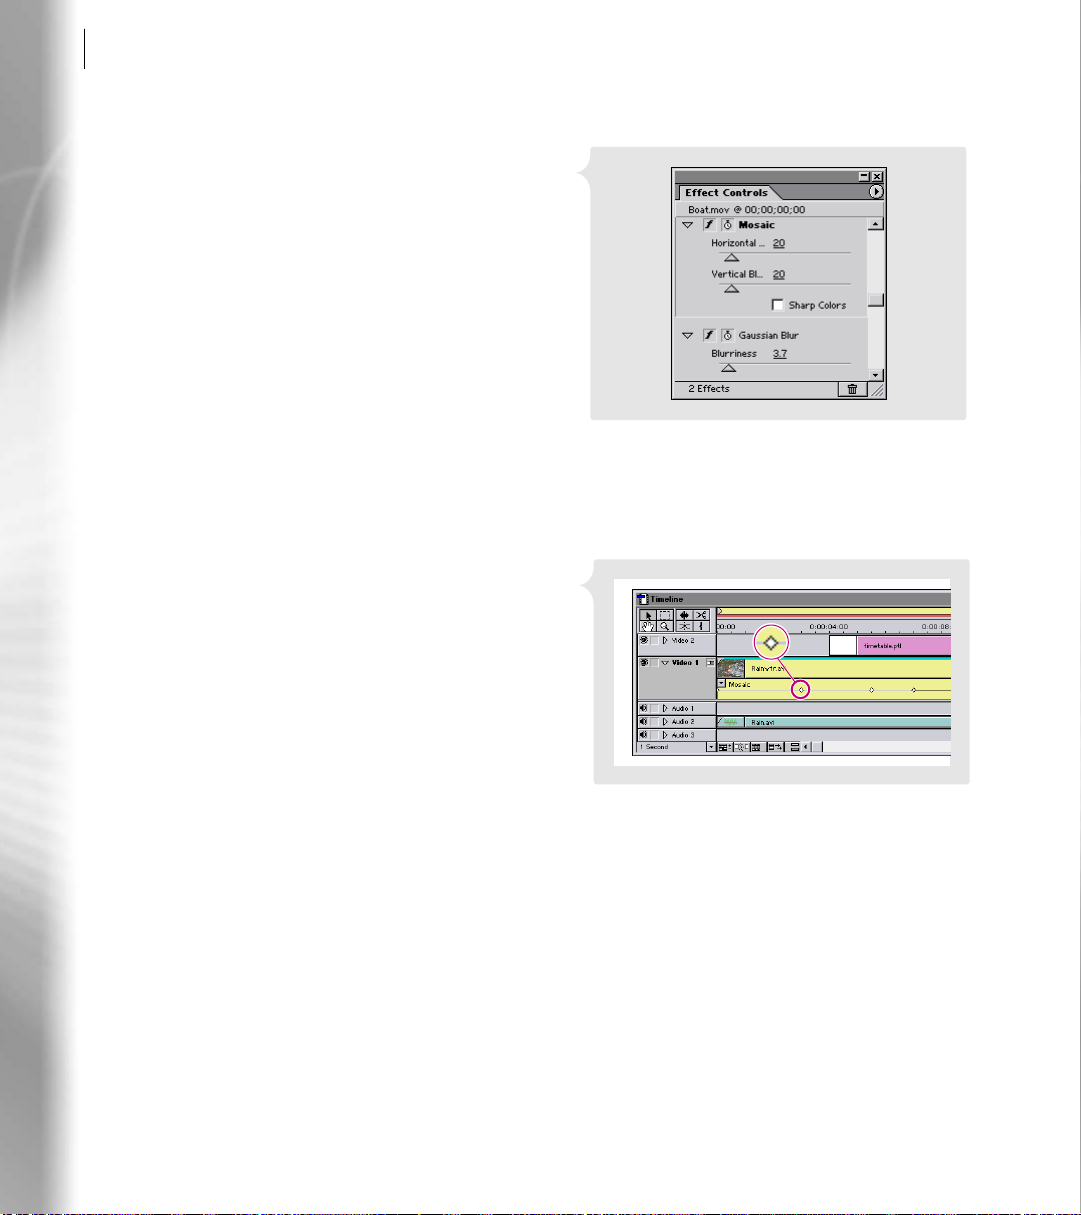
66
What’s New in Premiere 6.0
Effect Controls palette This palette is similar to the
Adobe After Effects Effect Controls palette. To
open it, choose Window > Show Effect Controls.
Use this palette to manage your effects: enable or
disable keyframing, adjust settings, hide or show,
and delete. The palette contains information on
every effect applied to clips in your video program
as well as any motion or transparency settings
you’ve applied. To see an effect and its settings in
the Effect Controls palette, select the clip in the
Timeline. All the effects for the selected clip appear
in the palette.
Some effects, including those from After Effects, do not use a Settings dialog box, so always check the Effect
Controls palette for adjustable settings when applying an effect. For more information, see “Applying and
controlling effects” on page 327.
Effect Keyframes Premiere uses keyframes to
change an effect’s behavior over time. Now you can
add the keyframes directly in the Timeline, using
the new Effect Keyframe area underneath each clip.
Setting keyframes in the Timeline allows you to see
when an effect’s settings change relative to the
entire program. You can also quickly edit and
preview the settings at each keyframe. For more
information, see “Working with keyframes” on
page 324.
Page 75

ADOBE PREMIERE 6.0
Customizable workspace
Depending on the type of work you are doing in Premiere, you may want to hide or display certain window
features and palettes. This arrangement of windows is called the “workspace.” When you start Premiere 6.0
for the first time, you choose the workspace that you want to work within. You can choose a new workspace
option from the Window > Workspace menu. You can also rearrange the workspace and save it as a custom
workspace. Workspaces do not limit how you use the windows and palettes, since you can alter their
arrangement at any time. For example, if you’re using the A/B Editing workspace, you can choose Dual View
from the Monitor window menu to display the Source view. For more information, see “Selecting an editing
workspace” on page 169.
A/B Editing workspace If you want to work in a
simple A/B roll environment, you can now simplify
the work area by choosing the A/B Editing
workspace:
• The Monitor window uses the Single View,
displaying only the Program View window and
controllers. Individual clips open in separate
Clip windows.
• The Timeline window displays the Video 1A
track expanded, with the transition track
showing between Video 1A and Video 1B.
User Guide
67
Page 76

68
What’s New in Premiere 6.0
Single-Track Editing workspace If you prefer to use
professional editing techniques and work with the
Video 1 track as a single track, you’ll want to use the
Single-Track Editing workspace:
• The Monitor window displays both the Source
• The Timeline window has a single Video 1 track.
Audio workspace The Audio workspace uses your
current workspace (A/B Editing or Single-Track
Editing) with the following adjustments: clips open in a separate Clip window, the Audio Mixer is open,
and no palettes are displayed.
Effects workspace The Effects workspace uses your current workspace (A/B Editing or Single-Track
Editing) with the following adjustments: the Monitor window displays in Single view, and the Effect
Controls, Navigator, and Transitions palettes are active.
View and the Program View.
You can expand the Video 1 track to show the
transition track and the A and B tracks.
Custom workspaces You can create your own custom workspace that combines your favorite features of
the different default workspaces. Premiere offers unprecedented flexibility for you to choose your own
work environment. Custom workspaces that take advantage of dual monitors can also be saved. Dualmonitor configurations offer additional flexibility and the added benefit of having more windows and
palettes open and accessible.
Page 77

ADOBE PREMIERE 6.0
Integration
New tools and a more familiar interface
Premiere now provides the Edit Original command so that you can quickly edit content that was created in
another program. And the Adobe History palette makes experimenting with video edits and effects a carefree
process! Premiere has also thoroughly integrated the Adobe interface familiar to those who have worked in
other Adobe applications such as Adobe Photoshop and Adobe Illustrator.
Edit Original command The Edit Original
command opens clips in their original application
so that you can edit them and then update them in
the Timeline without exiting Premiere or replacing
the files. The Edit Original command works with
any application installed on your hard disk. For
example, if you want to edit a clip that you created
in After Effects, Photoshop, Illustrator, or
Premiere, select the clip in your project and choose
Edit > Edit Original. After you make and save
changes in the original application, Premiere
automatically incorporates those changes in your current project. To export a Premiere project with the
information necessary to use the Edit Original command, choose Project Link from the Embedding
Options menu in the Export Settings dialog box. For more information, see “Editing clips” on page 189.
User Guide
69
Page 78

70
What’s New in Premiere 6.0
History palette Premiere’s new History palette
adds a new dimension to the Undo/Redo
command. Use this palette to preview your project
at a previous state. You can choose to delete all edits
after the selected state, return to your current state,
or incrementally restore states.
All states created during your current working
session are listed in the History palette. If you jump
to a state earlier in your project, all the following
states are dimmed in the palette, and Premiere
deletes them if you resume editing. You can
manually delete them by clicking the Trash button ( ) or choosing Delete from the History palette menu.
When you close a project, all states are removed from the History palette. For more information, see
“Using the History palette” on page 104.
Adobe After Effects plug-in integration Premiere 6.0 has incorporated many effects from Adobe After
Effects 4.1. After Effects video effects are listed with the Premiere effects in the Video Effects palette, and
include the After Effects symbol next to the name ( ). Some After Effects video effects replace similar
Premiere effects; the replaced Premiere effects are located in the Obsolete folder in the Video Effects
palette. If you open a project from Premiere 5.0 and need to use a replaced effect, choose Show Hidden
from the Video Effect palette menu to access the obsolete effects. For more information, see “Using After
Effects effects” on page 332.
Selecting a state temporarily removes the effects for all
succeeding states.
Familiar Adobe interface The Premiere interface resembles the award-winning standard Adobe interface
used by other Adobe products such as Adobe Photoshop and Adobe Illustrator. The similarities make it
easy to move between Adobe programs with efficiency and ease.
Page 79

1
Page 80

Page 81

Chapter 1: Working with
Projects
project is a single Premiere file that describes a video program. It stores references
to all the clips in that file and contains information about how you arranged the
clips. It also includes details of any transitions or effects you applied. You can add
A
and remove clips, organize clips into bins within the project, and substitute low-resolution
clips as placeholders for your final, high-resolution clips.
Selecting an initial workspace
When you start Premiere for the first time (or when the Preferences file has been deleted),
Premiere asks you to select an initial workspace. Based on your decision, Premiere
optimizes the layout you will use to assemble and edit programs. Your choice of workspace
depends on the kind of editing you will be doing.
If you will primarily be dragging clips from the Project window to the Timeline, select the
A/B Editing workspace. If you will be using more advanced editing techniques such as
three- or four-point editing, select the Single-Track Editing workspace. For more information, see “Customizable workspace” on page 67 and “Selecting an editing workspace”
on page 169.
73
Starting a project
Start a new project by specifying project settings. It’s a good idea to save the project
immediately afterward. See “Saving and autosaving a project” on page 83.
To start a new project:
1 Do one of the following:
• If Premiere is not open, start Premiere.
• If Premiere is already open, choose File > New Project.
Page 82

CHAPTER 1
74
Working with Projects
2 When the Load Project Settings dialog box appears, do one of the following:
• To apply preset project settings, select an item from the list of Available Presets and
click OK.
• To customize settings, choose the preset that most closely matches your editing
environment, and then click Custom, select your specific project settings, and click OK.
See “Saving and loading project settings” on page 82.
Specifying project settings
When you start a project, review the project settings, which are organized into five
categories:
General Settings Control the fundamental characteristics of the video program,
including the method Premiere uses to process video (Editing Mode), count time (Time
Display), and play back video (Timebase). See “General settings” on page 75.
Video Settings Control the frame size, picture quality, compression settings, and aspect
ratios that Premiere uses when you play back video from the Timeline (the window where
you edit your video program). See “Video settings” on page 77.
Audio Settings Control the characteristics of audio you play back from the Timeline. See
“Audio settings” on page 78.
Keyframe and Rendering Options Control frame-related characteristics when you build
(render) and play back video previews from the Timeline. These options work in combination with the Video settings. See “Keyframe and rendering options” on page 80.
Capture Settings Control how Premiere transfers video and audio directly from a deck or
camera. (Other Project Settings panels do not affect capturing.) For more information
about capture settings, see “Digitizing analog video as DV” on page 113 and “Preparing
for DV video capture” on page 120.
Page 83

ADOBE PREMIERE 6.0
The appropriate settings for your project are usually determined by the current stage of
your project. Many video capture cards provide their own presets or recommend project
settings for optimal results. For information on comparing and changing settings, see
“Comparing settings using the Settings Viewer” on page 82. Keep the following guidelines
in mind as you progress through your project:
• When setting up or editing a project, specify settings that will provide the quality you
want when you play back the Timeline. For example, specify project settings that match
the requirements of the final program or that temporarily lower the frame rate so that your
computer can process edits faster. For more information on using low-resolution files, see
“About offline editing” on page 111.
• If you are about to use a videotape deck to record directly from the Timeline, specify
project settings that represent the final picture quality you want.
• If you are about to export the video program to a file (for example, a QuickTime .MOV
file) and you want to specify different settings than you did for editing, you must also
specify export settings. Export settings are available through the File > Export Timeline
command, not in the Project Settings dialog box. Since you use separate settings for
previewing and exporting, you can also maintain a set of preview settings that stays
constant no matter how often you change export settings (such as when you repurpose a
program for multiple distribution media such as television and the Web). When you
specify project settings for the first time, the settings are copied to the export settings,
making your export settings the same as your project settings unless you change the
project or export settings later. See “Exporting a video” on page 346.
User Guide
75
General settings
Choose Project > Project Settings > General, to specify the following options:
Editing Mode Determines which video method is used to play video back from the
Timeline and which compression methods are listed in the Video Settings panel. The
QuickTime editing mode is installed with Premiere. In Windows, the Video for Windows
and DV Playback editing modes are also installed. Manufacturers of video-capture
cards or other video hardware may provide plug-in software that adds editing modes
for maximum quality and compatibility with their hardware.
Note: The Editing Mode does not necessarily specify the export format. For more information,
see “Exporting a video” on page 346.
Page 84

CHAPTER 1
76
Working with Projects
Advanced Settings This button may be available if you have installed an editing mode
plug-in provided by another manufacturer. For information on settings for your plug-in
editing mode, see the documentation provided by the plug-in’s manufacturer.
Timebase Specifies the time divisions Premiere uses to calculate the time position of each
edit. In general, choose 24 for editing motion-picture film, 25 for editing PAL (European
standard) and SECAM video, 29.97 for editing NTSC (North American standard) video,
or 30 for other video types. Do not confuse timebase with the frame rate of the video you
play back or export from the Timeline, although timebase and frame rate often use the
same value.
Playback Settings This button is available when you use a DV preset or choose the DV
editing mode (Windows) or QuickTime editing mode (Mac OS), or if you have installed
a plug-in that provides additional playback functions. When you use the DV (Windows)
or QuickTime (Mac OS) editing mode, use this option to indicate where you want your
previews to play back: on your DV camcorder or other connected device, or on your
desktop. For information on the playback settings available for third-party plug-ins, see
the documentation provided by the manufacturer of the plug-in.
Time Display Specifies the way time is displayed throughout the project. The time display
options correspond to standards for editing video and motion-picture film. For broadcast
NTSC video, choose 30 fps Drop-Frame Timecode if that was the time display used by the
original video. For video to be played back from the Web or CD-ROM, choose 30 fps Non
Drop-Frame Timecode. For PAL and SECAM video, choose 25 fps Timecode. For motionpicture film, choose Feet + Frames 16mm or Feet + Frames 35mm. To count individual
frames and audio samples instead of timecode, choose Frames/Samples.
Current Settings Displays a summary of the settings you specified in all Project Settings
panels.
Page 85

ADOBE PREMIERE 6.0
Video settings
Choose Project > Project Settings > Video, to specify the following options:
Compressor Specifies the codec (compressor/decompressor) for Premiere to apply when
building a preview of the Timeline. The codecs available depend on the Editing Mode
specified by your preset or selected in the General Settings panel. Click Configure (if
available) to set options specific to the selected codec. If you chose an editing mode
provided by a manufacturer of a video-capture card or other hardware, see the documentation for the hardware, as it may recommend a particular codec for editing with that
hardware. Otherwise, consider choosing a fast codec so that edits are processed quickly. If
you want to play video back through your capture card to an NTSC or PAL monitor,
choose the codec specific to your capture card.
Note: If you use a clip in your video program without applying effects or changing frame or
time characteristics, Premiere uses the clip’s original codec for playback. If you make changes
that require recalculation of each frame, Premiere applies the codec you choose here.
Depth Indicates the color bit depth, or number of colors to include in video played back
from the Timeline. This button may not be available if the selected compressor provides
only one option for bit depth. You can also specify an 8-bit (256-color) palette when
preparing a video program for 8-bit color playback, such as for the Web or for some
presentation software. The Palette button may be available when 256 Colors is chosen, if
the selected Editing Mode and Compressor support creating custom palettes. When the
button is available, click it and then either select Make Palette from Movie (to derive a
color palette from the frames used in the video program) or Load Palette Now (to import
a color palette you prepared and saved previously). You can load color palettes stored in
the .ACO (Photoshop color swatch), .ACT (Photoshop color palette), or .PAL (Windows
palette—Windows only) format.
User Guide
77
Frame Size Specifies the dimensions, in pixels, for frames when you play back video from
the Timeline. Ideally, you want the frame size for your project to match the frame size of
your video clips. A large frame size shows more detail but requires more processing. If
preview playback is slow, you can reduce the frame size to a smaller dimension, as long as
your capture card supports it. When changing the frame size, keep the dimensions proportional to the original video clip.
4:3 Aspect If you’re using analog captured video, select 4:3 Aspect to constrain the frame
size to the 4:3 aspect ratio used by conventional television. If you are using a D1/DV NTSC
pixel aspect ratio, do not select this option.
Page 86

CHAPTER 1
78
Working with Projects
Frame Rate Indicates the number of frames per second to play back video from the
Timeline. In general, type a value that matches the frame rate of the final video, or type a
lower value to process previews faster. When changing the frame rate, make sure that the
new rate is evenly divisible by the original rate. For example, if your original frame rate is
29.97, lower it to 14.985, or if it is 30 fps, lower it to 15 or 10 fps.
Pixel Aspect Ratio Sets the aspect ratio for individual pixels. Choose Square Pixels for
analog video, scanned images, and computer-generated graphics, or choose the format
used by your video. If you use a pixel aspect ratio that is different from your video, the
video may play back and render with distortion. For more information, see “About D1,
DV, and various pixel aspect ratios” on page 147.
Quality Affects the picture quality and disk space used when you play back video from the
Timeline. Low quality usually plays faster and uses less disk space, and may be preferable
for editing. High quality provides the best-looking image the selected compressor can
provide, but requires more disk space. You can change the quality setting while working
on a project without causing distortions or affecting the final output. Some codecs, such
as DV codecs, use a fixed quality level and do not provide access to this option.
Data Rate If available for the selected compressor, places an upper limit on the amount of
video data that Premiere compiles for previews. Do not set the data rate higher than the
data transfer capacity of your system. Select Limit Data Rate to _ K/Sec and type the data
rate required. If previews do not play smoothly, reduce this value. By default, Premiere
recompresses frames that use different settings than those selected in the Video settings
dialog box. Select Always from the Recompress menu to compress every frame even if it is
already within the data rate, or select Maintain Data Rate to preserve quality by
compressing only the frames that are above the specified data rate.
Audio settings
Choose Project > Project Settings > Audio, to specify the following options:
Rate In general, higher rates provide better audio quality when you play audio back from
the Timeline, but they require more disk space and processing. Resampling, or setting a
different rate from the original audio, also requires additional processing time and affects
the quality; try to capture audio at the final rate. Note that with DV audio, you can capture
only at the rate that was originally used to record the audio. In this case, it’s best to match
the predominant rate of the clips in your project. If you want to use a different rate in your
final output, you can export at a different rate to resample, or you can change the rate in
the project preset when you are done editing.
Page 87

ADOBE PREMIERE 6.0
Format Higher bit depths and stereo provide better quality but require more disk space
and processing.
Compressor Specifies the codec for Premiere to apply when playing audio back from the
Timeline. The codecs available depend on the Editing Mode you specified in the General
panel in the Project Settings dialog box. Click Advanced Settings (if available) to set
options specific to the selected codec. Generally, you don’t want to compress audio for
playback from the Timeline; instead, compress audio when exporting.
Interleave Specifies how often audio information is inserted among the video frames in
the preview file that is created when you play audio back from the Timeline. This value is
set by the preset you choose and generally does not require adjusting. A value of 1 frame
means that when Premiere plays back a frame, the audio for the duration of that frame is
loaded into RAM so that it can play until the next frame appears. If the audio breaks up
when playing, the interleave value may be causing the computer to process too much
audio at once. Decreasing the value makes Premiere store longer segments that need to be
processed less often, but it requires more RAM.
Enhanced Rate Conversion When you play audio back from the Timeline, this option
specifies a level of quality for converting the sample rates of clips in the Timeline to the
sample rate you specified in the Rate and Format options. Enhanced Rate Conversion
controls both rate upsampling and downsampling. The Off option resamples audio the
fastest, but produces moderate quality. The Better option balances quality and processing
time. The Best option resamples audio for the highest possible quality but requires the
most processing time. Because this option can affect playback performance, you may want
to select Off while editing, and then select Better or Best for the final render after you have
finished editing or when you are exporting.
User Guide
79
Use Logarithmic Audio Fades Controls how audio gain increases or decreases are
perceived during playback in Premiere. Select this option to process gain levels using the
logarithmic scale used by the human ear and by conventional volume controls. Deselect
this option to process gain changes using a linear curve. Selecting this option creates more
natural-sounding changes as sounds become louder or softer, but increases audio
processing time. Audio faders in the Timeline are not changed except as a result of this
option’s processing of the overall gain level.
Page 88

CHAPTER 1
80
Working with Projects
Create Audio Preview Files If There Are _ or More Specifies when Premiere creates an
audio preview instead of real-time playback, based on how many audio tracks are active
and how many audio effects are applied in those tracks. The number of audio tracks active
and effects applied directly affects the load on your system resources. When your system
resources are exceeded by audio processing demands, you will hear pops and clicks while
playing back audio in Premiere. If you encounter this problem, decrease the settings for
these parameters so that Premiere creates audio preview files instead of trying to process
more than it can handle.
Keyframe and rendering options
Choose Project > Project Settings > Keyframe and Rendering to specify the following
options:
Ignore Audio Effects Select to render audio without applied audio effects.
Ignore Video Effects Select to render video without applied video effects.
Ignore Audio Rubber Bands Select to render audio excluding changes made to the
Timeline’s rubberband controls for audio fading and audio panning.
Optimize Stills Select to use still images efficiently when rendering video. For example, if
a still image has a duration of 2 seconds in a project set to 30 frames per second, Premiere
will create one 2-second frame instead of 60 frames at 1/30 of a second. Deselect this
option if the exported video file exhibits playback problems when displaying the still
images. This option is determined by your preset. Some capture cards do not support
optimized stills—if you are using a preset provided by your capture card, do not adjust this
setting.
Frames Only at Markers Select when you want to render only the frames at which you
have added a marker in the Timeline. This option does not affect compression keyframes.
Preview Choose To Screen when you want to preview edits, transitions, and effects but
don’t care if the preview is at final playback speed. When To Screen is selected, Premiere
renders directly to the screen as quickly as possible. Playback speed depends on image size
and resolution, the number and complexity of effects and transitions, and the processing
speed of your system. This option is not recommended for previewing areas that include
many effects. Choose From Disk when you want to preview edits, transitions, and effects
at the final playback speed. With this option selected, Premiere renders the preview to the
hard disk. Choose From RAM when you want to preview edits, transitions, and effects
quickly, without having to first render a preview file. When From RAM is selected,
Page 89

ADOBE PREMIERE 6.0
Premiere creates a preview by displaying frames as they are rendered. Because frames are
rendered in RAM, this process depends on the amount of RAM available. If sufficient
RAM is not available or if the frame rate, frame size, or effects used require more RAM
than is available, frames may be dropped during playback, or Premiere may render the
preview to disk instead. To minimize the effects of limited RAM, use a smaller frame size
(for example, 320 x 240 or 240 x 180). A smaller frame size also produces a more even
frame rate during Preview to RAM. If you have chosen From RAM or To Screen, you can
speed up previewing by choosing 1:2 or 1:4 to reduce resolution. Choose 1:1 for normal
resolution. To preview with the selected option, choose Timeline > Preview or press Enter
(Windows) or Return (Mac OS). To stop a preview, press the spacebar.
Field settings Select an option that matches the playback display. This option is set by
your preset. If you use a preset provided by your capture card, do not change this setting.
No Fields is the default and is the equivalent of progressive scan. Some DV cameras offer
a “frame movie mode,” which resembles progressive scan. If you shot your video using this
mode, or if you’re using video that is anything other than interlaced, use No Fields. Select
Lower Field First for interlaced DV video to maximize motion smoothness. For analog
video, select either Upper Field First or Lower Field First, depending on your capture card
specifications, when your final output will be played back on a television monitor using
an interlaced standard such as NTSC, PAL, or SECAM. Choosing the wrong field settings
causes the video to flicker or appear jagged when rendered and played back on an NTSC
monitor.
User Guide
81
Some codecs support compression keyframes, which can increase the effectiveness of
compression by acting as starting points for temporal compression. Temporal
compression looks for ways to compact the description of the changes during a sequence
of frames. It does this by looking for patterns and repetition over time. If the codec you
specified supports compression keyframes, the following Keyframe Options are available:
Keyframe Every _ Frames Select and type the number of frames after which the codec will
create a compression keyframe when exporting video.
Add Keyframes at Markers Select to create a compression keyframe at each marker.
Add Keyframes at Edits Select to create a compression keyframe between each clip.
For information on the Capture Settings dialog box, see “Preparing for analog capture” on
page 117 or “Preparing for DV video capture” on page 120.
Page 90

CHAPTER 1
82
Working with Projects
Saving and loading project settings
Use the Save and Load buttons in the Project Settings dialog box to save all project settings
into a file and later load them into a new project. Premiere comes equipped with settings
files preset for typical programs, which you can adapt and save for your own projects.
Most certified video-capture cards include preset settings files for Premiere. Adobe
strongly recommends that if your capture card provides a preset file, you use it and do not
manually change the settings. For information about loading saved settings, see “Starting
a project” on page 73.
To save the custom settings as a preset for use in other projects:
1 In the New Project Settings dialog box, specify your settings, and then click Save.
2 In the Save Project Settings dialog box, type a name and description (if desired) and
click OK. The settings are saved as a preset file that appears in the list of available presets
in the Load Project Settings dialog box.
Save and name your project settings even if you plan to use them in only one project.
Saving settings creates a backup copy of the settings in case someone accidentally alters
the current project settings. These preset files are stored in the Settings folder in the Premiere
folder on your hard disk, so you can back them up and distribute them if you want.
Comparing settings using the Settings Viewer
Premiere stores settings for projects and clips, as well as settings used when you export or
capture files. To make it easier to see and compare settings, Premiere displays all settings
together in the Settings Viewer window. Settings that do not match display in red. Avoid
potential conflicts by matching settings for each of the four categories wherever possible.
You can change Capture, Project, and Export settings by clicking the associated setting
heading in the Settings Viewer window.
To view, compare, and adjust settings in the Settings Viewer:
1 Choose Project > Settings Viewer.
2 Compare settings and ensure that they are the same in each category. Settings that do
not match are red.
Page 91

ADOBE PREMIERE 6.0
3 To view the settings for different clips in your project, select a clip from the clip heading,
which is also a pop-up menu.
4 To change a setting, click the setting’s heading (for example, click Project Settings),
locate the setting in the dialog box that appears (you may need to navigate to different
panels within a dialog box), change the setting, and then click OK.
5 Click OK when you are done comparing settings.
Saving and autosaving a project
Saving a project saves your editing decisions, references to source files, and the most recent
arrangement of the program’s windows. Protect your work by saving often. If you prefer,
Premiere can save your project automatically at a specified interval. Premiere can either
save the project to the same file each time or to a new file. For example, you can set
Premiere to save a new archive of your project every 15 minutes, producing a series of files
that represent the state of your project at each interval. In this way, automatic archiving
can serve as an alternate form of the Undo command, depending on how much the project
changed between each save. Because project files are quite small compared to source video
files, archiving many iterations of a project consumes relatively little disk space. Adobe
recommends saving project files to the same drive as your application. Archived files are
saved in the Project-Archive folder inside the Adobe Premiere 6.0 folder. For information
about other ways of returning to earlier versions of a project, see “Correcting mistakes” on
page 89.
User Guide
83
Page 92

CHAPTER 1
84
Working with Projects
To save a project:
Do one of the following:
• Choose File > Save. If necessary, specify a location and filename, and click Save.
• To save a copy of a project under a new name or location and continue working in the new
copy of the project, choose File > Save As, specify a location and filename, and click Save.
• To save a copy of a project under a new name or location but continue working in the
original project, choose File > Save a Copy, specify a location and filename, and click Save.
To automatically save a project or series of projects:
1 Choose Edit > Preferences > Auto Save and Undo.
2 Do any of the following, and then click OK:
• In the Auto Save section, select Automatically Save Projects, and type the number of
minutes after which Premiere will save the project.
• In the Project Archive section, type a number for Maximum Files in Archive to specify
how many copies of project files from all projects will be saved into the Project-Archive
folder. When the limit is reached, Premiere deletes the oldest project file to make room for
the newest one. Type a number for the Maximum Project Versions to specify how many
versions of each project file you want to save. For example, to save the last five versions of
each project you work with, type 5.
To open an autosaved project file:
1 If a project is currently open, close it.
2 Choose File > Open.
3 Locate and double-click the Project-Archive folder in the folder containing Premiere.
4 Select a project file, and click Open. If no files are available, the autosave feature may be
turned off; see the previous procedure.
Page 93

ADOBE PREMIERE 6.0
Opening a project
You can open only one project at a time. Premiere recognizes Premiere project files created
using versions 4.2 or later on Windows or Mac OS. See “Using a Premiere project on
another platform” on page 87.
To open an existing Premiere project:
Choose File > Open. Locate and select the file, and then click Open.
Premiere doesn’t copy the original source file into the project—it stores only a reference to
the source file based on its filename and location at the time you imported it. If you move,
rename, or delete a source file after you import it, Premiere will be unable to find it the next
time you open the project. In this case, Premiere displays the Locate File dialog box, listing
the missing file. You can resolve this situation using the options explained below.
OK (Windows) or Open (Mac OS) Replaces the missing file if you first use this dialog box to
locate and select the original file or its replacement, and then click this button.
Offline Replaces the missing file with an offline file, a blank placeholder that preserves all
references to the missing file throughout the project until you replace the offline file with
the original file.
User Guide
85
All Offline Replaces all missing files with offline files, without asking you for confirmation.
Skip Removes all references to the missing file throughout the project. All instances of the
clip will disappear from the Project and Timeline windows.
Skip All Removes all references to all missing files throughout the project, without asking
you for confirmation. See Skip.
Important: Select Skip or Skip All only when you are certain that you want to rework all the
instances where the file is used in the project. If you want to keep the file in the project but can’t
locate it at the moment, use Offline instead.
Skip Preview Files Skips preview files if they cannot be found by their original path and
file name. Preview files that can be found by their original path and file name are loaded
automatically.
Page 94

CHAPTER 1
86
Working with Projects
When you want to replace an offline file after the project is open, you don’t have to close
the project and then open it again. Instead, use the Replace Files command. For more
information, see “Using offline files” on page 158.
Note: Because a clip is only a reference to its source file, do not delete source files while you are
using them as clips in a Premiere project. After you deliver the final movie, you can delete
source files if you do not plan to edit the project or use the source files again.
Removing unused frames from source clips
Editing a video program means putting the best segments of the original clips into the
program. Sometimes, the clips you use in the final program are only small portions of the
original clips. Because video clips can take up large amounts of hard disk space, you can
trim the project so that unused frames are removed. Project trimming is especially useful
before archiving a completed project.
When you trim a project, Adobe Premiere first creates a copy of the project. In the new
project, each clip’s original In and Out points become the new beginning and ending of the
clip, respectively. Clips that weren’t used in the original project aren’t copied into the new
project. Premiere can also create trimmed copies of the source clips. You can preserve extra
frames (called handles) before the In point and after the Out point of each trimmed clip.
To trim a project:
1 With a project open, choose Project > Utilities > Project Trimmer.
2 Select Create Trimmed Batch List to create a batch list that can be used to redigitize the
trimmed versions of the clips. For more information, see “Creating a batch list to redigitize
project clips” on page 137.
3 Select Copy Trimmed Source Files to make new copies of existing source files that
include only the frames used in the Timeline plus handles as specified below.
4 For Keep _ Frame Handles, type the number of frames to retain before the In point and
after the Out point of each clip so that edits can still be adjusted later.
Note: Adding handles after trimming a project a second time will offset your In and Out
points.
5 Click Create Project.
Page 95

ADOBE PREMIERE 6.0
6 When asked, specify the location and name of the new project based on the trimmed
clips; make sure it’s a different folder than the original location. Click Save.
7 Close the original project. Choose File > Open, locate the trimmed version, and click OK.
8 Examine the trimmed version of the project. If it’s satisfactory, you can delete the
original project and its source clips or move them to an archive disk.
Using a Premiere project on another platform
Premiere project files are designed to be usable across computer platforms. You can open
and work with a Premiere project on any other platform on which Premiere 6.0 is
available.
Transferring a Premiere project to another platform is similar to moving a Premiere
project to another computer: You must move not only the project file, but all of the source
clips used in the project. In addition, follow these guidelines:
• All of the source files must be in a format supported by the destination platform. For
example, if you plan to transfer a project to Mac OS for editing, don’t use Windows PCX
files. For more information about filename extensions and platform support for various
file formats, see “Importing clips” on page 151.
• All files must conform to the destination platform’s filename conventions. For best
results, use the 8.3 filename convention (eight characters and a three-character filename
extension). For example, a Premiere project uses the extension .PPJ.
• For best results, make sure that source clips are saved using cross-platform codecs such
as Motion JPEG A or Motion JPEG B, provided by QuickTime.
• Any fonts used in titles must be available on the destination platform.
• When you open the project on the other platform, you’ll be asked to locate each source
clip (see “Opening a project” on page 85). You might want to remove unused clips (see
“Naming, finding, and deleting items” on page 97) or run the Project Trimmer (see
“Removing unused frames from source clips” on page 86) so that you don’t have to
transfer any more clips than necessary.
User Guide
87
Page 96

CHAPTER 1
88
Working with Projects
Many Premiere settings files can be transferred across platforms, including batch capture
lists (Windows filename extension: .PBL), batch processing lists (.HBP), edit decision lists
(.EDL), exported file lists (.TXT), filmstrip files (.FLM), motion settings (.PMT), project
files (.PPJ), project settings (.PRS), storyboards (.PSQ), and titles (.PTL).
Command sets (.PFN) and transition sets (.PFX) files cannot be transferred across
platforms.
If you have trouble opening a project file from another platform by double-clicking, try
using the File > Open command from within Premiere.
Setting up Premiere’s scratch disks
When you edit a project, Premiere processes your changes in RAM. When the available RAM
isn’t enough, Premiere can use hard disk space as an additional work area. Also, Premiere
stores some project information, such as preview files, on your hard disk, using the disk the
same way you would use a paper scratch pad. If your system has access to multiple volumes
(disks or disk partitions), you can specify which one Premiere uses as a scratch disk for the
different temp files it creates when capturing movies, building video previews, and building
audio previews. The scratch disk space Premiere uses increases as a program becomes longer
or more complex. For maximum performance, follow these tips:
• Store Premiere and the operating system on one hard disk, and capture video to an
additional AV-certified hard disk on which nothing else is stored. Save and store your
project on the same hard disk as Premiere (preferably the system disk).
• Specify your fastest hard disk for video preview files and capturing. You can use a slower
disk for audio preview files. Ideally, you want your video and audio preview files on
different disks to reduce the amount of activity necessary for playback. Two partitions on
the same disk do not improve playback—you must use two physically different disks.
• Specify only disks attached to your computer—a hard disk located on a network is
usually too slow. Removable media may be acceptable if it is fast enough.
To specify scratch disks:
1 Choose Edit > Preferences > Scratch Disks and Device Control.
2 For Captured Movies, select or create a new folder where Premiere will store video and
audio files when you digitize using Premiere.
Page 97

ADOBE PREMIERE 6.0
3 For Video Previews, select or create a new folder where Premiere will store files
generated when previewing video clips.
4 For Audio Previews, select or create a new folder where Premiere will store files
generated when previewing audio clips.
5 Click OK.
When generating preview files, Premiere can warn you when a scratch disk you specified
is running out of space. You can specify the point at which the warning appears.
To specify the warning level for low disk space:
1 Choose Edit > Preferences > General and Still Image.
2 For Low Disk Space Warning Level, indicate in kilobytes the amount of unused scratch
disk space that will trigger the warning. Click OK.
Correcting mistakes
If you change your mind or make a mistake, Premiere provides several ways to undo your
work. You can undo only those actions that alter the video program; for example, you can
undo an edit, but you cannot undo scrolling a window.
User Guide
89
To correct mistakes:
Do one of the following:
• To undo the most recent change, choose Edit > Undo. You can sequentially undo up to
99 of the most recent changes made to the program in any Premiere window. The 99 levels
of undo are shared among all Premiere windows.
• To jump to a specific state of the project within the last 99 changes, select an item in the
History palette. See “Using the History palette” on page 104.
• To undo all changes made since the last time you saved the project, choose File > Revert.
• To undo changes made before the last time you saved a project, try opening a previous
version of your project that may be stored in the Project Archive folder. The degree to
which you can go back depends on the settings you specified for automatic project
archiving and how often you saved. See “Saving and autosaving a project” on page 83.
Page 98

CHAPTER 1
90
Working with Projects
• To stop a change that Premiere isn’t finished processing (for example, when you see a
progress bar), press Esc, or press Command-period (Mac OS only)
• To close a dialog box without applying changes, click Cancel.
For both the Undo menu item and the History palette, you can specify the number of steps
that can be undone. The default is 15. Specifying more steps increases memory requirements but may not affect performance.
To set the number of undo levels:
1 Choose Edit > Preferences > Auto Save and Undo.
2 In the History/Undo Levels section, type a number for Levels of Undo (1 to 99) and
click OK.
3 Exit and restart Premiere. You do not need to restart the computer.
Working with windows in Premiere
Three named windows form the main work area in Premiere:
• The Project window is where you import, organize, and store references to clips. It lists
all source clips you import into a project, though you don’t have to use every clip you
import.
• The Monitor window can include the Source and Program views. Use the Source view
to see an individual video clip and the Program view to see the current state of the video
program being edited in the Timeline.
• The Timeline window provides a schematic view of your program, including all video,
audio, and superimposed video tracks. Changes you make in this window appear in the
Program view.
For an introduction to these windows, see, “An Overview of Adobe Premiere.” For more
information about using and customizing the Project window, see “Using the Monitor
window” on page 163 and “Using the Timeline window” on page 171.
Page 99

ADOBE PREMIERE 6.0
Premiere also provides specialized windows for tasks such as capturing video (see “Using
the Movie Capture window” on page 125), creating titles (see “Creating and setting up a
new title” on page 275), mixing audio (see “Working with the Audio Mixer window” on
page 263), and storyboarding (see “Creating a storyboard” on page 203).
When you exit Premiere, the positions of windows and palettes are saved. In addition, you
can create and save named window layouts as a workspace. For more information, see
“Customizable workspace” on page 67 and “Selecting an editing workspace” on page 169.
Using window and palette menus
In Premiere, most windows and palettes include menus that can be displayed by clicking
a button. In addition, all windows also have context menus, the content of which depends
on the current task or mode. The commands found in window menus, palette menus, and
context menus are specific to individual windows or palettes.
To open window and palette menus:
Click the Menu button ( ) near the upper right corner of the window or palette. Choose
a menu item or click outside the menu to close it.
User Guide
91
To open window context menus:
Right-click (Windows) or Control-click (Mac OS) in the window. Choose a menu item or
click outside the menu to close it.
Page 100

CHAPTER 1
92
Working with Projects
Using the Project window’s bin view
A Project window includes a bin view, which shows the bins that have been added to the
project. The bin view appears on the left side of the Project window, and can be resized or
hidden. When the bins in the bin view contain other bins, the hierarchical structure
appears, much like the graphical view of folders and subfolders in your operating system.
A
B
C
KJIHGFED
A. Thumbnail viewer B. Bins C. Clip D. Find E. New Bin
F. Create Item G. Delete Selected Items H. Resize Bin Area
I. Icon View J. Thumbnail View K. List View L. Clip
information M. Project window menu
To hide or display the bin view:
L
M
Choose Hide Bin Area or Show Bin Area from the Project window menu.
To resize the bin view:
Drag the Resize Bin Area button located at the bottom of the Project window until you
have the size you want. You cannot make the bin view smaller than the four buttons below
it. To make it bigger, you may need to first make the Project window bigger.
 Loading...