

Page 1
Us er Guide
Page 2

© 2002 Adobe Systems Incorporated. All rights reserved.
Adobe® Photoshop® Elements 2.0 User Guide for Windows® and Macintosh
If this guide is distributed with software that includes an end-user agreement, this guide, as well as the software described in it, is furnished
under license and may be used or copied only in accordance with the terms of such license. Except as permitted by any such license, no part
of this guide may be reproduced, stored in a retrieval system, or transmitted, in any form or by any means, electronic, mechanical, recording,
or otherwise, without the prior written permission of Adobe Systems Incorporated. Please note that the content in this guide is protected
under copyright law even if it is not distributed with software that includes an end-user license agreement. The content of this guide is
furnished for informational use only, is subject to change without notice, and should not be construed as a commitment by Adobe Systems
Incorporated. Adobe Systems Incorporated assumes no responsibility or liability for any errors or inaccuracies that may appear in the informational content contained in this guide.
Please remember that existing artwork or images that you may want to include in your project may be protected under copyright law.
The unauthorized incorporation of such material into your new work could be a violation of the rights of the copyright owner. Please be sure
to obtain any permission required from the copyright owner.
Any references to company names in sample templates are for demonstration purposes only and are not intended to refer to any actual
organization.
Adobe, the Adobe logo, Acrobat, Acrobat Reader, Adobe Dimensions, Adobe Gamma, Illustrator, InDesign, Minion, Myriad, Photomerge,
Photoshop, Photoshop Elements, PostScript, Premiere, and Streamline are either registered trademarks or trademarks of Adobe Systems
Incorporated in the United States and/or other countries. Microsoft and Windows are either registered trademarks or trademarks of
Microsoft Corporation in the United States and/or other countries. Apple, AppleTalk, Mac, Macintosh, and QuickTime are trademarks of
Apple Computer, Inc. registered in the United States and other countries. QuickTime trademark used under license. Kodak and Photo CD
are trademarks of Eastman Kodak Company.
The Proximity/Merriam-Webster Inc./Franklin Electronic Publishers Inc. Database © 1990/1994 Merriam-Webster Inc./Franklin Electronic
Publishers Inc., © 1994. All Rights Reserved. Proximity Technology Inc. The Proximity/Mer riam-Webster Inc./Franklin Electronic Publishers
Inc. All other trademarks are the property of their respective owners.
Second Ed. C: “Copyright (C) 1987-1992 Numerical Recipes Software.
Contains an implementation of the LZW algorithm licensed under U.S Patent 4,558,302.
Portions copyright 1984-1998 FairCom Corporation. “FairCom” and “c-tree Plus” are trademarks of FairCom Corporation and are registered in the United States and other countries. All Rights Reserved.
Adobe Systems Incorporated, 345 Park Avenue, San Jose, California 95110, USA
Notice to U.S. Government End Users. The Software and Documentation are “Commercial Items,” as that term is defined at 48 C.F.R. §2.101,
consisting of “Commercial Computer Software” and “Commercial Computer Software Documentation,” as such terms are used in 48 C.F.R.
§12.212 or 48 C.F.R. §227.7202, as applicable. Consistent with 48 C.F.R. §12.212 or 48 C.F.R. §§227.7202-1 through 227.7202-4, as applicable, the Commercial Computer Software and Commercial Computer Software Documentation are being licensed to U.S. Government end
users (a) only as Commercial Items and (b) with only those rights as are granted to all other end users pursuant to the terms and conditions
herein. Unpublished-rights reserved under the copyright laws of the United States. Adobe Systems Incorporated, 345 Park Avenue, San Jose,
CA 95110-2704, USA. For U.S. Government End Users, Adobe agrees to comply with all applicable equal opportunity laws including, if
appropriate, the provisions of Executive Order 11246, as amended, Section 402 of the Vietnam Era Veterans Readjustment Assistance Act of
1974 (38 USC 4212), and Section 503 of the Rehabilitation Act of 1973, as amended, and the regulations at 41 CFR Parts 60-1 through
60-60, 60-250, and 60-741. The affirmative action clause and regulations contained in the preceding sentence shall be incorporated by reference in this Agreement.
Part Number: 90040603 (7/02)
Page 3

Contents
iii
Installing and Learning Adobe Photoshop Elements 2.0
Registration . . . . . . . . . . . . . . . . . . . . . . . . . . . . . . . . . . . . . . . . . . . . . . . . . . . 1
Installing Adobe Photoshop Elements 2.0 . . . . . . . . . . . . . . . . . . . . . . 1
Learning Adobe Photoshop Elements 2.0 . . . . . . . . . . . . . . . . . . . . . . 1
Using Web resources . . . . . . . . . . . . . . . . . . . . . . . . . . . . . . . . . . . . . . . . . . 3
Customer support . . . . . . . . . . . . . . . . . . . . . . . . . . . . . . . . . . . . . . . . . . . . . 4
An Overview of Adobe Photoshop Elements 2.0
Use the tools of the trade . . . . . . . . . . . . . . . . . . . . . . . . . . . . . . . . . . . . . . 5
Get up to speed quickly . . . . . . . . . . . . . . . . . . . . . . . . . . . . . . . . . . . . . . . 6
Explore digital imaging . . . . . . . . . . . . . . . . . . . . . . . . . . . . . . . . . . . . . . . . 6
Quickly Fix Photographs
Photoshop Elements Quick Fix . . . . . . . . . . . . . . . . . . . . . . . . . . . . . . . . . 9
Chapter 1
Chapter 2
Looking at the Work Area
Getting familiar with the work area . . . . . . . . . . . . . . . . . . . . . . . . . . . 11
Getting the most out of Photoshop Elements . . . . . . . . . . . . . . . . . 16
Viewing images . . . . . . . . . . . . . . . . . . . . . . . . . . . . . . . . . . . . . . . . . . . . . . 20
Using rulers and the grid . . . . . . . . . . . . . . . . . . . . . . . . . . . . . . . . . . . . . 24
Undoing operations . . . . . . . . . . . . . . . . . . . . . . . . . . . . . . . . . . . . . . . . . . 25
Reverting to any state of an image . . . . . . . . . . . . . . . . . . . . . . . . . . . . 26
Working with preset options . . . . . . . . . . . . . . . . . . . . . . . . . . . . . . . . . 27
Setting Up Photoshop Elements
About color management . . . . . . . . . . . . . . . . . . . . . . . . . . . . . . . . . . . . 31
Setting up color management . . . . . . . . . . . . . . . . . . . . . . . . . . . . . . . . 31
Calibrating your monitor . . . . . . . . . . . . . . . . . . . . . . . . . . . . . . . . . . . . . 32
Configuring Photoshop Elements . . . . . . . . . . . . . . . . . . . . . . . . . . . . . 33
About Web access . . . . . . . . . . . . . . . . . . . . . . . . . . . . . . . . . . . . . . . . . . . . 37
Page 4

CONTENTS
iv
Chapter 3
Chapter 4
Acquiring and Opening Photos
About this chapter . . . . . . . . . . . . . . . . . . . . . . . . . . . . . . . . . . . . . . . . . . . 39
About digital images . . . . . . . . . . . . . . . . . . . . . . . . . . . . . . . . . . . . . . . . . 39
Getting photos from a scanner . . . . . . . . . . . . . . . . . . . . . . . . . . . . . . . 40
Importing photos from a digital camera . . . . . . . . . . . . . . . . . . . . . . 41
Getting images from video . . . . . . . . . . . . . . . . . . . . . . . . . . . . . . . . . . .43
Creating new images . . . . . . . . . . . . . . . . . . . . . . . . . . . . . . . . . . . . . . . . . 44
Using the File Browser . . . . . . . . . . . . . . . . . . . . . . . . . . . . . . . . . . . . . . . .44
Opening images . . . . . . . . . . . . . . . . . . . . . . . . . . . . . . . . . . . . . . . . . . . . . 47
Placing files . . . . . . . . . . . . . . . . . . . . . . . . . . . . . . . . . . . . . . . . . . . . . . . . . . 52
Closing files and quitting . . . . . . . . . . . . . . . . . . . . . . . . . . . . . . . . . . . . . 53
Choosing an image mode . . . . . . . . . . . . . . . . . . . . . . . . . . . . . . . . . . . . 54
Fixing Your Photos
About fixing your photos . . . . . . . . . . . . . . . . . . . . . . . . . . . . . . . . . . . . . 57
Quickly fixing your photos . . . . . . . . . . . . . . . . . . . . . . . . . . . . . . . . . . . . 58
Adjusting the range of dark and light tones in an image . . . . . . . 62
Describing color . . . . . . . . . . . . . . . . . . . . . . . . . . . . . . . . . . . . . . . . . . . . . 64
Adjusting color . . . . . . . . . . . . . . . . . . . . . . . . . . . . . . . . . . . . . . . . . . . . . . . 65
Retouching an image . . . . . . . . . . . . . . . . . . . . . . . . . . . . . . . . . . . . . . . . 70
Chapter 5
Chapter 6
Resizing, Cropping, and Laying Out Images
About image size and resolution . . . . . . . . . . . . . . . . . . . . . . . . . . . . . .75
Changing image size and resolution . . . . . . . . . . . . . . . . . . . . . . . . . .77
Cropping images . . . . . . . . . . . . . . . . . . . . . . . . . . . . . . . . . . . . . . . . . . . . .79
Changing the size of the work canvas . . . . . . . . . . . . . . . . . . . . . . . . . 80
Rotating and straightening images . . . . . . . . . . . . . . . . . . . . . . . . . . . 81
™
Creating panoramic images using Photomerge
. . . . . . . . . . . . . . .82
Creating multiple-image layouts . . . . . . . . . . . . . . . . . . . . . . . . . . . . . . 87
Creating PDF slideshows . . . . . . . . . . . . . . . . . . . . . . . . . . . . . . . . . . . . . 89
Using Layers
About layers . . . . . . . . . . . . . . . . . . . . . . . . . . . . . . . . . . . . . . . . . . . . . . . . . 91
About the Layers palette . . . . . . . . . . . . . . . . . . . . . . . . . . . . . . . . . . . . . 92
Using the Layers palette . . . . . . . . . . . . . . . . . . . . . . . . . . . . . . . . . . . . . . 94
Selecting layers . . . . . . . . . . . . . . . . . . . . . . . . . . . . . . . . . . . . . . . . . . . . . . 95
Page 5

Creating a layered image . . . . . . . . . . . . . . . . . . . . . . . . . . . . . . . . . . . . . 95
Specifying opacity and blending options . . . . . . . . . . . . . . . . . . . .100
Using adjustment and fill layers . . . . . . . . . . . . . . . . . . . . . . . . . . . . . .101
Creating grouped layers . . . . . . . . . . . . . . . . . . . . . . . . . . . . . . . . . . . . .106
Editing layers . . . . . . . . . . . . . . . . . . . . . . . . . . . . . . . . . . . . . . . . . . . . . . .107
Managing layered images . . . . . . . . . . . . . . . . . . . . . . . . . . . . . . . . . . .109
v
Chapter 7
Chapter 8
Chapter 9
Selecting
About selections . . . . . . . . . . . . . . . . . . . . . . . . . . . . . . . . . . . . . . . . . . . .113
Selecting pixels . . . . . . . . . . . . . . . . . . . . . . . . . . . . . . . . . . . . . . . . . . . . .114
Adjusting selection borders . . . . . . . . . . . . . . . . . . . . . . . . . . . . . . . . .118
Softening the edges of a selection . . . . . . . . . . . . . . . . . . . . . . . . . . .121
Moving, copying, and pasting selections . . . . . . . . . . . . . . . . . . . . .122
Saving and loading selections . . . . . . . . . . . . . . . . . . . . . . . . . . . . . . .125
Deleting selected areas . . . . . . . . . . . . . . . . . . . . . . . . . . . . . . . . . . . . . .126
Painting
About painting and drawing . . . . . . . . . . . . . . . . . . . . . . . . . . . . . . . .127
Selecting foreground and background colors . . . . . . . . . . . . . . . .127
Using the Adobe Color Picker . . . . . . . . . . . . . . . . . . . . . . . . . . . . . . .131
Using the painting tools . . . . . . . . . . . . . . . . . . . . . . . . . . . . . . . . . . . . .133
Setting options for painting and editing tools . . . . . . . . . . . . . . . .135
Erasing . . . . . . . . . . . . . . . . . . . . . . . . . . . . . . . . . . . . . . . . . . . . . . . . . . . . .142
Filling and tracing selections and layers . . . . . . . . . . . . . . . . . . . . . .144
Using the gradient tools . . . . . . . . . . . . . . . . . . . . . . . . . . . . . . . . . . . . .147
Transforming and Distorting Images
Transforming layers, selections, and shapes . . . . . . . . . . . . . . . . . .153
Transforming objects in three dimensions . . . . . . . . . . . . . . . . . . .157
Using Distort filters to transform an image . . . . . . . . . . . . . . . . . . .160
Chapter 10
Applying Filters, Effects, and Layer Styles
Using the Filters, Effects, and Layer Styles palettes . . . . . . . . . . . .165
Using filters . . . . . . . . . . . . . . . . . . . . . . . . . . . . . . . . . . . . . . . . . . . . . . . . .166
Using effects . . . . . . . . . . . . . . . . . . . . . . . . . . . . . . . . . . . . . . . . . . . . . . . .168
Using layer styles . . . . . . . . . . . . . . . . . . . . . . . . . . . . . . . . . . . . . . . . . . . .169
Page 6

CONTENTS
vi
Improving performance with filters and effects . . . . . . . . . . . . . . .171
Choosing a filter . . . . . . . . . . . . . . . . . . . . . . . . . . . . . . . . . . . . . . . . . . . .172
Applying special color effects to images . . . . . . . . . . . . . . . . . . . . .186
Chapter 11
Chapter 12
Creating Shapes and Text
About vector graphics . . . . . . . . . . . . . . . . . . . . . . . . . . . . . . . . . . . . . . .191
About shapes . . . . . . . . . . . . . . . . . . . . . . . . . . . . . . . . . . . . . . . . . . . . . . .191
Editing shapes . . . . . . . . . . . . . . . . . . . . . . . . . . . . . . . . . . . . . . . . . . . . . .193
Creating text . . . . . . . . . . . . . . . . . . . . . . . . . . . . . . . . . . . . . . . . . . . . . . . .196
Working with type layers . . . . . . . . . . . . . . . . . . . . . . . . . . . . . . . . . . . .196
Formatting text . . . . . . . . . . . . . . . . . . . . . . . . . . . . . . . . . . . . . . . . . . . . .199
Creating a text selection border . . . . . . . . . . . . . . . . . . . . . . . . . . . . .202
Setting options for Asian type . . . . . . . . . . . . . . . . . . . . . . . . . . . . . . .202
Optimizing Images for the Web and E-mail
About creating images for the Web and e-mail . . . . . . . . . . . . . . .205
Using the Save For Web dialog box . . . . . . . . . . . . . . . . . . . . . . . . . .205
Choosing a file format for the Web . . . . . . . . . . . . . . . . . . . . . . . . . . .207
Optimizing Web images . . . . . . . . . . . . . . . . . . . . . . . . . . . . . . . . . . . . .210
Making transparent and matted images . . . . . . . . . . . . . . . . . . . . .214
Previewing and controlling dithering . . . . . . . . . . . . . . . . . . . . . . . .216
Previewing an image in a browser . . . . . . . . . . . . . . . . . . . . . . . . . . .218
Saving optimized images . . . . . . . . . . . . . . . . . . . . . . . . . . . . . . . . . . . .218
Creating animated GIFs . . . . . . . . . . . . . . . . . . . . . . . . . . . . . . . . . . . . .218
Creating Web banners . . . . . . . . . . . . . . . . . . . . . . . . . . . . . . . . . . . . . . .220
Creating Web photo galleries . . . . . . . . . . . . . . . . . . . . . . . . . . . . . . . .220
Sending images with an e-mail message . . . . . . . . . . . . . . . . . . . . .222
Chapter 13
Saving Images
Saving images . . . . . . . . . . . . . . . . . . . . . . . . . . . . . . . . . . . . . . . . . . . . . .225
Saving images in different file formats . . . . . . . . . . . . . . . . . . . . . . .226
About file compression . . . . . . . . . . . . . . . . . . . . . . . . . . . . . . . . . . . . . .232
Setting preferences for saving files . . . . . . . . . . . . . . . . . . . . . . . . . . .233
Adding file information . . . . . . . . . . . . . . . . . . . . . . . . . . . . . . . . . . . . . .234
Using the Batch command . . . . . . . . . . . . . . . . . . . . . . . . . . . . . . . . . .234
Page 7

vii
Chapter 14
Printing
Printing images . . . . . . . . . . . . . . . . . . . . . . . . . . . . . . . . . . . . . . . . . . . . .237
Setting print options . . . . . . . . . . . . . . . . . . . . . . . . . . . . . . . . . . . . . . . .237
Positioning and scaling images . . . . . . . . . . . . . . . . . . . . . . . . . . . . . .238
Setting output options . . . . . . . . . . . . . . . . . . . . . . . . . . . . . . . . . . . . . .238
Choosing a print encoding method . . . . . . . . . . . . . . . . . . . . . . . . . .239
Using color management when printing . . . . . . . . . . . . . . . . . . . . .239
Using online services . . . . . . . . . . . . . . . . . . . . . . . . . . . . . . . . . . . . . . . .240
Index
. . . . . . . . . . . . . . . . . . . . . . . . . . . . . . . . . . . . . . . . . . . . . . . . . . . . . . .241
Page 8

Page 9

Installing and Learning
Adobe Photoshop Elements 2.0
1
elcome to the Adobe® Photoshop®
Elements application, an easy-
W
photo-retouching, and Web-graphics solution.
Photoshop Elements offers robust features
designed specifically for amateur photographers,
hobbyists, and business users who want to create
professional-quality images for print and the Web.
to-use, yet powerful image-editing,
Registration
So that Adobe can continue to provide you with
the highest quality software, offer technical
support, and inform you about new Photoshop
Elements software developments, please register
your application.
When you first start the Adobe Photoshop
Elements 2.0 application, you’re prompted to
register online. You can choose to submit the form
directly or fax a printed copy. You can also register
by filling out and returning the registration card
included with your software package.
Follow the on-screen installation instructions. For
more detailed information, see the following file
on the CD:
•
(Windows®)
•
(Mac® OS)
HowToInstall.wri
HowToInstall.txt
Learning Adobe Photoshop Elements 2.0
Adobe provides a variety of options you can use to
learn Photoshop Elements, including a printed
user guide, online Help, Hints, Recipes, tutorials,
and tool tips. You can also use the free Adobe
Online service to easily access a number of
continually updated Web resources, from tips and
tutorials to technical support information.
To view the Adobe Portable Document Format
(PDF) files included on the Photoshop Elements
®
CD, you must use Adobe Acrobat
Adobe Acrobat. Acrobat Reader software is
included on the CD.
Reader™ or
Installing Adobe Photoshop Elements 2.0
You must install the Photoshop Elements application from the Adobe Photoshop Elements 2.0
CD onto your hard drive; you cannot run the
application from the CD.
Using the printed documentation
A printed user guide,
2.0 User Guide,
Adobe Photoshop Elements
is included with the application.
Page 10

2
Installing and Learning Adobe Photoshop Elements 2.0
The user guide assumes you have a working
knowledge of your computer and its operating
conventions, including how to use a mouse and
standard menus and commands. It also assumes
you know how to open, save, and close files. For
help with any of these techniques, please see your
Microsoft Windows or Mac OS documentation.
Using online Help
The Adobe Photoshop Elements 2.0 application
includes complete documentation in an accessible
HTML-based help system. The help system
includes all of the information in the
Photoshop Elements 2.0 User Guide.
essential information on using all Photoshop
Elements commands, features, and tools, as well as
tutorials, keyboard shortcuts, and full-color
illustrations.
The accessible HTML format allows for easy
navigation and reading using Web browsers. To
produce a handy desktop reference, you can print
the HTML file or an included PDF copy.
Adobe
It contains
Using Hints, recipes, and tutorials
Photoshop Elements provides Hints, recipes, and
tutorials to help you learn the application quickly
and work knowledgeably.
The Hints palette displays an illustration and brief
description of any palette or tool your mouse
pointer is on. The How To palette provides recipes
that guide you through typical image-editing
tasks, such as removing red eye in photos, adding
effects to text, and creating GIF animations.
Note:
To add new recipes, choose Download New
Adobe Recipes from the How To palette pop-up
menu.
Tu torials are available through the Help system
and use sample files to take you step-by-step
through the basics of working with layers,
animated GIFs, and merging photos. The layers
tutorial is particularly helpful, because understanding layers is an important step in mastering
fundamental Photoshop Elements tools and
techniques.
Online Help requires Netscape Communicator 4.x
or Microsoft Internet Explorer 4.0 or 5.x.
To start online Help:
Do one of the following:
Choose Help > Photoshop Elements Help.
•
(Windows) Press F1.
•
Note:
To properly view online Help topics, you must
open them in Photoshop Elements.
Using context-sensitive menus
Context-sensitive menus, which display options
for tools and palettes, change depending on the
item you’ve currently selected.
To display context menus:
1
Position the pointer over an image or palette
item.
2
Right-click (Windows) or hold down Control
and press the mouse button (Mac OS).
If no context-sensitive menu appears, no menu is
available for that tool or palette.
Page 11
ADOBE PHOTOSHOP ELEMENTS 2.0
User Guide
3
Using tool tips
The tool tips feature lets you display the names of
tools, buttons, or controls.
To identify a tool, button, or control:
Position the pointer over a tool, button, or control,
and pause. A tool tip appears showing the name
and keyboard shortcut (if any) for the item.
Note:
To ol tips are not available in most dialog
boxes.
Using Web resources
If you have an Internet connection, you can access
additional resources for learning Photoshop
Elements on the Adobe Systems Web site. These
resources are continually updated.
To access the Adobe home page for your region:
1
Open the Adobe U.S. home page at
www.adobe.com.
2
From the Adobe sites pop-up menu, choose
your geographical region. Adobe’s home page is
customized for 20 different geographical regions.
About Adobe Online
Adobe Online provides access to the latest
tutorials, quicktips, and other Web content for
Photoshop Elements and other Adobe products.
Adobe Online also provides bookmarks that take
you quickly to noteworthy sites related to Adobe
and Photoshop Elements.
Using Adobe Online
Adobe Online is constantly changing, so you
should update it before you use it. Updating
Adobe Online updates its bookmarks and buttons
so you can access the most current content
available. You can set preferences to automatically
update Adobe Online daily, weekly, or monthly.
When you set up Adobe Online, you can choose to
have Adobe either notify you when new information for Adobe Online is available, or automatically download and install that information to
your hard disk. You can also choose Help >
Updates to view and download new Adobe Online
files whenever they are available.
To set preferences for Adobe Online:
Choose Edit > Preferences > Adobe Online
1
(Windows and Mac OS 9) or Photoshop
Elements> Preferences > Adobe Online
(Mac OS X).
2
To specify how often Adobe Online checks for
updates, choose an option from the pop-up menu.
3
Click OK.
To use Adobe Online:
In Photoshop Elements, click the icon at the top
1
of the toolbox.
Adobe Online icon
Page 12

4
Installing and Learning Adobe Photoshop Elements 2.0
Note:
To use Adobe Online, you must have an
Internet connection and an installed Web browser.
Do any of the following:
2
Click Updates to access updated files.
•
Click Preferences to specify how often Adobe
•
Online checks for updates.
•
Click Go Online to access the Adobe Web site.
•
Click Close to return to Photoshop Elements.
Customer support
When you register your product, you may be
entitled to technical support for a single incident.
Te r ms vary depending on the country of residence
and are only available for retail and upgrade
versions. For more information, refer to the
technical support card provided with your
Photoshop Elements documentation.
Customer support on Adobe Online
Adobe Online provides access to the Support
Knowledgebase, where you can find troubleshooting information that provides solutions
to common problems.
Additional customer support resources
Adobe Systems also provides several forms of
automated technical support:
•
See the ReadMe and ReadMe First! files installed
with the program for information that became
available after this guide went to press.
•
Explore the extensive customer support
information on Adobe’s World Wide Web
site (www.adobe.com). To access Adobe’s
We b site from Photoshop Elements, choose
Help > Support.
Page 13

An Overview of
Adobe Photoshop Elements 2.0
5
dobe Photoshop Elements 2.0 makes
digital imaging a breeze. Use Photoshop
A
print, e-mail, and the Web.
With a broad set of features, Photoshop Elements
gives you endless ways to explore your creativity —
restore old photographs, adjust color and lighting,
create a new image by combining photographs,
apply artistic effects, and prepare photos for
sending via email or posting on the Web.
Elements to create high-quality images for
Use the tools of the trade
Based on the leading image-editing software that
professionals have always relied on, Photoshop
Elements 2.0 offers you an easy way to create highquality images.
Quick Fix dialog
with just a few clicks in the Quick Fix dialog box.
Digital video frame acquisition
individual video frames from downloaded files
with support for common video file formats,
including MPEG2, MPEG3, and AVI.
Photomerge
photos into one seamless panorama.
File browser
all of your photos and view important metadata
about each photo using the File menu Browse
feature.
Make instant color adjustments
Easily capture
Automatically assemble multiple
Quickly preview, open, and organize
Red eye brush
single stroke of the red eye brush.
Color variations
photo by previewing various color adjustments
to your photo and applying your choice with a
single click.
Auto straighten/auto crop
taken or scanned at a slight angle, and may need
to be cropped or rotated. You can correct skewed
photos with one click.
Fill flash/adjust backlighting
improper lighting with Fill Flash and Adjust
Backlighting tools.
Broad file format support
virtually any use: print on photo paper, import
into newsletters, presentations, reports, or
greeting cards; attach to e-mail, post on the
We b, and share as PDF (Portable Document
Format) files on almost any computer or
handheld device.
GIF animation
tions using Photoshop Elements layers and
then interactively preview the results before
saving.
Save for Web
look sharp on the Web and download quickly.
Mac OS X and Windows XP support
advantage of the newest operating systems
including Windows XP and Mac OS X.
Fix unwanted red eye with a
Bring out the best in any
Photos are often
Instantly fix
Save your images for
Import or create GIF anima-
Compress your photos so they
Ta ke
Page 14

6
An Overview of Adobe Photoshop Elements 2.0
WIA Support (Windows only)
Easily acquire
photos from Windows Image Acquisition (WIA)
enabled digital cameras, scanners, and other
devices.
Get up to speed quickly
The intuitive design, built-in glossary, tutorials,
and innovative Help features in Photoshop
Elements 2.0 make it easy to learn and easy to use.
Comprehensive Help features
answers to your questions simply by typing a word
in the new Help field. Linked to all Hints, Recipes,
Tu torials, and the Glossary, the new Help feature
does the searching for you and provides all the
information you need in plain English.
Glossary
Built-in glossary explains digital-
imaging and computer terms.
Attach E-mail
Easily attach edited pictures
to e-mail using your existing e-mail program.
Photoshop Elements can automatically resize and
optimize the file for sending and viewing.
Graphics file management (Windows only)
the built-in file association manager to set the file
formats you want to be associated with Photoshop
Elements.
Hints palette
Get productive fast with illustrations and tips that show you how to use the wide
variety of painting tools and palettes.
Dialog tips
Tips embedded in the more complex
dialogs eliminate confusion.
Get immediate
Use
Web photo gallery
Quickly and easily create a
We b photo gallery featuring your pictures. Choose
from a variety of templates that includes holiday,
sports, and business themes, an old-fashioned
slide show, and many other cool designs.
Batch processing
Automatically rename, resize,
convert the format, reorganize, or make other
changes to multiple images at once using convenient Batch Processing.
History palette
Wo rk without worry knowing you
can instantly undo or redo multiple steps with the
History Palette.
Customizable palette well
Access the tools you
need quickly by organizing palettes any way you
like in the palette well.
Explore digital imaging
Expand your creativity with powerful tools and
effects.
Recipes
nation and describe how to perform complex
editing techniques.
Selection brush
unwanted areas of a photo with the Selection
Brush that lets you see feathered edges as you
brush.
Editable text
and make changes at any time to the font, size,
color.
Inspirational Recipes spark your imagi-
Easily and precisely mask
Ty pe and see text right on the canvas
Page 15

ADOBE PHOTOSHOP ELEMENTS 2.0
User Guide
7
PDF Slideshow
Create PDF slide shows, complete
with transitions that you can share with anyone
who has Adobe Acrobat Reader—even on Palm
and Pocket PC devices.
Picture package printing
Lay out multiple
pictures in various sizes on the same page for highquality printouts from your home inkjet printer.
Painting tools
Add creative touches to your
photos using realistic paintbrush effects that
simulate oils, watercolors, charcoal, pastels, and
different canvas textures.
Effects
Instantly apply frames, edges, and other
complex effects to your photos, text, and shapes
from the Effects Browser.
Filters
Never run out of ways to enhance your
photos. Visually scan the complete range of filter
effects from a floating palette and apply any filter
simply by dragging and dropping it onto your
photo.
Layer styles
Quickly create drop shadows, bevels,
glows, and other effects by applying Layer Styles
to the contents of a layer. Watch the contents
instantly update anytime you edit the layer.
Liquify
Create surreal effects by interactively
twisting and pulling an image, or use Liquify as a
touch-up tool to make subtle enhancements.
Background eraser
Easily erase the background
from a photo without disturbing objects in the
foreground. Then paste the objects into another
photo to effortlessly create composite pictures
without harsh edges.
Darkroom-style tools
Adjust the tone of specific
areas of a photo using professional photographers’
darkroom tools, including dodge, burn, and
sponge.
Drawing tools
Add graphic elements to your
photos from a newly expanded library of shapes
and symbols.
Layers
Combine multiple images, text, and
graphics on layers that you can move and modify
independently with complete flexibility.
Contact sheet
Quickly create a visual index of
your photos that you can save or print for future
reference.
Page 16

Page 17

Quickly Fix Photographs
9
Photoshop Elements Quick Fix
f you are new to digital photography or experienced at digital imaging, you’ll find the tools
I
you need to correct and enhance your photos
in Photoshop Elements. In this tutorial you’ll learn
about basic tools and techniques to make your
photos look their best. Be sure to look under the
Help menu to read additional tutorials.
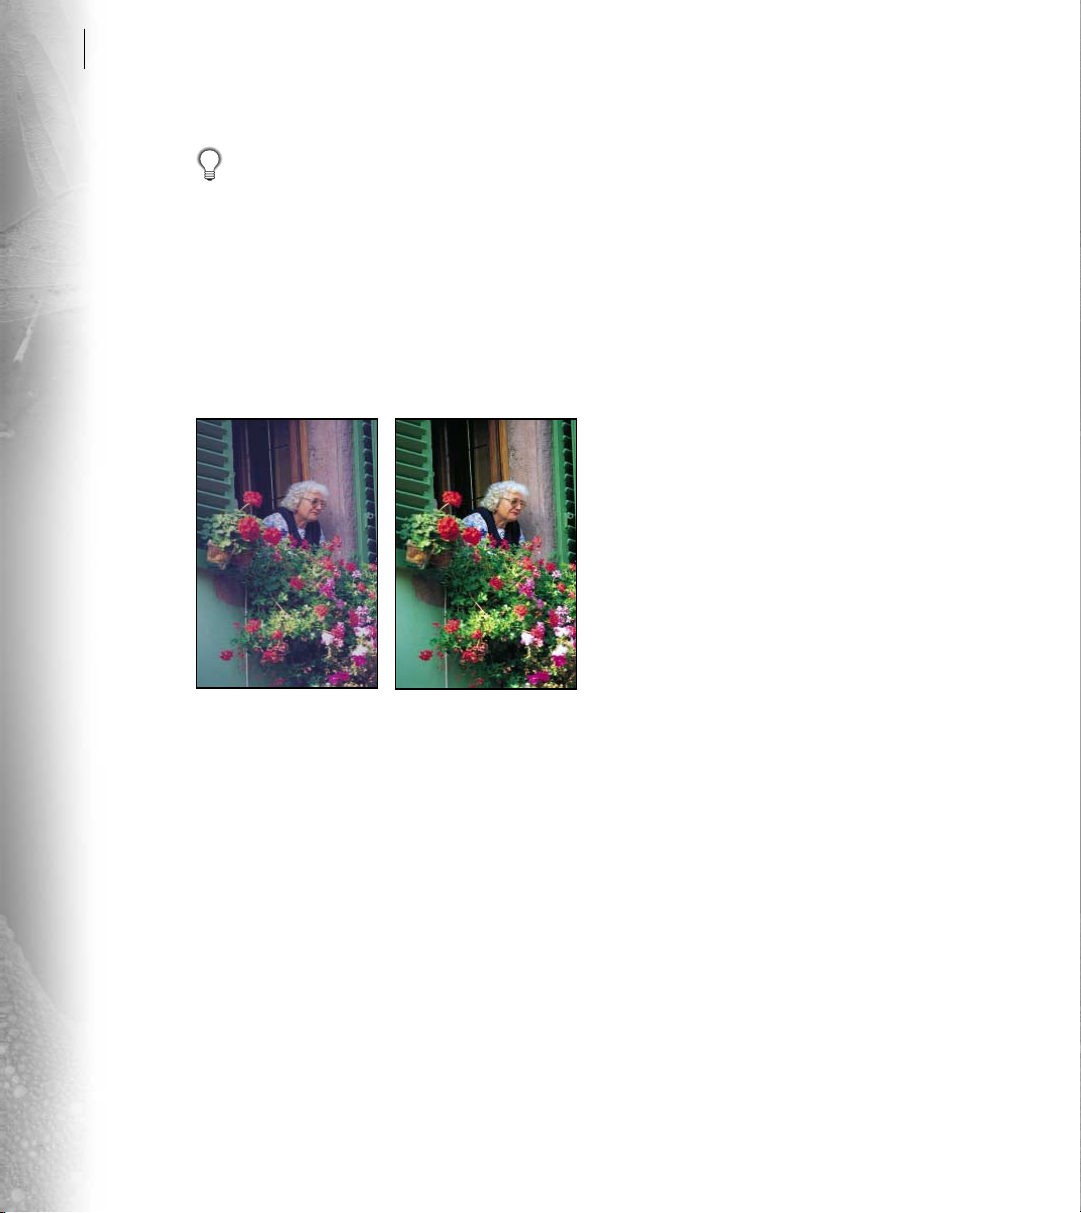
The Photoshop Elements Quick Fix dialog box
gathers several image correction tools in one spot.
You can fix photos that are too dark or too light,
have an off-color cast, need more contrast, or need
sharpening. Before and after previews let you
compare adjustments to your original image
before saving the changes.
1. Open the Quick Fix dialog box.
With the file you want to fix open, choose
Enhance > Quick Fix. The Quick Fix dialog box
opens and presents tools for fixing photographs
and tips for using the tools.
To make adjustments to your photograph:
Select an adjustment category Choose a category
from the list:
• Brightness adjusts your photo’s contrast and
brightness, and quickly fixes overexposed or
underexposed areas.
• Color Correction adjusts the saturation and
color (hue) in your photo, and automatically
corrects a color cast.
• Focus sharpens or blurs your photo.
• Rotate flips your image horizontally and verti-
cally, or rotates your image at 90° or 180° angles.
Select an adjustment Each category has multiple
adjustments that you can choose. The Tips
provide more information for each adjustment.
Apply the adjustment If an adjustment has
options to set, drag the slider to increase or
decrease the value. If you selected an automatic
adjustment, click Apply.
2. Rotate the photograph.
Choose Rotate from Select Adjustment Category,
rotate the photo right, and then click Apply.
The photograph in our example was taken with a
digital camera at a vertical orientation. The After
preview shows the new orientation.
Page 18
10
Quickly Fix Photographs
To straighten an image that was captured at an
angle, or for more rotation options, choose
Image > Rotate rather than Quick Fix.
3. Correct the color and contrast.
The photograph in our example has a blue color
cast, and it needs a little more contrast. We can fix
both of these problems using Auto Color.
Choose Color Correction from Select Adjustment
Category, select Auto Color, and then click Apply.
If your photograph needs more contrast, but the
color looks fine, you could use the Auto Contrast
command in the Brightness category. The Tips
provide more information on when to use an
adjustment.
4. Sharpen the photos.
Choose Focus from Select Adjustment Category,
select Auto Focus, and then click Apply. You
can click Apply multiple times for additional
sharpening.
5. Accept the changes.
If you are satisfied with the adjustments click OK.
If you are not satisfied, you can undo, redo, or reset
the adjustments:
• Click Undo once or multiple times for each
successive adjustment you’d like to undo.
Clicking Undo can undo the Reset Image
option.
• Click Redo once or multiple times for each
adjustment you’d like to redo that was undone.
• Click Reset Image to start over and undo all
adjustments you’ve set in the current Quick Fix
dialog box.
6. Learn more correction techniques.
The image adjustment tools in the Quick Fix
dialog box are individually available in the
Photoshop Elements menus. You can work in the
Quick Fix dialog box or choose the tools you need
individually.
In addition, you might want to become familiar
with other image correction tools:
Variations to fix color casts, add color saturation,
and lighten and darken images.
Levels and adjustment layers to have more
control over contrast, brightness, and color
adjustments.
Unsharp mask to precisely control sharpening in
your photo.
Complete information for these tools is available
in the Photoshop Elements Help.
Page 19
Chapter 1: Looking at the Work Area
W
11
elcome to Adobe Photoshop Elements.
Photoshop Elements gives you an
efficient work area and user interface to
create and edit images for both print and the Web.
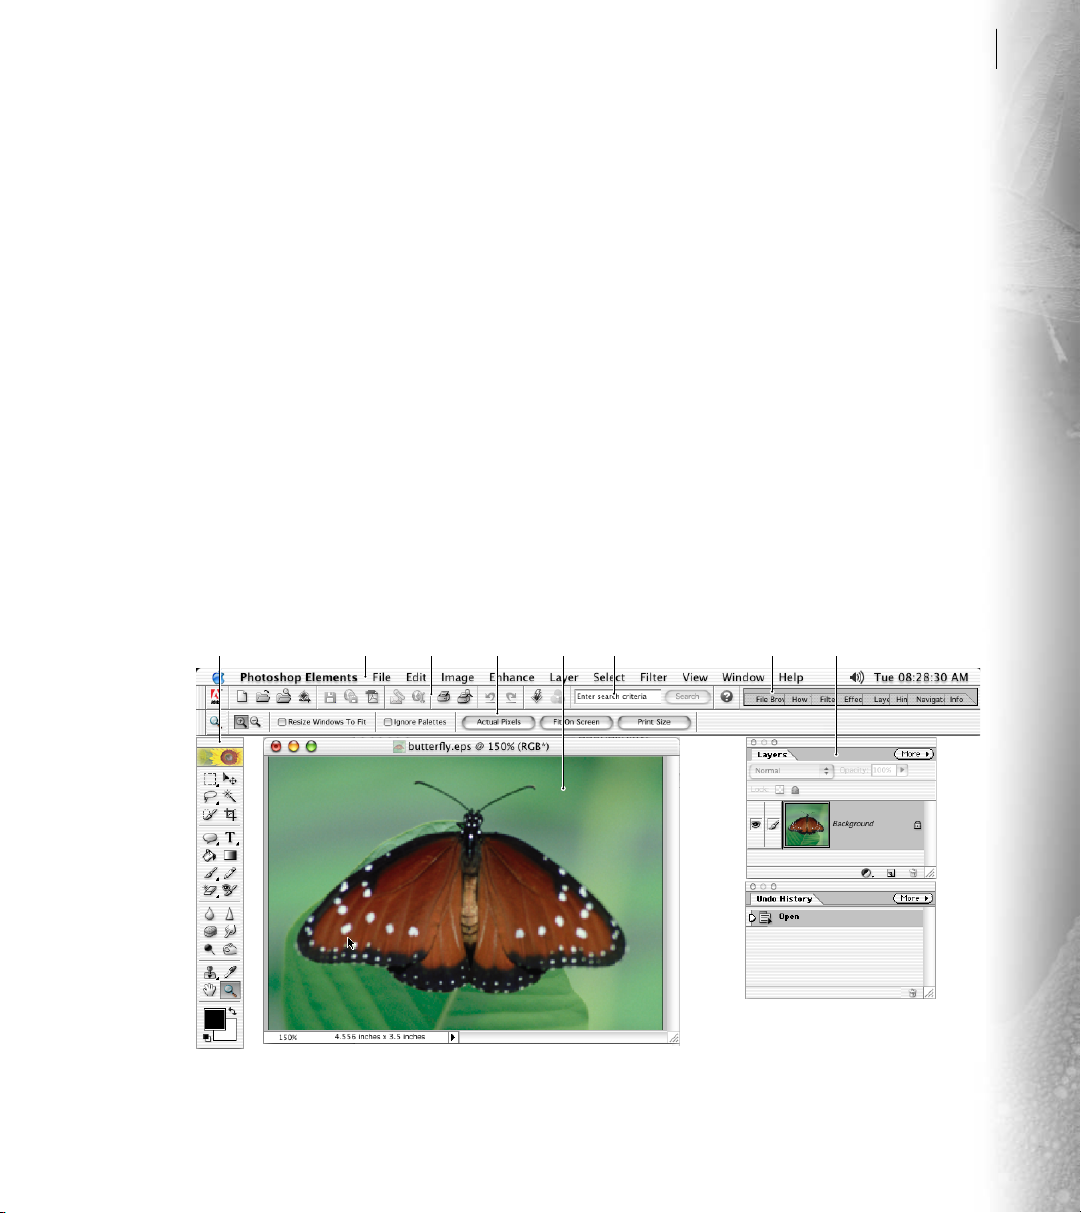
Getting familiar with the
work area
The Photoshop Elements work area is arranged to
help you focus on creating and editing images. The
work area consists of the following components:
Menu bar The menu bar contains menus for
performing tasks. The menus are organized by
topic. For example, the Layers menu contains
commands for working with layers.
ABCDE GHF
Shortcuts bar The shortcuts bar displays buttons
for executing common commands. (See “Using
the shortcuts bar” on page 13.)
Options bar The options bar provides options for
using a tool. (See “Using the options bar” on
page 12.)
To olbox The toolbox holds tools for creating and
editing images. (See “Using the tools” on page 12.)
Palette well The palette well helps you organize
the palettes in your work area. (See “Using the
palette well” on page 13.)
Palettes Palettes help you monitor and modify
images. (See “Using palettes” on page 14.)
Photoshop Elements work area
A. Too lbox B. Menu bar C. Shortcuts bar D. Options bar E. Active image area F. Search field G. Palette well H. Palettes
Page 20

CHAPTER 1
12
Looking at the Work Area
Using the tools
You use tools in the toolbox to select, edit, and
view images; other tools let you paint, draw, and
type. You can view information about any tool in
the toolbox by positioning the pointer over it. The
name of the tool appears below the pointer—this
is called the tool tip. Additional information about
the tool appears in the Hints palette. (See “Using
the Hints palette” on page 16.)
You must select a tool in order to use it. The
currently selected tool is highlighted in the
toolbox. Some tools have additional tools beneath
them—these are called hidden tools. When you see
a small triangle at the lower right of the tool icon,
you know that there are hidden tools.
A
D
B
C
Selecting a hidden tool
A. Too lbox B. Active tool C. Hidden tool D. Shortcut key
• Press the tool’s keyboard shortcut. The
keyboard shortcut is displayed in its tool tip.
For example, you can select the move tool by
pressing the “v” key (see “Using keyboard
commands and modifier keys” on page 19).
To move the toolbox:
Drag the toolbox by its title bar.
To set tool preferences:
1 In Windows or Mac OS 9.x, choose Edit >
Preferences > General.
2 In Mac OS X, choose Photoshop Elements >
Preferences > General.
3 Set one or more of the following options:
• Select Show Tool Tips to show or hide tool tips
and rollover hints in the Hints palette.
• Select Use Shift Key for Tool Switch so you can
hold down the Shift key in order to cycle
through a set of hidden tools. When this option
is deselected, you can cycle through a set of
hidden tools by simply pressing the shortcut key
(without holding down Shift).
4 Click OK.
To select a tool:
Do one of the following:
• Click a tool in the toolbox. If there is a small
triangle at a tool’s lower right corner, hold down
the mouse button to view the hidden tools.
Then click the tool you want to select.
Using the options bar
The first thing you should do after you select a tool
is set its options in the options bar. By default, the
options bar appears below the shortcuts bar at the
top of the work area. The options bar is context
sensitive, which means that it changes as you select
different tools. Some settings in the options bar are
common to several tools, and some are specific to
one tool.
Page 21
ADOBE PHOTOSHOP ELEMENTS 2.0
User Guide
13
AB CD E
Options bar for lasso tool
A. Gripper bar B. Tool icon C. Active tool D. Hidden tools
E. Tool options
To use the options bar:
1 Select a tool. (See “Using the tools” on page 12.)
2 Look in the options bar to see the available
options. For more information on setting options
for a specific tool, search for the tool’s name in
online Help.
To return a tool or all tools to the default settings:
Click the tool icon in the options bar, then choose
Reset Tool or Reset All Tools from the context
menu.
Using the shortcuts bar
The shortcuts bar displays buttons for common
commands. You can quickly click commands as
you need them while you’re working in Photoshop
Elements. To see the name of a button, position
the pointer over the button and its tool tip appears.
You can also perform searches in the shortcuts bar.
In the search field, you can enter a word or a
phrase, click the Search button, and then a Search
Results palette will appear. You can click on a link
for more information about your search topic.
Clicking the Help Contents button in the
shortcuts bar takes you directly to the Help system.
In the Help system, you can search through the
User Guide on-screen to help you find the answers
you need. The results of your search will appear in
the Search Results palette.
Using the palette well
The palette well helps you organize and manage
palettes. You can store palettes that you don’t
frequently use in the palette well. You can still
access the palettes, without having them expanded
in the work area.
The shortcuts bar should always be left open in
the work area so you can access all the tools and
options that are available to you.
AB
Shortcuts bar
A. Gripper bar B. Too l t ip
Palette well
Note: The shortcuts bar must be showing in order to
use the palette well. Choose Window > Shortcuts to
display the shortcuts bar if it’s not open.
Page 22

CHAPTER 1
14
Looking at the Work Area
To use a palette in the palette well:
Click the palette’s tab. The palette remains open
until you click outside it or click the palette’s tab.
To store palettes in the palette well:
Do one of the following:
• Drag the desired palette’s tab into the palette
well so that the palette well is highlighted.
• Make sure that the Close Palette to Palette Well
option is selected in the palette’s menu (see
“Using palette menus” on page 15), and then
close the palette.
To move a palette in the palette well:
Click the palette’s tab and then drag it to a new
location in the palette well.
To view information about a palette in the
palette well:
1 Position the pointer over the palette’s tab.
2 Look at the Hints palette to see a brief
description of the palette. (See “Using the Hints
palette” on page 16.)
Using palettes
Palettes help you monitor and modify images.
There are many ways to organize palettes in the
work area. You can store palettes in the palette well
to keep them out of your way but easily accessible;
or, you can keep frequently used palettes open in
the work area. Another option is to group palettes
together in the work area, or to dock one palette at
the bottom of another palette.
Note: Drag a palette out of the palette well if you
want to keep it open.
To display a palette:
Do one of the following:
• Click its tab.
• Choose the palette’s name in the Window
menu. Choosing the palette a second time hides
the palette.
To change the size of a palette:
Drag any corner of the palette (Windows) or drag
the size box at its lower right corner (Mac OS).
Note: Not all palettes can be resized.
To close a palette:
Do one of the following:
• If the palette is in the palette well, click outside
the palette in the work area or click the palette’s
tab. (See “Using the palette well” on page 13.)
• Click the close icon on the palette title bar.
• If the palette is in a palette group, click the close
icon on the title bar for the group.
• Choose the palette name in the Window menu.
To show or hide multiple palettes:
Do one of the following:
• To show or hide all open palettes, the options
bar, the shortcuts bar, and the toolbox,
press Tab.
• To show or hide all palettes in the work area
(not in the palette well) press Shift+Tab.
Page 23
ADOBE PHOTOSHOP ELEMENTS 2.0
User Guide
15
To group palettes together:
1 Display the palettes you want to group together.
If the palettes are in the palette well, drag at least
one of them into the work area.
2 Drag a palette’s tab onto the body of the target
palette. A thick line appears around the body of
the target palette when the pointer is over the
correct area.
A
B
Grouping two palettes together
A. Dragging a palette onto another open palette
B. Palettes grouped together
Note: Entire palette groups cannot be docked
together at once, but you can dock the palettes from
one group to another, one at a time.
To move a palette group:
Drag its title bar.
To collapse a palette group:
Double-click a palette’s tab or title bar.
To reset palettes to their default positions:
Choose Window > Reset Palette Locations.
To always start with the default palette and dialog box
positions:
1 In Windows or Mac OS 9.x, choose Edit >
Preferences > General.
2 In Mac OS X, choose Photoshop Elements >
Preferences > General.
3 Deselect Save Palette Locations. The change
takes effect the next time you start the application.
To move a palette to another group, drag the
palette’s tab to that group. To separate a palette
from a group, drag the palette’s tab outside
the group.
To dock palettes together:
Drag a palette’s tab to the bottom of another
palette. A double line appears at the bottom of
the target palette when the pointer is over the
correct area.
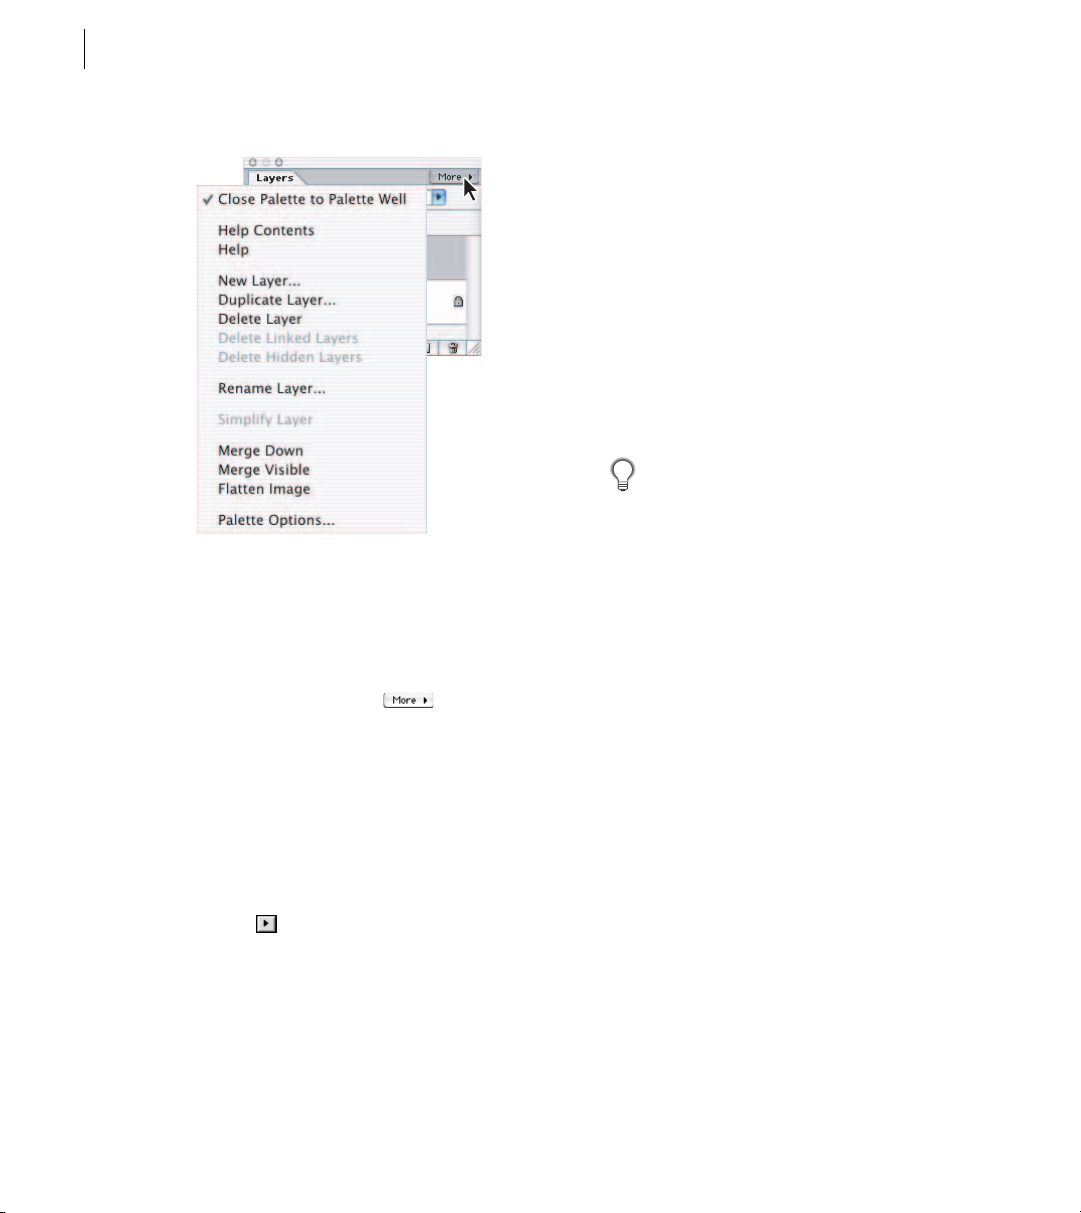
Using palette menus
Palette menus are an important part of working
with Photoshop Elements. Some commands in
palette menus can be found in the menu bar; other
commands are exclusive to palette menus.
When a palette has a palette menu, a More button
appears at the top of the palette. The exact location
and appearance of the More button depends on
where the palette is located: in the palette well, in a
palette group, or in the options bar. When a palette
is docked, the More button is a sideways triangle.
Page 24
CHAPTER 1
16
Looking at the Work Area
Layers palette menu
To use a palette menu:
1 Select a palette. If the palette is in the palette
well, click the palette’s tab to open it.
2 Click the More button in the upper right
corner of the palette.
3 Choose a command from the palette menu.
Using pop-up sliders
A number of palettes and dialog boxes contain
settings that use pop-up sliders (for example, the
Opacity option in the Layers palette). If there is a
triangle next to the text box, you can activate
the pop-up slider by clicking the triangle.
To use a pop-up slider:
Do one of the following:
• Position the pointer over the triangle next to the
setting, hold down the mouse button, and drag
the slider or angle radius to the desired value.
• Click the triangle next to the setting to open the
pop-up slider box, and drag the slider or angle
radius to the desired value. Click outside the
slider box or press Enter or Return to close the
slider box. To cancel changes, press the Escape
key (Esc).
To increase or decrease values in 10% increments when the pop-up slider box is open, hold
down Shift and press the Up Arrow or Down Arrow.
Getting the most out of Photoshop Elements
The Photoshop Elements interface provides a
variety of features to help you work efficiently and
knowledgeably. Some features—such as the Hints
palette and the How To palette—provide information about using tools and performing tasks.
Other features—such as the Info palette and status
bars—provide feedback about the current image
and operation. Yet other features—such as context
menus and keyboard commands—provide
alternate ways to access commands.
Using the Hints palette
The Hints palette helps you learn how to use tools
and palettes. As you run your mouse over a tool or
select a tool, the Hints palette will give you information on using the tool.
Page 25

ADOBE PHOTOSHOP ELEMENTS 2.0
User Guide
17
To use the Hints palette:
1 Display the Hints palette by clicking its tab. If
the Hints palette isn’t showing in the palette well
or the work area, choose Window > Hints to
display the palette.
2 Position the pointer over a tool or palette, and
look at the Hints palette to see a brief description
of the item.
3 Click on one of the Related topics links for more
information about an item.
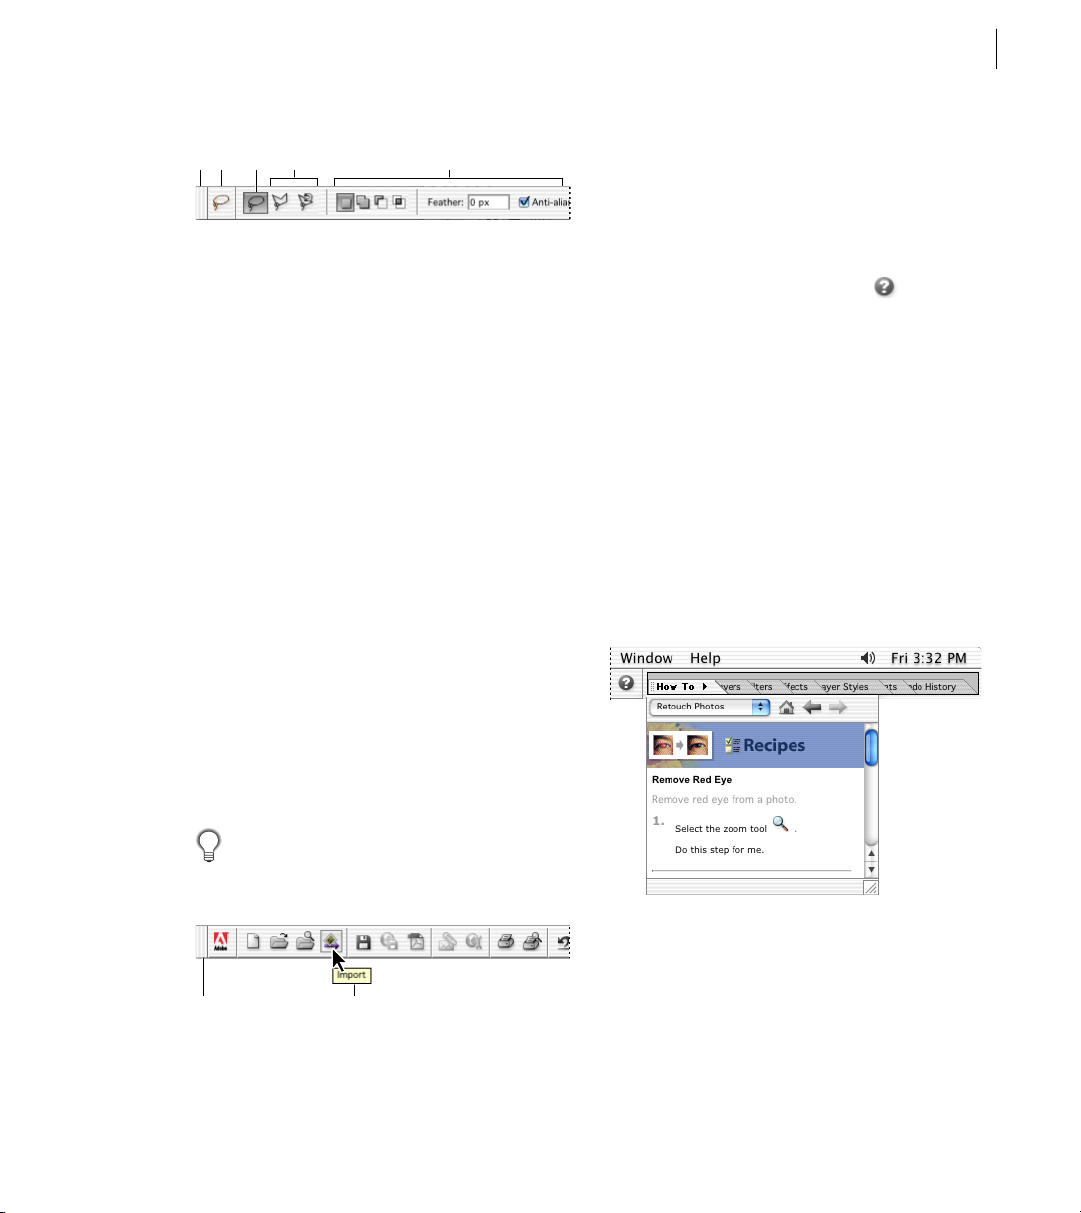
Using the How To palette
The How To palette provides activities, called
recipes, that guide you through different
image-editing tasks. For example, you can view
instructions about restoring an old photograph.
Photoshop Elements will even do some of the steps
for you.
To use the How To palette:
1 Display the How To palette by clicking its tab in
the palette well. If the How To palette isn’t showing
in the palette well or the work area, choose
Window > How To to display the palette.
2 Select a category of recipes, and click the recipe
you want to use.
3 Follow the instructions in the recipe. When
available, you can click Do this step for me to have
Photoshop Elements perform the task for you.
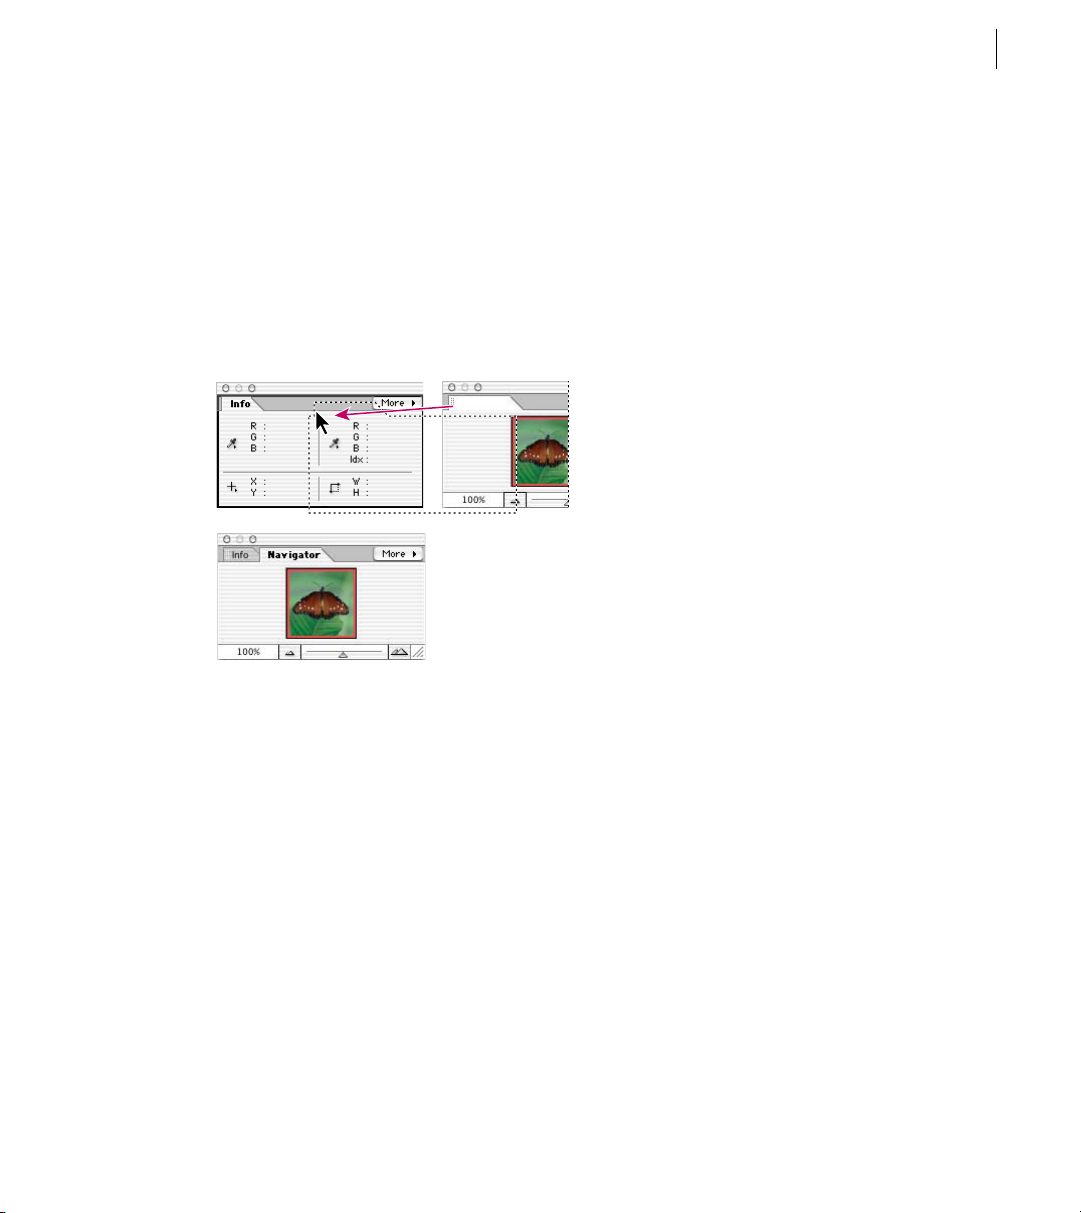
Using the Info palette
The Info palette provides feedback as you use a
tool. Make sure the Info palette is visible in your
work area if you want to view information while
dragging in the image.
To use the Info palette:
1 Display the Info palette by clicking its tab if it’s
in the palette well. If the Info palette isn’t showing
in the palette well or the work area, choose
Window > Info to display the palette.
2 Select the desired tool.
3 Move the pointer in the image, or drag in the
image to use the tool. The following information
may appear, depending on which tool you’re
using:
The numeric values for the color beneath the
pointer.
The x- and y-coordinates of the pointer.
The width (W) and height (H) of a marquee or
shape as you drag, or the width and height of an
active selection.
The x- and y-coordinates of your starting
position (when you click in the image).
The change in position along the x-coordinate,
X, and y-coordinate, Y, as you move a
selection, layer, or shape.
The angle (A) of a line or gradient; the change
in angle as you move a selection, layer, or shape; or
the angle of rotation during a transformation. The
change in distance (D) as you move a selection,
layer, or shape.
Page 26

CHAPTER 1
18
Looking at the Work Area
The percentage of change in width (W) and
height (H) as you scale a selection, layer, or shape.
The angle of horizontal skew (H) or vertical
skew (V) as you skew a selection, layer, or shape.
To change the mode of color values displayed in the
Info palette:
Do one of the following:
• Click an eyedropper icon in the Info palette,
and choose a color mode from the pop-up
menu.
• Choose Palette Options from the Info palette
menu. Choose a color mode for First Color
Readout and/or Second Color Readout, and
click OK.
Actual Color displays values in the current
color mode of the image; Grayscale displays the
grayscale values beneath the pointer; RGB Color
displays the RGB values beneath the pointer;
We b Color displays the hexadecimal code for the
RGB values beneath the pointer; and HSB Color
displays the HSB values beneath the pointer.
(See “About image modes” on page 54 for more
information.)
To change the unit of measurement displayed in the
Info palette:
Do one of the following:
• Click the cross-hair icon in the Info palette,
and choose a unit of measurement from the
pop-up menu.
• Choose Palette Options from the Info palette
menu. Choose a unit of measurement from the
Ruler Units pop-up menu, and click OK.
Using the status bar
The status bar at the bottom of the application
window (Windows) or document window
(Mac OS) displays useful information and is
divided into three sections:
• The leftmost section displays the current
magnification. (See “Magnifying and reducing
the view” on page 20).
• The middle section displays information about
the current file. You can change the type of
information that displays.
• (Windows only) The rightmost section
provides information as you use a tool. It also
displays a progress bar to help you monitor
operations. When an operation—such as
applying a filter or using the Photomerge
command—is in progress, you cannot perform
other operations. However, you can interrupt
the process or have the program notify you
when it has finished.
To display file information in the status bar:
1 Click the triangle in the status bar.
2 Select a view option:
• Document Sizes to display information on the
amount of data in the image. The number on
the left represents the printing size of the
image—approximately the size of the saved,
flattened file in Photoshop format. The number
on the right indicates the file’s approximate size,
including layers.
• Document Profile to display the name of the
color profile used by the image. (See “About
color management” on page 31.)
Page 27

ADOBE PHOTOSHOP ELEMENTS 2.0
User Guide
19
• Document Dimensions to display the
document size of the image. (See “Changing the
print dimensions and resolution of an image”
on page 78.)
• Scratch Sizes to display information on the
amount of RAM and scratch disk used to
process the image. The number on the left
represents the amount of memory that is
currently being used by the program to display
all open images. The number on the right represents the total amount of RAM available for
processing images.
• Efficiency to display the percentage of time
actually doing an operation instead of reading
or writing the scratch disk. If the value is below
100%, Photoshop Elements is using the scratch
disk and, therefore, is operating more slowly.
• Timing to display the amount of time it took to
complete the last operation.
• Current Tool to view the name of the active tool.
To cancel operations:
Hold down Esc until the operation in progress
has stopped. In Mac OS, you can also press
Command+period.
To set notification for completion of operations:
1 In Windows or Mac OS 9.x, choose Edit >
Preferences > General.
2 In Mac OS X, choose Photoshop Elements >
Preferences > General.
3 Select Beep when Done, and click OK.
Using context menus
In addition to the menus at the top of your screen,
context-sensitive menus display commands that
are relevant to the active tool, selection, or palette.
Context menu for a document window
To use a context menu:
1 Position the pointer over an image or
palette item.
2 Click the right mouse button (Windows) or
hold down Control and press the mouse
button (Mac OS).
3 Choose a command from the menu.
Using keyboard commands and
modifier keys
Keyboard commands let you quickly execute
commands without using a menu; modifier keys
let you alter how a tool operates. When available,
the keyboard command appears to the right of the
command name in the menu. You can view a list of
keyboard commands and modifier keys in the
Quick Reference Card section of online Help.
Page 28

CHAPTER 1
20
Looking at the Work Area
Using the Welcome window
The Welcome window provides options for
acquiring images, as well as links to online Help
and tutorials.
To display the Welcome window:
Choose Window > Welcome.
Deselect Show this screen at startup if you don’t
want the Welcome window to appear when you
restart Photoshop Elements.
Viewing images
The hand tool, the zoom tools, the Zoom
commands, and the Navigator palette let you view
different areas of an image at different magnifications. The document window is where your image
appears. You can open additional windows to
display several views of an image at once (such as
different magnifications).
Magnifying and reducing the view
You can magnify or reduce your view using
various methods. The window’s title bar displays
the zoom percentage (unless the window is too
small for the display to fit), as does the status bar at
the bottom of the window.
When using the zoom tool, hold down Alt
(Windows) or Option (Mac OS) to switch
between zooming in and zooming out.
To z oom in:
Do one of the following:
• Select the zoom tool , and click the Zoom In
button in the options bar. Click the area you
want to magnify. Each click magnifies the image
to the next preset percentage, centering the
display around the point you click. When the
image has reached its maximum magnification
level of 1600%, the magnifying glass appears
empty.
• Click the Zoom In button on the Navigator
palette bar.
• Ty pe the desired magnification in the Navigator
palette bar text box.
• Choose View > Zoom In.
To zoom out:
Do one of the following:
• Select the zoom tool , and click the Zoom
Out button in the options bar. Click the
center of the area of the image you want to
reduce. Each click reduces the view to the
previous preset percentage. When the file has
reached its maximum reduction level so that
only 1 pixel is visible horizontally or vertically,
the magnifying glass appears empty.
• Choose View > Zoom Out to reduce to the
previous preset percentage. When the image
reaches its maximum reduction level, the
command is dimmed.
Page 29

ADOBE PHOTOSHOP ELEMENTS 2.0
User Guide
21
• Enter the desired magnification level in the
Zoom text box in the status bar (See “Using the
status bar” on page 18) or in the Navigator
palette.
• Click the Zoom Out button on the Navigator
palette bar.
To magnify by dragging:
1 Select the zoom tool , and click the Zoom In
button in the options bar.
2 Drag over the part of the image you want
to magnify.
Drag the zoom tool to magnify the view.
The area inside the zoom marquee is displayed at
the highest possible magnification. To move the
marquee around the image, begin dragging a
marquee and then hold down the spacebar while
dragging the marquee to a new location.
To display an image at 100%:
Do one of the following:
• Double-click the zoom tool .
• Select the zoom tool or the hand tool, and click
Actual Pixels in the options bar.
• Choose View > Actual Pixels.
• Enter 100% in the Status Bar and press Enter or
Return.
To change the view to fit the screen:
Do one of the following:
• Double-click the hand tool .
• Select the zoom tool or the hand tool, and click
Fit on Screen in the options bar.
• Choose View > Fit on Screen.
These options scale both the zoom level and the
window size to fit the available screen space.
To automatically resize the window when magnifying
or reducing the view:
With the zoom tool active, select Resize Windows
To Fit in the options bar. The window resizes when
you magnify or reduce the view of the image.
When Resize Windows To Fit is deselected, the
window maintains a constant size regardless
of the image’s magnification. This can be helpful
when you are using smaller monitors or working
with tiled views.
To automatically resize the window when magnifying
or reducing the view using keyboard shortcuts:
1 In Windows or Mac OS 9.x, choose Edit >
Preferences > General.
2 In Mac OS X, choose Photoshop Elements >
Preferences > General.
3 Select the Keyboard Zoom Resizes Windows
preference, and click OK.
Page 30
CHAPTER 1
22
Looking at the Work Area
Navigating the view area
If you have enlarged your image, you can navigate
to bring another area of the image into view.
To view another area of an image:
Do one of the following:
• Use the window scroll bars.
• Select the hand tool and drag to pan over
the image.
To use the hand tool while another tool is
selected, hold down the spacebar as you drag
in the image.
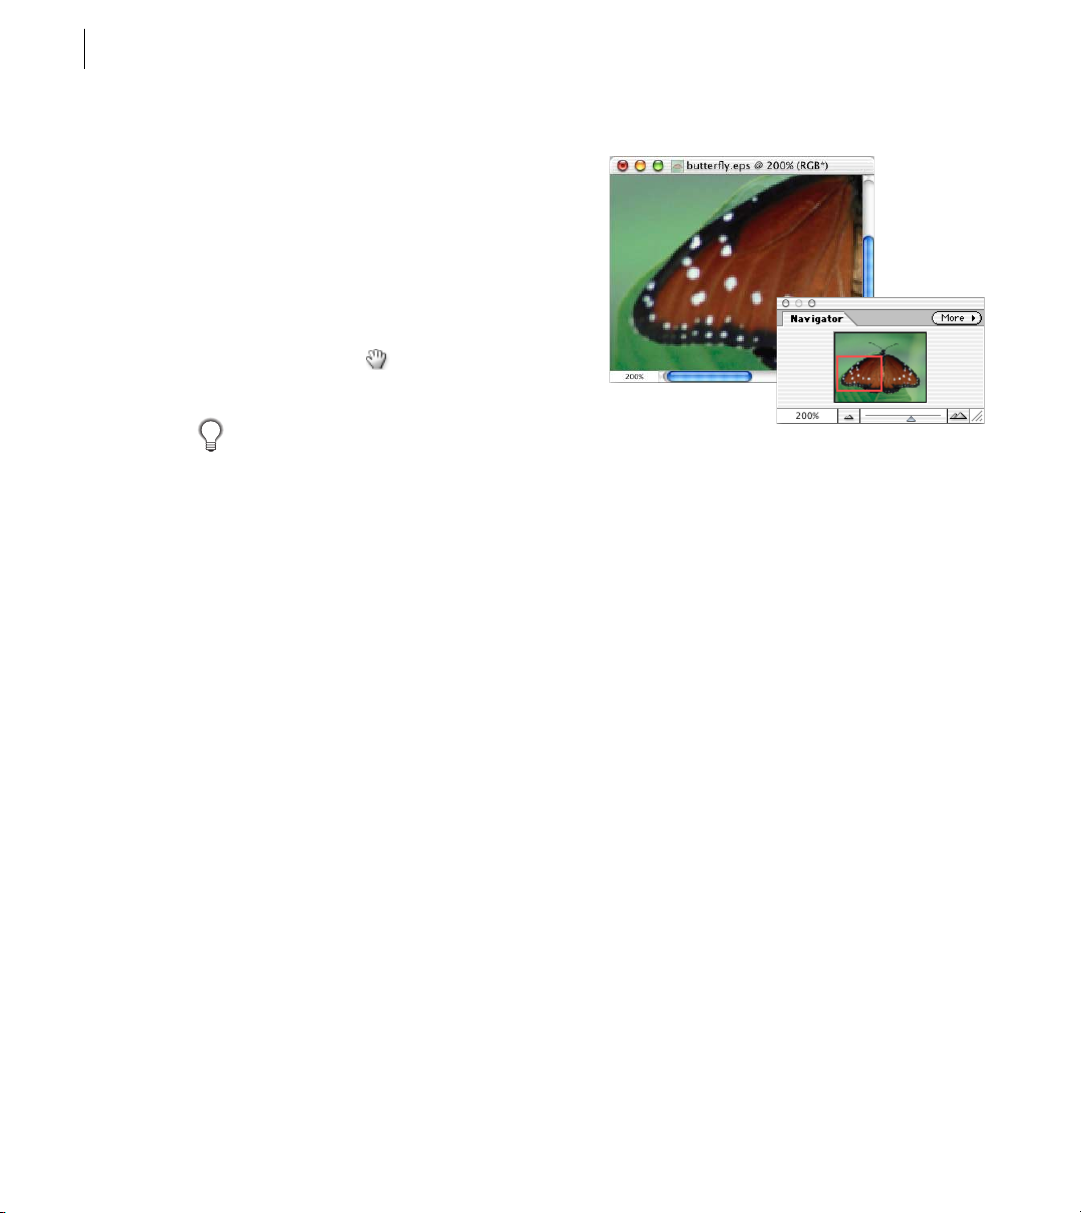
To move the view of an image using the Navigator
palette:
1 Choose Window > Navigator, or click the
Navigator tab in the palette well.
2 Do one of the following:
• Drag the view box in the thumbnail of the
image, which represents the boundaries of the
image window.
• Drag the slider in the Navigator palette.
• Click in the thumbnail of the image. The new
view includes the area you clicked.
View of an image in the Navigator palette
To change the color of the Navigator palette view box:
1 Choose Palette Options from the Navigator
palette menu.
2 Choose a color:
• To use a preset color, choose an option for
Color.
• To specify a different color, click the color box,
and choose a color. (See “Using the Adobe
Color Picker” on page 131.)
• Choose Custom from the preset list.
3 Click OK.
Using the document window
You can open multiple windows to display
different views of the same file. A list of open
windows appears in the Window menu. Available
memory may limit the number of windows
per image.
Page 31

ADOBE PHOTOSHOP ELEMENTS 2.0
User Guide
23
To open multiple views of the same image:
Choose View > New View. Depending on the
position of the first window, you may have to move
the second window to view both simultaneously.
Yo u can use the New View command when
you’re working with a zoomed image to see
what the image will look like at 100% size in a
separate window.
To arrange multiple windows:
Do one of the following:
• Choose Window > Images > Cascade to display
windows stacked and cascading from the upper
left to the lower right of the screen.
• Choose Window > Images >Tile to display
windows edge to edge.
• Choose Window > Images > Arrange Icons to
align minimized images along the bottom of the
work area (Windows only).
To close windows:
Do one of the following:
• Choose File > Close to close the active window.
• Click the close icon on the title bar for the
active window.
• Choose Window > Images > Close All to close
all windows (Windows).
• Choose File > Close All to close all windows
(Mac OS).
Duplicating images
Duplicating lets you experiment with and
compare multiple versions of the same image.
You can duplicate an entire image into available
memory without saving to disk.
To duplicate an image:
1 Open the image you want to duplicate.
2 Choose Image > Duplicate Image.
3 Enter a name for the duplicated image.
4 To duplicate the image without layers, select
Duplicate Merged Layers Only.
5 Click OK.
Viewing file information
You can view copyright and authorship information that has been added to the file. This
information includes standard file information
®
and Digimarc
automatically scans opened images for Digimarc
watermarks. If a watermark is detected, Photoshop
Elements displays a copyright symbol in the image
window’s title bar and includes the information
in the Copyright Status, Copyright Notice, and
Owner URL sections of the File Info dialog box.
To view additional file information:
Choose File > File Info. For Section, choose the
attribute you want to view.
watermarks. Photoshop Elements
Page 32

CHAPTER 1
24
Looking at the Work Area
To read a Digimarc watermark:
1 Choose Filter > Digimarc > Read Watermark.
If the filter finds a watermark, a dialog box displays
the Digimarc ID, copyright year (if present), and
image attributes.
2 Click OK. If you have a Web browser installed,
click Web Lookup to get more information about
the owner of the image. This option launches the
browser and displays the Digimarc Web site, where
contact details appear for the given Digimarc ID.
Using rulers and the grid
Rulers and the grid help you position items (such
as selections, layers, and shapes) precisely across
the width or length of an image.
When visible, rulers appear along the top and left
side of the active window. Markers in the ruler
display the pointer’s position when you move it.
Changing the ruler origin (the (0, 0) mark on the
top and left rulers) lets you measure from a specific
point on the image. The ruler origin also determines the grid’s point of origin.
To show or hide rulers:
If the rulers aren’t visible, choose View > Rulers.
Choose the command a second time to hide the
rulers.
To show or hide the grid:
If the grid isn’t visible, choose View > Grid.
Choose the command a second time to hide
the grid.
To change the rulers’ zero origin:
Position the pointer over the intersection of the
rulers in the upper left corner of the window, and
drag diagonally down onto the image. A set of
cross hairs appears, marking the new origin on
the rulers. The new zero origin will be set where
you release the mouse button.
Note: To reset the ruler origin to its default value,
double-click the upper left corner of the rulers.
To change the rulers’ settings:
1 Do one of the following:
• Double-click a ruler.
• In Windows or Mac OS 9.x, choose Edit >
Preferences > Units & Rulers.
• In Mac OS X, choose Photoshop Elements >
Preferences > Units & Rulers.
2 For Rulers, choose a unit of measurement.
Note: Changing the units on the Info palette
automatically changes the units on the rulers.
(See “Using the Info palette” on page 17.)
3 For Column size, enter values for Width and
Gutter.
Page 33

ADOBE PHOTOSHOP ELEMENTS 2.0
User Guide
25
Some layout programs use the column width
setting to specify the display of an image across
columns. The Image Size and Canvas Size
commands also use this setting. (See “Changing
the print dimensions and resolution of an image”
on page 78 and “Changing the size of the work
canvas” on page 80.)
4 Click OK.
To change the grid settings:
1 In Windows or Mac OS 9.x, choose Edit >
Preferences > Grid.
2 In Mac OS X, choose Photoshop Elements >
Preferences > Grid.
3 For Color, choose a preset color, or select
Custom to choose a custom color.
4 For Style, choose the line style for the grid.
Choose Lines for solid lines, or choose Dashed
lines or Dots for broken lines.
5 For Gridline every, enter a number value, and
then choose the unit of measurement to define the
spacing of major grid lines.
6 For Subdivisions, enter a number value to
define the frequency of minor grid lines.
7 Click OK.
For information on how to restore your image to
how it looked at any point in the current work
session, see “Reverting to any state of an image”
on page 26.
To undo the last operation:
Choose Edit > Undo, or click the Step Backward
button in the shortcuts bar.
If an operation can’t be undone, the command
dims and changes to Can’t Undo.
To redo the last operation:
Choose Edit > Redo, or click the Step Forward
button in the shortcuts bar.
To free memory used by the Undo command, the
Undo History palette, or the Clipboard:
Choose Edit > Purge, and choose the item type or
buffer you want to clear. If already empty, the item
type or buffer is dimmed.
Important: The Purge command permanently
clears from memory the operation stored by the
command or buffer; it cannot be undone. Use the
Purge command when the amount of information
held in memory is so large that the performance of
Photoshop Elements is noticeably diminished.
Undoing operations
Most operations can be undone if you make a
mistake. Alternatively, you can restore all or part of
an image to its last saved version. But available
memory may limit your ability to use these
options.
To revert to the last saved version:
Choose File > Revert.
Note: Revert is added as a history state in the Undo
History palette and can be undone.
Page 34

CHAPTER 1
26
Looking at the Work Area
Reverting to any state of an image
The Undo History palette lets you jump to any
recent state of the image created during the
current working session. Each time you apply a
change to pixels in an image, the new state of that
image is added to the palette.
For example, if you select, paint, and rotate part of
an image, each of those states is listed separately in
the palette. You can then select any of the states,
and the image will revert to how it looked when
that change was first applied. You can then work
from that state.
Actions that do not affect pixels in the image, such
as zooming and scrolling, will not appear in the
Undo History palette.
About the Undo History palette
Note the following guidelines when using the
Undo History palette:
• Program-wide changes, such as changes to
palettes, color settings, and preferences, are not
changes to a particular image and so are not
added to the Undo History palette.
• By default, the Undo History palette lists 20
previous states. Older states are automatically
deleted to free more memory for Photoshop
Elements. You can change the number of states
displayed in the Undo History palette in
General Preferences. The maximum number of
states is 100.
• Once you close and reopen the document,
all states from the last working session are
cleared from the palette.
• States are added from the top down. That is, the
oldest state is at the top of the list, the most
recent one at the bottom.
• Each state is listed with the name of the tool or
command used to change the image.
• By default, selecting a state dims those below.
This way you can easily see which changes will
be discarded if you continue working from the
selected state.
• Selecting a state and then changing the image
eliminates all states that came after it. Likewise,
deleting a state deletes that state and those that
came after it.
• If you select a state and then change the image,
eliminating the states that came after it, you can
use the Undo command to undo the last change
and restore the eliminated states.
Using the Undo History palette
You can use the Undo History palette to revert
to a previous state of an image and delete an
image’s states.
Page 35

A
BC
Undo History palette
A. Undo History state slider B. History state
C. Trash button
To display the Undo History palette:
Choose Window > Undo History, or click the
Undo History palette tab.
To revert to a previous state of an image:
Do any of the following:
• Click the name of the state.
• Drag the slider at the left of the state up or down
to a different state.
• Click the Step Forward or Step Backward
buttons on the shortcuts bar.
• Choose Step Forward or Step Backward from
the palette menu or the Edit menu to move to
the next or previous state.
To set the keyboard command for Step Forward
and Step Backward, in Windows or Mac OS
9.x, choose Edit > Preferences > General, or in Mac
OS X, choose Photoshop Elements > Preferences >
General, and select an option for Step Back/Fwd.
ADOBE PHOTOSHOP ELEMENTS 2.0
User Guide
To delete one or more states of an image:
Do one of the following:
• Click the name of the state, and choose Delete
from the Undo History palette menu to delete
that change and those that came after it.
• Drag the state to the Trash button to delete
that change and those that came after it.
• Choose Clear Undo History from the palette
menu to delete the list of states from the Undo
History palette, without changing the image.
This option doesn’t reduce the amount of
memory used by Photoshop Elements because
it can be undone.
• Hold down Alt (Windows) or Option
(Mac OS), and choose Clear Undo History from
the palette menu to purge the list of states from
the Undo History palette (and from the Undo
buffer) without changing the image. If you get a
message that Photoshop Elements is low on
memory, purging states is useful, since the
command frees up memory.
Important: This action cannot be undone.
• Choose Edit > Purge > Histories to purge the
list of states from the Undo History palette for
all open documents.
Important: This action cannot be undone.
Working with preset options
Photoshop Elements provides predefined libraries
of brushes, swatches, gradients, patterns, layer
styles, and custom shapes called presets. You can
use the Presets Manager to load different preset
libraries.
27
Page 36

CHAPTER 1
28
Looking at the Work Area
Presets are stored in separate library files that can
be found in the Presets folder in the Photoshop
Elements application folder.
Using pop-up palettes
Pop-up palettes appear in the options bar and
provide access to libraries of brushes, swatches,
gradients, patterns, layer styles, and custom
shapes. When closed, pop-up palettes display a
thumbnail image of the currently selected preset.
When you click the triangle to the right of the
thumbnail image, the pop-up palette opens to
show you the currently loaded preset libraries. You
can change the display of a pop-up palette to view
presets by their names, as thumbnail icons, or with
both names and icons.
AB
To select a preset in a pop-up palette:
1 Click the triangle in the upper right area of a
pop-up palette.
2 Choose a preset.
To rename a brush, gradient, or pattern in a pop-up
palette:
1 Select an item, click the triangle in the upper
right corner of the pop-up palette, and choose the
Rename command from the palette menu.
2 Enter a new name in the dialog box provided,
and click OK.
To delete a brush, gradient, or pattern from a pop-up
palette:
Do one of the following:
• Select an item, click the triangle in the upper
right corner of the pop-up palette, and choose
the Delete command from the palette menu.
• Hold down Alt (Windows) or Option (Mac OS)
and click a brush or gradient.
The Brush pop-up palette in the options bar.
A. Click to open the pop-up palette. B. Click to view
the pop-up palette menu.
To save a library of brushes, gradients, or patterns for
later use:
Choose the Save command from the pop-up
palette menu. Then enter a name for the library
file, and click Save.
To load a library of brushes, gradients, or patterns:
Choose the Load command from the pop-up
palette menu. Then select the library file you want
to add to the pop-up palette, and click Load.
Page 37

ADOBE PHOTOSHOP ELEMENTS 2.0
User Guide
29
Note: Using the Load command will add the brush
library to the brushes you have available. If you
choose a preset library of brushes, the preset library
will replace your current set of brushes.
To replace the current set of brushes, gradients, or
patterns in a pop-up palette:
Do one of the following:
• Choose the Replace command from the pop-up
palette menu. Then select the library file you
want to use, and click Load.
• Choose a library file from the bottom section of
the palette menu. Then click OK to replace the
current list (gradients or patterns only).
To load to the default library of brushes, gradients,
or patterns:
Choose the Reset command from the pop-up
palette menu.
To change the display of items in a pop-up palette:
1 Click the triangle in the upper right corner of
the pop-up palette to view the palette menu.
2 Select a view option:
• Te xt Only to display the name of each item.
• Small Thumbnail or Large Thumbnail to
display a thumbnail of each item.
• Small List or Large List to display the name and
thumbnail of each item.
• Stroke Thumbnail to display a sample brush
stroke and brush thumbnail. (This option is
available for brushes only.)
Note: Not all of the above options are available for
all pop-up palettes.
Using the Preset Manager
The Preset Manager lets you manage the libraries
of brushes, swatches, gradients, and patterns that
come with Photoshop Elements. For example, you
can create a set of favorite brushes, or you can
restore the default presets. The configuration
of presets in the Preset Manager corresponds to
presets that appear in pop-up palettes and regular
palettes.
Each type of library has its own file extension
and default folder. Preset files are installed on
your computer inside the Presets folder in the
Photoshop Elements program folder.
To display the Preset Manager:
Choose Edit > Preset Manager.
To load a library:
1 Choose Brushes, Swatches, Gradients, or
Patterns from the Preset Type menu.
2 Do one of the following:
• Click Load, then select a library from the list.
If you want to load a library located in another
folder, navigate to that folder, then select the
library. By default, preset files are installed on
your computer inside the Presets folder in the
Photoshop Elements program folder.
• Click the More button , and choose a
library from the bottom section of the pop-up
menu.
3 Click the Done button when you’re finished.
Page 38

CHAPTER 1
30
Looking at the Work Area
To restore the default library or replace the currently
displayed libraries:
Click the More button , and choose a
command from the pop-up menu:
• Reset to restore the default library for that type.
• Replace to replace the current library with the
contents of another library.
To save a subset of a library:
1 Shift-click to select multiple presets. Only the
selected presets will be saved to the new library.
2 Click Save Set, then enter a name for the library.
If you want to save the library to a folder other
than the default, navigate to the new folder before
saving.
To rename a preset:
1 Do one of the following:
• Select a preset in the list, and click Rename.
• Double-click a preset in the list.
2 Enter a new name for the preset. If you selected
multiple presets, you will be prompted to enter
multiple names.
To delete a preset:
Select the preset you want to delete, and
click Delete.
To change the display of presets in the Preset
Manager:
Click the More button , and choose a
display mode from the middle section of the
pop-up menu:
• Te xt Only to display the name of each
preset item.
• Small Thumbnail or Large Thumbnail to
display a thumbnail of each preset item.
• Small List or Large List to display the name and
thumbnail of each preset item.
• Stroke Thumbnail to display a sample brush
stroke and brush thumbnail of each brush
preset. (This option is available for brush
presets only.)
Page 39

Chapter 2: Setting Up
Photoshop Elements
31
dobe Photoshop Elements can be
customized to your working
A
environment.
About color management
Color management allows you to get consistent
color between digital cameras, scanners, monitors,
and printers. Color management also helps
different applications, monitors, and operating
systems display colors consistently.
When you create computer graphics, each piece of
equipment you work with that reproduces color—
such as a scanner, color monitor, and desktop
printer—is called a device. Each type of device
reproduces a different range of color, called a color
gamut. As you move an image from one device to
another, its colors can shift in appearance,
sometimes resulting in dramatic changes. Color
management maps colors from a device, such as a
monitor, to another device, such as a printer.
Color mapping ensures that colors on the monitor
represent colors that the printer can reproduce.
By attaching, or tagging, a color profile to an
image, you define how colors appear in the image;
changing the attached profile changes how colors
appear. Images without attached profiles are
known as untagged images and are not color
managed.
When an image has a color profile assigned to it,
each device recognizes the profile, and displays
colors according to the settings in the profile. This
way, colors should look the same with all the
devices.
Setting up color management
Photoshop Elements allows you to create colormanaged images easily.
To create a color-managed image:
1 Open a file and choose Edit > Color Settings.
2 Select one of these color management options:
• No color management leaves your image
untagged.
• Limited color management optimizes your
images for the Web.
• Full color management tags your image with a
standard ICC color profile for print optimization. The exact color profile depends on the
color mode of your image.
3 Click OK.
4 Choose File > Save As, and select ICC Profile
(Windows) or Embed Color Profile (Mac OS) in
the Save As dialog box.
5 Finish saving the image, as described in “Saving
images” on page 225.
Page 40

CHAPTER 2
32
Setting Up Photoshop Elements
Calibrating your monitor
Your monitor will display color more reliably if
you use color management and accurate ICC
(International Color Consortium) profiles. Using
an ICC monitor profile helps you eliminate any
color cast in your monitor, make your monitor
grays as neutral as possible, and standardize image
display across different monitors.
On Windows, you can use the Adobe Gamma
software (installed with Photoshop Elements) to
create a monitor profile. On Mac OS, you can use
®
the Apple
profile. Be sure to use only one calibration utility
to display your profile; using multiple utilities can
result in incorrect color.
About monitor calibration settings
Monitor calibration involves adjusting video
settings, which may be unfamiliar to you.
A monitor profile uses these settings to precisely
describe how your monitor reproduces color.
Brightness and contrast The overall level and
range, respectively, of display intensity. These
parameters work just as they do on a television set.
Gamma The brightness of the midtone values.
The values produced by a monitor from black to
white are nonlinear—if you graph the values, they
form a curve, not a straight line. The gamma value
defines the slope of that curve halfway between
black and white. Gamma adjustment compensates
for the nonlinear tonal reproduction of output
devices such as monitor tubes.
calibration utility to create a monitor
Phosphors The substance that monitors use to
emit colors. Different phosphors have different
color characteristics.
White point The coordinates at which red, green,
and blue phosphors at full intensity create white.
Getting ready to calibrate
Before you begin calibrating:
• Make sure that your monitor is displaying
thousands (16 bits) of colors or more.
• Set your desktop to display neutral grays only,
using RGB values of 128. For more information,
see the documentation for your operating
system.
• Make sure your monitor has been on for at least
30 minutes. If your monitor isn’t warmed up,
the colors it displays may not be accurate.
Calibrating with Adobe Gamma (Windows)
The ICC profile you get by using Adobe Gamma
uses the calibration settings to describe how your
monitor reproduces color.
Note: If you’re using Windows NT, some calibration
options documented here may not be available.
To use Adobe Gamma:
1 Start Adobe Gamma, located in the Control
Panels folder or in the Program Files/Common
Files/Adobe/Calibration folder on your hard drive.
Page 41

ADOBE PHOTOSHOP ELEMENTS 2.0
User Guide
33
2 Do one of the following:
• To use a version of the utility that will guide you
through each step, select Step by Step, and click
OK. This version is recommended if you’re new
to color management. If you choose this option,
follow the instructions described in the utility.
Start from the default profile for your monitor if
available, and enter a unique description name
for the profile. When you are finished with
Adobe Gamma, save the profile using the same
description name. (If you do not have a default
profile, contact your monitor manufacturer for
appropriate phosphor specifications.)
• To use a compact version of the utility with all
the controls in one place, select Control Panel,
and click OK. This version is recommended if
you have experience creating color profiles.
At any time while working in the Adobe
Gamma control panel, you can click the Wizard
button to switch to the wizard for instructions that
guide you through the same settings as in the control
panel, one option at a time.
Configuring Photoshop
Elements
You can configure preferences in Photoshop
Elements to best meet your needs. By setting
preferences, you can control the working
environment in Photoshop Elements and change
how the program uses memory.
Setting preferences
Preferences settings control how Photoshop
Elements displays images, cursors, and transparencies, saves files, and uses plug-ins and scratch
disks. You set most of these options in the Preferences dialog box from the Edit menu.
If the preferences you set are not behaving as you
expect, the preferences file may be damaged. You
can restore all preferences to their defaults, then
create a new file by setting new preferences.
To open the preferences dialog box:
1 Choose the desired preference set from the
Edit > Preferences submenu.
2 To switch to a different preference set, do one of
the following:
• Choose the preference set from the Edit >
Preferences drop-down menu.
• Choose the preference set from the menu at the
top of the dialog box.
• Click Next to display the next preference set in
the menu list; click Prev to display the previous
preference set.
For information on a specific preference option,
search for the preference name in the index.
To restore all preferences to their default settings:
In Windows, press and hold Alt+Control+Shift
immediately after launching Photoshop Elements.
Click Yes to delete the Adobe Photoshop Elements
settings file.
Page 42

CHAPTER 2
34
Setting Up Photoshop Elements
In Mac OS, hold down Option+Command+Shift
immediately after launching Photoshop Elements.
Click Yes to delete the Adobe Photoshop Elements
settings file.
New preferences files are available the next time
you start Photoshop Elements.
Using tool pointers
When you select most tools, the mouse pointer
matches the tool’s icon. The marquee pointer
appears by default as cross hairs, the text tool
pointer appears as an I-beam, and painting tools
appear as the Brush Size icon.
To set the appearance of a tool pointer:
1 Choose Edit > Preferences > Display & Cursors.
2 Select a setting for the tool pointer:
• Standard to display pointers as tool icons.
• Precise to display pointers as cross hairs.
• Brush Size to display the painting cursors as
brush shapes representing the size of the current
brush. Brush Size cursors may not display for
very large brushes.
3 Click OK.
The Painting Cursors options control the pointers
for the eraser, pencil, airbrush, paintbrush,
impressionist brush, background eraser, magic
eraser, selection brush, red eye brush, clone stamp,
pattern stamp, and the smudge, blur, sharpen,
dodge, burn, and sponge tools.
The Other Cursors options control the pointers
for the marquee, lasso, magic wand, crop,
eyedropper, gradient, paint bucket, shape, hand,
and zoom tools.
To toggle between standard and precise cursors
of some tool pointers, press Caps Lock. Press
Caps Lock again to return to your original setting.
Making previews display more quickly
Pixel Doubling speeds up an image preview by
temporarily doubling the size of the pixels by
halving the resolution of the preview. This option
has no effect on the pixels in the file; it simply
provides faster previews.
To speed up previews:
1 Choose Edit > Preferences > Display & Cursors.
2 Select Use Pixel Doubling.
3 Click OK.
Resetting all warning dialogs
In certain situations, Photoshop Elements displays
messages containing warnings or prompts. You
can disable the display of these messages by
selecting the Don’t Show Again option in the
message. You can also reset Photoshop Elements to
display all messages that you've disabled.
To reset the display of all warning messages:
1 Choose Edit > Preferences > General.
2 Click Reset All Warning Dialogs, and click OK.
Page 43

ADOBE PHOTOSHOP ELEMENTS 2.0
User Guide
35
Using plug-in modules
Plug-in modules are software programs developed
by Adobe Systems and other software developers
to add functionality to Photoshop Elements.
A number of importing, exporting, and specialeffects plug-ins come with your program; they
are in folders inside the Photoshop Elements
Plug-ins folder.
You can select an additional plug-ins folder to use
compatible plug-ins stored with another application. You can also create a shortcut (Windows)
or an alias (Mac OS) for a plug-in stored in
another folder on your system. You can then add
the shortcut or alias to the Plug-ins folder to use
that plug-in with Photoshop Elements. Once
installed, plug-in modules appear as options
added to the Import or Export menu, or as file
formats in the Open and Save As dialog boxes.
Photoshop Elements can accommodate a large
number of plug-ins. However, if the number of
installed plug-in modules becomes great enough,
Photoshop Elements may not be able to list all the
plug-ins in their appropriate menus. Newly
installed plug-ins will then appear in the Filter >
Other submenu.
• In Mac OS, drag a copy of the module to the
appropriate Plug-ins folder inside the
Photoshop Elements folder.
Note: Before copying or dragging the plug-in files
into the Plug-ins folder, make sure that the files are
uncompressed.
To install a third-party plug-in module:
Follow the installation instructions that came with
the plug-in module.
To select an additional plug-ins folder:
1 Choose Edit > Preferences > Plug-Ins & Scratch
Disks.
2 In the Preferences dialog, do one of the
following:
• In Windows, select Additional Plug-ins
Directory, click Choose, and select a folder from
the list. Click OK.
• In Mac OS, select Additional Plug-ins Folder,
select a folder from the list. Click Select or
Choose.
3 To display the contents of a folder, double-click
the directory (Windows) or click Open (Mac OS).
To install an Adobe Systems plug-in module:
Do one of the following:
• Use the plug-in installer, if provided.
• In Windows, copy the module into the appro-
priate Plug-ins folder in the Photoshop
Elements folder.
The path to the folder appears in the preferences
window.
Make sure that you do not select a location
inside the Plug-ins folder for Photoshop
Elements.
4 Restart Photoshop Elements to load the
plug-ins.
Page 44

CHAPTER 2
36
Setting Up Photoshop Elements
To prevent a plug-in or folder of plug-ins from
loading:
Add a tilde character (~) at the beginning of the
plug-in name, folder, or directory. That file (or all
files in the folder) is ignored by the application
when you restart it.
To view information about installed plug-ins:
Choose Help > About Plug-In and select a plug-in
from the submenu (Windows) or choose Apple
menu > About Plug-In and select a plug-in from
the submenu (Mac OS).
Setting memory preferences
The amount of memory (RAM) Photoshop
Elements needs is approximately three to five
times the file size of your open images. When the
amount of memory is insufficient, the application
uses any available hard-disk space. To improve the
application’s performance, you can increase the
amount of memory reserved for the application.
If you use other applications simultaneously
with Photoshop Elements, make sure you leave
enough memory for the other applications to use.
To set memory preferences in Windows:
1 Choose Edit > Preferences > Memory & Image
Cache.
• In the Memory Usage menu, drag the
Maximum Used By Photoshop Elements slider
to the right.
To set memory preferences in Mac OS:
In Mac OS, memory preferences are set outside of
Photoshop Elements. Refer to your Mac OS
documentation.
Assigning scratch disks
When your system does not have enough RAM
to perform an operation, Photoshop Elements
uses a proprietary virtual memory technology, also
called scratch disks. A scratch disk is any drive or
partition of a drive with free memory. By default,
Photoshop Elements uses the hard drive that the
operating system is installed on as its primary
scratch disk.
You can change the primary scratch disk or
designate a second, third, or fourth scratch disk, to
be used when the primary disk is full. Your
primary scratch disk should be your fastest hard
disk and have plenty of defragmented space
available.
The following guidelines can help you assign
scratch disks:
• You can use up to four scratch disks of any size
your file system supports. Photoshop lets you
create up to 200 GB of scratch disk space.
• For best performance, scratch disks should be
on a different drive than any large files you are
editing.
• Scratch disks should be on a different drive than
the one used for virtual memory.
• Scratch disks should be on a local drive. That is,
they should not be accessed over a network.
• Scratch disks should be conventional (non-
removable) media.
• Raid disks/disk arrays are good choices for
dedicated scratch disk volumes.
• Drives with scratch disks should be defrag-
mented regularly.
Page 45

ADOBE PHOTOSHOP ELEMENTS 2.0
User Guide
37
To change the scratch disk assignment:
1 Choose Edit > Preferences > Plug-Ins & Scratch
Disks.
2 Select the desired disks from the Scratch Disks
menu (you can assign up to four scratch disks).
3 Click OK.
4 Restart Photoshop Elements for the change to
take effect.
Important: The scratch disk file that is created by
Photoshop Elements must be in contiguous hard
drive space. For this reason you should frequently
defragment your hard drive. Adobe recommends
that you use a disk tool utility, such as Windows Disk
Defragmenter or Norton Speed Disk, to defragment
your hard drive on a regular basis. See your
Windows or Mac OS documentation for information on defragmentation utilities.
About Web access
So that you can use all of the Web-related features
in Photoshop Elements, including Online
Services, make sure that you’ve set up your
computer to send e-mail and browse the Web.
Refer to any documentation provided by your
preferred e-mail or Internet provider for setting
up Web access.
You can also adjust these settings in your operating
system. Refer to the operating system’s documentation if you need help with settings.
Page 46

Page 47

Chapter 3: Acquiring and Opening
Photos
39
ou can acquire digital images from a
variety of sources—you can create new
Y
graphics application, or capture them using a
digital camera. Often you will begin by scanning a
photograph, a slide, or an image.
images, import them from another
About this chapter
Before you begin working with your photos, it’s
helpful to understand a few things about digital
images. In this chapter, you’ll also learn about the
different ways of getting your photos into
Photoshop Elements.
About digital images
Computer graphics falls into two main
categories—bitmap and vector. Files can contain
both bitmap and vector data. Understanding the
difference between the two categories helps as you
create, edit, and import artwork.
Bitmap images—technically called raster images—
use a grid of colors known as pixels to represent
images. Each pixel is assigned a specific location
and color value. For example, a bicycle tire in a
bitmap image is made up of a mosaic of pixels in
that location. When working with bitmap images,
you edit pixels rather than objects or shapes.
Bitmap images are the most common electronic
medium for continuous-tone images, such as
photographs or digital paintings, because they can
represent subtle gradations of shades and color.
Bitmap images are resolution-dependent—that is,
they contain a fixed number of pixels. As a result,
they can lose detail and appear jagged if they are
scaled on-screen or if they are printed at a lower
resolution than they were created for.
300%
1600%
Bitmap images are good for reproducing subtle gradations
of color, as in photographs. They can have jagged edges
when printed at too large a size or displayed at too high a
magnification.
Ve ctor images are displayed according to
geometric characteristics and are resolutionindependent—that is, they can be scaled to any
size and printed at any resolution without losing
detail or clarity. Vector objects include shapes and
text in Photoshop Elements. (See “About vector
graphics” on page 191.)
Page 48

CHAPTER 3
40
Acquiring and Opening Photos
Getting photos from a scanner
Before you scan a photo, make sure that the
software necessary for your scanner has been
installed. Scanner drivers are provided and
supported by scanner manufacturers, not Adobe
Systems Incorporated. If you have problems with
scanning, make sure that you are using the latest
version of the appropriate scanner driver.
If you can’t import the scan using the TWAIN
interface, use the scanner manufacturer’s
software to scan your images, and save the images as
TIFF, PICT, or BMP files. Then open the files in
Photoshop Elements.
Importing scanned photos
You can directly import scanned photos from any
scanner that has an Adobe Photoshop Elementscompatible plug-in module. See your scanner
documentation for instructions on installing the
scanner plug-in. For general plug-in information,
see “Using plug-in modules” on page 35.
If your scanner does not have a compatible
plug-in, you can import scanned photos using
the TWAIN interface. (See “Importing photos using
a TWAIN device” on page 40.)
To import the scan using a plug-in module:
1 Do one of the following:
• Click the Connect to Camera or Scanner button
in the Welcome window, then choose the
scanner name from the Import pop-up menu in
the Select Import Source dialog box.
• Choose the scanner name from the File >
Import submenu.
Importing photos using a TWAIN device
TWAIN is a cross-platform interface for acquiring
images captured by certain scanners, digital
cameras, and frame grabbers. The manufacturer
of the TWAIN device must provide a Source
Manager and TWAIN Data Source for your device
to work with Photoshop Elements.
You must install the TWAIN device and its
software, and restart your computer before you
can use it to import images into Photoshop
Elements. See the documentation provided by
your device manufacturer for installation
information.
To import a photo using the TWAIN interface:
Do one of the following:
• Choose File > Import, and choose the device
you want to use from the submenu.
• Click the Connect to Camera or Scanner button
in the Welcome window, then choose the
scanner name from the Import pop-up menu in
the Select Import Source dialog box.
Importing photos using WIA (Windows Image Acquisition) Support
You can use WIA Support to import images from
certain scanners. When you use WIA Support,
Photoshop Elements works with Windows Me,
Windows XP or later, and your scanner software to
import images.
Note: WIA Support is only available if you are using
Windows Me or Windows XP, or later.
Page 49

ADOBE PHOTOSHOP ELEMENTS 2.0
User Guide
41
To import images from a scanner using WIA Support:
1 Choose File > Import > WIA Support.
2 Choose a destination on your computer to save
image files to.
3 Click Start.
4 Make sure Open Acquired Images in Photoshop
Elements is checked. If you have a large number of
images to import, or if you want to edit the images
at a later time, deselect it.
5 Make sure Unique Subfolder is selected so that
the imported images are put directly into a folder
named with the current date.
6 Select the scanner that you want to use.
Note: If the name of your scanner does not appear in
the submenu, verify that the software and drivers
were properly installed and that the scanner is
connected.
7 Choose the kind of image you want to scan:
• Color picture to use the default settings for
scanning color images.
• Grayscale picture to use the default settings for
scanning grayscale images.
• Black and White picture or Text to use the
default settings.
• Click Adjust the Quality of the Scanned Picture
to use custom settings.
8 Click Preview to view the scan. Crop the scan
if needed by pulling the rectangle so it surrounds
the image.
9 Click Scan.
10 The scanned image will be saved in the .bmp
file format.
Importing photos from a digital camera
Photoshop Elements works with digital camera
software to import images directly from a camera.
Make sure that the software and drivers that came
with your digital camera are properly installed
before you import images.
There are several ways digital cameras connect to
computers. Be sure to check the documentation
that came with your camera before you try to
import photos.
To import photos:
1 Follow the procedures in the digital camera
documentation to install any software that came
with your camera and to connect the digital
camera to your computer.
2 Do one of the following:
• Click the Connect to Camera or Scanner button
in the Welcome window, and then choose the
digital camera name from the Import pop-up
menu in the Select Import Source dialog box.
• Choose File > Import, and select your digital
camera from the submenu.
Note: If the camera name does not appear in the
submenu, verify that the software and drivers were
installed properly.
3 Once the digital camera software launches,
import the desired images as you would if you
were downloading them to your computer.
Page 50

CHAPTER 3
42
Acquiring and Opening Photos
4 Save the imported image as a Photoshop
Elements file.
Importing photos from digital cameras mounted to your computer
Certain digital cameras are connected, or
mounted, to your computer in such a way that
they are treated as additional storage devices. You
can browse the contents of your mounted digital
cameras as you would a CD-ROM drive or a hard
disk drive.
Note: Some cameras mounted to your computer
cannot be accessed via the Import command. In that
case, you can use the File > Open command and
then navigate to your camera to retrieve your photos.
Some mounted cameras require that you install
manufacturer’s software before you can connect
the camera to your computer, so check any
documentation that came with your camera.
To import photos from a mounted digital camera:
1 Connect your digital camera to your computer
as directed in the documentation accompanying
your camera.
2 Once your camera is detected by your
computer, launch Photoshop Elements.
3 Do one of the following:
• Click the Browse for File button in the Welcome
window, or choose Window > File Browser to
browse the contents of your digital camera and
open photos.
• Choose File > Open to navigate to a specific
photo.
4 Save your photos as .psd files on your computer
so you can edit them in Photoshop Elements. (See
“Saving images” on page 225.)
If you’re using Windows XP, you can set up
your computer so Photoshop Elements is
automatically launched as soon as photos are
detected after your digital camera is connected. See
the Windows XP documentation for more help.
Importing photos using WIA (Windows Image Acquisition) Support
You can use WIA Support to import images from
certain digital cameras. When you use WIA
Support, Photoshop Elements works with
Windows Me, Windows XP or later, and your
digital camera software to import images.
Note: WIA Support is only available if you are using
Windows Me, Windows XP or later.
To import images from a digital camera using
WIA support:
1 Choose File > Import > WIA Support.
2 Choose a destination on your computer for
saving your image files.
3 Make sure Open Acquired Images in Photoshop
Elements is checked. If you have a large number of
images to import, or if you want to edit the images
at a later time, deselect it.
4 Make sure Unique Subfolder is selected so that
the imported images are put directly into a folder
named with the current date.
5 Click Start.
Page 51

6 Select the digital camera from which you want
to import images.
Note: If the name of your camera does not appear in
the submenu, verify that the software and drivers
were properly installed and that the camera is
connected.
7 Choose the image or images you want to
import:
• Click the image from the list of thumbnails to
import the image.
• Hold down Shift and click on multiple images
to import them at the same time.
• Click Select All to import all available images.
8 Click Get Picture to import the image.
ADOBE PHOTOSHOP ELEMENTS 2.0
User Guide
43
Getting images from video
You can quickly and easily capture frames from
your digital videos using the Frame from Video
command. When you see a frame you’d like to
import as a still image, click the Grab Frame
button, or simply press the space bar.
Your video clips must be saved in video file
formats that Photoshop Elements can open in the
Frame for Video dialog box. Windows formats
include .avi, .mpg, and .mpeg, and Mac OS
formats include QuickTime and .mpeg.
Capturing a frame from video
To acquire still frames from a video:
1 Do one of the following:
• Choose File > Import > Frame from Video.
• Click the Connect to Camera or Scanner button
in the Welcome window, and then choose
Frame from Video from the Import pop-up
menu in the Select Import Source dialog box.
2 In the Frame from Video dialog box, click the
Browse button, navigate to the video from which
you want to acquire still frames, and then click
Open.
3 To start the video, click the Play button .
Page 52

CHAPTER 3
44
Acquiring and Opening Photos
4 To import a frame of the video as a still image,
click the Grab Frame button or press the space bar
when the frame is visible on the screen. You can
move forward and backward in the video to
capture additional frames.
Note: Some video formats don’t support rewinding
or fast-forwarding. In these cases, the Rewind and
Fast Forward buttons are grayed out.
5 When you have all the frames you want, click
the Done button.
6 Save the still files in Photoshop Elements.
Creating new images
The New command lets you create a blank
image.
To create a new image:
1 Do one of the following:
• Click New on the Welcome window that
appears when you start Photoshop Elements.
• To base the image dimensions and resolution on
copied art pasted on the Clipboard, choose
File > New. If the Clipboard does not contain
image data, the image dimensions and
resolution are based on the last image you
created.
• To create an image from data on the Clipboard,
select File > Create from Clipboard.
2 If desired, enter a name for the image, and set
the width and height.
To match the width and height of the new
image to that of any open image, choose a
filename from the Window > Images menu.
3 Set the resolution and mode. (See “About image
modes” on page 54.)
4 Select an option for the contents of the
bottommost layer of the image:
• White to create a white background.
• Background Color to fill the background with
the current background color. (See “Selecting
foreground and background colors” on
page 127.)
• Tr ansparent to make the background layer
transparent, with no color values. The resulting
document will not have a background layer.
(See “About the Background layer” on page 92.)
5 Click OK.
Using the File Browser
File Browser lets you view, sort, and process image
files. You can use the File Browser to perform tasks
such as creating new folders; renaming, moving,
and deleting files; and rotating images. You can
also view individual file information and data
imported from your digital camera.
Page 53

ADOBE PHOTOSHOP ELEMENTS 2.0
User Guide
45
A
B D EC
File Browser screen
A. File Browser menu B. File information pop-up menu
C. File information D. Sort By pop-up menu
E. View By pop-up menu
To display the File Browser:
Do one of the following:
• Click the Browse for File button in the Welcome
window.
• Choose File > Browse.
• Choose Window > File Browser.
To display the File Browser menu:
Click the More button .
Opening files from File Browser
File Browser helps you quickly locate image files
and open them in the work area. You can also
rotate images and view file information in the
File Browser.
To open a file:
Select the file or files you want to open, and do one
of the following:
• Double-click the file.
• Drag the selected file or files into the work area.
• Choose Open from the File Browser menu.
• Press Enter (Windows) or Return (Mac OS).
To rotate an image in the File Browser:
Select one or more files, and do one of the
following:
• Choose a rotation option from the File Browser
menu.
• Click the Rotate button to rotate the images
clockwise by 90 degrees.
• Alt-click (Windows) or Option-click (Mac OS)
the Rotate button to rotate the images
counterclockwise by 90 degrees.
Note: Using the File Browser, you can’t Rotate or
Batch Rename files stored on your computer desktop.
To display file information:
Click the File Information pop-up menu at the
bottom of the File Browser, and select one of the
following:
• All to view all image information for a file.
Page 54

CHAPTER 3
46
Acquiring and Opening Photos
• EXIF to view image information imported from
your digital camera. (See “Viewing file information” on page 23).
Working with files and folders
Using File Browser, you can manage your folders
and files. You can select files and folders, sort them
by different criteria, and move, copy, and delete
files. You can rename one file, or rename all of the
files in a folder using the Batch Rename command.
To select or deselect files:
Do any of the following:
• On the right side of the palette, click a
thumbnail to select a file.
• Shift-click to select multiple files.
• Control-click (Windows) or Command-click
(Mac OS) to select non-contiguous images.
To select all files in the current folder:
Choose Select All from the palette menu. To
deselect all files, choose Deselect All from the
palette menu.
To sort files:
Click the Sort By pop-up menu at the bottom of
the File Browser, and choose a sorting option.
To copy files:
Alt-drag (Windows) or Option-drag (Mac OS)
files to a different folder.
To delete files:
1 Select the file or files you want to delete.
2 Do one of the following:
• Click the Trash button.
• Drag the files to the Trash button .
• Press the Delete key.
• Choose Delete from the File Browser menu.
To create new folders:
1 Choose New Folder from the File Browser
menu.
2 Ty pe a name, and press Enter (Windows) or
Return (Mac OS).
To rename files or folders:
1 On the right side of the palette, click a filename
or folder name, or select a file or folder and choose
Rename from the palette menu.
2 Ty pe a new name, and press Enter (Windows)
or Return (Mac OS).
Note: To move to the next filename, press Tab.
To move to the previous filename, press Shift+Tab.
To rename all the files in a folder:
1 Make sure that no files are selected.
2 To rename a subset of files in a folder, select the
files you want to rename.
3 Choose Batch Rename from the File Browser
menu, and set the following options:
• For Destination Folder, select where you want to
place the renamed files: in the same folder or in
a different folder. If you select Move to New
Folder, click Browse (Windows) or Choose
(Mac OS) to select a different folder.
Page 55

ADOBE PHOTOSHOP ELEMENTS 2.0
User Guide
47
• For File Naming, choose elements from the
pop-up menus or enter text into the fields. The
specified elements and text will be combined to
create the new filename.
• For Compatibility, select the operating systems
with which you want renamed files to be
compatible. The current operating system is
selected by default, and you cannot deselect it.
To change the display of files:
Do one of the following:
• Choose a thumbnail display option from the
File Browser menu.
• Click the View By pop-up menu at the bottom
of the File Browser and choose a display option.
To refresh the view:
Choose Refresh Desktop View from the File
Browser menu. Closing and reopening the File
Browser also refreshes the view.
When you rename a file, the order of files in the
File Browser is not automatically updated, so
you can refresh the view to see the changes you made.
To display files in Windows Explorer or Mac OS Finder:
Choose Reveal Location in Explorer (Windows) or
Reveal Location in Finder (Mac OS) from the File
Browser menu.
Working with the cache
The cache stores thumbnail and file information
to make loading times quicker when you return to
a previously viewed folder. Purging the cache frees
up disk space on your computer.
To purge the cache:
Choose Purge Cache from the File Browser menu.
Opening images
You can open and import images in various file
formats. The available formats appear in the Open
dialog box, the Open As dialog box (Windows),
or the Import submenu.
Note: Photoshop Elements uses plug-in modules to
open and import many file formats. If a file format
does not appear in the Open dialog box or in the
File > Import submenu, you may need to install
the format’s plug-in module. (See “Using plug-in
modules” on page 35.)
Opening files
The Open dialog box provides controls for
locating and previewing files. You can also quickly
access frequently used files with the Open Recent
command.
There may be instances when Photoshop Elements
cannot determine the correct format for a file.
For example, transferring a file between Mac OS
and Windows can cause the format to be
mislabeled. In such cases, you must specify the
correct format in which to open the file.
To open a file:
1 Choose File > Open .
2 Navigate to the file you want to open. If the file
does not appear, select the option for showing all
files from the Files of Type (Windows) or Show
(Mac OS) pop-up menu.
Page 56

CHAPTER 3
48
Acquiring and Opening Photos
3 (Mac OS) Click Show Preview to preview the
selected file. This option requires the Apple
QuickTime extension.
Note: Previews display faster if they are saved with
the file. Select Always Save for Image Previews in the
Saving Files preferences to always save a preview;
select Ask When Saving to save previews on a fileper-file basis.
4 Click Open. In some cases, a dialog box appears,
letting you set format-specific options.
(See “Opening and importing PDF files” on
page 48 and “Opening PostScript artwork” on
page 49.)
To open a recently used file:
Choose File > Open Recent, and select a file from
the submenu.
To specify the number of files that are available in
the Open Recent submenu, choose Edit > Preferences > Saving Files, and enter a number in the
Recent File List Contains text box.
Important: If the file does not open, then the chosen
format may not match the file’s true format, or the
file may be damaged.
Opening and importing PDF files
Portable Document Format (PDF) is a versatile file
format that can represent both vector and bitmap
data and can contain electronic document search
and navigation features. PDF is the primary
format for Adobe Acrobat.
Photoshop Elements recognizes two types of PDF
files: Photoshop PDF files and Generic PDF files.
You can open both types of PDF files; however,
you can only save images to Photoshop PDF
format.
Photoshop PDF files Created using the Photoshop
Elements Save As command, Photoshop PDF files
can contain only a single image.
Photoshop PDF format supports all of the color
modes and features that are supported in standard
Photoshop format.
To specify the file format in which to open a file:
Do one of the following:
• (Windows) Choose File > Open As, and
select the file you want to open. Then choose the
desired format from the Open As pop-up menu,
and click Open.
• (Mac OS) Choose File > Open, and choose
All Documents from the Show pop-up menu.
Then select the file you want to open, choose the
desired file format from the Format pop-up
menu, and click Open.
Generic PDF files Created using applications
other than Photoshop Elements, such as Adobe
®
Acrobat and Adobe Illustrator
, Generic PDF files
can contain multiple pages and images. When you
open a Generic PDF file, Photoshop Elements
rasterizes the image.
You can also bring PDF data into Photoshop
Elements using the Place command, the Paste
command, and the drag-and-drop feature.
(See “Placing files” on page 52, “Using drag-anddrop to copy between applications” on page 124,
and “Using the Clipboard to copy between applications” on page 124.)
Page 57

ADOBE PHOTOSHOP ELEMENTS 2.0
User Guide
49
To open a PDF file:
1 Choose File > Open.
2 Select the name of the file, and click Open.
You can change which types of files are shown by
selecting an option from the Files of Type
(Windows) or Show (Mac OS) pop-up menu.
3 If you are opening a Generic PDF file, do the
following:
• If the file contains multiple pages, select the
page you want to open, and click OK.
• Indicate the desired dimensions, resolution,
and mode. If the file has an embedded ICC
profile, you can choose the profile from the
mode pop-up menu.
• Select Constrain Proportions to maintain the
same height-to-width ratio.
• Select Anti-aliased to minimize the jagged
appearance of the artwork’s edges as it is
rasterized.
• Click OK.
To import images from a PDF file:
1 Choose File > Import > PDF Image, select
the file from which you want to import images,
and click Open.
2 Select the image you want to open:
• To open a specific image, select it and click OK.
You can use the arrows to scroll through the
images, or click Go to Image to enter an image
number.
• To open each image as a separate file, click
Import All Images.
Press Esc to cancel the import operation before
all images are imported.
To create a new Photoshop file for each page of a
multiple-page PDF file:
1 Choose File > Automation Tools > Multi-Page
PDF to PSD.
2 Under Source PDF, click the Choose button,
and select the file from which you want to import
images.
3 Under Page Range, specify a range of pages to
import.
4 Under Output Options, specify a resolution,
choose a color mode, and set the Anti-alias
option for rasterizing each page of the PDF file.
(To blend edge pixels during rasterization, select
the Antialias option. To produce a hard-edged
transition between edge pixels during rasterization, deselect the Anti-alias option.)
5 Under Destination, enter a base name for the
generated files. (When Photoshop creates the new
files, the base name is appended with a number
that corresponds to the page number of the
PDF file.) Then click the Choose button, and
select the location where you want to save the
generated files.
Opening PostScript artwork
Encapsulated PostScript® (EPS) can represent both
vector and bitmap data and is supported by
virtually all graphics, illustration, and page-layout
programs. Adobe applications that produce
PostScript artwork include Adobe Illustrator.
When you open an EPS file containing vector art,
Page 58

CHAPTER 3
50
Acquiring and Opening Photos
it is rasterized—the mathematically defined lines
and curves of the vector artwork are converted
into the pixels or bits of a bitmap image.
You can also bring PostScript artwork into
Photoshop Elements using the Place command,
the Paste command, and the drag-and-drop
feature. (See “Placing files” on page 52, “Using
drag-and-drop to copy between applications” on
page 124, and “Using the Clipboard to copy
between applications” on page 124.)
To open an EPS file:
1 Choose File > Open.
2 Select the file you want to open, and click Open.
3 Indicate the desired dimensions, resolution,
and mode. To maintain the same height-to-width
ratio, select Constrain Proportions.
4 Select Anti-aliased to minimize the jagged
appearance of the artwork’s edges as it is opened.
Anti-aliasing lets you produce smooth-edged
objects by partially filling the edge pixels, so
the edges of the objects blend into the background.
5 Click OK.
2 Select the PCD file you want to open, and click
Open. If the file does not appear, select the option
for showing all files from the Files of Type
(Windows) or Show (Mac OS) menu.
3 Select options for the source image:
• Pixel Size to specify the pixel dimensions of the
image. Keep in mind that the on-screen size of
the opened image depends on both the pixel size
and resolution you choose. (See “About image
size and resolution” on page 75.)
• Profile to specify a device profile for color
management. (See “Setting up color
management” on page 31.)
4 Select options for the destination image:
• Resolution to specify the resolution of the
opened image.
• Color Space to specify a color profile for the
opened image. (See “Setting up color
management” on page 31.)
• Landscape or Portrait to specify the orientation
of the opened image.
5 Click OK.
Opening Photo CD files
You can open Kodak® Photo CD™ (PCD) files,
including high-resolution files from Pro
Photo CDs.
Note: Yo u cannot save files in PCD format in
Photoshop Elements.
To open a Photo CD file:
1 Choose File > Open.
Opening Raw files
The Raw format is designed to accommodate
images saved in undocumented formats, such
as those created by scientific applications.
Compressed files, such as PICT and GIF, cannot
be opened using this format.
To open a file using the Raw format:
1 Choose File > Open or File > Open As
(Windows).
Page 59

ADOBE PHOTOSHOP ELEMENTS 2.0
User Guide
51
2 Choose Raw from the file format list, and
click Open.
3 For Width and Height, enter values for the
dimensions of the file.
4 To reverse the order of the width and height,
click Swap.
5 Enter the number of channels.
6 Select Interleaved if the file was saved with an
interlaced data option.
7 Select a color depth and, if necessary, a byte
order.
8 For Header, enter a value.
9 If you are missing the dimensions or header
value, you can have Photoshop Elements estimate
the parameters. Either enter the correct height and
width values to estimate the header size, or enter
the correct header size to estimate the height and
width, and then click Guess.
10 To have Photoshop Elements retain the header
when you save the file, select Retain When Saving.
11 Click OK.
Importing anti-aliased PICT files (Mac OS)
Choose File > Import > Anti-aliased PICT to
import object-oriented PICT files (such as those
created with MacDraw and Canvas) as smoothedged, or anti-aliased, images. Because the entire
PICT file must be held in memory for this module
to operate, you may not be able to use the module
with large PICT files.
The Anti-aliased PICT dialog box indicates the
current file size and dimensions. To change the
image dimensions, enter new values for Width and
Height. The file size is then updated. To maintain
image proportions, select Constrain Proportions.
You can choose Grayscale or RGB color mode for
an anti-aliased PICT file.
Importing PICT resources (Mac OS)
The PICT Resource module lets you read PICT
resources from a file—for example, from another
application. To open a PICT resource, choose
File > Import > PICT Resource.
To preview a resource, click Preview. Click the
arrow buttons to step forward and backward
through the resources. Note that the number
displayed for Resource refers to the resource’s
position in ascending order in the resource fork
and not to the resource’s identification number.
Note: In Photoshop Elements, you can also open a
file in the PICT Resource file format by choosing
File > Open, choosing All Documents from the Show
pop-up menu, selecting the file you want to open,
choosing PICT Resource from the Format pop-up
menu, and clicking Open. However, the Open
command automatically opens the first resource in
the file and does not display any other PICT
resources in the file.
Page 60

CHAPTER 3
52
Acquiring and Opening Photos
Opening images in EPS TIFF or EPS PICT Preview format
These formats let you open images saved in file
formats that create previews but are not supported
by Adobe Photoshop Elements (such as QuarkX-
®
). An opened preview image can be edited
Press
and used like any other low-resolution file. EPS
PICT Preview is available only in Mac OS.
Using the File Association Manager (Windows only)
The File Association Manager lets you decide
which file types are opened in Photoshop
Elements. Choosing to open digital images in
Photoshop Elements can help you streamline your
workflow.
To select file types:
1 Choose Edit > File Association.
2 Do one of the following to select the file types
you want to open in Photoshop Elements:
• Click the box next to the file type names to add
a file type. Selected file types have a check next
to them.
• Click the Default button to have the suggested
file types checked.
• Click the Select All button to have all available
file types open in Photoshop Elements.
• Click Deselect All if you don’t want any of the
listed file formats to open in Photoshop
Elements. This means that you would have to
use the Open command to open an image file
from your computer.
3 Click the OK button when you’re done.
Placing files
You can use the File > Place command to
place artwork into a new layer in an image.
In Photoshop Elements, you can place PDF,
Adobe Illustrator, and EPS files.
When you place a PDF, Adobe Illustrator, or EPS
file, it is rasterized; you cannot edit text or vector
data in placed artwork. Keep in mind that artwork
is rasterized at the resolution of the file into which
it is placed.
To place a PDF, Adobe Illustrator, or EPS file:
1 Open the Photoshop Elements image into
which you want to place the artwork.
2 Choose File > Place, select the file you want to
place, and click Place.
3 If you are placing a PDF file that contains
multiple pages, select the page you want to place
from the provided dialog box, and click OK.
The placed artwork appears inside a bounding box
at the center of the Photoshop Elements image.
The artwork maintains its original aspect ratio;
however, if the artwork is larger than the
Photoshop Elements image, it is resized to fit.
4 If desired, reposition the placed artwork by
doing one or more of the following:
• Position the pointer inside the bounding box of
the placed artwork, and drag.
Page 61

ADOBE PHOTOSHOP ELEMENTS 2.0
User Guide
53
• In the options bar, enter a value for X to specify
the distance between the center point of the
placed artwork and the left edge of the image.
Enter a value for Y to specify the distance
between the center point of the placed artwork
and the top edge of the image.
5 If desired, scale the placed artwork by doing one
or more of the following:
• Drag one of the handles at the corners or
sides of the bounding box. Hold down Shift as
you drag a corner handle to constrain the
proportions.
• In the options bar, enter values for W and H to
specify the width and height of the artwork.
By default, these options represent scale as a
percentage; however, you can enter another unit
of measurement (in, cm, or px). To constrain
the proportions of the artwork, click the
Constrain Proportions icon ; the option is on
when the icon has a white background.
6 If desired, rotate the placed artwork by doing
one or more of the following:
• Position the pointer outside the bounding box
of the placed artwork (the pointer turns into a
curved arrow), and drag.
• In the options bar, enter a value (in degrees) for
the Rotation option .
7 If desired, skew the placed artwork by holding
down Ctrl (Windows) or Command (Mac OS)
and dragging a side handle of the bounding box.
8 Set the Anti-alias option in the options bar as
desired. To blend edge pixels during rasterization,
select the Anti-alias option. To produce a hardedged transition between edge pixels during
rasterization, deselect the Anti-alias option.
9 To commit the placed artwork to a new layer,
do one of the following:
• Click the OK button in the options bar.
• Press Enter or Return.
To cancel the placement, click the Cancel
button in the options bar, or press Esc.
Closing files and quitting
To close a file:
1 Do one of the following:
• Choose File > Close.
• Choose Window > Close All (Windows).
• Choose File > Close All (Mac OS).
2 Choose whether or not to save the file:
• Click Yes (Windows) or Save (Mac OS) to save
the file.
• Click No (Windows) or Don’t Save (Mac OS) to
close the file without saving it.
To exit Photoshop Elements:
1 Choose File > Exit (Windows) or File >
Quit (Mac OS).
2 Choose whether or not to save any open files:
• Click Yes (Windows) or Save (Mac OS) for each
open file to save the file.
Page 62

CHAPTER 3
54
Acquiring and Opening Photos
• Click No (Windows) or Don’t Save (Mac OS)
for each open file to close the file without
saving it.
Choosing an image mode
Photoshop Elements provides several image
modes for displaying and printing images. The
image mode you choose determines the number of
colors that can be displayed in an image and can
also affect the file size of the image.
About image modes
Photoshop Elements provides four image modes:
RGB, Bitmap, Grayscale, and Indexed color.
RGB mode RGB is the default mode for new
Photoshop images. It uses the RGB image model
to assign an intensity value to each pixel ranging
from 0 (black) to 255 (white) for each of the RGB
components in a color image. For example,
a bright red color might have an R value of 246,
a G value of 20, and a B value of 50. When the
values of all three components are equal, the result
is a shade of neutral gray. When the value of all
components is 255, the result is pure white;
when the value is 0, pure black.
RGB images use three colors, or channels, to
reproduce up to 16.7 million colors on-screen. In
addition to being the default mode for new
Photoshop images, the RGB model is used by
computer monitors to display colors.
Bitmap mode This mode uses one of two color
values (black or white) to represent the pixels in
an image. Images in Bitmap mode are called
bitmapped 1-bit images because they have a bit
depth of 1.
Grayscale mode This mode uses up to 256 shades
of gray. Every pixel of a grayscale image has a
brightness value ranging from 0 (black) to 255
(white). Grayscale values can also be measured as
percentages of black ink coverage (0% is equal to
white, 100% to black). Images produced using
black-and-white or grayscale scanners typically are
displayed in Grayscale mode.
Indexed Color mode This mode uses at most
256 colors. When converting to indexed color,
Photoshop Elements builds a color lookup table
(CLUT), which stores and indexes the colors in the
image. If a color in the original image does not
appear in the table, the program chooses the
closest one or simulates the color using available
colors.
By limiting the palette of colors, indexed color can
reduce file size while maintaining visual quality—
for example, for a Web page. Limited editing is
available in this mode. For extensive editing you
should convert temporarily to RGB mode.
For more information, see “Converting to
indexed color” in online Help.
Converting between color modes
When you choose a different color mode for an
image, you permanently change the color values in
the image.
Page 63

ADOBE PHOTOSHOP ELEMENTS 2.0
User Guide
55
Consequently, before converting images, it’s best
to do the following:
• Edit as much as possible in RGB mode.
• Save a backup copy before converting. Be sure to
save a copy of your image that includes all layers
in order to edit the original version of the image
after the conversion.
• Flatten the file before converting it. The inter-
action of colors between layer blending modes
will change when the mode changes.
To convert an image to another mode:
Choose Image > Mode, and choose the mode you
want from the submenu. Modes not available for
the active image appear dimmed in the menu.
Note: Images are flattened when you convert them to
Bitmap or Indexed Color mode, because these modes
do not support layers.
For more information, see “Converting
between Grayscale and Bitmap modes” in
online Help.
Page 64

Page 65

Chapter 4: Fixing Your Photos
Y
57
ou can fix photos in Adobe Photoshop
Elements by using the retouching, editing,
and color adjusting features. You can
correct an entire image, or portions of an image.
About fixing your photos
You may need to correct the color and tone of an
image for several reasons. The original photograph may have a color cast caused by the film,
lighting, or aging. Or the scan may have been
imperfect—scanners can introduce color casts or
artifacts. Or the colors in your original art may be
out of printable range.
You can quickly fix simple image problems by
using automated or simple correction features in
Photoshop Elements. For example, you can easily
fix underexposed photos or subtle color casts with
an auto correction command or with a few simple
visual adjustments. For more information, see
“Quickly fixing your photos” on page 58 and
“Using the Color Variations command” on
page 66.
If you need more precise controls for adjusting a
photo’s color, highlights, and shadows, you can use
more advanced features, including the Levels
command. For more information, see “Adjusting
the range of dark and light tones in an image” on
page 62.
For more information, see “Checking scan
quality and tonal range” in online Help.
To remove blemishes, such as dust and scratches,
you can use filters to quickly repair the damaged
areas. If the blemished areas are more complex,
you can use the clone stamp tool to manually
repair the photo. To fix other common issues,
including red-eye, color-saturation, and exposure
problems, you can use other retouching tools. For
more information, see “Retouching an image” on
page 70.
Workflow for fixing photos
To correct the color balance and tonal range of an
image, complete the following steps:
Calibrate your monitor Use Adobe Gamma to
calibrate your monitor or the display calibrator
(Mac OSX only). A calibrated monitor ensures
consistent color from other devices such as
printers. (See “Calibrating your monitor” on
page 32.)
View the image at 100% Before making any color
corrections, view the image at a zoom percentage
of 100%. At that percentage, Photoshop Elements
displays color most accurately.
Check the scan quality and tonal range Look at
the image’s histogram to evaluate whether the
image has sufficient detail to produce high-quality
output. The greater the range of values in the
histogram, the greater the detail. Poor scans and
photographs without much detail can be difficult
if not impossible to correct. Too many color
corrections can also result in a loss of pixel values
and too little detail.
Page 66

CHAPTER 4
58
Fixing Your Photos
For more information, see “Checking scan
quality and tonal range” in online Help.
Adjust the tonal range Begin tonal corrections by
adjusting the values of the extreme highlight and
shadow pixels in the image, setting an overall tonal
range that allows for the sharpest detail possible
throughout the image. This process is known as
setting the highlights and shadows or setting the
white and black points. (See “Adjusting the range of
dark and light tones in an image” on page 62.)
Setting the highlights and shadows typically redistributes the midtone pixels appropriately. When
pixel values are concentrated at either end of the
tonal range, however, you may need to adjust your
midtones manually.
Adjust the color balance After correcting the
tonal range, you can adjust the image’s color
balance to remove unwanted color casts or to
correct oversaturated or undersaturated colors.
(To manually fix a color cast, see “Using the Color
Cast command” on page 67; or you can try the
Auto Color Correction command: See “Using the
Auto Color Correction command” on page 59.)
Make other special color adjustments Once you
have corrected the overall color balance of your
image, you can make optional adjustments to
enhance colors. For example, you can increase the
vividness of color in your image by increasing its
saturation. (See “Adjusting color” on page 65.)
Sharpen the edges of the image As a final step,
use the Unsharp Mask filter to sharpen the clarity
of edges in the image. This step helps restore detail
and sharpness that tonal adjustments may reduce.
(See “Sharpen filters” on page 179.)
For information on viewing the range of
shadows, midtones, and highlights in an
image, see “Checking scan quality and tonal range”
in online Help.
Quickly fixing your photos
Some image problems are simple enough that they
can be quickly fixed using the automated or simple
correction features in Photoshop Elements.
Using the Auto Levels command
To enhance the contrast of an image that has an
average distribution of color values, use the Auto
Levels command. Auto Levels defines the lightest
and darkest pixels in an image, and then redistributes intermediate pixel values proportionately.
Note: Because Auto Levels adjusts each color channel
(red, green, and blue) individually, it may remove or
introduce color casts. If Auto Levels introduces an
undesirable color cast, undo the command, and then
try the Auto Contrast command instead. See “Using
the Auto Contrast command” on page 59.
To use the Auto Levels command:
1 Do one of the following:
• To make adjustments to your entire image,
choose Select > Deselect to make sure nothing is
selected. If your image has multiple layers, select
a layer to adjust in the Layers palette.
• To make adjustments to a portion of your
image, make a selection in the document
window. See “Selecting pixels” on page 114.
Page 67

ADOBE PHOTOSHOP ELEMENTS 2.0
User Guide
59
2 Do one of the following:
• Choose Enhance > Auto Levels.
• Choose Enhance > Adjust Brightness/
Contrast > Levels. In the Levels dialog box,
click Auto, and then click OK.
Using the Auto Contrast command
The Auto Contrast command adjusts the overall
contrast and mixture of colors in an image
automatically. Because it does not adjust each
color channel (red, green, and blue) individually,
Auto Contrast does not introduce or remove color
casts. It maps the lightest and darkest pixels in the
image to white and black, which makes highlights
appear lighter and shadows appear darker.
Auto Contrast can improve the appearance of
many photographic or continuous-tone images.
It does not improve flat-color images.
To use the Auto Contrast command:
1 Do one of the following:
• To make adjustments to your entire image,
choose Select > Deselect to make sure nothing is
selected. If your image has multiple layers, select
a layer to adjust in the Layers palette.
• To make adjustments to a portion of your
image, make a selection in the document
window. See “Selecting pixels” on page 114.
2 Choose Enhance > Auto Contrast.
Using the Auto Color Correction command
The Auto Color Correction command adjusts the
contrast and color by identifying shadows,
midtones, and highlights in the image as a whole,
rather than in individual color channels. It
neutralizes the midtones and clips the white and
black pixels using a default set of values.
To apply Auto Color Correction command:
1 Do one of the following:
• To make adjustments to your entire image,
choose Select > Deselect to make sure nothing is
selected. If your image has multiple layers, select
a layer to adjust in the Layers palette.
• To make adjustments to a portion of your
image, make a selection in the document
window. See “Selecting pixels” on page 114.
2 Choose Enhance > Auto Color Correction.
Using the Adjust Backlighting command
When taking photos with a camera, you can use
backlighting to emphasize the shape of the subject.
However, backlighting can cause overexposure in
the areas surrounding the subject. You can use the
Adjust Backlighting command to correct this
problem by darkening the overexposed areas.
The Adjust Backlighting command is especially
useful for correcting overexposed skies, and other
backgrounds.
Page 68

CHAPTER 4
60
Fixing Your Photos
Original image, and Backlighting applied
To use the Adjust Backlighting command:
1 Do one of the following:
• To make adjustments to your entire image,
choose Select > Deselect to make sure nothing is
selected. If your image has multiple layers, select
a layer to adjust in the Layers palette.
• To make adjustments to a portion of your
image, make a selection in the document
window. See “Selecting pixels” on page 114.
2 Choose Enhance > Adjust Lighting > Adjust
Backlighting.
3 Drag the Darker slider or enter a value in the
text box to adjust the tonal variation in the image.
Va lues can range from 0 to 100.
4 Click OK.
Using the Fill Flash command
In pictures taken in bright light, shadows are often
so dark that they show little detail. You can lighten
such shadows using the Fill Flash command.
Original image, and Fill Flash applied
To use the Fill Flash command:
1 Do one of the following:
• To make adjustments to your entire image,
choose Select > Deselect to make sure nothing is
selected. If your image has multiple layers, select
a layer to adjust in the Layers palette.
• To make adjustments to a portion of your
image, make a selection in the document
window. See “Selecting pixels” on page 114.
2 Choose Enhance > Adjust Lighting > Fill Flash.
3 Drag the Lighter slider or enter a value in the
text box to adjust the tonal variation in the image.
Va lues can range from 0 to 100.
4 Click OK.
Using the Quick Fix dialog box
The Quick Fix command lets you adjust the
brightness, color, sharpness, and even the rotation
of your image in a single dialog box. You compare
your original image without changes next to a
preview of the same image with the adjustments
you select.
Page 69

Quick Fix dialog box
ADOBE PHOTOSHOP ELEMENTS 2.0
User Guide
61
To use the Quick Fix command:
1 Do one of the following:
• To make adjustments to your entire image,
choose Select > Deselect to make sure nothing is
selected. If your image has multiple layers, select
a layer to adjust in the Layers palette.
• To make adjustments to a portion of your
image, make a selection in the document
window. See “Selecting pixels” on page 114.
2 To open the Quick Fix dialog box, you can
either click the Quick Fix button in the
Shortcuts bar or choose Enhance > Quick Fix.
3 Select an Adjustment Category in the first step
of the Quick Fix dialog box:
• Brightness lets you adjust your photo’s contrast,
tonal range, and brightness, and quickly fix
overexposed or underexposed areas.
• Color Correction lets you adjust the saturation
and color (hue) in your photo, and automatically correct a color cast.
• Focus lets you sharpen or blur your photo.
• Rotate lets you flip your image horizontally and
vertically, or rotate your image at 90° or 180°
angles. (To straighten an image or for more
rotation options, see “Rotating and straightening images” on page 81.)
Page 70

CHAPTER 4
62
Fixing Your Photos
4 Select an adjustment type in the second step of
the Quick Fix dialog box. The text in the Tip
section provides helpful information and instructions about using the selected adjustment.
5 Some adjustments give you options to set, and
others have default options you can apply
automatically. Depending on the adjustment you
selected, one of the following options will be
available to you in the third step of the Quick Fix
dialog box:
• If there are options to set, drag the slider to the
left to decrease the value, or drag it to the right
to increase it.
• Click Apply to apply the default adjustment
values to the preview image.
6 To undo or redo adjustments made in the Quick
Fix dialog box, you can do any of the following:
• Click Reset Image to start over and undo all
adjustments you’ve set in the current Quick Fix
dialog box.
• Click Undo for each successive adjustment
you’d like to undo. Note that you can click Undo
to undo the Reset Image command.
• Click Redo for each adjustment you’d like to
redo that was undone.
7 To apply the adjustments to your image,
click OK.
Adjusting the range of dark and light tones in an image
You can adjust the tonal relationships between
pixels in an image using a variety of commands
with different levels of control in Photoshop
Elements. Of all the features for adjusting tonal
values, the Levels dialog box gives you the most
precision.
Using the Levels dialog box
The Levels dialog box lets you correct the tonal
range and color balance of an image by adjusting
intensity levels of the image’s shadows, midtones,
and highlights. The Levels histogram serves as a
visual guide for adjusting the image’s key tones.
Note that dragging the gray slider in Levels has no
effect on the black and white points of the image.
You can set the highlights and shadows in an image
by moving Input sliders to the first group of pixels
on both ends of the Levels histogram. This maps
these pixels—the darkest and lightest pixels in
each channel—to black and white, increasing the
tonal range of the image. The corresponding pixels
in the other channels are adjusted proportionately
to avoid altering the color balance. You can use the
middle Input slider to change the intensity values
of the middle range of gray tones without dramatically altering the highlights and shadows.
To adjust tonal range using Levels:
1 Do one of the following:
• To make adjustments to your entire image,
choose Select > Deselect to make sure nothing is
selected. If your image has multiple layers, select
a layer to adjust in the Layers palette.
• To make adjustments to a portion of your
image, make a selection in the document
window. See “Selecting pixels” on page 114.
2 Do one of the following:
• Choose Enhance > Adjust Brightness/
Contrast > Levels.
Page 71

ADOBE PHOTOSHOP ELEMENTS 2.0
User Guide
63
• Create a new Levels adjustment layer, or open
an existing Levels adjustment layer. (See “Using
adjustment and fill layers” on page 101.)
3 To adjust the values for the composite channels
(RGB) or for a specific color channel (red, green,
or blue), choose an option from the Channel
menu.
4 To adjust the shadows or highlights, do any of
the following:
• Drag the black and white Input Levels sliders
(directly underneath the histogram) to the edge
of the first group of pixels on either end of the
histogram. You can also enter values directly
into the first and third Input Levels text boxes.
• Drag the black and white Output Levels sliders
(at the bottom of the dialog box) to adjust the
shadow and highlight range. You can also enter
values directly into the Output Levels text boxes.
Note: Yo u can click Auto to move the highlight and
shadow sliders automatically to the brightest and
darkest points. This is the same as using the Auto
Levels command and may be adequate for an
average-key image. (See “Using the Auto Levels
command” on page 58.)
5 If your image needs midtone corrections, use
the gray Input Levels slider. Drag the slider to the
right to darken the midtones; drag it to the left to
lighten the midtones. You can also enter values
directly in the middle Input Levels text box. (A
value of 1.0 represents the current unadjusted
midtone value.)
6 Click OK.
7 To view the adjusted histogram, reopen the
Levels dialog box.
Gaps in the adjusted histogram do not indicate a
problem unless they are large.
To use the eyedropper tool to set target
colors for the lightest, darkest, and neutral
gray areas in the image, see “Using the
Brightness/Contrast command” in online Help.
A
B
Adjusting the white Input Levels slider
A. Original B. Resulting histogram and image
Using the Brightness/Contrast command
The Brightness/Contrast command lets you make
simple adjustments to the tonal range of an image.
To use the Brightness/Contrast command:
1 Do one of the following:
• To make adjustments to your entire image,
choose Select > Deselect to make sure nothing is
selected. If your image has multiple layers, select
a layer to adjust in the Layers palette.
Page 72

CHAPTER 4
64
Fixing Your Photos
• To make adjustments to a portion of your
image, make a selection in the document
window. (See “Selecting pixels” on page 114.)
2 Do one of the following:
• Choose Enhance > Adjust Brightness/
Contrast > Brightness/Contrast.
• Create a new Brightness/Contrast adjustment
layer, or open an existing Brightness/Contrast
adjustment layer. (See “Using adjustment and
fill layers” on page 101.)
3 Drag the sliders to adjust the brightness and
contrast.
Dragging to the left decreases the level; dragging to
the right increases it. The number at the right of
each slider value displays the brightness or
contrast value. Values range from –100 to +100.
4 Click OK.
Describing color
The human eye perceives color in terms of three
characteristics—hue, saturation, and brightness
(HSB), while computer monitors display colors by
generating varying amounts of red, green, and
blue (RGB) light. Photoshop Elements lets you use
the HSB and RGB color models to select and
manipulate color.
HSB model
Based on the human perception of color, the HSB
model describes three fundamental characteristics
of color:
on the standard color wheel, expressed as a
degree between 0 and 360. In common use, hue
is identified by the name of the color such as red,
orange, or green.
• Saturation, sometimes called chroma, is the
strength or purity of the color. Saturation represents the amount of gray in proportion to the
hue, measured as a percentage from 0 (gray) to
100 (fully saturated). On the standard color
wheel, saturation increases from the center to
the edge.
• Brightness is the relative lightness or darkness of
the color, usually measured as a percentage from
0 (black) to 100 (white).
Although you can use the HSB model in
Photoshop Elements to define a color in the Color
Picker dialog box, there is no HSB mode available
for creating and editing images.
0 360
100
BS
0
HSB model
H. Hue S. Saturation B. Brightness
H
100
0
• Hue is the color reflected from or transmitted
through an object. It is measured as a location
Page 73
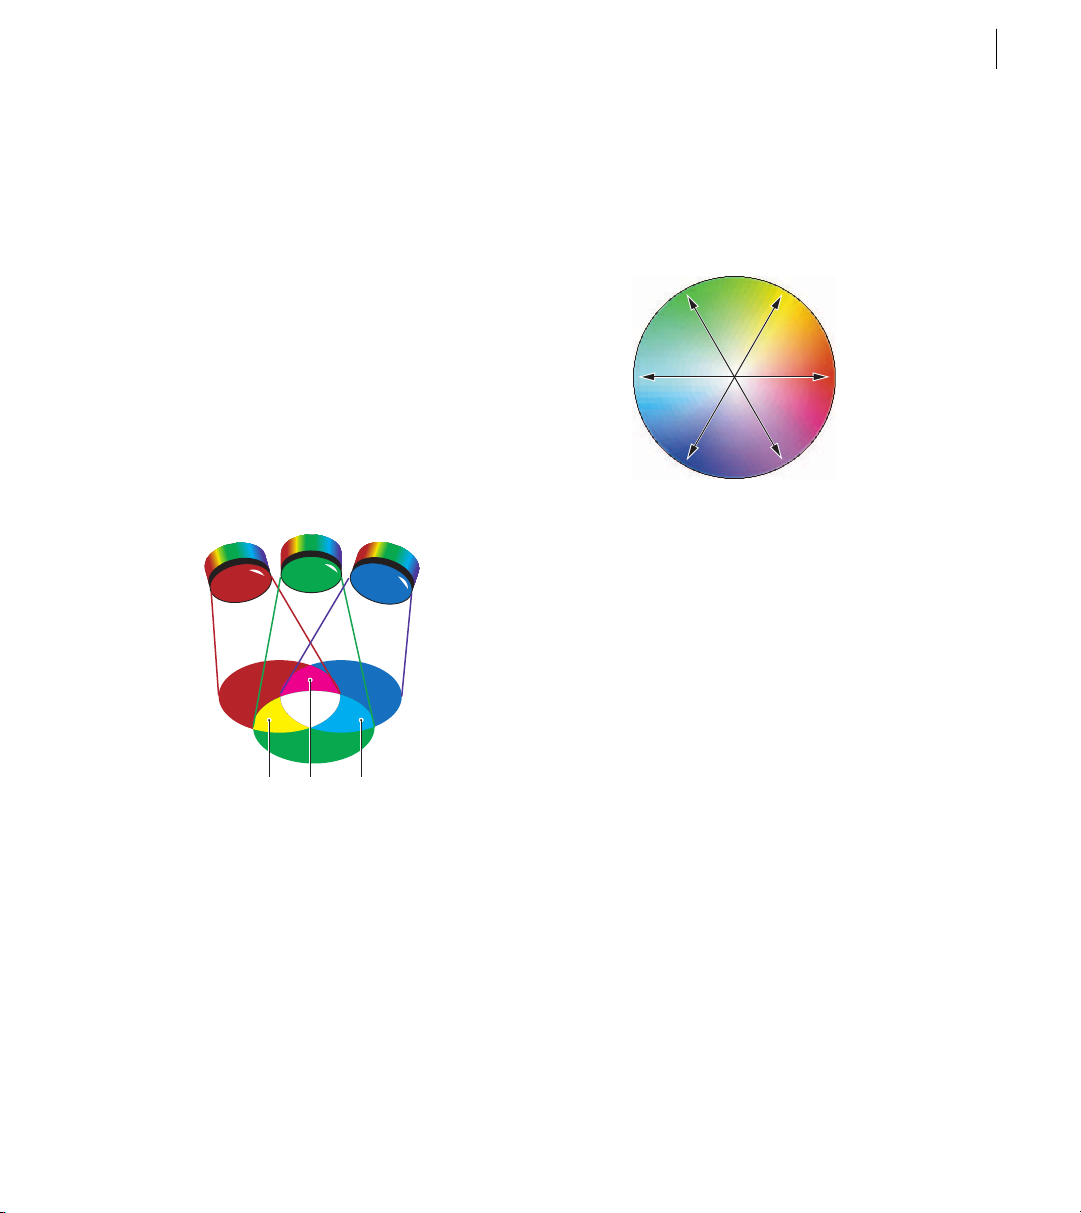
ADOBE PHOTOSHOP ELEMENTS 2.0
User Guide
65
RGB model
A large percentage of the visible spectrum can be
represented by mixing red, green, and blue (RGB)
colored light in various proportions and intensities. Where the colors overlap, they create cyan,
magenta, yellow, and white.
Because the RGB colors combine to create white,
they are also called additive colors. Adding all
colors together creates white—that is, all light is
transmitted back to the eye. Additive colors are
used for lighting, video, and monitors. Your
monitor, for example, creates color by emitting
light through red, green, and blue phosphors.
R
Additive colors (RGB)
R. Red G. Green B. Blue Y. Ye l l ow M. Magenta C. Cyan
G
YM
B
C
color components, it helps to keep a diagram of
the color wheel on hand. You can use the color
wheel to predict how a change in one color
component affects other colors.
GY
CR
MB
Color wheel
C. Cyan G. Green Y. Ye l l o w R. Red M. Magenta B. Blue
You can decrease the amount of any color in an
image by increasing the amount of its opposite on
the color wheel—and vice versa. Similarly, you can
increase and decrease a color by adjusting the two
adjacent colors on the wheel, or even by adjusting
the two colors adjacent to its opposite. For
example, in an RGB image you can decrease
magenta by removing red and blue or by adding
green. This results in an overall color balance
containing less magenta.
About the color wheel
Because there are numerous ways to achieve
similar results in color balance, it’s useful to
consider the type of image you have and the effect
you want to produce. If you’re new to adjusting
Adjusting color
You can quickly adjust an image’s color balance to
remove unwanted color casts or to correct color
saturation using the Color Cast and Color
Va r iation commands.
Page 74

CHAPTER 4
66
Fixing Your Photos
Using the Color Variations command
The Color Variations command lets you adjust the
color balance, contrast, and saturation of an image
by selecting previews that show the effect of
different adjustments.
This command is most useful for averagekey images that don’t require precise color
adjustments.
Note: Yo u can’t use the Color Variations command
with images in Indexed Color mode.
To use the Color Variations command:
1 Do one of the following:
• To make adjustments to your entire image,
choose Select > Deselect to make sure nothing is
selected. If your image has multiple layers, select
a layer to adjust in the Layers palette.
• To make adjustments to a portion of your
image, make a selection in the document
window. See “Selecting pixels” on page 114.
2 To open the Color Variations dialog box, you
can either choose Enhance > Adjust Color > Color
Va r iations, or click the Color Variations button
in the Shortcuts bar.
The two thumbnails at the top of the dialog box
show the original image (Before) and the image
with its currently selected adjustments (After).
When you first open the dialog box, these two
images are the same. As you make adjustments, the
After image changes to reflect your choices.
3 Select what to adjust in the image:
• Shadows, Midtones, or Highlights to indicate
whether you want to adjust the dark, middle, or
light areas.
• Saturation to change the vividness of color in
the image.
4 Drag the Adjust Color Intensity slider to
determine the amount of each adjustment.
Dragging the slider to the left decreases the
amount, and dragging to the right increases it.
5 With either the Midtones, Shadows, or
Highlights option selected, do either of the
following:
• To add a color to the image, click the appro-
priate Increase color thumbnail.
• To subtract a color, click the appropriate
Decrease color thumbnail.
Each time you click a thumbnail, all thumbnails
are updated.
6 With the Saturation option selected, click either
the Less Saturation or More Saturation buttons.
7 To undo or redo adjustments made in the Color
Va r iations dialog box, you can do any of the
following:
• Click Reset Image to start over and undo all
adjustments you’ve set in the current Color
Va r iations dialog box.
• Click Undo once or multiple times for each
successive adjustment you’d like to undo. You
cannot undo the Reset Image option.
• Click Redo once or multiple times for each
adjustment you’d like to redo that was undone.
8 To apply the adjustments to your image,
click OK.
Page 75

ADOBE PHOTOSHOP ELEMENTS 2.0
User Guide
67
Using the Color Cast command
The Color Cast command changes the overall
mixture of colors to remove color casts in your
image.
To use the Color Cast command:
1 Do one of the following:
• To make adjustments to your entire image,
choose Select > Deselect to make sure nothing is
selected. If your image has multiple layers, select
a layer to adjust in the Layers palette.
• To make adjustments to a portion of your
image, make a selection in the document
window. (See “Selecting pixels” on page 114.)
2 Choose Enhance > Adjust Color > Color Cast.
3 In your image, click an area that should be
neutral gray, white, or black. The image changes
based on the color you selected.
To start over, and undo the changes made to the
image, click the Reset button.
4 Click OK.
Adjusting color using the Levels
dialog box
The Levels dialog box lets you correct the color
balance and tonal range of an image by adjusting
intensity levels of the image’s shadows, midtones,
and highlights. The Levels histogram serves as a
visual guide for adjusting the image’s key tones.
To use Levels to fine-tune the color balance of your
image:
In the Levels dialog box, choose a single color
channel from the Channel pop-up menu, and
use the sliders or text boxes to adjust the intensity
levels. (See “Using the Levels dialog box” on
page 62.)
Using the Hue/Saturation command
The Hue/Saturation command lets you adjust the
hue (color), saturation, and lightness of the entire
image or of individual color components in an
image. Adjusting the hue represents a move
around the color wheel. Adjusting the saturation,
or purity of the color, represents a move across the
radius of the color wheel.
You can also use the Colorize option to add color
to a grayscale image converted to RGB, or to an
RGB image—for example, to make it look like a
duotone by reducing its color values to one hue.
To use the Hue/Saturation command:
1 Do one of the following:
• To make adjustments to your entire image,
choose Select > Deselect to make sure nothing is
selected. If your image has multiple layers, select
a layer to adjust in the Layers palette.
• To make adjustments to a portion of your
image, make a selection in the document
window. (See “Selecting pixels” on page 114.)
2 Do one of the following:
• Choose Enhance > Adjust Color >
Hue/Saturation.
Page 76

CHAPTER 4
68
Fixing Your Photos
• Create a new Hue/Saturation adjustment layer,
or open an existing Hue/Saturation adjustment
layer. (See “Using adjustment and fill layers” on
page 101.)
The two color bars in the dialog box represent the
colors in their order on the color wheel. The upper
bar shows the color before the adjustment; the
lower bar shows how the adjustment affects all
hues at full saturation.
3 For Edit, choose which colors to adjust:
• Choose Master to adjust all colors at once.
• Choose one of the other preset color ranges
listed for the color you want to adjust. (An
adjustment slider appears between the color
bars, which you can use to edit any range of
hues. For information on how to modify the
slider’s range, see “To modify the range of an
adjustment slider” after step 7.)
4 For Hue, enter a value or drag the slider until
the colors appear as you want.
The values displayed in the text box reflect the
number of degrees of rotation around the wheel
from the pixel’s original color. A positive value
indicates clockwise rotation, a negative value
counterclockwise rotation. Values range from
–180 to +180. (See “About the color wheel” on
page 65.)
6 For Lightness, enter a value or drag the slider to
the right to increase the lightness or to the left to
decrease it. Values range from –100 to +100.
7 Click OK.
To modify the range of an adjustment slider:
1 In the Hue/Saturation dialog box, choose an
individual color from the Edit menu.
2 Do any of the following to the adjustment
slider:
• Drag one of the triangles to adjust the amount
of color fall-off without affecting the range.
• Drag one of the light gray bars to adjust the
range without affecting the amount of fall-off.
• Drag the dark-gray center part to move the
entire adjustment slider, selecting a different
color area.
• Drag one of the vertical white bars next to the
dark gray center part to adjust the range of the
color component. Increasing the range
decreases the fall-off, and vice versa.
• To move the color bar and the adjustment slider
bar together, Ctrl-drag (Windows) or
Command-drag (Mac OS) the color bar.
5 For Saturation, enter a value or drag the slider
to the right to increase the saturation or to the left
to decrease it.
The color shifts away from or toward the center
of the wheel, relative to the beginning color
values of the selected pixels. Values range from
–100 to +100.
AA
BB
Adjustment slider
A. Adjusts fall-off without affecting range B. Adjusts range
without affecting fall-off C. Adjusts range of color
component D. Moves entire slider
DCC
Page 77

ADOBE PHOTOSHOP ELEMENTS 2.0
User Guide
69
If you modify the adjustment slider so that it falls
into a different color range, the name changes to
reflect this. For example, if you choose Yellow and
alter its range so that it falls in the red part of the
color bar, the name changes to Red 2. You can
convert up to six of the individual color ranges to
varieties of the same color range (for example, Red
through Red 6).
Note: By default, the range of color selected when
you choose a color component is 30° wide, with 30°
of fall-off on either side. Setting the fall-off too low
can produce banding in the image.
3 To edit the range by choosing colors from the
image, select the eyedropper tool in the dialog
box, and click in the image. Use the eyedropper +
tool to add to the range; use the eyedropper – tool
to subtract from the range.
While the eyedropper tool is selected, you can also
press Shift to add to the range or Alt (Windows) or
Option (Mac OS) to subtract from it.
To colorize a grayscale image or create a duotone
effect:
1 If you are colorizing a grayscale image, choose
Image > Mode > RGB to convert the image
to RGB.
2 Open the Hue/Saturation dialog box.
3 Select Colorize. If the foreground color isn’t
black or white, Photoshop Elements converts the
image to the hue of the current foreground color.
The lightness value of each pixel does not change.
4 Use the Hue slider to select a new color if
desired. Use the Saturation and Lightness sliders to
adjust the saturation and lightness of the pixels.
5 Click OK.
Using the Remove Color command
The Remove Color command converts the colors
in the image to gray values. For example, it assigns
equal red, green, and blue values to each pixel in an
RGB image to make the image appear grayscale.
The lightness value of each pixel does not change.
The Remove Color command can also be used on
a selected area.
This command has the same effect as setting
Saturation to –100 in the Hue/Saturation
dialog box.
To use the Remove Color command:
1 Do one of the following:
• To make adjustments to your entire image,
choose Select > Deselect to make sure nothing is
selected. If your image has multiple layers, select
a layer to adjust in the Layers palette.
• To make adjustments to a portion of your
image, make a selection in the document
window. (See “Selecting pixels” on page 114.)
2 Choose Enhance > Adjust Color > Remove
Color.
Using the Replace Color command
The Replace Color command lets you create a
mask around specific colors and then replace
those colors in the image. You can set the hue,
saturation, and lightness of the area identified by
the mask. The mask is temporary.
Page 78

CHAPTER 4
70
Fixing Your Photos
To use the Replace Color command:
1 Do one of the following:
• To make adjustments to your entire image,
choose Select > Deselect to make sure nothing is
selected. If your image has multiple layers, select
a layer to adjust in the Layers palette.
• To make adjustments to a portion of your
image, make a selection in the document
window. (See “Selecting pixels” on page 114.)
2 Choose Enhance > Adjust Color > Replace
Color.
3 Select a display option under the image
thumbnail:
• Selection to display the mask in the preview
box. Masked areas are black and unmasked
areas are white. Partially masked areas (areas
covered with a semitransparent mask) appear as
varying levels of gray according to their opacity.
• Image to display the image in the preview box.
This option is useful when you are working with
a magnified image or have limited screen space.
4 Click the eyedropper button, and then click in
the image or in the preview box to select the area
exposed by the mask. Use the eyedropper + button
to add areas or use the eyedropper – button to
remove areas.
5 Adjust the tolerance of the mask by dragging the
Fuzziness slider or entering a value. This controls
the degree to which related colors are included in
the selection.
6 Drag the Hue, Saturation, and Lightness sliders
(or enter values in the text boxes) to change the
color of the selected areas.
7 Click OK.
Retouching an image
You can retouch images using filters, and the clone
stamp, red eye brush, smudge, focus, toning, and
sponge tools.
Using the clone stamp tool
The clone stamp tool takes a sample of an image,
which you can then apply over another image or
part of the same image. Each stroke of the tool
paints on more of the sample. Cross hairs mark the
original sampling point.
To use the clone stamp tool:
1 Select the clone stamp tool . (For infor-
mation about the pattern stamp tool , see
“Using the pattern stamp tool” on page 135.)
2 Choose a brush from the pop-up palette in the
options bar, and drag the Size pop-up slider to set
the brush size.
3 Specify a blending mode and opacity.
(See “Setting options for painting and editing
tools” on page 135.)
4 Select Aligned to copy the sampled area once,
regardless of how many times you stop and resume
painting. This option is useful when you want to
eliminate unwanted areas such as a telephone line
across the skyline or a rip in a scanned photo.
Page 79

ADOBE PHOTOSHOP ELEMENTS 2.0
User Guide
71
If Aligned is deselected, the clone stamp tool
applies the sampled area from the initial sampling
point each time you stop and resume painting.
This option is useful for applying multiple copies
of the same part of an image to different areas
within the same image or to another image.
5 To sample data from all visible layers, select Use
All Layers. To sample data from only the active
layer, deselect this option.
6 Position the pointer on the part of any
open image you want to sample, and Alt-click
(Windows) or Option-click (Mac OS). This
sample point is the location from which the tool
duplicates your image as you paint.
7 Drag to paint with the tool.
Using the Dust & Scratches filter
If your photo has a lot of minor imperfections, you
can use the Dust & Scratches filter to quickly
remove the defects. The filter reduces defects by
changing dissimilar pixels. To achieve a balance
between sharpening the image and hiding defects,
try various radius and threshold settings. Or apply
the filter to selected areas of the image.
To use the Dust & Scratches filter:
1 Do one of the following:
• To make adjustments to your entire image,
choose Select > Deselect to make sure nothing is
selected. If your image has multiple layers, select
a layer to adjust in the Layers palette.
• To make adjustments to a portion of your
image, make a selection in the document
window. See “Selecting pixels” on page 114.
2 Choose Filter > Noise > Dust & Scratches, or
use the Filters palette to apply the Dust & Scratches
filter.
3 If you need to adjust the preview image in the
Dust & Scratches dialog box, you can do any of the
following:
• Click the zoom out or zoom in button
until the area containing defects is visible.
• Drag in the preview image to view other areas in
your image
• Move your pointer over your image in the
document window and click in an area you
want to center.
4 Drag the Threshold slider left to 0 to turn off the
value, so that all pixels in the selection or image
can be examined.
The Threshold determines how different the
pixels’ values should be before they are eliminated.
Note: The Threshold slider gives greater control for
values between 0 and 128—the most common range
for images—than for values between 128 and 255.
5 Drag the Radius slider left or right, or enter a
value in the text box from 1 to 100 pixels. The
radius determines how far the filter searches for
differences among pixels.
Increasing the radius makes the image more
blurry. Stop at the lowest value that eliminates the
defects.
To correct large defects in your image, try using
the clone stamp tool. See “Using the clone
stamp tool” on page 70.
Page 80

CHAPTER 4
72
Fixing Your Photos
6 Increase the threshold gradually by dragging
the slider to the lowest value that eliminates
defects by entering a value between 1 and 255.
7 Click OK.
Using the red eye brush
Red eye occurs in photos when light from a camera
flash reflects off the back of a person’s eye. You can
easily remove red eye from an image using the red
eye brush. You can also use the red eye brush to
retouch other details in an image, such as dental
braces. The red eye brush tool changes the hue of
the area you paint without removing detail in the
image.
To use the red eye brush:
1 Select the red eye brush .
2 Choose a brush from the pop-up palette in the
options bar, and drag the Size pop-up slider to set
the brush size. A brush that is a little larger than
the pupil of the eye may be the most effective size.
3 Specify a target color (the color you want to
remove) by doing one of the following:
• To set the target color when you click in the
image, choose First Click from the Sampling
pop-up menu.
• To use the default target color, choose Current
Color from the Sampling pop-up menu. Then
click Default Colors.
• To pick a custom target color, choose Current
Color from the Sampling pop-up menu. Then
click the Current color swatch. When the Color
Picker appears, click in the image on the color
you want to remove. Alternately, you can choose
a target color using the Color Picker.
4 Specify a replacement color by doing one of
the following:
• To use the default replacement color, click
Default Colors.
Note: Clicking Default Colors also resets the
target color.
• To pick a custom replacement color, click the
Replacement color swatch, and pick the color
that you want to use for the correction.
5 Specify a value for Tolerance. This setting
defines how similar in color replaced pixels must
be. A low percentage replaces adjacent pixels
within a range of color values very similar to the
pixel you click. A high percentage replaces adjacent
pixels within a broader range of color values.
If a person has pinkish skin, the red eye brush
might have problems differentiating between the
colors of the pupil and the face. Specifying a lower
tolerance might help.
6 Click in the image over the details you want to
correct and drag if necessary. Any pixels that
match the target color are colorized with the
replacement color.
If you want to darken the effect, try using the burn
tool over the details you want to correct. See
“Using the toning tools” on page 72.
Using the toning tools
The toning tools consist of the dodge tool and the
burn tool. Used to lighten or darken areas of the
image, the dodge and burn tools are based on a
traditional photographer’s technique for changing
exposure on specific areas of a print. Photographers hold back light to lighten an area on the
Page 81

ADOBE PHOTOSHOP ELEMENTS 2.0
User Guide
73
print (dodging) or increase the exposure to darken
areas on a print (burning). You can use the dodge
tool to bring out details in shadows and the
burn tool to bring out details in highlights.
To use the dodge or burn tool:
1 Select the dodge tool or burn tool .
2 Choose a brush from the pop-up palette in the
options bar, and drag the Size pop-up slider to set
the brush size.
3 Select the tonal range to change in the image:
• Midtones to change the middle range of grays.
• Shadows to change the dark areas.
• Highlights to change the light areas.
4 Specify the exposure for the tool. (See “Speci-
fying opacity, strength, exposure, or flow” on
page 138.)
5 Drag over the part of the image you want to
modify.
To gradually dodge or burn an area, set the tool
with a low exposure value and drag several
times over the area you want to correct.
Using the sponge tool
The sponge tool subtly changes the color
saturation or vividness of an area. In Grayscale
mode, the tool increases or decreases contrast by
moving gray levels away from or toward the
neutral gray.
To use the sponge tool:
1 Select the sponge tool .
2 Choose a brush from the pop-up palette in the
options bar, and drag the Size pop-up slider to set
the brush size.
3 Select how to change the color:
• Saturate to intensify the color’s saturation.
• Desaturate to dilute the color’s saturation.
4 To set the rate of saturation change, drag the
Flow pop-up slider or enter a value in the text box.
5 Drag over the part of the image you want
to modify.
Using the focus tools
The focus tools consist of the blur tool and the
sharpen tool. The blur tool softens hard edges or
areas in an image to reduce detail. The sharpen
tool focuses soft edges to increase clarity. For
information on other ways to adjust sharpness, see
“Sharpen filters” on page 179.
To use the blur or sharpen tool:
1 Select the blur tool or sharpen tool .
2 Choose a brush from the pop-up palette in the
options bar, and drag the Size pop-up slider to set
the brush size.
3 Specify a blending mode and stroke strength.
(See “Setting options for painting and editing
tools” on page 135.)
4 To blur or sharpen using data from all layers
visible in the document window, select Use All
Layers. To affect only the active layer, deselect this
option.
Drag over the part of the image you want to blur or
sharpen.
Page 82

Page 83

Chapter 5: Resizing, Cropping, and
Laying Out Images
75
djusting the resolution and size of
your images is easy using the tools
A
in Photoshop Elements.
About image size and resolution
When you take a photo with a digital camera, or
scan a photo, you create an image that has specific
number of pixels on each side. For example, your
digital camera may make a photo that is 1024
pixels wide and 800 pixels high. These two
measurements, referred to as the pixel dimensions,
have a direct correlation to the image’s file size,
and both are an indication of the amount of image
data in a photo.
Resolution is the number of pixels per linear unit
of measure—for example, the number of pixels
per inch (ppi). While a digital photo contains a
specific amount of image data, it doesn’t have a
specific physical output size or resolution. As you
change the resolution of a file, its physical dimensions change, or as you change the width and
height of an image the resolution changes.
You can see the relationship between image size
and resolution in the image size dialog box
(choose Image > Resize > Image Size). Deselect
Resample Image, because you don’t want to
change the amount of image date in your photo.
Then change the width or the height or the
resolution. Notice that as you change one value the
other two values change.
The image size dialog box with Resample Image deselected
Generally, the higher the resolution of your image,
the better the printed image quality. Some printing
devices may require a specific image resolution,
but for a photo inkjet printer, the resolution can
range from 240 to 360 ppi.
Page 84

CHAPTER 5
76
Resizing, Cropping, and Laying Out Images
Same image printed at 72-ppi and 300-ppi; inset zoom 200%
If you need to print using a specific resolution, or
you want to print an image significantly smaller or
larger than the image’s pixel dimensions allow, you
can resample the image. Resampling involves
either throwing away or adding pixels to the
image. For more information, see“Resampling
images” on page 77.
Your printer’s resolution is different from, but
related to your image’s resolution. To print a high
quality photo on an inkjet printer, an image
resolution of about 300 ppi should provide very
good results. Depending on the image, you can get
acceptable results with a resolution of 240 ppi.
Using the lower resolution will let you print a
slightly larger photo—if you are willing to accept
some image degradation.
Your monitor’s resolution is described in pixels per
inch. For example, if your monitor resolution is set
to 1024 x 768 and your photo’s pixel dimensions
are the same size, the photo will fill the screen. You
should consider the lowest monitor resolution that
your photo is likely to be viewed on when you are
preparing images for viewing on-screen.
20"
15"
About printer and monitor resolution
Printer resolution refers to the number of ink dots
per inch (dpi) produced by a printer. Most desktop
laser printers have a resolution of 600 dpi. Inkjet
printers produce a spray of ink, not actual dots;
however, most inkjet printers have an approximate
resolution of 720 to 2880 dpi.
1024 x 768 / 640 x 480832 x 624 / 640 x 480
How large an image appears on-screen depends on a combination of factors––the pixel dimensions of the image, the monitor
size, and the monitor resolution setting. The examples above
show a 620- by 400-pixel image displayed on monitors of
various sizes and resolutions.
Page 85

ADOBE PHOTOSHOP ELEMENTS 2.0
User Guide
77
When you work in Photoshop Elements, you
can change the image magnification on-screen,
so you can easily work with images of any pixel
dimensions.
Changing image size and resolution
Once you have scanned or imported an image,
you may want to adjust its size. The Image Size
command lets you adjust the pixel dimensions,
print dimensions, and resolution of an image.
Keep in mind that bitmap and vector data can
produce different results when you resize an
image. Bitmap data is resolution-dependent;
therefore, changing the pixel dimensions of a
bitmap image can cause a loss in image quality and
sharpness. In contrast, vector data is resolutionindependent; you can resize it without losing its
crisp edges.
Displaying image size information
You can display information about the current
image size using the information box at the
bottom of the application window (Windows)
or the document window (Mac OS). (See “Using
the status bar” on page 18.)
Resampling images
Changing the pixel dimensions of an image is
called resampling. Resampling also affects the
display size of your image. When you downsample,
meaning that you decrease the number of pixels in
your image, information is deleted from the
image. When you resample up, or increase the
number of pixels in your image, new pixels are
added based on color values of existing pixels.
A
B
C
To display the current image size:
Click the file information box, and hold down the
mouse button. The box displays the width and
height of the image (both in pixels and in the unit
of measurement currently selected for the rulers),
the number of channels, and the image resolution.
Resampling pixels that make up the dog’s eye
A. Downsampled B. Original C. Resampled up
(Selected pixels displayed for each image.)
Page 86

CHAPTER 5
78
Resizing, Cropping, and Laying Out Images
Keep in mind that resampling can result in poorer
image quality. For example, when you resample an
image to larger pixel dimensions, the image will
lose some detail and sharpness.
Applying the Unsharp Mask filter to a
resampled image can help refocus the image’s
details. (See “Using the focus tools” on page 73.)
To avoid the need for resampling, scan or create
the image at a high resolution. If you want to
preview the effects of changing pixel dimensions
on-screen or print proofs at different resolutions,
resample a duplicate of your file.
Resampling affects not only the size of an image
on-screen but also its image quality and its printed
output—either its printed dimensions or its image
resolution. (See “About image size and resolution”
on page 75.)
If you’re preparing images for the Web, it’s
useful to specify image size in terms of the pixel
dimensions.
To resample an image:
1 Choose Image > Resize > Image Size.
2 Make sure that Resample Image is selected, and
choose an interpolation method:
• Bicubic is the slowest but most precise method,
resulting in the smoothest tonal gradations.
• Nearest Neighbor is the fastest but least precise
method.This method can result in jagged
effects, which become apparent when distorting
or scaling an image or performing multiple
manipulations on a selection.
• Bilinear is the medium-quality method.
3 To maintain the current proportions of pixel
width to pixel height, select Constrain Proportions. This option automatically updates the width
as you change the height, and vice versa.
4 In Pixel Dimensions, enter values for Width and
Height. To enter values as percentages of the
current dimensions, choose Percent as the unit of
measurement.
The new file size for the image appears at the top
of the Image Size dialog box, with the old file size
in parentheses.
5 Click OK to change the pixel dimensions and
resample the image.
For best results in producing a smaller image,
downsample and apply the Unsharp Mask
filter. To produce a larger image, rescan the image at
a higher resolution.
Changing the print dimensions and resolution of an image
When creating an image for print media, it’s useful
to specify image size in terms of the printed
dimensions and the image resolution. These two
measurements, referred to as the document size,
determine the total pixel count and therefore
the file size of the image; document size also
determines the base size at which an image is
placed into another application. You can further
manipulate the scale of the printed image in the
Print Options dialog box; however, changes you
make in the Print Options dialog box affect only
the printed image, not the document size of the
image file. (See “Positioning and scaling images”
on page 238.)
Page 87

ADOBE PHOTOSHOP ELEMENTS 2.0
User Guide
79
If you turn on resampling for the image, you can
change print dimensions and resolution independently (and change the total number of pixels in
the image). If you turn resampling off, you can
change either the dimensions or the resolution—
Photoshop Elements adjusts the other value
automatically to preserve the total pixel count.
For the highest print quality, it’s generally best
to change the dimensions and resolution first
without resampling. Then resample only as
necessary.
To change the print dimensions and resolution of
an image:
1 Choose Image > Resize > Image Size.
2 Change the print dimensions, image resolution,
or both:
• To c hange only the print dimensions or only the
resolution and adjust the total number of pixels
in the image proportionately, make sure that
Resample Image is selected. Then choose an
interpolation method. (See “Resampling
images” on page 77.)
• To change the print dimensions and resolution
without changing the total number of pixels in
the image, deselect Resample Image.
3 To maintain the current proportions of image
width to image height, select Constrain Proportions. This option automatically updates the width
as you change the height, and vice versa.
4 Under Document Size, enter new values for the
height and width. If desired, choose a new unit of
measurement. Note that for Width, the Columns
option uses the width and gutter sizes specified in
the Units & Rulers preferences. (See “Using rulers
and the grid” on page 24.)
5 For Resolution, enter a new value. If desired,
choose a new unit of measurement.
6 Click OK.
To return to the original values displayed in
the Image Size dialog box, hold down Alt
(Windows) or Option (Mac OS), and click Reset.
To view the print size on-screen:
Do one of the following:
• Choose View > Print Size.
• Select the hand tool or zoom tool, and click
Print Size in the options bar.
The magnification of the image is adjusted to
display its approximate printed size, as specified in
the Document Size section of the Image Size dialog
box. Keep in mind that the size and resolution of
your monitor affect the on-screen print size.
Cropping images
Cropping is the process of selecting and removing
a portion of an image to create focus or strengthen
its composition. You can crop an image using the
crop tool or the Crop command. In addition, you
can use the Straighten and Crop Image command
to automatically correct a skewed image. (See
“Straightening images” on page 82.)
Page 88
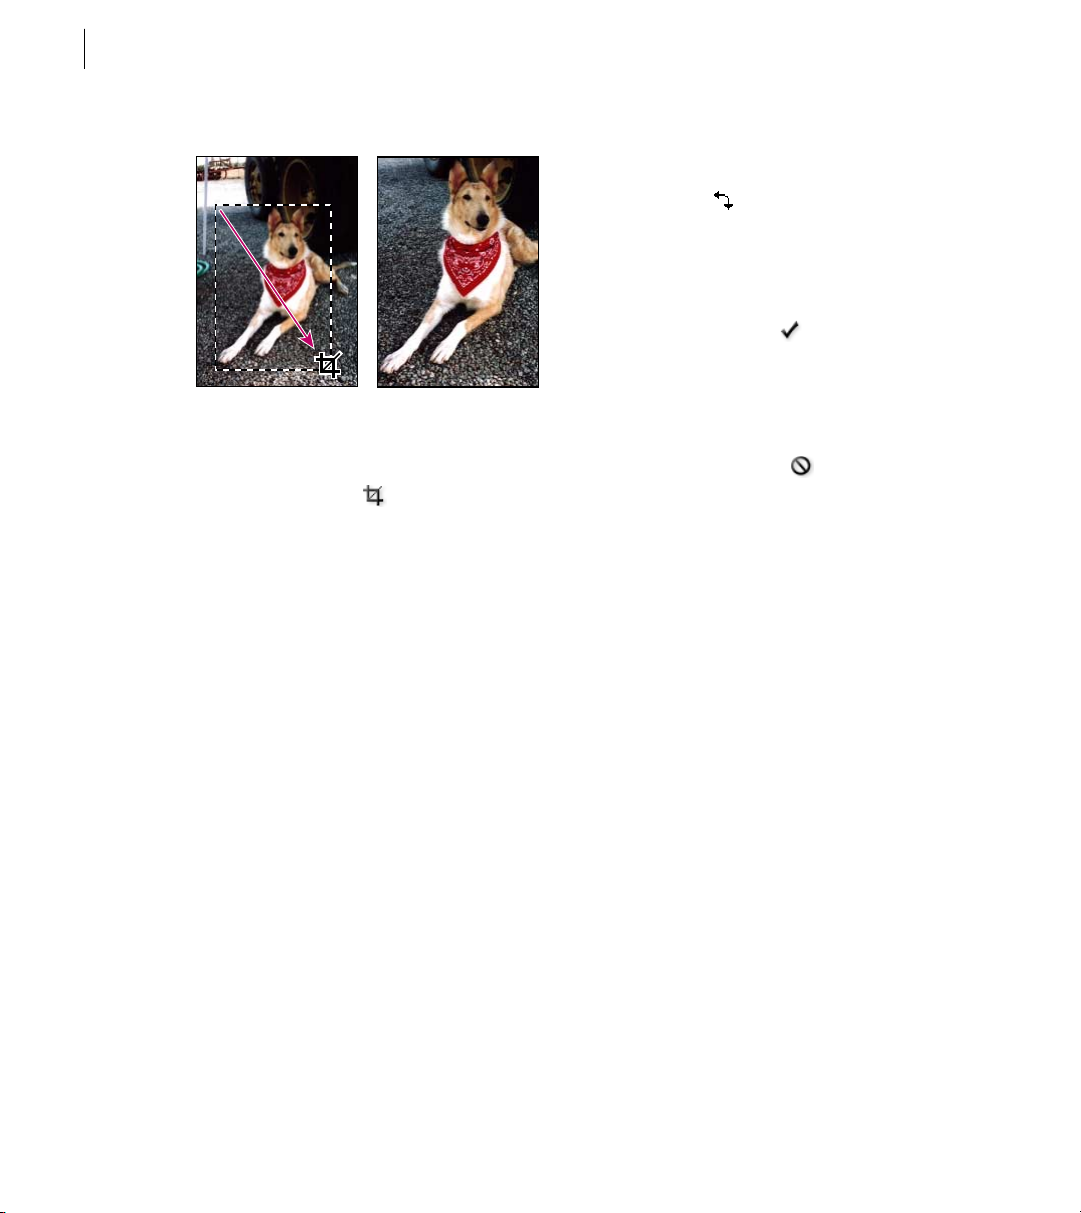
CHAPTER 5
80
Resizing, Cropping, and Laying Out Images
Using the crop tool to focus on the dog in the image.
To crop an image using the crop tool:
1 Select the crop tool .
2 If you want to specify the size or resolution of
the crop, enter the values in the Width, Height, or
Resolution text boxes in the options bar. You can
also click Front Image to enter the values of the
currently active image.
3 Drag over the part of the image you want to
keep. When you release the mouse button,
the crop marquee appears as a bounding box with
handles at the corners and sides.
4 If necessary, select the Shield cropped area
option to show the cropping shield. To adjust the
color and opacity of the cropping shield, use the
color selection box and the opacity pop-up slider
in the options bar.
5 Adjust the crop marquee:
• To move the marquee to another position, place
the pointer inside the bounding box, and drag.
• To scale the marquee, drag a handle. To
constrain the proportions, hold down Shift as you
drag a corner handle.
• To rotate the marquee, position the pointer
outside the bounding box (the pointer turns into a
curved arrow ), and drag.
Note: Yo u can’t rotate the crop tool marquee for an
image in Bitmap mode.
6 Do one of the following to crop the image:
• Click the OK button in the options bar.
• Double-click inside the crop marquee.
• Select a different tool in the toolbox.
• Press Enter (Windows) or Return (Mac OS).
Click the Cancel button in the options bar to
cancel the cropping operation.
To crop an image using the Crop command:
1 Select the part of the image you want to keep.
(See “About selections” on page 113.)
2 Choose Image > Crop.
Changing the size of the work canvas
The Canvas Size command lets you add or remove
work space around an existing image. You can crop
an image by decreasing the canvas area. Added
canvas appears in the currently selected
background color or transparent as the
background.
To use the Canvas Size command:
1 Choose Image > Resize > Canvas Size.
Page 89

ADOBE PHOTOSHOP ELEMENTS 2.0
User Guide
81
2 Choose the units of measurement you want.
The Columns option measures width in terms
of the columns specified in the Units & Rulers
preferences.
3 Enter the dimensions in the Width and
Height boxes.
4 For Anchor, click a square to indicate where to
position the existing image on the new canvas.
5 Click OK.
Adding canvas to an image.
Rotating and straightening images
You can rotate, flip, and straighten an entire image
using the commands in the Image > Rotate
submenu.
To rotate or flip an entire image:
Choose Image > Rotate, and choose one of the
following commands from the submenu:
• 90° Left to rotate the image counterclockwise by
a quarter-turn.
• 90° Right to rotate the image clockwise by a
quarter-turn.
• 180°
to rotate the image by a half-turn.
• Custom to rotate the image by the angle you
specify. If you choose this option, enter an angle
between –359.99 and 359.99 in the angle text box,
and then select Right or Left to rotate clockwise or
counterclockwise. Click OK.
• Flip Horizontal to flip the image horizontally.
• Flip Vertical to flip the image vertically.
A B C
D F
E
Rotating and flipping images
Rotating an image turns it around its center point,
while flipping an image inverts it across its
horizontal or vertical axis.
G
Rotating an image
A. Rotate 90° left B. Flip Horizontal C. Rotate 90° right
D. Rotate 180° E. Original image F. Free rotate
G. Flip Vertical
Page 90
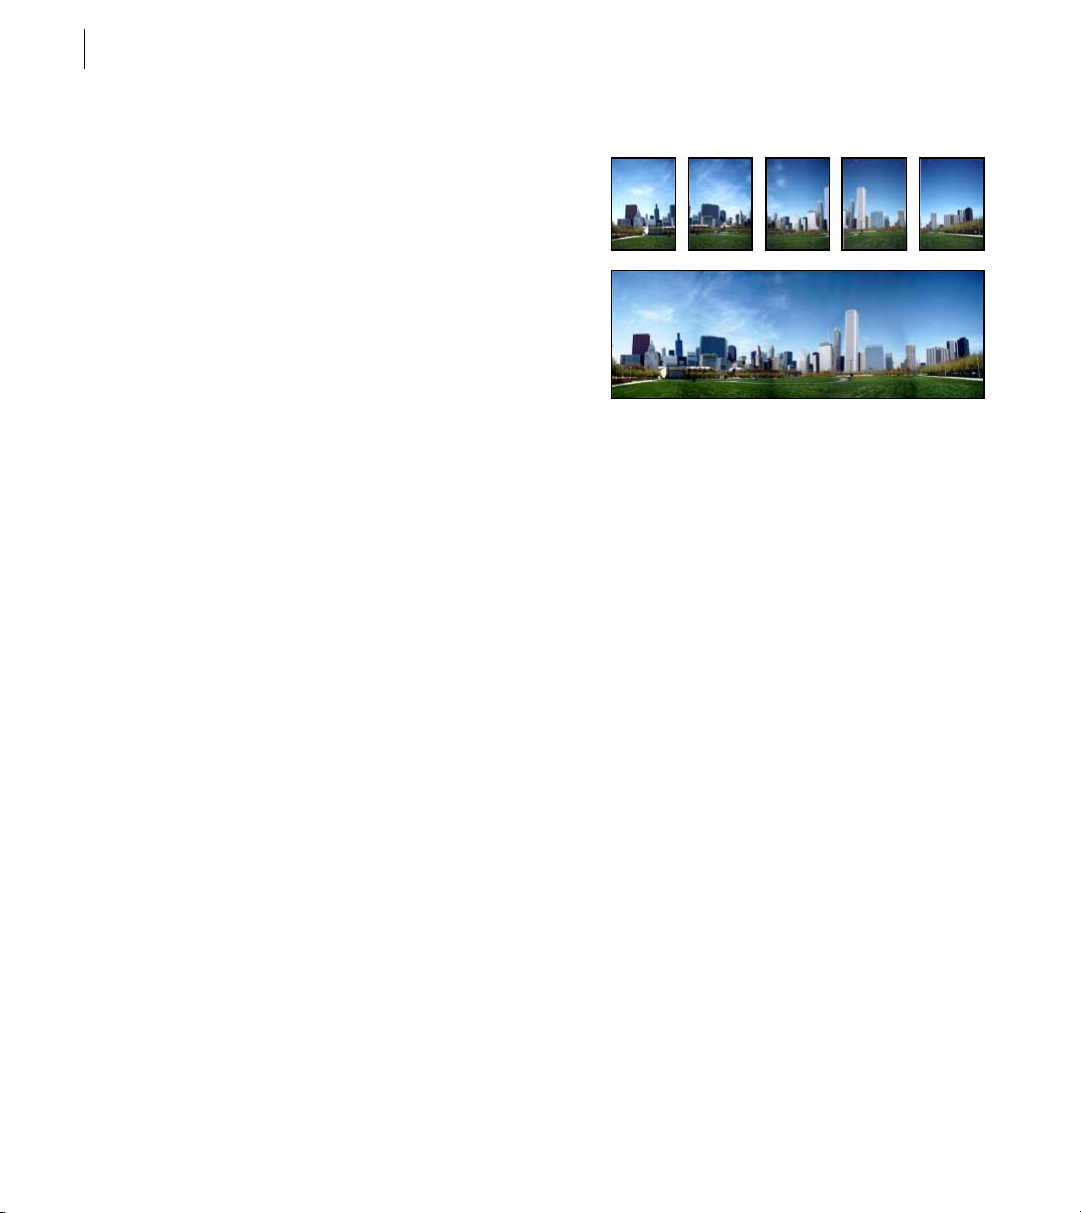
CHAPTER 5
82
Resizing, Cropping, and Laying Out Images
Straightening images
Skewed images are a common by-product of the
scanning process. For example, if you lay a photograph on the scanner at an angle, the image will
appear rotated when you open it in Photoshop
Elements. You can quickly correct a rotated image
using one of the Straighten Image commands.
To straighten an image:
Do one of the following:
• To straighten and crop the image, choose
Image > Rotate > Straighten and Crop Image.
Note: The Straighten and Crop Image command
may not produce good results if the edges of the
rotated scan are too close to the image window
boundaries. In this case, you can use the Canvas Size
command to enlarge the work canvas. (See
“Changing the size of the work canvas” on page 80.)
• To straighten the image and leave the canvas size
the same, choose Image > Rotate > Straighten
Image. Using this command results in an image
with a transparent border at its edges.
Creating panoramic images
using Photomerge
The Photomerge command combines several
photographs into one continuous image. For
example, you can take five overlapping photographs of a city skyline, and then assemble them
into a panorama. The Photomerge command is
capable of assembling photos that are tiled
horizontally as well as vertically.
Photomerge composition of the skyline of Chicago
Taking pictures for use with Photomerge
Your source photographs play a large role in
panoramic compositions. To avoid problems,
follow these guidelines when taking pictures for
use with Photomerge:
Overlap images sufficiently Images should have
an overlap of approximately 15% to 40% of the
image area. If the overlap is less, Photomerge may
not be able to automatically assemble the
panorama. However, keep in mind that the images
shouldn’t overlap too much. If images overlap by
50% or more, it can be difficult to work with them,
and blending may not be as effective. Try to keep
™
the individual photos at least somewhat distinct
from each other.
Use a consistent focal length Avoid using the
zoom feature of your camera while taking your
pictures.
Page 91

ADOBE PHOTOSHOP ELEMENTS 2.0
User Guide
83
Keep the camera level Although Photomerge can
process slight rotations between pictures, a tilt of
more than a few degrees can result in errors when
automatically assembling the panorama. Using a
tripod with a rotating head helps maintain camera
alignment and viewpoint.
When photographing a panoramic scene from a
high place, the natural inclination is to keep the
horizon level in the viewfinder. However, this
actually produces a noticeable rotation between
images. Try using a tripod to keep the camera level
when taking photographs in this situation.
Stay in the same position Tr y not to change your
position as you take a series of photographs so the
pictures are from the same viewpoint. If you walk
to a new position while taking photographs, you’ll
likely disrupt the continuity of your images. Using
the optical viewfinder with the camera held close
to the eye helps keep the viewpoint consistent.
Or try using a tripod to keep the camera in the
same place.
Avoid using distortion lenses Lenses, such as fish-
eye lenses, that cause noticeable distortion to the
image can interfere with Photomerge.
Maintain the same exposure Avoid using the flash
in some pictures and not in others. The advanced
blending feature in Photomerge helps smooth out
different exposures, but extreme differences make
alignment difficult.
Creating a Photomerge composition
When you set up a Photomerge composition, you
identify your source files, and then the assembly of
the panorama is automatically done for you. Once
the panorama is complete, you can still make
changes to the placement of the individual photos,
if necessary.
The Photomerge dialog box helps you create
panoramic compositions. This dialog box
contains tools for manipulating the composition,
a lightbox for storing source images that are not
in use, a work area for assembling the composition, and options for viewing and editing the
composition.
To set up a new Photomerge composition:
1 Choose File > Create Photomerge.
2 Click the Browse button in the Photomerge
dialog box. Open files are automatically added to
the Source Files list.
3 Navigate to the source files and select the files
for your Photomerge composition.
4 Click Open to add the files to the Source Files
list in the Photomerge dialog box.
Yo u can add more files by clicking the Browse
button again and navigating to the source files.
Yo u can always remove a file from the Source Files
list by selecting the file and clicking the Remove
button.
Page 92

CHAPTER 5
84
Resizing, Cropping, and Laying Out Images
5 When you’ve added all the source files, click OK
to create the Photomerge composition. The source
files will open automatically, and will be processed.
6 Once the new panorama image appears in the
Photomerge dialog box, you can work with
individual source files and change your view of the
work area. (See “Editing a Photomerge composition” on page 85.)
A
C
If the panorama can’t be automatically
assembled, a message appears on-screen. You
can assemble the composition manually in the
Photomerge dialog box. (See “Editing a Photomerge
composition” on page 85.)
7 If necessary, adjust the settings of your
panorama. (See “Changing Photomerge composition settings” on page 85.)
8 Click OK to generate the panorama as a new
Photoshop Elements file.
9 Save the panorama image.
B
D
E
Photomerge dialog box
A. Lightbox B. Navigator C. To olbox D. Wo rk area E. Status bar
Page 93

ADOBE PHOTOSHOP ELEMENTS 2.0
User Guide
85
Editing a Photomerge composition
You may need to reposition an individual source
file, or rotate a file in your composition. The
editing tools in the Photomerge dialog box help
you work with your panorama. You can also zoom
in and out to better see the alignment of each file.
To reposition images in a composition:
1 Select the select image tool .
2 Do one or more of the following:
• Drag an image in the work area to reposition it.
• Drag an image from the lightbox to the work
area to add it to the composition.
• Drag an image from the work area to the
lightbox to remove it from the composition.
• Double-click an image in the lightbox to add it to
the composition.
Make sure Snap to Image is selected to
automatically snap overlapping images into
place when a commonality is detected.
To rotate an image in the work area:
1 Select the select image tool , and click on the
image you want to rotate.
2 Select the rotate tool .
3 Click near the edge of the image and drag in a
circular motion around the center of the image.
To navigate in the Photomerge dialog box:
Do one or more of the following in the
Photomerge dialog box:
• Select the hand tool and drag in the work area
to move the view.
• Drag the view box or the scroll bars in the
Navigator thumbnail. The view box represents the
boundaries of the work area.
To z oom in:
Do one of the following:
• Click the zoom in icon below the Navigator.
• Use the zoom tool to zoom in.
To zoom out:
Click the zoom out icon below the Navigator.
Changing Photomerge composition settings
How source images appear in the Photomerge
dialog box depends on the settings you choose.
Photoshop Elements lets you adjust the
perspective and blend exposure differences to
produce the best possible effect.
To change the vanishing point of a composition:
1 Select Perspective in the Settings area of the
Photomerge dialog box.
Page 94
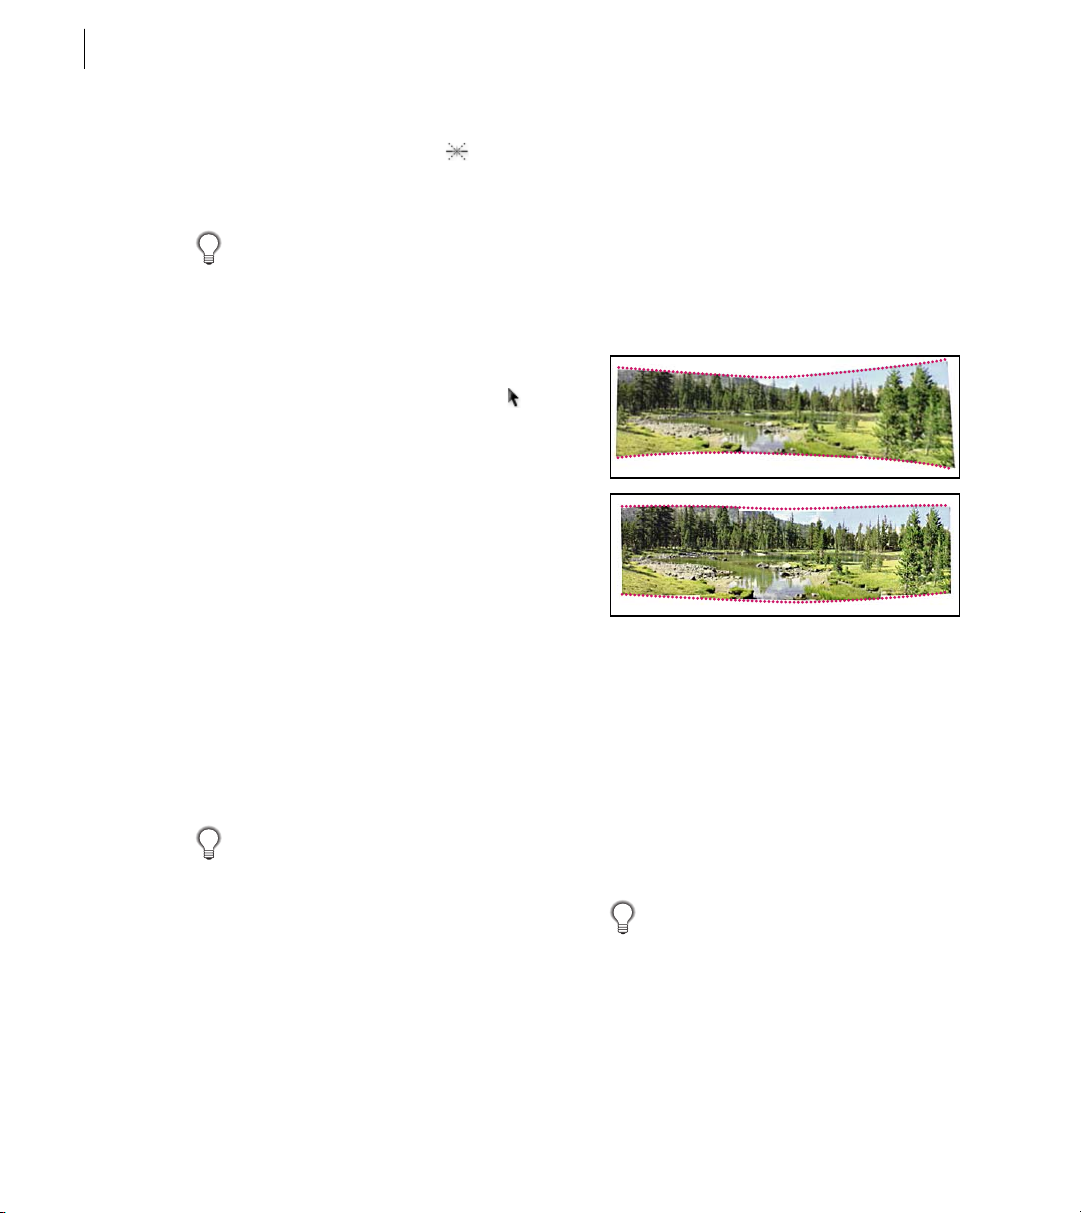
CHAPTER 5
86
Resizing, Cropping, and Laying Out Images
2 Select the vanishing point tool , and click on
an image in the work area to make it the vanishing
point image.
The vanishing point tool selects the vanishing
point image, which changes the perspective of
the composition. The middle image is the default
vanishing point image (it has a blue border around
it when selected). There can only be one vanishing
point image in a composition.
3 If necessary, use the Select Image Tool to
adjust the position of the non-vanishing point
images. A non-vanishing point image has a red
border around it when selected.
When you apply perspective correction to a
composition, the non-vanishing point images are
linked to the vanishing point image. You can break
this link by clicking the Normal button, by
separating the images in the work area, or by
dragging the vanishing point image back to the
lightbox. Once the link is broken, images return to
their original shapes.
The perspective correction only works up to an
approximately 120° angle of view. For a wider
angle of view, the Perspective option should be
deselected.
To change the perspective of a composition,
select the vanishing point tool, and click on a
non-vanishing point image in the work area. Notice
how the perspective of the composition changes
depending on which image is the vanishing
point image.
To apply Advanced Blending or Cylindrical Mapping:
1 Select Composition options as desired:
• Cylindrical Mapping to reduce the “bow tie”
distortion that can occur when you apply
perspective correction. You must select the
Perspective option in order to apply cylindrical
mapping.
A
B
Adding Cylindrical Mapping
A. Original B. Cylindrical Mapping applied
• Advanced Blending to minimize color inconsis-
tencies that result from blending images with
exposure differences. When this option is selected,
broad colors and tones are blended over a large
area, while detailed colors and tones are blended
over a smaller area.
2 Click Preview.
The Cylindrical Mapping and Advanced
Blending options are used to process the final
image. The results of applying these options are
visible only in Preview mode or in the final,
generated image.
Page 95

ADOBE PHOTOSHOP ELEMENTS 2.0
User Guide
87
To preview changes to your Photomerge composition:
Click the Preview button. To return to edit mode,
click Exit Preview.
Creating multiple-image layouts
You can export multiple images automatically
as contact sheets and picture packages using
Automate commands.
Creating picture packages
With the Picture Package command, you can place
multiple copies of one or more photos on a single
page, similar to the photo packages traditionally
sold by portrait studios. You can choose from a
variety of size and placement options to customize
your package layout.
Using Picture Package is a great way to print
more than one image on a single page.
To create a picture package from a single image:
1 Choose File > Print Layouts > Picture Package.
2 Specify the photos you want to use:
• Frontmost Document to use the currently
active image.
• File to browse to a saved image.
• Folder to browse to a folder containing multiple
image files.
Select Include All Subfolders to include images
inside any subfolders.
3 To add other pictures to the layout, click on an
image and then choose a new source image.
4 Under Document, select page size, layout,
resolution, and color mode for the picture
package. (A thumbnail of the selected layout is
displayed on the right side of the dialog box.)
Select Flatten All Layers to create a picture package
with all images and text on a single layer. Deselect
Flatten All Layers to create a picture package where
each image is on a separate layer and each caption
is on a separate text layer.
Picture package
5 For Layout, choose a preset layout option.
Layout dimensions are measured in inches, and
a preview of the chosen layout appears in the
dialog box.
6 Under Label, select the source for label text
from the Content menu (or choose None). Specify
font, font attributes, and position for the labels.
7 Click OK to create the package layout.
Page 96

CHAPTER 5
88
Resizing, Cropping, and Laying Out Images
Customizing picture package layouts
You can customize existing layouts or create new
layouts using a text-editing application. The layout
options in the Picture Package dialog box are
determined by text files that are stored in the
Layouts folder (inside the Presets folder). For
example, the following text describes a layout with
two 5 x 7 images:
I 8 10
(2) 5x7
0.5 0 7 5
0.5 5 7 5
First line Defines the unit of measurement and the
document size.
Second line Contains the name of the layout as it
appears in the Picture Package dialog box.
Subsequent lines Define the position and dimen-
sions of each image in the layout.
To customize a new picture package layout:
1 In a text-editing application, create a new file,
or open an existing file in the Layouts folder
(inside the Presets folder).
2 In the first line of the file, enter the following
elements (separated by a space):
• A letter for the unit of measurement: i or I
(for inches), p or P (for pixels), or c or C (for
centimeters). All numbers in the file use the
specified unit.
• The width of the document.
• The height of the document.
Note: The width and height of the document should
not exceed the printable area of the paper. For
example, if you plan to print on 11 x 17 paper,
specify 10 x 16 as the document size.
3 In the second line of the file, enter the name of
the layout as you want it to appear in the Picture
Package dialog box. You can enter up to 75
characters.
4 In the subsequent lines of the file, enter the
position and dimensions for images in the layout
using the following elements (separated by a
space):
• The position of the image in relation to the
left edge of the document (the x position of
the image).
• The position of the image in relation to the
top edge of the document (the y position of
the image).
• The width of the image.
• The height of the image.
Enter the position and dimensions for each image
in the layout on a separate line. You can specify up
to 50 images per layout.
5 To add comments to the file, start the line with
a semicolon (;). Lines beginning with a semicolon
are ignored, as are blank lines.
6 Save the file in the Layouts folder.
Page 97

ADOBE PHOTOSHOP ELEMENTS 2.0
User Guide
89
Creating contact sheets
By displaying a series of thumbnail previews on a
single page, contact sheets let you easily preview
and catalog groups of images. You can automatically create and place thumbnails on a page using
the Contact Sheet command.
Note: Make sure that the images are closed before
applying this command.
To create a contact sheet:
1 Choose File > Print Layouts > Contact Sheet.
2 Click Browse (Windows) or Choose (Mac OS)
to specify the folder containing the images you
want to use. Select Include All Subfolders to
include images inside any subfolders of the chosen
folder.
3 Under Document, specify the dimensions,
resolution, and color mode for the contact sheet,
using the menus to specify measurement units.
4 Under Thumbnails, specify layout options for
the thumbnail previews:
• For Place, choose whether to arrange thumb-
nails across first (from left to right, then top to
bottom) or down first (from top to bottom,
then left to right).
• Enter the number of columns and rows that you
want per contact sheet. The maximum dimensions for each thumbnail are displayed to the
right, along with a visual preview of the
specified layout.
• Select Use Filename As Caption to label the
thumbnails using their source image filenames.
Use the menu to specify a caption font.
5 Click OK to create the contact sheet.
Creating PDF slideshows
A great way to share your pictures is to export
them as a PDF slideshow. Photoshop Elements
generates a PDF file of the images you select that
plays like a slideshow when it’s opened in Adobe
Acrobat.
PDF Slideshow dialog box
To create a PDF slideshow:
1 Choose File > Automation Tools > PDF
Slideshow.
2 Click the Browse button to navigate to the files
you want to include in the slideshow.
Click Add Open Files to add the active images to
the Source Files list.
Page 98

CHAPTER 5
90
Resizing, Cropping, and Laying Out Images
3 Select the files (Shift-click to select more
than one file at a time) and then click Open.
The filenames will appear in the PDF Slideshow
dialog box.
If you want to remove a file from the list, select the
filename and then click the Remove button. To
rearrange the files, click and drag them into a new
position.
4 In the PDF Slideshow dialog box, click Choose
to set the name and location of the slideshow file,
and then click the Save button.
Note: If you want to compress your final PDF
file, click the Advanced button to specify
encoding options.
5 In Slide Show Options, select from the
following:
• Enter the number of seconds each slide remains
on the screen in the Advance Every text box.
• Select Loop After Last Page if you want the
slideshow to continuously loop instead of
playing through just one time.
• For Transition, choose how a new slide replaces
the slide before it.
6 When you’re done setting options, click the OK
button to generate the slideshow.
7 Once processing is complete, a message will
appear indicating the success of the generation.
To see your slideshow, open the PDF file in
Adobe Acrobat.
Page 99

Chapter 6: Using Layers
91
ayers are the basis for creating and editing
images in Photoshop Elements. Layers can
help you customize your images, fix color
L
and contrast, and give your images different
artistic effects. Layers also make composing and
managing different elements in an image much
easier.
About layers
You create and manage layers using the Layers
palette and the Layers menu. Layers give you the
freedom to rearrange your image, adjust its color
and brightness, apply special effects, edit, and add
new elements to your image. With layers, all these
things can be done without making permanent
changes to your original image and without
affecting other layers.
When you create, import, or scan an image in
Photoshop Elements, the image consists of a single
layer. If you’re retouching the image, you can edit
the original layer to make permanent changes.
Alternatively, you can leave the original layer intact
as a backup, and retouch a duplicate copy of the
layer, or use adjustment layers to fine-tune your
image.
experiment freely with different compositions
without making permanent changes to your
overall image. In addition, special features such as
adjustment layers, fill layers, and layer styles let
you create sophisticated effects.
A good way to think of layers is as sheets of transparent glass stacked one on top of the other. Where
there is no image on a layer, you can see through to
the layers below. Behind all of the layers is the
Background layer. In the following illustration,
each animal and the map are on separate layers.
The map of Africa is the Background layer.
Depending on how you stack and position the
layers, the composition changes.
The power of layers is that they enable you to work
on one element of your image without disturbing
the others, and without making tedious selections.
Until you combine, or merge, the layers, each
layer remains independent. This means you can
Transparent areas on a layer let you see through to the
layers below.
Page 100

CHAPTER 6
92
Using Layers
You can also create sophisticated visual effects with
layers. Grouped layers use a base layer to define the
image boundaries of a layer group, and you can
use layers to create a Web animation. In addition,
the Layer Styles palette lets you apply special visual
effects to a layer. (See“About layer styles” on
page 169.)
In addition to pixel-based image layers, there are
several other layer types. Fill layers are filled with a
color gradient, solid color, or pattern. You can fill
the entire image area or just a selected area. You
can fine-tune the color, brightness, saturation of
your image using Adjustment layers. Type layers
and Shape layers let you create crisp vector-based
text and shapes. See “Creating text” on page 196
and “Creating shapes” on page 191. When you’re
ready to paint on these four layer types or apply
special effects to them, you must convert them to
regular pixel-based image layers by simplifying
them.
About the Layers palette
The Layers palette lists all layers in an image. The
order of layers in the Layers palette indicates the
stacking order of layers in the image—the topmost
layer in the Layers palette is the topmost layer
in the image. You can drag any layer except the
Background layer up or down in the Layers palette
to change the layer stacking order.
About the Background layer
When you create a new image with a color-filled
background, the bottommost layer in the Layers
palette is locked and labeled Background. You
cannot change the stacking order of a Background
layer, its blending mode, or its opacity. However,
to do any of these things, you can convert a
Background layer to a regular layer. (See “Adding
layers” on page 95.)
To create a new image with transparent regions—
for example, a round button with transparent
edges for a Web page—select Transparent in the
New dialog box. (See “Creating new images” on
page 44.) In a new transparent image, the
bottommost layer is called Layer 1 by default. This
layer is not constrained like the Background layer;
you can move it anywhere in the Layers palette and
change its opacity and blending mode.
Zebra is the topmost layer.
 Loading...