

Page 1

ADOBE® PHOTOSHOP® ELEMENTS HELP
Page 2

Legal notices
Legal notices
For legal notices, see http://help.adobe.com/en_US/legalnotices/index.html.
Last updated 10/3/2016
Page 3

Contents
Chapter 1: What's new
What's new in Photoshop Elements 15 . . . . . . . . . . . . . . . . . . . . . . . . . . . . . . . . . . . . . . . . . . . . . . . . . . . . . . . . . . . . . . . . . . . . . . . . . . . . . . . . . .1
Chapter 2: Workspace and workflows
Workspace basics . . . . . . . . . . . . . . . . . . . . . . . . . . . . . . . . . . . . . . . . . . . . . . . . . . . . . . . . . . . . . . . . . . . . . . . . . . . . . . . . . . . . . . . . . . . . . . . . . . . . . 12
Panels and bins . . . . . . . . . . . . . . . . . . . . . . . . . . . . . . . . . . . . . . . . . . . . . . . . . . . . . . . . . . . . . . . . . . . . . . . . . . . . . . . . . . . . . . . . . . . . . . . . . . . . . . . 14
Tools . . . . . . . . . . . . . . . . . . . . . . . . . . . . . . . . . . . . . . . . . . . . . . . . . . . . . . . . . . . . . . . . . . . . . . . . . . . . . . . . . . . . . . . . . . . . . . . . . . . . . . . . . . . . . . . . . 19
Rulers, grids, and guides . . . . . . . . . . . . . . . . . . . . . . . . . . . . . . . . . . . . . . . . . . . . . . . . . . . . . . . . . . . . . . . . . . . . . . . . . . . . . . . . . . . . . . . . . . . . . . 22
Undo, redo, and cancel actions . . . . . . . . . . . . . . . . . . . . . . . . . . . . . . . . . . . . . . . . . . . . . . . . . . . . . . . . . . . . . . . . . . . . . . . . . . . . . . . . . . . . . . . . 23
Scratch disks, plug-ins, and application updates . . . . . . . . . . . . . . . . . . . . . . . . . . . . . . . . . . . . . . . . . . . . . . . . . . . . . . . . . . . . . . . . . . . . . . . 25
Viewing images . . . . . . . . . . . . . . . . . . . . . . . . . . . . . . . . . . . . . . . . . . . . . . . . . . . . . . . . . . . . . . . . . . . . . . . . . . . . . . . . . . . . . . . . . . . . . . . . . . . . . . 27
Enhanced Quick mode . . . . . . . . . . . . . . . . . . . . . . . . . . . . . . . . . . . . . . . . . . . . . . . . . . . . . . . . . . . . . . . . . . . . . . . . . . . . . . . . . . . . . . . . . . . . . . . 30
Using Windows 7 features . . . . . . . . . . . . . . . . . . . . . . . . . . . . . . . . . . . . . . . . . . . . . . . . . . . . . . . . . . . . . . . . . . . . . . . . . . . . . . . . . . . . . . . . . . . . 35
Presets and libraries . . . . . . . . . . . . . . . . . . . . . . . . . . . . . . . . . . . . . . . . . . . . . . . . . . . . . . . . . . . . . . . . . . . . . . . . . . . . . . . . . . . . . . . . . . . . . . . . . . 36
Multitouch support . . . . . . . . . . . . . . . . . . . . . . . . . . . . . . . . . . . . . . . . . . . . . . . . . . . . . . . . . . . . . . . . . . . . . . . . . . . . . . . . . . . . . . . . . . . . . . . . . . . 38
iii
Chapter 3: Importing
Importing files . . . . . . . . . . . . . . . . . . . . . . . . . . . . . . . . . . . . . . . . . . . . . . . . . . . . . . . . . . . . . . . . . . . . . . . . . . . . . . . . . . . . . . . . . . . . . . . . . . . . . . . 39
Chapter 4: File management
Open files . . . . . . . . . . . . . . . . . . . . . . . . . . . . . . . . . . . . . . . . . . . . . . . . . . . . . . . . . . . . . . . . . . . . . . . . . . . . . . . . . . . . . . . . . . . . . . . . . . . . . . . . . . . . 40
File information . . . . . . . . . . . . . . . . . . . . . . . . . . . . . . . . . . . . . . . . . . . . . . . . . . . . . . . . . . . . . . . . . . . . . . . . . . . . . . . . . . . . . . . . . . . . . . . . . . . . . . 44
Chapter 5: Editing photos
Adjust color, saturation, and hue . . . . . . . . . . . . . . . . . . . . . . . . . . . . . . . . . . . . . . . . . . . . . . . . . . . . . . . . . . . . . . . . . . . . . . . . . . . . . . . . . . . . . . 48
Retouch and correct photos . . . . . . . . . . . . . . . . . . . . . . . . . . . . . . . . . . . . . . . . . . . . . . . . . . . . . . . . . . . . . . . . . . . . . . . . . . . . . . . . . . . . . . . . . . 54
Enhance photos . . . . . . . . . . . . . . . . . . . . . . . . . . . . . . . . . . . . . . . . . . . . . . . . . . . . . . . . . . . . . . . . . . . . . . . . . . . . . . . . . . . . . . . . . . . . . . . . . . . . . . 66
Adjust shadows and light . . . . . . . . . . . . . . . . . . . . . . . . . . . . . . . . . . . . . . . . . . . . . . . . . . . . . . . . . . . . . . . . . . . . . . . . . . . . . . . . . . . . . . . . . . . . . 71
Transfor ming . . . . . . . . . . . . . . . . . . . . . . . . . . . . . . . . . . . . . . . . . . . . . . . . . . . . . . . . . . . . . . . . . . . . . . . . . . . . . . . . . . . . . . . . . . . . . . . . . . . . . . . . . 79
Cropping . . . . . . . . . . . . . . . . . . . . . . . . . . . . . . . . . . . . . . . . . . . . . . . . . . . . . . . . . . . . . . . . . . . . . . . . . . . . . . . . . . . . . . . . . . . . . . . . . . . . . . . . . . . . . 83
Using actions to process photos . . . . . . . . . . . . . . . . . . . . . . . . . . . . . . . . . . . . . . . . . . . . . . . . . . . . . . . . . . . . . . . . . . . . . . . . . . . . . . . . . . . . . . 95
Painting tools . . . . . . . . . . . . . . . . . . . . . . . . . . . . . . . . . . . . . . . . . . . . . . . . . . . . . . . . . . . . . . . . . . . . . . . . . . . . . . . . . . . . . . . . . . . . . . . . . . . . . . . . 96
Create a panorama . . . . . . . . . . . . . . . . . . . . . . . . . . . . . . . . . . . . . . . . . . . . . . . . . . . . . . . . . . . . . . . . . . . . . . . . . . . . . . . . . . . . . . . . . . . . . . . . . . 101
Sharpen photos . . . . . . . . . . . . . . . . . . . . . . . . . . . . . . . . . . . . . . . . . . . . . . . . . . . . . . . . . . . . . . . . . . . . . . . . . . . . . . . . . . . . . . . . . . . . . . . . . . . . . 106
Process camera raw image files . . . . . . . . . . . . . . . . . . . . . . . . . . . . . . . . . . . . . . . . . . . . . . . . . . . . . . . . . . . . . . . . . . . . . . . . . . . . . . . . . . . . . . 110
Fix color casts . . . . . . . . . . . . . . . . . . . . . . . . . . . . . . . . . . . . . . . . . . . . . . . . . . . . . . . . . . . . . . . . . . . . . . . . . . . . . . . . . . . . . . . . . . . . . . . . . . . . . . . 115
Adjustment filters . . . . . . . . . . . . . . . . . . . . . . . . . . . . . . . . . . . . . . . . . . . . . . . . . . . . . . . . . . . . . . . . . . . . . . . . . . . . . . . . . . . . . . . . . . . . . . . . . . . 117
Painting overview . . . . . . . . . . . . . . . . . . . . . . . . . . . . . . . . . . . . . . . . . . . . . . . . . . . . . . . . . . . . . . . . . . . . . . . . . . . . . . . . . . . . . . . . . . . . . . . . . . . 121
Photomerge Compose . . . . . . . . . . . . . . . . . . . . . . . . . . . . . . . . . . . . . . . . . . . . . . . . . . . . . . . . . . . . . . . . . . . . . . . . . . . . . . . . . . . . . . . . . . . . . . . 125
Auto Smart Tone . . . . . . . . . . . . . . . . . . . . . . . . . . . . . . . . . . . . . . . . . . . . . . . . . . . . . . . . . . . . . . . . . . . . . . . . . . . . . . . . . . . . . . . . . . . . . . . . . . . . 128
Recomposing . . . . . . . . . . . . . . . . . . . . . . . . . . . . . . . . . . . . . . . . . . . . . . . . . . . . . . . . . . . . . . . . . . . . . . . . . . . . . . . . . . . . . . . . . . . . . . . . . . . . . . . 131
Resize images . . . . . . . . . . . . . . . . . . . . . . . . . . . . . . . . . . . . . . . . . . . . . . . . . . . . . . . . . . . . . . . . . . . . . . . . . . . . . . . . . . . . . . . . . . . . . . . . . . . . . . . 133
Last updated 10/3/2016
Page 4

PHOTOSHOP ELEMENTS
Content s
Chapter 6: Selecting
Use tools to make selections . . . . . . . . . . . . . . . . . . . . . . . . . . . . . . . . . . . . . . . . . . . . . . . . . . . . . . . . . . . . . . . . . . . . . . . . . . . . . . . . . . . . . . . . . 138
Move and copy selections . . . . . . . . . . . . . . . . . . . . . . . . . . . . . . . . . . . . . . . . . . . . . . . . . . . . . . . . . . . . . . . . . . . . . . . . . . . . . . . . . . . . . . . . . . . 150
Modifying selections . . . . . . . . . . . . . . . . . . . . . . . . . . . . . . . . . . . . . . . . . . . . . . . . . . . . . . . . . . . . . . . . . . . . . . . . . . . . . . . . . . . . . . . . . . . . . . . . 153
Smooth selection edges with anti-aliasing and feathering . . . . . . . . . . . . . . . . . . . . . . . . . . . . . . . . . . . . . . . . . . . . . . . . . . . . . . . . . . . . 157
Saving selections . . . . . . . . . . . . . . . . . . . . . . . . . . . . . . . . . . . . . . . . . . . . . . . . . . . . . . . . . . . . . . . . . . . . . . . . . . . . . . . . . . . . . . . . . . . . . . . . . . . . 159
Edit and refine selections . . . . . . . . . . . . . . . . . . . . . . . . . . . . . . . . . . . . . . . . . . . . . . . . . . . . . . . . . . . . . . . . . . . . . . . . . . . . . . . . . . . . . . . . . . . . 160
Editing and refining selections . . . . . . . . . . . . . . . . . . . . . . . . . . . . . . . . . . . . . . . . . . . . . . . . . . . . . . . . . . . . . . . . . . . . . . . . . . . . . . . . . . . . . . . 164
Chapter 7: Color
Understanding color . . . . . . . . . . . . . . . . . . . . . . . . . . . . . . . . . . . . . . . . . . . . . . . . . . . . . . . . . . . . . . . . . . . . . . . . . . . . . . . . . . . . . . . . . . . . . . . . 166
Color and tonal correction basics . . . . . . . . . . . . . . . . . . . . . . . . . . . . . . . . . . . . . . . . . . . . . . . . . . . . . . . . . . . . . . . . . . . . . . . . . . . . . . . . . . . . 167
Color and camera raw . . . . . . . . . . . . . . . . . . . . . . . . . . . . . . . . . . . . . . . . . . . . . . . . . . . . . . . . . . . . . . . . . . . . . . . . . . . . . . . . . . . . . . . . . . . . . . . 175
Set up color management . . . . . . . . . . . . . . . . . . . . . . . . . . . . . . . . . . . . . . . . . . . . . . . . . . . . . . . . . . . . . . . . . . . . . . . . . . . . . . . . . . . . . . . . . . . 179
Using image modes and color tables . . . . . . . . . . . . . . . . . . . . . . . . . . . . . . . . . . . . . . . . . . . . . . . . . . . . . . . . . . . . . . . . . . . . . . . . . . . . . . . . . 182
Chapter 8: Drawing and painting
Choose colors . . . . . . . . . . . . . . . . . . . . . . . . . . . . . . . . . . . . . . . . . . . . . . . . . . . . . . . . . . . . . . . . . . . . . . . . . . . . . . . . . . . . . . . . . . . . . . . . . . . . . . . 188
Set up brushes . . . . . . . . . . . . . . . . . . . . . . . . . . . . . . . . . . . . . . . . . . . . . . . . . . . . . . . . . . . . . . . . . . . . . . . . . . . . . . . . . . . . . . . . . . . . . . . . . . . . . . 192
Fills and strokes . . . . . . . . . . . . . . . . . . . . . . . . . . . . . . . . . . . . . . . . . . . . . . . . . . . . . . . . . . . . . . . . . . . . . . . . . . . . . . . . . . . . . . . . . . . . . . . . . . . . . 196
Gradients . . . . . . . . . . . . . . . . . . . . . . . . . . . . . . . . . . . . . . . . . . . . . . . . . . . . . . . . . . . . . . . . . . . . . . . . . . . . . . . . . . . . . . . . . . . . . . . . . . . . . . . . . . . 198
Create shapes . . . . . . . . . . . . . . . . . . . . . . . . . . . . . . . . . . . . . . . . . . . . . . . . . . . . . . . . . . . . . . . . . . . . . . . . . . . . . . . . . . . . . . . . . . . . . . . . . . . . . . . 202
Patterns . . . . . . . . . . . . . . . . . . . . . . . . . . . . . . . . . . . . . . . . . . . . . . . . . . . . . . . . . . . . . . . . . . . . . . . . . . . . . . . . . . . . . . . . . . . . . . . . . . . . . . . . . . . . . 205
Editing shapes . . . . . . . . . . . . . . . . . . . . . . . . . . . . . . . . . . . . . . . . . . . . . . . . . . . . . . . . . . . . . . . . . . . . . . . . . . . . . . . . . . . . . . . . . . . . . . . . . . . . . . 207
iv
Chapter 9: Effects and filters
Effects . . . . . . . . . . . . . . . . . . . . . . . . . . . . . . . . . . . . . . . . . . . . . . . . . . . . . . . . . . . . . . . . . . . . . . . . . . . . . . . . . . . . . . . . . . . . . . . . . . . . . . . . . . . . . . 209
Guided mode . . . . . . . . . . . . . . . . . . . . . . . . . . . . . . . . . . . . . . . . . . . . . . . . . . . . . . . . . . . . . . . . . . . . . . . . . . . . . . . . . . . . . . . . . . . . . . . . . . . . . . . 212
Filters . . . . . . . . . . . . . . . . . . . . . . . . . . . . . . . . . . . . . . . . . . . . . . . . . . . . . . . . . . . . . . . . . . . . . . . . . . . . . . . . . . . . . . . . . . . . . . . . . . . . . . . . . . . . . . . 215
Distort filters . . . . . . . . . . . . . . . . . . . . . . . . . . . . . . . . . . . . . . . . . . . . . . . . . . . . . . . . . . . . . . . . . . . . . . . . . . . . . . . . . . . . . . . . . . . . . . . . . . . . . . . . 219
Black and white Guided Edits . . . . . . . . . . . . . . . . . . . . . . . . . . . . . . . . . . . . . . . . . . . . . . . . . . . . . . . . . . . . . . . . . . . . . . . . . . . . . . . . . . . . . . . . 224
Guided mode - Special edits . . . . . . . . . . . . . . . . . . . . . . . . . . . . . . . . . . . . . . . . . . . . . . . . . . . . . . . . . . . . . . . . . . . . . . . . . . . . . . . . . . . . . . . . . 230
Guided mode - Photomerge edits . . . . . . . . . . . . . . . . . . . . . . . . . . . . . . . . . . . . . . . . . . . . . . . . . . . . . . . . . . . . . . . . . . . . . . . . . . . . . . . . . . . . 237
Guided mode - Color edits . . . . . . . . . . . . . . . . . . . . . . . . . . . . . . . . . . . . . . . . . . . . . . . . . . . . . . . . . . . . . . . . . . . . . . . . . . . . . . . . . . . . . . . . . . . 249
Guided mode - Basic edits . . . . . . . . . . . . . . . . . . . . . . . . . . . . . . . . . . . . . . . . . . . . . . . . . . . . . . . . . . . . . . . . . . . . . . . . . . . . . . . . . . . . . . . . . . . 250
Guided mode - Black & White edits . . . . . . . . . . . . . . . . . . . . . . . . . . . . . . . . . . . . . . . . . . . . . . . . . . . . . . . . . . . . . . . . . . . . . . . . . . . . . . . . . . . 254
Guided mode - Fun edits . . . . . . . . . . . . . . . . . . . . . . . . . . . . . . . . . . . . . . . . . . . . . . . . . . . . . . . . . . . . . . . . . . . . . . . . . . . . . . . . . . . . . . . . . . . . 263
Guided Edits - Share panel . . . . . . . . . . . . . . . . . . . . . . . . . . . . . . . . . . . . . . . . . . . . . . . . . . . . . . . . . . . . . . . . . . . . . . . . . . . . . . . . . . . . . . . . . . . 276
Artistic filters . . . . . . . . . . . . . . . . . . . . . . . . . . . . . . . . . . . . . . . . . . . . . . . . . . . . . . . . . . . . . . . . . . . . . . . . . . . . . . . . . . . . . . . . . . . . . . . . . . . . . . . . 277
Render filters . . . . . . . . . . . . . . . . . . . . . . . . . . . . . . . . . . . . . . . . . . . . . . . . . . . . . . . . . . . . . . . . . . . . . . . . . . . . . . . . . . . . . . . . . . . . . . . . . . . . . . . . 279
Other filters . . . . . . . . . . . . . . . . . . . . . . . . . . . . . . . . . . . . . . . . . . . . . . . . . . . . . . . . . . . . . . . . . . . . . . . . . . . . . . . . . . . . . . . . . . . . . . . . . . . . . . . . . 280
Sketch filters . . . . . . . . . . . . . . . . . . . . . . . . . . . . . . . . . . . . . . . . . . . . . . . . . . . . . . . . . . . . . . . . . . . . . . . . . . . . . . . . . . . . . . . . . . . . . . . . . . . . . . . . 281
Noise filters . . . . . . . . . . . . . . . . . . . . . . . . . . . . . . . . . . . . . . . . . . . . . . . . . . . . . . . . . . . . . . . . . . . . . . . . . . . . . . . . . . . . . . . . . . . . . . . . . . . . . . . . . 284
Blur filters . . . . . . . . . . . . . . . . . . . . . . . . . . . . . . . . . . . . . . . . . . . . . . . . . . . . . . . . . . . . . . . . . . . . . . . . . . . . . . . . . . . . . . . . . . . . . . . . . . . . . . . . . . . 285
Brush Stroke filters . . . . . . . . . . . . . . . . . . . . . . . . . . . . . . . . . . . . . . . . . . . . . . . . . . . . . . . . . . . . . . . . . . . . . . . . . . . . . . . . . . . . . . . . . . . . . . . . . . 286
Stylize filters . . . . . . . . . . . . . . . . . . . . . . . . . . . . . . . . . . . . . . . . . . . . . . . . . . . . . . . . . . . . . . . . . . . . . . . . . . . . . . . . . . . . . . . . . . . . . . . . . . . . . . . . 287
Texture filters . . . . . . . . . . . . . . . . . . . . . . . . . . . . . . . . . . . . . . . . . . . . . . . . . . . . . . . . . . . . . . . . . . . . . . . . . . . . . . . . . . . . . . . . . . . . . . . . . . . . . . . . 289
Last updated 10/3/2016
Page 5

PHOTOSHOP ELEMENTS
Content s
Chapter 10: Text and shapes
Add text . . . . . . . . . . . . . . . . . . . . . . . . . . . . . . . . . . . . . . . . . . . . . . . . . . . . . . . . . . . . . . . . . . . . . . . . . . . . . . . . . . . . . . . . . . . . . . . . . . . . . . . . . . . . 290
Edit text . . . . . . . . . . . . . . . . . . . . . . . . . . . . . . . . . . . . . . . . . . . . . . . . . . . . . . . . . . . . . . . . . . . . . . . . . . . . . . . . . . . . . . . . . . . . . . . . . . . . . . . . . . . . . 295
Work with Asian type . . . . . . . . . . . . . . . . . . . . . . . . . . . . . . . . . . . . . . . . . . . . . . . . . . . . . . . . . . . . . . . . . . . . . . . . . . . . . . . . . . . . . . . . . . . . . . . . 299
Chapter 11: Layers
Create layers . . . . . . . . . . . . . . . . . . . . . . . . . . . . . . . . . . . . . . . . . . . . . . . . . . . . . . . . . . . . . . . . . . . . . . . . . . . . . . . . . . . . . . . . . . . . . . . . . . . . . . . . 301
Copy and arrange layers . . . . . . . . . . . . . . . . . . . . . . . . . . . . . . . . . . . . . . . . . . . . . . . . . . . . . . . . . . . . . . . . . . . . . . . . . . . . . . . . . . . . . . . . . . . . . 305
Edit layers . . . . . . . . . . . . . . . . . . . . . . . . . . . . . . . . . . . . . . . . . . . . . . . . . . . . . . . . . . . . . . . . . . . . . . . . . . . . . . . . . . . . . . . . . . . . . . . . . . . . . . . . . . . 310
Adjustment and fill layers . . . . . . . . . . . . . . . . . . . . . . . . . . . . . . . . . . . . . . . . . . . . . . . . . . . . . . . . . . . . . . . . . . . . . . . . . . . . . . . . . . . . . . . . . . . . 312
Layer masks . . . . . . . . . . . . . . . . . . . . . . . . . . . . . . . . . . . . . . . . . . . . . . . . . . . . . . . . . . . . . . . . . . . . . . . . . . . . . . . . . . . . . . . . . . . . . . . . . . . . . . . . . 317
Clipping masks . . . . . . . . . . . . . . . . . . . . . . . . . . . . . . . . . . . . . . . . . . . . . . . . . . . . . . . . . . . . . . . . . . . . . . . . . . . . . . . . . . . . . . . . . . . . . . . . . . . . . . 317
Layer styles . . . . . . . . . . . . . . . . . . . . . . . . . . . . . . . . . . . . . . . . . . . . . . . . . . . . . . . . . . . . . . . . . . . . . . . . . . . . . . . . . . . . . . . . . . . . . . . . . . . . . . . . . . 318
Opacity and blending modes . . . . . . . . . . . . . . . . . . . . . . . . . . . . . . . . . . . . . . . . . . . . . . . . . . . . . . . . . . . . . . . . . . . . . . . . . . . . . . . . . . . . . . . . 321
Chapter 12: Printing, sharing, and exporting
Print or share photos online . . . . . . . . . . . . . . . . . . . . . . . . . . . . . . . . . . . . . . . . . . . . . . . . . . . . . . . . . . . . . . . . . . . . . . . . . . . . . . . . . . . . . . . . . 323
Create photo prints . . . . . . . . . . . . . . . . . . . . . . . . . . . . . . . . . . . . . . . . . . . . . . . . . . . . . . . . . . . . . . . . . . . . . . . . . . . . . . . . . . . . . . . . . . . . . . . . . . 326
Print photos . . . . . . . . . . . . . . . . . . . . . . . . . . . . . . . . . . . . . . . . . . . . . . . . . . . . . . . . . . . . . . . . . . . . . . . . . . . . . . . . . . . . . . . . . . . . . . . . . . . . . . . . . 329
Save and export images . . . . . . . . . . . . . . . . . . . . . . . . . . . . . . . . . . . . . . . . . . . . . . . . . . . . . . . . . . . . . . . . . . . . . . . . . . . . . . . . . . . . . . . . . . . . . 332
v
Chapter 13: Photo projects
Project basics . . . . . . . . . . . . . . . . . . . . . . . . . . . . . . . . . . . . . . . . . . . . . . . . . . . . . . . . . . . . . . . . . . . . . . . . . . . . . . . . . . . . . . . . . . . . . . . . . . . . . . . 338
Making photo projects . . . . . . . . . . . . . . . . . . . . . . . . . . . . . . . . . . . . . . . . . . . . . . . . . . . . . . . . . . . . . . . . . . . . . . . . . . . . . . . . . . . . . . . . . . . . . . 338
Create a greeting card . . . . . . . . . . . . . . . . . . . . . . . . . . . . . . . . . . . . . . . . . . . . . . . . . . . . . . . . . . . . . . . . . . . . . . . . . . . . . . . . . . . . . . . . . . . . . . . 342
Create a photo book . . . . . . . . . . . . . . . . . . . . . . . . . . . . . . . . . . . . . . . . . . . . . . . . . . . . . . . . . . . . . . . . . . . . . . . . . . . . . . . . . . . . . . . . . . . . . . . . . 343
Editing photo projects . . . . . . . . . . . . . . . . . . . . . . . . . . . . . . . . . . . . . . . . . . . . . . . . . . . . . . . . . . . . . . . . . . . . . . . . . . . . . . . . . . . . . . . . . . . . . . . 343
Create photo calendars . . . . . . . . . . . . . . . . . . . . . . . . . . . . . . . . . . . . . . . . . . . . . . . . . . . . . . . . . . . . . . . . . . . . . . . . . . . . . . . . . . . . . . . . . . . . . . 346
Create a Facebook profile and cover picture . . . . . . . . . . . . . . . . . . . . . . . . . . . . . . . . . . . . . . . . . . . . . . . . . . . . . . . . . . . . . . . . . . . . . . . . . . 346
Chapter 14: Web graphics
Optimizing images . . . . . . . . . . . . . . . . . . . . . . . . . . . . . . . . . . . . . . . . . . . . . . . . . . . . . . . . . . . . . . . . . . . . . . . . . . . . . . . . . . . . . . . . . . . . . . . . . . 349
Dithering in web images . . . . . . . . . . . . . . . . . . . . . . . . . . . . . . . . . . . . . . . . . . . . . . . . . . . . . . . . . . . . . . . . . . . . . . . . . . . . . . . . . . . . . . . . . . . . . 351
Optimizing images for the PNG-24 format . . . . . . . . . . . . . . . . . . . . . . . . . . . . . . . . . . . . . . . . . . . . . . . . . . . . . . . . . . . . . . . . . . . . . . . . . . . . 353
Optimizing images for the GIF or PNG-8 format . . . . . . . . . . . . . . . . . . . . . . . . . . . . . . . . . . . . . . . . . . . . . . . . . . . . . . . . . . . . . . . . . . . . . . . 354
Use transparency and mattes . . . . . . . . . . . . . . . . . . . . . . . . . . . . . . . . . . . . . . . . . . . . . . . . . . . . . . . . . . . . . . . . . . . . . . . . . . . . . . . . . . . . . . . . 356
Optimizing images for the JPEG format . . . . . . . . . . . . . . . . . . . . . . . . . . . . . . . . . . . . . . . . . . . . . . . . . . . . . . . . . . . . . . . . . . . . . . . . . . . . . . 358
Previewing web images . . . . . . . . . . . . . . . . . . . . . . . . . . . . . . . . . . . . . . . . . . . . . . . . . . . . . . . . . . . . . . . . . . . . . . . . . . . . . . . . . . . . . . . . . . . . . 360
Chapter 15: Keyboard shortcuts
Keys for the Magic Extractor dialog box | Photoshop Elements 10, 11 . . . . . . . . . . . . . . . . . . . . . . . . . . . . . . . . . . . . . . . . . . . . . . . . . . 362
Windows 7 keyboard shortcuts . . . . . . . . . . . . . . . . . . . . . . . . . . . . . . . . . . . . . . . . . . . . . . . . . . . . . . . . . . . . . . . . . . . . . . . . . . . . . . . . . . . . . . 362
Keys for selecting tools . . . . . . . . . . . . . . . . . . . . . . . . . . . . . . . . . . . . . . . . . . . . . . . . . . . . . . . . . . . . . . . . . . . . . . . . . . . . . . . . . . . . . . . . . . . . . . 363
Keys for painting and brushes . . . . . . . . . . . . . . . . . . . . . . . . . . . . . . . . . . . . . . . . . . . . . . . . . . . . . . . . . . . . . . . . . . . . . . . . . . . . . . . . . . . . . . . . 364
Keys for transforming selections . . . . . . . . . . . . . . . . . . . . . . . . . . . . . . . . . . . . . . . . . . . . . . . . . . . . . . . . . . . . . . . . . . . . . . . . . . . . . . . . . . . . . 365
Keys for the Liquify filter . . . . . . . . . . . . . . . . . . . . . . . . . . . . . . . . . . . . . . . . . . . . . . . . . . . . . . . . . . . . . . . . . . . . . . . . . . . . . . . . . . . . . . . . . . . . . 365
Keys for the Filter Gallery . . . . . . . . . . . . . . . . . . . . . . . . . . . . . . . . . . . . . . . . . . . . . . . . . . . . . . . . . . . . . . . . . . . . . . . . . . . . . . . . . . . . . . . . . . . . 366
Keys for the Color Swatches panel . . . . . . . . . . . . . . . . . . . . . . . . . . . . . . . . . . . . . . . . . . . . . . . . . . . . . . . . . . . . . . . . . . . . . . . . . . . . . . . . . . . . 366
Last updated 10/3/2016
Page 6

PHOTOSHOP ELEMENTS
Content s
Keys for using blending modes . . . . . . . . . . . . . . . . . . . . . . . . . . . . . . . . . . . . . . . . . . . . . . . . . . . . . . . . . . . . . . . . . . . . . . . . . . . . . . . . . . . . . . 367
Keys for showing or hiding panels (expert mode) . . . . . . . . . . . . . . . . . . . . . . . . . . . . . . . . . . . . . . . . . . . . . . . . . . . . . . . . . . . . . . . . . . . . . 367
Keys for the Camera Raw dialog box . . . . . . . . . . . . . . . . . . . . . . . . . . . . . . . . . . . . . . . . . . . . . . . . . . . . . . . . . . . . . . . . . . . . . . . . . . . . . . . . . 368
Keys for using text . . . . . . . . . . . . . . . . . . . . . . . . . . . . . . . . . . . . . . . . . . . . . . . . . . . . . . . . . . . . . . . . . . . . . . . . . . . . . . . . . . . . . . . . . . . . . . . . . . . 368
Keys for selecting and moving objects . . . . . . . . . . . . . . . . . . . . . . . . . . . . . . . . . . . . . . . . . . . . . . . . . . . . . . . . . . . . . . . . . . . . . . . . . . . . . . . 369
Keys for the Layers panel . . . . . . . . . . . . . . . . . . . . . . . . . . . . . . . . . . . . . . . . . . . . . . . . . . . . . . . . . . . . . . . . . . . . . . . . . . . . . . . . . . . . . . . . . . . . 370
Keys for viewing images (expertmode) . . . . . . . . . . . . . . . . . . . . . . . . . . . . . . . . . . . . . . . . . . . . . . . . . . . . . . . . . . . . . . . . . . . . . . . . . . . . . . . 371
Keys for using Photomerge Panorama | Photoshop Elements 10, 11 . . . . . . . . . . . . . . . . . . . . . . . . . . . . . . . . . . . . . . . . . . . . . . . . . . . 371
vi
Last updated 10/3/2016
Page 7

Chapter 1: What's new
What's new in Photoshop Elements 15
We all enjoy capturing our enthralling memories. Adobe Photoshop Elements 15 simplifies the process of organizing
and editing these moments. You can use one-click fixes and add effects to create impressive snapshots, collages,
slideshows, cards, and scrapbook pages. Share on social media and get the world talking.
• Touch - bas e d e d i tin g
• New Guided Edits
• Photo Text
• Effects Collage
• Speed Pan
• Painterly
1
• Frame Creator
• Adjust facial features
• Perspective Crop tool
• Enhanced filters for effects
• New frames and backgrounds
• Layer grouping and color coding
• Retouch photos with enhanced tools
• Disable automatic creation of Smart Objects
• eLive Search
Adobe Photoshop Elements includes Elements Organizer, which helps you organize your assets. For information about
new features in Elements Organizer, see What's new in Photoshop Elements 15.
Try the latest Photoshop Elements|Explore Elements product suite
Touch-based editing
Organizer and Quick Edit mode are now touch-friendly!
Edit and organize photos with your fingertips. Now, you can simply tap to find, sort, and enhance your photos in the
Organizer and Quick Edit mode in your touch-screen devices.
Last updated 10/3/2016
Page 8

What's new
New Guided Edits
Photo Text
Create cool visual text!
Now create fun text with one of your photos as the background. The new Photo Text Guided Edit makes it easy to create
text outlines filled with a photo and add effects like emboss and drop shadow to bring the text in the spotlight.
Creatively make use of this photo text in collages, scrapbook pages, cards, and more. Find this new Guided Edit using
Guided > Fun Edits > Photo Text.
2
For detailed steps, see Photo Text Guided Edit.
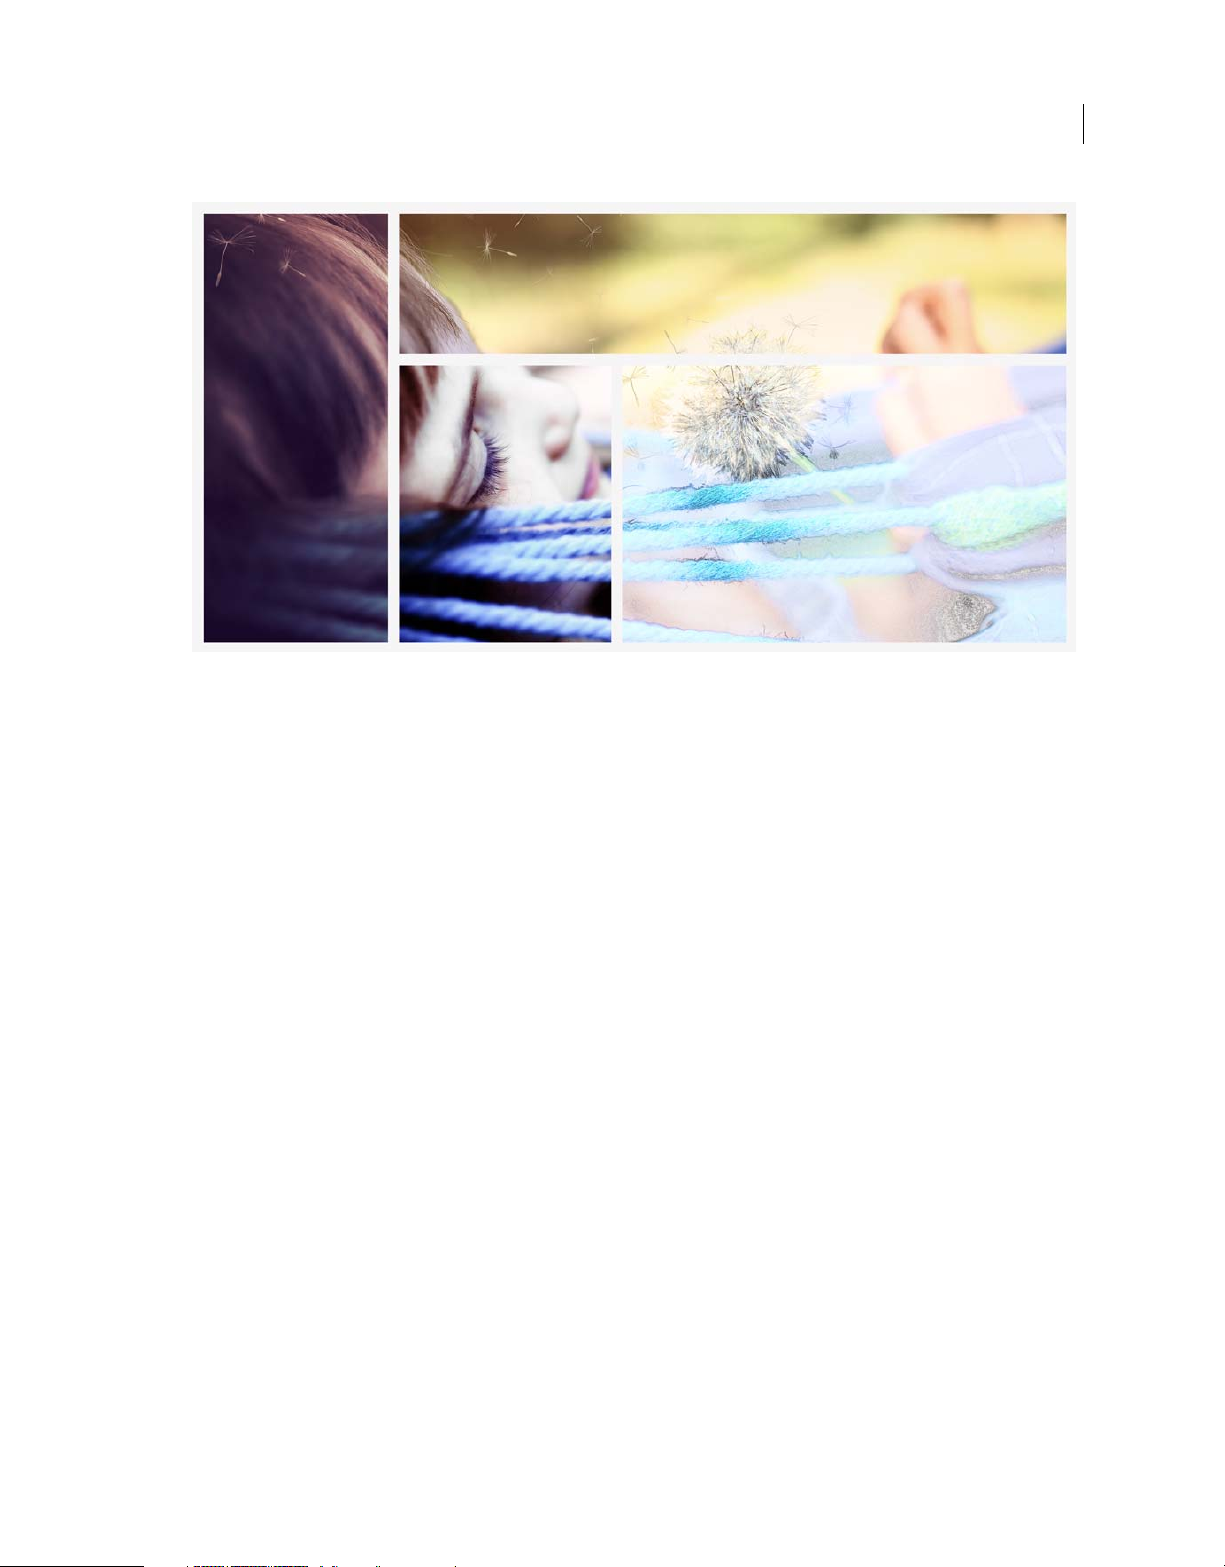
Effects Collage
A new way to look artistic!
With Photoshop Elements 15, you can now apply different effects to different sections of your photograph. In a few
guided steps, transform a regular photo into an artistic collage. Photoshop Elements gives you a choice of templates and
themes. Find this new Guided Edit using Guided > Fun Edits > Effects Collage.
Last updated 10/3/2016
Page 9
What's new
3
For detailed steps, see Effects Collage Guided Edit.
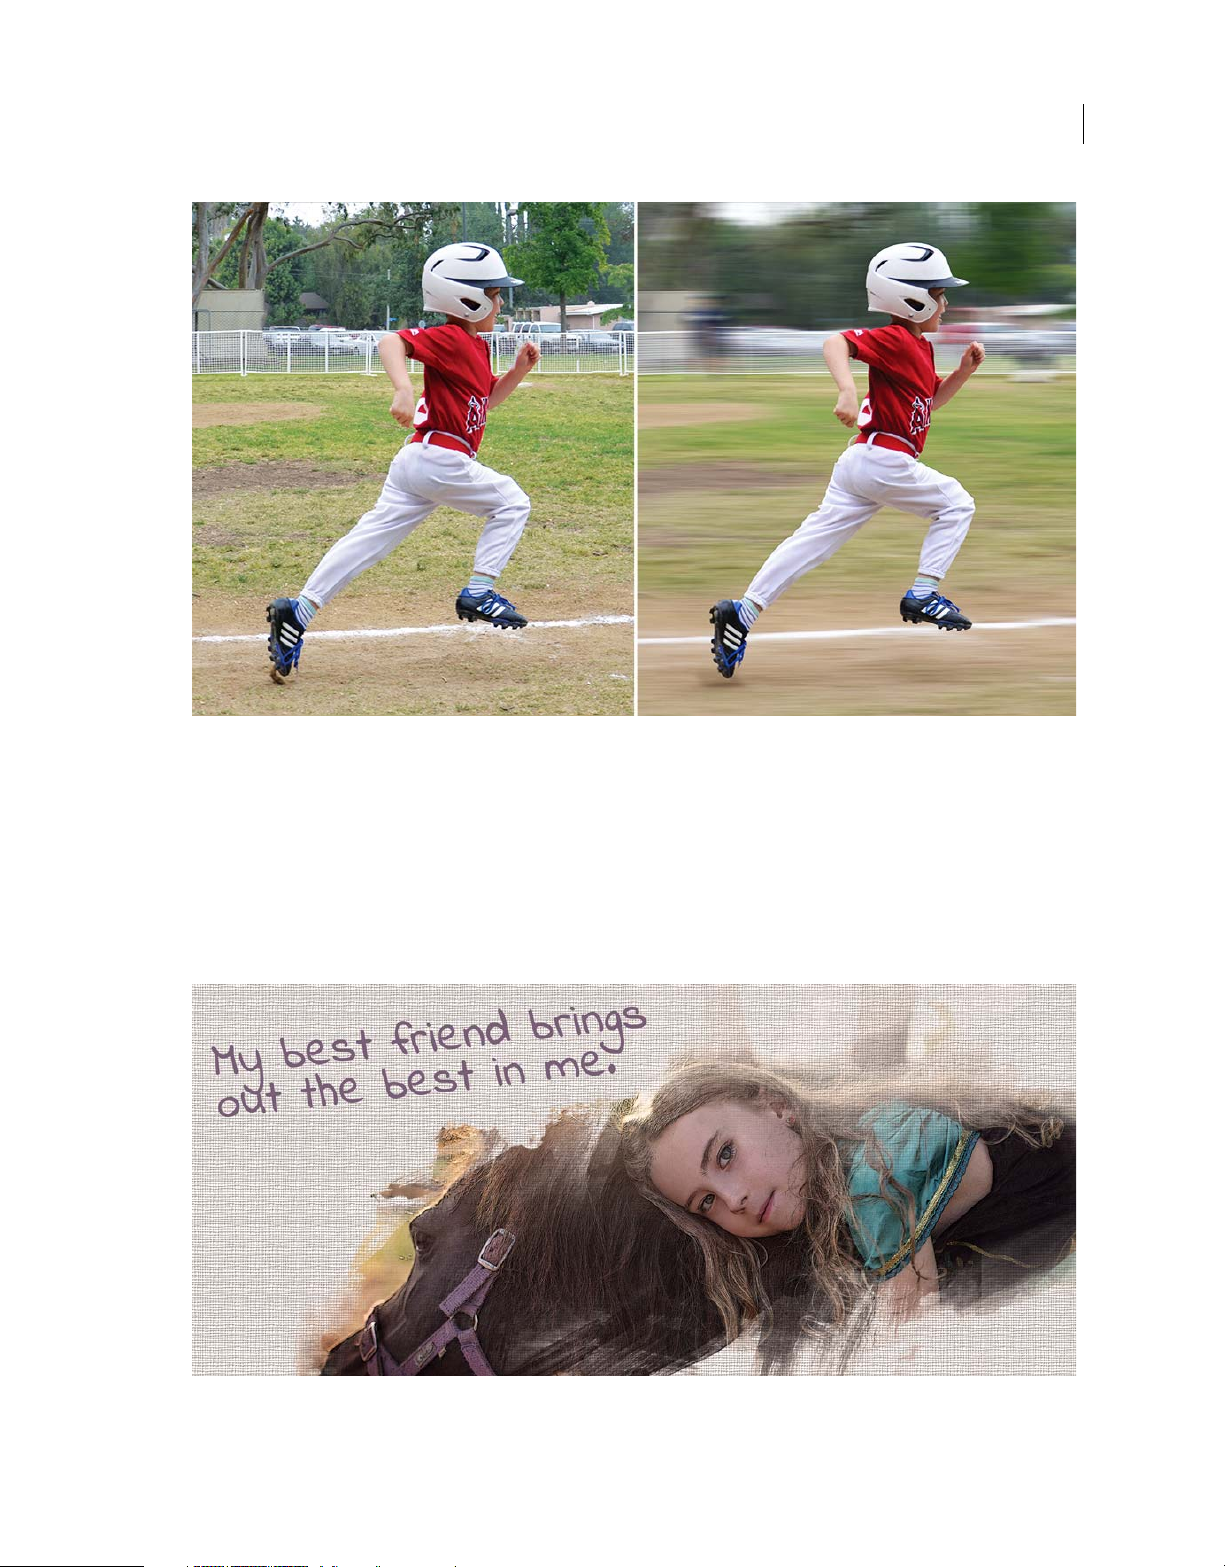
Speed Pan
Create a dramatic action shot!
Follow the steps in the Speed Pan Guided Edit to give your photo’s subject a panning effect by blurring the backg round.
Use the Quick Selection tool to select the subject of your photo and click Add Motion Blur to make the background
blurred and your subject appear in action.
Last updated 10/3/2016
Page 10
What's new
4
For detailed steps, see Speed Pan Guided Edit.
Painterly
Portray your photos as paintings!
Use the new Painterly Guided Edit to create unique work of art by painting your photo with Paint Brush, adding
different colored and textured canvasses, and applying effects to your painting. Share your work of art on social media
or keep a printed copy as a memento. Find this Guided Edit using Guided > Fun Edits > Painterly.
Last updated 10/3/2016
Page 11

What's new
For detailed steps, see Painterly Guided Edit.
Frame Creator
Create your own frames!
Bored of the existing choices to frame your photo? Now create frames using any photo from your library to complement
your photos using the Frame Creator Guided Edit.
You can also import frames that other Elements users have created. You can find this new guided workflow using
Guided > Special Edits > Frame Creator.
5
Last updated 10/3/2016
Page 12

What's new
6
For detailed steps, see Frame Creator.
Last updated 10/3/2016
Page 13

What's new
Adjust facial features
Keep smiling!
Have you ever missed that perfect shot with a smiling face by a second? Now, you can change frowns into smiles, adjust
squinting eyes, and make other adjustments with Photoshop Elements 15 (Enhance > Facial Features). You can easily
retouch the height, width, and other characteristics of facial features, including lips, eyes, nose, forehead, jawbone, and
chin, to get the desired looks. Enhance any face in photos by simply adjusting the sensitivity slider to get back your
smile.
7
For detailed steps, see Adjust facial features.
Perspective Crop tool
Change the perspective of your photograph!
In Expert mode, use the Perspective Crop tool to transform the perspective in an image while cropping. This tool
enables you to remove any distortion present in an image taken from an angle rather than a straight view. You can
simply drag the corners of the bounding box of this tool or specify the dimensions to change the perspective and
remove any distortions.
Last updated 10/3/2016
Page 14

What's new
8
For more information, see Perspective Crop tool.
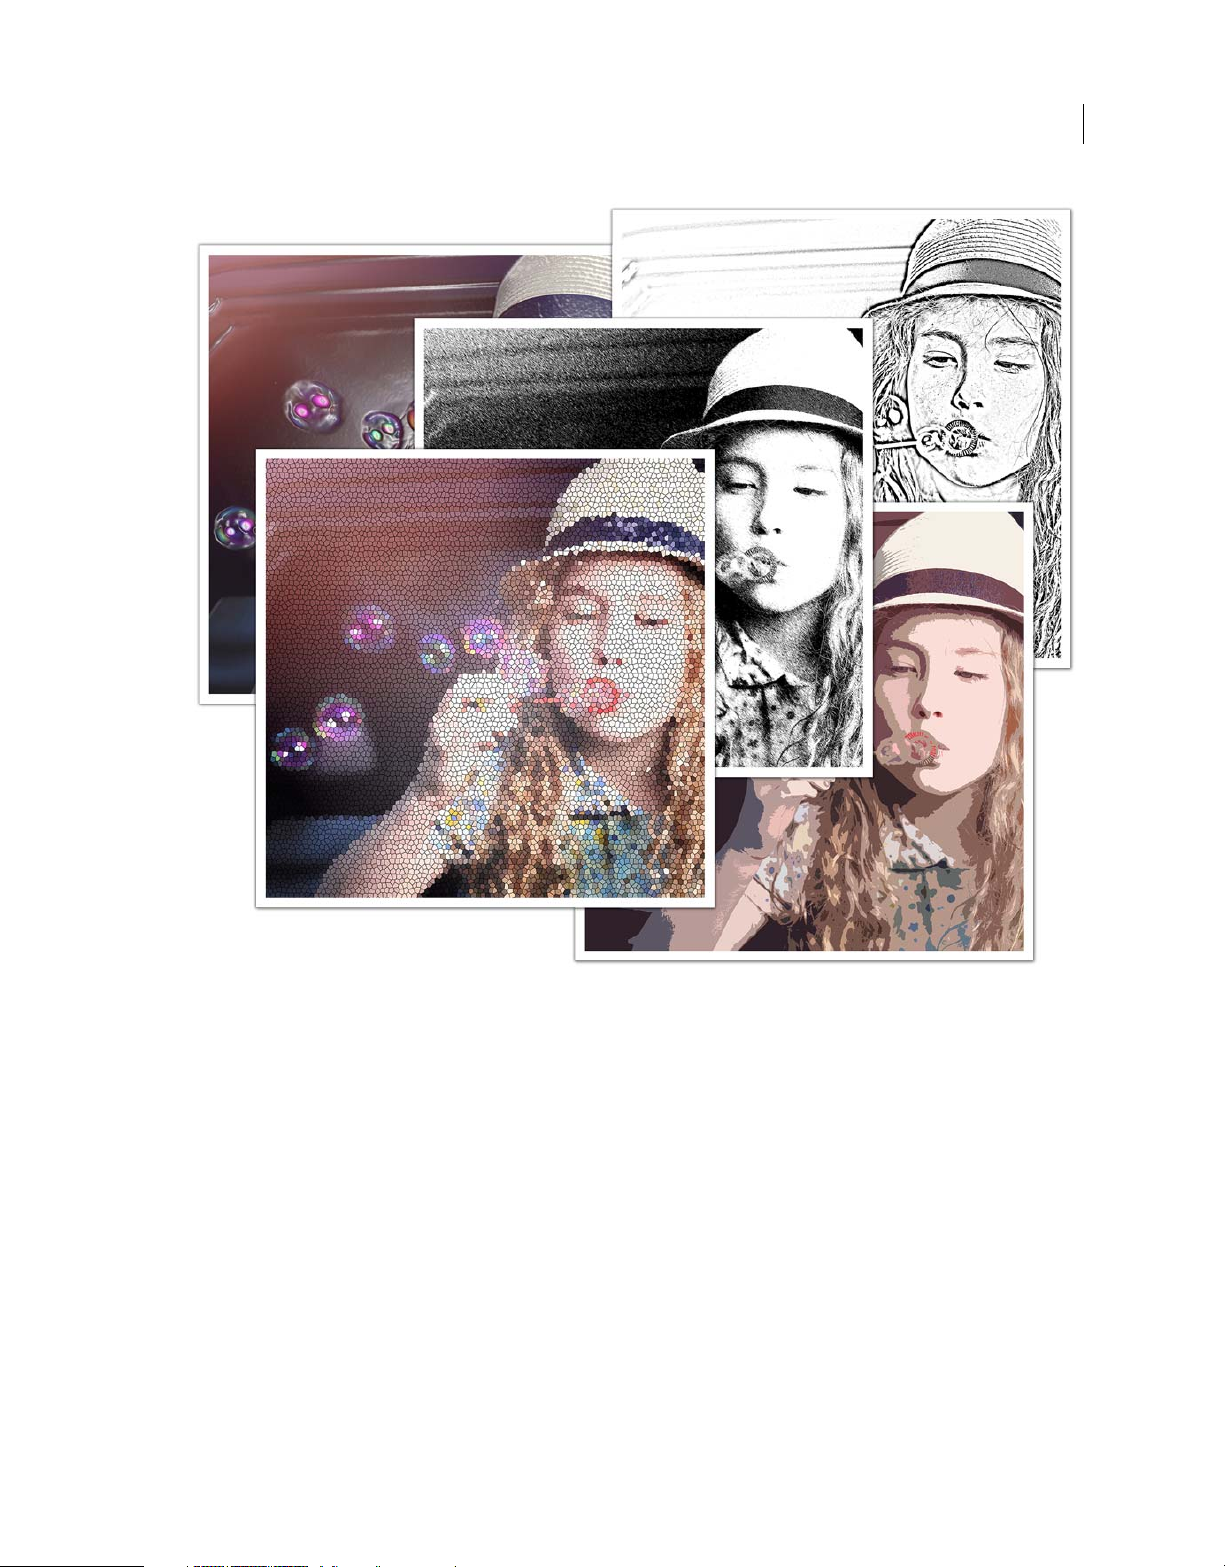
Enhanced filters for effects
Have more fun with filters!
Filters are a great way to try on new looks and show off your creativity, and now it's even easier to choose the best filter
for your photo and fine-tune the details. You can now apply the filters directly from the Filters panel in the Expert
mode. For some filters, Photoshop Elements 15 even lets you modify the intensity of the applied filter by simply
adjusting a slider. Try a combination of filters and effects to spruce up your photographs before sharing it with family
and friends.
Last updated 10/3/2016
Page 15
What's new
9
For more information, seeFilters .
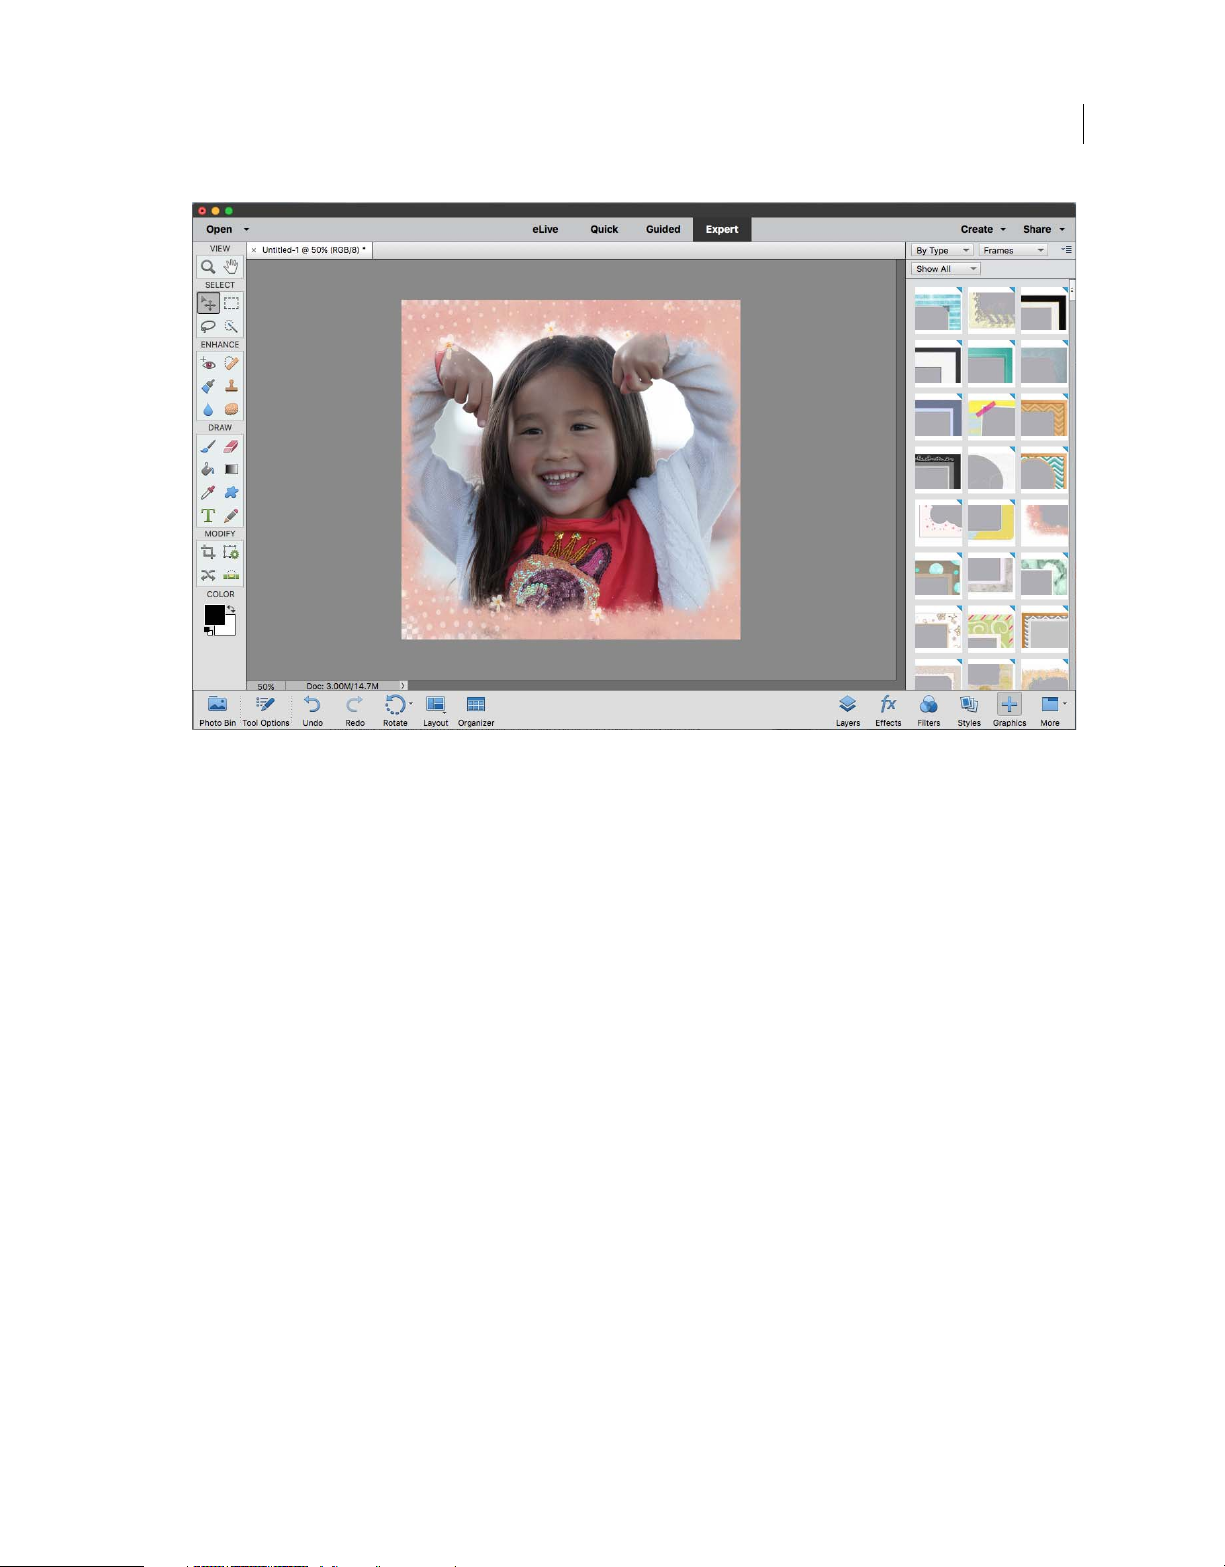
New frames and backgrounds
Photoshop Elements 15 brings to you more than 100 new frames and backgrounds that are ready for use. Select By Type
in the Graphics panel in Expert mode to use fresh graphical additions for enhancing your photographs.
Last updated 10/3/2016
Page 16
What's new
10
Layer grouping and color coding
Photoshop Elements 15 comes with enhancements to help you manage your layers better. You can now group layers
and color-code layers and layer groups.
Grouping layers helps you organize the different components of your projects and keeps your Layers panel uncluttered.
Color coding layers and groups helps you locate related layers in the Layers panel. Simply right-click the layer or group
to select a color.
For more information, see Manage layers.
Retouch photos with enhanced tools
The Healing Brush and Spot Healing Brush tools are now enhanced for better performance.
The enhanced Content-aware Move Tool now allows you to adjust the scale and rotation of the object that you are
moving or the area that you are extending.
For more information, see Remove spots and unwanted objects.
Disable automatic creation of Smart Objects
Photoshop Elements preferences (Edit > Preferences > General) now includes an option to disable automatic creation
of Smart Objects when you place or drag images from the photo bin.
Last updated 10/3/2016
Page 17

What's new
For more information, see Too l s .
eLive Search
Need help? Find your answers directly in the eLive view. Photoshop Elements 15 enables you to search for eLive
content, Help pages, and troubleshooting articles from within the eLive view.
11
For more information, seeeLive .
Last updated 10/3/2016
Page 18

Chapter 2: Workspace and workflows
Workspace basics
The Welcome screen
When you start Photoshop Elements, the Welcome screen opens by default. The Welcome screen is a convenient
starting place, or hub, for major tasks.
On the Welcome screen, click:
• Photo Editor, to enhance your images or add special effects.
• Click the Photo Editor icon to open the editor in default mode.
12
• Click the Photo Editor drop-down icon to open the editor along with one of the recently opened files, a new file,
or choose a file to open.
• Organizer, to import, tag, or organize your photos.
• Video Editor, to creatively edit and create fun movies with your videos.
• Close button (X) in the upper-right corner of the Welcome screen to close the Welcome screen. It’s not necessary to
return to the Welcome screen to open other workspaces—you can open different workspaces from within any other
workspace.
• Settings icon (adjacent to the Close button) to choose what application is started when you start.
Last updated 10/3/2016
Page 19

Workspace and workflows
Photoshop Elements window
The Photoshop Elements window provides modes to create and edit images. Select one of the following options:
Quick
Enables you to edit photos in the Quick mode.
Guided
Enables you to edit photos in the Guided Edit mode.
Expert
Enables you to edit photos in the Expert mode.
The Expert mode has tools to correct color problems, create special effects, and enhance photos. The Quick mode
contains simple tools for correcting color and lighting, and commands to quickly fix common problems, such as red
eye. The Guided mode contains tools for basic photo edits, guided activities, and photographic effects. If you are new
to digital imaging, Quick or Guided modes are a good place to start fixing photos.
If you’ve worked with image-editing applications before, you’ll find that the Expert mode provides a flexible and
powerful image-correction environment. It has lighting and color-correction commands, along with tools for fixing
image defects, making selections, adding text, and painting on your images. You can rearrange the Expert workspace
to best suit your needs. You can move, hide, and show panels, and arrange panels in the Panel Bin. You can also zoom
in or out of the photo, scroll to a different area of the document window, and create multiple windows and views.
13
A Active tab B Inac tive tab C Active image area D Options bar E Toolbox F Tool Options bar / Photo bin G Taskba r H Panel bar
Menu bar Contains menus for performing tasks. The menus are organized by topic. For example, the Enhance menu
contains commands for applying adjustments to an image.
Last updated 10/3/2016
Page 20

Workspace and workflows
Mode selector Contains buttons to enter the three available editing modes. Also, contains the Open (recently used
files) drop-down and the Create (photo projects) drop-down.
Toolbox Holds tools for editing images.
Panel bin Logically grouped features, actions, or controls.
Photo Bin / Tools Options Toggles between Photo Bin (display and manage thumbnails of currently used photos) and
Tools Options (displays and sets options for the currently selected tool)
Tas k ba r Displays the most frequently used actions as buttons, for quick and easy access.
Use context menus
You can use context menus in both the Photo Editor and Organizer workspaces. Context-sensitive menus display
commands that are relevant to the active tool, selection, or panel. These menus are often another way to access the
commands in the main menus.
1 Position the pointer over an image or panel item.
Note: Not all panels offer context menus.
2 Right-click and choose a command from the menu.
14
Using keyboard commands and modifier keys
You can use keyboard shortcuts in both the Photo Editor and Organizer workspaces. Keyboard commands let you
quickly execute commands without using a menu; modifier keys let you alter how a tool operates. When available, the
keyboard command appears to the right of the command name in the menu.
Exit Photoshop Elements
To exit Photoshop Elements, close both the Photo Editor and Organizer workspaces—closing one does not
automatically close the other.
1 From any workspace, do one of the following:
• In Windows, choose File > Exit. In Mac, choose Photoshop Elements > Quit Photoshop Elements.
• Click the Close button (X) in the upper-right corner of the workspace.
2 When closing Photoshop Elements, choose whether to save any open files.
Panels and bins
About panels
Panels are available in both Photoshop Elements and Elements Organizer; however, they behave a little differently in
each. Panels help you manage, monitor, and modify images. Some panels have menus that provide additional
commands and options. You can organize panels in the basic and custom workspaces in Expert mode. You can store
panels in the Panel Bin to keep them out of your way, but easily accessible.
Last updated 10/3/2016
Page 21

Workspace and workflows
15
Panel menus
Some commands appear in both the panel menu and the menu bar. Other commands are exclusive to panel menus.
Click panel menu to view the different commands in each panel.
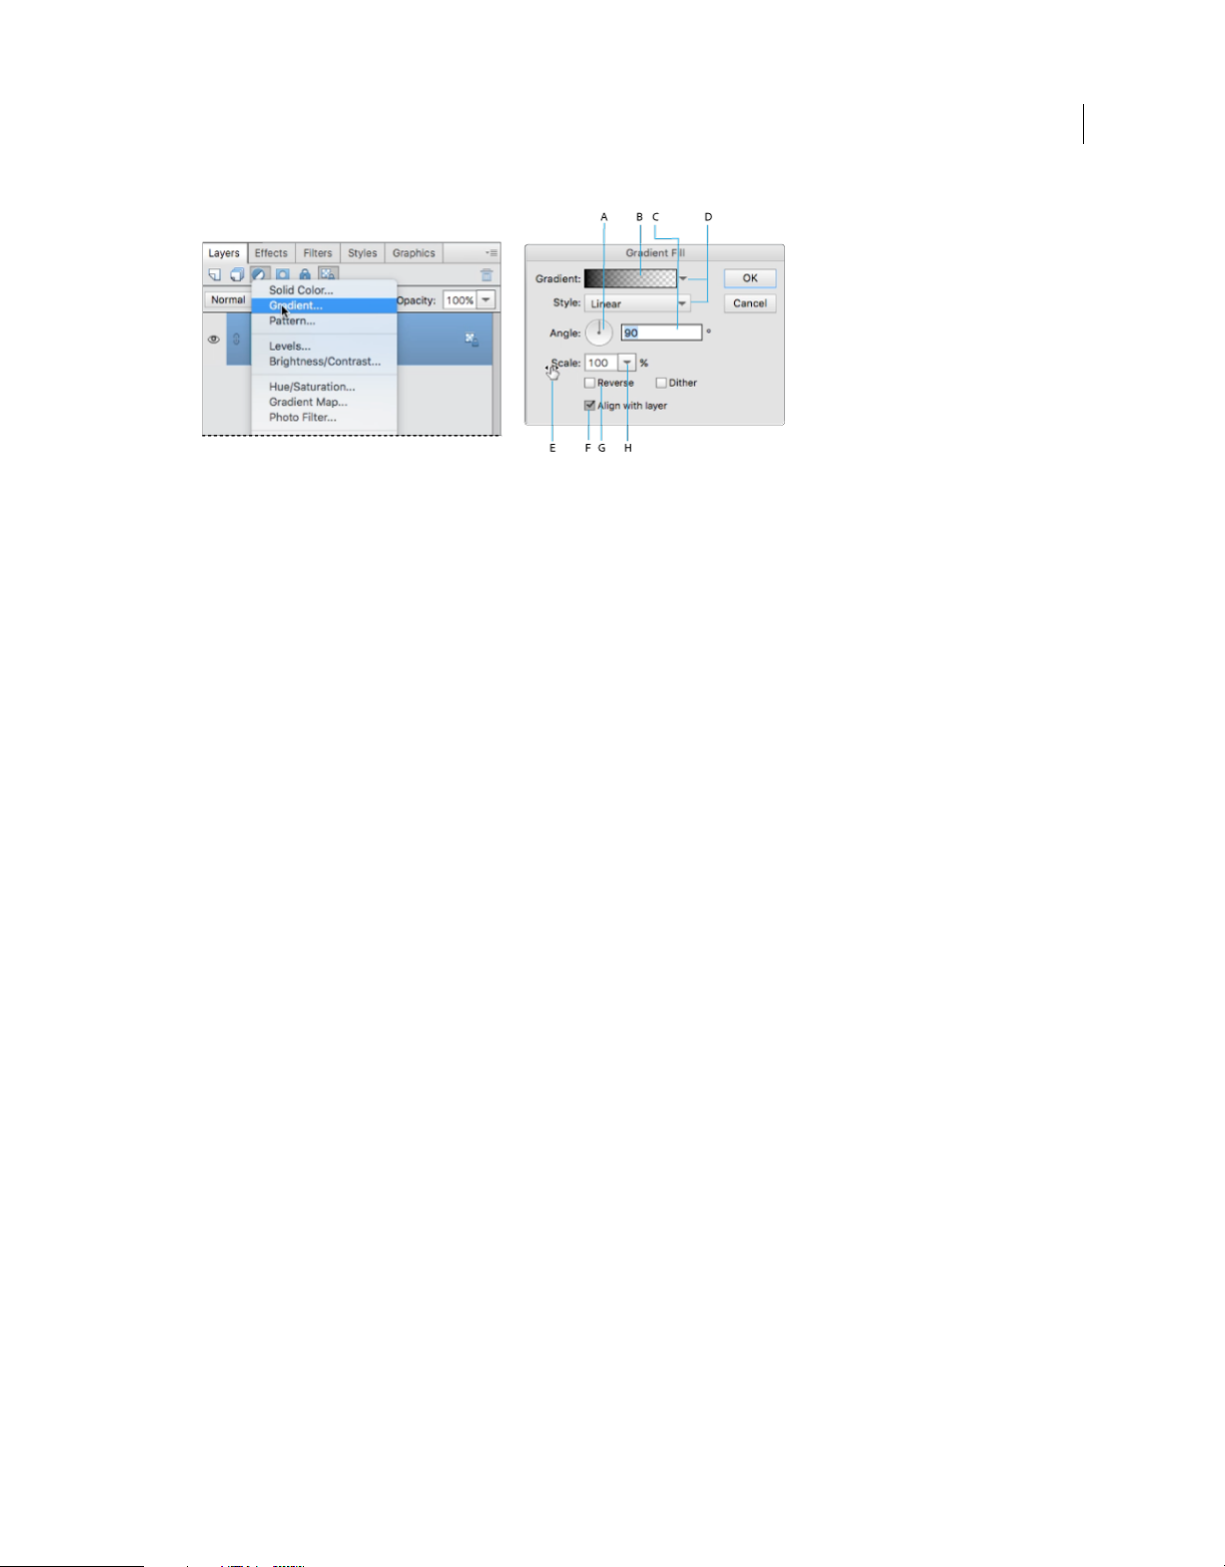
Pop-up sliders within panels
Some panels and dialog boxes contain settings that use pop-up sliders (for example, the Opacity option in the Layers
panel). If there is a triangle next to the text box, you can activate the pop-up slider by clicking the triangle. Position the
pointer over the triangle next to the setting, hold down the mouse button, and drag the slider or angle radius to the
desired value. Click outside the slider box or press Enter to close the slider box. To cancel changes, press Esc.
To increase or decrease values in 10% increments when the pop-up slider box is open, hold down Shift and press the Up
or Down arrow keys.
Last updated 10/3/2016
Page 22
Workspace and workflows
A Dial B Click to open window C Text box D Menu arrow E Scrubby slider F Check box G Hotkey H Pop-up slider triangle
Work with panels
Panels contain features, information, or functionality, in logical groups, for fast and easy access. The Panel Bin is on the
right side of Photoshop Elements. It displays tabs and panels, depending on the mode you are in, or the kind of elements
you want to work with. The Panel Bin displays:
• Quick mode: lists the quick-mode effects that can be applied to a photo
• Guided mode: lists all the guided-mode edits that you can apply to a photo
• Expert mode: lists the options for a selected panel (Layers, Effects, Graphics, or Favorites)
16
Panels in the Expert mode
In the Expert mode, panels can be displayed in two ways - Basic Workspace, and Custom Workspace.
Basic Workspace By default, the available workspace displayed is the Basic Workspace. In this view, buttons for the
most frequently used panels are placed in the taskbar. The buttons in this workspace are Layers, Effects, Graphics, and
Favorites. For example, clicking the Layers button displays all the layers-related options. To view all the other available
tabs, or close open tabs, click More.
Custom Workspace To view panels in a tabbed layout in the Panel Bin, click the arrow next to More, and select Custom
Workspace. Click More to view a list of all the available tabs, and select one from the pop-up list. The selected tab is
displayed. You can keep the frequently used panels open in the custom workspace. Group panels together or dock one
panel at the bottom of another panel. You can drag title bar of the tab and drop it in the tabbed layout, or drag-anddrop the tabs dialog into the tabbed layout.
Note: Drag a panel out of the Panel Bin if you want to remove it from the Panel Bin and keep it open.
Last updated 10/3/2016
Page 23

Workspace and workflows
17
1 To show or hide the Panel Bin, Choose Window > Panel Bin.
2 In the Panel Bin (Custom Workspace),
• To remove a panel from the Panel Bin, drag the title bar of the panel out of the Panel Bin.
• To add a panel to the Panel Bin, drag the title bar of the panel into the Panel Bin.
• To rearrange panels in the Panel Bin, drag the title bar of the panel to a new location.
• To expand or collapse panels in the Panel Bin, double-click the name of the panel.
Last updated 10/3/2016
Page 24

Workspace and workflows
3 To use panels outside the Panel Bin, in Custom Workspace view, do any of the following:
• To open a panel, choose the name of the panel from the Window menu, or click the arrow next to the More button
in the taskbar and select a panel.
• To close a panel, choose the name of the panel from the Window menu. Or click the Close button in the title
bar of the panel.
• To change the size of a panel, drag any corner of the panel.
• To group panels (one panel with multiple tabs), drag the panel onto the body of the target panel. A thick line
appears around the body of the target panel when the pointer is over the correct area for grouping to occur. If
you want to move a panel to another group, drag the tab of the panel to that group. To separate a panel from a
group, drag the tab of the panel outside the group.
• To move a panel group, drag the title bar.
• To expand or collapse a panel or panel group, double-click the tab of the panel or title bar.
• To dock panels together (stacked panels), drag a tab of the panel or the title bar to the bottom of another panel.
A double line appears at the bottom of the target panel when the pointer is over the correct area.
• To reset panels to their default positions, choose Window > Reset Panels.
18
Use the taskbar
At the bottom of the Photoshop Elements, the taskbar displays buttons for the most frequently used panels and
operations performed while editing and modifying images. You can use the Photo Bin and Tool Options buttons to
toggle between displaying thumbnails and tool options. You can quickly undo and redo operations, or rotate images
using the options available taskbar, or Organizer to start Photoshop Elements Organizer. In the Expert mode, click the
arrow beside the More button, to see the option to toggle between Basic and Custom workspaces.
Use the Photo Bin
Located toward the bottom of the Photoshop Elements window, above the taskbar, the Photo Bin displays thumbnails
of open photos. It’s useful for switching between multiple open photos in your workspace. The Photo Bin has controls
that let you open or close images, hide images, navigate through open images, make a specific image the frontmost
image, dupl icat e an image, rotate an image, or v iew file i nfor mation. You can easily b ring ope n images into Quick mode
for editing. Multipage projects created using the Create tab open in the Create panel.
Last updated 10/3/2016
Page 25

Workspace and workflows
Do any of the following:
• (Window s on ly) To open an i mage , dra g a f il e fr om a ny l oc ati on o n yo ur c omp ute r (in clu ding the P hot o Brows er )
or from any storage device connected to your computer into the Photo Bi
n.
• To bring an opened image forward as the frontmost image, click a thumbnail.
• To rearrange photos, drag thumbnails in the Photo Bin. The order here does not impact the photo’s order in the
Elements Organizer.
• To close an image, right-click a thumbnail in the Photo Bin and choose Close.
• To hide an image that is in a floating window, right-click the thumbnail and choose Minimize from the context
menu.
19
Note: To show an image after hiding it, double-click its thumbnail in the Photo Bin, or right-click the thumbnail and
choose Restore from the context menu.
• To view a photo’s file information, right-click a thumbnail and choose File Info from the context menu.
• To duplicate an image, right-click a thumbnail, choose Duplicate from the context menu, and name the file.
• To rotate an image, right-click a thumbnail and choose Rotate 90° Left or Rotate 90° Right from the context
u.
men
• To show filenames, right-click in the Photo Bin and choose Show Filenames from the context menu.
• To manually show or hide the bin, click the Photo Bin taskbar icon.
• The flyout menu of the Photo Bin contains additional options to work with the images that are available in the
Photo Bin
:
• Print Bin Files. Opens the Photoshop Elements Print dialog box, with options to print the photos currently
selected in the Photo Bin.
• Save Bin as an Album. Enables you to name and save an album containing the images in the Photo Bin. The
new album is available in Organizer.
• Show Grid. Displays a grid around images in the Photo bin.
To ol s
Last updated 10/3/2016
Page 26
Workspace and workflows
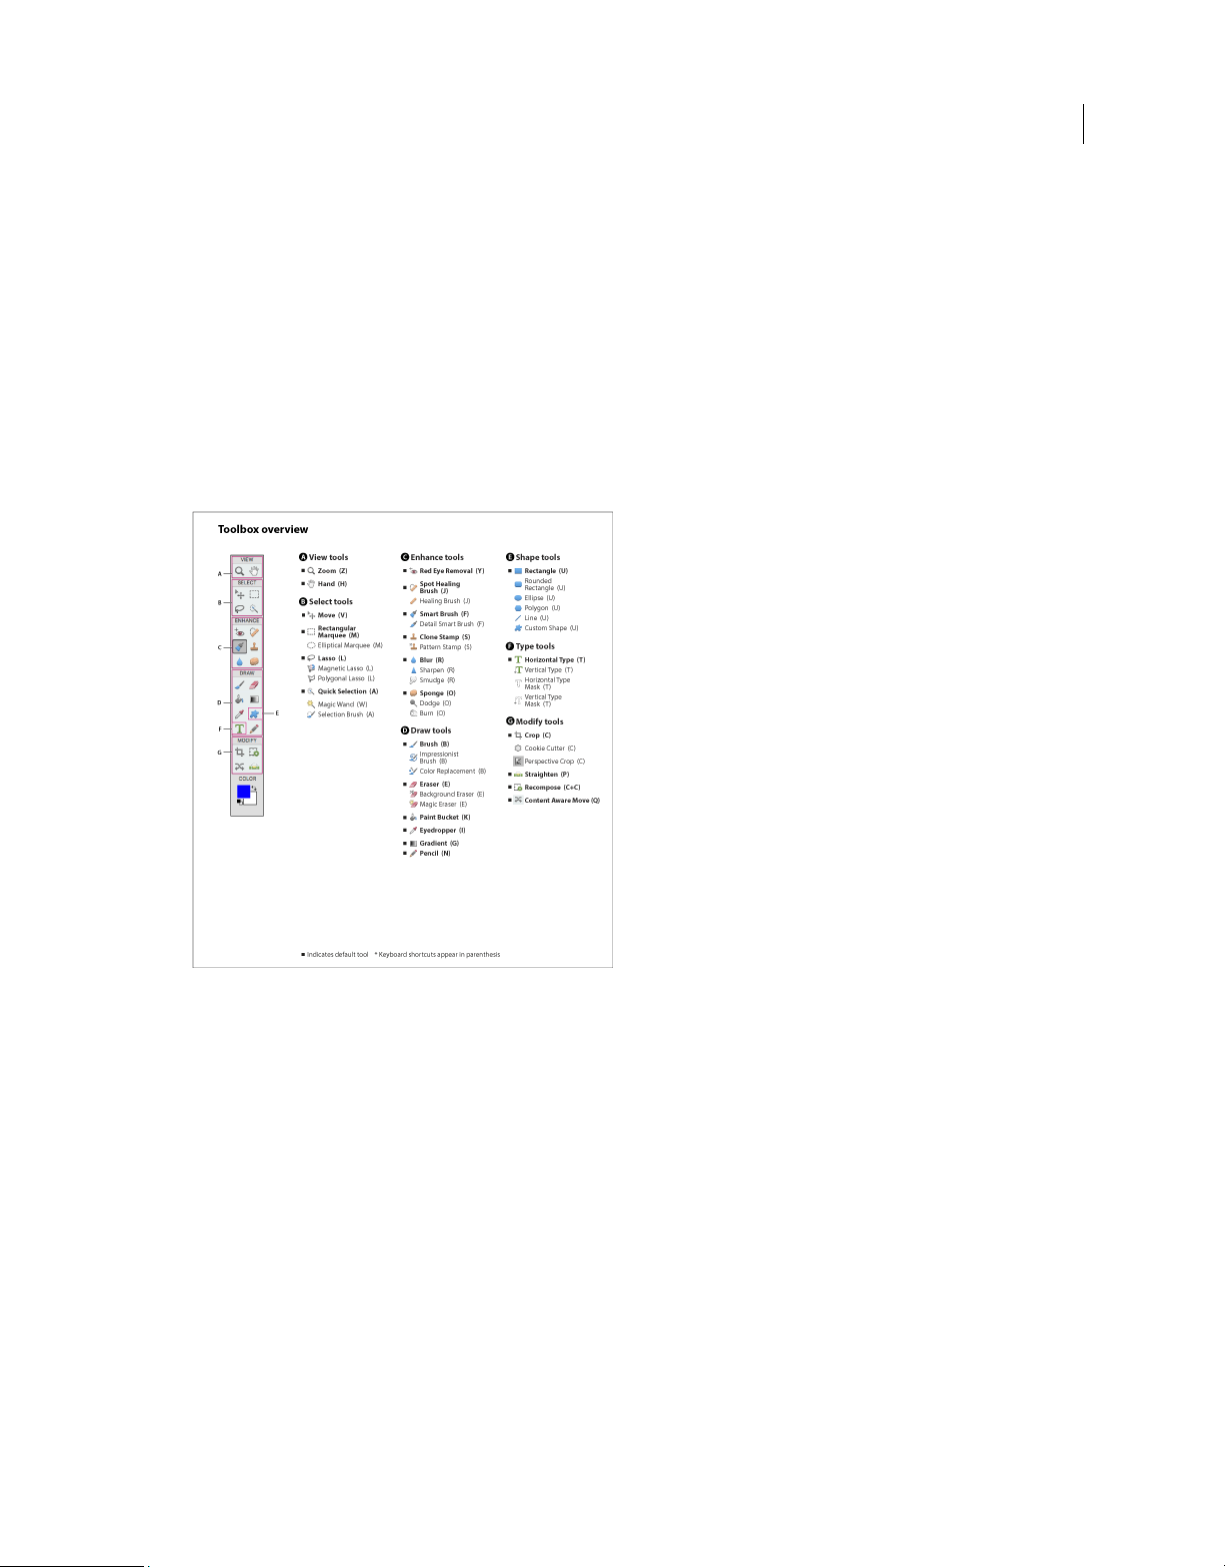
About the toolbox
You use tools in the Photoshop Elements toolbox to select, edit, and view images; some tools let you paint, draw, and
type. The toolbox appears on the left side in the Quick and Expert modes.
Tools in the toolbox are grouped logically, in the Quick and Expert modes. For example, in the Expert view, the Move,
Recta
ngular Marquee, Lasso, and Quick Selection tools are placed together in the Select group.
Select a tool in the toolbox to use it. Once selected, the tool is highlighted in the toolbox. Optional settings for the tool
a
ppear in the Tool Options bar, towards the bottom of the Photoshop Elements window.
note: Y
ou cannot deselect a tool—once you select a tool, it remains selected until you select a different tool. For
example, if you’ve selected the Lasso tool, and you want to click your image without selecting anything, select the Hand
tool.
20
Select a tool
Do one of
• Click a tool in the toolbox. If there are additional tool options, they are displayed in the Tool Options bar. Click
• Press the tool’s keyboard shortcut. The keyboard shortcut is displayed in its tool tip. For example, you can select
the following:
he tool you want to select.
t
the Brush tool by pressing the B key.
Set Edit preferences
1 In Windows, choose Edit > Preferences > General. In Mac, choose Photoshop Elements > Preferences > General.
Last updated 10/3/2016
Page 27

Workspace and workflows
2 Set one or more of the following options, and click OK.
• Select Show Tool Tips to show or hide tool tips.
• Select Use Shift Key For Tool Switch to cycle through a set of hidden tools by holding down the Shift key. When
this option is deselected, you can cycle through a set of tool options by pressing the shortcut key (without holding
down Shift). For example, pressing B on your keyboard repeatedly, cycles through all the Brush tool option
(B
rush, Impressionist Brush, and Color Replacement tools)
s
Set the appearance of a tool pointer
1 In Windows, choose Edit > Preferences > Display & Cursors. In Mac, choose Photoshop Elements > Preferences >
Display & Cursors.
2 Select a setting for the Painting Cursors:
Standard Displays pointers as tool icons.
Precise Displays pointers as cross-hairs.
Normal Brush Tip Displays pointers as circles at 50% of the size you specify for the brush.
Full Size Brush Tip Displays pointers as circles at the full size you specify for the brush.
Show Crosshair In Brush Tip Displays cross-hairs in the circles when you choose either Normal Brush Tip or Full
Size Brush Tip.
21
3 Select a setting for Other Cursors:
Standard Displays pointers as tool icons.
Precise Displays pointers as cross-hairs.
Resize or change the hardness of painting cursors by dragging
You can resize or change the hardness of a painting cursor by dragging in the image. As you drag, you preview both the
size and hardness of the painting tool.
• To resize a cursor, right-click + press Alt (Windows only), and drag to the left or right.
• To change the hardness of a cursor, right-click + press Alt (Windows only), and drag up or down.
Set tool options
The Tool Options bar appears above the taskbar at the bottom of the Photoshop Elements window. The Tool Options
bar displays different options when you select different tools.
A Tool icon B Active tool in the Tool Options bar C Hidden tools D Tool options
1 Select a tool.
Last updated 10/3/2016
Page 28
Workspace and workflows
2 Look in the Tool Options bar to see the available options. For more information on setting options for a specific tool,
search for the tool’s name in Photoshop Elements Help.
Note: T
o return a tool or all tools to their default settings, click the tool icon, select the flyout menu from the Tool Options
bar, and then choose Reset Tool or Reset All Tools.
3 To close the Tool Options bar, click Tool Options in the task bar. To reopen the bar, click Tool Options from the task
bar.
Rulers, grids, and guides
About rulers, grids, and guides
In Expert mode, rulers, grids, and guides help you position items (such as selections, layers, and shapes) precisely across
the width or length of an image. In Quick mode, only grids are available.
When visible, rulers appear along the top and left side of the active window. Markers in the ruler display the pointer’s
position when you move it. Changing the ruler origin (the 0, 0 mark on the top and left rulers) lets you measure from
a specific point on the image. The ruler origin also determines the grid’s point of origin.
22
Use the View menu to show or hide the rulers (Expert mode only), the grid, or the guide. The View menu also helps
you to enable or disable the snapping of items to the grid or guide.
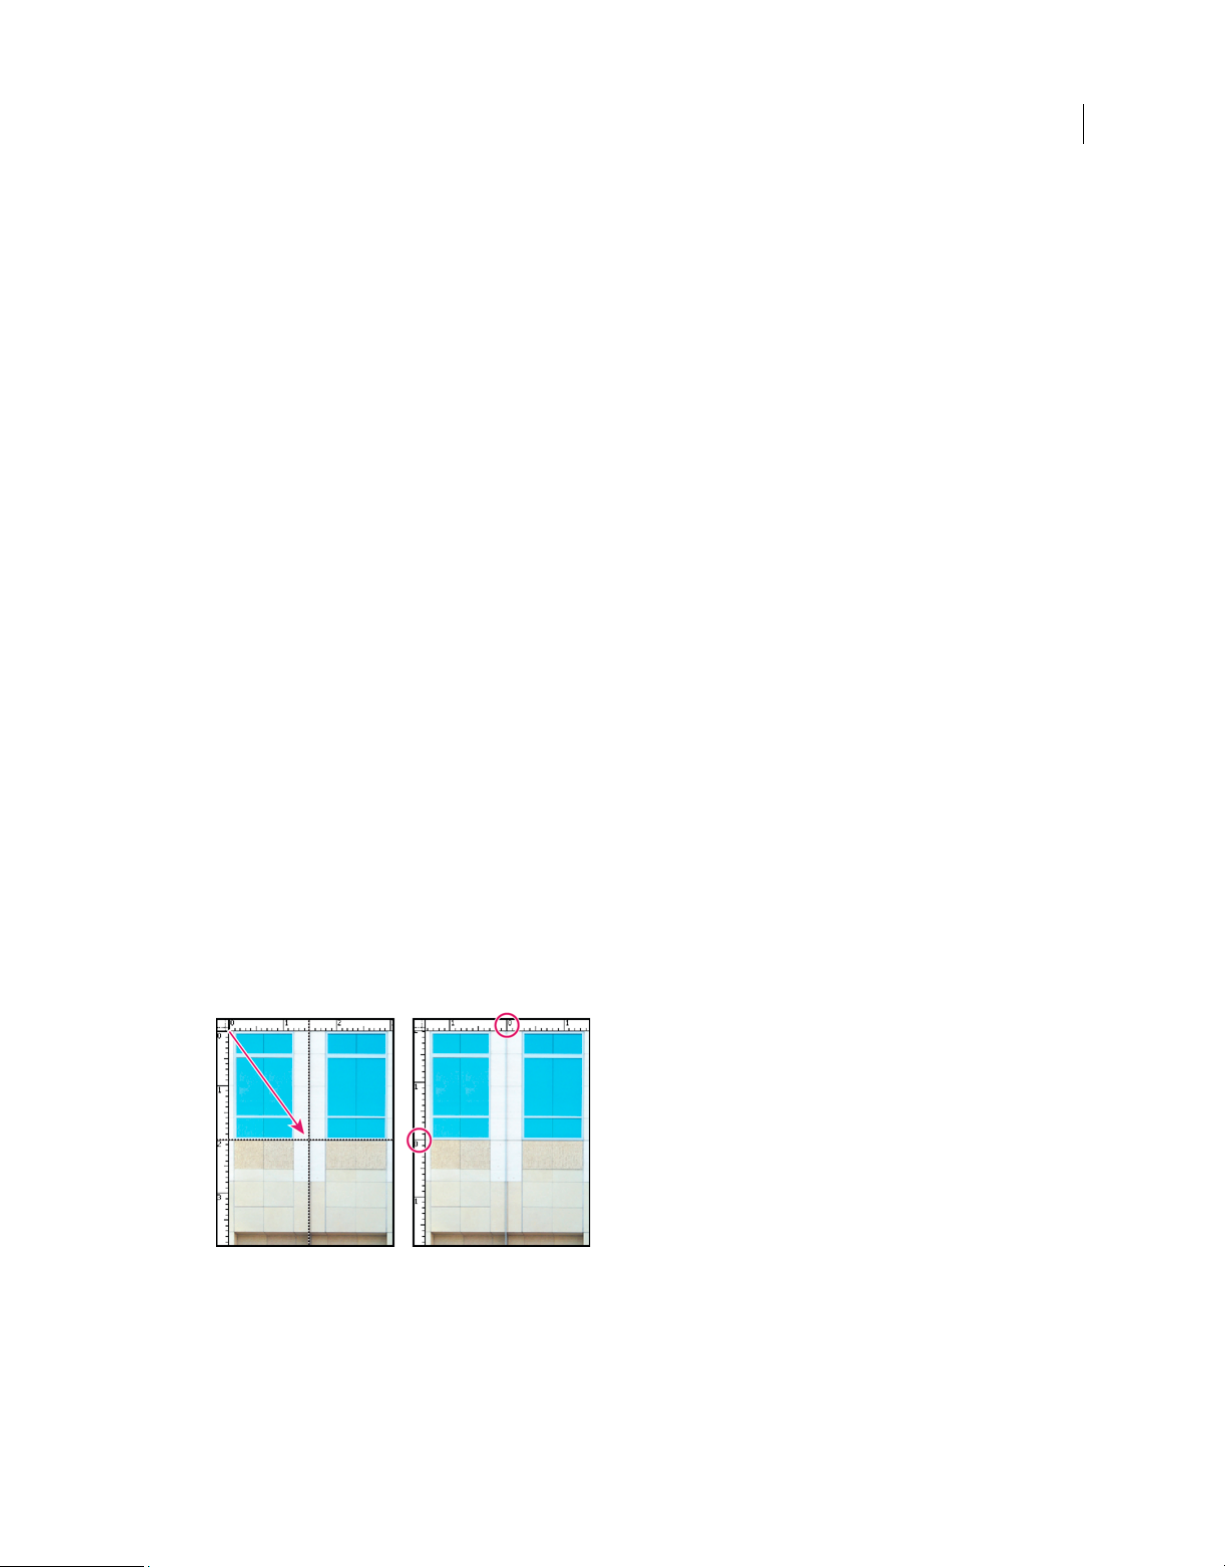
Change the rulers’ zero origin and settings
In Expert mode, do one of the following:
• To change the rulers’ zero origin, position the pointer over the intersection of the rulers in the upper-left corner
of the window, and drag diagonally down onto the image. A set of cross hairs appears, marking the new origin
on the rulers. The new zero origin will be set where you release the mouse button.
Note: T
o reset the ruler origin to its default value, double-click the upper-left corner of the rulers.
• To change the rulers’ settings, double-click a ruler, or choose Edit > Preferences > Units & Rulers. For Rulers,
hoose a unit of measurement. Click OK.
c
Note: C
hanging the units on the Info panel automatically changes the units on the rulers.
Last updated 10/3/2016
Page 29

Workspace and workflows
Change the guides and grid settings
1 Choose Edit > Preferences > Guides & Grid.
2 Under the Guides or Grids area:
• Choose a preset color, or click the color swatch to choose a custom color.
• Choose the line style for the grid. Choose Lines for solid lines, or choose Dashed lines or Dots for broken lines.
3 For Gridline Every, enter a number value, and then choose the unit of measurement to define the spacing of major
grid lines.
4 For Subdivisions, enter a number value to define the frequency of minor grid lines, and click OK.
More Help topics
Use the Info panel
Change the size of the canvas
Change print dimensions and resolution without resampling
Undo, redo, and cancel actions
23
Undo, redo, or cancel actions
Many operations in both the Elements Organizer and Photoshop Elements can be undone or redone. For example, you
can restore all or part of an image to its last saved version. Low amounts of available memory limit your ability to use
these options.
1 To undo or redo an operation, Choose Edit > Undo or choose Edit > Redo.
2 To cancel an operation, hold down the Esc key until the operation in progress has stopped.
Using the History panel while editing
The History panel (F10 or Window > History) lets you jump to any recent state of the image created during the current
work session. Each time you apply a change to pixels in an image, the new state of that image is added to the History
panel.
For example, if you select, paint, and rotate part of an image, each of those states is listed separately in the panel. You
can then select any of the states, and the image reverts to how it looked when that change was first applied. You can then
work from that state.
Actions, such as zooming and scrolling, do not affect pixels in the image and do not appear in the History panel. Nor
do program-wide changes, such as changes to panels, color settings, and preferences.
Last updated 10/3/2016
Page 30

Workspace and workflows
A Original state B State C Selected state
Note the following guidelines when using the History panel:
• By default, the History panel lists 50 previous states. Older states are automatically deleted to free more memory for
Photoshop Elements. You can set the number of states in the application settings (Preferences > Performa
H
istory States). The maximum number of states is 1000.
nce >
• The original state of the photo is always displayed at the top of the History panel. You can always revert an image to
its original state by clicking this top state. Clicking the original state is also handy for comparing before and af
v
ersions of your editing.
ter
• When you close and reopen the document, all states from the last working session are cleared from the panel.
• States are added to the bottom of the list. That is, the oldest state is at the top of the list, the most recent one is at the
bottom.
24
• Each state is listed with the name of the tool or command used to change the image.
• Selecting a state dims the subsequent states (steps that were performed after the selected step). This way you can
easily see which changes will be discarded if you continue working from the selected state.
• Selecting a state and then changing the image eliminates all states that came after it. Likewise, deleting a state deletes
that state and all states (edits) after it.
Revert to a previous state of an image
In Quick and Expert modes, do any of the following:
• Click the name of the state in the History panel.
• Click the Undo or Redo buttons in the taskbar.
• Choose Undo or Redo from the History panel menu or the Edit menu.
To set the keyboard command for Step Forward and Step Backward, choose Edit > Preferences > Generalin Windows
(P
hotoshop Elements > Preferences > General in Mac), and choose from the Step Back/Fwd menu.
Delete one or more states from the Undo History panel
Do one of the following:
• To delete a state, click the name of the state, and choose Delete from the History panel menu. States following the
o
ne you selected are also deleted.
• To delete the list of states from the History panel, without changing the image, choose Clear History from the panel
menu or choose Edit > Clear > Clear History. Clearing is useful for freeing up memory, especially if you get an alert
that Photoshop Elements is low on memory.
Note: Cl
earing the History panel cannot be undone.
Last updated 10/3/2016
Page 31

Workspace and workflows
Clear memory used by the clipboard and the History panel
You can delete items copied to the clipboard or states in the Undo History panel to free up memory.
In Expert mode, do one of the following:
• To clear memory used by the clipboard, choose Edit > Clear > Clipboard Contents.
• To clear memory used by the Undo History panel, choose Edit > Clear > Clear History or choose Clear History from
the History panel flyout menu.
• To clear the memory used in both the clipboard and the History panel simultaneously, choose Edit > Clear > All.
Note: Cl
earing the History panel or clipboard cannot be undone.
Scratch disks, plug-ins, and application updates
About scratch disks
When your system does not have enough RAM to perform an operation, Photoshop Elements uses scratch disks. A
scratch disk is any drive or partition of a drive with free memory. By default, Photoshop Elements uses the hard drive
on which the operating system is installed as its primary scratch disk.
25
You can change the primary scratch disk, or designate additional scratch disks. When the primary disk is full, additional
sc
ratch disks are used. Set your fastest hard disk as your primary scratch disk. Ensure that the disk has plenty of
defragmented space available.
For best performance, use the following guidelines when assigning scratch disks:
• Do no create scratch disks on the same physical drive as Photoshop Elements or any large files you are editing.
• Do not create scratch disks on the same physical drive as the one used for the operating system’s virtual memory.
• Create scratch disks on a local drive, not a network location.
• Create scratch disks on conventional (non-removable) media.
• RAID disks/disk arrays are good choices for dedicated scratch disk volumes.
• Defragment drives with scratch disks regularly. Or better yet, use an empty drive or a drive with plenty of unused
space, to avoid fragmentation issues.
Change scratch disks
Photoshop Elements needs contiguous hard drive space to create a scratch disk. Frequently defragmenting your hard
drive ensures that there is contiguous space available, especially the disk containing your scratch disk. Adobe
recommends that you use a disk tool utility, such as Windows Disk Defragmenter, to defragment your hard drive on a
regular basis. See your Windows documentation for information on defragmentation utilities.
1 In Windows, choose Edit > Preferences > Performance. In Mac, choose, Photoshop Elements > Preferences >
Performance.
2 Select the desired disks from the Scratch Disks listing (you can assign up to four scratch disks).
3 Select a scratch disk and use the arrow keys next to the Scratch Disks list to rearrange the order in which scratch
disks will be used.
Last updated 10/3/2016
Page 32

Workspace and workflows
4 Click OK, and restart Photoshop Elements for the change to take effect.
About plug-in modules
Adobe Systems and other software developers create plug-ins to add functionality to Photoshop Elements. A number
of importing, exporting, and special-effects plug-ins come with your program; they are inside the Photoshop Elements
plug-ins and optional plug-ins folders.
Once installed, plug-in modules appear as:
• Options added to the Import or Export menu
• Filters added to the Filter menu, or,
• File formats in the Open and Save As dialog boxes.
If you install a large number of plug-ins, Photoshop Elements may not be able to list them all in their appropriate
menus. If so, newly installed plug-ins appear in the Filter > Other submenu. To prevent a plug-in or folder of plug-ins
from loading, add a tilde character (~) at the beginning of the plug-in name, folder, or directory. The program ignores
files marked with a tilde character, while starting. To view information about installed plug-ins, choose Help > About
Plug-In and select a plug-in from the submenu.
Note: T
o use an optional plug-in module, copy the plug-in module from the optional plug-ins folder to the relevant subfolder
in the plug-ins folder. Then, install the plug-in module, and relaunch Photoshop Elements.
26
You can select an additional plug-ins folder in which to load compatible plug-ins stored with another application. You
c
an also create a shortcut for a plug-in stored in another folder on your system. You can then add the shortcut or alias
to the plug-ins folder to use that plug-in with Photoshop Elements.
Install plug-in modules
Do one of the following:
• Use the plug-in installer, if provided.
• Follow the installation instructions that came with the plug-in module.
• Make sure the plug-in files are uncompressed, and then copy them to the appropriate plug-ins folder in the
Photoshop Elements folder.
Select an additional plug-ins folder
You can select an additional plug-ins folder in which to load compatible plug-ins stored with another application.
1 In Windows, choose Edit > Preferences > Plug-Ins. In Mac, choose Photoshop Elements > Preferences > Plug-Ins.
2 In the Preferences dialog, select Additional Plug-Ins Folder, select a folder from the list, and click Choose.
3 To display the contents of a folder, double-click the directory. The path to the folder appears in the preferences
window.
Note: D
o not select a location inside the plug-ins folder for Photoshop Elements.
4 Restart Photoshop Elements to load the plug-ins.
Last updated 10/3/2016
Page 33

Workspace and workflows
Load default plug-ins only
When Photoshop Elements starts, all plug-ins that are pre-installed, third-party, or located in additional pluginsfolders, are loaded. To load only the preinstalled plug-ins Photoshop Elements was shipped with, press and hold the
Shift key while starting the software. When asked, click yes on the dialog that requests confirmation to skip loading
optional and third-party plug-ins.
Application Updates
You get to decide when an application update is installed. In Photoshop Elements 13, Premiere Elements 13, and
Elements Organizer, you have the option to set what to do when an application update is available from Adobe.
To access the update dialog, press Ctrl/Cmd + K to open the Preferences dialog, browse to the Application Updates tab,
an
d then make a choice:
• Automatically download and install updates: Downloads an available update and installs it when you next restart
your application.
27
• Notify me when an update is available: Notifies the user about an available update in the application. You can
hoose to delay an update or use the notification to start the update process.
c
Viewing images
Viewing images in Expert or Quick modes
The Hand tool, the Zoom tools, the Zoom commands, and the Navigator panel let you view different areas of an image
at different magnifications.
You can magnify or reduce your view using various methods. The window’s title bar displays the zoom percentage
(unless the windo
If you want to view another area of an image, either use the window scroll bars or select the Hand tool and drag to pan
o
ver the image. You can also use the Navigator panel.
To use the Hand tool while another tool is selected, hold down the spacebar as you drag within the image.
w is too small for the display to fit).
Last updated 10/3/2016
Page 34

Workspace and workflows
Zoom in or out
Do one of the following:
• Select the Zoom tool from the toolbar, and click either the Zoom In or Zoom Out button in the Tool Options bar.
Click the area you want to magnify. Each click magnifies or reduces the image to the next preset percentage, and
centers the display around the point you click. When the image has reached its maximum magnification level of
3200% or minimum reduction level of 1 pixel, the magnifying glass appears empty.
28
Note: Y
ou can drag a Zoom tool over the part of an image you want to magnify. Make sure that the Zoom In button is
selected in the Tool Options bar. To move the zoom marquee around the image, begin dragging a marquee, and then
hold down the spacebar while dragging the marquee to a new location.
• Drag the Zoom slider in the Tool Options bar.
• Choose View > Zoom In or View > Zoom Out.
• Enter the desired magnification level in the Zoom text box, in the Tool Options bar.
When using a Zoom tool, hold down Alt to switch between zooming in and zooming out.
splay an image at 100%
Di
Do one of the following:
• Double-click the Zoom tool in the toolbox.
• Select the Hand tool or a Zoom tool and click the 1:1 button in the Tool Options bar.
• Choose View > Actual Pixels, or right-click the image and choose Actual Pixels.
• Enter 100% in the status bar and press Enter.
Fit an image to the screen
Do one of the following:
• Double-click the Hand tool in the toolbox.
• Select a Zoom tool or the Hand tool, and then click the Fit Screen button in the Tool Options bar. Or, right-click
the image and choose Fit On Screen.
• Choose View > Fit On Screen.
Last updated 10/3/2016
Page 35

Workspace and workflows
These options scale both the zoom level and the window size to fit the available screen space.
Resize the window while zooming
With a Zoom tool active, select Resize Windows To Fit in the Tool Options bar. The window changes size as you
magnify or reduce the view of the image.
When Resize Windows To Fit is deselected, the window maintains a constant size regardless of the image’s
magnification. This can be helpful when you are using smaller monitors or working with tiled images.
Using the Navigator panel
The Navigator panel lets you adjust the image’s magnification and area of view. Typing a value in the text box, clicking
the Zoom Out or Zoom In button, or dragging the zoom slider changes the magnification. Drag the view box in the
image thumbnail to move the view of an image. The view box represents the boundaries of the image window. You can
also click in the thumbnail of the image to designate the area of view.
Note: To change the color of the view box, choose Panel Options from the Navigator panel menu. Choose a color from the
Color menu or click the color swatch to open the Color Picker and select a custom color. Click OK.
Open multiple windows of the same image
In Expert mode, you can open multiple windows to display different views of the same file. A list of open windows
appears in the Window menu, and thumbnails of each open image appear in the Photo Bin. Available memory may
limit the number of windows per image.
29
Choose View > New Window For [image filename]. Depending on the position of the first window, you may have
to move the second window to view both simultaneously.
You can use the New Window command when you’re working with a zoomed image to see what the image will look
like at 100% size in a separate window.
View and arrange multiple windows
In Expert mode, do one of the following:
• To display windows stacked and cascading from the upper left to the lower right of the screen, choose Window
mages > Cascade.
> I
• To display windows edge-to-edge, choose Window > Images > Tile. As you close images, the open windows are
r
esized to fill the available space.
• To view all open images at the same magnification as the active image, choose Window > Images > Match Zoom.
• To view the same section (upper-left corner, center, lower-right corner, and so on) of all open photos, choose
Window > Images > Match Location. The view in all windows shifts to match the active (frontmost) image. The
zoom level does not change.
• For more options to arrange images, in the Taskbar, click Layout, and choose a new layout from the pop-up
menu.
he Window > Images options are enabled only when Allow Floating Documents In Expert Mode is selected in
Note: T
preferences.
Last updated 10/3/2016
Page 36

Workspace and workflows
Close windows
In Expert mode, do one of the following:
• Choose File > Close to close the active window.
• Click the Close button on the title bar of the active window.
• Right-click a thumbnail in the Photo Bin and choose Close.
• Choose File > Close All to close all open windows.
Enhanced Quick mode
The Quick mode groups basic photo-fixing tools in one place, to quickly fix the exposure, color, sharpness, and other
aspects of an image. From Photoshop Elements 12, in addition to correcting your photos, you can also transform your
photos into professional-looking objects of art using Effects, Textures, and Frames panels, available next to the
Adjustments panel.
30
Each panel has ten thumbnails. Each thumbnail is a live preview. Clicking a thumbnail applies the effect, texture, or
f
rame, to your image. Names for these effects, textures, and frames is displayed when you hover the mouse pointer on
the thumbnail.
Last updated 10/3/2016
Page 37

Workspace and workflows
Effects
31
Eleven available effects each have five variations. Transform your photo by applying an effect. The clickable thumbnails
for available Effects are live previews, to understand how the effect looks on the image before applying it. Effects range
from Black & White effect to Vintage looks to Cross-process presets.
Auto Smart Looks Analyzes the image available, and, based on the content of the image, provides options with
different effects applied. Available variations:
• Auto1
• Auto2
• Auto3
• Auto4
• Auto5
Effects are applied as a new layer with layer mask. You can edit the layer mask in Expert mode to remove/reduce effect
from certain areas.
The following list provides a brief description of each of the available effects:
Auto Smart Looks Analyzes the image available, and, based on the content of the image, provides options with
different effects applied. Available variations:
• Auto1
• Auto2
• Auto3
• Auto4
Last updated 10/3/2016
Page 38

Workspace and workflows
• Auto5
Tint Provides a color tint (such as golden, sepia, green) to the image. Available variations:
• Copper
• Golden
• Sepia
• Green
• Blues
Seasons Applies a season effect to the image. Available variations:
• Spring
• Summer
• Autumn
• Wi nt er
• Snow
Pencil Sketch Applies an effect to make the image appear like a pencil sketch. Available variations:
• Soft Lines
• Pencil Sketch
• Charcoal
32
• Stippling
• Colored Pencil
Toy Camera Applies an effect that makes the image appear as it is a photograph taken by a toy camera. Available
variations:
• Toy C a m e ra
• Lomo Blue
• Lomo Contrast
• Lomo Green
• Holga
Black & White Applies a Black & White effect to the image. Available variations:
• Simple B & W
• Silver
• Old School
• Platinum
• Tint e d Bl ack
Lithograph Applies a lithograph effect to the image. Available variations:
• Sepia
• Black
• Copper
• Blue
Last updated 10/3/2016
Page 39

Workspace and workflows
• Green
Cross Process Applies the effect of processing of photographic film in a chemical solution intended for a different type
of film. Available variations:
• Deep Blue
• Orange Wash
• Blue Wash
• Green Wash
• Purple Wash
Split Tone Applies the effect of tinting the highlights in a black and white image one color and the shadows another
color. Available variations:
• Split Tone
• Blue Tone
• Red Tone
• Green Tone
• Grey Tone
Vinta ge Applies a vintage effect to the image. Available variations:
33
• Vintage Leak
• Faded Vintage
• Vintage Color
• Sepia Glow
• Heavy Vintage
Light Leaks Applies the effect of light on the negative of a picture that has leaked into the light-tight chamber of a
camera. Available variations:
• Diffused Colors
• Burnt Edges
• Soft Leak
• White Leak
• Ye l lo w S tre a k
Last updated 10/3/2016
Page 40

Workspace and workflows
Te xt u re s
34
Use the Textures panel to choose from ten textures you can apply to your photo. Textures simulate various surfaces or
backgrounds that the photo could be printed on. For example, old paper look, cracked paint texture, rough blue grid,
chrome feel.
Textures are applied as a new layer with layer mask. You can edit the layer mask in Expert mode to remove/reduce
texture from certain areas (face/skin).
Last updated 10/3/2016
Page 41

Workspace and workflows
Frames
35
Use the Frames panel to choose and apply from ten available frames for your photo. The frame is automatically fitted
in best possible way. You can also move or transform the image and frame. This can be done by using the move tool
and double-clicking the frame. You can change the background color from white to any other choice in Expert mode
by modifying the Color Fill layer
Apply an Effect, Texture, or Frame
1 Open a photograph in Photoshop Elements Editor, and switch to the Quick mode.
2 Three panels - Effects, Textures, and Frames - are available, in addition to the Adjustments panel. Click the icon for
any of the panels.
3 The Panel bar displays live preview thumbnails of the open image. Click a thumbnail to apply the Effect, Texture, or
Frame.
4 (Optional) Switch to the Expert mode, and modify the effect, texture, or frame that you used on the image. The
modification applied in the Quick mode is available in a separate layer.
Using Windows 7 features
Photoshop Elements supports the following Windows 7 features:
Live Taskbar Displays icons for all running and pinned applications. The icons for all running applications are
highlighted with a border. Point to an icon to view images of the open files and applications. To work with an
application, point to its icon, move over the images to preview in full screen, and click the full screen image.
Last updated 10/3/2016
Page 42

Workspace and workflows
Aero Peek Makes all windows transparent, allowing you to view the desktop. To view a hidden window, point to its
taskbar icon.
Aero Shake Allows you to focus on a window by hiding all others. To work in an application, click its pane and shake
the mouse. This hides all other windows, except the selected window. To display the hidden windows, shake the mouse
again.
Aero Snap Allows you to quickly resize and organize windows. To resize a window, drag it to a side of the display and
expand vertically or horizontally.
Presets and libraries
About presets
In the Expert mode, pop-up panels appear in the Tool Options bar and provide access to predefined libraries of brushes,
color swatches, gradients, patterns, layer styles, and custom shapes. The items in each library are called presets. When
closed, pop-up panels display a thumbnail image of the currently selected preset.
36
You can change the display of a pop-up panel to view presets by their names, as thumbnail icons, or with both names
an
d icons.
You can use the Presets Manager to load different preset libraries. Presets are stored in separate library files that can be
fo
und in the Presets folder in the Photoshop Elements application folder.
Use preset tool options
1 Select the tool you want to use.
2 In the Tool Options bar, open the pop-up panel. (Only certain tools have pop-up panels.)
3 Do any of the following:
• To view and select currently loaded preset libraries, click the panel menu icon.
• To select a preset, click an item in the library.
• To save a brush, open the pop-up panel menu, choose the Save Brush command, then enter a name in the dialog
box provided and click OK.
• To save a gradient or pattern, open the panel menu, choose the New Gradient or New Pattern command, then
ter a name in the dialog box provided and click OK.
en
• To rename a brush, gradient, or pattern in a panel, open the pop-up panel menu, choose the Rename command,
then enter a new name and click OK.
• To delete a brush, gradient, or pattern from a panel, select an item, open the pop-up panel menu and choose the
Delete command. You can also hold down Alt (Option key in Mac OS) and click a brush or gradient.
• To save a library of brushes, gradients, or patterns, open the pop-up panel menu. From the menu, choose the Save
Brushes, Save Gradients, or Save Patterns command, then enter a name for the library file, and click Save.
• To load a library of brushes, gradients, or patterns, open the pop-up panel menu, choose the Load command,
then select the library file you want to add and click Load.
Last updated 10/3/2016
Page 43

Workspace and workflows
Note: Using the Load command adds the brush library to the brushes you have available. If you choose a preset library
of brushes, the preset library replaces your current set of brushes.
• To add assets from a library to an existing library, click Append. Select the library file you want to add and click
pend.
Ap
• To replace the current set of gradients in a panel, open the pop-up panel menu, choose a library file from the
b
ottom section of the menu, and click OK. You can also choose the Replace command, browse to select a library
file, and click Load.
• To replace the current set of brushes or patterns in a panel, choose a library from the Brushes menu.
Note: T
o replace the current set of brushes, gradients, or patterns, you can also choose Preset Manager from the pop-up
panel menu and use the Preset Manager to load a different library of brushes, gradients, or patterns.
• To load the default set of brushes, gradients, or patterns, open the pop-up panel menu and choose the Reset
command.
Change the display of items in a pop-up panel menu
1 Do one of the following:
• To change the display of one panel, open the pop-up panel menu by clicking the menu icon in the upper-right
rner of the pop-up panel.
co
• To change the display for all panels, choose Edit > Preset Manager to open the Preset Manager, and then click the
More button.
2 Select a view option:
Tex t O nly Displays the name of each item.
37
Small Thumbnail or Large Thumbnail Displays a thumbnail of each item.
Small List or Large List Displays the name and thumbnail of each item.
Stroke Thumbnail Displays a sample brush stroke and brush thumbnail. (This option is available for brushes only.)
Note: N
ot all of the above options are available for all pop-up panels.
Use the Preset Manager
In the Expert mode, the Preset Manager (Edit > Preset Manager) lets you manage the libraries of preset brushes, color
swatches, gradients, styles, effects, and patterns included in Photoshop Elements. For example, you can create a set of
favorite brushes, or you can restore the default presets.
Each type of library is a file with its own file extension and default folder. Preset files are installed on your computer
i
nside the Presets folder in the Photoshop Elements program folder.
Note: Y
ou can delete a preset in the Preset Manager by selecting the preset and clicking Delete. You can always use the Reset
command to restore the default items to a library.
Load a library
1 In the Preset Manager, choose Brushes, Swatches, Gradients, Styles, Patterns, or Effects, from the Preset Type menu.
Last updated 10/3/2016
Page 44

Workspace and workflows
2 Do one of the following:
• Click Add, select a library from the list, and then click Load. If you want to load a library located in another folder,
navigate to that folder, then select the library. By default, preset files are installed on your computer inside th
resets folder in the Photoshop Elements program folder.
P
e
• Click the More button and choose a library from the bottom section of the menu.
3 Click the Done button when you’re finished.
Restore the default library or replace the currently displayed library
In the Preset Manager, click the More button and choose a command from the menu:
Reset Restores the default library for that type.
Save a subset of a library
1 In the Preset Manager, Shift-click to select multiple contiguous presets or Ctrl-click (Command-click in Mac OS) to
select multiple noncontiguous presets. Only the selected presets are saved in the new library.
2 Click Save Set, then enter a name for the library. If you want to save the library in a folder other than the default,
navigate to the new folder before saving.
38
Rename a preset
1 In the Preset Manager, do one of the following:
• Select a preset in the list, and click Rename.
• Double-click a preset in the list.
2 Enter a new name for the preset. If you selected multiple presets, you are prompted to enter multiple names.
Multitouch support
If the hardware and operating system of your computer supports the Touch functionality, you can scroll and zoom in
on an image. You can also tap to find, sort, and enhance your photos in the Organizer and Quick Edit mode. Multitouch
is supported in all three modes: Quick, Guided, and Expert.
Flicking
Scrolls the image horizontally or vertically. Touch the screen with one finger (two fingers on the trackpad for a Mac)
a
nd move the finger left or right, and up or down.
Pinching in or out
Zooms in or out of the image. To zoom out, place two fingers on the image (trackpad on a Mac) and pinch. Similarly,
t
o zoom in, pinch, and move the two fingers apart.
Last updated 10/3/2016
Page 45

Chapter 3: Importing
Importing files
Import images from a digital camera using WIA (Windows only)
Certain digital cameras import images using Windows Image Acquisition (WIA) support. When you use WIA,
Photoshop Elements works with Windows and your digital camera or scanner software to import images directly into
Photoshop Elements.
1 Choose File > Import > WIA Support.
2 Choose a destination in which to save your image files on your computer.
39
3 Make sure that Open Acquired Image(s) in Photoshop is selected. If you are importing a large number of images, or
if you want to edit the images later, deselect this option.
4 To save the imported images directly into a folder whose name is the current date, select Create Unique Subfolder
Using Date Today.
5 Click Start.
6 Select the digital camera from which to import images.
Note: If the name of your camera does not appear in the submenu, verify that the software and drivers were properly
installed and that the camera is connected.
7 Choose the image or images you want to import:
• Click the image from the list of thumbnails to import the image.
• Hold down Shift and click multiple images to import them at the same time.
• Click Select All to import all available images.
8 Click Get Picture to import the image.
Last updated 10/3/2016
Page 46

Chapter 4: File management
Open files
Working in the Edit workspace of Photoshop Elements gives you choices about working with your files. You can set
options for opening, saving, and exporting files by type, by file size, and resolution. You can also process and save
camera raw files. These tools make it easy to combine files of different types and optimize them in Adobe Photoshop
Elements.
In the Edit workspace, you can create a blank file, open a recently used file, specify which files types to open in
Photoshop Elements, and more.
An additional option for working in the Edit workspace is to use the Guided Edit feature. Guided Edits helps you when
you’re unsure of a workflow or how to accomplish a task. They empower users to complete complex editing workflows
in a small number of easy steps.
40
Create a new blank file
You may want to create a web graphic, banner, or company logo and letterhead, in which case you need to start from a
new blank file.
1 Choose File > New > Blank File.
2 Enter options for the new image and click OK.
Name Names the new image file.
Preset Provides options for setting the width, height, and resolution of images that you intend to print or to view
on-screen. Select Clipboard to use the size and resolution of data that you copied to the clipboard. You can also base
a new image on the size and resolution of any open image by choosing its name from the bottom of the Preset menu.
Size Choose from a list of standard sizes available for the selected preset.
Width, Height, and Resolution Sets these options individually. The default values are based on the last image you
created, unless you’ve copied data to the clipboard.
Color Mode Sets an image to RGB color, grayscale, or bitmap (1-bit mode).
Background Contents Sets the color of the image Background layer. White is the default. Select Background Color
to use the current background color (shown in the toolbox). Select Transparent to make the default layer
transparent, with no color values—the new image will have a Layer 1 instead of a Background layer.
You can also right-click the background of an image to choose a background color (gray, black, or a custom color).
Open a file
You can open and import images in various file formats. The available formats appear in the Open dialog box, the Open
As dialog box, and the Import submenu.
Last updated 10/3/2016
Page 47

File management
41
To open a file from Elements Organizer, select it, click Editor in the task bar.
1 Do one of the following
• Choose File > Open. Locate and select the file you want to open. If the file does not appear, choose All Formats
rom the Files Of Type menu. Click Open.
f
• Click the Open drop-down (above the tool box). The Open drop-down is a list of recently opened files.
• Drag an image from a folder on your computer or storage device, and drop it in the Editor.
2 In the dialog box that appears, set format-specific options, and continue opening the file.
There may be instances when Photoshop Elements cannot determine the correct format of a file. For example,
t
ransferring a file between Mac OS® and Windows can cause the format to be mislabeled. In such cases, you must
specify the correct format in which to open the file.
Open a file in an Application Frame (Mac OS)
1 D rag a file from any loca tio n on you r com put er i nto the App lica tio n Fr ame . You ca n als o dra g pho tos from the P hot o
Browser and any storage device connected to your computer.
2 To drag additional images into the Application Frame to open them, enable floating document windows (see Vi e w
and arrange multiple windows). Convert open images into floating document windows to view the Application
Frame.
Open a recently edited file
Choose File > Open Recently Edited File, and select a file from the submenu.
Note: To specify the number of files that are available in the Open Recently Edited File submenu, choose Edit >
Preferences > Saving Files, and enter a number in the Recent File List Contains text box.
Specify the file format in which to open a file
Choose File > Open As, and select the file you want to open. Then choose the desired format from the Open As
menu, and click Open.
Note: If the file does not open, then the chosen format may not match the file’s true format, or the file may be damaged.
Open a PDF file
Portable Document Format (PDF) is a versatile file format that can represent both vector and bitmap data and can
contain electronic document search and navigation features. PDF is the primary format for Adobe® Acrobat®.
With the Import PDF dialog box, you can preview the pages and images in a multipage PDF file, then decide if you want
t
o open them in the Photoshop Editor. You can choose to import full pages (including text and graphics), or you can
import just the images from a PDF file. If you import only the images, the resolution, size, and color mode of the images
remains unchanged. If you import pages, you can change the resolution and color mode.
Last updated 10/3/2016
Page 48

File management
Each page is shown as a thumbnail. To increase the size, choose an option from the Thumbnail Size menu.
1 Choose File > Open.
2 Select a PDF file, and click Open. You can change which types of files are shown by selecting an option from the
Files Of Type menu.
3 To import just the images from a PDF file, choose the Images option from the Select area, in the Import PDF dialog
box. Select the image or images you want to open. (To select multiple images, hold Ctrl (Windows) or Command
(Mac OS) and click each image). If you do not want to import pages, skip to step 5.
42
4 To import pages from a PDF file, choose the Pages option from the Select area in the Import PDF dialog box, and
then do any of the following:
• If the file contains multiple pages, select the page or pages you want to open, and click OK. (To select multiple
p
ages, press Ctrl (Windows) or Command (Mac OS) and click each page.)
• Under Page Options, accept the existing name, or type a new filename in the Name box.
• Select Anti-aliased to minimize the jagged edges as the image is rasterized (bitmapped).
• Specify the Width and Height. Enable Constrain Proportions to avoid image distortion due to change in size.
• For Resolution, accept the default (300 ppi) or type a new value. A higher resolution increases the file size.
• Choose an option from the Mode menu (RGB to keep the photos in color, or Grayscale to automatically make
them black and white). If the file has an embedded ICC (International Color Consortium) profile, you can choose
the profile from the menu.
5 Select Suppress Warnings to hide any error messages during the import process.
6 Click OK to open the file.
Place a PDF file in a new layer
You can place pages or images from PDF files into a new layer in an image. Because the placed artwork is rasterized
(bitmapped) , you cannot edit text or vector data in placed artwork. The artwork is raster ized at the resolution of the file
into which it is placed.
1 In Photoshop Elements, open the image into which you want to place the artwork.
2 Choose File > Place, select the file you want to place, and click Place.
3 If you are placing a PDF file that contains multiple pages, select the page you want to place from the provided dialog
box, and click OK.
The placed artwork appears inside a bounding box at the center of the Photoshop Elements image. The artwork
m
aintains its original aspect ratio; however, if the artwork is larger than the Photoshop Elements image, it is resized
to fit.
Last updated 10/3/2016
Page 49

File management
4 (Optional) Reposition the placed artwork by positioning the pointer inside the bounding box of the placed artwork
and dragging.
5 (Optional) Scale the placed artwork by doing one or more of the following:
• Drag one of the handles at the corners or sides of the bounding box.
• In the Tool Options bar, enter values for W and H to specify the width and height of the artwork. By default, these
options represent scale as a percentage. However, you can enter a different unit of measurement—in (inches), cm
(centimeters), or px (pixels). To constrain the proportions of the artwork, click the Constrain Proportions box.
This option is on when the icon has a white background.
6 (Optional) Rotate the placed artwork by doing one of the following:
• Position the pointer outside the bounding box of the placed artwork (the pointer turns into a curved arrow), and
drag
.
• In the Tool Options bar, click and drag the pointer in the Angle option.
7 (Optional) Skew the placed artwork by holding down Ctrl (Command in Mac OS) and dragging a side handle of the
bounding box.
8 To blend edge pixels during rasterization, select the Anti-alias option. To produce a hard-edged transition between
edge pixels during rasterization, deselect the Anti-alias option.
9 To commit the placed artwork to a new layer, click Commit .
43
Process multiple files
The Process Multiple Files command applies settings to a folder of files. If you have a digital camera or a scanner with
a document feeder, you can also import and process multiple images. (Your scanner or digital camera’s software driver
may need an acquire plug-in module that supports these actions.)
When processing files, you can leave all the files open, close and save the changes to the original files, or save modified
v
ersions of the files to a new location (leaving the originals unchanged). If you are saving the processed files to a new
location, you may want to create a new folder for the processed files before starting the batch.
Note: T
he Process Multiple Files command does not work on multiple page files.
1 Choose File > Process Multiple Files.
2 Choose the files to process from the Process Files From pop-up menu:
Folde r Processes files in a folder you specify. Click Browse to locate and select the folder.
Import Processes images from a digital camera or scanner.
Opened Files Processes all open files.
3 Select Include All Subfolders if you want to process files in subdirectories of the specified folder.
4 For Destination, click Browse and select a folder location for the processed files.
5 If you chose Folder as the destination, specify a file-naming convention and select file compatibility options for the
processed files:
• For Rename Files, select elements from the pop-up menus or enter text into the fields to be combined into the
ult names for all files. The fields let you change the order and formatting of the components of the filename.
defa
You must include at least one field that is unique for every file (for example, file name, serial number, or serial
letter) to prevent files from overwriting each other. Starting Serial Number specifies the starting number for any
serial number fields. If you select Serial Letter from the pop-up menu, serial letter fields always start with the
letter “A” for the first file.
Last updated 10/3/2016
Page 50

File management
• For Compatibility, choose Windows, Mac OS, and UNIX® to make filenames compatible with the Windows, Mac
OS, and UNIX operating systems.
6 Under Image Size, select Resize Images if you want each processed file resized to a uniform size. Then type in a width
and height for the photos, and choose an option from the Resolution menu. Select Constrain Proportions to keep
the width and height proportional.
7 To apply an automatic adjustment to the images, select an option from the Quick Fix panel.
8 To attach a label to the images, choose an option from the Labels menu, then customize the text, text position, font,
size, opacity, and color. (To change the text color, click the color swatch and choose a new color from the Color
Picker.)
Note: T
he Watermark option enables you to add a permanent visual watermark to images. For more information, see
Add permanent watermarks to a batch of photos.
9 Select Log Errors That Result From Processing Files to record each error in a file without stopping the process. If
errors are logged to a file, a message appears after processing. To review the error file, open with a text editor after
the Batch command has run.
10 Click OK to process and save the files.
Close a file
1 Do one of the following in Photoshop Elements:
44
• Choose File > Close.
• Choose File > Close All.
2 Choose whether or not to save the file:
• Click Yes to save the file.
• Click No to close the file without saving it.
Select the Apply to All option, to apply the current action to
choose Apply to All and click Yes to save the first file, all other open files are saved and then closed.
all the files that are being closed. For example, if you
File information
About file information (metadata)
When you take a photo with your digital camera, each image file includes information such as the date and time the
photo was taken, the shutter speed and aperture, the specific camera model, and so on. All of this information is called
metadata, and you can view it and add to it in the Properties panel of the Elements Organizer and the File Info dialog
box in the Photoshop Elements.
You can add file information, such as a title, keyword tags, and descriptions, to help identify your images as you manage
a
nd organize your collection. As you edit your images, Photoshop Elements automatically keeps track of the file’s edit
history and adds this information to the file’s metadata.
In addition, opened images are automatically scanned for Di
Elements displays a copyright symbol in the image window’s title bar and includes the information in the Copyright
Status, Copyright Notice, and Copyright Info URL sections of the File Info dialog box.
gimarc watermarks. If a watermark is detected, Photoshop
Last updated 10/3/2016
Page 51

File management
You can add visual watermarks to images to indicate them as your own work. Visual watermarks are not tracked in file
information. For information about how to create visual watermarks, see the following articles:
• Adding permanent watermarks to a batch of photos
• Create a watermark using text layering
• Create a watermark brush
For a video about creating a watermark, see www.adobe.com/go/lrvid927_pse_en.
View or add file information
The File Info dialog box displays camera data, caption, and copyright and authorship information that has been added
to the file. Using this dialog box, you can modify or add information to files saved in Photoshop Elements. The
information you add is embedded in the file using XMP (Extensible Metadata Platform). XMP provides Adobe
applications and workflow partners with a common XML framework that standardizes the creation, processing, and
interchange of document metadata across publishing workflows. If you have metadata that you repeatedly enter for
different files, you can create metadata templates to expedite the adding of information to files.
You cannot edit the information displayed for the Camera Data metadata category.
45
Note: T
ags added to a file in the Photo Browser appear as keywords in the File Info dialog box. Some file formats, such as
PDF and BMP, do not support tags as keywords.
1 With an image open, choose File > File Info. (You can also right-click a thumbnail in the Photo Bin and choose File
Info.)
2 Click the Description tab on the top of the dialog box to display specific information. In Description, you can add
or modify the document title, author information, keywords, and copyright information. Type in the appropriate
text boxes and click OK to embed the information. For copyright status, choose from the Copyright Status dropdown list.
Use the Info panel
In the Expert mode, the Info panel displays file information about an image and shows the color value beneath the
pointer. Depending on the tool in use, the Info panel also provides other useful information.
Make sure the Info panel is visible in your work area if you want to view information while dragging in the image.
1 Choose Window > Info (F8) to display the Info panel.
2 Select a tool.
3 Move the pointer into the image, or drag within the image to use the tool. The following information may appear,
depending on which tool you’re using:
• The numeric values for the color beneath the pointer
• The x- and y-coordinates of the pointer.
• The width (W) and height (H) of a marquee or shape as you drag, or the width and height of an active selection.
• The x- and y-coordinates of your starting position (when you click in the image).
• The change in position along the x-coordinate and y-coordinate as you move a selection, layer, or shape.
• The angle (A) of a line or gradient, the change in angle as you move a selection, layer, or shape, or the angle of
rotation during a transformation. The change in distance (D) as you move a selection, layer, or shape.
Last updated 10/3/2016
Page 52

File management
• The percentage of change in width (W) and height (H) as you scale a selection, layer, or shape.
• The angle of horizontal skew (H) or vertical skew (V) as you skew a selection, layer, or shape.
Set color modes and units of measurement in the Info panel
Do one of the following:
• To change the mode of color values displayed, choose a color mode from the pop-up menu. You can also choose
Panel Options from the More menu in the Info panel, then choose a color mode for First Color Readout and/or
Second Color Readout:
GrayscaleDisp
lays the grayscale values beneath the pointer.
46
RGB ColorDisp
Web C o l orD
HSB ColorDis
lays the RGB (red, green, blue) values beneath the pointer.
isplays the hexadecimal code for the RGB values beneath the pointer.
plays the HSB (hue, saturation, brightness) values beneath the pointer.
• To change the unit of measurement displayed, choose a unit of measurement from the pop-up menu. You can
o choose Panel Options from the More menu in the Info panel. Choose a unit of measurement from the Mouse
als
Coordinates option, and click OK.
Display file information in the Info panel or status bar
You can change the information displayed in the Info panel or the status bar. (The leftmost section of the status bar,
which is located at the bottom of the document window, displays the current magnification. The section next to the
leftmost one displays information about the current file.)
1 In the Info panel, choose Panel Options from the More menu.
2 Select a view option:
Document Sizes Displays information on the amount of data in the image. The number on the left represents the
printing size of the image—approximately the size of the saved, flattened file in PSD format. The number on the
right indicates the file’s approximate size, including layers.
Document Profile Displays the name of the color profile used by the image.
Document Dimensions Displays the size of the image in the currently selected units.
Scratch Sizes Displays RAM and scratch disk space utilized to process the image. The number on the left indicates
the amount of memory currently being used by Photoshop Elements to display all open images. The number on the
right indicates the amount of RAM available to Photoshop Elements to process images.
Efficiency Displays the percentage of time actually spent performing an operation instead of reading from or
writing to the scratch disk. If the value is below 100%, Photoshop Elements is using the scratch disk and, therefore,
is operating more slowly.
Timing Shows how long it took to complete the last operation.
Current Tool Shows the name of the active tool.
Last updated 10/3/2016
Page 53

File management
Save or delete metadata templates
If you have metadata that you repeatedly enter, you can save the metadata entries in metadata templates. The templates
can be used for entering information, and they save you the effort of retyping metadata in the File Info dialog box. In
the Photo Browser, you can search for metadata to locate files and photos.
Open the File Info dialog box (File > File Info) and do one of the following:
• To save metadata as a template, click the drop-down button in the row of buttons in the File Info dialog box, and
select Export. Enter a template name, and click Save.
• To delete a metadata template, click Show Templates Folder. Browse and select the template you want to delete,
nd press Delete.
a
Use a saved metadata template
1 Choose File > File Info, click the drop-down button in the row of buttons in the File Info dialog box, and select
Import.
2 Select an import option and click OK.
3 Choose a template from the list of saved metadata templates and click Open.
47
More Help topics
About color
About image modes
About color
About scratch disks
About rulers, grids, and guides
Last updated 10/3/2016
Page 54

Chapter 5: Editing photos
Adjust color, saturation, and hue
Try the latest Photoshop Elements|Explore Elements product suite
Adjust saturation and hue
The Hue/Saturation command adjusts the hue (color), saturation (purity), and lightness of the entire image or of
individual color components in an image.
Use the Hue slider to add special effects, to color a black and white image (like a sepia effect), or to change the range of
colo
rs in a portion of an image.
48
A Original B Entire image changed to sepia using the Colorize option C Magenta colors targeted in the Edit menu and changed using the Hue
slider
Use the Saturation slider to make colors more vivid or more muted. For example, you could add a color punch to a
landscape by saturating the colors in it. Or, tone down a distracting color, like a vivid red sweater in a portrait.
Last updated 10/3/2016
Page 55

Editing photos
Use the Lightness slider with the other adjustments to lighten or darken a portion of an image. Take care not to use it
on an entire image—this adjustment reduces the overall tonal range.
Change color saturation or hue
1 Do one of the following:
• Choose Enhance > Adjust Color > Adjust Hue/Saturation.
• Choose Layer > New Adjustment Layer > Hue/Saturation, or open an existing Hue/Saturation adjustment layer.
• The two color bars in the dialog box represent the colors in their order on the color wheel. The upper bar shows
the color before the adjustment; the lower bar shows how the adjustment affects all hues at full saturation.
2 In the Edit drop-down menu, choose which colors to adjust:
• Choose Master to adjust all colors at once.
• Choose one of the other preset color ranges listed for the color you want to adjust. An adjustment slider appears
between the color bars, which you can use to edit any range of hues.
3 For Hue, enter a value or drag the slider until the colors appear as you want.
The values displayed in the text box reflect the number of degrees of rotation around the color wheel from the pixel’s
o
riginal color. A positive value indicates clockwise rotation, a negative value counterclockwise rotation. Values range
from –180 to +180.
49
4 For Saturation, enter a value or drag the slider to the right to increase the saturation or to the left to decrease it.
Values range from –100 to +100.
5 For Lightness, enter a value or drag the slider to the right to increase the lightness or to the left to decrease it. Values
range from –100 to +100. Be careful when using this slider on an entire image. It will reduce the tonal range of the
overall image.
6 Click OK. Or, to cancel your changes and start over, hold down Alt (Option in Mac OS), and click Reset.
Modify the range of Hue/Saturation sliders
1 Do one of the following:
• Choose Enhance > Adjust Color > Adjust Hue/Saturation.
• Choose Layer > New Adjustment Layer > Hue/Saturation, or open an existing Hue/Saturation adjustment layer.
2 Choose an individual color from the Edit menu.
3 Do any of the following to the adjustment slider:
• Drag one of the triangles to adjust the amount of color fall-off without affecting the range.
• Drag one of the gray bars to adjust the range without affecting the amount of color fall-off.
• Drag the gray center part to move the entire adjustment slider, selecting a different color area.
• Drag one of the vertical white bars next to the dark gray center part to adjust the range of the color component.
ncreasing the range decreases the color fall-off, and vice versa.
I
• To move the color bar and the adjustment slider bar together, Ctrl-drag (Command-drag in Mac OS) the color
ba
r.
Last updated 10/3/2016
Page 56

Editing photos
A Adjusts color fall-off without affecting range B Adjusts range without affecting color fall-off C Adjusts the range of color component
D Moves entire slider
• If you modify the adjustment slider so that it falls into a different color range, the name changes to reflect this.
F
or example, if you choose Yellow and alter its range so that it falls in the red part of the color bar, the na
hanges to Red 2. You can convert up to six of the individual color ranges to varieties of the same color range (for
c
me
example, Red 1 through Red 6).
Note: B
y default, the color range selected when you choose a color component is 30° wide, with 30° color fall-off on either
side. Setting the fall-off too low can produce banding in the image.
4 To edit the range by choosing colors from the image, select the color picker, and click the image. Use the color picker
+ t
ool to add to the range; use the color picker – tool to subtract from the range.
While the color picker tool is selected, you can also press Shift to add to the range or press Alt (Option in Mac OS)
subtract from it.
to
50
Adjust the color of skin tone
The Adjust Color For Skin Tone command adjusts the overall color in a photo to bring out more natural skin tones.
When you click an area of skin in the photo, Photoshop Elements adjusts the skin tone—as well as all other colors in
the photo. You can manually adjust the brown and red colors separately to achieve the final color you want.
1 Open the photo and select the layer that needs correction.
2 Choose Enhance > Adjust Color > Adjust Color For Skin Tone.
3 Click an area of skin.
Photoshop Elements automatically adjusts the colors in the image. Changes might be subtle.
Note: M
ake sure Preview is selected so that you can see the color changes as they occur.
Last updated 10/3/2016
Page 57

Editing photos
4 (Optional) Drag any of the following sliders to fine-tune the correction:
Tan Increases or decreases the level of brown in skin tones.
Blush Increases or decreases the level of red in skin tones.
Te mp e ra tu r e Changes the overall color of skin tones.
5 When you’re finished, click OK. Or, to cancel your changes and start over, click Reset.
Adjust saturation in isolated areas
The Sponge tool changes the color saturation of an area.
51
1 Select the Sponge tool.
2 Set tool options in the options bar:
Mode Increases or decreases color saturation. Choose Saturate to intensify the color’s saturation. In grayscale,
Saturate increases contrast. Choose Desaturate to dilute the color’s saturation. In grayscale, Desaturate decreases
contrast.
Brush Sets the brush tip. Click the arrow next to the brush sample, choose a brush category from the Brushes
pop-up menu, and then select a brush thumbnail.
Size Sets the size of the brush, in pixels. Drag the Size slider or enter a size in the text box.
Flow Sets the rate of saturation change. Drag the Flow pop-up slider or enter a value in the text box.
3 Drag over the part of the image you want to modify.
Change the color of an object
The Replace Color command replaces a specific color in an image. You can set the hue, saturation, and lightness of the
replacement color.
1 Choose Enhance > Adjust Color > Replace Color.
2 Select a display option under the image thumbnail:
Selection Displays the mask, which looks like a black and white version of the image, in the preview box.
Image Displays the image in the preview box. This option is useful when you are working with a magnified image
or have limited screen space.
3 Click the color picker button, and then click the color you want to change in the image or in the preview box. Use
the color picker + tool to add colors, or use the color picker – tool to remove colors to keep them from changing.
Last updated 10/3/2016
Page 58

Editing photos
4 Drag the Fuzziness slider to control the degree to which related colors are included in the selection.
5 Do one of the following to specify a new color:
• Drag the Hue, Saturation, and Lightness sliders (or enter values in the text boxes).
• Click the Results box and specify a new color in the Color Picker, then click OK.
6 To cancel your changes and start over, hold down Alt (Option in Mac OS), and click Reset.
Precisely convert to black and white
The Convert To Black And White command lets you choose a specific conversion style to be applied to the image. This
is unlike the Remove Color command, which automatically converts to black and white for you.
In the Convert To Black And White dialog box, the available image styles help you compare and choose from different
conversion presets. Select a style and then use the available sliders to fine-tune the conversion.
52
A Displays Before and After views B Select a style C Adjust intensity
1 Open an image, and select an area or layer to convert. If you do not select an area or layer, the entire image is
converted.
To experiment with black and white conversion while preserving the original photo, convert a duplicate layer.
2 Choose Enhance > Convert To Black And White.
3 Select a style option that reflects the content of your image (for example, Portraits or Scenic Landscape).
4 Drag the Adjustment Intensity sliders to adjust red, green, blue, or contrast.
Note: The Adjustment Intensity sliders for red, green, and blue don’t colorize your image; they simply include more or
less data from the original color channels in the new black and white image.
5 To convert your image, click OK. Or, to cancel your changes and start over, click Reset. To close the Convert To Black
And White dialog box, click Cancel.
Last updated 10/3/2016
Page 59

Editing photos
Automatically convert to black and white
The Remove Color command converts to black and white by assigning equal red, green, and blue values to each pixel
in an RGB image. The overall brightness of each pixel remains constant. This command has the same effect as setting
Saturation to -100 in the Hue/Saturation dialog box.
1 To adjust a specific image area, select it with one of the selection tools. If no selection is made, the adjustment applies
to the entire image.
2 Choose Enhance > Adjust Color > Remove Color.
Add custom presets for black and white conversion
You can manually add custom presets to the black and white converter by editing a specific text file.
Note: A
dding custom presets for conversion to black and white is a task for advanced users.
1 Close the Photoshop Elements, and navigate to the folder that contains the bwconvert.txt file:
• Windows: [Photoshop Elements installation directory]\Required\bwconvert.txt
• Mac OS: /Applications/Adobe Photoshop Elements/Support Files/Adobe Photoshop Elements
E
ditor.app/Contents/Required/bwconvert.txt. Command-click Adobe Photoshop Elements and select Show
Package Contents. Navigate to the folder Contents/Required.
53
2 Open the bwconvert.txt file in a plain text editor (such as Notepad).
3 Following the same naming convention as the presets already in the file, add your new preset and give it a unique
name.
4 Save the file (keeping the original filename).
5 Start the Photoshop Elements and choose Enhance > Convert To Black And White to view the presets.
Add color to a grayscale image
You can colorize an entire grayscale image, or select areas to colorize with different colors. For example, you can select
a person’s hair and color it brown, and then add pink to the person’s cheeks after making another selection.
Note: I
f the image you are coloring is in grayscale mode, convert it into RGB by choosing Image > Mode > RGB Color.
1 Choose Enhance > Adjust Color > Adjust Hue/Saturation, or Layer > New Adjustment Layer > Hue/Saturation to
work on an adjustment layer.
2 Select Colorize. If the foreground color isn’t black or white, Photoshop Elements converts the image into the hue of
the current foreground color. The lightness value of each pixel does not change.
3 Use the Hue slider to select a new color if desired. Use the Saturation slider to adjust the saturation. Then click OK.
More Help topics
Black and white Guided Edits
Color wheel
Understanding layers
Last updated 10/3/2016
Page 60

Editing photos
Retouch and correct photos
Try the latest Photoshop Elements|Explore Elements product suite
Adjust facial features
The Adjust Facial Features workflow uses face-aware technology to identify and adjust facial characteristics of people
in a photograph. You can take a portrait picture and adjust facial features like the jaw, nose, lips, and eyes by using
simple sliders to increase or decrease an effect.
1 Open a photo in Photoshop Elements.
For Adjust Facial Features to work well, ensure that there are one or more faces in the photograph that you are using.
2Click Enhance > Adjust Facial Features.
3 In the Adjust Facial Features dialog, you will notice that the face of the person is marked with a circular highlighter
to indicate that the face-aware feature has found a face in the picture.
More than one face in the picture? I
highlighters indicating where Photoshop Elements was able to detect faces. Click a ring or a face to adjust the features
of
that face.
f there are more than one faces in the picture, there will be multiple circular
54
4 For a selected face, you can adjust the following features using the available sliders:
Featur e Characteristics
Lips Smile, Height, Width, Upper lip, Lower lip
Last updated 10/3/2016
Page 61

Editing photos
Eyes Height, Width, Size, Tilt, Distance
Nose Height, Width
Fac e Width, Forehead height, Jawbone shape, Chin height
55
Click the Before/After toggle button to review the changes caused by moving the sliders left or right.
5 (Optional) To reset edits to a particular characteristic, double-click the slider. Modifications for that characteristic
are canceled.
6 Do one of the following:
• To cancel the set of modifications you have made to facial features, click Reset.
• To apply the modifications made to the facial features, click OK.
Precisely remove red eye
Red eye is a common issue that occurs when your photo subject's retina is illuminated by your camera's fl ash. You’ll s ee
it more often when taking pictures in a darkened room because the subject’s iris is wide open. To avoid red eye, use the
camera’s red-eye reduction feature, if available.
To automatically fix red eye when you import photos into the Elements Organizer, select Automatically Fix Red Eyes
in the Get Photos dialog box. You can also remove red eye from selected photos in the Photo Browser.
Last updated 10/3/2016
Page 62

Editing photos
1 To manually fix red eye, select the Red Eye Removal tool in Quick or Expert modes.
2 In the Tool Options bar, set the Pupil Radius and Darken Amount.
3 In the image, do one of the following:
• Click a red area of an eye.
• Draw a selection over the eye area.
When you release the mouse button, the red is removed from the eyes.
Note: You can also automatically fix red eye by clicking Auto Correct in the Red Eye Removal tool options bar.
56
Remove the Pet Eye effect
The red-eye removal tool enables you to remove the reddish glow in the eyes, due to reflection of light (resulting from
low ambient light or the use of a flash). For animals, the eyes glow white, green, red, or yellow, and the often-used redeye removal tools may not fix the effect correctly.
To fix the Pet Eye effect:
1 In the Quick or Expert mode, select the Red Eye Removal Tool.
2 In the Tool Options bar, select the Pet Eye check box.
Last updated 10/3/2016
Page 63

Editing photos
3 Do one of the following using a mouse:
• Draw a rectangle around the eye region.
• Click on the eye in the picture.
Note: When you select the Pet Eye check box, the Auto Correct button is disabled.
Move and reposition objects
The Content-Aware Move tool allows you to select an object in your photograph and move the selection to a different
location, or extend it.
57
1 Select the Content-Aware Move tool .
2 Choose a mode to specify whether you want to move an object or create a copy of the object.
Move Enables you to move objects to a different location in the image.
Extend Enables you to replicate the object multiple times.
3 Choose the type of selection you want to make:
New Drag your mouse around the object you want to move, or extend to create a new selection.
Add Any selection you make adds to the previous selection.
Subtract When you make a new selection over an existing selection, the overlapping portion is removed from the
resulting selection.
Intersect When you make a new selection over an existing selection, only the common area overlapping the new
and old selection continues to be selected.
4 Drag the mouse pointer ( ) over the image, select the object you want to move or extend.
Last updated 10/3/2016
Page 64

Editing photos
58
5 When you have made a selection, move the object to a new location. To do this, click and drag the object to a new
location.
The area where the selection is moved from is automatically filled, based on the image content surrounding the area.
6 Transform your selection at the new location. Click one of the following options:
• Rotate Enables you to rotate your selection to a different angle in the image.
• Scale Enables you to adjust the size of your selection.
• Skew Enables you to change the perspective of your selection in the image.
7 If the automatically-filled area does not appear correct, select the Sample All Layers check box and adjust the
Healing slider.
Remove spots and unwanted objects
Photoshop Elements has several tools you can use to remove small flaws, such as spots or unwanted objects, from your
images.
Remove spots and small imperfections
The Spot Healing Brush quickly removes blemishes and other imperfections from your photos. You can either click
once on a blemish, or drag to smooth away imperfections in an area.
Last updated 10/3/2016
Page 65

Editing photos
1 Select the Spot Healing Brush tool .
2 Choose a brush size. A brush that is slightly larger than the area you want to fix works best so that you can cover the
entire area with one click.
3 Choose one of the following Type options in the Tool Options bar.
Proximity Match Uses the pixels around the edge of the selection to find an image area to use as a patch for the
selected area. If this option doesn’t provide a satisfactory fix, choose Edit > Undo, and try the Create Texture option.
Create Texture Uses all the pixels in a selection to create a texture for fixing the area. If the texture doesn’t work, try
dragging through the area a second time.
59
Note: Click Sample All Layers to apply your change to all layers of the image.
4 Click the area you want to fix in the image, or click and drag over a larger area.
Remove unwanted objects with content-aware healing
You can remove unwanted objects or figures from your photos without destroying the photos. Using the ContentAware option with the Spot Healing Brush tool, you can remove selected objects from a photo. Photoshop Elements
compares nearby image content to seamlessly fill the selection, realistically maintaining key details such as shadows and
object edges.
To remove an unwanted object:
1 Select the Spot Healing Brush tool .
2 Select Content-Aware in the Tool Options bar.
3 Paint over the object that you want to remove from the image.
Spot healing works best on small objects. If the image you're working on is large and has a large unwanted object, make
sure that you work with high-end computer configuration. You can see the
Photoshop Elements system requirements
for the recommended computer configuration.
Last updated 10/3/2016
Page 66

Editing photos
If you experience problems with large images, try the following approaches:
• Draw smaller brush strokes at a time.
• Downsample the image.
• Increase the RAM allocated and relaunch the application.
Fix large imperfections
The Healing Brush fixes large areas of imperfection when you drag over them. You can remove objects from a uniform
background, such as an object in a field of grass.
60
1 Select the Healing Brush tool .
2 Choose a brush size from the Tool Options bar and set healing brush options:
Mode Determines how the source or pattern blends with existing pixels. Normal mode lays new pixels over the
original pixels. Replace mode preserves film grain and texture at the edges of the brush stroke.
Source Sets the source to use for repairing pixels. Sampled uses pixels from the current image. Pattern uses pixels
from the pattern you specify in the Pattern panel.
Aligned Samples pixels continuously without losing the current sampling point, even if you release the mouse
button. Deselect Aligned to continue using the sampled pixels from the initial sampling point each time you stop
and resume painting.
Sample All Layers Choose Sample All Layers to sample data from the current layer, the current layer and below, or
all visible layers.
3 Position the pointer in any open image and press Alt (Option in Mac OS) click to sample data.
Note: If
you are sampling from one image and applying to another, both images must be in the same color mode unless
one of the images is in Grayscale mode.
4 Drag the image over the flaw to meld existing data with sampled data. The sampled pixels meld with the existing
pixels each time you release the mouse button.
If there is a strong contrast at the edges of the area you want to heal, make a selection before you use the Healing
Brush tool. Make the selection bigger than the area you want to
heal but precisely follow the boundary of contrasting
pixels. When you paint with the Healing Brush tool, the selection prevents colors from bleeding from the outside.
Last updated 10/3/2016
Page 67

Editing photos
Correct camera distortion
The Correct Camera Distortion dialog box enables you to fix common lens distortion problems, like darkened edges
due to lens faults or improper lens shading. For example, in a picture of the sky taken in low light, the corners of the
image are darker than the center. Changing the vignette amount and midtone settings fixes the distortion.
Adjust distortions due to vertical or horizontal camera tilt by using the perspective controls. Rotate an image or fix
image perspective to adjust distortions. The filter image grid for Correct Camera Distortion helps you make easy and
accurate adjustments.
61
1 Choose Filter > Correct Camera Distortion.
2 Select Preview check box.
3 Set any of the following options to correct your image, and then click OK:
Remove Distortion Corrects lens barrel or pincushion distortion. Type a number in the box, or move the slider to
straighten horizontal and vertical lines that bend either away from or toward the center of the image.
Vignette Amount Sets the amount of lightening or darkening along the edges of an image. Type a number in the
box, or move the slider to gradually shade the image.
Vignette Midpoint Specifies the width of area affected by the Amount slider. Move the slider, or type a lower
number to affect more of the image. Type a higher number to restrict the effect to the edges of the image.
Vertical Perspective Corre cts im age p erspe ctive caus ed by t ilting t he camer a up or down . Type a numb er in t he box
or use the slider to make vertical lines in an image parallel.
Horizontal Perspective Type a number in the box or use the slider to correct perspective by making horizontal lines
in an image parallel.
Angle Rotates the image to correct for camera tilt or to make adjustments after correcting perspective. Type a
number in the box or drag the angle dial to rotate the image to the left (counterclockwise) or right (clockwise).
Last updated 10/3/2016
Page 68

Editing photos
Scale Adjusts the image scale up or down. The image pixel dimensions aren’t changed. Type a number in the box
or use the slider to remove blank areas of the image caused by pincushion, rotation, or perspective corrections.
Scaling up effectively results in cropping the image and interpolating up to the original pixel dimensions.
Show Grid Shows the grid when selected. Hides the grid when deselected.
Zoom Shows a closer view when you zoom in, and shows a more distant view when you zoom out.
Color Specifies the grid color.
Automatically remove haze
You can now remove the dampening effect that environmental or atmospheric conditions have on your pictures,
particularly photos of landscapes. Using the Auto Haze Removal feature, you can reduce the masking effect that haze,
fog, or smog creates.
To use the Auto Haze Removal feature:
1 Open an picture in Photoshop Elements, in the Quick or Expert modes.
2 With the image open, choose Enhance > Auto Haze Removal.
The image is processed and the effects of haze or fog are reduced. Repeat Step 2, to further process the photograph.
62
Auto Haze Removal works better on uncompressed/raw images.
Manually remove haze
Last updated 10/3/2016
Page 69

Editing photos
63
1 Open an image in Photoshop Elements, in the Quick or Enhanced room.
2 Choose Enhance > Haze Removal.
3 Use the Haze Reduction and Sensitivity sliders to achieve the desired level of haze reduction.
Last updated 10/3/2016
Page 70

Editing photos
64
Last updated 10/3/2016
Page 71

Editing photos
65
Remember that using too much of either of the sliders may result in an image with high levels of contrast or minor
imperfections in the photograph getting magnified. Play with both sliders till you get the right result.
4 Use the Before / After toggle button to see the effectiveness of the Haze Reduction feature on the photo.
5 When done, click OK. To cancel Haze Removal edits to the image, click Cancel.
More Help topics
Automatically correct lighting and color
Fix photos with touch up buttons
About blending modes
About patterns
Improve shadow and highlight detail
Last updated 10/3/2016
Page 72

Editing photos
Enhance photos
Blur or soften edges
The Blur tool softens hard edges or areas in an image by reducing detail. Blurring a busy background can bring your
target images more into focus. You can also use Blur filters for this purpose.
1 Select the Blur tool.
2 Set options in the options bar:
Brush Sets the brush tip, from the brush popup menu. For more brush shapes, click the Brush drop-down inside
the popup, and then select a brush thumbnail.
66
Size Sets the size of the brush, in pixels. Drag the Size slider, or enter a size in the text box.
Mode Specifies how the pixels you blur blend into other pixels in the image.
Strength Specifies the amount of blur that occurs with each stroke.
Sample All Layers Blurs all visible layers. If this is deselected, the tool blurs only the active layer.
3 Drag over the part of the image you want to blur.
Replace colors in an image
The Color Replacement tool simplifies replacing specific colors in your image. You can paint over a targeted color—for
example, a yellow flower in an image—with a different color, like red. You can also use the Color Replacement tool to
correct colors.
Last updated 10/3/2016
Page 73

Editing photos
1 Select the Color Replacement tool. (The Color Replacement tool is part of the Brush Tool Options bar).
2 Choose a brush tip from the Brush menu in the options bar. For Mode, generally, you’ll want to keep the blending
mode set to Color.
3 For Limits, choose one of the following:
Discontiguous Replaces the sampled color wherever it occurs under the pointer.
67
Contiguous Replaces colors that are contiguous with the color immediately under the pointer.
4 For Tolerance, specify a low percentage to replace colors very similar to the pixel you click, or raise the percentage
to replace a broader range of colors.
5 To give a smooth edge to the areas you correct, select Anti-aliasing.
6 Choose the required method of sampling. Available options are:
Continuous Continuously samples color, as you drag the color replacement tool.
Once Samples color only once, when you start dragging the color replacement tool.
Background Swatch Replaces the area containing the background color, whenever you drag the color replacement
tool over it.
7 Choose a foreground color to use to replace the unwanted color.
8 Click the color you want to replace in the image.
9 Drag within the image to replace the targeted color.
Clone images or areas in an image
The Clone Stamp tool paints with an image sample, which you can use to duplicate objects, remove image
imperfections, or paint over objects in your photo.
Last updated 10/3/2016
Page 74

Editing photos
68
1 Select the Clone Stamp tool.
2 (Optional) Set options in the options bar:
Brush Sets the brush tip. Click the arrow next to the brush sample, choose a brush category from the Brushes
pop-up menu, and then select a brush thumbnail.
Sample All Layers To sample (copy) data from all visible layers, select Sample All Layers. To sample data from only
the active layer, deselect this option.
Opacity Sets the opacity of the paint you apply. A low opacity setting allows pixels under a paint stroke to show
through. Drag the slider, or enter an opacity value.
Size Sets the size of the brush in pixels. Drag the Size slider, or enter a size in the text box.
Mode Determines how the source or pattern blends with existing pixels. Normal mode lays new pixels over the
original pixels.
Aligned Moves the sampled area with the cursor as you begin to paint, regardless of how many times you stop and
resume painting. Selecting this option is useful when you want to eliminate unwanted areas, such as a telephone line
across the skyline or a rip in a scanned photo. If Aligned is deselected, the Clone Stamp tool applies the sampled area
from the initial sampling point each time you stop and resume painting. Deselecting this option is useful for
applying multiple copies of the same part of an image to different areas within the same image or to another image.
3 Click Clone Overlay, and set the following options:
Show Overlay Select show Overlay for the overlay to be visible inside brush size.
Opacity To set the opacity of the overlay, enter a percentage value in the Opacity text box.
Clipped To clip overlay to the brush size, enable the Clipped option.
Auto Hide To hide the overlay while you apply the paint strokes, select Auto Hide.
Last updated 10/3/2016
Page 75

Editing photos
Invert Overlay To invert the colors in the overlay, select Invert.
4 Position the pointer on the part of any open image you want to sample, and press Alt (Option in Mac OS) and click.
The tool duplicates the pixels at this sample point in your image as you paint.
5 Drag or click to paint with the tool.
Photomerge Style Match
If you like the style of an image, you can apply its style properties to another image. You can work with a set of images,
apply styles, and choose to update the image with the style that produces the best results.
Note: When you apply styles multiple times, the effect is not cumulative. Only the last applied style is saved.
69
1 Open the image, and select Enhance > Photomerge > Photomerge Style Match
2 In the Style bin, add the images from which you want to transfer the style. Choose images that have strong stylistic
properties and details.
Note: You can also choose an image from the default style images displayed in the Style bin.
3 To apply the style of an image, double-click the style image in the Style bin or drag the image from the Style bin to
the Style Image placeholder.
4 To refine the image, use the options in the Edit panel.
Intensity Controls the amount or intensity of the style to transfer. The maximum value implies that you want to
transfer 100% style of the style image.
Last updated 10/3/2016
Page 76

Editing photos
Clarity Improves the local contrast of a stylized image. The contrast of the slowly varying intensity regions are
enhanced, bringing out crisp details in darkened regions.
Details Improves the overall or global contrast of the image.
Style Eraser Removes the applied style from specific image areas.
Style Painter Adds the style back to areas from which you have removed the applied style.
Soften Stroke Edges Softens hard edges caused by to style erasing and painting.
Transfer Tones Transfers the tones of the style image. For example, if the style image is black and white or sepia, and
the image to which you want to apply Photomerge Style Transfer is colored, selecting Transfer Tones transfers the
style tone (black and white or sepia) to the colored image.
70
5 Click Done to update the image with the applied style.
More Help topics
Blur and Blur More
Gaussian Blur
About blending modes
Last updated 10/3/2016
Page 77

Editing photos
Adjust shadows and light
Adjust color and tonality using the Smart Brush tools
The Smart Brush tool and the Detail Smart Brush tool apply tonal and color adjustments to specific areas of a photo.
Certain effects can also be applied using these tools. You simply pick a preset adjustment and apply the correction. Both
tools automatically create adjustment layers. This feature offers you flexibility in working with your photos because the
original image layer is not altered. You can go back and tweak the adjustments and no image information is discarded.
When you apply the Smart Brush tool, it makes a selection based on color and texture similarly. The adjustment is
simultaneously applied to the selected area. You can adjust shadows, highlights, colors, and contrasts. Apply colors of
the objects in your image, add textures, apply various photographic effects.
71
1 Select the Smart Brush tool.
2 Select an effect from the preset drop-down in the Tools Options bar, and then drag your mouse on the objects in the
image to which you want to apply the effect.
You can apply various effects and patterns using smart brush from the available preset options.
Last updated 10/3/2016
Page 78

Editing photos
72
However you cannot change the settings of an effect because the layer with the effect is a pixel layer and not an
adjustment layer.
Last updated 10/3/2016
Page 79

Editing photos
The Textures presets help provide the following effects to your images:
• Enhance dull and boring backgrounds.
• Create a Satin effect for clothes/textiles in an image.
• Add flowery patterns to dresses in an image.
• Add designer patterns to walls or backgrounds in an image.
The Detail Smart Brush tool enables you to paint the adjustment to specific areas of the photo just like a painting tool.
This t
ool helps adjust fine details with pattern and effect presets. Painting and applying the preset in small areas is more
precise. Click an effect from the drop-down list and paint over the area to apply the effect. You can choose from a range
of brushes. It has settings for brush size and shape in the options bar.
It also works like a Selection tool; you can click Refine Edge in the options bar to modify the selection’s shape and size.
T
o remove an area from the selection, click the Remove area from Selection brush.
73
Both brush tools enable you to add to or subtract from th
adjustment preset applied to a photo. Each preset adjustment is applied to its own adjustment layer. You can tweak the
settings for each correction separately.
When a correction is made, a pin appears where you first applied the adjustment. The pin provides a reference for the
s
pecific adjustment. A new pin appears when a different adjustment preset is applied. This feature makes it easier to
modify a specific correction, especially if you apply different adjustments.
e areas being adjusted. You can also have more than one
Apply the Smart Brush tools
1 Select the Smart Brush tool or the Detail Smart Brush tool from the toolbox.
A pop-up panel opens displaying adjustment presets.
2 Select an effect from the preset drop-down in the Tools Options bar.
Choose an option from the pop-up panel menu to view different sets of adjustments. For more information on
configuring the pop-up panel, see .
3 (Optional) Adjust the size and quality of the brush tool by doing one of the following:
• If you selected the Smart Brush tool, open the Brush Picker in the options bar and adjust the settings.
• If you selected the Detail Smart Brush tool, select a preset brush tip from the Brush presets pop-up panel. Then
ad
just the brush size setting in the options bar.
4 Paint or drag the tool in the image.
The correction is applied on its own adjustment layer and a color pin appears where you first applied the brush tool.
Last updated 10/3/2016
Page 80

Editing photos
5 (Optional) Do any of the following:
• To ad d the c urrent adjustment to more areas of th e photo, p aint or dr ag in t he image. If necess ary, make sure Add
To Selection is selected.
• To remove parts of the current adjustment, select Subtract From Selection and paint in the image.
• To apply a different type of adjustment, select New Selection, select a preset from the pop-up panel, and then
p
aint in the image.
• To smooth the edges of the selection, click Refine Edges in the options bar, adjust the settings in the dialog box,
and then click OK. For more information, see Smooth selection edges with anti-aliasing and feathering.
Note: I
f you use a different tool from the toolbox and then return to the Smart Brush tool or Detail Smart Brush tool,
the last adjustment you applied is active.
6 (Optional) If you have multiple adjustments, do one of the following to select the adjustment you want to add to,
subtract from, or modify:
• Click a pin.
• Right-click in the photo and choose the adjustment listed in the bottom portion of the menu.
Modify Smart Brush tool correction settings
1 Do any of the following:
74
• In the image, right-click a pin or an active selection and choose Change Adjustment Settings.
• In the Layers panel, double-click the layer thumbnail for the specific adjustment layer.
• Double-click a pin.
2 Adjust the settings in the dialog box and then click OK.
Change the Smart Brush tool correction preset
1 Click a pin or active selection and then open the preset pop-up panel in the options bar.
2 Choose an adjustment preset from the pop-up panel.
Delete a Smart Brush tool correction
Right-click a pin or an active selection and choose Delete Adjustment.
Note: In the Layers panel, you can also delete a Smart Brush tool correction by deleting the specific adjustment layer.
Smart Brush pop-up panel
Photoshop Elements lets you apply many different preset adjustments using the Smart Brush tool and the Detail
Smart Brush tool . You pic k an adju stm ent fro m the pre set p op- up pa nel in the opt ion s bar. Like all pop -up pan els ,
the Smart Brush preset pop-up panel can be configured. Use the panel menu to display the adjustments as thumbnails
or in a list. You can also drag the picker out of the options bar so it floats where you want it in the workspace.
Specific sets of adjustments or all adjustments can be viewed by choosing from a menu near the upper-left area of the
panel. The adjustments range from tonal and corrections.
About Levels adjustments
The Levels dialog box is a powerful tonal and color-adjustment tool. You can make levels adjustments in the entire
image or a selected portion. (To access the dialog box, choose Enhance > Adjust Lighting > Levels.)
Last updated 10/3/2016
Page 81

Editing photos
You can do any of the following with the Levels dialog box:
A Channels to adjust color B Shadow values C Middle tones D Highlight values
• Set the shadow and highlight values to make sure that your image uses the full tonal range.
• Adjust the brightness of the image’s middle tones without affecting the shadow and highlight values.
• Fix a color cast by making grays neutral. You can also enhance an image by adding a slight color cast, for example,
by adding a warming effect on a sunset.
• Target shadow and highlight RGB values if you are preparing images for commercial printing.
75
When you work with Levels, you can work directly on the image pixels or through an adjustment layer. Adjustment
l
ayers give you flexibility in the following ways:
• You can modify an adjustment at any time by double-clicking the adjustment layer to reopen the Levels dialog box.
• You can reduce the effect of an adjustment by lowering the adjustment layer’s opacity in the Layers panel.
• You can stack adjustment layers to make multiple adjustments without degrading the image because of too many
successive adjustments.
• You can use the adjustment layer’s layer mask to confine an adjustment to a portion of your image.
Improve shadow and highlight detail
1 Choose Enhance > Adjust Lighting > Shadow/Highlights.
2 Drag any of the adjustment sliders or enter values in the text boxes, then click OK.
Lighten Shadows Brightens the dark areas of your photo and reveals more of the shadow detail that was captured
in your image.
Darken Highlights Darkens the light areas of your photo and reveals more of the highlight detail that was captured
in your image. Pure white areas of your photo don’t have any detail and aren’t affected by this adjustment.
Midtone Contrast Adds or reduces the contrast of the middle tones. Use this slider if the image contrast doesn’t look
right after you’ve adjusted shadows and highlights.
To reset the image to how it looked when you opened the dialog box, hold down Alt (Option in Mac OS) and click
th
e Reset button.
Last updated 10/3/2016
Page 82

Editing photos
76
Adjust shadows and brightness using Levels
1 Do one of the following:
• Choose Enhance > Adjust Lighting > Levels.
• Choose Layer > New Adjustment Layer > Levels, or open an existing Levels adjustment layer.
2 Choose RGB from the Channel menu. When set to RGB, your adjustment affects all three (red, green, and blue)
channels. If you are working on a grayscale image, it will only have the gray channel.
3 Set the shadow and highlight values by dragging the black and white Input Levels sliders (the left and right sliders
directly under the histogram) to the edge of the first group of pixels on either end of the histogram. You can also
enter values directly into the first and third Input Levels text boxes.
Last updated 10/3/2016
Page 83

Editing photos
77
Press Alt (Option in Mac OS) and drag the Shadow slider to see which areas will be clipped to black (level 0). Press
Alt (Option in Mac OS) and drag the Highlight slider to see which areas will be clipped to white (level 255). Colored
areas show clipping in individual channels.
4 To adjust the brightness of the middle tones without affecting the shadow and highlight values, drag the gray Input
Levels (middle) slider. You can also enter values directly in the middle Input Levels text box. (A value of 1.0
represents the current unadjusted midtone value.) Click OK.
You can see the adjustment reflected in the Histogram panel.
Note: You can click Auto to move the Highlight and Shadow sliders automatically to the brightest and darkest points in
each channel. This is the same as using the Auto Levels command and may cause a color shift in your image.
Adjust brightness and contrast in selected areas
The Brightness/Contrast command is best used on selected portions of an image. Use this command to adjust the
brightness of an entire image or to reduce contrast results in an image. The Levels and Shadow/Highlight commands
are better choices for making tonal adjustments.
1 Do one of the following:
• Choose Enhance > Adjust Lighting > Brightness/Contrast to make adjustments directly to image pixels.
• Choose Layer > New Adjustment Layer > Brightness/Contrast to make adjustments to a layer.
2 Drag the sliders to adjust the brightness and contrast, then click OK.
Dragging to the left decreases the level; dragging to the right increases it. The number at the right of each slider
displays the brightness or contrast value.
Last updated 10/3/2016
Page 84

Editing photos
Quickly lighten or darken isolated areas
The Dodge tool and the Burn tool lighten or darken areas of the image. You can use the Dodge tool to bring out details
in shadows and the Burn tool to bring out details in highlights.
78
1 Select the Dodge tool or the Burn tool. If you do not see these tools, look for the Sponge tool.
2 Set tool options in the options bar:
Brushes pop-up menu Sets the brush tip. Click the arrow next to the brush sample, choose a brush category from
the Brushes pop-up menu, and then select a brush thumbnail.
Size Sets the size of the brush, in pixels. Drag the Size slider or enter a size in the text box.
Range Sets the image tonal range that the tool adjusts. Select Midtones to change the middle range of grays,
Shadows to change the dark areas, and Highlights to change the light areas.
Exposure Sets the effect of the tool with each stroke. A higher percentage increases the effect.
Ti p: To dodge or burn an area gradually, set the tool to a low exposure value and drag several times over the area
you want to correct.
3 Drag over the part of the image you want to modify.
Quickly saturate or desaturate isolated areas
The Sponge tool saturates or desaturates areas of the image. You can use the Sponge tool to bring out or mute the color
on an object or area.
1 Select the Sponge tool. If you do not see the Sponge tool, look for the Dodge or Burn tool.
2 Set the tool options in the options bar.
Brushes pop-up menu Sets the brush tip. Click the arrow next to the brush sample, choose a brush category from
the Brushes pop-up menu, and then select a brush thumbnail.
Size Sets the size of the brush, in pixels. Drag the Size slider or enter a size in the text box.
Last updated 10/3/2016
Page 85

Editing photos
Mode Sets whether to saturate or desaturate.
Flow Sets the strength of the tool with each stroke. In Saturate mode, a higher percentage increases the saturation.
In Desaturate mode, a higher percentage increases the desaturation.
More Help topics
About adjustment and fill layers
Automatically correct lighting and color
Presets and libraries
Transforming
79
Rotate or flip an item
You can rotate or flip a selection, a layer, or an entire image. Make sure to choose the correction command depending
on the item you want to rotate or flip.
1 In the Edit workspace, select the photo, layer, selection, or shape you want to rotate or flip.
2 Choose Image > Rotate, choose one of the following commands from the submenu, and then click OK:
90° Left, Layer 90° Left, or Selection 90° Left Rotates the photo, layer, or selection a quarter-turn counterclockwise.
(Rotate Selection is only available when you have an active selection in an image.)
90° Right, Layer 90° Right, or Selection 90° Right Rotates the photo, layer, or selection a quarter-turn clockwise.
180°, Layer 180°, or Selection 180° Rotates the photo, layer, or selection a half-turn.
Custom Rotates the item by the amount you specify. If you select this option, enter the number of degrees you want
to rotate the item by, and the direction in which you want to rotate the item.
Note: A positive number rotates the object clockwise, and a negative number rotates the object counterclockwise.
Flip Horizontal, Flip Layer Horizontal, or Flip Selection Horizontal Flips the photo, layer, or selection
horizontally.
Last updated 10/3/2016
Page 86

Editing photos
Freely rotate an item
With the Free Rotate Layer and Free Rotate Selection commands, you can rotate an item by any amount.
80
1 In the Edit workspace, select the layer or selection you want to rotate.
2 Choose Image > Rotate > Free Rotate Layer or Selection. A bounding box appears in the image.
Note: If you select an image that is a Background layer (such as a photo imported from a camera or scanner), you are
given the option of turning it into a regular layer so that you can transform it.
3 (Optional) To change the point around which the item rotates, click a square on the reference point locator in
the options bar.
Last updated 10/3/2016
Page 87

Editing photos
4 Do one of the following to specify the rotation amount:
• Click and drag the rotate handle at the bottom of the bounding box. The cursor will change to concentric arrows
when it’s hovering over the handle. To constrain the rotation to 15° increments, hold down Shift as you drag.
• Type an angle of rotation between –180 (maximum counterclockwise rotation) and 180 (maximum clockwise
otation) in the Set Rotation text box of the options bar.
r
5 Do one of the following:
• To apply the transformation, double-click inside the bounding box, click the Commit button , or press Enter.
• To cancel the transformation, click the Cancel button , or press Esc.
Scale an item
1 In the Edit workspace, select the photo, layer, selection, or shape you want to scale.
2 Choose Image > Resize > Scale.
Note: I
f you select a photo that is a Background layer (such as a photo imported from a camera or scanner), you are
given the option of turning it into a regular layer so that you can transform it.
3 Do any of the following to specify the scale amount:
• To maintain the relative proportions (avoiding image distortion) as you scale, select Constrain Proportions, and
then drag a corner handle. Alternatively, press Alt (Option in Mac OS) as you drag a corner handle.
• To scale only the height or the width, drag a side handle.
81
• Enter a percentage for the Width, Height, or both in the options bar.
4 Do one of the following:
• To apply the transformation, double-click inside the bounding box, click the Commit button or press Enter.
• To cancel the transformation, click the Cancel button or press Esc.
Skew or distort an item
Skewing applies a vertical or horizontal slant to an item. Distorting stretches or squishes an item.
1 In the Edit workspace, select the photo, layer, selection, or shape you want to transform.
2 Choose Image > Transform > Skew or Image > Transform > Distort. If you are transforming a shape with the Shape
tool selected, choose Image > Transform Shape > Skew or Image > Transform Shape > Distort.
Note: I
f you select a photo that is a Background layer (such as a photo imported from a camera or scanner), you are
given the option of turning it into a regular layer so that you can transform it.
3 Drag a handle to skew or distort the bounding box.
4 Do one of the following:
• To apply the transformation, double-click inside the bounding box, click the Commit button , or press Enter.
• To cancel the transformation, click the Cancel button , or press Esc.
Apply perspective to an item
Applying perspective creates the appearance of objects existing in three dimensions.
Last updated 10/3/2016
Page 88

Editing photos
1 In the Edit workspace, select the item you want to transform.
2 Choose Image > Transform > Perspective. If you are transforming a shape with the Shape tool selected, choose
Image > Transform Shape > Perspective.
Note: I
f you select a photo that is a background layer (such as a photo imported from a camera or scanner), you are
given the option of turning it into a regular layer so that you can transform it.
3 Drag a corner handle on the bounding box to apply perspective.
4 Do one of the following:
82
• To commit the transformation, double-click inside the bounding box, click the Commit button , or press
Enter.
• To cancel the transformation, click the Cancel button , or press Esc.
Freely transform an item
The Free Transform command lets you apply transformations (rotating, scaling, skewing, distorting, and perspective)
in one step. Instead of choosing different commands, you simply hold down a key on your keyboard to switch between
transformation types.
1 In the Edit workspace, select the item you want to transform.
2 Choose Image > Transform > Free Transform. If you are transforming a shape, choose Image > Transform Shape >
Free Transform Shape.
Note: I
f you select a photo that is a Background layer (such as a photo imported from a camera or scanner), you are
given the option of turning it into a regular layer so that you can transform it.
3 (Optional) To change the point around which the item rotates, click a square on the reference point locator in
the options bar.
Last updated 10/3/2016
Page 89

Editing photos
4 Do one or more of the following to transform the object:
• To scale, drag any handle of the bounding box. To scale the width and height proportionally, either press Shift as
you drag a corner handle, or select Constrain Proportions in the options bar, and then drag a corner handle.
• To rotate, move the pointer outside of the bounding box and drag. When positioned outside the bounding box,
the pointer becomes a curved, two-sided arrow . Press Shift and drag to constrain the rotation to 15°
increments.
• To distort, press Ctrl (Command in Mac OS), and drag any handle. When positioned over a handle, the pointer
comes a gray arrowhead .
be
• To skew, press Ctrl+Shift (Command+Shift in Mac OS) and drag a handle in the middle of any side of the
ounding box. When positioned over a side handle, the pointer becomes a gray arrowhead with a small doub
b
ar
row .
• To apply perspective, press Ctrl+Alt+Shift (Command+Option+Shift), and drag a corner handle. When
positioned over a corner handle, the pointer becomes a gray arrowhead .
5 Do one of the following:
• To commit the transformation, double-click inside the bounding box, and then click the Commit button , or
press Enter.
• To cancel the transformation, click the Cancel button , or press Esc.
83
le
Apply a transformation to a Background layer
Before you can apply transformations to the Background layer, you need to convert it into a regular layer.
1 In the Edit workspace, select the Background layer in the Layers panel.
2 Convert the background.
3 Apply the transformation.
More Help topics
Resizing an image
Cropping
Try the latest Photoshop Elements|Explore Elements product suite
Crop an image
The Crop tool removes the part of an image surrounding the crop marquee, or selection. Cropping is useful for
removing distracting background elements and creating a focus for your photo. By default, when you crop a photo, the
resolution remains the same as the original photo. Using the Photo Ratio option allows you to view and modify the size
and resolution when cropping a photo. If you use a preset size, the resolution changes to fit the preset.
Last updated 10/3/2016
Page 90

Editing photos
1 Select the Crop tool .
2 From the Tool Options bar, select a cropping guide that meets your requirement. You can choose one of Rule of
Thirds, Grid, Golden Ratio, or None. For more information on cropping guides, see the section on Use guides for
better cropping resultsin this article.
3 If you want to use a resolution other than that of the original photo, select one of the following options from the
Aspect Ratio menu or specify new custom values in the Width and Height boxes in the options bar:
No Restriction Lets you resize the image to any dimension.
84
Use Photo Ratio Displays the original aspect ratio of the photo when you crop. The Width and Height boxes show
the values that are used for the cropped image. The Resolution box allows you to change the image resolution.
Preset Size Specifies a preset size for the cropped photo. If you want your final output to be a specific size, such as
4 x 6 inches to fit a picture frame, choose that preset size.
Note: Whe
4 Drag over the part of the image you want to keep. When you release the mouse button, the crop marquee appears
n you specify values for the Width and Height boxes, the Aspect Ratio menu changes to Custom.
as a bounding box with handles at the corners and sides.
5 (Optional) Adjust the crop marquee by doing any of the following:
• To change the preset size or aspect ratio, choose new values from the Aspect Ratio menu in the options bar.
• To move the marquee to another position, place the pointer inside the bounding box and click-drag, or use the
rrow keys to move the marquee.
a
• To resize the marquee, drag a handle. (If you choose No Restriction from the Aspect Ratio menu, you can
co
nstrain the proportions while scaling by holding down Shift as you drag a corner handle.)
• To swap Width and Height values, click the Swap icon in the options bar.
• To rotate the marquee, position the pointer outside the bounding box (the pointer turns into a curved arrow ),
and drag. (You can’t rotate the crop marquee for an image in Bitmap mode.)
Note:
You can change the color and opacity of the crop shield (the cropped area surrounding the image) by
changing the Crop tool preferences. Choose Edit > Preferences > Display & Cursors and specify a new Color and
Opacity value in the Crop Tool area of the Preferences dialog box. If you don’t want to see a colored shield while
cropping, deselect Use Shield.
Last updated 10/3/2016
Page 91
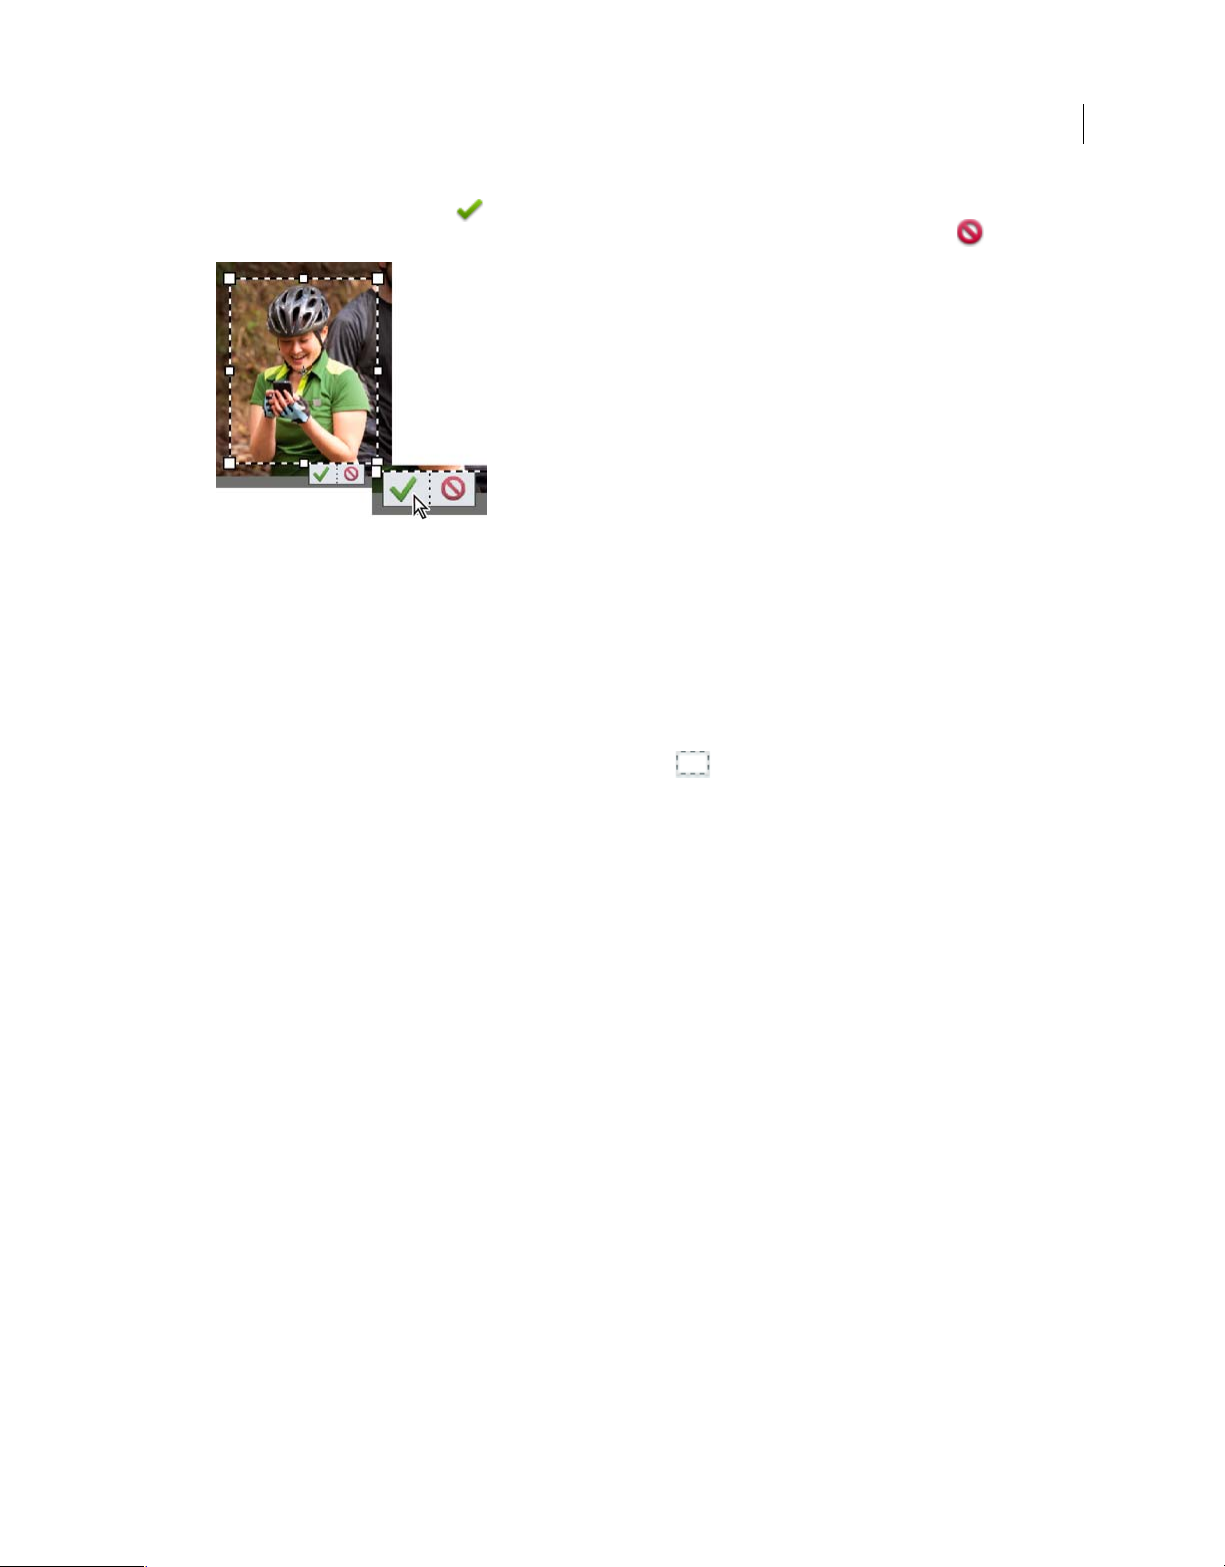
Editing photos
6 Click the green Commit button located in the lower-right corner of the marquee, or double-click the bounding
box to finish the cropping. If you want to cancel the cropping operation, click the red Cancel button or press Esc.
Crop to a selection boundary
Using the Crop command, you can remove the areas that fall outside the current selection. When you crop to a selection
boundary, Photoshop Elements trims the image to the bounding box that contains the selection. (Irregularly shaped
selections, such as those made by using the Lasso tool, are cropped to a rectangular bounding box that contains the
selection.) If you use the Crop command without first making a selection, Photoshop Elements trims the image by 50
pixels from each visible edge.
85
1 Use any selection tool, such as the Rectangular Marquee tool , to select the part of the image you want to keep.
2 Choose Image > Crop.
Automatic cropping suggestions
The Crop tool and technique is an essential part of the photo editing workflow. From Photoshop Elements 13, the Crop
tool automatically displays four ready-to-use suggestions. You can choose the best crop for your needs from one of
them. You can also continue to crop as much as you want to, after taking one of the four suggestions or rejecting all four
suggestions.
Last updated 10/3/2016
Page 92

Editing photos
86
To use the automatic cropping suggestions:
1 Open a photograph in Photoshop Elements.
2 Choose the Crop tool. Four thumbnails displaying the automatic suggestions are visible in the Tool Options box.
3 Click a thumbnail that you think is the best fit. However, you can look at more suggestions when you select a
different aspect ratio from the drop-down in the tool options.
Hovering your mouse pointer on the suggestions in the Tool Options box will present a preview of how the particular
crop suggestion.
Use guides for better cropping results
The following overlay options are available in the crop tool:
Last updated 10/3/2016
Page 93

Editing photos
Rule of Thirds Breaks the image in thirds, horizontally and vertically (equidistant lines) into nine parts thus providing
a better visual aid to decide a crop. You can commit or cancel a crop suggestion. The crop overlay is decided based on
the W and H options in the options bar. For example, your main subject (A tree, person, or animal) can be at 2/3rd of
the horizon coinciding with one of the lines.
87
Grid Creates a grid guide on the image. Use the grid to position objects before you crop the image.
Golden Ratio The Golden Ratio provides a guideline for placement of objects in a photograph. Positioning objects in
the picture along the lines and intersections of this grid makes an image visually appealing. With Golden Ratio grid,
you can position an important part of the image. For example, an eye or ornament or a leaf at the point of focus which
is highlighted with a concentric circle in the grid.
Use the Swap height and width icon to rotate the grid. Depending on the aspect ratio of the crop box (tall or wide), the
v
ertical or horizontal flip option is displayed.
In the Tool Options bar, click Flip to flip the golden ratio grid horizontally or vertically. The Golden Ratio crop can be
r
otated clockwise or counter-clockwise. The behavior of the flip button is:
• If crop dimensions are such that width is greater than height in crop options bar then a horizontal flip appears
hich is shown graphically) as the button.
(w
• If crop dimensions are such that width is less than height in crop options bar then a vertical flip button appears
(w
hich is shown graphically) as the button.
None No crop guide overlay is displayed inside the bounding box.
Perspective Crop tool
The Perspective Crop tool lets you transform the perspective of a picture while cropping it. This is especially useful
when you have an image with keystone or barrel distortion. Distortion occurs when an object is photographed from an
angle rather than from a straight on view, or when wide-angle lenses are used to photograph a large expanse of an
object. For example, if you take a picture of a tall building from the ground level, the ed ges of the building appear clos er
to each other at the top than they do at the bottom.
1 Open a photo in Photoshop Elements.
2 In Expert mode, from the Modify section of the toolbox, select the Perspective Crop tool.
Last updated 10/3/2016
Page 94

Editing photos
3 Draw a marquee around the object that you want to correct the perspective of while cropping the image to the area
of the marquee.
88
4 Use the corners of the selection to modify the shape of the marquee. Hover your mouse pointer on any corner, and
when the pointer turns white, click and move the corner.
For best results, move the corners to align the vertical edge of the marquee with a pattern or object in the photo that
should appear vertical.
Last updated 10/3/2016
Page 95

Editing photos
89
5 (Optional) In the tool options area, provide values for the width (W), height (H), and the Resolution boxes. The final
image is transformed to this height, width, and resolution.
6 Click to transform the perspective and crop the image to the region of the marquee.
Last updated 10/3/2016
Page 96

Editing photos
90
Use the Cookie Cutter tool
The Cookie Cutter tool crops a photo into a shape that you choose. After you drag the shape in your photo, you can
move and resize the bounding box until you have just the area you want.
1 Select the Cookie Cutter tool.
Last updated 10/3/2016
Page 97

Editing photos
2 Click the Cookie Cutter pop-up menu in the Tool Options bar, and select a shape. To view other libraries, select a
different library from the Shapes drop-down.
3 Double-click a shape to select it.
4 Set Shape Options:
Unconstrained Draws the shape to any size or dimension.
Defined Proportions Keeps the height and width of the cropped shape in proportion.
Defined Size Crops the photo to the exact size of the shape you chose.
Fixed Size Specifies the exact measurements of the finished shape. The measurements are picked up from the height
and width settings that you provide.
From Center Draws the shape from the center.
Feather Decides how soft the edges of the finished shape must be. Feathering softens the edges of the cropped image
so that the edges fade out and blend into the background.
Crop Select to trim the image to the bounding box that contains the shape created
5 Drag within the image to create the shape boundary and move it to the desired location in the image.
6 Click the Commit button , or press Enter to finish the cropping. If you want to cancel the cropping operation,
click the Cancel button or press Esc.
91
Change the size of the canvas
The canvas is the workspace around an existing image, within the image window. It is the full editable area of an image.
You can increase or decrease the size of the canvas, on any side of an image. Added canvas appears in the currently
selected background color on the Background layer (by default), or selected canvas extension color from the Canvas
size window. In other layers, the added canvas is transparent.
Last updated 10/3/2016
Page 98

Editing photos
92
1 Choose Image > Resize > Canvas Size.
2 Do one of the following:
• In the Width and Height boxes, enter the full dimensions of the new canvas. Choose the units of measurement
you want from the adjacent drop-downs.
• Select Relative, and enter the amount by which you want to increase or decrease the size of the canvas. Enter a
negative number to decrease the size of the canvas. Use this option if you want to increase the canvas by
ecified amount, such as 2 inches on each side.
sp
3 Click an arrow on the Anchor icon to indicate the position at which the existing image should be, on the new canvas.
4 To change the color of the added canvas, choose an option from the Canvas Extension Color menu and click OK.
a
Straighten an image
Camera shake may cause an image to be improperly aligned. For example, the horizon in the picture of a sunset may
not be perfectly horizontal. In Photoshop Elements, you can realign the photo to cause the horizon to be perfectly
horizontal. You can use the Straighten tool (P) to realign an image vertically or horizontally. If necessary, choose to also
automatically resize or crops the canvas to accommodate straightening of the image.
• In Quick mode, with the Straighten tool (P) active, simply draw a line along the horizon (if visible). If not visible,
dra
w a line that you consider must represent the horizontal axis of the photo. The photo is straightened, a
pending on the option you chose, any empty edges created are automatically filled.
de
Manually straighten an image in Expert mode
1 Select the Straighten tool.
nd
Last updated 10/3/2016
Page 99

Editing photos
2 Choose from the available option buttons:
Grow Or Shrink Canvas To Fit Resizes the canvas to fit the rotated image. Straightening causes corners of the image
to fall outside the current canvas. The straightened image will contain areas of blank background, but no pixels are
clipped.
Crop To Remove Background Crops the image to remove any blank background area that becomes visible after
straightening. Some pixels will be clipped.
Crop To Original Size Keeps the canvas the same size as the original image. The straightened image will include
areas of blank background and some pixels will be clipped.
Note: T
he three straighten options are enabled when the Rotate All Layers options is enabled.
3 To straighten the image, do one of the following:
• To align horizontally, draw a line along an edge that should be horizontal. For example, you may have the image
of a train with an improperly aligned horizon. Draw a horizontal line parallel to the train.
93
• To align vertically, draw a line along an edge that should be vertical. For example, you may have the image of a
wer that is improperly aligned. Draw a vertical line parallel to the tower.
to
Last updated 10/3/2016
Page 100

Editing photos
Automatically fill empty edges
The Straighten tool has an enhanced option to automatically fill the edges with relevant image data intelligently, instead
of filling in background color or transparent pixels.
The Autofill edges option is available only in the Grow or Shrink and Original Size modes. Before you draw a line to
e
nable image straightening, select the Autofill edges checkbox. When you draw the line, any gaps created along the
edges of the photo are automatically and intelligently filled.
Manually straighten an image in Quick mode
1 Select the Straighten tool.
2 Choose from the available option buttons:
Maintain Canvas Size Resizes the canvas to fit the rotated image. Straightening causes corners of the image to fall
outside the current canvas. The straightened image will contain areas of blank background, but no pixels are clipped.
Maintain Image Size Resizes the image to remove any blank background area that becomes visible after
straightening. Some pixels will be clipped.
3 To straighten the image, do one of the following:
• To align horizontally, draw a line along an edge that should be horizontal. For example, you may have the image
of a train with an improperly aligned horizon. Draw a horizontal line parallel to the train.
• To align vertically, draw a line along an edge that should be vertical. For example, you may have the image of a
wer that is improperly aligned. Draw a vertical line parallel to the tower.
to
94
Automatically fill empty edges
The Straighten tool has an enhanced option to automatically fill the edges with relevant image data intelligently, instead
of filling in background color or transparent pixels.
Before you draw a line to enable image straightening, select the Autofill edges checkbox. When you draw the line, any
ga
ps created along the edges of the photo are automatically and intelligently filled.
Automatically straighten an image
• To automatically straighten the image and leave the canvas around the image, choose Image > Rotate > Straighten
age. The straightened image contains areas of blank background, but no pixels are clipped.
Im
• To automatically straighten and crop the image, choose Image > Rotate > Straighten And Crop Image. The
straightened image does not contain areas of blank background, but some pixels are clipped.
Divide a scanned image containing multiple photos
If you scanned several pictures at once on a flatbed scanner, you can automatically divide and straighten the scanned
image into its component photos. The photos must have a clear separation between them.
Last updated 10/3/2016
 Loading...