

Page 1

ADOBE® PHOTOSHOP® ELEMENTS
Help and tutorials
Page 2

Getting started tutorials
Page 3
Getting started tutorials
Knowing your devices
You can take photos or videos with a variety of devices and bring them into Elements. Here are some guidelines that are good to follow:
Read the documentation that came with your device.
Switch on the camera.
Follow any instructions that appear on the computer to install drivers and other software.
If your camera or computer is not responding, try using a card reader instead.
Installing Photoshop Elements
How do I install Photoshop Elements ?
How do I convert a trial version into a full version?
To the top
Importing and organizing
How do I import photos from my camera?
I have imported thousands of photos. How can I organize them?
To the top
Page 4
Is there a way I can mark or tag people in photos?
How can I add information about places in my photos?
In photos of birthdays and other events, can I add event information?
Editing and compositing
Can I make quick fixes in the Organizer workspace?
How can I open Photoshop Elements Editor from the Organizer workspace and work on my photo?
What are Guided Edits?
How do I crop a photo?
How do I resize a photo?
How can I fix an overexposed photo?
How do I select an area of a photo with precision?
Can I merge multiple photos into a panorama?
How do I add a watermark to my photos?
What are photo projects? How do I create a greeting card?
To the top
Saving and sharing
Can I optimize a photo for uploading on the web?
How do I print my photos? Can I order prints from an online service provider?
How do I upload photos on facebook?
Can I maintain my contact list in Photoshop Elements and email photos?
To the top
Page 5

Twitter™ and Facebook posts are not covered under the terms of Creative Commons.
Legal Notices | Online Privacy Policy
Page 6

What's new
Page 7

What's new
Guided Edits
Filters
Exposure and Vibrance (Quick edit mode)
Usability Enhancements
Actions Panel
Adobe Camera Raw (ACR) 7.1
Photo service provider for users in Europe - CEWE Color
Tool enhancements
Online Content
Effects and Styles
Preferences
Guided Edits
Adobe Photoshop Elements Editor 11 includes four new guided edits, to quickly enhance your images with special effects. You can apply effects
that generally take many complex steps to obtain. Use the step-by-step instructions on the guided edits panel to get the exact effect you want to
obtain. For more information, see the video on the new guided edits.
High key
moment, with the professional-looking high key effect (Elements Editor > Guided mode > High Key). For more information, see Add high key
effect.
For a quick tutorial, watch this video on working with the high key guided edit.
Picture before applying the high key effect (left), and after (right)
Low key
dominant aspects of your photo, with the low-key effect (Elements Editor > Guided mode > Low Key). For more information, see Add low key
effect.
For a quick tutorial, watch this video on creating dynamic effects with the low key guided edit.
Pictures with high key lighting convey a positive vibe. Negate shadows and transform a portrait or family picture into a memorable
Photographs with low key lighting portray a darker edge in the theme of the photo. Accentuate shadows and create dramatic play with
To the top
Picture before applying the low key effect (left), and after (right)
Tilt-shift
blurring the rest, using the tilt-shift effect (Elements Editor > Guided mode > Tilt-Shift). Obtain the miniature effect that would normally need a tiltshift lens, with just a few clicks of the mouse. For more information, see Add tilt-shift effect.
For a quick tutorial, watch a video on the new tilt-shift guided edit.
Photographs treated with the tilt-shift effect focus on specific portions of a picture. Keep certain areas of your picture sharp, while
Page 8
Picture before applying the tilt- shift effect (left), and after (right)
Vignette
areas, and automatically drawing attention to the center of the photo. Use the option to create a white vignette and explore the results that the
vignette effect (Elements Editor > Guided mode > Vignette Effect) can produce. For more information, see Add vignette effect.
For a quick tutorial, watch a video on applying a vignette effect.
Picture before applying the vignette effect (left), and after (right)
Filters
Comic Filter
Sketch > Comic), converts your photo into seemingly hand-sketched artwork. A variety of controls enable you to attain granular control over the
final result.
Pictures that have vignetting tend to have a brighter central region, and a dark periphery. Enhance a portrait by darkening the peripheral
To the top
Add an element of fun to your favorite portrait by making it look like a panel from a comic strip. Applying the new Comic filter (Filter >
Original image (left), and image after applying the Comic filter (right)
Pen and Ink filter
Pen and Ink) creates the effect of artistic sketching, with options to control pen and ink attributes.
Original image (left), and image after applying the Pen and Ink filter (right)
Graphic Novel Filter
photo, unique to the world of graphic novels. Select from the presets, or customize the effect with the available controls.
Convert your photograph into a work of art, making it appear hand -sketched. Applying the Pen and Ink filter (Filter > Sketch >
Apply the new Graphic Novel filter (Filter > Editor > Graphic Novel) to your picture, to obtain a dark, yet distinct and vivid
Page 9

Original image (left), and image after applying the Graphic Novel filter (right)
Lens Blur filter
the lens blur filter (Filter > Blur > Lens Blur) creates an effect similar to applying a narrow depth of field while taking a picture. For more information
and a quick tutorial, watch the video on blur filter effect.
Original image (left), and image after applying the Lens Blur filter (right)
Exposure and Vibrance (Quick edit mode)
The new Exposure and Vibrance options allow you to preview various settings, manipulate settings manually, and then commit the effect to the
photograph.
Exposure
Simulate the blur created by a camera lens, by blurring certain objects in an image, while retaining the clarity of the rest. Applying
To the top
The Exposure setting (Quick mode > Exposure) adjusts the brightness and darkness of your photograph.
Original image (left), and image after enhancing exposure (right)
Vibrance
clipping.
Original image (left), and image after increasing vibrance (right)
Usability Enhancements
Adobe Photoshop Elements 11 has numerous advancements and new features. However, much effort has been invested in ensuring that working
in Elements Editor is easier and faster than ever before. For more information, see the video on the new Photoshop Elements 11 user interface.
The Vibrance setting (Quick mode > Color > Vibrance) adjusts the tone of colors as it approaches saturation, and helps prevent
To the top
Page 10
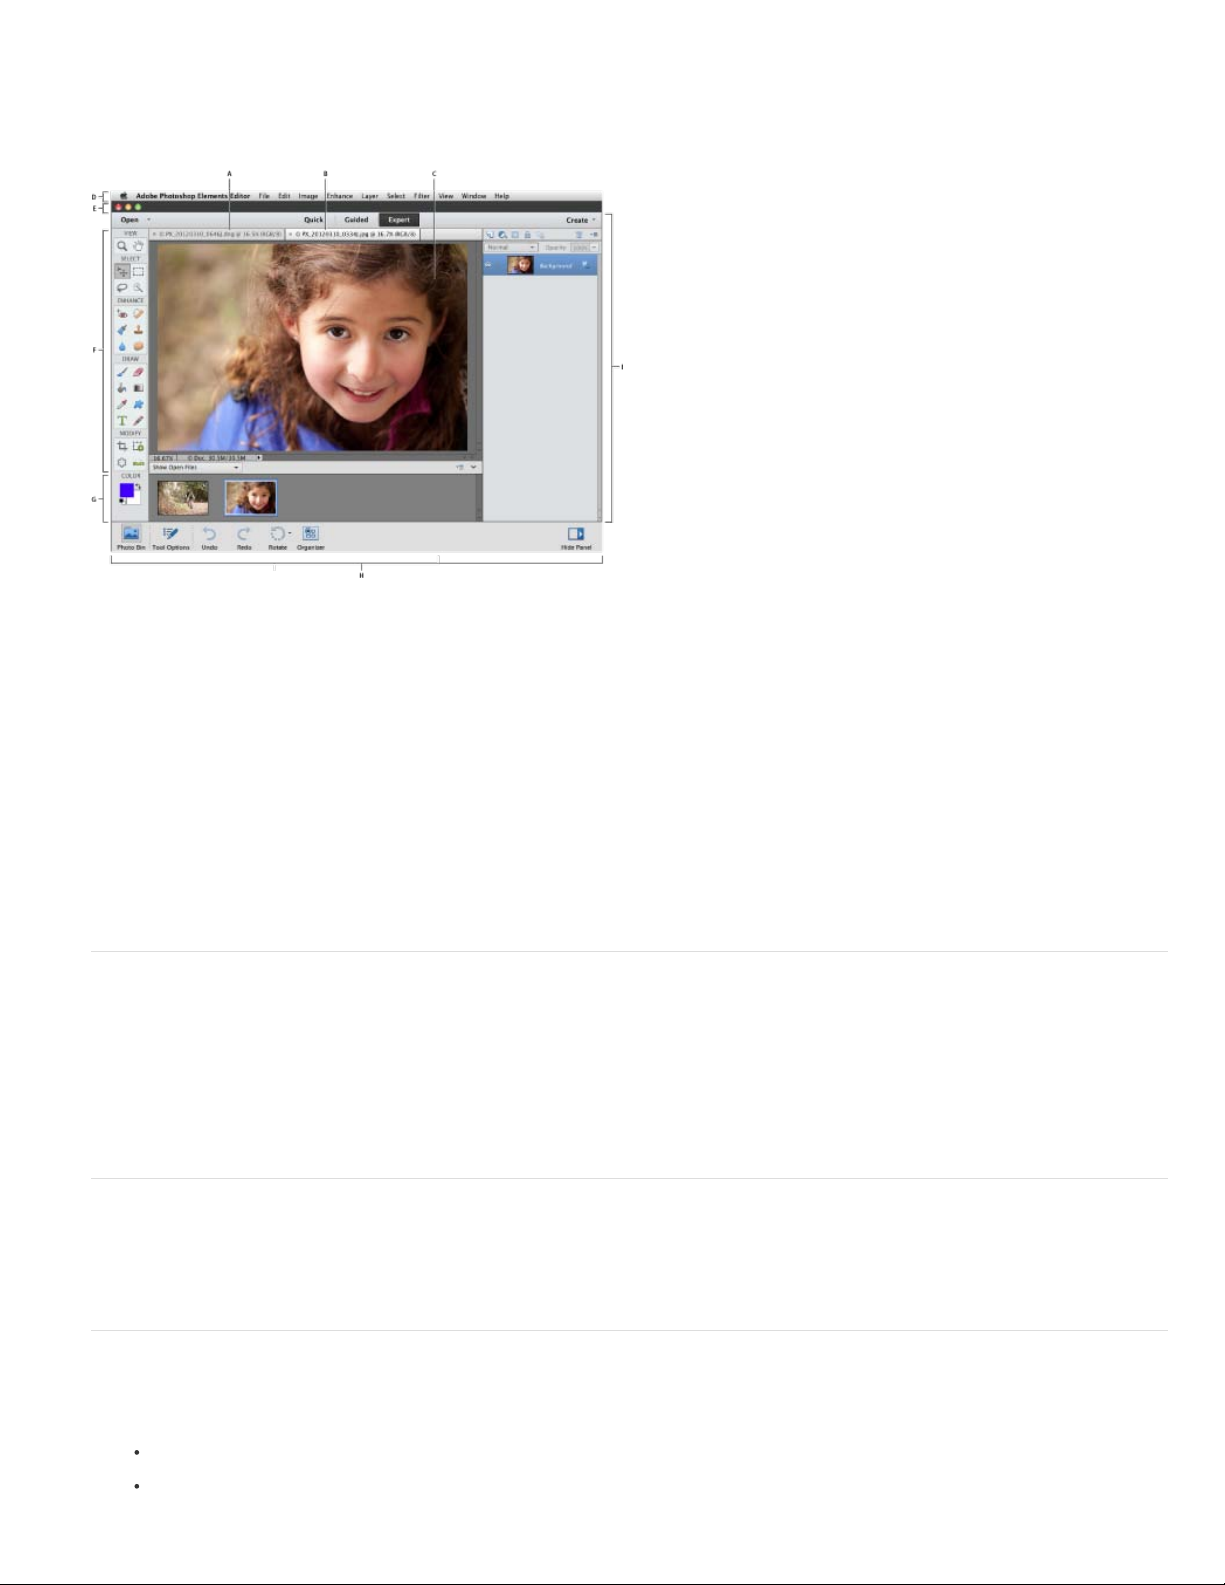
Photoshop Elements in Expert mode
A. Inactive tab B. Active tab C. Active image area D. Menu bar E. Options bar F. Toolbox G. Tool Options bar / Photo bin H. Taskbar I. Panel bar
User interface
The user interface is simpler to navigate, more intuitive, and ensures that learning is a natural outcome of working Photoshop Elements.
Enhancements to the user interface include:
Taskbar The taskbar contains buttons to important shortcuts to aspects of Photoshop Elements, and important tasks.
Photo bin The Photo bin displays open images that you are currently working on in Photoshop Elements, or photos or albums
selected in Photoshop Elements Organizer.
Tools bar The Tools bar contains all the available tools in a particular mode. Tools are grouped logically.
Tool Options bar The Tool Options bar displays all the options of the currently selected tool, below an open image.
Panels By default, Photoshop Elements opens in the Basic panel view, that displays the Layers, Effects, Graphics, and
Favorites panels. Thus, novice users always have a consistent view of the most important panels. Advanced users can open
the Custom view to view or dock additional panels into the interface.
Guided edits
Guided edits have an icon associated with them, enabling users to quickly understand what that particular edit does.
Step numbers enable the user to always have context of the actions being performed.
Guided edits are better categorized, and step-wise descriptions for each edit have been simplified.
Panel shortcuts
Quick mode toolbar
Create menu
project, in any mode that you are in.
Panels
Basic To enable novice users to have a consistent view in Photoshop Elements, this mode displays the most important panels
- Layers, Effects, Graphics, and Favorites.
Custom To enable advanced users to choose the panels that they need, the Custom mode displays panels in floating or
tabbed mode. In this mode, users can open a panel, and dock it in the Panel bin.
Photoshop Elements has been reworked to present the working spaces, tools, modes, and panels in neat and efficient layouts.
Guided edits are available in the Guided mode. Some enhancements include:
Important panels now have keyboard shortcuts associated with them. For example, you can press F11 to view the Layers panel.
The Text tool and the Spot Healing Brush tools are now available in Quick mode.
The Create drop-down, above the Panel bin, lists all the projects that you can start with your photographs. You can easily start a
Panels can be viewed in two modes, Basic and Custom.
Actions Panel
An action is a series of tasks that Photoshop Elements performs with a click of a button. Actions are now available in the Actions panel (Window >
Actions). Use the Actions panel menu to load, play, delete, or reset actions.
For more information on the Actions panel and how to use it, see Using actions to process photos.
Also, watch this video on adding actions to speed up editing tasks.
Adobe Camera Raw (ACR) 7.1
Photoshop Elements 11 uses the newest algorithms and technology to process raw file formats. Enhancements include:
To the top
To the top
Page 11
Process Version 2012
Effects and Styles
the raw file format. The ACR 7.1 dialog allows you to choose the latest process version (2012), or any of the older versions - 2010 or
2003.
The Adobe Camera Raw 7.1 (ACR 7.1) converter introduces Process Version 2012, a newer form of deciphering
Additional control
For more information, see Process Versions.
Photo service provider for users in Europe - CEWE Color
For Photoshop Elements users in Europe, Adobe has partnered with CEWE Color, an online photo service company. CEWE Color services are
available in 24 European countries. You can place orders for photos, photo books, calendars, and other projects with CEWE Color, from within
Photoshop Elements.
Tool enhancements
Tools have been refined to obtain optimal results. Additional features have been added to existing tools:
Sharpen tool
details.
Move tool
Choosing a layer this way automatically selects the layer in the Layers panel.
Color Picker
a selected layer, or all available layers.
Color Replacement tool
choose to control how the color is replaced using the Continuous, Once, or Background Swatch settings.
Refine edges tool
from an image.
The Sharpen tool now has a Protect Detail option, that ensures minimized pixelated artifacts while enhancing and sharpening
The Move tool now has a layer selection option, that enables you to right-click a multi-layered image and select a specific layer.
The Color Picker tool has been equipped with additional settings in the Tool Options bar. You can now choose to sample color from
Refine Edges tool The Refine Edges tool has been enhanced to provide the ability to select the more granular and finer details
Process Version 2012 exposes three new sliders - Luminance Detail, Luminance Contrast, and Color Detail.
To the top
To the top
The Color Replacement tool now has a sampling option to choose how a color is picked for replacement. You can
Online Content
Most sample and collateral graphics, backgrounds, frames, and themes have been moved online. Storing files online saves a large amount of disk
space on the computer where you have Photoshop Elements 11 installed.
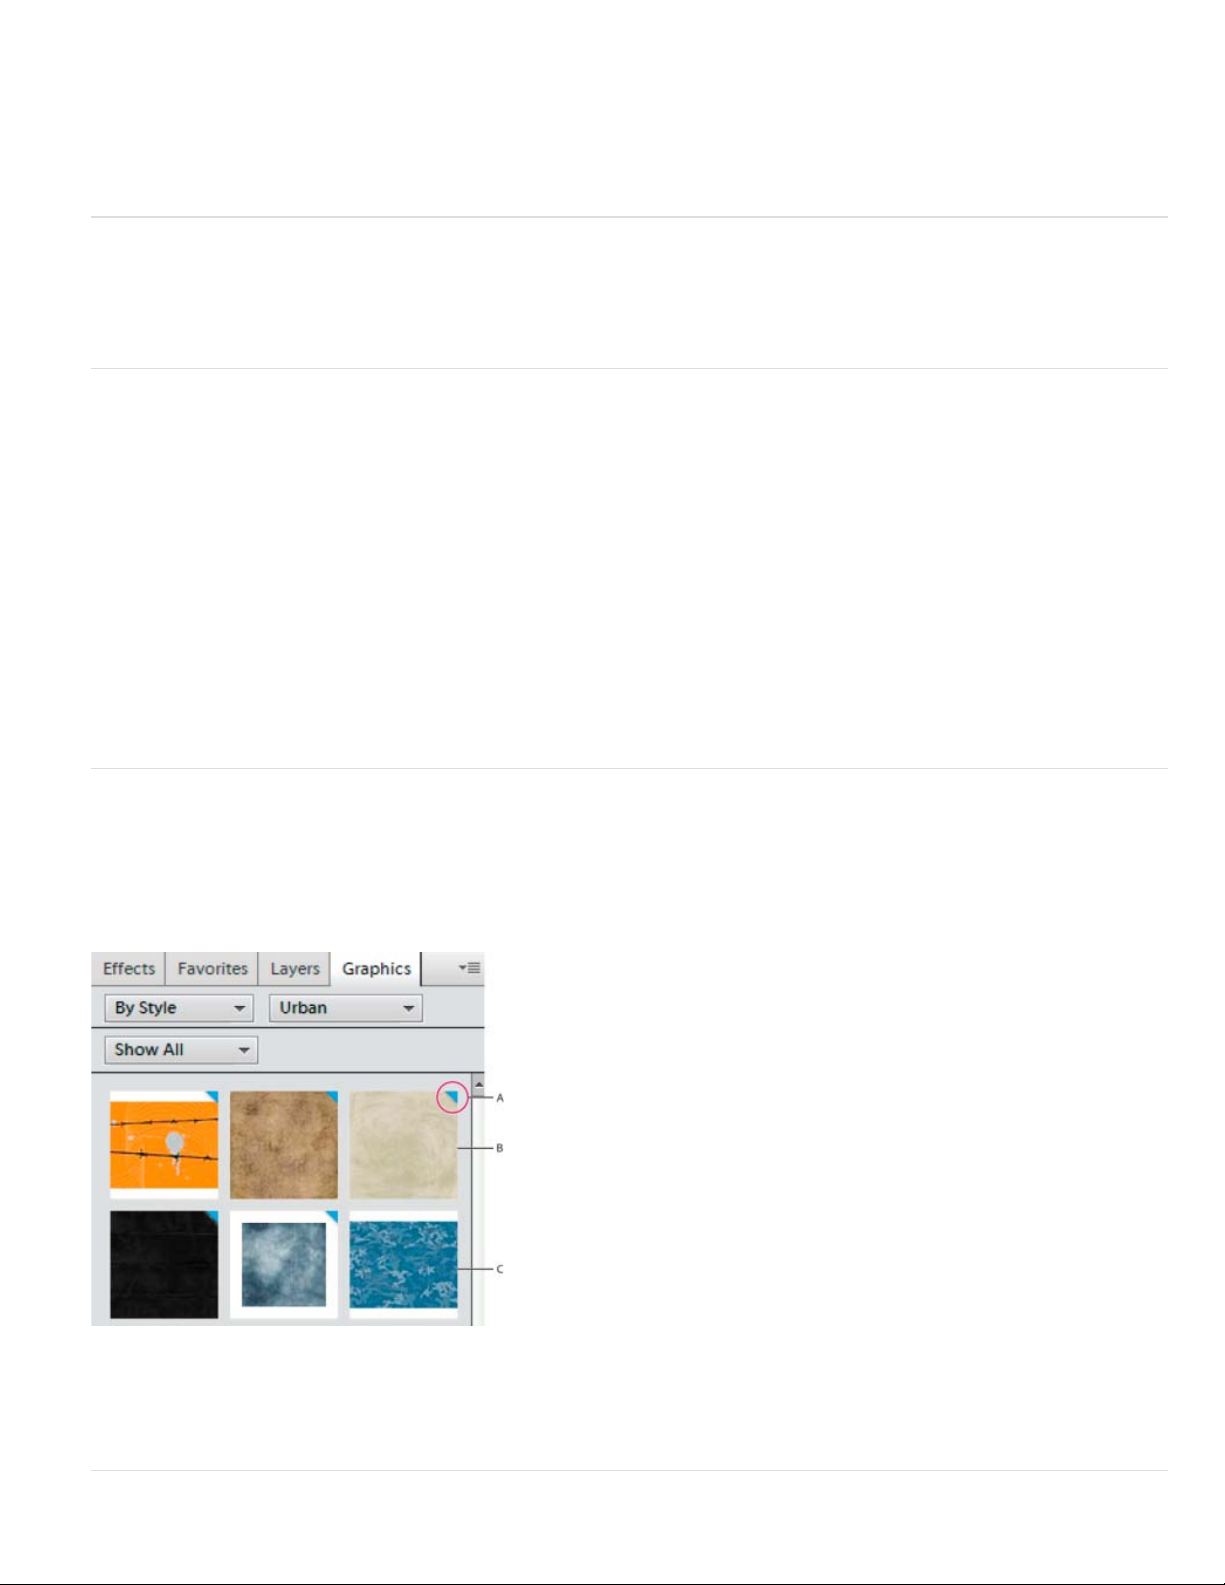
When you install Photoshop Elements 11, these files are downloaded as thumbnails. Files that have not been downloaded have a small blue band
that runs diagonally across the upper-right corner of the thumbnail (similar to a blue photo-corner).
Thumbnails in the Graphics panel, with a blue photo corner to indicate if graphic is available for download
A. Blue photo corner B. Graphic not downloaded, but available online C. Graphic downloaded to computer, available for use
To the top
When you choose to use the file in a project (for example, a background in a photo book project), these files are downloaded in their full size.
Double-click a graphic to download it from the online repository in its full size.
To the top
Page 12

Photoshop Elements 11 enables you to import your favorite effects and styles. Use the preset manager (Edit > Preset Manager), or the panel
menu in the Effects panel, to load, use, or delete effect (.atn) or style (.asl) files.
For more information, see Use the Preset Manager.
Preferences
Preferences have been added or modified to ensure that working in Photoshop Elements 11 is a pleasing and consistent experience.
Reset Preferences on next launch
Editor is restarted next. Available at Preferences > General.
Save As to Original Folder
Specifies the folder location that is opened by default in the Save As dialog. When this option is cleared, the
Save As dialog always opens the folder where you last saved a file. When selected, the Save As dialog always opens the folder from
where you last opened a file. Available at Preferences > Saving Files.
Maximize PSD File Compatibility
Never Compatibility settings are never applied
Always Compatibility settings are always applied
Ask While saving to PSD format, a Photoshop Elements Format Options dialog is displayed. You can now select the
Don't show again option.
Twitter™ and Facebook posts are not covered under the terms of Creative Commons.
Legal Notices | Online Privacy Policy
Click this button to ensure that all product preferences are reset to default settings when Elements
Specifies if compatibility settings must be enforced when you save a photograph to PSD file format.
To the top
Page 13

Workspace and workflows
Page 14
Workspace basics
The Welcome screen
Photoshop Elements window
Use context menus
Using keyboard commands and modifier keys
Exit Photoshop Elements
The Welcome screen
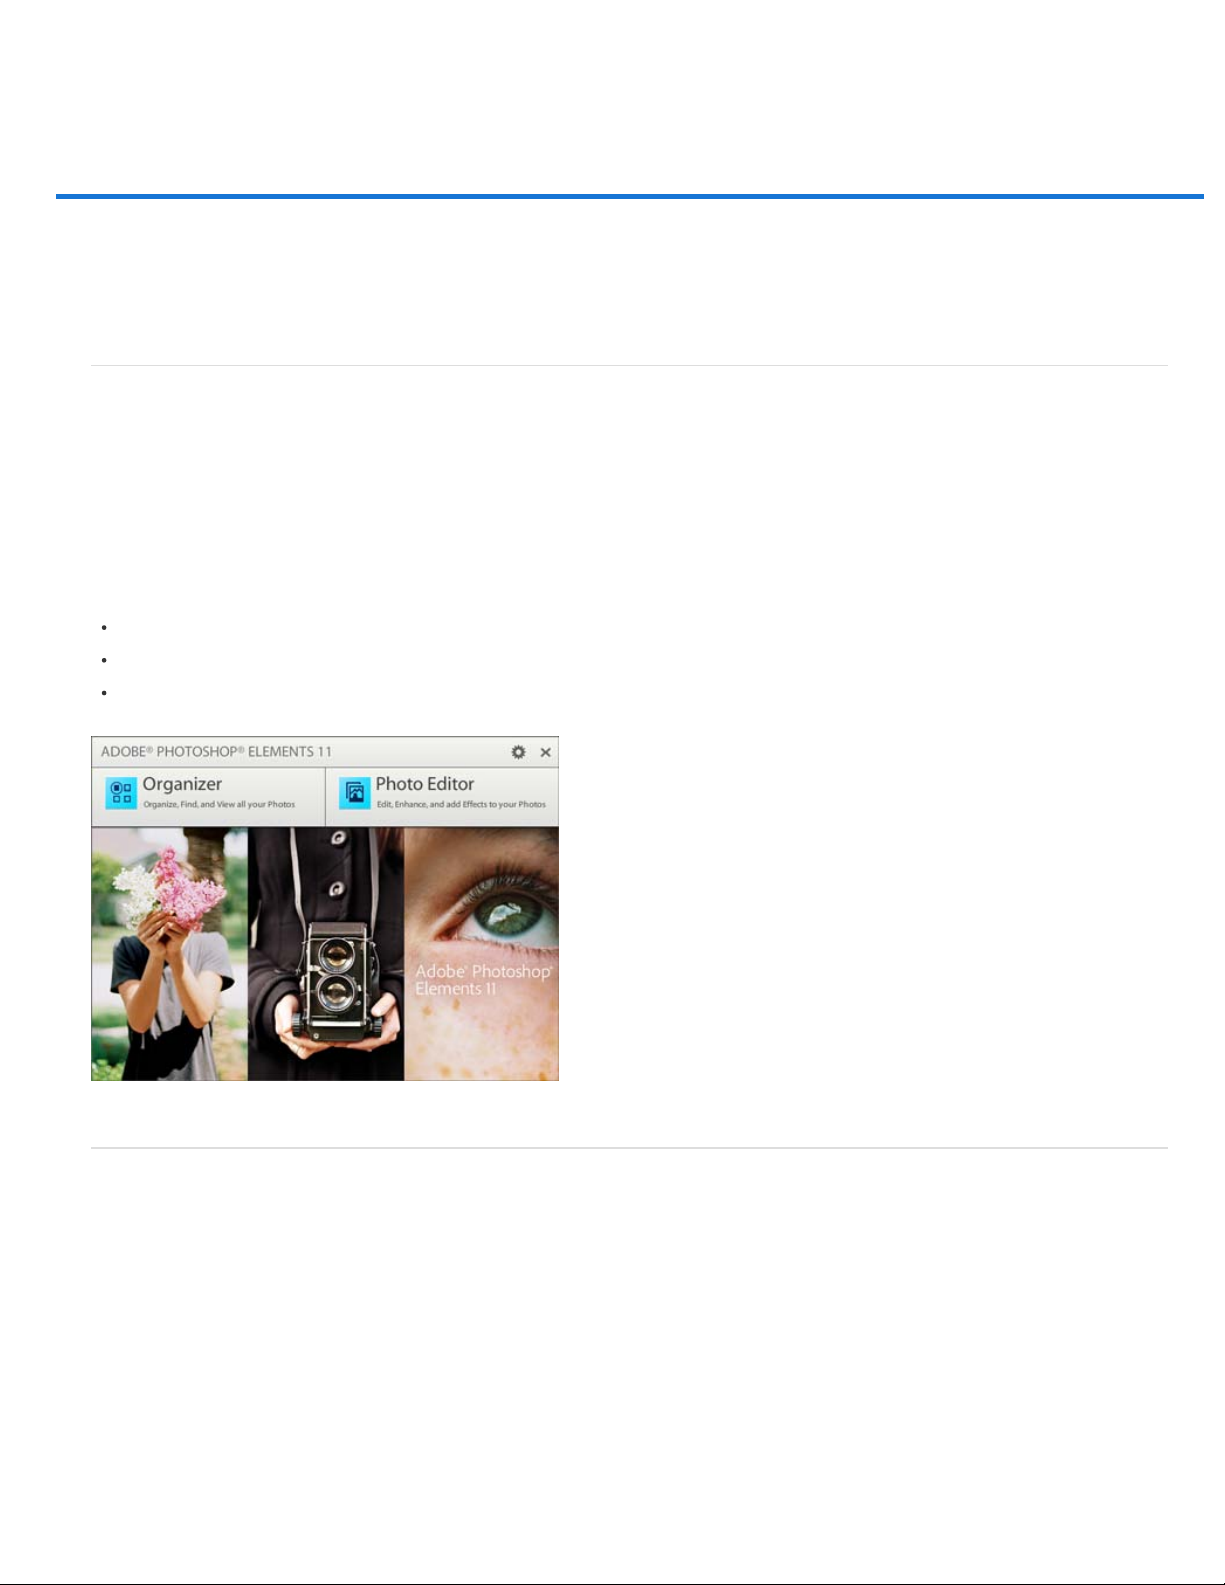
When you start Photoshop Elements, the Welcome screen opens by default. The Welcome screen is a convenient starting place, or hub, for major
tasks.
Click Organizer to import, tag, or organize your photos. Click Photo Editor to enhance your images or add special effects.
Click the Close button (X) in the upper -right corner of the Welcome screen to close the Welcome screen. It’s not necessary to return to the
Welcome screen to open other workspaces—you can open different workspaces from within any other workspace.
Click the settings icon (adjacent to the Close button) to choose what application is started when you start. Select one of these options from the On
Start Always Launch drop down, and then click Done:
Welcome Screen
Organizer
Photo Editor
To the top
Photoshop Elements 11 welcome screen
Photoshop Elements window
The Photoshop Elements window provides modes to create and edit images. Select one of the following options:
Quick
Enables you to edit photos in the Quick mode.
Guided
Enables you to edit photos in the Guided Edit mode.
Expert
Enables you to edit photos in the Expert mode.
The Expert mode has tools to correct color problems, create special effects, and enhance photos. The Quick mode contains simple tools for
correcting color and lighting, and commands to quickly fix common problems, such as red eye. The Guided mode contains tools for basic photo
edits, guided activities, and photographic effects. If you are new to digital imaging, Quick or Guided modes are a good place to start fixing photos.
To the top
Page 15
If you’ve worked with image-editing applications before, you’ll find that the Expert mode provides a flexible and powerful image-correction
environment. It has lighting and color-correction commands, along with tools for fixing image defects, making selections, adding text, and painting
on your images. You can rearrange the Expert workspace to best suit your needs. You can move, hide, and show panels, and arrange panels in
the Panel Bin. You can also zoom in or out of the photo, scroll to a different area of the document window, and create multiple windows and views.
Photoshop Elements in Expert mode
A. Inactive tab B. Active tab C. Active image area D. Menu bar E. Options bar F. Toolbox G. Tool Options bar / Photo bin H. Taskbar I. Panel bar
Menu bar
applying adjustments to an image.
Mode selector
Create (photo projects) drop-down.
Toolbox
Panel bin
Photo Bin / Tools Options
and sets options for the currently selected tool)
Taskbar
Use context menus
You can use context menus in both the Photo Editor and Organizer workspaces. Context-sensitive menus display commands that are relevant to
the active tool, selection, or panel. These menus are often another way to access the commands in the main menus.
1. Position the pointer over an image or panel item.
2. Right-click and choose a command from the menu.
Using keyboard commands and modifier keys
You can use keyboard shortcuts in both the Photo Editor and Organizer workspaces. Keyboard commands let you quickly execute commands
without using a menu; modifier keys let you alter how a tool operates. When available, the keyboard command appears to the right of the
command name in the menu.
Contains menus for performing tasks. The menus are organized by topic. For example, the Enhance menu contains commands for
Contains buttons to enter the three available editing modes. Also, contains the Open (recently used files) drop-down and the
Holds tools for editing images.
Logically grouped features, actions, or controls.
Toggles between Photo Bin (display and manage thumbnails of currently used photos) and Tools Options (displays
Displays the most frequently used actions as buttons, for quick and easy access.
Note:
Not all panels offer context menus.
To the top
To the top
Exit Photoshop Elements
To exit Photoshop Elements, close both the Photo Editor and Organizer workspaces—closing one does not automatically close the other.
1. From any workspace, do one of the following:
In Windows, choose File > Exit. In Mac, choose Photoshop Elements > Quit Photoshop Elements.
Click the Close button (X) in the upper -right corner of the workspace.
To the top
Page 16

2. When closing Photoshop Elements, choose whether to save any open files.
Twitter™ and Facebook posts are not covered under the terms of Creative Commons.
Legal Notices | Online Privacy Policy
Page 17
Panels and bins
About panels
Work with panels
Panels in the Expert mode
Use the taskbar
Use the Photo Bin
About panels
Panels are available in both Photoshop Elements and Elements Organizer; however, they behave a little differently in each. Panels help you
manage, monitor, and modify images. Some panels have menus that provide additional commands and options. You can organize panels in the
basic and custom workspaces in Expert mode. You can store panels in the Panel Bin to keep them out of your way, but easily accessible.
Dragging a panel.
To the top
Panel menus
Some commands appear in both the panel menu and the menu bar. Other commands are exclusive to panel menus. Click panel menu to view the
different commands in each panel.
Pop-up sliders within panels
Some panels and dialog boxes contain settings that use pop-up sliders (for example, the Opacity option in the Layers panel). If there is a triangle
next to the text box, you can activate the pop-up slider by clicking the triangle. Position the pointer over the triangle next to the setting, hold down
the mouse button, and drag the slider or angle radius to the desired value. Click outside the slider box or press Enter to close the slider box. To
cancel changes, press Esc.
To increase or decrease values in 10% increments when the pop-up slider box is open, hold down Shift and press the Up or Down Arrow keys.
Page 18
Different ways to enter values
To remove a panel from the Panel Bin, drag the title bar of the panel out of the Panel Bin.
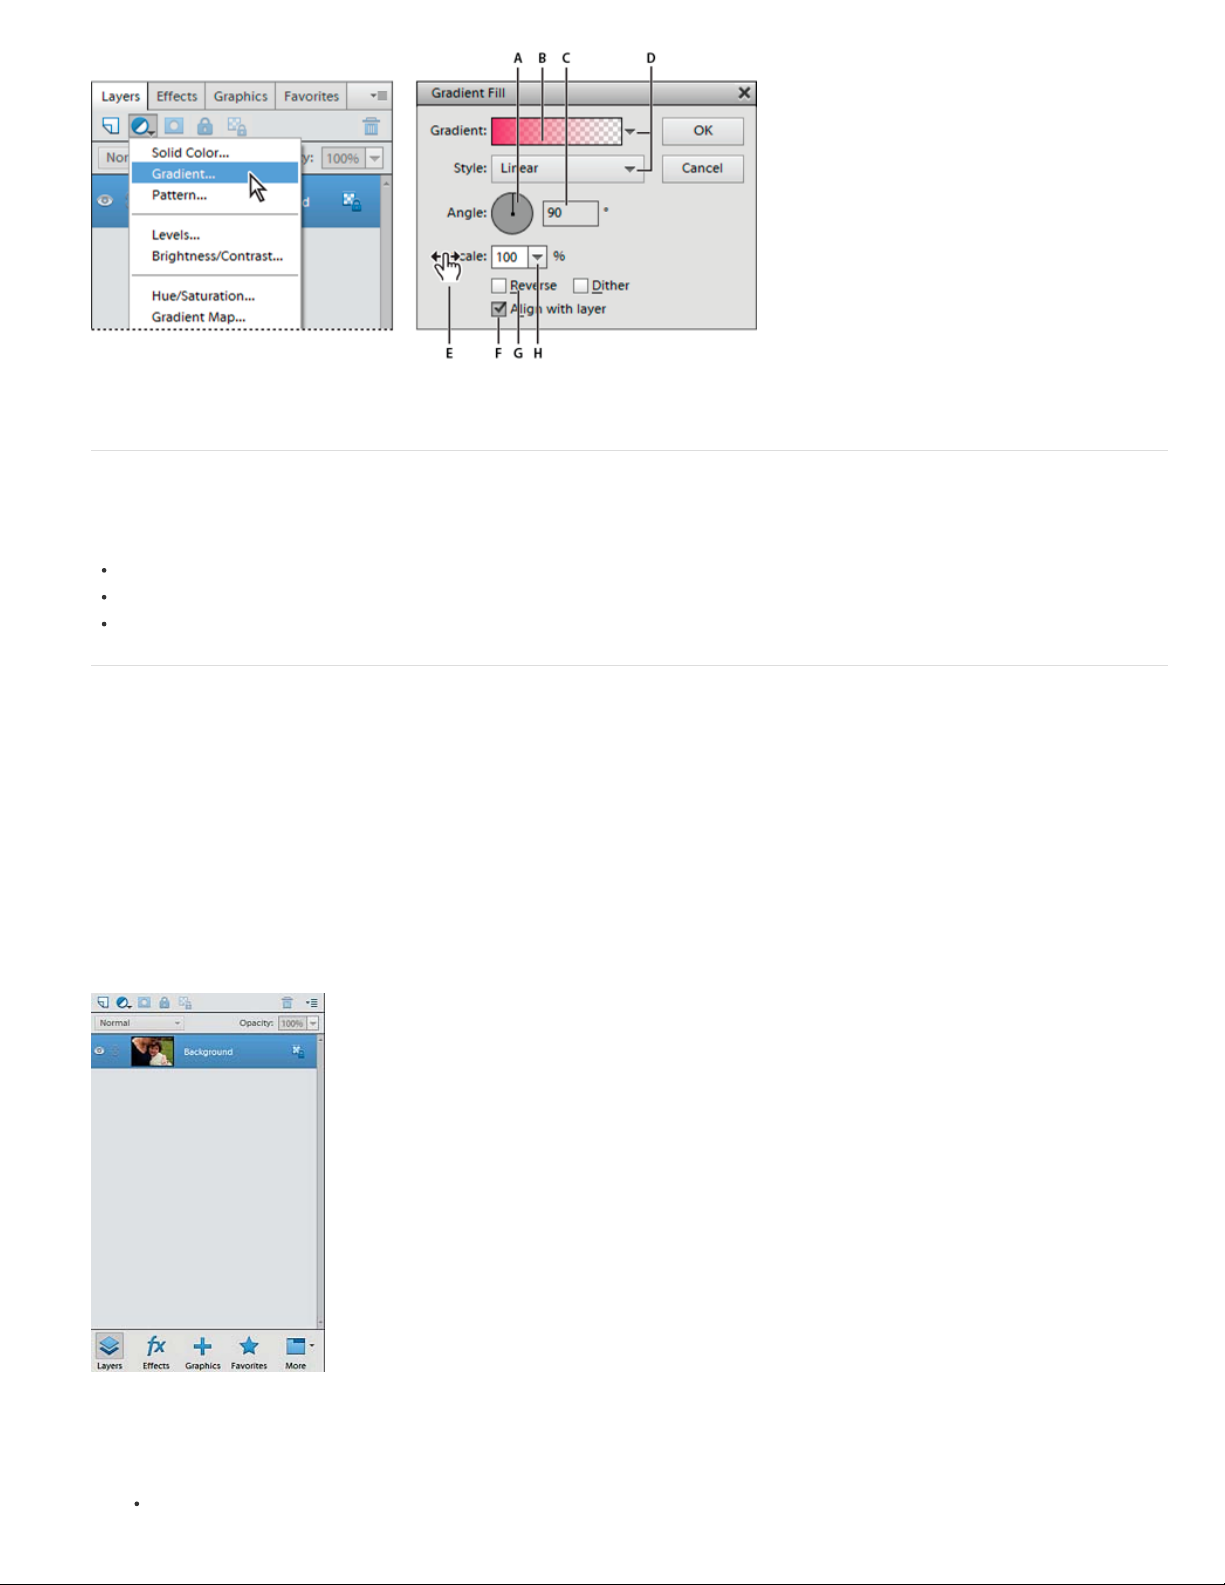
A. Dial B. Click to open window C. Text box D. Menu arrow E. Scrubby slider F. Check box G. Hotkey H. Pop-up slider triangle
Work with panels
Panels contain features, information, or functionality, in logical groups, for fast and easy access. The Panel Bin is on the right side of Photoshop
Elements. It displays tabs and panels, depending on the mode you are in, or the kind of elements you want to work with. The Panel Bin displays:
Quick mode: lists the quick-mode effects that can be applied to a photo
Guided mode: lists all the guided-mode edits that you can apply to a photo
Expert mode: lists the options for a selected panel (Layers, Effects, Graphics, or Favorites)
Panels in the Expert mode
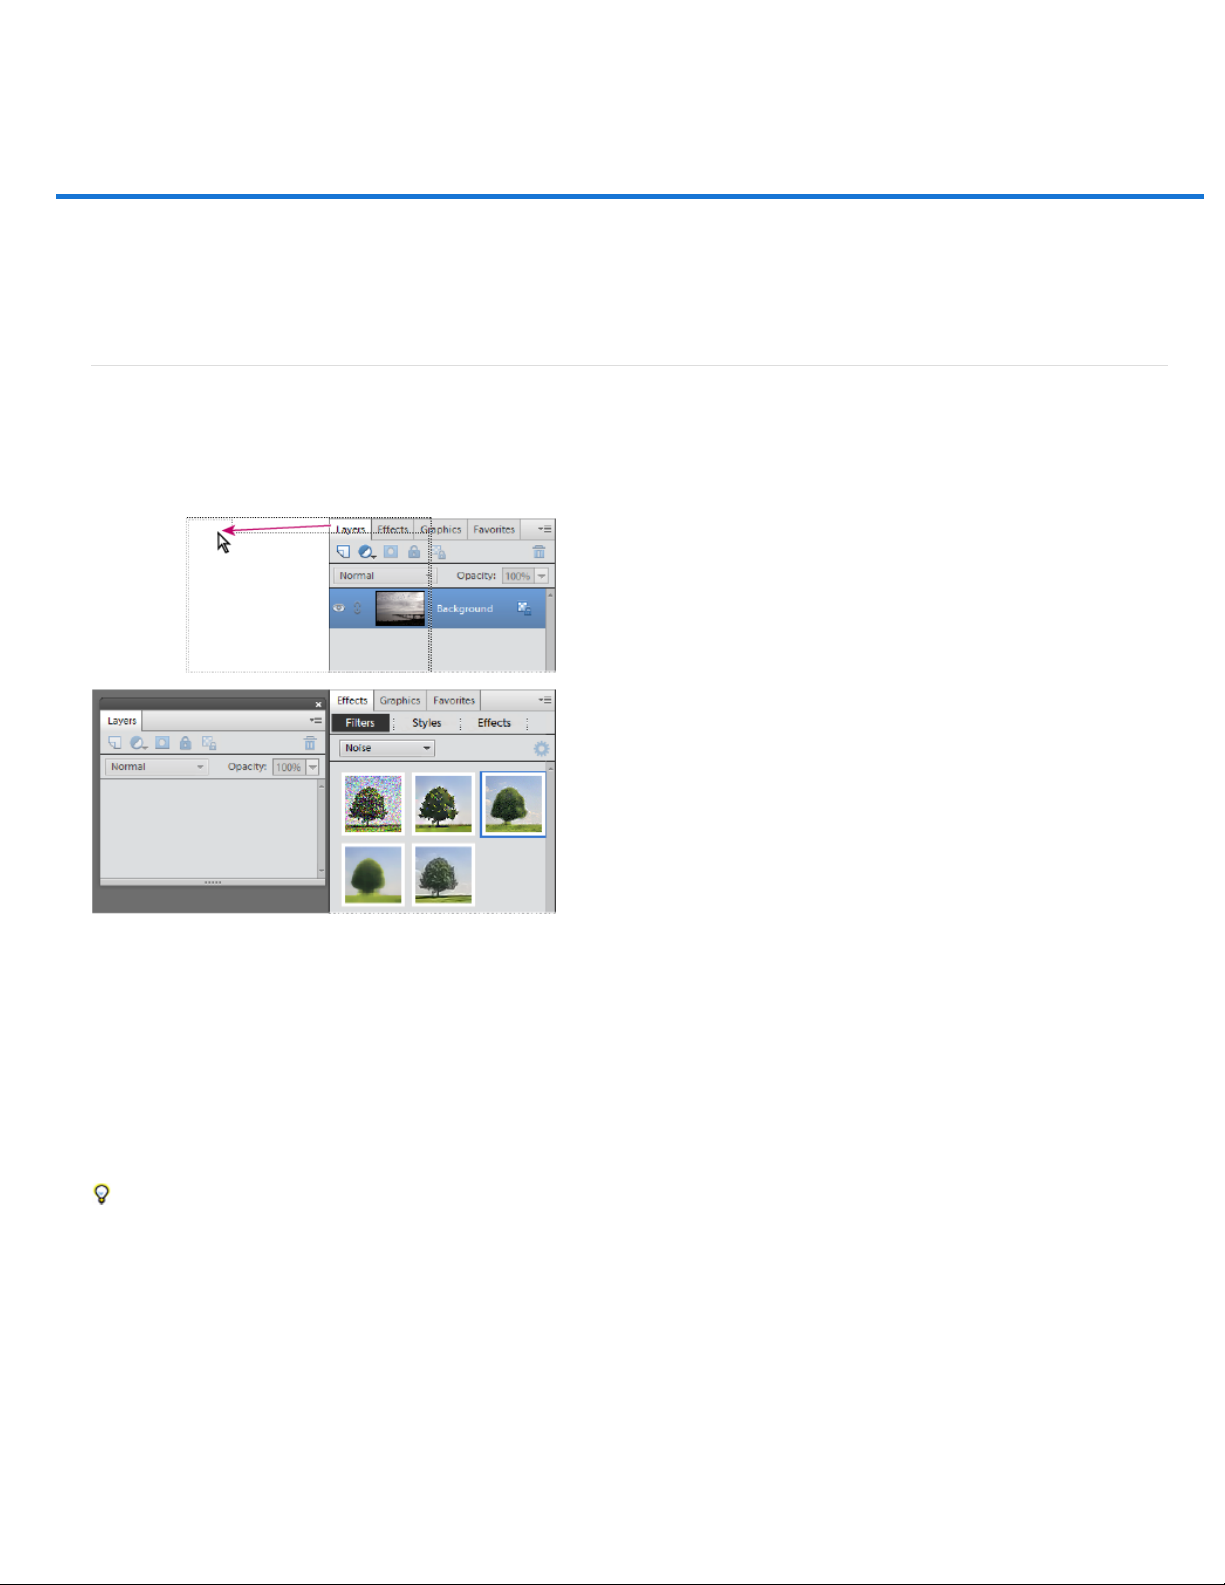
In the Expert mode, panels can be displayed in two ways - Basic Workspace, and Custom Workspace.
Basic Workspace
are placed in the taskbar. The buttons in this workspace are Layers, Effects, Graphics, and Favorites. For example, clicking the Layers button
displays all the layers-related options. To view all the other available tabs, or close open tabs, click More.
Custom Workspace
to view a list of all the available tabs, and select one from the pop- up list. The selected tab is displayed. You can keep the frequently used panels
open in the custom workspace. Group panels together or dock one panel at the bottom of another panel. You can drag title bar of the tab and drop
it in the tabbed layout, or drag and drop the tabs dialog into the tabbed layout.
Drag a panel out of the Panel Bin if you want to remove it from the Panel Bin and keep it open.
Note:
By default, the available workspace displayed is the Basic Workspace. In this view, buttons for the most frequently used panels
To view panels in a tabbed layout in the Panel Bin, click the arrow next to More, and select Custom Workspace. Click More
To the top
To the top
The Panel Bin
1. To show or hide the Panel Bin, Choose Window > Panel Bin.
2. In the Panel Bin (Custom Workspace),
Page 19

To add a panel to the Panel Bin, drag the title bar of the panel into the Panel Bin.
To rearrange panels in the Panel Bin, drag the title bar of the panel to a new location.
To expand or collapse panels in the Panel Bin, double-click the name of the panel.
3. To use panels outside the Panel Bin, in Custom Workspace view, do any of the following:
To open a panel, choose the name of the panel from the Window menu, or click the arrow next to the More button in the
taskbar and select a panel.
To close a panel, choose the name of the panel from the Window menu. Or click the Close button in the title bar of the
panel.
To change the size of a panel, drag any corner of the panel.
To group panels (one panel with multiple tabs), drag the panel onto the body of the target panel. A thick line appears
around the body of the target panel when the pointer is over the correct area for grouping to occur. If you want to move a
panel to another group, drag the tab of the panel to that group. To separate a panel from a group, drag the tab of the
panel outside the group.
To move a panel group, drag the title bar.
To expand or collapse a panel or panel group, double-click the tab of the panel or title bar.
To dock panels together (stacked panels), drag a tab of the panel or the title bar to the bottom of another panel. A double
line appears at the bottom of the target panel when the pointer is over the correct area.
To reset panels to their default positions, choose Window > Reset Panels.
Use the taskbar
Taskbar
At the bottom of the Photoshop Elements, the taskbar displays buttons for the most frequently used panels and operations performed while editing
and modifying images. You can use the Photo Bin and Tool Options buttons to toggle between displaying thumbnails and tool options. You can
quickly undo and redo operations, or rotate images using the options available taskbar, or Organizer to start Photoshop Elements Organizer. In the
Expert mode, click the arrow beside the More button, to see the option to toggle between Basic and Custom workspaces.
Use the Photo Bin
Located toward the bottom of the Photoshop Elements window, above the taskbar, the Photo Bin displays thumbnails of open photos. It’s useful for
switching between multiple open photos in your workspace. The Photo Bin has controls that let you open or close images, hide images, navigate
through open images, make a specific image the frontmost image, duplicate an image, rotate an image, or view file information. You can easily
bring open images into Quick mode for editing. Multipage projects created using the Create tab open in the Create panel.
To the top
To the top
The Photo Bin
Do any of the following:
(Windows only) To open an image, drag a file from any location on your computer (including the Photo Browser) or from
any storage device connected to your computer into the Photo Bin.
To bring an opened image forward as the frontmost image, double-click a thumbnail.
To rearrange photos, drag thumbnails in the Photo Bin. The order here does not impact the photo’s order in the Elements
Organizer.
To close an image, right-click a thumbnail in the Photo Bin and choose Close.
Page 20

Note:
To hide an image that is in a floating window, right -click the thumbnail and choose Minimize from the context menu.
To show an image after hiding it, double -click its thumbnail in the Photo Bin, or right- click the thumbnail and choose
Restore from the context menu.
To view a photo’s file information, right-click a thumbnail and choose File Info from the context menu.
To duplicate an image, right-click a thumbnail, choose Duplicate from the context menu, and name the file.
To rotate an image, right-click a thumbnail and choose Rotate 90° Left or Rotate 90° Right from the context menu.
To show filenames, right-click in the Photo Bin and choose Show Filenames from the context menu.
To manually show or hide the bin, click the Photo Bin taskbar icon.
The flyout menu of the Photo Bin contains additional options to work with the images that are available in the Photo Bin:
Print Bin Files. Opens the Photoshop Elements Print dialog box, with options to print the photos currently selected in
the Photo Bin.
Save Bin as an Album. Enables you to name and save an album containing the images in the Photo Bin. The new
album is available in Organizer.
Reset Style Bin. Resets the Style bin images, while performing a photomerge style match (Enhance > Photomerge >
Photomerge Style Match) .
Show Grid. Displays a grid around images in the Photo bin.
Twitter™ and Facebook posts are not covered under the terms of Creative Commons.
Legal Notices | Online Privacy Policy
Page 21
Tools
About the toolbox
Select a tool
Set Edit preferences
Set the appearance of a tool pointer
Resize or change the hardness of painting cursors by dragging
Set tool options
About the toolbox
You use tools in the Photoshop Elements toolbox to select, edit, and view images; some tools let you paint, draw, and type. The toolbox appears
on the left side in the Quick and Expert modes.
Tools in the toolbox are grouped logically, in the Quick and Expert modes. For example, in the Expert view, the Move, Rectangular Marquee,
Lasso, and Quick Selection tools are placed together in the Select group.
Select a tool in the toolbox to use it. Once selected, the tool is highlighted in the toolbox. Optional settings for the tool appear in the Tool Options
bar, towards the bottom of the Photoshop Elements window.
note: You cannot deselect a tool—once you select a tool, it remains selected until you select a different tool. For example, if you’ve selected the
Lasso tool, and you want to click your image without selecting anything, select the Hand tool.
To the top
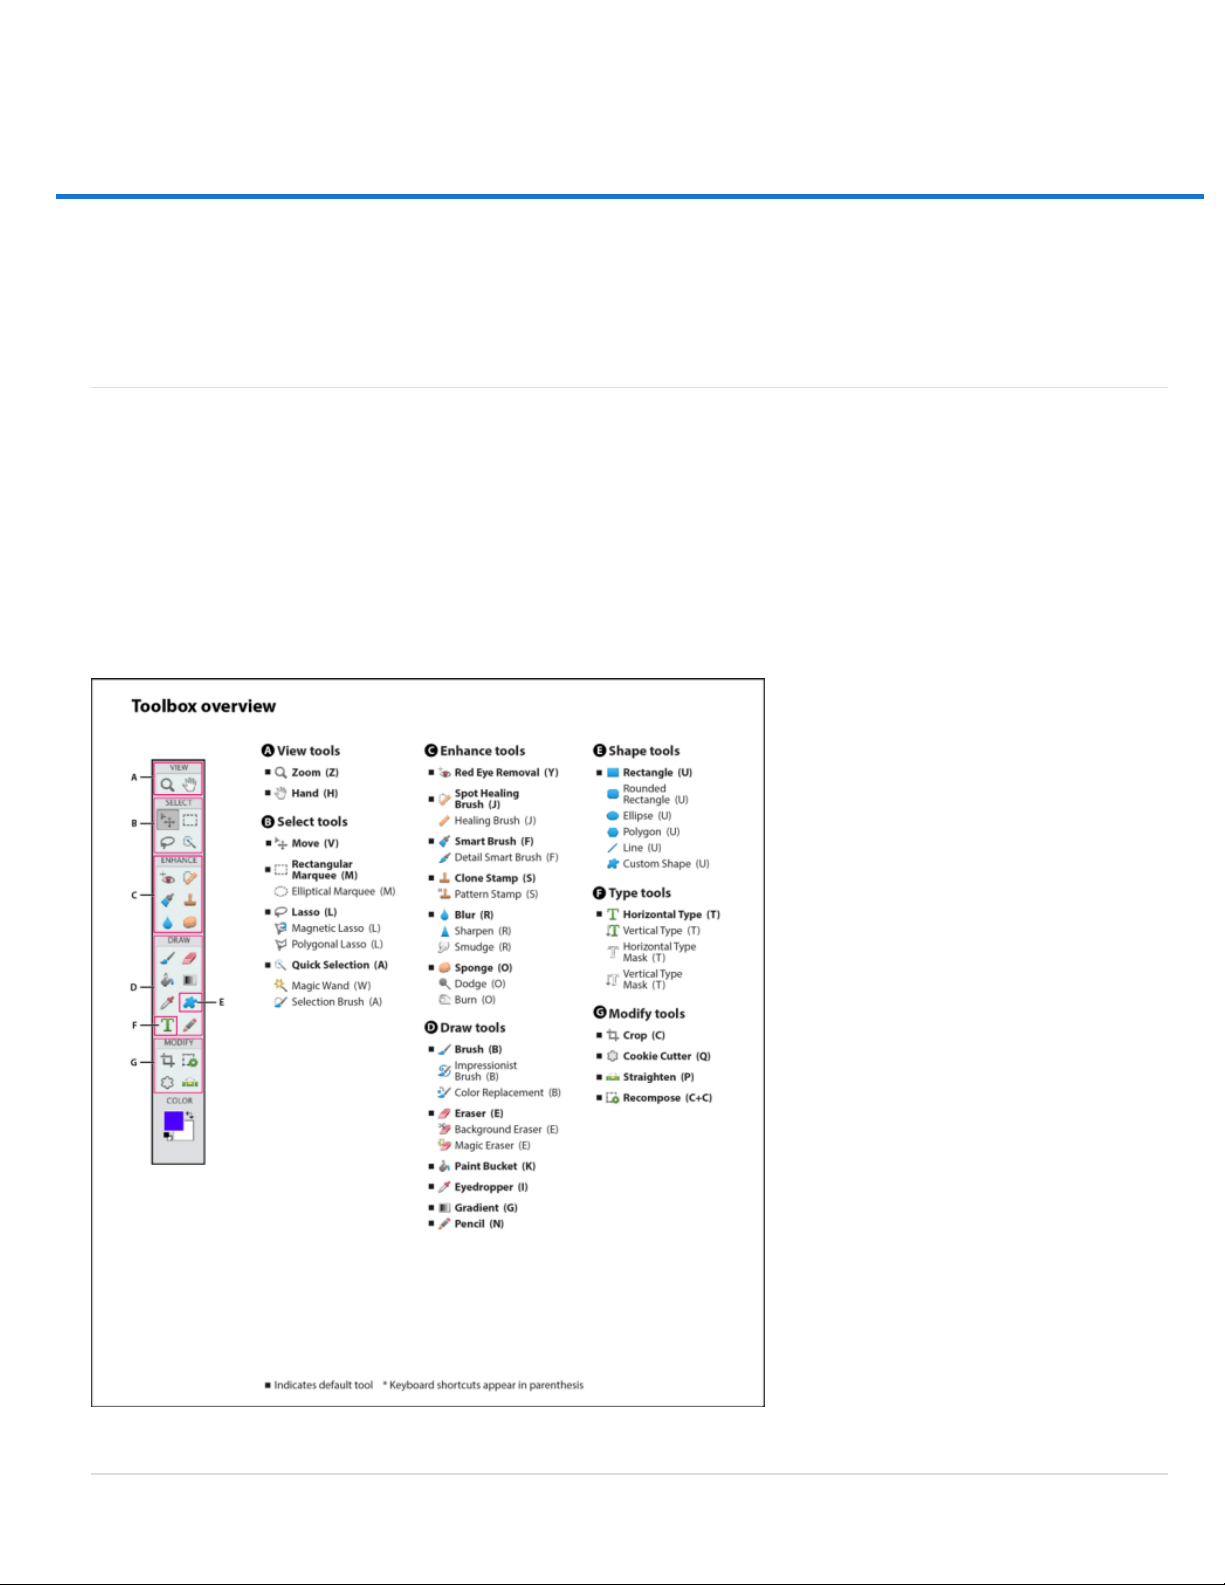
Toolbox overview
To the top
Page 22

Select a tool
Do one of the following:
Click a tool in the toolbox. If there are additional tool options, they are displayed in the Tool Options bar. Click the tool you
want to select.
Press the tool’s keyboard shortcut. The keyboard shortcut is displayed in its tool tip. For example, you can select the Brush
tool by pressing the B key.
Set Edit preferences
1. In Windows, choose Edit > Preferences > General. In Mac, choose Photoshop Elements > Preferences > General.
2. Set one or more of the following options, and click OK.
Select Show Tool Tips to show or hide tool tips.
Select Use Shift Key For Tool Switch to cycle through a set of hidden tools by holding down the Shift key. When this
option is deselected, you can cycle through a set of tool options by pressing the shortcut key (without holding down Shift).
For example, pressing B on your keyboard repeatedly, cycles through all the Brush tool options (Brush, Impressionist
Brush, and Color Replacement tools)
Set the appearance of a tool pointer
1. In Windows, choose Edit > Preferences > Display & Cursors. In Mac, choose Photoshop Elements > Preferences > Display &
Cursors.
2. Select a setting for the Painting Cursors:
Standard
Precise
Normal Brush Tip
Full Size Brush Tip
Show Crosshair In Brush Tip
Brush Tip.
3. Select a setting for Other Cursors:
Standard
Displays pointers as tool icons.
Displays pointers as cross-hairs.
Displays pointers as circles at 50% of the size you specify for the brush.
Displays pointers as circles at the full size you specify for the brush.
Displays cross-hairs in the circles when you choose either Normal Brush Tip or Full Size
Displays pointers as tool icons.
To the top
To the top
Precise
Resize or change the hardness of painting cursors by dragging
You can resize or change the hardness of a painting cursor by dragging in the image. As you drag, you preview both the size and hardness of the
painting tool.
To resize a cursor, right-click + press Alt (Windows only), and drag to the left or right.
To change the hardness of a cursor, right-click + press Alt (Windows only), and drag up or down.
Set tool options
The Tool Options bar appears above the taskbar at the bottom of the Photoshop Elements window. The Tool Options bar displays different options
when you select different tools.
Displays pointers as cross-hairs.
To the top
To the top
Page 23
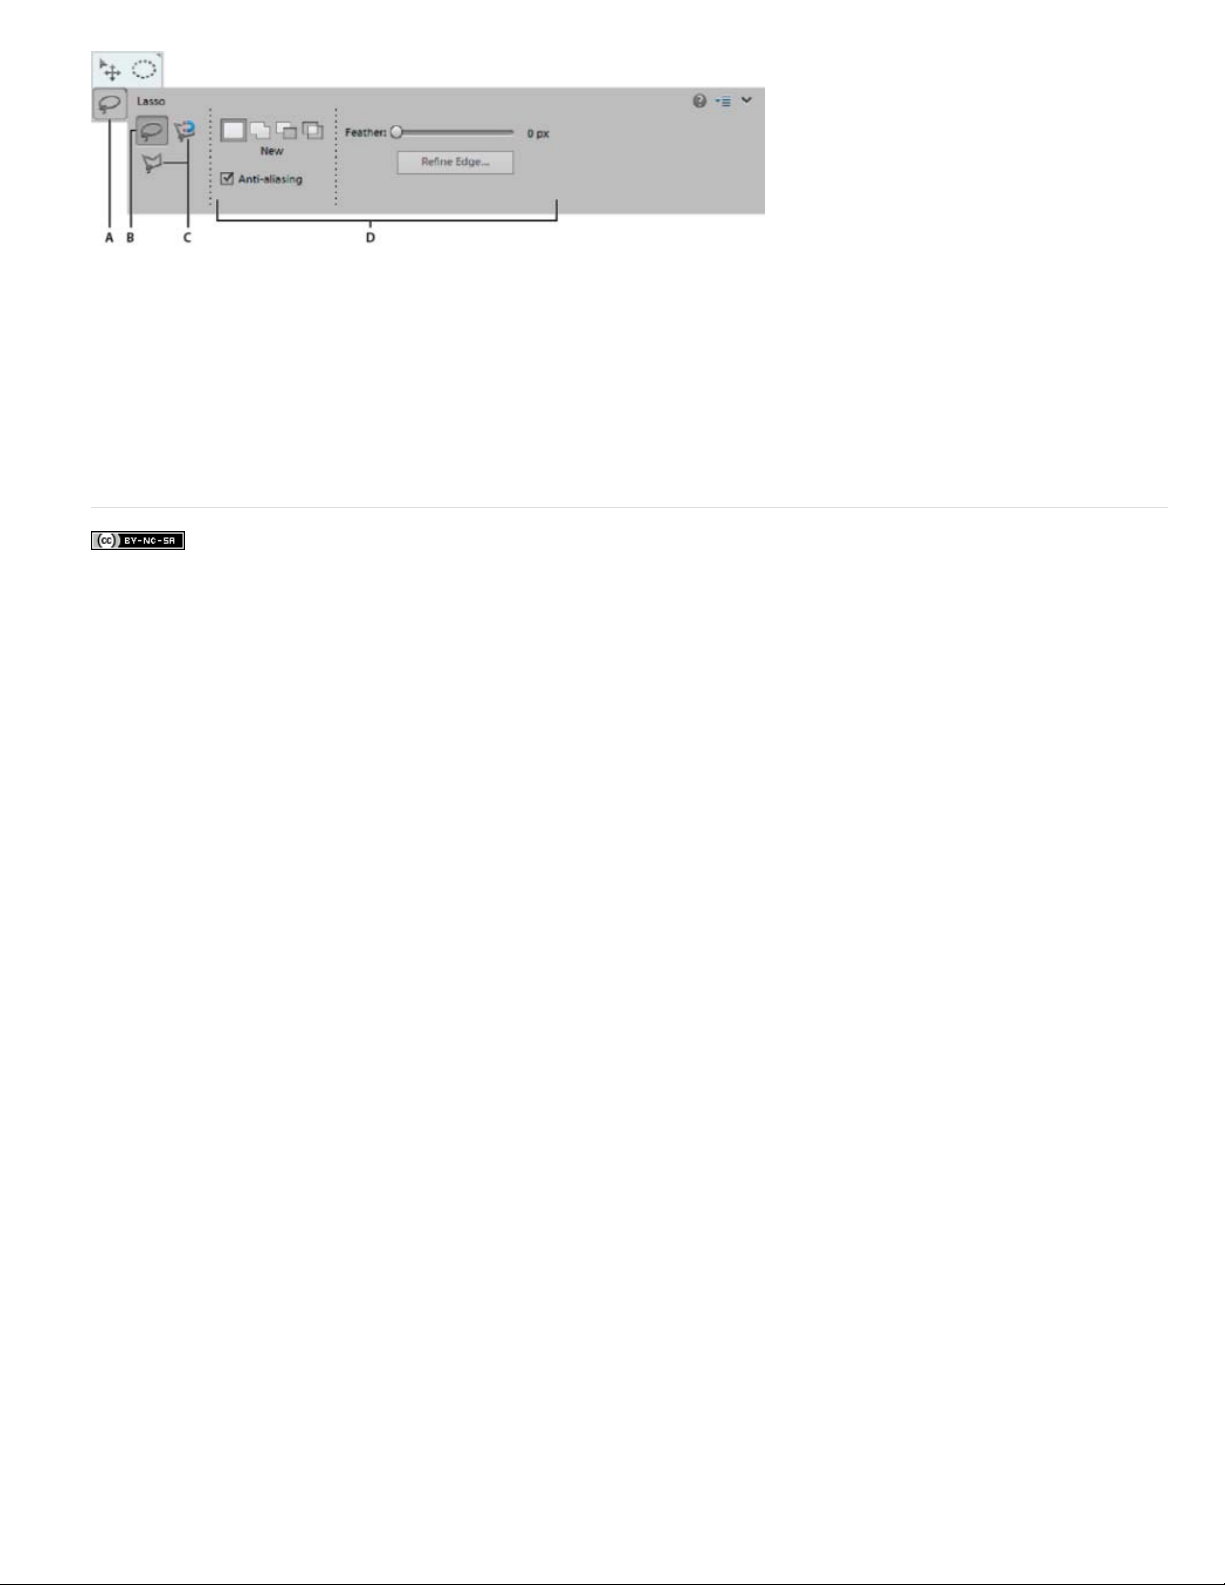
A. Tool icon B. Active tool in the Tool Options bar C. Hidden tools D. Tool options
1. Select a tool.
2. Look in the Tool Options bar to see the available options. For more information on setting options for a specific tool, search
for the tool’s name in Photoshop Elements Help.
Note:
To return a tool or all tools to their default settings, click the tool icon, select the flyout menu from the Tool Options bar,
and then choose Reset Tool or Reset All Tools.
3. To close the Tool Options bar, click Tool Options in the task bar. To reopen the bar, click Tool Options from the task bar.
Twitter™ and Facebook posts are not covered under the terms of Creative Commons.
Legal Notices | Online Privacy Policy
Page 24
Rulers, grids, and guides
About rulers, grids, and guides
Change the rulers’ zero origin and settings
Change the guides and grid settings
About rulers, grids, and guides
In Expert mode, rulers, grids, and guides help you position items (such as selections, layers, and shapes) precisely across the width or length of
an image. In Quick mode, only grids are available.
When visible, rulers appear along the top and left side of the active window. Markers in the ruler display the pointer’s position when you move it.
Changing the ruler origin (the 0, 0 mark on the top and left rulers) lets you measure from a specific point on the image. The ruler origin also
determines the grid’s point of origin.
Use the View menu to show or hide the rulers (Expert mode only), the grid, or the guide. The View menu also helps you to enable or disable the
snapping of items to the grid or guide.
Change the rulers’ zero origin and settings
In Expert mode, do one of the following:
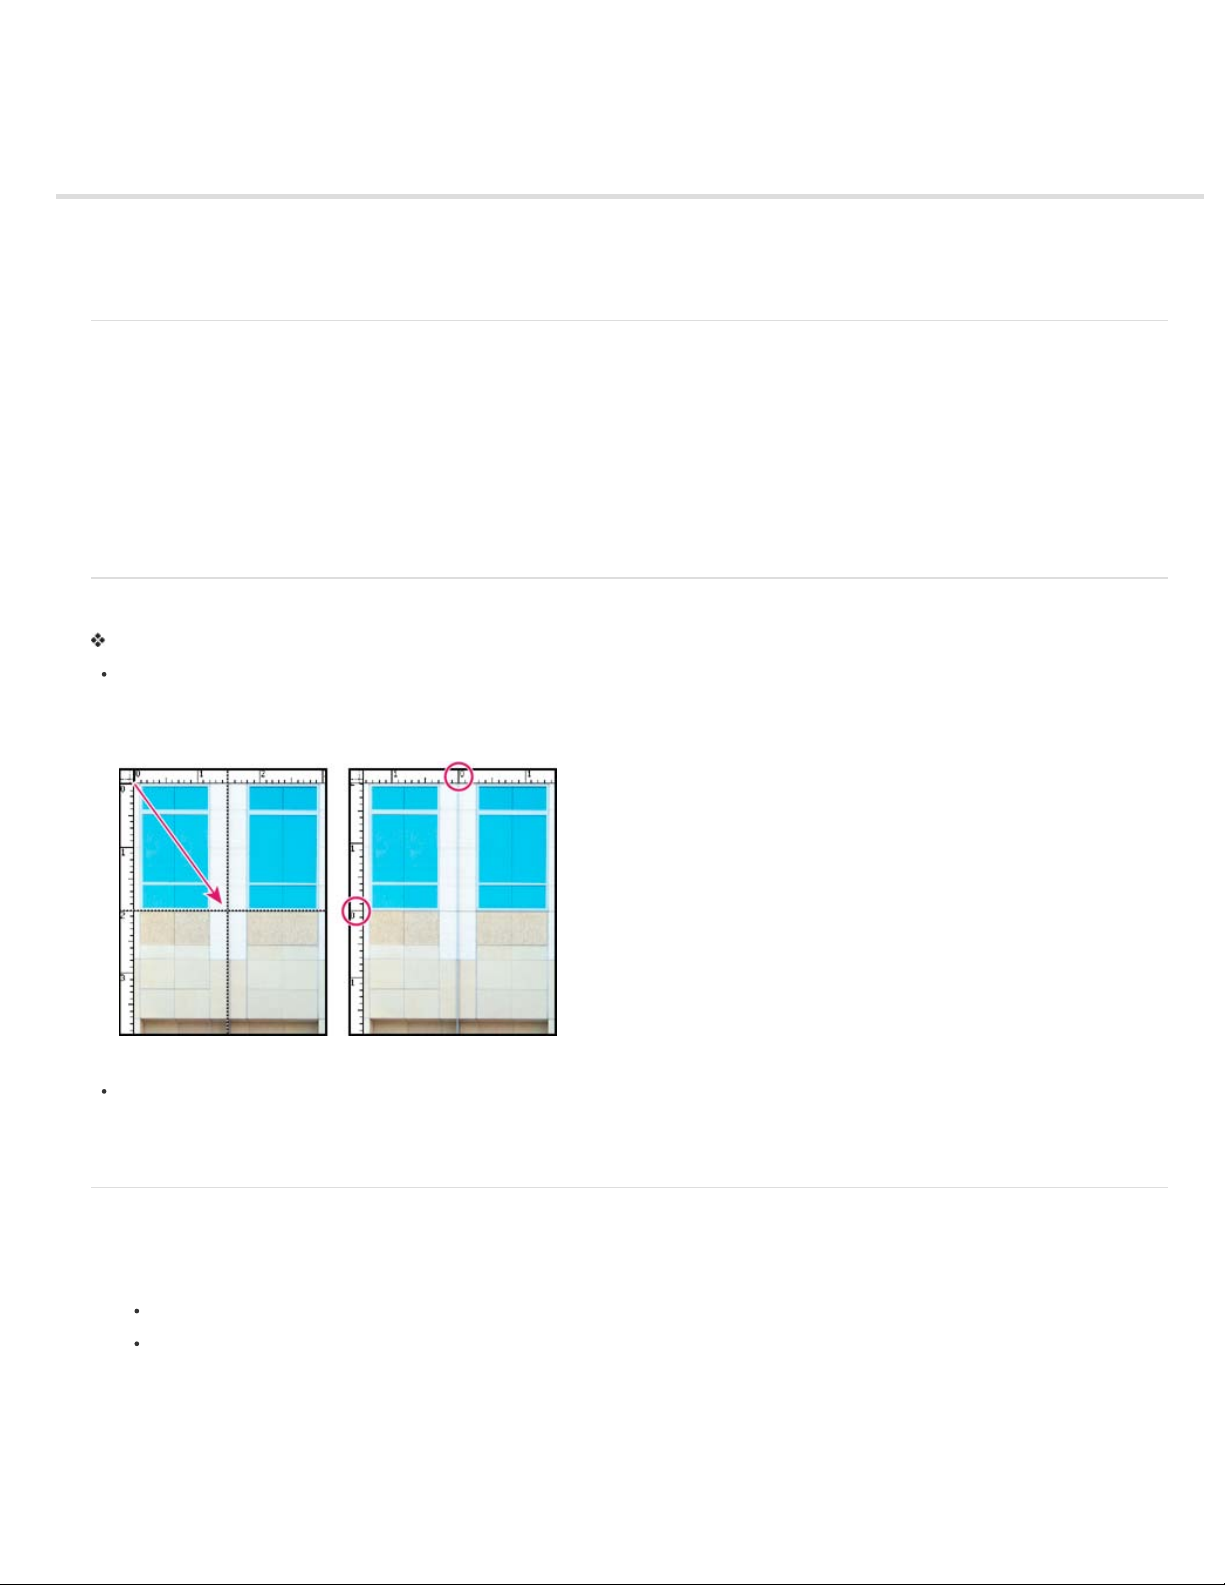
To change the rulers’ zero origin, position the pointer over the intersection of the rulers in the upper-left corner of the window,
and drag diagonally down onto the image. A set of cross hairs appears, marking the new origin on the rulers. The new zero
origin will be set where you release the mouse button.
Note: To reset the ruler origin to its default value, double-click the upper-left corner of the rulers.
To the top
To the top
Dragging to create a new ruler origin.
To change the rulers’ settings, double-click a ruler, or choose Edit > Preferences > Units & Rulers. For Rulers, choose a unit
of measurement. Click OK.
Note: Changing the units on the Info panel automatically changes the units on the rulers.
Change the guides and grid settings
1. Choose Edit > Preferences > Guides & Grid.
2. Under the Guides or Grids area:
Choose a preset color, or click the color swatch to choose a custom color.
Choose the line style for the grid. Choose Lines for solid lines, or choose Dashed lines or Dots for broken lines.
3. For Gridline Every, enter a number value, and then choose the unit of measurement to define the spacing of major grid lines.
4. For Subdivisions, enter a number value to define the frequency of minor grid lines, and click OK.
More Help topics
Change the size of the canvas
Change print dimensions and resolution without resampling
To the top
Page 25

Legal Notices | Online Privacy Policy
Page 26
Undo, redo, and cancel actions
Undo, redo, or cancel actions
Using the History panel while editing
Clear memory used by the clipboard and the History panel
Restore default preferences
Redisplay disabled warning messages
Undo, redo, or cancel actions
Many operations in both the Elements Organizer and Photoshop Elements can be undone or redone. For example, you can restore all or part of
an image to its last saved version. Low amounts of available memory limit your ability to use these options.
1. To undo or redo an operation, Choose Edit > Undo or choose Edit > Redo.
2. To cancel an operation, hold down the Esc key until the operation in progress has stopped.
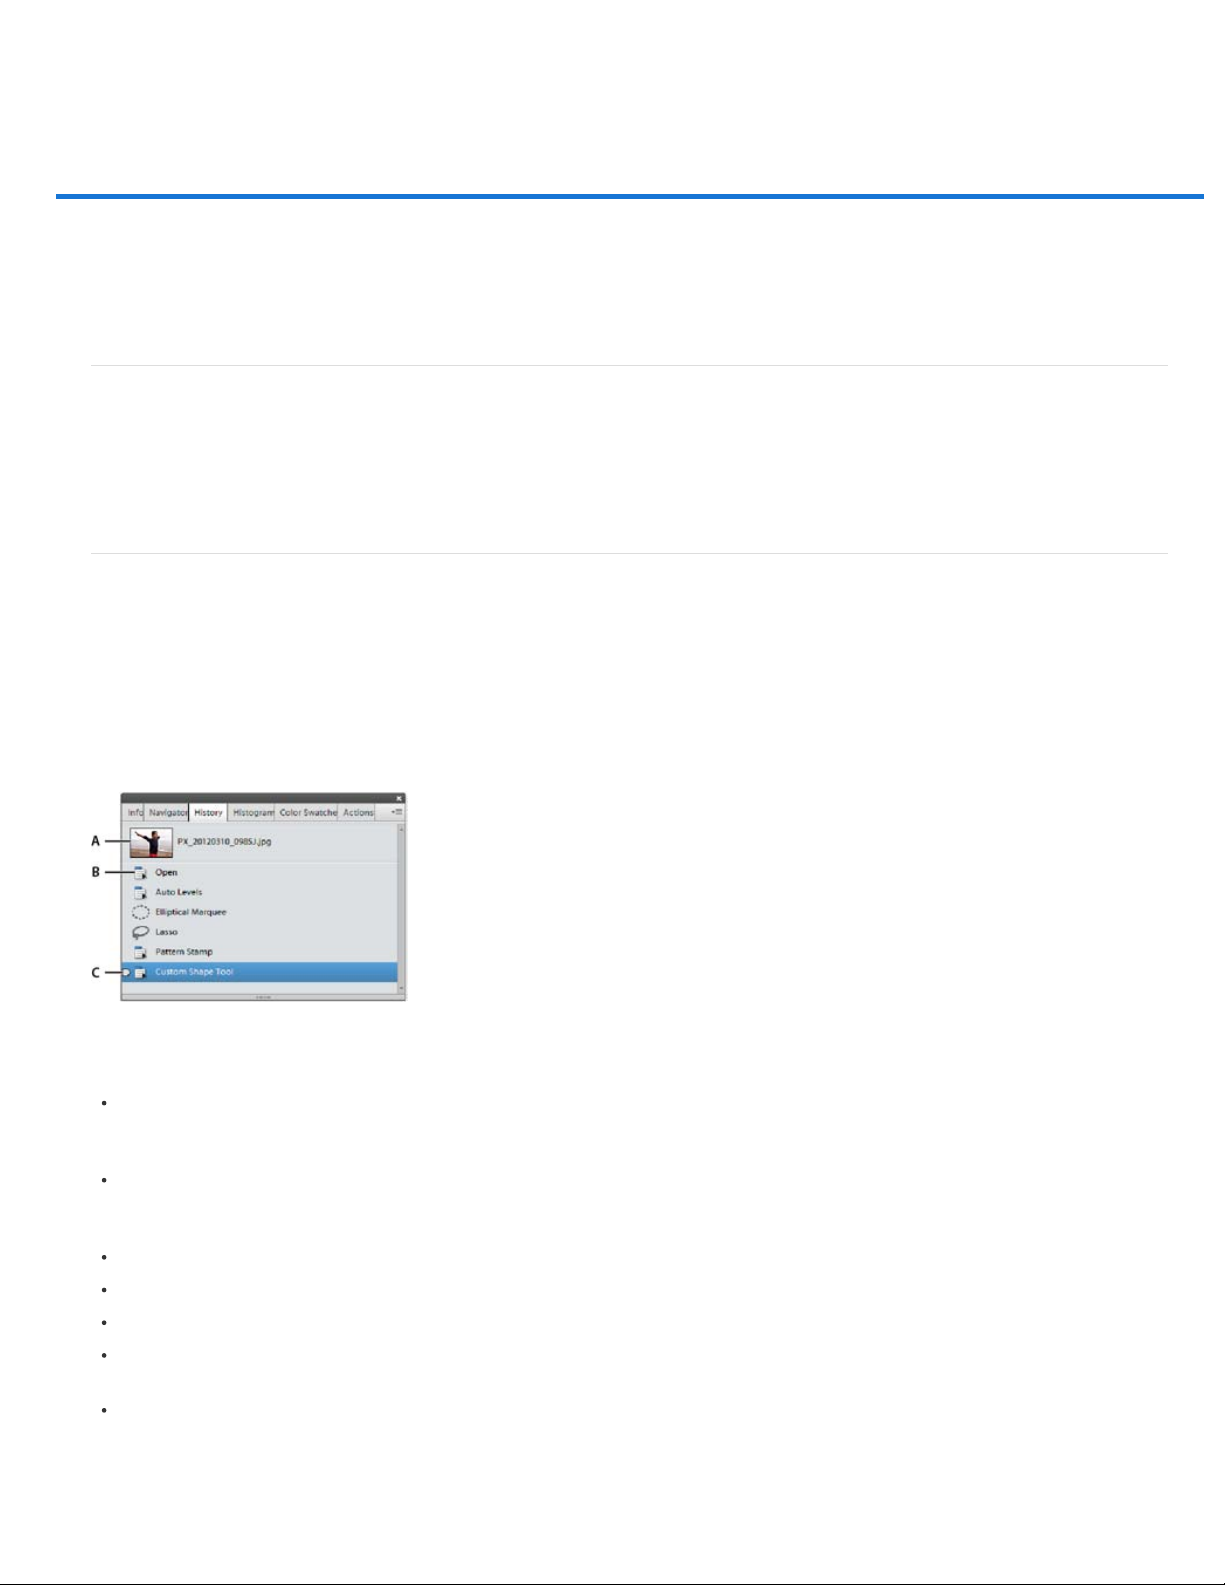
Using the History panel while editing
The History panel (F10 or Window > History) lets you jump to any recent state of the image created during the current work session. Each time
you apply a change to pixels in an image, the new state of that image is added to the History panel.
For example, if you select, paint, and rotate part of an image, each of those states is listed separately in the panel. You can then select any of the
states, and the image reverts to how it looked when that change was first applied. You can then work from that state.
Actions, such as zooming and scrolling, do not affect pixels in the image and do not appear in the History panel. Nor do program-wide changes,
such as changes to panels, color settings, and preferences.
To the top
To the top
A. Original state B. State C. Selected state
Note the following guidelines when using the History panel:
By default, the History panel lists 50 previous states. Older states are automatically deleted to free more memory for
Photoshop Elements. You can set the number of states in the application settings (Preferences > Performance > History
States). The maximum number of states is 1000.
The original state of the photo is always displayed at the top of the History panel. You can always revert an image to its
original state by clicking this top state. Clicking the original state is also handy for comparing before and after versions of your
editing.
When you close and reopen the document, all states from the last working session are cleared from the panel.
States are added to the bottom of the list. That is, the oldest state is at the top of the list, the most recent one is at the bottom.
Each state is listed with the name of the tool or command used to change the image.
Selecting a state dims the subsequent states (steps that were performed after the selected step). This way you can easily see
which changes will be discarded if you continue working from the selected state.
Selecting a state and then changing the image eliminates all states that came after it. Likewise, deleting a state deletes that
state and all states (edits) after it.
Revert to a previous state of an image
Page 27

In Quick and Expert modes, do any of the following:
Click the name of the state in the History panel.
Click the Undo or Redo buttons in the taskbar.
Choose Undo or Redo from the History panel menu or the Edit menu.
To set the keyboard command for Step Forward and Step Backward, choose Edit > Preferences > Generalin Windows
(Photoshop Elements > Preferences > General in Mac), and choose from the Step Back/Fwd menu.
Delete one or more states from the Undo History panel
Do one of the following:
To delete a state, click the name of the state, and choose Delete from the History panel menu. States following the one
you selected are also deleted.
To delete the list of states from the History panel, without changing the image, choose Clear History from the panel menu
or choose Edit > Clear > Clear History. Clearing is useful for freeing up memory, especially if you get an alert that
Photoshop Elements is low on memory.
Clearing the History panel cannot be undone.
Note:
Clear memory used by the clipboard and the History panel
You can delete items copied to the clipboard or states in the Undo History panel to free up memory.
In Expert mode, do one of the following:
To clear memory used by the clipboard, choose Edit > Clear > Clipboard Contents.
To clear memory used by the Undo History panel, choose Edit > Clear > Clear History or choose Clear History from the
History panel flyout menu.
To clear the memory used in both the clipboard and the History panel simultaneously, choose Edit > Clear > All.
Note:
Clearing the History panel or clipboard cannot be undone.
Restore default preferences
Preference settings control how Photoshop Elements displays images, cursors, and transparencies, saves files, uses plug-ins and scratch disks,
and so on. If the application exhibits unexpected behavior, the preferences file may be damaged. You can restore all preferences to their defaults.
Note:
Deleting the preferences file is an action that cannot be undone.
Do one of the following:
Press and hold Alt+Control+Shift (Mac: Option+Command+Shift) immediately after Photoshop Elements begins launching. Click
Yes to delete the Adobe Photoshop Elements settings file.
Go to Edit > Preferences (Mac: Photoshop Elements > Preferences > General), click the Reset Preferences on next launch
button, and then click OK. When you restart Adobe Photoshop Elements, all preferences are reset to default settings.
A new preferences file is created the next time you start Photoshop Elements. For information on a specific preference option, search for the
preference name in Help.
To the top
To the top
Redisplay disabled warning messages
In certain situations, messages containing warnings or prompts are displayed. You can disable the display of these messages by selecting the
Don’t Show Again option in the message. You can also reset the messages you’ve disabled at a later time.
1. In Windows, choose Edit > Preferences > General. In Mac, choose Photoshop Elements > Preferences > General.
2. Click Reset All Warning Dialogs, and click OK.
Twitter™ and Facebook posts are not covered under the terms of Creative Commons.
Legal Notices | Online Privacy Policy
To the top
Page 28

Scratch disks and plug-ins
About scratch disks
Change scratch disks
About plug-in modules
Install plug-in modules
Select an additional plug-ins folder
Load default plug-ins only
About scratch disks
When your system does not have enough RAM to perform an operation, Photoshop Elements uses scratch disks. A scratch disk is any drive or
partition of a drive with free memory. By default, Photoshop Elements uses the hard drive on which the operating system is installed as its primary
scratch disk.
You can change the primary scratch disk, or designate additional scratch disks. When the primary disk is full, additional scratch disks are used. Set
your fastest hard disk as your primary scratch disk. Ensure that the disk has plenty of defragmented space available.
For best performance, use the following guidelines when assigning scratch disks:
Do no create scratch disks on the same physical drive as Photoshop Elements or any large files you are editing.
Do not create scratch disks on the same physical drive as the one used for the operating system’s virtual memory.
Create scratch disks on a local drive, not a network location.
Create scratch disks on conventional (non -removable) media.
RAID disks/disk arrays are good choices for dedicated scratch disk volumes.
Defragment drives with scratch disks regularly. Or better yet, use an empty drive or a drive with plenty of unused space, to
avoid fragmentation issues.
Change scratch disks
Photoshop Elements needs contiguous hard drive space to create a scratch disk. Frequently defragmenting your hard drive ensures that there is
contiguous space available, especially the disk containing your scratch disk. Adobe recommends that you use a disk tool utility, such as Windows
Disk Defragmenter , to defragment your hard drive on a regular basis. See your Windows documentation for information on defragmentation
utilities.
1. In Windows, choose Edit > Preferences > Performance. In Mac, choose, Photoshop Elements > Preferences > Performance.
To the top
To the top
2. Select the desired disks from the Scratch Disks listing (you can assign up to four scratch disks).
3. Select a scratch disk and use the arrow keys next to the Scratch Disks list to rearrange the order in which scratch disks will be
used.
4. Click OK, and restart Photoshop Elements for the change to take effect.
About plug-in modules
Adobe Systems and other software developers create plug-ins to add functionality to Photoshop Elements. A number of importing, exporting, and
special-effects plug-ins come with your program; they are inside the Photoshop Elements plug-ins and optional plug-ins folders.
Once installed, plug-in modules appear as:
Options added to the Import or Export menu
Filters added to the Filter menu, or,
File formats in the Open and Save As dialog boxes.
If you install a large number of plug-ins, Photoshop Elements may not be able to list them all in their appropriate menus. If so, newly installed
plug-ins appear in the Filter > Other submenu. To prevent a plug-in or folder of plug-ins from loading, add a tilde character (~) at the beginning of
the plug-in name, folder, or directory. The program ignores files marked with a tilde character, while starting. To view information about installed
To the top
Page 29

Note:
plug-ins, choose Help > About Plug-In and select a plug-in from the submenu.
To use an optional plug-in module, copy the plug-in module from the optional plug-ins folder to the relevant subfolder in the plug-ins folder.
Then, install the plug-in module, and relaunch Photoshop Elements.
You can select an additional plug-ins folder in which to load compatible plug-ins stored with another application. You can also create a shortcut for
a plug-in stored in another folder on your system. You can then add the shortcut or alias to the plug-ins folder to use that plug-in with
Photoshop Elements.
Install plug-in modules
Do one of the following:
Use the plug -in installer, if provided.
Follow the installation instructions that came with the plug-in module.
Make sure the plug-in files are uncompressed, and then copy them to the appropriate plug-ins folder in the
Photoshop Elements folder.
Select an additional plug-ins folder
You can select an additional plug-ins folder in which to load compatible plug-ins stored with another application.
1. In Windows, choose Edit > Preferences > Plug-Ins. In Mac, choose Photoshop Elements > Preferences > Plug-Ins.
2. In the Preferences dialog, select Additional Plug-Ins Folder, select a folder from the list, and click Choose.
3. To display the contents of a folder, double- click the directory. The path to the folder appears in the preferences window.
Note:
Do not select a location inside the plug-ins folder for Photoshop Elements.
4. Restart Photoshop Elements to load the plug-ins.
Load default plug-ins only
When Photoshop Elements starts, all plug-ins that are pre-installed, third-party, or located in additional plugins-folders, are loaded. To load only
the preinstalled plug-ins Photoshop Elements was shipped with, press and hold the Shift key while starting the software. When asked, click yes on
the dialog that requests confirmation to skip loading optional and third-party plug-ins.
To the top
To the top
To the top
Twitter™ and Facebook posts are not covered under the terms of Creative Commons.
Legal Notices | Online Privacy Policy
Page 30

Using Windows 7 features
Photoshop Elements supports the following Windows 7 features:
Live Taskbar
an icon to view images of the open files and applications. To work with an application, point to its icon, move over the images to preview in full
screen, and click the full screen image.
Aero Peek
Aero Shake
other windows, except the selected window. To display the hidden windows, shake the mouse again.
Aero Snap
horizontally.
Legal Notices | Online Privacy Policy
Displays icons for all running and pinned applications. The icons for all running applications are highlighted with a border. Point to
Makes all windows transparent, allowing you to view the desktop. To view a hidden window, point to its taskbar icon.
Allows you to focus on a window by hiding all others. To work in an application, click its pane and shake the mouse. This hides all
Allows you to quickly resize and organize windows. To resize a window, drag it to a side of the display and expand vertically or
Twitter™ and Facebook posts are not covered under the terms of Creative Commons.
Page 31

Multitouch support
If the hardware and operating system of your computer supports the Touch functionality, you can scroll, rotate, and zoom in on an image.
Multitouch is supported in all three modes: Quick, Guided, and Expert.
Flicking
Scrolls the image horizontally or vertically. Touch the screen with one finger (two fingers on the trackpad for a Mac) and move the finger left or
right, and up or down.
Twisting
Rotates the image clockwise or counterclockwise by 90 degrees. To rotate an image, touch two spots on the image (trackpad on a Mac) and twist
the image just like you would twist a real photo. Move two fingers in the opposite direction or use one finger to pivot around the other.
Pinching in or out
Zooms in or out of the image. To zoom out, place two fingers on the image (trackpad on a Mac) and pinch. Similarly, to zoom in, pinch, and move
the two fingers apart.
Twitter™ and Facebook posts are not covered under the terms of Creative Commons.
Legal Notices | Online Privacy Policy
Page 32

Importing files
Import frames from video
Import images from a digital camera using WIA (Windows only)
Import frames from video
You can play a video from within Photoshop Elements and grab frames to edit and save as images.
1. Select File > Import > Frame From Video.
2. Browse and select the video.
3. Click Play.
The video starts playing in the Frame From Video dialog box. You can use the playback controls to display the frames your
want to grab. If you find the audio distracting, select Mute.
4. Click Grab Frame.
Photoshop Elements places the grabbed frames as images in new files., ready for editing.
5. Click Done.
Import images from a digital camera using WIA (Windows only)
Certain digital cameras import images using Windows Image Acquisition (WIA) support. When you use WIA, Photoshop Elements works with
Windows and your digital camera or scanner software to import images directly into Photoshop Elements.
1. Choose File > Import > WIA Support.
2. Choose a destination in which to save your image files on your computer.
3. Make sure that Open Acquired Image(s) in Photoshop is selected. If you are importing a large number of images, or if you
want to edit the images later, deselect this option.
4. To save the imported images directly into a folder whose name is the current date, select Create Unique Subfolder Using
Date Today.
5. Click Start.
6. Select the digital camera from which to import images.
Note: If the name of your camera does not appear in the submenu, verify that the software and drivers were properly
installed and that the camera is connected.
7. Choose the image or images you want to import:
Click the image from the list of thumbnails to import the image.
Hold down Shift and click multiple images to import them at the same time.
Click Select All to import all available images.
8. Click Get Picture to import the image.
To the top
To the top
Legal Notices | Online Privacy Policy
Page 33

Keys for painting and brushes
This partial list includes the most helpful shortcuts. You'll find additional shortcuts in menu commands and tool tips.
Result Windows Mac OS
Switch to Eyedropper tool Any painting tool or shape tool + Alt
Select background color Eyedropper tool + Alt-click Eyedropper tool + Option-click
Set opacity, tolerance, or exposure for
painting
Cycle through blending modes Shift + + (plus) or - (minus) Shift + + (plus) or - (minus)
Fill selection/layer with foreground or
background color
Display Fill dialog box Shift + Backspace Shift + Delete (Backspace)
Lock transparent pixels on/off / (forward slash) / (forward slash)
Connect points with a straight line (draw a
straight line)
Delete brush Alt-click brush Option-click brush
Decrease/increase brush size [ or ] [ or ]
Decrease/increase brush
softness/hardness in 25% increments
(except Impressionist Brush)
Any painting or editing tool + number keys
(for example, 0 = 100%, 1 = 10%, 4 and 5
in quick succession = 45%). When
airbrush option is enabled, use Shift +
number keys.
Alt + Backspace, or Control + Backspace Option + Delete (Backspace), or
Any painting tool + Shift-click Any painting tool + Shift -click
Shift + [ or ] Shift + [ or ]
Any painting tool or shape tool + Option
(except Impressionist Brush)
Any painting or editing tool + number keys
(for example, 0 = 100%, 1 = 10%, 4 and 5
in quick succession = 45%). When
airbrush option is enabled, use Shift +
number keys.
Command + Delete (Backspace)
Select previous/next brush size , (comma) or . (period) , (comma) or . (period)
Select first/last brush Shift + , (comma) or . (period) Shift + , (comma) or . (period)
Display precise cross hair for brushes Caps Lock Caps Lock
Legal Notices | Online Privacy Policy
Page 34

Keys for selecting and moving objects
This partial list includes the most helpful shortcuts. You'll find additional shortcuts in menu commands and tool tips.
Result Windows Mac OS
Deselect a selection Control + D Command + D
Reposition marquee while selecting Spacebar-drag Spacebar-drag
Add to or subtract from a selection Any selection tool + Shift or Alt-drag Any selection tool + Shift or Option-drag
Intersect a selection Any selection tool (except Quick Selection
Constrain marquee to square or circle (if
no other selections are active)
Draw marquee from center (if no other
selections are active)
Constrain shape and draw marquee from
center
Switch to Move tool Control (except when Hand or any shape
Switch from Magnetic Lasso tool to
Polygonal Lasso tool
Delete last anchor point for Magnetic or
Polygonal Lasso tool
Apply/cancel an operation of the Magnetic
Lasso tool
Move copy of selection Move tool + Alt-drag selection Move tool + Option-drag selection
Move selection area 1 pixel Any selection + Right Arrow, Left Arrow,
tool and Selection Brush tool) + Shift +
Alt-drag
Shift-drag Shift-drag
Alt-drag Option-drag
Shift + Alt -drag Shift + Option-drag
tool is selected)
Alt-click and drag Option-click and drag
Delete Delete
Enter/Esc Enter/Esc
Up Arrow, or Down Arrow
Any selection tool (except Quick Selection
tool and Selection Brush tool) + Shift +
Option-drag
Command (except when Hand or any
shape tool is selected)
Any selection + Right Arrow, Left Arrow,
Up Arrow, or Down Arrow
Move selection 1 pixel Move tool + Right Arrow, Left Arrow, Up
Move layer 1 pixel when nothing selected
on layer
Increase/decrease detection width Magnetic Lasso tool + [ or ] Magnetic Lasso tool + [ or ]
Accept cropping or exit cropping Crop tool + Enter or Esc Crop tool + Enter or Esc
Toggle crop shield off and on / (forward slash) / (forward slash)
Legal Notices | Online Privacy Policy
Arrow, or Down Arrow
Control + Right Arrow, Left Arrow, Up
Arrow, or Down Arrow
Move tool + Right Arrow, Left Arrow, Up
Arrow, or Down Arrow
Command + Right Arrow, Left Arrow, Up
Arrow, or Down Arrow
Page 35

Keys for selecting tools
This partial list includes the most helpful shortcuts. You'll find additional shortcuts in menu commands and tool tips.
Result Windows Mac OS
Cycle through tools that have the same
keyboard shortcut
Cycle through nested tools Alt-click tool Option-click tool
Move tool V V
Zoom tool Z Z
Hand tool H H
Eyedropper tool I I
Rectangular Marquee tool
Elliptical Marquee tool
Lasso tool
Magnetic Lasso tool
Polygonal Lasso tool
Magic Wand tool
Selection Brush tool
Quick Selection tool
Horizontal Type tool
Vertical Type tool
Horizontal Type Mask tool
Vertical Type Mask tool
Text on Selection
Text on Shape
Text on Path
Shift-press keyboard shortcut (preference
setting, Use Shift Key for Tool Switch,
must be enabled)
M M
L L
A A
T T
Shift-press keyboard shortcut (preference
setting, Use Shift Key for Tool Switch,
must be enabled)
Crop tool C C
Recompose tool W W
Cookie Cutter tool Q Q
Straighten tool P P
Red Eye Removal tool Y Y
Spot Healing Brush tool
Healing Brush tool
Clone Stamp tool
Pattern Stamp tool
Eraser tool
Background Eraser tool
Magic Eraser tool
J J
S S
E E
Page 36

Pencil tool N N
Brush tool
B B
Impressionist Brush
Color Replacement tool
Smart Brush tool
F F
Detail Smart Brush tool
Paint Bucket tool K K
Gradient tool G G
Custom Shape tool
U U
Rectangle tool
Rounded Rectangle tool
Ellipse tool
Polygon tool
Star tool
Line tool
Shape Selection tool
Blur tool
R R
Sharpen tool
Smudge tool
Sponge tool
O O
Dodge tool
Burn tool
Show/Hide all panels Tab Tab
Default foreground and background colors D D
Switch foreground and background colors X X
Legal Notices | Online Privacy Policy
Page 37

Keys for showing or hiding panels (expert mode)
This partial list includes the most helpful shortcuts. You'll find additional shortcuts in menu commands and tool tips.
Result Windows Mac OS
Open Help F1 command+ ?
Show/Hide Tool Options F4 F4
Show/Hide Photo Bin F5 F5
Show/Hide Effects panel F6 F6
Show/Hide Graphics panel F7 F7
Show/Hide Info panel F8 F8
Show/Hide Histogram panel F9 Option + F9
Show/Hide History panel F10 Option + F10
Show/Hide Layers panel F11 Option + F11
Show/Hide Navigator panel F12 Option + F12
Legal Notices | Online Privacy Policy
Page 38

Keys for the Camera Raw dialog box
This partial list includes the most helpful shortcuts. You'll find additional shortcuts in menu commands and tool tips.
Result Windows Mac OS
Display highlights that will be clipped in
Preview
Enable Open Copy button in the Camera
Raw dialog box
Legal Notices | Online Privacy Policy
Alt-drag Exposure, Blacks sliders, or
Recovery bar
Alt Option
Option-drag Exposure, or Blacks sliders,
or Recovery Bar
Page 39

Keys for the Color Swatches panel
This partial list includes the most helpful shortcuts. You'll find additional shortcuts in menu commands and tool tips.
Result Windows Mac OS
Create new swatch from foreground color Click in empty area of panel Click in empty area of panel
Select background color Control- click swatch Command-click swatch
Delete color Alt-click swatch Option-click swatch
Legal Notices | Online Privacy Policy
Page 40

Keys for the Filter Gallery
This partial list includes the most helpful shortcuts. You'll find additional shortcuts in menu commands and tool tips.
Result Windows Mac OS
Apply a new filter on top of selected Alt-click on a filter Option-click on a filter
Open/close all disclosure triangles Alt-click on a disclosure triangle Option-click on a disclosure triangle
Change Cancel button to Default Control Command
Change Cancel button to Reset Alt Option
Undo/redo Control + Z Command + Z
Step forward Control + Shift + Z Command + Shift + Z
Step backward Control + Alt + Z Command + Option + Z
Legal Notices | Online Privacy Policy
Page 41

Keys for the Layers panel
This partial list includes the most helpful shortcuts. You'll find additional shortcuts in menu commands and tool tips.
Result Windows Mac OS
Set layer options Alt-click New button Option-click New button
Delete without confirmation Alt-click Trash button Option-click Trash button
Apply value and keep text box active Shift + Enter Shift + Enter
Load layer transparency as a selection Control- click layer thumbnail Command-click layer thumbnail
Add to current selection Control + Shift-click layer Command + Shift-click layer thumbnail
Subtract from current selection Control + Alt-click layer thumbnail Command + Option-click layer thumbnail
Intersect with current selection Control + Shift + Alt-click layer thumbnail Command + Shift + Option-click layer
Merge visible layers Control + Shift + E Command + Shift + E
Create new empty layer with dialog Alt-click New Layer button Option-click New Layer button
Create new layer below target layer Control-click New Layer button Command-click New Layer button
Activate bottom/top layer Alt + .(period)/ ,(comma) Option + .(period)/ ,(comma)
Select next layer down/up Alt + [ or ] Option + [ or ]
Move target layer down/up Control + [ or ] Command + [ or ]
Merge a copy of all visible layers into
target layer
Merge down Control + E Command + E
Copy current layer to layer below Alt + Merge Down command from the
Copy all visible layers to active layer Alt + Merge Visible command from the
Show/hide all other currently visible layers Alt-click the eye icon Option-click the eye icon
Control + Shift + Alt + E Command + Shift + Option + E
panel pop-up menu
panel pop-up menu
thumbnail
Option + Merge Down command from the
panel pop-up menu
Option + Merge Visible command from the
panel pop-up menu
Toggle lock transparency for target layer,
or last applied lock
Edit layer properties Double-click layer thumbnail Double-click layer thumbnail
Select all text; temporarily select Type tool Double-click text layer thumbnail Double-click text layer thumbnail
Create a clipping mask Alt-click the line dividing two layers Option-click the line dividing two layers
Rename layer Double-click the layer name Double-click the layer name
Add to layer selection in Layers panel Shift + Alt + [ or ] Shift + Option + [ or]
Legal Notices | Online Privacy Policy
/ (forward slash) / (forward slash)
Page 42

Keys for the Liquify filter
This partial list includes the most helpful shortcuts. You'll find additional shortcuts in menu commands and tool tips.
Result Windows Mac OS
Warp tool W W
Turbulence tool T T
Twirl Clockwise tool C C
Twirl Counter Clockwise tool L L
Pucker tool P P
Bloat tool B B
Shift Pixels tool S S
Reflection tool M M
Reconstruct tool E E
Zoom tool Z Z
Hand tool H H
Legal Notices | Online Privacy Policy
Page 43

Keys for the Magic Extractor dialog box
This partial list includes the most helpful shortcuts. You'll find additional shortcuts in menu commands and tool tips.
Result Shortcut (both Windows and Mac OS)
Foreground brush B
Background Brush tool P
Point Eraser E
Add To Selection tool A
Remove From Selection tool D
Smoothing Brush tool J
Zoom tool Z
Hand tool H
Legal Notices | Online Privacy Policy
Page 44

Keys for transforming selections
This partial list includes the most helpful shortcuts. You'll find additional shortcuts in menu commands and tool tips.
Result Windows Mac OS
Transform from center or reflect Alt Option
Constrain Shift Shift
Distort Control Command
Skew Control + Shift Command + Shift
Change perspective Control + Shift + Alt Command + Shift + Option
Apply Enter Enter
Cancel Esc or Control + . (period) Esc or Command + . (period)
Legal Notices | Online Privacy Policy
Page 45

Keys for using Photomerge Panorama
Note: This dialog box only appears for Interactive Layouts.
This partial list includes the most helpful shortcuts. You'll find additional shortcuts in menu commands and tool tips.
Result Windows Mac OS
Select Image tool A A
Rotate Image tool R R
Set Vanishing Point tool (Perspective
option selected)
Zoom tool Z Z
Hand tool H H
Switch to Hand tool Spacebar Spacebar
Step backward Control + Z Command + Z
Step forward Control + Shift + Z Command + Shift + Z
Move selected image 1 pixel Right Arrow, Left Arrow, Up Arrow, or
Change Cancel button to Reset Alt Option
Show individual image border Alt-move pointer over image Option-move pointer over image
Legal Notices | Online Privacy Policy
V V
Down Arrow
Right Arrow, Left Arrow, Up Arrow, or
Down Arrow
Page 46

Keys for using blending modes
This partial list includes the most helpful shortcuts. You'll find additional shortcuts in menu commands and tool tips.
Result Windows Mac OS
Cycle through blending modes Shift + + (plus) or - (minus) Shift + + (plus) or - (minus)
Normal Shift + Alt + N Shift + Option + N
Dissolve Shift + Alt + I Shift + Option + I
Behind Shift + Alt + Q Shift + Option + Q
Clear Shift + Alt + R Shift + Option + R
Darken Shift + Alt + K Shift + Option + K
Multiply Shift + Alt + M Shift + Option + M
Color Burn Shift + Alt + B Shift + Option + B
Linear Burn Shift + Alt + A Shift + Option + A
Lighten Shift + Alt + G Shift + Option + G
Screen Shift + Alt + S Shift + Option + S
Color Dodge Shift + Alt + D Shift + Option + D
Linear Dodge Shift + Alt + W Shift + Option + W
Overlay Shift + Alt + O Shift + Option + O
Soft Light Shift + Alt + F Shift + Option + F
Hard Light Shift + Alt + H Shift + Option + H
Vivid Light Shift + Alt + V Shift + Option + V
Linear Light Shift + Alt + J Shift + Option + J
Pin Light Shift + Alt + Z Shift + Option + Z
Hard Mix Shift + Alt + L Shift + Option + L
Difference Shift + Alt + E Shift + Option + E
Exclusion Shift + Alt + X Shift + Option + X
Hue Shift + Alt + U Shift + Option + U
Saturation Shift + Alt + T Shift + Option + T
Color Shift + Alt + C Shift + Option + C
Luminosity Shift + Alt + Y Shift + Option + Y
Legal Notices | Online Privacy Policy
Page 47

Keys for using text
This partial list includes the most helpful shortcuts. You'll find additional shortcuts in menu commands and tool tips.
Result Windows Mac OS
Move type in image Control- drag type when Type layer is
Select 1 character left/right or 1 line
down/up, or 1 word left/right
Select characters from insertion point to
mouse click point
Move 1 character left/right, 1 line down/up,
or 1 word left/right
Select word, line, or paragraph Double-click, triple-click, or quadruple-
Scale and skew text within a bounding box
when resizing the bounding box
Align left, center, or right Horizontal Type tool or Horizontal Type
Align top, center, or bottom Vertical Type tool or Vertical Type Mask
Return to default font style Control + Shift + Y Command + Shift + Y
Turn Underlining on/off Control + Shift + U Command + Shift + U
selected
Shift + Left Arrow/Right Arrow or Down
Arrow/Up Arrow, or Control + Shift + Left
Arrow/Right Arrow
Shift-click Shift-click
Left Arrow/Right Arrow, Down Arrow/Up
Arrow, or Control + Left Arrow/Right Arrow
click
Control- drag a bounding box handle Command-drag a bounding box handle
Mask tool + Control + Shift + L, C, or R
tool + Control + Shift + L, C, or R
Command-drag type when Type layer is
selected
Shift + Left Arrow/Right Arrow or Down
Arrow/Up Arrow, or Command + Shift +
Left Arrow/Right Arrow
Left Arrow/Right Arrow, Down Arrow/Up
Arrow, or Command + Left Arrow/Right
Arrow
Double-click, triple-click, or quadrupleclick
Horizontal Type tool or Horizontal Type
Mask tool + Command + Shift + L, C, or R
Vertical Type tool or Vertical Type Mask
tool + Command + Shift + L, C, or R
Turn Strikethrough on/off Control + Shift + / (forward slash) Command + Shift + / (forward slash)
Decrease or increase type size of selected
text 2 pts/px
Legal Notices | Online Privacy Policy
Control + Shift + < or > Command + Shift + < or >
Page 48
Keys for viewing images (expert mode)
This partial list includes the most helpful shortcuts. You'll find additional shortcuts in menu commands and tool tips.
Result Windows Mac OS
Cycle forward through open documents Control + Tab
Cycle backward through open documents Control + Shift + Tab
Fit image in window Ctrl + 0 (or double-click Hand tool) Command + 0 (or double-click Hand tool)
Magnify 100% Ctrl + Alt + 0 (or double-click Zoom tool) Command + Option + 0 (or double -click
Switch to Hand tool (when not in text-edit
mode)
Switch to Zoom In tool Control + Spacebar Spacebar + Command
Switch to Zoom Out tool Spacebar + Alt Spacebar + Option
Reposition zoom marquee while dragging Spacebar-drag Spacebar-drag
Zoom in on specified area of an image Control- drag over preview in Navigator
Scroll image with Hand tool Drag, or drag view area box in Navigator
Scroll up or down 1 screen Page Up or Page Down Page Up or Page Down
Scroll up or down 10 units Shift + Page Up or Page Down Shift + Page Up or Page Down
Spacebar Spacebar
panel
panel
Zoom tool)
Command-drag over preview in Navigator
panel
Drag, or drag view area box in Navigator
panel
Scroll left or right 1 screen Ctrl + Page Up or Page Down Command + Page Up or Page Down
Scroll left or right 10 units Ctrl + Shift + Page Up or Page Down Command + Shift + Page Up or Page
Move view to upper-left corner or lowerright corner
Legal Notices | Online Privacy Policy
Home or End Home or End
Down
Page 49

Viewing images
Viewing images in Expert or Quick modes
Zoom in or out
Display an image at 100%
Fit an image to the screen
Resize the window while zooming
Using the Navigator panel
Open multiple windows of the same image
View and arrange multiple windows
Close windows
Viewing images in Expert or Quick modes
The Hand tool, the Zoom tools, the Zoom commands, and the Navigator panel let you view different areas of an image at different magnifications.
You can magnify or reduce your view using various methods. The window’s title bar displays the zoom percentage (unless the window is too small
for the display to fit).
If you want to view another area of an image, either use the window scroll bars or select the Hand tool and drag to pan over the image. You can
also use the Navigator panel.
To use the Hand tool while another tool is selected, hold down the spacebar as you drag within the image.
To the top
Dragging the Hand tool to view another area of an image.
Zoom in or out
Do one of the following:
Select the Zoom tool from the toolbar, and click either the Zoom In or Zoom Out button in the Tool Options bar. Click the area
you want to magnify. Each click magnifies or reduces the image to the next preset percentage, and centers the display around
the point you click. When the image has reached its maximum magnification level of 3200% or minimum reduction level of 1
pixel, the magnifying glass appears empty.
Note: You can drag a Zoom tool over the part of an image you want to magnify. Make sure that the Zoom In button is
selected in the Tool Options bar. To move the zoom marquee around the image, begin dragging a marquee, and then hold
down the spacebar while dragging the marquee to a new location.
Drag the Zoom slider in the Tool Options bar.
Choose View > Zoom In or View > Zoom Out.
Enter the desired magnification level in the Zoom text box, in the Tool Options bar.
When using a Zoom tool, hold down Alt to switch between zooming in and zooming out.
To the top
Page 50

Display an image at 100%
Do one of the following:
Double-click the Zoom tool in the toolbox.
Select the Hand tool or a Zoom tool and click the 1:1 button in the Tool Options bar.
Choose View > Actual Pixels, or right-click the image and choose Actual Pixels.
Enter 100% in the status bar and press Enter.
To the top
Fit an image to the screen
Do one of the following:
Double-click the Hand tool in the toolbox.
Select a Zoom tool or the Hand tool, and then click the Fit Screen button in the Tool Options bar. Or, right-click the image and
choose Fit On Screen.
Choose View > Fit On Screen.
These options scale both the zoom level and the window size to fit the available screen space.
Resize the window while zooming
With a Zoom tool active, select Resize Windows To Fit in the Tool Options bar. The window changes size as you magnify or reduce the view of
the image.
When Resize Windows To Fit is deselected, the window maintains a constant size regardless of the image’s magnification. This can be helpful
when you are using smaller monitors or working with tiled images.
Using the Navigator panel
The Navigator panel lets you adjust the image’s magnification and area of view. Typing a value in the text box, clicking the Zoom Out or Zoom In
button, or dragging the zoom slider changes the magnification. Drag the view box in the image thumbnail to move the view of an image. The view
box represents the boundaries of the image window. You can also click in the thumbnail of the image to designate the area of view.
Note: To change the color of the view box, choose Panel Options from the Navigator panel menu. Choose a color from the Color menu or click
the color swatch to open the Color Picker and select a custom color. Click OK.
To the top
To the top
To the top
Open multiple windows of the same image
In Expert mode, you can open multiple windows to display different views of the same file. A list of open windows appears in the Window menu,
and thumbnails of each open image appear in the Photo Bin. Available memory may limit the number of windows per image.
Choose View > New Window For [image filename]. Depending on the position of the first window, you may have to move the second window to
view both simultaneously.
You can use the New Window command when you’re working with a zoomed image to see what the image will look like at 100% size in a
separate window.
View and arrange multiple windows
In Expert mode, do one of the following:
To display windows stacked and cascading from the upper left to the lower right of the screen, choose Window > Images >
Cascade.
To display windows edge-to-edge, choose Window > Images > Tile. As you close images, the open windows are resized to fill
the available space.
To view all open images at the same magnification as the active image, choose Window > Images > Match Zoom.
To view the same section (upper-left corner, center, lower-right corner, and so on) of all open photos, choose Window >
Images > Match Location. The view in all windows shifts to match the active (frontmost) image. The zoom level does not
change.
For more options to arrange images, in the Taskbar, click Layout, and choose a new layout from the pop -up menu.
Note: The Window > Images options are enabled only when Allow Floating Documents In Expert Mode is selected in preferences.
To the top
To the top
Page 51

Close windows
In Expert mode, do one of the following:
Choose File > Close to close the active window.
Click the Close button on the title bar of the active window.
Right-click a thumbnail in the Photo Bin and choose Close.
Choose File > Close All to close all open windows.
Legal Notices | Online Privacy Policy
To the top
Page 52

Windows 7 keyboard shortcuts
Photoshop Elements supports the following Windows 7 keyboard shortcuts:
Result Shortcut
Activate Aero Peek Windows + Spacebar
Activate Aero Shake Windows + Home
Maximize Windows + Up Arrow
Restore or minimize Windows + Down Arrow
Maximize the current window vertically Windows + Shift + Up Arrow
Snap the current window to the left or right half of the display
Note: In a multi-monitor configuration, repeat the command to
move the window to other monitors.
Move the current window to the left or right display Windows + Shift + Left Arrow
Zoom in on the desktop Windows ++
Zoom out of the desktop Windows +- (minus)
Navigate the windows (or tabs) within a grouped icon on the
taskbar
Legal Notices | Online Privacy Policy
Windows + Left Arrow
Windows + Right Arrow
Windows + Shift + Right Arrow
Control + click
Page 53

Importing
Page 54

Elements Organizer and Photoshop Elements Editor
Elements Organizer helps you import, manage, view, search, and share all of your media (photos and video clips). You can also instantly fix
photos in the Organizer workspace. After collecting hundreds and thousands of photos on your computer, you’ll discover that finding and
managing photos with Elements Organizer is much easier.
Photoshop Elements Editor helps refine your photos, make basic edits, follow step-by-step guided editing tasks, or use advanced editing tools to
enhance your photos. There are lots of great things you can do with your photos in Photoshop Elements Editor.
Welcome Screen When you launch Photoshop Elements, the Welcome Screen is displayed. Click Organizer
Click Photo Editor
Legal Notices | Online Privacy Policy
to launch Photoshop Elements Editor and start editing or enhancing your images.
to start organizing your media.
Page 55

Importing files
Import frames from video
Import images from a digital camera using WIA (Windows only)
Import frames from video
You can play a video from within Photoshop Elements and grab frames to edit and save as images.
1. Select File > Import > Frame From Video.
2. Browse and select the video.
3. Click Play.
The video starts playing in the Frame From Video dialog box. You can use the playback controls to display the frames your
want to grab. If you find the audio distracting, select Mute.
4. Click Grab Frame.
Photoshop Elements places the grabbed frames as images in new files., ready for editing.
5. Click Done.
Import images from a digital camera using WIA (Windows only)
Certain digital cameras import images using Windows Image Acquisition (WIA) support. When you use WIA, Photoshop Elements works with
Windows and your digital camera or scanner software to import images directly into Photoshop Elements.
1. Choose File > Import > WIA Support.
2. Choose a destination in which to save your image files on your computer.
3. Make sure that Open Acquired Image(s) in Photoshop is selected. If you are importing a large number of images, or if you
want to edit the images later, deselect this option.
4. To save the imported images directly into a folder whose name is the current date, select Create Unique Subfolder Using
Date Today.
5. Click Start.
6. Select the digital camera from which to import images.
Note: If the name of your camera does not appear in the submenu, verify that the software and drivers were properly
installed and that the camera is connected.
7. Choose the image or images you want to import:
Click the image from the list of thumbnails to import the image.
Hold down Shift and click multiple images to import them at the same time.
Click Select All to import all available images.
8. Click Get Picture to import the image.
To the top
To the top
Legal Notices | Online Privacy Policy
Page 56

File management
Page 57

Scratch disks and plug-ins
About scratch disks
Change scratch disks
About plug-in modules
Install plug-in modules
Select an additional plug-ins folder
Load default plug-ins only
About scratch disks
When your system does not have enough RAM to perform an operation, Photoshop Elements uses scratch disks. A scratch disk is any drive or
partition of a drive with free memory. By default, Photoshop Elements uses the hard drive on which the operating system is installed as its primary
scratch disk.
You can change the primary scratch disk, or designate additional scratch disks. When the primary disk is full, additional scratch disks are used. Set
your fastest hard disk as your primary scratch disk. Ensure that the disk has plenty of defragmented space available.
For best performance, use the following guidelines when assigning scratch disks:
Do no create scratch disks on the same physical drive as Photoshop Elements or any large files you are editing.
Do not create scratch disks on the same physical drive as the one used for the operating system’s virtual memory.
Create scratch disks on a local drive, not a network location.
Create scratch disks on conventional (non -removable) media.
RAID disks/disk arrays are good choices for dedicated scratch disk volumes.
Defragment drives with scratch disks regularly. Or better yet, use an empty drive or a drive with plenty of unused space, to
avoid fragmentation issues.
Change scratch disks
Photoshop Elements needs contiguous hard drive space to create a scratch disk. Frequently defragmenting your hard drive ensures that there is
contiguous space available, especially the disk containing your scratch disk. Adobe recommends that you use a disk tool utility, such as Windows
Disk Defragmenter , to defragment your hard drive on a regular basis. See your Windows documentation for information on defragmentation
utilities.
1. In Windows, choose Edit > Preferences > Performance. In Mac, choose, Photoshop Elements > Preferences > Performance.
To the top
To the top
2. Select the desired disks from the Scratch Disks listing (you can assign up to four scratch disks).
3. Select a scratch disk and use the arrow keys next to the Scratch Disks list to rearrange the order in which scratch disks will be
used.
4. Click OK, and restart Photoshop Elements for the change to take effect.
About plug-in modules
Adobe Systems and other software developers create plug-ins to add functionality to Photoshop Elements. A number of importing, exporting, and
special-effects plug-ins come with your program; they are inside the Photoshop Elements plug-ins and optional plug-ins folders.
Once installed, plug-in modules appear as:
Options added to the Import or Export menu
Filters added to the Filter menu, or,
File formats in the Open and Save As dialog boxes.
If you install a large number of plug-ins, Photoshop Elements may not be able to list them all in their appropriate menus. If so, newly installed
plug-ins appear in the Filter > Other submenu. To prevent a plug-in or folder of plug-ins from loading, add a tilde character (~) at the beginning of
the plug-in name, folder, or directory. The program ignores files marked with a tilde character, while starting. To view information about installed
To the top
Page 58

Note:
plug-ins, choose Help > About Plug-In and select a plug-in from the submenu.
To use an optional plug-in module, copy the plug-in module from the optional plug-ins folder to the relevant subfolder in the plug-ins folder.
Then, install the plug-in module, and relaunch Photoshop Elements.
You can select an additional plug-ins folder in which to load compatible plug-ins stored with another application. You can also create a shortcut for
a plug-in stored in another folder on your system. You can then add the shortcut or alias to the plug-ins folder to use that plug-in with
Photoshop Elements.
Install plug-in modules
Do one of the following:
Use the plug -in installer, if provided.
Follow the installation instructions that came with the plug-in module.
Make sure the plug-in files are uncompressed, and then copy them to the appropriate plug-ins folder in the
Photoshop Elements folder.
Select an additional plug-ins folder
You can select an additional plug-ins folder in which to load compatible plug-ins stored with another application.
1. In Windows, choose Edit > Preferences > Plug-Ins. In Mac, choose Photoshop Elements > Preferences > Plug-Ins.
2. In the Preferences dialog, select Additional Plug-Ins Folder, select a folder from the list, and click Choose.
3. To display the contents of a folder, double- click the directory. The path to the folder appears in the preferences window.
Note:
Do not select a location inside the plug-ins folder for Photoshop Elements.
4. Restart Photoshop Elements to load the plug-ins.
Load default plug-ins only
When Photoshop Elements starts, all plug-ins that are pre-installed, third-party, or located in additional plugins-folders, are loaded. To load only
the preinstalled plug-ins Photoshop Elements was shipped with, press and hold the Shift key while starting the software. When asked, click yes on
the dialog that requests confirmation to skip loading optional and third-party plug-ins.
To the top
To the top
To the top
Twitter™ and Facebook posts are not covered under the terms of Creative Commons.
Legal Notices | Online Privacy Policy
Page 59

File information
About file information (metadata)
View or add file information
Use the Info panel
Display file information in the Info panel or status bar
Save or delete metadata templates
Use a saved metadata template
About file information (metadata)
When you take a photo with your digital camera, each image file includes information such as the date and time the photo was taken, the shutter
speed and aperture, the specific camera model, and so on. All of this information is called metadata, and you can view it and add to it in the
Properties panel of the Elements Organizer and the File Info dialog box in the Photoshop Elements.
You can add file information, such as a title, keyword tags, and descriptions, to help identify your images as you manage and organize your
collection. As you edit your images, Photoshop Elements automatically keeps track of the file’s edit history and adds this information to the file’s
metadata.
In addition, opened images are automatically scanned for Digimarc watermarks. If a watermark is detected, Photoshop Elements displays a
copyright symbol in the image window’s title bar and includes the information in the Copyright Status, Copyright Notice, and Copyright Info URL
sections of the File Info dialog box.
You can add visual watermarks to images to indicate them as your own work. Visual watermarks are not tracked in file information. For information
about how to create visual watermarks, see the following articles:
Adding permanent watermarks to a batch of photos
Create a watermark using text layering
Create a watermark brush
For a video about creating a watermark, see www.adobe.com/go/lrvid927_pse_en.
View or add file information
The File Info dialog box displays camera data, caption, and copyright and authorship information that has been added to the file. Using this dialog
box, you can modify or add information to files saved in Photoshop Elements. The information you add is embedded in the file using XMP
(Extensible Metadata Platform). XMP provides Adobe applications and workflow partners with a common XML framework that standardizes the
creation, processing, and interchange of document metadata across publishing workflows. If you have metadata that you repeatedly enter for
different files, you can create metadata templates to expedite the adding of information to files.
You cannot edit the information displayed for the Camera Data metadata category.
Important: Tags added to a file in the Photo Browser appear as keywords in the File Info dialog box. Some file formats, such as PDF and BMP,
do not support tags as keywords.
1. With an image open, choose File > File Info. (You can also right-click a thumbnail in the Photo Bin and choose File Info.)
2. Click the Description tab on the top of the dialog box to display specific information. In Description, you can add or modify the
document title, author information, keywords, and copyright information. Type in the appropriate text boxes and click OK to
embed the information. For copyright status, choose from the Copyright Status drop-down list.
To the top
To the top
Use the Info panel
In the Expert mode, the Info panel displays file information about an image and shows the color value beneath the pointer. Depending on the tool
in use, the Info panel also provides other useful information.
Make sure the Info panel is visible in your work area if you want to view information while dragging in the image.
1. Choose Window > Info (F8) to display the Info panel.
2. Select a tool.
3. Move the pointer into the image, or drag within the image to use the tool. The following information may appear, depending on
which tool you’re using:
The numeric values for the color beneath the pointer
To the top
Page 60

The x- and y-coordinates of the pointer.
The width (W) and height (H) of a marquee or shape as you drag, or the width and height of an active selection.
The x- and y-coordinates of your starting position (when you click in the image).
The change in position along the x-coordinate and y-coordinate as you move a selection, layer, or shape.
The angle (A) of a line or gradient, the change in angle as you move a selection, layer, or shape, or the angle of rotation
during a transformation. The change in distance (D) as you move a selection, layer, or shape.
The percentage of change in width (W) and height (H) as you scale a selection, layer, or shape.
The angle of horizontal skew (H) or vertical skew (V) as you skew a selection, layer, or shape.
Set color modes and units of measurement in the Info panel
Do one of the following:
To change the mode of color values displayed, choose a color mode from the pop-up menu. You can also choose Panel
Options from the More menu in the Info panel, then choose a color mode for First Color Readout and/or Second Color
Readout:
Grayscale Displays the grayscale values beneath the pointer.
RGB Color Displays the RGB (red, green, blue) values beneath the pointer.
Web Color Displays the hexadecimal code for the RGB values beneath the pointer.
HSB Color Displays the HSB (hue, saturation, brightness) values beneath the pointer.
To change the unit of measurement displayed, choose a unit of measurement from the pop-up menu. You can also choose
Panel Options from the More menu in the Info panel. Choose a unit of measurement from the Mouse Coordinates option, and
click OK.
Display file information in the Info panel or status bar
You can change the information displayed in the Info panel or the status bar. (The leftmost section of the status bar, which is located at the bottom
of the document window, displays the current magnification. The section next to the leftmost one displays information about the current file.)
1. In the Info panel, choose Panel Options from the More menu.
2. Select a view option:
Document Sizes Displays information on the amount of data in the image. The number on the left represents the printing size
of the image—approximately the size of the saved, flattened file in PSD format. The number on the right indicates the file’s
approximate size, including layers.
Document Profile Displays the name of the color profile used by the image.
Document Dimensions Displays the size of the image in the currently selected units.
Scratch Sizes Displays RAM and scratch disk space utilized to process the image. The number on the left indicates the
amount of memory currently being used by Photoshop Elements to display all open images. The number on the right indicates
the amount of RAM available to Photoshop Elements to process images.
Efficiency Displays the percentage of time actually spent performing an operation instead of reading from or writing to the
scratch disk. If the value is below 100%, Photoshop Elements is using the scratch disk and, therefore, is operating more
slowly.
Timing Shows how long it took to complete the last operation.
Current Tool Shows the name of the active tool.
Save or delete metadata templates
If you have metadata that you repeatedly enter, you can save the metadata entries in metadata templates. The templates can be used for entering
information, and they save you the effort of retyping metadata in the File Info dialog box. In the Photo Browser, you can search for metadata to
locate files and photos.
Open the File Info dialog box (File > File Info) and do one of the following:
To save metadata as a template, click the drop-down button in the row of buttons in the File Info dialog box, and select Export.
Enter a template name, and click Save.
To delete a metadata template, click Show Templates Folder. Browse and select the template you want to delete, and press
Delete.
To the top
To the top
Page 61

Use a saved metadata template
1. Choose File > File Info, click the drop-down button in the row of buttons in the File Info dialog box, and select Import.
2. Select an import option and click OK.
3. Choose a template from the list of saved metadata templates and click Open.
More Help topics
About scratch disks
Find media files by details (metadata)
Legal Notices | Online Privacy Policy
To the top
Page 62

Get started quickly
Import photos and videos
Organize photos and videos
Find photos and video clips
Make your photos look great
Create photo projects
Print and share photos
Import photos and videos
Start by importing media (videos and photos) into Elements Organizer. You can import media from devices such as cameras, card readers,
scanners, and Adobe® Revel™ or from any folder on a computer.
Follow these steps to import photos and videos from your camera or card reader:
1. Connect your camera or card reader to your computer. (See the documentation that came with your device, if necessary.)
Note: (Windows) If AutoPlay is enabled, the Windows AutoPlay dialog box opens with a list of options for getting the photos.
In the Windows AutoPlay dialog box, select Organize, and Edit using Adobe Elements 11 Organizer. If Elements Organizer is
not already open, the Photo Downloader dialog box opens. Click Get Photos. Elements Organizer opens and imports the
media files.
2. In the Organizer workspace, click Import and select From Camera or Card Reader.
Import options in Windows
To the top
3. In the Photo Downloader dialog box under Source, select where to copy/import from using the Get Photos From drop-down
list.
4. Use default settings, or set the options in the Import Settings area.
5. Click Get Media.
The photos and videos are copied to your hard drive.
6. Click OK in the Files Successfully Copied dialog box.
Note: If Elements Organizer is launched while copying the photos, click Yes in the Files Successfully Copied box.
Organize photos and videos
Elements Organizer views
To the top
Page 63

Elements Organizer views help you manage media in different ways
Use Elements Organizer to manage your media. Elements Organizer enables you to find photos, video files, audio clips, and Adobe PDF
documents, even if they’re imported from different sources and stored in different locations on your computer.
The following views help you to manage the media imported into Elements Organizer:
Media All the media files (photos, videos, and sound clips) that have been imported into Elements Organizer are visible in this view. You can
organize the media by folders, albums, keyword tags, star ratings, and other sort capabilities provided in Elements Organizer.
People Elements Organizer helps you find the people in your photos by recognizing their faces, and stacking together photos of the people you
identify. Select photos and click the Add People button
Places Elements Organizer helps you quickly find the photo you are looking for by associating your photos with places on a map. Select photos
and click the Add Places button
Events The Events view helps organize your media with the events during which they were taken. For example, you want to associate all the
photos taken at different birthday parties last month with an event. Select photos and click the Add Event button
event, and add the photos to it.
on the taskbar to get started.
on the taskbar to get started.
on the taskbar to create an
Create an album
You can create albums for different sets of photos and videos. For example, you can create an album for photos and videos you had shot last
summer on a visit to Europe. Albums are great for sharing media files.
1. In the left panel of the Organizer workspace, click the Create New Album Or Album Category button
2. Specify a name for the album.
3. Drag-and-drop photos from the Media view to the Content area of the Add New Album panel.
.
Drag photos from the Media view on the left to the panel on the right
4. Click Done.
Page 64

Find photos and video clips
You can find photos and video files by date, star rating, album, folder location, filename, media type, keyword tag, metadata, or other criteria. You
can also use various search options to automatically find your photos based on visual similarities and objects in them.
Here are a few ways you can find photos in Elements Organizer:
Albums and My Folders in the left panel Select an album or folder to view the media files stored in it.
Search bar Type text in the Search box to find files with matching metadata. Matches can include items such as filenames, metadata, keyword
tags, captions, notes, album names, album groups, camera information, dates, and formats.
Search options Search photos using various options from the Search drop-down list in the Search bar. Options such as Visual Similarity Search,
Object Search, and Duplicate Photo Search help you quickly find similar or identical photos.
Keyword Tags panel Find media tagged with default or custom keywords in the Keyword Tags panel.
Find an image file on your hard drive
You can find or view the physical location of a photo or video clip in the following way:
1. In the Organizer workspace, select the photo or video clip.
2. Click the Tags/Info button
3. Click the Information tab in the Tags/Info panel.
4. Click Location in the General tab to open the location of the file.
.
To the top
View file location
Make your photos look great
Photoshop Elements offers several levels of editing, from simple one-click fixes in the Organizer workspace to advanced color correction and
composition in the Editor workspace.
To the top
Get started with editing photos in Photoshop Elements Editor
Open a photo for editing in the Editor workspace
Do one of the following:
In the Organizer workspace, select a photo and click Editor on the taskbar.
In the Editor workspace, click Open or File > Open. Select the file that you want to edit and click Open.
Note: If you don’t like the results of any change you made, click Undo from the taskbar or from the Edit menu, or press Ctrl +
Z (Windows) or Command + Z (Mac OS).
Quick, Guided, and Expert modes in the Editor workspace
In the Editor workspace, choose one of the following modes to edit your photos:
Editing modes in Photoshop Elements Editor
Quick Lets you quickly perform the most common editing tasks
Page 65

Guided Provides step-by-step instructions to help you achieve a range of interesting editing tasks
Expert Lets you edit and enhance your photos using the complete set of powerful tools available in Photoshop Elements
Fix or enhance photos in Quick mode
The Quick mode offers several easy ways to fix or enhance your photos. With a single click or in a few steps, you can fix common flaws, adjust
brightness and exposure, and do much more to make your photos look extraordinary.
In the Editor workspace, open the photos you want to work on, click Quick, and explore various editing options:
Apply Smart Fix In the right panel, click Smart Fix. You can click Auto or select from the different options that Photoshop Elements provides.
Drag the slider or select an option
Fine-tune exposure In the right panel, click Exposure. Drag the slider to increase or decrease exposure or select from the different options that
Photoshop Elements provides.
Make the colors richer In the right panel, click Color and click Vibrance. Click Auto or select from the different options that Photoshop Elements
provides.
Remove red eye You can automatically fix red eye when you import photos into Elements Organizer. If you have not done that, click the Red Eye
Removal tool
Whiten teeth Use the Whiten Teeth tool in the Tools panel on the left for pearly white smiles in your photos. Click the tool and drag in the
image area with the teeth that you want to brighten.
Remove blemishes Use the Spot Healing Brush tool
photos. You can either click once on a blemish, or click and drag to smooth away imperfections in an area.
in the Tools panel on the left and click in the red area of an eye. Alternatively, you can click Auto Correct for a quick correction.
in the Tools panel on the left to removes blemishes and other imperfections from your
Use the Spot Healing brush to smooth away imperfections
Crop a photo in Quick mode
Cropping removes unwanted areas from a photo.
1. In the Editor workspace, open the photo you want to crop and click Quick.
2. (Optional) Drag the slider to zoom in on the crop area.
3. Click the Crop Tool button
and outline the crop area. Increase or decrease the area if necessary.
Page 66

Crop a photo in a few steps
4. Click the Commit icon
Note: If you are not happy with your crop area selection and want to start all over again, you can click the Cancel icon .
.
Resize a photo in Quick mode
Resizing allows you to change the dimensions of a photo.
1. In the Editor workspace, open the photo you want to resize and click Quick.
2. Choose Image > Resize > Image Size.
3. Select Constrain Proportions.
Note: If you want to increase or decrease the size without changing the photo’s proportions, make sure that you keep the
Constrain Proportions option selected.
4. Change the width or the height.
5. Click OK.
Get step-by-step help in Guided Edit mode
The Guided Edit mode makes it easy for you to apply touchups and effects by providing streamlined workflows with step-by-step assistance.
In the Editor workspace, open the photos you want to work on, click Guided Edit, and explore various editing options in the Guided Edit panel on
the right.
Vignette Effect Click Black or White to choose the color of the vignette and adjust the intensity. If you want to refine the applied effect, click
Refine Shape to display sliders for adjusting the feather and roundness.
Perfect Portrait Follow the onscreen instructions to transform your portrait to a flawless image in seven easy steps.
Experiment with the toolset in Expert mode
The Expert mode provides you the complete toolset available in Photoshop Elements.
In the Editor workspace, open the photos you want to work on, click Expert, and start playing with the various tools and options.
Note: If you are new to photo editing, first make a copy of your photo.
Zoom
Pan Use the Hand tool to drag your photo and bring different areas into view.
Brush, Pencil, and Eraser Use the Brush tool to paint smooth lines and the Pencil tool to draw hard-edged lines. The Eraser tool works
exactly like a real eraser; move it over an area to erase the color pixels from that area.
Rectangular Marquee and Quick Selection
to select an area with corners or rounded edges, use the Quick Selection tool. This tool automatically makes a selection based on color and
texture when you click or click-drag an area.
Cookie Cutter
look.
Use the Zoom tool to get a closer view of a part of your photo. Hold down Alt (Option in Mac OS) to zoom out.
Use the Rectangular Marquee tool to draw rectangular or square selection borders. If you want
Crop a photo into a shape that you choose from a list that the Cookie Cutter tool provides. You can adjust the feather for a better
Saving your edits
After you edit an image in the Editor workspace, save it, or you’ll lose your work.
Page 67

In the Editor workspace, choose File > Save.
Photos saved from the Editor workspace are saved as a version and grouped with other saved versions of the original photo. These version sets
are stacked together in Elements Organizer with the latest saved version at the top of the stack.
What if I don’t want to save versions of a photo ? It’s recommended that you save versions of a photo to preserve the original file. If for some
reason, you don’t want to save a version of a photo, choose File > Save after you’ve finished editing a photo. Under Save Options in the Save As
dialog box, deselect the Save In Version Set With Original option.
What if I must optimize the photo for the web? Choose File > Save For Web. You can use different optimization options and preview the
changes. Typically, GIF, JPEG, and PNG formats are used on the web.
Create photo projects
You can use your photos in various fun projects and share with your family and friends. For example, you can create photo projects, such as photo
calendars, greeting cards, CD/DVD labels and jackets, and photo collages. You can print these photo projects at home, or you can upload them to
an online printing service. You can also use your photos at online photo galleries and in photo slide shows.
To the top
Create greeting cards
1. In the Organizer workspace, select the photos you want in the greeting card.
2. Click Create > Greeting Card.
3. From the list of options, select the size you want.
4. Select a theme. A preview of the selected theme appears in the Preview area of the Greeting Card dialog box.
5. Click OK.
6. Add text as required.
7. Click the Commit icon
8. Save and print the greeting card.
Print and share photos
Photoshop Elements offers many ways to quickly share your media. You can let people view your photos through an interactive online album. You
can send photos to people via email. You can print photos to your home printer or order professionally printed photos. Or, you can put your media
on CDs/DVDs.
For more information, see www.adobe.com/go/learn_org11_share_en.
.
To the top
Print photos
You can print photos from the Editor workspace or the Organizer workspace.
1. Select the photos you want to print.
2. Click Create > Photo Prints.
3. Click Print With Local Printer.
4. Specify printing options, and then click Print.
Share photos using email
In Elements Organizer, select the media you want to share. Click Share, and then select the way you want to share photos.
Follow these steps to share photos using email:
1. Make sure that your email client is specified in Preferences. In Windows, choose Edit > Preferences > Sharing.
Note: In Mac OS, you can find the Preferences option in the Adobe Elements 11 Organizer menu.
2. In Microsoft® Windows® 7 or Microsoft® Windows® Vista™, choose Microsoft Outlook, Windows Live Mail, or Adobe Email
Service. In Windows® XP, choose Microsoft Outlook, Outlook Express, or Adobe Email Service.
Note: In Mac OS, choose Entourage, Mail, or Outlook.
3. Select a photo in the Media view, and then click Share > Email Attachments.
4. To add more items to the email, select them in the Media view, then drag-and-drop into the media bin on the right.
Note: You can also remove items by selecting them in the media bin, and then clicking the Delete icon
5. Choose an option from the Maximum Photo Size menu, and use the Quality slider to adjust image clarity.
6. Select recipients of the email by doing one of the following:
Select a name from the Select Recipients list (the names you see are from your contact book).
If you want, add the recipient to your contact book by selecting New Contact in the Contact Book dialog box. Click OK.
.
Page 68

7. Click Next.
Photoshop Elements opens the message in your default email application.
Share photos on Facebook
Upload photos on Facebook to share with your friends.
1. In the Organizer workspace, select photos and click Share.
2. Select Facebook.
3. (First time only) Authorize Photoshop Elements to access your Facebook account.
Note: If you leave the Download Facebook Friend List option selected, Photoshop Elements downloads the list of friends
from your Facebook account.
4. (Optional) If the photos have people tags, select the Upload People Tags In These Photos option.
5. Select an existing album or specify the details of a new album.
6. Specify who can see the photos.
7. Click Upload.
Legal Notices | Online Privacy Policy
Page 69

Image adjustments
Page 70

Adjusting color, saturation, and hue
Adjust saturation and hue
Adjust the color of skin tone
Adjust saturation in isolated areas
Change the color of an object
Precisely convert to black and white
Automatically convert to black and white
Add custom presets for black and white conversion
Add color to a grayscale image
Adjust saturation and hue
The Hue/Saturation command adjusts the hue (color), saturation (purity), and lightness of the entire image or of individual color components in an
image.
Use the Hue slider to add special effects, to color a black and white image (like a sepia effect), or to change the range of colors in a portion of an
image.
Changing colors in an image using the Hue/Saturation command
A. Original B. Entire image changed to sepia using the Colorize option C. Magenta colors targeted in the Edit menu and changed using the Hue
slider
Use the Saturation slider to make colors more vivid or more muted. For example, you could add a color punch to a landscape by saturating the
colors in it. Or, tone down a distracting color, like a vivid red sweater in a portrait.
To the top
Before and after adjusting color saturation
Use the Lightness slider with the other adjustments to lighten or darken a portion of an image. Take care not to use it on an entire image—this
adjustment reduces the overall tonal range.
Change color saturation or hue
1. Do one of the following:
Choose Enhance > Adjust Color > Adjust Hue/Saturation.
Choose Layer > New Adjustment Layer > Hue/Saturation, or open an existing Hue/Saturation adjustment layer.
The two color bars in the dialog box represent the colors in their order on the color wheel. The upper bar shows the color
before the adjustment; the lower bar shows how the adjustment affects all hues at full saturation.
2. In the Edit drop-down menu, choose which colors to adjust:
Page 71

Choose Master to adjust all colors at once.
Choose one of the other preset color ranges listed for the color you want to adjust. An adjustment slider appears between
the color bars, which you can use to edit any range of hues.
3. For Hue, enter a value or drag the slider until the colors appear as you want.
The values displayed in the text box reflect the number of degrees of rotation around the color wheel from the pixel’s original
color. A positive value indicates clockwise rotation, a negative value counterclockwise rotation. Values range from -180 to
+180.
4. For Saturation, enter a value or drag the slider to the right to increase the saturation or to the left to decrease it. Values range
from -100 to +100.
5. For Lightness, enter a value or drag the slider to the right to increase the lightness or to the left to decrease it. Values range
from -100 to +100. Be careful when using this slider on an entire image. It will reduce the tonal range of the overall image.
6. Click OK. Or, to cancel your changes and start over, hold down Alt (Option in Mac OS), and click Reset.
Modify the range of Hue/Saturation sliders
1. Do one of the following:
Choose Enhance > Adjust Color > Adjust Hue/Saturation.
Choose Layer > New Adjustment Layer > Hue/Saturation, or open an existing Hue/Saturation adjustment layer.
2. Choose an individual color from the Edit menu.
3. Do any of the following to the adjustment slider:
Drag one of the triangles to adjust the amount of color fall -off without affecting the range.
Drag one of the gray bars to adjust the range without affecting the amount of color fall-off.
Drag the gray center part to move the entire adjustment slider, selecting a different color area.
Drag one of the vertical white bars next to the dark gray center part to adjust the range of the color component. Increasing
the range decreases the color fall-off, and vice versa.
To move the color bar and the adjustment slider bar together, Ctrl -drag (Command-drag in Mac OS) the color bar.
Adjustment slider
A. Adjusts color fall- off without affecting range B. Adjusts range without affecting color fall-off C. Adjusts the range of color
component D. Moves entire slider
If you modify the adjustment slider so that it falls into a different color range, the name changes to reflect this. For
example, if you choose Yellow and alter its range so that it falls in the red part of the color bar, the name changes to Red
2. You can convert up to six of the individual color ranges to varieties of the same color range (for example, Red 1 through
Red 6).
By default, the color range selected when you choose a color component is 30° wide, with 30° color fall-off on either
Note:
side. Setting the fall-off too low can produce banding in the image.
4. To edit the range by choosing colors from the image, select the color picker, and click the image. Use the color picker tool to
add to the range; use the color picker - tool to subtract from the range.
While the color picker tool is selected, you can also press Shift to add to the range or press Alt (Option in Mac OS) to subtract
from it.
Adjust the color of skin tone
The Adjust Color For Skin Tone command adjusts the overall color in a photo to bring out more natural skin tones. When you click an area of skin
in the photo, Photoshop Elements adjusts the skin tone—as well as all other colors in the photo. You can manually adjust the brown and red
colors separately to achieve the final color you want.
To the top
Page 72

Original (top), and after adjusting skin tone (bottom)
1. Open the photo and select the layer that needs correction.
2. Choose Enhance > Adjust Color > Adjust Color For Skin Tone.
3. Click an area of skin.
Photoshop Elements automatically adjusts the colors in the image. Changes might be subtle.
Make sure Preview is selected so that you can see the color changes as they occur.
Note:
4. (Optional) Drag any of the following sliders to fine-tune the correction:
Increases or decreases the level of brown in skin tones.
Tan
Increases or decreases the level of red in skin tones.
Blush
Temperature
5. When you’re finished, click OK. Or, to cancel your changes and start over, click Reset.
Changes the overall color of skin tones.
Adjust saturation in isolated areas
The Sponge tool changes the color saturation of an area.
Increasing saturation by scrubbing with the Sponge tool
1. Select the Sponge tool.
2. Set tool options in the options bar:
Increases or decreases color saturation. Choose Saturate to intensify the color’s saturation. In grayscale, Saturate
Mode
increases contrast. Choose Desaturate to dilute the color’s saturation. In grayscale, Desaturate decreases contrast.
Sets the brush tip. Click the arrow next to the brush sample, choose a brush category from the Brushes pop-up menu,
Brush
and then select a brush thumbnail.
To the top
Sets the size of the brush, in pixels. Drag the Size slider or enter a size in the text box.
Size
Sets the rate of saturation change. Drag the Flow pop-up slider or enter a value in the text box.
Flow
3. Drag over the part of the image you want to modify.
Page 73

Change the color of an object
The Replace Color command replaces a specific color in an image. You can set the hue, saturation, and lightness of the replacement color.
1. Choose Enhance > Adjust Color > Replace Color.
2. Select a display option under the image thumbnail:
Selection
Image
limited screen space.
3. Click the color picker button, and then click the color you want to change in the image or in the preview box. Use the color
picker tool to add colors, or use the color picker - tool to remove colors to keep them from changing.
4. Drag the Fuzziness slider to control the degree to which related colors are included in the selection.
5. Do one of the following to specify a new color:
6. To cancel your changes and start over, hold down Alt (Option in Mac OS), and click Reset.
Displays the mask, which looks like a black and white version of the image, in the preview box.
Displays the image in the preview box. This option is useful when you are working with a magnified image or have
Drag the Hue, Saturation, and Lightness sliders (or enter values in the text boxes).
Click the Results box and specify a new color in the Color Picker, then click OK.
To the top
Precisely convert to black and white
For a video about this process, see www.adobe.com/go/lrvid2325_pse9_en.
The Convert To Black And White command lets you choose a specific conversion style to be applied to the image. This is unlike the Remove
Color command, which automatically converts to black and white for you.
In the Convert To Black And White dialog box, the available image styles help you compare and choose from different conversion presets. Select a
style and then use the available sliders to fine- tune the conversion.
Convert to black and white
A. Displays Before and After views B. Select a style C. Adjust intensity
To the top
1. Open an image, and select an area or layer to convert. If you do not select an area or layer, the entire image is converted.
To experiment with black and white conversion while preserving the original photo, convert a duplicate layer.
2. Choose Enhance > Convert To Black And White.
3. Select a style option that reflects the content of your image (for example, Portraits or Scenic Landscape).
4. Drag the Adjustment Intensity sliders to adjust red, green, blue, or contrast.
The Adjustment Intensity sliders for red, green, and blue don’t colorize your image; they simply include more or less
Note:
data from the original color channels in the new black and white image.
5. To convert your image, click OK. Or, to cancel your changes and start over, click Reset. To close the Convert To Black And
White dialog box, click Cancel.
Page 74

Automatically convert to black and white
The Remove Color command converts to black and white by assigning equal red, green, and blue values to each pixel in an RGB image. The
overall brightness of each pixel remains constant. This command has the same effect as setting Saturation to -100 in the Hue/Saturation dialog
box.
1. To adjust a specific image area, select it with one of the selection tools. If no selection is made, the adjustment applies to the
entire image.
2. Choose Enhance > Adjust Color > Remove Color.
To the top
Add custom presets for black and white conversion
You can manually add custom presets to the black and white converter by editing a specific text file.
Note:
Adding custom presets for conversion to black and white is a task for advanced users.
1. Close the Photoshop Elements, and navigate to the folder that contains the bwconvert.txt file.
In Windows, [Photoshop Elements 11 installation directory]\Required\bwconvert.txt
In Mac, /Applications/Adobe Photoshop Elements/Support Files/Adobe Photoshop Elements
Editor.app/Contents/Required/bwconvert.txt. Command-click Adobe Photoshop Elements and select Show
Package Contents. Navigate to the folder Contents/Required.
2. Open the bwconvert.txt file in a plain text editor (such as Notepad).
3. Following the same naming convention as the presets already in the file, add your new preset and give it a unique name.
4. Save the file (keeping the original filename).
5. Start the Photoshop Elements and choose Enhance > Convert To Black And White to view the presets.
Add color to a grayscale image
You can colorize an entire grayscale image, or select areas to colorize with different colors. For example, you can select a person’s hair and color
it brown, and then add pink to the person’s cheeks after making another selection.
Note:
If the image you are coloring is in grayscale mode, convert it into RGB by choosing Image > Mode > RGB Color.
1. Choose Enhance > Adjust Color > Adjust Hue/Saturation, or Layer > New Adjustment Layer > Hue/Saturation to work on an
adjustment layer.
2. Select Colorize. If the foreground color isn’t black or white, Photoshop Elements converts the image into the hue of the current
foreground color. The lightness value of each pixel does not change.
3. Use the Hue slider to select a new color if desired. Use the Saturation slider to adjust the saturation. Then click OK.
To the top
To the top
Twitter™ and Facebook posts are not covered under the terms of Creative Commons.
Legal Notices | Online Privacy Policy
Page 75

Retouching and correcting
Precisely remove red eye
Remove spots and unwanted objects
Fix large imperfections
Correct camera distortion
Use Photomerge Group Shot
Use Photomerge Scene Cleaner
Precisely remove red eye
For a video about this process, see www.adobe.com/go/lrvid906_pse_en
The Red Eye Removal tool removes red eye in flash photos of people. Illumination of the subject's retina by the camera's flash causes Red eye.
You’ll see it more often when taking pictures in a darkened room because the subject’s iris is wide open. To avoid red eye, use the camera’s redeye reduction feature, if available.
To automatically fix red eye when you import photos into the Elements Organizer, select Automatically Fix Red Eyes in the Get Photos dialog
box. You can also remove red eye from selected photos in the Photo Browser.
Correct red eye by selecting an eye (top) or clicking an eye (center).
1. To manually fix red eye, select the Red Eye Removal tool in Quick or Expert modes.
2. In the Tool Options bar, set the Pupil Radius and Darken Amount.
3. In the image, do one of the following:
Click a red area of an eye.
Draw a selection over the eye area.
When you release the mouse button, the red is removed from the eyes.
Note: You can also automatically fix red eye by clicking Auto Correct in the Red Eye Removal tool options bar.
To the top
Remove spots and unwanted objects
To the top
Remove spots and small imperfections
The Spot Healing Brush quickly removes blemishes and other imperfections from your photos. You can either click once on a blemish, or drag to
smooth away imperfections in an area.
Easily remove spots or imperfections using the Spot Healing Brush tool.
Page 76

1. Select the Spot Healing Brush tool
2. Choose a brush size. A brush that is slightly larger than the area you want to fix works best so that you can cover the entire
area with one click.
3. Choose one of the following Type options in the Tool Options bar.
.
Proximity Match
area. If this option doesn’t provide a satisfactory fix, choose Edit > Undo, and try the Create Texture option.
Create Texture
dragging through the area a second time.
note: Click Sample All Layers to apply your change to all layers of the image.
4. Click the area you want to fix in the image, or click and drag over a larger area.
Uses the pixels around the edge of the selection to find an image area to use as a patch for the selected
Uses all the pixels in the selection to create a texture with which to fix the area. If the texture doesn’t work, try
Remove unwanted objects with content-aware healing
You can remove unwanted objects or figures from your photos without destroying the photos. Using the Content-Aware option with the Spot
Healing Brush tool, you can remove selected objects constructively from one photo. Photoshop Elements compares nearby image content to
seamlessly fill the selection, realistically maintaining key details such as shadows and object edges.
Image before and after an unwanted object (the brush) is removed with content-aware fill
To remove an unwanted object:
1. Select the Spot Healing Brush tool.
2. Select Content-Aware in the Tool Options bar.
3. Paint over the object that you want to remove from the image.
Spot healing works best on small objects. If the image you're working on is large and has a large unwanted object, make sure that you work with
high-end machine configuration. If you experience problems with large images, try the following approaches:
Draw smaller brush strokes at a time.
Downsample the image.
Increase the RAM allocated and relaunch the application.
Fix large imperfections
The Healing Brush fixes large areas of imperfections when you drag over them. You can remove objects from a uniform background, such as an
object in a field of grass.
Before and after using Healing Brush.
To the top
1. Select the Healing Brush tool
2. Choose a brush size from the Tool Options bar and set healing brush options:
Mode
Determines how the source or pattern blends with existing pixels. Normal mode lays new pixels over the original pixels.
.
Page 77

Source
Replace mode preserves film grain and texture at the edges of the brush stroke.
pattern you specify in the Pattern panel.
Sets the source to use for repairing pixels. Sampled uses pixels from the current image. Pattern uses pixels from the
Aligned
Deselect Aligned to continue using the sampled pixels from the initial sampling point each time you stop and resume painting.
Sample All Layers
visible layers.
3. Position the pointer in any open image and press Alt (Option in Mac OS) click to sample data.
Note:
of the images is in Grayscale mode.
4. Drag the image over the flaw to meld existing data with sampled data. The sampled pixels meld with the existing pixels each
time you release the mouse button.
Correct camera distortion
The Correct Camera Distortion dialog box enables you to fix common lens distortion problems, like darkened edges due to lens faults or improper
lens shading. For example, in a picture of the sky taken in low light, the corners of the image are darker than the center. Changing the vignette
amount and midtone settings fixes the distortion.
Adjust distortions due to vertical or horizontal camera tilt by using the perspective controls. Rotate an image or fix image perspective to adjust
distortions. Correct Camera Distortion filter’s image grid helps make easy and accurate adjustments.
Samples pixels continuously without losing the current sampling point, even if you release the mouse button.
Choose Sample All Layers to sample data from the current layer, the current layer and below, or all
If you are sampling from one image and applying to another, both images must be in the same color mode unless one
If there is a strong contrast at the edges of the area you want to heal, make a selection before you use the Healing Brush
tool. Make the selection bigger than the area you want to heal but precisely follow the boundary of contrasting pixels.
When you paint with the Healing Brush tool, the selection prevents colors from bleeding in from the outside.
To the top
Correct camera distortion
1. Select Filter > Correct Camera Distortion.
2. Select Preview check box.
3. Set any of the following options to correct your image, and then click OK:
Remove Distortion
horizontal and vertical lines that bend either away from or toward the center of the image.
Vignette Amount
move the slider to gradually shade the image.
Vignette Midpoint
affect more of the image. Type a higher number to restrict the effect to the edges of the image.
Vertical Perspective
the slider to make vertical lines in an image parallel.
Horizontal Perspective
Corrects lens barrel or pincushion distortion. Type a number in the box, or move the slider to straighten
Sets the amount of lightening or darkening along the edges of an image. Type a number in the box, or
Specifies the width of area affected by the Amount slider. Move the slider, or type a lower number to
Corrects image perspective caused by tilting the camera up or down. Type a number in the box or use
Type a number in the box or use the slider to correct perspective by making horizontal lines in an
Page 78

Angle
image parallel.
box or drag the angle dial to rotate the image to the left (counterclockwise) or right (clockwise).
Scale
slider to remove blank areas of the image caused by pincushion, rotation, or perspective corrections. Scaling up effectively
results in cropping the image and interpolating up to the original pixel dimensions.
Rotates the image to correct for camera tilt or to make adjustments after correcting perspective. Type a number in the
Adjusts the image scale up or down. The image pixel dimensions aren’t changed. Type a number in the box or use the
Show Grid
Zoom
Color
Shows the grid when selected. Hides the grid when deselected.
Shows a closer view when you zoom in, and shows a more distant view when you zoom out.
Specifies the grid color.
Use Photomerge Group Shot
For a video about Photomerge features, see www.adobe.com/go/lrvid2342_pse9_en.
Use Photomerge Group Shot to create the perfect group photo from multiple photos.
Note:
For best results, pick the multiple images used to create a Photomerge Group Shot from the same photo session.
1. Do one of the following to select the group photos you want to use as source images for the Photomerge Group Shot:
In Elements Organizer, select the photos.
In Photoshop Elements, open the photos.
2. Choose Enhance > Photomerge > Photomerge Group Shot.
3. Select the best group photo, and drag it from the Photo Bin to the Final window.
4. Click other photos in the Photo Bin (color coded to help you keep track). Use the Pencil tool to mark over the areas that you
want to merge into the final photo. To fine-tune the final image, use the Pencil tool to add additional content, or the Eraser tool
to remove content.
5. Set any of the following:
Show Strokes
Click this option to show the Pencil strokes you marked in the source image.
To the top
Show Regions
Advanced Options
Alignment Tool
image and three markers in the final image, then click Align Photos.
Note: Photomerge Group Shot uses auto alignment. Use the Alignment Tool only if the automatic alignment didn’t produce the
expected result.
Pixel Blending
6. Click Reset to start the process over, Done to complete the Photomerge Group Shot, or Cancel to close Photomerge Group
Shot.
Click this option to reveal the selected regions in the final image.
Expand or collapse this arrow for Advanced Options.
To correct the alignment of multiple photos, click the Alignment Tool, place three markers in the source
Click this option to blend pixels.
Page 79

Photomerge Group Shot window
To add an area to the Final window, use the Pencil tool to mark the area in the Source window.
Note:
Use Photomerge Scene Cleaner
Use Photomerge Scene Cleaner to create the perfect scenic photo from multiple photos. For example, you can eliminate unwanted elements like
tourists that inadvertently wandered into the scenery.
Note:
For best results, use images from the same scene taken from the same angle.
1. Do one of the following to select 2 - 10 photos you want to use for the Photomerge Scene Cleaner:
In the Elements Organizer, select the photos.
In Photoshop Elements, open the photos.
2. Choose Enhance > Photomerge > Photomerge Scene Cleaner.
3. Select the best photo and then drag it from the Photo Bin to the Final window.
This photo becomes the base image for the final photo.
4. Click a photo in the Photo Bin (color- coded to help you keep track).
It appears in the Source window.
5. Do any of the following to add or remove areas from the Final window:
To remove an area, use the Pencil tool to mark the area in the Final window.
To the top
Page 80

To fine-tune the final image, use the Pencil tool to add additional content or the Eraser tool to remove content.
6. (Optional) Select one of the following:
Show Strokes
Shows your Pencil strokes in the source image.
Show Regions
Reveals the selected regions in the final image.
7. (Optional) If there’s a problem with the photos aligning properly, click the Advanced Options arrow to access the following:
Alignment Tool
Corrects the alignment of the multiple photos. Click the Alignment Tool to place three markers in the source
image and three markers in the final image. Drag markers to similar areas in each photo and then click Align Photos.
note: Photomerge Scene Cleaner uses auto alignment. The Alignment Tool should only be used if the automatic alignment
didn’t produce the result you want.
Pixel Blending
Blends pixels using different options. Experiment to see whether this option improves the photo or not.
8. (Optional) Select other photos in the Photo Bin for use in the Source window and repeat step 5.
9. Click Reset to start the process over, Done to complete the Photomerge Scene Cleaner, or Cancel to close Photomerge
Scene Cleaner.
Photomerge Scene Cleaner
A. Dragging a photo to the Final window B. Using the Pencil tool to the mark area to be replaced in the Final window C. Result in the Final
window
Twitter™ and Facebook posts are not covered under the terms of Creative Commons.
Legal Notices | Online Privacy Policy
Page 81

Enhancing
Blur or soften edges
Replace colors in an image
Clone images or areas in an image
Photomerge Faces
Photomerge Exposure
Photomerge Style Match
Blur or soften edges
The Blur tool softens hard edges or areas in an image by reducing detail. Blurring a busy background can bring your target images more into
focus. You can also use Blur filters for this purpose.
Original photo (left), and photo after blurring the background (right).
1. Select the Blur tool.
2. Set options in the options bar:
Sets the brush tip, from the brush popup menu. For more brush shapes, click the Brush drop-down inside the popup,
Brush
and then select a brush thumbnail.
Sets the size of the brush, in pixels. Drag the Size slider, or enter a size in the text box.
Size
Specifies how the pixels you blur blend into other pixels in the image.
Mode
Strength
Sample All Layers
3. Drag over the part of the image you want to blur.
Specifies the amount of blur that occurs with each stroke.
Blurs all visible layers. If this is deselected, the tool blurs only the active layer.
To the top
Replace colors in an image
The Color Replacement tool simplifies replacing specific colors in your image. You can paint over a targeted color—for example, a yellow flower in
an image—with a different color, like red. You can also use the Color Replacement tool to correct colors.
Replacing colors
To the top
Page 82

1. Select the Color Replacement tool
2. Choose a brush tip from the Brush menu in the options bar. For Mode, generally, you’ll want to keep the blending mode set to
Color.
3. For Limits, choose one of the following:
Discontiguous
Replaces the sampled color wherever it occurs under the pointer.
(The Color Replacement tool is part of the Brush Tool Options bar).
Contiguous
4. For Tolerance, specify a low percentage to replace colors very similar to the pixel you click, or raise the percentage to replace
a broader range of colors.
5. To give a smooth edge to the areas you correct, select Anti-aliasing.
6. Choose the required method of sampling. Available options are:
Continuous
Once
Background Swatch
it.
7. Choose a foreground color to use to replace the unwanted color.
8. Click the color you want to replace in the image.
9. Drag within the image to replace the targeted color.
Clone images or areas in an image
The Clone Stamp tool paints with an image sample, which you can use to duplicate objects, remove image imperfections, or paint over objects in
your photo.
Replaces colors that are contiguous with the color immediately under the pointer.
Continuously samples color, as you drag the color replacement tool.
Samples color only once, when you start dragging the color replacement tool.
Replaces the area containing the background color, whenever you drag the color replacement tool over
To the top
Original photo (top), after adding two starfish with the Clone Stamp tool (center), and after removing a person with the Clone Stamp tool (bottom).
1. Select the Clone Stamp tool
2. (Optional) Set options in the options bar:
Brush
Sets the brush tip. Click the arrow next to the brush sample, choose a brush category from the Brushes pop-up menu,
and then select a brush thumbnail.
Sample All Layers
active layer, deselect this option.
Opacity
Drag the slider, or enter an opacity value.
Sets the opacity of the paint you apply. A low opacity setting allows pixels under a paint stroke to show through.
To sample (copy) data from all visible layers, select Sample All Layers. To sample data from only the
.
Page 83

Sets the size of the brush in pixels. Drag the Size slider, or enter a size in the text box.
Size
Determines how the source or pattern blends with existing pixels. Normal mode lays new pixels over the original pixels.
Mode
Aligned
painting. Selecting this option is useful when you want to eliminate unwanted areas, such as a telephone line across the
skyline or a rip in a scanned photo. If Aligned is deselected, the Clone Stamp tool applies the sampled area from the initial
sampling point each time you stop and resume painting. Deselecting this option is useful for applying multiple copies of the
same part of an image to different areas within the same image or to another image.
3. Click Clone Overlay, and set the following options:
Show Overlay
Opacity
Clipped
Auto Hide
Invert Overlay
4. Position the pointer on the part of any open image you want to sample, and press Alt (Option in Mac OS) and click. The tool
duplicates the pixels at this sample point in your image as you paint.
5. Drag or click to paint with the tool.
Moves the sampled area with the cursor as you begin to paint, regardless of how many times you stop and resume
Select show Overlay for the overlay to be visible inside brush size.
To set the opacity of the overlay, enter a percentage value in the Opacity text box.
To clip overlay to the brush size, enable the Clipped option.
To hide the overlay while you apply the paint strokes, select Auto Hide.
To invert the colors in the overlay, select Invert.
Photomerge Faces
For a video about Photomerge features, see www.adobe.com/go/lrvid2342_pse9_en.
Use Photomerge Faces to combine multiple facial features to create one composite face.
1. Do one of the following to select the face images you want to use as source images for Photomerge Faces:
In Elements Organizer, select the face image photos.
Open the face image photos.
To the top
2. Choose Enhance > Photomerge > Photomerge Faces.
3. Pick a face photo as your base image, and drag it from the Photo Bin to the Final window.
4. Click another image in the Photo Bin, and click the Alignment tool. Place the three alignment markers on the eyes and mouth
on the source image and the final image, and click Align Photos.
5. Click other photos in the Photo Bin (color coded to help you keep track). Use the Pencil tool to mark the areas that you would
like to merge into the final photo. To fine-tune the final image, use the Pencil tool to add additional content, or the Eraser tool
to remove content.
6. Set the following:
Show Strokes
Show Regions
7. Click Reset to start the process over, Done to complete the Photomerge Faces, or Cancel to close Photomerge Faces.
Click this option to show the Pencil strokes you marked in the source image.
Click this option to reveal the selected regions in the final image.
Page 84

Photomerge Faces window
Photomerge Exposure
For a video about Photomerge features, see www.adobe.com/go/lrvid2342_pse9_en.
Use Photomerge Exposure to efficiently handle scenes in photos with exposure challenges. You can blend two photos together to get a perfectly
exposed photo. For example, if you have a photo with a window in the background and you want a perfect photo with the following properties:
A good exposure of the scenery outside the window.
A good exposure of the darker objects inside the room.
In such a scenario, you often end up with either overexposed scenery outside the window or underexposed objects inside the room.
To ensure that you get a perfect photo, do the following:
Take two or more photos of the same scene with different exposures. For best results, take the photos at different exposure
value, with minimum shake. For example:
You can take two or more photos with the flash turned on to properly expose the subject (the objects inside the room).
You can then take one photo with the flash turned off to properly expose the background (the scenery outside the window).
Tip: You can use Exposure Bracketing in your camera to capture the same subject with a number of shots with different
exposure settings.
Blend the photos to create a perfectly exposed photo.
Photomerge Exposure facilitates blending the two photos together to get a perfectly exposed photo.
Photomerge Exposure can be done in the following modes:
Automatic mode
Manual mode
To obtain best results while using the Automatic mode, use photos that are shot at different exposure values, using Exposure Bracketing. To
obtain best results while using the manual mode, use photos shot with flash turned on and flash turned off.
To the top
Page 85

Photomerge Exposure
Automatic Photomerge Exposure
You can select the required photos from Elements Organizer, and select and deselect the photos through the Photo Bin.
1. Do one of the following:
In Elements Organizer, select a minimum of two and a maximum of ten photos, and select Enhance > Photomerge >
Photomerge Exposure.
Open the required files using File > Open.
a.
i. Select Show Open Files In The Photo Bin to view all the opened files.
ii. Select a minimum of two and a maximum of ten photos from the Photo Bin.
iii. Select Enhance > Photomerge > Photomerge Exposure.
Photoshop Elements displays the selected photos.
2. In the Photomerge panel, select Automatic.
3. Select one of the following options:
Simple Blending
the merged photo.
This option does not allow you to change the Photomerge Exposure settings. Selecting this option displays
Smart Blending
on the settings you provide. You can adjust the following settings:
Highlight
Shadows
Saturation
4. After you get the desired result, click Done to complete Photomerge Exposure.
Selecting this option enables you to adjust the settings using the sliders. You can view the final photo based
Enables you to increase or decrease the details that are in the highlight.
Enables you to lighten or darken the shadows.
Enables you to change the intensity of the color.
Manual Photomerge Exposure
For Photomerge Exposure, if you are using photos that have been taken with your flash on, then manual Photomerge Exposure is the
Note:
default mode.
1. Do one of the following:
In Elements Organizer, select a minimum of two and a maximum of ten photos and select Enhance > Photomerge >
Photomerge Exposure.
Open the required files using File > Open.
a.
i. Select Show Open Files In The Photo Bin to view all the opened files.
ii. Select a minimum of two and a maximum of ten photos from the Photo Bin.
iii. Select Enhance > Photomerge > Photomerge Exposure.
Page 86

Photoshop Elements displays the selected photos.
2. In the Photomerge panel, select Manual.
The first image in the Photo Bin is displayed as the source photo. You can select an image from the Photo Bin as the final
photo.
3. Set the following:
Show Strokes
Click to show your Pencil strokes in the source image.
Show Regions
4. Select exposed regions from the current source image by using the pencil tool. Change the source photo, and select regions
from this photo if necessary.
You can now view a final image with different regions copied from different source photos above the initially selected final
photo.
5. Change the transparency of these selected regions to blend them properly with the background by using the Transparency
Slider. Select Edge Blending to smoothen the blended edges.
Transparency Slider affects only those regions that are selected from the currently displayed source image. Change to
Note:
a different source image if you want to change the transparency of the regions selected from the other images. It remembers
the value used for a particular image. If the slider is not changed, the default is set to 0.
6. To correct the alignment of multiple photos, select Advanced Option, and click the Alignment tool. Place three markers in the
source image and three markers in the final image, then click Align Photos. Click Done.
Photomerge Style Match
If you like the style of an image, you can apply its style properties to another image. You can work with a set of images, apply styles, and choose
to update the image with the style that produces the best results.
Note:
When you apply styles multiple times, the effect is not cumulative. Only the last applied style is saved.
Click to reveal the selected regions in the final image.
To the top
Image after the style of the style image is applied
1. Open the image, and select Enhance > Photomerge > Photomerge Style Match
2. In the Style bin, add the images from which you want to transfer the style. Choose images that have strong stylistic properties
and details.
You can also choose an image from the default style images displayed in the Style bin.
Note:
3. To apply the style of an image, double-click the style image in the Style bin or drag the image from the Style bin to the Style
Image placeholder.
4. To refine the image, use the options in the Edit panel.
Page 87

Intensity
Controls the amount or intensity of the style to transfer. The maximum value implies that you want to transfer 100%
style of the style image.
Clarity
Improves the local contrast of a stylized image. The contrast of the slowly varying intensity regions are enhanced,
bringing out crisp details in darkened regions.
Details
Style Eraser
Style Painter
Soften Stroke Edges
Transfer Tones
Improves the overall or global contrast of the image.
Removes the applied style from specific image areas.
Adds the style back to areas from which you have removed the applied style.
Softens hard edges caused by to style erasing and painting.
Transfers the tones of the style image. For example, if the style image is black and white or sepia, and the
image to which you want to apply Photomerge Style Transfer is colored, selecting Transfer Tones transfers the style tone
(black and white or sepia) to the colored image.
Original colored image changed to black and white through Transfer Tones
5. Click Done to update the image with the applied style.
Twitter™ and Facebook posts are not covered under the terms of Creative Commons.
Legal Notices | Online Privacy Policy
Page 88

Adjusting shadows and light
Adjust color and tonality using the Smart Brush tools
Apply the Smart Brush tools
About Levels adjustments
Improve shadow and highlight detail
Adjust shadows and brightness using Levels
Adjust brightness and contrast in selected areas
Quickly lighten or darken isolated areas
Quickly saturate or desaturate isolated areas
Adjust color and tonality using the Smart Brush tools
The Smart Brush tool and the Detail Smart Brush tool apply tonal and color adjustments to specific areas of a photo. Certain effects can also be
applied using these tools. You simply pick a preset adjustment and apply the correction. Both tools automatically create adjustment layers. This
feature offers you flexibility in working with your photos because the original image layer is not altered. You can go back and tweak the
adjustments and no image information is discarded.
When you apply the Smart Brush tool, it makes a selection based on color and texture similarly. The adjustment is simultaneously applied to the
selected area. You can adjust shadows, highlights, colors, and contrasts. Apply colors of the objects in your image, add textures, apply various
photographic effects.
Smart Brush tool applying an adjustment selection
1. Select the Smart Brush tool.
2. Select an effect from the preset drop-down in the Tools Options bar, and then drag your mouse on the objects in the image to
which you want to apply the effect.
You can apply various effects and patterns using smart brush from the available preset options.
To the top
Available presets
Page 89

However you cannot change the settings of an effect because the layer with the effect is a pixel layer and not an adjustment layer.
There is an exciting new set of presets, now available under the Textures category for Smart Brush.
Textures Option
The 15 new presets help provide the following effects to your images:
Enhance dull and boring backgrounds.
Create a Satin effect for clothes/textiles in an image.
Add flowery patterns to dresses in an image.
Add designer patterns to walls or backgrounds in an image.
The Detail Smart Brush tool enables you to paint the adjustment to specific areas of the photo just like a painting tool. This tool helps adjust fine
details with pattern and effect presets. Painting and applying the preset in small areas is more precise. Click an effect from the drop-down list and
paint over the area to apply the effect. You can choose from a range of brushes. It has settings for brush size and shape in the options bar.
It also works like a Selection tool; you can click Refine Edge in the options bar to modify the selection’s shape and size. To remove an area from
the selection, click the Remove area from Selection brush.
Both brush tools enable you to add to or subtract from the areas being adjusted. You can also have more than one adjustment preset applied to a
photo. Each preset adjustment is applied to its own adjustment layer. You can tweak the settings for each correction separately.
When a correction is made, a pin appears where you first applied the adjustment. The pin provides a reference for the specific adjustment. A new
pin appears when a different adjustment preset is applied. This feature makes it easier to modify a specific correction, especially if you apply
different adjustments.
Detail Smart Brush tool applying an adjustment stroke
Apply the Smart Brush tools
To the top
Page 90

1. Select the Smart Brush tool or the Detail Smart Brush tool from the toolbox.
A pop-up panel opens displaying adjustment presets.
2. Select an effect from the preset drop-down in the Tools Options bar.
Choose an option from the pop-up panel menu to view different sets of adjustments. For more information on configuring
the pop -up panel, see About presets.
3. (Optional) Adjust the size and quality of the brush tool by doing one of the following:
If you selected the Smart Brush tool, open the Brush Picker in the options bar and adjust the settings.
If you selected the Detail Smart Brush tool, select a preset brush tip from the Brush presets pop-up panel. Then adjust the
brush size setting in the options bar.
4. Paint or drag the tool in the image.
The correction is applied on its own adjustment layer and a color pin appears where you first applied the brush tool.
5. (Optional) Do any of the following:
To add the current adjustment to more areas of the photo, paint or drag in the image. If necessary, make sure Add To
Selection is selected.
To remove parts of the current adjustment, select Subtract From Selection and paint in the image.
To apply a different type of adjustment, select New Selection, select a preset from the pop-up panel, and then paint in the
image.
To smooth the edges of the selection, click Refine Edges in the options bar, adjust the settings in the dialog box, and then
click OK. For more information, see Smoothing selection edges with anti-aliasing and feathering.
If you use a different tool from the toolbox and then return to the Smart Brush tool or Detail Smart Brush tool, the last
Note:
adjustment you applied is active.
6. (Optional) If you have multiple adjustments, do one of the following to select the adjustment you want to add to, subtract from,
or modify:
Click a pin.
Right-click in the photo and choose the adjustment listed in the bottom portion of the menu.
Modify Smart Brush tool correction settings
1. Do any of the following:
In the image, right-click a pin or an active selection and choose Change Adjustment Settings.
In the Layers panel, double -click the layer thumbnail for the specific adjustment layer.
Double-click a pin.
2. Adjust the settings in the dialog box and then click OK.
Change the Smart Brush tool correction preset
1. Click a pin or active selection and then open the preset pop-up panel in the options bar.
2. Choose an adjustment preset from the pop-up panel.
Delete a Smart Brush tool correction
Right-click a pin or an active selection and choose Delete Adjustment.
Note:
In the Layers panel, you can also delete a Smart Brush tool correction by deleting the specific adjustment layer.
Smart Brush pop-up panel
Photoshop Elements lets you apply many different preset adjustments using the Smart Brush tool and the Detail Smart Brush tool . You
pick an adjustment from the preset pop-up panel in the options bar. Like all pop-up panels, the Smart Brush preset pop-up panel can be
configured. Use the panel menu to display the adjustments as thumbnails or in a list. You can also drag the picker out of the options bar so it floats
where you want it in the workspace.
Specific sets of adjustments or all adjustments can be viewed by choosing from a menu near the upper-left area of the panel. The adjustments
range from tonal and corrections.
About Levels adjustments
To the top
Page 91

The Levels dialog box is a powerful tonal and color-adjustment tool. You can make levels adjustments in the entire image or a selected portion.
(To access the dialog box, choose Enhance > Adjust Lighting > Levels.)
You can do any of the following with the Levels dialog box:
Levels dialog box
A. Channels to adjust color B. Shadow values C. Middle tones D. Highlight values
Set the shadow and highlight values to make sure that your image uses the full tonal range.
Adjust the brightness of the image’s middle tones without affecting the shadow and highlight values.
Fix a color cast by making grays neutral. You can also enhance an image by adding a slight color cast, for example, by adding
a warming effect on a sunset.
Target shadow and highlight RGB values if you are preparing images for commercial printing.
When you work with Levels, you can work directly on the image pixels or through an adjustment layer. Adjustment layers give you flexibility in the
following ways:
You can modify an adjustment at any time by double-clicking the adjustment layer to reopen the Levels dialog box.
You can reduce the effect of an adjustment by lowering the adjustment layer’s opacity in the Layers panel.
You can stack adjustment layers to make multiple adjustments without degrading the image because of too many successive
adjustments.
You can use the adjustment layer’s layer mask to confine an adjustment to a portion of your image.
Improve shadow and highlight detail
1. Choose Enhance > Adjust Lighting > Shadow/Highlights.
2. Drag any of the adjustment sliders or enter values in the text boxes, then click OK.
Lighten Shadows
image.
Darken Highlights
image. Pure white areas of your photo don’t have any detail and aren’t affected by this adjustment.
Midtone Contrast
after you’ve adjusted shadows and highlights.
To reset the image to how it looked when you opened the dialog box, hold down Alt (Option in Mac OS) and click the Reset
button.
Brightens the dark areas of your photo and reveals more of the shadow detail that was captured in your
Darkens the light areas of your photo and reveals more of the highlight detail that was captured in your
Adds or reduces the contrast of the middle tones. Use this slider if the image contrast doesn’t look right
To the top
Page 92

Before adjusting shadows and highlights (top) and after (bottom). Adjusting softens the face and reveals more detail behind
sunglasses.
Adjust shadows and brightness using Levels
1. Do one of the following:
Choose Enhance > Adjust Lighting > Levels.
Choose Layer > New Adjustment Layer > Levels, or open an existing Levels adjustment layer.
2. Choose RGB from the Channel menu. When set to RGB, your adjustment affects all three (red, green, and blue) channels. If
you are working on a grayscale image, it will only have the gray channel.
3. Set the shadow and highlight values by dragging the black and white Input Levels sliders (the left and right sliders directly
under the histogram) to the edge of the first group of pixels on either end of the histogram. You can also enter values directly
into the first and third Input Levels text boxes.
To the top
Dragging the highlight slider to the left lightens the photo.
Press Alt (Option in Mac OS) and drag the Shadow slider to see which areas will be clipped to black (level 0). Press Alt
(Option in Mac OS) and drag the Highlight slider to see which areas will be clipped to white (level 255). Colored areas
show clipping in individual channels.
4. To adjust the brightness of the middle tones without affecting the shadow and highlight values, drag the gray Input Levels
(middle) slider. You can also enter values directly in the middle Input Levels text box. (A value of 1.0 represents the current
unadjusted midtone value.) Click OK.
You can see the adjustment reflected in the Histogram panel.
You can click Auto to move the Highlight and Shadow sliders automatically to the brightest and darkest points in each
Note:
Page 93

channel. This is the same as using the Auto Levels command and may cause a color shift in your image.
Adjust brightness and contrast in selected areas
The Brightness/Contrast command is best used on selected portions of an image. Use this command to adjust the brightness of an entire image or
to reduce contrast results in an image. The Levels and Shadow/Highlight commands are better choices for making tonal adjustments.
1. Do one of the following:
Choose Enhance > Adjust Lighting > Brightness/Contrast to make adjustments directly to image pixels.
Choose Layer > New Adjustment Layer > Brightness/Contrast to make adjustments to a layer.
2. Drag the sliders to adjust the brightness and contrast, then click OK.
Dragging to the left decreases the level; dragging to the right increases it. The number at the right of each slider displays the
brightness or contrast value.
To the top
Quickly lighten or darken isolated areas
The Dodge tool and the Burn tool lighten or darken areas of the image. You can use the Dodge tool to bring out details in shadows and the Burn
tool to bring out details in highlights.
Original image (left), after using the Burn tool (top center), and after using the Dodge tool (bottom right)
1. Select the Dodge tool or the Burn tool. If you do not see these tools, look for the Sponge tool.
2. Set tool options in the options bar:
Brushes pop-up menu
Brushes pop-up menu, and then select a brush thumbnail.
Sets the brush tip. Click the arrow next to the brush sample, choose a brush category from the
To the top
Sets the size of the brush, in pixels. Drag the Size slider or enter a size in the text box.
Size
Range
change the dark areas, and Highlights to change the light areas.
Exposure
Tip: To dodge or burn an area gradually, set the tool to a low exposure value and drag several times over the area you want
to correct.
3. Drag over the part of the image you want to modify.
Quickly saturate or desaturate isolated areas
The Sponge tool saturates or desaturates areas of the image. You can use the Sponge tool to bring out or mute the color on an object or area.
1. Select the Sponge tool. If you do not see the Sponge tool, look for the Dodge or Burn tool.
2. Set the tool options in the options bar.
Brushes pop-up menu
Sets the image tonal range that the tool adjusts. Select Midtones to change the middle range of grays, Shadows to
Sets the effect of the tool with each stroke. A higher percentage increases the effect.
To the top
Sets the brush tip. Click the arrow next to the brush sample, choose a brush category from the
Page 94

Size
Brushes pop-up menu, and then select a brush thumbnail.
Sets the size of the brush, in pixels. Drag the Size slider or enter a size in the text box.
Mode
Sets whether to saturate or desaturate.
Flow
Sets the strength of the tool with each stroke. In Saturate mode, a higher percentage increases the saturation. In
Desaturate mode, a higher percentage increases the desaturation.
Twitter™ and Facebook posts are not covered under the terms of Creative Commons.
Legal Notices | Online Privacy Policy
Page 95

Transforming
Rotate or flip an item
Freely rotate an item
Scale an item
Skew or distort an item
Apply perspective to an item
Freely transform an item
Apply a transformation to a Background layer
Rotate or flip an item
You can rotate or flip a selection, a layer, or an entire image. Make sure to choose the correction command depending on the item you want to
rotate or flip.
1. In the Edit workspace, select the photo, layer, selection, or shape you want to rotate or flip.
2. Choose Image > Rotate, and choose one of the following commands from the submenu:
90° Left, Layer 90° Left, or Selection 90° Left
(Rotate Selection is only available when you have an active selection in an image.)
90° Right, Layer 90° Right, or Selection 90° Right
180°, Layer 180°, or Selection 180°
Custom
the item by, and the direction in which you want to rotate the item.
note: A positive number rotates the object clockwise, and a negative number rotates the object counterclockwise.
When you are finished, click OK.
Flip Horizontal, Flip Layer Horizontal, or Flip Selection Horizontal
Flip Vertical, Flip Layer Vertical, or Flip Selection Vertical
Rotates the item by the amount you specify. If you select this option, enter the number of degrees you want to rotate
Rotates the photo, layer, or selection a half-turn.
Rotates the photo, layer, or selection a quarter-turn counterclockwise.
Rotates the photo, layer, or selection a quarter-turn clockwise.
Flips the photo, layer, or selection horizontally.
Flips the photo, layer, or selection vertically.
To the top
Rotating an image
Freely rotate an item
With the Free Rotate Layer and Free Rotate Selection commands, you can rotate an item by any amount.
To the top
Page 96

Use the Free Rotate Layer command to straighten the image, and click the Commit button to apply the rotation.
1. In the Edit workspace, select the layer or selection you want to rotate.
2. Choose Image > Rotate > Free Rotate Layer or Selection. A bounding box appears in the image.
Note:
If you select an image that is a Background layer (such as a photo imported from a camera or scanner), you are given
the option of turning it into a regular layer so that you can transform it.
3. (Optional) To change the point around which the item rotates, click a square on the reference point locator
bar.
4. Do one of the following to specify the rotation amount:
Click and drag the rotate handle at the bottom of the bounding box. The cursor will change to concentric arrows when it’s
hovering over the handle. To constrain the rotation to 15° increments, hold down Shift as you drag.
Type an angle of rotation between -180 (maximum counterclockwise rotation) and 180 (maximum clockwise rotation) in the
Set Rotation text box of the options bar.
5. Do one of the following:
To apply the transformation, double-click inside the bounding box, click the Commit button , or press Enter.
To cancel the transformation, click the Cancel button , or press Esc.
Scale an item
1. In the Edit workspace, select the photo, layer, selection, or shape you want to scale.
2. Choose Image > Resize > Scale.
Note:
If you select a photo that is a Background layer (such as a photo imported from a camera or scanner), you are given
the option of turning it into a regular layer so that you can transform it.
3. Do any of the following to specify the scale amount:
To maintain the relative proportions (avoiding image distortion) as you scale, select Constrain Proportions, and then drag a
corner handle. Alternatively, press Alt (Option in Mac OS) as you drag a corner handle.
To scale only the height or the width, drag a side handle.
Enter a percentage for the Width, Height, or both in the options bar.
4. Do one of the following:
To apply the transformation, double-click inside the bounding box, click the Commit button or press Enter.
in the options
To the top
To cancel the transformation, click the Cancel button or press Esc.
Skew or distort an item
Skewing applies a vertical or horizontal slant to an item. Distorting stretches or squishes an item.
1. In the Edit workspace, select the photo, layer, selection, or shape you want to transform.
2. Choose Image > Transform > Skew or Image > Transform > Distort. If you are transforming a shape with the Shape tool
selected, choose Image > Transform Shape > Skew or Image > Transform Shape > Distort.
Note:
If you select a photo that is a Background layer (such as a photo imported from a camera or scanner), you are given
the option of turning it into a regular layer so that you can transform it.
To the top
Page 97

3. Drag a handle to skew or distort the bounding box.
4. Do one of the following:
To apply the transformation, double-click inside the bounding box, click the Commit button , or press Enter.
To cancel the transformation, click the Cancel button , or press Esc.
Apply perspective to an item
Applying perspective creates the appearance of objects existing in three dimensions.
Original image (left) and image after perspective applied (right).
1. In the Edit workspace, select the item you want to transform.
2. Choose Image > Transform > Perspective. If you are transforming a shape with the Shape tool selected, choose Image >
Transform Shape > Perspective.
Note:
If you select a photo that is a background layer (such as a photo imported from a camera or scanner), you are given
the option of turning it into a regular layer so that you can transform it.
3. Drag a corner handle on the bounding box to apply perspective.
4. Do one of the following:
To commit the transformation, double -click inside the bounding box, click the Commit button , or press Enter.
To cancel the transformation, click the Cancel button , or press Esc.
To the top
Freely transform an item
The Free Transform command lets you apply transformations (rotating, scaling, skewing, distorting, and perspective) in one step. Instead of
choosing different commands, you simply hold down a key on your keyboard to switch between transformation types.
1. In the Edit workspace, select the item you want to transform.
2. Choose Image > Transform > Free Transform. If you are transforming a shape, choose Image > Transform Shape > Free
Transform Shape.
Note:
If you select a photo that is a Background layer (such as a photo imported from a camera or scanner), you are given
the option of turning it into a regular layer so that you can transform it.
3. (Optional) To change the point around which the item rotates, click a square on the reference point locator
bar.
4. Do one or more of the following to transform the object:
To scale, drag any handle of the bounding box. To scale the width and height proportionally, either press Shift as you
drag a corner handle, or select Constrain Proportions in the options bar, and then drag a corner handle.
To rotate, move the pointer outside of the bounding box and drag. When positioned outside the bounding box, the pointer
becomes a curved, two-sided arrow
To distort, press Ctrl (Command in Mac OS), and drag any handle. When positioned over a handle, the pointer becomes a
gray arrowhead
To skew, press Ctrl+Shift (Command+Shift in Mac OS) and drag a handle in the middle of any side of the bounding box.
When positioned over a side handle, the pointer becomes a gray arrowhead with a small double arrow
To apply perspective, press Ctrl+Alt+Shift (Command+Option+Shift), and drag a corner handle. When positioned over a
corner handle, the pointer becomes a gray arrowhead
5. Do one of the following:
To commit the transformation, double -click inside the bounding box, and then click the Commit button , or press Enter.
.
. Press Shift and drag to constrain the rotation to 15° increments.
.
in the options
.
To the top
To cancel the transformation, click the Cancel button , or press Esc.
Page 98

Apply a transformation to a Background layer
Before you can apply transformations to the Background layer, you need to convert it into a regular layer.
1. In the Edit workspace, select the Background layer in the Layers panel.
2. Convert the background.
3. Apply the transformation.
Twitter™ and Facebook posts are not covered under the terms of Creative Commons.
Legal Notices | Online Privacy Policy
To the top
Page 99

Resizing
About image size and resolution
About monitor resolution
Display the image size of an open file
View the print size onscreen
Change print dimensions and resolution without resampling
Resample an image
About image size and resolution
The image size (or pixel dimensions) of an image is a measure of the number of pixels along an image’s width and height. For example, your
digital camera may take a photo that is 1500 pixels wide and 1000 pixels high. These two measurements indicate the amount of image data in a
photo and determine the file size.
Resolution is the amount of image data in a given space. It is measured in pixels per inch (ppi). The more pixels per inch, the greater the
resolution. Generally, the higher the resolution of your image, the better the printed image quality. Resolution determines the fineness of detail you
can see in an image.
Although a digital image contains a specific amount of image data, it doesn’t have a specific physical output size or resolution. As you change the
resolution of an image, its physical dimensions change, and as you change the width or height of an image, its resolution changes.
To the top
Two images (A and B) with same image data and file size but different image size and resolution; C shows that a higher resolution means better
quality
You can see the relationship between image size and resolution in the Image Size dialog box (choose Image > Resize > Image Size). As you
change one value, the other two values change accordingly.
Constrain Proportions lets you change image size without altering any image data
The Constrain Proportions option lets you maintain the aspect ratio (the ratio of image width to image height). If you select this option and change
the image size and resolution, the image does not stretch or shrink.
Page 100

The Resample Image option lets you change the size of an image without changing the resolution. If you need to print at a specific resolution, or at
a smaller or larger resolution than the current image allows, resample the image. However, resampling can degrade image quality.
About monitor resolution
Your monitor’s resolution is described in pixel dimensions. For example, if your monitor resolution is set to 1600 x 1200 and your photo’s pixel
dimensions are the same size, at 100%, the photo will fill the screen. The size an image appears onscreen depends on a combination of factors:
the pixel dimensions of the image, the monitor size, and the monitor resolution setting. In Photoshop Elements, you can change the image
magnification onscreen, so you can easily work with images of any pixel dimensions.
A 620 x 400-pixel image displayed on monitors of different sizes and resolutions
When preparing images for onscreen viewing, you should consider the lowest monitor resolution that your photo is likely to be viewed on.
Display the image size of an open file
Click-hold the file information box at the bottom of the document. The box displays the width and height of the image (in pixels,
and in the unit of measurement currently selected for the rulers), the number of color channels, and the image resolution (ppi).
To the top
To the top
View the print size onscreen
Do one of the following:
Choose View > Print Size.
Select the Hand tool or Zoom tool, and click Print Size in the Tool Options bar.
The magnification of the image is adjusted to display its approximate printed size, as specified in the Document Size
section of the Image Size dialog box. Keep in mind that the size and resolution of your monitor affect the onscreen print
size.
Change print dimensions and resolution without resampling
You might need to change the print dimensions and resolution if you are sending the image to a print shop that requires files to be at a specific
resolution.
If you are printing directly from Photoshop Elements, you don’t have to perform this procedure. Instead, you can choose a size in the Print dialog
box and Photoshop Elements applies the appropriate image resolution.
Note:
To change only the print dimensions or the resolution, and adjust the total number of pixels in the image proportionately, you must resample
the image.
1. Choose Image > Resize > Image Size.
2. Make sure that Resample Image is deselected. If deselected, you can change the print dimensions and resolution without
changing the total number of pixels in the image, but the image may not keep its current proportions.
Resample Image must be selected in order to use the Constrain Proportions and Scale Style functions.
Note:
3. To maintain the current aspect ratio, select Constrain Proportions. This option automatically updates the width as you change
the height, and vice versa.
To the top
To the top
4. Under Document Size, enter new values for the height and width. If desired, choose a new unit of measurement.
5. For Resolution, enter a new value. If desired, choose a new unit of measurement, and then click OK.
To return to the original values displayed in the Image Size dialog box, use Alt (Option in Mac OS) + click Reset.
 Loading...