

Page 1

SCRIPTING GUIDE
bbc
Page 2

© Copyright 2007 Adobe Systems Incorporated. All rights reserved.
Adobe® Creative Suite® 3 Photoshop
®
Scripting Guide for Windows® and Macintosh®.
NOTICE: All information contained herein is the property of Adobe Systems Incorporated. No part of this publication (whether in hardcopy or
electronic form) may be reproduced or transmitted, in any form or by any means, electronic, mechanical, photocopying, recording, or
otherwise, without the prior written consent of Adobe Systems Incorporated. The software described in this document is furnished under
license and may only be used or copied in accordance with the terms of such license.
This publication and the information herein is furnished AS IS, is subject to change without notice, and should not be construed as a
commitment by Adobe Systems Incorporated. Adobe Systems Incorporated assumes no responsibility or liability for any errors or
inaccuracies, makes no warranty of any kind (express, implied, or statutory) with respect to this publication, and expressly disclaims any and
all warranties of merchantability, fitness for particular purposes, and noninfringement of third party rights.
Any references to company names in sample templates are for demonstration purposes only and are not intended to refer to any actual
organization.
®
, the Adobe logo, Illustrator®, and Photoshop® are either registered trademarks or trademarks of Adobe Systems Incorporated in the
Adobe
United States and/or other countries.
Apple®, Mac OS®, and Macintosh® are trademarks of Apple Computer, Inc., registered in the United States and other countries. Microsoft®, and
Windows® are either registered trademarks or trademarks of Microsoft Corporation in the United States and other countries. JavaScriptTM and
all Java-related marks are trademarks or registered trademarks of Sun Microsystems, Inc. in the United States and other countries. UNIX
®
is a
registered trademark of The Open Group. All other trademarks are the property of their respective owners.
All other trademarks are the property of their respective owners.
If this guide is distributed with software that includes an end user agreement, this guide, as well as the software described in it, is furnished
under license and may be used or copied only in accordance with the terms of such license. Except as permitted by any such license, no part
of this guide may be reproduced, stored in a retrieval system, or transmitted, in any form or by any means, electronic, mechanical, recording,
or otherwise, without the prior written permission of Adobe Systems Incorporated. Please note that the content in this guide is protected
under copyright law even if it is not distributed with software that includes an end user license agreement.
The content of this guide is furnished for informational use only, is subject to change without notice, and should not be construed as a
commitment by Adobe Systems Incorporated. Adobe Systems Incorporated assumes no responsibility or liability for any errors or
inaccuracies that may appear in the informational content contained in this guide.
Adobe Systems Incorporated, 345 Park Avenue, San Jose, California 95110, USA.
Page 3

Contents
1 Introduction ................................................................................................................................. 5
About this manual.......................................................................................................................................................................... 5
Conventions in this guide ........................................................................................................................................................... 5
2 Photoshop CS3 Scripting Basics ................................................................................................. 7
Scripting Overview ........................................................................................................................................................................ 7
Why use scripts instead of actions?................................................................................................................................... 7
Scripting Support in Photoshop CS3 ...................................................................................................................................... 8
JavaScript Support................................................................................................................................................................... 8
Startup Scripts........................................................................................................................................................................... 9
Executing JavaScripts from AS or VBS.............................................................................................................................. 9
Photoshop CS3 Object Model.................................................................................................................................................... 9
Containment Hierarchy .......................................................................................................................................................10
The Containment Hierarchy and the Photoshop CS3 User Interface..................................................................12
Additional Objects.................................................................................................................................................................14
Constants ..................................................................................................................................................................................14
Creating a Sample Hello World Script...................................................................................................................................15
Creating and Running an AppleScript............................................................................................................................15
Creating and Running a VBScript.....................................................................................................................................16
Creating and Running a JavaScript .................................................................................................................................17
3 Scripting Photoshop CS3 .......................................................................................................... 19
Viewing Photoshop CS3 Objects, Commands, and Methods ......................................................................................19
Viewing Photoshop CS3’s AppleScript Dictionary.....................................................................................................19
Viewing Photoshop CS3’s Type Library (VBS)..............................................................................................................20
Targeting and Referencing the Application Object.........................................................................................................20
Creating New Objects in a Script............................................................................................................................................21
Setting the Active Object ..........................................................................................................................................................23
Setting the Active Document............................................................................................................................................24
Setting the Active Layer.......................................................................................................................................................25
Setting the Active Channels...............................................................................................................................................25
Opening a Document .................................................................................................................................................................26
Opening a File with Default File Format........................................................................................................................26
Specifying File Formats to Open ......................................................................................................................................27
Saving a Document .....................................................................................................................................................................29
Setting Application Preferences ............................................................................................................................................30
Allowing or Preventing Dialogs ..............................................................................................................................................31
Working with the Photoshop CS3 Object Model..............................................................................................................31
Using the Application Object ............................................................................................................................................31
Using the Document Object ..............................................................................................................................................32
Working with Layer Objects...............................................................................................................................................34
Creating an ArtLayer Object...............................................................................................................................................34
Creating a Layer Set Object................................................................................................................................................35
Working with Layer Set Objects........................................................................................................................................37
Using the Text Item Object.................................................................................................................................................39
Working with Selection Objects .......................................................................................................................................41
3
Page 4

Photoshop CS3
Adobe Photoshop CS3 Scripting Guide Contents 4
Working with Channel Objects.........................................................................................................................................45
Using the Document Info Object .....................................................................................................................................46
Using History State Objects................................................................................................................................................46
Using Notifier Objects ..........................................................................................................................................................47
Using the PathItem Object .................................................................................................................................................48
Working with Color Objects .....................................................................................................................................................50
Getting and Converting Colors.........................................................................................................................................51
Working with Filters ....................................................................................................................................................................53
Understanding Clipboard Interaction ..................................................................................................................................54
Using the Copy and Paste commands ...........................................................................................................................54
Using the Copy Merged Command/Method...............................................................................................................55
Working with Units ......................................................................................................................................................................55
Unit Values................................................................................................................................................................................56
Unit Value Usage....................................................................................................................................................................57
Setting Ruler and Type Units in a Script ........................................................................................................................59
Sample Workflow Automation JavaScripts.........................................................................................................................59
Advanced Scripting .....................................................................................................................................................................60
Working with Document Preferences ............................................................................................................................60
Applying Color to a Text Item............................................................................................................................................63
Applying a Wave Filter .........................................................................................................................................................66
Applying a MotionBlur Filter..............................................................................................................................................69
4 Action Manager ......................................................................................................................... 72
The ScriptListener Plug-In .........................................................................................................................................................72
Installing ScriptListener .......................................................................................................................................................72
Action Manager Scripting Objects.........................................................................................................................................73
Recording a Script using ScriptListener ...............................................................................................................................73
Using the Action Manager from JavaScript ........................................................................................................................74
Using the Action Manager from a VBS Script.....................................................................................................................75
Running JavaScript-based Action Manager code from VBScript................................................................................78
Running JavaScript-based Action Manager code from AppleScript.........................................................................78
Using ScriptListener to find event IDs and class IDs........................................................................................................79
Index ...........................................................................................................................................82
Page 5

1
Introduction
About this manual
This manual provides an introduction to scripting Adobe® Photoshop® CS3 on Mac OS® and Windows®.
Chapter one covers the basic conventions used in this manual.
Chapter two covers a brief overview of scripting, how to execute scripts, and the Photoshop CS3 object
model.
Chapter three covers Photoshop CS3-specific objects and components and describes advanced
techniques for scripting the Photoshop CS3 application. Code examples are provided in three languages:
● AppleScript
● VBScript
● JavaScript
Note: Separate Photoshop CS3 Scripting reference information is provided for each of these languages
TM
through the Scripting Reference Manuals provided with this installation, or through the object
browsers available for each language. See ‘Viewing Photoshop CS3’s AppleScript Dictionary’ on
page 19 and ‘Viewing Photoshop CS3’s Type Library (VBS)’ on page 20. For information about using
the Extend Script Object Model Viewer, see the JavaScript Tools Guide.
Chapter four covers the Action Manager, which allows you to write scripts that target Photoshop CS3
functionality that is not otherwise accessible in the scripting interface.
Note: Please review the README file shipped with Photoshop CS3 for late-breaking news, sample scripts,
and information about outstanding issues.
Conventions in this guide
Code and specific language samples appear in monospaced courier font:
app.documents.add
Several conventions are used when referring to AppleScript, VBScript and JavaScript. Please note the
following shortcut notations:
● AS stands for AppleScript
● VBS stands for VBScript
● JS stands for JavaScript
The term “commands” will be used to refer both to commands in AppleScript and methods in VBScript and
JavaScript.
When referring to specific properties and commands, this manual follows the AppleScript naming
convention for that property and the VBScript and JavaScript names appear in parenthesis. For example:
display dialogs (DisplayDialogs/displayDialogs) property is part of the Application
“The
object.”
5
Page 6

Photoshop CS3
Adobe Photoshop CS3 Scripting Guide Introduction 6
In this case, display dialogs refers to the AppleScript property, DisplayDialogs refers to the
VBScript property and
For larger blocks of code, scripting examples are listed on separate lines.
displayDialogs refers to the JavaScript property.
AS
layer 1 of layer set 1 of current document
VBS
appRef.ActiveDocument.LayerSets(1).Layers(1)
JS
app.activeDocument.layerSets[0].layers[0]
Finally, tables are sometimes used to organize lists of values specific to each scripting language.
Page 7

2
Photoshop CS3 Scripting Basics
This chapter provides an overview of scripting for Photoshop, describes scripting support for the scripting
languages AppleScript, VBScript, and JavaScript, how to execute scripts, and covers the Photoshop CS3
object model. It provides a simple example of how to write your first Photoshop CS3 script.
If you are familiar with scripting or programming languages, you most likely will want to skip much of this
chapter. Use the following list to locate information that is most relevant to you.
● For more information on the Photoshop CS3 object model, see ‘Photoshop CS3 Object Model’ on
page 9.
● For information on selecting a scripting language, refer to the Introduction to Scripting guide.
● For examples of scripts created specifically for use with Photoshop CS3, see Chapter 3, ‘Scripting
Photoshop CS3’ on page 19.
● For detailed information on Photoshop CS3 objects and commands, please use the reference
information in the three reference manuals provided with this installation: Adobe Photoshop CS3
AppleScript Scripting Reference, Adobe Photoshop CS3 Visual Basic Scripting Reference, and Adobe
Photoshop CS3 JavaScript Scripting Reference.
Note: You can also view information about the Photoshop CS3 objects and commands through the object
browsers for each of the three scripting languages. See ‘Viewing Photoshop CS3 Objects,
Commands, and Methods’ on page 19.
Scripting Overview
A script is a series of commands that tells Photoshop CS3 to perform a set of specified actions, such as
applying different filters to selections in an open document. These actions can be simple and affect only a
single object, or they can be complex and affect many objects in a Photoshop CS3 document. The actions
can call Photoshop CS3 alone or invoke other applications.
Scripts automate repetitive tasks and are often used as a creative tool to streamline tasks that might be too
time consuming to do manually. For example, you could write a script to generate a number of localized
versions of a particular image or to gather information about the various color profiles used by a collection
of images.
If you are new to scripting, you should acquaint yourself with the basic scripting information provided in
the Introduction to Scripting manual.
Why use scripts instead of actions?
If you’ve used Photoshop CS3 Actions, you’re already familiar with the enormous benefits of automating
repetitive tasks. Scripting allows you to extend those benefits by allowing you to add functionality that is
not available for Photoshop CS3 Actions. For example, you can do the following with scripts and not with
actions:
● You can a dd conditional logic, so that the script automatically makes “decisions” based on the current
situation. For example, you could write a script that decides which color border to add depending on
the size of the selected area in an image: “If the selected area is smaller than 2 x 4 inches, add a green
border; otherwise add a red border.”
7
Page 8

Photoshop CS3
Adobe Photoshop CS3 Scripting Guide Photoshop CS3 Scripting Basics 8
● A single script can perform actions that involve multiple applications. For example, depending on the
scripting language you are using, you could target both Photoshop CS3 and another Adobe Creative
®
Suite 3 Application, such as Illustrator
● You can open, save, and rename files using scripts.
● You can copy scripts from one computer to another. If you were using an Action and then switched
CS3, in the same script.
computers, you’d have to recreate the Action.
● Scripts provide more versatility for automatically opening files. When opening a file in an action, you
must hard code the file location. In a script, you can use variables for file paths.
Note: See Photoshop CS3 Help for more information on Photoshop CS3 Actions.
Scripting Support in Photoshop CS3
Photoshop CS3 supports scripting in three scripting languages: AppleScript, VBScript, and JavaScript.
AppleScript and JavaScript run on Mac OS, and JavaScript and VBScript run on Windows. For information
about how to choose which scripting language to use, and for additional information about using these
languages with Adobe applications, see Introduction to Scripting.
See ‘Creating and Running an AppleScript’ on page 15
‘Creating and Running a JavaScript’ on page 17
.
You can call JavaScript scripts from AppleScript and VBScript scripts. See ‘Executing JavaScripts from AS or
VBS’ on page 9.
, ‘Creating and Running a VBScript’ on page 16, and
For a file to be recognized by Photoshop as a valid script file it must have the correct file name extension:
Script Type File Type Extension Platform
AppleScript compiled script
JavaScript
ExtendScript
VBScript text
Visual Basic executable
JavaScript Support
For a JavaScript file to be recognized by Photoshop as a valid script file, it must use either a .js or a .jsx
extension. On the Mac OS, there is no difference in the way scripts with the two extensions function. On
Windows, if the script files is opened from inside Photoshop, there is no difference between using the
.jsx extension. However, if the script is launched by double-clicking on it, a script with the .js
and
extension is interpreted with the Microsoft JScript engine, and it cannot launch Photoshop CS3. For
Windows, using the
engine.
Scripts written in JavaScript can be accessed from the Adobe Photoshop CS3 Scripts menu (File > Scripts),
which provides quick and easy access to your JavaScripts. By putting a JavaScript file into the appropriate
location on disk, it can be accessed directly from the Photoshop CS3 menu.
.scpt
OSAS file
text
.jsx extension is preferable, since it interprets the script with the ExtendScript
(none)
.js
.jsx
.vbs
.exe
Mac OS®
Mac OS & Windows
Windows
Windows
.js
Page 9

Photoshop CS3
Adobe Photoshop CS3 Scripting Guide Photoshop CS3 Scripting Basics 9
To install a JavaScript in the Scripts menu, place it in the Scripts folder (Photoshop CS3 /Presets /Scripts).
The names of the scripts in the Scripts folder, without the file name extension, are displayed in the Scripts
menu. Any number of scripts may be installed in the Scripts menu.
Scripts added to the Scripts folder while Photoshop CS3 is running do not appear in the Scripts menu until
the next time you launch the application.
All scripts found in the Scripts folder and sub-folders are displayed at the top level of the File > Scripts
menu. The addition of sub-folders does not add a hierarchical organization to the Scripts menu.
Executing other scripts
The Browse item at the end of the Scripts menu (File > Scripts > Browse) allows you to execute scripts
that are not installed in the Scripts folder. You can also use Browse to select scripts installed in the Scripts
folder after the application was last launched.
Selecting Browse displays a file browser dialog which allows you to select a script file for execution. Only
.js or .jsx files are displayed in the browse dialog. When you select a script file, it is executed the same
way as an installed script.
Startup Scripts
On startup, Photoshop CS3 executes all .jsx files that it finds in the startup folders.
● On Windows, the startup folder for user-defined scripts is:
C:\Program Files\Common Files\Adobe\Startup Scripts CS3\Adobe Photoshop
● On Mac OS, the startup folder for user-defined scripts is:
~/Library/Application Support/Adobe/Startup Scripts CS3/Adobe Photoshop
If your script is in this main startup folder, it is also executed by all other Adobe Creative Suite 3
applications at startup. If such a script is meant to be executed only by Photoshop CS3, it must include
code such as the following:
if( BridgeTalk.appName == "photoshop" ) {
//continue executing script
}
For additional details, see the JavaScript Tools Guide.
Executing JavaScripts from AS or VBS
You can take advantage of JavaScript’s platform-independence by running scripts from AppleScript or
VBScript. You can execute either a single JavaScript statement or a complete JavaScript file. For more
information, please refer to Introduction to Scripting.
Photoshop CS3 Object Model
A document object model (DOM) is an application programming interface (API), which allows you to
programmatically access various components of a document (as defined for that application) through a
scripting language. For additional information about Adobe object models and the scripting languages
that support them, see Introduction to Scripting.
The Photoshop CS3 DOM consists of a hierarchical representation of the Photoshop application, the
documents used in it, and the components of the documents. The DOM allows you to programmatically
access and manipulate the document and its components. For example, through the DOM, you can create
Page 10

Photoshop CS3
Adobe Photoshop CS3 Scripting Guide Photoshop CS3 Scripting Basics 10
a new document, add a layer to an existing document, or change the background color of a layer. Most of
the functionality available through the Photoshop CS3 user interface is available through the DOM.
A good understanding of the Photoshop CS3 DOM, and how each aspect of the DOM relates to the
Photoshop application and its documents will make script writing easier.
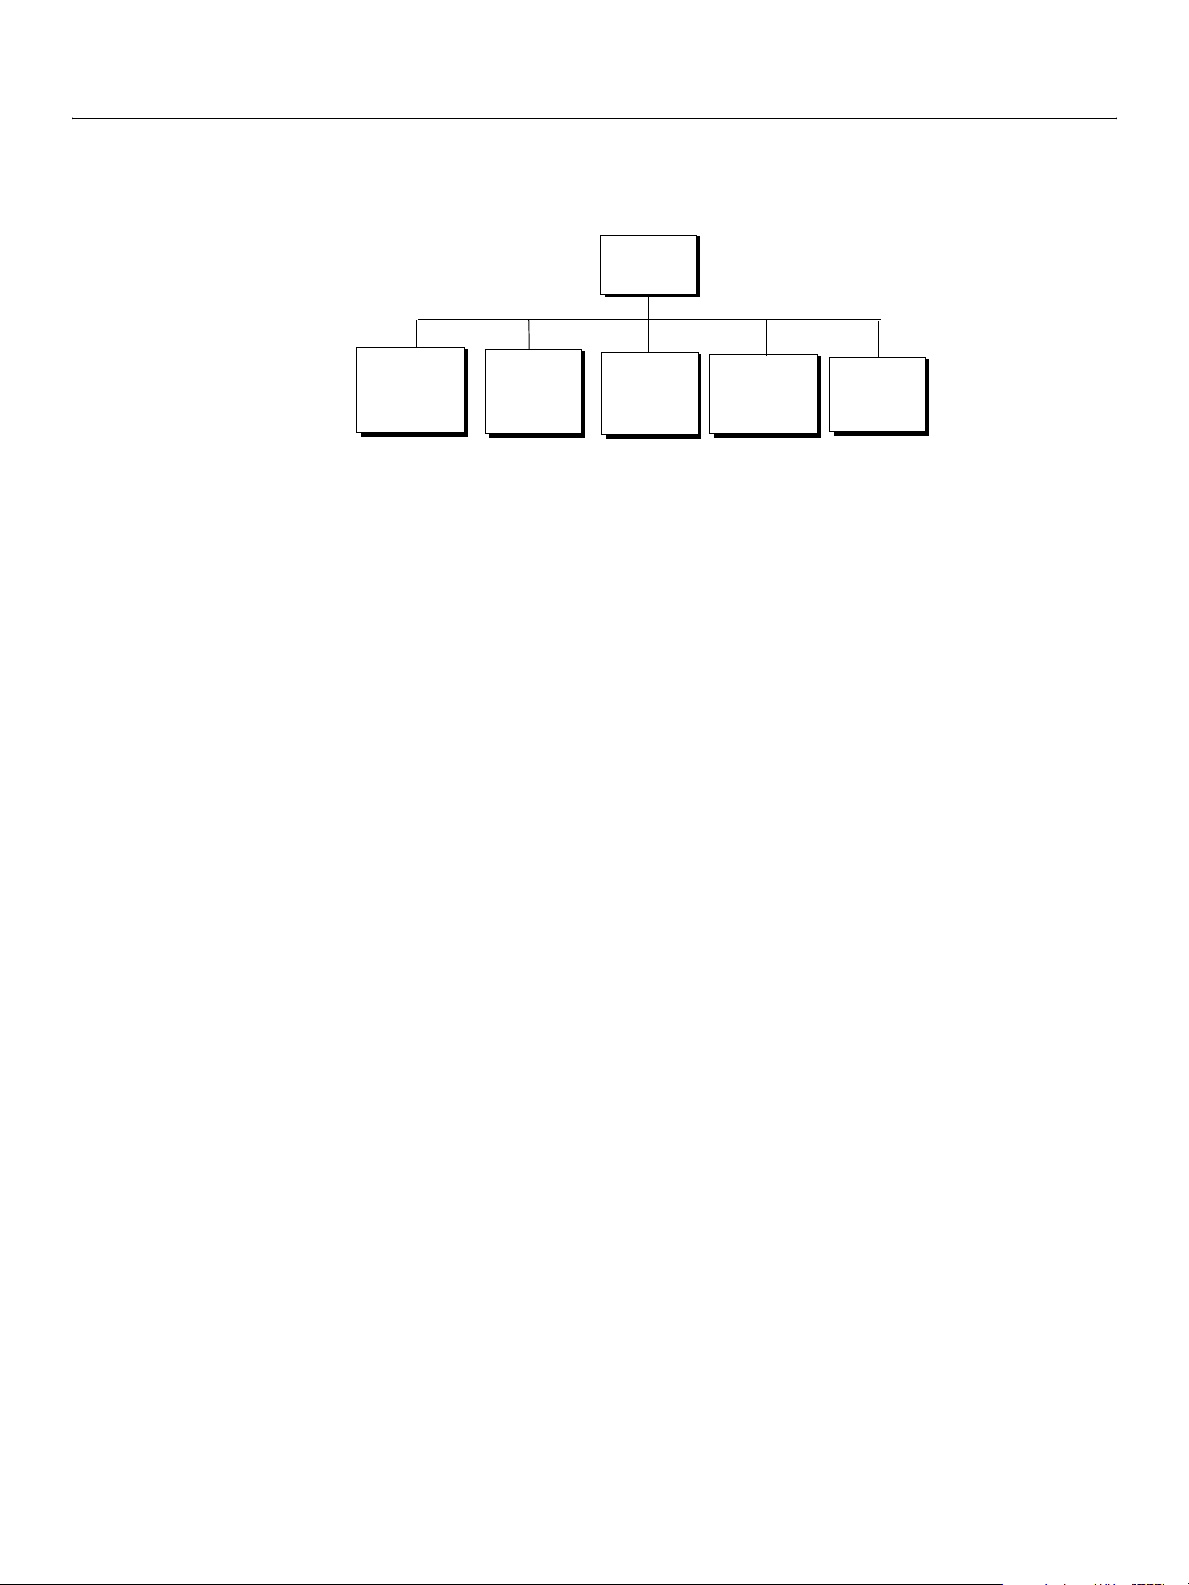
Containment Hierarchy
The Photoshop CS3 object model is a containment hierarchy, which means that objects in the model are
identified partially by the objects that contain them. In Photoshop CS3, the
top of the hierarchy. Applications contain a Documents collection. The Documents collection contains
Document objects. A Document object contains an ArtLayers collection, a HistoryStates collection, a
Layers collection, a Layersets collection, and a Channels collection. Through using commands or methods
in the DOM, you can tell Photoshop CS3 documents to add and remove objects, or set or change
individual object properties like color, size and shape. In the diagram below, each node in the hierarchy
represents a class in the Photoshop CS3 DOM.
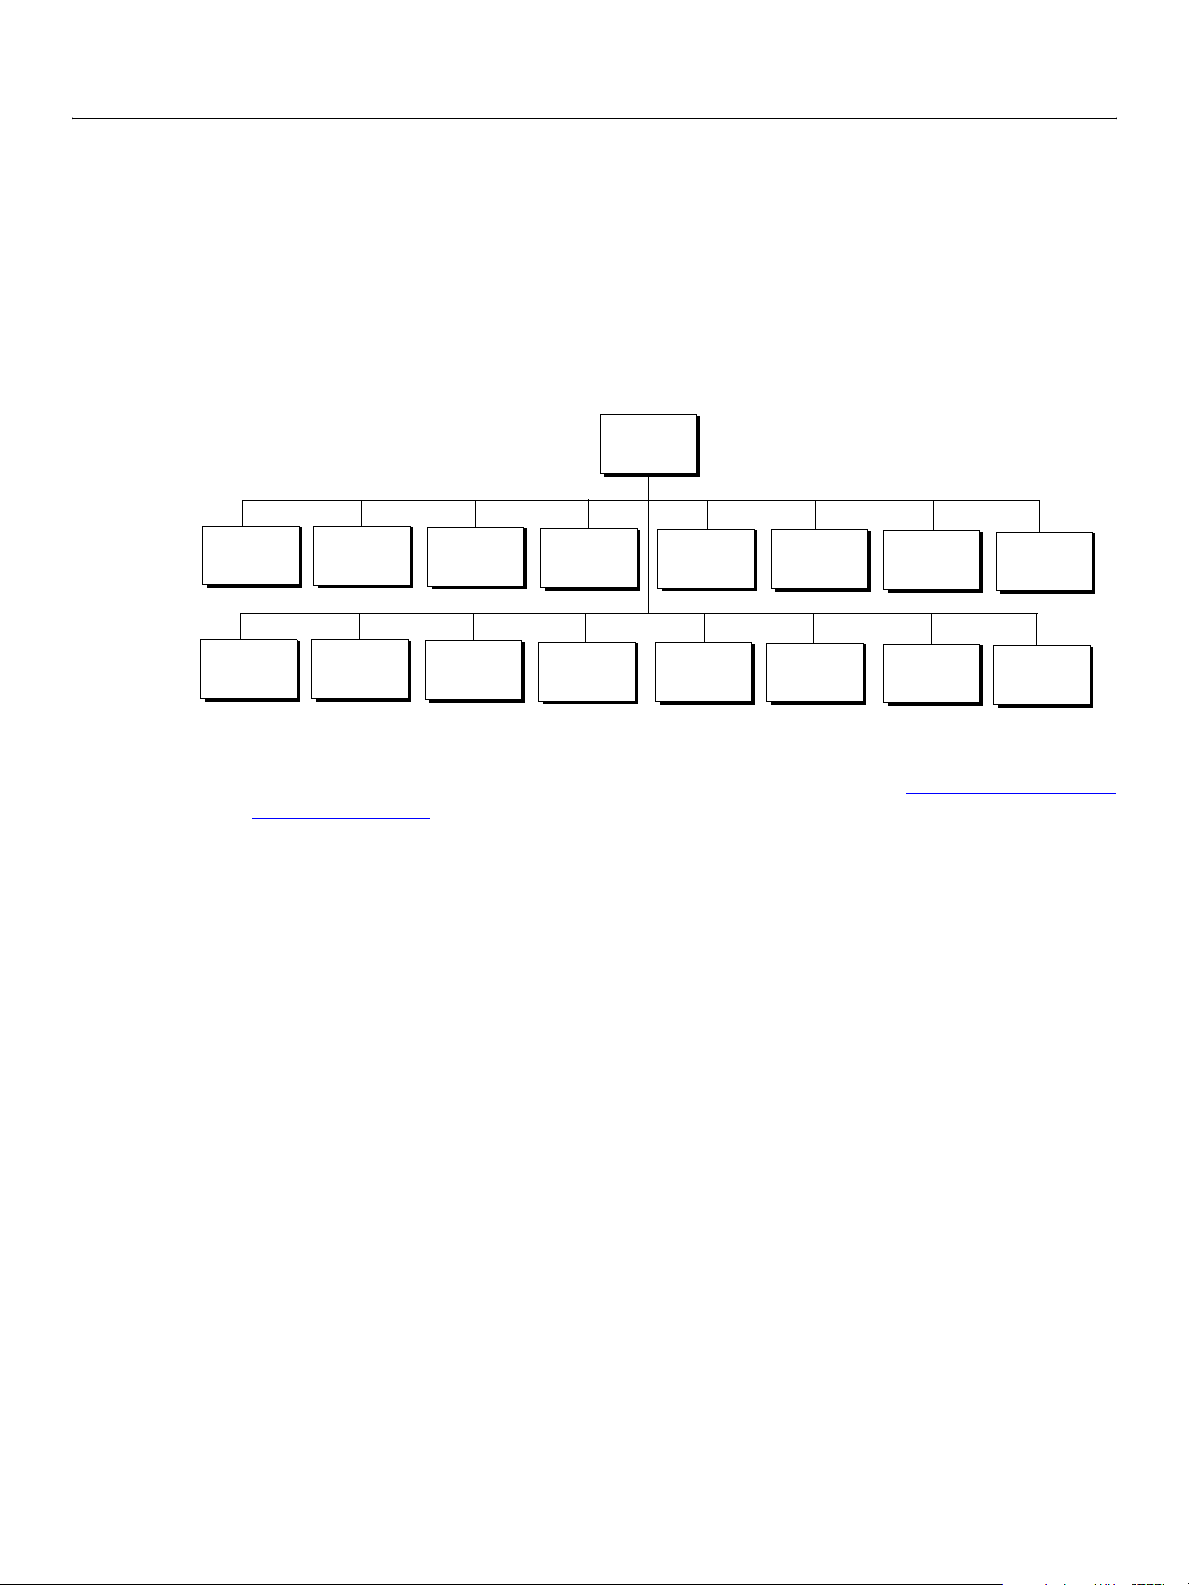
The Photoshop CS3 object model uses elements (AppleScript) or collections (VBScript, JavaScript) as a
convenient way to group classes. We have not shown object elements or collections in the object model
diagram below. Not all classes are associated with a collection. However, some key classes are grouped by
elements or collection. The following elements/collections exist in Photoshop CS3:
Channels, Color Samplers, Count Items, Documents, Layers, Layer Comps, Layer Sets, History
States
, Notifiers, Path Items, Path Points Sub Path Items, and Text Fonts. See Introduction to
Scripting for more information on elements and collections.
Application object sits at the
Art Layers,
Caution: In Photoshop, VBScript collections index from 1 rather than 0. This stands in contrast to other
VBScript arrays, which index from 0.
.
Photoshop Containment Hierarchy
Application
(showing key classes only)
Layer Set
Layer Set
Document
Count
Item
Color
Sampler
Preferences
Measurement
Scale
Document
Info
History
State
Selection
Path Point
Path Item
Sub Path
Item
Channel
Art Layer
Notifier
Layer
Comp
Text Item
(Object)
Art Layer
Application and Document Classes
Page 11

Photoshop CS3
Adobe Photoshop CS3 Scripting Guide Photoshop CS3 Scripting Basics 11
The Application class is the root of the Photoshop CS3 object model hierarchy. Scripts must target the
appropriate application in order to run correctly. See ‘Targeting and Referencing the Application Object’
on page 20.
Document class is used to make modifications to the document image. By using the Document object
The
you can crop, rotate or flip the canvas, resize the image or canvas, and trim the image. You could also use
Document object to get the active layer, then, save the current document, and copy and paste within
the
the active document or between different documents. For more information on using document objects,
see ‘Creating New Objects in a Script’ on page 21
and ‘Using the Document Object’ on page 32.
Layer Classes
Photoshop has two types of layers: an Art Layer that can contain image contents and a Layer Set that
can contain zero or more art layers.
Art Layer is a layer class within a document that allows you to work on one element of an image
An
without disturbing the others. Images are typically composed of multiple layers, defined by a
You can change the composition of an image by changing the order and attributes of the layers that
comprise it.
Text Item is a particular type of art layer that allows you to add type to an image. In Photoshop, a Text
A
item is implemented as a property of the art layer. For more information on text items, see ‘Using the
Item
Text Item Object’ on page 39.
A Layer Set is a class that comprises multiple layers. Think of it as a folder on your desktop. Since folders
can contain other folders, a layer set is recursive. That is, one layer set may call another layer set in the
Object Model hierarchy.
For more information on layers, see ‘Working with Layer Objects’ on page 34
.
Layer Set.
Layer Comp Class
The Layer Comp class allows you to create, manage, and view multiple versions of a layout within a single
document.
Channel Class
The Channel class is used to store pixel information about an image’s color. Image color determines the
number of channels available. An RGB image, for example, has four default channels: one for each primary
color and one for editing the entire image. You could have the red channel active in order to manipulate
just the red pixels in the image, or you could choose to manipulate all the channels at once.
These kinds of channels are related to the document mode and are called component channels. In addition
to the component channels, Photoshop lets you to create additional channels. You can create a spot color
channel, a masked area channel, and a selected area channel.
Using the commands or methods of a
can also retrieve a channel's histogram, change its kind or change the current channel selection.
For more information on channels, see ‘Working with Channel Objects’ on page 45
Channel object, you can create, delete and duplicate channels. You
.
Selection Class
The Selection class is used to specify an area of pixels in the active document (or in a selected layer of the
active document) that you want to work with. For more information on selections, see ‘Working with
Selection Objects’ on page 41.
Page 12

Photoshop CS3
Adobe Photoshop CS3 Scripting Guide Photoshop CS3 Scripting Basics 12
History State Class
The History State class is a palette object that keeps track of changes made to a document. Each time
you apply a change to an image, the new state of that image is added to the palette. These states are
accessible from document object and can be used to reset the document to a previous state. A history
state can also be used to fill a selection. For more information on history objects, see ‘Using History State
Objects’ on page 46.
Note: In AppleScript, if you create a document and then immediately try to get history state, Photoshop
returns an error. You must first activate Photoshop—make it the front-most application—before
you can access history states.
Document Info Class
The Document Info class stores metadata about a document. Metadata is any data that helps to describe
the content or characteristics of a file. For more information on document info, see ‘Using the Document
Info Object’ on page 46.
Path Item, Sub Path Item, and Path Point Classes
The Path Item class represents information about a drawing object, such as the outline of a shape, or a
curved line. The
geometry of the shape. The
‘Using the PathItem Object’ on page 48
Sub Path Item class is contained in the Path Item class, and provides the actual
Path Point class contains information about each point in a sub path. See
.
Preferences Class
The Preferences class allows you to access and set the user preference settings. See ‘Working with
Document Preferences’ on page 60.
Notifier Class
The Notifier object ties an event to a script. For example, if you would like Photoshop CS3 to
automatically create a new document when you open the application, you could tie a script that creates a
Document object to an Open Application event. For more information on notifiers, see ‘Using Notifier
Objects’ on page 47.
Count Item Class
The Count Item object provides scripting support for the Count Tool.
Color Sampler Class
The Color Sampler object provides scripting support for the Color Sampler Tool.
Measurement Scale Class
The Measurement Scale object provides scripting support for the new Measurement Scale feature that
allows you to set a scale for your document.
The Containment Hierarchy and the Photoshop CS3 User Interface
The following table provides describes how each object relates to the Photoshop CS3 user interface.
Page 13

Photoshop CS3
Adobe Photoshop CS3 Scripting Guide Photoshop CS3 Scripting Basics 13
To create this object without
Object Name Description
using a script:
Application The Photoshop CS3 application. Start the Photoshop CS3
application.
Document The working object, in which you create layers,
channels, actions, and so on. In a script, you name,
In Photoshop CS3, choose
File > New or File > Open.
open, or save a document as you would a file in the
application.
Selection The selected area of a layer or document. Choose the marquee or lasso
tools and drag your mouse.
Path Item A drawing object, such as the outline of a shape or a
straight or curved line
Choose the path selection or
pen tools and draw a path with
the mouse.
Channel Pixel information about an image’s color. Choose Window > Channels.
Art Layer A layer class within a document that allows you to
work on one element of an image without affecting
Choose Layer > New > Layer
or Window > Layers.
other elements in the image.
Layer Set A collection of
Art Layer objects. Choose Layer > New >
Layer Set.
Layer Comp A snapshot of a state of the layers in a document. Choose Window > Layer
Comp. Then select the New
Layer Comp icon.
Document Info Metadata about a
Document object.
Choose File > File Info.
Note: Metadata is any data that helps to describe
the content or characteristics of a file, such
filename, creation date and time, author
name, the name of the image stored in the
file, etc.
Notifier Notifies a script when an event occurs; the event
then triggers the script to execute. For example,
Choose File > Scripts > Script
Events Manager.
when a user clicks an OK button, the notifier object
tells the script what to do next.
Preferences The application preference settings. Choose Edit > Preferences in
Windows, or
Photoshop > Preferences in
Mac OS.
History State Stores a version of the document in the state the
document was in each time you saved it.
Choose Window > History,
and then choose a history
state from the History palette.
Note: You c a n u se a
Selection object or to reset the document
History State object to fill a
to a previous state.
Page 14

Photoshop CS3
Adobe Photoshop CS3 Scripting Guide Photoshop CS3 Scripting Basics 14
To create this object without
Object Name Description
using a script: (Continued)
Color Sampler Represents a color sampler in your document. Choose the Color Sampler
Tool, and click in the
document.
Count Item Represents a counted item in the document. Choose the Count Tool and
click in the document.
Measurement
Scale
Additional Objects
The Photoshop CS3 object model includes additional objects beyond the ones described in the
containment hierarchy above. Most of these classes are used as types for properties or to provide
information (as arguments) for commands or methods. For example:
● The color value (SolidColor/SolidColor) class provides the type for the background color
(backgroundColor/backgroundColor)
(ForegroundColor/foregroundColor)
Color Objects’ on page 50.
● Open and save options for documents are defined as classes, and these are passed to the commands
that open and save documents; e.g., the
class can be passed as an argument to the save (saveAs/saveAs) command or method. See ‘Opening a
Document’ on page 26 and ‘Saving a Document’ on page 29.
Constants
An additional important component of the Photoshop CS3 object model for JavaScript and VBScript are
constants. Constants are a type of value that defines a property. For example, with the
Art Layer object, you can define only specific kinds that Photoshop CS3 allows. For general information
about constants, see Introduction to Scripting.
Represents the measurement scale for your
document.
and foreground color
properties of the Application object. See ‘Working with
BMP save options (BMPSaveOptions/BMPSaveOptions)
The Measurement Scale object
cannot be created, but you can
change its properties by using
Image > Measurement Scale
> Custom.
kind property of an
Note: Throughout this document, actual values of enumerations for VBScript are given using the
following format:
newLayerRef.Kind = 2 '2 indicates psLayerKind --> 2 (psTextLayer)
The ' before the explanation creates a comment and prevents the text to the right of the ' from being
read by the scripting engine. For more information about using comments, see Introduction to
Scripting.
For example, look up the art
ArtLayer object in either the Adobe Photoshop CS3 JavaScript Scripting
Reference or in the Adobe Photoshop CS3 Visual Basic Scripting Reference. One of the properties of this
object is
allowed values for the property. For VBScript, the constant is
LayerKind. Click the link to view the values you can use to define the kind property.
Kind( kind). The value type for that property contains a link to the constant that define the
PSLayerKind, for JavaScript, the constant is
Note: Different objects can use the same property name with different constant values. The constant
values for the
object’s kind property.
Layer
Channel object’s kind property are different than the constant values for the Art
Page 15

Photoshop CS3
Adobe Photoshop CS3 Scripting Guide Photoshop CS3 Scripting Basics 15
Creating a Sample Hello World Script
This section demonstrates a very simple script in each of the three scripting languages for Photoshop CS3.
Traditionally, the first thing to accomplish in any programming environment is the display of a "Hello
World" message.
➤ Our Hello World scripts will do the following:
1. Open the Photoshop CS3 application.
2. Create a new
When we create the document, we will also create a variable named
reference to the document as the value of
Document object.
docRef and then assign a
docRef. The document will be 4 inches wide and 2 inches
high.
3. Create an
In our script, we will create a variable named
Layer
4. Define
Art Layer object.
artLayerRef and then assign a reference to the Art
object as the value of artLayerRef.
artLayerRef as a text item.
5. Set the contents of the text item to "Hello World".
Note: We will also include comments throughout the scripts. In fact, because this is our first script, we will
use comments to excess.
These steps mirror a specific path in the containment hierarchy, as illustrated below.
Application
Document
Creating and Running an AppleScript
You must open Apple’s Script Editor application in order to complete this procedure.
Note: The default location for the Script Editor is Applications > AppleScript > Script Editor.
➤ To create and run your first Photoshop CS3 AppleScript:
1. Enter the following script in the Script Editor:
Art Layer
Text Item
Page 16

Photoshop CS3
Adobe Photoshop CS3 Scripting Guide Photoshop CS3 Scripting Basics 16
Note: The lines preceded by “--” are comments. Entering the comments is optional.
-- Sample script to create a new text item and
-- change its contents.
--target Photoshop CS3
tell application "Adobe Photoshop CS3"
-- Create a new document and art layer.
set docRef to make new document with properties ¬
{width:4 as inches, height:2 as inches}
set artLayerRef to make new art layer in docRef
-- Change the art layer to be a text layer.
set kind of artLayerRef to text layer
-- Get a reference to the text object and set its contents.
set contents of text object of artLayerRef to "Hello, World"
end tell
2. Click Run to run the script. Photoshop CS3 creates a new document, adds a new layer, changes the
layer’s type to text and sets the text to “Hello, World”
Note: If you encounter errors, refer to Introduction to Scripting, which has a section on AppleScript
debugging.
Creating and Running a VBScript
Follow these steps to create and run a VBScript that displays the text Hello World! in a Photoshop CS3
document.
➤ To create and run your first Photoshop CS3 VBScript:
1. Type the following script into a script or text editor.
Note: Entering comments is optional.
Dim appRef
Set appRef = CreateObject( "Photoshop.Application" )
' Remember current unit settings and then set units to
' the value expected by this script
Dim originalRulerUnits
originalRulerUnits = appRef.Preferences.RulerUnits
appRef.Preferences.RulerUnits = 2
' Create a new 2x4 inch document and assign it to a variable.
Dim docRef
Dim artLayerRef
Dim textItemRef
Set docRef = appRef.Documents.Add(2, 4)
' Create a new art layer containing text
Set artLayerRef = docRef.ArtLayers.Add
artLayerRef.Kind = 2
' Set the contents of the text layer.
Set textItemRef = artLayerRef.TextItem
textItemRef.Contents = "Hello, World!"
' Restore unit setting
Page 17

Photoshop CS3
Adobe Photoshop CS3 Scripting Guide Photoshop CS3 Scripting Basics 17
appRef.Preferences.RulerUnits = originalRulerUnits
2. Save file as a text file with a .vbs file name extension.
3. Double-click the file in Windows Explorer to run the script.
The script opens Photoshop CS3.
Creating and Running a JavaScript
Follow these steps to create and run a JavaScript that displays the text Hello World! in a Photoshop CS3
document.
Because you will be actually using Photoshop CS3 to run your JavaScripts, it is not necessary to include
code that opens Photoshop CS3 at the beginning of the script.
Note: Adobe has created the Extend Script scripting language to augment JavaScript for use with
Photoshop CS3. You can use the Extend Script command
application and create the ability to open JavaScripts that manipulate Photoshop CS3 from
anywhere in your file system. See the “Script UI” chapter of the JavaScript Tools Guide for more
information.
#target to target the Photoshop CS3
➤ To create and run your first Photoshop CS3 JavaScript:
1. Type the following script.
Note: Entering comments is optional.
// Hello Word Script
// Remember current unit settings and then set units to
// the value expected by this script
var originalUnit = preferences.rulerUnits
preferences.rulerUnits = Units.INCHES
// Create a new 2x4 inch document and assign it to a variable
var docRef = app.documents.add( 2, 4 )
// Create a new art layer containing text
var artLayerRef = docRef.artLayers.add()
artLayerRef.kind = LayerKind.TEXT
// Set the contents of the text layer.
var textItemRef = artLayerRef.textItem
textItemRef.contents = "Hello, World"
// Release references
docRef = null
artLayerRef = null
textItemRef = null
// Restore original ruler unit setting
app.preferences.rulerUnits = originalUnit
2. Save file as a text file with a .jsx file name extension in the Presets/Scripts folder in your Adobe
Photoshop CS3 directory.
Note: You must place your JavaScripts in the Presets/Scripts folder in order to make the scripts
accessible from the File > Scripts menu in Photoshop CS3. The scripts do not appear on the File
> Scripts menu until you restart the application.
Page 18

Photoshop CS3
Adobe Photoshop CS3 Scripting Guide Photoshop CS3 Scripting Basics 18
Note: Photoshop CS3 also supports JavaScript files that use a .js extension.
3. Do either of the following:
● If Photoshop CS3 is already open, choose File > Scripts > Browse, and then navigate to the Presets
> Scripts folder and choose your script.
● Start or restart Photoshop CS3, and then choose File > Scripts, and then select your script from the
Scripts menu.
Page 19

3
Scripting Photoshop CS3
This chapter demonstrates several techniques for using the Photoshop Document Object Model (DOM) to
create scripts to use specifically with Photoshop CS3.
You will also learn how to use the reference manuals and object model browsers to find information about
the objects, classes, properties, commands, and even some values (called constants or enumerations) you
can use to create AppleScripts, VBScript scripts, and JavaScripts for Photoshop CS3.
Tip: Throughout this chapter, the explanation of how to create a script is followed by instructions for
locating information about the specific elements used in the script. Using these instructions will help
you quickly understand how to script Photoshop CS3.
Viewing Photoshop CS3 Objects, Commands, and Methods
The Photoshop CS3 reference material for each of the three scripting languages is found in the reference
manuals provided in this installation:
● Adobe Photoshop CS3 AppleScript Scripting Reference
● Adobe Photoshop CS3 Visual Basic Scripting Reference
● Adobe Photoshop CS3 JavaScript Scripting Reference
In addition, you can also access reference material by using the associated object model browser for each
language:
● For AppleScript, use the AppleScript Script Editor to view the Photoshop CS3 AppleScript Dictionary.
● For VBScript, use the VBA editor in Microsoft Word, or the Visual Basic Object Browser in Visual Basic, or
Visual Studio.
● For JavaScript, use the ExtendScript Object Model Viewer. See the JavaScript Tools Guide for more
information.
Viewing Photoshop CS3’s AppleScript Dictionary
You use Apple’s Script Editor application to view the dictionary.
Note: The default location for the Script Editor is Applications > AppleScript > Script Editor.
➤ To view the AppleScript dictionary:
1. In Script Editor, choose File > Open Dictionary.
Script Editor displays an Open Dictionary dialog.
2. Choose AdobePhotoshop CS3, and then click Open.
Script Editor opens Photoshop CS3 and then displays the Photoshop CS3 dictionary, which lists objects
as well as the commands, properties and elements associated with each object. The dictionary also lists
the parameters for each command.
Note: The Photoshop CS3 AppleScript Dictionary does not display the complete list of open and save
formats.
19
Page 20

Photoshop CS3
Adobe Photoshop CS3 Scripting Guide Scripting Photoshop CS3 20
Viewing Photoshop CS3’s Type Library (VBS)
You can use the VBA editor in Microsoft Word to display the objects and commands available for VBScript
in Photoshop CS3.
➤ To view the VBS object library in Microsoft Word:
1. Start Word, and then choose Tools > Macro > Visual Basic Editor.
2. Choose Tools > References, and then select the Adobe Photoshop CS3 Type Library check box and
click OK.
3. Choose View > Object Browser.
4. Choose Photoshop CS3 type library from the list of open libraries shown in the top-left pull-down
menu.
5. Choose an object class to display more information abut the class.
You can also use the object browser in the Visual Basic development environment to display the objects
and commands available for VBScript in Photoshop CS3.
➤ To view the VBS object library in the Visual Basic development environment:
1. Start Visual Studio 2005, or Visual Basic.
2. Select View > Object Browser.
3. In the Browse drop-down box, select Edit Custom Component Set.
4. On the COM tab, find “Adobe Photoshop CS3 Object Library”. Select it.
5. Click Add. The selected library appears in the “Selected Projects and Components” portion of the
window.
6. Click OK.
7. Now the Photoshop CS3 Library is loaded into the object browser. Click on the plus sign next to the
Photoshop Library icon.
8. Click on the plus sign next to the Photoshop objects icon.
9. The objects defined in the Photoshop CS3 library are listed. You can select one to display more
information about the class.
Targeting and Referencing the Application Object
Because you run your AppleScript and VBScript scripts from outside the Photoshop CS3 application, the
first thing your script should do is indicate that the commands be executed in Photoshop CS3.
Note: In JavaScript, you do not need to target the
the Photoshop CS3 application itself. (See ‘Creating and Running a JavaScript’ on page 17
Application object because you open the scripts from
AS
To target Photoshop CS3 in AppleScript, you must enclosing your script in the following statements:
tell application "Adobe Photoshop CS3"
.)
Page 21

Photoshop CS3
Adobe Photoshop CS3 Scripting Guide Scripting Photoshop CS3 21
…
end tell
Note: Because you include all commands in the tell block, there is no need to reference the
Application object throughout the script.
VBS
In VBScript, do the following to target the application:
Dim appRef
Set appRef = CreateObject("Photoshop.Application")
JS
In JavaScript, because you do not need to reference an Application object, all properties and methods of
the application are accessible without any qualification. You can reference the application as part of the
containment hierarchy or leave it out, whichever makes your scripts easier for you to read.
To reference the
The following statements are equivalent:
var docRef = app.documents[1]
and
var docRef=documents[1]
Application object, use the pre-defined global object app, rather than the class name.
Note: Many JavaScript samples throughout this guide do not reference the Application object.
Creating New Objects in a Script
To create a new document in the Photoshop CS3 application, you select File > New. To create other types
of objects within a document, such as a layer, channel, or path, you use the Window menu or choose the
New icon on the appropriate palette. This section demonstrates how to accomplish these same tasks in a
script.
To create an object in a script, you name the type of object you want to create and then use the following
command:
● AS: make
● VBS: Add
● JS: add()
As you can see in the ‘Photoshop CS3 Object Model’ on page 9, the Document object contains all other
objects except the
Document object when adding objects other than Document and Notifier objects to your script. (It is not
possible to add a new Preferences object.)
Note: In VBScript and JavaScript, you use the object’s collection name to name the object type. For
example, you add a document to the
collection. See Introduction to Scripting for more information on elements and collections.
Application, Notifier, and Preferences objects. Therefore, you must reference the
Documents collection; you add an art layer to the art layers
AS
The following statement creates a Document object in an AppleScript.
make new document
You can also use the set command to create a variable to hold a reference to a new document. In the
following example, the variable named
docRef holds a reference to the new document:
Page 22

Photoshop CS3
Adobe Photoshop CS3 Scripting Guide Scripting Photoshop CS3 22
set docRef to make new document
To create an object other than a document, you must reference the Document object that contains the
object. The following sample creates an art layer in the document contained in the variable named
docRef.
make new art layer in docRef
Note: When you create object in AppleScript, you actually add the object to an element the same way you
add a VBScript or JavaScript object to a collection. However, in AppleScript, the element name is
implied in the
make new document
make or set statement. For example, the statement:
actually means:
make new document in the documents element
Do the following to find out more about creating objects in an AppleScript:
● Look up the make and set commands in the Adobe Photoshop CS3 AppleScript Scripting Reference or in
the Photoshop CS3 AppleScript Dictionary. See ‘Viewing Photoshop CS3’s AppleScript Dictionary’ on
page 19.
● To find out which commands can be used with an object, look up the object in the Adobe Photoshop
CS3 AppleScript Scripting Reference. If an object has valid commands, there will be a “Valid Commands”
list at the end of the object description.
VBS
In VBScript, you can use the Add method only with the collection name. The Add method is not valid with
objects other than collection objects. Also, in VBScript, you must reference the
creating when creating, or referring to, an object in your script.
For example, to create a document in a VBScript script, you cannot use the object name, as in the following
sample, which creates a
appRef.Document.Add()
Document object:
You must use the collection name, which is a plural form of the object name, as follows:
appRef.Documents.Add()
Note: In this sample statement, the Application object is referenced via a variable named appRef. See
‘Targeting and Referencing the Application Object’ on page 20
To add an
ArtLayer object, you must reference both the Application and Document objects that will
contain the art layer. The following sample references the
and the
Document object using the document’s index rather than the documents name.
appRef.Documents(1).ArtLayers.Add()
Application object using the variable appRef
for more information.
Caution: In Photoshop, VBScript collections index from 1 rather than 0. That is to say, the first document
created has index 1, rather than index 0.
If you look up in the
Visual Basic Object Browser, you will see that there is no
method is available for the
method; the
ArtLayers object does.
Document object in the Adobe Photoshop CS3 Visual Basic Scripting Reference or in the
Add() method for the object. However, the Add()
Documents object. Similarly, the ArtLayer object does not have an Add()
Application object when
Note: The
Layers object is an exception because, although it is a collection object, it does not include an
Add() method. The Layers collection includes both ArtLayer and LayerSet objects, which are
created with the
information, look up the
Add method on either the ArtLayers or LayerSets collections. For more
Layers object in theAdobe Photoshop CS3 Visual Basic Scripting Reference.
Page 23

Photoshop CS3
Adobe Photoshop CS3 Scripting Guide Scripting Photoshop CS3 23
JS
In JavaScript, you can use the add() method only with the collection name. The add() method is not valid
with objects other than collection objects.
Similar to VBScript, the JavaScript statement to create a document is:
documents.add()
and not:
document.add()
Note: You can include an Application object reference if you wish. The following statement is equivalent
to the previous sample:
app.documents.add()
To add an ArtLayer object, you must reference the Document object that contains the layer, and use the
add() method for the ArtLayers collection, using the artLayers property of Document.
documents[0].artLayers.add()
As with VBScript, the add() method is associated with the JavaScript Documents object but not with the
Document object. Similarly, the ArtLayer object does not have an add() method; the ArtLayers object
does.
Note: The
Layers collection object does not include an add() method. For more information, look up the
Layers object in the Adobe Photoshop CS3 JavaScript Scripting Reference.
Setting the Active Object
To work on a an object in the Photoshop CS3 application, you must make the object the front-most, or
active object. For example, to work in a layer, you must first bring the layer to the front.
In scripting, the same rule applies. If your script creates two or more documents, the commands and
methods in your script are executed on the active document. Therefore, to ensure that your commands are
acting on the correct document, it is good programming practice to designate the active document
before executing any commands or methods in the script.
To set an active object, do the following:
● In AppleScript, you use the current property of the parent object.
● In VBScript, you use the ActiveObject property of the parent object (such as ActiveDocument or
ActiveLayer).
● In JavaScript, you use the activeObject property of the parent object (such as activeDocument or
activeLayer).
Note: The parent object is the object that contains the specified object. For example, the application is the
parent of the document; a document is the parent of a layer, selection, or channel.
For example, if you look at the
Reference, or in the ExtendScript Object Model Viewer, you find one of its properties is
activeDocument; if you look at the Document object, you will find activeLayer and
activeHistoryState as properties. Similarly, if you look at application in the Adobe Photoshop
CS3 AppleScript Scripting Reference, or in thePhotoshop CS3 AppleScript Dictionary, you find it has
the property of
current, and so on.
Application object in the Adobe Photoshop CS3 JavaScript Scripting
For sample scripts that set active objects, see the following sections.
● ‘Setting the Active Document’ on page 24
● ‘Setting the Active Layer’ on page 25
● ‘Setting the Active Channels’ on page 25
Page 24

Photoshop CS3
Adobe Photoshop CS3 Scripting Guide Scripting Photoshop CS3 24
Setting the Active Document
The following examples demonstrate how to set the active document.
AS
--create 2 documents
set docRef to make new document with properties ¬
{width:4 as inches, height:4 as inches}
set otherDocRef to make new document with properties ¬
{width:4 as inches, height:6 as inches}
--make docRef the active document
set current document to docRef
--here you would include command statements
--that perform actions on the active document. Then, you could
--make a different document the active document
--use the current document property of the application class to
--bring otherDocRef front-most as the new active document
set current document to otherDocRef
VBS
JS
'Create 2 documents
Set docRef = app.Documents.Add ( 4, 4)
Set otherDocRef = app.Documents.Add (4,6)
'make docRef the active document
Set app.ActiveDocument = docRef
'here you would include command statements
'that perform actions on the active document. Then, you could
'make a different document the active document
'use the ActiveDocument property of the Application object to
'bring otherDocRef front-most as the new active document
Set app.ActiveDocument = otherDocRef
// Create 2 documents
var docRef = app.documents.add( 4, 4)
var otherDocRef = app.documents.add (4,6)
//make docRef the active document
app.activeDocument = docRef
//here you would include command statements
//that perform actions on the active document. Then, you could
//make a different document the active document
//use the activeDocument property of the Application object to
//bring otherDocRef front-most as the new active document
app.activeDocument = otherDocRef
Page 25

Photoshop CS3
Adobe Photoshop CS3 Scripting Guide Scripting Photoshop CS3 25
Setting the Active Layer
The following examples demonstrate how to use the current layer (ActiveLayer/activeLayer)
property of the
document itself must be the current document.
AS
set current layer of current document to layer “Layer 1” of current document
Note: By default, Photoshop names the layers “Layer 1”, “Layer2”, etc.
VBS
‘ This example assumes appRef and docRef have been previously defined and assigned
‘ to the application object and a document object that contains at least one layer.
appRef.ActiveDocument = docRef
docRef.ActiveLayer = docRef.Layers(1)
Look up the ActiveLayer property on the Document object in the Adobe Photoshop CS3 Visual Basic
Scripting Reference, or in the Visual Basic Object Browser.
Note: You can also use the name of the layer to indicate which layer to use. By default, Photoshop names
the layers “Layer 1”, “Layer2”. See ‘Referencing ArtLayer Objects’ on page 36
Document object to set the active layer. In order to set the active layer for a document, the
.
JS
// This example assumes docRef has been previously defined and assigned to a
// document object that contains at least one layer.
activeDocument = docRef
docRef.activeLayer = docRef.layers[0]
Look up the activeLayer property on the Document object in the Adobe Photoshop CS3 JavaScript
Scripting Reference, or in the ExtendScript Object Model Viewer.
Note: You can also use the name of the layer to indicate which layer to use. By default, Photoshop names
the layers “Layer 1”, “Layer2”. See ‘Referencing ArtLayer Objects’ on page 36
Setting the Active Channels
More than one channel can be active at a time, so the current channels
(ActiveChannels/activeChannels) property of the Document object takes an array of channels
as a value. In order to set the active channels of a document, it must be the active document.
AS
Set the active channels to the first and third channel using a channel array:
set current channels of current document to ¬
{ channel 1 of current document, channel 3 of current document }
Alternatively, select all component channels using the component channels property of the Document
object.
set current channels of current document to component channels ¬
of current document
.
VBS
Set the active channels of the active document to the first and third channel using a channel array:
Page 26

Photoshop CS3
Adobe Photoshop CS3 Scripting Guide Scripting Photoshop CS3 26
‘ This example assumes docRef is already the ActiveDocument
Dim theChannels
theChannels = Array(docRef.Channels(0), docRef.Channels(2))
docRef.ActiveChannels = theChannels
Alternatively, select all component channels using the ComponentChannels property of the Document
object:
appRef.ActiveDocument.ActiveChannels= _
appRef.ActiveDocument.ComponentChannels
JS
Set the active channels to the first and third channel using a channel array:
theChannels = new Array(docRef.channels[0], docRef.channels[2])
docRef.activeChannels = theChannels
Alternatively, select all component channels by using the componentChannels property of the Document
object:
app.activeDocument.activeChannels =
activeDocument.componentChannels
Opening a Document
You use the open/Open/open() command of the Application object to open an existing document. You
must specify the document name (that is, the path to the file that contains the document) with the
command.
Opening a File with Default File Format
Because Photoshop CS3 supports many different file formats, the open/Open/open() command lets you
specify the format of the document you are opening. If you do not specify the format, Photoshop CS3
infers the type of file for you, which is called the file’s default format. The following examples open a
document by inferring the most appropriate format to use:
AS
set theFile to alias "Applications:Documents:MyFile"
open theFile
VBS
fileName = "C:\MyFile"
Set docRef = appRef.Open(fileName)
JS
var fileRef = File(app.path + "/Samples/Fish.psd")
var docRef = app.open(fileRef)
Notice that in JavaScript, you must create a File object and then pass a reference to the object to the
open() command.
Page 27
Photoshop CS3
Adobe Photoshop CS3 Scripting Guide Scripting Photoshop CS3 27
Specifying File Formats to Open
Open Classes
Photo CD
Open
Options
Raw
Format
Open
Options
Open
Options
Camera
Raw
Open
Options
EPS
Open
Options
PDF
Open
Options
For the document types on the following list, you can set options to specify how the document will be
opened, such as the height and width of the window in which the document is opened, which page to
open to in a multi-page file, etc.
● PhotoCD
● CameraRaw
● RawFormat
● Adobe PDF
● EPS
To find out which options you can set for each of file type, look up the properties for the OpenOptions
objects that begin with the file format name. For example:
● In the Adobe Photoshop CS3 AppleScript Scripting Reference look up the Photo CD open options class
EPS open objects class.
or the
● In the Adobe Photoshop CS3 Visual Basic Scripting Reference, or the Adobe Photoshop CS3 JavaScript
Scripting Reference, look up the
PhotoCDOpenOptions or EPSOpenOptions objects.
The following examples demonstrate how to open a generic (multi-page/multi-image) PDF document
with the following specifications:
● The document will open in a window that is 100 pixels high and 200 pixels wide.
● The document will open in RGB mode with a resolution of 72 pixels/inch.
● Antialiasing will be used to minimize the jagged appearance of the edges of images in the document.
● The document will open to page 3.
● The document’s original shape will change to conform to the height and width properties if the
original shape is not twice as wide as it is tall.
AS
tell application "Adobe Photoshop CS3"
set myFilePath to alias "OS X 10.4.8 US:Users:psauto:Desktop:opal_screen.pdf"
with timeout of 300 seconds
open myFilePath as PDF with options ¬
{class:PDF open options, height:pixels 100, width:pixels 200, ¬
mode:RGB, resolution:72, use antialias:true, page:1, ¬
constrain proportions:false}
end timeout
end tell
Page 28

Photoshop CS3
Adobe Photoshop CS3 Scripting Guide Scripting Photoshop CS3 28
VBS
Dim appRef
Set appRef = CreateObject("Photoshop.Application")
'Remember unit settings and set to values expected by this script
Dim originalRulerUnits
originalRulerUnits = appRef.Preferences.RulerUnits
appRef.Preferences.RulerUnits = 1 'value of 1 = psPixels
'Create a PDF option object
Dim pdfOpenOptionsRef
Set pdfOpenOptionsRef = CreateObject("Photoshop.PDFOpenOptions")
pdfOpenOptionsRef.AntiAlias = True
pdfOpenOptionsRef.Height = 100
pdfOpenOptionsRef.Width = 200
pdfOpenOptionsRef.Mode = 2 ' psOpenRGB
pdfOpenOptionsRef.Resolution = 72
pdfOpenOptionsRef.Page = 3
pdfOpenOptionsRef.ConstrainProportions = False
' open the file
Dim docRef
Set docRef = appRef.Open(“C:\\PDFFiles\MyFile.pdf”, pdfOpenOptionsRef)
'Restore unit setting
appRef.Preferences.RulerUnits = originalRulerUnits
JS
Note: The ExtendScript File object expects Universal Resource Identifier (URI) notation. Please see the
JavaScript Tools Guide for more information.
// Set the ruler units to pixels
var originalRulerUnits = app.preferences.rulerUnits
app.preferences.rulerUnits = Units.PIXELS
// Get a reference to the file that we want to open
var fileRef = new File(“/c/pdffiles/myfile.pdf”)
// Create a PDF option object
var pdfOpenOptions = new PDFOpenOptions
pdfOpenOptions.antiAlias = true
pdfOpenOptions.height = 100
pdfOpenOptions.width = 200
pdfOpenOptions.mode = OpenDocumentMode.RGB
pdfOpenOptions.resolution = 72
pdfOpenOptions.page = 3
pdfOpenOptions.constrainProportions = false
// open the file
app.open( fileRef, pdfOpenOptions )
// restore unit settings
app.preferences.rulerUnits = originalRulerUnits
Page 29
Photoshop CS3
Adobe Photoshop CS3 Scripting Guide Scripting Photoshop CS3 29
Saving a Document
Options for saving documents in Photoshop CS3 are illustrated below. To find out which properties you
can specify for a specific file format save option, look up the object that begins with the file format name.
For example, to find out about properties for saving an
● In the Adobe Photoshop CS3 AppleScript Scripting Reference, look up the class EPS save options.
● In the Adobe Photoshop CS3 Visual Basic Scripting Reference or in the Adobe Photoshop CS3 JavaScript
Scripting Reference look up
EPSSaveOptions.
.eps file, do the following:
Save Classes
Photoshop
Pixar
Note: It is important to note that the
BMP
PNG
GIF
TIFF
Open and Save formats are not identical. See ‘Specifying File Formats
EPS
Raw
Save
Options
JPEG
DSC1
PDF
DSC2
to Open’ on page 27 for comparison.
Note: The following optional formats are available only when installed explicitly:
● Alias PIX
● Electric Image
● SGI RGB
● Wavefront RLA
Pict
File
SGI
RGB
Pict
Resource
Tar ga
● SoftImage
The following scripts save a document as a
AS
tell application "Adobe Photoshop CS3"
make new document
set myFile to "OS X 10.4.8 US:Users:psauto:Desktop:Rat.jpg"
set myOptions to ¬
{class:JPEG save options, embed color profile:false, ¬
format options:standard, matte:background color matte}
save current document in file myFile as JPEG with options ¬
myOptions appending no extension without copying
end tell
VBS
Dim appRef,docRef
Set appRef = CreateObject("Photoshop.Application")
.jpeg file.
Page 30

Photoshop CS3
Adobe Photoshop CS3 Scripting Guide Scripting Photoshop CS3 30
Set docRef = appRef.Documents.Add()
Set jpgSaveOptions = CreateObject("Photoshop.JPEGSaveOptions")
jpgSaveOptions.EmbedColorProfile = True
jpgSaveOptions.FormatOptions = 1 'for psStandardBaseline
jpgSaveOptions.Matte = 1 'for psNoMatte
jpgSaveOptions.Quality = 1
appRef.ActiveDocument.SaveAs "c:\temp\myFile2", _
jpgSaveOptions, True, 2 'for psLowercase
JS
app.documents.add( 4, 4 )
jpgFile = new File( "/Temp001.jpeg" )
jpgSaveOptions = new JPEGSaveOptions()
jpgSaveOptions.embedColorProfile = true
jpgSaveOptions.formatOptions = FormatOptions.STANDARDBASELINE
jpgSaveOptions.matte = MatteType.NONE
jpgSaveOptions.quality = 1
app.activeDocument.saveAs(jpgFile, jpgSaveOptions, true,
Extension.LOWERCASE)
Setting Application Preferences
Your script can set application preferences such as color picker, file saving options, guide-grid-slice
settings, and so on.
Note: The properties in the
Preferences dialog options, which you display by choosing Photoshop > Preferences on Mac OS or
Edit > Preferences in Windows versions of Photoshop CS3. For explanations of individual
preferences, please refer to Photoshop CS3 Help.
AS
You use properties of the settings class to set application preferences in AppleScript. The following script
sets ruler and type unit settings:
set ruler units of settings to inch units
set type units of settings to pixel units
In the Adobe Photoshop CS3 AppleScript Scripting Reference, or in the Photoshop CS3 AppleScript
Dictionary, look up class
VBS
The Preferences object is a property of the Application object. When you use the Preferences object
in a VBScript script, you must indicate its containment in the
appRef.Preferences.RulerUnits = 2 'for PsUnits --> 2 (psInches)
appRef.Preferences.TypeUnits = 1 'for PsTypeUnits --> 1 (psPixels)
In the Adobe Photoshop CS3 Visual Basic Scripting Reference, or in the Visual Basic Object Browser, look up
Preferences object to view all of the settings properties you can use. Additionally, look up the
the
Preferences property on the Application object.
settings class/Preferences object correlate to the Photoshop CS3
settings-object to view all of the settings properties you can use.
Application object.
JS
The Preferences object is a property of the Application object.
preferences.rulerUnits = Units.INCHES
Page 31

Photoshop CS3
Adobe Photoshop CS3 Scripting Guide Scripting Photoshop CS3 31
preferences.typeUnits = TypeUnits.PIXELS
In the Adobe Photoshop CS3 JavaScript Scripting Reference, or in the ExtendScript Object Model Viewer, look
up the
preferences property on the Application object.
Preferences object to view all of the settings properties you can use. Additionally, look up the
Allowing or Preventing Dialogs
It is important to be able to control dialogs properly from a script. If a dialog appears, your script stops
until a user dismisses the dialog. This is normally fine in an interactive script that expects a user to be
sitting at the machine. But if you have a script that runs in an unsupervised (batch) mode, you do not want
dialogs to be displayed and stop your script.
You use the
to control whether or not dialogs are displayed.
Note: Using dialogs in your script is roughly equivalent to using stops in a Photoshop CS3 action.
AS
The following script prevents dialogs from being displayed:
set display dialogs to never
In the Adobe Photoshop CS3 AppleScript Scripting Reference or in the Photoshop CS3 AppleScript Dictionary,
look up the
display dialogs (DisplayDialogs/displayDialogs) property of the Application object
Class application to find the values you can use for the display dialogs property.
VBS
To set dialog preferences, you use the DisplayDialogs property of the Application object.
appRef.DisplayDialogs = 3
'for PsDialogModes --> 3 (psDisplayNoDialogs)
Note that, because DisplayDialogs is a property of the Application object, you must reference the
Application object in the script to get to the property.
In the Adobe Photoshop CS3 Visual Basic Scripting Reference, or in the Visual Basic Object Browser, look up
Application object property DisplayDialogs. You’ll see the value type for this property is the
the
constant
PsDialogModes. You can also look up the options for PsDialogModes.
JS
To set dialog preferences, you use the displayDialogs property of the Application object.
displayDialogs = DialogModes.NO
In the Adobe Photoshop CS3 JavaScript Scripting Reference, or in the ExtendScript Object Model Viewer, look
up the
Application object property displayDialogs, and then look up the constant DialogModes.
Working with the Photoshop CS3 Object Model
This section contains information about using the objects in the Photoshop CS3 Object Model. For
information on object models, see Introduction to Scripting and ‘Photoshop CS3 Object Model’ on page 9
.
Using the Application Object
This section describes how and when to use the Application object in a script. It also describes how to
use some properties of the
Application object.
Page 32

Photoshop CS3
Adobe Photoshop CS3 Scripting Guide Scripting Photoshop CS3 32
You use the properties and commands of the Application object to work with Photoshop CS3
functionality and objects such as the following:
● Global Photoshop CS3 settings or preferences, such as unit values or color settings. See ‘Setting
Application Preferences’ on page 30.
● Documents—You can add or open documents and set the active document. ‘Opening a Document’ on
page 26 and ‘Setting the Active Object’ on page 23.
● Actions—You can execute actions created either via scripting or using the Actions palette in the
Photoshop CS3 application. See ‘Action Manager’ on page 72
.
You can u se
● A list of fonts installed on the system.
● AS: Set theFonts to fonts
Application object properties to get information such as the following:
Note: In AppleScript, fonts is a separate collection, and does not require a reference to the application
object to retrieve it.
● VBS: Set fontsInstalled = AppRef.Fonts
● JS: var fontsInstalled = app.fonts
● The amount of unused memory available to Adobe Photoshop CS3, using the free memory
(FreeMemory/freeMemory)
● The location of the Preferences folder, using the preferences folder
(PreferencesFolder/preferencesFolder)
For further information, look up the properties of the
object browser of the language you are using.
Using the Document Object
The Document object can represent any open document in Photoshop CS3. You can think of a Document
object as a file; you can also think of it as a canvas. You work with the
● Access script objects contained in the Document object, such as ArtLayer or Channel objects. See
‘Photoshop CS3 Object Model’ on page 9
property of the Application object.
property of the Application object.
Application object in the reference manual or the
Document object to do the following:
for more information.
● Manipulate a specific Document object, using commands or methods. For example, you could crop,
rotate or flip the canvas, resize the image or canvas, and trim the image. See ‘Manipulating a Document
Object’ on page 32 for a demonstration.
● Get the active layer. See ‘Setting the Active Layer’ on page 25.
● Save the current document. See ‘Saving a Document’ on page 29.
● Copy and paste within the active document or between different documents. See ‘Understanding
Clipboard Interaction’ on page 54.
Manipulating a Document Object
The following examples demonstrate how to do the following:
● Save the existing ruler unit preferences, and set ruler units to inches
● Open an existing file as a document (using file Ducky.tif)
● Change the size of the image to 4 inches wide and 4 inches high.
● Change the size of the document window (or canvas) to 4 inches high and 4 inches wide.
● Trim the top and bottom of the image.
Page 33

Photoshop CS3
Adobe Photoshop CS3 Scripting Guide Scripting Photoshop CS3 33
● Crop the image.
● Flip the entire window.
● Restore the original ruler units.
Note: See ‘Setting Application Preferences’ on page 30
AS
tell application "Adobe Photoshop CS3"
set saveUnit to ruler units of settings
set ruler units of settings to inch units
set duckFile to alias ¬
"OS X 10.4.8 US:Applications:Adobe Photoshop CS3:Samples:Ducky.tif"
open duckFile
set docRef to current document
resize image docRef width 4 height 4
resize canvas docRef width 4 height 4
trim docRef basing trim on top left pixel with top trim ¬
and bottom trim without left trim and right trim
set ruler units of settings to pixel units
crop current document bounds {100, 200, 400, 500} angle 45 width 20 height 20
flip canvas docRef direction horizontal
set ruler units of settings to saveUnit
end tell
VBS
Dim appRef, docRef
Set appRef = CreateObject("Photoshop.Application")
for information on ruler units.
'save original ruler units, then set ruler units to inches
startRulerUnits = appRef.Preferences.RulerUnits
appRef.Preferences.RulerUnits = 2 'for PsUnits --> 2 (psInches)
Set docRef = appRef.Open(appRef.Path & "\Samples\Ducky.tif")
docRef.ResizeImage 4,4
docRef.ResizeCanvas 4,4
'Trim the document with
' type = 1 (psTopLeftPixel)
' top=true, left=false, bottom=true, right=false
docRef.Trim 1,True,False,True,False
'the crop command uses unit values
'so change the ruler units to pixels
appRef.Preferences.RulerUnits = 1 ' (psPixels)
'Crop the document with
' angle=45, width=20,height=20
docRef.Crop Array(100,200,400,500),45,20,20
docRef.FlipCanvas 1 ' psHorizontal
'restore ruler units
appRef.Preferences.RulerUnits = startRulerUnits
Page 34

Photoshop CS3
Adobe Photoshop CS3 Scripting Guide Scripting Photoshop CS3 34
JS
//save original ruler units, then assign it to inches
startRulerUnits = app.preferences.rulerUnits
app.preferences.rulerUnits = Units.INCHES
//get a reference to the file, and open it
var fileRef = new File(app.path + "/samples/ducky.tif")
var docRef = app.open(fileRef)
//this sample script assumes the ruler units have been set to inches
docRef.resizeImage( 4,4 )
docRef.resizeCanvas( 4,4 )
docRef.trim(TrimType.TOPLEFT, true, false, true, false)
//the crop command uses unit values
//so change the ruler units to pixels
app.preferences.rulerUnits =Units.PIXELS
docRef.crop (new Array(100,200,400,500), 45, 20, 20)
docRef.flipCanvas(Direction.HORIZONTAL)
//restore original preferences
app.preferences.rulerUnits = startRulerUnits
Working with Layer Objects
The Photoshop CS3 object model contains two types of layer objects:
● ArtLayer objects, which can contain image contents and are basically equivalent to Layers in the
Photoshop CS3 application.
Note: An
ArtLayer object can also contain text if you use the kind property to set the ArtLayer
object’s type to text layer.
● Layer Set objects, which can contain zero or more ArtLayer objects.
When you create a layer you must specify whether you are creating an
Note: Both the
LayerSets, which have an add/Add/add() command.You can reference, but not add, ArtLayer
and
it does not have an
ArtLayer and LayerSet objects have corresponding collection objects, ArtLayers and
LayerSet objects using the Layers collection object, because, unlike other collection objects,
add/Add/add() command.
Creating an ArtLayer Object
The following examples demonstrate how to create an ArtLayer object filled with red at the beginning of
the current document.
AS
tell application "Adobe Photoshop CS3"
make new document
make new art layer at beginning of current document ¬
with properties {name:"MyBlendLayer", blend mode:normal}
select all current document
fill selection of current document with contents ¬
{class:RGB color, red:255, green:0, blue:0}
end tell
ArtLayer or a Layer Set.
Page 35

Photoshop CS3
Adobe Photoshop CS3 Scripting Guide Scripting Photoshop CS3 35
VBS
Dim appRef
Set appRef = CreateObject("Photoshop.Application")
' Create a new art layer at the beginning of the current document
Dim docRef
Dim layerObj
Set docRef = appRef.Documents.Add()
Set layerObj = appRef.ActiveDocument.ArtLayers.Add
layerObj.Name = "MyBlendLayer"
layerObj.BlendMode = 2 'psNormalBlend
' Select all so we can apply a fill to the selection
appRef.ActiveDocument.Selection.SelectAll
' Create a color to be used with the fill command
Dim colorObj
Set colorObj = CreateObject("Photoshop.SolidColor")
colorObj.RGB.Red = 255
colorObj.RGB.Green = 0
colorObj.RGB.Blue = 0
' Now apply fill to the current selection
appRef.ActiveDocument.Selection.Fill colorObj
JS
//make a new document
app.documents.add()
// Create a new art layer at the beginning of the current document
var layerRef = app.activeDocument.artLayers.add()
layerRef.name = "MyBlendLayer"
layerRef.blendMode = BlendMode.NORMAL
// Select all so we can apply a fill to the selection
app.activeDocument.selection.selectAll
// Create a color to be used with the fill command
var colorRef = new solidColor
colorRef.rgb.red = 255
colorRef.rgb.green = 100
colorRef.rgb.blue = 0
// Now apply fill to the current selection
app.activeDocument.selection.fill(colorRef)
Creating a Layer Set Object
The following examples show how to create a Layer Set object after the creating the first ArtLayer
object in the current document:
AS
tell application "Adobe Photoshop CS3"
make new document with properties {name:"My Document"}
make new art layer at beginning of current document
make new layer set after layer 1 of current document
Page 36

Photoshop CS3
Adobe Photoshop CS3 Scripting Guide Scripting Photoshop CS3 36
end tell
VBS
Dim appRef
Set appRef = CreateObject("Photoshop.Application")
'Make a new document and a first layer in the document
appRef.Documents.Add()
appRef.ActiveDocument.ArtLayers.Add()
' Get a reference to the first layer in the document
Dim layerRef
Set layerRef = appRef.ActiveDocument.Layers(1)
' Create a new LayerSet (it will be created at the beginning of the document)
Dim newLayerSetRef
Set newLayerSetRef = appRef.ActiveDocument.LayerSets.Add
' Move the new layer to after the first layer
newLayerSetRef.Move layerRef, 4 'psPlaceAfter
JS
// make a new document and a layer in the document
app.documents.add()
app.activeDocument.artLayers.add()
// Get a reference to the first layer in the document
var layerRef = app.activeDocument.layers[0]
// Create a new LayerSet (it will be created at the beginning of the // document)
var newLayerSetRef = app.activeDocument.layerSets.add()
// Move the new layer to after the first layer
newLayerSetRef.move(layerRef, ElementPlacement.PLACEAFTER)
Referencing ArtLayer Objects
When you create a layer in the Photoshop CS3 application (rather than a script), the layer is added to the
Layers palette and given a number. These numbers act as layer names and do not correspond to the index
numbers of
Your script—VBScript or JavaScript—will always consider the layer at the top of the list in the Layers
palette as the first layer in the index. For example, if your document has four layers, the Photoshop CS3
application names them Background Layer, Layer 1, Layer 2, and Layer 3. Normally, Layer 3 would be at the
top of the list in the Layers palette because you added it last. If your script is working on this open
document and uses the syntax
a layer, Layer 3 is selected. If you then you drag the Background layer to the top of the list in the Layers
palette and run the script again, the Background layer is selected.
You can use the following syntax to refer to the layers by the names given them by the Application:
ArtLayer objects you create in a script.
Layers(1).Select/layers[0].select() to tell Photoshop CS3 to select
AS
layer 1 of layer set 1 of current document
Page 37

Photoshop CS3
Adobe Photoshop CS3 Scripting Guide Scripting Photoshop CS3 37
Note: Unlike object references in JavaScript or VBScript, AppleScript object reference names do not
remain constant. Refer to an AppleScript language guide or text book for information on
referencing a file using either
as alias or to a reference to file.
VBS
Layers("Layer 3").Select
JS
layers["Layer 3"].select() //using the collection name and square brackets for the
collection
Working with Layer Set Objects
Existing layers can be moved into layer sets. The following examples show how to create a Layer Set
object, duplicate an existing
AS
set current document to document "My Document"
set layerSetRef to make new layer set at end of current document
set newLayer to duplicate layer "Layer 1" of current document ¬
to end of current document
move newLayer to end of layerSetRef
ArtLayer object, and move the duplicate object into the layer set.
In AppleScript, you can also duplicate a layer directly into the destination layer set.
set current document to document "My Document"
set layerSetRef to make new layer set at end of current document
duplicate layer "Layer 1" of current document to end of layerSetRef
VBS
In VBScript you can duplicate and place the layer with the same method.
Dim appRef, docRef
Set appRef = CreateObject("Photoshop.Application")
'Make a new document and a first layer in the document
Set docRef = appRef.Documents.Add()
appRef.ActiveDocument.ArtLayers.Add()
Set layerSetRef = docRef.LayerSets.Add()
Set layerRef = docRef.ArtLayers(1).Duplicate(layerSetRef, 2)
JS
In JavaScript you can place the layer during the duplication method.
// create a document and an initial layer
var docRef = app.documents.add()
docRef.artLayers.add()
var layerSetRef = docRef.layerSets.add()
var layerRef = docRef.artLayers[0].duplicate(layerSetRef,
ElementPlacement.PLACEATEND)
Page 38

Photoshop CS3
Adobe Photoshop CS3 Scripting Guide Scripting Photoshop CS3 38
Linking Layer Objects
Scripting also supports linking and unlinking layers. You link layers together so that you can move or
transform the layers in a single statement.
AS
make new art layer in current document with properties {name:"L1"}
make new art layer in current document with properties {name:"L2"}
link art layer "L1" of current document with art layer "L2" of ¬
current document
Look up the link command in the Adobe Photoshop CS3 AppleScript Scripting Reference or in the
Photoshop CS3 AppleScript Dictionary.
VBS
Set layer1Ref = docRef.ArtLayers.Add()
Set layer2Ref = docRef.ArtLayers.Add()
layer1Ref.Link layer2Ref
Look up Link in as a method of the ArtLayer object in the Adobe Photoshop CS3 Visual Basic Scripting
Reference, or in the Visual Basic Object Browser. Additionally, look up
object.
Add as a method of the ArtLayers
JS
var layerRef1 = docRef.artLayers.add()
var layerRef2 = docRef.artLayers.add()
layerRef1.link(layerRef2)
Look up link() as a method of the ArtLayer object in the Adobe Photoshop CS3 JavaScript Scripting
Reference, or in the ExtendScript Object Model Viewer. Additionally, look up
ArtLayers object.
add() as a method of the
Applying Styles to Layers
Note: This procedure corresponds directly to dragging a style from the Photoshop CS3 Styles palette to a
layer.
Your script can apply styles to an
style/ApplyStyle/applyStyle()
ArtLayer object. To apply a style in a script, you use the apply layer
command with the style’s name as an argument enclosed in straight
double quotes.
Note: The layer style names are case sensitive.
Please refer to Photoshop CS3 Help for a list of styles and for more information about styles and the Styles
palette.
The following examples set the Puzzle layer style to the layer named “L1.”
AS
apply layer style art layer "L1" of current document using "Puzzle (Image)"
Look up the apply layer style command in the Adobe Photoshop CS3 AppleScript Scripting Reference or
in the Photoshop CS3 AppleScript Dictionary.
Page 39

Photoshop CS3
Adobe Photoshop CS3 Scripting Guide Scripting Photoshop CS3 39
VBS
docRef.ArtLayers("L1").ApplyStyle "Puzzle (Image)"
Look up ApplyStyle as a method of the ArtLayer object in the Adobe Photoshop CS3 Visual Basic
Scripting Reference, or in the Visual Basic Object Browser.
JS
docRef.artLayers["L1"].applyStyle("Puzzle (Image)")
Look up applyStyle() as a method of the ArtLayer object in the Adobe Photoshop CS3 JavaScript
Scripting Reference, or in the ExtendScript Object Model Viewer.
Using the Text Item Object
You can change an existing ArtLayer object to a text layer, that is, a Text Item object, if the layer is
empty. Conversely you can change a
rasterizes the text in the layer object.
Text Item object is a property of the ArtLayer object. However, to create a new text layer, you must
The
create a new
(psTextLayer)/ LayerKind.TEXT
ArtLayer object and then set the art layer's kind/Kind/kind property to text layer (2
To set or manipulate text in a text layer, you use the text-object (TextItem/TextItem) object, which is
contained in the
text object/TextItem/textItem property of the ArtLayer object.
Text Item object to an ArtLayer object. This “reverse” procedure
. ).
Creating a Text Item Object
The following examples create an ArtLayer object and then use the kind property to convert it to a text
layer.
AS
make new art layer in current document with properties { kind: text layer }
VBS
set newLayerRef = docRef.ArtLayers.Add()
newLayerRef.Kind = 2
'2 indicates psTextLayer
JS
var newLayerRef = docRef.artLayers.add()
newLayerRef.kind = LayerKind.TEXT
See ‘Photoshop CS3 Object Model’ on page 9 for information on the relationship between ArtLayer
objects and
Also, look up the following:
● The Kind/kind and TextItem/textItem properties of the ArtLayer object in the Adobe Photoshop
CS3 Visual Basic Scripting Reference, Adobe Photoshop CS3 JavaScript Scripting Reference, or in the Visual
Basic Object Browser and the ExtendScript Object Model Viewer.
TextItem objects.
● The kind and text object properties of the class art layer in the Adobe Photoshop CS3 AppleScript
Scripting Reference or in the Photoshop CS3 AppleScript Dictionary.
Page 40

Photoshop CS3
Adobe Photoshop CS3 Scripting Guide Scripting Photoshop CS3 40
Determining a Layer’s Kind
The following examples use an if statement to check whether an existing layer is a text layer.
AS
if (kind of layerRef is text layer) then
...
endif
VBS
If layerRef.Kind = 2 Then '2 indicates psTextLayer
...
End If
JS
if (newLayerRef.kind == LayerKind.TEXT)
{...}
Adding and Manipulating Text in a Text Item Object
The following examples add and right-justify text in a text layer.
AS
VBS
JS
set layerRef to make new art layer in current document with properties¬
{kind:text layer}
set contents of text object of layerRef to "Hello, World!"
set justification of text object of layerRef to right
Set textLayerRef = docRef.ArtLayers.Add()
textLayerRef.Kind = 2
textLayerRef.Name = "my text"
Set textItemRef = docRef.ArtLayers("my text").TextItem
textItemRef.Contents = "Hello, World!"
textItemRef.Justification = 3
'3 = psRight (for the constant value psJustification)
var textLayerRef = docRef.artLayers.add()
textLayerRef.name = "my text"
textLayerRef.kind = LayerKind.TEXT
var textItemRef = docRef.artLayers["my text"].textItem
textItemRef.contents = "Hello, World!"
textItemRef.justification = Justification.RIGHT
Note: The text-object (TextItem/TextItem) object has a kind (Kind/kind) property, which can
be set to either
point text (psPointText/TextType.POINTTEXT) or paragraph text
Page 41

Photoshop CS3
Adobe Photoshop CS3 Scripting Guide Scripting Photoshop CS3 41
(psParagraphText/TextType.PARAGRAPHTEXT
property is automatically set to
text-object properties height, width, and leading are valid only when the text item's kind
The
property is set to
paragraph text.
To familiarize yourself with this objects, properties, and commands in the scripting references, do the
following:
● In the Adobe Photoshop CS3 AppleScript Scripting Reference or in the Photoshop CS3 AppleScript
Dictionary, look up the
● In the Adobe Photoshop CS3 Visual Basic Scripting Reference, or in the Visual Basic Object Browser
look up the
TextItem property of the ArtLayer object. To find the properties and methods you can
text-object properties and methods.
use with a text layer, look up the
● In the Adobe Photoshop CS3 JavaScript Scripting Reference, or in the ExtendScript Object Model
Viewer, look up the
textItem property of the ArtLayer object. To find the properties and methods
you can use with a text layer, look up the
Working with Selection Objects
You use a Selection object to allow your scripts to act only on a specific, selected section of your
document or a layer within a document. For example, you can apply effects to a selection or copy the
current selection to the clipboard.
Selection object is a property of the Document object. Look up the following for more information:
The
. ) When a new text-object is created, its kind
point text.
TextItem object.
TextItem object.
● In the Adobe Photoshop CS3 AppleScript Scripting Reference or in the Photoshop CS3 AppleScript
Dictionary, look up the command
object, and the
● In the Adobe Photoshop CS3 Visual Basic Scripting Reference, or in the Visual Basic Object Browser, look
Selection as a property of the Document object. Also, look up the Select as a method of the
up
Selection object.
● In the Adobe Photoshop CS3 JavaScript Scripting Reference, or in the ExtendScript Object Model Viewer,
look up
Selection object.
selection as a property of the Document object. Also, look up the select as a method of the
selection-object.
Note: You cannot create a new
Document object contains a pre-existing selection object for the document. Use the select
the
(Select/select) command to specify the area for the selection.
select. Also, look up the selection property of the Document
Selection object. The property selection (Selection/selection) on
Creating and Defining a Selection
To create a selection, you use the select/Select/select() command of the Selection object.
You define a selection by specifying the coordinates on the screen that describe the selection’s corners.
Since your document is a 2-dimensional object, you specify coordinates using the x-and y-axes as follows:
● You use the x-axis to specify the horizontal position on the canvas.
● You use the y-axis to specify the vertical position on the canvas.
The origin point in Photoshop CS3, that is, x-axis = 0 and y-axis = 0, is the upper left corner of the screen.
The opposite corner, the lower right, is the extreme point of the canvas. For example, if your canvas is 1000
x 1000 pixels, then the coordinate for the lower right corner is x-axis = 1000 and y-axis = 1000.
You specify coordinate points that describe the shape you want to select as an array, which then becomes
the argument or parameter value for the
select/Select/select() command.
Page 42

Photoshop CS3
Adobe Photoshop CS3 Scripting Guide Scripting Photoshop CS3 42
➤ The following examples assume that the ruler units have been set to pixels and create a selection
by:
1. Creating a variable to hold a new document that is 500 x 500 pixels in size.
2. Creating a variable to hold the coordinates that describe the selected area (that is, the
object).
3. Adding an array as the selection variable’s value.
4. Using the
Document object’s selection property, and the Selection object’s select command to
select an area. The area’s coordinates are the selection variable’s values.
AS
set docRef to make new document with properties {height:500, width:500}
set shapeRef to {{0, 0}, {0, 100}, {100, 100}, {100, 0}}
select current document region shapeRef
VBS
DocRef = appRef.Documents.Add
ShapeRef = Array(Array(0, 0), Array(0, 100), Array(100,100), Array(100,0))
docRef.Selection.Select ShapeRef
JS
var docRef = app.documents.add(500, 500)
var shapeRef = [
[0,0],
[0,100],
[100,100],
[100,0]
]
docRef.selection.select(shapeRef)
Selection
Stroking the Selection Border
The following examples use the stroke (Stroke/stroke()) command of the Selection object to
stroke the boundaries around the current selection and set the stroke color and width.
Note: The transparency parameter cannot be used for background layers.
AS
stroke selection of current document using color ¬
{class:CMYK color, cyan:20, magenta:50, yellow:30, black:0} ¬
width 5 location inside blend mode vivid light opacity 75 ¬
without preserving transparency
VBS
Set strokeColor = CreateObject ("Photoshop.SolidColor")
strokeColor.CMYK.Cyan = 20
strokeColor.CMYK.Magenta = 50
strokeColor.CMYK.Yellow = 30
strokeColor.CMYK.Black = 0
appRef.ActiveDocument.Selection.Stroke strokeColor, 5, 1, 15, 75, False
Page 43

Photoshop CS3
Adobe Photoshop CS3 Scripting Guide Scripting Photoshop CS3 43
JS
strokeColor = new solidColor
strokeColor.cmyk.cyan = 20
strokeColor.cmyk.magenta = 50
strokeColor.cmyk.yellow = 30
strokeColor.cmyk.black = 0
app.activeDocument.selection.stroke (strokeColor, 2,
StrokeLocation.OUTSIDE, ColorBlendMode.VIVIDLIGHT, 75,
false)
Inverting Selections
You can use the invert (Invert/invert()) command of the Selection object to a selection so you
can work on the rest of the document, layer or channel while protecting the selection.
invert selection of current document
AS
VBSselRef.Invert
JSselRef.invert()
Expanding, Contracting, and Feathering Selections
You can change the size of a selected area using the expand, contract, and feather commands.
The values are passed in the ruler units stored in Photoshop CS3 preferences and can be changed by your
scripts. If your ruler units are set to pixels, then the following examples will expand, contract, and feather
by five pixels. See section ‘Setting Application Preferences’ on page 30
ruler units.
for examples of how to change
AS
expand selection of current document by pixels 5
contract selection of current document by pixels 5
feather selection of current document by pixels 5
VBS
Dim selRef
Set selRef = appRef.ActiveDocument.Selection
selRef.Expand 5
selRef.Contract 5
selRef.Feather 5
JS
var selRef = app.activeDocument.selection
selRef.expand( 5 )
selRef.contract( 5 )
selRef.feather( 5 )
Filling a Selection
You can fill a selection either with a color or a history state.
To fill with a color:
Page 44

Photoshop CS3
Adobe Photoshop CS3 Scripting Guide Scripting Photoshop CS3 44
AS
fill selection of current document with contents ¬
{class:RGB color, red:255, green:0, blue:0} blend mode ¬
vivid light opacity 25 without preserving transparency
VBS
Set fillColor = CreateObject("Photoshop.SolidColor")
fillColor.RGB.Red = 255
fillColor.RGB.Green = 0
fillColor.RGB.Blue = 0
selRef.Fill fillColor, 15, 25, False
JS
var fillColor = new SolidColor()
fillColor.rgb.red = 255
fillColor.rgb.green = 0
fillColor.rgb.blue = 0
app.activeDocument.selection.fill( fillColor, ColorBlendMode.VIVIDLIGHT,
25, false)
To fill the current selection with the tenth item in the history state:
Note: See ‘Using History State Objects’ on page 46
for information on History State objects.
AS
fill selection of current document with contents history state 10¬
of current document
VBS
selRef.Fill docRef.HistoryStates(10)
JS
selRef.fill(app.activeDocument.historyStates[9])
Loading and Storing Selections
You can s to r e Selection objects in, or load them from, Channel objects. To store a selection in a channel,
it should have its
selected area channel ( (psSelectedAreaAlphaChannel)/ ChannelType.SELECTEDAREA). The
following examples use the
current selection in a channel named
currently in that channel.
kind (Kind/kind) property set to a type that indicates that channel holds a selected area:
store (Store/store()) command of the Selection object to store the
My Channel and extend the selection with any selection that is
AS
set myChannel to make new channel of current document with properties ¬
{name:"My Channel"}
store selection of current document into channel ¬
"My Channel" of current document combination type extended
Page 45

Photoshop CS3
Adobe Photoshop CS3 Scripting Guide Scripting Photoshop CS3 45
VBS
Set chanRef = docRef.Channels.Add
chanRef.Name = "My Channel"
chanRef.Kind = 3 'psSelectedAreaAlphaChannel
docRef.Selection.Store docRef.Channels("My Channel"), 2
'PsSelectionType is 2 (psExtendSelection)
JS
var chanRef = docRef.channels.add()
chanRef.name = "My Channel"
chanRef.kind = ChannelType.SELECTEDAREA
docRef.selection.store(docRef.channels["My Channel"], SelectionType.EXTEND)
To restore a selection that has been saved to a Channel object, use the load (Load/load) method.
AS
set myChannel to make new channel of current document with properties ¬
{name:"My Channel"}
load selection of current document from channel "My Channel" of ¬
current document combination type extended
VBS
selRef.Load docRef.Channels("My Channel"), 2
'PsSelectionType is 2 (psExtendSelection)
JS
selRef.load (docRef.channels["My Channel"], SelectionType.EXTEND)
See section ‘Understanding Clipboard Interaction’ on page 54 for examples on how to copy, cut and paste
selections.
Working with Channel Objects
The Channel object gives you access to much of the available functionality on Photoshop CS3 channels.
You can create, delete, and duplicate channels or retrieve a channel's histogram and change its kind. See
‘Creating New Objects in a Script’ on page 21
You can set or get (that is, find out about) a
and Storing Selections’ on page 44 for script samples that demonstrate how to create a selected area
channel.
Changing Channel Types
You can change the kind of any channel except component channels. The following examples
demonstrate how to change a masked area channel to a selected area channel:
for information on creating a Channel object in your script.
Channel object’s type using the kind property. See ‘Loading
Note: Component channels are related to the document mode. Refer to Photoshop CS3 Help for
information on channels, channel types, and document modes.
Page 46

Photoshop CS3
Adobe Photoshop CS3 Scripting Guide Scripting Photoshop CS3 46
AS
set kind of myChannel to selected area channel
VBS
channelRef.ind = 3 'for psSelectedAreaAlphaChannel
'from the constant value PsChannelType
JS
channelRef.kind = ChannelType.SELECTEDAREA
Using the Document Info Object
In Photoshop CS3, you can associate information with a document by choosing File > File Info.
To accomplish this task in a script, you use the
which is stored in the
demonstrate how to use the
info (Info/info) property of the Document object. The following examples
DocumentInfo object to set the copyrighted status and owner URL of a
document.
info-object (DocumentInfo/DocumentInfo) object,
AS
set docInfoRef to info of current document
get EXIF of docInfoRef
set copyrighted of docInfoRef to copyrighted work
set owner url of docInfoRef to "http://www.adobe.com"
get EXIF of docInfoRef
VBS
Set docInfoRef = docRef.Info
docInfoRef.Copyrighted = 1 'for psCopyrightedWork
docInfoRef.OwnerUrl = "http://www.adobe.com"
JS
docInfoRef = docRef.info
docInfoRef.copyrighted = CopyrightedType.COPYRIGHTEDWORK
docInfoRef.ownerUrl = "http://www.adobe.com"
For information about other types of information (properties) you can associate with a document, look up
the following:
● In the Adobe Photoshop CS3 AppleScript Scripting Reference or in the Photoshop CS3 AppleScript
Dictionary, look up the properties for the class
● In the Adobe Photoshop CS3 Visual Basic Scripting Reference, the Adobe Photoshop CS3 JavaScript
Scripting Reference, the Visual Basic Object Browser or the ExtendScript Object Model Viewer, look up
the properties for the
DocumentInfo object.
info-object.
Using History State Objects
Photoshop CS3 keeps a history of the actions that affect documents. Each time you apply a change to an
image in the Photoshop CS3 application, you create a history state; you can access a document’s history
states from the History palette by selecting Window > History. See Photoshop CS3 Help for additional
information about History State.
Page 47

Photoshop CS3
Adobe Photoshop CS3 Scripting Guide Scripting Photoshop CS3 47
In a script, you can access a Document object’s history states using the HistoryStates object, which is a
property of the
state or to fill a
The following examples revert the document contained in the variable
Document object. You can use a HistoryStates object to reset a document to a previous
Selection object.
docRef back to the form and
properties it had when it was first opened or created. Using history states in this fashion gives you the
ability to undo modifications to the document.
AS
set current history state of current document to history state 1 ¬
of current document
VBS
docRef.ActiveHistoryState = docRef.HistoryStates(1)
JS
docRef.activeHistoryState = docRef.historyStates[0]
Note: Reverting back to a previous history state does not remove any later states from the history
collection. Use the
shown below:
Purge command to remove later states from the History States collection as
● AS: purge history caches
● VBS: appRef.Purge(2) 'for psPurgeTarget --> 2 (psHistoryCaches)
● JS: app.purge(PurgeTarget.HISTORYCACHES)
The example below saves the current state, applies a filter, and then reverts back to the saved history state.
AS
set savedState to current history state of current document
filter current layer of current document using motion blur with options ¬
{class:motion blur, angle:20, radius:20}
set current history state of current document to savedState
VBS
Set savedState = docRef.ActiveHistoryState
docRef.ArtLayers(1).ApplyMotionBlur 20, 20
docRef.ActiveHistoryState = savedState
JS
savedState = docRef.activeHistoryState
docRef.artLayers[0].applyMotionBlur( 20, 20 )
docRef.activeHistoryState = savedState
Using Notifier Objects
You use the Notifier object to tie an event to a script. For example, if you would like Photoshop CS3 to
automatically create a new document when you open the application, you could tie a script that creates a
Document object to an Open Application event.
Page 48

Photoshop CS3
Adobe Photoshop CS3 Scripting Guide Scripting Photoshop CS3 48
Note: This type of script corresponds to selecting Start Application in the Script Events Manager (File >
Scripts > Script Events Manager) in the Photoshop CS3 application. Please refer to Photoshop CS3
Help for information on using the Script Events Manager.
make (Add/add) command requires you to specify an event ID to identify the event to set up
The
notification for. Many event IDs are listed in an Appendix in the Adobe Photoshop CS3 JavaScript Scripting
Reference, Adobe Photoshop CS3 Visual Basic Scripting Reference, and Adobe Photoshop CS3 AppleScript
Scripting Reference. Some events also operate on several types of objects, and the
make (Add/add)
command requires an additional argument for a class ID, which identifies the object. For example, the
“New” command is used for Document, Art Layer, and Channel objects.
Tip: You can determine the event and class IDs of any recordable event by using ScriptListener. See ‘Using
ScriptListener to find event IDs and class IDs’ on page 79.
The following example shows how to set up event notification for an “Open Document” event. First the
script ensures that event notification is enabled, then it sets up the event to trigger the execution of the
Welcome.jsx file. Once the script completes, any time you open a document outside of a script, it triggers
the notification, which runs the
.jsx file. This .jsx file displays an alert box.
Note: Notification generally does not take effect on events that occur inside of a script, because these
events are embedded with in an
"AdobeScriptAutomation Scripts" event.
AS
VBS
JS
tell application "Adobe Photoshop CS3"
try
delete notifiers
end try
make new notifier with properties {event:"Opn ", ¬
event file:alias "OS X 10.4.8 US:Users:psauto:Desktop:Welcome.jsx"}
end tell
Dim appRef,eventFile
Set appRef = CreateObject("Photoshop.Application")
appRef.NotifiersEnabled = True
eventFile = appRef.Path & "Presets\Scripts\Event Scripts Only\Welcome.jsx"
appRef.Notifiers.Add "Opn ", eventFile
app.notifiersEnabled = true
var eventFile = new File(app.path +
"/Presets/Scripts/Event Scripts Only/Welcome.jsx")
app.notifiers.add("Opn ", eventFile)
Using the PathItem Object
To create a PathItem object, you must add a PathItem to the PathItems element or collection for a
document. This requires that you first create an array of
coordinates of the corners or anchor points of your path. Then you create an array of
to contain the
The following script creates a
PathPoint arrays.Once you have the points and a subpath, you can add a new PathItem.
PathPointInfo objects, which specify the
SubPathInfo objects
PathItem object that is a straight line.
Page 49

Photoshop CS3
Adobe Photoshop CS3 Scripting Guide Scripting Photoshop CS3 49
AS
--line #1--it’s a straight line so the coordinates for anchor, left, and
--right for each point have the same coordinates
tell application "Adobe Photoshop CS3"
set ruler units of settings to pixel units
set type units of settings to pixel units
set docRef to make new document with properties {height:700, width:500, ¬
name:"Snow Cone"}
set pathPointInfo1 to {class:path point info, kind:corner point, ¬
anchor:{100, 100}, left direction:{100, 100}, right direction:{100, 100}}
set pathPointInfo2 to {class:path point info, kind:corner point, ¬
anchor:{150, 200}, left direction:{150, 200}, right direction:{150, 200}}
set subPathInfo1 to ¬
{class:sub path info, ¬
entire sub path:{pathPointInfo1, pathPointInfo2}, ¬
operation:shape xor, closed:false}
set newPathItem to make new path item in docRef with properties ¬
{entire path:{subPathInfo1}, name:"Line", kind:normal}
end tell
VBS
Dim appRef, docRef
Dim lineArray(1), lineArray2(1), lineSubPathArray(0), myPathItem
Set appRef = CreateObject("Photoshop.Application")
' create a document to work with
Set docRef = appRef.Documents.Add(5000, 7000, 72, "Simple Line")
'line #1--it’s a straight line so the coordinates for anchor, left, and
'right for each point have the same coordinates
'First create the array of PathPointInfo objects. The line has two points,
'so there are two PathPointInfo objects.
Set lineArray(0) = CreateObject("Photoshop.PathPointInfo")
lineArray(0).Kind = 2 ' for PsPointKind --> 2 (psCornerPoint)
lineArray(0).Anchor = Array(100, 100)
lineArray(0).LeftDirection = lineArray(0).Anchor
lineArray(0).RightDirection = lineArray(0).Anchor
Set lineArray(1) = CreateObject("Photoshop.PathPointInfo")
lineArray(1).Kind = 2
lineArray(1).Anchor = Array(150, 200)
lineArray(1).LeftDirection = lineArray(1).Anchor
lineArray(1).RightDirection = lineArray(1).Anchor
'Next create a SubPathInfo object, which will hold the line array
'in its EntireSubPath property.
Set lineSubPathArray(0) = CreateObject("Photoshop.SubPathInfo")
lineSubPathArray(0).Operation = 2 'for PsShapeOperation --> 2 (psShapeXOR)
lineSubPathArray(0).Closed = false
lineSubPathArray(0).EntireSubPath = lineArray
'create the PathItem object using Add. This method takes the SubPathInfo object
'and returns a PathItem object, which is added to the pathItems collection
'for the document.
Set myPathItem = docRef.PathItems.Add("A Line", lineSubPathArray)
Page 50

Photoshop CS3
Adobe Photoshop CS3 Scripting Guide Scripting Photoshop CS3 50
' stroke it so we can see something
myPathItem.StrokePath(2) 'for PsToolType --> 2 (psBrush)
JS
// create a document to work with
var docRef = app.documents.add(5000, 7000, 72, "Simple Line")
//line #1--it’s a straight line so the coordinates for anchor, left, and //right
//for each point have the same coordinates
// First create the array of PathPointInfo objects. The line has two points,
// so there are two PathPointInfo objects.
var lineArray = new Array()
lineArray[0] = new PathPointInfo
lineArray[0].kind = PointKind.CORNERPOINT
lineArray[0].anchor = Array(100, 100)
lineArray[0].leftDirection = lineArray[0].anchor
lineArray[0].rightDirection = lineArray[0].anchor
lineArray[1] = new PathPointInfo
lineArray[1].kind = PointKind.CORNERPOINT
lineArray[1].anchor = Array(150, 200)
lineArray[1].leftDirection = lineArray[1].anchor
lineArray[1].rightDirection = lineArray[1].anchor
// Next create a SubPathInfo object, which holds the line array
// in its entireSubPath property.
var lineSubPathArray = new Array()
lineSubPathArray[0] = new SubPathInfo()
lineSubPathArray[0].operation = ShapeOperation.SHAPEXOR
lineSubPathArray[0].closed = false
lineSubPathArray[0].entireSubPath = lineArray
//create the path item, using add. This method takes the SubPathInfo object
//and returns a PathItem object, which is added to the pathItems collection
// for the document.
var myPathItem = docRef.pathItems.add("A Line", lineSubPathArray);
// stroke it so we can see something
myPathItem.strokePath(ToolType.BRUSH)
Working with Color Objects
Your scripts can use the same range of colors that are available from the Photoshop CS3 user interface.
Each color model has its own set of properties. For example, the
contains three properties: red, blue and green. To set a color in this class, you indicate values for each of
the three properties.
In VBScript and JavaScript, the
object, you first create an instance of a
the object. Once a color model has been assigned to a
be reassigned to a different color model.
The following examples demonstrate how to set a color using the
SolidColor class contains a property for each color model. To use this
RGB color (RGBColor/RGBColor) class
SolidColor object, then set appropriate color model properties for
SolidColor object, the SolidColor object cannot
CMYK color class.
AS
set foreground color to {class:CMYK color, cyan:20.0,¬
magenta:90.0, yellow:50.0, black:50.0}
Page 51

Photoshop CS3
Adobe Photoshop CS3 Scripting Guide Scripting Photoshop CS3 51
VBS
'create a solidColor array
Dim solidColorRef
Set solidColorRef = CreateObject("Photoshop.SolidColor")
solidColorRef.CMYK.Cyan = 20
solidColorRef.CMYK.Magenta = 90
solidColorRef.CMYK.Yellow = 50
solidColorRef.CMYK.Black = 50
appRef.ForegroundColor = solidColorRef
JS
//create a solid color array
var solidColorRef = new solidColor()
solidColorRef.cmyk.cyan = 20
solidColorRef.cmyk.magenta = 90
solidColorRef.cmyk.yellow = 50
solidColorRef.cmyk.black = 50
foregroundColor = solidColorRef
Solid Color Classes
The solid color classes available in Photoshop CS3 are illustrated below.
Color Classes
RGB
Color
CMYK
Color
Using Hex Values for RGB Color
You can express RGB colors as hex (or hexadecimal) values. A hex value contains three pairs of numbers
which represent red, blue and green (in that order).
In AppleScript, the hex value is represented by the
you use the
In VBScript and JavaScript, the
convert color command described below to retrieve the hex value.
RGBColor object has a string property called HexValue/hexValue.
Getting and Converting Colors
The following examples convert an RGB color to its CMYK equivalent.
Gray
Color
Solid
Color
HSB
Color
hex value string property in class RGB hex color, and
Lab
Color
No
Color
Page 52

Photoshop CS3
Adobe Photoshop CS3 Scripting Guide Scripting Photoshop CS3 52
AS
The following script, which assumes an RGB color model, gets the foreground color and then uses the
convert command of the color class to convert the color to its CMYK equivalent.
get foreground color
convert color foreground color to CMYK
Look up the following in the Adobe Photoshop CS3 AppleScript Scripting Reference or in the Photoshop CS3
AppleScript Dictionary:
● In the “Objects” section, the foreground color property of the class application
● In the “Commands” section, convert
VBS
The following script uses an If Then statement and the model property of the SolidColor object to
determine the color model in use. The
object, the
cmyk property of the SolidColor object then allows you to access the color with its CMYK
equivalent.
Dim someColor
If (someColor.model = 2) Then
someColor.cmyk
'someColor.model = 2 indicates psColorModel --> 2 (psRGBModel)
End If
Look up the following in the Adobe Photoshop CS3 Visual Basic Scripting Reference, or in the Visual Basic
Object Browser:
If Then statement returns a SolidColor object; if it returns an RGB
● model and cmyk as properties of the SolidColor object
JS
This example uses the foregroundColor property of the Application object to get the original color to
be converted. The
cmyk property of the SolidColor object that foregroundColor refers to provides a
way to access the cmyk equivalent of the rgb color.
var someColor = foregroundColor.cmyk
Look up the following in the Adobe Photoshop CS3 JavaScript Scripting Reference, or in the ExtendScript
Object Model Viewer:
● cmyk as a property of the SolidColor object
● foregroundColor as a property of the Application object
Comparing Colors
Using the equal colors (IsEqual/isEqual) command, you can compare colors. The following
statements return
● AS: if equal colors foreground color with background color then
● VBS: If (appRef.ForegroundColor.IsEqual(appRef.BackgroundColor)) Then
● JS: if (app.foregroundColor.isEqual(backgroundColor))
true if the foreground color is visually equal to background color.
Getting a Web Safe Color
To convert a color to a web safe color use the web safe color command on AppleScript and the
NearestWebColor/nearestWebColor property of the SolidColor object for VBScript and JavaScript.
Page 53

Photoshop CS3
Adobe Photoshop CS3 Scripting Guide Scripting Photoshop CS3 53
AS
set myWebSafeColor to web safe color for foreground color
VBS
Dim myWebSafeColor
Set myWebSafeColor = appRef.ForegroundColor.NearestWebColor
JS
var webSafeColor = new RGBColor()
webSafeColor = app.foregroundColor.nearestWebColor
Working with Filters
To apply a filter in AppleScript, you use the filter command with an option from the class filter
options
filter, you use the
ArtLayer object.
. In VBScript and JavaScript, you use a specific filter method. For example, to apply a Gaussian blur
ApplyGaussianBlur/applyGaussianBlur() method. All filter methods belong to the
Note: Please refer to Photoshop CS3 Help for information about the effects produced by individual filter
types.
The following examples apply the Gaussian blur filter to the active layer.
AS
Use the filter command and then both specify the layer and the name of the filter and any options.
filter current layer of current document using gaussian blur ¬
with options {radius:5}
Note: In the Adobe Photoshop CS3 AppleScript Scripting Reference, or in the Photoshop CS3 AppleScript
Dictionary, look up the
filter command; also look up class filter options.
VBS
appRef.docRef.ActiveLayer.ApplyGaussianBlur 5
Note: In the Adobe Photoshop CS3 Visual Basic Scripting Reference, on in the Visual Basic Object Browser
look up the
begins with ‘Apply’.
ApplyGaussianBlur method and other methods of the ArtLayer object whose name
JS
docRef.activeLayer.applyGaussianBlur(5)
Note: In the Adobe Photoshop CS3 JavaScript Scripting Reference, or in the ExtendScript Object Model
Viewer look up the
whose name begins with ‘apply’.
applyGaussianBlur() method and other methods of the artLayer object
Other Filters
If the filter type that you want to use on your layer is not part of the scripting interface, you can use the
Action Manager from a JavaScript to run a filter. If you are using AppleScript or VBScript, you can run the
Page 54

Photoshop CS3
Adobe Photoshop CS3 Scripting Guide Scripting Photoshop CS3 54
JavaScript from your script. See ‘Action Manager’ on page 72 for information on using the Action Manager.
Also, see ‘Executing JavaScripts from AS or VBS’ on page 9
.
Understanding Clipboard Interaction
The clipboard commands in Photoshop CS3 operate on ArtLayer, Selection, and Document objects. The
commands can be used to operate on objects within a single document, or to move information between
documents.
The clipboard commands of the
(Selection/Selection)
● copy (Copy/copy)
● copy merged (Copy Merge parameter value/copy(merge parameter value))
● cut(Cut/cut)
The clipboard commands of the document/Document/Document object are:
● paste (Paste/paste)
● paste into (Paste IntoSelection parameter value/paste(intoSelection parameter
value))
Note: For information on copy, copy merged, paste, paste into, and cut functions, see Photoshop CS3
Help.
art layer (ArtLayer/ArtLayer) and selection
objects are:
Using the Copy and Paste commands
The following examples copy the contents of the background layer to the clipboard, create a new
document, and then paste the clipboard contents to the new document. The scripts assume that there is a
document already open in Photoshop CS3 and that the document has a background layer.
Note: If your script creates a new document in which you paste the clipboard contents, be sure the
document uses the same ruler units as the original document. See ‘Setting Application Preferences’
on page 30 for information.
AS
Note: On Mac OS, Photoshop CS3 must be the front-most application when executing these commands.
You must use the
commands.
tell application "Adobe Photoshop CS3"
activate
select all of current document
copy
set current layer of current document to layer "Background" ¬
of current document
set newDocRef to make new document
paste newDocRef
end tell
activate command to activate the application before executing any clipboard
VBS
'make firstDocument the active document
Set docRef = appRef.ActiveDocument
docRef.ArtLayers("Background").Copy
Page 55

Photoshop CS3
Adobe Photoshop CS3 Scripting Guide Scripting Photoshop CS3 55
Set newDocRef = appRef.Documents.Add(8, 6, 72, "New Doc")
newDocRef.Paste
JS
//make firstDocument the active document
var docRef = app.activeDocument
docRef.artLayers["Background"].copy()
var newDocRef = app.documents.add(8, 6, 72, "New Doc")
newDocRef.paste()
Using the Copy Merged Command/Method
You can also perform a merged copy to copy all visible layers in the selected area. In AppleScript, you use
copy merged command. For VBScript and JavaScript, you use the Copy/copy command, passing in a
the
value of
AS
Note: On Mac OS, Photoshop CS3 must be the front-most application when executing these commands.
True/true for the optional merge parameter.
You must use the
activate command to activate the application before executing any clipboard
commands.
set docRef to make new document
make new art layer of docRef
select all of docRef
copy merged selection of docRef
VBS
docRef.Selection.Copy True
Look up the Copy method for the ArtLayer and Selection objects in the Adobe Photoshop CS3 Visual
Basic Scripting Reference, or in the Visual Basic Object Browser
JS
docRef.selection.copy(true)
Look up the copy() method for the ArtLayer and Selection objects in the Adobe Photoshop CS3
JavaScript Scripting Reference, or in the ExtendScript Object Model Viewer.
Working with Units
Photoshop CS3 provides two rulers for documents. Using properties on the settings-object
Preferences/Preferences) object, you can set the measurement units for the rulers in your script. The
(
rulers are:
● A graphics ruler used for most graphical layout measurements or operations on a document where
height, width, or position are specified.
You set measurement unit types for the graphics ruler using the
(RulerUnits/rulerUnits)
property.
ruler units
Page 56

Photoshop CS3
Adobe Photoshop CS3 Scripting Guide Scripting Photoshop CS3 56
● A type ruler, which is active when using the type tool.
You set measurement unit types for the type ruler using the
property.
Note: These settings correspond to those found in the Photoshop CS3 preference dialog under
Photoshop > Preferences > Units & Rulers on Mac OS or Edit > Preferences > Units & Rulers in
Windows.
Unit Values
All languages support plain numbers for unit values. These values are treated as being of the type
currently specified for the appropriate ruler.
For example, if the ruler units are currently set to inches and the following VBScript statement sets a
document’s size to 3 inches by 3 inches:
docRef.ResizeImage 3,3
If the ruler units had been set to pixels, the document would be 3 pixels by 3 pixels. To ensure that your
scripts produce the expected results you should check and set the ruler units to the type appropriate for
your script. After executing a script the original values of the ruler settings should be restored if changed in
the script. See ‘Setting Ruler and Type Units in a Script’ on page 59
Please refer to Photoshop CS3 Help for information about available unit value types.
Special Unit Value Types
The unit values used by Photoshop CS3 are length units, representing values of linear measurement.
Support is also included for pixel and percent unit values. These two unit value types are not, strictly
speaking, length values but are included because they are used extensively by Photoshop CS3 for many
operations and values.
type units (TypeUnits/typeUnits)
for directions on setting unit values.
AppleScript Unit Considerations
AppleScript provides an additional way of working with unit values. You can provide values with an
explicit unit type where unit values are used. When a typed value is provided its type overrides the ruler’s
current setting.
For example, to create a document which is 4 inches wide by 5 inches high you would write:
make new document with properties {width:inches 4, ¬
height:inches 5}
The values returned for a Photoshop CS3 property that uses units is returned as a value of the current ruler
type. Getting the height of the document created above:
set docHeight to height of current document
returns a value of 5.0, which represents 5 inches based on the current ruler settings.
In AppleScript, you can optionally ask for a property value as a particular type.
set docHeight to height of current document as points
This returns a value of 360 (5 inches x 72 points per inch).
points and picas unit value types are PostScript points, with 72 points per inch. The traditional
The
points
points per inch.
You can convert, or coerce, a unit value from one value type to another. For example, the following script
converts a point value to an inch value.
and traditional picas unit value types are based on classical type setting values, with 72.27
set pointValue to 72 as points
set inchValue to pointValue as inches
Page 57

Photoshop CS3
Adobe Photoshop CS3 Scripting Guide Scripting Photoshop CS3 57
When this script is run, the variable inchValue will contain inches 1, which is 72 points converted to
inches. This conversion ability is built in to the AppleScript language.
Note: The unit values
cm or mm. They are not supported by the AppleScript terminology.
to
cm units and mm units cannot be used in this way with a corresponding reference
Using Unit Values in Calculations
To use a unit value in a calculation in Applescript it is necessary to first convert the value to a number (unit
value cannot be used directly in calculations). To multiply an inch value write:
set newValue to (inchValue as number) * 5
Note: In AppleScript you can get and set values as pixels or percent as you would any other unit value
type. You cannot, however, convert a pixel or percent value to another length unit value as you can
with other length value types. Trying to run the following script will result in an error.
set pixelValue to 72 as pixels
-- Next line will result in a coercion error when run
set inchValue to pixelValue as inches
Note: Because Photoshop CS3 is a pixel-oriented application you may not always get back the same value
as you pass in when setting a value. For example, if
a document that is 30 x 30, the value returned for the height or width will be 30.056 if your
document resolution is set to 72 ppi. The scripting interface assumes settings are measured by ppi.
Unit Value Usage
The following tables list the properties of the classes/objects that are defined to use unit values. Unit
values for these properties, unless otherwise indicated in the table, are based the graphics ruler setting.
To use this table, do one of the following:
ruler units is set to mm units, and you create
● Look up the properties of the class in the Adobe Photoshop CS3 AppleScript Scripting Reference, or in the
Photoshop CS3 AppleScript Dictionary.
● Look up the property of the object in the Adobe Photoshop CS3 Visual Basic Scripting Reference, the
Adobe Photoshop CS3 JavaScript Scripting Reference, the Visual Basic Object Browser, or the ExtendScript
Object Model Viewer.
AppleScript
Class/Object
Document height
EPS open options height
PDF open options height
lens flare open
options
Properties
width
width
width
height
width
VBScript
Properties
Height
Width
Height
Width
Height
Width
Height
Width
JavaScript
Properties
height
width
height
width
height
width
height
width
Page 58

Photoshop CS3
Adobe Photoshop CS3 Scripting Guide Scripting Photoshop CS3 58
AppleScript
Class/Object
offset filter horizontal
Text Item baseline shift*
Properties
offset
vertical offset
first line
indent*
height
hyphenation
zone*
leading*
left indent*
position
right indent*
space before*
space after*
width
VBScript
Properties
HorizontalOffset
VerticalOffset
BaselineShift*
FirstLineIndent*
Height
HyphenationZone*
Leading*
LeftIndent*
Position
RightIndent*
SpaceBefore*
SpaceAfter*
Width
JavaScript
Properties
horizontalOffset
verticalOffset
baselineShift*
firstLineIndent*
height
hyphenationZone*
leading*
leftIndent*
position
rightIndent*
spaceBefore*
spaceAfter*
width
* Unit values based on type ruler setting.
The following table lists the commands that use unit values as parameters or arguments. In some cases the
parameters are required. The VBScript and JavaScript methods are preceded by the object to which they
belong.
To use this table:
● For AppleScript commands, look up the command in the “Commands” chapter of the Adobe Photoshop
CS3 AppleScript Scripting Reference, or use the Photoshop CS3 AppleScript Dictionary.
● For VBScript methods, look up the method in the Methods table of the object in the “Interface” chapter
of the Adobe Photoshop CS3 Visual Basic Scripting Reference, or use the Visual Basic Object Browser.
● For JavaScript methods, look up the method in the Methods table of the object in the “Object
Reference” chapter in the Adobe Photoshop CS3 JavaScript Scripting Reference, or use the ExtendScript
Object Model Viewer.
AppleScript VBScript JavaScript
crop
(bounds, height,
width)
resize canvas
(height, width)
resize image
(height, width)
contract
(by)
expand
(by)
feather
(by)
Document.Crop
(Bounds, Height, Width)
Document.ResizeCanvas
(Height, Width)
Document.ResizeImage
(Height, Width)
Selection.Contract
(By)
Selection.Expand
(By)
Selection.Feather
(By)
document.crop
(bounds, height,
width)
document.resizeCanvas
(height, width)
document.resizeImage
(height, width)
selection.contract
(by)
selection.expand
(by)
selection.feather
(by)
select border
(width)
Selection.SelectBorder
(Width)
selection.selectBorder
(width)
Page 59

Photoshop CS3
Adobe Photoshop CS3 Scripting Guide Scripting Photoshop CS3 59
AppleScript VBScript JavaScript (Continued)
translate
(delta x, delta y)
translate boundary
(delta x, delta y)
Selection.Translate
(DeltaX, DeltaY)
Selection.TranslateBoun
dary
(DeltaX, DeltaY)
Setting Ruler and Type Units in a Script
The unit type settings of the two Photoshop CS3 rulers control how numbers are interpreted when dealing
with properties and parameters that support unit values. Be sure to set the ruler units as needed at the
beginning of your scripts and save and restore the original ruler settings when your script has completed.
AS
In AppleScript ruler units and type units are properties of the settings-object, accessed through
the Application object's
set ruler units of settings to inch units
set type units of settings to pixel units
set point size of settings to postscript size
VBS
In VBScript RulerUnits and TypeUnits are properties of the Preferences object, accessed through the
Application object's Preferences property as shown below.
settings property as shown below.
selection.translate
(deltaX, deltaY)
selection.translateBou
ndary
(deltaX, deltaY)
appRef.Preferences.RulerUnits = 2 'for PsUnits --> 1 (psInches)
appRef.Preferences.TypeUnits = 1 'for PsTypeUnits --> 1 (psPixels)
appRef.Preferences.PointSize = 2
'2 indicates psPointType --> 2 (PsPostScriptPoints)
JS
In JavaScript rulerUnits and typeUnits are properties of the Preferences object, accessed through
Application object's preferences property as shown below.
the
app.preferences.rulerUnits = Units.INCHES
app.preferences.typeUnits = TypeUnits.PIXELS
app.preferences.pointSize = PointType.POSTSCRIPT
Note: Remember to reset the unit settings back to the original values at the end of a script. See ‘Working
with Document Preferences’ on page 60 for an example of how to do this.
Sample Workflow Automation JavaScripts
The following sample workflow automation JavaScripts are provided with Photoshop CS3 and
demonstrate various kinds of scripting usage. The scripts are located in the
your application directory. See Creating and Running a JavaScript
Presets/Scripts folder.
Presets/Scripts folder in
for information on the
Page 60

Photoshop CS3
Adobe Photoshop CS3 Scripting Guide Scripting Photoshop CS3 60
Script Name Description
Layer Comps to Files.jsx
Layer Comps to PDF.jsx
Layer Comps to WPG.jsx
Export Layers to Files.jsx
Script Events Manager.jsx
Image Processor.jsx
Load Files into Stack.jsx
Merge to HDR.jsx
Advanced Scripting
This section demonstrates how to use the information contained in the previous sections of this chapter to
create scripts that do the following:
● Configure document preferences.
Saves layer comps as files.
Saves layer comps as a PDF presentation.
Saves layer comps as a Web photo gallery.
Exports each layer in the document to a separate file.
Enables and disables notifier objects.
Processes camera raw images into various file formats.
Loads separate files into an image stack in a single document.
Combines multiple images of the same scene or image, capturing
the dynamic range of a scene in a single High Dynamic Range (HDR)
image.
● Apply color to text items. In this section, you will also learn how to do the following:
● Create a reference to an existing document.
● Create a layer object and make the layer a text layer.
● Rasterize text so that wrap and blur processing can be applied to words. In these sections you will also
learn how to do the following:
● Select and work with a specific area of a layer by creating a selection object.
● Apply wave and motion blur filters to selected text.
Note: When you finish the lesson in each of the following sections, save the script you have created in the
lesson. Each lesson builds upon the script created in the previous lesson.
Working with Document Preferences
The sample scripts in this section activate a Photoshop CS3 Application object and then save the default
configuration settings into variables so that they can be restored later when the script completes. These
are the default configurations you probably set up in the Preferences dialog when you initially installed
and configured Photoshop CS3.
Note: To view or set the Preferences on Mac OS, choose Photoshop > Preferences > Units & Rulers; in
Windows choose Edit > Preferences > Units & Rulers.
Next, the scripts set the following preferences to the following values:
Page 61

Photoshop CS3
Adobe Photoshop CS3 Scripting Guide Scripting Photoshop CS3 61
Preference Set to What it does
rulers inches Uses inches as the unit of measurement for graphics.
units pixels Uses pixels as the unit of measurement for text (type).
dialog modes never Suppresses the use of dialogs so that your script executes without
the user being asked for input (such as clicking an OK button) at
various stages of the process.
Note: dialog modes is not an option in the Photoshop CS3
application.
Next, the script declares variables that store document dimensions in inches and document resolution in
pixels. The script then declares a display resolution, and assigns the text "Hello, World!" to a string variable.
Next, an
Document object if none exists.
if statement checks whether a Document object has been created and then creates a new
Finally, the script restores the original preferences.
AS
➤ To work with document preferences:
1. Create and run the following script. See ‘Creating and Running an AppleScript’ on page 15 for details.
tell application "Adobe Photoshop CS3"
--make Photoshop CS3 the active (front-most) application
activate
--create variables for the default settings
set theStartRulerUnits to ruler units of settings
set theStartTypeUnits to type units of settings
set theStartDisplayDialogs to display dialogs
--change the settings
set ruler units of settings to inch units
set type units of settings to pixel units
set display dialogs to never
--create variables for default document settings
set theDocWidthInInches to 4
set theDocHeightInInches to 2
set theDocResolution to 72
set theDocString to "Hello, World!"
--check to see whether any documents are open
--if none are found, create a document
--use the default document settings as its properties
if (count of documents) is 0 then
make new document with properties ¬
{width:theDocWidthInInches, height:theDocHeightInInches,¬
resolution:theDocResolution, name:theDocString}
end if
--change the settings back to the original units stored in the variables
set ruler units of settings to theStartRulerUnits
set type units of settings to theStartTypeUnits
Page 62

Photoshop CS3
Adobe Photoshop CS3 Scripting Guide Scripting Photoshop CS3 62
set display dialogs to theStartDisplayDialogs
end tell
2. In Photoshop CS3, choose Photoshop > Preferences > Units & Rulers to verify that your preferences
have been returned to your original settings.
3. After viewing the document in Photoshop CS3, close the document without saving it.
4. Save the script as
HelloWorldDoc.
VBS
➤ To work with document preferences:
1. Create the following script. See ‘Creating and Running a VBScript’ on page 16 for details.
'create variables for default preferences, new preferences
Dim startRulerUnits
Dim startTypeUnits
Dim docWidthInInches
Dim docHeightInInches
Dim resolution
Dim helloWorldStr
Dim appRef
Set appRef = CreateObject("Photoshop.Application")
'assign default preferences to save values in variables
startRulerUnits = appRef.Preferences.RulerUnits
startTypeUnits = appRef.Preferences.TypeUnits
startDisplayDialogs = appRef.DisplayDialogs
'set new preferences and document defaults
appRef.Preferences.RulerUnits = 2 'for PsUnits --> 2 (psInches)
appRef.Preferences.TypeUnits = 1 'for PsTypeUnits --> 1 (psPixels)
appRef.DisplayDialogs = 3 'for PsDialogModes --> 3 (psDisplayNoDialogs)
docWidthInInches = 4
docHeightInInches = 2
resolution = 72
helloWorldStr = "Hello, World!"
'see if any documents are open
'if none, create one using document defaults
If appRef.Documents.Count = 0 Then
appRef.Documents.Add docWidthInInches, docHeightInInches, resolution,
helloWorldStr
End If
'restore beginning preferences
appRef.Preferences.RulerUnits = startRulerUnits
appRef.Preferences.TypeUnits = startTypeUnits
appRef.DisplayDialogs = startDisplayDialogs
2. Double click the file name in Windows Explorer to run the script.
3. In Photoshop CS3, choose Edit > Preferences > Units & Rulers to verify that your preferences have
been returned to your original settings.
Page 63

Photoshop CS3
Adobe Photoshop CS3 Scripting Guide Scripting Photoshop CS3 63
4. After viewing the document in Photoshop CS3, close the document without saving it.
5. Name the script
HelloWorldDoc and save it.
JS
➤ To work with document preferences:
1. Create the following script.
Note: See ‘Creating and Running a JavaScript’ on page 17
//create and assign variables for default preferences
startRulerUnits = app.preferences.rulerUnits
startTypeUnits = app.preferences.typeUnits
startDisplayDialogs = app.displayDialogs
//change settings
app.preferences.rulerUnits = Units.INCHES
app.preferences.typeUnits = TypeUnits.PIXELS
app.displayDialogs = DialogModes.NO
//create and assign variables for document settings
docWidthInInches = 4
docHeightInInches = 2
resolution = 72
docName = “Hello World”
//use the length property of the documents object to
//find out if any documents are open
//if none are found, add a document
if (app.documents.length == 0)
app.documents.add(docWidthInInches, docHeightInInches, resolution, docName)
for details on creating a JavaScript.
//restore beginning preferences
app.preferences.rulerunits = startRulerUnits
app.preferences.typeunits = startTypeUnits
app.displayDialogs = startDisplayDialogs
2. Name the script HelloWorldDoc.jsx and save it in the Presets/Scripts folder.
3. Open Photoshop CS3 and choose File > Scripts > HelloWorldDoc to run the script.
4. Choose Edit > Preferences > Units & Rulers to verify that your preferences have been returned to
your original settings.
5. After viewing the document in Photoshop CS3, close the document without saving it.
6. Save the script.
Applying Color to a Text Item
In this section, we will add a layer to the HelloWorldDoc script, then change the layer to a text object that
displays the text Hello, World! in red.
Before you begin, do the following:
● Make sure Photoshop CS3 is closed.
● Open the script file HelloWorldDoc in your script editor application.
Page 64

Photoshop CS3
Adobe Photoshop CS3 Scripting Guide Scripting Photoshop CS3 64
AS
➤ To create and specify details in a text item:
1. Type the following code into the HelloWorldDoc script immediately before the statements at the end
of the file that restore original preferences.
--create a variable named theDocRef
--assign the current (active) document to it
set theDocRef to the current document
--create a variable that contains a color object of the RGB color class
--whose color is red
set theTextColor to {class:RGB color, red:255, green:0, blue:0}
--create a variable for the text layer, create the layer as an art layer object
--and use the kind property of the art layer object to make it a text layer
set theTextLayer to make new art layer in theDocRef with ¬
properties {kind:text layer}
--Set the contents, size, position and color of the text layer
set contents of text object of theTextLayer to "Hello, World!"
set size of text object of theTextLayer to 36
set position of text object of theTextLayer to {0.75 as inches, 1 as inches}
set stroke color of text object of theTextLayer to theTextColor
2. Run the complete script. Be patient while Photoshop CS3 executes your commands one by one.
3. After viewing the document in Photoshop CS3, close the document without saving it.
Note: Look up the following classes in the Adobe Photoshop CS3 AppleScript Scripting Reference or in the
Photoshop CS3 AppleScript Dictionary to see if you understand how you used them in this script:
● RGB color class
● art layer class
VBS
➤ To create and specify details in a text item:
1. Type the following code into the HelloWorldDoc script immediately before the statements at the end
of the file that restore original preferences.
'create a reference to the active (current) document
Set docRef = appRef.ActiveDocument
' create a variable named textColor
'create a SolidColor object whose color is red
'assign the object to textColor
Set textColor = CreateObject ("Photoshop.SolidColor")
textColor.RGB.Red = 255
textColor.RGB.Green = 0
textColor.RGB.Blue = 0
'create an art layer object using the
'Add method of the ArtLayers class
'assign the layer to the variable newTextLayer
Set newTextLayer = docRef.ArtLayers.Add()
Page 65

Photoshop CS3
Adobe Photoshop CS3 Scripting Guide Scripting Photoshop CS3 65
'use the Kind property of the Art Layers class to
'make the layer a text layer
newTextLayer.Kind = 2
newTextLayer.TextItem.Contents = helloWorldStr
newTextLayer.TextItem.Position = Array(0.75, 1)
newTextLayer.TextItem.Size = 36
newTextLayer.TextItem.Color = textColor
2. Run the complete script. Be patient while Photoshop CS3 executes your commands one by one.
3. After viewing the document in Photoshop CS3, close the document without saving it.
Note: Look up the following classes in the Adobe Photoshop CS3 Visual Basic Scripting Reference, or in the
Visual Basic Object Browser to see if you understand how you used them in this script:
● SolidColor
● ArtLayer
JS
➤ To create and specify details in a text item:
1. Type the following code into the HelloWorldDoc script immediately before the statements at the end
of the file that restore original preferences.
//create a reference to the active document
docRef = app.activeDocument
//create a variable named textColor
//create a SolidColor object whose color is red
//assign the object to textColor
textColor = new solidColor
textColor.rgb.red = 255
textColor.rgb.green = 0
textColor.rgb.blue = 0
helloWorldText = "Hello, World!"
//create a variable named newTextLayer
//use the add() method of the artLayers class to create a layer object
//assign the object to newTextLayer
newTextLayer = docRef.artLayers.add()
//use the kind property of the artLayer class to make the layer a text layer
newTextLayer.kind = LayerKind.TEXT
newTextLayer.textItem.contents = helloWorldText
newTextLayer.textItem.position = Array(0.75, 1)
newTextLayer.textItem.size = 36
newTextLayer.textItem.color = textColor
2. Save the script, and then open Photoshop CS3 and select the script from the Scripts menu (choose File
> Script > HelloWorldDoc). Be patient while Photoshop CS3 executes your commands one by one.
3. After viewing the document in Photoshop CS3, close Photoshop CS3 without saving the document.
Page 66

Photoshop CS3
Adobe Photoshop CS3 Scripting Guide Scripting Photoshop CS3 66
Note: Look up the following classes in the Adobe Photoshop CS3 JavaScript Scripting Reference, or in the
ExtendScript Object Model Viewer to see if you understand how you used them in this script:
● SolidColor
● ArtLayer. Notice that the LayerKind.TEXT value of the kind property uses the LayerKind
constant. Constants are always depicted in upper case letters in Photoshop CS3 JavaScripts.
Applying a Wave Filter
In this section we’ll apply a wave filter to the word Hello in our document. This entails the following steps:
● Set the document width and height to pixels and then rasterize the text object in the Text Layer.
Note: Because text is a vector graphic and cannot apply a wave filter to vector graphics, we must first
convert the image to a bitmap. Rasterizing converts mathematically defined vector artwork to
pixels. For more information on rasterizing, refer to Photoshop CS3 Help.
● Select the area of the layer to which we want to apply the wave filter.
Note: See Defining the Area of a Selection Object
in order to understand the code within the script
that accomplishes this task.
● Apply a wave filter to the selection.
Note: The wave is a truncated sine curve.
Defining the Area of a Selection Object
To define the area of a selection object, we create an array of coordinates, or points specified in pixels
within the document. The array indicates the coordinates that define the outside corners of a rectangular
area that begins at the top left corner of the document and extends half way across the document.
Note: You can define any number of points for a selected area. The number of coordinates determines the
shape of the selection. The last coordinate defined must be the same as the first so that the area is a
closed selection path.
Note: See ‘Photoshop CS3 Object Model’ on page 9
Photoshop CS3 objects.
The array values in order are:
● Upper left corner of the selection: 0,0
● 0 indicates the left-most column in the document.
● 0 indicates the top row in the document.
for information on selection objects and other
● Upper right corner of the selection: theDocWidthInPixels / 2, 0
● theDocWidthInPixels / 2 indicates the column in the middle of the document; that is, the
column whose coordinate is the total number of columns in the document divided by 2.
Note: The value of
theDocWidthInPixels is the total number of pixels that defines the document’s
horizontal dimension. Columns are arranged horizontally.
● 0 indicates the top row in the document.
● Lower right corner: theDocWidthInPixels / 2, theDocHeightInPixels
● theDocWidthInPixels / 2 indicates the middle of the document.
Page 67

Photoshop CS3
Adobe Photoshop CS3 Scripting Guide Scripting Photoshop CS3 67
● theDocHeightInPixels indicates the bottom row in the document; that is row whose coordinate
is the total number of rows in the document.
Note: The value of
theDocHeightInPixels is the total number of pixels that determine the vertical
dimension of the document. Rows are stacked vertically.
● Lower left corner: 0, theDocHeightInPixels
● 0 indicates the left-most column in the document.
● theDocHeightInPixels indicates the bottom row in the document
● Upper left corner of the selection: 0,0
● This closes the selection path back at the initial point.
AS
➤ To select an area and apply a wave filter to it:
1. Type the following code into the script file HelloWorldDoc just above the statements that restore
original preferences:
--create new variables to contain the document object’s width and height
--determine width and height values by multiplying the
--width and height in inches by the resolution
--(which equals the number of pixels per inch)
set theDocWidthInPixels to theDocWidthInInches * theDocResolution
set theDocHeightInPixels to theDocHeightInInches * theDocResolution
--use the rasterize command of the art layer object
rasterize theTextLayer affecting text contents
--create a variable named theSelRegion
--assign an array of coordinates as its value
set theSelRegion to {{0, 0}, ¬
{theDocWidthInPixels / 2, 0}, ¬
{theDocWidthInPixels / 2, theDocHeightInPixels}, ¬
{0, theDocHeightInPixels}, ¬
{0, 0}}
--replace the document object with the selection object
--so that the wave is applied only to the selected text
select theDocRef region theSelRegion combination type replaced
--apply the wave filter using the filter command of the
--wave filter class (inherited from the filter options super class)
filter current layer of theDocRef using wave filter ¬
with options {class:wave filter, number of generators:1, minimum wavelength:1,¬
maximum wavelength:100, minimum amplitude:5, maximum amplitude:10, ¬
horizontal scale:100, vertical scale:100, wave type:sine,¬
undefined areas:repeat edge pixels, random seed:0}
2. Choose Run to run the script.
3. After viewing the document in Photoshop CS3, close the document without saving it.
4. Save the script in the Script Editor.
Page 68

Photoshop CS3
Adobe Photoshop CS3 Scripting Guide Scripting Photoshop CS3 68
Note: Look up the following classes in the Adobe Photoshop CS3 AppleScript Scripting Reference, or in the
Photoshop CS3 AppleScript Dictionary to see if you understand how you used them in this script:
● wave filter class
● art layer class
● rasterize command
● filter command
● document class: select command, combination type parameter
VBS
➤ To select an area and apply a wave filter to it:
1. Type the following code into the script file HelloWorldDoc just above the statements at the end of the
file that restore original preferences:
'create new variables to contain doc width and height
'convert inches to pixels by multiplying the number of inches by
'the resolution (which equals number of pixels per inch)
docWidthInPixels = docWidthInInches * resolution
docHeightInPixels = docHeightInInches * resolution
'use the Rasterize() method of the ArtLayer class to
'convert the text in the ArtLayer object (contained in the newTextLayer variable)
'to postscript text type
newTextLayer.Rasterize (1)
'create an array to define the selection property
'of the Document object
'define the selected area as an array of points in the document
docRef.Selection.Select Array(Array(0, 0), _
Array(docWidthInPixels / 2, 0), _
Array(docWidthInPixels / 2, docHeightInPixels), _
Array(0, docHeightInPixels), Array(0, 0))
'use the ApplyWave() method of the ArtLayer class
'to apply the wave of the selected text
newTextLayer.ApplyWave 1, 1, 100, 5, 10, 100, 100, 1, 1, 0
2. Double click the file name in Windows Explorer to run the script.
3. After viewing the document in Photoshop CS3, close the document without saving it.
4. Save the script.
Note: Look up the following classes in the Adobe Photoshop CS3 Visual Basic Scripting Reference, or in the
Visual Basic Object Browser to see if you understand how you used them in this script:
● ArtLayer class
● ApplyWave method
● Rasterize method
● Selection class: Select method
Page 69

Photoshop CS3
Adobe Photoshop CS3 Scripting Guide Scripting Photoshop CS3 69
JS
➤ To select an area and apply a wave filter to it:
1. Type the following code into the script file HelloWorldDoc just above the statements that restore
original preferences:
//create new variables to contain doc width and height
//convert inches to pixels by multiplying the number of inches by
//the resolution (which equals number of pixels per inch)
docWidthInPixels = docWidthInInches * resolution
docHeightInPixels = docHeightInInches * resolution
//use the rasterize method of the artLayer class
newTextLayer.rasterize(RasterizeType.TEXTCONTENTS)
//create a variable to contain the coordinate values
//for the selection object
selRegion = Array(Array(0, 0),
Array(docWidthInPixels / 2, 0),
Array(docWidthInPixels / 2, docHeightInPixels),
Array(0, docHeightInPixels),
Array(0, 0))
//use the select method of the selection object
//to create an object and give it the selRegion values
//as coordinates
docRef.selection.select(selRegion)
newTextLayer.applyWave(1, 1, 100, 5, 10, 100, 100,
WaveType.SINE, UndefinedAreas.WRAPAROUND, 0)
2. Save the script, and then open Photoshop CS3 and select the script from the Scripts menu (choose File
> Script > HelloWorldDoc).
3. After viewing the document in Photoshop CS3, close Photoshop CS3 without saving the document.
Note: Look up the following classes in the Adobe Photoshop CS3 JavaScript Scripting Reference, or in the
ExtendScript Object Model Viewer to see if you understand how you used them in this script:
● ArtLayer
● rasterize() method. Notice that the RasterizeType.TEXTCONTENTS argument uses the
RasterizeType constant. Constants are always depicted in upper case letters in
Photoshop CS3 JavaScripts.
● applyWave() method
Applying a MotionBlur Filter
In this section, we will apply a different filter to the other half of our document.
AS
➤ To apply a motionblur filter to HelloWorldDoc:
1. Type the following code into the script file HelloWorldDoc just above the statements that restore
original preferences.
--change the value of the variable theSelRegion
--to contain the opposite half of the screen
Page 70

Photoshop CS3
Adobe Photoshop CS3 Scripting Guide Scripting Photoshop CS3 70
set theSelRegion to {{theDocWidthInPixels / 2, 0},¬
{theDocWidthInPixels, 0}, ¬
{theDocWidthInPixels, theDocHeightInPixels}, ¬
{theDocWidthInPixels / 2, theDocHeightInPixels}, ¬
{theDocWidthInPixels / 2, 0}}
select theDocRef region theSelRegion combination type replaced
filter current layer of theDocRef using motion blur ¬
with options {class:motion blur, angle:45, radius:5}
deselect theDocRef
2. Choose Run to run the script.
Note: Look up the
motion blur class in the Adobe Photoshop CS3 AppleScript Scripting Reference, or in the
Photoshop CS3 AppleScript Dictionary to see if you understand how you used it in this script:
VBS
➤ To apply a motionblur filter to HelloWorldDoc:
1. Type the following code into the script file HelloWorldDoc just above the statements that restore
original preferences.
docRef.Selection.Select Array(Array(docWidthInPixels / 2, 0), _
Array(docWidthInPixels, 0), _
Array(docWidthInPixels, docHeightInPixels), _
Array(docWidthInPixels / 2, docHeightInPixels), _
Array(docWidthInPixels / 2, 0))
newTextLayer.ApplyMotionBlur 45, 5
docRef.Selection.Deselect
2. Double click on the file in Windows Explorer to run the script.
Note: Look up the
Scripting Reference, or in the Visual Basic Object Browser to see if you understand how you used it in
this script:
ArtLayer class: ApplyMotionBlur method in the Adobe Photoshop CS3 Visual Basic
JS
➤ To apply a motionblur filter to HelloWorldDoc:
1. Type the following code into the script file HelloWorldDoc just above the statements that restore
original preferences.
//change the value of selRegion to the other half of the document
selRegion = Array(Array(docWidthInPixels / 2, 0),
Array(docWidthInPixels, 0),
Array(docWidthInPixels, docHeightInPixels),
Array(docWidthInPixels / 2, docHeightInPixels),
Array(docWidthInPixels / 2, 0))
docRef.selection.select(selRegion)
newTextLayer.applyMotionBlur(45, 5)
docRef.selection.deselect()
Page 71

Photoshop CS3
Adobe Photoshop CS3 Scripting Guide Scripting Photoshop CS3 71
2. Save the script, and then open Photoshop CS3 and select the script from the Scripts menu (choose File
> Script > HelloWorldDoc).
Note: Look up the
ArtLayer class applyMotionBlur() method in the Adobe Photoshop CS3 JavaScript
Scripting Reference, or in the ExtendScript Object Model Viewer to see if you understand how you
used it in this script:
Page 72

4
Action Manager
Photoshop CS3 actions allow you to save time by automating repetitive tasks. You create and run actions
in the application interface using the Actions palette.
You can also manage actions in scripts using a utility called the Action Manager. The Action Manager allows
you to write scripts that target Photoshop CS3 functionality that is not otherwise accessible in the
scripting interface, such as third party plug-ins and filters. The only requirement for using the Action
Manager is that the task that you want to access from the Action Manager is recordable.
This chapter describes how to use the Action Manager and the scripting interface objects it includes.
The ScriptListener Plug-In
Before you use the Action Manager, you must install the ScriptListener plug-in. ScriptListener records a file
with scripting code corresponding to the actions you perform in the UI.
Tip: Because ScriptListener records most of your actions, install ScriptListener only when you are creating
Action Manager scripts. Leaving ScriptListener installed continuously will not only create large files
that occupy memory on your hard drive, it can slow Photoshop CS3 performance.
When you perform a task or series of tasks in Photoshop CS3, ScriptListener creates several files, which
contain code that represents the actions taken in Photoshop:
● ScriptingListenerJS.log, containing JavaScript code,
● ScriptingListenerVB.log, containing VBScript code (Windows only).
ScriptListener creates these files on the desktop.
Note: There is no AppleScript interface to the Action Manager. However, you can access the Action
Manager from an AppleScript by executing a JavaScript from AppleScript. See ‘Running
JavaScript-based Action Manager code from AppleScript’ on page 78.
Installing ScriptListener
The ScriptListener plug-in is located in the ..\Adobe Photoshop CS3\Scripting Guide\Utilities
folder.
➤ To install the ScriptListener:
1. Select the file ScriptListener.8li and then choose Edit > Copy.
2. Paste the file copy to the following location:
..\Adobe Photoshop CS3\Plug-Ins\Automate
3. Open Photoshop CS3.
Note: If Photoshop CS3 is already open, close it and then start it again. This will allow Photoshop to
load the plug-in.
72
Page 73

Photoshop CS3
Adobe Photoshop CS3 Scripting Guide Action Manager 73
➤ To uninstall the ScriptListener:
1. Close Photoshop CS3.
2. Verify that a copy of the file
CS3\Scripting Guide\Utilities
3. Delete the file
..\Adobe Photoshop CS\Plug-Ins\Automate
ScriptListener.8li from the following location:
ScriptListener.8li still exists in the ..\Adobe Photoshop
folder.
4. Delete the log files ScriptingListenerJS.log and ScriptingListenerVB.log from your desktop.
Note: In Windows, even though you remove the ScriptListener from the Automate folder, it may continue
to record actions. To prevent the
ScriptingListenerJS.log file from becoming too large, delete it
each time you finish playing a Photoshop CS3 action.
Action Manager Scripting Objects
The objects Action Descriptor, Action List, and Action Reference are part of the Action Manager
functionality. For detailed information about these objects, see the appropriate reference manual, or use
the object browser for the language you are using.
Note: These objects are not available in AppleScript.
Recording a Script using ScriptListener
The section demonstrates how to create a script log file using ScriptListener. We will record the actions
necessary to apply the emboss filter to a document. (By default, the Emboss filter is available only via the
Photoshop CS3 interface.)
Note: ScriptListener must be installed in the
See ‘Installing ScriptListener’ on page 72
➤ To make the Emboss filter scriptable:
Automate folder before you begin the following procedure.
.
1. Open Photoshop CS3, then open a document.
2. Choose Window > Actions, then choose New Action from the Actions palette menu.
3. Name the action, then click Record.
4. Choose Filter > Stylize > Emboss.
5. Using the following settings:
● Angle: 135
● Height: 3
● Amount: 100
6. Click OK.
7. Check for the script log files:
● In Windows, the log files are in your desktop.
Page 74

Photoshop CS3
Adobe Photoshop CS3 Scripting Guide Action Manager 74
● On Mac OS, the log files are on the desktop.
Using the Action Manager from JavaScript
The section demonstrates how to use the contents of the ScriptingListenerJS.log log to create your
script. Before you begin this section, you need have already recorded an action. The example in this
section assumes you have followed the instructions in ‘Recording a Script using ScriptListener’ on page 73
The procedures in this section use the Action Manager to make the Emboss filter available to the scripting
interface.
➤ To create a JavaScript from the ScriptListener output:
1. Do one of the following:
● Open ScriptingListenerJS.log on the desktop.
At the end of the file you will see code similar to the following (although your numbers may be
different):
var id19 = charIDToTypeID( "Embs" );
var desc4 = new ActionDescriptor();
var id20 = charIDToTypeID( "Angl" );
desc4.putInteger( id20, 135 );
var id21 = charIDToTypeID( "Hght" );
desc4.putInteger( id21, 3 );
var id22 = charIDToTypeID( "Amnt" );
desc4.putInteger( id22, 100 );
executeAction( id19, desc4 ,DialogModes.NO);
.
Note: ScriptListener separates logged commands with horizontal lines composed of equal signs
(=====...). If this is not the first action recorded in the log, you can easily locate the most recent
action; it follows the final equal sign line.
2. Copy the JavaScript code associated with the emboss action from
file, called
3. In the
emboss.jsx.
emboss.jsx script, identify the values that you used with the filter (135, 3 and 100). Substitute
ScriptListenerJS.log to another
the filter specification values with variable names.
In the following example,
been replaced with
var id19 = charIDToTypeID( "Embs" );
var desc4 = new ActionDescriptor();
var id20 = charIDToTypeID( "Angl" );
desc4.putInteger( id20, angle );
var id21 = charIDToTypeID( "Hght" );
desc4.putInteger( id21, height );
var id22 = charIDToTypeID( "Amnt" );
desc7.putInteger( id22, amount );
executeAction( id19, desc4,DialogModes.NO );
135 has been replaced with angle; 3 has been replaced with height; 100 has
amount.
4. Wrap the code in a JavaScript function. In the following example, the function name is emboss.
function emboss( angle, height, amount )
{
var id19 = charIDToTypeID( "Embs" );
var desc4 = new ActionDescriptor();
var id20 = charIDToTypeID( "Angl" );
Page 75

Photoshop CS3
Adobe Photoshop CS3 Scripting Guide Action Manager 75
desc4.putInteger( id20, angle );
var id21 = charIDToTypeID( "Hght" );
desc4.putInteger( id21, height );
var id22 = charIDToTypeID( "Amnt" );
desc7.putInteger( id22, amount );
executeAction( id19, desc4 ,DialogModes.NO);
}
5. To use a JavaScript to apply the Emboss filter to a document, include the emboss function in the
JavaScript and call the function with the desired parameters. For example, the following example
applies the Emboss filter with angle 75, height 2, and amount 89. (See ‘Opening a Document’ on
page 26, for help in writing the code to open a document within the script.)
// Open the document in the script
var fileRef = new File("/c/myfile")
var docRef = app.open(fileRef)
//Call emboss with desired parameters
emboss( 75, 2, 89 );
//finish the script
//include the function in the script file
function emboss(angle, height, amount )
{
var id32 = charIDToTypeID( "Embs" );
var desc7 = new ActionDescriptor();
var id33 = charIDToTypeID( "Angl" );
desc7.putInteger( id33, angle );
var id34 = charIDToTypeID( "Hght" );
desc7.putInteger( id34, height );
var id35 = charIDToTypeID( "Amnt" );
desc7.putInteger( id35, amount );
executeAction( id32, desc7,DialogModes.NO );
}
6. Open Photoshop CS3, to apply the emboss filter by selecting File > Scripts > Browse, and then
browsing to the location of your emboss.jsx script. Select Open to run the script.
Using the Action Manager from a VBS Script
The section demonstrates how to use the contents of the ScriptingListenerVB.log log to create your
script. Before you begin this section, you need to have already recorded an action. The example in this
section assumes you have followed the instructions in ‘Recording a Script using ScriptListener’ on page 73
The procedures in this section use the Action Manager to make the Emboss filter available to the scripting
interface.
➤ To create a VBScript from the ScriptListener output:
1. Open ScriptingListenerVB.log from the desktop.
At the end of the file you will see code similar to the following (although your numbers may be
different):
DIM objApp
SET objApp = CreateObject("Photoshop.Application")
REM Use dialog mode 3 for show no dialogs
DIM dialogMode
dialogMode = 3
.
Page 76

Photoshop CS3
Adobe Photoshop CS3 Scripting Guide Action Manager 76
DIM id9
id9 = objApp.CharIDToTypeID( "Embs" )
DIM desc4
SET desc4 = CreateObject( "Photoshop.ActionDescriptor" )
DIM id10
id10 = objApp.CharIDToTypeID( "Angl" )
Call desc4.PutInteger( id10, 135 )
DIM id11
id11 = objApp.CharIDToTypeID( "Hght" )
Call desc4.PutInteger( id11, 3 )
DIM id12
id12 = objApp.CharIDToTypeID( "Amnt" )
Call desc4.PutInteger( id12, 100 )
Call objApp.ExecuteAction( id9, desc4, dialogMode )
Note: ScriptListener separates logged commands with horizontal lines composed of equal signs (====...).
If this is not the first action recorded in the log, you can easily locate the most recent action; it
follows the final equal sign line.
2. Copy the VBScript code associated with the emboss action from
file, called
3. In the
emboss.vbs.
emboss.vbs script, identify the values that you used with the filter (135, 3, and 100). Substitute
the filter specification values with variable names.
In the following example,
has been replaced with
DIM objApp
SET objApp = CreateObject("Photoshop.Application")
REM Use dialog mode 3 for show no dialogs
DIM dialogMode
dialogMode = 3
DIM id9
id9 = objApp.CharIDToTypeID( "Embs" )
DIM desc4
SET desc4 = CreateObject( "Photoshop.ActionDescriptor" )
DIM id10
id10 = objApp.CharIDToTypeID( "Angl" )
Call desc4.PutInteger( id10, angle)
DIM id11
id11 = objApp.CharIDToTypeID( "Hght" )
Call desc4.PutInteger( id11, height )
DIM id12
id12 = objApp.CharIDToTypeID( "Amnt" )
Call desc4.PutInteger( id12, amount )
Call objApp.ExecuteAction( id9, desc4, dialogMode )
135 has been replaced with angle, 3 has been replaced with height, and 100
amount.
ScriptListenerVB.log to another
4. Wrap the code in a VBScript function. In the following example, the function name is Emboss. The
creation of the Photoshop application object needs to be outside of the function, as we will explain in
the next step.
DIM objApp
SET objApp = CreateObject("Photoshop.Application")
Function Emboss( angle, height, amount )
REM Use dialog mode 3 for show no dialogs
DIM dialogMode
dialogMode = 3
DIM id9
Page 77

Photoshop CS3
Adobe Photoshop CS3 Scripting Guide Action Manager 77
id9 = objApp.CharIDToTypeID( "Embs" )
DIM desc4
SET desc4 = CreateObject( "Photoshop.ActionDescriptor" )
DIM id10
id10 = objApp.CharIDToTypeID( "Angl" )
Call desc4.PutInteger( id10, angle )
DIM id11
id11 = objApp.CharIDToTypeID( "Hght" )
Call desc4.PutInteger( id11, height )
DIM id12
id12 = objApp.CharIDToTypeID( "Amnt" )
Call desc4.PutInteger( id12, amount )
Call objApp.ExecuteAction( id9, desc4, dialogMode )
End Function
5. To use a VBScript to apply the Emboss filter to a document, include the emboss function in the script
and call the function with the desired parameters. For example, the following example applies the
Emboss filter with angle 75, height 2, and amount 89. Before the script calls the function, it needs to
have an open document. (See ‘Opening a Document’ on page 26
, for help in writing the code to open a
document within the script.) Since the script is opening a document, it needs access to the Photoshop
DOM when it calls the
Photoshop.Application object before it opens a new document.
DIM objApp
SET objApp = CreateObject("Photoshop.Application")
Application .Open method, so the script must create the
'Open the document in the script
filename = “C:\MyFile”
DIM docRef
SET docRef = objApp.Open(filename)
'Call emboss with desired parameters
Call Emboss( 75, 2, 89 )
Function Emboss( angle, height, amount )
REM Use dialog mode 3 for show no dialogs
DIM dialogMode
dialogMode = 3
DIM id9
id9 = objApp.CharIDToTypeID( "Embs" )
DIM desc4
SET desc4 = CreateObject( "Photoshop.ActionDescriptor" )
DIM id10
id10 = objApp.CharIDToTypeID( "Angl" )
Call desc4.PutInteger( id10, angle )
DIM id11
id11 = objApp.CharIDToTypeID( "Hght" )
Call desc4.PutInteger( id11, height )
DIM id12
id12 = objApp.CharIDToTypeID( "Amnt" )
Call desc4.PutInteger( id12, amount )
Call objApp.ExecuteAction( id9, desc4, dialogMode )
End Function
6. Apply the emboss filter script by double clicking on the file emboss.vbs. This launches Photoshop,
opens the file and applies the emboss filter to the file.
Page 78

Photoshop CS3
Adobe Photoshop CS3 Scripting Guide Action Manager 78
Running JavaScript-based Action Manager code from VBScript
You can also access JavaScript-based Action Manager code from a VBScript using the DoJavaScriptFile
method. Use the VBscript object browser for more information on the
method.
➤ To execute JavaScript-based Action Manager code from a VBScript:
1. Follow steps 1-4 in ‘Using the Action Manager from JavaScript’ on page 74. You will end up with a file
emboss.jsx) containing the following JavaScript code:
(
function emboss( angle, height, amount )
{
var id32 = charIDToTypeID( "Embs" );
var desc7 = new ActionDescriptor();
var id33 = charIDToTypeID( "Angl" );
desc7.putInteger( id33, angle );
var id34 = charIDToTypeID( "Hght" );
desc7.putInteger( id34, height );
var id35 = charIDToTypeID( "Amnt" );
desc7.putInteger( id35, amount );
executeAction( id32, desc7 );
}
Application.DoJavaScriptFile
2. At the end of the file emboss.jsx, add the following line of JavaScript code, which executes the
emboss function with arguments passed to it from an external invocation. See Introduction to Scripting
for more information about passing arguments from a VBScript to a JavaScript.
// Call emboss with values provided in the "arguments" collection
emboss( arguments[0], arguments[1], arguments[2] );
3. From a VBScript you can then run the Emboss filter by saying (this example assumes emboss.jsx is
found in C:\):
Set objApp = CreateObject("Photoshop.Application")
'Open the document in the script
filename = “C:\MyFile”
DIM docRef
SET docRef = objApp.Open(filename)
objApp.DoJavaScriptFile "C:\emboss.jsx", Array(75, 2, 89)
Running JavaScript-based Action Manager code from AppleScript
There is no Action Manager functionality in AppleScript. However, you can execute JavaScript code and
files from AppleScript using the
Introduction to Scripting.
1. Follow steps 1-4 in ‘Using the Action Manager from JavaScript’ on page 74
emboss.jsx) containing the following JavaScript code:
(
function emboss( angle, height, amount )
{
var id32 = charIDToTypeID( "Embs" );
var desc7 = new ActionDescriptor();
var id33 = charIDToTypeID( "Angl" );
desc7.putInteger( id33, angle );
var id34 = charIDToTypeID( "Hght" );
do javascript command. For further information, please refer to
. You will end up with a file
Page 79

Photoshop CS3
Adobe Photoshop CS3 Scripting Guide Action Manager 79
desc7.putInteger( id34, height );
var id35 = charIDToTypeID( "Amnt" );
desc7.putInteger( id35, amount );
executeAction( id32, desc7 );
}
2. At the end of the file emboss.jsx, add the following line of JavaScript code, which executes the
emboss function with arguments passed to it from an external invocation. See Introduction to Scripting
for more information about passing arguments from a AppleScript to a JavaScript.
// Call emboss with values provided in the "arguments" collection
emboss( arguments[0], arguments[1], arguments[2] );
3. The following AppleScript code sample opens a document and runs the Emboss filter on it:
tell application "Adobe Photoshop CS3"
set theFile to alias “Application:Documents:MyFile”
open theFile
do javascript (file <path to Emboss.jsx>) ¬
with arguments { 75,2,89 }
end tell
Using ScriptListener to find event IDs and class IDs
The section demonstrates how to use ScriptListener to determine event IDs and class IDs for actions taken
by Photoshop CS3. These event and class IDs are used to set up notification using the Notifier Class
You can determine the event ID for any recordable action by using ScriptListener. Simply install the
ScriptListener plug in, as described in ‘Installing ScriptListener’ on page 72
want to find the event ID for. The event is logged in the Script Listener log file. (See ‘The ScriptListener
Plug-In’ on page 72) If the event applies to several different classes of objects, the class ID is also logged in
the log file.
The following examples show how to find the event ID for the “Open Document” event, and the event and
class IDs for the “New” event, which applies to several different classes.
➤ Finding the event ID for the “Open Document” event
1. Make sure that the ScriptListener plug in is installed.
2. Open Photoshop CS3, then open a document.
3. Find the ScriptListener log file and open it. You can use either the VBScript log file or the JavaScript log
file. In the JavaScript version of the file, you will see code that looks something like this at the end of the
file, everything below the row of equal signs the log of the last action taken:
// =======================================================
var id14 = charIDToTypeID( "Opn " );
var desc5 = new ActionDescriptor();
var id15 = charIDToTypeID( "null" );
desc5.putPath( id15, new File( "C:\\Program Files\\Adobe\\Adobe Photoshop
CS3\\Samples\\Fish.psd" ) );
executeAction( id14, desc5, DialogModes.NO );
. Then execute the action you
.
4. The executeAction method runs the action from a script, and it needs the event ID to identify which
action to take. The first argument, in this case
the variable
action is
id14 defined several lines earlier, and it shows that the event ID for the Open Document
"Opn ".
id14, provides the event ID to the method. You can see
Page 80

Photoshop CS3
Adobe Photoshop CS3 Scripting Guide Action Manager 80
5. You can now use this event ID to set up event notification on Open Document from your scripts. In
JavaScript, for example:
var eventFile = new File(app.path +
"/Presets/Scripts/Event Scripts Only/Welcome.jsx")
app.notifiers.add( "Opn ", eventFile)
➤ Finding the event ID and class ID for the “New” event
1. Make sure that the ScriptListener plug in is installed.
2. Open Photoshop CS3, then create a new document using File > New.
3. Next, create a new channel, using the Create New Channel icon on the Channels palette.
4. Find the ScriptListener log file and open it. You can use either the VBScript log file or the JavaScript log
file. We have recorded two actions, so we are interested in looking at the last two sections in the file
that are delimited by the rows of equal signs. In the JavaScript log file, you will see code that looks
something like this:
// =======================================================
var id17 = charIDToTypeID( "Mk " );
var desc6 = new ActionDescriptor();
var id18 = charIDToTypeID( "Nw " );
var desc7 = new ActionDescriptor();
var id19 = charIDToTypeID( "Md " );
var id20 = charIDToTypeID( "RGBM" );
desc7.putClass( id19, id20 );
var id21 = charIDToTypeID( "Wdth" );
var id22 = charIDToTypeID( "#Rlt" );
desc7.putUnitDouble( id21, id22, 800.000000 );
var id23 = charIDToTypeID( "Hght" );
var id24 = charIDToTypeID( "#Rlt" );
desc7.putUnitDouble( id23, id24, 800.000000 );
var id25 = charIDToTypeID( "Rslt" );
var id26 = charIDToTypeID( "#Rsl" );
desc7.putUnitDouble( id25, id26, 72.000000 );
var id27 = stringIDToTypeID( "pixelScaleFactor" );
desc7.putDouble( id27, 1.000000 );
var id28 = charIDToTypeID( "Fl " );
var id29 = charIDToTypeID( "Fl " );
var id30 = charIDToTypeID( "Wht " );
desc7.putEnumerated( id28, id29, id30 );
var id31 = charIDToTypeID( "Dpth" );
desc7.putInteger( id31, 8 );
var id32 = stringIDToTypeID( "profile" );
desc7.putString( id32, "sRGB IEC61966-2.1" );
var id33 = charIDToTypeID( "Dcmn" );
desc6.putObject( id18, id33, desc7 );
executeAction( id17, desc6, DialogModes.NO );
// =======================================================
var id34 = charIDToTypeID( "Mk " );
var desc8 = new ActionDescriptor();
var id35 = charIDToTypeID( "Nw " );
var desc9 = new ActionDescriptor();
var id36 = charIDToTypeID( "ClrI" );
var id37 = charIDToTypeID( "MskI" );
var id38 = charIDToTypeID( "MskA" );
Page 81

Photoshop CS3
Adobe Photoshop CS3 Scripting Guide Action Manager 81
desc9.putEnumerated( id36, id37, id38 );
var id39 = charIDToTypeID( "Clr " );
var desc10 = new ActionDescriptor();
var id40 = charIDToTypeID( "Rd " );
desc10.putDouble( id40, 255.000000 );
var id41 = charIDToTypeID( "Grn " );
desc10.putDouble( id41, 0.000000 );
var id42 = charIDToTypeID( "Bl " );
desc10.putDouble( id42, 0.000000 );
var id43 = charIDToTypeID( "RGBC" );
desc9.putObject( id39, id43, desc10 );
var id44 = charIDToTypeID( "Opct" );
desc9.putInteger( id44, 50 );
var id45 = charIDToTypeID( "Chnl" );
desc8.putObject( id35, id45, desc9 );
executeAction( id34, desc8, DialogModes.NO );
5. The first section represents the scripting code to execute the “New Document” event. The second
section represents the scripting code for the “New Channel” event.
6. The
executeAction method for both of these actions takes an argument whose value is defined as
"Mk ". (See id17 and id34.) This is the event ID for the “New” action. This action also needs to know
what class to use, the class ID for the event.
7. The
putObject method identifies the class the action operates on. The second argument to
putObject provides us with the class ID that we need. In the first action, id33 is defined as "Dcmn", in
the second action,
id45 is defined as "Chnl". These provide our class IDs for Document and Channel,
respectively.
8. You can now use these event and class IDs to set up event notification on the New Document and New
Channel events from your scripts. In JavaScript, for example:
var eventFile = new File(app.path +
"/Presets/Scripts/Event Scripts Only/Welcome.jsx")
app.notifiers.add("Mk ", eventFile, "Dcmn")
app.notifiers.add("Mk ", eventFile, "Chnl")
Page 82

Photoshop CS3
Adobe Photoshop CS3 Scripting Guide Index 82
Index
A
Action Manager
defined 72
running JavaScript code from AppleScript 78
running JavaScript code from VBScript 78
scripting objects 73
using from JavaScript 74
using from VBScript 75
actions
vs. scripts 7
working with 72
Actions palette 72
active objects, setting 23
Adobe Photoshop CS3 object model 10, 31
AppleScript
conventions 5
creating 15
executing JavaScript from 9
running 15
unit value considerations 56
Applescript
viewing dictionary 19
Application object
defined 10
display dialogs 31
referencing 20
relationship to user interface 13
targeting 20
using 31
Art Layer object
adding in JavaScript 23
adding in VBScript 22
applying styles 38
creating 34
defined 11
filters 53
making text layer 40
referencing 36
relationship to user interface 13
working with 34
C
calculations, unit values 57
Channel object
activating 25
changing type 45
defined 11
relationship to user interface 13
setting the active channel 25
working with 45
Channel object, kinds of 11
class IDs, finding with ScriptListener 79
classes, finding 19
clipboard commands 54
collections, VBScript indexing 10
Color object
in the DOM 14
Color objects
applying to text 63
comparing 52
defined 50
getting and converting 51
setting hex values 51
solid color classes 51
web safe 52
working with 50
Color Sampler object
defined 12
relationship to user interface 14
commands
conventions 5
viewing 19
component channels 11
conditional logic 7
constants
defined 14
finding 14, 19
containment hierarchy 10
conventions 5
copy and paste commands 54
copy merged command 55
Count Item object
defined 12
relationship to user interface 14
D
dialogs, controlling 31
display dialogs 31
Document Info object
defined 12
relationship to user interface 13
using 46
Document object
activating 24
adding 21
defined 10
document information 46
manipulating 32
opening 26
relationship to user interface 13
saving 29
unit values 57
using 32
document object model (DOM), See object model
E
enumerated values
finding 19
EPS open options object, unit values 57
event IDs, finding with ScriptListener 79
event notification, setting up 48
F
file extensions
Page 83

Photoshop CS3
Adobe Photoshop CS3 Scripting Guide Index 83
script files 8
files
inferring format 26
opening 26
opening using specific settings 27
saving 29
specifying format 27
filters
additional 53
applying motionblur 69
applying wave 66–69
making scriptable 73
working with 53
H
Hello World script 15–18
hex color values, setting 51
hierarchy 10
History State object
defined 12
purging 47
relationship to user interface 13
reverting 47
using 46
history states
defined 46
I
images, changing composition 11
J
JavaScript
conventions 5
creating 17
executing 9
executing from AppleScript 9
executing from VBScript 9
running 17
support 8
using Action Manager 74
workflow automation sample 59
L
layer classes 11
Layer Comp object
defined 11
relationship to user interface 13
Layer objects
activating 25
adding 23
applying styles 38
creating 34
defined 11
determining kind 40
linking 38
referencing 36
testing for text layers 40
working with 34
Layer Set object
creating 35
defined 11
relationship to user interface 13
working with 34, 37
lens flare open options object, unit values 57
logic, conditional 7
M
masked area channels 11
Measurement Scale object
defined 12
relationship to user interface 14
measurement units
document preferences 61
working with 55
merged copies 55
metadata defined 13
methods
conventions 5
viewing 19
motionblur filters, defining 69
N
Notifier object
defined 12
finding class IDs 79
finding event IDs 79
relationship to user interface 13
using 47
O
object model
concepts 9
working with 31
objects
Also see individual objects
activating 23
Adobe Photoshop CS3 object model 10
creating in a script 21–23
hierarchy 10
viewing 19
offset filter object, unit values 58
Open options classes 14
P
parent objects defined 23
paste commands 54
Path Item object
creating a straight line 48
defined 12
relationship to user interface 13
Path Point object defined 12
paths, creating 48
PDF open options object, unit values 57
Photoshop CS3 object model 10
preferences
setting 30
Page 84

Photoshop CS3
Adobe Photoshop CS3 Scripting Guide Index 84
working with 60
Preferences object
defined 12
relationship to user interface 13
properties
conventions 5
finding 19
R
ruler units
defined 55
setting 59
value usage 57
values 56
S
Save options classes 14
saving documents 29
Script Editor
using 15
scripting languages
example scripts 15
supported 8
ScriptListener
finding class IDs 79
finding event IDs 79
installing 72
log files 72
recording scripts 73
uninstalling 73
scripts
advanced 60
capabilities 7
creating 60
creating objects 21–23
defined 7
executing 9
file locations 9
functionality 8
recording 73
startup 9
valid file extensions 8
vs. actions 7
selected area channels 11
Selection object
creating 41
defined 11
defining area 66
feathering 43
filling 43
inverting 43
loading 44
relationship to user interface 13
resizing 43
restoring 45
storing 44
stroking 42
working with 41
Solid Color classes 51
spot color channels 11
startup scripts 9
stroking
selections 42
text 64
styles, applying to layers 38
Sub Path Item object defined 12
T
text
applying color 63
formatting 40
layers 40
stroking 64
Text Item object
creating 39
defined 11
formatting text 40
unit values 58
working with 39
text layers 40
The 54
type library, VBScript 20
type units
defined 55
setting 59
typographic conventions 5
U
units
AppleScript considerations 56
as parameters 58
as properties 57
in arguments 58
in calculations 57
setting 59
special types 56
value usage 57
values 56
working with 55
V
value types
constants 14
VBScript
conventions 5
creating 16
executing JavaScript from 9
running 16
type library 20
using Action Manager 75
W
wave filters, applying 66–69
web safe color 52
workflow automation, JavaScript 59
Page 85

Photoshop CS3
Adobe Photoshop CS3 Scripting Guide Index 85
 Loading...