

Page 1
Page 2

©2000 Adobe Systems Incorporated. All rights reserved.
Adobe® Photoshop® 6.0 User Guide for Windows® and Macintosh
This manual, as well as the software described in it, is furnished under license and may be used or copied only in accordance with the terms
of such license. The content of this manual is furnished for informational use only, is subject to change without notice, and should not be
construed as a commitment by Adobe Systems Incorporated. Adobe assumes no responsibility or liability for any errors or inaccuracies that
may appear in this documentation. Except as permitted by such license, no part of this publication may be reproduced, stored in a retrieval
system, or transmitted, in any form or by any means, electronic, mechanical, recording, or otherwise, without the prior written permission
of Adobe.
Please remember that existing artwork or images that you may want to include in your project may be protected under copyright law.
The unauthorized incorporation of such material into your new work could be a violation of the rights of the copyright owner. Please be sure
to obtain any permission required from the copyright owner.
Any references to company names in sample templates are for demonstration purposes only and are not intended to refer to any actual
organization.
Adobe, the Adobe logo, Acrobat, Acrobat Reader, Adobe Dimensions, Adobe Gamma, After Effects, FrameMaker, GoLive, Illustrator,
ImageReady, InDesign, InProduction, Minion, Myriad, PageMaker, Photoshop, PostScript, PressReady, and Streamline are either registered
trademarks or trademarks of Adobe Systems Incorporated in the United States and/or other countries. Microsoft and Windows are either
registered trademarks or trademarks of Microsoft Corporation in the United States and/or other countries. Apple, AppleTalk, ColorSync,
LaserWriter, Mac, Macintosh, and QuickTime are trademarks of Apple Computer, Inc. registered in the U.S. and other countries. QuickTime
and the QuickTime logo are trademarks used under license. Kodak and Photo CD are trademarks of Eastman Kodak Company. All other
trademarks are the property of their respective owners.
Contains an implementation of the LZW algorithm licensed under U.S Patent 4,558,302.
Adobe Systems Incorporated, 345 Park Avenue, San Jose, California 95110, USA
Notice to U.S. Government End Users. The Software and Documentation are “Commercial Items,” as that term is defined at 48 C.F.R. §2.101,
consisting of “Commercial Computer Software” and “Commercial Computer Software Documentation,” as such terms are used in 48 C.F.R.
§12.212 or 48 C.F.R. §227.7202, as applicable. Consistent with 48 C.F.R. §12.212 or 48 C.F.R. §§227.7202-1 through 227.7202-4, as applicable, the Commercial Computer Software and Commercial Computer Software Documentation are being licensed to U.S. Government end
users (a) only as Commercial Items and (b) with only those rights as are granted to all other end users pursuant to the terms and conditions
herein. Unpublished-rights reserved under the copyright laws of the United States. Adobe Systems Incorporated, 345 Park Avenue, San Jose,
CA 95110-2704, USA. For U.S. Government End Users, Adobe agrees to comply with all applicable equal opportunity laws including,
if appropriate, the provisions of Executive Order 11246, as amended, Section 402 of the Vietnam Era Veterans Readjustment Assistance Act
of 1974 (38 USC 4212), and Section 503 of the Rehabilitation Act of 1973, as amended, and the regulations at 41 CFR Parts 60-1 through
60-60, 60-250, and 60-741. The affirmative action clause and regulations contained in the preceding sentence shall be incorporated by reference in this Agreement.
Part Number: 90024592 (09/00)
Page 3

Contents
iii
Getting Started
Adobe Photoshop Basics
Registration . . . . . . . . . . . . . . . . . . . . . . . . . . . . . . . . . . . . . . . . . . . . 1
Installing Adobe Photoshop and ImageReady . . . . . . . . . . . 1
Learning Adobe Photoshop and ImageReady . . . . . . . . . . . 1
Using Web resources . . . . . . . . . . . . . . . . . . . . . . . . . . . . . . . . . . . 3
Other learning resources . . . . . . . . . . . . . . . . . . . . . . . . . . . . . . . 4
Customer support . . . . . . . . . . . . . . . . . . . . . . . . . . . . . . . . . . . . . . 5
Using tools and palettes . . . . . . . . . . . . . . . . . . . . . . . . . . . . . . . 10
Opening images in Photoshop and ImageReady . . . . . . . 12
Streamlining your workflow . . . . . . . . . . . . . . . . . . . . . . . . . . . 14
Making tonal and color adjustments . . . . . . . . . . . . . . . . . . . 16
Retouching images . . . . . . . . . . . . . . . . . . . . . . . . . . . . . . . . . . . . 17
Making pixel selections . . . . . . . . . . . . . . . . . . . . . . . . . . . . . . . . 18
Making edits . . . . . . . . . . . . . . . . . . . . . . . . . . . . . . . . . . . . . . . . . . 20
Using layers . . . . . . . . . . . . . . . . . . . . . . . . . . . . . . . . . . . . . . . . . . . 22
Compositing images . . . . . . . . . . . . . . . . . . . . . . . . . . . . . . . . . . 24
Painting . . . . . . . . . . . . . . . . . . . . . . . . . . . . . . . . . . . . . . . . . . . . . . . 26
Drawing shapes . . . . . . . . . . . . . . . . . . . . . . . . . . . . . . . . . . . . . . . 27
Creating type . . . . . . . . . . . . . . . . . . . . . . . . . . . . . . . . . . . . . . . . . 30
Editing type . . . . . . . . . . . . . . . . . . . . . . . . . . . . . . . . . . . . . . . . . . . 31
Designing Web graphics . . . . . . . . . . . . . . . . . . . . . . . . . . . . . . . 32
Creating animations (ImageReady) . . . . . . . . . . . . . . . . . . . . . 33
Optimizing Web graphics . . . . . . . . . . . . . . . . . . . . . . . . . . . . . . 34
What’s New in Adobe
Photoshop 6.0
Superb vector support . . . . . . . . . . . . . . . . . . . . . . . . . . . . . . . . 40
Enhanced vector output . . . . . . . . . . . . . . . . . . . . . . . . . . . . . . . 42
Layer styles . . . . . . . . . . . . . . . . . . . . . . . . . . . . . . . . . . . . . . . . . . . 42
Interactive image warping . . . . . . . . . . . . . . . . . . . . . . . . . . . . . 44
Enhanced slicing capabilities . . . . . . . . . . . . . . . . . . . . . . . . . . 45
Enhanced support for image maps and rollovers . . . . . . . 47
Weighted optimization . . . . . . . . . . . . . . . . . . . . . . . . . . . . . . . . 48
Improved Web workflow . . . . . . . . . . . . . . . . . . . . . . . . . . . . . . 48
Streamlined interface . . . . . . . . . . . . . . . . . . . . . . . . . . . . . . . . . 49
Page 4

CONTENTS
iv
Enhanced layer management . . . . . . . . . . . . . . . . . . . . . . . . . . 50
Expanded text features . . . . . . . . . . . . . . . . . . . . . . . . . . . . . . . . 51
Preset Manager . . . . . . . . . . . . . . . . . . . . . . . . . . . . . . . . . . . . . . . 53
Other new and enhanced features . . . . . . . . . . . . . . . . . . . . . 53
Looking at the Work Area
Chapter 1
Using the toolbox . . . . . . . . . . . . . . . . . . . . . . . . . . . . . . . . . . . . . 57
Using the tool options bar . . . . . . . . . . . . . . . . . . . . . . . . . . . . . 59
Using palettes . . . . . . . . . . . . . . . . . . . . . . . . . . . . . . . . . . . . . . . . . 60
Using context menus . . . . . . . . . . . . . . . . . . . . . . . . . . . . . . . . . . 64
Viewing images . . . . . . . . . . . . . . . . . . . . . . . . . . . . . . . . . . . . . . . 64
Correcting mistakes . . . . . . . . . . . . . . . . . . . . . . . . . . . . . . . . . . . 68
Reverting to any state of an image . . . . . . . . . . . . . . . . . . . . . 69
Duplicating images . . . . . . . . . . . . . . . . . . . . . . . . . . . . . . . . . . . . 73
Using rulers, the measure tool, guides, and the grid . . . . . 74
Working with Extras . . . . . . . . . . . . . . . . . . . . . . . . . . . . . . . . . . . 77
Displaying status information . . . . . . . . . . . . . . . . . . . . . . . . . . 78
Displaying file and image information . . . . . . . . . . . . . . . . . 78
Annotating images (Photoshop) . . . . . . . . . . . . . . . . . . . . . . . 80
Jumping between applications . . . . . . . . . . . . . . . . . . . . . . . . 82
Previewing an image in a browser . . . . . . . . . . . . . . . . . . . . . 84
Managing libraries with the Preset Manager
(Photoshop) . . . . . . . . . . . . . . . . . . . . . . . . . . . . . . . . . . . . . . . . . . . 85
Setting preferences . . . . . . . . . . . . . . . . . . . . . . . . . . . . . . . . . . . 86
Resetting all warning dialogs . . . . . . . . . . . . . . . . . . . . . . . . . . 87
Monitoring operations . . . . . . . . . . . . . . . . . . . . . . . . . . . . . . . . 88
Closing files and quitting . . . . . . . . . . . . . . . . . . . . . . . . . . . . . . 88
Getting Images into
Photoshop and
ImageReady
Chapter 2
About bitmap images and vector graphics . . . . . . . . . . . . . 91
About image size and resolution . . . . . . . . . . . . . . . . . . . . . . . 92
Changing image size and resolution . . . . . . . . . . . . . . . . . . . 95
Scanning images . . . . . . . . . . . . . . . . . . . . . . . . . . . . . . . . . . . . . . 99
Creating new images . . . . . . . . . . . . . . . . . . . . . . . . . . . . . . . . . 100
Opening and importing images . . . . . . . . . . . . . . . . . . . . . . 101
Placing files . . . . . . . . . . . . . . . . . . . . . . . . . . . . . . . . . . . . . . . . . . 104
Managing files with WebDAV . . . . . . . . . . . . . . . . . . . . . . . . . 106
Page 5

v
Working with Color
Producing Consistent
Color (Photoshop)
Chapter 3
About color modes and models (Photoshop) . . . . . . . . . . 109
Color gamuts (Photoshop) . . . . . . . . . . . . . . . . . . . . . . . . . . . . 114
Adjusting the monitor display . . . . . . . . . . . . . . . . . . . . . . . . 114
Channels and bit depth (Photoshop) . . . . . . . . . . . . . . . . . . 116
Converting between color modes (Photoshop) . . . . . . . . 117
Converting to indexed color (Photoshop) . . . . . . . . . . . . . 118
Applying colors . . . . . . . . . . . . . . . . . . . . . . . . . . . . . . . . . . . . . . 118
Making color and tonal adjustments . . . . . . . . . . . . . . . . . . 118
Chapter 4
Why colors sometimes don’t match . . . . . . . . . . . . . . . . . . .121
About color management . . . . . . . . . . . . . . . . . . . . . . . . . . . . 121
Do you need color management? . . . . . . . . . . . . . . . . . . . . . 122
Creating a viewing environment for
color management . . . . . . . . . . . . . . . . . . . . . . . . . . . . . . . . . . . 123
Setting up color management . . . . . . . . . . . . . . . . . . . . . . . . 124
Using predefined color management settings . . . . . . . . . 124
Customizing color management settings . . . . . . . . . . . . . 126
Specifying working spaces . . . . . . . . . . . . . . . . . . . . . . . . . . . . 127
Specifying color management policies . . . . . . . . . . . . . . . . 128
Customizing advanced color management settings . . . 130
Saving and loading color management settings . . . . . . . 130
Synchronizing color management between
applications . . . . . . . . . . . . . . . . . . . . . . . . . . . . . . . . . . . . . . . . . . 131
Soft-proofing colors . . . . . . . . . . . . . . . . . . . . . . . . . . . . . . . . . . 131
Changing the color profile of a document . . . . . . . . . . . . . 133
Embedding profiles in saved documents . . . . . . . . . . . . . . 134
Obtaining, installing, and updating color profiles . . . . . . 134
Creating an ICC monitor profile . . . . . . . . . . . . . . . . . . . . . . . 136
Selecting
Chapter 5
About selections . . . . . . . . . . . . . . . . . . . . . . . . . . . . . . . . . . . . . 139
Making pixel selections . . . . . . . . . . . . . . . . . . . . . . . . . . . . . . . 139
Adjusting pixel selections . . . . . . . . . . . . . . . . . . . . . . . . . . . . . 146
Softening the edges of a selection . . . . . . . . . . . . . . . . . . . . 147
Moving, copying, and pasting selections and layers . . . . 149
Working with snap . . . . . . . . . . . . . . . . . . . . . . . . . . . . . . . . . . . 152
Page 6

CONTENTS
vi
Saving and loading selections . . . . . . . . . . . . . . . . . . . . . . . . 153
Deleting selections . . . . . . . . . . . . . . . . . . . . . . . . . . . . . . . . . . . 153
Removing fringe pixels from a selection
(Photoshop) . . . . . . . . . . . . . . . . . . . . . . . . . . . . . . . . . . . . . . . . . . 154
Extracting objects from their background
(Photoshop) . . . . . . . . . . . . . . . . . . . . . . . . . . . . . . . . . . . . . . . . . . 154
Drawing and Editing
Using Channels and Masks
Chapter 6
About drawing and painting . . . . . . . . . . . . . . . . . . . . . . . . . . 161
Drawing shapes and paths . . . . . . . . . . . . . . . . . . . . . . . . . . . . 161
Using the shape tools . . . . . . . . . . . . . . . . . . . . . . . . . . . . . . . . 164
Using the pen tools (Photoshop) . . . . . . . . . . . . . . . . . . . . . . 166
Drawing overlapping shapes (Photoshop) . . . . . . . . . . . . . 171
Using the Paths palette (Photoshop) . . . . . . . . . . . . . . . . . . 171
Editing paths (Photoshop) . . . . . . . . . . . . . . . . . . . . . . . . . . . . 172
Managing paths (Photoshop) . . . . . . . . . . . . . . . . . . . . . . . . . 179
Converting between paths and selection borders
(Photoshop) . . . . . . . . . . . . . . . . . . . . . . . . . . . . . . . . . . . . . . . . . . 180
Adding color to paths (Photoshop) . . . . . . . . . . . . . . . . . . . . 182
Transforming and retouching . . . . . . . . . . . . . . . . . . . . . . . . . 182
Chapter 7
About channels . . . . . . . . . . . . . . . . . . . . . . . . . . . . . . . . . . . . . . 185
Using the Channels palette (Photoshop) . . . . . . . . . . . . . . 185
Managing channels (Photoshop) . . . . . . . . . . . . . . . . . . . . . . 187
Mixing color channels (Photoshop) . . . . . . . . . . . . . . . . . . . 190
Adding spot colors (Photoshop) . . . . . . . . . . . . . . . . . . . . . . 191
Using channel calculations to blend layers
and channels (Photoshop) . . . . . . . . . . . . . . . . . . . . . . . . . . . . 194
About masks (Photoshop) . . . . . . . . . . . . . . . . . . . . . . . . . . . . 197
Creating temporary masks in Quick Mask mode
(Photoshop) . . . . . . . . . . . . . . . . . . . . . . . . . . . . . . . . . . . . . . . . . . 197
Storing masks in alpha channels . . . . . . . . . . . . . . . . . . . . . . 199
Using Layers
Chapter 8
About layers . . . . . . . . . . . . . . . . . . . . . . . . . . . . . . . . . . . . . . . . . 205
About layer sets . . . . . . . . . . . . . . . . . . . . . . . . . . . . . . . . . . . . . . 206
Using the Layers palette . . . . . . . . . . . . . . . . . . . . . . . . . . . . . . 206
Creating a layered image . . . . . . . . . . . . . . . . . . . . . . . . . . . . . 210
Page 7

Grouping layers into sets . . . . . . . . . . . . . . . . . . . . . . . . . . . . . 213
Moving and aligning the contents of layers . . . . . . . . . . . 214
Editing layers . . . . . . . . . . . . . . . . . . . . . . . . . . . . . . . . . . . . . . . . . 216
Creating clipping groups . . . . . . . . . . . . . . . . . . . . . . . . . . . . . 218
Specifying layer properties . . . . . . . . . . . . . . . . . . . . . . . . . . . 219
Using the Layer Style dialog box (Photoshop) . . . . . . . . . 220
Setting layer blending options . . . . . . . . . . . . . . . . . . . . . . . . 221
Using layer styles . . . . . . . . . . . . . . . . . . . . . . . . . . . . . . . . . . . . . 226
Customizing layer styles . . . . . . . . . . . . . . . . . . . . . . . . . . . . . . 230
Creating and editing contours (Photoshop) . . . . . . . . . . . 236
Hiding portions of a layer . . . . . . . . . . . . . . . . . . . . . . . . . . . . . 237
Using adjustment layers or fill layers (Photoshop) . . . . . . 242
Managing layered images . . . . . . . . . . . . . . . . . . . . . . . . . . . . 246
vii
Using Type
Designing Web Pages
Chapter 9
About type . . . . . . . . . . . . . . . . . . . . . . . . . . . . . . . . . . . . . . . . . . . 251
Creating type . . . . . . . . . . . . . . . . . . . . . . . . . . . . . . . . . . . . . . . . 251
Working with type layers . . . . . . . . . . . . . . . . . . . . . . . . . . . . . 254
Formatting characters . . . . . . . . . . . . . . . . . . . . . . . . . . . . . . . . 258
Formatting paragraphs . . . . . . . . . . . . . . . . . . . . . . . . . . . . . . . 265
Controlling hyphenation and justification . . . . . . . . . . . . . 267
Working with composition . . . . . . . . . . . . . . . . . . . . . . . . . . . 267
Setting options for Chinese, Japanese,
and Korean type (Photoshop) . . . . . . . . . . . . . . . . . . . . . . . . . 267
Chapter 10
About designing Web pages with Photoshop and
ImageReady . . . . . . . . . . . . . . . . . . . . . . . . . . . . . . . . . . . . . . . . . 271
Creating and viewing slices . . . . . . . . . . . . . . . . . . . . . . . . . . . 272
Selecting and modifying slices . . . . . . . . . . . . . . . . . . . . . . . . 276
Specifying slice options . . . . . . . . . . . . . . . . . . . . . . . . . . . . . . 281
Creating and viewing image maps (ImageReady) . . . . . . 286
Selecting and modifying image maps (ImageReady) . . . 288
Specifying image map options (ImageReady) . . . . . . . . . 291
Selecting an image map type (ImageReady) . . . . . . . . . . . 292
Working with rollovers (ImageReady) . . . . . . . . . . . . . . . . . 292
Creating Web photo galleries (Photoshop) . . . . . . . . . . . . 297
Page 8

viii
CONTENTS
Creating Animations
(ImageReady)
Optimizing Images for
the Web
Chapter 11
About animation . . . . . . . . . . . . . . . . . . . . . . . . . . . . . . . . . . . . . 301
Creating animations . . . . . . . . . . . . . . . . . . . . . . . . . . . . . . . . . . 301
Working with layers in animations . . . . . . . . . . . . . . . . . . . . 306
Viewing animations . . . . . . . . . . . . . . . . . . . . . . . . . . . . . . . . . . 309
Optimizing animations . . . . . . . . . . . . . . . . . . . . . . . . . . . . . . . 309
Viewing animated images in Photoshop . . . . . . . . . . . . . . 310
Saving animations . . . . . . . . . . . . . . . . . . . . . . . . . . . . . . . . . . . . 310
Opening and importing files as animations . . . . . . . . . . . . 311
Chapter 12
About optimization . . . . . . . . . . . . . . . . . . . . . . . . . . . . . . . . . . 315
Viewing images during optimization . . . . . . . . . . . . . . . . . . 316
Choosing a file format for optimization . . . . . . . . . . . . . . . 317
Optimizing images . . . . . . . . . . . . . . . . . . . . . . . . . . . . . . . . . . . 320
Using weighted optimization . . . . . . . . . . . . . . . . . . . . . . . . . 327
Optimizing colors in GIF and PNG-8 images . . . . . . . . . . . 330
Working with hexadecimal values for color . . . . . . . . . . . 337
Making transparent and matted images . . . . . . . . . . . . . . . 339
Previewing and controlling dithering . . . . . . . . . . . . . . . . . 341
Setting optimization preferences (ImageReady) . . . . . . . 345
Using a droplet to automate optimization settings
(ImageReady) . . . . . . . . . . . . . . . . . . . . . . . . . . . . . . . . . . . . . . . . 346
Saving optimized images . . . . . . . . . . . . . . . . . . . . . . . . . . . . . 347
Setting output options . . . . . . . . . . . . . . . . . . . . . . . . . . . . . . . 348
Creating background images . . . . . . . . . . . . . . . . . . . . . . . . . 352
Saving and Exporting
Images
Chapter 13
Saving images . . . . . . . . . . . . . . . . . . . . . . . . . . . . . . . . . . . . . . . 357
About file formats . . . . . . . . . . . . . . . . . . . . . . . . . . . . . . . . . . . . 364
Adding file information (Photoshop) . . . . . . . . . . . . . . . . . . 366
Adding digital copyright information . . . . . . . . . . . . . . . . . 366
Setting preferences for saving files (Photoshop) . . . . . . . 366
Creating multiple-image layouts (Photoshop) . . . . . . . . . 367
Placing Photoshop images in other applications
(Photoshop) . . . . . . . . . . . . . . . . . . . . . . . . . . . . . . . . . . . . . . . . . . 369
Page 9

ix
Printing (Photoshop)
Automating Tasks
Chapter 14
About printing . . . . . . . . . . . . . . . . . . . . . . . . . . . . . . . . . . . . . . . 375
Printing images . . . . . . . . . . . . . . . . . . . . . . . . . . . . . . . . . . . . . . 376
Positioning and scaling images . . . . . . . . . . . . . . . . . . . . . . . 377
Setting output options . . . . . . . . . . . . . . . . . . . . . . . . . . . . . . . 378
Selecting halftone screen attributes . . . . . . . . . . . . . . . . . . . 379
Printing part of an image . . . . . . . . . . . . . . . . . . . . . . . . . . . . . 382
Choosing a print encoding method . . . . . . . . . . . . . . . . . . . 382
Printing vector graphics . . . . . . . . . . . . . . . . . . . . . . . . . . . . . . 382
Using color management when printing . . . . . . . . . . . . . . 382
Printing with Adobe PressReady . . . . . . . . . . . . . . . . . . . . . . 383
Creating color traps . . . . . . . . . . . . . . . . . . . . . . . . . . . . . . . . . . 384
Printing duotones . . . . . . . . . . . . . . . . . . . . . . . . . . . . . . . . . . . . 384
Printing color separations . . . . . . . . . . . . . . . . . . . . . . . . . . . . 389
Chapter 15
About actions . . . . . . . . . . . . . . . . . . . . . . . . . . . . . . . . . . . . . . . . 393
Using the Actions palette . . . . . . . . . . . . . . . . . . . . . . . . . . . . . 394
Recording actions . . . . . . . . . . . . . . . . . . . . . . . . . . . . . . . . . . . . 394
Playing actions . . . . . . . . . . . . . . . . . . . . . . . . . . . . . . . . . . . . . . . 399
Setting playback options (Photoshop) . . . . . . . . . . . . . . . . 400
Editing actions . . . . . . . . . . . . . . . . . . . . . . . . . . . . . . . . . . . . . . . 400
Managing actions in the Actions palette . . . . . . . . . . . . . . 402
Using the Batch command (Photoshop) . . . . . . . . . . . . . . . 405
Using droplets . . . . . . . . . . . . . . . . . . . . . . . . . . . . . . . . . . . . . . . 406
Using the Automate commands (Photoshop) . . . . . . . . . 410
External automation . . . . . . . . . . . . . . . . . . . . . . . . . . . . . . . . . . 411
Index
. . . . . . . . . . . . . . . . . . . . . . . . . . . . . . . . . . . . . . . . . . . . . . . . 413
Page 10

Page 11

Getting Started
1
elcome to the Adobe® Photoshop® 6.0
application, the world-standard
W
and Web-graphics solution. With its integrated
Web tool application, Adobe ImageReady
Photoshop delivers a comprehensive environment
for professional designers and graphics producers
to create sophisticated images for both print and
the Web. Moreover, Photoshop 6.0 expands the
definition of desktop image-editing by adding new
support for vector-based drawing and editing,
improved tools for producing Web graphics,
and an enhanced user interface, all to your
creative advantage.
image-editing, photo-retouching,
™
3.0,
Registration
Adobe is confident you will find that its software
greatly increases your productivity. So that Adobe
can continue to provide you with the highest
quality software, offer technical support, and
inform you about new Photoshop software developments, please register your application.
When you first start the Photoshop or ImageReady
application, you’re prompted to register online.
You can choose to submit the form directly or fax
a printed copy. You can also register by filling out
and returning the registration card included with
your software package.
Installing Adobe Photoshop and ImageReady
You must install the Photoshop and ImageReady
applications from the Adobe Photoshop CD onto
your hard drive; you cannot run the program from
the CD.
Follow the on-screen installation instructions.
For more detailed information, see the
ReadMe
both the Photoshop and ImageReady applications.
file on the CD. The single installer installs
Install-
Learning Adobe Photoshop and ImageReady
Adobe provides a variety of options for you to
learn Photoshop, including printed guides,
online Help, and tool tips. Using the Adobe
Online feature, you can easily access a host of
continually updated Web resources for learning
Photoshop, from tips and tutorials to tech
support information.
®
Adobe Acrobat
Photoshop CD, lets you view PDF files. Acrobat
Reader or Adobe Acrobat is required to view many
documents included on this CD.
Using the printed documentation
Two printed documents are included with
the application.
Reader™ software, included on the
Page 12

2
Getting Started
Using online Help
The Adobe Photoshop and ImageReady applications include complete documentation in an
HTML-based help system. The help system
includes all of the information in the
Photoshop 6.0 User Guide
plus information on
additional features, keyboard shortcuts, and fullcolor illustrations.
For more detailed information about using
online Help, click the Help on Help button
next to the Content tab.
To properly view online Help topics, you need
Netscape Communicator 4.0 (or later) or
®
Microsoft
Internet Explorer 4.0 (or later).
You must also have JavaScript active.
To start online Help:
Do one of the following:
•
Choose Help > Help Contents (Photoshop) or
Help > Help Topics (ImageReady).
•
Press F1 (Windows).
Adobe Photoshop 6.0 User Guide
essential information on using Photoshop and
ImageReady commands and features. Complete
information on all topics is available in online
Help. The printed guide and help also indicate
when a topic, procedure, or command pertains
specifically to Photoshop or ImageReady,
for example, “Choose View > Actual Pixels
(Photoshop) or View > Actual Size (ImageReady).”
Adobe
Contains
The user guide assumes you have a working
knowledge of your computer and its operating
conventions, including how to use a mouse
and standard menus and commands. It also
assumes you know how to open, save, and close
files. For help with any of these techniques,
®
please see your Microsoft Windows
or Mac® OS
documentation.
Adobe Photoshop Quick Reference Card
Contains basic information about the Adobe
Photoshop and ImageReady tools and palettes,
and shortcuts for using them. Shortcuts are also
included in the online Help.
Using tool tips
The tool tips feature lets you display the name of
tools, or buttons and controls in palettes.
To identify a tool or control:
Position the pointer over a tool or control and
pause. A tool tip appears showing the name and
keyboard shortcut (if any) for the item.
If tool tips don’t appear, the preference for
displaying them may be turned off.
To display tool tips:
Choose Edit > Preferences > General.
1
Select Show Tool Tips, and click OK.
2
Note:
Tool tips are not available in most dialog
boxes.
Page 13
ADOBE PHOTOSHOP 6.0
User Guide
3
Using Web resources
If you have an Internet connection and a Web
browser installed on your system, you can access
additional resources for learning Photoshop and
ImageReady located on the Adobe Systems home
page on the World Wide Web. These resources are
continually updated.
To access the Adobe home page for your region:
1
Open the Adobe U.S. home page at
www.adobe.com.
From the Adobe Sites menu, choose your
2
geographical region. The Adobe home page is
customized for several geographical regions.
About Adobe Online
Adobe Online provides access to the latest
tutorials, quicktips, and other Web content for
Photoshop and other Adobe products.
Using Adobe Online, you can also download and
view the current version of the Photoshop Top
Issues document containing the latest Photoshop
technical support solutions. Bookmarks are also
included to take you quickly to noteworthy
Adobe- and Photoshop-related sites.
Using Adobe Online
Adobe Online is constantly changing, so you
should refresh before you use it. Refreshing
through Adobe Online updates bookmarks and
buttons so you can quickly access the most current
content available. You can use preferences to
automatically refresh Adobe Online daily, weekly,
or monthly.
When you set up Adobe Online to connect to your
Web browser, Adobe can either notify you
whenever new information is available through
the Downloadables feature or automatically
download that information to your hard disk.
If you choose not to use the automatic download
feature, you can still view and download new files
whenever they are available using the Downloadables command in the Help menu.
To use Adobe Online:
In Photoshop or ImageReady, choose
1
Help > Adobe Online, or click the icon at the
top of the toolbox.
Note:
You must have an Internet connection and
an Internet browser installed. Adobe Online will
launch your browser using your default Internet
configuration.
Do any of the following:
2
•
Click Refresh to make sure you have the latest
version of the Adobe Online window and its
buttons, as well as the latest bookmarks. It is
important to refresh the screen so that the current
options are available for you to choose from.
•
Click Preferences to specify connection options.
General preferences affect how Adobe Online
interacts with all Adobe products installed on your
system, and Application preferences affect how
Page 14

4
Getting Started
Adobe Online interacts with Photoshop and
ImageReady. To see an explanation of each
preference option, click Setup and follow the
prompts. You also can set up an automatic refresh
using the Update Options.
Note:
You can also set Adobe Online preferences by
choosing Edit > Preferences > Adobe Online.
•
Click any button in the Adobe Online window to
open the Web page to which the button is linked.
•
Click the bookmark button ( ) to view
suggested Web sites related to Photoshop and
Adobe. These bookmarks are automatically
updated as new Web sites become available.
•
Click Close to return to Photoshop or
ImageReady.
Accessing Adobe Online through the
Help menu
The Help menu includes options to view and
download information from the Adobe Web site.
To view updated articles or documents:
Click Help and choose the topic you want to view.
To view and download information from the Adobe
Web site using the Help menu:
1
In Photoshop or ImageReady, choose Help >
Downloadables.
2
Select a View Option:
•
Select Show Only New Files to view only the files
that are new since the last time you viewed
downloadable files or were notified of them.
•
Select Show All Files to view all the files on the
Adobe Web site that are currently available for
download.
Select Download Options:
3
•
Select Auto Install Downloaded Components if
you want Adobe to start the component’s installer
(if available) as soon as the download is complete.
You can then follow the prompts to install the files.
•
Select Download in Background if you want to
continue working in Photoshop, ImageReady,
and other applications while the file downloads.
•
Select Notify When Download Complete if you
want Adobe to display a message when the files
have been transferred to your computer.
4
To view a list of files, open the Downloadables
folder and any other folder listed.
5
To see a description of a file, position the mouse
cursor over a filename and view its description in
the Item Description section.
To see the location where a file will be installed
6
if downloaded, select a file and view its location in
the Download Directory section. To change the
location, click the Folder button ( ).
7
To download a file, select it and click
Download.
8
To close the Downloadables dialog box,
click Close.
Other learning resources
Other Adobe learning resources are available but
are not included with your application.
Page 15

ADOBE PHOTOSHOP 6.0
User Guide
5
Classroom in a Book
Is the official training series
for Adobe graphics and publishing software.
This book is developed by experts at Adobe and
published by Adobe Press. The
Classroom in a Book
includes lessons about using
Photoshop. For information on purchasing
Photoshop Classroom in a Book
Adobe Photoshop
Adobe
, visit the Adobe
Web site at www.adobe.com, or contact your local
book distributor.
Official Adobe Print Publishing Guide
Provides in-depth information on successful
print production, including topics such as color
management, commercial printing, constructing a
publication, imaging and proofing, and project
management guidelines. For information on
purchasing the
, visit the Adobe Web site at
Guide
Official Adobe Print Publishing
www.adobe.com.
Official Adobe Electronic Publishing Guide
Tackles the fundamental issues essential to
ensuring quality online publications in HTML and
PDF. Using simple, expertly illustrated explanations, design and publishing professionals tell
you how to design electronic publications for
maximum speed, legibility, and effectiveness.
For information on purchasing the
Electronic Publishing Guide
, visit the Adobe Web
Official Adobe
site at www.adobe.com.
The Adobe Certification program
Offers users,
instructors, and training centers the opportunity
to demonstrate their product proficiency and
promote their software skills as Adobe Certified
Experts, Adobe Certified Instructors, or Adobe
Authorized Learning Providers. Certification is
available for several different geographical regions.
Visit the Partnering with Adobe Web site at
www.partners.adobe.com to learn how you can
become certified.
Customer support
When you register your product, you may be
entitled to technical support for up to 90 days from
the date of your first call. Terms may vary
depending on the country of residence. For more
information, refer to the technical support card
provided with the Photoshop documentation.
Customer support on Adobe Online
Adobe Online provides access to FAQs
(Frequently Asked Questions) and troubleshooting information that provides solutions to
common problems.
Additional customer support resources
Adobe Systems provides several forms of
automated technical support:
•
See the ReadMe and ReadMe First! files installed
with the program for information that became
available after this guide went to press.
•
Explore the extensive customer support information on Adobe’s World Wide Web site
(www.adobe.com). To access the Adobe Web site
from Photoshop, choose Help > Adobe Online or
click the icon at the top of the toolbox. (See “Using
Web resources” on page 3.)
•
Read the Top Issues PDF that is available from
the Help menu.
Page 16

Page 17

Page 18

Page 19

Adobe Photoshop Basics
This interactive overview of Adobe Photoshop offers a number of short lesson modules designed to
introduce the key features of the program. You can complete the modules in sequence, or select individual
ones to design your own program introduction. If you are an experienced Photoshop user, you may want
to quickly review sections of this overview and then skip to “What’s New in Adobe Photoshop 6.0.”
Page 20

10
Adobe Photoshop Basics
Setting up the work area
Using tools and palettes
The Photoshop or ImageReady work area consists of the image window, the toolbox, the options bar, and a set
of floating palettes. This module shows you the basics of navigating the work area, from selecting tools and
tool options to customizing the display and arrangement of palettes.
Select a tool
tools, as indicated by the small triangle to the lower right of the tool icon. To select a hidden tool, position
the pointer on the visible tool and hold down the mouse button until the tools list appears. Then, click the
tool you want.
Choose tool options
your screen. This options bar contains option settings for the currently selected tool.
•
To display the options bar if it is hidden, click a tool in the toolbox, or choose Window > Show Options.
•
To move the options bar to a different location, drag the title bar on the left edge of the bar. You can
move the options bar anywhere in the work area and dock it to the top or bottom of the screen.
Options bar
To select a tool, click its icon in the toolbox. Some tools in the toolbox have additional hidden
When you first start the application, the options bar appears docked to the top of
Page 21
ADOBE PHOTOSHOP 6.0
User Guide
11
Display the palettes
When you first start the
application, the floating palettes appear stacked in
default groups. Use the following techniques to
show and hide palettes:
•
To bring a palette to the front of its group,
click the palette’s tab.
•
To show or hide a palette as you work, choose
the appropriate Window > Show or Window >
Hide command.
•
(ImageReady) To show or hide options for
Palette group with Color palette at front
palettes that include hidden options, click the Show Options button ( ) on the palette tab to cycle
through palette displays.
•
To hide or display all open palettes and the toolbox, press Tab. To hide or display palettes only,
press Shift+Tab.
Arrange the palettes
Depending on your
available screen area and work needs, you may
want to reposition and regroup the palettes.
Use the following techniques to change palette
arrangements:
•
To move an entire palette group, drag its
title bar.
•
To rearrange or separate a palette from its
group, drag the palette’s tab. Dragging
Click a tab to display a palette stored in the palette well.
a palette outside of an existing group creates
a new group.
•
To dock palettes together, drag a palette’s tab to the bottom of another palette so that the bottom of the
second palette is highlighted. You can move an entire docked group by dragging its title bar. You cannot
dock existing palette groups together.
•
To store an undocked palette in the palette well at the options bar’s right edge, drag the palette’s tab into
the palette well so that the palette well is highlighted. To display a palette in the well, click the palette’s
tab. This technique is useful for providing quick and compact access to palettes.
Page 22

12
Adobe Photoshop Basics
Display a palette menu
Most palettes have menus that contain additional commands and options.
To display a palette menu, click the black triangle at the upper right of the palette. (For palettes stored in
the options bar, first display the palette and then click the black triangle in the palette’s tab.)
Opening images in Photoshop and ImageReady
Photoshop and ImageReady let you open or import a variety of source images. You can create new images,
import digital images saved in various formats, and scan or capture images from an imaging device.
(Photoshop) Specify color management settings
management settings you want to use. Photoshop color management features are designed to help keep
colors in your image consistent as the image is transferred between different users, systems, and display
and output devices. To set up color management, choose Edit > Color Settings, choose a predefined
configuration from the Settings menu, and click OK.
The configuration you choose defines the specific color spaces that Photoshop uses when working with
images in RGB, CMYK, and Grayscale modes. For complete information on setting up color management,
see the online help section on producing consistent color.
Scan the image at the correct size and resolution
Photoshop or ImageReady, it’s a good idea to scan the image as close as possible to the size dimensions and
resolution that you want. When in doubt, scan at a higher resolution than what is needed. You can always
reduce the image later in Photoshop or ImageReady by cutting down the resolution or pixel dimensions.
Before opening or creating new images, specify the color
If you are scanning an image to be opened in
Open or create an image
•
Choose File > Open, and locate and select the desired image file. Depending on your color
Do one of the following:
management settings and the color profile associated with the file, you may be prompted to specify how
to handle color information in the file.
•
Choose File > New. Enter a name for the image, and specify its dimensions, resolution (Photoshop
only), and color mode (Photoshop only). In addition, specify whether to fill the image with white,
the current background color, or transparency.
Page 23
ADOBE PHOTOSHOP 6.0
User Guide
13
Set rulers, guides, and the grid
To help position and align elements accurately in the image, use rulers,
guides, and grid lines:
• To display rulers along the top and left side of the document window, choose View > Show Rulers.
(In Photoshop, you can change the ruler units by choosing Edit > Preferences > Units & Rulers.)
• To place a horizontal or vertical guide, drag from either the horizontal or vertical ruler.
• (Photoshop) To display grid lines throughout the document window, choose View > Show > Grid.
(You can control the color, style, and spacing of the grid and guide lines by choosing Edit >
Preferences > Guides & Grid.)
You can toggle the display of guides and grid lines at any time by choosing the appropriate command from
the View > Show submenu. Checked items are visible; unchecked items are hidden.
Adjust the image view Photoshop and
ImageReady offer several tools for navigating and
magnifying the view of your image:
• To move a different area of the image into view,
drag with the hand tool ( ) in the image.
You can use the hand tool while another tool is
selected by holding down the spacebar.
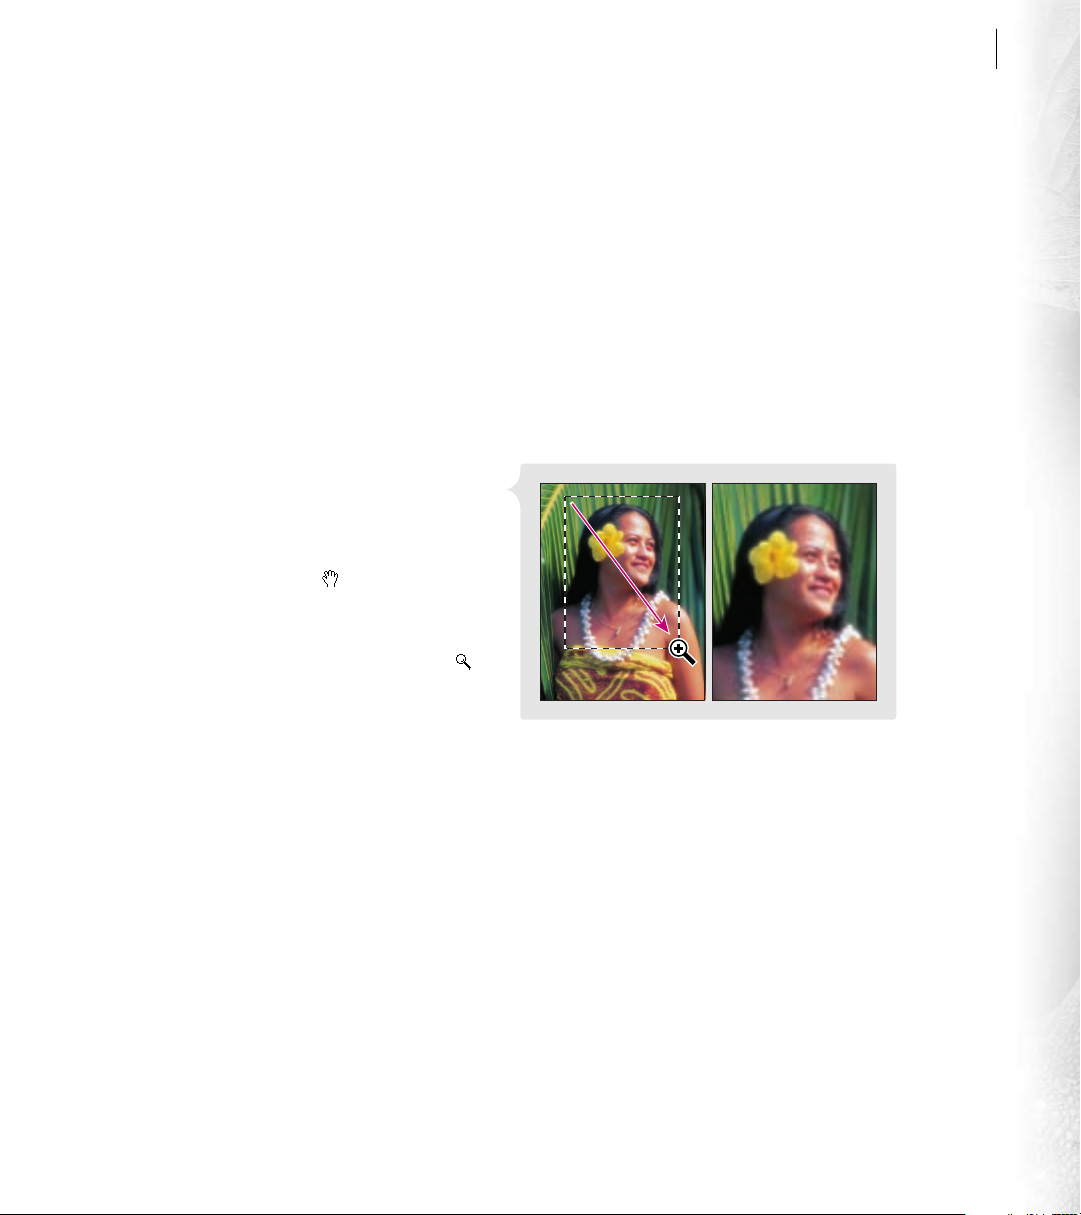
• To magnify the view, select the zoom tool ( ),
and click in the image or drag over the part of
the image you want to magnify. To reduce the
view magnification, Alt-click (Windows) or
Drag with the zoom tool to magnify.
Option-click (Mac OS) with the zoom tool in
the image.
• (Photoshop) To adjust the image view using the Navigator palette, choose Window > Show Navigator.
In the Navigator palette, drag the view box in the image thumbnail to move the view, or click the area
of the thumbnail that you want to display in the window.
• To display the same image in multiple windows, choose View > New View. Multiple windows let you
display different views of the same image.
Page 24
14
Adobe Photoshop Basics
Monitor your work status As you experiment with
different tools, commands, and image views,
check out the status bar at the bottom edge of the
document window. This area displays useful
information about your work status, such as the
current magnification percentage or the name of
the currently selected tool. You can specify the type
of information displayed by using the pop-up
menu in the status bar.
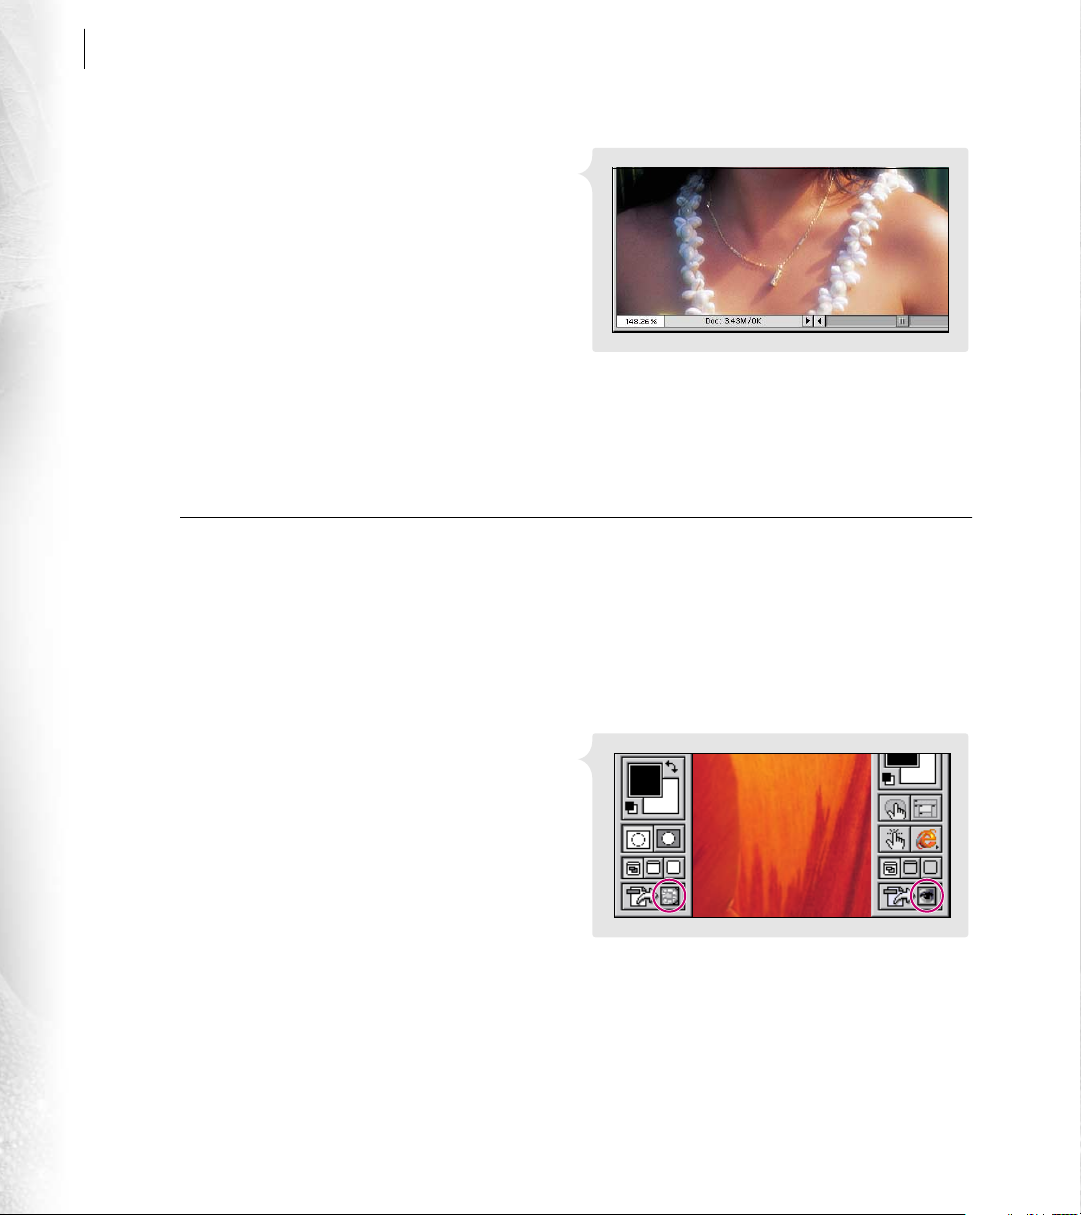
Display the Info palette For convenient access to additional information about your image, display the
Info palette by choosing Window > Show Info. The Info palette displays information about the color
values in the image beneath the pointer and, depending on the tool in use, other useful measurements.
Streamlining your workflow
Photoshop and ImageReady provide a number of convenient features to help your work flow more smoothly.
The Jump To button makes it easy to work on the same image seamlessly in both Photoshop and ImageReady.
The Undo command and History palette let you correct editing mistakes. And the Actions palette lets
you save sequences of commonly used tasks so that you can perform them automatically on an image or
batch of images.
Status bar
Switch between Photoshop and ImageReady
You can easily jump between Photoshop and
ImageReady when working on an image to use the
full feature sets of both applications. To switch to
either application, click the Jump To button in
the toolbox.
Jump To button in Photoshop and ImageReady
Page 25
ADOBE PHOTOSHOP 6.0
Undo the last performed operation If you make a mistake while working, simply choose Edit > Undo to
reverse the effect of the last operation. Most, but not all, operations can be reversed this way.
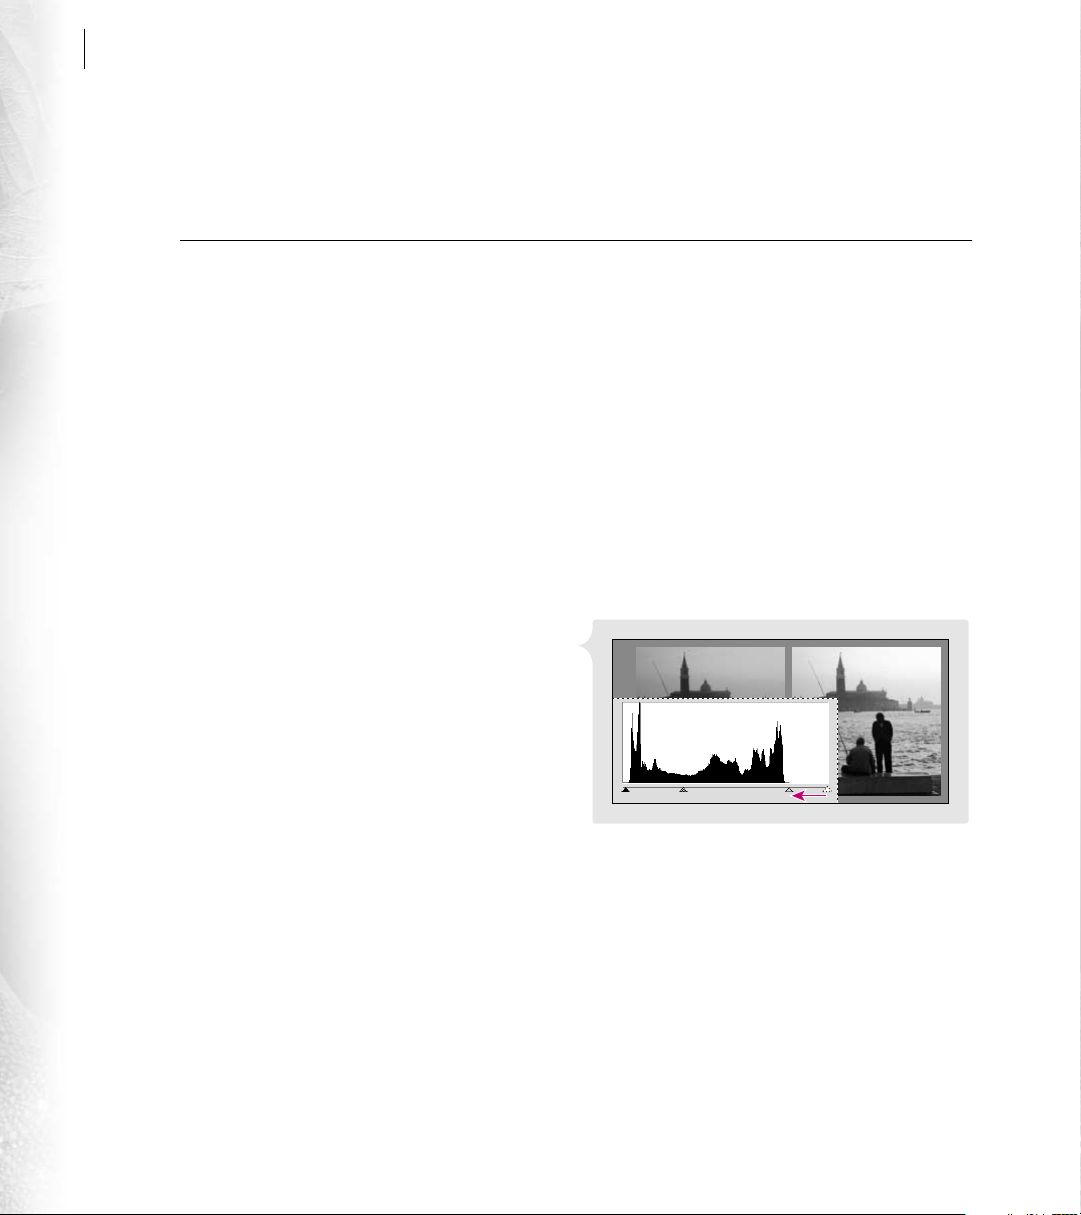
Undo multiple operations If you need to undo more than one operation, choose Window > Show History
to display the History palette. This palette lists all the different states that the image has undergone as a
result of the recent edits you’ve made. To revert the image to a previous state, click the name of the state in
the History palette.
User Guide
15
History palette Playing an action
Automate repeated tasks To automatically apply a sequence of operations to your image, choose
Window > Show Actions to display the Actions palette. This palette includes a default list of common
tasks, or actions. You can perform a desired action automatically by selecting it and clicking the Play
button ( ) at the bottom of the Actions palette. Or, you can record your own sequence of operations as a
stored action in the palette for future playback on a single image or batch of images.
Page 26
16
Adobe Photoshop Basics
Adjusting and retouching images
Making tonal and color adjustments
Upon first opening a scanned image or digital photograph in Photoshop or ImageReady, it’s common to notice
some problems with color quality and tonal range. The image may appear washed out, for example, or appear
too dark or too light in certain areas.
Open the Levels dialog box When making tonal adjustments to an image in Photoshop, it’s a good idea to
use adjustment layers. You can limit the application of flexible and reversible adjustments to an adjustment
layer, so that underlying layers show the effects of the adjustment without being permanently altered.
(You can even block areas from being adjusted by painting the adjustment layer with black.) To create an
adjustment layer that adjusts the tonality of an image, choose Layer > New Adjustment Layer > Levels.
Name the layer and click OK.
In ImageReady, you do not have the option of adjustment layers, so choose Image > Adjust > Levels.
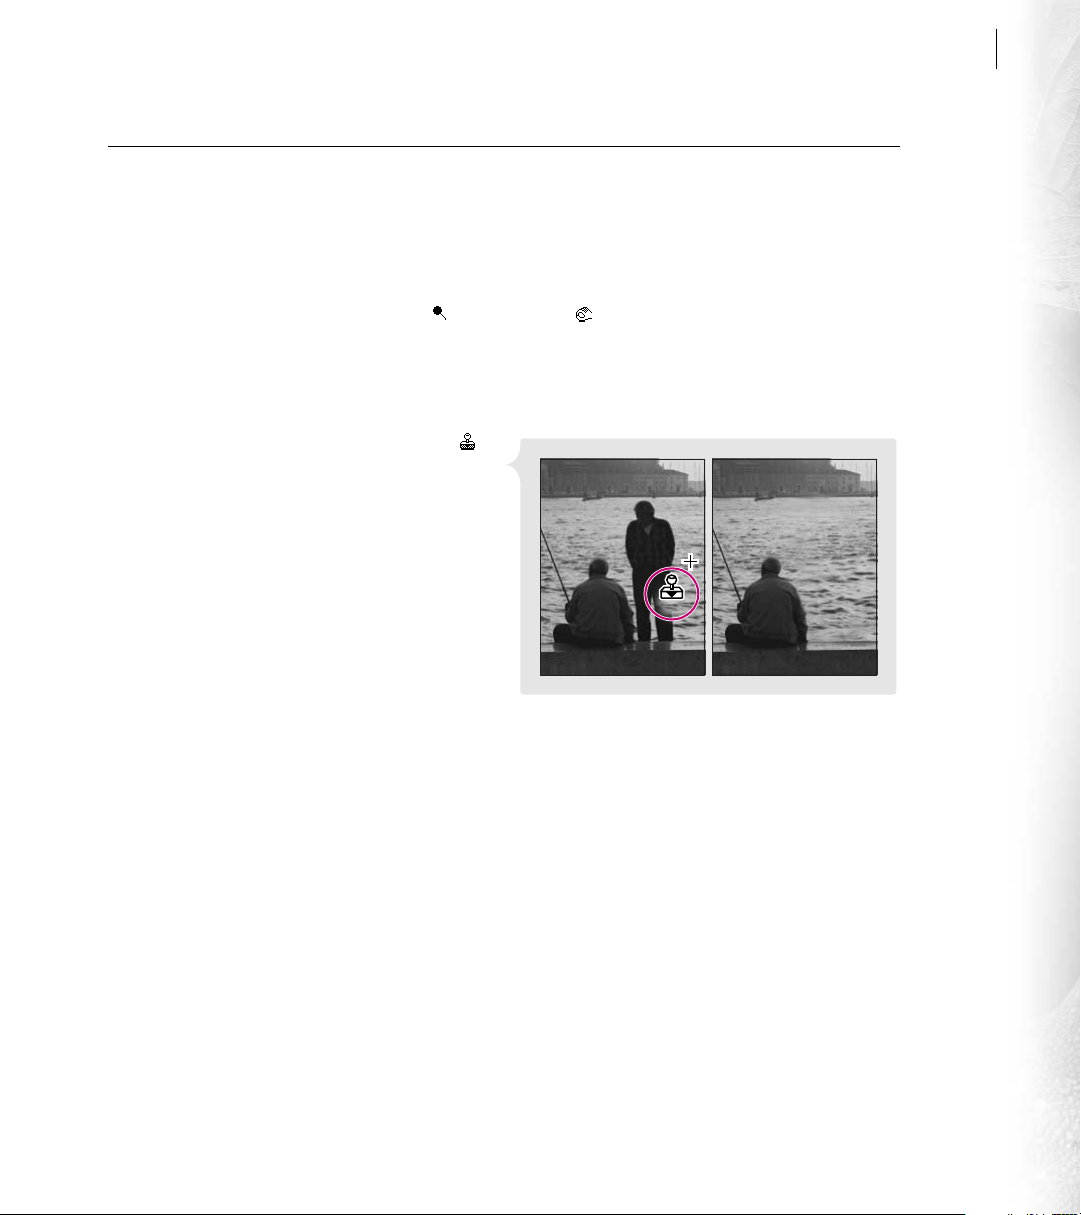
Adjust tonal levels The Levels dialog box displays a
graph representing the tonal distribution of the
image—from shadows (on the left) to midtones
(in the middle) to highlights (on the right).
To achieve good tonal range, drag the black and
white sliders to where the graph begins at either
end. Then drag the middle slider to adjust
midtones to the desired level.
The Levels dialog box provides a useful way to
adjust your image’s overall tonal range. The Curves
dialog box represents another, more precise method, letting you adjust any point along a 0–255 tonal scale.
Make other adjustments If needed, you can use other adjustment features to correct for color casts and
sharpen details in the final image.
Adjusting tonal levels
Page 27
ADOBE PHOTOSHOP 6.0
Retouching images
Many of the retouching tools in Photoshop and ImageReady are modeled after traditional photo-studio
techniques for correcting blemishes and faulty exposures in images. However, with the power of digital
technology you can use these tools to apply all sorts of creative effects beyond basic photo retouching.
Dodge or burn the image The dodge tool ( ) and burn tool ( ) let you respectively lighten and darken
a localized area in your image. With either tool selected, choose a brush from the brushes menu in the
options bar. In addition, choose the range of tones you want to affect from the range menu in the options
bar. Then drag over the part of the image that you want to lighten.
Remove imperfections The clone stamp tool ( )
lets you paint over an area of your image using a
sample taken from the same image or another
image. With the clone stamp tool selected, choose a
brush from the options bar. Alt-click (Windows) or
Option-click (Mac OS) the image area you want to
sample. Release Alt/Option, and then drag to paint
with the sample.
User Guide
17
For best results, use short strokes when painting,
and Alt/Option-click to take updated samples
frequently between strokes. This helps to produce a
smoother, more natural effect.
Removing areas with the clone stamp tool
Page 28
18
Adobe Photoshop Basics
Editing images
Making pixel selections
Before you can edit an area of an image, you must first select the image area. This type of selection is called a
pixel selection because you are selecting an area that contains pixel information. If you experience trouble
selecting the image area you want, you may need to check that you are working on the proper layer.
Select with a marquee tool The marquee tools let you select image areas by dragging to define a shaped
selection border. First, select the rectangular marquee ( ) or the elliptical marquee ( ) from the toolbox.
Then drag over the area you want to select.
Reposition a selection border At times, you may want to adjust the position of a selection border to
enclose a different area of the image. To reposition a selection border using any selection tool, move the
pointer inside the border and drag to the desired location. Or, use the arrow keys to move the selection
border in gradual increments.
Select with a lasso tool The lasso ( ) and
polygon lasso ( ) tools let you select areas by
dragging and clicking, respectively, to define the
boundary of the selected area. (In Photoshop,
you can also use the magnetic lasso tool ( ) to find
the edges of the desired area automatically.) These
tools are especially useful for selecting irregularly
shaped areas.
Selecting with the magnetic lasso tool
Page 29

ADOBE PHOTOSHOP 6.0
Select with the magic wand The magic wand tool ( ) lets you select a consistently colored area without
having to trace its outline. To use the magic wand, first enter a tolerance value in the options bar. (A higher
tolerance selects a broader range of colors.) Then click the area in the image you want to select.
Modify a selection border The selection tools come with several options for enhancing or modifying an
existing selection border. These options can help you select areas that are difficult to define with a single
selection. First, make a selection. Then, using any selection tool, specify an option in the options bar:
• The Add to Selection option ( ) adds the new selection to the first selection.
• The Subtract from Selection option ( ) subtracts the new selection from the first selection.
• The Restrict Selection option ( ) selects only the intersection of the two selections.
(Photoshop) Quick Mask mode A quick mask lets you refine an existing selection border with the aid of
painting tools. This technique is useful for selecting areas that are more easily defined with a painting
brush. Use any selection tool to select the desired image area, and then click the Quick Mask mode
button ( ) in the toolbox. In Quick Mask mode, everything outside the selection appears masked by a
color overlay. Do any of the following to modify the selection border:
• To add to the selection, use a painting tool to paint with white. (See “Painting” on page 26 for more
information.)
• To subtract from the selection, paint with black.
• To create a semitransparent selection area, paint with gray. This is useful for creating a selection with
feathered edges.
User Guide
19
Click the Standard mode button ( ) to turn off the quick mask and display the modified selection border.
Page 30

20
Adobe Photoshop Basics
Making edits
Photoshop and ImageReady are equipped with a rich collection of editing tools and commands that you can
use to modify your images. In addition to basic edits such as repositioning or applying geometric changes to a
selection, you can create an unlimited variety of special effects using the Filter commands.
Resize the image To change the dimensions or resolution of your image, choose Image > Image Size and
specify values for the image:
• For an image intended for the Web or online display, enter values for the pixel dimensions and click OK.
• (Photoshop) For an image intended for printed output, enter values for the physical output size. Enter
Move a selection To move a selected pixel area, select the move tool ( ) in the toolbox. Position the
pointer inside the selection, and drag the selection to a new location.
the resolution value recommended for your press or desktop printer, and click OK.
Page 31

ADOBE PHOTOSHOP 6.0
Duplicate a selection You can also use the move tool to duplicate a selection. With the move tool selected,
simply Alt-drag (Windows) or Option-drag (Mac OS) the selection to copy it.
Duplicating a selection Rotating a selection
Apply a transformation The transformation commands let you make geometric changes—such as
resizing, rotations, shears, distortions, and reflections—to a selection. To apply a transformation, do one
of the following:
User Guide
21
• Choose the desired command from the Edit > Transform menu. (In Photoshop, this menu changes to
Edit > Transform Path if a vector shape is selected.)
• Select the move tool ( ), and select Show Bounding Box in the options bar.
If applicable, drag the handles that appear around the selection to achieve the desired effect. Then press
Enter or Return to apply the transformation. You can even choose additional transformation commands
before you press Enter or Return, adjusting the handles for each command to achieve a cumulative effect.
Apply a filter Photoshop and ImageReady provide a generous array of filters for creating all kinds of
special effects—from blurs and ripples to mosaics, brushlike patterns, and other artistic effects. To apply
a filter to a pixel selection, select a command from a submenu in the Filter menu. (If no selection exists,
the filter is applied to the entire layer.)
Page 32
22
Adobe Photoshop Basics
Using layers
Layers provide a powerful way for you to organize and manage the various components of your image.
For example, by placing an element on a separate layer, you can easily edit and arrange the element without
interfering with other parts of the image. Layers also provide the basis for managing and defining advanced
features such as Web animations and rollovers.
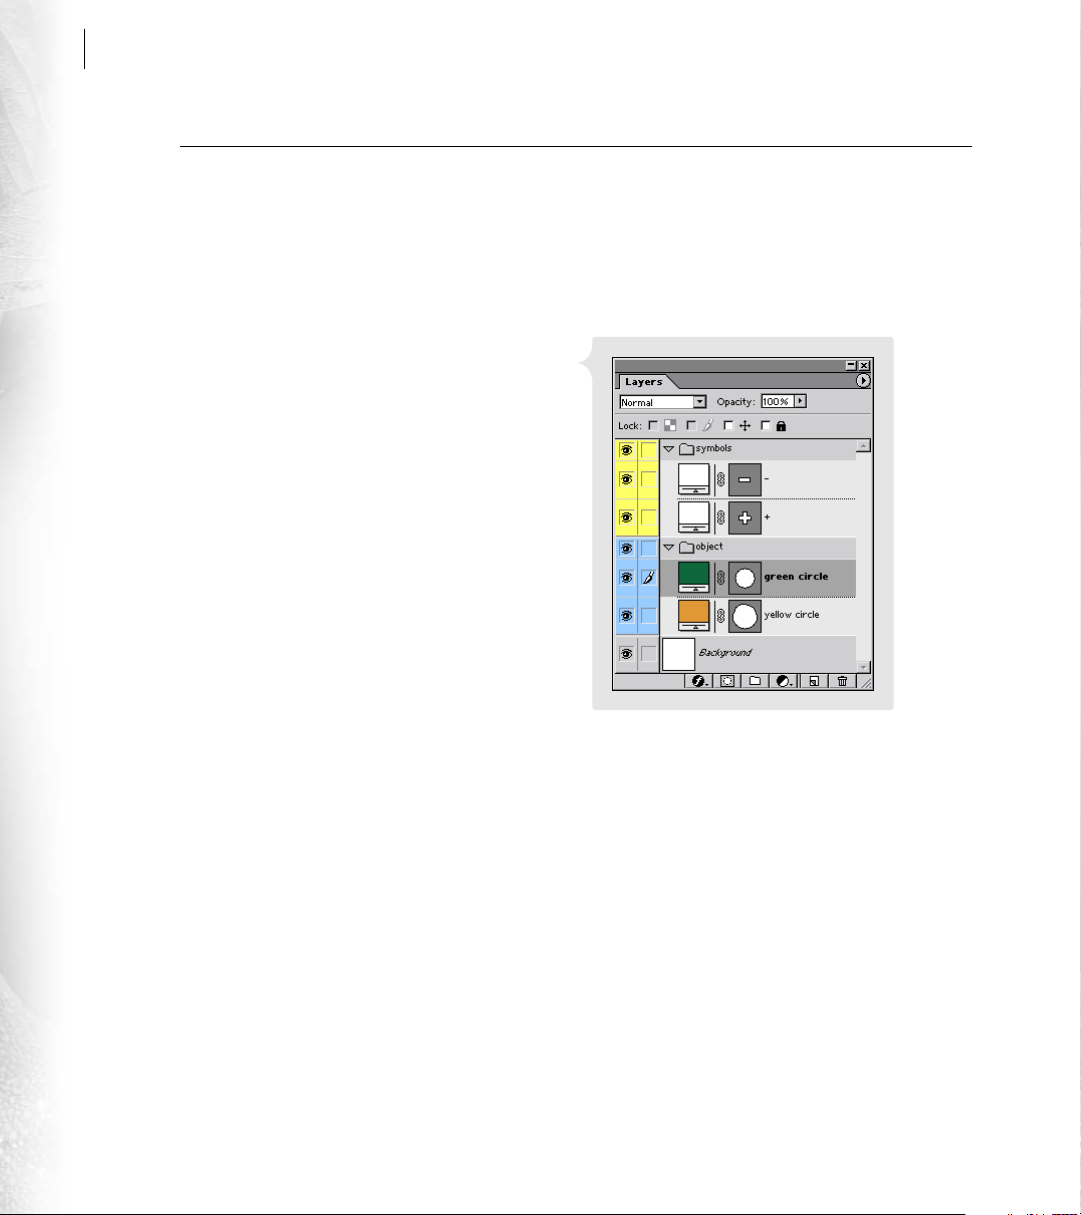
Display the list of layers If needed, choose
Window > Show Layers to display the Layers
palette. This palette shows the list of layers that
have been created in the image. The thumbnail
previews help you monitor the contents of each
layer. Layers may be grouped under layer sets to aid
in organizing complex images. To toggle between
the expanded and collapsed displays of a layer set,
click the triangle to the left of the layer set’s name.
Change the visibility of a layer To help focus your
work on individual layers in the image, you can
toggle the visibility of one or more layers:
• To make a single layer invisible, click the eye
icon next to that layer in the Layers palette.
• To display just a single layer and make all other
Layers palette with expanded display
layers invisible, Alt-click (Windows) or Option-click (Mac OS) the eye icon next to the layer you
want to show.
Page 33
ADOBE PHOTOSHOP 6.0
Select a layer Often you will need to target a specific layer for further editing in Photoshop or
ImageReady. For instance, many tasks—such as transformations or filters—can be applied to entire layers
as well as to individual selections. In addition, you must first target a layer in order to select an area or
shape that sits on that layer. To select or target a layer, click its name in the Layers palette.
Create a selection based on the contents of a layer To select all the opaque contents of a layer, Ctrl-click
(Windows) or Command-click (Mac OS) the layer in the Layers palette. The resulting selection border
represents the boundaries of the layer.
Adjust opacity and blending mode For each layer, you can specify an opacity percentage (to control how
much layers beneath show through) and blending mode (to control how the colors in the layer are blended
with the colors of underlying layers). To specify the opacity of a selected layer, enter a value for Opacity or
drag the slider at the upper right of the Layers palette. To specify a blending mode for a selected layer,
choose an option from the menu at the upper left of the Layers palette.
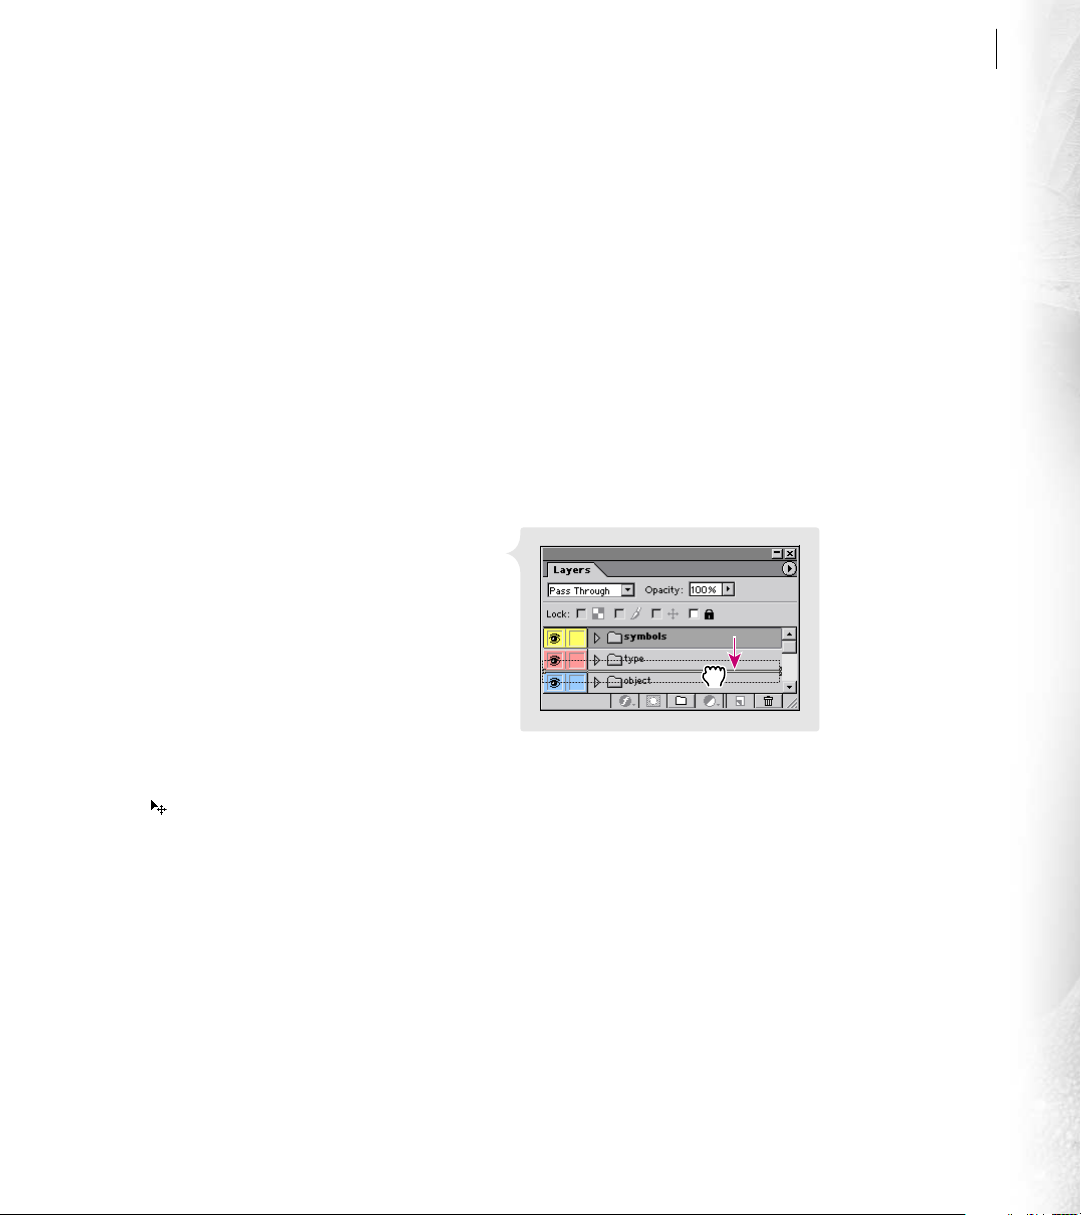
Move a layer’s stacking order The Layers palette
displays layers in the order that they are stacked in
the image, with the topmost layer appearing at the
top of the list. To move a layer (or layer set) to a
different level in the stacking order, simply drag the
layer up or down in the palette. You can also move
a layer into a layer set by dragging the layer over the
layer set icon.
User Guide
23
Move a layer’s contents To move all the contents of
Reordering a layer set
a layer to a different position in the image, first select the layer in the Layers palette. Then use the move
tool ( ) to drag in the image. Only the contents of the selected layer are affected.
Page 34
24
Adobe Photoshop Basics
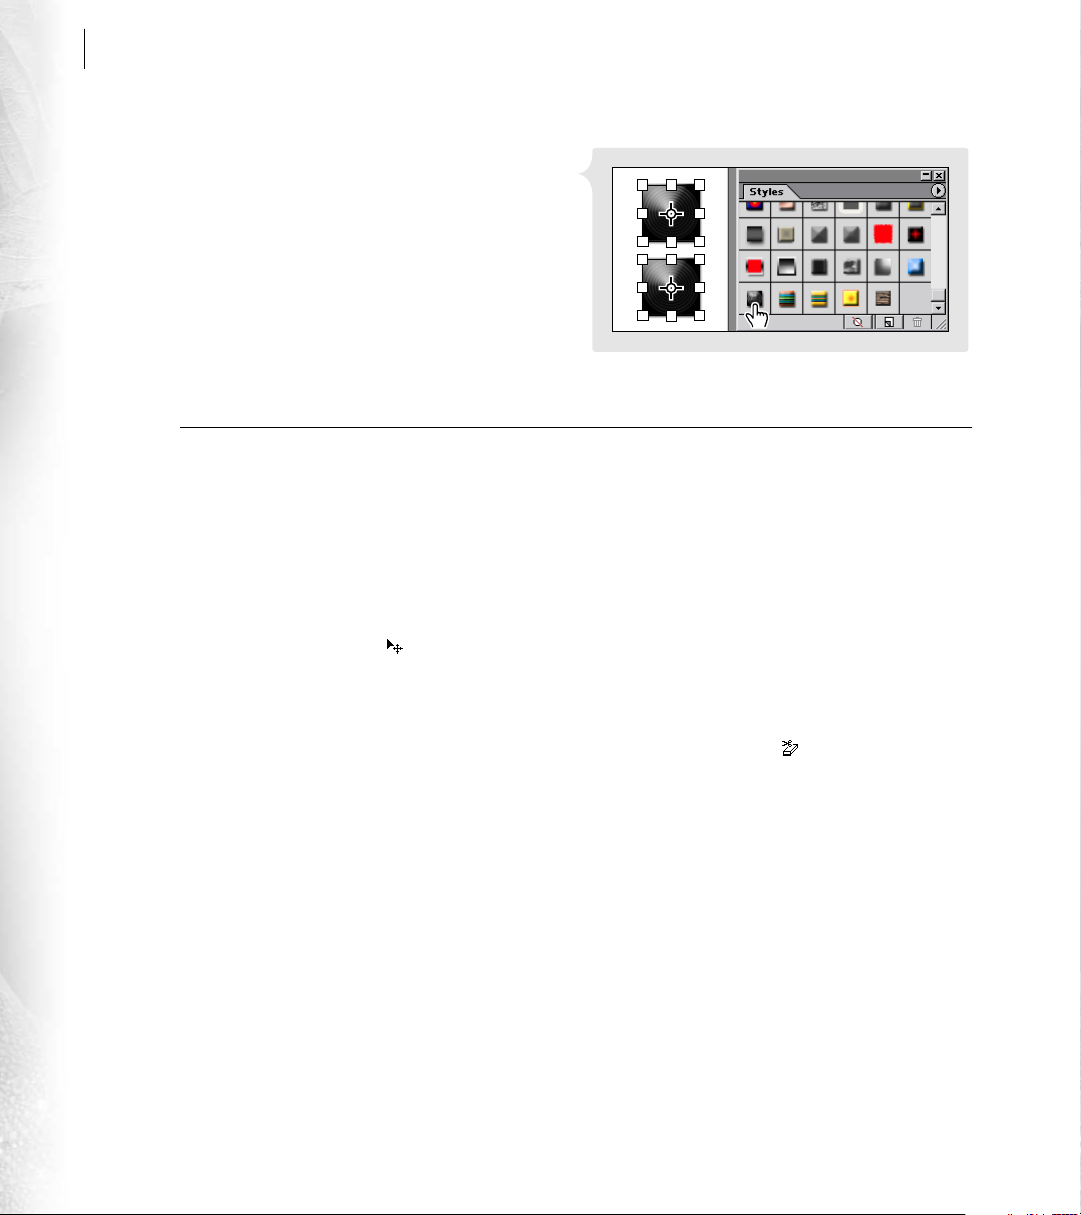
Apply a layer style You can apply predefined styles
to the contents of a layer to produce instant graphic
effects. This feature is especially useful for creating
Web buttons and rollover states. You can also define
your own layer styles.
To apply a style, choose Window > Show Styles to
display the Styles palettes. Select the desired layer in
the Layers palette, and then select the style you
want to apply from the Styles palette.
Compositing images
You can use various features in Photoshop and ImageReady to combine several images or parts of images to
produce creative compositions. For example, by isolating the foreground area of an image and placing it
against the background of another image, you can create unlimited composite effects.
Copy a layer between images To copy a layer with all its contents from one image to another, make sure
that both images are open. In the Layers palette for the source image, select the layer that you want to copy.
Then select the move tool ( ), and drag from the source image to the destination image until a border
highlights the destination window. (If you have made a selection, only the selected area is copied to the
destination image.)
Applying a layer style
(Photoshop) Erase the background area of a layer The background eraser tool ( ) lets you erase
similarly colored areas of a layer. This is useful for extracting a foreground object that is surrounded by a
consistently colored background. First select the desired layer in the Layers palette. Select the background
eraser tool, and set the Tolerance option to a low value. Then drag in the area that you want to remove.
Page 35
ADOBE PHOTOSHOP 6.0
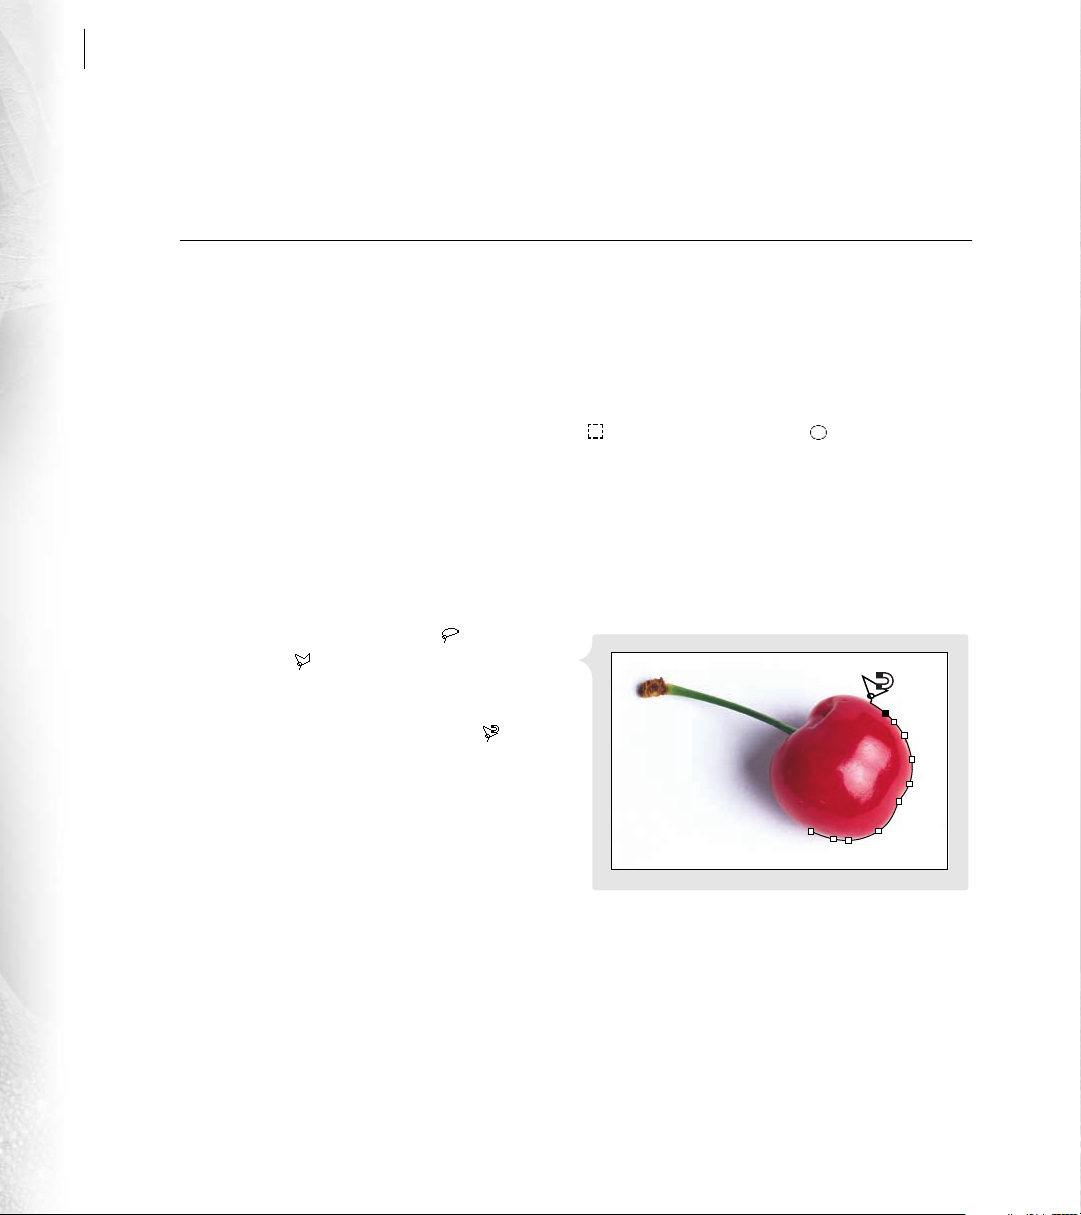
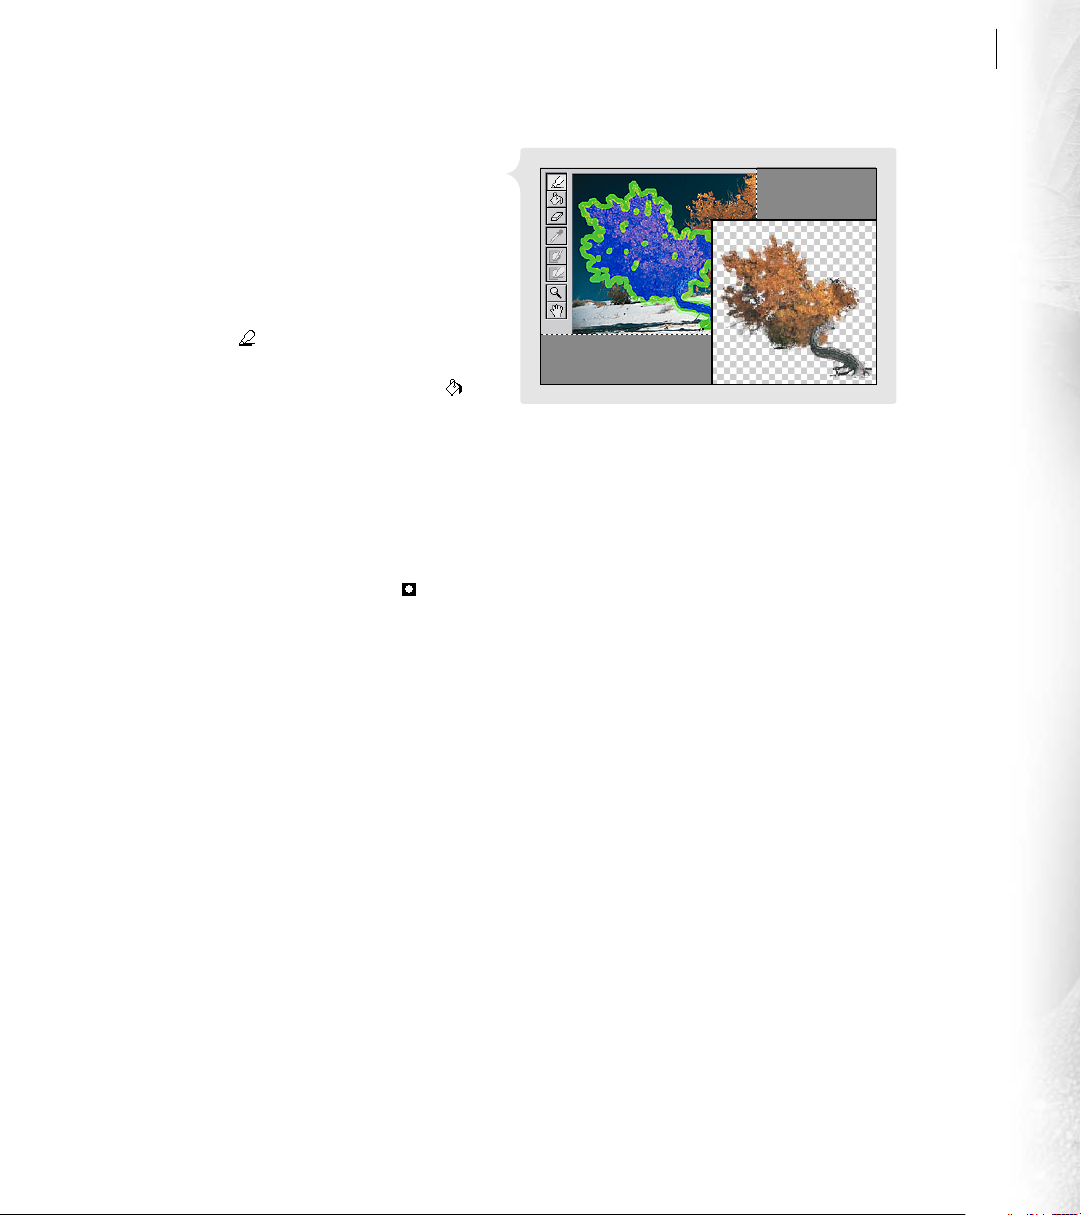
(Photoshop) Extract part of an image The Extract
Image command provides controls for isolating
image areas with wispy or intricate edges.
First, duplicate the layer containing the desired
area, and select the duplicate layer in the Layers
palette. Then choose Image > Extract.
In the Extract dialog box, drag with the edge
highlighter tool ( ) in the image preview to
highlight the edges of the desired area. Then click
inside the highlighted area with the fill tool ( ).
Click OK to perform the extraction. All areas on
Extracting an image area
the layer outside the extracted area are erased
to transparency.
Mask part of a layer Layer masks let you selectively hide parts of a layer without permanently altering the
layer. For example, you can create a mask that reveals a certain area of detail on a layer; the rest of the layer
is hidden but still available behind the mask. In the Layers palette, select the layer that you want to mask,
and click the New Layer Mask button ( ) at the bottom of the palette. Create the mask:
User Guide
25
• To add to the mask and hide more of the layer, use a painting tool to paint with black. (See “Painting”
on page 26 for more information.)
• To subtract from the mask and reveal more of the layer, paint with white.
• To create a semitransparent mask, paint with gray. This is useful for partially hiding areas of the layer.
Page 36

26
Adobe Photoshop Basics
Painting and drawing
Painting
Painting in Photoshop or ImageReady is as easy as choosing a color, selecting a tool, choosing a brush tip, and
dragging in the image to paint. The various painting tools are modeled after styles of traditional paint media.
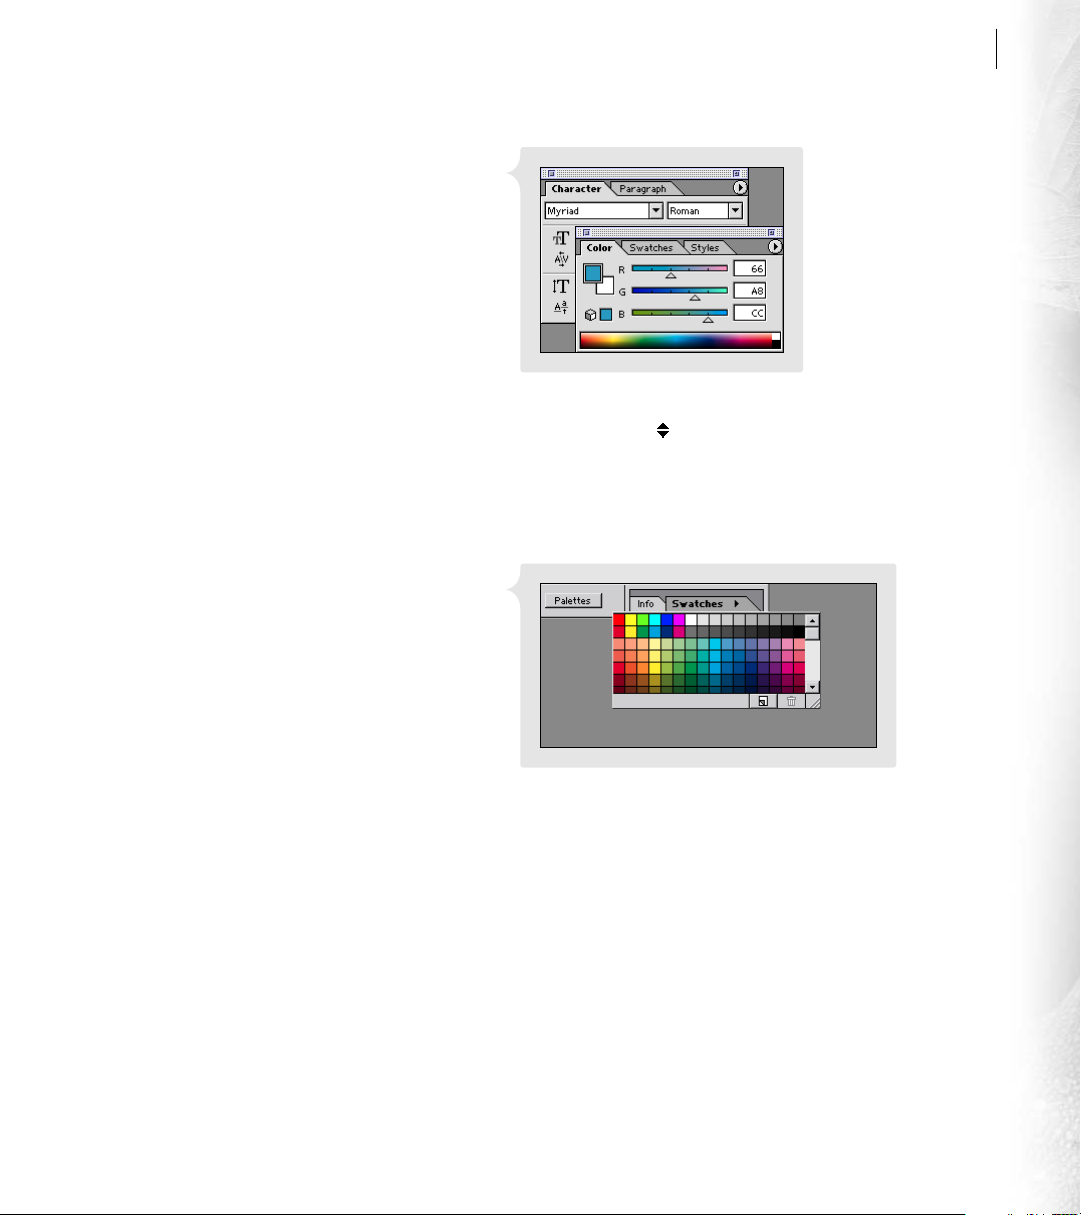
Choose a foreground color Before painting an
image, you need to specify the foreground color
that will be used to paint. Click the top color
selection box in the toolbox, and choose a color
in the color picker. You can select the Only Web
Colors option to confine your range of choices to
Web-safe colors.
You can also use the Color or Swatches palette to
choose colors.
Choosing a foreground color
Select a painting tool Select a painting tool from the toolbox and drag in the image to paint:
• The paintbrush tool ( ) creates soft strokes of color.
• The pencil tool ( ) creates hard-edged freehand lines.
• The airbrush tool ( ) lets you apply gradual tones and sprays of color. You can build up color (as with
a traditional airbrush) by holding down the mouse in a stationary position.
• The eraser tool ( ) lets you erase areas to transparency or, if you’re working in the background layer
or in a layer with locked transparency, to the background color. (You set the background color by
clicking the bottom color selection box in the toolbox.)
Page 37
ADOBE PHOTOSHOP 6.0
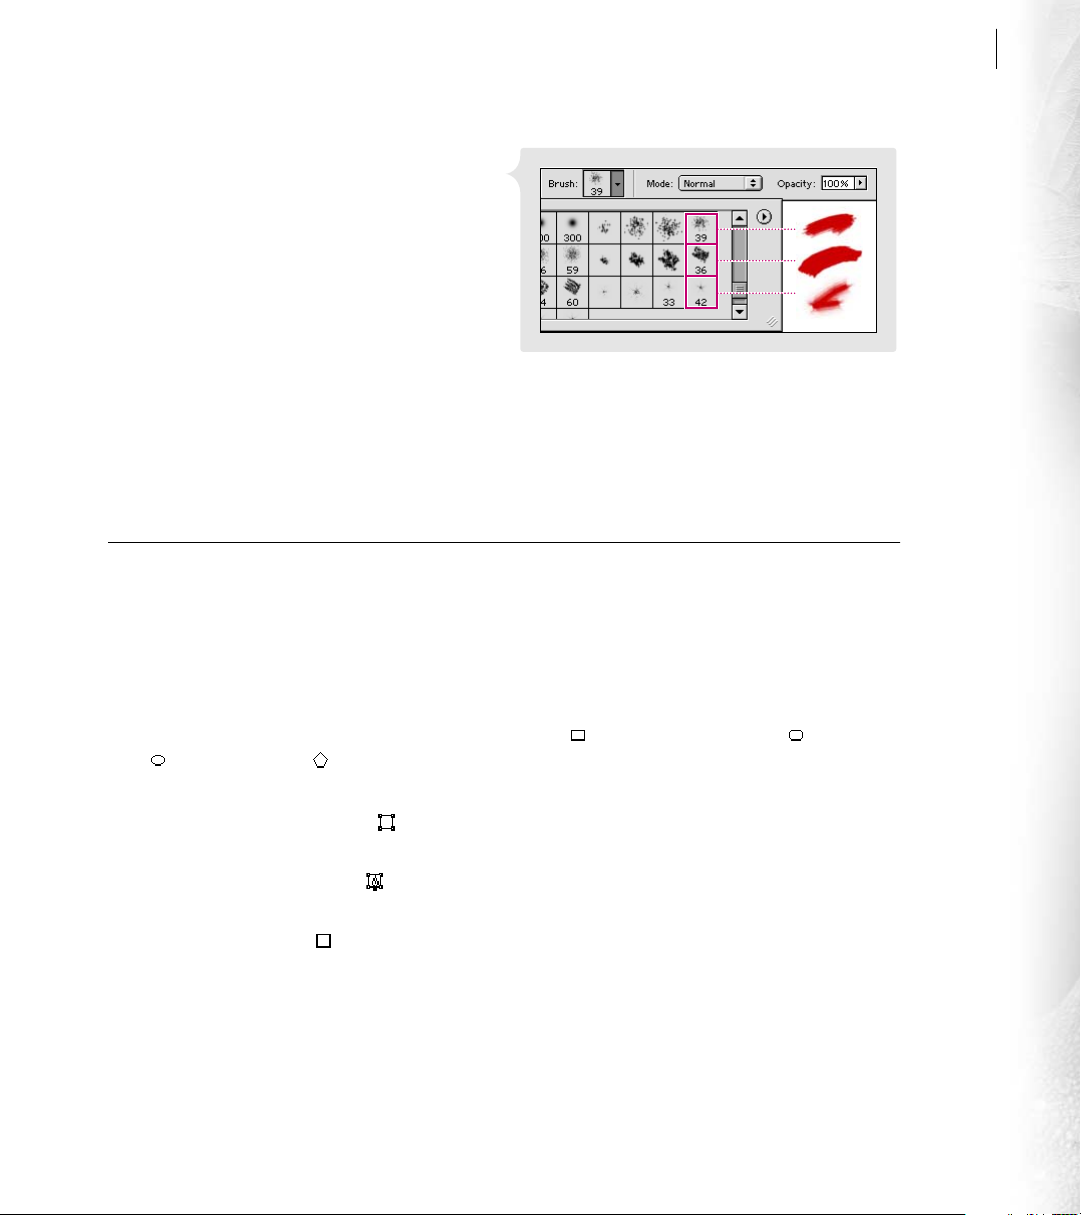
Choose a brush The Brush option in the options
bar lets you specify the brush tip used by many
painting and editing tools. With a painting tool
selected, click the triangle to the right of the Brush
option in the options bar to display the brushes.
Then click to select the desired brush tip.
(Larger brushes are indicated by numeric size
rather than representative preview.) You can
customize the specified brush by clicking its
preview in the options bar.
Specify opacity and blending mode In the options bar for each painting tool, you can also specify an
Sample brushes
opacity (to control how much the underlying image shows through the paint) and a blending mode
(to control how the paint is blended with the colors of the underlying image).
Drawing shapes
The shape tools let you draw crisp-edged shapes of various dimensions and colors. Unlike pixel data such as a
scanned photograph, these shapes are defined using the mathematical principle of vectors. Used in drawing
®
applications such as Adobe Illustrator
and boundary properties of graphics with clean, resolution-independent precision.
and now Photoshop and ImageReady, vectors describe shape, size,
User Guide
27
Select a shape tool and set options Select the rectangle tool ( ), rounded rectangle tool ( ), ellipse
tool ( ), or polygon tool ( ) from the toolbox. Then select one of the following drawing options from
the options bar:
• The Create Shape Layer option ( ) creates a vector shape filled with the current foreground color.
The shape is created on a new layer containing a layer clipping path.
• The Create Work Path option ( ) creates an unfilled vector path with shaped boundaries. The shape
appears as a new work path in the Paths palette.
• The Fill Region option ( ) creates a rasterized shape filled with the current foreground color on the
active layer. Selecting this option creates a shape based on pixel, rather than vector, information.
You can also specify other settings in the options bar, such as layer style, opacity, and blending mode.
Page 38

28
Adobe Photoshop Basics
Draw a vector shape Drag in the image to draw the specified shape.
Drawing a shape on a shape layer
Select a shape To select a vector shape for editing, you must first target the layer or path containing the
Adding to an existing shape
shape. Do one of the following:
• If the shape is part of a layer, click the shape thumbnail in the Layers palette. (The path associated with
the shape is automatically selected in the Paths palette.) In ImageReady, the shape is automatically
selected in the image with a bounding box for repositioning or transforming.
• (Photoshop) If the shape is stored in the Paths palette, select that path in the palette.
After you have targeted the layer or path in Photoshop, select the path component selection tool ( ) in the
toolbox, and click anywhere inside the shape in the artwork. To help make the selected shape more visible,
select Show Bounding Box in the options bar.
Selecting a shape on a shape layer Selecting a shape on a work path
Page 39

ADOBE PHOTOSHOP 6.0
(Photoshop) Create a custom shape When the shape layer or work path option is selected in the options
bar, you can use the basic shape tools in combination with one another to create more complex shapes.
Select the shape you want to modify, and then select the shape tool you want to use to add variations to
the first shape. Then select one of the following from the options bar:
• The Add Path Area option ( ) adds the new shape on top of the first shape.
• The Subtract Path Area option ( ) subtracts the overlapping area of the two shapes.
• The Restrict Path Area option ( ) keeps only the overlapping area of the two shapes.
• The Invert Path Area option ( ) reverses the fill of the overlapping area of the two shapes and
the background.
Drag with the shape tool to draw a shape that interacts with the first shape in the manner specified.
You can continue to add more variations to the custom shape using the different shape tools and options.
(Photoshop) Define a custom shape You can simplify the process of recreating a custom shape by storing
it in the custom shape library. You can then redraw the shape automatically at any time using the custom
shape tool. Select the shape that you just created and choose Edit > Define Custom Shape.
(Photoshop) Draw with the custom shape tool Select the custom shape tool ( ), and choose your custom
shape from the Shape list in the options bar. Then drag in the image to draw the shape.
User Guide
29
Page 40

30
Adobe Photoshop Basics
Working with type
Creating type
Photoshop and ImageReady provide excellent support for adding graphic type and text to images. You can
enter and preview type directly in an image, as well as specify a full range of formatting options. Type is
automatically added to a new layer.
Set a type insertion point Select the type tool ( ) in the toolbox, and do one of the following:
• To enter type at a point, click in the image to set an insertion point. The type is added starting from the
• To enter type inside a bounding box, drag in the image to define the box. The type automatically wraps
Set type attributes You can use the options bar, Character palette, or Paragraph palette to specify various
type attributes, such as orientation, font, style, color, and alignment.
point you click.
to fit inside the bounding box.
Enter text Enter the desired text using the keyboard, pressing Enter or Return to start new paragraphs.
You can continue to change type attributes in the options bar, the Character palette, or the Paragraph
palette as you enter additional text.
In Photoshop, you must commit the type to its type layer before you can perform other operations.
Click the Commit button ( ) in the options bar to commit the type.
Page 41

ADOBE PHOTOSHOP 6.0
Editing type
Using the type tool in conjunction with the options bar, the Character palette, and the Paragraph palette, you
can edit type directly as it appears in an image. In addition, you can apply special warp effects to the shape of
type and make global edits to type layers.
Edit type content and attributes Select the type tool ( ), and click inside the desired type to
set an insertion point or drag to highlight the characters you want to edit. Then change the type
content and attributes as desired. In Photoshop, click the Commit button ( ) in the options bar to
commit the changes.
User Guide
31
Changing the font of a single character
Warp the shape of type The warp feature lets you creatively stretch and distort the shape of type.
Use the type tool to click inside the type you want to warp, and click the warp icon ( ) in the options bar.
For Style, choose a warp effect. Specify whether to apply the warp horizontally or vertically, drag the sliders
to adjust the intensity of the effect, and click OK.
Apply layer edits to type Because type resides on its own type layer, you can apply all sorts of
layer-specific edits to type—from changing the opacity and blending mode to adding layer styles.
(See “Using layers” on page 22.)
Page 42

32
Adobe Photoshop Basics
Preparing Web graphics
Designing Web graphics
Photoshop and ImageReady provide a rich set of tools for adding Web features to your images. Among other
benefits, you can divide an image into download-efficient slices, define image maps directly in the image,
and add interactive rollover effects.
Slice an image When you slice an image,
each rectangular slice downloads individually
so that users can view parts of the image as the
downloading progresses. You can also use slices to
help keep file sizes down and define Web features
such as links, rollovers, and animations. To slice
an image, select the slice tool ( ) and drag in the
image to define the slice areas. Photoshop or
ImageReady automatically generates slices for the remaining areas of the image.
Slicing an image
Another way to define slices is by using the boundaries of layers. See “Enhanced slicing capabilities” on
page 45 for more information.
Assign a URL link to a slice Assigning a URL to a slice makes the entire slice area a hotspot in the Web page,
with a link to the specified URL. Select the slice select tool ( ), and double-click the desired slice to display
the Slice Options dialog box (Photoshop) or the Slice palette (ImageReady). Then enter the desired URL
destination and, if needed, the target frame.
For information on setting other slice options such as message text and Alt tags, see “Enhanced slicing
capabilities” on page 45.
(ImageReady) Create an image map Image maps let you add URL links to different areas of an image.
Select the rectangle image map tool ( ), and drag in the image to define the image map. Then select the
image map selection tool ( ) and double-click the desired image map to display the Image Map palette.
Enter a name and URL link destination for the image map. If desired, enter a target frame destination and
text for an Alt tag.
Page 43

ADOBE PHOTOSHOP 6.0
(ImageReady) Add a rollover effect Rollover effects display different states of an image when a viewer
performs a mouse action—such as rolling or clicking—over an area of the Web page. Layers provide an
efficient way to store different image states for rollovers.
Select the slice or image map to which you want to add the rollover, and choose Window > Show Rollover.
The Rollover palette shows a single thumbnail representing the normal, inactivated state. Click the New
State button ( ) at the bottom of the palette. From the pop-up menu above the new rollover thumbnail,
choose the mouse action that you want to trigger the rollover. Then hide and show appropriate layers in
the Layers palette to define the appearance of the new rollover state. (The rollover thumbnail updates to
reflect the new appearance, which applies only to this rollover state.)
Creating animations (ImageReady)
With ImageReady, it’s easy to create multiple-frame animations from a single image. The key is to use the
Animation palette in conjunction with the Layers palette to set up the composition of animation frames.
To output your animated image for Web use, optimize the image in GIF format.
Set up the starting frame Choose Window > Show
Animation to display the Animation palette. Show
and hide appropriate layers in the Layers palette to
set up the contents of the starting animation frame.
(The frame thumbnail updates to reflect the
current image state, which applies only to this
animation frame.)
User Guide
33
Set up additional frames Click the New Frame
button ( ) at the bottom of the Animation palette,
and do one of the following:
• Using the Layers palette, modify the image to
create the state of the second animation frame.
For example, you can show and hide appropriate layers and layer effects, reposition a layer
in the image, or change a layer’s opacity or
Setting up animation frames
blending mode. Click the New Frame button and repeat this step to set up more frames.
Page 44

34
Adobe Photoshop Basics
• Using the Layers palette, adjust the position, opacity, or layer effects of desired layers to create the
Preview the animation ImageReady offers the convenience of previewing your animation directly in the
image window. In the Animation palette, select the first animation frame and then click the Play
button ( ) at the bottom of the palette.
Optimizing Web graphics
Optimization involves compressing the file size while optimizing the display quality of an image for
Web output. Photoshop and ImageReady let you optimize images in several Web file formats—
GIF, JPEG, and PNG—and provide you with both basic and advanced controls for fine-tuning the quality
and compression level of the optimization. Because live previews of the optimized image are regenerated
whenever an optimization setting is adjusted, you are free to experiment with different settings before
committing to final changes.
state of the final animation frame. Then choose Tween from the Animation palette menu to have
ImageReady generate intermediate frames from the starting and ending states you’ve defined.
Specify which layers and parameters to tween, enter the number of frames to generate, and click OK.
The Tween feature is useful for generating a variety of animations, such as making a single layer move
across the canvas or fade in or out.
Compare original and optimized images Choose File > Save for Web (Photoshop) or Window > Show
Optimize (ImageReady) to display the Web optimization settings. Click the Optimized tab above the
image preview (Photoshop) or in the image window (ImageReady) to display how the image will appear
on the Web using the current optimization settings. To display original and optimized previews side by
side, click the 2-Up tab.
Choose an optimization set Photoshop and ImageReady provide a number of predefined optimization
settings. To apply a predefined optimization set, choose the desired set from the Settings menu in the Save
for Web dialog box (Photoshop) or the Optimize palette (ImageReady).
Page 45

ADOBE PHOTOSHOP 6.0
View optimized file information In Photoshop, you can view optimized file information—such as file size
and projected download time for various modem speeds—below the optimized preview in the Save for
Web dialog box. In ImageReady, you can display two sets of file information in the status bar along the
bottom edge of the image window. Click the triangle next to either information set to choose one of the
optimized information display options.
User Guide
35
Optimizing a GIF image with 8 colors, shifted to Web-safe values
Fine-tune optimization settings You can further customize the optimization by adjusting individual
optimization settings. You can even name and save your customized settings as a new optimization set.
Save the optimized image Click OK in the Save for Web dialog box (Photoshop) or choose File > Save
Optimized As (ImageReady). For Format, choose one of the following options:
• Images Only generates only the optimized image files. If you have defined slices in your image,
an optimized file is generated for each slice.
• HTML and Images generates an HTML file along with the optimized image files. If you have defined
slices in your image, this HTML file contains code for the table that assembles the slices. If you are
saving the image from ImageReady, the HTML file also contains code for any Web features—such as
image maps, animations, or rollovers—that you have added to the image.
Page 46

Page 47

Page 48

Page 49

What’s New in Adobe Photoshop 6.0
Adobe Photoshop 6.0, along with the dedicated Web tool ImageReady 3.0, delivers powerful imageediting capabilities with a range of new features that offer something for every user. New capabilities
include integrated vector-drawing tools to extend your creative range, expanded tools and features for
Web-production tasks, and numerous interface enhancements to help you get to work quickly and use
the Photoshop and ImageReady features more fully.
Page 50
40
What’s New in Adobe Photoshop 6.0
Expand beyond pixels
Superb vector support
Photoshop 6.0 provides integrated tools for creating and outputting crisp, editable vector shapes and text.
With these new tools, you can incorporate resolution-independent, vector-based graphics and type along with
pixel-based images to achieve an unparalleled range of design effects. You can save vector data in EPS, DCS,
TIFF, and PDF formats.
Shape tools The new rectangle, rounded rectangle, ellipse, polygon, custom shape, and line tools let you
create a wide variety of vector-based shapes. These tools let you create shapes in three forms: as work paths,
as shape layers, or as painted pixels.
Shape editing Photoshop 6.0—like Adobe
Illustrator and other Adobe programs—also
provides pathfinder operations for quickly
combining basic vector shapes into hard-to-draw
shapes. These operations include add, subtract,
restrict, and invert. You can edit the segments of
any basic or combined shape by using the direct
selection, add anchor point, delete anchor point,
and convert anchor point tools.
Adding to a basic shape and result after combining
Page 51

ADOBE PHOTOSHOP 6.0
Storage of custom shapes Once you’ve created shapes that you want to use over again or share with
colleagues, you can save them as custom shapes. Photoshop stores custom shapes in a shape library that’s
available from the options bar when you select the custom shape tool. Alternatively, you can use the Preset
Manager to save custom shapes in separate shape libraries. Shape libraries are portable, so workgroups can
easily design, share, and add to them.
Defining and working with a custom shape
User Guide
41
Resolution-independent type With Photoshop 6.0, you can easily combine crisp, resolution-independent
type with pixel-based images and then output sharp type edges with your image to produce high-quality
results.
Vector-based masks One powerful new vector feature involves using editable shapes to clip out or mask
image areas. Known as layer clipping paths, these shapes can be modified just like any other vector shapes
using the direct selection, add anchor point, and delete anchor point tools. To produce a mix of hard and
soft masking edges, simply combine layer clipping paths and layer masks on the same layer.
Page 52

42
What’s New in Adobe Photoshop 6.0
Enhanced vector output
Creating vector graphics and type to incorporate into your images is only part of a complete workflow.
Photoshop 6.0 provides complete support for outputting vector-based graphics along with your pixel-based
images—all with the highest-quality printed results.
PostScript vector output You can print images containing resolution-independent shapes and text
directly to any PostScript output device.
Advanced PDF output Photoshop 6.0 extends its integration with Adobe products by offering enhanced
support for Adobe PDF, including the ability to save transparency, layers, and vector objects in PDF files.
Any service provider with Adobe Acrobat
prepare those PDF files for high-end printing.
Layer styles
Photoshop 6.0 presents an intuitive new layer effects interface, new effect options, and new support for saving
combinations of layer effects as layer styles for ongoing use. Layer effects and styles update automatically as
you edit your image and are particularly useful for designing type, buttons, and banners.
®
InProduction™ (or other Acrobat prepress plug-ins) can then
New and enhanced layer effects Photoshop 6.0 introduces a number of new and enhanced features for
layer effects, including the new stroke, overlay, and satin layer effects; a new contour option; advanced
blending and transparency options; and enhancements to the drop shadow, inner shadow, glow, and bevel
and emboss effects.
Page 53

ADOBE PHOTOSHOP 6.0
New layer styles The new Layer Styles dialog box
shows at a glance which effects are applied to the
currently selected layer. To add effects to a layer,
you simply check each one you want in the list and
specify appropriate settings.
Once you’ve designed a custom layer style, you can
save it in the Styles palette for future use. Layer
styles work just like layer effects, applying nondestructive changes that update automatically when
you change layer contents. You can store styles in a
default styles library or in your own style libraries
Defining a new layer style
using the Preset Manager. Style libraries are
portable, so you can share them with colleagues. Plus, Photoshop layer styles are compatible with
ImageReady—you can open a Photoshop layer style library in ImageReady, and vice versa.
User Guide
43
Modifying an existing layer style
Easy application of layer styles Applying layer styles is easy: You create type, shapes, and other artwork
elements on a layer, and then click a style in the Styles palette to apply it. Or, select a shape tool, select the
shape layer option and choose a layer style in the options bar, and then start drawing; the style is applied
as you draw. The combination of layer styles and the new shape tools opens up a wide array of creative
opportunities for print and Web designers alike.
Page 54

44
What’s New in Adobe Photoshop 6.0
Interactive image warping
With the new Liquify command in Photoshop 6.0, you can quickly distort or warp an image by interactively
pushing, pulling, rotating, enlarging, and shrinking different image areas. These distortion controls are ideal
for a wide range of tasks from making fine warping adjustments to a small image area to making sweeping
adjustments for a wildly warped-out effect. When you open the Liquify dialog box, you can display a fine
mesh over the image to help you achieve precise adjustments. To prevent unwanted changes, freeze certain
parts of the image and zero in on the areas you want to modify. To switch between large-scale changes and
finer adjustments, vary the size of the brush you’re using. The Liquify command also provides options for
reconstructing the original image as needed.
Warping in Amplitwist mode
Page 55
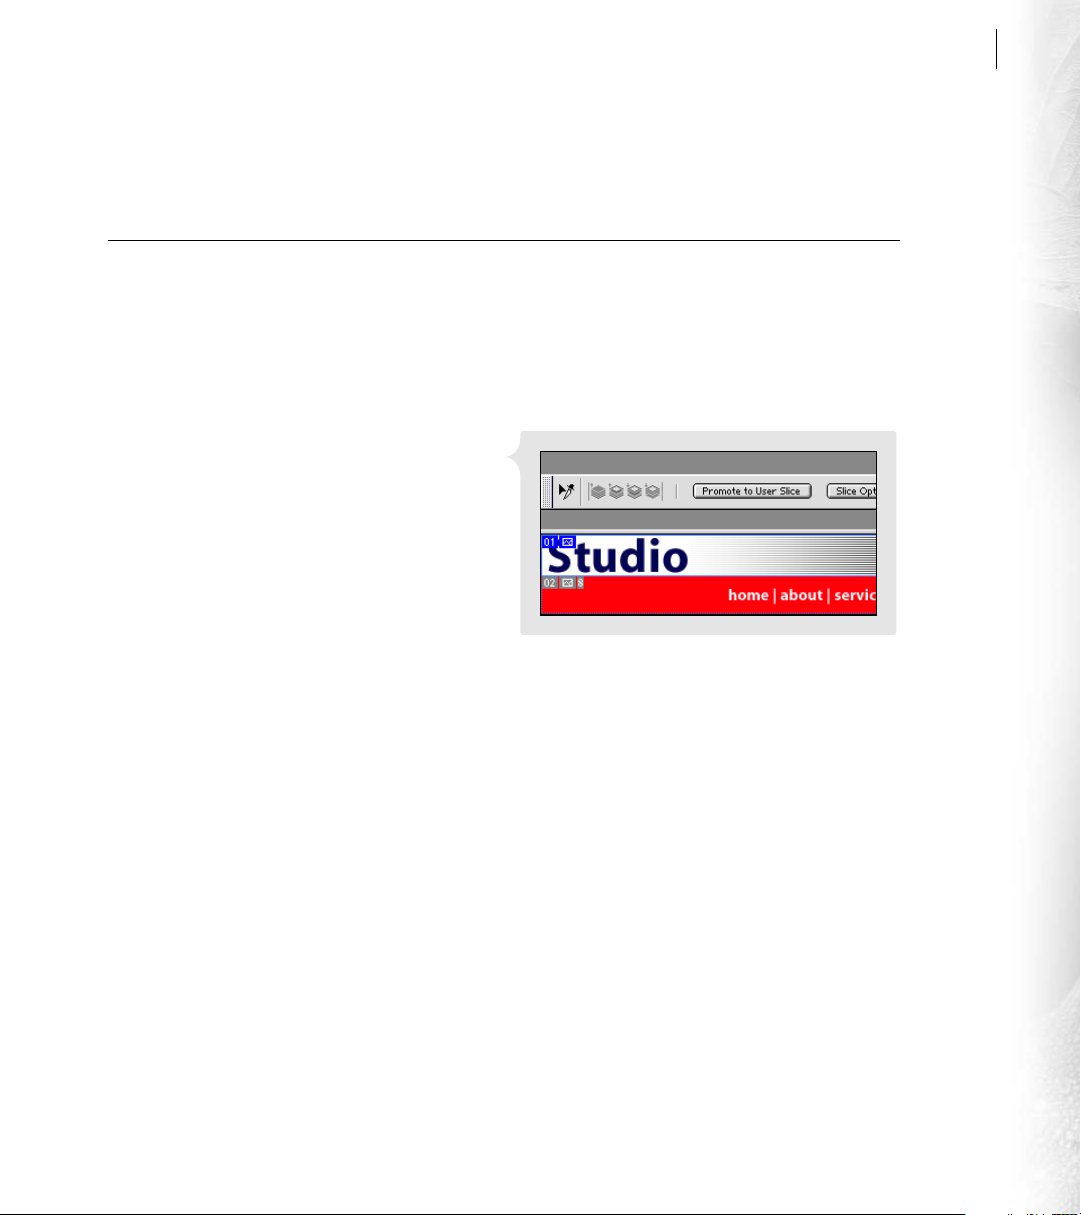
ADOBE PHOTOSHOP 6.0
Produce superb Web graphics
Enhanced slicing capabilities
Slicing images is the key to incorporating large or complex image files into your Web site because browsers can
download and display sliced images more efficiently. You can also use slices as a basis for creating rollovers or
setting up animations. Or, you can generate HTML pages directly from Photoshop, including the HTML table
code necessary to reassemble the sliced image.
Direct Photoshop slicing With the new slice tool
and slice select tool, you can now define and
edit slices directly in Photoshop 6.0. Create userdefined slices by dragging over different image
areas with the slice tool; Photoshop defines slices
automatically for the areas you don’t define.
You can modify many attributes of user-slices,
including size, position, stacking order,
and visibility.
Slices created with slice tool
User Guide
45
Page 56
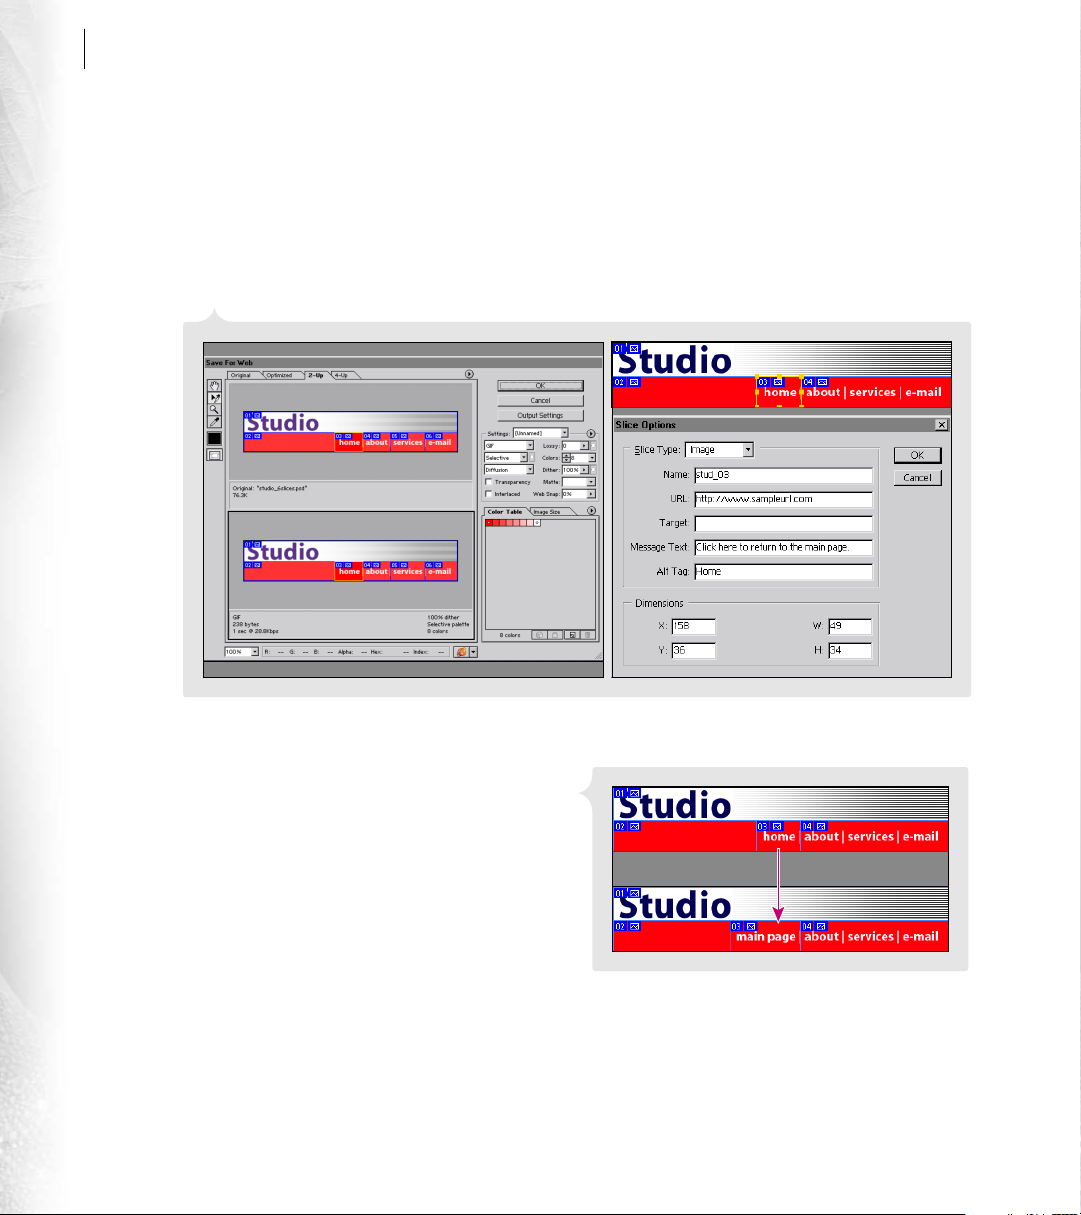
46
What’s New in Adobe Photoshop 6.0
Slice-specific formatting and optimization Sliced images give you more control over how optimization
options are applied because you can select separate slices and apply appropriate settings. An image that
includes solid colors, text, and photographic images, for example, looks best with different settings applied
to different areas. You can also assign a separate file name, URL link, Alt tag, and message to each slice.
In ImageReady, you can link multiple slices together in a set, so you can quickly select, optimize, output,
and delete only those slices.
Setting optimization options for an individual slice; assigning a URL, message text, and an Alt tag to a slice
Dynamic layer-based slices Photoshop 6.0 intro-
duces a new way to slice images: Set up your slice
content on separate layers and then let Photoshop
or ImageReady generate layer-based slices for you.
When you slice images this way, each slice is bound
to the outermost pixels on each layer. If you then
reposition or edit the content of the layer, the slice
adjusts dynamically to accommodate the changes.
This technique is particularly useful for generating
precise slices for rollovers.
Slice updates automatically when source layer is modified.
Page 57

ADOBE PHOTOSHOP 6.0
Enhanced support for image maps and rollovers
ImageReady 3.0 provides new and enhanced support for creating image maps and rollover effects directly in
an image.
Image map creation Using the new image map tools in conjunction with the new Image Map palette,
you can define image map areas in your image, complete with URL, target frame, and Alt text options.
You can also define an image map based on the boundaries of a layer.
Rollover enhancements You can now save a
rollover as a style in the Styles palette. All of the
rollover’s attributes, including its effects, slices, and
states, are saved in the style, which you can reapply
easily with a single click. Other enhancements
include the sharing of color palettes between
rollover states and the ability to preview rollovers
directly in ImageReady.
User Guide
47
Creating a new rollover style
Page 58

48
What’s New in Adobe Photoshop 6.0
Weighted optimization
Photoshop 6.0 incorporates new weighted optimization controls that let you use 8-bit alpha channels to
smoothly vary compression settings across an image. This technique produces higher-quality results in critical
image areas without sacrificing file size. In the past, you would have made harder trade-offs, either favoring
image quality in a complex image over smaller files sizes, or vice versa. Using channels, you can produce
gradual variations in GIF dithering, lossy GIF settings, and JPEG compression. Weighted optimization
controls also let you favor colors in selected image areas as you generate custom color palettes.
Improved Web workflow
Photoshop 6.0 and the built-in Web-production tool, ImageReady 3.0, are now more tightly integrated than
ever, resulting in a powerful new tool combination for creating your Web graphics from start to finish. Adobe
Photoshop 6.0 also offers improved integration with Adobe GoLive
Integrated optimization with Adobe GoLive 5.0 Adobe Photoshop 6.0 and Adobe GoLive 5.0 integrate
tightly to support your Web production process. Now you can add native Photoshop (PSD) files directly
to the Adobe GoLive application without having to optimize them first. Instead, you can use the built-in
image optimization tools in the Adobe GoLive application to perform those steps.
™
5.0.
Automated updates with Adobe GoLive 5.0 Any URLs written by Photoshop or ImageReady are acces-
sible in Adobe GoLive for management and editing. You can even update edited URLs in the original
Photoshop (PSD) file. You can also set up a sliced file, complete with rollovers and image maps, in
ImageReady or Photoshop and then add the single PSD file to Adobe GoLive. Adobe GoLive automatically
calls ImageReady or Photoshop to compile the sliced pieces and update edits you make to the image.
Adobe GoLive also goes back to the original PSD file to generate the final GIF or JPEG file for the Web page.
HTML integration with Adobe GoLive 5.0 When exporting sliced images, Photoshop and ImageReady
both generate a set of named image files and an HTML file with the table code necessary to reassemble the
image. Alternatively, you can save sliced image files as CSS-based (cascading style sheet) objects. The highquality HTML code produced is ready to be copied into Adobe GoLive or another HTML editor. When
exporting rollovers from ImageReady, select the Include GoLive Code option in the Save Optimized As
dialog box for optimal results.
Page 59

ADOBE PHOTOSHOP 6.0
Master Photoshop more quickly
Streamlined interface
Photoshop 6.0 introduces numerous interface enhancements designed to make it easier and more efficient to
use its powerful features.
Options bar Now, when you select a tool in the toolbox, all the options that control its behavior are easily
accessible in a context-sensitive options bar. For example, when you’re working with the shape or selection
tools, you have access to modifiers such as add, subtract, restrict, and invert, which were previously
available only by keyboard shortcuts. You can dock the options bar to the top or bottom of your screen or
let it float anywhere on your screen.
Palette docking and storage In Photoshop 6.0, you can dock palettes to each other. You can also store the
palettes you use most often in the palette well in the options bar, where they are readily available when you
need them but out of your way when you’re focused on a task. When you want to display a palette in the
well, click the palette’s tab; click again and the palette tucks out of sight.
User Guide
49
Improved color management and proofing The new Edit > Color Settings command simplifies ICC-
based color management by gathering controls in a single dialog box and offering a choice of predefined
color management settings based on common press and Web conditions. Based on Adobe Color Engine
(ACE) technology, this color management workflow encompasses much of the RGB, CMYK, and
Grayscale setup controls of previous Photoshop versions and offers improved integration with Adobe
Illustrator 9.0 and other upcoming Adobe products. In addition, Photoshop 6.0 provides new controls for
generating soft proofs of images on-screen and for printing hard proofs based on ICC color profiles.
Page 60

50
What’s New in Adobe Photoshop 6.0
Enhanced layer management
Layers are more flexible than ever in Photoshop 6.0. Now you can create hundreds of layers in an image to
help arrange elements in an intricate composition. In addition, you can use an array of new features to help
organize and manage layers more efficiently.
Layer sets You can organize layers into sets to keep better track of related parts. You can then toggle the
visibility of layer sets, hiding or showing them as you work, or move a layer set in the stacking order by
dragging it in the Layers palette. And you can specify the opacity of an entire layer set.
Layer identification and locking Color-coding
layers in the Layers palette lets you quickly
identify layer relationships. Once your layers
are set as desired, you can lock them to prevent
accidental edits.
Layers palette enhancements The enhanced
Layers palette helps you handle layer effects more
efficiently. If you assign a layer effect to one layer
and want to reuse it on another, just drag and drop
it on the target layer. All of the settings are
preserved and instantly copied to the target layer.
Locking the selected layer
Fill layers You can now experiment with color, gradient, or pattern fills by adding them to a new type of
layer, called a fill layer. Like adjustment layers, fill layers apply nondestructive changes to the underlying
image and can be modified or discarded at any time.
Page 61

ADOBE PHOTOSHOP 6.0
Expanded text features
Photoshop 6.0 offers an expanded range of formatting options for both Roman and Asian text, as well as
direct, on-canvas text editing. The new Character and Paragraph palettes make it easy to choose formatting
options for your type.
Direct text editing in the image You can enter text and modify style directly in the image, without having
to toggle back and forth from a dialog box. If you rotate, scale, or skew your text in the image, the text
remains editable.
Type warping The new type-warping feature lets you distort type layers in the form of special shapes such
as arcs and waves.
User Guide
51
Warping type using Arc style Setting paragraph formatting options
New paragraph options Extensive new options for styling paragraphs now appear in the new Paragraph
palette, which operates similarly to the Paragraph palette in Adobe InDesign™ and Adobe Illustrator.
You can specify alignment, auto-leading, space before and after, hanging punctuation, and left-, right-,
and first-line indents on a per-paragraph basis.
Page 62

52
What’s New in Adobe Photoshop 6.0
Hyphenation, justification, and composition controls Photoshop provides professional-quality hyphen-
ation settings with control over the minimum word size, minimum number of characters before and after
a hyphen, number of consecutive hyphens, and hyphenation zone. Photoshop also fully supports
paragraph justification with various option settings. Photoshop even supports the next generation of
Adobe composition engines, offering you a choice of the every-line and single-line composers. The everyline composer sets multiple lines of text in relation to each other to ensure optimal line breaks, while the
single-line composer handles one line of text at a time.
New character options With the controls in the new Character palette, you can apply color on a
per-character basis, scale characters vertically and horizontally, and set baseline shift. Plus, Photoshop
fully supports OpenType fonts and their related features, such as all caps, small caps, superscript,
and subscript. (Photoshop produces faux versions of these text options for non-OpenType fonts.)
A new no-break option controls whether or not a range of characters wraps as a single word.
Formatting options for Asian type Photoshop 6.0 includes extensive Asian formatting controls such as the
following: Tsume for manual kerning and tracking; Tate-chu-yoko for setting horizontal text within
vertical text; Kinsoku shori for setting word breaks; Burasagari for hanging punctuation; and Mojikumi
for auto-kerning, tracking, and justification.
Page 63

ADOBE PHOTOSHOP 6.0
Preset Manager
The new Preset Manager centralizes management of your custom brushes, gradients, shapes, contours,
patterns, and layer styles and offers instant access to extensive libraries of these elements included with
Photoshop 6.0. When you create your own custom element, save it in a library file so that it can be accessed
through the Preset Manager. Once you load a library in the Preset Manager, it becomes available whenever
its elements are used in Photoshop—in the options bar, the Styles palette, the Gradient Editor dialog box,
and other locations. Libraries can also be shared with colleagues to streamline their creative work.
User Guide
53
Using the Preset Manager
Other new and enhanced features
Annotations The new notes and audio annotation tools let you attach text and voice comments to images.
These annotations are supported in both Photoshop and Adobe Acrobat. You can also import annotations
from a PDF document into a Photoshop image.
Control of nonprinting elements The new View > Show Extras and Hide Extras commands let you
globally control the display of nonprinting elements such as guides, grids, target paths, selection edges,
slices, image maps, text bounding boxes, text selections, and annotations. Commands for controlling the
display and snapping behavior of specific nonprinting element types are grouped under the new View >
Show and View > Snap To submenus.
Perspective cropping The crop tool offers a new Perspective option, which lets you correct perspective
distortions as you crop an image.
Page 64

54
What’s New in Adobe Photoshop 6.0
WebDAV workflow management New commands under the File > Manage Workflow submenu let you
manage files using the Web Distributed Authoring and Versioning (WebDAV) server technology.
Cascading style sheets You can now generate a cascading style sheet along with an HTML file when saving
an optimized image.
Expanded file format support You can now preserve layers, transparency, and multiresolution pyramid
data in exported TIFF files and choose from more TIFF compression options. The File > Import > PDF
Image command lets you import specific images into Photoshop from a PDF document.
Reorganized and expanded print options The new File > Print Options command gathers together many
of the output and color management options that once only appeared in the Page Setup and Print dialog
boxes. In addition, you can now adjust and preview the position and scale of an image before printing.
Photoshop droplets In Photoshop, the new File > Automate > Create Droplet command lets you create a
droplet from an action.
Gradient Map adjustment The new Gradient Map adjustment layer lets you map the tonal range of an
image to the colors of a gradient fill.
Expanded support for 16-bit-per-channel images In Photoshop, the following tools and commands are
now available for images containing 16 bits per channel: the history brush, slice, and shape tools, and the
Canvas Size, Auto Contrast, Gradient Map, Gaussian Blur, Add Noise, Median, Unsharp Mask, High Pass,
and Dust & Scratches commands.
Easy measurement switching Now you can switch the units of measurement for your rulers on the fly.
Just right-click (Windows) or Control-click (Mac OS) the rulers and choose the measurement unit you
want from the context menu. In addition, whenever you are asked to enter measurement values for a tool
or dialog box, you can use any combination of units you want—for example, 2 inches by 45 pixels for a
rectangle.
Enhanced multiple-image options The Contact Sheet II command offers more label options, the Picture
Package command offers an enhanced set of layout options, and the Web Photo Gallery lets you choose
from a variety of customizable HTML templates.
Moved preferences The preference commands now appear under the Edit menu.
Page 65

1
Page 66

Page 67

Chapter 1: Looking at the Work Area
57
he Adobe Photoshop and Adobe
ImageReady work area includes the
T
command menus at the top of your screen
and a variety of tools and palettes for editing and
adding elements to your image. You can also add
commands and filters to the menus by installing
third-party software known as plug-in modules.
Using the toolbox
The first time you start the application, the
toolbox appears on the left side of the screen.
Some tools in the toolbox have options that
appear in the context-sensitive tool options bar.
(See “Using the tool options bar” on page 59.)
These include the tools that let you use type, select,
paint, draw, sample, edit, move, annotate, and
view images. Other tools in the toolbox allow you
to change foreground/background colors, go to
Adobe Online, work in different modes, and jump
between Photoshop and ImageReady applications.
For an overview of each tool, see the
“Toolbox overview” topics in online Help.
For information on the foreground and
background color controls, see “Choosing
foreground and background colors” in
online Help.
Displaying and working with tools
You select a tool by clicking its icon in the toolbox.
A small triangle at the lower right of a tool icon
indicates hidden tools. Positioning the pointer
over a tool displays a tool tip with the tool’s name
and keyboard shortcut.
To show or hide the toolbox:
Choose Window > Show Tools or Window >
Hide Tools.
To move the toolbox:
Drag the toolbox by its title bar.
To select a tool:
Do one of the following:
• To select a visible tool, click its icon or press its
keyboard shortcut.
• To select a hidden tool, position the pointer
on the visible tool and hold down the mouse
button until the tools list appears. Then, click the
tool you want.
To cycle through a set of hidden tools, hold
down Shift and press the visible tool’s shortcut
key. To enable or disable this option, choose Edit >
Preferences > General, then select or deselect Use
Shift Key for Tool Switch.
Page 68

CHAPTER 1
58
Looking at the Work Area
To view or move a hidden tools list (ImageReady):
1 Position the pointer on the visible tool and
hold down the mouse button until the hidden
tools list appears.
2 Select the small downward-pointing triangle at
the bottom of the hidden tools list. A hidden tools
list appears and remains open until you click the
close box. You can view more than one hidden
tools list simultaneously.
3 Drag the hidden tools list by its title bar to move
it anywhere on your desktop.
To display or hide tool tips:
1 Choose Edit > Preferences > General, then
select or deselect Show Tool Tips. Show Tool Tips
is the default.
To enable or disable cycling through a set of hidden
tools:
Choose Edit > Preferences > General, then select
or deselect Use Shift Key for Tool Switch.
Using the tool pointers
When you select most tools, the mouse pointer
matches the tool’s icon. The marquee pointer
appears by default as cross-hairs, the text tool
pointer as an I-beam, and painting tools default to
the Brush Size icon.
Each default pointer has a different hot spot,
where an effect or action in the image begins.
With all tools except the move tool, annotation
tools, and the type tool, you can switch to precise
cursors, which appear as cross-hairs centered
around the hot spot.
To set the tool pointer appearance:
1 Do one of the following:
• (Photoshop) Choose Edit > Preferences >
Display & Cursors.
• (ImageReady) Choose Edit > Preferences >
Cursors.
2 Choose a tool pointer setting:
• Click Standard under Painting Cursors, Other
Cursors, or both to display pointers as tool icons.
• Click Precise under Painting Cursors, Other
Cursors, or both to display pointers as cross-hairs.
• Click Brush Size under Painting Cursors to
display the painting tool cursors as brush shapes
representing the size of the current brush. Brush
Size cursors may not display for very large brushes.
3 Click OK.
The Painting Cursors options control the pointers
for the following tools:
• (Photoshop) Eraser, pencil, airbrush, paint-
brush, rubber stamp, pattern stamp, smudge, blur,
sharpen, dodge, burn, and sponge tools.
• (ImageReady) Paintbrush, pencil,
and eraser tools.
Page 69

ADOBE PHOTOSHOP 6.0
User Guide
59
The Other Cursors options control the pointers
for the following tools:
• (Photoshop) Marquee, lasso, polygon lasso,
magic wand, crop, slice, eyedropper, pen, gradient,
line, paint bucket, magnetic lasso, magnetic pen,
measure, and color sampler tools.
• (ImageReady) Marquee, lasso, magic wand,
eyedropper, paint bucket, and slice tools.
To toggle between standard and precise cursors
in some tool pointers, press Caps Lock. Press
Caps Lock again to return to your original setting.
Using the tool options bar
Most tools have options that are displayed in the
tool options bar. The options bar is context
sensitive and changes as different tools are
selected. Some settings in the options bar are
common to several tools (such as painting modes
and opacity), and some are specific to one tool
(such as the Auto Erase setting for the pencil tool).
You can move the options bar anywhere in the
work area. In Photoshop, you can dock it at the top
or bottom of the screen.
(Photoshop) The options bar includes a palette
well for storing other palettes, providing quick
access to palettes such as Swatches and Actions
that you reference briefly while using the
application. The palette well is only available
when using a screen resolution greater than
800 pixels x 600 pixels (a setting of at least
1024 x 768 is recommended).
To display the tool options bar:
Do one of the following:
• Choose Window > Show Options.
• Single-click a tool in the toolbox.
Note: You can double-click the title bar at the left
edge to collapse the options bar, showing only the
tool icon.
Lasso options bar
To return a tool or all tools to the default settings:
Do one of the following:
• Click the tool icon on the options bar, then
choose Reset Tool or Reset All Tools from the
context menu.
• Choose Edit > Preferences > General, then click
Reset All Tools.
To move the options bar:
Do one of the following:
• Drag the title bar at the left edge of the
options bar.
• (Photoshop) Grab the gripper bar at the left edge
of the options bar. The gripper bar will only
appear if the options bar is docked at the top or
bottom of your screen.
Page 70

CHAPTER 1
60
Looking at the Work Area
To store other palettes in the options bar
(Photoshop):
Drag the desired palette’s tab into the palette well
so that the palette well is highlighted.
Palettes are considered hidden when stored in the
options bar. The Window menu item associated
with a stored palette will say Show when it is
stored. Clicking on the title of a palette stored in
the well shows the palette until you click outside
the palette.
Using palettes
Palettes help you monitor and modify images.
By default, palettes appear stacked together in
groups.
Displaying palettes
You can display or hide palettes as you work.
To show or hide palettes:
Do one of the following:
• To show or hide all open palettes, the options
bar, and the toolbox, press Tab.
• To show or hide all palettes, press Shift+Tab.
Changing the palette display
You can rearrange your palettes to make better
use of your work area by using the following
techniques:
• To make a palette appear at the front of its group,
click the palette’s tab, or choose Window > Show.
• To move an entire palette group, drag its title bar.
• To rearrange or separate a palette group, drag a
palette’s tab. Dragging a palette outside of an
existing group creates a new group.
• To move a palette to another group, drag the
palette’s tab to that group.
• To display a palette menu, position the pointer
on the triangle ( ) in the upper right corner of
the palette, and press the mouse button.
• To change the size of a palette, drag any corner of
the palette (Windows) or drag the size box at its
lower right corner (Mac OS). Not all palettes can
be resized.
• To collapse a group to palette titles only, click the
Minimize/Maximize box (Windows) or the Zoom
box (Mac OS), or double-click a palette’s tab.
You can still access the menu of a collapsed palette.
A
To show or hide one palette:
Choose Window > Show to display the selected
palette at the front of its group. Or, choose
Window > Hide to conceal the entire group of
which the selected palette is a part.
B
Click to collapse or expand palette.
A. Windows B. Mac OS
Page 71

ADOBE PHOTOSHOP 6.0
User Guide
61
• (ImageReady) To show or hide options
for palettes that include hidden options
(the Optimize, Color, Type, Layer Options, and
Slice palettes), click the Show Options button ( )
on the palette tab to cycle through palette displays,
or choose Show Options or Hide Options from the
palette menu.
Docking palettes together
Docking palettes together lets you view multiple
palettes at the same time and move them as a
group. Entire palette groups cannot be docked
together at once, but you can dock the palettes
from one group to another, one at a time.
In Photoshop, you can also store palettes in the
palette well of the tool options bar. (See “Using
the tool options bar” on page 59.)
To dock palettes together:
Drag a palette’s tab to the bottom of another
palette so that the bottom of the target palette
is highlighted.
To move an entire docked group, drag its title bar.
To reset palettes to the default positions:
Do one of the following:
• (Photoshop) Choose Edit > Preferences >
General, and select Save Palette Locations.
• (Photoshop) Choose Window > Reset
Palette Locations.
• (ImageReady) Choose Window > Arrange >
Reset Palettes.
To always start with the default palette and dialog box
positions:
1 Choose Edit > Preferences > General.
2 Deselect Save Palette Locations. The change
takes effect the next time you start the application.
Using pop-up sliders
A number of palettes and dialog boxes contain
settings that use pop-up sliders (for example,
the Opacity option in the Layers palette).
To use a pop-up slider:
Do one of the following:
Setting the positions of palettes and
dialog boxes
The positions of all open palettes and moveable
dialog boxes are saved when you exit the application. Alternatively, you can always start with
default palette positions or restore default
positions at any time.
• Position the pointer over the triangle next to the
setting, hold down the mouse, and drag the slider
or angle radius to the desired value.
• Click the triangle next to the setting to open the
pop-up slider box, and drag the slider or angle
radius to the desired value. Click outside the slider
box or press Enter or Return to close the slider box.
To cancel changes, press the Escape key (Esc).
To increase or decrease values in 10% incre-
ments when the pop-up slider box is open, hold
down Shift and press the Up or Down arrow key.
Page 72
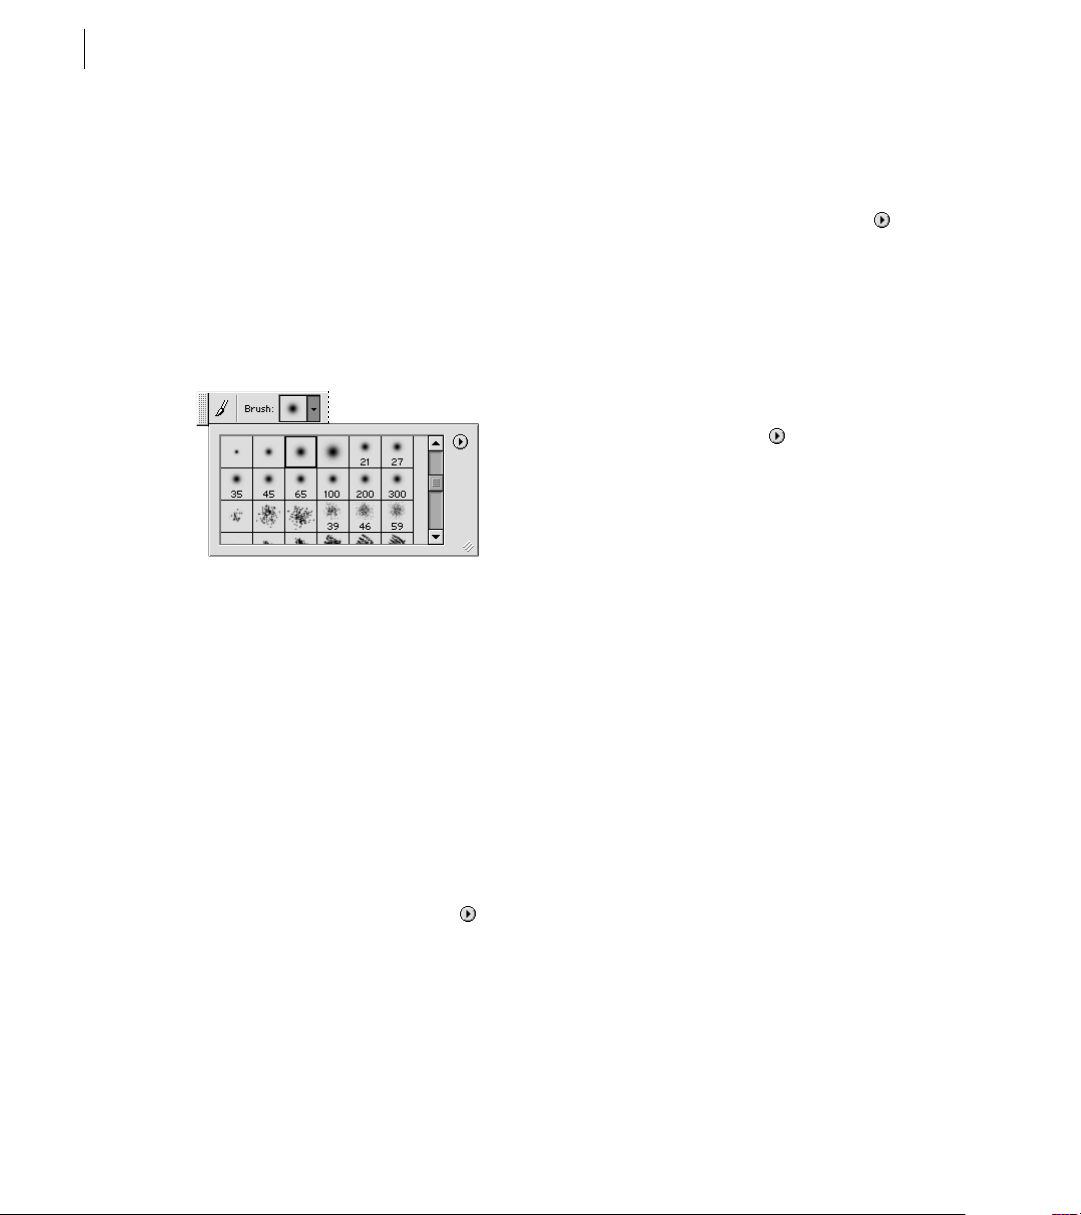
CHAPTER 1
62
Looking at the Work Area
Using pop-up palettes
Pop-up palettes provide easy access to libraries of
brushes, swatches, gradients, styles, patterns,
contours, and shapes. You can customize pop-up
palettes by renaming and deleting items and by
loading, saving, and replacing libraries. You can
also change the display of a pop-up palette to view
items by their names, as thumbnail icons, or with
both names and icons.
The Brush pop-up palette in the options bar.
To select an item in a pop-up palette:
1 Click the triangle next to the thumbnail image
of the current item. Be careful not to click the
thumbnail image—doing so will display the
settings editor for the item.
2 Click an item in the pop-up palette.
To rename an item in a pop-up palette:
1 Do one of the following:
• Double-click an item.
• Select an item, click the triangle ( ) in the
upper right corner of the pop-up palette,
and choose the Rename command from the
palette menu.
2 Enter a new name in the provided dialog box,
and click OK.
To delete an item in a pop-up palette:
Do one of the following:
• Select an item, click the triangle ( ) in the
upper right corner of the pop-up palette,
and choose the Delete command from the
palette menu.
• Hold down Alt (Windows) or Option (Mac OS)
and click an item.
To customize the list of items in a pop-up palette:
1 Click the triangle ( ) in the upper right corner
of the pop-up palette to view the palette menu.
2 To return to the default library, choose the Reset
command. You can either replace the current list
or append the default library to the current list.
3 To load a different library, do one of
the following:
• Choose the Load command to add a library to
the current list. Then select the library file you
want to use, and click Load.
• Choose the Replace command to replace the
current list with a different library. Then select the
library file you want to use, and click Load.
• Choose a library file (displayed at the
bottom of the palette menu). Then click OK
to replace the current list, or click Append to
append the current list.
Page 73

ADOBE PHOTOSHOP 6.0
User Guide
63
4 To save the current list as a library for later use,
choose the Save command. Then enter a name for
the library file, and click Save.
You can specify that a file extension is always
appended to a library file by choosing Edit >
Preferences > Saving Files, and setting Append File
Extension to Always. You should put the extension on
a library filename so that you can easily share the
libraries across operating systems.
To change the display of items in a pop-up palette:
1 Click the triangle ( ) in the upper right corner
of the pop-up palette to view the palette menu.
2 Select a view option: Text Only, Small
Thumbnail, Large Thumbnail, Small List, and
Large List.
Using the Info palette
The Info palette displays information about the
color values beneath the pointer and, depending
on the tool in use, other useful measurements.
To display the Info palette:
Choose Window > Show Info.
(Photoshop) The Info palette displays the
following information:
• When displaying CMYK values, the Info
palette displays an exclamation point next to the
CMYK values if the color beneath the pointer or
color sampler is out of the printable CMYK
color gamut.
For more information, see “Identifying
out-of-gamut colors (Photoshop) in
online Help.
• When you use the marquee tool, the Info palette
displays the x- and y-coordinates of the pointer
position and the width (W) and height (H) of the
marquee as you drag.
• When you use the crop tool or zoom tool, the
Info palette displays the width (W) and height (H)
of the marquee as you drag. The palette also shows
the angle of rotation of the crop marquee.
• When you use the line tool, pen tool, or gradient
tool or when you move a selection, the Info palette
displays the x- and y-coordinates of your starting
position, the change in X (DX), the change in
Y (DY), the angle (A), and the distance (D) as
you drag.
• When you use a two-dimensional transfor-
mation command, the Info palette displays the
percentage change in width (W) and height (H),
the angle of rotation (A), and the angle of
horizontal skew (H) or vertical skew (V).
• When you use any color adjustment dialog box
(for example, Curves), the Info palette displays the
before and after color values of the pixels beneath
the pointer and beneath color samplers.
For more information, see “Seeing the
color values of pixels (Photoshop)” in
online Help.
(ImageReady) The Info palette displays the
following information:
• The RGB numeric values for the color beneath
the pointer.
• The Opacity value for the pixels beneath
the pointer.
Page 74

CHAPTER 1
64
Looking at the Work Area
• The hexadecimal value for the color beneath the
pointer.
• The index color table position for the color
beneath the pointer.
• The x- and y-coordinates of the pointer.
• The x- and y-coordinates of your starting
position (before you click in the image) and your
ending position (as you drag in the image) when
you use the marquee tool, the shape tools, the crop
tool, and the slice tool.
• The width (W) and height (H) of the selection as
you drag when you use the crop tool, the shape
tools, the slice tool, or the zoom tool.
• The percentage change in width (W) and height
(H), the angle of rotation (A), and the angle of
horizontal skew (H) or vertical skew (V) when you
use a Transform or Free Transform command.
To change the Info palette options:
1 Choose Palette Options from the Info palette
menu.
2 For First Color Readout, choose one of the
following display options:
• Actual Color to display values in the current
color mode of the image.
• Total Ink to display the total percentage of all
CMYK ink at the pointer’s current location, based
on the values set in the CMYK Setup dialog box.
• Opacity to display the opacity of the current
layer. This option does not apply to the
background.
• Any other option to display the color values in
that color mode.
3 For Second Color Readout, choose a display
option listed in step 2.
4 For Ruler Units, choose a unit of measurement.
5 Click OK.
To change measurement units, click the
cross-hair icon in the Info palette for a menu of
options. To change color readout modes, click the
eyedropper icon.
Using context menus
In addition to the menus at the top of your screen,
context-sensitive menus display commands
relevant to the active tool, selection, or palette.
To display context menus:
1 Position the pointer over an image or
palette item.
2 Click with the right mouse button (Windows)
or hold down Control and press the mouse
button (Mac OS).
Viewing images
The hand tool, the zoom tools, the Zoom
commands, and the Navigator palette let you view
different areas of an image at different magnifications. You can open additional windows to display
several views at once (such as different magnifications) of an image. You can also change the screen
display mode to change the appearance of the
Photoshop or ImageReady work area.
Page 75

ADOBE PHOTOSHOP 6.0
User Guide
65
Changing the screen display mode
The window controls let you change the screen
display mode, including menu bar, title bar,
and scroll bar options.
To change the screen display mode:
Click a screen mode button in the toolbox:
• The left button ( ) displays the default
window with a menu bar at the top and scroll bars
on the sides.
• The center button ( ) displays a full-screen
window with a menu bar and a 50% gray
background, but no title bar or scroll bars.
• The right button ( ) displays a full-screen
window with a black background, but no title bar,
menu bar, or scroll bars.
Using the document window
The document window is where your image
appears. Depending on the screen display mode
(see “Changing the screen display mode” on
page 65), the document window may include a
title bar and scroll bar.
In ImageReady, the document window allows you
to switch easily between original and optimized
views of an image using tabs, and to view the
original image and multiple versions of an
optimized image simultaneously. For information
on changing the view in the document window,
see “Viewing images during optimization” on
page 316.
You can open multiple windows to display
different views of the same file. A list of open
windows appears in the Window menu.
Available memory may limit the number of
windows per image.
To open multiple views of the same image:
Do one of the following:
• Choose View > New View.
• (ImageReady) Drag any tab away from the
document window.
To arrange multiple windows (Windows only):
Do one of the following:
• Choose Window > Cascade (Photoshop) or
Window > Arrange > Cascade (ImageReady) to
display windows stacked and cascading from the
upper left to the lower right of the screen.
• Choose Window > Tile (Photoshop) or
Window > Arrange > Tile (ImageReady)to display
windows edge to edge.
• Choose Window > Arrange Icons (Photoshop)
or Window > Arrange > Arrange Icons
(ImageReady) to align minimized images along
the bottom of the work area.
To close windows:
Choose a command:
• Choose File > Close to close the active window.
• (Windows) Choose Window > Close All to close
all windows.
Page 76

CHAPTER 1
66
Looking at the Work Area
Navigating the view area
If the entire image is not visible in the document
window, you can navigate to bring another area of
the image into view.
In Photoshop, you can also use the Navigator
palette to quickly change the view of an image.
To view another area of an image:
Do one of the following:
• Use the window scroll bars.
• Select the hand tool ( ) and drag to pan over
the image.
To use the hand tool while another tool is
selected, hold down the spacebar as you drag in
the image.
To move the view of an image using the Navigator
palette (Photoshop):
1 Choose Window > Show Navigator.
2 Do one of the following:
• Drag the view box in the thumbnail of the
image, which represents the boundaries of the
image window.
• Click in the thumbnail of the image. The new
view includes the area you click.
To change the color of the Navigator palette view box
(Photoshop):
1 Choose Palette Options from the Navigator
palette menu.
2 Choose a color:
• To use a preset color, choose an option for Color.
• To specify a different color, click the color box,
and choose a color.
For more information on choosing colors,
see “Using the Adobe Color Picker” in
online Help.
3 Click OK.
Magnifying and reducing the view
You can magnify or reduce your view using
various methods. The window’s title bar displays
the zoom percentage (unless the window is too
small for the display to fit), as does the status bar at
the bottom of the window.
Note: The 100% view of an image displays an image
as it will appear in a browser (based on the monitor
resolution and the image resolution). (See “About
image size and resolution” on page 92.)
To zoom in:
Do one of the following:
• Select the zoom tool ( ). The pointer becomes a
magnifying glass with a plus sign in its center ( ).
Click the area you want to magnify. Each click
magnifies the image to the next preset percentage,
centering the display around the point you click.
When the image has reached its maximum magnification level of 6400%, the magnifying glass
appears empty.
Page 77

ADOBE PHOTOSHOP 6.0
User Guide
67
• Choose View > Zoom In to magnify to the
next preset percentage. When the image has
reached its maximum magnification level,
the command is dimmed.
• (Photoshop) Enter a magnification level in the
Zoom text box at the lower left of the window.
• (ImageReady) Click on the Zoom Level pop-up
menu at the bottom left of the document window,
and choose a zoom level.
To zoom out:
Do one of the following:
• Select the zoom tool. Hold down Alt (Windows)
or Option (Mac OS) to activate the zoom-out tool.
The pointer becomes a magnifying glass with a
minus sign in its center ( ). Click the center of the
area of the image you want to reduce. Each click
reduces the view to the previous preset percentage.
When the file has reached its maximum reduction
level so that only 1 pixel is visible horizontally or
vertically, the magnifying glass appears empty.
• Choose View > Zoom Out to reduce to the
previous preset percentage. When the image
reaches its maximum reduction level, the
command is dimmed.
• (Photoshop) Enter a reduction level in the Zoom
text box at the lower left of the window.
• (ImageReady) Click on the Zoom Level pop-up
menu at the lower left of the document window,
and choose a zoom level.
To magnify by dragging:
1 Select the zoom tool.
2 Drag over the part of the image you want
to magnify.
The area inside the zoom marquee is displayed at
the highest possible magnification. To move the
marquee around the artwork in Photoshop, begin
dragging a marquee and then hold down the space
bar while dragging the marquee to a new location.
To display an image at 100%:
Do one of the following:
• Double-click the zoom tool.
• Choose View > Actual Pixels (Photoshop)
or View > Actual Size (ImageReady).
To change the view to fit the screen:
Do one of the following:
• Double-click the hand tool.
• Choose View > Fit on Screen.
These options scale both the zoom level and the
window size to fit the available screen space.
To automatically resize the window when magnifying
or reducing the view:
With the Zoom tool active, select Resize Windows
to Fit in the options bar. The window resizes when
you magnify or reduce the view of the image.
When Resize Windows to Fit is deselected (the
default), the window maintains a constant size
regardless of the image’s magnification. This can
be helpful when using smaller monitors or
working with tiled views.
Page 78

CHAPTER 1
68
Looking at the Work Area
To automatically resize the window when magnifying
or reducing the view using keyboard shortcuts:
Choose Edit > Preferences > General, then select
the Keyboard Zoom Resizes Windows preference.
Correcting mistakes
Most operations can be undone if you make a
mistake. Alternatively, you can restore all or
part of an image to its last saved version.
But available memory may limit your ability
to use these options.
For information on how to restore your image to
how it looked at any point in the current work
session, see “Reverting to any state of an image” on
page 69.
To undo the last operation:
Choose Edit > Undo.
If an operation can’t be undone, the command is
dimmed and changes to Can’t Undo.
To redo the last operation:
Choose Edit > Redo.
You can set the Redo keystroke preference to be
the same for Photoshop and ImageReady.
Choose Edit > Preferences > General and select a
preference for the Redo key. You can also set the key
to toggle between Undo and Redo.
To free memory used by the Undo command, the
History palette, or the Clipboard:
Choose Edit > Purge, and choose the item type or
buffer you want to clear. If already empty, the item
type or buffer is dimmed.
Important: The Purge command permanently
clears from memory the operation stored by the
command or buffer; it cannot be undone.
For example, choosing Edit > Purge > Histories
deletes all history states from the History palette.
Use the Purge command when the amount of
information held in memory is so large that
Photoshop’s performance is noticeably diminished.
To revert to the last saved version:
Choose File > Revert.
Note: Revert is added as a history state in the History
palette and can be undone.
To restore part of an image to its previously saved
version (Photoshop):
Do one of the following:
• Use the history brush tool ( ) to paint with the
selected state or snapshot on the History palette.
For more information, see “Painting with a
state or snapshot of an image (Photoshop)”
in online Help.
• Use the eraser tool ( ) with the Erase to History
option selected.
For more information, see “Using the eraser
tool” in online Help.
Page 79

ADOBE PHOTOSHOP 6.0
User Guide
69
• Select the area you want to restore, and choose
Edit > Fill. For Use, choose History, and click OK.
For more information, see “Filling and
stroking selections and layers” in
online Help.
Note: To restore the image with a snapshot of the
initial state of the document, choose History Options
from the Palette menu and make sure that the
Automatically Create First Snapshot option is on.
Reverting to any state of an image
The History palette lets you jump to any recent
state of the image created during the current
working session. Each time you apply a change to
an image, the new state of that image is added to
the palette.
For example, if you select, paint, and rotate part of
an image, each of those states is listed separately in
the palette. You can then select any of the states,
and the image will revert to how it looked when
that change was first applied. You can then work
from that state.
About the History palette
Note the following guidelines when using the
History palette:
• Program-wide changes, such as changes to
palettes, color settings, actions, and preferences,
are not changes to a particular image and so are
not added to the History palette.
• By default, the History palette lists the previous
20 states. Older states are automatically deleted to
free more memory for Photoshop. To keep a
particular state throughout your work session,
make a snapshot of the state. (See “Making a
snapshot of an image (Photoshop)” on page 72.)
• Once you close and reopen the document,
all states and snapshots from the last working
session are cleared from the palette.
• By default, a snapshot of the initial state of the
document is displayed at the top of the palette.
• States are added from the top down. That is, the
oldest state is at the top of the list, the most recent
one at the bottom.
• Each state is listed with the name of the tool or
command used to change the image.
• By default, selecting a state dims those below.
This way you can easily see which changes will be
discarded if you continue working from the
selected state. For information on customizing the
history options, see “Setting history options
(Photoshop)” on page 71.
• By default, selecting a state and then changing
the image eliminates all states that come after.
• If you select a state and then change the image,
eliminating the states that came after, you can use
the Undo command to undo the last change and
restore the eliminated states.
• By default, deleting a state deletes that state and
those that came after it. If you choose the Allow
Non-Linear History option, deleting a state deletes
just that state. (See “Setting history options
(Photoshop)” on page 71.)
Page 80

CHAPTER 1
70
Looking at the Work Area
Using the History Palette
You can use the History palette to revert to a
previous state of an image, to delete an image’s
states, and in Photoshop, to create a document
from a state or snapshot.
A
B
C
D
E F G
A. Sets the source for the history brush
B. Thumbnail of a snapshot C. History state
D. History state slider E. Create new document
from current state button F. Create new
snapshot button G. Trash button
To display the History palette:
Choose Window > Show History, or click the
History palette tab.
To revert to a previous state of an image:
Do any of the following:
• (Photoshop) Choose Step Forward or Step
Backward from the palette menu or the Edit menu
to move to the next or previous state.
To delete one or more states of the image
(Photoshop):
Do one of the following:
• Click the name of the state, and choose Delete
from the History palette menu to delete that
change and those that came after it.
• Drag the state to the Trash button ( ) to delete
that change and those that came after it.
• Choose Clear History from the palette menu to
delete the list of states from the History palette,
without changing the image. This option doesn’t
reduce the amount of memory used by Photoshop.
• Hold down Alt (Windows) or Option (Mac OS),
and choose Clear History from the palette menu to
purge the list of states from the History palette
without changing the image. If you get a message
that Photoshop is low on memory, purging states
is useful, since the command deletes the states
from the Undo buffer and frees up memory.
Important: This action cannot be undone.
• Choose Edit > Purge > Histories to purge the list
of states from the History palette for all open
documents.
Important: This action cannot be undone.
• Click the name of the state.
• Drag the slider at the left of the state up or down
to a different state.
Page 81

ADOBE PHOTOSHOP 6.0
User Guide
71
To delete all of an image’s states (ImageReady):
Choose Clear Undo/Redo History from the
History palette menu.
Important: This action cannot be undone.
To create a new document from the selected state or
snapshot of the image (Photoshop):
Do one of the following:
• Drag a state or snapshot onto the New
Document button ( ).
• Select a state or snapshot, and click the New
Document button.
• Select a state or snapshot, and choose New
Document from the History palette menu.
The history list for the newly created document
will be empty.
To save one or more snapshots or image states
for use in a later editing session, create a new
file for each state you save, and save each in a
separate file. When you reopen your original file,
plan to open the other saved files also. You can drag
each file’s initial snapshot to the original image and
thus access the snapshots again from the original
image’s History palette.
To replace an existing document with a selected state
(Photoshop):
Drag the state onto the document.
Setting history options (Photoshop)
You can specify the maximum number of items to
include in the History palette and set other options
that customize the way you work with the palette.
To set history options:
1 Choose History Options from the History
palette menu.
2 Select an option:
• Automatically Create First Snapshot to automat-
ically create a snapshot of the initial state of the
image when the document is opened.
• Automatically Create New Snapshot When
Saving to generate a snapshot every time you save.
• Allow Non-Linear History to make changes to a
selected state without deleting the states that come
after. Normally, when you select a state and change
the image, all states that come after the selected
one are deleted. This enables the History palette to
display a list of the editing steps in the order you
made them. By recording states in a nonlinear way,
you can select a state, make a change to the image,
and delete just that state. The change will be
appended at the end of the list.
• Show New Snapshot Dialog By Default to force
Photoshop to prompt you for snapshot names
even when using the buttons on the palette.
3 Click OK.
Page 82

CHAPTER 1
72
Looking at the Work Area
Making a snapshot of an image
(Photoshop)
The Snapshot command lets you make a
temporary copy (or snapshot) of any state of the
image. The new snapshot is added to the list of
snapshots at the top of the History palette.
Selecting a snapshot lets you work from that
version of the image.
Important: Snapshots are not saved with the
image—closing an image deletes its snapshots.
Also, unless you select the Allow Non-Linear
History option, selecting a snapshot and changing
the image deletes all of the states currently listed in
the History palette.
Snapshots let you do the following:
• Switch repeatedly between several states.
By taking a temporary snapshot of a state, you can
keep that state for the entire work session, even if
the original state is deleted from the list of states in
the History palette.
• Give a unique name to states to make them easier
to identify.
• Experiment more freely. For example, you may
want to compare two different techniques for
achieving a similar effect. You can take a snapshot
before and after trying the first technique. You can
then select the first snapshot, try the second
technique on it, and then compare snapshots of
each technique.
• Take a snapshot before creating or applying an
action. Then you can recover your work more
easily if you decide later you don’t like the action.
Each step in an action is added to the list of states
on the History palette. An action with many steps
could scroll the current states off the palette, so
that you could not return to any of them. Using the
Undo command lets you undo only one step and
state. By making a snapshot first, you can select
and redisplay the pre-action image.
To create a snapshot:
1 Select a state.
2 To automatically create a snapshot, click the
New Snapshot button ( ) on the History palette,
or if Automatically Create New Snapshot When
Saving is selected in the history options, choose
New Snapshot from the History palette menu.
3 To set options when creating a snapshot, choose
New Snapshot from the History palette menu,
or Alt-click (Windows) or Option-click (Mac OS)
the New Snapshot button.
4 Enter the name of the Snapshot in the Name
text box.
5 For From, select the snapshot contents:
• Full Document to make a snapshot of all layers in
the image at that state.
• Merged Layers to make a snapshot that merges
all layers in the image at that state.
• Current Layer to make a snapshot of only the
currently selected layer at that state.
6 Click OK.
To select a snapshot:
Do any of the following:
• Click the name of the snapshot.
• Drag the slider at the left of the snapshot up or
down to a different snapshot.
Page 83

ADOBE PHOTOSHOP 6.0
User Guide
73
To rename a snapshot:
Double-click the snapshot and enter a name.
To delete a snapshot:
Do one of the following:
• Select the snapshot, and choose Delete from the
palette menu.
• Select the snapshot, and click the Trash
button ( ).
• Drag the snapshot to the Trash button.
For more information, see “Painting with a
state or snapshot of an image (Photoshop)
in online Help.
Duplicating images
You can duplicate an entire image (including all
layers, layer masks, and channels) into available
memory without saving to disk. In ImageReady,
you can also duplicate optimized versions of an
image.
Using duplicates in ImageReady lets you
experiment and then compare several versions
of the optimized image to the original.
To duplicate an image (Photoshop):
1 Open the image you want to duplicate.
2 Choose Image > Duplicate.
3 Enter a name for the duplicated image.
4 To duplicate the image without layers, select
Duplicate Merged Layers Only.
5 Click OK.
To duplicate an image in Photoshop and
automatically append the name “copy” to its
filename, hold down Alt (Windows) or Option
(Mac OS) when you choose Image > Duplicate.
To duplicate an original image (ImageReady):
1 Open the image you want to duplicate.
2 Select the Original tab at the top of the
image window.
3 Hold down Alt (Windows) or Option
(Mac OS), and drag the Original tab from the
image window, or choose Image > Duplicate.
4 Name the duplicate, specify whether to flatten
the layers, and click OK.
To duplicate an optimized image (ImageReady):
1 Open the image you want to duplicate.
2 Select the Optimized tab at the top of the image
window.
3 Hold down Alt (Windows) or Option
(Mac OS), and drag the Optimized tab from the
image window, or choose Image > Duplicate
Optimized.
4 Name the duplicate, and click OK.
Note: When you duplicate an image in Optimized,
2-Up, or 4-Up view, the duplicate image appears in
the Original view in the duplicate image window.
If you want a duplicate optimized image to appear in
the Optimized, 2-Up, or 4-Up view, duplicate the
original image, and then select the Optimized, 2-Up,
or 4-Up tab in the duplicate image window.
Page 84

CHAPTER 1
74
Looking at the Work Area
Using rulers, the measure tool, guides, and the grid
Rulers, the measure tool, guides, and the grid help
you position images or elements precisely across
the width or length of an image.
Note: You can also align and distribute parts of an
image using the Layers palette. (See “Moving and
aligning the contents of layers” on page 214.)
Using rulers
When visible, rulers appear along the top and left
side of the active window. Markers in the ruler
display the pointer’s position when you move it.
Changing the ruler origin (the (0, 0) mark on the
top and left rulers) lets you measure from a specific
point on the image. The ruler origin also determines the grid’s point of origin.
To display or hide rulers:
Choose View > Show Rulers or View >
Hide Rulers.
To change the rulers’ zero origin:
1 To snap the ruler origin to guides, slices,
or Document bounds, choose View > Snap To,
then choose any combination of options from the
submenu. (See “Working with snap” on page 152.)
(Photoshop) You can also snap to a grid in
addition to guides, slices, and Document bounds.
2 Position the pointer over the intersection
of the rulers in the upper left corner of the
window, and drag diagonally down onto the
image. A set of cross hairs appears, marking the
new origin on the rulers.
To make the ruler origin snap to the ruler ticks
(Photoshop), hold down Shift as you drag.
Note: To reset the ruler origin to its default value,
double-click the upper left corner of the rulers.
To change the rulers’ settings (Photoshop):
1 Do one of the following:
• Double-click a ruler.
• Choose Edit > Preferences > Units & Rulers.
2 For Rulers, choose a unit of measurement.
Note: Changing the units on the Info palette
automatically changes the units on the rulers.
3 For Width and Gutter, enter values for the
column size. You can also change the units.
Some layout programs use the column width
setting to specify the display of an image across
columns. The Image Size and Canvas Size
commands also use this setting. (See “Changing
the print dimensions and resolution of an image
(Photoshop)” on page 97.)
For more information, see “Changing the
size of the work canvas” in online Help.
4 For Point/Pica Size, choose from the following
options:
• PostScript (72 points per inch) if you are
printing to a PostScript device.
• Traditional to use printer’s 72.27 points per inch.
5 Click OK.
Page 85

ADOBE PHOTOSHOP 6.0
User Guide
75
Using the measure tool (Photoshop)
The measure tool calculates the distance between
any two points in the work area. When you
measure from one point to another, a nonprinting
line is drawn and the options bar and Info palette
show the following information:
• The starting location (X and Y).
• The horizontal (W) and vertical (H) distances
traveled from the x- and y-axes.
• The angle measured relative to the axis (A).
• The total distance traveled (D1).
• When using a protractor, you can view two
distances traveled (D1 and D2).
All measurements except the angle are calculated
in the unit of measure currently set in the Units &
Rulers preference dialog box. For information on
setting the unit of measure, see “Using rulers” on
page 74.
To display an existing measuring line:
Select the measure tool ( ).
To measure between two points:
1 Select the measure tool ( ).
2 Drag from the starting point to the ending
point. Hold down the Shift key to constrain the
tool to multiples of 45°.
3 To create a protractor from an existing
measuring line, Alt-drag (Windows) or Optiondrag (Mac OS) at an angle from one end of the
measuring line, or double-click the line and drag.
Hold down the Shift key to constrain the tool to
multiples of 45°.
To edit a measuring line or protractor:
1 Select the measure tool ( ).
2 Do one of the following:
• To resize the line, drag one end of an existing
measuring line.
• To move the line, place the pointer on the line
away from either endpoint, and drag the line.
• To remove the line, place the pointer on the line
away from either endpoint, and drag the line out
of the image.
Note: You can drag out a measure line on an image
feature that should be horizontal or vertical, then
choose Image > Rotate Canvas > Arbitrary and the
correct angle of rotation required to straighten the
image will already be entered into the Rotate Canvas
dialog box.
Using guides and the grid
Guides appear as lines that float over the entire
image and do not print. You can move, remove,
or lock a guide to avoid accidentally moving it.
In Photoshop, a grid appears by default as
nonprinting lines but can also be displayed
as dots. The grid is useful for laying out elements
symmetrically.
Guides and grids behave in similar ways:
• Selections, selection borders, and tools snap to a
guide or the grid when dragged within 8 screen
(not image) pixels. Guides also snap to the grid
when moved. You can turn this feature on and off.
Page 86

CHAPTER 1
76
Looking at the Work Area
• Guide spacing, along with guide and grid
visibility and snapping, is specific to an image.
• Grid spacing, along with guide and grid color
and style, is the same for all images.
To show or hide a grid or guides:
Do one of the following:
• (Photoshop) Choose View > Show > Grid.
• Choose View > Show > Guides.
• Choose View > Show Extras. This command also
shows or hides: (Photoshop) selection edges,
target path, slices, and notes, or (ImageReady)
selection edges, slices, image maps, text bounds,
text baseline, and text selection. (See “Working
with Extras” on page 77.)
To place a guide:
1 If the rulers are not visible, choose View >
Show Rulers.
Note: For the most accurate readings, view the image
at 100% magnification or use the Info palette.
2 Create a guide:
• Choose View > New Guide. In the dialog box,
select Horizontal or Vertical orientation, and enter
a position.
• Drag from the horizontal ruler to create a
horizontal guide.
• Hold down Alt (Windows) or Option (Mac OS),
and drag from the vertical ruler to create a
horizontal guide.
• Drag from the vertical ruler to create a vertical
guide.
• Hold down Alt (Windows) or Option (Mac OS),
and drag from the horizontal ruler to create a
vertical guide.
• Hold down Shift and drag from the horizontal or
vertical ruler to create a guide that snaps to the
ruler ticks.
The pointer changes to a double-headed
arrow ( ) when you drag a guide.
To move a guide:
1 Select the move tool ( ), or hold down Ctrl
(Windows) or Command (Mac OS) to activate the
move tool. (This option does not work with the
hand ( ), zoom ( ), and slice ( ) tools.)
2 Position the pointer over the guide (the pointer
turns into a double-headed arrow).
3 Move the guide:
• Drag the guide to move it.
• Change the guide from horizontal to vertical,
or vice versa, by holding down Alt (Windows) or
Option (Mac OS) as you click or drag the guide.
• (Photoshop) Align the guide with the ruler ticks
by holding down Shift as you drag the guide.
The guide will snap to the grid if the grid is visible
and View > Snap To > Grid is selected.
To lock all guides:
Choose View > Lock Guides.
Page 87

ADOBE PHOTOSHOP 6.0
User Guide
77
To remove guides from the image:
Do one of the following:
• To remove a single guide, drag the guide outside
the image window.
• To remove all guides, choose View > Clear
Guides.
To turn snapping to guides on or off:
Choose View > Snap To > Guides. (See “Working
with snap” on page 152.)
To turn snapping to the grid on or off (Photoshop):
Choose View > Snap To > Grid. (See “Working
with snap” on page 152.)
To set guide and grid preferences (Photoshop):
1 Choose Edit > Preferences > Guides & Grid.
2 For Color, choose a color for the guides, the
grid, or both. If you choose Custom, click the color
box, choose a color, and click OK.
For more information on choosing colors,
see “Using the Color palette” in online Help.
3 For Style, choose a display option for guides or
the grid, or both.
4 For Gridline Every, enter a value for the grid
spacing. For Subdivisions, enter a value to
subdivide the grid.
If desired, change the units for this option.
The Percent option creates a grid that divides the
image into even sections. For example, choosing
25 for the Percent option creates an evenly divided
4-by-4 grid.
5 Click OK.
Working with Extras
Guides, grid, target paths, selection edges, slices,
image maps, text bounds, text baselines, text selections, and annotations are nonprinting Extras that
help you select, move, or edit images and objects.
You can turn on or off an Extra or any combination of Extras without affecting the image.
You can also show or hide Extras by choosing
the Show Extras command in the View menu.
For a description of using specific Extras,
see “Using guides and the grid” on page 75;
“Annotating images (Photoshop)” on page 80;
“Making pixel selections” on page 139; “Using the
marquee tools” on page 140; “Selecting paths
(Photoshop)” on page 173; “Entering paragraph
type” on page 252; “Formatting characters” on
page 258; “Creating and viewing slices” on
page 272; and “Creating and viewing image maps
(ImageReady)” on page 286.
Note: Show Extras also shows or hides color
samplers, even though color samplers are not an
option in the Show submenu.
To show Extras:
Choose View > Show Extras. A check mark
appears next to all shown Extras in the Show
submenu.
To hide Extras:
With Extras showing, choose View > Show Extras.
A dot (Windows) or a dash (Mac OS) appears next
to all hidden Extras in the Show submenu.
Note: Hiding only suppresses the display of Extras.
It does not turn off these options.
Page 88

CHAPTER 1
78
Looking at the Work Area
To show one Extra from a list of hidden Extras:
Choose View > Show and choose an Extra from
the submenu. Choosing one of the hidden Extras
will cause it to show, and turn off all other Extras.
To Turn on and off a group of Extras:
Choose View > Show > All to turn on and show all
available Extras. Choose View > Show > None to
turn off all Extras.
Displaying status information
The status bar at the bottom of the window
displays useful information—such as the current
magnification and file size of the active image,
and brief instructions for using the active tool.
To show or hide the status bar (Windows only):
Choose Window > Show Status Bar or Window >
Hide Status Bar.
You can also view copyright and authorship
information that has been added to the file.
This information includes standard file infor-
®
mation and Digimarc
watermarks. Photoshop
automatically scans opened images for watermarks using the Digimarc Detect Watermark
plug-in. If a watermark is detected, Photoshop
displays a copyright symbol in the image window’s
title bar and updates the Copyright & URL section
of the File Info dialog box.
To display file information in the document window
(Photoshop):
1 Click the triangle in the bottom border of the
application window (Windows) or document
window (Mac OS).
Displaying file and image
information
Information about the current file size and other
features of the image is displayed at the bottom of
the application window (Windows) or document
window (Mac OS).
Note: In ImageReady, if the document window is
wide enough, two image information boxes appear,
enabling you to view two different information
options for the image at the same time. For more
information about original and optimized images,
see “Viewing images during optimization” on
page 316.
2 Select a view option:
• Document Size to display information on the
amount of data in the image. The number on the
left represents the printing size of the image—
approximately the size of the saved, flattened file in
Adobe Photoshop format. The number on the
right indicates the file’s approximate size including
layers and channels. For more information on how
layers affect file size, see “Using layer styles” on
page 226.
Page 89
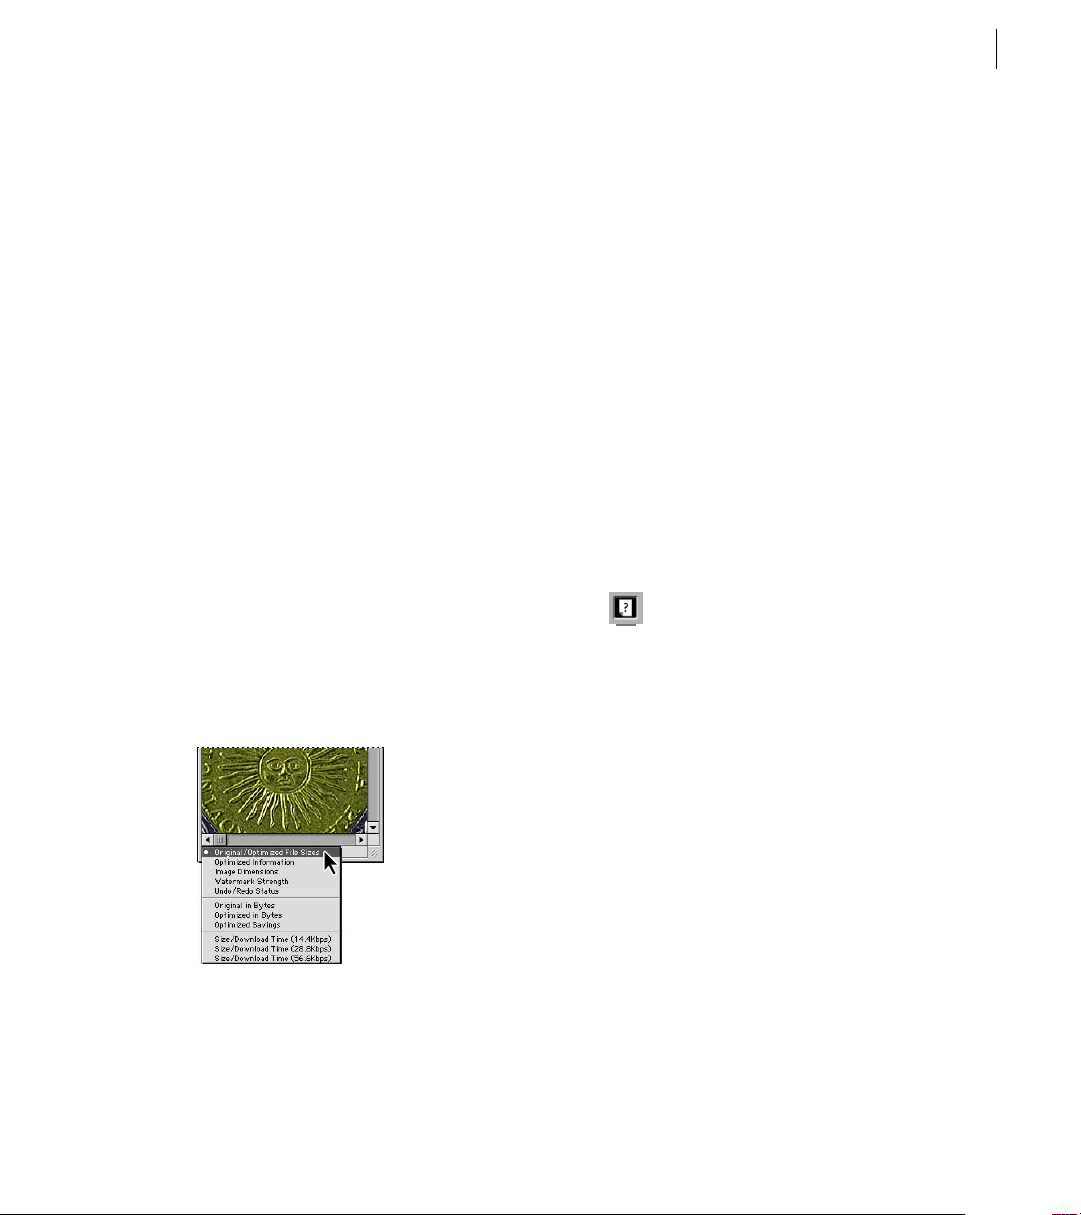
ADOBE PHOTOSHOP 6.0
User Guide
79
• Document Profile to display the name of the
color profile used by the image.
• Scratch Sizes to display information on the
amount of RAM and scratch disk used to process
the image. The number on the left represents
the amount of memory that is currently being
used by the program to display all open images.
The number on the right represents the total
amount of RAM available for processing images.
• Efficiency to display the percentage of time
actually doing an operation instead of reading or
writing the scratch disk. If the value is below
100%, Photoshop is using the scratch disk and,
therefore, is operating more slowly.
• Timing to display the amount of time it took to
complete the last operation.
• Current Tool to view the name of the active tool.
To display image information in the document
window (ImageReady):
1 Click an image information box at the bottom
of the document window.
2 Select a view option:
• Original/Optimized File Size to view the original
and optimized file size images. The first value
indicates the original image file size. The second
value (present if the original image has been
optimized) indicates the optimized image file size
and file format based on the current settings in the
Optimize palette.
• Optimized Information to view the file format,
file size, number of colors, and dither percentage
for the optimized image.
• Image Dimensions to view the image’s pixel
dimensions.
• Watermark Strength to view the strength of the
Digimarc digital watermark in the optimized
image, if present.
For more information on using digital
watermarks, see “Adding digital copyright
information” in online Help.
• Undo/Redo Status to view the number of undos
and redos that are available for the image.
• Original in Bytes to view the size of the original,
flattened image expressed in bytes.
• Optimized in Bytes to view the size of the
optimized image expressed in bytes.
• Optimized Savings to view the percentage of the
optimized image file size reduction, followed by
the difference in bytes between the original and
optimized sizes.
Page 90

CHAPTER 1
80
Looking at the Work Area
• Size/Download Time (14.4 Kbps/28.8 Kbps/
56.6 Kbps) to view the file size for the optimized
image and estimated download time using the
selected modem speed.
Note: Download times may vary based on Internet
traffic and modem compression schemes. The value
displayed is an approximation.
To view additional file information:
Do one of the following:
• (Photoshop) Choose File > File Info. For section,
choose the attribute you want to view.
• (ImageReady) Choose File > Image Info.
To read a Digimarc watermark:
1 Choose Filter > Digimarc > Read Watermark.
If the filter finds a watermark, a dialog box displays
the Creator ID, copyright year (if present), and
image attributes.
2 Click OK, or for more information, choose
from the following:
• If you have a Web browser installed, click Web
Lookup to get more information about the owner
of the image. This option launches the browser
and displays the Digimarc Web site, where contact
details appear for the given Creator ID.
• Call the phone number listed in the Watermark
Information dialog box to get information faxed
back to you.
For more information on adding digital
watermarks to an image, see “Adding digital
copyright information with the Digimarc filter” in
online Help.
Annotating images (Photoshop)
You can attach note annotations (notes) and
audio annotations to an image in Photoshop.
This is useful for associating review comments,
production notes, or other information with the
image. Because Photoshop annotations are
compatible with Adobe Acrobat, you can use them
to exchange information with Acrobat users as
well as Photoshop users.
To circulate a Photoshop document for review
in Acrobat, save the document in Portable
Document Format (PDF) and ask reviewers to use
Acrobat to add notes or audio annotations.
Then import the annotations into Photoshop.
Notes and audio annotations appear as small
nonprintable icons on the image. They are
associated with a location on the image rather than
with a layer. You can hide and show annotations,
open notes to view or edit their contents, and play
audio annotations. You can also add audio annotations to actions, and set them to play during an
action or during a pause in an action. (See “Setting
playback options (Photoshop)” on page 400.)
Page 91

ADOBE PHOTOSHOP 6.0
User Guide
81
Adding notes and audio annotations
You can add notes and audio annotations
anywhere on a Photoshop image canvas.
When you create a note, a resizable window
appears for entering text. When you record an
audio annotation, you must have a microphone
plugged into the audio-in port of your computer.
You can import both kinds of annotations from
Photoshop documents saved in PDF or from
Acrobat documents saved in PDF or Form Data
Format (FDF).
To create a note:
1 Select the notes tool ( ).
2 Set options as needed:
• Enter an author name. The name appears in the
title bar of the notes window.
• Choose a font and size for the note text.
• Select a color for the note icon and the title bar
of note windows.
3 Click where you want to place the note, or drag
to create a custom-sized window.
4 Click inside the window, and type the text.
If you type more text than fits in the note window,
the scroll bar becomes active.
Edit the text as needed:
• You can use the standard editing commands for
your system (Undo, Cut, Copy, Paste, and Select
All). In Windows, right-click in the text area and
choose the commands from the context menu.
In Mac OS, choose the commands from the Edit
and Select menus. You can also use standard
keyboard shortcuts for these editing commands.
• If you have the required software for different
script systems (for example, Roman, Japanese,
or Cyrillic) installed on your computer, you can
switch between the script systems. Right-click
(Windows) or Control-click (Mac OS) to display
the context menu, and then choose a script system.
5 To close the note to an icon, click the close box.
To create an audio annotation:
1 Select the audio annotation tool ( ).
2 Set options as needed:
• Enter an author name.
• Select a color for the audio annotation icon.
3 Click where you want to place the annotation
icon.
4 Record and save the audio annotation:
• (Windows) Click Start and then speak into the
microphone. When you’re finished, click Stop.
• (Mac OS) Click Record and then speak into the
microphone. You can click Pause to temporarily
stop the recording, and then click Record to
resume. When you’re finished, click Stop and then
click Save.
To import annotations:
1 Choose File > Import > Annotations.
2 Select a PDF or FDF file that contains annota-
tions, and then click Load. The annotations appear
in the locations where they were saved in the
source document.
Page 92

CHAPTER 1
82
Looking at the Work Area
Opening and editing annotations
A note or audio annotation icon marks the
location of an annotation on an image. When you
move the pointer over an annotation icon and
pause, a message displays the author name.
You use the icons to open notes or play audio
annotations. You can show, hide, or move the
icons, and edit the contents of notes.
Note: Resizing an image does not resize the
annotation icons and note windows. The icons and
note windows keep their locations relative to the
image. Cropping an image removes any annotations
in the cropped area; you can recover the annotations
by undoing the Crop command.
To open a note or play an audio annotation:
Double-click the icon:
• If you are opening a note, a window appears,
displaying the note text.
• If you are playing an audio annotation and have
a sound card installed, the audio file begins to play.
To edit annotations:
Do any of the following:
• To move an annotation icon, move the pointer
over the icon until it turns into an arrow, and then
drag the icon. You can do this with any tool
selected. Moving a note icon does not move its
note window.
• To move a note window, drag it by the title bar.
• To delete a selected annotation, press Delete.
• To edit the contents of a note, open the note,
change any options, and add, delete, or change the
text. You can use the same editing commands that
you use when creating a note. (See “Adding notes
and audio annotations” on page 81.)
• To delete all annotations, right-click (Windows)
or Control-click (Mac OS) an annotation icon to
display the context menu, and choose Delete All
Annotations. You can also delete all annotations by
clicking Clear All in the options bar for notes or
audio annotations.
To show or hide annotation icons:
Do one of the following:
• Choose View > Show > Notes.
• Choose View > Show Extras. This command also
shows or hides grids, guides, selection edges, target
paths, and slices.
Jumping between applications
You can jump between Photoshop and
ImageReady to transfer an image between the two
applications for editing without closing or exiting
the originating application. In addition, you can
jump from ImageReady to other graphics editing
applications and HTML editing applications
installed on your system.
Jumping to an application saves you from having
to close the file in one application and reopen it in
another application.
Page 93

ADOBE PHOTOSHOP 6.0
User Guide
83
Jumping between Photoshop and
ImageReady
You can easily jump between Photoshop and
ImageReady to use features in both applications
when preparing graphics for the Web or other
purposes. Jumping between the applications
allows you to use the full feature sets of both
applications while maintaining a streamlined
workflow. Files and documents updated in one
application can be automatically updated in the
other application by choosing a preference.
To jump between Photoshop and ImageReady:
Do one of the following:
• Click the Jump To button ( ) in the toolbox.
• Choose File > Jump To > Photoshop or File >
Jump To > ImageReady.
When jumping between Photoshop and
ImageReady, the applications use a temp file for
transferring changes.
To automatically update files or documents when
jumping between Photoshop and ImageReady:
Do one of the following:
• (Photoshop) Choose Edit > Preferences >
General, then select Auto-update open
documents.
• (ImageReady) Choose Edit > Preferences >
General, then select Auto-Update Files.
Jumping to other applications
(ImageReady)
You can jump to graphics-editing applications
and HTML-editing applications from within
ImageReady.
When you install ImageReady, Adobe graphicsediting and HTML-editing applications currently
on your system are added to the Jump To
submenu. You can add more applications,
including non-Adobe applications, to the Jump
To submenu.
When you jump to a graphics-editing application,
the original file is opened in the destination
application. When you jump to an HTML editor,
the optimized file and the HTML file are saved and
opened in the destination application. If the image
contains slices, all filesfor the full image are
included. A preference enables files updated in
another application to be automatically updated
in ImageReady, when jumping back to
ImageReady.
To jump to another application from ImageReady:
1 Choose a method for jumping to the desti-
nation application:
• Choose File > Jump To > Other Graphics Editor
or File > Jump To > Other HTML Editor, and
select an application by navigating through the
Jump To dialog.
Page 94

CHAPTER 1
84
Looking at the Work Area
2 If the file has been modified since the last save,
choose an option in ImageReady for saving the file:
• Click Save, and save the file with its current name
and location.
• Click Save As, and save the file with a new name,
a new location, or both.
To add an application to the Jump To submenu:
1 Create a shortcut (Windows) or an alias
(Mac OS) for the application you want to add to
the menu.
2 Drag the icon for the shortcut or alias into the
Jump To Graphics Editor or the Jump To HTML
Editor folder in the Helpers folder in the
Photoshop folder.
3 Restart ImageReady to view the application in
the Jump To submenu.
To automatically update a file when jumping back to
ImageReady from another application:
Choose Edit > Preferences > General, then select
Auto-Update Files.
Previewing an image in a browser
You can open a browser and preview an optimized
image. You can preview the image in any browser
installed on your system. The browser displays the
image with a caption listing the image’s file type,
pixel dimensions, file size, and compression specifications in the first paragraph, and filename and
other HTML information in the second
paragraph.
When you install Photoshop and ImageReady,
all browsers currently on your system are added to
the Preview In menu. You can add additional
browsers to the menu, and specify which browser
will be launched when using a keyboard shortcut.
To preview an optimized image in a browser:
Do one of the following:
• (Photoshop) Choose File > Save for Web, then
select a browser from the Preview In button at the
bottom right area of the Save for Web window.
• (ImageReady) Choose File > Preview In,
then choose an option from the submenu.
(Choose Other to select a browser not listed in
the submenu.)
• (ImageReady) Select a browser from the Preview
in Default Browser tool in the toolbox.
To add a browser to the Preview In menu:
1 Create a shortcut (Windows) or an alias
(Mac OS) for the browser you want to add to
the menu.
2 Drag the icon for the shortcut or alias into the
Preview In folder, located in the Helpers folder in
the Photoshop program folder.
3 Restart Photoshop and ImageReady to view the
browser in the Preview In menu.
Page 95

ADOBE PHOTOSHOP 6.0
User Guide
85
(ImageReady) To specify a browser to be launched by
the Preview In keyboard shortcut:
Do one of the following:
• Choose File > Preview In, then choose an option
from the submenu.
• Select a browser from the Preview in Default
Browser tool in the toolbox.
The shortcut specification takes effect immediately and will persist the next time you launch
ImageReady.
Managing libraries with the Preset Manager (Photoshop)
You can use the Preset Manager to manage
libraries of preset brushes, swatches, gradients,
styles, patterns, contours, and custom shapes.
This lets you easily reuse or share libraries of
presets. Each type of library has its own file
extension and default folder. You can always
restore the default presets. Note that you cannot
create new presets using the Preset Manager,
as each preset is created in its own type of editor.
The Preset Manager lets you create a library
composed of multiple presets of a single type.
Any new preset brush, swatch, and so on,
automatically displays in the Preset Manager.
Prior to saving it into a preset library, the new
brush, swatch, and so on, is saved in the Preferences file so that it persists between editing
sessions. To permanently save the new item as a
preset, you need to save it in the editor used to
create it. Otherwise, it will be lost if you create a
new one, or if you replace (rather than append)
a new library of the same type.
To create, load, save, or delete libraries:
1 Choose Edit > Preset Manager.
2 Choose a preset type from the Preset
Type menu.
3 Do one of the following:
• Choose Save Set, then enter a name for
the library. If you want to save it to a folder
other than the default, navigate to the new folder
before saving.
• Choose Load, then select a library from the list.
If you want to load a library located in another
folder, navigate to that folder, then select the
library. Or select a library from the pop-up menu.
• Choose Delete to delete the selected presets in
the library. You can delete the default presets,
but they can always be restored.
To reset or replace libraries:
1 Choose Edit > Preset Manager.
2 Select the preset type you want to reset or
replace in the Preset Type menu. Any unsaved
presets in the list will be lost. You may want to save
the current library before you continue.
Page 96

CHAPTER 1
86
Looking at the Work Area
3 From the Preset Manager pop-up menu do one
of the following:
• Choose Reset to restore the default library for
that type. Select Append to append the default
presets to the current set, OK to replace the
current presets with the default presets, or Cancel.
• Choose Replace to replace the current library
with the contents of another libraryloaded
from a file.
To save a subset of a library:
1 Choose Edit > Preset Manager.
2 Choose a preset type from the Preset Type
menu.
3 Shift-click to select multiple presets. Only the
selected presets will be saved to the new library.
4 Choose Save Set, then enter a name for the
library. If you want to save the library to a folder
other than the default, navigate to the new folder
before saving.
To rename presets contained in a library:
1 Choose Edit > Preset Manager.
2 Choose a preset type from the Preset Type
menu.
3 Select a preset in the list.
4 Choose Rename, then enter a new name for the
brush, swatch, and so on. If you selected multiple
presets, you will be prompted to enter multiple
names.
Changing views of the Preset Manager
You can change the view of the Preset Manager to
display presets by name, by thumbnail, or for some
preset types, you can choose to show both the
name and thumbnail of each item. Only the
available choices for each type of preset display
when you change the view for that preset type.
To change the view of the Preset Manager:
In the Preset Manager dialog box, choose one of
the available views from the pop-up menu:
• Text Only to display the name of each preset
item.
• Small Thumbnail or Large Thumbnail to display
a thumbnail of each preset item.
• Small List or Large List to display the name and
thumbnail of each preset item.
Setting preferences
Numerous program settings are stored in Adobe
Photoshop 6 Prefs.psp file (Windows) or the
Adobe Photoshop 6 Prefs file (Mac OS) in the
Adobe Photoshop 6 Settings folder. Among the
settings stored in this file are general display
options, file-saving options, cursor options,
transparency options, and options for plug-ins
and scratch disks. Most of these options are set in
Page 97

ADOBE PHOTOSHOP 6.0
User Guide
87
dialog boxes that can be opened through the
Preferences submenu in the Edit menu. Preference
settings are saved each time you exit the
application.
Note: The default location of the Adobe Photoshop 6
Settings folder varies by operating system; use your
operating system’s Find command to locate this
folder.
Unexpected behavior may indicate damaged
preferences. By removing damaged preferences,
you can restore preferences to their default
settings.
To open a preferences dialog box:
1 Choose the desired preference set from the
Edit > Preferences submenu.
2 To switch to a different preference set, do one of
the following:
• Choose the preference set from the menu at the
top of the dialog box.
• Click Next to display the next preference set in
the menu list; click Prev to display the previous
preference set.
For information on a specific preference option,
see the Index.
To restore all preferences to their default settings:
In Windows, press and hold Alt+Control+Shift
immediately after launching Photoshop or
ImageReady. Click Yes to (Photoshop) delete the
Adobe Photoshop settings file or (ImageReady)
erase all ImageReady preferences.
In Mac OS, do one of the following:
• Hold down the Shift, Option, and Command
keys at the startup of Photoshop to reset preferences to their default settings.
• Open the Preferences folder in the System
Folder, and drag the following files to the Trash:
(Photoshop) Adobe Save For Web 2.0 prefs,
and, located in the Adobe Photoshop 6 Settings
folder, Adobe Photoshop 6 Prefs, Actions Palette
(prefs), Color Settings (prefs), Contours.psp,
Custom Shape.psp, Patterns.psp, Shape
Curves.psp, and Styles.psp; (ImageReady)
Adobe ImageReady 3.0 Prefs.
New Preferences files will be created the next time
you start Photoshop or ImageReady.
Resetting all warning dialogs
Sometimes messages containing warnings or
prompts regarding certain situations are
displayed. You can disable the display of these
messages by selecting the Don’t Show Again
option in the message. You can also globally reset
the display of all messages that have been disabled.
To reset the display of all warning messages
(Photoshop):
1 Choose Edit > Preferences > General.
2 Click Reset All Warning Dialogs, and click OK.
To turn on or off warning messages (ImageReady):
1 Choose Edit > Preferences > General.
2 Deselect or select Disable Warnings,
and click OK.
Page 98

CHAPTER 1
88
Looking at the Work Area
Monitoring operations
A progress bar indicates that an operation is in
process. You can interrupt the process or have the
program notify you when it has finished.
To cancel operations:
Hold down Esc until the operation in progress has
stopped. In Mac OS, you can also press
Command+period.
To set notification for completion of operations:
1 Choose Edit > Preferences > General.
2 Do one of the following:
• (Photoshop) Select Beep When Done.
• (ImageReady) Select Notify When Done and
choose (Mac OS only): System Alert to use your
system alert for notification or Text to Speech to
use a spoken notification.
3 Click OK.
To exit Photoshop or ImageReady:
1 Choose File > Exit (Windows) or File >
Quit (Mac OS).
2 Choose whether or not to save any open files:
• Click Yes (Windows) or Save (Mac OS) for each
open file to save the file.
• Click No (Windows) or Don’t Save (Mac OS) for
each open file to close the file without saving it.
For information on using Adobe and thirdparty plug-in modules, see “Using plug-in
modules” in online Help.
Closing files and quitting
To close a file:
1 Choose File > Close (Windows and Mac OS) or
File > Close All (Mac OS).
2 Choose whether or not to save the file:
• Click Yes (Windows) or Save (Mac OS) to save
the file.
• Click No (Windows) or Don’t Save (Mac OS) to
close the file without saving it.
Page 99

2
Page 100

 Loading...