

Page 1

®
User Guide
version
®
Adobe Photoshop
5.0
Page 2

1998 Adobe Systems Incorporated. All rights reserved.
Adobe Photoshop 5.0 User Guide for Macintosh and Windows
This manual, as well as the software described in it, is furnished under license and may be used or copied only in accordance with the terms of
such license. The content of this manual is furnished for informational use only, is subject to change without notice, and should not be construed
as a commitment by Adobe Systems Incorporated. Adobe Systems Incorporated assumes no responsibility or liability for any errors or
inaccuracies that may appear in this book.
Except as permitted by such license, no part of this publication may be reproduced, stored in a retrieval system, or transmitted, in any form or by
any means, electronic, mechanical, recording, or otherwise, without the prior written permission of Adobe Systems Incorporated.
Please remember that existing artwork or images that you may desire to scan as a template for your new image may be protected under copyright
law. The unauthorized incorporation of such artwork or images into your new work could be a violation of the rights of the copyright owner.
Please be sure to obtain any permission required from such copyright owner.
Adobe, the Adobe logo, Acrobat, the Acrobat logo, Acrobat Reader, Photoshop, FrameMaker, Illustrator, Adobe Dimensions, PageMaker, Adobe
Premiere, PSPrinter, Streamline, Adobe Type Manager, ATM, and PostScript are trademarks of Adobe Systems Incorporated. Apple, AppleScript,
AppleTalk, ColorSync, ImageWriter, Mac OS, QuickDraw, Macintosh, and TrueType are trademarks of Apple Computer, Inc. registered in the
U.S. and other countries. QuickTime and the QuickTime logo are trademarks used under license. Microsoft, Windows, and Windows NT are
either registered trademarks or trademarks of Microsoft Corporation in the U.S. and/or other countries. Intel, MMX, the MMX logo, and
Pentium are registered trademarks of Intel Corporation. IBM and OS/2 are registered trademarks of International Business Machines
Corporation. Kodak, Digital Science, and Photo CD are trademarks of Eastman Kodak Company. Frutiger and Granjon are trademarks of
Linotype-Hell AG and/or its subsidiaries. UNIX is a registered trademark of The Open Group. All other trademarks are the property of their
respective owners.
©
Eastman Kodak Company, 1998.
Portions
©
MacApp
1985–1992 Apple Computer, Inc. Apple Computer, Inc. makes no warranties whatsoever, either express or implied, regarding this
product, including warranties with respect to its merchantability or its fitness for any particular purpose. The MacApp software is a trademark
of Apple Computer, Inc. and is proprietary to Apple Computer, Inc., licensed to Adobe Systems, Incorporated for distribution only for use in
combination with Adobe Photoshop.
®
PANTONE
Computer Video simulations displayed may not match PANTONE-identified solid color standards. Use current PANTONE Color
Reference Manuals for accurate color. All trademarks noted herein are either the property of Adobe Systems Incorporated, Pantone, Inc. or their
respective companies.
Contains an implementation of the LZW algorithm licensed under U.S. Patent 4,558,302.
Protected by U.S. Patents 5,146,346, 5,546,528, and 4,837,613. Patents pending.
™
QuickHelp
is licensed from Altura Software, Inc. End-User is prohibited from taking any action to derive a source code equivalent of QuickHelp,
including reverse assembly or reverse compilation.
Written and designed at Adobe Systems Incorporated, 345 Park Avenue, San Jose, California 95110, USA
Adobe Systems Europe Limited, Adobe House, Edinburgh EH11 4DU, Scotland, United Kingdom
Adobe Systems Co., Ltd., Yebisu Garden Place Tower, 4-20-3 Ebisu, Shibuya-ku, Tokyo 150, Japan
Notice to U.S. government end users. The software and documentation are “commercial items,” as that term is defined at 48 C.F.R. §2.101,
consisting of “commercial computer software” and “commercial computer software documentation,” as such terms are used in 48 C.F.R. §12.212
or 48 C.F.R. §227.7202, as applicable. Consistent with 48 C.F.R. §12.212 or 48 C.F.R. §§227.7202-1 through 227.7202-4, as applicable, the
commercial computer software and commercial computer software documentation are being licensed to U.S. government end users (A) only as
commercial items and (B) with only those rights as are granted to all other end users pursuant to the terms and conditions set forth in the Adobe
standard commercial agreement for this software. Unpublished rights reserved under the copyright laws of the United States.
Printed in the U.S.A.
Part Number: 90011345
Page 3

Contents
iii
Introduction
A Quick Tour of
Adobe Photoshop
About this manual . . . . . . . . . . . . . . . . . . . . . . . . . . . . . . . . . . . 1
Learning Adobe Photoshop . . . . . . . . . . . . . . . . . . . . . . . . . . . . 1
Windows system requirements . . . . . . . . . . . . . . . . . . . . . . . . . . 2
Mac OS system requirements . . . . . . . . . . . . . . . . . . . . . . . . . . . 2
The Adobe Photoshop package contents . . . . . . . . . . . . . . . . . . . 3
Registration . . . . . . . . . . . . . . . . . . . . . . . . . . . . . . . . . . . . . . . . 4
About Adobe products and services . . . . . . . . . . . . . . . . . . . . . . 4
Adobe Systems training opportunities . . . . . . . . . . . . . . . . . . . . . 5
Installing and starting Adobe Photoshop . . . . . . . . . . . . . . . . . . . 5
Starting Adobe Photoshop . . . . . . . . . . . . . . . . . . . . . . . . . . . . . 6
What’s new in Adobe Photoshop 5.0 . . . . . . . . . . . . . . . . . . . . . 6
Changed keyboard shortcuts, tools, and commands . . . . . . . . . . 9
Chapter 1
Selecting . . . . . . . . . . . . . . . . . . . . . . . . . . . . . . . . . . . . . . . . . 13
Layers . . . . . . . . . . . . . . . . . . . . . . . . . . . . . . . . . . . . . . . . . . . 15
Filters . . . . . . . . . . . . . . . . . . . . . . . . . . . . . . . . . . . . . . . . . . . 18
Painting . . . . . . . . . . . . . . . . . . . . . . . . . . . . . . . . . . . . . . . . . . 18
Retouching . . . . . . . . . . . . . . . . . . . . . . . . . . . . . . . . . . . . . . . 20
Actions . . . . . . . . . . . . . . . . . . . . . . . . . . . . . . . . . . . . . . . . . . 21
Saving the file . . . . . . . . . . . . . . . . . . . . . . . . . . . . . . . . . . . . . 22
Looking at the Work Area
Chapter 2
Using the toolbox . . . . . . . . . . . . . . . . . . . . . . . . . . . . . . . . . . . 26
Using the status bar . . . . . . . . . . . . . . . . . . . . . . . . . . . . . . . . . 28
Using palettes . . . . . . . . . . . . . . . . . . . . . . . . . . . . . . . . . . . . . 28
Using context menus . . . . . . . . . . . . . . . . . . . . . . . . . . . . . . . . 32
Using online help . . . . . . . . . . . . . . . . . . . . . . . . . . . . . . . . . . . 32
Using Adobe online services . . . . . . . . . . . . . . . . . . . . . . . . . . . 32
Viewing images . . . . . . . . . . . . . . . . . . . . . . . . . . . . . . . . . . . . 33
Using plug-in modules . . . . . . . . . . . . . . . . . . . . . . . . . . . . . . . 36
Setting preferences . . . . . . . . . . . . . . . . . . . . . . . . . . . . . . . . . 37
Page 4

iv
CONTENTS
Getting Images into
Photoshop
Choosing a Color Mode
Chapter 3
About bitmap images and vector graphics . . . . . . . . . . . . . . . . 41
About image size and resolution . . . . . . . . . . . . . . . . . . . . . . . 42
Changing image size and resolution . . . . . . . . . . . . . . . . . . . . . 46
Scanning images . . . . . . . . . . . . . . . . . . . . . . . . . . . . . . . . . . . 51
Creating new images . . . . . . . . . . . . . . . . . . . . . . . . . . . . . . . 54
Opening and importing images . . . . . . . . . . . . . . . . . . . . . . . . 55
Viewing copyright and file information . . . . . . . . . . . . . . . . . . . 57
Cropping an image . . . . . . . . . . . . . . . . . . . . . . . . . . . . . . . . . 58
Increasing the size of the work canvas . . . . . . . . . . . . . . . . . . . 59
Chapter 4
Color modes and models . . . . . . . . . . . . . . . . . . . . . . . . . . . . . 63
Color gamuts . . . . . . . . . . . . . . . . . . . . . . . . . . . . . . . . . . . . . . 66
Color channels . . . . . . . . . . . . . . . . . . . . . . . . . . . . . . . . . . . . . 67
Measuring color values in the Info palette . . . . . . . . . . . . . . . . 67
Adjusting the monitor display . . . . . . . . . . . . . . . . . . . . . . . . . . 67
Converting between bit depths . . . . . . . . . . . . . . . . . . . . . . . . . 69
Converting images from one mode to another . . . . . . . . . . . . . 69
Converting between Grayscale mode and Bitmap mode . . . . . . 70
Converting to indexed color . . . . . . . . . . . . . . . . . . . . . . . . . . . 72
Reproducing Color
Accurately
Chapter 5
About workflow . . . . . . . . . . . . . . . . . . . . . . . . . . . . . . . . . . . . 80
About calibration . . . . . . . . . . . . . . . . . . . . . . . . . . . . . . . . . . . 80
About ICC profiles . . . . . . . . . . . . . . . . . . . . . . . . . . . . . . . . . . 81
Choosing a color management module . . . . . . . . . . . . . . . . . . . 81
About the RGB, Grayscale, and CMYK Setup dialog boxes . . . . . 81
Calibrating your monitor . . . . . . . . . . . . . . . . . . . . . . . . . . . . . 82
Entering RGB setup information . . . . . . . . . . . . . . . . . . . . . . . . 84
Entering CMYK setup information . . . . . . . . . . . . . . . . . . . . . . 86
Using ICC profiles to define the CMYK color space . . . . . . . . . . 87
Using the Built-in option to define the CMYK color space . . . . . 88
Adjusting separation options . . . . . . . . . . . . . . . . . . . . . . . . . . 89
Printing a color proof . . . . . . . . . . . . . . . . . . . . . . . . . . . . . . . . 92
Calibrating the screen image to the proof . . . . . . . . . . . . . . . . . 92
Page 5

Converting to CMYK . . . . . . . . . . . . . . . . . . . . . . . . . . . . . . . . 97
Managing ICC profiles in files . . . . . . . . . . . . . . . . . . . . . . . . . . 99
Converting the color space of open images . . . . . . . . . . . . . . . 100
v
Making Color and Tonal
Adjustments
Selecting
Chapter 6
Using the Adobe Photoshop color correction tools . . . . . . . . . 105
Comparing CMYK and RGB mode corrections . . . . . . . . . . . . . 109
Step 1: Calibrate your system . . . . . . . . . . . . . . . . . . . . . . . . . 111
Step 2: Check the scan quality and tonal range . . . . . . . . . . . . 112
Step 3: Set the highlight and shadow values . . . . . . . . . . . . . . 114
Step 4: Adjust the midtones and fine-tune the tonal correction 119
Step 5: Adjust the color balance . . . . . . . . . . . . . . . . . . . . . . . 122
Step 6: Sharpen the image . . . . . . . . . . . . . . . . . . . . . . . . . . . 128
General-purpose color and tonal adjustment commands . . . . . 129
Special-purpose color adjustment commands . . . . . . . . . . . . . 130
Chapter 7
Making selections . . . . . . . . . . . . . . . . . . . . . . . . . . . . . . . . . 137
Adjusting selections . . . . . . . . . . . . . . . . . . . . . . . . . . . . . . . . 144
Softening the edges of a selection . . . . . . . . . . . . . . . . . . . . . 147
About paths . . . . . . . . . . . . . . . . . . . . . . . . . . . . . . . . . . . . . . 149
Using the Paths palette . . . . . . . . . . . . . . . . . . . . . . . . . . . . . 149
Drawing freehand paths . . . . . . . . . . . . . . . . . . . . . . . . . . . . . 151
Drawing with the pen tool . . . . . . . . . . . . . . . . . . . . . . . . . . . 153
Adjusting path segments . . . . . . . . . . . . . . . . . . . . . . . . . . . . 157
Moving and copying paths . . . . . . . . . . . . . . . . . . . . . . . . . . . 160
Filling and stroking paths . . . . . . . . . . . . . . . . . . . . . . . . . . . . 161
Converting between paths and selection borders . . . . . . . . . . 163
Editing and Retouching
Chapter 8
Monitoring operations . . . . . . . . . . . . . . . . . . . . . . . . . . . . . . 167
Correcting mistakes . . . . . . . . . . . . . . . . . . . . . . . . . . . . . . . . 167
Reverting to any state of the image . . . . . . . . . . . . . . . . . . . . 168
Duplicating images . . . . . . . . . . . . . . . . . . . . . . . . . . . . . . . . 172
Using rulers, the measure tool, guides, and grids . . . . . . . . . . . 173
Moving, copying, and pasting selections . . . . . . . . . . . . . . . . . 176
Page 6

vi
CONTENTS
Deleting a selection . . . . . . . . . . . . . . . . . . . . . . . . . . . . . . . . 180
Removing fringe pixels from a selection . . . . . . . . . . . . . . . . . 181
Transforming objects in two dimensions . . . . . . . . . . . . . . . . . 182
Transforming objects in three dimensions . . . . . . . . . . . . . . . . 187
Using the rubber stamp tool and pattern stamp tool . . . . . . . . 190
Using other retouching tools . . . . . . . . . . . . . . . . . . . . . . . . . 191
Painting
Using Channels and
Masks
Chapter 9
Using the painting tools . . . . . . . . . . . . . . . . . . . . . . . . . . . . . 197
Using the line tool . . . . . . . . . . . . . . . . . . . . . . . . . . . . . . . . . 198
Erasing . . . . . . . . . . . . . . . . . . . . . . . . . . . . . . . . . . . . . . . . . 198
Using the Brushes palette . . . . . . . . . . . . . . . . . . . . . . . . . . . . 200
Using the Options palette for painting and editing tools . . . . . 203
Using the paint bucket tool . . . . . . . . . . . . . . . . . . . . . . . . . . 207
Using the gradient tools . . . . . . . . . . . . . . . . . . . . . . . . . . . . . 207
Filling and stroking selections and layers . . . . . . . . . . . . . . . . 211
Choosing the foreground and background colors . . . . . . . . . . 214
Using the Adobe Photoshop Color Picker . . . . . . . . . . . . . . . . 218
Using other color pickers . . . . . . . . . . . . . . . . . . . . . . . . . . . . 221
Color Signature
Chapter 10
About channels . . . . . . . . . . . . . . . . . . . . . . . . . . . . . . . . . . . 239
About channels and file size . . . . . . . . . . . . . . . . . . . . . . . . . . 239
Using the Channels palette . . . . . . . . . . . . . . . . . . . . . . . . . . 240
Saving and managing channels . . . . . . . . . . . . . . . . . . . . . . . 243
Adding spot colors . . . . . . . . . . . . . . . . . . . . . . . . . . . . . . . . . 245
About masks . . . . . . . . . . . . . . . . . . . . . . . . . . . . . . . . . . . . . 249
Using Quick Mask mode . . . . . . . . . . . . . . . . . . . . . . . . . . . . 250
Using alpha channels . . . . . . . . . . . . . . . . . . . . . . . . . . . . . . . 252
. . . . . . . . . . . . . . . . . . . . . . . . . . . . . . . . . . . 223
Using Layers
Chapter 10
Using the Layers palette . . . . . . . . . . . . . . . . . . . . . . . . . . . . . 259
Creating a layered image . . . . . . . . . . . . . . . . . . . . . . . . . . . . 263
Moving and aligning layer contents . . . . . . . . . . . . . . . . . . . . 265
Managing layered images . . . . . . . . . . . . . . . . . . . . . . . . . . . 267
Page 7

Editing layers . . . . . . . . . . . . . . . . . . . . . . . . . . . . . . . . . . . . . 269
Specifying layer options . . . . . . . . . . . . . . . . . . . . . . . . . . . . . 271
Using channel calculations to blend layers and channels . . . . . 273
Creating clipping groups . . . . . . . . . . . . . . . . . . . . . . . . . . . . 275
Using layer masks . . . . . . . . . . . . . . . . . . . . . . . . . . . . . . . . . 276
Selecting opaque areas on a layer . . . . . . . . . . . . . . . . . . . . . 281
Using adjustment layers . . . . . . . . . . . . . . . . . . . . . . . . . . . . . 281
Using layer effects . . . . . . . . . . . . . . . . . . . . . . . . . . . . . . . . . 284
vii
Using Type
Using Filters
Saving and Exporting
Images
Printing
Chapter 12
About type . . . . . . . . . . . . . . . . . . . . . . . . . . . . . . . . . . . . . . . 291
Creating type . . . . . . . . . . . . . . . . . . . . . . . . . . . . . . . . . . . . . 292
Setting type attributes . . . . . . . . . . . . . . . . . . . . . . . . . . . . . . 295
Chapter 13
Previewing and applying filters . . . . . . . . . . . . . . . . . . . . . . . . 301
Tips for creating special effects . . . . . . . . . . . . . . . . . . . . . . . . 305
Improving performance with filters . . . . . . . . . . . . . . . . . . . . . 306
Choosing a filter effect . . . . . . . . . . . . . . . . . . . . . . . . . . . . . . 306
Chapter 14
Saving files . . . . . . . . . . . . . . . . . . . . . . . . . . . . . . . . . . . . . . 311
Exporting images . . . . . . . . . . . . . . . . . . . . . . . . . . . . . . . . . . 317
About file formats . . . . . . . . . . . . . . . . . . . . . . . . . . . . . . . . . 321
Placing Photoshop images in other applications . . . . . . . . . . . 326
Chapter 15
Printing: an overview . . . . . . . . . . . . . . . . . . . . . . . . . . . . . . . 333
General printing options . . . . . . . . . . . . . . . . . . . . . . . . . . . . . 333
Selecting halftone screen attributes . . . . . . . . . . . . . . . . . . . . 335
Additional printing options . . . . . . . . . . . . . . . . . . . . . . . . . . . 337
Converting the color space of images while printing . . . . . . . . 338
Creating color traps . . . . . . . . . . . . . . . . . . . . . . . . . . . . . . . . 338
Using monotones, duotones, tritones, and quadtones . . . . . . . 339
Printing color separations . . . . . . . . . . . . . . . . . . . . . . . . . . . . 343
Page 8

viii
CONTENTS
Automating Tasks
Troubleshooting
Chapter 16
Creating and recording actions . . . . . . . . . . . . . . . . . . . . . . . . 347
Playing actions . . . . . . . . . . . . . . . . . . . . . . . . . . . . . . . . . . . . 352
Editing actions . . . . . . . . . . . . . . . . . . . . . . . . . . . . . . . . . . . . 354
Organizing sets of actions . . . . . . . . . . . . . . . . . . . . . . . . . . . 357
Using the Automate commands . . . . . . . . . . . . . . . . . . . . . . . 358
External automation . . . . . . . . . . . . . . . . . . . . . . . . . . . . . . . . 358
Appendix
Before you call Adobe Technical Support . . . . . . . . . . . . . . . . . 361
Setup and performance problems . . . . . . . . . . . . . . . . . . . . . . 363
Problems starting Photoshop or opening or saving files
(Windows 95 only) . . . . . . . . . . . . . . . . . . . . . . . . . . . . . . . . . 365
Problems with image appearance . . . . . . . . . . . . . . . . . . . . . . 366
Index
. . . . . . . . . . . . . . . . . . . . . . . . . . . . . . . . . . . . . . . . . . . . 369
Page 9

Introduction
W
1
elcome to the Adobe® Photoshop®
program—extraordinary photo
retouching, image editing, and color
painting software. Whether you are a novice or
an expert in image editing, the Adobe Photoshop
program offers you the tools you need to get
professional-quality results.
You’ll find that Photoshop excels as an art
production tool, whether you are a graphics
producer who needs to merge and edit color
images, a photographer who wants to retouch
proofs, or a graphic designer who is creating
original or composite artwork, collages, or photo
montages for print or on the Web. Photoshop is
equally useful to printers and service bureaus that
want to generate color separations, to animators
who want to colorize images and produce audiovisual materials quickly, and to artists who want
to create new artwork using the latest media
and tools.
About this manual
The
Adobe Photoshop User Guide
information about the Adobe Photoshop tools and
commands. It is designed to be used as a reference
tool in your everyday work with Adobe
Photoshop. This cross-platform manual provides
instructions for using Adobe Photoshop on both
®
the Microsoft
Any differences in procedures and commands
between platforms are noted in the text.
Windows
®
provides detailed
and Mac OS platforms.
Before using this manual, you need to install the
program by following the instructions given in this
chapter. This chapter also describes system
requirements, and provides information on new
features in Adobe Photoshop 5.0.
This manual assumes you have a working
knowledge of your operating system and its
conventions, including how to use a mouse and
standard menus and commands and how to open,
save, and close files. For help with any of these
techniques, please see your Windows or Mac OS
documentation.
Learning Adobe Photoshop
Adobe Photoshop 5.0 includes the following
printed and online documentation. For information on troubleshooting and technical support,
see Appendix, “Troubleshooting.”
The
Adobe Photoshop User Guide
mation on using all Adobe Photoshop commands
and features. The user guide also indicates when
further information on a topic is available in the
Help system.
The Adobe Photoshop Help system
of the information in the Adobe Photoshop user
guide, optimized for use online. In addition, the
Help system includes a description of the Adobe
Photoshop shortcuts, and more detailed information on some commands and filters.
Contains infor-
Contains all
Page 10

2
Introduction
The Adobe Photoshop Tutorials
On the Tour and
Training CD-ROM contain step-by-step tutorials
in PDF format. These are some of the same
tutorials included in
in a Book
. For more information, see the
Adobe Photoshop Classroom
Classroom in a Book section when viewing the
tutorials. For information on how to install and
use Adobe Acrobat
and QuickTime to view these
tutorials, see the Read Me file for these programs
The Adobe Photoshop Movies
On the Tour and
Training CD-ROM are QuickTime movies that
provide a general tour of Photoshop’s features,
demonstrate new features, and show how to use
layers in Photoshop 5.0.
The Adobe Photoshop Quick Reference Card
Contains basic information about the Adobe
Photoshop tools and palettes, and shortcuts for
using them.
The Electronic Publishing Guide
On the Tour and
Training CD-ROM gives an overview of electronic
publishing design issues and publishing with
Adobe Acrobat on the Web and on CD-ROM.
A hard drive with at least 60 MB of free space.
•
You’ll need additional disk space if you work with
very large image files.
An 8-bit (256-color) display adapter card.
•
A CD-ROM drive.
•
A sound card (required to use the Adobe
•
Photoshop Tour and Training CD-ROM).
.
For the best performance, Adobe Systems recommends the following hardware and software:
64 MB or more of RAM.
•
A 24-bit (millions of colors) video display card.
•
A PostScript® printer.
•
Adobe Photoshop performance improves with
more RAM, faster CPUs, and faster and larger
hard disk drives. Multiprocessor systems and
systems with Intel’s MMX® technology can also
speed performance.
For the latest system requirements, see the
Read Me file.
Windows system requirements
To use Adobe Photoshop, you need the following
hardware and software:
An Intel Pentium-class or faster processor.
•
Windows 95 (or later), or Intel-based
•
®
Windows NT
At least 32 megabytes (MB) of random-access
•
memory (RAM).
version 4.0 or later.
Mac OS system requirements
To use Adobe Photoshop, you need the following
hardware and software:
•
An Apple Power Macintosh computer.
•
At least 32 megabytes (MB) of random-access
memory (RAM).
•
Mac OS version 7.5 or later.
•
A color monitor with an 8-bit (256-color) or
better video display card.
Page 11

•
A hard drive with at least 60 MB of free space.
You’ll need additional disk space if you work with
very large image files.
A CD-ROM drive.
•
For the best performance, Adobe Systems recommends the following hardware and software:
Mac OS version 8.1 or later.
•
At least 64 MB of RAM.
•
A 24-bit (millions of colors) video display card.
•
A PostScript printer.
•
Adobe Photoshop performance improves with
more RAM, faster CPUs, and faster and larger
hard disk drives. Multiprocessor systems can also
speed performance.
For the latest system requirements, see the
Read Me file.
The Adobe Photoshop package contents
The Adobe Photoshop software package includes
the following software and documentation:
The Adobe Photoshop CD-ROM Set consisting
•
of the Application and Tutorial CD-ROM discs.
(For a description of their contents, see the
following sections.)
•
Adobe Photoshop User Guide.
•
Adobe Photoshop Quick Reference Card.
•
Registration card. (The card is not included
in upgrades from previous versions.)
ADOBE PHOTOSHOP 5.0
User Guide
Contents of the Adobe Photoshop
Application CD-ROM
The Application CD-ROM contains the following
software:
The Adobe Photoshop installer
thing needed to install Adobe Photoshop 5.0 on
your hard drive—the installer, the Adobe
Photoshop program, Adobe Gamma control
utility, plug-in modules, the Adobe Photoshop
tutorial files, and numerous sample files.
Goodies (Windows)\Other Goodies (Mac OS) folder
Includes textures for use with the Lighting Effects
plug-in filter, third-party plug-in modules, the
HSL and HSB filter for converting Adobe
Photoshop RGB images to HSL or HSB mode
(Mac OS only), the Filter Factory plug-in which
lets you create your own plug-in filters, and
™
the Adobe PSPrinter
driver. Documentation
is included in Adobe Acrobat electronic format
(PDF).
QuickTime® software (QuickTime for Windows, Apple
QuickTime for Mac OS)
the movies included in the Adobe Photoshop
CD-ROM Set.
Adobe technical notes
Written by the Adobe
technical staff, this information appears on-screen
as Acrobat PDF files. You can print the sections
you refer to regularly.
Stock art
Includes many high-resolution digitized
images, backgrounds, and textures for your
personal, non-commercial use.
Tryout versions of other Adobe applications
Includes every-
Enables you to view
3
Page 12

4
Introduction
Adobe Acrobat Reader software
PDF files online
Training CD-ROM
and is required to use the Tour and
.
Lets you view
Contents of the Adobe Photoshop Tour
and Training CD-ROM
The Tour and Training CD-ROM contains the
following documentation and software:
The Adobe Photoshop Overview
active movies and links to tutorials, as described in
this section.
The Photoshop Quick Tour movie
overview of Adobe Photoshop’s features. A stepby-step description of the techniques shown in
this movie is in Chapter 1 of this user guide.
The New Features movie
strates new features in Adobe Photoshop 5.0,
including re-editable type, layer effects, the history
palette, and new transformation commands.
The Layers movie
Teaches you how to use layers in
Photoshop.
A series of tutorials in PDF format
Adobe Photoshop Classroom in a Book
from
The Electronic Publishing Guide
use Adobe products to produce art and documentation for online display.
The Photoshop Digital Art show
of digital art.
Adobe Acrobat Reader software.
Is a set of inter-
Gives a basic
Introduces and demon-
Is an excerpt
.
Explains how to
Displays examples
Registration
Adobe is confident you will find that the Adobe
Photoshop program greatly increases your
productivity. So that Adobe can continue to
provide you with the highest-quality software,
offer technical support, and inform you about new
Photoshop software developments, please register
your copy using the online registration software
(if you have a modem and the software is available
in your version of the program), or fill out and
return the enclosed warranty registration card.
About Adobe products and services
For more information about Adobe products and
services, you can use forums through Internet
services such as CompuServe
SM
Online
, and the Adobe Home Page on the World
Wide Web. Forums vary by country.
To open the Adobe Home Page, enter the URL
http://www.adobe.com in your Web browser. To
launch the Adobe Photoshop Home Page from
within Photoshop, with links to relevant
Photoshop information and the Adobe site,
choose File > Adobe Online or click the image at
the top of the tool bar.
For more information about Adobe technical
support resources, see the notice that came with
Adobe Photoshop.
and America
QuickTime software for Windows and Mac OS.
Page 13

ADOBE PHOTOSHOP 5.0
User Guide
5
Adobe Systems training opportunities
The Adobe Photoshop 5.0 Tutorials have been
excerpted from Adobe Photoshop Classroom in a
Book. Classroom in a Book is the official training
series for Adobe graphics and publishing software
developed by experts at Adobe and published by
Adobe Press. For information on purchasing
Adobe Photoshop Classroom in a Book, contact
Macmillan Computer Publishing in the U.S. at
800-428-5331 or http://mcp.com, or contact your
local book distributor.
The Adobe Certification program offers endusers, instructors, and training centers the opportunity to demonstrate their product proficiency
and promote their software skills as Adobe
Certified Experts, Adobe Certified Instructors, or
Adobe Authorized Learning Providers. Visit the
U.S. web site at http://www.adobe.com to learn
how you can become certified.
Installing and starting Adobe Photoshop
You must install the application from the Application CD-ROM onto your hard drive; you cannot
run the program from the CD-ROM.
If you’re upgrading to Adobe Photoshop 5 from an
earlier version, the installer creates by default a
new folder containing the new Adobe Photoshop
files. Your current Adobe Photoshop files are not
affected.
For tips on installing the software, see “Before you
call Adobe Technical Support” on page 361.
To install the Adobe Photoshop program:
1
Do one of the following:
Start Windows, if necessary.
•
In Mac OS, turn off or remove any virus-
•
protection software, and restart your computer.
2
Insert the Application CD-ROM disc into your
CD-ROM drive.
3
Start the Adobe Photoshop installer:
In Windows, follow the on-screen instructions
•
to start the installer; or open the Photoshp folder
and double-click the Setup.exe file.
In Mac OS, double-click the Install Adobe
•
Photoshop 5 icon.
4
Follow the on-screen instructions to install the
program files. A message appears when the installation is complete.
The following sections provide more information
on the installation procedure.
Installation setup
When prompted, specify an
installation option:
Typical (Windows) or Easy Install (Mac OS)
•
installs the complete set of Photoshop program
files and system support files.
Compact (Windows only) installs the minimum
•
options required to use Photoshop.
Page 14

6
Introduction
• Custom (Windows) or Custom Install (Mac OS)
lets you choose the options you want to install.
Note: In the Chinese, Japanese, and Korean versions
of Photoshop, the Typical or Easy Install option also
installs CMap files that enable the use of double-byte
fonts in Photoshop images. To install the CMap files
in any other version of Photoshop, you must use the
Custom or Custom Install option.
Registration When prompted, enter your name
and company information. Type the serial number
exactly as it appears on the registration card or on
the inside front cover of the user guide (including
the hyphen).
If you’re upgrading to Adobe Photoshop 5 from an
earlier version, the serial number is also located on
the first page of your original user guide. If you’re
upgrading from the LE version, use the serial
number that you received with the upgrade. Your
original LE serial number won’t work.
Gamma utility (Mac OS only) If you have installed
earlier versions of Adobe Photoshop on your
system, perform this step after completing the
version 5 installation: Open your System Folder
and drag the Gamma control panel to the Trash.
This step prevents conflicts with the new Adobe
Gamma utility installed with Photoshop 5.
QuickTime To view the movies in the Adobe
Photoshop CD-ROM Set and to show previews
when opening images in Mac OS, you also must
install QuickTime, located on the CD-ROM.
Starting Adobe Photoshop
Follow these steps to start the program.
To start Adobe Photoshop in Windows:
Choose Start > Programs > Adobe > Adobe
Photoshop 5.0. (If you installed the program in a
folder other than Adobe, choose that folder from
the Start > Programs menu.)
The Adobe Photoshop window appears. You can
now open an image and start working.
To start Adobe Photoshop in Mac OS:
Open the Adobe Photoshop folder, and doubleclick the Adobe Photoshop program icon.
The Adobe Photoshop window appears. You can
now open an image and start working.
What’s new in Adobe
Photoshop 5.0
Adobe Photoshop 5.0 includes new features for
undoing changes made during the working
session, transforming paths and selection borders,
applying interactive effects to a layer, re-editing
text, managing color, creating spot colors,
selecting images and drawing paths, and rotating
images in three dimensions. This version of Adobe
Photoshop also enhances support for file formats
and includes many new commands, palette
features, and keyboard shortcuts that simplify
common tasks.
Page 15

ADOBE PHOTOSHOP 5.0
User Guide
7
History palette Photoshop’s new History palette
allows multiple undos by tracking and listing
recent changes you make to an image during the
current working session. Selecting any change
listed in the History palette returns the image to
that earlier state. (See “Reverting to any state of the
image” on page 168.)
Reselect command The new Reselect command
lets you easily retrieve the last selection used on
your image in the current work session. (See
“Making selections” on page 137.)
Path and selection transformation In addition to
transforming images, you can now rotate, resize,
and reshape paths and selection borders. (See
“Transforming objects in two dimensions” on
page 182.)
Layer effects New in Photoshop 5.0, layer effects
automatically apply complex effects such as
beveling, embossing, and drop shadows to any
layer. You can turn these effects on and off. You
don’t have to reapply these effects each time you
change the artwork—Photoshop automatically
updates the effect when you make changes to the
layer. (See “Using layer effects” on page 284.)
Type layers with re-editable text You can now
create type on a type layer, with character-level
formatting and precise control over kerning and
tracking. Type layers can be re-edited at any time.
(See Chapter 12, “Using Type.”)
Improved color management With new ICC profile
support, you can more easily maintain consistent
color in your images, regardless of the monitor or
printer you use. (See Chapter 5, “Reproducing
Color Accurately.”)
Expanded support for 16-bit color Support for
16-bit channels is increased and can now be used
with more commands and tools. Both 48-bit RGB
and 64-bit CMYK images are supported. (See
“Converting between bit depths” on page 69.)
Color samplers To monitor color changes more
easily, you can place up to four non-printing color
samplers into your image. These samplers display
color information in the Info palette, showing
before-and-after color data as you make color
adjustments. (See “Previewing color adjustments”
on page 106.)
Enhanced Hue/Saturation command The updated
Hue/Saturation dialog box now gives you special
color range controls for much finer and more
targeted adjustments of hue, saturation, and
lightness. (See “Using the Hue/Saturation
command” on page 124.)
Channel Mixer Photoshop’s new Channel Mixer
command enables blending one or more channels
into an existing channel. For example, you can use
this command to blend parts of the cyan, magenta,
yellow, and black channels to create a grayscale
image. (See “Mixing channels” on page 243.)
Alignable layers New Layer alignment commands
let you align and distribute linked layers by edges
and centers. (See the procedure to align or
distribute layers on page 266.)
Spot color Photoshop images can now be
separated to one or more spot color plates.
(See“Adding spot colors” on page 245.)
Page 16

8
Introduction
Measure tool The measure tool lets you measure
the length, angle, and location of areas in the
image. (See “Using the measure tool” on page 174;
“Using rulers, the measure tool, guides, and grids”
on page 173.)
Magnetic lasso tool Because it discriminates
between different levels of contrast in an image,
the magnetic lasso tool snaps a selection border to
the edge of the area you drag around. (See “Using
the lasso, polygon lasso, and magnetic lasso tools”
on page 139.)
Magnetic pen tool The magnetic pen tool works
much like the magnetic lasso tool, but lets you
draw a path that snaps to the edge of a defined area
in your image. (See “Drawing freehand paths” on
page 151.)
Freeform pen tool The freeform pen tool lets you
create paths simply by drawing the shape of the
path you want. As you drag, the tool automatically
places anchor points, which you can then adjust.
(See “Drawing freehand paths” on page 151.)
Action palette enhancements You can now record
more tools and palettes in actions. For easier
organization, you can now also create sets of
actions. (See Chapter 16, “Automating Tasks.”)
Wizards (Windows) and Assistants (Mac OS) New
commands in the File > Automate and Help
menus simplify multi-step operations such as
exporting transparent images, resizing images,
and creating contact sheets. (See “Using the
Automate commands” on page 358.)
3-D transformation The new 3D Transform filter
can map parts of an image to a cube, sphere, or
cylinder, enabling you to rotate an image in three
dimensions. (See “Transforming objects in three
dimensions” on page 187.)
Expanded scratch space support Photoshop now
supports up to four scratch volumes, for a total of
up to 200 GB of scratch space.
Interface improvements Photoshop’s interface is
further improved, including an updated Curves
dialog box and changes to the Path tools to make
®
them more consistent with Adobe Illustrator
More live previews The Color Settings, Duotone,
.
and Indexed Color dialog boxes now provide live
previews, making it easier to see the results before
applying the change.
PDF import Any PDF file can now be opened and
rasterized in Photoshop. Support for Adobe Illustrator and generic EPS files also is improved. (See
Chapter 14, “Saving and Exporting Images.”)
New Save As options New Save As options make it
easy to minimize file size by excluding unwanted
options. (See “About file formats” on page 321.)
DCS 2.0 support The EPS export module now
includes support for DCS (Desktop Color Separations) 2.0 format, which permits more than four
separated plates. (See “Saving files in Photoshop
EPS or DCS format” on page 315.)
PostScript Level 3 support Photoshop supports
printing to PostScript Level 3 printers.
Page 17

Changed keyboard shortcuts, tools, and commands
The following are some of the Photoshop 4.0
shortcuts, tools, and commands that have been
changed for Photoshop 5.0. For a complete list of
shortcuts, see the online help:
• To cycle through a series of related tools on the
Tool palette, press Shift+(the shortcut key for the
tool).
• To select the add-anchor-point tool while the
delete-anchor-point tool is selected, press +.
• To select the subtract-anchor-point tool while
another tool is selected, press -.
• To select the direct-selection tool while another
tool is selected, press A.
• To scroll forward or backward through the blend
modes for the current tool, press Shift+(+) or
Shift+(-).
• To select the airbrush tool while another tool is
selected, press J.
• To repeat the last transformation, press
Ctrl+Shift+T (Windows) or Command+Shift+T
(Mac OS). This shortcut no longer displays the
Numeric Transformation dialog box.
• Pressing Option while choosing Apply Images
no longer provides additional options to the
dialog box.
• The image transformation commands are now
located under the Edit menu.
• The functions of the rubber stamp tool are now
split into three tools: the rubber stamp tool, the
pattern stamp tool, and the history brush.
ADOBE PHOTOSHOP 5.0
User Guide
9
Page 18

Page 19
1
Page 20

Page 21
Chapter 1: A Quick Tour of
Adobe Photoshop
13
his interactive tour introduces you to key
features of Adobe Photoshop and takes
T
about an hour to complete.
For detailed instructions on how to use many of
the features introduced in this tour, as well as a
movie version of the tour, see the lessons on the
Tutorial CD. For complete information about any
feature, see the index in this user guide.
1 Start Adobe Photoshop.
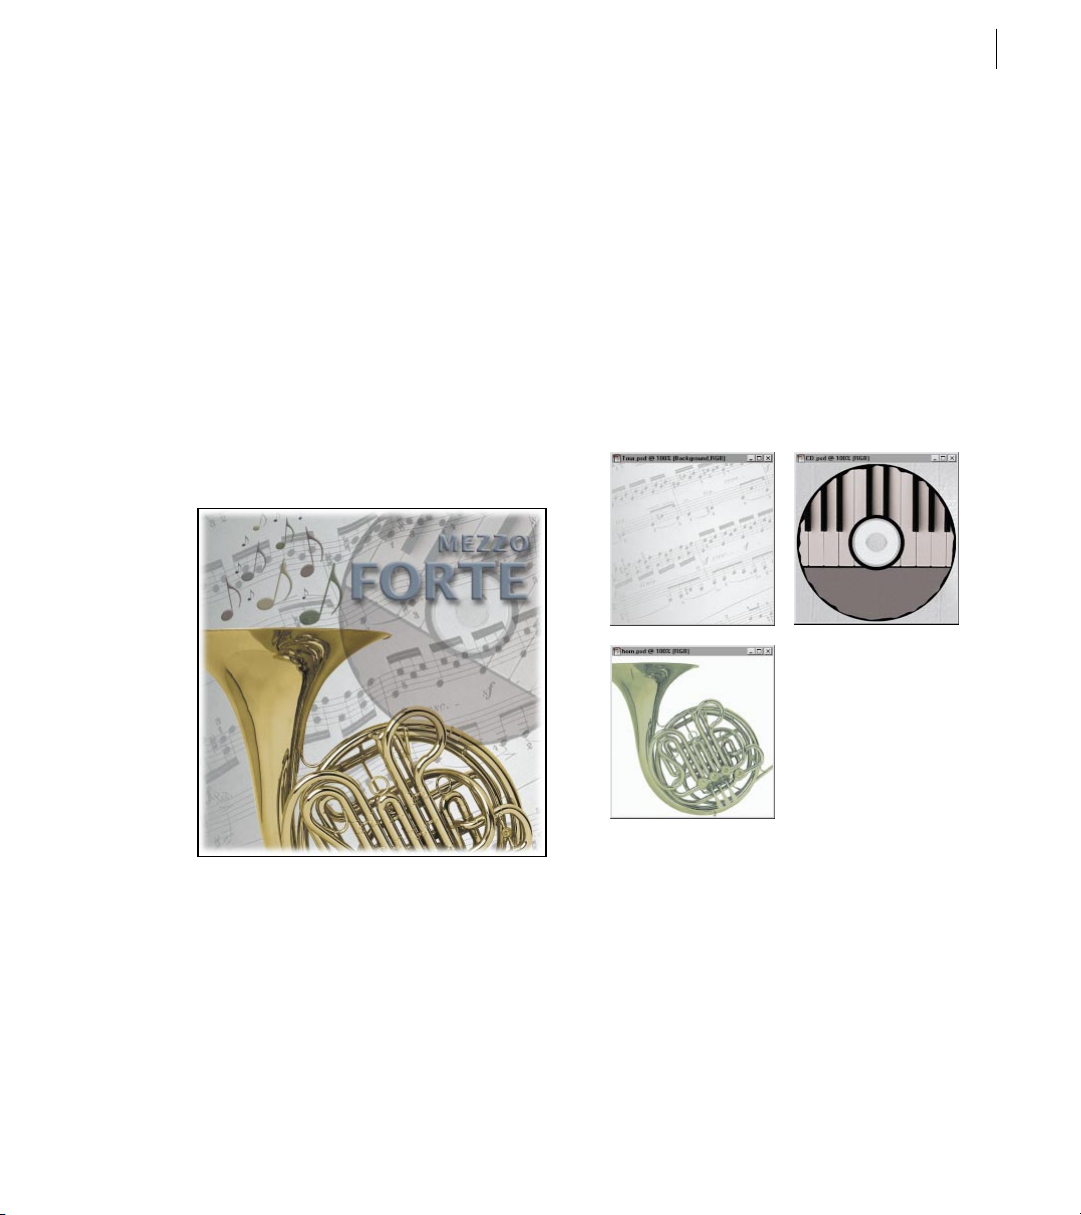
2 Choose File > Open, and open the files
Tour.psd, CD.psd, and Horn.psd, located in the in
the Adobe Photoshop 5/Training/Tour folder or
on the tutorial CD. Arrange the windows so that
you can work with them easily.
You can bring images into Adobe Photoshop in
many ways. Most projects begin with a scanned
image, stock digital art, or artwork created with a
drawing program, such as Adobe Illustrator. You
can also create images from scratch in Adobe
Photoshop. For this tour, you’ll use files from all
of these sources.
Selecting
In Adobe Photoshop, you modify part of an image
by first selecting that area. You’ll begin the tour by
making selections in images using the selection
tools. (If you make a mistake at any point in the
tour, simply choose Edit > Undo, and try again.)
Page 22
CHAPTER 1
14
A Quick Tour of Adobe Photoshop
First, you’ll make a simple selection, and drag an
image from one file to another.
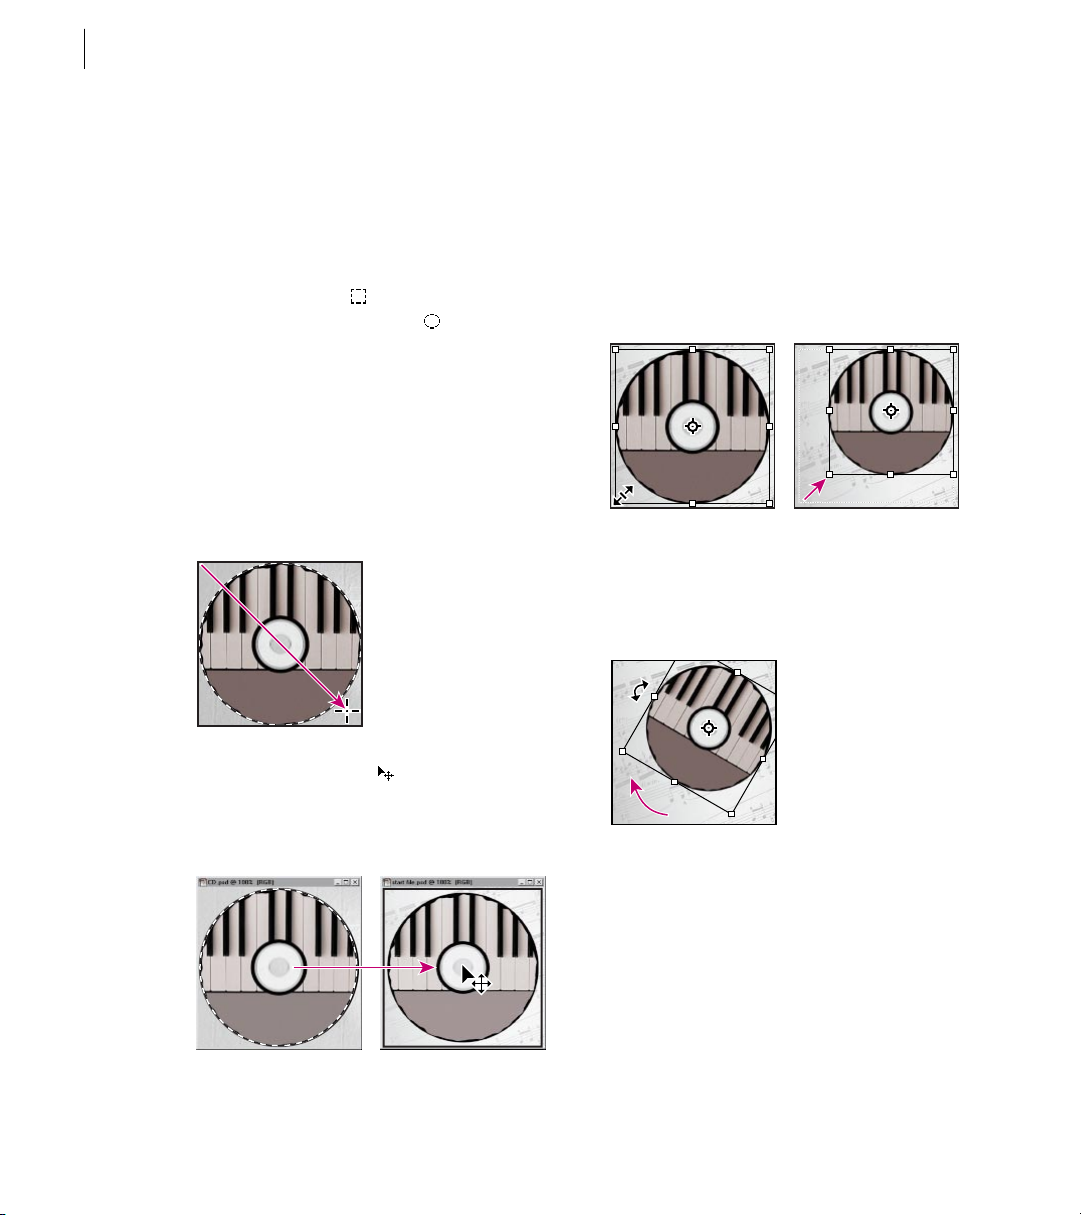
1 Click the title bar of the CD.psd window to
make it active.
2 Hold down the mouse button on the rectan-
gular marquee tool ( ) in the toolbox, and drag
to the elliptical marquee tool ( ). Click in the
upper left corner of the image’s gray background,
and begin dragging diagonally. Then hold down
Shift to change the elliptical selection to a circular
selection, and drag to the bottom right corner of
the image.
3 When the selection border matches the outside
edge of the CD, release the mouse button and then
release Shift.
Now you’ll resize the CD.
5 Choose Edit > Free Transform. Move the
pointer onto one of the corner handles. Hold
down Shift, and drag a corner handle to shrink the
CD to about three-fourths its current size.
Holding down Shift constrains the image’s
proportions as you resize it.
6 Move the pointer outside the selection handles,
°
and drag clockwise to rotate the CD about 30
.
Press Enter (Windows) or Return (Mac OS) to
apply the transformation to the CD.
4 Select the move tool ( ) in the toolbox,
position it within the selection border, and drag
the CD onto the Tour.psd window. The CD is now
part of that file.
Note: You can also use the Numeric Transform
dialog box to transform a selection using specific
numeric values.
Next, you’ll make a selection with the magic wand
tool, which selects areas based on how similar they
are in color.
Page 23
ADOBE PHOTOSHOP 5.0
User Guide
15
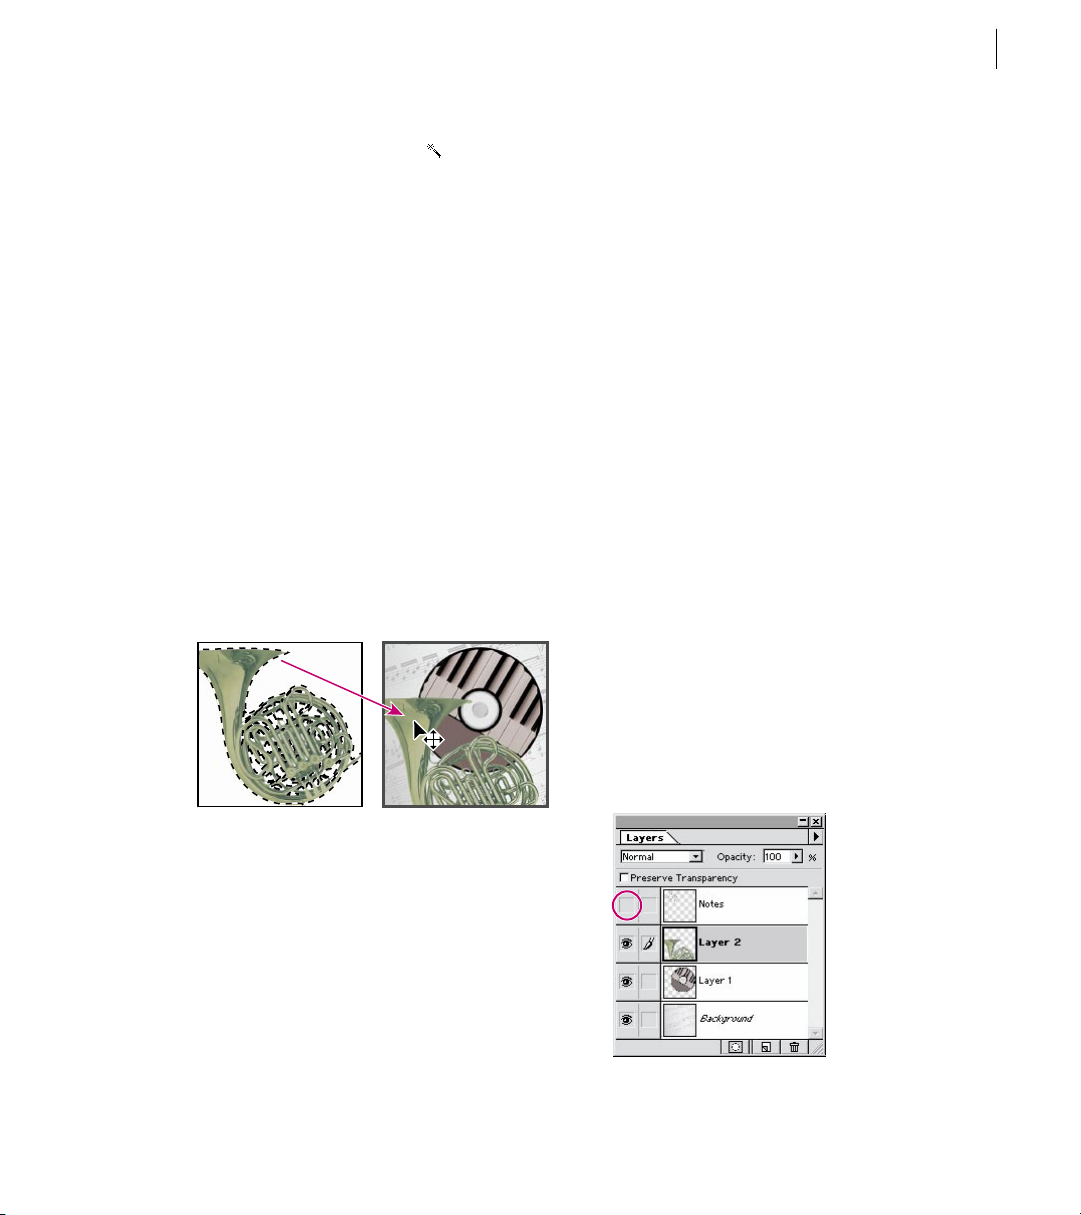
7 Select the magic wand tool ( ); then click the
title bar of the Horn.psd window to make it active.
8 Click the white background in the upper right
corner of the image to select it. Notice that not all
the white background was selected.
9 Choose Select > Similar to add the rest of the
background to the selection. You’ve now selected
everything except the horn.
10 Choose Select > Inverse. The Inverse
command selects everything that wasn’t
selected—in this case, the horn.
11 Hold down Control (Windows) or Command
(Mac OS), position the pointer within the
selection marquee, and drag the horn onto the
Tour.psd window. (Holding down
Control/Command temporarily changes the
current tool to the move tool.) Move the horn to
the bottom left corner of the image.
Layers
Photoshop lets you organize artwork on separate
transparent layers so that you can easily construct
composite images and experiment with various
effects.
1 If the Layers palette is not visible on your screen,
choose Window > Show Layers. Click the
minimize/maximize box (Windows) or resize box
(Mac OS) at the top of the Layers palette to expand
the palette.
Notice that this file has several layers, each named
and with a thumbnail, or miniature representation, of the image on that layer. Photoshop
automatically created separate layers for the CD
image (Layer 1) and horn image (Layer 2) when
you brought them into the Tour file. In addition,
the background and the Notes layer were already
in the file.
From the Layers palette you can display or hide
layers in the image.
2 Click the eye icon column to the far left of the
Notes layer to display the layer. Then try clicking
the eye icon for Layer 2 to hide the layer, and again
to redisplay it.
12 Choose File > Save As. Select a folder in which
to save the file, enter the filename Work01.psd, and
click Save.
13 Close the CD.psd and Horn.psd files.
Page 24
CHAPTER 1
16
A Quick Tour of Adobe Photoshop
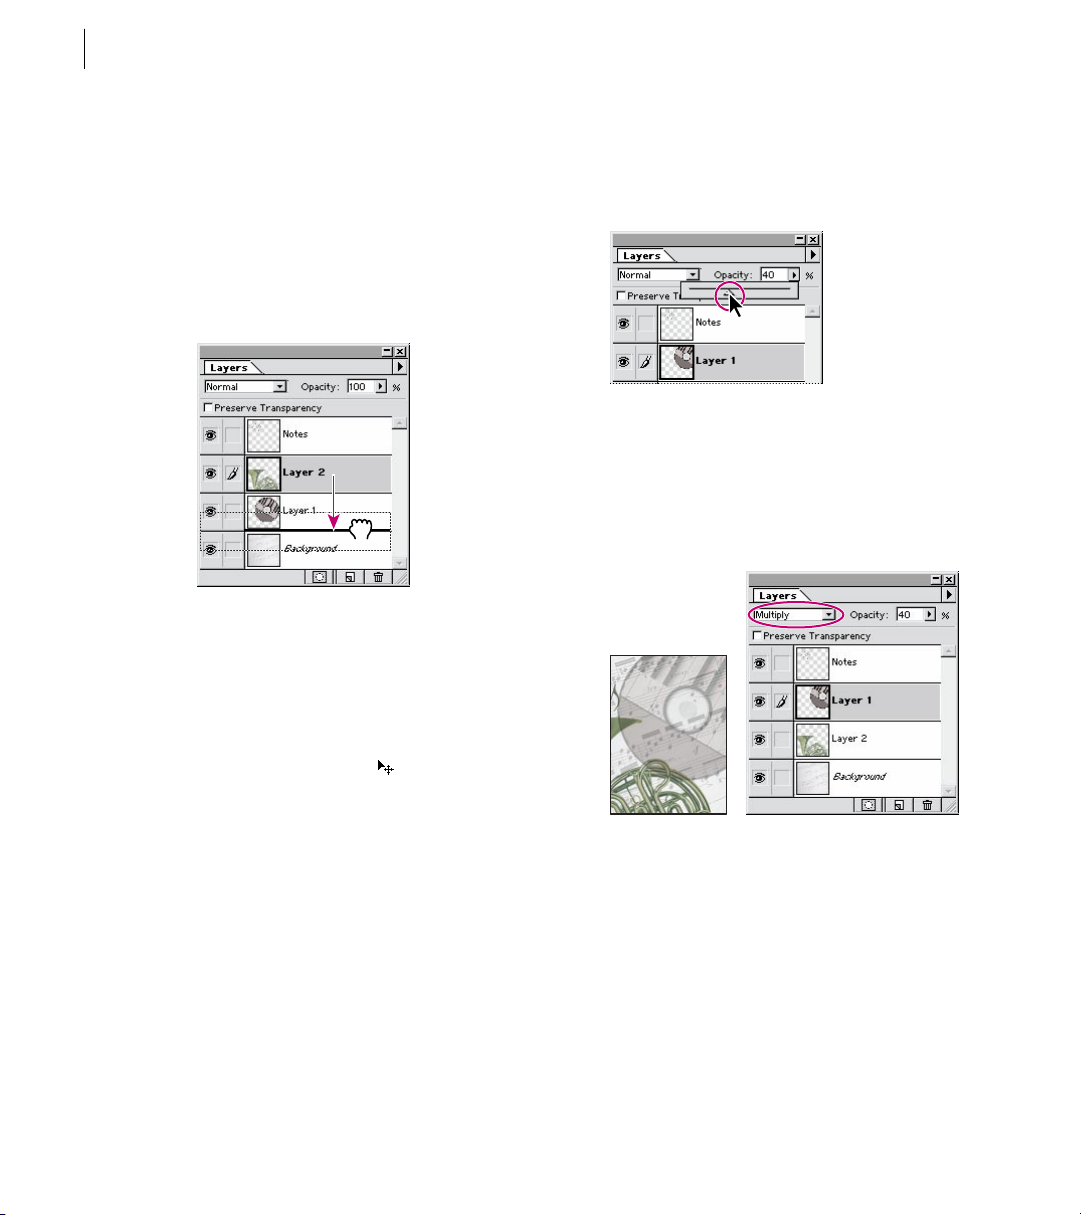
By changing the order of layers, you can restack
images in the artwork.
3 Drag Layer 2 (the horn layer) until it’s between
Layer 1 (the CD layer) and the background on the
Layers palette. Release the mouse button to set
Layer 2 in its new position. The horn now appears
behind the CD in the artwork.
4 Click Layer 1 in the Layers palette to make it the
active layer. The layer is highlighted and a paintbrush icon appears next to the layer thumbnail,
indicating that your changes now will affect
artwork only on that layer.
5 Select the move tool ( ). Then drag the CD
to the top right corner of the artwork. Because the
CD is on its own layer, you can move it separately
from artwork on other layers.
Now you’ll adjust the opacity of Layer 1.
6 Select Layer 1 in the Layers palette, and drag the
opacity slider to 40%. You can now see other layers
through the CD.
By specifying blending modes, you can determine
how one layer interacts with another.
7 Choose Multiply from the mode menu at
the top left of the Layers palette. Notice how the
CD blends with the layers below it.
Now you’re ready to create and manipulate some
text. You will create the text with the type tool,
which places the text on its own type layer. You
will then edit the text and apply special effects to
its layer.
Page 25
ADOBE PHOTOSHOP 5.0
User Guide
17
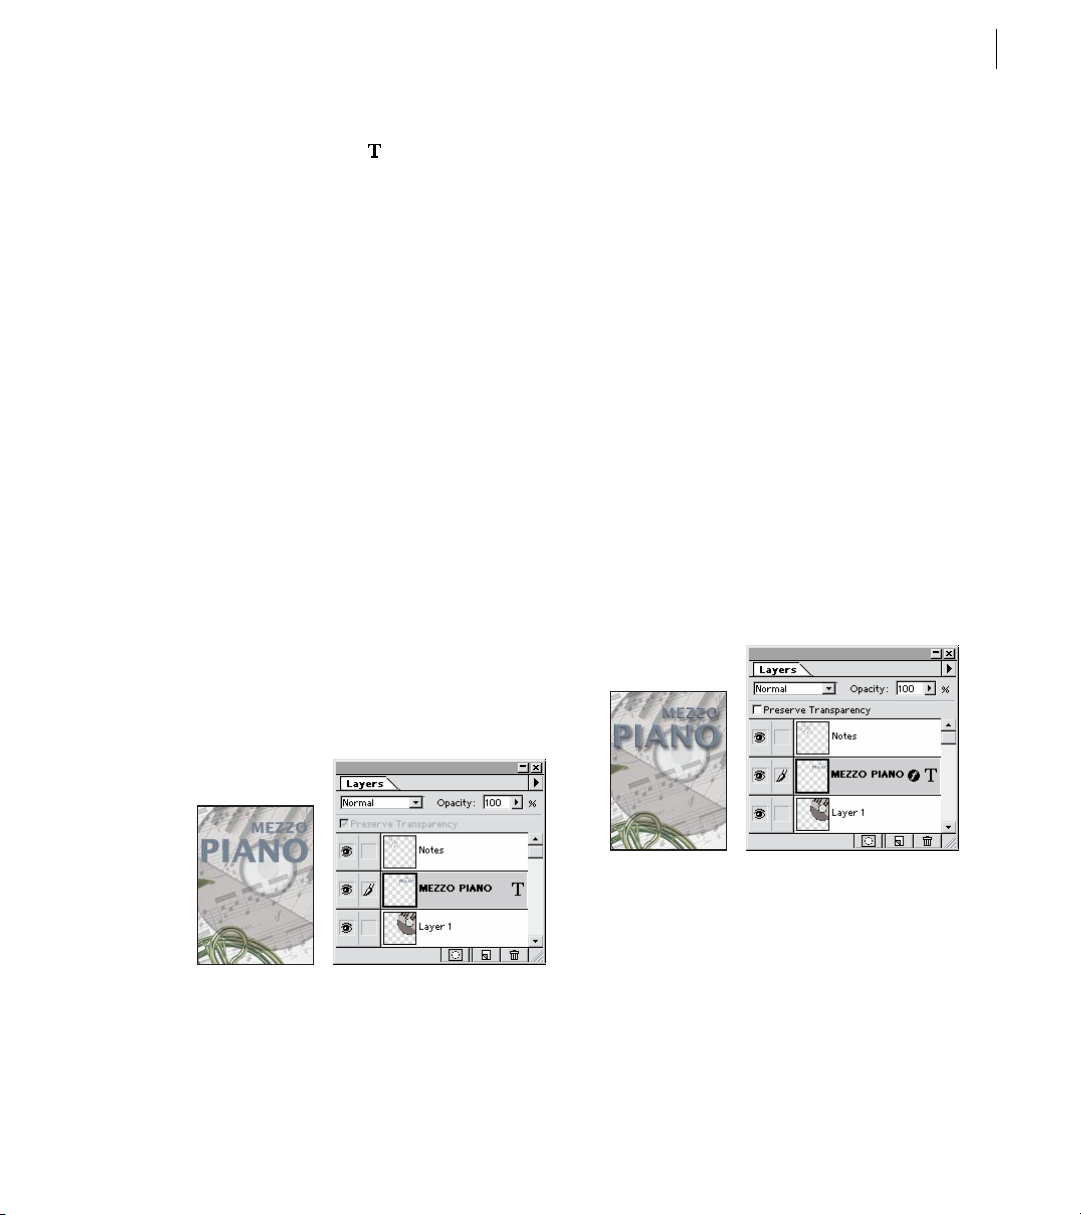
8 Select the type tool ( ), and click the image in
the upper right corner.
9 Choose a font from the Font menu in the Type
Tool dialog box, and enter a point size in the Size
and Leading boxes (we used 22-point Lucida Sans
Bold with 43-point leading). At the far right of the
dialog box, select the right alignment option.
10 Type “MEZZO PIANO” in two lines in the
large text box at the bottom of the dialog box.
11 Click the color box on the left side of the dialog
box, select a color from the color picker, and
click OK.
12 Then select “PIANO,” and enter a larger point
size in the Size box.
13 With the Type Tool dialog box still displayed,
move the pointer into the image area. Notice that
the pointer temporarily changes to the move tool.
You can now reposition the text.
14 When the text looks the way you want it,
click OK in the dialog box. The text is automatically placed in the Layers palette on a new type
layer, marked with a T icon.
You can enhance any layer by adding a shadow,
glow, bevel, or emboss special effect from the
program’s assortment of layer effects. You can also
apply a combination of layer effects to the same
layer. Here you’ll apply the Drop Shadow and
Bevel and Emboss layer effects to the type.
15 Make sure that the MEZZO PIANO type layer
is active. Then choose Layer > Effects > Drop
Shadow.
16 In the dialog box, change the opacity to 60%
°
and set the angle to 150
17 Now choose Bevel and Emboss from the menu
.
at the top of the dialog box.
18 In the new dialog box, click Apply. Then
change the opacity for both Highlight and Shadow
to 50%, select Inner Bevel for Style, set Blur to
2 pixels, and click OK. The drop shadow and bevel
and emboss effects are now applied to the type.
Photoshop makes it easy to change text on a type
layer and assures that any layer effects applied will
automatically track changes made to the layer. You
can see how this works by changing the wording of
your text.
Page 26
CHAPTER 1
18
A Quick Tour of Adobe Photoshop
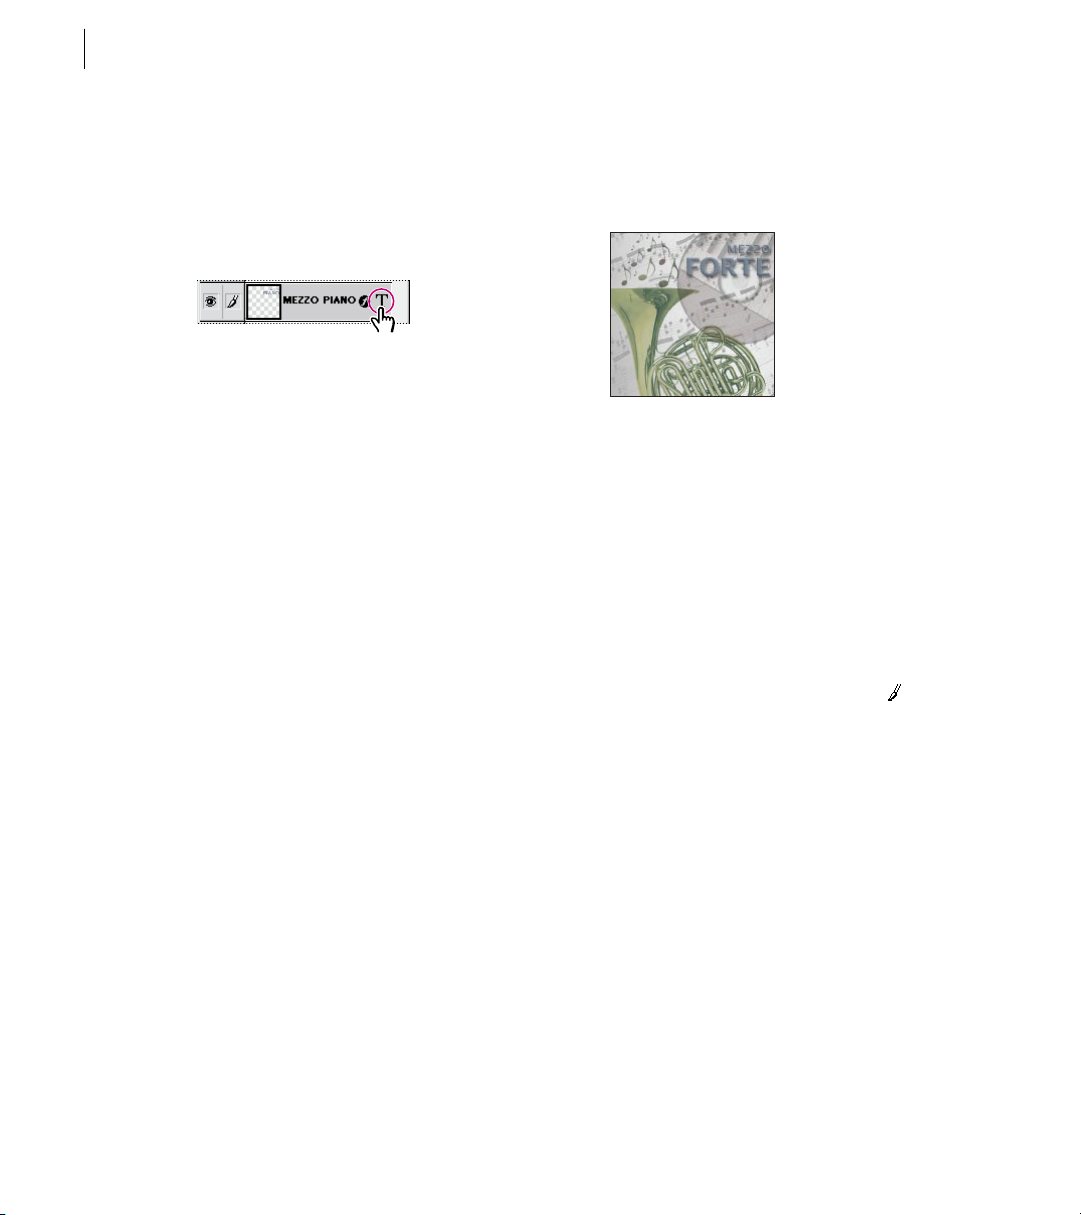
19 Double-click the T icon on the Mezzo Piano
layer in the Layers palette. In the Type Tool dialog
box, select the word “PIANO” and change it to
“FORTE.” Notice how the layer effects are applied
to the new word.
20 If you like, try applying other layer effects to
the text. When you are finished, click OK.
21 Choose File > Save.
Filters
To quickly add special effects to your artwork, you
can choose from a wide variety of filters. In this
part of the tour, you’ll apply some filters to
transform the background.
1 Click the background in the Layers palette to
make it active.
2 Choose Filter > Distort > Wave. In the dialog
box, set Number of Generators to 3, Maximum
Wavelength to 350, Minimum Amplitude to 1, and
Maximum Amplitude to 20. Click OK.
3 Choose Filter > Brush Strokes > Angled Strokes,
and click OK to accept the default settings.
4 Then choose Filter > Fade Angled Strokes. In
the dialog box, set the opacity to 50%, select
Multiply for the mode, and click OK.
Explore some additional filters if you like.
Painting
With the Photoshop painting tools, you can add
color to your artwork using preset swatches, colors
you create, or colors you sample from existing art.
Now you’ll paint part of the background using the
paintbrush tool.
1 Double-click the paintbrush tool ( ), and
make sure that the opacity in the Paintbrush
Options palette is set to 100%.
Note: Each tool in Photoshop has its own Options
palette, which you can display by double-clicking the
tool in the toolbox.
2 Choose Window > Show Brushes, and click the
35-pixel brush from the bottom row of the
Brushes palette.
Page 27
ADOBE PHOTOSHOP 5.0
User Guide
19
Now you’ll paint arcs of four different colors over
the bell of the French horn. The first color is white,
which you’ll select through the toolbox color
selection box. This box sets the foreground color,
the color you paint with, and the background
color, the color used when you erase part of an
image. The default colors are black for foreground
and white for background.
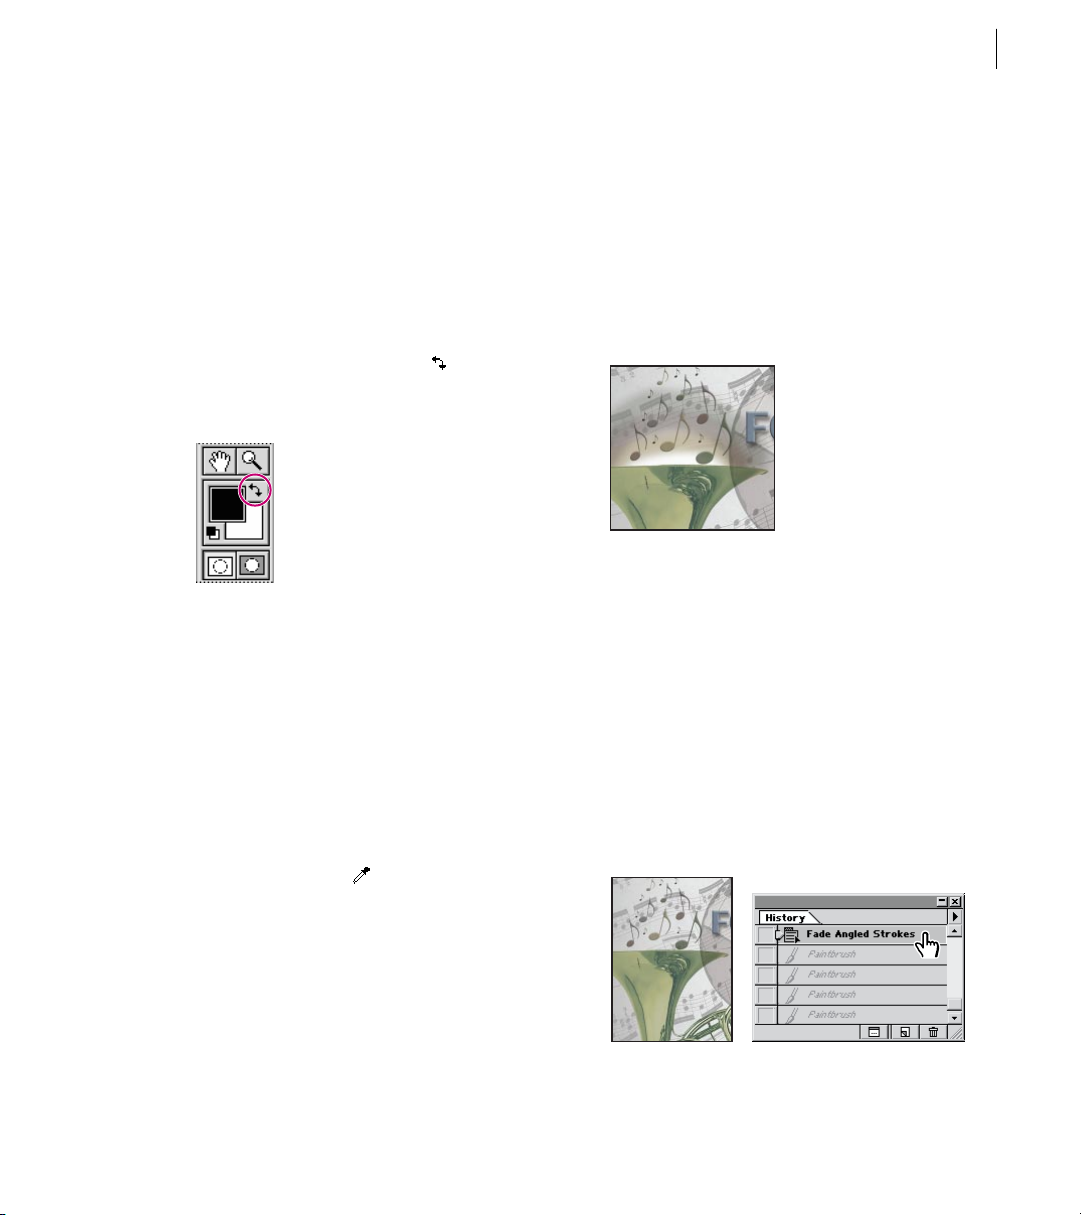
3 Click the switch colors icon ( ) in the upper
right corner of the color selection box to make the
foregound color white.
4 Paint a white arc over the bell of the French
horn.
You can use the eyedropper tool to select
additional colors by sampling (copying) them
from artwork in the image. You’ll use a keyboard
shortcut to access the eyedropper when selecting
colors for the next three arcs.
5 Hold down Alt (Windows) or Option (Mac OS)
to temporarily change from the paintbrush tool to
the eyedropper tool ( ). Then click a yellow note
in the image. The foreground color in the color
selection box switches to the same yellow as in the
note, indicating that you can now paint with this
color.
6 Release the Alt/Option key, change the opacity
in the Options palette to 80%, and paint a yellow
arc just above the first white arc.
7 Now hold down Alt/Option, and click a red note
to change the foreground color to red. Release the
Alt/Option key, change the opacity in the Options
palette to 60%, and paint a red arc above the
yellow arc.
8 Repeat the process but this time sample the
foreground color from a green note, change the
opacity to 40%, and paint a green arc.
Next you’ll use the History palette to remove the
paint you just applied. The History palette records
changes you make to the image and lets you step
back through recent changes. Using this palette,
you can return to an earlier version of the image
and continue working from that point.
9 To display the History palette, choose Window>
Show History.
10 Click Fade Angled Strokes in the history list.
The image reverts to the way it looked right after
you applied the Fade Angled Strokes filter.
Page 28
CHAPTER 1
20
A Quick Tour of Adobe Photoshop
You can now continue working from this version
of the image. All changes past Fade Angled Strokes
will be deleted, and new changes will be recorded
in their place.
Next you’ll try out a gradient fill to “paint” or
blend between two colors on the background of
the image.
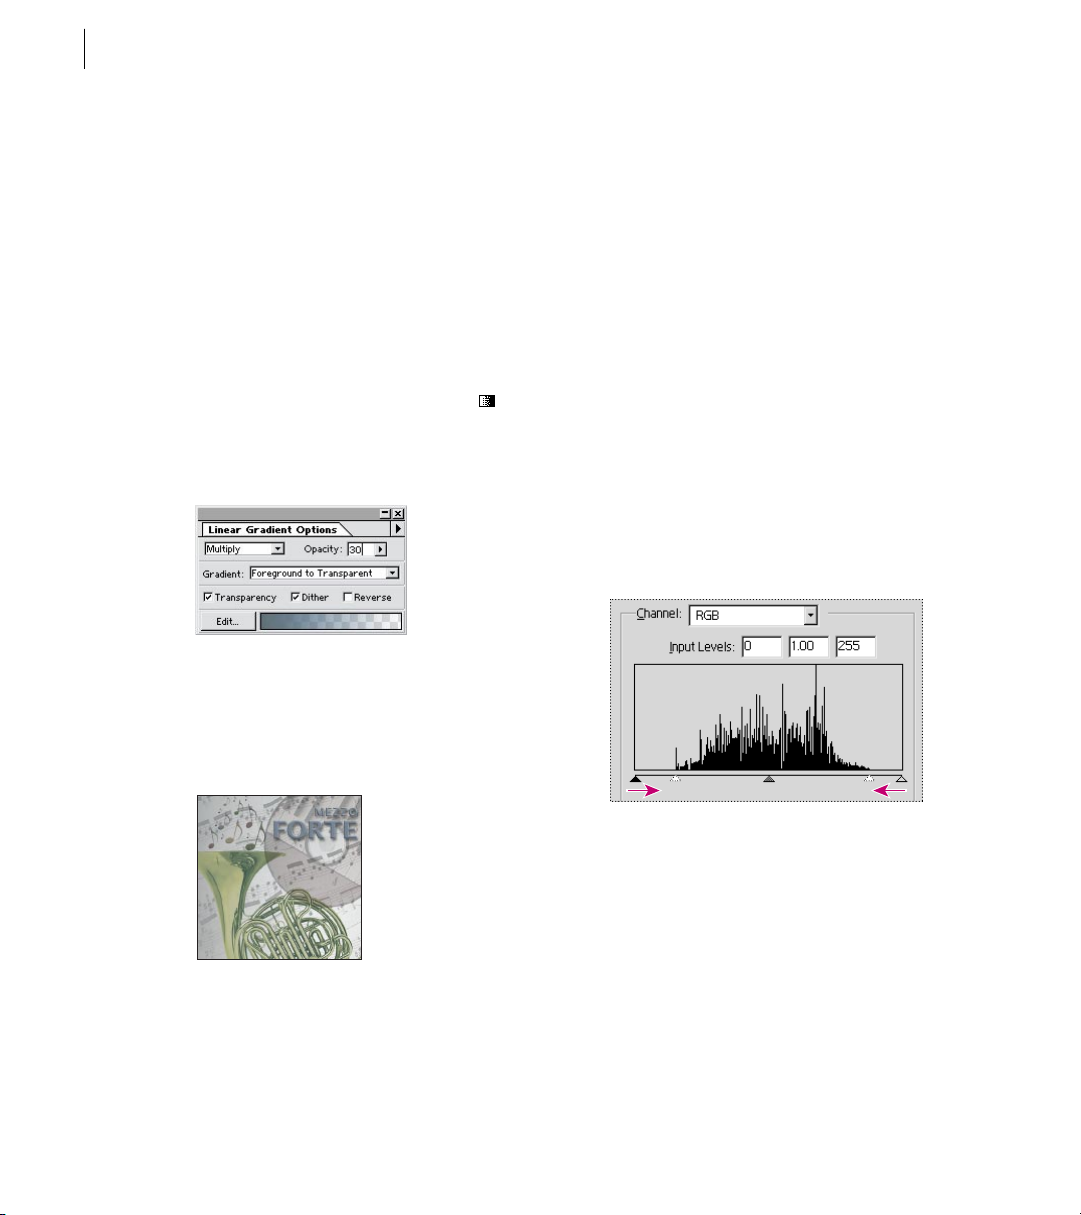
11 Choose Window > Show Swatches, and click a
blue swatch to set your foreground color. Then
double-click the linear gradient tool ( ), and in
the Gradient Tool Options palette choose
Foreground to Transparent for the gradient, 30%
for the opacity, and Multiply for the mode.
12 Drag the gradient tool from the top left to the
bottom right corner of the background to set the
beginning and end of the gradient.
13 Choose File > Save.
Retouching
Adobe Photoshop provides a full range of tools for
retouching images, including dodge and burn
tools, as well as features for adjusting color, tone,
contrast, hue, and saturation. You’ll use a few of
these tools to do some basic color correction and
editing on an image.
1 Click Layer 2 in the Layers palette to make it
active.
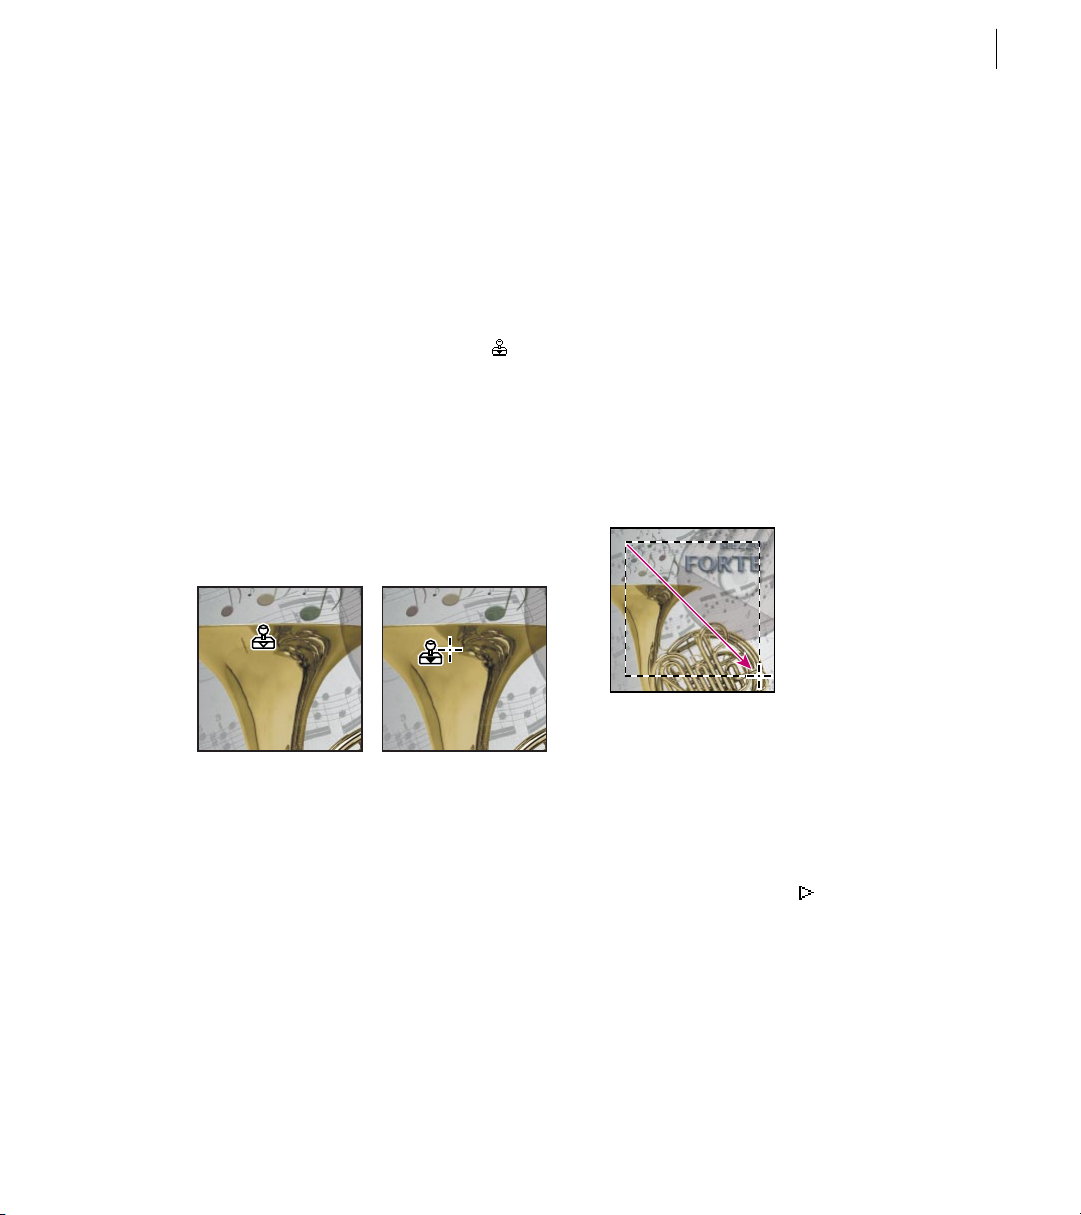
2 To set the basic contrast and tonal range
between the highlights and shadows in the horn,
choose Image > Adjust > Levels.
3 In the dialog box, select the Preview option and
then drag the left and right triangles inward to
where the first spikes of the dark and light ends of
the histogram’s color range begin.
4 Click OK to apply the changes and extend the
tonal range of the image.
Notice that the midtones in the horn are still not
right; they need to be more red. To correct the
color, you’ll use the Color Balance command.
5 Choose Image > Adjust > Color Balance. A
dialog box appears for adjusting the mixture of
colors in the image.
Page 29
ADOBE PHOTOSHOP 5.0
User Guide
21
6 Select the Preview option in the dialog box, drag
the top slider away from Cyan toward Red, and
click OK. The horn turns more red.
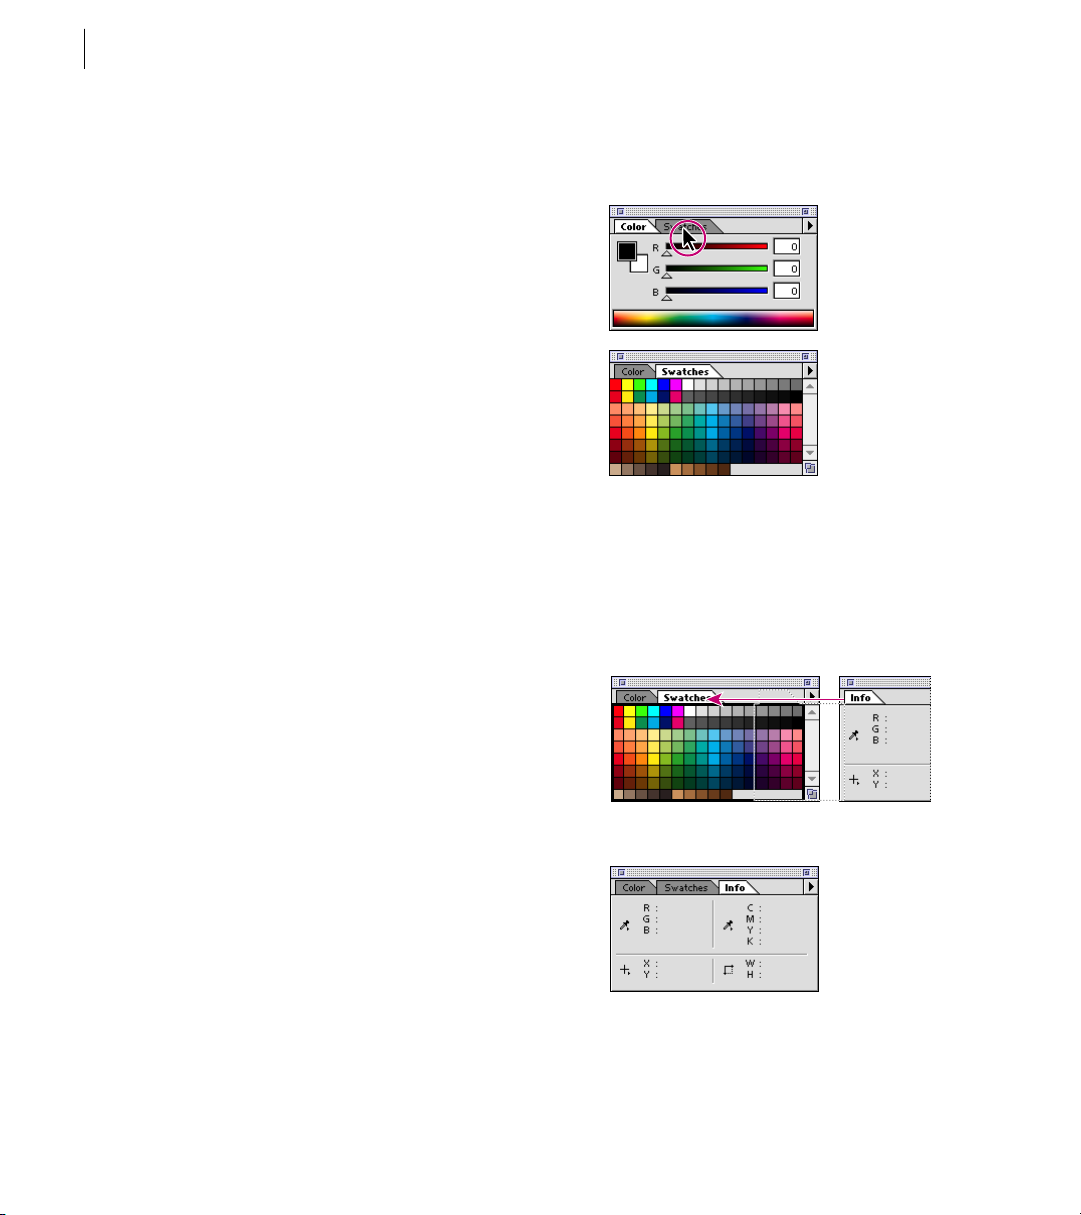
Now you’ll remove a scratch on the horn with the
rubber stamp tool. This tool lets you sample part
of an image and then paint with a copy of the
sampled area.
7 Double-click the rubber stamp tool ( ) to
display its Options palette, and select the Aligned
option. Then choose a small feathered brush in the
second row of the Brushes palette.
8 Place the rubber stamp tool over the horn next
to the scratch. Hold down Alt (Windows) or
Option (Mac OS), and click to sample this area.
Release the Alt/Option key. Then drag the rubber
stamp tool to paint over the scratch.
Adobe Photoshop offers some ready-made actions
you can run on a file or set of files. You’ll use one
of these actions to add a vignette effect to the
image. But first, to get the best results from the
vignette, you’ll flatten the file’s layers into one
layer. Then you’ll make a selection to set the
vignette’s border.
1 Choose Layer > Flatten Image.
2 Hold down the mouse button on the elliptical
marquee tool, and drag to the rectangular
marquee tool. Then click approximately 1/8 inch
in from the upper left corner of the image, and
drag diagonally to 1/8 inch in from the lower right
corner.
9 Choose File > Save.
Actions
The Actions palette lets you combine a set of
commands into a single command or action and
then execute the action on a single file or multiple
files within a folder. With the Actions palette, you
can record, play, edit, and delete commands to
easily automate common techniques.
You can now apply the vignette action.
3 To display the Actions palette, choose Window>
Show Actions.
4 In the Actions palette, select Vignette (selection)
by clicking on its name.
5 Click the Play button ( ) at the bottom of the
palette.
6 In the Feather Selection dialog box, accept the
default feather radius of 5 pixels, and click OK.
The action is then run on the image, creating the
vignette.
Page 30

CHAPTER 1
22
A Quick Tour of Adobe Photoshop
7 When the action is complete, choose Layer >
Flatten Image, and in the dialog box click OK to
discard the hidden layers.
Saving the file
Because you may want to return to a version of the
file with all its layers intact, you can use the Save As
command to save the flattened file with a new
name.
Choose File > Save As. Select a folder in which to
save the file, enter a new filename, and click Save.
Note that you can save files in various formats,
depending on how you plan to use the file. For
example, you can save a file in JPEG format for
display on the World Wide Web. (See About file
formats in Chapter 14.)
Congratulations, you’ve finished the tour.
Continue experimenting by creating your own
Photoshop artwork, or try some of the lessons
on the Tutorial CD.
Page 31

2
Page 32

Page 33

Chapter 2: Looking at the Work Area
25
he Adobe Photoshop work area includes the
menu bar at the top of your screen, the
image window containing an image, and a
variety of tools and palettes for editing and
adding elements such as masks, layers, and
channels. You can also add commands and filters
to the menus by installing software programs
called plug-in modules.
SELECTING TOOLS You select a tool from the toolbox by clicking the tool or pressing the shortcut key shown in parentheses in the illustration below. You can select the hidden tools by dragging, or Alt-clicking (Windows) or Option-clicking
(Mac OS).
Elliptical marquee
Single row marquee
Crop (C)
Single column marquee
Polygon lasso
Magnetic lasso
Sharpen
Smudge
Burn
Sponge
Magnetic pen
Delete-anchor-point (-)
Add-anchor-point (+)
Type mask
Vertical Type
Vertical Type mask
Freeform pen
Convert-anchor point
Direct-selection (A)
(M) Rectangular
Marquee
(L) Lasso
(J) Airbrush
(S) Rubber stamp
(E) Eraser
(R) Blur
(P) Pen
(U) Measure
(K) Paint bucket
(H) Hand
Foreground color
(D) Default colors
(Q) Standard mode
Standard screen
mode (F)
Full screen mode with menu bar (F)
Adobe Online
Move (V)
Magic wand (W)
Paintbrush (B)
History Brush (Y)
Pencil (N)
Dodge (O)
Type (T)
Linear Gradient (G)
Eyedropper (I)
Zoom (Z)
Switch colors (X)
Background color
Quick Mask mode (Q)
Full screen mode (F)
Line
Pattern stamp
Radial Gradient
Color sampler
Angle Gradient
Diamond Gradient
Reflected Gradient
Page 34

CHAPTER 2
26
Looking at the Work Area
Using the toolbox
The tools in the toolbox let you select, paint, edit,
and view images. Other controls choose
foreground and background colors, create quick
masks, and change the screen display mode. Most
tools have associated Brushes and Options
palettes, which let you define the tools’ painting
and editing effects. (See “Using the Options
palette” on page 29.)
For information on the foreground and
background color controls, see page 214; on Quick
Mask mode control, see page 250.
For an overview of each tool, see
online help.
To display the toolbox:
Choose Window > Show Tools.
To move the toolbox:
Drag the toolbox by its title bar.
• To select a hidden tool, position the pointer on
the visible tool, and drag to highlight the tool
you want.
Use these shortcuts to select tools:
• To select a tool quickly, press its shortcut
key on the keyboard. These keys appear in the
illustration on page 25.
• To cycle through a set of hidden tools, press Alt
(Windows) or Option (Mac OS) and click the
visible tool; or hold down Shift and press the
visible tool’s shortcut key.
To display the active tool name:
Position the pointer over the triangle in the
bottom border of the program window
(Windows) or image window (Mac OS), hold
down the mouse button, and choose Current Tool
from the menu.
Selecting tools
You select a tool by clicking its icon in the toolbox.
A small triangle to the right of a tool icon indicates
a pull-out menu of hidden tools.
To select a tool:
Do one of the following:
• To select a visible tool, click its icon.
The name of the currently selected tool appears in
the lower left of the window.
Using the tool pointers
When you select most tools, the mouse pointer
matches the tool’s icon. This is the default
standard tool pointer. The marquee, line, and
gradient pointers appear by default as crosshairs.
Page 35

ADOBE PHOTOSHOP 5.0
User Guide
27
Each default pointer has a different hot spot,
where an effect or action begins. You can switch
to precise pointers, which appear for most tools
as cross hairs centered around the hot spot. For
the magnetic lasso and magnetic pen tools, precise
pointers appear as circles representing the lasso
or pen width. With the painting tools, you can
also display the pointer as a brush shape of a
certain size.
To set the tool pointer appearance:
1 Choose File > Preferences > Display & Cursors.
2 Select the tool pointer appearance:
• Click Standard under Painting Cursors, Other
Cursors, or both to display pointers as tool icons.
• Click Precise under Painting Cursors, Other
Cursors, or both to display pointers for most tools
as crosshairs.
• Click Brush Size under Painting Cursors to
display the painting tool pointers as brush shapes
representing the size of the current brush. Brush
Size pointers may not display for very large
brushes.
3 Click OK.
With very small brushes, the brush shape is
surrounded by four dots for finer accuracy.
ABC
A. Standard B. Precise C. Brush Size
The Painting Cursors options control the pointers
for the eraser, pencil, airbrush, paintbrush, rubber
stamp, pattern stamp, smudge, blur, sharpen,
dodge, burn, and sponge tools.
The Other Cursors options control the pointers
for the marquee, lasso, polygon lasso, magic wand,
crop, eyedropper, pen, gradient, line, paint bucket,
magnetic lasso, magnetic pen, measure, and color
sampler tools.
To change the appearance of some tool
pointers, press Caps Lock. Press Caps Lock
again to return to your original setting. The
pointers change in these ways:
• Standard to precise
• Precise to brush size
• Brush size to precise
Page 36
CHAPTER 2
28
Looking at the Work Area
Using the status bar
The status bar at the bottom of the program
window displays useful information—such as
the current magnification and file size of the active
image, and brief instructions for using the active
tool.
To show or hide the status bar (Windows only):
Choose Window > Show Status Bar or Window >
Hide Status Bar.
Using palettes
Palettes help you monitor and modify images. You
can display or hide them as you work. By default,
they appear in stacked groups.
To show or hide a palette:
Choose the appropriate Window > Show or
Window > Hide command.
Show displays the selected palette at the front of its
group; Hide conceals the entire group.
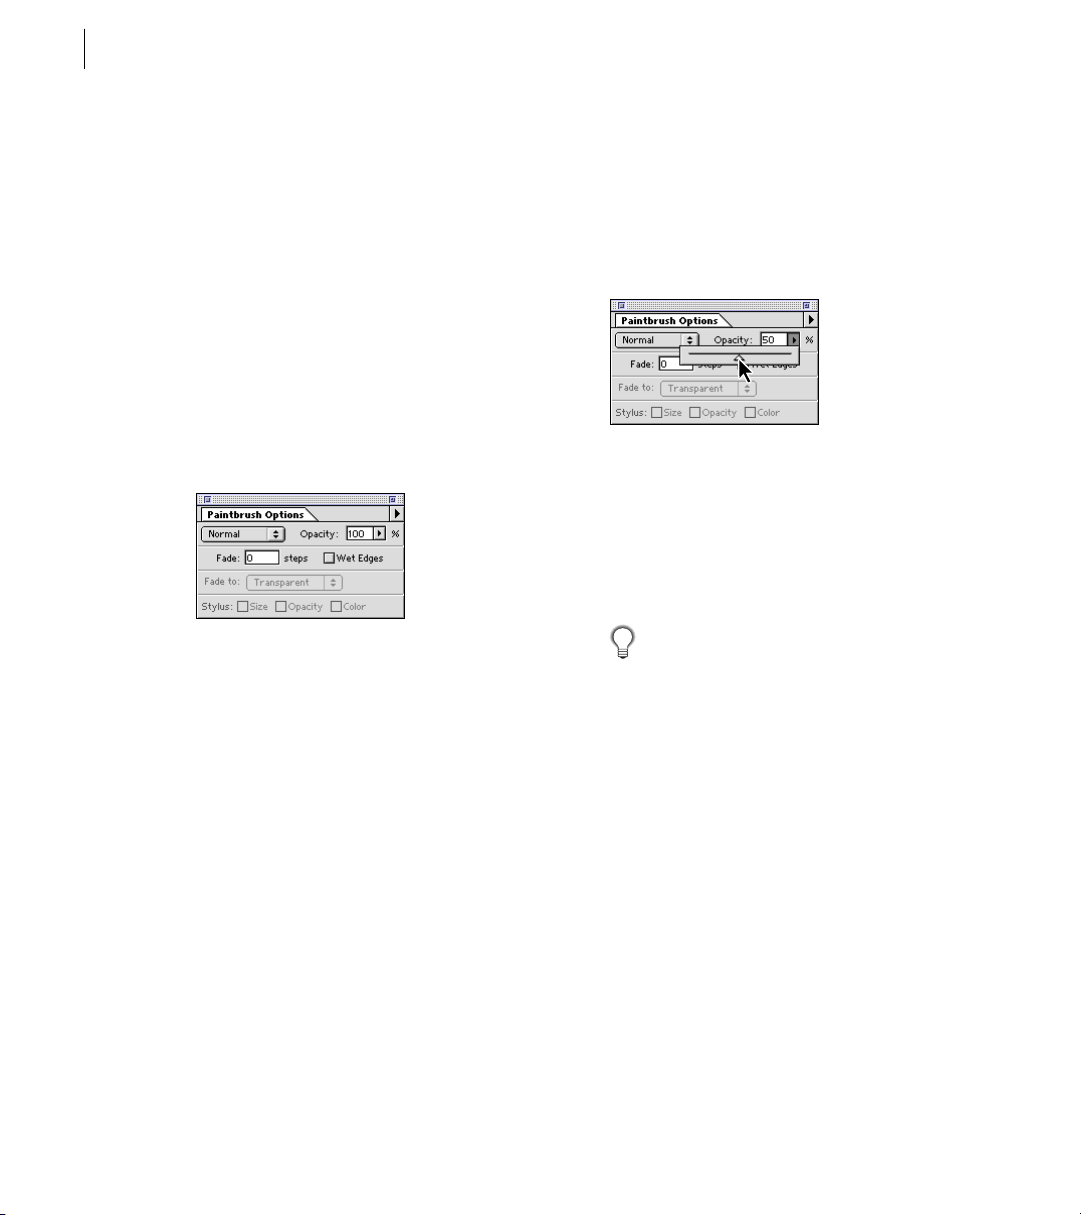
• To make a palette appear at the front of its group,
click the palette’s tab.
Click the Swatches tab to move it to
the front.
• To move an entire palette group, drag its title bar.
• To rearrange or separate a palette group, drag a
palette’s tab. Dragging a palette outside of an
existing group creates a new group.
Changing the palette display
You can reorganize your work space using the
following techniques:
• To hide or display all open palettes and the
toolbox, Press Tab. To hide or display the palettes
only, press Shift+Tab.
Click the palette tab, and drag the palette to a
new group.
Palettes are grouped.
Page 37

ADOBE PHOTOSHOP 5.0
User Guide
29
• To move a palette to another group, drag the
palette’s tab to that group.
• To display a palette menu, position the pointer
on the triangle in the upper right corner of the
palette, and hold down the mouse button.
• To change the height of a palette (except the
Color, Options, or Info palette), drag its lower
right corner. To return the palette to default size,
click the minimize/maximize box (Windows) or
the resize box (Mac OS) in the right of the title bar.
(A second click collapses the palette group.)
A
B
To collapse a group to palette titles only, Alt-click
•
the minimize/maximize box (Windows) or
Option-click the resize box (Mac OS). Or doubleclick a palette’s tab. You can still access the menu of
a collapsed palette.
Setting the positions of palettes and
dialog boxes
The positions of all open palettes and moveable
dialog boxes are saved by default when you exit the
program. Alternatively, you can always start with
default palette positions or restore default
positions at any time.
To reset palettes to the default positions:
1 Choose File > Preferences > General.
2 Click Reset Palette Locations to Defaults.
To start always with the preset palette and dialog
box positions:
1 Choose File > Preferences > General.
2 Deselect Save Palette Locations. The change
takes effect the next time you start Adobe
Photoshop.
Click to collapse or expand palette.
A. Windows B. Macintosh
Using the Options palette
Most tools have an Options palette. Depending on
the tool selected, the palette’s appearance and
available choices change.
Page 38
CHAPTER 2
30
Looking at the Work Area
Some settings in the Options palette are common
to several tools (such as painting modes and
opacity), some specific to one tool (such as the
Auto Erase setting for the pencil tool).
To display the Options palette:
Do one of the following:
• Choose Window > Show Options.
• Double-click a tool in the toolbox (except the
zoom or hand tool).
• Click a tool or press its keyboard shortcut, and
press Enter (Windows) or Return (Mac OS).
Paintbrush Options palette
To return to a tool’s default settings:
Do one of the following:
• To return a tool to its default settings, double-
click the tool in the toolbox, and choose Reset Tool
from the Options palette menu.
• To return all the tools to their default settings,
choose Reset All Tools from the Options palette
menu.
Using pop-up sliders
A number of palettes and dialog boxes contain
settings that use pop-up sliders (for example, the
Opacity option in the Layers palette).
To use a pop-up slider:
Do one of the following:
• Position the pointer over the triangle next to the
setting, hold down the mouse, and drag the slider
or angle radius to the desired value.
• Click the triangle next to the setting to open the
pop-up slider box, and drag the slider or angle
radius to the desired value. Click outside the slider
box or press Enter (Windows) or Return (Mac OS)
to close the slider box. (To cancel changes,
press Esc.)
Use the following shortcuts when the
pop-up slider box is open:
• To increase or decrease values in 1%
increments, press the Up or Down arrow key.
• To increase or decrease values in 10%
increments, hold down Shift and press the Up
or Down arrow key.
Using the Info palette
The Info palette displays information about the
color values beneath the pointer and, depending
on the tool in use, other useful measurements. You
can also display color values of specific target
points in your image using color samplers (see
“Previewing color values” on page 107) and use
the measure tool to measure distances and angles
(see “Using the measure tool” on page 174).
Page 39

ADOBE PHOTOSHOP 5.0
User Guide
31
To display the Info palette:
Choose Window > Show Info.
The Info palette displays the following specific
information:
• When displaying CMYK values, the Info palette
displays an exclamation point if the color beneath
the pointer or color sampler is out of the printable
CMYK color gamut. (See “Identifying out-ofgamut colors” on page 110.)
Out-of-gamut color
When you use the marquee tool, the Info palette
•
displays the x and y coordinates of your starting
position and the width (W) and height (H) of the
marquee as you drag.
• When you use the crop tool or zoom tool, the
Info palette displays the width (W) and height (H)
of the marquee as you drag. The palette also shows
the angle of rotation of the crop marquee.
• When you use the line tool, pen tool, or gradient
tool or when you move a selection, the Info palette
displays the x and y coordinates of your starting
position, the change in X (∆X), the change in
Y (∆Y), the angle (A), and the distance (D) as
you drag.
• When you use a two-dimensional transfor-
mation command, the Info palette displays the
percentage change in width (W) and height (H),
the angle of rotation (A), and the angle of
horizontal skew (H) or vertical skew (V).
• When you use any color adjustment dialog box
(for example, Curves), the Info palette displays the
before and after color values of the pixels beneath
the pointer and beneath color samplers. (See
“Previewing color values” on page 107.)
To change the Info palette options:
1 Choose Palette Options from the Info palette
menu.
2 For First Color Readout, choose one of the
following display options:
• Actual Color to display values in the current
color mode of the image.
• Total Ink to display the total percentage of
all CMYK ink at the pointer’s current location,
based on the values set in the CMYK Setup
dialog box.
• Opacity to display the opacity of the current
layer. This option does not apply to the
background.
• Any other option to display the color values in
that color mode. (See “Color modes and models”
on page 63.)
3 For Second Color Readout, choose a display
option listed in step 2.
4 For Ruler Units, choose a unit of measurement.
5 Click OK.
Page 40

CHAPTER 2
32
Looking at the Work Area
To change measurement units, click the
cross-hair icon in the Info palette for a
menu of options. To change color readout
modes, click the eyedropper icon.
Using context menus
In addition to the menus at the top of your screen,
context-sensitive menus display commands
relevant to the active tool, selection, or palette.
To display context menus:
1 Position the pointer over the image or over an
item in a palette list (for example, a thumbnail in
the Layers palette).
2 Click with the right mouse button (Windows)
or press Control and hold down the mouse button
(Mac OS).
To get online help in Windows:
Do one of the following:
• Press F1 to display the Help Contents menu.
• Choose Help > Contents, or choose another
topic from the Help menu.
To get online help on the Macintosh:
Choose Help > Help Contents.
To get context-sensitive help (Windows only):
Do one of the following:
• Press Shift + F1 (a question mark appears next to
the pointer), and choose a command or click in a
palette to display the appropriate help topic.
• With a dialog box open, press F1 to display the
help topic for that dialog box.
Using Adobe online services
If you have an Internet connection and a Web
browser installed on your system, you can access
the Adobe Systems Home Page on the World Wide
Web (at http://www.adobe.com) for information
on services, products, and tips pertaining to
Photoshop.
Using online help
Adobe Photoshop includes complete documentation in online help, including all of the information in this user guide, plus a description of
new features, keyboard shortcuts (including
shortcut key changes from Photoshop 4.0),
and more.
To use Adobe Online:
1 Do one of the following:
• Choose File > Adobe Online.
• Click the icon at the top of the toolbox.
2 Click a topic to open the Adobe Home Page.
Page 41

ADOBE PHOTOSHOP 5.0
User Guide
33
Viewing images
The hand tool, the zoom tools, the Zoom
commands, and the Navigator palette let you view
different areas of an image at different magnifications. You can open additional windows to display
several views at once (such as different magnifications) of an image.
A list of open windows appears in the Window
menu. Available memory may limit the number of
windows per image.
To change the viewing mode of image windows:
Click a window control in the toolbox:
ABC
A. Standard screen mode
B. Full screen mode with menu bar
C. Full screen mode
• The left window control to display the default
window with a menu bar at the top and scroll bars
on the sides.
• The center window control to display a full-
screen window with a menu bar but no title bar or
scroll bars.
• The right window control to display a full-screen
window with no title bar, menu bar, or scroll bars.
The hand tool or the Navigator palette can be used
for scrolling.
To open multiple views of the same image:
Choose View > New View.
To arrange multiple windows (Windows only):
Do one of the following:
• Choose Window > Cascade to display windows
stacked and cascading from the top left to the
bottom right of the screen.
• Choose Window > Tile to display windows edge
to edge.
To close windows:
Choose a command:
• Choose File > Close to close the active window.
• Choose Window > Close All (Windows only) to
close all windows.
To view another part of an image:
Do one of the following:
• Use the window scroll bars.
• Select the hand tool, and drag in the image to
move its view.
Drag the hand tool to move the view.
Page 42

CHAPTER 2
34
Looking at the Work Area
To use the hand tool while another tool is
selected, hold down the spacebar as you
drag in the image.
Using the Navigator palette
With a thumbnail, the Navigator palette lets you
quickly change the view of an image.
To display the Navigator palette:
Choose Window > Show Navigator.
To move the view of an image using the Navigator
palette:
Do one of the following:
• Drag the view box, which represents the bound-
aries of the image window.
• Click in the thumbnail of the image. The new
view includes the area you click.
To change the color of the Navigator palette view
box:
1 Choose Palette Options from the Navigator
palette menu.
2 Choose a color:
• To use a preset color, choose an option for Color.
• To specify a different color, click the color box,
and choose a color as described in “Using the
Adobe Photoshop Color Picker” on page 218.
3 Click OK.
Try these viewing shortcuts:
• Press Page Up/Page Down to scroll the
view up/down by one screen.
• Press Shift+Page Up/Shift+Page Down to
scroll up or down by 10 pixels, or to move to the
previous or next frame in a Filmstrip file.
Magnifying and reducing the view
You can magnify or reduce your view using
various methods. The window’s title bar displays
the zoom percentage at all times.
Note: The 100% view of an image displays an image
based on the monitor resolution and the image
resolution, not on the actual image dimensions.
(See “Pixel dimensions and monitor resolution” on
“About image size and resolution” on page 42.)
To zoom in:
Do one of the following:
• Select the zoom tool, and click the area you want
to magnify. Each click magnifies the image to the
next preset percentage, centering the display
around the point you click. At maximum magnification, the center of the zoom tool appears empty.
• Choose View > Zoom In to magnify to the next
preset percentage.
To zoom out:
Do one of the following:
• Select the zoom tool. Hold down Alt (Windows)
or Option (Mac OS) to activate the zoom-out tool,
and click the area of the image you want to reduce.
Each click reduces the view to the previous preset
percentage.
Page 43

ADOBE PHOTOSHOP 5.0
User Guide
35
• Choose View > Zoom Out to reduce to the
previous preset percentage.
Use these zoom shortcuts:
• To activate the zoom-in tool, press
Ctrl+spacebar (Windows) or
Command+spacebar (Mac OS).
• To activate the zoom-out tool, press Alt+
spacebar/Option+spacebar.
• To zoom in, press Ctrl+(=)/Command+(=).
• To zoom out, press Ctrl+(-)/Command+(-).
To magnify by dragging:
1 Select the zoom tool.
2 Drag over the part of the image you want to
magnify.
To display an image at 100%:
Do one of the following:
• Double-click the zoom tool.
• Choose View > Actual Pixels.
To change the view to fit the screen:
Do one of the following:
• Double-click the hand tool.
• Choose View > Fit on Screen.
These options scale both the view and the window
size to match the monitor size.
To constrain the window size:
In the Zoom Tool Options palette, deselect Resize
Windows To Fit. Doing this maintains a constant
window size regardless of the image’s magnification and can be helpful when using smaller
monitors or working with tiled views.
Drag the zoom tool to magnify the view.
The area inside the zoom marquee appears at the
highest possible magnification.
To magnify or reduce to a specified percentage:
Enter a percentage value in the zoom percentage
box at the lower left of the program window
(Windows) or image window (Mac OS), and press
Enter (Windows) or Return (Mac OS).
View in Navigator palette, and 210% view of image
Page 44

CHAPTER 2
36
Looking at the Work Area
To magnify or reduce the view using the Navigator
palette:
Do one of the following:
• Click the zoom in ( ) or zoom out ( ) button
at the bottom of the Navigator palette.
• Drag the zoom slider at the bottom of the
palette.
• Enter the percentage of magnification or
reduction you want, and press Enter (Windows)
or Return (Mac OS).
• Hold down Ctrl (Windows) or Command
(Mac OS), and drag over the area of the Navigator
palette’s thumbnail that you want to magnify.
To zoom to the specified percentage and
keep the zoom percentage box highlighted,
hold down Shift while pressing Enter/Return.
Using plug-in modules
Plug-in modules are software programs developed
by Adobe Systems, and by other software developers in conjunction with Adobe Systems, to add
features to Adobe Photoshop. A number of
importing, exporting, automation, and special
effects plug-ins come with your program—
automatically installed in the Plug-Ins folder. If
you want to use a plug-in that is installed in
another folder, you must change the preference
settings so Photoshop uses the other plug-ins
location.
Once installed, plug-in modules appear as options
in the Import, Export, or Automate menus; as file
formats in the Open, Save As, and Save a Copy
dialog boxes; or as filters in the Filter menus.
Note: If many plug-in modules are installed,
Photoshop may not be able to list all the plug-ins in
their appropriate menus. Newly installed plug-ins
will appear in the Filter > Other submenu.
To install an Adobe Systems plug-in module:
If an installer is provided, use it to install the plugin module. Otherwise, drag a copy of the module
to the Plug-Ins folder inside the Adobe Photoshop
folder.
Follow any installation instructions that come
with third-party plug-ins.
To set plug-ins preferences:
1 Choose File > Preferences > Plug-Ins & Scratch
Disk.
2 Click Choose, and select a folder or directory
from the list. (Be sure not to select a location inside
the Plug-Ins folder.) To display the contents of a
folder, double-click the folder (Windows) or click
Open (Mac OS).
Important: If you change the plug-ins location, the
usual Photoshop plug-ins, filters, and scanners will
be unavailable until you change back to the Plug-Ins
location inside the application folder.
3 When you have highlighted the new plug-ins
folder, click OK (Windows) or Select (Mac OS).
Page 45

ADOBE PHOTOSHOP 5.0
User Guide
37
4 Restart Adobe Photoshop.
On the Macintosh, to select the plug-ins
location immediately upon starting Adobe
Photoshop, press Command+Option as you
launch the program.
Setting preferences
Numerous program settings are stored in preferences files, located in the Adobe Photoshop
Settings folder inside the application folder. The
settings stored in these files include general display
options, separation setup information, calibration
options, display options, tool options, ruler units,
and options for exporting information from the
Clipboard. Most of these options are set in dialog
boxes that can be opened through the Preferences
submenus in the File menu. Preference settings are
saved each time you exit Adobe Photoshop.
To open a preferences dialog box:
1 Choose the desired preference dialog box from
the File > Preferences submenu.
2 Switch to a different preference dialog box:
• Choose an option from the menu at the top of
the dialog box.
• Click Next to display the next preference dialog
box in the menu list; click Prev to display the
previous preference dialog box.
To restore all preferences to their default settings:
Open the Adobe Photoshop Settings folder inside
the Photoshop folder, and rename or delete the
Adobe Photoshop 5.0 Prefs file and the Color
Settings file.
New default preferences files will be created the
next time you start Photoshop.
Note: You should not rename or delete the Actions
Palette file, unless you believe that your actions have
been damaged.
For information on a specific preferences option,
see the Index.
Page 46

Page 47

3
Page 48

Page 49

Chapter 3: Getting Images into
Photoshop
41
n Adobe Photoshop, you can create new
images, import them from another graphics
I
application, or capture them from video. Often
you will begin by scanning a photograph, a slide,
or an image. To create effective artwork, you must
understand some basic concepts about how to
work with digital images, how to produce highquality scans, how to work with a variety of file
formats, and how to adjust the resolution and size
of images.
About bitmap images and vector graphics
Computer graphics fall into two main
categories—bitmap images and vector graphics.
Understanding the difference between the two
will help as you create and edit digital images.
Bitmap images
Photoshop and other paint and image-editing
programs generate bitmap images, also called
raster images. Bitmap images use a grid (the
bitmap or raster) of small squares known as
pixels to represent images. Each pixel is assigned
a specific location and color value. For example,
a bicycle tire in a bitmap image is made up of a
mosaic of pixels in that location. When working
with bitmap images, you edit pixels rather than
objects or shapes.
A bitmap image is resolution-dependent—that is,
it contains a fixed number of pixels to represent its
image data. As a result, a bitmap image can lose
detail and appear jagged if viewed at a high magnification on-screen or printed at too low a
resolution. Bitmap images are the best choice
for representing subtle gradations of shades and
color—for example, in photographs or painted
images.
Vector graphics
Drawing programs such as Adobe Illustrator®
create vector graphics, made of lines and curves
defined by mathematical objects called vectors.
Vectors describe graphics according to their
geometric characteristics. For example, a bicycle
tire in a vector graphic is made up of a mathematical definition of a circle drawn with a certain
radius, set at a specific location, and filled with a
specific color. You can move, resize, or change the
color of the tire without losing the quality of the
graphic.
A vector graphic is resolution-independent—that
is, it can be scaled to any size and printed on any
output device at any resolution without losing its
detail or clarity. As a result, vector graphics are the
best choice for type (especially small type) and
bold graphics that must retain crisp lines when
scaled to various sizes—for example, logos.
Page 50

CHAPTER 3
42
Getting Images into Photoshop
Because computer monitors represent images by
displaying them on a grid, both vector and bitmap
images are displayed as pixels on-screen.
About image size and resolution
To produce high-quality images using Photoshop,
it is important to understand how the pixel data of
bitmap images is measured and displayed. For
more on how pixel data is displayed as color, see
“About bit depth” on page 68.
Pixel dimensions The number of pixels along the
height and width of a bitmap image. The display
size of an image on-screen is determined by the
pixel dimensions of the image plus the size and
setting of the monitor. The file size of an image is
proportional to its pixel dimensions.
A typical 13-inch monitor displays 640 pixels
horizontally and 480 vertically. An image with
pixel dimensions of 640 by 480 would fill this small
screen. On a larger monitor with a 640 by 480
setting, the same image (with pixel dimensions of
640 by 480) would still fill the screen, but each
pixel would appear larger. Changing the setting of
this larger monitor to 1152 pixels by 870 pixels
would display the image at a smaller size,
occupying only part of the screen.
BITMAP VS. VECTOR A bitmap image is composed
of a grid of small squares known as pixels. A vector
graphic is defined by mathematical objects called
vectors.
3:1
Bitmap images are good at reproducing subtle gradations of color, as in photographs. They can show jagged
edges when printed at too large a size or displayed at too
high a magnification.
24:1
When preparing an image for online display (for
example, a Web page that will be viewed on a
variety of monitors), pixel dimensions become
especially important. Because your image may be
viewed on a 13-inch monitor, you’ll probably want
to limit the size of your image to a maximum of
640 pixels by 480 pixels.
3:1
Vector graphics are good at reproducing crisp outlines,
as in logos or illustrations. They can be printed or displayed at any resolution without losing detail.
24:1
Page 51
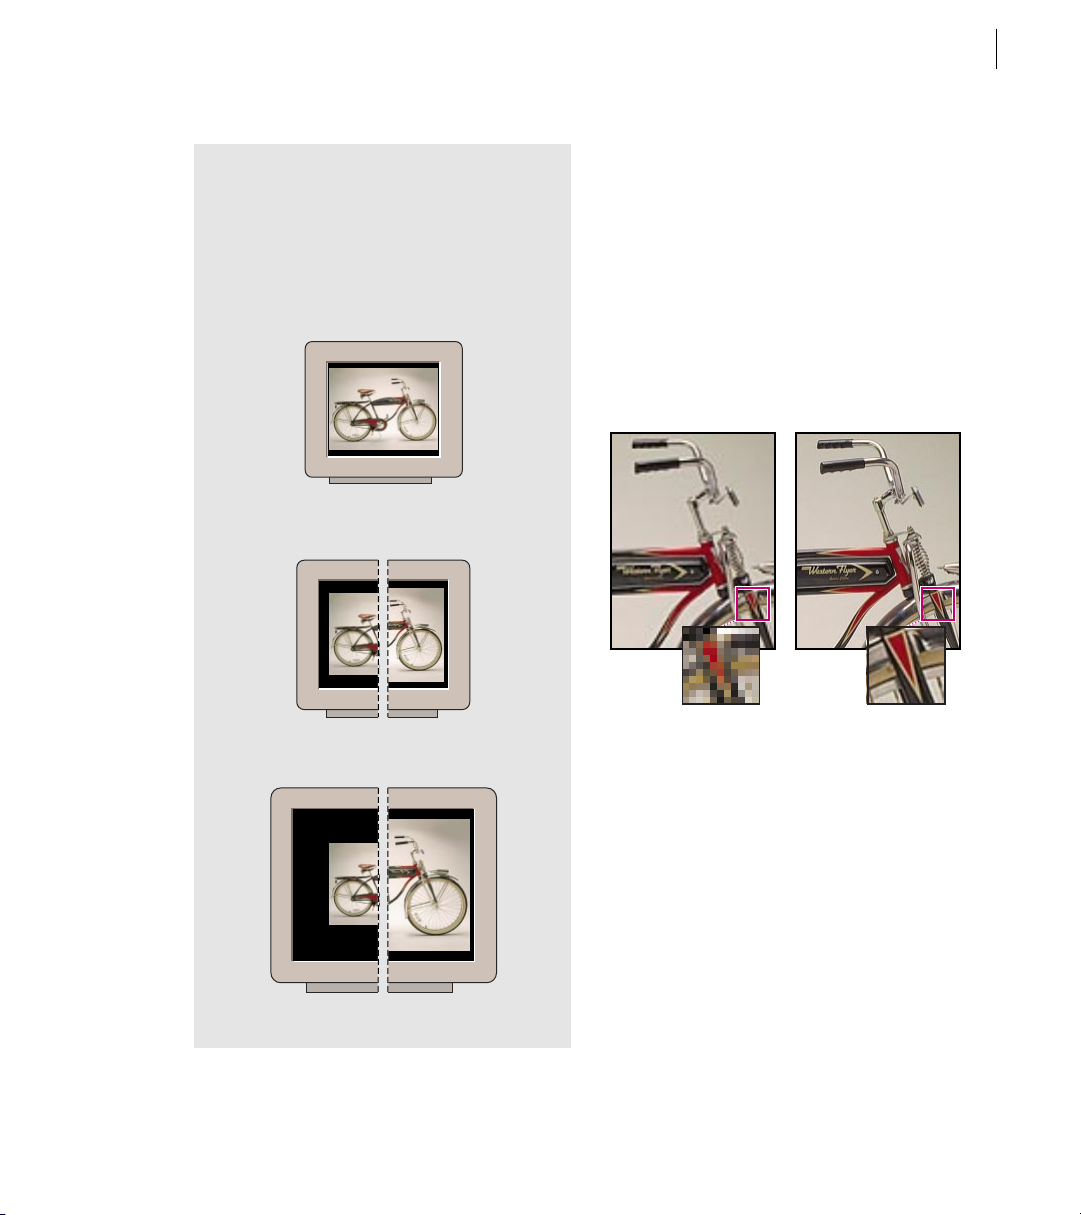
ADOBE PHOTOSHOP 5.0
User Guide
43
ON-SCREEN DISPLAY SIZE How large an image
appears on-screen depends on a combination of
factors––the pixel dimensions of the image, the
monitor size, and the monitor resolution setting.
The examples below show a 620 x 400 pixel image
displayed with various monitor sizes and monitor
resolutions.
13"
640 x 480
15"
832 x 624
640 x 480
Image resolution The number of pixels displayed
per unit of printed length in an image, usually
measured in pixels per inch (ppi). An image with
a high resolution contains more, and therefore
smaller, pixels than an image of the same printed
dimensions with a low resolution. For example,
a 1-inch-by-1-inch image with a resolution of
72 ppi contains a total of 5184 pixels (72 pixels
wide x 72 pixels high = 5184). The same 1-inchby-1-inch image with a resolution of 300 ppi
would contain a total of 90,000 pixels.
72-ppi and 300-ppi images; inset zoom 200%
1024 x 768
20"
Because they use more pixels to represent each
unit of area, higher-resolution images usually
reproduce more detail and subtler color transitions than lower-resolution images when printed.
However, increasing the resolution of an image
scanned or created at a lower resolution only
spreads the original pixel information across a
greater number of pixels and rarely improves
image quality.
640 x 480
Page 52

CHAPTER 3
44
Getting Images into Photoshop
To determine the image resolution to use, consider
the medium of final distribution for the image. If
you’re producing an image for online display, the
image resolution only needs to match the typical
monitor resolution (72 or 96 ppi). However, using
too low a resolution for a printed image results in
pixelation—output with large, coarse-looking
pixels. Using too high a resolution (pixels smaller
than what the output device can produce)
increases the file size and slows the printing of the
image; furthermore, the device will be unable to
print the image at the high resolution. (See
“Screen frequency” on page 45 for guidelines on
choosing an image resolution for a printed image.)
Monitor resolution The number of pixels or dots
displayed per unit of length on the monitor,
usually measured in dots per inch (dpi). Monitor
resolution depends on the size of the monitor plus
its pixel setting. The typical resolution of a PC
monitor is about 96 dpi, of a Mac OS monitor
72 dpi. Understanding monitor resolution helps
explain why the display size of an image on-screen
often differs from its printed size.
In Photoshop, image pixels are translated directly
into monitor pixels. This means that when the
image resolution is higher than the monitor
resolution, the image appears larger on-screen
than its specified print dimensions. For example,
when you display a 1-inch-by-1-inch, 144-ppi
image on a 72-dpi monitor, it appears in a 2-inchby-2-inch area on-screen. Because the monitor
can display only 72 pixels per inch, it needs
2 inches to display the 144 pixels that make up one
edge of the image.
Printer resolution The number of ink dots per inch
(dpi) produced by an imagesetter or laser printer.
For best results, use an image resolution that is
proportional to, but not the same as, printer
resolution. Most laser printers have output resolutions of 300 dpi to 600 dpi and produce good results
with images from 72 ppi to 150 ppi.
Page 53

ADOBE PHOTOSHOP 5.0
User Guide
45
IMAGE RESOLUTION AND SCREEN FREQUENCY
To ensure high-quality output when printing with
a halftone screen, you need to choose an image
resolution based on the screen frequency of the
printing device. In general, an image resolution
from 1.5 to 2 times the screen frequency gives the
best results.
65 lpi: Coarse screen
commonly used to
print newsletters and
grocery coupons.
85 lpi: Average screen
often used to print
newspapers.
High-end imagesetters can print at 1200 dpi or
higher and produce good results with images from
200 ppi to 300 ppi.
Screen frequency The number of printer dots or
halftone cells per inch used to print grayscale
images or color separations. Also known as screen
ruling or line screen, screen frequency is measured
in lines per inch (lpi)—or lines of cells per inch in
a halftone screen.
The relationship between image resolution and
screen frequency determines the quality of detail
in the printed image. To produce a halftone image
of the highest quality, you generally use an image
resolution that is from 1.5 to at most 2 times the
screen frequency. But with some images and
output devices, a lower resolution can produce
good results.
133 lpi: High-quality
screen typically used
to print four-color
magazines.
177 lpi: Very fine screen
typically used for annual
reports and images in art
books.
354 ppi (2 x 177 lpi)
A resolution at the low end of the recommended range can
produce good results.
266 ppi (1.5 x 177 lpi)
Note: Some imagesetters and 600-dpi laser printers
use screening technologies other than halftoning. If
you are printing an image on a nonhalftone printer,
consult your service provider or your printer
documentation for the recommended image
resolutions.
Page 54
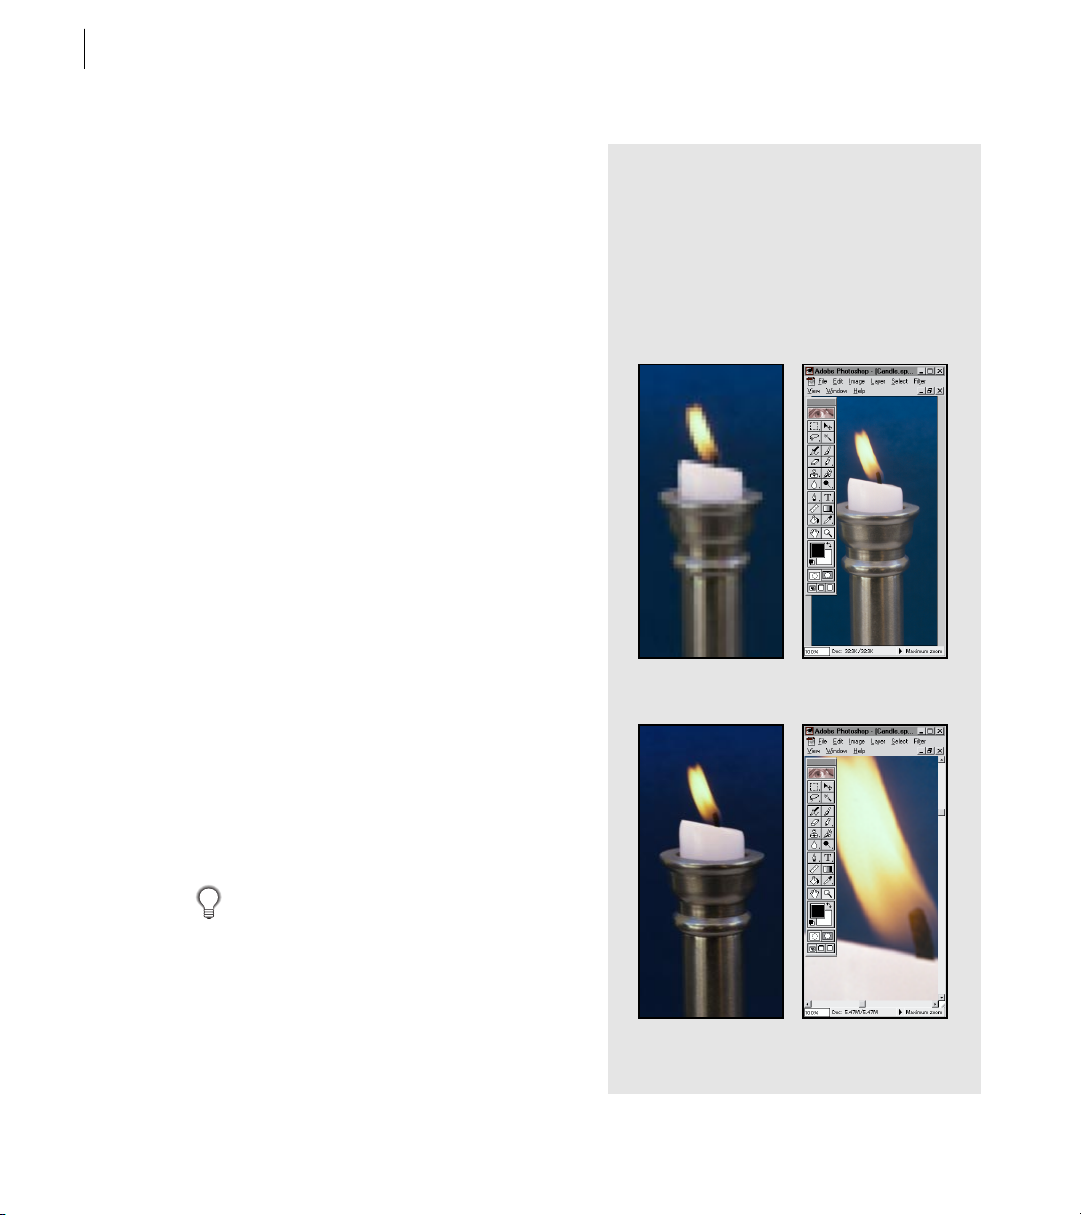
CHAPTER 3
46
Getting Images into Photoshop
File size The digital size of an image, measured in
kilobytes (K), megabytes (MB), or gigabytes (GB).
File size is proportional to the pixel dimensions of
the image. Images with more pixels may produce
more detail at a given printed size, but they require
more disk space to store and may be slower to
edit and print. For instance, a 1-inch-by-1-inch
200-ppi image contains four times as many pixels
as a 1-inch-by-1-inch 100-ppi image and so has
four times the file size. Image resolution thus
becomes a compromise between image quality
(capturing all the data you need) and file size.
Photoshop supports a maximum file size of 2 GB
and maximum pixel dimensions of 30,000 by
30,000 pixels per image. This restriction places
limits on the print size and resolution available to
an image. For example, an image 100 by 100 inches
can have a resolution of at most 300 ppi (30,000
pixels / 100 inches = 300 ppi).
Changing image size and resolution
Once you have scanned or imported an image into
Photoshop, you may want to adjust its size or
resolution. The Image Size command lets you
adjust the pixel dimensions, print dimensions, and
resolution of an image.
RESOLUTION, FILE SIZE, AND OUTPUT The file
size of an image refers to the total amount of pixel
information in the image. For example, a 1-inch-by2-inch high-resolution image has more pixels, and
thus a larger file size, than a 1-inch-by-2-inch lowresolution image. In print, a high-resolution image
has more detail than the same image at low resolution. On-screen, a high-resolution image appears
larger (see page 43). The enlarged on-screen display
does not affect the dimensions of the printed image.
1 in. x 2 in. @ 72 ppi;
file size 323K
100% view on-screen
For assistance with resizing and resampling
images, choose Help > Resize Image. This interactive wizard helps you scale your images for printed
or online display.
1 in. x 2 in. @ 300 ppi;
file size 5.47 MB
100% view on-screen
Page 55

ADOBE PHOTOSHOP 5.0
User Guide
47
Information about the current file size and
resolution of an image is displayed at the lower left
of the image window. Before you change the size of
an image, you also may want to preview how the
image will appear when printed.
To display the file size:
Position the pointer over the triangle in the
bottom border of the program window
(Windows) or image window (Mac OS), hold
down the mouse button, and choose Document
Sizes from the menu.
To display dimensions, channel information, and
resolution information:
Press Alt (Windows) or Option (Mac OS),
position the pointer over the box in the lower left
of the window, and hold down the mouse button.
The box displays the width and height of the image
(both in pixels and in the unit of measurement
currently selected for the rulers), the number of
channels, and the image resolution.
The file size appears at the lower left of the
window. The first value indicates the size if saved
as a flattened file with no layer data, the second
value the size if saved with all layers and channels.
For more information on how layers affect file size,
see “Managing layered images” on page 267.
To preview a page:
Position the pointer over the box where the file size
is displayed, and hold down the mouse button.
Page 56

CHAPTER 3
48
Getting Images into Photoshop
The dimensions of the page shown in the page
preview box correspond to the page size specified
with the Page Setup command (see “General
printing options” on page 333). Other options
selected appear as gray boxes.
A
B
C
E
D
Previewing a page
A. Label B. Registration marks C. Crop marks
D. Calibration bar E. Caption
To view the print size on-screen:
Choose View > Print Size.
The magnification of the image is adjusted to
display its approximate printed size, as specified in
the Print Size section of the Image Size dialog box.
(See “Changing the print dimensions and
resolution of an image” on page 49.)
About resampling
Resampling refers to changing the pixel dimensions (and therefore file size) of an image. When
you downsample (or decrease the number of
pixels), information is deleted from the image.
When you resample up (or increase the number of
pixels), new pixel information is added based on
color values of existing pixels. You specify an
approximation or interpolation method to
determine how pixels are added or deleted. (See
“Choosing an interpolation method” on page 51.)
A
A. Resampled down B. Original C. Resampled up
Keep in mind that resampling can result in poorer
image quality. For example, when you resample an
image to a higher resolution, the pixels interpolated from the new image data can make the image
appear blurry or out of focus.
CB
Page 57

ADOBE PHOTOSHOP 5.0
User Guide
49
You can avoid the need for resampling by scanning
in or creating the image at a high enough
resolution. If you want to preview the effects of
changing pixel dimensions on-screen or print
proofs at different resolutions, resample a
duplicate of your original file. (See “Duplicating
images” on page 172.)
Applying the Unsharp Mask filter to a
resampled image can help refocus the
image’s details. For instructions, see “Step 6:
Sharpen the image” on page 128.
ABC
A. Original B. Resampled down C. Unsharp Mask applied
Changing the pixel dimensions of an
image
When preparing images for online distribution
(on a Web site, for example), it’s useful to specify
image size in terms of the pixel dimensions. Keep
in mind that changing pixel dimensions affects not
only the size of an image on-screen but also its
image quality and its printed characteristics—
either its printed dimensions or its image
resolution. (See “About image size and resolution”
on page 42; “About resampling” on page 48.)
To change the pixel dimensions of an image:
1 Choose Image > Image Size.
2 Make sure that Resample Image is selected, and
choose an interpolation method, as described in
“Choosing an interpolation method” on page 51.
3 To maintain the current proportions of pixel
width to pixel height, select Constrain Proportions. This option automatically updates the width
as you change the height, and vice versa.
4 Under Pixel Dimensions, enter values for Width
and Height. To enter values as percentages of the
current dimensions, choose Percent as the unit of
measurement.
The new file size for the image appears at the top
of the Image Size dialog box with the old file size in
parentheses.
5 Click OK to change the pixel dimensions and
resample the image.
For best results in producing a smaller
image, resample down and apply the
Unsharp Mask filter. To produce a larger image,
rescan the image at a higher resolution.
Changing the print dimensions and
resolution of an image
When preparing images for print, it’s useful to
specify image size in terms of the printed dimensions and the image resolution. These two
measurements determine the total pixel count and
therefore the file size of the image. (See “About
image size and resolution” on page 42.)
Page 58

CHAPTER 3
50
Getting Images into Photoshop
If you turn on resampling for the image, you can
change print dimensions and resolution independently. If you turn resampling off, you can change
either the dimensions or the resolution—
Photoshop adjusts the other value automatically to
preserve the total pixel count. For the highest print
quality, it’s generally best to change the dimensions and resolution first without resampling.
Then resample only as necessary.
Note: If your image resolution is more than 2.5
times
the screen ruling, an alert message appears when you
try to print the image. This means that the image
resolution is higher than necessary for the printer
(see page 42). Save a copy of the file, and then lower
the resolution.
To change the print dimensions and resolution of
an image:
1 Choose Image > Image Size.
2 Change the print dimensions or image
resolution or both:
• To change only the print dimensions or only the
resolution and adjust the total number of pixels in
the image proportionately, make sure that
Resample Image is selected. Then choose an interpolation method, as described in “Choosing an
interpolation method” on page 51.
• To change the print dimensions and resolution
without changing the total number of pixels in the
image, deselect Resample Image.
3 To maintain the current proportions of image
width to image height, select Constrain Proportions. This option automatically updates the width
as you change the height, and vice versa.
4 Under Print Size, enter new values for the height
and width. If desired, choose a new unit of
measurement. Note that for Width, the Columns
option uses the width and gutter sizes specified in
the Units & Rulers preferences (see “Using rulers”
on page 173).
5 For Resolution, enter a new value. If desired,
choose a new unit of measurement.
6 Click OK.
To return to the original values displayed
in the Image Size dialog box, hold down
Alt (Windows) or Option (Mac OS), and
click Reset.
Determining a recommended resolution
for an image
If you plan to print your image using a halftone
screen, the range of suitable image resolutions
depends on the screen frequency of your output
device. You can have Photoshop determine a
recommended resolution for your image based on
your device’s screen frequency. (See “Screen
frequency” on page 45.)
To determine a suggested resolution for
an image:
1 Choose Image > Image Size.
2 Click Auto.
Page 59

ADOBE PHOTOSHOP 5.0
User Guide
51
3 For Screen, enter the screen frequency for the
output device. If desired, choose a new unit of
measurement. Note that the screen value is used
only to calculate the image resolution, not to set
the screen for printing.
Important: To specify the halftone screen ruling for
printing, you must use the Halftone Screens dialog
box, accessible through the Page Setup dialog box.
4 For Quality, select an option:
• Draft to produce a resolution the same as the
screen frequency (no lower than 72 pixels per
inch).
• Good to produce a resolution 1.5 times the
screen frequency.
• Best to produce a resolution 2 times the screen
frequency.
5 Click OK.
Choosing an interpolation method
When an image is resampled, Adobe Photoshop
uses an interpolation method to assign color values
to any new pixels based on the color values of
existing pixels in the image. The more sophisticated the method, the more quality and detail
from the original image are preserved.
The General Preferences dialog box lets you
specify a default interpolation method to use
whenever images are resampled with the Image
Size or transformation commands. The Image Size
command also lets you specify an interpolation
method other than the default.
To specify the default interpolation method:
1 Choose File > Preferences > General.
2 For Interpolation, choose an option:
• Nearest Neighbor for the fastest, but least
precise, method. This method can result in jagged
effects, which become apparent when distorting or
scaling an image or performing multiple manipulations on a selection.
• Bilinear for a medium-quality method.
• Bicubic for the slowest, but most precise,
method, resulting in the smoothest tonal
gradations.
Scanning images
Before you scan an image, make sure that the
software necessary for your scanner has been
installed. To ensure a high-quality scan, you
should predetermine the scanning resolution and
dynamic range your image requires. These preparatory steps can also prevent unwanted colors casts
from being introduced by your scan.
Scanner drivers are provided and supported by
the manufacturers of the scanners, not Adobe
Systems. If you have problems with scanning,
make sure that you are using the latest version
of the appropriate scanner driver.
Page 60

CHAPTER 3
52
Getting Images into Photoshop
Importing scanned images
You can import scanned images directly from any
scanner that has an Adobe Photoshop-compatible
plug-in module or supports the TWAIN interface.
To import the scan, choose the scanner name from
the File > Import submenu. (See your scanner
documentation for instructions on installing the
scanner plug-in; see page 36 for general plug-in
information.)
If your scanner does not have an Adobe
Photoshop-compatible scanner driver,
use the manufacturer’s software to scan your
images, and save the images as TIFF, BMP, or PICT
files. Then open the files in Adobe Photoshop.
Importing an image using the TWAIN
interface
TWAIN is a cross-platform interface for acquiring
images captured by certain scanners, digital
cameras, and frame grabbers. The manufacturer
of the TWAIN device must provide a Source
Manager and TWAIN Data source for your device
to work with Photoshop.
Adobe Photoshop supports the current
TWAIN_32 standard for scanning. Photoshop
does not support TWAIN software used with
Windows 3.1. Contact your scanner manufacturer
for information on the availability of TWAIN_32
source modules.
To import an image using the TWAIN interface:
1 If you’re using the TWAIN device for the
first time with Adobe Photoshop, choose File >
Import > Select TWAIN_32 Source. Then select
the device you’re using. You do not need to repeat
this step for subsequent uses of the TWAIN
module.
If more than one TWAIN device is installed in
your system and you want to switch devices, use
the Select Source command.
2 To import the image, choose TWAIN_32
(Windows) or TWAIN Acquire (Mac OS) from the
File > Import submenu.
Scanning using the resolution setting
You can determine the settings for your scan using
the original and final image dimensions and the
screen frequency of your output device to calculate
a scan resolution to enter in the scanner settings.
This scan resolution translates into image
resolution when you open the scan in Photoshop.
The quality of final output depends not only on
the scan resolution but also on the resolution of
your output device and the size of the original
image compared with the final image. (See “About
image size and resolution” on page 42 and “Image
resolution and screen frequency” on page 45.)
To estimate scan resolution:
1 Multiply the screen frequency by 2 (the typical
ratio of image resolution to screen frequency
needed to produce a high-quality image).
Page 61

ADOBE PHOTOSHOP 5.0
User Guide
53
2 Multiply the result in step 1 by the ratio of final
image dimensions to original dimensions to
determine an estimated scan resolution.
For example, suppose you are scanning a 2-inchby-3-inch image and want to produce a final
6-inch-by-9-inch image. You are using a screen
frequency of 85 lpi.
First multiply 85 (the screen frequency) by 2 to get
170. Then multiply 170 by 3 (the ratio of final
image dimensions to original ones) to get a scan
resolution of 510 ppi.
Different color separation procedures might
require different ratios of image resolution to
screen frequency (see page 45). It’s a good idea to
check with your service provider or print shop
before you scan the image.
Scanning using the file size setting
You can create a dummy file to predict the file size
needed for the final output of your scan.
To calculate the file size before scanning an image:
1 Open Adobe Photoshop, and choose
File > New.
2 Enter the width, height, and resolution for your
final printed image. The resolution should be 1.5
to 2 times the screen frequency you will use to
print. Make sure that the mode you plan to scan in
is selected. (See “Color modes and models” on
page 63.) The New dialog box then displays the
file size.
For example, suppose you want the final image to
be 4 inches wide and 5 inches high. You plan to
print it with a 150-line screen using a 2:1 ratio, so
you set the resolution to 300. The resulting file size
is 5.15 megabytes.
To produce the scan, enter the resulting file size in
your scanner settings. Don’t worry about
resolution or image dimensions. After you have
scanned the image and imported it into
Photoshop, use the Image Size command to enter
the correct width and height for the image.
Optimizing the dynamic range of the scan
Keep in mind that the human eye can detect a
wider tonal range than can be printed. If your
scanner allows, set the black and white points
before scanning a file to produce the best tonal
range and capture the widest dynamic range. Then
use Photoshop’s color correction tools to set the
white and black points for the scanned image (see
“Step 3: Set the highlight and shadow values” on
page 114).
Eliminating unwanted color casts
If your scanned image contains an unwanted color
cast, you can perform a simple test to determine
whether the cast was introduced by your scanner.
If it was, you can use the same test file to create a
color-cast correction for all images scanned with
the scanner.
Page 62

CHAPTER 3
54
Getting Images into Photoshop
To identify and correct a color cast introduced by
a scanner:
1 Make sure that your monitor has been
calibrated. (See “Calibrating your monitor” on
page 82.)
2 Open a new Photoshop file, and use the linear
gradient tool ( ) to create a blend from pure
black to pure white.
3 Choose Image > Adjust > Posterize, and
posterize the blend using 11 levels.
4 Print the 11-step gray wedge on a black-and-
white printer, and then scan it into Photoshop.
Note: You can also perform this test using an
18-percent neutral gray card or an 11-step gray
wedge from a photography store.
5 Open the Info palette, and read the RGB values
on-screen for each of the gray levels. Uneven R, G,
and B values indicate a color cast.
6 Use Levels or Curves to correct the color cast,
and then save the dialog box settings. (For instructions, see Chapter 6, “Making Color and Tonal
Adjustments.”)
7 Open the scanned image you want to correct,
reopen the dialog box you used to correct the cast
in step 6, and load the saved settings.
To create a new image:
1 Do one of the following:
• To base the image dimensions and resolution on
the Clipboard contents, choose File > New.
• To base the image size on the default dimensions
and resolution or the last entered settings, hold
down Alt (Windows) or Option (Mac OS) as you
choose File > New.
• To base the image size on an open window,
choose File > New. With the New dialog box open,
choose the image whose size you want to match
from the Window menu.
2 Type a name for the image and if desired, set the
width, height, resolution, and mode. (See “Color
modes and models” on page 63.)
3 For Contents, select an option:
• White to fill the background with white, the
default background color.
• Background Color to fill the image with the
current background color. (See “Choosing the
foreground and background color” on “Choosing
the foreground and background colors” on
page 214.)
• Transparent to create an image containing a
single layer with no color values.
Creating new images
The New command lets you create a blank,
untitled Photoshop image. You can also use this
command to create a new image with the exact
same pixel dimensions as an image or selection
that has been copied to the Clipboard.
Note: Because images created with the transparent
option contain a single layer instead of a background,
they must be saved in Photoshop format. Photoshop
is the only format that supports layers. (See “Saving
files” on page 311.)
Page 63

ADOBE PHOTOSHOP 5.0
User Guide
55
Opening and importing images
In Adobe Photoshop, you can open and import
images in various file formats and have multiple
images open at one time. If a file format does not
appear in the Open dialog box or in the File >
Import submenu, install the format’s plug-in
module (see “Using plug-in modules” on
page 36). For more information on a specific file
format, see “About file formats” on page 321.
To import an image, choose the import module
from the File > Import submenu. The options for
some import modules are discussed later in this
section.
For information on opening Raw, Antialiased PICT, or PICT Resource files, see
online help.
To open a file:
1 Choose File > Open.
2 Specify a file format:
• In Windows, for Files of Type, choose All
Formats to display all the files in the selected
directory. Choose an individual format to display
only files saved in that format.
• In Mac OS, select Show All Files to display all
files in the selected folder. To locate files in other
folders, click Find and type the filename.
3 In Mac OS, select Show Thumbnail to preview
files before opening them (if a preview has been
saved with the image). This option requires the
Apple QuickTime extension.
4 Select the file.
5 Click Open. In some cases, a dialog box appears,
letting you set the open options. The formats
requiring an open dialog box are described in the
following sections.
In some cases (such as when first opening a file
that was saved in an older version of Photoshop),
a status bar appears indicating the file is being
converted to a specified color space. If the Profile
Mismatch dialog box appears, specify whether to
convert the file’s color profile (see “Managing ICC
profiles in files” on page 99).
To specify the file format in which to open a file:
Do one of the following:
• In Windows, choose File > Open As, select the
desired format, and click Open.
• In Mac OS, choose File > Open, and select Show
All Files. For Format, choose the desired file
format, and click Open.
Note: If the file does not open, then the chosen
format may not match the file’s true format, or the
file may be damaged.
Importing Adobe Illustrator, PDF, and EPS
files
You can import files created in Adobe Illustrator
and PDF and EPS files containing vector art using
these commands:
• The Open command to open an Illustrator, PDF,
or EPS file as a new Photoshop image.
• The Place command to place an Illustrator, PDF,
or EPS file as a new layer in an existing Photoshop
image.
Page 64

CHAPTER 3
56
Getting Images into Photoshop
• The Paste commands to paste copied Illustrator
artwork into a Photoshop image either as pixels
or as a path. (See “Using drag and drop to copy
between applications” on page 179.)
When an Illustrator, PDF, or EPS image is opened
or placed in Photoshop, it is rasterized—the
mathematically defined lines and curves of the
vector image are converted into the pixels or bits of
a bitmap image. For more on vector and bitmap
images, see page 41.
To convert a multiple-page PDF file to
multiple images in Photoshop format,
choose File > Automate > Multi-Page PDF
to PSD.
To open an Adobe Illustrator, PDF, or EPS file as a new
Adobe Photoshop image:
1 Choose File > Open.
2 Select the file you want to open, and click Open.
If the file does not appear, for Files of Type, choose
All Formats (Windows) or select Show All Files
(Mac OS).
3 If you are opening a PDF file that contains
multiple pages, select the page you want to open,
and click OK.
4 Indicate the desired dimensions, resolution,
and mode. To maintain the same height-to-width
ratio, select Constrain Proportions.
5 Select Anti-aliased to minimize the jagged
appearance of the artwork’s edges as it is
rasterized.
6 Click OK.
To place Adobe Illustrator, PDF, or EPS artwork into
an Adobe Photoshop image:
1 Open the Adobe Photoshop image in which you
want to place the artwork.
2 Choose File > Place, select the file you want to
place, and click Open.
3 If you are placing a PDF file that contains
multiple pages, select the page you want to place,
and click OK.
The placed artwork appears as a new layer inside a
bounding box at the center of the Adobe
Photoshop image. The artwork maintains its
original aspect ratio.
4 Adjust the placed artwork:
• To move, position the pointer inside the
bounding box, and drag.
• To scale, drag one of the handles at the corners or
sides of the bounding box. Hold down Shift as you
drag to constrain the proportions.
• To rotate, position the pointer outside the
bounding box (the pointer turns into a curved
arrow), and drag. To adjust the point around
which the marquee is rotated, drag the circle at the
center of the bounding box.
• To skew, hold down Ctrl (Windows) or
Command (Mac OS) and drag a side handle of the
bounding box.
5 To confirm the placement of the artwork, press
Enter (Windows) or Return (Mac OS). To cancel
the placement, press Esc.
Page 65

ADOBE PHOTOSHOP 5.0
User Guide
57
Turning off anti-aliasing for imported
objects
The Anti-alias PostScript
edges from a pasted or placed selection by making
a subtle transition between the edges of the
selection and its surrounding pixels. Turning off
this option helps maintain the hard edges of line
art as it is rasterized.
To turn off the Anti-alias Postscript option:
1 Choose File > Preferences > General.
2 Deselect Anti-alias PostScript. Clearing this
option can decrease the time it takes to import
the file.
.
®
option removes jagged
Opening Photo CD files
You can open Kodak® Photo CD™ files, including
high-resolution files from Pro Photo CD discs,
directly in Photoshop. The Kodak Precision Color
Management System (KPCMS) lets you control
the color mode and display of Photo CD images by
specifying profiles for the source film and the
destination output device. The KPCMS is
automatically installed on your system when you
install Photoshop.
Note: You cannot save files in the Photo CD format
from Photoshop.
To open a Photo CD file:
1 Choose File > Open.
2 Select the file you want to open, and click Open.
If the file does not appear, for Files of Type, choose
All Formats (Windows) or select Show All Files
(Mac OS).
3 Choose a resolution for the image.
4 Select Landscape to open portrait images in
landscape orientation.
5 Click Source. Choose a device and a profile
description, and click OK.
If you are unsure of the source profile, click Image
Info and note the number next to Product Type of
Original. Then click Source and choose the profile
that displays the same number for Input Device
Settings.
6 Click Destination, choose a profile for the
output device, and click OK.
In addition to the RGB and Lab color mode
profiles, you can install profiles for specialized
output needs.
7 To display scanner information about the
image, click Image Info.
8 Click OK to open the image.
Viewing copyright and file
information
Once you have opened a file, you can view
copyright and authorship information that has
been added to the file. This information includes
standard file information (see “Adding file information” on page 313) and Digimarc watermarks.
Photoshop automatically scans opened images for
watermarks using the Digimarc Detect Watermark
plug-in. If a watermark is detected, Photoshop
displays a copyright symbol in the image window’s
title bar and updates the Copyright & URL section
of the File Info dialog box.
Page 66

CHAPTER 3
58
Getting Images into Photoshop
To view file information:
Choose File > File Info. For section, choose the
attribute you want to view.
To read a Digimarc watermark:
1 Choose Filter > Digimarc > Read Watermark. If
the filter finds a watermark, a dialog box displays
the Creator ID, copyright year (if present), and
image attributes.
2 Click OK, or for more information choose from
the following:
• If you have a Web browser installed, click Web
Lookup to get more information about the owner
of the image. This option launches the browser
and displays the Digimarc Web site, where contact
details appear for the given Creator ID.
• Call the phone number listed in the Watermark
Information dialog box to get information faxed
back to you.
For information on adding Digimarc watermarks to images, see online help.
To crop an image using the Crop command:
1 Use the rectangle marquee tool to select the part
of the image you want to keep. Make sure that the
Feather option is set to 0 pixels. (See “Feathering”
on page 147.)
2 Choose Image > Crop.
To use the crop tool:
1 Select the crop tool ( ).
2 Drag over the part of the image you want to
keep.
When you release the mouse button, the crop
marquee appears as a bounding box with handles
at the corners and sides.
Cropping an image
Photoshop provides two ways to crop an image:
• The Image > Crop command discards the area
outside of a rectangular selection and keeps the
same resolution as the original.
• The crop tool ( ) lets you crop an image by
dragging over the area you want to keep. The
advantage of using the crop tool is that you can
rotate and resample the area as you crop. See
“About resampling” on page 48 for more information on resampling.
3 Adjust the crop marquee:
• To move the marquee to another position,
position the pointer inside the bounding box
and drag.
• To scale the marquee, drag a handle. To
constrain the proportions, hold down Shift as
you drag a corner handle.
Page 67

ADOBE PHOTOSHOP 5.0
User Guide
59
• To rotate the marquee, position the pointer
outside the bounding box (the pointer turns into a
curved arrow), and drag. To adjust the point
around which the marquee is rotated, drag the
circle at the center of the bounding box.
Drag handle to scale; drag outside bounding box to rotate.
4 To crop the image, press Enter (Windows) or
Return (Mac OS). To cancel the cropping
operation, press Esc.
Cropped area
4 Choose the units of measurement you want
from the menus. The Columns option measures
width in terms of the columns specified in the
Rulers & Units preferences.
5 Enter values for the size and resolution you
want for the cropped area.
The Fixed Target Size option constrains the file size
of the image. If you specify size but not resolution,
the resolution changes automatically to
compensate for the size change. If you specify
resolution but not size, the size changes automatically to compensate for the resolution change.
6 Drag over the area you want to keep with the
crop tool, and then press Enter (Windows) or
Return (Mac OS).
Increasing the size of the work canvas
The Canvas Size command lets you add or remove
work space around an existing image. You can crop
an image by decreasing the canvas area. Added
canvas appears in the same color or transparency
as the background.
Note: You can’t rotate the crop tool marquee for an
image in Bitmap mode.
To specify the size and resolution of the cropped area:
1 Double-click the crop tool ( ) to display its
Options palette.
2 Select Fixed Target Size.
3 To begin with the size and resolution values of
the current image, click Front Image.
To use the Canvas Size command:
1 Choose Image > Canvas Size.
2 Choose the units of measurement you want.
The Columns option measures width in terms
of the columns specified in the Rulers & Units
preferences.
3 Enter the dimensions in the Width and Height
boxes. A new file size appears.
Page 68

CHAPTER 3
60
Getting Images into Photoshop
4 For Anchor, click a square to indicate where to
position the existing image on the new canvas.
5 Click OK.
Original canvas, and canvas added to top of image
Page 69

4
Page 70

Page 71

Chapter 4: Choosing a Color Mode
63
amiliarity with color theory and terminology can help you understand how color
F
is measured and how Adobe Photoshop
uses this information to define, display, and print
color values.
Color modes and models
A color mode in Photoshop determines the color
model used to display and print Photoshop
documents. Photoshop bases its color modes on
established models for describing and reproducing
color. Common models include HSB (for hue,
saturation, brightness); RGB (for red, green, blue);
CMYK (for cyan, magenta, yellow, black); and
CIE L*a*b. Photoshop also includes modes for
specialized color output such as indexed color
and duotones.
HSB model
Based on the human perception of color, the HSB
model describes three fundamental characteristics
of color:
• Hue is the color reflected from or transmitted
through an object. It is measured as a location on
the standard color wheel, expressed as a degree
°
between 0
identified by the name of the color such as red,
orange, or green.
• Saturation, sometimes called chroma, is the
strength or purity of the color. Saturation represents the amount of gray in proportion to the hue,
and 360°. In common use, hue is
measured as a percentage from 0% (gray) to 100%
(fully saturated). On the standard color wheel,
saturation increases from the center to the edge.
• Brightness is the relative lightness or darkness of
the color, usually measured as a percentage from
0% (black) to 100% (white).
Although you can use the HSB model in
Photoshop to define a color in the Color palette or
Color Picker dialog box, there is no HSB mode
available for creating and editing images.
For a color illustration of the HSB model,
see figure 4-1 on page 223.
RGB model
A large percentage of the visible spectrum can be
represented by mixing red, green, and blue (RGB)
colored light in various proportions and intensities. Where the colors overlap, they create cyan,
magenta, and yellow.
Because the RGB colors combine to create white,
they are also called additive colors. Adding all
colors together creates white—that is, all light is
reflected back to the eye. Additive colors are used
for lighting, video, and monitors. Your monitor,
for example, creates color by emitting light
through red, green, and blue phosphors.
For a color illustration of additive colors in
RGB, see figure 4-2 on page 223.
Page 72

CHAPTER 4
64
Choosing a Color Mode
RGB mode
Photoshop’s RGB mode uses the RGB model,
assigning an intensity value to each pixel ranging
from 0 (black) to 255 (white) for each of the RGB
components in a color image. For example, a
bright red color might have an R value of 246, a
G value of 20, and a B value of 50. When the values
of all three components are equal, the result is a
shade of gray. When the value of all components is
255, the result is pure white; when the value is 0,
pure black.
RGB images use three colors to reproduce up to
16.7 million colors on-screen. RGB images are
three-channel images, so they contain 24 (8 x 3)
bits per pixel. RGB is the default mode for new
Photoshop images. Computer monitors always
display colors using the RGB model. This means
that when working in color modes other than
RGB, such as CMYK, Photoshop temporarily
converts data into RGB data for display on-screen.
CMYK model
The CMYK model is based on the light-absorbing
quality of ink printed on paper. As white light
strikes translucent inks, part of the spectrum is
absorbed and part is reflected back to your eyes.
In theory, pure cyan (C), magenta (M), and yellow
(Y) pigments should combine to absorb all color
and produce black. For this reason these colors are
called subtractive colors. Because all printing inks
contain some impurities, these three inks actually
produce a muddy brown and must be combined
with black (K) ink to produce a true black. (K is
used instead of B to avoid confusion with blue.)
Combining these inks to reproduce color is called
four-color process printing.
The subtractive (CMY) and additive (RGB) colors
are complementary colors. Each pair of subtractive
colors creates an additive color, and vice versa.
For a color illustration of subtractive color
in CMYK, see figure 4-3 on page 223.
CMYK mode
In Photoshop’s CMYK mode, each pixel is
assigned a percentage value for each of the process
inks. The lightest (highlight) colors are assigned
small percentages of process ink colors, the darker
(shadow) colors higher percentages. For example,
a bright red might contain 2% cyan, 93% magenta,
90% yellow, and 0% black. In CMYK images, pure
white is generated when all four components have
values of 0%.
Use the CMYK mode when preparing an image to
be printed using process colors. Converting an
RGB image into CMYK creates a color separation.
If you start with an RGB image, it’s best to edit first
and then convert to CMYK. In RGB mode, you can
use the CMYK Preview command to simulate the
effects of the change without actually changing
image data (see “Previewing CMYK colors” on
page 110). You can also use CMYK mode to work
directly with CMYK images scanned or imported
from high-end systems.
Page 73

ADOBE PHOTOSHOP 5.0
User Guide
65
L*a*b model
The L*a*b color model is based on the model
proposed by the Commission Internationale
d’Eclairage (CIE) in 1931 as an international
standard for color measurement. In 1976, this
model was refined and named CIE L*a*b.
L*a*b color is designed to be device independent;
creating consistent color whatever the device (such
as monitor, printer, computer, or scanner) used to
create or output the image.
L*a*b color consists of a luminance or lightness
component (L) and two chromatic components:
the a component (from green to red) and the
b component (from blue to yellow).
For a color illustration of the luminance
model, see figure 4-4 on page 223.
Lab mode
In Photoshop’s Lab mode (the asterisks are
dropped from the name), the lightness component
(L) can range from 0 to 100. The a component
(green-red axis) and the b component (blueyellow axis) can range from +120 to –120.
You can use Lab mode to work with Photo CD
images, edit the luminance and the color values in
an image independently, move images between
®
systems, and print to PostScript
3 printers. To print Lab images to other color
PostScript devices, convert to CMYK first.
Lab color is the internal color model Photoshop
uses when converting from one color mode
to another.
Level 2 and Level
Specialized color modes
Photoshop also provides specialized color modes.
Bitmap mode Uses one of two color values (black
or white) to represent the pixels in an image.
Images in Bitmap mode are called bitmapped, or
1-bit, images because they have a bit depth of 1.
(See “About bit depth” on page 68.)
Grayscale mode Uses up to 256 shades of gray.
Every pixel of a grayscale image has a brightness
value ranging from 0 (black) to 255 (white).
Grayscale values can also be measured as
percentages of black ink coverage (0% is equal to
white, 100% to black). Images produced using
black-and-white or grayscale scanners typically are
displayed in Grayscale mode. You can convert both
Bitmap-mode and color images to grayscale.
To convert a color image to a high-quality blackand-white image, Photoshop discards all color
information in the original image. The gray levels
(shades) of the converted pixels represent the
luminosity of the original pixels.
You can mix information from the color
channels to create a custom grayscale
channel by using the Channel Mixer command.
When converting from grayscale to RGB, the color
values for a pixel are based on its previous gray
value. A grayscale image can also be converted to a
CMYK image (for creating process-color
quadtones without converting to Duotone mode)
or to a Lab color image.
Page 74

CHAPTER 4
66
Choosing a Color Mode
Duotone mode Creates duotone (two-color),
tritone (three-color), and quadtone (four-color)
grayscale images using two to four colored inks.
(See “Using monotones, duotones, tritones, and
quadtones” on page 339.)
Indexed color mode Uses at most 256 colors. When
converting to indexed color, Photoshop builds a
color lookup table (CLUT), which stores and
indexes the colors in the image. If a color in the
original image does not appear in the table, the
program chooses the closest one or simulates the
color using available colors.
By limiting the palette of colors, indexed color can
reduce file size while maintaining visual quality—
for example, for a multimedia animation application or a Web page. Limited editing is available
in this mode. For extensive editing you should
convert temporarily to RGB mode. (See
“Converting to indexed color” on page 72.)
Multichannel mode Uses 256 levels of gray in each
multiple channel. Multichannel images are useful
for specialized printing—for example, converting
a duotone for printing in Scitex CT format.
These guidelines apply to converting images to
Multichannel mode:
• You can convert any image composed of more
than one channel to a multichannel image. The
original channels are converted to spot color
channels.
• When converting a color image to multichannel,
the new grayscale information is based on the
color values of the pixels in each channel.
• Converting a CMYK image to multichannel
creates cyan, magenta, yellow, and black spot
channels.
• Converting an RGB image to multichannel
creates cyan, magenta, and yellow spot channels.
• Deleting a channel from an RGB, a CMYK, or a
Lab image automatically converts the image to
multichannel mode. See “Color channels” on
page 67 for more information on channels.
Note: You cannot print a color composite from
Multichannel mode. Also, most export file formats
do not support multichannel mode images.
However, you can export the file in Photoshop
DCS 2.0 format.
For a color illustration of the effect of color
modes on file size, see the figure
on page 229.
Color gamuts
A gamut is the range of colors that a color system
can display or print. The spectrum of colors seen
by the human eye is wider than the gamut available
in any color model.
Among the color models used in Photoshop,
L*a*b has the largest gamut, encompassing all
colors in the RGB and CMYK gamuts. Typically,
the RGB gamut contains the subset of these colors
that can be viewed on a computer or television
monitor (which emits red, green, and blue light).
Page 75

ADOBE PHOTOSHOP 5.0
User Guide
67
Therefore, some colors, such as pure cyan or pure
yellow, can’t be displayed accurately on a monitor.
Note: The Wide Gamut RGB mode extends this color
range beyond what can be previewed on a monitor,
creating a larger RGB color range in which to work.
For information on editing images in this mode, see
“Entering RGB setup information” on page 84.
The CMYK gamut is smaller, consisting only of
colors that can be printed using process-color
inks. When colors that cannot be printed are
displayed on-screen, they are referred to as out-ofgamut colors—that is, outside the CMYK gamut.
(See “Identifying out-of-gamut colors” on
page 110.)
For a color illustration of the Lab, RGB,
and CMYK color gamuts, see figure 4-5
on page 223.
Color channels
Every Adobe Photoshop image has one or more
channels, each storing information about color
elements in the image. The number of default
color channels in an image depends on its color
mode. For example, a CMYK image has at least
four channels, one each for cyan, magenta, yellow
and black information. Think of a channel as
analogous to a plate in the printing process, with a
separate plate applying each layer of color.
In addition to these default color channels, extra
channels, called alpha channels, can be added to an
image for storing and editing selections as masks;
and spot color channels can be added, to add spot
color plates for printing. (See Chapter 10, Using
Channels and Masks.)
An image can have up to 24 channels. By default,
Bitmap-mode, grayscale, duotone, and indexedcolor images have one channel; RGB and Lab
images have three; and CMYK images have four.
You can add channels to all image types except
Bitmap-mode images. For information on these
image types and other distinctions, see the sidebar
“Color modes” on page 229.
Measuring color values in the Info palette
Depending on how your Info palette is set up, you
can select any tool, position the pointer over any
part of an image, and determine the color value
under the pointer. You can customize the Info
palette and color samplers to express color values
using the HSB, RGB, CMYK, Lab, or Grayscale
modes without changing the mode of the image
itself. For more information on measuring color
with the Info palette and color samplers, see
“Previewing color values” on page 107 and the
procedure to change Info palette options in “Using
the Info palette” on page 30.
Adjusting the monitor display
Although the RGB color model used by computer
monitors is capable of displaying much of the
visible spectrum, the video system sending data to
a given monitor often limits how many colors can
be displayed at once. By understanding how color
data is measured in digital files and on-screen, you
can better adjust Photoshop’s preferences to offset
the limitations of your video system.
Page 76

CHAPTER 4
68
Choosing a Color Mode
This understanding also will help you choose a file
format for your images. For more information, see
Chapter 14, Saving and Exporting Images.
About bit depth
Bit depth—also called pixel depth or color depth—
measures how much color information is in the
image to display or print pixels. Greater bit depth
(more bits of information per pixel) means more
available colors and more accurate color representation in the digital image. For example, a pixel
with a bit depth of 1 has two possible values: black
and white. A pixel with a bit depth of 8 has 2
256, possible values. And a pixel with a bit depth of
24
24 has 2
, or roughly 16 million, possible values.
Common values for bit depth range from 1 to
64 bits per pixel.
Photoshop supports up to 16 bits per pixel for each
channel in an image. A 24-bit RGB image, for
example, would have 8 bits per pixel for each of the
red, green, and blue channels.
For a color illustration of bit depth as
displayed on monitors, see figure 4-6
on page 224.
8
, or
Color display options for 8-bit color
displays
Each image mode in Adobe Photoshop uses a color
lookup table, or color palette, to store the colors
used in the image. When you’re working with a
display system that supports 8-bit color (or fewer
colors), the monitor displays only 256 different
colors at a time. For example, a 24-bit RGB image
can display 16.7 million colors in any image at a
time. However, if the monitor can display only 256
of the 16.7 million colors, Adobe Photoshop uses a
technique called dithering to mix pixels of available
colors and thus simulate colors not currently
available.
By default, Adobe Photoshop uses pattern
dithering, which can result in a distinctive pattern
of darker or lighter areas in the image. In contrast,
diffusion dithering eliminates this distinctive
patterning by using the surrounding pixels in the
mix of pixel color. But diffusion dithering can
cause visual inconsistencies when only part of a
screen is redrawn as you scroll, edit, or paint. Keep
in mind that dithering effects only appear onscreen, not in print.
To select a color display option:
1 Choose File > Preferences > Display & Cursors.
2 Choose one or both of these display options:
• System Palette to use the system’s standard
256-color palette.
• Diffusion Dither to minimize dither patterns
produced by dithering.
Page 77

ADOBE PHOTOSHOP 5.0
User Guide
69
Converting between bit depths
In most cases, RGB, grayscale, and CMYK images
contain 8 bits of data per color channel. With three
channels in an RGB image, this translates to a
24-bit RGB bit depth (8 bits x 3 channels), an 8-bit
grayscale bit depth (8 bits x 1 channel), and a
32-bit CMYK bit depth (8 bits x 4 channels).
Photoshop can also read and import 48-bit RGB,
64-bit CMYK, and 16-bit grayscale images (each
with 16 bits of data per color channel).
Note: A16-bit-per-channel image provides finer
distinctions in color, but its file size is much larger
than an 8-bit-per-channel image.
Photoshop supports these tools and commands in
16-bit-per-channel images: the marquee, lasso,
crop, measure, zoom, hand, pen, eyedropper,
color sampler, and rubber stamp tools; and the
Duplicate, Feather, Modify, Levels, Auto Levels,
Curves, Histogram, Hue/Saturation,
Brightness/Contrast, Color Balance, Equalize,
Invert, Channel Mixer, Image Size, Transform
Selection, and Rotate Canvas commands. To take
full advantage of Photoshop’s features, you can
convert a 16-bit-per-channel image to an 8-bitchannel image.
To convert from 8 bits per channel to 16 bits per
channel:
1 Flatten the image you want to convert, as
explained in “Flattening all layers” on page 269.
2 Choose Image > Mode > 16 Bits/Channel.
To convert from 16 bits per channel to 8 bits per
channel:
Choose Image > Mode > 8 Bits/Channel.
Converting images from one mode to another
The transition between converting an image from
one mode to another permanently changes color
values in the image. For example, when you
convert an RGB image to CMYK mode, RGB color
values outside the CMYK gamut are adjusted to
fall within the CMYK gamut. Consequently,
before converting images, it’s best to do the
following:
• Do as much editing as possible in the image’s
original mode (usually RGB from most scanners,
or CMYK from traditional drum scanners or if
imported from Adobe Illustrator or from a Scitex
system).
• Save a backup copy before converting. Be sure to
save a copy of your image that includes all layers in
order to edit the original version of the image after
the conversion.
• Flatten the file before converting it. The inter-
action of colors between layer blending modes will
change when the mode changes.
For information on converting to CMYK, see
“Converting to CMYK” on page 97, “About
calibration” on page 80, and “Adjusting the
separation type and black generation” on page 90.
For converting open images to a different color
space, see “Converting the color space of open
images” on page 100.
To convert an image to another mode:
Choose Image > Mode and the mode you want
from the submenu. Modes not available for the
active image appear dimmed in the menu.
Page 78

CHAPTER 4
70
Choosing a Color Mode
The following mode conversions flatten the file:
• RGB to Indexed color or Multichannel mode.
• CMYK to Multichannel mode.
• Lab to Multichannel, Bitmap, or Grayscale
mode.
• Grayscale to Bitmap, Indexed, or Multichannel
mode.
• Duotone to Bitmap, Indexed, or Multichannel
mode.
Converting between Grayscale mode and Bitmap mode
Converting an image to Bitmap mode reduces the
image to two colors, greatly simplifying the color
information in the image and reducing its file size.
To convert an image to Bitmap mode, you must
first convert it to Grayscale mode. This removes
the hue and saturation information from the
pixels and leaves just the brightness values.
However, because few editing options are available
for Bitmap-mode images, it’s usually best to edit
the image in Grayscale mode and then convert it.
Keep in mind that a Bitmap-mode image edited in
Grayscale mode may not look the same when
converted back to Bitmap mode. For example, a
pixel that is black in Bitmap mode and then edited
in Grayscale mode may be converted to a shade of
gray. If the pixel is light enough, it will be white
when converted back to Bitmap mode.
To convert an image to Bitmap mode:
1 Do one of the following:
• If the image is in color, choose Image > Mode >
Grayscale. Then choose Image > Mode > Bitmap.
• If the image is grayscale, choose Image > Mode >
Bitmap.
2 For Output, enter a value for the output
resolution of the Bitmap-mode image, and choose
a unit of measurement. By default, the current
image resolution appears as both the input and the
output resolutions.
3 Select a bitmap conversion method, and click
OK. If you choose Halftone Screen, see the
following section. For other conversion methods,
see “Additional bitmap conversion options” on
page 71.
To convert a Bitmap-mode image to grayscale:
1 Choose Image > Mode > Grayscale.
2 Enter a value between 1 and 16 for the size ratio.
The size ratio is the factor for scaling down the
image. For example, to reduce a grayscale image by
50%, enter 2 for the size ratio. If you enter a
number greater than 1, the program averages
multiple pixels in the Bitmap-mode image to
produce a single pixel in the grayscale image. This
process lets you generate multiple shades of gray
from an image scanned on a 1-bit scanner.
Page 79
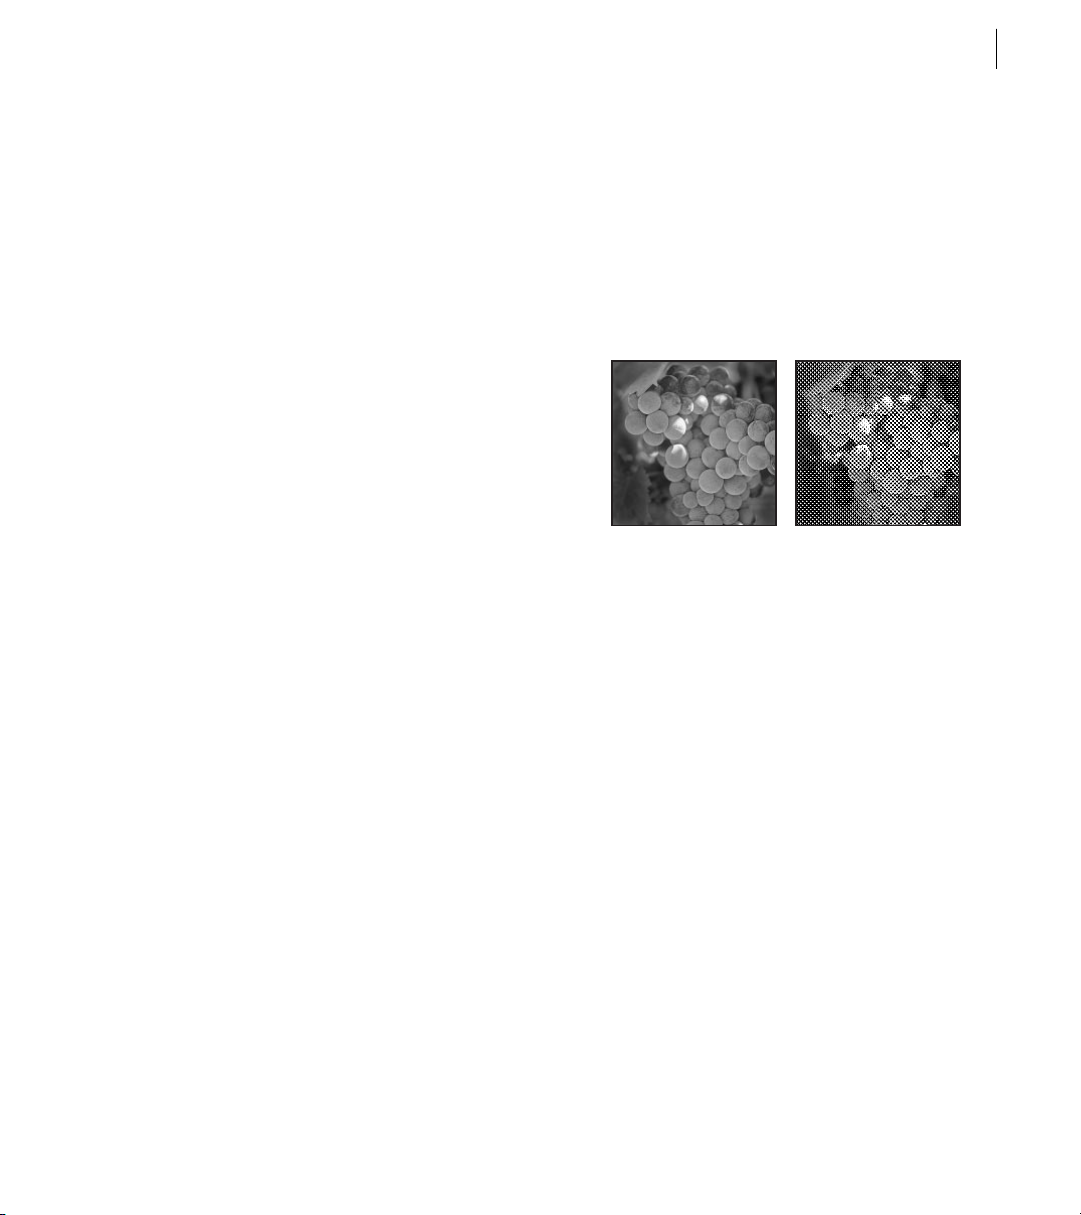
ADOBE PHOTOSHOP 5.0
User Guide
71
Specifying a halftone screen for a Bitmapmode image
The Halftone Screen option in the Bitmap dialog
box lets you convert a grayscale image to simulated
halftone dots.
Important: The halftone screen becomes part of the
image. If you print the image on a halftone printer,
it will print with the halftone screen you choose here
plus that of the printer. On some printers, the result
probably will be a moiré pattern in the image.
To specify the halftone screen for a Bitmap-mode
image:
1 Choose Image > Mode > Bitmap.
2 Click Halftone Screen; then click OK.
3 For Frequency, enter a value for the screen
frequency, and choose a unit of measurement.
Values can range from 1 to 999 for lines per inch
and from 0.400 to 400 for lines per centimeter. You
can enter decimal values.
The screen frequency specifies the ruling of the
halftone screen in lines per inch (lpi). The
frequency depends on the paper stock and type of
press used for printing. Newspapers commonly
use an 85-line screen. Magazines use higher
resolution screens, such as 133 lpi and 150 lpi.
Check with your print shop for correct screen
frequencies.
4 Enter a value for the screen angle in degrees
from –180 to +180.
The screen angle refers to the orientation of the
screen. Continuous-tone and black-and-white
°
halftone screens commonly use a 45
5 For Shape, choose the dot shape you want.
6 Click OK.
Original grayscale image, and Halftone Screen conversion:
53 lpi, 45ª angle, round dot
angle.
You can save and reuse halftone screen settings by
using the Save and Load buttons in the Halftone
Screen dialog box.
Additional bitmap conversion options
Like the Halftone Screen option, the other bitmap
conversion options determine the quality of the
Bitmap-mode image.
50% Threshold Converts pixels with gray values
above the middle gray level (128) to white and
below to black. The result is a very high-contrast,
black-and-white representation of the image.
Pattern Dither Converts an image by organizing
the gray levels into geometric configurations of
black-and-white dots.
Page 80

CHAPTER 4
72
Choosing a Color Mode
Diffusion Dither Converts an image by using an
error-diffusion process, starting at the pixel in the
upper left corner of the image. If the pixel’s value
is above middle gray (128), the pixel is changed
to white—if below, to black. Because the original
pixel is rarely pure white or pure black, error is
inevitably introduced. This error is transferred to
surrounding pixels and diffused throughout the
image, resulting in a grainy, filmlike texture. This
option is useful for viewing images on a blackand-white screen.
Original grayscale image, and 50% Threshold
conversion method
You can create a pattern representing the texture
you want and then screen the grayscale image to
apply the texture. To cover the entire image, the
pattern must be as large as the image. Otherwise,
the pattern will be tiled. For example, if you apply
a 1-inch-by-1-inch pattern to a 4-inch-by-4-inch
image, the pattern appears as 16 squares. Adobe
Photoshop comes with several self-tiling patterns
that can be used as halftone screen patterns (see
the procedure to use a pattern from the PostScript
Patterns folder in “Filling and stroking selections
and layers” on page 211).
Because the Custom Pattern option simulates dark
and light colors by making the halftone pattern
thicker and thinner, it makes sense to choose a
pattern that lends itself to thickness variations,
typically one with a variety of gray shades.
To prepare a black-and-white pattern for
conversion, you can first convert the image
to grayscale and then apply the Blur More filter
several times. This blurring technique creates
thick lines tapering from dark gray to white.
Pattern Dither conversion method, and Diffusion Dither
conversion method
Custom Pattern Simulates the effect of printing a
grayscale image through a custom halftone screen.
This method lets you apply a screen texture, such
as a wood grain, to an image. To use this option,
you must first define a pattern (see “Filling and
stroking selections and layers” on page 211).
Converting to indexed color
Converting to indexed color deletes all but 256
colors from the image—the standard number of
colors supported by many multimedia animation
applications and Web pages. Converting an
RGB image to indexed color lets you edit the
image’s color table or export it to an application
supporting only 8-bit color. The conversion also
reduces the file size by deleting color information
from the image.
Page 81

ADOBE PHOTOSHOP 5.0
User Guide
73
To convert an RGB image to an indexed-color image:
1 Choose Image > Mode > Indexed Color.
Note: The image must be flattened first, or you will
lose layers.
2 Select Preview to display a preview of the
changes.
3 Select a palette, color depth (bit depth), and
dither method as described in the following
sections.
4 Click OK.
Specifying a palette
Eight palette types are available for converting an
image to indexed color.
Exact Creates a palette using the exact colors
appearing in the RGB image—an option available
only if the image uses 256 or fewer colors. Because
the image’s palette contains all colors in the image,
there is no dithering.
System (Windows) Uses the Windows system’s
default 8-bit palette, which is based on a uniform
sampling of RGB colors.
System (Macintosh) Uses the Macintosh system’s
default 8-bit palette, which is based on a uniform
sampling of RGB colors.
Web Uses the palette most often used by Web
browsers to display 8-bit images. This palette is a
subset of the Windows and Macintosh systems’
palettes.
Uniform Creates a palette by uniformly sampling
colors from the spectrum. For example, if you
choose an 8-bit color depth, Photoshop takes 6
evenly spaced color levels each of red, green, and
blue and calculates the combinations of these
colors to produce a uniform palette of 216 colors
(6 x 6 x 6 = 216). A lower bit depth creates a
uniform palette composed of fewer colors. The
total number of colors displayed in the image
corresponds to the cube nearest the chosen bit
depth (8, 27, 64, 125, or 216).
Adaptive Creates a palette by sampling the colors
from the spectrum appearing most commonly in
the image. For example, an RGB image with only
the colors green and blue produces a palette made
primarily of greens and blues. Most images
concentrate colors in particular areas of the
spectrum.
To control a palette more precisely, first select a
part of the image containing the colors you want to
emphasize. Photoshop weights the conversion
toward these colors.
Custom Creates a custom palette using the Color
Table dialog box. Either edit the color table and
save it for later use or click Load to load a previously created color table. (See “Specifying color
matching options” on page 74.)
This option also displays the current adaptive
palette, which is useful for previewing the colors
most often used in the image.
Page 82

CHAPTER 4
74
Choosing a Color Mode
Previous Uses the custom palette from the
previous conversion, making it easy to convert
several images with the same custom palette.
For a color illustration of color palettes, see
figure 4-7 on page 224.
Specifying the bit depth
Using the Uniform or Adaptive palette, you can
specify the bit depth of an indexed-color image—
the number of bits of color information per pixel.
Bit depth, also known as color depth, determines
the number of colors used to display (or print) an
image. For example, if you choose 4 bits per pixel,
the image is composed of 16 colors; 6 bits per pixel,
64 colors; 8 bits per pixel, 256 colors. (The number
of colors used is displayed in the Colors text box.)
In addition, you can specify the exact number of
colors to be displayed (up to 256) by choosing
Other for Color Depth and entering a value for
Colors.
The options in the Indexed Color dialog box
control only how the indexed color table is created.
Adobe Photoshop still treats the image as an 8-bit,
256-color image.
Specifying dithering options
Unless you’re using the Exact color table option,
the color table may not contain all the colors used
in the image. To simulate colors not in the color
table, you can dither the colors. Dithering mixes
the pixels of the available colors to simulate the
missing colors. You can choose from three
dithering options:
None Does not dither colors but instead uses the
color closest to the missing color. This tends to
result in sharp transitions between shades of color
in the image, creating a posterized effect.
Diffusion Uses an error-diffusion method that
produces a less structured dither than the Pattern
option.
Pattern Uses a halftone-like square pattern to
simulate any colors not in the color table. This
option is available only when you’re using the
Mac OS System palette, the Web palette, or the
Uniform (216 colors) palette.
Specifying color matching options
You can choose from three options to match colors
in the original image when dithering:
Best Finds the best possible match for each pixel.
Although this option takes longer to process, it can
provide a better image. This option is only
available if you choose None or Diffusion for the
dithering option.
Faster Takes less time than Best, but may not find
the best color match for each pixel. This option is
only available if you choose None or Diffusion for
the dithering option.
Preserve Exact Colors Prevents colors that are
already in the chosen palette from being dithered.
This is useful for preserving fine lines and text for
Web images. This option is only available if you
choose Diffusion for the dithering option.
Page 83

ADOBE PHOTOSHOP 5.0
User Guide
75
Manipulating the color table
You can change one or more colors in the color
table of an indexed-color image, edit colors to
produce special effects, model the colors after a
predefined color table, and save a color table for
reuse with other indexed-color images.
Another type of image with fewer than 256 colors
is a pseudocolor image—a grayscale image
displaying variations in gray levels with color
rather than shades of gray, and often used in scientific and medical applications. The color tableediting features are particularly useful with
pseudocolor images, but can also produce special
effects with indexed-color images having a limited
number of colors.
Note: Simply to change colors in an image, choose
Image > Adjust, and use the color correction
commands in the submenus. (See Chapter 6,
Making Color and Tonal Adjustments, for a
description of these commands.)
To edit colors in the color table:
1 Open the indexed-color image.
2 Choose Image > Mode > Color Table.
3 Click or drag in the table to choose the color or
range of colors you want to change.
4 Choose the color you want, as explained in
“Using the Adobe Photoshop Color Picker” on
page 218, and click OK.
If you are changing a range of colors, Photoshop
creates a gradient in the color table between the
starting and ending colors. The first color you
choose in the Color Picker is the beginning color
for the range. When you click OK, the Color Picker
reappears so that you can choose the last color in
the range.
The colors you selected in the Color Picker are
placed in the range you selected in the Color Table
dialog box.
5 Click OK in the Color Table dialog box to apply
the new colors to the indexed-color image.
Choosing a color-table option
Your indexed color table can be modeled after
predefined color tables, which you select from the
Table menu in the Color Table dialog box.
Custom Creates a palette you specify.
Black Body Displays a palette based on the
different colors a blackbody radiator emits as it is
heated—from black to red, orange, yellow, and
white.
Grayscale Displays a palette based on 256 levels of
gray—from black to white.
Spectrum Displays a palette based on the colors
produced as white light passes through a prism—
from violet, blue, and green to yellow, orange,
and red.
Windows System Displays the standard Windows
256-color system palette.
Macintosh System Displays the standard Mac OS
256-color system palette.
Page 84

CHAPTER 4
76
Choosing a Color Mode
Saving and loading a color table
You use the Save and Load buttons in the Color
Table dialog box to save your indexed color tables
for use with other Adobe Photoshop images. Once
you load a color table into an image, the colors in
the image change to reflect the color positions they
reference in the new color table.
Note: You can also load saved color tables into the
Swatches palette. See the procedure to save and reuse
custom swatch sets in “Using the Swatches palette”
on page 216.
Page 85

5
Page 86

Page 87

Chapter 5: Reproducing Color
Accurately
79
hether preparing artwork for print or
online use, you should begin by
calibrating your monitor. This will
ensure the closest possible match between your
colors on-screen and those produced by a printer,
a video display, or a different computer monitor,
and also between your colors in Adobe Photoshop
and in other software programs. If your monitor
isn’t calibrated, the resulting colors may not even
be close to what you originally saw on it.
Most problems associated with accurately reproducing colors from a software program stem from
reconciling the differences between the total set of
colors, or gamut, produced by the red, green, and
blue phosphors of a computer monitor and the
gamut produced by the cyan, magenta, yellow, and
black inks of a printer. In addition, colors can vary
dramatically between different monitors, printers,
and software. The color space for a device is
defined by the gamut it can represent.
Every image file you create needs to reside in a
specific color space. For example, a CMYK file
created for one printer may have slightly different
color characteristics than one created for another
printer. Photoshop requires you to specify what
color space you want to use for all of your RGB,
CMYK, and Grayscale files.
This workflow provides an overview of how to
reproduce colors accurately:
1 Calibrate your monitor as described on page 82.
The Adobe Gamma utility calibrates your monitor
and defines the RGB color space that your monitor
can display. You must calibrate your monitor
before you can display colors accurately on it.
Once you have calibrated your monitor,
Photoshop will compensate for differences
between the color space in which your image
resides and the color space in which your monitor
displays images.
2 In most cases you should not have to adjust
RGB Setup information, especially if you have left
the dialog box at its default settings. However, if
you want to change the RGB color space in which
Photoshop edits RGB images, enter RGB Setup
information as described on page 84.
The RGB Setup dialog box defines the RGB color
space to use for editing RGB images. It also determines whether images are converted to your
monitor’s RGB space when displaying them.
3 If you plan to create or edit CMYK files, either
for print, for color separations, or for exporting to
another application, enter CMYK setup information as described on page 86.
Page 88

CHAPTER 5
80
Reproducing Color Accurately
The CMYK Setup dialog box defines which CMYK
color space to use for editing and printing CMYK
images.
Even if you plan to print your files, you may not
need to do this step. Most low-end inkjet printers
and some other output devices accept RGB data
directly, and don’t require that you define a CMYK
color space. If you are unsure whether your printer
is an RGB printer, see the documentation that
came with your printer or contact the printer’s
manufacturer.
4 If you plan to work on grayscale images, enter
Grayscale Setup information as described on
page 95.
The Grayscale Setup dialog box defines whether
grayscale images behave as RGB images or
black ink.
5 If you want to control how Photoshop opens
and saves ICC profiles (color space definitions) in
files, enter Profile Setup information as described
on page 99.
The Profiles Setup dialog box specifies whether
ICC profiles are saved with files, and lets you
specify how to handle files that don’t match the
working color spaces defined for Photoshop (as
described in the RGB Setup and CMYK Setup
dialog boxes).
6 To fine-tune the CMYK settings you made in
step 3, print a pre-separated CMYK proof as
described on page 92. Then adjust the CMYK
Setup settings to match the proof as described on
page 92.
Note: If you defined your CMYK color space using
ICC profiles, your ability to fine-tune the settings
will be limited.
About workflow
Once you’ve calibrated your system and defined
your working color spaces, the normal workflow is
that any file that is opened or acquired is compared
against those defined color spaces. If it doesn’t
match, the file is converted to the defined color
space. When you save an image, the profile of the
working color space is saved with the file so that
the file can be handled correctly with Photoshop
and other applications.
About calibration
Calibration is the process of adjusting your
monitor and Photoshop’s color conversion
settings to compensate for factors that affect how
colors in the image appear on-screen and in print.
Calibration helps you do the following:
This step is optional, particularly if you left the
Profile Setup dialog box at its default settings.
• Display printed colors accurately on the screen.
With a well-calibrated system, the color corrections you make to the image are an accurate
reflection of what will come out of the printer.
Page 89

ADOBE PHOTOSHOP 5.0
User Guide
81
• Display RGB colors accurately on the screen.
• Display CMYK colors accurately on the screen.
About ICC profiles
One of the methods Photoshop can use to manage
color is based on the use of ICC profiles. An ICC
profile is a color space description. The ICC profile
format was defined by the International Color
Consortium (ICC) as a cross-application
standard. ICC profiles help you reproduce colors
accurately across different platforms, devices,
and ICC-compliant applications (such as Adobe
®
Illustrator and Adobe PageMaker
Adobe Photoshop uses a Color Management
Module (CMM) to interpret the ICC profiles that
describe the RGB and CMYK color spaces you are
using in your system. You can select from existing
ICC profiles or create your own. These profiles can
then become part of your image files. The CMM
interprets the ICC profiles to automatically
manage color issues among different color models
as well as color issues between your monitor, other
monitors, and the final print image. Although you
do not have to use ICC profiles, it can greatly
simplify managing color.
Important: To ensure that color management works
correctly on your system, change the color
management settings every time you change
printing devices.
).
Choosing a color management module
To work with ICC profiles in Adobe Photoshop,
you can choose which CMM to use for converting
images. These are typical CMMs:
• The Photoshop built-in CMM. In most cases,
this CMM will give you the best results. If you have
trouble matching colors between applications, you
can try setting Photoshop’s CMM to match the
other application’s.
• The Kodak Digital Science Color Management
System®, which is installed on your system when
you install the Kodak Photo CD Acquire plug-in
that comes with Photoshop.
• The CMM specified by the operating system,
such as Apple ColorSync 2.1.2 or later, and
Microsoft ICM 2.0.
• Any other CMM on your system.
About the RGB, Grayscale, and CMYK Setup dialog boxes
The RGB Setup, Grayscale Setup, and CMYK
Setup dialog boxes let you define the native color
space for editing RGB, Grayscale, and CMYK
images. The settings in these dialog boxes are used
for the following:
• To convert images between standard color
modes (such as from RGB to CMYK).
Page 90

CHAPTER 5
82
Reproducing Color Accurately
• When opening an RGB, Grayscale, or CMYK
file, to compare the file’s color space to the color
space defined in the appropriate Setup dialog box.
If the two color spaces are not the same, you can
convert the file. (See “Managing ICC profiles in
files” on page 99.)
• When viewing a file on-screen, to convert the file
to the monitor’s color space. This only affects the
display, not the file—Photoshop assumes that the
file’s true color space is the one defined in the
appropriate Setup dialog box.
Note: If you have disabled the Display Using
Monitor Compensation option in the RGB Setup
dialog box, files may not be displayed accurately in
the monitor’s color space. (See “Entering RGB setup
information” on page 84.)
Changes to the Setup dialog boxes do not affect the
pixel values of open images. However, the onscreen appearance may change, because
Photoshop then displays the image assuming a
different native color space.
For example, suppose your file was created in the
sRGB color space and you use the RGB Setup
dialog box to change the color space to ColorMatch RGB. Photoshop will treat your file as a
ColorMatch RGB file when it displays it online,
even though it is not changing the actual pixel
values in the file.
Calibrating your monitor
The Adobe Gamma utility lets you calibrate the
contrast and brightness, gamma (midtones), color
balance, and white point of monitors. This helps
you eliminate any color cast in your monitor
display, make your monitor grays as neutral as
possible, and standardize your display of images
on different monitors (whatever the combinations
of monitor and video card). The utility then saves
these settings as an ICC profile for your monitor.
The following guidelines can help you in
calibrating your monitor:
• You can use a third-party calibration utility and
an ICM 2.0- or ColorSync-compatible ICC profile
generator instead of the Adobe Gamma utility. See
the utility’s documentation for details.
• You don’t need to recalibrate your monitor if you
have already done so with an ICC-aware
calibration tool and you have not changed your
monitor settings.
• Gamma settings saved by the Monitor Setup
Utility (Windows) or the Gamma control panel
(Mac OS) in Photoshop 4.0 and earlier are not
supported.
• You only need to set calibration and save it as an
ICC profile once on your system, for all applications, unless you change any of the factors
affecting calibration. For example, if you change
the room lighting or readjust the monitor
Page 91

ADOBE PHOTOSHOP 5.0
User Guide
83
brightness and contrast controls, you must recalibrate the system. If you haven’t done so already,
after calibrating the monitor consider taping
down your monitor’s brightness and contrast
controls and your room’s lighting controls.
To calibrate a monitor:
1 Make sure your monitor has been turned on for
at least a half hour, to stabilize the monitor display.
2 Set the room lighting at the level you plan to
maintain.
3 Turn off any desktop patterns and change the
background color on your monitor to a light gray.
This prevents the background color from interfering with your color perception and helps you
adjust the display to a neutral gray. (For more on
how to do this, refer to the manual for your
operating system.)
4 Start the Adobe Gamma utility located in the
Photoshop/Calibrate folder (Windows) or
Photoshop/Goodies/Calibration folder (Mac OS).
5 Select which version of the utility you want:
• Step by Step and click OK for a version of the
utility that will guide you through each step of the
process. If you choose this option, follow the
instructions described in the utility.
• Control Panel and click OK for a version of the
utility that is contained in a single dialog box. If
you choose this option, follow the instructions in
the rest of this section.
6 If desired, choose Load and select the monitor
ICC profile that most closely matches your
monitor. Use this as a starting point from which to
calibrate your monitor.
Note: In Windows, the folder
Windows/System/Color is displayed by default, and
contains .icm files in 8.3 format. Select a file to
display the type of monitor ICC profile at the bottom
of the Open Monitor Profile dialog box.
7 Turn up the contrast and brightness controls on
your monitor to their maximum settings. Leave
the contrast control at maximum.
8 For Brightness and Contrast, adjust the
brightness control on your monitor to make the
alternating gray squares in the top bar as dark as
possible (but not black), while keeping the bottom
bar a bright white.
9 For Phosphors, choose a monitor type. If the
correct type is not listed, choose Custom, and
enter the red, green, and blue chromaticity coordinates as specified by the monitor manufacturer.
This option accounts for the different red, green,
and blue phosphors used by monitors to display
color.
10 For Gamma, choose one of the following
options to establish your current gamma settings:
• View Single Gamma Only to adjust the gamma
based on a single combined grayscale reading.
Drag the slider under the gamma preview until the
center box fades into the patterned frame.
Page 92

CHAPTER 5
84
Reproducing Color Accurately
• Deselect View Single Gamma Only to adjust the
gamma based on Red, Blue, and Green reading.
Drag the slider under each box, until the center
box matches the patterned frame.
The gamma setting of your monitor defines how
bright the midtones are.
11 For Desired, choose the target gamma you
want. For example, the default target gamma in
Windows is 2.2 and in Mac OS is 1.8.
Note: This option is not available on Windows
systems that cannot control the monitor.
12 For Hardware, choose the white point of your
monitor as described by your monitor’s manufacturer. This setting determines whether you are
using a warm or cool white. To measure the
hardware white point, choose Measure and follow
the instruction on-screen.
13 For Adjusted, if you know the color temper-
ature at which the finished image will be viewed,
choose it here. Otherwise, choose Same As
Hardware. Only choose a different setting to work
at a different white point than your monitor’s
factory-specified hardware setting.
Note: This option is not available on Windows
systems that cannot control the monitor.
14 Click the close button on the window.
15 Save the settings.
To calibrate multiple monitors:
1 Drag the Adobe Gamma control panel onto the
secondary monitor.
2 Repeat the calibration steps for that monitor.
3 Deselect Use As Default Monitor Profile in the
Adobe Gamma control panel unless you want the
secondary monitor’s profile to be used as the
default monitor profile for all of your monitors.
Entering RGB setup information
The RGB Setup dialog box lets you describe the
RGB color space in which to edit RGB images. This
space is usually different from the monitor’s RGB
definition (listed in the bottom part of the RGB
Setup dialog box), so that you can create RGB
images without being restricted by a particular
monitor’s limitations.
The default settings are generally the most appropriate. You should change them if you need to
specify a different RGB space.
Note: RGB Setup is not the same as Monitor Setup
in Photoshop 4.0. To set up your monitor, use the
Adobe Gamma utility as described in “Calibrating
your monitor” on page 82.
To enter RGB setup information:
1 Choose File > Color Settings > RGB Setup.
2 Select Preview to display a preview of your
changes.
3 For RGB, choose one of the following:
• sRGB for the standard RGB color space.
This color space is endorsed by a wide variety
of hardware and software manufacturers and is
becoming the default color space for many
scanners, low-end printers, and software
applications.
Page 93

ADOBE PHOTOSHOP 5.0
User Guide
85
• Apple RGB for the RGB color space used by
earlier versions of Adobe Photoshop as well as a
variety of other desktop publishing applications.
Apple RGB is a good choice for online images that
will be displayed on Mac OS systems.
• CIE RGB for the RGB color space defined by the
Commission Internationale d’Eclairage. This
option provides a fairly large color gamut, but
does not handle cyan very well.
• ColorMatch RGB for the RGB color space
defined by Radius that matches the native color
space of their Pressview monitors.
• NTSC (1953) for the video color space defined
by the National Television Standards Committee
(NTSC). This is the original color television
standard. It has been mostly superseded by the
more recent SMPTE-C standard.
• PAL/SECAM for the current color television
standard for Europe and other parts of the world
that use PAL or SECAM-based television.
• SMPTE-240M for the RGB color space for high-
definition television production (as opposed to
broadcast). It has a larger color gamut than the
spaces based on HDTV phosphors. This option
can be a good choice if you need a wider color
gamut than many of the other color spaces—sRGB
in particular—without going to the extreme of
using Wide-Gamut RGB.
• SMPTE-C for the current color television
standard in the United States and other parts of the
world that use NTSC-based television.
• Wide-Gamut RGB for a very wide-gamut RGB
space defined using pure spectral-color primaries.
This space’s gamut includes almost all visible
colors and is wider than what the typical monitor
can display accurately. However, many colors
specified in the gamut cannot be reproduced on
RGB monitors or on press.
• Custom to create a custom RGB profile. This
option may be useful if you know the description
of the RGB space for your scanner and you want to
set Photoshop’s RGB color space to be the same.
(For details see the instructions “To create a
custom RGB profile” later in this section.)
4 Select Display Using Monitor Compensation to
display images using the monitor’s RGB color
space. This does not affect the color information in
images, only the way images look on the screen,
and provides a more accurate display. Leaving this
option deselected displays images directly to the
monitor, with no compensation, and can make
screen updates faster but less accurate.
5 Click OK.
To create a custom RGB profile:
1 Enter the Gamma value you want to use.
2 For White Point, choose a setting.
Page 94

CHAPTER 5
86
Reproducing Color Accurately
3 For Primaries, choose a set of red, green, and
blue phosphor or primary types. This option is
based on the different red, green, and blue
phosphors or primaries used by monitors to
display color. If the correct type is not listed,
choose Custom, and enter the red, green, and blue
chromaticity coordinates.
Note: Because you are defining the color space in
which to edit images, the primaries do not have to
match your monitor.
To save and load the settings for different RGB color
spaces:
Select Save or Load in the RGB Setup dialog box.
Saving the setting saves it as an ICC profile.
Note: Only RGB profiles that exactly match
Photoshop’s RGB model can be loaded. They must be
matrix-based, and use a single, pure-gamma tone
response curve. Most RGB profiles are not supported
as a working RGB space.
Entering CMYK setup information
The CMYK Setup dialog box lets you define the
CMYK color space using ICC profiles, color
separation tables, or by specifying the properties of
the inks and paper stock used to reproduce your
color plates.
As with the RGB Setup dialog box, Photoshop uses
information in the CMYK Setup dialog box when
converting color values between modes. If you
change the CMYK Setup settings after you have
converted an image to CMYK mode, only the
display is affected. You must revert to the original
RGB image (by choosing File > Revert) and then
reconvert the image for the changes to affect the
separation data. See “Converting to CMYK” on
page 97, for more information on how the
printing inks settings affect mode conversions.
If you are using an RGB-based printer (such as
most low-end inkjet printers, some thermal
printers, and some high-end proofing devices,
such as Fujix Pictography), you don’t need to enter
CMYK setup information. Such printers use RGB
information, not CMYK information, to print the
file. If you are unsure whether your printer is an
RGB printer, see the documentation that came
with your printer or contact the printer’s
manufacturer. All options for managing color in
RGB-based output devices are in the Print dialog
box. For more information, see “Converting the
color space of images while printing” on page 338.
To specify the CMYK settings:
Do one of the following:
• To use an ICC profile to define the CMYK color
space for your printer, see “Using ICC profiles to
define the CMYK color space” on page 87.
Page 95

ADOBE PHOTOSHOP 5.0
User Guide
87
• To specify the ink and separation options
yourself, see “Using the Built-in option to define
the CMYK color space” on page 88.
• To create or use third-party, Photoshop-
compatible color separation tables, see “Using
color separation tables” on page 98.
Using ICC profiles to define the
CMYK color space
The CMYK Setup dialog box lets you specify the
CMYK color space based on the ICC profile of the
printer you select. The CMM then maps the colors
in the image to the profiled printer’s color gamut,
or range of printable colors.You can choose the
method (called rendering intent) that is used to
translate the colors to the printed gamut.
To use ICC printer profiles to define the CMYK color
space:
1 Choose File > Color Settings > CMYK Setup.
2 For CMYK Model, select ICC.
3 Select Preview to display a preview of your
changes. A flashing bar under the option indicates
a preview is being created.
4 For Profile, choose the printer profile you want
to use. If the printer you use is not listed in the
Profile menu, contact your printer manufacturer
for the appropriate printer profile or create one
using third-party printer profiling software.
5 For Engine, choose the CMM you want to use.
Built-in refers to Photoshop’s built-in CMM.
Note: This option is not the same as choosing
Built-in for CMYK Model.
6 For Intent, choose one of the following:
• Perceptual (Images) to maintain the relative
color values among the original pixels as they are
mapped to the printer gamut. This method
preserves the relationship between colors,
although the color values themselves may change.
• Saturation (Graphics) to maintain the relative
saturation values of the original pixels. Out-ofgamut colors are converted to colors that have the
same saturation but fall just inside the gamut.
• Relative Colorimetric to leave colors that fall
inside the gamut unchanged. This method usually
converts out-of-gamut colors to colors that have
the same lightness but fall just inside the gamut.
• Absolute Colorimetric to disable white point
matching when converting colors. This option is
not generally recommended.
7 If desired, choose Black Point Compensation to
map the darkest neutral color of the source’s color
space to the darkest neutral color of the destination’s color space rather than to black when
converting colors.
8 Click OK.
Page 96

CHAPTER 5
88
Reproducing Color Accurately
Using the Built-in option to
define the CMYK color space
The Built-in option in the CMYK Setup dialog box
lets you specify the ink and separation options.
Photoshop then enters a default value for the dot
gain (the change in the halftone dot size caused by
absorption on the output device). After you print
a proof or talk to your print shop, you might need
to return to the CMYK Setup dialog box to adjust
for dot gain, ink characteristics, and color casts.
(See “About dot gain” on page 93.)
To specify the CMYK settings using the Built-in
option:
1 Choose File > Color Settings > CMYK Setup.
2 Select Preview to display a preview of your
changes. A flashing bar under the option indicates
a preview is being created.
3 For CMYK Model, choose Built-in.
4 For Ink Colors, select an ink type.
The default color values used in the color
separation calculations are designed to produce
quality separations using SWOP (Specifications
for Web Offset Publication) inks on coated paper.
These inks differ slightly from those used in
Europe. Similarly, the color and ink absorption
qualities of the paper stock affect the final printed
result. You can think of this information as telling
Photoshop what printed cyan, magenta, yellow,
and black look like given a certain set of inks and
paper stock under your lighting conditions.
Note: In most cases, printing ink characteristics do
not vary greatly from printer to printer within the
same printer type. For example, one Tektronix
Phaser II printer prints ink hues very similar to
another one. But the amount of dot gain can vary
significantly. Thus, for a different printer of the same
type, you may have to change the dot gain setting in
the CMYK Setup dialog box but not the printing
ink colors.
If you choose Custom for Ink Colors, the Ink
Colors dialog box appears. (See “Setting the
characteristics of custom ink colors” on page 96.)
5 Verify the dot gain percentage.
Do not adjust this value until you have run a proof
(which includes a calibration bar) and have
measured the density values on the proof with a
reflective densitometer. Change this value if your
print shop has provided a different value for
estimated dot gain. See “Calibrating the screen
image to the proof” on page 92 and “Specifying
dot gain” on page 94 for more information on
dot gain.
6 Click OK.
For information on choosing separation options,
see “Adjusting separation options” on page 89.
Page 97

ADOBE PHOTOSHOP 5.0
User Guide
89
To save and load settings:
Use the Save and Load buttons in the CMYK Setup
dialog box to save these settings as an ICC profile.
The profile can then be used again by Photoshop
and other ICC-aware applications.
Adjusting separation options
Along with the other options when you choose
Built-in as the CMYK model in the CMYK Setup
dialog box, the separation options control how the
CMYK plates are generated. The separation
options determine the method used for black
generation and undercolor removal and specify
the total ink limit for the press.
When converting RGB values to CMYK,
Photoshop uses information in the RGB Setup and
CMYK Setup dialog boxes. The settings in these
dialog boxes help ensure the closest match possible
between the colors on-screen and in the final
output. The CMYK Setup dialog box settings
determine the precise CMYK values chosen for a
given RGB color. Once an image is in CMYK
mode, Photoshop converts the CMYK color values
internally to display them on an RGB monitor.
(See “Converting to CMYK” on page 97.)
About separation types and black
generation
To make color separations, the three additive
colors (red, green, and blue) are translated into
their subtractive counterparts (cyan, magenta,
and yellow). In theory, equal parts of cyan,
magenta, and yellow combine to subtract all
light reflected from the paper and create black.
Due to impurities present in all printing inks,
however, a mix of these colors instead yields a
muddy brown. To compensate for this deficiency
in the color separation process, printers remove
some cyan, magenta, and yellow in areas where
the three colors exist in equal amounts, and they
add black ink.
A given color can be translated from RGB mode to
CMYK mode in an endless number of ways. But
prepress operators typically use one of two ways to
generate black in print: undercolor removal
(UCR) or gray component replacement (GCR):
• With UCR, black ink is used to replace cyan,
magenta, and yellow ink in neutral areas only (that
is, areas with equal amounts of cyan, magenta, and
yellow). This results in less ink and greater depth
in shadows. Because it uses less ink, UCR is
generally used for newsprint and uncoated stock.
• With GCR, black ink is used to replace portions
of cyan, magenta, and yellow ink in colored areas
as well as in neutral areas. GCR separations tend to
reproduce dark, saturated colors somewhat better
than UCR separations do and maintain gray
balance better on press.
Choose the type of separation based on your paper
stock and the requirements of your print shop.
Page 98

CHAPTER 5
90
Reproducing Color Accurately
Adjusting the separation type and black
generation
In most cases, the Photoshop color separation
defaults produce excellent results. But when
necessary, you can modify the black generation
method, set new ink limits, and change the
separation type. If you have already converted the
image to CMYK mode, you must reconvert the
image after adjusting the separation options.
Note: The separation options don’t affect output
from non-PostScript color printers (such as HP
®
DeskJet, Canon
™
), because they generate their own black
Stylus
values.
To adjust the separation type and black generation:
Choose File > Color Settings > CMYK Setup.
For Color Model, choose Built-in.
Bubblejet™, and Epson® Color
The Separation Options area in the CMYK Setup
dialog box displays a graph based on current
settings showing how the neutral colors in the
image will separate. In the graph, sometimes called
a gray ramp, neutral colors have equal parts of
cyan, magenta, and yellow. The horizontal axis
represents the neutral color value, from 0%
(white) to 100% (black). The vertical axis represents the amount of each ink that will be generated
for the given value. In most cases, the cyan curve
extends beyond the magenta and yellow curves,
because a small extra amount of cyan is required to
produce a true neutral.
Choosing the separation type
By default, Photoshop uses the GCR type of color
separation. Select UCR if you want to use undercolor removal. Check with your print shop to find
out which to use.
Choosing the degree of black generation
For GCR separations, you choose the degree of
black generation, set ink limits, and indicate
undercolor addition.
Note: ICC profiles specify the degree of black generation.
For a color illustration of black generation,
see figure 5-2 on page 225.
Page 99

ADOBE PHOTOSHOP 5.0
User Guide
91
You can choose from several Black Generation
settings in the Separation Setup dialog box:
• None generates the color separation using no
black plate.
• The Light and Heavy settings decrease and
increase the effect of the Medium setting (the
default). In most cases, Medium produces the best
results.
• Maximum maps the gray value directly to the
black generation value. This option is useful for
images with a large amount of solid black against a
light background, such as screen shots from a
computer.
• Custom lets you adjust the black generation
curve manually.
To use the Custom option:
1 For Black Generation, select an option (Light,
Medium, Heavy, or Maximum) that is closest to
the type of black generation you want. This gives
you a black generation curve to use as a starting
point.
2 For Black Generation, select Custom.
3 Position the pointer on the curve, and drag to
adjust the black curve. The curves for cyan,
magenta, and yellow are adjusted automatically
relative to the new black curve and the total ink
densities.
Choosing the ink limits
For both GCR and UCR separations, the black
generation uses the ink limit settings you enter in
the Separation Options area. The total ink limit is
the maximum ink density your press can support.
By default, the Black Ink Limit is 100%; the Total
Ink Limit is 300%. Check with your print shop to
see if you should adjust these values.
Note: In the Gray Ramp graph, these limits
determine the cutoff points for the CMYK curves.
Using undercolor addition
Use the UCA (undercolor addition) Amount text
box in the Separation Options area to compensate
for the loss of ink density in neutral shadow areas.
This additional ink produces rich, dark shadows in
areas that might appear flat if printed with only
black ink. UCA can also prevent posterization in
subtle detail in the shadows. This option is
available only for GCR separations.
Increasing the UCA Amount increases the amount
of CMY added to shadow areas. Values can range
from 0 to 100%. Check with your print shop for
the preferred value. If you are unsure of this value,
leave it at 0%.
Page 100

CHAPTER 5
92
Reproducing Color Accurately
Printing a color proof
After calibrating your monitor and entering
settings for CMYK Setup, you should print a
CMYK image, called a proof, on the printer you are
calibrating to. The document you use to generate
the proof should contain color samples of all the
CMYK color combinations and must be created or
imported directly in CMYK mode.
You can produce a proof by printing the
Testpict.jpg (Windows) or Olé No Moire
(Mac OS) CMYK image included with the Adobe
Photoshop software, or you can create your own
CMYK image. Do not print an RGB image that has
been converted to CMYK in Photoshop. Instead
use an image that has been saved in CMYK format
without an embedded ICC profile and whose
CMYK values have been assigned directly in
CMYK mode.
Important: Before opening an existing test file, open
the Profile Setup dialog box. In the Profile Mismatch
Handling area, for CMYK, choose Ignore. This will
prevent the file from being converted to a different
CMYK color space, and possibly changing the results
of the test. Reset this dialog box when you are done
printing the file.
For a color illustration of a color proof, see
figure 5-1 on page 224.
To create your own CMYK proof document:
1 Create a new Photoshop document in
CMYK mode.
2 Create a set of swatches that includes the
following:
• Four swatches, each containing 100% of the
CMYK colors (100% cyan, 100% magenta, 100%
yellow, and 100% black).
• Four combination swatches (100% each of
magenta and yellow, 100% each of cyan and
yellow, 100% each of cyan and magenta, and 100%
each of cyan, magenta, and yellow).
• A set of swatches that make up a four-color
black, such as 60% cyan, 50% magenta,
50% yellow, and 100% black.
3 To include a calibration bar in the image, choose
File > Page Setup, and select the Calibration Bars
option. Then click OK.
4 Print the document on a color printer you are
calibrating to.
Calibrating the screen image to the proof
If you are not using ICC profiles, after examining
the color proof you may need to adjust some
calibration settings to make the image on-screen
exactly match the proof. In particular, you may
need to adjust settings in the CMYK Setup dialog
box to compensate for dot gain, custom ink
characteristics, and color casts.
 Loading...