

Page 1

ADOBE® CAPTIVATE® HELP
Page 2

Legal notices
Legal notices
For legal notices, see http://help.adobe.com/en_US/legalnotices/index.html.
Last updated 10/10/2016
Page 3

Contents
Chapter 1: What’s new
What's New in Adobe Captivate . . . . . . . . . . . . . . . . . . . . . . . . . . . . . . . . . . . . . . . . . . . . . . . . . . . . . . . . . . . . . . . . . . . . . . . . . . . . . . . . . . . . . . . . .1
Using the Captivate Draft iPad app . . . . . . . . . . . . . . . . . . . . . . . . . . . . . . . . . . . . . . . . . . . . . . . . . . . . . . . . . . . . . . . . . . . . . . . . . . . . . . . . . . . . 11
Capture content from iOS devices (Captivate for MAC feature) . . . . . . . . . . . . . . . . . . . . . . . . . . . . . . . . . . . . . . . . . . . . . . . . . . . . . . . . . 21
Working with multi-state objects in Adobe Captivate . . . . . . . . . . . . . . . . . . . . . . . . . . . . . . . . . . . . . . . . . . . . . . . . . . . . . . . . . . . . . . . . . . 25
Review and collaboration in Adobe Captivate Draft . . . . . . . . . . . . . . . . . . . . . . . . . . . . . . . . . . . . . . . . . . . . . . . . . . . . . . . . . . . . . . . . . . . . 34
Publish project to Adobe Captivate Prime . . . . . . . . . . . . . . . . . . . . . . . . . . . . . . . . . . . . . . . . . . . . . . . . . . . . . . . . . . . . . . . . . . . . . . . . . . . . . 40
What's New in Adobe Captivate 8.0.1 . . . . . . . . . . . . . . . . . . . . . . . . . . . . . . . . . . . . . . . . . . . . . . . . . . . . . . . . . . . . . . . . . . . . . . . . . . . . . . . . . . 43
What's New in Adobe Captivate 8 . . . . . . . . . . . . . . . . . . . . . . . . . . . . . . . . . . . . . . . . . . . . . . . . . . . . . . . . . . . . . . . . . . . . . . . . . . . . . . . . . . . . . 48
What’s new in Cp 6 . . . . . . . . . . . . . . . . . . . . . . . . . . . . . . . . . . . . . . . . . . . . . . . . . . . . . . . . . . . . . . . . . . . . . . . . . . . . . . . . . . . . . . . . . . . . . . . . . . . 64
What's new in Adobe Captivate 7 . . . . . . . . . . . . . . . . . . . . . . . . . . . . . . . . . . . . . . . . . . . . . . . . . . . . . . . . . . . . . . . . . . . . . . . . . . . . . . . . . . . . . 66
Chapter 2: Workspace
Using rulers and guides . . . . . . . . . . . . . . . . . . . . . . . . . . . . . . . . . . . . . . . . . . . . . . . . . . . . . . . . . . . . . . . . . . . . . . . . . . . . . . . . . . . . . . . . . . . . . . . 69
Working with grids in Adobe Captivate . . . . . . . . . . . . . . . . . . . . . . . . . . . . . . . . . . . . . . . . . . . . . . . . . . . . . . . . . . . . . . . . . . . . . . . . . . . . . . . . 73
Adobe Captivate workspace panels . . . . . . . . . . . . . . . . . . . . . . . . . . . . . . . . . . . . . . . . . . . . . . . . . . . . . . . . . . . . . . . . . . . . . . . . . . . . . . . . . . . 74
How to undo and redo actions in Adobe Captivate . . . . . . . . . . . . . . . . . . . . . . . . . . . . . . . . . . . . . . . . . . . . . . . . . . . . . . . . . . . . . . . . . . . . 75
Working with the timeline in Adobe Captivate . . . . . . . . . . . . . . . . . . . . . . . . . . . . . . . . . . . . . . . . . . . . . . . . . . . . . . . . . . . . . . . . . . . . . . . . . 75
Shortcut keys in Adobe Captivate . . . . . . . . . . . . . . . . . . . . . . . . . . . . . . . . . . . . . . . . . . . . . . . . . . . . . . . . . . . . . . . . . . . . . . . . . . . . . . . . . . . . . 78
Working with the filmstrip . . . . . . . . . . . . . . . . . . . . . . . . . . . . . . . . . . . . . . . . . . . . . . . . . . . . . . . . . . . . . . . . . . . . . . . . . . . . . . . . . . . . . . . . . . . . 83
Disable confirmation messages in Adobe Captivate . . . . . . . . . . . . . . . . . . . . . . . . . . . . . . . . . . . . . . . . . . . . . . . . . . . . . . . . . . . . . . . . . . . . 84
How to customize the Adobe Captivate workspace . . . . . . . . . . . . . . . . . . . . . . . . . . . . . . . . . . . . . . . . . . . . . . . . . . . . . . . . . . . . . . . . . . . . 84
How to use the Adobe Captivate library . . . . . . . . . . . . . . . . . . . . . . . . . . . . . . . . . . . . . . . . . . . . . . . . . . . . . . . . . . . . . . . . . . . . . . . . . . . . . . . 86
How to use the Branching panel in Adobe Captivate . . . . . . . . . . . . . . . . . . . . . . . . . . . . . . . . . . . . . . . . . . . . . . . . . . . . . . . . . . . . . . . . . . . 87
iii
Chapter 3: Creating Projects
Responsive Project Design with Adobe Captivate . . . . . . . . . . . . . . . . . . . . . . . . . . . . . . . . . . . . . . . . . . . . . . . . . . . . . . . . . . . . . . . . . . . . . . 90
Working with responsive text in Adobe Captivate . . . . . . . . . . . . . . . . . . . . . . . . . . . . . . . . . . . . . . . . . . . . . . . . . . . . . . . . . . . . . . . . . . . . . 99
Working with themes in Adobe Captivate . . . . . . . . . . . . . . . . . . . . . . . . . . . . . . . . . . . . . . . . . . . . . . . . . . . . . . . . . . . . . . . . . . . . . . . . . . . . 102
Create different types of projects in Adobe Captivate . . . . . . . . . . . . . . . . . . . . . . . . . . . . . . . . . . . . . . . . . . . . . . . . . . . . . . . . . . . . . . . . . 104
How to apply view specific properties in responsive projects . . . . . . . . . . . . . . . . . . . . . . . . . . . . . . . . . . . . . . . . . . . . . . . . . . . . . . . . . . 107
How to create backup files for Adobe Captivate projects . . . . . . . . . . . . . . . . . . . . . . . . . . . . . . . . . . . . . . . . . . . . . . . . . . . . . . . . . . . . . . 110
Customize the size of an Adobe Captivate project . . . . . . . . . . . . . . . . . . . . . . . . . . . . . . . . . . . . . . . . . . . . . . . . . . . . . . . . . . . . . . . . . . . . 111
Chapter 4: Slides
Set up knowledge check slides in Adobe Captivate . . . . . . . . . . . . . . . . . . . . . . . . . . . . . . . . . . . . . . . . . . . . . . . . . . . . . . . . . . . . . . . . . . . 112
Add and convert slide notes to audio files with Adobe Captivate . . . . . . . . . . . . . . . . . . . . . . . . . . . . . . . . . . . . . . . . . . . . . . . . . . . . . . 114
Tips for creating introductory slides in Adobe Captivate . . . . . . . . . . . . . . . . . . . . . . . . . . . . . . . . . . . . . . . . . . . . . . . . . . . . . . . . . . . . . . 117
Setting slide properties in Adobe Captivate . . . . . . . . . . . . . . . . . . . . . . . . . . . . . . . . . . . . . . . . . . . . . . . . . . . . . . . . . . . . . . . . . . . . . . . . . . 118
How to add slide transitions in Adobe Captivate . . . . . . . . . . . . . . . . . . . . . . . . . . . . . . . . . . . . . . . . . . . . . . . . . . . . . . . . . . . . . . . . . . . . . . 120
How to work with master slides in Adobe Captivate . . . . . . . . . . . . . . . . . . . . . . . . . . . . . . . . . . . . . . . . . . . . . . . . . . . . . . . . . . . . . . . . . . 120
How to lock Adobe Captivate slides . . . . . . . . . . . . . . . . . . . . . . . . . . . . . . . . . . . . . . . . . . . . . . . . . . . . . . . . . . . . . . . . . . . . . . . . . . . . . . . . . . 123
How to hide or exclude slides in an Adobe Captivate project . . . . . . . . . . . . . . . . . . . . . . . . . . . . . . . . . . . . . . . . . . . . . . . . . . . . . . . . . . 123
Last updated 10/10/2016
Page 4

CAPTIVATE
Content s
How to group and ungroup slides in Adobe Captivate . . . . . . . . . . . . . . . . . . . . . . . . . . . . . . . . . . . . . . . . . . . . . . . . . . . . . . . . . . . . . . . . 123
Editing slides in an Adobe Captivate project . . . . . . . . . . . . . . . . . . . . . . . . . . . . . . . . . . . . . . . . . . . . . . . . . . . . . . . . . . . . . . . . . . . . . . . . . . 124
Delete Adobe Captivate project slides . . . . . . . . . . . . . . . . . . . . . . . . . . . . . . . . . . . . . . . . . . . . . . . . . . . . . . . . . . . . . . . . . . . . . . . . . . . . . . . . 126
Change slide order in Adobe Captivate . . . . . . . . . . . . . . . . . . . . . . . . . . . . . . . . . . . . . . . . . . . . . . . . . . . . . . . . . . . . . . . . . . . . . . . . . . . . . . . 126
Adding slides to an Adobe Captivate project . . . . . . . . . . . . . . . . . . . . . . . . . . . . . . . . . . . . . . . . . . . . . . . . . . . . . . . . . . . . . . . . . . . . . . . . . 126
Chapter 5: Recording Projects
Automatic and manual recording with Captivate . . . . . . . . . . . . . . . . . . . . . . . . . . . . . . . . . . . . . . . . . . . . . . . . . . . . . . . . . . . . . . . . . . . . . 130
Set recording preferences in Adobe Captivate . . . . . . . . . . . . . . . . . . . . . . . . . . . . . . . . . . . . . . . . . . . . . . . . . . . . . . . . . . . . . . . . . . . . . . . . 132
Record video demonstrations with Adobe Captivate . . . . . . . . . . . . . . . . . . . . . . . . . . . . . . . . . . . . . . . . . . . . . . . . . . . . . . . . . . . . . . . . . . 135
How to record software simulations in Adobe Captivate . . . . . . . . . . . . . . . . . . . . . . . . . . . . . . . . . . . . . . . . . . . . . . . . . . . . . . . . . . . . . . 144
How to pause recording . . . . . . . . . . . . . . . . . . . . . . . . . . . . . . . . . . . . . . . . . . . . . . . . . . . . . . . . . . . . . . . . . . . . . . . . . . . . . . . . . . . . . . . . . . . . . 146
Chapter 6: Adding and Managing Objects
Object effects . . . . . . . . . . . . . . . . . . . . . . . . . . . . . . . . . . . . . . . . . . . . . . . . . . . . . . . . . . . . . . . . . . . . . . . . . . . . . . . . . . . . . . . . . . . . . . . . . . . . . . . 147
Inserting web objects in Adobe Captivate projects . . . . . . . . . . . . . . . . . . . . . . . . . . . . . . . . . . . . . . . . . . . . . . . . . . . . . . . . . . . . . . . . . . . 160
Working with object styles in Adobe Captivate . . . . . . . . . . . . . . . . . . . . . . . . . . . . . . . . . . . . . . . . . . . . . . . . . . . . . . . . . . . . . . . . . . . . . . . 163
How to rotate objects in Adobe Captivate . . . . . . . . . . . . . . . . . . . . . . . . . . . . . . . . . . . . . . . . . . . . . . . . . . . . . . . . . . . . . . . . . . . . . . . . . . . . 164
Resize and reposition objects by pixel . . . . . . . . . . . . . . . . . . . . . . . . . . . . . . . . . . . . . . . . . . . . . . . . . . . . . . . . . . . . . . . . . . . . . . . . . . . . . . . . 165
How to manage objects with the Main Options toolbar . . . . . . . . . . . . . . . . . . . . . . . . . . . . . . . . . . . . . . . . . . . . . . . . . . . . . . . . . . . . . . . 165
How to merge objects in a slide . . . . . . . . . . . . . . . . . . . . . . . . . . . . . . . . . . . . . . . . . . . . . . . . . . . . . . . . . . . . . . . . . . . . . . . . . . . . . . . . . . . . . . 166
How to manage objects in the library . . . . . . . . . . . . . . . . . . . . . . . . . . . . . . . . . . . . . . . . . . . . . . . . . . . . . . . . . . . . . . . . . . . . . . . . . . . . . . . . 166
How to group objects in Adobe Captivate . . . . . . . . . . . . . . . . . . . . . . . . . . . . . . . . . . . . . . . . . . . . . . . . . . . . . . . . . . . . . . . . . . . . . . . . . . . . 167
Edit object information using the Advanced Interaction panel . . . . . . . . . . . . . . . . . . . . . . . . . . . . . . . . . . . . . . . . . . . . . . . . . . . . . . . . 168
How to copy, paste, and duplicate objects in Adobe Captivate . . . . . . . . . . . . . . . . . . . . . . . . . . . . . . . . . . . . . . . . . . . . . . . . . . . . . . . . 169
Controlling the visibility of objects . . . . . . . . . . . . . . . . . . . . . . . . . . . . . . . . . . . . . . . . . . . . . . . . . . . . . . . . . . . . . . . . . . . . . . . . . . . . . . . . . . . 171
How to change the display order of objects in Adobe Captivate . . . . . . . . . . . . . . . . . . . . . . . . . . . . . . . . . . . . . . . . . . . . . . . . . . . . . . . 171
Apply shadows to objects . . . . . . . . . . . . . . . . . . . . . . . . . . . . . . . . . . . . . . . . . . . . . . . . . . . . . . . . . . . . . . . . . . . . . . . . . . . . . . . . . . . . . . . . . . . 172
How to align objects in Adobe Captivate . . . . . . . . . . . . . . . . . . . . . . . . . . . . . . . . . . . . . . . . . . . . . . . . . . . . . . . . . . . . . . . . . . . . . . . . . . . . . 172
How to add reflection to objects in Adobe Captivate . . . . . . . . . . . . . . . . . . . . . . . . . . . . . . . . . . . . . . . . . . . . . . . . . . . . . . . . . . . . . . . . . . 176
iv
Chapter 7: Noninteractive Objects and Media
How to use images and rollover images with Captivate . . . . . . . . . . . . . . . . . . . . . . . . . . . . . . . . . . . . . . . . . . . . . . . . . . . . . . . . . . . . . . . 177
How to customize smart shapes in Adobe Captivate . . . . . . . . . . . . . . . . . . . . . . . . . . . . . . . . . . . . . . . . . . . . . . . . . . . . . . . . . . . . . . . . . . 184
Edit and create text captions with Captivate . . . . . . . . . . . . . . . . . . . . . . . . . . . . . . . . . . . . . . . . . . . . . . . . . . . . . . . . . . . . . . . . . . . . . . . . . . 186
Creating and editing smart shapes . . . . . . . . . . . . . . . . . . . . . . . . . . . . . . . . . . . . . . . . . . . . . . . . . . . . . . . . . . . . . . . . . . . . . . . . . . . . . . . . . . . 199
How to create zoom areas in Adobe Captivate . . . . . . . . . . . . . . . . . . . . . . . . . . . . . . . . . . . . . . . . . . . . . . . . . . . . . . . . . . . . . . . . . . . . . . . . 203
How to set audio for noninteractive objects . . . . . . . . . . . . . . . . . . . . . . . . . . . . . . . . . . . . . . . . . . . . . . . . . . . . . . . . . . . . . . . . . . . . . . . . . . 205
How to create rollover slidelets in Adobe Captivate . . . . . . . . . . . . . . . . . . . . . . . . . . . . . . . . . . . . . . . . . . . . . . . . . . . . . . . . . . . . . . . . . . . 205
How to create rollover captions in Adobe Captivate . . . . . . . . . . . . . . . . . . . . . . . . . . . . . . . . . . . . . . . . . . . . . . . . . . . . . . . . . . . . . . . . . . 208
Changing mouse properties in Adobe Captivate . . . . . . . . . . . . . . . . . . . . . . . . . . . . . . . . . . . . . . . . . . . . . . . . . . . . . . . . . . . . . . . . . . . . . . 210
Working with mathematical equations in Adobe Captivate 7 . . . . . . . . . . . . . . . . . . . . . . . . . . . . . . . . . . . . . . . . . . . . . . . . . . . . . . . . . . 213
Use highlight boxes in Captivate . . . . . . . . . . . . . . . . . . . . . . . . . . . . . . . . . . . . . . . . . . . . . . . . . . . . . . . . . . . . . . . . . . . . . . . . . . . . . . . . . . . . . 214
Working with swatches in Adobe Captivate . . . . . . . . . . . . . . . . . . . . . . . . . . . . . . . . . . . . . . . . . . . . . . . . . . . . . . . . . . . . . . . . . . . . . . . . . . 216
Fix size and position of non-interactive objects . . . . . . . . . . . . . . . . . . . . . . . . . . . . . . . . . . . . . . . . . . . . . . . . . . . . . . . . . . . . . . . . . . . . . . . 217
Adding animations to an Adobe Captivate project . . . . . . . . . . . . . . . . . . . . . . . . . . . . . . . . . . . . . . . . . . . . . . . . . . . . . . . . . . . . . . . . . . . . 217
Last updated 10/10/2016
Page 5

CAPTIVATE
Content s
Chapter 8: Interactive Objects
Using Adobe Captivate 8's new learning interactions . . . . . . . . . . . . . . . . . . . . . . . . . . . . . . . . . . . . . . . . . . . . . . . . . . . . . . . . . . . . . . . . . 221
Add text entry boxes with Adobe Captivate . . . . . . . . . . . . . . . . . . . . . . . . . . . . . . . . . . . . . . . . . . . . . . . . . . . . . . . . . . . . . . . . . . . . . . . . . . 233
How to use interactive objects for project navigation . . . . . . . . . . . . . . . . . . . . . . . . . . . . . . . . . . . . . . . . . . . . . . . . . . . . . . . . . . . . . . . . . 237
Creating click boxes in Adobe Captivate . . . . . . . . . . . . . . . . . . . . . . . . . . . . . . . . . . . . . . . . . . . . . . . . . . . . . . . . . . . . . . . . . . . . . . . . . . . . . . 240
Add interactive buttons to your Captivate projects . . . . . . . . . . . . . . . . . . . . . . . . . . . . . . . . . . . . . . . . . . . . . . . . . . . . . . . . . . . . . . . . . . . 243
How to add audio to boxes and buttons . . . . . . . . . . . . . . . . . . . . . . . . . . . . . . . . . . . . . . . . . . . . . . . . . . . . . . . . . . . . . . . . . . . . . . . . . . . . . . 247
How to add JavaScript to boxes and buttons in Adobe Captivate . . . . . . . . . . . . . . . . . . . . . . . . . . . . . . . . . . . . . . . . . . . . . . . . . . . . . . 248
Chapter 9: Audio
View audio details in Adobe Captivate . . . . . . . . . . . . . . . . . . . . . . . . . . . . . . . . . . . . . . . . . . . . . . . . . . . . . . . . . . . . . . . . . . . . . . . . . . . . . . . 249
Working with system audio in Adobe Captivate 7 . . . . . . . . . . . . . . . . . . . . . . . . . . . . . . . . . . . . . . . . . . . . . . . . . . . . . . . . . . . . . . . . . . . . . 250
Setting audio recording preferences and recording audio . . . . . . . . . . . . . . . . . . . . . . . . . . . . . . . . . . . . . . . . . . . . . . . . . . . . . . . . . . . . . 253
How to preview audio in Adobe Captivate . . . . . . . . . . . . . . . . . . . . . . . . . . . . . . . . . . . . . . . . . . . . . . . . . . . . . . . . . . . . . . . . . . . . . . . . . . . . 258
How to insert audio into an Adobe Captivate project . . . . . . . . . . . . . . . . . . . . . . . . . . . . . . . . . . . . . . . . . . . . . . . . . . . . . . . . . . . . . . . . . 259
How to export audio from Adobe Captivate . . . . . . . . . . . . . . . . . . . . . . . . . . . . . . . . . . . . . . . . . . . . . . . . . . . . . . . . . . . . . . . . . . . . . . . . . . 261
How to edit audio files with Adobe Captivate . . . . . . . . . . . . . . . . . . . . . . . . . . . . . . . . . . . . . . . . . . . . . . . . . . . . . . . . . . . . . . . . . . . . . . . . . 261
Chapter 10: Video
Multi-slide synchronized video . . . . . . . . . . . . . . . . . . . . . . . . . . . . . . . . . . . . . . . . . . . . . . . . . . . . . . . . . . . . . . . . . . . . . . . . . . . . . . . . . . . . . . . 268
Working with event videos in Adobe Captivate . . . . . . . . . . . . . . . . . . . . . . . . . . . . . . . . . . . . . . . . . . . . . . . . . . . . . . . . . . . . . . . . . . . . . . . 272
Differences between events and synchronized videos in Adobe Captivate . . . . . . . . . . . . . . . . . . . . . . . . . . . . . . . . . . . . . . . . . . . . . 274
v
Chapter 11: Widgets
Creating learning interactions in Adobe Captivate . . . . . . . . . . . . . . . . . . . . . . . . . . . . . . . . . . . . . . . . . . . . . . . . . . . . . . . . . . . . . . . . . . . . 276
How to create and preview learning interactions . . . . . . . . . . . . . . . . . . . . . . . . . . . . . . . . . . . . . . . . . . . . . . . . . . . . . . . . . . . . . . . . . . . . . 282
Create drag-and-drop interactions in Adobe Captivate . . . . . . . . . . . . . . . . . . . . . . . . . . . . . . . . . . . . . . . . . . . . . . . . . . . . . . . . . . . . . . . 284
How to use the Twitter widget in Adobe Captivate projects . . . . . . . . . . . . . . . . . . . . . . . . . . . . . . . . . . . . . . . . . . . . . . . . . . . . . . . . . . . 292
How to configure widgets and interactions in Adobe Captivate . . . . . . . . . . . . . . . . . . . . . . . . . . . . . . . . . . . . . . . . . . . . . . . . . . . . . . . 296
Example XML code in Adobe Captivate widgets . . . . . . . . . . . . . . . . . . . . . . . . . . . . . . . . . . . . . . . . . . . . . . . . . . . . . . . . . . . . . . . . . . . . . . 298
Using Adobe Captivate variables in widgets . . . . . . . . . . . . . . . . . . . . . . . . . . . . . . . . . . . . . . . . . . . . . . . . . . . . . . . . . . . . . . . . . . . . . . . . . . 299
Using ActionScript 3.0 in widgets . . . . . . . . . . . . . . . . . . . . . . . . . . . . . . . . . . . . . . . . . . . . . . . . . . . . . . . . . . . . . . . . . . . . . . . . . . . . . . . . . . . . 299
How to use the different types of widgets in Adobe Captivate . . . . . . . . . . . . . . . . . . . . . . . . . . . . . . . . . . . . . . . . . . . . . . . . . . . . . . . . . 300
Functions in question widgets . . . . . . . . . . . . . . . . . . . . . . . . . . . . . . . . . . . . . . . . . . . . . . . . . . . . . . . . . . . . . . . . . . . . . . . . . . . . . . . . . . . . . . . 301
Set the properties of widgets with Adobe Captivate . . . . . . . . . . . . . . . . . . . . . . . . . . . . . . . . . . . . . . . . . . . . . . . . . . . . . . . . . . . . . . . . . . 301
New widget APIs in Adobe Captivate 6 . . . . . . . . . . . . . . . . . . . . . . . . . . . . . . . . . . . . . . . . . . . . . . . . . . . . . . . . . . . . . . . . . . . . . . . . . . . . . . . 304
Using the Learner Notes interaction widget . . . . . . . . . . . . . . . . . . . . . . . . . . . . . . . . . . . . . . . . . . . . . . . . . . . . . . . . . . . . . . . . . . . . . . . . . . 305
How to create WDGT files for SWF and HTML5 outputs in Adobe Captivate . . . . . . . . . . . . . . . . . . . . . . . . . . . . . . . . . . . . . . . . . . . . 306
Defining visibility mode for widgets . . . . . . . . . . . . . . . . . . . . . . . . . . . . . . . . . . . . . . . . . . . . . . . . . . . . . . . . . . . . . . . . . . . . . . . . . . . . . . . . . . 313
How to create static, interactive, and question widgets in Adobe Captivate . . . . . . . . . . . . . . . . . . . . . . . . . . . . . . . . . . . . . . . . . . . . 315
How to add widgets to your Adobe Captivate project . . . . . . . . . . . . . . . . . . . . . . . . . . . . . . . . . . . . . . . . . . . . . . . . . . . . . . . . . . . . . . . . . 315
Accessing Adobe Captivate movie properties . . . . . . . . . . . . . . . . . . . . . . . . . . . . . . . . . . . . . . . . . . . . . . . . . . . . . . . . . . . . . . . . . . . . . . . . 316
Chapter 12: Variables and Advanced Actions
Shared actions in Adobe Captivate projects . . . . . . . . . . . . . . . . . . . . . . . . . . . . . . . . . . . . . . . . . . . . . . . . . . . . . . . . . . . . . . . . . . . . . . . . . . 318
Tutorial on using scripts in Adobe Captivate projects . . . . . . . . . . . . . . . . . . . . . . . . . . . . . . . . . . . . . . . . . . . . . . . . . . . . . . . . . . . . . . . . . 322
Edit or delete user-defined variables in Adobe Captivate . . . . . . . . . . . . . . . . . . . . . . . . . . . . . . . . . . . . . . . . . . . . . . . . . . . . . . . . . . . . . . 328
How to create user-defined variables in Adobe Captivate . . . . . . . . . . . . . . . . . . . . . . . . . . . . . . . . . . . . . . . . . . . . . . . . . . . . . . . . . . . . . 328
Last updated 10/10/2016
Page 6

CAPTIVATE
Content s
Adobe Captivate SWF events . . . . . . . . . . . . . . . . . . . . . . . . . . . . . . . . . . . . . . . . . . . . . . . . . . . . . . . . . . . . . . . . . . . . . . . . . . . . . . . . . . . . . . . . 330
How to assign advanced actions to an event . . . . . . . . . . . . . . . . . . . . . . . . . . . . . . . . . . . . . . . . . . . . . . . . . . . . . . . . . . . . . . . . . . . . . . . . . 331
Advanced actions . . . . . . . . . . . . . . . . . . . . . . . . . . . . . . . . . . . . . . . . . . . . . . . . . . . . . . . . . . . . . . . . . . . . . . . . . . . . . . . . . . . . . . . . . . . . . . . . . . . 332
Chapter 13: Creating a Quiz
Import questions from GIFT format files (Cp 7) . . . . . . . . . . . . . . . . . . . . . . . . . . . . . . . . . . . . . . . . . . . . . . . . . . . . . . . . . . . . . . . . . . . . . . . . 335
How to enable learners to submit all quiz responses simultaneously . . . . . . . . . . . . . . . . . . . . . . . . . . . . . . . . . . . . . . . . . . . . . . . . . . 336
How to set up question slides with Adobe Captivate . . . . . . . . . . . . . . . . . . . . . . . . . . . . . . . . . . . . . . . . . . . . . . . . . . . . . . . . . . . . . . . . . . 336
Using random question slides in Adobe Captivate . . . . . . . . . . . . . . . . . . . . . . . . . . . . . . . . . . . . . . . . . . . . . . . . . . . . . . . . . . . . . . . . . . . . 343
Setting quiz preferences for Adobe Captivate . . . . . . . . . . . . . . . . . . . . . . . . . . . . . . . . . . . . . . . . . . . . . . . . . . . . . . . . . . . . . . . . . . . . . . . . 345
Insert question slides in Adobe Captivate projects . . . . . . . . . . . . . . . . . . . . . . . . . . . . . . . . . . . . . . . . . . . . . . . . . . . . . . . . . . . . . . . . . . . . 350
How to insert pretests in Adobe Captivate . . . . . . . . . . . . . . . . . . . . . . . . . . . . . . . . . . . . . . . . . . . . . . . . . . . . . . . . . . . . . . . . . . . . . . . . . . . . 353
How to allow users to return to quiz . . . . . . . . . . . . . . . . . . . . . . . . . . . . . . . . . . . . . . . . . . . . . . . . . . . . . . . . . . . . . . . . . . . . . . . . . . . . . . . . . . 354
Chapter 14: Advanced Editing and Project Reviews
How to review Adobe Captivate projects using the AIR Review application . . . . . . . . . . . . . . . . . . . . . . . . . . . . . . . . . . . . . . . . . . . . 356
Skins . . . . . . . . . . . . . . . . . . . . . . . . . . . . . . . . . . . . . . . . . . . . . . . . . . . . . . . . . . . . . . . . . . . . . . . . . . . . . . . . . . . . . . . . . . . . . . . . . . . . . . . . . . . . . . . . 360
Creating accessible projects in Adobe Captivate . . . . . . . . . . . . . . . . . . . . . . . . . . . . . . . . . . . . . . . . . . . . . . . . . . . . . . . . . . . . . . . . . . . . . . 363
Create a table of contents (TOC) with Adobe Captivate . . . . . . . . . . . . . . . . . . . . . . . . . . . . . . . . . . . . . . . . . . . . . . . . . . . . . . . . . . . . . . . 369
Check spelling and perform find and replace operations in Adobe Captivate . . . . . . . . . . . . . . . . . . . . . . . . . . . . . . . . . . . . . . . . . . 373
Re-sizing Adobe Captivate projects . . . . . . . . . . . . . . . . . . . . . . . . . . . . . . . . . . . . . . . . . . . . . . . . . . . . . . . . . . . . . . . . . . . . . . . . . . . . . . . . . . 376
Projects and project preferences . . . . . . . . . . . . . . . . . . . . . . . . . . . . . . . . . . . . . . . . . . . . . . . . . . . . . . . . . . . . . . . . . . . . . . . . . . . . . . . . . . . . . 377
How to preview projects in Adobe Captivate . . . . . . . . . . . . . . . . . . . . . . . . . . . . . . . . . . . . . . . . . . . . . . . . . . . . . . . . . . . . . . . . . . . . . . . . . 381
How to create localized Adobe Captivate projects . . . . . . . . . . . . . . . . . . . . . . . . . . . . . . . . . . . . . . . . . . . . . . . . . . . . . . . . . . . . . . . . . . . . 382
How to link Adobe Captivate projects . . . . . . . . . . . . . . . . . . . . . . . . . . . . . . . . . . . . . . . . . . . . . . . . . . . . . . . . . . . . . . . . . . . . . . . . . . . . . . . . 383
Import, export, and delete content . . . . . . . . . . . . . . . . . . . . . . . . . . . . . . . . . . . . . . . . . . . . . . . . . . . . . . . . . . . . . . . . . . . . . . . . . . . . . . . . . . . 384
How to combine multiple SWF files with aggregator . . . . . . . . . . . . . . . . . . . . . . . . . . . . . . . . . . . . . . . . . . . . . . . . . . . . . . . . . . . . . . . . . . 386
vi
Chapter 15: Publishing Projects
Preview and publish responsive projects . . . . . . . . . . . . . . . . . . . . . . . . . . . . . . . . . . . . . . . . . . . . . . . . . . . . . . . . . . . . . . . . . . . . . . . . . . . . . 388
Publish projects as HTML5 files with Adobe Captivate . . . . . . . . . . . . . . . . . . . . . . . . . . . . . . . . . . . . . . . . . . . . . . . . . . . . . . . . . . . . . . . . 395
Publish projects as executable files . . . . . . . . . . . . . . . . . . . . . . . . . . . . . . . . . . . . . . . . . . . . . . . . . . . . . . . . . . . . . . . . . . . . . . . . . . . . . . . . . . . 401
Publish projects as MP4 files with Adobe Captivate . . . . . . . . . . . . . . . . . . . . . . . . . . . . . . . . . . . . . . . . . . . . . . . . . . . . . . . . . . . . . . . . . . . 402
Set publishing preferences in Adobe Captivate . . . . . . . . . . . . . . . . . . . . . . . . . . . . . . . . . . . . . . . . . . . . . . . . . . . . . . . . . . . . . . . . . . . . . . . 405
Report quiz results to Acrobat.com or internal server . . . . . . . . . . . . . . . . . . . . . . . . . . . . . . . . . . . . . . . . . . . . . . . . . . . . . . . . . . . . . . . . . 406
Publish projects as SWF files with Adobe Captivate . . . . . . . . . . . . . . . . . . . . . . . . . . . . . . . . . . . . . . . . . . . . . . . . . . . . . . . . . . . . . . . . . . . 408
How to upload and share files on Acrobat.com . . . . . . . . . . . . . . . . . . . . . . . . . . . . . . . . . . . . . . . . . . . . . . . . . . . . . . . . . . . . . . . . . . . . . . . 410
Change the default location of published files . . . . . . . . . . . . . . . . . . . . . . . . . . . . . . . . . . . . . . . . . . . . . . . . . . . . . . . . . . . . . . . . . . . . . . . . 411
Chapter 16: Using Adobe Captivate with Other Applications
Uploading an Adobe Captivate project to a Learning Management System . . . . . . . . . . . . . . . . . . . . . . . . . . . . . . . . . . . . . . . . . . . . 412
Learn about the Common JavaScript interface for Adobe Captivate . . . . . . . . . . . . . . . . . . . . . . . . . . . . . . . . . . . . . . . . . . . . . . . . . . . 420
Support for Adobe Captivate App Packager discontinued . . . . . . . . . . . . . . . . . . . . . . . . . . . . . . . . . . . . . . . . . . . . . . . . . . . . . . . . . . . . . 430
Using Captivate with Animate CC . . . . . . . . . . . . . . . . . . . . . . . . . . . . . . . . . . . . . . . . . . . . . . . . . . . . . . . . . . . . . . . . . . . . . . . . . . . . . . . . . . . . 431
How to publish Captivate projects to Microsoft Word . . . . . . . . . . . . . . . . . . . . . . . . . . . . . . . . . . . . . . . . . . . . . . . . . . . . . . . . . . . . . . . . . 433
Using Adobe Connect with Captivate . . . . . . . . . . . . . . . . . . . . . . . . . . . . . . . . . . . . . . . . . . . . . . . . . . . . . . . . . . . . . . . . . . . . . . . . . . . . . . . . 437
How to add Captivate projects to a RoboHelp online help system . . . . . . . . . . . . . . . . . . . . . . . . . . . . . . . . . . . . . . . . . . . . . . . . . . . . . 441
Import and edit PowerPoint presentations in Captivate . . . . . . . . . . . . . . . . . . . . . . . . . . . . . . . . . . . . . . . . . . . . . . . . . . . . . . . . . . . . . . . 442
Last updated 10/10/2016
Page 7

CAPTIVATE
Content s
How to package multiple SCOs using the Adobe Multi-SCORM Packager . . . . . . . . . . . . . . . . . . . . . . . . . . . . . . . . . . . . . . . . . . . . . . 448
Using Adobe Bridge with Captivate . . . . . . . . . . . . . . . . . . . . . . . . . . . . . . . . . . . . . . . . . . . . . . . . . . . . . . . . . . . . . . . . . . . . . . . . . . . . . . . . . . 450
Chapter 17: Troubleshooting
Reducing time taken to preview an Adobe Captivate project . . . . . . . . . . . . . . . . . . . . . . . . . . . . . . . . . . . . . . . . . . . . . . . . . . . . . . . . . . 452
How to improve the file size of Adobe Captivate output . . . . . . . . . . . . . . . . . . . . . . . . . . . . . . . . . . . . . . . . . . . . . . . . . . . . . . . . . . . . . . 452
How to uninstall Adobe Captivate . . . . . . . . . . . . . . . . . . . . . . . . . . . . . . . . . . . . . . . . . . . . . . . . . . . . . . . . . . . . . . . . . . . . . . . . . . . . . . . . . . . . 453
About the CLIP audio file in Adobe Captivate . . . . . . . . . . . . . . . . . . . . . . . . . . . . . . . . . . . . . . . . . . . . . . . . . . . . . . . . . . . . . . . . . . . . . . . . . 454
Troubleshooting Flash video file-related errors in Adobe Captivate output . . . . . . . . . . . . . . . . . . . . . . . . . . . . . . . . . . . . . . . . . . . . 454
How to fix issues where text does not display in browser . . . . . . . . . . . . . . . . . . . . . . . . . . . . . . . . . . . . . . . . . . . . . . . . . . . . . . . . . . . . . . 454
Working with the Skin Editor in Adobe Captivate . . . . . . . . . . . . . . . . . . . . . . . . . . . . . . . . . . . . . . . . . . . . . . . . . . . . . . . . . . . . . . . . . . . . . 455
Security warning with Flash Player 9 or later . . . . . . . . . . . . . . . . . . . . . . . . . . . . . . . . . . . . . . . . . . . . . . . . . . . . . . . . . . . . . . . . . . . . . . . . . . 455
Recording Applications on Mac . . . . . . . . . . . . . . . . . . . . . . . . . . . . . . . . . . . . . . . . . . . . . . . . . . . . . . . . . . . . . . . . . . . . . . . . . . . . . . . . . . . . . . 455
How to prevent learners from jumping to the result slide during quiz . . . . . . . . . . . . . . . . . . . . . . . . . . . . . . . . . . . . . . . . . . . . . . . . . 455
JavaScript does not appear when previewing Adobe Captivate output . . . . . . . . . . . . . . . . . . . . . . . . . . . . . . . . . . . . . . . . . . . . . . . . 456
How to correct colors in Adobe Captivate slides . . . . . . . . . . . . . . . . . . . . . . . . . . . . . . . . . . . . . . . . . . . . . . . . . . . . . . . . . . . . . . . . . . . . . . 456
How to avoid choppy full motion recording in Adobe Captivate . . . . . . . . . . . . . . . . . . . . . . . . . . . . . . . . . . . . . . . . . . . . . . . . . . . . . . . 456
Tips to capture screens while recording a web application . . . . . . . . . . . . . . . . . . . . . . . . . . . . . . . . . . . . . . . . . . . . . . . . . . . . . . . . . . . . 457
How to record applications having elevated permissions in Windows Vista or Windows 7 . . . . . . . . . . . . . . . . . . . . . . . . . . . . . . 457
How to fix application distortion issues while recording . . . . . . . . . . . . . . . . . . . . . . . . . . . . . . . . . . . . . . . . . . . . . . . . . . . . . . . . . . . . . . 457
Synchronize animation timing with the Adobe Captivate timeline . . . . . . . . . . . . . . . . . . . . . . . . . . . . . . . . . . . . . . . . . . . . . . . . . . . . . 458
vii
Last updated 10/10/2016
Page 8

Chapter 1: What’s new
What's New in Adobe Captivate
Adobe Captivate reimagines the way interactive eLearning is created for a multi-device world. Rapidly author a wide
range of interactive and responsive HTML5-based eLearning content without programming.
Read on for a quick introduction to the new features and enhancements introduced in Adobe Captivate 9.0.2, 9.0.1, and
9 r
eleases.
What's new and changed in Adobe Captivate 9.0.2
1
Import assets
Import assets and e -learning templates from Adobe Stock and eLearning Brothers and customize your e-learning
projects.
To import assets from Adobe Stock,
• Click Assets in the main toolbar and click Get Adobe Stock Assets.
To import assets from eLearning Brothers portal,
• Click Assets in the main toolbar and click Get Free eLearning Assets.
For more information, see Importing assets into a Captivate project .
Last updated 10/10/2016
Page 9

What’s new
Community portal
Join conversations about creating and managing e-learning projects with Adobe Captivate.
To access the community portal,
• Click Community in the main toolbar.
For more information, see Using the Community Portal .
Performance enhancements in this release
2
Captivate 9.0.2 comes with several runtime performance enhancements. Some of them are:
• Multi-state objects now load faster.
• Images in a project load faster as there are fewer http calls to the images.
• Changes in timer logic to prevent heavy load on CPU and battery.
What's new and changed in Adobe Captivate 9.0.1
Last updated 10/10/2016
Page 10
What’s new
Rulers and guides
Enhanced rulers and guides are added to improve your design experience.
For more information, see:
•
• How to align objects in Adobe Captivate
Enhancements to the multi-state object feature
3
Multiple enhancements are added to the multi-state feature that was introduced in Adobe Captivate 9.
With Adobe Captivate 9.0.1, you can now:
• Relatively position object states automatically when you move an object on the slide.
• Retain state on slide revisit
In addition, there are some bugs fixed related to undo and redo operations while working with object states.
For more information on these enhancements, see Working with multi-state objects in Adobe Captivate.
Device capture enhancements
Last updated 10/10/2016
Page 11
What’s new
A number of enhancements are added to this device capture feature (applicable for Mac OS only):
• Enhancements to the gesture palette
• The depiction of gestures on the timeline is changed to show them as gestures instead of smart shapes (which was
the case in Adobe Captivate 9)
• Added a timer while recording to indicate the duration of the recording time
• Added an alarm that will sound if you change the recording orientation
• The device audio now plays through the Mac while recording thereby improving the recording audio
For more information, see Capture content from iOS devices (Captivate for MAC feature).Capture content from iOS
devices (Captivate for MAC feature)
Captivate Draft app enhancements
4
For easier usability, the gesture mode has been discontinued and its main feature - the ability to "draw" shapes on screen
is merged into the edit mode.
The copy and paste feature is also enhanced allowing you to copy and paste objects from one slide to another within a
projec
t.
Another navigation method is added - the two-finger swipe.
For more information, see Using the Captivate Draft iPad app.Using the Captivate Draft iPad app
Platform support
Apart from supporting all the operating systems supported by Captivate 9, Captivate 9.0.1 also offers Mac 10.11.3
support.
For more information, see System Requirements .
What's new and changed in Adobe Captivate 9
Last updated 10/10/2016
Page 12
What’s new
5
Captivate Draft app for iPad
Enhanced effects
Capture content from iOS devices
Preview project in LMS
Multi-state objects
Work i n C a p t iv a t e w i t h s v g g r aphi c s
Additional breakpoints and UI enhancements for responsive projects
Last updated 10/10/2016
Page 13
What’s new
6
Create knowledge check slides
Publish to Adobe Captivate Prime
Other features
Last updated 10/10/2016
Page 14
What’s new
Captivate Draft app for iPad
7
Use the Captivate Draft app for iPad to quickly create content on the go. Create storyboards whenever inspiration
strikes you, and then export it to the Cloud, to work on it later. You can also send your draft projects to reviewers and
collaborators.
For more information, see Using the Captivate Draft iPad appand Review and collaboration in Adobe Captivate Draft
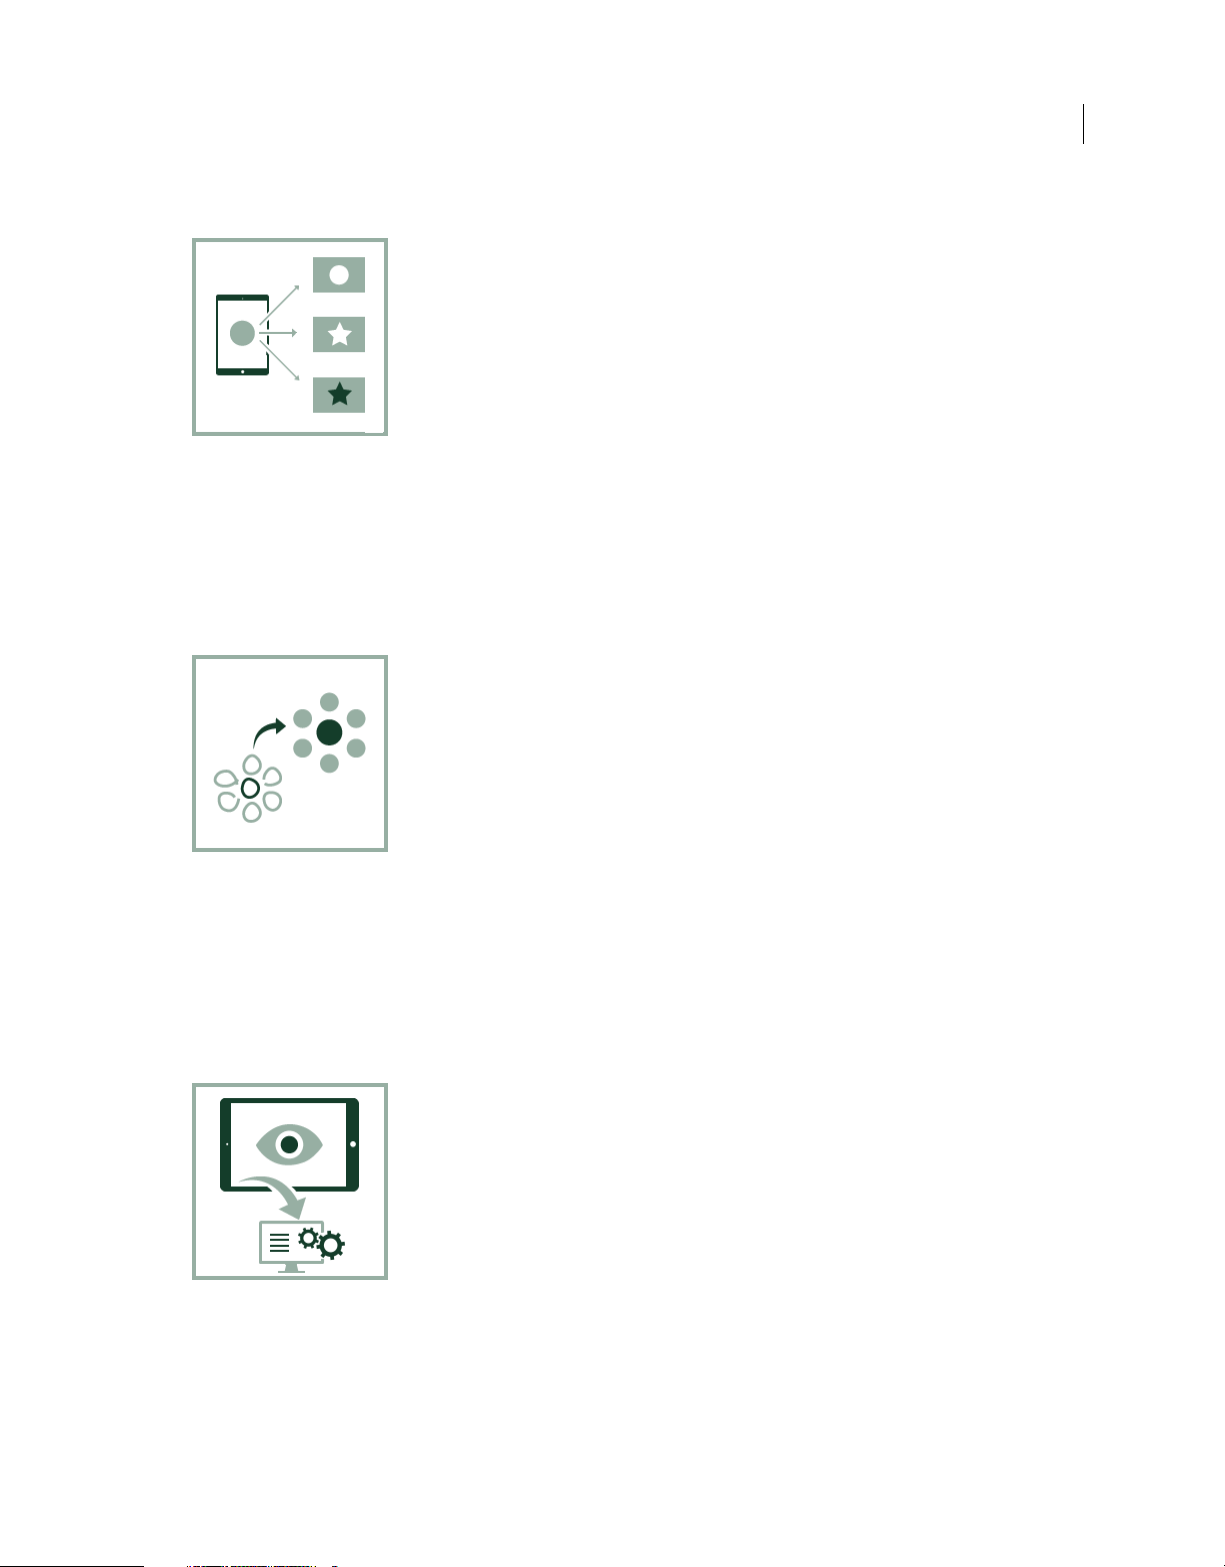
Capture content from iOS devices
You can now connect your iOS device to your computer, and capture actions on the device.
For more information, see Capture content from iOS devices (Captivate for MAC feature)
Last updated 10/10/2016
Page 15
What’s new
Multi-state objects
Objects can now have multiple states. This feature gives you the freedom to manipulate object behavior and appearance
quickly and easily directly from the Property Inspector.
For more information, see Working with multi-state objects in Adobe Captivate.
Enhanced effects
8
The effects panel UI has been revamped for a better user-friendly experience.
New effects have been added. Also motion path effects are now available for responsive projects also.
For more information, see Object effects .
Preview project in LMS
Preview your project in an LMS and verify it is structurally accurate before actual publishing.
For more information, see Preview LMS.
Last updated 10/10/2016
Page 16
What’s new
Work in Captivate with svg graphics
Import and edit your svg graphics within Captivate.
For more information, see Working with SVG images.
Additional breakpoints and UI enhancements for responsive projects
9
Additional breakpoints are introduced to help you refine your project further. In addition, several UI enhancements
have been included.
For more information, see Responsive Project Design with Adobe Captivate.
Create knowledge check slides
You can create knowledge check slides to enforce learning activity for learners.
For more information, see Set up knowledge check slides in Adobe Captivate.
Last updated 10/10/2016
Page 17

What’s new
Publish to Adobe Captivate Prime
Adobe Captivate Prime is a new learning management system that you can use to distribute your e-learning content
over the internet to learners.
You can now publish your Captivate projects to Captivate Prime.
For more information, see Publish project to Adobe Captivate Prime
Other features
10
Emulate geolocation
You can test any geolocation functionality you have set up when you preview your project in the browser.
For more information, see Emulate geolocation while testing your project.
Introduction of delays in advanced actions
In previous versions of Captivate, a given set of actions in an advanced action gets exe cuted a ll at the same time and not
sequentially. This issue is now addressed by the Delay action.
Syntax:
Delay wait_time seconds
wait_time is the amount of time required before executing the next action.
wait_time can also be parameterized in shared action.
Usage example:
DelayNextActionsBy 2 seconds
Show smartshape1
DelayNextActionsBy 2 seconds
Hide smartshape1
In runtime, show action gets executed at 2 seconds and hide action gets executed at 4 seconds.
Sample workflows:
• Used to execute a set of actions after 'X' seconds the movie has started playing.
• Combined with jump to slide actions.
Last updated 10/10/2016
Page 18
What’s new
• Used to show/hide objects after playing an effect, audio, and so on.
• Combined with change state of action to show objects at desired time interval
Note:Delay does not interfere in movie state (pause or continue).
Exclusive e-learning assets
Click Assets on the toolbar to access more than 30,000 assets available to you free with Adobe Captivate 9.
Using the Captivate Draft iPad app
You can quickly create your e-learning content on-the-go using the Captivate Draft app for iPad. Prepare your draft
content in collaboration with other content authors while you are away from your desktop/laptop by using Captivate
Draft.
Drag-and-drop Captivate native objects, smart shapes, set the styles and reuse them in your desktop as Captivate
p
roject. You can import the iPad app content into a desktop project and also export the project from iPad app.
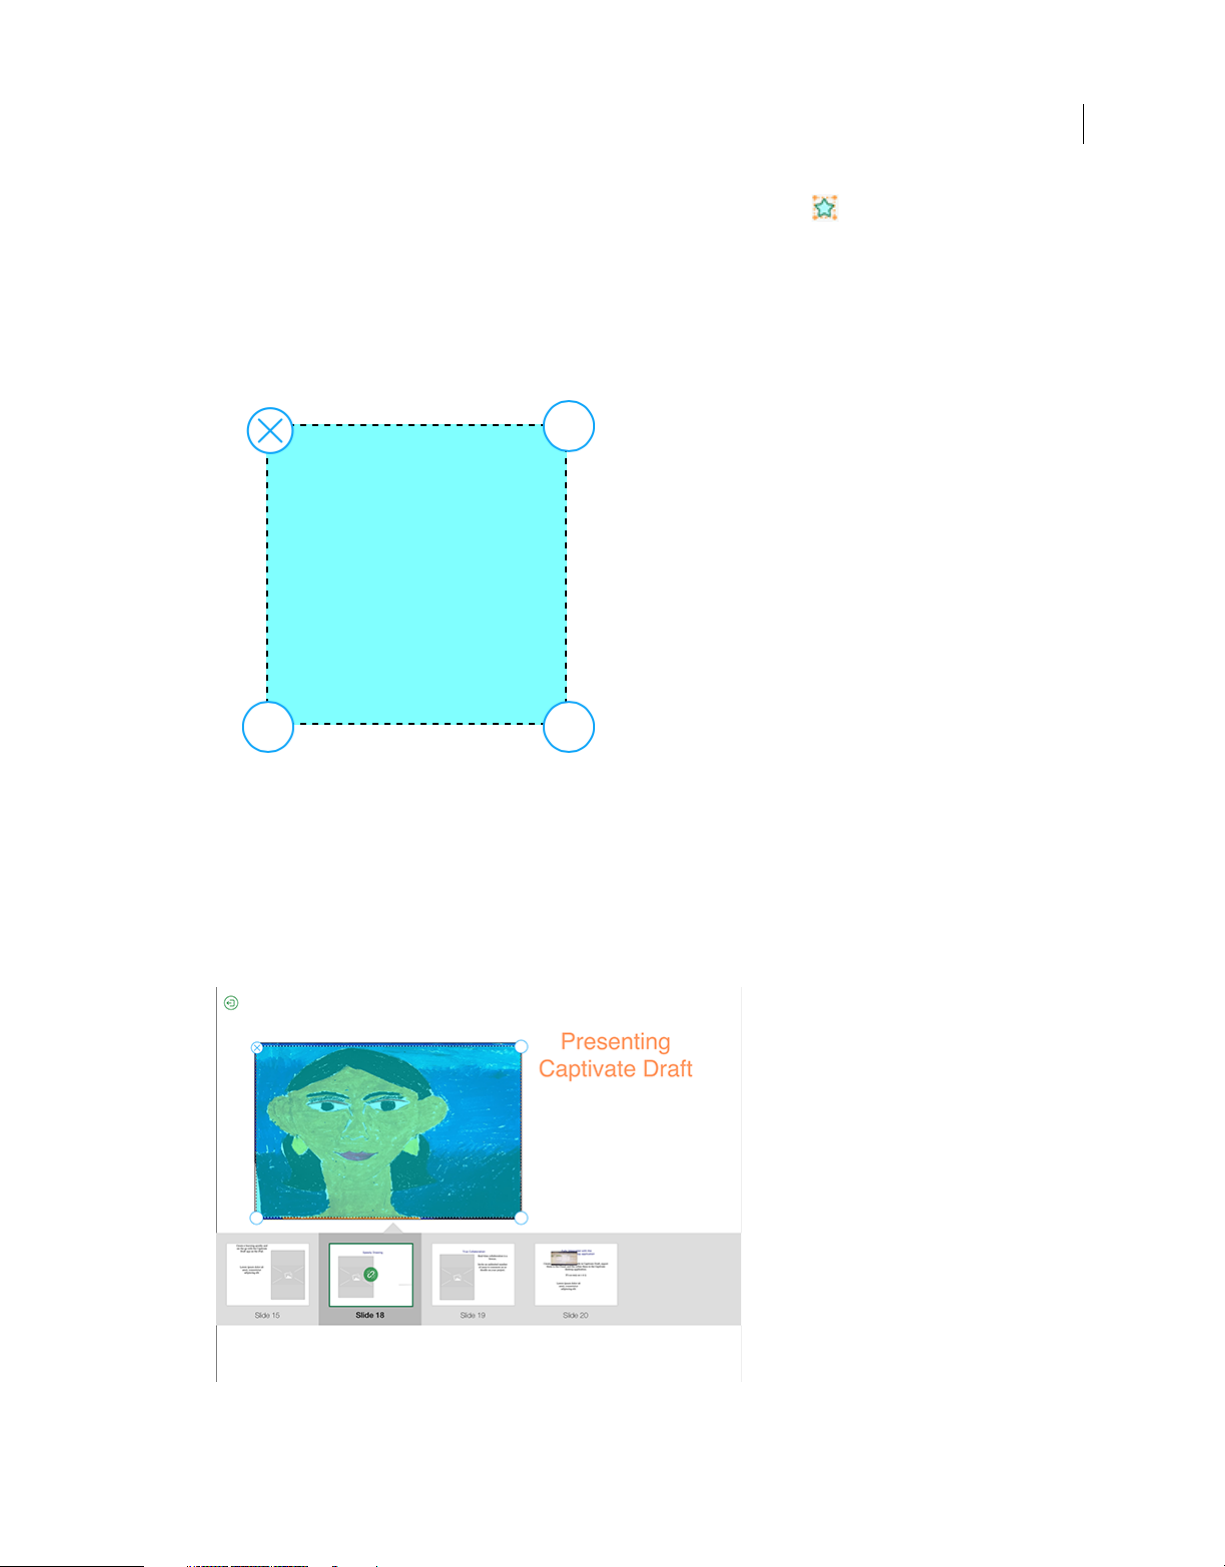
Create a project
1 Launch the Captivate Draft app on your iPad.
11
2 Click the tile named Create New Project as shown here.
3 Start creating your project in the blank slide.
Your project gets autosaved once you move away from the app. View your saved project in the landing page of your
A
dobe Captivate Draft app.
Create content
You can create different types of content - draw or add objects, add text, and embed media.
Last updated 10/10/2016
Page 19
What’s new
Draw objects
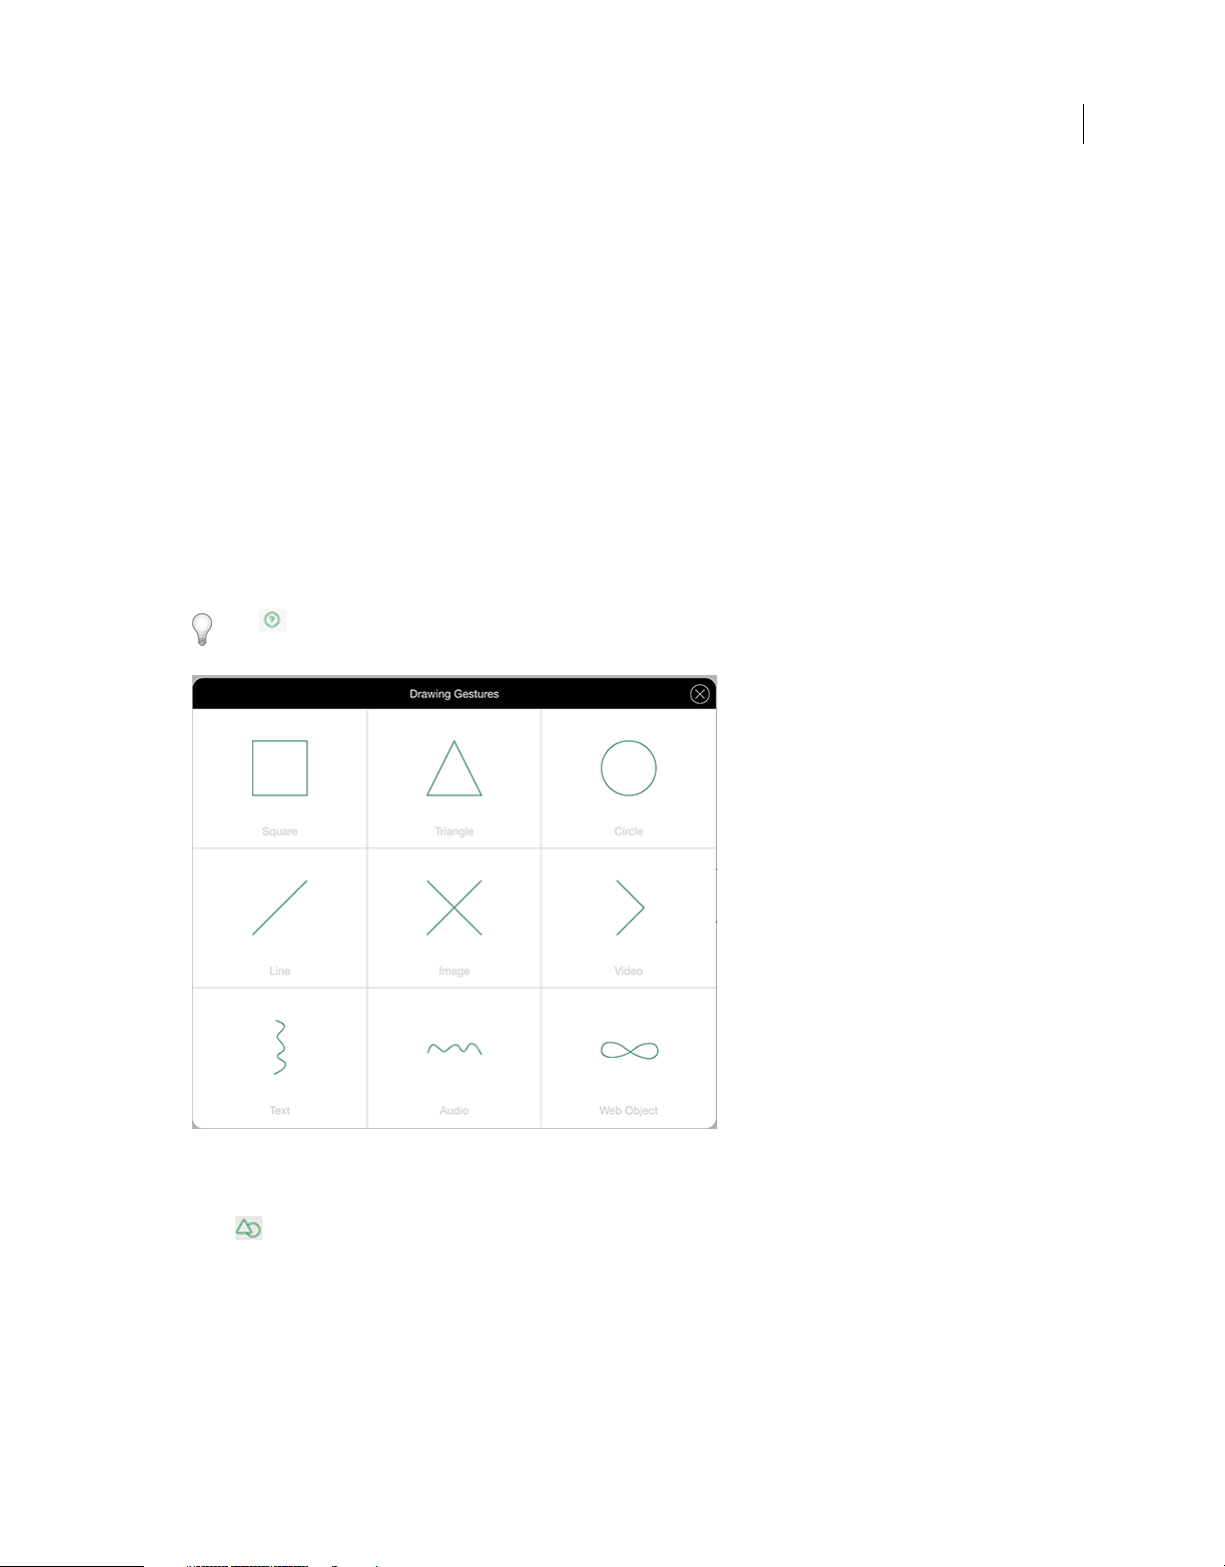
The Captivate Draft app supports the following gestures to insert corresponding objects:
• Square - Draw square shape on the slide to get this object
• Triangle - Draw triangle shape on the slide to get this object
• Circle - Draw circle shape on the slide to get this object
• Line - Draw line shape on the slide to get this object
• Image - Draw x shape on the slide to get this object
• Video - Draw > shape on the slide to get this object
• Text - Draw wave shape vertically on the slide to get this object
• Audio - Draw wave shape on the slide to get this object
• Web Object - Draw infinity shape on the slide to get this object
Simply draw a shape on the screen with your finger to get an object.
12
Click on the upper right of the screen to access the Help that sh
on your slide.
ows how you can use gestures to quickly draw objects
Add objects and embed media
Press on the left of the screen. A pop-up menu with shapes appears. To insert corresponding shape objects on the
slide, press each of these icons.
Last updated 10/10/2016
Page 20
What’s new
You can edit the properties of your objects such as size and fill/stroke color using the options on the right-side.
13
You can also add audio, video, and web objects. For more information, see Add multimedia.
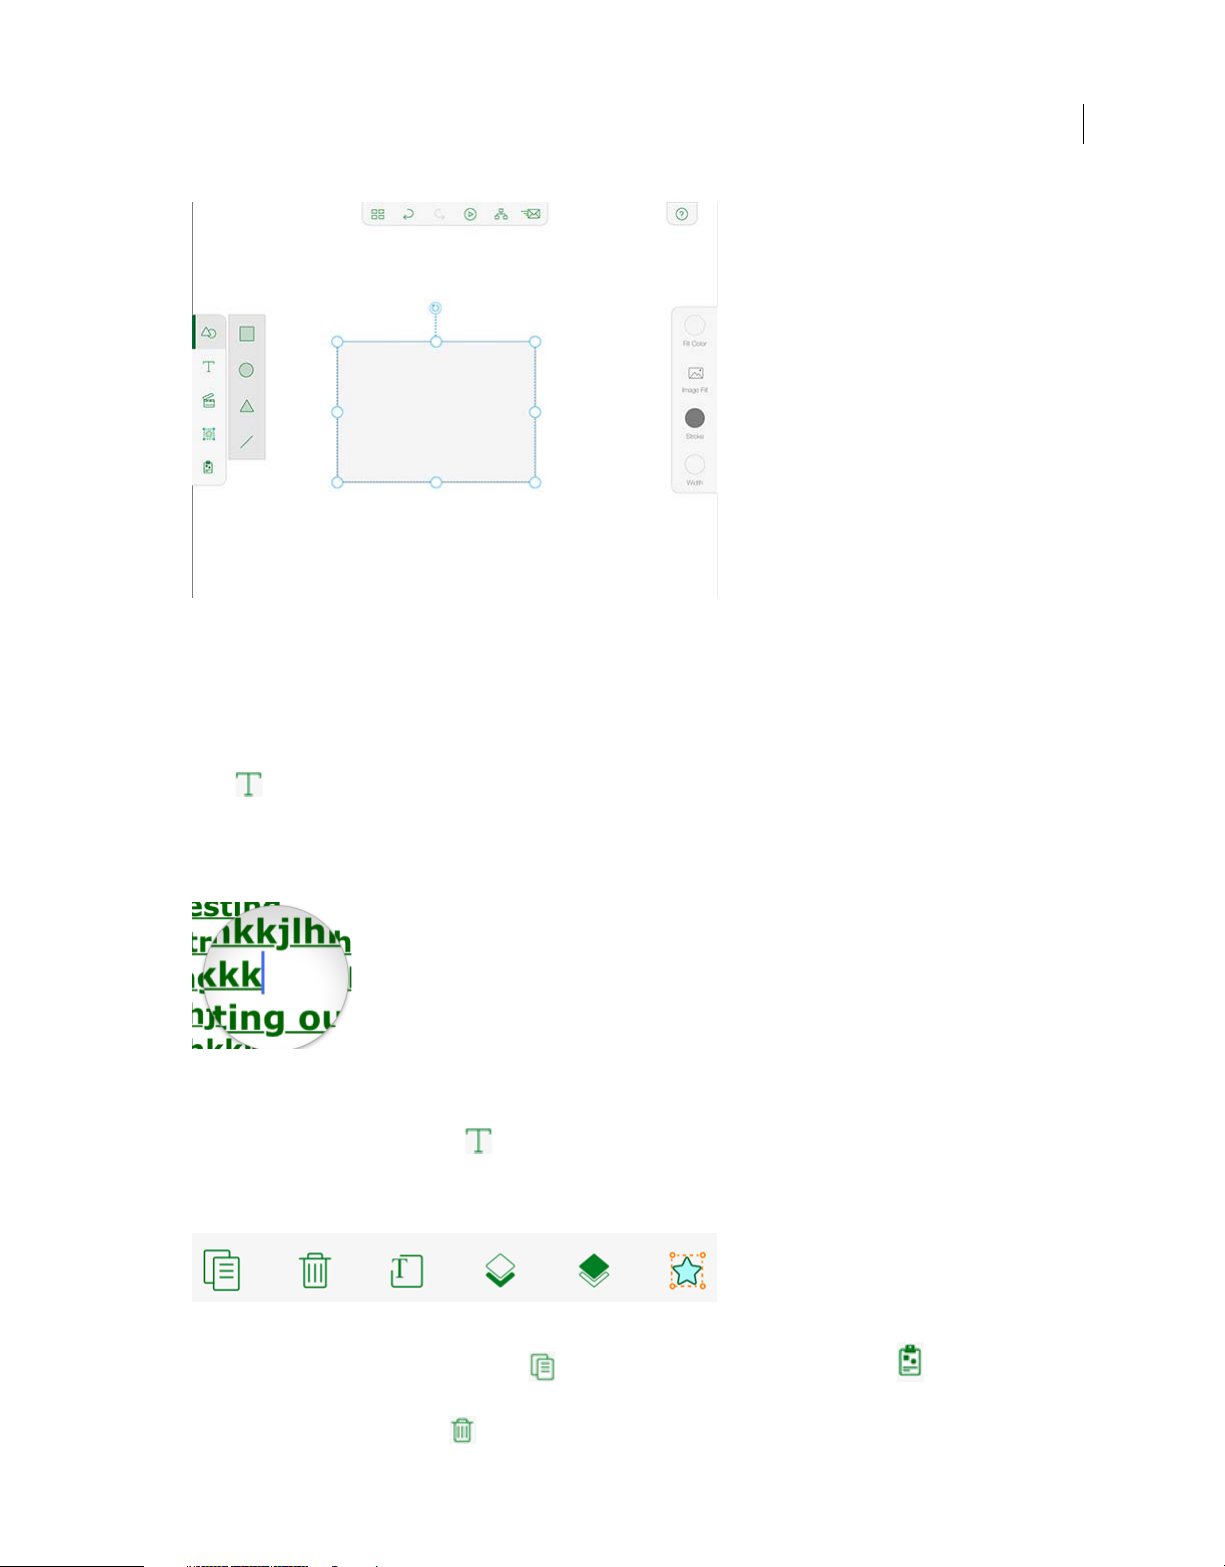
Add and edit text
Press on the left side menu of the screen. A text area appears on the slide. To start adding the content, double tap
the text area.
To edit the text, long press on the text inside text area to open a bubble shaped magnifier. You can move your cursor
around the large text content using it.
Change text properties - You can change the font type, size, and also apply text properties to the text area. From the
right side menu on the screen, press
and color icons.
A single tap on the object or text area pops up the text editing menu panel at the top:
icon to change the font. You can also edit the text size and color using the size
Copy To generate a copy of the text area, tap . To paste it anywhere within the project, tap from the toolbar on
the left.
Delete To delete the text area, tap .
Last updated 10/10/2016
Page 21
What’s new
Edit To start editing the content, tap .
14
z-index I
object/text area. The white layer on the stack icon represents your selected object/text area position
Hotspot If you want the user to tap the text to navigate to another slide, tap and select the slide you want to navigate
to. A hotspot is created for that text area.
f you have multiple overlapped objects/text areas, tap the z-index stack icons to bring up or send down the
.
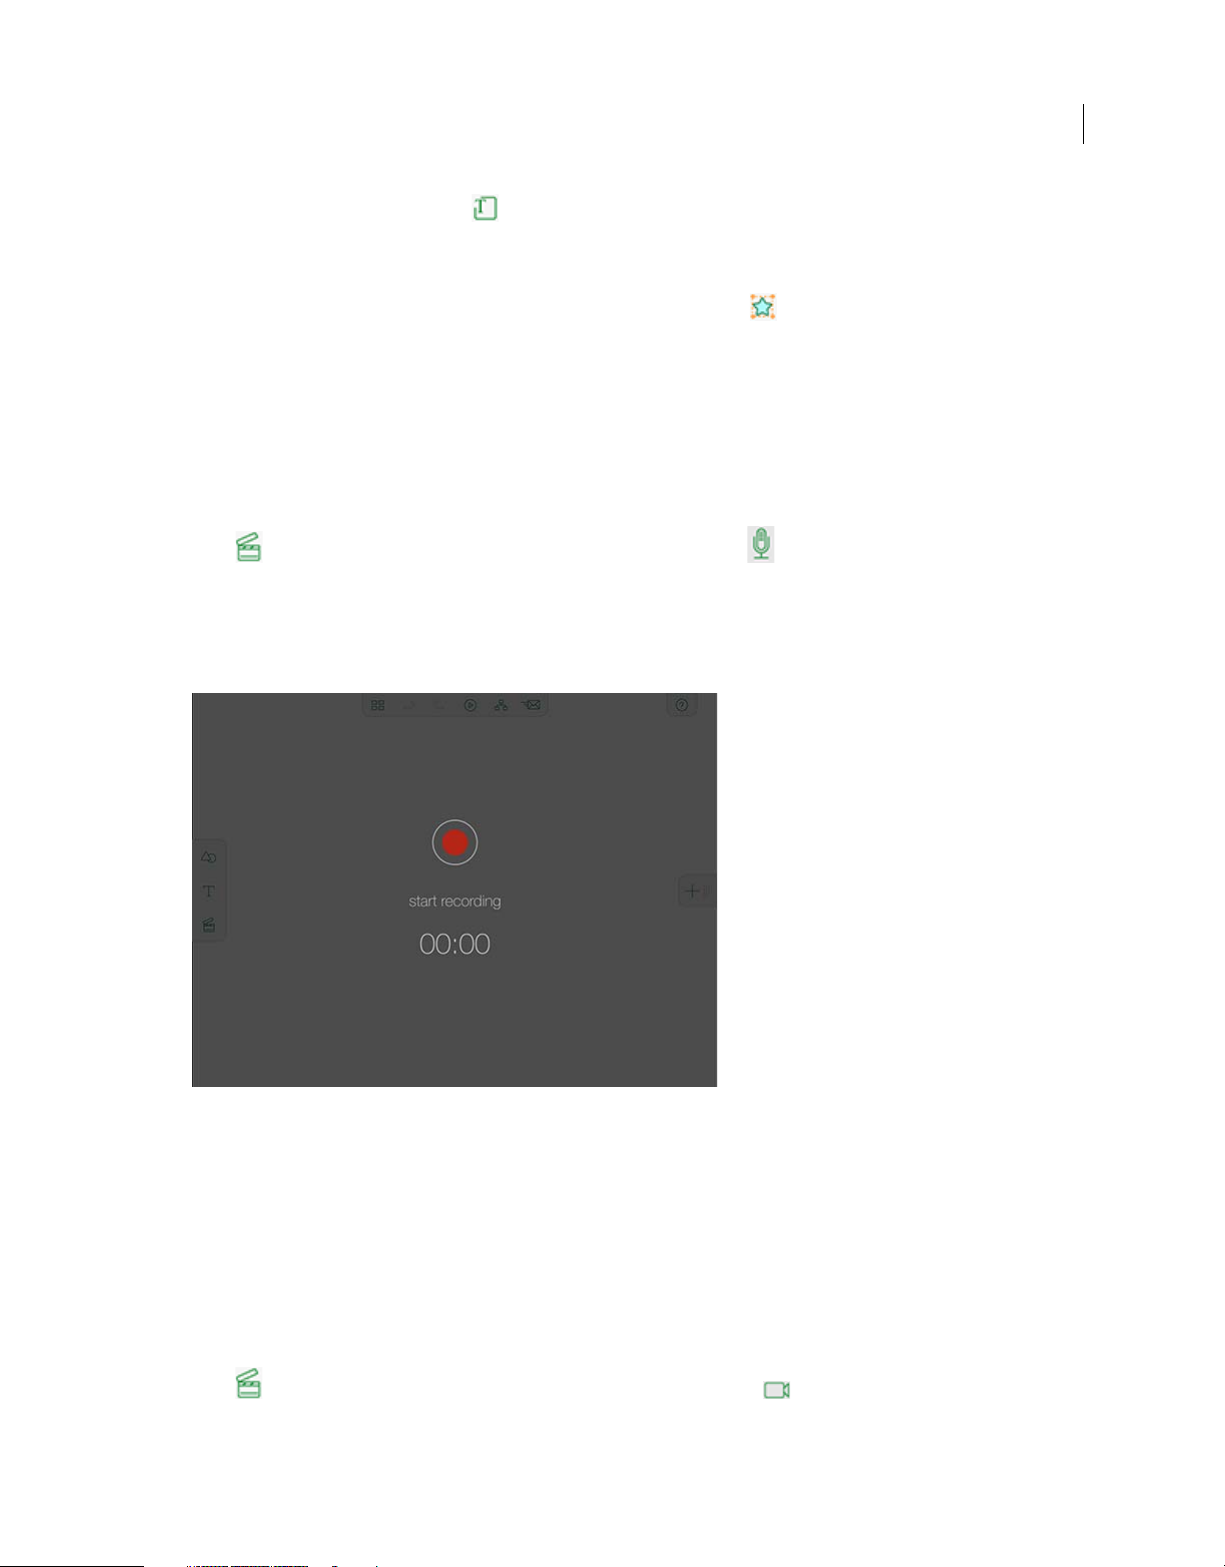
Add multimedia
You can add multimedia objects such as images, audio, video, and web objects.
Add audio
You can record audio live in Adobe Captivate Draft.
Press on the left of the screen. In the submenu pop-up window, press . A recording button appears with a
message to start recording audio. To start recording the audio, tap the red circle. Tap the red circle again to stop
re
cording.
An audio icon at the upper right corner of the slide indicates that the audio is saved to the slide. When you stop the
a
udio recording, you can opt to play audio, record again or delete the audio clip. Choose the appropriate option.
The audio files are auto saved into the slides. All the audio slides are represented with an audio icon at the upper right
co
rner of the slide for identification.
At any point in time, you can access the audio clip by tapping the audio icon. You can then choose to play audio, record
a
gain, or delete the audio clip.
Add video
You can record videos live in slides or add existing videos. Similarly, you can capture live pictures into the slide or
import existing images to the slide.
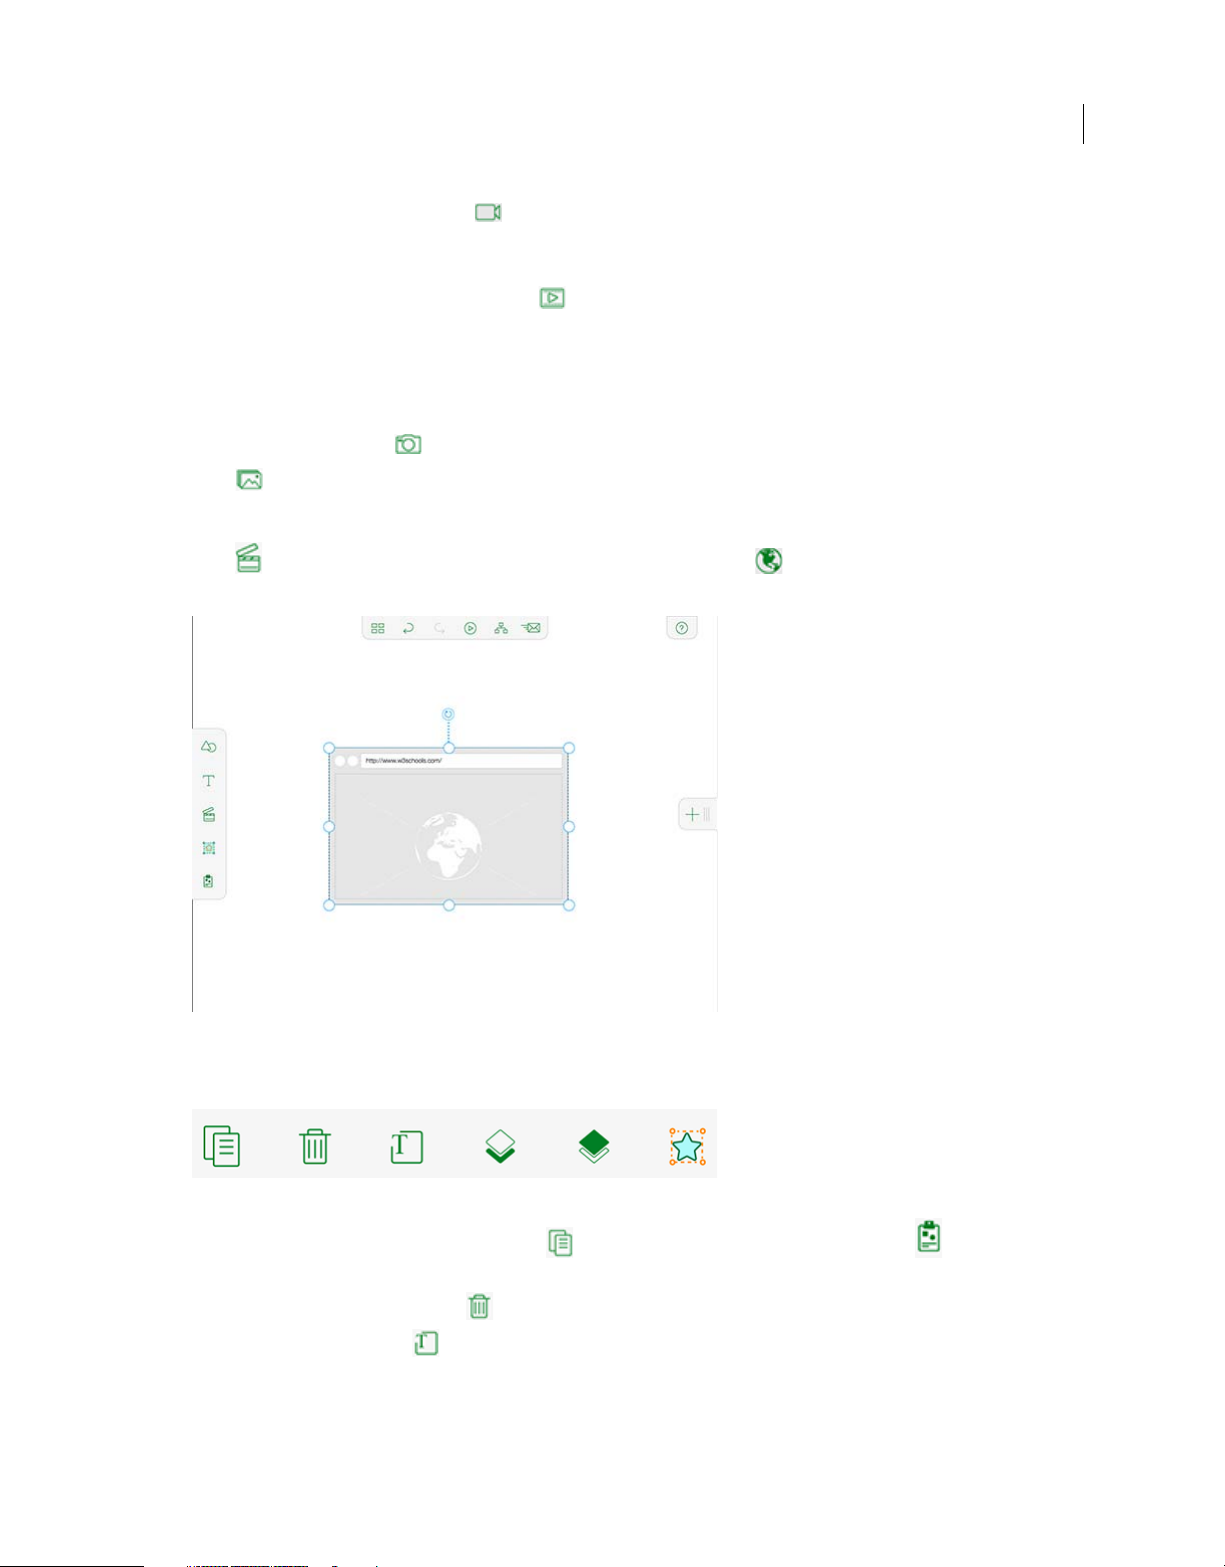
Press on the left side menu of the screen. In the pop-up submenu, press . A video placeholder area appears on
the slide.
Last updated 10/10/2016
Page 22
What’s new
On the right-side of the screen, press to record live videos. After recording the video, tap Use Video at the lowerright corner of the screen to include in the slide. To re-record the video, tap Retake at the lower-left corner of the screen.
T
o cancel recording and go back to the slide, press Cancel.
To import existing videos into the slide, press on the right side.
Add images
Press the multimedia icon on the left side menu of the screen. In the pop-up submenu, tap the image icon. An image
placeholder area appears on the slide.
To take live pictures, press on the right side of the screen.
Press to import existing images into the slide.
Add web object
Press on the left side menu of the screen. In the pop-up submenu press . It creates a web object on the slide. To
edit/add the url of your choice
, double tap the url space.
15
More editing options are available for the inserted web object.
Copy T
o generate a copy of the web object, tap . To paste it anywhere within the project, tap on the left side of
the screen.
Delete T
Edit T
z-index I
object/text area. The white layer on the stack icon represents your selected object/text area position
o delete the web object, tap .
o change the URL, tap .
f you have multiple overlapped objects/text areas, tap the z-index stack icons to bring up or send down the
.
Last updated 10/10/2016
Page 23
What’s new
Hotspot If you want the user to tap the web object to navigate to another slide, tap and select the slide you want to
navigate to. A hotspot is created for that web object.
Add hotspots
You can branch or inter-link slides within the project by using hotspots.
1 Tap the hotspot icon, then tap on the screen where you want to create a hotspot.
16
A square hotspot appears on the screen.
2 Press and drag the corners of the hotspot to increase or decrease the size of it. Change the positions by pressing the
hotspot and moving it.
3 To delete a hotspot, click the X icon on the upper left corner of the hotspot.
4 To link the slides, press the hotspot, all the slides in the project appear on the screen.
Last updated 10/10/2016
Page 24
What’s new
5 Press the slide you want the hotspot to link to.
A link icon appears on the linked slide.
n any slide, you can use a maximum of four hotspots to link other slides.
Note: O
Add slides to a project
You can add blank or question slides to your project.
Add a blank slide
To add a blank slide:
1 Ta p on the right side of the screen.
2 Start creating your content in the slide.
Note: Y
our slide is autosaved.
3 To include more slides to your project, repeat the above steps.
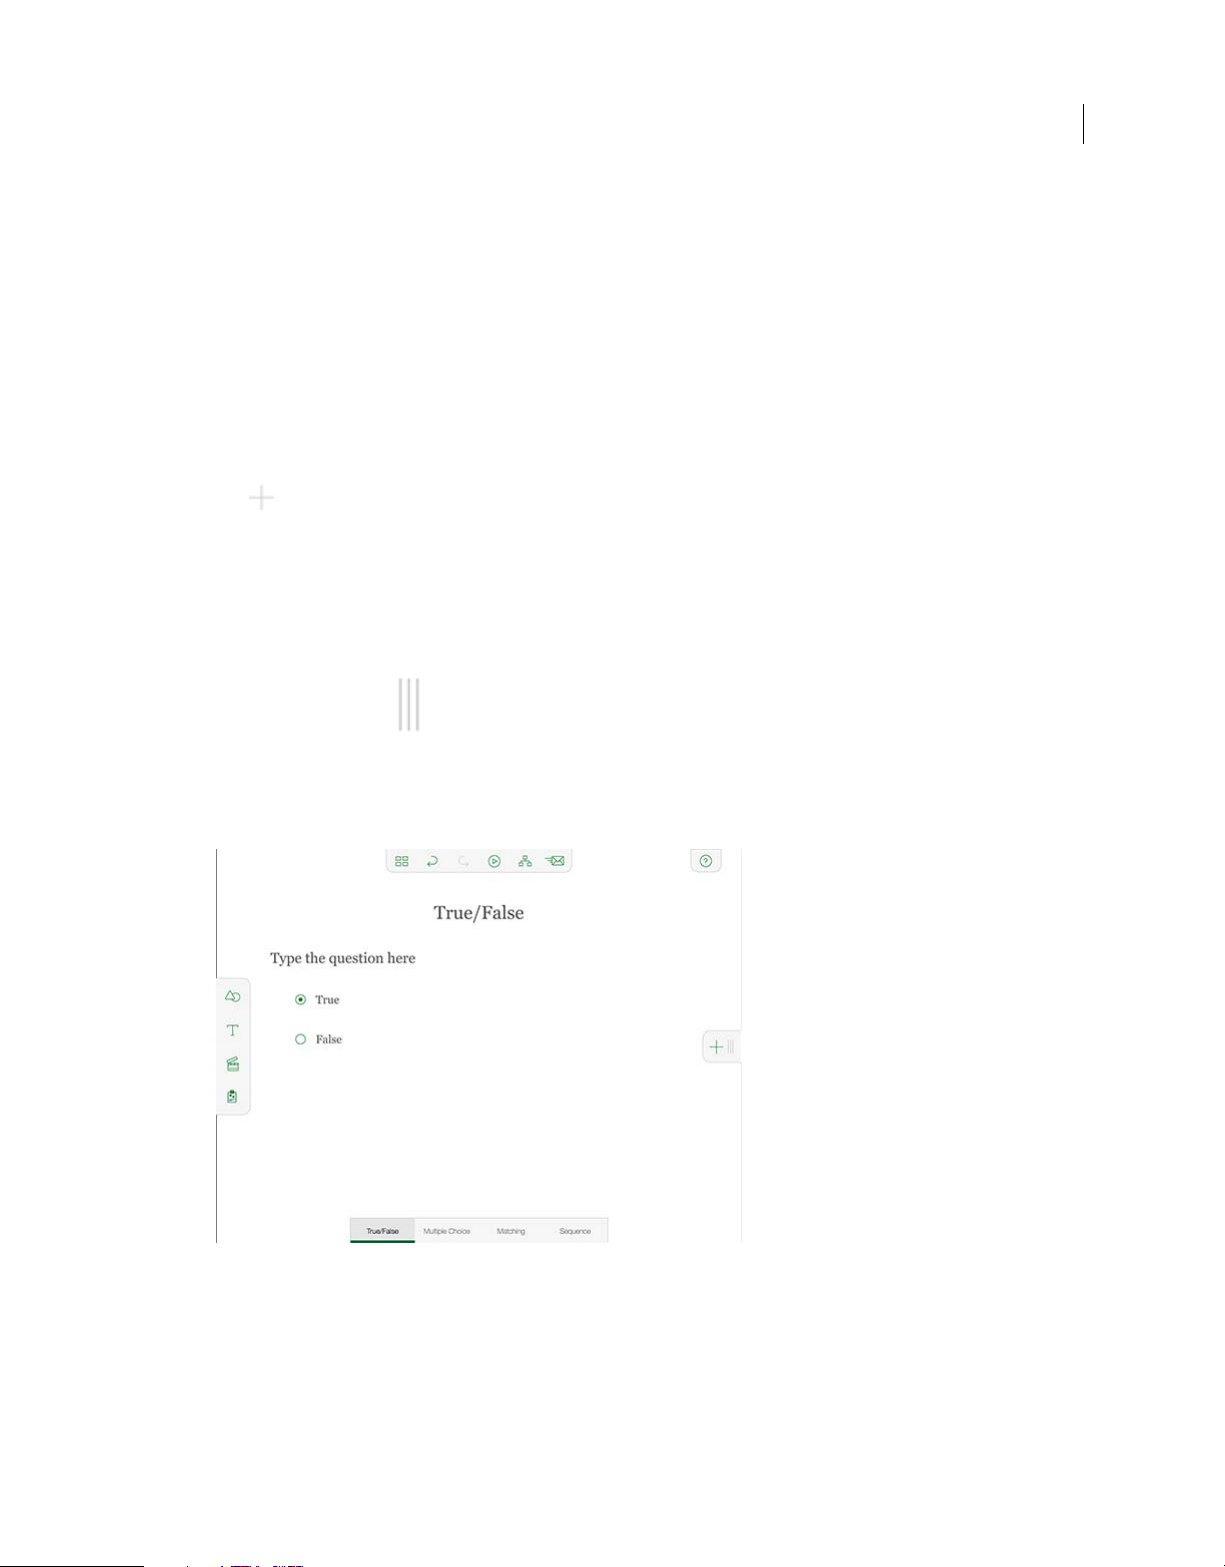
Add a question slide
To ad d a q u est i on s l id e :
17
1 Slide your finger across on the right of the screen, and click Add Question Slide in the pane that opens.
A pane offering four question slide options opens up allowing you to create True/False, Multiple Choice, Matching,
a
nd Sequence type of questions.
2 Select one of the options and edit it according to your requirements.
Tr ue /F al s e - D
Multiple Choice D
Double tap the text area, named 'Type the answer here' to add the answer text of your choice.
ouble tap the text area, named 'Type the question here' to add the question text of your choice.
ouble tap the text area, named 'Type the question here' to add the question text of your choice.
Last updated 10/10/2016
Page 25

What’s new
Matching Double tap 'Insert column 1 text here' text area and 'Insert Answer' text area to add your choice of text. A
minimum of two answers are required for this slide, two answers are shown by default.
18
Sequence Do
slide, two sequence items are shown by default.
3 To add more answer choices to the question in multiple choice, matching and sequence question slides, press on
the left side of the screen. On the right, you can see '#Answers' icon with the current number of available answers
eing highlighted in circle. Press the icon, a side level scrolling menu appears. You can scroll up or down to add the
b
number of answers. A minimum of two answers are shown by default.
4 To edit the fonts of the quiz questions and answers, single press on the text area to select it. Options to modify the
text, size, and color appear on the right-side of the screen.
uble tap 'Type the sequence item' to add text. A minimum of two sequence items are required for this
Navigate across slides and projects
You can navigate through the project in the following ways:
• Swipe with two fingers right or left to navigate to previous or next slides.
• Double-tap anywhere on the screen and then tap on the next and previous icons that appear at the bottom of the
screen.
To navigate to a specific slide, swipe on the right of the screen to see all the slides in your project. Then tap on the
slide you want to navigate to.
To navigate across projects, tap the Home icon to get back to the home screen that lists all your projects. Then tap on
th
e project you want to access.
Copy, move, and delete slides in a project
To view the filmstrip with all the slides of your project shown as thumbnails in it, press and swipe to your left.
A long press on the slide on the filmstrip shows the Delete icon on the lower-right of the thumbnail. To delete the slide,
ss on the Delete icon.
pre
To copy a slide, click .
You can also move the slides from one position to another at this
location.
state, by dragging and placing them at your desired
Last updated 10/10/2016
Page 26
What’s new
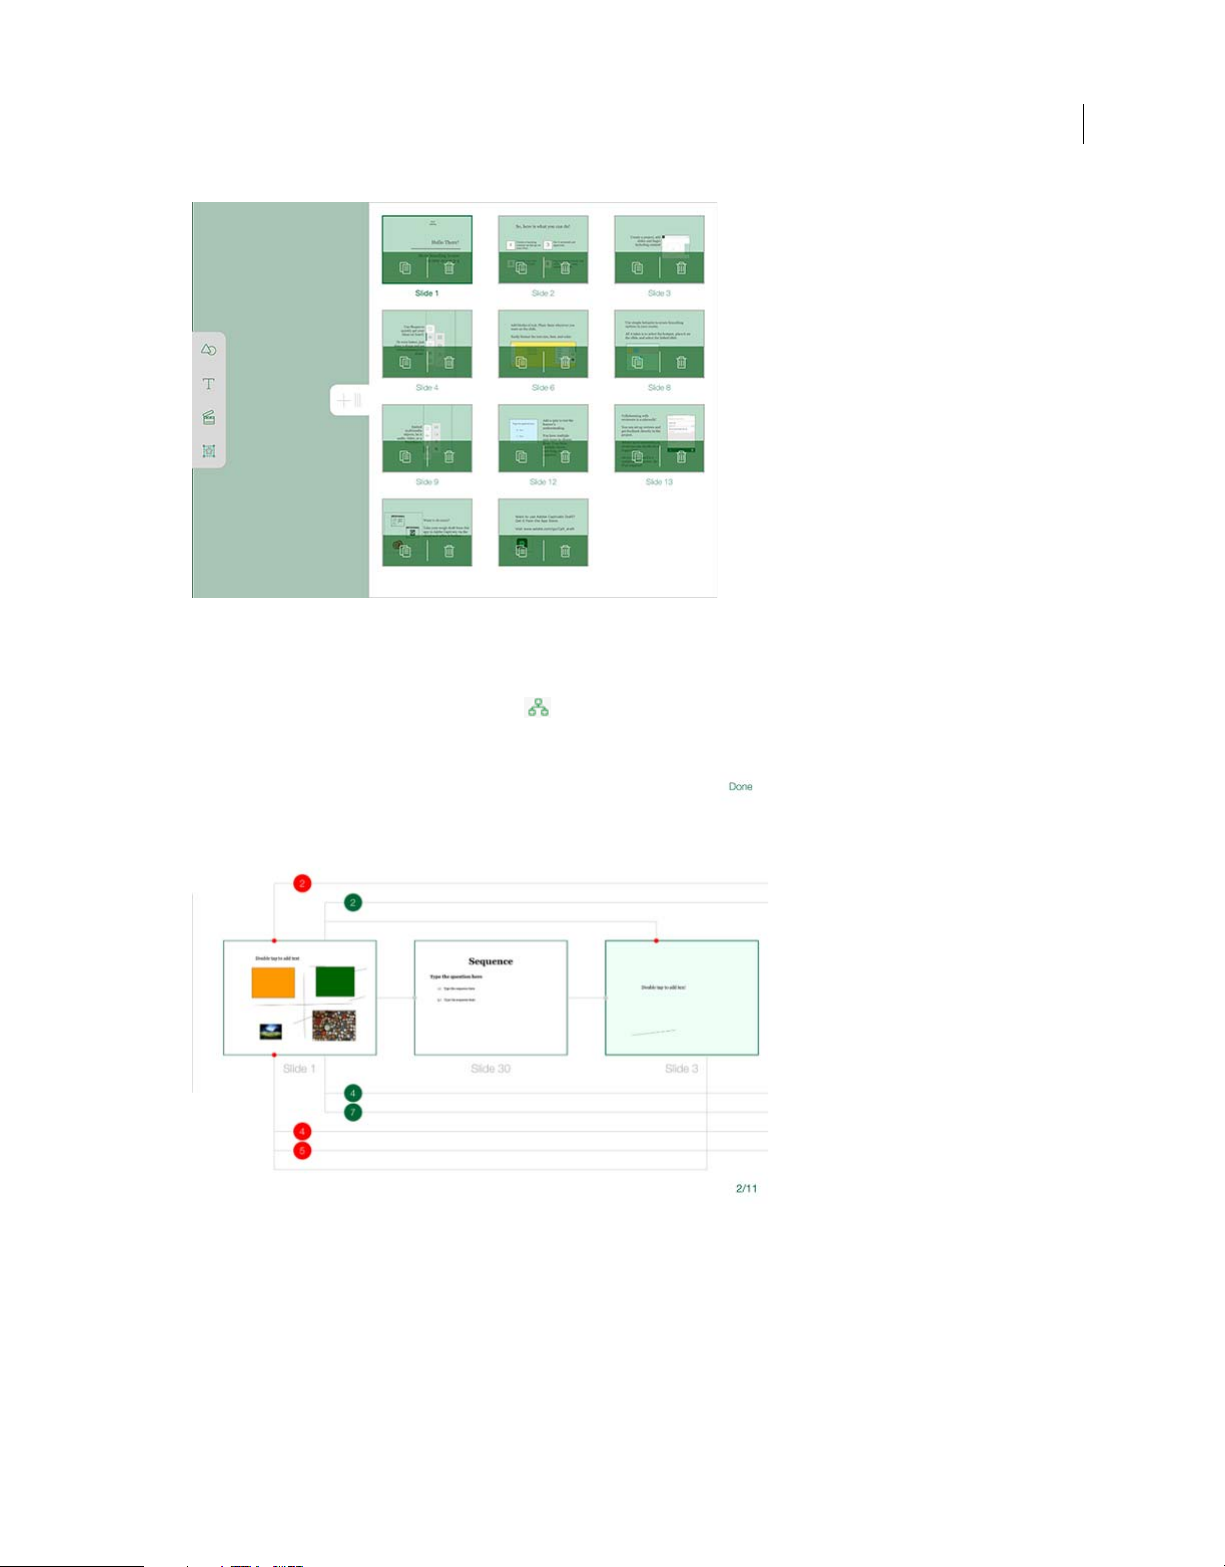
View a project in Branching view
To view the branching for your slides, press at the top of the screen.
19
As shown in the below image, the host and target slides links are shown with red dots on target thumbnail slides.
Pinch and drag to zoom in and out, so you can see all the branches/links.
To go to a particular slide, select and press any slide in this view.
Undo/redo changes
To undo/redo any changes, press the Left Arrow at the top of the screen. To redo changes you made in the slide, press
the Right Arrow.
Last updated 10/10/2016
Page 27
What’s new
Preview a project
To preview the project, press the play icon at the top menu. While previewing the content in play mode:
• You can swipe the slide to left or right to move from one slide to another directly.
• To pause the preview mode, press anywhere on the slide.
• You can view green dots zooming in and out indicating the availability of hotspots on the slide.
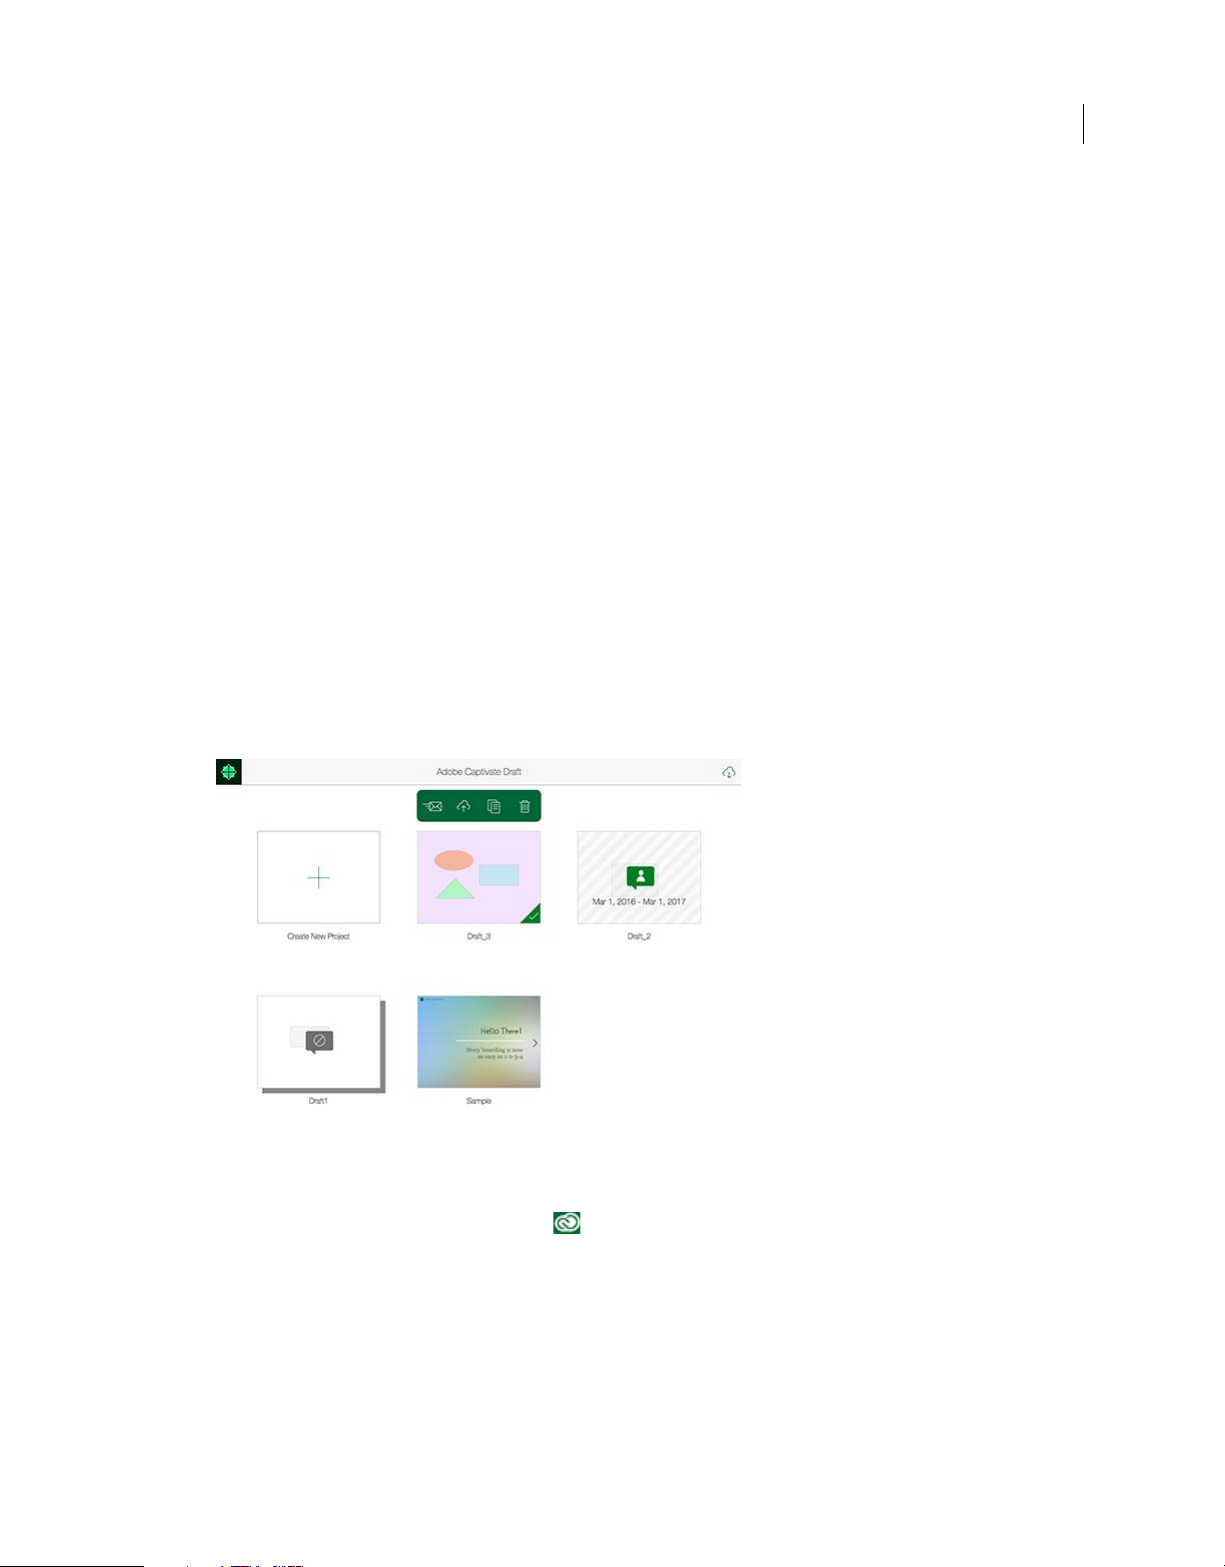
Export/import a project
You can import and export projects from and to the creative cloud.
Import project from Creative Cloud
1 In the welcome screen/landing page of the Draft app, tap the down-arrow icon at the upper right corner of the
screen.
2 If you are connected to the Internet, you are prompted to log in with your Adobe credentials.
3 After signing in, you can import the project from the creative cloud.
Export project to Creative Cloud
1 In the home screen of the Captivate Draft app, a long press on your project thumbnail loads a menu at the top of the
screen.
20
2 To upload the project to Creative Cloud, tap .
3 If you are connected to the Internet, you are prompted to log in with your Adobe credentials.
4 After signing in, you can export the project to the creative cloud.
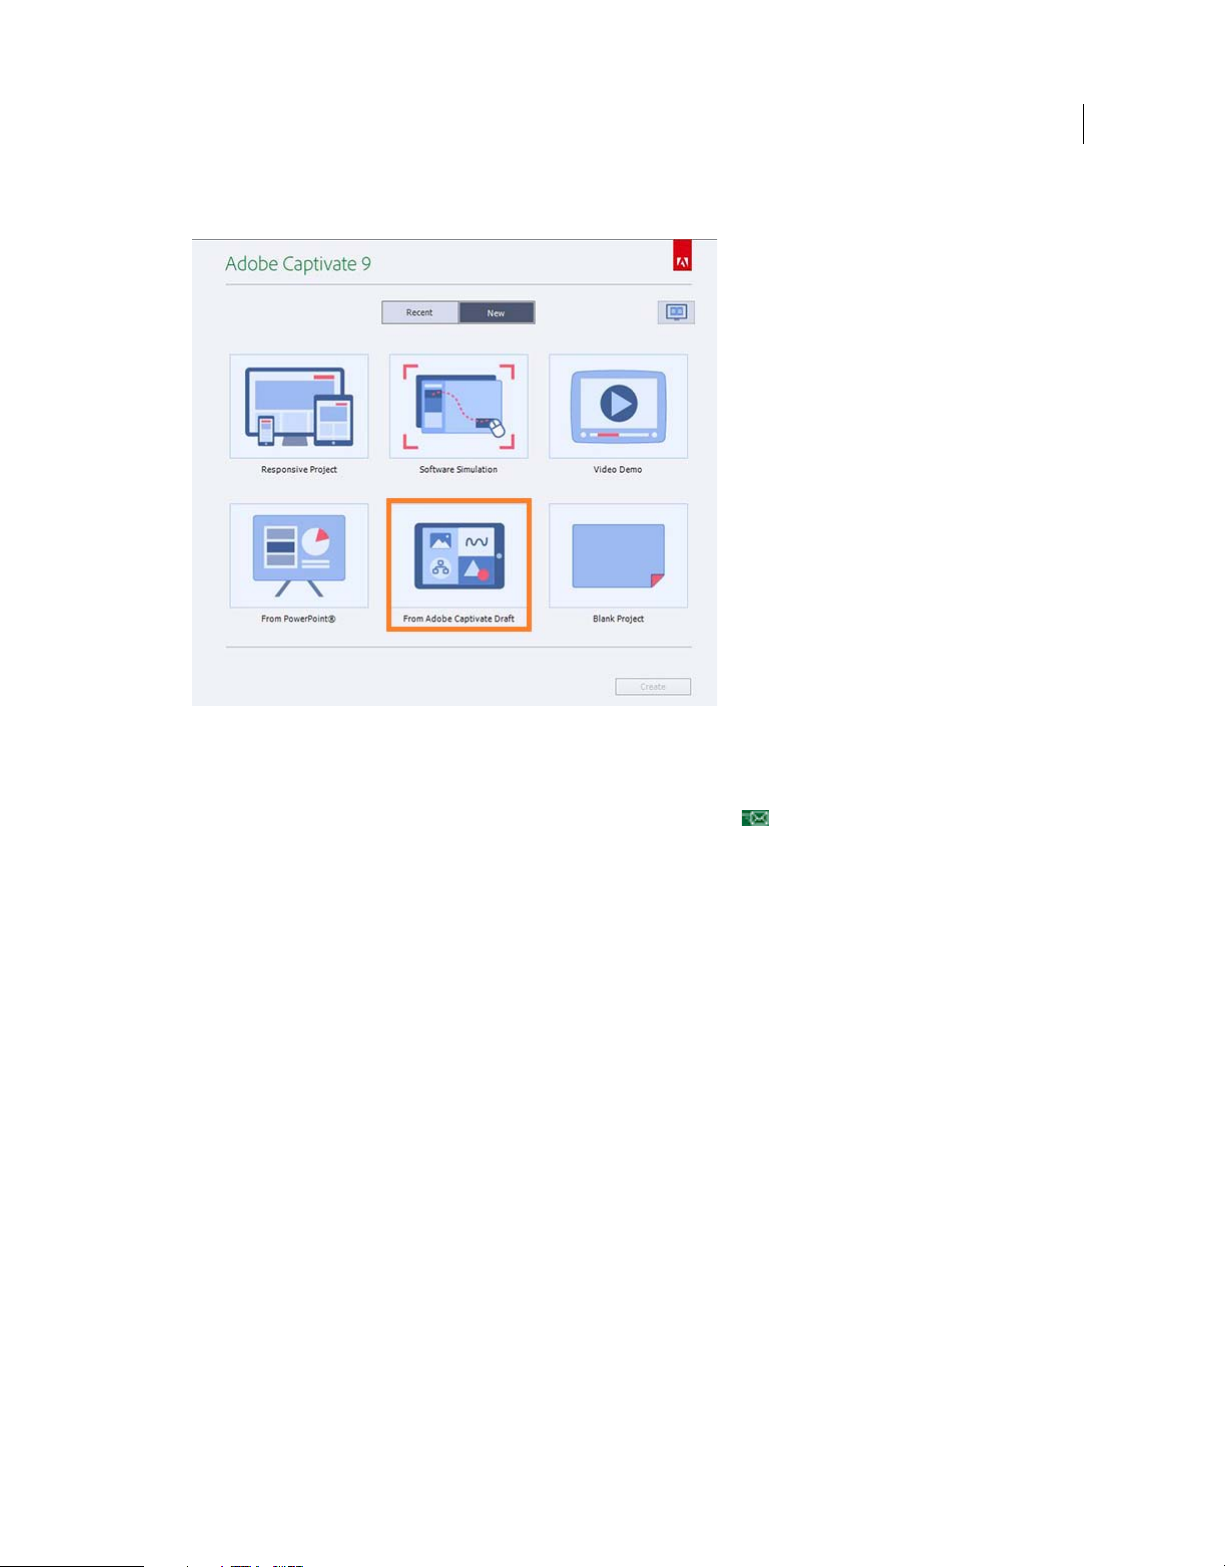
Import Adobe Captivate Draft project into Captivate
You can import Adobe Captivate Draft (*.cpdx) projects into your desktop Captivate application to refine the project.
First download the project from the creative cloud to your computer.
Click New Project > Project from Adobe Captivate Draft and navigate to the folder with the *.cpdx project.
Last updated 10/10/2016
Page 28
What’s new
Alternatively, you can click From Adobe Captivate Draft from the home screen as shown in the screenshot below.
21
Send project for review
To share the project with other resources for review and collaboration, tap . For more information on t his workflow,
see Review and collaboration in Adobe Captivate Draft .
Capture content from iOS devices (Captivate for MAC feature)
Using the Device Capture feature, you can record video demos (*.cpvc projects) of content and apps that are on your
iOS device. Just plug in the device, and start recording all the actions that you perform on the device.
Note: This feature supports only those iOS devices that are connected to the Mac with a lightning connecter (that is IOS
devices with IOS 8 and above and with MAC OSX version 10 and above).
Before recording
Decide on the orientation of the device before you start recording. You cannot change device orientation while
recording as the resolution changes abruptly and Captivate stops the recording.
Last updated 10/10/2016
Page 29
What’s new
22
Connect the device
Use the lightning device connector to connect your iOS device to the Mac.
Record new video demonstrations of your device
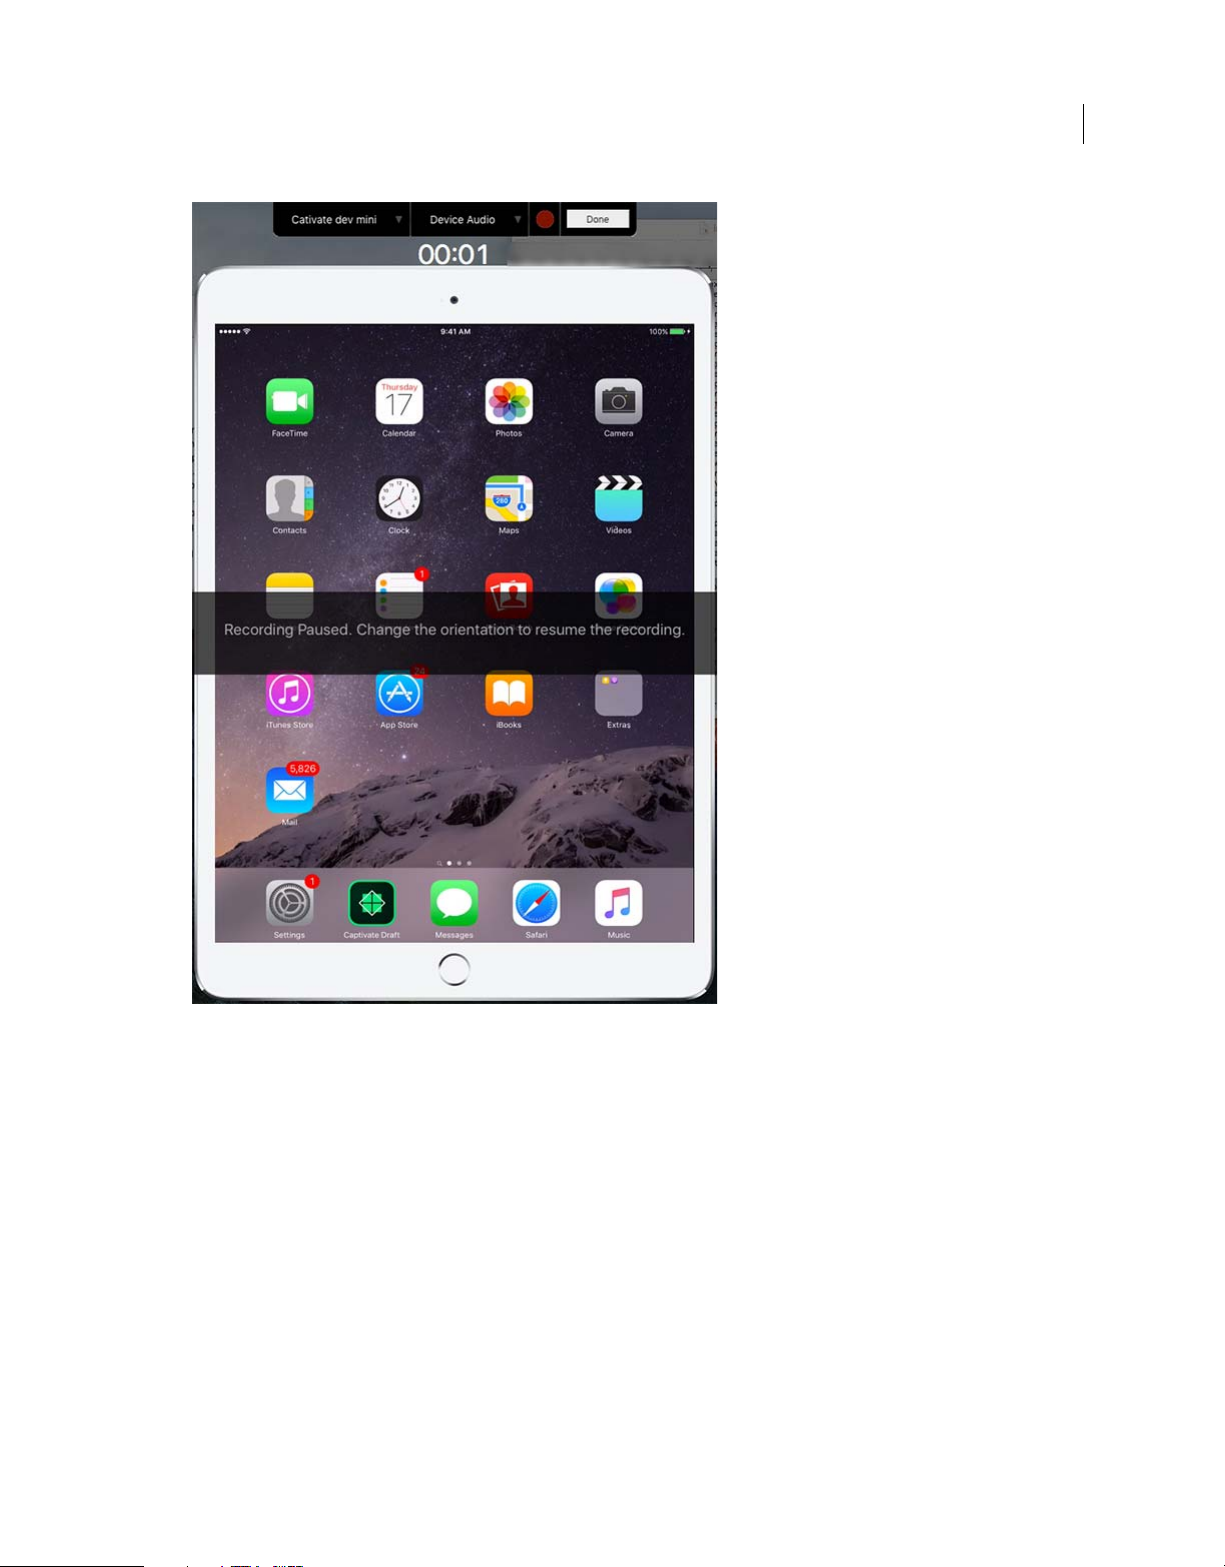
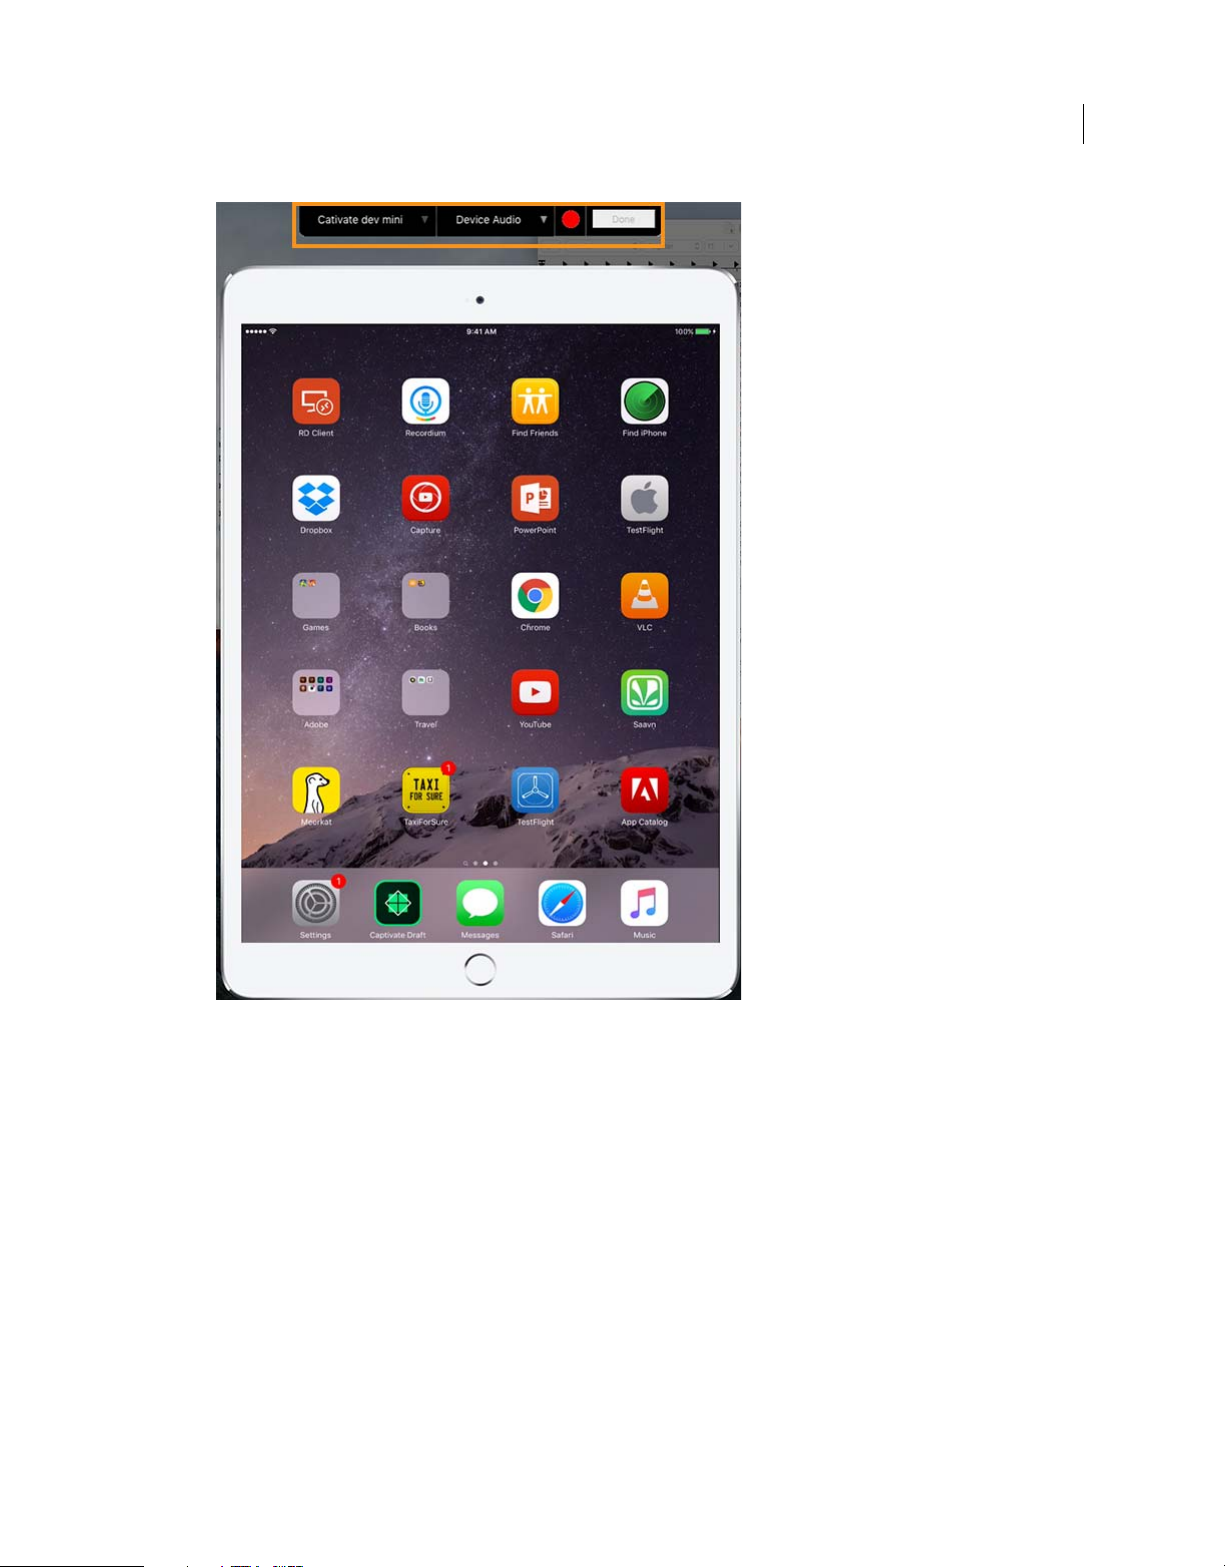
1 Click File > Record a new > Device Demo. A screen appears on the monitor displaying the connected device. If there
is more than one connected device, select the required device from the drop-down list on the left of the Device
Audio button.
Last updated 10/10/2016
Page 30
What’s new
23
If the device is not connected properly, Captivate issues a warning beep and displays the following error message:
Last updated 10/10/2016
Page 31

What’s new
24
If you see this message, unconnect and reconnect the device, and make sure it is unlocked.
2 Select the audio recording options by clicking the Device Audio dropdown and press to start recording.
You can pause the recording at any point by clicking again.
The timer starts counting the time in seconds at the top of the screen indicating the length of the device capture
video.
Note: If you have audio playing on your device, Captivate plays the audio through the Mac, capturing the audio content
from the device in your recording.
3 Once you are done with the recording, press on the skin to stop the recording. The project now opens in
Captivate with all the standard video editing options available to you for editing the video demo.
More Help topics
Edit videos
Publish video projects
Add gestures
To show the actual device user experience, gesture support is added.
You can now add and edit gestures such as swipes, taps, pinches, and zooms. When a video demo is open for editing in
Captivate, all the available gestures appear in the Property Inspector.
Last updated 10/10/2016
Page 32

What’s new
1 Click, drag, and drop the gesture you want to add from the Property Inspector to the stage.
Note: T
he gesture appears on the timeline as a gesture showing the name of the gesture such as tap or swipe, allowing
for easier identification of the gesture.
25
2 Edit the gesture to look and behave the way you want it to.
Working with multi-state objects in Adobe Captivate
Objects can have multiple states within Captivate. This feature allows you to develop interactive content easily without
using multiple objects, or "hide and show" techniques in a single project.
Using a single object with multiple states, you can unclutter y
example, to change image color based on user's actions, you can use different colored states for a single image.
To work with multi-state objects, keep these features of multi-state objects in mind:
• Each object now can have multiple states.
• Interactive objects have in-built states.
• Users can customize the states of static and interactive objects.
• Button and smart shapes have in-built states with associated styles.
• Objects with multiple states can be added to regular slides only.
Support for multi-state objects
All smart shapes, text captions, objects, and media can have multiple states.
Question slide buttons, and drag-and-drop buttons do not support states.
our project timeline and reduce timeline complexity. For
Last updated 10/10/2016
Page 33

What’s new
Note: Feedback captions, rollover objects, and text entry box buttons have in-built states, but they do not support adding
custom states.
Add states to an object
1 To add a state to an object, select the object and click + on the right of Object State in the Property Inspector. Enter
a name for the state in the dialog that pops up and click OK.
2 Click State View to open the State view where you can see the original object and the new state you have created.
26
The object in focus is highlighted in the project slide. You can choose to add some characters or supplementary
objects as part of the object in focus.
You can also see that there are two instances of the object. One is the original object in its normal (default) state, and
the other is the new state of the object.
3 Edit the properties of the object making sure that you are doing the edits in the new state of the object.
Some edits you can do are modifying the shape, color, and size.
4 Trigger an action for any object with a custom state by clicking Set Action to Object State directly from the Object
State panel as shown here.
Use the Go to next state and Go to previous state actions to create interactive slideshows to allow the learner to move
back and forth between different states.You can also use the Change state of action. This action enables you to trigger
a custom state based on a user's action.
5 Select Retain State on Slide Revisit for a particular state if you want the object to retain that state when a learner
revisits that slide.
Last updated 10/10/2016
Page 34

What’s new
Move objects and their states
When you move an object that has multiple states, by default the respective states and additional state items move in
relation to the object.
27
Delete/reset state
While creating the states, to go back to normal state, right-click on any state in the left pane, and choose reset state.
You can delete any states apart from default and normal state of an object. Delete and reset states options are available
in the right-click pop-up window of state.
To exit State view and return to your slide, click exit state button in the toolbar.
Objects and their in-built states
Captivate provides the following in-built states that you can customize according to your requirement. You can choose
the type by using the State drop-down and clicking each state.
Last updated 10/10/2016
Page 35

What’s new
Object type In-built states
28
Text captions, highlight boxes, smart shapes, images, characters,
videos, animations, text animations, equations, and web objects.
Button or smart shape used as a button
Drag and drop interactions (for more information, see Multi-state
objects in drag and drop interactions)
Drop sources
Drop targets
Custom s tate - Custom states are supported for static and interactive
objects. Users can trigger them through the 'change state of ' action.
• Normal - the default state of an object
• Rollover - the state when a user hovers mouse cursor over the
button
• Down - the state when a user clicks the button
• DragOver
• DropAccept
• DropReject
• DragStart
• DragOver
• DropAccept
• DropReject
• DropCorrect
• DropIncorrect
The Drop Correct and Drop Incorrect states are triggered
based on the Drag and Drop evaluation of the user's
action when they submit their action.
The default state for every object is Normal.
You can add new states using Property inspector and also make your states as default state for an object. To make your
state the default state, simply choose the state, click the drop-down icon next it, and make it the default state.
You can pre-define project properties for normal, down and rollover states in Object Style Manager as well.
Note: The Set As default option is not available for interactive objects.For drag and drop interactions, the in-built states
cannot be set as default states.
Effects behavior when objects have multiple states
When an effect is added to an object, the effect is applicable for all the states of an object.
In addition, an effect plays across all states of an object. For example, if an object changes state mid-effect, the behavior
of the effect does not change in any way.
Sample usage
Some samples depicting the usage of object states during interactive content development are shown below:
Last updated 10/10/2016
Page 36

What’s new
Scenario 1 - To change the colors of the dress (object) based on user's click action on respective color codes (shown
below the object).
29
Scenario 2 - To use characters to demonstrate the response for users choice in question slide, use object states and
change the character's actions.
Property flow for multi-state objects in responsive projects
Property flow in a responsive project is across all states and views.
Captivate maintains a parent-child relationship among the breakpoints from Desktop-to-Tablet views and Tablet-toMobile views respectively. The object states created in a particular breakpoint flow to the lower breakpoint views unless
you modify the state for a particular view and break the link.
Example to demonstrate this relationship
For example, if you create a button, and add/edit states in a responsive project, the object and its states get added in all
the other breakpoints.
If you make any edits to these object states in Desktop view, these edits are present in all the other breakpoints.
If you make any edits to these object states in Tablet Portrait breakpoint, the link between the Tablet Portrait breakpoint
and the Desktop breakpoint breaks. The object changes in the Desktop view no longer reflect in the Tablet Portrait and
Mobile views. The objects in the Mobile view now reflect any object changes in the Tablet Portrait view.
Example to demonstrate how the relationship breaks
Consider the following example.
User adds a text entry box to the slide, selects the object, and clicks State View on the Property Inspector. User is
working in Desktop view.
The State View opens showing the default states of the text entry box that are available. You can edit these states or create
more states.
Last updated 10/10/2016
Page 37

What’s new
User edits the properties of the in-built states, or creates a state. In this example, the text entry box is made transparent
in the Down state so that when a learner presses the Submit button, the button becomes transparent.
This change to the object state (which is done in Desktop view) flows across all the breakpoints.
30
User next goes to the Tablet Portrait view and edits the Down state further. If these changes deal with responsive
properties such as character properties, position, or size then the link between the Desktop view and the Tablet Portrait
view breaks. The Desktop view does not reflect these changes.
From now on, all changes done in the Tablet Portrait view (for that object) flow to the mobile views.
Last updated 10/10/2016
Page 38

What’s new
Best practices to follow
• Customize the normal state of the object before you add custom states
• Mark the Smart shape as a button before you customize button properties
Object properties that do not flow across states
There are some object properties that do not flow across states.
31
Properties such as shadow and reflection, text effects, and a
you have an object with multiple states, and if you add a glow to it, the glow is not visible in the other states. Add the
glow again to all the states.
In addition, text with different formats applied to it does not automatically flow across states.
Consider the below example. The word different has a different format applied to it. You can see that the formatting has
no
t flowed to the new state.
udio properties do not flow across states. For example, if
To make this text flow across states, right-click the text and select Apply text to all states.
Multi-state objects in drag and drop interactions
Drag and drop interactions provide lot of options where you can use the multi-state nature of objects.
Consider this simple drag-and-drop interaction (choose the correct answer) example below.
Last updated 10/10/2016
Page 39

What’s new
In the above interaction, the LDAP oval object is the drag target and the rectangular options on the right are the drag
sources. The correct answer 389 is mapped to the LDAP drag target.
Each of these drop sources and the drop target have multiple states that you can customize to enhance the appearance
and function of this interaction.
32
Last updated 10/10/2016
Page 40

What’s new
Add all these in-built states by selecting the object and clicking + in the Object State panel in the Property Inspector.
33
You can set the appearance of each state of the drop target and drop source objects.
Drop target:
• DragOver: This is the state of the object when the learner drags a source over the target.
• DropAccept: This is the state of the object when the learner drops an acceptable source over the target.
• DropReject: This is the state of the object when the learner drops an unacceptable source over the target.
• DropCorrect: This is the state of the object when the learner drops the correct answer over the target and submits
th
e answer.
• DropIncorrect: This is the state of the object when the learner drops the incorrect answer over the target and submits
the answer.
Last updated 10/10/2016
Page 41

What’s new
34
Note: See that in spite of the many states, the LPDAP object still is only one object on the timeline above, thus keeping the
timeline clutter-free.
Similar to the drop target, you can add the in-built states to the drop source as well.
Drop source:
• DragOver: This is the state of the object when you drag it over the target.
• DropAccept: This is the state of the object when you drag the acceptable source to the target.
• DropReject: This is the state of the object when you drag the unacceptable source to the target.
• DragStart: This is the state of the object when you start to drag the source toward the target.
Note: You can also add your own custom states to these objects to enhance your drag-and-drop interaction further.
Review and collaboration in Adobe Captivate Draft
You can collaborate with remote partners on projects directly from the Captivate Draft app on your iPad.
Last updated 10/10/2016
Page 42

What’s new
After creating your project, you can send a draft for review so that others can provide suggestions for you to incorporate
into the final project.
When you choose to send a project for review, Adobe Captivate automatically publishes the file to a temporary location
and sends an email notification with the link to the assigned reviewers.
When you send a project for review, it goes through these states:
Under review state: In this state, the project is undergoing reviews. The author and the reviewer can add comments
and doodles. However, the project itself is not editable.
Work in progress state: After the review is ended, the project enters the work in progress state, where the author can
fix all comments received. Once done, the author removes all doodles and comments, and the project gets back into its
normal state.
Send a project for review
1 From the homepage, long-press the project.
35
2 Click to send an email notification to a reviewer/collaborator to let them know that a project is available for
review.
3 Select the review end date from the drop-down if you want to end the review by a particular date. Click None if you
don't have a review end date. Enter the email addresses of the reviewers separated by commas.
Last updated 10/10/2016
Page 43

What’s new
4 Sign in with your Adobe ID.
36
An email is sent to the reviewer and the status of the project changes to In Review status.
Last updated 10/10/2016
Page 44

What’s new
In this state, the project is not editable. The project creator and reviewers can only annotate the project.
Note: A reviewer can review a project created using Captivate Draft from any system. The reviewer just needs to click
on the link in the email to open up the project in a web browser. For more information on reviewing a project, see
Reviewing a project .
37
5 You and/or the reviewer can now add comments and doodles to the project by clicking on . Click to publish
the doodle or comment.
When a reviewer adds a comment, you will see a notification appear on top of your project on the home page of your
Captivate Draft app.
You can respond to the reviewer's comment by clicking on the comment icon and responding. The reviewer will get
a notification within his project view.
Last updated 10/10/2016
Page 45

What’s new
6 To end the review, long press the project on the home screen and press .
38
7 Press OK in the confirmation dialog box that appears.
The project exits the review state and can now be edited again.
The comments are retained within the project.
Last updated 10/10/2016
Page 46

What’s new
8 To view the comments on each slide, press at the top of the screen.
9 To remove all doodles and comments from the project, click DONE at the top of the screen, and then click OK.
This action removes all comments/doodles from the project, and changes its state to the normal default state again.
39
Adding reviewers
You can ask additional reviewers to look through and comment on your project at any time during your review.
Just long-press the project on the home page, and select Add Reviewers. Add reviewers email addresses, and review end
date and click Send.
Last updated 10/10/2016
Page 47

What’s new
Reviewing a project
When you get an email request to review a Captivate Draft app, just click on the link to open up the project in a web
browser.
40
1 Login to review using your Adobe ID or Google ID.
2 Press to add a comment or a doodle. Press to save it.
3 Click at the top of the screen to view your dashboard, which displays the status of all the projects assigned to
you for review.
4 Press at the top of the screen to see the branching view of the project.
Publish project to Adobe Captivate Prime
Adobe Captivate Prime is a full featured LMS (Learning Management System), with a learner-first approach, that lets
you take charge of your learning environment.
You can now publish your completed project to Adobe Captivate Prime.
1 In an open project, click Publish > Publish to Adobe Captivate Prime to open the Publish to Adobe Captivate Prime
dialog box.
Last updated 10/10/2016
Page 48

What’s new
If you don't have a Captivate Prime account, the Setup/Retrieve Captivate Prime Account option is displayed in the
Account dropdown.
If you already have a Captivate Prime account, that account is displayed in the Account dropdown.
41
2 Click Publish.
If you don't have a Captivate Prime account, a Captivate Prime pop-up launches with videos that go over the
Captivate Prime experience. Click Continue to Publish.
3 In the Publish to Captivate Prime window that opens as shown here, enter your account name or email ID that you
used during registration.
All accounts associated with your email address or account name appear.
If you don't have an account, you can set up one by clicking Create an Account with your Adobe ID.
Last updated 10/10/2016
Page 49

What’s new
42
4 Sign in with your Adobe ID and password if prompted.
If you do not have an Adobe ID already, you can create one in the following window. Administrators of an
organization can also login with Adobe ID initially.
5 Enter the module name, description, and time duration in the fields in the dialog box as shown here.
Last updated 10/10/2016
Page 50

What’s new
Check whether it is a public module or a private module, and enter tags that make it easier for people to find your
module.
Click Publish to publish your project to Adobe Captivate Prime.
43
What's New in Adobe Captivate 8.0.1
Adobe Captivate reimagines the way interactive eLearning is created for a multi-device world. Rapidly author a wide
range of interactive and responsive HTML5-based eLearning content without programming. Adobe Captivate 8.0.1
release includes phone gap integration, exe publishing, responsive project support for drag-and-drop, custom shapes,
smart shape conversion of captions, smart positioning, and many feature enhancements.
Adobe Captivate 8.0.1 is an update release which is available to Adobe Captivate 8 customers through Adobe Update
Manager.
Read on for a quick introduction to these new features and enhancements, and links to resources offering more
information.
What's new and changed
Updated interactions in Captivate 8.0.1
In Captivate 8.0.1, 12 interactions have been updated to provide better user experience on mobile devices. For more
information, see
App packager integration
Publish apps for devices from within Captivate project instead of using app packager. Choose Publish > Publish for
Devices (App). It is supported for Android, iOS, and Windows 8 platforms.
Creating learning interactions in Adobe Captivate
For more information on publishing apps for devices in responsive projects, see Publish as Apps for devices
Last updated 10/10/2016
Page 51

What’s new
For non-responsive/blank projects, see Publish as Apps for devices
Convert captions to smart shapes
Success/Failure/Hint Captions can be replaced with Smart Shapes. Right-click the Caption and select Convert to Smartshape. To revert, right-click and click Revert to text.
For more information, see Captions as smart shapes .
Responsive drag & drop
Users can drag-and-drop objects in responsive projects with a seamless experience. For more information, see
Responsive drag-and-drop
Custom shapes & line support
Now, you can use custom shapes and line to create your own objects in responsive project.
For more information, see How to customize smart shapes in Adobe Captivate.
Publish projects as exe files
Adobe Captivate 8.0.1 enables you to publish your projects as stand-alone executable files for both personal computer
and for Mac. This publishing option enables you to create a Windows executable file (.exe) or MAC executable file
(.app). For more information, see
Publish projects as executable files
44
Other enhancements
Map support
Map support is included for selecting geolocation in variables. Users can browse through Google™ integrated maps and
choose the location. Values are populated automatically.
For more information, see Geo location map .
Embed support for web objects
Now, you can embed code in to the properties window along with URL. An option to choose Help (i) is also added.
Width and height of Video web objects aligns according to the web object container dimensions seamlessly in
responsive projects.
For more information, see .
Symmetrical editing
Shift+draw option added for drawing shapes like circle or square. Now, by pressing shift key authors can draw a circle
or square symmetrically in projects.
Shift+control+drag option is included for all shapes enabling authors to draw shapes symmetrically with reference to
a starting point.
Last updated 10/10/2016
Page 52

What’s new
In the above image, A and B graphs are drawn with reference to Origin (intersection point of x and y-axis) by using
shift+ctrl+draw. In A, you can see the starting point with crossbar cursor at the origin. When you draw circle with
shift+ctrl+draw, it moves symmetrically with reference to the starting point (here, the origin).
In the image C also the pink colored circle is drawn with origin as a starting point, but here shift+ctrl+draw is not used.
45
You can notice the difference and the usefulness of this enhancement for drawing.
Apply position properties across all views
Now you can update position properties of objects across all views to match the properties of the currently selected text
element. To support Applying the object position properties across all the views, right click context menu is included.
This setting relinks objects across the views in responsive projects.
For more information, see Position properties .
Apply text and text properties across all views
Now you can reset the properties of responsive text elements or update all views to match the properties of the currently
selected text element. To support applying the text and text properties across all the views, right click context menu is
included. This setting relinks objects across the views in responsive projects.
For more information, see Responsive text .
Color coding
Now, text objects in different views of responsive projects can have color coding. You can see different color coding in
text area border in properties window. Earlier, it was applicable for only position properties.
For more information, see Color coding .
Project size
Project Info panel displays the project content size enabling users to know the size of the projects before publishing.
Users can choose Windows >Project Info panel to view the size. In non-responsive projects, it displays SWF content
and HTML content sizes. For responsive projects, only HTML size.
A sample project info view is shown in the below snapshot. Figure A represents responsive project and Figure B
represents blank project. By default, when you open project info, the size of the project is not displayed in responsive
and blank projects. Click blue colored Check text to view the size.
Last updated 10/10/2016
Page 53

What’s new
Smart positioning between breakpoints
Smart Positioning is honored in between breakpoints of responsive projects. View published projects seamlessly across
all device sizes.
46
For more information, see Smart positioning
Export responsive views captions to single Word or xml file
Project Captions and Closed Captions in responsive projects can be exported to a single Word™ or xml document. Now,
it is responsive. Exported documents contain data from all the views of responsive projects. This feature facilitates
translation of responsive captions, even when the text is different in various views.
Automatic linked files inclusion in output
Open URL/File/Project options copy/paste the linked file to the destination folder if the file is present in an accessible
location. It copies automatically in the published output folder. (Note: files in next level reference url do not get copied.)
Swatch manager
Swatches are integrated in color palette. Users can load swatch manager from color palette by clicking at the upper-right
corner as shown in the Figure - B below. In windows menu, swatches menu item is renamed to swatch manager as
shown in Figure -A below.
Last updated 10/10/2016
Page 54

What’s new
47
You can add more colors to the swatch manager:
1 Choose any color from the swatch manager dialog
2 Click eyedropper icon
3 Type the name of your chosen color and
4 Click OK.
You can see your chosen color being added to your swatch manager dialog at the bottom. When you click color palette,
you can notice the new color being shown at the bottom of all other existing colors. You can also include a set of colors
to the swatch manager by clicking Append and choosing the file. Your new set of colors appear at the bottom row of the
existing colors in swatch manager dialog.
Lock individual objects
Now you can lock or unlock the size and position of individual items contained in group, from within timeline.
fx symbol for objects in timeline
Visual indication added for objects with effects in timeline. fx symbol appears next to object in timeline.
Color tool tip
Color Category is displayed as tool tips in theme color palette. For example, hovering over a color theme displays Title
component of theme.
Note: See what's new of What's New in Adobe Captivate 8to understand all the features that were introduced in Adobe
Captivate 8.
Last updated 10/10/2016
Page 55

What’s new
What's New in Adobe Captivate 8
Adobe Captivate 8 reimagines the way interactive eLearning is created for a multi-device world. This release includes
resp onsive authoring th at le ts you de velop mobil e lear ning conte nt for any screen or dev ice without pr ogramming. The
user interface is redesigned to make it more intuitive for beginners as well as advanced users. New customizable
interactions, themes, and enhancements to smart shapes let you create more engaging content than ever.
Read on for a quick introduction to these new features and enhancements, and links to resources offering more
information .
What's new and changed
48
Responsive projects
Last updated 10/10/2016
Page 56

What’s new
49
Redesigned user interface
Last updated 10/10/2016
Page 57

What’s new
50
Native support for HTML5 animations
Last updated 10/10/2016
Page 58

What’s new
51
Enhanced HTML5 publishing
Last updated 10/10/2016
Page 59

What’s new
52
Enhancements to smart shapes
Last updated 10/10/2016
Page 60

What’s new
53
New gaming interactions
Last updated 10/10/2016
Page 61

What’s new
54
Enhancements to shared actions
Last updated 10/10/2016
Page 62

What’s new
55
Import colors from Adobe Photoshop and Adobe Kuler
Last updated 10/10/2016
Page 63

What’s new
56
Other enhancements
Responsive projects
Create a single project and author content Create different types of projects in Adobe Captivate- the content adapts
itself to tablets, mobile, and desktops based on the selected theme. During authoring, you can view the content on stage
in different screen sizes and edit the content as appropriate. Adobe Captivate helps you ensure content and layout
integrity across devices by providing relative positioning of objects on stage.
Harness the power of mobile devices by enabling gesture support and location-aware features. Preview your responsive
projects easily by selecting multiple device layouts on-the-fly. Publish as a single project and Adobe Captivate
automatically delivers the most appropriate experience for your learners' device.
Last updated 10/10/2016
Page 64

What’s new
For more information, see Responsive Project Design with Adobe Captivate
Responsive screen capture
Create a single screen capture that can be used across multiple screens and devices. Adobe Captivate allows you to
choose the portion of the screen capture you wish to display on smaller screens.
For more information see Responsive capture (Responsive simulation)
Responsive themes
Choose from a bunch of out-of-the-box responsive themes to render differentiated content for multiple devices. You
can customize these themes to meet your requirements, or create your own themes. You can also save these themes for
reuse across projects.
For more information, see Responsive Themes
MinMax object sizing
Fix the minimum and maximum size of objects so that they do not rescale across device views. This is especially useful
for images such as logos, which need to look consistent and be legible at all times.
For more information, see Min-Max objects
57
Gesture-enabled mlearning
Use the multitouch technology embedded in modern user interfaces to allow learners to tap, scroll, pinch, and swipe
their way through courses. Leverage gesture support to enable more instinctive interaction between the learner and the
content.
For more information, see Gestures
Scrolling support for tablets and mobiles
Easily enable scrolling of content on tablets and mobiles to accommodate content that spills over a single screen.
For more information, see Slide height .
Geo-location support
Utilize the GPS capabilities of mobile devices to deliver timely, location-aware content to learners. Create assessments
that require learners to be at a particular geolocation.
For more information, see Geo-location .
Device aware eLearning delivery
Adobe Captivate 8 delivers the appropriate version of the course automatically. It does not matter if your learners are
using your courses on desktops or mobile devices, Captivate will take care of the content delivery and report to your
Learning Management solution.
Even if the learner changes from one device to another while working their way through a course, it delivers the
appropriate course version.
Use Captivate’s new cpInfoMobileOS variable to learn which Operating system a learner is using making it possible to
change the course content based on the current device.
Last updated 10/10/2016
Page 65

What’s new
Redesigned user interface
The user interface in Adobe Captivate 8 is redesigned to make authoring simple and efficient. Enjoy authoring with an
interface that is simple enough for subject matter experts and powerful enough for experienced users.
Some of the major enhancements in the user interface are described below.
Experience the revamped Toolbar and Welcome screen with an option to view recent projects. Use toggle button to
sh
ow/hide Timeline, which is hidden by default. Customize Theme colors for your projects using varied options such
as swatches and shades.
• Support for High DPI (retina display)
• Default Image buttons are updated
• Effects are absolutely timed with objects
58
• Common JavaScript interface for SWF format and HTML5 to access Adobe Captivate demo (or movie) variables,
unctions, and event listeners.
f
Retina display support
Use Adobe Captivate 8 at a resolution that matches your MAC. Enjoy a superior authoring experience with highresolution icons and User Interface assets that make your program elements look crisp.
New toolbar panel
As shown in the image below, an attractive Toolbar panel has been introduced in Adobe Captivate 8. A Down Arrow
adjacent to the Toolbar icon indicates the optional list of items under it.
Timeline
You can click the Show/hide Timeline button to display Timeline of objects. Double-click Timeline button to hide.
Timeline button is available at the bottom of the project window. By default, the Timeline is invisible.
For information on Timeline feature, see Working with the timeline in Adobe Captivate
Welcome screen
After launching Adobe Captivate 8, under NEW tab, you can see six thumbnail options for creating new projects, as
shown in the following image:
Last updated 10/10/2016
Page 66

What’s new
59
Choose the thumbnail by clicking it and click Create button to open a brand new project.
From t he RECE NT tab, you have an option to browse through the recently used projects and op en them. Re cently us ed
projects are displayed as Thumbnails.
Several sample projects and tutorials are available for you to get started. You can click Monitor icon to view these
sample projects and tutorials.
Properties/Windows/Menus appearance
Click any object in the slide and view redesigned Property Inspector. Witness the enhanced appearance of the tabs and
preview buttons. You can apply styles and preview with Styles Previewoption in Properties. Styles Preview displays a
drop-down with three unique styles.
All the pop-up window options and menu items have new appearance with colored icons as shown in the image below:
Last updated 10/10/2016
Page 67

What’s new
60
Web objects
You can insert Webobjects into the slides using Objects > Web. Type the URL in the Address bar of Property Inspector
as shown in the image below, and the web page appears in theWeb object. You can also click folder icon adjacent to
Address bar, and fetch the local content into the web object container.
Webobjects is the native obje ct now. You can browse OAM fi le (Adobe Edge Animate) pdf, and zip files. Use Auto Lo ad
option to enable Autoloading of file in Output. If Auto Load is not enabled, user needs to click Play button to view the
object.
Note: When you zip the published content, ensure that the index.html file is not in any of the internal folders, else it does
not load as expected.
Last updated 10/10/2016
Page 68

What’s new
Common JS interface
Adobe Captivate 8.0 enables its users to make more powerful yet leaner content using the new JavaScript Interface
feature. This feature gives a common platform for executing JavaScript actions between SWF and HTML.
Common JavaScript interface for SWF format and HTML5 to access Adobe Captivate demo (or movie) variables,
functions, and event listeners.
For more information, see Learn about the Common JavaScript interface for Adobe Captivate
Native support for HTML5 animations
Import HTML5 animations into your Adobe Captivate project without requiring any plug-ins. Place animations exactly
where you need them, resize if required, and publish effortlessly in the HTML5 format.
61
1 Open new blank project.
2 From Toolbar, click Media > HTML5 Animation
3 From the Open dialog, choose any existing Adobe Edge Animate files or zip files and click OK.
4 Resize if required.
5 From Toolbar, click Publish > Publish for Devices
6 Choose HTML5 output and click Publish.
Enhanced HTML5 publishing
Deliver eLearning on-the-go with full support for scalable HTML5, new mobile themes, and play bar. Deliver courses
that are optimized for mobile devices by publishing HTML5 output of your eLearning content.
For more information see Publishing HTML5 output .
Last updated 10/10/2016
Page 69

What’s new
Enhancements to smart shapes
With Adobe Captivate 8, you can now customize shapes and reuse them across different slides and projects with ease.
Use Hover state with fill for color/gradient/image.
For more information, see How to customize smart shapes in Adobe Captivate
New gaming interactions
62
Make learning interesting, fun, and interactive for your learners through the new gaming interactions introduced in
Adobe Captivate 8.
Catch Alpha nums interaction is an accelerometer-based interaction. Your learners can use tilt gesture controls on
tablets and mobile devices that support accelerometer to play this interaction game.
Memory game is also revamped in Adobe Captivate 8. For more information, see Using Adobe Captivate 8's new
learning interactions.
Shared actions enhancements
Drag-and-drop Shared Actions from Library on to Objects. Now, you can parameterize variables and literals. You can
use variables as parameters and set different values while creating the project. You can also choose which objects and
variables can be parameters. Associate actions to different interactive triggers (Success and OnEnter of objects and
Slides).
For more information, see Drag-and-Drop Shared Actions on to Objects.
Last updated 10/10/2016
Page 70

What’s new
Import colors from Adobe Photoshop and Adobe Kuler
Bring your favorite colors from Adobe Photoshop and Adobe Kuler, add them to the swatches, and use them in your
Adobe Captivate projects.
You can now import swatches from Adobe Photoshop and Adobe Kuler, or create custom swatches, and apply them to
Adobe Captivate objects with a single click.
For more information, see Working with swatches in Adobe Captivate
Other enhancements
63
Changes to preview options
Preview on stage or F3 is now changed to Full screen preview (Preview > Project). Preview the content for each slide or
for the project. Preview the project in browser (F11) with Primary, Tablet, and Mobile view port size options. Publish
the content as HTML 5 with support for gestures and geolocation.
For more information, see Preview and publish responsive projects.
Popup blocker
Now, you can get rid of annoying notifications that pop up in the middle of your screen capture. You can choose to
either remove the unwanted popup with a single click or replace it with a notification or a popup of your own.
Remove the unwanted pop-ups in Videos by using Clean Up option automatically or Replace option manually.
Removing pop-ups using clean up
1 Open the video file in Adobe Captivate 8.
2 Click Properties button and then click Video Effects Inspector.
3 Click popup tab. You can see Cleanup popup option to cleanup automatically.
4 Click Cleanup button from the Cleanup popup option. A cross bar appears.
Last updated 10/10/2016
Page 71

What’s new
5 With the help of cross bar, outline the video section you would like to remove.
Note: If you select the area out of the window dimensions, you get an error message.
6 Click Cleanup button, as shown in the following snapshot, to remove the unwanted popup.
64
Note: Cleanup determines the start and end frames of Video and removes the area.
Removing popups using Replace
You can also remove the unwanted popups using Replace. Follow the steps 1 through 3 as in clean up. Replace option
appears.
You can click on Replace button and follow the online help instructions to remove the unwanted popup manually. For
more information, see the following video:
What’s new in Cp 6
High-definition Screencast Create high-definition product demos with a new capture-as-a-video workflow. Preview
them instantly and publish them to YouTube, social media (Twitter, Facebook), or as MP4 files. Use the edit mode to
Last updated 10/10/2016
Page 72

What’s new
enhance your videos with Pan and Zoom effects, or add more objects and Picture-In-Picture videos (PIP). Also, add or
edit mouse paths and points that you recorded in the video. See
HTML5 Publishing Publish your Adobe Captivate projects in HTML5 format for use on devices such as iPad and
iPhones. See
Themes Spend less time and effort to liven up your courses. Choose from attractive, professionally designed themes
Publish projects as HTML5 files for more information.
Creating video projects for more information.
that blend backgrounds, styles, fonts, and layouts. Apply them within and across projects to maintain a consistent look
and feel. You can also customize themes to suit your requirements. For more information, see
Smart shapes Add a wide range of shapes, including circles, rectangles, triangles, callouts, arrows, lines, banners, and
Themes.
flowchart symbols, to your eLearning content. Customize them and convert them into buttons. For more information,
Creating and editing smart shapes.
see
Reflections Add a new dimension to text, images, and even videos using reflections. See Add reflection to objects for
more information.
Object grouping Group a set of smart shapes, images, or other objects so that you can work with them collectively.
Resize, rotate, time, flip, move, or format all the objects in the group as if they were a single object. See
Group objects
for more information.
Hyperlinks Insert text hyperlinks to direct learners to other sections of the course or external sources for more
information. See
Insert hyperlinksfor more information.
65
Text margins and custom bullets Improve the appearance and readability of text by adding margins and custom
bullets.
Pre-test and branch-aware quizzing Use pre-tests to assess the knowledge, skill level, or training needs of individual
learners. Based on the results, direct learners to the appropriate section, and quiz them at the end to gauge what they
have learned. See
Partial and negative scoring Assign a score to each correct option when a question has more than one correct answer.
Discourage guesswork by penalizing learners for wrong answers. See
Insert pretests for more information.
Multiple-choice question slides and Quiz
properties for more information.
Remediation Make eLearning content more effective and improve the percentage of successful outcomes using the all-
new remedial workflow. When answering a quiz question incorrectly, let learners revisit the relevant section,
understand the concept correctly, and retry the question. See
Enhanced integration with SCORM and AICC compliant LMSs Publish your courses effortlessly to leading LMSs such as
Allow users to return to quiz for more information.
Moodle, Blackboard, and Saba, rest assured that your scoring data will integrate smoothly with your LMS. See
Uploading an Adobe Captivate project to a Learning Management Systemfor more information.
Smart learning interactions Insert aesthetically designed interactive elements to eLearning content with just a click.
Select from a wide range of stunning out-of-the-box interactions such as Process, Accordion, and Pyramid, customize
the content and appearance, and you're done.
Click Insert > Interactions, choose the interaction, and double-click the text placeholders to type your text.
Ready-to-use character images Choose different personas, for example, a business executive or a medical practitioner,
to add to your Adobe Captivate projects. Click Insert > Characters, choose a category, and click the image you require.
Roundtrip with Microsoft PowerPoint (enhanced) Import your existing presentations, including PowerPoint 2010
slides in eLearning projects. Bring in objects, animations and multimedia, easily update the content, and keep your
PowerPoint and Adobe Captivate projects in sync with the dynamically linked import option.
Last updated 10/10/2016
Page 73

What’s new
What's new in Adobe Captivate 7
Roundtripping with Microsoft® PowerPoint
Import your PowerPoint slides, including PowerPoint 2013, in eLearning projects. Bring in objects, animations, and
multimedia, easily update the content, and keep your PowerPoint and Adobe Captivate projects in sync dynamically.
Advanced Action templates (Shared actions)
Use Advanced Actions to configure and modify the learning experience by enabling conditional or multiple actions in
an interaction. Now create Advanced Action templates which can be reused across projects. See
Adobe Captivate projectsfor more information.
Equation editor
Easily add complex mathematical equations, with operators and scientific symbols, to courses using the multi-purpose
equation editor from [Math+Magic]™. See
information.Working with mathematical equations in Adobe Captivate 7
Working with mathematical equations in Adobe Captivate 7for more
Shared actions in
66
Learning notes
Enable learners to add and edit notes as they take their course, thereby allowing them to place cues within the course
for reference.
In-course web browsing
Enable more effective learning by embedding a browser interface within your courses. Allow your learners to access
additional web-based reference material that complements course content
In-course YouTube videos
Stream YouTube videos within your courses, for greater impact and retention.
Specify which section of the video you want the learner to view, to make it contextually relevant.
Support for GIFT format
Easily convert offline questions into a GIFT format question bank that you can draw on to create quizzes. Import GIFT
format questions quickly and conveniently into Adobe Captivate 7 projects to create assessment modules. Maximize
instructor time by using the same questions in multiple quizzes. See
more information.
Import questions from GIFT format files (Cp 7)for
Last updated 10/10/2016
Page 74

What’s new
Enhanced Accessibility support
Expand your outreach to defense, government, and educational organizations. Easily create simulations and
demonstrations that address accessibility standards such as Section 508 and Web Content Accessibility Guidelines 2.0
(WCAG 2.0). Define text equivalents, insert clickable areas that allow keyboard access, and more to help ensure that
everyone can access your content.
Multiformat publishing
Publish projects in multiple formats (MP4, SWF, EXE, PDF) to the web, desktops, notebooks, tablets, smartphones,
iOS, and Android™devices, and leading Tin Can-, SCORM- and AICC-compliant LMSs.
Drag-and-drop interactions
Make eLearning fun with drag and drop games, quizzes, and learning modules that users can access on desktops and
iPads. Choose from a variety of drag-drop combinations based on what a drop target can accept, reject, or replace with
while providing audio feedback for every user attempt. For more information see
Adobe Captivate.
Create drag-and-drop interactions in
HTML5 support for PowerPoint
Import your Microsoft PowerPoint project including text, shapes, audio and animations into Adobe Captivate and
publish them directly to HTML5.
67
Adobe Captivate App Packager
Embed a range of HTML5 animations and synchronize them with your Adobe Captivate course. Publish the course as
an app to multiple mobile platforms, including Windows RT—Metro using the PhoneGap Service.
Note: You need to purchase PhoneGap service separately.
Improved social media engagement
Instantly enable social conversations within Adobe Captivate courses with the enhanced Twitter widget. Help learners
collaborate with you and other learners, in real time, by selecting a specific area within a course and tweeting a question.
Track all conversations using the Learning Analytics dashboard.
Enhanced interactions library
Easily create engaging courses with a large library of professionally designed interactions, including Hangman and
Jigsaw, which can be customized to suit your needs. For more information on interactions, see
preview learning interactions.
How to create and
Enhanced quizzing with HTML5
Outupt all your quizzes with Matching, Short Answer, and Fill in the blanks question types to HTML5.
Last updated 10/10/2016
Page 75

What’s new
Record system audio
With Adobe Captivate 6.1, record system audio along with narration in an Adobe Captivate course. Use the system
audio edit options to modify and synchronize the system audio across your course. For more information, see
with system audio in Adobe Captivate 7.
Wo rk i n g
RTL language support
Widen your learner base by making your courses available in more languages than earlier. Adobe Captivate now
supports Right-to-Left languages such as Arabic, Hebrew and Urdu. For more information, see
languages.
Author in right-to-left
Publish HTML5 courses to Adobe Connect
Make your content more 'mobile' by publishing as HTML5 to Adobe Connect. Leverage the 'pause-resume anywhere'
feature to provide seamless learning experience to your users on virtually any device or any browser.
68
Last updated 10/10/2016
Page 76

Chapter 2: Workspace
Using rulers and guides
Use rulers
Rulers help you accurately place and measure objects in the Captivate design window. The point where 0 appears on
each ruler is the ruler origin, which is the upper-left corner of the design window.
To show or hide rulers, choose View > Show Rulers or View> Hide Rulers.
69
Change the unit of measurement
The unit of measurement available in a non-responsive project is pixels. In responsive projects, the default unit of
measurement is percent.
To change the unit of measurement in a responsive project, right-click the ruler in a responsive project and select your
preferred unit.
You cannot change your unit of measurement in a non-responsive project.
Last updated 10/10/2016
Page 77

Workspace
70
Use guides
Guides help you align text and graphic objects. In Captivate, you can create ruler guides (straight horizontal or vertical
lines).
You can change the default color of guides. For more information, see .
By default, guides are unlocked so that you can move, modify, delete, or revert them, but you can choose to lock them
in
to place.
For more information on:
• Deleting or moving guides, see .
• Locking or unlocking guides, see .
• Snapping objects to guides, see Snap objects to guides.
Hover over a guide to find out its exact co-ordinates.
Create guides
You can create guides both on stage and off stage (using the menu) in different ways.
Creating guides on stage
Create guides easily on stage using the following methods:
By dragging
1 If the rulers aren’t showing, choose View > Show Rulers.
2 Position the pointer on the left ruler for a vertical guide or on the top ruler for a horizontal guide.
3 Drag the guide into position.
Last updated 10/10/2016
Page 78

Workspace
By double-clicking
1 If the rulers aren’t showing, choose View > Show Rulers.
2 Double-click on the exact point on the ruler where you want to position your guide.
From existing guides
1 If the rulers aren’t showing, choose View > Show Rulers.
2 Right-click on an existing guide and choose Add New Guide.
A guide is created 20 pixels to the right (vertical guide), or 20 pixels to the bottom (horizontal guide).
Creating guides off stage
You can create a grid at one go, or add guides individually to your Captivate design area.
Creating guides individually
1 Choose View > New Guide.
71
2 Specify whether it is a horizontal or vertical guide, and specify its position in pixels accordingly from the left of the
stage or the top. Click OK.
A new guide is created.
Creating multiple guides
You can create a set of evenly spaced guides at one go.
1 Choose View > Create Multiple Guides.
Last updated 10/10/2016
Page 79

Workspace
2 Specify the number of columns and rows and the required width between each guide. For the gutter, type a value to
specify the padding around each guide. Later when you specify an object to snap to guide, if the object is within the
gutter space of a guide, it snaps to that guide.
72
Select:
• Center Column: if you want to create the guides from the center of the stage.
• Clear Existing Guides: if you want to delete all earlier guides.
Note: All the values specified while creating multiple guides are in pixels.
3 Click OK.
Note: You can create a maximum number of 50 guides at a time using this menu.
A set of guides is created on the stage.
Move or delete guides
To move a guide, drag it.
To delete a single guide:
Right-click the guide and select Delete Guide.
To delete or clear all guides:
Choose View > Clear Guides.
If you cannot delete a guide, check to see if it is locked. Unlock the guide, and then delete it. For information on locking
and unlocking guides, see Lock and unlock guides.
Lock or unlock guides
To lock or unlock all guides, choose View > Lock Guides to select or deselect the menu command.
Last updated 10/10/2016
Page 80

Workspace
Change the appearance of guides
To change the appearance of guides, do the following:
1 Click Edit > Preferences.
2 Open the Defaults section of the Preferences dialog box.
3 Choose a different color from the Default Guides color and click OK.
Use smart guides
Smart Guides are temporary snap-to guides that appear when you create or manipulate objects. They help you align,
edit, and transform objects relative to other objects, or by snap-aligning them to guides on the screen.
To turn Smart Guides on or off, check or uncheck View > Show Drawing/Smart Guides .
Guides: Property flow in responsive projects
The behavior of guides is the same as the behavior of any other object in responsive projects.
You can add or delete guides in lower breakpoints, and it is reflected in all the views (both high and low). However, if
ou edit a guide in a lower breakpoint, its link with higher views is broken.
y
73
Working with grids in Adobe Captivate
The Snap To Grid option helps you position objects accurately on a page. A grid is a set of lines to which the objects
“stick” when the Snap To Grid feature is enabled. When you bring an object close to a grid line, the object snaps to the
line much in the same way as iron sticks to a magnet. For example, you can stack objects accurately one above the other
using a grid.
Work with grids
• Select View > Show Grid. The grid is displayed as a matrix of dots on the slide.
• Select View > Snap To Grid.
• Select View > Snap To Object
Snap To Object is applicable only when you are drawing objects on a slide and not when you are editing or moving
th
em. When both Snap To Grid and Snap To Object options are selected, the Snap To Object option take
p
recedence.
Change the dimensions of a grid
1 Select Edit > Preferences (Windows) or Adobe Captivate > Preferences (Mac OS).
2 In the Preferences dialog box, select General Settings from the Global menu.
3 Change the Grid Size value. The smaller the value, the smaller is the gap between the dots in the grid.
s
Last updated 10/10/2016
Page 81

Workspace
Adobe Captivate workspace panels
To show or hide panels, select Window and then select the name of the panel.
Align Displays alignment options for objects in a slide. For more information, see How to align objects in Adobe
Captivate.
Filmstrip Displays a thumbnail view of the slides in the project in the order of their appearance. For more information,
Work i ng w i th t he f il m s tr i p .
see
Mobile Palette Displays options to enable or disable geolocation features in a project and gesture options in a mobile
project.
Question Pool Displays a thumbnail view of the slides in question pools from where quiz questions are randomly
picked at run-time. For more information, see
Master Slide Displays the slides that define background and common objects, such as logos, headers, and footers for
other slides. For more information, see
Timeline Displays the timeline of a slide and its objects. For more information, see Working with the timeline in Adobe
Captivate.
Library Displays all the resources, such as, images and audio files that are currently available for a project. For more
information, see
Adobe Captivate Library .
Create question pools.
How to work with master slides in Adobe Captivate.
74
Project Info Displays the properties associated with the current project.
Quiz Properties Displays the properties associated with quiz slides.
Slide Notes Displays notes that are added for a slide. For more information, see Add and convert slide notes to audio
files with Adobe Captivate.
Comments Displays review comments provided by reviewers. For more information, see View or sort c omments in the
Adobe Captivate project.
Skin Editor Displays the options for the ‘skin’ of the project output. Using this panel, you can switch between the
interfaces for playback control, table of contents, and borders, and edit their settings. For more information, see
Drag and Drop Displays the drag and drop properties of a particular interaction. You can either show or hide
interactions between objects. For more information, see
Advanced Interaction Lists the names of all the interactive objects, widgets, questions, and hidden slides in the project.
For more information, see
Branching View Displays the linkage between the slides in the project and lets you edit the way the slides and objects
Edit object information using the Advanced Interaction panel .
are linked. For more information on Branching View, see
Progress Indicator Indicates the progress of the conversion of non-flash video files into FLV/F4V format by Adobe
Media Encoder (AME). For more information, see
HTML5 Tracker Shows the objects and features that are not supported in HTML5 output. When you make changes to
these objects in the project, this panel updates the list accordingly. For more information, see
Create drag-and-drop interactions in Adobe Captivate.
How to use the Branching panel in Adobe Captivate.
Inserting non-Flash video file formats.
Publish projects as
Skins.
HTML5 files
Swatch Manager Displays the color swatch panel. For more information, see Worki n g wit h s watch e s in Ado b e
Captivate.
Effects Enable this option to display or hide effects in the timeline. If you enable the option Enable Effects in Timeline,
the effect applied to any object displays in the timeline. The screenshot below shows an effect applied to a text object.
Last updated 10/10/2016
Page 82

Workspace
Work spac e Switch between different workspaces and create custom workspaces. For more information, see How to
customize the Adobe Captivate workspace.
How to undo and redo actions in Adobe Captivate
You can reverse the previous action by using the Undo command.
• From the Edit menu, select Undo [Name of the recent action] or press Control+Z.
Each click reverses one more action. Continue clicking Undo (or pressing Control+Z) to remove as many of
revious changes as necessary.
p
the
75
When the Undo command is unavailable (dimmed), you cannot undo the previous action.
Adobe Captivate tracks actions from the time you open a project until the time you close the project. Therefore, you
c
an undo as many times as you need to, as long as the project remains open.
You can reverse the action of the Undo command by using the Redo command.
• After you have used the Undo command, from the Edit menu, select Redo or press Control+Y.
Working with the timeline in Adobe Captivate
The Timeline is a visual representation of the timing of all objects on a slide. The Timeline provides an easy way to view,
at a high level, all objects on a slide and their relationship to each other.
With the Timeline, you can organize objects and precisely control the timing of objects. For example, on a slide that
co
ntains a caption, an image, and a highlight box, you can display the caption, then the image 4 seconds later, and then
the highlight box 2 seconds after that. The Timeline also shows any audio associated with the slide or with objects on
the slide. You can easily coordinate the timing of audio with the slide using the Timeline.
Last updated 10/10/2016
Page 83

Workspace
A Show/Hide All Items B Lock/Unlock All Items C Playhead D Time line Heade r E Fly-Out Menu F Move the Playhead to the beginning G Stop
H
Play I Move the Playhead to the end J Mute K Elapsed Time L Selected Start Time M Selected Duration N Slide Duration O Zoom Slider
The major components of the Timeline are objects, the header, and the playhead. The objects on a slide are displayed
as stacked bars in the right pane of the Timeline. The header at the top of the Timeline indicates time in seconds (and
parts of seconds). The playhead shows the point in time in which the slide is being viewed.
76
The Timeline header shows time, in minutes:seconds format. For example, 01:05 indicates 1 minute and 5 seconds. The
markings helps you see exactly when objects appear.
You can use the Timeline to hide or lock objects easily. This is useful when a slide contains many objects and you need
to edit the objects separately.
Show or hide the Timeline
Select Window > Timeline.
Rearrange the Timeline panel
By default, the Timeline panel is docked at the bottom of any slide in an Adobe Captivate project. You can move, resize,
group, or dock the Timeline panel to suit your requirement.
Change the zoom level of the Timeline panel
Use the slider in the Timeline panel. The center of the slider indicates 100% zoom. To increase the zoom level, drag the
slider to the right. To reduce the zoom level, drag the slider to the left.
Change the order of object layers
1 Move the mouse over the object in the Timeline panel until the hand icon appears and drag the object up or down
to reposition it.
2 If you have two objects that overlap on the slide, you need to select the object you want in front by setting the
stacking order.
Last updated 10/10/2016
Page 84

Workspace
Changing the stacking order consists of moving objects to the back and front of the slide Stage. The key point to
remember is that objects at the back of the Stage appear behind other objects. Use one of the following methods to
set the stacking order:
• Right-click (Windows) or Control-click (Mac OS) an object on the slide, click Arrange, and select one of the
bject order options. If necessary, right-click (Windows) or Control-click (Mac OS) other objects on the slide and
o
adjust their order.
Bring To FrontThi
top of all others.
s option brings the selected object to the top. When the project plays, the object appears on
77
Send To BackTh
behind all ot
Bring ForwardT
Send BackwardThi
is opt ion s en ds t he sel ec ted obj ec t to the ba ckgro und . Whe n the pro ject pl ays , the o bjec t app ears
hers.
his option moves the object one layer forward.
s option moves the object one layer back.
• On the Timeline, move the mouse over an object until the hand appears and drag the object up or down to change
its position in the stacking order. Moving an object higher in the stacking order moves it to the front of the Stage,
while moving an object lower moves it to the back of the Stage.
Hide objects during editing
In the Timeline, click the dot below the eye icon in the layer that you want to hide.
he object disappears from the slide and an X icon appears in th
T
the X icon.
When you hide an object layer, it is hidden only on the Stage. You can still view the layer when it is previewed or
pu
ished.
bl
e column. To display the object on the slide, click
Timeline for slidelets
A slidelet is a slide within a slide. A slidelet has its own Timeline. All the objects in the slidelet are displayed in its
Timeline. When you select a slidelet, the Timeline changes automatically to that of the slidelet. To display the Timeline
for the slide containing the slidelet, click anywhere outside the slidelet. For more information on slidelets, see How to
create rollover slidelets in Adobe Captivate.
Lock objects
In the Timeline, click the dot below the lock icon in the layer that you want to lock.
yer and its corresponding object cannot be edited or moved until you unlock the layer. To unlock the layer,
The la
cli
ck the lock icon.
Set time for objects and slides using the Timeline
You can change the amount of time an object or slide appears in the movie using its Property Inspector or by using the
Timeline. You may find this feature useful in several situations. For example, you may want to set exact object timing
when coordinating a voice-over with a highlight box; you may want the highlight box to appear only when the voiceover says, “Enter the date here.”
• Move the mouse over the left or right edge of the slide or object on the Timeline until the resize pointer appears.
Click and drag the edge to the required position in the Timeline.
Last updated 10/10/2016
Page 85

Workspace
• To set two objects to appear at the same time, align their left and right edges. For example, you can set a highlight
box to appear at the same time as an image so that the highlight box can appear over the image.
• To adjust the display time of interactive objects (such as text entry boxes, click boxes, and buttons) rest the pointer
ver the line between Active and Inactive in the bar until the slider handle appears. Drag the slider to adjust th
o
e
display time.
You can select multiple objects and move them at the same time. Hold down the Shift key and click objects to select
con
secutive stacked objects in the Timeline, or to select nonconsecutive objects, hold down the Control key and
click the objects to move.
78
You can determine whether keystroke
in
creasing the speed will make the pace of the project faster. However, if keystrokes are critical in the project, you may
s are played slowly or quickly in a project. If the project has many keystrokes,
want them to play slowly so users can view them clearly. Use the Timeline to change keystroke speed. Keystrokes are
contained in a Timeline object named Typing.
You determine the speed at which the mouse moves on any individual slide in a project. A high mouse speed increases
t
he pace at which the project plays. However, if mouse movements are complicated, you may want to decrease the
mouse speed so users can view all movements. Mouse movement is contained in a Timeline object named Mouse. To
shorten the amount of time it takes for the mouse movement to play, move the mouse pointer over the left edge of the
Mouse object until the resize pointer appears. Click and drag the edge to the left.
Preview a slide using the playhead
The red line that moves across the Timeline is the playhead. The playhead moves through the Timeline to indicate how
the currently displayed slide appears in the project. It is a quick and efficient way to preview a single slide and check
object timing.
To see how the playhead functions, press F3. You can stop a p
playhead to a require
d position, move the mouse over its “head” in the area displaying the time. When the pointer
appears, drag the playhead to the required position.
Do one of the following to preview a slide:
• “Scrub” the slide by dragging the playhead to the left or right. As you move the playhead, objects appear and fade
as they will when users view the slide. Scrubbing gives you the ability to control the pace and view the slide at
any speed from very slowly to very quickly.
• With the playhead in any location on the Timeline, press the Spacebar or F3 to begin playing the slide.
layhead whe
n it is playing by clicking it. To drag the
• With the playhead in any location on the Timeline, press in the lower-left corner of the Timeline. (To end
playback, press , o
r to wait, press .)
Shortcut keys in Adobe Captivate
Shortcut keys provide an easier and quicker way to navigate and use Adobe Captivate. They let you use keyboard key
combinations instead of a mouse or program menu. The common shortcut keys are listed in the table.
Shortcut key Action
F1 (Win & Mac) Open Adobe Captivate Help (To access dial
Help button on individual dialog boxes.)
F2 (Win & Mac) Rename the selected object
Last updated 10/10/2016
og-box-level help, click the
Page 86

Workspace
F3 (Win & Mac) Test view the current slide
F4 (Win & Mac) Preview the project
F5 (Win & Mac) Record audio
F6 (Win & Mac) Import audio
F7 (Win & Mac) Perform a spelling and grammar check
F8 (Win only) Preview project from current slide
F9 (Win only) Show the Advanced Interaction panel
F10 (Win only) Preview the current slide and the following “N” slides
F11 (Win), Command+F11 (Mac) Preview the project in a web browser (HTML)
F12 (Win), Command+F12 (Mac) Preview the project in a web browser (SWF)
Page Up (win & Mac) Scroll to the previous slide
Page Down (win & Mac) Scroll to the next slide
Alt+A (Win), Option+A (Mac) Create question pool
79
Alt+Up, Down, Left, Right Arrows (Win), Option+Up, Down, Left, Right
Arrows
Control+A (Win), Command+A (Mac) Select all
Control+B (Win), Command+B (Mac) Find audio in the Library/Change text to Bold
Control+C (Win), Command+C (Mac) Copy (slide in Filmstrip, and selected object on stage)
Control+D (Win) Duplicate (slide in Filmstrip, and selected object on stage)
Control+E (Win), Command+E (Mac) Extend the length of the objec t display time to the end of the slide on
Control+F (Win), Command+F (Mac) Find/replace a particular object in the project Library
Control+I (Win), Command+I (Mac) Increase the indent (selected object on stage)/Change text to Italics.
Control+L (Win), Command+L (Mac) Sync the selected object to the playhead
Control+M (Win), Command+M (Mac) Merge the selected object with the background
Control+N (Win), Command+N (Mac) Open new project
Control+O (Win), Command+S (Mac) Open the project
Control+Q (Win), Shift+Option+R (Mac) Insert a random question slide
Control+R (Win), Command + R (Mac) Start/record new capture project
Control+S (Win), Command+S (Mac) Save
Click the object, click a resize handle, and use these options to resize
the object in the selected direction by 1 pixel
the Timeline
Indentation is equal to the grid size.
Control+T (Win), Command+T(Mac) Open project template
Control+U (Win) Underline the selected text
Control+V (Win), Command+V (Mac) Paste what is on the clipboard (for example, slide, image, object, and
Control+W (Win), Command+W (Mac) Close the project
Control+X (Win), Command+X (Mac) Cut (selected object on stage)
so on)
Last updated 10/10/2016
Page 87

Workspace
Control+Y (Win), Command+Y (Mac) Redo
Control+Z (Win), Command+Z (Mac) Undo
Control+Enter (Win), Conmmand+Enter (Mac) Preview the project
Control+Alt+A (Win), Command+Option+A (Mac) Export PowerPoint slides as animation
Control+Alt+B (Win), Command+Option+B (Mac) Show or hide Filmstrip
Control+Alt+C (Win), Command+Option+C (Mac) Show the Closed Captioning dialog box
Control+Alt+D (Win), Shift+Option+D (Mac) Update the Library
Control+Alt+E (Win), Command+Option+E (Mac) Edit points of polygon drawing object
Control+Alt+F (Win), Command+Option+F (Mac) Find in the Library
Control+Alt+G (win), Command+Option+G (Mac) Create a slide group and autoadjust the rollover area
Control+Alt+H (Win), Command+Option+H (Mac) Hide the selected object
Control+Alt+I (Win), Command+Options+I (Mac) Find PowerPoint slides in the Library
Control+Alt+J (Win), Command+Option+J (Mac) Edit PowerPoint slides
Control+Alt+K (Win), Command+Option+K (Mac) Lock the selected object
80
Control+Alt+L (Win), Command+Option+L (Mac) Show or hide the Library
Control+Alt+M (Win), Command+Option+M (Mac) Insert master slide
Control+Alt+N (Win), Command+Option+N (Mac) Show slide notes
Control+Alt+O (Win), Command+Option+O (Mac) Record additional slides
Control+Alt+P (Win), Command+Option+P (Mac) Remove a slide group.
Control+Alt+Q (Win), Option+Shift+Q (Mac) Show the Question Pools Manager
Control+Alt+S (Win only) Edit PowerPoint slide
Control+Alt+T (Win), Command+Option+T (Mac) Show or hide the Timeline
Control+Alt+U (Win), Command+Option+U (Mac) Library usage
Control+Alt+V (Win), Command+Option+V (Mac) Import video file
Control+Alt+X (Win), Command+Options X (Mac) Show/hide the SWF-Commenting pane
Control+Alt+Z (Win), Command+Option+Z (Mac) Show/hide the Widget panel
Shift+F7 (Win & Mac) Show objects style manager
Shift+F8 (Win), Command + , (Mac) Preferences dialog box
Shift+F9 (Win), Shift+Command+F9 (Mac) Actions dialog box
Shift+F10 (Win), Shift+Command+F10 (Mac) Table of contents
Shift+F11 (Win), Shift+ Command+F11 (Mac) Skin Editor panel
Shift+F12 (Win), Shift+Option+F12 (Mac) Publish the file
Shift+A (Win & Mac) Insert Animation placeholder
Shift+F (Win & Mac) Insert Flash video placeholder
Shift+R (Win & Mac) Insert rollover caption placeholder
Last updated 10/10/2016
Page 88

Workspace
Shift+O (Win & Mac) Insert rollover image placeholder
Shift+C (Win & Mac) Insert Text Caption placeholder
Shift+V (Win & Mac) Insert video place holder
Shift+M (Win & Mac) Insert Image placeholder
Shift+Q (Win), Option + Q (Mac) Insert Question slide placeholder
Shift+X (Win & Mac) Insert Text Animation placeholder
Shift+Alt+A (Win), Shift+Option+A (Mac) Show Audio Management panel
Shift+Alt+W (Win), Shift+Option+W (Mac) Close all the open projects
Shift+Alt+O (Win), Shift+Option+O (Mac) Insert recording slide placeholder
Shift+Alt+P (Win), Shift+Option+P (Mac) Import Photoshop file
Shift+Alt+S (Win), Shift+Option+A (Mac) Show Speech Management panel
Shift+Alt+V (Win), Shift+Option+V (Mac) Paste as Background
81
Shift+Alt+Up, Down, Left, Right Arrows (Win), Shift+Option+Up,
Down, Left, Right Arrows
Shift+Control+A (Win), Shift+ Command+A (Mac) Add an animation object
Shift+Control+B (Win), Shift+Command+B (Mac) Add a new button
Shift+Control+C (Win), Shift+ Control+C (Mac) Add a new text caption
Shift+Control+D (Win), Command+Shift+D (Mac) View slide properties
Shift+Control+E (Win), Shift+Command+E (Mac) Insert a new zoom area
Shift+Control+F (Win), Shift+Command+F (Mac) Insert an FLV file
Shift+Control+H (Win), Shift+Command+H (Mac) Hide/show slide
Shift+Control+I (Win), Shift+Command+I (Mac) Decrease the indent
Shift+Control+J (win), Shift+Command+J (Mac) Insert a blank slide
Shift+Control+K (Win), Shift+Command+K (Mac) Add a new click box
Shift+Control+L (Win), Shift+Command+L (Mac) Insert a highlight box
Shift+Control+M (Win), Shift+Command+M (Mac) Add a new image
Shift+Control+N (Win), Shift+Command+N (Mac) Add a new animation slide
Shift+Control+O (Win), Shift+Command+O (Mac) Add a new rollover image
Shift+Control+P (Win), Shift+Command+P (Mac) Import PPT
Shift+Control+Q (Win), Shift+Q (Mac) Insert a question slide
Click the object, click a resize handle, and use these options to resize
the object in the selected direction by 10 pixel
Shift+Control+R (Win), Shift+Command+R (Mac) Insert a rollover caption
Shift+Control+S (Win), Shift+Command+S (Mac) Save the project with different name
Shift+Control+T (Win), Shift+Command+T (Mac) Insert a text entry box
Shift+Control+U (Win), Shift+Command+U (Mac) Insert the mouse
Shift+Control+W (Win), Shift+Command+W (Mac) Insert a widget
Shift+Control+X (Win), Shift+Command+X (Mac) Insert a text animation
Last updated 10/10/2016
Page 89

Workspace
Shift+Control+Y (Win), Shift+Command+Y (Mac) Copy the background
Shift+Control+Z (Win), Shift+Command+Z (Mac) Insert Slidelet
Shift + Control + Alt + B (Win), Shift+Command+Option+B (Mac) Show Branching View
Shift+Control+Alt+S (Win), Shift+Command+Option+S (Mac) Insert an image slide
Shift+Control+Alt+E (Win), Shift+Command+Option+E (Mac) Show/Hide effects panel
Shift+Control+V (Win), Shift+Command+V (Mac) Insert stencil slides
Shift+Control+G (Win), Shift +Command+G (Mac) Edit gradient
Magnification shortcuts
Shortcut key Magnification level
Control+1 (Win), Command + 1 (Mac) 100%
Control+2 (Win), Command + 2 (Mac) 200%
Control+3(Win), Command + 3 (Mac) 300%
Control+4 (Win), Command + 4 (Mac) 400%
82
Control+ - (Win), Command + - (Mac) Zoom out
Control++ (Win), Command + + (Mac) Zoom in
Control + 0 (win), Command + 0 (Mac) Best Fit Zoom / Center Align Workspace
Shortcut keys for recording
The following table lists the default shortcut keys used during recording. These shortcuts should be used only after you
start the recording process. The same keys function differently when you are editing a project.
Shortcut key Action
Control+R (Win), Command + R (Mac) Start/record new capture project
Control+Alt+O (Win), Command+Option+O (Mac) Record additional slides
End (Win), Command+Enter (Mac) Stop recording
Delete (Win & Mac) Delete the current selection
Pause (Win), Command+F2 (Mac) Pause or resume recording
Print Screen (Win), Command +F6 (Mac) Capture a screenshot manually
F4 (Win & Mac) Preview project
F3 (Win & Mac) Preview single slide
F2 (Win & Mac) Edit caption text
F12 (Win & Mac) Preview project in browser
F4 (Win), Command+F4 (Mac) Auto panning
F3 (Win), Command+F3(Mac) Manual panning
F7 (Win), Command+F7(Mac) Stop panning
Last updated 10/10/2016
Page 90

Workspace
F9 (Win), Command+F9 (Mac) Start Full Motion Recording
F10 (Win), Command+F10 (Mac) Stop Full Motion Recording
F11 (Win), Command+F11 (Mac) Snap recording window to mouse
F12 (Win), Command+F12 (Mac) Toggle mouse capture
Change shortcut keys for recording
1 Select Edit > Preferences (Windows) or Adobe Captivate > Preferences (Mac OS).
2 In the Preferences dialog box, select Keys from the Recording menu.
3 To change keys, click once in one of the text boxes and, on the keyboard, press the key or key combination you want
to use. For example, click inside the To Stop Recording text box and then press Shift+Alt+4. The key combination
you entered now appears in the To Stop Recording text box. You can use almost any key, including the Control, Alt,
Shift+Control, and Shift+Alt keys. For example, you could change the stop recording key to Alt+R.
Working with the filmstrip
83
The Filmstrip displays all the slides in the project in the order in which they appear when published.
You can change the order of a slide by dragging it to a new location within the Filmstrip. To select multiple slides, hold
do
wn the Shift or Control key when clicking on slides. To select all slides, press Control+A.
To change the size of the thumbnails in the Filmstrip, right-click (Windows) or Control-click (Mac OS) on any slide,
s
elect Filmstrip, and then select Small, Medium, or Large.
If a slide has a label (short title) assigned, the label appears under the slide. It might be easier to move slides and jump
t
o a specific slide if you have assigned labels instead of just using the slide number.
A Slide Label B Slide Number
A handycam icon appears at the bottom of slides if the slide was recorded in:
• Video Demo mode
• Full Motion Recording (FMR) mode. You can record in the FMR mode by pressing F9 (to start FMR) and F10 (to
e
nd FMR) while doing Automatic or Manual recording.
If a slide has an audio file associated with it, the audio icon appears at the bottom of the slide. You can click the sound
on to show a menu with sound options such a Play, Import, and Edit.
ic
Last updated 10/10/2016
Page 91

Workspace
If a slide is locked, the lock icon appears on the upper-right corner of the slide. You can click the lock icon to unlock
the slide.
If a slide contains mouse movement, the mouse icon appears at the bottom of the slide. You can click the mouse icon
to modify some of mouse properties. For more information on mouse properties, see Change mouse properties.
Disable confirmation messages in Adobe Captivate
Confirmation messages appear when you perform important, and often permanent, actions in Adobe Captivate. The
confirmation messages give you an opportunity to reconsider your decisions when deleting information or changing
key attributes.
If you find that certain messages are not necessary for the way you work or are slowing down your work, you might
want to disable them.
1 In an open project, select Edit > Preferences (Windows) or Adobe Captivate > Preferences (Mac OS).
2 In the Category panel, select Global > General Settings.
3 Click Confirmation Messages in the General Settings panel.
4 In the Confirmation Messages dialog box, deselect the options for which you do not require confirmation messages.
84
How to customize the Adobe Captivate workspace
You can create a custom workspace by rearranging and resizing document windows and panels. You can save the
customized workspaces and switch between them.
Rearrange document windows
When you open more than one file, the Document windows are tabbed. To rearrange the tabbed Document windows,
drag and drop the window’s tab to the new location.
Move panels
• To move a panel, drag it by its tab.
• To move a panel group, drag the title bar.
As you drag the panels, you see blue highlighted drop zones, areas where you can drop the panels. If you drag to an area
that is not a drop zone, the panel floats freely in the workspace.
Note: The position of the mouse pointer, rather than the position of the panel, activates the drop zone.
Press Ctrl (Windows) or Command (Mac OS) while moving a panel to prevent it from docking. Press Esc while moving
the panel to cancel the operation.
Dock and undock panels
A dock is a collection of panels or panel groups displayed together, generally in a vertical orientation. You dock and
undock panels by moving them into and out of a dock.
• To dock a panel, drag it by its tab into the dock, at the top, bottom, or in between other panels.
Last updated 10/10/2016
Page 92

Workspace
• To dock a panel group, drag it by its title bar (the solid empty bar above the tabs) into the dock.
• To remove a panel or panel group from a dock, drag it out of the dock by its tab or title bar. You can also drag it into
another dock or make it free-floating.
• To resize a panel, move the mouse over the edges of the panel. When double-sided arrow appears, drag the panel to
the required size.
Add and remove panels from docks
If you remove all panels from a dock, the dock disappears. You can create a dock by moving panels to the right edge of
the workspace until a drop zone appears.
• To remove a panel, right-click (Windows) or Control-click (Mac) its tab and then select Close, or deselect it from
the Window menu.
• To add a panel, select it from the Window menu and dock it wherever you want.
Stack floating panels
When you drag a panel out of its dock but not into a drop zone, the panel floats freely. The floating panel allows you to
position it anywhere in the workspace. You can stack floating panels or panel groups so that they move as a unit when
you drag the topmost title bar.
85
• To stack floating panels, drag a panel by its tab to the drop zone at the bottom of another panel.
• To change the stacking order, drag a panel up or down by its tab.
Note: B
e sure to release the tab over the narrow drop zone between panels, rather than the broad drop zone in a title bar.
• To remove a panel or panel group from the stack, so that it floats by itself, drag it out by its tab or title bar.
Resize panels
• To minimize or maximize a panel, panel group, or stack of panels, double-click a tab. You can also single-click the
b area (the empty space next to the tabs).
ta
• To resize a panel, drag any side of the panel when the mouse cursor turns into an arrow.
Collapse and expand panel icons
You can collapse panels to icons to reduce clutter on the workspace. In some cases, panels are collapsed to icons in the
default workspace.
• To collapse or expand all panel icons in a column, click the double arrow at the top of the dock.
• To expand a single panel icon, click it.
• To resize panel icons so that you see only the icons (and not the labels), adjust the width of the dock until the text
disappears. To display the icon text again, make the dock wider.
• To collapse an expanded panel back to its icon, click its tab, its icon, or the double arrow in the panel’s title bar.
• To add a floating panel or panel group to an icon dock, drag it in by its tab or title bar. (Panels are automatically
coll
apsed to icons when added to an icon dock.)
• To move a panel icon (or panel icon group), drag the icon. You can drag panel icons up and down in the dock, into
ther docks (where they appear in the panel style of that dock), or outside the dock (where they appear as floating,
o
expanded panels).
Last updated 10/10/2016
Page 93

Workspace
Save customized workspaces
By saving the current size and position of panels as a named workspace, you can restore that workspace even if you
move or close a panel. The names of saved workspaces appear in the workspace switcher in the Application bar.
1 Go to Window > Workspace > New Workspace.
2 Type a name for the new workspace, and click OK.
Any changes that are made to the workspace are saved automatically. To revert to the default state of a workspace, select
Wi
ndow > Workspa c e > Rese t [Workspace Name].
Switch workspaces
Select a workspace from the workspace switcher in the Application bar.
Rename and delete workspaces
Se l ec t Win d ow > Wo r ks p ace > Man a g e Wor k sp a ce.
• To rename a workspace, select the workspace and click Rename.
• To delete a workspace, select the workspace and click Delete.
86
How to use the Adobe Captivate library
Library overview
An Adobe Captivate library is a repository of resources, such as, audio files, images, and animations. Every Adobe
Captivate project contains its own library.
Resources or ‘items’ are automatically added to the library when you use them in the project. However, you can also
im
port them into the library and use them when needed.
By default, the Library panel is displayed in all the preset wo
show) the Library panel, select Window > Library.
The items in the library are categorized and organized in folders, such as, Audio, Images, and Media. The following
i
nformation is displayed for each item:
• Name
• Ty pe
• Size (in kilobytes)
• Use Count, which indicates the number of times the item is used in the project.
• Date Modified
Note: C
lick the title of any of these columns to sort the list of items within each folder.
rkspaces, except in the Quizzing workspace. To hide (or
Using the Library panel, you can do the following:
• Edit the properties of the items.
• Reuse the items within a project as well as across other Adobe Captivate projects by exporting or importing them.
Last updated 10/10/2016
Page 94

Workspace
• Synchronize the items with their source files. You can also open and edit the source files directly in the supported
grams.
pro
Import objects into the Library
You can import objects from other Adobe Captivate projects or templates into the library of your current project.
1 Select File > Import > External Library.
2 In the Open dialog box, navigate to and select the Adobe Captivate project or project template from which you want
to import objects.
3 Click Open. The external library panel appears.
4 Drag-and-drop the required items from the external library panel to the current project’s library.
How to use the Branching panel in Adobe Captivate
The Branching panel (Window > Branching View) provides a visual representation of all links between the slides in a
project and lets you quickly edit those links. Using this panel, you can analyze and interpret how the slides in a project
are interlinked.
87
The Branching panel is particularly helpful when creating instructional materials containing question slides and
s
pecifying different paths for right and wrong answers. For example, you can set one action (such as “Go to the next
slide”) when a user supplies a correct answer, and you can set a different action (such as “Jump To Slide”) when a user
supplies an incorrect answer. Using the Branching view, you can easily make changes to the branching design.
You can also export the Branching view of an existing Adobe Captivate project into a BMP, JPEG/JPG, PNG, or a GIF
fi
le.
Panes in the Branching panel
Preview pane
This pane is at the bottom of the panel and displays all the slides in the project. If the pane is not visible, click the arrow
at the bottom of the panel.
The rectangle in the pane indicates the slides that are currently displayed in the main pane. To bring a different set of
slid
es into the main pane, click and move the rectangle to the required area.
Main pane
This pane is at the center of the panel and is the main area where you interpret and edit the branches in your project.
The arrows between the slides indicate how they are related to each other.
Black Arrow Indicates that the slide from which the arrow originates does not have any interactive object. During
runtime, after this slide's duration elapses, the next slide (to which the arrowhead points) appears.
Green Arrow Indicates that the slide from which the arrow originates contains an interactive object. When users click
this object during runtime, the slide to which the arrowhead points appears.
Last updated 10/10/2016
Page 95

Workspace
Red Arrow Points to the slide that appears when users fail to click an interactive object on the slide from which the
arrow originates.
When you click an arrow, a pop-up appears and shows the name of the object that links the slides.
Options in this pane:
Create Slide Group Combines the selected slides into a single group. For more information on grouping slides, see
Grouping slides using the Branching view.
Expand Slide Group Displays all the slides belonging to the selected group. The slides in a group are by default in a
collapsed state.
Collapse Slide Group Combines the expanded slides of a group back into a group.
Remove Slide Group Ungroups the grouped slides.
Export Branching View Export the Branching view as a BMP, JPEG/JPG, PNG, or a GIF file using the dialog box that
appears.
Zoom Zooms the main view in or out based on the value selected in the list or the slider.
For more information on using this pane for editing the slide links, see Editing the links between slides.
Unlinked slides pane
This pane lists all the slides that are not linked to any slide in the project. If this pane is not visible, click the arrow on
the left of the panel.
88
Editing the links between slides
To change the linkage of a slide, double-click the thumbnail of the slide, and in the pop-up that appears, choose an
option in the Action (Success) list.
To change the linkage of an interactive object, double-click the thumbnail of the slide, and click the object. In the popup that appears, choose an option from the Action (Success) and Action (Failure) lists, and click the Save icon.
For example, consider Slide 1 has a button. When users click the button, Slide 4 must appear and when the button is
not clicked (Failure), Slide 23 must appear. Using the pop-up box, you can specify the slides for success and failure
events accordingly. If the target slide (Slide 23) contains an interactive object that brings the users back to Slide 1, a
reverse-link to Slide 1 appears below the slide.
The Action (Success) and Action (Failure) lists show the following options:
• Go to the Next Slide
• Go to the Previous Slide
• Jump to Slide
To assign other actions such as send an email or open a URL or a file, use the Property Inspector of the slide. The
Advanced Interaction panel (Project > Advanced Interaction) helps you view all the interactions in the project.
Last updated 10/10/2016
Page 96

Workspace
Grouping slides using the Branching view
1 Click in the panel (not on any slide), hold down the mouse button, and move the mouse over the slides you want to
group.
A rectangular marquee appears and the selected slides are highlighted with a bold border around them.
2 Click the Create Slide Group icon. A single group slide appears in the panel.
• To expand the group, click the arrow on the group slide, or select the group slide and click the Expand Slide
Group
icon.
• To ungroup the slides, select the group slide and click the Remove Slide Group icon.
Note: U
se the Property Inspector to name the group slide. For more information, see Name slide groups and mark them.
89
Last updated 10/10/2016
Page 97

Chapter 3: Creating Projects
Responsive Project Design with Adobe Captivate
Responsive Project Design
With a single project, you can design and create content in multiple layouts for devices. You can also preview using
Adobe® Edge Inspect across devices.
Create content with five breakpoints:
• Desktop with a viewport of 1024x627,
• Tablet Landscape with a viewport of 896x627
90
• Tablet Portrait with a viewport of 768x627
• Mobile Landscape with a viewport of 667x410, and
• Mobile Portrait with a viewport of 360x460
Preview the output using play slide in respective device layouts. Publish the content as HTML5.
Adobe Captivate enables you to drag and drop objects with a seamless experience across all the three breakpoint views
in
responsive projects.
For information on View-specific properties of Responsive project, see How to apply view specific properties in
responsive projects
You can view the Align panel by clicking Window > Align.
Creating a Responsive Project
1 After launching Adobe Captivate, click the first thumbnail on the home screen, Responsive Project and click Create.
Alternatively, you can choose File > New Project > Responsive Project.
2 Click the Desktop, Tablet, and Mobile icons in the Responsive Project layout to navigate through the different
breakpoints.
You can view the responsive project area divided into six unique breakpoints as shown in the screenshot below. Each
b
reakpoint area is a unique authoring space.
Last updated 10/10/2016
Page 98

Creating Projects
Adaptive design (Smart positioning)
You can see sliders available at the beginning and end of each breakpoint.
By default, five breakpoints are available for you to author content.
If you create content for any device bigger than the viewport size of the mobile layout, you can increase the size by just
dragging the slider.
Note: Any size above the default viewport size would assume the next higher viewport layout. For example, if you want to
have the mobile viewport as 450x450 instead of the default values. In such a case, since this size is higher than the Mobile
and lesser than Tablet, it would assume the layout of Tablet.Smart positioning is allowed in between breakpoints. Adobe
Captivate enables you to preview the projects with seamless experience in between breakpoints. In other words, users do
not experience any time lag in preview of output while traversing from one view to another view in between breakpoints.
Customize Theme colors
You can choose the Preset Theme Colors or customize Theme Colors to make your own color schemes.
1 From the Toolbar, click Themes > Theme Colors
2 Choose any one of the Preset Theme Colors from Select Theme Color drop-down and clickCustomize. Customize
Theme Colors window appears as shown below:
91
3 Choose the component for which you want to change the colors. You can change the colors of each component of
slide such as Title, Skin, Sub Title, Slide BG.
4 You can pick the color with the help of Shades, or Swatches, Color Picker, or Eyedropper tools.
5 Click the title of the Preset Theme and use your own title name.
6 Click Save. Now, you can see your customized Theme color displayed in the drop-down list.
You can use Settings wheel icon, to Manage the theme colors: Delete, rename.
Device height
Set different backgrounds in different views through inclusion/exclusion of objects.
Last updated 10/10/2016
Page 99

Creating Projects
You can also set the device height for each layout by selecting the Device Height check box in the Property Inspector.
If Device Height is selected, you can see the yellow border for each layout as shown in below screenshots for Mobile
layout.
92
Last updated 10/10/2016
Page 100

Creating Projects
93
Slide Height can be linked to Device Height by clicking the link icon next to Slide Height in Properties window as
shown in the screenshot below. Change the slide height for specific view or for all views.
Slide Height
Adobe Captivate also allows you to customize the height of viewport as per the device height.
Viewport height is the page layout height for Primary (Desktop), Tablet, and Mobile. You can adjust this height to fit
any specific device height with the help of Slide Height option in Properties.
Note: Unlink the slide height from the device height in order to modify it.
Customizing Slide Height
Let us assume the viewport height and device height for mobile layout is 415. Consider a case where the device height
is 500, you can adjust the viewport height by moving vertical device height slider until you reach 500. By default, the
device height is linked with Slide Height. You can de-link it by clicking the link icon next to Slide Height value in the
Property Inspector.
Last updated 10/10/2016
 Loading...