

Page 1

Using
Updated 19 May 2009
ADOBE® CAPTIVATE
®
4
Page 2

Copyright
Updated 19 May 2009
© 2008 Adobe Systems Incorporated. All rights reserved.
Using Adobe
If this guide is distributed with software that includes an end user agreement, this guide, as well as the software described in it, is furnished under license and
may be used or copied only in accordance with the terms of such license. Except as permitted by any such license, no part of this guide may be reproduced, stored
in a retrieval system, or transmitted, in any form or by any means, electronic, mechanical, recording, or otherwise, without the prior written permission of Adobe
Systems Incorporated. Please note that the content in this guide is protected under copyright law even if it is not distributed with software that includes an end
user license agreement.
The content of this guide is furnished for informational use only, is subject to change without notice, and should not be construed as a commitment by Adobe
Systems Incorporated. Adobe Systems Incorporated assumes no responsibility or liability for any errors or inaccuracies that may appear in the informational
content contained in this guide.
Please remember that existing artwork or images that you may want to include in your project may be protected under copyright law. The unauthorized
incorporation of such material into your new work could be a violation of the rights of the copyright owner. Please be sure to obtain any permission required
from the copyright owner.
Any references to company names in sample templates are for demonstration purposes only and are not intended to refer to any actual organization.
Adobe, the Adobe logo, Adobe AIR, Adobe Captivate, Acrobat, Acrobat Connect, ActionScript, Fireworks, Flash, Flex, Photoshop, Reader, RoboHelp,
RoboScreenCapture, and Soundbooth are either registered trademarks or trademarks of Adobe Systems Incorporated in the United States and/or other
countries.
Microsoft, Windows, and Windows Vista are registered trademarks or trademarks of Microsoft Corporation in the United States and/or other countries.
Macintosh is a trademark of Apple Inc., registered in the United States and other countries. All other trademarks are the property of their respective owners.
This work is licensed under the Creative Commons Attribution Non-Commercial 3.0 License. To view a copy of this license, visit
http://creativecommons.org/licenses/by-nc/3.0/us/
e_Db is a licensed Product from Simple Software Solutions, Inc.
This product contains either BSAFE and/or TIPEM software by RSA Security, Inc.
Portions include technology used under license from Autonomy, and are copyrighted.
Portions include technology from Gilles Vollant.
This product includes software developed by the Apache Software Foundation (
This Program was written with MacApp
EITHER EXPRESS OR IMPLIED, REGARDING THIS PRODUCT, INCLUDING WARRANTIES WITH RESPECT TO ITS MERCHANTABILITY OR ITS
FITNESS FOR ANY PARTICULAR PURPOSE. The MacApp software is proprietary to Apple Computer, Inc. and is licensed to Adobe for distribution only for
use in combination with Adobe Captivate software.
PANTONE
PANTONE
Portions include technology used under license from Focoltone Color Matching System.
Portions include technology used under license from Dainippon Ink and chemical, Inc.
This product includes software developed by the OpenSymphony Group (
Portions include technology used under license from Nellymoser, Inc. (
Video compression and decompression is powered by On2 TrueMotion video technology. © 1992-2005 On2 Technologies, Inc. All Rights Reserved.
http://www.on2.com.
® Captivate® 4 for Windows®
http://www.apache.org/).
®: ©1985-1988 Apple Computer, Inc. APPLE COMPUTER, INC. MAKES NO WARRANTIES WHATSOEVER,
® colors displayed here may not match PANTONE-identified standards. Consult current PANTONE Color Publications for accurate color.
® and other Pantone, Inc. trademarks are the property of Pantone, Inc. © Pantone, Inc., 2008.
http://www.opensymphony.com/).
www.nellymoser.com)
Sorenson Spark
MPEG Layer-3 audio compression technology licensed by Fraunhofer IIS and THOMSON multimedia.
This software uses code from the LAME encoding engine, version 3.96.1. LAME is under the LGPL. A copy of the LAME source can be obtained at
www.mp3dev.org.
Copyright © 2000, 2001, 2002, 2003, 2004, 2005, 2006, 2007 Josh Coalson
Redistribution and use in source and binary forms, with or without modification, are permitted provided that the following conditions are met:
Redistributions of source code must retain the above copyright notice, this list of conditions and the following disclaimer.
Redistributions in binary form must reproduce the above copyright notice, this list of conditions and the following disclaimer in the documentation and/or other
materials provided with the distribution.
Neither the name of the Xiph.org Foundation nor the names of its contributors may be used to endorse or promote products derived from this software without
specific prior written permission.
THIS SOFTWARE IS PROVIDED BY THE COPYRIGHT HOLDERS AND CONTRIBUTORS ``AS IS'' AND ANY EXPRESS OR IMPLIED WARRANTIES,
INCLUDING, BUT NOT LIMITED TO, THE IMPLIED WARRANTIES OF MERCHANTABILITY AND FITNESS FOR A PARTICULAR PURPOSE ARE
DISCLAIMED.
EXEMPLARY, OR CONSEQUENTIAL DAMAGES (INCLUDING, BUT NOT LIMITED TO, PROCUREMENT OF SUBSTITUTE GOODS OR SERVICES;
LOSS OF USE, DATA, OR PROFITS; OR BUSINESS INTERRUPTION) HOWEVER CAUSED AND ON ANY THEORY OF LIABILITY, WHETHER IN
CONTRACT, STRICT LIABILITY, OR TORT (INCLUDING NEGLIGENCE OR OTHERWISE) ARISING IN ANY WAY OUT OF THE USE OF THIS
SOFTWARE, EVEN IF ADVISED OF THE POSSIBILITY OF SUCH DAMAGE.
This product includes software developed by Fourthought, Inc. (
Adobe Systems Incorporated, 345 Park Avenue, San Jose, California 95110, USA.
™ video compression and decompression technology licensed from Sorenson Media, Inc.
IN NO EVENT SHALL THE FOUNDATION OR CONTRIBUTORS BE LIABLE FOR ANY DIRECT, INDIRECT, INCIDENTAL, SPECIAL,
http://www.fourthought.com).
Page 3

Notice to U.S. government end users. The software and documentation are “Commercial Items,” as that term is defined at 48 C.F.R. §2.101, consisting of
Updated 19 May 2009
“Commercial Computer Software” and “Commercial Computer Software Documentation,” as such terms are used in 48 C.F.R. §12.212 or 48 C.F.R. §227.7202,
as applicable. Consistent with 48 C.F.R.. §12.212 or 48 C.F.R. §§227.7202-1 through 227.7202-4, as applicable, the Commercial Computer Software and
Commercial Computer Software Documentation are being licensed to U.S. Government end users (a) only as Commercial items and (b) with only those rights
as are granted to all other end users pursuant to the terms and conditions herein. Unpublished-rights reserved under the copyright laws of the United States.
Adobe Systems Incorporated, 345 Park Avenue, San Jose, CA 95110-2704, USA. For U.S. Government End Users, Adobe agrees to comply with all applicable
equal opportunity laws including, if appropriate, the provisions of Executive Order 11246, as amended, Section 402 of the Vietnam Era Veterans Readjustment
Assistance Act of 1974 (38 USC 4212), and Section 503 of the Rehabilitation Act of 1973, as amended, and the regulations at 41 CFR Parts 60-1 through 60-60,
60-250 ,and 60-741. The affirmative action clause and regulations contained in the preceding sentence shall be incorporated by reference.
Page 4

Contents
Updated 19 May 2009
Chapter 1: Getting Started
Resources
Activation and registration
Help and support
Services, downloads, and extras
What's new in Adobe Captivate 4
Chapter 2: Workspace
Adobe Captivate views
Timeline
Toolbars
Panels
Adobe Captivate Library
Grids
Shortcut keys
Undoing and redoing actions
Disable confirmation messages
. . . . . . . . . . . . . . . . . . . . . . . . . . . . . . . . . . . . . . . . . . . . . . . . . . . . . . . . . . . . . . . . . . . . . . . . . . . . . . . . . . . . . . . . . . . . . . . . . . . . . . . . . . . . . 1
. . . . . . . . . . . . . . . . . . . . . . . . . . . . . . . . . . . . . . . . . . . . . . . . . . . . . . . . . . . . . . . . . . . . . . . . . . . . . . . . . . . . . . . . . . . . 1
. . . . . . . . . . . . . . . . . . . . . . . . . . . . . . . . . . . . . . . . . . . . . . . . . . . . . . . . . . . . . . . . . . . . . . . . . . . . . . . . . . . . . . . . . . . . . . . . . . . . . . 2
. . . . . . . . . . . . . . . . . . . . . . . . . . . . . . . . . . . . . . . . . . . . . . . . . . . . . . . . . . . . . . . . . . . . . . . . . . . . . . . . . . . . . . . . 3
. . . . . . . . . . . . . . . . . . . . . . . . . . . . . . . . . . . . . . . . . . . . . . . . . . . . . . . . . . . . . . . . . . . . . . . . . . . . . . . . . . . . . . 3
. . . . . . . . . . . . . . . . . . . . . . . . . . . . . . . . . . . . . . . . . . . . . . . . . . . . . . . . . . . . . . . . . . . . . . . . . . . . . . . . . . . . . . . . . . . . . . . . 5
. . . . . . . . . . . . . . . . . . . . . . . . . . . . . . . . . . . . . . . . . . . . . . . . . . . . . . . . . . . . . . . . . . . . . . . . . . . . . . . . . . . . . . . . . . . . . . . . . . . . . . . . . . . . . . 9
. . . . . . . . . . . . . . . . . . . . . . . . . . . . . . . . . . . . . . . . . . . . . . . . . . . . . . . . . . . . . . . . . . . . . . . . . . . . . . . . . . . . . . . . . . . . . . . . . . . . . . . . . . . . . 12
. . . . . . . . . . . . . . . . . . . . . . . . . . . . . . . . . . . . . . . . . . . . . . . . . . . . . . . . . . . . . . . . . . . . . . . . . . . . . . . . . . . . . . . . . . . . . . . . . . . . . . . . . . . . . . . 13
. . . . . . . . . . . . . . . . . . . . . . . . . . . . . . . . . . . . . . . . . . . . . . . . . . . . . . . . . . . . . . . . . . . . . . . . . . . . . . . . . . . . . . . . . . . . . . 13
. . . . . . . . . . . . . . . . . . . . . . . . . . . . . . . . . . . . . . . . . . . . . . . . . . . . . . . . . . . . . . . . . . . . . . . . . . . . . . . . . . . . . . . . . . . . . . . . . . . . . . . . . . . . . . . . . 14
. . . . . . . . . . . . . . . . . . . . . . . . . . . . . . . . . . . . . . . . . . . . . . . . . . . . . . . . . . . . . . . . . . . . . . . . . . . . . . . . . . . . . . . . . . . . . . . . . . . . . . . . 15
. . . . . . . . . . . . . . . . . . . . . . . . . . . . . . . . . . . . . . . . . . . . . . . . . . . . . . . . . . . . . . . . . . . . . . . . . . . . . . . . . . . . . . . . . 19
. . . . . . . . . . . . . . . . . . . . . . . . . . . . . . . . . . . . . . . . . . . . . . . . . . . . . . . . . . . . . . . . . . . . . . . . . . . . . . . . . . . . . . . 20
iv
Chapter 3: Creating Projects
About Adobe Captivate projects
Create projects
Enable backup file creation
Chapter 4: Recording Projects
Automatic recording
Full motion recording
Manual recording
Hide recording icons and info in the recording window
Record additional slides
Pause while recording projects
Set recording preferences
Automate the recording process
Recording tips
Chapter 5: Slides
Slide properties
Add slides
Delete and edit slides
Lock slides
Hide slides
Group slides
Change slide order
Slide notes
. . . . . . . . . . . . . . . . . . . . . . . . . . . . . . . . . . . . . . . . . . . . . . . . . . . . . . . . . . . . . . . . . . . . . . . . . . . . . . . . . . . . . . . . . . . . . . . . . . . . . . . 22
. . . . . . . . . . . . . . . . . . . . . . . . . . . . . . . . . . . . . . . . . . . . . . . . . . . . . . . . . . . . . . . . . . . . . . . . . . . . . . . . . . . . . . . . . . . . . . . . . 27
. . . . . . . . . . . . . . . . . . . . . . . . . . . . . . . . . . . . . . . . . . . . . . . . . . . . . . . . . . . . . . . . . . . . . . . . . . . . . . . . . . . . . . . . . . . . . . . . 30
. . . . . . . . . . . . . . . . . . . . . . . . . . . . . . . . . . . . . . . . . . . . . . . . . . . . . . . . . . . . . . . . . . . . . . . . . . . . . . . . . . . . . . . . . . . . . . . . . . . . 31
. . . . . . . . . . . . . . . . . . . . . . . . . . . . . . . . . . . . . . . . . . . . . . . . . . . . . . . . . . . . . . . . . . . . . . . . . . . . . . . . . . . . . . . . . . . . . . 31
. . . . . . . . . . . . . . . . . . . . . . . . . . . . . . . . . . . . . . . . . . . . . . . . . . . . . . . . . . . . . . . . . . . . . . . . . . . . . . . . . . . . . . . . . . . . . . . . . . . . . . . . 37
. . . . . . . . . . . . . . . . . . . . . . . . . . . . . . . . . . . . . . . . . . . . . . . . . . . . . . . . . . . . . . . . . . . . . . . . . . . . . . . . . . . . . . . . . . . . . . . . . . . . . . 39
. . . . . . . . . . . . . . . . . . . . . . . . . . . . . . . . . . . . . . . . . . . . . . . . . . . . . . . . . . . . . . . . . . . . . . . . . . . . . . . . . . . . . . . . . . . . . . . . . . . . . . . . . . . . 41
. . . . . . . . . . . . . . . . . . . . . . . . . . . . . . . . . . . . . . . . . . . . . . . . . . . . . . . . . . . . . . . . . . . . . . . . . . . . . . . . . . . . . . . . . . . . . . . . . 45
. . . . . . . . . . . . . . . . . . . . . . . . . . . . . . . . . . . . . . . . . . . . . . . . . . . . . . . . . . . . . . . . . . . . . . . . . . . . . . . . . . . . . . . . . . . . . . . . . . . . . . . . . . . 47
. . . . . . . . . . . . . . . . . . . . . . . . . . . . . . . . . . . . . . . . . . . . . . . . . . . . . . . . . . . . . . . . . . . . . . . . . . . . . . . . . . . . . . . . . . . . . . . . . . . . . . . . . . . 47
. . . . . . . . . . . . . . . . . . . . . . . . . . . . . . . . . . . . . . . . . . . . . . . . . . . . . . . . . . . . . . . . . . . . . . . . . . . . . . . . . . . . . . . . . . . . . . . . . . . . . . . . . . 47
. . . . . . . . . . . . . . . . . . . . . . . . . . . . . . . . . . . . . . . . . . . . . . . . . . . . . . . . . . . . . . . . . . . . . . . . . . . . . . . . . . . . . . . . . . . . . . . . . . . 48
. . . . . . . . . . . . . . . . . . . . . . . . . . . . . . . . . . . . . . . . . . . . . . . . . . . . . . . . . . . . . . . . . . . . . . . . . . . . . . . . . . . . . . . . . . . . . . . . . . . . . . . . . . . 48
. . . . . . . . . . . . . . . . . . . . . . . . . . . . . . . . . . . . . . . . . . . . . . . . . . . . . . . . . . . . . . . . . . . . . . . . . . . . . . . . . . . . . . 21
. . . . . . . . . . . . . . . . . . . . . . . . . . . . . . . . . . . . . . . . . . . . . . . . . . . . . . . . . . . . . . . . . . . . . . . . . . . . . . . . . . . . . . . . . . . 26
. . . . . . . . . . . . . . . . . . . . . . . . . . . . . . . . . . . . . . . . . . . . . . . . . . . . . . . . . . . . . . . . . . . . . . . . . . . . . . . . . . . . . . . 32
. . . . . . . . . . . . . . . . . . . . . . . . . . . . . . . . . . . . . . . . . . . . . . . . . . . . . . . . . . . . . . . . . . . . . . . . . . . . . . . . . . . . . . . . . . . . 32
. . . . . . . . . . . . . . . . . . . . . . . . . . . . . . . . . . . . . . . . . . . . . . . . . . . . . . . . . . . . . . . . . . . . . . . . . . . . . . . . . . . . . . 36
. . . . . . . . . . . . . . . . . . . . . . . . . . . . . . . . . . . . . . . . . . . . . . . . . . . . . . . . . . . . . . . . 31
Page 5

USING ADOBE CAPTIVATE 4
Updated 19 May 2009
Contents
Slide transitions . . . . . . . . . . . . . . . . . . . . . . . . . . . . . . . . . . . . . . . . . . . . . . . . . . . . . . . . . . . . . . . . . . . . . . . . . . . . . . . . . . . . . . . . . . . . . . . . . . . . . . 51
Tips for introductory slides . . . . . . . . . . . . . . . . . . . . . . . . . . . . . . . . . . . . . . . . . . . . . . . . . . . . . . . . . . . . . . . . . . . . . . . . . . . . . . . . . . . . . . . . . . . . 51
Chapter 6: Adding and Managing Objects
Types of objects
Controlling the visibility of objects
Import objects
Manage Library objects
Managing objects with the Stage toolbar
Copy, paste, and duplicate objects
Align objects
Resize and reposition objects by pixel
Change the display order of objects
Merge objects into a slide
Edit object information in the Advanced Interaction dialog box
. . . . . . . . . . . . . . . . . . . . . . . . . . . . . . . . . . . . . . . . . . . . . . . . . . . . . . . . . . . . . . . . . . . . . . . . . . . . . . . . . . . . . . . . . . . . . . . . . . . . . . 52
. . . . . . . . . . . . . . . . . . . . . . . . . . . . . . . . . . . . . . . . . . . . . . . . . . . . . . . . . . . . . . . . . . . . . . . . . . . . . . . . . . . . 52
. . . . . . . . . . . . . . . . . . . . . . . . . . . . . . . . . . . . . . . . . . . . . . . . . . . . . . . . . . . . . . . . . . . . . . . . . . . . . . . . . . . . . . . . . . . . . . . . . . . . . . . 53
. . . . . . . . . . . . . . . . . . . . . . . . . . . . . . . . . . . . . . . . . . . . . . . . . . . . . . . . . . . . . . . . . . . . . . . . . . . . . . . . . . . . . . . . . . . . . . . 54
. . . . . . . . . . . . . . . . . . . . . . . . . . . . . . . . . . . . . . . . . . . . . . . . . . . . . . . . . . . . . . . . . . . . . . . . . . . . . 55
. . . . . . . . . . . . . . . . . . . . . . . . . . . . . . . . . . . . . . . . . . . . . . . . . . . . . . . . . . . . . . . . . . . . . . . . . . . . . . . . . . . . 55
. . . . . . . . . . . . . . . . . . . . . . . . . . . . . . . . . . . . . . . . . . . . . . . . . . . . . . . . . . . . . . . . . . . . . . . . . . . . . . . . . . . . . . . . . . . . . . . . . . . . . . . . . 56
. . . . . . . . . . . . . . . . . . . . . . . . . . . . . . . . . . . . . . . . . . . . . . . . . . . . . . . . . . . . . . . . . . . . . . . . . . . . . . . . . 59
. . . . . . . . . . . . . . . . . . . . . . . . . . . . . . . . . . . . . . . . . . . . . . . . . . . . . . . . . . . . . . . . . . . . . . . . . . . . . . . . . . . 59
. . . . . . . . . . . . . . . . . . . . . . . . . . . . . . . . . . . . . . . . . . . . . . . . . . . . . . . . . . . . . . . . . . . . . . . . . . . . . . . . . . . . . . . . . . . . . 60
. . . . . . . . . . . . . . . . . . . . . . . . . . . . . . . . . . . . . . . . . . . . . . . . . . . . . . . . 60
Chapter 7: Noninteractive Objects and Media
Text captions
Rollover captions
Highlight boxes
Mouse
Rollover slidelets
Zoom areas
Images and rollover images
Drawing tools
Animations
Video
Set audio for noninteractive objects
Fix size and position of noninteractive objects
. . . . . . . . . . . . . . . . . . . . . . . . . . . . . . . . . . . . . . . . . . . . . . . . . . . . . . . . . . . . . . . . . . . . . . . . . . . . . . . . . . . . . . . . . . . . . . . . . . . . . . . . . 62
. . . . . . . . . . . . . . . . . . . . . . . . . . . . . . . . . . . . . . . . . . . . . . . . . . . . . . . . . . . . . . . . . . . . . . . . . . . . . . . . . . . . . . . . . . . . . . . . . . . . . 72
. . . . . . . . . . . . . . . . . . . . . . . . . . . . . . . . . . . . . . . . . . . . . . . . . . . . . . . . . . . . . . . . . . . . . . . . . . . . . . . . . . . . . . . . . . . . . . . . . . . . . . 74
. . . . . . . . . . . . . . . . . . . . . . . . . . . . . . . . . . . . . . . . . . . . . . . . . . . . . . . . . . . . . . . . . . . . . . . . . . . . . . . . . . . . . . . . . . . . . . . . . . . . . . . . . . . . . . . 75
. . . . . . . . . . . . . . . . . . . . . . . . . . . . . . . . . . . . . . . . . . . . . . . . . . . . . . . . . . . . . . . . . . . . . . . . . . . . . . . . . . . . . . . . . . . . . . . . . . . . . 79
. . . . . . . . . . . . . . . . . . . . . . . . . . . . . . . . . . . . . . . . . . . . . . . . . . . . . . . . . . . . . . . . . . . . . . . . . . . . . . . . . . . . . . . . . . . . . . . . . . . . . . . . . . 82
. . . . . . . . . . . . . . . . . . . . . . . . . . . . . . . . . . . . . . . . . . . . . . . . . . . . . . . . . . . . . . . . . . . . . . . . . . . . . . . . . . . . . . . . . . . 84
. . . . . . . . . . . . . . . . . . . . . . . . . . . . . . . . . . . . . . . . . . . . . . . . . . . . . . . . . . . . . . . . . . . . . . . . . . . . . . . . . . . . . . . . . . . . . . . . . . . . . . . . 87
. . . . . . . . . . . . . . . . . . . . . . . . . . . . . . . . . . . . . . . . . . . . . . . . . . . . . . . . . . . . . . . . . . . . . . . . . . . . . . . . . . . . . . . . . . . . . . . . . . . . . . . . . . . 90
. . . . . . . . . . . . . . . . . . . . . . . . . . . . . . . . . . . . . . . . . . . . . . . . . . . . . . . . . . . . . . . . . . . . . . . . . . . . . . . . . . . . . . . . . . . . . . . . . . . . . . . . . . . . . . . . 93
. . . . . . . . . . . . . . . . . . . . . . . . . . . . . . . . . . . . . . . . . . . . . . . . . . . . . . . . . . . . . . . . . . . . . . . . . . . . . . . . . . . 96
. . . . . . . . . . . . . . . . . . . . . . . . . . . . . . . . . . . . . . . . . . . . . . . . . . . . . . . . . . . . . . . . . . . . . . . . . 96
v
Chapter 8: Interactive Objects
Defining project navigation
Click boxes
Text entry boxes
Buttons
. . . . . . . . . . . . . . . . . . . . . . . . . . . . . . . . . . . . . . . . . . . . . . . . . . . . . . . . . . . . . . . . . . . . . . . . . . . . . . . . . . . . . . . . . . . . . . . . . . . . . . . . . . . 98
. . . . . . . . . . . . . . . . . . . . . . . . . . . . . . . . . . . . . . . . . . . . . . . . . . . . . . . . . . . . . . . . . . . . . . . . . . . . . . . . . . . . . . . . . . . . . . . . . . . . . 101
. . . . . . . . . . . . . . . . . . . . . . . . . . . . . . . . . . . . . . . . . . . . . . . . . . . . . . . . . . . . . . . . . . . . . . . . . . . . . . . . . . . . . . . . . . . . . . . . . . . . . . . . . . . . . 105
. . . . . . . . . . . . . . . . . . . . . . . . . . . . . . . . . . . . . . . . . . . . . . . . . . . . . . . . . . . . . . . . . . . . . . . . . . . . . . . . . . . . . . . . . . . 97
Chapter 9: Widgets
About widgets
Create widgets
Defining visibility mode for widgets
Using XML in widgets
Using variables in widgets
Using ActionScript 3.0 in widgets
. . . . . . . . . . . . . . . . . . . . . . . . . . . . . . . . . . . . . . . . . . . . . . . . . . . . . . . . . . . . . . . . . . . . . . . . . . . . . . . . . . . . . . . . . . . . . . . . . . . . . . 113
. . . . . . . . . . . . . . . . . . . . . . . . . . . . . . . . . . . . . . . . . . . . . . . . . . . . . . . . . . . . . . . . . . . . . . . . . . . . . . . . . . . . . . . . . . . . . . . . . . . . . . 116
. . . . . . . . . . . . . . . . . . . . . . . . . . . . . . . . . . . . . . . . . . . . . . . . . . . . . . . . . . . . . . . . . . . . . . . . . . . . . . . . . . 119
. . . . . . . . . . . . . . . . . . . . . . . . . . . . . . . . . . . . . . . . . . . . . . . . . . . . . . . . . . . . . . . . . . . . . . . . . . . . . . . . . . . . . . . . . . . . . . . . 121
. . . . . . . . . . . . . . . . . . . . . . . . . . . . . . . . . . . . . . . . . . . . . . . . . . . . . . . . . . . . . . . . . . . . . . . . . . . . . . . . . . . . . . . . . . . 122
. . . . . . . . . . . . . . . . . . . . . . . . . . . . . . . . . . . . . . . . . . . . . . . . . . . . . . . . . . . . . . . . . . . . . . . . . . . . . . . . . . . . 122
Accessing Adobe Captivate movie properties
Question widgets
Add widgets
Troubleshooting widgets
. . . . . . . . . . . . . . . . . . . . . . . . . . . . . . . . . . . . . . . . . . . . . . . . . . . . . . . . . . . . . . . . . . . . . . . . . . . . . . . . . . . . . . . . . . . . . . . . . . . 125
. . . . . . . . . . . . . . . . . . . . . . . . . . . . . . . . . . . . . . . . . . . . . . . . . . . . . . . . . . . . . . . . . . . . . . . . . . . . . . . . . . . . . . . . . . . . . . . . . . . . . . . . 126
. . . . . . . . . . . . . . . . . . . . . . . . . . . . . . . . . . . . . . . . . . . . . . . . . . . . . . . . . . . . . . . . . . . . . . . . . . . . . . . . . . . . . . . . . . . . 127
. . . . . . . . . . . . . . . . . . . . . . . . . . . . . . . . . . . . . . . . . . . . . . . . . . . . . . . . . . . . . . . . . . . . . . . . 123
Page 6

USING ADOBE CAPTIVATE 4
Updated 19 May 2009
Contents
Chapter 10: Audio
Adding audio . . . . . . . . . . . . . . . . . . . . . . . . . . . . . . . . . . . . . . . . . . . . . . . . . . . . . . . . . . . . . . . . . . . . . . . . . . . . . . . . . . . . . . . . . . . . . . . . . . . . . . . 128
Recording in sync
Insert audio
Preview audio
Edit audio
View audio details
Export audio
. . . . . . . . . . . . . . . . . . . . . . . . . . . . . . . . . . . . . . . . . . . . . . . . . . . . . . . . . . . . . . . . . . . . . . . . . . . . . . . . . . . . . . . . . . . . . . . . . . . 128
. . . . . . . . . . . . . . . . . . . . . . . . . . . . . . . . . . . . . . . . . . . . . . . . . . . . . . . . . . . . . . . . . . . . . . . . . . . . . . . . . . . . . . . . . . . . . . . . . . . . . . . . . 133
. . . . . . . . . . . . . . . . . . . . . . . . . . . . . . . . . . . . . . . . . . . . . . . . . . . . . . . . . . . . . . . . . . . . . . . . . . . . . . . . . . . . . . . . . . . . . . . . . . . . . . . 135
. . . . . . . . . . . . . . . . . . . . . . . . . . . . . . . . . . . . . . . . . . . . . . . . . . . . . . . . . . . . . . . . . . . . . . . . . . . . . . . . . . . . . . . . . . . . . . . . . . . . . . . . . . . 136
. . . . . . . . . . . . . . . . . . . . . . . . . . . . . . . . . . . . . . . . . . . . . . . . . . . . . . . . . . . . . . . . . . . . . . . . . . . . . . . . . . . . . . . . . . . . . . . . . . . 141
. . . . . . . . . . . . . . . . . . . . . . . . . . . . . . . . . . . . . . . . . . . . . . . . . . . . . . . . . . . . . . . . . . . . . . . . . . . . . . . . . . . . . . . . . . . . . . . . . . . . . . . . 142
Chapter 11: Variables and Advanced Actions
Variables
Advanced actions
Tutorial on scripting
ActionScript
Assign multiple actions to an event
. . . . . . . . . . . . . . . . . . . . . . . . . . . . . . . . . . . . . . . . . . . . . . . . . . . . . . . . . . . . . . . . . . . . . . . . . . . . . . . . . . . . . . . . . . . . . . . . . . . . . . . . . . . . 143
. . . . . . . . . . . . . . . . . . . . . . . . . . . . . . . . . . . . . . . . . . . . . . . . . . . . . . . . . . . . . . . . . . . . . . . . . . . . . . . . . . . . . . . . . . . . . . . . . . . 146
. . . . . . . . . . . . . . . . . . . . . . . . . . . . . . . . . . . . . . . . . . . . . . . . . . . . . . . . . . . . . . . . . . . . . . . . . . . . . . . . . . . . . . . . . . . . . . . . . 148
. . . . . . . . . . . . . . . . . . . . . . . . . . . . . . . . . . . . . . . . . . . . . . . . . . . . . . . . . . . . . . . . . . . . . . . . . . . . . . . . . . . . . . . . . . . . . . . . . . . . . . . . . 150
. . . . . . . . . . . . . . . . . . . . . . . . . . . . . . . . . . . . . . . . . . . . . . . . . . . . . . . . . . . . . . . . . . . . . . . . . . . . . . . . . . 151
Chapter 12: Creating a Quiz
Preferences
General workflow for question slides
Create question slides
Question pools and random questions
. . . . . . . . . . . . . . . . . . . . . . . . . . . . . . . . . . . . . . . . . . . . . . . . . . . . . . . . . . . . . . . . . . . . . . . . . . . . . . . . . . . . . . . . . . . . . . . . . . . . . . . . . 152
. . . . . . . . . . . . . . . . . . . . . . . . . . . . . . . . . . . . . . . . . . . . . . . . . . . . . . . . . . . . . . . . . . . . . . . . . . . . . . . . 155
. . . . . . . . . . . . . . . . . . . . . . . . . . . . . . . . . . . . . . . . . . . . . . . . . . . . . . . . . . . . . . . . . . . . . . . . . . . . . . . . . . . . . . . . . . . . . . . 157
. . . . . . . . . . . . . . . . . . . . . . . . . . . . . . . . . . . . . . . . . . . . . . . . . . . . . . . . . . . . . . . . . . . . . . . . . . . . . . . 161
vi
Chapter 13: Advanced Editing and Project Reviews
Projects and project preferences
Edit FMR files
. . . . . . . . . . . . . . . . . . . . . . . . . . . . . . . . . . . . . . . . . . . . . . . . . . . . . . . . . . . . . . . . . . . . . . . . . . . . . . . . . . . . . . . . . . . . . . . . . . . . . . . . 169
Create design templates
Skins
. . . . . . . . . . . . . . . . . . . . . . . . . . . . . . . . . . . . . . . . . . . . . . . . . . . . . . . . . . . . . . . . . . . . . . . . . . . . . . . . . . . . . . . . . . . . . . . . . . . . . . . . . . . . . . . . 172
Table of contents (TOC)
Preview projects
. . . . . . . . . . . . . . . . . . . . . . . . . . . . . . . . . . . . . . . . . . . . . . . . . . . . . . . . . . . . . . . . . . . . . . . . . . . . . . . . . . . . . . . . . . . . . . 175
. . . . . . . . . . . . . . . . . . . . . . . . . . . . . . . . . . . . . . . . . . . . . . . . . . . . . . . . . . . . . . . . . . . . . . . . . . . . . . . . . . . . . . . . . . . . . . . . . . . . . 179
Combining multiple SWF files with aggregator
Combining multiple SCOs with aggregator
Resize projects
Spelling and search
. . . . . . . . . . . . . . . . . . . . . . . . . . . . . . . . . . . . . . . . . . . . . . . . . . . . . . . . . . . . . . . . . . . . . . . . . . . . . . . . . . . . . . . . . . . . . . . . . . . . . . 182
. . . . . . . . . . . . . . . . . . . . . . . . . . . . . . . . . . . . . . . . . . . . . . . . . . . . . . . . . . . . . . . . . . . . . . . . . . . . . . . . . . . . . . . . . . . . . . . . . . 183
Link Adobe Captivate projects
View bandwidth utilization
Creating accessible projects
Localizing Adobe Captivate projects
Import, export, and delete content
Using the AIR Review application
. . . . . . . . . . . . . . . . . . . . . . . . . . . . . . . . . . . . . . . . . . . . . . . . . . . . . . . . . . . . . . . . . . . . . . . . . . . . . . . . . . . . . 165
. . . . . . . . . . . . . . . . . . . . . . . . . . . . . . . . . . . . . . . . . . . . . . . . . . . . . . . . . . . . . . . . . . . . . . . . . . . . . . . . . . . . . . . . . . . . 170
. . . . . . . . . . . . . . . . . . . . . . . . . . . . . . . . . . . . . . . . . . . . . . . . . . . . . . . . . . . . . . . . . . . . . . . 179
. . . . . . . . . . . . . . . . . . . . . . . . . . . . . . . . . . . . . . . . . . . . . . . . . . . . . . . . . . . . . . . . . . . . . . . . . . . 181
. . . . . . . . . . . . . . . . . . . . . . . . . . . . . . . . . . . . . . . . . . . . . . . . . . . . . . . . . . . . . . . . . . . . . . . . . . . . . . . . . . . . . . . 186
. . . . . . . . . . . . . . . . . . . . . . . . . . . . . . . . . . . . . . . . . . . . . . . . . . . . . . . . . . . . . . . . . . . . . . . . . . . . . . . . . . . . . . . . . . 186
. . . . . . . . . . . . . . . . . . . . . . . . . . . . . . . . . . . . . . . . . . . . . . . . . . . . . . . . . . . . . . . . . . . . . . . . . . . . . . . . . . . . . . . . . 187
. . . . . . . . . . . . . . . . . . . . . . . . . . . . . . . . . . . . . . . . . . . . . . . . . . . . . . . . . . . . . . . . . . . . . . . . . . . . . . . . . 191
. . . . . . . . . . . . . . . . . . . . . . . . . . . . . . . . . . . . . . . . . . . . . . . . . . . . . . . . . . . . . . . . . . . . . . . . . . . . . . . . . . . 193
. . . . . . . . . . . . . . . . . . . . . . . . . . . . . . . . . . . . . . . . . . . . . . . . . . . . . . . . . . . . . . . . . . . . . . . . . . . . . . . . . . . . 195
Chapter 14: Publishing Projects
Change the default location of published files
Set publishing preferences
Publish a project as a SWF file
. . . . . . . . . . . . . . . . . . . . . . . . . . . . . . . . . . . . . . . . . . . . . . . . . . . . . . . . . . . . . . . . . . . . . . . . . . . . . . . . . . . . . . . . . . 200
. . . . . . . . . . . . . . . . . . . . . . . . . . . . . . . . . . . . . . . . . . . . . . . . . . . . . . . . . . . . . . . . . . . . . . . . . . . . . . . . . . . . . . . . 201
Publish the project as an executable file or AVI file
Publish projects to the web using FTP
Send projects using e-mail
Get reports by e-mail
. . . . . . . . . . . . . . . . . . . . . . . . . . . . . . . . . . . . . . . . . . . . . . . . . . . . . . . . . . . . . . . . . . . . . . . . . . . . . . . . . . . . . . . . . . . 205
. . . . . . . . . . . . . . . . . . . . . . . . . . . . . . . . . . . . . . . . . . . . . . . . . . . . . . . . . . . . . . . . . . . . . . . . . . . . . . . . . . . . . . . . . . . . . . . . 206
. . . . . . . . . . . . . . . . . . . . . . . . . . . . . . . . . . . . . . . . . . . . . . . . . . . . . . . . . . . . . . . . . . . . . . . . 200
. . . . . . . . . . . . . . . . . . . . . . . . . . . . . . . . . . . . . . . . . . . . . . . . . . . . . . . . . . . . . . . . . . . . 203
. . . . . . . . . . . . . . . . . . . . . . . . . . . . . . . . . . . . . . . . . . . . . . . . . . . . . . . . . . . . . . . . . . . . . . . . . . . . . . . . 204
Page 7

USING ADOBE CAPTIVATE 4
Updated 19 May 2009
Contents
Chapter 15: Using Adobe Captivate with Other Applications
Microsoft PowerPoint . . . . . . . . . . . . . . . . . . . . . . . . . . . . . . . . . . . . . . . . . . . . . . . . . . . . . . . . . . . . . . . . . . . . . . . . . . . . . . . . . . . . . . . . . . . . . . . 208
Microsoft Word
Learning management system (LMS)
Adobe Acrobat Connect Pro
Questionmark Perception
Adobe Flash
RoboHelp
. . . . . . . . . . . . . . . . . . . . . . . . . . . . . . . . . . . . . . . . . . . . . . . . . . . . . . . . . . . . . . . . . . . . . . . . . . . . . . . . . . . . . . . . . . . . . . . . . . . . . . 213
. . . . . . . . . . . . . . . . . . . . . . . . . . . . . . . . . . . . . . . . . . . . . . . . . . . . . . . . . . . . . . . . . . . . . . . . . . . . . . . . . 216
. . . . . . . . . . . . . . . . . . . . . . . . . . . . . . . . . . . . . . . . . . . . . . . . . . . . . . . . . . . . . . . . . . . . . . . . . . . . . . . . . . . . . . . . . 220
. . . . . . . . . . . . . . . . . . . . . . . . . . . . . . . . . . . . . . . . . . . . . . . . . . . . . . . . . . . . . . . . . . . . . . . . . . . . . . . . . . . . . . . . . . . 224
. . . . . . . . . . . . . . . . . . . . . . . . . . . . . . . . . . . . . . . . . . . . . . . . . . . . . . . . . . . . . . . . . . . . . . . . . . . . . . . . . . . . . . . . . . . . . . . . . . . . . . . . . 225
. . . . . . . . . . . . . . . . . . . . . . . . . . . . . . . . . . . . . . . . . . . . . . . . . . . . . . . . . . . . . . . . . . . . . . . . . . . . . . . . . . . . . . . . . . . . . . . . . . . . . . . . . . . 227
Chapter 16: Troubleshooting
Adobe Captivate project startup
Animation timing
. . . . . . . . . . . . . . . . . . . . . . . . . . . . . . . . . . . . . . . . . . . . . . . . . . . . . . . . . . . . . . . . . . . . . . . . . . . . . . . . . . . . . . . . . . . . . . . . . . . 229
Application distortion when recording
Capturing while recording a web application
Capture of elevated applications in Windows Vista
Choppy full motion recording
Correcting colors in slides
Fonts on transparent captions
Adobe Captivate output
Video errors
. . . . . . . . . . . . . . . . . . . . . . . . . . . . . . . . . . . . . . . . . . . . . . . . . . . . . . . . . . . . . . . . . . . . . . . . . . . . . . . . . . . . . . . . . . . . . . . . . . . . . . . . . 232
Text viewed in a browser
Font size in text entry boxes
Button sizes while resizing projects
The number of slides in a project
Publishing projects
Quizzing errors
. . . . . . . . . . . . . . . . . . . . . . . . . . . . . . . . . . . . . . . . . . . . . . . . . . . . . . . . . . . . . . . . . . . . . . . . . . . . . . . . . . . . . . . . . . . . . . . . . . 234
. . . . . . . . . . . . . . . . . . . . . . . . . . . . . . . . . . . . . . . . . . . . . . . . . . . . . . . . . . . . . . . . . . . . . . . . . . . . . . . . . . . . . . . . . . . . . . . . . . . . . . 234
Exporting projects to Flash
JavaScript that does not appear
The Skin Editor
. . . . . . . . . . . . . . . . . . . . . . . . . . . . . . . . . . . . . . . . . . . . . . . . . . . . . . . . . . . . . . . . . . . . . . . . . . . . . . . . . . . . . . . . . . . . . . . . . . . . . . 235
Uninstalling Adobe Captivate
Security warning with Flash Player 8
Recording audio produces recording(Clip).wav file
Slide Notes
. . . . . . . . . . . . . . . . . . . . . . . . . . . . . . . . . . . . . . . . . . . . . . . . . . . . . . . . . . . . . . . . . . . . . . . . . . . . . . . . . . . . . . . . . . . . . . . . . . . . . . . . . . 236
. . . . . . . . . . . . . . . . . . . . . . . . . . . . . . . . . . . . . . . . . . . . . . . . . . . . . . . . . . . . . . . . . . . . . . . . . . . . . . . . . . . . . 229
. . . . . . . . . . . . . . . . . . . . . . . . . . . . . . . . . . . . . . . . . . . . . . . . . . . . . . . . . . . . . . . . . . . . . . . . . . . . . . . 229
. . . . . . . . . . . . . . . . . . . . . . . . . . . . . . . . . . . . . . . . . . . . . . . . . . . . . . . . . . . . . . . . . . . . . . . . . 230
. . . . . . . . . . . . . . . . . . . . . . . . . . . . . . . . . . . . . . . . . . . . . . . . . . . . . . . . . . . . . . . . . . . 230
. . . . . . . . . . . . . . . . . . . . . . . . . . . . . . . . . . . . . . . . . . . . . . . . . . . . . . . . . . . . . . . . . . . . . . . . . . . . . . . . . . . . . . . 230
. . . . . . . . . . . . . . . . . . . . . . . . . . . . . . . . . . . . . . . . . . . . . . . . . . . . . . . . . . . . . . . . . . . . . . . . . . . . . . . . . . . . . . . . . . . 230
. . . . . . . . . . . . . . . . . . . . . . . . . . . . . . . . . . . . . . . . . . . . . . . . . . . . . . . . . . . . . . . . . . . . . . . . . . . . . . . . . . . . . . . 231
. . . . . . . . . . . . . . . . . . . . . . . . . . . . . . . . . . . . . . . . . . . . . . . . . . . . . . . . . . . . . . . . . . . . . . . . . . . . . . . . . . . . . . . . . . . . . 231
. . . . . . . . . . . . . . . . . . . . . . . . . . . . . . . . . . . . . . . . . . . . . . . . . . . . . . . . . . . . . . . . . . . . . . . . . . . . . . . . . . . . . . . . . . . . 232
. . . . . . . . . . . . . . . . . . . . . . . . . . . . . . . . . . . . . . . . . . . . . . . . . . . . . . . . . . . . . . . . . . . . . . . . . . . . . . . . . . . . . . . . . 233
. . . . . . . . . . . . . . . . . . . . . . . . . . . . . . . . . . . . . . . . . . . . . . . . . . . . . . . . . . . . . . . . . . . . . . . . . . . . . . . . . . 233
. . . . . . . . . . . . . . . . . . . . . . . . . . . . . . . . . . . . . . . . . . . . . . . . . . . . . . . . . . . . . . . . . . . . . . . . . . . . . . . . . . . . . 233
. . . . . . . . . . . . . . . . . . . . . . . . . . . . . . . . . . . . . . . . . . . . . . . . . . . . . . . . . . . . . . . . . . . . . . . . . . . . . . . . . . . . . . . . . . 234
. . . . . . . . . . . . . . . . . . . . . . . . . . . . . . . . . . . . . . . . . . . . . . . . . . . . . . . . . . . . . . . . . . . . . . . . . . . . . . . . . . . . . 235
. . . . . . . . . . . . . . . . . . . . . . . . . . . . . . . . . . . . . . . . . . . . . . . . . . . . . . . . . . . . . . . . . . . . . . . . . . . . . . . . . . . . . . . 235
. . . . . . . . . . . . . . . . . . . . . . . . . . . . . . . . . . . . . . . . . . . . . . . . . . . . . . . . . . . . . . . . . . . . . . . . . . . . . . . . . 236
. . . . . . . . . . . . . . . . . . . . . . . . . . . . . . . . . . . . . . . . . . . . . . . . . . . . . . . . . . . . . . . . . . . 236
vii
Index
...............................................................................................................238
Page 8

Chapter 1: Getting Started
Updated 19 May 2009
Resources
Before you begin working with your software, take a few moments to read an overview of activation and the many
resources available to you. You have access to instructional videos, plug-ins, templates, user communities, seminars,
tutorials, RSS feeds, and much more.
Activation and registration
To review complete system requirements and recommendations for your Adobe® Captivate® software, see the ReadMe
file on the installation disc.
Install the software
1 Close any other Adobe applications open on your computer.
2 Insert the installation disc into your hard drive, and follow the onscreen instructions.
Note: For more information, see the ReadMe file on the installation disc.
1
Help with installation
For help with installation issues, see the Installation Support Center at www.adobe.com/go/learn_cp_install_en.
License activation
During the installation process, your Adobe software contacts an Adobe server to complete the license activation
process. No personal data is transmitted. For more information on product activation, visit the Adobe website at
www.adobe.com/go/activation.
A single-user retail license activation supports two computers. For example, you can install the product on a desktop
computer at work and on a laptop computer at home. If you want to install the software on a third computer, first
deactivate it on one of the other two computers. Choose Help > Deactivate.
Register
Register your product to receive complimentary installation support, notifications of updates, and other services.
• To register, follow the onscreen instructions in the Registration dialog box, which appears after you install the
software.
If you postpone registration, you can register at any time by choosing Help > Registration.
Page 9

USING ADOBE CAPTIVATE 4
Updated 19 May 2009
Getting Started
ReadMe
A ReadMe file for your software is available online and on the installation disc. Open the file to read important
information about topics such as the following:
• System requirements
• Installation (including removing the software)
• Activation and registration
• Troubleshooting
• Customer support
Help and support
Community Help
Community Help is an integrated environment on Adobe.com that gives you access to community-generated content
moderated by Adobe and industry experts. Comments from users help guide you to an answer. Search Community
Help to find the best content on the web about Adobe products and technologies, including these resources:
2
• Videos, tutorials, tips and techniques, blogs, articles, and examples for designers and developers.
• Complete online Help, which is updated regularly and is more complete than the Help delivered with your product.
If you are connected to the Internet when you access Help, you automatically see the latest online Help rather than
the set delivered with your product.
• All other content on Adobe.com, including knowledgebase articles, downloads and updates, Adobe Developer
Connection, and more.
Use the Help search field in your product’s user interface to access Community Help. You can search for content
within the Adobe.com site and also in websites that have useful information about your product. Moderators continue
to identify the most relevant web content for your product. You can add comments to online Help and view comments
added by other users. For a video of Community Help, see www.adobe.com/go/learn_community_help_en.
Adobe Help Viewer 2
Adobe Help Viewer 2 is an Adobe® AIR™ application that seamlessly merges the online and offline experience. When
online, you get the most recently updated product Help on the web. You can also access an Adobe PDF version of Help.
When offline, you access Help installed with the product on your system. Adobe Help Viewer 2 has a user-friendly
interface that supports advanced navigation features. For example, you can get overviews of topics through mini TOCs
and bookmark local and online content.
The search feature supports both online and offline modes. Adobe Help Viewer 2 searches content in Community
Help when you are online and the Help installed with the product when you are offline. Online search suggestions offer
relevant results from product Help, Adobe.com, and other websites. Offline search uses indexes to return preferred
topics for key terms.
You can use the commenting feature to post your comments to Adobe.com or add notes for your own reference. Your
feedback on Help content is welcome.
Note: For a video of Adobe Help Viewer, see www.adobe.com/go/learn_air_viewer2_en.
Page 10

USING ADOBE CAPTIVATE 4
Updated 19 May 2009
Getting Started
Other resources
Online Help also includes a link to the complete, updated PDF version of Help.
Visit the Adobe Support website at www.adobe.com/support to learn about free and paid technical support options.
Services, downloads, and extras
You can enhance your product by integrating various services, plug-ins, and extensions in your product. You can also
download samples and other assets to help you get your work done.
Adobe Exchange
Visit the Adobe Exchange at www.adobe.com/go/exchange to download samples as well as plug-ins and extensions
from Adobe and third-party developers. The plug-ins and extensions can help you automate tasks, customize
workflows, create specialized professional effects, and more.
Adobe downloads
Visit www.adobe.com/go/downloads to find free updates, trials, and other useful software.
3
Adobe Labs
Adobe Labs at www.adobe.com/go/labs gives you the opportunity to experience and evaluate new and emerging
technologies and products from Adobe. At Adobe Labs, you have access to resources such as these:
• Prerelease software and technologies
• Code samples and best practices to accelerate your learning
• Early versions of product and technical documentation
• Forums, wiki-based content, and other collaborative resources to help you interact with like-minded users
Adobe Labs fosters a collaborative software development process. In this environment, customers quickly become
productive with new products and technologies. Adobe Labs is also a forum for early feedback. The Adobe
development teams use this feedback to create software that meets the needs and expectations of the community.
Adobe TV
Visit Adobe TV at http://tv.adobe.com to view instructional and inspirational videos.
What's new in Adobe Captivate 4
Adobe® Captivate® 4 software is packed with new features that help you work faster, collaborate more effectively, and
create more realistic and engaging e-Learning content with advanced interactivity, software and scenario simulations,
quizzes, tables of contents, widgets, and more—all without programming or multimedia skills.
Page 11

USING ADOBE CAPTIVATE 4
Updated 19 May 2009
Getting Started
Here are the top new features of Adobe Captivate 4:
SWF commenting Accelerate content creation cycles with real-time reviews in Adobe Captivate Reviewer, an Adobe
AIR™ application. Reviewers can add comments to your SWF files while playing them without having Adobe Captivate
installed, and comments will be imported to the appropriate slides in your project.
Project templates Use enhanced project templates that make it easy for subject-matter experts to contribute
instructionally sound content without compromising structure.
Customizable widgets Create more compelling learning experiences by including widgets such as games, question
types, and more. Create widgets in Adobe Flash® Professional software, easily share them via Adobe Exchange®, and
customize them to meet your content needs.
Round-trip PowerPoint workflow Leverage existing Microsoft® PowerPoint® 2007 (PPTX format) slides in your
projects. Import slides with audio and interactivity, and easily update the imported content from Adobe Captivate,
keeping your PowerPoint and Adobe Captivate files in sync with the linked import option.
Table of Contents and Aggregator Enable learners to easily navigate through content and track their progress with a
multilevel Table of Contents. Also, use the Aggregator to combine multiple content modules to create a complete eLearning course.
Text-to-speech functionality Keep learners tuned in to your content thanks to automatic voice-over functionality that
turns text to high-quality speech.
4
Variables and Advanced Actions Use Variables to personalize the learning experience by using learner-provided data,
such as the learner’s name, throughout a scenario. Use Advanced Actions to further configure and modify the
experience by enabling conditional actions, or more than one action in an interaction.
Expanded output options Embed Adobe Captivate movies in Adobe PDF files to enliven text-based instructional
content, or embed your movies in Adobe® Flex® content using Adobe® ActionScript® 3.0 publishing. Output AVI files
for streaming on the web or publishing to YouTube™.
Adobe Photoshop layer support Preserve layers in imported Adobe® Photoshop® (PSD) files so you can easily edit or
animate individual image areas for the effect you want.
Streamlined workflows and enhanced usability Use workflow and usability enhancements, including inline editing of
text captions, templates to standardize the look and feel of projects, panning to optimize viewing on small screens and
devices, support for right-clicking in simulations, drawing tools and image editing, and improved accessibility
features.
Page 12

Chapter 2: Workspace
Updated 19 May 2009
The Adobe Captivate workspace is designed to help you create a movie in the shortest possible time.
Adobe Captivate views
Adobe Captivate has three main views: Storyboard, Edit, and Branching. Use the view menu, or press Control+Tab to
navigate between views. Each view features a window at the bottom of the screen where you can view, add, and edit
notes about individual slides in your project. The notes are visible to viewers viewing the source files. They do not
appear in the published output.
Storyboard view
This view appears when you open a project from the Start page. In Storyboard view, you can see all the slides and slide
groups in the project. The slides are arranged in the order in which they are displayed in the movie. The storyboard
view is made of four panels:
5
Slide Tasks You can use the various options in this panel to change the properties of selected slides in the slide panel.
Information Provides details about the project. The following information is available in the panel:
• Size Size of the SWF file that is generated using the project. The size does not take into account the compression
techniques used before publishing the file. So, there could be a difference between the mentioned size and the size of
the SWF file generated after publishing. The time taken for the SWF file to download at the specified streaming is also
displayed in kilobits per second.
• Time Time, in seconds, required to play the movie completely. The total number of frames that are displayed in
this interval is also displayed.
• Audio The combined size of the audio files in the movie. The download speed of the audio file at the specified
streaming is also displayed in kilobits per second.
• Video The size of the SWF file excluding the size of the audio files in the project. The download speed of the audio
file at the specified streaming is also displayed in kilobits per second.
• Lowest Stream The value used to calculate the download speed of the audio and SWF files. For example,
Broadband indicates that broadband speed is being used to calculate the download time.
• Resolution Dimensions of the project, in pixels.
• Slides Number of slides in the project including hidden slides.
Slides Displays the slides in the project. You can use this panel to move slides to their desired locations in the project.
The slides are displayed in the movie in the order of their slide numbers. It is always a good idea to name slides because
their numbers change when they are moved to another location.
Slide Notes If you want to add additional information about the selected slide for yourself or for other people viewing
the source files, add slide notes. The notes are not displayed when the movie is played. For more information, see “Slide
notes” on page 48.
You can do the following in Storyboard view:
• Move slides to other locations. The numbering of the slides automatically changes when you move the slides.
Page 13
USING ADOBE CAPTIVATE 4
Updated 19 May 2009
Workspace
• Group slides.
• View project information.
• Set various properties for the slides using the Slide Tasks menu.
.You can change the properties of multiple slides at the same time. To select multiple slides, hold down the Shift or
Control key while clicking slides. To select all slides, press Control+A.
Edit view
This view appears when you double-click a slide in Storyboard or Branching view. After recording an Adobe Captivate
project, you will probably spend most of your time in Edit view. You can close any panel in the Edit View using the
Window menu. The panel containing the slide however, cannot be hidden.
The Edit view consists of the following panels:
Menu bar Lists all the options that you can use when working with Adobe Captivate. Adobe Captivate has a dynamic
menu bar in that the options in the menu change according to the selected object.
Menu bar
6
Toolbar The toolbar displays icons that act as a shortcut to the options available in the menu bar.
Tool bar
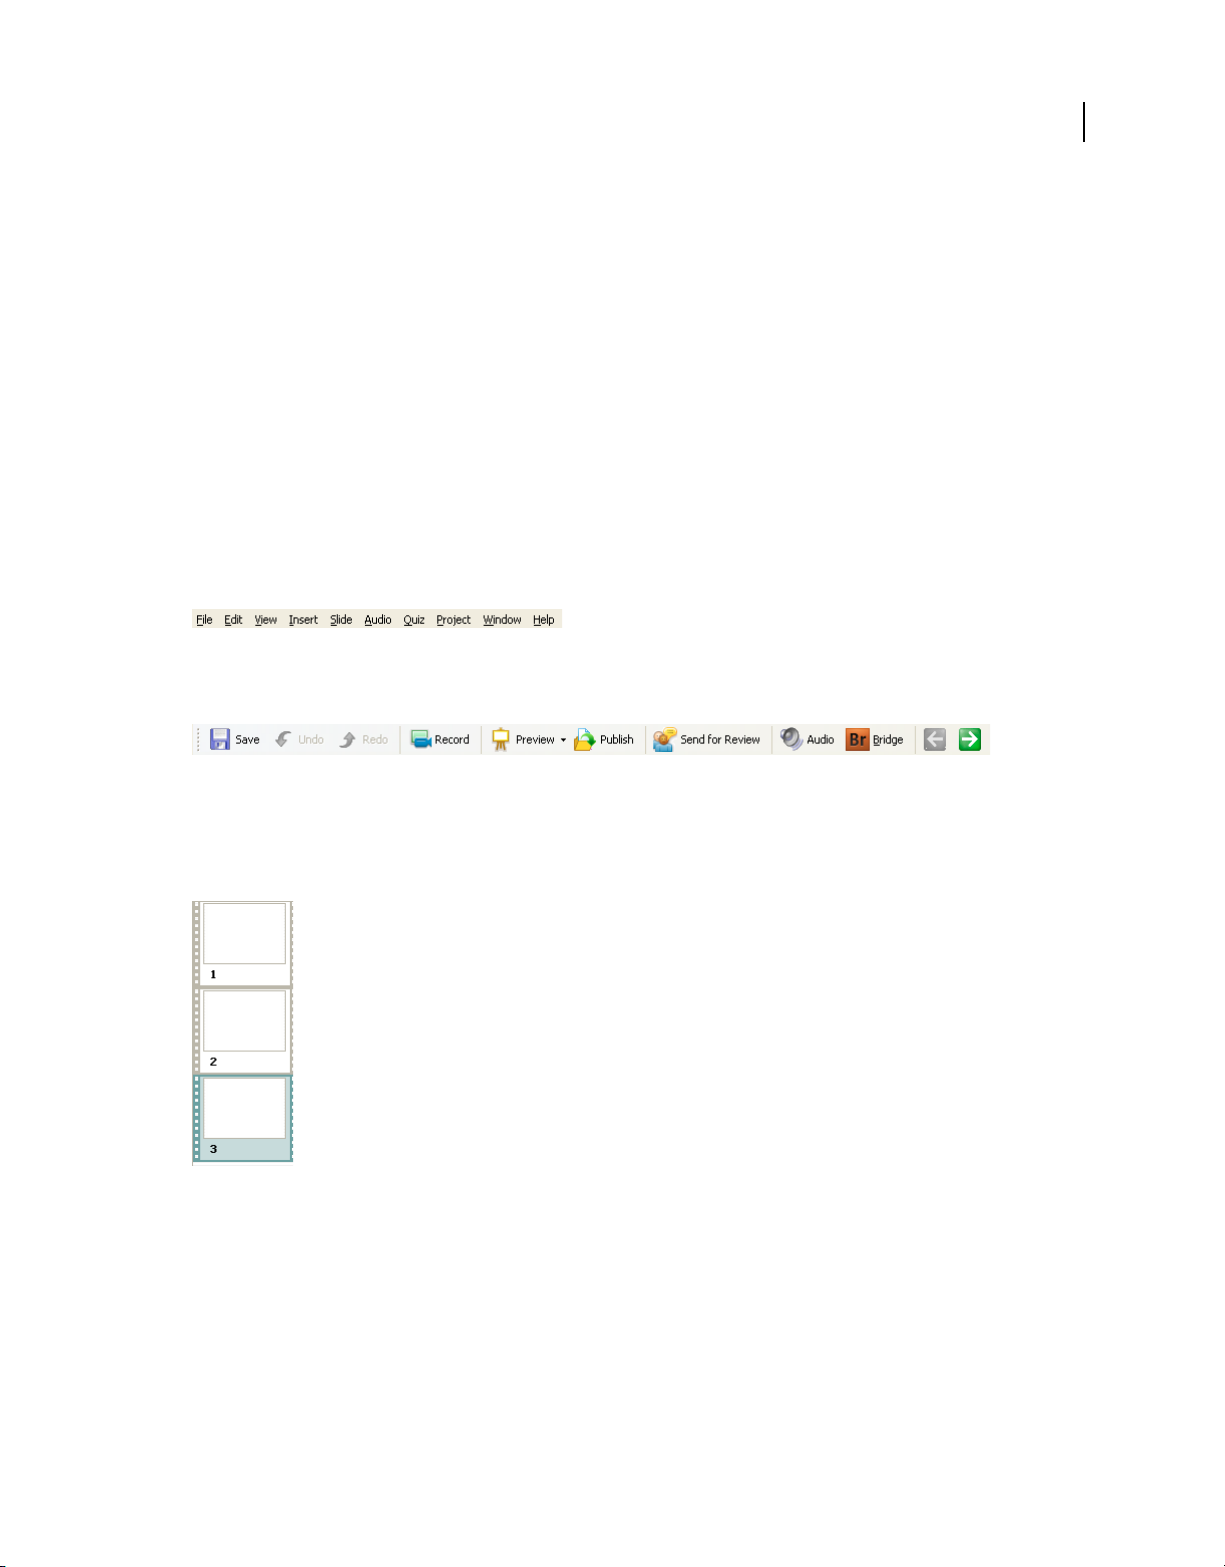
Filmstrip Displays a thumbnail view of the slides in the movie in the order of their appearance. You can use this view
to move slides as you can in Storyboard view. When you select a slide in the Filmstrip, the corresponding slide appears
in the Slides panel.
Filmstrip
You can increase the size of the Slides panel by reducing the size of the Filmstrip. To change the size of the Filmstrip,
drag the splitter bar toward the outside of the program window.
• The Filmstrip displays all of the slides in your project in viewing order. You can change the slide order by dragging
a slide to a new location within the project. (To select multiple slides, hold down the Shift or Control key when
clicking on slides; to select all slides, press Control+A.)
• If a slide has a label (short title) assigned, the label appears under the slide. It might be easier to move slides and
jump to a specific slide if you have assigned labels instead of just using the slide number.
Page 14
USING ADOBE CAPTIVATE 4
Updated 19 May 2009
Workspace
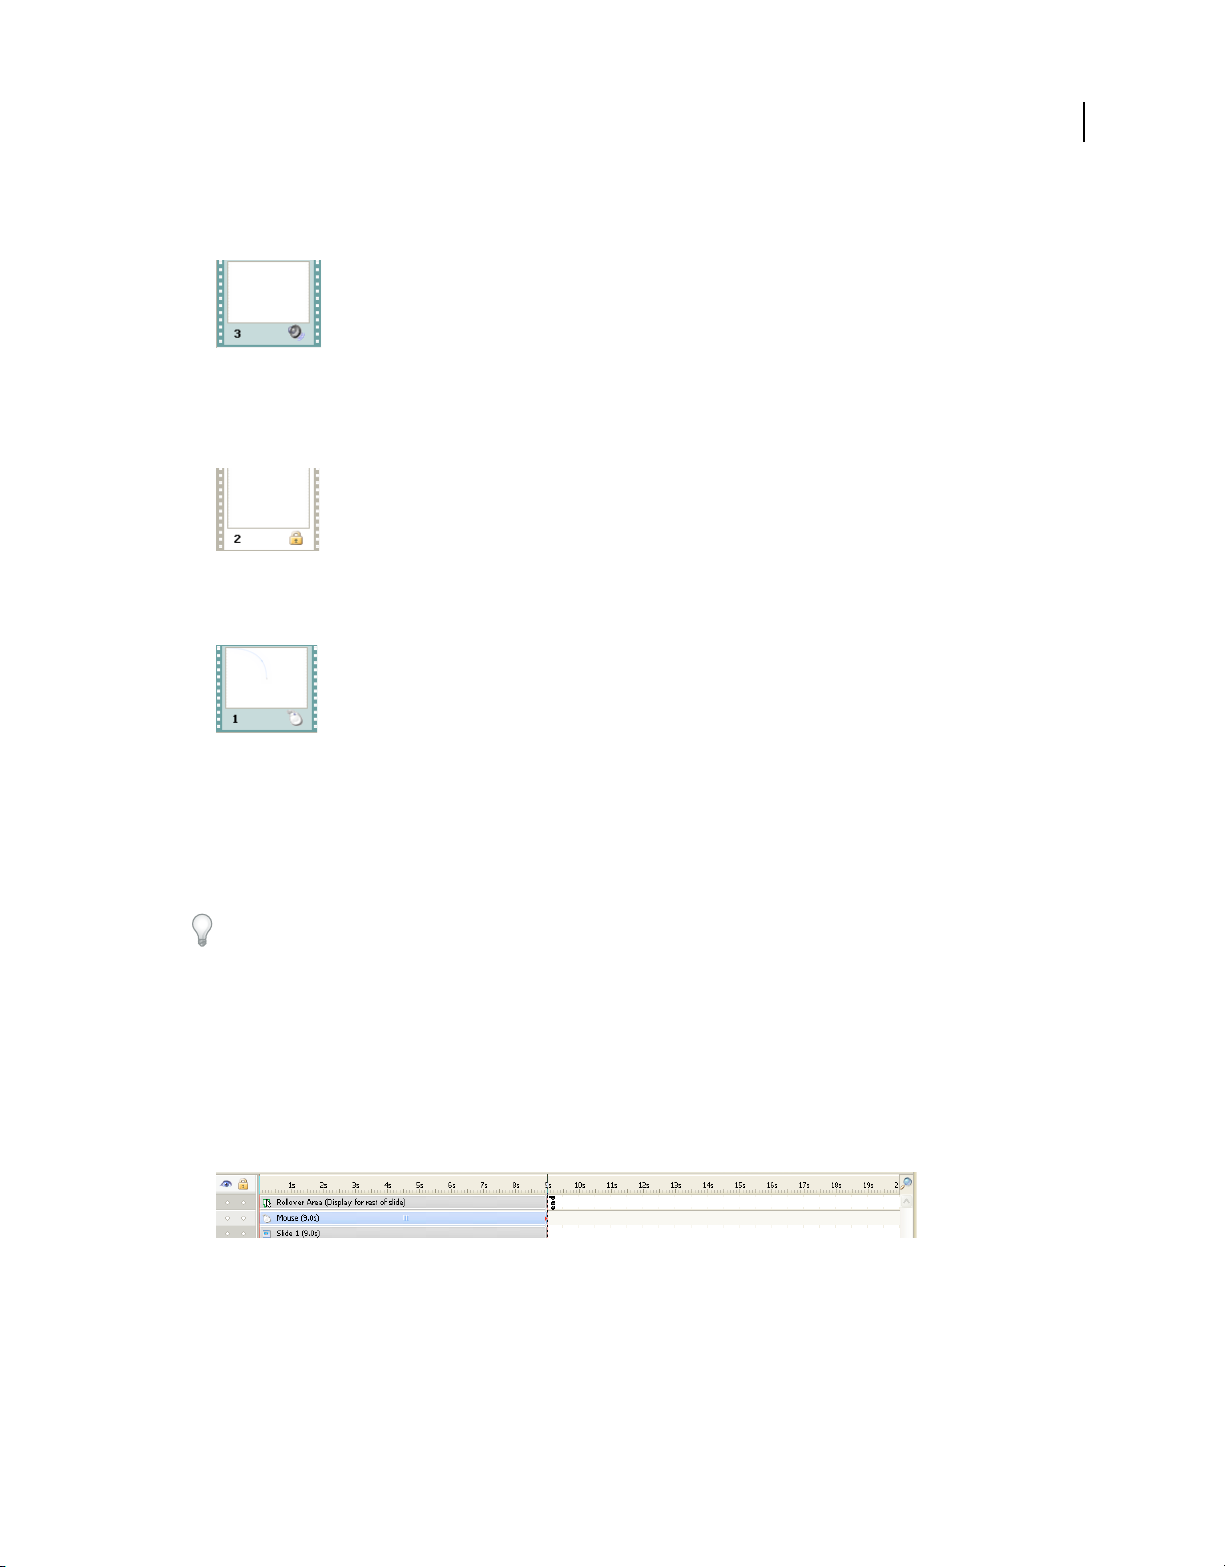
• If a slide has an audio file associated with it, the audio icon appears in the lower-right corner of the slide. You can
click the sound icon to show a menu with sound options such a Play, Import, and Edit.
Slide with audio
• If a slide is locked, the lock icon appears in the lower-right corner of the slide. You can click the lock icon to unlock
the slide.
Locked slide
• If a slide contains mouse movement, the mouse icon appears in the lower-right corner of the slide.
7
Slide with mouse movement
• When the display for the Question Pool tab has been turned on, you can change the view in the Filmstrip between
the main project and the question pools by clicking the appropriate tabs.
Slides Displays the slide that has been selected in the Filmstrip. You can edit the slide by adding, deleting, or modifying
objects in this view.
For maximum editing space, open a project and press F11 to display Adobe Captivate in full-screen edit view.
Timeline Displays the Timeline for the specified slide. The slide and its objects appear as different layers in the
Timeline. You can do the following using the Timeline:
• Change the time during which the object or slide plays during the movie.
• Change the order of appearance of the objects on the slide.
• Hide objects on the slide.
• Lock objects on the slide that you do not want edited.
Timeline
Slide Notes Similar in appearance and functionality to the slide notes in Storyboard view. For more information, see
“Slide notes” on page 48.
Object Toolbar Displays shortcuts to the various objects that you can add to the slide.
Library Displays the list of images, audio, and video files that you have previously inserted into the project. You can
drag objects from the Library to the slide instead of inserting them.
Page 15
USING ADOBE CAPTIVATE 4
Updated 19 May 2009
Workspace
In addition to the above panels, the Edit view might also contain other windows that you have opened.
Branching view
This view appears when you click the Branching tab. The Branching view gives you a visual representation of all links
between the slides in a project and lets you quickly edit those links. The main pane displays the type of link between
slides and lets you find and select the slide you want to review. The bottom pane displays and lets you add notes for
the slide selected in the main pane.
The Branching view is particularly helpful when creating instructional materials containing question slides and
specifying different paths for right and wrong answers. For example, you can set one action (such as “Go to the next
slide”) when a user supplies a correct answer, and you can set a different action (such as “Open URL or file”) when a
user supplies an incorrect answer. Using the Branching view, you can easily make changes to the branching design.
You can export the Branching view of an existing Adobe Captivate project into a BMP, JPEG, or JPG file.
Properties The Properties panel shows the link properties of the selected slide or link, and lets you edit the navigation
type. Click a slide or the arrow between slides to view and edit the properties of the link. When you’ve made changes
to that link, click Apply. Links between interactive objects (such as a button to send e-mail or open JavaScript) have
icons between slides instead of arrows. The Legend panel shows the various arrows and icons and their meanings.
Overview The Overview panel indicates which portion of the project you’re reviewing in the main Branching pane.
8
Legend The Legend panel defines how each type of link between slides is displayed in the main Branching pane.
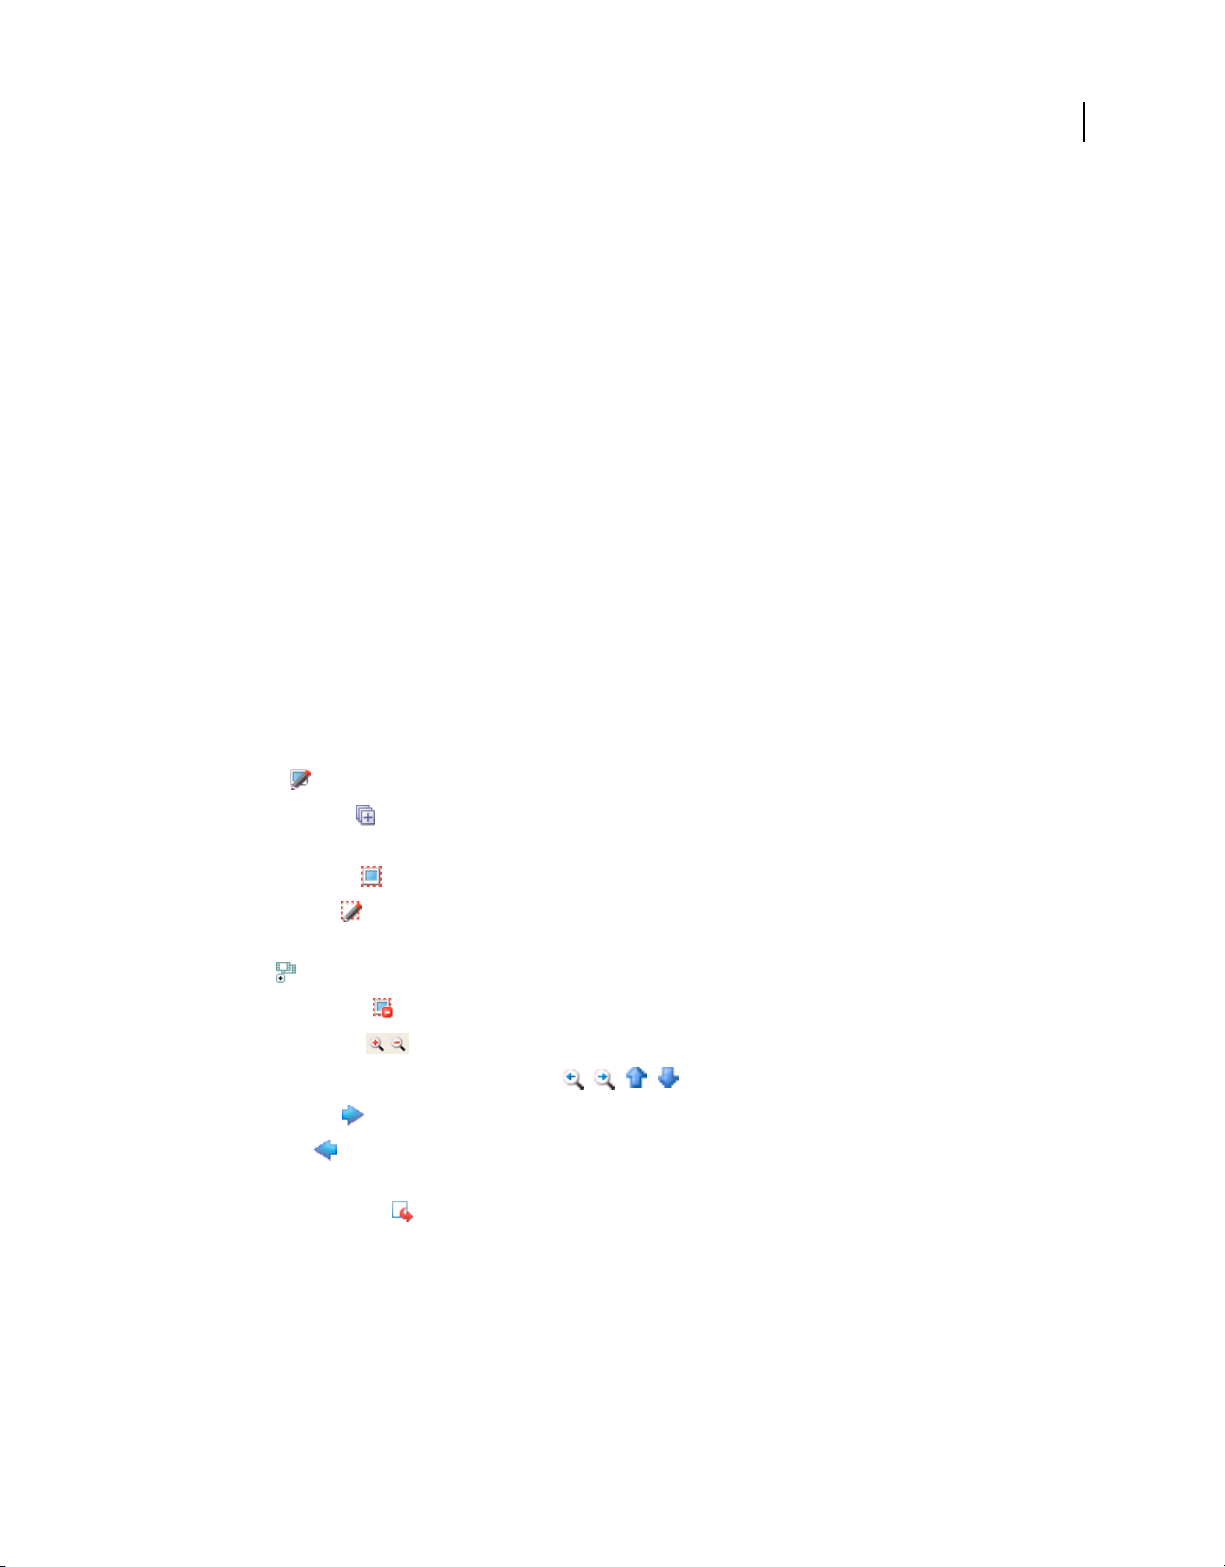
Tools The Tools panel has icons that act as shortcuts for the various actions you can perform in the Branching view:
• Edit Slide Opens the selected slide in Edit view.
• Expand Slide Path All the slides are opened up for display. Use the same icon to toggle between the expanded
and collapsed views.
• Create Slide Group Combines the selected slides into a single group.
• Edit Slide Group Opens a dialog box that you can use to name the group and assign a border color for the slides
in that group.
• Expand Displays all the slides belonging to the group. The slides in a group are usually in a collapsed state.
• Remove Slide Group Ungroups the grouped slides.
• Zoom In /Zoom Out Displays a magnified view of the branching when zoomed in.
• Zoom Left/Zoom Right/Zoom Up/Zoom Down , , , Moves the slides in the specified direction.
• Browse Forward Branching view displays slides starting from the selected slide.
• Browse Back Slides from the previous view are displayed. For example, if you had browsed into slide number
12 earlier, the Branching view now displays slides starting with slide number 1.
• Export Branching View Export the Branching view as a JPEG or BMP file using the dialog box that appears.
Slide Notes Similar in appearance and functionality to the slide notes in Storyboard view.
Page 16
USING ADOBE CAPTIVATE 4
Updated 19 May 2009
Workspace
Timeline
The Timeline is a visual representation of all objects on slides. The Timeline provides an easy way to view, at a high
level, all objects on a slide and their relationship to each other. With the Timeline, you can organize objects and
precisely control the timing of objects. For example, on a slide that contains a caption, an image, and a highlight box,
you can display the caption, then the image 4 seconds later, and then the highlight box 2 seconds after that. The
Timeline also shows any audio associated with the slide or with objects on the slide, letting you easily coordinate the
timing of audio with objects.
Timeline
The Timeline header shows time, in seconds (1s for 1 second, 2s for 2 seconds, and so on), so you see exactly when
objects appear.
The major components of the Timeline are objects, the header, and the playhead. The objects on a slide are displayed
as stacked bars in the right pane of the Timeline. The header at the top of the Timeline indicates time in seconds (and
parts of seconds). The playhead shows the point in time in which the slide is being viewed.
9
You can use the Timeline to hide or lock objects easily. This is useful when a slide contains many objects and you need
to edit the objects separately.
Rest the mouse pointer over any bar in the Timeline and use the hint message that appears to view details about the
timing of that object.
Show or hide the Timeline
1 Open an Adobe Captivate project.
2 Double-click any slide to open Edit view.
By default, the Timeline appears along the top of the slide.
a If it is not open already, select Window > Timeline.
If you are not able to see the Timeline even after doing this, click the splitter bar arrow.
b To close the Timeline, select Window > Timeline again.
c To expand the Timeline, click the small, black display arrow. To close the Timeline, click the display arrow
again.
Change the location of the Timeline
By default, the Timeline appears docked at the top of the slide in Edit view. To customize it, first open a project and
double-click any slide to open Edit view.
Note: Adobe Captivate remembers the position of the Timeline (location and size). If the Timeline is displayed when
Adobe Captivate closes, the Timeline appears in the same location the next time Adobe Captivate is opened.
• To dock the window Timeline, click the title bar of the Timeline and drag the Timeline to the top or bottom edge
of the slide.
Page 17

USING ADOBE CAPTIVATE 4
Updated 19 May 2009
Workspace
• To place a Timeline that is docked at the top of a window at the bottom (or vice versa), move the mouse over the
four vertical dots to the left of the Timeline display arrow until a four-pointed arrow appears. Then drag the
Timeline to a new location (either the top or bottom of the slide).
• To display the Timeline in a new window, move the mouse over the four vertical dots to the left of the Timeline
display arrow until a four-pointed arrow appears and drag the Timeline slightly to the left. Release the mouse. The
Timeline should appear in a new window above the main Adobe Captivate application window.
• To hide the Timeline, select Window > Timeline.
• To resize the Timeline if the Timeline is docked to the main application window, drag the bar separating the
Timeline from the application window. If the Timeline is not docked to the main application window, drag the
lower-right corner.
• To increase or decrease the zoom level, click in the Timeline ruler and spin the mouse wheel. (Alternatively, click
the ruler then press Control+] or Control+[.)
Magnify the time layer
You can adjust the zoom level of the Timeline easily. Click the ruler and then press Control+[ to decrease the zoom
level, or Control+] to increase the zoom level.
10
Change the order of object layers
The Timeline shows all the objects that you have placed on the slide. The objects on a slide are displayed as stacked
bars in the right pane of the Timeline. If any objects on the slide overlap other objects on the slide, it is important to
set their stacking order on the Timeline to control what objects appear in front of others.
1 In an open project, double-click a slide that contains objects.
2 Move the mouse over one of the objects on the Timeline until the hand icon appears and drag the object up or down
to reposition it.
3 If you have two objects that overlap on the slide, you need to select the object you want to appear in front by setting
the stacking order. Changing the stacking order consists of moving objects to the back and front of the slide Stage.
The key point to remember is that objects at the back of the Stage appear behind other objects. Use one of the
following methods to set the stacking order:
• In Edit view, right-click an object on the slide and select one of the object order options. If necessary, right-click
other objects on the slide and adjust their order.
Bring To Front This option brings the selected object to the top. When the project plays, the object appears on
top of all others.
Send To Back This option sends the selected object to the background. When the project plays, the object
appears behind all others.
Bring Forward This option moves the object one layer forward.
Send Backward This option moves the object one layer back.
• In Edit view, on the Timeline, move the mouse over an object until the hand appears and drag the object up or
down to change its position in the stacking order. Moving an object higher in the stacking order moves it to the
front of the Stage, while moving an object lower moves it to the back of the Stage.
Page 18

USING ADOBE CAPTIVATE 4
Updated 19 May 2009
Workspace
Hide objects during editing
❖ In the Timeline, click the dot below the eye icon in the layer that you want to hide.
The object disappears from the slide and an X icon appears in the column. To display the object on the slide, click
the X icon.
When you hide an object layer, it is hidden only on the Stage. You can still view the layer when it is previewed or
published.
Timeline for slidelets
A slidelet is a slide within a slide. A slidelet has its own Timeline. All the objects in the slidelet are displayed in its
Timeline. When you select a slidelet, the Timeline changes automatically to that for the slidelet. To display the
Timeline for the slide containing the slidelet, click anywhere outside the slidelet. For more information on slidelets,
see “Rollover slidelets” on page 79.
Lock objects
❖ In the Timeline, click the dot below the lock icon in the layer that you want to hide.
The layer and its corresponding object cannot be edited or moved until you unlock the layer. To unlock the layer,
click the lock icon.
11
Set time for objects and slides using the Timeline
You can change the amount of time an object or slide appears in the movie using its Properties dialog box or by using
the Timeline. You may find this feature useful in several situations. For example, you may want to set exact object
timing when coordinating a voice-over with a highlight box; you might want the highlight box to appear only when
the voice-over says, “Enter the date here.”
• Move the mouse over the left or right edge of the slide or object on the Timeline until the resize pointer appears.
Click and drag the edge to the required position in the Timeline.
• To set two objects to appear at the same time, align their left and right edges. For example, you can set a highlight
box to appear at the same time as an image so that the highlight box can appear over the image.
• To adjust the display time of interactive objects (such as text entry boxes, click boxes, and buttons) rest the pointer
over the line between Active and Inactive in the bar until the slider handle appears. Drag the slider to adjust the
display time.
You can select multiple objects and move them at the same time. Hold down the Shift key and click objects to select
consecutive stacked objects in the Timeline, or to select nonconsecutive objects, hold down the Control key and
click the objects to move.
You can determine whether keystrokes are played slowly or quickly in a project. If the project has many keystrokes,
increasing the speed will make the pace of the project faster. However, if keystrokes are critical in the project, you may
want them to play slowly so users can view them clearly. Use the Timeline to change keystroke speed. Keystrokes are
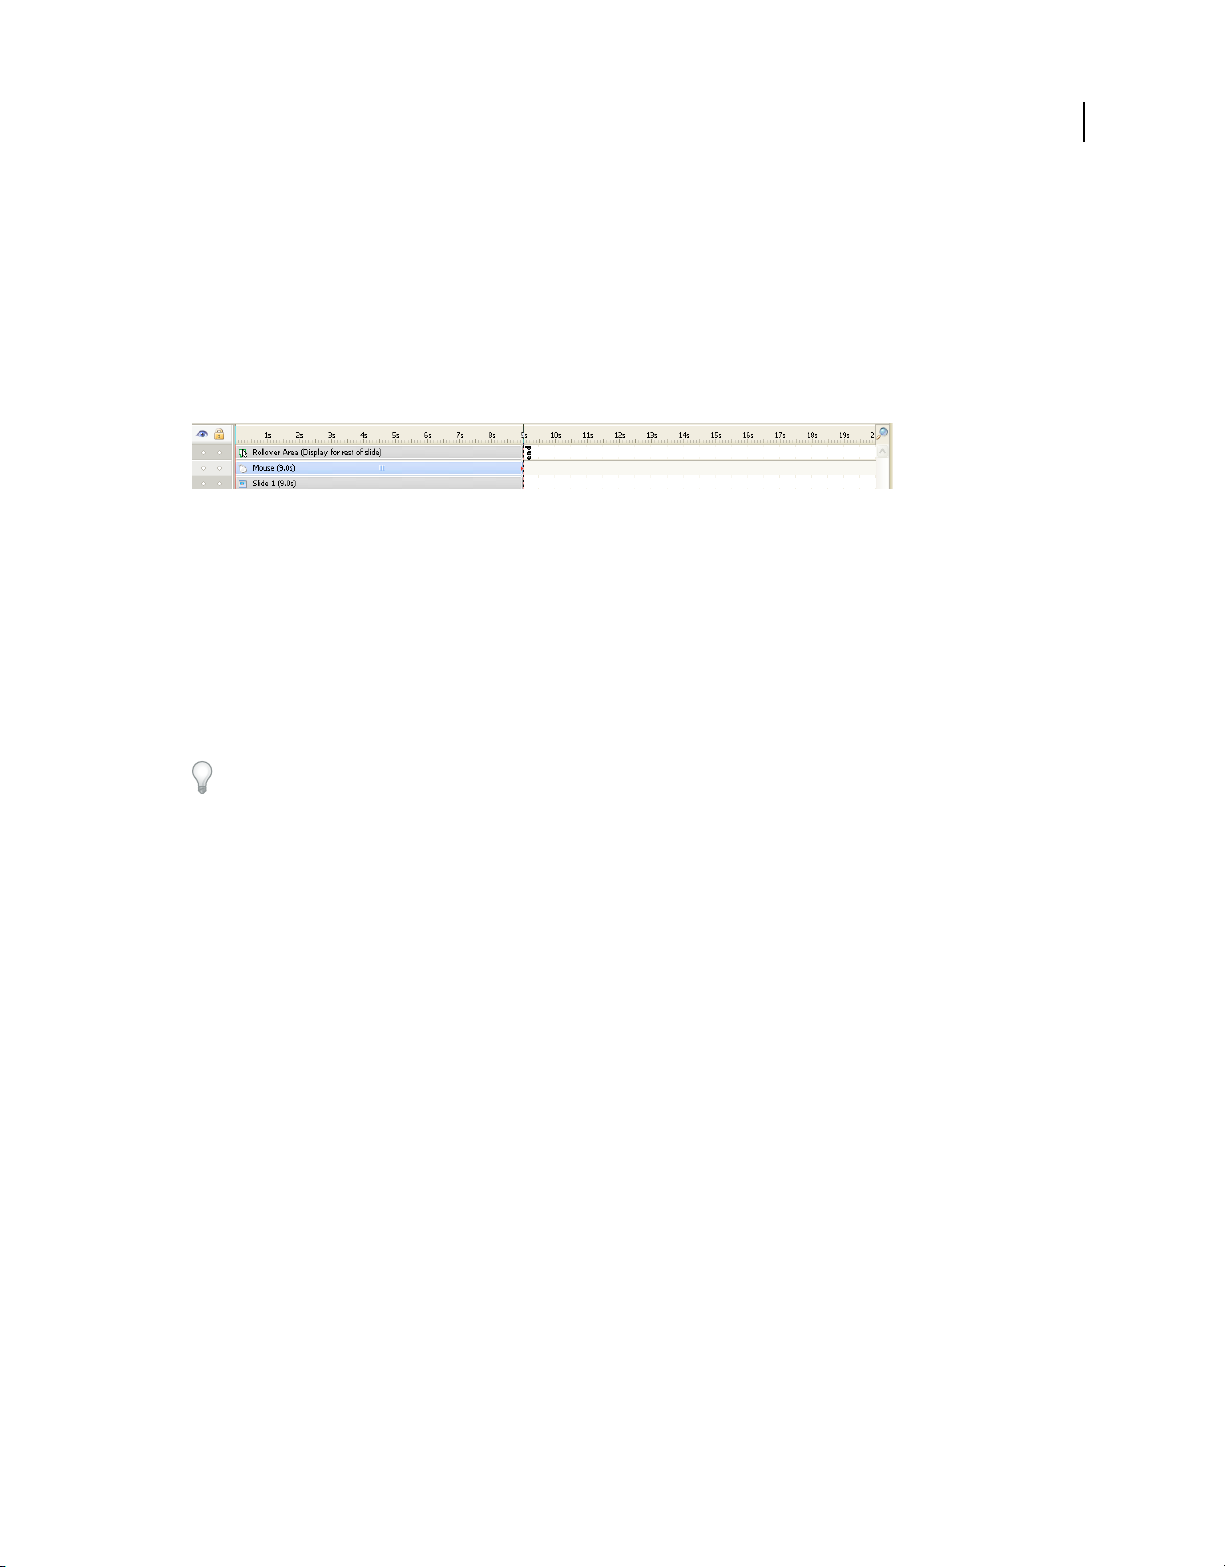
contained in a Timeline object named Typing.
You determine the speed at which the mouse moves on any individual slide in a project. A high mouse speed increases
the pace at which the project plays. However, if mouse movements are complicated, you may want to decrease the
mouse speed so users can view all movements. Mouse movement is contained in a Timeline object named Mouse. To
shorten the amount of time it takes for the mouse movement to play, move the mouse pointer over the left edge of the
Mouse object until the resize pointer appears. Click and drag the edge to the left.
Page 19

USING ADOBE CAPTIVATE 4
Updated 19 May 2009
Workspace
Preview a slide using the playhead
The playhead moves through the Timeline to indicate how the currently displayed slide appears in the project. It is a
quick and efficient way to preview a single slide and check object timing. To see how the playhead functions, press F3.
The red line that moves across the Timeline is the playhead. You can stop a playhead when it is playing by clicking it.
To drag the playhead to a required position, move the mouse over its “head” in the area displaying the time. When the
pointer appears, drag the playhead to the required position.
❖ Do one of the following:
• “Scrub” the slide by dragging the playhead to the left or right. As you move the playhead, objects appear and fade
as they will when users view the slide. Scrubbing gives you the ability to control the pace and view the slide at
any speed from very slowly to very quickly.
• With the playhead in any location on the Timeline, press the Spacebar or F3 to begin playing the slide.
• With the playhead in any location on the Timeline, press Play in the lower-left corner of the Timeline. (To end
playback, press Stop, or to wait, press Pause.)
Toolbars
12
Toolbars provide you an easier way of adding projects or performing a procedure. Click the various buttons on the
toolbar instead of navigating the menu to perform the desired task. You can choose to display or hide toolbars
according to your requirements.
The following toolbars are available in Adobe Captivate. Select Window > Toolbars, and select the corresponding
option to display the toolbar for that option.
Main Shortcuts to frequently performed actions like Save, Record, Preview, and so on.
Object Shortcuts for adding Adobe Captivate objects.
Advanced Shortcuts for the following:
• Opening the skin editor
• Setting project preferences
• Setting audio properties for mouse-clicks
• Setting mouse options.
Drawing Shortcuts for creating drawing objects.
Workspace Shortcut for displaying the menu that helps you switch between different views.
Alignment Shortcuts for aligning the different objects on the slide. For more information, see “Align objects” on
page 56.
Text Edit Shortcuts for editing the properties of the selected text on the slide.
Labels On Toolbar Clear this option if you are familiar with the Adobe Captivate icons on the toolbar, and do not
require the labels. You can optimize the space on your toolbar using this option.
Show and hide toolbars
• In an open project, select Window > Toolbars, and select or clear the toolbar that you want to display or hide.
Page 20

USING ADOBE CAPTIVATE 4
Updated 19 May 2009
Workspace
Move toolbars and panels to a different location
You can dock toolbars or panels into a single stack, or you can disconnect a toolbar from the stack, and have the toolbar
float in its own separate window.
1 In an open project, move the mouse over the left or top edge of a toolbar or panel until a four-point arrow appears.
2 Drag the toolbar to an edge of the program window where it can dock or to the middle of the program window
where it can float. (If you want, you can always drag toolbars back to their original locations.)
Panels
Adobe Captivate consists of the following types of dockable panels:
Library The library panel consists of reusable objects that are organized in different folders. You can drag objects from
the library panel to the slide. For more information, see “Adobe Captivate Library” on page 13.
Comments The comments provided by reviewers are displayed in this panel. You can filter comments using the
options in the panel. For more information, see “View or sort comments in the Adobe Captivate project” on page 198.
Design Template Consists of design templates that you can apply to individual slides or to your entire project. For
more information, see “Create design templates” on page 170.
13
Widget Displays widgets available in the widget gallery that you can add to the slide. For more information, see “About
widgets” on page 113.
Image Edit Consists of various options to edit the selected image on the slide. The options are disabled if you have not
selected the image. For more information, see “Properties of images and rollover images” on page 84.
Adobe Captivate Library
Library overview
The Adobe Captivate Library, which is available in Edit view, lists media items in a project and lets you easily view and
reuse the images, backgrounds, audio, and animation in your project.
To open the library, select Window > Library.
You can also open items for editing from the Library. For example, you can right-click an image in the Library, select
Edit With from the menu, and browse to your favorite image editing program. The image opens in the program, and
you can edit and save the updated image in the project.
You can float the Library outside the program window or move it to a different location in the window. To do so, rest
the pointer over the top-left corner of the Library pane until a four-point arrow appears; then drag the Library to an
edge of the program window where it can dock or to the middle of the program window where it can float. (If you
want, you can always drag the Library back.)
For each item, the Library displays the following columns: Name, Type, Size (in kilobytes), Use Count, and Date
Modified. (Use Count is the number of times the item is used in the project.) Click the title of any of these columns to
sort the list of items within each item category folder.
You can only see the Library location when you’re in Edit view. If you switch to a different view, you cannot see the
Library. When you move back to Edit view, the Library reappears in the same location.
Page 21
USING ADOBE CAPTIVATE 4
Updated 19 May 2009
Workspace
New items appear in the Library whenever you add an item to the project. An item remains in the Library and is
available for reuse even if you delete the slide in which that item was originally located.
If you use an item in one slide and then drag it from the Library to another slide, you can alter the item properties in
the subsequent slide without affecting the first instance of the item.
The Library toolbar appears at the top of the main Library pane, below the Library preview pane. Use the following
toolbar options to perform their corresponding actions:
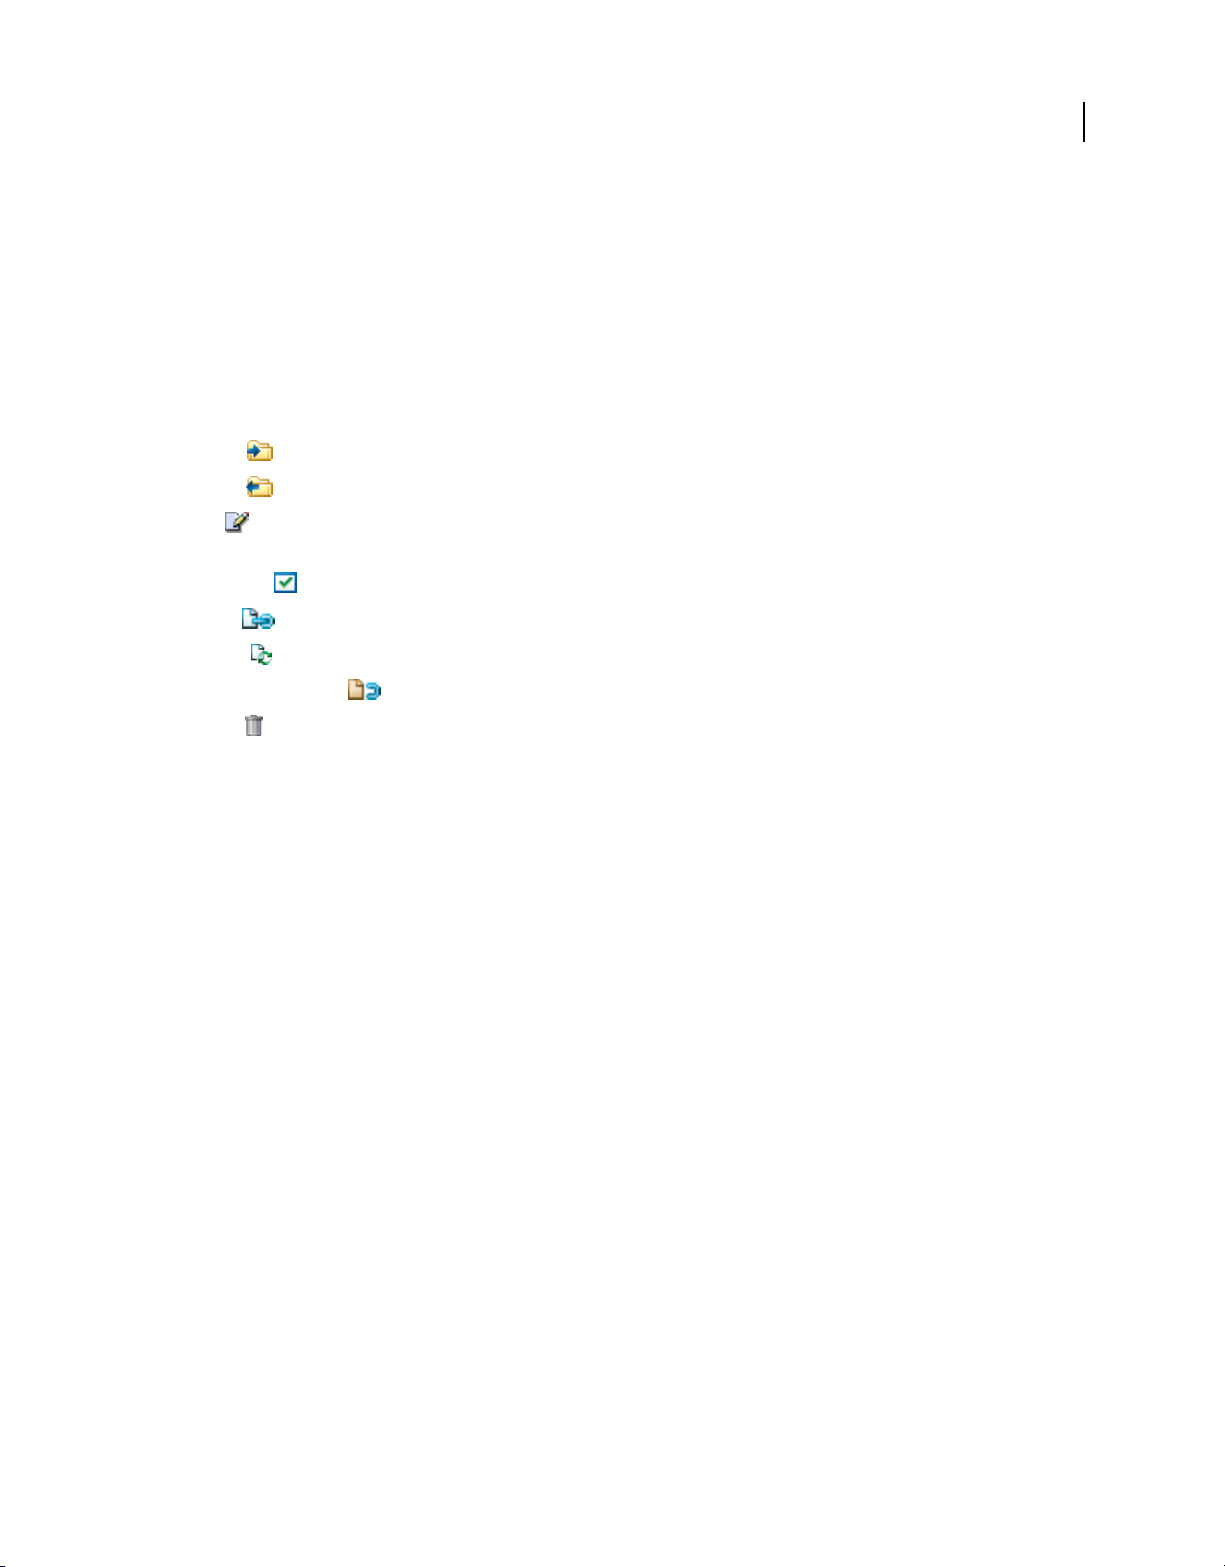
Open Library Opens another Adobe Captivate project’s Library. This allows you to reuse any item from that project’s
Library in your current project.
Import Imports a copy of an item from the Library of another project.
Export Saves a copy of an item to a location outside of the project.
14
Edit
Opens an item in the editing application you previously selected for the file type. This option is not enabled until
you select an editing application for the specific file type through the Edit With option in a Library item’s context menu.
Properties Opens the Properties dialog box for the selected item.
Usage Displays the list of slides on which the selected item is used.
Update Updates Library items that have been edited outside of the project.
Select Unused Items Highlights all items in the Library that are not currently used in the project.
Delete Deletes the selected item or items from the project.
Note: If you do not see the Library toolbar, select Window > Library.
Import objects to a Library
You can import objects from other Adobe Captivate projects or templates into the Library of your current project.
1 Select File > Import > External Library.
2 In the Open dialog box, navigate to and select the Adobe Captivate project or project template from which you want
to import objects.
3 Click Open.
The objects in the project or project template are added to the Library of your current project.
Grids
The Snap To Grid option helps you position objects accurately on a page. A grid is a set of lines to which the objects
“stick” when the Snap To Grid feature is enabled. When you bring an object close to a grid line, the object snaps to the
line much in the same way as iron sticks to a magnet. For example, you can stack objects accurately one above the other
using a grid.
Work with grids
• Select View > Show Grid. The grid is displayed as a matrix of dots on the slide.
• Select View > Snap To Grid.
Try moving the objects on the slide, and see how they snap to the grid.
Page 22

USING ADOBE CAPTIVATE 4
Updated 19 May 2009
Workspace
Change the dimensions of a grid
1 Select Edit > Preferences.
2 In the Preferences dialog box, select General Settings from the Global menu.
3 Change the value for the grid size in the Global panel. The smaller the value, the smaller is the gap between the dots
in the grid.
Shortcut keys
Shortcut keys provide an easier and quicker way to navigate and use Adobe Captivate. They let you use keyboard key
combinations instead of a mouse or program menu. The common shortcut keys are listed in the table.
Shortcut key Action
15
F1 Open Adobe Captivate Help (To access dialog-box-level help, click the Help button on
F3 Test view the current slide (Edit view only)
F4 Preview the project
F5 Record audio
F6 Import audio
F7 Perform a spelling and grammar check
F8 Preview project from current slide
F9 Show the Advanced Interaction dialog box
F10 Preview the current slide and the following “N” slides
F11 View Adobe Captivate in full screen
F12 Preview the project in a web browser
Alt+Up, Down, Left, Right Arrows Click the object, click a resize handle, and use these options to resize the object in the selected
Control+A Select all
Control+B Find audio in the Library
Control+C Copy (slide in Storyboard view or Filmstrip, and selected object in Edit view)
Control+D Duplicate (slide in Storyboard view or Filmstrip, and selected object in Edit view)
individual dialog boxes.)
direction
Control+E Extend the length of the object display time to the end of the slide on the Timeline (Edit view
only)
Control+F Open the Find And Replace dialog box
Control+F Find/replace a particular object in the project Library
Control+G Change the slide to optimized quality
Control+H Change the slide to high quality
Control+I Increase the indent (selected object in Edit view)
Control+J Change the slide to JPEG quality
Page 23

USING ADOBE CAPTIVATE 4
Updated 19 May 2009
Shortcut key Action
Control+K Lock the slide
Control+L Sync the selected object to the playhead
Control+M Merge the selected object with the background
Control+N Move to the Slide Notes pane
Control+O Open the project
Control+P Align the selected object with the playhead on the Timeline (Edit view only)
Control+Q Insert a random question slide
Control+R Print the project (through the Publish dialog box)
Control+S Save
Control+T Change the slide to standard quality
Control+U Edit with (in project Library)
Control+V Paste what is on the clipboard (for example, slide, image, object, and so on)
Control+W Close the project
16
Workspace
Control+X Cut (selected object in Edit view)
Control+Y Redo
Control+Z Undo
Control + = Zoom in
Control + - Zoom out
Control + Up Shift the object upward in the grid
Control+Tab Shift between Storyboard, Edit, and Branching views
Control+Alt+A Export PowerPoint slides as animation
Control+Alt+B Show thumbnails (Edit view only)
Control+Alt+C Show the Closed Captioning dialog box
Control+Alt+D Update the Library
Control+Alt+E Edit the slide group and edit points of polygon drawing object
Control+Alt+F Find in the Library
Control+Alt+G Create a slide group and autoadjust the rollover area
Control+Alt+H Hide the selected object
Control+Alt+I Find PowerPoint slides in the Library
Control+Alt+L Show the Library (Edit view only)
Control+Alt+M Show/hide the Image Edit pane
Control+Alt+N Show slide notes (Edit view only)
Control+Alt+O Record additional slides
Control+Alt+P Remove a slide group.
Page 24

Shortcut key Action
Updated 19 May 2009
Control+Alt+Q Show the Question Pools Manager dialog box
Control+Alt+R Reset to the original size
Control+Alt+S Edit PowerPoint slide
Control+Alt+T Show the Timeline (Edit view only)
Control+Alt+U Library usage
Control+Alt+V Show/hide the Design Templates panel
Control+Alt+W Redraw the shape of the rollover slidelet
Control+Alt+X Show/hide the SWF-Commenting pane
Control+Alt+Z Show/hide the Widget panel
Shift+F8 Preferences dialog box
Shift+F9 Actions dialog box
Shift+F10 Table of contents
Shift+F11 Skin Editor dialog box
USING ADOBE CAPTIVATE 4
Workspace
17
Shift+F12 Publish the file
Shift+Up Shift the object upwards by 10 pixels
Shift+Control+A Add an animation object (Edit and Storyboard views only)
Shift+Control+B Add a new button (Edit and Storyboard views only)
Shift+Control+C Add a new text caption (Edit and Storyboard views only)
Shift+Control+D View slide properties
Shift+Control+E Insert a new zoom area (Edit and Storyboard views only)
Shift+Control+F Insert an FLV file (Edit and Storyboard views only)
Shift+Control+G Show the Go To Slide dialog box
Shift+Control+H Hide/show slide
Shift+Control+I Decrease the indent (selected object in Edit view)
Shift+Control+J Insert a blank slide (Edit and Storyboard views only)
Shift+Control+K Add a new click box (Edit and Storyboard views only)
Shift+Control+L Insert a highlight box
Shift+Control+M Add a new image
Shift+Control+N Add a new animation slide
Shift+Control+O Add a new rollover image
Shift+Control+P Import PPT
Shift+Control+Q Insert a question slide
Shift+Control+R Insert a rollover caption
Shift+Control+S Insert an image slide
Page 25
Shortcut key Action
Updated 19 May 2009
Shift+Control+T Insert a text entry box
Shift+Control+U Insert the mouse
Shift+Control+V Paste as background
Shift+Control+W Insert a widget
Shift+Control+X Insert a text animation
Shift+Control+Y Copy the background
Shift+Control+Z Insert a rollover slidelet
Magnification shortcuts
Shortcut key Magnification level
Control+1 100%
Control+2 200%
Control+3 300%
USING ADOBE CAPTIVATE 4
Workspace
18
Control+4 400%
Control+= Zoom in
Control+- Zoom out
Shortcut keys for recording
The following table lists the default shortcut keys used during recording. These shortcuts should be used only after you
start the recording process. The same keys function differently when you are editing a project.
Shortcut key Action
End Stop recording
Pause Pause or resume recording
F8 Resume rerecording
Print Screen Capture a screenshot manually
F9 Start full motion recording
F10 Stop full motion recording
F4 Automatic panning
F3 Manual panning
F7 Stop panning
F11 Snap the recording window to the mouse
F12 Toggle mouse capture in full motion recording
Page 26

USING ADOBE CAPTIVATE 4
Updated 19 May 2009
Workspace
Change shortcut keys for recording
1 Select Edit > Preferences.
2 In the Preferences dialog box, select Keys from the Recording menu.
3 To change keys, click once in one of the text boxes and, on the keyboard, press the key or key combination you want
to use. For example, click inside the Stop Recording text box and then press Shift+Alt+4. The key combination you
entered now appears in the Stop Recording text box. You can use almost any key, including the Control, Alt,
Shift+Control, and Shift+Alt keys. For example, you could change the stop recording key to Alt+R.
Change shortcut key for an object
Use the Shortcut Key dialog box to select a new shortcut key combination. The dialog box appears when you click the
Select Keys button available for some of the objects in their Properties dialog box. Using the check boxes, key list, and
pop-up menus in this dialog box, you can set almost any key combination that is possible on a standard computer
keyboard as a shortcut key. Examples include Control+Shift+K, Control+Right Arrow, or Backspace+M.
Allow Mouse Clicks Select this option to allow users to click in the control.
Attach A Shortcut Select this option to add a shortcut to the selected key.
Include Numeric Keypad (0–9) Keys Select this option to include the numeric keypad keys as part of the shortcut key
combination.
19
CTRL Select this option to include the Control key as part of the shortcut key combination.
SHIFT Select this option to include the Shift key as part of the shortcut key combination.
ALT Select this option to include the Alt key as part of the shortcut key combination.
Key List Select any key from the list to include as part of the shortcut key combination. Use the scroll bar on the right
to view the entire list of keys.
Letter Or Number Click the pop-up menu to select any letter or number as part of the shortcut key combination.
Note: The Control, Shift, and Alt keys map to the relevant Macintosh® keys.
Current Shortcut This item lists the current shortcut key combination assigned to the task. As you make selections in
the dialog box, this item automatically updates so you can view the complete combination you have created.
Note: If your Adobe Captivate movie will be displayed in a browser, set shortcut keys that do not conflict with common
browser shortcuts. For example, F1 is frequently used as a keyboard shortcut to display Help.
Undoing and redoing actions
You can reverse the previous action by using the Undo command.
• From the Edit menu, select Undo or press Control+Z.
Each click reverses one more action. Continue clicking Undo (or pressing Control+Z) to remove as many of the
previous changes as necessary.
When the Undo command is unavailable (dimmed), you cannot undo the previous action.
Adobe Captivate tracks actions from the time you open a project until the time you close the project. Therefore,
you can undo as many times as you need to, as long as the project remains open.
Page 27

USING ADOBE CAPTIVATE 4
Updated 19 May 2009
Workspace
You can reverse the action of the Undo command by using the Redo command.
• After you have used the Undo command, from the Edit menu, select Redo or press Control+Y.
Disable confirmation messages
Confirmation messages appear when you perform important, and often permanent, actions in Adobe Captivate. The
confirmation messages give you an opportunity to change your mind when deleting information or changing key
attributes. If you find that certain messages are not necessary for the way you work or are slowing down your
development time, you might want to disable confirmation messages for actions that you perform frequently.
1 In an open project, select Edit > Preferences.
2 In the Category panel, select General Settings from the Global menu.
3 Click Confirmation Messages in the General Settings panel.
4 In the Confirmation Messages dialog box, deselect the options for which you do not require confirmation messages.
20
Page 28

Chapter 3: Creating Projects
Updated 19 May 2009
About Adobe Captivate projects
An Adobe Captivate project is a set of slides that are played in a desired sequence as a movie.
Start creating an Adobe Captivate project from one of the following:
Software simulation Record events in an application or a screen area on your computer screen using Adobe Captivate.
A series of screenshots is captured and placed sequentially in separate slides. A mouse, keyboard, or system event is
the usual trigger for a new slide. During recording, use the application or website you want to demonstrate as you
would normally—by moving the mouse, using the keyboard, and navigating through menus.
Project templates When working on similar projects or modules within a larger project, you could create projects
from templates. Project templates ensure consistency and improve the efficiency of people working in a collaborative
setup. For more information, see“Create project templates” on page 24.
Blank project You can start from a blank project with the selected project dimensions. You could add Adobe
Captivate objects, import Microsoft PowerPoint presentations, images, audio, video, and animations, or even record
a software demonstration or simulation. For more information, see “Create a project starting with blank slides” on
page 23.
21
Microsoft PowerPoint Slides You can import an entire PowerPoint presentation, or only selected slides, into an Adobe
Captivate project. You can later edit the PowerPoint presentations from within Adobe Captivate. For more
information, see “Microsoft PowerPoint” on page 208.
Image slide show Import a set of images to create an image slideshow. For more information, see “Create a project
from images” on page 23.
Mobile projects (only if Adobe eLearning Suite is installed) Create an Adobe Captivate project for mobile devices by
selecting the target mobile device in Adobe Device Central. Use the screen resolution of the device as the dimensions
for your project. Use Adobe Device Central to test the project on the target device.
You can add voice-over during recording, or at the editing stage.
After you create a project, you can edit it by doing the following:
• Edit content on the slides.
• Add Adobe Captivate objects such as text captions, buttons, text entry boxes, rollover captions, rollover slidelets,
highlight boxes and mouse pointers to the project.
• Add different media files, such as images, audio, video, and animations in multiple formats.
• Change the display times of slides and objects.
• Change the order of slides and objects.
• Add different kinds of slides, such as PowerPoint slides, image slides, and slides from other Adobe Captivate
projects to the project
• Add quizzes to your project by adding question slides of different types, including multiple choice, matching, fill in
the blanks and image hot-spots. Randomize the questions to provide an entirely new set of questions to the learners
every time they take the course.
• Add narration to the project, either by recording audio or by converting text to speech.
Page 29

USING ADOBE CAPTIVATE 4
Updated 19 May 2009
Creating Projects
To get feedback on the edited file, send it out to one or more reviewers. Reviewers can comment on the SWFs while
playing them in the Adobe Captivate Reviewer, an Adobe AIR application. The comments are automatically imported
into the project and displayed on the timeline, and in the SWF Commenting panel.
You can make the required changes to the project and publish it in multiple formats, including SWF, PDF and AVI
files. You can use the LMS settings in Adobe Captivate to publish a LMS-ready file.
You can do the following to improve efficiency when creating similar Adobe Captivate projects:
• Achieve consistency across projects using project templates.
• Ensure a consistent appearance for projects using design templates.
• Use rerecording scripts to automate the recording process for similar sequences for web applications.
You can enhance the potential of Adobe Captivate by using it with other software such as Adobe® Flash®, Microsoft®
PowerPoint®, RoboScreen Capture®, and Acrobat Connect®.
See also
“Overview of project editing” on page 165
“Publishing Projects” on page 200
22
Create projects
Create a project by recording
You can create an Adobe Captivate project by recording events in an application or screen area on your computer. The
following modes of recording are available.
Automatic Recording Adobe Captivate captures screenshots automatically and places them in separate slides. For
more information, see “Use autorecording” on page 27.
Full Motion Recording Adobe Captivate records the entire set of events in real time as a video. For more information,
see “Full motion recording” on page 30.
Manual Recording You can manually capture screenshots using this option. The chosen set of screenshots appears
sequentially in separate slides after the recording is complete. For more information, see “Manual recording” on
page 31.
For more information, see “Recording Projects” on page 27.
Create a project from PowerPoint presentations
You can import an entire PowerPoint presentation, or only selected slides into an Adobe Captivate project. Each
PowerPoint slide is imported as a separate slide in the Adobe Captivate project. You can later edit the PowerPoint
presentations from within Adobe Captivate.
See also
“Microsoft PowerPoint” on page 208
Page 30

USING ADOBE CAPTIVATE 4
Updated 19 May 2009
Creating Projects
Create a project from images
Projects created from images can be viewed as a slideshow. Each image is imported into a separate slide.
1 Select File > New > Project.
2 Select Image Slideshow in the New Project dialog box.
3 Set the dimensions of the project.
4 Click Browse, and select the images that you want to add to your project.
5 If the Resize/Crop image dialog box appears, set the following options:
Note: You see the Crop/Resize dialog box only when an image exceeds the height or width limits of the project. If you
are inserting more than one slide, only those images that exceed the dimension limits are displayed in the dialog box .
Fit To Stage Resizes the image to fit the dimensions of the slide.
Crop Displays a bounding box with dimensions corresponding to that of the project. Resize the handles of the box
to select the area that you want displayed on the slide. If you selected Constrain Proportions, Adobe Captivate
maintains the height-to-width ratio of the bounding box.
Zoom You can zoom in and zoom out of the image by moving the slider. Alternatively, you can choose from a list
of standard zoom sizes from the menu.
23
Constrain Proportions Maintains the height-to-width ratio of the bounding box used to crop the image. This
option is enabled only when you choose to crop the image. When you disable this option, resize the bounding box,
and enable the option again; the new dimensions are used thereafter to calculate the ratio.
See also
“Images and rollover images” on page 84
Create a project starting with blank slides
You can start with a blank project, and then import slides or images from PowerPoint presentations, images, or other
Adobe Captivate projects. You can also add a software demonstration, or interactive simulation by recording
additional slides.
1 Select File > New > Project.
2 In the New Project dialog box, select Blank Project.
3 Set the dimensions of the project.
4 Click OK.
Create template-based projects
Adobe Captivate templates allow you to improve consistency across similar projects or modules of a project and
reduce the effort required to create new projects.
Create a storyboard and workflow
No matter what project you want to create, it is helpful to do some planning before you start taking screenshots.
Consider first what you want the user to do, learn, or achieve as a result of viewing your project. Defining this goal
allows you to create a comprehensive plan for success. Once you have defined the action you want the audience to take,
you can create the “core” of the project.
Page 31

USING ADOBE CAPTIVATE 4
Updated 19 May 2009
Creating Projects
Every movie tells a story. A storyboard is a written version of that story either in the form of text or graphics. It tells
you whether you have a clear understanding of what you are about to present to your audience. You can use the 5W,
1H rule adopted in journalism to get your story straight—who, what, when, where, why, and how.
You can create a workflow readily when you have a storyboard in place. A workflow is the flow of information in a
project that follows the rules you create for it. For example, you can have a nonlinear presentation in which you can
move back and forth between slides, skip slides, or set rules for slide sequence. Defining the workflow in advance helps
you complete your project earlier, with minimal changes during the editing cycle.
If your project includes a great deal of text (captions), a script is the best place to begin. Scripts use text-based pages.
They are like pages in a book: logical, sequential, and containing as much detail as you care to provide.
Create project templates
When you want to create similar projects or similar modules in a project, use project templates to ensure consistency
and save time. Project templates are especially useful when multiple authors are working on different project modules
or on similar projects.
You can apply design templates to project templates to ensure a uniform appearance for your projects.
Project templates help achieve the following:
• Consistency across Adobe Captivate projects.
• Reduced development time for multiple projects due to reuse of design.
• Reuse of project preferences across multiple projects.
In a collaborative environment where the designers work separately from the people creating the content, designers
use templates to ensure consistency across projects. Content developers do not have to worry about the workflow of
the project, the various standards involved, or the creation of the layout. All they have to do is follow the instructions
in the template and provide the required content in the relevant placeholders.
24
Creating a repository of templates requires a disciplined effort involving all stakeholders. However, the effort pays for
itself over time in terms of reduced development time for projects.
An Adobe Captivate project template consists of the following:
• Slides with placeholders for various Adobe Captivate objects
• Placeholders for the following:
• Recording slides
• Question slides.
When you create a project using a template, the placeholders in the template are marked with a placeholder icon. The
icon disappears when you insert an object into a placeholder.
Note: The placeholder objects are not visible when you preview or publish a project created with a project template.
In addition to placeholders, you can add all Adobe Captivate objects and supported media to templates. The template
serves as guidance only. Users can change the objects and placeholders without any restriction when creating a project
from the template.
To make a project template more effective, add slide notes providing information or instructions. Include information
on the recommended types and properties of objects, media, or slides that users are to insert in the placeholders.
Note: You can apply a design template to a project template. The properties defined for objects in the design template are
applied to the respective objects constructed from the placeholder.
1 Select File > New > Project.
Page 32

USING ADOBE CAPTIVATE 4
Updated 19 May 2009
Creating Projects
2 Select Project Template in the Create tab.
3 Specify the dimensions of the project template, and click OK.
4 To insert placeholders for various objects in the slides, select Insert > Placeholder, and choose the placeholder that
you want to insert. You can also insert placeholders for recording and quiz slides using this menu.
Object and media placeholders define the size and position of the object/media that can be inserted. The user can
alter these parameters when creating a project based on the template.
5 Specify the properties for the various placeholder objects that you have inserted.
6 In addition to placeholders, you can also do the following:
• Set the properties for the slide, such as background, navigation, and audio.
• Use drawing tools to color and demarcate different sections of the slide.
• Set preferences for that template using the Preferences dialog box. The preferences are automatically applied
when you use the project template to create a project.
7 Insert other Adobe Captivate objects, and supported media types.
Best practice is to add all objects or media that don't change from project to project (for example, a logo) as actual
objects. Use placeholders for objects or media that are specific to the project.
8 Save the file with a.cptl extension.
25
Create projects from project templates
1 Select File > New > Project.
2 Select From Template in the Create tab.
3 Click Browse, and navigate to the template file.
4 Double-click the placeholder and do the following:
• For placeholder objects, use the respective dialog box to add objects to the placeholder. The placeholder is
converted to a concrete object.
• For recording slide placeholders, double-click the placeholder slide to start recording.
• For question slide placeholders, double-click the placeholder slide to insert a question slide.
See also
“Create design templates” on page 170
Add custom project size to the Select Size list
You can add your custom project size to the list of options availabe in the Select Size menu.
1 Select File > New > Project.
2 In the New Project dialog box, select Project Template.
3 In the Select Size menu, select Customize. The Custom Project Sizes dialog box appears.
4 Click Add.
5 In Description, enter a description for the size. For example, you could enter, “Size for Adobe Projects.”
6 Set the custom width and height of the project.
Page 33

USING ADOBE CAPTIVATE 4
Updated 19 May 2009
Creating Projects
Enable backup file creation
Adobe Captivate creates a backup file for your project when you save it. When you re-save the project, the changes are
saved to the backup file too. The backup file is saved with a .bak extension.
If your project file gets corrupt, use the backup file to recover your project. Rename the backup file using a .cp
extension, and open it. Changes that you made after the last save, however, are not reflected in the backup file.
The provision to create a backup file is enabled by default in the Preferences dialog box. You can choose to disable the
option if it interferes with the speed of saving the project.
Note: The size of the backup file might be larger than that of your main project.
1 Select Edit > Preferences.
2 In the Preferences dialog box, select General Settings from the Global menu.
3 Select Generate Project Backup.
26
Page 34

Chapter 4: Recording Projects
Updated 19 May 2009
Automatic recording
Use autorecording
When you record using automatic recording, Adobe Captivate captures screenshots automatically and places them on
separate slides. Mouse, keyboard, or system events are the common triggers for capturing screenshots. Automatic
recording is the most commonly used recording method in Adobe Captivate.
1 Select File > New > Project.
2 In the Record tab, set the recording area according to your preferences. For more information, see “Set recording
area” on page 32.
3 Click OK after you have completed recording your preferences.
4 When the recording window appears, click anywhere on the margins of the recording window to set its position.
5 Select Automatic Recording Mode .
6 Select one or more recording modes in which you want to record the project.
7 Optionally, do the following:
• Select a panning mode if you want the recording window to follow your movements across the screen. For more
information, see “Panning” on page 33.
• If you are adding commentary during recording, select the type of audio input.
• To change the default settings that Adobe Captivate uses when recording, click Settings. For more information
on customizing recording preferences, see “Set recording preferences” on page 32.
• Click Advanced when you want to do one of the following:
• Generate text captions in languages other than English.
• Capture the actions performed as a rerecording script.
• Run the project using a previously recorded script. When you choose this option, the project gets created
using the actions defined in the script without your intervention.
For more information on rerecording scripts, see “Automate the recording process” on page 36.
27
8 Click the Record In Selected Mode button . Alternatively, press Alt+R.
Adobe Captivate starts recording events on your screen.
9 Press End when you have completed the procedure. The Save Project Files dialog box appears.
Note: Alternatively, click the task icon or the system tray icon to stop recording.
a In the Project Name field, enter a name for the project.
b In the Project Location field, specify a location for your saved project.
c Enter a name in the following fields to save the project in the corresponding mode:
• Demo Project Name
• Assessment Project Name
Page 35

USING ADOBE CAPTIVATE 4
Updated 19 May 2009
Recording Projects
• Training Project Name
• Custom Project Name
Note: The fields are enabled depending on the modes that you selected before recording the project (Step 6).
d In the Project To Open field, select the project that you want to open for editing.
e Enter a name for the rerecording script. This option is enabled if you select the rerecording option before
recording the project (step 7).
Autorecording modes
When autorecording projects, you can record a procedure in one or more of the following modes in a single recording:
• Demonstration mode
• Training simulation mode
• Assessment simulation mode
• Custom mode
Depending on the mode, one or more of the following objects are added automatically during the recording. You can
change recording preferences for the various modes. The descriptions for the various modes assume that you have not
changed the default recording preferences
28
Text Captions Text captions are used to point out certain areas on a slide, explain concepts, or provide users with
additional information. Text captions can be created automatically or manually. If you are autorecording a project,
you can have Adobe Captivate automatically create text captions. Text captions are generated for the various mouse
and keyboard events.
The text captions use the labels in the application to describe a step. For example, if the user clicks File in the menu
bar, a text caption with the text, “Select the File menu” is created automatically. You can later edit the captions to your
requirements. When the user views the movie, the actions performed during recording are displayed along with the
captions
Text Entry Boxes Text entry boxes are Adobe Captivate objects that require user input. During recording in some of
the modes, text entry boxes with default hint, success, or failure captions are added to the slides. You can later edit the
text in these captions.
Click Boxes A click box is an object in Adobe Captivate that designates an area around the place where the mouse was
clicked during recording. Click boxes help users try out an application or website using the movie. After viewers click
a click box, you can have the project perform different actions. For example, the project resumes playing, opens a new
project, or opens a specific website.
Highlight boxes Highlight boxes are transparent, colored rectangles that can be placed over areas on a slide to draw
attention to the area. You can edit the formatting, color, transparency, and size of all highlight boxes. If you
automatically record a project or slides, Adobe Captivate creates a highlight box for the area on which a mouse or
keyboard event occurs. If you have an existing project, you can also add highlight boxes manually.
See also
“Text captions” on page 62
“Highlight boxes” on page 74
“Click boxes” on page 98
“Text entry boxes” on page 101
Page 36

USING ADOBE CAPTIVATE 4
Updated 19 May 2009
Recording Projects
Demonstration mode
Use the demonstration mode when you want to demonstrate a procedure or feature. The movie produced in this mode
however, does not provide any scope for user interaction. The user can only passively view actions that were performed
when the project was recorded.
When recording a movie in the demonstration mode, Adobe Captivate does the following:
• Adds text captions using the labels of the controls in the application. For example, if the user clicks File in the menu
bar, a text caption with the text, “Select the File menu” is created automatically.
• Adds highlight boxes to highlight those areas where the mouse is clicked.
• Adds text that is typed manually during the recording.
Training Mode
Use the training mode when you want the user to try the procedure during the movie. The movie moves to the next
slide only after the user has performed the previous action correctly.
When recording slides in training mode, Adobe Captivate does the following:
• Adds click boxes at places where the user must click the mouse.
• Adds text entry boxes for user input. The success, failure, and hint captions are added to each text entry box.
29
Assessment mode
Use the assessment mode when you want to test how well the user has understood a procedure. You can set a score for
every correct click. You can also set the number of times the user can attempt a procedure. When the user fails to click
the right option in the number of attempts provided, the movie moves to the next step. The user does not get any score
for the failed attempt.
When recording slides in assessment mode, Adobe Captivate does the following:
• Adds click boxes at places where the user must click the mouse.
• Adds text entry boxes for user input. The success and failure captions are added to each text entry box.
Custom mode
Use the custom mode when working on a project where you need a mix of features available in the other modes. This
mode allows you to achieve the highest level of customization in Adobe Captivate. Using the custom mode, you can
create a project that is part demo, part training, and also provide for assessment. None of the Adobe Captivate objects
are added by default during recording in the Custom mode.
For example, let us consider a movie meant for training the user on editing a file. In the first few slides for simpler tasks
like opening the application and opening the file, you can retain the slides created in the demo mode. Most users
wouldn't appreciate being guided through the simpler tasks. When you move to the slides describing the procedure for
editing, you can add the various objects with which the user can interact. Finally, you can provide for assessment slides
at the end of the project.
See also
“Set recording preferences” on page 32
Page 37

USING ADOBE CAPTIVATE 4
Updated 19 May 2009
Recording Projects
Multimode recording
When you record an Adobe Captivate project, you can choose to record in more than one mode. Multimode recording
helps you save time when working on projects that require outputs in more than one autorecording mode.
Full motion recording
During full motion recording (FMR), the entire set of events is captured in real time as a video. Use FMR for movies
that demonstrate complex procedures, like drawing or reshaping an object. FMR movies are also useful when
demonstrating visual cues, such as the change in the shape of the pointer when it moves over certain objects. A handy
cam icon is displayed on slides generated using FMR.
In the automatic recording mode, actions like drag-and-drop and mouse movements are automatically captured in the
FMR mode. You can change this setting using the Preferences dialog box.
When the FMR mode is disabled during autorecording, you can selectively capture FMR slides by pressing F9 to shift
to FMR mode. To end FMR mode, press F10. The full motion recorded movie is placed into one slide of a project and
plays like a “mini movie” within the larger project.
You know that full motion recording has begun by looking at the Adobe Captivate icon in the system tray (lower-right
corner of your computer screen). When you are recording normally, the icon appears as a regular icon. When full
motion recording automatically begins, the icon flashes.
30
Note: FMR files increase the size of the project.
1 Select File > New > Project.
2 In the Record tab, set the recording area according to your preferences. For more information, see “Set recording
area” on page 32.
3 Click OK after you have completed recording your preferences.
4 When the recording window appears, click anywhere on the margins of the recording window to set its position.
5 Select Full Motion Recording Mode .
6 Optionally do the following:
• Select a panning mode if you want the recording window to follow your movements across the screen. For more
information, see “Panning” on page 33.
• If you are adding commentary during recording, select the type of audio input.
• To change the default settings that Adobe Captivate uses when recording, click Settings. For more information
on customizing recording preferences, see “Set recording preferences” on page 32.
7 Click the Record In Selected Mode button . Alternatively, press Alt+R.
8 Press End when you have completed the procedure.
Note: Alternatively, click the task icon or the system tray icon to stop recording.
Page 38

USING ADOBE CAPTIVATE 4
Updated 19 May 2009
Recording Projects
Manual recording
You can construct a project by manually taking screenshots during recording. Use manual recording when you want
to pick and choose a few screenshots during the recording process. The procedure can get tedious for complicated
procedures involving many steps.
1 Select File > New > Project.
2 In the Record tab, set the recording area according to your preferences. For more information, see “Set recording
area” on page 32.
3 Click OK after you have completed recording your preferences.
4 When the recording window appears, click anywhere on the margins of the recording window to set its position.
5 Select Manual Recording Mode .
6 Optionally do the following:
• Select a panning mode if you want the recording window to follow your movements across the screen. For more
information, see “Panning” on page 33.
• If you are adding commentary during recording, select the type of audio input.
• To change the default settings that Adobe Captivate uses when recording, click Settings. For more information
on customizing recording preferences, see “Set recording preferences” on page 32
7 Click the Record In Selected Mode button . Alternatively, press Alt+R.
8 Press Print Screen every time you want to take a screenshot during the procedure.
9 Press End when you have completed the procedure.
Note: Alternatively, click the task icon or the system tray icon to stop recording.
31
See also
“Set recording area” on page 32
“Set recording preferences” on page 32
“Recording in sync” on page 128
Hide recording icons and info in the recording window
Press Alt+H if you want to hide the icons and other info that is displayed in the recording window. Press Alt+H again
to make them visible.
Record additional slides
You can record new slides and insert them into an existing project.
You can add new slides to the end of the project, or click a slide in the list, and start recording. The new slides generated
after recording are inserted after the selected slide.
1 In the project in which you want to record and insert new slides, select File > New > Additional Slides.
Page 39

USING ADOBE CAPTIVATE 4
Updated 19 May 2009
Recording Projects
2 Select the slide after which to add the new slides. Click OK.
3 Set the recording options, and start recording.
4 Press End when you have completed recording.
Note: You can position the capture area anywhere on your screen. You cannot, however, resize the capture area
because it is set to the same size as the project to which you are adding the slides.
The newly recorded slides are inserted into your project at the specified location.
You can also add slides by importing them from other Adobe Captivate projects or PowerPoint presentations.
Pause while recording projects
You can pause while recording an Adobe Captivate project. Any action performed after a project is paused is not
recorded.
1 Open Adobe Captivate and begin recording a new project or slide.
2 When you want to pause recording, press the Pause/Break key on the keyboard. When you want to restart
recording, press Pause/Break again.
Note: You can change the keys that you want to use for pausing or resuming projects in the Preferences dialog box.
32
Set recording preferences
Adobe Captivate uses a default set of preferences for panning and other settings when recording or creating projects.
You can customize these preferences using the various options available in the Preferences dialog box.
Set recording area
A rectangular area with red borders called the recording window indicates the recording area. You can record a project
by performing actions on any area of your computer screen. The capture modes help you set the capture area on your
screen for recording.
When the size of the recording area is lesser than the size of the screen you are recording, use panning. In the panning
mode, the recording window can be made to move according to the movement of the mouse. This way, you can capture
actions across your computer screen within the limited confines of the recording window.
When you choose Custom Size, resizing the recording window changes the project dimensions. In the other options
Available under Application, resizing the application automatically resizes the recording window.
The recording window cannot be resized when you choose the Full Screen option.
1 Select File > New > Project.
2 Set the options in the Record tab according to your preferences.
Application Select this option if you want to specify the application which you want to record as part of your
project. In the Select Application menu, select the application or website on your computer that you want to record.
• Custom Size Select this option if you want to customize the dimensions of the recorded project. You can choose
from a list of standard sizes, or define a custom size. The selected application is automatically resized to fit inside
Page 40

USING ADOBE CAPTIVATE 4
Updated 19 May 2009
Recording Projects
the boundaries of the recording area. Best practice is to have a clear idea of the dimensions of the project before you
start recording it.
• Application Window Select this option if you want to record the entire application window. The dimensions of
the application are not altered. The recording rectangle is resized to fit the application.
• Application Region Select this option if you want to record defined areas in an application. For example, if you
are recording a window that has three frames, the recording window snaps to individual frames when the mouse
moves over them. The dimensions of the application are not altered. The recording rectangle is resized to fit the
defined area in the application.
Screen Area Select this option when you want to capture all events that occur within an area on the screen.
• Custom Size Select this option if you want to record your project using a specified dimension. You can choose
from a list of standard sizes, or create your own custom size window.
• Full Screen Select this option if you want to set the size of the recording window to the size of your computer
monitor. The entire computer screen is treated as the recording window. If you work on dual monitors, you can
choose the monitor that you want to use for recording. Recording in this mode can potentially produce very large
projects and output file sizes due to the large screen resolution on monitors.
Note: You can also resize the project during recording using the recording handles of the recording window.
33
See also
“Use autorecording” on page 27
“Full motion recording” on page 30
“Manual recording” on page 31
Panning
Use panning when you want the recording window to follow the movement of your mouse pointer across the screen.
It is like capturing a moving object by changing the angle of the recording device. Panning helps you capture events
across a large screen even when the recording window is smaller than the size of the screen.
The following panning options are available in Adobe Captivate:
Automatic Panning The recording window automatically moves along with the pointer whenever you move the
mouse during recording.
Manual Panning You must manually move the recording window to the area where the next event takes place. In all
other respects, It is like the automatic panning option.
See also
“Use autorecording” on page 27
“Full motion recording” on page 30
“Manual recording” on page 31
Set global recording preferences
Select Edit > Preferences. In the Preferences dialog box, select Settings from the Recording menu.
Page 41

Option Description
Updated 19 May 2009
USING ADOBE CAPTIVATE 4
Recording Projects
34
Narration Records audio as you record the project. You cannot enable camera sounds when you have
Actions in real time Record actions using their actual speed.
Camera sounds A “camera shutter” sound is played whenever a screenshot is captured during recording. It is
Keystrokes Records keyboard actions like typing text on the screen. Adobe Captivate records keyboard
Hear keyboard tap sounds Determines whether keyboard press sounds are audible during recording. The keyboard press
Hide recording window The red border of the recording window is not displayed during recording.
Hide Task icon Hides the task icon during recording.
Hide system tray icon Hides the system tray icon during recording. This icon is the small Adobe Captivate icon that is
Move new windows inside recording
area
Capture interim screenshot This option is enabled by default. When you disable this option, screenshots in the
chosen narration for a project.
helpful to turn on this sound so you know exactly when a screenshot is captured, especially
when using the autorecording feature. The camera sound is not included in the finished project.
input, but does not create a slide for every character that is typed.
sounds are not included in the finished project.
displayed in the system tray in the lower-right corner of the computer screen. Use this option if
you do not want to record the icon when recording the project.
Adobe Captivate automatically moves any new window during recording into the recording
window. Use this option when recording an application in which many dialog boxes open as
you use the application.
demonstration mode might not get recorded as intended.
Select this option when you do not want the focus to be set till the user performs the specified
action. This option is especially useful in the assessment mode when you do not want the focus
to automatically shift to the next area of action.The change in focus provides the user with the
hint to perform the next action.
Automatically use full motion capture
for drag-and-drop actions
Automatically use full motion capture
for mouse wheel actions
Adobe Captivate switches automatically to FMR mode when recording drag-and-drop actions.
Adobe Captivate switches automatically to FMR mode when recording mouse movements.
Set Full Motion Recording preferences
Adobe Captivate automatically captures some actions in the FMR mode during autorecording. You can choose to
disable this feature in the Preferences dialog box. You can also set options to optimize the size of the FMR SWF file
and set the color mode for the SWF file.
Select Edit > Preferences. In the Preferences dialog box, select Full Motion Recording from the Recording menu.
Option Description
Show mouse Displays mouse movements when the FMR movie is run.
Disable hardware acceleration
Use this option when recording videos from media players like Windows Media Player
RealPlayer
acceleration off results in better FMR quality. If you select this option, your computer screen
briefly flickers when you begin and end full motion recording. The screen flicker does not harm
your computer and does not appear in the final project.
®, or QuickTime®. Otherwise, a blank screen is recorded. Turning hardware
®,
Page 42

Option Description
Updated 19 May 2009
Working folder Location of the generated FMR SWF file on your computer.
USING ADOBE CAPTIVATE 4
Recording Projects
35
Video color mode Select this option to set your video color to 16 bit or 32 bit. Selecting 16 bit results in a smaller
FMR mode Depending on your requirements for the quality and size of the final FMR file, use the slider to
file size, but also a smaller range of colors. Selecting 32 bit creates a larger file with a wider range
of colors. The video color of most computers is set to 32 bit.
choose the corresponding option.
• Video. The highest-quality FMR files are produced in the Video option. The resulting SWF file
is considerably larger than files produced with the other options.
• Application And Low SWF Size. More splitting of SWF files occurs, and the frame rate is
reduced during capture. The resulting SWF file is smaller than files produced with the Video
option.
• Safe. If you are not sure about which option to use, choose Safe. Adobe Captivate
automatically calculates the available system resources and captures the movie at an
optimum setting.
Change keyboard shortcuts for recording
You can choose your own keyboard shortcuts for actions that are involved when recording a project using the
Preferences dialog box. For example, the End key is used to stop recording a project in Adobe Captivate. You can
change that by entering a different key in the dialog box.
1 Select Edit > Preferences.
2 In the Preferences dialog box, select Keys from the Recording menu.
3 Click inside the field that you want to change.
4 Type the keyboard shortcut.
Set Preferences for the different modes
Some of the options for recording modes are disabled in Adobe Captivate. The reason for disabling the options is based
on the logic for recording in that mode. However, you can still enable some of the options if you have a special
requirement.
For example, one wouldn't usually add text captions in an assessment movie. So, the options for text captions are not
enabled in Adobe Captivate. You can enable them in the Preferences dialog box if you have a special requirement.
1 Select Edit > Preferences.
2 In the Preferences dialog box, select Mode(s) from the Recording menu.
3 In the Mode menu, select the recording mode you want to customize.
Option Description
Add text captions Automatically creates captions based on user and system actions performed during
Convert tool tips to rollover captions Automatically converts any tool tips on the screens you are capturing to rollover captions. Tool
Show mouse location and movement Displays mouse movements during autorecording.
autorecording. The text captions use the labels in the application to describe a step. For
example, if the user clicks File in the menu bar, a text caption with the text, “Select the File
menu” is created automatically.
tips are small floating text windows that appear when the mouse hovers over buttons. This
option is not selected by default for any of the recording modes.
Page 43

USING ADOBE CAPTIVATE 4
Updated 19 May 2009
Option Description
Add highlight boxes on click Automatically adds a highlight box around the area where the mouse is clicked.
36
Recording Projects
Add click boxes on mouse click
• Automatically creates click boxes whenever you click screens you are autorecording.
• Enables or disables the hint, success, and failure captions.
• Sets the number of times the user can click before the movie moves to the next slide.
• Enables cursor display when the user moves the mouse over the mouse areas
Automatically add text entry boxed
for text fields.
• Automatically creates text entry boxes whenever you click text boxes you are autorecording.
• Enables or disables the hint, success, and failure captions.
• Sets the number of times the user can enter text within the same text entry box before the
movie moves to the next slide.
Change recording defaults for text captions and highlight boxes
Adobe Captivate uses a default set of styles when inserting text captions and highlight boxes during recording. You
can change these default settings using the Preferences dialog box.
Select Edit > Preferences. In the Preferences dialog box, select Defaults from the Recording menu. Change the styles
for the various text captions, and highlight boxes using this panel.
See also
“Text captions” on page 62
“Highlight boxes” on page 74
Automate the recording process
You can automate recording for procedures with similar steps using rerecording scripts. When you run a rerecording
script, the actions recorded in the file are performed in the order mentioned in the script without your intervention.
To use rerecording scripts, select the option to generate rerecording information when you record a new Adobe
Captivate project. A rerecording script is created as an XML file with the.cprr extension.
Note: Rerecording scripts are only supported in Internet Explorer® 6. If you are using a later version, downgrade to
Internet Explorer 6 before recording any browser-based actions.
Rerecording scripts are especially useful when localizing a project in several languages. When you run the script by
selecting a language for the autogenerated text captions, a project with the text captions in the selected language is
created. You can then save the project in the relevant language directories.
Editing rerecording scripts
You can edit a rerecording script file by doing the following:
• Debug rerecording errors by inserting <BREAK> and </BREAK> and <SKIP> and </SKIP> tags. When you insert
BREAK tags you can switch between manual and automatic rerecording. Use the SKIP tags to skip lines in the
script.
• Change editable content or translate localizable terminology by editing terms defined within <trans-unit> tags.
Page 44

USING ADOBE CAPTIVATE 4
Updated 19 May 2009
Recording Projects
When you insert the <BREAK> and </BREAK> tags in the script file, the rerecording script skips all operations
between these tags. However, Adobe Captivate records all manual operations that you perform in the running
client while the script waits. Press a predefined key to switch back to the automatic rerecording mode. When you
insert the <SKIP> and </SKIP> tags, the script automatically skips the operations between these tags and continues
rerecording.
During rerecording, Adobe Captivate enforces breakpoints after waiting for a predefined duration and then
displays a message with the following information:
Reason for the break The message can include any of the following reasons for breaking:
• The layout of the recorded page is different from the layout of the page that you are rerecording.
• The order of the elements in the recorded page is different from the order in the page that you are rerecording.
• The wait time for opening a new window has been exceeded.
• The wait time for opening a dialog box has been exceeded.
• The wait time for downloading a document or web page from the Internet has been exceeded.
Script index Adobe Captivate assigns an automatically generated number for every action and includes it in the
message.
Corrective actions to choose to perform You can choose to perform one of the following corrective actions:
37
• Retry Current Action Click this button if a new window or dialog box failed to open or if a web page failed to
download. This button is disabled when the error pertains to a page mismatch.
• Continue From Next Element Click this button if the window or dialog box opened or if the web page
downloaded after the message appeared. This button is disabled when the error pertains to a page mismatch.
• Switch To Manual Mode If a manual action is required to open the window or download or refresh the web page,
click Switch To Manual Mode. Ensure that the new window is open, or that the web page is downloaded, and then
press the predefined key. The automatic rerecording continues, starting with the next action in the rerecording
script.
Create projects from rerecording scripts
When recording a project in the autorecording mode, click Advanced, and do one of the following:
• To run a previously recorded script, click Browse, and open the script. Select a language for the text in the
autogenerated text captions. Adobe Captivate automatically records a project using the sequence of actions defined
in the script, and the text captions in the selected language.
• To create a rerecording script, select Re-recording Information, and choose a language for recording the script.
When you save the project after recording, choose the option to save the rerecording script. The script is saved
along with the project at the same location.
Recording tips
The following tips and tricks can help you create Adobe Captivate projects quickly and easily, while also giving you
professional, high-quality results:
Use automatic recording as far as possible Even for projects that need a few manually generated screenshots, consider
automatic recording. Set the autorecord option, but press Print Screen whenever you want to take an extra screenshot.
This method is effective if you are recording a website that contains many pop-ups, frames, and special effects. Adobe
Page 45

USING ADOBE CAPTIVATE 4
Updated 19 May 2009
Recording Projects
Captivate plays a camera shutter sound each time a screenshot is automatically captured. To generate a screenshot at
a place where you do not hear the sound, press Print Screen to manually take a screenshot.
For example, if you are recording Microsoft Internet Explorer, there can be dynamic HTML or Flash menus that
appear only when the mouse rolls over them. Adobe Captivate does not automatically capture the change that occurs
on mouse rollover. Press Print Screen to manually capture the change.
Go slowly when recording, particularly when recording websites in Internet Explorer Perform actions more slowly
than you would normally during recording. It is especially important to go slowly when capturing actions on a website
in Internet Explorer. If you are manually recording, ensure that each web page is loaded before capturing a screenshot.
Wait for the camera shutter sound During autorecording, wait for the shutter sound before performing another
action.
If you are manually recording, Adobe Captivate captures screenshots each time you press a designated key or key
combination. The default capture key is the Print Screen key. Each time you want to capture a screenshot, press the
Print Screen key; you'll hear the camera shutter sound.
38
Page 46

Chapter 5: Slides
Updated 19 May 2009
Adobe Captivate projects are composed of slides that are played in succession as a movie. A slide is the smallest unit
of a project.
Much of the work you do in Adobe Captivate is done at the slide level. In fact, after you have set your preferences and
completed your recording, you will probably work nearly exclusively at the slide level until you are ready to preview
and publish your project.
Adobe Captivate has different types of slides. You can include some or all of the following slide types in a single project:
• Blank slides are useful when you want to create a slide from scratch.
• Image slides contain an image in JPG, JPEG, GIF, PNG, BMP, ICO, EMF, or WMF format inserted as a
background. You can create an entire project from image slides and use it as an album.
• Question slides contain quizzing functionality.
• PowerPoint slides are slides imported from a PowerPoint presentation.
• Animation slides contain an animation in SWF, GIF, or AVI format.
39
Slide properties
You can set the properties for a slide using its Properties dialog box. Double-click the slide to display its Properties
dialog box.
Slide tab
Label The name of the slide. The slide label appears under the slide in the Filmstrip and in Storyboard view. It is a good
practice to name slides. When multiple users are working on the same project, naming slides helps to identify them
easily.
Display Time The duration for which the slide plays. The maximum value is 1 hour (3600 seconds).
Transition Specifies the transition effect for the slide. You can choose from the many options available in Adobe
Captivate. Adding transition effects breaks the monotony of slide transition.
Quality Specifies the quality level for the slide. Use the pop-up menu to select one of four quality options: Low (8-bit),
Optimized, JPEG, and High Quality.
Note: Selecting the Optimized, JPEG, or High Quality format may increase the file size and the time needed to download
your project. You should only use a format other than Low (8-bit) when appropriate.
Color Specifies the color of the slide. Select Project to have the color of the slide match the project background color.
Select Custom and click the color box to set virtually any color.
Hide Slide Select this option to retain the slide in the project but hide it from view when the project is played.
Lock Slide
objects does not lock the slide, so even if you lock objects, the slide can still be edited, moved, deleted, and so on.)
Select this option to lock (“freeze”) all of the objects on the slide so they cannot be deleted or changed. (Locking
Change Background Image Select this option to change the background image on the slide by selecting an image from
the project’s Library.
Page 47

USING ADOBE CAPTIVATE 4
Updated 19 May 2009
Slides
Navigation You can define the navigation options every time the user views a slide or moves away from the slide. The
On Slide Enter menu displays the actions that you can set for the slide when it is displayed. The On Slide Exit menu
displays actions that you can set when the user exits the slide. The following list describes actions available in both the
menus:
Note: The options Go To Previous Slide, Go To Next Slide, Go To Last Visited Slide, and Jump To Slide are available only
in the On Slide Exit menu.
• Continue The movie moves to the next defined action.
• Open URL Or File A web browser opens with the specified web page if the user has Internet connectivity.
Alternatively, you could open a specified file for the user.
• Open Other Project Opens the specified Adobe Captivate project.
• Send E-mail To A draft of the default e-mail editor opens with the e-mail address specified in the To field.
• Execute JavaScript Adobe Captivate runs the specified JavaScript.
• Execute Advanced Actions Adobe Captivate runs the script written using the application.
• Show When the user performs the required action, the specified hidden object is made visible
• Hide When the user performs the required action, the specified object is hidden from the user.
• Enable When the user performs the required action, it activates another object in the project. This option is
available only for interactive objects.
40
• Disable When the user performs the required action, it disables another object in the project. This option is
available only for interactive objects.
• Assign When the user performs the required action, the value of the specified variable is set inside the text caption.
• Increment When the user performs the required action, the value of the specified variable is incremented
accordingly.
• Decrement When the user performs the required action, the value of the specified variable is decremented
accordingly.
• Multiple Actions When the user performs the required action, multiple actions are performed in the order specified
by the user.
• Go To Previous Slide The movie moves to the previous slide.
• Go To Next Slide The movie moves to the next slide.
• Go To Last Visited Slide The movie moves to the previously viewed slide.
• Jump To Slide The movie moves to the specified slide.
• No Action Nothing happens when the user exits the slide.
Notes Click to display the Slide Notes dialog box, which lets you write information about the slide. Slide notes are not
seen by users who are viewing your project, but are an organizational tool for Adobe Captivate authors. The notes can
be seen in two places: in the Record Audio dialog box and in the handouts that you publish.
Accessibility Click to open the Slide Accessibility dialog box, which lets you add or type in text that can be read to users
with disabilities who use screen readers. You can choose to enable accessibility for text entered on slides, slide notes,
and closed captioned text. Note that the corresponding buttons are enabled only when such text exists in your project.
For more information, see “Add accessibility text to slides” on page 190.
Apply To All Applies the settings specified in the Settings menu to all slides.
Page 48

USING ADOBE CAPTIVATE 4
Updated 19 May 2009
Slides
Settings Click this button to select how to apply property changes in the project. To apply all your changes, select
Apply Only Changed Properties. To apply all the slide settings, select Apply All Properties. You can apply the slide
settings to all slides, the current slide only, or to slides of the same type.
Note: If you change the settings in this dialog box, they become the default settings, and any new slides you create use the
new settings.
Audio tab
Use this tab to add audio to a slide or edit audio that is already associated with a slide.
Record New Audio Opens the Record Audio dialog box. Recording audio requires some basic equipment.
Stop Audio Stops playing the audio file.
Play Audio Plays the audio file.
Import Import an audio file from your computer or network.
Library Opens the Audio Library, which lists all audio files that are already part of the currently open Adobe Captivate
project.
Edit Opens the Edit Audio dialog box. This dialog box lets you edit the audio file in a variety of ways, such as inserting
silent periods and adjusting the volume.
41
Closed Captioning Click to open the Closed Captioning dialog box, where you can enter captions for slide audio files
for hearing-impaired users. The text is displayed along with the audio when the slide is played. This option is only
available for slide audio, and is not available for other types of audio files.
Delete Removes the audio file associated with the slide.
Fade In [#] Seconds Specifies the time for audio to fade in to full volume.
Fade Out [#] Seconds Specifies the time for audio to fade out to silence.
Settings Opens the Audio Settings dialog box where you can define audio settings such as input source, quality level,
and calibration.
Loop Audio Plays the audio file continuously till the slide exits.
Stop Background Audio Stops playing any background audio associated with the slide.
Apply To All Applies the settings specified in the Settings menu to all slides in the project.
Settings Click this button to select how to apply property changes in the project. To apply all your changes, select
Apply Only Changed Properties. To apply all the slide settings, select Apply All Properties. You can apply the slide
settings to all slides, the current slide only, or to slides of the same type.
Note: If you change the settings in this dialog box, they become the default settings, and any new slides you create use the
new settings.
Add slides
Adobe Captivate offers a wide variety of options for adding slides to a project, including recording, importing, and
copying. You can add different types of slides such as blank, image, quiz, or animation.
Page 49

USING ADOBE CAPTIVATE 4
Updated 19 May 2009
Slides
Record additional slides for a project
There may be cases in which you record an Adobe Captivate project and begin working at the slide level, only to realize
that you need to record a few more slides. In this case, you probably don't want to rerecord the entire project but just
a few actions. Adobe Captivate allows you to do this by recording new slides and inserting the slides in an existing
project.
1 In an open project in which you want to record and insert new slides, select File > New > Additional Slides.
2 Specify the location for the new slides.
• Select Record Slides At The End Of This Project to add new slides to the end of the project.
• Click a slide in the list after which you want to insert the recorded slides, and select Record Slides And Insert
After The Slide Selected Below.
3 Select the application that you want to record from the Select Application menu. Ensure that you have opened the
application on your computer before you try to record it.
4 Select Snap To Window if you want the Recording window to snap to the borders of the application.
5 When you finish, click OK. The Recording window appears.
6 Select a recording mode, and click Record.
Note: You can position the capture area anywhere on your screen. You cannot, however, resize the capture area
because it is set to the same size as the project to which you are adding the slides.
42
7 When you are finished recording, press End (or another key combination you have designated) on the keyboard to
stop recording.
The newly recorded slides are inserted into your project in the specified location.
Import slides
Adobe Captivate allows you to import slides from one Adobe Captivate project into another. This can save you
valuable development time.
1 In an open project to which you want to add existing slides, select File > Import > Slides/Objects.
2 Select the project that contains the slides to import and click Open.
3 Use the following options according to your requirement:
Select All Use the options in this menu to select all slides or all objects in the project.
When you want to import most of the slides in the project, use this option to select all slides. Click the slides that
you do not want to import one by one, and select Do Not Import from the Import menu.
Clear All Use the options in this menu to clear any previous selections you made of the slides or objects.
When you want to import a few slides in the project, use this option to clear all slides. Click the slides that you want
to import one by one, and select Slide Only, or Slide And Objects from their Import menu.
Import Use the options in the menu to import the slide, its objects, or both the slide and its objects.
Place Objects On This option is available only if you have chosen the Objects Only option in the Import menu.
Select the slide in your project into which you want to place the imported objects.
Copy slides
You can copy and paste slides in Storyboard view or Edit view (with the thumbnails enabled in the Filmstrip.)
Page 50

USING ADOBE CAPTIVATE 4
Updated 19 May 2009
Slides
You can select multiple slides by pressing Shift or Control on the keyboard while clicking the desired slides. To select
all slides, press Control+A or select Edit > Select All Slides.
1 In an open project, right-click the slide to copy.
2 Select Copy Slide from the pop-up menu.
3 Open an Adobe Captivate project.
4 Right-click the slide after which you want the new slide or slides to appear. (For example, if you want to paste the
copied slide as Slide 6 of your project, click the slide currently labeled Slide 5.)
5 Select Paste Slide from the pop-up menu.
Copy slides from other projects
You can copy and paste slides from other projects. This can save you a great deal of time. For example, if you have a
detailed slide with captions containing important reusable text, simply copy and paste this slide into any new projects
you create.
You can select multiple slides by pressing Shift or Control on the keyboard while clicking the desired slides. To select
all slides, press Control+A or select Edit > Select All Slides.
1 In an open project, right-click the slide you want to copy.
2 Select Copy Slide from the pop-up menu.
3 Open the Adobe Captivate project to which you want to add the slide that you copied in the previous steps.
4 Right-click the slide after which you want the new slide or slides to appear. (For example, if you want to paste the
copied slide in as Slide 6 of your project, click the slide currently labeled Slide 5.)
5 Select Paste Slide from the pop-up menu.
43
Enable rescaling of slides during import
Adobe Captivate can automatically resize the content of imported slides according to the dimensions of the project to
which the slide is being imported.
1 Select Edit > Preferences.
2 Select General Settings from the Global menu.
3 Select Rescale Imported/Pasted slide.
Duplicate slides
You can duplicate slides in Storyboard view or Edit view (with the Filmstrip enabled). Duplicating slides is an easy way
to expand your projects. For example, if you carefully design a slide with a certain background color, layout, caption,
and highlight box, you can simply duplicate that slide and change some of the elements or text to add more
information to your project.
❖ In an open project, do one of the following:
• Right-click the slide to copy and select Duplicate Slide.
• Select a slide and press Control+D.
To select multiple slides, press Shift or Control on the keyboard while clicking the desired slides. To select all slides,
press Control+A or select Edit > Select All Slides.
Page 51

USING ADOBE CAPTIVATE 4
Updated 19 May 2009
Slides
The slide or slides you selected are duplicated and placed in the project. You can edit and work with the new slides just
like the original slides.
Insert blank slides
1 In an open project, right-click the slide after which you want the new blank slide or slides to appear.
2 Select Insert > Blank Slide.
The new slide is added to your project. You can edit and work with the new slide just like other slides in the project.
Insert images as slides
Image slides are slides that have an image inserted into their background.
1 Open an Adobe Captivate project.
2 Right-click the slide after which you want the new image slide or slides to appear.
3 Select Insert > Other Slide(s) > Image Slide.
4 Browse to and select the image that you want to import in the Open dialog box.
5 If the image that you are trying to import is larger in dimensions than that of your slide, the Resize/Crop Image
dialog box appears. Do one of the following:
• Select Fit To Stage if you want to resize the image to the dimensions of the slide.
• Select Crop, and resize the handles of the rectangular box that appears to select the portion of the image that you
want displayed.
44
Insert slides from a PowerPoint presentation
You can add PowerPoint slides to the end of a project or within a project.
1 In an open project, select Insert > Other Slide(s) > PowerPoint slide.
2 Select a PowerPoint presentation and click Open.
3 Do one of the following:
• Select Import Slides At The End Of This Project to add new slides to the end of the project.
• Select Import Slides and Insert After The Slide Selected Below to add new slides after the slide you select from
the list.
Insert animation slides
You can insert a SWF, AVI, or animated GIF file as a new slide.
Note: Adding animation as a slide is most appropriate with larger animation files.
1 In an open project select Insert > Other Slide(s) > Animation Slide.
2 Navigate to the animation file you want to insert (SWF, AVI, or animated GIF) and click Open. The animation slide
is generated and added to the project.
It is important to set the correct frame rate. All imported animation files play at the rate selected in the Project
Preferences dialog box, regardless of the rate prior to when the file is imported. The default setting is 30 Flash frames
per second and is appropriate in most cases. You may need to change the rate if you are embedding your Adobe
Captivate SWF file in another SWF file that has a frame rate different than 30.
Page 52

USING ADOBE CAPTIVATE 4
Updated 19 May 2009
Slides
When you create an animation slide, the amount of time the slide is displayed in the project automatically defaults to
the length of the animation file itself. For example, if the animation file that you use to create a new animation slide is
only 1.2 seconds in length, the animation slide appears for 1.2 seconds. To change the amount of time the slide is
displayed, open the slide in Edit view, select Slide > Properties, and enter a new number of seconds in Display Time.
Or use the Timeline to change the slide display time.
Delete and edit slides
Delete slides
Deleting a slide permanently removes the slide from the project. You can delete slides in Storyboard view or Edit view
(with the Filmstrip enabled).
❖ Do one of the following:
• Right-click the slide you want to delete, and select Delete Slide from the menu.
• Select the slide, and press Delete.
45
Change background color of slides
1 Double-click the slide whose background color you want to change.
2 Select Slide > Properties.
3 In the Color Setting options, select Custom, and do one of the following:
• Pick a color from the basic colors palette.
• Click More Colors to design a custom color.
• Click the eyedropper to select and copy any color on your screen.
• In the text field, enter the value for the color you want and press Enter.
4 If you want to apply the color to all slides, select Apply To All and then click Settings to choose how to apply the
change.
5 Click OK.
Note: To use the project color on a slide, open the Slide Properties dialog box (on the Slide menu, click Properties). In the
Color area, click Project. To change the background color for a project, select Edit > Preferences, and click Settings in the
Project menu. In the Project panel on the right, select a background color for the project in the Project Background Color list.
Edit slides in an image editor
Adobe Captivate provides an easy way to copy slides to the clipboard. You can then paste the slide into a graphics
editing program (for example, Fireworks® or Photoshop), edit the image, and then paste it back into Adobe Captivate.
This is especially useful when you want to make a small change to a recorded slide but do not want to rerecord it.
1 In Edit view in an open project, right-click the slide that you want to copy.
2 Select Copy Background from the menu.
3 Open a graphics editing program and paste the slide into the program by pressing Control+V.
4 Make any desired changes to the slide.
5 Copy the image in the graphics program by pressing Control+C so the image is saved to the clipboard.
Page 53

USING ADOBE CAPTIVATE 4
Updated 19 May 2009
Slides
6 In Adobe Captivate, select the slide that you had copied, and select Edit > Paste As Image.
The new, updated slide (as an image) is placed in the project. If the original slide contained objects such as captions or
highlight boxes, they appear on the new slide.
In Adobe Captivate, you can edit background images directly from the Library. To edit a background image, in the
Library, right-click the image you want to edit, and select the image editor from the menu.
Add plain text to a slide
As you edit a project, you may want to add some text to the slide but not have the text appear as a text caption over the
slide. There is an easy trick you can use to add plain text to a slide: simply add the text as a transparent text caption.
1 In Storyboard view, double-click the slide to which you want to add a transparent text caption.
2 Select Insert > Standard Object(s) > Text Caption.
3 In Caption Type, click the pop-up menu and select [transparent].
4 Change other text caption options as required.
Note: If you create a transparent caption, avoid underlining text. Underlined text might affect the quality of the text.
Edit text recorded on a slide
When you record text being typed, a new slide is created for every line break. Each line of typed text is treated as a
single object and appears as a separate layer on the Timeline. You can replace text recorded on a slide with new text
along with typing effects. For example, if you have recorded text being typed in an editing program and you want to
change the recorded text on the slide later, you can use this option.
46
Before you record text being typed, ensure that the option to record keystrokes has been enabled. For more
information, see “Set global recording preferences” on page 33.
1 In an open project, right-click the Typing layer in the Timeline, and select Replace With Text Animation.
2 Select one of the options in the Effect menu:
Typing Text Play text without any typing sound.
Typing Text With Sound Play text with a typing sound.
3 In the Text box, type the replacement text on the slide, and then click OK.
The text on the slide is replaced with the entered text. In the Timeline, the typing text object is replaced with the
text animation object, and the overwritten text appears on the object in the Timeline.
Name slides
It is easier to identify and keep track of slides using their name instead of their slide number. The name of the slide
appears under the slide.
1 Double-click the slide you want to name. The Slide Properties dialog box appears.
2 In Label, type a name for the slide.
Move to a specific slide
Press Control+Shift+G and specify a slide number in the Go To Slide dialog box to jump directly to the specified slide.
Alternatively, you can use Edit > Go To Slide to move to the specified slide.
Page 54

USING ADOBE CAPTIVATE 4
Updated 19 May 2009
Slides
Lock slides
Adobe Captivate gives you the option to lock individual slides. When you lock a slide, all objects on the slide can be
viewed but not edited. This feature is useful if you want to send your project to others for review but do not want them
to make changes to objects.
You can tell that a slide is locked by looking for the small lock icon. This icon appears below a locked slide in
Storyboard view and in the Filmstrip.
❖ In an open project, right-click the slide you want to lock and select Lock Slide.
To select multiple slides, press Shift or Control on the keyboard while clicking on the desired slides. To select all slides,
press Control+A or select Edit > Select All Slides.
Hide slides
Adobe Captivate allows you to hide an individual slide in a project; the slide stays in the project but is hidden from
view when the project is played. This option is useful in several situations, such as if others are reviewing the project,
but information on certain slides is changing so you want to hide the slides until they are correct.
47
Hide slides
• Do one of the following:
• Right-click a slide and select Hide Slide.
• In Storyboard view, select the slide, and click Hide Slide in the Slide Tasks panel.
The slide is dimmed in Storyboard view.
Include or exclude hidden slides when publishing handouts
1 In an open project, select File > Publish.
2 Select Print on the left panel.
3 In Type, select Handouts.
4 In the Handout Layout Options area, select Include Hidden Slides. (If a green check mark appears next to Include
Hidden Slides, the hidden slides are included in the Word document; remove the check mark to exclude the hidden
slides from the handouts.)
5 Click Publish.
Group slides
When the number of slides becomes unmanageable, you can group them. By expanding and collapsing groups, you
can view subsets of the slides instead of all slides at once. Groups also provide a useful overview for the project, and
they provide a convenient way of deleting or hiding multiple slides at once (for example, slides that you don’t want to
publish).
To help associate slides with their group, you can mark grouped slides with the same border color. The color is visible
from any of the three views (Storyboard, Edit, or Branching), but it doesn’t show when the project is run.
Page 55

USING ADOBE CAPTIVATE 4
Updated 19 May 2009
Slides
Create a slide group
1 In an open project, click a slide that you want to group, and use Control-click or Shift-click to select the other slides
for the group.
2 Select Slide > Group > Create.
The selected slides are grouped into a single group slide with their numbers and descriptions displayed on it.
Name slide groups and mark them
1 Click a slide group.
2 Select Slide > Group > Edit.
3 From the Color pop-up menu, select a color for all of the slides in the group. This color is not displayed when the
project is run.
4 In the Title box, type a name for the group. This title appears at the bottom of the grouped slide.
5 Click OK.
Expand or collapse a slide group
1 Click a slide group.
2 Do one of the following:
• Select Slide > Group > Expand.
• Select Slide > Group > Collapse.
A faster way is to click the arrow icon on top of the group slide.
48
Ungroup slides
1 Select a slide group.
2 Select Slide > Group > Remove.
Change slide order
To reorder slides, select them and drag them to the new position. You can change slide order only in Storyboard view
and in the Filmstrip.
You can select multiple slides by pressing Shift or Control on the keyboard while clicking the desired slides. To select
all slides, press Control+A or select Edit > Select All Slides.
Slide notes
You can add slide notes and convert them into an audio file using the text-to-speech converter in Adobe Captivate.
You can also convert slide notes to closed captioned text. Unlike slide notes, closed captioned text appears on the slide
during runtime.
Page 56

USING ADOBE CAPTIVATE 4
Updated 19 May 2009
Slides
You can also use slide notes to communicate with users who do not have any audio equipment or are hearing impaired.
Slide notes are a good location for adding extra information about a slide, such as numerical details, supporting
materials, or footnote text.
Add slide notes
You can add notes to slides in one of the following ways:
• Type text directly into the Slide Notes panel. Enter your notes in the Slide Notes column.
Note: If you do not see the panel, click the arrow icon at the bottom of the slide window.
• Click Notes in the Slide Properties dialog box. Enter the text in the Slide Notes dialog box that appears.
• You can add slide notes to an audio file using the Record Audio dialog box. Slide notes are useful in the Record
Audio dialog box because you can read the text directly from the dialog box as you record. After you insert an audio
file into the slide that you have recorded using slide notes, the slide notes are added to the Slide Notes column.
• Slide notes are automatically imported when you import slides from Microsoft PowerPoint.
Slide notes could act as instructions for developers or as reminders for unfinished items. Notes are not displayed when
the movie is played.
If you export your project to Microsoft Word to create handouts, you have the option to include slide notes in the
document. This can be useful when you want to add extra information for reviewers when you publish the project as
a Microsoft Word document.
49
Install text to speech converter
If you have not installed the text-to-speech software during installation, do one of the following:
• Re-run the installation CD. Click Install Text To Speech Voices in the autoplay options.
• Run the EXE file for the text-to-speech software. This file is in the Goodies folder on your installation disc.
If you have problems installing the text to speech software, see Rick Stone’s movie Installing Text to Speech.
Convert slide notes to speech or closed captioned text
You can convert text in the slide notes into an audio file using text-to-speech software from NeoSpeech™. The audio
file is inserted into the corresponding slide. Multiple slide notes are merged into a single audio file and appear on the
Timeline as a single object. You can also convert slide notes in the panel to closed captions in a single click.
The audio file pauses at locations where you have inserted commas or periods in the slide notes.
When you edit a slide note, you must click Convert To Speech for the changes to be applied.
When you play the movie:
• The slide notes are read aloud to the user.
• The closed caption text on the slide is displayed to the user.
1 In the Slide Notes section, enter the required text in the Slide Notes column. To add another row, double-click in
the Slide Notes column.
You can add as many rows of text as slide notes. However, Adobe Captivate reads text only from the last row. If you
want to add a chunk of text as a slide note, insert the text into a single row.
Page 57

USING ADOBE CAPTIVATE 4
Updated 19 May 2009
Slides
2 Click the green dot in the Speech column. The green dot changes to a green check mark . To convert text
in all the rows to speech, click the Text To Speech header.
3 Click Convert To Speech.
Note: If you do not have the required software installed on your computer, the Download Voice button is displayed
instead.
4 In the Speech Agent dialog box, select the voice that you want to use for reading the text.
5 Click the green dot in the Closed Caption column if you want to convert the slide notes to closed captioned text.
This text is displayed when the user plays the movie. Click the Closed Caption header to select all the rows in that
column.
To prevent slide notes from being read aloud when the movie is played, click the check mark.
Resolving the, “unable to decode and import the selected wav - mp3 file” error
This error might be displayed when you are using Adobe Captivate on Windows Vista. You must register the Adobe
DLL to fix this error.
1 Close Adobe Captivate.
2 Run Command Prompt in the admin mode.
3 Enter the location of the directory where you have installed Adobe Captivate.
4 Run regsvr32 NSAudio.dll. The message, “Registration of DLL successful” is displayed.
5 Right-click Adobe Captivate in the Program Files menu, and select Run As Administrator.
50
Add speech text to multiple slides
You can add speech text to multiple slides using the Speech Management dialog box. To add variety to the movie, you
can choose different speech agents for different slides. For example you could use a male voice and a female voice for
alternate slides.
1 Select Audio > Speech Management.
2 In the Speech Text column of the Speech Management dialog box, click Browse (...)
3 In the Slide Text To Audio dialog box, enter the text that you want to convert to speech.
4 From the Speech Agent column, select a speech agent for the slide.
5 Repeat the procedure for other slides.
Disable closed captions in a slide
You can prevent closed captions from appearing when the movie is played. Click the check mark icon in the
corresponding row of the Closed Caption column.
Delete closed captions/slide notes from a slide
To delete closed captions/slide notes from a slide, click in their corresponding rows.
Page 58

USING ADOBE CAPTIVATE 4
Updated 19 May 2009
Slides
Slide transitions
Transitions are special effects that appear when one slide changes to another. Transitions signal the end of one slide
and the beginning of another.
1 Double-click the slide to which you want to add a transition.
2 Select Slide > Properties.
3 From the Transition menu, choose one of the transition options.
4 If you want to apply the transition to all slides, select Apply To All and then click Settings to choose how to apply
the change.
Tips for introductory slides
• Add sound. Adobe Captivate makes it easy to add sound to projects, and sound is very powerful in an introduction.
You can add existing sound files or record your own voice-over. You can include a welcome message or play some
appropriate music.
Adobe Captivate contains a gallery that has buttons, sounds, and animations (in SWF format) for you to use in
your projects. By default, the gallery is stored in the following location when you install Adobe Captivate:
C:\Program Files\Adobe\Adobe Captivate 4\Gallery.
51
• Use special effects. If you are going to use special effects in your project, why not start off with them? Special effects
(such as fading, for example) create a polished and professional look right from the start.
• Use animated text. For an easy and impressive introductory slide, use the Adobe Captivate animated text feature.
This is a fast way to create a sophisticated look for your project.
• Use captions strategically. Add multiple captions to your introductory slide and then carefully set their timing so
they fade in and out, one at a time.
Page 59

Chapter 6: Adding and Managing Objects
Updated 19 May 2009
Objects are different elements that you can add to Adobe Captivate slides. Adobe Captivate has many different types
of objects.
Types of objects
Adobe Captivate provides various objects that you can use to enhance the usability and interactivity of your Adobe
Captivate project.
Adobe Captivate objects can be broadly classified as follows:
Interactive objects Objects that perform an action when the user interacts with them using a mouse or keyboard. You
can assign a score for user interactions with such objects.
For example, a click box is an interactive object that performs a defined action when the user clicks it. You can assign
points for every correct click. The following interactive objects are available in Adobe Captivate:
52
• “Click boxes” on page 98
• “Text entry boxes” on page 101
• “Buttons” on page 105
• “Widgets” on page 113
Noninteractive objects Objects that are used to display information to the user. You cannot assign scores to
noninteractive objects.
The following noninteractive objects are available in Adobe Captivate:
• “Text captions” on page 62
• “Rollover captions” on page 72
• “Highlight boxes” on page 74
• “Mouse” on page 75
• “Rollover slidelets” on page 79
• “Zoom areas” on page 82
• “Images and rollover images” on page 84
• “Drawing tools” on page 87
• “Animations” on page 90
• “Animated text” on page 92
• “Video” on page 93
Controlling the visibility of objects
You can hide an object on a slide, and define conditions that must be satisfied for the object to be displayed.
Page 60

USING ADOBE CAPTIVATE 4
Updated 19 May 2009
Adding and Managing Objects
The following example illustrates how to hide an image on a slide until the user clicks the Show Image button.
1 Select Insert > Image to insert an image on the slide.
2 Right-click the image, and select Properties from the menu.
3 In the Image dialog box, click the Options tab.
a In the Item Name field, enter My_Image.
b Deselect the Visible option.
c Click OK.
4 Select Insert > Standard Objects > Button.
5 In the New Button dialog box, do the following:
a In the If The User Clicks On The Button: On Success menu, select Show.
b In the Show menu, select My_Image.
c Click OK.
When you play the movie, the image appears only when you click the button.
53
Import objects
You can import objects from one Adobe Captivate project into another. This feature is useful in two situations. First,
you might want to delete an existing project, but keep the objects to add to another project. Second, you might need
to redo slides in a project, but want to keep the existing objects to save time.
Note: If you want to reuse individual media objects from another Adobe Captivate project, you can open that project
Library from within your current project Library. Then drag objects directly onto a slide or into the current project
Library for easy reuse.
1 In an open project to which you want to add existing objects, select File > Import > Slides/Objects.
2 Select the project that contains the objects to import, and click Open.
The Import Project dialog box appears.
3 Select the objects you want to add to your current project. For each slide click the Import pop-up menu and select
an option. Use the slider bar, or Tab (next slide) and Shift-Tab (previous slide) to navigate through all the slides in
the project. Click Select All-Objects to select all objects in the project. Click Clear All-Objects to clear all objects in
the project. To import objects only, select the Objects Only option.
Selecting the Objects Only option lets you specify exactly which slide you want to add the objects to in the current
project. Click the pop-up menu next to Place Objects On and select a current project slide number.
4 When you finish, click OK.
The objects are added to the open project.
5 Open different slides in Edit view to see the objects that were imported.
Page 61

USING ADOBE CAPTIVATE 4
Updated 19 May 2009
Adding and Managing Objects
Manage Library objects
View objects in the Library
1 In an open project, click the Edit tab to move to Edit view.
2 Select Window > Library.
The Library panel appears.
3 Double-click one of the folders (Audio, Backgrounds, Images, Media) to view the objects in that category.
4 Click an individual object to display it in the Library preview pane.
In addition to viewing image files, you can play audio and animation files in the Library preview pane.
Reuse an object listed in the Library
1 In Edit view, select the slide to which you want to add the object.
2 If the Library is hidden, select Window > Library.
3 In the Library, expand the folder for the category of object you want to reuse.
4 Click the object that you want to reuse and preview the object in the preview pane.
5 Drag the object to the selected slide or slidelet. The object becomes a part of the slide or slidelet depending on where
it is placed.
Note: After you copy the object to the slide, editing the properties of the object won’t affect that object in other slides.
54
Reuse an object in a different project Library
1 In Edit view, select the slide to which you want to add the object.
2 If the Library is hidden, select Window > Show Library.
3 In the toolbar of the library panel, click Open Library.
4 Navigate to, and select, the project that contains the objects you want to reuse and click Open.
The library for the other project opens in a separate and expandable window.
5 Click to select the object that you want to reuse.
6 Drag the object to the selected slide stage or to the appropriate folder in your current project Library.
7 Select and drag any additional objects that you want to reuse, and then click the Close button.
The new objects now appear in your current project Library, even if you dragged them directly onto a slide. You can
reuse them as many times as you want.
Note: After you open the Library of another Adobe Captivate project, that project stays in the Open Library menu. You
can quickly access that project Library at any time.
See also
“Adobe Captivate Library” on page 13
Page 62

USING ADOBE CAPTIVATE 4
Updated 19 May 2009
Adding and Managing Objects
Managing objects with the Stage toolbar
The Stage toolbar, available in Edit view, contains the following icons to help you manage objects:
• Slide properties. Click this option to open the Slide Properties dialog box. This toolbar option changes to Edit
Question or Edit Results if a question slide or results slide is selected.
• Cut, copy, paste, delete, and duplicate
• Open properties of selected object
• Bring selected object to front
• Send selected object to back
• Show/hide grid
• Snap to grid
• Size and position controls
• Zoom
• Redraw shape when rollover slidelet is selected.
55
Copy, paste, and duplicate objects
After you have created an object, you can copy that object and paste it onto the same slide, a different slide in your
project, or several slides in your project at the same time. This can save you a great deal of time, especially if you create
intricate objects with specific sizes, colors, and formatting.
You can also copy and paste objects between different projects.
Note: To reuse media objects that appear in the Library, simply drag the object from the Library onto the slide.
When objects from a slide are copied into a slidelet, the following properties of the object are modified:
• If timing for the object is specified as Rest Of Slide or Rest Of Project, it is changed to Rest Of Slidelet.
• The option Synchronize With Project loses its validity for FLV files.
Copy an object to a different slide
1 In storyboard view in an open project, double-click the slide that contains the object you want to copy.
Alternatively, go to Edit view and click the slide that contains the object.
2 Right-click the object and select Copy.
3 Open the slide to which you want to copy the object. If the Filmstrip is displayed, you can click any slide.
Alternatively, click the Storyboard tab and then double-click an individual slide.
4 Right-click the slide and select Paste Object.
Copy an object to multiple slides
1 In storyboard view in an open project, double-click the slide that contains the object you want to copy.
Alternatively, go to Edit view and click the slide that contains the object.
Page 63

USING ADOBE CAPTIVATE 4
Updated 19 May 2009
Adding and Managing Objects
2 Right-click the object and select Copy.
3 Select the slides to which you want to copy the object. Hold down the Shift key and click consecutive slides, or hold
down the Control key and select any slides, even if they are not consecutive. You can use the Storyboard view or
the Filmstrip panel in Edit view.
4 Right-click a selected slide and select Paste Object.
Copy objects from other projects
You can copy and paste objects from other projects. This strategy can save you a great deal of time. For example,
suppose you have created a detailed object in another project. Simply copy and paste the object into any new projects
you create.
Note: To reuse media objects from another Adobe Captivate project, open that project Library from within your current
project Library. Then drag objects directly onto a slide or into the current project Library for easy reuse.
1 Open the Adobe Captivate project that contains the object you want to copy.
2 Right-click the object, and select Copy.
3 Open the Adobe Captivate project to which you want to add the object copied in the previous steps.
4 Right-click the slide to which you want to add the object.
5 Select Paste Object.
You can also import an object or multiple objects from another project.
56
Duplicate objects
You can duplicate objects while in Edit view. Duplicating objects is an easy way to reuse content. For example, you can
duplicate a detailed caption and change some of the text to quickly add more information to your project.
Note: To reuse media objects that appear in the Library, simply drag the object from the Library onto the slide.
1 In an open project, double-click the slide that contains the object you want to duplicate.
2 Right-click the object and select Duplicate.
The object you selected is duplicated and the new object is placed on the slide. You can edit and work with the new
object just like the original object.
Align objects
Align multiple objects on a slide
If you have multiple objects on a slide, Adobe Captivate can automatically and perfectly align the objects for you. This
is an easy way to create precise and professional-looking project slides.
Page 64

USING ADOBE CAPTIVATE 4
Updated 19 May 2009
Adding and Managing Objects
You have many options for aligning objects both vertically and horizontally. Some of the alignment options depend
upon the location of the anchor object. The anchor object is simply the first object you select. You might want to select
the largest object or the object that appears first as the anchor object. So that you can easily identify the anchor object,
it appears with white resizing handles, while any subsequent objects you select appear with black resizing handles.
1 In an open project, open a slide that contains more than one object, such as two captions. You can also open a slide
and add more than one object to the slide.
2 If the alignment toolbar is not displayed, select Window > Toolbars > Alignment.
3 Select the objects on the slide by holding down the Shift key and clicking the individual objects.
4 Do one of the following:
• Click an alignment option on the alignment toolbar.
• Right-click the selected objects, choose Align, and select the appropriate option from the pop-up menu.
The x (horizontal) and y (vertical) coordinates of the mouse are automatically displayed in the lower-right corner of
the Adobe Captivate project window as you move the mouse. Knowing exact coordinates can help you place objects
in a precise location on a slide. When aligning objects, it can be helpful to display the grid.
You can move objects using only the keyboard. Select an object and press an arrow key on your keyboard to move 1 pixel
at a time. To move an item by the number of pixels defined in the grid, select an object and press Control+arrow key.
57
To change the height or width of an object by 1 pixel, hold Shift and press an arrow key. Similarly, hold Alt+Shift and
an arrow key to change the size 15 pixels at a time.
In the new Stage toolbar, the size and position options are helpful for aligning objects.
Aligning objects on the Timeline
The Timeline lets you align objects easily. For example, you can align objects to the playhead, the start of a slide, the
end of a slide, another object, or a point in time.
Display the Adobe Captivate Timeline
1 In an open project, double-click a slide that contains objects you want to align.
2 If it is not open already, show the Timeline by clicking the splitter bar. To expand the Timeline, click the display
arrow. You can also open the Timeline from the View menu by selecting the Show Timeline option, or using
Control+Alt+T.
Align an object to the playhead
When you sync an object to the playhead, the object moves to the location of the playhead in the Timeline.
• Right-click an object on the Timeline and select Sync With Playhead.
Sync with Playhead
Align an object to the start of a slide
• Click an object on the Timeline and drag it to the left side of the Timeline.
Page 65

USING ADOBE CAPTIVATE 4
Updated 19 May 2009
Adding and Managing Objects
Extend the playing time of an object to the end of a slide
• Right-click an object on the Timeline and select Show For Rest Of Slide.
Align an object to a point in time
• Click an object on the Timeline and drag it to the left or right so that the left edge of the object bar aligns with the
correct time in the header.
For example, if you have a caption that currently appears at the same time the slide displays, but you want a slight
delay, drag the caption so that its left edge aligns with 2s (a 2-second delay) or 4s (a 4-second delay) in the header.
You can select multiple objects and move them at the same time. Hold down the Shift key and click objects to select
consecutive stacked objects in the Timeline or to select nonconsecutive objects, hold down the Control key and
click the objects to move.
You can adjust the zoom level of the Timeline easily. Click in the Timeline ruler and spin the mouse wheel on your
mouse to increase or decrease the zoom level. Alternatively, use keystrokes to change the zoom level. Click the ruler
and then press Control+[ to decrease the zoom level, Control+] to increase the zoom level, or Control+W to set the
zoom level so that all objects will fit in the current Timeline.
Align objects with the grid
Adobe Captivate contains an optional grid that you can display while working on individual slides in Edit view. The
grid lets you more accurately place and position objects on a slide.
58
You can also select the Snap To Grid option if you want objects that are placed near grid lines to automatically “snap”
to the nearest lines.
Display the grid
1 In an open project, double-click any slide to open Edit view.
2 Select View > Show Grid.
The grid, a light pattern of dots, appears on the slide.
Align objects with grid lines
1 In an open project, double-click any slide to open Edit view.
2 Select View > Snap to Grid.
3 To test the snap-to-grid behavior, add an object such as a highlight box to the slide, and then move the box. As you
move the box, it automatically lines up with the grid lines.
Change the grid scale
1 In an open project, select Edit > Preferences.
2 In the Category panel, select Global.
3 In the Grid Size field, enter a new value for Grid size. Larger numbers display fewer grid lines; smaller numbers
display many grid lines for more precise object placement.
The x (horizontal) and y (vertical) coordinates of the mouse are automatically displayed in the lower-right corner of
the Adobe Captivate project window as you move the mouse. Knowing exact coordinates can help you place objects
in a precise location on a slide.
You can move objects using only the keyboard. Select an object and press an arrow key on your keyboard to move 1 pixel
at a time. To move an item by the number of pixels defined in the grid, select an object and press Control+arrow key.
Page 66

USING ADOBE CAPTIVATE 4
Updated 19 May 2009
Adding and Managing Objects
You can also access the Show Grid and Snap To Grid options by clicking the Options menu and selecting Preferences.
These options also appear in the new toolbar above the Stage area.
Resize and reposition objects by pixel
You can specify the position of an individual object by adjusting the pixel value of the left and top alignment, and the
size by adjusting the pixel value of the height and width of the object.
When you select an object on a slide in Edit view, four text boxes appear in the toolbar above the slide. The L, T, W,
and H text boxes are for left and top alignment and width and height. The lock symbol to the right of the text boxes is
to constrain the proportions of the object. When Constrain Proportions is active, the lock appears closed; when
Constrain Proportions is not selected for the object, the lock appears open.
Note: These options also appear on the Size And Position tab of each object’s properties dialog box, which you can access
by right-clicking an object and selecting Properties.
Change the display order of objects
59
Adobe Captivate lets you add multiple objects, such as captions, highlight boxes, animations, or images to slides. You
specify the order in which objects appear. Use the Timeline to precisely adjust the timing of all objects on a slide.
1 In an open project, navigate to the slide that contains the objects whose order you want to change.
2 If it is not open already, show the Timeline by clicking the splitter bar. To expand the Timeline, click the display
arrow. You can also open the Timeline using View > Show Timeline or Control+Alt+T.
3 Change the order and timing of objects as required.
For example, move the mouse over the left or right edge of an object on the Timeline until the resize cursor appears.
Then drag the edge left or right to change when and for how long the object appears.
If you have an object that currently appears at the same time the slide appears, but you want a slight delay, move
the mouse over the center of the object on the Timeline until the hand appears; then drag the entire object so the
left edge aligns with 2s (a 2-second delay) or 4s (a 4-second delay) in the header.
4 If you have two overlapping objects on the slide, specify the object you want to appear frontmost by setting the
stacking order. To change the stacking order, move objects to the back or front of the slide Stage. The key point to
remember is that objects at the back of the Stage appear behind other objects. Use one of the following methods to
set the stacking order:
• In Edit view, right-click an object on the slide and select one of the object order options. If necessary, right-click
other objects on the slide and adjust their order.
• In Edit view, on the Timeline, move the pointer over an object until the hand appears. Then drag the object up
or down to change its position in the stacking order. Moving an object higher in the stacking order moves it to
the front of the Stage. Moving an object lower moves it to the back of the Stage.
Note: If the order for a slidelet is changed, the objects it contains are also moved back or forward along with the
slidelet.
Page 67

USING ADOBE CAPTIVATE 4
Updated 19 May 2009
Adding and Managing Objects
Merge objects into a slide
You can merge any object that you create and place on a slide, including images, captions, click boxes, highlight boxes,
text entry boxes, and buttons. Merging permanently removes the interactivity of the object, making it an image of the
object.
The merging feature is useful in several situations. For example, suppose you import a large image into a slide that
contains other objects. You can merge the image into the slide so that it becomes a static background for the other
objects. You can also make text a permanent part of a slide by creating a transparent text caption and then merging the
caption.
1 In an open project, double-click the slide that contains the object you want to merge.
2 Right-click the object that you want to merge into the slide, for example, an image, caption, or click box.
3 Select Merge Into Background from the pop-up menu.
4 The object is merged into the slide.
Note: Merging objects in a slidelet into the background will merge the object into the slidelet background.
60
Edit object information in the Advanced Interaction dialog box
In the Advanced Interaction dialog box, you can view and edit all interactive objects in your project. The Advanced
Interaction dialog box opens in a separate window. When you’re done reviewing and changing the interactive object
properties, click Close.
Note: The dialog box is complex. To make reviewing the project information easier, print the dialog box by clicking Print.
1 In an open project, select Project > Advanced Interaction, or press F9.
The Advanced Interaction dialog box appears, populated with a collapsible list of all interactive objects in the
project.
2
Filter the list by clicking the button at the top of the dialog box that corresponds to the object type that you want to view.
Note: You can choose to filter by all scorable objects, click boxes, text entry boxes, buttons, questions, or hidden slides.
3 Click a slide title or object to select it.
Note: You can also select a specific slide by scrolling and clicking that slide in the Filmstrip in the left pane of the dialog
box. To remove Print from the view, click the Print button.
4 To view or edit the properties or results of a slide or object, click the Browse button wherever it appears. You can
also select or clear options, and change the selections in pop-up menus; the properties appear in the following
columns:
Slide/Object This column shows the slide or object name. Click the Browse button to view the properties dialog
box for the object or slide.
On Success This column shows the navigation that follows the slide if the user successfully completes an object’s
action. For more information, see “Defining project navigation” on page 97.
Attempts This column shows the maximum number of attempts you have set as a limit for an interactive object.
Page 68

USING ADOBE CAPTIVATE 4
Updated 19 May 2009
Adding and Managing Objects
On Failure If an object or slide has the possibility of failure (for example, if an incorrect answer is selected in a
multiple-choice question), this column shows where the slide leads after failure. For more information, see
“Defining project navigation” on page 97.
Shortcut View and edit keyboard shortcuts for a slide or object in this column.
Time Limit This column shows the time limit for specific objects.
Points This column shows the total points associated with each slide.
Add To Total This column allows you to add or remove scored objects from the total points.
Track score This option allows the interactive object to carry a score for the overall project quiz. If you select this
option, Adobe Captivate adds the score from the object to the overall score. (Selecting this option selects the Include
In Quiz option on the Reporting tab of the object’s Properties dialog box.)
Report Answer This option enables your project quiz scores to be integrated with a learning management system
(LMS). (Selecting this option selects the Report Answers option on the Reporting tab of the object’s Properties
dialog box.)
Objective ID and Interaction ID These columns contain the ID numbers, if you assign them, for integration with a
learning management system (LMS).
5 When you’re done reviewing and changing the interactive object properties, click Close.
61
Page 69

Chapter 7: Noninteractive Objects and
Updated 19 May 2009
Media
This chapter describes the noninteractive objects available in Adobe Captivate. Noninteractive objects are used to
display information to the user. You cannot assign scores to noninteractive objects.
Text captions
You can use text captions for the following:
Draw attention to specific areas of the slide Use text captions to point out menu options or icons or to focus user
attention on easily overlooked details. When you are not using voice-over narration, you can use text captions instead.
Add text to a slide The only way in which you can add plain text to a slide in Adobe Captivate is using transparent text
captions. For more information, see “Add plain text to a slide” on page 64.
62
You decide how text captions appear (font, size, color, and so on). Adobe Captivate provides a wide variety of
predefined text caption styles, but you can also create custom styles that match the standards of your company.
The following types of captions are available in Adobe Captivate:
Regular Use regular captions to “talk” to the viewer about features on the screen. You can have Adobe Captivate
automatically generate text captions based upon what is recorded. For example, when you click the File menu during
recording, Adobe Captivate creates a text caption that says “Select the File menu item.” It then places the text caption
on the slide showing the action. Alternatively, you can insert such text captions into the slides manually and edit them.
Captions for interactive objects Interactive objects are associated with success, failure, and hint captions. These
captions are automatically generated for the objects when you record in some of the modes.
• Success The success caption is displayed when the user performs the desired action on the object.
• Failure The failure caption is displayed when the user performs an action other than what is set in the application.
• Hint You can use hint captions to help users when they are unable to perform a certain task. Hint captions are
displayed when the user moves the mouse over the object.
Tips for creating text captions
Here are some tips for creating captions:
• If the caption is strictly text on the slide, use the Transparent caption style.
• Don't use fonts that are not available on most computers. For example, if you use FF Confidential, and the user
doesn't have it on the local computer, some other font is substituted.
• Create a style sheet by formatting a caption and selecting the Apply Properties To All Captions In The Movie check
box in the Text Caption dialog box. All captions in the SWF file or captions you create use the font, alignment, and
caption style you set.
• Captions can be used as a script for narrations. When you click the Audio button on the main toolbar to open the
Record Audio dialog box, click the Captions And Slide Notes option. If a caption is attached to the slide, you see it
in the Record Audio dialog box as a script.
Page 70

USING ADOBE CAPTIVATE 4
Updated 19 May 2009
Noninteractive Objects and Media
• Narrating a caption actually adds an extra degree of accessibility to the demo. When setting the size of the text in a
caption, be aware that Adobe Captivate makes captions large. Such large captions can overpower the text in the
slide. To get around this issue, use a font size that is a couple of points smaller than you would normally use. Text
in Adobe Captivate is rasterized and aliased. This is a known issue. To avoid it, don’t place light text on a
transparent background in a slide containing a solid dark background color.
Text caption properties
Use the Properties dialog box of a text caption to customize it.
The Properties dialog box for text captions has the following tabs:
• Text Caption
• Options
• Audio
• Size And Position
Note: If you change the settings in this dialog box, they become the default settings, and any new text captions that you
create use the new settings.
63
Text Caption tab
Caption Type Displays the types of captions available in Adobe Captivate. Each text caption type is named, and a small
thumbnail image shows what the text caption looks like.
Note: When adding or modifying a text caption, select the caption type before setting the style and format of text in a
caption. This ensures that style and format changes to text are retained.
Caption Style , , , , Five text caption types are available. Many of the text caption styles contain
text captions with directional callouts. You can select a text caption that points in the most appropriate direction.
Font Font of the text caption.
Size Font size of the caption text.
Font Color Font color of the caption text.
Highlight Color for highlighting the text.
Insert Variable Add a system or user-defined variable that acts as a placeholder for the text.
Display Options Font properties of the text in the text caption. You can align text, format it, and insert symbols, using
the various options.
Type Caption Text Here Text that is displayed on the text caption.
Options tab
Item Name Enter a unique name for the object. You can use this name when defining the visibility conditions for the
object.
• Visible Deselect this option if you want the object to be invisible on the slide. The object can be made visible using
the Show option. For more information, see “Controlling the visibility of objects” on page 52.
Display For [Time] Duration for which the text caption is displayed in the slide. From the pop-up menu, select one of
the following options:
• Specific Time The duration for which the text caption appears on the slide. Set the time in seconds by typing the
value in the field, or by using the scroll arrows.
Page 71

USING ADOBE CAPTIVATE 4
Updated 19 May 2009
Noninteractive Objects and Media
• Rest Of Slide The text caption is displayed for the entire duration of the slide.
• Rest Of Project The text caption is displayed for the entire duration of the project. For example, you can use this
option to display a text caption that displays the name of the company.
Appear After [#] Seconds The text caption appears on the slide after the specified duration.
Effect Transition effect for the highlight box. You can apply a fade in or fade out effect and set the time for the fading
effects.
In [#] Seconds Time for the caption to fully fade into view.
Out [#] Seconds Time for the caption to completely disappear.
See also
“Set audio for noninteractive objects” on page 96
“Fix size and position of noninteractive objects” on page 96
Add text and text captions
Add a text caption
If you change the settings in the Properties dialog box for text captions, they become the default settings. Any text
captions that you create use the new settings.
64
If you create a transparent caption, avoid underlining text because doing so can decrease text quality when the project
is viewed.
If you add a transparent text caption, avoid using bold text; regular text appears clearer than bold text on most
monitors.
1 In an open project, select the slide to which you want to add a text caption.
2 Select Insert > Standard Objects > Text Caption. You can also right-click in the slide, choose Insert from the pop-
up menu, then choose Text Caption.
3 Set the various options for the text caption.
4 Use the Settings menu to select how to apply property changes in the project. To apply all your changes, select Apply
Only Changed Properties. To apply all the text caption settings, select Apply All Properties. You can apply the text
caption settings to the current slide only or to all slides. And you can choose to apply the text caption settings to all
captions or only the text captions of the same type as the current one.
5 Select Apply To All to apply settings specified in the Settings menu to all slides
Add plain text to a slide
To add text to the slide without making it appear as a text caption, add the text as a transparent text caption.
Note: If you create a transparent caption, avoid underlining text because doing so can decrease text quality when the
project is viewed.
After adding the transparent text caption, you may want to merge the caption with the slide background.
1 In an open project, select the slide to which you want to add a transparent text caption.
2 Select Insert > Standard Objects > Text Caption.
Page 72

USING ADOBE CAPTIVATE 4
Updated 19 May 2009
Noninteractive Objects and Media
3 In the Caption Type area of the Caption Properties dialog box, select [Transparent].
4 Change other options as required.
To add superscript to a slide, select the text, and press Control +shift + “+”. To add a subscript, select the text, and
press Control + “+”.
Insert text as a variable
1 In an open project, right-click the text caption and select Properties.
2 In the Text Caption tab, move the cursor to the position in the text where you want to insert the variable.
3 Click the Insert Variable icon .
4 Select one of the following in the Variable Type menu:
• To insert a variable that you have previously created, select User. Select the variable from the Variables menu.
For more information, see “Create a user-defined variable” on page 144.
• To insert a system variable, select System. Select a system variable from the Variables menu. To filter system
variables by their category, select the corresponding option from the View By menu. When you do not choose
a category, all the system variables are listed in the menu.
5 To change the maximum number of characters that the variable can accommodate, enter a value in the Maximum
Length field. If the number of characters exceed the value specified in this field, the extra characters are not
displayed.
Note: Spaces are also considered for the character count.
65
6 To create a variable or to change the values of a selected variable, click Actions Dialog.
7 Click OK.
When you preview the project, the value of the variable is displayed inside the text caption.
Insert symbols and special characters
1 Select Insert > Standard Objects > Text Caption.
2 Click Insert Symbol.
3 Select a symbol that you want to insert from the menu.
4 For more options, click Other.
5 In the Insert Special Characters dialog box, select the character that you want to insert, and click OK.
Add text captions automatically during recording
When you record projects or record additional slides for projects, Adobe Captivate can automatically create text
captions based upon the action recorded. For example, if you record the action of selecting the File menu, Adobe
Captivate can automatically add a text caption that reads “Select File menu” on the same slide.
Actions that generate text captions include the following: selecting menus and menu items; pressing buttons; changing
values in locations such as lists, combo boxes, or check boxes; and opening child windows.
1 In an open project, select Edit > Preferences.
2 In the Preferences dialog box, select Mode(s) under the Recording menu.
3 In the Mode menu under the Recording panel, select the mode of recording for which you want to automatically
generate the text captions.
4 Select Automatically Add Text Captions.
Page 73

USING ADOBE CAPTIVATE 4
Updated 19 May 2009
Noninteractive Objects and Media
After you finish recording and the project is generated (including the automatically created captions), view the
individual slides in Edit mode to see the captions.
Note: Adobe Captivate can automatically generate text captions for all standard Windows user interface elements. It
might not, however, support nonstandard user interface elements, including menu text in applications created with
Delphi®.
Edit text captions
Edit a text caption
If you are resizing a text caption, you cannot make the text caption smaller than the bitmap used to create the text
caption. For example, the text caption style “Pill” uses bitmaps sized approximately 18 pixels (wide) x 16 pixels (high),
so these bitmaps could not be resized to 15 x 12 pixels. However, any of the text caption bitmaps can be made larger.
If you need very small text captions, consider creating custom captions.
To edit a text caption, right-click the text caption, and select Properties. Make the required changes in the Properties
dialog box for the text caption.
If you have a detailed slide that contains text captions and other objects, you might want to make the text caption a
permanent part of the background.
66
Copy text captions
You can copy and paste text captions between slides. This is a great time-saver, especially if you use the same text
caption on multiple slides.
1 In an open project, select the slide containing the text caption you want to copy.
2 Right-click the text caption and select Copy.
3 Navigate to the slide where you want to paste the caption.
4 Right-click in the slide and select Paste Object.
You can copy and paste more than one text caption at a time. To select multiple text captions, press Control and
click the text captions. Right-click one of the selected text captions and choose Copy.
Moving and resizing text captions
You can resize text captions manually or automatically and move text captions to new locations on a slide. To move
text captions on a slide, select the text caption, and drag it to the new location.
Note: If you are resizing a text caption, you cannot make the caption smaller than the bitmap used to create the caption.
For example, the caption style “Pill” uses bitmaps sized approximately 18 pixels (wide) x 16 pixels (high), so these bitmaps
could not be resized to 15 x 12 pixels. However, any of the caption bitmaps can be made larger. If you need very small
captions, consider creating custom captions.
Manually resize a text caption
To manually resize a text caption, select the text caption, and move the pointer over the selection handles. When the
pointer becomes a resize handle, drag the mouse to resize the object.
Page 74

USING ADOBE CAPTIVATE 4
Updated 19 May 2009
Noninteractive Objects and Media
Automatically resize text captions
Adobe Captivate can automatically resize a text caption according to the amount of text in the text caption. If you edit
the text, the caption is resized to accommodate the altered text. This is an easy way to keep your text captions looking
balanced and proportional.
1 In an open project, select Edit > Preferences.
2 In the Category panel, select Defaults from the Global menu.
3 In the Global panel, select Autosize Captions.
Change text caption order using the Timeline
Adobe Captivate lets you add multiple captions to each slide. You can specify the order in which these captions appear
using the Timeline. The Timeline enables you to precisely adjust the timing of all objects, including captions, on a slide.
1 In an open project, navigate to the slide containing the captions whose order you want to change.
2 If it is not open already, show the Timeline by clicking the splitter bar. To expand the Timeline, click the display
arrow.
3 Change the order and timing of captions as required.
• For example, move the mouse over the left or right edge of a caption on the Timeline until the resize cursor
appears. Then drag the edge left or right. This changes when the caption appears or disappears and how long it
is shown.
• Alternatively, suppose a caption and its slide appear concurrently, but you want a slight delay. To achieve this
effect, move the mouse over the center of the caption on the Timeline until the hand cursor appears. Then drag
the entire caption so the left edge aligns with 2s (a 2-second delay) or 4s (a 4-second delay) in the header.
4 If two captions overlap on the slide, select the caption you want to appear in front by setting the stacking order. To
change the stacking order, moving captions to the back or front of the slide Stage. The key point to remember is
that captions at the back of the Stage appear behind other captions. Use one of the following methods to set the
stacking order:
• In Edit view, right-click a caption on the slide and select one of the caption order options. If necessary, right-
click other captions on the slide and adjust their order.
• In Edit view, select a caption. On the Edit view toolbar (next to Slide Properties), click Bring Selected Objects
Forward In Z-Order or Send Selected Objects Backward In Z-Order.
• In Edit view, on the Timeline, move the mouse over a caption until the hand pointer appears. Drag the caption
up or down to change its position in the stacking order. Moving a caption higher in the stacking order moves it
to the front of the Stage. Moving a caption lower moves it to the back of the Stage.
67
Captions in other languages
Adding a language for text captions
You can add new languages to the list of existing languages in which text captions are recorded. The list of existing
languages is available in the Recording dialog box. Text captions of events are stored as
CaptureTextTemplates_<language>.rdl files in the \\Program Files\Adobe\Adobe Captivate 4 directory. For example,
the RDL file for Chinese-Simplified is CaptureTextTemplates_Chinese-Simplified.rdl. You can use the existing RDL
files to record text captions in a desired language.
Page 75

USING ADOBE CAPTIVATE 4
Updated 19 May 2009
Noninteractive Objects and Media
Record text captions in another language
1 Open Windows Explorer, and navigate to the \\Program Files\Adobe\Adobe Captivate <version number>
directory.
2 Copy a file with an RDL extension.
3 Paste the file in the same location, and rename it according to the new language. For example, if you want to record
in Polish, rename the file CaptureTextTemplates_Polish.rdl.
4 Open the RDL file in any text editor.
5 In the Object Name and the Event Name tags, change the text for Default Template And Template Attributes to the
specified language.
6 Save the file.
7 Select File > Record/Create > New Project to open the Recording dialog box.
8 Set the Recording preferences.
9 Click Advanced.
10 Select the added language in the Captions In pop-up menu.
11 Click Record.
The text captions are generated in the specified language.
68
Type text in another language
1 Open the Microsoft Windows Control Panel and double-click the Regional And Language Options icon. The
Regional And Language Options dialog box appears.
2 Click the Languages tab.
3 Click the Details button.
4 In the Settings tab of the Text Services And Input Languages dialog box, click the Add button.
5 In the Add Input Language dialog box, select a language from the Input Language list.
6 Click OK. The selected language is included in the Installed Services list.
7 Select the desired language in the Default Input Language list.
8 Click Apply and click OK to save the settings and close the Text Services And Input Languages dialog box.
9 Click the Regional Options tab, and choose the language you selected in the Default Input Language list.
10 Click Apply and click OK to save the settings and close the Regional And Language Options dialog box. The
Language bar or the Input Method Editor (IME) appears on the desktop of your computer.
11 Type content in the RDL file. The text appears in the selected language.
If you change the language in the Default Input Language list and the Regional Options tab, the language selected
in the Language bar is also updated automatically.
Localizing text captions
If you are localizing a project that contains text captions, you can export text captions to make the process more
efficient.
1 Create the initial (“source language”) version of the project, including all necessary text captions.
2 Open the completed project.
3 Select File > Export > Project Captions And Closed Captions.
Page 76

USING ADOBE CAPTIVATE 4
Updated 19 May 2009
Noninteractive Objects and Media
4 By default, the Word (DOC) file is saved to your My Documents\My Adobe Captivate Projects folder. Change the
location if you want. Also, the Word file is named [ProjectName] Captions.doc. You can change the name of the
file, if necessary, by clicking directly in the File name text box and entering a new name. (Retain the.doc filename
extension.) Click Save.
5 The Word file is generated with the name you specified and saved to the location you selected. A dialog box appears
asking if you want to view the document. Click Yes to view the document in Word.
6 The Word document contains the slide ID, item ID, original caption text, and the slide number. You can change
the caption text in the Updated Text Caption Data column. Provide a copy of the Word document to the
localizer/translator.
7 The localizer/translator should open the Word document and edit the caption text directly in the Updated Text
Caption Data column in the document, replacing the source language text with the new text.
8 While the localizer/translator is translating the text, make a copy of the original Adobe Captivate project for the
new language.
Note: When you create a copy of the original project, be sure to keep the original text captions (in the source language)
in the new project. The original text captions act as placeholders and are overwritten when you import the new
(localized) text captions.
9 When the text captions are localized, open the copy of the project you created in step 8.
10 Select File > Import > Project Captions And Closed Captions.
11 Navigate to the localized text captions Word (DOC) file, select the file, and click Open.
12 The new, localized text captions are imported into the project, and all formatting is retained. A dialog box appears
showing a successful import message. Click OK.
13 Test the new text captions by opening different slides in Edit view and reading the new caption text.
69
Creating custom text caption styles
You can create custom text caption styles for your Adobe Captivate projects with a graphics program, such as Adobe®
Fireworks® or Adobe® Photoshop®.
Custom text captions must be in BMP (bitmap) format. In general, each Adobe Captivate text caption has five
associated bitmap images.
Naming custom text caption styles
When creating custom text caption styles, be sure to follow the correct naming conventions. Each caption style has a
unique name, and you must use this name at the beginning of each associated bitmap filename. For example, if you
create a text caption style named “Brightblue,” the five bitmap images that constitute the new style should be named
as follows:
• Brightblue1.bmp, an image with no callouts
• Brightblue2.bmp, an image with a callout to the right or upper-right
• Brightblue3.bmp, an image with a callout to the left or upper-left
• Brightblue4.bmp, an image with a callout to the lower right
• Brightblue5.bmp, an image with a callout to the lower left
Page 77

USING ADOBE CAPTIVATE 4
Updated 19 May 2009
Noninteractive Objects and Media
Storing custom text caption styles
You must store all the bitmap images for a custom text caption style in the Adobe Captivate Captions folder (located
in C:\Program Files\Adobe\Adobe Captivate 4\Gallery\Captions). After you add the five new bitmaps to the captions
folder, Adobe Captivate recognizes the bitmap files as a new text caption style. The next time you add a new text
caption, your new custom style appears in the text caption style list.
Create custom text for caption styles
You can create a custom style for the text that appears in the text captions. These preferences are applied only if you
did not set a style for the text caption earlier.
1 Open the fonts.ini file, stored in the \\Program Files\Adobe\Adobe Captivate 4\Gallery\Captions folder, in a text
editor.
2 Customize the style for the text caption using the procedure described in the file.
3 Save the file.
4 In an open Adobe Captivate project, select Insert > Standard Objects > Text Caption.
5 In Caption Type, select the caption that you have customized.
The text in the text area changes to the specified style.
6 Edit the text in the text area.
7 Click OK.
70
Change text alignment on custom text captions
Sometimes text in custom text captions can appear out of alignment. To solve this problem, set the left, right, top, and
bottom margins.
Each of the five text caption styles requires different margin settings because text appears in slightly different places in
each text caption.
The margin settings are stored in a text file with the extension.fcm. You can use Notepad or WordPad to create or edit
FCM files.
1 Using Windows Explorer, navigate to C:\Program Files\Adobe\Adobe Captivate 4\Gallery\Captions. All the text
caption BMP and corresponding FCM files are located in this folder.
2 Right-click the FCM file you want to edit, and select Open With.
3 Select Notepad or WordPad.
4 Edit the following values as necessary:
• Left Margin is the number of pixels from the left side of the bitmap to the text.
• Right Margin is the number of pixels from the right side of the bitmap to the text.
• Top Margin is the number of pixels from the top of the bitmap to the text.
• Bottom Margin is the number of pixels from the bottom of the bitmap to the text.
5 (Optional) If necessary, you can edit the MarginX and MarginY settings. This can be important if you are adding
captions automatically.
• MarginX is the number of pixels horizontally from the nearest corner to the tip of the caption callout.
• Margin Y is the number of pixels vertically from the nearest corner to the tip of the caption callout.
Page 78

USING ADOBE CAPTIVATE 4
Updated 19 May 2009
Noninteractive Objects and Media
Note: The nearest corner is identified in the file open in Notepad or WordPad under “Corner.” For example,
Corner=right, top.
6 From the File menu, select Save.
A dialog box may appear, asking whether you want to replace the original file. Click Yes.
7 Close the program (Notepad or WordPad).
Design tips for custom text captions
Colors Don’t use the transparent colors for captions. The upper-left pixel determines which color is transparent. For
example, if the color in the upper-left pixel is yellow, everything that is the same yellow will be transparent in the text
caption. Also, the text caption itself can have a gradient background, but the area around (“behind”) the text caption,
must be a solid color.
Anti-alias Do not anti-alias the edges of your text captions. Your text captions will appear on different screenshots,
and the anti-alias can cause a jagged halo effect on some screenshots.
Import and export text captions
Import text captions
You can import text captions from a DOC file. First, you export the text captions from your Adobe Captivate project.
Adobe Captivate creates a DOC file that preserves all the formatting from the text captions. While the text captions are
in DOC format, you can make text and formatting changes in a word-processing program. Then you can import the
text captions back into the Adobe Captivate project using the following steps.
71
Note: If you export text captions to a DOC file, that DOC file can only be imported back into the original project.
Importing and exporting text captions to and from a DOC file can be useful in several situations. For example, if you
have to edit many captions, it is easier and faster to work in DOC files instead of navigating from slide to slide.
1 In an open project that contains text captions, select File > Export > Project Captions And Closed Captions.
2 Make the necessary changes while the text captions are in DOC format (in the Updated Text Caption Data column),
and save the DOC file.
3 Select File > Import > Project Captions And Closed Captions.
4 Select the DOC file that contains the exported text captions.
5 Click Open.
6 An Information dialog box appears, confirming that the import was successful. Click OK.
Export text captions
You can export text captions from an existing Adobe Captivate project into a DOC file if you have Microsoft Word
installed on your computer. All formatting done in Adobe Captivate is preserved when the text captions open as a
DOC file. Make text and formatting changes to the text captions while they are in DOC format. Then import them
back into the Adobe Captivate project.
Note: If you export text captions to a DOC file, that DOC file can only be imported back into the original project.
Exporting text captions can be useful in several situations:
• If you intend to record and voice-over narration and create a script, exported text captions can provide the
foundation for the script.
Page 79

USING ADOBE CAPTIVATE 4
Updated 19 May 2009
Noninteractive Objects and Media
• If you want to provide printed step-by-step instructions, you can export text captions and print the DOC file.
• If a project must be localized, you can export text captions into a DOC file and give it to a translator.
1 In an open project, select File > Export > Project Captions And Closed Captions.
2 In the Save As dialog box, enter a filename for the new DOC file.
Note the default directory where the file will be saved. If you want, navigate to a different location in which to save
the file.
3 Click Save.
4 The text captions from the project are converted into DOC format. A dialog box appears, confirming that the text
captions were exported to Word and asking if you would like to view the document. Click Yes.
5 A new DOC file that contains the caption text opens in Word. Make any necessary text changes in the Updated Text
Caption Data column. The slide number is also included as a reference.
6 Save the document.
Restore default settings for text captions
If you changed the appearance of text captions, you can restore all text caption settings to their defaults. (For example,
you change the font for text captions to Times New Roman and the font color to green. Click Restore To Default to
change the font back to the default font Arial and the color to the default blue.)
72
1 In an open project, select Edit > Preferences.
2 In the Category panel, select Mode(s) under the Recording menu.
3 In the Recording menu, > Mode(s) area, click Restore Defaults.
Rollover captions
Use rollover captions when you want to display the caption only when the user moves the mouse over a designated
area on the slide. Rollover captions consist of a caption and a rectangle that marks the designated area, also called the
rollover area. The caption appears when the user moves the mouse over the rollover area at run time.
Add rollover captions
1 In Storyboard view in an open project, select the slide to which you want to add a rollover caption.
2 Select Insert > Standard Objects > Rollover Caption.
3 Set the various options for the caption in the Rollover Caption dialog box. See “Text caption properties” on page 63
for more information.
4 Click OK. The text caption and the rollover area appear on the slide.
5 Right-click the rollover area and select Properties. Set the properties for the rollover area.
6 To snap the rollover area to the edges of an object, press Alt and move the rollover area over that object.
7 Use the Settings menu to select how to apply property changes in the project. To apply all your changes, select Apply
Only Changed Properties. To apply all the rollover caption settings, select Apply All Properties. You can apply the
rollover caption settings to the current slide only or to all slides. And you can choose to apply the rollover caption
settings to all captions or only the rollover captions of the same type as the current one.
Page 80

USING ADOBE CAPTIVATE 4
Updated 19 May 2009
Noninteractive Objects and Media
Note: If you change the settings in this dialog box, they become the default settings, and any new rollover captions you
create use the new settings.
8 Select Apply To All to apply settings specified from the Settings menu to all slides.
9 Click OK.
Edit rollover area
Rollover captions and rollover images consist of a caption or image and a rollover area (the “hot” area). The rollover
area defines where the mouse must be for the caption or image to appear.
1 Open an Adobe Captivate project.
2 In Storyboard view, select the slide containing the rollover caption or image.
• To change the size of the rollover area, click one of the handles and drag.
• To move the rollover area to another location, move the mouse over the rollover area until the hand cursor
appears. Drag the box to the desired location.
• To modify the rollover area attributes, right-click the rollover area, and select Properties. Make the required
changes in the Properties dialog box.
• You can customize the following for the rollover area in its Properties dialog box:
Frame Color Border color for the rollover area.
73
Fill Color Fill color for the rollover area.
Frame Width Thickness of the border of the rollover area.
Fill Transparency Degree of transparency for the fill color. A value of 10% is less transparent (more solid) than
a value of 90%.
Fill Outer Area Select this option to fill the area outside the boundaries of the rollover area with the color
selected in Fill Color. When you choose this option, the area within the rollover area is not colored.
Note: You can observe the fill color around the rollover area only when you preview or publish the project.
The other tabs in the Properties dialog box are similar to those for text captions. See “Text captions” on page 62
for more information.
Preview This area displays the settings you selected in the Appearance area.
Convert tooltips to rollover captions
When you record a new project or record additional slides for an existing project, you can set a recording option that
requires Adobe Captivate to convert tooltips to rollover captions. When this option is selected, Adobe Captivate
creates a rollover caption for every tooltip that is selected during the recording process.
Converting tooltips to rollover captions is an easy way to automatically create an appropriate and descriptive caption
for action taking place in a project.
1 In an open project, select Edit > Preferences.
2 In the Preferences dialog box, select Mode(s) in the Recording menu.
3 Select Convert Tooltips To Rollover Captions.
4 Click OK.
5 Click Record to begin recording a new project and automatically converting tooltips to rollover captions.
Page 81

USING ADOBE CAPTIVATE 4
Updated 19 May 2009
Noninteractive Objects and Media
See also
“Set audio for noninteractive objects” on page 96
“Edit rollover area” on page 73
“Fix size and position of noninteractive objects” on page 96
Highlight boxes
Use highlight boxes to spotlight areas within a slide. Highlight boxes focus the user’s attention on the required
areas of the slide.
Properties of highlight boxes
Use the Properties dialog box of the highlight box to customize it.
The Properties dialog box for highlight boxes has the following tabs:
• Highlight Box
• Options
• Audio
• Size And Position
74
Highlight Box tab
Frame Color Border color for the highlight box.
Fill Color Fill color for the highlight box.
Frame Width Thickness of the border of the highlight box.
Fill Transparency Degree of transparency for the fill color. Select a value from 0% to 100%. A value of 10% is less
transparent (more solid) than a value of 90%.
Fill Outer Area Fills the area outside the boundaries of highlight box with the color selected in Fill Color. When you
choose this option, the area within the highlight box is not colored.
Note: You can observe the fill color around the highlight box only when you preview or publish the project.
Preview Displays the settings you selected in the Appearance area.
Options tab
Item Name Enter a unique name for the object. You can use this name when defining the visibility conditions for the
object.
• Visible Deselect this option if you want the object to be invisible on the slide. The object can be made visible using
the Show option. For more information, see “Controlling the visibility of objects” on page 52.
Display For [Time] Specifies the duration for which the highlight box is displayed on the slide.
Appear After [#] Seconds The highlight box appears on the slide after the specified duration.
Effect Transition effect for the highlight box. You can apply a fade in or fade out effect and set the time for the fading
effects.
• In [#] Seconds Time for the highlight box to fully fade into view.
Page 82

USING ADOBE CAPTIVATE 4
Updated 19 May 2009
Noninteractive Objects and Media
• Out [#] Seconds Time for the highlight box to completely disappear.
Add highlight boxes
1 Open the slide to which you want to add the highlight box in Edit mode.
2 Select Insert > Standard Objects > Highlight Box.
3 Set the various options for the highlight box.
4 Use the Settings menu to select how to apply property changes in the project. To apply all your changes, select Apply
Only Changed Properties. To apply all the highlight box settings, select Apply All Properties. You can apply the
highlight box settings to the current slide only or to all slides.
Note: If you change the settings in this dialog box, they become the default settings, and new highlight boxes that you
create use the new settings.
5 Select Apply To All to apply settings specified in the Settings menu to all slides.
6 Click OK.
The highlight box appears on the slide.
See also
“Set audio for noninteractive objects” on page 96
75
“Fix size and position of noninteractive objects” on page 96
Mouse
Change mouse properties
You can change the properties of the mouse object using its Properties dialog box. The Properties dialog box has two
tabs: Options and Timing.
Options tab
Available Mouse Pointers List Displays the available pointers. Click Browse to navigate to a
custom file (CUR file format).
Double Mouse Size Doubles the size of the pointer.
Show Mouse Click Adds a visual click effect to the mouse movement.
Default Displays a quick, small burst of color when the user clicks the slide. You can select a color for the color burst.
Custom Select this option to use a SWF file as a visual click effect. Adobe Captivate includes two effects you can use.
Test them by clicking the pop-up menu, selecting one, and then clicking Play. View the effect in the small preview
window on the right.
Mouse Click Sound Select this option to play a sound when the pointer reaches its destination. Click the pop-up menu
to select a sound (Single Click or Double Click). You can also select Browse and navigate to a sound file.
Straight Pointer Path Select this option to have the pointer follow a straight path between its start and end points. (By
default, the pointer follows a curved path that gives the motion a more realistic look. You can change to a straight path
if, for example, your project is a demonstration showing how to draw a line in a graphics program.)
Page 83

USING ADOBE CAPTIVATE 4
Updated 19 May 2009
Noninteractive Objects and Media
Reduce Speed Before Click Select this option to slow the mouse movement down before the click occurs. This option
is useful for a long mouse path that moves quickly and stops suddenly.
See also
“Set audio for noninteractive objects” on page 96
“Fix size and position of noninteractive objects” on page 96
Timing tab
Display Time The time during which the pointer is displayed on the slide.
Appear After Delay between the first appearance of the slide and the first appearance of the slide pointer.
Pointers
Change the pointer shape
You can change the pointer for a particular slide or project. Select any system pointer or existing CUR file as the pointer
image. Open an Adobe Captivate project in Storyboard view or Edit view. From the Slide menu, select Mouse > Use
Current Mouse Pointer For All Slides.
76
Note: Some pointers from other applications may be displayed incorrectly in Adobe Captivate.
1 In an open project, open the slide you want in Edit view.
2 Select Slide > Mouse > Project Pointers or Slide > Mouse > Current Theme Pointers.
3 From the menu, select a new pointer shape.
Note: The choices on the Current Theme Pointers pop-up menu reflect the Windows theme you are currently using. If
you change the Windows theme, the choices on this menu change. Because the pointer files are included in the Adobe
Captivate project, users do not need to have the selected Windows theme installed.
Select a custom pointer
1 In an open project, open the slide you want in Edit view.
2 Do one of the following:
• Select Slide > Mouse > Project Pointers > Browse.
• Select Insert > Mouse, and click Browse in the Mouse Properties dialog box.
3 Select a custom pointer from the list.
4 Click Open.
Change pointer size
You can double the size of the pointer. Large pointers emphasize mouse movement and are also helpful if you are
creating accessible projects.
Pointer size is set on a slide-by-slide basis, so you choose exactly the slides that require the larger pointer.
1 In an open project, open the slide containing the pointer in Edit view.
2 Select Slide > Mouse > Properties.
3 In the Mouse Properties dialog box, select the Options tab. The following option is also available on the Options tab:
Double Mouse Size Doubles the size of the pointer.
Page 84

USING ADOBE CAPTIVATE 4
Updated 19 May 2009
Noninteractive Objects and Media
4 Click OK.
The new double-sized mouse is displayed on the slide.
Note: To change the pointer size for a mouse that has already been added, double-click it on the slide to open the
Mouse Properties dialog box.
Note: To restore the original pointer size, follow the steps above and clear Double Mouse Size.
Hide the pointer in an individual slide
1 In an open project, open a slide in Edit view.
2 Do one of the following:
• Select Slide > Mouse > Show Mouse.
• Right-click and select Show Mouse.
Hide the pointer for the entire project
1 In an open project, select Edit > Preferences.
2 In the Category panel, expand Project, and select Publish Settings.
3 In the Publish Settings panel, clear the option Include Mouse.
77
Change mouse movements
You can change mouse movements for an individual slide. For example, you may want to emphasize mouse movement
in a screenshot so that it is more obvious to the viewer.
1 In an open project, open a slide in Edit view.
2 Using the mouse, move the pointer over the end of the mouse line on the slide until the pointer turns into a hand.
3 Click the left mouse button and drag the pointer to a new location on the slide.
If you change the pointer on a slide, the starting pointer location changes on the next slide. Preview your project to
ensure that mouse movement flows smoothly from slide to slide.
You can’t align mouse movement to a previous slide. Make sure that you manually change the starting point of the
mouse on the first project slide containing mouse movements.
Mouse paths
Align mouse paths
You may need the pointer to be completely still during the playback of a slide and have it align properly with the
previous or next slide. In this case, it is difficult to manually position the pointer correctly. Adobe Captivate can solve
the problem by automatically aligning the pointer to the same position as the previous or next slide in the project.
1 In an open project, open a slide in Edit view.
2 Right-click and select Align To Previous Slide or Align To Next Slide.
3 Preview your project to see how the pointer is aligned between slides.
Note: If you have mouse movement on the first slide of your project, you can manually change the start point of the
mouse movement (because you cannot align to a previous slide).
Page 85

USING ADOBE CAPTIVATE 4
Updated 19 May 2009
Noninteractive Objects and Media
Change shape of mouse paths
By default, Adobe Captivate creates curved mouse paths on slides for a realistic, natural feel. However, a straight mouse
path is sometimes preferable, for example, showing movement across a toolbar.
You can set the curved or straight mouse movement option for an individual slide.
1 In an open project, open the slide you want in Edit view.
2 Select Slide > Mouse > Straight Pointer Path.
This option acts like a toggle. Select it again to restore curved paths.
Note: To change the pointer size of a mouse that has already been added, double-click it on the slide to open the Mouse
Properties dialog box.
Set mouse click effect
You can set a mouse click color or effect. Use this option to add a quick burst of color or special effect around the
pointer to emphasize mouse clicks during project playback.
1 In an open project, select a slide containing mouse movement.
2 Select Slide > Mouse > Properties.
3 Select Show Mouse Pointer.
4 In the Options tab, select Show Mouse Click.
5 Do one of the following:
• Select Default Click. Click the color box to open the Color dialog box. Select a color and click OK.
• Select Custom. Select an option from the pop-up menu. Several options are provided: BlueCircle, GreenRing,
OrangeCircle, OrangeRing, VisualClick, and VisualdblClick. To preview these options, select one and click Play.
The SWF file plays in the small Preview window on the right. You can also select Browse in the pop-up menu
and navigate to a SWF file.
6 Click OK.
To view the mouse click color, preview the project.
78
To change the mouse click effect for a mouse that has already been added, double-click it on the slide to open the
Mouse Properties dialog box.
Change mouse click sounds on an individual slide
You can change the default mouse click sound that plays whenever the mouse reaches the end of its movement path.
For example, you can change from single clicks to double clicks to reflect the correct action in a workflow. You can
also suppress all click sounds.
1 In an open project, open the slide you want in Edit view.
2 Select Slide > Mouse > Properties.
3 Select Show Mouse Pointer.
4 In the Options tab, select an option in the Mouse Click Sound menu:
• If you do not want a mouse click sound to play, remove the check mark from the box next to Mouse Click Sound.
• For a single-click sound (the sound of a mouse button being pressed once), select the box next to Mouse Click
Sound. When a green check mark appears, click the arrow and select Single Click.
Page 86

USING ADOBE CAPTIVATE 4
Updated 19 May 2009
Noninteractive Objects and Media
• For a double-click sound (the sound of a mouse button being pressed twice), select the box next to Mouse Click
Sound. When a green check mark appears, click the arrow and select Double Click.
• To browse to an alternative sound for a mouse click, select the box next to Mouse Click Sound. When a green
check mark appears, click the arrow and select Browse. The Open dialog box appears, letting you browse to an
mp3 file.
To preview the selected mouse click sound, click the Play button.
5 When you finish, click OK.
Enable the mouse wheel
When recording, you can choose to enable mouse wheel movement to initiate full motion recording. The project starts
recording in FMR mode when there is mouse wheel movement during recording.
1 In an open project, Select Edit > Preferences.
2 In the Category panel of Preferences, expand Recording, and select Settings.
3 Select Automatically Use Full Motion Recording For Mouse Wheel Actions and click OK.
79
Rollover slidelets
In Adobe Captivate, a rollover slidelet is a space on a slide that displays an associated slidelet (a slide within a slide)
when the mouse is moved over the space. You can insert and display objects in the slidelet using the same procedure
as that for the slides.
For example, you can create a rollover slidelet for a state on a map so that the demographics of the state are displayed
when the mouse moves over it.
Note: You cannot create rollover slidelets on question slides or quiz review slides.
The following is further information about slidelets:
• A slidelet is always linked to a rollover slidelet and is created along with the rollover slidelet.
• You can insert most of the Adobe Captivate objects into a slidelet.
• You can place more than one type of object into a slidelet. The objects become visible when the mouse is moved
over the rollover slidelet.
• You can drag audio and movie files from the Library into a slidelet.
• If a slidelet times out while an audio or movie file from the slide is running, the file stops running.
• When a slidelet or any of its objects is selected, the displayed Timeline and the corresponding menu options for the
slide change to that for the slidelet.
• Objects within a slidelet can be hidden or locked, but not the slidelet itself. To hide or lock a slidelet, hide or lock
the corresponding rollover slidelet from the slide Timeline.
• Slidelet objects cannot be dragged outside of the slidelet boundaries.
• When a slidelet is deleted, its associated objects are also deleted, and the Timeline reverts to the slide Timeline.
• Clicking an area outside the slidelet, or on the Filmstrip, reverts the Timeline to that for the corresponding slide.
Page 87

USING ADOBE CAPTIVATE 4
Updated 19 May 2009
Noninteractive Objects and Media
Properties of slidelets
You can set the following properties using the Properties dialog box of a slidelet.
Rollover Slidelet tab
Border Color Border color for the slidelet.
Border Width The thickness of the slidelet border.
Fill Color Fill color of the slidelet.
Fill Transparency The transparency of the fill color. The greater the value, the higher the transparency of the color.
Select Image Background image of the slidelet.
Clear Remove any previously selected image.
Preview A preview of the slidelet is displayed in this area every time you change an option.
Options tab
Item Name Enter a unique name for the object. You can use this name when defining the visibility conditions for the
object.
• Visible Deselect this option if you want the object to be invisible on the slide. The object can be made visible using
the Show option. For more information, see “Controlling the visibility of objects” on page 52
80
Display For The duration for which the slidelet is displayed on the slide.
The following options are in the Transition area:
Effect The transition effect for the slidelet when it appears and exits the slide.
In and Out boxes The time (in seconds) for the fading effects.
The following option is in the Effects area:
Show Runtime Shadow Select this option to display a shadow below the slidelet during run time. The shadow gives a
three-dimensional feel to the slidelet.
Advanced tab
You can define the action that takes place when the user moves the mouse over the rollover slidelet. For more
information, see “Defining project navigation” on page 97.
See also
“Set audio for noninteractive objects” on page 96
“Fix size and position of noninteractive objects” on page 96
Properties of rollover slidelets
You can set the following properties using the Properties dialog box of a rollover slidelet.
Rollover Slidelet tab
Border Color Border color for the rollover slidelet.
Show Border Displays the border of the rollover slidelet. The border is not displayed if you disable this option.
Fill Color Fill color for the rollover slidelet.
Page 88

USING ADOBE CAPTIVATE 4
Updated 19 May 2009
Noninteractive Objects and Media
Fill Transparency The transparency of the fill color. The greater the value, the higher the transparency of the color.
81
Stick Slidelet
Navigate Define the action to take when the user clicks the rollover slidelet by selecting one of the options in the On
The slidelet continues to be displayed even when you move the mouse away from the rollover slidelet area.
Click menu.
Select Keys You can specify a keyboard shortcut for the mouse-click. Users can use the keyboard shortcut instead of
using the mouse. For example, if you select Control+Shift+Enter as the keyboard shortcut for the mouse-click, the click
is treated as correct (click within the box) when the users press this combination. If they press the wrong combination,
it is treated as a click outside the box.
Note: If your Adobe Captivate project is displayed in a browser, set keyboard shortcuts that do not conflict with common
browser shortcuts. For example, F1 is frequently used as a keyboard shortcut to display Help. The Control, Alt, and Shift
keys map to the Control, Option, and Shift keys on Macintosh® computers, respectively.
Options tab
Item Name Enter a unique name for the object. You can use this name when defining the visibility conditions for the
object.
• Visible Deselect this option if you want the object to be invisible on the slide. The object can be made visible using
the Show option. For more information, see “Controlling the visibility of objects” on page 52.
Display For The duration for which the rollover slidelet is displayed.
Appear After Delay between the first appearance of the slide and the first appearance of the rollover slidelet.
Hover Delay The time delay before the appearance of the slidelet when the mouse moves over the rollover slidelet.
Effect The transition effect for the slidelet when it appears and exits the slide.
In and Out boxes The time (in seconds) for the fading effects.
The following option is in the Effects area:
Show Runtime Border When the mouse moves over the rollover slidelet, a border is displayed with the specified color.
Create a rollover slidelet
1 In an open project, double-click a slide to open it in Edit view.
2 Select Insert > Standard Objects > Rollover Slidelet. The New Slidelet dialog box appears.
3 Set the options for the rollover slidelet as required.
4 (Optional) To apply properties to all slidelets in the project, select Apply To All.
5 Click Settings to select whether to apply all the properties or only the changed properties to the respective slidelet
or to all the slidelets.
6 Click Apply.
7 Click OK.
The rollover slidelet along with the associated slidelet appears on the slide.
To change the properties of a slidelet, right-click it and select Properties from the pop-up menu.
Note: Whenever a new rollover slidelet is inserted, the default timing is Rest Of Slide.
Page 89

USING ADOBE CAPTIVATE 4
Updated 19 May 2009
Noninteractive Objects and Media
Insert objects within a slidelet
1 Select the slidelet by clicking it.
2 Select Insert and choose the object that you want to insert.
3 In the corresponding dialog box that opens, follow the procedure to insert the object.
4 Click OK.
Note: You cannot insert a rollover slidelet, mouse, text entry box, click box, or button within a slidelet.
Change properties of a rollover slidelet
You can change the properties of a rollover slidelet using the various options provided by Adobe Captivate.
1 Right-click the rollover slidelet, and select Properties.
2 Set the options for the rollover slidelet as required.
3 (Optional) To apply properties to all rollover slidelets in the project, select Apply To All.
4 Click Settings to select whether to apply all the properties or only the changed properties to the respective rollover
slidelet or to all the slidelets.
To select all objects in a slidelet, right-click an object within a slidelet, and choose Select All from the pop-up menu.
82
Zoom areas
Zoom areas help you draw the learner’s attention to important sections of a slide. For example, if you create a
simulation that includes a step that might be easily overlooked, you can add a zoom area to highlight the step. After
you add a zoom area, you can add timing, transition, and audio options to the zoom effect. Zoom areas consist of the
following:
Zoom area The area of the slide that you want to magnify.
Zoom destination area The area in which the magnified portion of the slide is displayed.
Properties of zoom destination areas
You can set the properties for a zoom destination area using its Properties dialog box. These are the options in the
Zoom Destination Area tab:
Zoom Destination Area tab
Frame Color Border color of the Zoom Destination Area box.
Fill Color Color of the area within the Zoom Destination Area box.
Frame Width Thickness of the border of the Zoom Destination Area box.
Fill Transparency Transparency of the fill color. The higher the number, the more transparent the box.
Select Image Image for the zoom destination area.
Use the Preview area to view the effects of the changes you make.
Page 90

USING ADOBE CAPTIVATE 4
Updated 19 May 2009
Noninteractive Objects and Media
Note: You can also change the size and position of the zoom area or zoom destination area directly on the slide. Select the
box you want to change. When the hand cursor is visible, you can adjust the position of the box. When the double-headed
arrow cursor is visible, you can adjust the size.
Properties of zoom areas
You can set the properties for a zoom area using its Properties dialog box.
Zoom Area tab
Frame Color Border color of the Zoom Area box.
Fill Color Color of the area within the Zoom Area box.
Frame Width Thickness of the border of the Zoom Area box.
Fill Transparency Transparency of the fill color. The higher the number, the more transparent the box.
Fill Outer Area Select this option to fill the area outside the boundaries of the Zoom Area box with the color selected
in Fill Color. When you choose this option, the area within the Zoom Area box is not colored.
Use the Preview area to view the effects of the changes you make.
Note: You can observe the fill color around the zoom area only when you preview or publish the project.
83
Options tab
Item Name Enter a unique name for the object. You can use this name when defining the visibility conditions for the
object.
• Visible Deselect this option if you want the object to be invisible on the slide. The object can be made visible using
the Show option. For more information, see “Controlling the visibility of objects” on page 52
Display For [Time] Specifies the duration for which the zoom area is displayed.
Appear After [#] Seconds Delay between the first appearance of the slide and the first appearance of the zoom area.
Zoom For The duration of the zoom, in tenths of a second.
Effect The transition effect for the slidelet when it appears and exits the slide.
In and Out boxes The time (in seconds) for the fading effects.
See also
“Set audio for noninteractive objects” on page 96
“Fix size and position of noninteractive objects” on page 96
Add zoom areas
1 In an open project, select the slide to which you want to add a zoom area.
2 Select Insert > Standard Objects > Zoom Area.
3 Set the options for the zoom area as required. Click OK after you are done. The Zoom Area box along with the
corresponding zoom destination area is placed on the slide.
4 Double-click the zoom destination area and set its properties using the Zoom Destination Area dialog box that
appears.
5 Select Apply To All to apply settings specified in the Settings menu to all slides.
Page 91

USING ADOBE CAPTIVATE 4
Updated 19 May 2009
Noninteractive Objects and Media
6 Use the Settings menu to select how to apply property changes in the project. To apply all your changes, select Apply
Only Changed Properties. To apply all the Zoom Destination Area settings, select Apply All Properties. You can
apply the Zoom Destination Area settings to the current slide only or to all slides.
Note: If you change the settings in this dialog box, they become the default settings, and any subsequent slides that you
create use the new settings.
7 Click Apply to view your changes without closing the dialog box.
8 Click OK to accept changes and close the dialog box.
Note: The Zoom Destination Area dialog box always appears on the top layer no matter where it is placed on the Timeline
of a slide.
Images and rollover images
You can incorporate images into projects as logos, startup screens, pointers, backgrounds, buttons, and more. You can
add images in the following formats: JPG, JPEG, GIF, PNG, BMP, ICO, EMF, POT, or WMF.
Rollover images consist of an image and a rollover area (the “hot” area). Rollover images appear when the end user
moves the pointer over the rollover area at run time. They are useful for heavily detailed slides or for slides that contain
buttons or toolbars that require explanation.
84
You can use the same type of graphics for rollover images that you use for traditional images. You can also customize
the location, outline, and size of the rollover area for rollover images.
Adobe Captivate contains a gallery of buttons, sounds, and animations (in SWF format) for you to use in your
projects. By default, the gallery is stored in the following location when you install Adobe Captivate: C:\Program
Files\Adobe\Adobe Captivate 4\Gallery.
Properties of images and rollover images
You can change the properties of an image using the Image Edit panel (Window > Image Edit). The options in the
Image Edit panel are enabled only when you select an image on the slide.
Brightness The brightness of the image. When you increase the value for brightness, the selected image appears
brighter.
Sharpness Sharpening enhances the definition of edges in an image. Whether your images come from a digital camera
or a scanner, most images can benefit from sharpening. The degree of sharpening needed varies according to the
quality of the digital camera or scanner. Keep in mind that sharpening cannot correct a severely blurred image.
Contrast The contrast between the light and dark areas of an image. When you increase the contrast of an image, the
brighter areas appear brighter, and the darker areas appear darker.
Transparency The transparency of the image. At 0% transparency, the image is opaque. At 100% transparency, the
image is invisible.
Hue You can change the colors of an image by changing the values for its hue.
Saturation The intensity of colors in the image. When you increase the saturation value, you increase the intensity of
the colors.
Mosaic The mosaic effect uses squares in a pattern to create a picture. You can split up an image into such separate
squares to achieve the mosaic effect in Adobe Captivate. You can achieve the required mosaic effect by changing the
mosaic value.
Page 92

USING ADOBE CAPTIVATE 4
Updated 19 May 2009
Noninteractive Objects and Media
Gray Scale In a basic sense, you can convert a colored image to monochrome using this effect. Grayscale mode uses
different shades of gray in an image. In 8-bit images, there can be up to 256 shades of gray. Every pixel of a grayscale
image has a brightness value ranging from 0 (black) to 255 (white). In 16-bit and 32-bit images, the number of shades
in an image is much greater than in 8-bit images.
Invert Colors Inverts the colors in an image. When you invert an image, the brightness value of each pixel in the
channels is converted to the inverse value on the 256-step color-values scale. For example, a pixel in a positive image
with a value of 255 is changed to 0, and a pixel with a value of 5, to 250.
Flip Flipping an image produces its mirror image. You can flip an image vertically or horizontally.
Rotate Rotate an image either clockwise or counterclockwise 90 at a time.
Crop Use the handles of the rectangular box to select the area of the image that you want displayed.
The following options are available in the Image tab of the Image dialog box that appears when you click the Properties
button:
Transparent Background All occurrences of one particular color in an image can be made transparent. For example,
you can make all occurrences of red (#FF0000) transparent.
Reset To Original Size Restores the image to its original size.
Preview Displays the image. If you edit the image, such as by changing the transparency, the preview reflects your
changes immediately.
85
Select Image From Library Select this option to reuse an image in your project file. Select the image and click OK.
Import Import an image stored on your computer or on a network location.
Crop Use the handles of the rectangular box to select the area of the image that you want displayed.
The Options tab has the following options:
Item Name Enter a unique name for the object. You can use this name when defining the visibility conditions for the
object.
• Visible Deselect this option if you want the object to be invisible on the slide. Use the Show option to make the
object visible. For more information, see “Controlling the visibility of objects” on page 52.
Display For [Time] Specifies how long the image is displayed on the slide.
Appear After [#] Seconds Delay between the first appearance of the slide and the first appearance of the image.
Effect Transition effect for the image. You can have the image fade in and fade out of the slide during its entry and exit.
In [#] Seconds Specifies the amount of time for the image to fully fade into view.
Out [#] Seconds Specifies the amount of time for the image to completely disappear from view.
See also
“Set audio for noninteractive objects” on page 96
“Fix size and position of noninteractive objects” on page 96
Add an image or rollover image
1 In Storyboard view in an open project, double-click the slide to which you want to add an image.
2 Select Insert > Image, or Insert > Standard Objects > Rollover Image.
3 Select an image from the list or browse to a new location for a different image. Click Open.
Page 93

USING ADOBE CAPTIVATE 4
Updated 19 May 2009
Noninteractive Objects and Media
4 When the height or width of the image is bigger than that of the project, the Resize/Crop Image dialog box appears.
If you are inserting more than one slide, only those images whose dimensions are bigger than that of the project are
displayed in the dialog box.
Set the following options.
Fit To Stage Resizes the image to fit the dimensions of the slide.
Crop Displays a bounding box with dimensions corresponding to that of the project. Resize the handles of the box
to select the area that you want displayed on the slide. If you have selected Constrain Proportions, the height- towidth ratio of the bounding box is maintained.
Zoom You can zoom in and zoom out of the image by moving the slider. Alternatively, you can choose from a list
of standard zoom sizes from the menu.
Constrain proportions Maintains the height-to-width ratio of the bounding box used to crop the image. This
option is enabled only when you choose to crop the image. When you disable this option, resize the bounding box,
and enable the option again; the new dimensions are used thereafter to calculate the ratio.
5 Set properties and options as required.
6 To snap the rollover area to the edges of an object, press Alt and move the rollover area over that object.
7 Click Apply To All to apply the latest settings specified to all slides.
8 Click OK.
The image is added to the slide. If you added a rollover image, the rollover area is also added. Drag the image to the
desired location and adjust the rollover area as needed.
86
You can create a watermark image using a transparency trick. Insert an image and set the transparency to 50%. This
setting works well with many company logos.
Import a PSD file
You can import a Photoshop (PSD) file into your Adobe Captivate project, while preserving Photoshop features. You
can select and import separate layers of the PSD file, or you can flatten selected layers and import them as a single
image. Each imported layer is treated as a separate image within the Adobe Captivate project. In the library, each
imported layer is stored in PNG format as a separate object in the Images folder.
You can resize the imported images to the size of your Adobe Captivate project. You can also apply all other available
image-editing properties of Adobe Captivate.
When importing a PSD file, you can select and import layer comps. A layer comp is a Photoshop feature that allows
you to create, manage, and view multiple versions of a layout in a single Photoshop file. See Photoshop Help for more
information on this feature.
1 In an open project, select File > Import > Photoshop File.
2 In the Importing dialog box, do one of the following:
• To select separate layers of the PSD file, select the As Layers option and select each layer that you want to import.
To merge the selected layers before importing, select Merge Layers.
Note: Importing each layer separately increases the size of your image file. To reduce the size of the image, you can
merge the layers. When you merge layers, the data on the top layers replaces any data it overlaps on the lower
layers.
• To flatten the layers and then import them as a single image, select As Flattened Image.
Page 94

USING ADOBE CAPTIVATE 4
Updated 19 May 2009
Noninteractive Objects and Media
Note: When you flatten layers, you cannot edit each layer separately within Adobe Captivate. Use this option only
if you are sure that layer editing is not required and the image is ready to use.
• To import any inherent layer comps, click the Select menu and choose the layer comp that you want to import.
3 Select Scale According To Stage Size to automatically resize the image to the size of your Adobe Captivate project.
Create watermark images
You can create a watermark image by setting the transparency of an image.
1 In an open project, select Insert > Image.
2 Select an image or browse to a new location for a different image. Click Open. The New Image dialog box appears.
3 Set the image transparency to 50% or higher in the Transparency text box. (A high number results in a dim version
of the image and a lower number displays a brighter image.)
4 Position the image on the slide as required.
Change JPEG quality
Adobe Captivate automatically sets the quality of JPEG images in projects. However, you can adjust this setting
depending upon the images used in your project. Using higher percentage values allows high-quality images but also
increases file size.
87
1 In an open project, select Edit > Preferences.s
2 In the Category panel, select SWF Size And Quality from the Project menu.
3 Enter your preferred value in the JPEG Image Quality text box.
Drawing tools
You can use the drawing tools in Adobe Captivate to create artwork for your projects. Drawing tools help you create
basic shapes within Adobe Captivate so that you don’t have to create and import them from other applications.
Drawing objects are converted to Flash drawing objects when they are imported into Flash.
Note: You can search for drawing objects, and text within them, using the Find dialog box.
If the drawing toolbar is not visible, select Window > Toolbars > Drawing.
The following drawing tools are available in Adobe Captivate:
Selection Tool To select, move, and resize objects. It is used to toggle the different drawing modes. You can exit the
drawing mode at any time using the selection tool. The selection tool is enabled by default in the drawing mode when
you are not working with the other drawing tools.
Draw Line To draw straight lines.
Draw Free-Form Polygon To create free-form polygons.
Draw Rectangle To draw rectangles and squares.
Draw Oval To draw oval shaped objects and circles.
Set Stroke Color To change the stroke color of an object.
Set Fill Color To change the fill color of an object.
Page 95

USING ADOBE CAPTIVATE 4
Updated 19 May 2009
Noninteractive Objects and Media
Set Stroke/Fill To Black/White To change the stroke color of an object to black and its fill color to white.
Swap Fill/Stroke Colors To interchange the color of the stroke and fill for the selected object.
Drawing objects
To draw an object once, click the corresponding icon in the toolbar and drag the pointer on the Stage to create the
object. Adobe Captivate resets to the Select tool after an object is created on Stage. To draw the same type of object
many times over (multiple drawing mode), click the corresponding icon on the drawing toolbar while pressing the
Control key.
Free-form polygons For free-form polygons, define the sides by clicking where you want the node to appear. To
complete drawing the polygon, double-click the final node to automatically join it to the starting node. To redraw a
free-form polygon, select it, and click Redraw Shape in the slide toolbar.
Squares and circles To draw a square or circle, click the rectangle or oval icon, press Shift, and draw the object. If you
want to create a rectangle or square with rounded corners, double-click the rectangular object, and increase the value
of the corner radius.
Horizontal, vertical, and diagonal lines You can rotate lines by 45 using the selection tool. Hold the end of the line,
press Shift, and move the mouse at different angles. This way, you can draw horizontal, vertical, and diagonal lines.
Note: An object is not visible on a slide with a white background if both the stroke and fill of objects are set to white.
88
To exit the drawing or multiple drawing mode, do one of the following:
• Click the selection icon.
• Press Escape.
• Click the Stage.
• Right-click outside the Stage.
Change the stroke and fill properties of drawing objects
Double-click the object, and set the fill and stroke properties for the object in the dialog box that appears. You can
change the fill/stroke properties of legacy objects like highlight boxes and rollover objects using the fill/stroke options
in the drawing toolbar.
You can set the following stroke properties for straight lines:
• Transparency of the line
• Style of the stroke, such as dashes or dots
• Color of the stroke
• Thickness (width) of the stroke
• Arrowheads, circles, diamonds, or squares at the ends of a line
You can set the following stroke and fill properties for the other drawing objects:
• Fill color
• Transparency of the fill color
• Style of the stroke, such as dashes or dots
• Color of the stroke
• Width of the stroke
Page 96

USING ADOBE CAPTIVATE 4
Updated 19 May 2009
Noninteractive Objects and Media
• Corners of the object: You can smooth the corners of a rectangle or square to varying degrees by changing the values
for its corner radius.
To change the stroke color of object to black, and its fill color to white, click Set Stroke/Fill To Black/White in the
Drawing toolbar.
To interchange the color options set for the stroke and fill for the object, click Swap Fill/Stroke Colors.
Resize drawing objects
• To manually resize objects, use the selection tool. Adobe Captivate does not have a separate transformation tool.
You can resize any object after selecting it. Move the cursor over the corners of objects, and when the relevant
cursor appears, resize the object to the required dimensions.
• To resize an object to specific dimensions, select the object, and change the dimensions in the Stage toolbar.
Resize rollover area to the bounding box of drawing objects
❖ Right-click the rollover area, and select Auto Adjust Rollover Area.
When you now move the rollover area over an object, it assumes the shape of the bounding box of that object.
89
Edit free-form polygons
When you edit the free-form polygon, the sides of the polygon are displayed along with the connecting nodes. You can
alter the shape of the polygon by dragging the nodes. The clarity provided by this skeletal structure is especially useful
when editing complex polygons.
1 Select the free-form polygon.
2 Click Edit Points in the Stage toolbar. The skeletal structure of the polygon is displayed.
3 Drag the required nodes.
4 To restore the fill and stroke, click outside the polygon.
You can redraw a selected polygon by doing one of the following:
• Click Redraw Shape in the drawing toolbar.
• Right-click the object, and select Redraw Shape.
• Press Control+Alt+W.
Duplicate drawing objects
Select the object that you want to duplicate, and do one of the following:
• Click the Duplicate Selected Objects icon in the standard toolbar.
• Press Control+D.
Place text inside drawing objects
1 Select the object, and click Add Text in the Stage toolbar.
2 Add text in the text area that appears within the object, and use the text edit toolbar to format the text.
To edit text within objects, click the Add Text icon. The text in the text area within the object is made available for
editing. The text option is not available when you have selected the line tool.
Page 97

USING ADOBE CAPTIVATE 4
Updated 19 May 2009
Noninteractive Objects and Media
Snap lines to objects
When drawing straight lines, you can make them snap to the contours of other Adobe Captivate objects, including
free-form objects. Use this option when you want to precisely connect the end of a straight line to the periphery of an
object.
To snap lines to objects, do the following:
1 Draw the object (rectangle, oval, free-form polygon, and so on).
2 Click the Snap To Object icon .
When you now draw a straight line, the line snaps to the contours of objects with which it comes in contact.
Animations
Adobe Captivate lets you add animation to Adobe Captivate SWF files. This introduces an element of motion that is
effective and eye-catching for users. Add existing animation files to a slide or use the animated text feature in Adobe
Captivate.
• You can add SWF, AVI, FLA, or GIF animation files directly to a slide. Slides containing an animation file can be
edited just like other slides containing an object.
Adobe Captivate contains a gallery that has buttons, sounds, and animations (in SWF format) for you to use in
your projects. By default, the gallery is stored in the following location when you install Adobe Captivate:
C:\Program Files\Adobe\Adobe Captivate 4\Gallery.
90
Note: If you want to add a Flash animation file (FLA), you must first convert it to a SWF file. To do this conversion
you must have the latest Flash version installed on your computer.
• To add animated text, select from a number of interesting effects included with Adobe Captivate. Experiment with
different fonts, colors, and effects to achieve the right look. Slides containing animated text, with their combination
of text, movement, and sound (if you choose to add audio) make great opening slides for projects.
Note: Device fonts are not displayed in Adobe Captivate. If you import an animation file containing text created with
device fonts, the animation appears in Adobe Captivate, but the text does not. For animations that will be imported
into Adobe Captivate, try to use embedded fonts for text.
Properties of animation objects
You can change the properties of animation objects using their Properties dialog box.
Animation tab
Statistics Lists key information about the animation file you selected including version, width, height, and the number
of frames that compose the file. The total duration of the animation file is also shown.
Transparency The transparency of the animation file. A low transparency value results in a bright version of the
animation file and a higher value in a dimmer animation.
Library Animations stored in your project file. When you add an animation file to your project, it automatically gets
added to the library.
Import Import an animation file from your computer or network.
Page 98

USING ADOBE CAPTIVATE 4
Updated 19 May 2009
Noninteractive Objects and Media
Options tab
Item Name Enter a unique name for the object. You can use this name when defining the visibility conditions for the
object.
• Visible Deselect this option if you want the object to be invisible on the slide. The object can be made visible using
the Show option. For more information, see “Controlling the visibility of objects” on page 52.
Display For [Time] The time the animation plays in the project.
• Rest Of Slide The animation plays until the slide stops playing. The animation plays once, unless the Loop option
is selected.
• Rest Of Project The animation plays for the length of the project, even on other slides. The animation plays once,
unless the Loop option is selected.
• Duration Of Animation The animation plays for its entire length once.
• Specific Time The animation plays for the specified time.
Appear After [#] Seconds Delay between the first appearance of the slide and the first appearance of the animation.
Synchronize With Project Synchronizes the speed at which the animation file plays with the Timeline speed. If you find
that the animation file is not playing smoothly, test with this option selected and cleared to see which setting gives you
better results.
91
Place Object On Top The video file starting from the time it appears on the top of all other objects until the project
stops playing.
Loop Select this option to have the animation file loop (replay continuously).
Effect Specify a transition effect for the animation. You can make an animation fade in during its entry, and fade out
during its exit.
In [#] Seconds Specifies the amount of time for the animation to fully fade into view.
Out [#] Seconds Specifies the amount of time for the animation to completely disappear from view.
See also
“Set audio for noninteractive objects” on page 96
“Fix size and position of noninteractive objects” on page 96
Add animations
1 In an open project, select Insert > Animation.
2 Navigate to the animation file you want to add to the slide, select it, and click Open.
3 Set properties and options as required.
4 Use the Settings menu to select how to apply property changes in the project. To apply all your changes, select Apply
Only Changed Properties. To apply all the new animation settings, select Apply All Properties. You can apply the
new animation settings to the current slide only or to all slides.
Note: If you change the settings in this dialog box, they become the default settings, and any new animations you create
use the new settings.
5 Select Apply To All to apply settings specified in the Settings menu to all slides.
6 When you finish, click OK.
The animation is added to the slide.
Page 99

USING ADOBE CAPTIVATE 4
Updated 19 May 2009
Noninteractive Objects and Media
Note: Device fonts are not displayed in Adobe Captivate. If you import an animation file containing text created with
device fonts, the animation appears in Adobe Captivate, but the text will not. For animations that will be imported into
Adobe Captivate, try to use embedded fonts for text.
Animated text
Animated text is text that has applied special effects. Adobe Captivate offers a wide variety of text animation effects
that you can experiment with. For example, on the opening slide of a project you can have text fly in or fade in for an
eye-catching start.
Slides containing animated text are displayed in Adobe Captivate Storyboard view, Edit view, and in the Filmstrip (an
option in Edit view) just like other slides.
Properties of animated text
Use the Properties dialog box of the animated text to set its properties.
Text Animation tab
Set font, transparency, and delay options:
Effect The animation effect that is applied to the text.
92
Text The text to which the animation is applied.
Change Font Specifies font options such as font name, style, size, effects, and colors.
Transparency Specifies a transparency level for the animated text. For a very dim animated text effect, select a high
number such as 90. For darker text, select a low number such as 10.
Delay (Frames) The time elapsed, in Flash frames, between the display of one animated letter and the next. If you set
a low number (for example, 0 or 1), all the letters appear quickly, one after the other. If you set a higher number (for
example, 30 or 40), each letter appears more distinctly. Try different numbers and watch the text in the Preview
window to select an appropriate number.
Note: The number you specify in Delay does not change the absolute amount of time the animated text feature appears.
For example, suppose you specify, in the Options tab) a total animation time of 8 seconds. The value of the Delay option,
whether it is 1 or 30, does not change the absolute time of 8 seconds.
Options tab
Item Name Enter a unique name for the object. You can use this name when defining the visibility conditions for the
object.
• Visible Deselect this option if you want the object to be invisible on the slide. The object can be made visible using
the Show option. For more information, see “Controlling the visibility of objects” on page 52
Display For [Time] Specifies the timing of the animated text. Click the pop-up menu and select an option. If you select
the specific time option, you can enter the exact number of seconds for the animated text to appear.
Appear After [#] Seconds Displays the animated text after the slide has been displayed for the selected number of
seconds.
Loop Select this option to have the animation file continuously loop (play over and over again) as the project plays.
Effect Specify a transition effect for the animation. You can make an animation fade in during its entry, and fade out
during its exit.
In [#] Seconds Specifies the amount of time for the animation to fully fade into view.
Page 100

USING ADOBE CAPTIVATE 4
Updated 19 May 2009
Noninteractive Objects and Media
Out [#] Seconds Specifies the amount of time for the animation to completely disappear from view.
See also
“Set audio for noninteractive objects” on page 96
“Fix size and position of noninteractive objects” on page 96
Add animated text
1 In an open project, open the slide to which you want to add animated text.
2 Select Insert > Text Animation.
3 Click the Text Animation tab.
4 In the Text box, enter the text to animate.
The text appears in the preview window.
5 Set the various options according to your requirements.
6 Use the Settings menu to select how to apply property changes in the project. To apply all your changes, select Apply
Only Changed Properties. To apply all the text animation settings, select Apply All Properties. You can apply the
text animation settings to the current slide only or to all slides.
Note: If you change the settings in this dialog box, they become the default settings, and any new animated text you
create uses the new settings.
93
7 Select Apply To All to apply settings specified in the Settings menu to all slides.
8 Click OK.
Video
You can add FLV files to make your projects more interesting.
Properties of video files
Set the properties for a video file using its Property dialog box.
Flash Video tab
Video Type The type of video that you want to insert:
• Progressive Download Video Loads external FLV files into your Adobe Captivate project and plays them during
run time. Because the video content is kept external to the other Adobe Captivate content and the video playback
controls, it’s relatively easy to update video content without having to rebuild the Adobe Captivate project. When the
movie is played, the video begins playing as soon as the first segment has been downloaded and cached to the local
computer’s hard disk.
• Streaming Video Streaming video either from your own server running Adobe Flash® Media Server or from a host
Flash Video Streaming Service provides the most complete, consistent, and robust delivery option for both audio and
video files. When streaming, each Flash client opens a persistent connection to the Flash Communication Server, and
there is a controlled relationship between the video being delivered and the client interaction. Streaming video is the
only delivery option that allows you to include a live video feed in your Adobe Captivate project.
 Loading...