

Page 1

Breeze Manager User Guide
Page 2

Trademarks
1 Step RoboPDF, ActiveEdit, ActiveTest, Authorware, Blue Sky Software, Blue Sky, Breeze, Breezo, Captivate, Central,
ColdFusion, Contribute, Database Explorer, Director, Dreamweaver, Fireworks, Flash, FlashCast, FlashHelp, Flash Lite,
FlashPaper, Flex, Flex Builder, Fontographer, FreeHand, Generator, HomeSite, JRun, MacRecorder, Macromedia, MXML,
RoboEngine, RoboHelp, RoboInfo, RoboPDF, Roundtrip, Roundtrip HTML, Shockwave, SoundEdit, Studio MX, UltraDev,
and WebHelp are either registered trademarks or trademarks of Macromedia, Inc. and may be registered in the United States or
in other jurisdictions including internationally. Other product names, logos, designs, titles, words, or phrases mentioned within
this publication may be trademarks, service marks, or trade names of Macromedia, Inc. or other entities and may be registered in
certain jurisdictions including internationally.
Third-Party Information
This guide contains links to third-party websites that are not under the control of Macromedia, and Macromedia is not
responsible for the content on any linked site. If you access a third-party website mentioned in this guide, then you do so at your
own risk. Macromedia provides these links only as a convenience, and the inclusion of the link does not imply that Macromedia
endorses or accepts any responsibility for the content on those third-party sites.
Copyright © 2005 Macromedia, Inc. All rights reserved. This manual may not be copied, photocopied, reproduced,
translated, or converted to any electronic or machine-readable form in whole or in part without written approval from
Macromedia, Inc. Notwithstanding the foregoing, the owner or authorized user of a valid copy of the software with which
this manual was provided may print out one copy of this manual from an electronic version of this manual for the sole
purpose of such owner or authorized user learning to use such software, provided that no part of this manual may be
printed out, reproduced, distributed, resold, or transmitted for any other purposes, including, without limitation,
commercial purposes, such as selling copies of this documentation or providing paid-for support services.
Acknowledgments
Director: Erick Vera
Project Management: Stephanie Gowin
Writing: Alice Polesky, with additional writing by Mary Burger and Suzanne Smith
Editing: Linda Adler, Geta Carlson, Evelyn Eldridge, Mary Kraemer, Noreen Maher, Anne Szabla, Lisa Stanziano
Production and Editing Management: Patrice O’Neill
Media Design and Production: Adam Barnett, Mario Reynoso, John Francis
Second Edition: June, 2005
Macromedia, Inc.
601 Townsend St.
San Francisco, CA 94103
Page 3

CONTENTS
INTRODUCTION: Using Breeze Manager . . . . . . . . . . . . . . . . . . . . . . . . . . . . . . . 7
Breeze Manager users. . . . . . . . . . . . . . . . . . . . . . . . . . . . . . . . . . . . . . . . . . . . . . . . 7
Integration with learning management systems . . . . . . . . . . . . . . . . . . . . . . . . . . . . 9
System requirements . . . . . . . . . . . . . . . . . . . . . . . . . . . . . . . . . . . . . . . . . . . . . . . . 9
What’s new in Breeze Manager . . . . . . . . . . . . . . . . . . . . . . . . . . . . . . . . . . . . . . . . 9
Accessing Breeze Manager . . . . . . . . . . . . . . . . . . . . . . . . . . . . . . . . . . . . . . . . . . . 12
About Breeze documentation . . . . . . . . . . . . . . . . . . . . . . . . . . . . . . . . . . . . . . . . 12
Additional Macromedia resources . . . . . . . . . . . . . . . . . . . . . . . . . . . . . . . . . . . . . 13
CHAPTER 1: Understanding the Workspace. . . . . . . . . . . . . . . . . . . . . . . . . . . . . 15
Breeze tab access . . . . . . . . . . . . . . . . . . . . . . . . . . . . . . . . . . . . . . . . . . . . . . . . . . 16
Breeze tab description . . . . . . . . . . . . . . . . . . . . . . . . . . . . . . . . . . . . . . . . . . . . . . 16
Home tab . . . . . . . . . . . . . . . . . . . . . . . . . . . . . . . . . . . . . . . . . . . . . . . . . . . . . . . 17
Breeze terms and concepts . . . . . . . . . . . . . . . . . . . . . . . . . . . . . . . . . . . . . . . . . . . 21
Breeze icons. . . . . . . . . . . . . . . . . . . . . . . . . . . . . . . . . . . . . . . . . . . . . . . . . . . . . . 22
Global Breeze Manager features. . . . . . . . . . . . . . . . . . . . . . . . . . . . . . . . . . . . . . . 23
CHAPTER 2: About Content . . . . . . . . . . . . . . . . . . . . . . . . . . . . . . . . . . . . . . . . . 29
About the Content library . . . . . . . . . . . . . . . . . . . . . . . . . . . . . . . . . . . . . . . . . . . 29
Types of files in the Content library. . . . . . . . . . . . . . . . . . . . . . . . . . . . . . . . . . . . 29
About Content library permissions . . . . . . . . . . . . . . . . . . . . . . . . . . . . . . . . . . . . 31
Structure of the Content library . . . . . . . . . . . . . . . . . . . . . . . . . . . . . . . . . . . . . . 32
Content library activities . . . . . . . . . . . . . . . . . . . . . . . . . . . . . . . . . . . . . . . . . . . . 33
CHAPTER 3: Working with Content . . . . . . . . . . . . . . . . . . . . . . . . . . . . . . . . . . . 35
Navigating the Content library . . . . . . . . . . . . . . . . . . . . . . . . . . . . . . . . . . . . . . . 35
Searching the Content library . . . . . . . . . . . . . . . . . . . . . . . . . . . . . . . . . . . . . . . . 36
Viewing a Macromedia Breeze Presentation. . . . . . . . . . . . . . . . . . . . . . . . . . . . . . 39
Adding new content to the Content library. . . . . . . . . . . . . . . . . . . . . . . . . . . . . . 44
Managing content files and folders . . . . . . . . . . . . . . . . . . . . . . . . . . . . . . . . . . . . 45
Viewing the Content Dashboard . . . . . . . . . . . . . . . . . . . . . . . . . . . . . . . . . . . . . . 54
Content reports. . . . . . . . . . . . . . . . . . . . . . . . . . . . . . . . . . . . . . . . . . . . . . . . . . . 55
3
Page 4

CHAPTER 4: About Training . . . . . . . . . . . . . . . . . . . . . . . . . . . . . . . . . . . . . . . . . 57
Accessing the Training library . . . . . . . . . . . . . . . . . . . . . . . . . . . . . . . . . . . . . . . . 57
About Training library permissions . . . . . . . . . . . . . . . . . . . . . . . . . . . . . . . . . . . . 58
AICC content for courses . . . . . . . . . . . . . . . . . . . . . . . . . . . . . . . . . . . . . . . . . . . 59
Viewing the Training Dashboard. . . . . . . . . . . . . . . . . . . . . . . . . . . . . . . . . . . . . . 59
Training tasks . . . . . . . . . . . . . . . . . . . . . . . . . . . . . . . . . . . . . . . . . . . . . . . . . . . . 60
CHAPTER 5: Working with Courses . . . . . . . . . . . . . . . . . . . . . . . . . . . . . . . . . . . 63
Viewing course information . . . . . . . . . . . . . . . . . . . . . . . . . . . . . . . . . . . . . . . . . 64
Creating a new course . . . . . . . . . . . . . . . . . . . . . . . . . . . . . . . . . . . . . . . . . . . . . . 66
Managing courses . . . . . . . . . . . . . . . . . . . . . . . . . . . . . . . . . . . . . . . . . . . . . . . . . 73
Course reports . . . . . . . . . . . . . . . . . . . . . . . . . . . . . . . . . . . . . . . . . . . . . . . . . . . . 79
CHAPTER 6: Working with Training Curriculums . . . . . . . . . . . . . . . . . . . . . . . . . 81
About curriculum tasks . . . . . . . . . . . . . . . . . . . . . . . . . . . . . . . . . . . . . . . . . . . . . 82
Creating a curriculum . . . . . . . . . . . . . . . . . . . . . . . . . . . . . . . . . . . . . . . . . . . . . . 83
Viewing and modifying curriculum information . . . . . . . . . . . . . . . . . . . . . . . . . . 90
Adding items to a curriculum . . . . . . . . . . . . . . . . . . . . . . . . . . . . . . . . . . . . . . . . 91
Assigning prerequisites to an item . . . . . . . . . . . . . . . . . . . . . . . . . . . . . . . . . . . . . 94
Assigning test-outs for an item or folder . . . . . . . . . . . . . . . . . . . . . . . . . . . . . . . . 95
Removing items from a curriculum . . . . . . . . . . . . . . . . . . . . . . . . . . . . . . . . . . . . 96
Editing curriculum information . . . . . . . . . . . . . . . . . . . . . . . . . . . . . . . . . . . . . . 96
Specifying or editing completion requirements . . . . . . . . . . . . . . . . . . . . . . . . . . . 97
Viewing curriculum status information . . . . . . . . . . . . . . . . . . . . . . . . . . . . . . . . . 97
Managing enrollees . . . . . . . . . . . . . . . . . . . . . . . . . . . . . . . . . . . . . . . . . . . . . . . . 98
Sending notification to curriculum enrollees . . . . . . . . . . . . . . . . . . . . . . . . . . . . . 99
Deleting a curriculum . . . . . . . . . . . . . . . . . . . . . . . . . . . . . . . . . . . . . . . . . . . . . 102
About curriculum reports . . . . . . . . . . . . . . . . . . . . . . . . . . . . . . . . . . . . . . . . . . 103
About setting and removing report filters . . . . . . . . . . . . . . . . . . . . . . . . . . . . . . 107
Downloading curriculum reports. . . . . . . . . . . . . . . . . . . . . . . . . . . . . . . . . . . . . 107
About the Training Dashboard . . . . . . . . . . . . . . . . . . . . . . . . . . . . . . . . . . . . . . 108
CHAPTER 7: Managing the Training Library . . . . . . . . . . . . . . . . . . . . . . . . . . . . 109
Structure of the Training library . . . . . . . . . . . . . . . . . . . . . . . . . . . . . . . . . . . . . 109
Training library tasks. . . . . . . . . . . . . . . . . . . . . . . . . . . . . . . . . . . . . . . . . . . . . . 111
Navigating the Training library . . . . . . . . . . . . . . . . . . . . . . . . . . . . . . . . . . . . . . 111
Managing training files and folders . . . . . . . . . . . . . . . . . . . . . . . . . . . . . . . . . . . 112
CHAPTER 8: About Meetings . . . . . . . . . . . . . . . . . . . . . . . . . . . . . . . . . . . . . . . 119
Accessing the Meetings library. . . . . . . . . . . . . . . . . . . . . . . . . . . . . . . . . . . . . . . 119
About meeting terminology and attributes . . . . . . . . . . . . . . . . . . . . . . . . . . . . . 119
About permissions. . . . . . . . . . . . . . . . . . . . . . . . . . . . . . . . . . . . . . . . . . . . . . . . 122
Meeting room templates . . . . . . . . . . . . . . . . . . . . . . . . . . . . . . . . . . . . . . . . . . . 123
Meeting tasks . . . . . . . . . . . . . . . . . . . . . . . . . . . . . . . . . . . . . . . . . . . . . . . . . . . 124
4 Contents
Page 5

CHAPTER 9: Working with Meetings . . . . . . . . . . . . . . . . . . . . . . . . . . . . . . . . . 127
Getting information about a meeting . . . . . . . . . . . . . . . . . . . . . . . . . . . . . . . . . 128
Joining a meeting . . . . . . . . . . . . . . . . . . . . . . . . . . . . . . . . . . . . . . . . . . . . . . . . 128
Creating a meeting . . . . . . . . . . . . . . . . . . . . . . . . . . . . . . . . . . . . . . . . . . . . . . . 129
Working with existing meetings. . . . . . . . . . . . . . . . . . . . . . . . . . . . . . . . . . . . . . 134
Viewing the Dashboard. . . . . . . . . . . . . . . . . . . . . . . . . . . . . . . . . . . . . . . . . . . . 141
Meeting reports . . . . . . . . . . . . . . . . . . . . . . . . . . . . . . . . . . . . . . . . . . . . . . . . . . 142
CHAPTER 10: Managing the Meetings Library . . . . . . . . . . . . . . . . . . . . . . . . . . 143
Structure of the Meetings library . . . . . . . . . . . . . . . . . . . . . . . . . . . . . . . . . . . . . 143
Navigating the Meetings library. . . . . . . . . . . . . . . . . . . . . . . . . . . . . . . . . . . . . . 145
Searching the Meetings library archives . . . . . . . . . . . . . . . . . . . . . . . . . . . . . . . . 146
Moving and deleting meetings and meeting content . . . . . . . . . . . . . . . . . . . . . . 147
Managing meeting folders . . . . . . . . . . . . . . . . . . . . . . . . . . . . . . . . . . . . . . . . . . 151
CHAPTER 11: About Seminars . . . . . . . . . . . . . . . . . . . . . . . . . . . . . . . . . . . . . . 159
About licensing for meetings and seminars . . . . . . . . . . . . . . . . . . . . . . . . . . . . . 159
Accessing the Seminar library . . . . . . . . . . . . . . . . . . . . . . . . . . . . . . . . . . . . . . . 160
About seminar terminology and attributes. . . . . . . . . . . . . . . . . . . . . . . . . . . . . . 160
About permissions. . . . . . . . . . . . . . . . . . . . . . . . . . . . . . . . . . . . . . . . . . . . . . . . 162
Seminar room templates . . . . . . . . . . . . . . . . . . . . . . . . . . . . . . . . . . . . . . . . . . . 163
Seminar tasks. . . . . . . . . . . . . . . . . . . . . . . . . . . . . . . . . . . . . . . . . . . . . . . . . . . . 163
CHAPTER 12: Working with Seminars . . . . . . . . . . . . . . . . . . . . . . . . . . . . . . . . 165
Obtaining information about a seminar . . . . . . . . . . . . . . . . . . . . . . . . . . . . . . . 166
Joining a seminar. . . . . . . . . . . . . . . . . . . . . . . . . . . . . . . . . . . . . . . . . . . . . . . . . 166
Creating a seminar. . . . . . . . . . . . . . . . . . . . . . . . . . . . . . . . . . . . . . . . . . . . . . . . 167
Working with existing seminars . . . . . . . . . . . . . . . . . . . . . . . . . . . . . . . . . . . . . . 171
Viewing seminar information . . . . . . . . . . . . . . . . . . . . . . . . . . . . . . . . . . . . . . . 171
Viewing the Dashboard. . . . . . . . . . . . . . . . . . . . . . . . . . . . . . . . . . . . . . . . . . . . 179
Seminar reports . . . . . . . . . . . . . . . . . . . . . . . . . . . . . . . . . . . . . . . . . . . . . . . . . . 179
CHAPTER 13: Managing the Seminar Library. . . . . . . . . . . . . . . . . . . . . . . . . . . 181
About the Seminar library . . . . . . . . . . . . . . . . . . . . . . . . . . . . . . . . . . . . . . . . . . 181
Navigating the Seminar library . . . . . . . . . . . . . . . . . . . . . . . . . . . . . . . . . . . . . . 182
Searching the Seminar library archives. . . . . . . . . . . . . . . . . . . . . . . . . . . . . . . . . 184
Moving and deleting seminars and seminar content . . . . . . . . . . . . . . . . . . . . . . 185
Managing seminar folders . . . . . . . . . . . . . . . . . . . . . . . . . . . . . . . . . . . . . . . . . . 189
CHAPTER 14: About Events . . . . . . . . . . . . . . . . . . . . . . . . . . . . . . . . . . . . . . . . 195
When to create events . . . . . . . . . . . . . . . . . . . . . . . . . . . . . . . . . . . . . . . . . . . . . 195
Event life cycle. . . . . . . . . . . . . . . . . . . . . . . . . . . . . . . . . . . . . . . . . . . . . . . . . . . 196
Pre-event tasks. . . . . . . . . . . . . . . . . . . . . . . . . . . . . . . . . . . . . . . . . . . . . . . . . . . 196
In-event tasks . . . . . . . . . . . . . . . . . . . . . . . . . . . . . . . . . . . . . . . . . . . . . . . . . . . 198
Post-Event Tasks . . . . . . . . . . . . . . . . . . . . . . . . . . . . . . . . . . . . . . . . . . . . . . . . . 198
Event tasks . . . . . . . . . . . . . . . . . . . . . . . . . . . . . . . . . . . . . . . . . . . . . . . . . . . . . 199
Contents 5
Page 6

CHAPTER 15: Working with Events . . . . . . . . . . . . . . . . . . . . . . . . . . . . . . . . . . 201
Creating an event . . . . . . . . . . . . . . . . . . . . . . . . . . . . . . . . . . . . . . . . . . . . . . . . 201
Previewing and modifying registration and event pages . . . . . . . . . . . . . . . . . . . . 210
Publishing events. . . . . . . . . . . . . . . . . . . . . . . . . . . . . . . . . . . . . . . . . . . . . . . . . 214
Changing an existing event . . . . . . . . . . . . . . . . . . . . . . . . . . . . . . . . . . . . . . . . . 214
Event follow-up. . . . . . . . . . . . . . . . . . . . . . . . . . . . . . . . . . . . . . . . . . . . . . . . . . 218
Event reports . . . . . . . . . . . . . . . . . . . . . . . . . . . . . . . . . . . . . . . . . . . . . . . . . . . . 218
Joining events as a participant . . . . . . . . . . . . . . . . . . . . . . . . . . . . . . . . . . . . . . . 219
CHAPTER 16: Managing the Event Library. . . . . . . . . . . . . . . . . . . . . . . . . . . . . 221
Navigating the Event library . . . . . . . . . . . . . . . . . . . . . . . . . . . . . . . . . . . . . . . . 221
Viewing information about an event . . . . . . . . . . . . . . . . . . . . . . . . . . . . . . . . . . 223
Moving an event . . . . . . . . . . . . . . . . . . . . . . . . . . . . . . . . . . . . . . . . . . . . . . . . . 224
Deleting an event . . . . . . . . . . . . . . . . . . . . . . . . . . . . . . . . . . . . . . . . . . . . . . . . 225
Editing event information . . . . . . . . . . . . . . . . . . . . . . . . . . . . . . . . . . . . . . . . . . 225
Managing event participants . . . . . . . . . . . . . . . . . . . . . . . . . . . . . . . . . . . . . . . . 226
Sending event invitations. . . . . . . . . . . . . . . . . . . . . . . . . . . . . . . . . . . . . . . . . . . 229
Managing event folders . . . . . . . . . . . . . . . . . . . . . . . . . . . . . . . . . . . . . . . . . . . . 230
CHAPTER 17: About Administration . . . . . . . . . . . . . . . . . . . . . . . . . . . . . . . . . . 235
Administration workflow. . . . . . . . . . . . . . . . . . . . . . . . . . . . . . . . . . . . . . . . . . . 235
Account management activities . . . . . . . . . . . . . . . . . . . . . . . . . . . . . . . . . . . . . . 236
User management activities . . . . . . . . . . . . . . . . . . . . . . . . . . . . . . . . . . . . . . . . . 236
CHAPTER 18: Managing the Breeze Account . . . . . . . . . . . . . . . . . . . . . . . . . . 237
About your organization’s Breeze account . . . . . . . . . . . . . . . . . . . . . . . . . . . . . . 237
Editing Breeze account information . . . . . . . . . . . . . . . . . . . . . . . . . . . . . . . . . . 240
Customizing Breeze. . . . . . . . . . . . . . . . . . . . . . . . . . . . . . . . . . . . . . . . . . . . . . . 241
Viewing the Administration Dashboard . . . . . . . . . . . . . . . . . . . . . . . . . . . . . . . 246
Viewing your account reports . . . . . . . . . . . . . . . . . . . . . . . . . . . . . . . . . . . . . . . 246
CHAPTER 19: Working with Users and Groups . . . . . . . . . . . . . . . . . . . . . . . . . 255
Breeze permissions architecture . . . . . . . . . . . . . . . . . . . . . . . . . . . . . . . . . . . . . . 255
Types of groups and group permissions . . . . . . . . . . . . . . . . . . . . . . . . . . . . . . . . 258
Library activities and their permissions . . . . . . . . . . . . . . . . . . . . . . . . . . . . . . . . 264
Customizing user profile fields . . . . . . . . . . . . . . . . . . . . . . . . . . . . . . . . . . . . . . 272
Managing login and password parameters . . . . . . . . . . . . . . . . . . . . . . . . . . . . . . 275
Breeze account creation workflow . . . . . . . . . . . . . . . . . . . . . . . . . . . . . . . . . . . . 275
Working with LDAP-acquired users and groups . . . . . . . . . . . . . . . . . . . . . . . . . 276
Importing user and groups CSV files . . . . . . . . . . . . . . . . . . . . . . . . . . . . . . . . . . 276
Creating groups manually . . . . . . . . . . . . . . . . . . . . . . . . . . . . . . . . . . . . . . . . . . 280
Creating a new user manually . . . . . . . . . . . . . . . . . . . . . . . . . . . . . . . . . . . . . . . 282
Setting custom permissions for the Breeze libraries . . . . . . . . . . . . . . . . . . . . . . . 285
Changing and viewing information for existing users . . . . . . . . . . . . . . . . . . . . . 286
Viewing and changing information for existing groups . . . . . . . . . . . . . . . . . . . . 292
INDEX . . . . . . . . . . . . . . . . . . . . . . . . . . . . . . . . . . . . . . . . . . . . . . . . . . . . . . . . . . 297
6 Contents
Page 7

INTRODUCTION
Using Breeze Manager
Breeze Manager is a web application that acts as an access and control point for all Macromedia
Breeze applications. Breeze Manager allows you to set up and manage meetings, seminars, and
training courses and curriculums, as well as manage content that can be shared through meetings,
presentations, training courses, and events.
In addition, the user management component of Breeze Manager enables you to set access
permissions for both the users of this content and the content itself.
Note: Not everyone can use all the Breeze Manager features. The features you can access depend
on your Breeze configuration and your permissions.
Breeze Manager users
You use different features of Breeze Manager depending on your user needs. Breeze users are
divided into the following groups:
• “Meeting Hosts” on page 7
• “Authors” on page 8
• “Training Managers” on page 8
• “Seminar Hosts” on page 8
• “Event Managers” on page 8
• “Administrators” on page 8
Meeting Hosts
This group includes administrative assistants, managers, and everyone in an organization who can
create Breeze Meetings. You do not need Breeze Manager to attend such a meeting; all you need is
the meeting URL. However, in many cases, you can enter a Breeze Meeting from Breeze Manager
as well. For background information about meetings, see Chapter 8, “About Meetings,” on
page 119. For instructions on joining, creating, or modifying meetings, see Chapter 9, “Working
with Meetings,” on page 127.
7
Page 8

Authors
An author is anyone who uploads content to the Breeze server. Content can include files created
in Breeze Presenter, Macromedia Captivate, or any other content uploaded to the Breeze Content
library. For information on the types of files you can upload to Breeze, see “Types of files in the
Content library” on page 29.
For information on working with Macromedia Breeze Presenter, see Breeze Presenter User Guide.
Once the file conversion is complete, see Chapter 3, “Working with Content,” on page 35. This
chapter explains how to work with content files. In addition, the chapter includes instructions for
viewing presentations, since a completed presentation can be viewed from the Content library—
not only at the meeting, but any time thereafter—by those who have the proper permissions.
Training Managers
Breeze refers to trainers as “training managers.” This group includes anyone developing courses
and curriculums. If you are a trainer or course manager, see, Chapter 5, “Working with Courses,”
on page 63, Chapter 6, “Working with Training Curriculums,” on page 81, and Chapter 7,
“Managing the Training Library,” on page 109.
Seminar Hosts
This group includes individuals who present seminars. A seminar is a special kind of meeting with
its own attributes and licensing structure. For information on seminars, see Chapter 11, “About
Seminars,” on page 159. For instructions on creating and changing seminars, see Chapter 12,
“Working with Seminars,” on page 165; for information on managing seminar files, see
Chapter 13, “Managing the Seminar Library,” on page 181.
Event Managers
This group includes anyone who organizes events. An event can be any meeting, presentation,
course, curriculum, or seminar that requires registration and generates reports with participant
tracking information. For a description of events, see Chapter 14, “About Events,” on page 195.
For procedures on creating and managing events, see Chapter 15, “Working with Events,” on
page 201 and Chapter 16, “Managing the Event Library,” on page 221. If your event also includes
a presentation, see Chapter 3, “Working with Content,” on page 35.
Administrators
This group consists of the users who manage the Breeze application for the entire organization. As
such, administrators are responsible for customizing Breeze’s appearance for their organization
and managing all aspects of Breeze accounts. This includes performing any task that account and
user management entails, such as creating custom user groups and assigning users to these, as well
as to the Breeze built-in groups. If you are an administrator, see Chapter 17, “About
Administration,” on page 235, Chapter 18, “Managing the Breeze Account,” on page 237, and
Chapter 19, “Working with Users and Groups,” on page 255.
8 Introduction: Using Breeze Manager
Page 9

Integration with learning management systems
Enterprises can integrate Breeze content with their learning management systems (LMSs). Breeze
supports the two standard LMS communication protocols:
• Aviation Industry CBT Committee (AICC) with HTTP AICC Communication Protocol
(HACP), versions 2.0 through 3.5
• Sharable Content Object Reference Model (SCORM), version 1.2
You can select the appropriate LMS communication protocol when you publish content in Breeze
Presenter. For more details, see Breeze Presenter User Guide.
System requirements
To use Breeze Manager you need the following:
• An Internet connection
• One of the supported operating systems listed at www.macromedia.com/go/breeze_sysreqs
• One of the supported browsers listed at www.macromedia.com/go/breeze_sysreqs
• Macromedia Flash Player 6 (6.0.65) or later as a browser plug-in
Note: Macromedia Flash Player is standard in most browsers. You can find out what version of
Flash Player you have at the Test Macromedia Web Players page at www.macromedia.com/
software/flash/about/.
• A sound card and speakers for listening to audio accompanying presentations or broadcasts by
other meeting participants
• (Optional) A microphone to broadcast audio to other meeting participants or record narration
for Breeze Presentations
• (Optional) A web camera to broadcast video to other meeting participants
For complete Breeze system requirements and recommendations, see www.macromedia.com/go/
breeze_sysreqs.
What’s new in Breeze Manager
Breeze Manager 5.0 not only provides new and improved functionality for all the current users; it
also has new features and new functionality for new kinds of users. For information on these, see
the following:
• “New Breeze Manager tabs” on page 10
• “General application additions and enhancements” on page 10
• “New features for Breeze administrators” on page 11
• “New features for Breeze authors” on page 11
• “New features for Breeze trainers” on page 12
What’s new in Breeze Manager 9
Page 10

New Breeze Manager tabs
There are four new tabs, each representing a new functionality, that have been added to the Breeze
Manager interface:
• Training tab. This tab replaces and incorporates all the features from the previous Courses tab,
but also adds the ability to create and manage curriculums as well. See Chapter 6, “Working
with Training Curriculums,” on page 81.
• Seminar Rooms tab. A seminar room is a type of meeting room that is used to hold large live
events. See Chapter 11, “About Seminars,” on page 159, Chapter 12, “Working with
Seminars,” on page 165, and Chapter 13, “Managing the Seminar Library,” on page 181.
• Event Management tab. An event can be any meeting, training, seminar, or presentation that
requires registration and special reporting data. Since it is normally used to manage a large
number of users at a time, the events functionality enables you to do bulk imports of large user
lists via CSV (comma separated values) files. In addition, event reports include special features
for participant data. See Chapter 14, “About Events,” on page 195, Chapter 15, “Working
with Events,” on page 201, and Chapter 16, “Managing the Event Library,” on page 221.
• Administration tab. This tab combines the account administrator, reporting, and user
management (the former Accounts, Reports, and Users tabs) functions used by Breeze
administrators, with several new features and enhancements added. See “New features for
Breeze administrators” on page 11, as well as Chapter 17, “About Administration,” on
page 235, Chapter 18, “Managing the Breeze Account,” on page 237, and Chapter 19,
“Working with Users and Groups,” on page 255.
In addition, the Reports tab has been removed because the reporting functionality has been
moved into the individual tabs. Report functionality has been considerably enhanced; see
“Reporting features” on page 10.
General application additions and enhancements
Breeze 5.0 has a new user interface, which makes Breeze Manager easier to use, and includes some
additional features. For information about this, see Chapter 1, “Understanding the Workspace,”
on page 15.
Reporting features
All the Breeze Manager functionalities have increased reporting capabilities, including the ability
to set report filters and download or print reports.
A completely new reporting feature is the Dashboard. This feature provides a dashboard for each
tab, with a graphical representation of statistical information relevant to the tab’s function. Each
Dashboard allows you to drill down to view more information on a specific item.
List navigation
Any list of user and group names that you use now has a Search button that enables you to locate
a name in the list. You can also expand a group in a list to see the members, as well as select
multiple names.
10 Introduction: Using Breeze Manager
Page 11

Custom URLs
You can now create a custom URL for your meetings, training, events, presentations, or seminars
that is easy to remember. This name is appended to the domain name of your server, and is
created when you set up the meeting, training, event, or seminar, as explained in the relevant
chapters of this guide. For information on custom URLs, see “Custom URLs” on page 24.
Custom branding
The branding functionality for Breeze has been enhanced so you can incorporate your
organization’s identity throughout Breeze. You can apply color schemes and logos to your pages,
including login pages and Breeze Manager, Breeze Presentations, and Breeze Meeting pages.
New features for Breeze administrators
In addition to the features mentioned earlier, Breeze 5.0 now has enhanced and expanded both
the user management and account management aspects of account administration.
User management
This Breeze release has improved the user interface to make user and group management easier.
You can also now define managers and team members for Breeze users, as well as customize the
attributes you want to include on user profiles.
In addition, there are two new ways to add users and groups into Breeze. Both of these make user
management much easier:
• Administrators can now import users and groups into Breeze using CSV files. See “Importing
user and groups CSV files” on page 276.
• Breeze now supports Lightweight Directory Access Protocol (LDAP) synchronization. See
“Working with LDAP-acquired users and groups” on page 276.
Account management
Breeze now enables policies for management of passwords and administrator password resets that
are consistent with industry best practices. These policies are enforced across the Breeze
applications and allow administrators to align Breeze with their existing security policies.
For details, see Chapter 18, “Managing the Breeze Account,” on page 237.
New features for Breeze authors
You can now upload web pages, Captivate files, and other new file types to the Content library. In
addition, there is a new interface for viewing presentations. For details, see Chapter 3, “Working
with Content,” on page 35.
What’s new in Breeze Manager 11
Page 12

New features for Breeze trainers
Breeze training now includes the new curriculum functionality. With it, you can group courses
and add Breeze content, presentations, events, meetings, and courses, as well as learning content
external to Breeze, such as classroom training and required reading. You can also define
prerequisites for a curriculum, and you can design your program so that users can “test out” of
certain subjects by proving mastery in related subjects.
As users complete items in the curriculum, you can track their progress and generate reports,
thereby ensuring that the curriculum meets the learning objectives.
For details, see Chapter 4, “About Training,” on page 57.
Accessing Breeze Manager
Every Breeze user receives an organization-specific Breeze Manager URL, along with a Breeze user
name and a modifiable password, in an e-mail sent out by their organization’s Breeze
administrator. You access Breeze Manager by typing this Breeze Manager URL in a browser
window, and then logging in to Breeze, as described below.
Note: If you have Macromedia Breeze Presenter or Macromedia Captivate installed, you can also use
the Publish option to upload content to the Content library. For more details, see the Breeze Presenter
User Guide.
To access Breeze Manager:
1.
In a browser window, enter the URL provided by your Breeze administrator or included in the
Welcome email.
2.
On the Login page, enter your Breeze user name and password.
3.
Click the Submit button.
Breeze Manager appears. For a description of the Breeze Manager user interface, see Chapter 1,
“Understanding the Workspace,” on page 15.
About Breeze documentation
In addition to the Breeze Manager User Guide, Breeze user documentation consists of the
following guides:
Breeze Meeting User Guide for Hosts and Presenters/Participants This guide is for
participants and presenters in a Breeze Meeting. There are two versions: Breeze Meeting User
Guide for Hosts and Presenters and Breeze Meeting User Guide for Participants. You can access these
guides from within a Breeze meeting by selecting Meeting > Help.
Breeze Presenter User Guide This guide is for Breeze users who use the Breeze PowerPoint
plug-in, Breeze Presenter. It provides for installing the program, creating presentations, designing
the look of presentations, adding audio, including quizzes, publishing to the Breeze server, and
working with presentations in Breeze. You can access this guide by clicking Help from the Breeze
menu in PowerPoint.
12 Introduction: Using Breeze Manager
Page 13

Additional Macromedia resources
More information is available from the following websites:
Breeze Resource Center The Breeze Resource Center is updated regularly with tutorials,
simulations, best-practices information, and links to procedures. Check the website at
www.macromedia.com/resources/breeze.
Breeze Product Center The Breeze Product Center is updated regularly with the latest
information on Breeze, including FAQs, white papers, testimonials, and tips. Check the website
often for the latest news on Breeze at www.macromedia.com/software/breeze.
Breeze Support Center The Breeze Support Center contains the latest support information,
including TechNotes, Breeze presentation tutorials, and support program details. Check the
website often for the latest Breeze support information at www.macromedia.com/support/breeze.
Breeze Developer Center The Breeze Developer Center provides information for Breeze
developers on extending Breeze and developing Breeze applications, at www.macromedia.com/
devnet/breeze.
Additional Macromedia resources 13
Page 14

14 Introduction: Using Breeze Manager
Page 15

CHAPTER 1
Understanding the Workspace
The Macromedia Breeze Manager is the web application that enables users to manage content
and create meetings, events, courses, and much more.
The full Breeze Manager application user interface consists of seven tabs (also called pages),
each associated with a particular function and application, as the following illustration shows.
This chapter describes the tabs, and also explains some features and concepts that are common
across Breeze.
15
Page 16

Breeze tab access
You might not see all seven tabs on your own interface. This is because your organization has not
purchased the applications associated with particular tabs. If your organization has purchased a
specific Breeze application, it is visible in your Breeze Manager window, but you might get an
error message when you click on the tab to access it. If this happens, it means that you were not
assigned access privileges for this application. Breeze is a permissions-based system, so you cannot
access applications for which you do not have permission, although these applications are
available to other Breeze users in your organization. The same is true for any file or folder that you
cannot access. For example, although you can access your own folder on a specific tab, you might
get an error message if you try to access one for which you do not have permissions.
A user gains access to a tab when an administrator assigns the user to a built-in group that has
permission to access the tab. For a description of built-in groups, see “Built-in groups”
on page 259.
Breeze tab description
The tabs and their associated applications are:
• Home tab, the only tab accessible to all Breeze Manager users. It enables users to perform
various tasks related to their specific Breeze account. This chapter describes the Home tab in
detail. See “Home tab” on page 17.
• Content tab, for users to manage content that can be used for presentations, training,
meetings, and seminars. The Content tab contains the Content library, a set of Content folders
and files. In Breeze, users who create content are called authors. However, the Content tab is
available for all users with appropriate access permissions. For information about working with
content and the Content library, see Chapter 2, “About Content,” on page 29 and Chapter 3,
“Working with Content,” on page 35.
• Training tab, associated with courses and curriculums. If you use this tab to create courses and
curriculums, Breeze refers to you as a training manager. For information about the Training tab
and everything you can use it for, see Chapter 4, “About Training,” on page 57, Chapter 5,
“Working with Courses,” on page 63, Chapter 6, “Working with Training Curriculums,” on
page 81, and Chapter 7, “Managing the Training Library,” on page 109.
• Meetings tab, used to create and manage meetings. If you can create meetings that appear on
this tab, you are a Breeze Meeting host. For information, see Chapter 8, “About Meetings,” on
page 119, Chapter 9, “Working with Meetings,” on page 127, and Chapter 10, “Managing the
Meetings Library,” on page 143.
• Seminar Rooms tab, used to create and manage seminars, a special type of Breeze Meeting with
its own requirements. This tab is accessible to seminar hosts; for details, see Chapter 11,
“About Seminars,” on page 159, Chapter 12, “Working with Seminars,” on page 165, and
Chapter 13, “Managing the Seminar Library,” on page 181.
16 Chapter 1: Understanding the Workspace
Page 17

• Event Management tab, associated with events, which can be any Breeze Meeting, training,
presentation, or seminar that requires registration and special reporting requirements. Breeze
event managers use the Event Management tab to create and manage events. For information,
see Chapter 14, “About Events,” on page 195, Chapter 15, “Working with Events,” on
page 201, and Chapter 16, “Managing the Event Library,” on page 221.
• Administration tab, a critical part of the Breeze Manager and visible to all users. However, the
Administration tab is not accessible to anyone except the Breeze administrators, the users
responsible for performing all of the tasks associated with Breeze account and user
management functions. An administrator adds new users to Breeze, assigns permissions,
customizes the look of the Breeze interface, and performs numerous other tasks. If you are an
administrator, see Chapter 17, “About Administration,” on page 235, Chapter 18, “Managing
the Breeze Account,” on page 237, and Chapter 19, “Working with Users and Groups,” on
page 255.
Home tab
No matter what functions you use Breeze for, if you have a Breeze account, the Home tab (also
referred to as “Home page”) is always accessible to you. It is the tab that is active as soon as you
log in to Breeze (for the procedures on accessing Breeze, see “Using Breeze Manager” on page 7).
You can think of this page as your base of operations. From here, you join any Breeze meetings or
events for which you are scheduled, create any meetings or events for which you have permission,
locate information and resources, and manage your Breeze account, as explained in this chapter.
Home tab user listings and links
Below the Breeze Manager tabs is a row of links, each of which directs you to a list with
information that is relevant only to you. When you display one of these lists, you can often
perform additional actions. For information on these actions, see the following sections:
• “My Training” on page 17
• “My Scheduled Meetings” on page 18
• “My Scheduled Events” on page 18
• “Manager Reports” on page 18
My Training
Clicking the My Training link displays a list of the training courses or curriculums in which you
are enrolled. To get details about any item on the list, click the name in the list to view a profile
specific to that course or curriculum.
The same information is displayed in list form under Training I’m Enrolled In on the Home page.
However, clicking My Training allows more of the list to be displayed and also contains My
Completed Training, a link at the top of the page that you can click to see a list of training classes
that you’ve completed.
Alternatively, clicking the More link below the Training I’m Enrolled In list brings you to the
same page that appears when you click the My Training link.
Home tab 17
Page 18

My Scheduled Meetings
Clicking the My Scheduled Meetings link displays all of the current and expired Breeze Meetings
in which you are involved; your involvement is shown in the Role column. Although your current
and future meetings are also displayed in list form under My Scheduled Meetings, clicking My
Scheduled Meetings also displays a list of expired meetings. Clicking the Enter link brings you
into the meeting room, where you can join a live Breeze Meeting or view a presentation from a
past meeting. Click the meeting name to display the meeting details and an Enter Meeting Room
button so that you can join the meeting.
In addition, you can click the More link below the My Scheduled Meetings list to view the same
page that appears when you click the My Scheduled Meetings link.
For information and instructions on both joining and creating meetings, see Chapter 8, “About
Meetings,” on page 119, Chapter 9, “Working with Meetings,” on page 127, and Chapter 10,
“Managing the Meetings Library,” on page 143.
My Scheduled Events
Clicking the My Scheduled Events link displays a list of all the events for which you are registered,
as well as all your expired events. Just as you can join a meeting at any time, you can view an event
at any time, regardless of whether or not it has expired, click Enter. For more information on
joining events, see Chapter 15, “Working with Events,” on page 201.
Manager Reports
The Manager Reports link applies only to users who are managers. If you are a manager, you can
click Manager Reports to display a list of all your direct reports. You can also select links to the
training, meeting, and event reports for each of these individuals. From Manager Reports, you
can click the link for a report type to see a list of all reports for this team member for this report
type. You can then click the link for a given report to see the report information, and depending
on the report you selected, you can click another link to see more specific information.
In addition, if any of the users you manage also has subordinates, you can click the direct report’s
name to display a list of that person’s direct reports and the corresponding training, meeting, and
event reports for each of them. In this way, you can view reports for all of the people who report
to you either directly or indirectly.
18 Chapter 1: Understanding the Workspace
Page 19

Home tab actions
On the left side of the Home tab are two features that enable you to perform specific actions.
Create
The Create menu enables you to create new occurrences of those functions for which you have
permission. For example, if you are a meeting host, the menu includes the New Meeting option.
You can click New Meetings to start the Meeting wizard to create a new meeting.
Training managers can use the Create menu to create a new course or curriculum. To use the
Create feature, click the appropriate link below the Create label to start the wizard you want
to use.
Note: The Create menu displays create options only for those functions for which you have
permissions. For example, if you are a training manager but not a meeting host, the New Meeting
option does not appear in your Create menu.
Learn
The Learn menu has four links that are useful in learning Breeze:
• Getting Started: A list of Breeze manuals, including this guide, as well as procedures targeted to
specific audiences.
• Breeze Manager Help: This guide, providing user information for the Breeze Manager web
application.
• Breeze Resource Center: The Breeze Resource Center site is updated regularly with tutorials,
simulations, best-practices information, and links to procedures.
• Breeze Documentation: The full set of documentation provided with Breeze 5, including
information for administering, managing, and using Breeze applications.
Persistent features
A persistent feature is a feature that appears on every tab, so you can perform its associated
function from anywhere within Breeze Manager, not only from the Home tab. Breeze Manager
has four persistent features, located in the upper-right corner of the Manager window. The links
for My Profile, Help, and Logout are to the left of your name, above the tab bar, and the Search
Content input area is on the far right end of the tab bar.
Home tab 19
Page 20

My Profile
Clicking the My Profile link displays information about your Breeze account, as well as two
additional links, Change My Password and Edit My Preferences.
User Information The information displayed may vary, depending on the information your
Breeze administrator has defined for user profiles, but at the very least your first and last names,
your login, and your e-mail address are listed. In addition, the following information also appears:
• Audio conference settings, which is telephone access information (your moderator code and
client ID) for dialing in to Breeze Meetings
Note: The client ID is the customer identification number assigned by Premiere Conferencing. If
your company uses another provider, this field has another name.
• Your manager’s name (if applicable)
• Your team members’ names (if applicable)
Change My Password Click here to change your password. When you do, you are prompted
once for your current password, and then twice for your new password.
Edit My Preferences Click here to display a page that enables you to change your time zone
and audio conference settings.
Group Memberships Click here to display a list of all the groups to which you belong,
including built-in groups.
Organization Click here to display a page that displays your manager’s name and the names of
all of your team members, if applicable.
Help
Clicking Help displays this manual as a set of Help topics, each of which corresponds to a chapter.
You can click any one of these topics to see more specific information within a given chapter.
Logout
Click this link to exit from Breeze Manager. When you do, the Breeze Manager login page
appears. Close the login page to exit from the application.
Search Content
You can enter keywords at the Search Content link to search the Content library for
presentations, as well as meeting and seminar archives.
Note: The presentations themselves must be searchable for the Search feature to be operable. In
addition, you must have permissions to view the content you are searching for.
To use Search Content, enter a keyword and click Search Content. You can also click Search
Content without entering a keyword to set the search parameters to refine your search. For
detailed information and instructions about how to use this feature, see “Searching the Content
library” on page 36.
20 Chapter 1: Understanding the Workspace
Page 21

Breeze terms and concepts
If you are new to Breeze Manager, this section contains some terminology you might find helpful.
For more information, see the following sections:
• “Meetings and seminars versus meeting rooms and seminar rooms” on page 21
• “Breeze content” on page 21
• “Breeze events” on page 22
• “Breeze reports” on page 22
Meetings and seminars versus meeting rooms and seminar rooms
A Macromedia Breeze Meeting is an online real-time meeting in which a presenter can show slides
or multimedia presentations, share pages, chat, and broadcast live audio and video. A Breeze
Meeting takes place in a Breeze meeting room, a Macromedia Flash application that you run in a
browser window by using Macromedia Flash Player. The meeting room continues to exist even
after the meeting is over.
In addition, depending on the pricing model your organization has purchased, you might or
might not be able to enter a meeting if the meeting is not live. In some cases, only the host can
enter the meeting room when the meeting is not live. In other cases, you can enter the meeting
room when the meeting is not live if enough meeting room spaces are available across the system
at the moment you enter.
You create the meeting room with Breeze Manager. In Breeze Manager, all Breeze meeting rooms
are contained in the Meeting library. For more details about the library, as well as procedures for
joining, participating in, and setting up meetings, see Chapter 9, “Working with Meetings,” on
page 127.
A Breeze seminar is a unique kind of Breeze Meeting, with its own licensing requirements and
attributes. A seminar room is comparable to a meeting room, that is, a Flash application that runs
in a browser window. Unlike some meeting rooms, however, at least one Breeze presenter or host
for the seminar must be in the room in order for others to enter, even if the seminar is a public
meeting. A seminar ends if all the presenters and hosts exit from the room. Because of their
unique requirements and format, seminars have a dedicated Breeze Manager tab named Seminar
Rooms, as well as their own Seminar library. A seminar ends if all meeting users with presenter or
host rights exit from the meeting. For general information on seminars, see Chapter 11, “About
Seminars,” on page 159.
Breeze content
Any file or folder that is stored in the Breeze Content library is referred to in Breeze as content.
Content is synonymous with information and accessed from the Content tab of Breeze Manager.
The Content library is associated with Breeze authors (see “Breeze Manager users” on page 7), the
only users who can upload files to this library. For information about the library, the types of files
it contains, and how to use it, see Chapter 3, “Working with Content,” on page 35.
Breeze terms and concepts 21
Page 22

Breeze events
In Breeze, the term event means a large-scale web meeting, presentation, seminar, or training that
requires registration and has unique reporting requirements. As such, the Breeze Event
Management functionality contains special features that are exclusive to events.
For more information about events, see Chapter 14, “About Events,” on page 195. For procedures
for performing all the activities involved in holding an event, see “Creating an event”
on page 201.
Breeze reports
You can create diverse types of reports in Breeze Manager for information about individual
meetings, courses, curriculums, seminars, and users, among others. You can add report filters to
streamline report information, and if you are a manager, you can view reports for your team
members. For information about manager reports, see “Manager Reports” on page 18. For
background information and procedures on reports for a specific function, see the report
description in the relevant chapter of this manual.
Breeze icons
Breeze Manager uses icons to represent meetings, seminars, presentations, courses, and
curriculums. To identify these events, see the following table:
Icon Description
Content Breeze content includes files such as Adobe PDF files or Microsoft Word
documents that are used with Breeze meetings, seminars, presentations, or training.
Course A Breeze course is a presentation that is associated with a group of enrolled
learners with tracking for each individual. The course can be used independently or as
part of a curriculum.
Curriculum A Breeze curriculum is a group of courses and other learning content that
guides students along a learning path. Curriculum can include Breeze content,
presentations, meetings, seminars and external content such as classroom sessions
and reading lists.
Event A Breeze event includes registration, invitations, reminders, and reporting.
Events usually involve a large number of participants and are built upon a Breeze
meeting, seminar, presentation, or training.
Meeting A Breeze meeting is an online real-time meeting in which a host or presenter
can show slides or multimedia presentations, share screens, chat, and broadcast live
audio and video.
Seminar A Breeze seminar is similar to a Breeze meeting, but seminars are usually
conducted for one-time or infrequent meetings that have at least 50 participants and
will include little audience participation or interaction.
Archive An archived file is a recorded Breeze meeting or seminar, which users can
view at their convenience.
22 Chapter 1: Understanding the Workspace
Page 23

Icon Description
Authorware content Files created in Macromedia Authorware, a visual authoring tool
for creating e-learning applications that can be delivered on corporate networks, CDs,
DVDs, and websites.
Captivate content Files created in Macromedia Captivate, an application that
automatically records all onscreen actions and instantly creates an interactive Flash
simulation.
External training In a Breeze curriculum, external training is training that occurs
outside of Breeze, such as classroom training.
Flash Video file (FLV) A video file that Breeze users can access just as they access
other Breeze content.
HTML file An HTML file defines the structure and layout of a web document using a
variety of tags.
Image file (JPEG, GIF, PNG, BMP) Image files can be drawings, photographs,
charts, graphs, icons, or any other type of graphics.
MP3 file An MP3 file is an audio, sound, or music sequence that is compressed to a
small file size.
Macromedia Breeze Presentation A Breeze presentation created using the
Macromedia Breeze Plug-in for Microsoft PowerPoint. These presentations have not
been converted into Macromedia Breeze Presenter presentations.
Macromedia Breeze Presenter content A presentation created with Macromedia
Breeze Presenter, a plug-in for Microsoft PowerPoint that lets users add audio, quizzes,
and visual features to a PowerPoint presentation.
Shockwave file (SWF) A multimedia animation file that can be viewed in a web
browser.
Global Breeze Manager features
This section contains descriptions of three features that apply across multiple Breeze Manager
tabs:
• “Custom URLs” on page 24
• “Setting and removing report filters” on page 25
• “Downloading reports” on page 28
Global Breeze Manager features 23
Page 24

Custom URLs
When you add a new piece of content, a new meeting, a new course or curriculum, a new
seminar, or a new event, you can include a custom URL. This URL is unique across the entire
Breeze account and is meaningful for the item you are creating. For example, the custom URL
might be your name or the name of your organization:
Custom URL use
A custom URL can only be tied to the specific item it is included in, and you cannot use it for any
other Breeze function. For example, if you use /yourname as the custom URL for a piece of
content, you cannot use it for a another piece of content or for a meeting, nor can any other user
who shares your Breeze account use it. If you delete the content that includes the custom URL,
however, the custom URL becomes available for re-use.
If another Breeze user is currently using the custom URL, you receive an error message when you
enter the URL. In this case, depending on the circumstances (for example, if another user was
using your full name for a custom URL), you can check with your administrator to see who is
using the URL, since the administrator can verify this for you.
Custom URL rules
When you create a custom URL, use the following rules:
• You cannot edit a custom URL after you create it.
• You cannot use digits (0 to 9) at the beginning of a custom URL.
• Custom URLs cannot contain any punctuation, spaces, or control codes.
• Custom URLs cannot contain uppercase letters.
• Do not use any of the terms in the following table, because they are keywords reserved by the
Breeze server.
• account • curriculum • input • search
• admin • data • macromedia • seminar
• administration • default • meeting • send
• api • download • metadata • service
• app • event • monitor • servlet
• archive • fcs • open • soap
24 Chapter 1: Understanding the Workspace
Page 25

• breeze • flash • output • source
• close • gateway • presenter • src
• com • go • producer • stream
• common • home • public • system
• console • hosted • publish • training
• content • idle • report • user
• course • info • sco • xml
Setting and removing report filters
Where appropriate, you can further define the information you see on a particular report by
specifying report filters. When the filters are operable for a given report, the Report Filters link
appears above the report display. You can set any or all of the following criteria to refine your
reports:
Time period A date range for the information in that report. For example, if you select a date
range for the By Slides report, it shows only the slides that were viewed within that time frame.
Team members (for managers only) The data on the report only applies to the people who
are the manager’s subordinates, either as direct reports or all reports (including both direct and
indirect subordinates). This distinction depends on which option was selected: Show Data From
People I Manage Directly or Show Data From People I Manage Directly And Indirectly.
Groups The data on the report only applies to the members of a specific group that
participated. You can select more than one group, and then deselect any group.
Report filter implications
It’s important to remember that any filters you set apply to all reports that you create, both for the
specific report and for any other Breeze functionality. For example, if you create a training report
after you set filters for a content report, the filters you set apply not only to the content report,
but to the training report, as well. This rule includes any date range you might have specified. If
you do not clear a date range filter that you set for one particular report, the data you obtain for
any Breeze functionality always applies exclusively to that date range.
Global Breeze Manager features 25
Page 26

To clear filters you have set, click Reset on the Set Report Filters page.
To set report filters:
1.
Follow the appropriate procedure to access the information page for the report you want (for
example, the Content, Meeting, Course Information page, and so on) for the file whose report
filters you want to set.
2.
On the information page, click the Reports link above the information title bar for the
information page you opened.
A set of report links appears above the title bar, with Summary highlighted, and the Summary
report for this meeting appears below the information heading.
3.
Click the report type for which you want to set filters.
The data for the report type you selected appears in the Breeze Manager window.
4.
Click the Report Filters link, to the right of the No Filters Have Been Set label above the report
display.
The Set Report Filters page appears.
5.
Do one of the following:
■ To change the date range for this report data, go to step 6.
■ To select team member reports, go to step 7.
■ To select groups, go to step 8.
26 Chapter 1: Understanding the Workspace
Page 27

6.
Do the following to set the date range filters:
a
Select the From and/or To check boxes, as appropriate.
b
From the pop-up menus, select the start and/or end dates and times, as appropriate, to set
the parameters for the report data you want.
c
If you do not want to set any more filters, click Save.
The report page reappears with data for the dates and times you specified shown in the
appropriate columns and the date range specified above the display bar.
d
To set filters to display your direct reports or all of your subordinates (for managers only), go
to step 7.
To set filters for groups, go to step 8.
7.
Click the appropriate button (Show Data From People I Manage Directly or Show Data From
People I Manage Directly And Indirectly) for the team members you want to see.
■ If you do not want to set any group filters, click Save.
The report page reappears with the following text above the display bar, depending on your
selection: “Show data from people I manage directly” or “Show data from people I manage
directly and indirectly”. The report-specific information for these participants appears in the
appropriate columns.
■ To set filters for groups, go to step 8.
8.
Click the Add/Remove Groups link.
A list of all the groups in the system appears.
9.
Select the check box to the left of each group that you want to see data for in your report, and
then click Save.
The Set Report Filters page reappears with the names of all the groups you selected after the
Filter Settings label. If you previously set other filters, the names of these appear as well.
10.
Click Save at the bottom of the Set Report Filters page.
The report page reappears with the names of the groups you selected, as well as any other filters
you set, above the display bar. The filtered, report-specific information for these participants
appears in the appropriate columns.
To remove report filters:
1.
From the report page, click the Report Filters link.
The Set Filters page appears, with your settings.
2.
Do either of the following:
■ To clear all filters, click Reset.
The report page reappears with the filters removed and the text “No Filters Have Been Set.”
The data shown in the report no longer applies to this filter.
■ To clear a specific filter, clear the check box and click Save; if it’s a group, click Add/Remove
Groups, clear the group check box, and click Save.
The report page reappears with the filters removed. The data shown in the report no longer
applies to the filters that you removed.
Global Breeze Manager features 27
Page 28

Downloading reports
If the Download Report Data button appears for a specific report, you can click it to export all
the report data to a comma separated values (CSV) file. After you do so, you can either save or
open the report. If you are running Breeze Manager in an Internet Explorer browser and choose
to open the report, Windows automatically opens it in Excel. In this case, you must double-click
each cell to see its information.
Another option is to save the CSV file to your desktop, select Notepad from the Accessories
menu (select Start > Accessories > Notepad), and open the file from Notepad, which makes it
easier to read.
In addition, if the Printable Version button appears for a report, you can click the button to
export the report to a browser window.
28 Chapter 1: Understanding the Workspace
Page 29

CHAPTER 2
About Content
In Macromedia Breeze, the word content describes any file that contains instructional,
promotional, or other information that you deliver in meetings, training, seminars, or
presentations. Content can consist of various types of files; for a description of these files, see
“Types of files in the Content library” on page 29.
All such content is contained and organized in a directory of folders called the Content library,
accessed from the Content tab of Breeze Manager. This chapter provides background information
that you need to know when working with content in the Content library.
About the Content library
The Content library is the place where Breeze authors upload their content files. In addition,
since the Content library is permissions-based, it is from here that you assign permissions to any
content files for which you have Manage permissions. Anyone to whom you have assigned the
proper permissions can retrieve and view your content folders on demand, and if you permit
them, manage or publish contents to these folders as well. For information about the different
types of permissions possible for the Content library, see “About Content library permissions”
on page 31. For information about assigning permissions, see “Shared Content folder”
on page 33.
Types of files in the Content library
All content in the Content library must be one of the following types of media:
• A single PPT file (it is converted to a Macromedia Breeze Presentation file from Macromedia
Breeze Presenter)
• A single SWF file
• A single HTML file
• A single Captivate SWF file
• Captivate content published through the Macromedia Captivate application
• Presenter content published through the Presenter plug-in
• Presenter content packaged as a ZIP file
• An old Breeze 4.1 presentation packaged as a ZIP file (downloaded for a 4.1 server)
29
Page 30

• A ZIP file that contains old pods (pod.swf, pod.asc)
• A ZIP file that contains multiple SWF files and extra files (images, XML files, and so on) and
one file called index.swf that will be loaded first
• A ZIP file that contains simple Macromedia Authorware content (one HTM file, one AAM
file, and extra Authorware files)
• A ZIP file that contains multiple HTM or HTML files and extra files (images, SWF, and so
on) and one file called index.htm or index.html
• A Macromedia Flash Video file (FLV file)
• A single image (JPEG, GIF, or PNG)
• A single audio file (MP3)
Each file type is represented by a separate icon in the Content library; see “Breeze icons”
on page 22.
A Macromedia Breeze Presentation is a multimedia presentation that contains slides, streaming
audio, synchronized animation, and navigation controls. An author creates it from Microsoft
PowerPoint slides with Macromedia Breeze Presenter and publishes the presentation to the server.
Any presentation you created in Breeze 4.1 is still available to you in Breeze 5. However, to take
advantage of the Breeze 5 features, you must republish the presentation to the Breeze 5 server. For
instructions about how to publish presentations, see the Breeze Presenter User Guide. A packaged
content file is a ZIP file that contains any of the other file types permissible for the Content
library.
Guidelines for using AICC content
To upload Aviation Industry CBT Committee (AICC) content into the Content library, you
must zip up the files into a content package and upload it through the New Content interface in
the Breeze Manager (see “Adding new content to the Content library” on page 44).
Use the following guidelines when you create AICC content:
1.
The content must be able to report either "complete" or "passed" to indicate that the user has
finished interacting with the content.
2.
The content package must have a file named index.htm or index.html that the server relies on
to launch the content.
3.
Content must report "Incomplete" on all communications until the user has completed the
content. Some AICC content reports "Failed" until the user completes, however, when Breeze
receives the "failed" message, assume that the content is complete and count that as an attempt
for a user, which will result in incorrect data.
30 Chapter 2: About Content
Page 31

About Content library permissions
The ability to view, manage, and publish content to various folders in the Content library is
determined by the groups a user belongs to and the individual permissions that have been
assigned to a user for specific files and folders. Unlike other Breeze libraries, Content library files
permissions can differ from the parent folder permissions.
You can access only the folders on the Content tab that you have created or the folders to which
you have been assigned View, Publish, or Manage permissions. These permissions are defined as
follows:
View Users or groups with a View permission setting for a folder can view any content within
that folder (this includes accessing the content in a Macromedia Breeze Meeting). A View
permission setting for an individual file allows view access for that particular file.
Publish Users or groups with a Publish permission setting for a folder or presentation can
publish, update, and view presentations, as well as view reports for files in that folder. However,
these users must also be members of the built-in Author group, as well as have Publish
permission, to publish content to this folder. For more information about this group and Publish
permissions, see “Content permissions for Built-in groups” on page 32.
Manage Users or groups with a Manage permission setting for a folder or file can view, delete,
move, and edit the file or folder, view reports for files in that folder, set permissions for the file or
folder, and create new folders. However, they cannot publish to that folder.
Denied Users or groups with a Denied permission setting for a folder or file cannot view,
publish, or manage this folder or file.
For more information about how permissions are resolved for a user who belongs to multiple
groups and has multiple permissions, see “Multiple permissions precedence” on page 269.
Breeze content access through a browser
Although all folders within the Shared Content and User Content folders are visible to you, you
can open only the files or folders for which you have access permission. If you try to open a file or
folder for which you do not have permission, you get an error message.
However, if you access Breeze content directly in a browser window by using a URL, you may or
may not be able to view the content. One of the following situations occurs:
• If the Breeze content is accessible to the public or you are logged in to your Breeze account,
you see the Breeze content displayed in the browser window.
• If the Breeze content has restricted access and you are not currently logged in to your Breeze
account, the Breeze login page appears and you must log in before you can view the file. Even
if you have a valid Breeze account, you cannot log in and view the file unless you have
permission to do so.
About Content library permissions 31
Page 32

Content permissions for Built-in groups
The Breeze server recognizes six default permission groups, each of which is associated with a
different Breeze library. Each member of a Built-in group has an individual user folder within the
corresponding library. You cannot change the permissions for these groups, but you can extend
them by assigning individuals or groups to more than one Built-in group. In addition, the
administrator can create custom groups, and assign these groups the appropriate permissions to
specific library folders. The Built-in groups are as follows:
• Administrators
• Meeting hosts
• Training managers
• Seminar hosts
• Event managers
• Authors
The Authors group is associated with the Content library; no one can publish anything at all to
the Content library unless they are authors. In addition to membership in the Author group, a
user must also have Publish permissions for the file or folder to which they are publishing
content. When a user is assigned to the Author group, Breeze automatically assigns them an
individual User Content folder within the library to which they can publish (upload) content.
They also have Manage permissions for this folder, which enables them to assign Publish
permissions for this folder to other authors. See “Structure of the Content library” on page 32 and
“About Content library permissions” on page 31.
Structure of the Content library
The Content library is structured as the following illustration shows.
Content
Library
Shared
Content
user1@macromedia.com
(My Content for user 1)
user2@macromedia.com
(My Content for user 2)
User
Content
user3@macromedia.com
(My Content for user 3)
32 Chapter 2: About Content
Page 33

Shared Content folder
By default, only administrators have Manage permissions for the Shared Content folder.
Administrators can create folders in the Shared Content folder and can assign Manage
permissions to other users for these folders. These users, who may or may not be authors, can
then place content in the Shared Content folder, which multiple users can access and manipulate.
However, although any Breeze user with Manage permissions can manage a Shared Content
folder, only authors can create new content in these folders. To create new content, a user must
have Publish permission, and only authors can be assigned this permission.
User Content folder
The User Content folder includes one folder for each author. When a user is assigned to the
Authors Built-in group, Breeze creates an individual user folder within the User Content folder.
Administrators can manage all folders in this folder, whereas authors can only manage and
publish to their own individual folder. Other users who are not authors cannot manage folders in
the User Content folder unless they have been assigned Manage permissions, either by the
administrator or by the folder’s owner; nor can such users create (that is, publish) new content in
any User Content folder they manage; only authors can do this.
My Content folder
Each author has an individual content folder within the User Content folder. The actual name of
the folder is the author’s login name. The My Content folder is a shortcut to an author’s specific
folder in the User Content folder. Authors can only manage and publish to their individual My
Content folders unless they were assigned Manage and Publish rights to other Content library
folders by the administrator or users with Manage rights for these folders. Users can view files or
folders only if they were assigned View permissions.
Content library activities
The following table lists the tasks that you can perform within the Content library.
Task Description See
Navigate content folders Open a folder and move up and down
through folder levels
Search the Content library Locate a piece of content in the
library by using keywords
View content file properties View properties about a content file “Shared Content folder”
View content Open a content file for viewing, such
as a presentation or a Captivate
simulation
“Navigating the Content
library” on page 35
“Searching the Content
library” on page 36
on page 33
“Breeze content access
through a browser”
on page 31
View a Macromedia Breeze
Presentation
See a presentation that was
uploaded from the Macromedia
Breeze Presenter
“Viewing a Macromedia
Breeze Presentation”
on page 39
Content library activities 33
Page 34

Task Description See
Publish/update presentations Convert PowerPoint presentations to
a Flash file and publish to the Breeze
See Breeze Presenter User
Guide
server
Upload content Upload content to a Content library
file or folder
Move content Move a content file to another
Content library folder
Delete content Delete a piece of content from the
Content library
“Adding new content to the
Content library” on page 44
“Moving a content file or
folder” on page 46
“Deleting a content file or
folder” on page 46
Edit content properties Change a content file summary “Editing content file
properties information”
on page 47
Send an e-mail message that
contains a link
Provide users with a URL for viewing
content
“Using e-mail to send a
content URL for viewing”
on page 47
Download content Download a content file to your
computer
“Downloading content”
on page 48
Set content permissions Assign permissions to a content file “Setting custom
permissions for content files
and folders” on page 51
Create folders Add new folders to the Content
library
Move folders Move a content folder to a different
location within the Content library
Delete folders Delete content folders within the
Content library
“Creating a content folder”
on page 45
“Moving a content file or
folder” on page 46
“Deleting a content file or
folder” on page 46
Change access control Edit user and group permissions. “Modifying file or folder
permissions” on page 53
View Dashboard View statistical information about
your content files
View reports View usage reports about your
content
“Viewing the Content
Dashboard” on page 54
“Content reports”
on page 55
34 Chapter 2: About Content
Page 35

CHAPTER 3
Working with Content
The Content tab of Macromedia Breeze Manager is your interface for managing content.
Working with content not only means creating, editing, and managing files within the library, but
also adding and viewing content media. This chapter contains instructions on Content library
navigation and file management, as well the procedures needed to view presentations and create
content reports.
Navigating the Content library
You can navigate the Content library if you know the location of the content you want to view or
if you want to browse the Content library.
Navigation controls exist for the following tasks:
• “Opening a folder to view its contents”
• “Moving up one directory level”
• “Returning to any higher parent directory level”
Opening a folder to view its contents
To view the contents of a folder, click the folder name in the display list to open it.
To open a content folder:
• Click the name of the folder.
The folders and files within that content folder appear, and the name of the selected folder
appears in the navigation trail at the top of the browser window.
Moving up one directory level
Use the following procedure to move to the parent folder, the folder one level above the current
folder,.
To move up one folder:
• Click Up One Level on the navigation bar above the content list.
The folders and files within the parent folder appear. The name and location of the parent
folder appear in the navigation trail at the top of the browser window.
35
Page 36

Returning to any higher parent directory level
Above the navigation bar is a trail of navigation links, called the navigation trail, which indicates
your current location in the directory structure. You can move to any parent folder (including the
one immediately above the current folder) by clicking this folder’s name in the navigation trail.
To return to any parent folder:
• Click the name of the parent directory in the navigation trail above the navigation bar.
The folders and files within the higher parent directory appear. The name and location of the
parent folder appear in the navigation trail at the top of the browser window.
Searching the Content library
You can quickly locate any Breeze content to which you have access permission by using keywords
to search the Content library. When you use the search option, Breeze searches any of the
following fields, as applicable:
• Title
• All slide content
You can also specify criteria to narrow your search and display your search results:
Show This option allows you to filter your search results by content type.
Display This option defines how many matches to display on a page. The default is 5, but you
can change it to 10, 15, or 20.
To use keywords to search for content information:
1.
Type one or more keywords into the Search Content text field in the upper-right corner of the
Breeze Manager window, on the right side of the menu bar.
2.
Click Search Content.
The browser window shows the following for any content that contains your keywords:
■ Name
■ Description
■ File preview
You can click a specific filename and view its properties, or open the file to view the content.
For information about properties, see “Viewing the properties of a content file” on page 37.
For information about opening the file, see “Viewing Breeze content from a search list”
on page 38. In addition, if this content is a presentation, Breeze displays a specific slide
number that you can click to find the word that matches your keyword.
36 Chapter 3: Working with Content
Page 37

To refine your search criteria:
1.
Click Search Content.
A bar appears with three text fields: Show, Display, and Search For.
2.
To change the Show default, select the content type you want to search for from the Show popup menu.
3.
To change the number of matches that display per page, select how many results you want
displayed on each page from the Display pop-up menu.
4.
If applicable, type a keyword in the Search For text box and click Go.
Viewing the properties of a content file
Every content file has a Content Information page that displays the following properties for each
piece of content:
Title The title of the content.
Disk usage The approximate file size of the content in kilobytes.
Permissions The permissions for the content. If no specific permissions are set, the content
inherits the permissions of the folder in which the content is contained. The values here are
Custom (if the permissions were changed from those of the parent folder), or Same as parent
folder
(if the permissions were not changed).
URL for Viewing The URL to view the content. You can click this URL to view the content
directly, or you can enter the URL in the address text box of an open browser window.
Summary The summary that describes the content.
Language The language of the content.
Links The course, curriculum, meeting, event, or seminar that this content is linked to. The
content may have multiple links, or none at all.
You can also edit the content profile; for information, see “Editing content file properties
information” on page 47.
To view content properties:
1.
Click the Content tab at the top of the Breeze Manager window.
2.
Locate the content you want to view; for information, see “Navigating the Content library”
on page 35.
3.
Click the content title.
The Content Information page appears.
Searching the Content library 37
Page 38

Viewing Breeze content
To view Macromedia Breeze Presentations, Flash content, or Flash Video files, you must have the
appropriate version of Macromedia Flash Player. For more information, see “System
requirements” on page 9. You can view the contents of a Content library file, including a Breeze
Presentation, in one of the following ways:
• Viewing Breeze content from the Content library
• Viewing Breeze content from a search list
• Viewing Breeze content in a browser window
In addition, if the content you want to view is a Breeze Presentation, see “Viewing a Macromedia
Breeze Presentation” on page 39.
Viewing Breeze content from the Content library
You can open content for viewing from within Breeze Manager after you browse to it in the
Content library.
To view a content file from the Content library:
1.
Click the Content tab at the top of the Breeze Manager window.
2.
Browse the Content library, and locate the file you want to view; for information, see
“Navigating the Content library” on page 35.
3.
Click the name of the file to view its Content Information page.
4.
Click the file’s URL for Viewing link.
A new browser window appears, displaying the selected file or presentation.
Viewing Breeze content from a search list
You can open content from within Breeze Manager from the Search Results page. For
instructions, see “Searching the Content library” on page 36. This procedure also explains how
you can refine your search.
Viewing Breeze content in a browser window
You do not have to open Breeze content from within Breeze Manager. When you have the URL
for viewing the file, you can also browse to it directly from any browser window.
You can obtain the URL for viewing the file from the Content Information page in Breeze
Manager, from the individual who is presenting the content, or from another viewer. For more
information, see “Viewing the properties of a content file” on page 37. However, if the content is
not publicly accessible, you might need to log in before you can view the file. For more
information, see “Breeze content access through a browser” on page 31.
38 Chapter 3: Working with Content
Page 39

To view a file or presentation directly in a browser window:
1.
Open a browser window.
2.
Enter the URL for viewing the content in the browser URL address text box or click a link
received in an e-mail.
The Breeze content appears in the browser window.
Viewing a Macromedia Breeze Presentation
A Macromedia Breeze Presentation is a multimedia presentation that contains slides, streaming
audio, synchronized animation, and navigation controls. When you open a presentation for
viewing, a new browser window opens and the presentation begins to load. Use the procedures in
this section to work with the various presentation features:
• “Breeze Presentation layout” on page 39
• “Using the presentation Outline pane” on page 40
• “Using the presentation Thumb pane” on page 40
• “Viewing presentation slide Notes” on page 40
• “Using the presentation Search pane” on page 41
• “Using the presentation toolbar” on page 41
• “Changing to full-screen viewing mode” on page 42
• “Navigating between slides” on page 42
• “Navigating within the current slide” on page 43
• “Adjusting the presentation audio” on page 43
Breeze Presentation layout
The layout of a Breeze Presentation consists of the following parts:
Presentation The main part of the window, which displays the presentation slides.
Presentation sidebar A pane on the right side (default location) of the browser window that
shows the name of the presentation, the presenter information, and the Outline, Thumb, Notes,
and Search panes (if you added the panes to your theme).
Note: The Show sidebar to participants option must be selected for the sidebar to appear in the
presentation. If the option is not displayed, click Full Screen at the bottom of the presentation and
select Show sidebar to participants.
Presentation toolbar
over the presentation playback, audio, attachments, and page size.
A control bar at the bottom of the presentation, which gives you control
Viewing a Macromedia Breeze Presentation 39
Page 40

Using the presentation Outline pane
Most presentations have an Outline pane on the sidebar. The Outline pane lists the title and
duration of each slide. You can use the Outline pane to display information and to move to a
specific slide in the presentation.
To view the Outline pane:
• Click the Outline pane in the sidebar on the right side.
The Outline pane contains the following features:
■ The current slide is highlighted with a glow color. (You can change this color in the theme.)
■ The entire slide title appears when the pointer is held over the title.
■ The duration of the slide is shown next to each slide.
■ You can move to any slide in the presentation by clicking the slide title in the Outline pane.
Using the presentation Thumb pane
Presentations can have a Thumb pane on the sidebar. The Thumb pane shows a small picture of
each slide, the slide title and the slide duration. You can use the Thumb pane to see the contents
of each slide quickly and to move to a specific slide in the presentation.
To view the Thumb pane:
• Click the Thumb pane in the sidebar on the right side.
The Thumb pane contains the following features:
■ The current slide is highlighted with a glow color. (This color can be changed in the theme.)
■ The entire slide title appears when the pointer is held over the title.
■ You can move to any slide in the presentation by clicking the slide title in the Thumb pane.
Viewing presentation slide Notes
When you create a presentation in PowerPoint, you can enter notes for individual slides. If any
slide Notes exist, they can be displayed in the Breeze Presentation.
Note: Slide Notes are optional.
When slide Notes appear, they are located on the right side of the presentation window. You
cannot change the size of the slide Notes pane.
To view slide notes:
• Click the Notes pane in the sidebar on the right side.
The Notes pane contains the following features:
■ The complete notes text is displayed. The text is unformatted and cannot be edited directly
on the pane.
40 Chapter 3: Working with Content
Page 41

Using the presentation Search pane
Users can use the Search pane (if you have included it in your theme) to find specific text in a
presentation. For example, in a presentation that serves as a company human resources handbook,
a user might search for the word vacation to find text about vacation leave policies.
To view and use the Search pane:
1.
Click the Search pane in the sidebar on the right side.
2.
Type the text to search for directly into the text box.
3.
Click Search.
Search results are displayed below the text box. Click any slide title in the results list to display
that slide.
Using the presentation toolbar
You can control the presentation appearance and playback by using the toolbar located at the
bottom of the presentation.
The presentation toolbar includes the following items:
Play/Pause lets you pause and then resume play of the current slide.
Back lets you move to the previous slide in the presentation.
Forward lets you move to the next slide in the presentation.
Slide progress bar shows and controls the playback location within the current slide. The
position marker arrow moves as the slide plays. You can drag the position marker arrow forward
or back in the current slide to change your location within the slide playback. You can also click a
specific location on the progress bar to move the slide marker position and slide playback to that
position.
Current slide number shows the slide number of the currently displayed slide and the total
number of slides (e.g., slide 2 out of 10).
Status shows the status of the current slide, such as Playing, Stopped, No audio, or Presentation
complete.
Time shows the current slide time and the total slide time as the slide plays (e.g., 00.02/00.05).
Audio volume shows how loud the audio is set for the slide.
Attachments displays a small window that shows any attachments (e.g., documents,
spreadsheets, images, URL addresses, etc.) that were added.
Show/Hide Sidebar and Toolbar toggles between showing and hiding the sidebar and toolbar.
Viewing a Macromedia Breeze Presentation 41
Page 42

Changing to full-screen viewing mode
You can view Breeze Presentations in two modes:
Normal is the default viewing mode. It includes the presentation toolbar at the bottom of the
browser window and the presentation sidebar.
Full-screen is an optional viewing mode in which the presentation toolbar is removed and the
size of the presentation slides increases to fill your browser window.
To toggle between viewing modes:
1.
Click Full Screen at the bottom of the viewer.
If the presentation outline was originally visible, the Breeze Presentation switches to full-screen
mode without a presentation side.
If a presentation outline is not originally visible, the Breeze Presentation switches to full-screen
mode with no toolbar.
2.
Click Full Screen again to change viewing modes.
If presentation controls are originally visible, the Breeze Presentation switches to full-screen
mode without a presentation outline or presentation toolbar. If a presentation toolbar is not
originally visible, the Breeze Presentation switches to normal viewing mode with or without a
presentation outline.
Navigating between slides
You can navigate between slides during playback by using either the presentation toolbar, or the
presentation Outline or Thumb pane.
Note: The Outline pane and Thumb pane are optional; use the Theme Editor in Breeze Presenter to
set panes for presentations.
To move to the previous slide by using the presentation toolbar:
• Click Previous Slide in the presentation toolbar.
To move to the next slide by using the presentation toolbar:
• Click Next Slide in the presentation toolbar.
To move to the next slide by using the presentation Outline or Thumb pane:
• Click the title of a slide in the presentation Outline or Thumb pane.
42 Chapter 3: Working with Content
Page 43

Navigating within the current slide
You can control the following options from within a slide:
• Pause and resume slide playback.
• Move to a specific location in the slide playback.
• Move backward in the slide playback.
To pause slide playback:
• Click Pause on the presentation toolbar.
The button changes from Pause to Play.
To resume slide playback:
• Click Play on the presentation toolbar.
The button changes from Play to Pause.
To move to a specific location in the slide playback:
• On the presentation toolbar, do one of the following:
■ Click a specific location on the slide progress bar to move the slide playback to that position.
■ Drag the position marker arrow on the slide progress bar forward or backward to change
your location within the slide’s playback.
To move to a specific location in the slide playback:
1.
Click the slide playback Back button on the slide progress bar to move your playback location
backward by a specific amount.
2.
Click Back multiple times to continue moving further back in the slide playback.
Adjusting the presentation audio
You can turn the presentation audio on and off by using the audio button on the presentation
toolbar.
Note: Not all slides or presentations contain audio.
If a slide does not have any audio, the text No audio appears as the slide status on the slide
progress bar. The slide still has an audio length and appears for that period of time before the next
slide appears. The presentation speaker sets this time.
To mute the audio:
• Click Audio in the presentation toolbar and move the volume bar to the bottom.
To enable the audio:
• Click Audio on the presentation toolbar and move the volume bar up to increase the volume.
Viewing a Macromedia Breeze Presentation 43
Page 44

Adding new content to the Content library
You can add numerous types of files to the Content library. For more information on the files you
can add, see “Types of files in the Content library” on page 29. This section also explains
guidelines for uploading AICC content into the Content library.
Within Breeze Manager, you can add content to the Content library in the following ways:
Uploading files from Breeze Manager For instructions, see “Uploading files from Breeze
Manager” on page 44.
Publishing Breeze Presentations from PowerPoint For instructions, see the Breeze Presenter
User Guide.
Publishing demonstrations and simulations from Macromedia Captivate You can add
Captivate simulations to the Content library; for instructions, see Using Captivate.
In addition, if a presenter uploads content from a Breeze meeting room, the content is not placed
in the Content library but in the Meetings library. To move uploaded content to the Content
library, see “Moving and deleting meetings and meeting content” on page 147.
Adding content to be used for an event
If you plan to use an existing presentation for an event, you must republish the PowerPoint
presentation to a Content library folder that is different than the folder that contains the original
presentation. If you do not, all of the reporting information for the original presentation will be
merged with the event-specific report data, and any event-specific data will be carried over into
any future reports for the original presentation. For instructions about how to work with
presentations, see Breeze Presenter User Guide. For instructions about how to work with events, see
Chapter 14, “About Events,” on page 195 and Chapter 15, “Working with Events,” on page 201.
Custom URLs
When you add new content, you can include a custom URL. This URL is unique across the
entire Breeze account and is meaningful for your content. For details about custom URLs and
rules for their use, see “Custom URLs” on page 24.
Uploading files from Breeze Manager
Only members of the built-in Authors group with Publish permissions for a specific Content
library folder can upload files to this folder.
To upload a content file:
1.
Do either of the following:
■ To start from the Home tab, select New Content from the Create pop-up menu. Proceed to
step 4.
■ To start from the Content tab, click the Content tab at the top of the Breeze Manager
window and proceed to step 2.
2.
Navigate to the location where you want to add the new content file; for more information, see
“Navigating the Content library” on page 35.
44 Chapter 3: Working with Content
Page 45

3.
Click New Content on the menu bar above the content list.
The Enter Content page appears, with the appropriate folder displayed in the navigation trail.
If you opened this page from the Home tab, the folder is your My Content user folder.
4.
Click Browse under Select Content Information to locate the file you want to upload.
The Choose File window appears.
5.
Select the file you want and click Open.
6.
Enter a title for the new content file (required) and a summary (optional) in the Enter Content
Information text boxes.
7.
(Optional) Enter a custom URL (if you do not assign a custom URL, the system automatically
assigns one).
8.
Click Save.
The file is uploaded to the Breeze server and appears in the content folder.
Note: If you attempt to upload a file of an unsupported file type, the Enter Content page
reappears with the message “Invalid file format selected.” From here, you can repeat the
procedure from step 4.
Managing content files and folders
Administrators and users with permission to manage a specific folder can organize the Content
library by performing the following tasks:
• “Creating a content folder” on page 45
• “Moving a content file or folder” on page 46
• “Deleting a content file or folder” on page 46
• “Editing content file properties information” on page 47
• “Using e-mail to send a content URL for viewing” on page 47
• “Downloading content” on page 48
• “Changing a content folder name and description” on page 51
• “Setting custom permissions for content files and folders” on page 51
Creating a content folder
Administrators and users with permission to manage a specific folder can create folders and
subfolders within it.
To create a content folder:
1.
Click the Content tab at the top of the Breeze Manager window.
2.
Navigate to the location where you want to add the new folder; for information, see “Navigating
the Content library” on page 35.
3.
Click New Folder on the menu bar above the content list.
4.
Enter the name of the new folder on the new page that appears.
5.
Click Save to create the new folder.
Managing content files and folders 45
Page 46

Moving a content file or folder
When you move a content folder, all of the contents within the folder also move to the new
location.
To move a content file or folder:
1.
Click the Content tab at the top of the Breeze Manager window.
2.
Navigate to the location of the content file or folder that you want to move; for more
information, see “Navigating the Content library” on page 35.
3.
Select the check box to the left of the content file or folder that you want to move.
4.
Click Move on the menu bar above the content list.
The Move window appears, listing the items you have selected and letting you specify their
new folder location.
5.
Navigate to the folder location where you want to place the content file or folder by clicking the
folder title or Up One Level.
As you navigate to the new location, the new destination appears in the upper right of the
Breeze Manager window.
6.
Click Move.
The Move Successful page appears, confirming that the move was successful.
7.
Click OK.
Deleting a content file or folder
Before you delete any content, be aware of the consequences. When content files or folders are
deleted, they are permanently deleted and cannot be retrieved. This means that any presentation,
course, curriculum, meeting, or seminar that links to this content can no longer use this content.
If possible, review the file properties to see what items (if any) are linked to the content and notify
the individuals who are using this content. See “Viewing the properties of a content file”
on page 37.
To delete a content file or folder:
1.
Click the Content tab at the top of the Breeze Manager window.
2.
Navigate to the file or folder that you want to delete.
3.
Select the check box to the left of the file or folder that you want to delete.
4.
Click Delete on the menu bar above the content list.
The Delete page appears, listing the content files or folders you selected. If any items (for
example, courses) link to this content, the message advises you that these links will be
destroyed, and asks you to confirm that you want to permanently delete these files or folders.
5.
Click Delete on the Delete page to permanently delete the selected items.
The listing page displays without the files or folders you deleted.
46 Chapter 3: Working with Content
Page 47

Editing content file properties information
When you edit the properties of a given content file, you can modify the Breeze content title and
summary information.
To edit content file properties:
1.
Click the Content tab at the top of the Breeze Manager window.
2.
Navigate to the content file whose properties information you want to edit; for more
information, see “Navigating the Content library” on page 35.
3.
Click the name of the content file in the content list.
The Content Information page appears.
4.
Click the Edit Information link in the navigation bar below the navigation trail.
The Edit Information page appears.
5.
Edit the content file properties information (either the content title or the summary).
6.
Click Save.
The Content Information page appears.
Using e-mail to send a content URL for viewing
Every content file in the Content library has a unique URL that lets users view the contents of the
file. You can send this URL to other people by e-mail from within Breeze Manager.
When you use Breeze Manager to send the URL to other people, a unique version of the URL is
created for each e-mail recipient. This process has the following advantages over sending the URL
by pasting it into an e-mail message in your own e-mail client:
• You can request that a return receipt be sent to you when each e-mail recipient views the
content file by using the web link sent to them. The recipients can be tracked because a unique
URL for viewing was created for each one.
• The content is available to each recipient for viewing without requiring them to log in with a
Breeze user name and password, even if the permissions for the content file in the Content
library are not set for public viewing.
To send a content file URL by e-mail:
1.
Click the Content tab at the top of the Breeze Manager window.
2.
Navigate to the content file for which you want to send the e-mail notification; for more
information, see “Navigating the Meetings library” on page 145.
3.
Click the name of the content file.
The Content Information page appears.
4.
Click E-mail Link on the navigation bar.
The E-Mail Link page appears.
Managing content files and folders 47
Page 48

5.
Enter the e-mail addresses for all recipients in the To text box on the E-mail Link page.
If necessary, separate multiple e-mail addresses with commas to create a unique URL for each
e-mail recipient.
6.
Edit the Subject and Message Body text boxes as needed.
Note: Do not delete the information in the braces (“{tracking-url}”) in the message body. This is a
placeholder that is replaced with the content URL in the generated e-mail message.
7.
Select the Generate a Return Receipt When Presentation Is Viewed check box to receive an email notification when a recipient views the content file; otherwise, clear the check box.
8.
Click Send.
The e-mail notification is sent.
Downloading content
If you are an administrator or an author with Manage permissions for the content, you can
download Content library files, including compiled Breeze Presentations, to your own computer
from the Breeze server. This action lets you post the files to any web server or copy them to a CD.
Depending on the circumstances, you can download any type of content as a ZIP file.
This section contains two procedures: the first describes how to download a content file other
than a Breeze Presentation, and the second explains how to download a Breeze Presentation.
For instructions on downloading files, see the appropriate following procedure:
• “Downloading non-Presentation content files” on page 48
• “Downloading Breeze Presentations” on page 49
Downloading non-Presentation content files
Authors who have Manage permissions can download content files to their computers. For the
types of files you can download, see “Adding new content to the Content library” on page 44. If
you download a ZIP file, you must extract it using the unzip utility on your computer.
To download a file:
1.
Click the Content tab.
2.
Navigate to the content file that you want to download.
For more information, see “Searching the Meetings library archives” on page 146.
3.
Click the name of the content file.
The Content Information page appears.
4.
Click the Download Content link on the navigation bar.
The Download Content page appears.
5.
Right-click the Download File link, and select Save Target As.
A browser download dialogue box appears and asks where you want to save this file.
6.
Navigate to where you want to save the file in the Save As dialog box.
48 Chapter 3: Working with Content
Page 49

7.
If necessary, replace the default filename.
8.
Click Save.
A Download Progress dialog box appears, showing the download progress. When the
download is complete, you can immediately view or extract the content on your computer.
Downloading Breeze Presentations
You can download a Breeze Presentation in either of the following formats:
• The complete Breeze Presentation as a ZIP file
• The PowerPoint source files, which consist of the PowerPoint (PPT) source file and the audio/
timing source file (PPC)
Downloading a complete Breeze Presentation
Download the complete Breeze Presentation to deploy it intact on an intranet or distribute it on a
CD. It is downloaded as a ZIP file, which you then extract on your computer.
To download a complete Breeze Presentation:
1.
Click the Content tab.
2.
Navigate to the presentation that you want to download; for more information, see “Navigating
the Content library” on page 35.
3.
Click the name of the presentation.
The Content Information page appears.
4.
Click the Download Content link on the navigation bar.
The Download Content page appears.
5.
Click the Download Output File link.
A browser download dialogue box appears and asks where you want to save this file.
6.
In the Save As dialog box, navigate to where you want to save the file.
7.
Click Save in the File Download dialog box.
A download progress bar appears. When the download is complete, you can immediately view
or extract the content on your computer. For more information, see “Extracting a ZIP file”
on page 50.
Managing content files and folders 49
Page 50

Extracting a ZIP file
After you download a Breeze Presentation, unzip it. To unzip the presentation, you need utility
software that can unzip ZIP files.
Since each ZIP utility has separate directions for unzipping a file, you can refer to your utility help
file for more information. In addition, you must create a new directory for each presentation that
you download, since you can only have one Breeze Presentation per directory and unzipping a new
presentation to a directory that already contains a presentation overwrites the existing presentation.
• For UNIX or Macintosh computers, you can use a utility such as Unzip.
• For Windows, you can use a utility such as WinZip.
You then unzip the content to a new directory.
Downloading Breeze Presentation source files
Download the Breeze Presentation source files if you no longer have your source PPT and PPC
files.
You must save the PPC file in the same folder in which you saved the PPT file, and you must give
it the same name as the PPT file, with the PPC extension, to maintain any audio or timings in the
presentation. Thus, you should have both the PPC and PPT files in your folder, with the same
name but with different file extensions. It’s critical that you do not overwrite the PPT file
extension with a PPC extension; if you do, the file may become unusable.
To download the Breeze Presentation source files:
1.
Click the Content tab.
2.
Navigate to the presentation that you want to download.
For more information, see “Navigating the Meetings library” on page 145.
3.
Select the name of the presentation.
The Content Information page appears.
4.
Click the Download Content link on the navigation bar.
The Download Content page appears.
5.
Click the Download PowerPoint Source File link.
6.
Click Save in the File Download dialog box.
7.
Navigate to where you want to save the file in the Save As dialog box.
Caution: Do not change the file extension (PPT), or the file may become unusable. If you change
the filename, you must also name the PPC file with the same name.
8.
Click Save.
9.
Click the Download Audio/Timing Source File link on the Download Content page.
10.
Click Save in the File Download dialog box.
11.
Navigate to where you want to save the file in the Save As dialog box.
12.
Click Save.
A download progress bar appears.
50 Chapter 3: Working with Content
Page 51

Changing a content folder name and description
To change a meeting folder name and description, you must be an administrator or a user with
permissions to manage the specific content folder in question.
To create a meeting folder:
1.
Click the Content tab at the top of the Breeze Manager window.
2.
Navigate to the location of the folder whose name and description you want to change; for more
information, see “Navigating the Content library” on page 35.
3.
Click the folder name to open it.
The folder name appears in the navigation trail and the list of files in this folder appears.
4.
Click the Edit Information link above the content list.
The Edit Information page appears.
5.
Enter the new name for the folder in the Title text input box, and, if desired, a description in
the Summary text input box.
6.
Click Save.
The Content List page reappears with the new folder name in the navigation trail.
Setting custom permissions for content files and folders
By default, when you add content to the Content library using any method (see “Add ing ne w
content to the Content library” on page 44), the file permissions are set to Same As Parent. The
file has the same permissions as that of the folder in which you have saved it.
Folder and file permissions
A content file does not have to keep the same permissions as its parent folder. Administrators and
users with permission to manage a specific Content library folder can edit a content file’s
permissions profile. To change permissions on a file or folder, you must first open it.
In addition, presentations that you upload using Breeze Presenter may have a different permission
setting than the folder you are uploading to. This is because although Same As Parent is the
default setting during the publishing process, authors with Manage permissions can customize the
file permissions when they are publishing the presentation. For more information, see Breeze
Presenter User Guide.
Options for viewing content files and folders
You can make content files public or private, as follows:
Public Anyone can view a public content file if they have its URL.
Private Only Breeze users with View, Manage, or Publish permissions can view private content.
To do so, they must first log in with a Breeze user name and password.
Managing content files and folders 51
Page 52

If you publish or upload a file to a folder that has its permissions set to allow public viewing, the
content file is also available for public viewing by default. Similarly, if the parent folder has a
custom permissions profile that allows only certain groups to view or manage it, the content file
by default has the same profile.
You can customize the permission settings of a content file or folder by using the following
options:
Allow public viewing Make the content file or folder available publicly, even if the parent folder
permissions are not set to allow public viewing.
Set a custom permission profile for users and groups Add users or groups to the profile and
set the access for each to Denied, View, Publish, or Manage. User and group permissions that you
set for the file or folder take precedence over the permissions that are set for the parent folder.
Reset to parent Set the content file permissions back to the permissions of the parent folder.
Setting permissions for content files or folders
If you are an administrator or a user with Manage permission for a specific Content library folder,
you can use the following procedure to customize the permissions list for the folder.
To set permissions for a content file or folder:
1.
Click the Content tab.
2.
Navigate to the content file or folder that has permissions you want to set; for more information,
see “Navigating the Content library” on page 35.
3.
Click the name of the content file or folder to open it. One of two pages appears:
■ If this is a file, the Content Information page appears.
■ If this is a folder, the list of the folder’s contents appears.
4.
To set permissions for a file within the folder list, select the check box to the left of the file name
and click Set Permissions on the navigation bar. To set permissions for the whole folder, just
click Set Permissions. One of the following pages appears:
■ If this file or folder has already been customized, the Set Permissions page appears with the
Available Users and Groups list on the left and the Current Permissions list on the right.
To modify this list, go to step 6.
To reset to the permissions to the parent folder, click Reset To Parent above the Available
Users and Groups list.
■ If the file or folder was never customized, the customization page appears with the message
“Current Setting: same as parent folder.”
To maintain the same setting, click OK to return to the meetings and folders list page.
To customize the permissions, proceed to step 5.
52 Chapter 3: Working with Content
Page 53

5.
Click Customizeation.
The Set Permissions page appears with the Available Users and Groups list on the left and the
Current Permissions list on the right.
6.
Set or modify permissions for this file or folder as follows:
■ Press Control-click or Shift-click, as appropriate, to select multiple users or groups in the
Available Users and Groups list.
■ To expand a group so that you can select individual members in the Available Users and
Groups list, double-click the group name; when you are finished with this group, click Up
One Level in the list to return to the parent folder list.
■ To search for a name in the list in the Available Users and Groups list, click Search at the
bottom of the window, enter the name to display it in the list, then select the name.
7.
Click Add.
The users and/or groups you added appear in the Current Permissions list with a default
permission setting of View. To remove a user or group from this list, select it and click Remove.
8.
Assign permissions for each user and group in the Current Permissions list as follows:
a
Select a name in the list:
Press Control-click or Shift-click, as appropriate, to select multiple users or groups.
To search for a name, click Search at the bottom of the window and enter the name to
display it in the list, and then select it.
b
For each selection, click Permissions at the bottom of the window.
A pop-up permissions menu appears.
c
Click the permission setting that is appropriate for each selected name.
The permissions for the selected names change to the permissions you assigned.
Modifying file or folder permissions
You can change the permissions for a content file or folder by adding or removing users and
groups from the list:
• To add a user or group, use the procedure for setting permissions; see “Setting custom
permissions for content files and folders” on page 51.
• To remove a user or group, see “Removing a user or group from the permission access list”
on page 53.
Removing a user or group from the permission access list
Follow this procedure to disable a user’s or group’s access to a content file or folder.
To remove a user or group from the permission access list:
1.
Click the Content tab at the top of the Breeze Manager window.
2.
Navigate to the meeting folder whose permissions you want to set; for more information, see
“Navigating the Content library” on page 35.
Managing content files and folders 53
Page 54

3.
Click the folder name to open it.
4.
Click Set Permissions on the navigation bar.
One of the following pages appears:
■ If this folder has already been customized, the Set Permissions page appears with the
Available Users and Groups list on the left and the Current Permissions list on the right.
To delete users or groups, go to step 6.
■ If the folder was never customized, the customization page appears with the message
“Current Setting: same as parent folder.”
To remove users or groups, go to step 5.
5.
Click Customization.
The Set Permissions page appears with the Available Users and Group list on the left and the
Current Permissions list on the right.
6.
To remove users or groups from the access list, do one of the following in the Current
Permissions list:
■ Press Control-click or Shift-click, as appropriate, to select multiple users or groups.
■ To search for a name in the list, click Search at the bottom of the window, enter the name to
display it in the list, and then select it.
7.
Click Remove
The users and/or groups you removed disappear from the Current Permissions list.
Viewing the Content Dashboard
The Content Dashboard provides a graphical representation of statistical data about your content.
The data reflects all of the content in your My Content folder and appears in four bar graphs:
Most Viewed Content over the Last 30 Days Shows the number of views. Click any item in
the display to view the Content Information page for the item.
Most Effective Presentations over the Last 30 Days Determined by percentage of slides
viewed across all viewers. Click any item in the display to view the Content Information page for
the item.
Most Recently Viewed Content In list format, shows the name, content type, number of
views, and last time this content was viewed. The most recently viewed is listed first. Click any
item in the display to view the Content Information page for the item.
Aging Content In list format, shows the name, content type, and last time this content was
viewed. The most recently viewed is listed last. Click any item in the display to view the Content
Information page for the item.
The bar graphs appear within the Breeze Manager Content tab window. However, you can also
export the Dashboard to a browser window that you can print. To do so, click Printable Version
on the left, above the display.
54 Chapter 3: Working with Content
Page 55

Content reports
The Reports feature of the Breeze Manager lets you create reports that show you a given piece of
content from different perspectives. To use the Reports feature, open the Content Information
page (see “Viewing the properties of a content file” on page 37), and click the Reports link above
the Content Information title bar. This displays other links that let you define the kinds of report
information you can see for this content. The links are as follows:
Summary The first report type that appears when you access the Reports feature. The
Summary provides the content name, the date that the content was last modified, and the
number of times this content was viewed.
By Slides Applies to presentations only. A bar graph lists each slide in the presentation by slide
number and the number times it was viewed; below the graph is a table with the same
information, which also includes the last time each slide was viewed.
By Questions A bar chart shows each question, color-coded as correct or incorrect, and the
number of respondents for the question. Click on a specific question in the bar to display a pie
chart with a table that provides the answer key and answer distribution. The answer key lists all
possible answers for the selected question and their corresponding answer number or letter. The
answer distribution lists all of the answer choices selected for this question, flags the correct
answer, and shows the number of users who selected each answer, as well what percent of the total
each number of users represents. Finally, the chart totals the users by number of users and percent
of users. Below the graph is a table that provides an overview of all questions, listing each question
by number, name, number of correct answers, number of incorrect answers, percentage of correct,
percentage of incorrect, as well as the score.
By Answers A table provides the maximum possible score, the passing score, the average score,
and the high score for the quiz. For each question, the table also shows the question number, the
question itself, and the answer distribution; that is, how each question was answered, if at all.
Click on the view answers link to display a pie chart with a table that provides the answer key and
answer distribution. The answer key lists all of the possible answers for the selected question and
their corresponding answer number or letter. The answer distribution lists all of the answer
choices selected for this question, flags the correct answer, and shows the number of users who
selected each answer, as well as what percent of the total each number of users represents. Finally,
the chart totals the users by number of users and percent of users.
Note: Breeze resets content scores for quizzes and surveys each time the user accesses the content.
This means that if a user closes out of the content without completing the quiz or survey, then returns
to it later, all of the previous answers are lost. If you do not want the score to reset, and you have
access to the Training tab, you can create a new course and select the content in question as the
course content. This way, you have turned the content into a course. For details about how to create a
new course, see “Creating a new course” on page 66.
The Hide Answer Distribution/Show Answer Distribution button is a toggle that lets you hide
the distribution of answers for each question, then show them again.
Content reports 55
Page 56

Setting and removing report filters
Where appropriate, you can further define the information you see on a particular report by
specifying report filters. For content files, these filters are operable for all of the four report types.
For a description of report filters and procedures for setting and removing them, see “Setting and
removing report filters” on page 25.
Downloading reports
With the exception of the Summary report, you can export all content reports to comma
separated values (CSV) file by clicking Download Report Data under the report types links. For
information about how to download reports, see “Downloading reports” on page 28.
56 Chapter 3: Working with Content
Page 57

CHAPTER 4
About Training
Note: This chapter applies only to accounts that include the Macromedia Breeze Training
application.
The Macromedia Breeze Training application consists of two components: courses and
curriculums.
A course is a Macromedia Breeze Presentation that is associated with a given set of enrolled
learners with usage tracking for each individual. The presentation can be delivered and
administered independently or as part of a curriculum.
A curriculum is a group of courses and other learning content that moves students along a
particular learning path. A curriculum can include Breeze content, presentations that are not
constructed as courses, meetings, seminars, and courses, as well as learning content external to
Breeze, such as classroom training and required reading. As is the case with courses, you can
generate reports to track the progress of the enrollees as they move through the curriculum, to
ensure that it meets the learning objectives.
All Breeze courses and curriculums are contained and organized in a directory of folders called the
Training library.
Accessing the Training library
You access the Training library by clicking the Training tab at the top of the Breeze Manager
window. As you navigate the library, the names of the folders appear as a navigation trail at the
top of the browser window.
To create courses and curriculums, you must be a training manager. To manage a Training library
folder, you need not be a training manager, but you must have Manage permissions for this folder
in the Training library.
For a list of activities that you can perform in the Training library with the appropriate
permissions, see “Training tasks” on page 60.
57
Page 58

About Training library permissions
Consider the following aspects of permissions when you work with the Training library:
Attendance role permissions define the roles that learners play in a given course or curriculum.
The two attendance role permissions are Enrolled and Denied. Individuals with an Enrolled
permission can view a course or curriculum; individuals with a Denied permission cannot access
the course or curriculum.
Attendance role permissions are assigned when a course or curriculum is created; for more
information, see “Creating a new course” on page 66 or “Creating a curriculum” on page 83, as
appropriate. Permissions can also be changed after the course or curriculum is created. To change
permissions, the training manager must open the course or curriculum file and edit the
participant list to add or remove enrollees. The training manager must also have Manage
permissions for the folder where this course or curriculum is located.
Training library management permissions define who can perform the different tasks associated
with the Training library files and folders, such as adding and deleting files, searching the library
archives, and so on. The ability to create, delete, and edit courses and curriculums in various
folders in the Training library is determined by the groups that a user belongs to and the
individual permissions that are assigned to a user for specific files and folders. The Training
library has only two permissions: Manage and Denied.
Members of the Administrator group can manage all files and folders in the Training library. By
default, training managers have Manage permissions only for their individual folder in the User
Training folder. This means that training managers can add, delete, change, or assign permissions
only for their own folders. All other Manage permissions are assigned on an individual or group
basis by the administrator.
Training library permissions for Built-in groups
Breeze recognizes six default permission groups called Built-in groups. You cannot change the
permissions for these groups, but you can extend them by assigning individuals or groups to more
than one Built-in group.
The Training Managers group is associated with the Training library, which means that each
training manager has an individual folder in the User Training folder within the Training library,
in which they can create and administer their courses and curriculums. The Breeze administrator
can also assign Manage permissions for specific Training library folders to users who are not
training managers. Only training managers can create new courses or curriculums, however.
For more information about how permissions are configured for a user who belongs to multiple
groups and has multiple permissions, see “Multiple permissions precedence” on page 269.
58 Chapter 4: About Training
Page 59

Course and curriculum registration
Depending on the type and purpose of a given course or curriculum, the training manager might
want to have the guests register. If so, the manager must have the Event Management tab as part
of the Breeze Manager application, since registration for any training can only be done through
the Event Management tab. A training manager who has this tab must first use the Course or
Curriculum wizard to create the course or curriculum from the Training tab (see Chapter 5,
“Working with Courses,” on page 63 or Chapter 6, “Working with Training Curriculums,” on
page 81), but skip the select participant and send invitations steps. Next, the training manager
creates an event by using the Present a Breeze Training Course or Curriculum option in the Event
wizard, and selects the meeting that was created as the event.
The Event wizard lets the training manager select and invite enrollees, select and customize
registration questions, and send invitations, even to large e-mail lists. For information about
events, see Chapter 14, “About Events,” on page 195 and Chapter 15, “Working with Events,” on
page 201.
If the training is presented as an event, all enrollees, regardless of whether they have a Breeze
account or whether the URL is public, must provide registration information before the training.
In this case, the training manager can review the registration applications before the training and
approve or deny admittance to each registrant.
AICC content for courses
When you use Aviation Industry CBT Committee (AICC) content in courses, Breeze applies
some specific rules. For information, see “Guidelines for using AICC content” on page 30.
Viewing the Training Dashboard
The Training Dashboard contains two bar graphs, one for courses and one for curriculums:
Course Summary Over the Last 30 Days Shows the courses over the last 30 days with the
greatest number of enrollees who have passed this course; click on any bar to see more detail.
Curriculum Summary Over the Last 30 Days Shows the courses over the last 30 days with the
greatest number of enrollees who have completed this curriculum; click on any bar to see more
detail.
The bar graphs appear within the Breeze Manager Content tab window. However, you can also
export the Dashboard to a browser window that you can print. To do this, click Printable Version
on the left, above the display.
Viewing the Training Dashboard 59
Page 60

Training tasks
In addition to the information in this chapter, you can find all of the information about any
Breeze Training task you can perform using Breeze Manager in the following chapters of this
guide:
• This chapter, Chapter 4, “About Training,” provides background information relevant to the
Training application.
• Chapter 5, “Working with Courses,” provides procedures about how to create and change
individual courses. It does not address the file management functions of the Training library.
• Chapter 6, “Working with Training Curriculums,” provides information and procedures for
creating and changing individual curriculums, including assigning prerequisites and
completion requirements.
• Chapter 7, “Managing the Training Library,” provides procedures about the administrative
tasks associated with the library and deals specifically with file management, such as
instructions about how to add, move, and delete folders.
The following table lists all of the tasks you can perform by using Breeze Training and directs you
to the appropriate topic in this guide.
Task Description See
Navigate course or curriculum folders Open a folder and move up
and down through folder
levels.
View course or curriculum summary
information
View course or curriculum enrollee list View a list of course or
Create a new course Use the Course wizard to
Create a new curriculum Use the Curriculum wizard
View a profile of a specific
course or curriculum,
including name, description,
time, and URL.
curriculum enrollees.
perform the steps to set up a
new course, from naming
the course to sending
invitations.
to perform the steps to set
up a new curriculum, from
naming the curriculum to
sending invitations
“Navigating the Training
library” on page 111
“Viewing the course
information” on page 65 and
“Viewing and modifying
curriculum information”
on page 90
“Viewing the enrollee list”
on page 66 and “Viewing and
adding enrollees to a
curriculum” on page 98
“Creating a new course”
on page 66
“Creating a curriculum”
on page 83
Move courses or curriculums Move a course or curriculum
60 Chapter 4: About Training
file or folder to a different
training folder.
“Moving a course or
curriculum” on page 113
Page 61

Task Description See
Delete courses or curriculums Delete a course or
curriculum.
Edit course or curriculum information Change the course or
curriculum summary details
for a specific course or
curriculum.
Change course or curriculum content Change the content for a
specific course or
curriculum.
Change course or curriculum
enrollees
Add or remove enrollees
from a specific course or
curriculum.
Send or change settings for course or
curriculums notifications
Send, or change settings or
text for, course or curriculum
e-mail notifications.
“Deleting a course”
on page 73 and “Deleting a
curriculum” on page 102
“Editing course profile
information” on page 74 and
“Editing curriculum
information” on page 96
“Selecting course content”
on page 68 and “Removing
items from a curriculum”
on page 96
“Changing course enrollees”
on page 76, “Viewing and
adding enrollees to a
curriculum” on page 98, and
“Deleting enrollees from a
curriculum” on page 99
“Changing settings for course
notifications” on page 77 and
“Sending notification to
curriculum enrollees”
on page 99
Send or change settings for course or
curriculum reminders
Send, or change settings or
text for, course or curriculum
e-mail reminders.
Assign prerequisites to an item Associate prerequisites with
an item to construct a
learning path in a curriculum.
Assign test-outs Associate a test-out with an
item in a curriculum.
Set up or modify completion
requirement
Create or change
completion requirements for
a curriculum.
Change the order of a curriculum item Move a curriculum item to
another position in the
curriculum to manipulate the
learning path.
“Changing settings for course
reminders” on page 78 and
“Sending reminders to
curriculum enrollees”
on page 100
“Assigning prerequisites to an
item” on page 94
“Assigning test-outs for an
item or folder” on page 95
“Specifying or editing
completion requirements”
on page 97
“Changing the order of items
in a curriculum” on page 91
Training tasks 61
Page 62

Task Description See
Add different items to a curriculum Add a folder, content,
course, meeting, or external
training to a curriculum.
Create course or curriculum folders Add new folders to a
Training library folder.
Move a course or curriculum Move a course or a
curriculum to another
training folder.
Move course or curriculum folders Move a training folder to a
different location within the
Training library.
Delete course or curriculum folders Delete training folders within
the Training library.
“Adding a folder to group
items in a curriculum”
on page 92
“Adding content to a
curriculum” on page 92
“Adding a course to a
curriculum” on page 93
“Adding a meeting to a
curriculum” on page 93
“Adding external training to a
curriculum” on page 94
“Creating a training folder”
on page 112
“Moving a course or
curriculum” on page 113
“Moving a training folder”
on page 113
“Deleting a training folder”
on page 114
Set course or curriculum folder
permissions
Assign permissions to a
training folder.
View the Training Dashboard View graphical information
about your courses and
curriculums.
View course or curriculum reports View reports for your course
or curriculum in the Breeze
Manager window.
“Setting training folder
permissions” on page 114
“Viewing the Training
Dashboard” on page 59
“Course reports” on page 79
and “About curriculum reports”
on page 103
62 Chapter 4: About Training
Page 63

CHAPTER 5
Working with Courses
Note: This chapter applies only to accounts that include the Macromedia Breeze Training
application.
A course is a Macromedia Breeze Presentation that is associated with a given set of enrolled
learners and with usage tracking of each individual enrollee. As such, a course might consist of a
stand-alone presentation, or it might be offered as part of a curriculum (see Chapter 4, “About
Training,” on page 57).
All Breeze courses are contained, organized, and manipulated in a directory of folders called the
Training library. This chapter does not discuss library management activities. For this
information, see Chapter 7, “Managing the Training Library,” on page 109. Instead, this chapter
addresses all tasks involved in creating and administering courses that you can do in Breeze
Manager. This includes modifying any aspect of a course, such as course description and times,
content, enrollees, notifications, and reminders.
The following table describes the topics in this chapter and provides links to access them.
Task Description See
View course summary
information
View course enrollee list View a list of course enrollees. “Viewing the enrollee list”
Create a new course Use the Course wizard to perform all of
Delete a course Delete a course. “Deleting a course”
Edit course information Change the course summary details for
Change course content Change the content for a specific
View a profile of a specific course,
including name, description, time, and
URL.
the steps necessary to set up a new
course, from naming the course to
sending notifications and reminders.
a given course.
course.
“Viewing the course
information” on page 65
on page 66
“Creating a new course”
on page 66
on page 73
“Editing course profile
information” on page 74
“Changing course content”
on page 75
63
Page 64

Task Description See
Change course enrollees Add or remove enrollees from a
specific course.
Send or change settings for
course notifications
Send or change settings for
course reminders
View course reports Create reports with information about a
Send (or change settings or text for)
course e-mail notifications.
Send (or change settings or text for)
course e-mail reminders.
specific course, including applying
filters to define specific parameters for
the report information.
“Changing course enrollees”
on page 76
“Changing settings for course
notifications” on page 77
“Changing settings for course
reminders” on page 78
“Course reports” on page 79
Viewing course information
You can view or change information about a course from within Breeze Manager. The starting
point for any of this information is the Course Information page, the page that appears when you
click the course name in the Training folder list. From this page, you can view or edit the
information for a specific course, including the course summary, content, enrollees, and settings
for notifications and reminders. Each of these features is accessible as a navigation link when you
access the Course Information page.
64 Chapter 5: Working with Courses
Page 65
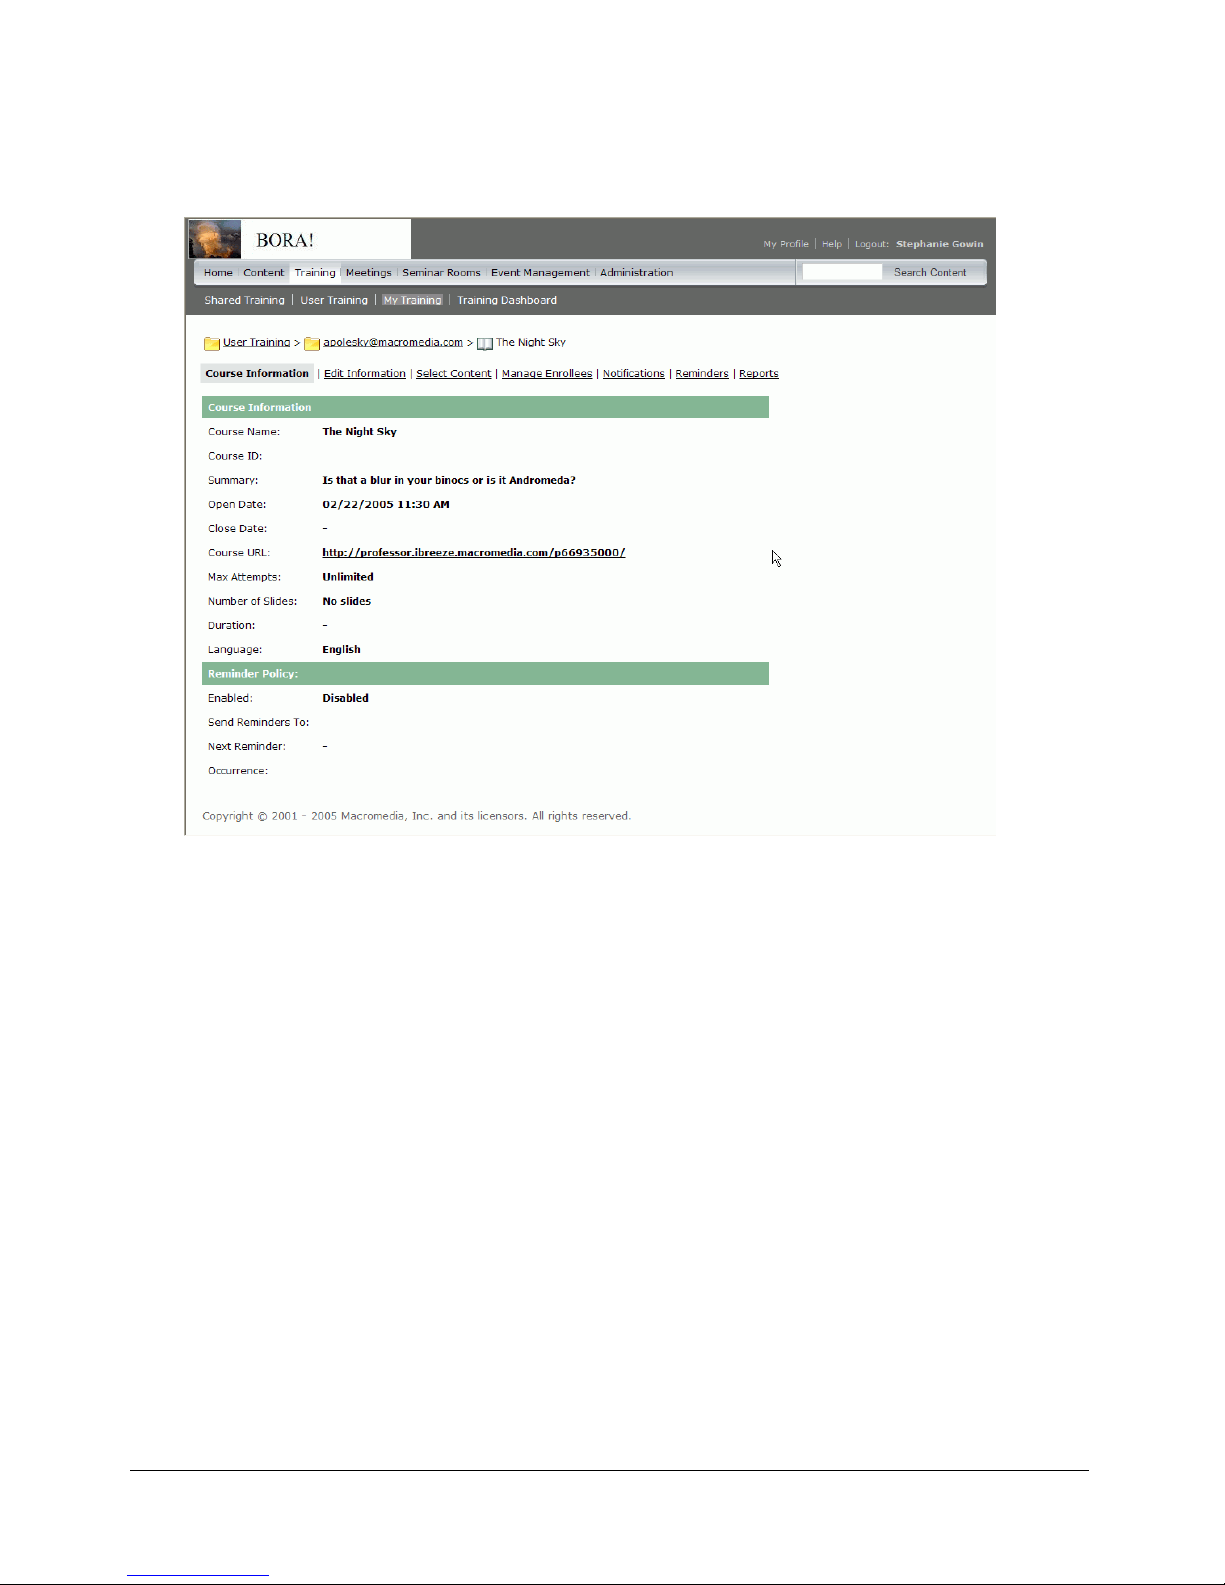
Viewing the course information
Every course has a Course Information page, which is a summary that contains the information
displayed in the following illustration.
Course Information The course name, ID, summary, open date, close date, course URL,
number of slides, duration, maximum attempts (the maximum number of times an enrollee can
take this course), and language.
Reminder Policy A field that indicates whether a reminder policy is enabled, to whom
reminders are being sent, the date that the next reminder will be sent, and how often reminders
are sent.
To view a course summary:
1.
Click the Training tab at the top of the Breeze Manager window.
2.
Navigate to the folder that contains the course for which you want to get information.
For more information, see “Navigating the Training library” on page 111.
3.
In the course list, click the name of the course to select it.
The Course Information page appears.
Viewing course information 65
Page 66

Viewing the enrollee list
You can view a list of all enrollees for each course who are registered Breeze users.
To view a course enrollee list:
1.
Click the Training tab at the top of the Breeze Manager window.
2.
Navigate to the folder that contains the course for which you want to get information; for more
information, see “Navigating the Training library” on page 111.
3.
In the course list, click the name of the course to select it.
The Course Information page appears.
4.
Click the Manage Enrollees link in the navigation bar.
A page appears with the Available Users and Groups list on the left, and the Current Enrollees
for this course on the right with the names of enrolled users and groups. To edit this list, see
“Changing course enrollees” on page 76.
Creating a new course
Before you create a course, make sure that the following are true:
• The content that you want to use for the course exists in the Content library.
• You have View or Manage permissions for the file in the Content library that you want to use
as your content. For more information, see “Structure of the Content library” on page 32,
“Adding new content to the Content library” on page 44, and Breeze Presenter User Guide.
Custom URLs
When you create a new course, you can include a custom URL. This URL is unique across the
entire Breeze account, and is meaningful for your course. For information about how to use
custom URLs, including restricted terms and usage rules, see “Custom URLs” on page 24.
Starting the Course wizard
You can use the Course wizard to create a new course, as described in the following procedure.
To start the Course wizard:
1.
Do either of the following:
■ To start from the Home tab, click New Course under Create. Proceed to step 4.
■ To start from the Training tab, click the Training tab and proceed to step 2.
2.
Navigate to the folder where you want to add a new course; for more information, see
“Navigating the Training library” on page 111.
3.
Click New Course in the navigation bar.
The Enter Course Information page appears; if you launched the wizard from the Home tab,
the new course is in your My Training folder.
4.
Follow the steps in the Course wizard, beginning with “Entering course information”
on page 67.
66 Chapter 5: Working with Courses
Page 67

Entering course information
The first step in the Course wizard is to enter the following background details about the course.
You can edit this information any time after the course is created. For more information, see
“Editing course profile information” on page 74.
Course Name The name of the course; a required field that appears in the course list and
in reports.
Course ID The course number or ID: for example, 100, CS100, and so on.
Custom URL An optional field that lets you recreate a personalized URL for this course that is
reusable and easy to remember. If you do not enter one, the system automatically generates a URL
for you. For information you need to know before entering a custom URL, see “Custom URLs”
on page 24.
Summary A course description that appears on the Course Information page. A course
summary can be up to 750 characters long.
Course Starts On The course start date. A required field for setting a date before which users
cannot access the course.
Course Closes On The course end date. An optional field for setting a date after which users
cannot access the course.
Max Attempts The maximum number of times an enrollee can take this course (for example, if
the enrollee fails repeatedly). If you don’t enter a value, the number is unlimited.
To enter course information:
1.
On the Enter Course Information page, enter values for the following fields: Course Name
(required), Course ID (optional), Custom URL (optional), and Summary (optional).
2.
Select the month, day, year, and time for the Course Starts On date.
3.
Set the Course Closes On value by doing either of the following:
■ Select the No Close Date option.
■ Select the month, day, year, and time.
4.
Enter the number of maximum attempts an enrollee can take this course; leave this field blank
to allow unlimited retries.
5.
Click Next.
The Select Content page appears.
6.
Proceed to “Selecting course content”.
Creating a new course 67
Page 68

Selecting course content
The second step in the Course wizard is to select the course content. In this step, Breeze directs
you to the Content library, where you navigate to the content file you want to use. This must be a
file for which you have either View or Manage permissions. In addition, you can select only one
item from the library.
For more information on the structure of the Content library, see “Structure of the Content
library” on page 32.
When you select the content to use in a course, Breeze makes a copy of it and this copy is used for
the course. This means that any changes made to the original content that you select do not affect
the course. You can also change the content used for a course any time after the course is created.
For more information, see “Changing course content” on page 75.
To select course content:
1.
On the Select Content page, navigate to the folder that contains the item you want to use; for
more information, see “Navigating the Content library” on page 35.
2.
Select the option that you want to use for the course.
3.
Do one of the following:
■ Click Next to enroll learners now.
The Enroll Learners page appears with the Available Users and Groups list on the left and
the Current Enrollees list on the right. (See the next section.)
■ Click Finish
The Course Information page appears. This ends the Course wizard without permitting you
to enroll learners or set up course notifications and reminders.
To enroll learners, set up course notifications, or enable e-mail reminders later, you can edit the
course. See “Changing course enrollees” on page 76, “Changing settings for course notifications”
on page 77, or “Changing settings for course reminders” on page 78.
Enrolling learners
The third step in the Course wizard is to select the course enrollees. You can enroll users or groups
of users. Only the users you add to this list can browse to the course URL and log in to view the
course. To enroll large numbers of users, if you have the Event Management application, present
the course as an event. For details, see “Course and curriculum registration” on page 59.
You can also change the learners enrolled in a course any time after the course is created. For more
information, see “Changing course enrollees” on page 76.
68 Chapter 5: Working with Courses
Page 69

To enroll learners:
1.
In the Available Users and Groups list, select each user and/or group that you want to invite to
this course by doing one of the following:
■ Press Control-click or Shift-click to select multiple users or groups.
■ To expand a group to select any individual members, double-click the group name; when
you are done with selection, click Up One Level in the list to restore the original list.
■ To search for a name in the list, click Search at the bottom of the window and enter the
name to display it in the list, and then select it. Click Clear to return to the list.
2.
Click Add.
The users and/or groups you added appear in the Current Enrollees list with a default
permission of Enrolled. To remove a name from this list, select it and click Remove.
3.
Do either of the following:
■ Click Next to send notifications.
The Set Up Notification page appears. (See the next section.)
■ Click Finish.
This ends the Course wizard without permitting you to set up course notifications or
reminders.
To set up course notifications or enable e-mail reminders later, edit the course. See “Changing
settings for course notifications” on page 77 or “Changing settings for course reminders”
on page 78.
Setting up notifications
The fourth step in the Course wizard is setting up course notifications. A course notification is an
e-mail notification sent to either all or designated course enrollees, informing them that they are
enrolled in the course and telling them how to access it. When you set up a course e-mail
notification, you select whether to send an e-mail notification, and if so, you set the notification
timing (when the e-mail notification is sent to enrollees) and the e-mail subject and message.
When you format your notification, you can use run time fields in the subject line and in the
body of the message. These fields are course information variables that are automatically filled in
for you when the e-mail notification is sent. For more information on run time fields, see
“Notification e-mail settings” on page 70 and “Default notification e-mail fields” on page 71.
You can also change the course notifications any time after the course is created. For more
information, see “Changing settings for course notifications” on page 77.
To set up course notifications:
1.
On the Set Up Notification page, select the option for the notification timing you want.
2.
Select the option for the recipients whom you want to receive the notifications.
3.
Edit the e-mail subject and message; to use run time fields, select and copy the field name from
the Run Time Fields list to the right of the message body and paste it into the message subject
or body. Do not change any of the run time field text in braces.
Creating a new course 69
Page 70

4.
Do either of the following:
■ Click Next to set up course reminders.
The Set Up Reminders page appears. Proceed to “Setting up reminders” on page 71.
■ Click Finish.
This ends the Course wizard without setting up reminders.
To set up reminders later, edit the course. See “Changing settings for course reminders”
on page 78.
Notification e-mail settings
The following are the settings for notification timing and valid run time fields:
Notification Timing Setting for when the e-mail notification is sent to enrollees. The following
are the possible values:
• Do not send a notification.
• Send notification now.
• Send notification on course start date (the default value).
• Send on (a specific month, day, and year that you select from a pop-up menu).
Recipients Setting for which recipients receive notifications. The following are the possible
values:
• All enrollees (the default value)
• Enrollees who have not completed the course
• Enrollees who have failed the course
• Enrollees who have failed or not completed the course
• Only to specific e-mail addresses (you can enter the specific e-mail addresses in a text box, with
each user separated by a comma)
Message Modifiable text for the message subject and body. You can customize these, and you
can select from run time fields, which are values that Breeze automatically provides.
Run time fields Course information variables that you can use in your e-mail notification that
are automatically filled in for you when the e-mail notification is sent. The following are the run
time fields, shown in braces because they are variables:
{name} The current name of the course
{course-id} The current course ID
{description} The current course summary
{start-date} The current course start date, displayed in the format Saturday 12 July
{end-date} The current course close date, displayed in the format Saturday 12 July
Do not change a run time field; if you do, it will not be replaced.
70 Chapter 5: Working with Courses
Page 71

Default notification e-mail fields
You can use or change the following default e-mail subject and message text:
Default subject You are enrolled in: {name}
Default message The default e-mail message is as follows:
You are enrolled in the following course that you are required to complete.
Course: {name} (or {course-id})
To access the course go to the following URL:
The course URL is shown here.
Note: If the preceding URL is a hyperlink, click it to access the course. Otherwise, cut and
paste the URL into your browser address box.
Notification e-mail timing
Notifications are placed in a queue and are sent as follows:
• Notifications set to send now are sent shortly after the course is created.
• Notifications set up for future dates are processed every night at midnight. On the set date,
depending on the number of notifications in the queue, they are sent within a few minutes or a
few hours after midnight PST.
Notifications appear to be sent from whoever creates the course, using the e-mail address specified
in their Breeze account. Any e-mail delivery failure notifications are sent to that address.
All e-mail notifications are sent individually. Recipients do not see the list of other recipients in
the message header.
Setting up reminders
The fifth step in the Course wizard is setting up course reminders. Reminders are optional—the
Course wizard lets you disable course reminders if you do not want to use them.
A course reminder is an e-mail reminder sent to either all or selected course enrollees after you set
up the course. You can use reminders for the following purposes:
• To remind the current enrollees that they are scheduled to take the course as the course date
approaches
• To notify specific individuals that they are required to complete this course
• To notify specific individuals who have failed this course that they are required to take it again
to pass
You can use the same run time field variables you used for notifications. For more information,
see “E-mail reminder settings” on page 72 and “Default e-mail reminder fields” on page 73.
You can also change the course reminders any time after the course is created. For more
information, see “Changing settings for course reminders” on page 78.
Creating a new course 71
Page 72

To set up course reminders:
1.
On the Set Up Reminders page, select the option for the reminder notification timing that you
want, including the starting date and recurrence frequency.
2.
Select the option for the recipients to whom you want to send the reminder; for more
information, see “E-mail reminder settings” on page 72.
3.
Edit the e-mail subject and message; to use run time fields, select and copy the field name from
the Run Time Fields list to the right of the message body and paste it into the message subject
or body. Do not change any of the run time field text in braces.
4.
Click Finish.
This ends the course creation process. The Course Information page appears.
E-mail reminder settings
The following are the settings for e-mail reminders and valid run time fields:
Notification Timing Setting for specifying whether to send reminders, and if so, when e-mail
reminders are sent to enrollees. You set the reminder start date and specify whether the reminders
are sent once, daily, weekly, or monthly.
Recipients Setting for which recipients receive reminders. The following are the possible
values:
• All enrollees (the default value)
• Enrollees who have not completed the course
• Enrollees who have failed the course
• Enrollees who have failed or not completed the course
• Only to specific e-mail addresses (you can enter the specific e-mail addresses in a text box, with
each user separated by a comma)
Run time fields Course information variables that you can use in your e-mail and that are
automatically filled in for you when the e-mail reminder is sent. The following are the run time
fields, shown in braces because they are variables:
{name} The current name of the course
{course-id} The current course ID
{description} The current course summary
{start-date} The current course start date, displayed in the format Saturday 12 July
{end-date} The current course close date, displayed in the format Saturday 12 July
Do not change any of the text within the braces in a run time field; if you do, it will not be
replaced.
72 Chapter 5: Working with Courses
Page 73

Default e-mail reminder fields
You can use or change the following default e-mail subject and message fields:
Default subject You are enrolled in: {name}
Default message
You are enrolled in the following course that you are required to complete.
Course: {name} (or {course-id})
To access the course go to this URL:
The course URL is shown here.
Note: If the preceding URL is a hyperlink, click it to access the course. Otherwise, cut and
paste the URL into your browser address box.
E-mail reminder properties
Reminders are placed in a queue and are sent as follows:
The default e-mail message is as follows:
• Reminders set to be sent starting on the current date are sent shortly after the course is created.
• Reminders set up for future dates are processed every night at midnight. On the set date,
depending on the number of e-mail reminders in the queue, they are sent within a few minutes
or a few hours after midnight PST.
Reminders appear to be sent from whoever creates the course, using the e-mail address specified
in their Breeze account. Any e-mail delivery failure notifications are sent to that address.
All e-mail reminders are sent individually. Recipients do not see the list of other recipients in the
message header.
Managing courses
If you are an administrator or a user with permission to manage a specific Training library folder,
you can manage courses by performing the following tasks:
• “Deleting a course” on page 73
• “Editing course profile information” on page 74
• “Changing course content” on page 75
• “Changing course enrollees” on page 76
• “Changing settings for course notifications” on page 77
• “Changing settings for course reminders” on page 78
Deleting a course
Before you delete a course, be aware of the effect of this action:
• The course is removed from the Training library.
• Enrollees can no longer access the course.
• Reports for the course are no longer available.
Managing courses 73
Page 74

• No more course reminders are sent.
• Any delayed course notifications are not sent.
• The content used by the course remains in the Content library.
If you want to prevent access to a course but retain reporting information, set the course close
date and do not delete the course.
To delete a course:
1.
Click the Training tab at the top of the Breeze Manager window.
2.
Navigate to the course that you want to delete.
3.
Select the check box located to the left of the course that you want to delete.
4.
Click Delete in the menu bar above the course listing.
The delete confirmation page appears.
5.
On the delete confirmation page, click Delete to permanently delete the selected items.
The folder list reappears without the deleted course.
Editing course profile information
You can edit the profile information for a course. The profile information includes the course
name, ID, summary, start date, and close date.
If you change the course start date to a later date, no users (not even those who may have already
accessed the course) are able to access the course until the new course start date. If some enrollees
have already accessed the course, their tracking and quiz information is retained in reports.
In addition, changing the course title or course summary does not change the information
presented on a presentation summary slide. The title and summary used on the initial course
summary slide uses the information specified at the time the presentation was originally
published. To change this information, you must republish the content, and then reselect the
content that the course uses. You can change the following information:
Course name The name of the course. A required field that appears in the course list and in
reports.
Course ID The course number or ID: for example, 100, CS100, and so on.
Course summary A course description that appears on the Course Information page. A course
summary can be up to 750 characters long.
Course start date A required field for setting a date before which users cannot access the
course.
Course close date An optional field for setting a date after which users cannot access the
course.
Max attempts The maximum number of times a user can take this course; if you leave this
blank, you are allowing an unlimited number of retries.
74 Chapter 5: Working with Courses
Page 75

To edit course information:
1.
Click the Training tab at the top of the Breeze Manager window.
2.
Navigate to the course whose information you want to edit.
For more information, see “Navigating the Training library” on page 111.
3.
In the course list, click the name of the course to select it.
The Course Information page appears.
4.
Click the Edit Information link in the navigation list.
The Edit Information page appears.
5.
Edit the Course information.
6.
Click Save.
The Course Information page appears.
Changing course content
When you create a new course, you select the content to be used in the course from the Content
library (see “Selecting course content” on page 68). A copy of the content is made, and this copy
is used for the course. This means that changes made to the original content do not affect the
course.
Do not change course content if the current course content has a quiz that users have already
taken. If you do, you may have problems resulting from grading inconsistency, such as the
following:
• Quiz scoring becomes inconsistent.
• Reports might not provide an accurate representation of pass or fail status for users who took
the course before quiz changes occurred.
If you want to update a course quiz (including changing the passing score, adding or removing
questions, changing answers, changing question scoring, reordering questions, changing quiz
options such as forward and backward progress, or adding information to a course that may
increase or reduce the difficulty of a quiz question) and still ensure that reports and grades are
consistent, create a new course that uses the updated content.
To change course content:
1.
Click the Training tab at the top of the Breeze Manager window.
2.
Navigate to the course whose content you want to change; for more information, see
“Navigating the Training library” on page 111.
3.
In the course list, click the name of the course to select it.
The Course Information page appears.
4.
Click the Select Content link in the navigation bar.
The Select Content page appears; you are now in the Content library.
5.
Navigate to the folder that contains the content that you want to use for the course; for more
information, see “Navigating the Content library” on page 35.
Managing courses 75
Page 76

6.
Select the button next to the content that you want to use for the course.
7.
Click Save.
A warning page appears, informing you of the consequences of changing the course’s content.
8.
If you still want to change the content, click Yes, Update My Content.
The Course Information page reappears.
Changing course enrollees
If you add enrollees to a course, you must notify the new learners. For instructions, see “Changing
settings for course notifications” on page 77. You might also want to set up reminders for them;
for information, see “Changing settings for course reminders” on page 78.
Enrollees who are removed from enrollment do not receive any notification; they are simply no
longer able to access the course.
To add course enrollees:
1.
Click the Training tab at the top of the Breeze Manager window.
For more information, see “Navigating the Training library” on page 111.
2.
Navigate to the course to which you are adding enrollees.
3.
In the list, click the name of the course to select it.
The Course Information page appears.
4.
Click the Manage Enrollees link in the navigation bar.
The Manage Enrollees page appears with the Available Users and Groups list on the left and
the Current Enrollees list on the right.
5.
Do one of the following to select enrollees in the Available Users and Groups list:
■ Press Control-click or Shift-click to select multiple users or groups.
■ To expand a group so you can select individual members, double-click the group name;
when you are done with this group, double-click Up One Level in the list to return to the
parent folder list.
■ To search for a name in the list, click Search at the bottom of the window and enter the
name to display it in the list, and then select it.
6.
Click Add.
The users and/or groups you added appear in the Current Enrollees list; to remove a name
from this list, select it and click Remove.
To remove course enrollees:
1.
Click the Training tab at the top of the Breeze Manager window.
2.
Navigate to the course whose content you want to change.
For more information, see “Navigating the Training library” on page 111.
3.
In the course list, click the name of the course to select it.
The Course Information page appears.
76 Chapter 5: Working with Courses
Page 77

4.
Click the Manage Enrollees link in the navigation bar.
The Manage Enrollees page appears with the Available Users and Group list on the left and the
Current Enrollees list on the right.
5.
To select users or groups to be removed, do one of the following in the Current Enrollees list:
■ Press Control-click or Shift-click to select multiple users or groups.
■ To search for a name in the list, click Search at the bottom of the window, enter the name to
display it in the list, and then select the name.
6.
Click Remove.
The users and/or groups you removed disappear from the Current Enrollees list.
Changing settings for course notifications
If a course notification was already sent (for example, you had a notification sent when the course
was created or on the day the course started and that date has already passed), you can select a
later date to have another e-mail notification sent. If a scheduled course notification was not yet
sent, you can change the date when it will be sent.
When you change a course e-mail notification, you can reset the notification timing (when the
e-mail notification is sent to enrollees), the recipients of the e-mail notification (all enrollees,
those who have not yet taken the course, those who failed the course, those who have failed or not
completed the course, or custom recipients), and the e-mail subject and message. For example, if
you added just a small number of new enrollees, you can specify their e-mail addresses
individually. You can also use run time fields in the subject line and in the body of the message.
To change settings for a course notification:
1.
Click the Training tab at the top of the Breeze Manager window.
2.
Navigate to the course whose notification settings you want to change; for more information,
see “Navigating the Training library” on page 111.
3.
In the course list, click the name of the course to select it.
The Course Information page appears.
4.
Click the Notifications link in the navigation bar.
5.
On the Notifications page, click the button for the notification timing you want and reset the
Send On date, if necessary.
For more information, see “Notification e-mail settings” on page 70.
6.
Click the option that identifies the group of recipients to which you want to send the
notification; for more information, see “Notification e-mail settings” on page 70.
Managing courses 77
Page 78

7.
(Optional) Edit the e-mail subject and message, using any of the run time fields; to use run time
fields, select and copy the field name from the Run Time Field list to the right of the message
body and paste it into the message subject or body. Do not alter any text in braces in a run time
field.
For more information, see “Notification e-mail settings” on page 70 and “Default notification
e-mail fields” on page 71.
8.
Click Send.
The Course Information page appears.
Changing settings for course reminders
When changing course reminder e-mail settings, you can reset the reminder timing (when the
e-mail reminder is sent to enrollees and how often), the reminder recipients (all enrollees, those
who have not yet taken the course, those who failed the course, those who have failed or not
completed the course, or custom recipients), and the e-mail subject and message. You can also use
run time fields in the subject line and in the body of the message.
To change settings for course reminders:
1.
Click the Training tab at the top of the Breeze Manager window.
2.
Navigate to the course whose reminder settings you want to change; for more information, see
“Navigating the Training library” on page 111.
3.
In the course list, click the name of the course to select it.
The Course Information page appears.
4.
Click the Reminders link in the navigation bar.
The Reminders page appears.
5.
On the Reminders page, click the option for the notification timing you want; change the
starting date or recurrence period, as necessary; for more information, see “E-mail reminder
settings” on page 72.
6.
Click the option that identifies the group of recipients to which you want to send the reminder;
for more information, see “E-mail reminder settings” on page 72.
7.
(Optional.) Edit the e-mail subject and message, using any of the run time fields; to use run time
fields, select and copy the field name from the Run Time Fields list to the right of the message
body and paste it into the message subject or body. Do not alter any text in braces in a run time
field. For more information, see “E-mail reminder settings” on page 72 and “Default
notification e-mail fields” on page 71.
8.
Click Save.
The Course Information page appears.
78 Chapter 5: Working with Courses
Page 79

Course reports
The Reports feature of the Breeze Manager lets you create reports that show you a given course
from different perspectives. To use this feature, access the Course Information page (see “Viewing
the course information” on page 65), and then click the Reports link above the Course
Information title bar. This displays other links that let you define the kinds of report information
you can see for this course. The links are as follows:
Summary The first report type that appears when you access the Reports feature. The
Summary shows you the course name, the date it was last modified, and the number of times this
content was viewed.
By Slides This link shows a bar graph that lists each slide in the course by slide number and
how many times it has been viewed; below this is a table with the same information, which also
includes the last time each slide was viewed.
By Users This report shows all of he users who have taken this course and for each shows the
user’s name, status (Passed, Failed, or Incomplete), score, date completed (the date of the user’s
first attempt at the course), time the user took the course (the time of the user’s first attempt at the
course), how many times the user took the course, and the certificate number, if applicable. Click
on the name of an individual user to view a bar graph and a table that shows each question and
whether the user answered it correctly or incorrectly, as well as the score for this question. You can
also click the View Answers link for each question, which displays the answer distribution for this
question.
By Questions This link shows a table with an overview of all questions, listing each question by
number, name, number of correct answers, number of incorrect answers, percentage of correct,
percentage of incorrect, as well as the score. Above this is a bar chart that shows each answer,
color-coded as correct or incorrect. Click on a specific question in the bar to view a pie chart with
a table that provides the answer key and answer distribution. The answer key lists all possible
answers for the selected question and their corresponding answer number or letter; the answer
distribution lists all of the answer choices selected for this question, flags the correct answer, and
shows the number of users who selected each answer, as well what percent of the total each
number of users represents. Finally, it totals the users by number of users and percent of users.
By Answers This link shows a table that shows the maximum possible score, the passing score,
the average score, the high score, and the low score for the quiz. For each question, the table also
shows the question number, the question itself, and the answer distribution; that is, how each
question was answered, if at all. Click on the view answers link to view a pie chart with a table
that provides the answer key and answer distribution. The answer key lists all of the possible
answers for the selected question and their corresponding answer number or letter; the answer
distribution lists all of the answer choices selected for this question, flags the correct answer, and
shows the number of users who selected each answer, as well as what percent of the total each
number of users represents. Finally, it totals the users by number of users and percent of users.
Note: Breeze resets content scores for quizzes and surveys each time the user accesses the content.
If you do not want the score to reset, and you have access to the Training tab, you can create a new
course and select the content in question as the course content. This way, you have turned the
content into a course. For details about how to create a new course, see “Creating a new course”
on page 66.
Course reports 79
Page 80

The Hide Answer Distribution/Show Answer Distribution button is a toggle that lets you hide
the distribution of answers for each question, then show them again.
Setting and removing report filters
Where appropriate, you can further define the information you see on a particular report by
specifying report filters. For courses, these filters are operable for all of the four report types. For a
description of report filters and procedures for setting and removing them, see “Setting and
removing report filters” on page 25.
Downloading reports
With the exception of the Summary report, you can export all course reports to a comma
separated values (CSV) file by clicking Download Report Data under the report types links. For
information about how to download reports, see “Downloading reports” on page 28.
You can also export the By Slides or By Questions report to a browser window by clicking
Printable Version on the left, above the display.
80 Chapter 5: Working with Courses
Page 81

CHAPTER 6
Working with Training Curriculums
Note: This chapter applies only to accounts that include the Training application.
If you have Training Manager permission, you can use Breeze Manager to group courses and
other learning content into a curriculum, which guides users through a prescribed learning path.
(For more information about Training Manager permission, see “Training managers”
on page 261.)
A curriculum can include Breeze content, presentations, meetings, and courses, as well as learning
content external to Breeze, such as classroom training and required reading. You can define
prerequisites for a curriculum, as well as design your program so that users can test-out of certain
curriculum items, such as courses and content, by passing a related topic.
As users complete items in the curriculum, you can track their progress and generate reports, to
ensure that the curriculum meets the learning objectives.
You can use the key features of Breeze curriculums to perform the following tasks:
• Group items, such as courses and presentations, to support user navigation.
• Define prerequisites and “test-outs” for items, which allows enrollees to bypass taking certain
items if they pass a test-out item.
• Specify items as required to successfully complete the curriculum.
• Enroll users based on specific criteria, such as work group.
• Send e-mail notifications and reminders to users regarding the curriculum.
• Generate reports that include curriculum statistics.
• View a visual representation of report data using the Training Dashboard.
81
Page 82

About curriculum tasks
The following table lists key tasks that you can complete when you create a new curriculum with
the New Curriculum wizard, with links to related procedures:
Task See
Browse to a location in which to save your new
curriculum
Add details about a new curriculum “Entering curriculum information for a new
Add items, such as courses, to a new
curriculum
Change the order of items in a new curriculum “Changing the order of items within a new
Delete items from a new curriculum “Removing items from a new curriculum”
Exit from the New Curriculum wizard “Exiting from the New Curriculum wizard”
“Browsing to a curriculum location” on page 84
curriculum” on page 85
“Adding items to a new curriculum” on page 86
curriculum” on page 89
on page 89
on page 90
After you create a curriculum, you no longer work with the New Curriculum wizard. You can
modify your curriculum and complete the tasks listed in the following table, independent of the
New Curriculum wizard:
Task See
View information about a curriculum “Viewing and modifying curriculum information”
on page 90
Edit curriculum information “Editing curriculum information” on page 96
Change the order of items in an existing
curriculum
Add items to an existing curriculum “Adding items to a curriculum” on page 91
Group items within a folder “Adding a folder to group items in a curriculum”
Assign prerequisites to an item “Assigning prerequisites to an item” on page 94
Specify that users can skip an item if they pass
another item
Specify completion requirements, which
determine whether the user must complete the
item to successfully complete the curriculum
Send an e-mail reminder to curriculum
enrollees
Send an e-mail notification about the
curriculum to enrollees
“Changing the order of items in a curriculum”
on page 91
on page 92
“Assigning test-outs for an item or folder”
on page 95
“Specifying or editing completion requirements”
on page 97
“Sending reminders to curriculum enrollees”
on page 100
“Sending notification to curriculum enrollees”
on page 99
82 Chapter 6: Working with Training Curriculums
Page 83

Task See
Generate reports that pertain to the curriculum “About curriculum reports” on page 103
View the Training Dashboard to see curriculum
data presented visually
“Viewing the Training Dashboard” on page 59
Creating a curriculum
The New Curriculum wizard simplifies the process of creating a curriculum. The following
procedures outline the typical workflow for creating a curriculum:
• “Browsing to a curriculum location” on page 84
• “Entering curriculum information for a new curriculum” on page 85
• “Adding items to a new curriculum” on page 86
After you create a curriculum, you can complete additional tasks, such as adding external training,
adding enrollees, and sending reminders.
Sample curriculum, containing external training item, three meetings, SWF file, course, and folder
Creating a curriculum 83
Page 84
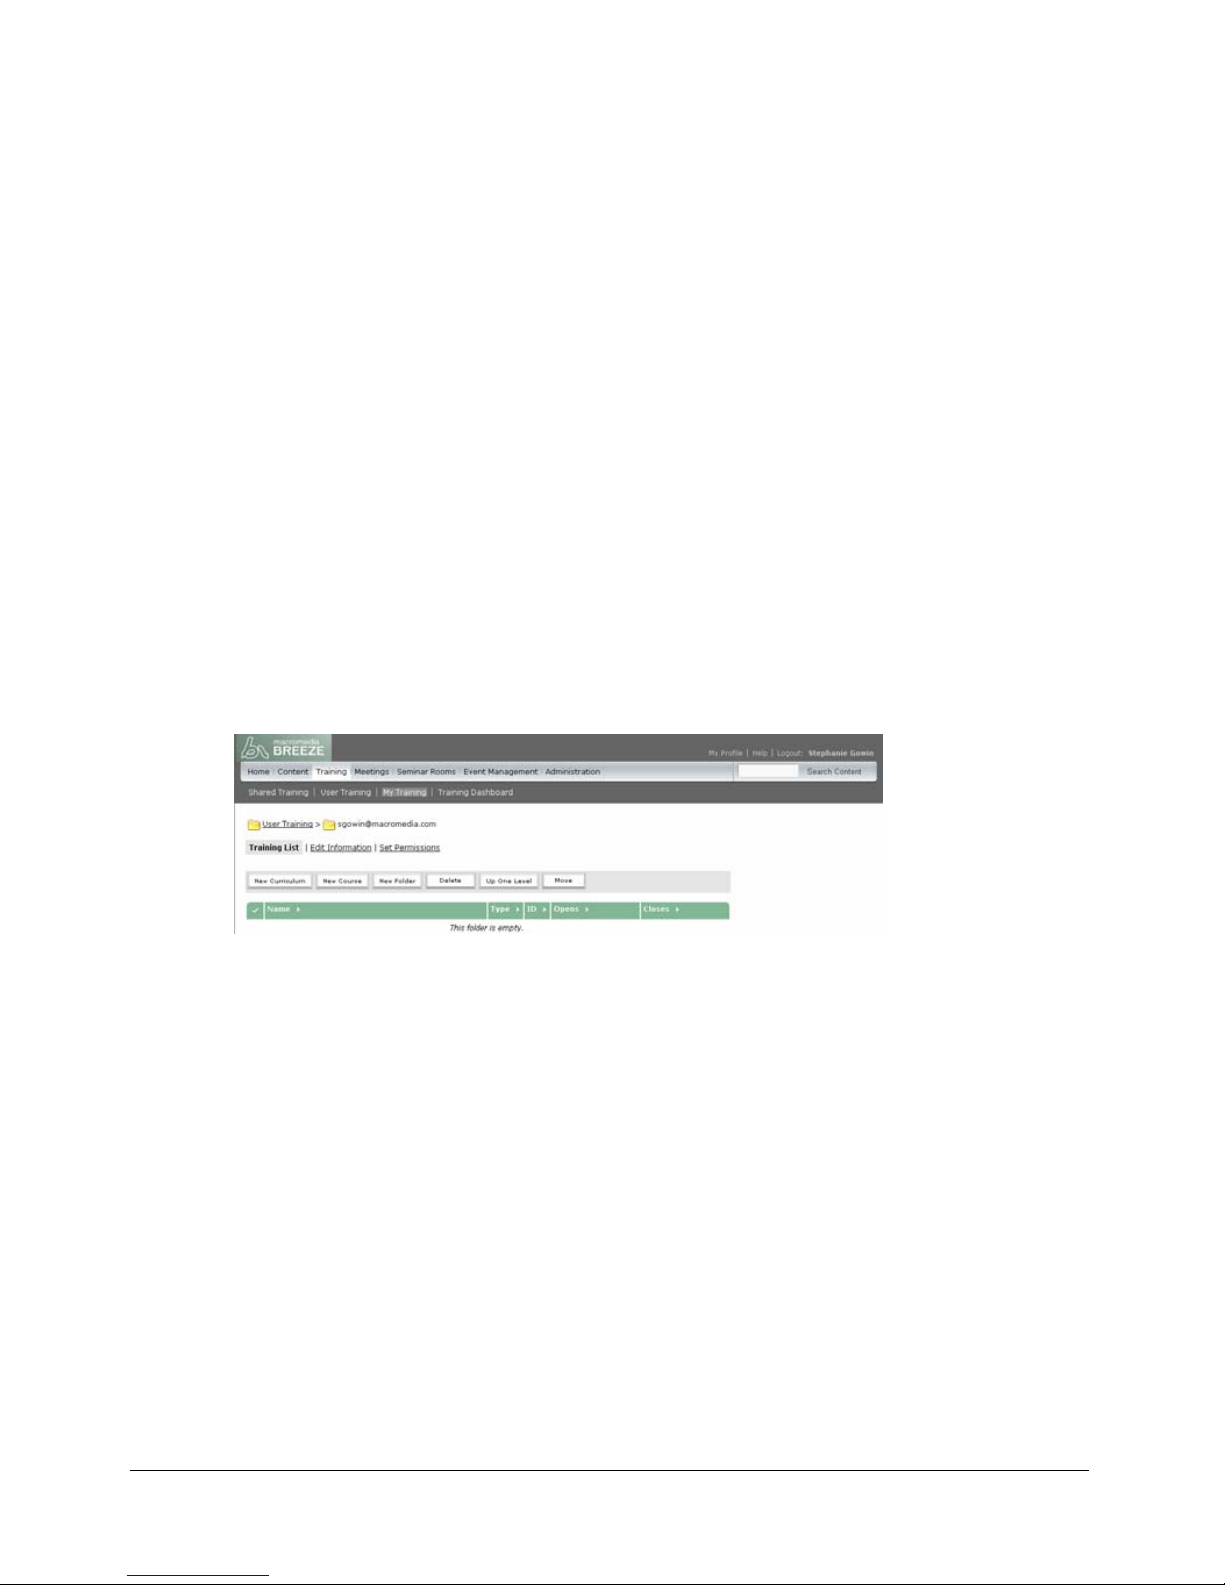
Browsing to a curriculum location
You can create or browse to a folder in the Training library that will contain the curriculum (you
must have permission to access the folder). When you determine a location, you open the New
Curriculum wizard to create your curriculum in the selected location.
Note: If you want to save your curriculum in your User Training folder, you can bypass this procedure
by simply clicking the New Curriculum link on the Breeze Manager Home page and following the
steps to enter curriculum information. See “Entering curriculum information for a new curriculum”
on page 85.
To browse to a location and enter a description:
1.
Click the Training tab of Breeze Manager, and click the Shared Training folder or User
Training folder. For more information about the library structure and permissions, see “Setting
training folder permissions” on page 114.
2.
Do one of the following:
■ Click a folder in the Name column to save the curriculum in a subfolder of the selected
folder.
■ Click New Folder to create a folder for your curriculum. Enter a name in the Folder Name
text box and click Save.
Note: For information about setting folder permissions in the Training library, see “Setting
training folder permissions” on page 114.
A path to your curriculum location appears toward the top of the window.
3.
When you’ve selected a location, click New Curriculum.
The New Curriculum wizard opens, which allows you to create your curriculum.
84 Chapter 6: Working with Training Curriculums
Page 85
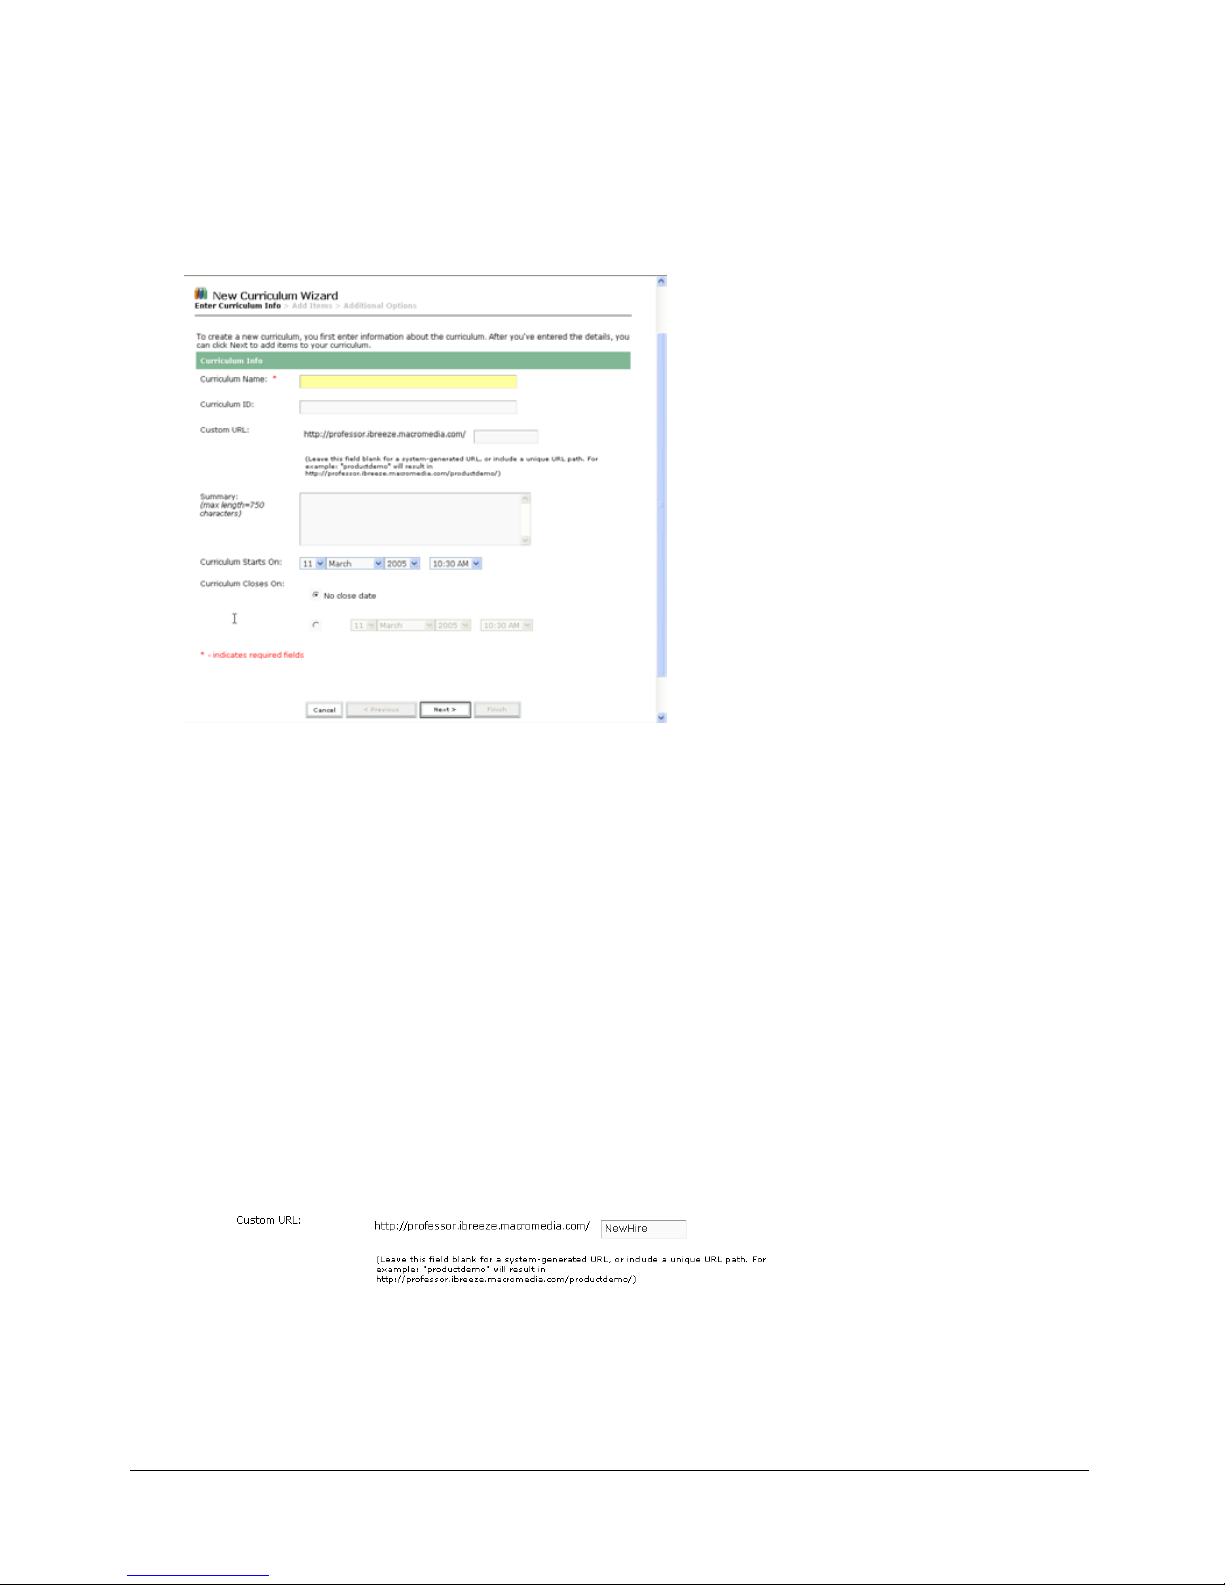
Entering curriculum information for a new curriculum
The first page of the New Curriculum wizard lets you enter details, such as descriptive summary
information and start and end dates, about the curriculum. The information that you enter in the
wizard appears later on the Curriculum Info page, as well as on the page that enrollees access from
their My Training link.
The first page of the New Curriculum wizard
Note: The following procedure assumes that you completed the previous procedure, “Browsing to a
curriculum location” on page 84.
To enter curriculum information for a new curriculum:
1.
In the Curriculum Name text box, enter a title for the curriculum.
2.
In the Curriculum ID text box, you have the option of entering an identification code or
number for the curriculum. You can assign any code, such as a catalog number.
3.
The Custom URL text box displays the first part of the URL that users click to access the
curriculum. Do one of the following:
■ Leave the text box blank to have Breeze generate a system URL that lets users enter the
meeting room.
■ Enter a custom URL in the text box to specify how the remainder of the URL should read.
For example, you can enter a word that describes the curriculum.
For information about creating custom URLs and a list of restricted words, see “Custom
URL rules” on page 24.
Creating a curriculum 85
Page 86

4.
In the Summary text box, enter a description, which users can read to learn more about the
curriculum.
5.
Select the date the curriculum begins in the Curriculum Starts On pop-up menu.
Note: The start and end dates that you select override the start and end dates for the individual
items in your curriculum. For example, if you add a Breeze Meeting with an end date that already
passed, yet your end date for the curriculum is in the future, the Breeze Meeting assumes the end
date of the curriculum.
6.
Either select the date the curriculum ends in the Curriculum Closes On pop-up menu, or select
No Close date and click Next to add items to the curriculum.
After you add information, you follow procedures to add items to the curriculum.
Adding items to a new curriculum
After you enter curriculum information in the New Curriculum wizard and click Next, a page
appears that lets you add items to the curriculum. (When you add an item to a curriculum, you
are actually adding a link to the item, not copying the item in a new location within Breeze.)
Note: If you want to group items in folders, do not add the items using the New Curriculum wizard.
Instead, exit from the wizard, add the folder, and then add items to the folder. For more information,
see “Adding a folder to group items in a curriculum” on page 92.
You can add the following types of items from the New Curriculum wizard:
Item Description See
Content Any Breeze or third-party content available in
the Content library, such as Breeze
Presentations, Macromedia Flash SWF files,
Flash Video (FLV) files, JPEG files, and
FlashPaper documents. You can also add
Macromedia Captivate and Macromedia
Authorware files. All content is AICC compliant.
Breeze course A Breeze course that you can access in the
Training library
Breeze Meeting A Breeze Meeting that you can access in the
Meetings library
“Adding content to a new
curriculum” on page 87
“Adding a course to a new
curriculum” on page 88
“Adding a meeting to a new
curriculum” on page 88
86 Chapter 6: Working with Training Curriculums
Page 87
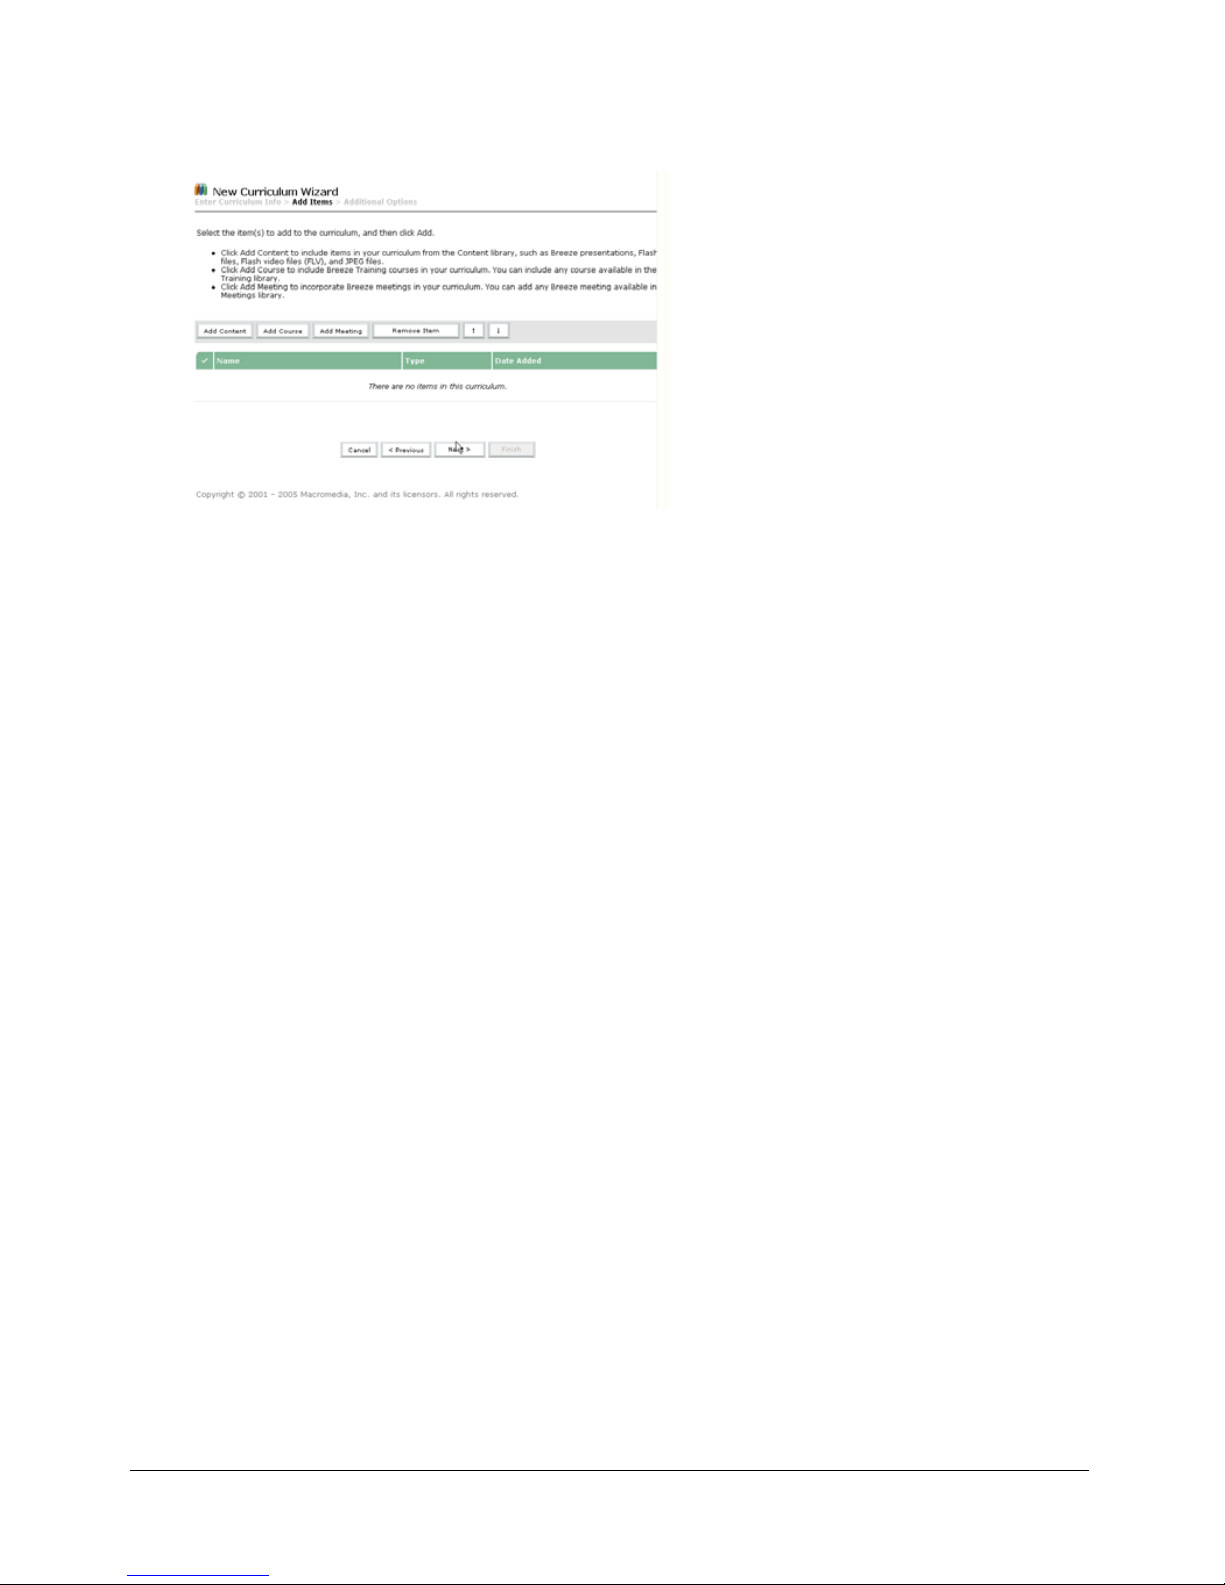
Note: If you’d like to add external training to your curriculum, you can do so after you exit from the
wizard. See “Adding external training to a curriculum” on page 94.
The Add Items page of the New Curriculum wizard
Adding content to a new curriculum
Note: This procedure assumes that you are adding content using the New Curriculum wizard. If you
are adding content to an existing curriculum independent of the wizard, see the procedure “Adding
content to a curriculum” on page 92.
You can add any files that you can access in your Content library to a curriculum.
Keep in mind that if you want to be able to track data for individual users with a curriculum item,
you should add the item to the curriculum as a course, not as content.
To add Breeze content to a curriculum:
1.
On the Add Items page of the New Curriculum wizard, click Add Content.
Content in your user folder appears.
2.
To select content from a different content folder, click a folder, or click the Up One Level
button to browse to another folder.
3.
Select the check box for the content that you want to add to the curriculum, and then click Add.
4.
If you’d like to add another type of item, or otherwise manipulate the items in the list, do one
of the following:
■ To add a course or Breeze Meeting, see “Adding a course to a new curriculum” on page 88 or
“Adding a meeting to a new curriculum” on page 88.
■ To change the order of items in the curriculum, see “Changing the order of items within a
new curriculum” on page 89.
■ To remove an item from the curriculum, see “Removing items from a new curriculum”
on page 89.
5.
When your list of items is complete and in the order you want, click Next.
The Additional Options page appears, which is the last page of the wizard. To exit from the
wizard, see “Exiting from the New Curriculum wizard” on page 90.
Creating a curriculum 87
Page 88

Adding a course to a new curriculum
Note: This procedure assumes that you are adding a course using the New Curriculum wizard. If you
are adding a course to an existing curriculum independent of the wizard, see the procedure “Adding a
course to a curriculum” on page 93.
To add a Breeze course to a curriculum, you select the course from the Training library.
To add a Breeze course to a curriculum:
1.
On the Add Items page of the New Curriculum wizard, click Add Course.
Content in your User Training folder appears.
2.
If necessary, browse to the folder that contains the course.
You can click a folder or click the Up One Level button to browse.
3.
Select the check box for the course that you want to add to the curriculum, and click Add.
The course becomes part of the curriculum.
4.
If you’d like to add another type of item, or otherwise manipulate the items in the list, do one
of the following:
■ To add content or a Breeze Meeting, see “Adding content to a new curriculum” on page 87
or “Adding a meeting to a new curriculum” on page 88.
■ To change the order of items in the curriculum, see “Changing the order of items within a
new curriculum” on page 89.
■ To delete an item from the curriculum, see “Removing items from a new curriculum”
on page 89.
5.
When your list of items is complete and in the order that you want, click Next.
The Additional Options page appears. To exit from the wizard, see “Exiting from the New
Curriculum wizard” on page 90.
Note: Invitations, enrollments, and reminders that you created for a course are not carried over when
you add a course to a curriculum.
Adding a meeting to a new curriculum
Note: This procedure assumes that you are adding a meeting using the New Curriculum wizard. If you
are adding a meeting to an existing curriculum independent of the wizard, see the procedure “Adding
a meeting to a curriculum” on page 93.
If your Breeze account or installation includes Breeze Meeting, you can add any meeting that you
can access in your Meetings library to your training curriculum.
To add a Breeze Meeting to a curriculum:
1.
On the Add Items page of the New Curriculum wizard, click Add Meeting.
Content in your User Meetings folder appears.
2.
To select content from a different folder, browse to another folder by clicking the folder links
or the Up One Level button.
88 Chapter 6: Working with Training Curriculums
Page 89

3.
Select the check box for the meeting that you want to add to the curriculum, and click Add.
The meeting becomes part of your curriculum.
4.
If you’d like to add another type of item, or otherwise manipulate the items in the list, do one
of the following:
■ To add content or a course, see “Adding content to a new curriculum” on page 87 or
“Adding a course to a new curriculum” on page 88.
■ To change the order of items in the curriculum, see “Changing the order of items within a
new curriculum” on page 89.
■ To delete an item from the curriculum, see “Removing items from a new curriculum”
on page 89.
5.
When your list of items is complete and in the order that you want, click Next.
The Additional Options page appears. To exit from the wizard, see “Exiting from the New
Curriculum wizard” on page 90.
Changing the order of items within a new curriculum
You can alter your learning path by changing the order of a learning object within a curriculum.
For Breeze to enforce a specific order, you can specify prerequisites, completion requirements, and
test-out items after you exit from the New Curriculum wizard. For more information, see
“Assigning prerequisites to an item” on page 94, “Specifying or editing completion requirements”
on page 97, and “Assigning test-outs for an item or folder” on page 95.
Note: Although you can move items within a folder, you cannot move items in or out of folders.
To change the order of items within a curriculum:
• On the Add Items page of the New Curriculum wizard (see “Adding items to a new
curriculum” on page 86), click the check box next to the item that you want to move, and then
click either the up or down arrow to move the item up or down the list of items, in the
corresponding direction.
Removing items from a new curriculum
Breeze Manager lets you remove items that you no longer want to include in your curriculum.
Even though you remove the item from the curriculum, the item is still available in its respective
library.
To remove an item from a curriculum:
1.
On the Add Items page of the New Curriculum wizard (see “Adding items to a new curriculum”
on page 86), click the check box next to the item that you want to delete, and then click Remove
Item.
A page appears that lists the items selected for deletion.
2.
After verifying that you do want to delete the selections, click Delete.
Creating a curriculum 89
Page 90

Exiting from the New Curriculum wizard
After you add items to your curriculum, and you organize the items in the order that you want,
you can exit from the New Curriculum wizard. This is the last step in the New Curriculum
wizard.
To exit from the New Curriculum wizard:
1.
On the Add items page of the New Curriculum wizard, click Next.
The Additional Options page indicates additional tasks that you can complete for the
curriculum.
2.
After reviewing the information, click Finish to exit from the wizard.
3.
The Curriculum Info page appears. The path to your curriculum, in the Training library,
appears toward the top of the page.
For more information about tasks that you can complete from the Curriculum Info page, see the
next procedure, “Viewing and modifying curriculum information” on page 90.
Viewing and modifying curriculum information
After you create a new curriculum, you can view and modify curriculum details on the
Curriculum Info page, which provides the following information:
A list of items in the curriculum The list of items appears on the left side of the page. To
change the order of the items, see “Specifying or editing completion requirements” on page 97.
To add an item, see “Adding items to a curriculum” on page 91. To remove an item, see
“Removing items from a curriculum” on page 96.
Curriculum Information This area includes the curriculum name, ID, summary, open date,
close date, and curriculum URL. To edit this information, see “Editing curriculum information”
on page 96.
Completion Requirements This area specifies items required to successfully complete the
curriculum. To edit the completion requirements, see “Specifying or editing completion
requirements” on page 97.
Curriculum Status This area shows the status information, such as the number of enrollees and
the number of users who have passed the curriculum. To view additional status information, see
“Viewing curriculum status information” on page 97.
Reminder Policy This area indicates whether a reminder policy is enabled, to whom reminders
are being sent, the date that the next reminder will be sent, and how often reminders are sent. To
edit the reminder policy, see “Sending reminders to curriculum enrollees” on page 100.
90 Chapter 6: Working with Training Curriculums
Page 91

To view curriculum information:
1.
Click the Training tab at the top of the Breeze Manager window.
2.
Navigate to the folder that contains the curriculum.
For more information, see “Navigating the Content library” on page 35.
3.
Select the name of the curriculum in the course list.
The Curriculum Info page appears.
Changing the order of items in a curriculum
Note: This procedure assumes that you are modifying an existing curriculum and not using the New
Curriculum wizard. If you are changing the order of items using the New Curriculum wizard, see the
procedure “Changing the order of items within a new curriculum” on page 89.
You can manipulate your learning path by changing the order of a learning object in a
curriculum. For Breeze to enforce a specific order, you can specify prerequisites, completion
requirements, and test-out items. For more information, see “Assigning prerequisites to an item”
on page 94, “Specifying or editing completion requirements” on page 97, “Assigning test-outs for
an item or folder” on page 95.
To change the order of items in a curriculum:
1.
If you’re not on the Curriculum Info page for the curriculum that you want to modify, click the
Training tab and browse to the curriculum. Select the curriculum name to open the Curriculum
Info page.
For more information, see “Viewing and modifying curriculum information” on page 90.
2.
Select the check box next to the item that you want to move, and then click either the up or
down arrow to move the item up or down the list of items.
Adding items to a curriculum
Note: This procedure assumes that you are modifying an existing curriculum and not using the New
Curriculum wizard. If you are adding items using the New Curriculum wizard, see the procedure
“Adding items to a new curriculum” on page 86.
After you create a curriculum, you add items from the Curriculum Info page rather than the New
Curriculum wizard. Additionally, the Curriculum Info page lets you add external training, as well
as folders in which you can group items.
To add items to a curriculum:
1.
If you’re not on the Curriculum Info page for the curriculum that you want to modify, click the
Training tab and browse to the curriculum. Select the curriculum name to open the Curriculum
Info page.
For more information, see “Viewing and modifying curriculum information” on page 90.
2.
Click Add Item.
A page appears that lets you select the type of item to add.
Adding items to a curriculum 91
Page 92

3.
Complete one of the following procedures:
■ To add a folder in which you can group items, see “Adding a folder to group items in a
curriculum” on page 92.
■ To add content available from the Content library, see “Adding content to a curriculum”
on page 92.
■ To add a course, see “Adding a course to a curriculum” on page 93.
■ To add a meeting, see “Adding a meeting to a curriculum” on page 93.
■ To add external training, see “Adding external training to a curriculum” on page 94.
Adding a folder to group items in a curriculum
You can group items in folders to create training modules, or to otherwise organize your items.
For example, you can group a set of items in a Beginner Topics folder and another set in an
Intermediate Topics folder. You add items to a folder similarly to the process you follow to add
items to a curriculum.
Note: You add items to a curriculum folder rather than move items already in your curriculum into a
folder. You can assign completion requests and prerequisites for the folder.
To add a Breeze folder to a curriculum:
1.
After completing steps 1 and 2 to add items to a curriculum in “Adding items to a curriculum”
on page 91, click New Folder.
2.
On the New Folder page, enter a name for the folder in the Folder Name text box, and click
Save.
The curriculum now includes the folder.
If you need to set permission for the folder, see “Setting training folder permissions”
on page 114.
3.
In the curriculum list, you can select the name of the folder that you just created and add items
to the folder. For more information, see “Adding items to a curriculum” on page 91.
Adding content to a curriculum
Note: This procedure assumes that you are modifying an existing curriculum and not using the New
Curriculum wizard. If you are changing the order of items using the New Curriculum wizard, see the
procedure “Changing the order of items within a new curriculum” on page 89.
You can easily add content from your Content library to an existing curriculum.
To add content to a curriculum:
1.
After completing steps 1 and 2 to add items to a curriculum in “Adding items to a curriculum”
on page 91, click Add Content.
Content in your User Content folder appears.
2.
If necessary, browse to the folder that contains the content.
You can click the folder links or the Up One Level button to browse.
92 Chapter 6: Working with Training Curriculums
Page 93

3.
Select the check box for the content that you want to add to the curriculum, and click Save.
The content becomes part of the curriculum.
Note: When a user launches content from a curriculum, the launches are not tracked in Breeze. if you
want to track the number of times a user launches an item, you should add the item to the curriculum
as a course.
Adding a course to a curriculum
Note: This procedure assumes that you are adding a course to an existing curriculum and not using
the New Curriculum wizard. If you are adding a course using the New Curriculum wizard, see the
procedure “Adding a course to a new curriculum” on page 88.
Breeze courses available in your Training library are also available for you to include in an existing
curriculum.
To add a course to a curriculum:
1.
After completing steps 1 and 2 to add items to a curriculum in “Adding items to a curriculum”
on page 91, click Add Course.
Courses in your user training folder appear.
2.
If necessary, browse to the folder that contains the course.
Click the folder links or the Up One Level button to browse.
3.
Select the check box for the course that you want to add to the curriculum, and click Save.
The selected items become part of the curriculum.
Note: Invitations, enrollments, and reminders that you created for a course are not carried over when
you add a course to a curriculum.
Adding a meeting to a curriculum
Note: This procedure assumes that you are adding a meeting to an existing curriculum and not using
the New Curriculum wizard. If you are adding a meeting using the New Curriculum wizard, see the
procedure “Adding a meeting to a new curriculum” on page 88.
You can add a Breeze Meeting, available in your Meetings library, to an existing curriculum.
To add a meeting to a curriculum:
1.
After completing steps 1 and 2 to add items to a curriculum in “Adding items to a curriculum”
on page 91, click Add Meeting.
Meetings in your User Meetings folder appear.
2.
If necessary, browse to the folder that contains the meeting.
Click the folder links or the Up One Level button to browse.
3.
Select the check box for the meeting that you want to add to the curriculum, and click Save.
The selected items become part of the curriculum.
Note: To send an Outlook Calendar Event, which lets users add the meeting to their Outlook
calendars, you select the vCal option when you send meeting reminders (not when you add the
meeting to your curriculum). For more information, see “Sending invitations” on page 133.
Adding items to a curriculum 93
Page 94

Adding external training to a curriculum
A Breeze curriculum is not limited to Breeze items. You can include external training, such as
classroom training.
Note: When the user status changes for external training, you can update the user’s completion
status manually. For more information, see “Changing the user status or score for an item”
on page 104.
To add external content to a curriculum:
1.
After completing steps 1 and 2 to add items to a curriculum in “Adding items to a curriculum”
on page 91, click New External Training.
2.
In the Enter Content Information area, enter the name of the external training in the Title text
box.
3.
In the Summary text box, enter a description of the external training, and then click Save.
On the Curriculum Info page, the external training appears in your list of items.
Editing external content information
After you add information about external training, complete the following procedure if you need
to edit the information.
To edit external content information:
1.
If you’re not on the Curriculum Info page for the curriculum that you want to modify, click the
Training tab and browse to the curriculum. Select the curriculum name to open the Curriculum
Info page.
For more information, see “Viewing and modifying curriculum information” on page 90.
2.
In the list of items, select the name of the external training.
3.
In the External Training Information area, click Edit.
4.
In the Item Info area, edit the Name, ID, or Summary information, and click Save.
Assigning prerequisites to an item
Associating prerequisites with other items is one way to enforce an order, or learning path, for
users to follow. With Breeze Manager, you can define prerequisites and specify the importance of
the prerequisite in completing the item. You can designate that the prerequisite is recommended,
or that enrollees must successfully complete the prerequisite before taking the item. Additionally,
you can specify that the item does not appear on the list of users training or enrollment page until
the prerequisite is satisfied. You can assign prerequisites to any item or to an entire folder.
To assign prerequisites to an item:
1.
If you’re not on the Curriculum Info page for the curriculum that you want to modify, click the
Training tab and browse to the curriculum. Select the curriculum name to open the Curriculum
Info page.
For more information, see “Viewing and modifying curriculum information” on page 90.
2.
In the list of items, click the name of the item or folder that requires a prerequisite.
94 Chapter 6: Working with Training Curriculums
Page 95

3.
In the Prerequisites area, click Edit.
4.
The Select Prerequisite area lists the items in the curriculum. Use the pop-up menu to specify
prerequisites, using the following criteria:
Required Indicates that the prerequisite must be completed before taking the item.
Suggested Indicates that the prerequisite is optional. The user receives a message requesting
the user take the prerequisite before taking the item.
Hidden Indicates that the item appears on the enrollment page only after the user completes
the prerequisite.
5.
When you finish selecting prerequisites, click Save.
The prerequisites appear in the Prerequisites area of the Curriculum Info page.
Assigning test-outs for an item or folder
You can design the curriculum so that enrollees are not required to take an item if they pass a
related test-out item. You can also assign test-outs to an entire folder, to specify that users do not
need to complete the items in the folder if they pass the related test-out item.
To assign a test-out for an item:
1.
If you’re not on the Curriculum Info page for the curriculum that you want to modify, click the
Training tab and browse to the curriculum. Select the curriculum name to open the Curriculum
Info page.
For more information, see “Viewing and modifying curriculum information” on page 90.
2.
In the list of items, click the name of the item or folder that requires a test-out item. This
procedure refers to this item as the selected item.
3.
In the Test-Outs area, click Edit.
4.
The Select Test-Outs area lists items in the curriculum. Use the pop-up menu by an item to
designate it as a test-out for the selected item, using the following criteria:
Optional Indicates that if the enrollee passes the test-out item, the selected item is no longer
required to complete the curriculum.
Blocked Indicates that if the enrollee passes the test-out item, the selected item is
unavailable to the enrollee. If the enrollee fails the test-out item, the selected item becomes
available.
Hidden Indicates that if the enrollee passes the test-out item, the selected item is hidden
from the enrollee. If the enrollee fails the test-out item, the test-out item is visible and available
for the enrollee to take.
Note: You also have the option of leaving the pop-up menu blank if you do not want to designate
an item as a test-out for the selected item.
5.
When you finish specifying test-out items, click Save.
The page indicates that a test-out is assigned.
Assigning test-outs for an item or folder 95
Page 96

Removing items from a curriculum
Note: This procedure assumes that you are modifying an existing curriculum and not using the New
Curriculum wizard. If you are deleting items using the New Curriculum wizard, see the procedure
“Removing items from a new curriculum” on page 89.
If you no longer want to include an item in a curriculum, you can remove it without affecting the
original item that exists in its respective library.
To delete items from a curriculum:
1.
If you’re not on the Curriculum Info page for the curriculum that you want to modify, click the
Training tab and browse to the curriculum. Select the curriculum name to open the Curriculum
Info page.
For more information, see “Viewing and modifying curriculum information” on page 90.
2.
In the list of items, select the check box next to the items that you want to remove, and then
click Remove Item.
A page appears that lists the items you selected for deletion.
3.
Verify that you do want to remove the selected items, and click Delete.
The item that you removed no longer appears in the list.
Editing curriculum information
After entering curriculum information in the New Curriculum wizard, you can edit the
information from the Curriculum Info page for the curriculum.
To edit curriculum information:
1.
If you’re not on the Curriculum Info page for the curriculum that you want to modify, click the
Training tab and browse to the curriculum. Select the curriculum name to open the Curriculum
Info page.
For more information, see “Viewing and modifying curriculum information” on page 90.
2.
In the Curriculum Information area, click Edit to edit the following information:
Curriculum Name A title for the curriculum.
Curriculum ID The identification number for the curriculum.
Summary The curriculum description.
Curriculum Starts On The date on which the curriculum starts.
Curriculum Closes On The date on which the curriculum ends; select from the pop-up
menu or select No Close date.
3.
When you finish editing the curriculum information, click Save.
Your changes appear on the Curriculum Info page.
96 Chapter 6: Working with Training Curriculums
Page 97

Specifying or editing completion requirements
You can designate an item as required, which specifies that an enrollee must successfully complete
the item to complete the curriculum.
You can select one or more items in a curriculum that enrollees must pass in order to successfully
complete the curriculum.
Caution: All items in a curriculum are required, by default. If you designate at least one item in a
curriculum as required, other items in the curriculum that do not have a completion requirement
become optional.
To edit completion requirements:
1.
If you’re not on the Curriculum Info page for the curriculum that you want to modify, click the
Training tab and browse to the curriculum. Select the curriculum name to open the Curriculum
Info page.
For more information, see “Viewing and modifying curriculum information” on page 90.
2.
In the Completion Requirements area, click Edit.
A list of all items in the curriculum appears in the Select Completion Requirements area.
3.
For each item that you want to specify as required for successful completion of the curriculum,
select Required from the pop-up menu.
4.
When you finish specifying required items, click Save.
The Curriculum Info page includes the completion requirements that you specified.
Viewing curriculum status information
Viewing curriculum status offers another way to view a summary report. For more information
about viewing curriculum reports, see “Viewing a curriculum summary report” on page 103.
To view curriculum status information:
1.
If you’re not on the Curriculum Info page for the curriculum that you want to modify, click the
Training tab and browse to the curriculum. Select the curriculum name to open the Curriculum
Info page.
For more information, see “Viewing and modifying curriculum information” on page 90.
2.
In the Curriculum Status area, click View.
The Reports tab opens on a Summary page. In addition to the same information that appears
in the curriculum information area of the Curriculum Info page, the Summary page includes
the following information:
Enrolled Users The number of users enrolled in the curriculum.
Total Curriculum Completions The number of times users completed the curriculum. (It’s
possible for a user to complete a curriculum multiple times; this number includes all successful
attempts.)
Curriculum Completions by Unique User The number of times that a user completed the
curriculum. Unlike the Total Curriculum Completions number, this field does not increase in
number if a user completes the curriculum multiple times.
Viewing curriculum status information 97
Page 98

Users Passed The number of users who successfully completed the curriculum.
Users Failed The number of users who did not pass the items required to complete the
curriculum.
For more information about reports, and how to view and download additional reports, see
“About curriculum reports” on page 103.
Managing enrollees
Breeze Manager allows you to view and add enrollees to a curriculum, as well as set access
permissions for enrollees.
Viewing and adding enrollees to a curriculum
In Breeze Manager, you can view or add enrollees to a curriculum.
To view and add enrollees:
1.
If you’re not already on the Curriculum Info page for the desired curriculum, go to the Training
tab in Breeze Manager and browse to the curriculum. Click the curriculum name to open the
Curriculum Info page.
For more information, see “Viewing and modifying curriculum information” on page 90.
2.
Click Manage Enrollees.
The page includes two lists:
■ Available Users and Groups, which lists every user or group that you can add as an enrollee.
■ Current Enrollees For (Curriculum Name), which lists users and groups already enrolled in
the curriculum.
3.
To add enrollees, select the name or group in the Available Users and Groups list.
■ To select multiple users or groups, press Control-click or Shift-click, as appropriate.
■ To expand a group so that you can select individual names within the group, double-click
the group name; when you finish, double-click Up One Level to return to the original list.
■ To search for a name in the list, click the Search button at the bottom of the window and
enter the name to display it in the list, and then select it.
■ Use the Select All button to check all names on the list. The Select None button removes
the check marks.
4.
After selecting the enrollees, click Add.
Note: After adding enrollees, you must send notification to the enrollees that the curriculum is
available. See “Sending notification to curriculum enrollees” on page 99.
98 Chapter 6: Working with Training Curriculums
Page 99

Setting permissions for curriculum enrollees
After you’ve added enrollees to a curriculum, you can determine permissions for enrolled users
and groups.
To set permissions:
1.
If you’re not already on the Curriculum Info page for the desired curriculum, go to the Training
tab in Breeze Manager and browse to the curriculum. Click the curriculum name to open the
Curriculum Info page.
For more information, see “Viewing and modifying curriculum information” on page 90.
2.
Click Manage Enrollees.
3.
Select the enrollee or enrolled group in the Current Enrollees column and click Permissions.
4.
Select one of the following permissions:
■ Enrolled allows the enrollee to access the curriculum.
■ Denied bars the enrollee from accessing the curriculum.
Deleting enrollees from a curriculum
You can easily remove an enrollee from a curriculum.
To delete enrollees:
1.
If you’re not already on the Curriculum Info page for the desired curriculum, go to the Training
tab in Breeze Manager and browse to the curriculum. Click the curriculum name to open the
Curriculum Info page.
For more information, see “Viewing and modifying curriculum information” on page 90.
2.
Click Manage Enrollees.
3.
Select the enrollee or enrolled group in the Current Enrollees column and click Remove.
Sending notification to curriculum enrollees
You can use the notifications feature in Breeze Manager to send an e-mail message to enrollees.
Although you can modify the default message text to state anything, a typical message tells
enrollees that the curriculum is available, provides details about the curriculum, and includes a
link to the curriculum. The message can go to all enrollees, or to a specific subset of enrollees,
such as those who have not completed the curriculum.
You can specify settings for e-mail notifications. See “Notification e-mail settings” on page 70.
Note: You can also send messages that remind users they’re enrolled in a curriculum. For more
information, see “Sending reminders to curriculum enrollees” on page 100.
Sending notification to curriculum enrollees 99
Page 100

To send notification to curriculum enrollees:
1.
If you’re not already on the Curriculum Info page for the desired curriculum, go to the Training
tab in Breeze Manager and browse to the curriculum. Click the curriculum name to open the
Curriculum Info page.
For more information, see “Viewing and modifying curriculum information” on page 90.
2.
If you plan to send notification to all enrollees, you can click Manage Enrollees to view who will
receive notification. If necessary, follow the procedures to add or remove enrollees. See
“Viewing and adding enrollees to a curriculum” on page 98, and “Deleting enrollees from a
curriculum” on page 99.
3.
Click Notifications. On the Notifications page, select when recipients should receive the
notification.
■ Send Notification Now sends the message when you click Send.
■ Send Notification on Start Date sends the message on the date when the curriculum begins.
■ Send On allows you to use the pop-up menus to select a date on which to send the message.
4.
Select one of the following Recipients options, which specifies who receives the message:
All Enrollees Send the message to every individual or group listed in the Current Enrollees
column on the Manage Enrollees page.
Enrollees Who Have Not Completed the Curriculum Send notification only to users who
have not finished the curriculum.
Enrollees Who Have Failed or Not Completed the Curriculum Send notification to both
users who have not passed items, and to users who have not completed the curriculum.
Only to Specific E-mail Addresses Send notification to users whose e-mail addresses you
enter in the Specific E-mail Address text box.
5.
If you selected Only to Specific E-mail Addresses in the previous step, enter the addresses,
separated by a comma, in the Specific E-mail Address text box.
6.
The Message area displays the text that appears in the notification. Modify the text as desired.
7.
To send the e-mail notification to the recipients, click Send.
Sending reminders to curriculum enrollees
The reminders feature in Breeze Manager, similar to the notification feature, lets you send e-mail
messages to enrollees. The primary difference between notifications and reminders, however, is
that the Reminders page lets you send the messages at specified intervals. The message can go to
all enrollees, or to a specific subset of enrollees.
For information about sending notification messages, see “Sending notification to curriculum
enrollees” on page 99.
Breeze sends reminders from the person who creates the curriculum, using the e-mail address
specified in the curriculum creator’s Breeze account.
Breeze sends e-mail reminders individually; recipients do not see the list of other recipients in the
message header.
100 Chapter 6: Working with Training Curriculums
 Loading...