

Page 1

Using the Breeze Publish Wizard
Page 2

Trademarks
Add Life to the Web, Afterburner, Aftershock, Andromedia, Allaire, Animation PowerPack, Aria, Attain, Authorware,
Authorware Star, Backstage, Bright Tiger, Clustercats, ColdFusion, Design In Motion, Director, Dream Templates,
Dreamweaver, Drumbeat 2000, EDJE, EJIPT, Extreme 3D, Fireworks, Flash, Fontographer, FreeHand, Generator, HomeSite,
JFusion, JRun, Kawa, Know Your Site, Knowledge Objects, Knowledge Stream, Knowledge Track, LikeMinds, Lingo, Live
Effects, MacRecorder Logo and Design, Macromedia, Macromedia Action!, Macromedia Breeze, Macromedia Flash,
Macromedia M Logo and Design, Macromedia Spectra, Macromedia xRes Logo and Design, MacroModel, Made with
Macromedia, Made with Macromedia Logo and Design, MAGIC Logo and Design, Mediamaker, Movie Critic, Open Sesame!,
Roundtrip, Roundtrip HTML, Shockwave, Sitespring, SoundEdit, Titlemaker, UltraDev, Web Design 101, what the web can
be, Xtra are either registered trademarks or trademarks of Macromedia, Inc. and may be registered in the United States or in
other jurisdictions including internationally. Other product names, logos, designs, titles, words or phrases mentioned within this
publication may be trademarks, servicemarks, or tradenames of Macromedia, Inc. or other entities and may be registered in
certain jurisdictions including internationally.
This guide contains links to third-party Web sites that are not under the control of Macromedia, and Macromedia is not
responsible for the content on any linked site. If you access a third-party Web site mentioned in this guide, then you do so at your
own risk. Macromedia provides these links only as a convenience, and the inclusion of the link does not imply that Macromedia
endorses or accepts any responsibility for the content on those third-party sites.
Copyright Notice
Copyright © 2004 Macromedia, Inc. All rights reserved. This manual may not be copied, photocopied, reproduced,
translated, or converted to any electronic or machine-readable form in whole or in part without prior written approval of
Macromedia, Inc.
Acknowledgments
Director: Erick Vera
Writing: David Gordon, Jeanette Stallons
Managing Editor: Rosana Francescato
Editing: Barbara Milligan, Antonio Padial
Production Management: Patrice O’Neill
Help Design and Production: Adam Barnett, John Francis
Second Edition: April 2004
Macromedia, Inc.
600 Townsend St.
San Francisco, CA 94103
Page 3

CONTENTS
INTRODUCTION: Using the Breeze Publish Wizard . . . . . . . . . . . . . . . . . . . . . . . . 5
Overview of creating a Breeze presentation . . . . . . . . . . . . . . . . . . . . . . . . . . . . . . . 5
Intended audience . . . . . . . . . . . . . . . . . . . . . . . . . . . . . . . . . . . . . . . . . . . . . . . . . . 6
System requirements and account information . . . . . . . . . . . . . . . . . . . . . . . . . . . . 6
Accessing the Breeze Publish Wizard . . . . . . . . . . . . . . . . . . . . . . . . . . . . . . . . . . . . 6
Key features of the Breeze Publish Wizard . . . . . . . . . . . . . . . . . . . . . . . . . . . . . . . . 6
About Breeze documentation . . . . . . . . . . . . . . . . . . . . . . . . . . . . . . . . . . . . . . . . . 7
Additional Macromedia resources . . . . . . . . . . . . . . . . . . . . . . . . . . . . . . . . . . . . . . 7
CHAPTER 1: Publishing a New Breeze Presentation . . . . . . . . . . . . . . . . . . . . . . . . 9
Step 1: Accessing the Breeze Publish Wizard . . . . . . . . . . . . . . . . . . . . . . . . . . . . . 10
Step 2: Selecting a presentation location . . . . . . . . . . . . . . . . . . . . . . . . . . . . . . . . 10
Step 3: Setting presentation information . . . . . . . . . . . . . . . . . . . . . . . . . . . . . . . . 12
Step 4: Selecting presentation features . . . . . . . . . . . . . . . . . . . . . . . . . . . . . . . . . . 13
Step 5: Selecting a speaker photo (optional) . . . . . . . . . . . . . . . . . . . . . . . . . . . . . 15
Step 6: Setting presentation permissions . . . . . . . . . . . . . . . . . . . . . . . . . . . . . . . . 17
Step 7: Uploading a presentation. . . . . . . . . . . . . . . . . . . . . . . . . . . . . . . . . . . . . . 23
CHAPTER 2: Updating and Replacing Presentations . . . . . . . . . . . . . . . . . . . . . . 25
Publishing a presentation that already exists . . . . . . . . . . . . . . . . . . . . . . . . . . . . . 25
Replacing an existing presentation. . . . . . . . . . . . . . . . . . . . . . . . . . . . . . . . . . . . . 27
CHAPTER 3: Frequently Asked Questions . . . . . . . . . . . . . . . . . . . . . . . . . . . . . . 29
How do I add a new user? . . . . . . . . . . . . . . . . . . . . . . . . . . . . . . . . . . . . . . . . . . . 29
How do I create a presentation that does not require a password? . . . . . . . . . . . . . 29
What is the difference between a private and a public presentation? . . . . . . . . . . . 29
What is a presentation outline? . . . . . . . . . . . . . . . . . . . . . . . . . . . . . . . . . . . . . . . 30
How do I add a speaker photo? . . . . . . . . . . . . . . . . . . . . . . . . . . . . . . . . . . . . . . . 30
What format style and size does Breeze support for a speaker photo?. . . . . . . . . . . 30
CHAPTER 4: Troubleshooting . . . . . . . . . . . . . . . . . . . . . . . . . . . . . . . . . . . . . . . . 31
Cannot set permissions for a presentation . . . . . . . . . . . . . . . . . . . . . . . . . . . . . . . 31
User name and password do not work . . . . . . . . . . . . . . . . . . . . . . . . . . . . . . . . . . 31
3
Page 4

4 Contents
Page 5

INTRODUCTION
Using the Breeze Publish Wizard
Macromedia Breeze is a web platform that provides a single solution for delivering rapid training
and communication across an organization. It consists of three components: the Macromedia
Breeze Presentation platform, the Breeze Training Module, and the Breeze Live Module.
The Macromedia Breeze Presentation platform provides the base for you to create and deploy
multimedia content. It has been designed to work with the Breeze Training Module and the
Breeze Live Module.
The Breeze Training Module lets you create courses, enroll students, and track and monitor
student and course results. This module can be integrated with your Learning Management
System (LMS).
The Breeze Live Module lets you host online real-time meetings, in which you can show
multimedia presentations, screen-share, chat, and broadcast live audio and video.
The Breeze Presentation platform lets you create, deploy, and view multimedia presentation and
learning materials through a web browser. These presentation and learning materials can include
the following:
Breeze presentations Multimedia presentations containing slides, streaming audio,
synchronized animation, and navigation controls.
Macromedia Flash presentations (SWF files)
Images (JPG files)
Flash videos (FLV files)
This guide details step-by-step procedures for using the Macromedia Breeze Publish Wizard to
publish Breeze presentations. The Breeze Publish Wizard is a web application that is part of the
Breeze Presentation platform. You use it in conjunction with the Macromedia Breeze Plug-in for
Microsoft PowerPoint to publish your PowerPoint presentation to your Breeze server for
conversion into a dynamic, high-quality web presentation.
Overview of creating a Breeze presentation
You perform the following steps to create a Breeze presentation:
Create a PowerPoint presentation
5
Page 6

Use the Macromedia Breeze Plug-in for Microsoft PowerPoint to add audio and synchronized
animations to your PowerPoint presentation. For more information, see Using the Macromedia
Breeze Plug-in for Microsoft PowerPoint. You can access this information after installing the Breeze
plug-in by selecting Breeze > Help in PowerPoint.
Publish your presentation to the Breeze server by using the Breeze Publish Wizard web
application in conjunction with the Breeze Plug-in for PowerPoint. Your PowerPoint presentation
and associated audio file are uploaded to the Breeze server and are then converted into a
multimedia web presentation. When the conversion process is complete, you receive an e-mail
message containing the URL for the website where you can view your new Breeze presentation.
Intended audience
This guide is for Breeze users who are publishing Breeze presentations from PowerPoint to the
Content Library on the Breeze server.
System requirements and account information
To use the Breeze Publish Wizard to publish a Breeze presentation, you need the following
software and accounts:
• PowerPoint 97 or later
• Macromedia Breeze Plug-in for PowerPoint
• An Internet connection
Note: PowerPoint presentations and their accompanying audio files can become quite large (1 to
20 MB or larger if you have more than 30 minutes of audio or uncompressed bitmap images). For
reasonable upload times, Macromedia recommends using an Internet connection of 56 Kbps or
faster. For example, over a 56 Kbps connection, the estimated time for uploading a 1 MB file is
about 2 minutes.
• Internet Explorer 4 or later
• A Macromedia Breeze account (For more information, see www.macromedia.com/products/
breeze.)
• Your user name and password for logging in to your Breeze account
For complete Breeze system requirements and recommendations, see www.macromedia.com/go/
breeze_sysreqs.
Accessing the Breeze Publish Wizard
After you install the Breeze Plug-In for PowerPoint, you can access the Breeze Publish Wizard by
selecting Breeze > Publish in PowerPoint.
Key features of the Breeze Publish Wizard
Using the Breeze Publish Wizard, you can accomplish the following tasks:
6 Introduction: Using the Breeze Publish Wizard
Page 7

Publish a new Breeze presentation Upload a new presentation to the Breeze server by
specifying its title, summary, speaker details, where it should be stored in the Content Library,
what features it should include, and who has permission to view it.
Update an existing Breeze presentation You need to upload only the differential changes
from the previous version of the presentation. You can also edit the presentation information,
features, and permissions.
About Breeze documentation
In addition to this guide, Using the Breeze Publish Wizard, Breeze documentation includes three
other guides described in this section. The relevance of these guides to you depends on the
modules that are installed on the Breeze platform, and on your Breeze account permissions.
Using the Macromedia Breeze Plug-In for Microsoft PowerPoint This guide is for Breeze
users who are publishing Breeze presentations from PowerPoint. You can access this guide from
within PowerPoint by selecting Breeze > Help.
Using the Breeze Manager This guide is for Breeze users who have permission to manage or
administer users, content, courses, or meetings. You can access this guide from a help link within
the Breeze Manager web application.
Breeze Live User Guide This guide is for participants and presenters in a Breeze meeting.
There are two versions: Breeze Live User Guide for Meeting Presenters and Breeze Live User Guide
for Meeting Participants. You can access these guides from within a Breeze meeting by selecting
Meeting > Help.
Note: If you purchase just the Breeze Live module of the Breeze Presentation platform, only Breeze
Live User Guide applies to you.
Additional Macromedia resources
More information is available at the Breeze Product Center and Breeze Support Center websites.
Breeze Product Center The Breeze Product Center is updated regularly with the latest
information on Breeze, including FAQs, white papers, testimonials, and tips. Check the website
often for the latest news on Breeze at www.macromedia.com/software/breeze.
Breeze Documentation Center The Breeze Documentation Center, at
www.macromedia.com/go/breeze_documentation, contains documentation for all Breeze
products, answers to frequently asked questions, articles about specialized topics, and Breeze
presentations.
Breeze Support Center The Breeze Support Center contains the latest support information,
including tech notes, Breeze presentation tutorials, and support program details. Check the
website often for the latest Breeze support information at www.macromedia.com/support/breeze.
Additional Macromedia resources 7
Page 8

8 Introduction: Using the Breeze Publish Wizard
Page 9

CHAPTER 1
Publishing a New Breeze Presentation
After adding audio and synchronized animations to your PowerPoint presentation, you are ready
to publish the presentation to your Macromedia Breeze server for conversion into a multimedia
web presentation.
The steps for publishing a new presentation are as follows:
“Step 1: Accessing the Breeze Publish Wizard” on page 10 Access the Breeze Publish Wizard in
PowerPoint. Open the PowerPoint presentation you want to publish (if the file includes unsaved
changes, you must first save the file), and select Breeze > Publish from the PowerPoint menu. Log
in to Breeze using your user name and password.
“Step 2: Selecting a presentation location” on page 10 Select the folder in the Publish Wizard
on the Breeze server where you want to publish your presentation. The default publish location is
the My Contents folder, your personal folder in the Publish Wizard. You can publish to this
default location or navigate to any other folder for which you have publish permissions.
“Step 3: Setting presentation information” on page 12 Enter information about the
presentation (title and summary) and the speaker (name, title, and company).
“Step 4: Selecting presentation features” on page 13 Select whether to include a presentation
outline, a summary page, or a speaker photo in your presentation. You also set slide timings,
selecting whether to pause playback between slides and animations, and how long to play slides
with no audio.
“Step 6: Setting presentation permissions” on page 17 Set the appropriate permissions for the
presentation. This step applies only to users who have manage permissions for the destination
folder of the presentation. You can make a presentation public so that anyone can view it over the
web, or you can make it private, selecting which Breeze users have permission to view it and
requiring them to log in with a Breeze user name and password.
“Step 7: Uploading a presentation” on page 23 Upload the presentation and audio file to the
Breeze server. After Breeze creates your multimedia web presentation, you receive an e-mail
notification containing the URL for the website where you can view the presentation.
9
Page 10
Step 1: Accessing the Breeze Publish Wizard
When you are ready to publish a PowerPoint presentation, the first step in the publishing process
is to access the Breeze Publish Wizard. You access it by selecting Breeze > Publish from within
PowerPoint. If you are starting a new session, you must access the Breeze server.
To access the Breeze Publish Wizard:
1.
In PowerPoint, open the PowerPoint presentation that you want to publish as a Breeze
presentation.
2.
From the Breeze menu in PowerPoint, select Publish.
The Breeze Publish Wizard login window appears.
3.
If prompted to log in, do the following:
■ Enter your user name (your account e-mail) and password.
■ Click the Login button.
The Set Presentation Location page appears.
Note: You can log out of the Breeze Publish Wizard application at any point by either closing
PowerPoint and all open browser windows, or by clicking the Logout link.
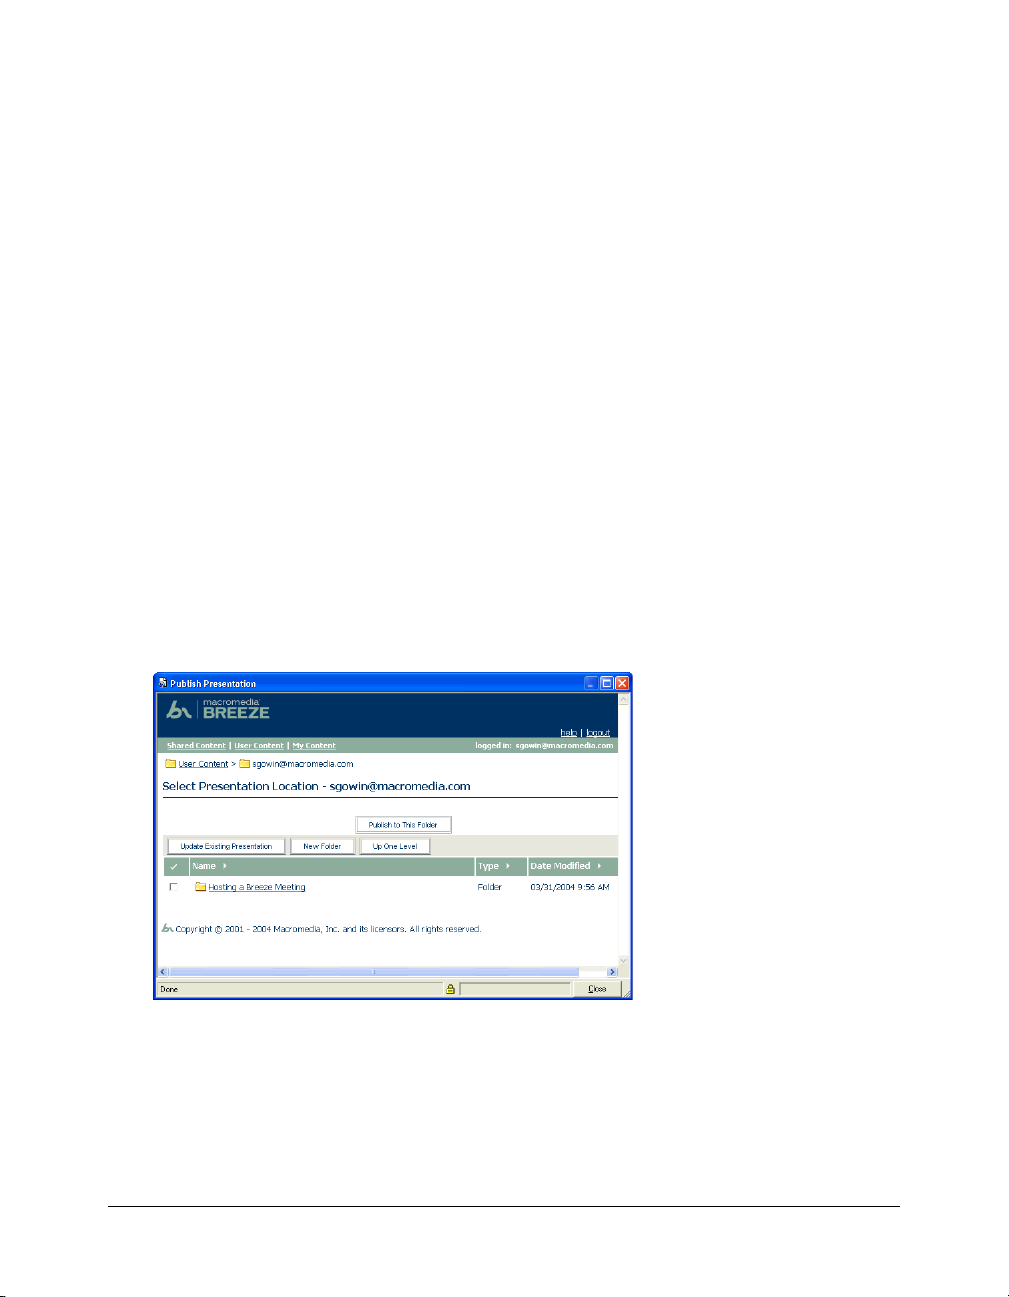
Step 2: Selecting a presentation location
The second step in the publish process is to select where to store the new presentation in the
Breeze Content Library.
You can navigate to an existing folder or create a folder.
To select a presentation location:
1.
Navigate to the location where you want to save the presentation. The trail of navigation links
near the top of the browser window indicates the directory path to the selected folder.
For more information, see “Navigating to an existing folder in the Content Library”
on page 11 or “Creating a Content Library folder” on page 12.
10 Chapter 1: Publishing a New Breeze Presentation
Page 11

2.
Click the Publish to This Folder button.
The Edit Information page appears.
Navigating to an existing folder in the Content Library
When you log in to the Breeze Publish Wizard, you are in your personal user folder in the
Content Library.
Note: Only your Breeze presentations are displayed in the Content Library. Other Breeze content,
including SWF files, FLA files, and JPG files, are not displayed when you view the Content Library in
the Breeze Publish Wizard.
In the Content Library, navigate to the folder where you want to save your presentation. You can
perform the following tasks:
• “Opening a folder” on page 11
• “Moving up one directory level” on page 11
• “Returning to any higher parent directory level” on page 11
Opening a folder
You open a folder by clicking the folder name in the display list.
To open a content folder:
• Click the name of the folder.
The folders and files within that content folder appear. The trail of navigation links near the
top of the browser window is updated to indicate the directory path to the selected folder.
Moving up one directory level
You can move up to the parent folder, the folder one level above the current folder, by clicking the
Up One Level button in the navigation bar above the content list.
To move up one folder:
• Click the Up One Level button in the navigation bar above the content list.
The folders and files in the parent folder appear. The name and location of the parent folder
appears in the trail of navigation links near the top of the browser window.
Returning to any higher parent directory level
You can move up to any parent folder, not just the one immediately above the current folder, by
clicking the name of the parent directory in the list of navigation links. The navigation links let
you navigate quickly to any parent folder.
To return to any parent folder:
• Click the name of the parent directory in the trail of navigation links above the navigation bar.
The folders and files in the higher parent directory appear. The name and location of the
parent folder appear in the trail of navigation links near the top of the browser window.
Step 2: Selecting a presentation location 11
Page 12

Creating a Content Library folder
You can add new folders to the Content Library to better organize your presentations.
Note: You can add folders only if you are a Breeze Account Administrator or if you have manage
permissions for the parent folder.
To create a folder:
1.
Navigate to the location where you want to add a folder.
For more information, see “Navigating to an existing folder in the Content Library”
on page 11.
2.
Click the New Folder button located in the menu bar above the presentation list.
3.
On the New Folder page, enter the name of the new folder.
4.
Click the Save button.
Step 3: Setting presentation information
The third step in the publishing process is to enter information about the presentation. On the
Edit Information page, enter the following information about a presentation:
Presentation information Information about the presentation, including a title and summary
(maximum of 750 characters).
Speaker information Information about the speaker, including the speaker’s first name, last
name, title, and company.
12 Chapter 1: Publishing a New Breeze Presentation
Page 13

To set presentation information:
1.
On the Edit Information page, enter the presentation and speaker information.
The presentation title, speaker first name, and speaker last name are required fields. All other
fields are optional.
2.
Click the Next button.
The Select Features page appears.
Step 4: Selecting presentation features
The fourth step in the publishing process is to select the presentation features to include in your
Breeze presentation. These can include any of the following:
• “Presentation outline” on page 14
• “Presentation summary page” on page 14
• “Speaker photo” on page 14
• “Settings for slide timings” on page 15
To select presentation features:
1.
On the Select Features page, select each feature that you want to add (outline, summary, photo,
or slide timings).
Note: The presentation summary page and speaker photo options are available only if you select
Outline.
2.
Click the Next button.
Step 4: Selecting presentation features 13
Page 14

If you select the options to include an outline and a speaker photo, the Upload Photo page
appears (see “Step 5: Selecting a speaker photo (optional)” on page 15).
If you do not select the option to include a photo and you have manage permissions for the
folder you are publishing to, the Set Permissions page appears (see “Step 6: Setting presentation
permissions” on page 17).
Otherwise, the presentation begins uploading (see “Step 7: Uploading a presentation”
on page 23).
Presentation outline
A presentation outline contains the presentation title, speaker information, and the name of each
slide in the presentation. The outline is displayed on the left of the Breeze presentation. Your
viewers can click individual slide titles to navigate to specific slides.
If you include a presentation outline, you can also add a presentation summary page and a
speaker photo to the presentation.
To add a presentation outline:
• On the Select Features page, select Outline.
Presentation summary page
A presentation summary page is an additional slide that you can add to the Breeze presentation to
give the viewer information about the presentation and the speaker. It becomes the first slide in
the Breeze presentation and is included in the list of presentation outline slide titles.
A presentation summary page contains the following information:
• Presentation title
• Presentation summary
• Presentation duration (number of slides and total presentation length)
• Speaker’s name, title, and company
To add a presentation summary page:
• On the Select Features page, select the Outline and Include Summary Page.
Speaker photo
You can add a small photo of the speaker. This photo appears with the speaker information in the
presentation outline.
To add a speaker photo:
1.
Select the Outline and Include speaker photo options when selecting presentation features.
2.
Click next and enter the complete file path and name of the photo file (see “Step 5: Selecting a
speaker photo (optional)” on page 15).
14 Chapter 1: Publishing a New Breeze Presentation
Page 15

Settings for slide timings
The Select Features page includes three settings for slide timings:
Pause after each slide If this option is selected, presentation playback is not continuous. Every
new slide starts in a paused mode, and the viewer must click the Play button in the presentation
control bar to play it. If this option is not selected, each slide begins playback at the moment it is
displayed.
Pause after each animation If this option is selected, presentation playback pauses after each
PowerPoint animation in a slide is played. The viewer must click the Play button to play each
successive animation in the presentation. If this option is not selected, slide playback moves
continuously from one animation to another without the user having to click the Play button
in between.
Time to wait for slides with no audio Slides that have no audio still need a playback length so
that they can be displayed for a certain period of time during continuous presentation playback.
The default time for displaying a slide with no audio is 5 seconds before moving on to the next
slide. A user can pause a slide at any time during playback for longer viewing.
To set slide timings, select the appropriate timing checkboxes and set the desired playback time
for slides with no audio in “Step 4: Selecting presentation features” on page 13.
Audio Quality The Audio Quality setting controls the quality of audio playback in the
converted presentation. By default, the Breeze Publish Wizard converts audio using the mediumquality setting of 24 kilobits per second, which is sufficient for users who access the presentation
through a modem.
If the Audio Quality drop-down list is enabled, you can select the following options in addition to
24 kilobits per second:
• 16 kilobits per second, which is an ideal setting for large presentations, for users in rural
locations with lower-quality modem connections, or for customers who want to save on
bandwidth costs in exchange for lower quality.
• 64 kilobits per second, which is an ideal setting for users on a local area network (LAN) who
want professional-quality audio. At this bit rate, the final audio quality depends on the quality
of the audio equipment. Modem users will not experience the higher audio quality.
If the Audio Quality drop-down list is not enabled, you can contact Macromedia Breeze
Technical Support for information about enabling this feature: www.macromedia.com/go/
breeze_contact_support.
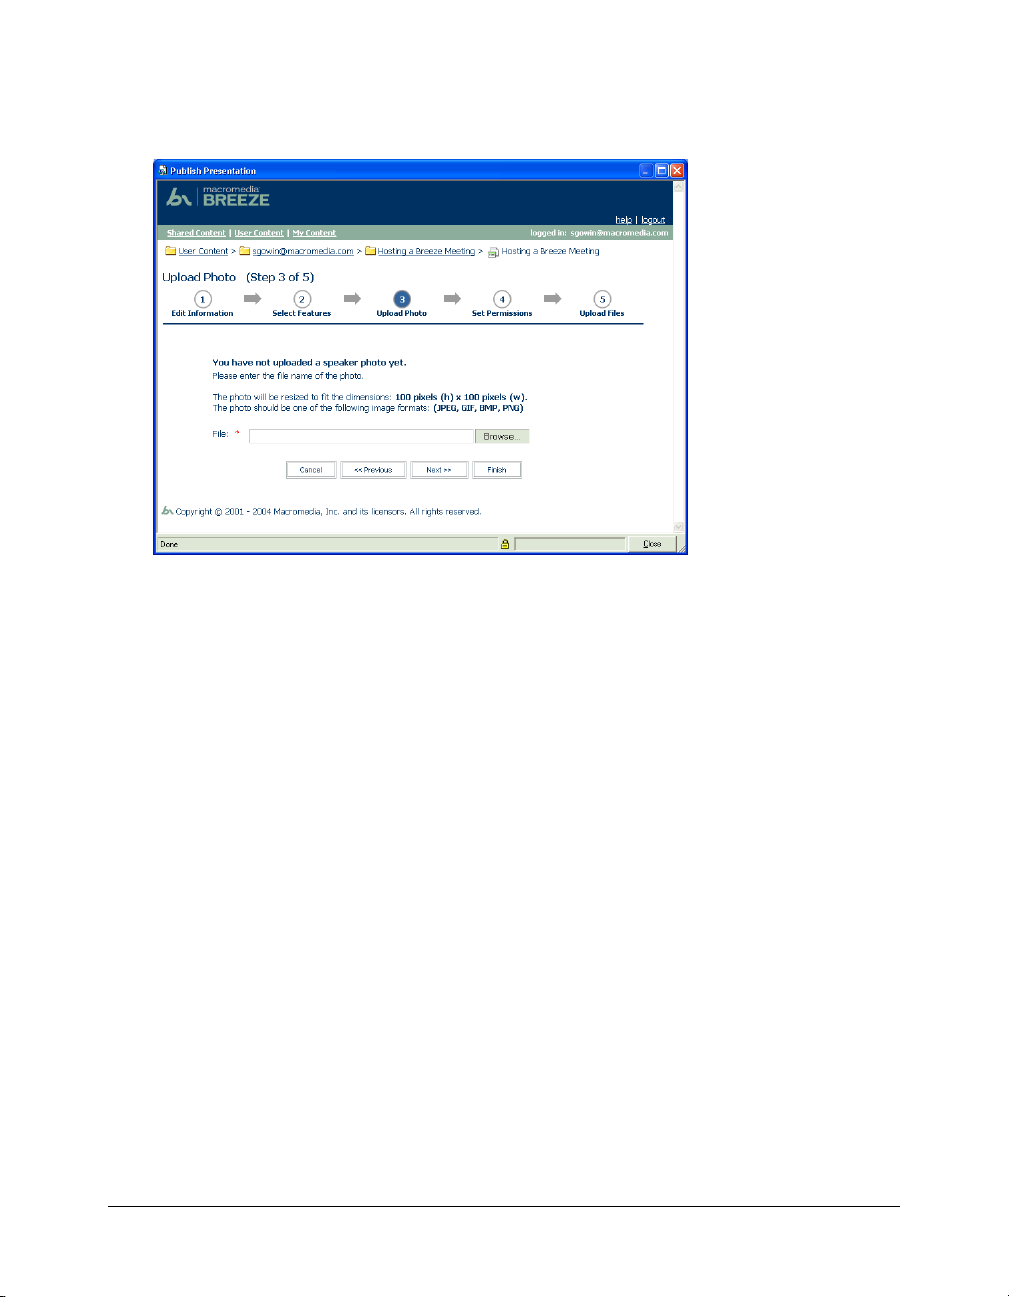
Step 5: Selecting a speaker photo (optional)
In step 4, if you chose to have a presentation outline and include a speaker photo, the next step in
the publishing process is to select a speaker photo.
Step 5: Selecting a speaker photo (optional) 15
Page 16
If you did not choose to have a presentation outline and you have manage permissions for the
folder you are publishing to, the next step in the publishing process is “Step 6: Setting
presentation permissions” on page 17.
Follow these guidelines when including a photo:
Photo formats Use one of the following supported formats: JPG, GIF, BMP, or PNG.
Photo size Use a photo less than 100 pixels high and 150 pixels wide. If either of your photo
dimensions is larger, Breeze resizes the image to fit those dimensions.
The speaker photo is placed with the speaker information in the presentation outline above the
listing of slide titles.
To add a speaker photo:
1.
On the Upload Photo page, click the Browse button.
Note: The Upload Photo page appears after “Step 4: Selecting presentation features” on page 13.
On the Select Features page, you must choose to include a presentation outline and a speaker
photo.
2.
In the dialog box, browse to the photo file, and then click the Open button.
3.
Click the Next button.
If you have manage permissions for the folder to which you are publishing, the Set Permissions
page appears (see “Step 6: Setting presentation permissions” on page 17).
If you do not have manage permissions for the folder to which you are publishing, the
presentation begins uploading to the Breeze server (see “Step 7: Uploading a presentation”
on page 23).
For more information on user permissions, see “About permissions” on page 20.
16 Chapter 1: Publishing a New Breeze Presentation
Page 17

Step 6: Setting presentation permissions
The sixth step in the publishing process is to set presentation permissions.
This step applies only to users who have manage permissions for the folder to which they are
publishing. If you do not have manage permissions, go to “Step 7: Uploading a presentation”
on page 23.
You can create two types of presentations:
Public Anyone can view a public presentation.
Private Only selected Breeze users can view private presentations. They must log in with a
Breeze user name and password.
For more information on private and public presentations, see “Customizing the permission
setting” on page 18.
When you are publishing a presentation, you can choose from two options on the Set Permissions
page:
Use the default Same as Parent Folder setting The default is Same as Parent Folder. The
presentation automatically inherits the permission profile of the parent folder in which it is
published (see “Using the default permission setting” on page 18).
Customize the permissions setting Click the Customize button and create a unique
permission profile for this presentation. User and group permissions that you set for the
presentation take precedence over those that you set for the parent folder (see “Customizing the
permission setting” on page 18).
Step 6: Setting presentation permissions 17
Page 18

Using the default permission setting
The default permission setting is Same as Parent Folder. The presentation automatically inherits
the same permission profile as the parent folder in which it is published. If the parent folder has
permission for public viewing, the presentation also has permission for public viewing. If the
parent folder has private settings, the presentation also has private settings.
For more information on user and folder permissions, see “About permissions” on page 20.
Here is an example of using the Same as Parent permission setting:
• Presentation A is located in folder A.
• Folder A’s permission profile gives all users view permissions.
• Presentation A’s permission setting is set to Same as Parent.
• All users have view permissions to presentation A.
To set presentation permissions to use the same setting as the parent folder:
• On the Set Permissions page, click the Finish button.
The presentation begins uploading to the Breeze server. For more information, see “Step 7:
Uploading a presentation” on page 23.
Note: The Set Permissions page appears after “Step 4: Selecting presentation features”
on page 13, or after “Step 5: Selecting a speaker photo (optional)” on page 15 if you included a
speaker photo.
Customizing the permission setting
You can create a unique permission profile for the presentation that differs from its parent folder’s
permission profile. Click the Customize button and then assign groups and/or individuals a
permission type (no access, view, publish, or manage) for the presentation. For more information
on permission types, see “Permission types” on page 21.
The permission profile for the presentation takes precedence over the permission profile assigned
to the parent folder.
You have two options when customizing permissions for a presentation:
Public presentation Anyone can view a public presentation. After you finish publishing a
presentation, you receive an e-mail notification containing the URL for the website where you
can view the Breeze presentation. Anyone to whom you give this URL can view the presentation
without logging in with a Breeze user name and password.
Private presentation Only Breeze users with a valid Breeze user account and the appropriate
permission can view private presentations. After you finish publishing a presentation, you receive
an e-mail notification containing the URL for the website where you can view the Breeze
presentation. Anyone who uses the URL to view the presentation is prompted to log in with a
Breeze user name and password.
18 Chapter 1: Publishing a New Breeze Presentation
Page 19

Creating a public presentation
To create a public presentation, select the Allow Public Viewing option on the Set Presentation
Permissions page.
To create a presentation available for public viewing:
1.
On the Set Permissions page, click the Customize button.
Note: The Set Presentation Permissions page appears after “Step 4: Selecting presentation
features” on page 13, or after “Step 5: Selecting a speaker photo (optional)” on page 15 if you
included a speaker photo.
2.
Select Yes next to the Allow Public Viewing option.
3.
Click the Finish button.
The presentation begins uploading to the Breeze server. For more information, see “Step 7:
Uploading a presentation” on page 23.
Creating a private presentation with custom permissions
To create a private presentation with a custom permission profile that is different from that of its
parent folder, make sure the Allow Public Viewing option is not selected, and create a list of users
and groups with specific permission types.
To create a private presentation with custom permissions:
1.
On the Set Permissions page, click the Customize button.
Note: The Set Permissions page appears after “Step 4: Selecting presentation features”
on page 13, or after “Step 5: Selecting a speaker photo (optional)” on page 15 if you included a
speaker photo.
2.
Set access permissions for users and groups.
For detailed steps, see “Modifying the permission access list” on page 19.
Note: Account administrators are not included in the user list, because they have access to
all functions.
3.
Click the Finish button.
The presentation begins uploading to the Breeze server. For more information, see “Step 7:
Uploading a presentation” on page 23.
Modifying the permission access list
You can change the permission access list for a private presentation by adding or removing users
and groups from the list. Doing this lets you control exactly who has what type of access to your
presentation.
Note: Users belonging to the Account Administrators group can always view all presentations. By
default, users belonging to the Account Authors groups can view all presentations, but you can set
custom permissions to override this.
To add a user or group to the access list of a private presentation:
1.
On the Set Permissions page, click the Customize button.
Step 6: Setting presentation permissions 19
Page 20

2.
Make sure that you select No for the Allow Public Viewing option.
3.
Click the Add button.
A list of users and groups appears.
4.
Select the type of permission you want to assign to specific groups or users from the select box
at the top of the window.
For more information, see “Permission types” on page 21.
5.
Select the groups or users that you want to add to the permission profile for the permission type
selected in step 4.
6.
If you want to add more users or groups with a different permission type, do the following:
■ Click Apply.
■ Repeat steps 4 and 5 with another permission type.
7.
Click OK.
The Set Permissions page appears. This page lists all the users and groups and their
corresponding permissions.
8.
If you want to update the permission type assigned to any user or group, do the following:
■ Select a new permission type from the pop-up menu next to the user’s or group’s name.
■ Click the Apply button at the top of the page.
To remove a user or group from the access list of a private presentation:
1.
On the Set Permissions page, select the names of groups or users that you want to remove from
the permission profile.
2.
Click the Remove button.
3.
On the Remove confirmation page, click the Remove button.
About permissions
You control what features a Breeze user can access for a particular file or folder by assigning
permissions for that file or folder.
You can assign permissions for a folder or file to a group or to an individual. If a member of a
group with a certain permission type is also assigned an individual permission type, the
permission type assigned to the individual user takes precedence over that of the group. To
simplify account management, it is best to assign permissions only at the group level, not at the
individual level, whenever possible.
Note: However, you cannot assign a permission type of lesser capabilities to a user who is a member
of the Account Administrators group. The permission type of the Account Administrators group
cannot be overridden.
Permissions are used as follows:
Permission types Permission types are assigned to a user or a group for a particular file or
folder. Possible values are manage, publish, view, and no access. For more information, see
“Permission types” on page 21.
20 Chapter 1: Publishing a New Breeze Presentation
Page 21

Permission profile This is a list of all groups or users and their corresponding permission types
for a specific folder or file.
Group default permissions These are the default permissions for the built-in groups and the
permissions you set when you create a group. They correspond to the group’s permission type for
the Shared Content folder in the Content Library and the Shared Courses folder in the Course
Library. To edit these permissions, you must go to the corresponding root folder and edit its
permission profile.
Note: Users who are members of the Account Administrators group have permission to do
everything except publish. This permission cannot be overridden with individual permissions. For
more information on built-in groups, see “Group permissions” on page 22.
Permission types
There are four types of permissions:
Manage Users or groups with manage permissions for a folder or presentation can publish,
update, and view all presentations; view reports for presentations in that folder; set permissions
for presentations and folders in that folder; and create folders. They can do everything but
publish to that folder.
Publish Users or groups with publish permissions for a folder or presentation can publish,
update, and view presentations and view reports. Users with publish permissions for a folder
cannot create folders within it or set permissions for it.
View Users with view permissions for a folder can view any content in that folder. Users with
view permissions for an individual file can view content in that file.
No Access Users or groups with no access permission for a folder or file cannot view it, access
it, or manage it in any way.
The following table shows the level of access to the Content Library capabilities for each
permission type:
Content Library capabilities No access/
Access denied
Navigate/ search content
folders
View content file information X
View content files X ✔ ✔ ✔
Publish/update presentations X ✔
Add SWF files, FLV files, or
JPG files
Move content files X
Delete content files X
Edit content file information X
Send/view receipt e-mails X ✔ ✔
X
X
View Publish Manage
✔✔✔
✔✔✔
✔
✔
✔
✔
Step 6: Setting presentation permissions 21
Page 22

Content Library capabilities No access/
Access denied
Download content X ✔
Set content file permissions X
Create content folders X
Move content folders X
Delete content folders X
Set content folder permissions X
View reports X ✔
View My Content X
View Users Content* X
* Must be a member of the Account Administrators group.
View Publish Manage
✔
✔
✔
✔
✔
✔✔
Group permissions
There are four built-in groups: Account Administrators, Account Authors, Account Course
Managers, and Account Meeting Administrators. Your type of Breeze account determines which
groups you see.
The following table shows the features that are accessible to each built-in group:
Group Shared Content
folder
Account Administrators Manage / no publish Manage / no publish Manage individual user
Account Authors Publish / no manage None Publish / no manage /have
Account Course
Administrators
Account Meeting
Administrators
Manage Manage Manage individual user
None None None
User Content
folder
My Content
folders / no publish /
do not have their own folder
their own folder
folders / do not have their
own folder
You should create your own groups in addition to these so that you can avoid assigning individual
permissions for content or folders, which greatly complicates account and asset management.
When you create your own group, you set the group’s permission type for the root folders of the
Content Library and the Course Library. You can also change permissions for a group after you
create it by changing permissions on the individual folders.
To change group permissions:
1.
Navigate to the main Content, Course, or Meeting Library folder, or any other library folder.
2.
Click the Permissions button for that folder.
22 Chapter 1: Publishing a New Breeze Presentation
Page 23

3.
From this permissions page, change the permission type assigned to each group and individual
for this folder.
Note: To simplify account management, it is best to assign permissions only at the group level, not at
the individual level, whenever possible.
Step 7: Uploading a presentation
The final step in the publishing process is to upload your presentation to the Breeze server. Your
presentation begins uploading when you click the Finish button in “Step 6: Setting presentation
permissions” on page 17.
Note: Uploading a presentation might take a long time, depending on the size of your presentation
and audio files and your Internet connection speed. For example, over a 56 Kbps connection, the
estimated time for uploading a 1 MB file is about 2 minutes. You can estimate that 1 minute of audio is
roughly 0.5 MB, so 20 minutes of audio is about 10 MB.
After your file is uploaded to the Breeze server, it is automatically converted into a multimedia
web presentation. This conversion process on the server typically takes 15 to 30 minutes. When
the conversion is complete, you receive a notification e-mail with the URL for the website where
you can view the presentation.
Step 7: Uploading a presentation 23
Page 24

24 Chapter 1: Publishing a New Breeze Presentation
Page 25

CHAPTER 2
Updating and Replacing Presentations
In addition to creating a Macromedia Breeze presentation with the Breeze Publish Wizard, you
can also update or replace an existing Breeze presentation.
Updating a presentation If you attempt to republish a presentation that has already been
published to the Breeze server, you are given the option to update the existing presentation.
Updating an existing presentation is much faster than uploading to a new location (which creates
a new presentation), because only the changes are uploaded to the server.
Replacing a presentation When you are publishing a new or existing presentation from
PowerPoint, you can choose to replace an existing presentation instead of creating a new one. This
differs from updating a presentation in that the presentation you replace does not have to be an
older version of the presentation you are uploading; it doesn’t even need to have the same name.
Publishing a presentation that already exists
To republish an existing presentation, you access the Breeze Publish Wizard exactly as you do
when publishing a new presentation: select Breeze > Publish from the menu in PowerPoint. When
you log in, the Set Presentation Location page indicates that the presentation was published
previously, and the page includes the path to the previously published presentation.
On the Set Presentation Location page, you can see the folder, title, speaker, and summary
information of the existing Breeze presentation, and you have the following options:
Publish Now For more information on this option, see “Replacing a Breeze presentation with
no changes to the presentation information” on page 26.
Edit Information For more information on this option, see “Replacing a Breeze presentation
with changes to the presentation information” on page 26.
Select New Location For more information on this option, see “Creating a presentation in a
new location” on page 27.
25
Page 26

Replacing a Breeze presentation with no changes to the presentation information
When you attempt to publish a presentation that already exists, a Publish Existing Presentation
page with three options is displayed. One option is Publish Now. If you select this option, only
the differential changes in the presentation are uploaded. You cannot edit the presentation
information, included features, or permissions.
For information on how to change any of this presentation information, see “Replacing a Breeze
presentation with changes to the presentation information” on page 26. If you do not want to
overwrite the existing presentation, see “Creating a presentation in a new location” on page 27.
To replace a Breeze presentation with no changes to the presentation information:
• On the Set Presentation Location page, Select Publish Now.
The presentation is immediately uploaded to the server and replaces the existing
Breeze presentation. A dialog box lets you know that the presentation has been uploaded
successfully.
Replacing a Breeze presentation with changes to the presentation information
When you attempt to publish a presentation that already exists, the Set Presentation Location
page displays three options. One option is Edit Information, which allows you to change the
presentation’s information, included features, or permissions in addition to uploading the
differential changes in the presentation.
If you do not need to change any of the presentation information, see “Replacing a Breeze
presentation with no changes to the presentation information” on page 26. If you do not want to
overwrite the existing presentation, see “Creating a presentation in a new location” on page 27.
To replace a Breeze presentation with changes to the presentation information:
1.
On the Set Presentation Location page, select Edit Information.
The Edit Information page appears, with the existing values for the presentation and speaker
information.
2.
On the Edit Information page, make any changes to the presentation and speaker information.
For more information, see “Step 3: Setting presentation information” on page 12.
3.
Click the Next button.
The Select Features page appears. The current features are preselected.
4.
On the Select Presentation Features page, make any changes to the included presentation
features. For more information, see “Step 4: Selecting presentation features” on page 13.
5.
Click the Next button.
If you selected the Outline and Include speaker photo features, the Upload Photo page
appears. Otherwise, the Set Presentation Permissions page appears.
6.
If you decide to include a speaker photo, on the Upload Photo page do one of the following:
26 Chapter 2: Updating and Replacing Presentations
Page 27

■ If the presentation does not contain a photo, Click Browse and browse to the file with the
speaker photo and then click the Next button. For more details, see “Step 5: Selecting a
speaker photo (optional)” on page 15.
■ If the presentation already contains a speaker photo, the current photo is displayed on this
page. You have the option of using the current photo or uploading a new photo. To change
the photo, click Browse and browse to the file with the speaker photo, and then click the
Next button. For more details, see “Step 5: Selecting a speaker photo (optional)”
on page 15.
The Set Permissions page appears.
7.
On the Set Permissions page, make any changes to the included presentation permissions. For
more information, see “Step 6: Setting presentation permissions” on page 17.
8.
Click the Finish button.
The presentation is immediately uploaded to the server and replaces the existing Breeze
presentation.
Creating a presentation in a new location
When you attempt to publish a presentation that already exists, the Set Presentation Location
page appears with three options. If you select the Select New Location button, a new Breeze
presentation is created.
For information on how to replace the existing presentation, see “Replacing a Breeze presentation
with no changes to the presentation information” on page 26 or “Replacing a Breeze presentation
with changes to the presentation information” on page 26.
To create a presentation in a new location:
1.
On the Set Presentation Location page, click Select New Location.
2.
Navigate to the folder where you want to publish, and click the Publish to This Folder button.
For more information, see “Step 2: Selecting a presentation location” on page 10.
Note: You do not have to change the folder you are publishing to. If you do not change it, a new
version of the presentation is published in the same folder as the old version.
3.
Complete the rest of the publishing process, entering presentation information, selecting
features, and setting permissions exactly as you do for a new presentation. For more
information, see “Step 3: Setting presentation information” on page 12, “Step 4: Selecting
presentation features” on page 13, and “Step 6: Setting presentation permissions” on page 17.
Replacing an existing presentation
When you publish a new or existing presentation from PowerPoint, you can replace an existing
presentation instead of creating one. On the Select Presentation Location page, instead of
selecting a folder to publish to, click the name of an existing Breeze presentation.
Note: You do not use the Update Existing Presentation button located on the Select Presentation
Location page to replace presentations. This button just opens a help dialog box that explains how to
replace an existing presentation.
Replacing an existing presentation 27
Page 28

To replace an existing presentation:
1.
On the Set Presentation Location page, click Select New Location.
The Select Presentation Location page appears.
2.
For new and existing presentations, in the Content Library, navigate to the presentation that
you want to replace on the Set Location Presentation page.
For more information, see “Navigating to an existing folder in the Content Library”
on page 11.
3.
Click the name of the existing Breeze presentation that you want to replace.
The Edit Information page appears, showing the information of the existing Breeze
presentation that you selected.
4.
Do one of the following:
■ If you do not need to edit the presentation information, click the Finish button.
The presentation is immediately uploaded to the server and replaces the existing Breeze
presentation.
■ If you want to edit the presentation information, enter your changes, and then complete the
rest of the publish process, selecting features, and setting permissions exactly as you do for a
new presentation. For more information, see “Step 3: Setting presentation information”
on page 12, “Step 4: Selecting presentation features” on page 13, and “Step 6: Setting
presentation permissions” on page 17.
28 Chapter 2: Updating and Replacing Presentations
Page 29

CHAPTER 3
Frequently Asked Questions
This chapter includes questions frequently asked by users who are publishing Breeze content with
the Breeze Publish Wizard.
How do I add a new user?
You cannot add new users using the Breeze Publish Wizard. A Breeze Account Administrator
must add users in the Breeze Manager web application.
For more information, see Using the Breeze Manager.
How do I create a presentation that does not require a password?
Only Breeze users with manage permissions for the folder to which the presentation is being
published can set permissions for the presentation.
If you have permission to set a presentation’s viewing permissions, you can change them in step 6
of the publish process.
For more information, see “Step 6: Setting presentation permissions” on page 17 and “Creating a
public presentation” on page 19.
What is the difference between a private and a public presentation?
There are two types of Breeze presentations:
Public presentation Anyone can view a public presentation. After you publish a presentation,
you receive an e-mail notification containing the URL for the website where you can view the
Breeze presentation. Anyone to whom you give this URL can view the presentation without
logging in with a Breeze user name and password.
29
Page 30

Private presentation Only authorized Breeze users can view private presentations. After you
finish publishing a presentation, you receive an e-mail notification containing the URL for the
website where you can view the Breeze presentation. Anyone who uses the URL to view the
presentation is prompted to log in with a Breeze user name and password. Even with a valid
Breeze user account, the user cannot view the presentation without the appropriate permission.
For more information, see “Step 6: Setting presentation permissions” on page 17.
What is a presentation outline?
A presentation outline contains the presentation title, speaker information, and the name of each
slide in the presentation. The outline appears to the left of the Breeze presentation. Your viewers
can click individual slide titles to navigate to specific slides.
If you include a presentation outline, you can also add a presentation summary page and a
speaker photo to the presentation.
For more information, see “Presentation outline” on page 14.
How do I add a speaker photo?
To add a speaker photo that appears with the speaker information in the presentation outline:
• Select the Outline and Include speaker photo options on the Select Features page.
• Enter the complete file path and name of the photo file on the Upload Photo page.
For more information, see “Step 4: Selecting presentation features” on page 13 and “Step 5:
Selecting a speaker photo (optional)” on page 15.
What format style and size does Breeze support for a speaker photo?
Follow these guidelines when including a photo:
Photo formats Use one of the following supported formats: JPG, GIF, BMP, or PNG.
Photo size Use a photo less than 100 pixels high and 150 pixels wide. If either of your photo
dimensions is too large, Breeze resizes the image to fit those dimensions.
The speaker photo is placed with the speaker information in the presentation outline above the
listing of slide titles. For a sample illustration, see “Presentation outline” on page 14.
For more information, see “Step 5: Selecting a speaker photo (optional)” on page 15.
30 Chapter 3: Frequently Asked Questions
Page 31

CHAPTER 4
Troubleshooting
This chapter presents solutions to problems that some users encounter when using the Breeze
Publish Wizard to publish Breeze content.
Cannot set permissions for a presentation
Only Breeze users who have manage permissions for the folder to which the presentation is being
published can set permissions for that presentation. Contact your Breeze Account Administrator
to make sure that you have manage permissions for the folder.
For more information, see “Step 6: Setting presentation permissions” on page 17.
User name and password do not work
If you cannot log in to the Breeze Publish Wizard, try the following:
Make sure that you typed your password correctly Keep in mind that passwords are case-
sensitive. In addition, make sure that the Caps Lock button is not enabled.
Check your permissions Contact your Breeze Account Administrator to make sure that you
have the necessary permissions to publish presentations.
Make sure that you have a valid user name and password Check this by contacting your
Breeze Account Administrator.
31
Page 32

32 Chapter 4: Troubleshooting
 Loading...