

Page 1

Adobe® Audition® CC
Help
Page 2

Legal notices
Legal notices
For legal notices, see http://help.adobe.com/en_US/legalnotices/index.html.
Last updated 6/16/2016
Page 3

Contents
Chapter 1: What's New
New features summary . . . . . . . . . . . . . . . . . . . . . . . . . . . . . . . . . . . . . . . . . . . . . . . . . . . . . . . . . . . . . . . . . . . . . . . . . . . . . . . . . . . . . . . . . . . . . . . . .1
Chapter 2: Digital audio fundamentals
Understanding sound . . . . . . . . . . . . . . . . . . . . . . . . . . . . . . . . . . . . . . . . . . . . . . . . . . . . . . . . . . . . . . . . . . . . . . . . . . . . . . . . . . . . . . . . . . . . . . . . . .4
Digitizing audio . . . . . . . . . . . . . . . . . . . . . . . . . . . . . . . . . . . . . . . . . . . . . . . . . . . . . . . . . . . . . . . . . . . . . . . . . . . . . . . . . . . . . . . . . . . . . . . . . . . . . . . .6
Chapter 3: Workspace and setup
Viewing, zooming, and navigating audio . . . . . . . . . . . . . . . . . . . . . . . . . . . . . . . . . . . . . . . . . . . . . . . . . . . . . . . . . . . . . . . . . . . . . . . . . . . . . . . .9
Customizing workspaces . . . . . . . . . . . . . . . . . . . . . . . . . . . . . . . . . . . . . . . . . . . . . . . . . . . . . . . . . . . . . . . . . . . . . . . . . . . . . . . . . . . . . . . . . . . . . 12
Connecting to audio hardware in Audition . . . . . . . . . . . . . . . . . . . . . . . . . . . . . . . . . . . . . . . . . . . . . . . . . . . . . . . . . . . . . . . . . . . . . . . . . . . . 19
Customizing and saving application settings . . . . . . . . . . . . . . . . . . . . . . . . . . . . . . . . . . . . . . . . . . . . . . . . . . . . . . . . . . . . . . . . . . . . . . . . . . 20
Default keyboard shortcuts . . . . . . . . . . . . . . . . . . . . . . . . . . . . . . . . . . . . . . . . . . . . . . . . . . . . . . . . . . . . . . . . . . . . . . . . . . . . . . . . . . . . . . . . . . . 21
Finding and customizing shortcuts . . . . . . . . . . . . . . . . . . . . . . . . . . . . . . . . . . . . . . . . . . . . . . . . . . . . . . . . . . . . . . . . . . . . . . . . . . . . . . . . . . . . 23
Chapter 4: Importing, recording, and playing
Create, open, or import files for Adobe Audition . . . . . . . . . . . . . . . . . . . . . . . . . . . . . . . . . . . . . . . . . . . . . . . . . . . . . . . . . . . . . . . . . . . . . . . 24
Importing with the Files panel . . . . . . . . . . . . . . . . . . . . . . . . . . . . . . . . . . . . . . . . . . . . . . . . . . . . . . . . . . . . . . . . . . . . . . . . . . . . . . . . . . . . . . . . 27
Supported import formats . . . . . . . . . . . . . . . . . . . . . . . . . . . . . . . . . . . . . . . . . . . . . . . . . . . . . . . . . . . . . . . . . . . . . . . . . . . . . . . . . . . . . . . . . . . . 28
Extracting audio from CDs . . . . . . . . . . . . . . . . . . . . . . . . . . . . . . . . . . . . . . . . . . . . . . . . . . . . . . . . . . . . . . . . . . . . . . . . . . . . . . . . . . . . . . . . . . . . 29
Navigate time and playing audio in Adobe Audition . . . . . . . . . . . . . . . . . . . . . . . . . . . . . . . . . . . . . . . . . . . . . . . . . . . . . . . . . . . . . . . . . . . 30
Recording audio . . . . . . . . . . . . . . . . . . . . . . . . . . . . . . . . . . . . . . . . . . . . . . . . . . . . . . . . . . . . . . . . . . . . . . . . . . . . . . . . . . . . . . . . . . . . . . . . . . . . . . 33
Monitoring recording and playback levels . . . . . . . . . . . . . . . . . . . . . . . . . . . . . . . . . . . . . . . . . . . . . . . . . . . . . . . . . . . . . . . . . . . . . . . . . . . . . 36
iii
Chapter 5: Editing audio files
Editing, repairing, and improving audio using Essential Sound panel . . . . . . . . . . . . . . . . . . . . . . . . . . . . . . . . . . . . . . . . . . . . . . . . . . . 38
Generating text-to-speech . . . . . . . . . . . . . . . . . . . . . . . . . . . . . . . . . . . . . . . . . . . . . . . . . . . . . . . . . . . . . . . . . . . . . . . . . . . . . . . . . . . . . . . . . . . . 47
Matching loudness across multiple audio files . . . . . . . . . . . . . . . . . . . . . . . . . . . . . . . . . . . . . . . . . . . . . . . . . . . . . . . . . . . . . . . . . . . . . . . . . 50
Displaying audio in the Waveform Editor . . . . . . . . . . . . . . . . . . . . . . . . . . . . . . . . . . . . . . . . . . . . . . . . . . . . . . . . . . . . . . . . . . . . . . . . . . . . . . 52
Selecting audio . . . . . . . . . . . . . . . . . . . . . . . . . . . . . . . . . . . . . . . . . . . . . . . . . . . . . . . . . . . . . . . . . . . . . . . . . . . . . . . . . . . . . . . . . . . . . . . . . . . . . . . 55
How to copy, cut, paste, and delete audio in Audition . . . . . . . . . . . . . . . . . . . . . . . . . . . . . . . . . . . . . . . . . . . . . . . . . . . . . . . . . . . . . . . . . . 59
Visually fading and changing amplitude . . . . . . . . . . . . . . . . . . . . . . . . . . . . . . . . . . . . . . . . . . . . . . . . . . . . . . . . . . . . . . . . . . . . . . . . . . . . . . . 61
Working with markers . . . . . . . . . . . . . . . . . . . . . . . . . . . . . . . . . . . . . . . . . . . . . . . . . . . . . . . . . . . . . . . . . . . . . . . . . . . . . . . . . . . . . . . . . . . . . . . . 63
Inverting, reversing, and silencing audio . . . . . . . . . . . . . . . . . . . . . . . . . . . . . . . . . . . . . . . . . . . . . . . . . . . . . . . . . . . . . . . . . . . . . . . . . . . . . . 65
How to automate common tasks in Audition . . . . . . . . . . . . . . . . . . . . . . . . . . . . . . . . . . . . . . . . . . . . . . . . . . . . . . . . . . . . . . . . . . . . . . . . . . 66
Analyze phase, frequency, and amplitude with Audition . . . . . . . . . . . . . . . . . . . . . . . . . . . . . . . . . . . . . . . . . . . . . . . . . . . . . . . . . . . . . . . 68
Frequency Band Splitter . . . . . . . . . . . . . . . . . . . . . . . . . . . . . . . . . . . . . . . . . . . . . . . . . . . . . . . . . . . . . . . . . . . . . . . . . . . . . . . . . . . . . . . . . . . . . . 72
Undo, redo, and history . . . . . . . . . . . . . . . . . . . . . . . . . . . . . . . . . . . . . . . . . . . . . . . . . . . . . . . . . . . . . . . . . . . . . . . . . . . . . . . . . . . . . . . . . . . . . . . 73
Converting sample types . . . . . . . . . . . . . . . . . . . . . . . . . . . . . . . . . . . . . . . . . . . . . . . . . . . . . . . . . . . . . . . . . . . . . . . . . . . . . . . . . . . . . . . . . . . . . 73
Chapter 6: Applying effects
Enabling CEP extensions . . . . . . . . . . . . . . . . . . . . . . . . . . . . . . . . . . . . . . . . . . . . . . . . . . . . . . . . . . . . . . . . . . . . . . . . . . . . . . . . . . . . . . . . . . . . . . 77
Effects controls . . . . . . . . . . . . . . . . . . . . . . . . . . . . . . . . . . . . . . . . . . . . . . . . . . . . . . . . . . . . . . . . . . . . . . . . . . . . . . . . . . . . . . . . . . . . . . . . . . . . . . . 77
Applying effects in the Waveform Editor . . . . . . . . . . . . . . . . . . . . . . . . . . . . . . . . . . . . . . . . . . . . . . . . . . . . . . . . . . . . . . . . . . . . . . . . . . . . . . 81
Last updated 6/16/2016
Page 4

ADOBE AUDITION
Content s
Applying effects in the Multitrack Editor . . . . . . . . . . . . . . . . . . . . . . . . . . . . . . . . . . . . . . . . . . . . . . . . . . . . . . . . . . . . . . . . . . . . . . . . . . . . . . . 82
Adding third-party plug-ins . . . . . . . . . . . . . . . . . . . . . . . . . . . . . . . . . . . . . . . . . . . . . . . . . . . . . . . . . . . . . . . . . . . . . . . . . . . . . . . . . . . . . . . . . . . 83
Notch Filter effect
Fade and Gain Envelope effects (Waveform Editor only)
Manual Pitch Correction effect (Waveform Editor only)
Graphic Phase Shifter effect
Doppler Shifter effect (Waveform Editor only)
. . . . . . . . . . . . . . . . . . . . . . . . . . . . . . . . . . . . . . . . . . . . . . . . . . . . . . . . . . . . . . . . . . . . . . . . . . . . . . . . . . . . . . . . . . . . . . . . . . . . 84
. . . . . . . . . . . . . . . . . . . . . . . . . . . . . . . . . . . . . . . . . . . . . . . . . . . . . . . . . . . . . . . . 85
. . . . . . . . . . . . . . . . . . . . . . . . . . . . . . . . . . . . . . . . . . . . . . . . . . . . . . . . . . . . . . . . 85
. . . . . . . . . . . . . . . . . . . . . . . . . . . . . . . . . . . . . . . . . . . . . . . . . . . . . . . . . . . . . . . . . . . . . . . . . . . . . . . . . . . . . . . . . . 86
. . . . . . . . . . . . . . . . . . . . . . . . . . . . . . . . . . . . . . . . . . . . . . . . . . . . . . . . . . . . . . . . . . . . . . . . . 86
Chapter 7: Effects reference
Amplitude and compression effects in Audition
Delay and echo effects
. . . . . . . . . . . . . . . . . . . . . . . . . . . . . . . . . . . . . . . . . . . . . . . . . . . . . . . . . . . . . . . . . . . . . . . . . . . . . . . . . . . . . . . . . . . . . . . . 96
Diagnostics effects (Waveform Editor only) for Audition
Filter and equalizer effects
Modulation effects
. . . . . . . . . . . . . . . . . . . . . . . . . . . . . . . . . . . . . . . . . . . . . . . . . . . . . . . . . . . . . . . . . . . . . . . . . . . . . . . . . . . . . . . . . . . 100
. . . . . . . . . . . . . . . . . . . . . . . . . . . . . . . . . . . . . . . . . . . . . . . . . . . . . . . . . . . . . . . . . . . . . . . . . . . . . . . . . . . . . . . . . . . . . . . . . . 105
Noise reduction techniques and restoration effects for Audition
Reverb effects
. . . . . . . . . . . . . . . . . . . . . . . . . . . . . . . . . . . . . . . . . . . . . . . . . . . . . . . . . . . . . . . . . . . . . . . . . . . . . . . . . . . . . . . . . . . . . . . . . . . . . . . 118
How to use special effects with Audition
Stereo imagery effects
Time and pitch manipulation effects
Generate tones and noise
. . . . . . . . . . . . . . . . . . . . . . . . . . . . . . . . . . . . . . . . . . . . . . . . . . . . . . . . . . . . . . . . . . . . . . . . . . . . . . . . . . . . . . . . . . . . . . . 126
. . . . . . . . . . . . . . . . . . . . . . . . . . . . . . . . . . . . . . . . . . . . . . . . . . . . . . . . . . . . . . . . . . . . . . . . . . . . . . . . . 128
. . . . . . . . . . . . . . . . . . . . . . . . . . . . . . . . . . . . . . . . . . . . . . . . . . . . . . . . . . . . . . . . . . . . . . . . . . . . . . . . . . . . . . . . . . . . 133
. . . . . . . . . . . . . . . . . . . . . . . . . . . . . . . . . . . . . . . . . . . . . . . . . . . . . . . . . . . . . . . . . . . . . . . 88
. . . . . . . . . . . . . . . . . . . . . . . . . . . . . . . . . . . . . . . . . . . . . . . . . . . . . . . . . . . . . . . 98
. . . . . . . . . . . . . . . . . . . . . . . . . . . . . . . . . . . . . . . . . . . . . . . . . . . . . . 108
. . . . . . . . . . . . . . . . . . . . . . . . . . . . . . . . . . . . . . . . . . . . . . . . . . . . . . . . . . . . . . . . . . . . . . . . . . . . . 123
iv
Chapter 8: Mixing multitrack sessions
Creating remix
Multitrack Editor overview
Basic multitrack controls
Multitrack routing and EQ controls
Arrange and edit multitrack clips with Audition
Looping clips
. . . . . . . . . . . . . . . . . . . . . . . . . . . . . . . . . . . . . . . . . . . . . . . . . . . . . . . . . . . . . . . . . . . . . . . . . . . . . . . . . . . . . . . . . . . . . . . . . . . . . . 136
. . . . . . . . . . . . . . . . . . . . . . . . . . . . . . . . . . . . . . . . . . . . . . . . . . . . . . . . . . . . . . . . . . . . . . . . . . . . . . . . . . . . . . . . . . . 137
. . . . . . . . . . . . . . . . . . . . . . . . . . . . . . . . . . . . . . . . . . . . . . . . . . . . . . . . . . . . . . . . . . . . . . . . . . . . . . . . . . . . . . . . . . . . . 139
. . . . . . . . . . . . . . . . . . . . . . . . . . . . . . . . . . . . . . . . . . . . . . . . . . . . . . . . . . . . . . . . . . . . . . . . . . . . . . . . . . . 143
. . . . . . . . . . . . . . . . . . . . . . . . . . . . . . . . . . . . . . . . . . . . . . . . . . . . . . . . . . . . . . . . . . . . . . . 148
. . . . . . . . . . . . . . . . . . . . . . . . . . . . . . . . . . . . . . . . . . . . . . . . . . . . . . . . . . . . . . . . . . . . . . . . . . . . . . . . . . . . . . . . . . . . . . . . . . . . . . . . 151
How to match, fade, and mix clip volume with Audition
Automating mixes with envelopes
Multitrack clip stretching
. . . . . . . . . . . . . . . . . . . . . . . . . . . . . . . . . . . . . . . . . . . . . . . . . . . . . . . . . . . . . . . . . . . . . . . . . . . . . . . . . . . . . . . . . . . . 160
. . . . . . . . . . . . . . . . . . . . . . . . . . . . . . . . . . . . . . . . . . . . . . . . . . . . . . . . . . . . . . . . . . . . . . . . . . . . . . . . . . . 155
Chapter 9: Video and surround sound
Working with video applications
Importing video and working with video clips
5.1 surround sound
. . . . . . . . . . . . . . . . . . . . . . . . . . . . . . . . . . . . . . . . . . . . . . . . . . . . . . . . . . . . . . . . . . . . . . . . . . . . . . . . . . . . . . . . . . . . . . . . . . 164
. . . . . . . . . . . . . . . . . . . . . . . . . . . . . . . . . . . . . . . . . . . . . . . . . . . . . . . . . . . . . . . . . . . . . . . . . . . . . . . . . . . . . 161
. . . . . . . . . . . . . . . . . . . . . . . . . . . . . . . . . . . . . . . . . . . . . . . . . . . . . . . . . . . . . . . . . . . . . . . . 163
Chapter 10: Saving and exporting
Save and export files in Adobe Audition
Viewing and editing XMP metadata
. . . . . . . . . . . . . . . . . . . . . . . . . . . . . . . . . . . . . . . . . . . . . . . . . . . . . . . . . . . . . . . . . . . . . . . . . . . . . . 167
. . . . . . . . . . . . . . . . . . . . . . . . . . . . . . . . . . . . . . . . . . . . . . . . . . . . . . . . . . . . . . . . . . . . . . . . . . . . . . . . . . 173
. . . . . . . . . . . . . . . . . . . . . . . . . . . . . . . . . . . . . . . . . . . . . . . . . . . . . . . . . . . . . . 152
Last updated 6/16/2016
Page 5
Chapter 1: What's New
New features summary
The 2015.2 release of Adobe Audition CC includes advanced features that enhance your audio quality and overall
efficiency of editing audio. Use the Essential Sound panel to make common adjustments to obtain professional-quality
results even if you are not a professional audio editor and send projects directly to Adobe Media Encoder without going
back to Premiere Pro.
1
Essential Sound panel
New in Audition CC 2015.2 | June 2016
With shorter turnaround times and shrinking budgets, many video editors mix their audio without engaging a
professional audio engineer. This release of Adobe Audition empowers video editors with limited audio experience to
easily handle mixing techniques for their projects.
The Essential Sound panel gives you a complete toolset to mix your audio for achieving professional-quality output.
The panel provides simple controls to unify volume levels, repair sound, improve clarity, and add special effects that
help your video projects sound like a professional audio engineer has mixed them. You can save the applied adjustments
as presets for re-use and they reflect in the full Audition toolset, making them handy for more audio refinements.
For more information, see Editing, repairing, and improving audio using Essential Sound panel.
Last updated 6/16/2016
Page 6
What's New
Export Multitrack to Adobe Media Encoder
New in Audition CC 2015.2 | June 2016
Audition can now export your edited audio directly to Adobe Media Encoder for a fully linear post-production
workflow, using format presets and audio channel customization without rendering or wrangling various mixdown
files.
To export, just select your destination format and preset, which might include re-wrapping your video for many
formats to prevent re-encoding the video stream, and add to the render queue. You can even customize how your final
audio channels are assigned to your video file.
Your project will start rendering automatically in the background when the project files are prepared. Projects that you
had edited using Audition wear the Audition logo, making it easy to identify which projects are complete and ready for
use. You can get back to work in Audition or Premiere on your next project while Adobe Media Encoder renders the
files in the background.
2
For more information, see Save and export files in Adobe Audition.
Remix
New in Audition CC 2015.1 | November 2015
Create remixes of music files from a collection. For example, you can take a song that has a longer duration and create
a shorter version that still sounds like the original. You can recompose any piece of music in your collection to fit the
video or project duration.
For more information, see Creating remix.
Text t o spe ech
Last updated 6/16/2016
Page 7
What's New
New in Audition CC 2015.1 | November 2015
Type or paste text, and generate a realistic voice-over or narration track. Use this tool to create synthesized voices for
videos, games, and audio productions.
For more information, see Generating text-to-speech.
Match loudness
New in Audition CC 2015.1 | November 2015
Match loudness in audio clips, and apply correction to support various loudness standards and true peak limiting. The
Match Loudness panel replaces the old Match Volume panel.
3
For more information, see Matching loudness across multiple audio files.
Enable CEP extensions
New in Audition CC 2015.1 | November 2015
You can use Common Extensibility Platform (CEP) extensions and build integrated panels in Adobe desktop
applications.
For more information, see Enabling CEP extensions.
Last updated 6/16/2016
Page 8
Chapter 2: Digital audio fundamentals
Understanding sound
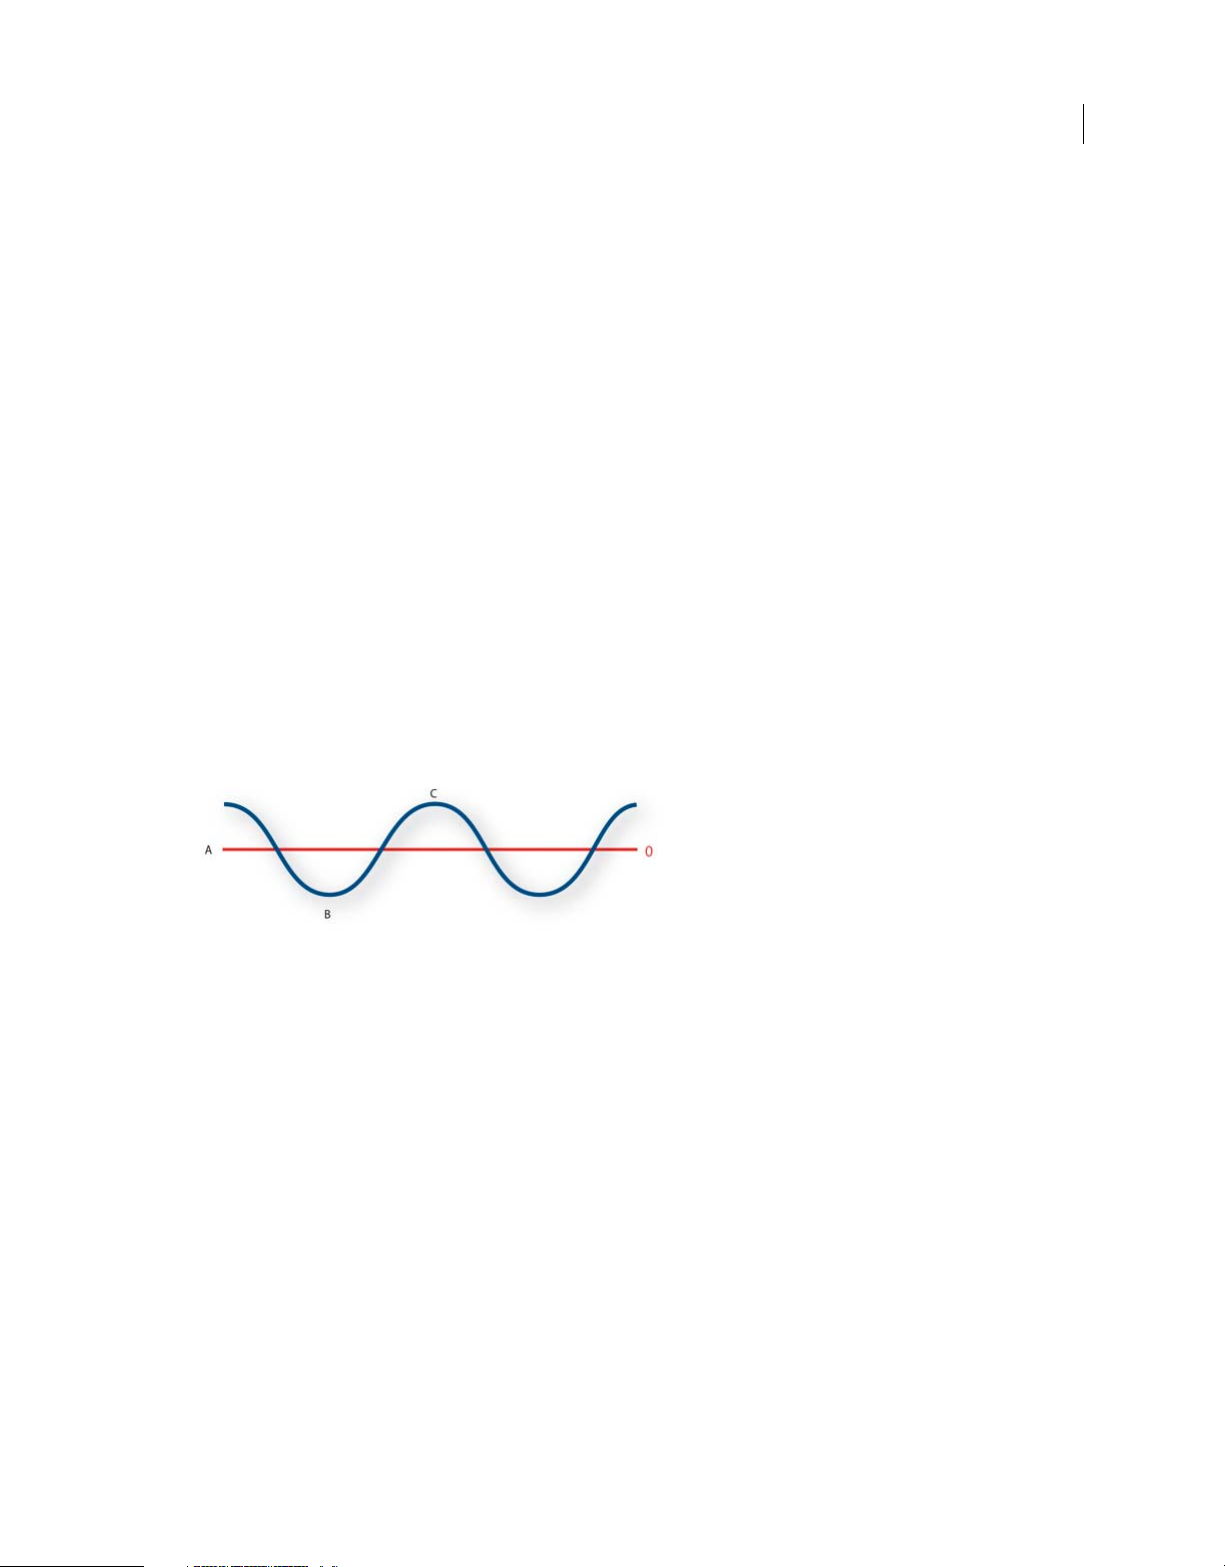
Sound waves
Sound starts with vibrations in the air, like those produced by guitar strings, vocal cords, or speaker cones. These
vibrations push nearby air molecules together, raising the air pressure slightly. The air molecules under pressure then
push on the air molecules surrounding them, which push on the next set of molecules, and so on. As high-pressure
areas move through the air, they leave low-pressure areas behind them. When these waves of pressure changes reach
us, they vibrate the receptors in our ears, and we hear the vibrations as sound.
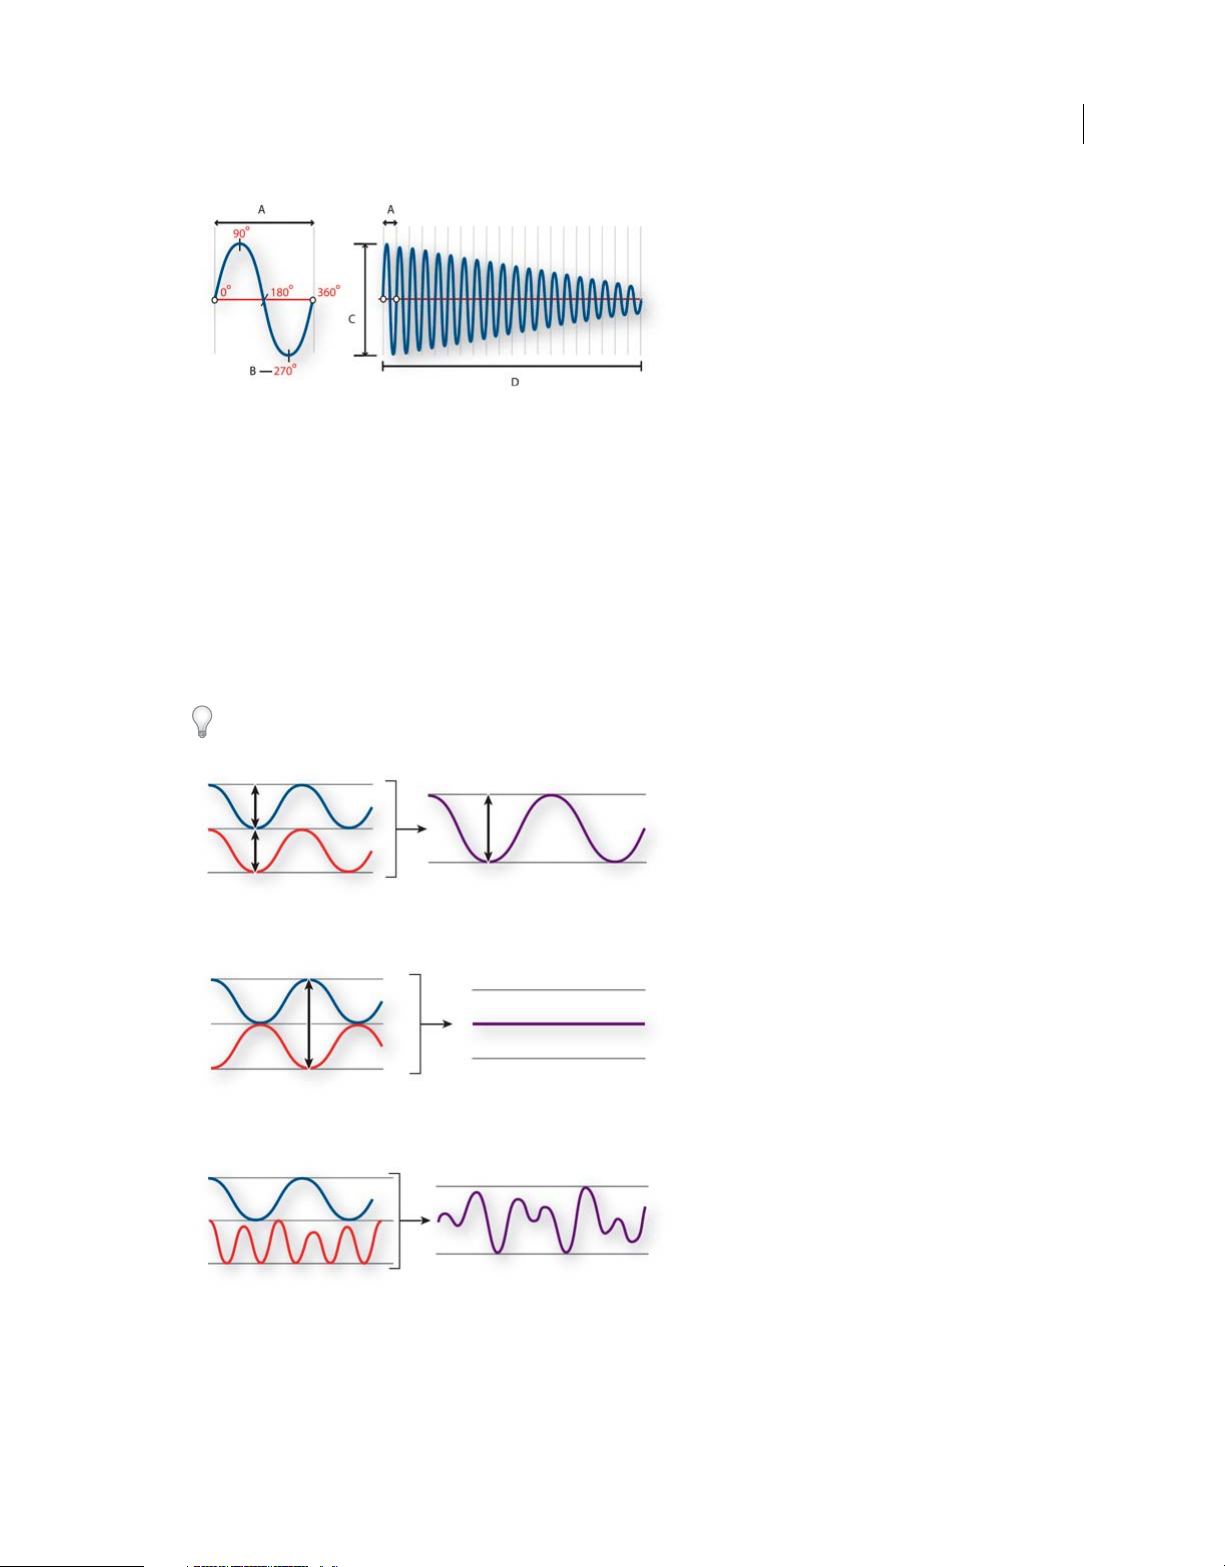
When you see a visual waveform that represents audio, it reflects these waves of air pressure. The zero line in the
waveform is the pressure of air at rest. When the line swings up to a peak, it represents higher pressure; when the line
swings down to a trough, it represents lower pressure.
4
A Zero line B Low-pressure area C High-pressure area
Waveform measurements
Several measurements describe waveforms:
Amplitude Reflects the change in pressure from the peak of the waveform to the trough. High-amplitude waveforms
are loud; low-amplitude waveforms are quiet.
Cycle Describes a single, repeated sequence of pressure changes, from zero pressure, to high pressure, to low pressure,
and back to zero.
Frequency Measured in hertz (Hz), describes the number of cycles per second. (For example, a 1000-Hz waveform has
1000 cycles per second.) The higher the frequency, the higher the musical pitch.
Phase Measured in 360 degrees, indicates the position of a waveform in a cycle. Zero degrees is the start point, followed
by 90º at high pressure, 180º at the halfway point, 270º at low pressure, and 360º at the end point.
Wave length Measured in units such as inches or centimeters, is the distance between two points with the same degree
of phase. As frequency increases, wavelength decreases.
Last updated 6/16/2016
Page 9
Digital audio fundamentals
A Wavelength B Degree of phase C Amplitude D One second
How sound waves interact
When two or more sound waves meet, they add to and subtract from each other. If their peaks and troughs are perfectly
in phase, they reinforce each other, resulting in a waveform that has higher amplitude than either individual waveform.
If the peaks and troughs of two waveforms are perfectly out of phase, they cancel each other out, resulting in no
waveform at all.
In most cases, however, waves are out of phase in varying amounts, resulting in a combined waveform that is more
complex than individual waveforms. A complex waveform that represents music, voice, noise, and other sounds, for
example, combines the waveforms from each sound.
5
Because of its unique physical structure, a single instrument can create extremely complex waves. That’s why a violin
and a trumpet sound different even when playing the same note.
Last updated 6/16/2016
Page 10
Digital audio fundamentals
Digitizing audio
Comparing analog and digital audio
In analog and digital audio, sound is transmitted and stored very differently.
Analog audio: positive and negative voltage
A microphone converts the pressure waves of sound into voltage changes in a wire: high pressure becomes positive
voltage, and low pressure becomes negative voltage. When these voltage changes travel down a microphone wire, they
can be recorded onto tape as changes in magnetic strength or onto vinyl records as changes in groove size. A speaker
works like a microphone in reverse, taking the voltage signals from an audio recording and vibrating to re-create the
pressure wave.
Digital audio: zeroes and ones
Unlike analog storage media such as magnetic tape or vinyl records, computers store audio information digitally as a
se ri es o f zer oes a nd o nes . In d igit al st ora ge, the o rigi nal w ave form is brok en up int o in divi dua l s nap sho ts c al led samples.
This process is typically known as digitizing or sampling the audio, but it is sometimes called analog-to-digital
conversion.
6
When you record from a microphone into a computer, for example, analog-to-digital converters transform the analog
signal into digital samples that computers can store and process.
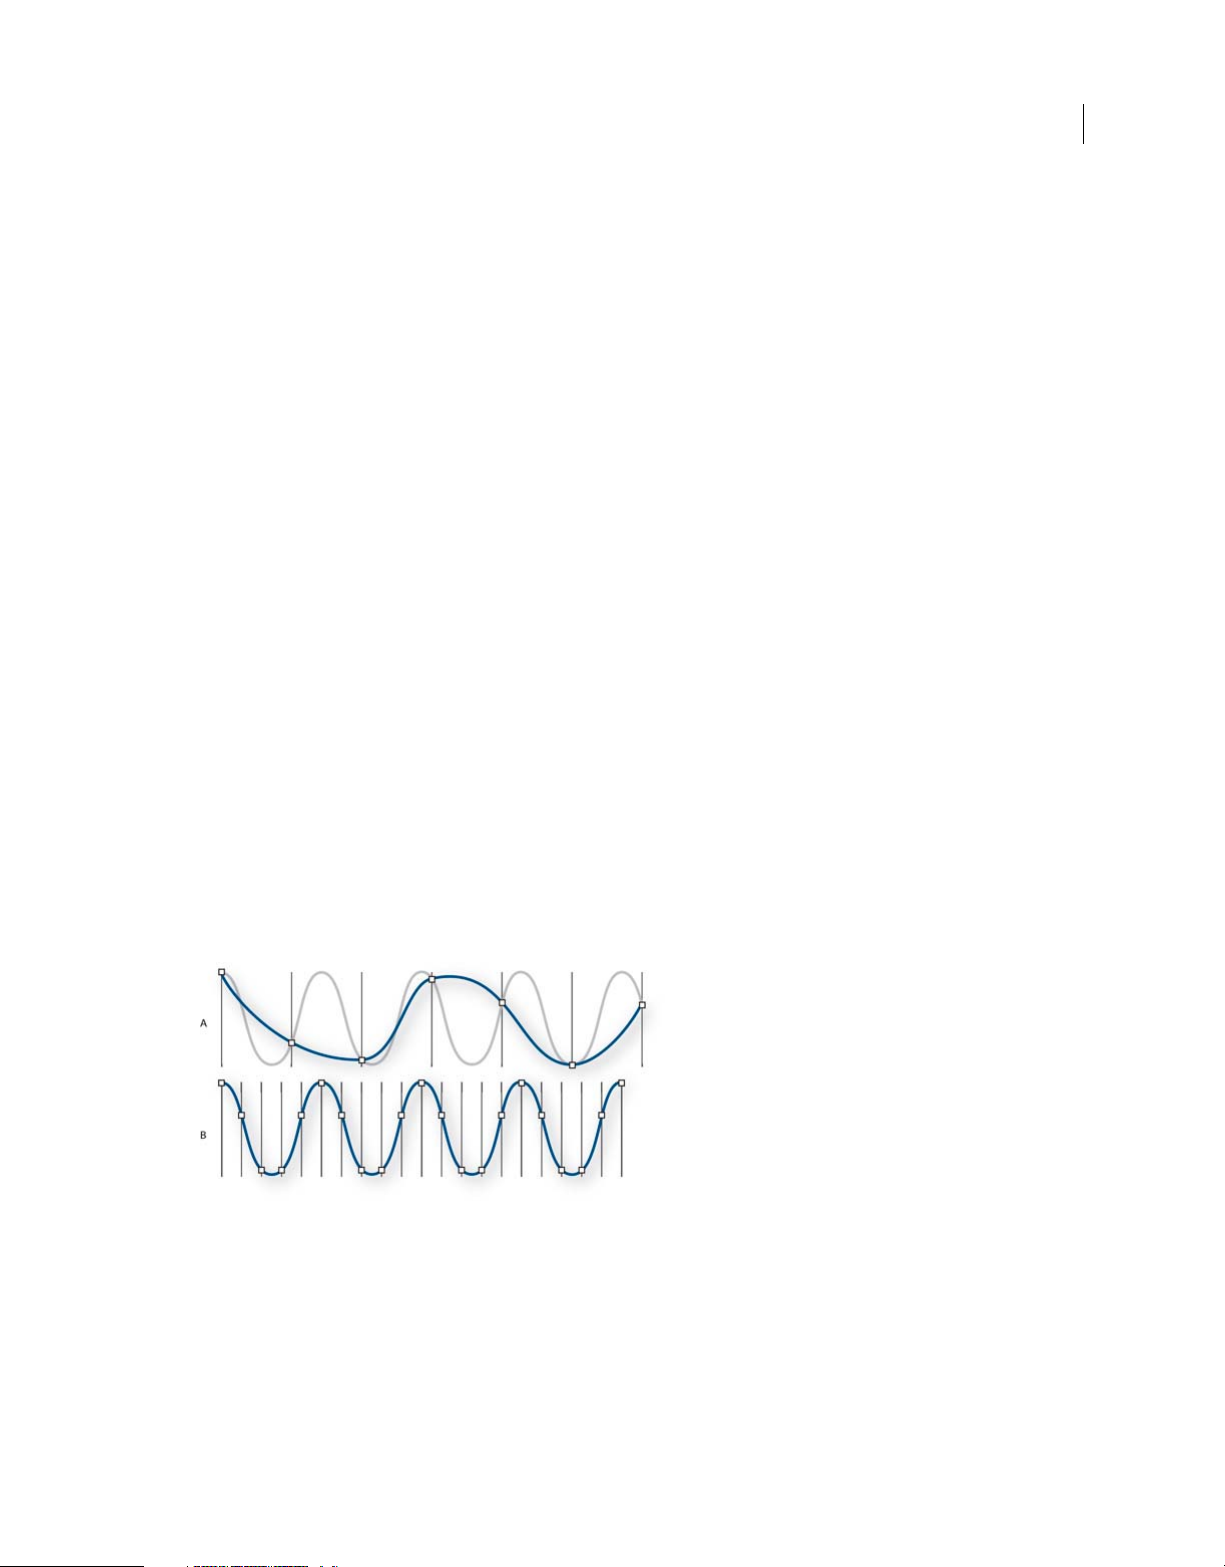
Understanding sample rate
Sample rate indicates the number of digital snapshots taken of an audio signal each second. This rate determines the
frequency range of an audio file. The higher the sample rate, the closer the shape of the digital waveform is to that of
the original analog waveform. Low sample rates limit the range of frequencies that can be recorded, which can result in
a recording that poorly represents the original sound.
A Low sample rate that distorts the original sound wave. B High sample rate that perfectly reproduces the original sound wave.
To reproduce a given frequency, the sample rate must be at least twice that frequency. For example, CDs have a sample
rate of 44,100 samples per second, so they can reproduce frequencies up to 22,050 Hz, which is just beyond the limit of
human hearing, 20,000 Hz.
Here are the most common sample rates for digital audio:
Last updated 6/16/2016
Page 11
Digital audio fundamentals
Sample rate Quality level Frequency range
11,025 Hz Poor AM radio (low-end multimedia) 0–5,512 Hz
22,050 Hz Near FM radio (high-end multimedia) 0–11,025 Hz
32,000 Hz Better than FM radio (standard broadcast rate) 0–16,000 Hz
44,100 Hz CD 0–22,050 Hz
48,000 Hz Standard DVD 0–24,000 Hz
96,000 Hz Blu-ray DVD 0–48,000 Hz
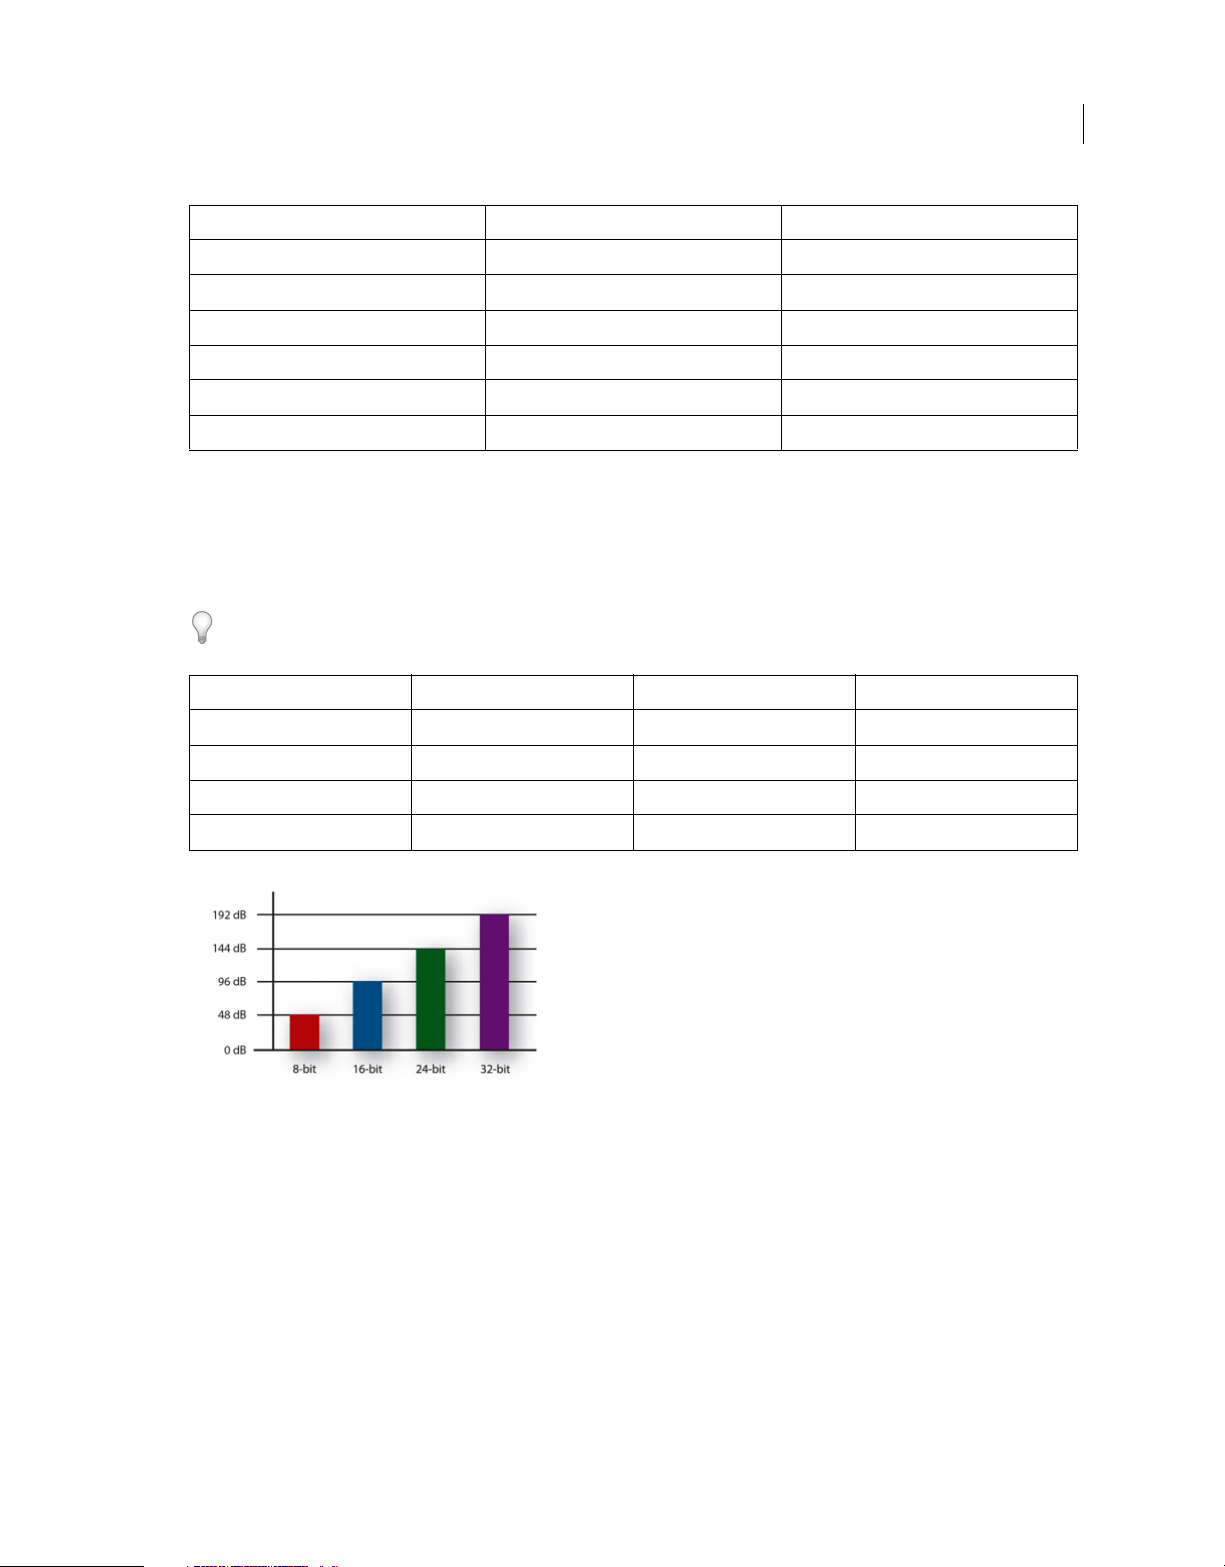
Understanding bit depth
Bit depth determines dynamic range. When a sound wave is sampled, each sample is assigned the amplitude value
closest to the original wave’s amplitude. Higher bit depth provides more possible amplitude values, producing greater
dynamic range, a lower noise floor, and higher fidelity.
For the best audio quality, Audition transforms all audio in 32-bit mode and then converts to a specified bit depth when
saving files.
Bit depth Quality level Amplitude values Dynamic range
7
8-bit Tel ep ho ny 256 48 dB
16-bit Audio CD 65,536 96 dB
24-bit Audio DVD 16,777,216 144 dB
32-bit Best 4,294,967,296 192 dB
Measuring amplitude in dBFS
In digital audio, amplitude is measured in decibels below full scale, or dBFS. The maximum possible amplitude is 0
dBFS; all amplitudes below that are expressed as negative numbers.
Note: A given dBFS value does not directly correspond to the original sound pressure level measured in acoustic dB.
Audio file contents and size
An audio file on your hard drive, such as a WAV file, consists of a small header indicating sample rate and bit depth,
and then a long series of numbers, one for each sample. These files can be very large. For example, at 44,100 samples
per second and 16 bits per sample, a mono file requires 86 KB per second—about 5 MB per minute. That figure doubles
to 10 MB per minute for a stereo file, which has two channels.
Last updated 6/16/2016
Page 12

Digital audio fundamentals
How Adobe Audition digitizes audio
When you record audio in Adobe Audition, the sound card starts the recording process and specifies what sample rate
and bit depth to use. Through Line In or Microphone In ports, the sound card receives analog audio and digitally
samples it at the specified rate. Adobe Audition stores each sample in sequence until you stop recording.
When you play a file in Adobe Audition, the process happens in reverse. Adobe Audition sends a series of digital
samples to the sound card. The card reconstructs the original waveform and sends it as an analog signal through Line
Out ports to your speakers.
To sum up, the process of digitizing audio starts with a pressure wave in the air. A microphone converts this pressure
wave into voltage changes. A sound card converts these voltage changes into digital samples. After analog sound
becomes digital audio, Adobe Audition can record, edit, process, and mix it—the possibilities are limited only by your
imagination.
8
Last updated 6/16/2016
Page 13

Chapter 3: Workspace and setup
Viewing, zooming, and navigating audio
Comparing the Waveform and Multitrack editors
Adobe Audition provides different views for editing audio files and creating multitrack mixes. To edit individual files,
use the Waveform Editor. To mix multiple files and integrate them with video, use the Multitrack Editor.
The Waveform and Multitrack editors use different editing methods, and each has unique advantages. The Waveform
Editor uses a destructive method, which changes audio data, permanently altering saved files. Such permanent changes
are preferable when converting sample rate and bit depth, mastering, or batch processing. The Multitrack Editor uses
a nondestructive method, which is impermanent and instantaneous, requiring more processing power, but increasing
flexibility. This flexibility is preferable when gradually building and reevaluating a multilayered musical composition
or video soundtrack.
9
You can combine destructive and nondestructive editing to suit the needs of a project. If a multitrack clip requires
destructive editing, for example, simply double-click it to enter the Waveform Editor. Likewise, if an edited waveform
contains recent changes that you dislike, use the Undo command to revert to previous states—destructive edits aren’t
applied until you save a file.
For more information about the Waveform Editor, see Editing audio files ; for more information about the Multitrack
Editor, see Mixing multitrack sessions .
Basic components of the editors
Though available options differ in the Waveform and Multitrack editors, both views share basic components, such as
the tool and status bars, and the Editor panel.
Last updated 6/16/2016
Page 14
Workspace and setup
10
A View buttons and toolbar B Editor panel with zoom navigator at top C Various o ther panels D Status bar
Switch editors
Do one of the following:
• From the View menu, choose Waveform or Multitrack Editor.
• In the toolbar, click the Waveform or Multitrack Editor button.
• In t he Mu ltitrack E ditor, d oubl e-click an audi o clip to open it in the Waveform Editor. Alte rnatively, d oubl e-click
a file in the Files panel.
• In the Waveform Editor, choose Edit > Edit Original to open the multitrack session that created a mixdown file.
(This command requires embedded metadata in the file. See Link sessions to exported mixdown files.)
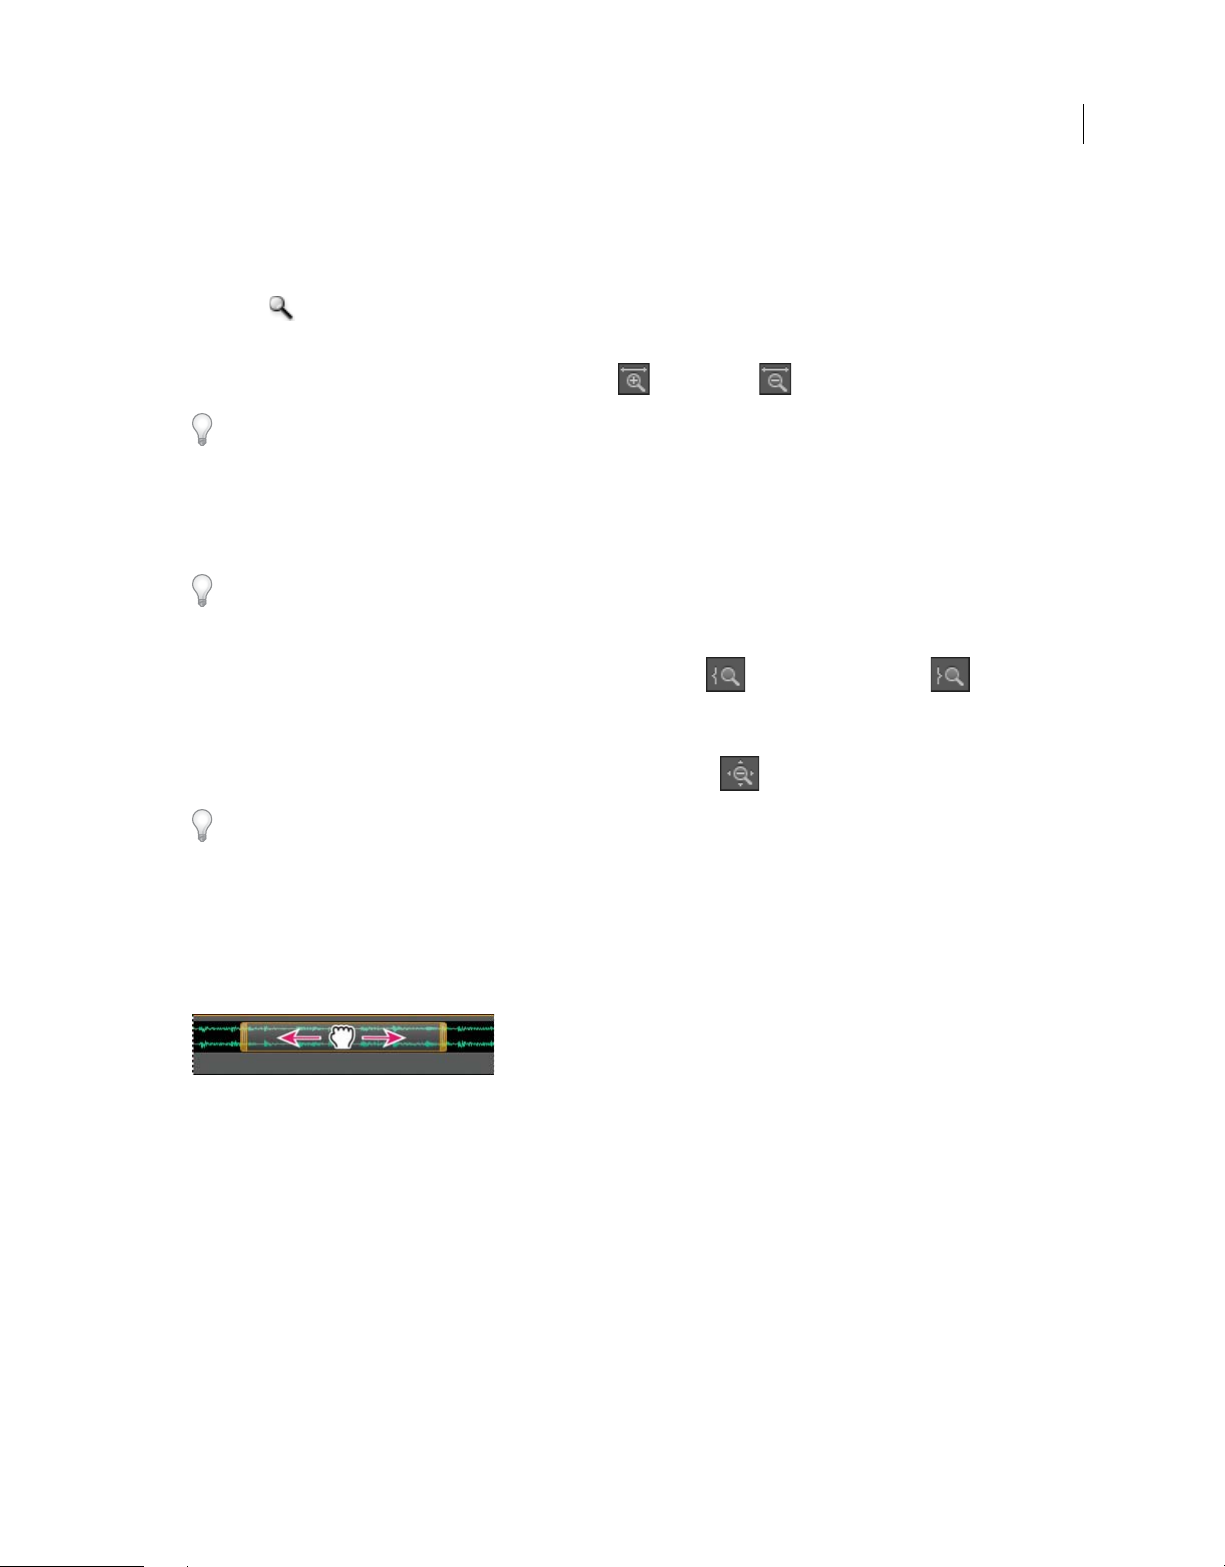
Zoom audio in the Editor panel
A Zoom navigator B Timeline ruler
Zoom into a specific time range
In either the zoom navigator or the timeline ruler, right-click and drag. The magnifying glass icon creates a
selection showing the range that will fill the Editor panel.
Zoom into a specific frequency range
Last updated 6/16/2016
Page 15
Workspace and setup
In the vertical ruler for the spectral display, right-click and drag. (See View audi o w avefor ms and s p e c t r ums.)
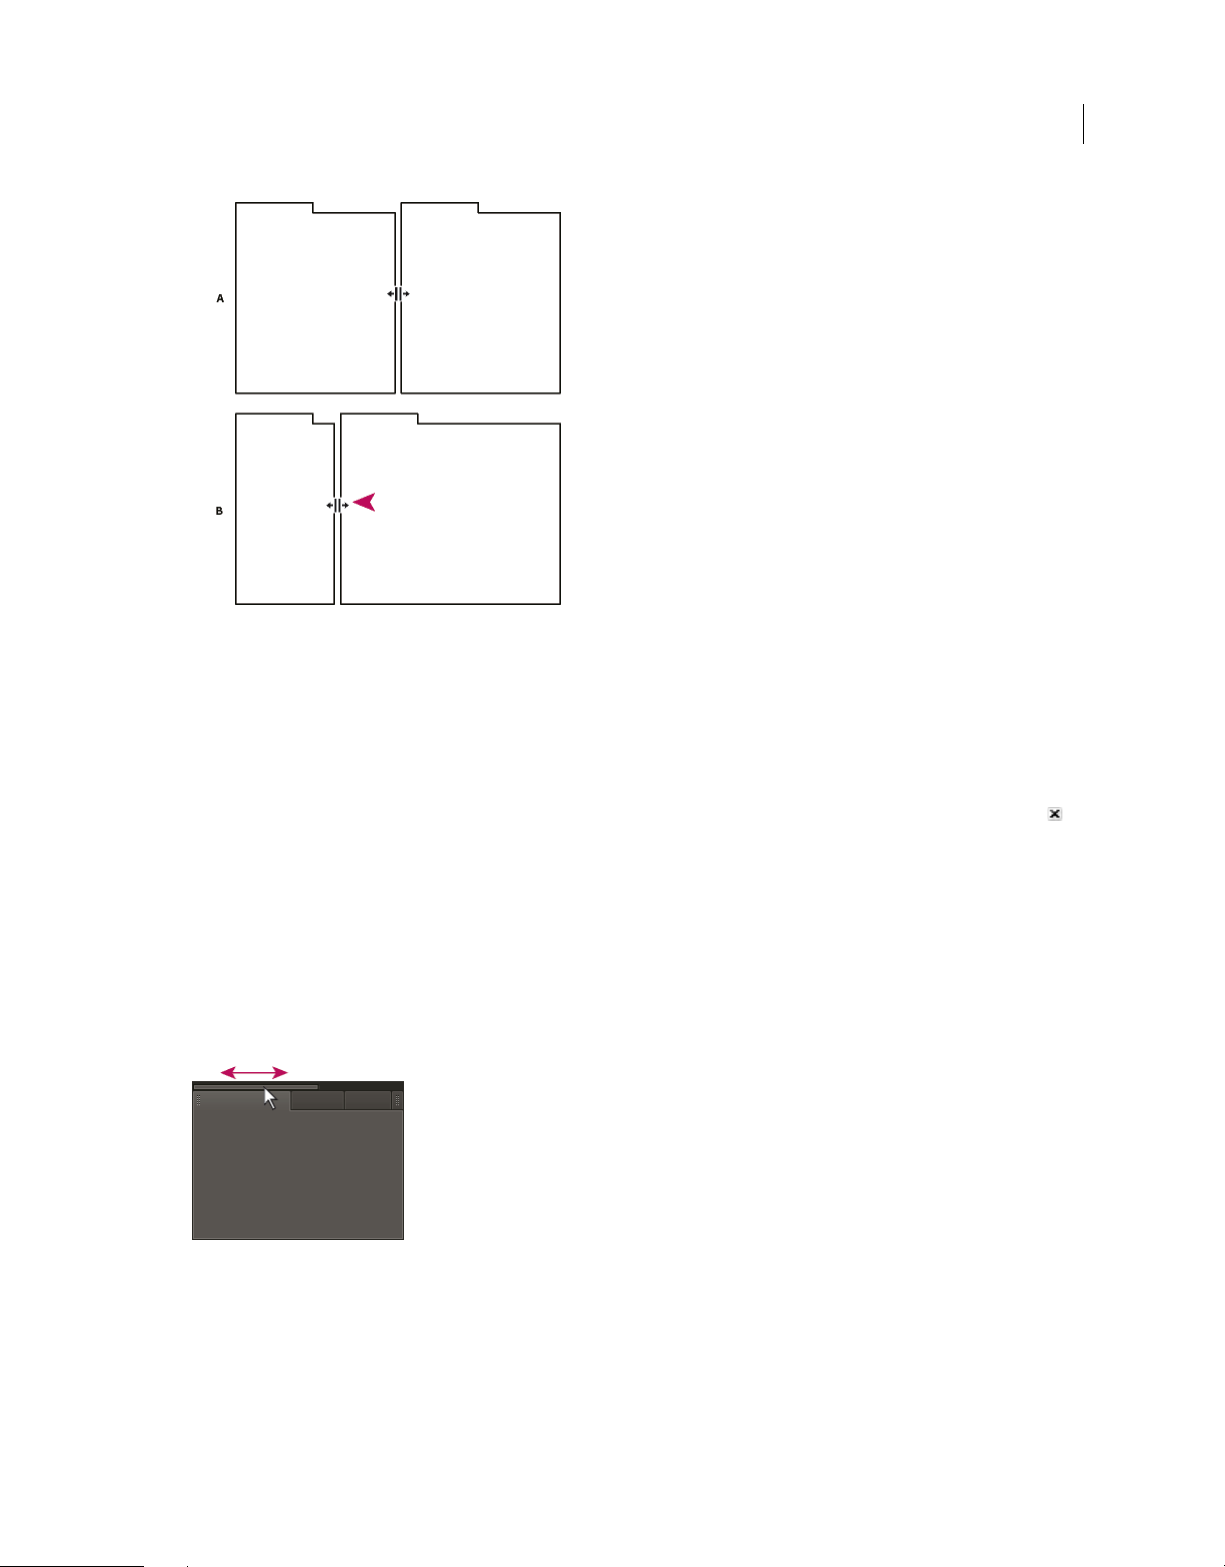
Extend or shorten the displayed range
Place the pointer over the left or right edge of the highlighted area in the zoom navigator, and then drag the magnifying
glass icon
Gradually zoom in or out
In the lower right of the Editor panel, click the Zoom In or Zoom Out button.
.
11
You can set the Zoom Factor in the General section of the Preferences dialog box. (See Customize preferences.)
Zoom with the mouse wheel or Mac trackpad
Place the pointer over the zoom navigator or ruler, and either roll the wheel or drag up or down with two fingers. (In
the Waveform Editor, this zoom method also works when the pointer is over the waveform.)
Roll or drag over the spectral display, and press Shift to switch between logarithmic and linear frequency scales.
(Logarithmic better reflects human hearing; linear makes individual frequencies more visually distinct.)
Magnify selected audio
In the lower right of the Editor panel, click the Zoom In At In Point , Zoom In At Out Point , or Zoom To
Selection buttons.
Display the entire audio file or multitrack session
In the lower right of the Editor panel, click the Zoom Out Full button .
To display zoom buttons in a separate panel, choose Window > Zoom.
Navigate through time
At higher zoom levels, you can navigate to different audio content in the Editor panel.
Navigate by scrolling
• In the zoom navigator, drag left or right.
• To scroll through audio frequencies in the spectral display, drag up or down in the vertical ruler. (See View audio
waveforms and spectrums.)
Navigate with the Selection/View panel
The Selection/View panel shows the start and end of the current selection and view in the Editor panel. The panel
displays this information in the current time format, such as Decimal or Bars And Beats. (See
format.)
1 To display the Selection/View panel, choose Window > Selection/View Controls.
2 (Optional) Enter new values into the Begin, End, or Duration boxes to change the selection or view.
Last updated 6/16/2016
Change the time display
Page 16

Workspace and setup
More Help topics
Keys for playing and zooming audio
Monitoring time
Position the current-time indicator
Dock, group, or float panels
Customizing workspaces
About workspaces
Adobe video and audio applications provide a consistent, customizable workspace. Although each application has its
own set of panels (such as Project, Metadata, and Timeline), you move and group panels in the same way across
products.
The main window of a program is the application window. Panels are organized in this window in an arrangement
called a workspace. The default workspace contains groups of panels as well as panels that stand alone.
12
You customize a workspace by arranging panels in the layout that best suits your working style. As you rearrange panels,
the other panels resize automatically to fit the window. You can create and save several custom workspaces for different
tasks—for example, one for editing and one for previewing.
You can use floating windows to create a workspace more like workspaces in previous versions of Adobe applications,
or to place panels on multiple monitors.
In these two tutorials Andrew Devis from Creative Cow shows how to use different workspaces, and how to customize
your workspace.
A Application window B Grouped panels C Individual panel
Last updated 6/16/2016
Page 17
Workspace and setup
Choose a workspace
Each Adobe video and audio application includes several predefined workspaces that optimize the layout of panels for
specific tasks. When you choose one of these workspaces, or any custom workspaces you’ve saved, the current
workspace is redrawn accordingly.
Open the project you want to work on, choose Window > Workspace, and select the desired workspace.
Dock, group, or float panels
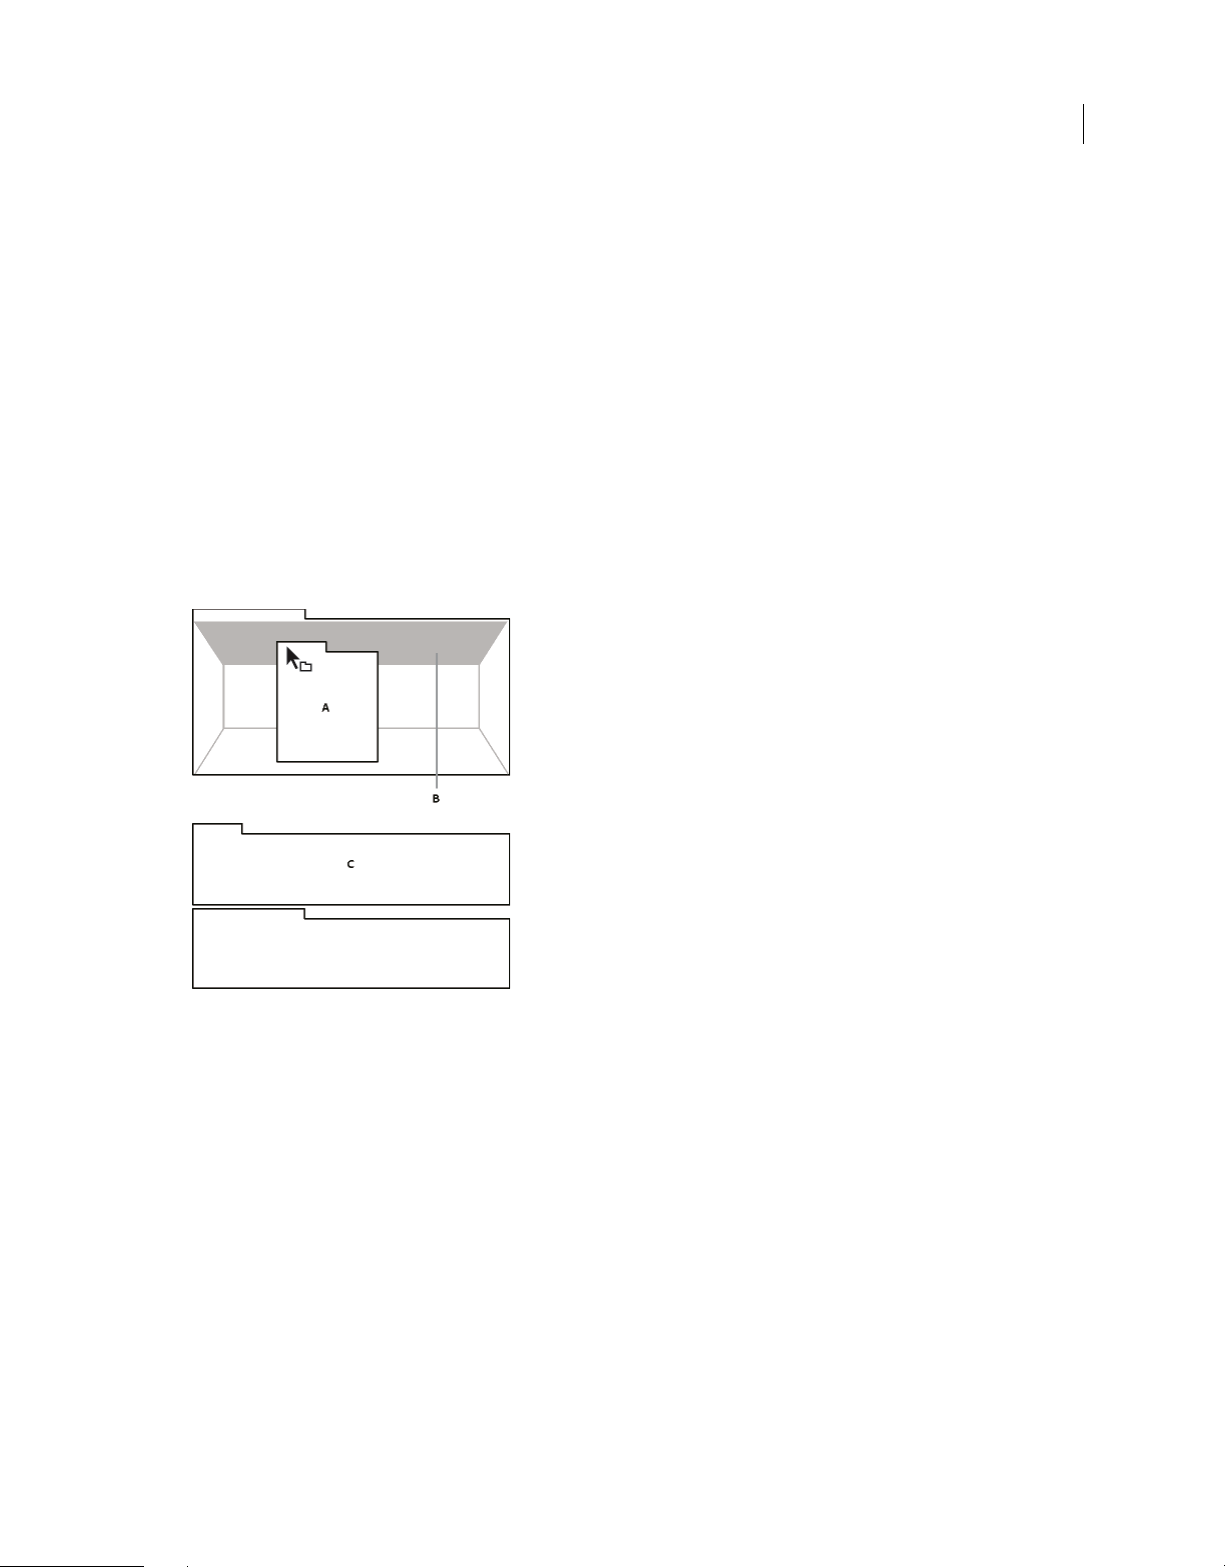
You can dock panels together, move them into or out of groups, and undock them so they float above the application
window. As you drag a panel, drop zones—areas onto which you can move the panel—become highlighted. The drop
zone you choose determines where the panel is inserted, and whether it docks or groups with other panels.
Docking zones
Docking zones exist along the edges of a panel, group, or window. Docking a panel places it adjacent to the existing
group, resizing all groups to accommodate the new panel.
13
Grouping zones
Grouping zones exist in the middle of a panel or group, and along the tab area of panels. Dropping a panel on a grouping
ne stacks it with other panels.
zo
Last updated 6/16/2016
Page 18
Workspace and setup
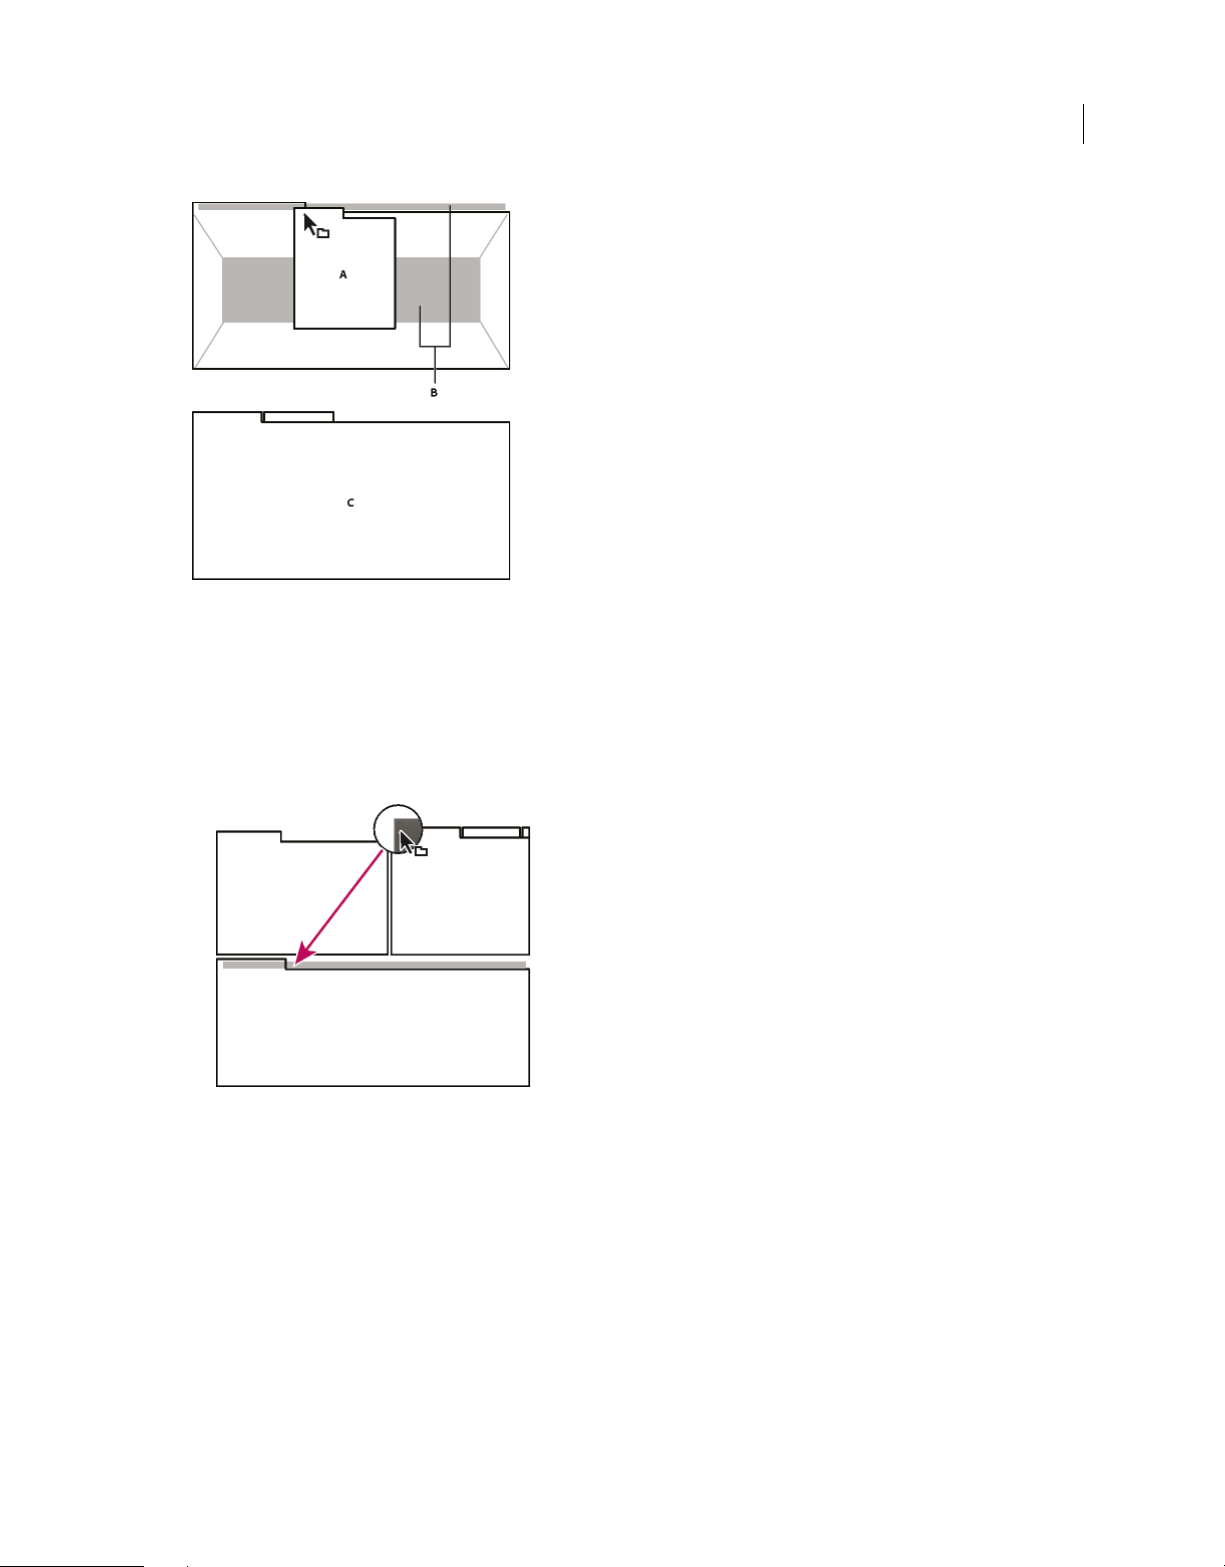
Dock or group panels
1 If the panel you want to dock or group is not visible, choose it from the Window menu.
2 Do one of the following:
14
• To move an individual panel, drag the gripper area in the upper-left corner of a panel’s tab onto the desired drop
zone.
• To move an entire group, drag the group gripper in the upper-right corner onto the desired drop zone.
Last updated 6/16/2016
Page 19
Workspace and setup
The application docks or groups the panel, according to the type of drop zone.
Undock a panel in a floating window
15
When you undock a panel in a floating window, you can add panels to the window and modify it similarly to the
application window. You can use floating windows to use a secondary monitor, or to create workspaces like the
workspaces in earlier versions of Adobe applications.
Select the panel you want to undock (if it’s not visible, choose it from the Window menu), and then do one of the
following:
• Choose Undock Panel or Undock Frame from the panel menu. Undock Frame undocks the panel group.
• Hold down Ctrl (Windows®) or Command (Mac OS®), and drag the panel or group from its current location.
hen you release the mouse button, the panel or group appears in a new floating window.
W
• Drag the panel or group outside the application window. (If the application window is maximized, drag the panel
to the Windows taskbar.)
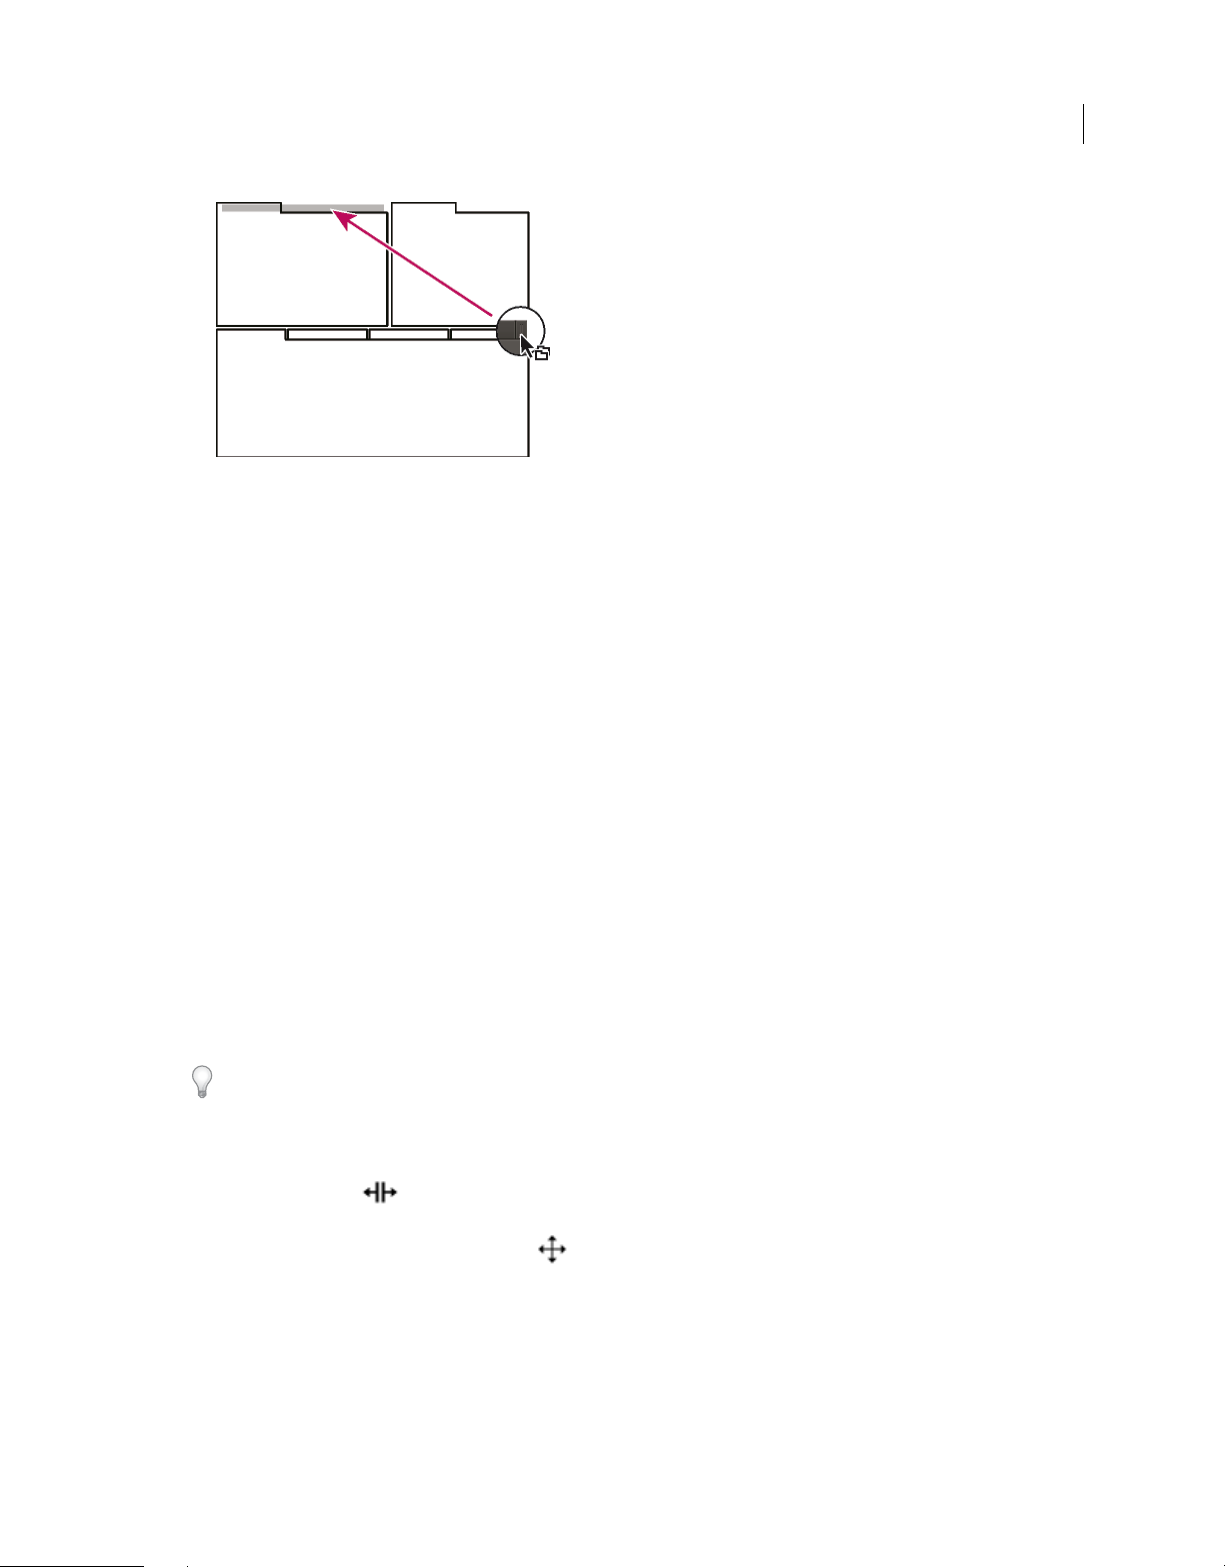
Resize panel groups
When you position the pointer over dividers between panel groups, resize icons appear. When you drag these icons, all
groups that share the divider are resized. For example, suppose your workspace contains three panel groups stacked
vertically. If you drag the divider between the bottom two groups, they are resized, but the topmost group doesn’t
change.
To quickly maximize a panel beneath the pointer, press the accent key. (Do not press Shift.) Press the accent key again
to return the panel to its original size.
1 Do either of the following:
• To resize either horizontally or vertically, position the pointer between two panel groups. The pointer becomes
a double-arrow .
• To resize in both directions at once, position the pointer at the intersection between three or more panel groups.
The pointer becomes a four-way arrow .
2 Hold down the mouse button, and drag to resize the panel groups.
Last updated 6/16/2016
Page 20
Workspace and setup
A Original group with resize icon B Resized groups
Open, close, and scroll to panels
When you close a panel group in the application window, the other groups resize to use the newly available space. When
you close a floating window, the panels within it close, too.
16
• To open a panel, choose it from the Window menu.
• To close a panel or window, press Control-W (Windows) or Command-W (Mac OS), or click its Close button .
• To see all the panel tabs in a narrow panel group, drag the horizontal scroll bar.
• To bring a panel to the front of a group of panels, do one of the following:
• Click the tab of the panel you want in front.
• Hover the cursor above the tab area, and turn the mouse scroll wheel. Scrolling brings each panel to the front,
one after another.
• Drag tabs horizontally to change their order.
• To reveal panels hidden in a narrow panel group, drag the scroll bar above the panel group.
Working with multiple monitors
To increase the available screen space, use multiple monitors. When you work with multiple monitors, the application
window appears on one monitor, and you place floating windows on the second monitor. Monitor configurations are
stored in the workspace.
Last updated 6/16/2016
Page 21
Workspace and setup
Display the toolbar
The toolbar provides quick access to tools, the Workspace menu, and buttons that toggle between the Waveform and
Multitrack editors. Some tools are unique to each view. Likewise, some Waveform Editor tools are available only in the
spectral display.
By default, the toolbar is docked immediately below the menu bar. However, you can undock the toolbar, converting it
to the Tools panel, which you can manipulate like any other panel.
• To show or hide th e toolbar, cho ose Wind ow > Tools. A che ck mark by the Tool s command indicat es that it is shown.
• To undock the toolbar from its default location, drag the handle at the left edge to another location in the work area.
• To redock the Tools panel in its default location, drag the Tools panel tab to the drop zone that spans the entire width
of the Adobe Audition window, just under the menu bar.
A Waveform Editor tools for spectral display B Multitrack Editor tools
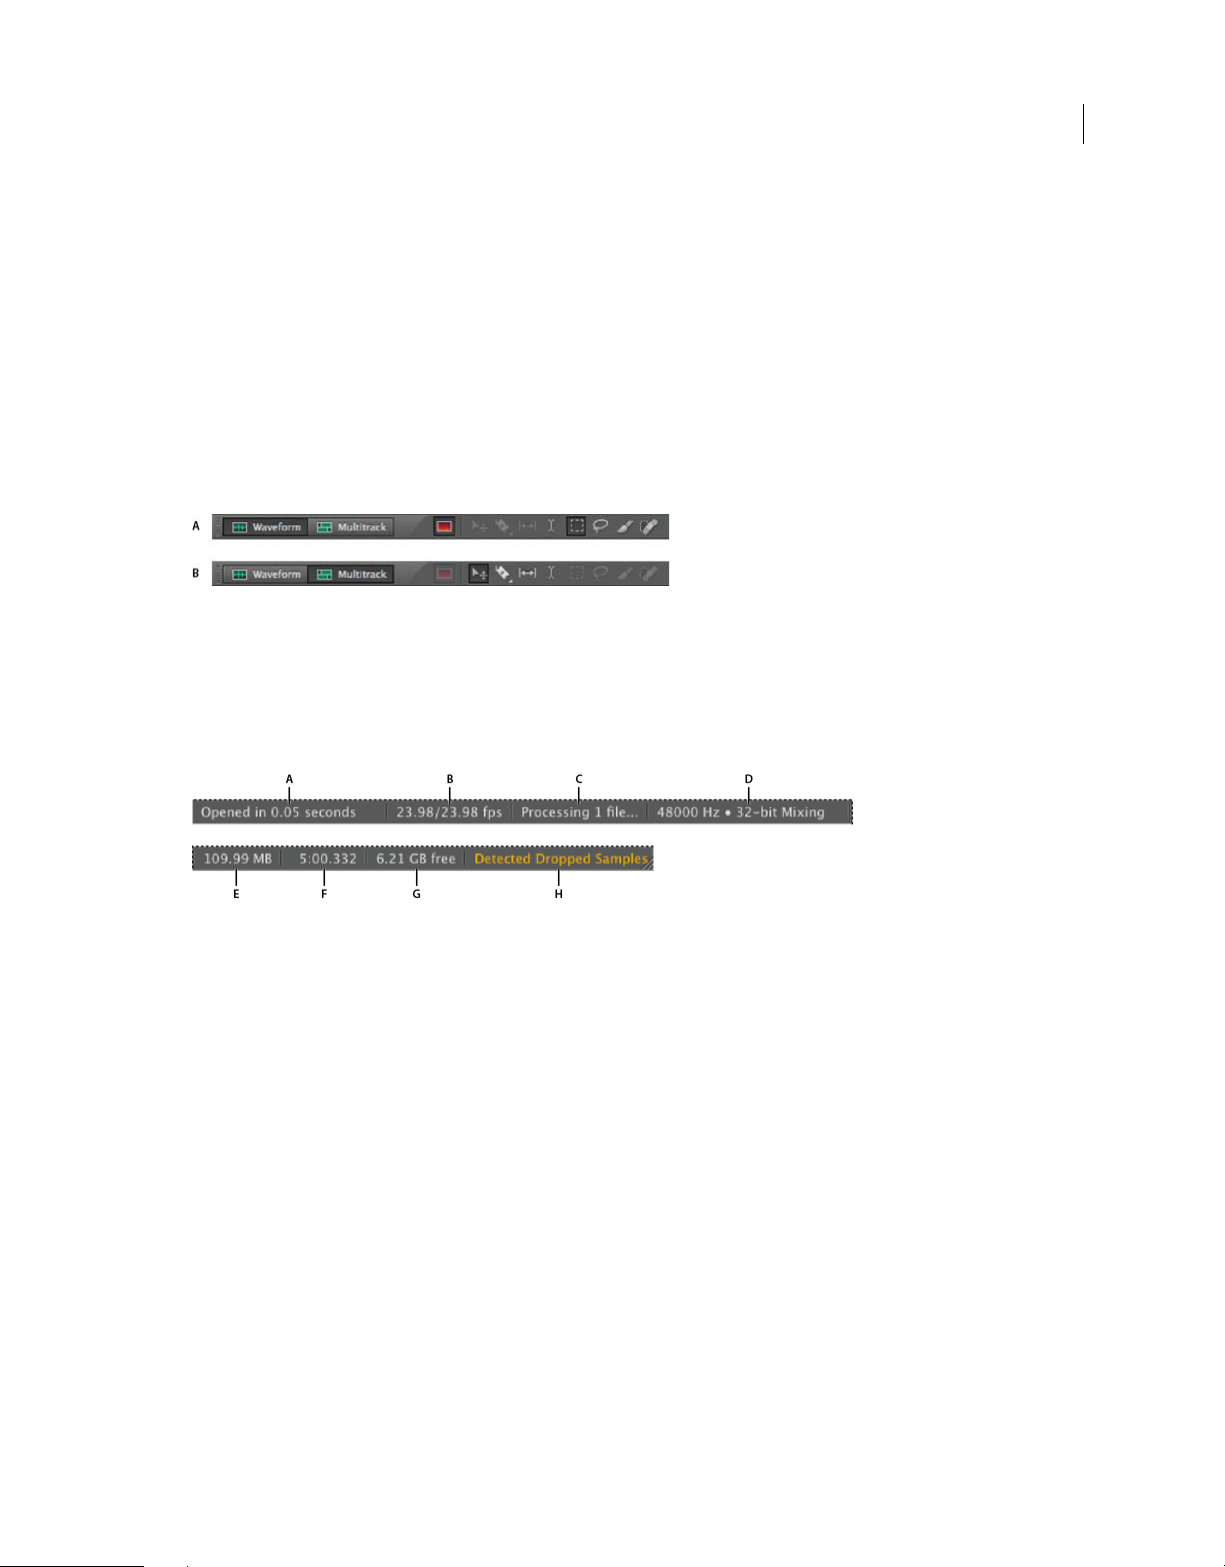
Display the status bar
The status bar runs across the bottom of the Adobe Audition work area. The far left of the status bar indicates the time
required to open, save, or process a file, as well as the current transport status (Playing, Recording, or Stopped). The far
right of the bar displays various information that you can customize.
17
A Time to open, save, or process file B Vide o Frame Rate C File Status D Sample Type E Uncompressed Audio Size F Duration G Free Space
H
Detect Dropped Samples
• To show or hide the status bar, choose View > Status Bar > Show. A check mark indicates that the status bar is visible.
• To change the information displayed at the far right of the bar, choose View > Status Bar, or right-click the bar. Then
select from the following options:
Show Data Under Cusror: Displays the frequency, time, channel, and amplitude information at the location under
the cursor.
Video Frame Rate: Displays the current and target frame rate of open video files in the Multitrack Editor.
File Status: Indicates when processing is occurring for effects and amplitude adjustments.
Sample Type: Displays sample information about the currently opened waveform (Waveform Editor) or session file
(Multitrack Editor). For example, a 44,100 Hz, 16-bit stereo file is displayed as 44100 Hz • 16-bit • Stereo.
Uncompressed Audio Size: Indicates either how large the active audio file would be if saved to an uncompressed
format such as WAV and AIFF, or the total size of a multitrack session.
Duration: Shows you the length of the current waveform or session. For example, 0:01:247 means the waveform or
session is 1.247 seconds long.
Free Space: Shows how much space is available on your hard drive.
Last updated 6/16/2016
Page 22

Workspace and setup
Free Space (Time): Displays the time remaining for recording, based upon the currently selected sample rate. This
value is shown as minutes, seconds, and thousandths of seconds. For example, if Adobe Audition is set to record
8-bit mono audio at 11,025 Hz, the time remaining might read 4399:15.527 free. Change the recording options to
16-bit stereo at 44,100 Hz, and the time remaining becomes 680:44.736 free.
Ti p:
By default, Free Space (Time) information is hidden. To show it, right-click the status bar, and select Free Space
(Time) from the pop-up menu.
18
Detect Dropped Samples: I
ndicates that samples were missing during recording or playback. If this indicator
appears, consider rerecording the file to avoid audible dropouts.
Change interface colors, brightness, and performance
1 Choose Edit > Preferences > Appearance (Windows) or Audition > Preferences > Appearance (Mac OS).
2 Adjust any of the following options, and then click OK:PresetsApplies, saves, or deletes a combination of Colors and
Brightness settings.ColorsClick a swatch to change the color of waveforms, selections, or the current-time
indicator.BrightnessBrightens or darkens panels, windows, and dialog boxes.Use GradientsWhen deselected,
removes shadows and highlights from panels, buttons, and meters.
Save, reset, or delete workspaces
Save a custom workspace
As you customize a workspace, the application tracks your changes, storing the most recent layout. To store a specific
layout more permanently, save a custom workspace. Saved custom workspaces appear in the Workspace menu, where
you can return to and reset them.
Arrange the frames and panels as desired, and then choose Window > Workspace > New Workspace. Type a name
for the workspace, and click OK.
Note: (After Effects, Premiere Pro, Encore) If a project saved with a custom workspace is opened on another system, the
application looks for a workspace with a matching name. If it can’t find a match (or the monitor configuration doesn’t
match), it uses the current local workspace.
Reset a workspace
Reset the current workspace to return to its original, saved layout of panels.
Choose Window > Workspace > Reset workspace name.
Delete a workspace
1 Choose Window > Workspace >Delete Workspace.
2 Choose the workspace you want to delete, and then click OK.
Note: You cannot delete the currently active workspace.
More Help topics
Comparing the Waveform and Multitrack editors
Basic components of the editors
Last updated 6/16/2016
Page 23
Workspace and setup
Connecting to audio hardware in Audition
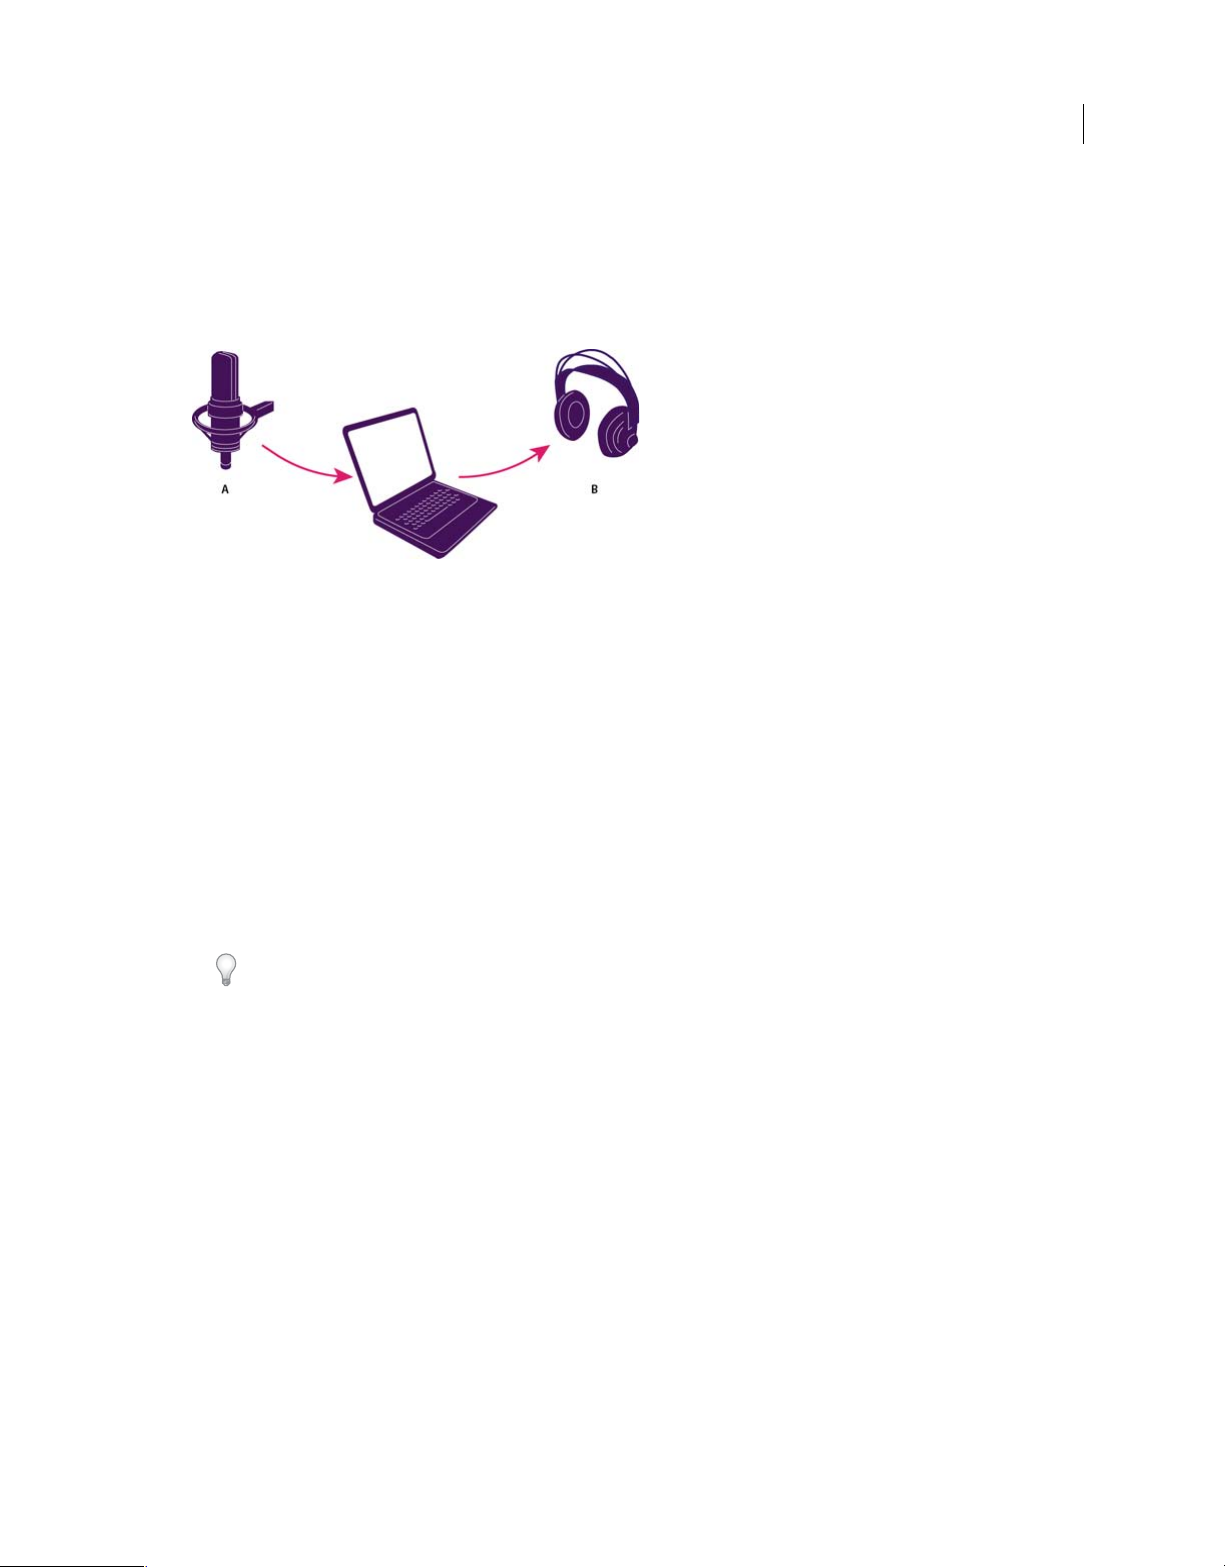
You can use a wide range of hardware inputs and outputs with Adobe Audition. Sound card inputs let you bring in audio
from sources such as microphones, tape decks, and digital effects units. Sound card outputs let you monitor audio
through sources such as speakers and headphones.
A Sound card inputs connect to sources such as microphones and tape decks. B Sound card outputs connect to speakers and headphones.
Configure audio inputs and outputs
When you configure inputs and outputs for recording and playback, Adobe Audition can use these kinds of sound card
drivers:
19
• In Windows, ASIO drivers support professional cards and MME drivers typically support standard cards.
• In Mac OS, CoreAudio drivers support both professional and standard cards.
ASIO and CoreAudio drivers are preferable because they provide better performance and lower latency. You can also
monitor audio as you record it and instantly hear volume, pan, and effects changes during playback.
1 Choose Edit > Preferences > Audio Hardware (Windows) or Audition > Preferences > Audio Hardware (Mac OS).
2 From the Device Class menu, choose the driver for the sound card you want to use.
3 Choose a Default Input and Output from the card.
In the Multitrack Editor, you can override the defaults for specific tracks. See Assign audio inputs and outputs to
tracks.
4 (MME and CoreAudio) For Master Clock, choose the input or output to which you want other digital audio
hardware to synchronize (ensuring accurate alignment of samples).
5 For I/O Buffer Size (ASIO and CoreAudio) or Latency (MME), specify the lowest setting possible without audio
dropouts. The ideal setting depends on the speed of your system, so some experimentation may be necessary.
6 Choose a Sample Rate for the audio hardware. (For common rates for different output mediums, see Understanding
sample rate.)
7 (Optional) To optimize the performance of ASIO and CoreAudio cards, click Settings. For more information,
consult the documentation for the sound card.
Note: By default, Adobe Audition controls ASIO sound cards while playing or monitoring audio. If you want to access the
card in another application, select Release ASIO Driver In Background. (Audition still controls the card while recording to
avoid having recordings suddenly stop.)
Last updated 6/16/2016
Page 24

Workspace and setup
Apply machine-specific hardware settings for network users
In network environments, Audition preferences are stored with each user account. For editing, interface, and other
preferences, this creates a customized experience for each user. Audio hardware preferences, however, should typically
remain consistent on a given machine, ensuring that inputs and outputs on the installed audio interface are available in
Audition.
1 Choose Edit > Preferences > Audio Hardware (Windows) or Audition > Preferences > Audio Hardware (Mac OS).
2 At the bottom of the Audio Hardware settings, select Use Machine-Specific Device Defaults. (Deselect this option
only if users move an assigned audio interface from machine to machine.)
To instead duplicate hardware settings from one machine to others, search for and copy the
MachineSpecificSettings.xml file.
Assign file channels to inputs and outputs
1 Choose Edit > Preferences > Audio Channel Mapping (Windows) or Audition > Preferences > Audio Channel
Mapping (Mac OS).
2 To the far right of items in the Input and Output lists, click the triangles to choose a hardware port for each file
channel.
This procedure also sets default outputs for the Master track in the Multitrack Editor. To override the defaults, see
Assign audio inputs and outputs to tracks.
20
More Help topics
Monitoring 5.1 surround sound
Customizing and saving application settings
Customize preferences
The Preferences dialog box lets you customize Adobe Audition’s display, editing behavior, use of hard disk space, and
other settings.
Choose Edit > Preferences (Windows) or Audition > Preferences (Mac OS). Then choose the area you want to
customize.
For information about a particular option, hover the mouse over it until a tooltip appears.
In the Media & Disk Cache preferences, choose your fastest drive for the Primary Temp folder, and a separate drive for
the Secondary Temp folder. Select Save Peak Files to store information about how to display WAV files. (Without peak
files, larger WAV files reopen more slowly.)
Restore preferences to default settings
Unexpected behavior may indicate damaged preferences files. To re-create preferences files, do the following.
Hold down the Shift key, and start Adobe Audition.
Last updated 6/16/2016
Page 25

Workspace and setup
Export and import customized application settings
Application settings files store all current preferences, effect settings, and workspaces. Export and import these files to
store groups of customized settings for specific workflows, or transfer favorite settings to another machine.
1 Choose File > Export > Application Settings. Then specify a filename and location.
2 To reapply the settings at a later time, choose File > Import > Application Settings.
To import preferences from Audition 2.0 or 3.0, search your system for the audition_settings.xml file. You can import
that file into both the Mac and Windows versions of Audition CS.
More Help topics
Change interface colors, brightness, and performance
Configure audio inputs and outputs
Working with markers
Customize the spectral display
Change the time display format
Navigating time and playing audio
21
Default keyboard shortcuts
These partial lists include the shortcuts that Adobe Audition experts find most useful. For a complete list of shortcuts,
choose Edit > Keyboard Shortcuts.
Keys for playing and zooming audio
Result Windows shortcut Mac OS shortcut
Toggle between Waveform and Multitrack
Editor
Start and stop playback Spacebar Spacebar
Move current-time indicator to beginning of
timeline
Move current-time indicator to end of
timeline
Move current-time indicator to previous
marker, clip, or selection edge
Move current-time indicator to next marker,
clip, or selection edge
Toggle preference for Return CTI To Start
Position On Stop
Zoom in horizontally = =
8 8
Home Home
End End
Ctrl+left arrow Command+left arrow
Ctrl+right arrow Command+right arrow
Shift+X Shift+X
Zoom in vertically Alt+= Option+=
Zoom out horizontally - -
Last updated 6/16/2016
Page 26

Workspace and setup
Zoom out vertically Alt+minus sign Option+minus sign
Add marker M or * (asterisk) M or * (asterisk)
Move to previous marker Crtl+Alt+left arrow Cmd+Option+left arrow
Move to next marker Crtl+Alt+right arrow Cmd+Option+right arrow
Keys for editing audio files
The following keyboard shortcuts apply only in the Waveform Editor.
Result Windows shortcut Mac OS shortcut
22
Repeat previous command (opening its
dialog box and clicking OK)
Repeat previous command (opening its
dialog box but not clicking OK)
Open Convert Sample Type dialog box Shift+T Shift+T
Capture a noise reduction profile for the Noise
Reduction effect
Activate left channel of a stereo file for editing Up arrow Up arrow
Activate right channel of a stereo file for
editing
Make spectral display more logarithmic or
linear
Make spectral display fully logarithmic or
linear
Increase or decrease spectral resolution Shift+Ctrl+up or down arrow Shift+Command-up or down arrow
Shift+R Shift+R
Ctrl+R Command+R
Shift+P Shift+P
Down arrow Down arrow
Ctrl+Alt+up or down arrow Option+Command+up or down arrow
Ctrl+Alt+Page Up or Down Option+Command+Page Up or Down
Keys for mixing multitrack sessions
The following keyboard shortcuts apply only in the Multitrack Editor.
Result Windows shortcut Mac OS shortcut
Select the same input or output for all audio
tracks
Ctrl+Shift-select Command+Shift-select
Activate or deactivate Mute, Solo, Arm For
Record, or Monitor Input in all tracks
Adjust knobs in large increments Shift-drag Shift-drag
Adjust knobs in small increments Ctrl-drag Command-drag
Nudge selected clip to the left Alt+comma Option+comma
Nudge selected clip to the right Alt+period Alt+period
Maintain keyframe time position or parameter
value
Reposition envelope segment without
creating keyframe
Ctrl+Shift-click Command+Shift-click
Shift-drag Shift-drag
Ctrl-drag Command-drag
Last updated 6/16/2016
Page 27

Workspace and setup
More Help topics
Customize shortcuts
Finding and customizing shortcuts
Adobe Audition provides a default set of keyboard shortcuts to help you speed up the editing process. In menus and
tool tips, available keyboard shortcuts appear to the right of command and button names. You can customize nearly all
default shortcuts and add shortcuts for other functions.
Find shortcuts
Do any of the following:
• For menu commands, look for shortcuts to the right of command names.
• For tools or buttons, look for shortcuts to the right of tool tips. (To display tool tips, hold the pointer over a tool
or button.)
• For a complete list of all shortcuts, choose Edit > Keyboard Shortcuts.
23
Customize shortcuts
You can customize nearly all default keyboard shortcuts and add shortcuts for other commands.
1 Choose Edit > Keyboard Shortcuts.
2 In the Command column, select the command you want to customize.
3 If you want to replace or remove an existing shortcut, choose it from the Shortcuts For Command menu.
4 Do any of the following:
• To create a shortcut, click inside the Press Shortcut box, and press the desired key combination. Then click
sign.
As
• To remove a shortcut, click Remove.
If you enter a key combination that’s already in use, Audition displays an alert. Click Yes to transfer the shortcut to
a d
ifferent command, or No to retain the existing assignment.
Assign shortcuts to the Workspace commands to quickly switch between custom panel layouts.
Save or delete custom sets of shortcuts
1 Choose Edit > Keyboard Shortcuts.
2 Do either of the following:
• To save a custom set, click Save As, enter a name, and click OK.
• To delete a custom set, choose it from the Set menu, and then click Delete.
Restore the default shortcuts
1 Choose Edit > Keyboard Shortcuts.
2 From the Set menu, choose Default Set.
Last updated 6/16/2016
Page 28

Chapter 4: Importing, recording, and playing
Create, open, or import files for Adobe Audition
Create a new, blank audio file
New, blank audio files are perfect for recording new audio or combining pasted audio.
1 Choose File > New > Audio File.
To quickly create a file from selected audio in an open file, choose Edit > Copy To New. (See Copy or cut audio data.)
24
2 Enter a filename, and set the following options:
Sample Rate Determines the frequency range of the file. To reproduce a given frequency, the sample rate must be
at least twice that frequency. (See
Channels Determines if the waveform is mono, stereo, 5.1 surround. Audition saves the last five custom audio
channel layouts that you had used for quick access.
Note: Certain custom channel layout settings are not supported by all file formats.
For voice-only recordings, the mono option is a good choice that results in quicker processing and smaller files.
Bit Depth Determines the amplitude range of the file. The 32-bit level provides maximum processing flexibility in
Adobe Audition. For compatibility with common applications, however, convert to a lower bit depth when editing
is complete. (See
Understanding bit depthand Change the bit depth of a file.)
Understanding sample rate.)
Create a new multitrack session
Session (*.sesx) files contain no audio data themselves. Instead, they are small XML-based files that point to other audio
and video files on the hard drive. A session file keeps track of which files are a part of the session, where they are
inserted, which envelopes and effects are applied, and so on.
To examine settings in detail, SESX files can be opened in text editors or stored in version control systems (such as
Perforce or Git, which are popular in the gaming industry).
1 Choose File > New > Multitrack Session.
2 Enter a filename and location, and set the following options:
Te mp l at e Specifies either a default template or one you've created. Session templates specify source files and settings
such as Sample Rate and Bit Depth.
Last updated 6/16/2016
Page 29

Importing, recording, and playing
Sample Rate Determines the frequency range of the session. To reproduce a given frequency, the sample rate must
be at least twice that frequency. (See
Note: All files added to a session must share the sample rate. If you attempt to import files with different sample rates,
Adobe Audition prompts you to resample them, which may lower audio quality. To change resampling quality, adjust
the Sample Rate Conversion settings in the Data preferences.
Bit Depth Determines the amplitude range of the session, including recordings and files created with the Multitrack
> Mixdown To New File command. (See
Note: Choose a bit depth carefully, because it cannot be changed after you create a session. Ideally, you should work at
the 32-bit level with fast systems. If your system performs slowly, try a lower bit depth.
Master Determines whether tracks are mixed down to a mono, stereo, or 5.1 Master track. (See Routing audio to
buses, sends, and the Master track.)
Understanding sample rate.)
Understanding bit depth.)
Open existing audio files and multitrack mixes
The following file types open in the Multitrack Editor: Audition Session, Audition 3.0 XML, Adobe Premiere Pro
Sequence XML, Final Cut Pro XML Interchange, and OMF.
All other supported file types open in the Waveform Editor, including the audio portion of video files.
25
Note: SES session files from Audition 3.0 and earlier are unsupported. If you have Audition 3.0, save sessions to XML
format to open them in later versions.
1 Choose File > Open.
2 Select an audio or video file. (See Supported import formats.)
If you don’t see the file you want, choose All Supported Media from the menu at the bottom of the dialog box.
Append audio files to another
Append files with CD Track markers to quickly assemble audio and apply consistent processing.
1 In the Waveform Editor, do either of the following:
• To add to the active file, choose File > Open Append > To Current.
• To add to a new file, choose File > Open Append > To New.
2
In the Open Append dialog box, select one or more files.
Note: If the selected files have a different sample rate, bit depth, or channel type than the open file, Audition converts
the selected files to match the open file. For the best results, append files with the same sample type as the original file.
Last updated 6/16/2016
Page 30

Importing, recording, and playing
3 Click Open.
Import a file as raw data
If you can’t open a particular file, it may lack necessary header information that describes the sample type. To manually
specify this information, import the file as raw data.
1 Choose File > Import > Raw Data.
2 Select the file, and click Open.
3 Set the following options:
Sample Rate Should match the known rate of the file, if possible. For examples of common settings, see
Understanding sample rate. Adobe Audition can import raw data with rates ranging from 1 to 10,000,000 Hz, but
playback and recording are supported only between 6000 Hz and 192,000 Hz.
Channels Enter a number from 1 to 32.
Encoding Specifies the data storage scheme for the file. If you are unsure what encoding the file uses, consult the
supplier of the file, or the documentation for the application that created it. In many cases, trial and error might be
necessary.
Byte Order Specifies the numerical sequence for bytes of data. The Little-Endian method is common to WAV files,
while the Big-Endian method is common to AIFF files. The Default Byte Order automatically applies the default for
your system processor and is typically the best option.
26
Start Byte Offset Specifies the data point in the file at which the import process should begin.
Insert an audio file into a multitrack session
When you insert an audio file in the Multitrack Editor, the file becomes an audio clip on the selected track. If you insert
several files at once, or a single file that’s longer than the space available on the selected track, Adobe Audition inserts
new clips on the nearest empty tracks.
1 In the Multitrack Editor, select a track, and then place the playhead at the desired time position.
2 Choose Multitrack > Insert Files.
3 Select an audio or video file. (See Supported import formats.)
Drag ranges from the Markers panel to the Multitrack Editor to automatically convert them to clips.
Spot-insert a Broadcast Wave file into a session
When you insert a Broadcast Wave (BWF) file into a multitrack session, Adobe Audition can use the embedded
timestamp to insert the file at a specific time. This is commonly called spot-inserting.
1 Choose Edit > Preferences > Multitrack (Windows) or Audition > Preferences > Multitrack (Mac OS).
2 Select Use Embedded Timecode When Inserting Clips Into Multitrack.
3 In the Multitrack Editor, select a track.
4 Choose Multitrack > Insert Files, and select one or more BWF files.
Adobe Audition inserts an audio clip at the designated start time.
To view or edit the timestamp for a BWF clip, open the clip in the Waveform Editor, and then choose Window >
Metadata. On the BWF tab, the timestamp value appears as the Time Reference.
Last updated 6/16/2016
Page 31

Importing, recording, and playing
More Help topics
About multitrack sessions
Insert a video file into a multitrack session
Importing with the Files panel
Arranging and editing clips
Viewing and editing XMP metadata
Importing with the Files panel
The Files panel displays a list of open audio and video files for easy access.
27
Double-click an empty area of the file list to quickly access the Open File dialog box.
Import files into the Files panel
Import files into the Files panel if you want to retain the currently open file in the Editor panel. This technique is
particularly helpful when assembling files for a multitrack session.
1 Do either of the following:
• In the Files panel, click the Import File button .
• Choose File > Import > File.
2 Select an audio or video file. (See Supported import formats.)
Insert from the Files panel into a multitrack session
1 In the Files panel, select the files you want to insert.
To select multiple adjacent files, click the first file in the desired range, and then Shift-click the last. To select
nonadjacent files, Ctrl-click (Windows) or Command-click (Mac OS).
2 At the top of the Files panel, click the Insert Into Multitrack button . Then choose either New Multitrack
Session (see Create a new multitrack session) or an open session.
The files are inserted on separate tracks at the current time position.
Change displayed metadata in the Files panel
1 In the upper right of the Files panel, click the menu icon , and choose Metadata Display.
2 Select the metadata you want to display, and click OK
3 To move metadata columns left or right, drag column headers such as Name or Duration.
To change the sort order of files, click column headers.
More Help topics
Viewing and editing XMP metadata
Last updated 6/16/2016
Page 32

Importing, recording, and playing
Supported import formats
Audio import formats
Adobe Audition can open audio files in the following formats:
• AAC (including HE-AAC)
• AIF, AIFF, AIFC (including files with up to 32 channels)
There are many different variations of AIFF format. Audition can open all uncompressed AIFF files and most common
compressed versions.
Note: To see Author metadata in AIFF files, view the Dublin Core: Creator field on the XMP tab of the Metadata panel.
Viewing and editing XMP metadata .)
(See
• AC-3
• APE
• AU
• AV R
• BWF
28
• CAF (all uncompressed and most compressed versions)
• EC-3
• FLAC
• HTK
• IFF
• M4A
• MAT
• MPC
• MP2
• MP3 (including MP3-surround files)
• OGA, OGG
• PAF
• PCM
• PVF
• RAW
• RF64
• SD2
• SDS
• SF
• SND
Last updated 6/16/2016
Page 33

Importing, recording, and playing
• VOC
• VOX
• W64
• WAV (including files with up to 32 channels)
There are many different variations of WAV format. Adobe Audiition can open all uncompressed WAV files and most
common compressed versions.
• WMA (Windows only, and enabled with DLMS Format Support in Media & Disk Cache preferences)
• WVE
• XI
Video import formats
The Waveform Editor lets you open the audio portion of video files in the formats below. The Multitrack Editor lets
you insert the same file types and provides a preview in the Video panel.
To access these video formats, install QuickTime. To import additional formats, extend QuickTime support. For more
information, see this article on the Apple website.
29
• AV I
• DV
• MOV
• MPEG-1
• MPEG-4
• 3GPP and 3GPP2
Note: The following formats are enabled with DLMS Format Support in Media & Disk Cache preferences. This preference
is turned on by default.
• AVI (Windows only)
• FLV
• R3D
• SWF
• WMV
More Help topics
Saving and exporting files
Insert a video file into a multitrack session
Export sessions to OMF or Final Cut Pro Interchange format
Extracting audio from CDs
Last updated 6/16/2016
Page 34

Importing, recording, and playing
Extract CD tracks with the Extract Audio From CD command
The Extract Audio From CD command is faster and provides more control, including the ability to optimize drive
speed and rename tracks.
1 Place an audio CD in the computer’s CD-ROM drive.
2 Choose File > Extract Audio From CD.
3 For Drive, choose the drive that contains the audio CD.
4 For Speed, choose from all the extraction speeds that the selected drive supports. The Maximum Speed option
usually produces satisfactory results, but if it produces errors, specify a slower speed.
5 Do any of the following:
• To preview a track, click its Play button.
• To include or exclude tracks, click the checkboxes to the left of track numbers, or click Toggle All.
• To rename a track, double-click it.
6 Audition CC only: Enable Extract to Single File to create a single file that contains all selected tracks.
Configure track information and CD databases
In the center of the Extract Audio From CD dialog box, Artist, Album, Genre, and Year information is drawn from the
specified CD database by default. To adjust these entries, do any of the following:
30
• To customize information, overwrite current entries.
• To insert original information from the database, click the Retrieve Titles icon .
• If a message indicates multiple matching records, click the arrows to insert different database records.
• To specify a different database and file naming convention, click the Title Settings icon . For details about each Title
Settings option, position the mouse over it until a tool tip appears.
Note: If multiple Artist entries are detected, Audition automatically selects the Compilation option. In the Title Settings
dialog box, enter a Separator For Compilations character to separate Artist and Track Title for each track.
Extract CD tracks with the Open command (Mac OS)
Note: This extraction method can greatly degrade Audition performance. The Extract Audio From CD command is usually
a better choice.
The Open command lets you extract tracks in AIFF format but requires Audition to continue reading audio data from
CD, slowing importing and editing.
1 Place an audio CD in the computer’s CD-ROM drive.
2 Choose File > Open.
3 Choose QuickTime as the file type, and navigate to the CD-ROM drive.
4 Select the tracks you want to extract, and click Open.
Navigate time and playing audio in Adobe Audition
Last updated 6/16/2016
Page 35

Importing, recording, and pla
ying
Monitoring time
In the Editor panel, the following features help you monitor time:
In the timeline near the top of the panel, the current-time indicator lets you start playback or recording at a
specific point.
In the lower left of the panel, the time display shows the current time in numerical format. The default time format
is Decimal, but you can easily change it. (See
timeline.
To show the time display in separate panel, choose Window > Time.
Change the time display format.) The same format is used by the
31
A Current-time indicator B Tim elin e C Time displ ay
Position the current-time indicator
In the Editor panel, do any of the following:
a In the timeline, drag the indicator or click a specific time point.
b In the time display at lower left, drag across the numbers, or click to enter a specific time.
c At the bottom of the panel, click one of the following buttons:
To display these buttons in a separate panel, choose Window > Transport.
Pause Temporarily stops the current-time indicator. Click the Pause button again to resume playback or
recording.
Move CTI to Previous Places the current-time indicator at the beginning of the next marker. If there are no
markers, the current-time indicator moves to the beginning of the waveform or session.
Rewind Shuttles the current-time indicator backward in time.
Right-click the Rewind button to set the rate at which the cursor moves.
Fast Forward Shuttles the current-time indicator forward in time.
Right-click the Fast Forward button to set the rate at which the cursor moves.
Move CTI to Next Moves the current-time indicator to the next marker. If there are no markers, the
current-time indicator moves to the end of the waveform or session.
Last updated 6/16/2016
Page 36

Importing, recording, and playing
Preview audio by scrubbing
To scrub audio (producing an audible preview as you shuttle across a file), do any of the following:
Drag the current-time indicator .
32
Press the Rewind
Press the J, K, and L keys to shuttle backward, stop, or shuttle forward. Repeatedly pressing the J or L key gradually
or Fast Forward buttons.
increases shuttle speed. (To change the default, set JKL Shuttle Speed in the Playback preferences.)
Play audio linearly or in a loop
To quickly start and stop playback, press the spacebar.
1 In the Editor panel, position the current-time indicator, or select a range.
2 (Optional) At the bottom of the panel, right-click the Play button , and select one of the following:
Return CTI to Start Position on Stop Reflects the behavior of Audition 3.0 and earlier. (Press Shift+X to toggle this
option on and off.)
Play Spectral Selection Only Plays only frequencies you’ve selected with the Marquee , Lasso , or
Paintbrush Selection tool.
3 (Optional) Click the Loop Playback button if you want to fine-tune a selected range or experiment with
different effects processing.
4 To start playback, click the Play button.
Note: B
y default, the Editor panel scrolls when playback extends beyond the visible section of a waveform. In the Playback
area of the Preferences dialog box, you can disable auto-scrolling.
Synchronize the current-time indicator across files or views
In the Waveform Editor, you can maintain the position of the current-time indicator when you switch between files—
a useful technique when editing different versions of the same waveform. In the Multitrack Editor, you can maintain
the position of the current-time indicator when you switch to the Waveform Editor—a useful technique when applying
edits and effects in both views.
Synchronize the current-time indicator between files in the Waveform Editor
1 Choose Edit > Preferences > General (Windows) or Adobe Audition Preferences > General (Mac OS).
2 Select Synchronize Selection, Zoom Level, and CTI Across Files In The Waveform Editor.
Synchronize the current-time indicator between the Multitrack and Waveform Editors
1 Choose Edit > Preferences > Multitrack (Windows) or Adobe Audition Preferences > Multitrack (Mac OS).
2 Select Synchronize Clips With Waveform Editor.
Last updated 6/16/2016
Page 37

Importing, recording, and playing
Change the time display format
By default, all audio files and multitrack sessions use the same time display format. To customize the format for an open
file or session, choose Window > Properties, expand the Advanced settings, and deselect Synchronize With Time Display
Preferences.
Choose View > Display Time Format, and choose the desired option:
Decimal (mm:ss.ddd) Displays time in minutes, seconds, and thousandths of a second.
Compact Disc 75 fps Displays time in the same format used by audio compact discs, where each second equals 75
frames.
SMPTE 30 fps Displays time in the SMPTE format, where each second equals 30 frames.
SMPTE Drop (29.97 fps) Displays time in the SMPTE drop-frame format, where each second equals 29.97 frames.
SMPTE 29.97 fps Displays time in the SMPTE non-drop-frame format, where each second equals 29.97 frames.
SMPTE 25 fps (EBU) Displays time using the European PAL television frame rate, where each second equals 25
frames.
SMPTE 24 fps (Film) Displays time in a format where each second equals 24 frames, suitable for film.
Samples Displays time numerically, using as a reference the actual number of samples that have passed since the
beginning of the edited file.
33
Bars and Beats Displays time in a musical measures format of bars:beats:subdivisions. To customize settings,
choose Edit Tempo, and set the following options in the Properties panel:
Te m p o S
Time Si gn atu re S
a signature of 3/8, there are three notes per measure, and eighth-notes represent full beats.
SubdivisionsS
example, if you enter 32 subdivisions per beat, a time setting of 4:2:16 represents an eighth note halfway between
beats 2 and 3 in 4/4 time.
Custom (X frames per second) Displays time in a custom format. To modify a custom format, choose Edit Custom
Frame Rate, and enter a number of frames per second. Valid values are whole numbers from 2 to 1000.
pecifies beats per minute.
pecifies the number of beats per measure, and the note that represents full beats. For example, with
pecifies the number of sections each beat is divided into, or the value after the decimal point. For
More Help topics
Customize start offset and time display for multitracksessions
Recording audio
Record audio in the Waveform Editor
You can record audio from a microphone or any device you can plug into the Line In port of a sound card. Before
recording, you may need to adjust the input signal to optimize signal-to-noise levels. (See either Adjust recording levels
for standard sound cardsor the documentation for a professional card.)
1 Set audio inputs. (See Configure audio inputs and outputs.)
Last updated 6/16/2016
Page 38

Importing, recording, and playing
2 Do one of the following:
• Create a new file.
• Open an existing file to overwrite or add new audio, and place the current-time indicator where you want to
start recording.
3 At the bottom of the Editor panel, click the Record button to start and stop recording.
Correct DC offset
Some sound cards record with a slight DC offset, in which direct current is introduced into the signal, causing the center
of the waveform to be offset from the zero point (the center line in the waveform display). DC offset can cause a click
or pop at the beginning and end of a file.
In the Waveform Editor, choose Favorites > Repair DC Offset.
34
To measure DC offset, see Analyze amplitude.
Direct-to-file recording in the Multitrack Editor
In the Multitrack Editor, Adobe Audition automatically saves each recorded clip directly to a WAV file. Direct-to-file
recording lets you quickly record and save multiple clips, providing tremendous flexibility.
Inside the session folder, you’ll find each recorded clip in the [se
with the track name, followed by the take number (for example, Track 1_003.wav).
After recording, you can edit takes to produce a polished final mix. For example, if you create multiple takes of a guitar
so
lo, you can combine the best sections of each solo. (See Trimming and extending clips.) Or, you can use one version
of the solo for a video soundtrack, and another version for an audio CD.
ssion name]_Recorded folder. Clip file names begin
Record audio clips in the Multitrack Editor
In the Multitrack Editor, you can record audio on multiple tracks by overdubbing. When you overdub tracks, you listen
to previously recorded tracks and play along with them to create sophisticated, layered compositions. Each recording
becomes a new audio clip on a track.
1 In the Inputs/Outputs area of the Editor panel, choose a source from a track’s Input menu.
Note: T
o change the available inputs, choose Audio Hardware, and then click Settings.
2 Click the Arm For Record button for the track.
The track meters display the input, helping you optimize levels. (To disable this default and display levels only while
r
ecording, deselect Enable Input Metering When Arming Tracks in the Multitrack preferences.)
3 To hear hardware inputs routed through any track effects and sends, click the Monitor Input button .
Note: R
outing inputs through effects and sends requires significant processing. To reduce latency (an audible delay) that
disrupts timing for performers, see Configure audio inputs and outputs.
4 To simultaneously record on multiple tracks, repeat steps 1-3.
5 In the Editor panel, position the current-time indicator at the desired starting point, or select a range for the new
clip.
6 At the bottom of the panel, click the Record button to start and stop recording.
Last updated 6/16/2016
Page 39

Importing, recording, and playing
Punch into a selected range in the Multitrack Editor
If you’re dissatisfied with a time range of a recorded clip, you can select that range and punch in a new recording, leaving
the original clip intact. Though you can record into a specific range without punching in, punching in lets you hear
audio immediately before and after a range; that audio provides vital context that helps you create natural transitions.
For particularly important or difficult sections, you can punch in multiple takes, and then select or edit takes to create
the best performance.
35
1 In the Editor panel, drag the Time Selection tool in the appropriate track to select a time range for the clip.
2 Select the correct track input. (See Assign audio inputs and outputs to tracks.)
3 Click the Arm For Record button for the track.
4 Position the current-time indicator a few seconds before the selected range.
5 At the bottom of the Editor panel, click the Record button .
Audition plays the audio preceding the selection, records for the duration of the selected range, and then resumes
playback.
Punch in during playback in the Multitrack Editor
If you don’t need to punch into a specific range, you can quickly punch into a general area during playback.
1 Enable one or more tracks for recording. (See Record audio clips in the Multitrack Editor.)
2 At the bottom of the Editor panel, click the Play button .
3 When you reach an area where you want to begin recording, click the Record button . When you finish
recording, click the button again.
Choose punch-in takes
If you punch in multiple takes, Audition layers the takes over each other in the Editor panel. To choose between takes,
do the following:
1 With the Time Selection to ol , select a range that snaps to the start and end of the punch-in takes. (See Snap to
clip endpoints.)
2 In the track, position the mouse over the clip header. (The header displays the track name, followed by take number.)
3 Drag the topmost take to a different location (typically the end of the session to avoid unwanted playback).
4 Play the session. If you prefer a take you previously moved, drag it back to the selected range.
Last updated 6/16/2016
Page 40

Importing, recording, and playing
To mute the original clip for the duration of the punch-in range, adjust the volume envelope. (See Automating clip
settings.)
More Help topics
Create a new, blank audio file
Position the current-time indicator
Monitoring recording and playback levels
Monitoring recording and playback levels
Monitoring recording and playback levels
Level meters overview
To monitor the amplitude of incoming and outgoing signals during recording and playback, you use level meters. The
Waveform Editor provides these meters only in the Levels panel. The Multitrack Editor provides them in both the
Levels panel, which shows the amplitude of the Master output, and track meters, which show the amplitude of
individual tracks.
36
You can dock the Levels panel horizontally or vertically. When the panel is docked horizontally, the upper meter
represents the left channel, and the lower meter represents the right channel.
To show or hide the panel, choose Window > Level Meters.
A Left channel B Right channel C Peak indicators D Clip indicators
The meters show signal levels in dBFS (decibels below full scale), where a level of 0 dB is the maximum amplitude
possible before clipping occurs. Yellow peak indicators remain for 1.5 seconds so you can easily determine peak
amplitude.
If amplitude is too low, sound quality is reduced; if amplitude is too high, clipping occurs and produces distortion. The
red clip-indicator to the right of the meters lights up when levels exceed the maximum of 0 dB.
To clear clip indicators, either click them individually, or right-click the meters and choose Reset Indicators.
Customize level meters
Right-click the meters and select any of the following options:
Meter Input Signal In the Waveform Editor, displays the level of the default hardware input. (See Configure audio
inputs and outputs.) To quickly enable or disable this option, double-click the meters.
Range options Change the displayed decibel range.
Show Valleys Shows valley indicators at low-amplitude points.
Last updated 6/16/2016
Page 41

Importing, recording, and playing
Ti p: If valley indicators are close to peak indicators, dynamic range (the difference between the quietest and loudest
sounds) is low. If the indicators are spread far apart, dynamic range is high.
Show Color Gradient Gradually transitions the meters from green, to yellow, to red. Deselect this option to display
abrupt color shifts to yellow at -18 dBFS, and red at -6.
Show LED Meters Displays a separate bar for each whole decibel level.
Dynamic or Static Peaks Change the mode of peak indicators. Dynamic Peaks resets the yellow peak level indicators to
a new peak level after 1.5 seconds, letting you easily see recent peak amplitude. As the audio gets quieter, the peak
indicators recede. Static Peaks retains peak indicators, letting you determine the maximum amplitude of the signal
since monitoring, playback, or recording began. However, you can manually reset peak indicators by clicking clip
indicators.
Ti p: To find out how loud audio will get before you record it, choose Static Peaks. Then monitor input levels; the peak
indicators show the level of the loudest part.
Adjust recording levels for standard sound cards
Adjust levels if recordings are too quiet (causing unwanted noise) or too loud (causing distortion). To get the best
sounding results, record audio as loud as possible without clipping. When setting recording levels, watch the meters,
and try to keep the loudest peaks in the yellow range below -3 dB
37
Adobe Audition doesn’t directly control a sound card’s recording levels. For a professional sound card, you adjust these
levels with the mixer application provided with the card (see the card’s documentation for instructions). For a standard
sound card, you use the mixer provided by Windows or Mac OS.
Adjust sound card levels in Windows 7 and Vista
1 Right-click the speaker icon in the taskbar, and choose Recording Devices.
2 Double-click the input source you want to use.
3 Click the Levels tab, and adjust the slider as needed.
Adjust sound card levels in Windows XP
1 Double-click the speaker icon in the taskbar.
2 Choose Options > Properties.
3 Select Recording, and then click OK.
4 Select the input source you want to use, and adjust the Volume slider as needed.
Adjust sound card levels in Mac OS
1 Choose System Preferences from the Apple menu.
2 Click Sound, and then click the Input tab.
3 Select the device you want to use, and adjust the Input Volume slider as needed.
Last updated 6/16/2016
Page 42

Chapter 5: Editing audio files
Editing, repairing, and improving audio using Essential Sound panel
Overview
Essential Sound is an all-in-one panel that gives you an extensive toolset of mixing techniques and repair options that
are useful for your common audio mixing tasks. The panel provides simple controls to unify volume levels, repair
sound, improve clarity, and add special effects that help your video projects sound like a professional audio engineer
has mixed them. You can save the applied adjustments as presets for reuse and they reflect in the full Audition toolset,
making them handy for more audio refinements.
38
Audition allows you to classify your audio clips as Dialogue, Music, SFX, or Ambience and configure and apply presets
to set of clips that belong to the same type or to multiple clips that you add as a sequence.
Once you assign a mix type, for example Dialogue for a voiceover clip, the Dialogue tab of the Essential Sound panel
presents you several parameter groups that allow you to carry out the common tasks that are associated with dialogue,
such as unifying the different recordings to common loudness, reducing background noise, and adding compression
and EQ. Note that the mix types in the Essential Sound panel are mutually exclusive, that is, selecting one mix type for
a track will revert the previous changes done on that track using another mix type.
All the changes that you do using the Essential Sound panel controls are reflected in the more advanced clip settings.
For an effect like restoration or clarity, audio effects are inserted into the clip rack. If you are an advanced user, you can
start with your primary edits in the Essential Sound panel and then go on with your sophisticated internal effect settings
and apply finishing touches.
To launch the Essential Sound panel, select a track from a multitrack sequence and choose Window > Essential Sound.
Unify loudness in your audio
1 In the Essential Sound panel, select the clip type as Dialogue, Music, SFX, or Ambience.
2 To make the loudness level uniform throughout the clip, expand Unify Loudness and click Auto Match. The
loudness level (in LUFS) to which Audition auto-matched your clip appears below the Auto Match button.
Last updated 6/16/2016
Page 43

Editing audio files
Repair a dialogue track
If your clip contains dialogue audio data, you can use the options under the Dialogue tab in the Essential Sound panel
to repair the sound by reducing noise, rumble, hum, and ‘ess’ sounds.
1 Add the audio clip to an empty track in a multitrack session.
2 Select the audio clip and in the Essential Sound panel, select the clip type as Dialogue.
3 Select the Repair Sound checkbox and expand the section.
39
4 Select the checkbox for the property that you want to change, and use the slider to adjust the level of the following
properties between 0 and 10:
• Reduce Noise: Re duce the level of unwanted nois es in t he backg roun d, such as studi o fl oor sounds and microphone
background noise, and clicks. The proper amount of noise reduction depends upon the type of background noise
and the acceptable loss in quality for the remaining signal.
• Reduce Rumble: Reduce the rumble noise--very low-frequency noise that ranges below the 80 Hz range, for
example, noise produced by a turntable motor or an action camera.
• DeHum: Reduce or eliminate Hum—noise consists of a single frequency, in 50 Hz range (common in Europe, Asia,
and Africa) or 60 Hz range (common in North and South America). For example, electrical interference due to
power cables laid too close to the audio cables can use such noise. You can select the hum level depending on the clip.
• DeEss: Reduce harsh, high-frequency ess-like sounds. For example, sibilance in vocal recordings that cause s-
sounds created by breathing or air movement between the microphone and the singer’s mouth.
Last updated 6/16/2016
Page 44

Editing audio files
40
Improve the clarity of your dialogue track
Improving the clarity of the dialogue track in your sequence has dependency on a variety of factors because of the
variations in volume and frequency of the human voice that range between 50Hz and 2kH and the contents of the other
tracks that go with it. Some of the common methods used for improving dialogue audio clarity are compressing or
expanding the dynamic range of the recording, adjusting the frequency response of the recording, and processing the
enhancing male and female voices.
1 Add the audio clip to an empty track in a multitrack session.
2 Select the clip and in the Essential Sound panel, select the clip type as Dialogue.
3 Select the Improve Clarity checkbox and expand the section.
4 Select the checkbox for the property that you want to change, and use the slider to adjust the level of the following
properties between 0 and 10:
1 Dynamics: Change the impact of the recording by compressing or expanding the dynamic range of your
recording. You can change the level from natural to focused.
2 EQ: Reduce or boost selected frequencies in your recording. You can choose from a list of EQ presets that you
can readily test on your audio and use and adjust the amount using the slider.
Note: To edit an EQ preset, select a preset, click the Edit icon. The Effect-Graphic Equalizer dialog box displays
the graphic equalizer that you can adjust during playback, and save the changes.
3 Enhance speech: Select the dialogue as Male or Female to process and enhance it at the appropriate frequency.
Last updated 6/16/2016
Page 45

Editing audio files
41
Remix or stretch background music to fit a duration
Often, editors and remix engineers use abrupt fading, looping, or remixing the music to fit in to a set duration. The
remix and stretch features help you edit your music to fit to any duration real quick.
Audition Remix analyzes your song files, identifying hundreds of loops, transitions, and important segments, and then
allows you to remix to any duration.
The stretch option allows you to stretch a short clip to fit a longer duration without applying the remix features.
To remix a clip in your project
1 Add the audio clip to an empty track in a multitrack session.
2 Select the audio clip and choose Window > Essential Sound > Music.
3 Under Duration, select Remix. Audition analyzes and prepares the clip for remix.
4 In the Target box, type the desired length of the remixed audio clip.
5 Select Favor shorter segments checkbox to make audition favor shorter segments with more transitions to make the
remix flow more naturally.
6 Optional: After playback, if you want to improve the remix, try the following controls in the Remix tab of the
Properties panel:
• Edit length: Use this to favor shorter segments with more transitions, or longer segments with fewer transitions. If
your original song changes fairly dramatically from start to finish, shorter segments and more transitions allow your
remix to flow more naturally. Songs with a consistent structure and style may benefit from fewer transitions, keeping
any changes to a minimum.
Last updated 6/16/2016
Page 46

Editing audio files
• Features: Select this to favor Timbre (rhythmic elements) or Harmonic structure when making transitions and
crossfades. For electronic or pop music, Timbre makes sure that the beat stays locked in place. For choral or softer
tracks, Harmonic emphasis helps create smooth blends.
• Minimum loop: Select this to define the shortest segment that you can have, in number of beats. Setting this value
helps if the algorithm makes short transitions, which might be mathematically ideal, but might sound unnatural to
our subjective ears.
• Maximum slack: Use this to constrain the remix duration to as close to your target duration as possible. If an exact
duration is not necessary, adjusting this parameter can make for better-sounding remixes.
42
To stretch a music clip to fit a duration
1 Add the audio clip to an empty track in a multitrack session.
2 Select the audio clip and choose Window > Essential Sound > Music.
3 Under Duration, select Stretch.
4 In the Target box, type the desired length of the stretched audio clip.
Working with Sound effects clips
Audition allows you to create artificial sound effects for your audio. SFX helps you create illusions such as the music
originating from a particular position in the stereo field or an ambience of a room or field with appropriate reflections
and reverberation.
To add SFX and ambience to your audio
1 Add the audio clip to an empty track in a multitrack session.
2 Select the audio clip and choose Window > Essential Sound > SFX.
Last updated 6/16/2016
Page 47

Editing audio files
3 To set reverb effect, switch on the Reverb knob under Creative.
4 In the Preset box, select a Reverb preset that suits your needs.
5 To manually adjust the SFX elements during playback:
1 To add the desired level of reflection and reverberation, adjust the Amount slider.
2 To set the origin of the sound at a particular position in the stereo field, adjust the Position slider under Pan.
3 To set stereo width at an ideal position depending on your composition, switch on the Width knob under Stereo
Width and adjust the slider.
43
Last updated 6/16/2016
Page 48

Editing audio files
44
Creating presets
Professional Audition users can create presets for the benefit of the users and projects that work on a similar set of audio
assets to ensure consistency and to save time. You can create audio presets for particular type of sound, such as dialogue,
music, SFX, or Ambience, or create effects presets for EQ, Reverb for SFX, and Reverb for Ambience.
To create a preset
1 In the Essential Sound panel, click the panel menu and choose Master Template View.
2 Click the + icon next to the preset dropdown, for example, Dialogue, EQ, or Reverb.
3 Change the desired settings and click Save settings as a preset button next to the Presets dropdown.
4 Type a name for the new preset and click OK. The new preset is listed under the audio or effect type it was created
for.
Last updated 6/16/2016
Page 49

Editing audio files
45
Note: Presets are coupled to their selected master templates. Selecting a new master template for a preset or creating a new
master template give you another preset selection and different sound settings.
Select all the clips of the same mix type
Audition allows you to select all the clips of a specific mix type, such as dialogue, music, SFX, or ambience, and
uniformly apply your audio edits to all of them.
To select all the clips of a mix type, for example dialogue, choose Edit > Select > Clips of Mix Type > Dialogue.
Customize and share master settings for consistency
If you are a professional audio engineer working on a large project or in a multi-editor, multi-session environment that
requires a uniform set of standards or signature sound settings, you can create a master template with custom ranges.
Using the Master Template View, you can customize and share the ranges and default settings for the effects that you
use with your project team for uniformly applying them across sessions and projects. The Master Template is
particularly useful when you want to share common min/max ranges or EQ/reverb settings within your team.
1 In the Essential Sound panel, click the panel menu and choose Master Template View.
2 Select the mix type for which you want to change the settings.
3 Expand the effect for which you want to change the minimum and maximum limits, for example Reduce Noise.
4 Under the effect, click Set Minimum or Set Maximum.
5 In the Effect dialog box, set your values and use the Play button or the Toggle Loop button to preview your changes
before saving.
Last updated 6/16/2016
Page 50

Editing audio files
Note: Presets are coupled to a master template. As presets in the user mode refer to settings configured in the master
template mode, changing a template or creating a new template might alter the sound of existing presets. When you delete
an EQ preset in the master template, all ESP presets that refer to that EQ preset stop working.
46
Last updated 6/16/2016
Page 51

Editing audio files
47
Generating text-to-speech
Overview
The Generate Speech tool enables you to paste or type text, and generate a realistic voice-over or narration track. The
tool uses the libraries available in your Operating System. Use this tool to create synthesized voices for videos, games,
and audio productions.
Last updated 6/16/2016
Page 52

Editing audio files
Speech Generation on Mac uses a different underlying speech synthesis engine than Windows. Both engines are
provided by the respective operating system and are not cross-platform compatible. As such, the XML tags that
Windows supports in its engine are not compatible on Mac, and vice versa for the tag format that Mac supports.
Note: Voices have license restrictions for commercial or public usage. Check if you have rights to distribute any work
containing voices.
Generate speech
1 Generate speech in either Waveform view or Multitrack view:
a Waveform v i ew :
b Choose File > New > Audio File and create a mono audio file.
c Choose Effects > Generate > Speech.
d Multitrack view:
e Position the playhead and select the track to insert the speech.
f Choose Effects > Generate > Speech.
48
2 In the Generate Speech dialog box, you can select the language, gender, and voice of the speech to synthesize. In
Mac OS and Windows, you can find additional voices in the following ways:
• Mac OS: In the dialog box. click Settings. Choose System Voice > Customize. You can install voices and
languages, directly from Apple.
You can also use embedded speech commands to create speech. See the Apple developer documentation on using
embedded speech commands.
You can control pronunciation and other parameters by using the tags. For example, type [[emph +]] to speak a
word or phrase with emphasis.
Last updated 6/16/2016
Page 53

Editing audio files
49
Last updated 6/16/2016
Page 54

Editing audio files
50
• Wi nd o w s: You can download new voices and languages from Cepstral or NeoSpeech.
3 Enter the text in the text entry field. Click Preview to hear the speech in the current voice.
4 Click OK.
Matching loudness across multiple audio files
Overview
In Audition CC, you can measure loudness in audio clips and apply correction to support various loudness standards
and true peak limiting.
Match loudness across multiple audio files
1 Choose Window > Match L o u d n e ss to open the Match Loudness panel.
Last updated 6/16/2016
Page 55

Editing audio files
2 Drag one or more audio files and drop them in the panel.
51
3 Click Scan to analyze the current loudness values for each clip.
4 Click Match Loudness Settings to expand the loudness parameter group.
5 From the Match To drop-down list, select a loudness standard for your region.
6 Adjust the Maximum True Peak Level, loudness and tolerance levels and click Run.
Note: Max imu m Tru e Pe ak Limiti ng p rev ents a sig nal from cro ssi ng a pre -def ined lim it, whi ch ot her wi se ca n po tentia lly
damage speakers and other output devices. True Peak Limiting ensures that the signal never exceeds the limit.
Last updated 6/16/2016
Page 56

Editing audio files
List of loudness standards in Audition CC
• ITU BS1770
• ITU BS1770-2
• ITU BS1770-3 only differs from ITU BS1770-2 by removing filters from the true peak level measurement that
have been optional beforehand.
• EBU R128 (Target Loudness: -23 LUFS +/-0.5 LUFS (+/-1 LUFS for live content), True Peak: -1dB). EBU also
provides corresponding test signals.
• EBU TECH3341 defines how to measure momentary, short-term and integrated loudness based on ITU BS1770-
2
• EBU TECH3342 defines how to measure loudness range (LRA) based on short-term loudness (using a relative
gate of -20LU instead of -10LU) and taking the 10th and 95th percentile
• EBU TECH3343 describes the correction part of the loudness workflow (see chapter 4.4 and 6)
• EBU TECH3344 describes loudness metering usage in distribution systems
• EBU R128 s1 defines loudness measurement for short form content such as commercials
• ATSC A/85 (Target Loudness: -24 LUFS +/-2 LUFS, True Peak: -2dB)
• FreeTV OP59
• ARIB TR-B32
52
• PRSS (National Public Radio)
• Podcasting
Displaying audio in the Waveform Editor
View audio waveforms and spectrums
In the Waveform Editor, the Editor panel provides a visual representation of sound waves. Below the panel’s default
waveform display, which is ideal for evaluating audio amplitude, you can view audio in the spectral display, which
reveals audio frequency (low bass to high treble).
To view the spectral display, do either of the following:.
• In the toolbar, click the Spectral Display button.
• In the Editor panel, drag the divider between the waveform and spectral displays to change the proportion of
each. To instantly show or hide the spectral display, double-click the handle or click the triangle to its right.
Last updated 6/16/2016
Page 57

Editing audio files
A Drag the divider to change the proportion of each. B Click the triangle to show or hide the spectral display.
53
To identify specific channels in stereo and 5.1 surround files, note the indicators in the vertical ruler.
About the waveform display
The waveform display shows a waveform as a series of positive and negative peaks. The x-axis (horizontal ruler)
measures time, and the y-axis (vertical ruler) measures amplitude—the loudness of the audio signal. Quiet audio has
both lower peaks and lower valleys (near the center line) than loud audio. You can customize the waveform display by
changing the vertical scale and colors.
With its clear indication of amplitude changes, the waveform display is perfect for identifying percussive changes in
vocals, drums, and more. To find a particular spoken word, for example, simply look for the peak at the first syllable
and the valley after the last.
About the spectral display
The spectral display shows a waveform by its frequency components, where the x-axis (horizontal ruler) measures time
and the y-axis (vertical ruler) measures frequency. This view lets you analyze audio data to see which frequencies are
most prevalent. Brighter colors represent greater amplitude components. Colors range from dark blue (low-amplitude
frequencies) to bright yellow (high-amplitude frequencies).
Last updated 6/16/2016
Page 58

Editing audio files
The spectral display is perfect for removing unwanted sounds, such as coughs and other artifacts.
54
View layered or uniquely colored waveform channels
For stereo and 5.1 surround files, you can view layered or uniquely colored channels. Layered channels better reveal
overall volume changes. Uniquely colored channels help you visually distinguish them.
Choose View > Waveform Channels, and then select Layered or Uniquely Colored.
A Uniquely Colored B Layered (with Uniquely Colored still selected)
Customize the spectral display
The Spectral Display preferences help you enhance different details and better isolate artifacts.
1 Choose Edit > Preferences > Spectral Display (Windows) or Audition > Preferences > Spectral Display (Mac OS).
2 Set the following options
Windowing Function Determines the Fast Fourier transform shape. These functions are listed in order from
narrowest to widest. Narrower functions include fewer surrounding frequencies but less precisely reflect center
frequencies. Wider functions include more surrounding frequencies but more precisely reflect center frequencies.
The Hamming and Blackman options provide excellent overall results.
Spectral Resolution Specifies the number of vertical bands used to draw frequencies. As you increase resolution,
frequency accuracy increases, but time accuracy decreases. Experiment to find the right balance for your audio
content. Highly percussive audio, for example, may be better reflected by low resolution.
Last updated 6/16/2016
Page 59

Editing audio files
To adjust resolution directly in the Editor panel, right-click the vertical ruler next to the spectral display, and choose
Increase or Decrease Spectral Resolution.
Decibel Range Changes the amplitude range over which frequencies are displayed. Increasing the range intensifies
co lors, helpi ng you see more d etail i n qu iet er aud io. Th is v alue simply adjus ts t he s pec tral dis play; it d oes not chang e
audio amplitude.
Play Only Selected Frequencies When A Spectral Selection Exists Deselect this option to hear all frequencies in the
same time range as a selection.
Change the vertical scale
the Waveform Editor, you can change the amplitude or frequency scale of the vertical ruler.
In
Change the amplitude scale of the waveform display
In the waveform display, right-click the vertical ruler and select one of the following:
Decibels Indicates amplitude on a decibel scale that ranges from –Infinity to zero dBFS.
Percentage Indicates amplitude on a percentage scale that ranges from –100% to 100%.
Sample Values Indicates amplitude on a scale that shows the range of data values supported by the current bit depth.
(See Understanding bit depth.) 32-bit float values reflect the normalized scale below.
55
Normalized Values Indicates amplitude on a normalized scale that ranges from –1 to 1.
Change the frequency scale of the spectral display
In the spectral display, right-click the vertical ruler and select one of the following:
More Logarithmic or Linear Gradually displays frequencies in a more logarithmic scale (reflecting human hearing)
or a more linear scale (making high frequencies more visually distinct).
Hold down Shift and roll the mouse wheel over the spectral display to show frequencies more logarithmically (up)
or linearly (down).
Full Logarithmic or Linear Displays frequencies completely logarithmically or linearly.
More Help topics
Sound waves
Comparing the Waveform and Multitrack editors
Change interface colors, brightness, and performance
Select spectral ranges
Techniques for restoring audio
Selecting audio
Select time ranges
1 In the toolbar, select the Time Selection tool .
Last updated 6/16/2016
Page 60

Editing audio files
2 Do any of the following:
• To select a range, drag in the Editor panel.
56
• To extend or shorten a selection, drag the selection edges. (Shift-click beyond the edges to quickly extend a
selection to a specific location.)
note: If you prefer, you can right-click to extend or shorten a selection. To enable this feature, select Extend
Selection in the General section of the Preferences dialog box.
Select spectral ranges
When working in a spectral display, you can use the Marquee, Lasso, or Paintbrush Selection tool to select audio data
within specific spectral ranges. The Marquee Selection tool lets you select a rectangular area. The Lasso Selection and
Paintbrush Selection tools let you make free-form selections. All three tools allow for detailed editing and processing,
including incredible flexibility in audio restoration work. For example, if you find audio artifacts, you can select and
edit just the affected frequencies, producing superior results with faster processing.
The Paintbrush Selection tool creates unique selections that determine the intensity of applied effects. To adjust
intensity, either layer brush strokes or change the Opacity setting in the toolbar. The more opaque the white, selected
area is, the more intense applied effects will be.
Last updated 6/16/2016
Page 61

Editing audio files
A Marquee B Lasso C Paintbrush
1 In the toolbar, select the Marquee , Lasso , or Paintbrush Selection .
2 In the Editor panel, drag in the spectral display to select the desired audio data.
Note: When you make a selection in a stereo waveform, the selection is applied to all channels by default. To select audio
data in specific channels, choose them from the Edit > Enable Channels menu.
3 To adjust the selection, do any of the following:
• To move the selection, position the pointer in the selection, and drag it to the desired location.
• To resize the selection, position the pointer on the corner or edge of the selection, and drag it to the desired size.
(For paintbrush selections, you can also adjust the brush Size setting in the toolbar.)
• To add to a lasso or paintbrush selection, Shift-drag. To subtract from the selection, Alt-drag.
• To determine the intensity of effects applied to paintbrush selections, adjust the Opacity setting in the toolbar.
57
By default, Adobe Audition plays only audio the spectral selection. To hear all audio in the same time range, right-click
the Play button , and deselect Play Spectral Selection Only.
Select artifacts and repair them automatically
For the quickest repair of small, individual audio artifacts like isolated clicks or pops, use the Spot Healing Brush. When
you select audio with this tool, it automatically applies the Favorites > Auto Heal command.
Note: Auto-healing is optimized for small audio artifacts and thus limited to selections of four seconds or less.
1 In the toolbar, select the Spot Healing Brush .
2 To change the pixel diameter, adjust the Size setting. Or press the square bracket keys.
3 In the Editor panel, either click and hold or drag across an audio artifact in the spectral display.
Note: If you click without holding down the mouse button, Audition moves the current-time indicator so you can
preview audio, but doesn’t repair it. To repair audio by clicking, select Create A Circular Selection On Mouse Down in
the General preferences.
Last updated 6/16/2016
Page 62
Editing audio files
A Before B After
Select all of a waveform
Do either of the following:
• To select the visible range of a waveform, double-click in the Editor panel.
58
• To select all of a waveform, triple-click in the Editor panel.
Specify which channels you want to edit
By default, Adobe Audition applies selections and edits to all channels of a stereo or surround waveform. However, you
can easily select and edit specific channels.
• At the right of the Editor panel, click channel buttons in the amplitude ruler. For a stereo file, for example, click the
left channel or right channel button.
Ti p:
To select one stereo channel simply by dragging across the very top or bottom of the Editor panel, select Allow
Context-Sensitive Channel Editing in the General section of the Preferences dialog box.
Last updated 6/16/2016
Page 63

Editing audio files
Adjust a selection to zero-crossing points
For many editing tasks such as deleting or inserting audio, zero-crossings (points where amplitude is zero) are the best
places to make selections. Selections that begin and end at zero-crossings reduce the chance that edits will create audible
pops or clicks.
To adjust a selection to the closest zero-crossing points, choose Edit > Zero Crossings. Then select an option such
as Adjust Selection Inward (which moves both edges inward to the next zero crossing).
To further reduce the chance of pops or clicks, all edits are crossfaded. You can change crossfade durations in the Data
section of the Preferences dialog box.
Snap to markers, rulers, frames, and zero crossings
Snapping causes selection boundaries, as well as the current-time indicator, to move to items such as markers, ruler
ticks, zero-crossing points, and frames. Enabling snapping helps you make accurate selections; however, if you prefer,
you can disable snapping for specific items.
1 To enable snapping for selected items, click the Toggle Snapping icon at the top of the Editor panel.
2 To specify items to snap to, choose Edit > Snapping, and select any of the following:
Snap To Markers Snaps to a marker point. For information on defining markers, see Working with markers.
59
Snap To Ruler (Coarse) Snaps only to the major numeric divisions (such as minutes and seconds) in the timeline.
You can enable only one Snap To Ruler command at a time.
note:
Snap To Ruler (Fine) Snaps to subdivisions (such as milliseconds) in the timeline. Zoom in (right-click and drag
across the timeline) to display more accurate subdivisions and place the cursor more precisely.
Snap To Zero Crossings Snaps to the nearest place where audio crosses the center line (the zero amplitude point).
Snap To Frames Snaps to a frame boundary if the time format is measured in frames (such as Compact Disc and
SMPTE).
You can access snapping commands by right-clicking the timeline.
More Help topics
Techniques for restoring audio
About the spectral display
Customize the spectral display
Techniques for restoring audio
Snap to clip endpoints
Snap to loop beats
How to copy, cut, paste, and delete audio in Audition
Last updated 6/16/2016
Page 64

Editing audio files
Copy or cut audio data
1 In the Waveform Editor, select the audio data you want to copy or cut. Or, to copy or cut the entire waveform,
deselect all audio data.
2 Choose one of the following:
• Edit > Copy to copy audio data to the clipboard.
• Edit > Copy To New to copy and paste the audio data into a newly created file.
• Edit > Cut to remove audio data from the current waveform and copy it to the clipboard.
Paste audio data
Do either of the following:
• To paste audio into the current file, place the current-time indicator where you want to insert the audio or
select existing audio you want to replace. Then choose Edit > Paste.
• To paste audio data into a new file, choose Edit > Paste To New. The new file automatically inherits the sample
type (rate and bit depth) from the original clipboard material.
Mix audio data when pasting
The Mix Paste command mixes audio data from the clipboard with the current waveform.
60
1 In the Editor panel, place the current-time indicator where you want to start mixing the audio data. Alternately,
select the audio data you want to replace.
2 Choose Edit > Mix Paste.
3 Set the following options and click OK.
Copied and Existing Audio Adjust the percentage volume of copied and existing audio.
Invert Copied Audio Reverses the phase of copied audio, either exaggerating or reducing phase cancellation if the
existing audio contains similar content. (To understand phase cancellation, see How sound waves interact.)
Crossfade Applies a crossfade to the beginning and end of the pasted audio, producing smoother transitions.
Specify the fade length in milliseconds.
Paste Type | Audition CC Specify the paste type. The options are as follows:
Insert Inserts audio at the current location or selection. Adobe Audition inserts audio at the cursor location,
moving any existing data to the end of the inserted material.
Overlap (Mix) Mixes audio at the selected volume level with the current waveform. If the audio is longer than the
current waveform, the current waveform is lengthened to accommodate the pasted audio.
Overwrite Overdubs the audio beginning at the cursor location, and replaces the existing material thereafter for the
duration of audio. For example, pasting 5 seconds of material replaces the first 5 seconds after the cursor.
Modulate Modulates the audio with the current waveform for an interesting effect. The result is similar to
overlapping, except that the values of the two waveforms are multiplied by each other, sample by sample, instead of
added.
From Clipboard Pastes audio data from the active internal clipboard.
From File Pastes audio data from a file. Click Browse to navigate to the file.
Loop Paste Pastes audio data the specified number of times. If the audio is longer than the current selection, the
current selection is automatically lengthened accordingly.
Last updated 6/16/2016
Page 65

Editing audio files
Delete or crop audio
Do one of the following:
• Select audio you want to delete, and choose Edit > Delete.
• Select audio you want to keep, and choose Edit > Crop. (Unwanted audio at the beginning and end of the file is
removed.)
More Help topics
Convert a waveform between surround, stereo, and mono
Channel Mixer effect
Visually fading and changing amplitude
Though various effects can change amplitude or produce fades, visual fade and gain controls make the task quick and
intuitive. As you drag these controls in the Editor panel, a preview helps you precisely adjust audio.
61
A Fade controls B Gain control (heads-up display)
To quickly fade selected audio, choose Favorites > Fade In or Fade Out.
Visually fade in or out
Adobe Audition offers three types of visual fades:
• Linear fades produce an even volume change that works well for much material. If this fade sounds too abrupt,
however, try one of the other options.
• Logarithmic fades smoothly change volume slowly and then rapidly, or vice versa.
• Cosine fades are shaped like an S-curve, changing volume slowly at first, rapidly through the bulk of the fade, and
slowly at the finish.
n the Waveform Editor, fades permanently change audio data. To apply fades you can readjust in the Multitrack
Note: I
Editor, see Fade or crossfade multitrack clips.
Last updated 6/16/2016
Page 66

Editing audio files
A Linear B Logarithmic C Cosine
62
In the upper left or right of the waveform, drag the Fade In or Fade Out handle inward, and do any of
following:
• For a linear fade, drag perfectly horizontally.
• For a logarithmic fade, drag up or down.
• For a cosine (S-curve) fade, hold down Ctrl (Windows) or Command (Mac OS).
To create cosine fades by default and hold the keys above to create linear or logarithmic fades, change the Defaul
Fade setting in the General preferences.
Visually raise or lower amplitude
1 In the Editor panel, select specific audio, or select nothing to adjust the entire file.
2 In the gain control that floats above the panel, drag the knob or numbers.
The numbers indicate how new amplitude compares with existing amplitude. When you release the mouse button,
t
he numbers return to 0 dB, so you can make further adjustments.
the
t
Pin or hide the visual amplitude control
By default, the visual amplitude control appears in a heads-up display (HUD) that floats over all waveforms. If you find
the HUD distracting, do any of the following:
• To lock the HUD in one location, click the Pin button .
• To show the HUD only over highlighted selections, select Show HUD for Selection Ranges Only in the General
references.
p
• To totally hide the HUD, deselect View > Show HUD.
Last updated 6/16/2016
Page 67

Editing audio files
More Help topics
Volume Envelope effect (Waveform Editor only)
Amplify effect
Working with markers
Markers (sometimes called cues) are locations that you define in a waveform. Markers make it easy to navigate within
a waveform to make a selection, perform edits, or play back audio.
In Adobe Audition, a marker can be either a point or a range. A point refers to a specific time position within a
waveform (for instance, 1:08.566 from the start of the file). A range has both a start time and an end time (for example,
all of the waveform from 1:08.566 to 3:07.379). You can drag start and end markers for a range to different times.
In the timeline at the top of the Editor panel, markers have white handles you can select, drag, or right-click to access
additional commands.
63
A Marker point B Marker range
Note: To preserve markers when you save a file, select Include Markers and Other Metadata.
Add, select, and rename markers
Though you can add markers directly in the Editor panel, you use the Markers panel (Windows > Markers) to define
and select markers.
To hide or show information such as Duration and Type, choose Markers Display from the panel menu .
Add a marker
1 Do one of the following:
• Play audio.
• Place the current-time indicator where you want a marker point to be.
• Select the audio data you want to define as a marker range.
2 Either press the M key, or click the Add Marker button in the Markers panel.
To automatically create markers where silence occurs, see Delete Silence and Mark Audio options.
Last updated 6/16/2016
Page 68

Editing audio files
Select markers
• Click a marker in the Editor or Markers panel. Or double-click to move the current-time indicator to that
location and select the area for range markers.
• To select adjacent markers, click the first marker you want to select in the Markers panel, and then Shift-click the
last.
• To select nonadjacent markers, Ctrl-click (Windows) or Command-click (Mac OS) them in the Markers panel.
• To move the current-time indicator to the nearest marker, choose Edit > Marker > Move CTI to Next or Previous.
Rename a marker
1 In the Markers panel, select the marker.
2 Click the marker name, and enter a new name.
Adjust, merge, convert, or delete markers
After creating markers, you can fine-tune them to best address the needs of an audio project.
Reposition markers
• In the Editor panel, drag marker handles to a new location.
64
• In the Markers panel, select the marker, and enter new Start values for point markers, or Start, End, and Duration
values for range markers.
Merge individual markers
In the Markers panel, select the markers you want to merge, and click the Merge button .
The new merged marker inherits its name from the first marker. Merged point markers become range markers.
Convert a point marker to a range marker
Right-click the marker handle, and choose Convert to Range.
The marker handle splits into two handles.
Convert a range marker to a point marker
Right-click a marker handle, and choose Convert to Point.
The two parts of the range marker handle merge into a single handle, with the start time of the range becoming the
time for the point marker.
Delete markers
• Select one or more markers, and click the Delete button in the Markers panel.
• Right-click the marker handle in the Editor panel, and choose Delete Marker.
Save audio between markers to new files
1 In the Waveform Editor, choose Window > Markers.
2 Select one or more marker ranges. (See Working with markers .)
3 Click the Export Audio button in the Markers panel.
4 Set the following options:
Use Marker Names In Filename Uses the marker name as the prefix for the filename.
Last updated 6/16/2016
Page 69

Editing audio files
Prefix Specifies a filename prefix for the new files.
Postfix Starting # Specifies the number to begin with when adding numbers to the filename prefix. Adobe Audition
automatically adds numbers after the prefix (for example, prefix02, prefix03) to distinguish saved files.
Location Specifies the destination folder for saved files. Click Browse to specify a different folder.
Format Specifies the file format. The Format Settings area below indicates and data compression and storage
modes; to adjust these, click Change. (See Audio format settings .)
Sample Type Indicates the sample rate and bit depth. To adjust these options, click Change. (See Convert the sample
rate of a file.)
Include Markers and Other Metadata Includes audio markers and information from the Metadata panel in
processed files. (See Viewing and editing XMP metadata .)
Creating playlists
A playlist is an arrangement of marker ranges that you can play back in any order and loop a specified numb er of times.
A playlist lets you try different versions of an arrangement before you commit to edits. You create playlists in the Playlist
panel (Window > Playlist).
65
Note: T
o store a playlist with a file, you must save in WAV format. (See Sa
Create a playlist
1 In the Playlist panel, click the Open Markers Panel button .
2 In the Markers panel, select marker ranges you want to add to the playlist. Then click the Insert Selected Range
Markers Into Playlist button , or drag the range markers to the Playlist panel.
Change the order of items in a playlist
Drag the item up or down.
Play items in a playlist
ve audio files .)
• To play all or part of the list, select the first item you want to play. Then click the Play button at the top of the
panel.
• To play a specific item, click the Play button to the left of the item name.
an item in a playlist
Loop
Select an item, and enter a number in the Loops column. Each item
Delete items from a playlist
Select the items, and click the Remove button .
can loop a different number of times.
More Help topics
Delete Silence and Mark Audio options
Batch process files
Inverting, reversing, and silencing audio
Last updated 6/16/2016
Page 70

Editing audio files
Invert a waveform
The Invert effect inverts audio phase by 180 degrees. (To understand phase degrees, see Wavef or m m e as u r e m ents .)
Inverting doesn’t produce an audible change on an individual waveform, but you can hear a difference when combining
waveforms. For example, you might invert pasted audio to better align it with existing audio. Or, you could invert one
channel of a stereo file to correct an out-of-phase recording.
1 If you want to invert part of a waveform, select the desired range. Or, deselect all audio data to invert the entire
waveform.
2 Choose Effects > Invert.
Reverse a waveform
The Reverse effect reverses a waveform from right to left so it plays backwards. Reversing is useful for creating special
effects.
1 If you want to reverse part of the waveform, select the desired range. Or, deselect all audio data to reverse the entire
waveform.
2 Choose Effects > Reverse.
66
Create silence
Creating silence is useful for inserting pauses and removing nonessential noise from an audio file. Adobe Audition
provides two ways to create silence:
• To mute existing audio in the Waveform Editor, select the desired content, and choose Effects > Silence. Unlike
deleting or cutting a selection, which splices the surrounding material together, muting leaves the duration of the
selection intact.
• To add silence in the Waveform or Multitrack Editor, either position the current-time indicator or select existing
audio. Then choose Edit > Insert >Silence, and enter the number of seconds. Any audio to the right is pushed out
in time, lengthening duration. Multitrack clips are split if necessary.
More Help topics
Waveform m e a s urem e n t s
Delete Silence and Mark Audio options
How to automate common tasks in Audition
Favorites
Favorites are combinations of effects, fades, and amplitude adjustments that you can save and quickly reapply to any file
or selection in the Waveform Editor. The Favorites menu lists some defaults to get you started, plus any additional
favorites you create.
To assign favorites to keyboard shortcuts, see Customize shortcuts.
Last updated 6/16/2016
Page 71

Editing audio files
Create a favorite from a combination of adjustments
1 In the Waveform Editor, choose Favorites > Start Recording Favorite.
2 Apply the effects, fades, and amplitude adjustments you want to save.
3 Choose Favorite > Stop Recording Favorite, and name the favorite.
Create a favorite from a specific effect
1 Adjust effect settings as desired.
2 In the upper right of the effect dialog box, click the Favorite icon . Then name the favorite.
Delete a favorite
1 Choose Favorites > Delete Favorite.
2 Select the favorite name, and click OK.
Batch process files
Batch process groups of files to quickly apply favorite processing, resample, or save to a new format. Quickly automate
common tasks like exporting to mp3 format or applying identical effects to related files.
67
1 In the Waveform Editor, choose Window > Batch Process.
2 In the Batch Process panel, click the Add Files button to browse to files on your system. (To quickly add all open
files, choose File > Save All Audio as Batch Process.)
Note: By default, batch processing is limited to three files at a time for optimal performance. To process more files, change
the value for Maximum Number Of Concurrent File Processes in the Data preferences.
3 Select a processing option from the Favorite menu. Then do one of the following:
• To process the existing files, deselect Export at the bottom of the panel, and click Run.
• To process new files, select Export, and click Run. (To customize Export Settings, see the following step.)
4 Click Export Settings, and set the following options:
Filename Prefix and Postfix Help you identify batched files.
Te mp l at e Specifies a naming convention for processed files, such as Artist, Date, Song (%a/%d/%s/).
To learn more about the different batch processing filename templates, read this blog post by Durin Gleaves.
Location Specifies the destination folder for processed files.
Same As Source File Location Saves modified files in the same folder as the file’s source file.
Overwrite Existing Files Automatically replaces existing files with the same name.
Format Specifies the file format. The Format Settings area below indicates data compression and storage modes; to
adjust these, click Change. (See
Audio format settings .)
Sample Type Indicates the sample rate and bit depth. To customize these options, click Change. (See Convert the
sample rate of a file.)
New Sample Type Indicates the sample rate and bit depth after export. If source files have varying sample types,
click the pop-up menu to see how each file will be converted. (The menu does not apply conversion options; to
adjust those, click Change for Sample Type.)
Last updated 6/16/2016
Page 72

Editing audio files
Remove Files from Panel After Completion Removes filenames from the Batch Process panel after export.
Include Markers and Other Metadata Includes audio markers and information from the Metadata panel in
processed files. (See
Working with markers and Viewing and editing XMP metadata .)
More Help topics
Selecting audio
Use effect presets
Normalize effect (Waveform Editor only)
Analyze amplitude
Analyze phase, frequency, and amplitude with Audition
Adobe Audition provides several ways to analyze audio. To compare phase relationships between any two channels, use
the Phase Meter panel. To analyze tonal and dynamic range, use the Frequency Analysis and Amplitude Statistics
panels.
The Waveform Editor also provides Spectral Frequency Display, which you can use together with the analysis methods
above. (See
Displaying audio in the Waveform Editor.)
68
Analyze phase
The Phase Meter panel reveals out-of-phase channels for stereo and surround waveforms, which you can address with
the Effects > Invert command. (See
will sound similar if summed to mono. (See Convert a waveform between surround, stereo, and mono.)
To understand audio phase, see How sound waves interact.
1 Choose Window > Phase Meter.
2 Right-click the Phase Meter panel, and choose channels from the Channel and Compare To menus.
3 In Editor panel, select a range if desired, and start playback.
In the Phase Meter, audio to the left is more out of phase, while audio to the right is more in phase. -1.0 reflects total
phase cancellation, while 1.0 reflects identical audio content in each channel.
To customize meter appearance, right-click them, and select Show Color Gradient or Show LED Meters.
Invert a waveform.) T his pa nel als o he lps yo u id entif y hig hly in-ph ase chann els that
Analyze frequency range
You can use the Frequency Analysis panel to identify problematic frequency bands, which you can then correct with a
filter effect.
1 Choose Window > Frequency Analysis.
2 In the Editor panel, click a time point, select a range, or start playback.
3 In the Frequency Analysis panel, view frequency along the horizontal axis, and amplitude along the vertical axis.
Last updated 6/16/2016
Page 73

Editing audio files
If you selected a range, Adobe Audition analyzes only the center point. To analyze the overall frequency of the range,
click Scan Selection.
Frequency Analysis options
Scale Displays the frequency scale either logarithmically (reflecting human hearing) or linearly (providing more detail
for upper frequencies).
Copy All Graph Data
Copies a text report of the frequency data to the system clipboard.
Hold buttons Let you take up to eight frequency snapshots as a waveform is playing. The frequency outline (which is
rendered in the same color as the button clicked) is frozen on the graph and overlaid on other frequency outlines. To
clear a frozen frequency outline, click its corresponding Hold button again.
Display Changes the graph display. Choose one of the following styles:
Lines Displays amplitude at each frequency with simple lines. By default, the left channel is green; the right is blue.
Area Also displays lines for amplitude, but fills the area beneath the lines in a solid color, and smooths out amplitude
differences in the same area.
Bars Shows the effect of analysis resolution by splitting the display into rectangular segments. The higher the FFT size,
the greater the analysis resolution, and the narrower the bars.
69
Top Channel Determines which channel of a stereo or surround file appears over others in the graph. To combine
displayed channels, choose Average.
Scan or Scan Selection Scans the entire file or selection, and displays average frequency data in the graph. (By default,
the graph displays data from the center point of files and selections.)
Advanced options
FFT Size Specifies the Fast Fourier Transform size. Higher FFT sizes report frequency data more accurately but they
require longer processing times.
Window Determines the Fast Fourier transform shape. These functions are listed in order from narrowest to widest.
Narrower functions include fewer surrounding frequencies but less precisely reflect center frequencies. Wider
functions include more surrounding frequencies but more precisely reflect center frequencies. The Hamming and
Blackman options provide excellent overall results.
0 dB Reference Determines the amplitude at which full scale, 0 dBFS audio data is displayed. For example, a value of
zero displays 0 dBFS audio at 0 dB. A value of 30 displays 0 dBFS audio at –30 dB. This value simply moves the graph
up or down; it does not change the amplitude of audio data.
Ti p: Adjust the 0 dB Reference to calibrate this display to another decibel reference, like sound pressure level (SPL).
Value at [x] Hz Reveals precise amplitude for specific frequencies when you position the mouse over the graph.
Overall Frequency For the start point of a selected range, indicates average frequency.
Overall Musical Note For the start point of a selected range, indicates keyboard position and variance from standard
tuning (A440). For example, A2 +7 equals the second-lowest A on a keyboard tuned 7% higher than normal.
Last updated 6/16/2016
Page 74

Editing audio files
Zoom frequency graphs
In the Frequency Analysis panel, you can zoom graphs to analyze frequency in more detail.
Do any of the following:
• To zoom in on a graph, right-click and drag the magnifying glass icon in the vertical or horizontal ruler.
• To navigate a magnified graph, left-click and drag the hand icon in the vertical or horizontal ruler.
• To zoom out on a magnified graph, right-click in the vertical or horizontal ruler, and choose Zoom Out to return
to the previous magnification, or Zoom Out Full to zoom out completely.
70
Analyze amplitude
1 In the Waveform Editor, choose Window > Amplitude Statistics.
2 To calculate statistics from an entire file or selection, click Scan or Scan Selection. (By default, statistics are calculated
from the center point of files and selections.)
You can adjust a selection in the Editor panel. Click Scan Selection again to recalculate statistics.
3 Evaluate amplitude on the following tabs:
• The General tab displays numerical statistics that indicate dynamic range, identify clipped samples, and note any
DC offset.
• The RMS Histogram tab displays a graph that shows the relative prevalence of each amplitude. The horizontal
ruler measures amplitude in decibels, and the vertical ruler measures prevalence using the RMS formula. Choose
a channel to display from the Show Channel menu.
Ti p:
Use the Histogram tab to identify prevalent amplitudes, and then compress, limit, or normalize them with
an amplitude effect.
Last updated 6/16/2016
Page 75

Editing audio files
General options
Peak Amplitude Shows the sample with the highest amplitude in decibel form.
Maximum Sample Value Shows the sample with the highest amplitude.
Minimum Sample Value Shows the sample with the lowest amplitude.
Possibly Clipped Samples Shows the number of samples have likely exceeded 0 dBFS. Click the icon to the right of
this value to navigate to the first clipped sample in the audio file. (If necessary, click the icon again to view subsequent
clipped samples.)
71
Total, Maximum, Minimum, and Average RMS Amplitude Show the root-mean-square values of the selection. RMS
values are based on the prevalence of specific amplitudes, often reflecting perceived loudness better than absolute or
average amplitudes.
DC Offset Shows any direct current offset applied to the waveform during recording. Positive values are above the
center line, and negative values are below it. (See
Measured Bit Depth Reports the waveform’s bit depth. (32 indicates that the waveform uses the full 32-bit float range).
Dynamic Range Reflects the difference between the Maximum and Minimum RMS Amplitude.
Dynamic Range Used Shows the dynamic range minus unusually long periods of low RMS amplitude, such as silent
Correct DC offset.)
passages.
Loudness Shows the average amplitude.
Perceived Loudness Compensates for the human ear’s emphasis on middle frequencies.
Copy Copies all statistics on the General tab to the system clipboard.
RMS Settings options
To adjust how RMS statistics are calculated, set the following options:
0dB = FS Sine Wave Correspond the dB level to a full-scale sine wave, where peak amplitude is about 3.01 dB quieter
than a full-scale square wave.
0dB = FS Square Wave Corresponds the dB level to a full-scale square wave, where peak amplitude is about 3.01 dB
louder than a full-scale sine wave.
Account For DC Ignores any DC offset in the measurements.
Window Width Specifies the number of milliseconds in each RMS window. A selected range contains a series of such
windows, which Adobe Audition averages to calculate the Minimum RMS and Maximum RMS values. To achieve the
most accurate RMS values, use wide windows for audio with a wide dynamic range, and narrow windows for audio with
a narrow dynamic range.
Last updated 6/16/2016
Page 76

Editing audio files
Frequency Band Splitter
The Frequency Band Splitter lets you take a selected audio clip (or a highlighted section thereof ) and make up to eight
copies of it, with each copy assuming a different frequency range of the original. The specified crossover frequencies
determine the split points. Each copy of the waveform is placed in its own track in the session window. You can then
edit or apply effects to each band separately.
For example, using the default setting of three bands with crossover values of 800 and 3200 creates three copies of the
selected waveform: one with the frequencies of the selected wave from 0 Hz to 800 Hz, one from 800 Hz to 3200 Hz,
and one from 3200 Hz to 22050 Hz (or whatever the maximum frequency present is, based on the sample rate).
1 Open an audio clip. To process a selection, using a selection tool, select a range you want to process.
2 Choose Edit > Frequency Band Splitter.
72
3 Set the desired options and click OK.
Frequency Splitter options
Bands Sets the number of split points. The original waveform is copied the number of times you specify, with each copy
having a different frequency range, as determined by the number of crossovers.
Maximum Specifies the maximum frequency for each band. The Minimum and Bandwidth display calculated values
based on the maximum frequency values for the current and adjacent bands.
Scale Specifies the scale displayed to indicate the bands graphically. You can choose either Linear or Logarithmic.
Max FIR Filter Size Sets the maximum size of the FIR (Finite Impulse Response) filter, which maintains phase errors
over the response curve. FIR filters are unlike IIR filters, which can have phase error (often audible as a ringing quality).
Higher values create higher accuracy in the frequency filtering. The default value, 320, works most of the time, but you
should increase it if distortion or ringing occurs in the filtered waves.
Last updated 6/16/2016
Page 77

Editing audio files
Undo, redo, and history
Undo or redo changes
Each time you start Adobe Audition, it keeps track of the edits you perform. Edits aren’t permanently applied until you
save and close a file, giving you unlimited undo and redo capability.
To undo or redo changes, do any of the following:
• To undo a change, choose Edit > Undo [name of change].
• To redo a change, choose Edit > Redo [name of change].
• To repeat the last command in the Waveform Editor, choose Edit > Repeat Last Command. You can repeat most
commands; however, there are a few exceptions (such as Delete).
To repeat the last command without opening its dialog box, press Ctrl+R (Windows) or Command+R (Mac OS).
Compare history states
While the Undo and Redo commands restrict you to an incremental sequence of changes, the History panel lets you
instantly revert back to any previous change. Use the panel to quickly compare processed and original audio or discard
a series of changes that produced undesired results.
73
Note: H
istory states disappear when you close a file.
Revert to states
• To revert to any history state, click it.
• To incrementally move through states, press the up and down arrows on the keyboard.
Delete states
When you work with very large audio files, delete unnecessary history states to clear disk space and improve
per
formance.
• To delete all states, choose Clear History from the panel menu .
• To delete a specific state, select it, and then click the trash icon .
Note: D
eleting history states also removes related Undo commands.
Converting sample types
Hear a file in a different sample rate
The Interpret Sample Rate command lets you hear how an audio file sounds at a different sample rate. (See
Understanding sample rate.) This command helps you identify files that specify an incorrect rate in the file header. To
then permanently convert the sample rate, choose Edit > Convert Sample Type.
1 In the Waveform Editor, choose Edit > Interpret Sample Rate.
Last updated 6/16/2016
Page 78

Editing audio files
2 Enter a sample rate in the text box, or choose a common sample rate from the list.
Note: Although you can work with sample rates ranging from 6000 to 192,000 Hz in Adobe Audition, your sound card may
not be capable of playing all rates properly. To determine supported sample rates, consult the documentation for the card.
Convert the sample rate of a file
The sample rate of a file determines the frequency range of the waveform. When converting the sample rate, keep in
mind that most sound cards support only certain sample rates.
1 In the Waveform Editor, choose Edit > Convert Sample Type.
To quickly access the Convert Sample Type dialog box, double-click the Sample Type section of the status bar. (See
Display the status bar.)
2 Select a rate from the Sample Rate list, or enter a custom rate in the text box.
3 In the Advanced section, drag the Quality slider to adjust the quality of the sampling conversion.
Higher values retain more high frequencies, but the conversion takes longer. Lower values require less processing
time but reduce high frequencies.
Use higher Quality values whenever you downsample a high rate to a low rate. When upsampling, higher values
have little effect.
74
4 For the best results, select Pre/Post Filter to prevent aliasing noise.
Convert a waveform between surround, stereo, and mono
The Convert Sample Type command is the quickest way to convert a waveform to a different number of channels.
1 In the Waveform Editor, choose Edit > Convert Sample Type.
2 From the Channels menu, select Mono, Stereo, or 5.1.
3 In the Advanced section, Enter percentages for Left Mix and Right Mix:
• When you convert from mono to stereo, the Left Mix and Right Mix options specify the relative amplitude with
which the original mono signal is placed into each side of the new stereo signal. For example, you can place the
mono source on the left channel only, the right channel only, or any point in between.
• When you convert from stereo to mono, the Left Mix and Right Mix options control the amount of signal from
the respective channel that will be m ixed into the final mono waveform. The most common mixing method uses
50% of both channels.
For other channel-conversion techniques, see the following topics:
• Extract audio channels to mono files
• Mix audio data when pasting
• Channel Mixer effect
Change the bit depth of a file
The bit depth of a file determines the dynamic range of the audio. (See Understanding bit depth.) Adobe Audition
supports up to 32-bit resolution. You can raise the bit depth of a file to gain a greater dynamic range, or you can lower
the bit depth to reduce the file size.
Last updated 6/16/2016
Page 79

Editing audio files
Note: Some common applications and media players require 16-bit or lower audio.
1 In the Waveform Editor, choose Edit > Convert Sample Type.
2 Select a Bit Depth from the menu, or enter a custom bit depth in the text box.
3 In the Advanced section, set the following options:
Dithering Enables or disables dithering when converting to lower bit depths. If dithering is disabled, bit depth is
abruptly truncated, producing a crackly effect on low-volume passages caused by quantization distortion.
Although dithering introduces a small amount of noise, the result is far preferable to the increased distortion that
you w oul d ot her wise hea r at low s ign al le vels. Dit her ing als o le ts y ou hear sound s th at wou ld b e ma sked by th e no ise
and distortion limits of audio at lower bit depths.
Dither Type Controls how dithering noise is distributed relative to the original amplitude value. Usual ly, Triangu lar
provides the best tradeoff among signal-to-noise ratio, distortion, and noise modulation.
Dither type Reduces signal-to-noise ratio Noise modulation
Triangular 4.8 dB No
Gaussian 6.0 dB Negligible
note: Triangular (Shaped) and Gaussian (Shaped) move slightly more noise to higher frequencies. For additional
control, set Noise Shaping options.
75
Noise Shaping Determines which frequencies contain dithering noise. By introducing noise shaping, you may be
able to use lower dither depths without introducing audible artifacts. The best shaping depends on the source audio,
final sample rate, and bit depth.
note: Noise Shaping is disabled for sample rates below 32Khz because all noise would remain in audible frequencies.
High PassWith a crossover set to 7.3 kHz, drops dithering noise to -180dB at 0 Hz and -162dB at100 Hz.
Light SlopeWith a crossover set to 11 kHz, drops noise to -3dB at 0 Hz and -10dB at 5 kHz.
Neutral Light is flat up to 14 kHz, ramps noise up to a maximum at 17kHz, and is again flat at higher frequencies.
Background noise sounds the same as it does without noise shaping but is about 11dB quieter. Heavy is flat up to
15.5kHz, placing all dithering noise above 16kHz (or wherever you specify the crossover). Sensitive ears may hear
a high pitched ringing if the crossover is too low. If converting 48 or 96 kHz audio, however, the crossover can be
placed well above 20 kHz.
Ti p: Choose a Neutral shape to avoid sonically coloring background hiss. Note, however, that hiss will sound louder
than with other shapes.
U-ShapedShallow is mostly flat from 2 kHz up to 14 kHz but gets louder as audio approaches 0 Hz because low
frequencies are much less audible. Medium places a little more noise in the highs above 9 kHz, allowing for lower
noise below that frequency. Deep increases noise above 9 kHz even more, but also lowers it much more in the 2-6
kHz range.
We ig h t ed Light attempts to match how the ear perceives low-level sounds by reducing noise more in the 2-6 kHz
range and raising it in the 10-14 kHz range. At high volumes, hiss may be more noticeable. Heavy more evenly
reduces the most sensitive 2-6KHz range at the expense of more noise above 8kHz.
Crossover Specifies the frequency above which noise shaping will occur.
Strength Specify the maximum amplitude of noise added to any one frequency.
Adaptive Mode Varies the distribution of noise across frequencies.
Last updated 6/16/2016
Page 80

Editing audio files
Use sample rate conversion presets
If you need to make the same conversion on multiple files, you can save time by using a sample rate conversion preset.
1 Choose Edit > Convert Sample Type.
2 Adjust the settings as desired.
3 Click the New Preset button .
After you create a preset, it appears in the Presets list at the top of the dialog box. If you want to delete a preset,
choose it from the list, and click the Delete button
.
76
Last updated 6/16/2016
Page 81
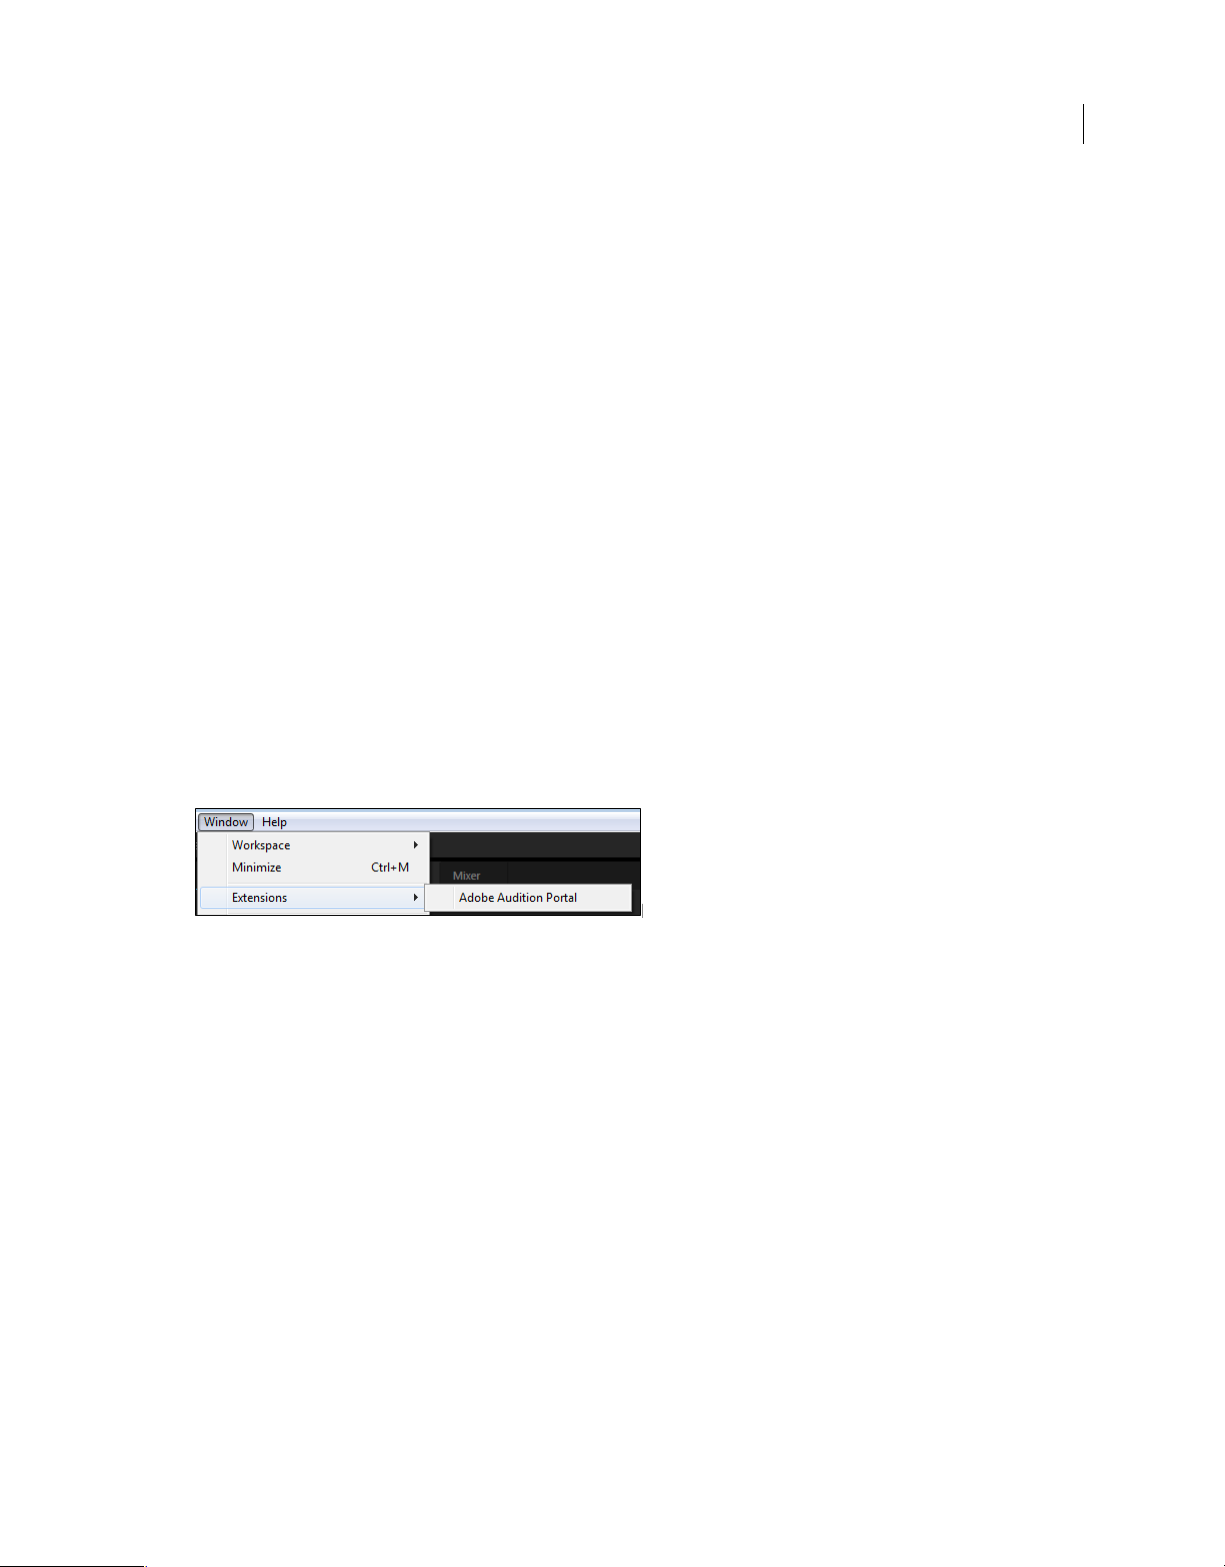
Chapter 6: Applying effects
Enabling CEP extensions
Overview
Audition CC supports Common Extensibility Platform (CEP) extensions, which enable developers to build integrated
panels in Adobe desktop applications.
Developers design the panels using HTML5 and JavaScript. They use ExtendScript to communicate with the
application.
The Adobe-CEP repository at Github contains source code, documentation, and community-built extensions.
77
Accessing the CEP extensions
Choose Window > Extensions > Adobe Audition Portal to access extensions.
You can install extensions using the Creative Cloud desktop application. Download from the Adobe Add-ons
Marketplace and then enable File Sync in the application to automatically install extensions.
You can use the SDK to create custom CEP extensions. Refer to the documentation and sample code in the SDK.
Download the Audition SDK from the Audition Developer Center.
Effects controls
Effects Rack overview
The Effects Rack lets you insert, edit, and reorder up to 16 effects, optimize mix levels, and store favorite presets. Most
rack controls appear in both the Waveform and Multitrack editors.
Last updated 6/16/2016
Page 82

Applying effects
A Rack Preset controls B Effect slots C Level controls D Main Power button
Controls unique to the Waveform Editor
In the Waveform Editor, the Effects Rack provides a Process menu that that lets you modify a selection or the entire file,
and an Apply button that permanently applies effects.
78
A Apply button permanently applies effects B Process menu lets you modify selection or entire file
Controls unique to the Multitrack Editor
The Effects Rack provides Pre-render Track and FX Pre/Post-Fader buttons that you use to optimize and route effects.
Each clip and track has its own Effects Rack, which is saved with the session.
Note: Buses and the Master track lack a Pre-render option because processing effects from all source tracks would reduce
performance.
A FX Pre/Post-Fader B Pre-render
Set input, output, and mix levels in racks
• To optimize volume, adjust Input and Output levels so their meters peak without clipping.
• To change the percentage of processed audio, drag the Mix slider. 100% (Wet) equals fully processed audio; 0% (Dry)
equals original, unprocessed audio.
Insert, bypass, reorder, or remove effects in racks
In the Effects Rack, you manage groups of effects by using individual effect slots.
In the Multitrack Editor, the fx section of the Editor panel or Mixer provides quick access to slots in the Effects Rack.
Last updated 6/16/2016
Page 83

Applying effects
A Reorder by dragging B Insert with the slot menu
To insert an effect, choose it from a slot’s pop-up menu. Then adjust effect settings as desired.
79
To later reaccess effect settings, double-click the effect name in the rack.
To bypass an effect, click its Power button .
To bypass all effects, click the main Power button in the lower left corner of a rack, or the fx power button in the
Editor pane
To bypass a selected group of effects, choose Toggle Power State of Selected Effects from the panel menu
l or Mixer.
Bypass effects to quickly compare processed and unprocessed audio.
To remove a single effect, choose Remove Effect from a slot’s pop-up menu. Or select the slot, and press Delete.
To remove all effects, choose Remove All Effects from the panel menu .
To reorder effects, drag them to different slots.
Reordering effects produces different sonic results. (For an example, place Reverb prior to Phaser, and vice versa.)
Use effect presets
Many effects provide presets that let you store and recall favorite settings. In addition to effect-specific presets, the
Effects Rack provides rack presets that store
To apply a preset, choose it from the Presets menu.
groups of effects and settings.
.
1 To save current settings as a preset, click the New Preset button .
To delete a preset, se
lect it, and click the Delete button .
To modify an existing preset, apply it, adjust settings as desired, and then save a new preset with the same name.
Control effect settings with graphs
Many Adobe Audition effects provide graphs where you can adjust parameters. By adding and moving control points
on the graph, you can precisely tailor effect settings.
Last updated 6/16/2016
Page 84

Applying effects
Graph control points function together with related numerical settings. If you change or disable a numerical setting,
the related graph control follows suit.
To move a point on a graph, drag it to a new location.
Note: The following techniques don’t apply to the DeHummer, Mastering, Full Reverb, Parametric Equalizer, and Track
EQ graphs.
80
To add a control point to a graph, click in the grid at the location where you want to place the point.
To enter numeric values for a control point, right-click it, and choose Edit Point
To remove a point from a graph, drag it off the graph.
To return a graph to its default state, click the Reset button .
About spline curves for graphs
By default, graphs display straight lines between control points. However, some graphs provide a Spline Curves option
that creates a curve between control points for smoother transitions.
When you use spline curves, lines don’t travel directly through control points. Instead, the points control the shape of
the curve. To move the curve closer to a control point, click near it to create a cluster of control points.
Last updated 6/16/2016
Page 85

Applying effects
More Help topics
Apply groups of effects in the Waveform Editor
Apply effects to clips or tracks
Comparing the Waveform and Multitrack editors
Favorites
Applying effects in the Waveform Editor
While previewing effects, you can adjust selections and the current-time indicator in the Editor panel. (The Normalize
and Stretch effects are exceptions.)
Apply groups of effects in the Waveform Editor
In the Waveform Editor, the Effects Rack lets you apply groups of effects. (It doesn’t provide process effects such as
Noise Reduction, which must be applied individually.)
1 Choose Window > Effects Rack.
2 In the numbered list, choose effects for up to 16 slots. (See Insert, bypass, reorder, or remove effects in racks.)
81
3 Start playback to preview the changes, and then edit, mix, and reorder effects as needed.
To compare processed audio to original audio, select and deselect the main Power button in the lower left corner of
the rack, or the Power buttons for individual effects.
4 To apply the changes to the audio data, click Apply.
To store settings, save a rack preset. (See Use effect presets.)
Apply individual effects in the Waveform Editor
1 From any submenu in the Effects menu, choose an effect.
2 Click the Preview button , and then edit settings as needed.
As you edit settings, watch the Levels panel to optimize amplitude.
3 To compare original audio to processed audio, select and deselect the Power button .
4 To apply the changes to the audio data, click Apply.
About process effects
You can identify process effects by the word process in menu commands. These processing-intensive effects are
available only offline in the Waveform Editor. Unlike real-time effects, process effects can be applied only individually,
so they aren’t accessible in the Effects Rack.
Last updated 6/16/2016
Page 86

Applying effects
More Help topics
Effects Rack overview
Use effect presets
Control effect settings with graphs
Applying effects in the Multitrack Editor
Apply effects to clips or tracks
In the Multitrack Editor, you can apply up to 16 effects to each clip, track, and bus and adjust them while a mix plays.
(Apply clip effects if a track contains multiple clips that you want to process independently.)
You can insert, reorder, and remove effects in the Editor, Mixer, or Effects Rack panel. Only in the Effects Rack,
however, can you save favorite settings as presets, which you can apply to multiple tracks.
In the Multitrack Editor, effects are nondestructive, so you can change them at any time. To readapt a session for
different projects, for example, simply reopen it and change effects to create new sonic textures.
82
1 Do any of the following:
• Select a clip, and click Clip Effects at the top of the Effects Rack.
• Select a track, and click Track Effects at the top of the Effects Rack.
• Display the fx section of the Editor or Mixer. (In the Editor panel, click the button in the upper-left corner.)
2 Choose effects for up to 16 slots in the list. (See Insert, bypass, reorder, or remove effects in racks.)
3 Press the spacebar to play the session, and then edit, reorder, or remove effects as needed.
To change effect settings over time, use envelopes. (See Automating mixes with envelopes.)
Last updated 6/16/2016
Page 87

Applying effects
Pre-render track effects to improve performance
In the Multitrack Editor, pre-render track effects to address heavy CPU usage, improving performance for complex
mixes or low-latency recording. (Latency measures the delay between user input and sound output from a computer. If
latency is high, it produces an audible echo during recording, disrupting timing for musicians.)
You can continue to edit track settings normally; pre-rendering processes audio when pauses occur in playback or
edi
ting.
83
In the Editor panel, Effects Rack, or Mixer, click the Pre-Render Track button
.
Insert effects before or after sends and EQ
On each track, you can insert effects either pre- or post-fader. Pre-fader effects process audio before sends and EQ.
Post-fader effects process audio after sends and EQ. For most mixes, the default, pre-fader setting works well. The
post-fader setting offers signal-routing flexibility for particularly complex mixes.
In the fx section of the Editor panel or Mixer, click the Pre-Fader/Post-Fader button to insert effects either before
sends and EQ
If you’re editing effect settings in the Effects Rack, click the Pre-Fader/Post-Fader button in the lower-left corner.
, or after .
A Input B EQ C Vo lume D Mute E Send F Effects Rack
More Help topics
Effects Rack overview
Routing audio to buses, sends, and the Master track
Set up a send
Adding third-party plug-ins
Third-party plug-ins let you extend the already powerful effects provided with Adobe Audition. The application
supports VST plug-ins on both platforms and Audio Units plug-ins on Mac OS.
Last updated 6/16/2016
Page 88

Applying effects
Applying plug-in effects is identical to applying built-in effects. For information about plug-in features, consult the
documentation provided by the plug-in manufacturer.
Enable VST and Audio Units plug-ins
To access third-party plug-ins in Adobe Audition, you must first enable them. By default, all third-party plug-ins are
disabled. To optimize performance, enable only the plug-ins you plan to use in Adobe Audition.
Note: If effects are being used in a multitrack session, close the session.
1 Choose Effects > Audio Plug-in Manager.
2 In the VST Plug-in Folders section, click Add to specify custom folders you want to scan for plug-ins. Click Default
to specify the standard VST folder for your operating system.
3 In the Available Plug-ins section, click Scan For Plug-ins.
If you’ve recently updated a plug-in, select Rescan Existing Plug-ins.
4 Select the plug-ins you want to access in Adobe Audition, and then click OK.
Note: If a third-party effect is incompatible, Adobe Audition adds it to an Unsupported submenu in effects menus.
More Help topics
Applying effects in the Waveform Editor
84
Applying effects in the Multitrack Editor
Automating track settings
Notch Filter effect
The Filter and EQ > Notch Filter effect removes up to six user-defined frequency bands. Use this effect to remove very
narrow frequency bands, such as a 60 Hz hum, while leaving all surrounding frequencies untouched.
To remove shrill “ess” sounds, use the Sibilance Softener preset. Or use DTMF presets to remove standard tones for
analog telephone systems.
Frequency Specifies the center frequency for each notch.
Gain Specifies the amplitude for each notch.
Notch width Determines frequency range for all notches. The three options range from Narrow for a second order
filter, which removes some adjacent frequencies, to Super Narrow for a sixth order filter, which is very specific.
Generally, use no more than 30 dB of attenuation for a Narrow setting, 60 dB for Very Narrow, and 90 dB for Super
Narrow. Greater attenuation can remove a wide range of neighboring frequencies.
Ultra-Quiet Virtually eliminates noise and artifacts, but requires more processing. This option is audible only on high-
end headphones and monitoring systems.
Fix Attenuations To Determines if notches have equal or individual attenuation levels.
Last updated 6/16/2016
Page 89

Applying effects
Fade and Gain Envelope effects (Waveform Editor only)
The Amplitude and Compression > Fade and Gain Envelope effects function similarly but modify audio differently:
• Choose Fade Envelope to reduce amplitude by varying amounts over time.
• Choose Gain Envelope to boost or reduce amplitude over time.
In the Editor panel, click the yellow envelope line to add keyframes, and drag them up or down to change amplitude.
To quickly select, reposition, or delete multiple keyframes, see
Select the Spline Curves option to create smoother, curved transitions between keyframes, rather than linear transitions.
See About spline cur ves for graphs.
Adjust automation with keyframes.
Manual Pitch Correction effect (Waveform Editor only)
The Manual Pitch Correction effect lets you visually adjust pitch with the Spectral Pitch Display. The Spectral Pitch
Display shows the fundamental pitch as a bright blue line, and overtones in yellow to red hues. Corrected pitch appears
as a bright green line.
85
You can visually monitor pitch at any time, without using the Manual Pitch Correction effect. Simply click the Spectral
Pitch Display icon in the options bar. To customize resolution, decibel range, and gridlines, adjust Pitch Display settings
in the Spectral Displays preferences.
1 Choose Effects > Time and Pitch > Manual Pitch Correction.
2 In the Manual Pitch Correction window, set the following options:
Reference Channel Choose a source channel in which pitch changes are most clear. The effect analyzes only the
channel you choose, but applies the pitch correction equally to all channels.
Spline Curves Create smoother transitions when using envelope keyframes to apply different pitch correction over
time.
Pitch Curve Resolution Sets the Fast Fourier Transform size of each piece of data that the effect processes. In general,
use smaller values for correcting higher frequencies. For voices, a setting of 2048 or 4096 sounds most natural, and
a setting of 1024 creates robotic effects.
3 In the Editor panel, do either of the following:
• To change pitch uniformly, drag the Adjust Pitch knob in the heads-up display.
• To change pitch over time, add keyframes to the yellow envelope line in the center of the waveform display.
To zoom in on specific pitch ranges, right-click and drag in the vertical ruler to the right of the Spectral Pitch Display.
To reset the zoom level or customize the displayed scale, right-click the ruler and select options from the pop-up
menu.
Last updated 6/16/2016
Page 90

Applying effects
Graphic Phase Shifter effect
The Stereo Imagery > Graphic Phase Shifter effect lets you adjust the phase of a waveform by adding control points to
a graph.
86
Right-click points to access the Edit Point dialog box for precise, numerical control.
Phase shift graph The horizontal ruler (x-axis) measures frequency, while the vertical ruler (y-axis) displays the degree
of phase to shift, where zero is no phase shift. You can create simulated stereo by creating a zigzag pattern that gets more
extreme at the high end on one channel.
Frequency Scale Sets the values of the horizontal ruler (x-axis) on a linear or logarithmic scale. Select Logarithmic to
work at finer detail in the lower frequencies. (The logarithmic scale better reflects the frequency-emphasis of human
hearing.) Select Linear to work at finer detail in the higher frequencies.
Range Sets the values of the vertical ruler (y-axis) on a 360° or 180° scale.
Channel Specifies the channel(s) to apply the phase shift to.
Note: Process a single channel for the best results. If you apply identical phase shift to two stereo channels, the resulting file
sounds exactly the same.
FFT Size Specifies the Fast Fourier Transform size. Higher sizes create more precise results, but they take longer to
process.
Doppler Shifter effect (Waveform Editor only)
The Special > Doppler Shifter effect creates the increase and decrease in pitch we notice when an object approaches and
then passes us, such as when a police car passes with its siren on. When the car comes toward you, the sound reaches
your ears as a higher frequency because each sound wave is compressed by the car moving forward. The opposite
happens as the car passes by; the waves are stretched out, resulting in a lower-pitched sound.
Note: Unlike many graphs in Adobe Audition effects, the Doppler Shifter graph is noninteractive: You can’t directly
manipulate the graph. Instead, the graph changes as you adjust the effect’s parameters.
Path Type Defines which path the sound source appears to take. Depending on the path type, a different set of options
is available.
Straight Line options:
• Starting Distance Away sets the virtual starting point (in meters) of the effect.
• Velocity defines the virtual speed (in meters per second) at which the effect moves.
• Coming From sets the virtual direction (in degrees) from where the effect appears to come.
• Passes In Front By specifies how far (in meters) the effect seems to pass in front of the listener.
• Passes On Right By specifies how far (in meters) the effect seems to pass to the right of the listener.
Circular options:
• Radius sets the circular dimensions (in meters) of the effect.
• Velocity defines the virtual speed (in meters per second) at which the effect moves.
• Starting Angle sets the beginning virtual angle (in degrees) of the effect.
Last updated 6/16/2016
Page 91

Applying effects
• Center In Front By specifies how far (in meters) the sound source is from the front of the listener.
• Center On Right By specifies how far (in meters) the sound source is from the right of the listener.
Adjust Volume Based on Distance or Direction Automatically adjusts the effect’s volume based on the values specified.
Quality Level Provides six different levels of processing quality. Lower quality levels require less processing time, but
higher quality levels generally produce better sounding results.
87
Last updated 6/16/2016
Page 92

Chapter 7: Effects reference
Amplitude and compression effects in Audition
Amplify effect
The Amplitude And Compression > Amplify effect boosts or attenuates an audio signal. Because the effect operates in
real time, you can combine it with other effects in the Effects Rack.
Gain sliders Boost or attenuate individual audio channels.
Link Sliders Moves the channel sliders together.
88
Channel Mixer effect
The Amplitude and Compression > Channel Mixer effect alters the balance of stereo or surround channels, letting you
change the apparent position of sounds, correct mismatched levels, or address phasing issues.
Channel tabs Select the output channel.
Input channel sliders Determine the percentage of the current channels to mix into the output channel. For a stereo
file, for example, an L value of 50 and an R value of 50 results in an output channel that contains equal audio from the
current left and right channels.
Invert Inverts a channel’s phase. (To understand this key audio concept, see How sound waves interact.) Inverting all
channels causes no perceived difference in sound. Inverting only one channel, however, can greatly change the sound.
DeEsser effect
The Amplitude and Compression > DeEsser effect removes sibilance, “ess” sounds heard in speech and singing that can
distort high frequencies.
The graph reveals the processed frequencies. Click the Preview button to see how much audio content exists in
the processed range.
Mode Choose Broadband to uniformly compress all frequencies or Multiband to only compress the sibilance range.
Multiband is best for most audio content but slightly increases processing time.
Threshold Sets the amplitude above which compression occurs.
Last updated 6/16/2016
Page 93

Effects reference
Center Frequency Specifies the frequency at which sibilance is most intense. To verify, adjust this setting while playing
audio.
Bandwidth Determines the frequency range that triggers the compressor.
89
Ti p: To visually adjust Center Frequency and Bandwidth, drag the edges of the selection in the graph.
Output Sibilance Only Lets you hear detected sibilance. Start playback, and fine-tune settings above.
Gain Reduction Shows the compression level of the processed frequencies.
Dynamics Processing effect
The Amplitude And Compression > Dynamics Processing effect can be used as a compressor, limiter, or expander. As
a compressor and limiter, this effect reduces dynamic range, producing consistent volume levels. As an expander, it
increases dynamic range by reducing the level of low-level signals. (With extreme expander settings, you can create a
noise gate that totally eliminates noise below a specific amplitude threshold.)
The Dynamics Processing effect can produce subtle changes that you notice only after repeated listening. When
applying this effect in the Waveform Editor, use a copy of the original file so you can return to the original audio if
necessary.
Use the Broadcast Limiter preset to simulate the processed sound of a contemporary radio station.
Dynamics tab
Graph Depicts input level along the horizontal ruler (x-axis) and the new output level along the vertical ruler (y-axis).
The default graph, with a straight line from the lower left to the upper right, depicts a signal that has been left
untouched; every input level has the same output level. Adjusting the graph changes the relationship between input and
output levels, altering dynamic range.
For example, if a desirable sonic element occurs around -20 dB, you can boost the input signal at that level, but leave
everything else unchanged. You can also draw an inverse line (from the upper left to the lower right) that will
dramatically boost quiet sounds and suppress loud ones.
Add point
Adds control point in graph using numerical input and output levels you specify. This method is more precise than
clicking the graph to add points.
Ti p: To numerically adjust an existing control point, right-click it, and choose Edit Point.
Delete point
Removes selected point from the graph.
Invert
Flips the graph, converting compression into expansion, or vice versa.
Last updated 6/16/2016
Page 94

Effects reference
note: You can invert a graph only if it has points in the two default corners (-100, -100 and 0, 0) and if its output level
increases from left to right (that is, each control point must be higher than the one to its left).
Reset
Resets the graph to its default state.
Spline Curves creates smoother, curved transitions between control points, rather than more abrupt, linear transitions.
About spline curves for graphs.)
(See
Make-Up Gain Boosts the processed signal.
Settings tab
General Provides overall settings.
Look-Ahead Time Addresses transient spikes that can occur at the onset of extremely loud signals that extend beyond
the compressor’s Attack Time settings. Extending Look-Ahead Time causes compression to attack before the audio gets
loud, ensuring that amplitude never exceeds a certain level. Conversely, reducing Look-Ahead Time may be desirable
to enhance the impact of percussive music like drum hits.
Noise Gating Completely silences signals that are expanded below a 50-to-1 ratio.
Level Detector Determines the original input amplitude.
90
Input Gain Applies gain to the signal before it enters the Level Detector.
Attack Time Determines how many milliseconds it takes for the input signal to register a changed amplitude level. For
example, if audio suddenly drops 30 dB, the specified attack time passes before the input registers an amplitude change.
This avoids erroneous amplitude readings due to temporary changes.
Release Time Determines how many milliseconds the current amplitude level is maintained before another amplitude
change can register.
Ti p: Use fast attack and release settings for audio with fast transients, and slower settings for less percussive audio.
Peak mode Determines levels based on amplitude peaks. This mode is a bit more difficult to use than RMS, because
peaks aren’t precisely reflected in the Dynamics graph. However, it can be helpful when audio has loud transient peaks
you want to subdue.
RMS mode Dete rmi nes level s ba sed on t he r oot-m ean -sq uare f ormul a, a n aver agi ng met hod tha t more cl ose ly m atch es
the way people perceive volume. This mode precisely reflects amplitudes in the Dynamics graph. For example, a limiter
(flat horizontal line) at -10 dB reflects an average RMS amplitude of -10 dB.
Gain Processor Amplifies or attenuates the signal depending on the amplitude detected.
Output Gain Applies gain to the output signal after all dynamics processing.
Attack Time Determines how many milliseconds it takes for the output signal to reach the specified level. For example,
if audio suddenly drops 30 dB, the specified attack time passes before the output level changes.
Release Time Determines how many milliseconds the current output level is maintained.
note: If the sum of Attack and Release times is too short (less than about 30 milliseconds), audible artifacts can be heard.
To see good attack and release times for different types of audio content, choose various options from the Presets menu.
Link Channels Processes all channels equally, preserving the stereo or surround balance. For example, a compressed
drum beat on the left channel will reduce the right channel level by an equal amount.
Band Limiting Restricts dynamics processing to a specific frequency range.
Last updated 6/16/2016
Page 95

Effects reference
Low Cutoff Is the lowest frequency that dynamics processing affects.
High Cutoff Is the highest frequency that dynamics processing affects.
Fade Envelope effect
Choose Fade Envelope (Effects > Amplitude and Compression) to reduce amplitude by varying amounts over time.
In the Waveform Editor panel, click the yellow envelope line to add keyframes, and drag them up or down to change
amplitude. To quickly select, reposition, or delete multiple keyframes, see
Select the Spline Curves option to create smoother, curved transitions between keyframes, rather than linear transitions.
See About spline cur ves for graphs.
Adjust automation with keyframes.
Gain Envelope effect
Choose Gain Envelope (Effects > Amplitude and Compression) to boost or reduce amplitude over time.
In the Waveform Editor panel, click the yellow envelope line to add keyframes, and drag them up or down to change
amplitude. To quickly select, reposition, or delete multiple keyframes, see
Select the Spline Curves option to create smoother, curved transitions between keyframes, rather than linear transitions.
See About spline cur ves for graphs.
Adjust automation with keyframes.
91
Hard Limiter effect
The Amplitude And Compression > Hard Limiter effect greatly attenuates audio that rises above a specified threshold.
Typically, limiting is applied with an input boost, a technique that increases overall volume while avoiding distortion.
Maximum Amplitude Sets the maximum sample amplitude allowed.
Ti p: To avoid clipping when working with 16-bit audio, set this value to no more than -0.3 dB. If you set it even lower,
to -3 dB, you’ll have a little more clearance for any future edits.
Input Boost Preamplifies audio before you limit it, making a selection louder without clipping it. As you increase this
level, compression increases. Try extreme settings to achieve the loud, high-impact audio heard in contemporary pop
music.
Look-Ahead Time Sets the amount of time (in milliseconds) generally needed to attenuate the audio before the loudest
peak is hit.
note: Make sure that the value is at least 5 milliseconds. If this value is too small, audible distortion effects may occur.
Release Time Sets the time (in milliseconds) needed for the attenuation to rebound back 12 dB (or roughly the time
needed for audio to resume normal volume if an extremely loud peak is encountered). In general, a setting of around
100 (the default) works well and preserves very low bass frequencies.
note: If this value is too large, audio may remain very quiet and not resume normal levels for a while.
Link Channels Links the loudness of all channels together, preserving the stereo or surround balance.
Last updated 6/16/2016
Page 96

Effects reference
Multiband Compressor effect
The Amplitude And Compression > Multiband Compressor effect lets you independently compress four different
frequency bands. Because each band typically contains unique dynamic content, multiband compression is a
particularly powerful tool for audio mastering.
Controls in the Multiband Compressor let you precisely define crossover frequencies and apply band-specific
compression settings. Click Solo buttons to preview bands in isolation, or Bypass buttons to pass bands through without
processing. After you fine-tune individual bands, select Link Band Controls to adjust them globally, and then optimize
overall volume with the Output Gain slider and Limiter settings.
To change compression settings over time, use automation lanes in the Multitrack Editor. (See Automating track
settings.)
92
A Frequency bands B Crossover markers C Bypassed band (no processing applied) D Amplitude scale E Frequency scale
Crossover Sets the crossover frequencies, which determine the width of each band. Either enter specific Low,
Midrange, and High frequencies, or drag the crossover markers above the graph.
A Solo B Bypass C Threshold slider D Input Level meters E Gain Reduction meters
Solo buttons Let you hear specific frequency bands. Enable one Solo button at a time to hear bands in isolation, or
enable multiple buttons to hear two or more bands together.
Bypass buttons Bypass individual bands so they pass through without processing.
Ti p: Alt-click (Windows) or Option-click (Mac OS) Solo or Bypass buttons to quickly apply a unique setting to one band.
Threshold sliders Set the input level at which compression begins. Possible values range from -60 to 0 dB. The best
setting depends on audio content and musical style. To compress only extreme peaks and retain more dynamic range,
Last updated 6/16/2016
Page 97

Effects reference
try thresholds around 5 dB below the peak input level; to highly compress audio and greatly reduce dynamic range, try
settings around 15 dB below the peak input level.
Input Level meters Measure input amplitude. Double-click the meters to reset peak and clip indicators.
Gain Reduction meters Measure amplitude reduction with red meters that extend from top (minimal reduction) to
bottom (maximum reduction).
Gain Boosts or cuts amplitude after compression. Possible values range from -18 to +18 dB, where 0 is unity gain.
Ratio Sets a compression ratio between 1-to-1 and 30-to-1. For example, a setting of 3.0 outputs 1 dB for every 3 dB
increase above the compression threshold. Typical settings range from 2.0 to 5.0; higher settings produce the extremely
compressed sound often heard in pop music.
Attack Determines how quickly compression is applied when audio exceeds the threshold. Possible values range from
0 to 500 milliseconds. The default, 10 milliseconds, works well for a wide range of audio. Faster settings may work better
for audio with fast transients, but such settings sound unnatural for less percussive audio.
Release Determines how quickly compression stops after audio drops below the threshold. Possible values range from
0 to 5000 milliseconds. The default, 100 milliseconds, works well for a wide range of audio. Try faster settings for audio
with fast transients, and slower settings for less percussive audio.
Output Gain Boosts or cuts overall output level after compression. Possible values range from -18 to +18 dB, where 0
is unity gain. Double-click the meters to reset peak and clip indicators.
93
Limiter Applies limiting after Output Gain, at the end of the signal path, optimizing overall levels. Specify Threshold,
Attack, and Release settings that are less agressive than similar band-specific settings. Then specify a Margin setting to
determine the absolute ceiling relative to 0 dBFS.
Ti p: To create extremely compressed audio, enable the Limiter, and then experiment with very high Output Gain
settings.
Spectrum On Input Displays the frequency spectrum of the input signal, rather than the output signal, in the multiband
graph. To quickly see the amount of compression applied to each band, toggle this option on and off.
Brickwall Limiter Applies immediate, hard limiting at the current Margin setting. (Deselect this option to apply slower
soft limiting, which sounds less compressed but may exceed the Margin setting.)
note: The maximum Attack time for brickwall limiting is 5 ms.
Link Band Controls Lets you globally adjust the compression settings for all bands, while retaining relative differences
between bands.
Ti p: To temporarily link band controls, hold down Alt+Shift (Windows) or Option+Shift (Mac OS). To reset a control
in all bands, hold down Ctrl+Alt+Shift (Windows) or Command+Option+Shift (Mac OS), and click the control.
Normalize effect (Waveform Editor only)
Note: This effect requires offline processing. While it is open, you cannot edit the waveform, adjust selections, or move the
current-time indicator.
The Amplitude And Compression > Normalize effect lets you set a peak level for a file or selection. When you
normalize audio to 100%, you achieve the maximum amplitude that digital audio allows—0 dBFS. If you’re sending
audio to a mastering engineer, however, normalize audio to between –3 and –6 dBFS, providing a cushion for further
processing.
The Normalize effect amplifies the entire file or selection equally. For example, if the original audio reaches a loud peak
of 80% and a quiet low of 20%, normalizing to 100% amplifies the loud peak to 100% and the quiet low to 40%.
Last updated 6/16/2016
Page 98

Effects reference
To apply RMS normalization, choose Effects > Match Volume. If desired, you can apply that command to only one file.
(See Match volume across multiple files.)
Normalize To Sets the percentage of the highest peak relative to the maximum possible amplitude.
94
Ti p: Select dB to enter the Normalize value in decibels instead of a percentage.
Normalize All Channels Equally Uses all channels of a stereo or surround waveform to calculate the amplification
amount. If this option is deselected, the amount is calculated separately for each channel, potentially amplifying one
considerably more than others.
DC Bias Adjust Lets you adjust the position of the waveform in the wave display. Some recording hardware may
introduce a DC bias, causing the recorded waveform to appear to be above or below the normal center line in the wave
display. To center the waveform, set the percentage to zero. To skew the entire selected waveform above or below the
center line, specify a positive or negative percentage.
Single-band Compressor effect
The Amplitude And Compression > Single-band Compressor effect reduces dynamic range, producing consistent
volume levels and increasing perceived loudness. Single-band compression is particularly effective for voice-overs,
because it helps the speaker stand out over musical soundtracks and background audio.
For examples of highly-compressed audio, listen to recordings of modern pop music. By contrast, most jazz recordings
are lightly compressed, while typical classical recordings feature no compression at all.
Threshold Sets the input level at which compression begins. The best setting depends on audio content and style. To
compress only extreme peaks and retain more dynamic range, try thresholds around 5 dB below the peak input level.
To highly compress audio and greatly reduce dynamic range, try settings around 15 dB below the peak input level.
Ratio Sets a compression ratio between 1-to-1 and 30-to-1. For example, a setting of 3 outputs 1 dB for every 3-dB
increase above the threshold. Typical settings range from 2 to 5; higher settings produce the extremely compressed
sound often heard in pop music.
Attack Determines how quickly compression starts after audio exceeds the Threshold setting. The default, 10
milliseconds, works well for a wide range of source material. Use faster settings only for audio with quick transients,
such as percussion recordings.
Release Determines how quickly compression stops when audio drops below the Threshold setting. The default, 100
milliseconds, works well for a wide range of audio. Try faster settings for audio with fast transients, and slower settings
for less percussive audio.
Output Gain Boosts or cuts amplitude after compression. Possible values range from -30 dB to +30 dB, where 0 is unity
gain.
Speech Volume Leveler effect
The Amplitude and Compression > Speech Volume Leveler is a compression effect that optimizes dialogue, evening
out levels and removing background noise.
Last updated 6/16/2016
Page 99

Effects reference
For the best results, do the following:
1 Select audio with the lowest level. Set Target Volume Level and Leveling Amount to the left. Start playback, and
gradually increase the Leveling Amount until speech becomes nicely audible without increasing background noise.
2 Select audio with the highest level, and start playback. Adjust the Target Volume Level until the volume matches the
loudness of the quiet passage you adjusted previously.
3 If necessary, readjust the Leveling Amount to avoid an over-compressed sound.
Here are additional details about each option:
Tar get Volum e Le vel Sets the desired output level relative to zero dBFS. (See Measuring amplitude in dBFS.)
Leveling Amount At low settings, amplifies speech slightly without boosting the noise floor. At high settings, amplifies
the entire signal more as the signal drops closer to the noise floor.
Boost Low Signals Interprets shorter, low-volume passages as speech that should be amplified. For most audio content,
deselect this option to produce smoother sound.
Target Dynamic Range Minimizes background noises while amplifying and leveling only speech.
For best results with most content, specify a Target Dynamic Range value between –45dB and –60dB.
Note: Speci fying a hig her para meter val ue ( up to – 80d B) can sig nif icantly redu ce b ack ground n ois e, b ut app lies l ess le vel ing
and amplification of speech content.Specifying a lower parameter value (down to –30dB) provides better speech leveling,
but may amplify the background noise more than desired.
95
Advanced settings Click the triangle to access the following options:
Compressor Maintains a strong level if the processed signal falls below a threshold relative to zero dBFS.
Noise Gate Eliminates background noise by dramatically reducing output level when the signal drops by an offset you
specify.
Tube-modeled Compressor effect
The Amplitude And Compression > Tube-modeled Compressor effect simulates the warmth of vintage hardware
compressors. Use this effect to add subtle distortion that pleasantly colors audio.
Threshold slider Sets the input level at which compression begins. Possible values range from -60 to 0 dB. The best
setting depends on audio content and musical style. To compress only extreme peaks and retain more dynamic range,
try thresholds around 5 dB below the peak input level; to highly compress audio and greatly reduce dynamic range, try
settings around 15 dB below the peak input level.
Input Level meters To the left of the slider, these meters measure input amplitude. Double-click the meters to reset
peak and clip indicators.
Gain Reduction meters To the right of the slider, these meters measure amplitude reduction with red bars that extend
from top (minimal reduction) to bottom (maximum reduction).
Gain Boosts or cuts amplitude after compression. Possible values range from -18 to +18 dB, where 0 is unity gain.
Ratio Sets a compression ratio between 1-to-1 and 30-to-1. For example, a setting of 3.0 outputs 1 dB for every 3 dB
increase above the compression threshold. Typical settings range from 2.0 to 5.0; higher settings produce the extremely
compressed sound often heard in pop music.
Attack Determines how quickly compression is applied when audio exceeds the threshold. Possible values range from
0 to 500 milliseconds. The default, 10 milliseconds, works well for a wide range of audio. Faster settings may work better
for audio with fast transients, but such settings sound unnatural for less percussive audio.
Last updated 6/16/2016
Page 100

Effects reference
Release Determines how quickly compression stops after audio drops below the threshold. Possible values range from
0 to 5000 milliseconds. The default, 100 milliseconds, works well for a wide range of audio. Try faster settings for audio
with fast transients, and slower settings for less percussive audio.
Volume Envelope effect
The Amplitude And Compression > Volume Envelope effect lets you change volume over time with boosts and fades.
In the Waveform Editor panel, simply drag the yellow line. The top of the panel represents 100% (normal)
amplification; the bottom represents 100% attenuation (silence).
Though the Volume Envelope effect isn’t available in the Multitrack Editor, you can use automation lanes to accomplish
the same task. (See Automating track settings.)
96
Yellow envelope line in Editor panel Drag to adjust amplitude percentage, and click to add keyframes for additional
boosts and fades. To quickly select, reposition, or delete multiple keyframes, see
Spline curves Applies smoother, curved transitions between keyframes, rather than linear transitions. See About spline
curves for graphs.
Adjust automation with keyframes.
More Help topics
Applying effects in the Waveform Editor
Applying effects in the MultitrackEditor
Use effect presets
Mix audio data when pasting
Delay and echo effects
Delays are separate copies of an original signal that reoccur within milliseconds of each other. Echoes are sounds that
are delayed far enough in time so that you hear each as a distinct copy of the original sound. When reverb or chorus
might muddy the mix, both delays and echoes are a great way to add ambience to a track.
To access familiar options from hardware delays, use the Echo effect in Adobe Audition.
Last updated 6/16/2016
 Loading...