

Page 1

Adobe
"OJNBUF CC
Help
Page 2

Legal notices
Legal notices
For legal notices, see http://help.adobe.com/en_US/legalnotices/index.html.
Last updated 6/17/2016
Page 3

Contents
Chapter 1: What's New
New features summary . . . . . . . . . . . . . . . . . . . . . . . . . . . . . . . . . . . . . . . . . . . . . . . . . . . . . . . . . . . . . . . . . . . . . . . . . . . . . . . . . . . . . . . . . . . . . . . . .1
Chapter 2: Platforms
Use Document Type Converter to convert Animate CC projects to other document formats . . . . . . . . . . . . . . . . . . . . . . . . . . . . . 12
Custom Platform Support . . . . . . . . . . . . . . . . . . . . . . . . . . . . . . . . . . . . . . . . . . . . . . . . . . . . . . . . . . . . . . . . . . . . . . . . . . . . . . . . . . . . . . . . . . . . . 13
Create and publish HTML5 Canvas documents in Animate CC . . . . . . . . . . . . . . . . . . . . . . . . . . . . . . . . . . . . . . . . . . . . . . . . . . . . . . . . . . 14
Creating and publishing a WebGL document . . . . . . . . . . . . . . . . . . . . . . . . . . . . . . . . . . . . . . . . . . . . . . . . . . . . . . . . . . . . . . . . . . . . . . . . . . 29
How to package applications for AIR for iOS . . . . . . . . . . . . . . . . . . . . . . . . . . . . . . . . . . . . . . . . . . . . . . . . . . . . . . . . . . . . . . . . . . . . . . . . . . . 34
Publishing AIR for Android applications . . . . . . . . . . . . . . . . . . . . . . . . . . . . . . . . . . . . . . . . . . . . . . . . . . . . . . . . . . . . . . . . . . . . . . . . . . . . . . . 39
Publishing for Adobe AIR for desktop . . . . . . . . . . . . . . . . . . . . . . . . . . . . . . . . . . . . . . . . . . . . . . . . . . . . . . . . . . . . . . . . . . . . . . . . . . . . . . . . . 44
ActionScript publish settings . . . . . . . . . . . . . . . . . . . . . . . . . . . . . . . . . . . . . . . . . . . . . . . . . . . . . . . . . . . . . . . . . . . . . . . . . . . . . . . . . . . . . . . . . 51
Best practices - Organizing ActionScript in an application . . . . . . . . . . . . . . . . . . . . . . . . . . . . . . . . . . . . . . . . . . . . . . . . . . . . . . . . . . . . . . 57
How to use ActionScript with Animate CC . . . . . . . . . . . . . . . . . . . . . . . . . . . . . . . . . . . . . . . . . . . . . . . . . . . . . . . . . . . . . . . . . . . . . . . . . . . . . 58
Best practices - Accessibility guidelines . . . . . . . . . . . . . . . . . . . . . . . . . . . . . . . . . . . . . . . . . . . . . . . . . . . . . . . . . . . . . . . . . . . . . . . . . . . . . . . . 64
Accessibility in the Animate workspace . . . . . . . . . . . . . . . . . . . . . . . . . . . . . . . . . . . . . . . . . . . . . . . . . . . . . . . . . . . . . . . . . . . . . . . . . . . . . . . 68
Writing and managing scripts . . . . . . . . . . . . . . . . . . . . . . . . . . . . . . . . . . . . . . . . . . . . . . . . . . . . . . . . . . . . . . . . . . . . . . . . . . . . . . . . . . . . . . . . . 71
Enabling Support for Custom Platforms . . . . . . . . . . . . . . . . . . . . . . . . . . . . . . . . . . . . . . . . . . . . . . . . . . . . . . . . . . . . . . . . . . . . . . . . . . . . . . . 82
Enabling Support for Custom Platforms . . . . . . . . . . . . . . . . . . . . . . . . . . . . . . . . . . . . . . . . . . . . . . . . . . . . . . . . . . . . . . . . . . . . . . . . . . . . . . . 86
Custom Platform Support API Reference . . . . . . . . . . . . . . . . . . . . . . . . . . . . . . . . . . . . . . . . . . . . . . . . . . . . . . . . . . . . . . . . . . . . . . . . . . . . . . 91
Creating accessible content . . . . . . . . . . . . . . . . . . . . . . . . . . . . . . . . . . . . . . . . . . . . . . . . . . . . . . . . . . . . . . . . . . . . . . . . . . . . . . . . . . . . . . . . . . . 91
Debugging ActionScript 3.0 . . . . . . . . . . . . . . . . . . . . . . . . . . . . . . . . . . . . . . . . . . . . . . . . . . . . . . . . . . . . . . . . . . . . . . . . . . . . . . . . . . . . . . . . . 103
Enabling Support for Custom Platforms . . . . . . . . . . . . . . . . . . . . . . . . . . . . . . . . . . . . . . . . . . . . . . . . . . . . . . . . . . . . . . . . . . . . . . . . . . . . . . 107
iii
Chapter 3: Workspace and workflow
Using Creative Cloud Libraries and Adobe Animate CC . . . . . . . . . . . . . . . . . . . . . . . . . . . . . . . . . . . . . . . . . . . . . . . . . . . . . . . . . . . . . . . . 112
Use the Stage and Tools panel for Animate . . . . . . . . . . . . . . . . . . . . . . . . . . . . . . . . . . . . . . . . . . . . . . . . . . . . . . . . . . . . . . . . . . . . . . . . . . . 116
Animate workflow and workspace . . . . . . . . . . . . . . . . . . . . . . . . . . . . . . . . . . . . . . . . . . . . . . . . . . . . . . . . . . . . . . . . . . . . . . . . . . . . . . . . . . . 124
Using Typekit Web fonts in HTML5 Canvas documents . . . . . . . . . . . . . . . . . . . . . . . . . . . . . . . . . . . . . . . . . . . . . . . . . . . . . . . . . . . . . . . . 132
Timelines and ActionScript . . . . . . . . . . . . . . . . . . . . . . . . . . . . . . . . . . . . . . . . . . . . . . . . . . . . . . . . . . . . . . . . . . . . . . . . . . . . . . . . . . . . . . . . . . 135
Working with multiple timelines . . . . . . . . . . . . . . . . . . . . . . . . . . . . . . . . . . . . . . . . . . . . . . . . . . . . . . . . . . . . . . . . . . . . . . . . . . . . . . . . . . . . . 138
Set preferences . . . . . . . . . . . . . . . . . . . . . . . . . . . . . . . . . . . . . . . . . . . . . . . . . . . . . . . . . . . . . . . . . . . . . . . . . . . . . . . . . . . . . . . . . . . . . . . . . . . . . . 139
Using Animate CC authoring panels . . . . . . . . . . . . . . . . . . . . . . . . . . . . . . . . . . . . . . . . . . . . . . . . . . . . . . . . . . . . . . . . . . . . . . . . . . . . . . . . . . 144
Create timeline layers with Animate CC . . . . . . . . . . . . . . . . . . . . . . . . . . . . . . . . . . . . . . . . . . . . . . . . . . . . . . . . . . . . . . . . . . . . . . . . . . . . . . 149
Create a sprite sheet . . . . . . . . . . . . . . . . . . . . . . . . . . . . . . . . . . . . . . . . . . . . . . . . . . . . . . . . . . . . . . . . . . . . . . . . . . . . . . . . . . . . . . . . . . . . . . . . . 156
Moving and copying objects . . . . . . . . . . . . . . . . . . . . . . . . . . . . . . . . . . . . . . . . . . . . . . . . . . . . . . . . . . . . . . . . . . . . . . . . . . . . . . . . . . . . . . . . . 157
Sync Animate Preferences with Creative Cloud . . . . . . . . . . . . . . . . . . . . . . . . . . . . . . . . . . . . . . . . . . . . . . . . . . . . . . . . . . . . . . . . . . . . . . . 158
Working with Adobe Color panel . . . . . . . . . . . . . . . . . . . . . . . . . . . . . . . . . . . . . . . . . . . . . . . . . . . . . . . . . . . . . . . . . . . . . . . . . . . . . . . . . . . . . 162
Tem p la te s . . . . . . . . . . . . . . . . . . . . . . . . . . . . . . . . . . . . . . . . . . . . . . . . . . . . . . . . . . . . . . . . . . . . . . . . . . . . . . . . . . . . . . . . . . . . . . . . . . . . . . . . . . . 164
Find and Replace in Animate . . . . . . . . . . . . . . . . . . . . . . . . . . . . . . . . . . . . . . . . . . . . . . . . . . . . . . . . . . . . . . . . . . . . . . . . . . . . . . . . . . . . . . . . . 164
Undo, redo, and the History panel . . . . . . . . . . . . . . . . . . . . . . . . . . . . . . . . . . . . . . . . . . . . . . . . . . . . . . . . . . . . . . . . . . . . . . . . . . . . . . . . . . . . 168
Keyboard shortcuts . . . . . . . . . . . . . . . . . . . . . . . . . . . . . . . . . . . . . . . . . . . . . . . . . . . . . . . . . . . . . . . . . . . . . . . . . . . . . . . . . . . . . . . . . . . . . . . . . . 170
How to use the Timeline in Animate . . . . . . . . . . . . . . . . . . . . . . . . . . . . . . . . . . . . . . . . . . . . . . . . . . . . . . . . . . . . . . . . . . . . . . . . . . . . . . . . . . 172
Last updated 6/17/2016
Page 4

ANIMATE
Content s
Chapter 4: Animation and Interactivity
Using Bone tool animation in Animate CC . . . . . . . . . . . . . . . . . . . . . . . . . . . . . . . . . . . . . . . . . . . . . . . . . . . . . . . . . . . . . . . . . . . . . . . . . . . . 176
Animation Guide . . . . . . . . . . . . . . . . . . . . . . . . . . . . . . . . . . . . . . . . . . . . . . . . . . . . . . . . . . . . . . . . . . . . . . . . . . . . . . . . . . . . . . . . . . . . . . . . . . . . 185
How to work with classic tween animation in Animate CC . . . . . . . . . . . . . . . . . . . . . . . . . . . . . . . . . . . . . . . . . . . . . . . . . . . . . . . . . . . . . 189
How to edit motion tweens using Motion Editor . . . . . . . . . . . . . . . . . . . . . . . . . . . . . . . . . . . . . . . . . . . . . . . . . . . . . . . . . . . . . . . . . . . . . . 198
Shape tweening . . . . . . . . . . . . . . . . . . . . . . . . . . . . . . . . . . . . . . . . . . . . . . . . . . . . . . . . . . . . . . . . . . . . . . . . . . . . . . . . . . . . . . . . . . . . . . . . . . . . . 204
How to use frames and keyframes in Animate CC . . . . . . . . . . . . . . . . . . . . . . . . . . . . . . . . . . . . . . . . . . . . . . . . . . . . . . . . . . . . . . . . . . . . . 210
Frame-by-frame animation in Animate CC . . . . . . . . . . . . . . . . . . . . . . . . . . . . . . . . . . . . . . . . . . . . . . . . . . . . . . . . . . . . . . . . . . . . . . . . . . . . 212
Best practices - Advertising with Animate CC . . . . . . . . . . . . . . . . . . . . . . . . . . . . . . . . . . . . . . . . . . . . . . . . . . . . . . . . . . . . . . . . . . . . . . . . . 216
Animation basics in Animate CC . . . . . . . . . . . . . . . . . . . . . . . . . . . . . . . . . . . . . . . . . . . . . . . . . . . . . . . . . . . . . . . . . . . . . . . . . . . . . . . . . . . . . 218
Add interactivity with code snippets in Animate CC . . . . . . . . . . . . . . . . . . . . . . . . . . . . . . . . . . . . . . . . . . . . . . . . . . . . . . . . . . . . . . . . . . . 223
Custom Brushes . . . . . . . . . . . . . . . . . . . . . . . . . . . . . . . . . . . . . . . . . . . . . . . . . . . . . . . . . . . . . . . . . . . . . . . . . . . . . . . . . . . . . . . . . . . . . . . . . . . . . 225
How to create buttons with Animate CC . . . . . . . . . . . . . . . . . . . . . . . . . . . . . . . . . . . . . . . . . . . . . . . . . . . . . . . . . . . . . . . . . . . . . . . . . . . . . . 228
Working with multiple timelines . . . . . . . . . . . . . . . . . . . . . . . . . . . . . . . . . . . . . . . . . . . . . . . . . . . . . . . . . . . . . . . . . . . . . . . . . . . . . . . . . . . . . 230
How to work with scenes in Animate . . . . . . . . . . . . . . . . . . . . . . . . . . . . . . . . . . . . . . . . . . . . . . . . . . . . . . . . . . . . . . . . . . . . . . . . . . . . . . . . . 231
How to use mask layers in Adobe Animate CC . . . . . . . . . . . . . . . . . . . . . . . . . . . . . . . . . . . . . . . . . . . . . . . . . . . . . . . . . . . . . . . . . . . . . . . . 232
Adding custom eases . . . . . . . . . . . . . . . . . . . . . . . . . . . . . . . . . . . . . . . . . . . . . . . . . . . . . . . . . . . . . . . . . . . . . . . . . . . . . . . . . . . . . . . . . . . . . . . . 234
Setting up animation tween spans . . . . . . . . . . . . . . . . . . . . . . . . . . . . . . . . . . . . . . . . . . . . . . . . . . . . . . . . . . . . . . . . . . . . . . . . . . . . . . . . . . . 235
Animate position with a tween . . . . . . . . . . . . . . . . . . . . . . . . . . . . . . . . . . . . . . . . . . . . . . . . . . . . . . . . . . . . . . . . . . . . . . . . . . . . . . . . . . . . . . 238
Creating a Motion Tween Animation . . . . . . . . . . . . . . . . . . . . . . . . . . . . . . . . . . . . . . . . . . . . . . . . . . . . . . . . . . . . . . . . . . . . . . . . . . . . . . . . . 239
Create tween animation . . . . . . . . . . . . . . . . . . . . . . . . . . . . . . . . . . . . . . . . . . . . . . . . . . . . . . . . . . . . . . . . . . . . . . . . . . . . . . . . . . . . . . . . . . . . . 243
Creating and Applying Motion Presets . . . . . . . . . . . . . . . . . . . . . . . . . . . . . . . . . . . . . . . . . . . . . . . . . . . . . . . . . . . . . . . . . . . . . . . . . . . . . . . 246
Editing the motion path of a tween animation . . . . . . . . . . . . . . . . . . . . . . . . . . . . . . . . . . . . . . . . . . . . . . . . . . . . . . . . . . . . . . . . . . . . . . . . 250
Setting up animation tween spans . . . . . . . . . . . . . . . . . . . . . . . . . . . . . . . . . . . . . . . . . . . . . . . . . . . . . . . . . . . . . . . . . . . . . . . . . . . . . . . . . . . 253
Motion tween and ActionScript 3.0 . . . . . . . . . . . . . . . . . . . . . . . . . . . . . . . . . . . . . . . . . . . . . . . . . . . . . . . . . . . . . . . . . . . . . . . . . . . . . . . . . . 255
iv
Chapter 5: Multimedia and Video
Exporting SVG files . . . . . . . . . . . . . . . . . . . . . . . . . . . . . . . . . . . . . . . . . . . . . . . . . . . . . . . . . . . . . . . . . . . . . . . . . . . . . . . . . . . . . . . . . . . . . . . . . . 256
How to use sound in Adobe Animate . . . . . . . . . . . . . . . . . . . . . . . . . . . . . . . . . . . . . . . . . . . . . . . . . . . . . . . . . . . . . . . . . . . . . . . . . . . . . . . . . 258
Create video files for use in Animate CC . . . . . . . . . . . . . . . . . . . . . . . . . . . . . . . . . . . . . . . . . . . . . . . . . . . . . . . . . . . . . . . . . . . . . . . . . . . . . . 265
How to add video to an Animate document . . . . . . . . . . . . . . . . . . . . . . . . . . . . . . . . . . . . . . . . . . . . . . . . . . . . . . . . . . . . . . . . . . . . . . . . . 270
Working with video cue points . . . . . . . . . . . . . . . . . . . . . . . . . . . . . . . . . . . . . . . . . . . . . . . . . . . . . . . . . . . . . . . . . . . . . . . . . . . . . . . . . . . . . . . 276
Transforming and combining graphic objects in Animate CC . . . . . . . . . . . . . . . . . . . . . . . . . . . . . . . . . . . . . . . . . . . . . . . . . . . . . . . . . . 277
Work ing with and create symbol instances in Animate CC . . . . . . . . . . . . . . . . . . . . . . . . . . . . . . . . . . . . . . . . . . . . . . . . . . . . . . . . . . . . 282
Draw and create objects with Animate CC . . . . . . . . . . . . . . . . . . . . . . . . . . . . . . . . . . . . . . . . . . . . . . . . . . . . . . . . . . . . . . . . . . . . . . . . . . . . 288
Color Panels in Animate CC . . . . . . . . . . . . . . . . . . . . . . . . . . . . . . . . . . . . . . . . . . . . . . . . . . . . . . . . . . . . . . . . . . . . . . . . . . . . . . . . . . . . . . . . . . 294
Strokes, fills, and gradients with Animate CC . . . . . . . . . . . . . . . . . . . . . . . . . . . . . . . . . . . . . . . . . . . . . . . . . . . . . . . . . . . . . . . . . . . . . . . . . . 301
Draw lines & shapes with Adobe Animate . . . . . . . . . . . . . . . . . . . . . . . . . . . . . . . . . . . . . . . . . . . . . . . . . . . . . . . . . . . . . . . . . . . . . . . . . . . . 309
Arranging objects . . . . . . . . . . . . . . . . . . . . . . . . . . . . . . . . . . . . . . . . . . . . . . . . . . . . . . . . . . . . . . . . . . . . . . . . . . . . . . . . . . . . . . . . . . . . . . . . . . . 322
Automating tasks with the Commands menu . . . . . . . . . . . . . . . . . . . . . . . . . . . . . . . . . . . . . . . . . . . . . . . . . . . . . . . . . . . . . . . . . . . . . . . . . 324
Apply patterns with the Spray Brushtool . . . . . . . . . . . . . . . . . . . . . . . . . . . . . . . . . . . . . . . . . . . . . . . . . . . . . . . . . . . . . . . . . . . . . . . . . . . . . 325
Applying blend modes . . . . . . . . . . . . . . . . . . . . . . . . . . . . . . . . . . . . . . . . . . . . . . . . . . . . . . . . . . . . . . . . . . . . . . . . . . . . . . . . . . . . . . . . . . . . . . 326
3D graphics . . . . . . . . . . . . . . . . . . . . . . . . . . . . . . . . . . . . . . . . . . . . . . . . . . . . . . . . . . . . . . . . . . . . . . . . . . . . . . . . . . . . . . . . . . . . . . . . . . . . . . . . . 329
Exporting Sounds . . . . . . . . . . . . . . . . . . . . . . . . . . . . . . . . . . . . . . . . . . . . . . . . . . . . . . . . . . . . . . . . . . . . . . . . . . . . . . . . . . . . . . . . . . . . . . . . . . . 336
Work with the libraries in Animate CC . . . . . . . . . . . . . . . . . . . . . . . . . . . . . . . . . . . . . . . . . . . . . . . . . . . . . . . . . . . . . . . . . . . . . . . . . . . . . . . . 339
How to embed fonts for consistent text appearance . . . . . . . . . . . . . . . . . . . . . . . . . . . . . . . . . . . . . . . . . . . . . . . . . . . . . . . . . . . . . . . . . . 344
Drawing preferences . . . . . . . . . . . . . . . . . . . . . . . . . . . . . . . . . . . . . . . . . . . . . . . . . . . . . . . . . . . . . . . . . . . . . . . . . . . . . . . . . . . . . . . . . . . . . . . . 345
Last updated 6/17/2016
Page 5

ANIMATE
Content s
Scaling and caching symbols . . . . . . . . . . . . . . . . . . . . . . . . . . . . . . . . . . . . . . . . . . . . . . . . . . . . . . . . . . . . . . . . . . . . . . . . . . . . . . . . . . . . . . . . 346
Graphic filters . . . . . . . . . . . . . . . . . . . . . . . . . . . . . . . . . . . . . . . . . . . . . . . . . . . . . . . . . . . . . . . . . . . . . . . . . . . . . . . . . . . . . . . . . . . . . . . . . . . . . . . 349
Sharing library assets across files . . . . . . . . . . . . . . . . . . . . . . . . . . . . . . . . . . . . . . . . . . . . . . . . . . . . . . . . . . . . . . . . . . . . . . . . . . . . . . . . . . . . . 358
Reshape lines and shapes . . . . . . . . . . . . . . . . . . . . . . . . . . . . . . . . . . . . . . . . . . . . . . . . . . . . . . . . . . . . . . . . . . . . . . . . . . . . . . . . . . . . . . . . . . . . 362
Working with Fireworks files . . . . . . . . . . . . . . . . . . . . . . . . . . . . . . . . . . . . . . . . . . . . . . . . . . . . . . . . . . . . . . . . . . . . . . . . . . . . . . . . . . . . . . . . . 365
Using Animate CC with Adobe Scout . . . . . . . . . . . . . . . . . . . . . . . . . . . . . . . . . . . . . . . . . . . . . . . . . . . . . . . . . . . . . . . . . . . . . . . . . . . . . . . . . 367
Working with Text Layout Framework (TLF) text . . . . . . . . . . . . . . . . . . . . . . . . . . . . . . . . . . . . . . . . . . . . . . . . . . . . . . . . . . . . . . . . . . . . . . 368
Working with Illustrator AI files in Animate CC . . . . . . . . . . . . . . . . . . . . . . . . . . . . . . . . . . . . . . . . . . . . . . . . . . . . . . . . . . . . . . . . . . . . . . . . 382
Working with InDesign files in Animate . . . . . . . . . . . . . . . . . . . . . . . . . . . . . . . . . . . . . . . . . . . . . . . . . . . . . . . . . . . . . . . . . . . . . . . . . . . . . . 397
Working with symbols in Animate CC . . . . . . . . . . . . . . . . . . . . . . . . . . . . . . . . . . . . . . . . . . . . . . . . . . . . . . . . . . . . . . . . . . . . . . . . . . . . . . . . 397
Check spelling . . . . . . . . . . . . . . . . . . . . . . . . . . . . . . . . . . . . . . . . . . . . . . . . . . . . . . . . . . . . . . . . . . . . . . . . . . . . . . . . . . . . . . . . . . . . . . . . . . . . . . . 402
Chapter 6: Exporting and Publishing
How to export files from Animate CC . . . . . . . . . . . . . . . . . . . . . . . . . . . . . . . . . . . . . . . . . . . . . . . . . . . . . . . . . . . . . . . . . . . . . . . . . . . . . . . . . 404
OAM publishing . . . . . . . . . . . . . . . . . . . . . . . . . . . . . . . . . . . . . . . . . . . . . . . . . . . . . . . . . . . . . . . . . . . . . . . . . . . . . . . . . . . . . . . . . . . . . . . . . . . . . 406
Publishing AS3 documents . . . . . . . . . . . . . . . . . . . . . . . . . . . . . . . . . . . . . . . . . . . . . . . . . . . . . . . . . . . . . . . . . . . . . . . . . . . . . . . . . . . . . . . . . . 408
Export QuickTime video files . . . . . . . . . . . . . . . . . . . . . . . . . . . . . . . . . . . . . . . . . . . . . . . . . . . . . . . . . . . . . . . . . . . . . . . . . . . . . . . . . . . . . . . . . 412
Controlling external video playback with ActionScript . . . . . . . . . . . . . . . . . . . . . . . . . . . . . . . . . . . . . . . . . . . . . . . . . . . . . . . . . . . . . . . . 412
Best practices - Tips for creating content for mobile devices . . . . . . . . . . . . . . . . . . . . . . . . . . . . . . . . . . . . . . . . . . . . . . . . . . . . . . . . . . . 417
Best practices - Video conventions . . . . . . . . . . . . . . . . . . . . . . . . . . . . . . . . . . . . . . . . . . . . . . . . . . . . . . . . . . . . . . . . . . . . . . . . . . . . . . . . . . . 423
Best practices - SWF application authoring guidelines . . . . . . . . . . . . . . . . . . . . . . . . . . . . . . . . . . . . . . . . . . . . . . . . . . . . . . . . . . . . . . . . 425
Best practices - Structuring FLA files . . . . . . . . . . . . . . . . . . . . . . . . . . . . . . . . . . . . . . . . . . . . . . . . . . . . . . . . . . . . . . . . . . . . . . . . . . . . . . . . . . 429
Best Practices to optimize FLA files for Animate CC . . . . . . . . . . . . . . . . . . . . . . . . . . . . . . . . . . . . . . . . . . . . . . . . . . . . . . . . . . . . . . . . . . . 431
Best practices - Behaviors conventions . . . . . . . . . . . . . . . . . . . . . . . . . . . . . . . . . . . . . . . . . . . . . . . . . . . . . . . . . . . . . . . . . . . . . . . . . . . . . . . 440
ActionScript publish settings . . . . . . . . . . . . . . . . . . . . . . . . . . . . . . . . . . . . . . . . . . . . . . . . . . . . . . . . . . . . . . . . . . . . . . . . . . . . . . . . . . . . . . . . 442
Specify publish settings for Animate . . . . . . . . . . . . . . . . . . . . . . . . . . . . . . . . . . . . . . . . . . . . . . . . . . . . . . . . . . . . . . . . . . . . . . . . . . . . . . . . . 448
Working with Adobe Premiere Pro and After Effects . . . . . . . . . . . . . . . . . . . . . . . . . . . . . . . . . . . . . . . . . . . . . . . . . . . . . . . . . . . . . . . . . . 465
Working with Animate and FlashBuilder . . . . . . . . . . . . . . . . . . . . . . . . . . . . . . . . . . . . . . . . . . . . . . . . . . . . . . . . . . . . . . . . . . . . . . . . . . . . . . 468
Exporting Projector files . . . . . . . . . . . . . . . . . . . . . . . . . . . . . . . . . . . . . . . . . . . . . . . . . . . . . . . . . . . . . . . . . . . . . . . . . . . . . . . . . . . . . . . . . . . . . 470
Export Video with Animate CC . . . . . . . . . . . . . . . . . . . . . . . . . . . . . . . . . . . . . . . . . . . . . . . . . . . . . . . . . . . . . . . . . . . . . . . . . . . . . . . . . . . . . . . 471
HTML publishing templates . . . . . . . . . . . . . . . . . . . . . . . . . . . . . . . . . . . . . . . . . . . . . . . . . . . . . . . . . . . . . . . . . . . . . . . . . . . . . . . . . . . . . . . . . . 473
v
Last updated 6/17/2016
Page 6
Chapter 1: What's New
New features summary
Adobe® Flash Professional® CC is now Adobe® Animate® CC.
Adobe Animate CC lets you create vector animations, advertisements, multimedia content, immersive experiences,
applications, games, and more, in a timeline-based authoring environment. Animate offers native support for multiple
outputs such as HTML5 Canvas and WebGL, and is extensible to support custom formats such as SnapSVG.
1
Animate’s flexibility with output formats ensure that your content can be viewed anywhere, without the need for plugins.
Animate also offers best in class drawing and illustration tools and powerful integration with Adobe CreativeSync. As
Animate CC is part of Adobe Creative Cloud, you get access to all the latest updates and future releases the moment
they’re available. Learn more about
The latest update to Animate CC 2015 release (2015.2) introduces new features such as Pattern brushes, Frame picker,
Layer transparency, improved web publishing options, and other enhancements.
Creative Cloud.
Adobe Animate CC 2015.2 release | June 2016
The 2015.2 release introduced exciting new features such as:
• Pattern brushes
• Frame picker
• Layer transparency
• Improved web publishing options
• Merging JSON/JS code
• Embed JavaScript into HTML
• Support for transparent canvas background
• HiDPI compatible HTML5 canvas output
• Responsive scaling
• Transparent and responsive OAMs
• Author-time bitmap snapping
Last updated 6/17/2016
Page 7

What's New
• Preloader
• HTML5 canvas publish template improvements
• JSAPI support to import and export HTML templates for canvas documents
• Publish canvas assets to root folder
• Center stage
• Other enhancements
• User-defined colored onion skinning
• Pinscript
• Advanced PSD import options
• Advanced AI import options
• Turbo charged performance on windows platform
• Improved paint brush interactions
• Latest flash player and AIR SDK integration
2
Pattern brushes
New in Animate CC 2015.2 | June 2016
Learn how to use Pattern brushes to paint a vector pattern along the path or stretch to its entire length. Use the
ntegrated global library within Animate to use Art and Pattern brushes. In addition to the default brush presets, you
i
can import new Pattern Brushes to your Animate document using the CC Libraries.
Last updated 6/17/2016
Page 8

What's New
3
For more information on this new feature, see the Pattern brushes.
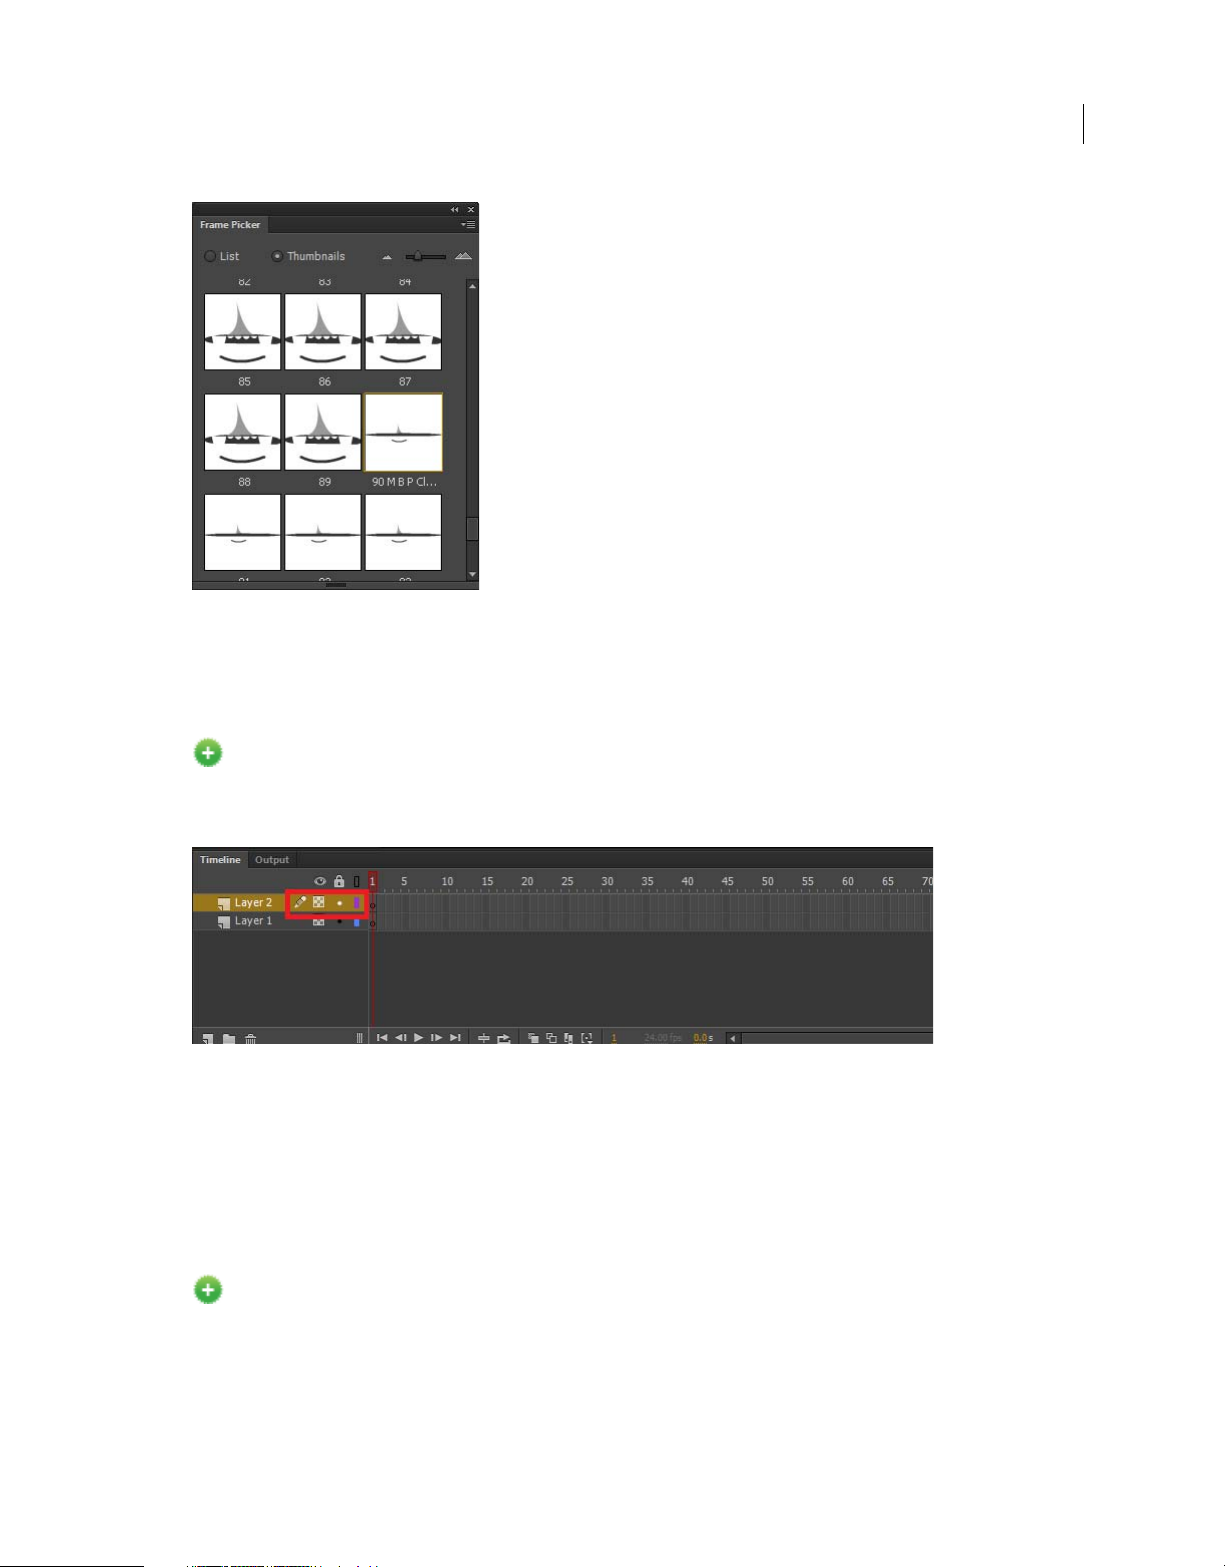
Frame picker
New in Animate CC 2015.2 | June 2016
Use frame picker to visually preview and choose the first frame for a graphic symbol. In previous releases, you could
not preview the frames without getting within the symbol. This feature enhances the user experience for animation
workflows such as Lip Sync.
Last updated 6/17/2016
Page 9
What's New
For more information on this new feature, see Frame Picker
4
Layer transparency
New in Animate CC 2015.2 | June 2016
Animate introduces the capability to set the visibility of the layer to transparent. To do so, Shift+Click on the eye
column in the timeline to set the visibility to transparent.
For more information, see Layer transparency.
Improved web publishing options
Merging JSON/JS code
New in Animate CC 2015.2 | June 2016
Animate embeds JSON file into JS. When you create a Spritesheet during canvas publishing, no external Json file is
created and is included within the JS instead by default.
With this change, you can even preview the published files locally without hosting them on a server (as before).
For more information on this new feature, see Merging JSON/JS code.
Last updated 6/17/2016
Page 10
What's New
Embed JavaScript into HTML
New in Animate CC 2015.2 | June 2016
Animate introduces the capability to include JS file within the HTML file during canvas publishing.
5
For more information on this new feature, see Embed JavaScript into HTML
Support for transparent canvas background
New in Animate CC 2015.2 | June 2016
Want to create a transparent canvas during publishing to view the underlying HTML content? You can now set the
canvas background to transparent. To do so, use the Alpha % to set the transparency level and the No Color swatch
option to completely set the canvas stage to transparent.
For more information on this new feature, see Support for transparent background.
HiDPI compatible HTML5 canvas output
New in Animate CC 2015.2 | June 2016
Animate generated output is now HiDPI compliant and delivers a sharper output on high resolution displays.
For more information on this new feature, see HiDPI compatible HTML5 canvas output.
Last updated 6/17/2016
Page 11
What's New
Responsive scaling
New in Animate CC 2015.2 | June 2016
Want to create a responsive animation? Learn how Animate resizes the published output based on various form factors
to deliver a responsive, sharper, and a crisper HiDPI compliant output.
6
For more information on this new feature, see Responsive scaling.
Transparent and responsive OAMs
You can now generate transparent and responsive OAMs from Animate and directly embed them within Muse,
Captivate, and Dreamweaver.
For more information, see OAM publishing
Author-time bitmap snapping
New in Animate CC 2015.2 | June 2016
Learn how to snap the bitmaps to the nearest pixels during author-time so that they look sharper on canvas. In previous
releases, the bitmaps blurred on the canvas and did not provide an optimum user experience. From this release
onwards, when publishing an HTML canvas document, Animate ensures that the bitmaps are snapped to the nearest
pixels so that they look sharper on the canvas.
For more information on this new feature, see Author-time bitmap snapping.
Preloader in HTML5 canvas
New in Animate CC 2015.2 | June 2016
Preloader is an animated GIF which is displayed when the scripts and assets required to render an animation is loading.
Once the assets are loaded, the preloader is hidden and the actual animation is displayed.
Last updated 6/17/2016
Page 12
What's New
For more information on this new feature, see Basic settings
HTML5 canvas publish template improvements
New in Animate CC 2015.2 | June 2016
Learn how Animate has modularized the HTML 5 canvas template for better customizations and provides more control
over published outputs.
For more information on this new feature, see HTML 5 canvas template improvements.
JSAPI support to import and export HTML templates for canvas documents
New in Animate CC 2015.2 | June 2016
Use new JSAPIs that support import and export of HTML templates for canvas documents.
For more information on this new feature, see JSAPI support.
7
Publish canvas assets to root folder
New in Animate CC 2015.2 | June 2016
Use this feature to publish canvas assets to the root folder instead of the sub folders.
Last updated 6/17/2016
Page 13
What's New
For more information on this new feature, see Publish canvas assets to root folder.
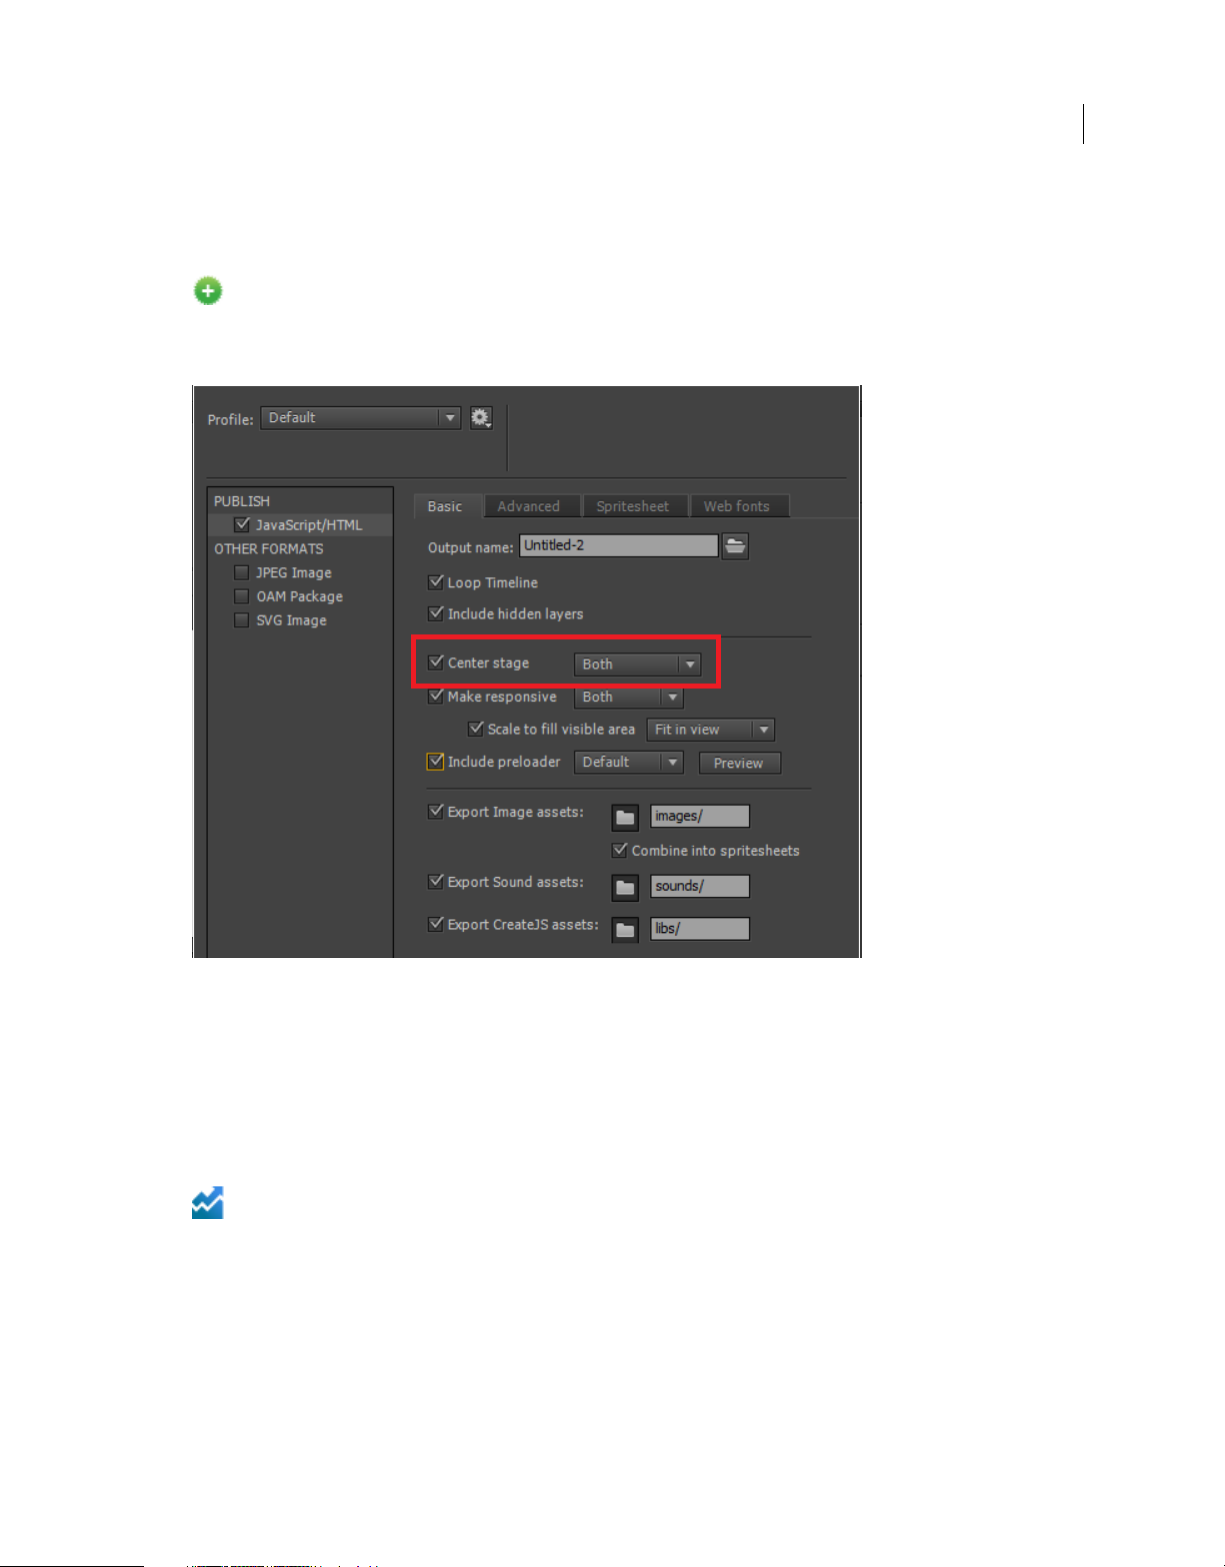
Center stage
New in Animate CC 2015.2 | June 2016
Improve your user experience by using the various alignment options to display the canvas in the center of the browser
window. Select options to center the stage horizontally, vertically or both.
8
For more information on this new feature, see Center stage.
Other enhancements
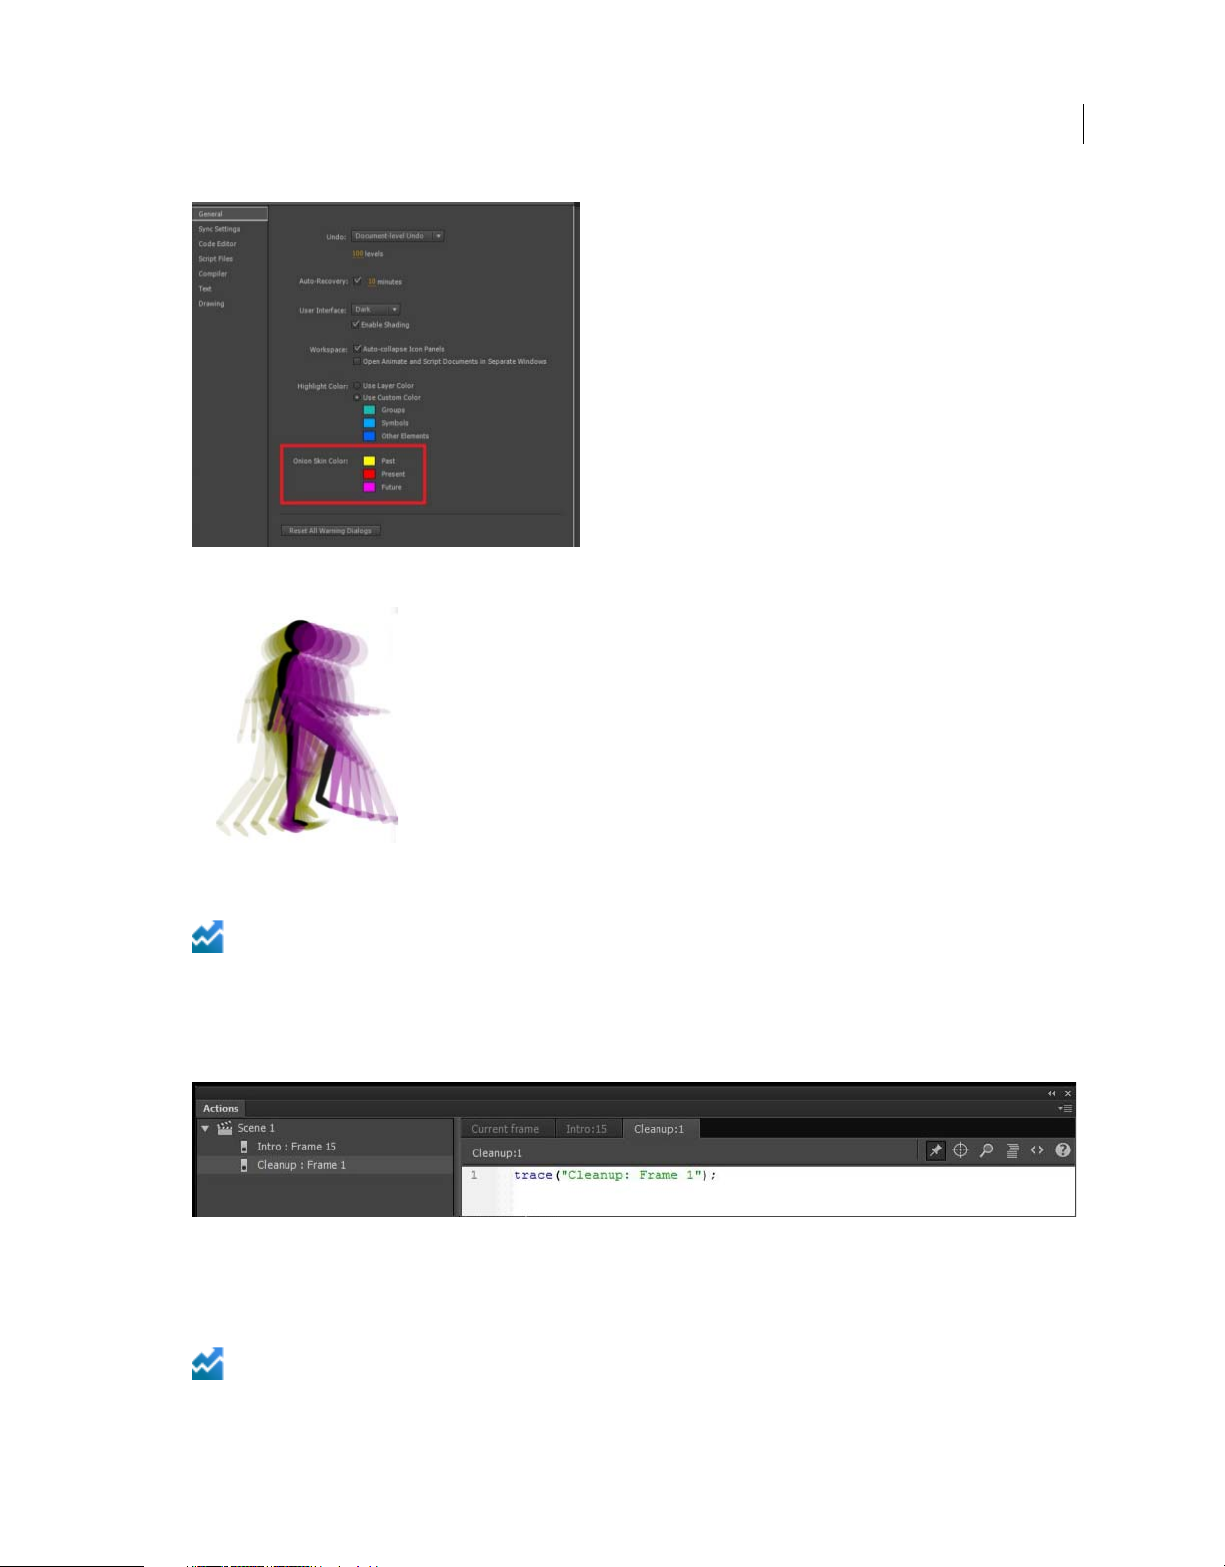
User-defined colored onion skinning
Enhanced in Adobe Animate CC 2015.2 | June 2016
Use customized onion skinning color coding to help you distinguish between the past, present, and future frames.
Onion skin frames that move away from active frame appear with progressively decreasing transparency.
For more information on this enhanced feature, refer Use onion skinning
Last updated 6/17/2016
Page 14
What's New
9
Pinscript
Enhanced in Adobe Animate CC 2015.2 | June 2016
Use the Pin Script feature to pin tabs of individual scripts in the Actionscript pane and move them accordingly. This
feature is useful if you have not organized the code within your FLA file into one central location or if you are using
multiple scripts. You can pin a script to retain the open location of the code in the Actions panel and toggle between
the open scripts.
For more information on this enhanced feature, refer Overview of the Actions panel
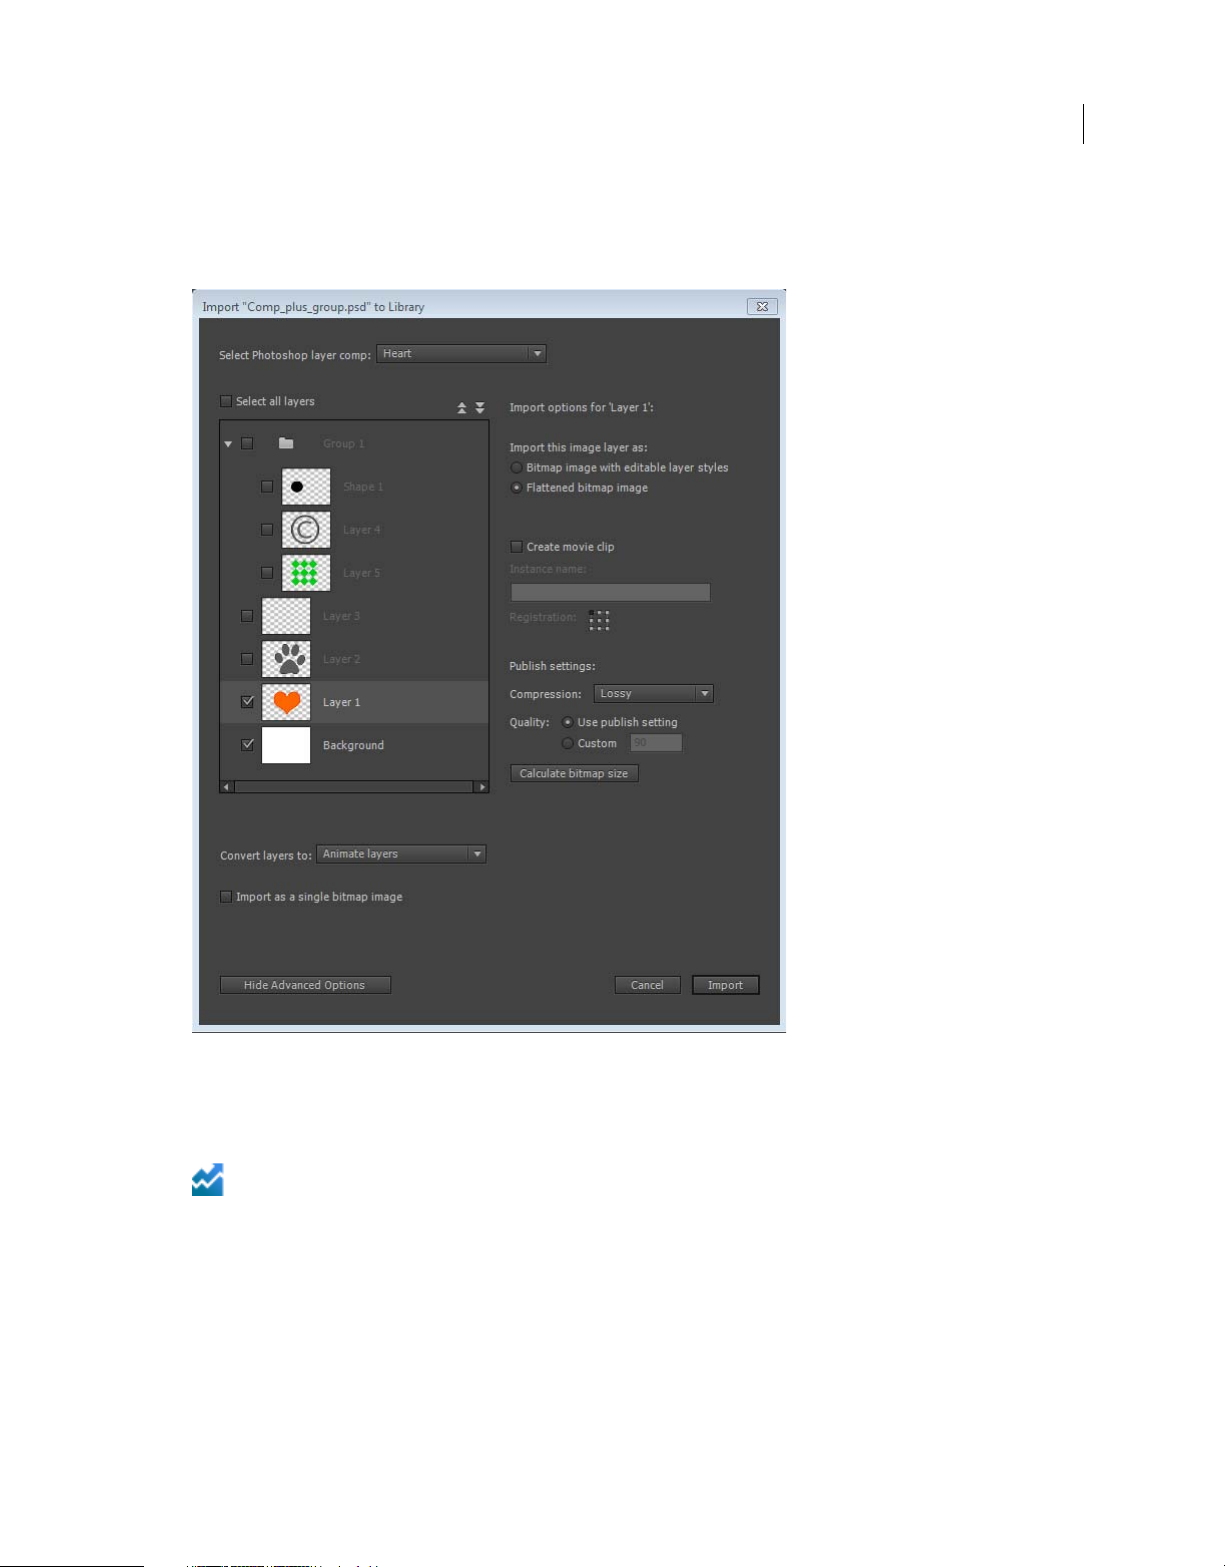
Advanced PSD import options
Enhanced in Adobe Animate CC 2015.2 | June 2016
Last updated 6/17/2016
Page 15
What's New
Animate can import still images in many formats, but you usually use the native Photoshop PSD format when
importing still images from Photoshop into Animate. When importing a PSD file, Animate preserves many of the
attributes that were applied in Photoshop and provides options to maintain the visual fidelity of the image.
10
For more information on this enhanced feature, see Advanced PSD import options.
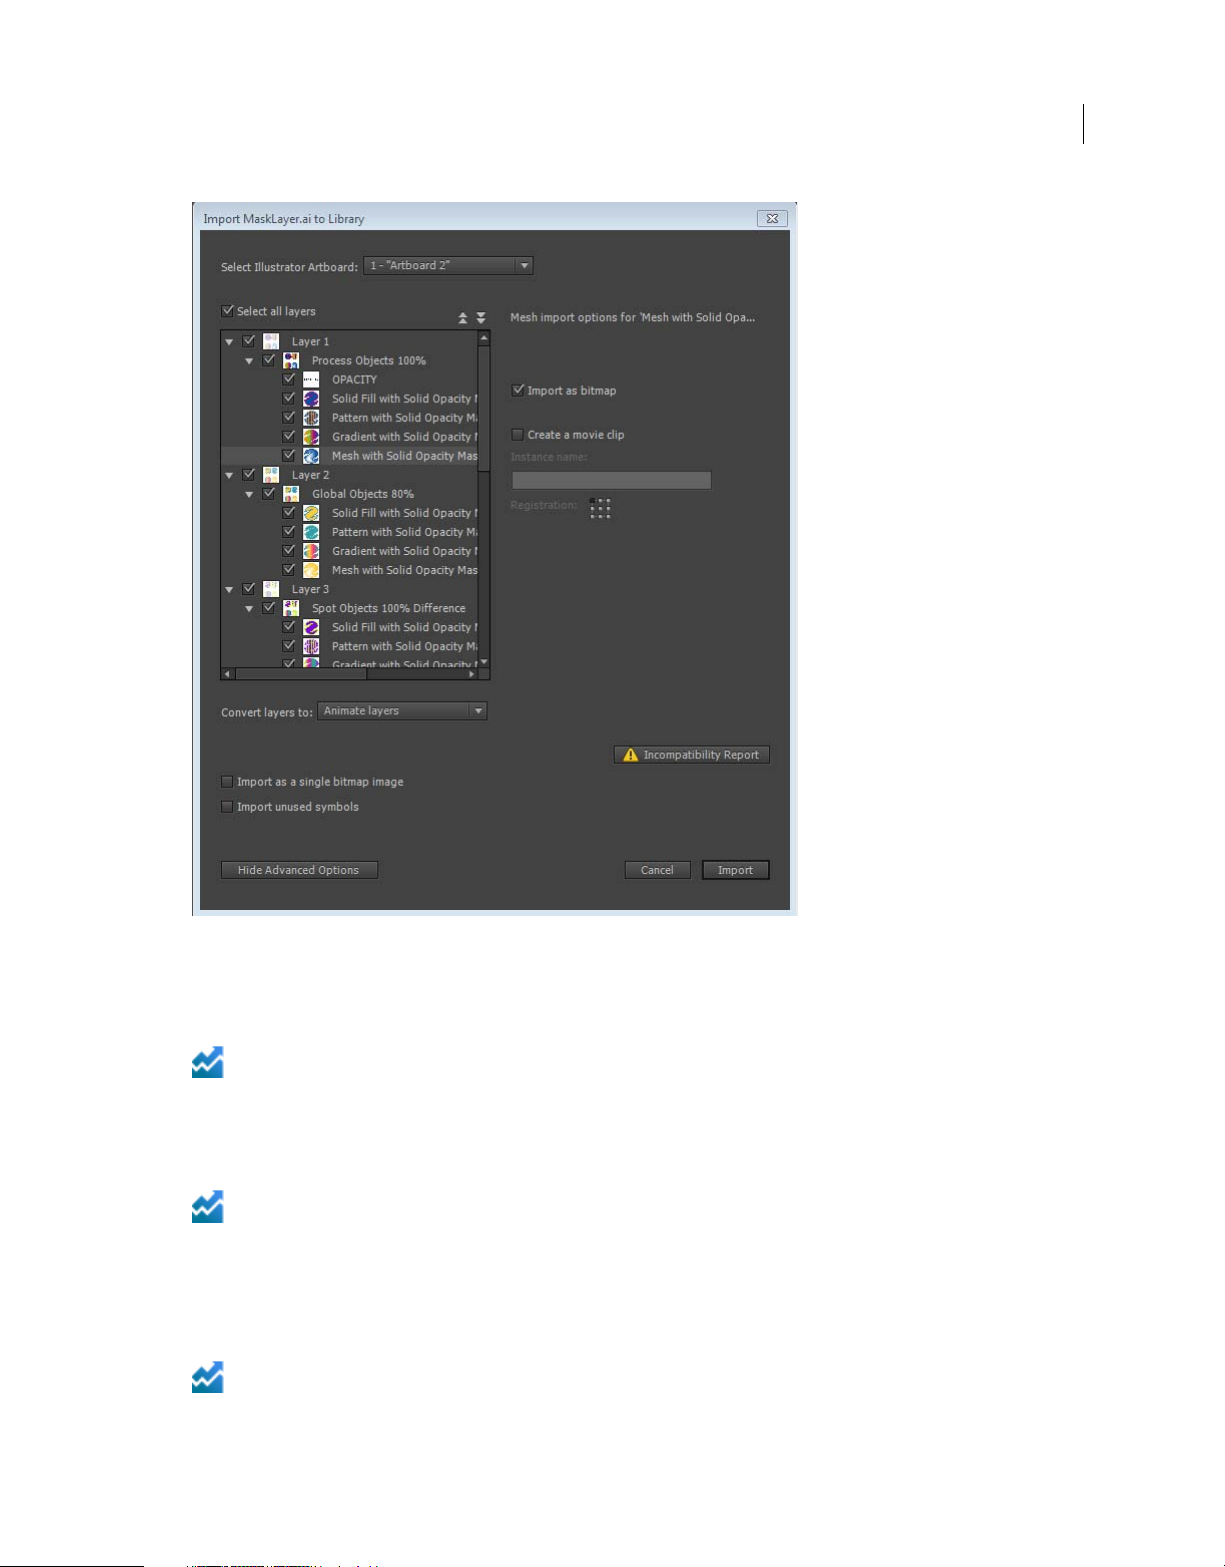
Advanced AI import options
Enhanced in Adobe Animate CC 2015.2 | June 2016
Animate lets you import Adobe® Illustrator® AI files and preserve most of the editability and visual fidelity of your
artwork. Enhanced AI Importer also provides you with a great degree of control in determining how your Illustrator
artwork is imported into Animate and lets you specify how to import specific objects into an AI file.
Last updated 6/17/2016
Page 16
What's New
11
For more information on this enhanced feature, see Advanced AI import options.
Turbo charged performance on windows platform
Enhanced in Adobe Animate CC 2015.2 | June 2016
Experience turbo charged performance improvements for all your everyday workflows such as Timeline Playback,
Timeline scrubbing, Drawing, Panning, Zooming, Transforms, and watch your animations come alive!
Improved paint brush interactions
Enhanced in Adobe Animate CC 2015.2| June 2016
Animate introduces enhanced performance and experience when using paint brush strokes. Paint brush performance
enhancements are applicable for transform operations on paint brush strokes such as scale/translate/rotate in addition
to zoom/pan of stage.
Latest Flash player and AIR SDK integration
Enhanced in Adobe Animate CC 2015.2 | June 2016
Animate supports the latest version of Flash Player (version 21) and integrates AI SDK version 21.0.
Last updated 6/17/2016
Page 17
Chapter 2: Platforms
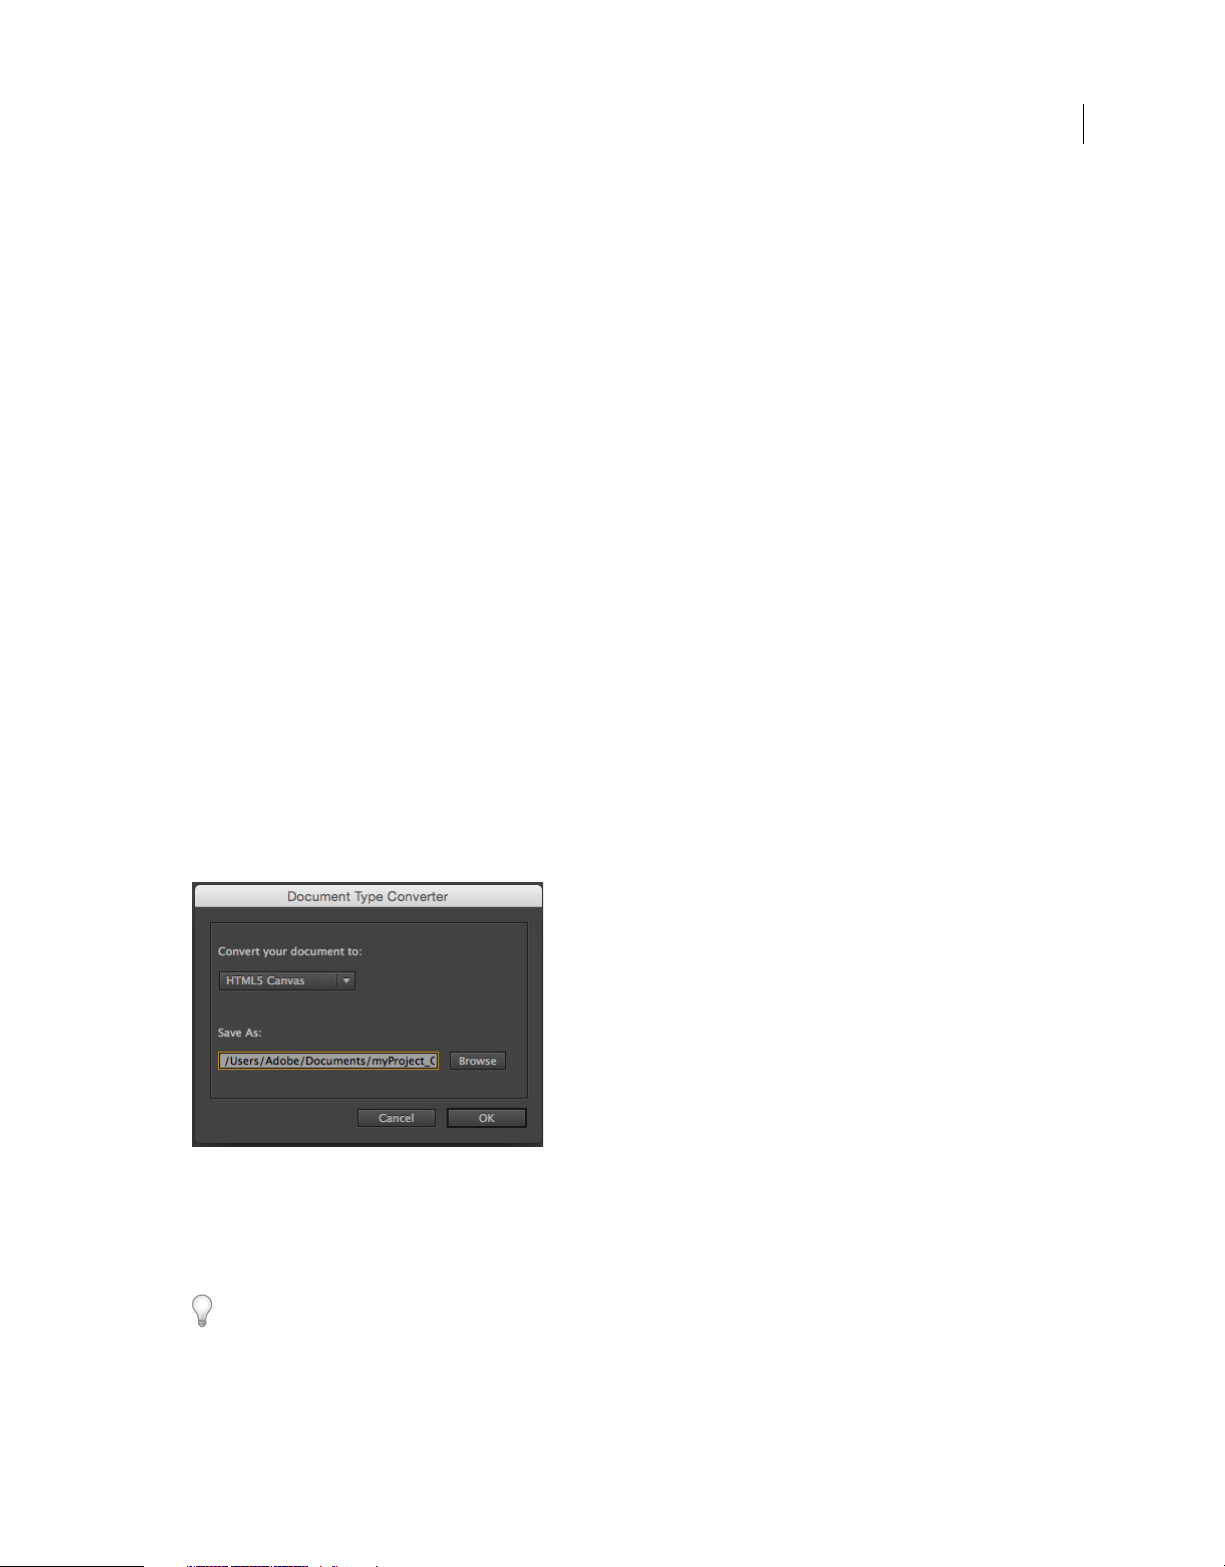
Use Document Type Converter to convert Animate CC projects to other document formats
Convert your Animate document to another document format
The universal document type converter enables conversion of your existing FLA projects (of any type) to any other
document type such as HTML5 Canvas, ActionScript/AIR, WebGL, or a custom document type. When you convert to
a format, you can take advantage of the authoring features that Animate offers for that document type.
12
Converting your Animate document using the document type converter
To convert your Animate document to another document type:
1 Open the document that you want to convert and click Commands > Convert to Other Document Formats. The
Document Type Converter dialog box appears.
2 In the Convert your document to drop-down, select the document type that you want the convert the document to.
3 Click Browse to select the directory in which you want to save the converted file and click OK.
Note: When you try to convert any multi-scene document to HTML5 Canvas doctype, all the scenes are saved as
separate files because HTML5 Canvas document type does not support multiple scenes. Place all your scenes within
separate symbols if you want to use them in a single document.
You can convert your existing Animate projects to another format or reuse assets in a project by simply copying and
pasting layers and library symbols.
Last updated 6/17/2016
Page 18

Platforms
Custom Platform Support
Animate supports creating rich graphics and animations using document types such as ActionScript, HTML5, and
WebGL. The Custom Platform Support feature helps to extend the power of Animate CC to support platforms that are
not native to Animate.
Custom Platform Support can be added to Animate by implementing a plugin using a set of Application Programming
Interfaces (APIs) that are provided as part of the Custom Platform Support Development Kit. The developers can create
custom platform support plugins for Animate using these interfaces and referring to the the sample code. By installing
a platform support plugin for a new document type, users can create their art using the rich feature set of Animate and
publish it in the output format of the custom platform.
Workflows
The Custom Platform Support feature includes two parts: one for the developer who creates custom platform support
plugins and the other for the user who installs and uses the plugin.
Developer
If you are a developer who builds add-ons for Animate, you can use the following workflow to develop and distribute
your plugins:
13
Note: For instructions on how to develop Custom Platform Support plugins using the development kit, see Enabling Support
for Custom Platforms.For detailed documentation of APIs in the development kit, see Custom Platform Support API
Reference.
User
Last updated 6/17/2016
Page 19

Platforms
If you are a Animate user, you can acquire a Custom Platform Plugin using one of the following methods:
• Download the Custom Platform Support plugin for a platform of your choice from the Adobe Add-ons page. The
Adobe Add-on page allows you to acquire a plugin and install it using the Adobe Creative Cloud application.
• Get a .zxp file from a plugin developer and install it using the Adobe Extension Manager application.
The following workflow illustrates how you can install a custom platform support plugin and create your custom
platform document.
14
More Help topics
Enabling Custom Platform Support
Custom Platform Support API Reference
Working with Custom Platform Support Plugins
Create and publish HTML5 Canvas documents in Animate CC
Last updated 6/17/2016
Page 20

Platforms
What is HTML5 Canvas?
Canvas is a new element in HTML5, which provides APIs that allow you to dynamically generate and render graphics,
charts, images, and animation. The presence of the Canvas API for HTML5, strengthens the HTML5 platform by
providing two-dimensional drawing capabilities. These capabilities are supported on most modern operating systems
and browsers.
Essentially, Canvas is a bitmap rendering engine, and the drawings are final and cannot be resized. Furthermore, objects
drawn on Canvas are not part of the web page's DOM.
Within a web page, you can add Canvas elements using the <Canvas> tag. These elements can then be enhanced using
JavaScript to build interactivity. For more information, see
this link.
The new HTML5 Canvas document-type
Animate CC enables you to create an HTML5 Canvas document with rich artwork, graphics, animations, and so on. A
new document type (HTML5 Canvas) has been added to Animate that provides native support for creating rich and
interactive HTML5 content. It means that you can use the traditional Animate timeline, workspace, and tools to create
content, but produce HTML5 output. With a few simple clicks, you are ready to create an HTML5 Canvas doc and
generate a fully functional output. To its end, within Animate, the document and publish options are preset to generate
HTML5 output.
15
Animate CC is integrated with CreateJS, which enables rich interactive content on open web technologies via HTML5.
Animate CC generates HTML and JavaScript for content (includes bitmaps, vectors, shapes, sounds, tweens, and so on)
created on stage. The output can be run on any device or browser that supports HTML5 Canvas.
Animate and the Canvas API
An imate publis hes to HTM L5 b y le ver aging t he C anvas API . An imate Pro sea mle ssl y tr anslates obj ect s created on st age
in to their Canvas counterparts. By providing a 1-to-1 mapping of Animate features with the APIs within Canvas,
Animate enables you to publish complex content to HTML5.
Creating an HTML5 Canvas document
To create an HTML5 Canvas document, do the following:
1 On the Animate CC Welcome screen, click the HTML5 Canvas option. This opens a new FLA with Publish Settings
modified to produce HTML5 output.
2 Alternatively, select File> New to display the New Document dialog. Click the HTML5 Canvas option.
You can now begin creating HTML5 content using the tools within Animate. As you begin working with the HTML5
Canvas document, you notice that certain features and tools are not supported and are disabled. This is because,
Animate supports those features that are in-turn supported by the Canvas element within HTML5. For example, 3D
transformations, dotted lines, bevel effects are not supported.
Adding interactivity in HTML5 Canvas document
Animate CC publishes HTML5 content using the CreateJS libraries. CreateJS is a suite of modular libraries and tools
which enable rich interactive content on open web technologies via HTML5. The CreateJS suite comprises of: EaselJS,
TweenJS, SoundJS, and PreloadJS. CreateJS converts content created on stage to HTML5 using these individual
libraries to produce HTML and JavaScript output files. You can also manipulate this JavaScript file to enhance your
content.
Last updated 6/17/2016
Page 21
Platforms
However, Animate CC allows you to add interactivity to objects on stage created for HTML5 Canvas from within. It
means that you can actually add JavaScript code to individual objects on stage from within Animate and preview at
author-time. In turn, Animate provides native support for JavaScript with useful features within the code-editor to help
improve workflow efficiency of programmers.
You can choose individual frames and keyframes on the Timeline to add interactivity to your content. For an HTML5
Canvas document, you can add interactivity using JavaScript. For more information about writing JavaScript code, see
this link.
JavaScript code can be written directly in the Actions panel, and it supports the following features while writing the
JavaScript code:
Code Hinting Al lows you to qu ickly inser t and e dit JavaSc ript code and without mi stakes. As y ou typ e characters in the
Actions Panel, you can see a list of candidates that possibly complete your entry.
Additionally, Animate also supports some features inherent to Actions Panel when working with HTML5 Canvas.
These features help improve workflow efficiency when adding interactivity to objects on stage. They are:
Syntax Highlighting Displays code in different fonts or colors according to the syntax. This feature allows you to write
code in a structured manner, helping you visually distinguish correct code and syntax errors.
Code Coloring Displays co de in different colors according to the syntax. This allows you to visually distinguish various
parts of a syntax.
16
Bracket Automatically adds closing brackets and parentheses for open when writing JavaScript code.
You can add interactivity to shapes or objects on stage using JavaScript. You can add JavaScript to individual frames and
keyframes.
1 Select the frame you want to add JavaScript to.
2 Select Win d ow > Actions to open the Actions Panel.
Using JavaScript Code Snippets
You can add interactivity using JavaScript code snippets available within Animate CC. To access and use Code Snippets,
select Windows > Code Snippets. For more information about adding JavaScript code snippets, see
with code snippets in Animate CC.
Add interactivity
Last updated 6/17/2016
Page 22

Platforms
References to CreateJS documentation
CreateJS Library API Documentation Code Samples on Github
17
EaselJS http://createjs.com/Docs/EaselJS/modules/Ea
selJS.html
Twee nJS http://createjs.com/Docs/TweenJS/modules/
TweenJS.html
SoundJS http://createjs.com/Docs/SoundJS/modules/
SoundJS.html
PreloadJS http://createjs.com/Docs/PreloadJS/modules
/PreloadJS.html
More Help topics
EaselJS
TweenJS
SoundJS
PreloadJS
Publishing animations to HTML5
To publish the content on stage to HTML5, do the following:
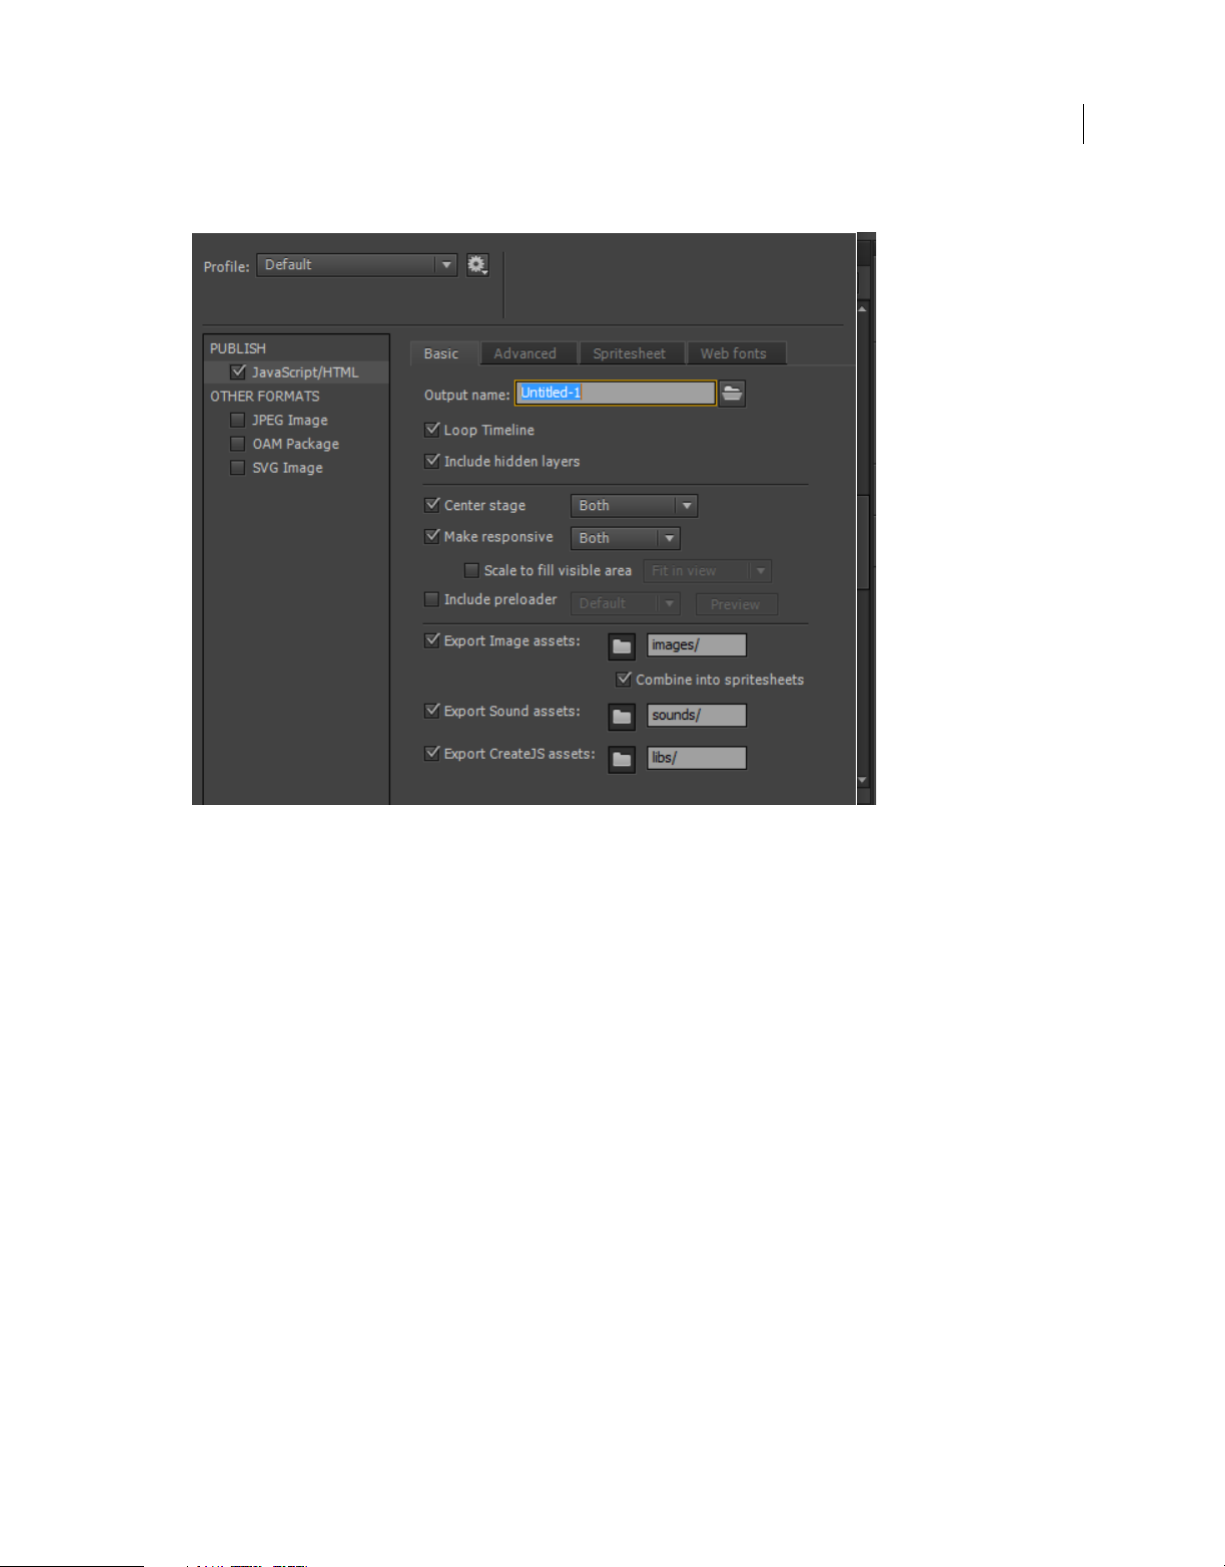
1 Select File > Publish Settings.
2 In the Publish Settings dialog, specify the following settings:
https://github.com/createjs/easeljs/
https://github.com/createjs/tweenjs/
https://github.com/createjs/soundjs/
https://github.com/createjs/preloadjs/
Last updated 6/17/2016
Page 23
Platforms
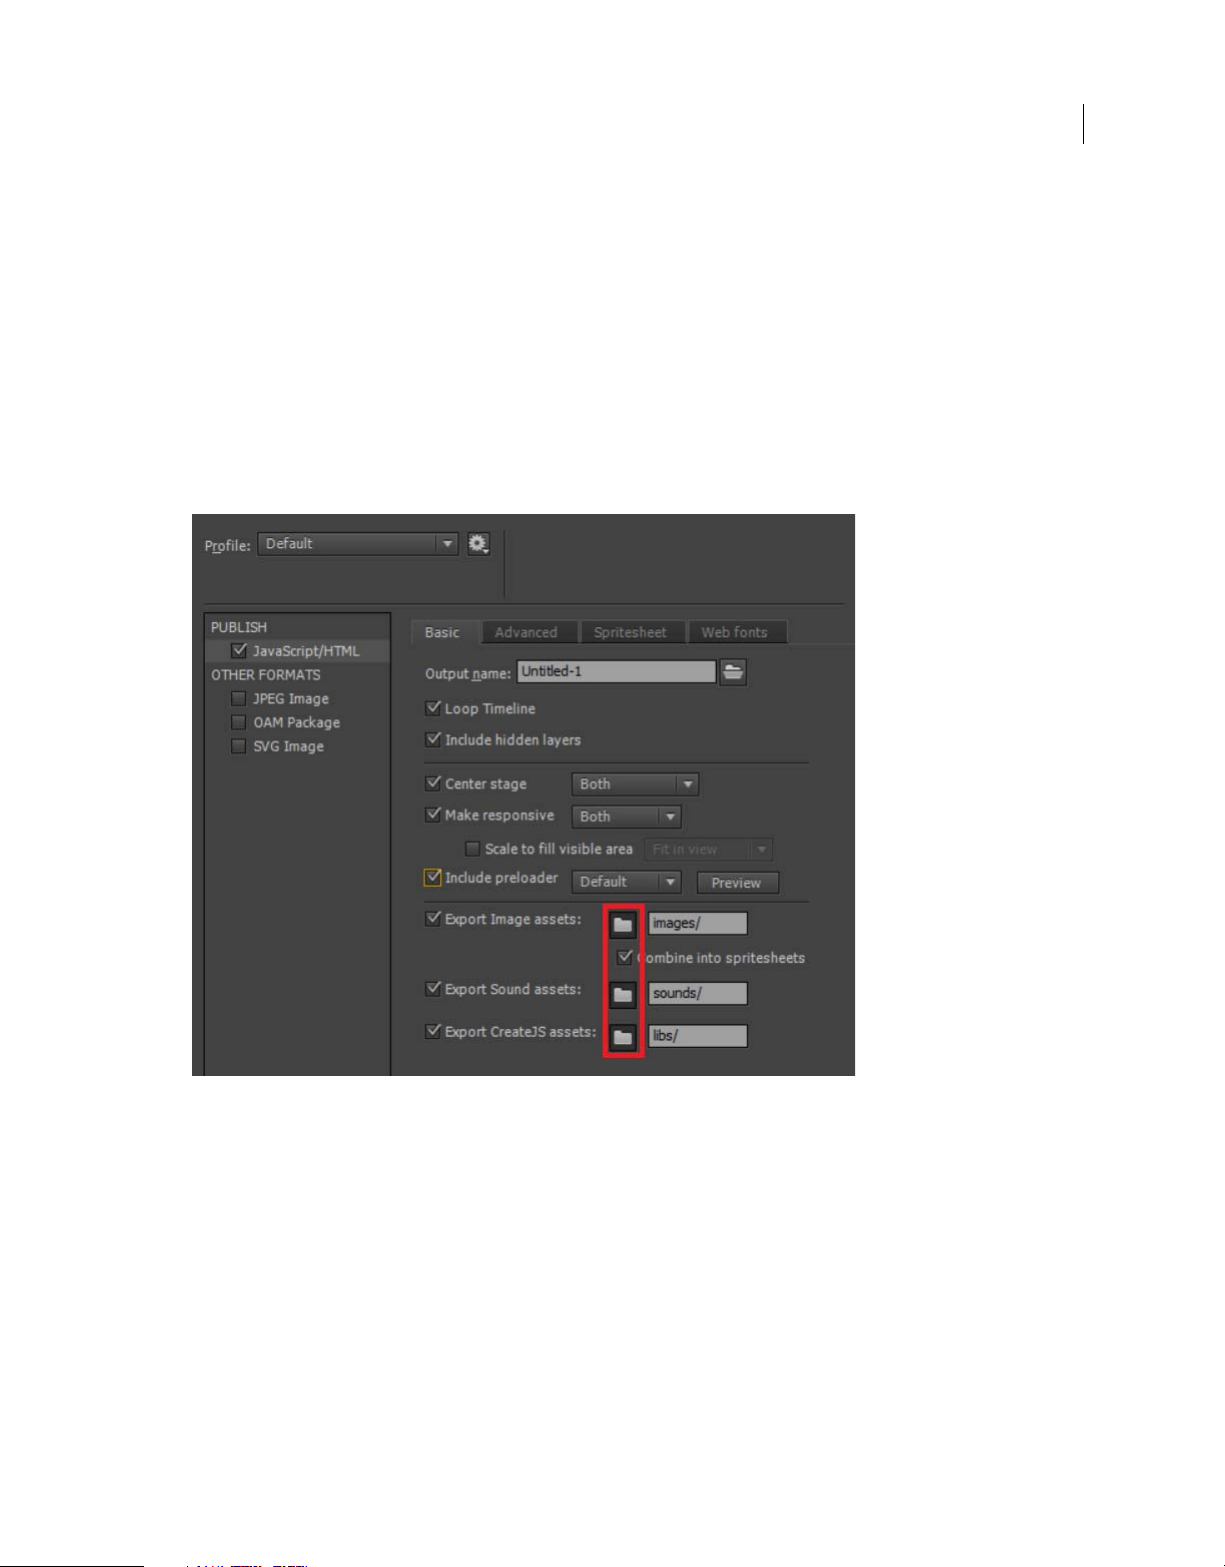
Basic settings
18
Output The directory the FLA is published to. This defaults to the same directory as the FLA, but can be changed by
clicking the browse button "...".
Loop Timeline If checked the timeline loops, if not it stops when it plays to the end.
Include Hidden Layers If deselected, hidden layers are not included in the output.
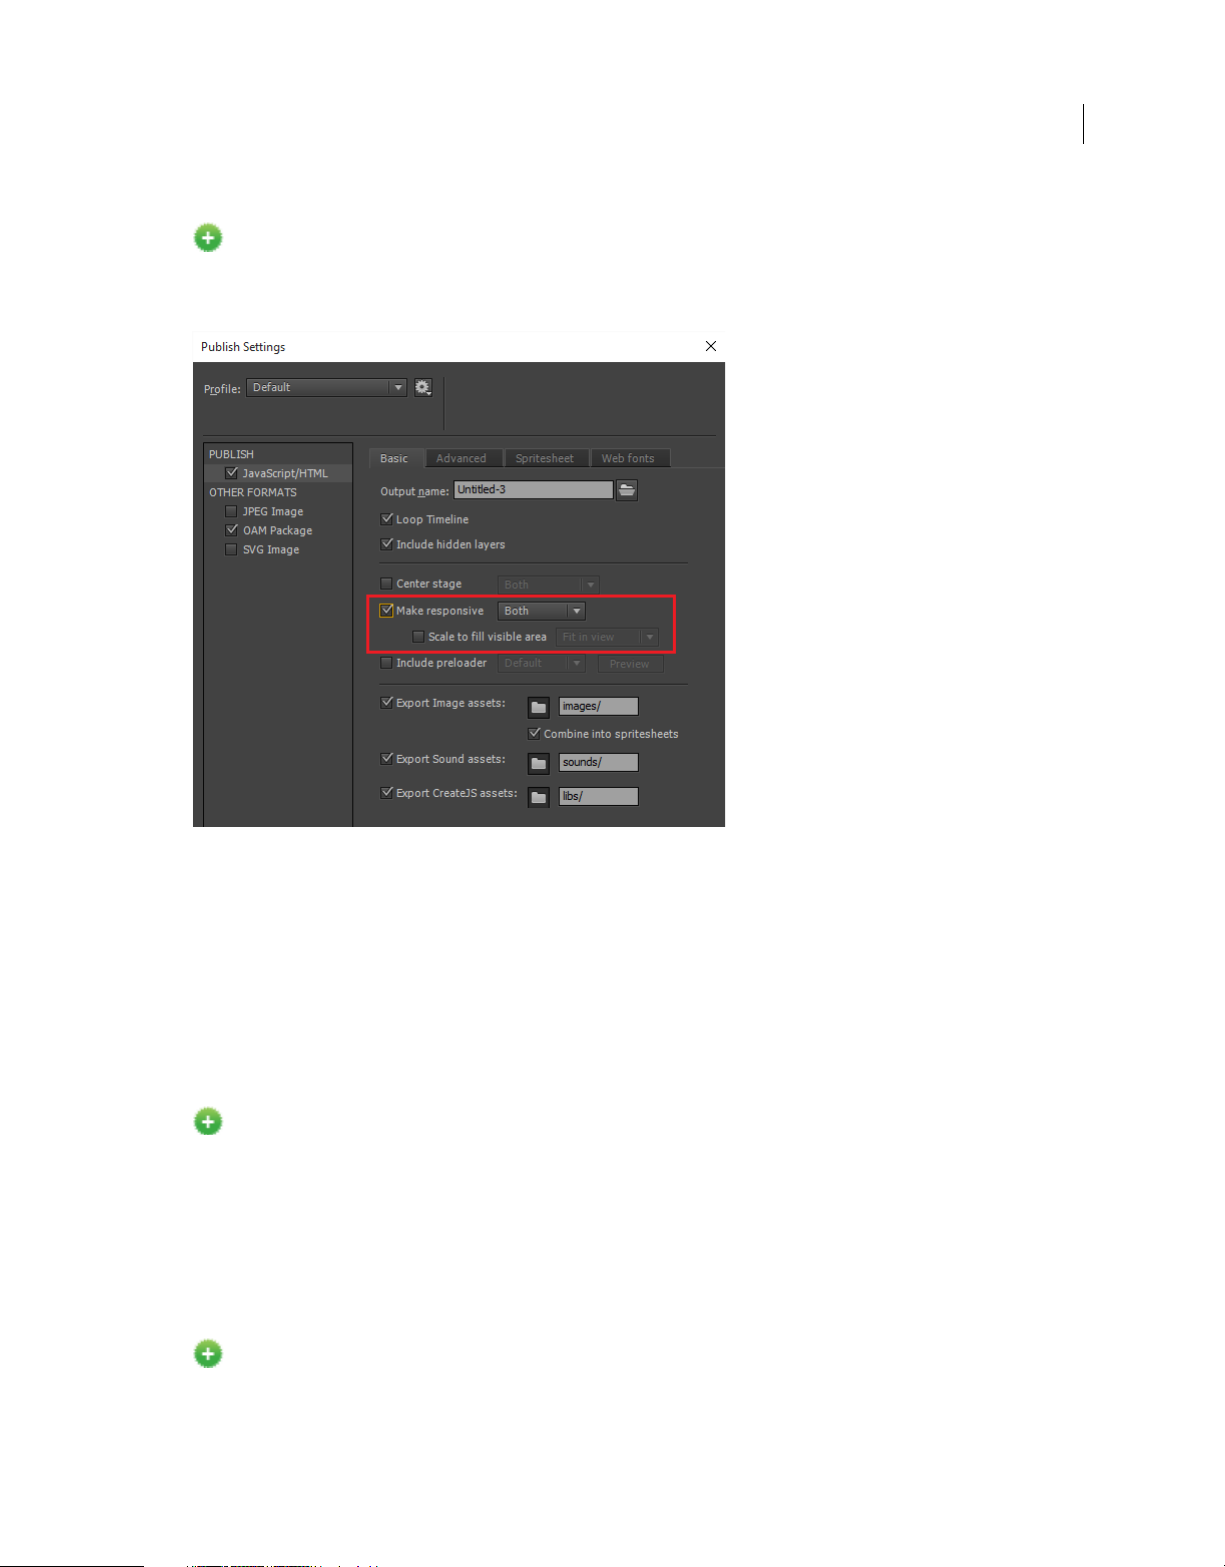
Center Stage Allows users to select if the stage should be centered Horizontally, Vertically or Both. The HTML
canvas/stage is displayed at the center of the browser window by default.
Make Responsive Allows users to select if the animation should be responsive with reference to Width, Height, or both
and resizes the published output based on various form factors. The result is a responsive, sharper and a crisper HiDPI
compliant output.
The output also stretches to cover the entire screen area with no borders, and yet maintains the original aspect ratio,
though some part of the canvas may not fit in view.
• Width, Height or Both options ensures that the entire content is scaled down to the canvas size and is visible even
when you view on a small screen (such as mobile devices or tablets). If the screen size is larger than the authored
stage size, canvas is displayed in the original size.
Enable Scale to Fill Visible Area Allows users to select if the animation should fit to view the output in full screen mode
or should stretch to fit. By default, this option is disabled.
Fit in view: Displays the output in Full screen mode with the entire screen space and yet maintains the aspect ratio.
Stretch to fit: Stretches such that there are no border spaces in the output.
Last updated 6/17/2016
Page 24
Platforms
Include Preloader: Allows users to select if they want the default Preloader or select a Preloader of their choice from
the document library.
Preloader is a visual indicator in the form of an animated GIF that is displayed when the scripts and assets required to
render an animation is loading. Once the assets are loaded, the preloader is hidden and the actual animation is
displayed.
By default, the Preloader option is not selected.
• Default option to use the default preloader or the
• Browse option to use the preloader GIF of your choice. The preloader GIF is copied to the configured images folder
in the Export Image assets.
• Use the Preview option to preview the selected GIF.
19
Use the toggle options to opt for publishing at the root or the sub-folder level. This button is toggled ON by default.
Toggling OFF disables the folder field and exports assets to the same folder as the output file.
Last updated 6/17/2016
Page 25
Platforms
20
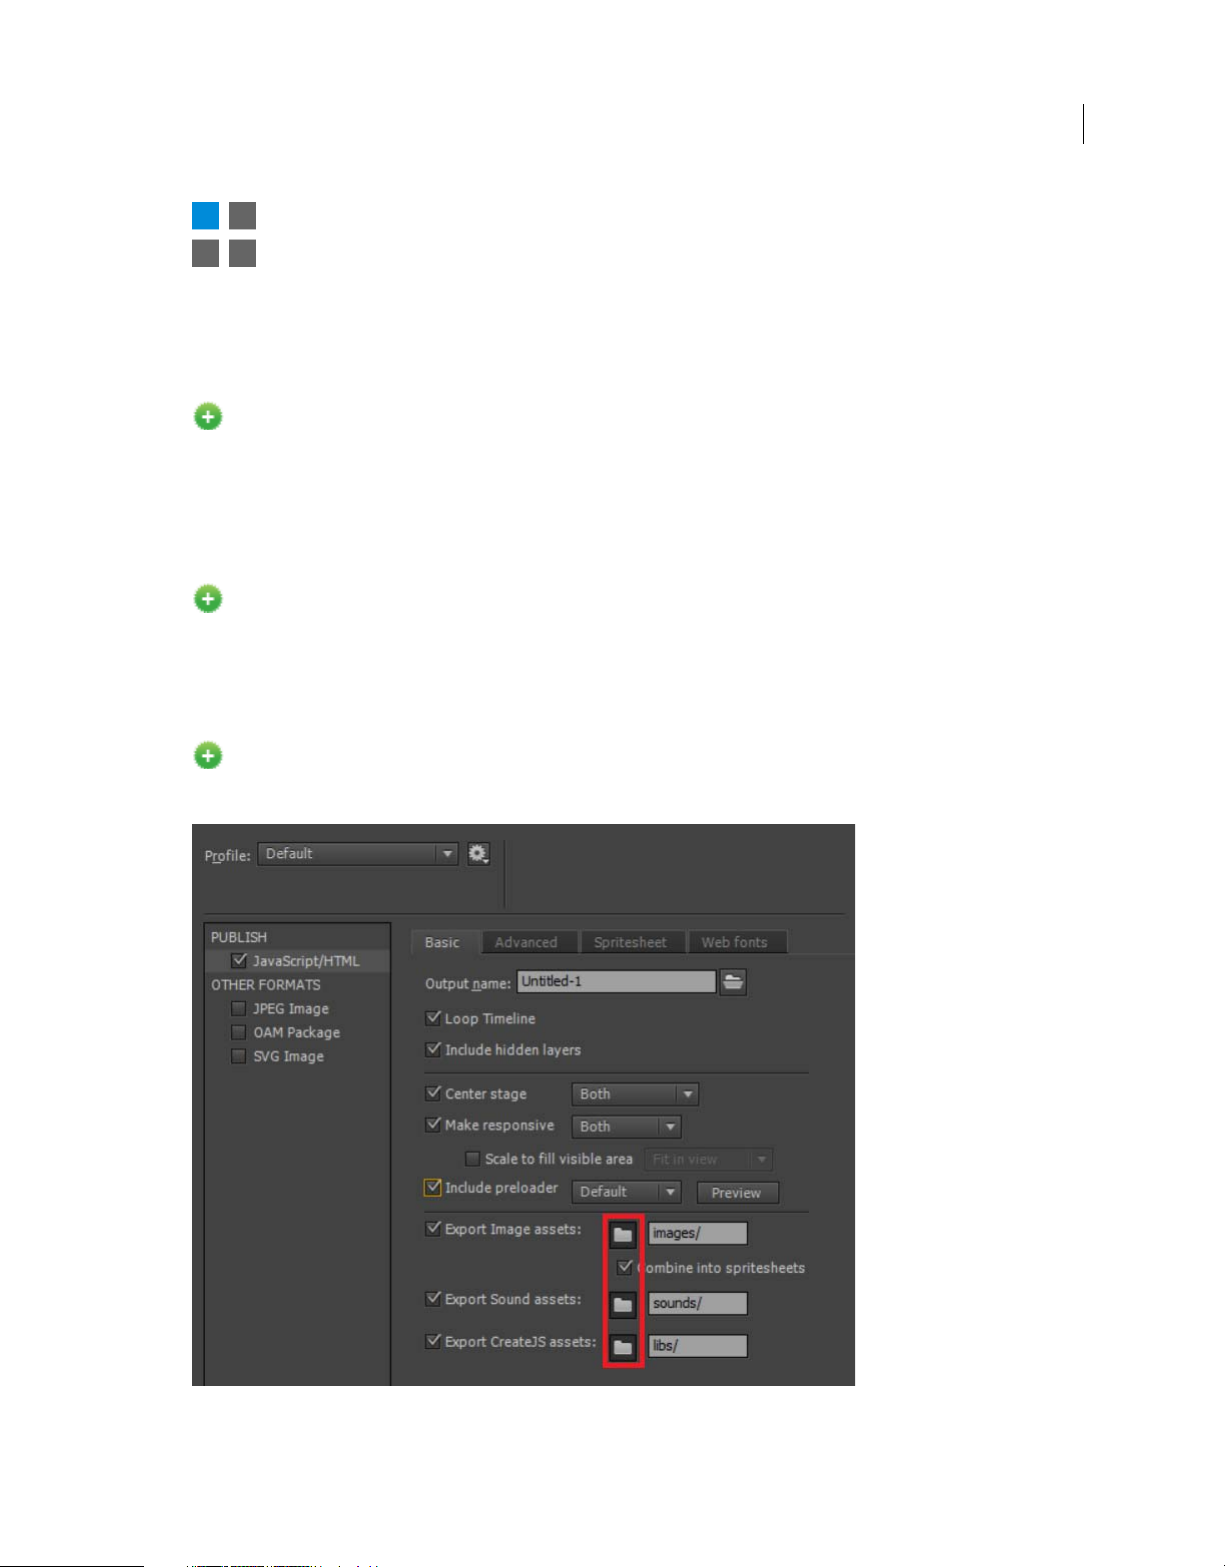
Export image assets The folder in which images assets are placed into and referenced from.
Combine into spritesheets: Select this to combine all the image assets into a spritesheet. For more spritesheet options,
Export bitmaps as spritesheets
see
Export Sound assets The folder in which the sound assets in your document are placed into and referenced from.
Export CreateJS assets The folder in which the CreateJS libraries are placed into and referenced from.
Note: The default setting continues to publish files segregated into logical sub folders.
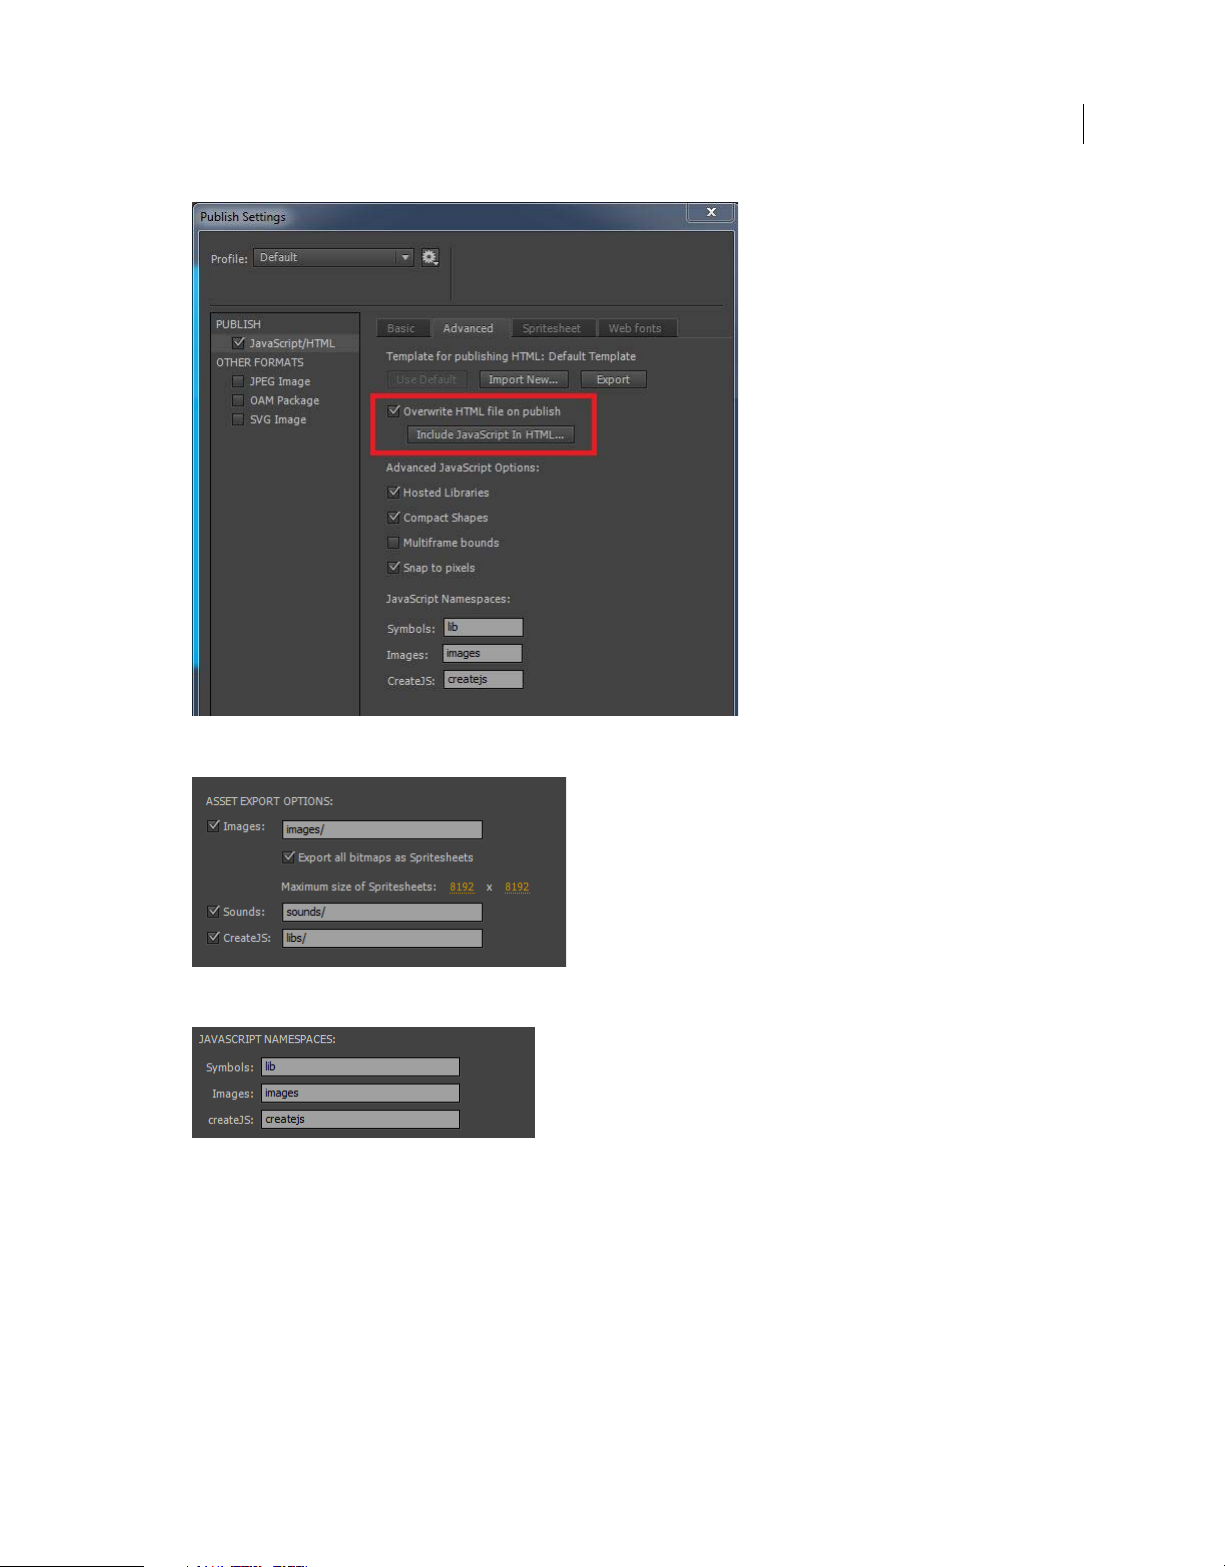
Advanced settings
Asset Export Options The relative URLs to export images, sounds, and supporting CreateJS JavaScript libraries to. If
the check box to the right is not checked, those assets are not exported from the FLA, but the specified path is still used
to assemble their URLs. It expedites publishing from an FLA with many media assets, or avoid overwriting modified
JavaScript libraries.
The Export all bitmaps as Spritesheets option allows you to pack all the bitmaps in canvas document in to a sprite sheet,
which reduces the number of server requests and improves performance. You can specify the maximum size of the
sprite sheet by giving the height and width values.
Last updated 6/17/2016
Page 26
Platforms
21
Template for publishing HTML:
Use Default: Publish your HTML5 output using the default template.
Import New: Import a new template for your HTML5 document.
Export: Export your HTML5 document as a template.
Hosted Libraries: If checked, it uses copies of the libraries hosted on the CreateJS CDN at code.createjs.com. It allows
the libraries to be cached and shared between various sites.
Include Hidden Layers: If deselected, hidden layers are not included in the output.
Last updated 6/17/2016
Page 27

Platforms
Compact Shapes: If che cked, ve cto r ins tructio ns ar e out putte d in a comp act fo rm. De se lec t to expo rt read able , ver bose
instructions (useful for learning purposes).
Multiframe bounds: If checked, timeline symbols include a frameBounds property containing an array of Rectangles
corresponding to the bounds of each frame in the timeline. Multiframe bounds significantly increases publish time.
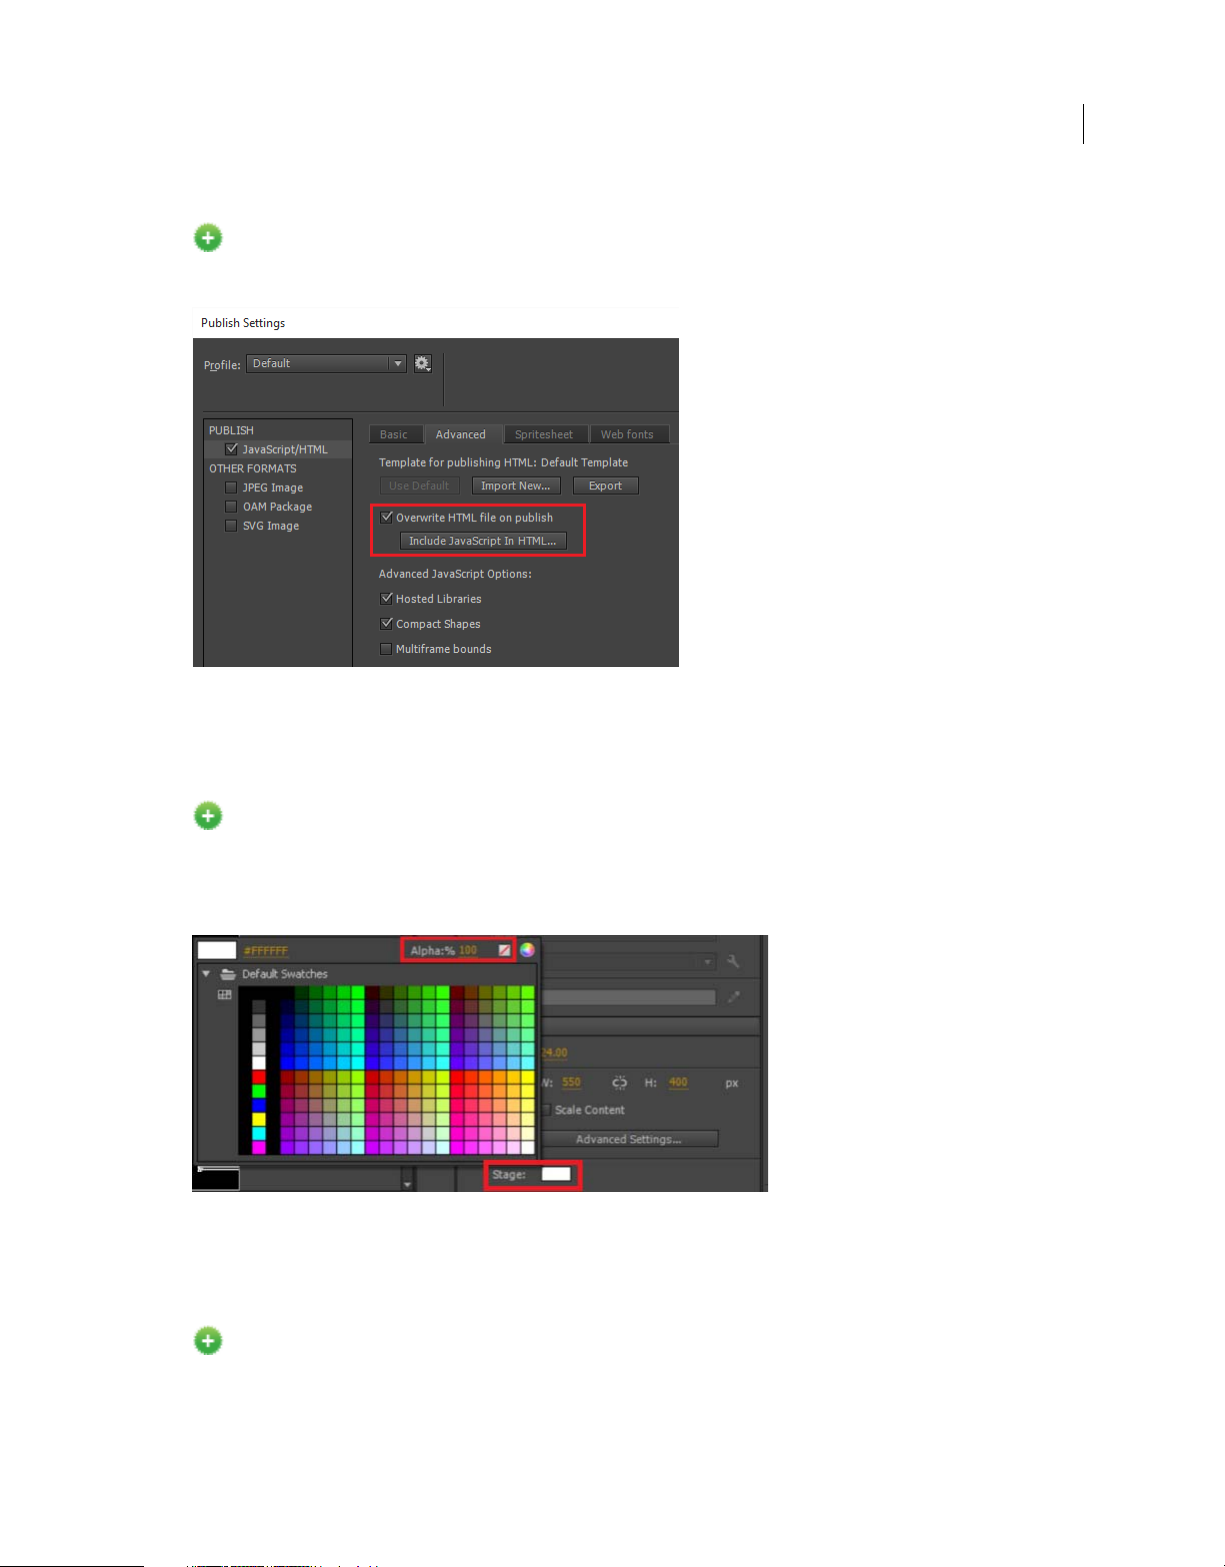
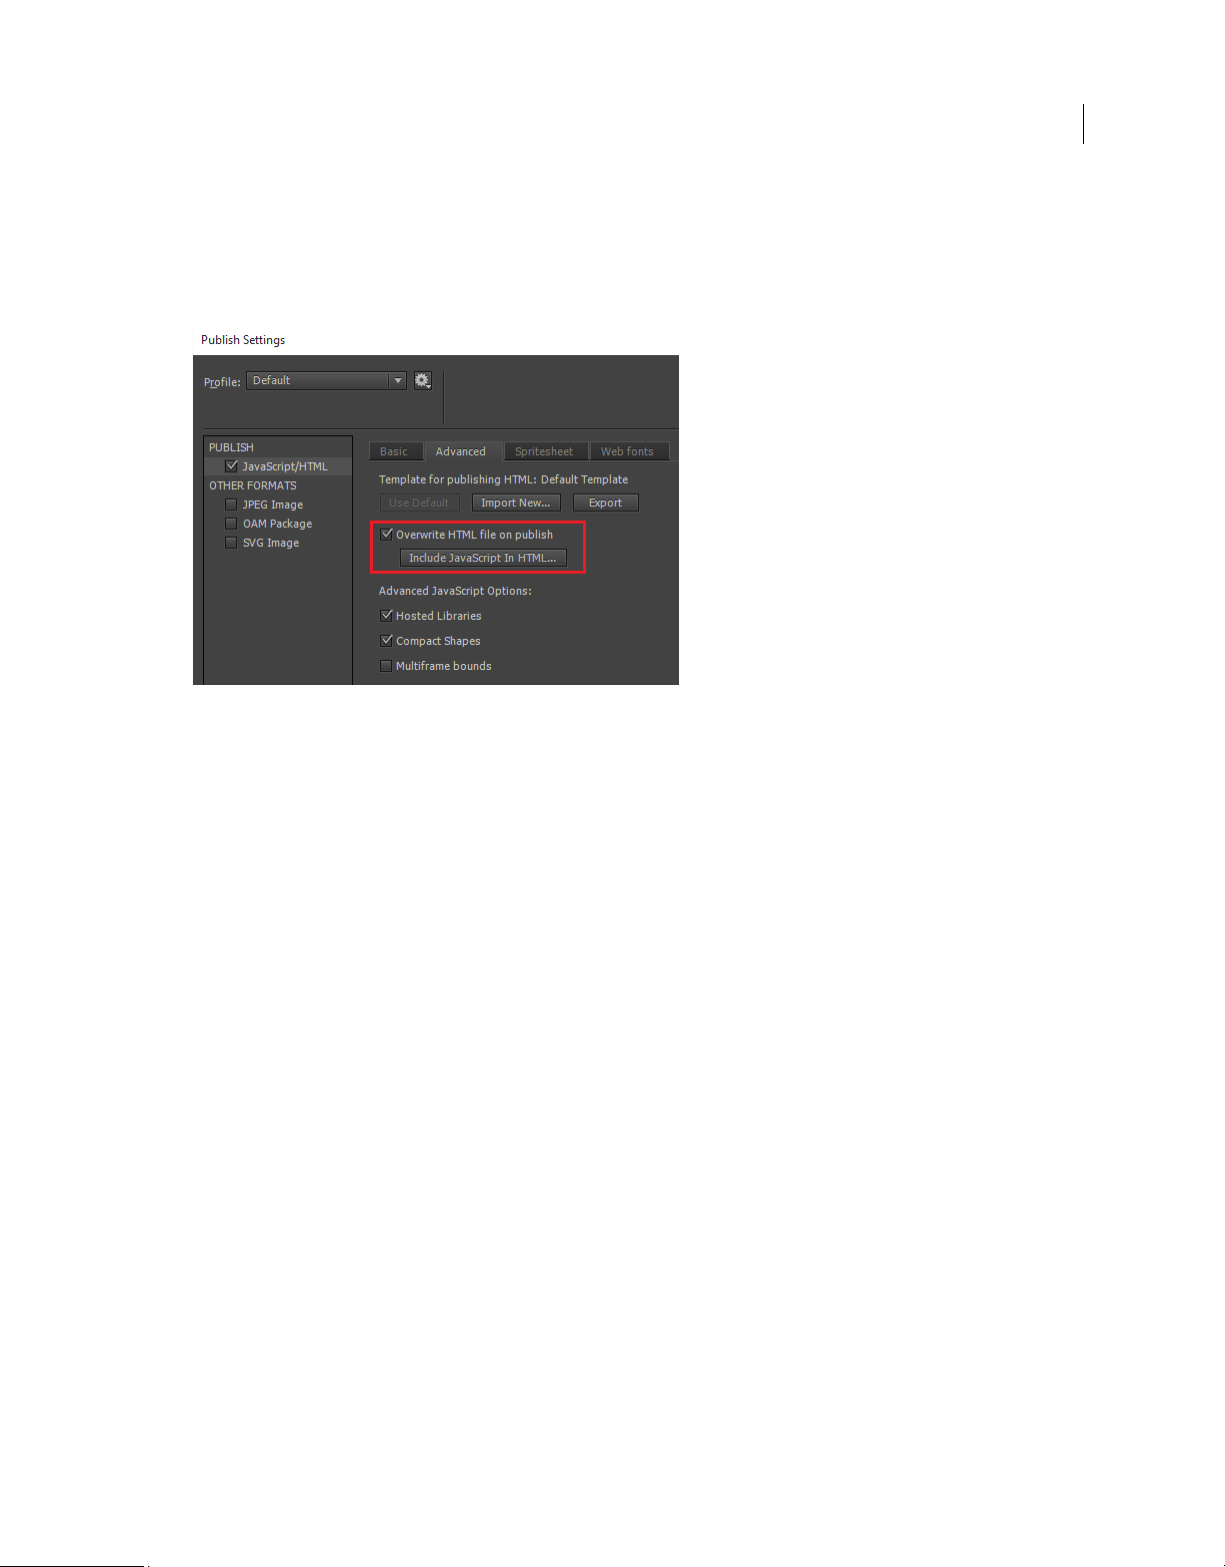
Overwrite HTML file on publish and include JavaScript In HTML: If include JavaScript In HTML is selected, the
Overwrite HTML file on Publish check box is checked and disabled. If you uncheck the Overwrite HTML file on
Publish check box, then include JavaScript in HTML is unchecked and disabled.
Click Publish to publish your content to the specified location.
Note: An animation designed using nested timelines, with a single frame, cannot be looped.
HTML template variables
When you import a new custom HTML template, during publishing, the default variables are replaced with customized
code snippets based on the components of your FLA file.
The following table lists the current template variables that Animate recognizes and replaces:
Attribute Parameter Template Variable
Title of the HTML document $TITLE
22
Placeholder for including CreateJS scripts $CREATEJS_LIBRARY_SCRIPTS
Placeholder for including generated scripts (including web font
scripts)
HTML Tag to start a client-side script $SCRIPT_START
Placeholder for code to create loader (CreateJS LoadQueue) $CREATE_LOADER
Placeholder for code to load assets present in the manifest $LOAD_MANIFEST
Placeholder for code defining the method to load files $HANDLE_FILE_LOAD_START
Placeholder for code to handle file load event $HANDLE_FILE_LOAD_BODY
Placeholder for code concluding the method to load files $HANDLE_FILE_LOAD_END
Placeholder for code defining the method handle Complete, called
ter assets are loaded
af
Placeholder for code to create the stage $CREATE_STAGE
Placeholder for code to register for tick event, after which animation
st
arts
Placeholder for code to support responsive scaling and hidpi displays $RESP_HIDPI
Placeholder for code concluding the method handle Complete $HANDLE_COMPLETE_END
Placeholder for a function to handle content with sounds $PLAYSOUND
Placeholder for styling section to support centering the canvas $CENTER_STYLE
$ANIMATE_CC_SCRIPTS
$HANDLE_COMPLETE_START
$START_ANIMATION
Placeholder for canvas display style property to support Preloader $CANVAS_DISP
Placeholder for code to display Preloader $PRELOADER_DIV
HTML Tag for end of client-side script $SCRIPT_END
Canvas element ID $CANVAS_ID
Last updated 6/17/2016
Page 28
Platforms
Width of the stage or canvas element $WT
Height of the stage or canvas element $HT
Background color of the stage or canvas element $BG
Version of Animate CC used to generate content $VERSION
Following tokens from the previous versions are deprecated in the current version:
Attribute Parameter Template Variable
Placeholder to include scripts (CreateJS and generated Javascript) $CREATEJS_SCRIPTS
23
Placeholder for code to initialize CreateJS libraries, load media, create
and update stage
$CJS_INIT*
Note: These tokens are modularized and replaced by other tokens.
JSAPI support to import and export HTML templates for Canvas documents
Following JSAPIs support import and export of HTML templates for canvas documents:
• Exports the HTML5 Canvas Publishing Template for given document,at the specified location:
bool document::exportCanvasPublishTemplate(pathURI)
• Example:
var pathURI ="file:///C|/Users/username/desktop/CanvasTemplate.html”
var exportFlag =fl.getDocumentDOM().exportCanvasPublishTemplate(pathURI);
if(!exportFlag)
fl.trace(“Template could not be exported”);
• Imports and sets the HTML5 Canvas Publishing Template for given document, from the specified location pathURI:
bool document::importCanvasPublishTemplate(pathURI)
• Example:
var pathURI= “file:///C|/Users/username/desktop/CanvasTemplate.html”;
var exportFlag =fl.getDocumentDOM().importCanvasPublishTemplate(pathURI);
if(!exportFlag)
fl.trace(“Template could not be imported”);
Embed JavaScript into HTML
Animate introduces the capability to include JS file within the HTML file during canvas publishing.
1 In the Publish Settings menu, switch to Advanced tab and select Include JavaScript In HTML.
2 Select OK in the Include JavaScript in HTML on Publish dialog box to republish the content overwriting HTML.
3 This disables the Overwrite HTML file on Publish check box, and during any publishing event, HTML is
generated, but overwritten.
4 In the Select Stop including JavaScript in HTML, select OK to exclude the JavaScript and republish the HTML file.
Last updated 6/17/2016
Page 29
Platforms
5 When the Overwrite HTML file on Publish is not selected, the Include JavaScript In HTML option is
automatically disabled.
Note: If you do not want the HTML to be overwritten, the options Overwrite HTML file on Publish and Embed JS in
HTML option cannot coexist.
24
Merging JSON data into JS
Ba sed on custome r feed back and JSON f iles be ing in here ntly insecure , we have merge d the rel evant data w ith th e JS file
and hence a separate JSON file is not created.
Optimizing HTML5 Canvas output
Animate optimizes HTML5 Canvas output size and performance by:
• Exporting bitmaps as sprite sheet using the options in the Spritesheet tab in Publish Settings.
• Excluding hidden layers (by deselecting the Include hidden layers check box) from published output.
• Excluding all unused assets such as sounds and bitmaps, and all assets on unused frames (default).
• Specifying not to export the assets from the FLA by deselecting the asset export options for images, sounds, and
supporting CreateJS JavaScript libraries and using the relative URLs to export.
• HiDPI compatible HTML5 Canvas output: Animate scales the output based on the pixel ratio of the device on which
you view the content. This compatibility delivers a sharper output with zoom and also fixes the pixelation issues for
canvas documents when you view the HTML canvas output on a High DPI machine.
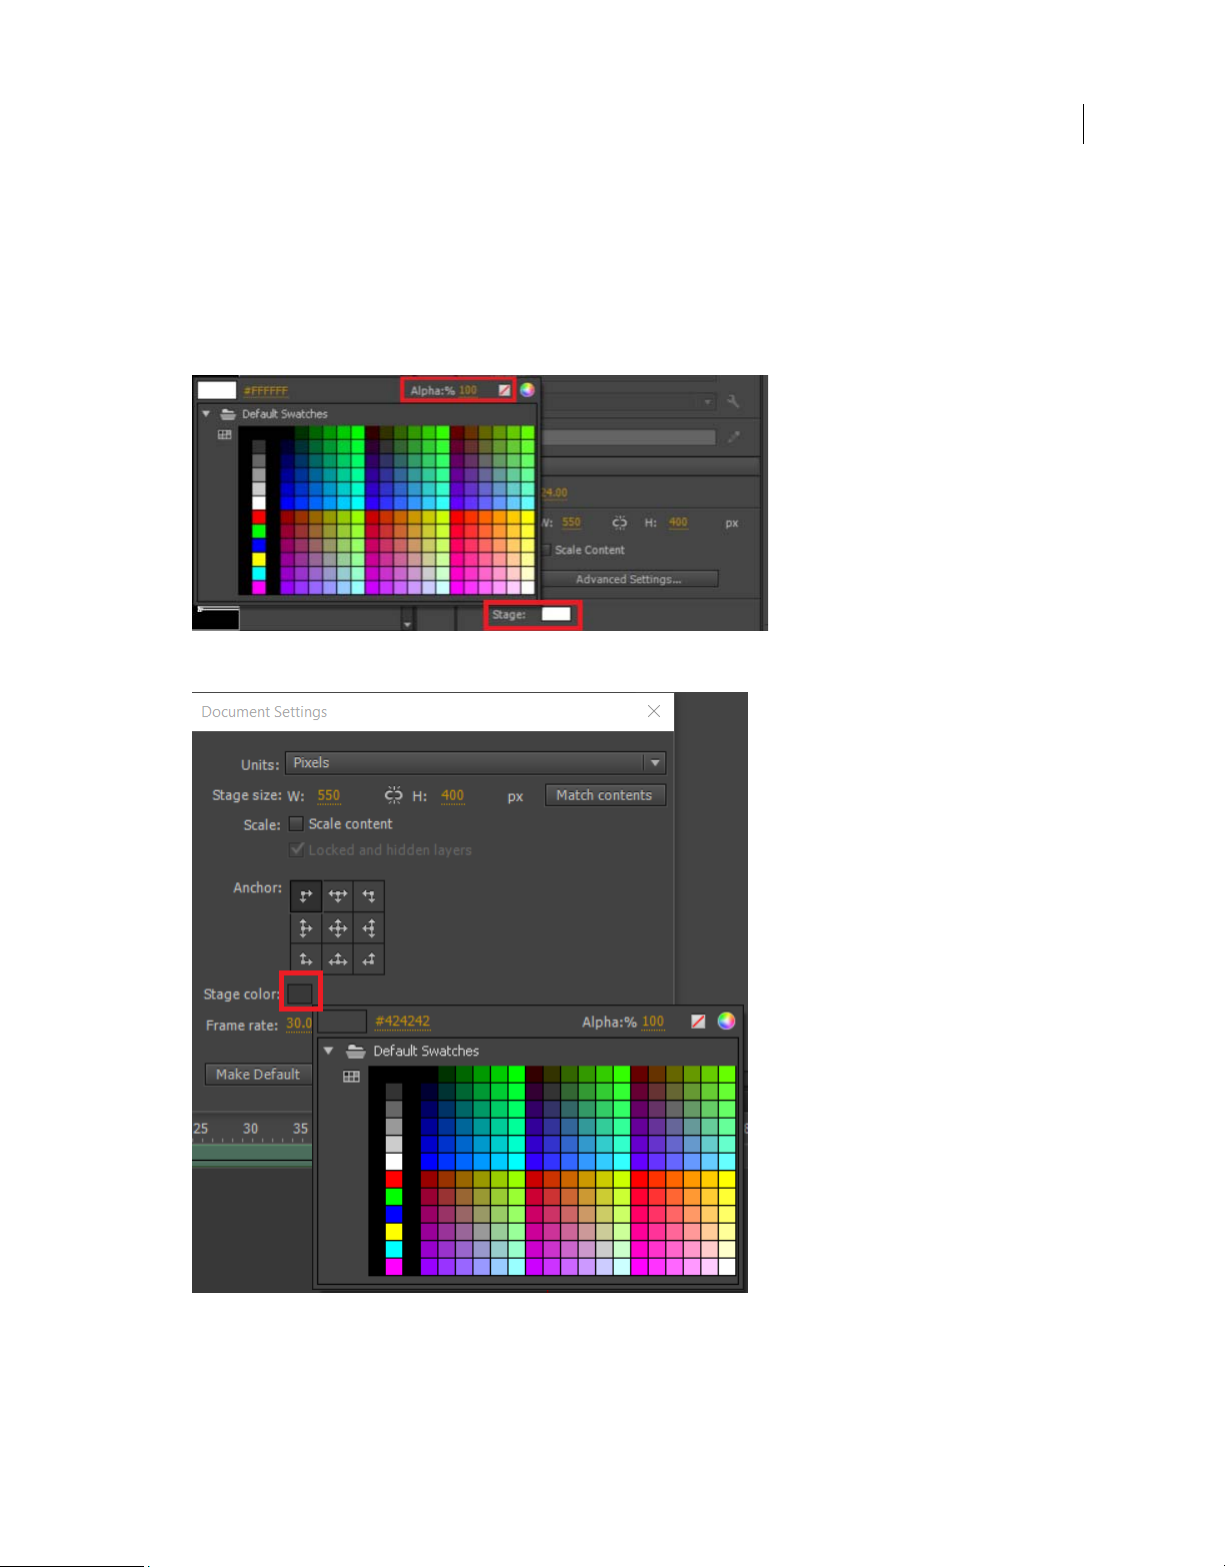
Setting a transparent canvas background
You can customize the canvas to various colors and also modify its display transparency. When you create a transparent
canvas, you can view the underlying HTML content during publishing.
Note: This setting also makes the background transparent during OAM publishing.
1 Select the canvas you wish to modify.
2 In the Properties pane, select Stage.
3 In Stage, set the percentage values for Alpha.
Last updated 6/17/2016
Page 30
Platforms
"No color" swatch support
You can also use the No Color Swatch option to make the canvas background as transparent:
1 Select Modify>Document>Stage Color or in the Property Inspector, select Advanced Settings.
2 In the Stage Color swatch, select No Color.
25
Last updated 6/17/2016
Page 31

Platforms
Export bitmaps as sprite sheet
Exporting a number of bitmaps that you have used in your HTML5 Canvas document as a single sprite sheet reduces
the number of server requests, reduces the output size, and improves performance. You can export spritesheet either as
PNG (default), JPEG, or both.
1 In the Spritesheet tab, select the Combine image and assets into spritesheets check box.
2 Select the Format as PNG, JPEG, or Both.
3 If you have selected PNG or Both, specify the following options under PNG Settings:
• Quality: set the spritesheet quality as 8-Bit (default), 24-Bit, or 32-Bit.
• Max Size: specify the maximum height and width of the sprite sheet in pixels.
• Background: click and set the background color for the spritesheet.
4 If you have selected JPEG or Both, specify the following options under JPEG Settings:
• Quality: set the spritesheet quality.
• Max Size: specify the maximum height and width of the sprite sheet in pixels.
• Background: click and set the background color for the spritesheet.
26
Working with text in HTML5 Canvas document
HTML canvas supports Static and Dynamic text.
Static Text
Static text is a richer option where all the assets are converted to outlines during publish time and provides excellent
WSYWIG user experience. Since the text is published as vector outlines, you cannot edit them at runtime.
Note: Too much of static text usage may lead to bloated file size.
Last updated 6/17/2016
Page 32

Platforms
27
Dynamic text
Dynamic text allows modification of text at runtime and does not add too much to the file size. It supports lesser
options than Static text. It also supports web fonts via Typekit.
If you are using dynamic text with fonts unavailable on end user machines, the output uses the default font for display
and thus skews user experience. Such issues are resolved through web fonts.
Add TypeKit web fonts to your HTML5 Canvas document
Animate CC offers Typekit Web fonts for Dynamic Text type in HTML5 Canvas document. Typekit provides direct
access to thousands of quality, premium fonts from top foundry partners. You can access and use Typekit fonts
seamlessly in your HTML5 output for modern browsers and mobile devices, using your Creative Cloud membership.
To know more about using Typekit fonts in Animate CC, see Using Typekit Webfonts in HTML5 Canvas documents
Animate release 2015.2 enhances the visual experience for dynamic text in a canvas document so that the stage and
published appearances are in sync.
Note: Typekit web fonts are not available for Static text type.
Understanding the HTML5 Canvas output
The published HTML5 output contains the following files:
HTML file Contains definitions for all shapes, objects, and artwork within the Canvas element. It also invokes the
CreateJS namespace to convert Animate to HTML5 and the corresponding JavaScript file that contains interactive
elements.
JavaScript file Contains dedicated definitions and code for all interactive elements of the animation. Also defined
within the JavaScript file are, code for all types of tweens.
These files are copied to the same location as that of the FLA by default. You can change the location by providing the
output path on the Publish Settings dialog (File > Publish Settings).
Last updated 6/17/2016
Page 33

Platforms
Migrating existing content to HTML5 Canvas
You can migrate existing content within Animate to generate an HTML5 output. To its end, Animate allows you to
migrate content by manually copying or importing individual layers, symbols, and other library items. Alternatively,
you could run the Convert AS3 to HTML5 Canvas document command to automatically port existing ActionScript
content to a new HTML5 Canvas document. For more information, see
However, when working the HTML5 document type in Animate CC, you can notice that certain Animate features are
not supported. This is because, the features within Animate do not have corresponding features within the Canvas API.
And hence, these features cannot be used within the HTML5 Canvas document type. This may affect you during
content migration, when you attempt to:
Copy content (layers or library symbols) from a traditional Animate document type (such as ActionScript 3.0, AIR for
Android, AIR for Desktop, and so on) into an HTML5 document. In this case, an unsupported content-type is either
removed or converted to supported defaults.
For example, copying 3D animation will remove all 3D transformations applied to objects on stage.
Import a PSD or AI file that contain unsupported content. In this case, the content is either removed or converted to
supported defaults.
For example, import a PSD file that has Gradient Bevel effect applied. Animate removes the effect.
Work with multiple document types (for example, ActionScript 3.0 and HTML5 Canvas) simultaneously, you switch
documents with an unsupported tool or option selected. In this case, Animate CC visually indicates that the feature is
not supported.
this link .
28
For example, you created a dotted line in an ActionScript 3.0 document and switch to HTML5 Canvas with the Line
tool still selected. Observe the pointer and the Properties Inspector, they display icons to indicate that dotted line is not
supported within HTML5 Canvas.
Scripts ActionSc ript compo nent s are remove d and the code i s commented ou t. And also, if you have JavaScr ipt w ritten
within the comment block (for Toolkit for CreateJS with Animate CC 13.0), ensure that you manually uncomment the
code.
For example, if you copied layers that contain buttons, they are removed.
Changes applied to content after migrating
The following are the types of changes that are applied when you migrate legacy content to an HTML5 Canvas
document.
Content is removed Content types that are not supported in HTML5 Canvas are removed. For example:
• 3D Transformations are removed
• ActionScript code is commented out
• Vi d eos are removed
Content is modified to a supported default value Content type or feature is supported, but a property of the feature is
not. For example:
• Overlay Blendmode is not supported; is modified to Normal.
• Dotted Line is not supported; is modified to Solid.
For a full list of features that are not supported and their fallback values during migration, see this article .
Last updated 6/17/2016
Page 34

Platforms
Converting other document types to HTML5 Canvas documents
The universal document type converter enables conversion of your existing FLA projects (of any type) to any other
document type such as HTML5 Canvas, ActionScript/AIR, WebGL, or a custom document type. When you convert to
a format, you can take advantage of the authoring features that Animate offers for that document type.
For more information, see
Converting ActionScript 3 to HTML5 Canvas document using JSFL script
Animate CC provides a JSFL script to convert an AS3 document to HTML5 Canvas document. When run, the JSFL
script does the following:
• Creates a new HTML5 Canvas document.
• Copies all layers, symbols, and library items to the new HTML5 Canvas document.
• Applies defaults to unsupported features, subfeatures, or feature-properties.
• Creates separate FLA files for each scene, because HTML5 Canvas document does not support multiple scenes.
To convert an AS3 document to HTML5 Canvas document, do the following:
1 Open the ActionScript 3 document in Animate CC.
2 Select Commands > Convert AS3 to HTML5 Canvas document.
29
Creating and publishing a WebGL document
Note: Support for WebGL is only available as preview. This update of Animate includes support for basic animations with
sound and scripting, and a set of interactivity features. With future releases of Animate, you will see more features being
enabled for the WebGL document type. For a complete list of Animate features that are supported for WebGL, see this
article.
What is WebGL?
WebGL is an open web standard for rendering graphics on any compatible browser, without the need for additional
plug-ins. WebGL is integrated completely into all the web standards of the browser allowing GPU accelerated usage of
image processing and effects as part of the web page canvas. WebGL elements can be embedded with other HTML
elements and composited with other parts of the page.
Although, most modern-day browsers support WebGL, visit this link to know more details about the exact versions
that are supported.
Some browsers do not have WebGL enabled by default. To enable WebGL on your browser, see this article.
Note: Ensure that you enable WebGL on your browser, because some browsers disable WebGL by default.
The WebGL document type
Animate CC allows you to create and publish rich interactive content to the Web Graphics Library (WebGL) format.
Since WebGL is fully integrated into browsers, it allows Animate to leverage GPU accelerated usage of graphics
processing and rendering, as part of the web page canvas.
KB
Last updated 6/17/2016
Page 35

Platforms
In Animate CC, a new document type has been added for WebGL. This allows you to create content and quickly publish
to a WebGL output. You can leverage powerful tools within Animate to create rich content, but render WebGL output
that runs on any compatible browser. This means that you can use the traditional Animate timeline, workspace, and
drawing tools to natively author and produce WebGL content. Most commonly used browsers support WebGL, there
by, allowing Animate to render content on most web platforms.
Creating a WebGL document
In Animate CC, the WebGL document allows you to quickly create and publish content for the WebGL format. To
create a WebGL document:
1 Launch Animate CC.
2 On the Welcome Screen, click the WebGL(Preview) option. Alternatively, select File > New menu option to display
the New Document dialog. Click the WebGL(Preview) option.
Previewing WebGL content on browsers
You can use the Test Movie feature of Animate to preview or test your content. To preview, do the following:
Within Animate CC, press Ctrl+Enter on Windows and CMD+Enter on MAC. This launches your default browser
and renders the WebGL content.
30
Animate CC requires a web server to run WebGL content. Animate CC has a built-in Web Server that is configured to
run WebGL content on Port #8090. If a server is already using this port, Animate automatically detects and resolves the
conflict.
Publishing content to the WebGL format
Animate allows you to create and publish WebGL content natively from within.
To publish your WebGL document, do the following:
1 Select File> Publish Settings to display the Publish Settings dialog. Alternatively, select File > Publish. if you have
already specified Publish Settings for WebGL.
2 On the Publish Settings dialog, specify values for:
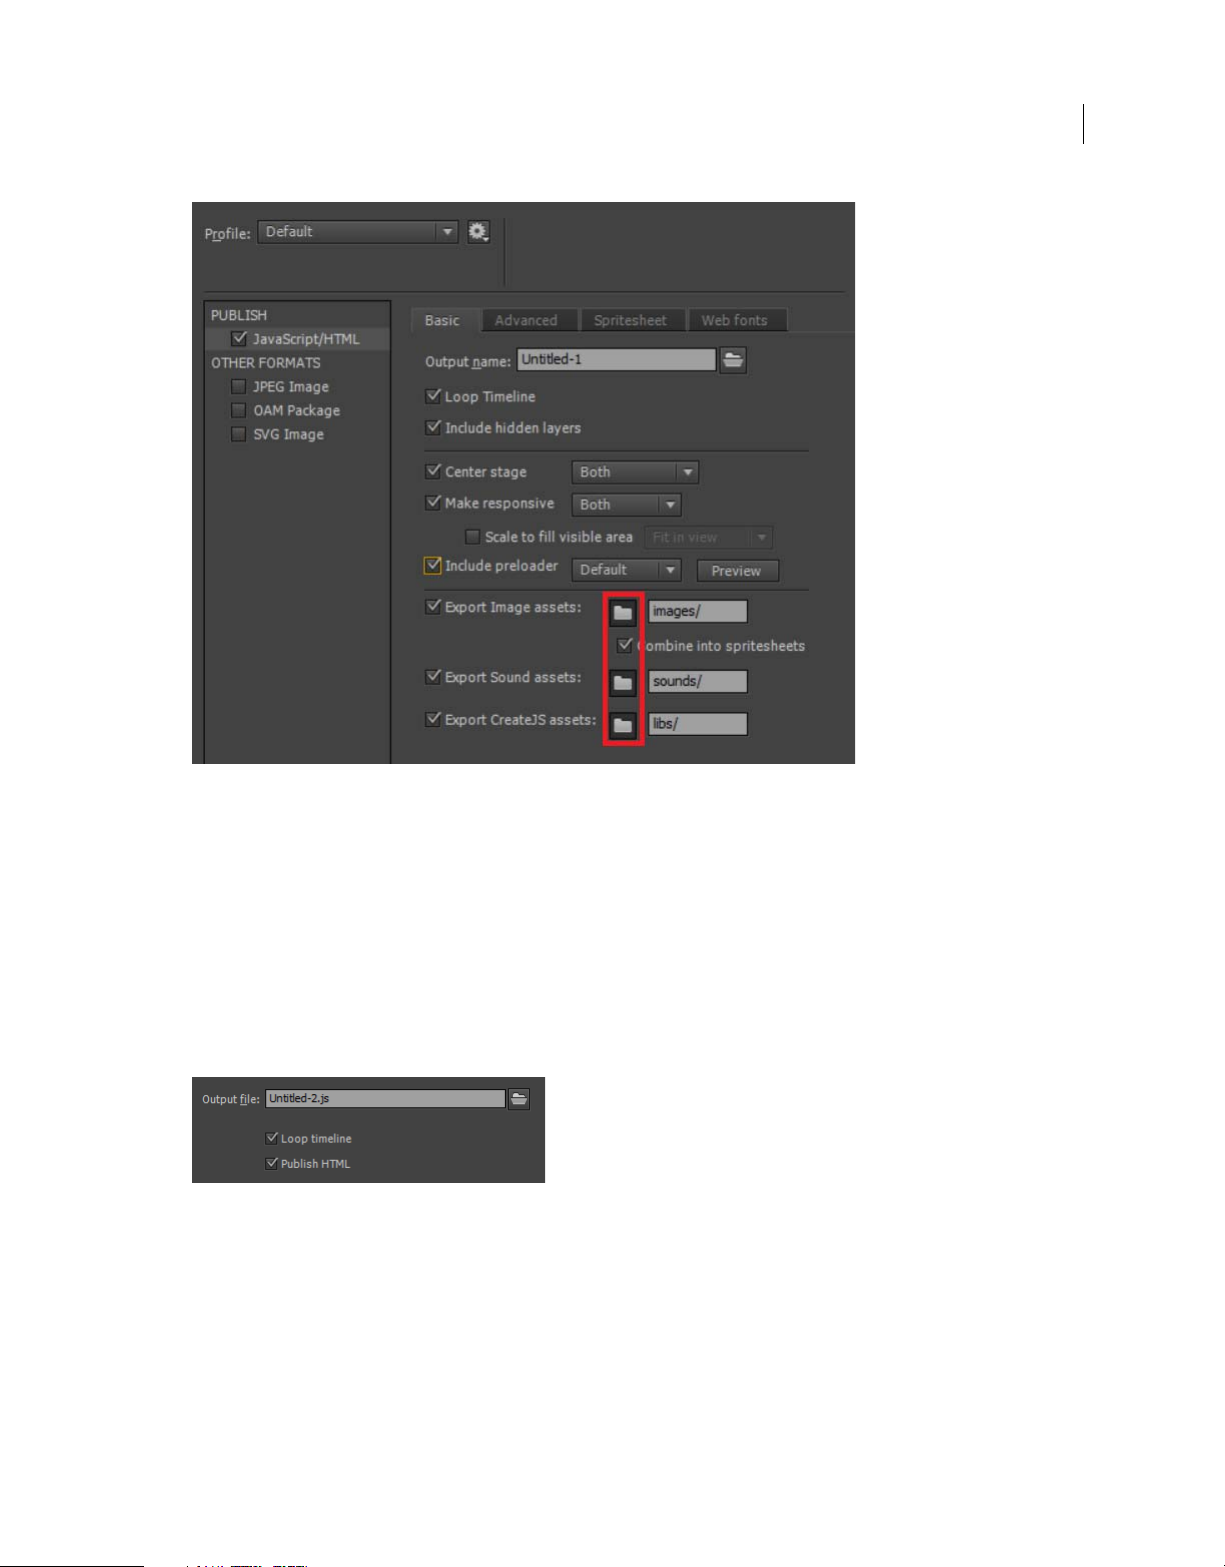
Output file Provide a meaningful name for the output. Also, browse to or enter the location where you want to publish
the WebGL output.
Overwrite HTML Lets you specify whether to overwrite the HTML Wrapper or not everytime you publish your WebGL
project. You may uncheck this option if you have made any external changes to the published HTML file and wish to
retain them while updating any changes made to the animation or assets in Flahs Pro.
Include Hidden Layers Includes all hidden layers in the WebGL output. Deselecting Include Hidden Layers prevents all
layers (including layers nested inside movie clips) marked as hidden from being exported in the resulting WebGL. This
lets you easily test different versions of WebGL document by making layers invisible.
Loop Timeline Repeats the content when it reaches the last frame. Deselect this option to stop the content when it
reaches the last frame.
Last updated 6/17/2016
Page 36

Platforms
Click Publish to publish WebGL content to the specified location.
Note: The maximum FPS that could specified for WebGL content that run on browsers is 60FPS.
Understanding the WebGL output
The published WebGL output contains the following files:
HTML Wrapper file It includes the runtime, calls for assets, and also, initializes the WebGL renderer. The file is named
as <FLA_name>.html by default. You can provide a different name for the HTML file in the Publish Settings dialog
(File > Publish Settings).
The HTML file is placed in the same directory as that of the FLA by default. You can provide a different location on the
Publish Settings dialog.
31
JavaScript File (WebGL Runtime) Renders published content on WebGL. Is published in the libs/ folder of the WebGL
document. The file is named as: flwebgl-<version>.min.js
The HTML wrapper makes use of this JS file to render WebGL content.
Textu re Atlas Stores all the color value ( of shapes ) including the bitmap instances on the stage.
Adding audio to your WebGL document
You can import and embed audio to the your WebGL document, control the playback using the sync settings (event,
start, and stop), and play timeline audio at runtime. WebGL currently supports only .wav and .mp3 formats.
For more information on working with audio, see How to use sound in Adobe Animate.
Migrating existing content to a WebGL document
You can migrate existing content within Animate to a WebGL document. To its end, Animate allows you to migrate via
copying or importing content manually. Also, when working with multiple documents within Animate, it is a common
practice to copy content across documents as Layers or assets in the Library. Although, most features of Animate are
supported, some content types are modified to better accommodate the WebGL format.
Animate contains several powerful features that help produce visually rich content. However, considering that some of
these features are native to Animate, they will not be supported in a WebGL document. Animate has been designed to
modify such content to a supported format, and visually indicate when a tool or feature is not supported.
Copy content (layers or library symbols) from a traditional Animate document type (such as ActionScript 3.0, AIR for
Android, AIR for Desktop, and so on) into a WebGL document. In this case, an unsupported content-type is either
removed or converted to supported defaults.
For example, copying 3D animation will remove all 3D transformations applied to objects on stage.
Import a PSD or AI file that contain unsupported content. In this case, the content is either removed or converted to
supported defaults.
For example, import a PSD file that has Blur effects applied. Animate removes the effect.
Last updated 6/17/2016
Page 37

Platforms
Work with multiple document types (for example, ActionScript 3.0 and WebGL) simultaneously, you switch
documents with an unsupported tool or option selected. In this case, Animate CC visually indicates that the feature is
not supported.
For example, you created a dotted line in an ActionScript 3.0 document and switch to WebGL with the Line tool still
selected. Observe the pointer and the Properties Inspector, they visually indicate that dotted line is not supported
within WebGL.
Scripts You can write Javascript code in the Actions panel, which will be executed after player enters the frame. The
'this' variable in the context of frame scripts refers to the instance of the MovieClip it belongs to. In addition, frame
scripts can access Javascript functions and variables declared in the container HTML file. When you copy a frame or
layer from an ActionScript document and paste it in a WebGL document, scripts if any will be commented.
Changes applied to content after migrating
The following are the types of changes that are applied when you migrate legacy content to an WebGL document.
Content is removed Content types that are not supported in HTML5 Canvas are removed. For example:
Filters are not supported. The effect will be removed, and the shape will assume a solid fill, instead.
32
Content is modified to a supported default value Content type or feature is supported, but a property of the feature is
not. For example:
Radial Gradient is modified to assume Solid fill using the primary color.
Last updated 6/17/2016
Page 38

Platforms
33
For a full list of features that are not supported and their fallback values during migration, see this article .
Improving rendering performance with bitmap caching
Runtime bitmap caching lets you optimize rendering performance by specifying that a static movie clip (for example,
a background image) or button symbol be cached as a bitmap at runtime. By default, vector items are redrawn in every
frame. Caching a movie clip or button symbol as a bitmap prevents the browser from having to continually redraw the
item, because the image is a bitmap and its position does not change. This provides a significant improvement in
performance of rendering WebGL content.
For example, when you create an animation with a complex background, create a movie clip containing all the items
included in the background. Then select Cache as Bitmap for the background movie clip in the Property inspector.
During playback, the background is rendered as a bitmap stored at the current screen depth. Browser draws the bitmap
on the Stage quickly and only once, letting the animation play faster and more smoothly.
Bitmap caching lets you use a movie clip and freeze it in place automatically. If a region changes, vector data updates
the bitmap cache. This process minimizes the number of redraws that browser must perform, and provides smoother,
faster rendering performance.
To en ab le Cache as Bitmap property for a movieclip symbol, select the movieclip instance, and select Cache as Bitmap
from the Render drop-down on Properties Inspector (Window > Properties).
Last updated 6/17/2016
Page 39

Platforms
34
Considerations when using Cache as Bitmap
When using Cache as Bitmap property on WebGL content, consider the following:
• Maximum size of the movieclip symbol is limited to 2048x2048. Note that the actual bounds of the movie clip
instance that can be cached are lesser than 2048x2048, WebGL reserves some pixels.
• If there is more than one instance of the same movieclip, Animate generates the cache with the size of the first
instance encountered. However, the cache is not re-generated and Cache as Bitmap property is not ignored, even if
the transform of the movie clip changes to a large extent. And hence, if the movieclip symbol is greatly scaled during
the course of animation, the animation may appear pixelated.
How to package applications for AIR for iOS
Animate CC includes support for publishing applications for AIR for iOS. AIR for iOS applications can run on the
Apple iPhone and iPad. When you publish for iOS, Animate converts your FLA files into native iPhone applications.
For information about hardware and software requirements for desktop and mobile AIR applications, see AIR system
requirements.
For detailed instructions about packaging applications for the iPhone, see Building Adobe AIR Applications with the
Packager for iPhone.
Note: Animate allows you to add path to the iOS SDK only when the AIR application includes an ANE file. Go to File >
ActionScript Settings > Library Path to include an ANE file.
Support for AIR 17.0 and Flash Player 17.0
AIR 17.0 for iOS allows you to generate 64-bit binaries along with the default 32-bit binaries of your applications to
comply with the Apple requirement for iOS applications. With the AIR 17.0 update for iOS, the Enable Faster Packaging
option under the Deployment tab of AIR for iOS Setting dialog has been enabled by default.
Last updated 6/17/2016
Page 40

Platforms
Deploying AIR applications on iOS devices directly
An important change to the AIR application deployment workflow allows you to deploy AIR applications directly to
iOS devices. Earlier, to deploy applications to iOS devices, invoking AIR applications from iTunes was necessary.
However, with Animate, you can deploy AIR applications on iOS directly, bypassing the usage of iTunes. This feature
r
educes the time required to publish an AIR application for iOS and improves productivity and performance
significantly.
Note: I
t is necessary that you install iTunes on the machine that has Animate installed.
To enable direct deployment on an iOS device, do the following:
1 Ensure that iTunes is installed on the machine on which you have Animate installed.
2 In Animate, on the Properties panel, click the button, beside the Target drop-down to bring up the AIR for iOS
Settings dialog.
35
On the Deployment tab, se
Click Publish.
lect Install Application On The Connected iOS Device option.
Last updated 6/17/2016
Page 41

Platforms
Testing and debugging AIR applications using the native iOS simulator
Animate can be integrated with Apple Xcode to enable Native iOS Simulator to test and debug AIR applications written
for iOS. The iOS Simulator is highly useful when you do not have access to actual devices (iPhone or iPad). With the
Native iOS Simulator, you can also test and debug AIR applications across multiple devices (iPhone and iPad).
However, the iOS Simulator can be integrated with Flash CS6 that runs on Macintosh systems only.
To use the iOS Simulator, Animate requires you to download and install Xcode. For more information, see Setting up
Xcode for iOS Simulator Support .
• Download and install the latest version of AIR to work with the iOS simulator.
• Since SDK version 16 onwards (CC 2014.2 update), Animate CC installs and launches the iOS app on the IOS
sim
ulator.
Setting up Xcode for iOS Simulator Support
1 Download and install Xcode from http://developer.apple.com or download from Mac App Store.
2 Launch Animate.
3 Create or open an existing AIR for iOS document.
4 On the Properties panel, set the Player target to the latest AIR version.
5 Click the button, beside the Target drop-down to bring up the AIR for iOS Settings dialog.
36
On the General tab, provide the
fully qualified path to the iOS Simulator SDK manually or browse to location. For
example:
Applications/Xcode.app/Contents/Developer/Platforms/iPhoneSimulator.platform/Developer/SDKs/
iPhoneSimulator6.0.sdk
On the Deployment tab, provide the Certificate and Password. Optionally, provide the Provisioning Profile for the
AIR application.
Last updated 6/17/2016
Page 42

Platforms
Click OK to finish.
You can now use the iOS Simulator to test and debug your application. For information, see Testing AIR applications
using the Natives iOS Simulator and Debugging AIR applications using the Native iOS Simulator .
Testing AIR applications using the Native iOS Simulator
Ensure that you have set up Xcode and set the path to iPhone SDK before testing your AIR application.
1 In Animate, Control > Test Movie > on iOS Simulator to bring up the iOS Simulator. However, if you have not set
the iOS Simulator SDK path in AIR for iOS Settings dialog, an error is thrown to indicate the same.
2 Browse to your application on the iOS Simulator, and click to launch.
37
Debugging AIR applications using the Native iOS Simulator
Ensure that you have set up Xcode and set the path to iPhone SDK path before debugging your AIR application.
1 In Animate, select Debug > Debug Movie > on iOS Simulator to bring up the iOS Simulator. However, if you have
not set the iOS Simulator SDK path in AIR for iOS Settings dialog, an error is thrown to indicate the same.
2 In Animate, select Debug > Begin Remote Debugging Session > ActionScript 3.0.
3 Browse to your application on iOS Simulator, and click to launch.
Publishing AIR applications for devices with High Resolution Retina Display support
Animate allows you to create rich AIR applications for iOS with an extended support for High-resolution Retina
display. You can choose to select High-resolution Retina Display when publishing AIR applications.
1 In Animate, create or open an existing AIR for iOS document.
2 On the Properties panel, click the button beside the Target drop-down to bring up the AIR for iOS Settings
dialog.
Last updated 6/17/2016
Page 43

Platforms
On the General tab, set the Resolution as High.
38
Click Publish.
Test and debug using Interpreter Mode
The Interpreter Mode allows you to quickly debug or test your AIR applications written for iOS. When the Interpreter
Mode is selected, AIR applications are installed without converting to ARM code.
To enable the Interpreter Mode, do the following:
1 On the Properties panel, click the button, beside the Target drop-down to bring up the AIR for iOS Settings
dialog.
2 On the Deployment tab, select Device Testing In Interpreter Mode or Device Debugging In Interpreter Mode for
the iOS deployment type option.
3 Click OK to finish.
Note: You can package and load multiple SWFs that contain ActionScript byte code using both the Interpreter and AOT
(Ahead of Time) modes. For more information, see this blog.
Note: The Interpreter Mode should only be used for testing or debugging purposes. The AIR installation files produced using
the Interpreter Mode cannot be uploaded to the Mac App Store.
Last updated 6/17/2016
Page 44

Platforms
Testing and debugging on iOS via USB
You can test and debug applications on iOS devices connected via USB. This adds on to the remote testing and
debugging functionality via wi-fi available within Animate CC. However, by connecting devices via USB, testing, and
debugging workflows are simplified by reducing the number of manual steps and in effect, expediting the testing and
debugging processes.
To enable testing or debugging via USB, do one of the following:
• (For debugging) Select Debug > Debug Movie > on Device Via USB.
• (For testing) Select Control >Test Movie > on Device Via USB.
Multi-device connectivity via USB
Animate supports testing of applications on multiple devices simultaneously. You can connect to and test multiple
devices via USB.
You can take advantage of this feature to test by deploying to multiple devices of varying screen sizes, OS versions, and
hardware configurations simultaneously. This allows you to analyze performance of your application across a spectrum
of devices at once.
1 On the Properties panel, click the button, beside the Target drop-down to bring up the AIR for iOS Settings
dialog.
2 On the Deployment tab, a list of all connected devices is displayed. Select devices on to which you wish to publish
the application.
39
3 Click Publish.
Adding xxhdpi icons (144x144)
You can manually add xxhdpi icons for an AIR application using the app-descriptor.xml file. Animate CC allows you
to add xhdpi icons (96x96) icons using the Manage AIR SDK dialog. However, if you wish to add icons of higer
resolution, you can manually add them in the app-descriptor.xml file for your AIR application using the following tag:
<icon><image144x144>{Location of png}/[icon_name-144x144].png</image144x144></icon>
For more information about the app-descriptor.xml file, see this help article.
Troubleshooting
• Publishing an AIR for iOS application fails if the file name specified for the FLA or the SWF contain double-byte
characters.
• When publishing an AIR for iOS application, Animate hangs if the device is unplugged.
Publishing AIR for Android applications
Animate CC allows you to publish content for Adobe® AIR™ for Android.
This article describes configuring the AIR for Android publish settings in Animate. For complete information about
developing Adobe AIR™ applications, see
Building Adobe AIR Applications.
For information about hardware and software requirements for desktop and mobile AIR applications, see AIR system
requirements.
Last updated 6/17/2016
Page 45

Platforms
For complete AIR developer documentation see the Adobe AIR Reference.
Videos and tutorials
The following video tutorials describe how to create AIR™ for Android applications in Animate:
• Vi d eo : AIR for Android - Part 1: Set up your development environment (GotoAndLearn.com, 18:49)
• Vi d eo : AIR for Android - Part 2: Access the camera on an Android device (GotoAndLearn.com, 13:35)
• Vi d eo : AIR for Android GPU Acceleration (GotoAndLearn.com, 15:55)
• Blog/Video: One Application, Five Screens (Christian Cantrell, Adobe blogs)
• Article: Developing a Mobile Application with Animate (John Hattan, gamedev.net)
Note: (AIR 3.7 only) Packaging applications with only captive runtime (Android)With AIR 3.7, packaging of AIR
applications for Android in any target will embed the AIR runtime. This would help in improving the user-experience as
there would be no need to download the AIR runtime separately. A side-effect would however be that there would be an
increase in app size of around 9MB.Animate displays warnings if an AIR for Android application was packaged using the
Shared Runtime option.
Create an Adobe AIR for Android file
You can create Adobe AIR for Android documents in Animate using the File > New command. You can also create an
ActionScript® 3.0 FLA file and convert it to an AIR for Android file through the Publish Settings dialog box.
40
To create an AIR for Android file, do one of the following:
• Choose AIR for Android from the Welcome screen or the New Document dialog box (File > New).
• Open an existing FLA file and convert it to an AIR for Android file. Select AIR for Android from the Target menu
in the Publish Settings dialog box (File > Publish Settings).
Preview or publish an AIR for Android application
You c an p r ev i ew a Animate AIR for Android SWF file as it would appear in the AIR application window. Previewing
is useful when you want to see what the visible aspects of the application look like without packaging and installing the
application.
1 Make sure you’ve set the Target setting in the Publish Settings dialog box to AIR for Android.
2 Select Control > Test Movie > Test or press Control+Enter.
If you have not set application settings through the Application & Installer Settings dialog box, Animate enerates a
default application descriptor file (swfname-app.xml) for you. Animate creates the file in the same folder where the
SWF file is written. If you have set application settings using the Application & Installer Settings dialog box, the
application descriptor file reflects those settings.
To p u b li sh an AIR for Android file, do one of the following:
• Click the Publish button in the Publish Settings dialog box.
• Click the Publish button in the AIR for Android Settings dialog box.
• Choose File > Publish.
• Choose File >Publish Preview.
When you Publish an AIR file, Animate creates a SWF file and XML application descriptor file. Then Animate packages
copies of both, along with any other files you have added to your application, into an AIR installer file (swfname.apk).
Last updated 6/17/2016
Page 46

Platforms
Creating AIR for Android applications
After you’ve finished developing your application, specify the settings for the AIR for Android application descriptor
and installer files required to deploy it. Animate creates the descriptor and installer files along with the SWF file when
you publish an AIR for Android file.
You specify the settings for these files in the AIR for Android - Application & Installer Settings dialog box. Once you
have created an AIR for Android file, this dialog box can be opened from the document Property inspector. You can
also access it from the Player menu Settings button in the Animate tab of the Publish Settings dialog box.
Create the Adobe AIR application file
1 In Animate, open the FLA file or set of files that make up your Adobe AIR application.
2 Save the AIR for Android FLA file before you open the AIR Application & Installer Settings dialog box.
3 Select File > AIR for Android Settings.
4 Complete the AIR for Android Application & Installer Settings dialog box, and then click Publish.
When you click the Publish button, the following files are packaged:
• The SWF file
• The application descriptor file
• The application icon files
• The files listed in the Included Files text box
41
Note: Publishing an AIR for Android application fails if the file name specified for the FLA or the SWF contain doublebyte characters.
The AIR for Android Application and Installer Settings dialog box is divided into four tabs: General, Deployment,
Icons, and Permissions.
General settings
The General tab of the AIR for Android Application and Installer Settings dialog box contains the following options:
Output file The name and location of the AIR file to create when using the Publish command. The output filename
extension is APK.
App Name The name used by the AIR application installer to generate the application filename and the application
folder. The name must contain only valid characters for filenames or folder names. Defaults to the name of the SWF file.
App ID Identifies your application with a unique ID. You can change the default ID if you prefer. Do not use spaces or
special characters in the ID. The only valid characters are 0-9, a-z, A-Z, and . (dot), from 1 to 212 characters in length.
Defaults to com.adobe.example.applicationName.
Ver sion Optional. Specifies a version number for your application. Defaults to 1.0.
Version label Optional. A string to describe the version.
Aspect Ratio Allows you to select Portrait, Landscape, or Auto orientation for the application. When Auto is selected
along with Auto orientation, the application launches on the device depending on its current orientation.
Full Screen Sets the application to run in full screen mode. This setting is deselected by default.
Auto orientation Allows the application to switch from portrait to landscape mode, depending on the current
orientation of the device. This setting is deselected by default.
Last updated 6/17/2016
Page 47

Platforms
Render mode Allows you to specify which method the AIR runtime uses to render graphic content. The options
include:
• Auto - automatically detect and use the fastest rendering method available on the host device.
• CPU - Use the CPU.
• GPU - Use the GPU. If no GPU is available, the CPU is used.
• Direct - Render using Stage3D. This is the fastest available rendering method.
For a list of processors that do not support Direct mode, see Stage3D unsupported chipsets, drivers | Flash Player 11,
AIR 3.
Processor: Allows you to select the processor type of the devices that you are publishing the application for. The
supported processor types are ARM and Intel x86. Support for x86 processors is available since the Animate CC 2014.1
release.
42
Included Files Specifies which additional files and folders to include in your application package. Click the Plus (+)
button to add files, and the folder button to add folders. To delete a file or folder from your list, select the file or folder
and click the Minus (-) button.
By default, the application descriptor file and the main SWF file are automatically added to the package list. The
package list shows these files even if you have not yet published the Adobe AIR FLA file. The package list displays the
Last updated 6/17/2016
Page 48

Platforms
files and folders in a flat structure. Files in a folder are not listed, and full paths to files are shown but are truncated if
necessary.
If you have added any AIR native extension files to the ActionScript library path, those files will appear in this list as
well.
Icon files are not included in the list. When Animate packages the files, it copies the icon files to a temporary folder that
is relative to the location of the SWF file. Animate deletes the folder after packaging is complete.
Deployment settings
The Deployment tab of the AIR for Android Application and Installer Settings dialog box lets you specify the following
settings.
Certificate The digital certificate for the application. You can browse to a certificate or create a new one. For
information about creating a digital certificate, see
must have a validity period set to at least 25 years.
Password The password for the selected digital certificate.
Deployment type Specifies which type of package to create.
• The Device Release setting allows you to create packages for the marketplace or any other distribution medium such
as a website.
• The Emulator Release setting allows you to create packages for debugging in the Mobile Device Simulator.
Signing your application. Note certificates for Android applications
43
• The Debug setting allows you to do on-device debugging, including setting breakpoints in Animate and remote
debugging the application running on the Android device. You can also choose which netwirk interface and IP
address to use for debugging sessions.
AIR runtime Specifies how the application should behave on devices that do not already have the AIR runtime installed.
• Embed AIR runtime with application adds the runtime to the application installer package so that no additional
download will be required. This increases the size of your application package significantly.
• Get AIR runtime from makes the installer to download the runtime from Google Playstore or Amazon Appstore.
After publish Allows you to specify whether to install the application on a currently connected Android device, and
whether to immediately launch the application after the installation.
Icons settings
The Icons tab of the AIR for Android Application And Installer Settings dialog box lets you specify an icon for the
Android application. The icon is shown after you install the application and run it in the AIR for Android runtime. You
can specify different sizes for the icon for different views in which the icon appears. The icons you choose for Android
do not have to strictly adhere to these sizes.
To specify an icon, click an icon size in the Icons tab and then navigate to the file you want to use for that size. The files
must be in PNG (Portable Network Graphics) format.
If you do not supply an image for a particular icon size, Adobe AIR scales one of the supplied images to create the
missing icon image.
Permissions settings
The Permissions tab allows you to specify which services and data the application has access to on the device.
• To apply a permission, select its checkbox.
• To see a description of a permission, click the permission name. The description appears below the permission list.
Last updated 6/17/2016
Page 49

Platforms
• To manually manage permissions instead of using the dialog box, select “Manually manage permissions and
manifest additions in the application descriptor file”.
Languages settings
The Languages pane alllows you to select the languages that you want your application to be associated with in the
application store or marketplace. By selecting a language, you enable users of the Android operating system in that
language to download your application. Note that these language settings do not do anything else to localize your
application user interface.
If no languages are selected, the application is published with all languages supported. This prevents you from needing
to select every language. The languages listed are those supported by Adobe AIR. Android may support additional
languages.
Publishing for Adobe AIR for desktop
44
About Adobe AIR
Adobe® AIR™ is a cross-operating system runtime that allows you to leverage your existing web development skills
(Adobe® Animate®, Adobe® Flex™, Adobe® Flash Builder™ HTML, JavaScript®, Ajax) to build and deploy Rich Internet
Applications (RIAs) to the desktop. AIR enables you to work in familiar environments, to leverage the tools and
approaches you find most comfortable, and by supporting Animate, Flex, HTML, JavaScript, and Ajax, to build the best
possible experience that meets your needs.
Users interact with AIR applications in the same way that they interact with native desktop applications. The runtime
is installed once on the user's computer, and then AIR applications are installed and run just like any other desktop
application. The runtime provides a consistent cross-operating system platform and framework for deploying
applications and therefore eliminates cross-browser testing by ensuring consistent functionality and interactions across
desktops. Instead of developing for a specific operating system, you target the runtime.
AIR dramatically changes how applications can be created, deployed, and experienced. You gain more creative control
and can extend your Animate, Flex, HTML, and Ajax-based applications to the desktop, without learning traditional
desktop development technologies.
For information about hardware and software requirements for desktop and mobile AIR applications, see AIR system
requirements.
For complete information about developing Adobe AIR™ applications, see Building Adobe AIR Applications.
Create an Adobe AIR file
You can create Adobe AIR Animate documents using the Animate Welcome screen, or the File > New command, or
you can create an ActionScript® 3.0 Animate File and convert it to an Adobe AIR file through the Publish Settings dialog
box.
Last updated 6/17/2016
Page 50

Platforms
To create an Adobe AIR file, do one of the following:
• Start Animate. The Welcome screen appears. If you have already started Animate, close any open documents to
return to the Welcome screen. In the Welcome screen, select Adobe AIR 2 (CS5) or AIR (CS5.5).
Note: If you’ve disabled the Animate Welcome screen, you can display it again by selecting Edit > Preferences and
selecting Welcome Screen from the On Launch pop-up menu in the General category.
• Choose File > New and select Adobe AIR 2 (CS5) or AIR (CS5.5) and click OK.
• Open an existing Animate file and convert it to an AIR file by selecting Adobe AIR from the Player menu in the
Animate tab of the Publish Settings dialog box (File > Publish Settings).
Note: (Flash CS5 only) If you save a Flash CS5 AIR file in Flash CS4 format, set the Player version to AIR 1.5 manually in
the Publish Settings dialog box when opening the file in Flash CS4. Flash CS4 only supports publishing to AIR 1.5.
Preview or publish an Adobe AIR application
You can preview an AIR SWF file as it would appear in the AIR application window. Previewing is useful when you
want to see what the visible aspects of the application look like without packaging and installing the application.
1 Make sure you’ve set the Target setting in the Animate tab of the Publish Settings dialog box to Adobe AIR.
2 Select Control > Test Movie > Test or press Control+Enter.
If you have not set application settings through the AIR - Application And Installer Settings dialog box, Animate
generates a default application descriptor file (swfname-app.xml) for you in the same folder where the SWF file is
written. If you have set application settings using the AIR Application & Installer Settings dialog box, the application
descriptor file reflects those settings.
45
To publish an AIR file, do one of the following:
• Click the Publish button in the Publish Settings dialog box.
• Click the Publish button in the AIR Application & Installer Settings dialog box.
• Choose File > Publish.
• Choose File >Publish Preview.
When you Publish an AIR file, Animate creates a SWF file and XML application descriptor file and packages copies of
both, along with any other files you have added to your application, into an AIR installer file (swfname.air).
Note: (Windows only) Publishing of AIR application fails if the file name contains non-english characters.
Creating AIR application and installer files
After you’ve finished developing your application, specify the settings for the AIR application descriptor and installer
files required to deploy it. Animate creates the descriptor and installer files along with the SWF file when you publish
an AIR file.
You specify the settings for these files in the AIR - Application & Installer Settings dialog box. Once you have created
an AIR file, this dialog box can be opened from either the document Property inspector or the Player menu Settings
button in the Animate tab of the Publish Settings dialog box.
Create the Adobe AIR application and installer files
1 In Animate, open the FLA file or set of files that make up your Adobe AIR application.
2 Save the Adobe AIR FLA file before you open the AIR Settings dialog box.
3 Select File > AIR 2 Settings.
Last updated 6/17/2016
Page 51

Platforms
4 Complete the AIR Settings dialog box, and then click Publish.
When you click the Publish button, the following files are packaged: the SWF file, the application descriptor file, the
application icon files, and the files listed in the Included Files text box. If you have not already created a digital
certificate, Animate displays the Digital Signature dialog box when you click the Publish button.
The AIR Application And Installer Settings dialog box is divided into 4 tabs: General, Signature, Icons, and Advanced.
For more information on these settings, see the following sections.
General settings
The General tab of the AIR Application And Installer Settings dialog box contains the following options:
Output file The name and location of the .air file to create when using the Publish command.
Output as The type of package to create.
• AIR package - Creates a standard AIR installer file that assumes the AIR runtime can be separately downloaded
during installation or is already installed on the target device.
• Mac installer - Creates a complete Macintosh installer file.
• Application with runtime embedded - Creates an AIR installer file that contains the AIR runtime so no additional
download is required.
Windows Installer Select this option to compile a native, platform specific Windows installer (.exe) instead of a
platform-independent AIR installer (.air).
46
Name The name of the main file of the application. Defaults to the name of the FLA file.
Ver sion Optional. Specifies a version number for your application. Defaults to 1.0.
App ID Identifies your application with a unique ID. You can change the default ID if you prefer. Do not use spaces or
special characters in the ID. The only valid characters are 0-9, a-z, A-Z, . (dot), and - (dash), from 1 to 212 characters
in length. Defaults to com.adobe.example.applicationName.
Description Optional. Lets you enter a description of the application to display in the installer window when the user
installs the application. Defaults to blank.
Copyright Optional. Lets you enter a copyright notice. Defaults to blank.
Window Style Specifies what window style (or chrome) to use for the user interface when the user runs the application
on their computer. You can specify System Chrome (the default), which refers to the standard window visual style that
the operating system uses. You can al so spe cif y Cus tom C hrome (opaque) or Custom Chrome ( transparent). To disp lay
your application without the system chrome, select None. System Chrome surrounds the application with the
operating-system standard window control. Custom Chrome (opaque) eliminates the standard system chrome and lets
you create a chrome of your own for the application. (You build the custom chrome directly in the FLA file.) Custom
Chrome (transparent) is like Custom Chrome (opaque), but it adds transparent capabilities to the edges of the page.
These capabilities allow for application windows that are not square or rectangular in shape.
Render mode Allows you to specify which method the AIR runtime uses to render graphic content. The options
include:
• Auto - automatically detect and use the fastest rendering method available on the host device.
• CPU - Use the CPU.
• Direct - Render using Stage3D. This is the fastest available rendering method.
For a list of processors that do not support Direct mode, see Stage3D unsupported chipsets, drivers | Flash Player 11,
AIR 3.
Last updated 6/17/2016
Page 52

Platforms
Profiles Which profiles to include when building the AIR file. To limit your AIR application to a specific profile,
deselect the unneeded profiles. For more information about AIR profiles, see
Included Files Specifies which additional files and folders to include in your application package. Click the Plus (+)
button to add files, and the folder button to add folders. To delete a file or folder from your list, select the file or folder
and click the Minus (-) button.
By default, the application descriptor file and the main SWF file are automatically added to the package list. The
package list shows these files even if you have not yet published the Adobe AIR FLA file. The package list displays the
files and folders in a flat structure. Files in a folder are not listed, and full path names to files are shown but are truncated
if necessary.
If you have added any AIR native extension files to the ActionScript library path, those files will appear in this list as
well.
Icon files are not included in the list. When Animate packages the files, it copies the icon files to a temporary folder that
is relative to the location of the SWF file. Animate deletes the folder after packaging is complete.
Application profiles .
Signature settings
The Signature tab of the AIR Application & Installer Settings dialog box allows you to specify a code signing certificate
for your application.
47
For more information about digital signatures, see Signing your applicationand Digitally signing an AIR file.
Icons settings
The Icons tab of the AIR Application And Installer Settings dialog box lets you specify an icon for the application. The
icon is shown after you install the application and run it in the Adobe AIR runtime. You can specify four different sizes
for the icon (128, 48, 32, and 16 pixels) to allow for the different views in which the icon appears. For example, the icon
can appear in the file browser in thumbnail, detail, and tile views. It can also appear as a desktop icon and in the title of
the AIR application window, as well as in other places.
The icon image defaults to a sample AIR application icon if no other icon files are specified (Flash CS5 only).
To specify an icon, click an icon size at the top of the Icons tab and then navigate to the file you want to use for that size.
The files must be in PNG (Portable Network Graphics) format.
If you do specify an image, it must be the exact size (either 128x128, 48x48, 32x32, or 16x16). If you do not supply an
image for a particular icon size, Adobe AIR scales one of the supplied images to create the missing icon image.
Advanced settings
The Advanced tab allows you to specify additional settings for the application descriptor file.
You can specify any associated file types that your AIR application should handle. For example, if you wanted your
application to be the principal application for handling HTML files, you would specify that in the Associated File Types
text box.
You can also specify settings for the following aspects of the application:
• The size and placement of the initial window
• The folder in which the application is installed
• The Program menu folder in which to place the application.
Last updated 6/17/2016
Page 53

Platforms
The dialog box has the following options:
Associated file types Lets you specify associated file types that the AIR application will handle. Click the Plus (+)
button to add a new file type to the text box. Clicking the Plus b utton disp lays the Fi le Typ e S ett ings di alo g b ox. Clic king
the Minus (-) button removes an item that is selected in the text box. Clicking the Pencil button displays the File Type
Settings dialog box and allows you to edit an item that you’ve selected in the text box. By default, the Minus (-) and
Pencil buttons are dimmed. Selecting an item in the text box enables the Minus (-) and Pencil buttons, allowing you to
remove or edit the item. The default value in the text box is None.
Initial window settings Lets you specify size and placement settings for the initial application window.
• Width: Specifies the initial width of the window in pixels. The value is blank by default.
• Height: Specifies the initial height of the window in pixels. The value is blank by default.
• X: Specifies the initial horizontal position of the window in pixels. The value is blank by default.
• Y: Specifies the initial vertical position of the window in pixels. The value is blank by default.
• Maximum Width and Maximum Height: Specify the maximum size of the window in pixels. These values are blank
by default.
• Minimum Width and Minimum Height: Specify the minimum size of the window in pixels. These values are blank
by default.
• Maximizable: Lets you specify whether the user can maximize the window. This option is selected (or true) by
default.
• Minimizable: Lets you specify whether the user can minimize the window. This option is selected (or true) by
default.
48
• Resizable: Lets you specify whether the user can resize the window. If this option is not selected, Maximum Width,
Maximum Height, Minimum Width, and Minimum Height are dimmed. This option is selected (or true) by default.
• Visible: Lets you specify whether the application window is visible initially. The option is selected (or true) by
default.
Other Settings Lets you specify the following additional information regarding the installation:
• Install Folder: Specifies the folder in which the application is installed.
• Program Menu Folder (Windows only): Specifies the name of the program menu folder for the application.
• Use Custom UI for Updates: Specifies what happens when a user opens an AIR installer file for an application that’s
already installed. By default, AIR displays a dialog box that allows the user to update the installed version with the
version in the AIR file. If you don’t want the user to make that decision and you want the application to have
complete control over its updates, select this option. Selecting this option overrides the default behavior and gives
the application control over its own updates.
Languages settings
The Languages pane alllows you to select the languages that you want your application to be associated with in the
application store or marketplace. By selecting a language, you enable users of operating systems in that language to
download your application. Note that these language settings do not do anything else to localize your application user
interface.
If no languages are selected, the application is published with all languages supported. This prevents you from needing
to select every language. The languages listed are those supported by Adobe AIR. Android may support additional
languages.
Last updated 6/17/2016
Page 54

Platforms
File type settings
Animate displays the File Type Settings dialog box if you click the Plus (+) button or the Pencil button in the Associated
File Types section of the Advanced tab to add or edit associated file types for the AIR application.
The only two required fields in this dialog box are Name and Extension. If you click OK and either of those fields is
blank, Animate displays an error dialog box.
You can specify the following settings for an associated file type:
Name The name of the file type (for example, Hypertext Markup Language, Text File, or Example).
Extension The filename extension (for example, html, txt, or xmpl), up to 39 basic alphanumeric characters, (A-Za-z0-
9), and without a leading period.
Description Optional. A description of the file type (for example, Adobe Video File).
Content type Optional. Specifies the MIME type for the file.
File Type Icon Settings Optional. Lets you specify an icon that’s associated with the file type. You can specify four
different sizes for the icon (128x128, 48x48, 32x32, and 16x16 pixels) to allow for the different views in which the icon
appears. For example, the icon can appear in the file browser in thumbnail, detail, and tile views.
49
If you specify an image, it must be of the size that you specify. If you do not specify a file for a particular size, AIR uses
the image of the closest size and scales it to fit for the given occurrence.
To specify an icon, either click the folder for the icon size and select an icon file to use or enter the path and filename
for the icon file in the text box next to the prompt. The icon file must be in PNG format.
After a new file type is created, it is shown in the File Type list box in the Advanced Settings dialog box.
Failure to create application and installer files
The application and installer files fail to be created in the following instances:
• The application ID string has an incorrect length or contains invalid characters. The application ID string can be
from 1 to 212 characters and can include the following characters: 0-9, a-z, A-Z, . (dot), - (hyphen).
• Files in the Included Files list do not exist.
• The sizes of custom icon files are incorrect.
• The AIR destination folder does not have write access.
• You have not signed the application or have not specified that it is an Adobe AIRI application that will be signed
later.
Signing your application
All Adobe AIR applications must be signed to be installed on another system. Animate provides the ability, however,
to create unsigned Adobe AIR installer files so that the application can be signed later. These unsigned Adobe AIR
installer files are called an AIRI (AIR Intermediate) package. This capability provides for cases in which the certificate
is on a different machine or signing is handled separately from application development.
Last updated 6/17/2016
Page 55

Platforms
Sign an Adobe AIR application with a pre-purchased digital certificate from a root certificate authority
1 Choose File > AIR 2 Settings and then click on the Signature tab.
This tab has two radio buttons that allow you to either sign your Adobe AIR application with a digital certificate or
p
repare an AIRI package. If you sign your AIR application, you can either use a digital certificate granted by a root
certificate authority or create a self-signed certificate. A self-signed certificate is easy to create but is not as
trustworthy as a certificate granted by a root certificate authority.
2 Select a certificate file from the pop-up menu or click the Browse button to locate a certificate file.
3 Select the certificate.
4 Enter a password.
5 Click OK.
For more information on signing your AIR application, see Digitally signing an AIR file .
Create a self-signed digital certificate
1 Click the Create button. The Self-Signed Digital Certificate dialog box opens.
2 Complete the entries for Publisher Name, Organization Unit, Organization Name, Country, Password, and Confirm
Password. For Country, you can select from the menu or enter a 2-letter country code that does not appear in the
menu. For a list of valid country codes, see http://www.iso.org/iso/country_codes.
50
3 Specify the type of certificate.
The Type option refers to the level of security that the cer
tificate carries. 1024-RSA uses a 1024-bit key (less secure),
and 2048-RSA uses a 2048-bit key (more secure). The default is 2048-RSA.
4 Save the information in a certificate file by completing the Save As entry or clicking the Browse button to browse to
a folder location.
5 Click OK.
6 In the Digital Signature dialog box, enter the password you assigned in the second step of this procedure and click
OK.
To have Animate remember the password you used for this session, click Remember Password For This Session.
If the Timestamp option is unselected when you click OK, a dialog box warns that the application will fail to install
when the digital certificate expires. If you click Yes in response to the warning, time stamping is disabled. If you click
No, the Timestamp option is automatically selected and time stamping is enabled.
For more information on creating a self-signed digital certificate, see Digitally signing an AIR file.
You can also create an AIR Intermediate (AIRI) application without a digital signature. A user cannot install the
application on a desktop, however, until you add a digital signature.
Prepare an AIRI package that will be signed later
In the Signature tab, select Prepare An AIR Intermediate (AIRI) File That Will Be Signed Later, and click OK.
The digital signature status changes to indicate that you have chosen to prepare an AIRI package that will be signed
later, and the Set button changes to a Change button.
If you choose to sign the application later, you will need to use the command-line AIR Developer Tool included with
An
imate and with the AIR SDK. For more information, see Building Adobe AIR Applications.
Last updated 6/17/2016
Page 56

Platforms
Add or remove a version of the AIR SDK
You can add new releases and custom versions of the AIR SDK to Animate. Once added, the new SDK appears in the
player target list in the Publish Settings.
To add an new verision of the SDK:
1 Download the new AIR SDK folder.
2 In Animate, choose Help > Manage AIR SDK.
3 In the Manage AIR SDK dialog, click the plus "+" button and then browse to the new AIR SDK folder. Click OK.
4 Click OK in the Manage AIR SDK dialog box.
The new SDK appears in the Player Target list in Publish Settings. The lowest acceptable SDK version should be greater
than the version included with Animate.
To remove a version of the SDK:
1 In Animate, choose Help > Manage AIR SDK.
2 In the Manage AIR SDK dialog, select the SDK you want to remove.
3 Click the minus "-" button. Click OK.
51
ActionScript publish settings
Modify ActionScript publish settings
When you create a new FLA document, Animate CC (formerly Flash Professional CC) asks you which version of
ActionScript you want to use. You can change this setting if you decide later to write your scripts in a different version
of ActionScript.
Note: ActionScript 3.0 is not compatible with ActionScript 2.0. The ActionScript 2.0 compiler can compile all ActionScript
1.0 code, except for the slash ( /) syntax use d to indicate movie clip paths (for example , parentClip/te stMC :varName= "hello
world"). To avoid this problem, either rewrite your code using dot (.) notation, or select the ActionScript 1.0 compiler.
1 Select File > Publish Settings.
2 Select the ActionScript version from the Script menu.
Class files and configuration files
When you install Animate, several ActionScript-related configuration folders and files are placed on your system. If
you modify these files to customize the authoring environment, back up the original files.
ActionScript classes folder Contains all of the built-in ActionScript 2.0 classes (AS files). Typical paths to this folder
are as follows:
• Windows 7 and 8: Hard Disk\Program Files\Adobe\Adobe Animate CC\Common\Configuration\ActionScript
3.0\Configuration\Classes
• Macintosh: Hard Disk/Users/user/Library/Application Support/Adobe/Animate
CC/language/Configuration/Classes
Last updated 6/17/2016
Page 57

Platforms
The Classes folder is organized into classes for Flash Player 10 and classes for Flash Player 11. For more information
on the organization of this directory, see the Read Me file in the Classes folder.
Include class folder Contains all of the global ActionScript include files. Locations are as follows:
• Windows 7 and 8: Hard Disk\Program Files\Adobe\Adobe Animate CC\Common\Configuration\ActionScript
3.0\libs\
• Macintosh: Hard Disk/Users/user/Library/Application Support/Adobe/Animate
CC/language/Configuration/Include
ActionsPanel.xml configuration file Includes the configuration file for ActionScript code hinting. Separate files
provide configuration for each version of ActionScript and Flash Lite, and for JavaScript. Locations are as follows:
• Windows 7 and 8: Hard Disk\Program Files\Adobe\Adobe Animate CC\Common\Configuration\ActionScript
3.0\libs\
• Macintosh: Hard Disk/Users/user/Library/Application Support/Adobe/Animate
CC/language/Configuration/ActionsPanel
AsColorSyntax.xml configuration file The configuration file for ActionScript code color syntax highlighting. Locations
are as follows:
• Windows 7 and 8: Hard Disk\Program Files\Adobe\Adobe Animate CC\Common\Configuration\ActionScript
3.0\libs\
52
• Macintosh: Hard Disk/Users/user/Library/Application Support/Adobe/Animate
CC/language/Configuration/ActionsPanel
Declare an ActionScript 3.0 document class
When you use ActionScript 3.0, a SWF file may have a top-level class associated with it. This class is called the
document class. When the SWF is loaded by Flash Player, an instance of this class is created to be the SWF file's toplevel object. This object of a SWF file can be an instance of any custom class you choose.
For example, a SWF file that implements a calendar component can associate its top level with a Calendar class, with
methods and properties appropriate to a calendar component. When the SWF is loaded, Flash Player creates an
instance of this Calendar class.
1 Deselect all objects on the Stage and in the Timeline by clicking a blank area of the Stage. This displays the
Document properties in the Property inspector.
2 Enter the filename of the ActionScript file for the class in the Document Class text box in the Property inspector.
Do not include the .as filename extension.
Note: You can also enter the Document Class information in the Publish Settings dialog box.
Note: Optionally, you can also enter the name of the Class within a SWC file, linked in Library Path, that you want to set
as the Document Class.
Set the location of ActionScript files
To use an ActionScript class that you’ve defined, Animate must locate the external ActionScript files that contain the
class definition. The list of folders in which Animate searches for class definitions is called the classpath for
ActionScript 2.0 and the source path for ActionScript 3.0. Classpaths and source paths exist at the application (global)
and document level. For more information about classpaths, see Classes in
Animate or “Packages ” in Learning ActionScript 3.0.
Learning ActionScript 2.0 in Adobe
Last updated 6/17/2016
Page 58

Platforms
You can set the following ActionScript locations in Animate:
• ActionScript 2.0
• Application level (available to all AS2 FLA files):
• Classpath (set in ActionScript preferences)
• Document level (available only to the FLA file that specifies this path):
• Classpath (set in Publish Settings)
• ActionScript 3.0
• Application level (available to all AS3 FLA files):
• Source path (set in ActionScript preferences)
• Library path (set in ActionScript preferences)
• External library path (set in ActionScript preferences)
• Document level (available only to the FLA file that specifies these paths):
• Source path (set in Publish Settings)
• Library path (set in Publish Settings)
• Document class (set in Document Property inspector)
The Library path specifies the location of pre-compiled ActionScript code which resides in SWC files you have created.
The FLA file that specifies this path loads every SWC file at the top level of this path and any other code resources that
are specified within the SWC files themselves. If you use the Library path, be sure none of the compiled code in the
SWC files is duplicated in uncompiled AS files in the Source path. The redundant code will slow down compilation of
your SWF file.
53
You can specify more than one path for Animate to look in. Resources found in any of the paths specified will be used.
When you add or modify a path, you can add absolute directory paths (for example, C:/my_classes) and relative
directory paths (for example, ../my_classes or ".").
Set the classpath for ActionScript 2.0
note: ActionScript 2.0 is deprecated with Animate CC. For more information, see this article
.To set the document-level classpath:
1 Select File > Publish Settings, and click Flash.
2 Verify that ActionScript 2.0 is selected in the ActionScript Version pop-up menu, and click Settings.
3 Specify the frame where the class definition should reside in the Export Frame for Classes text field.
4 To add paths to the classpath list, do any of the following:
• To add a folder to the classpath, click the Browse to Path button , browse to the folder to add, and click OK.
• To add a new line to the Classpath list, click the Add New Path button. Double-click the new line, type a relative
or absolute path, and click OK.
• To edit an existing classpath folder, select the path in the Classpath list, click the Browse to Path button, browse
to the folder to add, and click OK. Alternatively, double-click the path in the Classpath list, type the desired path,
and click OK.
Last updated 6/17/2016
Page 59

Platforms
• To delete a folder from the classpath, select the path in the Classpath list and click the Remove Selected Path
button
.
To set the application-level classpath:
1 Choose Edit Preferences (Windows) or Flash > Preferences (Macintosh) and click the ActionScript category.
2 Click the ActionScript 2.0 Settings button and add the path(s) to the Classpath list
Set the source path for ActionScript 3.0
To set the document-level source path:
1 Select File > Publish Settings, and click Animate.
2 Verify that ActionScript 3.0 is selected in the ActionScript Version pop-up menu, and click Settings. Your Flash
Player version must be set to Flash Player 9 or later to use ActionScript 3.0.
3 Specify the frame where the class definition should reside in the Export Classes in Frame text field.
4 Specify the Errors settings. You can select Strict Mode and Warnings Mode. Strict Mode reports compiler warnings
as errors, which means that compilation will not succeed if those types of errors exist. Warnings Mode reports extra
warnings that are useful for discovering incompatibilities when updating ActionScript 2.0 code to ActionScript 3.0.
5 (Optional) Select Stage to automatically declare stage instances.
6 Specify ActionScript 3.0 or ECMAScript as the dialect to use. ActionScript 3.0 is recommended.
54
7 To add paths to the source path list, do any of the following:
• To add a folder to the source path, click the Source path tab and then click the Browse To Path button , browse
to the folder to add, and click OK.
• To add a new line to the Source path list, click the Add New Path button. Double-click the new line, type a
relative or absolute path, and click OK.
• To edit an existing Source path folder, select the path in the Source path list, click the Browse To Path button,
browse to the folder to add, and click OK. Alternatively, double-click the path in the Source path list, type the
desired path, and click OK.
• To delete a folder from the source path, select the path in the Source path list and click the Remove From Path
button
.
To set the application-level source path:
1 Choose Edit Preferences (Windows) or Animate > Preferences (Macintosh) and click the ActionScript category.
2 Click the ActionScript 3.0 Settings button and add the path(s) to the Source path list.
Set the Library path for ActionScript 3.0 files
To set the document-level Library path, the procedure is similar to setting the Source path:
1 Choose File Publish Settings.
2 Make sure ActionScript 3.0 is specified in the Script menu and click the ActionScript Settings button.
3 In the Advanced ActionScript 3.0 Settings dialog box, click the Library path tab.
4 Add the library path to the Library path list. You can add folders or individual SWC files to the path list.
5 To set the Link Type property, double-click Link Type in the property tree of the path. The choices for Link Type are:
• Merged into code: The code resources found in the path are merged into the published SWF file.
Last updated 6/17/2016
Page 60

Platforms
• External: The code resources found in the path are not added to the published SWF file, but the compiler verifies
that they are in the locations you specified.
• Runtime shared library (RSL): Flash Player downloads the resources at runtime.
To set the Application-level Library path:
1 Choose Edit Preferences (Windows) or Animate > Preferences (Macintosh) and click the ActionScript category.
2 Click the ActionScript 3.0 Settings button and add the path(s) to the Library path list.
Compiling ActionScript conditionally
You can use conditional compilation in ActionScript 3.0 in the same way that it has been used in C++ and other
programming languages. For example, you can use conditional compilation to turn blocks of code throughout a project
on of off, such as code that implements a certain feature or code used for debugging.
Using config constants that you define in the publish settings, you can specify whether certain lines of ActionScript
code are compiled or not. Each constant takes the following form:
CONFIG::SAMPLE_CONSTANT
In this form, CONFIG is the config namespace and SAMPLE_CONSTANT is the constant that you will set to true or
false in the publish settings. When the value of the constant is true, the line of code that follows the constant in
ActionScript is compiled. When the value is false, the line of code that follows the constant is not compiled.
55
For example, the following function has 2 lines of code that are compiled only if the value of the constant that precedes
them is set to true in the publish settings:
public function CondCompTest() {
CONFIG::COMPILE_FOR_AIR {
trace("This line of code will be compiled when COMPILE_FOR_AIR=true.");
}
CONFIG::COMPILE_FOR_BROWSERS {
trace("This line of code will be compiled when COMPILE_FOR BROWSERS=true.");
}
}
To define a config constant using the Publish Settings dialog box:
1 Choose File > Publish Settings.
2 Ensure that the Script menu set to ActionScript 3.0 and click the Settings button next to the menu.
3 In the Advanced ActionScript 3.0 Settings dialog box, click the Config Constants tab.
4 To add a constant, click the Add button.
5 Type the name of the constant you want to add. The default config namespace is CONFIG and the default constant
name is CONFIG_CONST.
Note: The config namespace CONFIG is declared by the Animate compiler automatically. You can add your own config
namespaces by entering them with a constant name in the publish settings and adding them to your ActionScript code
using the following syntax:
config namespace MY_CONFIG;
6 Enter the value you want for the constant, either true or false. You change this value in order to turn on or off
compilation of specific lines of code.
Last updated 6/17/2016
Page 61

Platforms
Customizing context menus in documents (CS5.5)
You can customize the standard context menu and the text-editing context menu that appears with SWF files in Flash
Player 7 and later.
• The standard context menu appears when a user right-clicks (Windows) or Control-clicks (Macintosh) on a SWF
file in Flash Player, in any area except an editable text field. You can add custom items to the menu, and hide any
built-in items in the menu except Settings and Debugger.
• The editing context menu appears when a user right-clicks (Windows) or Control-clicks (Macintosh) in an editable
text field in a SWF file in Flash Player. You can add custom items to this menu. You cannot hide any built-in items.
Note: Flash Player also displays an error context menu when a user right-clicks (Windows) or Control-clicks (Macintosh)
in Flash Player and no SWF file is loaded. You cannot customize this menu.
Customize context menus in Flash Player 7 by using the ContextMenu and ContextMenuItem objects in ActionScript
2.0. For more information on using these objects, see ContextMenu in the
Remember the following conditions when creating custom context menu items for Flash Player:
• Custom items are added to a context menu in the order in which they are created. You cannot modify this order after
the items are created.
• You can specify the visibility and enabling of custom items.
• Custom context menu items are automatically encoded using Unicode UTF-8 text encoding.
ActionScript 2.0 Language Reference.
56
Configuration folders installed with Flash (CS5.5)
Flash places several configuration folders on your system when you install the application. The configuration folders
organize files associated with the application into appropriate levels of user access. You may want to view the contents
of these folders when you are working with ActionScript® or components. The configuration folders for Flash are as
follows:
Application-level configuration folder
Because it is in the application level, non-administrative users do not have write access to this directory. Typical paths
to this folder are as follows:
• In Microsoft Windows XP or Microsoft Windows Vista, browse to boot drive\Program Files\Adobe\Adobe Flash
CS3\language\Configuration\.
• On the Macintosh, browse to Macintosh HD/Applications/Adobe Flash CS3/Configuration/.
First Run folder
This sibling to the application-level configuration folder facilitates sharing configuration files among users of the same
computer. Folders and files in the First Run folder are automatically copied to the user-level configuration folder. Any
new files placed in the First Run folder are copied to the user-level configuration folder when you start the application.
Typical paths to the First Run folder are as follows:
• In Windows XP or Vista, browse to boot drive\Program Files\Adobe\Adobe Flash CS3\language\First Run\.
• On the Macintosh, browse to Macintosh HD/Applications/Adobe Flash CS3/First Run/.
User-level configuration folder
Last updated 6/17/2016
Page 62

Platforms
Found in the user profile area, this folder is always writable by the current user. Typical paths to this folder are as
follows:
• In Windows XP or Vista, browse to boot drive\Documents and Settings\username\Local Settings\Application
Data\Adobe\Flash CS3\language\Configuration.
• On the Macintosh, browse to Macintosh HD/Users/username/Library/Application Support/Adobe/Flash
CS3/language/Configuration/.
All-user-level configuration folder
Found in the common user profile area, this folder is part of the standard Windows and Macintosh operating system
installations and is shared by all users of a particular computer. The operating system makes available to all users of the
computer any files placed in this folder. Typical paths to this folder are as follows:
• In Windows XP or Vista, browse to boot drive\Documents and Settings\All Users\Application Data\Adobe\Flash
CS3\language\Configuration\.
• On the Macintosh, browse to Macintosh HD/Users/Shared/Application Support/Adobe/Flash
CS3/language/Configuration/.
Restricted Users configuration folder
For users with restricted privileges on a workstation, typically, in a networked environment, only system administrators
have administrative access to workstations. All other users are given restricted access, which usually means that these
users can’t write to application-level files (such as the Program Files directory in Windows or the Applications folder in
Macintosh OS X).
57
Best practices - Organizing ActionScript in an application
Keeping actions together
Whenever possible, put your ActionScript® in a single location. Organizing your code in one place helps you edit
projects more efficiently, because you can avoid searching in different places when you debug or modify the
ActionScript. If you put code in a FLA file, put ActionScript on Frame 1 or Frame 2 in a layer called actions on the
topmost layer in the Timeline. Alternatively, you might put all of your code in ActionScript files. Some Animate
applications do not always put all code in a single place (in particular, ActionScript 2.0-based applications that use
screens or behaviors).
You can usually put all your code in the same location (on a frame, or in ActionScript files), with the following
advantages:
• Code is easy to find in a potentially complex source file.
• Code is easy to debug.
Last updated 6/17/2016
Page 63

Platforms
Attaching code to objects
Avoid attaching ActionScript to objects in a FLA file, even in simple SWF files. (Only ActionScript 1.0 and 2.0. can be
attached to objects; ActionScript 3.0 cannot.) Attaching code to an object means that you select a movie clip,
component, or button instance; open the Actions panel; and add ActionScript using the on() or onClipEvent() handler
functions.
Attaching ActionScript code to objects is strongly discouraged for the following reasons:
• It is difficult to locate, and the FLA files are difficult to edit.
• It is difficult to debug.
• ActionScript that is written on the timeline or in classes is more elegant and easier to build upon.
• It encourages poor coding style.
• The contrast between two styles of coding can be confusing to people learning ActionScript; it forces students and
readers to learn different coding styles, additional syntax, and a poor and limited coding style.
Avoid attaching ActionScript 2.0 to a button called myButton_btn, which looks like the following:
on (release) { //do something }
However, placing ActionScript 2.0 with the same purpose on the timeline (which is encouraged), looks like the
following code:
58
myButton_btn.onRelease = function() { //do something };
note: Different practices apply when using behaviors, which sometimes involves attaching code to objects.
More Help topics
Best practices - Behaviors conventions
Using the MVC design pattern
Organizing files and storing code
Comparing timeline code with object code
How to use ActionScript with Animate CC
Getting started with ActionScript
The ActionScript® scripting language lets you add complex interactivity, playback control, and data display to your
application. You can add ActionScript in the authoring environment by using the Actions panel, Script window, or an
external editor.
ActionScript follows its own rules of syntax, reserved keywords, and lets you use variables to store and retrieve
information. ActionScript includes a large library of built-in classes that let you create objects to perform many useful
tasks. For more information on ActionScript, see the following Help titles:
• Learning ActionScript 3.0 at www.adobe.com/go/learn_flcs5_learnas3_en
• Learning ActionScript 2.0 in Adobe Animate at www.adobe.com/go/learn_cs5_learningas2_en
Last updated 6/17/2016
Page 64

Platforms
You don’t need to understand every ActionScript element to begin scripting; if you have a clear goal, you can start
building scripts with simple actions.
ActionScript and JavaScript are both rooted in the ECMA-262 standard, the international standard for the ECMAScript
scripting language. For this reason, developers who are familiar with JavaScript should find ActionScript immediately
familiar. For more information about ECMAScript, go to ecma-international.org.
Which version of ActionScript should you use?
Animate includes more than one version of ActionScript to meet the needs of different kinds of developers and
playback hardware. ActionScript 3.0 and 2.0 are not compatible with each other.
• ActionScript 3.0 executes extremely fast. This version requires somewhat more familiarity with object-oriented
programming concepts than the other ActionScript versions. ActionScript 3.0 is fully compliant with the
ECMAScript specification, offers better XML processing, an improved event model, and an improved architecture
for working with onscreen elements. FLA files that use ActionScript 3.0 cannot include earlier versions of
ActionScript.
• (Deprecated with Animate CC only) ActionScript 2.0 is simpler to learn than ActionScript 3.0. Although Flash
Player runs compiled ActionScript 2.0 code slower than compiled ActionScript 3.0 code, ActionScript 2.0 is still
useful for many kinds of projects that are not computationally intensive; for example, more design-oriented content.
ActionScript 2.0 is also based on the ECMAScript spec, but is not fully compliant.
• (Deprecated with Animate CC) ActionScript 1.0 is the simplest form of ActionScript, and is still used by some
versions of the Flash Lite Player. ActionScript 1.0 and 2.0 can coexist in the same FLA file.
• (Deprecated with Animate CC) Flash Lite 2.x ActionScript is a subset of ActionScript 2.0 that is supported by Flash
Lite 2.x running on mobile phones and devices.
59
• (Deprecated with Animate CC) Flash Lite 1.x ActionScript is a subset of ActionScript 1.0 that is supported by Flash
Lite 1.x running on mobile phones and devices.
Using the ActionScript documentation
Because there are multiple versions of ActionScript (2.0 and 3.0), and multiple ways of incorporating it into your FLA
files, there are several different ways to learn ActionScript.
This chapter describes the graphical user interface for working with ActionScript. This interface includes the Actions
panel, Script window, Script Assist mode, Behaviors panel, Output panel, and Compiler Errors panel. These topics
apply to all versions of ActionScript.
Other ActionScript documentation from Adobe will help you learn about the individual versions of ActionScript.
Ways of working with ActionScript
There are several ways to work with ActionScript.
• (Deprecated with Animate CC) Script Assist mode lets you add ActionScript to your FLA file without writing the
code yourself. You select actions, and the software presents you with a user-interface for entering the parameters
required for each one. You must know a little about what functions to use to accomplish specific tasks, but you don’t
have to learn syntax. Many designers and non-programmers use this mode.
• (Deprecated with Animate CC) Behaviors also let you add code to your file without writing it yourself. Behaviors
are prewritten scripts for common tasks. You can add a behavior and then easily configure it in the Behaviors panel.
Behaviors are available only for ActionScript 2.0 and earlier.
Last updated 6/17/2016
Page 65

Platforms
• Writing your own ActionScript gives you the greatest flexibility and control over your document, but it requires you
to become familiar with the ActionScript language and conventions.
• Components are prebuilt movie clips that help you implement complex functionality. A component can be a simple
user interface control, such as a check box, or it can be a complicated control, such as a scroll pane. You can
customize a component’s functionality and appearance, and you can download components created by other
developers. Most components require you to write some ActionScript code of your own to trigger or control a
component. For more information, see
Writing ActionScript
When you write ActionScript code in the authoring environment, you use the Actions panel or Script window. The
Actions panel and Script window contain a full-featured code editor that includes code hinting and coloring, code
formatting, syntax highlighting, debugging, line numbers, word wrapping, and support for Unicode.
Using ActionScript 3.0 Components.
• Use the Actions panel to write scripts that are part of your Animate document (that is, scripts that are embedded in
the FLA file). The Actions panel provides features such as the Actions toolbox, which gives you quick access to the
core ActionScript language elements, in which you are prompted for the elements needed to create scripts.
• Use the Script wind ow if you want to write external scripts—that is, scripts or classes that are store d in external files.
(You can also use a text editor to create an external AS file.) The Script window includes code-assistance features
such as code hinting and coloring, syntax checking, and auto-formatting.
Additional recommended community content
60
• Getting started with ActionScript 3.0 (CS3) (3:25)
• Optimizing animations and FLA files (7:24) (CS3)
• Creating a Document class using ActionScript 3.0 (CS3) (2:38)
• Creating an effective workflow between design and development (CS3) (3:41)
• Using components (CS3) (1:47)
• YouTube.com list of ActionScript channels
The following articles and tutorials provide additional detailed information about working with ActionScript:
• Introduction to ActionScript 3.0 (Slekx.com)
• ActionScript 3 migration table (Adobe.com)
The Actions panel
Looking for the Language Reference?
To find reference documentation for a specific ActionScript language element, do one of the following:
• Open the ActionScript 3.0 Language Reference, and search for the language element.
• (Deprecated with Animate CC) Open the ActionScript 2.0 Language Reference, and search for the language
element.
• Type the language element in the Actions panel, select it, then press F1. (You must press F1 immediately, or this topic
opens instead.)
Note: To open the Help in a web browser instead of the Community Help application, see this article:
http://kb2.adobe.com/community/publishing/916/cpsid_91609.html.
Last updated 6/17/2016
Page 66

Platforms
Learning ActionScript
To learn about writing ActionScript, use these resources:
• Learning ActionScript 3.0
• ActionScript 3.0 Language and Components Reference
• Learning ActionScript 2.0 in Adobe Animate
• ActionScript 2.0 Language Reference
Note: ActionScript 3.0 and 2.0 are not compatible with each other. You must choose only one version to use in each FLA
file you create.
Overview of the Actions panel
To create scripts embedded in a FLA file, enter ActionScript directly into the Actions panel (Window > Actions or press
F9).
61
The Actions panel consists of two panes:
Script pane Lets you type ActionScript code, which is associated with the currently selected frame.
Script navigator Lists the scripts in your Animate document, and lets you move quickly between them. Click an item
in the Script navigator to view the script in the Script pane.
The Actions panel let you access the code-assistance features that help simplify and streamline coding in ActionScript.
• Run Script: Runs the script
• Pin Script: Pins the script to the pin tabs of individual scripts in the Script pane and move them accordingly. This
feature is useful if you have not organized the code within your FLA file into one central location or if you are using
multiple scripts.You can pin a script to retain the open location of the code in the Actions panel and toggle between
the various open scripts. This can be especially useful when debugging.
• Insert Instance Path and Name: Helps you set an absolute or relative target path for an action in the script.
• Find: Finds and replaces text in your script.
• Format Code: Helps to format the code.
• Code Snippets:Opens the Code Snippets panel that displays sample code snippets.
• Help: Displays reference information for the ActionScript element that is selected in the Script pane. For example,
if you click an import statement and then click Help, the reference information for import appears in the Help panel.
(Deprecated with Animate CC) Print ActionScript
1 From the Actions panel pop-up menu, select Print.
2 Select Options and click Print.
Last updated 6/17/2016
Page 67

Platforms
Because the printed copy won’t include information about file it came from, you should include information such
as the name of the FLA file in a comment in the script.
Overview of Script window
The Script window lets you create external script files that you import into your application. These scripts can be
ActionScript or Animate JavaScript files.
62
If you have more than one external file open, filenames are displayed on tabs across the top of the Script window.
In the Script window, you can use the following features: PinScript, find and replace, syntax coloring, format code, code
hinting, code commenting, code collapse, debug options (ActionScript files only), and word wrap. The Script window
also lets you display line numbers and hidden characters.
Create an external file in the Script window
1 Select File > New.
2 Select the type of external file you want to create (ActionScript file or Animate JavaScript file).
Edit an existing file in the Script window
• To open an existing script, select File > Open, and then open an existing AS file.
• To edit a script that is already open, click the document tab that shows the script’s name.
Last updated 6/17/2016
Page 68

Platforms
Tools in the Actions panel and Script window
The Actions panel let you access the code-assistance features that help simplify and streamline coding in
ActionScript.Find
Finds and replaces text in your script. Insert Target Path (Actions panel only) Helps you set
an absolute or relative target path for an action in the script. Help Displays reference information for the
ActionScript element that is selected in the Script pane. For example, if you click an import statement and then click
Help, the reference information for import appears in the Help panel.Code SnippetsOpens the Code Snippets panel
that displays sample code snippets.
Access context-sensitive Help from the Actions panel
1 To select an item for reference, do any of the following:
• Select an ActionScript term in the Actions panel toolbox pane (on the left side of the Actions panel).
• Select an ActionScript term in the Actions panel in the Script pane.
• Place the insertion point before an ActionScript term in the Actions panel in the Script pane.
2 To open the Help panel reference page for the selected item, do one of the following:
• Press F1.
• Right-click the item and select View Help.
63
• Click Help above the Script pane.
Set ActionScript preferences
Whether you edit code in the Actions panel or the Script window, you can set and modify a single set of preferences.
1 Select Edit > Preferences (Windows) or Animate > Preferences (Macintosh), and then click Code Editor in the
Category list.
2 Set any of these preferences:
Automatic Indentation When automatic indentation is turned on, the text you type after an opening parenthesis “(“
or opening curly brace “{“ is automatically indented according to the Tab Size setting.
Tab Siz e Specifies the number of characters a new line is indented.
Code Hints Enables code hinting in the Script pane.
Delay Specifies the delay (in seconds) before code hints are displayed. Note that the option is deprecated with
Animate CC.
Font Specifies the font used for your script.
Open/Import Specifies the character encoding used when you open or import ActionScript files.
Save/Export Specifies the character encoding used when you save or export ActionScript files.
Reload Modified Files Specifies what happens when a script file is modified, moved, or deleted. Select Always,
Never, or Prompt.
Always No warning is displayed, and the file is automatically reloaded.
Never No warning is displayed, and the file remains in the current state.
Prompt (Default) A warning is displayed, and you can choose whether to reload the file.
Last updated 6/17/2016
Page 69

Platforms
When you build applications with external scripts, this preference helps you avoid overwriting a script that a team
member has modified since you opened the application, or avoid publishing the application with older versions of
scripts. The warnings let you automatically close a script and reopen the newer, modified version.
Syntax Colors Specifies code coloring in your scripts.
ActionScript 3.0 Settings These buttons open the ActionScript Settings dialog boxes, where you can set source path,
library path, and external library path for ActionScript 3.0.
More Help topics
Symbols and ActionScript
Timelines and ActionScript
Sound and ActionScript
Controlling external video playback with ActionScript
Multilanguage text and ActionScript
Creating accessibility with ActionScript
Organizing ActionScript in an application
64
DebuggingActionScript 3.0
Pin scripts in the Actions panel
Writing and managing scripts
Writing and managing scripts
DebuggingActionScript 3.0
(Deprecated with Animate CC) Import and export scripts
Format code
Use code hints
Best practices - Accessibility guidelines
About accessibility guidelines
Screen readers are complex, and you can easily encounter unexpected results in FLA files developed for use with screen
readers, which is software that visually impaired users run to read websites aloud. Text is read aloud using specially
designed software. A screen reader can only interpret textual content. However, any descriptions that you provide for
the overall SWF file, movie clips, images, or other graphical content are also read aloud. Write descriptions for the
important images and animations so that the screen reader can also interpret these assets in your SWF file. This is the
SWF file equivalent to alt text in an HTML web page.
note: Animate applications must be viewed in Internet Explorer on Windows, because Microsoft Active Accessibility
(MSAA) support is limited to this browser.
Last updated 6/17/2016
Page 70

Platforms
Flash Player uses Microsoft Active Accessibility (MSAA) to expose Animate content to screen readers. MSAA is a
Windows-based technology that provides a standardized platform for information exchange between assistive
technologies, such as screen readers, and other applications. Events (such as a change in the application) and objects
are visible to screen readers by using MSAA.
Note: Flash Player 7 (and later) does not work with all screen-reader technologies. The third-party software provider must
handle the information that MSAA provides.
Creating accessible sites
Making a website accessible involves several different criteria:
Expose the information to screen readers
Make text or images realizable Some visitors might have difficulty reading small text or seeing small graphics. Allow
users to zoom in on these elements, taking advantage of scalable vector graphics in SWF files.
Provide audio narration Consider providing an audio narration for visitors without a screen reader, or where screen
readers might not work, such as with video content.
Provide captions for audio narrations Some visitors might not be able to hear an audio narration for your site or a
video. Consider providing captions for these visitors.
65
Do not rely on color to communicate information Many visitors might be color blind. If you rely on color to
communicate information (such as: Click t he green button to go to page 1, click the red button to go to page 2), prov ide
text or speech equivalents.
Historically, many online presentations (such as videos) provide alternative ways for visually impaired visitors to access
the content, for instance, a textual description of a video. However, Animate provides textual information directly to
the screen reader. Although this usually means you need to make additional settings or ActionScript in a FLA file, you
do not have to create a completely separate version.
Parts of you r SW F fil e ca n be exp osed to s cre en read ers . Text elements (such as text fields, static text, and dynamic text),
buttons, movie clips, components, and the entire SWF file can be interpreted by MSA-compliant screen readers.
Section 508 is United States legislation that provides guidelines for making information accessible to people with
disabilities. Section 508 specifically addresses the need for websites to be accessible in several ways. Some websites,
including all federal websites, must comply with these guidelines. If a SWF file does not communicate all of the
information to the screen reader, the SWF file is no longer Section 508-compliant. For more information, see the
Section 508 website.
Many nations have specifi ed guidelines to follow to create ac cessible web sites, or follow guidel ines established by other
organizations. For more information on accessibility and web standards, see the World Wide Web Consortium (W3C)
Web Accessibility Initiative website. These standards and guidelines describe what factors you must address when you
create accessible HTML websites, and some of this information applies to Animate.
Exposing SWF file structure and navigation
Because of the visual nature of some SWF files, the layout and navigation of the page can be complex and difficult for
screen readers to translate. An overall description of the SWF file is important to communicate information about its
structure and how to navigate through the site’s structure. You can provide this description by clicking the Stage and
entering a description into the Accessibility panel. You can also create a separate area of the site to provide this
description or overview.
Note: If you enter a description for the main SWF file, this description is read each time the SWF file refreshes. You can
avoid this redundancy by creating a separate informational page.
Last updated 6/17/2016
Page 71

Platforms
Inform the user about any navigational elements that change in the SWF file. Perhaps an extra button is added, or the
text on the face of a button changes, and this change is read aloud by the screen reader. Flash Player 7 and later supports
updating these properties by using ActionScript. You can update the accessibility information in your applications if
the content changes at runtime.
Controlling descriptions and repetition
Designers and developers can assign descriptions for the animations, images, and graphics in a SWF file. Provide names
for graphics so the screen reader can interpret them. If a graphic or animation does not communicate vital information
to the SWF file (perhaps it is decorative or repetitive), or you outlined the element in the overall SWF file description,
do not provide a separate description for that element. Providing unnecessary descriptions can be confusing to users
who use screen readers.
Note: If you divide text or use images for text in your SWF files, provide either a name or description for these elements.
If you have several nested movie clips that serve a single purpose or convey one idea, ensure that you do the following:
• Group these elements in your SWF file.
• Provide a description for the parent movie clip.
• Make all the child movie clips inaccessible.
This is extremely important, or the screen reader tries to describe all the irrelevant nested movie clips, which will
confuse the user, and might cause the user to leave your website. Make this decision whenever you have more than
one ob jec t, s uch as man y movi e cl ips, in a SW F fi le. If t he ove ral l me ssa ge i s be st c onve yed usi ng a single des criptio n,
provide a description on one of the objects, and make all the other objects inaccessible to the screen reader.
66
Looping SWF files and applications cause screen readers to constantly refresh because the screen reader detects new
content on the page. Because the reader thinks the content is updated, it returns to the top of the web page and starts
rereading the content. Make inaccessible to screen readers any looping or refreshing objects that do not have to be
reread.
note: Do not type a description in the Description field of the Accessibility panel for instances (such as text) that the
screen reader reads aloud.
Using color
You must make decisions about using colors in an accessible file. You must not rely only on color to communicate
particular information or directives to users. A color-blind user cannot operate a page if it asks to click on the blue area
to launch a new page or the red area to hear music. Offer text equivalents on the page or in an alternate version to make
your site accessible. Also, check that significant contrast exists between foreground and background colors to enhance
read ability. If you plac e light g ray text on a wh ite b ackgrou nd, us ers cannot e asily re ad it. Simil arly, sm all te xt is d ifficu lt
for many visitors to read. Using high-contrast and large or resizable text benefits most users, even those without
impairments.
Ordering, tabbing, and the keyboard
Reading order and tabbing are important considerations for making accessible Animate websites. When you design an
interface, the order that it appears on the page might not match the order in which the screen reader describes each
instance. You can control and test reading order, as well as control tabbing in the SWF file.
Controlling reading order
Last updated 6/17/2016
Page 72

Platforms
The default reading order is not predictable and does not always match the placement of your assets or the visual layout
of the page. Keeping the layout simple can help create a logical reading order without using ActionScript. However, you
have more control over reading order if you use ActionScript and test the reading order in your SWF files.
Note: Do not miss ordering a single instance in your SWF file, or the reading order reverts to the default (and
unpredictable) reading order.
Controlling tabbing and content
Visitors who rely on screen readers to describe a site’s content typically use tabbing and keyboard controls to navigate
the operating system and web pages, because using the mouse is not useful when the screen cannot be seen. Use the
tabIndex and tabEnabled properties with the movie clip, button, text field, or component instances to offer intelligent
tabbing control in accessible SWF files. In addition to tabbing, you can use any key-press actions to navigate through
the SWF file, but you must communicate that information using the Accessibility panel. Use the Key class in
ActionScript to add key-press scripts to the SWF file. Select the object for which you want to use the key-press script,
and add the shortcut key in the Shortcut field on the Accessibility panel. Add keyboard shortcuts to essential and
frequently used buttons in your SWF file.note: In ActionScript 3.0, tabIndex and tabEnabled are properties of the
InteractiveObject class. In ActionScript 2.0, they do not require a class reference.
Note: Avoid invisible buttons in accessible SWF files, because screen readers do not recognize these buttons. (Invisible
buttons are buttons for which you define only a hit area, the clickable region, for the button.)
67
Many SWF files have a rapid succession of information, and screen readers frequently cannot keep up with this pace.
Provide controls for the SWF file, letting the user use buttons to navigate through the file at their own pace, and letting
them pause the process if necessary.
Handling audio, video, and animation
When you provide audio narrations or video that contains speech, provide captions for those users who cannot hear.
You can use text fields in Animate, import video that contains captions, or even use an XML caption file. You can use
video cue points to specify when a text field should update text information at runtime.
For information on using Hi-Caption SE and the Hi-Caption Viewer component, see the Adobe Add-ons page. This
third-party extension lets you create captions that you save in an XML file and load into the SWF file at runtime, among
other advanced controls. Alternatively, you can use cue points and a text field to display caption information.
Accessibility and extending Animate
With the extensibility layer in Animate, developers can create extensions that enable advanced authoring. This lets
third-party companies develop extensions that involve accessibility. You have several options for validating your SWF
files or adding captions.
For example, a validation tool can examine your SWF file for missing descriptions. It checks to see if a description is
added for a group of instances, or if text has a label for the instance, and tells you about any problems. The tool also
examines the reading order in your SWF file, and finds all instances that must be specified. You can specify reading
order by using a dialog box after the SWF file is analyzed.
For information on the currently available third-party extensions, see the Adobe Add-ons page.
Last updated 6/17/2016
Page 73

Platforms
Testing files and making changes
Test any SW F f ile that is in ten ded fo r us e wit h s cre en re ader s. Test yo ur S WF fil es whe n e ach new v ersi on of Fla sh Pl ayer
is released, including minor revisions, and test it with the following scenarios:
• Using the Window Eyes and JAWS for Windows screen readers. These each handle SWF files differently, so you
could get different results.
• In a browser without a screen reader, and navigate through your site without using the mouse.
• Turn off your monitor and use only the screen reader to navigate your website.
• If you use audio narration, test your site without speakers.
• With several users who are representative of your target web site visitors.
Note: You do not have to test different browsers, because the technology used to expose SWF files to screen readers (MSAA)
is supported only by Internet Explorer on Windows.
When listening to your SWF file using a screen reader, check the following points:
• Is the reading order correct?
• Do you have descriptions for shortcuts in your SWF file?
• Do you have adequate and complete descriptions for the elements in the interface?
• Do you have adequate descriptions for navigating the site’s structure?
• Is the SWF file content read when it is updated or refreshed?
68
• If you change the context of any elements on the Stage (such as a button that changes from Play to Pause), is that
change announced by the screen reader?
No official tool is available for validating SWF files, unlike HTML validation. However, some third-party tools exist
to help you validate the file. For more information on these extensions, see
the Adobe Add-ons page.
More Help topics
Creating accessibility with ActionScript
Using Animate to enter accessibility information for screen readers
Accessibility for hearing-impaired users
Accessibility in the Animate workspace
The Adobe Animate CC (formerly Flash Professional CC) workspace is keyboard-accessible for users who may have
difficulty using a mouse.
Note: Complete, updated Help is on the web. The application did not detect an Internet connection. For a complete version
of this topic, click the link below or search complete
The Adobe Animate \workspace is keyboard-accessible for users who may have difficulty using a mouse.
Animate CC Help.
See the discussion of Animate workspace accessibility in Help on the web to learn about navigating the user interface
without a mouse.
Last updated 6/17/2016
Page 74

Platforms
About accessibility support
Accessibility support in the authoring environment provides keyboard shortcuts for navigating and using interface
controls, including panels, the Property inspector, dialog boxes, the Stage, and objects on the Stage, so that you can
work with these interface elements without using the mouse.
Note: Certain keyboard controls and authoring environment accessibility features are available only in Windows.
To customize the keyboard shortcuts for accessibility in the authoring environment, use the Workspace Accessibility
Commands section of the Keyboard Shortcuts dialog box.
• To hide all panels and the Property inspector, press F4. To display all panels and the Property inspector, press F4
again.
Select controls in a panel using keyboard shortcuts
To move the focus through the panel controls when a panel or the Property inspector has the current focus, use the Tab
key. To activate a menu that has the current focus, use the Spacebar (that is, pressing Spacebar is equivalent to clicking
the menu in the panel). Animate does not support moving from panel to panel with the Tab key.
When you use the keyboard shortcut for panel controls, focus is applied to a control and the control is activated using
the following criteria:
69
• To select a control in the panel with the Tab key, the panel with the current focus must be expanded. If the panel is
collapsed, pressing Tab has no effect.
• To display the Panel menu items when the Panel menu has the focus, press the Space bar.
• You can move the focus to a panel control only if the control is active. If a control is dimmed (inactive), you cannot
apply focus to the control.
Move the focus through the items in the Panel menu of a panel
1 To display the Panel menu items when the focus currently applied to the Panel menu, press the Spacebar.
2 To move through the items in the Panel menu, press Down Arrow.
3 To activate the currently selected Panel menu item, press Enter (Windows) or Return (Macintosh).
Move the focus through the controls in a panel
1 Press Tab when the focus is currently applied to the Panel menu. To move the focus through the controls in the
panel, press Tab repeatedly.
2 To activate the currently selected menu in a panel , press Enter or Return.
3 To edit a numerical Hot Text value, type the number and press Enter or Return.
Navigate dialog box controls using keyboard shortcuts
• To move through the controls in the dialog box, press Tab.
• To move through the controls within one section of a dialog box, press Up Arrow and Down Arrow.
• To activate the button (equivalent to clicking the button), when the focus is applied to a dialog box control button,
press Enter.
• To apply the current settings and close the dialog box (equivalent to clicking OK), when the focus is not applied to
any dialog box control button, press Enter.
• To close the dialog box without applying the changes (equivalent to clicking Cancel), press Escape.
Last updated 6/17/2016
Page 75

Platforms
• To view the Help content for the dialog box (equivalent to clicking Help), when the focus is applied to the Help
button, press Enter or Spacebar.
Select the Stage or objects on the Stage using keyboard shortcuts
Selecting the Stage with a keyboard shortcut is equivalent to clicking on the Stage.
After the Stage is selected, use the Tab key to navigate through all objects on all layers, one at a time. You can select
instances (including graphic symbols, buttons, movie clips, bitmaps, videos, or sounds), groups, or boxes. You cannot
select shapes (such as rectangles) unless those shapes are instances of symbols. You cannot select more than one object
at a time using keyboard shortcuts.
To select objects on the Stage, use the following techniques:
• To select an object on the Stage, with the Stage selected, press Tab.
• To select the previous object when an object is currently selected, press Shift+Tab.
• To select the first object that was created on the active frame in the active layer, press Tab. When the last object on
the top layer is selected, press Tab to move to the next layer beneath it and select the first object there, and so on.
• When the last object on the last layer is selected, press Tab to move to the next frame and select the first object on
the top layer there.
• Objects on layers that are hidden or locked cannot be selected with the Tab key.
Note: If you are currently typing text in a box, you cannot select an object using the keyboard focus. You must first press
the Escape key and then select an object.
70
Navigate tree structures using keyboard shortcuts
To navigate tree structures, the hierarchical displays of file structures in certain Animate panels, use keyboard
shortcuts.
• To expand a collapsed folder, select the folder and press Right Arrow.
• To collapse an expanded folder, select the folder and press Left Arrow.
• To move to the parent folder of an expanded folder, press Left Arrow.
• To move to the child folder of an expanded folder, press Right Arrow.
Work with library items using keyboard shortcuts
1 To copy or paste a selected library item, press Control+X (Windows) or Command+X (Macintosh) to cut the item,
or press Control+C (Windows) or Command+C (Macintosh) to copy the item.
2 To paste a cut or copied item, click the Stage or in another library to set the insertion point, and press Control+V
(Windows) or Command+V (Macintosh) to paste in the center of the Stage; or press Control+Shift+V (Windows)
or Command+Shift+V (Macintosh) to paste in place (in the same location as the original).
To cut, copy, and paste items, use the following techniques:
• Cut or copy one item or multiple items.
• Cut or copy an item from the Library panel and paste it onto the Stage or into another library, or paste a folder
into another library.
• You cannot paste a shape from the Stage into the library.
Last updated 6/17/2016
Page 76

Platforms
• You cannot paste a library item into a common library, because common libraries cannot be modified. However,
you can create a common library.
• When you paste a library item onto the Stage, the item is centered.
• If you paste a folder, each item in the folder is included.
• To paste a library item into a folder in the destination library, click the folder before pasting.
• You can paste a library item into a different location in the same library where it originated.
• If you attempt to paste a library item into a location containing another item by the same name, select whether
to replace the existing item.
More Help topics
Animate Keyboard Shortcuts
Work with common libraries
Writing and managing scripts
71
Format code
Your code can be formatted and indented automatically when typing. If you use dynamic font mapping, you ensure that
the correct fonts are used for multilingual text.
Set Auto Format options
1 Do one of the following:
• From the panel menu (at the upper-right corner of the Actions panel), select Preferences.
• In the Script window, select Edit > Preferences (Windows) or Animate > Preferences (Macintosh).
2 In the Preferences dialog box, select Auto Format.
3 Select any of the Auto Format options.
After you set Auto Format options, your settings are applied automatically to the code you write, but not to existing
code; you must apply your settings to existing code manually.
Format code according to Auto Format settings
• Click Auto Format in the Actions panel or Script window toolbar.
• From the panel menu (at the upper-right corner of the Actions panel), select Auto Format.
• Press Control+Shift+F (Windows) or Command+Shift+F (Macintosh).
• In the Script window, select Tools > Auto Format.
Last updated 6/17/2016
Page 77

Platforms
Use dynamic font mapping
To turn dynamic font mapping on or off, select or deselect Use Dynamic Font Mapping in the Preferences dialog
box.
Dynamic font mapping is turned off by default because it increases performance time when you are scripting. If you
are working with multilingual text, turn on dynamic font mapping because it helps to ensure that the correct fonts
are used.
Use automatic indentation
To turn automatic indentation on or off, select or deselect Automatic Indentation in the Preferences dialog box.
When automatic indentation is turned on, the text you type after an opening parenthesis “(“ or opening curly brace
“{“ is automatically indented according to the Tab Size setting in ActionScript preferences.
In your scripts, you can indent a line by selecting it and pressing Tab. To remove the indent, select the line and press
Sh
ift+Tab.
Comment sections of code
Code comments are parts of code that the ActionScript compiler ignores. A comment line explains what your code is
doing, or temporarily deactivates code that you don’t want to delete. Comment a line of code by beginning it with a
double slash (//). The compiler ignores all text on that line after the double slash. You can also comment larger blocks
of code by placing a slash and asterisk (/*) at the beginning of the block and an asterisk and slash (*/) at the end of the
block.
72
You can type these comment markers manually, or you can use buttons at the top of the Actions panel or Script window
t
o add them.
Comment a line of code
1 Place the insertion point at the beginning of the line or at the character where you want the comment to begin.
2 Right-click and select Comment. You can also use the keyboard shortcuts Ctrl + M (Windows) or Command + M
or go to Edit > Comment Selection.
A double slash (//) is placed at the insertion point.
Comment multiple lines of code
1 Select the lines to comment. (The first and last lines of the selection can be partial lines.)
2 Right-click and select Comment. You can also use the keyboard shortcuts Ctrl + M (Windows) or Command + M
or go to Edit > Comment Selection.
Block comment characters are placed at the beginning (/*) and end (*/) of the selection.
Note: I
f there are comments in between the selected lines of text, a line comment will be applied on all selected lines.
Remove a comment
1 Place the insertion point in the line that contains the comment, or select the block of code that is commented.
2 Right-click and select Uncomment. You can also use the keyboard shortcuts Ctrl + Shift + M (Windows) or
Command + Shift + M or go to Edit > Uncomment Selection.
Last updated 6/17/2016
Page 78

Platforms
Use syntax coloring
In ActionScript, as in any language, syntax is the way elements are put together to create meaning. If you use incorrect
ActionScript syntax, your scripts cannot work.
To highlight syntax errors, set a color-code for parts of your scripts. For example, suppose you set the syntax coloring
preference to make keywords appear in blue. When you type var, the word var appears in blue. However, if you
mistakenly type vae, the word vae remains black, which shows that you made a typing error.
Do one of the following:
• Select Edit > Preferences (Windows) or Animate > Preferences (Macintosh), click Code Editor in the Category list,
and specify Syntax Coloring settings.
• With the insertion point in the Script pane, press Control-U (Windows) or Command-U (Macintosh).
Note: When you write scripts in the Actions panel, commands that are not supported by the version of the player you are
targeting appear in yellow in the Actions toolbox. For example, if the Flash Player SWF file version is set to Flash 7,
ActionScript that only Flash Player 8 supports appears in yellow in the Actions toolbox.
Using the identifier and keyword list at runtime
73
On launching Animate, the identifier and keyword lists are read from the resource file and cached. Apart from reading
the default lists from the resource, it also scans for additional keywords and identifier list in the Preference folder. It is
possible for you to add additional keywords and identifiers by adding ".txt files" in following folders:
• C:\Users\<Username>[AppData]\Roaming\Adobe\Animate\13.0[ActionscriptKeywords]\
• C:\Users\<UserName>[AppData]\Roaming\Adobe\Animate\13.0[ActionscriptIdentifiers]\
• C:\Users\<UserName>[AppData]\Roaming\Adobe\Animate\13.0[JavascriptKeywords]\
• C:\Users\<UserName>[AppData]\Roaming\Adobe\Animate\13.0[JavascriptIdentifiers]\
Use line numbers and word wrap
When you edit or modify code, line numbers make code easier to scroll and parse. Word wrap helps you avoid
horizontally scrolling long lines of code (especially when you work in the authoring environment, or at low screen
resolutions).
Enable or disable line numbers
• In the Script window, select View > Line Numbers.
• Press Control+Shift+L (Windows) or Command+Shift+L (Macintosh).
Highlight a specific line
• In the Script window, select Edit > Go To Line.
Enable or disable line word wrap
• In the Script window, select View > Word Wrap.
• Press Control+Shift+W (Windows) or Command+Shift+W (Macintosh).
Last updated 6/17/2016
Page 79

Platforms
Display hidden characters
Characters such as spaces, tabs, and line breaks are hidden in ActionScript code. You may need to display these
characters; for example, you must find and remove double-byte spaces that are not part of a string value, because they
cause compiler errors.
• Press Control+Shift+8 (Windows) or Command+Shift+8 (Macintosh).
The following symbols are used to display hidden characters.
Hidden character Symbol
Single-byte space .
Double-byte space l
Tab >>
line break
Find text in a script
The Find tool lets you find and replace text strings in your scripts.
74
Note: To search through text in every script in a Animate document, use the Movie Explorer.
Find text
1 In the Actions panel or Script window, click Find or press Control+F (Windows) or Command+F (Macintosh).
2 Enter the search string.
3 Click Find Next.
Find and replace text in a script
1 In the Actions panel or Script window, click Find or press Control+F (Windows) or Command+F (Macintosh).
2 Enter the search string.
3 In the Replace box, enter the new string.
4 Click Find Next.
5 To replace the string, click Replace; to replace all occurrences of the string, click Replace All.
(Deprecated with Animate CC) Repeat a search in the Actions panel
From the panel menu (at the upper-right corner of the Actions panel), select Find Again.
(Deprecated with Animate CC) Repeat a search in the Script window
Select Edit > Find Again.
(Deprecated with Animate CC) Check syntax and punctuation
You can do a quick check of your ActionScript code without publishing the FLA file.
When you check syntax, the current script is checked. If the current script calls ActionScript classes, those classes are
also checked. Other scripts that might be in the FLA file are not checked.
For ActionScript 2.0 files, Check Syntax runs the code through the compiler, generating syntax and compiler errors.
Last updated 6/17/2016
Page 80

Platforms
For ActionScript 3.0 files, Check Syntax generates only syntax errors. To generate compiler errors, such as type
mismatches, improper return values, and variable or method name misspellings, you must use the Control > Test
command.
Check syntax
To check syntax, do one of the following:
• In the Actions panel or Script window, click Check Syntax .
• Click in the Script pane, and then press Control+T (Windows) or Command+T (Macintosh). Clicking or typing in
the Script pane gives it the focus. If an object on the Stage has the focus, the Transform panel opens instead.
Syntax errors are listed in the Compiler Errors panel.
Note: In an external ActionScript class file in the Script window, the global classpath (AS2) or source path (AS3) affects the
syntax check. Even if the global classpath or source path is set correctly, you might generate errors, because the compiler is
not aware that this class is being compiled.
Check for punctuation balance
1 Click between braces {}, brackets [], or parentheses () in your script.
2 In Windows, press Control+' (single quote); on the Macintosh, press Command+' (single quote). The text between
braces, brackets, or parentheses is highlighted, and you can check that opening punctuation has corresponding
closing punctuation.
75
(Deprecated with Animate CC) Import and export scripts
You can import a script into the Actions panel or Script window. You can also export your scripts from the Actions
panel to external ActionScript files. (When you use the Script window, exporting is unnecessary because you can
instead save the AS file.)
If text in your scripts doesn’t look as expected when you open or import a file, change the import encoding preference.
Import an external AS file
1 In the Script pane, place the insertion point where you want to locate the first line of the external script.
2 Do one of the following:
• In the Actions panel, select Import Script from the panel menu, or press Control+Shift+I (Windows) or
Command+Shift+I (Macintosh).
• In the Script window, select File > Import Script or press Control+Shift+I (Windows) or Command+Shift+I
(Macintosh).
Export a script from the Actions panel
1 Select the script to export. Then select Export Script from the Actions Panel menu, or press Control+Shift+X
(Windows) or Command+Shift+X (Macintosh).
2 Save the ActionScript (AS) file.
Set text encoding options
1 Select Edit > Preferences (Windows) or Animate > Preferences (Macintosh), and select ActionScript in the Category
list.
Last updated 6/17/2016
Page 81

Platforms
2 Set any of these options:
Open/Import Select UTF-8 Encoding to open or import using Unicode encoding, or select Default Encoding to
open or import using the encoding form of the language currently used by your system.
Save/Export Select UTF-8 Encoding to save or export using Unicode encoding, or select Default Encoding to save
or export using the encoding form of the language currently used by your system.
Turn the export encoding warning off or on
1 Select Edit > Preferences (Windows) or Animate > Preferences (Macintosh), and select Warnings in the Category
list.
2 Select or deselect Warn On Encoding Conflicts When Exporting ActionScript Files.
(Deprecated with Animate CC) Encoding for imported and exported scripts
You can set ActionScript preferences to specify the type of encoding to use in imported or exported ActionScript files.
UTF-8 Encoding is 8-bit Unicode format, which lets you include text in multiple languages in your file; Default
En codin g is t he enc od ing sup por te d by the lang uage you r syst em is cu rre ntl y usi ng, a ls o ca lled th e traditional code page.
Note: When you use a non-English application on an English system, the Test Movie command fails if any part of the SWF
file path has characters that cannot be represented by using the Multibyte Character Sets (MBCS) encoding scheme. For
example, Japanese paths, which work on a Japanese system, won’t work on an English system. Be sure to use English-only
path names on English systems. All areas of the application that use the Test Movie player are subject to this limitation.
76
Pin scripts in the Actions panel
Use the Pin Script feature to pin tabs of individual scripts in the Script pane and move them accordingly. This feature
is useful if you have not organized the code within your FLA file into one central location or if you are using multiple
scripts.
You can pin a script to retain the open location of the code in the Actions panel and toggle between the various open
scripts. This can be especially useful when debugging.
You can also unpin a script or unpin all scripts to unpin a selected script or unpin all scripts from the Actions panel.
In the following figure, the script associated with the current location on the timeline is on Frame 1 of the layer named
Cleanup. (The tab at the far left always follows your location along the timeline.) The script is also pinned as shown as
the rightmost tab. The following two scripts are pinned:
• On Frame 1
• On Frame 15 of the layer named Intro
Use keyboard shortcuts or click the tabs to move among the pinned scripts. Moving among the various pinned scripts
do es not ch ange your c urrent p ositi on on the ti meline. If a new sc ript is sel ected in Action scrip t nav igat or, fo cus moves
to the first frame ie Frame 1.
If the content in the Script pane does not change to reflect the location you select on the timeline, the Script pane is
probably showing a pinned script. Click the current frame tab at the top left of the Script pane to show the script
associated with your location along the timeline.
Last updated 6/17/2016
Page 82

Platforms
Pin a script
1 Click the Tim el i ne for the script to appear in the current frame tab at top left of the Script pane in the Actions panel.
2 Do one of the following:
• Click the Pushpin icon to the right of the tab.
• Select View> Pin Script to pin the script.
Unpin all scripts
1 Select the pinned script in the Actions panel.
2 Select View> Unpin Script to unpin the selected script from the Actions panel.
3 Select View> Unpin All Scripts to unpin all the scripts from the Actions panel.
77
Keyboard shortcuts for pinned scripts
When the insertion point is in the Script pane, use the following keyboard shortcuts to work with pinned scripts.
Action Windows Macintosh
Pin script Control+Shift+= (equal sign) Command+Shift+=
Unpin script Control+Shift+- (minus sign) Command+Shift+-
Last updated 6/17/2016
Page 83

Platforms
Insert target paths
Many script actions are meant to affect movie clips, buttons, and other symbol instances. In your code, you can
reference symbol instances on a timeline by inserting a target path—the address of the instance you want to target. You
can set either an absolute or relative target path. An absolute path contains the entire address of the instance. A relative
path contains only the part of the address that is different from the address of the script itself in the FLA file, and will
no longer work if the script is moved to another location.
1 In the Actions panel, click an action in your script.
2 Click Target Path .
3 Enter the path to the target instance, or select the target from the list.
4 Select either the Absolute or Relative path option.
Use code hints
When you work in the Actions panel or Script window, the software can detect what action you are entering and display
a code hint. There are two types of code hint: a tooltip that contains the complete syntax for that action, and a pop-up
menu that lists possible ActionScript elements, such as method or property names (sometimes referred to as a form of
code completion).
78
Code hints are enabled by default. By setting preferences, you can disable code hints or determine how quickly they
appear. When code hints are disabled in preferences, you can still manually display a code hint for a specific command.
Note: If you cannot display code hints for a variable or object you created in ActionScript 2.0, but code hints are enabled
in ActionScript preferences, make sure you named your variable or object with the proper suffix or that you used strict
typing for your variable or object.
Enabling code hinting
You can trigger code hints in various ways.
Strict typing for objects
Wh en yo u us e Act ionS cr ipt 2.0 a nd us e stric t t ypi ng f or a varia ble t hat is base d on a built -in c lass (such as Bu tto n, A rr ay,
and so on), the Script pane displays code hints for the variable. For example, suppose you enter the following two lines
of code:
var foo:Array = new Array();
foo.
As soon as you enter the period (.), Animate displays a list of methods and properties available for Array objects in a
pop-up menu, because you typed the variable as an array.
Suffixes and code hints
If you use ActionScript 1.0 or you want to display code hints for objects without strictly typing them, add a suffix to the
name of each object when you create it. For example, the suffix that triggers code hinting for the Camera class is _cam.
Suppose you type the following code: var my_array = new Array(); var my_cam = Camera.get();
If you then enter my_cam followed by a period, code hints for the Camera object appear.
For objects that appear on the Stage, use the suffix in the Instance Name box in the Property inspector. For example, to
display code hints for MovieClip objects, use the Property inspector to assign instance names with the _mc suffix to all
MovieClip objects. Then, whenever you type the instance name followed by a period, code hints appear.
var my_array = new Array();
var my_cam = Camera.get();
Last updated 6/17/2016
Page 84

Platforms
Although suffixes are not required for triggering code hints when you use strict typing for an object, using suffixes
consistently helps make your code understandable.
The following table lists the suffixes that trigger code hints in ActionScript 2.0:
Object type Variable suffix
Array _array
Button _btn
Camera _cam
Color _color
ContextMenu _cm
ContextMenuItem _cmi
Date _date
Error _err
LoadVars _lv
LocalConnection _lc
79
Microphone _mic
MovieClip _mc
MovieClipLoader _mcl
PrintJob _pj
NetConnection _nc
NetStream _ns
SharedObject _so
Sound _sound
String _str
Tex t Fie ld _txt
TextFormat _fmt
Video _video
XML _xml
XMLNode _xmlnode
XMLSocket _xmlsocket
Comments and code hints
You can also use ActionScript comments to specify an object’s class for code hints. In the following example, a comment
tells ActionScript that the class of the theObject instance is Object, and so on.
// Object theObject;// Array theArray;// MovieClip theMC;
If you subsequently enter theMC followed by a period, code hints that display the list of MovieClip methods and
properties appear. If you enter theArray followed by a period, code hints that display the list of Array methods and
properties appear, and so on.
Last updated 6/17/2016
Page 85

Platforms
Instead of this technique, however, Adobe recommends that you use strict data typing or suffixes, because these
techniques enable code hints automatically and make your code more understandable.
Specify preference settings for automatic code hints
• In the Actions panel or Script window, select Edit > Preferences (Windows) or Animate > Preferences (Macintosh),
click Code Editor in the Category list, and then enable or disable Code Hints.
(Deprecated with Animate CC) Specify a delay for code hints
1 In the Actions panel or Script window, select Edit > Preferences (Windows) or Animate > Preferences (Macintosh).
2 Click ActionScript in the Category list.
3 Use the slider to select an amount of delay, in seconds.
Use tooltip-style code hints
1 Display the code hint by typing an opening parenthesis “(“ after an element that requires parentheses (for example,
after a method name, a command such as if or do..while, and so on).
80
2 Enter a value for the parameter.
For multiple parameters, separate the values with commas. For functions or statements, such as the for loop,
separate the parameters with semicolons.
Overloaded commands (functions or methods that can be invoked with different sets of parameters) such as
gotoAndPlay() or for display an indicator that lets you select the parameter you want to set. To select the parameter,
click the small arrows or press Control+Left Arrow and Control+Right Arrow.
3 To dismiss the code hint, do one of the following:
• Type a closing parenthesis “)”.
• Click outside the statement.
• Press Escape.
Use menu-style code hints:
1 Display the code hint by typing a period after a variable or object name.
Last updated 6/17/2016
Page 86

Platforms
2 To navigate through the code hints, use the Up and Down Arrow keys.
3 To select an item in the menu, press Enter or Tab, or double-click the item.
4 To dismiss the code hint, do one of the following:
• Select one of the menu items.
• Click above or below the menu window.
• Type a closing parenthesis “)” if you’ve already typed an opening parenthesis “(“.
• Press Escape.
Manually display a code hint
1 Click in a code location where code hints can appear, such as in the following locations:
81
• After the dot (.) following a statement or command, where a property or method must be entered
• Between parentheses [()] in a method name
2 Do one of the following:
• To enable Code Hinting manually, select View > Show Code Hint.
• Press Control+Spacebar (Windows) or Command+Spacebar (Macintosh).
Code hinting for custom classes
When you create custom ActionScript 3.0 classes, Animate parses the classes and determines the objects, properties,
and methods included in them. Animate can then provide code hinting when you write code that refers to the custom
classes. Custom class code completion is automatic for any class that you link to any other code with the import
command.
Code hinting allows developers to work faster because they don’t have to remember all the objects, methods, and
properties used by the class. Designers can work with classes they did not write themselves because they don’t have to
have first hand knowledge of how to work with the class.
Code hinting includes the following:
• Code hinting for nested class references
When you write nested references, the continued assistance of code hints is helpful.
• Code hinting for “this”
When you type “this” in a class file, you get code hints for that same class.
• Code hinting for “new+<space>”
When you type “new+<space>”, Animate displays a list of available classes and packages.
• Code hinting for “import”
Last updated 6/17/2016
Page 87

Platforms
When you type “import + <space>”, Animate displays a list of all the built-in packages and custom packages.
• Code hinting for SWC libraries
When you add a SWC library to the library path or the external library path, Animate enables code hinting for all
the classes included in the SWC file.
More Help topics
Set ActionScript preferences
Use the Movie Explorer
Compiling and exporting classes(ActionScript 2.0)
DebuggingActionScript 3.0
Enabling Support for Custom Platforms
This article guides the plug-in developers on how to create Animate plug-ins to support custom platforms using
Animate CC 2015.1 (February 2016). The following are the previous versions of this document:
82
Version 1.2 (2015)
Version 1.1 (2014.2)
Version 1.0 (2014)
To build a custom platform support plug-in, developers must download the Custom Platform Support Development
Kit from the following location:
CustomPlatformSupportDevelopmentKit.zip
Download a sample plug-in from the following location and use it as a reference for building a custom support platform
support plug-in:
SampleCreateJSPlatform.zip
A plug-in consists of the following elements:
• DocType adds a new document type for the custom platform in Animate and controls the authoring features.
• Publisher allows configuration of the publish settings and publishing the document to the custom platform.
For an overview of the Custom Platform Support feature, see Custom Platform Support.
Building a Animate custom platform support plug-in
You can develop a custom platform support plug-in using one of the following methods:
• Create a plug-in using the APIs in the custom platform support development kit.
• Customize the settings of the sample plug-in included in the development kit to suit your requirements.
Custom Platform Support plug-ins are packaged as .zxp files that can be installed with Animate CC. You can host the
plug-in on the
the plug-ins as .zxp packages to install them using the Manage Extensions utility.
Adobe Add-ons page for users to download and install using the Creative Cloud application or distribute
Last updated 6/17/2016
Page 88

Platforms
Software requirements
A developer needs the following software to build a plug-in using the custom platform support development kit:
• Microsoft Windows 7 or Apple Mac OS 10.8 and later
• Microsoft Visual Studio 2012 (for Windows) or XCode 4.5.2 (for Mac)
• Animate CC 2015
• Eclipse IDE for C/C++ Developers
• Adobe Extension Builder 3.0
• Manage Extensions utility
API reference documentation for plug-in developers
The custom platform support development kit contains the following elements:
• FCM (Flash Component Model): The header files contained in the development kit define a framework called FCM,
which is responsible for plug-in management.
• DocType: This contains a set of interfaces that helps you to add a new document type to the Animate start page and
allows you to enable or disable features for the custom document type.
• DOM (Document Object Model): This contains a set of interfaces that helps you to access the contents of the
animate document in the form of a DOM.
• Publisher: This contains a set of interfaces that provides hooks to the publish workflows.
83
For complete information about the APIs in the custom platform support and examples of how to use them to build
your plug-in, see
Custom Platform Support API Reference.
Creating a custom platform support plug-in
You can create a custom platform support plug-in as follows:
1 Download the Custom Platform Support Development Kit.
2 Extract the contents of the kit to your computer.
3 Open a new project in VisualStudio or Xcode and include the header files in the development kit to your software
development project. To quick-start the creation of your custom platform support plug-in, you can use the following
sample plug-in available under the SampleCreateJSPlatform directory as the base code for your plug-in project.
For example, the SampleCreateJS plug-in files are at SampleCreateJSPlatform\Plugin\SampleCreateJS\project\
4 Make necessary changes for your target platform.
5 Compile the code to generate a plug-in (.dll or .plug-in).
Packaging the custom platform support plug-in
You can generate a distributable package of the custom platform support plug-in as follows:
1 Open the sample Eclipse file or in the Eclipse New Project wizard, create a new Application Extension Project.
Provide a name for the project, then click Next.
2 On the New Adobe Application Extension Project panel, choose Adobe Animate as the target application and click
Next.
3 Change the extensions of the plug-in files that you had created from .dll to .fcm on Windows and from .plug-in to
.fcm.plug-in on Mac and add the plug-in files to the project (ExtensionContent/plugins/lib/win for Windows and
ExtensionContent/plugins/lib/mac for MAC).
Last updated 6/17/2016
Page 89

Platforms
4 Configure your extension by modifying the manifest.xml. To open the manifest file, right-click on the extension in
project explorer and select Adobe Extension Builder 3 > Bundle Manifest Editor and select the manifest tab in
Bundle Manifest Editor present at EclipseProject\.staged-extension\CSXS.
5 To enable editing the manifest.xml, right-click inside the window and select Open with > XML editor. The two tags
that you must concentrate on are: ExtensionList and DispatchInfoList:
A typical ExtensionList tag looks as below:
<ExtensionList>
<Extension Id="PluginID" Version="1.0" />
<Extension Id="PublishSettingsID" Version-"1.0" />
</ExtensionList>
This tag contains the list of extensions in the final ZXP package in which each extension has a unique string as its ID.
In this case, the .dll or .plugin file created in the previous section is included in an extension. Then, the other extension
is used for configuring the Publish Settings UI of the Publisher. In the sample, ExtensionList tag the extension with the
extension ID PluginID contains the .dll/.plugin file and the extension with the ID PublishSettingsID configures the
publish pettings UI of the publisher.
84
The DispatchInfoList tag contains details about each extension mentioned in the ExtensionList. The following is
an
example of DispatchInfoList:
<DispatchInfoList>
<Extension Id="PluginID">
<DispatchInfo >
<Resources>
<MainPath>./plugin/fcm.xml</MainPath>
</Resources>
<Lifecycle>
<AutoVisible>true</AutoVisible>
</Lifecycle>
<UI>
<Type>ModalDialog</Type>
<Menu>CreateJS</Menu>
<Geometry>
<Size>
<Height>200</Height>
<Width>200</Width>
</Size>
</Geometry>
</UI>
</DispatchInfo>
</Extension>
<Extension Id="PublishSettingsID">
Last updated 6/17/2016
Page 90

Platforms
<DispatchInfo >
<Resources>
<MainPath>./index.html</MainPath>
</Resources>
<Lifecycle>
<AutoVisible>true</AutoVisible>
</Lifecycle>
<UI>
<Type>ModalDialog</Type>
<Menu>Publish Settings</Menu>
<Geometry>
<Size>
<Height>170</Height>
<Width>486</Width>
</Size>
</Geometry>
</UI>
</DispatchInfo>
</Extension>
</DispatchInfoList>
1 For the extension containing the .dll or the .plugin file, you can ignore all the tags except the MainPath tag. The
MainPath tag contains path to the file fcm.xml relative to the ExtensionContent folder. You must rename the .dll file
to .fcm and placed inside the win folder beside the fcm.xml. Similarly, if you are working on the Mac environment,
rename the .plugin file to .fcm.plugin and place it inside the mac folder beside the fcm.xml.
2 The HTML extension to configure the publish settings user interface is an HTML extension to Animate. To know
more about HTML extensions to Animate, see
Creating HTML Extensions .
3 Ensure that the lower value of the version attribute in the Host tag is 15.1, the minimum (internal) version of
Animate CC with Custom Platform Support.
<ExecutionEnvironment>
<HostList>
<Host Name="FLPR" Version="15.1" />
</HostList>.
.
.
</ExecutionEnvironment>
85
1 Switch to the Script Explorer view, right-click on your project and choose Export > Adobe Extension Builder 3 >
Application Extension. The Export Wizard appears.
2 You must have a certificate to sign the extension package. Browse to an existing certificate or click Create to create
a new certificate.
3 Click Finish to compile the project. Eclipse generates a plug-in file with .zxp extension, which you can host on the
Adobe Add-ons site.
Distributing your custom platform support plug-in
You can distribute the custom platform support plug-in by hosting it on the Adobe Add-ons page and monetize it. Your
plug-in package goes through an Adobe review and approval process before it is listed on the page. You can host a plugin as follows:
1 Log in to the Adobe Add-ons page using your Adobe user ID and password.
2 On the left panel, under Become a producer, click the link Go to the producer portal.
Last updated 6/17/2016
Page 91

Platforms
3 Click the Sign-up button if you are not signed up as a producer.
4 For detailed instructions on how to sign up as a producer and host your plug-ins, see Getting Started with the
Producer Portal.
5 Complete the following steps in the producer portal workflow as documented in the Getting Started page:
1 Package your product in a single file.
2 Enter information about the product and upload the file.
3 Add marketing assets.
4 Preview your product.
5 Submit your product for approval.
6 After approval, your plug-in is listed under the Animate product category on the Add-ons page.
• If you are a user who wants to install a plug-in, create a custom platform document, and publish it using Animate,
Working with Custom Platform Support Plug-in .
see
• For complete information about managing Adobe extensions, see Downloading and Installing Extensions .
Feature requests and bug reporting
Fill the following form if you want to send any questions, concerns, product bugs, or feature requests to the Animate
product team:
86
Adobe Feature Requests and Bug Report Form
Enabling Support for Custom Platforms
This article guides the plug-in developers on how to create Animate plug-ins to support custom platforms using
Animate CC 2014.2. If you are using Animate CC 2014.1 (October 2014 update), see the
Platforms.
To build a custom platform support plug-in, developers must download the Custom Platform Support Development
Kit from the following location:
CustomPlatformSupportDevelopmentKit.zip
Download a sample plug-in from the following location and use it as a reference for building a custom support platform
support plug-in:
SampleCreateJSPlatform.zip
A plug-in consists of the following elements:
• DocType adds a new document type for the custom platform in Animate and controls the authoring features.
• Publisher allows configuration of the publish settings and publishing the document to the custom platform.
For an overview of the Custom Platform Support feature, see Custom Platform Support.
New in Animate CC 2015:
Enabling Support for Custom
• Ability to query the type of a library symbol: In case of symbols, ILibraryItem::GetProperties() will have an
additional entry with the key as kLibProp_SymbolType_DictKey. The value of key can be
kLibProp_SymbolType_Button, kLibProp_SymbolType_MovieClip, or kLibProp_SymbolType_Graphic.
Last updated 6/17/2016
Page 92

Platforms
• Ability to distinguish between button and MovieClip: Until the previous release, the button instances were treated
as MovieClips by both the DOM and the IFrameCommandGenerator service. Starting with Animate CC 2015, an
interface has been added to support button instances. If the IMovieClip instance also implements the IButton
interface, then it is treated as a button instance. The four states of a button namely, Up, Over, Down, and Hit are
always mapped to the frames 0, 1, 2, and 3 respectively. See the file IButton.h to know more about the button
instance.
• New API to get the bounds of IClassicText objects: The AddClassicText function in ITimelineBuilder interface
now returns an object of CLASSIC_TEXT_INFO_2 (instead of the old CLASSIC_TEXT_INFO), which contains a
new field "bounds" representing the bounds of the IClassicText object.
• The sample plug-in has been modified to reuse the bitmaps used for shape fills.
• Mongoose web server has been integrated to the sample plug-in.
Note: The new IK bone tool available in Animate CC 2015 release is disabled in Custom Platform document types.
Animate converts the IK content to frame-by-frame animation when you paste it into a custom platform document.
February 2015 update: Support for “masks” in IFrameCommandGenerator service--This release supports masks in
the IFrameCommandGenerator service. The new interface ITimelineBuilder2 that is inherited from the existing
ITimelineBuilder interface contains the functions that the plugin has to implement to make this feature work. See the
Custom Platform Support API documentation to know more about the new ITimelineBuilder2 interface.
87
Building a Animate custom platform support plug-in
You can develop a custom platform support plug-in using one of the following methods:
• Create a plug-in using the APIs in the custom platform support development kit.
• Customize the settings of the sample plug-in included in the development kit to suit your requirements.
Custom Platform Support plug-ins are packaged as .zxp files that can be installed with Animate CC. You can host the
plug-in on the
the plug-ins as .zxp packages to install them using Adobe Extensions Manager.
Software requirements
A developer needs the following software to build a plug-in using the custom platform support development kit:
• Microsoft Windows 7 or Apple Mac OS 10.8 and later
• Microsoft Visual Studio 2012 (for Windows) or XCode 4.5.2 (for Mac)
• Animate CC 2014.1 and above
• Eclipse IDE for C/C++ Developers
• Adobe Extension Builder 3.0
• Adobe Extension Manager 7.2.1.6
API reference documentation for plug-in developers
The custom platform support development kit contains the following elements:
Adobe Add-ons page for users to download and install using the Creative Cloud application or distribute
• FCM (Flash Component Model): The header files contained in the development kit define a framework called FCM,
which is responsible for plug-in management.
• DocType: This contains a set of interfaces that helps you to add a new document type to the Animate start page and
allows you to enable or disable features for the custom document type.
Last updated 6/17/2016
Page 93

Platforms
• DOM (Document Object Model): This contains a set of interfaces that helps you to access the contents of the
animate document in the form of a DOM.
• Publisher: This contains a set of interfaces that provides hooks to the publish workflows.
For complete information about the APIs in the custom platform support and examples of how to use them to build
your plug-in, see
Custom Platform Support API Reference.
Creating a custom platform support plug-in
You can create a custom platform support plug-in as follows:
1 Download the Custom Platform Support Development Kit.
2 Extract the contents of the kit to your computer.
3 Open a new project in VisualStudio or Xcode and include the header files in the development kit to your software
development project. To quick-start the creation of your custom platform support plug-in, you can use the following
sample plug-in available under the SampleCreateJSPlatform directory as the base code for your plug-in project.
For example, the SampleCreateJS plug-in files are at SampleCreateJSPlatform\Plugin\SampleCreateJS\project\
4 Make necessary changes for your target platform.
5 Compile the code to generate a plug-in (.dll or .plug-in).
88
Packaging the custom platform support plug-in
You can generate a distributable package of the custom platform support plug-in as follows:
1 Open the sample Eclipse file or in the Eclipse New Project wizard, create a new Application Extension Project.
Provide a name for the project, then click Next.
2 On the New Adobe Application Extension Project panel, choose Adobe Animate as the target application and click
Next.
3 Change the extensions of the plug-in files that you had created from .dll to .fcm on Windows and from .plug-in to
.fcm.plug-in on Mac and add the plug-in files to the project (ExtensionContent/plugins/lib/win for Windows and
ExtensionContent/plugins/lib/mac for MAC).
4 Configure your extension by modifying the manifest.xml. To open the manifest file, right-click on the extension in
project explorer and select Adobe Extension Builder 3 > Bundle Manifest Editor and select the manifest tab in
Bundle Manifest Editor present at EclipseProject\.staged-extension\CSXS.
5 To enable editing the manifest.xml, right-click inside the window and select Open with > XML editor. The two tags
that you must concentrate on are: ExtensionList and DispatchInfoList:
A typical ExtensionList tag looks as below:
<ExtensionList>
<Extension Id="PluginID" Version="1.0" />
<Extension Id="PublishSettingsID" Version-"1.0" />
</ExtensionList>
This tag contains the list of extensions in the final ZXP package in which each extension has a unique string as its ID.
In this case, the .dll or .plugin file created in the previous section is included in an extension. Then, the other extension
is used for configuring the Publish Settings UI of the Publisher. In the sample, ExtensionList tag the extension with the
extension ID PluginID contains the .dll/.plugin file and the extension with the ID PublishSettingsID configures the
publish pettings UI of the publisher.
Last updated 6/17/2016
Page 94

Platforms
The DispatchInfoList tag contains details about each extension mentioned in the ExtensionList. The following is an
example of DispatchInfoList:
<DispatchInfoList>
<Extension Id="PluginID">
<DispatchInfo >
<Resources>
<MainPath>./plugin/fcm.xml</MainPath>
</Resources>
<Lifecycle>
<AutoVisible>true</AutoVisible>
</Lifecycle>
<UI>
<Type>ModalDialog</Type>
<Menu>CreateJS</Menu>
<Geometry>
<Size>
<Height>200</Height>
<Width>200</Width>
</Size>
</Geometry>
</UI>
</DispatchInfo>
</Extension>
<Extension Id="PublishSettingsID">
<DispatchInfo >
<Resources>
<MainPath>./index.html</MainPath>
</Resources>
<Lifecycle>
<AutoVisible>true</AutoVisible>
</Lifecycle>
<UI>
<Type>ModalDialog</Type>
<Menu>Publish Settings</Menu>
<Geometry>
<Size>
<Height>170</Height>
<Width>486</Width>
</Size>
</Geometry>
</UI>
</DispatchInfo>
</Extension>
</DispatchInfoList>
89
1 For the extension containing the .dll or the .plugin file, you can ignore all the tags except the MainPath tag. The
MainPath tag contains path to the file fcm.xml relative to the ExtensionContent folder. You must rename the .dll file
to .fcm and placed inside the win folder beside the fcm.xml. Similarly, if you are working on the Mac environment,
rename the .plugin file to .fcm.plugin and place it inside the mac folder beside the fcm.xml.
2 The HTML extension to configure the publish settings user interface is an HTML extension to Animate. To know
more about HTML extensions to Animate, see Creating HTML Extensions .
3 Ensure that the lower value of the version attribute in the Host tag is 14.1, the minimum (internal) version of
Animate CC with Custom Platform Support.
Last updated 6/17/2016
Page 95

Platforms
<ExecutionEnvironment>
<HostList>
<Host Name="FLPR" Version="15.0" />
</HostList>.
.
.
</ExecutionEnvironment>
1 Switch to the Script Explorer view, right-click on your project and choose Export > Adobe Extension Builder 3 >
Application Extension. The Export Wizard appears.
2 You must have a certificate to sign the extension package. Browse to an existing certificate or click Create to create
a new certificate.
3 Click Finish to compile the project. Eclipse generates a plug-in file with .zxp extension, which you can host on the
Adobe Add-ons site.
Distributing your custom platform support plug-in
You can distribute the custom platform support plug-in by hosting it on the Adobe Add-ons page and monetize it. Your
plug-in package goes through an Adobe review and approval process before it is listed on the page. You can host a plugin as follows:
90
1 Log in to the Adobe Add-ons page using your Adobe user ID and password.
2 On the left panel, under Become a producer, click the link Go to the producer portal.
3 Click the Sign-up button if you are not signed up as a producer.
4 For detailed instructions on how to sign up as a producer and host your plug-ins, see Getting Started with the
Producer Portal.
5 Complete the following steps in the producer portal workflow as documented in the Getting Started page:
1 Package your product in a single file.
2 Enter information about the product and upload the file.
3 Add marketing assets.
4 Preview your product.
5 Submit your product for approval.
6 After approval, your plug-in is listed under the Animate product category on the Add-ons page.
• If you are a user who wants to install a plug-in, create a custom platform document, and publish it using Animate,
Working with Custom Platform Support Plug-in .
see
• For complete information about managing Adobe extensions, see Downloading and Installing Extensions .
Feature requests and bug reporting
Fill the following form if you want to send any questions, concerns, product bugs, or feature requests to the Animate
product team:
Adobe Feature Requests and Bug Report Form
Last updated 6/17/2016
Page 96

Platforms
Custom Platform Support API Reference
The Custom Platform Support development kit includes a set of header files, sample plugins, and project files that you
can use for building a plugin for Animate.
Animate provides a uniform way to integrate various publishers and document types in the Animate authoring
environment. Publishers and document types developed by third-party developers can be plugged into Animate
"document creation" and "publish/test movie" workflows using the pre-defined C++ interfaces.
The APIs or the C++ header files contained in the development kit define the Document Object Model (DOM) and
Flash Component Model (FCM), which you can use to build a custom platform support plugin.
Detailed API reference documentation is available at the following location:
Custom Platform Support API Reference
More Help topics
Custom Platform Support Overview
Enabling Support for Custom Platforms
Working with Custom Platform Support Plugins
91
Creating accessible content
About accessible content
Accessibility overview
You can create content that is accessible to all users, including those with disabilities, using the accessibility features that
Adobe Animate provides in the authoring environment user interface, taking advantage of ActionScript® designed to
implement accessibility. As you design accessible Animate applications, consider how users might interact with the
content and follow recommended design and development practices.
Worldwide accessibility standards
Many countries have adopted accessibility standards based on the standards developed by the World Wide Web
Consortium (W3C). The W3C publishes the Web Content Accessibility Guidelines, a document that prioritizes actions
designers should take to make web content accessible. For information about the Web Accessibility Initiative, see the
W3C website at w3.org.
In the United States, the law that governs accessibility is commonly known as Section 508, which is an amendment to
the U.S. Rehabilitation Act.
For additional information about Section 508, see the following websites:
• The US government-sponsored website at section508.gov
• The Adobe accessibility site at www.adobe.com/accessibility/
Last updated 6/17/2016
Page 97

Platforms
Understanding screen reader technology
Screen readers are software applications that visually impaired users can use to navigate a website and read the web
content aloud. To enable a screen reader to read nontextual objects in your application, such as vector art and
animations, use the Accessibility panel to associate a name and description with the object. The keyboard shortcuts you
define can allow users to use the screen reader to navigate through your document with ease.
To expose graphic objects, use the Accessibility panel or ActionScript to provide a description.
You cannot control how any screen reader behaves; you can control only the content, which you can mark up in your
Animate applications to expose the text and ensure that screen reader users can activate the controls. You decide which
objects in the Animate application are exposed to screen readers, provide descriptions for them, and decide the order
in which they are exposed to screen readers. You cannot force screen readers to read specific text at specific times or
control the manner in which that content is read. Test your applications with a variety of screen readers to ensure that
they perform as you expect.
Sound is the most important medium for most screen reader users. Consider how any sound in your document
interacts with the text spoken aloud by screen readers. It might be difficult for screen reader users to hear what their
screen readers are saying if your Animate application contains loud sounds.
Platform requirements
You can only create Animate content designed for use with screen readers with Windows platforms. Viewers of Animate
content must have Macromedia Flash® Player 6 from Adobe or later and Internet Explorer on Windows 98 or later.
92
Animate and Microsoft Active Accessibility (Windows only)
Flash Player is optimized for Microsoft Active Accessibility (MSAA), which provides a descriptive and standardized
way for applications and screen readers to communicate. MSAA is available only for Windows operating systems. For
more information on Microsoft Accessibility Technology, visit the Microsoft Accessibility website at
www.microsoft.com/enable/default.aspx.
The Windows ActiveX (Internet Explorer plug-in) version of Flash Player 6 supports MSAA, but Windows Netscape
and Windows stand-alone players do not.
Note: MSAA is currently not supported in the opaque windowless and transparent windowless modes. (These modes are
options in the HTML Publish Settings panel, available for use with the Windows version of Internet Explorer 4.0 or later,
with the Animate ActiveX control.) To make your Animate content accessible to screen readers, avoid using these modes.
Flash Player makes information about the following types of accessibility objects available to screen readers that use
MSAA.
Dynamic or static text T he pr inci pal pr ope rt y of a te xt obj ect is its n ame . To c omp ly w ith M SAA co nve nti ons , the n ame
is equal to the contents of the text string. A text object can also have an associated description string. Animate uses the
static or dynamic text immediately above or to the left of an input text field as a label for that field.
note: Any text that is a label is not passed to a screen reader, but is used as the name of the object that it labels. Labels
are never assigned to buttons or text fields that have author-supplied names.
Input text fields Have a value, an optional name, a description string, and a keyboard shortcut string. An input text
object’s name can come from a text object that is above or to the left of it.
Buttons Have a state (pressed or not pressed), support a programmatic default action that causes the button to depress
momentarily, and optionally have a name, a description string, and a keyboard-shortcut string. Animate uses any text
entirely inside a button as a label for that button.
note: For accessibility purposes, Flash Player considers movie clips used as buttons with button event handlers such as
onPress to be buttons, not movie clips.
Last updated 6/17/2016
Page 98

Platforms
Components Provide special accessibility implementation.
Movie clips Exposed to screen readers as graphic objects when they do not contain any other accessible objects, or
when you use the Accessibility panel to provide a name or a description for a movie clip. When a movie clip contains
other accessible objects, the clip itself is ignored, and the objects inside it are made available to screen readers.
note: All Animate Video objects are treated as simple movie clips.
Basic accessibility support in Flash Player
By default, the following objects are defined as accessible in all Animate documents and are included in the information
that Flash Player provides to screen reader software. This generic support for documents that do not use any
accessibility features includes the following:
Dynamic or static text Text is transferred to the screen reader program as a name, but with no description.
Input text fields Text is transferred to the screen reader. No names are transferred, except where a labeling relationship
is found for the input text, such as a static text field positioned close to the input text field. No descriptions or keyboard
shortcut strings are transferred.
Buttons The state of the button is transferred to the screen reader. No names are transferred, except where labeling
relationships are found, and no descriptions or keyboard shortcut strings are transferred.
Documents The document state is transferred to the screen reader, but with no name or description.
93
Accessibility for hearing-impaired users
Include captions for audio content that is integral to comprehending the material. A video of a speech, for example,
might require captions for accessibility, but a quick sound associated with a button probably wouldn’t.
Methods to add captions to a Animate document include the following:
• Add text as captions, ensuring that the captions are synchronized with the audio in the Timeline.
• Use Hi-Caption Viewer, a component available from Hi Software that works with Hi-Caption SE for use with
Animate. Captioning Macromedia Animate Movies with Hi-Caption SE, a white paper, explains how to use HiCaption SE and Animate together to create a captioned document.
Provide animation accessibility for the visually impaired
You can change the property of an accessible object during SWF file playback. For example, to indicate changes that
take place on a keyframe in an animation. However, different vendor’s screen readers treat new objects on frames
differently. Some screen readers might read only the new object, whereas other screen readers might re-read the entire
document.
To reduce the chance of causing a screen reader to emit extra “chatter” that can annoy users, avoid animating the text,
buttons, and input text fields in your document. Also, avoid making your content loop.
Flash Player can’t determine the actual text content of features such as Text Break Apart to animate text. Screen readers
can only provide accurate accessibility to information-carrying graphics such as icons and gestural animation, if you
provide names and descriptions for these objects in your document or for the entire Animate application. You can also
add supplementary text to your document or shift important content from graphics to text.
1 Select the object for which you want to change the accessibility properties.
2 Select Window > Other Panels > Accessibility.
3 Change the properties for the object.
Alternatively, use ActionScript to update accessibility properties.
Last updated 6/17/2016
Page 99

Platforms
Testing accessible content
When you test your accessible Animate applications, follow these recommendations:
• Download several screen readers and test your applicati on by playing it in a brows er with the screen reader enabled.
Check that the screen reader is not attempting to “talk over” places in your document where you inserted separate
audio. Several screen reader applications provide a demonstration version of the software as a free download; test as
many screen readers as you can to ensure compatibility across screen readers.
• Test interactive content and verify that users can navigate your content effectively using only the keyboard. Different
screen readers work in different ways when processing input from the keyboard; your Animate content might not
receive keystrokes as you intended. Test all keyboard shortcuts.
Using Animate to enter accessibility information for screen readers
Animate for screen readers and accessibility
Screen readers read aloud a description of the content, read text, and assist users as they navigate through the user
interfaces of traditional applications such as menus, toolbars, dialog boxes, and input text fields.
By default, the following objects are defined as accessible in all Animate documents and are included in the information
that Flash Player provides to screen reader software:
94
• Dynamic text
• Input text fields
• Buttons
• Movie clips
• Entire Animate applications
Flash Player automatically provides names for static and dynamic text objects, which are the contents of the text. For
each of these accessible objects, you can set descriptive properties for screen readers to read aloud. You can also
control how Flash Player decides which objects to expose to screen readers—for example, you can specify that
certain accessible objects are not exposed to screen readers at all.
The Animate Accessibility panel
The Animate Accessibility panel (Window > Other Panels > Accessibility) lets you provide accessibility information to
screen readers and set accessibility options for individual Animate objects or entire Animate applications.
Note: Alternatively, use ActionScript code to enter accessibility information.
If you selec t an object on the Stage, you can make that object accessible and specify options and tab order for the object.
For movie clips, you can specify whether child object information is passed to the screen reader (the default when you
make an object accessible).
With no objects selected on the Stage, use the Accessibility panel to assign accessibility options for an entire Animate
application. You can make the entire application accessible, make child objects accessible, have Animate label objects
automatically, and give specific names and descriptions to objects.
All objects in Animate documents must have instance names for you to apply accessibility options to them. Create
instance names for objects in the Property inspector. The instance name is used to refer to the object in ActionScript.
Last updated 6/17/2016
Page 100

Platforms
The following options are available in the Accessibility panel:
Make Object Accessible (Default) Instructs Flash Player to pass the accessibility information for an object to a screen
reader. When the option is disabled, accessibility information for the object is not passed to screen readers. Disabling
this option as you test content for accessibility can be useful because some objects might be extraneous or decorative
and making them accessible could produce confusing results in the Screen Reader. You can then apply a name manually
to the labeled object, and hide the labeling text by deselecting Make Object Accessible. When Make Object Accessible
is disabled, all other controls on the Accessibility panel are disabled.
Make Child Objects Accessible (Movie clips only ; Default) Instructs Flash Player to pass child object information to the
screen reader. Disabling this option for a movie clip causes that movie clip to appear as a simple clip in the accessible
object tree, even if the clip contains text, buttons, and other objects. All objects in the movie clip are then hidden from
the object tree. This option is useful mainly for hiding extraneous objects from screen readers.
note:
If a movie clip is used as a button—it has a button event handler assigned to it, such as onPress or onRelease—the
Make Child Objects Accessible option is ignored because buttons are always treated as simple clips, and their children are
never examined, except in the case of labels.
Auto Label Instructs Animate to automatically label objects on the Stage with the text associated with them.
Name Specifies the object name. Screen readers identify objects by reading these names aloud. When accessible objects
don’t have specified names, a screen reader might read a generic word, such as Button, which can be confusing.
95
Note:
Do not confuse object names specified in the Accessibility panel with instance names specified in the Property
inspector. Giving an object a name in the Accessibility panel does not give it an instance name.
Description Lets you enter a description of the object to the screen reader. The screen reader reads this description.
Shortcut Describes keyboard shortcuts to the user. The screen reader reads the text in this text field. Entering keyboard
shortcut text here does not create a keyboard shortcut for the selected object. You must provide ActionScript keyboard
handlers to create shortcut keys.
Tab Index ( only) Creates a tab order in which objects are accessed when the user presses the tab key. The tab index
feature works for keyboard navigation through a page, but not for screen reader reading order.
Selecting names for buttons, text fields, and entire SWF applications
Use the Accessibility panel in the following ways to assign names to buttons and input text fields so that the screen
reader identifies them appropriately:
• Use the auto label feature to assign text adjacent or in the object as a label.
• Enter a specific label in the Accessibility panel name field.
Animate automatically applies the name that you place on top of, in, or near a button or text field as a text label.
L
abels for buttons must appear within the bounding shape of the button. For the button in the following example,
most screen readers would first read the word button, then read the text label Home. The user can press Return or
Enter to activate the button.
A form might include an input text field where users enter their names. A static text field, with the text Name appears
nex
t to the input text field. When Flash Player discovers such an arrangement, it assumes that the static text object
serves as a label for the input text field.
For example, when the following part of a form is encou
Last updated 6/17/2016
ntered, a screen reader reads “Enter your name here.”
 Loading...