

Page 1

Building
ADOBE®
AIR® Applications
Page 2

Legal notices
Legal notices
For legal notices, see http://help.adobe.com/en_US/legalnotices/index.html.
Last updated 12/7/2015
Page 3

Contents
Chapter 1: About Adobe AIR
Chapter 2: Adobe AIR installation
Installing Adobe AIR . . . . . . . . . . . . . . . . . . . . . . . . . . . . . . . . . . . . . . . . . . . . . . . . . . . . . . . . . . . . . . . . . . . . . . . . . . . . . . . . . . . . . . . . . . . . . . . . . . . 3
Removing Adobe AIR . . . . . . . . . . . . . . . . . . . . . . . . . . . . . . . . . . . . . . . . . . . . . . . . . . . . . . . . . . . . . . . . . . . . . . . . . . . . . . . . . . . . . . . . . . . . . . . . . . 5
Installing and running the AIR sample applications . . . . . . . . . . . . . . . . . . . . . . . . . . . . . . . . . . . . . . . . . . . . . . . . . . . . . . . . . . . . . . . . . . . . . 5
Adobe AIR updates . . . . . . . . . . . . . . . . . . . . . . . . . . . . . . . . . . . . . . . . . . . . . . . . . . . . . . . . . . . . . . . . . . . . . . . . . . . . . . . . . . . . . . . . . . . . . . . . . . . . 6
Chapter 3: Working with the AIR APIs
AIR-specific ActionScript 3.0 classes . . . . . . . . . . . . . . . . . . . . . . . . . . . . . . . . . . . . . . . . . . . . . . . . . . . . . . . . . . . . . . . . . . . . . . . . . . . . . . . . . . . . 7
Flash Player classes with AIR-specific functionality . . . . . . . . . . . . . . . . . . . . . . . . . . . . . . . . . . . . . . . . . . . . . . . . . . . . . . . . . . . . . . . . . . . . . 11
AIR-specific Flex components . . . . . . . . . . . . . . . . . . . . . . . . . . . . . . . . . . . . . . . . . . . . . . . . . . . . . . . . . . . . . . . . . . . . . . . . . . . . . . . . . . . . . . . . . 15
Chapter 4: Adobe Flash Platform tools for AIR development
Installing the AIR SDK . . . . . . . . . . . . . . . . . . . . . . . . . . . . . . . . . . . . . . . . . . . . . . . . . . . . . . . . . . . . . . . . . . . . . . . . . . . . . . . . . . . . . . . . . . . . . . . . 16
Setting up the Flex SDK . . . . . . . . . . . . . . . . . . . . . . . . . . . . . . . . . . . . . . . . . . . . . . . . . . . . . . . . . . . . . . . . . . . . . . . . . . . . . . . . . . . . . . . . . . . . . . . 18
Setting up external SDKs . . . . . . . . . . . . . . . . . . . . . . . . . . . . . . . . . . . . . . . . . . . . . . . . . . . . . . . . . . . . . . . . . . . . . . . . . . . . . . . . . . . . . . . . . . . . . 18
iii
Chapter 5: Creating your first AIR application
Creating your first desktop Flex AIR application in Flash Builder . . . . . . . . . . . . . . . . . . . . . . . . . . . . . . . . . . . . . . . . . . . . . . . . . . . . . . . . 19
Creating your first desktop AIR application using Flash Professional . . . . . . . . . . . . . . . . . . . . . . . . . . . . . . . . . . . . . . . . . . . . . . . . . . . . 22
Create your first AIR application for Android in Flash Professional . . . . . . . . . . . . . . . . . . . . . . . . . . . . . . . . . . . . . . . . . . . . . . . . . . . . . . 24
Creating your first AIR application for iOS . . . . . . . . . . . . . . . . . . . . . . . . . . . . . . . . . . . . . . . . . . . . . . . . . . . . . . . . . . . . . . . . . . . . . . . . . . . . . 25
Create your first HTML-based AIR application with Dreamweaver . . . . . . . . . . . . . . . . . . . . . . . . . . . . . . . . . . . . . . . . . . . . . . . . . . . . . . 29
Creating your first HTML-based AIR application with the AIR SDK . . . . . . . . . . . . . . . . . . . . . . . . . . . . . . . . . . . . . . . . . . . . . . . . . . . . . . 31
Creating your first desktop AIR application with the Flex SDK . . . . . . . . . . . . . . . . . . . . . . . . . . . . . . . . . . . . . . . . . . . . . . . . . . . . . . . . . . 35
Creating your first AIR application for Android with the Flex SDK . . . . . . . . . . . . . . . . . . . . . . . . . . . . . . . . . . . . . . . . . . . . . . . . . . . . . . . 39
Chapter 6: Developing AIR applications for the desktop
Workflow for developing a desktop AIR application . . . . . . . . . . . . . . . . . . . . . . . . . . . . . . . . . . . . . . . . . . . . . . . . . . . . . . . . . . . . . . . . . . . . 43
Setting desktop application properties . . . . . . . . . . . . . . . . . . . . . . . . . . . . . . . . . . . . . . . . . . . . . . . . . . . . . . . . . . . . . . . . . . . . . . . . . . . . . . . . 44
Debugging a desktop AIR application . . . . . . . . . . . . . . . . . . . . . . . . . . . . . . . . . . . . . . . . . . . . . . . . . . . . . . . . . . . . . . . . . . . . . . . . . . . . . . . . . 49
Packaging a desktop AIR installation file . . . . . . . . . . . . . . . . . . . . . . . . . . . . . . . . . . . . . . . . . . . . . . . . . . . . . . . . . . . . . . . . . . . . . . . . . . . . . . . 51
Packaging a desktop native installer . . . . . . . . . . . . . . . . . . . . . . . . . . . . . . . . . . . . . . . . . . . . . . . . . . . . . . . . . . . . . . . . . . . . . . . . . . . . . . . . . . 54
Packaging a captive runtime bundle for desktop computers . . . . . . . . . . . . . . . . . . . . . . . . . . . . . . . . . . . . . . . . . . . . . . . . . . . . . . . . . . . 57
Distributing AIR packages for desktop computers . . . . . . . . . . . . . . . . . . . . . . . . . . . . . . . . . . . . . . . . . . . . . . . . . . . . . . . . . . . . . . . . . . . . . 59
Chapter 7: Developing AIR applications for mobile devices
Setting up your development environment . . . . . . . . . . . . . . . . . . . . . . . . . . . . . . . . . . . . . . . . . . . . . . . . . . . . . . . . . . . . . . . . . . . . . . . . . . . 62
Mobile application design considerations . . . . . . . . . . . . . . . . . . . . . . . . . . . . . . . . . . . . . . . . . . . . . . . . . . . . . . . . . . . . . . . . . . . . . . . . . . . . . 63
Workflow for creating AIR applications for mobile devices . . . . . . . . . . . . . . . . . . . . . . . . . . . . . . . . . . . . . . . . . . . . . . . . . . . . . . . . . . . . . 66
Setting mobile application properties . . . . . . . . . . . . . . . . . . . . . . . . . . . . . . . . . . . . . . . . . . . . . . . . . . . . . . . . . . . . . . . . . . . . . . . . . . . . . . . . . 67
Packaging a mobile AIR application . . . . . . . . . . . . . . . . . . . . . . . . . . . . . . . . . . . . . . . . . . . . . . . . . . . . . . . . . . . . . . . . . . . . . . . . . . . . . . . . . . . 89
Debugging a mobile AIR application . . . . . . . . . . . . . . . . . . . . . . . . . . . . . . . . . . . . . . . . . . . . . . . . . . . . . . . . . . . . . . . . . . . . . . . . . . . . . . . . . . 95
Last updated 12/7/2015
Page 4

BUILDING ADOBE AIR APPLICATIONS
Contents
Installing AIR and AIR applications on mobile devices . . . . . . . . . . . . . . . . . . . . . . . . . . . . . . . . . . . . . . . . . . . . . . . . . . . . . . . . . . . . . . . . . 103
Updating mobile AIR applications . . . . . . . . . . . . . . . . . . . . . . . . . . . . . . . . . . . . . . . . . . . . . . . . . . . . . . . . . . . . . . . . . . . . . . . . . . . . . . . . . . . . 106
Use push notifications . . . . . . . . . . . . . . . . . . . . . . . . . . . . . . . . . . . . . . . . . . . . . . . . . . . . . . . . . . . . . . . . . . . . . . . . . . . . . . . . . . . . . . . . . . . . . . . 106
Chapter 8: Developing AIR applications for television devices
AIR capabilities for TVs . . . . . . . . . . . . . . . . . . . . . . . . . . . . . . . . . . . . . . . . . . . . . . . . . . . . . . . . . . . . . . . . . . . . . . . . . . . . . . . . . . . . . . . . . . . . . . . 116
AIR for TV application design considerations . . . . . . . . . . . . . . . . . . . . . . . . . . . . . . . . . . . . . . . . . . . . . . . . . . . . . . . . . . . . . . . . . . . . . . . . . 118
Workflow for developing an AIR for TV application . . . . . . . . . . . . . . . . . . . . . . . . . . . . . . . . . . . . . . . . . . . . . . . . . . . . . . . . . . . . . . . . . . . 131
AIR for TV application descriptor properties . . . . . . . . . . . . . . . . . . . . . . . . . . . . . . . . . . . . . . . . . . . . . . . . . . . . . . . . . . . . . . . . . . . . . . . . . . 133
Packaging an AIR for TV application . . . . . . . . . . . . . . . . . . . . . . . . . . . . . . . . . . . . . . . . . . . . . . . . . . . . . . . . . . . . . . . . . . . . . . . . . . . . . . . . . . 136
Debugging AIR for TV applications . . . . . . . . . . . . . . . . . . . . . . . . . . . . . . . . . . . . . . . . . . . . . . . . . . . . . . . . . . . . . . . . . . . . . . . . . . . . . . . . . . . 138
Chapter 9: Using native extensions for Adobe AIR
AIR Native Extension (ANE) files . . . . . . . . . . . . . . . . . . . . . . . . . . . . . . . . . . . . . . . . . . . . . . . . . . . . . . . . . . . . . . . . . . . . . . . . . . . . . . . . . . . . . . 142
Native extensions versus the NativeProcess ActionScript class . . . . . . . . . . . . . . . . . . . . . . . . . . . . . . . . . . . . . . . . . . . . . . . . . . . . . . . . 143
Native extensions versus ActionScript class libraries (SWC files) . . . . . . . . . . . . . . . . . . . . . . . . . . . . . . . . . . . . . . . . . . . . . . . . . . . . . . . 143
Supported devices . . . . . . . . . . . . . . . . . . . . . . . . . . . . . . . . . . . . . . . . . . . . . . . . . . . . . . . . . . . . . . . . . . . . . . . . . . . . . . . . . . . . . . . . . . . . . . . . . . 143
Supported device profiles . . . . . . . . . . . . . . . . . . . . . . . . . . . . . . . . . . . . . . . . . . . . . . . . . . . . . . . . . . . . . . . . . . . . . . . . . . . . . . . . . . . . . . . . . . . 144
Task list for using a native extension . . . . . . . . . . . . . . . . . . . . . . . . . . . . . . . . . . . . . . . . . . . . . . . . . . . . . . . . . . . . . . . . . . . . . . . . . . . . . . . . . 144
Declaring the extension in your application descriptor file . . . . . . . . . . . . . . . . . . . . . . . . . . . . . . . . . . . . . . . . . . . . . . . . . . . . . . . . . . . . 144
Including the ANE file in your application’s library path . . . . . . . . . . . . . . . . . . . . . . . . . . . . . . . . . . . . . . . . . . . . . . . . . . . . . . . . . . . . . . . 145
Packaging an application that uses native extensions . . . . . . . . . . . . . . . . . . . . . . . . . . . . . . . . . . . . . . . . . . . . . . . . . . . . . . . . . . . . . . . . . 145
iv
Chapter 10: ActionScript compilers
About the AIR command-line tools in the Flex SDK . . . . . . . . . . . . . . . . . . . . . . . . . . . . . . . . . . . . . . . . . . . . . . . . . . . . . . . . . . . . . . . . . . . 148
Compiler setup . . . . . . . . . . . . . . . . . . . . . . . . . . . . . . . . . . . . . . . . . . . . . . . . . . . . . . . . . . . . . . . . . . . . . . . . . . . . . . . . . . . . . . . . . . . . . . . . . . . . . . 148
Compiling MXML and ActionScript source files for AIR . . . . . . . . . . . . . . . . . . . . . . . . . . . . . . . . . . . . . . . . . . . . . . . . . . . . . . . . . . . . . . . 149
Compiling an AIR component or code library (Flex) . . . . . . . . . . . . . . . . . . . . . . . . . . . . . . . . . . . . . . . . . . . . . . . . . . . . . . . . . . . . . . . . . . . 150
Chapter 11: AIR Debug Launcher (ADL)
ADL usage . . . . . . . . . . . . . . . . . . . . . . . . . . . . . . . . . . . . . . . . . . . . . . . . . . . . . . . . . . . . . . . . . . . . . . . . . . . . . . . . . . . . . . . . . . . . . . . . . . . . . . . . . . 152
ADL Examples . . . . . . . . . . . . . . . . . . . . . . . . . . . . . . . . . . . . . . . . . . . . . . . . . . . . . . . . . . . . . . . . . . . . . . . . . . . . . . . . . . . . . . . . . . . . . . . . . . . . . . . 155
ADL exit and error codes . . . . . . . . . . . . . . . . . . . . . . . . . . . . . . . . . . . . . . . . . . . . . . . . . . . . . . . . . . . . . . . . . . . . . . . . . . . . . . . . . . . . . . . . . . . . . 156
Chapter 12: AIR Developer Tool (ADT)
ADT commands . . . . . . . . . . . . . . . . . . . . . . . . . . . . . . . . . . . . . . . . . . . . . . . . . . . . . . . . . . . . . . . . . . . . . . . . . . . . . . . . . . . . . . . . . . . . . . . . . . . . . 158
ADT option sets . . . . . . . . . . . . . . . . . . . . . . . . . . . . . . . . . . . . . . . . . . . . . . . . . . . . . . . . . . . . . . . . . . . . . . . . . . . . . . . . . . . . . . . . . . . . . . . . . . . . . 171
ADT error messages . . . . . . . . . . . . . . . . . . . . . . . . . . . . . . . . . . . . . . . . . . . . . . . . . . . . . . . . . . . . . . . . . . . . . . . . . . . . . . . . . . . . . . . . . . . . . . . . . 176
ADT environment variables . . . . . . . . . . . . . . . . . . . . . . . . . . . . . . . . . . . . . . . . . . . . . . . . . . . . . . . . . . . . . . . . . . . . . . . . . . . . . . . . . . . . . . . . . . 180
Chapter 13: Signing AIR applications
Digitally signing an AIR file . . . . . . . . . . . . . . . . . . . . . . . . . . . . . . . . . . . . . . . . . . . . . . . . . . . . . . . . . . . . . . . . . . . . . . . . . . . . . . . . . . . . . . . . . . . 181
Creating an unsigned AIR intermediate file with ADT . . . . . . . . . . . . . . . . . . . . . . . . . . . . . . . . . . . . . . . . . . . . . . . . . . . . . . . . . . . . . . . . . 189
Signing an AIR intermediate file with ADT . . . . . . . . . . . . . . . . . . . . . . . . . . . . . . . . . . . . . . . . . . . . . . . . . . . . . . . . . . . . . . . . . . . . . . . . . . . . 190
Signing an updated version of an AIR application . . . . . . . . . . . . . . . . . . . . . . . . . . . . . . . . . . . . . . . . . . . . . . . . . . . . . . . . . . . . . . . . . . . . . 190
Creating a self-signed certificate with ADT . . . . . . . . . . . . . . . . . . . . . . . . . . . . . . . . . . . . . . . . . . . . . . . . . . . . . . . . . . . . . . . . . . . . . . . . . . . 194
Last updated 12/7/2015
Page 5

BUILDING ADOBE AIR APPLICATIONS
Contents
Chapter 14: AIR application descriptor files
Application descriptor changes . . . . . . . . . . . . . . . . . . . . . . . . . . . . . . . . . . . . . . . . . . . . . . . . . . . . . . . . . . . . . . . . . . . . . . . . . . . . . . . . . . . . . . 196
The application descriptor file structure . . . . . . . . . . . . . . . . . . . . . . . . . . . . . . . . . . . . . . . . . . . . . . . . . . . . . . . . . . . . . . . . . . . . . . . . . . . . . . 198
AIR application descriptor elements . . . . . . . . . . . . . . . . . . . . . . . . . . . . . . . . . . . . . . . . . . . . . . . . . . . . . . . . . . . . . . . . . . . . . . . . . . . . . . . . . . 199
Chapter 15: Device profiles
Restricting target profiles in the application descriptor file . . . . . . . . . . . . . . . . . . . . . . . . . . . . . . . . . . . . . . . . . . . . . . . . . . . . . . . . . . . . 236
Capabilities of different profiles . . . . . . . . . . . . . . . . . . . . . . . . . . . . . . . . . . . . . . . . . . . . . . . . . . . . . . . . . . . . . . . . . . . . . . . . . . . . . . . . . . . . . . 236
Chapter 16: AIR.SWF in-browser API
Customizing the seamless install badge.swf . . . . . . . . . . . . . . . . . . . . . . . . . . . . . . . . . . . . . . . . . . . . . . . . . . . . . . . . . . . . . . . . . . . . . . . . . . 239
Using the badge.swf file to install an AIR application . . . . . . . . . . . . . . . . . . . . . . . . . . . . . . . . . . . . . . . . . . . . . . . . . . . . . . . . . . . . . . . . . . 239
Loading the air.swf file . . . . . . . . . . . . . . . . . . . . . . . . . . . . . . . . . . . . . . . . . . . . . . . . . . . . . . . . . . . . . . . . . . . . . . . . . . . . . . . . . . . . . . . . . . . . . . . 242
Checking if the runtime is installed . . . . . . . . . . . . . . . . . . . . . . . . . . . . . . . . . . . . . . . . . . . . . . . . . . . . . . . . . . . . . . . . . . . . . . . . . . . . . . . . . . . 243
Checking from a web page if an AIR application is installed . . . . . . . . . . . . . . . . . . . . . . . . . . . . . . . . . . . . . . . . . . . . . . . . . . . . . . . . . . . 243
Installing an AIR application from the browser . . . . . . . . . . . . . . . . . . . . . . . . . . . . . . . . . . . . . . . . . . . . . . . . . . . . . . . . . . . . . . . . . . . . . . . . 244
Launching an installed AIR application from the browser . . . . . . . . . . . . . . . . . . . . . . . . . . . . . . . . . . . . . . . . . . . . . . . . . . . . . . . . . . . . . 245
Chapter 17: Updating AIR applications
About updating applications . . . . . . . . . . . . . . . . . . . . . . . . . . . . . . . . . . . . . . . . . . . . . . . . . . . . . . . . . . . . . . . . . . . . . . . . . . . . . . . . . . . . . . . . 248
Presenting a custom application update user interface . . . . . . . . . . . . . . . . . . . . . . . . . . . . . . . . . . . . . . . . . . . . . . . . . . . . . . . . . . . . . . . 249
Downloading an AIR file to the user’s computer . . . . . . . . . . . . . . . . . . . . . . . . . . . . . . . . . . . . . . . . . . . . . . . . . . . . . . . . . . . . . . . . . . . . . . 250
Checking to see if an application is running for the first time . . . . . . . . . . . . . . . . . . . . . . . . . . . . . . . . . . . . . . . . . . . . . . . . . . . . . . . . . 251
Using the update framework . . . . . . . . . . . . . . . . . . . . . . . . . . . . . . . . . . . . . . . . . . . . . . . . . . . . . . . . . . . . . . . . . . . . . . . . . . . . . . . . . . . . . . . . 254
v
Chapter 18: Viewing Source Code
Loading, configuring, and opening the Source Viewer . . . . . . . . . . . . . . . . . . . . . . . . . . . . . . . . . . . . . . . . . . . . . . . . . . . . . . . . . . . . . . . . 266
Source Viewer user interface . . . . . . . . . . . . . . . . . . . . . . . . . . . . . . . . . . . . . . . . . . . . . . . . . . . . . . . . . . . . . . . . . . . . . . . . . . . . . . . . . . . . . . . . . 269
Chapter 19: Debugging with the AIR HTML Introspector
About the AIR Introspector . . . . . . . . . . . . . . . . . . . . . . . . . . . . . . . . . . . . . . . . . . . . . . . . . . . . . . . . . . . . . . . . . . . . . . . . . . . . . . . . . . . . . . . . . . 270
Loading the AIR Introspector code . . . . . . . . . . . . . . . . . . . . . . . . . . . . . . . . . . . . . . . . . . . . . . . . . . . . . . . . . . . . . . . . . . . . . . . . . . . . . . . . . . . 270
Inspecting an object in the Console tab . . . . . . . . . . . . . . . . . . . . . . . . . . . . . . . . . . . . . . . . . . . . . . . . . . . . . . . . . . . . . . . . . . . . . . . . . . . . . . 271
Configuring the AIR Introspector . . . . . . . . . . . . . . . . . . . . . . . . . . . . . . . . . . . . . . . . . . . . . . . . . . . . . . . . . . . . . . . . . . . . . . . . . . . . . . . . . . . . . 273
AIR Introspector interface . . . . . . . . . . . . . . . . . . . . . . . . . . . . . . . . . . . . . . . . . . . . . . . . . . . . . . . . . . . . . . . . . . . . . . . . . . . . . . . . . . . . . . . . . . . . 273
Using the AIR Introspector with content in a non-application sandbox . . . . . . . . . . . . . . . . . . . . . . . . . . . . . . . . . . . . . . . . . . . . . . . . 279
Chapter 20: Localizing AIR applications
Localizing the application name and description in the AIR application installer . . . . . . . . . . . . . . . . . . . . . . . . . . . . . . . . . . . . . . . 281
Localizing HTML content with the AIR HTML localization framework . . . . . . . . . . . . . . . . . . . . . . . . . . . . . . . . . . . . . . . . . . . . . . . . . . 282
Chapter 21: Path environment variables
Setting the PATH on Linux and Mac OS using the Bash shell . . . . . . . . . . . . . . . . . . . . . . . . . . . . . . . . . . . . . . . . . . . . . . . . . . . . . . . . . . 292
Setting the Path on Windows . . . . . . . . . . . . . . . . . . . . . . . . . . . . . . . . . . . . . . . . . . . . . . . . . . . . . . . . . . . . . . . . . . . . . . . . . . . . . . . . . . . . . . . . 293
Last updated 12/7/2015
Page 6

Chapter 1: About Adobe AIR
Adobe® AIR® is a multi-operating system, multi-screen runtime that allows you to leverage your web development
skills to build and deploy rich Internet applications (RIAs) to the desktop and mobile devices. Desktop, television, and
mobile AIR applications can be built with ActionScript 3.0 using Adobe® Flex and Adobe® Flash® (SWF based).
Desktop AIR applications can also be built with HTML, JavaScript®, and Ajax (HTML based).
You can find more information about getting started with and using Adobe AIR at the Adobe AIR Developer
Connection (
AIR enables you to work in familiar environments, to leverage the tools and approaches you find most comfortable.
By supporting Flash, Flex, HTML, JavaScript, and Ajax, you can build the best possible experience that meets your
needs.
For example, applications can be developed using one or a combination of the following technologies:
• Flash / Flex / ActionScript
• HTML / JavaScript / CSS / Ajax
Users interact with AIR applications in the same way that they interact with native applications. The runtime is
installed once on the user's computer or device, and then AIR applications are installed and run just like any other
desktop application. (On iOS, a separate AIR runtime is not installed; each iOS AIR app is a stand-alone application.)
http://www.adobe.com/devnet/air/).
1
The runtime provides a consistent cross-operating system platform and framework for deploying applications and
therefore eliminates cross-browser testing by ensuring consistent functionality and interactions across desktops.
Instead of developing for a specific operating system, you target the runtime, which has the following benefits:
• Applications developed for AIR run across multiple operating systems without any additional work by you. The
runtime ensures consistent and predictable presentation and interactions across all the operating systems
supported by AIR.
• Applications can be built faster by enabling you to leverage existing web technologies and design patterns. You can
extend web-based applications to the desktop without learning traditional desktop development technologies or
the complexity of native code.
• Application development is easier than using lower-level languages such as C and C++. You do not need to manage
the complex, low-level APIs specific to each operating system.
When developing applications for AIR, you can leverage a rich set of frameworks and APIs:
• APIs specific to AIR provided by the runtime and the AIR framework
• ActionScript APIs used in SWF files and Flex framework (as well as other ActionScript based libraries and
frameworks)
• HTML, CSS, and JavaScript
• Most Ajax frameworks
• Native extensions for Adobe AIR, which provide ActionScript APIs that provide you access to platform-specific
functionality programmed in native code. Native extensions can also provide access to legacy native code, and
native code that provides higher performance.
Last updated 12/7/2015
Page 7

BUILDING ADOBE AIR APPLICATIONS
About Adobe AIR
AIR dramatically changes how applications can be created, deployed, and experienced. You gain more creative control
and can extend your Flash, Flex, HTML, and Ajax-based applications to the desktop, mobile devices, and televisions.
For information about what is included in each new AIR update, see the Adobe AIR Release Notes
http://www.adobe.com/go/learn_air_relnotes_en).
(
2
Last updated 12/7/2015
Page 8

Chapter 2: Adobe AIR installation
The Adobe® AIR® runtime allows you to run AIR applications. You can install the runtime in the following ways:
• By installing the runtime separately (without also installing an AIR application)
• By installing an AIR application for the first time through a web page installation “badge” (you are prompted to
also install the runtime)
• By creating a custom installer that installs both your application and the runtime. You must get approval from
Adobe to distribute the AIR runtime in this fashion. You can request approval on the
page. Note that Adobe does not provide tools for building such an installer. Many third-party installer toolkits are
available, however.
• By installing an AIR application that bundles AIR as a captive runtime. A captive runtime is used only by the
bundling application. It is not used to run other AIR applications. Bundling the runtime is an option on Mac and
Windows. On iOS, all applications include a bundled runtime. As of AIR 3.7, all Android applications include a
bundled runtime by default (although you have the option of using a separate runtime).
• By setting up an AIR development environment such as the AIR SDK, Adobe® Flash® Builder™ , or the Adobe Flex®
SDK (which includes the AIR command line development tools). The runtime included in the SDK is only used
when debugging applications — it is not used to run installed AIR applications.
The system requirements for installing AIR and running AIR applications are detailed here: Adobe AIR: System
requirements (http://www.adobe.com/products/air/systemreqs/).
Adobe runtime licensing
3
Both the runtime installer and the AIR application installer create log files when they install, update, or remove AIR
applications or the AIR runtime itself. You can consult these logs to help determine the cause of any installation
problems. See
Installation logs.
Installing Adobe AIR
To install or update the runtime, a user must have administrative privileges for the computer.
Install the runtime on a Windows computer
1 Download the runtime installation file from http://get.adobe.com/air.
2 Double-click the runtime installation file.
3 In the installation window, follow the prompts to complete the installation.
Install the runtime on a Mac computer
1 Download the runtime installation file from http://get.adobe.com/air.
2 Double-click runtime installation file.
3 In the installation window, follow the prompts to complete the installation.
4 If the Installer displays an Authenticate window, enter your Mac OS user name and password.
Install the runtime on a Linux computer
Note: At this time, AIR 2.7 and later are not supported on Linux. AIR applications deployed to Linux should continue to
use the AIR 2.6 SDK.
Last updated 12/7/2015
Page 9

BUILDING ADOBE AIR APPLICATIONS
Adobe AIR installation
Using the binary installer:
1 Locate the installation binary file from http://kb2.adobe.com/cps/853/cpsid_85304.html and download.
2 Set the file permissions so that the installer application can be executed. From a command line, you can set the file
permissions with:
chmod +x AdobeAIRInstaller.bin
Some versions of Linux allow you to set the file permissions on the Properties dialog opened through a context menu.
3 Run the installer from the command line or by double-clicking the runtime installation file.
4 In the installation window, follow the prompts to complete the installation.
Adobe AIR is installed as a native package. In other words, as rpm on an rpm based distribution and deb on a Debian
distribution. Currently AIR does not support any other package format.
Using the package installers:
1 Locate the AIR package file from http://kb2.adobe.com/cps/853/cpsid_85304.html. Download the rpm or Debian
package, depending on which package format your system supports.
2 If needed, double-click AIR package file to install the package.
You can also install from the command line:
4
a On a Debian system:
sudo dpkg -i <path to the package>/adobeair-2.0.0.xxxxx.deb
b On an rpm-based system:
sudo rpm -i <path to the package>/adobeair-2.0.0-xxxxx.i386.rpm
Or, if you are updating an existing version (AIR 1.5.3 or later):
sudo rpm -U <path to the package>/adobeair-2.0.0-xxxxx.i386.rpm
Installing AIR 2 and AIR applications requires you to have administrator privileges on your computer.
Adobe AIR is installed to the following location: /opt/Adobe AIR/Versions/1.0
AIR registers the mime-type "application/vnd.adobe.air-application-installer-package+zip", which means that .air files
are of this mime-type and are therefore registered with the AIR runtime.
Install the runtime on an Android device
You can install the latest release of the AIR runtime from the Android Market.
You can install development versions of the AIR runtime from a link on a web page or by using the ADT -
installRuntime command. Only one version of the AIR runtime can be installed at a time; you cannot have both a
release and a development version installed.
See “ADT installRuntime command” on page 169 for more information.
Install the runtime on an iOS device
The necessary AIR runtime code is bundled with each application created for iPhone, iTouch, and iPad devices. You
do not install a separate runtime component.
More Help topics
“AIR for iOS” on page 67
Last updated 12/7/2015
Page 10

BUILDING ADOBE AIR APPLICATIONS
Adobe AIR installation
Removing Adobe AIR
Once you have installed the runtime, you can remove it using the following procedures.
Remove the runtime on a Windows computer
1 In the Windows Start menu, select Settings > Control Panel.
2 Open the Programs, Programs and Features, or Add or Remove Programs control panel (depending on which
version of Windows you are running).
3 Select “Adobe AIR” to remove the runtime.
4 Click the Change/Remove button.
Remove the runtime on a Mac computer
• Double-click the “Adobe AIR Uninstaller”, which is located in the /Applications/Utilities folder.
Remove the runtime on a Linux computer
Do one of the following:
• Select the “Adobe AIR Uninstaller” command from the Applications menu.
• Run the AIR installer binary with the -uninstall option
• Remove the AIR packages (adobeair and adobecerts) with your package manager.
5
Remove the runtime from an Android device
1 Open the Settings app on the device.
2 Tap the Adobe AIR entry under Applications > Manage Applications.
3 Tap the Uninstall button.
You can also use the ADT -uninstallRuntime command. See “ADT uninstallRuntime command” on page 170 for
more information.
Remove a bundled runtime
To remove a captive bundled runtime, you must remove the application it is installed with. Note that captive runtimes
are only used to run the installing application.
Installing and running the AIR sample applications
To install or update an AIR application, a user must have administrative privileges for the computer.
Some sample applications are available that demonstrate AIR features. You can access and install them using the
following instructions:
1 Download and run the AIR sample applications. The compiled applications as well as the source code are available.
2 To download and run a sample application, click the sample application Install Now button. You are prompted to
install and run the application.
Last updated 12/7/2015
Page 11

BUILDING ADOBE AIR APPLICATIONS
Adobe AIR installation
3 If you choose to download sample applications and run them later, select the download links. You can run AIR
applications at any time by:
• On Windows, double-clicking the application icon on the desktop or selecting it from the Windows Start menu.
• On Mac OS, double-clicking the application icon, which is installed in the Applications folder of your user
directory (for example, in Macintosh HD/Users/JoeUser/Applications/) by default.
Note: Check the AIR release notes for updates to these instructions, which are located here:
http://www.adobe.com/go/learn_air_relnotes.
Adobe AIR updates
Periodically, Adobe updates Adobe AIR with new features or fixes to minor problems. The Automatic Notification and
Update feature allows Adobe to automatically notify users when an updated version of Adobe AIR is available.
Updates to Adobe AIR ensure that Adobe AIR works properly and often contain important changes to security. Adobe
recommends that users update to the latest version of Adobe AIR whenever a new version is available, especially when
a security update is mentioned.
By default, when an AIR application is launched, the runtime checks if an update is available. It performs this check if
it has been more than two weeks since the last update check. If an update is available, AIR downloads the update in the
background.
6
Users can disable the auto-update capability by using the AIR SettingsManager application. The AIR SettingsManager
application is available for download at
http://airdownload.adobe.com/air/applications/SettingsManager/SettingsManager.air.
The normal installation process for Adobe AIR includes connecting to http://airinstall.adobe.com to send basic
information about the installation environment such as operating system version and language. This information is
only transmitted once per installation and it allows Adobe to confirm that the installation was successful. No
personally identifiable information is collected or transmitted.
Updating captive runtimes
If you distribute your application with a captive runtime bundle, the captive runtime is not updated automatically. For
the security of your users, you must monitor the updates published by Adobe and update your application with the
new runtime version when a relevant security change is published.
Last updated 12/7/2015
Page 12
Chapter 3: Working with the AIR APIs
Adobe® AIR® includes functionality that is not available to SWF content running in Adobe® Flash® Player.
ActionScript 3.0 Developers
The Adobe AIR APIs are documented in the following two books:
• ActionScript 3.0 Developer's Guide
• ActionScript 3.0 Reference for the Adobe Flash Platform
HTML Developers
If you’re building HTML-based AIR applications, the APIs that are available to you in JavaScript via the AIRAliases.js
file (see
Accessing AIR API classes from JavaScript) are documented in the following two books:
• HTML Developer's Guide for Adobe AIR
• Adobe AIR API Reference for HTML Developers
7
AIR-specific ActionScript 3.0 classes
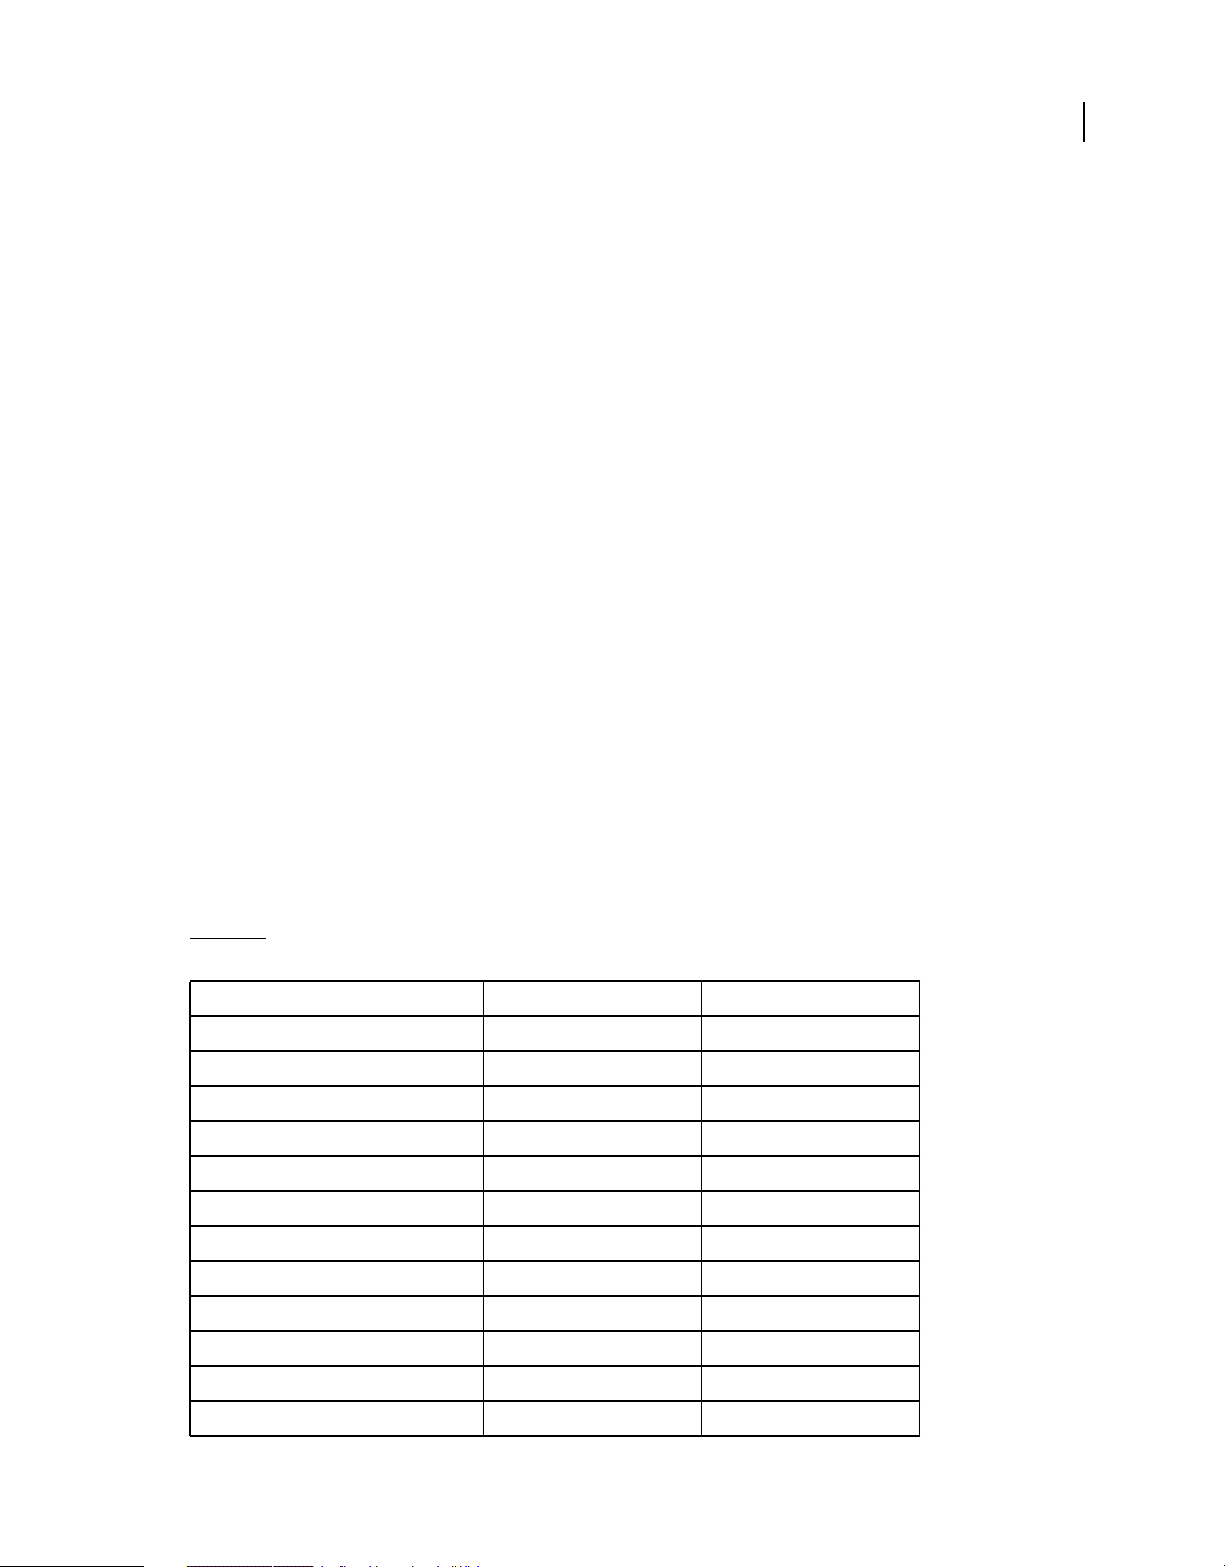
The following table contains runtime classes are specific to Adobe AIR. They are not available to SWF content running
in Adobe® Flash® Player in the browser.
HTML Developers
The classes that are available to you in JavaScript via the AIRAliases.js file are listed in Adobe AIR API Reference for
HTML Developers.
Class ActionScript 3.0 Package Added in AIR version
ARecord flash.net.dns 2.0
AAAARecord flash.net.dns 2.0
ApplicationUpdater air.update 1.5
ApplicationUpdaterUI air.update 1.5
AudioPlaybackMode flash.media 3.0
AutoCapitalize flash.text 3.0
BrowserInvokeEvent flash.events 1.0
CameraPosition flash.media 3.0
CameraRoll flash.media 2.0
CameraRollBrowseOptions flash.media 3.0
CameraUI flash.media 2.5
CertificateStatus flash.security 2.0
Last updated 12/7/2015
Page 13

BUILDING ADOBE AIR APPLICATIONS
Working with the AIR APIs
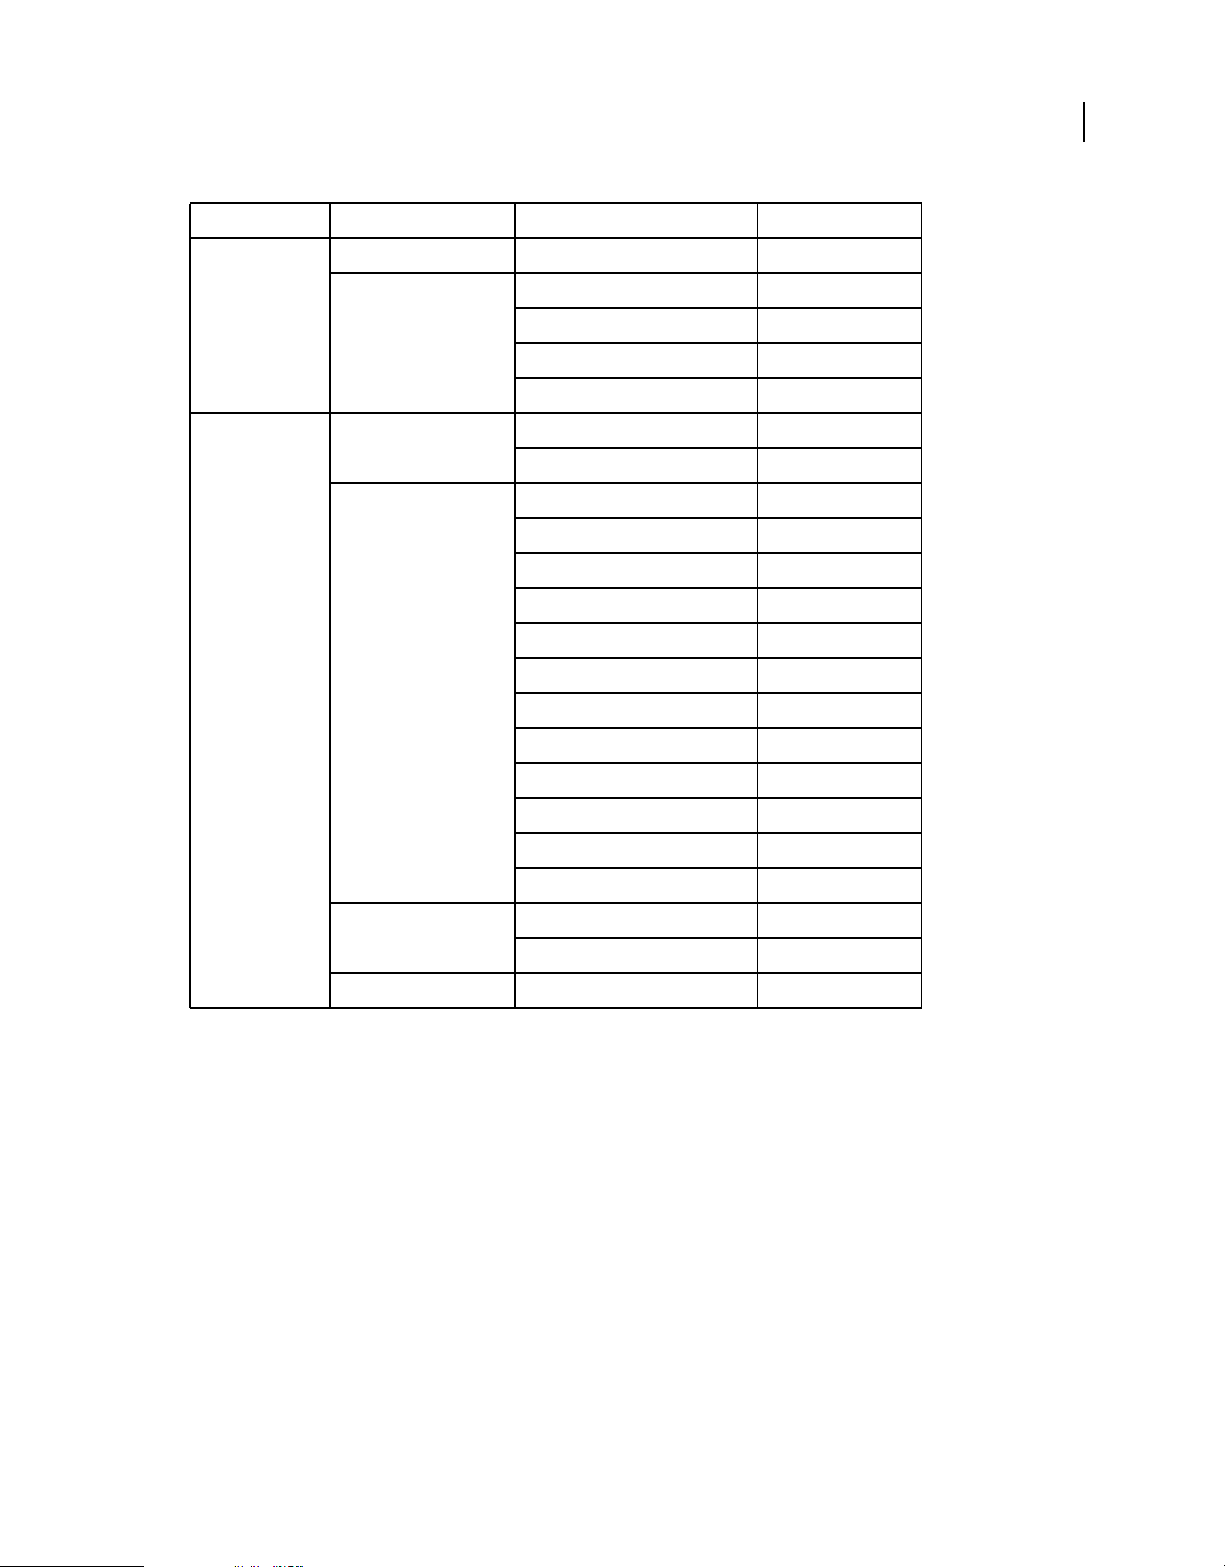
Class ActionScript 3.0 Package Added in AIR version
CompressionAlgorithm flash.utils 1.0
DatagramSocket flash.net 2.0
DatagramSocketDataEvent flash.events 2.0
DNSResolver flash.net.dns 2.0
DNSResolverEvent flash.events 2.0
DockIcon flash.desktop 1.0
DownloadErrorEvent air.update.events 1.5
DRMAuthenticateEvent flash.events 1.0
DRMDeviceGroup flash.net.drm 3.0
DRMDeviceGroupErrorEvent flash.net.drm 3.0
DRMDeviceGroupEvent flash.net.drm 3.0
DRMManagerError flash.errors 1.5
EncryptedLocalStore flash.data 1.0
8
ExtensionContext flash.external 2.5
File flash.filesystem 1.0
FileListEvent flash.events 1.0
FileMode flash.filesystem 1.0
FileStream flash.filesystem 1.0
FocusDirection flash.display 1.0
GameInput flash.ui 3.0
GameInputControl flash.ui 3.0
GameInputControlType flash.ui 3.6 and earlier; dropped, as of 3.7
GameInputDevice flash.ui 3.0
GameInputEvent flash.ui 3.0
GameInputFinger flash.ui 3.6 and earlier; dropped, as of 3.7
GameInputHand flash.ui 3.6 and earlier; dropped, as of 3.7
Geolocation flash.sensors 2.0
GeolocationEvent flash.events 2.0
HTMLHistoryItem flash.html 1.0
HTMLHost flash.html 1.0
HTMLLoader flash.html 1.0
HTMLPDFCapability flash.html 1.0
HTMLSWFCapabiltiy flash.html 2.0
HTMLUncaughtScriptExceptionEvent flash.events 1.0
Last updated 12/7/2015
Page 14

BUILDING ADOBE AIR APPLICATIONS
Working with the AIR APIs
Class ActionScript 3.0 Package Added in AIR version
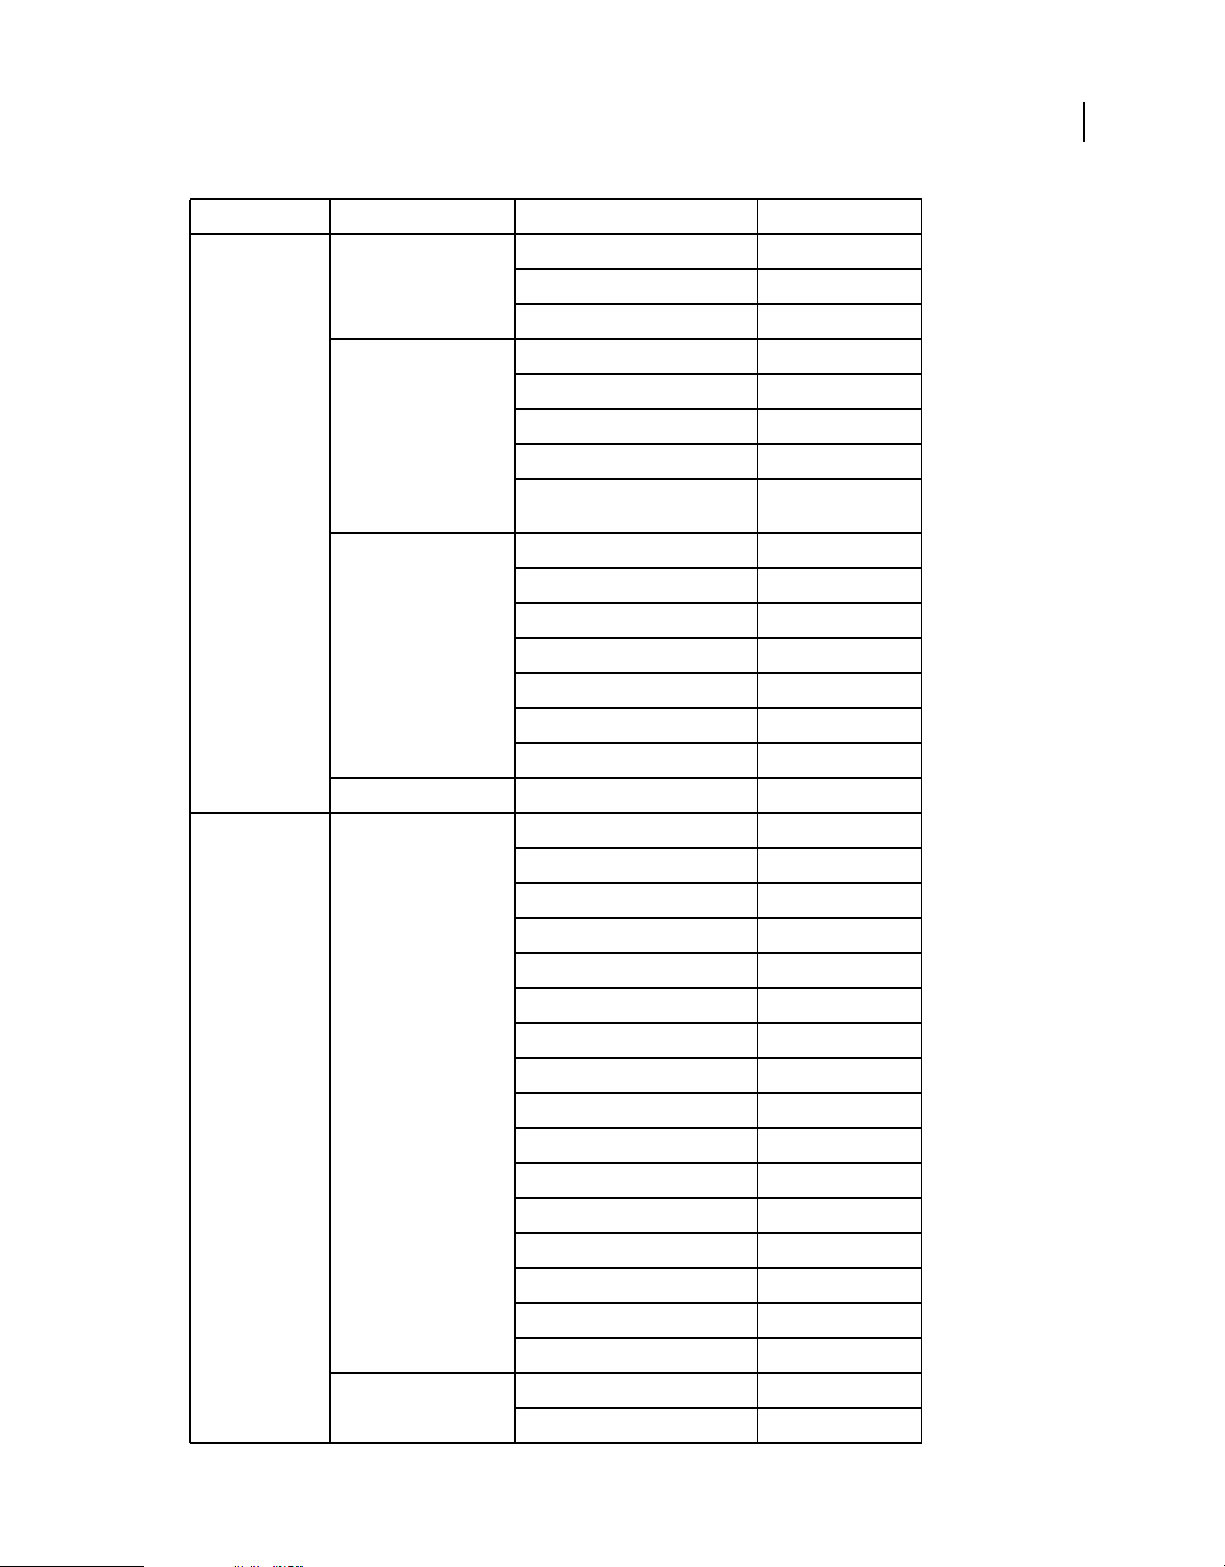
HTMLWindowCreateOptions flash.html 1.0
Icon flash.desktop 1.0
IFilePromise flash.desktop 2.0
ImageDecodingPolicy flash.system 2.6
InteractiveIcon flash.desktop 1.0
InterfaceAddress flash.net 2.0
InvokeEvent flash.events 1.0
InvokeEventReason flash.desktop 1.5.1
IPVersion flash.net 2.0
IURIDereferencer flash.security 1.0
LocationChangeEvent flash.events 2.5
MediaEvent flash.events 2.5
MediaPromise flash.media 2.5
9
MediaType flash.media 2.5
MXRecord flash.net.dns 2.0
NativeApplication flash.desktop 1.0
NativeDragActions flash.desktop 1.0
NativeDragEvent flash.events 1.0
NativeDragManager flash.desktop 1.0
NativeDragOptions flash.desktop 1.0
NativeMenu flash.display 1.0
NativeMenuItem flash.display 1.0
NativeProcess flash.desktop 2.0
NativeProcessExitEvent flash.events 2.0
NativeProcessStartupInfo flash.desktop 2.0
NativeWindow flash.display 1.0
NativeWindowBoundsEvent flash.events 1.0
NativeWindowDisplayState flash.display 1.0
NativeWindowDisplayStateEvent flash.events 1.0
NativeWindowInitOptions flash.display 1.0
NativeWindowRenderMode flash.display 3.0
NativeWindowResize flash.display 1.0
NativeWindowSystemChrome flash.display 1.0
NativeWindowType flash.display 1.0
Last updated 12/7/2015
Page 15

BUILDING ADOBE AIR APPLICATIONS
Working with the AIR APIs
Class ActionScript 3.0 Package Added in AIR version
NetworkInfo flash.net 2.0
NetworkInterface flash.net 2.0
NotificationType flash.desktop 1.0
OutputProgressEvent flash.events 1.0
PaperSize flash.printing 2.0
PrintMethod flash.printing 2.0
PrintUIOptions flash.printing 2.0
PTRRecord flash.net.dns 2.0
ReferencesValidationSetting flash.security 1.0
ResourceRecord flash.net.dns 2.0
RevocationCheckSettings flash.security 1.0
Screen flash.display 1.0
ScreenMouseEvent flash.events 1.0
10
SecureSocket flash.net 2.0
SecureSocketMonitor air.net 2.0
ServerSocket flash.net 2.0
ServerSocketConnectEvent flash.events 2.0
ServiceMonitor air.net 1.0
SignatureStatus flash.security 1.0
SignerTrustSettings flash.security 1.0
SocketMonitor air.net 1.0
SoftKeyboardType flash.text 3.0
SQLCollationType flash.data 1.0
SQLColumnNameStyle flash.data 1.0
SQLColumnSchema flash.data 1.0
SQLConnection flash.data 1.0
SQLError flash.errors 1.0
SQLErrorEvent flash.events 1.0
SQLErrorOperation flash.errors 1.0
SQLEvent flash.events 1.0
SQLIndexSchema flash.data 1.0
SQLMode flash.data 1.0
SQLResult flash.data 1.0
SQLSchema flash.data 1.0
Last updated 12/7/2015
Page 16

BUILDING ADOBE AIR APPLICATIONS
Working with the AIR APIs
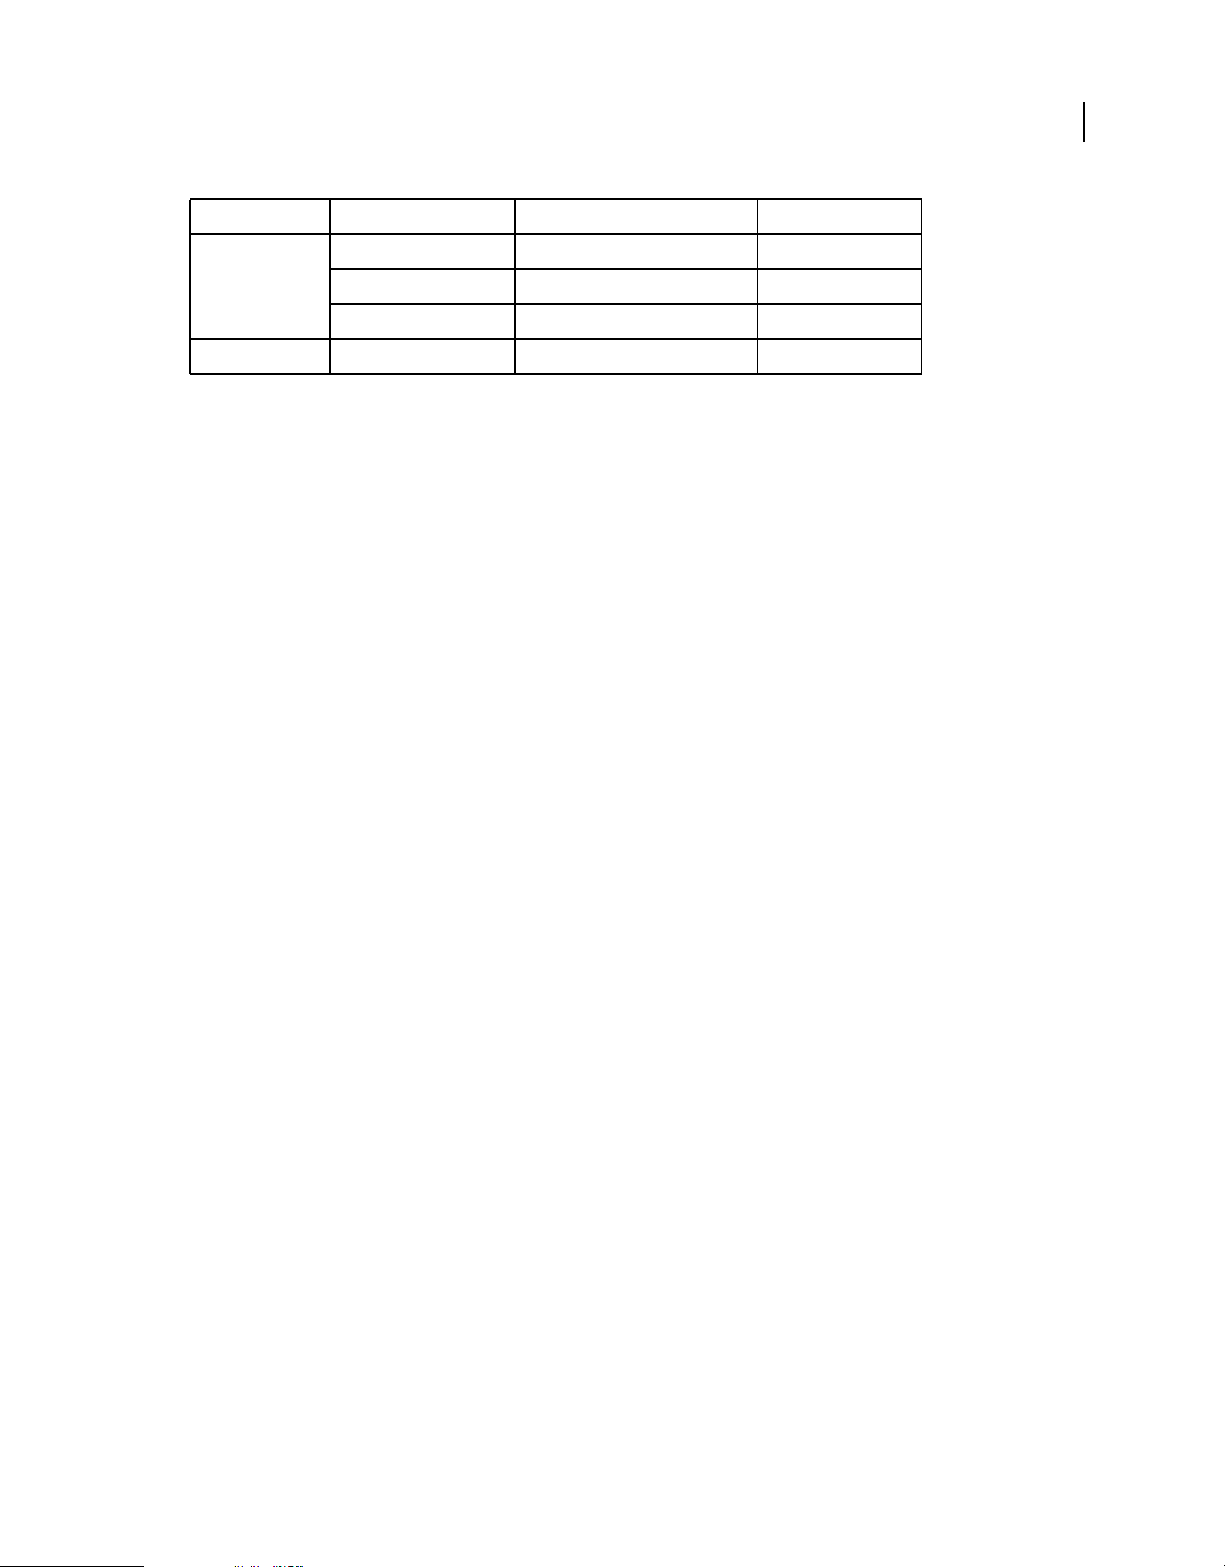
Class ActionScript 3.0 Package Added in AIR version
SQLSchemaResult flash.data 1.0
SQLStatement flash.data 1.0
SQLTableSchema flash.data 1.0
SQLTransactionLockType flash.data 1.0
SQLTriggerSchema flash.data 1.0
SQLUpdateEvent flash.events 1.0
SQLViewSchema flash.data 1.0
SRVRecord flash.net.dns 2.0
StageAspectRatio flash.display 2.0
StageOrientation flash.display 2.0
StageOrientationEvent flash.events 2.0
StageText flash.text 3.0
StageTextInitOptions flash.text 3.0
11
StageWebView flash.media 2.5
StatusFileUpdateErrorEvent air.update.events 1.5
StatusFileUpdateEvent air.update.events 1.5
StatusUpdateErrorEvent air.update.events 1.5
StatusUpdateEvent air.update.events 1.5
StorageVolume flash.filesystem 2.0
StorageVolumeChangeEvent flash.events 2.0
StorageVolumeInfo flash.filesystem 2.0
SystemIdleMode flash.desktop 2.0
SystemTrayIcon flash.desktop 1.0
TouchEventIntent flash.events 3.0
UpdateEvent air.update.events 1.5
Updater flash.desktop 1.0
URLFilePromise air.desktop 2.0
URLMonitor air.net 1.0
URLRequestDefaults flash.net 1.0
XMLSignatureValidator flash.security 1.0
Flash Player classes with AIR-specific functionality
The following classes are available to SWF content running in the browser, but AIR provides additional properties or
methods:
Last updated 12/7/2015
Page 17
BUILDING ADOBE AIR APPLICATIONS
Working with the AIR APIs
Package Class Property, method, or event Added in AIR version
flash.desktop Clipboard supportsFilePromise 2.0
ClipboardFormats BITMAP_FORMAT 1.0
FILE_LIST_FORMAT 1.0
FILE_PROMISE_LIST_FORMAT 2.0
URL_FORMAT 1.0
flash.display LoaderInfo childSandboxBridge 1.0
parentSandboxBridge 1.0
Stage assignFocus() 1.0
autoOrients 2.0
deviceOrientation 2.0
nativeWindow 1.0
orientation 2.0
orientationChange event 2.0
12
orientationChanging event 2.0
setAspectRatio 2.0
setOrientation 2.0
softKeyboardRect 2.6
supportedOrientations 2.6
supportsOrientationChange 2.0
NativeWindow owner 2.6
listOwnedWindows 2.6
NativeWindowInitOptions owner 2.6
Last updated 12/7/2015
Page 18

BUILDING ADOBE AIR APPLICATIONS
Working with the AIR APIs
Package Class Property, method, or event Added in AIR version
flash.events Event CLOSING 1.0
DISPLAYING 1.0
PREPARING 2.6
EXITING 1.0
HTML_BOUNDS_CHANGE 1.0
HTML_DOM_INITIALIZE 1.0
HTML_RENDER 1.0
LOCATION_CHANGE 1.0
NETWORK_CHANGE 1.0
STANDARD_ERROR_CLOSE 2.0
STANDARD_INPUT_CLOSE 2.0
STANDARD_OUTPUT_CLOSE 2.0
USER_IDLE 1.0
13
USER_PRESENT 1.0
HTTPStatusEvent HTTP_RESPONSE_STATUS 1.0
responseHeaders 1.0
responseURL 1.0
KeyboardEvent commandKey 1.0
controlKey 1.0
Last updated 12/7/2015
Page 19
BUILDING ADOBE AIR APPLICATIONS
Working with the AIR APIs
Package Class Property, method, or event Added in AIR version
flash.net FileReference extension 1.0
httpResponseStatus event 1.0
uploadUnencoded() 1.0
NetStream drmAuthenticate event 1.0
onDRMContentData event 1.5
preloadEmbeddedData() 1.5
resetDRMVouchers() 1.0
14
setDRMAuthenticationCredent
ials()
1.0
URLRequest authenticate 1.0
cacheResponse 1.0
followRedirects 1.0
idleTimeout 2.0
manageCookies 1.0
useCache 1.0
userAgent 1.0
URLStream httpResponseStatus event 1.0
flash.printing PrintJob active 2.0
copies 2.0
firstPage 2.0
isColor 2.0
jobName 2.0
lastPage 2.0
maxPixelsPerInch 2.0
paperArea 2.0
printableArea 2.0
printer 2.0
printers 2.0
selectPaperSize() 2.0
showPageSetupDialog() 2.0
start2() 2.0
supportsPageSetupDialog 2.0
terminate() 2.0
PrintJobOptions pixelsPerInch 2.0
printMethod 2.0
Last updated 12/7/2015
Page 20
BUILDING ADOBE AIR APPLICATIONS
Working with the AIR APIs
Package Class Property, method, or event Added in AIR version
flash.system Capabilities languages 1.1
LoaderContext allowLoadBytesCodeExecution 1.0
Security APPLICATION 1.0
flash.ui KeyLocation D_PAD 2.5
Most of these new properties and methods are available only to content in the AIR application security sandbox.
However, the new members in the URLRequest classes are also available to content running in other sandboxes.
The ByteArray.compress() and ByteArray.uncompress() methods each include a new algorithm parameter,
allowing you to choose between deflate and zlib compression. This parameter is available only to content running in AIR.
AIR-specific Flex components
The following Adobe® Flex™ MX components are available when developing content for Adobe AIR:
• FileEvent
• FileSystemComboBox
• FileSystemDataGrid
• FileSystemEnumerationMode
• FileSystemHistoryButton
• FileSystemList
• FileSystemSizeDisplayMode
• FileSystemTree
• FlexNativeMenu
• HTML
• Window
• WindowedApplication
• WindowedSystemManager
Additionally, Flex 4 includes the following spark AIR components:
15
• Window
• WindowedApplication
For more information about the AIR Flex components, see Using the Flex AIR components.
Last updated 12/7/2015
Page 21

Chapter 4: Adobe Flash Platform tools for AIR development
You can develop AIR applications with the following Adobe Flash Platform development tools.
For ActionScript 3.0 (Flash and Flex) developers:
• Adobe Flash Professional (see Publishing for AIR)
• Adobe Flex 3.x and 4.x SDKs (see “Setting up the Flex SDK” on page 18 and “AIR Developer Tool (ADT)” on
page 158)
• Adobe Flash Builder (see Developing AIR Applications with Flash Builder)
For HTML and Ajax developers:
• Adobe AIR SDK (see “Installing the AIR SDK” on page 16 and “AIR Developer Tool (ADT)” on page 158)
• Adobe Dreamweaver CS3, CS4, CS5 (see AIR Extension for Dreamweaver)
16
Installing the AIR SDK
The Adobe AIR SDK contains the following command-line tools that you use to launch and package applications:
AIR Debug Launcher (ADL) Allows you to run AIR applications without having to first install them. See “AIR Debug
Launcher (ADL)” on page 152.
AIR Development Tool (ADT) Packages AIR applications into distributable installation packages. See “AIR Developer
Tool (ADT)” on page 158.
The AIR command-line tools require Java to be installed your computer. You can use the Java virtual machine from
either the JRE or the JDK (version 1.5 or newer). The Java JRE and the Java JDK are available at http://java.sun.com/.
At least 2GB of computer memory is required to run the ADT tool.
Note: Java is not required for end users to run AIR applications.
For a quick overview of building an AIR application with the AIR SDK, see “Creating your first HTML-based AIR
application with the AIR SDK” on page 31.
Download and install the AIR SDK
You can download and install the AIR SDK using the following instructions:
Install the AIR SDK in Windows
• Download the AIR SDK installation file.
• The AIR SDK is distributed as a standard file archive. To install AIR, extract the contents of the SDK to a folder on
your computer (for example: C:\Program Files\Adobe\AIRSDK or C:\AIRSDK).
• The ADL and ADT tools are contained in the bin folder in the AIR SDK; add the path to this folder to your PATH
environment variable.
Last updated 12/7/2015
Page 22
BUILDING ADOBE AIR APPLICATIONS
Adobe Flash Platform tools for AIR development
Install the AIR SDK in Mac OS X
• Download the AIR SDK installation file.
• The AIR SDK is distributed as a standard file archive. To install AIR, extract the contents of the SDK to a folder on
your computer (for example: /Users/<userName>/Applications/AIRSDK).
• The ADL and ADT tools are contained in the bin folder in the AIR SDK; add the path to this folder to your PATH
environment variable.
Install the AIR SDK in Linux
• The SDK is available in tbz2 format.
• To install the SDK, create a folder in which you want to unzip the SDK, then use the following command: tar -jxvf
<path to AIR-SDK.tbz2>
For information about getting started using the AIR SDK tools, see Creating an AIR application using the commandline tools.
What's included in the AIR SDK
The following table describes the purpose of the files contained in the AIR SDK:
17
SDK folder Files/tools description
bin The AIR Debug Launcher (ADL) allows you to run an AIR application without first
frameworks The libs directory contains code libraries for use in AIR applications.
include The include directory contains the C-language header file for writing native
install The install directory contains the Windows USB drivers for Android devices. (These
lib Contains support code for the AIR SDK tools.
runtimes The AIR runtimes for the desktop and for mobile devices.
samples This folder contains a sample application descriptor file, a sample of the seamless
packaging and installing it. For information about using this tool, see
Launcher (ADL)” on page 152.
The AIR Developer Tool (ADT) packages your application as an AIR file for distribution.
For information about using this tool, see
The projects directory contains the code for the compiled SWF and SWC libraries.
extensions.
are the drivers provided by Google in the Android SDK.)
The desktop runtime is used by ADL to launch your AIR applications before they have
been packaged or installed.
The AIR runtimes for Android (APK packages) can be installed on Android devices or
emulators for development and testing. Separate APK packages are used for devices
and emulators. (The public AIR runtime for Android is available from the Android
Market.)
install feature (badge.swf), and the default AIR application icons.
“AIR Developer Tool (ADT)” on page 158.
“AIR Debug
templates descriptor-template.xml - A template of the application descriptor file, which is
required for each AIR application. For a detailed description of the application
descriptor file, see
Schema files for the XML structure of the application descriptor for each release
version of AIR are also found in this folder.
“AIR application descriptor files” on page 195.
Last updated 12/7/2015
Page 23

BUILDING ADOBE AIR APPLICATIONS
Adobe Flash Platform tools for AIR development
Setting up the Flex SDK
To develop Adobe® AIR® applications with Adobe® Flex™, you have the following options:
• You can download and install Adobe® Flash® Builder™, which provides integrated tools to create Adobe AIR projects
and test, debug, and package your AIR applications. See
Builder” on page 19.
• You can download the Adobe® Flex™ SDK and develop Flex AIR applications using your favorite text editor and the
command-line tools.
For a quick overview of building an AIR application with Flex SDK, see “Creating your first desktop AIR application
with the Flex SDK” on page 35.
Install the Flex SDK
Building AIR applications with the command-line tools requires that Java is installed on your computer. You can use
the Java virtual machine from either the JRE or the JDK (version 1.5 or newer). The Java JRE and JDK are available at
http://java.sun.com/.
Note: Java is not required for end users to run AIR applications.
“Creating your first desktop Flex AIR application in Flash
18
The Flex SDK provides you with the AIR API and command-line tools that you use to package, compile, and debug
your AIR applications.
1 If you haven't already done so, download the Flex SDK at
http://opensource.adobe.com/wiki/display/flexsdk/Downloads.
2 Place the contents of the SDK into a folder (for example, Flex SDK).
3 Copy the contents of the AIR SDK over the files in the Flex SDK.
Note: On Mac computers, make sure that you copy or replace the individual files in the SDK folders — not entire
directories. By default, copying a directory on the Mac to a directory of the same name removes the existing files in the
target directory; it does not merge the contents of the two directories. You can use the
window to merge the AIR SDK into the Flex SDK:
4 The command-line AIR utilities are located in the bin folder.
ditto air_sdk_folder flex_sdk_folder
ditto command in a terminal
Setting up external SDKs
Developing applications for Android and iOS requires that you download provisioning files, SDKs or other
development tools from the platform makers.
For information about downloading and installing the Android SDK, see Android Developers: Installing the SDK. As
of AIR 2.6, you are not required to download the Android SDK. The AIR SDK now includes the basic components
needed to install and launch APK packages. Still, the Android SDK can be useful for a variety of development tasks,
including creating and running software emulators and taking device screenshots.
An external SDK is not required for iOS development. However, special certificates and provisioning profiles are
needed. For more information, see
Obtaining developer files from Apple.
Last updated 12/7/2015
Page 24

Chapter 5: Creating your first AIR application
Creating your first desktop Flex AIR application in Flash Builder
For a quick, hands-on illustration of how Adobe® AIR® works, use these instructions to create and package a simple
SWF file-based AIR “Hello World” application using Adobe® Flash® Builder.
If you haven’t already done so, download and install Flash Builder. Also, download and install the most recent version
of Adobe AIR, which is located here:
Create an AIR project
Flash Builder includes tools to develop and package AIR applications.
www.adobe.com/go/air.
19
You begin to create AIR applications in Flash Builder or Flex Builder in the same way that you create other Flex-based
application projects: by defining a new project.
1 Open Flash Builder.
2 Select File > New > Flex Project.
3 Enter the project name as AIRHelloWorld.
4 In Flex, AIR applications are considered an application type. You have two type options:
• a web application that runs in Adobe® Flash® Player
• a desktop application that runs in Adobe AIR
Select Desktop as the application type.
5 Click Finish to create the project.
AIR projects initially consist of two files: the main MXML file and an application XML file (known as the application
descriptor file). The latter file specifies application properties.
For more information, see Developing AIR applications with Flash Builder.
Write the AIR application code
To write the “Hello World” application code, you edit the application MXML file (AIRHelloWorld.mxml), which is
open in the editor. (If the file isn't open, use the Project Navigator to open the file.)
Flex AIR applications on the desktop are contained within the MXML WindowedApplication tag. The MXML
WindowedApplication tag creates a simple window that includes basic window controls such as a title bar and close
button.
1 Add a title attribute to the WindowedApplication component, and assign it the value "Hello World":
Last updated 12/7/2015
Page 25

BUILDING ADOBE AIR APPLICATIONS
Creating your first AIR application
<?xml version="1.0" encoding="utf-8"?>
<s:WindowedApplication xmlns:fx="http://ns.adobe.com/mxml/2009"
xmlns:s="library://ns.adobe.com/flex/spark"
xmlns:mx="library://ns.adobe.com/flex/mx"
title="Hello World">
</s:WindowedApplication>
2 Add a Label component to the application (place it inside the WindowedApplication tag). Set the text property of
the Label component to
<?xml version="1.0" encoding="utf-8"?>
<s:WindowedApplication xmlns:fx="http://ns.adobe.com/mxml/2009"
<s:Label text="Hello AIR" horizontalCenter="0" verticalCenter="0"/>
</s:WindowedApplication>
"Hello AIR", and set the layout constraints to keep it centered, as shown here:
xmlns:s="library://ns.adobe.com/flex/spark"
xmlns:mx="library://ns.adobe.com/flex/mx"
title="Hello World">
3 Add the following style block immediately after the opening WindowedApplication tag and before the label
component tag you just entered:
<fx:Style>
@namespace s "library://ns.adobe.com/flex/spark";
s|WindowedApplication
{
skinClass:ClassReference("spark.skins.spark.SparkChromeWindowedApplicationSkin");
background-color:#999999;
background-alpha:"0.7";
}
</fx:Style>
20
These style settings apply to the entire application and render the window background a slightly transparent gray.
The application code now looks like the following:
<?xml version="1.0" encoding="utf-8"?>
<s:WindowedApplication xmlns:fx="http://ns.adobe.com/mxml/2009"
xmlns:s="library://ns.adobe.com/flex/spark"
xmlns:mx="library://ns.adobe.com/flex/mx"
title="Hello World">
<fx:Style>
@namespace s "library://ns.adobe.com/flex/spark";
s|WindowedApplication
{
skinClass:ClassReference("spark.skins.spark.SparkChromeWindowedApplicationSkin");
background-color:#999999;
background-alpha:"0.7";
}
</fx:Style>
<s:Label text="Hello AIR" horizontalCenter="0" verticalCenter="0"/>
</s:WindowedApplication>
Last updated 12/7/2015
Page 26
BUILDING ADOBE AIR APPLICATIONS
Creating your first AIR application
Next, you will change some settings in the application descriptor to allow the application to be transparent:
1 In the Flex Navigator pane, locate the application descriptor file in the source directory of the project. If you named
your project AIRHelloWorld, this file is named AIRHelloWorld-app.xml.
2 Double-click the application descriptor file to edit it in Flash Builder.
3 In the XML code, locate the commented lines for the systemChrome and transparent properties (of the
initialWindow property). Remove the comments. (Remove the "<!--" and "-->" comment delimiters.)
4 Set the text value of the systemChrome property to none, as in the following:
<systemChrome>none</systemChrome>
5 Set the text value of the transparent property to true, as in the following:
<transparent>true</transparent>
6 Save the file.
Test the AIR application
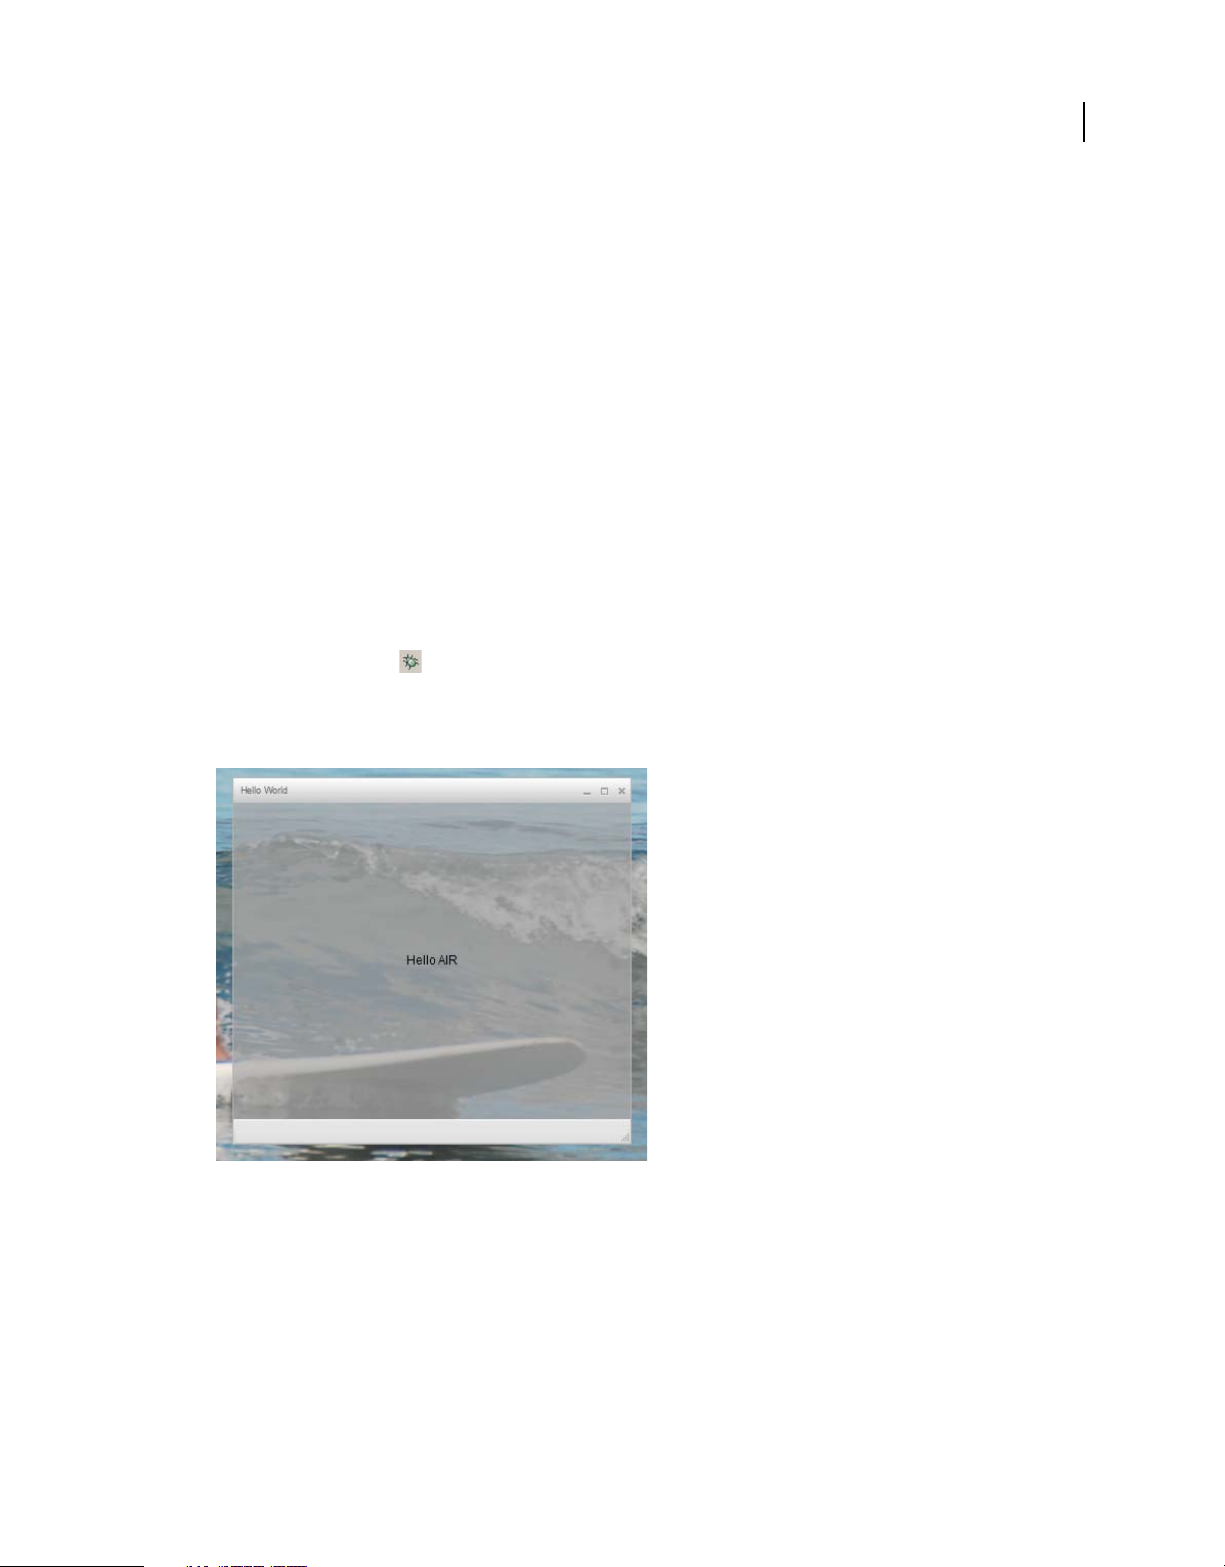
To test the application code that you’ve written, run it in debug mode.
1 Click the Debug button in the main toolbar.
You can also select the Run > Debug > AIRHelloWorld command.
21
The resulting AIR application should look like the following example:
2 Using the horizontalCenter and verticalCenter properties of the Label control, the text is placed in the center
of the window. Move or resize the window as you would any other desktop application.
Note: If the application does not compile, fix any syntax or spelling errors that you inadvertently entered into the code.
Errors and warnings are displayed in the Problems view in Flash Builder.
Last updated 12/7/2015
Page 27

BUILDING ADOBE AIR APPLICATIONS
Creating your first AIR application
Package, sign, and run your AIR application
You are now ready to package the "Hello World" application into an AIR file for distribution. An AIR file is an archive
file that contains the application files, which are all of the files contained in the project’s bin folder. In this simple
example, those files are the SWF and application XML files. You distribute the AIR package to users who then use it
to install the application. A required step in this process is to digitally sign it.
1 Ensure that the application has no compilation errors and runs as expected.
2 Select Project > Export Release Build.
3 Check that the AIRHelloWorld project and AIRHelloWorld.mxml application are listed for project and
application.
4 Select Export as signed AIR package option. Then click Next.
5 If you have an existing digital certificate, click Browse to locate and select it.
6 If you must create a new self-signed digital certificate, select Create.
7 Enter the required information and click OK.
8 Click Finish to generate the AIR package, which is named AIRHelloWorld.air.
You can now install and run the application from the Project Navigator in Flash Builder or from the file system by
double-clicking the AIR file.
22
Creating your first desktop AIR application using Flash Professional
For a quick, hands-on demonstration of how Adobe® AIR® works, follow the instructions in this topic to create and
package a simple “Hello World” AIR application using Adobe® Flash® Professional.
If you haven’t already done so, download and install Adobe AIR, which is located here: www.adobe.com/go/air.
Create the Hello World application in Flash
Creating an Adobe AIR application in Flash is much like creating any other FLA file. The following procedure guides
you through the process of creating a simple Hello World application using Flash Professional.
To create the Hello World application
1 Start Flash.
2 In the Welcome Screen, click AIR to create an empty FLA file with Adobe AIR publish settings.
3 Select the Text tool in the Tools panel and create a static text field (the default) in the center of the Stage. Make it
wide enough to contain 15 -20 characters.
4 Enter the text “Hello World” in the text field.
5 Save the file, giving it a name (for example, HelloAIR).
Test the application
1 Press Ctrl + Enter or select Control ->Test Movie->Test to test the application in Adobe AIR.
Last updated 12/7/2015
Page 28

BUILDING ADOBE AIR APPLICATIONS
Creating your first AIR application
2 To use the Debug Movie feature, first add ActionScript code to the application. You can try it quickly by adding a
trace statement like the following:
trace("Running AIR application using Debug Movie");
3 Press Ctrl + Shift + Enter, or select Debug->Debug Movie->Debug to run the application with Debug Movie.
The Hello World application looks like this illustration:
23
Package the application
1 Select File > Publish.
2 Sign the Adobe AIR package with an existing digital certificate or create a self-signed certificate using the following
steps:
a Click the New button next to the Certificate field.
b Complete the entries for Publisher name, Organizational unit, Organizational name, E-mail, Country,
Password, and Confirm Password.
c Specify the type of certificate. The certificate Type option refers to the level of security: 1024-RSA uses a 1024-
bit key (less secure), and 2048-RSA uses a 2048-bit key (more secure).
d Save the information in a certificate file by completing the Save as entry or clicking the Browse... button to
browse to a folder location. (For example, C:/Temp/mycert.pfx). When you’re finished click OK.
e Flash returns you to the Digital Signature Dialog. The path and filename of the self-signed certificate that you
created appears in the Certificate text box. If not, enter the path and filename or click the Browse button to locate
and select it.
f Enter the same password in the Password text field of the Digital Signature dialog box as the password that you
assigned in step b. For more information about signing your Adobe AIR applications, see
AIR file” on page 181.
3 To create the application and installer file, click the Publish button. (In Flash CS4 and CS5, click the OK button.)
You must execute Test Movie or Debug Movie to create the SWF file and application.xml files before creating the
AIR file.
“Digitally signing an
Last updated 12/7/2015
Page 29

BUILDING ADOBE AIR APPLICATIONS
Creating your first AIR application
4 To install the application, double click the AIR file (application.air) in the same folder where you saved your
application.
5 Click the Install button in the Application Install dialog.
6 Review the Installation Preferences and Location settings and make sure that the ‘Start application after installation’
checkbox is checked. Then click Continue.
7 Click Finish when the Installation Completed message appears.
Create your first AIR application for Android in Flash Professional
To develop AIR applications for Android, you must download the Flash Professional CS5 extension for Android from
Adobe Labs.
You must also download and install the Android SDK from the Android web site, as described in: Android Developers:
Installing the SDK.
Create a project
1 Open Flash Professional CS5
2 Create a new AIR for Android project.
The Flash Professional home screen includes a link to create an AIR for Android application. You can also select
File > New, and then select the AIR for Android template.
24
3 Save the document as HelloWorld.fla
Write the code
Since this tutorial isn't really about writing code, just use the Text tool to write, "Hello, World!" on the stage.
Set the application properties
1 Select File > AIR Android Settings.
2 In the General tab, make the following settings:
• Output File: HelloWorld.apk
• App name: HelloWorld
• App ID: HelloWorld
• Version number: 0.0.1
• Aspect ratio: Portrait
3 On the Deployment tab, make the following settings:
• Certificate: Point to a valid AIR code-signing certificate. You can click the Create button to create a new
certificate. (Android apps deployed via the Android Marketplace must have certificates that are valid until at
least 2033.) Enter the certificate password in the Password field.
• Android deployment type: Debug
• After Publish: Select both options
• Enter the path to the ADB tool in the tools subdirectory of the Android SDK.
Last updated 12/7/2015
Page 30

BUILDING ADOBE AIR APPLICATIONS
Creating your first AIR application
4 Close the Android settings dialog by clicking OK.
The app does not need icons or permissions at this stage in its development. Most AIR apps for Android do require
some permissions in order to access protected features. You should only set those permissions your app truly
requires since users may reject your app if it asks for too many permissions.
5 Save the file.
Package and Install the application on the Android device
1 Make sure that USB debugging is enabled on your device. You can turn USB debugging on in the Settings app under
Applications > Development.
2 Connect your device to your computer with a USB cable.
3 Install the AIR runtime, if you have not already done so, by going to the Android Market and downloading Adobe
AIR. (You can also install AIR locally using the
for use on Android devices and emulators are included in the AIR SDK.)
4 Select File > Publish.
Flash Professional creates the APK file, installs the app on the connected Android device, and launches it.
“ADT installRuntime command” on page 169. Android packages
25
Creating your first AIR application for iOS
AIR 2.6 or later, iOS 4.2 or later
You can code, build, and test the basic features of an iOS application using only Adobe tools. However, to install an
iOS application on a device and to distribute that application, you must join the Apple iOS Developer program (which
is a fee-based service). Once you join the iOS Developer program you can access the iOS Provisioning Portal where
you can obtain the following items and files from Apple that are required to install an application on a device for testing
and for subsequent distribution. These items and files include:
• Development and distribution certificates
• Application IDs
• Development and distribution provisioning files
Create the application content
Create a SWF file that displays the text, “Hello world!” You can perform this task using Flash Professional, Flash
Builder, or another IDE. This example simply uses a text editor and the command line SWF compiler included in the
Flex SDK.
1 Create a directory in a convenient location to store your application files. Create a file named, HelloWorld.as and
edit the file in your favorite code editor.
2 Add the following code:
Last updated 12/7/2015
Page 31

BUILDING ADOBE AIR APPLICATIONS
Creating your first AIR application
package{
import flash.display.Sprite;
import flash.text.TextField;
import flash.text.TextFormat;
import flash.text.TextFieldAutoSize;
public class HelloWorld extends Sprite
{
public function HelloWorld():void
{
var textField:TextField = new TextField();
textField.text = "Hello World!";
textField.autoSize = TextFieldAutoSize.LEFT;
var format:TextFormat = new TextFormat();
format.size = 48;
textField.setTextFormat ( format );
this.addChild( textField );
}
}
}
26
3 Compile the class using the amxmlc compiler:
amxmlc HelloWorld.as
A SWF file, HelloWorld.swf, is created in the same folder.
Note: This example assumes that you have set up your environment path variable to include the directory containing
amxmlc. For information on setting the path, see
“Path environment variables” on page 292. Alternately, you can type
the full path to amxmlc and the other command-line tools used in this example.
Create icon art and initial screen art for the application
All iOS applications have icons that appear in the user interface of the iTunes application and on the device screen.
1 Create a directory within your project directory, and name it icons.
2 Create three PNG files in the icons directory. Name them Icon_29.png, Icon_57.png, and Icon_512.png.
3 Edit the PNG files to create appropriate art for your application. The files must be 29-by-29 pixels, 57-by-57 pixels,
and 512-by-512 pixels. For this test, you can simply use solid color squares as the art.
Note: When you submit an application to the Apple App Store, you use a JPG version (not a PNG version) of the 512pixel file. You use the PNG version while testing development versions of an application.
All iPhone applications display an initial image while the application loads on the iPhone. You define the initial image
in a PNG file:
1 In the main development directory, create a PNG file named Default.png. (Do not put this file in the icons
subdirectory. Be sure to name the file Default.png, with an uppercase D.)
2 Edit the file so that it is 320 pixels wide and 480 pixels high. For now, the content can be a plain white rectangle.
(You will change this later.)
For detailed information on these graphics, see “Application icons” on page 83.
Last updated 12/7/2015
Page 32

BUILDING ADOBE AIR APPLICATIONS
Creating your first AIR application
Create the application descriptor file
Create an application descriptor file that specifies the basic properties for the application. You can complete this task
using an IDE such as Flash Builder or a text editor.
1 In the project folder that contains HelloWorld.as, create an XML file named, HelloWorld-app.xml. Edit this file in
your favorite XML editor.
2 Add the following XML:
<?xml version="1.0" encoding="utf-8" ?>
<application xmlns="http://ns.adobe.com/air/application/2.7" minimumPatchLevel="0">
<id>change_to_your_id</id>
<name>Hello World iOS</name>
<versionNumber>0.0.1</versionNumber>
<filename>HelloWorld</filename>
<supportedProfiles>mobileDevice</supportedProfiles>
<initialWindow>
<content>HelloWorld.swf</content>
<title>Hello World!</title>
</initialWindow>
<icon>
<image29x29>icons/AIRApp_29.png</image29x29>
<image57x57>icons/AIRApp_57.png</image57x57>
<image512x512>icons/AIRApp_512.png</image512x512>
</icon>
</application>
27
For the sake of simplicity, this example only sets a few of the available properties.
Note: If you are using AIR 2, or earlier, you must use the <version> element instead of the <versionNumber>
element.
3 Change the application ID to match the application ID specified in the iOS Provisioning Portal. (Do not include
the random bundle seed portion at the beginning of the ID.
4 Test the application using ADL:
adl HelloWorld-app.xml -screensize iPhone
ADL should open a window on your desktop that displays the text: Hello World! If it does not, check the source
code and application descriptor for errors.
Compile the IPA file
You can now compile the IPA installer file using ADT. You must have your Apple developer certificate and private key
in P12 file format and your Apple development provisioning profile.
Run the ADT utility with the following options, replacing the keystore, storepass, and provisioning-profile values with
your own:
adt -package -target ipa-debug
-keystore iosPrivateKey.p12 -storetype pkcs12 -storepass qwerty12
-provisioning-profile ios.mobileprovision
HelloWorld.ipa
HelloWorld-app.xml
HelloWorld.swf icons Default.png
(Use a single command line; the line breaks in this example are just added to make it easier to read.)
Last updated 12/7/2015
Page 33

BUILDING ADOBE AIR APPLICATIONS
Creating your first AIR application
ADT generates the iOS application installer file, HelloWorld.ipa, in the project directory. Compiling the IPA file can
take a few minutes.
Install the application on a device
To install the iOS application for testing:
1 Open the iTunes application.
2 If you have not already done so, add the provisioning profile for this application to iTunes. In iTunes, select File >
Add To Library. Then, select the provisioning profile file (which has mobileprovision as the file type).
For now, to test the application on your developer device, use the development provisioning profile.
Later, when distributing an application to the iTunes Store, use the distribution profile. To distribute the
application ad-hoc (to multiple devices without going through the iTunes Store), use the ad-hoc provisioning
profile.
For more information on provisioning profiles, see “iOS setup” on page 63.
3 Some versions of iTunes do not replace the application if the same version of the application is already installed. In
this case, delete the application from your device and from the list of applications in iTunes.
4 Double-click the IPA file for your application. It should appear in the list of applications in iTunes.
5 Connect your device to the USB port on your computer.
6 In iTunes, check the Application tab for the device, and ensure that the application is selected in the list of
applications to be installed.
7 Select the device in the left-hand list of the iTunes application. Then click the Sync button. When the sync
completes, the Hello World application appears on your iPhone.
If the new version is not installed, delete it from your device and from the list of applications in iTunes, and then redo
this procedure. This may be the case if the currently installed version uses the same application ID and version.
28
Edit the initial screen graphic
Before you compiled your application, you created a Default.png file (see “Create icon art and initial screen art for the
application” on page 26). This PNG file serves as the startup image while the application loads. When you tested the
application on your iPhone, you may have noticed this blank screen at startup.
You should change this image to match the startup screen of your application (“Hello World!”):
1 Open your application on your device. When the first “Hello World” text appears, press and hold the Home button
(below the screen). While holding the Home button, press the Power/Sleep button (at the top of the iPhone). This
takes a screenshot and sends it to the Camera Roll.
2 Transfer the image to your development computer by transferring photos from iPhoto or another photo transfer
application. (On Mac OS, you can also use the Image Capture application.)
You can also e-mail the photo to your development computer:
• Open the Photos application.
• Open the Camera Roll.
• Open the screenshot image you captured.
• Tap the image and then tap the “forward” (arrow) button in the bottom-left-hand corner. Then click the Email
Photo button and send the image to yourself.
Last updated 12/7/2015
Page 34

BUILDING ADOBE AIR APPLICATIONS
Creating your first AIR application
3 Replace the Default.png file (in your development directory) with a PNG version of the screen capture image.
4 Recompile the application (see “Compile the IPA file” on page 27) and reinstall it on your device.
The application now uses the new startup screen as it loads.
Note: You can create any art you’d like for the Default.png file, as long as it is the correct dimensions (320 by 480 pixels).
However, it is often best to have the Default.png image match the initial state of your application.
Create your first HTML-based AIR application with Dreamweaver
For a quick, hands-on illustration of how Adobe® AIR® works, use these instructions to create and package a simple
HTML-based AIR “Hello World” application using the Adobe® AIR® Extension for Dreamweaver®.
If you haven’t already done so, download and install Adobe AIR, which is located here: www.adobe.com/go/air.
For instructions on installing the Adobe AIR Extension for Dreamweaver, see Install the AIR Extension for
Dreamweaver.
For an overview of the extension, including system requirements, see AIR Extension for Dreamweaver.
29
Note: HTML-based AIR applications can only be developed for the desktop and the extendedDesktop profiles. The mobile
profile is not supported.
Prepare the application files
Your Adobe AIR application must have a start page and all of its related pages defined in a Dreamweaver site:
1 Start Dreamweaver and make sure you have a site defined.
2 Open a new HTML page by selecting File > New, selecting HTML in the Page Type column, selecting None in the
Layout column, and clicking Create.
3 In the new page, type Hello World!
This example is extremely simple, but if you want you can style the text to your liking, add more content to the page,
link other pages to this start page, and so on.
4 Save the page (File > Save) as hello_world.html. Make sure you save the file in a Dreamweaver site.
For more information on Dreamweaver sites, see Dreamweaver Help.
Create the Adobe AIR application
1 Make sure you have the hello_world.html page open in the Dreamweaver Document window. (See the previous
section for instructions on creating it.)
2 Select Site > Air Application Settings.
Most of the required settings in the AIR Application and Settings dialog box are auto-populated for you. You must,
however, select the initial content (or start page) of your application.
3 Click the Browse button next to the Initial Content option, navigate to your hello_world.html page, and select it.
4 Next to the Digital signature option, click the Set button.
Last updated 12/7/2015
Page 35

BUILDING ADOBE AIR APPLICATIONS
Creating your first AIR application
A digital signature provides an assurance that the code for an application has not been altered or corrupted since
its creation by the software author, and is required on all Adobe AIR applications.
5 In the Digital Signature dialog box, select Sign the AIR package with a digital certificate, and click the Create button.
(If you already have access to a digital certificate, you can click the Browse button to select it instead.)
6 Complete the required fields in the Self-Signed Digital Certificate dialog box. You’ll need to enter your name, enter
a password and confirm it, and enter a name for the digital certificate file. Dreamweaver saves the digital certificate
in your site root.
7 Click OK to return to the Digital Signature dialog box.
8 In the Digital Signature dialog box, enter the password you specified for your digital certificate and click OK.
Your completed AIR Application and Installer Settings dialog box might look like this:
30
For further explanation about all of the dialog box options and how to edit them, see Creating an AIR application
in Dreamweaver.
9 Click the Create AIR File button.
Dreamweaver creates the Adobe AIR application file and saves it in your site root folder. Dreamweaver also creates
an application.xml file and saves it in the same place. This file serves as a manifest, defining various properties of
the application.
Last updated 12/7/2015
Page 36

BUILDING ADOBE AIR APPLICATIONS
Creating your first AIR application
Install the application on a desktop
Now that you’ve created the application file, you can install it on any desktop.
1 Move the Adobe AIR application file out of your Dreamweaver site and onto your desktop, or to another desktop.
This step is optional. You can actually install the new application on your computer right from your Dreamweaver
site directory if you prefer.
2 Double-click the application executable file (.air file) to install the application.
Preview the Adobe AIR application
You can preview pages that will be part of AIR applications at any time. That is, you don’t necessarily need to package
the application before seeing what it will look like when it’s installed.
1 Make sure your hello_world.html page is open in the Dreamweaver Document window.
2 On the Document toolbar, click the Preview/Debug in Browser button, and then select Preview In AIR.
You can also press Ctrl+Shift+F12 (Windows) or Cmd+Shift+F12 (Macintosh).
When you preview this page, you are essentially seeing what a user would see as the start page of the application
after they’ve installed the application on a desktop.
31
Creating your first HTML-based AIR application with the AIR SDK
For a quick, hands-on illustration of how Adobe® AIR® works, use these instructions to create and package a simple
HTML-based AIR “Hello World” application.
To begin, you must have installed the runtime and set up the AIR SDK. You will use the AIR Debug Launcher (ADL)
and the AIR Developer Tool (ADT) in this tutorial. ADL and ADT are command-line utility programs and can be
found in the
are already familiar with running programs from the command line and know how to set up the necessary path
environment variables for your operating system.
Note: If you are an Adobe® Dreamweaver® user, read “Create your first HTML-based AIR application with
Dreamweaver” on page 29.
Note: HTML-based AIR applications can only be developed for the desktop and the extendedDesktop profiles. The mobile
profile is not supported.
Create the project files
Every HTML-based AIR project must contain the following two files: an application descriptor file, which specifies the
application metadata, and a top-level HTML page. In addition to these required files, this project includes a JavaScript
code file,
1 Create a directory named HelloWorld to contain the project files.
2 Create an XML file, named HelloWorld-app.xml.
3 Create an HTML file named HelloWorld.html.
4 Copy AIRAliases.js from the frameworks folder of the AIR SDK to the project directory.
bin directory of the AIR SDK (see “Installing the AIR SDK” on page 16). This tutorial assumes that you
AIRAliases.js, that defines convenient alias variables for the AIR API classes.
Last updated 12/7/2015
Page 37

BUILDING ADOBE AIR APPLICATIONS
Creating your first AIR application
Create the AIR application descriptor file
To begin building your AIR application, create an XML application descriptor file with the following structure:
<application xmlns="...">
<id>…</id>
<versionNumber>…</versionNumber>
<filename>…</filename>
<initialWindow>
<content>…</content>
<visible>…</visible>
<width>…</width>
<height>…</height>
</initialWindow>
</application>
1 Open the HelloWorld-app.xml for editing.
2 Add the root <application> element, including the AIR namespace attribute:
<application xmlns="http://ns.adobe.com/air/application/2.7"> The last segment of the namespace, “2.7”,
specifies the version of the runtime required by the application.
3 Add the <id> element:
<id>examples.html.HelloWorld</id> The application ID uniquely identifies your application along with the
publisher ID (which AIR derives from the certificate used to sign the application package). The application ID is
used for installation, access to the private application file-system storage directory, access to private encrypted
storage, and interapplication communication.
32
4 Add the <versionNumber> element:
<versionNumber>0.1</versionNumber> Helps users to determine which version of your application they are
installing.
Note: If you are using AIR 2, or earlier, you must use the <version> element instead of the <versionNumber>
element.
5 Add the <filename> element:
<filename>HelloWorld</filename> The name used for the application executable, install directory, and other
references to the application in the operating system.
6 Add the <initialWindow> element containing the following child elements to specify the properties for your
initial application window:
<content>HelloWorld.html</content> Identifies the root HTML file for AIR to load.
<visible>true</visible> Makes the window visible immediately.
<width>400</width> Sets the window width (in pixels).
<height>200</height> Sets the window height.
7 Save the file. The completed application descriptor file should look like the following:
Last updated 12/7/2015
Page 38

BUILDING ADOBE AIR APPLICATIONS
Creating your first AIR application
<?xml version="1.0" encoding="UTF-8"?>
<application xmlns="http://ns.adobe.com/air/application/2.7">
<id>examples.html.HelloWorld</id>
<versionNumber>0.1</versionNumber>
<filename>HelloWorld</filename>
<initialWindow>
<content>HelloWorld.html</content>
<visible>true</visible>
<width>400</width>
<height>200</height>
</initialWindow>
</application>
This example only sets a few of the possible application properties. For the full set of application properties, which
allow you to specify such things as window chrome, window size, transparency, default installation directory,
associated file types, and application icons, see
“AIR application descriptor files” on page 195.
Create the application HTML page
You now need to create a simple HTML page to serve as the main file for the AIR application.
1 Open the HelloWorld.html file for editing. Add the following HTML code:
<html>
<head>
<title>Hello World</title>
</head>
<body onLoad="appLoad()">
<h1>Hello World</h1>
</body>
</html>
33
2 In the <head> section of the HTML, import the AIRAliases.js file:
<script src="AIRAliases.js" type="text/javascript"></script>
AIR defines a property named runtime on the HTML window object. The runtime property provides access to the
built-in AIR classes, using the fully qualified package name of the class. For example, to create an AIR File object
you could add the following statement in JavaScript:
var textFile = new runtime.flash.filesystem.File("app:/textfile.txt");
The AIRAliases.js file defines convenient aliases for the most useful AIR APIs. Using AIRAliases.js, you could
shorten the reference to the File class to the following:
var textFile = new air.File("app:/textfile.txt");
3 Below the AIRAliases script tag, add another script tag containing a JavaScript function to handle the onLoad event:
<script type="text/javascript">
function appLoad(){
air.trace("Hello World");
}
</script>
The appLoad() function simply calls the air.trace() function. The trace message print to the command console
when you run the application using ADL. Trace statements can be very useful for debugging.
4 Save the file.
Your HelloWorld.html file should now look like the following:
Last updated 12/7/2015
Page 39

BUILDING ADOBE AIR APPLICATIONS
Creating your first AIR application
<html>
<head>
<title>Hello World</title>
<script type="text/javascript" src="AIRAliases.js"></script>
<script type="text/javascript">
function appLoad(){
air.trace("Hello World");
}
</script>
</head>
<body onLoad="appLoad()">
<h1>Hello World</h1>
</body>
</html>
Test the application
To run and test the application from the command line, use the AIR Debug Launcher (ADL) utility. The ADL
executable can be found in the
the AIR SDK” on page 16.
1 Open a command console or shell. Change to the directory you created for this project.
2 Run the following command:
adl HelloWorld-app.xml
bin directory of the AIR SDK. If you haven’t already set up the AIR SDK, see “Installing
34
An AIR window opens, displaying your application. Also, the console window displays the message resulting from
air.trace() call.
the
For more information, see “AIR application descriptor files” on page 195.
Create the AIR installation file
When your application runs successfully, you can use the ADT utility to package the application into an AIR
installation file. An AIR installation file is an archive file that contains all the application files, which you can distribute
to your users. You must install Adobe AIR before installing a packaged AIR file.
To ensure application security, all AIR installation files must be digitally signed. For development purposes, you can
generate a basic, self-signed certificate with ADT or another certificate generation tool. You can also buy a commercial
code-signing certificate from a commercial certificate authority such as VeriSign or Thawte. When users install a selfsigned AIR file, the publisher is displayed as “unknown” during the installation process. This is because a self-signed
certificate only guarantees that the AIR file has not been changed since it was created. There is nothing to prevent
someone from self-signing a masquerade AIR file and presenting it as your application. For publicly released AIR files,
a verifiable, commercial certificate is strongly recommended. For an overview of AIR security issues, see
(for ActionScript developers) or AIR security (for HTML developers).
Generate a self-signed certificate and key pair
❖ From the command prompt, enter the following command (the ADT executable is located in the bin directory of
the AIR SDK):
adt -certificate -cn SelfSigned 1024-RSA sampleCert.pfx samplePassword
AIR security
ADT generates a keystore file named sampleCert.pfx containing a certificate and the related private key.
This example uses the minimum number of attributes that can be set for a certificate. The key type must be either
1024-RSA or 2048-RSA (see
“Signing AIR applications” on page 181).
Last updated 12/7/2015
Page 40

BUILDING ADOBE AIR APPLICATIONS
Creating your first AIR application
Create the AIR installation file
❖ From the command prompt, enter the following command (on a single line):
adt -package -storetype pkcs12 -keystore sampleCert.pfx HelloWorld.air
HelloWorld-app.xml HelloWorld.html AIRAliases.js
You will be prompted for the keystore file password.
The HelloWorld.air argument is the AIR file that ADT produces. HelloWorld-app.xml is the application descriptor
file. The subsequent arguments are the files used by your application. This example only uses two files, but you can
include any number of files and directories. ADT verifies that the main content file, HelloWorld.html is included
in the package, but if you forget to include AIRAliases.js, then your application simply won’t work.
After the AIR package is created, you can install and run the application by double-clicking the package file. You
can also type the AIR filename as a command in a shell or command window.
Next Steps
In AIR, HTML and JavaScript code generally behaves the same as it would in a typical web browser. (In fact, AIR uses
the same WebKit rendering engine used by the Safari web browser.) However, there are some important differences
that you must understand when you develop HTML applications in AIR. For more information on these differences,
and other important topics, see
Programming HTML and JavaScript.
35
Creating your first desktop AIR application with the Flex SDK
For a quick, hands-on illustration of how Adobe® AIR® works, use these instructions to create a simple SWF-based AIR
"Hello World" application using the Flex SDK. This tutorial shows how to compile, test, and package an AIR
application with the command-line tools provided with the Flex SDK (the Flex SDK includes the AIR SDK).
To begin, you must have installed the runtime and set up Adobe® Flex™. This tutorial uses the AMXMLC compiler, the
AIR Debug Launcher (ADL), and the AIR Developer Tool (ADT). These programs can be found in the
the Flex SDK (see
“Setting up the Flex SDK” on page 18).
Create the AIR application descriptor file
This section describes how to create the application descriptor, which is an XML file with the following structure:
<application xmlns="...">
<id>...</id>
<versionNumber>...</versionNumber>
<filename>…</filename>
<initialWindow>
<content>…</content>
<visible>…</visible>
<width>…</width>
<height>…</height>
</initialWindow>
</application>
bin directory of
1 Create an XML file named HelloWorld-app.xml and save it in the project directory.
2 Add the <application> element, including the AIR namespace attribute:
Last updated 12/7/2015
Page 41

BUILDING ADOBE AIR APPLICATIONS
Creating your first AIR application
<application xmlns="http://ns.adobe.com/air/application/2.7"> The last segment of the namespace, “2.7,”
specifies the version of the runtime required by the application.
3 Add the <id> element:
<id>samples.flex.HelloWorld</id> The application ID uniquely identifies your application along with the
publisher ID (which AIR derives from the certificate used to sign the application package). The recommended form
is a dot-delimited, reverse-DNS-style string, such as
"com.company.AppName". The application ID is used for
installation, access to the private application file-system storage directory, access to private encrypted storage, and
interapplication communication.
4 Add the <versionNumber> element:
<versionNumber>1.0</versionNumber> Helps users to determine which version of your application they are
installing.
Note: If you are using AIR 2, or earlier, you must use the <version> element instead of the <versionNumber>
element.
5 Add the <filename> element:
<filename>HelloWorld</filename> The name used for the application executable, install directory, and similar
for references in the operating system.
36
6 Add the <initialWindow> element containing the following child elements to specify the properties for your
initial application window:
<content>HelloWorld.swf</content> Identifies the root SWF file for AIR to load.
<visible>true</visible> Makes the window visible immediately.
<width>400</width> Sets the window width (in pixels).
<height>200</height> Sets the window height.
7 Save the file. Your complete application descriptor file should look like this:
<?xml version="1.0" encoding="UTF-8"?>
<application xmlns="http://ns.adobe.com/air/application/2.7">
<id>samples.flex.HelloWorld</id>
<versionNumber>0.1</versionNumber>
<filename>HelloWorld</filename>
<initialWindow>
<content>HelloWorld.swf</content>
<visible>true</visible>
<width>400</width>
<height>200</height>
</initialWindow>
</application>
This example only sets a few of the possible application properties. For the full set of application properties, which
allow you to specify such things as window chrome, window size, transparency, default installation directory,
associated file types, and application icons, see
“AIR application descriptor files” on page 195
Write the application code
Note: SWF-based AIR applications can use a main class defined either with MXML or with Adobe® ActionScript® 3.0.
This example uses an MXML file to define its main class. The process for creating an AIR application with a main
ActionScript class is similar. Instead of compiling an MXML file into the SWF file, you compile the ActionScript class file.
When using ActionScript, the main class must extend flash.display.Sprite.
Last updated 12/7/2015
Page 42

BUILDING ADOBE AIR APPLICATIONS
Creating your first AIR application
Like all Flex-based applications, AIR applications built with the Flex framework contain a main MXML file. Desktop
AIR applications, use the WindowedApplication component as the root element instead of the Application
component. The WindowedApplication component provides properties, methods, and events for controlling your
application and its initial window. On platforms and profiles for which AIR doesn’t support multiple windows,
continue to use the Application component. In mobile Flex applications, you can also use the View or
TabbedViewNavigatorApplication components.
The following procedure creates the Hello World application:
1 Using a text editor, create a file named HelloWorld.mxml and add the following MXML code:
<?xml version="1.0" encoding="utf-8"?>
<s:WindowedApplication xmlns:fx="http://ns.adobe.com/mxml/2009"
xmlns:s="library://ns.adobe.com/flex/spark"
xmlns:mx="library://ns.adobe.com/flex/mx"
title="Hello World">
</s:WindowedApplication>
2 Next, add a Label component to the application (place it inside the WindowedApplication tag).
3 Set the text property of the Label component to "Hello AIR".
4 Set the layout constraints to always keep it centered.
The following example shows the code so far:
37
<?xml version="1.0" encoding="utf-8"?>
<s:WindowedApplication xmlns:fx="http://ns.adobe.com/mxml/2009"
xmlns:s="library://ns.adobe.com/flex/spark"
xmlns:mx="library://ns.adobe.com/flex/mx"
title="Hello World">
<s:Label text="Hello AIR" horizontalCenter="0" verticalCenter="0"/>
</s:WindowedApplication>
Compile the application
Before you can run and debug the application, compile the MXML code into a SWF file using the amxmlc compiler.
The amxmlc compiler can be found in the
of your computer to include the Flex SDK bin directory. Setting the path makes it easier to run the utilities on the
command line.
1 Open a command shell or a terminal and navigate to the project folder of your AIR application.
2 Enter the following command:
amxmlc HelloWorld.mxml
Running amxmlc produces HelloWorld.swf, which contains the compiled code of the application.
Note: If the application does not compile, fix syntax or spelling errors. Errors and warnings are displayed in the console
window used to run the amxmlc compiler.
For more information, see “Compiling MXML and ActionScript source files for AIR” on page 149.
bin directory of the Flex SDK. If desired, you can set the path environment
Last updated 12/7/2015
Page 43

BUILDING ADOBE AIR APPLICATIONS
Creating your first AIR application
Test the application
To run and test the application from the command line, use the AIR Debug Launcher (ADL) to launch the application
using its application descriptor file. (ADL can be found in the bin directory of the Flex SDK.)
❖ From the command prompt, enter the following command:
adl HelloWorld-app.xml
The resulting AIR application looks something like this illustration:
Using the horizontalCenter and verticalCenter properties of the Label control, the text is placed in the center of the
window. Move or resize the window as you would any other desktop application.
38
For more information, see “AIR Debug Launcher (ADL)” on page 152.
Create the AIR installation file
When your application runs successfully, you can use the ADT utility to package the application into an AIR
installation file. An AIR installation file is an archive file that contains all the application files, which you can distribute
to your users. You must install Adobe AIR before installing a packaged AIR file.
To ensure application security, all AIR installation files must be digitally signed. For development purposes, you can
generate a basic, self-signed certificate with ADT or another certificate generation tool. You can also buy a commercial
code-signing certificate from a commercial certification authority. When users install a self-signed AIR file, the
publisher is displayed as “unknown” during the installation process. This is because a self-signed certificate only
guarantees that the AIR file has not been changed since it was created. There is nothing to prevent someone from selfsigning a masquerade AIR file and presenting it as your application. For publicly released AIR files, a verifiable,
commercial certificate is strongly recommended. For an overview of AIR security issues, see
ActionScript developers) or AIR security (for HTML developers).
Generate a self-signed certificate and key pair
❖ From the command prompt, enter the following command (the ADT executable can be found in the bin directory
of the Flex SDK):
adt -certificate -cn SelfSigned 1024-RSA sampleCert.pfx samplePassword
This example uses the minimum number of attributes that can be set for a certificate. The key type must be either
1024-RSA or 2048-RSA (see
“Signing AIR applications” on page 181).
AIR security (for
Create the AIR package
❖ From the command prompt, enter the following command (on a single line):
Last updated 12/7/2015
Page 44

BUILDING ADOBE AIR APPLICATIONS
Creating your first AIR application
adt -package -storetype pkcs12 -keystore sampleCert.pfx HelloWorld.air
HelloWorld-app.xml HelloWorld.swf
You will be prompted for the keystore file password. Type the password and press Enter. The password characters
are not displayed for security reasons.
The HelloWorld.air argument is the AIR file that ADT produces. HelloWorld-app.xml is the application descriptor
file. The subsequent arguments are the files used by your application. This example only uses three files, but you
can include any number of files and directories.
After the AIR package is created, you can install and run the application by double-clicking the package file. You
can also type the AIR filename as a command in a shell or command window.
For more information, see “Packaging a desktop AIR installation file” on page 51.
Creating your first AIR application for Android with the Flex SDK
To begin, you must have installed and set up the AIR and Flex SDKs. This tutorial uses the AMXMLC compiler from
the Flex SDK and the AIR Debug Launcher (ADL), and the AIR Developer Tool (ADT) from the AIR SDK. See
up the Flex SDK” on page 18.
“Setting
39
You must also download and install the Android SDK from the Android website, as described in: Android Developers:
Installing the SDK.
Note: For information on iPhone development, see Creating a Hello World iPhone application with Flash Professional CS5.
Create the AIR application descriptor file
This section describes how to create the application descriptor, which is an XML file with the following structure:
<application xmlns="...">
<id>...</id>
<versionNumber>...</versionNumber>
<filename>…</filename>
<initialWindow>
<content>…</content>
</initialWindow>
<supportedProfiles>...</supportedProfiles>
</application>
1 Create an XML file named HelloWorld-app.xml and save it in the project directory.
2 Add the <application> element, including the AIR namespace attribute:
<application xmlns="http://ns.adobe.com/air/application/2.7"> The last segment of the namespace, “2.7,”
specifies the version of the runtime required by the application.
3 Add the <id> element:
<id>samples.android.HelloWorld</id> The application ID uniquely identifies your application along with the
publisher ID (which AIR derives from the certificate used to sign the application package). The recommended form
is a dot-delimited, reverse-DNS-style string, such as
"com.company.AppName".
4 Add the <versionNumber> element:
Last updated 12/7/2015
Page 45

BUILDING ADOBE AIR APPLICATIONS
Creating your first AIR application
<versionNumber>0.0.1</versionNumber> Helps users to determine which version of your application they are
installing.
5 Add the <filename> element:
<filename>HelloWorld</filename> The name used for the application executable, install directory, and similar
for references in the operating system.
6 Add the <initialWindow> element containing the following child elements to specify the properties for your
initial application window:
<content>HelloWorld.swf</content> Identifies the root HTML file for AIR to load.
7 Add the <supportedProfiles> element.
<supportedProfiles>mobileDevice</supportedProfiles> Specifies that the application only runs in the mobile
profile.
8 Save the file. Your complete application descriptor file should look like this:
<?xml version="1.0" encoding="UTF-8"?>
<application xmlns="http://ns.adobe.com/air/application/2.7">
<id>samples.android.HelloWorld</id>
<versionNumber>0.0.1</versionNumber>
<filename>HelloWorld</filename>
<initialWindow>
<content>HelloWorld.swf</content>
</initialWindow>
<supportedProfiles>mobileDevice</supportedProfiles>
</application>
40
This example only sets a few of the possible application properties. There are other settings that you can use in the
application descriptor file. For example, you can add <fullScreen>true</fullScreen> to the initialWindow element to
build a full-screen application. To enable remote debugging and access-controlled features on Android, you also will
have to add Android permissions to the application descriptor. Permissions are not needed for this simple application,
so you do not need to add them now.
For more information, see “Setting mobile application properties” on page 67.
Write the application code
Create a file named HelloWorld.as and add the following code using a text editor:
package
{
import flash.display.Sprite;
import flash.text.TextField;
public class HelloWorld extends Sprite
{
public function HelloWorld()
{
var textField:TextField = new TextField();
textField.text = "Hello, World!";
stage.addChild( textField );
}
}
}
Last updated 12/7/2015
Page 46

BUILDING ADOBE AIR APPLICATIONS
Creating your first AIR application
Compile the application
Before you can run and debug the application, compile the MXML code into a SWF file using the amxmlc compiler.
The amxmlc compiler can be found in the
bin directory of the Flex SDK. If desired, you can set the path environment
of your computer to include the Flex SDK bin directory. Setting the path makes it easier to run the utilities on the
command line.
1 Open a command shell or a terminal and navigate to the project folder of your AIR application.
2 Enter the following command:
amxmlc HelloWorld.as
Running amxmlc produces HelloWorld.swf, which contains the compiled code of the application.
Note: If the application does not compile, fix syntax or spelling errors. Errors and warnings are displayed in the console
window used to run the amxmlc compiler.
For more information, see “Compiling MXML and ActionScript source files for AIR” on page 149.
Test the application
To run and test the application from the command line, use the AIR Debug Launcher (ADL) to launch the application
using its application descriptor file. (ADL can be found in the bin directory of the AIR and Flex SDKs.)
41
❖ From the command prompt, enter the following command:
adl HelloWorld-app.xml
For more information, see “Device simulation using ADL” on page 96.
Create the APK package file
When your application runs successfully, you can use the ADT utility to package the application into an APK package
file. An APK package file is the native Android application file format, which you can distribute to your users.
All Android applications must be signed. Unlike AIR files, it customary to sign Android apps with a self-signed
certificate. The Android operating system does not attempt to establish the identity of the application developer. You
can use a certificate generated by ADT to sign Android packages. Certificates used for apps submitted to the Android
market must have a validity period of at least 25 years.
Generate a self-signed certificate and key pair
❖ From the command prompt, enter the following command (the ADT executable can be found in the bin directory
of the Flex SDK):
adt -certificate -validityPeriod 25 -cn SelfSigned 1024-RSA sampleCert.pfx samplePassword
This example uses the minimum number of attributes that can be set for a certificate. The key type must be either
1024-RSA or 2048-RSA (see the
Create the AIR package
❖ From the command prompt, enter the following command (on a single line):
adt -package -target apk -storetype pkcs12 -keystore sampleCert.p12 HelloWorld.apk
HelloWorld-app.xml HelloWorld.swf
“ADT certificate command” on page 166).
You will be prompted for the keystore file password. Type the password and press Enter.
For more information, see “Packaging a mobile AIR application” on page 89.
Last updated 12/7/2015
Page 47

BUILDING ADOBE AIR APPLICATIONS
Creating your first AIR application
Install the AIR runtime
You can install the latest version of the AIR runtime on your device from the Android Market. You can also install the
runtime included in your SDK on either a device or an Android emulator.
❖ From the command prompt, enter the following command (on a single line):
adt -installRuntime -platform android -platformsdk
Set the -platformsdk flag to your Android SDK directory (specify the parent of the tools folder).
ADT installs the Runtime.apk included in the SDK.
For more information, see “Install the AIR runtime and applications for development” on page 103.
Install the AIR app
❖ From the command prompt, enter the following command (on a single line):
adt -installApp -platform android -platformsdk path-to-android-sdk -package path-to-app
Set the -platformsdk flag to your Android SDK directory (specify the parent of the tools folder).
For more information, see “Install the AIR runtime and applications for development” on page 103.
You can launch your app by tapping the application icon on the screen of the device or emulator.
42
Last updated 12/7/2015
Page 48

Chapter 6: Developing AIR applications for the desktop
Workflow for developing a desktop AIR application
The basic workflow for developing an AIR application is the same as most traditional development models: code,
compile, test, and, towards the end of the cycle, package into an installer file.
You can write the application code using Flash, Flex, and ActionScript and compile using Flash Professional, Flash
Builder or the mxmlc and compc command-line compilers. You can also write the application code using HTML and
JavaScript and skip the compilation step.
You can test desktop AIR applications with the ADL tool, which runs an application without requiring it to be
packaged and installed first. Flash Professional, Flash Builder, Dreamweaver, and the Aptana IDE all integrate with the
Flash debugger. You can also launch the debugger tool, FDB, manually when using ADL from the command line. ADL,
itself, does display errors and trace statement output.
43
All AIR applications must be packaged into an install file. The cross-platform AIR file format is recommended unless:
• You need to access platform-dependent APIs such as the NativeProcess class.
• Your application uses native extensions.
In such cases, you can package an AIR application as a platform-specific native installer file.
SWF-based applications
1 Write the MXML or ActionScript code.
2 Create needed assets, such as icon bitmap files.
3 Create the application descriptor.
4 Compile ActionScript code.
5 Test the application.
6 Package and sign as an AIR file using the air target.
HTML-based applications
1 Write the HTML and JavaScript code.
2 Create needed assets, such as icon bitmap files.
3 Create the application descriptor.
4 Test the application.
5 Package and sign as an AIR file using the air target.
Creating native installers for AIR applications
1 Write the code (ActionScript or HTML and JavaScript).
2 Create needed assets, such as icon bitmap files.
Last updated 12/7/2015
Page 49

BUILDING ADOBE AIR APPLICATIONS
Developing AIR applications for the desktop
3 Create the application descriptor, specifying the extendedDesktop profile.
4 Compile any ActionScript code.
5 Test the application.
6 Package the application on each target platform using the native target.
Note: The native installer for a target platform must be created on that platform. You cannot, for example, create a
Windows installer on a Mac. You can use a virtual machine such as VMWare to run multiple platforms on the same
computer hardware.
Creating AIR applications with a captive runtime bundle
1 Write the code (ActionScript or HTML and JavaScript).
2 Create needed assets, such as icon bitmap files.
3 Create the application descriptor, specifying the extendedDesktop profile.
4 Compile any ActionScript code.
5 Test the application.
6 Package the application on each target platform using the bundle target.
7 Create an install program using the bundle files. (The AIR SDK does not provide tools for creating such an installer,
but many third-party toolkits are available.)
Note: The bundle for a target platform must be created on that platform. You cannot, for example, create a Windows
bundle on a Mac. You can use a virtual machine such as VMWare to run multiple platforms on the same computer
hardware.
44
Setting desktop application properties
Set the basic application properties in the application descriptor file. This section covers the properties relevant to
desktop AIR applications. The elements of the application descriptor file are fully described in
descriptor files” on page 195.
Required AIR runtime version
Specify the version of the AIR runtime required by your application using the namespace of the application descriptor file.
The namespace, assigned in the application element, determines, in large part, which features your application can
use. For example, if your application uses the AIR 1.5 namespace, and the user has AIR 3.0 installed, then your
application sees the AIR 1.5 behavior (even if the behavior has been changed in AIR 3.0). Only when you change the
namespace and publish an update will your application have access to the new behavior and features. Security and
WebKit changes are the primary exceptions to this policy.
Specify the namespace using the xmlns attribute of the root application element:
<application xmlns="http://ns.adobe.com/air/application/3.0">
More Help topics
“application” on page 200
“AIR application
Last updated 12/7/2015
Page 50

BUILDING ADOBE AIR APPLICATIONS
Developing AIR applications for the desktop
Application identity
Several settings should be unique for each application that you publish. The unique settings include the ID, the name,
and the filename.
<id>com.example.MyApplication</id>
<name>My Application</name>
<filename>MyApplication</filename>
More Help topics
“id” on page 215
“filename” on page 211
“name” on page 223
Application version
In versions of AIR earlier than AIR 2.5, specify the application in the version element. You can use any string. The
AIR runtime does not interpret the string; “2.0” is not treated as a higher version than “1.0.”
<!-- AIR 2 or earlier -->
<version>1.23 Beta 7</version>
45
In AIR 2.5 and later, specify the application version in the versionNumber element. The version element can no
longer be used. When specifying a value for
versionNumber, you must use a sequence of up to three numbers
separated by dots, such as: “0.1.2”. Each segment of the version number can have up to three digits. (In other words,
“999.999.999” is the largest version number permitted.) You do not have to include all three segments in the number;
“1” and “1.0” are legal version numbers as well.
You can also specify a label for the version using the versionLabel element. When you add a version label, it is
displayed instead of the version number in such places as the AIR application installer dialogs.
<!-- AIR 2.5 and later -->
<versionNumber>1.23.7<versionNumber>
<versionLabel>1.23 Beta 7</versionLabel>
More Help topics
“version” on page 231
“versionLabel” on page 231
“versionNumber” on page 232
Main window properties
When AIR starts an application on the desktop, it creates a window and loads the main SWF file or HTML page into
it. AIR uses the child elements of the
application window.
initialWindow element control the initial appearance and behavior of this initial
• content — The main application SWF file in the content child of the initalWindow element. When you target
devices in the desktop profile, you can use a SWF or an HTML file.
Last updated 12/7/2015
Page 51

BUILDING ADOBE AIR APPLICATIONS
Developing AIR applications for the desktop
<initialWindow>
<content>MyApplication.swf</content>
</initialWindow>
You must include the file in the AIR package (using ADT or your IDE). Simply referencing the name in the
application descriptor does not cause the file to be included in the package automatically.
• depthAndStencil — Specifies to use the depth or stencil buffer. You typically use these buffers when working with
3D content.
<depthAndStencil>true</depthAndStencil>
• height — The height of the initial window.
• maximizable — Whether the system chrome for maximizing the window is shown.
• maxSize — The maximum size allowed.
• minimizable — Whether the system chrome for minimizing the window is shown.
• minSize — The minimum size allowed.
• renderMode — In AIR 3 or later, the render mode can be set to auto, cpu, direct, or gpu for desktop applications.
In earlier versions of AIR, this setting is ignored on desktop platforms. The renderMode setting cannot be changed
at run time.
• auto — essentially the same as cpu mode.
• cpu — display objects are rendered and copied to display memory in software. StageVideo is only available when
a window is in fullscreen mode. Stage3D uses the software renderer.
• direct — display objects are rendered by the runtime software, but copying the rendered frame to display
memory (blitting) is hardware accelerated. StageVideo is available. Stage3D uses hardware acceleration, if
otherwise possible. If window transparency is set to true, then the window “falls back” to software rendering and
blitting.
Note: In order to leverage GPU acceleration of Flash content with AIR for mobile platforms, Adobe recommends
that you use renderMode="direct" (that is, Stage3D) rather than renderMode="gpu". Adobe officially supports and
recommends the following Stage3D based frameworks: Starling (2D) and Away3D (3D). For more details on
Stage3D and Starling/Away3D, see
http://gaming.adobe.com/getstarted/.
46
• gpu — hardware acceleration is used, if available.
• requestedDisplayResolution — Whether your application should use the standard or high resolution mode on
MacBook Pro computers with high-resolution screens. On all other platforms the value is ignored. If the value is
standard, each stage pixel renders as four pixels on the screen. If the value is high, each stage pixel corresponds to
a single physical pixel on the screen. The specified value is used for all application windows. Using the
requestedDisplayResolution element for desktop AIR applications (as a child of the intialWindow element)
is available in AIR 3.6 and later.
• resizable — Whether the system chrome for resizing the window is shown.
• systemChrome — Whether the standard operating system window dressing is used. The systemChrome setting of
a window cannot be changed at run time.
• title — The title of the window.
• transparent — Whether the window is alpha-blended against the background. The window cannot use system
chrome if transparency is turned on. The transparent setting of a window cannot be changed at run time.
• visible — Whether the window is visible as soon as it is created. By default, the window is not visible initially so that
your application can draw its contents before making itself visible.
Last updated 12/7/2015
Page 52

BUILDING ADOBE AIR APPLICATIONS
Developing AIR applications for the desktop
• width — The width of the window.
• x — The horizontal position of the window.
• y — The vertical position of the window.
More Help topics
“content” on page 205
“depthAndStencil” on page 207
“height” on page 214
“maximizable” on page 222
“maxSize” on page 222
“minimizable” on page 223
“minimizable” on page 223
“minSize” on page 223
“renderMode” on page 225
47
“requestedDisplayResolution” on page 226
“resizable” on page 227
“systemChrome” on page 229
“title” on page 230
“transparent” on page 231
“visible” on page 232
“width” on page 233
“x” on page 233
“y” on page 233
Desktop features
The following elements control desktop installation and update features.
• customUpdateUI — Allows you to provide your own dialogs for updating an application. If set to false, the
default, then the standard AIR dialogs are used.
• fileTypes — Specifies the types of files that your application would like to register for as the default opening
application. If another application is already the default opener for a file type, then AIR does not override the
existing registration. However, your application can override the registration at runtime using the
setAsDefaultApplication() method of the NativeApplication object. It is good form to ask for the user’s
permission before overriding their existing file type associations.
Note: File type registration is ignored when you package an application as a captive runtime bundle (using the -
bundle target). To register a given file type, you must create an installer program that performs the registration.
• installFolder — Specifies a path relative to the standard application installation folder into which the application is
installed. You can use this setting to provide a custom folder name as well as to group multiple applications within
a common folder.
Last updated 12/7/2015
Page 53

BUILDING ADOBE AIR APPLICATIONS
Developing AIR applications for the desktop
• programMenuFolder — Specifies the menu hierarchy for the Windows All Programs menu. You can use this
setting to group multiple applications within a common menu. If no menu folder is specified, the application
shortcut is added directly to the main menu.
More Help topics
“customUpdateUI” on page 206
“fileTypes” on page 212
“installFolder” on page 219
“programMenuFolder” on page 224
Supported profiles
If your application only makes sense on the desktop, then you can prevent it from being installed on devices in another
profile by excluding that profile from the supported profiles list. If your application uses the NativeProcess class or
native extensions, then you must support the
If you leave the supportedProfile element out of the application descriptor, then it is assumed that your application
supports all the defined profiles. To restrict your application to a specific list of profiles, list the profiles, separated by
whitespace:
extendedDesktop profile.
48
<supportedProfiles>desktop extendedDesktop</supportedProfiles>
For a list of ActionScript classes supported in the desktop and extendedDesktop profile, see “Capabilities of different
profiles” on page 236.
More Help topics
“supportedProfiles” on page 228
Required native extensions
Applications that support the extendedDesktop profile can use native extensions.
Declare all native extensions that the AIR application uses in the application descriptor. The following example
illustrates the syntax for specifying two required native extensions:
<extensions>
<extensionID> com.example.extendedFeature</extensionID>
<extensionID> com.example.anotherFeature</extensionID>
</extensions>
The extensionID element has the same value as the id element in the extension descriptor file. The extension
descriptor file is an XML file called extension.xml. It is packaged in the ANE file you receive from the native extension
developer.
Application icons
On the desktop, the icons specified in the application descriptor are used as the application file, shortcut, and program
menu icons. The application icon should be supplied as a set of 16x16-, 32x32-, 48x48-, and 128x128-pixel PNG
images. Specify the path to the icon files in the icon element of the application descriptor file:
Last updated 12/7/2015
Page 54

BUILDING ADOBE AIR APPLICATIONS
Developing AIR applications for the desktop
<icon>
<image16x16>assets/icon16.png</image16x16>
<image32x32>assets/icon32.png</image32x32>
<image48x48>assets/icon48.png</image48x48>
<image128x128>assets/icon128.png</image128x128>
</icon>
If you do not supply an icon of a given size, the next largest size is used and scaled to fit. If you do not supply any icons,
a default system icon is used.
More Help topics
“icon” on page 215
“imageNxN” on page 216
Ignored settings
Applications on the desktop ignore application settings that apply to mobile profile features. The ignored settings are:
• android
• aspectRatio
• autoOrients
• fullScreen
• iPhone
• renderMode (prior to AIR 3)
• requestedDisplayResolution
• softKeyboardBehavior
49
Debugging a desktop AIR application
If you are developing your application with an IDE such as Flash Builder, Flash Professional, or Dreamweaver,
debugging tools are normally built in. You can debug your application simply be launching it in debug mode. If you
are not using an IDE that supports debugging directly, you can use the AIR Debug Launcher (ADL) and the Flash
Debugger (FDB) to assist in debugging your application.
More Help topics
De Monsters: Monster Debugger
“Debugging with the AIR HTML Introspector” on page 270
Running an application with ADL
You can run an AIR application without packaging and installing it using ADL. Pass the application descriptor file to
ADL as a parameter as shown in the following example (ActionScript code in the application must be compiled first):
adl myApplication-app.xml
ADL prints trace statements, runtime exceptions, and HTML parsing errors to the terminal window. If an FDB process
is waiting for an incoming connection, ADL will connect to the debugger.
Last updated 12/7/2015
Page 55

BUILDING ADOBE AIR APPLICATIONS
Developing AIR applications for the desktop
You can also use ADL to debug an AIR application that uses native extensions. For example:
adl -extdir extensionDirs myApplication-app.xml
More Help topics
“AIR Debug Launcher (ADL)” on page 152
Printing trace statements
To print trace statements to the console used to run ADL, add trace statements to your code with the trace()
function.
Note: If your trace() statements do not display on the console, ensure that you have not specified
ErrorReportingEnable or TraceOutputFileEnable in the mm.cfg file. For more information on the platform-
specific location of this file, see
ActionScript example:
//ActionScript
trace("debug message");
JavaScript example:
Editing the mm.cfg file.
50
//JavaScript
air.trace("debug message");
In JavaScript code, you can use the alert() and confirm() functions to display debugging messages from your
application. In addition, the line numbers for syntax errors as well as any uncaught JavaScript exceptions are printed
to the console.
Note: To use the air prefix shown in the JavaScript example, you must import the AIRAliases.js file into the page. This
file is located inside the frameworks directory of the AIR SDK.
Connecting to the Flash Debugger (FDB)
To debug AIR applications with the Flash Debugger, start an FDB session and then launch your application using ADL.
Note: In SWF-based AIR applications, the ActionScript source files must be compiled with the -debug flag. (In Flash
Professional, check the Permit debugging option in the Publish Settings dialog.)
1 Start FDB. The FDB program can be found in the bin directory of the Flex SDK.
The console displays the FDB prompt: <fdb>
2 Execute the run command: <fdb>run [Enter]
3 In a different command or shell console, start a debug version of your application:
adl myApp.xml
4 Using the FDB commands, set breakpoints as desired.
5 Type: continue [Enter]
If an AIR application is SWF-based, the debugger only controls the execution of ActionScript code. If the AIR
application is HTML-based, then the debugger only controls the execution of JavaScript code.
To run ADL without connecting to the debugger, include the -nodebug option:
adl myApp.xml -nodebug
Last updated 12/7/2015
Page 56

BUILDING ADOBE AIR APPLICATIONS
Developing AIR applications for the desktop
For basic information on FDB commands, execute the help command:
<fdb>help [Enter]
For details on the FDB commands, see Using the command-line debugger commands in the Flex documentation.
Packaging a desktop AIR installation file
Every AIR application must, at a minimum, have an application descriptor file and a main SWF or HTML file. Any
other assets to be installed with the application must be packaged in the AIR file as well.
This article discusses packaging an AIR application using the command-line tools included with the SDK. For
information about package an application using one of the Adobe authoring tools, see the following:
• Adobe® Flex® Builder™, see Packaging AIR applications with Flex Builder.
• Adobe® Flash® Builder™, see Packaging AIR applications with Flash Builder.
• Adobe® Flash® Professional, see Publishing for Adobe AIR.
• Adobe® Dreamweaver® see Creating an AIR application in Dreamweaver.
All AIR installer files must be signed using a digital certificate. The AIR installer uses the signature to verify that your
application file has not been altered since you signed it. You can use a code signing certificate from a certification
authority or a self-signed certificate.
51
When you use a certificate issued by a trusted certification authority, you give users of your application some assurance
of your identity as publisher. The installation dialog reflects the fact that your identity is verified by the certificate
authority:
Installation confirmation dialog for application signed by a trusted certificate
When you use a self-signed certificate, users cannot verify your identity as the signer. A self-signed certificate also
weakens the assurance that the package hasn’t been altered. (This is because a legitimate installation file could be
substituted with a forgery before it reaches the user.) The installation dialog reflects the fact that the publisher’s identity
cannot be verified. Users are taking a greater security risk when they install your application:
Last updated 12/7/2015
Page 57

BUILDING ADOBE AIR APPLICATIONS
Developing AIR applications for the desktop
Installation confirmation dialog for application signed by a self-signed certificate
You can package and sign an AIR file in a single step using the ADT -package command. You can also create an
intermediate, unsigned package with the
-prepare command, and sign the intermediate package with the -sign
command in a separate step.
Note: Java versions 1.5 and above do not accept high-ASCII characters in passwords used to protect PKCS12 certificate
files. When you create or export your code signing certificate file, use only regular ASCII characters in the password.
52
When signing the installation package, ADT automatically contacts a time-stamp authority server to verify the time.
The time-stamp information is included in the AIR file. An AIR file that includes a verified time stamp can be installed
at any point in the future. If ADT cannot connect to the time-stamp server, then packaging is canceled. You can
override the time-stamping option, but without a time stamp, an AIR application ceases to be installable after the
certificate used to sign the installation file expires.
If you are creating a package to update an existing AIR application, the package must be signed with the same
certificate as the original application. If the original certificate has been renewed or has expired within the last 180 days,
or if you want to change to a new certificate, you can apply a migration signature. A migration signature involves
signing the application AIR file with both the new and the old certificate. Use the
migration signature as described in
“ADT migrate command” on page 166.
-migrate command to apply the
Important: There is a strict 180 day grace period for applying a migration signature after the original certificate expires.
Without a migration signature, existing users must uninstall their existing application before installing your new version.
The grace period only applies to applications that specify AIR version 1.5.3, or above, in the application descriptor
namespace. There is no grace period when targeting earlier versions of the AIR runtime.
Before AIR 1.1, migration signatures were not supported. You must package an application with an SDK of version 1.1
or later to apply a migration signature.
Applications deployed using AIR files are known as desktop profile applications. You cannot use ADT to package a
native installer for an AIR application if the application descriptor file does not support the desktop profile. You can
restrict this profile using the
supportedProfiles element in the application descriptor file. See “Device profiles” on
page 235 and “supportedProfiles” on page 228.
Note: The settings in the application descriptor file determine the identity of an AIR application and its default
installation path. See
“AIR application descriptor files” on page 195.
Publisher IDs
As of AIR 1.5.3, publisher IDs are deprecated. New applications (originally published with AIR 1.5.3 or later) do not
need and should not specify a publisher ID.
Last updated 12/7/2015
Page 58

BUILDING ADOBE AIR APPLICATIONS
Developing AIR applications for the desktop
When updating applications published with earlier versions of AIR, you must specify the original publisher ID in the
application descriptor file. Otherwise, the installed version of your application and the update version are treated as
different applications. If you use a different ID or omit the publisherID tag, a user must uninstall the earlier version
before installing the new version.
To determine the original publisher ID, find the publisherid file in the META-INF/AIR subdirectory where the
original application is installed. The string within this file is the publisher ID. Your application descriptor must specify
the AIR 1.5.3 runtime (or later) in the namespace declaration of the application descriptor file in order to specify the
publisher ID manually.
For applications published before AIR 1.5.3 — or that are published with the AIR 1.5.3 SDK, while specifying an earlier
version of AIR in the application descriptor namespace — a publisher ID is computed based on the signing certificate.
This ID is used, along with the application ID, to determine the identity of an application. The publisher ID, when
present, is used for the following purposes:
• Verifying that an AIR file is an update rather than a new application to install
• As part of the encryption key for the encrypted local store
• As part of the path for the application storage directory
• As part of the connection string for local connections
• As part of the identity string used to invoke an application with the AIR in-browser API
• As part of the OSID (used when creating custom install/uninstall programs)
Before AIR 1.5.3, the publisher ID of an application could change if you signed an application update with migration
signature using a new or renewed certificate. When a publisher ID changes, the behavior of any AIR features relying
on the ID also changes. For example, data in the existing encrypted local store can no longer be accessed and any Flash
or AIR instances that create a local connection to the application must use the new ID in the connection string.
53
In AIR 1.5.3, or later, the publisher ID is not based on the signing certificate and is only assigned if the publisherID tag
is included in the application descriptor. An application cannot be updated if the publisher ID specified for the update
AIR package does not match its current publisher ID.
Packaging with ADT
You can use the AIR ADT command-line tool to package an AIR application. Before packaging, all your ActionScript,
MXML, and any extension code must be compiled. You must also have a code signing certificate.
For a detailed reference on ADT commands and options see “AIR Developer Tool (ADT)” on page 158.
Creating an AIR package
To create an AIR package, use the ADT package command, setting the target type to air for release builds.
adt -package -target air -storetype pkcs12 -keystore ../codesign.p12 myApp.air myApp-app.xml
myApp.swf icons
The example assumes that the path to the ADT tool is on your command-line shell’s path definition. (See “Path
environment variables” on page 292 for help.)
You must run the command from the directory containing the application files. The application files in the example
are myApp-app.xml (the application descriptor file), myApp.swf, and an icons directory.
When you run the command as shown, ADT will prompt you for the keystore password. (The password characters
you type are not always displayed; just press Enter when you are done typing.)
Last updated 12/7/2015
Page 59

BUILDING ADOBE AIR APPLICATIONS
Developing AIR applications for the desktop
Creating an AIR package from an AIRI file
You can create sign an AIRI file to create an installable AIR package:
adt -sign -storetype pkcs12 -keystore ../codesign.p12 myApp.airi myApp.air
Packaging a desktop native installer
As of AIR 2, you can use ADT to create native application installers for distributing AIR applications. For example,
you can build an EXE installer file for distribution of an AIR application on Windows. You can build a DMG installer
file for distribution of an AIR application on Mac OS. In AIR 2.5 and AIR 2.6, you can build a DEB or RPM installer
file for distribution of an AIR application on Linux.
Applications installed with a native application installer are known as extended desktop profile applications. You
cannot use ADT to package a native installer for an AIR application if the application descriptor file does not support
the desktop extended profile. You can restrict this profile using the
descriptor file. See
You can build a native installer version of the AIR application in two basic ways:
“Device profiles” on page 235 and “supportedProfiles” on page 228.
• You can build the native installer based on the application descriptor file and other source files. (Other source files
may include SWF files, HTML files, and other assets.)
• You can build the native installer based on an AIR file or based on an AIRI file.
You must use ADT on the same operating system as that of the native installer file you want to generate. So, to create
an EXE file for Windows, run ADT on Windows. To create a DMG file for Mac OS, run ADT on Mac OS. To create a
DEB or RPG file for Linux, run ADT from the AIR 2.6 SDK on Linux.
supportedProfiles element in the application
54
When you create a native installer to distribute an AIR application, the application gains these capabilities:
• It can launch and interact with native processes, using the NativeProcess class. For details, see one of the following:
• Communicating with native processes in AIR (for ActionScript developers)
• Communicating with native processes in AIR (for HTML developers)
• It can use native extensions.
• It can use the File.openWithDefaultApplication() method to open any file with the default system application
defined to open it, regardless of its file type. (There are restrictions on applications that are not installed with a
native installer. For details, see the entry for the
reference.)
However, when packaged as a native installer, the application loses some of the benefits of the AIR file format. A single
file can no longer be distributed to all desktop computers. The built-in update function (as well as the updater
framework) does not work.
When the user double-clicks the native installer file, it installs the AIR application. If the required version of Adobe
AIR is not already installed on the machine, the installer downloads it from the network and installs it first. If there is
no network connection from which to obtain the correct version of Adobe AIR (if necessary), installation fails. Also,
the installation fails if the operating system is not supported in Adobe AIR 2.
Note: If you want a file to be executable in your installed application, make sure that it's executable on the filesystem
when you package your application. (On Mac and Linux, you can use chmod to set the executable flag, if needed.)
File.openWithDefaultApplication() entry in the language
Last updated 12/7/2015
Page 60

BUILDING ADOBE AIR APPLICATIONS
Developing AIR applications for the desktop
Creating a native installer from the application source files
To build a native installer out of the source files for the application, use the -package command with the following
syntax (on a single command line):
adt -package AIR_SIGNING_OPTIONS
-target native
[WINDOWS_INSTALLER_SIGNING_OPTIONS]
installer_file
app_xml
[file_or_dir | -C dir file_or_dir | -e file dir ...] ...
This syntax is similar to the syntax for packaging an AIR file (without a native installer). However there are a few
differences:
• You add the -target native option to the command. (If you specify -target air, then ADT generates an AIR
file instead of a native installer file.)
• You specify the target DMG or EXE file as the installer_file.
• Optionally, on Windows you can add a second set of signing options, indicated as
[WINDOWS_INSTALLER_SIGNING_OPTIONS] in the syntax listing. On Windows, in addition to signing the AIR file,
you can sign the Windows Installer file. Use the same type of certificate and signing option syntax as you would for
signing the AIR file (see
“ADT code signing options” on page 172). You can use the same certificate to sign the AIR
file and the installer file, or you can specify different certificates. When a user downloads a signed Windows
Installer file from the web, Windows identifies the source of the file, based on the certificate.
For details on ADT options other than the -target option, see “AIR Developer Tool (ADT)” on page 158.
55
The following example creates a DMG file (a native installer file for Mac OS):
adt -package
-storetype pkcs12
-keystore myCert.pfx
-target native
myApp.dmg
application.xml
index.html resources
The following example creates an EXE file (a native installer file for Windows):
adt -package
-storetype pkcs12
-keystore myCert.pfx
-target native
myApp.exe
application.xml
index.html resources
The following example creates an EXE file and signs it:
adt -package
-storetype pkcs12
-keystore myCert.pfx
-target native
-storetype pkcs12
-keystore myCert.pfx
myApp.exe
application.xml
index.html resources
Last updated 12/7/2015
Page 61

BUILDING ADOBE AIR APPLICATIONS
Developing AIR applications for the desktop
Creating a native installer for an application that uses native extensions
You can build a native installer out of the source files for the application and the native extension packages that the
application requires. Use the
adt -package AIR_SIGNING_OPTIONS
-migrate MIGRATION_SIGNING_OPTIONS
-target native
[WINDOWS_INSTALLER_SIGNING_OPTIONS]
installer_file
app_xml
-extdir extension-directory
[file_or_dir | -C dir file_or_dir | -e file dir ...] ...
-package command with the following syntax (on a single command line):
This syntax is the same syntax used for packaging an a native installer, with two additional options. Use the -extdir
extension-directory option to specify the directory that contains the ANE files (native extensions) that the
application uses. Use the optional
-migrate flag and MIGRATION_SIGNING_OPTIONS parameters to sign an update to
an application with a migration signature, when the primary code-signing certificate is different certificate than the
one used by the previous version. For more information see
“Signing an updated version of an AIR application” on
page 190.
For details on ADT options, see “AIR Developer Tool (ADT)” on page 158.
The following example creates a DMG file (a native installer file for Mac OS) for an application that uses native
extensions:
56
adt -package
-storetype pkcs12
-keystore myCert.pfx
-target native
myApp.dmg
application.xml
-extdir extensionsDir
index.html resources
Creating a native installer from an AIR file or an AIRI file
You can use ADT to generate a native installer file based on an AIR file or an AIRI file. To build a native installer based
on an AIR file, use the ADT
adt -package
-target native
[WINDOWS_INSTALLER_SIGNING_OPTIONS]
installer_file
air_file
-package command with the following syntax (on a single command line):
This syntax is similar to the syntax for creating a native installer based on the source files for the AIR application.
However, there are a few differences:
• As the source, you specify an AIR file, rather than an application descriptor file and other source files for the AIR
application.
• Do not specify signing options for the AIR file, as it is already signed
To build a native installer based on an AIRI file, use the ADT -package command with the following syntax (on a
single command line):
Last updated 12/7/2015
Page 62

BUILDING ADOBE AIR APPLICATIONS
Developing AIR applications for the desktop
adt AIR_SIGNING_OPTIONS
-package
-target native
[WINDOWS_INSTALLER_SIGNING_OPTIONS]
installer_file
airi_file
This syntax is similar to the syntax for creating a native installer based on an AIR file. However there are a few of
differences:
• As the source, you specify an AIRI file.
• You specify signing options for the target AIR application.
The following example creates a DMG file (a native installer file for Mac OS) based on an AIR file:
adt -package -target native myApp.dmg myApp.air
The following example creates an EXE file (a native installer file for Windows) based on an AIR file:
adt -package -target native myApp.exe myApp.air
The following example creates an EXE file (based on an AIR file) and signs it:
adt -package -target native -storetype pkcs12 -keystore myCert.pfx myApp.exe myApp.air
57
The following example creates a DMG file (a native installer file for Mac OS) based on an AIRI file:
adt -storetype pkcs12 -keystore myCert.pfx -package -target native myApp.dmg myApp.airi
The following example creates an EXE file (a native installer file for Windows) based on an AIRI file:
adt -storetype pkcs12 -keystore myCert.pfx -package -target native myApp.exe myApp.airi
The following example creates an EXE file (based on an AIRI file) and signs it with both an AIR and a native Windows
signature:
adt -package -storetype pkcs12 -keystore myCert.pfx -target native -storetype pkcs12 -keystore
myCert.pfx myApp.exe myApp.airi
Packaging a captive runtime bundle for desktop computers
A captive runtime bundle is a package that includes your application code along with a dedicated version of the
runtime. An application packaged in this manner uses the bundled runtime instead of the shared runtime installed
elsewhere on a user’s computer.
The bundle produced is a self-contained folder of application files on Windows and an .app bundle on Mac OS. You
must produce the bundle for a target operating system while running under that operating system. (A virtual machine,
such as VMWare, can be used to run multiple operating systems on one computer.)
The application can be run from that folder or bundle without installation.
Benefits
• Produces a self-contained application
• No Internet access required for installation
• Application is isolated from runtime updates
Last updated 12/7/2015
Page 63

BUILDING ADOBE AIR APPLICATIONS
Developing AIR applications for the desktop
• Enterprises can certify the specific application and runtime combination
• Supports the traditional software deployment model
• No separate runtime redistribution required
• Can use the NativeProcess API
• Can use native extensions
• Can use the File.openWithDefaultApplication() function without restriction
• Can run from a USB or optical disk without installation
Drawbacks
• Critical security fixes are not automatically available to users when Adobe publishes a security patch
• Cannot use the .air file format
• You must create your own installer, if needed
• AIR update API and framework are not supported
• The AIR in-browser API for installing and launching an AIR application from a web page is not supported
• On Windows, file registration must be handled by your installer
• Larger application disk footprint
58
Creating a captive runtime bundle on Windows
To create a captive runtime bundle for Windows, you must package the application while running under the Windows
operating system. Package the application using the ADT bundle target:
adt -package
-keystore ..\cert.p12 -storetype pkcs12
-target bundle
myApp
myApp-app.xml
myApp.swf icons resources
This command creates the bundle in a directory named, myApp. The directory contains the files for your application
as well as the runtime files. You can run the program directly from the folder. However, to create a program menu
entry, register file types, or URI scheme handlers, you must create an installer program that sets the requisite registry
entries. The AIR SDK does not include tools for creating such installers, but several third-party options are available,
including both commercial and free, open-source installer toolkits.
You can sign the native executable on WIndows, by specifying a second set of signing options after the -target
bundle entry on the command line. These signing options identify the private key and associated certificate to use
when applying the native Windows signature. (An AIR code signing certificate can typically be used.) Only the
primary executable is signed. Any additional executables packaged with your application are not signed by this
process.
File type association
To associate your application with public or custom file types on Windows, your installer program must set the
appropriate registry entries. The file types should be listed in the fileTypes element of the application descriptor file as well.
For more information about Windows file types, see MSDN Library: File Types and File Associations
Last updated 12/7/2015
Page 64

BUILDING ADOBE AIR APPLICATIONS
Developing AIR applications for the desktop
URI handler registration
In order for your application to handle the launch of a URL using a given URI scheme, your installer must set the
requisite registry entries.
For more information about registering an application to handle a URI scheme, see MSDN Library: Registering an
Application to a URL Protocol
Creating a captive runtime bundle on Mac OS X
To create a captive runtime bundle for Mac OS X, you must package the application while running under the
Macintosh operating system. Package the application using the ADT bundle target:
adt -package
-keystore ../cert.p12 -storetype pkcs12
-target bundle
myApp.app
myApp-app.xml
myApp.swf icons resources
This command creates the application bundle named, myApp.app. The bundle contains the files for your application
as well as the runtime files. You can run the application by double-clicking the myApp.app icon and install it by
dragging it to a suitable location such as the Applications folder. However, to register file types or URI scheme
handlers, you must edit the property list file inside the application package.
59
For distribution, you can create a disk image file (.dmg). The Adobe AIR SDK does not provide tools for creating a
dmg file for a captive runtime bundle.
File type association
To associate your application with public or custom file types on Mac OS X, you must edit the info.plist file in the
bundle to set the CFBundleDocumentTypes property. See
Mac OS X Developer Library: Information Property List
Key Reference, CFBundleURLTypes.
URI handler registration
In order for your application to handle the launch of a URL using a given URI scheme, you must edit the info.plist file
in the bundle to set the CFBundleURLTypes property. See
Mac OS X Developer Library: Information Property List
Key Reference, CFBundleDocumentTypes.
Distributing AIR packages for desktop computers
AIR applications can be distributed as an AIR package, which contains the application code and all assets. You can
distribute this package through any of the typical means, such as by download, by e-mail, or by physical media such as
a CD-ROM. Users can install the application by double-clicking the AIR file. You can use the AIR in-browser API (a
web-based ActionScript library) to let users install your AIR application (and Adobe® AIR®, if needed) by clicking a
single link on a web page.
AIR applications can also be packaged and distributed as native installers (in other words, as EXE files on Windows,
DMG files on Mac, and DEB or RPM files on Linux). Native install packages can be distributed and installed according
to the relevant platform conventions. When you distribute your application as a native package, you do lose some of
the benefits of the AIR file format. Namely, a single install file can no longer be used on most platforms, the AIR update
framework can no longer be used, and the in-browser API can no longer be used.
Last updated 12/7/2015
Page 65

BUILDING ADOBE AIR APPLICATIONS
Developing AIR applications for the desktop
Installing and running an AIR application on the desktop
You can simply send the AIR file to the recipient. For example, you can send the AIR file as an e-mail attachment or
as a link in a web page.
Once the user downloads the AIR application, the user follows these instructions to install it:
1 Double-click the AIR file.
Adobe AIR must already be installed on the computer.
2 In the Installation window, leave the default settings selected, and then click Continue.
In Windows, AIR automatically does the following:
• Installs the application into the Program Files directory
• Creates a desktop shortcut for application
• Creates a Start Menu shortcut
• Adds an entry for application in the Add / Remove Programs Control Panel
In the Mac OS, by default the application is added to the Applications directory.
If the application is already installed, the installer gives the user the choice of opening the existing version of the
application or updating to the version in the downloaded AIR file. The installer identifies the application using the
application ID and publisher ID in the AIR file.
60
3 When the installation is complete, click Finish.
On Mac OS, to install an updated version of an application, the user needs adequate system privileges to install to the
application directory. On Windows and Linux, a user needs administrative privileges.
An application can also install a new version via ActionScript or JavaScript. For more information, see “Updating AIR
applications” on page 247.
Once the AIR application is installed, a user simply double-clicks the application icon to run it, just like any other
desktop application.
• On Windows, double-click the application’s icon (which is either installed on the desktop or in a folder) or select
the application from the Start menu.
• On Linux, double-click the application’s icon (which is either installed on the desktop or in a folder) or select the
application from the applications menu.
• On Mac OS, double-click the application in the folder in which it was installed. The default installation directory is
the /Applications directory.
Note: Only AIR applications developed for AIR 2.6 or earlier can be installed on Linux.
The AIR seamless install feature lets a user install an AIR application by clicking a link in a web page. The AIR browser
invocation features lets a user run an installed AIR application by clicking a link in a web page. These features are
described in the following section.
Installing and running desktop AIR applications from a web page
The AIR in-browser API lets you install and run AIR application from a web page. The AIR in-browser API is provided
in a SWF library, air.swf, that is hosted by Adobe. The AIR SDK includes a sample “badge” application that uses this
library to install, update, or launch an AIR application (and the runtime, if necessary). You can modify the provided
sample badge or create your own badge web application that uses the online air.swf library directly.
Last updated 12/7/2015
Page 66

BUILDING ADOBE AIR APPLICATIONS
Developing AIR applications for the desktop
Any AIR application can be installed through a web page badge. But, only applications that include the
<allowBrowserInvocation>true</allowBrowserInvocation> element in their application descriptor files can be
launched by a web badge.
More Help topics
“AIR.SWF in-browser API” on page 239
Enterprise deployment on desktop computers
IT administrators can install the Adobe AIR runtime and AIR applications silently using standard desktop deployment
tools. IT administrators can do the following:
• Silently install the Adobe AIR runtime using tools such as Microsoft SMS, IBM Tivoli, or any deployment tool that
allows silent installations that use a bootstrapper
• Silently install the AIR application using the same tools used to deploy the runtime
For more information, see the Adobe AIR Administrator's Guide
(http://www.adobe.com/go/learn_air_admin_guide_en).
Installation logs on desktop computers
Installation logs are recorded when either the AIR runtime itself or an AIR application is installed. You can examine
the log files to help determine the cause of any installation or update problems that occur.
61
The log files are created in the following locations:
• Mac: the standard system log (/private/var/log/system.log)
You can view the Mac system log by opening the Console application (typically found in the Utilities folder).
• Windows XP: C:\Documents and Settings\<username>\Local Settings\Application
Data\Adobe\AIR\logs\Install.log
• Windows Vista, Windows 7: C:\Users\<username>\AppData\Local\Adobe\AIR\logs\Install.log
• Linux: /home/<username>/.appdata/Adobe/AIR/Logs/Install.log
Note: These log files were not created in versions of AIR earlier than AIR 2.
Last updated 12/7/2015
Page 67

Chapter 7: Developing AIR applications for mobile devices
AIR applications on mobile devices are deployed as native applications. They use the application format of the device,
not the AIR file format. Currently AIR supports Android APK packages and iOS IPA packages. Once you have created
the release version of your application package, you can distribute your app through the standard platform
mechanism. For Android, this typically means the Android Market; for iOS, the Apple App Store.
You can use the AIR SDK and Flash Professional, Flash Builder, or another ActionScript development tool to build
AIR apps for mobile devices. HTML-based mobile AIR apps are not currently supported.
Note: The Research In Motion (RIM) BlackBerry Playbook provides its own SDK for AIR development. For information
on Playbook development, see
Note: This document describes how to develop iOS applications using the AIR 2.6 SDK or later. Applications created with
AIR 2.6+ can be installed on iPhone 3Gs, iPhone 4, and iPad devices running iOS 4, or later. To develop AIR applications
for earlier versions of iOS, you must use the AIR 2 Packager for iPhone as described in
RIM: BlackBerry Tablet OS Development.
Building iPhone apps.
62
For more information on privacy best practices, see Adobe AIR SDK Privacy Guide.
For the full system requirements for running AIR applications, see Adobe AIR system requirements.
Setting up your development environment
Mobile platforms have additional setup requirements beyond the normal AIR, Flex, and Flash development
environment setup. (For more information about setting up the basic AIR development environment, see
Flash Platform tools for AIR development” on page 16.)
Android setup
No special setup is normally required for Android in AIR 2.6+. The Android ADB tool is included in the AIR SDK (in
the lib/android/bin folder). The AIR SDK uses the ADB tool to install, uninstall, and run application packages on the
device. You can also use ADB to view system logs. To create and run an Android emulator you must download the
separate Android SDK.
If your application adds elements to the <manifestAdditions> element in the application descriptor that the current
version of AIR does not recognize as valid, then you must install a more recent version of the Android SDK. Set the
AIR_ANDROID_SDK_HOME environment variable or the
of the SDK. The AIR packaging tool, ADT, uses this SDK to validate the entries in the
In AIR 2.5, you must download a separate copy of the Android SDK from Google. You can set the
AIR_ANDROID_SDK_HOME environment variable to reference the Android SDK folder. If you do not set this
environment variable, you must specify the path to the Android SDK in the
command line.
-platformsdk command line parameter to the file path
<manifestAdditions> element.
-platformsdk argument on the ADT
“Adobe
Last updated 12/7/2015
Page 68

BUILDING ADOBE AIR APPLICATIONS
Developing AIR applications for mobile devices
More Help topics
“ADT environment variables” on page 180
“Path environment variables” on page 292
iOS setup
To install and test an iOS application on a device and to distribute that application, you must join the Apple iOS
Developer program (which is a fee-based service). Once you join the iOS Developer program you can access the iOS
Provisioning Portal where you can obtain the following items and files from Apple that are required to install an
application on a device for testing and for subsequent distribution. These items and files include:
• Development and distribution certificates
• App IDs
• Development and distribution provisioning files
Mobile application design considerations
The operating context and physical characteristics of mobile devices demand careful coding and design. For example,
streamlining code so that it executes as fast as possible is crucial. Code optimization can only go so far, of course;
intelligent design that works within the device limitations can also help prevent your visual presentation from
overtaxing the rendering system.
63
Code
While making your code run faster is always beneficial, the slower processor speed of most mobile devices increases
the rewards of the time spent writing lean code. In addition, mobile devices are almost always run on battery power.
Achieving the same result with less work uses less battery power.
Design
Factors like the small screen size, the touch-screen interaction mode, and even the constantly changing environment
of a mobile user must be considered when designing the user experience of your application.
Code and design together
If your application uses animation, then rendering optimization is very important. However, code optimization alone
is often not enough. You must design the visual aspects of the application such that the code can render them
efficiently.
Important optimization techniques are discussed in the Optimizing Content for the Flash Platform guide. The
techniques covered in the guide apply to all Flash and AIR content, but are essential to developing applications that
run well on mobile devices.
• Paul Trani: Tips and Tricks for Mobile Flash Development
• roguish: GPU Test App AIR for Mobile
• Jonathan Campos: Optimization Techniques for AIR for Android apps
• Charles Schulze: AIR 2.6 Game Development: iOS included
Last updated 12/7/2015
Page 69

BUILDING ADOBE AIR APPLICATIONS
Developing AIR applications for mobile devices
Application life cycle
When your application loses focus to another app, AIR drops the framerate to 4 frames-per-second and stops
rendering graphics. Below this framerate, streaming network and socket connections tend to break. If your app doesn’t
use such connections, you can throttle the framerate even lower.
When appropriate, you should stop audio playback and remove listeners to the geolocation and accelerometer sensors.
The AIR NativeApplication object dispatches activate and deactivate events. Use these events to manage the transition
between the active and the background state.
Most mobile operating systems terminate background applications without warning. By saving application state
frequently, your application should be able to restore itself to a reasonable state whether it is returning to active status
from the background or by being launched anew.
Information density
The physical size of the screen of mobile devices is smaller than on the desktop, although their pixel density (pixels per
inch) is higher. The same font size will produce letters that are physically smaller on a mobile device screen than on a
desktop computer. You must often use a larger font to ensure legibility. In general, 14 point is the smallest font size
that can be easily read.
Mobile devices are often used on the move and under poor lighting conditions. Consider how much information you
can realistically display on screen legibly. It might be less than you would display on a screen of the same pixel
dimensions on a desktop.
64
Also consider that when a user is touching the screen, their finger and hand block part of the display from view. Place
interactive elements at the sides and bottom of the screen when the user has to interact with them for longer than a
momentary touch.
Text input
Many devices use a virtual keyboard for text entry. Virtual keyboards obscure part of the screen and are often
cumbersome to use. Avoid relying on keyboard events (except for soft keys).
Consider implementing alternatives to using input text fields. For example, to have the user enter a numerical value,
you do not need a text field. You can provide two buttons to increase or decrease the value.
Soft keys
Mobile devices include a varying number of soft keys. Soft keys are buttons that are programmable to have different
functions. Follow the platform conventions for these keys in your application.
Screen orientation changes
Mobile content can be viewed in portrait or landscape orientation. Consider how your application will deal with screen
orientation changes. For more information, see
Stage orientation.
Screen dimming
AIR does not automatically prevent the screen from dimming while video is playing. You can use the systemIdleMode
property of the AIR NativeApplication object to control whether the device will enter a power-saving mode. (On some
platforms, you must request the appropriate permissions for this feature to work.)
Last updated 12/7/2015
Page 70

BUILDING ADOBE AIR APPLICATIONS
Developing AIR applications for mobile devices
Incoming phone calls
The AIR runtime automatically mutes audio when the user makes or receives a phone call. On Android, you should
set the Android READ_PHONE_STATE permission in the application descriptor if your application plays audio while
it is in the background. Otherwise, Android prevents the runtime from detecting phone calls and muting the audio
automatically. See
“Android permissions” on page 73.
Hit targets
Consider the size of hit targets when designing buttons and other user interface elements that the user taps. Make these
elements large enough that they can be comfortably activated with a finger on a touch screen. Also, make sure that you
have enough space between targets. The hit target area should be about 44 pixels to 57 pixels on each side for a typical
high-dpi phone screen.
Application package install size
Mobile devices typically have far less storage space for installing applications and data than desktop computers.
Minimize the package size by removing unused assets and libraries.
On Android, the application package is not extracted into separate files when an app is installed. Instead, assets are
decompressed into temporary storage when they are accessed. To minimize this decompressed asset storage footprint,
close file and URL streams when assets are completely loaded.
65
File system access
Different mobile operating systems impose different file system restrictions and those restrictions tend to be different
than those imposed by desktop operating systems. The appropriate place to save files and data can, therefore, vary from
platform to platform.
One consequence of the variation in file systems is that the shortcuts to common directories provided by the AIR File
class are not always available. The following table shows which shortcuts can be used on Android and iOS:
Android iOS
File.applicationDirectory Read-only through URL (not native
path)
File.applicationStorageDirectory Available Available
File.cacheDirectory Available Available
File.desktopDirectory Root of sdcard Not available
File.documentsDirectory Root of sdcard Available
File.userDirectory Root of sdcard Not available
File.createTempDirectory() Available Available
File.createTempFile() Available Available
Apple’s guidelines for iOS applications provide specific rules on which storage locations should be used for files in
various situations. For example, one guideline is that only files that contain user-entered data or data that otherwise
can’t be regenerated or re-downloaded should be stored in a directory that’s designated for remote backup. For
information on how to comply with Apple’s guidelines for file backup and caching, see Controlling file backup and
caching.
Read-only
Last updated 12/7/2015
Page 71

BUILDING ADOBE AIR APPLICATIONS
Developing AIR applications for mobile devices
UI components
Adobe has developed a mobile-optimized version of the Flex framework. For more information, see Developing
Mobile Applications with Flex and Flash Builder.
Community component projects suitable for mobile applications are also available. These include:
• Josh Tynjala’s Feathers UI controls for Starling
• Derrick Grigg’s skinnable version of Minimal Comps
• Todd Anderson’s as3flobile components
Stage 3D accelerated graphics rendering
Starting with AIR 3.2, AIR for mobile supports Stage 3D accelerated graphics rendering. The Stage3D ActionScript
APIs are a set of low-level GPU-accelerated APIs enabling advanced 2D and 3D capabilities. These low-level APIs
provide developers the flexibility to leverage GPU hardware acceleration for significant performance gains. You can
also use gaming engines that support the Stage3D ActionScript APIs.
For more information, see Gaming engines, 3D, and Stage 3D.
Video smoothing
In order to enhance performance, video smoothing is disabled on AIR.
66
Native features
AIR 3.0+
Many mobile platforms provide features that are not yet accessible through the standard AIR API. As of AIR 3, you
can extend AIR with your own native code libraries. These native extension libraries can access features available from
the operating system or even specific to a given device. Native extensions can be written in C on iOS, and Java or C on
Android. For information on developing native extensions, see Introducing native extensions for Adobe AIR.
Workflow for creating AIR applications for mobile devices
The workflow for creating an AIR application for mobile (or other) devices is, in general, very similar to that for
creating a desktop application. The primary workflow differences occur when it is time to package, debug, and install
an application. For example, AIR for Android apps use the native Android APK package format rather than the AIR
package format. Hence, they also use the standard Android install and update mechanisms.
AIR for Android
The following steps are typical when developing an AIR application for Android:
• Write the ActionScript or MXML code.
• Create an AIR application descriptor file (using the 2.5, or later, namespace).
• Compile the application.
• Package the application as an Android package (.apk).
Last updated 12/7/2015
Page 72

BUILDING ADOBE AIR APPLICATIONS
Developing AIR applications for mobile devices
• Install the AIR runtime on the device or Android emulator (if using an external runtime; captive runtime is the
default in AIR 3.7 and higher).
• Install the application on device (or Android emulator).
• Launch the application on the device.
You can use Adobe Flash Builder, Adobe Flash Professional CS5, or the command-line tools to accomplish these steps.
Once your AIR app is finished and packaged as an APK file, you can submit it to the Android Market or distribute it
through other means.
AIR for iOS
The following steps are typical when developing AIR applications for iOS:
• Install iTunes.
• Generate the required developer files and IDs on the Apple iOS Provisioning Portal. These items include:
• Developer certificate
• App ID
• Provisioning profile
You must list the IDs of any test devices on which you plan to install the application when creating the provisioning
profile.
67
• Convert the development certificate and private key to a P12 keystore file.
• Write the application ActionScript or MXML code.
• Compile the application with an ActionScript or MXML compiler.
• Create icon art and initial screen art for the application.
• Create the application descriptor (using the 2.6, or greater, namespace).
• Package the IPA file using ADT.
• Use iTunes to place your provisioning profile on your test device.
• Install and test the application on your iOS device. You can use either iTunes or ADT over USB (USB support in
AIR 3.4 and above) to install the IPA file.
Once your AIR app is finished, you can repackage it using a distribution certificate and provisioning profile. It is then
ready to submit to the Apple App Store.
Setting mobile application properties
As with other AIR applications, you set the basic application properties in the application descriptor file. Mobile
applications ignore some of the desktop-specific properties, such as window size and transparency. Mobile
applications can also use their own platform-specific properties. For example, you can include an
Android apps and an
iPhone element for iOS apps.
android element for
Common settings
Several application descriptor settings are important for all mobile device applications.
Last updated 12/7/2015
Page 73

BUILDING ADOBE AIR APPLICATIONS
Developing AIR applications for mobile devices
Required AIR runtime version
Specify the version of the AIR runtime required by your application using the namespace of the application descriptor file.
The namespace, assigned in the application element, determines, in large part, which features your application can
use. For example, if your application uses the AIR 2.7 namespace, and the user has some future version installed, then
your application will still see the AIR 2.7 behavior (even if the behavior has been changed in the future version). Only
when you change the namespace and publish an update will your application have access to the new behavior and
features. Security fixes are an important exception to this rule.
On devices that use a runtime separate from the application, such as Android on AIR 3.6 and earlier, the user will be
prompted to install or upgrade AIR if they do not have the required version. On devices that incorporate the runtime,
such as iPhone, this situation does not occur (since the required version is packaged with the app in the first place).
Note: (AIR 3.7 and higher) By default, ADT packages the runtime with Android applications.
Specify the namespace using the xmlns attribute of the root application element. The following namespaces should
be used for mobile applications (depending on which mobile platform you are targeting):
iOS 4+ and iPhone 3Gs+ or Android:
<application xmlns="http://ns.adobe.com/air/application/2.7">
iOS only:
<application xmlns="http://ns.adobe.com/air/application/2.0">
68
Note: Support for iOS 3 devices is provided by the Packager for iPhone SDK, based on the AIR 2.0 SDK. For information
about building AIR applications for iOS 3, see
Building iPhone apps. The AIR 2.6 SDK (and later) support iOS 4, and
above on iPhone 3Gs, iPhone 4, and iPad devices.
More Help topics
“application” on page 200
Application identity
Several settings should be unique for each application that you publish. These include the ID, the name, and the
filename.
Android application IDs
On Android, the ID is converted to the Android package name by prefixing “air.” to the AIR ID. Thus, if your AIR ID
is com.example.MyApp, then the Android package name is air.com.example.MyApp.
<id>com.example.MyApp</id>
<name>My Application</name>
<filename>MyApplication</filename>
In addition, if the ID is not a legal package name on the Android operating system, it is converted to a legal name.
Hyphen characters are changed to underscores and leading digits in any ID component are preceded by a capital “A”.
For example, the ID: 3-goats.1-boat, is transformed to the package name: air.A3_goats.A1_boat.
Note: The prefix added to the application ID can be used to identify AIR applications in the Android Market. If you do
not want your application to identified as an AIR application because of the prefix, you must unpackage the APK file,
change the application ID, and repackage it as described in,
Opt-out of AIR application analytics for Android.
iOS application IDs
Set the AIR application ID to match the app ID you created in the Apple iOS Provisioning Portal.
Last updated 12/7/2015
Page 74

BUILDING ADOBE AIR APPLICATIONS
Developing AIR applications for mobile devices
iOS App IDs contain a bundle seed ID followed by a bundle identifier. The bundle seed ID is a string of characters,
such as 5RM86Z4DJM, that Apple assigns to the App ID. The bundle identifier contains a reverse-domain-style name
that you pick. The bundle identifier can end in an asterisk (*), indicating a wildcard app ID. If the bundle identifier
ends in the wildcard character, you can replace that wildcard with any legal string.
For example:
• If your Apple app ID is, 5RM86Z4DJM.com.example.helloWorld, you must use com.example.helloWorld in the
application descriptor.
• If your Apple app ID is 96LPVWEASL.com.example.* (a wildcard app ID), then you could use
com.example.helloWorld, or com.example.anotherApp, or some other ID that starts with com.example.
• Finally, if your Apple app ID is just the bundle seed ID and a wildcard, such as: 38JE93KJL.*, then you can use any
application ID in AIR.
When specifying the app ID, do not include the bundle seed ID portion of the app ID.
More Help topics
“id” on page 215
“filename” on page 211
69
“name” on page 223
Application version
In AIR 2.5 and later, specify the application version in the versionNumber element. The version element can no
longer be used. When specifying a value for
separated by dots, such as: “0.1.2”. Each segment of the version number can have up to three digits. (In other words,
“999.999.999” is the largest version number permitted.) You do not have to include all three segments in the number;
“1” and “1.0” are legal version numbers as well.
You can also specify a label for the version using the versionLabel element. When you add a version label it is
displayed instead of the version number in such places as the Android Application info screen. A version label must
be specified for apps that are distributed using the Android Market. If you do not specify a
AIR application descriptor, then the
<!-- AIR 2.5 and later -->
<versionNumber>1.23.7<versionNumber>
<versionLabel>1.23 Beta 7</versionLabel>
On Android, the AIR versionNumber is translated to the Android integer versionCode using the formula:
a*1000000 + b*1000 + c, where a, b, and c are the components of the AIR version number: a.b.c.
More Help topics
“version” on page 231
“versionLabel” on page 231
versionNumber, you must use a sequence of up to three numbers
versionLabel value in the
versionNumber value is assigned to the Android version label field.
“versionNumber” on page 232
Main application SWF
Specify the main application SWF file in the content child of the initialWindow element. When you target devices
in the mobile profile, you must use a SWF file (HTML-based applications are not supported).
Last updated 12/7/2015
Page 75

BUILDING ADOBE AIR APPLICATIONS
Developing AIR applications for mobile devices
<initialWindow>
<content>MyApplication.swf</content>
</initialWindow>
You must include the file in the AIR package (using ADT or your IDE). Simply referencing the name in the application
descriptor does not cause the file to be included in the package automatically.
Main screen properties
Several child elements of the initialWindow element control the initial appearance and behavior of the main
application screen.
• aspectRatio — Specifies whether the application should initially display in a portrait format (height greater than
width), a landscape format (height less than width), or any format (the stage automatically orients to all
orientations).
<aspectRatio>landscape</aspectRatio>
• autoOrients — Specifies whether the stage should automatically change orientation as the user rotates the device
or performs another orientation-related gesture such as opening or closing a sliding keyboard. If false, which is the
default, then the stage will not change orientation with the device.
<autoOrients>true</autoOrients>
70
• depthAndStencil — Specifies to use the depth or stencil buffer. You typically use these buffers when working with
3D content.
<depthAndStencil>true</depthAndStencil>
• fullScreen — Specifies whether the application should take up the full device display, or should share the display
with the normal operating system chrome, such as a system status bar.
<fullScreen>true</fullScreen>
• renderMode — Specifies whether the runtime should render the application with the graphics processing unit
(GPU) or the main, central processing unit (CPU). In general, GPU rendering will increase rendering speed, but
some features, such as certain blend modes and PixelBender filters, are unavailable in GPU mode. In addition,
different devices, and different device drivers, have varying GPU capabilities and limitations. You should always
test your application on the widest variety of devices possible, especially when using GPU mode.
You can set the render mode to gpu, cpu, direct, or auto. The default value is auto, which currently falls back to cpu
mode.
Note: In order to leverage GPU acceleration of Flash content with AIR for mobile platforms, Adobe recommends that
you use renderMode="direct" (that is, Stage3D) rather than renderMode="gpu". Adobe officially supports and
recommends the following Stage3D based frameworks: Starling (2D) and Away3D (3D). For more details on Stage3D
and Starling/Away3D, see
<renderMode>direct</renderMode>
http://gaming.adobe.com/getstarted/.
Note: You cannot use renderMode=”direct” for applications that run in the background.
The limitations of GPU mode are:
• The Flex framework does not support the GPU rendering mode.
• Filters are not supported
• PixelBender blends, and fills are not supported
• The following blend modes are not supported: layer, alpha, erase, overlay, hardlight, lighten, and darken
• Using GPU rendering mode in an app that plays video is not recommended.
Last updated 12/7/2015
Page 76

BUILDING ADOBE AIR APPLICATIONS
Developing AIR applications for mobile devices
• In GPU rendering mode, text fields are not properly moved to a visible location when the virtual keyboard
opens. To ensure that your text field is visible while the user enters text use the softKeyboardRect property of
the stage and soft keyboard events to move the text field to the visible area.
• If a display object cannot be rendered by the GPU, it is not displayed at all. For example, if a filter is applied to
a display object, the object is not shown.
Note: The GPU implementation for iOS in AIR 2.6+ is much different than the implementation used in the earlier,
AIR 2.0 version. Different optimization considerations apply.
More Help topics
“aspectRatio” on page 203
“autoOrients” on page 204
“depthAndStencil” on page 207
“fullScreen” on page 214
“renderMode” on page 225
Supported profiles
You can add the supportedProfiles element to specify which device profiles your application supports. Use the
mobileDevice profile for mobile devices. When you run your application with the Adobe Debug Launcher (ADL),
ADL uses the first profile in the list as the active profile. You can also use the
select a particular profile in the supported list. If your application runs under all profiles, you can leave the
supportedProfiles element out altogether. ADL uses the desktop profile as the default active profile in this case.
-profile flag when running ADL to
71
To specify that your application supports both the mobile device and desktop profiles, and you normally want to test
the app in the mobile profile, add the following element:
<supportedProfiles>mobileDevice desktop</supportedProfiles>
More Help topics
“supportedProfiles” on page 228
“Device profiles” on page 235
“AIR Debug Launcher (ADL)” on page 152
Required native extensions
Applications that support the mobileDevice profile can use native extensions.
Declare all native extensions that the AIR application uses in the application descriptor. The following example
illustrates the syntax for specifying two required native extensions:
<extensions>
<extensionID> com.example.extendedFeature</extensionID>
<extensionID> com.example.anotherFeature</extensionID>
</extensions>
The extensionID element has the same value as the id element in the extension descriptor file. The extension
descriptor file is an XML file called extension.xml. It is packaged in the ANE file you receive from the native extension
developer.
Last updated 12/7/2015
Page 77

BUILDING ADOBE AIR APPLICATIONS
Developing AIR applications for mobile devices
Virtual keyboard behavior
Set the softKeyboardBehavior element to none in order to disable the automatic panning and resizing behavior that
the runtime uses to make sure that the focused text entry field is in view after the virtual keyboard is raised. If you
disable the automatic behavior, then it is your application’s responsibility to make sure that the text entry area, or other
relevant content is visible after the keyboard is raised. You can use the
conjunction with the SoftKeyboardEvent to detect when the keyboard opens and determine the area it obscures.
To enable the automatic behavior, set the element value to pan:
<softKeyboardBehavior>pan</softKeyboardBehavior>
Since pan is the default value, omitting the softKeyboardBehavior element also enables the automatic keyboard
behavior.
Note: When you also use GPU rendering, the pan behavior is not supported.
More Help topics
“softKeyboardBehavior” on page 227
Stage.softKeyboardRect
SoftKeyboardEvent
softKeyboardRect property of the stage in
72
Android settings
On the Android platform, you can use the android element of the application descriptor to add information to the
Android application manifest, which is an application properties file used by the Android operating system. ADT
automatically generates the Android Manifest.xml file when you create the APK package. AIR sets a few properties to
the values required for certain features to work. Any other properties set in the android section of the AIR application
descriptor are added to the corresponding section of the Manifest.xml file.
Note: For most AIR applications, you must set the Android permissions needed by your application within the android
element, but you generally will not need to set any other properties.
You can only set attributes that take string, integer, or boolean values. Setting references to resources in the application
package is not supported.
Note: The runtime requires a minimum SDK version equal to or greater than 14. If you wish to create an application only
for higher versions, you should ensure that the Manifest includes
sdk> with correct version, accordingly.
Reserved Android manifest settings
AIR sets several manifest entries in the generated Android manifest document to ensure that application and runtime
features work correctly. You cannot define the following settings:
manifest element
You cannot set the following attributes of the manifest element:
• package
• android:versionCode
• android:versionName
• xmlns:android
<uses-sdk android:minSdkVersion=""></uses-
Last updated 12/7/2015
Page 78

BUILDING ADOBE AIR APPLICATIONS
Developing AIR applications for mobile devices
activity element
You cannot set the following attributes for the main activity element:
• android:label
• android:icon
application element
You cannot set the following attributes of the application element:
• android:theme
• android:name
• android:label
• android:windowSoftInputMode
• android:configChanges
• android:screenOrientation
• android:launchMode
Android permissions
The Android security model requires that each app request permission in order to use features that have security or
privacy implications. These permissions must be specified when the app is packaged, and cannot be changed at
runtime. The Android operating system informs the user which permissions an app is requesting when the user installs
it. If a permission required for a feature is not requested, the Android operating system might throw an exception when
your application access the feature, but an exception is not guaranteed. Exceptions are transmitted by the runtime to
your application. In the case of a silent failure, a permission failure message is added to the Android system log.
73
In AIR, you specify the Android permissions inside the android element of the application descriptor. The following
format is used for adding permissions (where PERMISSION_NAME is the name of an Android permission):
<android>
<manifestAdditions>
<![CDATA[
<manifest>
<uses-permission android:name="android.permission.PERMISSION_NAME" />
</manifest>
]]>
</manifestAdditions>
</android>
The uses-permissions statements inside the manifest element are added directly to the Android manifest document.
The following permissions are required to use various AIR features:
ACCESS_COARSE_LOCATION Allows the application to access WIFI and cellular network location data through the
Geolocation class.
ACCESS_FINE_LOCATION Allows the application to access GPS data through the Geolocation class.
ACCESS_NETWORK_STATE and ACCESS_WIFI_STATE Allows the application to access network information the
NetworkInfo class.
CAMERA Allows the application to access the camera.
Last updated 12/7/2015
Page 79

BUILDING ADOBE AIR APPLICATIONS
Developing AIR applications for mobile devices
Note: When you ask for permission to use the camera feature, Android assumes that your application also requires the
camera. If the camera is an optional feature of your application, then you should add a
manifest for the camera, setting the required attribute to
INTERNET Allows the application to make network requests. Also allows remote debugging.
READ_PHONE_STATE Allows the AIR runtime to mute audio during phone calls. You should set this permission if
false. See “Android compatibility filtering” on page 75.
uses-feature element to the
your app plays audio while in the background.
RECORD_AUDIO Allows the application to access the microphone.
WAKE_LOCK and DISABLE_KEYGUARD Allows the application to prevent the device from going to sleep using the
SystemIdleMode class settings.
WRITE_EXTERNAL_STORAGE Allows the application to write to the external memory card on the device.
For example, to set the permissions for an app that impressively requires every permission, you could add the following
to the application descriptor:
<android>
<manifestAdditions>
<![CDATA[
<manifest>
<uses-permission android:name="android.permission.ACCESS_COARSE_LOCATION" />
<uses-permission android:name="android.permission.ACCESS_FINE_LOCATION" />
<uses-permission android:name="android.permission.ACCESS_NETWORK_STATE" />
<uses-permission android:name="android.permission.ACCESS_WIFI_STATE" />
<uses-permission android:name="android.permission.CAMERA" />
<uses-permission android:name="android.permission.DISABLE_KEYGUARD" />
<uses-permission android:name="android.permission.INTERNET" />
<uses-permission android:name="android.permission.READ_PHONE_STATE" />
<uses-permission android:name="android.permission.RECORD_AUDIO" />
<uses-permission android:name="android.permission.WAKE_LOCK" />
<uses-permission android:name="android.permission.WRITE_EXTERNAL_STORAGE" />
</manifest>
]]>
</manifestAdditions>
</android>
74
More Help topics
Android Security and Permissions
Android Manifest.permission class
Android custom URI schemes
You can use a custom URI scheme to launch an AIR application from a web page or a native Android application.
Custom URI support relies on intent filters specified in the Android manifest, so this technique cannot be used on
other platforms.
To use a custom URI, add an intent-filter to the application descriptor within the <android> block. Both intent-
filter elements in the following example must be specified. Edit the <data android:scheme="my-customuri"/>
statement to reflect the URI string for your custom scheme.
Last updated 12/7/2015
Page 80

BUILDING ADOBE AIR APPLICATIONS
Developing AIR applications for mobile devices
<android>
<manifestAdditions>
<![CDATA[
<manifest>
<application>
<activity>
<intent-filter>
<action android:name="android.intent.action.MAIN"/>
<category android:name="android.intent.category.LAUNCHER"/>
</intent-filter>
<intent-filter>
<action android:name="android.intent.action.VIEW"/>
<category android:name="android.intent.category.BROWSABLE"/>
<category android:name="android.intent.category.DEFAULT"/>
<data android:scheme="my-customuri"/>
</intent-filter>
</activity>
</application>
</manifest>
]]>
</manifestAdditions>
</android>
75
An intent filter informs the Android operating system that your application is available to perform a given action. In
the case of a custom URI, this means that the user has clicked a link using that URI scheme (and the browser does not
know how to handle it).
When your application is invoked through a custom URI, the NativeApplication object dispatches an invoke event.
The URL of the link, including query parameters, is placed in the
arguments array of the InvokeEvent object. You can
use any number of intent-filters.
Note: Links in a StageWebView instance cannot open URLs that use a custom URI scheme.
More Help topics
Android intent filters
Android actions and categories
Android compatibility filtering
The Android operating system uses a number of elements in the application manifest file to determine whether your
application is compatible with a given device. Adding this information to the manifest is optional. If you do not include
these elements, your application can be installed on any Android device. However, it may not operate properly on any
Android device. For example, a camera app will not be very useful on a phone that does not have a camera.
The Android manifest tags that you can use for filtering include:
• supports-screens
• uses-configuration
• uses-feature
• uses-sdk (in AIR 3+)
Last updated 12/7/2015
Page 81

BUILDING ADOBE AIR APPLICATIONS
Developing AIR applications for mobile devices
Camera applications
If you request the camera permission for your application, Android assumes that the app requires all available camera
features, including auto-focus and flash. If your app does not require all camera features, or if the camera is an optional
feature, you should set the various
uses-feature elements for the camera to indicate that these are optional.
Otherwise, users with devices that are missing one feature or that do not have a camera at all, will not be able to find
your app on the Android Market.
The following example illustrates how to request permission for the camera and make all camera features optional:
<android>
<manifestAdditions>
<![CDATA[
<manifest>
<uses-permission android:name="android.permission.CAMERA" />
<uses-feature android:name="android.hardware.camera"
android:required="false"/>
<uses-feature android:name="android.hardware.camera.autofocus"
android:required="false"/>
<uses-feature android:name="android.hardware.camera.flash"
android:required="false"/>
</manifest>
]]>
</manifestAdditions>
</android>
76
Audio recording applications
If you request the permission to record audio, Android also assumes that the app requires a microphone. If audio
recording is an optional feature of your app, you can add a uses-feature tag to specify that the microphone is not
required. Otherwise, users with devices that do not have a microphone, will not be able to find your app on the Android
Market.
The following example illustrates how to request permission to use the microphone while still making the microphone
hardware optional:
<android>
<manifestAdditions>
<![CDATA[
<manifest>
<uses-permission android:name="android.permission.RECORD_AUDIO" />
<uses-feature android:name="android.hardware.microphone"
android:required="false"/>
</manifest>
]]>
</manifestAdditions>
</android>
More Help topics
Android Developers: Android Compatibility
Android Developers: Android feature name constants
Install location
You can permit your application to be installed or moved to the external memory card by setting the
installLocation attribute of the Android manifest element to either auto or preferExternal:
Last updated 12/7/2015
Page 82

BUILDING ADOBE AIR APPLICATIONS
Developing AIR applications for mobile devices
<android>
<manifestAdditions>
<![CDATA[
<manifest android:installLocation="preferExternal"/>
]]>
</manifestAdditions>
</android>
The Android operating system doesn’t guarantee that your app will be installed to the external memory. A user can
also move the app between internal and external memory using the system settings app.
Even when installed to external memory, application cache and user data, such as the contents of the app-storage
directory, shared objects, and temporary files, are still stored in the internal memory. To avoid using too much internal
memory, be selective about the data you save to the application storage directory. Large amounts of data should be
saved to the SDCard using the
File.userDirectory or File.documentsDirectory locations (which both map to
the root of the SD card on Android).
Enabling Flash Player and other plug-ins in a StageWebView object
In Android 3.0+, an application must enable hardware acceleration in the Android application element in order for
plug-in content to be displayed in a StageWebView object. To enable plug-in rendering, set the
android:hardwareAccelerated attribute of the application element to true:
77
<android>
<manifestAdditions>
<![CDATA[
<manifest>
<application android:hardwareAccelerated="true"/>
</manifest>
]]>
</manifestAdditions>
</android>
Color depth
AIR 3+
In AIR 3 and later, the runtime sets the display to render 32-bit colors. In earlier versions of AIR, the runtime uses 16bit color. You can instruct the runtime to use 16-bit color using the <colorDepth> element of the application
descriptor:
<android>
<colorDepth>16bit</colorDepth>
<manifestAdditions>...</manifestAdditions>
</android>
Using the 16-bit color depth can increase rendering performance, but at the expense of color fidelity.
iOS Settings
Settings that apply only to iOS devices are placed within the <iPhone> element in the application descriptor. The
iPhone element can have an InfoAdditions element, a requestedDisplayResolution element, an Entitlements
element, an
externalSwfs element, and a forceCPURenderModeForDevices element as children.
The InfoAdditions element lets you specify key-value pairs that are added to the Info.plist settings file for the
application. For example, the following values set the status bar style of the application and state that the application
does not require persistent Wi-Fi access.
Last updated 12/7/2015
Page 83

BUILDING ADOBE AIR APPLICATIONS
Developing AIR applications for mobile devices
<InfoAdditions>
<![CDATA[
<key>UIStatusBarStyle</key>
<string>UIStatusBarStyleBlackOpaque</string>
<key>UIRequiresPersistentWiFi</key>
<string>NO</string>
]]>
</InfoAdditions>
The InfoAdditions settings are enclosed in a CDATA tag.
Th Entitlements element lets you specify key-value pairs added to the Entitlements.plist settings file for the
application. Entitlements.plist settings provide application access to certain iOS features, such as push notifications.
For more detailed information on Info.plist and Entitlements.plist settings, see the Apple developer documentation.
Supporting background tasks on iOS
AIR 3.3
Adobe AIR 3.3 and higher supports multitasking on iOS by enabling certain background behaviors:
• Audio
• Location updates
• Networking
• Opting out of background app execution
Note: With swf-version 21 and its earlier versions, AIR does not support background execution on iOS and Android when
render mode direct is set. Due to this restriction, Stage3D based apps cannot execute background tasks like audio
playback, location updates, network upload or download, etc. iOS does not allow OpenGLES or rendering of calls in the
background. Applications which attempt to make OpenGL calls in the background are terminated by iOS. Android does
not restrict applications from either making OpenGLES calls in the background or performing other background tasks
like audio playback. With swf-version 22 and later, AIR mobile applications can execute in the background when
renderMode direct is set. The AIR iOS runtime results in an ActionScript error (3768 - The Stage3D API may not be used
during background execution) if OpenGLES calls are made in the background. However, there are no errors on Android
because its native applications are allowed to make OpenGLES calls in the background. For optimal utilization of mobile
resource, do not make rendering calls while an application is executing in the background.
78
Background audio
To enable background audio playback and recording, include the following key-value pair in the InfoAdditions
element:
<InfoAdditions>
<![CDATA[
<key>UIBackgroundModes</key>
<array>
<string>audio</string>
</array>
]]>
</InfoAdditions>
Background location updates
To enable background location updates, include the following key-value pair in the InfoAdditions element:
Last updated 12/7/2015
Page 84

BUILDING ADOBE AIR APPLICATIONS
Developing AIR applications for mobile devices
<InfoAdditions>
<![CDATA[
<key>UIBackgroundModes</key>
<array>
<string>location</string>
</array>
]]>
</InfoAdditions>
Note: Use this feature only when necessary, as location APIs are a significant drain on the battery.
Background networking
To execute short tasks in the background, your application sets the
NativeApplication.nativeApplication.executeInBackground property to true.
For example, your application may start a file upload operation after which the user moves another application to the
front. When the application receives an upload completion event, it can set
NativeApplication.nativeApplication.executeInBackground to false.
Setting the NativeApplication.nativeApplication.executeInBackground property to true does not guarantee
the application will run indefinitely, as iOS imposes a time limit on background tasks. When iOS stops background
processing, AIR dispatches the
NativeApplication.suspend event.
79
Opting out of background execution
Your application can explicitly opt out of background execution by including the following key-value pair in the
InfoAdditions element:
<InfoAdditions>
<![CDATA[
<key>UIApplicationExitsOnSuspend</key>
<true/>
]]>
</InfoAdditions>
Reserved iOS InfoAdditions settings
AIR sets several entries in the generated Info.plist file to ensure that application and runtime features work correctly.
You cannot define the following settings:
CFBundleDisplayName
CFBundleExecutable
CFBundleIconFiles
CFBundleIdentifier
CFBundleInfoDictionaryVersion
CFBundlePackageType
CFBundleResourceSpecification
CFBundleShortVersionString
CFBundleSupportedPlatforms
CFBundleVersion
CTAutoOrients
CTInitialWindowTitle
CTInitialWindowVisible
CTIosSdkVersion
CTMaxSWFMajorVersion
DTPlatformName
DTSDKName
MinimumOSVersion (reserved till 3.2)
NSMainNibFile
UIInterfaceOrientation
UIStatusBarHidden
UISupportedInterfaceOrientations
Last updated 12/7/2015
Page 85

BUILDING ADOBE AIR APPLICATIONS
Developing AIR applications for mobile devices
Note: You can define the MinimumOSVersion. The MinimumOSVersion definition is honoured in Air 3.3 and later.
Supporting different iOS device models
For iPad support, include the proper key-value settings for UIDeviceFamily within your InfoAdditions element.
UIDeviceFamily setting is an array of strings. Each string defines supported devices. The <string>1</string>
The
setting defines support for the iPhone and iPod Touch. The
If you specify only one of these strings, only that device family is supported. For example, the following setting limits
support to the iPad:
<key>UIDeviceFamily</key>
<array>
<string>2</string>
</array>>
The following setting supports both device families (iPhone/iPod Touch and iPad):
<key>UIDeviceFamily</key>
<array>
<string>1</string>
<string>2</string>
</array>
Additionally, in AIR 3.7 and higher, you can use the forceCPURenderModeForDevices tag to force CPU render mode
for a specified set of devices and enable GPU render mode for remaining iOS devices.
<string>2</string> setting defines support for the iPad.
80
You add this tag as a child of the iPhone tag and specify a space-separated list of device model names. For a list of valid
device model names, see
“forceCPURenderModeForDevices” on page 213.
For example, to use CPU mode in old iPods, iPhones, and iPads and enable GPU mode for all other devices, specify
the following in the application descriptor:
...
<renderMode>GPU</renderMode>
...
<iPhone>
...
<forceCPURenderModeForDevices>iPad1,1 iPhone1,1 iPhone1,2 iPod1,1
</forceCPURenderModeForDevices>
</iPhone>
High-resolution displays
The requestedDisplayResolution element specifies whether your application should use the standard or high
resolution mode on iOS devices with high-resolution screens.
<requestedDisplayResolution>high</requestedDisplayResolution>
In high-resolution mode, you can address each pixel on a high-resolution display individually. In the standard mode,
the device screen will appear to your application as a standard resolution screen. Drawing a single pixel in this mode
will set the color of four pixels on the high-resolution screen.
The default setting is standard. Note that for targeting iOS devices, you use the requestedDisplayResolution
element as a child of the
iPhone element (not the InfoAdditions element or initialWindow element).
If you want to use different settings on different devices, specify your default value as the
requestedDisplayResolution element’s value. Use the excludeDevices attribute to specify devices that should use
the opposite value. For example, with the following code, high resolution mode is used for all devices that support it
except 3rd-generation iPads, which use standard mode:
Last updated 12/7/2015
Page 86

BUILDING ADOBE AIR APPLICATIONS
Developing AIR applications for mobile devices
<requestedDisplayResolution excludeDevices="iPad3">high</requestedDisplayResolution>
The excludeDevices attribute is available in AIR 3.6 and later.
More Help topics
“requestedDisplayResolution” on page 226
Renaun Erickson: Developing for both retina and non-retina iOS screens using AIR 2.6
iOS custom URI schemes
You can register a custom URI scheme to allow your application to be invoked by a link in a web page or another,
native application on the device. To register a URI scheme, add a CFBundleURLTypes key to the InfoAdditions
element. The following example registers a URI scheme named com.example.app to allow an application to be invoked
by URLs with the form: example://foo.
<key>CFBundleURLTypes</key>
<array>
<dict>
<key>CFBundleURLSchemes</key>
<array>
<string>example</string>
</array>
<key>CFBundleURLName</key>
<string>com.example.app</string>
</dict>
</array>
81
When your application is invoked through a custom URI, the NativeApplication object dispatches an invoke event.
The URL of the link, including query parameters, is placed in the
arguments array of the InvokeEvent object. You can
use any number of custom URI schemes.
Note: Links in a StageWebView instance cannot open URLs that use a custom URI scheme.
Note: If another application has already registered a scheme, then your application cannot replace it as the application
registered for that URI scheme.
iOS compatibility filtering
Add entries to a UIRequiredDeviceCapabilities array within the InfoAdditions element if your application should
only be used on devices with specific hardware or software capabilities. For example, the following entry indicates that
an application requires a still camera and a microphone:
<key>UIRequiredDeviceCapabilities</key>
<array>
<string>microphone</string>
<string>still-camera</string>
</array>
If a device lacks the corresponding capability, the application cannot be installed. The capability settings relevant to
AIR applications include:
Last updated 12/7/2015
Page 87

BUILDING ADOBE AIR APPLICATIONS
Developing AIR applications for mobile devices
82
telephony
wifi
sms
still-camera
auto-focus-camera
front-facing-camera
camera-flash
video-camera
accelerometer
location-services
gps
microphone
AIR 2.6+ automatically adds armv7 and opengles-2 to the list of required capabilities.
Note: You do not need to include these capabilities in the application descriptor in order for your application to use them.
Use the UIRequiredDeviceCapabilities settings only to prevent users from installing your application on devices on which
it cannot function properly.
Exiting instead of pausing
When a user switches away from an AIR application it enters the background and pauses. If you want your application
to exit completely instead of pausing, set the
<key>UIApplicationExitsOnSuspend</key>
<true/>
UIApplicationExitsOnSuspend property to YES:
Minimize download size by loading external, asset-only SWFs
AIR 3.7
You can minimize your initial application download size by packaging a subset of the SWFs used by your application
and loading the remaining (asset-only) external SWFs at runtime using the
Loader.load() method. To use this
feature, you must package the application such that ADT moves all ActionScript ByteCode (ABC) from the externally
loaded SWF files to the main application SWF, leaving a SWF file that contains only assets. This is to conform with the
Apple Store’s rule that forbids downloading any code after an application is installed.
ADT does the following to support externally loaded SWFs (also called stripped SWFs):
• Reads the text file specified in the <iPhone> element’s <externalSwfs> subelement to access the line-delimited
list of SWFs to be loaded at execution time:
<iPhone>
...
<externalSwfs>FilewithPathsOfSWFsThatAreToNotToBePackaged.txt</externalSwfs>
</iPhone>
• Transfers the ABC code from each externally loaded SWF to the main executable.
• Omits the externally loaded SWFs from the .ipa file.
• Copies the stripped SWFs to the .remoteStrippedSWFs directory. You host these SWFs on a web server and your
application loads them, as necessary, at runtime.
You indicate the SWF files to be loaded at runtime by specifying their names, one per line in a text file, as the following
example shows:
assets/Level1/Level1.swf
assets/Level2/Level2.swf
assets/Level3/Level3.swf
assets/Level4/Level4.swf
Last updated 12/7/2015
Page 88

BUILDING ADOBE AIR APPLICATIONS
Developing AIR applications for mobile devices
The file path specified is relative to the application descriptor file. Additionally, you must specify these swfs as assets
adt command.
in the
Note: This feature applies to standard packaging only. For fast packaging (using for example, using interpreter, simulator,
or debug) ADT does not create stripped SWFs.
For more information on this feature, including sample code, see External hosting of secondary SWFs for AIR
apps on iOS, a blog post by Adobe engineer Abhinav Dhandh.
Geolocation Support
For Geolocation support, add one of the following key-value pairs to the InfoAdditions element:
<InfoAdditions>
<![CDATA[
<key>NSLocationAlwaysUsageDescription</key>
<string>Sample description to allow geolocation always</string>
<key>NSLocationWhenInUseUsageDescription</key>
<string>Sample description to allow geolocation when application is in
foreground</string>
]]>
</InfoAdditions>
83
Application icons
The following table lists the icon sizes used on each mobile platform:
Icon size Platform
29x29 iOS
36x36 Android
40x40 iOS
48x48 Android, iOS
50x50 iOS
57x57 iOS
58x58 iOS
60x60 iOS
72x72 Android, iOS
75x75 iOS
76x76 iOS
80x80 iOS
87x87 iOS
96x96 Android
100x100 iOS
114x114 iOS
120x120 iOS
144x144 Android, iOS
Last updated 12/7/2015
Page 89

BUILDING ADOBE AIR APPLICATIONS
Developing AIR applications for mobile devices
Icon size Platform
152x152 iOS
180x180 iOS
512x512 iOS
1024x1024 iOS
Specify the path to the icon files in the icon element of the application descriptor file:
<icon>
<image36x36>assets/icon36.png</image36x36>
<image48x48>assets/icon48.png</image48x48>
<image72x72>assets/icon72.png</image72x72>
</icon>
If you do not supply an icon of a given size, the next largest size is used and scaled to fit.
Icons on Android
On Android, the icons specified in the application descriptor are used as the application Launcher icon. The
application Launcher icon should be supplied as a set of 36x36-, 48x48-, 72x72-, 96x96-, and 144x144- pixel PNG
images. These icon sizes are used for low-density, medium-density, and high-density screens, respectively.
84
Icons on iOS
The icons defined in the application descriptor are used in the following places for an iOS application:
• A 29-by-29–pixel icon— Spotlight search icon for lower resolution iPhones/iPods and Settings icon for lower
resolution iPads.
• A 40-by-40–pixel icon— Spotlight search icon for lower resolution iPads.
• A 48-by-48–pixel icon—AIR adds a border to this image and uses it as a 50x50 icon for spotlight search on lower
resolution iPads.
• A 50-by-50–pixel icon— Spotlight search for lower resolution iPads.
• A 57-by-57–pixel icon— Application icon for lower resolution iPhones/iPods.
• A 58-by-58–pixel icon— Spotlight icon for Retina Display iPhones/iPods and Settings icon for Retina Display
iPads.
• A 60-by-60–pixel icon— Application icon for lower resolution iPhones/iPods.
• A 72-by-72–pixel icon (optional)—Application Icon for lower resolution iPads.
• A 76-by-76–pixel icon (optional)—Application Icon for lower resolution iPads.
• A 80-by-80–pixel icon— Spotlight search for high resolution iPhones/iPods/iPads.
• A 100-by-100–pixel icon— Spotlight search for Retina Display iPads.
• A 114-by-114–pixel icon— Application Icon for Retina display iPhone/iPods.
• A 114-by-114–pixel icon— Application Icon for Retina display iPhone/iPods.
• A 120-by-120–pixel icon— Application icon for high resolution iPhones/iPods.
• A 152-by-152–pixel icon— Application icon for high resolution iPads.
Last updated 12/7/2015
Page 90

BUILDING ADOBE AIR APPLICATIONS
Developing AIR applications for mobile devices
• A 512-by-512–pixel icon— Application icon for lower resolution iPhones/iPods/iPads). iTunes displays this icon.
The 512-pixel PNG file is used only for testing development versions of your application When you submit the final
application to the Apple App Store, you submit the 512 image separately, as a JPG file. It is not included in the IPA.
• A 1024-by-1024-pixel icon— Application icon for Retina Display iPhones/iPods/iPads.
iOS adds a glare effect to the icon. You do not need to apply the effect to your source image. To remove this default
glare effect, add the following to the
<InfoAdditions>
<![CDATA[
<key>UIPrerenderedIcon</key>
<true/>
]]>
</InfoAdditions>
InfoAdditions element in the application descriptor file:
Note: On iOS, application metadata is inserted as png metadata into the application icons so that Adobe can track the
number of AIR applications available in the Apple iOS app store. If you do not want your application to identified as an
AIR application because of this icon metadata, you must unpackage the IPA file, remove the icon metadata, and
repackage it. This procedure is described in the article
Opt-out of AIR application analytics for iOS.
More Help topics
“icon” on page 215
85
“imageNxN” on page 216
Android Developers: Icon Design Guidelines
iOS Human Interface Guidelines: Custom Icon and Image Creation Guidelines
iOS launch images
In addition to the application icons, you must also provide at least one launch image named Default.png. Optionally,
you can include separate launch images for different starting orientations, different resolutions (including highresolution retina display and 16:9 aspect ratio), and different devices. You can also include different launch images to
be used when your application is invoked through a URL.
Launch image files are not referenced in the application descriptor and must be placed in the root application
directory. (Do not put the files in a subdirectory.)
File naming scheme
Name the image according to the following scheme:
basename + screen size modifier + urischeme + orientation + scale + device + .png
The basename portion of the file name is the only required part. It is either Default (with a capital D) or the name you
specify using the
The screen size modifier portion designates the size of the screen when it is not one of the standard screen sizes. This
modifier only applies to iPhone and iPod touch models with 16:9 aspect-ratio screens, such as the iPhone 5 and iPod
touch (5th generation). The only supported value for this modifier is
resolution (retina) displays, the screen size modifier is always used with an image that has the
well. The complete default launch image name for these devices is
UILaunchImageFile key in the InfoAdditions element in the application descriptor.
-568h. Since these devices support high-
@2x scale modifier as
Default-568h@2x.png.
The urischeme portion is the string used to identify the URI scheme. This portion only applies if your app supports
one or more custom URL schemes. For example, if your application can be invoked through a link such as
example://foo, use -example as the scheme portion of the launch image file name.
Last updated 12/7/2015
Page 91

BUILDING ADOBE AIR APPLICATIONS
Developing AIR applications for mobile devices
The orientation portion provides a way to specify multiple launch images to use depending on the device orientation
when the application is launched. This portion only applies to images for iPad apps. It can be one of the following
values, referring to the orientation that the device is in when the application starts up:
• -Portrait
• -PortraitUpsideDown
• -Landscape
• -LandscapeLeft
• -LandscapeRight
The scale portion is @2x ( for iPhone 4, iPhone 5 and iPhone 6) or @3x (for iPhone 6 plus) for the launch images used
for high-resolution (retina) displays. (Omit the scale portion entirely for the images used for standard resolution
displays.) For launch images for taller devices such as iPhone 5 and iPod touch (5th generation), you must also specify
the screen size modifier
-528h after the basename portion and before any other portion.
The device portion is used to designate launch images for handheld devices and phones. This portion is used when your
app is a universal app that supports both handheld devices and tablets with a single app binary. The possible value must
be either
~ipad or ~iphone (for both iPhone and iPod Touch).
For iPhone, you can only include portrait aspect-ratio images. However, in case of iPhone 6 plus, landscape images
can also be added. Use 320x480 pixel images for standard resolution devices, 640x960 pixel images for high-resolution
devices, and 640x1136 pixel images for 16:9 aspect-ratio devices such as iPhone 5 and iPod touch (5th generation).
86
For iPad, you include images as follows:
• AIR 3.3 and earlier —Non-full-screen images: Include both landscape (1024x748 for normal resolution, 2048x1496
for high resolution) and portrait (768x1004 for normal resolution, 1536x2008 for high resolution) aspect-ratio
images.
• AIR 3.4 and later — Full-screen images: Include both landscape (1024x768 for normal resolution, 2048x1536 for
high resolution) and portrait (768x1024 for normal resolution, 1536x2048 for high resolution) aspect-ratio images.
Note that when you package a full-screen image for a non-full-screen application, the top 20 pixels (top 40 pixels
for high resolution ) are covered by the status bar. Avoid displaying important information in this area.
Examples
The following table shows an example set of launch images that you could include for a hypothetical application that
supports the widest possible range of devices and orientations, and can be launched with URLs using the
example://
scheme:
File name Image size Usage
Default.png 320 x 480 iPhone, standard resolution
Default@2x.png 640 x 960 iPhone, high resolution
Default-568h@2x.png 640 x 1136 iPhone, high resolution, 16:9 aspect ratio
Default-Portrait.png 768 x 1004 (AIR 3.3 and
earlier)
768 x 1024 (AIR 3.4 and
higher)
iPad, portrait orientation
Last updated 12/7/2015
Page 92

BUILDING ADOBE AIR APPLICATIONS
Developing AIR applications for mobile devices
File name Image size Usage
87
Default-Portrait@2x.png 1536 x 2008 (AIR 3.3 and
earlier)
1536 x 2048 (AIR 3.4 and
higher)
Default-PortraitUpsideDown.png 768 x 1004 (AIR 3.3 and
earlier)768 x 1024 (AIR 3.4
and higher)
Default-PortraitUpsideDown@2x.png 1536 x 2008 (AIR 3.3 and
earlier)1536 x 2048 (AIR
3.4 and higher)
Default-Landscape.png 1024 x 768 iPad, left landscape orientation
Default-LandscapeLeft@2x.png 2048 x 1536 iPad, high resolution, left landscape
Default-LandscapeRight.png 1024 x 768 iPad, right landscape orientation
Default-LandscapeRight@2x.png 2048 x 1536 iPad, high resolution, right landscape
Default-example.png 320 x 480 example:// URL on standard iPhone
Default-example@2x.png 640 x 960 example:// URL on high-resolution iPhone
Default-example~ipad.png 768 x 1004 example:// URL on iPad in portrait
Default-example-Landscape.png 1024 x 768 example:// URL on iPad in landscape
iPad, high resolution, portrait orientation
iPad, upside down portrait orientation
iPad, high resolution, upside down portrait
orientation
orientation
orientation
orientations
orientations
This example only illustrates one approach. You could, for example, use the Default.png image for the iPad, and
specify specific launch images for the iPhone and iPod with
Default~iphone.png and Default@2x~iphone.png.
See also
iOS Application Programming Guide: Application Launch Images
Launch images to package for iOS devices
Devices Resolution (pixels) Launch image name Orientation
iPhones
iPhone 4 (nonretina)
iPhone 4, 4s 640 x 960 Default@2x~iphone.png Potrait
iPhone 5, 5c, 5s 640 x 1136 Default-568h@2x~iphone.png Potrait
iPhone 6 750 x 1334 Default-375w-667h@2x~iphone.png Potrait
iPhone 6+ 1242 x 2208 Default-414w-736h@3x~iphone.png Potrait
iPhone 6+ 2208 x 1242 Default-Landscape-414w-
iPads
iPad 1, 2 768 x 1024 Default-Portrait~ipad.png Potrait
640 x 960 Default~iphone.png Potrait
Landscape
736h@3x~iphone.png
Last updated 12/7/2015
Page 93

BUILDING ADOBE AIR APPLICATIONS
Developing AIR applications for mobile devices
iPad 1, 2 768 x 1024 Default-PortraitUpsideDown~ipad.png Upside down potrait
iPad 1, 2 1024 x 768 Default-Landscape~ipad.png Left landscape
iPad 1, 2 1024 x 768 Default-LandscapeRight~ipad.png Right landscape
iPad 3, Air 1536 x 2048 Default-Portrait@2x~ipad.png Potrait
88
iPad 3, Air 1536 x 2048 Default-
PortraitUpsideDown@2x~ipad.png
iPad 3, Air 2048 x 1536 Default-LandscapeLeft@2x~ipad.png Left landscape
iPad 3, Air 2048 x 1536 Default-LandscapeRight@2x~ipad.png Right landscape
Upside down potrait
Art guidelines
You can create any art you’d like for a launch image, as long as it is the correct dimensions. However, it is often best
to have the image match the initial state of your application. You can create such a launch image by taking a screenshot
of the startup screen of your application:
1 Open your application on the iOS device. When the first screen of the user interface appears, press and hold the
Home button (below the screen). While holding the Home button, press the Power/Sleep button (at the top of the
device). This takes a screenshot and sends it to the Camera Roll.
2 Transfer the image to your development computer by transferring photos from iPhoto or another photo transfer
application.
Do not include text in the launch image if your application is localized into multiple languages. The launch image is
static and the text would not match other languages.
See also
iOS Human Interface Guidelines: Launch images
Ignored settings
Applications on mobile devices ignore application settings that apply to native windows or desktop operating system
features. The ignored settings are:
• allowBrowserInvocation
• customUpdateUI
• fileTypes
• height
• installFolder
• maximizable
• maxSize
• minimizable
• minSize
• programMenuFolder
• resizable
• systemChrome
• title
Last updated 12/7/2015
Page 94

BUILDING ADOBE AIR APPLICATIONS
Developing AIR applications for mobile devices
• transparent
• visible
• width
• x
• y
Packaging a mobile AIR application
Use the ADT -package command to create the application package for an AIR application intended for a mobile
device. The -target parameter specifies the mobile platform for which the package is created.
Android packages
AIR applications on Android use the Android application package format (APK), rather than the AIR package format.
Packages produced by ADT using the APK target type are in a format that can be submitted to the Android Market.
The Android Market does have requirements that submitted apps must meet to be accepted. You should review the
latest requirements before creating your final package. See
Android Developers: Publishing on the Market.
89
Unlike iOS applications, you can use a normal AIR code signing certificate to sign your Android application; however,
to submit an app to the Android Market, the certificate must conform to the Market rules, which require the certificate
to be valid until at least 2033. You can create such a certificate using the ADT -certificate command.
To submit an app to an alternate market that does not allow your app to require an AIR download from the Google
market, you can specify an alternate download URL using the
does not have the required version of the AIR runtime launches your app, they are directed to the specified URL. See
“ADT package command” on page 159 for more information.
By default, ADT packages Android application with shared runtime. So to run the application, user should install
separate AIR runtime on the device.
Note: To force ADT to create an APK that uses captive runtime, use target apk-captive-runtime.
iOS packages
AIR applications on iOS use the iOS package format (IPA), rather than the native AIR format.
Packages produced by ADT using the ipa-app-store target type and the correct code signing certificate and
provisioning profile are in the format that can be submitted to the Apple App Store. Use the ipa-ad-hoc target type to
package an application for ad hoc distribution.
You must use the correct Apple-issued developer certificate to sign your application. Different certificates are used for
creating test builds than are used for the final packaging prior to application submission.
For an example of how to package an iOS application using Ant, see Piotr Walczyszyn: Packaging AIR application for
iOS devices with ADT command and ANT script
-airDownloadURL parameter of ADT. When a user who
Packaging with ADT
The AIR SDK versions 2.6 and later support packaging for both iOS and Android. Before packaging, all your
ActionScript, MXML, and any extension code must be compiled. You must also have a code signing certificate.
For a detailed reference on ADT commands and options see “AIR Developer Tool (ADT)” on page 158.
Last updated 12/7/2015
Page 95

BUILDING ADOBE AIR APPLICATIONS
Developing AIR applications for mobile devices
Android APK packages
Creating an APK package
To create an APK package, use the ADT package command, setting the target type to apk for release builds, apk-debug
for debug builds, or apk-emulator for release-mode builds for running on an emulator.
adt -package
-target apk
-storetype pkcs12 -keystore ../codesign.p12
myApp.apk
myApp-app.xml
myApp.swf icons
Type the entire command on a single line; line breaks in the above example are only present to make it easier to read.
Also, the example assumes that the path to the ADT tool is on your command-line shell’s path definition. (See
environment variables” on page 292 for help.)
You must run the command from the directory containing the application files. The application files in the example
are myApp-app.xml (the application descriptor file), myApp.swf, and an icons directory.
When you run the command as shown, ADT will prompt you for the keystore password. (The password characters
you type are not displayed; just press Enter when you are done typing.)
“Path
90
Note: By default, all AIR Android applications have the air. prefix in the package name. To opt out of this default
behavior, set the environment variable,
AIR_NOANDROIDFLAIR to true , on your computer.
Creating an APK package for an application that uses native extensions
To create an APK package for an application that uses native extensions, add the -extdir option in addition to the
normal packaging options. In case of multiple ANEs that share resources/libraries, the ADT only picks a single
resource/library and ignores other duplicate entries before issuing a warning. This option specifies the directory that
contains the ANE files that the application uses. For example:
adt -package
-target apk
-storetype pkcs12 -keystore ../codesign.p12
myApp.apk
myApp-app.xml
-extdir extensionsDir
myApp.swf icons
Creating an APK package that includes its own version of the AIR runtime
To create an APK package that contains both the application and a captive version of the AIR runtime, use the apk-
captive-runtime target. This option specifies the directory that contains the ANE files that the application uses. For
example:
adt -package
-target apk-captive-runtime
-storetype pkcs12 -keystore ../codesign.p12
myApp.apk
myApp-app.xml
myApp.swf icons
Possible drawbacks of this technique include:
• Critical security fixes are not automatically available to users when Adobe publishes a security patch
• Larger application RAM footprint
Last updated 12/7/2015
Page 96

BUILDING ADOBE AIR APPLICATIONS
Developing AIR applications for mobile devices
Note: When you bundle the runtime, ADT adds the INTERNET and BROADCAST_STICKY permissions to your application.
These permissions are required by the AIR runtime.
Creating a debug APK package
To create a version of the app that you can use with a debugger, use apk-debug as the target and specify connection
options:
adt -package
-target apk-debug
-connect 192.168.43.45
-storetype pkcs12 -keystore ../codesign.p12
myApp.apk
myApp-app.xml
myApp.swf icons
The -connect flag tells the AIR runtime on the device where to connect to a remote debugger over the network. To
debug over USB, you must specify the
adt -package
-target apk-debug
-listen 7936
-storetype pkcs12 -keystore ../codesign.p12
myApp.apk
myApp-app.xml
myApp.swf icons
-listen flag instead, specifying the TCP port to use for the debug connection:
91
For most debugging features to work, you must also compile the application SWFs and SWCs with debugging enabled.
“Debugger connection options” on page 175 for a full description of the -connect and -listen flags.
See
Note: By default, ADT packages a captive copy of the AIR runtime with your Android app while packaging app with apkdebug target. To force ADT to create an APK that uses an external runtime, set the
environment variable to
true.
AIR_ANDROID_SHARED_RUNTIME
On Android, the app must also have permission to access the Internet in order for it to connect to the computer
running the debugger over the network. See
“Android permissions” on page 73.
Creating an APK package for use on an Android emulator
You can use a debug APK package on an Android emulator, but not a release mode package. To create a release mode
APK package for use on an emulator, use the ADT package command, setting the target type to apk-emulator :
adt -package -target apk-emulator -storetype pkcs12 -keystore ../codesign.p12 myApp.apk myAppapp.xml myApp.swf icons
The example assumes that the path to the ADT tool is on your command-line shell’s path definition. (See “Path
environment variables” on page 292 for help.)
Creating an APK package from an AIR or AIRI file
You can create an APK package directly from an existing AIR or AIRI file:
adt -target apk -storetype pkcs12 -keystore ../codesign.p12 myApp.apk myApp.air
The AIR file must use the AIR 2.5 (or later) namespace in the application descriptor file.
Creating an APK package for the Android x86 platform
Begining AIR 14, the argument, -arch, can be used to package an APK for the Android x86 platform. For example:
Last updated 12/7/2015
Page 97

BUILDING ADOBE AIR APPLICATIONS
Developing AIR applications for mobile devices
adt -package
-target apk-debug
-listen 7936
-arch x86
-storetype pkcs12 -keystore ../codesign.p12
myApp.apk
myApp-app.xml
myApp.swf icons
iOS packages
On iOS, ADT converts the SWF file byte code and other source files into a native iOS application.
1 Create the SWF file using Flash Builder, Flash Professional, or a command-line compiler.
2 Open a command shell or a terminal and navigate to the project folder of your iPhone application.
3 Next, use the ADT tool to create the IPA file, using the following syntax:
adt -package
-target [ipa-test | ipa-debug | ipa-app-store | ipa-ad-hoc |
ipa-debug-interpreter | ipa-debug-interpreter-simulator
ipa-test-interpreter | ipa-test-interpreter-simulator]
-provisioning-profile PROFILE_PATH
SIGNING_OPTIONS
TARGET_IPA_FILE
APP_DESCRIPTOR
SOURCE_FILES
-extdir extension-directory
-platformsdk path-to-iossdk or path-to-ios-simulator-sdk
92
Change the reference adt to include the full path to the adt application. The adt application is installed in the bin
subdirectory of the AIR SDK.
Select the -target option that corresponds to the type of iPhone application you want to create:
• -target ipa-test—Choose this option to quickly compile a version of the application for testing on your
developer iPhone. You can also use
interpreter-simulator to run in the iOS Simulator.
ipa-test-interpreter for even faster compilation or ipa-test-
• -target ipa-debug—Choose this option to compile a debug version of the application for testing on your
developer iPhone. With this option, you can use a debug session to receive
trace() output from the iPhone
application.
You can include one of the following -connect options (CONNECT_OPTIONS) to specify the IP address of the
development computer running the debugger:
• -connect—The application will attempt to connect through wifi to a debug session on the development
computer used to compile the application.
• -connect IP_ADDRESS—The application will attempt to connect through wifi to a debug session on the
computer with the specified IP address. For example:
-target ipa-debug -connect 192.0.32.10
• -connect HOST_NAME—The application will attempt to connect through wifi to a debug session on the
computer with the specified host name. For example:
-target ipa-debug -connect bobroberts-mac.example.com
Last updated 12/7/2015
Page 98

BUILDING ADOBE AIR APPLICATIONS
Developing AIR applications for mobile devices
The -connect option is optional. If not specified, the resulting debug application will not attempt to connect to
a hosted debugger. Alternatively, you can specify
described in
“Remote debugging with FDB over USB” on page 101.
-listen instead of -connect to enable USB debugging,
If a debug connection attempt fails, the application presents a dialog asking the user to enter the IP address of
the debugging host machine. A connection attempt can fail if the device is not connected to wifi. It can also occur
if the device is connected but not behind the firewall of the debugging host machine.
You can also use ipa-debug-interpreter for faster compilation or ipa-debug-interpreter-simulator to
run in the iOS Simulator.
For more information, see “Debugging a mobile AIR application” on page 95.
• -target ipa-ad-hoc—Choose this option to create an application for ad hoc deployment. See the Apple
iPhone developer center
• -target ipa-app-store—Choose this option to create a final version of the IPA file for deployment to the
Apple App Store.
Replace the PROFILE_PATH with the path to the provisioning profile file for your application. For more information
on provisioning profiles, see
“iOS setup” on page 63.
Use the -platformsdk option to point to the iOS Simulator SDK when you are building to run your application in
the iOS Simulator.
93
Replace the SIGNING_OPTIONS to reference your iPhone developer certificate and password. Use the following
syntax:
-storetype pkcs12 -keystore P12_FILE_PATH -storepass PASSWORD
Replace P12_FILE_PATH with the path to your P12 certificate file. Replace PASSWORD with the certificate
password. (See the example below.) For more information on the P12 certificate file, see
“Converting a developer
certificate into a P12 keystore file” on page 188.
Note: You can use a self-signed certificate when packaging for the iOS Simulator.
Replace the APP_DESCRIPTOR to reference the application descriptor file.
Replace the SOURCE_FILES to reference the main SWF file of your project followed by any other assets to include.
Include the paths to all icon files you defined in the application settings dialog box in Flash Professional or in a
custom application descriptor file. Also, add the initial screen art file, Default.png.
Use the -extdir extension-directory option to specify the directory that contains the ANE files (native
extensions) that the application uses. If the application uses no native extensions, do not include this option.
Important: Do not create a subdirectory in your application directory named Resources. The runtime automatically
creates a folder with this name to conform to the IPA package structure. Creating your own Resources folder results
in a fatal conflict.
Creating an iOS package for debugging
To create an iOS package for installing on test devices, use the ADT package command, setting the target type to iosdebug. Before running this command, you must have already obtained a development code signing certificate and
provisioning profile from Apple.
Last updated 12/7/2015
Page 99

BUILDING ADOBE AIR APPLICATIONS
Developing AIR applications for mobile devices
adt -package
-target ipa-debug
-storetype pkcs12 -keystore ../AppleDevelopment.p12
-provisioning-profile AppleDevelopment.mobileprofile
-connect 192.168.0.12 | -listen
myApp.ipa
myApp-app.xml
myApp.swf icons Default.png
Note: You can also use ipa-debug-interpreter for faster compilation or ipa-debug-interpreter-simulator to
run in the iOS Simulator
Type the entire command on a single line; line breaks in the above example are only present to make it easier to read.
Also, the example assumes that the path to the ADT tool is on your command-line shell’s path definition. (See
“Path
environment variables” on page 292 for help.)
You must run the command from the directory containing the application files. The application files in the example
are myApp-app.xml (the application descriptor file), myApp.swf, an icons directory, and the Default.png file.
You must sign the application using the correct distribution certificate issued by Apple; other code signing certificates
cannot be used.
Use the -connect option for wifi debugging. The application attempts to initiate a debug session with the Flash
Debugger (FDB) running on the specified IP or host name. Use the
the application and then start FDB, which initiates a debug session for the running application. See
-listen option for USB debugging. You first start
“Connecting to the
Flash debugger” on page 99 for more information.
94
Creating an iOS package for Apple App Store submission
To create an iOS package for submission to the Apple App store, use the ADT package command, setting the target
type to ios-app-store. Before running this command, you must have already obtained a distribution code signing
certificate and provisioning profile from Apple.
adt -package
-target ipa-app-store
-storetype pkcs12 -keystore ../AppleDistribution.p12
-provisioning-profile AppleDistribution.mobileprofile
myApp.ipa
myApp-app.xml
myApp.swf icons Default.png
Type the entire command on a single line; line breaks in the above example are only present to make it easier to read.
Also, the example assumes that the path to the ADT tool is on your command-line shell’s path definition. (See
“Path
environment variables” on page 292 for help.)
You must run the command from the directory containing the application files. The application files in the example
are myApp-app.xml (the application descriptor file), myApp.swf, an icons directory, and the Default.png file.
You must sign the application using the correct distribution certificate issued by Apple; other code signing certificates
cannot be used.
Important: Apple requires that you use the Apple Application Loader program in order to upload applications to the App
Store. Apple only publishes Application Loader for Mac OS X. Thus, while you can develop an AIR application for the
iPhone using a Windows computer, you must have access to a computer running OS X (version 10.5.3, or later) to submit
the application to the App Store. You can get the Application Loader program from the Apple iOS Developer Center.
Last updated 12/7/2015
Page 100

BUILDING ADOBE AIR APPLICATIONS
Developing AIR applications for mobile devices
Creating an iOS package for ad hoc distribution
To create an iOS package for ad hoc distribution, use the ADT package command, setting the target type to ios-ad-hoc.
Before running this command, you must have already obtained the appropriate ad hoc distribution code signing
certificate and provisioning profile from Apple.
adt -package
-target ipa-ad-hoc
-storetype pkcs12 -keystore ../AppleDistribution.p12
-provisioning-profile AppleDistribution.mobileprofile
myApp.ipa
myApp-app.xml
myApp.swf icons Default.png
Type the entire command on a single line; line breaks in the above example are only present to make it easier to read.
Also, the example assumes that the path to the ADT tool is on your command-line shell’s path definition. (See
“Path
environment variables” on page 292 for help.)
You must run the command from the directory containing the application files. The application files in the example
are myApp-app.xml (the application descriptor file), myApp.swf, an icons directory, and the Default.png file.
You must sign the application using the correct distribution certificate issued by Apple; other code signing certificates
cannot be used.
95
Creating an iOS package for an application that uses native extensions
To create an iOS package for an application that uses native extensions, use the ADT package command with the -
extdir option. Use the ADT command as appropriate for the target (ipa-app-store, ipa-debug, ipa-ad-hoc,
ipa-test). For example:
adt -package
-target ipa-ad-hoc
-storetype pkcs12 -keystore ../AppleDistribution.p12
-provisioning-profile AppleDistribution.mobileprofile
myApp.ipa
myApp-app.xml
-extdir extensionsDir
myApp.swf icons Default.png
Type the entire command on a single line; line breaks in the above example are only present to make it easier to read.
Regarding native extensions, the example assumes that the directory named extensionsDir is in the directory in
which you run the command. The
extensionsDir directory contains the ANE files that the application uses.
Debugging a mobile AIR application
You can debug your mobile AIR app in several ways. The simplest way to uncover application logic issues is to debug
on your development computer using ADL or the iOS Simulator. You can also install your application on a device and
debug remotely with the Flash debugger running on a desktop computer.
Last updated 12/7/2015
 Loading...