

Page 1

Adobe® Aer Eects® CC
Help
June 2014
Page 2

Legal notices
Legal notices
For legal notices, see http://help.adobe.com/en_US/legalnotices/index.html.
Last updated 6/14/2014
Page 3

Contents
Chapter 1: What's new
New features summary
Chapter 2: Workspace and workflow
Planning and setup
Setup and installation
General user interface items
Workflows
Dynamic Link and After Effects
Working with After Effects and other applications
Keyboard shortcuts reference
Workspaces, panels, and viewers
Modify keyboard shortcuts
Preferences
Sync Settings
After Effects keyboard shortcuts
. . . . . . . . . . . . . . . . . . . . . . . . . . . . . . . . . . . . . . . . . . . . . . . . . . . . . . . . . . . . . . . . . . . . . . . . . . . . . . . . . . . . . . . . . . . . . . . . . . . . . . . . . . . . 15
. . . . . . . . . . . . . . . . . . . . . . . . . . . . . . . . . . . . . . . . . . . . . . . . . . . . . . . . . . . . . . . . . . . . . . . . . . . . . . . . . . . . . . . . . . . . . . . . . . . . . . . . . . 49
. . . . . . . . . . . . . . . . . . . . . . . . . . . . . . . . . . . . . . . . . . . . . . . . . . . . . . . . . . . . . . . . . . . . . . . . . . . . . . . . . . . . . . . . . . . . . . . . . . . . . . . . . 52
. . . . . . . . . . . . . . . . . . . . . . . . . . . . . . . . . . . . . . . . . . . . . . . . . . . . . . . . . . . . . . . . . . . . . . . . . . . . . . . . . . . . . . . . . . . . . . . . .1
. . . . . . . . . . . . . . . . . . . . . . . . . . . . . . . . . . . . . . . . . . . . . . . . . . . . . . . . . . . . . . . . . . . . . . . . . . . . . . . . . . . . . . . . . . . . . . . . . . . . .6
. . . . . . . . . . . . . . . . . . . . . . . . . . . . . . . . . . . . . . . . . . . . . . . . . . . . . . . . . . . . . . . . . . . . . . . . . . . . . . . . . . . . . . . . . . . . . . . . 10
. . . . . . . . . . . . . . . . . . . . . . . . . . . . . . . . . . . . . . . . . . . . . . . . . . . . . . . . . . . . . . . . . . . . . . . . . . . . . . . . . . . . . . . . . . 11
. . . . . . . . . . . . . . . . . . . . . . . . . . . . . . . . . . . . . . . . . . . . . . . . . . . . . . . . . . . . . . . . . . . . . . . . . . . . . . . . . . . . . . . . 17
. . . . . . . . . . . . . . . . . . . . . . . . . . . . . . . . . . . . . . . . . . . . . . . . . . . . . . . . . . . . . . . . . . . . . . . . . . . . . . . . . . . . . . . . . 25
. . . . . . . . . . . . . . . . . . . . . . . . . . . . . . . . . . . . . . . . . . . . . . . . . . . . . . . . . . . . . . . . . . . . . . . . . . . . . . . . . . . . . . 43
. . . . . . . . . . . . . . . . . . . . . . . . . . . . . . . . . . . . . . . . . . . . . . . . . . . . . . . . . . . . . . . . . . . . . . . . . . . . . . . . . . . . . . . . . . . 49
. . . . . . . . . . . . . . . . . . . . . . . . . . . . . . . . . . . . . . . . . . . . . . . . . . . . . . . . . . . . . . . . . . . . . . . . . . . . . . . . . . . . . . 55
iii
. . . . . . . . . . . . . . . . . . . . . . . . . . . . . . . . . . . . . . . . . . . . . . . . . . . . . . . . . . . . . . . . . . . . . 20
Chapter 3: Projects and compositions
Projects
Precomposing, nesting, and pre-rendering
Composition basics
Timecode and time display units
Chapter 4: Importing footage
Importing and interpreting footage items
Importing and interpreting video and audio
Preparing and importing 3D imagefiles
Working with footage items
CINEMA 4D and Cineware
Importing from After Effects and Adobe Premiere Pro
Preparing and importing still images
Chapter 5: Layers and properties
Creating layers
Selecting and arranging layers
Managing layers
Layer properties
Blending modes and layer styles
3D layers
Cameras, lights, and points of interest
. . . . . . . . . . . . . . . . . . . . . . . . . . . . . . . . . . . . . . . . . . . . . . . . . . . . . . . . . . . . . . . . . . . . . . . . . . . . . . . . . . . . . . . . . . . . . . . . . . . . . . . . . . . . . . 56
. . . . . . . . . . . . . . . . . . . . . . . . . . . . . . . . . . . . . . . . . . . . . . . . . . . . . . . . . . . . . . . . . . . . . . . . . . . . 59
. . . . . . . . . . . . . . . . . . . . . . . . . . . . . . . . . . . . . . . . . . . . . . . . . . . . . . . . . . . . . . . . . . . . . . . . . . . . . . . . . . . . . . . . . . . . . . . . . . . 65
. . . . . . . . . . . . . . . . . . . . . . . . . . . . . . . . . . . . . . . . . . . . . . . . . . . . . . . . . . . . . . . . . . . . . . . . . . . . . . . . . . . . . . 71
. . . . . . . . . . . . . . . . . . . . . . . . . . . . . . . . . . . . . . . . . . . . . . . . . . . . . . . . . . . . . . . . . . . . . . . . . . . . . 74
. . . . . . . . . . . . . . . . . . . . . . . . . . . . . . . . . . . . . . . . . . . . . . . . . . . . . . . . . . . . . . . . . . . . . . . . . . 88
. . . . . . . . . . . . . . . . . . . . . . . . . . . . . . . . . . . . . . . . . . . . . . . . . . . . . . . . . . . . . . . . . . . . . . . . . . . . . . . 94
. . . . . . . . . . . . . . . . . . . . . . . . . . . . . . . . . . . . . . . . . . . . . . . . . . . . . . . . . . . . . . . . . . . . . . . . . . . . . . . . . . . . . . . . . . 97
. . . . . . . . . . . . . . . . . . . . . . . . . . . . . . . . . . . . . . . . . . . . . . . . . . . . . . . . . . . . . . . . . . . . . . . . . . . . . . . . . . . . . . . . . . . 103
. . . . . . . . . . . . . . . . . . . . . . . . . . . . . . . . . . . . . . . . . . . . . . . . . . . . . . . . . . . . . . . . . . . . . . . . . . . . . . . . . 113
. . . . . . . . . . . . . . . . . . . . . . . . . . . . . . . . . . . . . . . . . . . . . . . . . . . . . . . . . . . . . . . . . . . . . . . . . . . . . . . . . . . . . . . . . . . . . . . . . . . . . . 123
. . . . . . . . . . . . . . . . . . . . . . . . . . . . . . . . . . . . . . . . . . . . . . . . . . . . . . . . . . . . . . . . . . . . . . . . . . . . . . . . . . . . . . . 128
. . . . . . . . . . . . . . . . . . . . . . . . . . . . . . . . . . . . . . . . . . . . . . . . . . . . . . . . . . . . . . . . . . . . . . . . . . . . . . . . . . . . . . . . . . . . . . . . . . . . . 138
. . . . . . . . . . . . . . . . . . . . . . . . . . . . . . . . . . . . . . . . . . . . . . . . . . . . . . . . . . . . . . . . . . . . . . . . . . . . . . . . . . . . . . . . . . . . . . . . . . . . . 143
. . . . . . . . . . . . . . . . . . . . . . . . . . . . . . . . . . . . . . . . . . . . . . . . . . . . . . . . . . . . . . . . . . . . . . . . . . . . . . . . . . . . . 154
. . . . . . . . . . . . . . . . . . . . . . . . . . . . . . . . . . . . . . . . . . . . . . . . . . . . . . . . . . . . . . . . . . . . . . . . . . . . . . . . . . . . . . . . . . . . . . . . . . . . . . . . . . . . 162
. . . . . . . . . . . . . . . . . . . . . . . . . . . . . . . . . . . . . . . . . . . . . . . . . . . . . . . . . . . . . . . . . . . . . . . . . . . . . . . . 167
. . . . . . . . . . . . . . . . . . . . . . . . . . . . . . . . . . . . . . . . . . . . . . . . . . . . . . . . . . . . . . . . 109
Last updated 6/14/2014
Page 4

AFTER EFFECTS
Content s
Chapter 6: Views and previews
Previewing . . . . . . . . . . . . . . . . . . . . . . . . . . . . . . . . . . . . . . . . . . . . . . . . . . . . . . . . . . . . . . . . . . . . . . . . . . . . . . . . . . . . . . . . . . . . . . . . . . . . . . . . . . 179
Modifying and using views
Video preview with Mercury Transmit
. . . . . . . . . . . . . . . . . . . . . . . . . . . . . . . . . . . . . . . . . . . . . . . . . . . . . . . . . . . . . . . . . . . . . . . . . . . . . . . . . . . . . . . . . . 189
. . . . . . . . . . . . . . . . . . . . . . . . . . . . . . . . . . . . . . . . . . . . . . . . . . . . . . . . . . . . . . . . . . . . . . . . . . . . . . . . 194
Chapter 7: Animation and Keyframes
Animation basics
Setting, selecting, and deleting keyframes
Editing, moving, and copying keyframes
Assorted animation tools
Tracking and stabilizing motion
Speed
. . . . . . . . . . . . . . . . . . . . . . . . . . . . . . . . . . . . . . . . . . . . . . . . . . . . . . . . . . . . . . . . . . . . . . . . . . . . . . . . . . . . . . . . . . . . . . . . . . . . . . . . . . . . . . . 234
Keyframe interpolation
Time-stretching and time-remapping
Animating with Puppet tools
Tracking 3D camera movement
. . . . . . . . . . . . . . . . . . . . . . . . . . . . . . . . . . . . . . . . . . . . . . . . . . . . . . . . . . . . . . . . . . . . . . . . . . . . . . . . . . . . . . . . . . . . . . . . . . . . 197
. . . . . . . . . . . . . . . . . . . . . . . . . . . . . . . . . . . . . . . . . . . . . . . . . . . . . . . . . . . . . . . . . . . . . . . . . . . 201
. . . . . . . . . . . . . . . . . . . . . . . . . . . . . . . . . . . . . . . . . . . . . . . . . . . . . . . . . . . . . . . . . . . . . . . . . . . . . 204
. . . . . . . . . . . . . . . . . . . . . . . . . . . . . . . . . . . . . . . . . . . . . . . . . . . . . . . . . . . . . . . . . . . . . . . . . . . . . . . . . . . . . . . . . . . . 209
. . . . . . . . . . . . . . . . . . . . . . . . . . . . . . . . . . . . . . . . . . . . . . . . . . . . . . . . . . . . . . . . . . . . . . . . . . . . . . . . . . . . . . 217
. . . . . . . . . . . . . . . . . . . . . . . . . . . . . . . . . . . . . . . . . . . . . . . . . . . . . . . . . . . . . . . . . . . . . . . . . . . . . . . . . . . . . . . . . . . . . . 242
. . . . . . . . . . . . . . . . . . . . . . . . . . . . . . . . . . . . . . . . . . . . . . . . . . . . . . . . . . . . . . . . . . . . . . . . . . . . . . . . 248
. . . . . . . . . . . . . . . . . . . . . . . . . . . . . . . . . . . . . . . . . . . . . . . . . . . . . . . . . . . . . . . . . . . . . . . . . . . . . . . . . . . . . . . . 257
. . . . . . . . . . . . . . . . . . . . . . . . . . . . . . . . . . . . . . . . . . . . . . . . . . . . . . . . . . . . . . . . . . . . . . . . . . . . . . . . . . . . . . 264
Chapter 8: Color
Color basics
Color management
. . . . . . . . . . . . . . . . . . . . . . . . . . . . . . . . . . . . . . . . . . . . . . . . . . . . . . . . . . . . . . . . . . . . . . . . . . . . . . . . . . . . . . . . . . . . . . . . . . . . . . . . . 268
. . . . . . . . . . . . . . . . . . . . . . . . . . . . . . . . . . . . . . . . . . . . . . . . . . . . . . . . . . . . . . . . . . . . . . . . . . . . . . . . . . . . . . . . . . . . . . . . . . 278
iv
Chapter 9: Drawing, painting, and paths
Paint tools: Brush, Clone Stamp, and Eraser
Overview of shape layers, pat
Creating shapes and masks
hs, and vector graphics . . . . . . . . . . . . . . . . . . . . . . . . . . . . . . . . . . . . . . . . . . . . . . . . . . . . . . . . . . . . . . . . . 299
. . . . . . . . . . . . . . . . . . . . . . . . . . . . . . . . . . . . . . . . . . . . . . . . . . . . . . . . . . . . . . . . . . . . . . . . . . . . . . . . . . . . . . . . . . 305
Managing and animating shape paths and masks
Shape attributes, paint operations, and path op
Mask Tracking
. . . . . . . . . . . . . . . . . . . . . . . . . . . . . . . . . . . . . . . . . . . . . . . . . . . . . . . . . . . . . . . . . . . . . . . . . . . . . . . . . . . . . . . . . . . . . . . . . . . . . . . 334
Compositing Options and Mask Reference
. . . . . . . . . . . . . . . . . . . . . . . . . . . . . . . . . . . . . . . . . . . . . . . . . . . . . . . . . . . . . . . . . . . . . . . . . . . 290
. . . . . . . . . . . . . . . . . . . . . . . . . . . . . . . . . . . . . . . . . . . . . . . . . . . . . . . . . . . . . . . . . . . . 316
erations for shape layers . . . . . . . . . . . . . . . . . . . . . . . . . . . . . . . . . . . . . . . . . . . . . . 327
. . . . . . . . . . . . . . . . . . . . . . . . . . . . . . . . . . . . . . . . . . . . . . . . . . . . . . . . . . . . . . . . . . . . . . . . . . . 335
Chapter 10: Text
Li ve Te xt Tem plates
Creating and editing text layers
Formatting characters and the Character panel
Examples and resources for text animation
Animating text
Extruding text and shape layers
Formatting paragraphs and the Paragraph panel
. . . . . . . . . . . . . . . . . . . . . . . . . . . . . . . . . . . . . . . . . . . . . . . . . . . . . . . . . . . . . . . . . . . . . . . . . . . . . . . . . . . . . . . . . . . . . . . . . . 338
. . . . . . . . . . . . . . . . . . . . . . . . . . . . . . . . . . . . . . . . . . . . . . . . . . . . . . . . . . . . . . . . . . . . . . . . . . . . . . . . . . . . . . 339
. . . . . . . . . . . . . . . . . . . . . . . . . . . . . . . . . . . . . . . . . . . . . . . . . . . . . . . . . . . . . . . . . . . . . . . 345
. . . . . . . . . . . . . . . . . . . . . . . . . . . . . . . . . . . . . . . . . . . . . . . . . . . . . . . . . . . . . . . . . . . . . . . . . . . 351
. . . . . . . . . . . . . . . . . . . . . . . . . . . . . . . . . . . . . . . . . . . . . . . . . . . . . . . . . . . . . . . . . . . . . . . . . . . . . . . . . . . . . . . . . . . . . . . . . . . . . . 358
. . . . . . . . . . . . . . . . . . . . . . . . . . . . . . . . . . . . . . . . . . . . . . . . . . . . . . . . . . . . . . . . . . . . . . . . . . . . . . . . . . . . . . 369
. . . . . . . . . . . . . . . . . . . . . . . . . . . . . . . . . . . . . . . . . . . . . . . . . . . . . . . . . . . . . . . . . . . . . 374
Chapter 11: Transparency and compositing
Roto Brush, Refine Edge, and Refine Matte effects | CC
Alpha channels, masks, and mattes
. . . . . . . . . . . . . . . . . . . . . . . . . . . . . . . . . . . . . . . . . . . . . . . . . . . . . . . . . . . . . . . . . . . . . . . . . . . . . . . . . . 388
Compositing and transparency overview and resources
Keying
. . . . . . . . . . . . . . . . . . . . . . . . . . . . . . . . . . . . . . . . . . . . . . . . . . . . . . . . . . . . . . . . . . . . . . . . . . . . . . . . . . . . . . . . . . . . . . . . . . . . . . . . . . . . . . 401
. . . . . . . . . . . . . . . . . . . . . . . . . . . . . . . . . . . . . . . . . . . . . . . . . . . . . . . . . . . . . . . . 377
. . . . . . . . . . . . . . . . . . . . . . . . . . . . . . . . . . . . . . . . . . . . . . . . . . . . . . . . . . . . . . 399
Chapter 12: Effects and animation presets
Effects and animation presets overview
Detail-preserving Upscale effect
. . . . . . . . . . . . . . . . . . . . . . . . . . . . . . . . . . . . . . . . . . . . . . . . . . . . . . . . . . . . . . . . . . . . . . . . . . . . . . 405
. . . . . . . . . . . . . . . . . . . . . . . . . . . . . . . . . . . . . . . . . . . . . . . . . . . . . . . . . . . . . . . . . . . . . . . . . . . . . . . . . . . . . 433
Last updated 6/14/2014
Page 5

AFTER EFFECTS
Content s
Effect list . . . . . . . . . . . . . . . . . . . . . . . . . . . . . . . . . . . . . . . . . . . . . . . . . . . . . . . . . . . . . . . . . . . . . . . . . . . . . . . . . . . . . . . . . . . . . . . . . . . . . . . . . . . . 433
Audio effects . . . . . . . . . . . . . . . . . . . . . . . . . . . . . . . . . . . . . . . . . . . . . . . . . . . . . . . . . . . . . . . . . . . . . . . . . . . . . . . . . . . . . . . . . . . . . . . . . . . . . . . . 442
Blur and Sharpen effects
Channel effects
. . . . . . . . . . . . . . . . . . . . . . . . . . . . . . . . . . . . . . . . . . . . . . . . . . . . . . . . . . . . . . . . . . . . . . . . . . . . . . . . . . . . . . . . . . . . . . . . . . . . . . 453
Generate effects
Simulation effects
Tex t eff ects
. . . . . . . . . . . . . . . . . . . . . . . . . . . . . . . . . . . . . . . . . . . . . . . . . . . . . . . . . . . . . . . . . . . . . . . . . . . . . . . . . . . . . . . . . . . . . . . . . . . . . . . . . . 508
Perspective effects
3D Channel effects
Stylize effects
Distort effects
. . . . . . . . . . . . . . . . . . . . . . . . . . . . . . . . . . . . . . . . . . . . . . . . . . . . . . . . . . . . . . . . . . . . . . . . . . . . . . . . . . . . . . . . . . . . . . . . . . . . . . . 520
. . . . . . . . . . . . . . . . . . . . . . . . . . . . . . . . . . . . . . . . . . . . . . . . . . . . . . . . . . . . . . . . . . . . . . . . . . . . . . . . . . . . . . . . . . . . . . . . . . . . . . . 531
Noise and Grain effects
Matte effects
. . . . . . . . . . . . . . . . . . . . . . . . . . . . . . . . . . . . . . . . . . . . . . . . . . . . . . . . . . . . . . . . . . . . . . . . . . . . . . . . . . . . . . . . . . . . . . . . . . . . . . . . 569
Color Correction effects
Obsolete effects
The Rolling Shutter Repair effect
Keying effects
Utility effects
. . . . . . . . . . . . . . . . . . . . . . . . . . . . . . . . . . . . . . . . . . . . . . . . . . . . . . . . . . . . . . . . . . . . . . . . . . . . . . . . . . . . . . . . . . . . . . . . . . . . . . . 594
. . . . . . . . . . . . . . . . . . . . . . . . . . . . . . . . . . . . . . . . . . . . . . . . . . . . . . . . . . . . . . . . . . . . . . . . . . . . . . . . . . . . . . . . . . . . . . . . . . . . . . . . 606
Transition effec ts
. . . . . . . . . . . . . . . . . . . . . . . . . . . . . . . . . . . . . . . . . . . . . . . . . . . . . . . . . . . . . . . . . . . . . . . . . . . . . . . . . . . . . . . . . . . . . 446
. . . . . . . . . . . . . . . . . . . . . . . . . . . . . . . . . . . . . . . . . . . . . . . . . . . . . . . . . . . . . . . . . . . . . . . . . . . . . . . . . . . . . . . . . . . . . . . . . . . . . 459
. . . . . . . . . . . . . . . . . . . . . . . . . . . . . . . . . . . . . . . . . . . . . . . . . . . . . . . . . . . . . . . . . . . . . . . . . . . . . . . . . . . . . . . . . . . . . . . . . . . 476
. . . . . . . . . . . . . . . . . . . . . . . . . . . . . . . . . . . . . . . . . . . . . . . . . . . . . . . . . . . . . . . . . . . . . . . . . . . . . . . . . . . . . . . . . . . . . . . . . . 510
. . . . . . . . . . . . . . . . . . . . . . . . . . . . . . . . . . . . . . . . . . . . . . . . . . . . . . . . . . . . . . . . . . . . . . . . . . . . . . . . . . . . . . . . . . . . . . . . . . 514
. . . . . . . . . . . . . . . . . . . . . . . . . . . . . . . . . . . . . . . . . . . . . . . . . . . . . . . . . . . . . . . . . . . . . . . . . . . . . . . . . . . . . . . . . . . . . . 548
. . . . . . . . . . . . . . . . . . . . . . . . . . . . . . . . . . . . . . . . . . . . . . . . . . . . . . . . . . . . . . . . . . . . . . . . . . . . . . . . . . . . . . . . . . . . . . 570
. . . . . . . . . . . . . . . . . . . . . . . . . . . . . . . . . . . . . . . . . . . . . . . . . . . . . . . . . . . . . . . . . . . . . . . . . . . . . . . . . . . . . . . . . . . . . . . . . . . . . 587
. . . . . . . . . . . . . . . . . . . . . . . . . . . . . . . . . . . . . . . . . . . . . . . . . . . . . . . . . . . . . . . . . . . . . . . . . . . . . . . . . . . . . 594
. . . . . . . . . . . . . . . . . . . . . . . . . . . . . . . . . . . . . . . . . . . . . . . . . . . . . . . . . . . . . . . . . . . . . . . . . . . . . . . . . . . . . . . . . . . . . . . . . . . . 611
v
Chapter 13: Markers
Layer markers and composition markers
XMP metadata
. . . . . . . . . . . . . . . . . . . . . . . . . . . . . . . . . . . . . . . . . . . . . . . . . . . . . . . . . . . . . . . . . . . . . . . . . . . . . . . . . . . . . . . . . . . . . . . . . . . . . . 622
. . . . . . . . . . . . . . . . . . . . . . . . . . . . . . . . . . . . . . . . . . . . . . . . . . . . . . . . . . . . . . . . . . . . . . . . . . . . . 618
Chapter 14: Memory, storage, performance
Improve performance
GPU (CUDA, OpenGL) features
Memory and storage
. . . . . . . . . . . . . . . . . . . . . . . . . . . . . . . . . . . . . . . . . . . . . . . . . . . . . . . . . . . . . . . . . . . . . . . . . . . . . . . . . . . . . . . . . . . . . . . 628
. . . . . . . . . . . . . . . . . . . . . . . . . . . . . . . . . . . . . . . . . . . . . . . . . . . . . . . . . . . . . . . . . . . . . . . . . . . . . . . . . . . . . . . 631
. . . . . . . . . . . . . . . . . . . . . . . . . . . . . . . . . . . . . . . . . . . . . . . . . . . . . . . . . . . . . . . . . . . . . . . . . . . . . . . . . . . . . . . . . . . . . . . . 633
Chapter 15: Expressions and automation
Plug-ins
Automation
Expression basics
Expression language reference
Expression examples
Scripts
. . . . . . . . . . . . . . . . . . . . . . . . . . . . . . . . . . . . . . . . . . . . . . . . . . . . . . . . . . . . . . . . . . . . . . . . . . . . . . . . . . . . . . . . . . . . . . . . . . . . . . . . . . . . . 644
. . . . . . . . . . . . . . . . . . . . . . . . . . . . . . . . . . . . . . . . . . . . . . . . . . . . . . . . . . . . . . . . . . . . . . . . . . . . . . . . . . . . . . . . . . . . . . . . . . . . . . . . . 646
. . . . . . . . . . . . . . . . . . . . . . . . . . . . . . . . . . . . . . . . . . . . . . . . . . . . . . . . . . . . . . . . . . . . . . . . . . . . . . . . . . . . . . . . . . . . . . . . . . . . 646
. . . . . . . . . . . . . . . . . . . . . . . . . . . . . . . . . . . . . . . . . . . . . . . . . . . . . . . . . . . . . . . . . . . . . . . . . . . . . . . . . . . . . . . 660
. . . . . . . . . . . . . . . . . . . . . . . . . . . . . . . . . . . . . . . . . . . . . . . . . . . . . . . . . . . . . . . . . . . . . . . . . . . . . . . . . . . . . . . . . . . . . . . . 683
. . . . . . . . . . . . . . . . . . . . . . . . . . . . . . . . . . . . . . . . . . . . . . . . . . . . . . . . . . . . . . . . . . . . . . . . . . . . . . . . . . . . . . . . . . . . . . . . . . . . . . . . . . . . . . 688
Chapter 16: Rendering and Exporting
Basics of rendering an
Converting movies
d exporting . . . . . . . . . . . . . . . . . . . . . . . . . . . . . . . . . . . . . . . . . . . . . . . . . . . . . . . . . . . . . . . . . . . . . . . . . . . . . . . . . . . 691
. . . . . . . . . . . . . . . . . . . . . . . . . . . . . . . . . . . . . . . . . . . . . . . . . . . . . . . . . . . . . . . . . . . . . . . . . . . . . . . . . . . . . . . . . . . . . . . . . . 708
Export an After Effects project as an Adobe Premiere Pro project
Rendering and exporting still images and still-image sequences
Automated rendering and network rendering
. . . . . . . . . . . . . . . . . . . . . . . . . . . . . . . . . . . . . . . . . . . . . . . . . . . . . . . . . . . . . . . . . . . . . . . . 715
Rendering and exporting for Flash Professional and Flash Player
. . . . . . . . . . . . . . . . . . . . . . . . . . . . . . . . . . . . . . . . . . . . . . . . . . . . . . 713
. . . . . . . . . . . . . . . . . . . . . . . . . . . . . . . . . . . . . . . . . . . . . . . . . . . . . . 713
. . . . . . . . . . . . . . . . . . . . . . . . . . . . . . . . . . . . . . . . . . . . . . . . . . . . . . 722
Chapter 17: System Requirements
System requirements for After Effects
. . . . . . . . . . . . . . . . . . . . . . . . . . . . . . . . . . . . . . . . . . . . . . . . . . . . . . . . . . . . . . . . . . . . . . . . . . . . . . . . 730
Last updated 6/14/2014
Page 6
Chapter 1: What's new
New features summary
This document describes the new and updated features in the June 2014 release of After Effects CC.
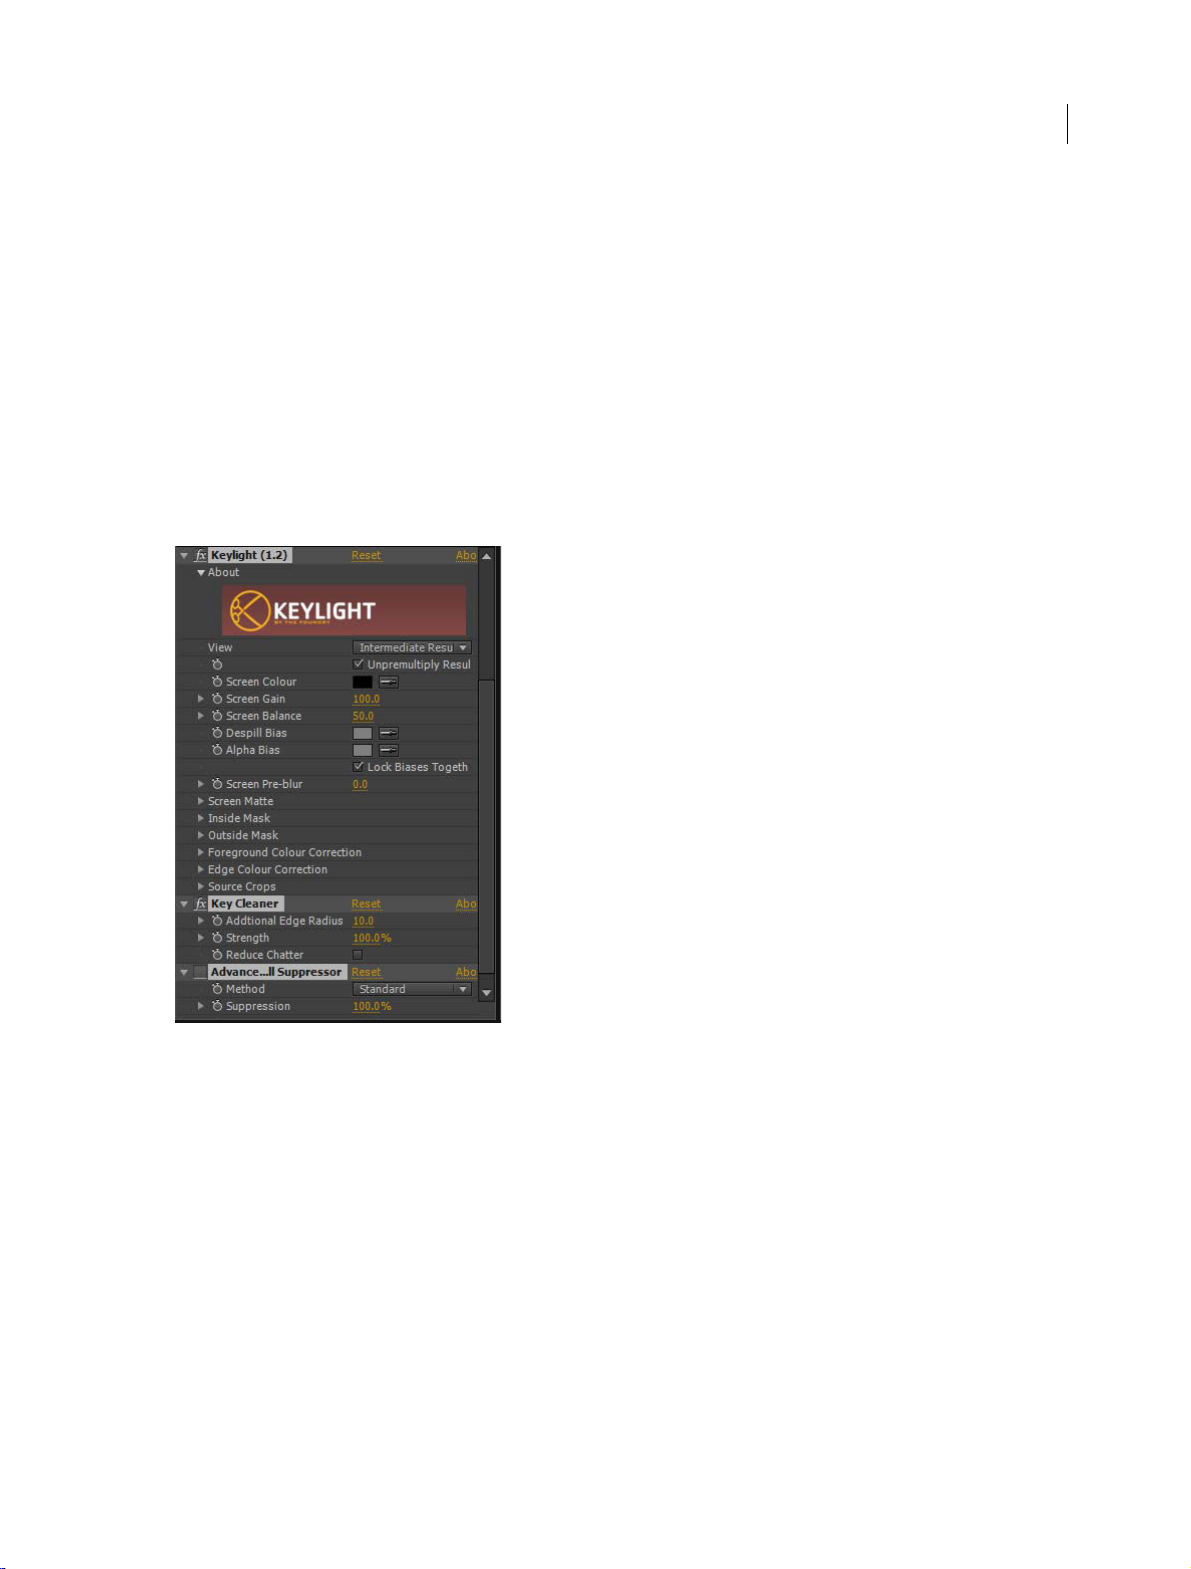
Key Cleaner effect and Advanced Spill Suppressor effect
1
The Key Cleaner effect recovers alpha-channel detail from a scene keyed by a typical keying effect, including recovering
detail lost due to compression artifacts.
The Advanced Spill Suppressor effect removes color spill on a foreground subject from a colored background used for
color ke
1 Standard - The Standard method is simpler, automatically detects the dominant key color, and requires less user
2 Ultra - The Ultra method is based on the spill suppression in the Ultra Key effect in Premiere Pro. See the Ultra Key
Starting with the 2014 version of After Effects, the Spill Sup
category. Users are recommended to use the Advanced Spill Suppressor effect instead.
An easy way of applying these effects is by using the Keylight + Key Cleaner + Spill Suppressor animation preset. See
the K
Note: U
RG
ying. It has two methods for spill suppression:
input.
section in Premiere Pro for details about the Ultra Key.
pressor effect has been moved to the Obsolete effects
ey Cleaner and Advanced Spill Suppressor effectfor details on using these effects.
se the new Key Cleaner and Advanced Spill Suppressor effects with any keying effect that can provide the original
B data as input. The new effects are found under the Effects > Keying menu.
Last updated 6/14/2014
Page 7

What's new
Compositing Options (including effect masks)
The Compositing Options property group for each effect includes a new Effect Opacity property, which provides
similar functionality as the Blend With Original compositing to every effect. The Effect Opacity allows you to blend
between the effect results and the image without applying the effect. You can precisely apply any effect to a particular
area of an image by masking and matting the desired area.
You can also restrict the area of effects applied to a layer using a new mask. The Mask Reference option is found under
th
e C
ompositing Options under each effect in the Timeline panel. Click the plus sign next to the Compositing Options
heading and choose a mask listed under the Mask Reference menu.
See the Compositing Options and Mask Referencearticle for detailed information.
Importing masks from Premiere Pro
When you import a clip from Premiere Pro that includes masks, the masks from Premiere Pro are preserved and
converted to After Effects masks. This works for all methods of importing clips from Premiere Pro including:
• Using the Replace With After Effects Composition command in Premiere Pro
• Copying and pasting the sequence from Premiere Pro to After Effects
• Importing a Premiere Pro project into After Effects.
The mask shape, feather, opacity, expansion, and inversion properties are all preserved and the keyframes on those
pro
perties are also included.
2
However some After Effects mask attributes, such as variable-width mask feathering, will not get imported into
Prem
iere Pro.
Masks are either effect masks or layer masks and the mask mode is always set to Add when the mask is imported from
Premiere Pro into After Effects.
Live text templates - Edit After Effects text templates in Premiere Pro
You can create text template compositions in After Effects wherein the source text can be edited in Premiere Pro. Any
composition with text layers can be used as a text template, and any unlocked text layers in that composition can be
edited in Premiere Pro.
See the Live Tex t Te mplates for more information.
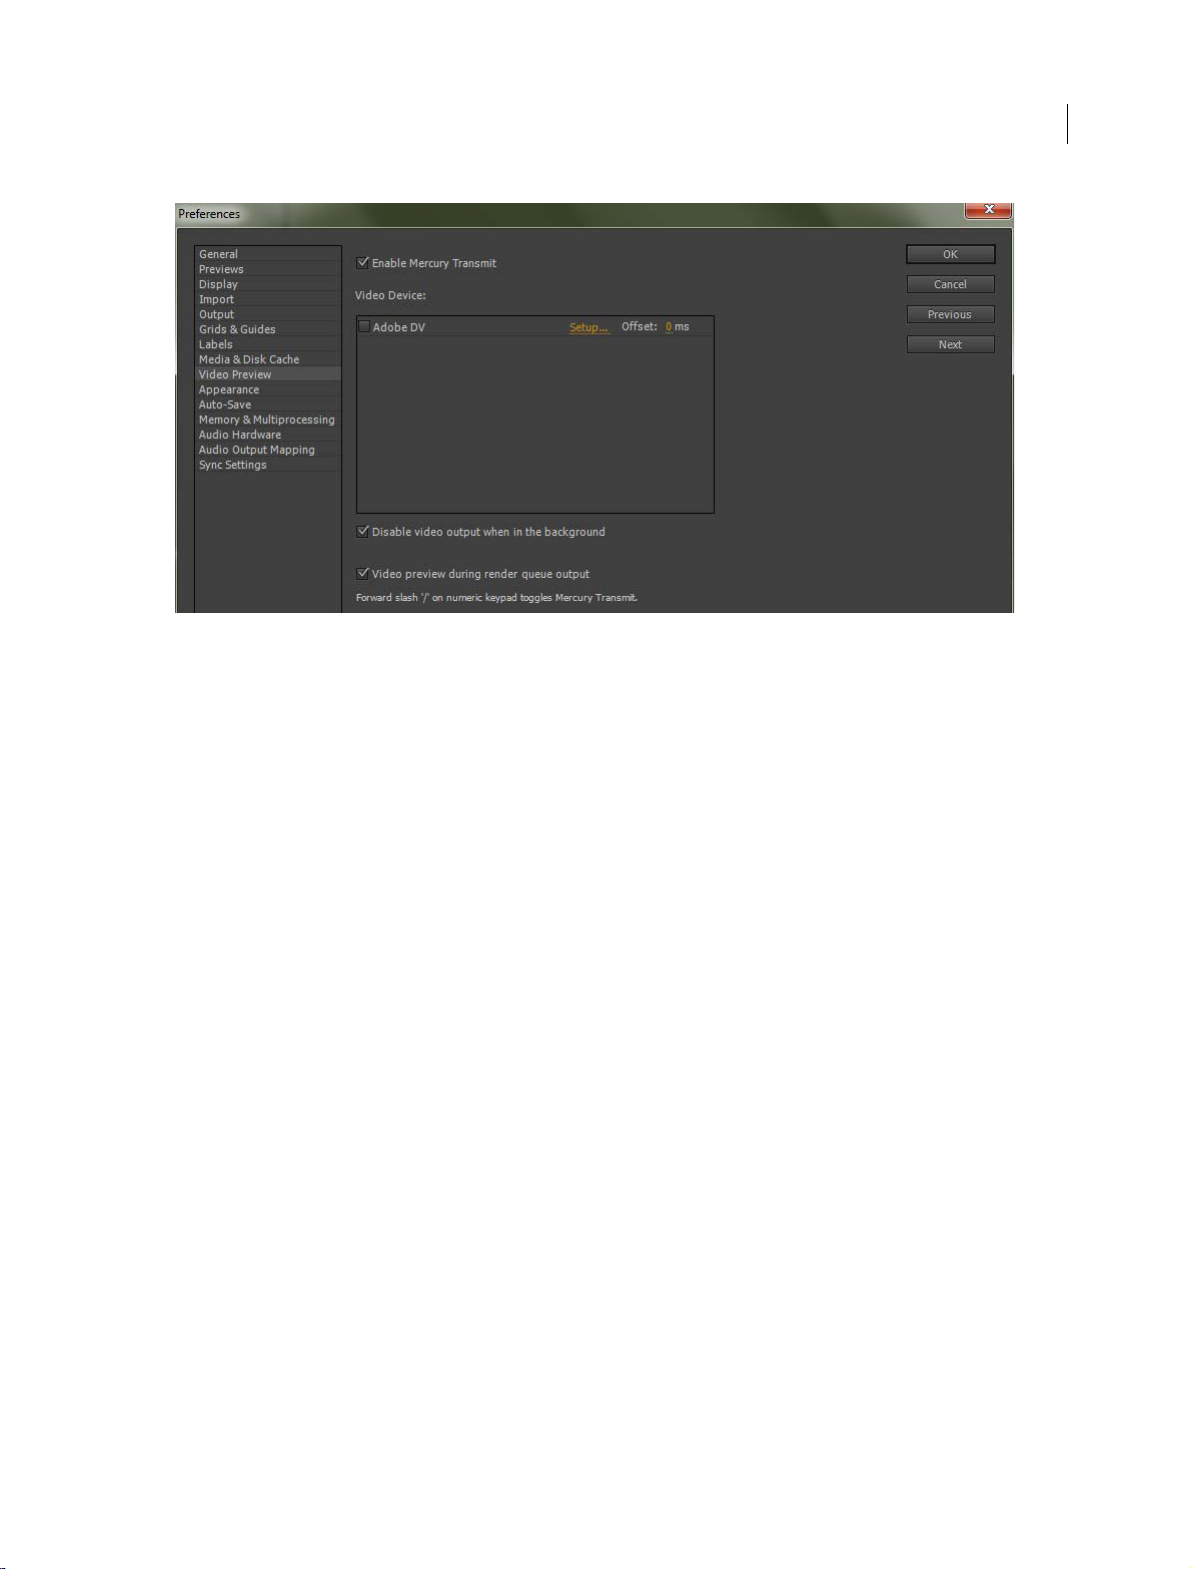
Video preview on external monitor using Mercury Transmit
In the l ates t rel ease of A fter Effects, the vide o pre vie w system for ext ernal monitors ha s been repl aced w ith the Mercury
Transmit-based system.
Last updated 6/14/2014
Page 8
What's new
The Mercury Transmit system for video previews sends the contents of the Composition, Layer, or Footage panel to an
external monitor. The external monitor can be one of the following:
• A video monitor connected through third-party video hardware such as AJA, Blackmagic, and Matrox I/O devices
3
• A DV device connected over FireWire
• A computer monitor connected to your video display card via such as HDMI, DVI, VGA, or DisplayPort.
For detailed information, see the Vid e o p re view with Merc u r y Transmitarticle.
Add fonts from Typekit in After Effects
You can download and install hundreds of fonts from within After Effects through the integration of Typekit with After
Effects. Click File > Add Fonts from Typekit.. to launch the Typekit website.
For more information about using Typekit with Creative Cloud, see the Typ ekit Help C e nter .
Integration of Kuler panel into After Effects
The Kuler panel integrated into After Effects is one of the first instances of an HTML5 CEP panel built for After Effects.
Using the Kuler panel, you can :
• Browse color themes that other users have shared through Creative Cloud
• Load color themes from your own library on Creative Cloud
• Create color themes on your iPhone or in your browser using various color models. You can use the color swatches
wi thi n ea ch c olor t hem e as a so urc e from whi ch t o sa mple colors for any purpose within After Effects. (This replaces
the old workflow of creating a document in Illustrator that held your color swatches and then importing that file
into After Effects as a a source from which to sample when matching colors in a logo or other other branded item.)
See the Adobe Kuler site at https://kuler.adobe.com and www.adobe.com/in/products/kuler.html
HTML5 panels using CEP infrastructure
After Effects now includes the CEP (Common Extensibility Platform) infrastructure for loading and using HTML5
panels. These panels have access to the entire After Effects scripting object model in addition to being able to use
HTML, CSS, and JavaScript. Hence a very wide variety of extensions can be created using this system.
Last updated 6/14/2014
Page 9
What's new
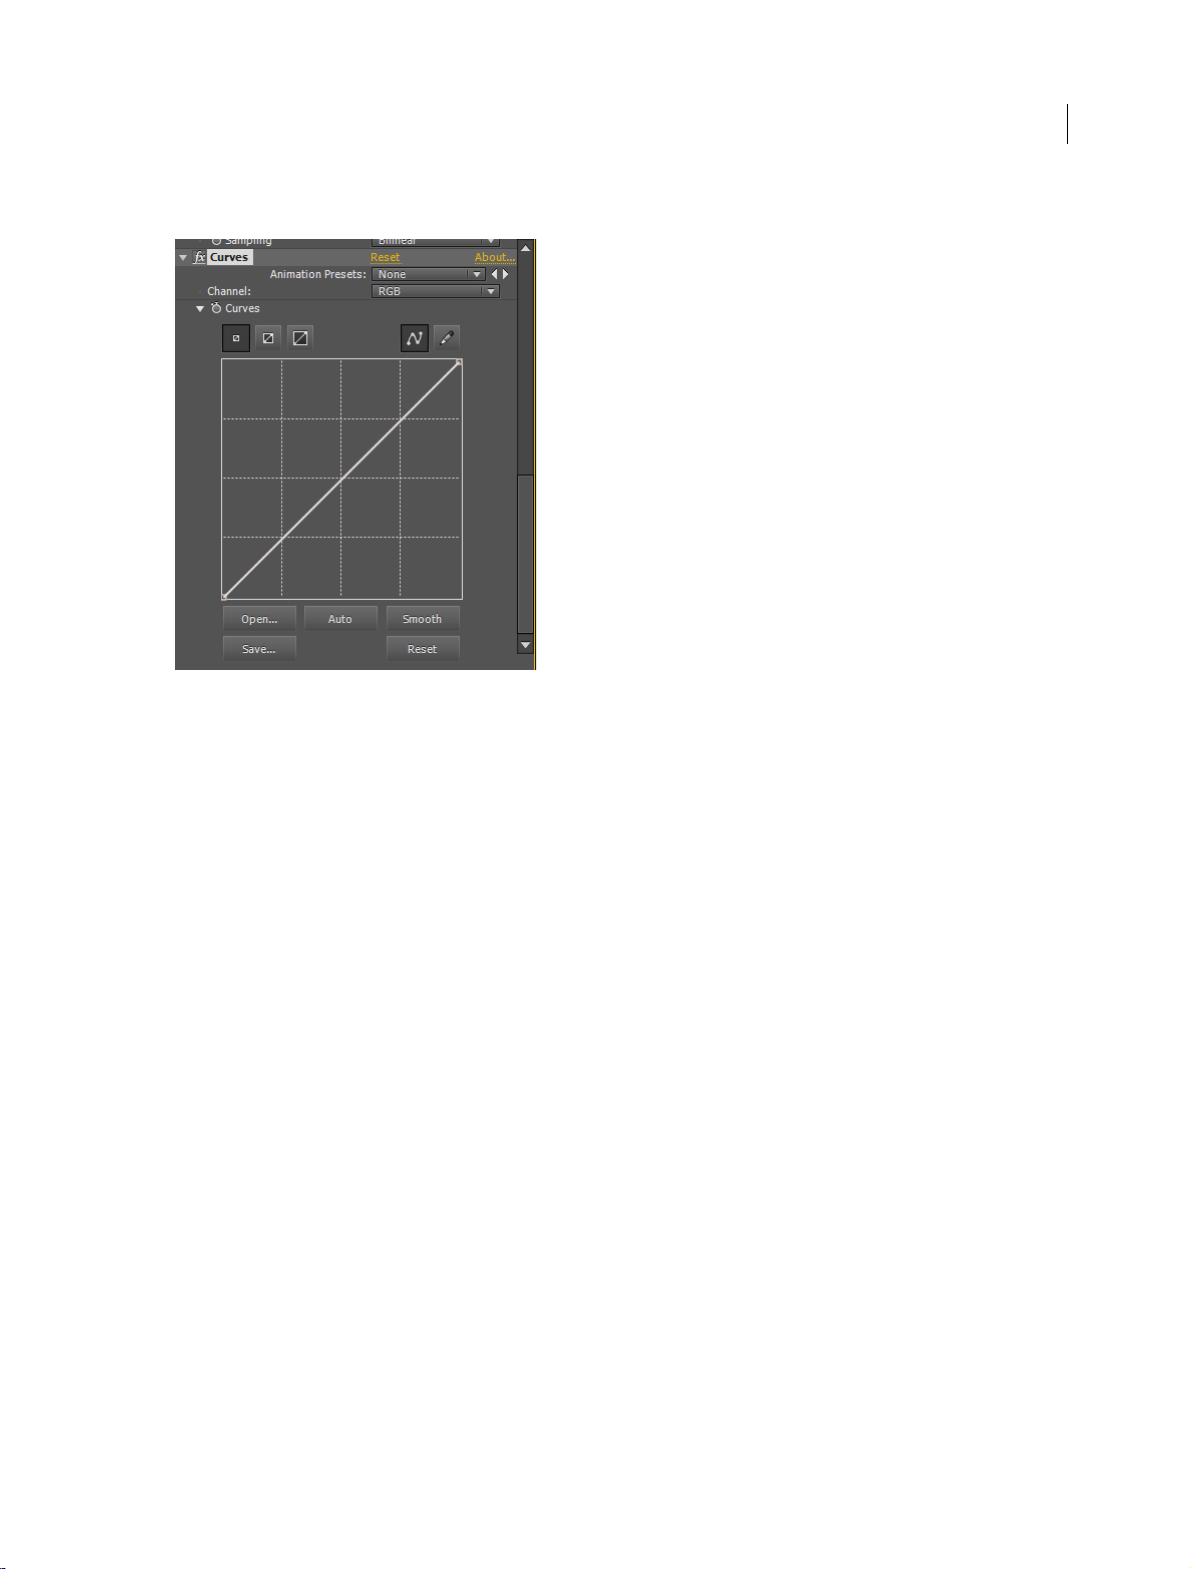
Improvements to Curves effect user interface
The primary user interface element in the Curves effect (the curves themselves) is now resizable using buttons
immediately above the curves. The icon-based buttons for Open, Save, Smooth, and Reset have been replaced with
word-based buttons that make their functionality more discoverable and the interface has been changed to increase the
size of the default window.
4
The new improvements have the following advantages:
• Click one of the three sizing icons at the top of the effect to adjust screen sizes.
• Channels will show separately and concurrently in White, Red Green Blue, and Gray(alpha).
• Channel selection is automatic when a curve or vertex is clicked to add or move a point.
• The curves are drawn more smoothly.
Auto Adjustment in Curves effect
To adjust the curves in the Curves effect automatically, click the Auto button beneath the curves in the Effect Controls
panel. This automatic adjustment is based on a database of curve adjustments performed by color and photography
experts on a broad range of input images. This will enable users to get a good starting point for their color adjustments.
The adjustment made to an image is based on the adjustments made to reference input images with similar color
di
ibutions.
str
Miscellaneous updates
• Use File > Save As > Save A Copy As CC (12) to save a project as a copy for the previous version. To open a project
created in the latest version of After Effects in After Effects CS6, you have to save back from After Effects CC (12).
See Project links embedded in QuickTime, Video for Windows filesfor detailed information.
• You can now import raw files from Sony F5, F55, and F65 cameras into After Effects. As with ARRIRAW files, the
source settings are not carried over when transferring a clip from Premiere Pro to After Effects.
• After Effects CC now installs mocha-AE version 3.2.1. Previous versions of After Effects CC installed mocha-AE
v3.1.0. See the release notes (pdf) on the Imagineer Systems website for details of what's new in mocha-AE v3.2.
Last updated 6/14/2014
Page 10

What's new
• You cannot export to the following formats in the 2014 version of After Effects CC:
• FLV/F4V
• MPEG-2
• H.264
• WMV
• SWF
Note: You can still import files in the above formats into After Effects.
5
Last updated 6/14/2014
Page 11

Chapter 2: Workspace and workflow
Planning and setup
Planning your work
Correct project settings, preparation of footage, and initial composition settings can help you to avoid errors and
unexpected results when rendering your final output movie. Before you begin, think about what kind of work you’ll be
doing in After Effects and what kind of output you intend to create. After you have planned your project and made some
basic decisions about project settings, you’ll be ready to start importing footage and assembling compositions from
layers based on that footage.
The best way to ensure that your movie is suitable for a specific medium is to render a test movie and view it using the
s
difficult and time-consuming parts of your work, to uncover problems early.
e of equipment that your audience will use to view it. It’s best to do such tests before you have completed the
ame typ
6
Aharon Rabinowitz provides an article on the Creative COW website about planning your project with the final
delivery specifications in mind.
For more information about encoding and compression options, see this FAQ entry: “FAQ: What is the best format for
rendering and exporting from After Effects?”
Storyboards and scripts (screenplays)
Before you begin shooting footage or creating animations, it is often best to start by planning your movie with
storyboards and a script (screenplay).
You can use Adobe Photoshop and Adobe Illustrator to create storyboards. You can use Adobe Story to collaboratively
w
te and manage screenplays. Adobe Story also converts information from a screenplay into XMP metadata that can
ri
automate the creation of shooting scripts, shot lists, and more.
Acquiring, choosing, and preparing footage
Before importing footage, first decide which media and formats you'll use for your finished movies, and then determine
the best settings for your source material. Often, it’s best to prepare footage before importing it into After Effects.
For example, if you want an image to fill your composition frame, configure the image in Adobe Photoshop so that the
ima
ge size and pixel aspect ratio match the composition size and pixel aspect ratio. If the image is too large when you
import it into After Effects, you’ll increase the memory and processor requirements of the compositions that use it. If
the image is too small, you’ll lose image quality when you scale it to the desired size. See Pixel aspect ratio and frame
aspect ratio.
If you can shoot footage with consistent lighting and colors—and otherwise prevent the need to do a lot of tedious
u
ty work in post-production—then you’ll have more time for creative work.
tili
Last updated 6/14/2014
Page 12

Workspace and workflow
If possible, use uncompressed footage or footage encoded with lossless compression. Lossless compression means
better results for many operations, such as keying and motion tracking. Certain kinds of compression—such as the
compression used in DV encoding—are especially bad for color keying, because they discard the subtle differences in
color that you depend on for good bluescreen or greenscreen keying. It’s often best to wait until the final rendering
phase to use compression other than lossless compression. See Keying introduction and resources.
If possible, use footage with a frame rate that matches that of your output, so that After Effects doesn’t have to use frame
b
nding or similar methods to fill in missing frames. See Frame rate.
le
The kind of work that you’ll be doing in After Effects and the kind of output movie that you want to create can even
influence ho
tracking, consider shooting your scene in a manner that optimizes for motion tracking—for example, using tracking
markers. See Motion tracking workflow.
w you shoot and acquire your footage. For example, if you know that you want to animate using motion
7
Also consider shooting at a larger frame size than what you ne
production, whether for fake pans and zooms, or for stabilization.
ed
for final delivery if you want "head-room" for post-
Project settings
Project settings fall into three basic categories: how time is displayed in the project, how color data is treated in the
project, and what sampling rate to use for audio. Of these settings, the color settings are the ones that you need to think
about before you do much work in your project, because they determine how color data is interpreted as you import
footage files, how color calculations are performed as you work, and how color data is converted for final output. See
Color managementand Timecode and time display units .
If you enable color management for your project, the colors t
when they view the movie that you create.
Note: Click the color depth indicator at the bottom of the Project panel
(Windows) or Option-click (Mac OS) to cycle through color bit depths: 8 bpc, 16 bpc, and 32 bpc. See Color depth and high
dynamic range color.
t you see are the same colors that your audience will see
ha
to open the Project Settings dialog box. Alt-click
Composition settings
After you prepare and import footage items, you use these footage items to create layers in a composition, where you
animate and apply effects. When you create a composition, specify composition settings such as resolution, frame size,
and pixel aspect ratio for your final rendered output. Although you can change composition settings at any time, it’s
best to set them correctly as you create each new composition to avoid unexpected results in your final rendered output.
For example, the composition frame size should be the image size in the playback medium. See Composition settings.
If you’ll be rendering and exporting a composition to more than one media format, always match the pixel dimensions
for your composition to the largest pixel dimensions used fo
Render Queue panel to encode and export a separate version of the composition for each format. See Output modules and
output module settings.
r
your output. Later, you can use output modules in the
Performance, memory, and storage considerations
If you work with large compositions, make sure that you configure After Effects and your computer to maximize
performance. Complex compositions can require a large amount of memory to render, and the rendered movies can
take a large amount of disk space to store. Before you attempt to render a three-hour movie, make sure that you have
the disk space available to store it. See Storage requirements for output files .
If your source footage files are on a slow disk drive (or across a slow network connection), then performance will be
p
oo
r. When possible, keep the source footage files for your project on a fast local disk drive. Ideally, you’ll have three
drives: one for source footage files, one from which the application runs, and one for rendered output.
Last updated 6/14/2014
Page 13

Workspace and workflow
For more information, see Improve performanceand Memory & Multiprocessing preferences .
Planning for playback on computer monitors and mobile devices
When you create a movie for playback on a personal computer—whether downloaded from the Web or played from a
CD-ROM—specify composition settings, render settings, and output module settings that keep file size low. Consider
that a movie with a high data rate may not play well from an older CD-ROM drive that cannot read data from the disc
fast enough. Similarly, a large movie may take a long time to download over a dial-up network connection.
When rendering your final movie, choose a file type and encoder appropriate for the final media. The corresponding
de
coder m
movie. Common codecs (encoders/decoders) include the codecs installed with media players such as Flash Player,
Windows Media Player, and QuickTime Player.
Aharon Rabinowitz provides an article on the Creative COW website about planning your project with the final
delivery specifications in mind.
Trish and Chris Meyer provide an article on the Artbeats website that describes some of the considerations for creating
video for the Web.
For more information about encoding and compression options for After Effects, see this FAQ entry: “FAQ: What is
the best format for rendering and exporting from After Effects?”
ust be available on the system used by your intended audience; otherwise they will not be able to play the
8
Mobile devices
Many of the considerations for creating movies for playback on mobile devices, such as mobile phones and the Apple
i
d, are similar to the considerations for creating movies for playback on personal computers—but the limitations are
Po
even more extreme. Because the amount of storage (disk space) and processor power are less for mobile phones than
for personal computers, file size and data rate for movies must be even more tightly controlled.
Screen dimensions, video frame rates, and color gamuts vary greatly from one mobile device to another.
Use these tips when shooting video for mobile devices:
•Tight shots are better. It’s hard to see a face on a tiny screen unless it’s shot in relative close-up.
• Light your subjects well, and keep them separated from the background; the colors and brightness values between
background and subject should not be too similar.
• Avoid excessive zooming and rolling, which hinder temporal compression schemes.
• Because stable (non-shaky) video is easier to compress, shoot video with a tripod to minimize the shaking of the
camera.
• Avoid using auto-focus and auto-exposure features. When these features engage, they change the appearance of all
of the pixels in an image from one frame to the next, making compression using interframe encoding schemes less
efficient.
Use these tips when working in After Effects (for mobile devices):
•Use a lower frame rate (12-24 fps) for mobile devices.
• Use motion-stabilization tools and noise-reduction or blur effects before rendering to final output, to aid the
compressor in reducing file size.
• Match the color palette to the mobile devices that you are targeting. Mobile devices, in general, have a limited color
gamut.
• Consider using cuts and other fast transitions instead of zooming in and out or using fades and dissolves. Fast cuts
also make compression easier.
Last updated 6/14/2014
Page 14

Workspace and workflow
Cross-platform project considerations
After Effects project files are compatible with Mac OS and Windows operating systems, but some factors—mostly
regarding the locations and naming of footage files and support files—can affect the ease of working with the same
project across platforms.
Project file paths
When you move a project file to a different computer and open it, After Effects attempts to locate the project’s footage
f
original path or folder location; finally, it searches the root of the directory where the project is located.
If you are building cross-platform projects, it’s best if the full paths have the same names on Mac OS and Windows
sys
before opening the project and that network volume names are the same on both systems.
It’s best to store footage in the same folder as the project file or in another folder within that folder. Here’s a sample
hi
/newproject/project_file.aep
ollows: After Effects first searches the folder in which the project file is located; second, it searches the file’s
iles as f
ms. If the footage and the project are on different volumes, make sure that the appropriate volume is mounted
te
chy:
erar
9
/newproject/source/footage1.psd
/newproject/source/footage2.avi
You can then copy the newproject folder in its entirety across platforms, and After Effects will properly locate all of the
fo
age.
ot
Use the Collect Files feature to gather copies of all the files in a project into a single folder. You can then move the folder
containing the copied project to the other platform. See Collect files in one location.
File-naming conventions
Name your footage and project files with the appropriate filename extensions, such as .mov for QuickTime movies and
.
for After Effects projects. If files will be used on the Web, be sure that filenames adhere to applicable conventions
aep
for extensions and paths.
Note: F
or After Effects CS6 and earlier versions, do not use high-ASCII or other extended characters in filenames that will
sed cross-platform.
be u
Supported file types
Some file types are supported on one platform but not others. See Supported import formatsand Supported output
formats.
Resources
Ensure that all fonts, effects, codecs, and other resources are available on both systems. Such resources are often plugin
s.
If y
ou use a native After Effects effect in a project on one operating system, the effect will still work on the other
ope
rating system to which you’ve transferred your project. However, some third-party effects and other third-party
plug-ins may not continue to operate, even if you have versions of these plug-ins on the target system. In such cases,
you may need to reapply some third-party effects.
Last updated 6/14/2014
Page 15

Workspace and workflow
More Help topics
Adobe Story workflow
Composition settings
Output modules and output module settings
Render settings
Plug-ins
Fonts
Setup and installation
To submit a feature request or bug report about After Effects, choose Help > Send Feedback.
Installing the software
Before installing Adobe After Effects software, review complete system requirements and recommendations in the
Read Me file. The Read Me file is included in the Release Notes document available through the After Effects support
section of the Adobe website.
10
In addition to the full version of Adobe After Effects, you can also install additional copies on additional computers to
us
the full version of the application. You run the render engine using the Adobe After Effects Render Engine shortcut in
the Adobe After Effects folder.
Limitations of the trial version
The trial version of After Effects includes all of the codecs that are included with the full version of After Effects. This
m
of Adobe After Effects software does not include some features that depend upon software licensed from parties other
than Adobe. For example, Cycore (CC) effects, mocha-AE, mocha Shape, FreeForm, and Color Finesse are available
only with the full version of Adobe After Effects software. (Keylight is included, however.) If your installation of After
Effects is missing some third-party components, contact your system administrator to ensure that all licensed
components have been installed correctly.
er Effects render engines to assist with network rendering. You install render engines in the same manner as
e as Aft
ns that you can import and export to all of the supported file formats using the trial version. The free trial version
ea
Activate the software
Activation is a simple, anonymous process. After installation, your Adobe software attempts to contact Adobe to
complete the license activation process. No personal data is transmitted.
A single-user retail license activation supports two computers. For example, you can install the software on a desktop
comp
uter at work and on a laptop computer at home.
For more information on product licensing and activation, see the Read Me file or go to the Adobe website.
Note: B
efore transferring an activation to a different computer, deactivate the software by choosing Help > Deactivate or
p > Sign Out.
Hel
Last updated 6/14/2014
Page 16

Workspace and workflow
More Help topics
Network rendering with watch folders and render engines
Plug-ins
General user interface items
Activate a tool
The Tools panel can be displayed as a toolbar across the top of the application window or as a normal, dockable panel.
Note: Controls related to some tools appear only when the tool is selected in the Tools panel.
• Click the button for the tool. If the button has a small triangle at its lower-right corner, hold down the mouse button
to view the hidden tools. Then, click the tool you want to activate.
• Press the keyboard shortcut for the tool. (Placing the pointer over a tool button displays a tool tip with the name and
keyboard shortcut for the tool.)
• To cycle through hidden tools within a tool category, repeatedly press the keyboard shortcut for the tool category.
(For example, press the Q key repeatedly to cycle through the pen tools.)
11
• To momentarily activate a tool, hold down the key for the desired tool; release the key to return to the previously
active tool. (This technique does not work with all tools.)
• To momentarily activate the Hand tool, hold down the spacebar, the H key, or the middle mouse button. (The
middle mouse button does not activate the Hand tool under a few circumstances, including when the Unified
Camera tool is active.)
To pan around in the Composition, Layer, or Footage panel, drag with the Hand tool. Hold Shift, too, to pan faster.
To show or hide panels most relevant to the active tool, click the panel button if available. For example, clicking this
button when a paint tool is active opens or closes the Paint and Brushes panels. Select the Auto-Open Panels option in
the T
ools panel to automatically open the relevant panels when certain tools are activated.
Open panel, viewer, and context menus
Panel menus provide commands relative to the active panel or frame. Viewer menus provide lists of compositions,
layers, or footage items that can be shown in the viewer, as well as commands for closing items and locking the viewer.
Context menus provide commands relative to the item that is context-clicked. Many items in the After Effects user
interface have associated context menus. Using context menus can make your work faster and easier.
• To open a p a n e l me nu , c l i ck t h e button in the upper-right corner of the panel.
• To open a viewer menu, click the name of the active composition, layer, or footage item in the viewer tab.
• To open a context menu, right-click (Windows or Mac OS) or Control-click (Mac OS). This action is sometimes
referred to as context-clicking.
Last updated 6/14/2014
Page 17

Workspace and workflow
Columns
The Project, Timeline, and Render Queue panels contain columns.
• To show or hide columns, right-click (Windows) or Control-click (Mac OS) a column heading (or choose Columns
from the panel menu), and select the columns that you want to show or hide. A check mark indicates that the
column is shown.
Note: In general, the search and filter functions in the Project and Timeline panels only operate on the content of columns
that
are shown.
• To reorder columns, select a column name and drag it to a new location.
• To resize columns, drag the bar next to a column name. Some columns cannot be resized.
• To sort footage items in the Project panel, click the column heading. Click once more to sort them in reverse order.
Search and filter in the Timeline, Project, and Effects & Presets panels
The Project, Timeline, and Effects & Presets panels each contain search fields that you can use to filter items in the
panel.
• To place the insertion point in a search field, click in the search field.
• To place the insertion point in the search field for the active panel, choose File > Find or press Ctrl+F (Windows) or
Command+F (Mac OS).
• To clear the search field, click the button that appears to the right of the text in the search field.
12
When you type in the search field, the list of items in the panel is filtered, showing some items and hiding others. Only
ite
ms with entries that match the search query that you’ve typed are shown. The folders, layers, categories, or property
groups that contain the matched items are also shown, to provide context.
In general, only text in columns that are shown is searched f
show the Comments column to search and filter by the contents of comments. (See Columns .)
If one or more layers are selected in a composition, the filtering operation in the Timeline panel only affects selected
l
n this case, unselected layers are not filtered out (hidden) if they don’t match the search query. However, if no
ayers. I
layers are selected in the composition, the filtering operation applies to all layers in the composition. This behavior
matches that for showing and hiding of layer properties by pressing their property shortcut keys. (See Show or hide
properties in the Timeline panel.)
Clearing the search field and ending the search causes expanded folders and property groups to collapse (close).
Therefore, it’s easier to work with the items that are found by the filter operation if you operate on them before you clear
t
he
search field and end the search.
If the text that you type in the search field in the Project or Timeline panel contains spaces, the spaces are treated as
and-
based operators. For example, typing dark solid matches footage items or layers named Dark Red Solid and Dark
Gray Solid. In the Effects & Presets panel, spaces are treated as space characters in the search field. For example, typing
change color matches the Change Color effect, but not the Change To Color effect.
Project, Timeline, and Effects & Presets panels accept or-based searching. In an or-based search, a comma denotes an
or,
with and-based operators taking precedence over or-based ones. For example, sometimes the name of the property
that determines the amount for a blur effect is Amount, sometimes it is Blurriness, and sometimes it is Blur Radius. If
you search for Amount, Blurriness, Radius, then you will see the equivalent values for all of your blur effects.
his filtering operation. For example, you may need to
or t
When you type in a search field, recent search strings that match your input appear.
Last updated 6/14/2014
Page 18

Workspace and workflow
This search method also allows a way to save items you use often via a menu that opens when you click the search icon
in th e search field. The search menu consist s of t wo lists, s eparated by a divider. The top list cont ains the six most rece nt
searches, with the most recent one at the top. The bottom list contains saved search items. As you type, the top list filters
to show matching terms.
• To save a search item, Shift-click it in the top list of the search menu. Up to ten items may be saved.
• To delete a saved search item from either list, hover the mouse over the the item to highlight it, and then press Delete
or Backspace.
See this video on the Video2Brain website to learn about the new features for searching and filtering in panels.
Examples of searches in the Project panel
• To show only footage items for which the name or comment contains a specific string, start typing the string.
• To show only footage items for which the source file is missing, type the entire word missing. (This search works
whether or not the File Path column is shown, which is an exception to the general rule that only shown columns
are searched.)
• To show only unused footage items, type the entire word unused.
• To show only used footage items, type the entire word used.
• To show only Cineon footage items, type Cineon with the Type column shown.
Examples of searches in the Timeline panel
13
• To show only layers and properties for which the name or comment contains a specific string, type the string. For
example, type starch to show pins created by the Puppet Starch tool.
• To show only properties that have an expression that uses a specific method, type the method name.
• To show only layers with a specific label, type the label name. (See Color labels for layers, compositions, and footage
items.)
Click the swatch for a label to see the context menu that lists the l
Label column heading to expand the column to read the label names.
abel names. Alternatively, drag the right edge of the
Scroll or zoom with the mouse wheel
You can use the mouse wheel to zoom in the Timeline, Composition, Layer, and Footage panels. You can use the mouse
wheel to scroll in the Timeline, Project, Render Queue, Flowchart, Effect Controls, Metadata, and Effects & Presets
panels.
• To zoom into the center of the panel, or into the feature region when tracking, roll the mouse wheel forward.
• To zoom out of the center of the panel, or out of the feature region when tracking, roll the mouse wheel backward.
• To zoo m int o the area und er the pointe r, hold d own A lt (Wind ows) or Option (Mac O S) as you roll th e mouse w heel
forward. In the Timeline, Footage, and Layer panels, this action zooms in time when the pointer is over the time
navigator or time ruler.
• To zoom out of the area under the pointer, hold down Alt (Windows) or Option (Mac OS) as you roll the mouse
wheel backward. In the Timeline, Footage, and Layer panels, this action zooms in time when the pointer is over the
time navigator or time ruler.
• To scroll vertically, roll the mouse wheel forward or backward.
• To scroll horizontally, hold down Shift as you roll the mouse wheel backward or forward. In the Timeline, Footage,
and Layer panels, Shift-rolling backward moves forward in time and vice versa when the pointer is over the time
navigator or time ruler.
Last updated 6/14/2014
Page 19

Workspace and workflow
14
You can scroll or zoom with the mouse wheel in a panel even if it is not currently active, as long as the pointer is over it.
Undo changes
You can undo only those actions that alter the project data. For example, you can undo a change to a property value,
but you cannot undo the scrolling of a panel or the activation of a tool.
You can sequentially undo as many as 99 of the most recent changes made to the project.
To avoid wasting time undoing accidental modifi cation s, lock a laye r when you want t o see it but do not want to modify
it.
• To undo the most recent change, choose Edit > Undo [action] or Ctrl-Z
• To undo a change and all changes after it, choose Edit > History, and select the first change that you want to undo.
• To revert to the last saved version of the project, choose File > Revert. All changes made and footage items imported
since you last saved are lost. You cannot undo this action.
After Effects user interface tips
• Use ClearType text anti-aliasing on Windows. ClearType makes the outlines of system text, such as menus and
dialog boxes, easier to read. See Windows Help for information on how to enable ClearType text anti-aliasing.
• To show tool tips, select the Show Tool Tips preference (Edit > > General (Windows) or After Effects > Preferences
> General (Mac OS)).
• Use a workspace that contains the Info panel, and leave that panel in front of other panels in its panel group
whenever possible. The Info panel shows messages about what After Effects is doing, information about items under
the pointer, and much more.
• In Windows, disable the Aero compositing mode. Hardware acceleration of panels and OpenGL features perform
better in After Effects when Windows is operating in Basic mode. For information, see the Microsoft website.
• Use context menus.
• Use keyboard shortcuts.
More Help topics
Activating tools (keyboard shortcuts)
Effects and Presets panel
Organize, view, manage, and trim footage items
Select layers
Zoom an image for preview
Zoom in or out in time for a composition
Move or adjust a camera or working 3D view with the Camera tools
Lock or unlock a layer
Last updated 6/14/2014
Page 20

Workspace and workflow
Workflows
General workflow in After Effects
Overview of general workflow in After Effects
Whether you use Adobe After Effects to animate a simple title, create complex motion graphics, or composite realistic
visual effects, you generally follow the same basic workflow, though you may repeat or skip some steps. For example,
you may repeat the cycle of modifying layer properties, animating, and previewing until everything looks right. You
may skip the step of importing footage if you intend to create graphical elements entirely in After Effects.
1. Import and organize footage
After you create a project, import your footage into the project in the Project panel. After Effects automatically
i
nte
rprets many common media formats, but you can also specify how you want After Effects to interpret attributes
such as frame rate and pixel aspect ratio. You can view each item in a Footage panel and set its start and end times to
fit your composition. For more information, see Importing and interpreting footage items .
15
2. Create, arrange, and composite layers in a composition
Create one or more compositions. Any footage item can be the source for one or more layers in a composition. You can
a
ange the layers spatially in the Composition panel or arrange them in time using the Timeline panel. You can stack
rr
layers in two dimensions or arrange them in three dimensions. You can use masks, blending modes, and keying tools
to composite (combine), the images of multiple layers. You can even use shape layers, text layers, and paint tools to
create your own visual elements. For more information, see Composition basics, Creating layers, Compositing and
transparency overview and resources, Overview of shape layers, paths, and vector graphics , and Creating and editing
text layers .
3. Modify and animate layer properties
You can modify any property of a layer, such as size, position, and opacity. You can make any combination of layer
p
ro
perties change over time, using keyframes and expressions. Use motion tracking to stabilize motion or to animate
one layer so that it follows the motion in another layer. For more information, see Animation basics, Expression basics,
and Tracking and stabilizing motion (CS5) .
4. Add effects and modify effect properties
You can add any combination of effects to alter the appearance or sound of a layer, and even generate visual elements
f
ro
m scratch. You can apply any of the hundreds of effects, animation presets, and layer styles. You can even create and
save your own animation presets. You can animate effect properties, too, which are simply layer properties within an
effect property group. For more information, see Effects and animation presets overview .
5. Preview
Previewing compositions on your computer monitor or an external video monitor is fast and convenient, even for
co
lex projects. You can change the speed and quality of previews by specifying their resolution and frame rate, and
mp
by limiting the area and duration of the composition that you preview. You can use color management features to
preview how your movie will look on another output device. For more information, see Previewingand Color
management.
6. Render and export
Last updated 6/14/2014
Page 21

Workspace and workflow
Add one or more compositions to the render queue to render them at the quality settings you choose and to create
movies in the formats that you specify. You can use File > Export or Composition > Add to Render Queue.
For more information, see Basics of rendering and exporting and the encoding quick start section in Adobe Media
Encoder.
Online resources for general workflow in After Effects
Read a basic step-by-step introduction to the general workflow in an excerpt from After Effects Classroom in a Book.
Read Trish and Chris Meyer’s step-by-step introduction to creating a basic animation in a PDF excerpt from their book,
The After Effects Apprentice.
For an overview of After Effects project navigtion, see the video tutorial, “Walking Through A Mini Project,” by Jeff
Sengstack and Infinite Skills.
Basic workflow tutorial: Create a simple movie
This tutorial assumes that you have already started After Effects and have not modified the empty default project. This
example skips the step of importing footage and shows you instead how to create your own synthetic visual elements.
After you have rendered a final movie, you can import it into After Effects to view it and use it as you would any other
footage item.
16
Some people prefer to use the mouse and menus to interact with After Effects, whereas others prefer to use keyboard
sh
or
tcuts for common tasks. For several steps in this example, two alternative commands are shown that produce the
same result—the first demonstrating the discoverability of menu commands and the second demonstrating the speed
and convenience of keyboard shortcuts. You’ll likely find that you use some combination of keyboard shortcuts and
menu commands in your work.
1 Create a new composition:
• Choose Composition > New Composition.
• Press Ctrl+N (Windows) or Command+N (Mac OS).
2 Change the Duration value in the Composition Settings dialog box by entering 5.00 (5 seconds), choose Web Video
from the Preset menu, and click OK.
3 Create a new text layer:
• Choose Layer > New > Text.
• Press Ctrl+Alt+Shift+T (Windows) or Command+Option+Shift+T (Mac OS).
4 Type your name. Press Enter on the numeric keypad or press Ctrl+Enter (Windows) or Command+Return (Mac
OS) on the main keyboard to exit text-editing mode.
5 Set an initial keyframe for the Position property:
• Click the triangle to the left of the layer name in the Timeline panel, click the triangle to the left of the Transform
group name, and then click the stopwatch button to the left of the Position property name.
• Press Alt+Shift+P (Windows) or Option+Shift+P (Mac OS).
6 Activate the Selection tool:
• Click the Selection Tool button in the Tools panel.
• Press V.
7 Using the Selection tool, drag your text to the bottom-left corner of the frame in the Composition panel.
Last updated 6/14/2014
Page 22

Workspace and workflow
8 Move the current-time indicator to the last frame of the composition:
• Drag the current-time indicator in the Timeline panel to the far right of the timeline.
• Press End.
9 Using the Selection tool, drag your text to the top-right corner of the frame in the Composition panel.
A new keyframe is created at this time for the Position property. Motion is interpolated between keyframe values.
10 Preview your animation using standard preview:
• Click the Play button in the Preview panel. Click Play again to stop the preview.
• Press the spacebar. Press the spacebar again to stop the preview.
11 Apply the Glow effect:
• Choose Effect > Stylize > Glow.
• Type glow in the search field at the top of the Effects & Presets panel to find the Glow effect. Double-click the
effect name.
12 In the Render Queue panel, click the underlined text to the right of Output To. In the Output Movie To dialog box,
choose a name and location for the output movie file, and then click Save. For the location, choose something easy
to find, like your desktop.
17
13 Click the Render button to process all items in the render queue. The Render Queue panel shows the progress of the
rendering operation. A sound is generated when rendering is complete.
You’ve created, rendered, and exported a movie.
You can import the movie that you’ve created and preview it in After Effects, or you can navigate to the movie and play
it usi
ng a movie player such as QuickTime Player or Windows Media Player.
More Help topics
Activating tools (keyboard shortcuts)
Import footage items
Dynamic Link and After Effects
Dynamic Link features work only between applications of the same major version, such as After Effects CC 2014 with
Premiere Pro CC 2014. Dynamic Link features do not work between applications that are not of the same major version,
such as After Effects CC and Premiere Pro CS6. For CS6 versions of the applications, Dynamic Link features are only
available with the Creative Suite Production Premium and Creative Suite Master Collection editions; Dynamic Link
features do not work between CS6 applications that have been installed and activated as separate applications.
About Dynamic Link
In the past, sharing media assets among post-production applications required you to render and export your work
from one application before importing it into another. This workflow was inefficient and time-consuming. If you
wanted to change the original asset, you rendered and exported the asset again. Multiple rendered and exported
versions of an asset consume disk space, and they can lead to file-management challenges.
Last updated 6/14/2014
Page 23

Workspace and workflow
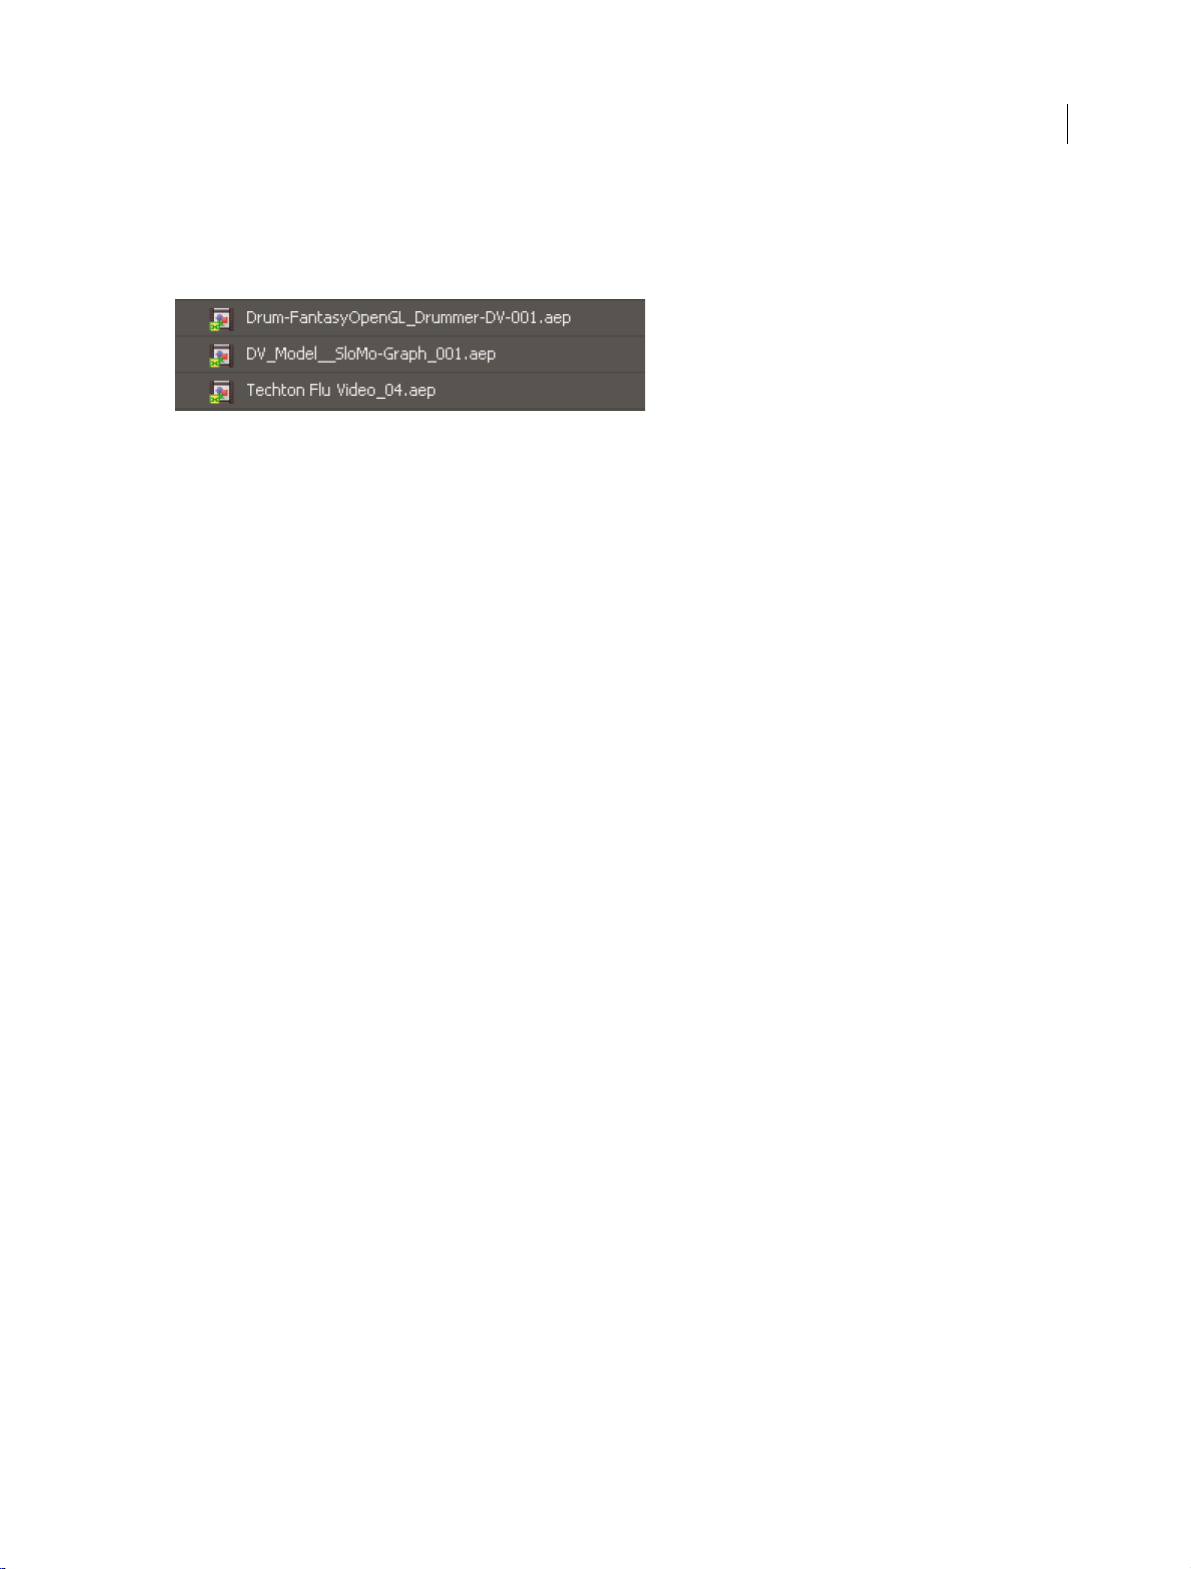
Dynamic Link offers an alternative to this workflow. You can create dynamic links between After Effects and Adobe
Premiere Pro. Creating a dynamic link is as simple as importing any other type of asset. Dynamically linked assets
appear with unique icons and label colors to help you identify them. Dynamic links are saved in projects generated by
these applications.
Create and link to After Effects compositions with Dynamic Link
You can create new After Effects compositions, and dynamically link to them from Adobe Premiere Pro. You can also
dynamically link to existing After Effects compositions from Adobe Premiere Pro.
Create a composition from clips in Adobe Premiere Pro
You can replace selected clips in Adobe Premiere Pro with a dynamically linked After Effects composition based on
those clips. The new composition inherits the sequence settings from Adobe Premiere Pro.
1 Open Premiere Pro and select the clips you want to replace.
2 Right-click any of the selected clips.
3 Select Replace With After Effects Composition.
After Effects opens (if it is not already open) and a new linked composition is created.
18
Create a dynamically linked composition from Adobe Premiere Pro
Creating a new dynamically linked composition from Adobe Premiere Pro launches After Effects. After Effects then
creates a project and composition with the dimensions, pixel aspect ratio, frame rate, and audio sample rate of the
originating project. (If After Effects is already running, it creates a composition in the current project.) The new
composition name is based on the Adobe Premiere Pro project name, followed by Linked Comp [x].
1 In Adobe Premiere Pro, choose File > Adobe Dynamic Link > New After Effects Composition. In the 2014 version
of Premiere Pro, you can import compositions using Media Browser. See the following sections in Premiere Pro for
more information:
• Import files with Media Browser
• Adobe Dynamic Link
2 If the After Effects Save As dialog box appears, enter a name and location for the After Effects project, and click Save.
When you create a dynamically linked After Effects composition, the composition duration is set to 30 seconds. To
change the duration, select the composition in After Effects, choose Composition > Composition Settings. Click the
B
c tab, and specify a new value for Duration.
asi
Link to an existing composition
For best results, match composition settings (such as dimensions, pixel aspect ratio, and frame rate) to the settings in
the Adobe Premiere Pro.
❖ Do one of the following:
• In Adobe Premiere Pro, choose File > Adobe Dynamic Link > ImportAfter Effects Composition. Choose an After
Effects project file (.aep), and then choose one or more compositions.
• In Adobe Premiere Pro, choose an After Effects project file and click Open. Then choose a composition in the
displayed dialog box and click OK.
• Drag one or more compositions from the After Effects Project panel to the Adobe Premiere Pro Project panel.
Last updated 6/14/2014
Page 24
Workspace and workflow
• Drag an After Effects project file into the Premiere Pro Project panel. If the After Effects project file contains
multiple compositions, the Import Composition dialog box opens.
Note: Y
ou can link to a single After Effects composition multiple times in a single Adobe Premiere Pro project.
Dynamically linked <span class="uicontrol">After Effects</span> compositions
Modify a dynamically linked composition in After Effects
Use the Edit Original command in Adobe Premiere Pro to modify a linked After Effects composition. Once the
composition is open in After Effects, you can change the composition without having to use the Edit Original
command again.
1 Select the Af ter Effec ts composition in Adobe Premiere Pro, or choose a lin ked clip in the Timeline, and choose Edit
> Edit Original.
2 Change the composition in After Effects. Then, switch back to Adobe Premiere Pro to view your changes.
The changes made in After Effects appear in Adobe Premiere Pro. Adobe Premiere Pro stops using any preview files
rend
ered for the clip before the changes.
19
Note: You can change the name of the composition in After Effects after creating a dynamic link to it from Adobe Premiere
Pro
. Adobe Premiere Pro does not update the linked composition name in the Project panel. Adobe Premiere Pro does retain
the dynamic link, however.
Delete a dynamically linked composition or clip
You can delete a linked composition from an Adobe Premiere Pro project at any time, even if the composition is used
in a project.
You can delete linked clips from the timeline of an Adobe Premiere Pro sequence or timeline at any time.
❖ In Adobe Premiere Pro, select the linked composition or clip and press the Delete key.
Create a linked sequence in Adobe Premiere Pro with Dynamic Link
Link to a new sequence
Creating an Adobe Premiere Pro sequence from After Effects launches Adobe Premiere Pro. Adobe Premiere Pro then
creates a project and sequence with the dimensions, pixel aspect ratio, frame rate, and audio sample rate of the
originating project. (If Adobe Premiere Pro is already running, it creates a sequence in the current project.)
❖ In After Effects, choose File > Adobe Dynamic Link > New Premiere Pro Sequence.
Link to an existing sequence
For best results, match sequence settings and project settings in Adobe Premiere Pro (such as dimensions, pixel aspect
ratio, and frame rate) to those settings in the After Effects project.
Last updated 6/14/2014
Page 25

Workspace and workflow
Do one of the following:
• In After Effects, choose File > Adobe Dynamic Link > Import Premiere Pro Sequence. Choose an Adobe Premiere
Proproject, and then choose one or more sequences.
• Drag one or more sequences from the Adobe Premiere Pro Project panel to the After Effects Project panel.
Dynamic Link performance
A linked clip can refer to a complex source composition. Actions you perform on the complex source composition
require additional processing time. After Effects takes time to apply the actions and make the final data available to
Adobe Premiere Pro. In some cases, the additional processing time delays preview or playback.
To reduce playback delays, do one of the following:
• take the linked composition offline
• disable a linked clip to temporarily stop referencing a composition
• render the composition and replace the dynamically linked composition with the rendered file
If you commonly work with complex source compositions, try adding RAM or a faster processor.
Note: A linked After Effects composition will not support Render Multiple Frames Simultaneously multiprocessing. See
prove performance by optimizing memory, cache, and multiprocessing settings.
Im
20
More Help topics
Working with Adobe Premiere Pro and After Effects
Importing from After Effects and Adobe Premiere Pro
Working with After Effects and other applications
Working with Adobe Bridge and After Effects
Adobe Bridge is the control center for Adobe Creative Suite software. Use Adobe Bridge to browse for project templates
and animation presets; run cross-product workflow automation scripts; view and manage files and folders; organize
your files by assigning keywords, labels, and ratings to them; search for files and folders; and view, edit, and add
metadata.
• To open Adobe Bridge from After Effects, choose File > Browse In Bridge.
• To reveal a file in Adobe Bridge, select a file in the Project panel and choose File > Reveal In Bridge.
• To use Adobe Bridge to browse for animation presets, choose Animation > Browse Presets.
Adobe Bridge is part of the Creative Cloud suite of applications and can be downloaded and installed through Creative
Clo
ud. See the help documentation and the Adobe Bridge CC product page for more information.
See this video to get an overview of Adobe Bridge CC.
After Effects includes template projects that include entire DVD menus for you to use as a basis for your own DVD
menus. To use Adobe Bridge to browse and import these template projects, choose File > Browse Template Projects. (See
Template projects and example projects.)
Last updated 6/14/2014
Page 26

Workspace and workflow
Working with Photoshop and After Effects
If you use Photoshop to create still images, you can use After Effects to bring those still images together and make them
move and change. In After Effects, you can animate an entire Photoshop image or any of its layers. You can even
animate individual properties of Photoshop images, such as the properties of a layer style. If you use After Effects to
create movies, you can use Photoshop to refine the individual frames of those movies.
Comparative advantages for specific tasks
The strengths of After Effects are in its animation and automation features. This means that After Effects excels at tasks
that can be automated from one frame to another. For example, you can use the motion tracking features of After Effects
to track the motion of a microphone boom, and then automatically apply that same motion to a stroke made with the
Clone Stamp tool. In this manner, you can remove the microphone from every frame of a shot, without having to paint
the microphone out by hand on each frame.
In contrast, Photoshop has excellent tools for painting and drawing.
Deciding which application to use for painting depends on the task. Paint strokes in Photoshop directly affect the pixels
o
f t
he layer. Paint strokes in After Effects are elements of an effect, each of which can be turned on or off or modified
at any time. If you want to have complete control of each paint stroke after you’ve applied it, or if you want to animate
the paint strokes themselves, use the After Effects paint tools. If the purpose of applying a paint stroke is to permanently
modify a still image, use the Photoshop paint tools. If you are applying several paint strokes by hand to get rid of dust,
consider using the Photoshop paint tools.
21
The animation and video features in Photoshop Extended include simple keyframe-based animation. After Effects uses
a si
milar i
nterface, though the breadth and flexibility of its animation features are far greater.
After Effects can also automatically create 3D layers to mimic the planes created by the Photoshop Vanishing Point
feat
ure.
Exchanging still images
After Effects can import and export still images in many formats, but you will usually want to use the native Photoshop
PSD format when transferring individual frames or still image sequences between After Effects and Photoshop.
When importing or exporting a PSD file, After Effects can preserve individual layers, masks, layer styles, and most
othe
r attributes. When you import a PSD file into After Effects, you can choose whether to import it as a flattened image
or as a composition with its layers separate and intact.
It is often a good idea to prepare a still image in Photoshop before importing it into After Effects. Examples of such
pre
tion include correcting color, scaling, and cropping. It is often better for you to do something once to the source
para
image in Photoshop than to have After Effects perform the same operation many times per second as it renders each
frame for previews or final output.
By creating your new PSD document from the Photoshop New File dialog box with a Film & Video preset, you can start
w
it
h a document that is set up correctly for a specific video output type. If you are already working in After Effects, you
can create a new PSD document that matches your composition and project settings by choosing File > New > Adobe
Photoshop File.
Exchanging movies
You can also exchange video files, such as QuickTime movies, between Photoshop and After Effects. When you open a
movie in Photoshop, a video layer is created that refers to the source footage file. Video layers allow you to paint
nondestructively on the movie’s frames, much as After Effects works with layers with movies as their sources. When
you save a PSD file with a video layer, you save the edits that you made to the video layer, not edits to the source footage
itself.
Last updated 6/14/2014
Page 27

Workspace and workflow
You can also render a movie directly from Photoshop. For example, you can create a QuickTime movie from Photoshop
that can then be imported into After Effects.
Color
After Effects works internally with colors in an RGB (red, green, blue) color space. Though After Effects can convert
CMYK images to RGB, you should do video and animation work in Photoshop in RGB.
If relevant for your final output, it is better to ensure that the colors in your image are broadcast-safe in Photoshop
b
e you import the image into After Effects. A good way to do this is to assign the appropriate destination color
efor
space—for example, SDTV (Rec. 601)—to the document in Photoshop. After Effects performs color management
according to color profiles embedded in documents, including imported PSD files.
Working with Flash and After Effects
If you use Adobe® Flash® to create video or animation, you can use After Effects to edit and refine the video. For
example, from Flash you can export animations and applications as QuickTime movies or Flash Video (FLV) files. You
can then use After Effects to edit and refine the video.
If you use After Effects to edit and composite video, you can then use Flash to publish that video.
Flash and After Effects use separate terms for some concepts that they share in common. The following table lists the
dif
ences between the terms used in the two applications:
fer
22
After Effects Flash Professional
Composition Movie Clip
Composition frame (Composition panel) Stage
Project panel Library panel
Project files FLA files
Render and export a movie Publish SWF file
Additional resources
The following articles provide additional information about using Flash and After Effects together:
• Richard Harrington and Marcus Geduld provide an excerpt, "Flash Essentials for After Effects Users", of their book
After Effects for Flash | Flash for After Effects on the Peachpit website. In this chapter, Richard and Marcus explain
Flash in terms that an After Effects user can understand. http://www.peachpit.com/articles/article.aspx?p=1350895
• Richard Harrington and Marcus Geduld also provide "After Effects Essentials for Flash Users", another excerpt from
their book After Effects for Flash | Flash for After Effects. In this chapter, Richard and Marcus explain After Effects
in terms that a Flash user can understand. http://www.peachpit.com/articles/article.aspx?p=1350894
• Robert Powers provides a video tutorial on the Slippery Rock NYC website that shows the basics of using After
Effects from the perspective of someone who is familiar with Flash Professional.
Exporting QuickTime video from Flash
If you create animations or applications with Flash, you can export them as QuickTime movies using the File > Export
> Ex
port Movie command in Flash. For a Flash animation, you can optimize the video output for animation. For a Flash
application, Flash renders video of the application as it runs, allowing the user to manipulate it. This lets you capture
the branches or states of your application that you want to include in the video file.
Importing and publishing video in Flash
Last updated 6/14/2014
Page 28

Workspace and workflow
When you import a movie file into Flash, you can use various techniques, such as scripting or Flash components, to
control the visual interface that surrounds your video. For example, you might include playback controls or other
graphics. You can also add graphic layers on top of the movie for composite results.
Composite graphics, animation, and video
Flash and After Effects each include many capabilities that allow you to perform complex compositing of video and
g
phics. Which application you choose to use will depend on your personal preferences and the type of final output
ra
you want to create.
Flash is the more web-oriented of the two applications, with its small final file size. Flash also allows for run-time
c
tr ol of a nim ation . Af ter Ef fect s is or ien ted to ward v ide o an d fi lm p roduc tion, provi des a wide r ange o f vi sua l ef fec ts,
on
and is generally used to create video files as final output.
Both applications can be used to create original graphics and animation. Both use a timeline and offer scripting
c
abilities for controlling animation programmatically. After Effects includes a larger set of effects.
ap
Both applications allow you to place graphics on separate layers for compositing. These layers can be turned on and off
as needed. Bo
In Flash, composites do not affect the video content directly; they affect only the appearance of the video during
p
yback in Flash Player. In contrast, when you composite with imported video in After Effects, the video file you
la
export actually incorporates the composited graphics and effects.
th also allow you to apply effects to the contents of individual layers.
23
Because all drawing and painting in After Effects is done on layers separate from any imported video, it is always nond
ructive. Flash has both destructive and nondestructive drawing modes.
est
Importing Flash SWF files into After Effects
Flash has a unique set of vector art tools that make it useful for a variety of drawing tasks not possible in After Effects
or A
dobe® Illustrator®. You can import SWF files into After Effects to composite them with other video or render them
as video with additional creative effects. Interactive content and scripted animation are not retained. Animation
defined by keyframes is retained.
Each SWF file imported into After Effects is flattened into a single continuously rasterized layer, with its alpha channel
p
res
erved. Continuous rasterization means that graphics stay sharp as they are scaled up. This import method allows
you to use the root layer or object of your SWF files as a smoothly rendered element in After Effects, allowing the best
capabilities of each tool to work together.
Working with Adobe Premiere Pro and After Effects
Ad obe Pre mier e Pro is d esig ned t o captu re, imp or t, a nd e dit m ovi es. A fter Ef fec ts is desi gned to cr eat e mo tion graphi cs,
apply visual effects, composite visual elements, perform color correction, and perform other post-production tasks for
movies.
You can easily exchange projects, compositions, sequences, tracks, and layers between After Effects and Adobe
iere Pro:
Prem
• You can import an Adobe Premiere Pro project into After Effects. (See Import an Adobe Premiere Pro project.)
• You can export an After Effects project as an Adobe Premiere Pro project. (See Export an After Effects project as an
Adobe Premiere Pro project .)
• You can copy and paste layers and tracks between After Effects and Adobe Premiere Pro. (See Copy between After
Effects and Adobe Premiere Pro.)
Last updated 6/14/2014
Page 29

Workspace and workflow
If you have Adobe Premiere Pro, you can do the following:
• Use Adobe Dynamic Link to work with After Effects compositions in Adobe Premiere Pro. A dynamically linked
composition appears as a clip in Adobe Premiere Pro.
• Use Adobe Dynamic Link to work with Adobe Premiere Pro sequences in After Effects. A dynamically linked
sequence appears as a footage item in After Effects.
• Start After Effects from within Premiere Pro and create a new composition with settings that match the settings of
your Premiere Pro project.
• Select a set of clips in Adobe Premiere Pro and convert them to a composition in After Effects.
For information on using Dynamic Link with After Effects and Premiere Pro, see Dynamic Link and After Effects and
the relevant sections of Adobe Premiere Pro Help.
Working with Adobe Media Encoder and After Effects
You can use Adobe Media Encoder to export video from After Effects. Use Adobe Media Encoder to encode formats
like H.264, MPEG-2, and WMV. Formats such as these are encoded at a higher quality than the Render Queue. Other
formats, are available in Adobe Media Encoder, but not in After Effects. For example, the DNxHD format is available
in Adobe Media Encoder CC, but not in After Effects CC.
For details about using Adobe Media Encoder with After Effects, see Adobe Media Encoder.
24
See this tutorial to learn how to export After Effects compositions using Adobe Media Encoder.
Edit in Adobe Audition
While working in After Effects, you can use the more comprehensive audio-editing capabilities of Adobe Audition to
fine-tune your audio. You can use the Edit in Adobe Audition command to start Adobe Audition from within After
Effects.
If you edit an audio-only file (for example, a WAV file) in Adobe Audition, you change the original file. If you edit a
l
that contains both audio and video (for example, an AVI file), you edit a copy of the source audio file.
ayer
1 Select the layer that contains the audio that you want to edit. The item must be of a type that is editable in Adobe
Audition.
2 Choose Edit > Edit In Adobe Audition to open the clip in Edit view in Adobe Audition.
3 Edit the file, and then do one of the following:
• If you’re editing an audio-only layer, choose File > Save to apply your edits to the original audio file. You can also
choose File > Save As to apply your edits to a copy of the audio file. If you choose File > Save As, import the copy
of the file into After Effects.
• If you’re editing a layer that contains both audio and video, choose File > Save As. After you save the file, import
it into After Effects. Then, add it to the composition, and mute the original audio in the audio-video clip by
deselecting the Audio switch in the Timeline panel.
Note: Any effects applied to audio in After Effects aren’t incl
Tutorials and resources about using Adobe Audition to modify audio from After Effects can be found on this post from
the After Effects Region of Interest blog.
uded in the copy that is sent to Adobe Audition.
Last updated 6/14/2014
Page 30

Workspace and workflow
More Help topics
Adobe Bridge
Template projects and example projects
Animation presets overview and resources
Preparing and importing Photoshop files
3D object layers from Photoshop
Video and animation overview
3D
Vanishing Point
Web links, chapter links, cue points, and markers
Importing from Adobe After Effects
Keyboard shortcuts reference
25
General (keyboard shortcuts)
Result Windows Mac OS
Select all Ctrl+A Command+A
Deselect all F2 or Ctrl+Shift+A F2 or Command+Shift+A
Rename selected layer, composition, folder,
effect, group, or mask
Open selected layer, composition, or footage
item
Move selected layers, masks, effects, or render
items down (back) or up (forward) in stacking
order
Move selected layers, masks, effects, or render
items t
o bottom (back) or top (front) of
stacking order
Extend selection to next item in Projec t panel,
Render Queue
Extend selection to previous item in Project
panel, Render Queue panel, or Effect Controls
panel
Duplicate selected layers, masks, effects, text
selectors, animators, puppet meshes, shapes,
render items, output modules, or
compositions
panel, or Effect Controls panel
Enter on main keyboard Return
Enter on numeric keypad Enter on numeric keypad
Ctrl+Alt+Down Arrow or Ctrl+Alt+Up Arrow Command+Option+Down Arrow or
Ctrl+Alt+Shift+Down Arrow or
Ctrl+Alt+Shift+Up Arrow
Shift+Down Arrow Shift+Down Arrow
Shift+Up Arrow Shift+Up Arrow
Ctrl+D Command+D
Command+Option+Up Arrow
Command+Option+Shift+Down Arrow or
Command+Option+Shift+Up Arrow
Quit Ctrl+Q Command+Q
Last updated 6/14/2014
Page 31

Workspace and workflow
Undo Ctrl+Z Command+Z
Redo Ctrl+Shift+Z Command+Shift+Z
Purge All Memory Ctrl+Alt+/ (on numeric keypad) Command+Option+/ (on numeric keypad)
Interrupt running a script Esc Esc
Projects (keyboard shortcuts)
Result Windows Mac OS
New project Ctrl+Alt+N Command+Option+N
Open project Ctrl+O Command+O
Open most recent project Ctrl+Alt+Shift+P Command+Option+Shift+P
New folder in Project panel Ctrl+Alt+Shift+N Command+Option+Shift+N
Open Project Settings dialog box Ctrl+Alt+Shift+K Command+Option+Shift+K
Find in Project panel Ctrl+F Command+F
26
Cycle through color bit depths for project Alt-click bit-depth button at
panel
Open Project Settings dialog box Click bit-depth button at bottom of Project
panel
bottom of Project
Option-click bit-depth button at bottom of
Project panel
Click bit-depth button at bottom of Project
panel
Preferences (keyboard shortcuts)
Result Windows Mac OS
Open Preferences dialog box Ctrl+Alt+; (semicolon) Command+Option+; (semicolon)
Restore default preferences settings Hold down Ctrl+Alt+Shift while starting After
Panels, viewers, workspaces, and windows (k
Effe
cts
eyboard shortcuts)
Note: (Mac OS) Shortcuts involving function keys F9-F12 may conflict with shortcuts used by the operating system. See
Mac OS Help for instructions to reassign Dashboard & Expose shortcuts.
Result Windows Mac OS
Open or close Project panel Ctrl+0 Command+0
Open or close Render Queue panel Ctrl+Alt+0 Command+Option+0
Open or close Tools panel Ctrl+1 Command+1
Hold down Command+Option+Shift while
starting After Effects
Open or close Info panel Ctrl+2 Command+2
Open or close Preview panel Ctrl+3 Command+3
Open or close Audio panel Ctrl+4 Command+4
Open or close Effects & Presets panel Ctrl+5 Command+5
Open or close Character panel Ctrl+6 Command+6
Last updated 6/14/2014
Page 32

Workspace and workflow
Result Windows Mac OS
Open or close Paragraph panel Ctrl+7 Command+7
Open or close Paint panel Ctrl+8 Command+8
Open or close Brushes panel Ctrl+9 Command+9
27
Open or close Effect Controls panel for
selected layer
Open Flowchart panel for project flowchart Ctrl+F11 Command+F11
Switch to workspace Shift+F10, Shift+F11, or Shift+F12 Shift+F10, Shift+F11, or Shift+F12
Close active viewer or panel (closes content
)
first
Close active panel or all viewers of type of
act
ive viewer (closes content first). For
example, if a Timeline panel is active, this
command closes all Timeline panels.
Split the frame containing the active viewer
and create a new viewer with opposite
locked/unlocked state
Maximize or restore panel under pointer ` (accent grave) ` (accent grave)
Resize application window or floating window
to fit screen. (Press again to resize window so
that contents fill the screen.)
Move application window or floating window
to main monitor; resize window to fit screen.
(Press again to resize window so that contents
fill the screen.)
Toggle activation between Composition
panel a
nd Timeline panel for current
composition
F3 or Ctrl+Shift+T F3 or Command+Shift+T
Ctrl+W Command+W
Ctrl+Shift+W Command+Shift+W
Ctrl+Alt+Shift+N Command+Option+Shift+N
Ctrl+\ (backslash) Command+\ (backslash)
Ctrl+Alt+\ (backslash) Command+Option+\ (backslash)
\ (backslash) \ (backslash)
Cycle to previous or next item in active viewer
ample, cycle through open
(for ex
compositions)
Cycle to previous or next panel in active frame
(for ex
ample, cycle through open Timeline
panels)
Activate a view in a multi-view layout in the
Composition panel without affecting layer
selection
Shift+, (comma) or Shift+. (period) Shift+, (comma) or Shift+. (period)
Alt+Shift+, (comma) or Alt+Shift+. (period) Option+Shift+, (comma) or Option+Shift+.
(period)
click with middle mouse button click with middle mouse button
Activating tools (keyboard shortcuts)
Note: You can activate some tools only under certain circumstances. For example, you can activate a camera tool only when
the active composition contains a camera layer.
To momentarily activate a tool with a single-letter keyboard shortcut, hold down the key; release the key to return to
the previously active tool. To activate a tool and keep it active, press the key and immediately release it.
Last updated 6/14/2014
Page 33

Workspace and workflow
Result Windows Mac OS
Cycle through tools Alt-click tool button in Tools panel Option-click tool button in Tools panel
Activate Selection tool V V
Activate Hand tool H H
28
Temporarily activate Hand tool Hold down spacebar or the middle mouse
Activate Zoom In tool Z Z
Activate Zoom Out tool Alt (when Zoom In tool is active) Option (when Zoom In tool is active)
Activate Rotation tool W W
Activate Roto Brush tool Alt+W Option+W
Activate and cycle through Camera tools
(Un
ified Camera, Orbit Camera, Track XY
Camera, and Track Z Camera)
Activate Pan Behind tool Y Y
Activate and cycle through mask and shape
s (Rectangle, Rounded Rectangle, Ellipse,
tool
Polygon, Star)
Activate and cycle through Type tools
(Horizontal and Vertical)
Activate and cycle between the Pen and Mask
Feather tools. Note - You can turn off this
setting in the Preferences dialog box.
Temporarily activate Selection tool when a
pen t
ool is selected
Temporarily activate pen tool when the
Selection tool is selected and pointer is over a
path (Add Vertex tool when pointer is over a
segment; Convert Vertex tool when pointer is
over a vertex)
button.
C C
Q Q
Ctrl+T Command+T
G G
Ctrl Command
Ctrl+Alt Command+Option
Ho
ld down spacebar or the middle mouse
button.
Activate and cycle through Brush, Clone
and Eraser tools
Stamp,
Activate and cycle through Puppet tools Ctrl+P Command+P
Temporarily convert Selection tool to Shape
lication tool
Dup
Temporarily convert Selection tool to Direct
Selection tool
Ctrl+B Command+B
Alt (in shape layer) Option (in shape layer)
Ctrl (in shape layer) Command (in shape layer)
Compositions and the work area (keyboard shortcuts)
Result Windows Mac OS
New composition Ctrl+N Command+N
Open Composition Settings dialog box for
selec
ted composition
Ctrl+K Command+K
Last updated 6/14/2014
Page 34

Workspace and workflow
29
Set beginning or end of work area to current
time
Set work area to duration of selected layers or,
if no layers are selected, set work area to
composition duration
Open Composition Mini-Flowchart for active
ion
composit
note: If you tap Shift several times without any
interv
ening keystrokes, you may invoke a
feature of your operating system’s StickyKeys
or Sticky Keys accessibility software. See your
operating system’s documentation for
disabling this feature.
Activate the most recently active composition
that
is in the same composition hierarchy
(network of nested compositions) as the
currently active composition
B or N B or N
Ctrl+Alt+B Command+Option+B
Tab Tab
Shift+Esc Shift+Esc
Time navigation (keyboard shortcuts)
Result Windows Mac OS
Go to specific time Alt+Shift+J Option+Shift+J
Go to beginning or end of work area Shift+Home or Shift+End Shift+Home or Shift+End
Go to previous or next visible item in time
ruler (keyframe, layer marker, work area
beginning or end)
note: Also goes to beginning, end, or base frame
of Roto Brush span if viewing Roto Brush in Layer
panel.
Go to beginning of compositio
footage item
Go to end of composition, layer, or footage
item
Go forward 1 frame Page Down or Ctrl+Right Arrow Page Down or Command+Right Arrow
Go forward 10 frames Shift+Page Down or Ctrl+Shift+Right Arrow Shift+Page Down or Command+Shift+Right
Go backward 1 frame Page Up or Ctrl+Left Arrow Page Up or Command+Left Arrow
Go backward 10 frames Shift+Page Up or Ctrl+Shift+Left Arrow Shift+Page Up or Command+Shift+Left Arrow
Go to layer In point I I
Go to layer Out point O O
Go to previous In point or Out point Ctrl+Alt+Shift+Left Arrow Command+Option+Shift+Left Arrow
Go to next In point or Out point Ctrl+Alt+Shift+Right Arrow Command+Option+Shift+Right Arrow
Scroll to current time in Timeline panel D D
n, layer, or
J or K J or K
Home or Ctrl+Alt+Left Arrow Home or Command+Option+Left Arrow
End or Ctrl+Alt+Right Arrow End or Command+Option+Right Arrow
Arro
w
Last updated 6/14/2014
Page 35

Workspace and workflow
Previews (keyboard shortcuts)
Result Windows Mac OS
Start or stop standard preview spacebar spacebar
30
RAM preview 0 on numeric keypad* 0 on numeric keypad* or Control+0 (zero) on
RAM
preview with alternate settings Shift+0 on numeric keypad* Shift+0 on numeric keypad* or
Save RAM preview Ctrl-click RAM Preview button or press Ctrl+0
Save RAM preview with alternate settings Ctrl+Shift-click RAM Preview button or press
Preview only audio, from current time . (decimal point) on numeric keypad* . (decimal point) on numeric keypad* or
Preview only audio, in work area Alt+. (decimal point) on numeric keypad* Option+. (decimal point) on numeric keypad*
Manually preview (scrub) video Drag or Alt-drag current-time indicator,
Manually preview (scrub) audio Ctrl-drag current-time indicator Command-drag current-time indicator
RAM preview number of frames specified by
ernate RAM Preview preference (defaults to
Alt
5)
Toggle Mercury Transmit video preview / (on numeric keypad) / (on numeric keypad), Control+/ on main
Take snapshot Shift+F5, Shift+F6, Shift+F7, or Shift+F8 Shift+F5, Shift+F6, Shift+F7, or Shift+F8
on numeric keypad*
Ctrl+Shift+0 on numeric keypad*
ing on Live Update setting
depend
Alt+0 on numeric keypad* Option+0 on numeric keypad* or
main keyboard
Shift+Control+0 (zero) on main keyboard
Command-click RAM Preview button or press
Command+0 on numeric keypad*
Command+Shift-click RAM Preview button or
press Command+Shift+0 on numeric keypad*
Control+. (period) on main keyboard
or Control+Option+. (period) on main
keyboard
Drag or Option-drag current-time indicator,
depending on Live Update setting
Control+Option+0 (zero) on main keyboard
keyboard
Display snapshot in active viewer F5, F6, F7, or F8 F5, F6, F7, or F8
Purge snapshot Ctrl+Shift+F5, Ctrl+Shift+F6, Ctrl+Shift +F7, or
Fast Previews > Off Ctrl+Alt+1 Command+Option+1
Fast Previews > Adaptive Resolution Ctrl+Alt+2 Command+Option+2
Fast Previews > Draft Ctrl+Alt+3 Command+Option+3
Fast Previews > Fast Draft Ctrl+Alt+4 Command+Option+4
Fast Previews > Wireframe Ctrl+Alt+5 Command+Option+5
Ctrl+Sh
ift+F8
Command+Shift+F5, Command+Shift+F6,
Command+Shift+F7, or Command+Shift+F8
Note: Some shortcuts are marked with an asterisk (*) to remind you to make sure that Num Lock is on when you use the
numeric keypad.
Last updated 6/14/2014
Page 36

Workspace and workflow
Views (keyboard shortcuts)
Result Windows Mac OS
31
Turn display color management on or off for
active
view
Show red, green, blue, or alpha channel as
grayscale
Show colorized red, green, or blue channel Alt+Shift+1, Alt+Shift+2, Alt+Shift+3 Option+Shift+1, Option+Shift+2,
Toggle showing straight RGB color Alt+Shift+4 Option+Shift+4
Show alpha boundary (outline between
transpar
ent and opaque regions) in Layer
panel
Show alpha overlay (colored overlay on
ent regions) in Layer panel
transpar
Show Refine Edge X-ray (After Effects CC 12.0
and later)
Reset view in the Composition panel to 100%
and center composition in the panel
Zoom in in Composition, Layer, or Footage
panel
Zoom out in Composition, Layer, or Footage
panel
Zoom to 100% in Composition, Layer, or
Footage panel
Shift+/ (on numeric keypad) Shift+/ (on numeric keypad)
Alt+1, Alt+2, Alt+3, Alt+4 Option+1, Option+2, Option+3, Option+4
Option+Shift+3
Alt+5 Option+5
Alt+6 Option+6
Alt+X Option+X
Double-click Hand tool Double-click Hand tool
. (period) on main keyboard . (period) on main keyboard
, (comma) , (comma)
/ (on main keyboard) / (on main keyboard)
Zoom to fit in Composition, Layer, or Footage
panel
Zoom up to 100% to fit in Composition, Layer,
age panel
or Foot
Set resolution to Full, Half, or Custom in
Composition panel
Open View Options dialog box for active
Composition panel
Zoom in time = (equal sign) on main keyboard = (equal sign) on main keyboard
Zoom out time - (hyphen) on main keyboard - (hyphen) on main keyboard
Zoom in Timeline panel to single-frame units
(Pre
ss again to zoom out to show entire
composition duration.)
Zoom out in Timeline panel to show the entire
ion duration (Press again to zoom
composit
back in to the duration specified by the Time
Navigator.)
Prevent images from being ren
previews in viewer panels
Show or hide safe zones ' (apostrophe) ' (apostrophe)
Show or hide grid Ctrl+' (apostrophe) Command+' (apostrophe)
dered for
Shift+/ (on main keyboard) Shift+/ (on main keyboard)
Alt+/ (on main keyboard) Option+/ (on main keyboard)
Ctrl+J, Ctrl+Shift+J, Ctrl+Alt+J Command+J, Command+Shift+J,
Command+Option+J
Ctrl+Alt+U Command+Option+U
; (semicolon) ; (semicolon)
Shift+; (semicolon) Shift+; (semicolon)
Caps Lock Caps Lock
Last updated 6/14/2014
Page 37

Workspace and workflow
Show or hide proportional grid Alt+' (apostrophe) Option+' (apostrophe)
Show or hide rulers Ctrl+R Command+R
Show or hide guides Ctrl+; (semicolon) Command+; (semicolon)
Turn snapping to grid on or off Ctrl+Shift+' (apostrophe) Command+Shift+' (apostrophe)
Turn snapping to guides on or off Ctrl+Shift+; (semicolon) Command+Shift+; (semicolon)
Lock or unlock guides Ctrl+Alt+Shift+; (semicolon) Command+Option+Shift+; (semicolon)
32
Show or hide layer controls (masks, motion
paths, light and camera wireframes, effect
control points, and layer handles)
Ctrl+Shift+H Command+Shift+H
Footage (keyboard shortcuts)
Result Windows Mac OS
Import one file or image sequence Ctrl+I Command+I
Import multiple files or image sequences Ctrl+Alt+I Command+Option+I
Open movie in an After Effects Footage panel Alt-double-click Option-double-click
Add selected items to most recently activated
composit
ion
Replace selected source footage for selected
layers with footage item selected in Project
panel
Replace source for a selected layer Alt-drag footage item from Project panel onto
Delete a footage item without a warning Ctrl+Backspace Command+Delete
Open Interpret Footage dialog box for
ted footage item
selec
Remember footage interpretation Ctrl+Alt+C Command+Option+C
Ctrl+/ (on main keyboard) Command+/ (on main keyboard)
Ctrl+Alt+/ (on main keyboard) Command+Option+/ (on main keyboard)
selected layer
Ctrl+Alt+G Command+Option+G
Option-drag footage item from Project panel
onto selected layer
Edit selected footage item in application with
which i
t’s associated (Edit Original)
Replace selected footage item Ctrl+H Command+H
Reload selected footage items Ctrl+Alt+L Command+Option+L
Set proxy for selected footage item Ctrl+Alt+P Command+Option+P
Ctrl+E Command+E
Effects and animation presets (keyboard shortcuts)
Result Windows Mac OS
Delete all effects from selected layers Ctrl+Shift+E Command+Shift+E
Apply most recently applied effec t to selected
layers
Apply most recently applied animation preset
to selected layers
Ctrl+Alt+Shift+E Command+Option+Shift+E
Ctrl+Alt+Shift+F Command+Option+Shift+F
Last updated 6/14/2014
Page 38

Workspace and workflow
Layers (keyboard shortcuts)
Note: Some operations do not affect shy layers.
Result Windows Mac OS
New solid layer Ctrl+Y Command+Y
New null layer Ctrl+Alt+Shift+Y Command+Option+Shift+Y
New adjustment layer Ctrl+Alt+Y Command+Option+Y
33
Select layer (1-999) by its number (enter digits
for two-digit and three-digit numbers)
rapidly
Toggle selection of layer (1-999) by its number
(enter digits rapidly for two-digit and threedigit numbers)
Select next layer in stacking order Ctrl+Down Arrow Command+Down Arrow
Select previous layer in stacking order Ctrl+Up Arrow Command+Up Arrow
Extend selection to next layer in stacking
order
Extend selection to previous layer in stacking
order
Deselect all layers Ctrl+Shift+A Command+Shift+A
Scroll topmost selected layer to top of
panel
Timeline
Show or hide Parent column Shift+F4 Shift+F4
Show or hide Layer Switches and Modes
colum
ns
Setting the sampling method for selected
layers (Best/Bilinear)
Setting the sampling method for selected
rs (Best/Bicubic)
laye
0-9 on numeric keypad* 0-9 on numeric keypad*
Shift+0-9 on numeric keypad* Shift+0-9 on numeric keypad*
Ct
rl+Shift+Down Arrow Command+Shift+Down Arrow
Ctrl+Shift+Up Arrow Command+Shift+Up Arrow
X X
F4 F4
Alt+B Option+B
Alt+Shift+B Option+Shift+B
Turn off all other solo switches Alt-click solo switch Option-click solo switch
Turn Video (eyeball) switch on or off for
ted layers
selec
Turn off Video switch for all video layers other
than selected layers
Open settings dialog box for selected solid,
light, camera, null, or adjustment layer
Paste layers at current time Ctrl+Alt+V Command+Option+V
Split selected layers (If no layers are selected,
split
all layers.)
Precompose selected layers Ctrl+Shift+C Command+Shift+C
Open Effect Controls panel for selected layers Ctrl+Shift+T Command+Shift+T
Open layer in Layer panel (opens source
composition for precomposition layer in
Composition panel)
Ctrl+Alt+Shift+V Command+Option+Shift+V
Ctrl+Shift+V Command+Shift+V
Ctrl+Shift+Y Command+Shift+Y
Ctrl+Shift+D Command+Shift+D
Double-click a layer Double-click a layer
Last updated 6/14/2014
Page 39

Workspace and workflow
34
Open source of a layer in Footage panel
(opens precomposition layer in Layer panel)
Reverse selected layers in time Ctrl+Alt+R Command+Option+R
Enable time remapping for selected layers Ctrl+Alt+T Command+Option+T
Move selected layers so that their In point or
point is at the current time
Out
Trim In point or Out point of selected layers to
current time
Add or remove expression for a property Alt-click stopwatch Option-click stopwatch
Add an effect (or multiple selected effects) to
ted layers
selec
Set In point or Out point by time-stretching Ctrl+Shift+, (comma) or Ctrl+Alt+, (comma) Command+Shift+, (comma) or
Move selected layers so that their In Point is at
beginning of composition
Move selected layers so that t heir Out point is
at end of composition
Lock selected layers Ctrl+L Command+L
Unlock all layers Ctrl+Shift+L Command+Shift+L
Set Quality to Best, Draft, or Wireframe for
selec
ted layers
Alt-double-click a layer Option-double-click a layer
[ (left bracket) or ] (right bracket) [ (left bracket) or ] (right bracket)
Alt+[ (left bracket) or Alt+] (right bracket) Option+[ (left bracket) or Option+] (right
Double-click effect selection in Effects &
Presets panel
Alt+Home Option+Home
Alt+End Option+End
Ctrl+U, Ctrl+Shift+U, or Ctrl+Alt+Shift+U Command+U, Command+Shift+U,
bracket)
Double-click effect selection in Effects &
Presets panel
Comman
d+Option+, (comma)
Command+Option+Shift+U
Cycle forward or backward through blending
modes for selected layers
Find in Timeline panel Ctrl+F Command+F
Shift+ - (hyphen) or Shift+= (equal sign) on
the main keyboard
Shift+ - (hyphen) or Shift+= (equal sign) on
the main keyboard
Note: Some shortcuts are marked with an asterisk (*) to remind you to make sure that Num Lock is on when you use the
numeric keypad.
Showing properties and groups in the Timeline panel (keyboard shortcuts)
Note: This table contains double-letter shortcuts (for example, LL). To use these shortcuts, press the letters in quick
succession.
Result Windows Mac OS
Find in Timeline panel Ctrl+F Command+F
Toggle expansion of selected layers to show
all proper
Toggle expansion of property group and all
child property groups to show all properties
Show only Anchor Point property (for lights
and cameras, Point Of Interest)
Show only Audio Levels property L L
Show only Mask Feather property F F
ties
Ctrl+` (accent grave) Command+` (accent grave)
Ctrl-click triangle to the left of the property
group name
A A
Command-click triangle to the left of the
property group name
Show only Mask Path property M M
Last updated 6/14/2014
Page 40

Workspace and workflow
Result Windows Mac OS
Show only Mask Opacity property TT TT
35
Show only Opacity property (for lights,
y)
Intensit
Show only Position property P P
Show only Rotation and Orientation
prop
erties
Show only Scale property S S
Show only Time Remap property RR RR
Show only instances of missing effects FF FF
Show only Effects property group E E
Show only mask property groups MM MM
Show only Material Options property group AA AA
Show only expressions EE EE
Show only modified properties UU UU
Show only paint strokes, Roto Brush strokes,
and Pu
ppet pins
Show only audio waveform LL LL
Show only properties with keyframes or
ns
expressio
Show only selected properties and groups SS SS
T T
R R
PP PP
U U
Hide property or group Alt+Shift-click property or group name Option+Shift-click property or group name
Add or remove property or group from set
is shown
that
Add or remove keyframe at current time Alt+Shift+property shortcut Option+property shortcut
Shift+property or group shortcut Shift+property or group shortcut
Showing properties in the Effect Controls panel (keyboard shortcuts)
Result Windows Mac OS
Toggle expansion of selected effects to show
all proper
Toggle expansion of property group and all
child property groups to show all properties
ties
Ctrl+` (accent grave) Command+` (accent grave)
Ctrl-click triangle to the left of the property
group name
Command-click triangle to the left of the
property group name
Last updated 6/14/2014
Page 41

Workspace and workflow
Modifying layer properties (keyboard shortcuts)
Result Windows Mac OS
Modify property value by default increments Drag property value Drag property value
36
Modify property value by 10x default
increment
Modify property value by 1/10 default
increments
Open Auto-Orientation dialog box for
selected layers
Open Opacity dialog box for selected layers Ctrl+Shift+O Command+Shift+O
Open Rotation dialog box for selected layers Ctrl+Shift+R Command+Shift+R
Open Position dialog box for selected layers Ctrl+Shift+P Command+Shift+P
Center selected layers in view (modifies
Position property to place anchor points of
selected layers in center of current view)
Move selected layers 1 pixel at current
magnificat
Move selected layers 10 pixels at current
magnification (Position)
Move selected layers 1 frame earlier or later Alt+Page Up or Alt+Page Down Option+Page Up or Option+Page Down
Move selected layers 10 frames earlier or later Alt+Shift+Page Up or Alt+Shift+Page Down Option+Shif t+Page Up or Opti on+Shift+Page
I
ncrease or decrease Rotation (Z Rotation) of
selected layers by 1°
s
ion (Position)
Shift-drag property value Shift-drag property value
Ctrl-drag property value Command-drag property value
Ctrl+Alt+O Command+Alt+O
Ctrl+Home Command+Home
arrow key arrow key
Shift+arrow key Shift+arrow key
Down
+ (plus) or - (minus) on numeric keypad + (plus) or - (minus) on numeric keypad
Increase or decrease Rotation (Z Rotation) of
selected layers by 10°
Increase or decrease Opacity (or Intensity for
light layers) of selected layers by 1%
Increase or decrease Opacity (or Intensity for
light layers) of selected layers by 10%
Increase Scale of selected layers by 1% Ctrl++ (plus) or Alt++ (plus) on numeric
Decrease Scale of selected layers by 1% Ctrl+- (minus) or Alt+- (minus) on numeric
Increase Scale of selected layers by 10% Ctrl+Shift++ (plus) or Alt+Shift++ (plus) on
Decrease Scale of selected layers by 10% Ctrl+Shift+- (minus) or Alt+Shift+- (minus) on
Modify Rotation or Orientation in 45°
increments
Modify Scale, constrained to footage frame
aspect ratio
Reset Rotation to 0° Double-click Rotation tool Double-click Rotation tool
Shift++ (plus) or Shift+- (minus) on numeric
keypad
Ctrl+Alt++ (plus) or Ctrl+Alt+- (minus) on
numeric keypad
Ctrl+Alt+Shift++ (plus) or Ctrl+Alt+Shift+(minus) on numeric keypad
keypad
keypad
numeric keypad
numeric keypad
Shift-drag with Rotation tool Shift-drag with Rotation tool
S
hift-drag layer handle with Selection tool Shift-drag layer handle with Selection tool
Shift++ (plus) or Shift+- (minus) on numeric
keypad
Control+Option++ (plus) or
Control+Option+- (minus) on numeric keypad
Control+Option+Shift++ (plus) or
Control+Option+Shift+- (minus) on numeric
keypad
mmand++ (plus) or Option++ (plus) on
Co
numeric keypad
Command+- (minus) or Option+- (minus) on
numeric keypad
C
ommand+Shift++ (plus) or Option+Shift++
(plus) on numeric keypad
Command+Shift+- (minus) or Option+Shift+(minus) on numeric keypad
Last updated 6/14/2014
Page 42

Workspace and workflow
Result Windows Mac OS
Reset Scale to 100% Double-click Selection tool Double-click Selection tool
37
Scale and reposition selected layers to fit
ion
composit
Scale and reposition selected layers to fit
composition width, preserving image aspect
ratio for each layer
Scale and reposition selected layers to fit
composit
ion height, preserving image aspect
ratio for each layer
Ctrl+Alt+F Command+Option+F
Ctrl+Alt+Shift+H Command+Option+Shift+H
Ctrl+Alt+Shift+G Command+Option+Shift+G
3D layers (keyboard shortcuts)
Note: (Mac OS) Shortcuts involving function keys F9-F12 may conflict with shortcuts used by the operating system. See
Mac OS Help for instructions to reassign Dashboard & Expose shortcuts.
Result Windows Mac OS
Switch to 3D view 1 (defaults to Front) F10 F10
Switch to 3D view 2 (defaults to Custom View 2)F11 F11
Switch to 3D view 3 (defaults to Active
Camera)
Return to previous view Esc Esc
New light Ctrl+Alt+Shift+L Command+Option+Shift+L
F12 F12
New camera Ctrl+Alt+Shift+C Command+Option+Shift+C
Move the camera and its point of interest to
look at selected 3D layers
With a camera tool selected
and its point of interest to look at selected 3D
layers
With a camera tool selected
and its point of interest to look at all 3D layers
Turn Casts Shadows property on or off for
selected 3D layers
, move the camera
, move the camera
Ctrl+Alt+Shift+\ Command+Option+Shift+\
F F
Ctrl+Shift+F Command+Shift+F
Alt+Shift+C Option+Shift+C
Keyframes and the Graph Editor (keyboard shortcuts)
Note: (Mac OS) Shortcuts involving function keys F9-F12 may conflict with shortcuts used by the operating system. See
Mac OS Help for instructions to reassign Dashboard & Expose shortcuts.
Result Windows Mac OS
Toggle between Graph Editor and layer bar
modes
Select all keyframes for a property Click property name Click property name
Select all visible keyframes and properties Ctrl+Alt+A Command+Option+A
Shift+F3 Shift+F3
Last updated 6/14/2014
Page 43

Workspace and workflow
38
Deselect all keyframes, properties, and
property groups
Move keyframe 1 frame later or earlier Alt+Right Arrow or Alt+Left Arrow Option+Right Arrow or Option+Left Arrow
Move keyframe 10 frames later or earlier Alt+Shift+Right Arrow or Alt+Shift+Left
Set interpolation for selected keyframes (layer
bar mode)
Set keyframe interpolation method to hold or
Auto Bezier
Set keyframe interpolation method to linear
or Auto Bezier
Set keyframe interpolation method to linear
or hold
Easy ease selected keyframes F9 F9
Easy ease selected keyframes in Shift+F9 Shift+F9
Easy ease selected keyframes out Ctrl+Shift+F9 Command+Shift+F9
Set velocity for selected keyframes Ctrl+Shift+K Command+Shift+K
Add or remove keyframe at current time. For
erty shortcuts, see Showing properties
prop
and groups in the Timeline panel (keyboard
shortcuts) .
Shift+F2 or Ctrl+Alt+Shift+A Shift+F2 or Command+Option+Shift+A
Arro
w
Ctrl+Alt+K Command+Option+K
Ctrl+Alt+H Command+Option+H
Ctrl-click in layer bar mode Command-click in layer bar mode
Ctrl+Alt-click in layer bar mode Command+Option-click in layer bar mode
Alt+Shift+property shortcut Option+property shortcut
Option+Shift+Right Arrow or
Option+Shift+Left Arrow
Text (keyboard shortcuts)
Result Windows Mac OS
New text layer Ctrl+Alt+Shift+T Command+Option+Shift+T
Align selected horizontal text left, center, or
right
Align selected vertical text top, center, or
bottom
Extend or reduce selection by one character
to right or left in horizontal text
Extend or reduce selection by one word to
or left in horizontal text
right
Extend or reduce selection by one line up or
down in horizontal text
Extend or reduce selection by on e line to right
or left in vertical text
Extend or reduce selection one word up or
down in vertical text
Extend or reduce selection by one character
up or down in vertical text
Select text from insertion point to beginning
or end of line
Ctrl+
Shift+L, Ctrl+Shift+C, or Ctrl+Shift+R Command+Shift+L, Command+Shift+C, or
Ctrl+Shift+L, Ctrl+Shift+C, or Ctrl+Shift+R Command+Shift+L, Command+Shift+C, or
Shift+Right Arrow or Shift+Left Arrow Shift+Right Arrow or Shift+Left Arrow
Ctrl+Shift+Right Arrow or Ctrl+Shift+Left
Arrow
Shift+Up Arrow or Shift+Down Arrow Shift+Up Arrow or Shift+Down Arrow
Shift+Right Arrow or Shift+Left Arrow Shift+Right Arrow or Shift+Left Arrow
Ctrl+Shift+Up Arrow or Ctrl+Shift+Down
Arrow
Shift+Up Arrow or Shift+Down Arrow Shift+Up Arrow or Shift+Down Arrow
Shift+Home or Shift+End Shift+Home or Shift+End
Command+Shift+R
Command+Shift+R
Command+Shift+Right Arrow or
Command+Shift+Left Arrow
Command+Shift+Up Arrow or
Command+Shift+Down Arrow
Last updated 6/14/2014
Page 44

Workspace and workflow
Result Windows Mac OS
39
Move insertion point to beginning or end of
line
Select all text on a layer Double-click text layer Double-click text layer
Select text from insertion point to beginning
nd of text frame
or e
Select text from inser tion point to mouse click
point
In horizontal text, move insertion point one
character left or right; one line up or down;
one word left or right; or one paragraph up or
down
In vertical text, move insertion point one
charac
ter up or down; one left or right; one
word up or down; or one paragraph left or
right
Select word, line, paragraph, or entire text
frame
Turn All Caps on or off for selected text Ctrl+Shift+K Command+Shift+K
Turn Small Caps on or off for selected text Ctrl+Alt+Shift+K Command+Option+Shift+K
Turn Superscript on or off for selected text Ctrl+Shift+= (equals) Command+Shift+= (equals)
Turn Subscript on or off for selected text Ctrl+Alt+Shift+= (equals) Command+Option+Shift+= (equals)
Set horizontal scale to 100% for selected text Ctrl+Shift+X Command+Shift+X
Home or End Home or End
Ctrl+Shift+Home or Ctrl+Shift+End Command+Shift+Home or
Shift-click Shift-click
Left Arrow or Right Arrow; Up Arrow or Down
Arrow; Ctrl+Left Arrow or Ctrl+Right Arrow; or
Ctrl+Up Arrow or Ctrl+Down Arrow
Up Arrow or Down Arrow; Left Arrow or Right
Arrow; Ctrl+Up Arrow or Ctrl+Down Arrow ; or
Ctrl+Left Arrow or Ctrl+Right Arrow
ouble-click, triple-click, quadruple-click, or
D
quintuple-click with Type tool
Command+Shift+End
Left Arrow or Right Arrow; Up Arrow or Down
Arrow; Command+Left Arrow or
Command+Right Arrow; or Command+Up
Arrow or Command+Down Arrow
Up Arrow or Down Arrow; Left Arrow or Right
Arrow; Command+Up Arrow or
Command+Down Arrow; or Command+Left
Arrow or Command+Right Arrow
Double-click, triple-click, quadruple-click, or
quintuple-click with Type tool
Set vertical scale to 100% for selected text Ctrl+Alt+Shift+X Command+Option+Shift+X
Auto leading for selected text Ctrl+Alt+Shift+A Command+Option+Shift+A
Reset tracking to 0 for selected text Ctrl+Shift+Q Command+Shift+Control+Q
Justify paragraph; left align last line Ctrl+Shift+J Command+Shift+J
Justify paragraph; right align last line Ctrl+Alt+Shift+J Command+Option+Shift+J
Justify paragraph; force last line Ctrl+Shift+F Command+Shift+F
Decrease or increase font size of selected text
units
by 2
Decrease or increase font size of selected text
by 10 units
Increase or decrease leading by 2 units Alt+Down Arrow or Alt+Up Arrow Option+Down Arrow or Option+Up Arrow
Increase or decrease leading by 10 units Ctrl+Alt+Down Arrow or Ctrl+Alt+Up Arrow Command+Option+Down Arrow or
Decrease or increase baseline shift by 2 units Alt+Shift+Down Arrow or Alt+Shift +Up Arrow Option+Shift+Down Arrow or
Decrease or increase baseline shift by 10 units Ctrl+Alt+Shift+Down Arrow or
Ctrl+Shift+, (comma) or Ctrl+Shift+. (period) Command+Shift+, (comma) or
Ctrl+Alt+Shift+, (comma) or Ctrl+Alt+Shift+.
(period)
Ctrl+Alt+Shift+Up Arrow
Command+Shift+. (period)
Command+Option+Shift+, (comma) or
Command+Option+Shift+. (period)
Comman
d+Option+Up Arrow
Option+Shift+Up Arrow
Command+Option+Shift+Down Arrow or
Command+Option+Shift+Up Arrow
Last updated 6/14/2014
Page 45

Workspace and workflow
Result Windows Mac OS
40
Decrease or increase kerning or tracking 20
units (20/1000 ems)
Decrease or increase kerning or tracking 100
units (100/1000 ems)
Toggle paragraph composer Ctrl+Alt+Shift+T Command+Option+Shift+T
Alt+Left Arrow or Alt+Right Arrow Option+Left Arrow or Option+Right Arrow
Ctrl+Alt+Left Arrow or Ctrl+Alt+Right Arrow Command+Option+Left Arrow or
Command+Option+Right Arrow
Masks (keyboard shortcuts)
Result Windows Mac OS
New mask Ctrl+Shift+N Command+Shift+N
Select all points in a mask Alt-click mask Option-click mask
Select next or previous mask Alt+` (accent grave) or Alt+Shift+` (accent
Enter free-transform mask editing mode Double-click mask with Selection tool or
Exit free-transform mask editing mode Esc Esc
Scale around center point in Free Transform
mode
Move selected path points 1 pixel at current
magnificat
ion
grave)
t mask in Timeline panel and press Ctrl+T
selec
Ctrl-drag Command-drag
arrow key arrow key
Option+` (accent grave) or Option+Shift+`
(accent grave)
Double-click mask with Selection tool or
select mask in Timeline panel and press
Command+T
Move selected path points 10 pixels at current
magnification
Toggle between smooth and corner points Ctrl+Alt-click vertex Command+Option-click vertex
Redraw Bezier handles Ctrl+Alt-drag vertex Command+Option-drag vertex
Invert selected mask Ctrl+Shift+I Command+Shift+I
Open Mask Feather dialog box for selected
mask
Open Mask Shape dialog box for selected
mask
Shift+arrow key Shift+arrow key
Ctrl+Shift+F Command+Shift+F
Ctrl+Shift+M Command+Shift+M
Paint tools (keyboard shortcuts)
Result Windows Mac OS
Swap paint background color and foreground
s
color
Set paint foreground color to black and
background color to white
Set foreground color to the color currently
under any paint tool pointer
Set foreground color to the average color of a
4-pixel x 4-pixel area under any paint tool
pointer
X X
D D
Alt-click Option-click
Ctrl+Alt-click Command+Option-click
Last updated 6/14/2014
Page 46

Workspace and workflow
Result Windows Mac OS
Set brush size for a paint tool Ctrl-drag Command-drag
41
Set brush hardness for a paint tool Ctrl-drag, then release Ctrl while dragging Command-drag, then release Command
Join current paint stroke to the previous
stroke
Set starting sample point to point currently
under Clone Stamp tool pointer
Momentarily activate Eraser tool with Last
Stroke Only option
Show and move overlay (change Offset value
of aligned Clone Stamp tool or change Source
Position value of unaligned Clone Stamp tool)
Activate a specific Clone Stamp tool preset 3, 4, 5, 6, or 7 on the main keyboard 3, 4, 5, 6, or 7 on the main keyboard
Duplicate a Clone Stamp tool preset in Paint
panel
Set opacity for a paint tool Digit on numeric keypad (for example,
Set opacity for a paint tool to 100% . (decimal) on numeric keypad* . (decimal) on numeric keypad*
Set flow for a paint tool Shift+a digit on numeric keypad (for example,
Set flow for a paint tool to 100% Shift+. (decimal) on numeric keypad* Shift+. (decimal) on numeric keypad*
Move earlier or later by number of frames
specif
ied for stroke Duration
Hold Shift while beginning stroke Hold Shift while beginning stroke
Alt-click Option-click
Ctrl+Shift Command+Shift
Alt+Shift-drag with Clone Stamp tool Option+Shift-drag with Clone Stamp tool
A
lt-click the button for the preset Option-click the button for the preset
9=90%, 1=10%)*
9=90%, 1=10%)*
Ctrl+Page Up or Ctrl+Page Down (or 1 or 2 on
the main keyboard)
agging
while dr
Digit on numeric keypad (for example,
9=90%, 1=10%)*
Shift+a digit on numeric keypad (for example,
9=90%, 1=10%)*
Command+Page Up or Command+Page
Down (or 1 or 2 on the main keyboard)
Note: Some shortcuts are marked with an asterisk (*) to remind you to make sure that Num Lock is on when you use the
numeric keypad.
Shape layers (keyboard shortcuts)
Result Windows Mac OS
Group selected shapes Ctrl+G Command+G
Ungroup selected shapes Ctrl+Shift+G Command+Shift+G
Enter free-transform path editing mode Select Path property in Timeline panel and
Increase star inner roundness Page Up when dragging to create shape Page Up when dragging to create shape
Decrease star inner roundness Page Down when dragging to create shape Page Down when dragging to create shape
Increase number of points for star or polygon;
increase roundness for rounded rectangle
Decrease number of points for star or
polygon; decrease roundness for rounded
rectangle
Reposition shape during creation Hold spacebar when dragging to create shape Hold spa cebar when dragging to create shape
press Ctrl+
Up Arrow when dragging to create shape Up Arrow when dragging to create shape
Down Arrow when dragging to create shape Down Arrow when dragging to create shape
T
Select Path property in Timeline panel and
press Command+T
Last updated 6/14/2014
Page 47

Workspace and workflow
Result Windows Mac OS
42
Set rounded rectangle roundness to 0 (sharp
corners); decrease polygon and star outer
roundness
Set rounded rectangle roundness to
maximum
roundness
Constrain rectangles to squares; constrain
ellips
stars to zero rotation
Change outer radius of star Ctrl when dragging to create shape Command when dragging to create shape
; increase polygon and star outer
es to circles; constrain polygons and
Left Arrow when dragging to create shape Left Arrow when dragging to create shape
Right Arrow when dragging to create shape Right Arrow when dragging to create shape
Shift when dragging to create shape Shift when dragging to create shape
Markers (keyboard shortcuts)
Result Windows Mac OS
Set marker at current time (works during RAM
preview and au
Set marker at current time and open marker
dialog box
Set and number a composition marker (0-9) at
the current time
Go to a composition marker (0-9) 0-9 on main keyboard 0-9 on main keyboard
Display the duration between two layer
marker
dio-only preview)
s or keyframes in the Info panel
* (multiply) on numeric keypad * (multiply) on numeric keypad or Control+8
on main keyboard
Alt+* (multiply) on numeric keypad Option+* (multiply) on numeric keypad or
Control+Option+8 on main keyboard
Shift+0-9 on main keyboard Shift+0-9 on main keyboard
Alt-click the markers or keyframes Option-click the markers or keyframes
Remove marker Ctrl-click marker Command-click marker
Motion tracking (keyboard shortcuts)
Result Windows Mac OS
Move feature region, search region, and
attach point 1 pi
Move feature region, search region, and
attach point 10 pixels at current magnification
Move feature region and search region 1 pixel
at current
Move feature region and search region 10
pixels at current magnification
xel at current magnification
magnification
Saving, exporting, and rendering (key
Result Windows Mac OS
Save project Ctrl+S Command+S
Increment and save project Ctrl+Alt+Shift+S Command+Option+Shift+S
Save As Ctrl+Shift+S Command+Shift+S
arrow key arrow key
Shift+arrow key Shift+arrow key
Alt+arrow key Option+arrow key
Alt+Shift+arrow key Option+Shift+arrow key
board shortcuts)
Last updated 6/14/2014
Page 48

Workspace and workflow
43
Add active composition or selected items to
render queue
Add current frame to render queue Ctrl+Alt+S Command+Option+S
Duplicate render item with same output
filenam
e as original
Ctrl+Shift+/ (on main keyboard) Command+Shift+/ (on main keyboard)
Ctrl+Shift+D Command+Shift+D
Keyboard shortcuts graphic
Click the link below to download a pdf of about 50 of the more commonly used and pouplar keyboard shortcuts.
AE_KeyboardShortcuts.pdf
Workspaces, panels, and viewers
Workspaces and panels
Adobe video and audio applications provide a consistent, customizable user interface. Although each application has
its own set of panels, you move and group panels in the same way in each application.
The main window of a program is the application
called a workspace.
window. Panels are organized in this window in an arrangement
Each application includes several predefined workspaces that optimize the layout of panels for specific tasks. You can
a
o create and customize your own workspaces by arranging panels in the layout that best suits your working style for
ls
specific tasks.
You can drag panels to new locations, move panels into or out of a group, place panels alongside each other, and undock
a
anel so that it floats in a new window above the application window. As you rearrange panels, the other panels resize
p
automatically to fit the window.
Example workspace
A Application window B Grouped panels C Individual panel
Last updated 6/14/2014
Page 49

Workspace and workflow
To increase the available screen space, use multiple monitors. When you work with multiple monitors, the application
window appears on the main monitor, and you place floating windows on the second monitor. Monitor configurations
are stored in the workspace.
Workspaces are stored in XML files in the preferences folder. With some caveats regarding monitor size and layout,
t
e workspaces can be moved to another computer and used there.
hes
• (Windows) [drive]:\Users\[user_name]\AppData\Roaming\Adobe\After Effects\12.2\ModifiedWorkspaces
• (Mac OS) [drive]/Users/[user_name]/Library/Preferences/Adobe/After Effects/12.2/ModifiedWorkspaces
See this video tutorial about workspaces by Andrew Devis on the Creative Cow website for more details.
Choose a workspace
• Choose Window > Workspace, and select the desired workspace.
• Choose a workspace from the Workspace menu in the Tools panel.
• If the workspace has a keyboard shortcut assigned, press Shift+F10, Shift+F11, or Shift+F12.
To assign a keyboard shortcut to the current workspace, choose Window > Assign Shortcut To [Workspace Name]
Wo rk sp ac e .
Save, reset, or delete workspaces
Save a custom workspace
44
As you customize a workspace, the application tracks your changes, storing the most recent layout. To store a specific
layo
ut more permanently, save a custom workspace. Saved custom workspaces appear in the Workspace menu, where
you can return to and reset them.
❖ Arrange the frames and panels as desired, and then choose Window > Workspace > New Workspace. Type a name
for the workspace, and click OK.
Note: (A
look
match), it uses the current local workspace.
Reset a workspace
Reset the current workspace to return to its original, saved layout of panels.
❖ Choose Window > Workspace > Reset workspace name.
Delete a workspace
1 Choose Window > Workspace >Delete Workspace.
2 Choose the workspace you want to delete, and then click OK.
fter Effects, Premiere Pro) If a project saved with a custom workspace is opened on another system, the application
s for a workspace with a matching name. If the application cannot find a match (or the monitor configuration doesn’t
Note: You cannot delete the currently active workspace.
Dock, group, or float panels
You can dock panels together, move them into or out of groups, and undock them so they float above the application
window. As you drag a panel, drop zones—areas onto which you can move the panel—become highlighted. The drop
zone you choose determines where the panel is inserted, and whether it docks or groups with other panels.
Docking zones
Docking zones exist along the edges of a panel, group, or window. Docking a panel places it adjacent to the existing
gr
p, resizing all groups to accommodate the new panel.
ou
Last updated 6/14/2014
Page 50

Workspace and workflow
Dragging panel (A) onto docking zone (B) to dock it (C)
Grouping zones
Grouping zones exist in the middle of a panel or group, and along the tab area of panels. Dropping a panel on a grouping
acks it with other panels.
zone st
45
Dragging panel (A) onto grouping zone (B) to group it with existing panels (C)
Dock or group panels
1 If the panel you want to dock or group is not visible, choose it from the Window menu.
2 Do one of the following:
• To move an individual panel, drag the gripper area in the upper-left corner of a panel’s tab onto the desired drop
zone.
Last updated 6/14/2014
Page 51

Workspace and workflow
Drag panel gripper to move one panel
• To move an entire group, drag the group gripper in the upper-right corner onto the desired drop zone.
46
Drag group gripper to move entire group
The application docks or groups the panel, according to the type of drop zone.
Undock a panel in a floating window
When you undock a panel in a floating window, you can add panels to the window and modify it similarly to the
applica
tion window. You can use floating windows to use a secondary monitor, or to create workspaces like the
workspaces in earlier versions of Adobe applications.
❖ Select the panel you want to undock (if it’s not visible, choose it from the Window menu), and then do one of the
following:
• Choose Undock Panel or Undock Frame from the panel menu. Undock Frame undocks the panel group.
• Hold down Ctrl (Windows®) or Command (Mac OS®), and drag the panel or group from its current location.
When you release the mouse button, the panel or group appears in a new floating window.
• Drag the panel or group outside the application window. (If the application window is maximized, drag the panel
to the Windows taskbar.)
Resize panel groups
To quickly maximize a panel beneath the pointer, press the ` (accent grave) key. (The accent grave is the unshifted
character under the tilde, ~, on standard US keyboards.) Press the key again to return the panel to its original size.
Last updated 6/14/2014
Page 52

Workspace and workflow
When you drag the divider between panel groups, all groups that share the divider are resized.
1 Do either of the following:
• To resize either horizontally or vertically, position the pointer between two panel groups. The pointer becomes
a double arrow .
• To resize in both directions at once, position the pointer at the intersection between three or more panel groups.
The pointer becomes a four-way arrow .
2 Hold down the mouse button, and drag to resize the panel groups.
47
Dragging divider between panel groups to resize them horizontally
A Original group with resize pointer B Resized groups
Open, close, and show panels and windows
Even if a panel is open, it may be out of sight, beneath other panels. Choosing a panel from the Window menu opens it
and brings it to the front of its group.
When you close a panel group in the application window, the other groups resize to use the newly available space. When
you clo
se a floating window, the panels within it close, too.
• To open or close a panel, choose the panel from the Window menu.
• To close a panel or window, click its Close button .
• To open or close a panel, use its keyboard shortcut.
• If a frame contains multiple panels, place the pointer over a tab and roll the mouse scroll wheel forward or backward
to change which panel is active.
• If a frame contains more grouped panels than can be shown at once, drag the scroll bar that appears above the tabs.
Last updated 6/14/2014
Page 53

Workspace and workflow
Scroll bar for showing tabs of other panels
Viewers
A viewer is a panel that can contain multiple compositions, layers, or footage items, or multiple views of one such item.
The Composition, Layer, Footage, Flowchart, and Effect Controls panels are viewers.
Locking a viewer prevents the currently displayed item from being replaced when you open or select a new item.
Ins
tead, when a viewer is locked and a new item is opened or selected, After Effects creates a new viewer panel for that
item. If you select the item from the viewer menu of a locked viewer, a new viewer isn't created; the existing viewer is
used.
Inst ead of hou sing m ult iple ite ms i n a s ing le v iew er and usi ng t he v iew er m enu to switc h be twe en t hem , yo u can c hoo se
t
o o
pen a separate viewer for each open composition, layer, or footage item. When you have multiple viewers open, you
can arrange them by docking or grouping them, like any other panels.
48
For example, you can create one Composition viewer each for different 3D views (Top, Bottom, Back, Front, custom
vi
s) so that you can maximize each of the views with the ` (accent grave) keyboard shortcut, which maximizes or
ew
restores the panel under the pointer.
To create a custom workspace with multiple viewers, ensure that all viewers are unlocked before you save the workspace.
Locked viewers are associated with a specific project context and are therefore not saved in the preferences file.
• To create a new viewer, choose New from the viewer menu. (See Open panel, viewer, and context menus.)
• To lock or unlock a viewer, choose Locked from the viewer menu, or click the Toggle Viewer Lock button.
• To lock the current viewer, split the current frame, and create a new viewer of the same type in the new frame, press
Ctrl+Alt+Shift+N (Windows) or Command+Option+Shift+N (Mac OS).
• To cycle forward or backward through the items in the viewer menu list for the active viewer, press Shift+period (.)
or Shift+comma (,).
Edit this, look at that (ETLAT) and locked Composition viewers
If a Composition viewer is locked, the Timeline panel for another composition is active, and the Composition viewer
for the active composition is not shown, then most commands that affect views and previews operate on the
composition for which the viewer is shown.
For example, pressing the spacebar can start a standard preview for the composition visible in a locked Composition
vi
er rather than the composition associated with the active Timeline panel.
ew
This behavior facilitates a working setup sometimes referred to as edit-this-look-at-that (ETLAT). The most common
s
nario in which this behavior is useful is the scenario in which you make a change in the Timeline panel for a nested
ce
(upstream) composition and want to preview the result of the change in a containing (downstream) composition.
Note: E
TLAT behavior works for keyboard shortcuts for zooming, fitting, previewing, taking and viewing snapshots,
ing channels, showing and hiding grids and guides, and showing the current frame on a video preview device.
show
Last updated 6/14/2014
Page 54

Workspace and workflow
To prevent this behavior, unlock the Composition viewer or show the Composition viewer for the composition that you
want to view or preview.
See this video on the Video2Brain website to learn about the improvements in ETLAT (edit-this-look-at-that) workflow
in After Effects CS5.5 and later.
More Help topics
Panels, viewers, workspaces, and windows (keyboard shortcuts)
Choose a viewer to always preview
Previews (keyboard shortcuts)
Views (keyboard shortcuts)
About precomposing and nesting
Modify keyboard shortcuts
To modi fy key bo ard sho rtcu ts, u se the Key Ed Up scr ipt from Jef f Alm asol , whi ch is ava ilab le on the Adobe After Effects
Exchange website.
49
Sebastien Perier provides instructions on his website for assigning keyboard shortcuts to scripts so that you can run a
script with a single keystroke. This technique relies on the KeyEd Up script.
For information on remapping keyboard shortcuts for keyboard layouts other than the standard US English layout, see
Jonas Hummelstrand’s website.
For a reference of keyboard shortcuts, see Keyboard shortcuts reference.
Note: O
n Mac OS, some keyboard commands for interacting with the operating system conflict with keyboard commands
for in
teracting with After Effects. Select Use System Shortcut Keys in the General preferences to override the After Effects
keyboard command in some cases in which there’s a conflict with the Mac OS keyboard command.
Preferences
The following sections describe the Preferences menu and and the various tasks that can be performed using this menu.
Open Preferences menu
To open the Preferences menu, go to:
• Edit > Preferences > [category name] (Windows)
• After Effects > Preferences > [category name] (Mac OS)
Use the following keyboard shortcuts to open the Preferences > General menu:
• Ctrl+Alt+; (semicolon) (Windows)
• Command+Option+; (semicolon) (Mac OS)
Last updated 6/14/2014
Page 55

Workspace and workflow
Reset preferences
To restore the default preference settings, press and hold the following keys while the application is starting.
• Ctrl+Alt+Shift (Windows)
• Command+Option+Shift (Mac OS)
To restore default keyboard shortcuts, Alt-click (Windows) or Option-click (Mac OS) the OK button.
Reveal preferences
Preferences, including keyboard shortcuts and workspaces, are stored as files in the following locations:
• (Windows) \Users\\AppData\Roaming\Adobe\After Effects\12.0
• (Mac OS) /Users//Library/Preferences/Adobe/After Effects/12.0
To reveal the preferences in After Effects without s
• Edit > Preferences > General and click Reveal Preferences in Explorer button (Windows)
• After Effects > Preferences > General and click Reveal Preferences in Finder button (Mac OS)
It is recommended that you do not modify the files in this directory manually; use the Preferences dialog box to modify
the prefer
on managing workspaces, see Workspaces and Panels.
ences. For information on modifying keyboard shortcuts, see Modify keyboard shortcuts. For information
earching on your hard drive, go to:
50
Note: T
he Library folder in Mac OS X is hidden. See the following article to learn how to access hidden user files on Mac
tp://helpx.adobe.com/x-productkb/global/access-hidden-user-library-files.html
OS:ht
The Preferences menu options
The following list briefly describes the different options listed under the Edit > Preferences menu, especially those
options that are not self-explanatory.
General preferences
• Levels Of Undo: Undo changes
• Path Point Size: Specifies size of Bezier direction handles and vertices for masks and shapes, direction handles for
motion paths, and other similar controls.
• Show Tool Tips: After Effects user interface tips
• Create Layers At Composition Start Time: Layers overview
• Switches Affect Nested Comps: About precomposing and nesting
• Default Spatial Interpolation To Linear: About spatial and temporal keyframe interpolation
• Preserve Constant Vertex Count When Editing Masks: Designate the first vertex for a Bezier path
Pe n To o l Shor t c ut To g g le s B et w e en Pen a n d M a s kFe at h e r To o l s : Var i abl e - wi d t h m a s k f e a t he r
• Synchronize Time Of All Related Items: Preferences and composition settings that affect nested compositions
• Expression Pick Whip Writes Compact English: Edit an expression with the pick whip
• Create Split Layers Above Original Layer: Split a layer
• Allow Scripts To Write Files And Access Network: Loading and running scripts
Last updated 6/14/2014
Page 56

Workspace and workflow
• Enable JavaScript Debugger: After Effects scripting guide at the Adobe After Effects Developer Center on the Adobe
website
• Use System Color Pi cker: Choose a color picker
• Create New Layers At Best Quality: Layer image quality and subpixel positioning
• Use System Shortcut Keys (Mac OS only): Keyboard shortcuts reference
• Dynamic Link with After Effects Uses Project File Name with Highest Number: About Dynamic Link (Production
Premium or Master Collection only)
Previews preferences
• Adaptive Resolution Limit: Preview modes and Fast Previews preferences
Also, see Fast Previews (CS6).
The GPU Information dialog box is available to check the texture memory for your GPU, and to set the ray-tracing
p
ference to the GPU, if it is available. The OptiX version number is available, as well as the Copy button to copy
re
the general information at the top of the dialog box to the system clipboard.
• Viewer Quality (Zoom Quality and Color Management Quality): Viewer Quality preferences
• Audio Preview Duration: Preview video and audio
51
Display preferences
• Motion Path: Motion paths
• Disable Thumbnails In Project Panel: Composition thumbnail images
• Show Rendering Progress In Info Panel And Flowchart: Preview video and audio
• Hardware Accelerate Composition, Layer, And Footage Panels: Improve performance
Import preferences
• Still Footage: Create layers from footage items or change layer source
• Sequence Footage: Import a single still image or a still-image sequence
• Interpret Unlabeled Alpha As: Alpha channel interpretation: premultiplied or straight
• Drag Import Multiple Items As: Import footage items by dragging
• There is a dropdown menu to choose drop-frame or non-drop-frame timecode for Indeterminate Media NTSC,
which applies to imports like still image sequences in which timecode values are not present or are unknown.
Output preferences
• Segment Sequences At, Segment Movie Files At, and Audio Block Duration: Segment settings
• Use Default File Name And Folder: Name output files automatically
Grids & Guides preferences
• Safe zones, grids, guides, and rulers
Labels preferences
• Color labels for layers, compositions, and footage items
Last updated 6/14/2014
Page 57

Workspace and workflow
Media & Disk Cache preferences
• Enable Disk Cache and Maximum Disk Cache Size: Caches: RAM cache, disk cache, and media cache
• Conformed Media Cache and Clean Database & Cache: Media cache
• Create Layer Markers From Footage XMP Metadata and Write XMP IDs To Files On Import: XMP metadata in
After Effects
Video Preview preferences
• Preview on an external video monitor
Appearance preferences
• Use Label Color For Layer Handles And Paths and Use Label Color For Related Tabs: Color labels for layers,
compositions, and footage items
• Cycle Mask Colors: Cycle through colors for mask paths
• Use Gradients: Us e gradients in user interface.
• Brightness: Brightens or darkens user interface (UI) colors.
Auto-Save preferences
Save and back up projects in After Effects
52
Memory & Multiprocessing preferences
Memory & Multiprocessing preferences
Audio Hardware and Audio Output Mapping preferences
Preview video and audio
Sync Settings
The Sync Settings feature enables you to sync preferences and settings through the Creative Cloud.
Sync Setting features in After Effects
Sync Settings
When you work on multiple computers, managing and syncing preferences among the computers can be timeconsuming, complex, and error prone.
The new Sync Settings feature enables you to sync preferences and settings via Creative Cloud. For example, if you use
two co
mputers, the Sync Settings feature makes it easy for you to keep those settings synchronized across these two
computers.
The synchronization takes place via your Adobe Creative Cloud
account and then are downloaded and applied on the other computer. You can also synchronize settings from another
Creative Cloud account. After Ef fects creates a user profile on your computer and uses it to synchronize settings to and
from the associated Creative Cloud account.
count. Settings are uploaded to your Creative Cloud
ac
You can initiate the synchronization manually; it does not happen automatically and it cannot be scheduled.
Last updated 6/14/2014
Page 58

Workspace and workflow
Sync settings
To initiate the sync, from the Edit menu (Windows) or After Effects menu (Mac OS) choose [your Adobe ID] > Sync
Settings Now.
• Download Settings: Sync Settings from Creative Cloud to your computer; overwrite the local version with the
Creative Cloud version of settings.
• Upload Settings: Sync settings from this local computer to Creative Cloud.
Progress and details about the Sync Settings process is displayed in the Info panel (Window > Info)
53
Restart After Effects to apply downloaded preferences after using Sync Settings .
Sync settings from a different account
By default, the Adobe ID associated with the license for the product is used to sync the preferences. To use a different
Adobe ID to sync the settings, from the Edit menu (Windows) or After Effects menu (Mac OS) choose [your Adobe
ID] > Use Settings From a Different Account. Enter the Adobe ID and password.
Managing sync
Clear Settings
You can clear all settings and revert to default settings. From the Edit menu (Windows) or After Effects menu (Mac OS),
choose [your Adobe ID] > Clear Settings.
Last updated 6/14/2014
Page 59

Workspace and workflow
Click Quit to clear the current preferences, and close After Effects. When the application is launched again, default
preferences are set.
Manage Sync settings
To change the Sync Settings for Windows:
• Click Edit > [your Adobe ID] > Manage Sync Settings
• Click Edit > Preferences > Sync Settings
To change the Sync Settings for Mac OS:
• Click After Effects > [your Adobe ID] > Manage Sync Settings
• Click After Effects > Preferences > Sync Settings
54
You can change the sync options and also choose what to do in case o
and settings. Synchronizable preferences refer to preferences that are not dependent on computer or hardware settings.
Automatically clear user profile on application quit Enable this option to clear the user profile when you quit After
Effects. On next launch, preferences are fetched from the default Adobe ID used to license the product.
Select the Preferences to sync.
f conflict. Select the options to sync preferences
• Synchronizable Preferences
• Keyboard Shortcuts
• Composition Settings Presets
• Interpretation Rules
• Render Settings Templates
• Output Module Settings Templates
For more details on what Settings are synced, see Details of Sync Settings features.
Note: Keyboard shortcuts created for Windows synchronize only with Windows and Mac OS keyboard shortcuts
ronize only with Mac OS.
synch
When Conflicts Occur Specify an action to take when a conflict is detected.
Note: The sync settings feature does not sync files manually placed in the preferences folder location.
Last updated 6/14/2014
Page 60

Workspace and workflow
After Effects keyboard shortcuts
Keyboard shortcuts are a great way to speed up your tasks and also work more efficiently. Here is a downloadable
shortcuts graphic of about 50 of the more commonly used and popular After Effects shortcuts.
AfterEffects_KeyboardShortcuts.pdf
The complete list of After Effects keyboard shortcuts is available here .
55
Last updated 6/14/2014
Page 61

Chapter 3: Projects and compositions
Projects
About projects
An After Effects project is a single file that stores compositions and references to all of the source files used by footage
items in that project. Compositions are collections of layers. Many layers use footage items (such as movies or still
images) as a source, though some layers—such as shape layers and text layers—contain graphics that you create within
After Effects.
A project file has the filename extension .aep or .aepx. A project file with the .aep filename extension is a binary project
file
. A project file with the .aepx filename extension is a text-based XML project file.
56
The name of the current project appears at the top of the application window.
A template project file has the filename extension .aet. (See Template projects and example projects .)
XML project files
Text-based XML project files contain some project information as hexadecimal-encoded binary data, but much of the
information is exposed as human-readable text in string elements. You can open an XML project file in a text editor
and edit some details of the project without opening the project in After Effects. You can even write scripts that modify
project information in XML project files as part of an automated workflow.
Elements of a project that you can modify in an XML project file:
• Marker attributes, including comments, chapter point parameters, and cue point parameters
• File paths of source footage items, including proxies
• Composition, footage item, layer, and folder names and comments
Note: Footage item names are exposed in string elements in XML project files only if the names have been customized.
Fo
otage item names derived automatically from the names of source files and solid color names are not exposed in string
elements
Some strings, such as workspace and view names, are expos
these strings are not respected when After Effects opens the project file.
Note: Do not use the XML project file format as your primary file format. The primary project file format for After Effects
is
the binary project file (.aep) format. Use the XML project file format to save a copy of a project and as an intermediate
format for automation workflows.
uman-readable strings, but modifications made to
ed as h
To save an XML project (.aepx) file as a binary project (.aep) file, choose File > Save As and enter a file name ending
with .aep, without the x. (See Save and back up projects in After Effects CS5 .)
Last updated 6/14/2014
Page 62

Projects and compositions
Project links embedded in QuickTime, Video for Windows files
When you render a movie and export it to a container format, you can embed a link to the After Effects project in the
container file.
To import the project, import the container file, and choose Project from the Import As menu in the Import File dialog
b
f the container file contains a link to a project that has been moved, you can browse to locate the project.
ox. I
Create and open projects
Only one project can be open at a time. If you create or open another project file while a project is open, After Effects
prompts you to save changes in the open project, and then closes it. After you create a project, you can import footage
into the project.
• To create a project, choose File > New > New Project.
• To open a project, choose File > Open Project, locate the project, and then click Open.
Jeff Almasol provides a script on his redefinery website that creates and saves a new project for each selected
composition in the current project.
Template projects and example projects
A template project is a file with the filename extension .aet. You can use the many template projects included with After
Effects—including DVD menu templates—as the basis for your own projects, and you can create new templates base
on your projects
57
Note: A
fter Effects CC does not install template projects, however, you can download the same template projects that came
th previous versions of After Effects on the After Effects Exchange. For more information, see this post on the After Effects
wi
team blog.
When you open a template project, After Effects creates a new, untitled project based on the template. Saving changes
t
his new project does not affect the template project.
o t
A great way to see how advanced users use After Effects is to open one of the template projects included with After
Effects, open a composition to activate it, and press U or UU to reveal only the animated or modified layer properties.
V
wing the animated and modified properties shows you what changes the designer of the template project made to create
ie
the template.
Often, the creator of a template project locks layers that should be left unmodified, and leaves layers that should be
mo
fied unlocked. This is a convenient way to prevent accidental or inappropriate modifications.
di
You can download example projects and template projects from many websites, including the After Effects Exchange
on the Adobe website. For more sources of After Effects example projects and template projects, see After Effects
community resources on the Adobe website.
See this video tutorial by Andrew Devis on the Creative Cow website for information about where to find template
projects and sample expressions included with After Effects.
Open a template project
• To open a template project, choose File > Open Project. On Windows, choose Adobe After Effects Project Template
from the Files Of Type menu.
Create a template project
• To convert a project to a template project, change the filename extension from .aep to .aet.
Last updated 6/14/2014
Page 63

Projects and compositions
• To save a copy of a project as a template project, choose File > Save A Copy, and then rename the copy with the
filename extension .aet.
Save and back up projects in After Effects
• To save a project, choose File > Save.
• To save a copy of the project with a new automatically generated name, choose File > Increment And Save, or press
Ctrl+Alt+Shift+S (Windows) or Command+Option+Shift+S (Mac OS).
• A copy of the current project is saved in the same folder as the original project. The name of the copy is the name of
the original followed by a number. If the name of the original ends with a number, that number is increased by 1.
• To save the project with a different name or to a different location, choose File > Save As > Save As. The open project
takes the new name and location; the original file remains unchanged.
• To save the project as a copy in the XML project file format, choose File > Save As > Save A Copy As XML. (See
About projects .)
• To save a copy of the project with a different name or to a different location, choose File > Save As > Save A Copy.
The open project retains its original name and location, and a copy is created with the new settings but is not opened.
• In After Effects CC (12), to save a project that can be opened in After Effects CS6, choose File > Save As > Save A
Copy As CS6.
58
• In After Effects CC 2014, to save a project that can be opened in After Effects CC (12), choose File > Save As > Save
A Copy As CC (12).
To save a copy of the project and copies of assets used in the project to a single folder on disk, use the Collect Files
co
Note: New features in the current version of After Effects that are used in a project will be ignored in the project that is saved
in
. (See Collect files in one locationsection for details).
mmand
the format of the previous version of After Effects.
Flowchart panel
In the flowchart for each project or composition, individual boxes (or tiles) represent each composition, footage item,
and layer. Directional arrows represent the relationships between components.
Note: T
he Flowchart panel shows you only the existing relationship
elements.
Nested compositions and other elements that make up the composition appear when you expand a composition tile.
Mid-gray lines between tiles in the flowchart indicate that the Video or Audio switch for those items is deselected in
t
imeline panel. Black or light gray lines indicate that the switch is selected, depending on the Brightness setting in
he T
the Appearance preferences.
• To open the project flowchart, press Ctrl+F11 (Windows) or Command+F11 (Mac OS), or click the Project
Flowchart button at the top of the vertical scroll bar on the right edge of the Project panel.
• To open a composition flowchart, select the composition and choose Composition > Composition Flowchart, or
click the Composition Flowchart button at the bottom of the Composition panel.
• To activate (select) an item, click its tile in the Flowchart panel.
When you click a composition in the flowchart, it becomes active in the Project panel and the Timeline panel. When
you cli
ck a layer, it becomes active in the Timeline panel. When you click a footage item, it becomes active in the
Project panel.
s. You cannot use it to change relationships between
Last updated 6/14/2014
Page 64

Projects and compositions
• To customize the appearance of the flowchart, use the Flowchart panel menu and the buttons along the bottom of
the panel.
For tool tips identifying the buttons in the Flowchart panel
appears.
et your pointer hover over a button until the tool tip
, l
• To delete elements, select them and press Delete. If the selected element is a footage item or composition, it is deleted
from the project and no longer appears in the Timeline and Project panels. If the selected element is a layer, it is
deleted from the composition in which it appears.
• To access the context menu for a selected element, right-click (Windows) or Control-click (Mac OS) the icon to the
left of the name in the element tile. The icons have various appearances, depending on the element type, such as
layers and compositions . For example, you can use the context menu for a layer to work with masks and
effects, or to change switches, apply transformations, and adjust layer image quality.
Note: Wh
na
element name.
Rich Young provides additional information about the Flowchart panel and the Composition Mini-flowchart on the
After Effects Portal website.
en you change element properties in the Flowchart panel, be careful to context-click the icon in the tile, not the
me of the element. The context menu associated with the element icon is different from the one that opens from the
59
More Help topics
Automation
Import an After Effects project
Lock or unlock a layer
Layer switches and columns in the Timeline panel
Opening and navigating nested compositions
Precomposing, nesting, and pre-rendering
About precomposing and nesting
If you want to group some layers that are already in a composition, you can precompose those layers. Precomposing
layers places them in a new composition, which replaces the layers in the original composition. The new nested
composition becomes the source for a single layer in the original composition. The new composition appears in the
Project panel and is available for rendering or use in any other composition. You can nest compositions by adding an
existing composition to another composition, just as you would add any other footage item to a composition.
Precomposing a single layer is useful for adding transform properties to a layer and influencing the order in which
elements of a composition are rendered.
Nesting is t
com
A nested composition is sometimes called a precomposi
or pre-comp. When a precomposition is used as the source footage item for a layer, the layer is called a precomposition
layer.
he inclusion of one composition within another. The nested composition appears as a layer in the containing
position.
tion, which is occasionally abbreviated in casual use to precomp
Last updated 6/14/2014
Page 65

Projects and compositions
During rendering, the image data and other information can be said to flow from each nested composition into the
composition that contains it. For this reason, nested compositions are sometimes referred to as being upstream of the
compositions that contain them, and the containing compositions are said to be downstream of the nested compositions
that they contain. A set of compositions connected through nesting is called a composition network. You can navigate
within a composition network using the Composition Navigator and Mini-Flowchart. (See Opening and navigating
nested compositions .)
Precompositions in After Effects are similar to Smart Objects in Adobe Photoshop.
Uses for precomposing and nesting
Precomposing and nesting are useful for managing and organizing complex compositions. By precomposing and
nesting, you can do the following:Apply complex changes to an entire compositionYou can create a composition that
contains multiple layers, nest the composition within the overall composition, and animate and apply effects to the
nested composition so that all of the layers change in the same ways over the same time period.Reuse anything you
buildYou can build an animation in its own composition and then drag that composition into other compositions as
many times as you want.Update in one stepWhen you make changes to a nested composition, those changes affect
ev ery c ompos iti on in w hich it is used, j ust li ke c hange s ma de to a sou rce foota ge ite m af fec t every c ompos iti on in w hich
it is used. Alter the default rendering order of a layerYou can specify that After Effects render a transformation (such
as rotation) before rendering effects, so that the effect applies to the rotated footage.Add another set of transform
properties to a layerThe layer that represents the composition has its own properties, in addition to the properties of
the layers that it contains. This allows you to apply an additional set of transformations to a layer or set of layers.
60
For example, you can use nesting to make a planet both rotate and revolve (moving like the Earth, which spins on its
o
wn axis a
precompose that layer, modify the Anchor Point property of the precomposition layer, and then animate the Rotation
property of the precomposition layer.
nd also travels around the Sun). To create such a system, animate the Rotation property of the planet layer,
Preferences and composition settings that affect nested compositions
Because a precomposition is itself a layer, you can control its behavior using layer switches and composition switches
in the Timeline panel. You can choose whether changes made to the switches in the containing composition are
propagated to the nested composition. To prevent layer switches from affecting nested compositions, choose Edit >
Preferences > General (Windows) or After Effects > Preferences > General (Mac OS), and then deselect Switches Affect
Nested Comps.
In the Advanced tab of the Composition Settings dialog box (Composition > Composition Settings), choose Preserve
R
olut ion When Nes ted or Preser ve F rame R ate When Nes ted Or I n Rend er Q ueu e fo r a c ompos ition to ret ain its own
es
resolution or frame rate, and not inherit those settings from the containing composition. For example, if you
deliberately used a low frame rate in a composition to create a jerky, hand-animated result, you should preserve the
frame rate for that composition when it is nested. Similarly, the results of rotoscoping may look wrong when converted
to a different frame rate or resolution. Use this setting instead of the Posterize Time effect, which is less efficient.
Jeff Almasol provides a script on his redefinery website that makes toggling the Preserve Resolution When Nested or
Preserve Frame Rate When Nested Or In Render Queue preference setting more convenient.
Changing the current time in one panel updates the current time in other panels associated with that composition. By
defa
ul
t, the current time is also updated for all compositions related to the current composition by nesting. To prevent
compositions related by nesting from updating their current times when you change the current time in one
composition, deselect the Synchronize Time Of All Related Items preference (Edit > Preferences > General (Windows)
or After Effects > Preferences > General (Mac OS)).
Last updated 6/14/2014
Page 66

Projects and compositions
Online resources about precomposing and nesting
Angie Taylor provides an extensive discussion and explanation of animation using nesting, parenting, expressions, and
null object layers in a PDF excerpt from her book Creative After Effects 7: Workf low Techniques for Animation, Visual
Effects, and Motion Graphics.
Chris and Trish Meyer provide an introduction to precomposing and nesting in a PDF excerpt from the “Parenting and
N
ting” chapter of their book After Effects Apprentice: Real-World Skills for the Aspiring Motion Graphics Artist.
es
Chris and Trish Meyer share tips on setting up a composition hierarchy so that making changes in a project is easier in
this article from the ProVideo Coalition website.
See this page on aescripts website for the Un-Precompose script, which extracts layers from a precomposition.
See this page on aescripts website for the Zorro-The Layer Tagger script, which allows you to group layers in your
composition using tags rather than precomposing.
Precompose layers
Precomposing layers places them in a new composition (sometimes called a precomposition), which replaces the layers
in the original composition. Precomposing a single layer is useful for adding transform properties to a layer and
influencing the order in which elements of a composition are rendered.
61
1 Select the layers in the Timeline panel, and choose Layer > Pre-compose or press Ctrl+Shift+C (Windows) or
Command+Shift+C (Mac OS).
2 Select one of the following:
Leave All Attributes In Leaves the properties and keyframes of the precomposed layer in the original composition,
applied to the new layer that represents the precomposition. The frame size of the new composition is the same as
the size of the selected layer. This option is not available when you select more than one layer, a text layer, or a shape
layer.
Move All Attributes Into The New Composition Moves the properties and keyframes of the precomposed layers one
level further from the root composition in the composition hierarchy. When you use this option, changes you
applied to the properties of the layers remain with the individual layers within the precomposition. The frame size
of the new composition is the same as the frame size of the original composition.
Jeff Almasol provides a script on his redefinery website that precomposes selected layers to the duration of the selected
layers, with options for head and tail durations for more editing flexibility.
Opening and navigating nested compositions
Nested compositions are sometimes referred to as being upstream of the compositions that contain them, and the
containing compositions are said to be downstream of the nested compositions that they contain. The root composition
is the most downstream; the most deeply nested composition is the most upstream. A composition flow path is a chain
of compositions that are related to one another by containing or being nested within one another. A composition
network is the entire set of compositions that are related to one another through nesting.
After Effects provides several ways to open a nested composition (precomposition):
• Double-click the composition entry in the Project panel.
• Double-click a precomposition layer in the Timeline panel. Alt-double-click (Windows) or Option-double-click
(Mac OS) to open the precomposition layer as a layer in the Layer panel.
Last updated 6/14/2014
Page 67

Projects and compositions
Note: Double-clicking a precomposition layer when a paint tool or the Roto Brush tool is active opens the layer in the Layer
panel.
• To open the most recently active composition in the same composition network as the currently active composition,
press Shift+Esc.
• Use the Composition Navigator.
• Use the Composition Mini-Flowchart.
The Composition Navigator
The Composition Navigator is a bar along the top edge of the Composition panel that shows the composition active in
th
viewer in relation to other compositions in the same composition network. The compositions shown are the most
at
recently active compositions in the flow path of the currently active composition.
A Active (current) composition B Arrow for opening Composition Mini-Flowchart C Panel menu button D Ellipsis
Arrows between the composition names indicate the direction in which pixel information flows for this flow path. The
default is to show compositions in the Composition Navigator bar with downstream compositions on the left and
upstream compositions on the right. This default is indicated by the Flow Right To Left option in the Composition
panel menu. To show compositions in the other order, choose Flow Left To Right. This setting is a global preference; it
applies to all compositions and to the Composition Mini-Flowchart view.
62
The names of downstream compositions are dim to indicate that their contents are not used or shown in the active
co
osition.
mp
• To show or hide the Composition Navigator bar, choose Show Composition Navigator from the Composition panel
menu.
• To activate any composition shown in the Composition Navigator bar, click the composition name.
• If the flow path is too long to show in the Composition panel, an ellipsis button appears at the left or right edge
of the Composition Navigator bar. To temporarily show the entire flow path, click the ellipsis button.
To scroll through a long flow path, place the pointer over a composition button in the Composition Navigator and roll
the mouse scroll wheel.
The Composition Mini-Flowchart
The Composition Mini-Flowchart is a transient control that you can use to quickly navigate within a composition
net
wo
rk. When you open the Composition Mini-Flowchart, it shows the compositions immediately upstream and
downstream of the selected composition.
Colors in the Composition Mini-Flowchart are based on the label colors assigned to compositions in the Project panel.
If
omposition is used multiple times within one composition, the multiple instances of the nested composition
a c
appear as one entry with a number in parentheses indicating the number of instances.
To open the Composition Mini-Flowchart, do one of the following:
Last updated 6/14/2014
Page 68

Projects and compositions
63
A Indicator that composition does not flow into other compositions B Flow direction C Active (current) composition D Upstream compositions
E Indicators that other compositions fl
ow into these compositions
• Tap the Shift key when a Composition, Layer, or Timeline panel is active.
Note: Do not hold the Shift key down; press it briefly. Tapping the Shift key to open the Composition Mini-Flowchart doesn’t
work i
f the insertion point is in a search field, text field, or expression field.
• Click the arrow to the right of a composition name in the Composition Navigator bar.
• Choose Composition Mini-Flowchart from the Composition menu, the Composition panel menu, or the Timeline
panel menu.
• Click the Composition Mini-Flowchart button at the top of the Timeline panel.
As with the Composition Navigator, you can choose whether to show the flow direction from left to right or from right
to left. Arr
ows indicate the direction of the flow. If a composition has a next to it instead of an arrow, then the
composition either does not have any compositions flowing into it or it does not flow into any compositions.
Upstream compositions in the Composition Mini-Flowchart are sorted from top to bottom either alphabetically or by
l
order. To switch between these sorting orders, press the S key when the Composition Mini-Flowchart is open.
ayer
When sorting by layer order, a composition used multiple times is sorted according to its topmost instance in the
stacking order. Downstream compositions are always sorted alphabetically.
To navigate among and select compositions in the Composition Mini-Flowchart, use the arrow keys or click the arrow
or
bu
ttons on either side of a composition. To activate the selected composition, press the spacebar or Enter
(Windows) or Return (Mac OS). To close the Composition Mini-Flowchart without taking any action, press Esc, tap
Shif
t, or click outside the Composition Mini-Flowchart.
Rich Young provides additional information about the Flowchart panel and the Composition Mini-flowchart on the
After Effects Portal website.
Pre-render a nested composition
A complex nested composition can take a long time to render, either for previews or for final output. If you have a
nested composition that you do not expect to work on further, you can save time during each rendering operation by
pre-rendering the nested composition into a movie and replacing the composition with the rendered movie. You can
still modify the original nested composition, because it remains in the Project panel. If you make a significant change
to the original nested composition, render it again.
Pre-rendering a nested composition is especially beneficial when you will use it multiple times in a project.
Note: A
pply your final output settings when you pre-render the nested composition.
1 Select the composition in the Project or Composition panel.
2 Choose Composition > Pre-render.
The Pre-render command adds the composition to the render queue and sets the Import & Replace Usage postrender ac
3 In the Render Queue panel, adjust settings as necessary, and click the Render button to render the composition.
tion to replace the composition with the rendered movie.
Last updated 6/14/2014
Page 69

Projects and compositions
See this video tutorial on the Video2Brain website about how to save time with pre-rendering and proxies in After
Effects.
Note: A
n alternative to replacing the composition with the movie is to use the rendered movie as a proxy for the nested
osition.
comp
Render order and collapsing transformations
A composition consists of layers stacked on top of one another in the Timeline panel. When the composition is
rendered—either for previewing or for final output—the bottom layer is rendered first. Within each raster (non-vector)
layer, elements are applied in the following order: masks, effects, transformations, and layer styles. For continuously
rasterized vector layers, the default rendering order is masks, followed by transformations, and then effects.
64
Transformations a
including Anchor Point, Position, Scale, Rotation, and Opacity. What you see in the Layer panel is the result of the
rendering before transformations are performed.
Note: F
or additional control over when transformations are performed, you can apply the Transform effect and reorder it
th respect to other effects.
wi
In a group of effects or masks, items are processed from top to bottom. For example, if you apply the Circle effect and
then a
pply the Magnify effect, the circle is magnified. However, if you drag the Magnify effect above (before) the Circle
effect in the Effect Controls or Timeline panel, the circle is drawn after the magnification and isn’t magnified.
After a layer has been rendered, rendering begins for the next layer. The rendered layer below may be used as input to
t
endering of the layer above—for example, for determining the result of a blending mode.
he r
If a composition contains other compositions nested within it, the nested composition is rendered before other layers
in the co
Note: S
pre
and nesting .)
Collapsing transformations
If the Collapse Transformations switch is selected for a nested composition, then the transformations for the nested
composition are not performed until after the masks and effects for the containing composition are rendered. This
r
or collapsed—and performed together. The same is true for vector layers that are not continuously rasterized.
ntaining composition.
ome effects ignore masks on the layer to which they’re applied. To have such an effect operate on a masked layer,
-compose the layer with the mask applied, and then apply the effect to the pre-composed layer. (See About precomposing
r order allows the transformations for the nested composition and the containing composition to be combined—
ende
re cha
nges to those properties grouped under the Transform category in the Timeline panel,
Note: I
nstead of a Collapse Transformations switch, vector layers have a Continuously Rasterize switch in the same
tion. Vector layers include shape layers, text layers, and layers with vector graphic files as the source footage. Text layers
loca
and shape layers are always continuously rasterized.
Collapsing transformations can, for example, preserve resolutio
composition, and the nested composition is scaled up by a factor of two in the containing composition. In this case,
rather than performing both transformations and losing image data in the process, one transformation can be
performed—doing nothing, because the individual transformations cancel each other.
If transformations are not collapsed, a nested composition that contains 3D layers is rendered as a 2D image of the 3D
arran
gement, using the default composition camera. This rendering prevents the nested composition from intersecting
with 3D layers, casting shadows on 3D layers, and receiving shadows from 3D layers in the containing composition.
The nested composition is also not controlled by the cameras and lights of the containing composition.
hen a layer is scaled down by half in a nested
n w
Last updated 6/14/2014
Page 70

Projects and compositions
If transformations are collapsed, the 3D properties of the layers in the nested composition are exposed to the containing
composition. Thus, the nested composition can intersect with 3D layers, cast shadows on 3D layers, and receive
shadows from 3D layers in the containing composition. The containing composition's camera and lights can also
control the nested composition.
Essentially, collapsing transformations for a nested composition tells After Effects to not flatten and crop the layers in
th
e p
recomposition. Because an adjustment layer operates on the composite of all of the layers beneath it within the
same composition, an adjustment layer within a nested composition with collapsed transformations will force the
flattening and cropping that collapsing transformations would normally prevent.
65
When a closed mask (with mask mode other than None), a layer
with collapsed transformations, the layers in the nested composition are first rendered on their own, then masks and
effects are applied, and then the result is composited into the main composition. This rendering order means that the
blending modes of the nested layers are not applied to any underlying layers in the main composition, and that 3D
layers above and below the collapsed layer cannot intersect or cast shadows on each other.
Online resources
This video from the “After Effects CS5: Learn by Video” series provides a detailed visual demonstration of the render
order and how to work with (and around) it.
Chris and Trish Meyer explain collapsing transformations and continuous rasterization in this article on the ProVideo
Coalition website.
styl
e, or an effect is applied to a nested composition
More Help topics
Create layers from footage items or change layer source
3D layer interactions, render order, and collapsed transformations
Layer switches and columns in the Timeline panel
Parent and child layers
Post-render actions
Placeholders and proxies
Basics of rendering and exporting
Change the stacking order for selected layers
Composition basics
For more information about creating compositions, see this video by Andrew Devis on the Creative Cow website.
About compositions
A composition is the framework for a movie. Each composition has its own timeline. A typical composition includes
multiple layers that represent components such as video and audio footage items, animated text and vector graphics,
still images, and lights. You add a footage item to a composition by creating a layer for which the footage item is the
source. You then arrange layers within a composition in space and time, and composite using transparency features to
determine which parts of underlying layers show through the layers stacked on top of them. (See Layers and properties
and Transparency and compositing .)
Last updated 6/14/2014
Page 71

Projects and compositions
A composition in After Effects is similar to a movie clip in Flash Professional or a sequence in Premiere Pro.
You render a composition to create the frames of a final output movie, which is encoded and exported to any number
of form
ats. (See Basics of rendering and exporting .)
Simple projects may include only one composition; complex projects may include hundreds of compositions to
organ
ize large amounts of footage or many effects.
In some places in the After Effects user interface, composition is abbreviated as comp.
Each composition has an entry in the Project panel. Double-click a composition entry in the Project panel to open the
co
osition in its own Timeline panel. To select a composition in the Project panel, right-click (Windows) or Control-
mp
click (Mac OS) in the Composition panel or Timeline panel for the composition and choose Reveal Composition In
Project from the context menu.
Use the Composition panel to preview a composition and modify its contents manually. The Composition panel
co
nt
ains the composition frame and a pasteboard area outside the frame that you can use to move layers into and out
of the composition frame. The offstage extents of layers—the portions not in the composition frame—are shown as
rectangular outlines. Only the area inside the composition frame is rendered for previews and final output.
The composition frame in the Composition panel in After Effects is similar to the Stage in Flash Professional.
When working with a complex project, you may find it easiest to organize the project by nesting compositions—putting
on
more compositions into another composition. You can create a composition from any number of layers by
e or
precomposing them. If you are finished modifying some layers of your composition, you can precompose those layers
and then pre-render the precomposition, replacing it with a rendered movie. (See Precomposing, nesting, and pre-
rendering.)
66
You can navigate within a hierarchy of nested compositions using the Composition Navigator and Composition MiniFlo
hart. (See Opening and navigating nested compositions.)
wc
Use the Flowchart panel to see the structure of a complex composition or network of compositions.
Timeline button Click this button at the bottom of the Composition panel to activate the Timeline panel for the
current composition.
Press the backslash (\) key to switch activation between the Co
mposition panel and Timeline panel for the current
composition.
Comp button Click this button in the upper-right corner of the Timeline panel to activate the Composition panel
for the current composition.
Flowchart button Click this button at the bottom of the Composition panel to activate the Flowchart panel for the
current composition.
Create a composition
You can change composition settings at any time. However, it’s best to specify settings such as frame aspect ratio and
frame size when you create the composition, with your final output in mind. Because After Effects bases certain
calculations on these composition settings, changing them late in your workflow can affect your final output.
For more information about creating compositions, see this video by Andrew Devis on the Creative Cow website.
Note: Y
ou can override some composition settings when rendering to final output. For example, you can use different frame
zes for the same movie. For more information see Render settings and Output modules and output module settings.
si
When you create a composition without changing settings in the Composition Settings dialog box, the new
comp
osition uses the settings from the previous time that composition settings were set.
Last updated 6/14/2014
Page 72

Projects and compositions
Note: New compositions do not inherit the previous Preserve Frame Rate When Nested Or In Render Queue and Preserve
Resolution When Nested settings.
You can create a set of After Effects compositions tailored for a selected set of devices by using the File > New Document
I
ter Effects command in Adobe Device Central. See Create compositions for playback on mobile devices .
n > Af
Jeff Almasol provides a script on his redefinery website that creates and saves a new project for each selected
composition in the current project. If a folder is selected in the Project panel when you create a new composition, the
n
composition is placed in the selected folder.
ew
Create a composition and manually set composition settings
❖ Choose Composition > New Composition, or press Ctrl+N (Windows) or Command+N (Mac OS).
Create a composition from a single footage item
❖ Drag the footage item to the Create A New Composition button at the bottom of the Project panel or choose File
> New Comp From Selection.
Composition settings, including frame size (width and height) and pixel aspect ratio, are automatically set to match
t
racteristics of the footage item.
he cha
Create a single composition from multiple footage items
1 Select footage items in the Project panel.
2 Drag the selected footage items to the Create A New Composition button at the bottom of the Project panel, or
choose File > New Comp From Selection.
67
3 Select Single Composition and other settings in the New Composition From Selection dialog box:
Use Dimensions From Choose the footage item from which the new composition gets composition settings,
including frame size (width and height) and pixel aspect ratio.
Still Duration The duration for the still images being added.
Add To Render Queue Add the new composition to the render queue.
Sequence Layers, Overlap, Duration, and Transition Arrange the layers in a sequence, optionally overlap them in
time, set the duration of the transitions, and choose a transition type.
Create multiple compositions from multiple footage items
1 Select footage items in the Project panel.
2 Drag the selected footage items to the Create A New Composition button at the bottom of the Project panel, or
choose File > New Comp From Selection.
3 Select Multiple Compositions and other settings in the New Composition From Selection dialog box:
Still Duration The duration of the compositions created from still images.
Add To Render Queue Add the new compositions to the render queue.
Duplicate a composition
1 Select the composition in the Project panel.
2 Choose Edit > Duplicate or press Ctrl+D (Windows) or Command+D (Mac OS).
Last updated 6/14/2014
Page 73

Projects and compositions
Create compositions for playback on mobile devices
Screen dimensions and video frame rates vary from one mobile device to another. For information on acquiring footage
for playback on mobile devices, see Planning for playback on computer monitors and mobile devices.
For a video tutorial about creating compositions for mobile devices, go to the Adobe TV website.
1 In Adobe Device Central, choose File > New Document In > After Effects.
2 Select one or more devices.
3 In the New Composition tab, select Create Master Composition.
4 Click Create in the lower-right corner of the New Composition tab.
If After Effects is already running, then the new compositions are created in the existing project. If After Effects is
not al
ready running, then After Effects starts and the new compositions are created in a new project.
68
You do your design, animation, and other work in the Device Ma
compositions for previews and to render for final output.
The Device Master composition is nested and centered in each of the device-specific compositions. The frame rate,
hei
t, and width settings for the Device Master composition are each set to the maximum of the values for the device-
gh
specific compositions. You can resize or move the nested Device Master composition within each device-specific
composition—for example, to tweak layout for different frame aspect ratios. A guide layer for each device in the Device
Master composition facilitates your design work.
A Preview composition is also created. The Preview composition co
that you can preview your master composition in the context of several mobile devices simultaneously.
After you render and export the compositions, you can preview and test the resulting movies on the simulated devices
with
in Adobe Device Central.
ster composition. You use the device-specific
ists of a grid of device-specific compositions so
ns
Timeline panel
Each composition has its own Timeline panel. You use the Timeline panel to perform many tasks, such as animating
layer properties, arranging layers in time, and setting blending modes. The layers at the bottom of the layer stacking
order in the Timeline panel are rendered first and—in the case of 2D image layers— appear farthest back in the
Composition panel and in the final composite.
To cycle forward through Timeline panels, press Alt+Shift+period
To cycle backward through Timeline panels, press Alt+Shift+comma (,) (Windows) or Option+Shift+comma (,) (Mac
OS).
(.) (Windows) or Option+Shift+period (.) (Mac OS).
The current time for a composition is indicated by the current-time indicator (CTI), the vertical red line in the time
g
ph. The current time for a composition also appears in the current time display in the upper-left corner of the
ra
Timeline panel. For more information on moving the current-time indicator, see Move the current-time indicator
(CTI).
The left side of the Timeline panel consists of columns of co
time graph—contains a time ruler, markers, keyframes, expressions, duration bars for layers (in layer bar mode), and
the Graph Editor (in Graph Editor mode).
nt
rols for layers. The right side of the Timeline panel—the
Last updated 6/14/2014
Page 74

Projects and compositions
A Current-time display B Current-time indicator (CTI) C Time ruler D Layer switches E Time graph
Press the backslash (\) key to switch activation between the Composition panel and Timeline panel for the current
composition.
Composition settings
You can enter composition settings manually, or you can use composition settings presets to automatically set frame
size (width and height), pixel aspect ratio, and frame rate for many common output formats. You can also create and
save your own custom composition settings presets for later use. Resolution, Start Timecode (or Start Frame), Duration,
and Advanced composition settings are not saved with composition settings presets.
69
Note: The l
th
ree hours does not display correctly. The maximum composition size is 30,000x30,000 pixels. A 30,000x30,000 8-bpc
image requires approximately 3.5 GB; your maximum composition size may be less, depending on your operating system
and available RAM.
imit for composition duration is three hours. You can use footage items longer than three hours, but time after
Working with composition settings
• To open the Composition Settings dialog box to change composition settings, do one of the following:
• Select a composition in the Project panel or activate the Timeline or Composition panel for a composition, and
choose Composition > Composition Settings, or press Ctrl+K (Windows) or Command+K (Mac OS).
• Right-click (Windows) or Control-click (Mac OS) a composition in the Project panel or Composition panel (not
on a layer), and choose Composition Settings from the context menu.
• To save a custom composition settings preset, set Width, Height, Pixel Aspect Ratio, and Frame Rate values in the
Composition Settings dialog box, and then click the Save button .
• To delete a composit ion settings preset, choose it from t he Preset menu in the Comp osition Settings dialog box, and
click the Delete button .
• To restore default composition settings presets, Alt-click (Windows) or Option-click (Mac OS) the Delete button
or the Save button in the Composition Settings dialog box.
Note: You cannot move custom composition settings presets from one system to another, as they are embedded into the
eferences file.
pr
• To scale an entire composition, choose File > Scripts > Scale Composition.jsx.
Note: Ensure all layers are unlocked in the selected composition or the script will fail.
Je
ff Almasol provides a script on his redefinery website to set the frame rate and duration of the current composition
and all compositions nested within it.
Christopher Green provides a script (Selected_Comps_Changer.jsx) on his website with which you can change the
composition settings for compositions selected in the Project panel.
Last updated 6/14/2014
Page 75

Projects and compositions
Basic composition settings
Start Timecode or Start Frame Timecode or frame number assigned to the first frame of the composition. This value
does not affect rendering; it merely specifies where to start counting from.
Background Color Use the color swatch or eyedropper to pick a composition background color. (See Select a color or
edit a gradient.)
70
note: When you add one composition to another (nesting), the back
preserved, and the background of the nested composition becomes transparent. To preserve the background color of
the nested composition, create a solid-color layer to use as a background layer in the nested composition.
For information on specific Basic composition settings not listed here, see the related sections:
ground color of the containing composition is
• Pixel aspect ratio and frame aspect ratio
• Frame rate
• Resolution
Advanced composition settings
After Effects includes an updated advanced section to allow for ray-traced 3D renderer options. The 3D renderer plugin has been renamed as, "Renderer" for these choices because you are choosing one renderer or another for a
composition.
To choose a composition type, select one of the following from the Renderer menu:
• Classic 3D
• Ray-traced 3D
Click the Options button to launch the Ray-traced 3D Renderer Options dialog box. You can also Ctrl-click (Windows)
or C
ommand-click (Mac OS) the Current Renderer Indicator button in the upper-right of the Composition panel to
launch the dialog box.
Here you can choose:
• Ray-tracing quality: Click the Ray-tracing quality setting to change it according to your workflow.
• Higher values for ray-tracing quality decrease noise but greatly increase render time.
• Ray-tracing quality controls the number of rays fired per pixel (for example, a value of 4 fires 16 or 4x4 rays, and
8 fires 64 rays).
• A larger number produces a more accurate pixel at the expense of computation time.
• A value of 1 will provide better performance, but there won't be any reflection blur (for example, it is always
sharp), soft shadow, depth of field, or motion blur.
Increasing the Ray-tracing Quality value will not increase the sharpness. Instead it decreases the noise inherent in point
s
pling. You should use the lowest value that produces an acceptable amount of noise or no noise.
am
• Anti-aliasing Filter: Controls the method of averaging the fired rays for a pixel. None fires all rays within the
bounds of a pixel, whereas the others spreads the grid of fired rays partially across adjacent pixels to produce a better
average. Box, Tent, and Cubic (which is not bicubic) are listed in the order of better quality.
• None
• Box
• Te nt
• Cubic
Last updated 6/14/2014
Page 76

Projects and compositions
The anti-aliasing filter controls the amount of blurriness. None gives the sharpest result but the edges of the projection
catcher may look aliased, with Box blur, Triangle, and Cubic giving blurrier results.
Note: R
ay-traced 3D layers use Ray-tracing Quality to control the appearance of motion blur.Depth of field calculations in
raced 3D are more accurate than they are in Classic 3D (and previously in Advanced 3D).
Ray-t
Anchor Click an arrow button to anchor layers to a corner or edge of the composition as it is resized.
For information on specific Advanced composition settings not listed here, see the related sections:
• Specify resolution to use for rendering shadows
• Preferences and composition settings that affect nested compositions
• Motion blur
Composition thumbnail images
You can choose which frame of a composition to show as a thumbnail image (poster frame) for the composition in the
Project panel. By default, the thumbnail image is the first frame of the composition, with transparent portions shown
as black.
• To set the thumbnail image for a composition, move the current-time indicator to the desired frame of the
composition in the Timeline panel, and choose Composition > Set Poster Time.
• To add a transparency grid to the thumbnail view, choose Thumbnail Transparency Grid from the Project panel
menu.
• To hide the thumbnail images in the Project panel, choose Edit > Preferences > Display (Windows) or After Effects
> Preferences > Display (Mac OS) and select Disable Thumbnails In Project Panel.
71
More Help topics
Creating layers
Preview video and audio
Flowchart panel
Basics of rendering and exporting
About precomposing and nesting
Test content in Adobe Device Central
Show and hide layers in the Timeline panel
Layer switches and columns in the Timeline panel
The Graph Editor
Columns
Keyboard shortcuts
Timecode and time display units
Many quantities in After Effects are either points in time or spans of time, including the current time, layer In and Out
points, and durations of layers, footage items, and compositions.
Last updated 6/14/2014
Page 77

Projects and compositions
By default, After Effects displays time in Society of Motion Picture and Television Engineers (SMPTE) timecode: hours,
minutes, seconds, and frames. You can change to another system of time display, such as frames, or feet and frames of
16mm or 35mm film.
You may want to see time values in feet plus frames format, for example, if you are preparing a movie for eventual output
t
film; or in simple frame numbers if you plan to use your movie in an animation program such as Flash. The format
o
you choose applies to the current project only.
Note: C
hanging the time display format does not alter the frame rate of your assets or output—it changes only how frames
e numbered for display in After Effects.
ar
Video-editing workstations often use SMPTE timecode that is recorded onto videotape for reference. If you are creating
vi
hat will be synchronized with video that uses SMPTE timecode, use the default timecode display style.
deo t
In After Effects CS5.5 and later, timecode from source files can be displayed from a variety of file formats. Source
time
code is found in several areas of the interface including the Project panel, Project Settings dialog box, Composition
Settings dialog box and Preferences dialog box. See Source timecode for more information.
Change time-display units
• To cycle through Timecode Base, or Frames / Feet + Frames (depending if you have the “Use Feet + Frames” option
checked in the Project Settings), Ctrl-click (Windows) or Command-click (Mac OS) the current-time display. The
current-time display is in the upper-left corner of the Timeline panel and at the bottom of the Layer, Composition,
and Footage panels. (See Timeline panel.) The option that is not selected in Project Settings will be displayed as
smaller text underneath.
72
• To change time display units, choose File > Project Settings, and choose from the options in the Time Display Style
section.
Options for time-display units
Timecode Displays time as timecode in the time rulers of the Timeline, Layer and Footage panels, using either Use
Media Source (source timecode) or starting at 00:00:00:00. Select the Timecode option to use timecode instead of
Frames. Note that there are no options for choosing frame rate or drop-frame / non-drop-frame, as source timecode is
detected and used instead.
Note: You may have both drop-frame and non-drop-frame timecode in any composition within a project.
Frames Displays frame number instead of time. Use this setting for convenience when doing work that you are
integrating with a frame-based application or format, like Flash or SWF. To use Frames, select Frames and deselect Feet
+ Frames.
Feet + Frames Displays the number of feet of film, plus frames for fractional feet, for 16mm or 35mm film. To use Feet
+ Frames, select Frames and select Feet + Frames.
Frame Count Determines the starting number for the time display style for Frames.
Timecode Conversion Timecode value of the item is used for the starting number (if the item has source timecode). If
there is no timecode value, counting begins with zero. Timecode Conversion causes After Effects to behave as it has in
previous versions, where the frame count and the timecode count of all assets are mathematically equivalent.
Start at 0 The counting for frames begins at zero.
Start at 1 The counting for frames begins at one.
Last updated 6/14/2014
Page 78

Projects and compositions
Note: The new options of “Start at 0” and “Start at 1” allow you to specify different frame counting schemes between the
“Frames” and “Timecode.” For example, you might choose to honor the source timecode of footage items, but count frames
beginning at zero or one.
Source timecode
Source timecode support file formats After Effects can read and use timecode for most formats including: QuickTime,
DV, AVI, P2, MPEG-2, MPEG-4, h.264, AVCHD, RED, XDCAM EX, XDCAM HD, WAV and DPX image sequence
importers.
Project panel Source timecode is displayed in columns in the Project panel: Media Start, Media End, Media Duration
and Tape Name. These refer to the source’s start, end and total duration. In addition, columns have been added for In,
Out, and Duration, which reflect the In and Out points set by the user in the Footage panel for footage item, or the work
area for compositions.
Project Settings The Project Settings dialog box has been substantially reworked to accommodate the source timecode
feature set. For details, see Options for time-display units .
Composition Settings dialog box The Composition Settings dialog box has been changed to accomodate the source
timecode feature set. For details, see Frame rate.
Preferences dialog box The Preferences dialog box’s Import pane has been changed to support source timecode
features. See Import preferences.
73
Online resources about timecode
Trish and Chris Meyer provide an article on the ProVideo Coalition website that describes the difference between dropframe and non-drop-frame timecode.
Chris Pirazzi provides technical details about timecode on his Lurker's Guide to Video website.
Last updated 6/14/2014
Page 79

Chapter 4: Importing footage
Importing and interpreting footage items
About imported files and footage items
You import source files into a project as the basis for footage items and use them as sources for layers. The same file can
be the source for multiple footage items, each with its own interpretation settings. Each footage item can be used as the
source for one or more layers. You work with collections of layers in a composition.
You primarily work with footage items in the Project panel. You can use the Footage panel to evaluate footage and
p
rm simple editing tasks, such as trimming the duration of a footage item.
erfo
74
You can import many different kinds of files, collections of files, or components of files as sources for individual footage
item
s, including moving image files, still-image files, still-image sequences, and audio files. You can even create footage
items yourself within After Effects, such as solids and precompositions. You can import footage items into a project at
any time.
When you import files, After Effects does not copy the image data itself into your project but creates a reference link to
th
e s
ource of the footage item, which keeps project files relatively small.
If you delete, rename, or move an imported source file, you break the reference link to that file. When a link is broken,
the n
ame of the source file appears in italics in the Project panel, and the File Path column lists it as missing. If the
footage item is available, you can reestablish the link—usually just by double-clicking the item and selecting the file
again.
You can find footage items for which the source items are missing by typing missing in the search field in the Project
panel. See Search and filter in the Timeline, Project, and Effects & Presets panels.
To reduce rendering time and increase performance, it is often best to prepare footage before you import it into After
E
ffe
cts. For example, it is often better to scale or crop a still image in Photoshop before you bring it into After Effects,
rather than scaling and cropping the image in After Effects. It is better to perform an operation once in Photoshop than
to force After Effects to perform the same action many times per second—once for each frame in which the image
appears.
To save time and minimize the size and complexity of a project, import a source item as a single footage item and then
us
ultiple times in a composition. It is occasionally useful, however, to duplicate a footage item and interpret each
e it m
differently. For example, you can use the same footage at two different frame rates.
If you use another application to modify a footage item that is used in a project, the changes appear in After Effects the
n
t time that you open the project or select the footage item and choose File > Reload Footage.
ex
To replace the source footage item for a layer with another footage item, without affecting changes made to the layer
properties, select the layer and then Alt-drag (Windows) or Option-drag (Mac OS) the new footage item onto the layer
i
the Timeline panel.
n
Last updated 6/14/2014
Page 80

Importing footage
To replace all uses of selected footage items with another footage item, select footage items in the Project panel, and then
Alt-drag (Windows) or Option-drag (Mac OS) the new footage item onto a selected footage item in the Project panel.
When After Effects imports video and audio in some formats, it processes and caches versions of these items that it can
r
dily access when generating previews. This caching greatly improves performance for previews, because the video
ea
and audio items do not need to be reprocessed for each preview. See Media cache .
For more information about importing assets, see this video tutorial on the Creative COW website by Andrew Devis.
Supported import formats
Some filename extensions—such as MOV, AVI, MXF, FLV, and F4V—denote container file formats rather than
denoting a specific audio, video, or image data format. Container files can contain data encoded using various
compression and encoding schemes. After Effects can import these container files, but the ability to import the data
that they contain is dependent on which codecs (specifically, decoders) are installed.
75
By installing additional codecs, you can extend the ability of A
must be installed into the operating system (Windows or Mac OS) and work as a component inside the QuickTime or
Video for Windows formats. Contact the manufacturer of your hardware or software for more information about
codecs that work with the files that your specific devices or applications create.
Importing and using some files requires the installation of additional import plug-ins. (See Plug-ins.)
Adobe Premiere Pro can capture and import many formats that After Effects can’t import natively. You can bring data
f
Adobe Premiere Pro into After Effects in many ways. (See Working with Adobe Premiere Pro and After Effects.)
rom
For workflow guides and updates for P2, RED, XDCAM, AVCCAM, and DSLR cameras and footage, see the Adobe
website.
This video from the "After Effects CS5: Learn by Video" series explains codecs, containers, and formats and shows how
to get information about source files and footage items.
Audio formats
ft
er Effects to import additional file types. Many codecs
• Adobe Sound Document (ASND; multi-track files imported as merged single track)
• Advanced Audio Coding (AAC, M4A)
• Audio Interchange File Format (AIF, AIFF)
• MP3 (MP3, MPEG, MPG, MPA, MPE)
• Video for Windows (AVI; requires QuickTime on Mac OS)
• Wav e f o r m ( WAV)
Still-image formats
• Adobe Illustrator (AI, AI4, AI5, EPS, PS; continuously rasterized)
• Adobe PDF (PDF; first page only; continuously rasterized)
• Adobe Photoshop (PSD)
• Bitmap (BMP, RLE, DIB)
• Camera raw (TIF, CRW, NEF, RAF, ORF, MRW, DCR, MOS, RAW, PEF, SRF, DNG, X3F, CR2, ERF)
• Cineon/DPX (CIN, DPX; 10 bpc)
• Discreet RLA/RPF (RLA, RPF; 16 bpc; imports camera data)
• EPS
Last updated 6/14/2014
Page 81

Importing footage
• GIF
• JPEG (JPG, JPE)
• Maya camera data (MA)
• Maya IFF (IFF, TDI; 16 bpc)
• OpenEXR (EXR, SXR, MXR; 32 bpc)
• PICT (PCT)
• Portable Network Graphics (PNG; 16 bpc)
• Radiance (HDR, RGBE, XYZE; 32 bpc)
• SGI (SGI, BW, RGB; 16 bpc)
• Softimage (PIC)
Note: 3D Channel effect plug-ins from fnord software are included with After Effects to provide access to multiple layers
and
channels of OpenEXR files. (See Using channels in OpenEXR files.)
76
Note: After Effects can also read ZPIC files corresponding to imported PIC files. See Im
applications.)
porting and using 3D files from other
• Tar g a ( T G A , VDA, ICB, VS T )
• TIFF (TIF)
You can import files of any still-image format as a sequence. See Preparing and importing still images .
Video and animation formats
• Animated GIF (GIF)
• Support for ARRIRAW files from the ARRI ALEXA, or ARRIFLEX D-21 cameras
• The following are known issues with ARRIRAW:
The importer works in 16 bit, so set your project to 16 or 32 bpc.
There is no exposure or color space control in the importer, and no importer options at all.
Footage is always decoded at full resolution, even if a lower frame size is needed.
Metadata is not exposed as XMP, so is not available in After Effects.
Collect Files does not work with ARRIRAW footage.
• CinemaDNG
Note:CinemaDNG is
the Interpret Footage dialog box. Color management for CinemaDNG includes the same color spaces as After Effects
existing CameraRAW: Adobe RGB, sRGB IEC619662.1, ColorMatch RGB, and ProPhoto RGB.
a subset of CameraRAW. A subset of CameraRAW settings can be accessed via More Options in
• For more information on CinemaDNG, and to download the CinemaDNG importer, go to the Adobe Labs website.
• DV (in MOV or AVI container, or as containerless DV stream)
• Electric Image (IMG, EI)
Project formats
• Adobe Premiere Pro 1.0, 1.5, 2.0, CS3, CS4, CS5 (PRPROJ; 1.0, 1.5, and 2.0 Windows only)
• Adobe After Effects 6.0 and later binary projects in After Effects CS5 (AEP, AET)
Last updated 6/14/2014
Page 82

Importing footage
• Adobe After Effects 6.5 and later binary projects in After Effects CS5.5 and later (AEP, AET)
• Adobe After Effects CS4 and later XML projects (AEPX)
The Automatic Duck Pro Import AE plug-in is now bundled with the application, and called Pro Import After Effects.
With
it, you can import AAF and OMF files from an Avid system, XML files from Final Cut Pro 7, or earlier, and project
files from Motion 4, or earlier. For more information on using Pro Import After Effects, see its User Guide, accessible
by choosing File > Import > Pro Import After Effects, then clicking the Help button.
You can also import Final Cut Pro projects into Premiere Pro and then bring that project's components into After
Effe
cts.
In this video by Todd Kopriva and video2brain, learn how to import projects using Pro Import After Effects. We
demonstrate using a Final Cut Pro project, but the same procedure works for other formats, such as XML, AAF, and
OM
F.
te: A
No
fter Effects can also read EIZ files corresponding to imported EI files. See Importing and using 3D files from other
plications.)
ap
• FLV, F4V
• Media eXchange Format (MXF)
MXF is a container format. After Effects can only import some kinds of data contained within MXF files. After Effects
can im
port the Op-Atom variety of MXF files used by Panasonic video cameras to record to Panasonic P2 media. After
Effects can import video from these MXF files using the AVC-Intra 50, AVC-Intra 100, DV, DVCPRO, DVCPRO50,
an d DVC PRO HD codecs . Af ter Effects ca n al so i mport X DCAM HD file s in MXF format, the MXF OP1 format, which
contains MPEG-2 video that complies with the XDCAM HD format.
77
• MPEG-1, MPEG-2, and MPEG-4 formats: MPEG, MPE, MPG, M2V, MPA, MP2, M2A, MPV, M2P, M2T, M2TS
(AVCHD), AC3, MP4, M4V, M4A
Note: Some MPEG data formats are stored in container formats with filename extensions that are not recognized by After
s; examples include .vob and .mod. In some cases, you can import these files into After Effects after changing the
Effect
filename extension to one of the recognized filename extensions. Because of variations in implementation in these container
formats, compatibility is not guaranteed.
For information about MPEG formats, see the MPEG website and the MPEG page on the Wik i p e d i a w ebsite.
• PSD file with video layer (requires QuickTime)
• QuickTime (MOV; 16 bpc, requires QuickTime)
Note: David Van Brink provides the qt_tools toolset on his omino
examining QuickTime files.
website. This toolset is useful for converting and
• RED (R3D)
Note: R3D files are interpreted as containing 32-bpc colors in a non-linear HDTV (Rec. 709) color space. The RED R3D
Sou
rce Settings color adjustments don't preserve overbright values. Color adjustments done within After Effects do preserve
overbright colors when you work in 32-bpc (bits per channel) color. To avoid clipping, manipulate exposure in After Effects,
rather than in the footage interpretation stage in the RED R3D Source Settings dialog box. (For more information on using
R3D files, see the RED website and the Adobe website.)
• SWF (continuously rasterized)
Note: SWF files are imported with an alpha channel. Audio is not retained. Interactive content and scripted animation are
not r
etained. Animation defined by keyframes in the main, top-level movie is retained.
• Video for Windows (AVI, WAV; requires QuickTime on Mac OS)
Last updated 6/14/2014
Page 83

Importing footage
• Windows Media File (WMV, WMA, ASF; Windows only)
• XDCAM HD and XDCAM EX
Note: After Effects can import Sony XDCAM HD assets if they were recorded to MXF files. After Effects cannot import
XD
CAM HD assets in IMX format. After Effects can import Sony XDCAM EX assets stored as essence files with the .mp4
filename extension in a BPAV directory. For information about the XDCAM format, see this PDF document on the Sony
website.
Import footage items
You can import media files into your project either by using the Import dialog box or by dragging. The imported
footage items appear in the Project panel.
If the Interpret Footage dialog box appears after you import a footage item, it contains an unlabeled alpha channel, and
y
ust select an alpha channel interpretation method or click Guess to let After Effects determine how to interpret
ou m
the alpha channel. (See Alpha channel interpretation: premultiplied or straight .)
Import footage items using the Import dialog box
1 Choose File > Import > File, choose File > Import > Multiple Files, or double-click an empty area of the Project
panel.
If you choose Import Multiple Files, then you can perform the next step more than once without needing to choose
a
mport command multiple times.
n I
78
To display only supported footage files (excluding project files), choose All Footage Files from the Files Of Type
(Windows) or Enable (Mac OS) menu.
2 Do one of the following:
• Select a file, and then click Open.
• Ctrl-click (Windows) or Command-click (Mac OS) multiple files to select them, and then click Open.
• Click a file and then Shift-click another file to select a range of files, and then click Open.
• (Windows only) Select an entire folder, and then click Import Folder.
Note: If the Sequence option is selected, multiple files from the folder are imported as a sequence of still images.
Import footage items by dragging
If you always want the layered still-image files that you drag into After Effects to be imported as a composition, choose
Edit > Preferences > Import (Windows) or After Effects > Preferences > Import (Mac OS), and choose Composition or
Comp
osition - Retain Layer Sizes from the Drag Import Multiple Items As menu. (See Import a still-image sequence as a
composition.)
• To import a single file, drag it from Windows Explorer (Windows) or the Finder (Mac OS) into the Project panel.
• To import the contents of a folder as a sequence of still images that appear in the Project panel as a single footage
item, drag a folder from Windows Explorer (Windows) or the Finder (Mac OS) into the Project panel.
• To import the contents of the folder as individual footage items that appear in the Project panel in a folder, Alt-drag
a folder from Windows Explorer (Windows) or Option-drag a folder from the Finder (Mac OS) into the Project
panel.
• To import a rendered output file from the Render Queue panel, drag the corresponding output module from the
Render Queue panel into the Project panel.
Last updated 6/14/2014
Page 84

Importing footage
Note: If you drag an output module from the Render Queue panel into the Project panel before rendering, After Effects
creates a placeholder footage item. References to the placeholder footage item are automatically replaced when the output
module is rendered; the placeholder footage item itself is not replaced.
Interpret footage items
After Effects uses a set of internal rules to interpret each footage item that you import according to its best guess for the
source file’s pixel aspect ratio, frame rate, color profile, and alpha channel type. If After Effects guesses wrong, or if you
want to use the footage differently, you can modify these rules for all footage items of a particular kind by editing the
interpretation rules file (interpretation rules.txt), or you can modify the interpretation of a specific footage item using
the Interpret Footage dialog box.
The interpretation settings tell After Effects the following about each footage item:
• How to interpret the interaction of the alpha channel with other channels (See Alpha channel interpretation:
premultiplied or straight .)
• What frame rate to assume for the footage item (See Frame rate .)
• Whether to separate fields and, if so, what field order to assume (See Interlaced video and separating fields.)
• Whether to remove 3:2 or 24Pa pulldown (See Remove 3:2 or 24Pa pulldown from video.)
• The pixel aspect ratio of the footage item (See Pixel aspect ratio and frame aspect ratio .)
79
• The color profile of the footage item (See Interpret a footage item by assigning an input color profile.)
Note: In all of these cases, the information is used to make decisions about how to interpret data in the imported footage
it
em—to tell After Effects about the input footage. The interpretation settings in the Interpret Footage dialog box should
match the settings used to create the source footage file. Do not use the interpretation settings to try to specify settings for
your final rendered output.
Generally, you don’t need to change interpretation settings. However, if a footage item isn’t of a common kind, After
Ef
fec
ts may need additional information from you to interpret it correctly.
You can use the controls in the Color Management section of the Interpret Footage dialog box to tell After Effects how
to i
nterpret the color information in a footage item. This step is usually only necessary when the footage item does not
contain an embedded color profile.
When you preview in the Footage panel, you see the results of the footage interpretation operations.
Jeff Almasol provides a script on his redefinery website that you can use to make guessing the 3:2 pulldown, 24Pa
pulldown, or alpha channel interpretation more convenient.
Note: S
elect Preview in the Interpret Footage dialog box to preview the results of the settings made in this dialog box before
you
accept the changes.
Interpret a single footage item using the Interpret Footage dialog box
❖ Select a footage item in the Project panel and do one of the following:
• Click the Interpret Footage button at the bottom of the Project panel.
• Drag the footage item to the Interpret Footage button.
• Choose File > Interpret Footage > Main.
• Press Ctrl+Alt+G (Windows) or Command+Option+G (Mac OS).
Last updated 6/14/2014
Page 85

Importing footage
Interpret a proxy using the Interpret Footage dialog box
❖ Select the original footage item in the Project panel and do one of the following:
• Alt-click (Windows) or Option-click (Mac OS) the Interpret Footage button at the bottom of the Project
panel.
• Alt-drag (Windows) or Option-drag (Mac OS) the footage item to the Interpret Footage button.
• Choose File > Interpret Footage > Proxy.
Apply Interpret Footage settings to multiple footage items
You can ensure that different footage items use the same settings by copying interpretation settings from one item and
applying them to others.
1 In the Project panel, select the item with the interpretation settings that you want to apply.
2 Choose File > Interpret Footage > Remember Interpretation.
3 Select one or more footage items in the Project panel.
4 Choose File > Interpret Footage > Apply Interpretation.
Edit interpretation rules for all items of a specific kind
The interpretation rules file contains the rules that specify how After Effects interprets footage items. In most cases,
you don’t need to customize the interpretation rules file. When you import a footage item, After Effects looks for a
match in the interpretation rules file, and then determines interpretation settings for the footage item. You can override
these settings after importing, using the Interpret Footage dialog box.
80
In most cases, the name of the interpretation rules file is interpretation rules.txt; however, some updates to After Effects
in
st
all a new interpretation rules file with a name that indicates the updated version number, and the updated
application uses this new file. If you’ve made changes to the old interpretation rules file, you may need to apply those
changes to the new file, too.
Locations of the interpretation rules file in After Effects CC:
• (Windows) <drive>\Users\<username>\AppData\Roaming\Adobe\After Effects <13.0>
• (Mac OS) <drive>/Users/<username>/Library/Preferences/Adobe/After Effects <13.0>
Locations of the interpretation rules file in previous versions of After Effects CC:
• (Windows) <drive>\Users\<username>\AppData\Roaming\Adobe\After Effects <12.x>
• (Mac OS) <drive>/Users/<username>/Library/Preferences/Adobe/After Effects <12.x>
1 Quit After Effects.
2 As a precaution, make a backup copy of the interpretation rules file. By default, this file is in the same location as the
After Effects application.
3 Open the interpretation rules file in a text editor.
4 Modify the settings according to the instructions in the file.
Note: You must supply a four-character file-type code for each footage type or codec. If you don’t know the code for a
fil
e or codec in a project, press Alt (Windows) or Option (Mac OS) as you select the file in the Project panel. The filetype code and codec code (if the file is compressed) appear in the last line of the file description at the top of the Project
panel.
5 Save interpretation rules.txt.
Last updated 6/14/2014
Page 86

Importing footage
Alpha channel interpretation: premultiplied or straight
Image files with alpha channels store transparency information in one of two ways: straight or premultiplied. Although
the alpha channels are the same, the color channels differ.
81
With straight (or unmatted) channels, transparency information
d only in the alpha channel, not in any of the
is store
visible color channels. With straight channels, the results of transparency aren’t visible until the image is displayed in
an application that supports straight channels.
With premultiplied (or matted) channels, transparency information is stored in the alpha channel and also in the visible
RGB cha
nnels, w
hich are multiplied with a background color. Premultiplied channels are sometimes said to be matted
with color. The colors of semitransparent areas, such as feathered edges, are shifted toward the background color in
proportion to their degree of transparency.
Some software lets you specify the background color with which the channels are premultiplied; otherwise, the
back
ground color is usually black or white.
Straight channels retain more accurate color information than premultiplied channels. Premultiplied channels are
co
atible with a wider range of programs, such as Apple QuickTime Player. Often, the choice of whether to use images
mp
with straight or premultiplied channels has been made before you receive the assets to edit and composite. Adobe
Premiere Pro and After Effects recognize both straight and premultiplied channels, but only the first alpha channel they
encounter in a file containing multiple alpha channels.
Setting the alpha channel interpretation correctly can prevent problems when you import a file, such as undesirable
colo
he edge of an image or a loss of image quality at the edges of the alpha channel. For example, if channels are
rs at t
interpreted as straight when they are actually premultiplied, semitransparent areas retain some of the background color.
If a color inaccuracy, such as a halo, appears along the semitransparent edges in a composition, try changing the
interpretation method.
A footage item with premultiplied channels (top) appears with a black halo when interpreted as Straight-Unmatted (lower-left). When the footage
item is interpreted as Premultiplied-Matted With Color and the background color is specified as black, the halo does not appear (lower-right).
You can use the Remove Color Matting effect to remove the fringes from the semi-transparent areas of a layer by
unmultiplying it.
Aharon Rabinowitz provides a video tutorial on the Creative COW website that describes how and when to use the
Remove Color Matting effect.
Set the alpha channel interpretation for a footage item
1 In the Project panel, select a footage item.
2 Choose File > Interpret Footage > Main.
Last updated 6/14/2014
Page 87

Importing footage
3 If you want to switch the opaque and transparent areas of the image, select Invert Alpha.
4 In the Alpha section, select an interpretation method:
Guess Attempts to determine the type of channels used in the image. If After Effects cannot guess confidently, it
beeps.
Ignore Disregards transparency information contained in the alpha channel.
Straight - Unmatted Interprets the channels as straight.
Premultiplied - Matted With Color Interprets channels as premultiplied. Use the eyedropper or color picker to
specify the color of the background with which the channels were premultiplied.
Set the default alpha channel preferences
1 Choose Edit > Preferences > Import (Windows) or After Effects > Preferences > Import (Mac OS).
2 Choose options from the Interpret Unlabeled Alpha As menu. The options in this menu are similar to the options
in the Interpret Footage dialog box. Ask User specifies that the Interpret Footage dialog box opens each time a
footage item with an unlabeled alpha channel is imported.
Frame rate
The composition frame rate determines the number of frames displayed per second, and how time is divided into
frames in the time ruler and time display. In other words, the composition frame rate specifies how many times per
second images are sampled from the source footage items, and it specifies the time divisions at which keyframes can be
set.
82
Note: A
fter Effects contains a menu for drop-frame or non-drop-frame timecode in the Composition Settings dialog box.
In
previous releases, this option was a global setting per project.
This video form the “After Effects CS5: Learn by Video” series provides an introduction to frame rates for footage items,
compositions, and rendered movies, and how to modify each kind of frame rate to achieve the desired result.
Composition frame rate is usually determined by the type of output that you are targeting. NTSC video has a frame rate
o
frames per second (fps), PAL video has a frame rate of 25 fps, and motion picture film typically has a frame
f 29.97
rate of 24 fps. Depending on the broadcast system, DVD video can have the same frame rate as NTSC video or PAL
video, or a frame rate of 23.976. Cartoons and video intended for CD-ROM or the web are often 10–15 fps.
Setting the composition frame rate to twice the rate of the output format causes After Effects to display each field of
interlaced source footage as its own, separate frame in the Composition panel. This process lets you set keyframes on
in
vidual fields and gain precision when animating masks.
di
When you render a movie for final output, you can choose to use the composition frame rate or another frame rate.
The abi
lity to set the frame rate for each output module is useful when you are using the same composition to create
output for multiple media.
Each motion-footage item in a composition can also have its own frame rate. The relationship between the footage-item
f
me rate and the composition frame rate determines how smoothly the layer plays. For example, if the footage-item
ra
frame rate is 30 fps and the composition frame rate is 30 fps, then whenever the composition advances one frame, the
next frame from the footage item is displayed. If the footage-item frame rate is 15 fps and the composition frame rate
is 30 fps, then each frame of the footage item appears in two successive frames of the composition. (This assumes, of
course, the simple case in which no time stretching or frame blending has been applied to the layer.)
Last updated 6/14/2014
Page 88

Importing footage
Ideally, use source footage that matches the final output frame rate. This way, After Effects renders each frame, and the
final output does not omit, duplicate, or interpolate frames. If, however, the source footage has a frame rate slightly
different from what you want to output to (for example, 30-fps footage and 29.97-fps final output), you can make the
footage frame rate match the composition frame rate by conforming it.
Conforming the frame rate of a footage item does not alter the original file, only the reference that After Effects uses.
W
he
n conforming, After Effects changes the internal duration of frames but not the frame content. Afterward, the
footage plays back at a different speed. For example, if you conform the frame rate from 15 fps to 30 fps, the footage
plays back twice as fast. In most cases, conform the frame rate only when the difference between the footage frame rate
and the output frame rate is small.
Note: C
onforming can change the synchronization of visual footage that has an audio track, because changing the frame
te changes the duration of the video but leaves the audio unchanged. If you want to stretch both audio and video, use the
ra
Time Stretch command. (See Time-stretch a layer.) Keyframes applied to the source footage remain at their original
locations (which retains their synchronization within the composi
n but not the visual content of the layer). You may need
tio
to adjust keyframe locations after conforming a footage item.
You can change the frame rate for any movie or sequence of still images. For example, you can import a sequence of ten
s
ll images and specify a frame rate for that footage item of 5 frames per second (fps); this sequence would then have
ti
a duration of two seconds when used in a composition.
83
Note: W
in
hen you import a sequence of still images, it assumes the frame rate specified by the Sequence Footage preference
the Import category. The default rate is 30 frames per second (fps). You can change the frame rate after importing by
reinterpreting the footage item. (See Interpret footage items .)
Lower frame rates tend to give the impression of unreality, so many people prefer to work at a lower frame rate such as
24 f
mes per second for creative work instead of working at the 29.97 frames per second that is standard for NTSC
ra
video.
Note: I
f you remove 3:2 pulldown from interlaced video footage, After Effects automatically sets the frame rate of the
sulting footage item to four-fifths of the original frame rate. When removing 3:2 pulldown from NTSC video, the resulting
re
frame rate is 24 fps.
The frame rate of the composition should match the frame rate of the final output format. In most cases, you can simply
cho
e a composition settings preset. In contrast, set the frame rate for each footage item to the frame rate of the
os
original source footage.
Trish and Chris Meyer provide tips and tricks regarding conforming footage items to a specific frame rate in an article
(P
on Artbeats website.
DF)
Trish and Chris Meyer provide links to technical reference materials about frame rates and other details of digital video
on th
e ProVideo Coalition website.
Change frame rate for a footage item
1 Select the footage item in the Project panel.
2 Choose File > Interpret Footage > Main.
3 Select Conform To Frame Rate, enter a new frame rate for Frames Per Second, and then click OK.
Instead of using Interpret Footage to change a footage item’s frame rate, you can time-stretch a layer based on the footage
item. For example, time-stretch a layer by 100.1% to convert between 30fps and 29.97fps. Time-stretching modifies the
ed of audio as well as video. (See Time-stretch a layer.)
spe
Change frame rate for a composition
1 Choose Composition > Composition Settings.
Last updated 6/14/2014
Page 89

Importing footage
2 Do one of the following:
• Choose a composition settings preset from the Preset menu.
• Set the Frame Rate value.
84
Note: Jeff Almasol provides a script on is red
efinery website to set the frame rate and duration of the current composition
and all compositions nested within it.
Pixel aspect ratio and frame aspect ratio
Pixel aspect ratio (PAR ) is the ratio of width to height of one pixel in an image. Frame aspect ratio (sometimes called
image aspect ratio or IAR) is the ratio of width to height of the image frame.
A 4:3 frame aspect ratio (left), and a wider 16:9 frame aspect ratio (right)
Most computer monitors use square pixels, but many video formats—including ITU-R 601 (D1) and DV—use nonsquare rectangular pixels.
Some video formats output the same frame aspect ratio but use a different pixel aspect ratio. For example, some NTSC
digitiz
ers produce a 4:3 frame aspect ratio, with square pixels (1.0 pixel aspect ratio), and a frame with pixel dimensions
of 640x480. D1 NTSC produces the same 4:3 frame aspect ratio but uses nonsquare pixels (0.91 pixel aspect ratio) and
a frame with pixel dimensions of 720x486. D1 pixels, which are always nonsquare, are vertically oriented in systems
producing NTSC video and horizontally oriented in systems producing PAL video.
If you display nonsquare pixels on a square-pixel monitor without alteration, images and motion appear distorted; for
exa
le, circles distort into ellipses. However, when displayed on a video monitor, the images are correct. When you
mp
import D1 NTSC or DV source footage into After Effects, the image looks slightly wider than it does on a D1 or DV
system. (D1 PAL footage looks slightly narrower.) The opposite occurs when you import anamorphic footage using
D1/DV N T S C Wi d e s c reen or D1/DV PA L Wi d e s c reen. Widescreen video fo r m ats have a f rame asp ect ratio of 1 6 : 9 .
Note: T
o preview non-square pixels on a computer monitor, click the Toggle Pixel Aspect Ratio Correction button at t
he
bottom of the Composition panel. The quality of the pixel aspect ratio correction for previews is affected by the Zoom
ity preference in the Previews category. (See Viewer Quality preferences.)
Qual
Last updated 6/14/2014
Page 90

Importing footage
Square and nonsquare pixels
A Square pixels and 4:3 frame aspect ratio B Nonsquare pixels and 4:3 frame aspect ratio C Nonsquare pixels displayed on a square-pixel
tor
moni
If a footage item uses nonsquare pixels, After Effects displays the pixel aspect ratio next to the thumbnail image for the
footage item in the Project panel. You can change the pixel aspect ratio interpretation for individual footage items in
the Interpret Footage dialog box. By ensuring that all footage items are interpreted correctly, you can combine footage
items with different pixel aspect ratios in the same composition.
85
After Effects reads and writes pixel aspect ratios directly from QuickTime movies. For example, if you import a movie
c
ap
tured as widescreen (16:9 DV), After Effects automatically tags it correctly. Similarly, AVI and PSD files contain
information that explicitly indicates the pixel aspect ratio of the images.
If a footage item does not contain information that explicitly indicates the pixel aspect ratio of the image, After Effects
us
e pixel dimensions of the footage item frame to make a guess. When you import a footage item with either the
es th
D1 pixel dimensions of 720x486 or the DV pixel dimensions of 720x480, After Effects automatically interprets that
footage item as D1/DV NTSC. When you import a footage item with the D1 or DV pixel dimensions of 720x576, After
Effects automatically interprets that footage item as D1/DV PAL. However, you can make sure that all files are
interpreted correctly by looking in the Project panel or the Interpret Footage dialog box.
Note: M
D1 or
ake sure to reset the pixel aspect ratio to Square Pixels when you import a square-pixel file that happens to have a
DV pixel dimensions—for example, a non-DV image that happens to have pixel dimensions of 720x480.
The pixel aspect ratio setting of the composition should match the pixel aspect ratio of the final output format. In most
cases
, you can simply choose a composition settings preset. In contrast, set the pixel aspect ratio for each footage item
to the pixel aspect ratio of the original source footage.
Trish and Chris Meyer provide tips and tricks regarding pixel aspect ratio in two PDF documents on the Artbeats
we
ite:
bs
• Pixel aspect ratio, part 1
• Pixel aspect ratio, part 2
Chris Pirazzi provides technical details ab
out aspect ratios on his Lurker's Guide to Video website.
Upgrade pixel aspect ratios to correct values
After Effects CS3 and earlier used pixel aspect ratios for standard-definition video formats that ignore the concept of
clean aperture. By not accounting for the fact that clean aperture differs from production aperture in standard-definition
video, the pixel aspect ratios used by After Effects CS3 and earlier were slightly inaccurate. The incorrect pixel aspect
ratios cause some images to appear subtly distorted.
Last updated 6/14/2014
Page 91

Importing footage
Note: The clean aperture is the portion of the image that is free from artifacts and distortions that appear at the edges of
an image. The production aperture is the entire image.
Chris Meyer explains why the corrected pixel aspect ratios are better and how some workflows are affected in the “New
P
el Aspect Ratios” video in the After Effects CS4 New Creative Techniques series on the Lynda.com website.
ix
Todd Kopriva summarizes information about the corrected pixel aspect ratios in a post on the Adobe website.
The following table provides details about pixel aspect ratio values in After Effects:
format value in After Effects CS4 and later previous value
D1/DV NTSC 0.91 0.9
D1/DV NTSC Widescreen 1.21 1.2
D1/DV PAL 1.09 1.07
D1/DV PAL Widescreen 1.46 1.42
This discrepancy is limited to these older, standard-definition formats for which clean aperture differs from production
a
ture. This discrepancy doesn’t exist in newer formats.
per
New projects and compositions created in After Effects CS4 and later use the correct pixel aspect ratio values by default.
86
Projects and compositions created in After Effects CS3 or earlier are upgraded to use the correct pixel aspect ratios
w
n these projects are opened in After Effects CS4 and later.
he
Note: If you have a custom interpretation rules file, then you should update it with the correct pixel aspect ratio values.
If
you use square-pixel footage items that are designed to fill the frame in a composition with non-square pixels, you
may
find that the change in pixel aspect ratios causes a difference in behavior. For example, if you previously created
768x576 square-pixel footage items to use in a PAL D1/DV composition, you should now create those items with
square-pixel dimensions of 788x576.
Composition settings presets for square-pixel equivalents of standard definition formats have changed as follows:
format pixel dimensions in After Effects CS4 and
NTSC D1 square-pixel equivalent 720x534 720x540
NTSC D1 Widescreen square-pixel equivalent 872x486 864x486
PAL D1/DV square-pixel equivalent 788x576 768x576
PAL D1/DV Widescreen square-pixel
equivale
nt
r
late
1050x576 1024x576
previous pixel dimensions
Change pixel aspect ratio interpretation for a footage item
1 Select a footage item in the Project panel.
2 Choose File > Interpret Footage > Main.
3 Choose a ratio from the Pixel Aspect Ratio menu and click OK.
Change pixel aspect ratio for a composition
1 Choose Composition > Composition Settings.
Last updated 6/14/2014
Page 92

Importing footage
2 Do one of the following:
• Choose a composition settings preset from the Preset menu.
• Choose a value from the Pixel Aspect Ratio menu.
Common pixel aspect ratios
Pixel aspect ratio When to use
87
Square pixels 1.0 Footage has a 640x480 or 648x486 frame size,
D1/DV NTSC 0.91 Footage has a 720x486 or 720x480 frame size,
D1/DV NTSC Widescreen 1.21 Footage has a 720x486 or 720x480 frame size,
D1/DV PAL 1.09 Footage has a 720x576 frame size, and the
D1/DV PAL Widescreen 1.46 Footage has a 720x576 frame size, and the
Anamorphic 2:1 2.0 Footage was shot using an anamorphic film
HDV 1080/DVCPRO HD 720, HD Anamorphic
1080
1.33 Footage has a 1440x1080 or 960x720 frame
920x1080 HD (not HDV or DVCPRO HD), is
is 1
1280x720 HD or HDV, or was exported from an
application that doesn’t support nonsquare
pixels. This setting can also be appropriate for
footage that was transferred from film or for
customized projects.
and t
he desired result is a 4:3 frame aspect
ratio. This setting can also be appropriate for
footage that was exported from an
application that works with nonsquare pixels,
such as a 3D animation application.
and t
he desired result is a 16:9 frame aspect
ratio.
ed result is a 4:3 frame aspect ratio.
desir
desir
ed result is a 16:9 frame aspect ratio.
lens, or it was anamorphically transfer red from
a film frame with a 2:1 aspect ratio.
, and the desired result is a 16:9 frame
size
aspect ratio.
DVCPRO HD 1080 1.5 Footage has a 1280x1080 frame size, and the
desir
ed result is a 16:9 frame aspect ratio.
More Help topics
Create layers from footage items or change layer source
Footage (keyboard shortcuts)
Camera Raw
Supported output formats
Import assets in Panasonic P2 format
Importing assets from tapeless formats
Importing XML project files from Final Cut Pro
Import a single still image or a still-image sequence
Footage (keyboard shortcuts)
Last updated 6/14/2014
Page 93

Importing footage
Footage (keyboard shortcuts)
Remove Color Matting effect
Render settings
Converting movies
Importing and interpreting video and audio
Interlaced video and separating fields
Interlacing is a technique developed for transmitting television signals using limited bandwidth. In an interlaced
system, only half the number of horizontal lines for each frame of video are transmitted at a time. Because of the speed
of transmission, the afterglow of displays, and the persistence of vision, the viewer perceives each frame in full
resolution. All of the analog television standards use interlacing. Digital television standards include both interlaced
and noninterlaced varieties. Typically, interlaced signals are generated from interlaced scanning, whereas noninterlaced
signals are generated from progressive scanning.
88
Each interlaced video frame consists of two fi
the upper field (or Field 1) contains the odd-numbered lines, and the lower field (or Field 2) contains the even-numbered
lines. An interlaced video monitor displays each frame by first drawing all of the lines in one field and then drawing all
of the lines in the other field. Field order specifies which field is drawn first. In NTSC video, new fields are drawn to the
screen approximately 60 times per second, corresponding to a frame rate of approximately 30 frames per second.
Noninterlaced video frames aren’t separated into fields. A pr
frame by drawing all the horizontal lines, from top to bottom, in one pass. Computer monitors are almost all
progressive-scan monitors, and most video displayed on computer monitors is noninterlaced.
The terms pr
scanning refers to the recording or drawing of t he sc an lines by a camera or monitor, whereas noninterlaced refers to the
fact that the video data itself isn’t separated into fields.
ressive and noninterlaced are thus closely related and are often used interchangeably, but progressive
og
el
ds. Each field contains half the number of horizontal lines in the frame;
ressive-scan monitor displays a noninterlaced video
og
Last updated 6/14/2014
Page 94

Importing footage
Interlaced scanning of interlaced video fields compared with progressive scanning of noninterlaced video frame.
A For interlaced video, entire upper field (odd-numbere d lines) is drawn to screen first, from top to bottom, in one pass. B Next, entire lower field
(even-num
is d
bered lines) is drawn to screen, from top to bottom, in one pass. C For noninterlaced video, entire frame (all lines in counting order)
rawn to screen, from top to bottom, in one pass.
89
Separate video fields
If you want to use interlaced or field-rendered footage (such as NTSC video) in an After Effects project, you get the best
results if you separate the video fields when you import the footage. After Effects separates video fields by creating a
full frame from each field, preserving all of the image data from the original footage.
Separating fields is critical if you plan to make significant changes to the image. When you scale, rotate, or apply effects
t
nterlaced video, unwanted artifacts, such as crossed fields, are often introduced. By separating fields, After Effects
o i
accurately converts the two interlaced frames in the video to noninterlaced frames, while preserving the maximum
amount of image quality. Using noninterlaced frames allows After Effects to apply edits and effects consistently and at
the highest quality.
After Effects creates field-separated footage from a single formerly interlaced frame by splitting it into two independent
f
mes. Each new frame has only half the information of the original frame, so some frames may appear to have a lower
ra
resolution than others when viewed at Draft quality. When you render the final composition, After Effects reproduces
high-quality interlaced frames for output. When you render a movie at Best quality, After Effects interpolates between
the scan lines of a field to produce maximum image quality.
If your output will not be interlaced, it’s best to use noninterlaced source footage, to avoid the need to separate fields.
H
ever, if a noninterlaced version of your source footage is not available, interlaced footage will work fine.
ow
Always separate fields for interlaced footage. Never separate fields for noninterlaced footage items.
You can only remove pull-down after you have separated fields.
When you render a composition containing field-separated footage, set the Field Rendering option to the same field
o
as your video equipment. If you don’t field-render the composition, or if you field-render with the incorrect
rder
settings, the final movie may appear too soft, jerky, or distorted.
To quickly give video footage a more film-like appearance, import the footage twice, and interpret each footage item
with a different field order. Then add them both to the same composition and blend them together. The misinterpreted
la
yer adds s
ome film-like blur.
Last updated 6/14/2014
Page 95

Importing footage
After Effects automatically separates fields for D1 and DV video footage items. You can manually separate fields for all
other types of video footage in the Interpret Footage dialog box.
1 Select the footage item in the Project panel.
2 Choose File > Interpret Footage > Main.
3 Choose an option from the Separate Fields menu.
4 Click Preserve Edges (Best Quality Only) to increase image quality in nonmoving areas when the image is rendered
at Best quality. Then click OK.
Note: If the field settings in the Interpret Footage dialog box are correct for the input footage and the field settings in the
der Settings dialog box are correct for the output device, you can mix footage items of different field orders in a
Ren
composition. If either of these settings is incorrect, however, the frames will be in the correct order, but the field order may
be reversed, resulting in jerky, unacceptable images.
Determine the original field order
The field order for an interlaced video footage item determines the order in which the two video fields (upper and
lower) are displayed. A system that draws the upper lines before the lower lines is called upper-field first; one that draws
the lower lines before the upper lines is called lower-field first. Many standard-definition formats (such as DV NTSC)
are lower-field first, whereas many high-definition formats (such as 1080i DVCPRO HD) are upper-field first.
90
The order in which the fields are displayed is important, especially when the fields contain motion. If you separate video
f
ields usi
Some programs, including After Effects, label the field order wh
ng the wrong field order, motion does not appear smooth.
en rendering interlaced video files. When you import
a labeled video file, After Effects honors the field order label automatically. You can override this field order by applying
different footage interpretation settings.
If a file does not contain a field order label, you can match the original field order of your footage. If you are not sure
w
ch field order was used to interlace a footage item, use this procedure to find out.
hi
1 Select the item in the Project panel.
2 Choose File > Interpret Footage > Main.
3 In the Interpret Footage dialog box, select Upper Field First from the Separate Fields menu, and then click OK.
4 In the Project panel, press Alt (Windows) or Option (Mac OS) as you double-click the footage to open it in the
Footage panel.
5 If the Preview panel is not visible, choose Window > Preview.
6 In the Footage panel, find a segment that contains one or more moving areas.
7 Using the Nex t Frame button in the Preview panel, step forward at least five frames in the Footage panel. Moving
areas should move consistently in one direction. If the moving areas move backward every other frame, the wrong
fie
ld-separation option has been applied to the footage.
Online resources about fields and interlaced video
Chris Pirazzi provides technical details of fields and interlacing on his Lurker's Guide to Video website.
This video from the “After Effects CS5: Learn by Video” series provides an introduction to fields and interlacing, and
shows how to avoid common problems.
Trish and Chris Meyer provide a variety of materials about interlacing, field order, field dominance, field rendering,
a
separating fields:
nd
• article (PDF) introducing interlacing and field separation on the Artbeats website
Last updated 6/14/2014
Page 96

Importing footage
• article introducing interlacing and field order on the ProVideo Coalition website
• article clarifying meanings of the terms field order and field dominance on the ProVideo Coalition website
• video overview of fields and interlacing on the Lynda.com website
Remove 3:2 or 24Pa pulldown from video
When you transfer 24-fps film to 29.97-fps video, you use a process called 3:2 pulldown, in which the film frames are
distributed across video fields in a repeating 3:2 pattern. The first frame of film is copied to fields 1 and 2 of the first
frame of video, and also to field 1 of the second video frame. The second frame of film is then spread across the next
two fields of video—field 2 of the second video frame and field 1 of the third frame of video. This 3:2 pattern is repeated
until four frames of film are spread over five frames of video, and then the pattern is repeated.
91
The 3:2 pulldown process results in whole
ames (represented by a W) and split-field frames (represented by an S). The
fr
three whole video frames contain two fields from the same film frame. The remaining two split-field frames contain a
video frame from two different film frames. The two split-field frames are always adjacent to each other. The phase of
3:2 pulldown refers to the point at which the two split-field frames fall within the first five frames of the footage.
Phase occurs as a result of two conversions that happen during 3:2 pulldown: 24-fps film is redistributed through 30fps video,
so each of four frames of 24-fps film is spread out over five frames of 30(29.97)-fps video. First, the film is
slowed down 0.1% to match the speed difference between 29.97 fps and 30 fps. Next, each film frame is repeated in a
special pattern and mated to fields of video.
When you apply 3:2 pulldown to footage, one frame of the film (A) is separated into two or three interlaced video fields (B) which are grouped
into video frames containing two fields each.
When importing interlaced video that was originally transferred from film, you can remove the 3:2 pulldown that was
applied during the transfer from film to video as you separate fields so that effects you apply in After Effects don’t
appear distorted.
It’s important to remove 3:2 pulldown from video footage that was originally film so that effects you add in After Effects
sy
onize perfectly with the original frame rate of film. Removing 3:2 pulldown reduces the frame rate by 1/5—from
nchr
30 to 24 fps or from 29.97 to 23.976 fps, which also reduces the number of frames you have to change. To remove 3:2
pulldown, you must also indicate the phase of the 3:2 pulldown.
After Effects also supports Panasonic DVX100 24p DV camera pulldown, called 24
P Ad
vance (24Pa). Some cameras
use this format to capture 23.976 progressive-scan imagery using standard DV tapes.
Last updated 6/14/2014
Page 97

Importing footage
Before you remove 3:2 pulldown, separate the fields as either upper-field first or lower-field first. Once the fields are
separated, After Effects can analyze the footage and determine the correct 3:2 pulldown phase and field order. If you
already know the phase and field order, choose them from the Separate Fields and the Remove menus in the Interpret
Footage dialog box.
1 In the Project panel, select the footage item from which to remove 3:2 pulldown.
2 Choose File > Interpret Footage > Main.
3 In the Fields and Pulldown section, select Upper Field First or Lower Field First from the Separate Fields menu.
4 Do one of the following and click OK:
• If you know the phase of the 3:2 or 24Pa pulldown, choose it from the Remove menu.
• To have After Effects determine the correct settings, click Guess 3:2 Pulldown or Guess 24Pa Pulldown.
Note: If your footage file contains frames from different sources, the phase may not be consistent. If the phase is
in
consistent, import the footage multiple times, once for each phase, and interpret each footage item with a different
setting. Then, add each footage item to your composition and trim each layer to use only the appropriate frames. In
other words, if you have an asset that has multiple pulldown phases, then you need to cut that asset into pieces and
remove pulldown separately for each of the pieces. This can come up if the asset is a movie that has been edited together
from several sources in an NLE.
92
Online resources about pulldown
Chris Meyer provides a video tutorial on identifying pulldown on the Lynda.com website.
Chris and Trish Meyer provides an overview of 3:2 pulldown in an article on the Artbeats website.
Chris Meyer provides links to resources about pulldown on the ProVideo Coalition website.
Import assets in Panasonic P2 format
A P2 card is a solid-state memory device that plugs into the PCMCIA slot of a Panasonic P2 video camera. The digital
video and audio data from the video camera is recorded onto the card in a structured, codec-independent format
known as MXF (Media eXchange Format). Specifically, Adobe Premiere Pro and After Effects support the Panasonic
Op-Atom variant of MXF, with video in AVC-Intra 50, AVC-Intra 100, DV, DVCPRO, DVCPRO50, and DVCPRO HD
formats. A clip is said to be in the P2 format if its audio and video are contained in Panasonic Op-Atom MXF files, and
these files are located in a specific folder structure.
The root of the P2 folder structur
in a separate MXF wrapper file; the video MXF files are in the VIDEO subfolder, and the audio MXF files are in the
AUDIO subfolder. The relationships between essence files and the metadata associated with them are tracked by XML
files in the CLIP subfolder.
Note: Adobe Premiere Pro and After Effects do not support proxies recorded by Panasonic P2 camcorders in P2 card
PROX
Y folders.
The video and audio on a P2 card are already in a digital form, as if the P2 card were a hard disk, so no capture step is
inv
ol ved in imp ort ing med ia f rom a P 2 card. Th e process of rea ding th e data f rom th e ca rd and converti ng it t o a for mat
that can be used in a project is sometimes referred to as ingest.
e is a C
ONTENTS folder. Each essence item (an item of video or audio) is contained
For your computer to read P2 cards, you must install the appropriate driver, which you can download from the
P
onic website. Panasonic also provides the P2 Viewer application, with which you can browse and play media
anas
stored on a P2 card.
Last updated 6/14/2014
Page 98

Importing footage
Because Panasonic P2 cards use the FAT32 file system, each file is limited to a size of 4 GB. When a shot is recorded
that requires more than the 4 GB, a P2 camera creates another file and continues recording the shot to the new file
without interruption. This is referred to as clip spanning, because the shot spans more than one file or clip. Similarly, a
camera may span a shot across files on different P2 cards: if the camera has more than one P2 card loaded, it will record
the shot until it runs out of room on the first P2 card, create a new file on the next P2 card with available space, and
continue recording the shot to it. Although a single shot can be recorded to a group of multiple spanned clips, the
mult iple- file shot i s de sig ned to b e trea ted as a si ngl e cl ip or foo tag e item in a vid eo e dit ing a pplic ati on. For A fter Ef fec ts
to automatically import a group of spanned clips simultaneously and assemble them into a single footage item, they
must all have been recorded to the same P2 card and none of the files can be missing, including the associated XML
metadata file.
1 (Optional) Copy the entire contents of the P2 card to a hard disk.
Though it is possible to import assets into Adobe Premiere Pro or After Effects directly from a P2 card, it is usually
more
efficient to copy the contents of the P2 card to a hard disk before importing.
2 Choose File > Import.
3 Navigate to the CONTENTS folder.
4 Select one or more MXF files:
• To import a video essence item and its associated audio essence items, select the MXF files from the VIDEO
folder.
93
• To import only the audio essence items, select the MXF files from the AUDIO folder.
• To import a group of spanned clips for a shot that were recorded onto the same P2 card, select only one of the
MXF files in the group from the VIDEO folder. The group is imported as a single footage item with a duration
equal to the total duration of all the spanned clips it includes. If you select more than one of these spanned clips,
you import duplicates of the whole group of spanned clips, as duplicate footage items in the Project panel.
You cannot import spanned clips from a shot that spans two different cards as a single footage item. Rather, you must
s
ct a single MXF file belonging to the shot from each card to create a separate footage item for the part of the shot
ele
recorded on each card. For example, if a group of spanned clips for a single shot itself spans two cards, you must
select a spanned clip from the group on card 1 and another from the group on card 2. This imports the contents of
the shot into two footage items in the Project panel.
The Date column in the Project panel shows when each source clip was acquired. After you import spanned clips, you
c
e the Date value to determine their correct chronological order within the shot.
an us
Note: After Effects can’t directly export to the P2 format. To render and export to the P2 format, use Adobe Media Encoder
or Pr
emiere Pro.
For additional information on the Panasonic P2 format and workflows with Adobe digital video software, see the
Ad
e website:
ob
• Adobe workflow guides for P2, RED, XDCAM, AVCCAM, and DSLR cameras and footage
• P2 workflow guide for Adobe digital video products
• Dave Helmly’s video introduction to the P2 workflow in After Effects
More Help topics
Interpret footage items
Introduce 3:2 pulldown
Importing assets from tapeless formats
Last updated 6/14/2014
Page 99

Importing footage
Export to Panasonic P2 format
File formats supported for export
Preparing and importing 3D imagefiles
Importing 3D images from Photoshop and Illustrator
3D object layers in PSD files
94
Adobe Photoshop CC can import and manipulate 3D models (3D objects) in
also create 3D objects in basic, primitive shapes.
After Effects cannot import 3D objects from PSD files.
See working with 3d layers video on the learn tutorials page.
Vanis h i n g Point exch a n g e
When you use the Vanishing Point feature in Photoshop Extended, you can then use the File > Export For After Effects
(.vp
e) comma
geometry of the scene. You can then import the .vpe file into After Effects. After Effects uses the information in the .vpe
file to re-create the scene as a composition containing a camera layer and one perspective-corrected 3D layer for each
PNG file.
The camera is on the negative z axis, at (x,y)=(0,0). The point of interest for the camera is in the center of the
co
osition. The camera zoom is set according to the field of view in the Vanishing Point scene.
mp
The 3D layers for the planes in the scene have a parent layer with its anchor point at the center of the composition, so
the w
hole scene can be transformed together.
Vanishing Point exchange only works well for images that have square pixels in Photoshop.
Bob Donlon provides a tutorial on his blog that shows how to use Vanishing Point Exchange.
Aharon Rabinowitz provides a video tutorial on the Creative COW website that shows how to use Vanishing Point
Exchange.
Lester Banks provides a video tutorial on his website that demonstrates how to use Vanishing Point in Photoshop
Extended and then either bring the 3D scene into After Effects as a .vpe file or bring the 3D scene in as a 3D object layer
in
a PS
nd to save the results as a collection of PNG files—one for each plane—and a .vpe file that describes the
D file.
several popular formats. Photoshop can
Andrew Kramer provides a video tutorial on his Vid e o C o pilot webs i te that shows how to use Vanishing Point
Exchange.
Importing PSD files as 3D scenes
Paul Tuersley provides a script on the AE Enhancers website that turns a layered PSD file into a 3D scene in After
Effects. The script creates a composition and adds expressions to the layers from the PSD file. When you move the
la
ye
rs along the z axis, the scene looks exactly like the original artwork through the Active Camera view. You can
animate the camera around the scene to see that the layers are at different depths in 3D space.
Illustrator 3D effects
Last updated 6/14/2014
Page 100

Importing footage
The effects in the 3D category in Illustrator—Extrude & Bevel, Revolve, and Rotate—give a three-dimensional
appearance to any vector graphics object, including text and drawings. If you want to add depth to your vector art and
text, consider creating it in Illustrator, using the 3D effects, and then importing the results into After Effects.
Importing and using 3D files from other applications
After Effects can import 3D-image files saved in Softimage PIC, RLA, RPF, OpenEXR, and Electric Image EI format.
These 3D-image files contain red, green, blue, and alpha (RGBA) channels, as well as auxiliary channels with optional
information, such as z depth, object IDs, texture coordinates, and more.
Though you can import composited files with 3D information into After Effects, you cannot modify or create 3D
m
ls directly with After Effects.
ode
After Effects treats each composited 3D file from another application as a single 2D layer. That layer, as a whole, can be
gi
n 3D attributes and treated like any After Effects 3D layer, but the objects contained within that 3D file cannot be
ve
manipulated individually in 3D space. To access the 3D depth information and other auxiliary channel information in
3D image files, use the 3D Channel effects. (See 3D Channel effects.)
3D Channel effect plug-ins from fnord software are included with After Effects to provide access to multiple layers and
cha
nnels of OpenEXR files. (See Using channels in OpenEXR files.)
After Effects can also import baked camera data, including focal length, film size, and transformation data, from Maya
p
ject files as a single composition or two compositions. (See Baking and importing Maya data .)
ro
95
After Effects imports camera data saved with RLA or RPF sequence files. (See Import RLA or RPF data into a camera
layer .)
Softimage PIC files have a corresponding ZPIC file that contains the z-depth channel information. Although you can’t
imp
ort a ZPIC file, you can access the additional channel information as long as the ZPIC file is stored in the same
folder as the imported PIC file.
Similarly, Electric Image (EI) files can have associated EIZ
cannot import EIZ files into After Effects; instead, you simply store them in the same folder as the EI files. For
information about creating EIZ files, see your Electric Image documentation.
Note: S
ome 3D applications, such as Cinema 4D, can export an After Effects composition directly.
A commo
loca
the 3D file into After Effects, you can use these null objects as a reference for the placements of other visual elements.
n technique when working in a 3D modeling application is to insert null objects, such as null lights or null
tor nodes in the locations where you want to composite in an image in After Effects. Then, after you have imported
s with z-depth channel data. As with ZPIC files, you
file
Online resources about importing and using 3D files from other applications
Lutz Albr ech t pr ovi des a two- par t d ocum ent on t he Adobe web site about integrating 3D applications with After Effects.
These articles cover the creation of UV maps, mattes, and channels from various 3D applications, including Maxon
Cinema 4D, N
and fnord ProEXR plug-ins to use that data in After Effects.
Tyson Ibele provides tutorials on his website that show how to use output from 3ds Max (3D Studio MAX) in After
Effects.
ewTek Lightwave, and Luxology modo. The articles then show you how to use RE:Vision Effects RE:Map
Dave Scotland provides a pair of tutorials on the CG Swot website in which he demonstrates how to create RPF files in
a
pplication and how to use RPF files in After Effects. The first part explains the RPF format and how to create RPF
3D a
files in 3DS Max. The second part shows how to use the Object ID and Z depth information in an RPF file within After
Effects, using the ID Matte, Depth of Field, Depth Matte, and Fog 3D effects.
Last updated 6/14/2014
 Loading...