

Page 1
2
3
2
3
4
Adobe After Effects Help Using Help
U
sing Help | Contents | Index Back 1
Using Help
About online Help
Adobe Systems, Inc. provides complete documentation in the Adobe PDF Help system.
The Help system includes information on all the tools, commands, and features for both
Windows and Mac OS. The PDF format is designed for easy navigation online, and support
for third-party screen readers compatible with Windows. The Help can also be printed as a
desktop reference.
Navigating in Help
The Help will open in an Acrobat window with the bookmark pane open. If the bookmark
pane is not open choose Window > Bookmarks. You can also navigate using the
navigation bar, the index, or search the document.
At the top and bottom of each page is a navigation bar. Click Using Help to return to this
introduction. Clicking Contents, or Index will take you to that section.
The Next Page and the Previous Page arrows let you move through the pages
sequentially. Click Back to return to the last page you viewed. You can also use the
navigation arrows in the Acrobat toolbar.
Using bookmarks, the table of contents, the index, and Find
The contents of Help are shown as bookmarks in the bookmark pane. To view subtopics,
click the plus sign next to a bookmark. Each bookmark is a hyperlink to the associated
section of the Help document.
To go to the information, click its bookmark. As the information is displayed in the
document pane, its bookmark is highlighted.
You can turn highlighting on or off by selecting the Highlight Current Bookmark option
from the bookmark pane menu.
To find a topic using the table of contents:
1 Click Contents in the navigation bar at the top or bottom of any page.
Click a topic on the Contents page to move to the first page of that topic.
In the bookmark pane, expand the topic to see its subtopics.
To find a topic using the index:
1 Click Index in the navigation bar at the top or bottom of any page.
Click the appropriate letter at the top of the page.
You can also expand the Index bookmark, and click the letter in the bookmark pane.
Locate your entry, and click the page number link to view the information.
To view multiple entries, click Back to return to the same place in the index.
U
sing Help | Contents | Index Back 1
Page 2

2
3
Adobe After Effects Help Using Help
U
sing Help | Contents | Index Back 2
To find a topic using the Find command:
1 Choose Edit > Find.
Enter a word or a phrase in the text box, and click OK.
Acrobat will search the document, starting from the current page, and display the first
occurrence of the word or phrase you are searching for.
To find the next occurrence, choose Edit > Find Again.
Printing the Help file
Although the Help has been optimized for on-screen viewing, you can print pages you
select, or the entire file.
To print, choose Print from the File menu, or click the printer icon in the Acrobat toolbar.
U
sing Help | Contents | Index Back 2
Page 3
Adobe After Effects Help Contents
U
sing Help | Contents | Index Back 3
Contents
W
orking with Projects, Windows, and Palettes 4
Preparing and Importing Footage 25
Building a Composition 50
Managing Layers 71
Animating Layers 95
Fine-tuning Animation 122
Working with Masks and Transparency 148
Applying Effects 170
3D Compositing 228
Creating Expressions 244
Managing Projects Effectively 264
Rendering a Movie 278
Using Property and Tracking Controls (PB only) 304
Using Motion Math (PB only) 317
Using Vector Paint (PB only) 333
Creating Particle Effects (PB only) 351
(5.5) Working with
After Effects 5.5 to Build a Composition 377
(5.5) Layers 381
(5.5) Working with Masks and Transparency 383
(5.5) Applying Effects 387
(5.5) 3D Compositing 391
(5.5) Expressions 397
(5.5) Rendering a Movie 402
Macintosh shortcuts 408
Windows shortcuts 423
Legal Notice 438
U
sing Help | Contents | Index Back 3
Page 4
A.
Adobe After Effects Help Working with Projects, Windows, and Palettes
U
sing Help | Contents | Index Back 4
Wo r king with Projects, Windows, and Palettes
Wo r king in a project
An After Effects project is a single file that stores references to all the footage you use in
that project. It also contains information about how you’ve arranged the footage in
compositions, including the details of any effects or animation you applied. Inside a
project, you create one or more compositions. After you have imported source footage
into the project, you can add footage items into the compositions.
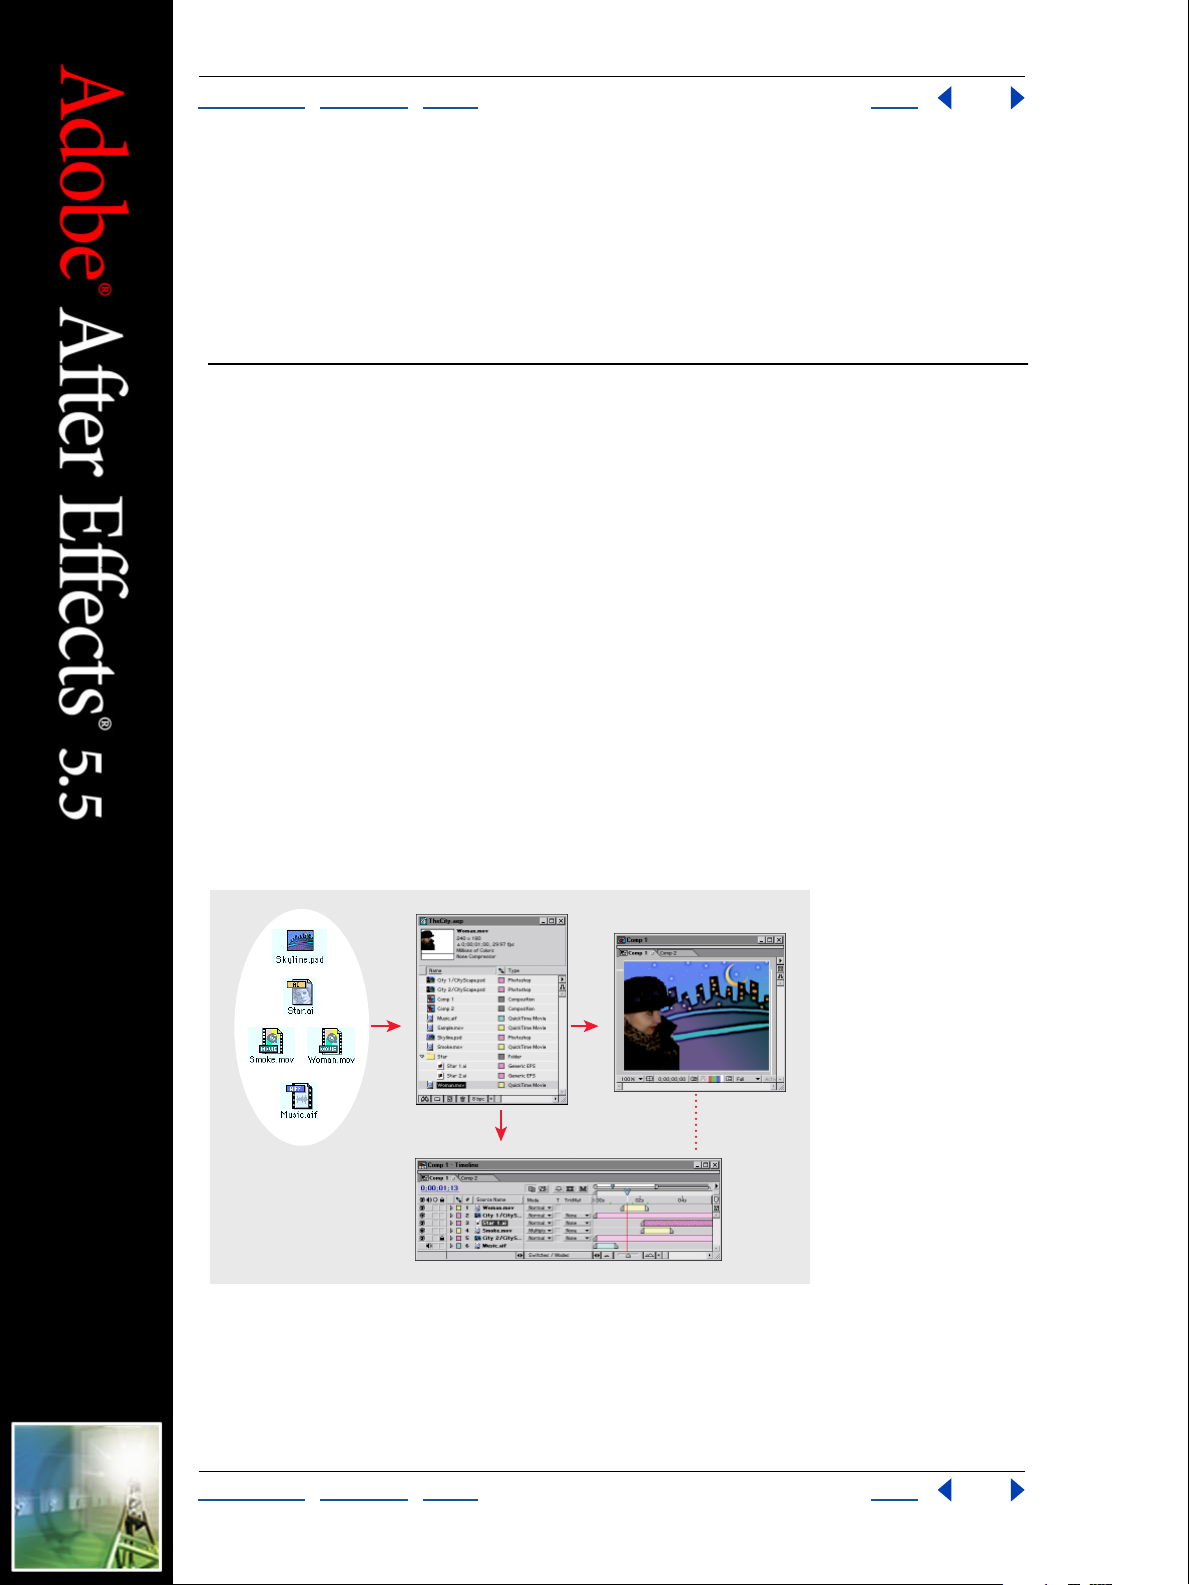
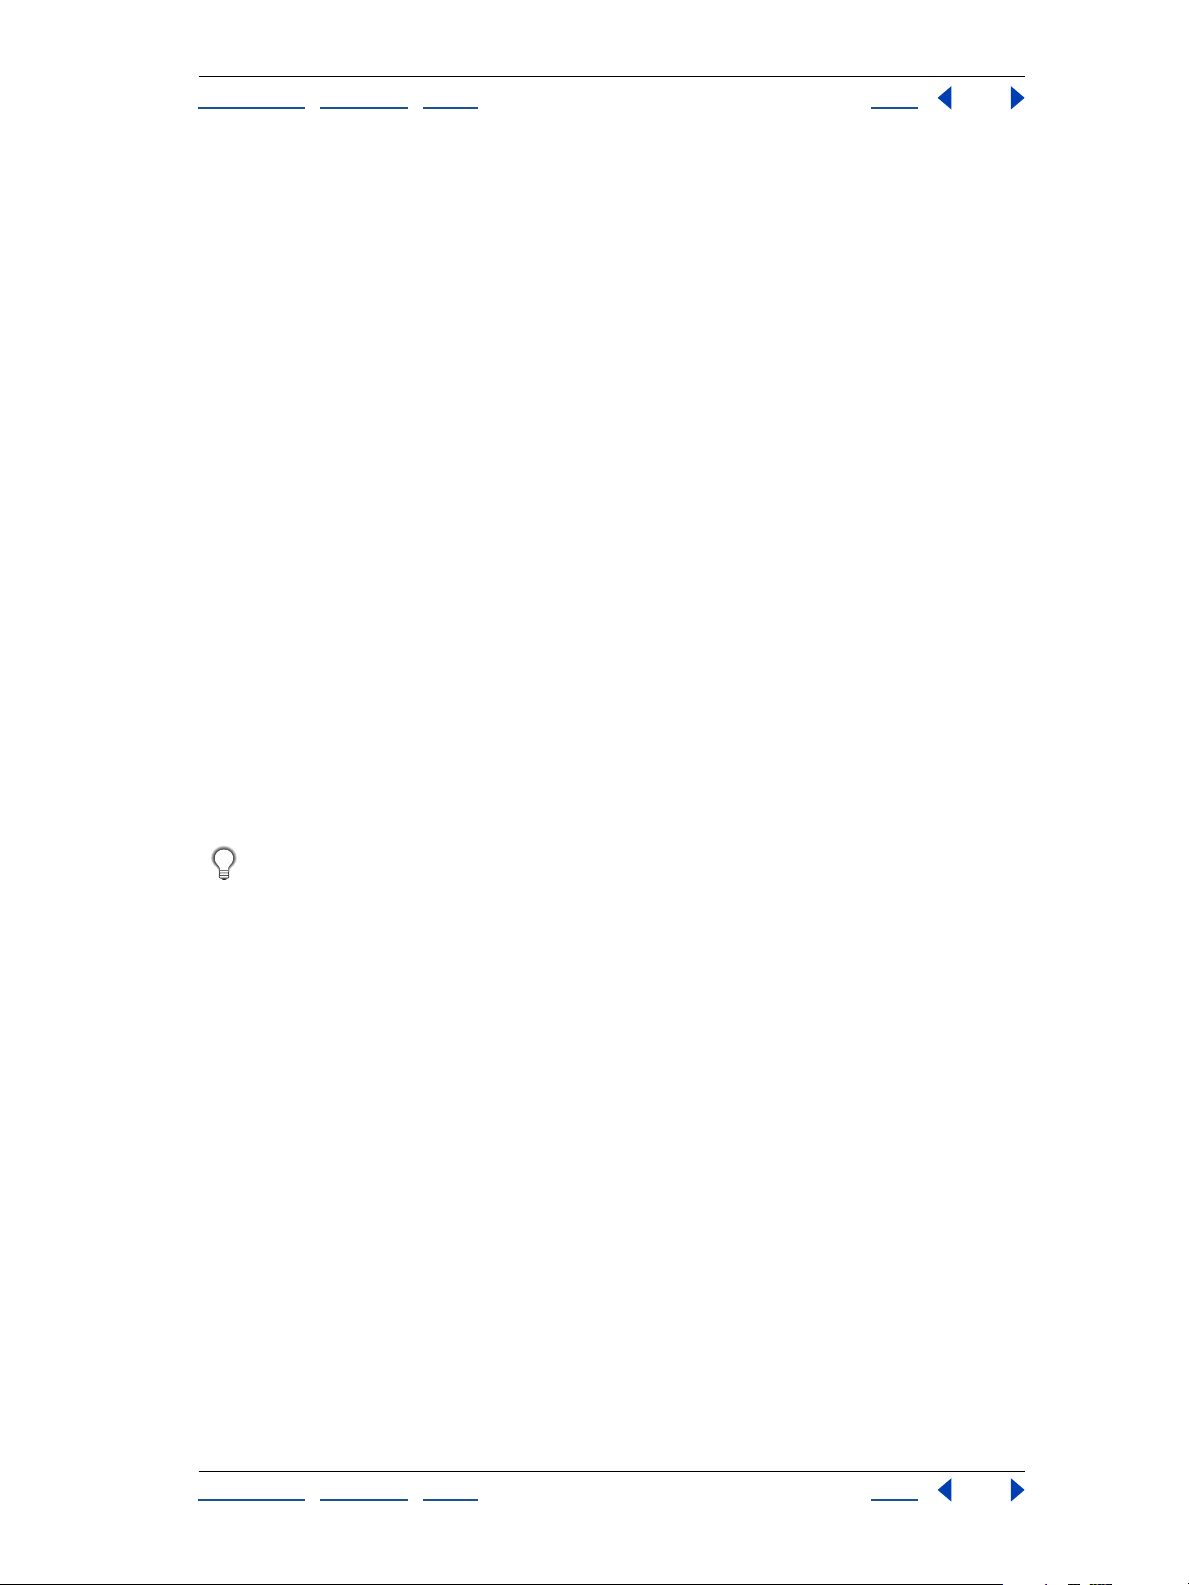
Where you work with footage items
In a project, you work with footage items using primarily three windows: the Project
window
which displays images as they relate in space; and the
compositions and animation events in terms of time. Add footage items to a composition
by dragging them from the Project window into either the Composition window or the
Timeline window.
Each Composition window has a corresponding Timeline window. When you edit a
composition in a Composition window, After Effects automatically displays the corresponding Timeline window, and vice versa.
, which lists all the source footage items you import; the
Timeline window
B
A
D
C
Composition window
, which displays
,
Source footage B. Project window C. Composition window D. Timeline window
As you work with compositions, you also use three other types of windows: Footage
windows, Layer windows, and Effect Controls windows.
U
sing Help | Contents | Index Back 4
Page 5

Adobe After Effects Help Working with Projects, Windows, and Palettes
U
sing Help | Contents | Index Back 5
•
Footage windows are useful for viewing and evaluating footage items in their original
form (see “Viewing imported footage” on page 50).
•
To view a layer’s original source independently of other layers or to trim footage, you
can open a Layer window (see “Composition, Layer, and Footage window controls” on
page 16).
•
As you work with effects, you use the Effect Controls window to modify and animate
the effects (see “Working with effects” on page 170).
When you render your compositions into a movie, you work in the Render Queue window
to select rendering options and queue compositions for rendering (see “Using the Render
Queue window” on page 279).
How you start a project
Starting a project involves two tasks: (1) planning your project based on the formats of the
final output and (2) creating a project file. Once you have planned your project and
learned how to perform some basic tasks related to working in After Effects, you’ll be
ready to start importing footage (see “Importing files into a project” on page 28). You then
create a composition and begin working with your source footage (see “Working with
imported footage” on page 50).
Planning your project
Planning your project before you start importing footage makes your work easier. A large
part of planning is simply determining the best settings for your source footage based on
the media for which you will render your finished project. This step is essential to
achieving optimal image quality. Rendering order and nesting may also be part of project
planning (see “Organizing a project using nesting” on page 265).
Choosing the right media
Before you start importing footage items into your project, decide which media you’ll use
for your finished movies. Then determine the best settings for your compositions and
source material. For example, if you will be rendering your project to videotape, create
footage at an image size, color bit-depth, and frame rate that will produce the best image
quality on videotape. Likewise, if your project is intended for streaming video on the Web,
the image size, color bit-depth, and frame rate may need to be reduced to work with the
data-rate limits of streaming video on the Web. However, any footage item that can be
imported can be used in any composition.
If you will be rendering a project to more than one media format, always match the
resolution setting for your composition to the highest resolution setting used for your
output. Then set up the Render Queue window to render a separate version of the project
for each format.
U
sing Help | Contents | Index Back 5
Page 6

Adobe After Effects Help Working with Projects, Windows, and Palettes
U
sing Help | Contents | Index Back 6
For film and video, try to match import and composition settings with settings in the
output module used to render a movie. For example, to ensure smooth playback, the
footage frame rate selected in the Interpret Footage dialog box should match the setting
in the Composition Settings dialog box and the output module in the Render Queue
window. Also, the composition-frame size should be determined by the image size in the
playback medium. However, any footage item that can be imported can be used in any
composition. See “Preparing motion-footage frame rates for final output” on page 42,
“Understanding basic composition settings” on page 57, and “Changing output module
settings” on page 284.
If you will be mixing source footage with different pixel aspect ratios, correctly specify this
ratio for each footage item in the Interpret Footage dialog box. See “About D1, DV, and
various pixel aspect ratio footage” on page 46.
The suggestions that follow will help you select composition settings. However, the best
way to ensure that your project is suitable for a specific medium is to make a test composition and view it using the same type of equipment your audience will use to view it.
Film
If you will be rendering for film, consider both the aspect ratio of the frame size you
select for your composition and the frame rate of your source footage. For footage that
was transferred from film to video using the 3:2 pulldown telecine method, you must
remove 3:2 pulldown before adding effects. See “Removing 3:2 pulldown from video
transferred from film” on page 45.
CD-ROM
When you create a movie that you plan to render for playback from a CD-ROM,
you may need to specify import and composition settings that take into account the wide
range of hardware that your audience may be using, possibly including older single- or
double-speed CD-ROM drives.
To make your final output compatible with older CD-ROM drives, try to reduce the datatransfer rate of your final output by specifying certain settings for footage items:
•
Lower the frame rate as far as you can in the Composition Settings dialog box without
making motion seem too jerky. Start at 15 frames per second (fps).
•
When rendering your final composition, choose a file type and compressor/decompressor ( codec ) appropriate for the final media. For example, for a cross-platform CDROM, you might specify a QuickTime codec or a codec designed for low data rates, such
as Indeo, Cinepak, or Sorenson Video. Regardless of which codec you select, however, it
must be available on the system used by your intended audience to ensure successful
playback. Also consider the key frame rate of the codec you have selected. See the
Adobe Web site for more information on QuickTime compressors and codec key frame
rates.
Videotape
If your final output will be videotape, set up your composition with a specific
video format in mind, such as NTSC or PAL. Using broadcast-safe colors and maintaining
frame size and compression ratios are also important considerations. These guidelines will
help in setting up a composition intended for videotape:
•
Select a frame size in the Composition Settings dialog box that matches the frame size
of the destination video format.
Use only NTSC-safe colors when adding or changing color in a project.
•
U
sing Help | Contents | Index Back 6
Page 7

Adobe After Effects Help Working with Projects, Windows, and Palettes
U
sing Help | Contents | Index Back 7
•
If you will be using an MJPEG codec, keep in mind that the frame sizes and resolutions
available for rendering are determined by the specific MJPEG board you are using. Refer
to the specifications for your MJPEG board.
Animated GIF When you render an animated GIF, colors are dithered to an 8-bit palette.
Before rendering your final project, render a test composition so that you can adjust colors
if the results are not what you expected. If any source footage includes an alpha channel,
be sure that you know how it will affect your final project before you start rendering.
Streaming video over the World Wide Web Streaming video resembles a conventional
television signal in that video is sent to the viewer frame by frame, instead of by
downloading a large file to the hard disk. Streaming video on the Web is constrained by
the limited bandwidth (56 Kbps or less) of most consumer modems, which is even lower
than those used for CD-ROM playback. Use the same techniques that are listed for CDROM playback, but adapt them for further reduction in file size and data-transfer rate. You
can export QuickTime streaming directly from After Effects. See “Exporting footage using
QuickTime components” on page 289.
Downloading video over the World Wide Web
If your final output will be downloaded
as a file from the World Wide Web, the main concern is the size of the file, which directly
affects how long it takes to download the file. QuickTime and Microsoft Video for Windows
are formats often used when rendering final output that will be downloaded. When you
render a QuickTime movie, After Effects automatically creates a movie that can play on
both Windows and Mac OS without modification.
Intranet playback
An
intranet
is an in-house or private network that uses Internet
network protocols. Intranets generally use higher-quality communications lines than
standard telephone lines, so they are usually much faster than the Internet. The datatransfer rate for playback can be 100K per second or faster, depending on the speed
of your intranet.
Flash (.swf) files
When you export compositions as Flash (.swf) movies, After Effects
maintains vectors as much as possible. However, some items cannot be represented as
vectors in the Flash file. See “Exporting to Macromedia Flash (SWF) format” on page 286.
Considerations for cross-platform projects
After Effects project files are compatible with both the Mac OS and Windows platforms.
You can do several things to ease the process of exchanging projects between platforms.
Project hierarchy
Effects attempts to locate the project’s footage files, first looking in the folder in which the
project file is located, second using the file’s original path or folder location, and third
searching the root of the directory where the project is located.
When you move a project to a different computer and open it, After
If you are building cross-platform projects, it is best if the full paths have the same names
on Mac OS and Windows systems. If the footage is on a different volume than the project,
make sure that the appropriate volume is mounted before opening the project, and that
network volume names are the same on both systems.
It helps to store footage in the same folder as the project file or in another folder within
that folder. Here's a sample hierarchy:
c:\newproject\project_file.aep
c:\newproject\source\footage1.psd
c:\newproject\source\footage2.avi
U
sing Help | Contents | Index Back 7
Page 8
Adobe After Effects Help Working with Projects, Windows, and Palettes
U
sing Help | Contents | Index Back 8
The newproject folder can then be copied in its entirety across platforms, and After Effects
will properly locate all of the footage.
File-naming conventions When possible, name your footage and project files with
Windows-compatible filename extensions, such as .mov for QuickTime movies and .aep
for After Effects projects. If files will be used on the World Wide Web, be sure that filenames
adhere to the appropriate conventions for extensions and paths.
Mac OS file types On Mac OS systems, footage files should have proper Mac OS file
types. Using services for Macintosh in Windows NT Server or Windows 2000 Server, you
can set up explicit extension-to-file-type mappings; see the system’s server documentation. If footage files are not properly recognized on Mac OS systems, select All Files for
Show in the Import File dialog box to override the Mac OS file types. To open a Windows
project on a Mac OS system, the project must have the correct .aep extension.
For a list of common extensions and their associated file types, see the Adobe Web
site.
Resources Ensure that all resources are available on both systems. Resources can include
fonts, effects, and compressors.
Time basics
Time is central to many operations in After Effects. You can view, specify, and manage time
in various ways. Whichever way you handle time, there are several specific time concepts
you should understand as you create a project.
Time display
The way you view and specify time in After Effects depends on the display style, or unit of
measure, that you use to describe time. By default, After Effects displays time in Society of
Motion Picture and Television Engineers (SMPTE) timecode : hours, minutes, seconds, and
frames. You can change to another system of time display, such as film frames, or feet and
frames of 16mm or 35mm film. See “Setting time-display options” on page 9.
Video-editing workstations use SMPTE timecode that is often striped (encoded) onto
videotape for reference. If you are creating video that will be synchronized with video that
uses SMPTE timecode, use the default timecode display style.
Frame rate
Each composition you create can have its own frame rate . T he frame rate is the number of
frames the rendered composition produces in every second when played back. The frame
rate you use is generally determined by the type of output you will produce. For example,
video for NTSC television plays at 29.97 frames per second (fps), and PAL plays at 25 fps.
When you set up changes over time, After Effects treats the changes as continuous
throughout a composition timeline. Each frame is rendered as a slice out of the timeline at
the frame rate you specify. Because After Effects treats time continuously, it is possible to
change a composition’s frame rate at any time or override the frame rate of a composition
when you render the final movie. See “Setting frame rate” on page 58.
U
sing Help | Contents | Index Back 8
Page 9
A.
Adobe After Effects Help Working with Projects, Windows, and Palettes
U
sing Help | Contents | Index Back 9
NTSC (29.97) drop-frame timecode
When you work with a composition that is set to a frame rate of 29.97 fps, After Effects
uses SMPTE 30-fps drop-frame timecode by default, making adjustments using the
SMPTE-standard method of renumbering the first two frame numbers of every minute,
except at every tenth minute. For example, the frame after 59:29 is labeled 1:00:02 instead
of 1:00:00. Non-drop-frame timecode is also available. In both cases, frames are not
discarded or skipped; they are merely numbered differently.
After Effects displays drop-frame timecode by using semicolons between the numbers
and displays non-drop-frame timecode using colons between the numbers. In the Project
Settings dialog box, you can choose how 29.97-fps compositions and footage display their
timecode. See “Setting time-display options” on page 9.
Duration
Each video footage item, layer, and composition in a project has its own duration.
Duration determines the beginning and ending times of the timelines in the Footage,
Layer, and Timeline windows. It is important to notice which duration you are viewing
while you edit in multiple windows. See “Understanding trimming” on page 81 and
“Positioning a layer in time” on page 76.
Frames and fields
Each frame in an interlaced video source is made up of fields . It’s important not to confuse
frames with fields. For video, every frame contains two interlaced fields. If you want to use
interlaced video as source footage, you’ll usually want After Effects to separate the interlaced fields. Separating fields ensures maximum image quality when you apply animations and effects to video that was originally interlaced. If you’re producing a movie for
videotape, you can render the composition to fields in a process known as
field-rendering
See “Interlaced and noninterlaced footage” on page 40 and “Field rendering” on page 44.
Setting time-display options
After Effects supports several methods of measuring and displaying time. The method you
choose applies to time display in the current project and in any subsequent project you
create. Changing the method does not alter the frame rate of footage or a composition—
it changes only how frames are numbered. You can choose from three time-display
options:
•
Timecode, which counts frames in frames per second (hours, minutes, seconds, frames).
Frames, which counts frames of footage without reference to time.
•
•
Feet and Frames, which counts feet of 16mm or 35mm motion-picture film, and counts
fractions of feet in frames; 35mm film has 16 frames per foot, and 16mm film has 40
frames per foot.
.
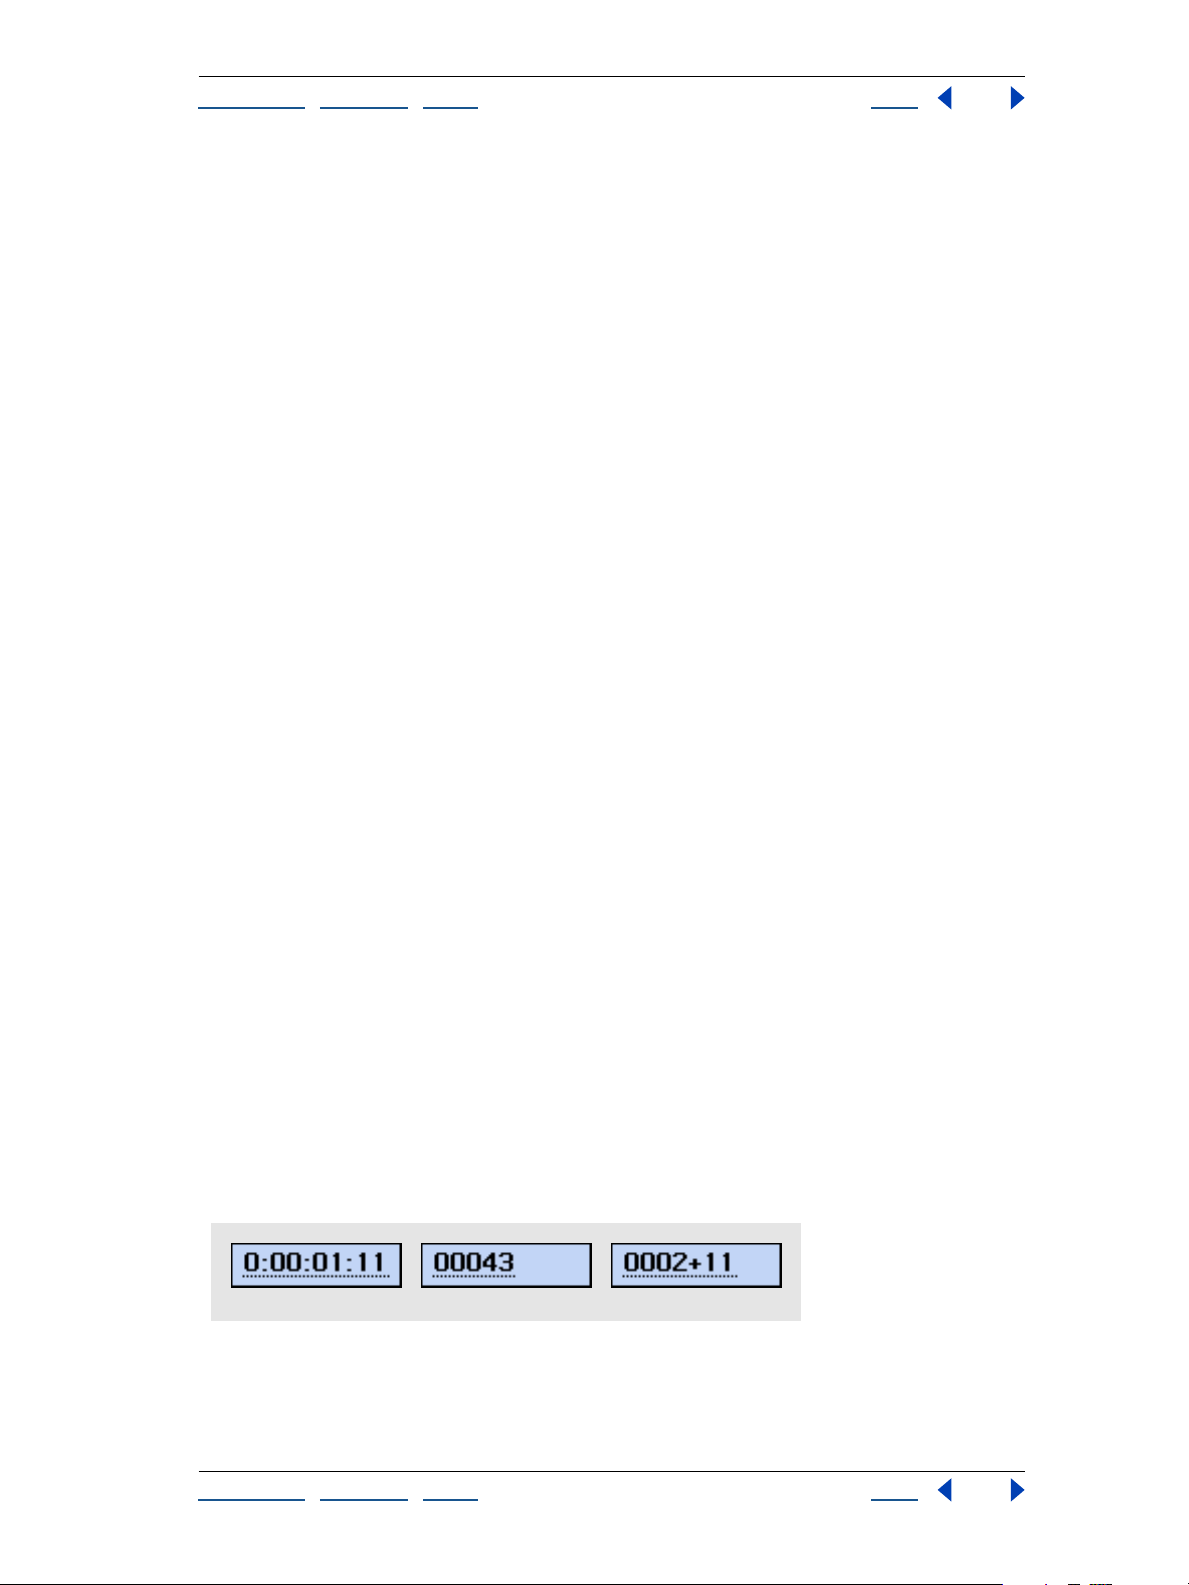
ABC
Timecode B. Frames C. Feet and Frames
U
sing Help | Contents | Index Back 9
Page 10
2
Adobe After Effects Help Working with Projects, Windows, and Palettes
U
sing Help | Contents | Index Back 10
When working with footage digitized from NTSC video, you usually use the 30-fps, dropframe timecode base. This counts NTSC-created frames using standard drop-frame
timecode for maximum device compatibility. For frames (or feet and frames) timecode,
you can also change the starting frame number to match the time-counting method of
another editing system you may be using.
To change the time display:
1 Open the project and choose File > Project Settings.
Select a time setting:
To use timecode, click Timecode Base, and then select a frame rate from the Timecode
•
pop-up menu.
•
To use drop-frame time code for footage and compositions with a frame rate of 29.97
fps, click Timecode Base, and then select 30 fps from the Timecode Base pop-up menu
and Drop Frame from the NTSC menu.
•
To use non-drop-frame timecode for footage and compositions with a frame rate of
29.97 fps, click Timecode Base and then select 30 fps from the Timecode Base pop-up
menu and Non-Drop Frame from the NTSC menu.
•
To use frames for the display style, click Frames.
To use feet and frames for the display style, click Feet + Frames, and then choose a film
•
type from the Feet + Frames pop-up menu.
3
If desired, type a value in the Start Numbering Frames At option. This value applies only
when you have chosen Frames or Feet + Frames.
4
Click OK.
To instantly cycle through Timecode, Frames, and Feet + Frames, Ctrl+click (Windows)
or Command+click (Mac OS) the timecode display at the bottom of the Composition
window or at the top of the Timeline window.
Setting up a project
After you create a new project, you import footage into the project. You can also specify
project settings or application-wide preferences.
Creating a new project
By default, After Effects opens a new Project window when you start the application.
When you know the media for your final project, you are ready to create a project by
importing your footage items into a new Project window. You can also open a new Project
window at any time from the File menu. See “Working with the Project window” on
page 15.
To create a new project after closing the current project in After Effects:
Choose File > New > New Project.
Importing footage items
When you import a footage item, After Effects creates only a reference to the file and does
not copy or move the file itself. These references to your source files are displayed in the
Project window.
U
sing Help | Contents | Index Back 10
Page 11

2
Adobe After Effects Help Working with Projects, Windows, and Palettes
U
sing Help | Contents | Index Back 11
To import source footage items into an After Effects project:
1 Choose File > Import > File or Multiple Files.
Locate and select footage files and click Open.
For details, see “Importing files into a project” on page 28.
Opening and closing a project
You can have only one project open at a time. If you try to open another project, After
Effects prompts you to save changes in the first project, and then closes the first project.
Closing the Project window closes any associated windows, but palettes remain open.
To open a project:
Choose File > Open Project, locate the project, and then click Open.
To close a project:
Click the Project window title bar to make it active and choose File > Close.
Saving a project
Save your work frequently as you develop a project.
To save a project:
Choose File > Save.
To save a project using a different name or location:
Choose File > Save As. Specify a filename and location and click Save.
The project currently open takes the new name and location; the original file remains as it
was.
To save a copy of the project using a different name or location:
Choose File > Save a Copy. Specify a filename and location and click Save.
The project currently open retains its original name and location, and a copy is created but
not opened.
Correcting mistakes
If you change your mind or make a mistake, undo your work. You can undo only those
actions that alter the project; for example, you can undo an edit, but you cannot undo
scrolling a window. Specify the number of levels that can be undone. The default is 20.
Specifying more levels increases memory requirements but may not affect performance.
Note: The Vector Paint effect (PB only) can perform only one level of undo, regardless of
the number of levels you set.
You can also discard changes by reverting to the last saved version of the project. Note
that when you revert to the last saved version, all editing and footage imported since you
last saved are lost. You cannot undo this action.
U
sing Help | Contents | Index Back 11
Page 12
Adobe After Effects Help Working with Projects, Windows, and Palettes
U
sing Help | Contents | Index Back 12
To undo the most recent change:
Choose Edit > Undo. You can sequentially undo as many as 99 of the most recent changes
made to the program in any After Effects window, depending on how many undo levels
are set in Preferences.
To set the number of undo levels:
1 Choose Edit > Preferences > General.
Specify a number for Levels of Undo, and then click OK.
To revert to the last saved version:
Choose File > Revert.
Selecting 16-bpc color depth (PB only)
After Effects can work in 16-bit-per-channel mode, making a larger range of colors
available. When you work with high-resolution images that use a narrow range of colors,
such as when you’re creating subtle gradients for film effects or HDTV output, transitions
between colors are smoother with less visible banding, and more detail is preserved.
2
You can choose whether to work in 8-bit-per-channel or 16-bit-per-channel color mode
for each project. Directly import 16-bit images, including those from Photoshop, and
composite and color-correct footage in 16-bit mode. Take advantage of 16-bit color when
performing most After Effects tasks, including layer adjustment, frame blending, 3D, and
Cineon file import. The Info palette displays 16-bit color values with exact precision.
Many effects support 16 bits per channel. If an effect supports only 8 bits, and your project
is set to 16 bits, After Effects displays a warning icon ( ) next to the effect name in the
Effect Controls palette. Using an 8-bit effect in a 16-bit project will result in a loss of detail
for the effect’s layer.
When rendering to output module depths of Trillions of Colors, set the project to 16-bit
color depth to take advantage of the output file’s extra color precision. To optimize performance, rough out a composition in 8-bit color mode, and then finalize and output 16-bit
files for maximum quality.
To specify color depth:
1
Open the project and choose File > Project Settings.
2
For Depth, choose 8 bits per channel or 16 bits per channel, and then click OK.
Hold down Alt (Windows) or Option (Mac OS) and click the color depth indicator at
the bottom of the project window to toggle between 8- and 16-bits per channel color.
Setting preferences
When you start After Effects for the first time, the default settings are used. You may want
to change some of these default settings so that each time After Effects is opened, it uses
your selections instead of the standard defaults. After changing settings, you can easily
restore the default settings at any time. All After Effects default settings are stored in a
single file.
U
sing Help | Contents | Index Back 12
Page 13

Adobe After Effects Help Working with Projects, Windows, and Palettes
U
sing Help | Contents | Index Back 13
After Effects saves the location and type of each open window with the project. Palette
positions are saved in the After Effects Preferences file, which applies to all projects. You
can also save custom workspaces; see “Customizing the workspace” on page 13.
To open a preferences dialog box:
1 Choose the preferences command you want from the Edit > Preferences submenu.
To switch to another dialog box, do any of the following:
•
Choose an option from the menu at the top of the dialog box.
Click Next to display the next dialog box in the menu list; click Previous to display the
•
previous dialog box.
For information on a specific option, see the index.
To restore all preferences to their default settings:
1 Make sure that After Effects is not running. If it is, choose File > Exit (Windows) or File >
Quit (Mac OS).
2
Do one of the following:
2
•
(Windows) Search for the “Adobe After Effects 5 Prefs” file (use quotation marks to
narrow the search) and delete it or move it to another folder.
• (Mac OS) Use the Finder to locate the “Adobe After Effects 5 Prefs” file in the Preferences
folder in your System folder and delete it or move it to another folder.
When you start After Effects again, it creates a new preferences file.
Customizing the workspace
Depending on the type of work you are doing, you may want to size and arrange palettes
and windows. This arrangement of windows is called a workspace. You can save custom
workspaces.
To restore default palette and window positions:
Do one of the following:
• Hold down Shift when starting After Effects.
• Choose Window > Workspace > Default.
• Choose Window > Reset Palette Locations.
To save the workspace:
1 Arrange the palettes and windows the way you want them, including size and location.
2 Choose Window > Workspace > Save Workspace.
3 Type a name for the workspace, and click OK. The new workspace is added to the
Workspace menu.
To select or delete a custom workspace:
1 To select a workspace, choose Window > Workspace, and then choose the name of the
workspace.
2 To delete a workspace, choose Window > Workspace > Delete Workspace, choose a
name, and click OK.
U
sing Help | Contents | Index Back 13
Page 14

Adobe After Effects Help Working with Projects, Windows, and Palettes
Using Help | Contents | Index Back 14
Using context menus
In addition to the menus at the top of your screen, context menus display commands
relative to the active tool or selected item.
To display context menus:
1 Position the pointer over the footage or over a label in a palette or window, such as a
button in the Time Controls palette.
2 Click the right mouse button (Windows) or press Control and hold down the mouse
button (Mac OS).
Using windows
Many After Effects windows are organized in groups by default. You can customize and
display these windows in certain ways depending on the type of window:
Composition window The title of a Composition window appears as a tab under the
group window’s title bar. By default, Composition windows are grouped into one window.
You can combine Composition windows with Layer and Footage windows.
Layer and Footage windows As with Composition windows, the title of a Layer or
Footage window appears as a tab under the group window’s title bar. By default, Layer
and Footage windows are grouped into one window. They can also be combined with the
Composition windows and other Layer and Footage windows.
Timeline windows Each composition name appears as a tab in the Timeline window. You
can combine Timeline windows only with other Timeline windows.
Effect Controls windows By default, effects you apply to layers are grouped in one Effect
Controls window. You can combine Effect Controls tabs only with other Effect Controls
windows.
Project window You cannot group Project windows with any other windows.
Reorganizing windows
Use the following techniques to reorganize windows:
• To change the default from grouped windows to ungrouped windows, choose Edit >
Preferences > General, deselect Tabbed Windows, and click OK.
• To rearrange or separate a group window, drag the tab for a window.
• To move a window to another group window, drag its tab to that group.
• To group Layer or Footage windows with Composition windows by default, open a
Layer or Footage window and choose Window > Group Tab with Comps.
• To display a window menu, click the triangle in the upper right corner of the palette or
window (not available for all windows or palettes).
• To resize a window, drag any edge (Windows) or drag its lower right corner (Mac OS).
• If a window contains more grouped windows than After Effects can display at once,
drag the slider bar that appears above the tabs.
• To open a Timeline window from its Composition window (and vice versa), select the
tab for the window and then click the Comp Family button above the vertical scroll bar.
Using Help | Contents | Index Back 14
Page 15

Adobe After Effects Help Working with Projects, Windows, and Palettes
Using Help | Contents | Index Back 15
• To display a window that is obscured by other windows, select it from the Window
menu.
• If both the Composition and Timeline windows are closed, double-click the compo-
sition’s icon in the Project window to open both windows again.
• When you close a single window in a group, you can make sure that related windows,
such as the Timeline and Composition window for the same composition, are closed at
the same time. To turn on this option, choose Window > Closing in Groups to select it.
To close individual windows without closing related windows, deselect this menu
command.
Working with the Project window
The Project window is a storage area for compositions and references to footage items. In
the Project window you import, identify, replace, remove, and interpret footage items and
compositions. You can organize footage and compositions in the Project window using
folders. The folders you create in the Project window exist only in the Project window. You
can expand a folder to reveal its contents. You can also put folders inside other folders.
To remove footage from a project:
Do any of the following:
• To eliminate an item from a project, select the item and press Delete.
• To remove all unused footage items from a project, choose File > Remove Unused
Footage.
• To remove all compositions and footage items that are not used in the selected compo-
sition, choose File > Reduce Project.
• To remove all duplicate footage items from a project, Choose File > Consolidate All
Footage.
To organize footage items using folders:
Do any of the following:
• To create a folder in the Project window, choose File > New > New Folder, or click the
create folder icon ( ) at the bottom of the Project window.
• To move a file or folder into a Project folder, drag the file or folder from the Project
window list into a folder.
Using Help | Contents | Index Back 15
Page 16
Adobe After Effects Help Working with Projects, Windows, and Palettes
Using Help | Contents | Index Back 16
• To move a file or folder from a folder to the top level of the Project window, drag the file
or folder to the gray information area at the top of the window.
• To show or hide the contents of a folder, click the triangle to the left of the folder icon.
To customize the Project window:
• To r esize a panel, drag the bar on the right side of the panel’s heading. Drag left to make
the panel smaller, or right to make it larger.
• To hide a panel, right-click (Windows) or Control-click (Mac OS) any panel heading and
choose Hide This.
• To show a panel, right click (Windows) or Control-click (Mac OS) any panel heading and
choose Panels > panel heading.
• To show or hide a panel, choose Panels > panel heading from the Project window menu.
• To disable thumbnails, choose Edit > Preferences > Display, select Disable Thumbnails
in Project Window, and then click OK.
To create a new composition from the Project window:
Click the create new composition icon ( ) at the bottom of the Project window.
To create a new composition that automatically uses the same dimensions, duration,
and frame-rate settings as a footage item, drag the selected item or items onto the
create new composition icon at the bottom of the Project window.
To manage footage items in the Project window:
Do any of the following:
• To display information about a footage item or composition, select the footage or
composition. Information is displayed at the top of the Project window next to the
thumbnail image.
• To sort footage items by any column, click the column name in the Project window. For
example, click Type to sort items by footage type.
• To rename a composition or folder, select the composition name or folder, press Enter
(Windows) or Return (Mac OS), type the new name, and then press Enter or Return
again.
• To find footage items in the Project window, choose File > Find, type the name of the
footage item, and click OK. Select Find Missing Footage to locate all footage items that
refer to a file that has been moved, deleted, or renamed.
Composition, Layer, and Footage window controls
Use the Composition, Layer, and Footage windows to preview and edit different parts of a
project. These windows share a set of controls that you can use to view safe zones (the
visible areas of a television screen), view RGB and alpha channels, and change the magnification. These controls function the same way in all three windows.
Using Help | Contents | Index Back 16
Page 17

Adobe After Effects Help Working with Projects, Windows, and Palettes
Using Help | Contents | Index Back 17
Displaying After Effects viewing controls in the Footage window
By default, the Footage window displays movie controls for movie footage rather than the
After Effects viewing controls found in the Layer and Composition windows. QuickTime
and Video for Windows controls are fast and familiar tools for playing movie footage, and
they play audio if it’s included in the footage. However, for the preview options discussed
in this section, you must open the footage in a standard After Effects Footage window.
Note: A standard After Effects Footage window is always used for non–QuickTime and
non–Video for Windows footage.
To display a footage item in the Footage window:
Double-click a footage item in the Project window.
To display .mov or .avi movies in the standard After Effects Footage window:
Press Alt (Windows) or Option (Mac OS) as you double-click a footage item in the Project
window. After Effects Footage windows provide editing commands not available in Video
for Windows or QuickTime Footage windows.
Changing magnification in windows
The lower left corner of a Composition, Layer, or Footage window shows the current
magnification. When you change magnification, you change the appearance of the pixels
in the window, not the actual resolution of the composition.
To zoom in or out:
Do one of the following:
• Using the zoom tool, click inside the window you want to magnify.
• Using the zoom tool, press Alt (Windows) or Option (Mac OS) as you click inside the
window you want to reduce.
• Double-click the zoom tool in the toolbox to view at actual size.
• Choose a magnification from the menu in the lower left corner of a Footage, Layer, or
Composition window.
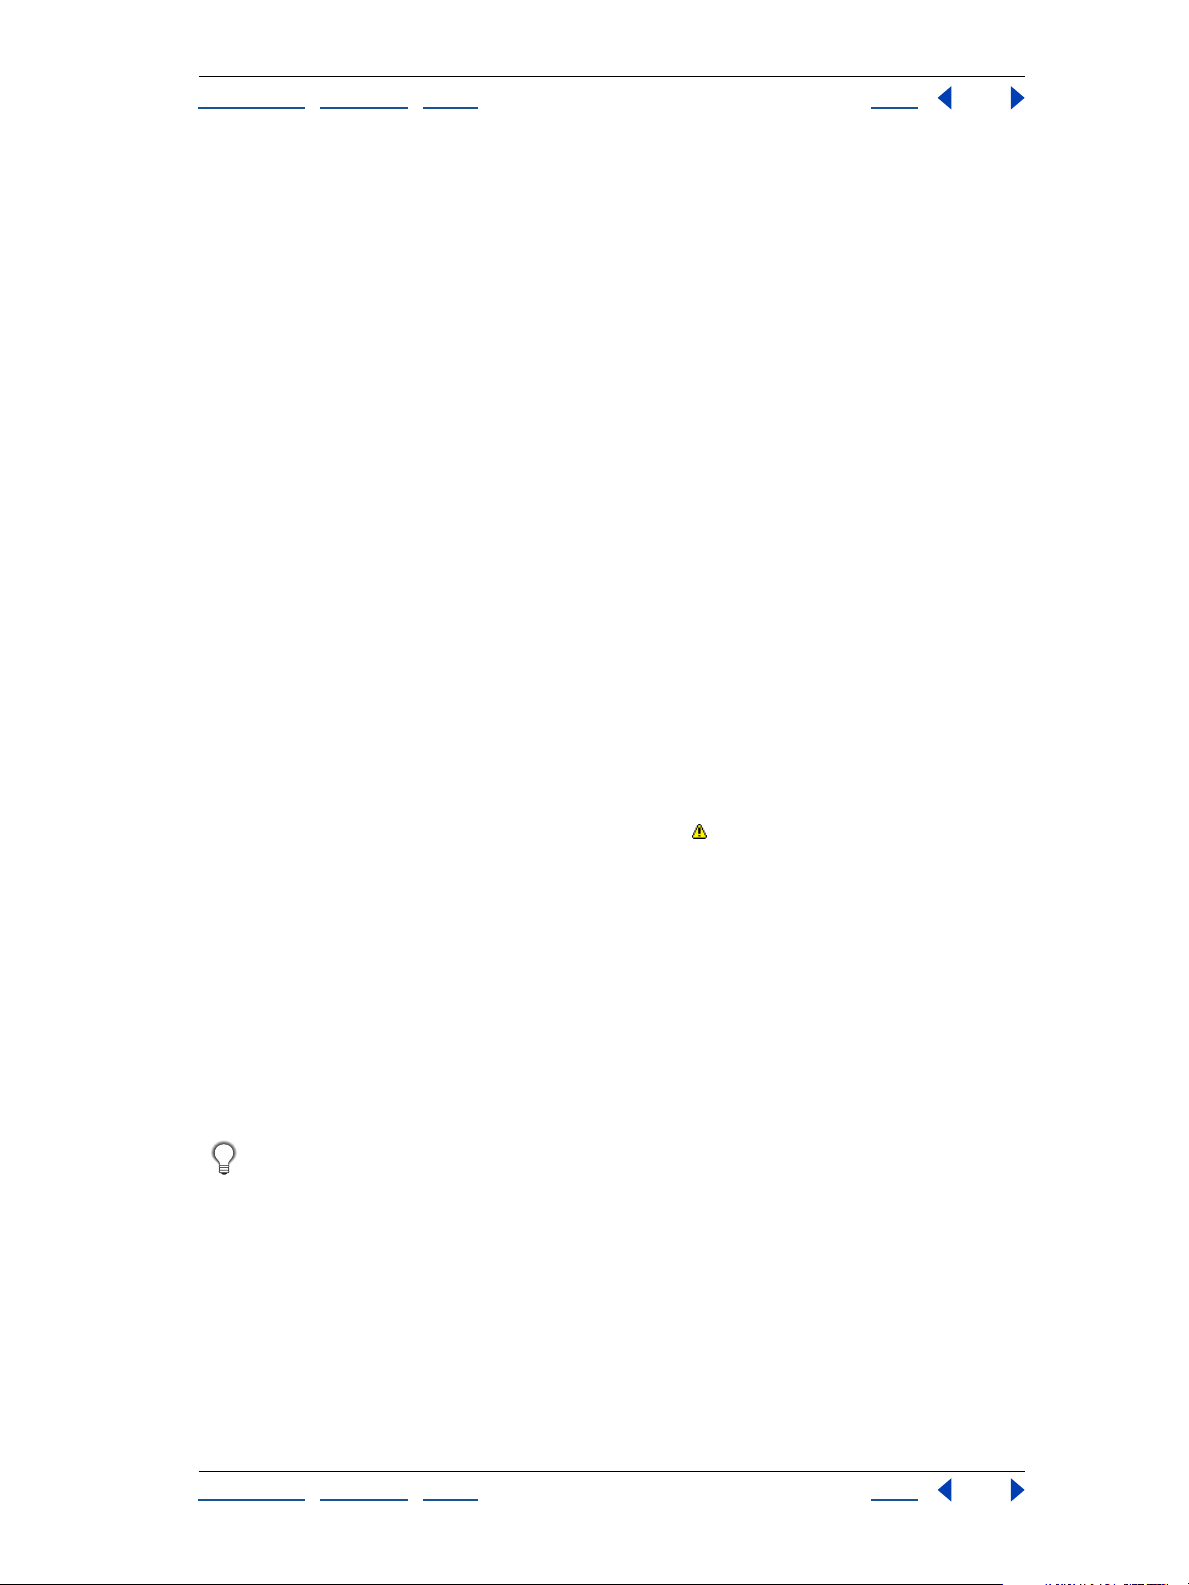
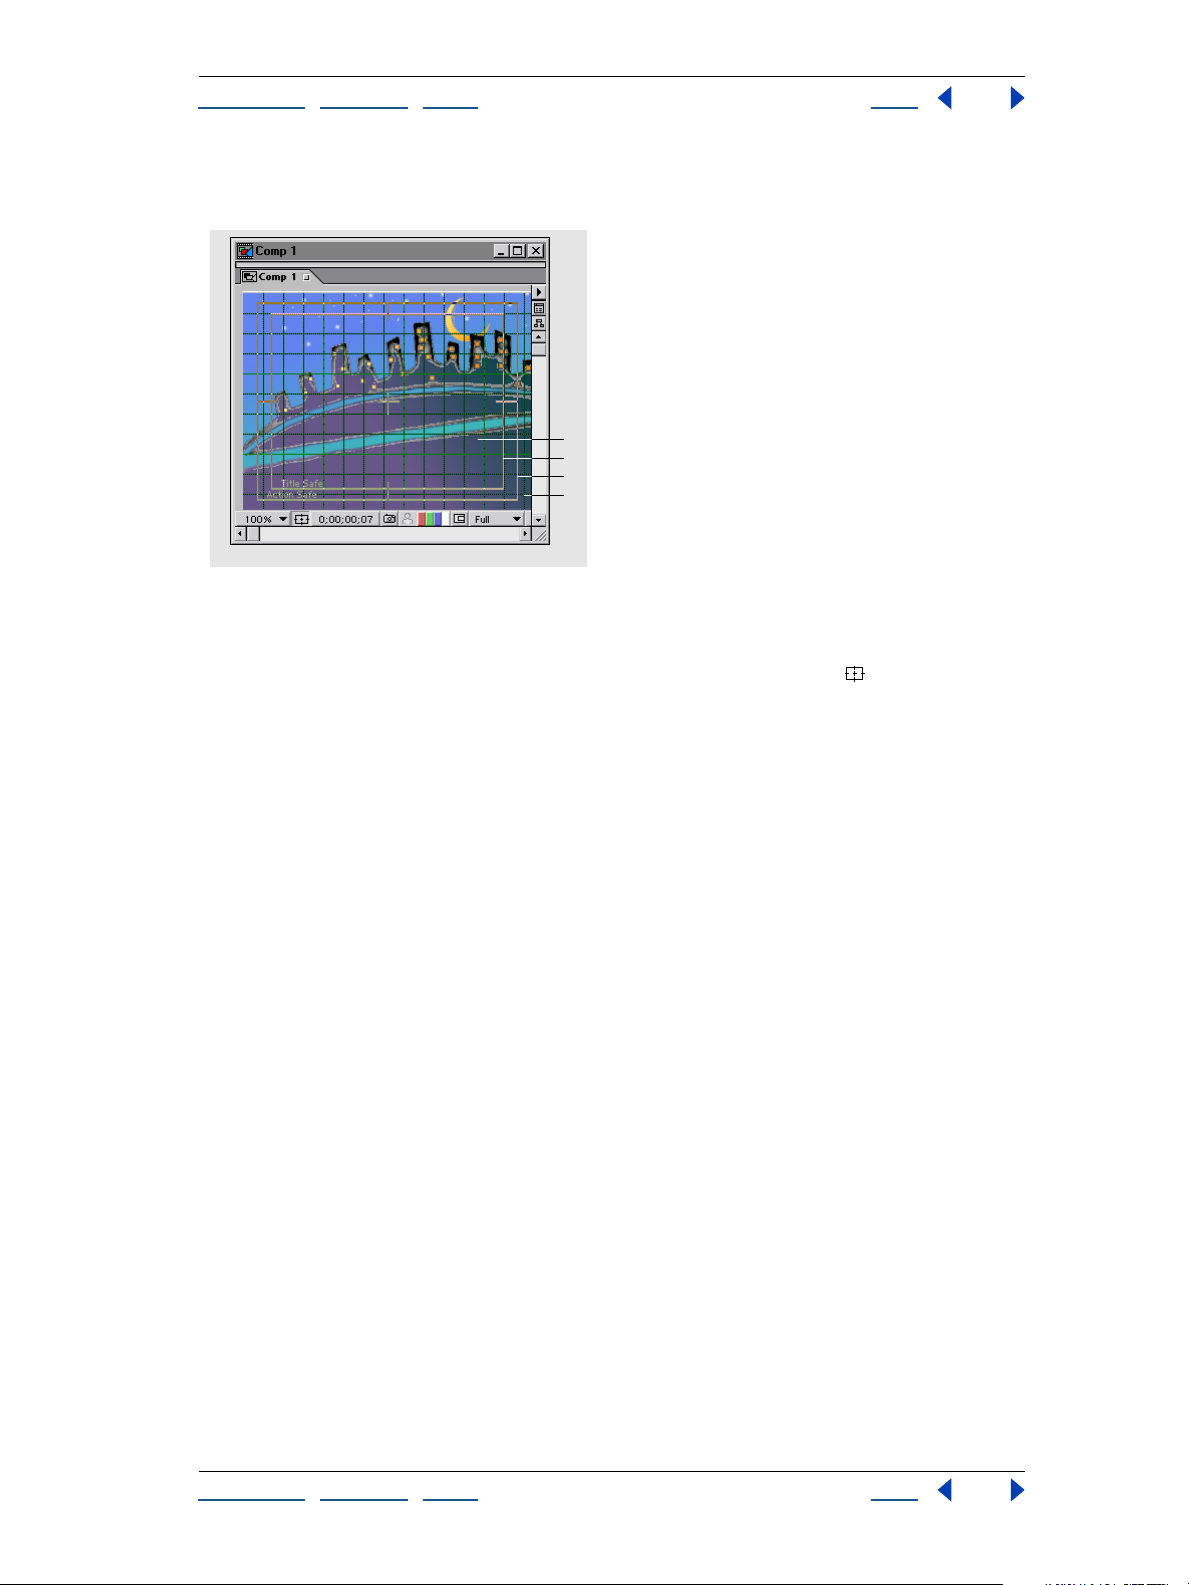
Viewing safe zones and grids
In Footage, Layer, or Composition windows, you can display safe zones for titles and
action, as well as grids used for aligning layers.
Television sets enlarge a video image and allow some portion of its outer edges to be cut
off by the edge of the screen. This is known as overscan. The amount of overscan is not
consistent across television sets, so you should keep important parts of a video image,
such as action or titles, within margins known as safe zones. When you arrange layers in a
composition, do the following:
• Keep important scene elements, graphics, and actors within the action-safe zone.
• Keep titles and other text within the title-safe zone.
Using Help | Contents | Index Back 17
Page 18
Adobe After Effects Help Working with Projects, Windows, and Palettes
Using Help | Contents | Index Back 18
After Effects also provides grids that you can use to help arrange and align layers. Set the
grid spacing using the Grids & Guides Preferences dialog box.
A
B
C
D
A. Grid B. Title-safe zone C. Action-safe zone D. Overscan
To view safe zones:
In a Footage, Layer, or Composition window, click the safe-zones icon ( ) to show or hide
the safe zones.
To view a standard grid:
With a Footage, Layer, or Composition window active, choose View > Show Grid or Hide
Grid.
To view a proportional grid:
Press and hold down Alt (Windows) or Option (Mac OS) and click the safe zones icon.
To snap a layer to a grid:
With a Footage, Layer, or Composition window active and the grid shown, choose View >
Snap to Grid and then drag a layer until it snaps to the desired grid lines.
Changing safe-zone margins and grid spacing
You can change the percentage of window area marked as title-safe or action-safe, and
you can change the number of grid cells. Safe-zone margins represent the percentage of
image area not included in the safe area. You can set spacing options for standard grids or
proportional grids. The size of proportional grids increases or decreases when the composition size changes; the size of standard grid squares remains the same regardless of
composition size.
To change safe-zone margins:
Choose Edit > Preferences > Grids & Guides, type values for Action-Safe Margin and TitleSafe Margin, and click OK.
To change grid spacing:
Choose Edit > Preferences > Grids & Guides, type a value for Gridline Every, type a value for
Subdivisions, and click OK.
Using Help | Contents | Index Back 18
Page 19

Adobe After Effects Help Working with Projects, Windows, and Palettes
Using Help | Contents | Index Back 19
To change proportional grid spacing:
Choose Edit > Preferences > Grids & Guides, type Horizontal and Vertical values for Proportional Grid, and click OK.
Using rulers and guides
You can display rulers along the sides of the Composition, Layer, and Footage windows to
provide a visual guide for positioning and editing your footage. Using the cross hair in the
upper left corner of the rulers, you can change the origin, or zero point, in both rulers.
Changing the zero point makes it easy to measure from a specific point in the image. By
default, rulers are hidden.
For added precision in positioning objects, you can create guide lines. You can also lock
guide lines to prevent them from being repositioned.
Note: Rulers and guide lines are only a reference in the Composition, Layer, and Footage
windows. They do not appear in your rendered movie.
To display or hide rulers:
Choose View > Show Rulers or Hide Rulers.
To set the zero point in rulers:
Drag the cross hair from the intersection of the two rulers (in the upper left corner) into
the image area.
To create, reposition, lock, hide, or remove a guide line:
Do any of the following:
• Position the pointer inside either ruler and drag where you want to create a guide line.
• In the image area, drag a guide to reposition it.
• To lock or unlock guides, choose View > Lock Guides.
• In the image area, drag a guide line into a ruler to remove it.
• To display or hide all guide lines, choose View > Show Guides or Hide Guides.
• To remove all guide lines, choose View > Clear Guides.
Using Help | Contents | Index Back 19
Page 20
Adobe After Effects Help Working with Projects, Windows, and Palettes
Using Help | Contents | Index Back 20
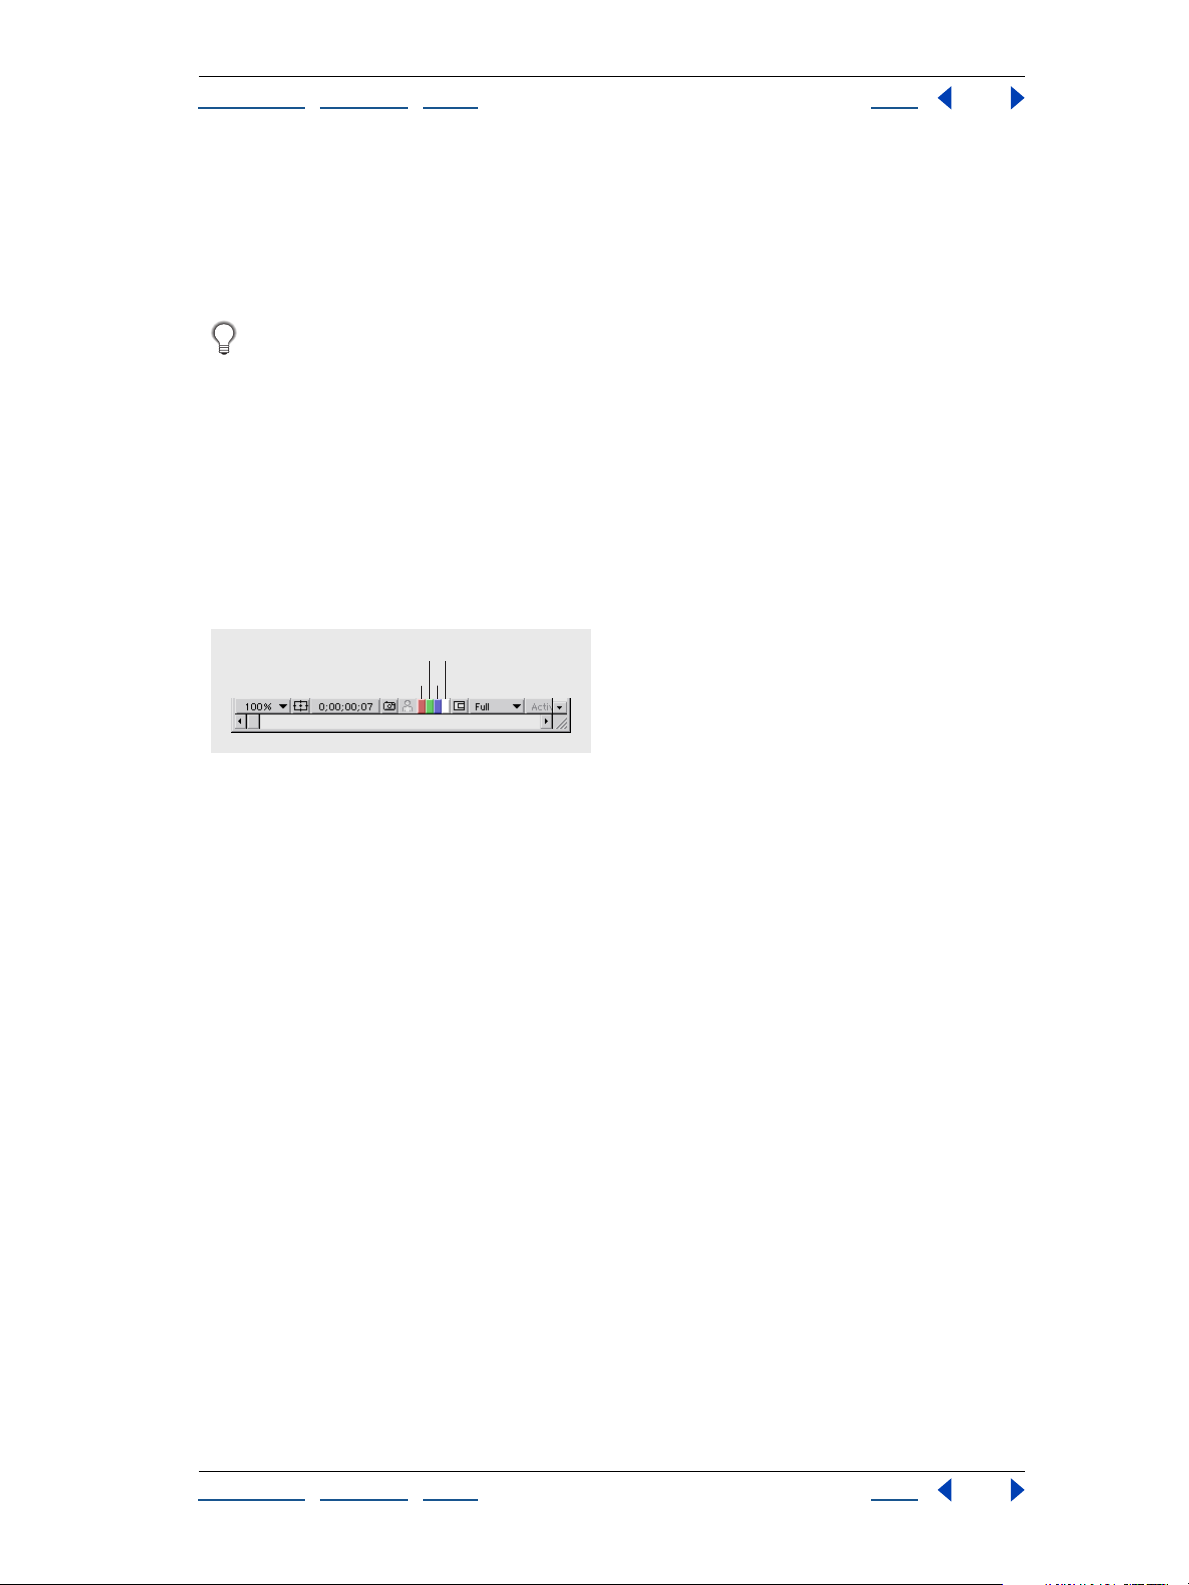
Viewing color and alpha channels
You can preview the red, green, blue, and alpha channels of a still image or movie in a
Footage window, Layer window, or Composition window. When you view a color channel,
areas with that color are displayed according to the color value of each pixel. For example,
if you view the red channel, areas with high red values are displayed as white.
To see the color values in a color channel displayed in the channel’s own color instead
of white, hold down Shift and click the desired color channel icon.
When you preview the alpha channel, After Effects displays transparent and opaque areas
as black and white to make identification easier. Degrees of opacity appear as shades of
gray.
To view a color channel or alpha channel:
1 Open the Composition, Layer, or Footage window to view a channel for a composition,
layer, or footage item, respectively.
2 At the bottom of the window, click the icon that corresponds to the channel you want
to display.
BCD
A
A. Red channel B. Green channel C. Blue channel D. Alpha channel
Taking and viewing a window snapshot
When you want to compare one view to another in the Composition, Layer, or Footage
window, take a snapshot of one view and temporarily replace the window image with the
snapshot. For example, you might want to compare two frames in different locations in a
movie. You can instantly show and hide the snapshot to identify differences between the
views. If you have a sound card installed, you hear a sound when you take a snapshot.
When working with snapshots, here are some tips to keep in mind:
• Snapshots taken in one kind of window can be displayed in another kind. For example,
you can take a snapshot of a Layer window and display the snapshot in the Composition or Footage window.
• Displaying a snapshot does not replace the content of the window.
• If the snapshot has a different size or aspect ratio than the window in which you display
it, the snapshot is resized to fit the window.
• Choose Edit > Purge > Snapshot to free up memory used by your snapshots.
• Snapshots are for reference only and do not become part of the layer, composition, or
rendered movie.
To take a snapshot:
Click the take-snapshot icon at the bottom of the window, or press Shift+F5.
To view a snapshot:
Click and hold the display-snapshot icon at the bottom of the window, or press F5.
Using Help | Contents | Index Back 20
Page 21
Adobe After Effects Help Working with Projects, Windows, and Palettes
Using Help | Contents | Index Back 21
To take and view multiple snapshots:
Do any of the following:
• Hold down Shift and press F5, F6, F7, or F8 to take separate snapshots.
• Press and hold F5, F6, F7, or F8 to view the corresponding snapshots.
• To purge any snapshot, hold down Ctrl+Shift (Windows) or Command+Shift (Mac OS)
and press F5, F6, F7, or F8.
For more information on using shortcut keystrokes, see the Quick Reference Card.
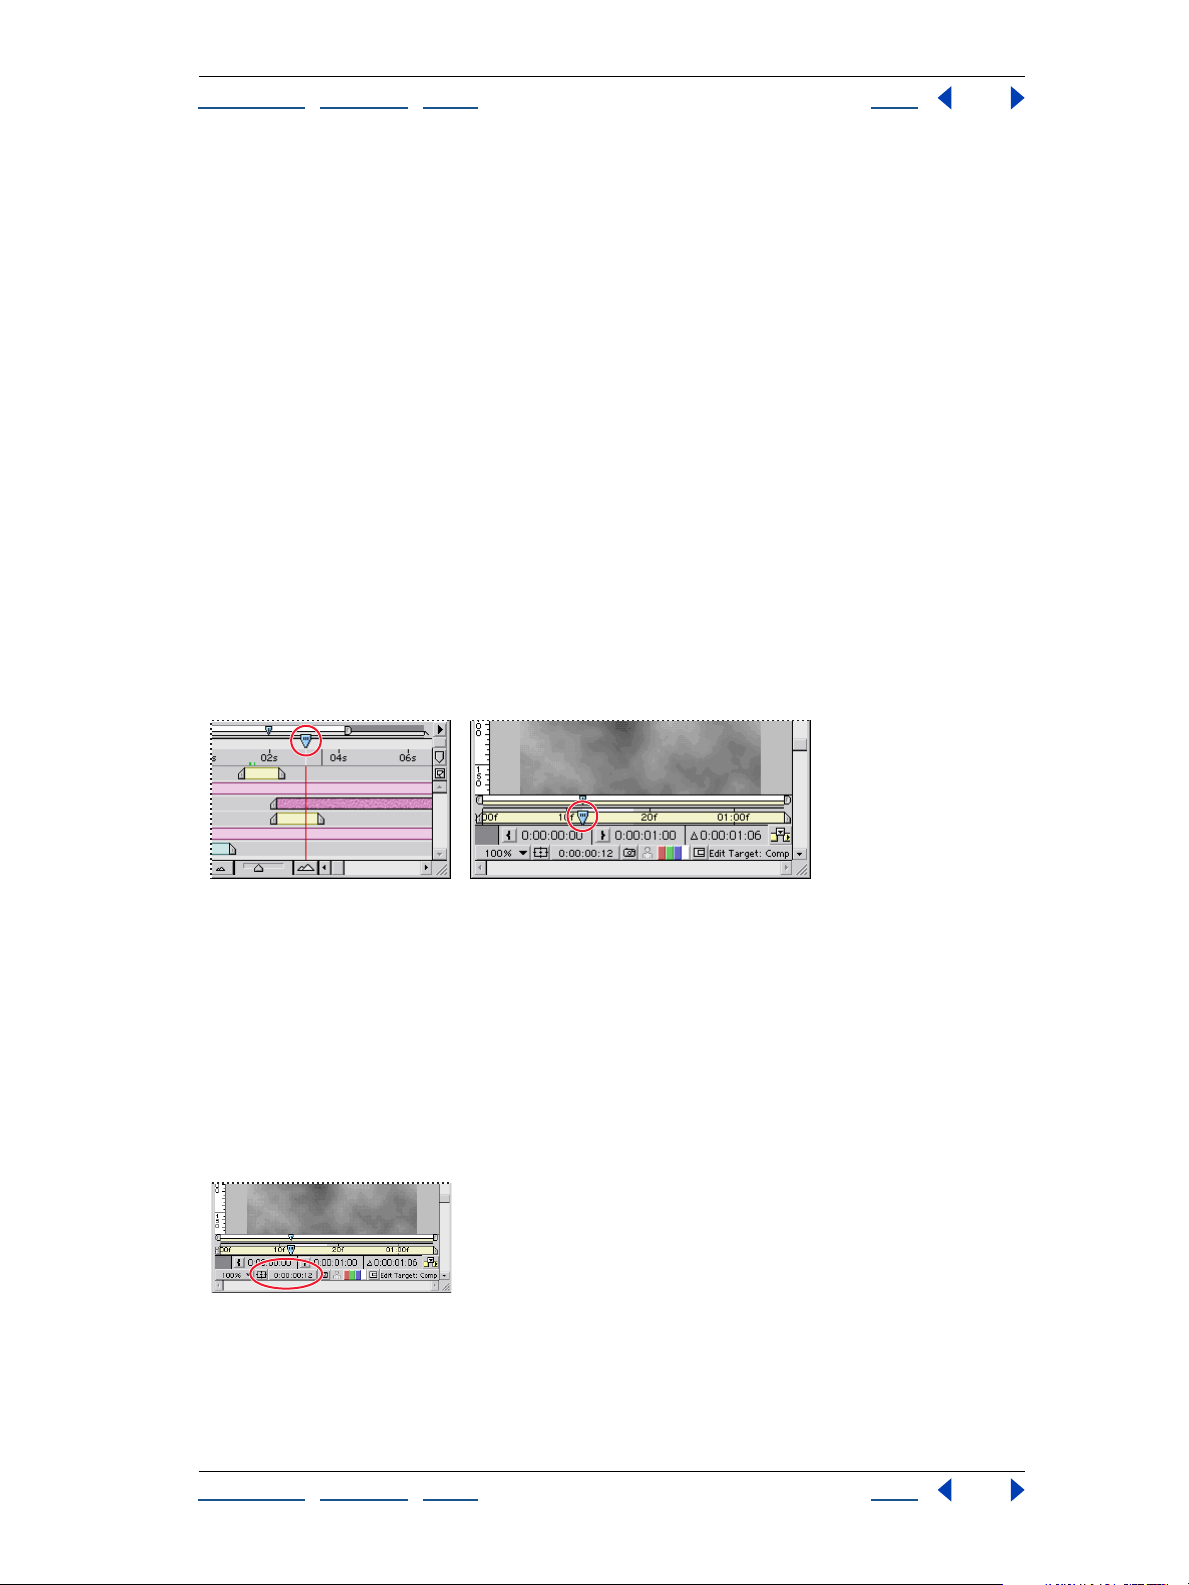
Viewing a specific frame
The duration of a composition, a layer, or a footage file is represented visually by the time
ruler. On the time ruler, the current-time marker indicates the frame you are viewing or
editing, and the frame appears in the corresponding window. You can view a different
frame by typing a number or by dragging the current-time marker.
In a Layer or Footage window, the time ruler appears near the bottom of the window. In a
Composition window, the time ruler appears in the corresponding Timeline window. Keep
in mind that the time rulers in different windows represent different durations. The time
ruler in Layer and Footage windows represent the duration of the contents of that
window, in contrast to the time ruler in the Timeline window, which represents the
duration of the entire composition.
Current-time marker in the Timeline window (left) and in the Layer window (right)
Like the Timeline window, Layer and Footage windows include viewing-area markers that
you can use to magnify or shrink the part of the time ruler displayed.
To view a specific frame by dragging:
In the time ruler, drag the current-time marker to a new point in time.
To view a specific frame numerically:
1 Choose View > Go to Time, or click the current-time display in a Footage, Layer, Compo-
sition, or Timeline window.
Using Help | Contents | Index Back 21
Page 22

Adobe After Effects Help Working with Projects, Windows, and Palettes
Using Help | Contents | Index Back 22
2 Type a new time and click OK.
To step forward or back a specified number of frames from the Go to Time dialog box,
type + or +- in front of the number, such as +5 or +-5. (If you simply type - in front of
the number, After Effects jumps to a negative time.)
Discontinuing window updates
Press the Caps Lock key to prevent After Effects from updating Footage, Layer, or Composition windows. This is useful for a Layer or Composition window that takes a long time to
update. When Caps Lock is active, all open Footage, Layer, or Composition windows
display the last update you made before pressing Caps Lock, regardless of the changes
you make. As soon as you make a change that would appear in a window, After Effects
adds a red outline to any affected windows, and the windows are not updated. After
Effects continues to update window controls such as motion paths, anchor points, and
mask outlines as you move them. To resume window updates and display all changes
made while Caps Lock was active, press Caps Lock again to deactivate it.
Viewing tool tips
You can turn on or off tool tips that provide descriptions when you hold the mouse
pointer over tools and buttons.
To turn on or off tool tips:
1 Choose Edit > Preferences > General.
2 Select Show Tool Tips to turn on tool tips, and then click OK.
To olbox
Use the tools in the toolbox to select, edit, and view layers. You can edit layer properties,
masks, and motion paths graphically, and you can change the view of a Footage, Layer, or
Composition window. The small triangle to the right of a tool indicates that additional
tools are available. Procedures for using these tools are included throughout this book.
See the tool name in the index.
To select a tool:
Do one of the following:
Using Help | Contents | Index Back 22
Page 23

Adobe After Effects Help Working with Projects, Windows, and Palettes
Using Help | Contents | Index Back 23
• If the tool is visible, click its icon. To view a tool tip, hold the mouse pointer over a tool.
CBDE
GFH
A
I
O Q
J
M
N
P
LK
A. Selection B. Pen C. Add Point D. Delete Point E. Convert Point
F. Orbit Camera G. Track XY Camera H. Track Z Camera I. Hand
J. Rotation K. Rectangle Mask L. Oval Mask M. Pan Behind N. Zoom
O. Local Axis Mode P. World Axis Mode Q. View Axis Mode
• If the tool is not visible, position the pointer on the appropriate tool and drag to
highlight the tool you want.
To select a tool quickly, press its shortcut key on the keyboard. These keys are listed on
the After Effects Quick Reference Card.
Info palette
The Info palette describes the area under the mouse pointer as you drag across a footage
frame in the Composition, Layer, or Footage window. This palette displays values for the
pixel color (R,G,B), alpha channel (A), and coordinates of the current position. When you
modify a layer property graphically, the bottom portion of this palette displays precise
values that relate to the layer instead of the pointer. For example, when you drag a layer,
the Info palette displays the coordinates of the layer’s center point and the offset from its
last position. This makes it easy to move a layer by a specific number of pixels in either axis.
During other operations, the Info palette provides context-sensitive information, such as
the progress of rendering a window preview.
The X coordinate represents position in the horizontal axis, and the Y coordinate represents position in the vertical axis. Values for these coordinates are in pixels. The X and Y
coordinates are relative to the origin (0,0), which is fixed at the upper left corner of the
image area. The upper right portion of the Info palette displays the X and Y coordinates of
the pointer. As you drag a layer, the lower portion of the Info palette displays the X and Y
coordinates of the layer’s anchor point. The lower portion of the Info palette also displays
Z coordinates if the layer includes 3D animation.
If the zero point differs from the origin, X' and Y' coordinates appear in the Info palette
below the X and Y coordinates. These values measure the distance from the zero point or
the ruler.
Note: The origin of the image area is different than the origin, or zero point, of the rulers.
You can set the ruler’s zero point to match the origin of the image area, but you cannot
change the origin of the image area.
Using Help | Contents | Index Back 23
Page 24

Adobe After Effects Help Working with Projects, Windows, and Palettes
Using Help | Contents | Index Back 24
To change the Info palette RGBA display:
Choose an option such as Percent or Web from the Info palette menu. Selecting Auto
Color Display automatically switches between 8 bits per channel and 16 bits per channel
depending on the project’s color depth. Clicking anywhere on the palette cycles through
the display options.
Using Help | Contents | Index Back 24
Page 25

Adobe After Effects Help Preparing and Importing Footage
Using Help | Contents | Index Back 25
Preparing and Importing Footage
How After Effects works with imported files
When you import files, After Effects does not copy the footage item itself into your project
but creates a reference link in the Project window to the footage item. This saves disk
space.
If you delete, rename, or move an imported source file, you break the reference link to that
file. When a link is broken, the name of the source file appears in italics in the Project
window, and the File Path column lists it as missing. If the footage item is available, you
can reestablish the link—usually just by double-clicking the item and selecting the file
again. See “Replacing and substituting footage” on page 52.
If you use another application to modify footage that is used in a project, the changes
appear in After Effects the next time you open the project. See “Opening footage in its
original application” on page 51.
When you add a footage item to an After Effects composition, you create a new layer, and
the footage item becomes the source for the new layer. You can replace the source without
affecting any edits you make to the layer properties.
Wo r king with file formats
You can import and export the file formats listed below into After Effects 5.0. For more
information and an extensive list of QuickTime-supported formats, see the Apple Web site.
You can also check the Adobe Web site for updates. Supported formats include:
File formats supported by After Effects: QuickTime, Direct Show (Windows only), AVI
(Windows only), WAV (Windows only), Adobe Photoshop, JPEG, SGI, Softimage PIC, Targa,
TIFF, PICT, Cineon, RLA, Electric Image, Filmstrip, FLC/FLI, EPS (import only), Adobe Illustrator (import only), Adobe Premiere (import only), GIF89a (export only), SWF (export
only), PDF (import only).
File formats supported using Adobe Photoshop plug-ins: Amiga IFF, BMP, PCX, Pixar, PNG,
GIF (import only).
Notable audio formats supported by QuickTime: AIFF, AU, WAV (Mac OS only), Mac Sound
(Mac OS only). For a complete listing, see your QuickTime documentation.
Preparing a still-image file for import into After Effects
Before you import a still image into After Effects, prepare the file as completely as possible.
It is usually easier and faster to prepare a file in its original application; this also reduces
rendering time in After Effects. Consider doing the following before you import still-image
files into After Effects:
• Set the pixel dimensions to the resolution you will use in After Effects. If you plan to
scale the image over time, set image dimensions that provide enough detail at the
Using Help | Contents | Index Back 25
Page 26

Adobe After Effects Help Preparing and Importing Footage
Using Help | Contents | Index Back 26
largest size the image has in the project. The maximum resolution you can use in After
Effects is 30,000 x 30,000 pixels. For D1 or DV, see “Using square-pixel footage for
output to D1 or DV NTSC” on page 48.
• Specify an even-numbered resolution for files imported into compositions that also use
even-numbered resolution, and odd numbers for compositions using odd-numbered
resolution. See the Adobe Web site for technical papers with more information.
• Crop the parts of the image that you do not want to be visible in After Effects.
• Correct the contrast and color balance for broadcast video, if necessary.
• Create an alpha channel if you want to designate areas as transparent.
• If final output will be broadcast video, avoid using thin lines (such as 1-pixel lines) for
images or text because they may appear to flicker. If you must use thin lines, add a
slight blur so the line or text displays on both video fields instead of flickering between
them.
• Save the file using the correct naming convention. For example, if you plan to import
the file to After Effects on a Windows system, save the file using a three-character
extension. If you plan to import the file to a Mac OS, use a name of 31 characters or
fewer.
• Make sure that the file format is supported on the operating system you plan to use.
For information on preparing and importing interlaced motion video to After Effects, see
“Preparing motion footage for import” on page 39.
Working with higher image resolutions
After Effects supports a maximum image resolution of 30,000 x 30,000 pixels for importing
and rendering files. Resolution refers to the dimensions (width and height) of an image
measured in pixels. When you work with higher resolutions, you can use a wider variety of
formats, such as IMAX frames (4096 x 3002 pixels), full-aperture/silent frames (4096 x 3112
pixels), and other large-format media.
When working with high-resolution images, consider the following:
• All input and output modules in After Effects support increased resolutions except PICT
(4,000 x 4,000 pixels), BMP (16,000 x 30,000 pixels), and PXR (30,000 x 16,000 pixels).
• The maximum resolution you can import or export is limited by the amount of physical
RAM available to After Effects. When working with large frame sizes, minimize the
RAM used by the system or other software running on your computer, but be sure to
leave at least 4 MB unused to handle system software requirements for additional RAM.
• The following formula helps you determine the amount of RAM you need based on the
footage: Image Width in Pixels x Image Height in Pixels x 4 Bytes of Memory for 32 bitsper-pixel (bpp) or 8 Bytes of Memory for 64 bpp. For example, a 30,000-x-30,000-pixel
image requires 3.5 GB of RAM to import and display each frame. However, a 30,000-x486-pixel image requires only 60 MB of RAM. Memory requirements for 16 bits-perchannel (bpc) project color depth are approximately double those for 8 bpc.
Using Help | Contents | Index Back 26
Page 27

Adobe After Effects Help Preparing and Importing Footage
Using Help | Contents | Index Back 27
Changing the default duration of still images
When you add a still image to a composition, its default duration is the duration of the
composition. You can manually trim the duration of a still image and change the default
duration of still footage in the Import Preferences dialog box. See “Understanding
trimming” on page 81.
To change the default duration of still footage:
1 Choose Edit > Preferences > Import.
2 Under Still Footage, do one of the following, and then click OK:
• Select Length of Composition: sets the same duration for the still image as the compo-
sition into which it is placed.
• Type numbers in the text box for the duration you want to use.
Specifying interpretation rules
The Interpretation Rules.txt file describes how After Effects interprets field order, alpha
channel, frame rate, and pixel aspect ratio when importing footage. You can customize
this file in any text editor and add or delete entries, to save time. When you import, After
Effects reads the file and follows any applicable rules, as long as Interpretation Rules.txt is
stored in the same folder as the After Effects application. You can always override these
interpretations after importing. For more information, see “Using interpretation rules” on
page 27.
Using interpretation rules
You can automate how After Effects interprets different types of imported footage. For
example, each time you import a clip with unlabeled fields, you must specify the field
separation order. When you import dozens of clips, you can save time by using the Interpretation Rules.txt file, which handles this for you.
The Interpretation Rules.txt file defines how After Effects identifies and matches footage
using parameters for frame dimensions, frame rates, file type, and codec. If it finds a match
for the footage you’re importing, it then automatically sets the field order, frame rate,
alpha channel interpretation, and pixel aspect ratio.
Ordinarily, the After Effects Interpretation Rules.txt file is stored in the same location as the
application. You can modify this file to produce the custom rules file you need. Editing this
file is straightforward if you follow the samples listed in the file. However, the more
experience you have with scripting or related tasks, the more comfortable you’ll feel
editing this file. You might make a backup copy of the file before changing the original as a
precaution.
When you edit the Interpretation Rules.txt file, you must supply a four-character file-type
code for each footage type or codec. If you don’t know the file-type code for a file or codec
in a project, press Alt (Windows) or Option (Mac OS) as you select the file in the Project
window. The file’s file-type code and codec code (if compressed) appear in the last line of
the file description at the top of the Project window.
Note: Any changes to the Interpretation Rules.txt file take effect the next time you open
After Effects. If After Effects is already open when you edit the rules, you must exit and
reopen the application to activate the new rules.
Using Help | Contents | Index Back 27
Page 28

Adobe After Effects Help Preparing and Importing Footage
Using Help | Contents | Index Back 28
Importing files into a project
With After Effects 5.0, you use the same Import File dialog box to import any usable file
into After Effects. To save time and minimize the size and complexity of a project, import a
footage item once and then use it multiple times in a composition. It is occasionally useful,
however, to import a footage item more than once, such as when you want to use it at two
different frame rates.
After Effects supports 24- and 32-bit files using 8 bits per channel (bpc)—including alpha
channel—and the RGB, Grayscale, and Black-and-White color modes. For information on
supported formats, see “Working with file formats” on page 25.
Note: The After Effects Production Bundle provides support for 16 bpc.
To import footage into a Project window:
1 Open a project or choose File > New > New Project.
2 With the Project window active, choose File > Import > File.
3 In the Files of Type pop-up menu, choose the setting you want to use:
• All Acceptable Files (the default selection). Shows files that After Effects recognizes as
supported formats.
• All Footage. Shows only supported footage files. Project files are not shown.
• All Files (*.*). Shows all files, whether or not After Effects recognizes them as supported
formats. (This is useful for compatible files transferred from another platform, such as a
Silicon Graphics workstation.) This option requires you to identify the format.
• A specific format. Restricts the files shown to the format you choose from the menu. (Use
this option as a convenience when the files you want are in large folders containing files
of mixed types.)
4 Do one of the following:
• To import a file, locate and select it, and then click Open.
• To import multiple files from the same location, hold down Ctrl (Windows) or Shift
(Mac OS), select the items you want, and then click Open.
• To import all the files in a folder, locate and select the folder, and then click the Import
Folder button.
The imported footage appears in the Project window. For more information about
importing folder contents, see “Importing a sequence of still-image files” on page 29.
Note: If the Interpret Footage dialog box appears instead, the imported footage item
contains an unlabeled alpha channel, and you’ll need to select a type or click Guess to let
After Effects determine the type. See “Interpreting alpha channels as straight or premultiplied” on page 31.
To search for a file in Mac OS, click Find, type the name of a file or folder, and click OK.
After Effects finds the first file or folder that matches the text.
To import items by dragging:
From the desktop or a folder, select one or more items you want to import and drag them
to the After Effects application icon (on the Windows Explorer or Macintosh Finder) or to
the Project window (in After Effects).
Using Help | Contents | Index Back 28
Page 29
Adobe After Effects Help Preparing and Importing Footage
Using Help | Contents | Index Back 29
If you import a folder by dragging it from the desktop, the contents of that folder are
imported as a sequence. To import the contents as individual footage files, press Alt
(Windows) or Option (Mac OS) as you drag. ( This is the equivalent of clicking the Import
Folder button in step 4 of the previous procedure, “To import footage into a Project
window.”) If you always want the layered footage that you drag into After Effects to be
imported as a composition, you can specify this in your Import Preferences.
To set default preference for dragging layered footage:
1 Choose Edit > Preferences > Import.
2 In the Default Drag Import As pop-up menu, choose Comp.
For more information about importing sequences, see “Importing a sequence of stillimage files” on page 29.
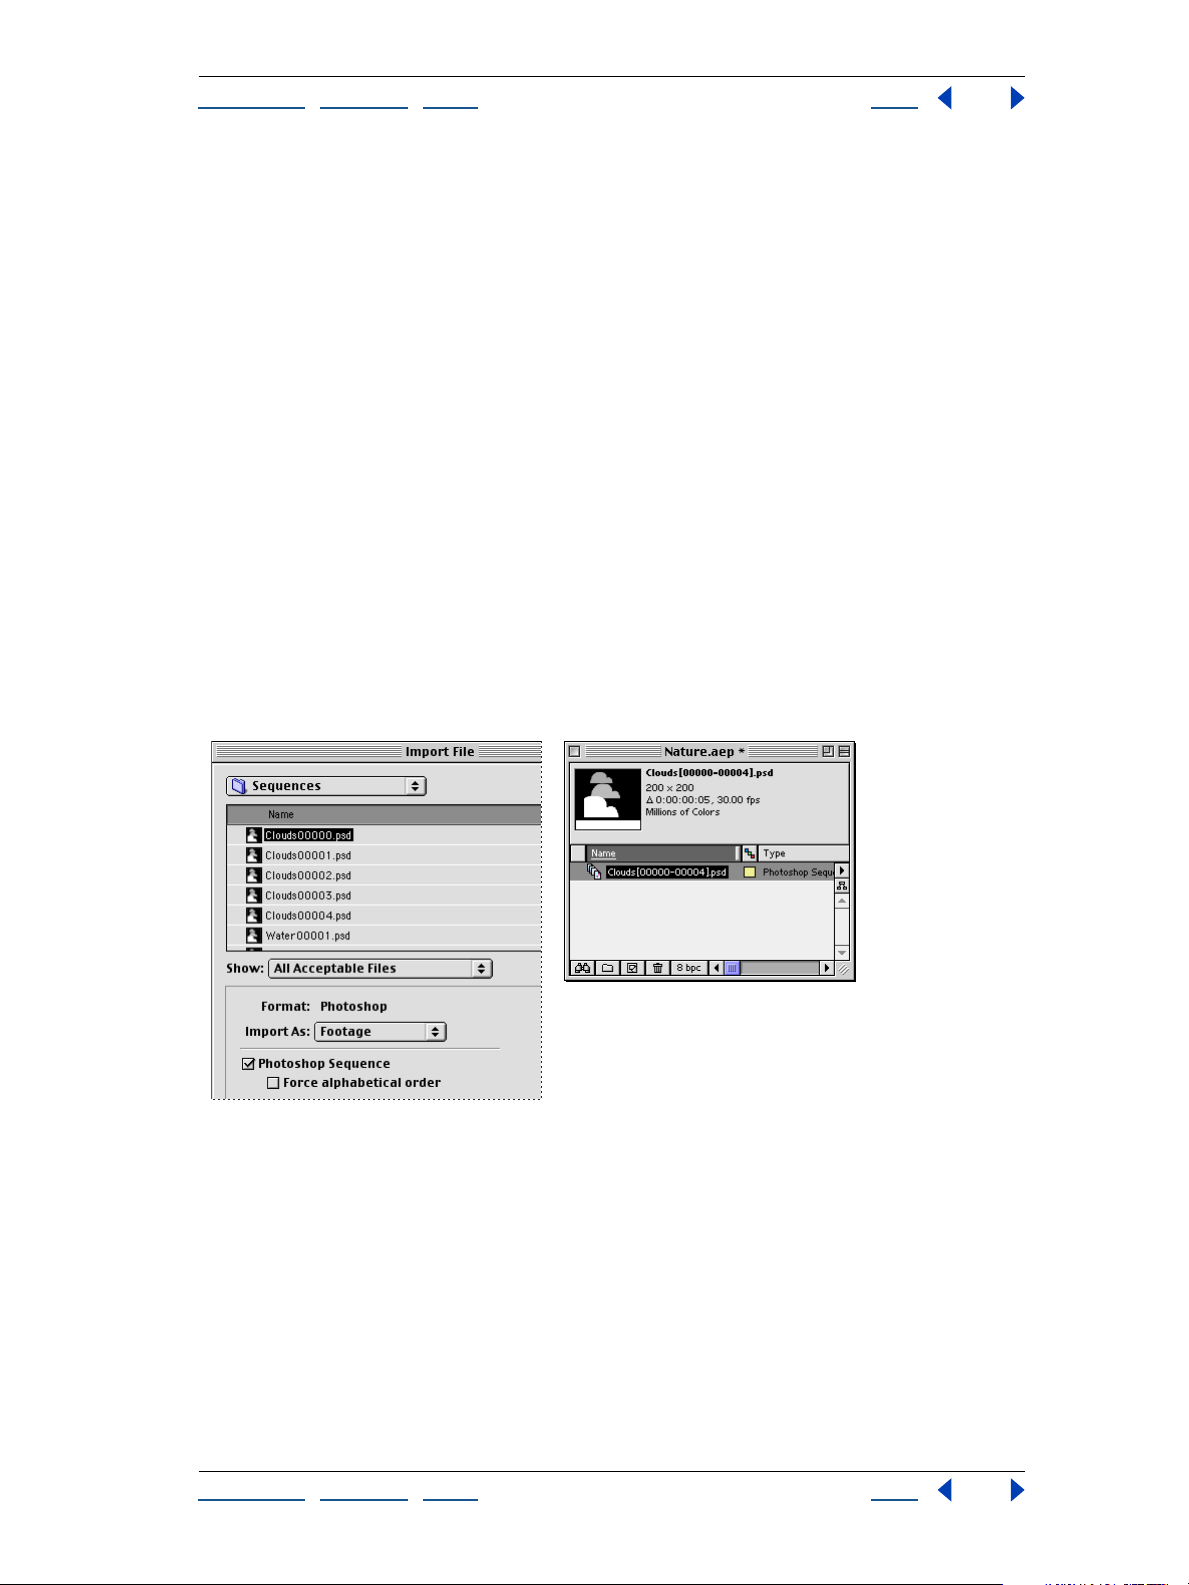
Importing a sequence of still-image files
After Effects can import a sequence of still images with the same numeric or alphabetic
filename pattern and automatically combine them into a single sequence file. In sequence
files, each original file represents one frame. After Effects uses the dimensions and bit
depth of the first image in the sequence. It then imports (in numeric or alphabetic order)
all still images in the folder that have the same filename pattern and file type as
the one you selected.
A sequence of still-image files (left) becomes one image sequence when imported into After Effects
(right).
To import a sequence of still images:
1 Move all the files in the sequence to the same folder.
2 In After Effects, choose File > Import > File.
3 Locate and select any file in the sequence.
4 Select the file format name Sequence option.
5 If you want to import alphabetically, select Force Alphabetical Order. Then click Open.
Note: You can import a subset of a numbered sequence by using a variation of this
procedure. In step 3, select the first file you want to include, hold down Shift, and select the
Using Help | Contents | Index Back 29
Page 30
Adobe After Effects Help Preparing and Importing Footage
Using Help | Contents | Index Back 30
last file you want to include. In this case, only the two files you selected appear highlighted
in the Import File dialog box, but all files that fall between those two in the sequence will
also be imported.
To import a folder of still images as a sequence by dragging:
1 Drag the folder from the desktop to the After Effects Project window.
After Effects imports the first sequence that is listed in the folder, based on the filename.
You can also import an existing sequence as individual footage files. There are two ways to
accomplish this.
To import a sequence as individual footage files:
Do either of the following:
• Choose File > Import > File to open the Import File dialog box, locate and select the
folder, and then click the Import Folder button.
• On the desktop, hold down Alt (Windows) or Option (Mac OS) and drag the folder into
either the After Effects icon on the desktop or into the Project window.
When you import a sequence of still images, they assume the frame rate specified in the
Preferences. The default rate is 30 frames per second (fps). You can change the frame rate
for the sequence either before or after importing.
To change the default frame rate for a sequence before importing:
1 Choose Edit > Preferences > Import.
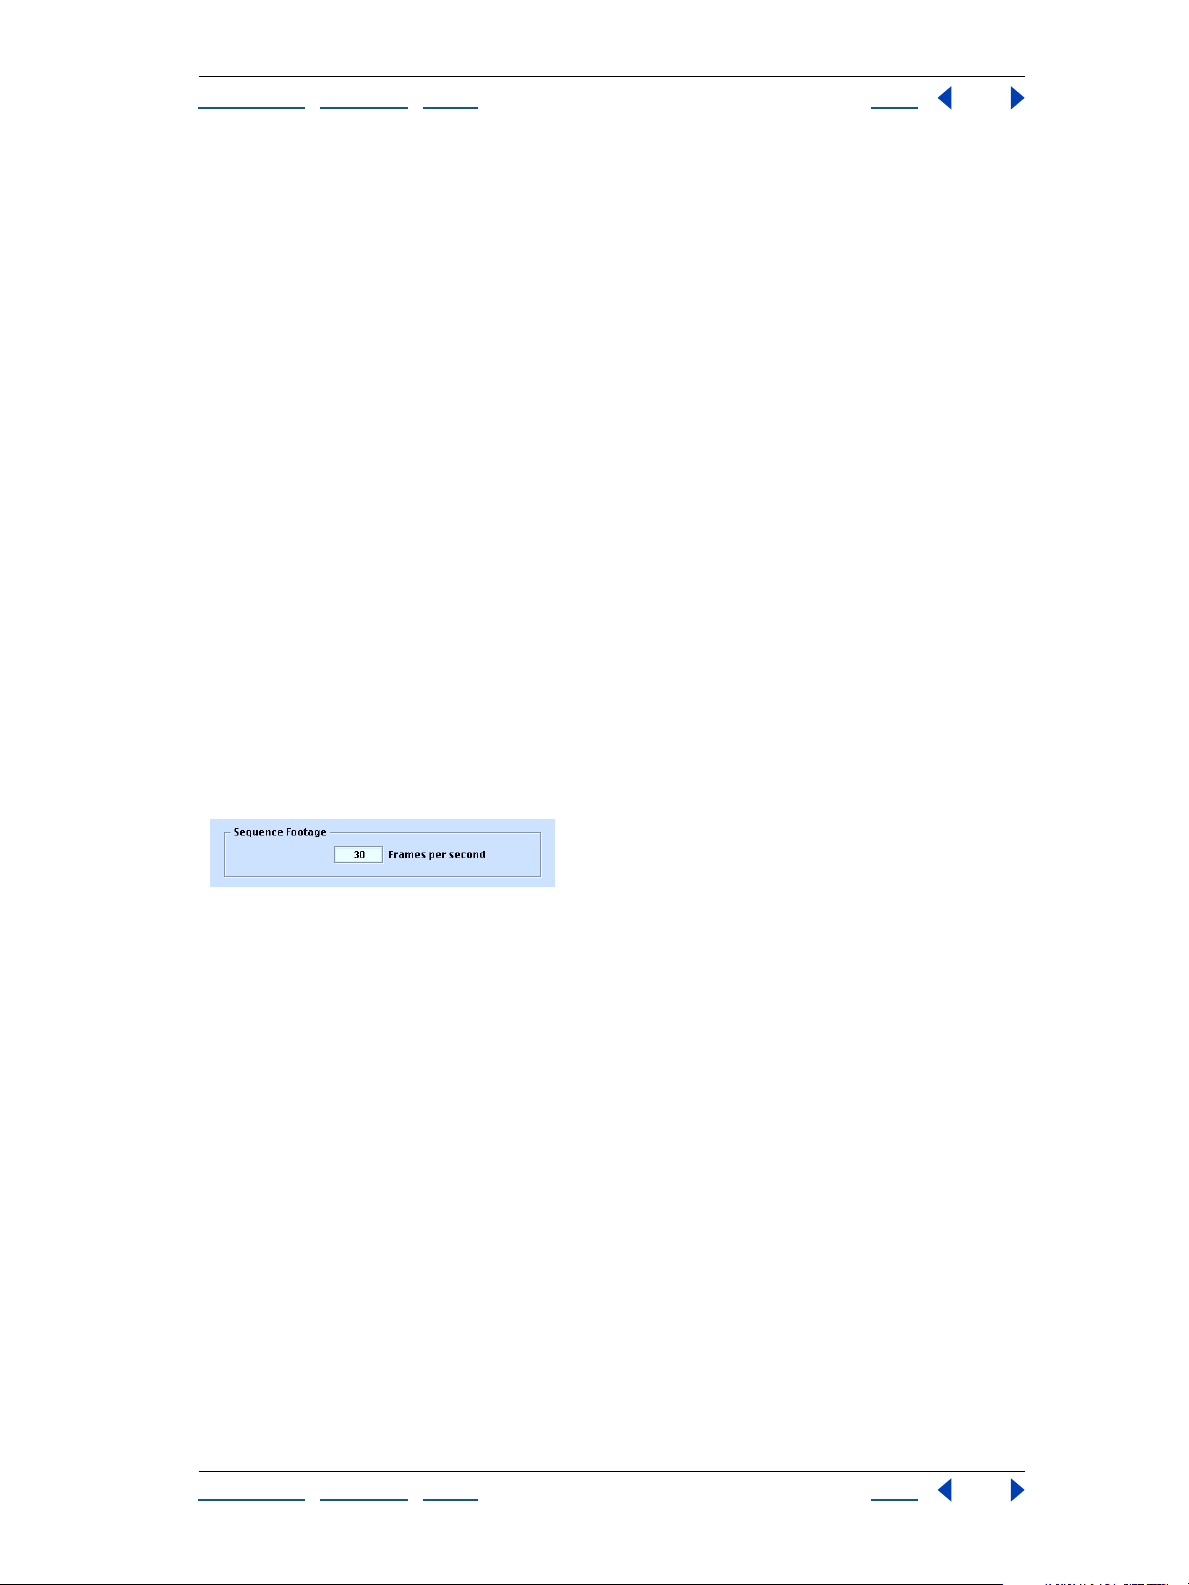
2 Under Sequence Footage, type a new default frame rate, and then click OK.
To assign a frame rate to a sequence you’ve already imported:
1 In the Project window, select the sequence of still images.
2 Choose File > Interpret Footage > Main.
3 Select Assume This Frame Rate and type the frame rate you want.
Importing footage containing an alpha channel
The color information in a typical footage item is contained in three channels: red, green,
and blue. In addition, a footage item can include a fourth channel, called an alpha channel,
that contains transparency information for the parts of the image that are partially or
completely transparent. An alpha channel is often used as a matte for creating effects.
When used in After Effects, a matte defines the transparent areas for its own or another
layer. White areas define what is opaque, and black areas define what is transparent. See
“Using a footage item with an alpha channel” on page 149.
Many file formats can include an alpha channel, including Adobe Photoshop,
ElectricImage IMAGE, TGA, TIFF, EPS, PDF, QuickTime (saved at a bit depth of Millions of
Colors+), and Adobe Illustrator. For Adobe Illustrator EPS and PDF files, After Effects
automatically converts empty areas to an alpha channel.
Using Help | Contents | Index Back 30
Page 31

Adobe After Effects Help Preparing and Importing Footage
Using Help | Contents | Index Back 31
Using straight or premultiplied alpha channels
Footage files with alpha channels fall into two categories: straight and premultiplied.
Although the alpha channels are the same, the color channels differ.
With a straight alpha channel, a footage item keeps the transparency information in a
separate channel (the alpha channel only), not in any of the visible color channels. This
kind of alpha channel is also known as unmatted alpha. With a straight alpha channel, the
effects of transparency are not visible until the image is displayed in an application that
supports straight alpha.
With a premultiplied alpha channel, a footage item keeps the transparency information in
the alpha channel and also keeps the same information in the visible RGB channels, which
are modified, or multiplied, with a background color. A premultiplied alpha channel is
known as matted alpha with a background color. The colors of semitransparent areas, such
as feathered edges, are shifted toward the background color in proportion to their degree
of transparency.
Some software lets you specify the background color with which the alpha channel is
premultiplied; otherwise, the background color is usually black or white.
Straight alpha channels can produce better results when used in movies that require the
highest level of color precision. Premultiplied alpha channels are compatible with a wider
range of programs, such as Apple QuickTime Player. After Effects recognizes both types, so
for most projects, either type will produce satisfactory results.
Interpreting alpha channels as straight or premultiplied
When you import a footage file containing an alpha channel, After Effects determines if
it is straight or premultiplied. If the alpha channel is unlabeled, After Effects displays the
Interpret Footage dialog box and prompts you to select Ignore Alpha, Straight
(Unmatted), Premultiplied (Matted with Black), Premultiplied (Matted with White), or
Guess. When you select Guess, After Effects determines the interpretation method. For
information on straight and premultiplied alpha channels, see “Using straight or premultiplied alpha channels” on page 31. For information on interpretation methods, see
“Choosing an interpretation method for alpha channels” on page 31.
Correctly identifying the type of alpha channel when you import a file can prevent
problems, such as undesirable colors at the edge of an image or a loss of image quality at
the edges of the alpha channel. If a color inaccuracy, such as a halo, appears along the
edges of an alpha channel in a composition, try changing the interpretation method.
If a footage item doesn’t have an alpha channel or transparency information, you can
create an alpha channel in After Effects using a layer mask. See “Working with masks” on
page 149.
Choosing an interpretation method for alpha channels
You can change the interpretation method for a file after you import the file. You can also
change the default alpha channel interpretation in the Import Preferences dialog box, in
the Interpret Unlabeled Alpha As pop-up menu. This is especially useful for importing
footage from an application that consistently uses one type of unlabeled alpha channel.
The interpretation methods include:
Ask User Displays a dialog box containing interpretation options each time you import
an unlabeled alpha channel.
Using Help | Contents | Index Back 31
Page 32

Adobe After Effects Help Preparing and Importing Footage
Using Help | Contents | Index Back 32
Guess Attempts to determine the type of alpha channel used in the image. If After Effects
cannot guess confidently, it beeps.
Ignore Disregards all transparency data in the file.
Straight (Unmatted) Interprets the alpha channel as straight alpha. If the application you
used to create the footage does not premultiply the alpha channel, select this option.
Premultiplied (Matted with Black) Interprets the alpha channel as premultiplied with
black.
Premultiplied (Matted with White) Interprets the alpha channel as premultiplied with
white.
To import a footage file containing an alpha channel:
1 Choose File > Import > File. Locate and select the file and click Open.
2 In the Interpret Footage dialog box, select an option for alpha channel type. If you
select Treat As Premultiplied (Matted with Color), you can click the eyedropper and select
a color.
3 Click OK.
To set the alpha channel interpretation method for a file:
1 In the Project window, select a footage item that includes an alpha channel.
2 Choose File > Interpret Footage > Main.
3 In the Alpha section, select an interpretation method.
4 Select Inverted to switch the opaque and transparent areas of the image, and click OK.
To set the default alpha channel interpretation:
1 Choose Edit > Preferences > Import.
2 For Interpret Unlabeled Alpha As, select the interpretation methods you want used by
default, and click OK.
Importing Adobe Photoshop files
You can import an Adobe Photoshop file directly into an After Effects project with the
option of preserving individual layers, layer masks, and so forth from Adobe Photoshop.
Importing layers makes it easy to prepare still images for animation using the imageediting tools in Adobe Photoshop.
Preparing layered Adobe Photoshop files
Importing layers into After Effects makes it possible to prearrange a composition in Adobe
Photoshop using layers, and preserve those layers in After Effects so that they are ready for
animation. Preserving layers is also useful if you want to use a single Adobe Photoshop file
as a source for both print and dynamic media.
Before you import a layered Adobe Photoshop file, prepare it thoroughly to reduce
preview and rendering time. Avoid problems importing and updating Adobe Photoshop
layers by naming them properly. Before you import them into After Effects, do the
following:
Using Help | Contents | Index Back 32
Page 33

Adobe After Effects Help Preparing and Importing Footage
Using Help | Contents | Index Back 33
• Organize and name layers. If you change a layer name or delete a layer in an Adobe
Photoshop file after you have imported it into After Effects, After Effects is unable to
find the original layer name, and the Project window lists that layer as Missing.
• Make sure that each layer has a unique name, because After Effects manages layers by
their names. Duplicate layer names can cause problems when you update footage.
• If you want to import a composited version of a layered Photoshop file along with a
layered version, select the Include Composited Image With Layered Files option in the
Photoshop Saving Files Preferences dialog box.
Importing layered Photoshop files
After Effects imports attributes that were applied in Adobe Photoshop, including position,
transfer modes, opacity, visibility, transparency (alpha channel), layer masks, adjustment
layers, common layer effects, layer clipping-paths, vector masks, and clipping groups.
You can import a multilayered Adobe Photoshop file in the following ways:
• As a new composition, with each layer in the Adobe Photoshop file becoming a
separate layer in the composition
• As a single still footage item imported from any one layer in the Adobe Photoshop file
• As a single still footage item imported from all the Adobe Photoshop layers merged
together
When you import a layered Adobe Photoshop file as a composition, all the layers
contained in the composition retain their original positions as set in Adobe Photoshop.
You can open the composition in After Effects and animate the layers.
To import a layered Adobe Photoshop file as a new composition:
1 Choose File > Import > File.
2 In the Import File dialog box, make sure that All Acceptable Files is selected for Files of
Type, and then locate and select the Adobe Photoshop file you want to import.
3 Choose Composition in the Import As pop-up menu, and then click Open.
The original filename is used twice in the Project window: for the file as a composition and
for the folder containing each Adobe Photoshop layer as a separate footage items.
To import an Adobe Photoshop file or one of its layers as a single footage item:
1 Choose File > Import > File.
2 In the Import File dialog box, make sure that All Acceptable Files is selected in the Files
of Type box, and then locate and select the Adobe Photoshop file you want to import.
3 Choose Footage in the Import As pop-up menu, and then click Open. The Interpret
Footage dialog box appears (unless you have set Preferences to skip this dialog box).
4 Select the layer you want to import from the file, or choose Merged Layers to import all
layers in the file as a single layer. Then click OK.
Note: When you import one Adobe Photoshop layer as a single footage item, its name in
the Project window consists of the layer name followed by the Adobe Photoshop filename.
Using Help | Contents | Index Back 33
Page 34

Adobe After Effects Help Preparing and Importing Footage
Using Help | Contents | Index Back 34
Using transparent areas and layer masks from Adobe Photoshop
Adobe Photoshop supports a transparent area and one optional layer mask (alpha
channel) for each layer in a file. You can use these layer masks to specify how different
areas within a layer are hidden or revealed. When you import one layer of an Adobe
Photoshop file, After Effects combines the layer mask (if present) with the transparent area
and imports it as a straight alpha channel.
If you import a layered Adobe Photoshop file as a merged file, After Effects merges the
transparent areas and layer masks of all the layers into one alpha channel that is premultiplied with white. See “Importing layered Photoshop files” on page 33.
If a layered Adobe Photoshop file contains clipping groups, After Effects imports each
clipping group as a composition nested within the main composition. After Effects
automatically applies its Preserve Underlying Transparency option to each layer in the
clipping-group composition, to maintain transparency settings.
When you import a Adobe Photoshop file as a composition, any clipping paths in the
imported layers are converted to After Effects masks. You can then modify and animate
these masks within After Effects.
After Effects also supports any blending modes applied to the file. For more information
on the Preserve Underlying Transparency option, see “Preserving underlying transparency
during compositing” on page 165.
Using adjustment layers from Adobe Photoshop
Adjustment layers in Adobe Photoshop versions 4.0 and later change the color and tonal
qualities of an image without permanently modifying the original image. Adobe
Photoshop adjustment layers affect the appearance of all layers below them. When you
import an Adobe Photoshop file containing one or more adjustment layers, After Effects
directly converts the Adobe Photoshop adjustment layers to After Effects adjustment
layers. Turn off the Adjustment Layer switch in After Effects to remove the effect and
display the layer as a white solid. To remove the effect and the white solid, either delete
the adjustment layer or turn off the Video switch for the layer. See “Creating an adjustment
layer” on page 73 and “About After Effects Audio/Video switches” on page 86.
Using Adobe Photoshop layer effects (styles)
In Adobe Photoshop 5.0 and later, you can use a layer effect (or style) to modify the layer
to which it is applied. When you import an Adobe Photoshop file as a composition, and
one or more of the layers contain layer effects, then After Effects includes the effects and
the layer as two or more separate layers in the Timeline window.
Note: Only some Adobe Photoshop styles (effects) can be imported into After Effects.
These include Drop Shadow, Inner Shadow, Outer Glow, Inner Glow, Bevel and Emboss,
and Color Fill.
You can edit or remove a layer effect by using either the Timeline window or the Effect
Controls window. You can also animate these Adobe Photoshop layer effects over time.
To edit an Adobe Photoshop layer effect in After Effects:
1 Open the composition containing the layer effect.
2 In the Timeline window, select the layer containing the effect and press E to display the
effect properties.
Using Help | Contents | Index Back 34
Page 35

Adobe After Effects Help Preparing and Importing Footage
Using Help | Contents | Index Back 35
3 Click the underlined value you want to change and type a new value.
A single Adobe Photoshop layer effect can become up to five layers and effects in After
Effects. You may need to edit multiple copies to achieve the desired result.
Importing an Adobe Illustrator, PDF, or EPS file
You can import Adobe Illustrator, many PDF, and EPS files directly into After Effects. When
you import an Adobe Illustrator file, After Effects converts all text information to paths,
eliminating the need to create outlines in Adobe Illustrator before importing. If you import
a file without creating outlines, make sure that all fonts used in the file are available to
After Effects when you import.
When you import an Adobe Illustrator file, After Effects automatically makes all empty
areas transparent by converting them into an alpha channel.
After Effects can import Adobe Illustrator CMYK files. However, to maintain accurate
color, convert your CMYK images to RGB images in Adobe Illustrator. When you import
Adobe Illustrator CMYK images, After Effects remaps the CMYK colors to RGB, and may
subtly shift colors.
Continuously rasterizing an Adobe Illustrator file
You can continuously rasterize an Illustrator file at any time while designing your project.
Whether you choose to continuously rasterize or not, if you view and render a composition using Best Quality, After Effects anti-aliases (smooths) the art.
A B C
Adobe Illustrator file imported and rasterized in After Effects A. Original B. Enlarged with
Continuously Rasterize switch turned off C. Enlarged with Continuously Rasterize switch turned on
To continuously rasterize an Adobe Illustrator file:
1 Select the layer containing the Adobe Illustrator file in the Timeline window.
2 Click the Collapse Transformations/Continuously Rasterize switch so that the “on”
icon ( ) appears for that layer.
Importing layers from Adobe Illustrator 5.0 and later
You can import a multilayered Adobe Illustrator file in the following ways:
• As a new composition, with each layer in the Adobe Illustrator file becoming a separate
layer in the composition
• As a single still image imported from any one layer in the Adobe Illustrator file
• As a single still image imported from all the Adobe Illustrator layers merged together
Using Help | Contents | Index Back 35
Page 36

Adobe After Effects Help Preparing and Importing Footage
Using Help | Contents | Index Back 36
To import a layered Adobe Illustrator file as a layered composition:
1 Choose File > Import > File.
2 In the Import File dialog box, make sure that All Acceptable Files is selected in the Files
of Type box; then locate and select an Adobe Illustrator file.
3 In Import File As, choose Composition, and then click Open.
The original filename is used twice in the Project window: for the file as a composition and
for the folder containing all the layers as separate footage items.
To import an Adobe Illustrator file or one of its layers as a single footage item:
1 Choose File > Import > File.
2 In the Import File dialog box, make sure that All Acceptable Files is selected in the Files
of Type box; then locate and select an Adobe Illustrator file.
3 In Import File As, choose Footage, and then click Open.
4 In the Import Adobe Illustrator dialog box, select a layer to import from the file, or
choose Merged Layers to import all layers in the file as a single layer in After Effects. Then
click OK.
Importing Adobe Illustrator paths as masks
You can use an Adobe Illustrator path as a mask in an After Effects layer composition by
copying the path in Adobe Illustrator and pasting it directly into the Layer or Composition
window in After Effects. After Effects creates a mask for each closed path copied from
Adobe Illustrator. For more information on using masks, see “Working with masks” on
page 149.
Note: You can also use an copied Adobe Illustrator or Photoshop path as an After Effects
motion path.
Shape drawn in Adobe Illustrator (left) and pasted into After Effects as a mask (right)
To import an Adobe Illustrator path as a mask:
1 In Adobe Illustrator, create your path, select all of the points along the path, and then
choose Edit > Copy.
2 In After Effects, open the Layer window for the layer into which you want to import the
path.
3 Choose Edit > Paste.
Note: This process works best if your Adobe Illustrator Preferences are set with AICB
Clipboard and Preserve Paths selected.
Using Help | Contents | Index Back 36
Page 37

Adobe After Effects Help Preparing and Importing Footage
Using Help | Contents | Index Back 37
Importing an After Effects project
You can import one After Effects project into another. Everything from the imported
project, including footage files, compositions, and folders, appears inside a new folder in
the current Project window. When you want to repeat a complicated mask, effect, or
animation in a different project, you can import the project containing the effect and
simply replace the source footage, keeping all the effect, composition, and layer settings
intact.
See “Importing files into a project” on page 28 for the procedure for importing.
Importing After Effects projects from different platforms
You can open and import an After Effects project from a different operating system as
long as you maintain the filenames, folder names, and either full paths or relative paths
(folder locations) for all files in the project. To maintain relative paths, the source footage
must reside on the same volume as the project file.
If a file format is not supported on the operating system you are using, if the file is missing,
or if the reference link is broken, After Effects substitutes a placeholder item containing
color bars. You can reconnect the placeholder to the appropriate file. You can use the same
process to connect a footage item in the Project window to a different source file.
To relink a reference:
1 Select the placeholder or footage file in the Project window, and choose File > Replace
Footage > File.
2 In the Replace Footage File dialog box, locate and select the footage file you want to
use.
Note: You can also open this dialog box by double-clicking the footage item.
For more information on substituting footage, see “Replacing and substituting footage”
on page 52.
For information about creating projects for both Windows and Mac OS, see “Considerations for cross-platform projects” on page 7.
Importing Adobe Premiere projects
The ability to import Adobe Premiere projects eliminates the need to render the project
before applying visual effects and animations in After Effects. When you import an Adobe
Premiere 5.0 or later project, After Effects imports it into the Project window as both a new
composition containing each Adobe Premiere clip as a layer, and as a folder containing
each clip as an individual footage item. If your Adobe Premiere project contains bins, After
Effects converts them to folders within the Adobe Premiere project folder.
After Effects preserves the order of clips in the Timeline, the footage duration (including all
trimmed In and Out points), and the marker and transition locations. The arrangement of
layers in the Timeline window is based on the arrangement of clips in the Premiere
Timeline. After Effects adds Adobe Premiere clips to the Timeline window as layers in the
order they appeared—from the bottom up and from left to right—in the Premiere
Timeline.
Using Help | Contents | Index Back 37
Page 38

Adobe After Effects Help Preparing and Importing Footage
Using Help | Contents | Index Back 38
Transitions and titles included in your Adobe Premiere project appear in the After Effects
composition as solid layers, maintaining their original location and duration. After Effects
discards all transparency and motion settings. See “Importing files into a project” on
page 28 for the procedure for importing.
Import Adobe Premiere projects in the same way you import footage files: choosing File >
Import > File, and locating the Adobe Premiere project file that you want to import.
Importing 3D-image files
After Effects can import 3D-image files saved in Softimage PIC, RLA, and Electric Image EI
format. These 3D-image files contain red, green, blue, and alpha (RGBA) channels, as well
as auxiliary channels with optional information, such as z depth, object IDs, texture coordinates, and more. The Standard Version of After Effects reads and displays the RGBA information.
With RLA files, all of the auxiliary channels are included in a single file. Softimage PIC files
have a corresponding ZPIC file that contains the z-depth channel information. Although
you can’t import a ZPIC file, you can access the additional channel information as long as
the ZPIC file is stored in the same folder as the imported PIC file.
Similarly, Electric Image (EI) files can now have associated EIZ files with z-depth channel
data. Just as with ZPIC files, you cannot import EIZ files into After Effects; instead, you store
them in the same folder as the EI files. For information about creating EIZ files, see your
Electric Image documentation.
Importing an audio file
You can import a variety of audio file formats directly into After Effects. When you add
audio-only files to a composition, they appear as layers in the Timeline window. You can
adjust the audio preview settings, such as sample rate, in the General Preferences dialog
box. These settings change the quality of audio playback when you preview the composition, not when you render it. For more information, see “Using audio layers” on page 91.
Importing Cineon files
You can import Cineon 4.5 or Digital Picture Exchange (DPX) files directly into an After
Effects project as individual frames or as a sequence of numbered stills. Once you have
imported a Cineon file, you can use it in a composition and then render the composition
as a Cineon sequence. See “Importing a sequence of still-image files” on page 29.
Cineon files are commonly used to transfer motion-picture film to a digital format. To
preserve the full dynamic range of motion-picture film, Cineon files are stored using
logarithmic 10 bits per channel (bpc). However, After Effects internally uses linear 8-bpc
color, (or 16-bpc, for the Production Bundle only). By default, After Effects stretches the
attendant logarithmic values to the full range of values available. You can then use the
Cineon Import Options dialog box or the Cineon Converter effect to control the
conversion. (If you are working with a film sequence in which exposure conditions vary
over time, you can vary the conversion over time by setting keyframes.) For information on
using the Cineon converter, see “Cineon Converter” on page 190.
Using Help | Contents | Index Back 38
Page 39

Adobe After Effects Help Preparing and Importing Footage
Using Help | Contents | Index Back 39
To import a Cineon sequence:
1 Choose File > Import > File.
2 For the file type, select Cineon, and then select Cineon Sequence.
3 Locate and select the first numbered Cineon sequence file.
4 Select the Cineon Sequence option, and then click Open.
The Cineon file or sequence appears in the Project window.
To convert a Cineon sequence from logarithmic to linear:
1 Select the sequence in the Project window, and choose File > Interpret Footage > Main.
2 In the Interpret Footage dialog box, click More Options.
3 In the Cineon Conversion dialog box, select the Logarithmic Conversion option, click
OK, and click OK again.
When you are ready to produce output from the Cineon file, it is important that you
reverse the conversion from logarithmic to linear.
Preparing motion footage for import
Some of the source footage you use may have been created digitally (for example, in
Adobe Photoshop or Adobe Premiere), but other footage may need to be transferred to
the computer from analog sources, such as film and videotape. When you work with After
Effects, understanding some of the differences among media can help you decide how to
handle footage as you transfer it between digital and analog devices. For more information, see “Analog video” on page 39, “Analog film” on page 39, “Digital video” on
page 40, and “Interlaced and noninterlaced footage” on page 40.
Analog video
Analog video carries picture and sound information by creating variations in an electromagnetic signal. Before you can import analog video into After Effects, you need to
digitize it. Digitizing converts the electromagnetic signal to a binary signal, which can be
read by a computer.
Analog film
Analog film, such as a still transparency or common motion-picture film, carries picture
information by creating variations in colored dyes on a strip of acetate.
To apply digital effects to motion-picture film using After Effects, you must first transfer
the film to a digital format. You can transfer film in two ways:
• Use a film scanner to transfer each analog film frame directly to a digital movie frame.
This method best preserves the image quality. Using a film scanner is preferable,
because you scan the footage directly to the computer as noninterlaced, full-resolution,
24-fps footage; in other words, it is ready to use in After Effects. See “Importing Cineon
files” on page 38.
• Transfer the analog film to analog videotape, and then digitize the videotape. This
process is called telecine transfer. It converts 24-fps film footage to 30-fps videotape
using 3:2 pulldown. Transferring using the 3:2 pulldown method introduces two issues:
you must resolve the different frame rates of videotape and motion-picture film, and
you must separate the fields of the interlaced video. After Effects can automatically
Using Help | Contents | Index Back 39
Page 40

Adobe After Effects Help Preparing and Importing Footage
Using Help | Contents | Index Back 40
resolve both of these issues while preserving image quality. See “About 3:2 pulldown”
on page 44.
Note: To use an After Effects movie in an analog motion-picture film, you must transfer the
movie back to the analog film medium. This transfer process is generally done at a postproduction facility.
Digital video
Digital video carries picture information by representing each pixel of a video frame as a
discrete color value, and transmitting and storing the pixel values in the binary data
format used by computers. Sound is also carried as binary data.
Digital video is not one format, but a medium within which many file formats exist. Even if
your source footage was created digitally, you still need to make sure that it is stored in a
file format that After Effects can import.
If you plan to distribute the movie digitally, for example on CD-ROM, you must render it in
a file format appropriate for your distribution method. For more information, see “Making
(rendering) a movie” on page 278.
Note: DV video format is a form of digital video that can be downloaded directly to your
hard disk for editing in applications such as Adobe After Effects and Adobe Premiere. Many
DV decks can connect directly to a computer using an IEEE 1394 (FireWire
interface. See “About D1, DV, and various pixel aspect ratio footage” on page 46.
™
/i.Link)
Interlaced and noninterlaced footage
Another way to classify analog or digital footage is as interlaced or noninterlaced. Currently,
most broadcast video is interlaced; each frame consists of two fields displayed in turn. The
computer operating system and After Effects display noninterlaced video, also known as
progressive scan, in which each frame is displayed completely from top to bottom. When
you finish creating a movie for display on a television, After Effects can render it back to
fields, maintaining high quality for broadcast display.
Interlaced video consists of two fields, known either as Field 1 and Field 2, even and odd,
or (as After Effects refers to them) upper and lower. When these fields are presented
sequentially on an NTSC or PAL video monitor they create a smooth, unified picture. See
“Frames and fields” on page 9.
Using Help | Contents | Index Back 40
Page 41

Adobe After Effects Help Preparing and Importing Footage
Using Help | Contents | Index Back 41
In interlaced video, a frame is divided into two fields. Each field contains every other
horizontal line in the frame. A TV displays the first field of alternating lines over the entire
screen, and then displays the second field to fill in the alternating gaps left by the first
field. One NTSC video frame, displayed for approximately
interlaced fields, displayed for approximately
1
3
5
7
2
4
1
/60 of a second each.
1
/30 of a second, contains two
6
8
Interlaced video describes a frame with two passes of alternating scan lines.
In noninterlaced video, scan lines are drawn in order from top to bottom, in one pass.
Computer video and computer movie formats are generally noninterlaced. Motionpicture film is similar to noninterlaced video because it also displays an entire frame in one
pass.
Interlacing is a factor in image quality only for certain effects, such as rotating a frame or
compositing video with digital effects. It is a characteristic of footage capture and display,
not a structural component of file formats or media. You can easily play back a digitized
NTSC or PAL movie (interlaced) on a computer display (noninterlaced), or display a 35mm
photograph (noninterlaced) on an NTSC or PAL video monitor (interlaced).
If you use interlaced video in a composition or want to use an After Effects movie in an
interlaced-video medium such as NTSC, you must separate fields as you import and fieldrender the composition to a finished movie file. For more information, see “Using interlaced video in After Effects” on page 43 and “Testing the field-rendering order” on
page 302.
Using Help | Contents | Index Back 41
Page 42

Adobe After Effects Help Preparing and Importing Footage
Using Help | Contents | Index Back 42
Preparing a movie for import when final output is NTSC interlaced video
You can edit and prepare video footage in other applications, such as Adobe Premiere,
before importing it into After Effects. If you want to render the footage from After Effects
as NTSC interlaced video, do not field-render or create interlaced frames when you render
the movie from the other application. It’s acceptable to render interlaced video for
temporary files, but 60 progressive gives better quality. Make sure that you keep track of
the original field order so you can correctly render it in After Effects. See “Field rendering”
on page 44 and “Testing the field-rendering order” on page 302.
As long as the footage is on a computer, it should remain noninterlaced. Keeping the
footage in noninterlaced format preserves more image quality and saves you the extra
step of separating fields in After Effects. Once it’s ready to go to your nonlinear editor, such
as Adobe Premiere, it should be interlaced.
When you render the movie from the other application, render it at 60 fps of framerendered (noninterlaced) video. After you integrate it into a composition, After Effects can
render it to high-quality field-rendered (interlaced) frames at 30 fps for videotape.
Preparing motion-footage frame rates for final output
When you import motion footage into After Effects, the file’s frame rate does not change. If
you plan to output your footage to a different frame rate, you can make it conform to the
new frame rate in After Effects. Conforming ensures that frames disperse evenly over the
new output frame rate.
Conforming footage does not alter the original footage, only the reference that is used by
After Effects. When it conforms, After Effects changes the internal duration of frames but
does not change the frame content. If the conformation is a large amount, the footage
plays back at a different speed. For example, if you change the frame rate from 15 fps to 30
fps, the footage plays back faster.
It’s best to make the frame rate the same as the final output frame rate for your project.
This way, After Effects renders each frame, and the final output does not omit or duplicate
frames. However, in order not to drastically change the speed of your motion footage, it
may be beneficial to conform only by a small amount, making the new frame rate divisible
by the output rate. For example, if your original footage has a frame rate of 29.97 fps and
you want to output it for playback on CD-ROM at 10 fps, you can conform to 30 fps. At 30
fps, the frames are divisible by 10, so After Effects can evenly render every third frame.
Note: If you want to output original NTSC footage as PAL or vice versa, you must have
access to hardware that supports each format.
To change the frame rate of a motion footage file:
1 Select the footage file in the Project window.
2 Choose File > Interpret Footage > Main.
3 Select Conform to Frame Rate, and type a new frame rate in the Frames Per Second box.
Then click OK.
Note: This procedure can change the synchronization of audio and video files. Be sure to
check your files and make any necessary adjustments.
Using Help | Contents | Index Back 42
Page 43

Adobe After Effects Help Preparing and Importing Footage
Using Help | Contents | Index Back 43
Using interlaced video in After Effects
If you want to use interlaced or field-rendered footage (such as from NTSC video) in an
After Effects project, you will get the best results if you separate the video fields when you
import the footage. After Effects separates video fields by creating a full frame from each
field, preserving all of the image data from the original footage.
When importing interlaced video that was originally transferred from film, you can
remove the 3:2 pulldown that was applied during the transfer from film to video as you
separate fields so that effects you apply in After Effects don’t appear distorted. See
“Removing 3:2 pulldown from video transferred from film” on page 45.
Separating fields
Separating fields is critical if you plan to make significant changes to the footage. When
you scale, rotate, or apply effects to interlaced video, unwanted artifacts, such as crossed
fields, are often introduced. By separating fields, After Effects accurately converts the two
interlaced frames in the video to noninterlaced frames, while preserving the maximum
amount of image quality. Using noninterlaced frames allows After Effects to apply edits
and effects consistently and at the highest quality.
After Effects creates field-separated footage from a single formerly interlaced field by
splitting fields into two independent frames. Each new frame has only half the information
of the original frame, so some frames may appear to have a lower resolution than others
when viewed at Draft quality. When you render the final composition, After Effects reproduces high-quality interlaced frames for videotape. When you render a movie at Best
quality, After Effects interpolates between the scan lines of a field to produce maximum
image quality.
Note: After Effects automatically separates fields for D1 and DV video footage files. You
can manually separate fields for all other types of video footage in the Interpret Footage
dialog box. For more information, see “Specifying interpretation rules” on page 27.
To separate video fields in imported footage:
1 Select the footage item in the Project window.
2 Choose File > Interpret Footage > Main.
3 Select an option from the Separate Fields pop-up menu.
4 Click Motion Detect to increase image quality in nonmoving areas when the image is
rendered at Best quality. Then click OK.
Interpreting field order
Interlaced video has a field order defining the order in which the two video fields (upper
and lower) are displayed. A system that draws the upper lines before the lower lines is
called upper-field first; one that draws the lower lines before the upper lines is called lower-
field first. T he order in which the fields are displayed is important, especially when the
fields contain motion. If you separate video fields using the wrong field order, motion will
not appear smooth.
Using Help | Contents | Index Back 43
Page 44

Adobe After Effects Help Preparing and Importing Footage
Using Help | Contents | Index Back 44
Some programs, including After Effects and current versions of Media 100, label the field
order when rendering interlaced video files. When you import a labeled video file, After
Effects honors the field order label automatically. You can override the field order using
the Interpretation Rules file. For more information about field order, see “Specifying interpretation rules” on page 27.
If a file does not contain a field order label, you can match the original field order of your
footage. If you are not sure which field order was used to interlace a footage item, use the
procedure below to find out.
To determine the original field order:
1 Select the item in the Project window.
2 Choose File > Interpret Footage > Main.
3 In the Interpret Footage dialog box, select Upper Field First from the Separate Fields
pop-up menu, and then click OK.
4 In the Project window, press Alt (Windows) or Option (Mac OS) as you double-click the
footage to open it in a Footage window.
5 If the Time Controls palette is not visible, choose Window > Show Time Controls.
6 In the Footage window, find a segment that contains one or more moving areas.
7 Using the Frame Advance button ( ) on the Time Controls palette, step forward at least
five frames in the Footage window. Moving areas should move consistently in one
direction. If the moving areas move backward every other frame, the wrong fieldseparation option has been applied to the footage.
Note: Analog capture cards can vary. DV or footage captures from IEEE 1394 FireWire/
i.Link are always lower field first.
Field rendering
When you render a composition containing separated footage, set the Field Rendering
option to the same field order as your video equipment. If you don’t field-render the
composition, or if you field-render with the incorrect settings, the final movie may appear
too soft, jerky, or distorted. See “Testing the field-rendering order” on page 302.
About 3:2 pulldown
When you transfer 24-fps film to 29.97-fps (NTSC) video, you use a process called 3:2
pulldown, in which the film frames are distributed across video fields in a repeating 3:2
pattern. The first frame of film is copied to fields 1 and 2 of the first frame of video, and also
to field 1 of the second video frame. The second frame of film is then spread across the
next two fields of video—field 2 of the second video frame and field 1 of the third frame of
video. This 3:2 pattern is repeated until four frames of film are spread over five frames of
video, and is then repeated.
The 3:2 pulldown process results in whole frames (represented by a W ) and split-field
frames (represented by an S). The three whole video frames contain two fields from the
same film frame. The remaining two split-field frames contain a video frame from two
different film frames. The two split-field frames are always adjacent to each other. The
phase of 3:2 pulldown refers to the point at which the two split-field frames fall within the
first five frames of the footage.
Using Help | Contents | Index Back 44
Page 45

Adobe After Effects Help Preparing and Importing Footage
Using Help | Contents | Index Back 45
Phase occurs as a result of two conversions that happen during 3:2 pulldown: 24-fps film is
redistributed through 30-fps video, so each of four frames of 24-fps film is spread out over
five frames of 30(29.97)-fps video. First, the film is slowed down 0.1% to match the speed
difference between 29.97 fps and 30 fps. Next, each film frame is repeated in a special
pattern and mated to fields of video.
2323
A
B
WS S WW
When you apply 3:2 pulldown to footage, one frame of the film (A) is separated into two or three
interlaced video fields (B), which are grouped into video frames containing two fields each.
Removing 3:2 pulldown from video transferred from film
When you transfer 24-fps film to 29.97-fps (NTSC) video, you use a process called 3:2
pulldown, in which the film frames are distributed across video fields in a repeating 3:2
pattern. It’s important to remove 3:2 pulldown from video footage that was originally film,
so that effects you add in After Effects synchronize perfectly with the original frame rate of
film. Removing 3:2 pulldown reduces the frame rate by 4/5: from 30 to 24 fps or from 29.97
to 23.976 fps, which also reduces the number of frames you have to change. To remove 3:2
pulldown, you must also indicate the phase of the 3:2 pulldown. For more information, see
“About 3:2 pulldown” on page 44.
Before you remove 3:2 pulldown, separate the fields as either upper-field first or lowerfield first. Once the fields are separated, After Effects can analyze the footage and
determine the correct 3:2 pulldown phase and field order. If you already know the phase
and field order, choose them.
Note: If your footage file contains frames from different sources, the phase may not be
consistent. If this is the case, import the footage once for each phase. Then, add the
footage to your composition as many times as there are phases and trim each layer to use
only the appropriate frames for each phase.
To remove 3:2 pulldown from video transferred from film:
1 In the Project window, select the footage from which you want to remove 3:2 pulldown.
2 Choose File > Interpret Footage > Main.
3 In the Fields and Pulldown section, select Upper Field First or Lower Field First from the
Separate Fields pop-up menu.
4 Do one of the following and click OK:
Using Help | Contents | Index Back 45
Page 46

Adobe After Effects Help Preparing and Importing Footage
Using Help | Contents | Index Back 46
• To have After Effects determine the correct settings, click Guess 3:2 Pulldown.
• If you know the phase of the 3:2 pulldown, choose it from the Remove Pulldown pop-
up menu.
About D1, DV, and various pixel aspect ratio footage
Pixel aspect ratio specifies the ratio of width to height of one pixel in an image. Frame
aspect ratio describes the ratio of width to height in the frame dimensions of an image. For
example, D1 NTSC has a pixel aspect ratio of 0.9 (or 0.9 width by 1.0 height). It also has a
frame aspect ratio of 4:3 (or 4.0 width by 3.0 height).
416
3
A 4:3 frame aspect ratio (left), and a wider 16:9 frame aspect ratio (right)
9
Some video formats output the same frame aspect ratio but use a different pixel aspect
ratio. For example, some NTSC digitizers produce a 4:3 frame aspect ratio, with square
pixels (1.0 pixel aspect ratio), and a resolution of 640 x 480. D1 NTSC produces the same
4:3 frame aspect ratio but uses rectangular pixels (0.9 pixel aspect ratio) and a resolution
of 720 x 486. D1 pixels, which are always rectangular, are vertically oriented in systems
producing NTSC video and horizontally oriented in systems producing PAL video.
If you display rectangular pixels on a square-pixel monitor without alteration, images and
motion appear distorted; for example, circles distort into ovals. However, when displayed
on a broadcast monitor, the images will be correct.
AB C
A. Square pixels and 4:3 frame aspect ratio B. Nonsquare pixels and 4:3 frame aspect ratio
C. Nonsquare pixels displayed on a square-pixel monitor
When you import D1 NTSC or DV source footage into After Effects, the image looks slightly
wider than it does on a D1 or DV system. (D1 PAL footage looks slightly narrower.) The
opposite effect occurs when you import anamorphic footage using D1/DV NTSC
Widescreen or D1/DV PAL Widescreen. Widescreen video formats have a frame aspect
ratio of 16:9.
Using Help | Contents | Index Back 46
Page 47

Adobe After Effects Help Preparing and Importing Footage
Using Help | Contents | Index Back 47
If a file uses rectangular pixels, After Effects displays the pixel aspect ratio next to the file’s
image thumbnail in the Project window. You can change the pixel aspect ratio interpretation for individual files in the Interpret Footage dialog box. By ensuring that all footage
files are interpreted correctly, you can combine footage with different ratios in the same
project or composition and generate output that plays correctly.
When you import footage with either the D1 resolution of 720 x 486, or the DV resolution
of 720 x 480, After Effects automatically sets the pixel aspect ratio for that file to D1/DV
NTSC. When you import footage with the D1 or DV resolution of 720 x 576, After Effects
automatically sets the pixel aspect ratio for that file to D1/DV PAL. However, it is always a
good idea to make sure that all files are interpreted correctly by looking in the Project
window or the Interpret Footage dialog box. For information about using interpretation
rules to automate the import process, see “Specifying interpretation rules” on page 27.
Note: Make sure to reset the pixel aspect ratio to Square Pixels when you import a squarepixel file that happens to have a D1 or DV resolution—for example, an Adobe Photoshop
image with a resolution of 720 x 480.
Setting pixel aspect ratio
It is important to set the pixel aspect ratio for a footage file at its original ratio, not the ratio
of the final output. For general information about pixel aspect ratio, see “About D1, DV,
and various pixel aspect ratio footage” on page 46.
Set pixel aspect ratios for footage and compositions with these approximate values:
Square Pixels Uses a 1.0 pixel aspect ratio. Use this setting if your footage has a 640 x
480 or 648 x 486 frame size.
D1/DV NTSC Uses a 0.9 pixel aspect ratio. Use this setting if your footage has a 720 x 480
or 720 x 486 frame size, and your desired result is a 4:3 frame aspect ratio.
D1/DV NTSC Widescreen Uses a 1.2 pixel aspect ratio. Use this setting if your footage
has a 720 x 480 or 720 x 486 frame size, and your desired result is a 16:9 frame aspect ratio.
D1/DV PAL Uses a 1.0666 pixel aspect ratio. Use this setting if your footage has a 720 x
576 frame size, and your desired result is a 4:3 frame aspect ratio.
D1/DV PAL Widescreen Uses a 1.422 pixel aspect ratio. Use this setting if your footage
has a 720 x 576 frame size, and your desired result is a 16:9 frame aspect ratio.
Anamorphic 2:1 Uses a 2.0 pixel aspect ratio. Use this setting if your footage was shot
using an anamorphic film lens.
D4/D16 Standard Uses a 0.948 pixel aspect ratio. Use this setting if your footage has a
1440 x 1024 or 2880 x 2048 frame size, and your desired result is a 4:3 frame aspect ratio.
D4/D16 Anamorphic Uses a 1.896 pixel aspect ratio. Use this setting if your footage has
a 1440 x 1024 or 2880 x 2048 frame size, and your desired result is an 8:3 frame aspect
ratio.
To set the pixel aspect ratio for imported footage:
1 Select the footage in the Project window.
2 Choose File > Interpret Footage > Main.
3 Select a ratio from the Pixel Aspect Ratio pop-up menu and click OK.
Using Help | Contents | Index Back 47
Page 48

Adobe After Effects Help Preparing and Importing Footage
Using Help | Contents | Index Back 48
If you are planning to render to the same pixel aspect ratio as your footage, you also need
to set the pixel aspect ratio for the composition.
To set the pixel aspect ratio for a composition:
1 Open the composition.
2 Choose Composition > Composition Settings.
3 Select a ratio from the Pixel Aspect Ratio pop-up menu and click OK.
In some circumstances, you may need to work on a monitor that doesn’t match the pixel
ratio, so that your working view doesn’t match the final output. You can correct the pixel
aspect for previewing purposes.
To correct pixel aspect distortion (for previewing only):
With the appropriate composition open, click the arrow above the vertical scroll bar in the
Composition window and choose Pixel Aspect Correction.
Using square-pixel footage for output to D1 or DV NTSC
You can use square-pixel footage in a D1/DV NTSC composition and generate output that
does not appear distorted. Note that the pixel aspect ratio is identical between D1 and DV,
but there is a slight difference in composition frame size. The steps that follow contain
information about issues discussed elsewhere in this guide.
To use square-pixel footage when outputting to D1 or DV NTSC:
1 Prepare square-pixel footage that fills the entire frame using one of the following
methods:
• If your final output is DV, create and save it at a 720 x 534 frame size.
• If your final output is D1, create and save it at a 720 x 540 frame size.
2 Import the file into After Effects.
Note: If your square-pixel footage was created and saved at 720 x 486 or 720 x 480, select
it and choose File > Interpret Footage > Main. Then choose Square Pixels from the Pixel
Aspect Ratio pop-up menu and click OK.
3 Choose Composition > New Composition, and then select one of the following:
• If your final output is DV, choose NTSC DV, 720 x 480 for Frame Size, and D1/DV NTSC for
Pixel Aspect Ratio.
• If your final output is D1, choose NTSC D1, 720 x 486 for Frame Size, and D1/DV NTSC for
Pixel Aspect Ratio.
4 Select your other Composition settings as desired, and then click OK.
5 Add your footage to the new composition.
Note: If your footage was created and saved at a frame size other than those noted in step
1, skip step 6.
6 Select the layer containing the square-pixel footage and apply the Shrink to Fit
command: press Ctrl+Alt+F (Windows) or Command+Option+F (Mac OS).
Using Help | Contents | Index Back 48
Page 49

Adobe After Effects Help Preparing and Importing Footage
Using Help | Contents | Index Back 49
Importing DDR-based footage
To find out if After Effects plug-ins are available for your digital disk recorder (DDR),
contact your DDR manufacturer.
You can bring DDR-based footage into an After Effects project in two ways. First, you can
work with the footage while it remains on the DDR, essentially treating the DDR as a
remote hard disk. You can also transfer the footage to your hard disk and import it into an
After Effects project as you would any other file.
For information on using your specific DDR with After Effects, refer to your DDR manufacturer’s plug-in documentation.
Setting up frames and fields for DDR-based footage
When working with DDR-based footage in After Effects, make sure that your Composition
Settings, Render Settings, and the Interpret Footage dialog boxes for the footage files are
all set to the fps used by your DDR. If the frame rate in the Interpret Footage dialog box is
29.97 and the Composition Settings frame rate is 30 fps, the footage will appear with
duplicate frames.
It is also important to separate fields when importing DDR-based footage. Make sure that
the field settings in the Interpret Footage and Render Settings dialog boxes are the same;
otherwise, the footage will preview and render with the wrong field order, causing the
footage to play back with a jerky appearance. See “Using interlaced video in After Effects”
on page 43.
For information on using your specific DDR with After Effects, refer to your DDR manufacturer’s plug-in documentation.
Using Help | Contents | Index Back 49
Page 50

Adobe After Effects Help Building a Composition
Using Help | Contents | Index Back 50
Building a Composition
Wo r king with imported footage
After you have imported footage, you can view, edit, and change settings for your
imported footage without using a Composition window.
Viewing imported footage
You can view any movie or graphic item listed in a Project window at full size by opening it
in a Footage window. You can also view the footage at different magnifications and
examine individual frames.
When you double-click a movie in the Project window, it opens by default in the appropriate Footage window: QuickTime (.mov) files open in the QuickTime Footage window;
Video for Windows (.avi) files open in the Video for Windows Footage window. Still images
always appear in an After Effects Footage window.
The QuickTime and Video for Windows Footage windows do not display the effect of
settings made in the Interpret Footage dialog box, such as the alpha channel interpretation. However, for any footage item that includes audio, the QuickTime and Video for
Windows Footage windows play the audio, while the After Effects Footage window does
not.
To view the footage with more controls and information but without audio, view it in an
After Effects Footage window, where you can trim the footage and insert it into the
Timeline window. For more information about playing back, magnifying or reducing,
viewing the alpha channel of a footage item, and trimming video, see “Composition, Layer,
and Footage window controls” on page 16 and “Trimming layer footage” on page 82.
To open a movie in the default Footage window:
Double-click a movie in the Project window.
Using Help | Contents | Index Back 50
Page 51
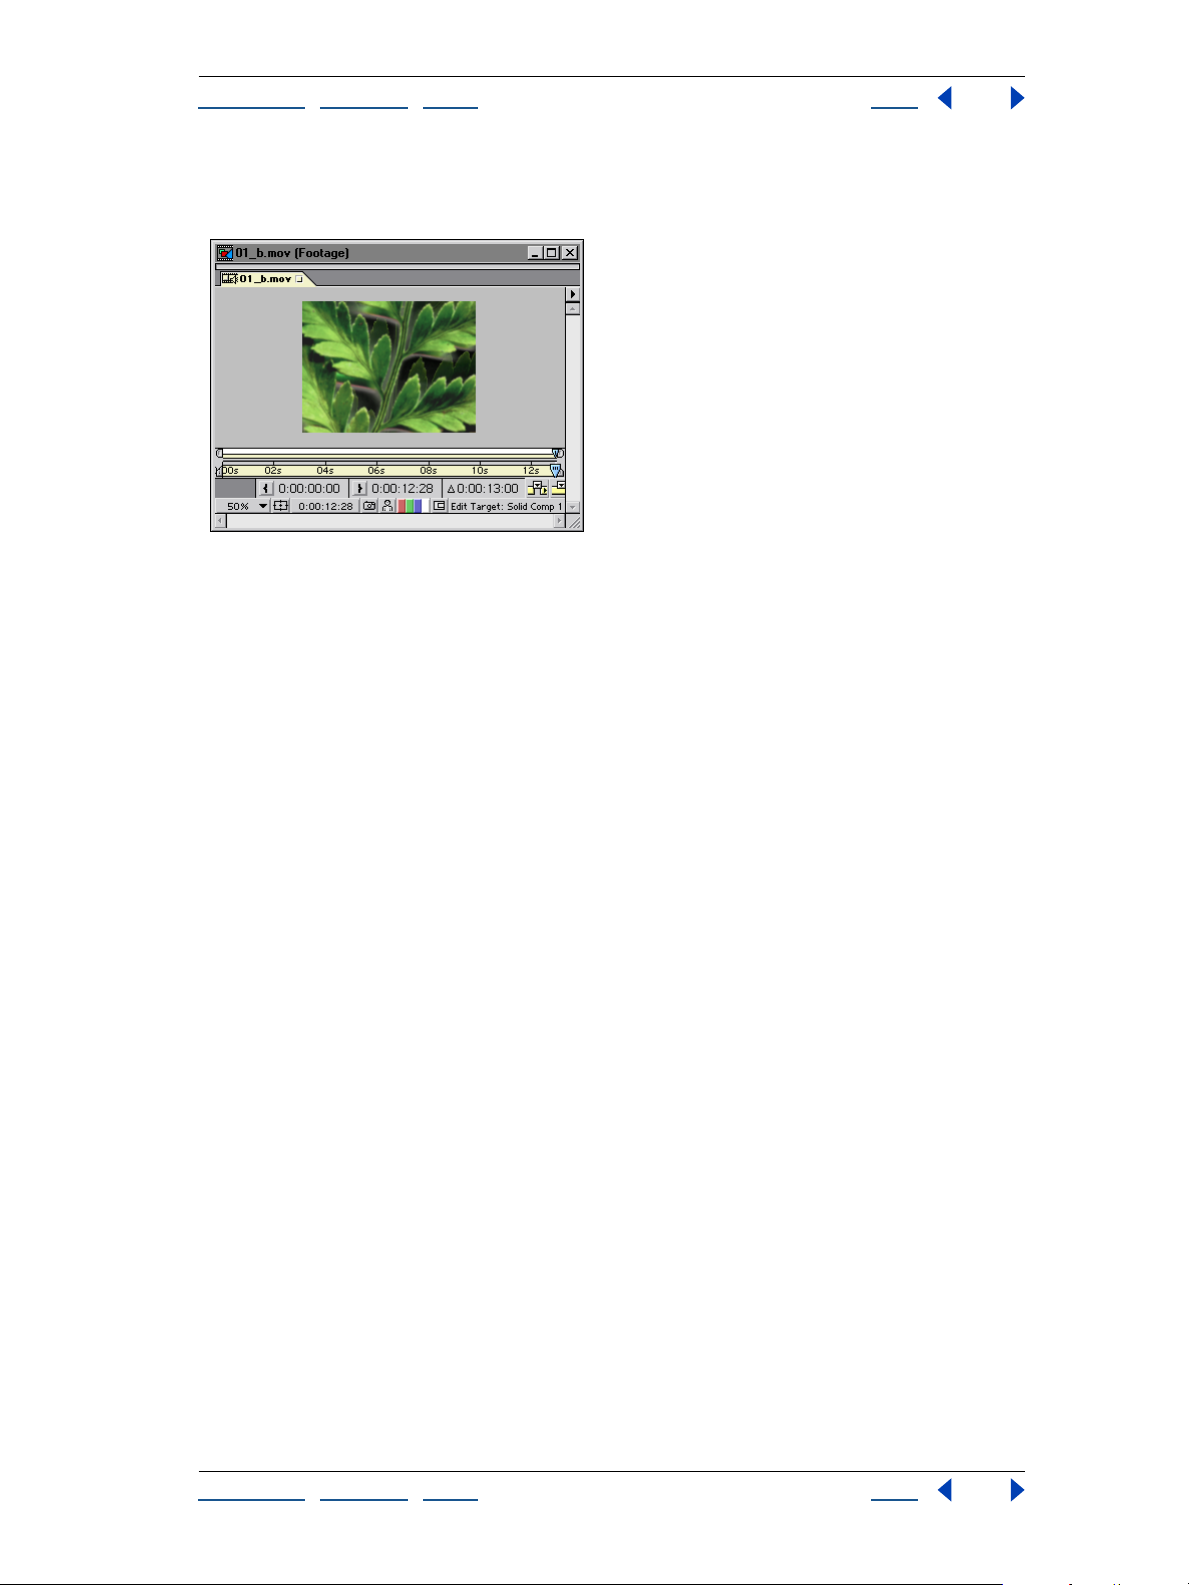
Adobe After Effects Help Building a Composition
Using Help | Contents | Index Back 51
To open a movie in an After Effects Footage window:
Press Alt (Windows) or Option (Mac OS) as you double-click a movie in the Project window.
In the After Effects Footage window, you can trim the footage and insert it into the Timeline window.
Opening footage in its original application
You can open and edit a footage item in the application in which it was created, directly
from an After Effects project. The original application must be installed on the computer
you are using, and there must be enough unused RAM for it to run. When you edit and
save changes to the footage in the original application, the changes are applied to all
instances of the footage in the After Effects project the next time you open the project.
When you edit a still-image sequence selected in the Timeline or Composition windows,
After Effects opens the individual image that is currently displayed. When you edit a stillimage sequence selected in the Project window, the first image in the sequence opens.
To open a footage item in the original application:
1 In the Project window, Composition window, or Timeline window, select the footage or
a layer containing the footage. If you selected a still-image sequence from the Composition or Timeline window, move the current-time marker to the frame displaying the still
image you want to edit.
2 Choose Edit > Edit Original.
3 Edit the footage in its original application, and save the changes.
Note: If you’re editing footage that has an alpha channel, make sure that you’re viewing
and editing all the channels, including the alpha channel, in the other application.
Otherwise, changes you make might not be applied to the alpha channel, and it may
become misaligned with the color channels.
If your project is open when you make a change to a footage file, After Effects can reload
the new version of the file while the project is open.
To reload an edited file:
1 In After Effects, select the footage file in the Project window.
2 Choose File > Reload Footage.
Using Help | Contents | Index Back 51
Page 52

Adobe After Effects Help Building a Composition
Using Help | Contents | Index Back 52
Setting the frame rate for footage
You can change the frame rate for any movie or sequence of still images. For example, you
can import a sequence of ten still images and specify a frame rate of 5 frames per
second (fps).
To set the frame rate for footage:
1 Select an item in the Project window.
2 Choose File > Interpret Footage > Main.
3 In the Frame Rate section of the Interpret Footage dialog box, specify a frame rate for
Conform to Frame Rate.
Note: If you remove 3:2 pulldown from interlaced video footage, After Effects automatically sets the frame rate of the resulting footage to four-fifths of the original frame rate.
When removing 3:2 pulldown from NTSC video, the resulting frame rate is 24 fps. See
“About 3:2 pulldown” on page 44.
Looping footage
If you intend to loop visual footage continuously in your project, you need to create only
one cycle of the footage in After Effects.
To loop footage:
1 In the Project window, select the footage you want to loop.
2 Choose File > Interpret Footage > Main.
3 Type an integer value for Looping and click OK.
Copying Interpret Footage settings
If you want to ensure that different footage items use the same Interpret Footage settings,
copy settings from one item and apply them to others.
To apply Interpret Footage settings to several footage items:
1 In the Project window, select the item whose footage interpretations you want to apply.
2 Choose File > Interpret Footage > Remember Interpretation.
3 Select one or more footage items.
4 Choose File > Interpret Footage > Apply Interpretation. After Effects applies the footage
interpretation options to the selected items.
Replacing and substituting footage
After Effects offers a number of ways to replace and substitute footage in a composition.
Using proxies or other items in place of original footage can be useful when the footage
you want to use is not available. Also, when you are working with large, high-resolution
items, you may want to use low-resolution proxies to work more quickly and efficiently.
Using Help | Contents | Index Back 52
Page 53

Adobe After Effects Help Building a Composition
Using Help | Contents | Index Back 53
Replacing footage throughout a project
You can replace one footage item with another at any time while working on a project.
This can be useful if you receive a new version of a source file used in your project, and you
want to replace the original footage with the new version. The new footage item replaces
the existing one in layers and compositions throughout the project. When you replace
footage, all values (property settings, effect settings, and so on) remain applied to the
layer.
To replace footage throughout a project:
1 In the Project window, select the name of the footage item you want to replace.
2 To import a replacement file, choose File > Replace Footage > File, select the file, and
then click Open.
Note: If the new footage item is a different size, it is not scaled to fit the original item’s size.
Replacing footage of one or more layers
You can replace the original source footage of one or more layers without changing any
settings applied to the original footage. The new source footage or composition takes the
place of the old source to the layers, but uses the existing keyframes.
To replace the source footage of one or more layers:
1 In a Timeline window, select the layer or layers to be replaced.
2 Hold down Alt (Windows) or Option (Mac OS) as you drag a footage item or compo-
sition from the Project window to any of the following places containing the selected
layers: the Composition window, the Timeline window, or the Composition icon in the
Project window.
About placeholders and proxies
When you want to temporarily use a substitute for footage, choose one of two alternatives: a placeholder or a proxy.
Placeholder A still image of color bars used to temporarily take the place of missing
footage. Use a placeholder when you are building a composition and want to try out ideas
for footage that is not yet available. After Effects generates placeholders automatically, so
you do not have to provide any placeholder footage.
Proxy Most often a lower-resolution or still version of existing footage used to replace
the original to save processing time. Use a proxy when you have the actual footage but
you want to speed up previewing or rendering of test movies. You must have a file
available to use as a proxy.
Using either method, any attributes and keyframes you apply to the placeholder or proxy
are transferred to the actual footage when you insert it. You can even set a proxy for a
placeholder, so that you use a low-resolution or still version of full-resolution footage that
is not yet available. See “Working with missing source footage” on page 54 and “Substituting a low-resolution proxy for footage” on page 54.
If final footage is unavailable, and you simply want to substitute draft footage or a storyboard still image, you can import the draft footage and replace it with final footage later.
Using Help | Contents | Index Back 53
Page 54

Adobe After Effects Help Building a Composition
Using Help | Contents | Index Back 54
Working with missing source footage
If After Effects cannot find footage when you open a project, it appears in the Project
window labeled Missing, and the name of the missing footage appears in italics. Any
composition using that item as a layer replaces it with placeholder color bars.
You can still work with the missing item in the project, and any effects you have already
applied to the missing layer remain intact.
If you replace the placeholder with the actual footage, it returns to its correct place in all
the compositions that use it. See “Substituting a placeholder for footage” on page 54.
Substituting a placeholder for footage
A placeholder appears in After Effects as a still image of color bars. You can apply a mask,
effects, and geometric properties to a placeholder. When the actual footage item becomes
available, you can replace the placeholder with it, and the applied attributes and
keyframes are transferred to the actual footage.
For best results, set the placeholder to exactly the same size, duration, and frame rate as
the actual footage.
To use a placeholder:
1 Choose File > Import > Placeholder or File > Replace Footage > Placeholder.
2 In the New Placeholder dialog box that appears, specify the placeholder’s name, size,
frame rate, and duration, and then click OK.
To replace a placeholder with the actual footage:
1 In the Project window, double-click the placeholder you want to replace.
2 Locate and select the actual footage, and then click OK, or choose File > Replace
Footage > File to locate the file.
Substituting a low-resolution proxy for footage
Movies, images, and compositions used as layers can take up significant amounts of RAM
and disk space when used in compositions, and can slow down working and rendering in
elaborate projects. Using low-resolution proxy items in place of actual items is a way to
lighten the burden on your computer and speed your work. Effects, masks, and properties
applied to the proxy are applied to the actual footage item when you replace the proxy
with the actual footage.
When you use a proxy, After Effects replaces the actual footage with the proxy in all
compositions that use the actual footage item. When you finish working, you can switch
back to the actual footage item in the project list. After Effects then replaces the proxy
with the actual footage item in any composition.
When you render your composition as a movie, you may choose to use either all the actual
high-resolution footage items or their proxies. You might want to use the proxies for a
rendered movie if, for example, you simply want to test motion using a rough movie that
renders quickly.
Using Help | Contents | Index Back 54
Page 55

Adobe After Effects Help Building a Composition
Using Help | Contents | Index Back 55
For best results, set a proxy so that it has the same aspect ratio as the actual footage item.
For example, if the actual footage item is a 640 x 480-pixel movie, create and use a
160 x 120-pixel proxy. When a proxy item is imported, After Effects scales the item to the
same size and duration as the actual footage. If you create a proxy with an aspect ratio that
is different from that of the actual footage item, scaling will take longer.
To locate and use a proxy:
1 In the Project window, select a footage item.
2 Choose File > Set Proxy > File.
3 In the Set Proxy File dialog box, locate and select the file you want to use as the proxy,
and click Open (Windows) or Import (Mac OS).
To toggle between using the original footage and its proxy:
In the Project window, click the proxy indicator to the left of the footage name.
To stop using a proxy:
1 In the Project window, select the original footage item.
2 Choose File > Set Proxy > None.
Identifying proxy items in the Project window
In the Project window, After Effects marks the footage name to indicate whether the
actual footage item or its proxy is currently in use:
• A box containing a black square indicates that a proxy item is currently in use
throughout the project; the name of the proxy appears in boldface in the project list.
• An empty box indicates that the actual footage item is in use throughout the project.
• No box indicates that no proxy is assigned to the footage item.
D
A
B
C
A. Proxy assigned and in use B. Proxy assigned, but original in use
C. No proxy assigned D. Proxy name
Using Help | Contents | Index Back 55
Page 56

Adobe After Effects Help Building a Composition
Using Help | Contents | Index Back 56
Creating a composition
When you first create a new project, you must create a composition before you can start
working with your footage items. When you create a composition without changing
settings in the Composition Settings dialog box, the new composition uses the same
settings as the previous composition. For information on changing composition settings,
see “Understanding basic composition settings” on page 57.
Once you have created a composition, you can change its settings at any time. Remember,
however, that changing frame size or pixel aspect ratio can affect your final movie, so set
these as early in the project as possible. Use the Flowchart View to get a “big picture”
perspective of complex projects; see “Visualizing organization with Flowchart View” on
page 264.
Note: When you set up a new composition, the settings you use become the default
settings that will appear the next time you create a composition.
To create a composition:
1 Choose Composition > New Composition.
2 Type a Composition Name.
3 Choose a Preset from the menu or specify basic settings as follows. For detailed descrip-
tions of basic settings, see “Understanding basic composition settings” on page 57.
• Specify the frame’s Width and Height. As a general rule, frame size and aspect ratio
should match your source footage and intended output media.
• Select Lock Aspect Ratio if you want to type a width or height not included in the menu
and if you want After Effects to ensure that the composition dimensions conform to the
aspect ratio for the current values.
• Choose a Pixel Aspect Ratio from the pop-up menu. This is set automatically if you
choose a digital format (D1, D4, D16, or DV) for Preset. See “Setting pixel aspect ratio for
compositions” on page 58.
• Specify a Frame Rate in frames per second. See “Setting frame rate” on page 58.
• Choose a Resolution from the pop-up menu. “Setting resolution” on page 59.
• Specify the Start Timecode or Start Frame to determine the time value that will be
displayed for the first frame of the composition. This value does not affect rendering.
See “Setting start timecode or start frame” on page 60.
• Type a Duration for your composition. “Setting duration” on page 60.
4 Click the Advanced tab, specify advanced settings as follows, and then click OK. For
detailed descriptions of advanced settings, see “Understanding advanced composition
settings” on page 60.
• Use the Anchor control if you want to anchor the layers to a corner or edge of the
composition as it is resized. “Setting the anchor” on page 61.
• If desired, specify Shutter Angle and Shutter Phase settings for motion blur. See
“Adjusting the shutter angle for motion blur” on page 91.
• If desired, select the Preserve Resolution When Nested option so that the nested
composition retains its resolution setting. Select the Preserve Frame Rate When Nested
option to lock a composition to a specific frame rate. “Setting nesting options” on
page 61.
Using Help | Contents | Index Back 56
Page 57

Adobe After Effects Help Building a Composition
Using Help | Contents | Index Back 57
• For Rendering Plug-In, you may want to specify a third-party plug-in for rendering 3D
compositions. “Setting the rendering plug-in” on page 61.
To change a composition’s settings:
1 Choose Composition > Composition Settings.
2 Adjust basic settings as explained in “Understanding basic composition settings” on
page 57.
3 Click the Advanced tab and adjust advanced settings as explained in “Understanding
advanced composition settings” on page 60 and click OK.
Note: You cannot undo changes that were made before changing the composition
settings.
Understanding basic composition settings
When you create a new composition, it appears as a new item in the Project window.
Before you set up a new composition, determine the specifications of the final output.
These specifications influence the composition settings you choose for frame size,
duration, frame rate, and pixel aspect ratio. Three factors determine composition settings:
• The type of movie you are producing
• The requirements of any systems that will process the movie that After Effects renders
• The final delivery medium of the movie
For best results, specify the composition settings at the beginning of your design process.
After Effects bases certain calculations on the composition settings, so changing settings
such as frame size and pixel aspect ratio late in the project can affect your final movie.
(However, you can override some composition settings when creating a movie. For
example, you might change the composition-frame size to a smaller image size when
rendering.)
Setting frame size
The Composition window in After Effects contains the viewing frame and an area outside
the frame that you can use to move layers into and out of the frame. For your convenience,
After Effects includes a variety of presets, each containing settings for frame size, pixel
aspect ratio, and frame rate. You can also create a custom preset and save it for later use.
Because After Effects can position footage items outside the frame, specify a frame size no
larger than the actual size of the final viewing screen. After Effects previews and renders
only the footage items within the frame. For information on working with high-resolution
images, see “Working with higher image resolutions” on page 26.
Using Help | Contents | Index Back 57
Page 58

Adobe After Effects Help Building a Composition
Using Help | Contents | Index Back 58
The viewing frame occupies the center of the frame’s pixel area, which is centered in a
larger work area. You can position items outside the frame if, for example, you want a layer
to enter the frame from one side, cross the screen, and leave the frame on the other side.
You can move layers into and out of the frame.
Saving custom preset values
You can save values you set in the Composition Settings dialog box so that you can
reapply them to other compositions. Settings for Width, Height, Pixel Aspect Ratio, and
Frame Rate options are saved with the presets. However, Resolution, Start Timecode,
Duration, and Advanced composition options are not saved.
To save custom preset values:
1 In the Composition Settings dialog box, specify the width, height, pixel aspect ratio,
and frame rate values, and then click the Save button ( ).
2 Type a name for the preset and then click OK.
To reuse custom preset values:
In the Composition Settings dialog box, select the custom name from the Preset pop-up
menu.
To delete a preset:
Select the custom name from the Preset pop-up menu and click the trash icon ( ).
Setting pixel aspect ratio for compositions
Most computer monitors use square pixels, while ITU-R 601 (D1) and DV video use rectangular pixels. The Pixel Aspect Ratio option compensates for the rectangular pixels of D1
video format. Set the pixel aspect ratio that corresponds to your final output format. See
“Setting pixel aspect ratio” on page 47.
If you intend to create a movie for the D1 output format, choose D1 NTSC or D1 PAL. For
more information about D1 format, see “About D1, DV, and various pixel aspect ratio
footage” on page 46.
Note: The correct pixel aspect ratio for D1 NTSC or D1 PAL is chosen automatically when
you choose the corresponding preset item.
Setting frame rate
The composition frame rate determines the number of frames displayed per second.
Frame rate is usually determined by the type of output you produce. NTSC video has a
frame rate of 29.97 frames per second (fps), PAL video has a frame rate of 25 fps, and
motion picture film has a frame rate of 24 fps. Video intended for CD-ROM or the World
Wide Web is often 10 to 15 fps.
Using Help | Contents | Index Back 58
Page 59

Adobe After Effects Help Building a Composition
Using Help | Contents | Index Back 59
Each motion-footage item in a composition can also have a frame rate, and the
relationship between the footage-item frame rate and the composition frame rate determines how smoothly the layer plays. For example, if the footage-item frame rate is 30 fps
and the composition frame rate is 30 fps, whenever the layer advances one frame, the next
composition frame is displayed. If the footage-item frame rate is 15 fps and the composition frame rate is 30 fps, then two composition frames are displayed before the current
layer advances one frame, unless frame blending is enabled. (See “Using frame blending”
on page 89.)
When you use footage that was shot or rendered at the NTSC-standard rate of 29.97 fps
and the composition frame rate is 30 fps, approximately two footage frames will be
repeated every minute to compensate for the differing rates. To avoid repeated frames,
make sure that your composition frame rate matches your source footage, or enable frame
blending for the layers.
Setting resolution
Resolution determines the dimensions of the image in pixels, which affects the image
quality of the rendered composition. Setting a low resolution significantly increases
frame-rendering speed and decreases the amount of memory required to render. You can
use a low-resolution setting when animating or previewing a movie, and then increase the
resolution before rendering your final movie.
Choose from the following resolution settings in the Composition Settings dialog box:
Full Resolution Renders each pixel in a composition. This setting gives you the best
image quality, but takes the longest to render.
Half Resolution Renders one-quarter of the pixels contained in the full-resolution
image—half the columns and half the rows. This results in a rendering time approximately
one-fourth of the time required to render the entire image at full resolution.
Third Resolution Renders one-ninth of the pixels contained in the full-resolution image.
This results in a rendering time approximately one-ninth of the time required to render
the entire image at full resolution.
Quarter Resolution Renders one-sixteenth of the pixels contained in the full-resolution
image. This results in a rendering time approximately one-sixteenth of the time required
to render the entire image at full resolution.
Custom Resolution Renders the image at the resolution you specify.
Using Help | Contents | Index Back 59
Page 60

Adobe After Effects Help Building a Composition
Using Help | Contents | Index Back 60
Adjusting the appearance of low-resolution compositions
When setting resolution, you can determine the size and appearance of the composition.
When you lower the resolution of a composition, you can maintain image clarity by
reducing the composition’s size. You can also maintain its size but reduce image clarity,
with the layers appearing blockier and more pixelated. The smaller on-screen image will
update faster than the original-size image with a lower resolution.
A
A. Original composition resolution B. Half resolution with the same clarity but with a reduction in
screen size C. Half resolution with the same screen size but with a reduction in clarity
BC
To determine the appearance of lower-resolution compositions:
1 Choose Edit > Preferences > Display.
2 Select Auto-Zoom When Resolution Changes to reduce the size of the composition
while maintaining image clarity. Deselect this option to maintain the composition size in
the Composition window but display layers with less clarity.
3 Click OK.
You can also set the magnification using the pop-up menu in the Composition
window.
Setting start timecode or start frame
Use the Composition Settings dialog box to determine when the composition will begin.
The name of the option in the Composition Settings dialog box is determined by whether
Timecode, Frames, or Feet + Frames is selected in the Project Settings dialog box. For
example, if Timecode Base is specified, you can use the Start Timecode option to specify
when the composition will begin; if Frames is selected, you can use the Start Frame option
to specify the frame number where the composition will begin. See “Setting time-display
options” on page 9.
Setting duration
The duration is the overall length of the composition. Set duration by typing values in the
Duration box in the Composition Settings dialog box.
When you preview or render a movie, you can choose to preview or render only a portion
of the total duration. See “Setting up a work area” on page 70.
Understanding advanced composition settings
When you click the Advanced tab in the Composition Settings dialog box, you can change
the anchor setting, adjust the shutter angle for motion blur, specify when the shutter
opens relative to the frame start, set precompose options, and specify a rendering plug-in.
Using Help | Contents | Index Back 60
Page 61

Adobe After Effects Help Building a Composition
Using Help | Contents | Index Back 61
For information on adjusting the shutter angle and shutter phase for motion blur, see
“Adjusting the shutter angle for motion blur” on page 91.
Setting the anchor
When you change the frame size of a composition, by default the layers are centered
within the new dimensions. Use the Anchor control to anchor the layers to a corner or
edge of the composition as it is resized. Set the anchor by clicking the arrow button in the
Anchor diagram (in the Advanced panel of the Composition Settings dialog box) to
indicate where to position the existing layers.
Setting nesting options
The Advanced panel of the Composition Settings dialog box includes two nesting options.
If the Preserve Resolution When Nested option is selected, the nested composition retains
its resolution setting. If this option is not selected, the containing composition’s resolution
overrides the nested composition’s resolution.
When selected, the Preserve Frame Rate When Nested option locks a composition to a
specific frame rate, which should improve performance in many cases as well as eliminate
the need to use Posterize Time in creating reduced frame rate effects. If this option is not
selected, the containing composition’s frame rate overrides the nested composition’s
frame rate.
Setting the rendering plug-in
You can animate layers inside a 3D space. This 3D environment includes shadows, specular
highlights, rack focus, and an automatic method of compositing layers based on depth.
The default 3D renderer is Standard. However, you can use the Advanced panel of the
Composition Settings dialog box to specify other rendering plug-ins for rendering 3D
compositions as they become available.
Adding footage items to a composition
Once you have created a new composition and imported footage into the project, you can
add footage items or another composition to it. To do this, drag footage items or folders
from the Project window to a Timeline window, a Composition window, or a composition
name or icon in the Project window. You can use individual items in the Project window
any number of times in one or more compositions.
Note: Although you cannot directly add a composition to itself, you can duplicate a
composition and add the copy to the original.
When you drag a footage item to the Timeline window, you can specify a precise layer
order and start time for the item. If you add multiple footage items to a composition, the
items appear in the order in which they were selected in the Project window. If you drag a
footage item into the Composition window, the layer appears where you drop it. If you
drag a footage item onto a composition in the Project window, the layer snaps to the
center of the Composition window. After you add a layer, you can move it to any position
within the Composition window. When you add multiple footage items, they appear in the
composition in the order selected.
Using Help | Contents | Index Back 61
Page 62

Adobe After Effects Help Building a Composition
Using Help | Contents | Index Back 62
Items added to a composition begin at the time indicated on the current-time marker in
the Timeline window. For example, if the current time box displays 0:00:04:00 (4 seconds),
when you place the item in the Composition window, the item begins its first frame at 4
seconds. By changing the location of the current-time marker ( Timeline window) or the
time displayed in the Current Time button (Composition window), you can add a layer at
any point in the composition.
In the Composition window, layers are visible only if they are active at the time currently
displayed. For example, if you have three layers in a composition, with two of the layers
starting at the beginning of the composition and one layer starting at 6 seconds, only two
of the layers appear in the Composition window when the current-time marker is set to
the beginning of the composition.
For more information on adjusting the duration or speed of a layer, see “Understanding
trimming” on page 81 and “Time-stretching a layer” on page 139. For more information on
setting and adjusting the current time, see “Viewing and setting the current time” on
page 69.
To add a footage item to a composition:
1 Activate the Timeline window for the composition to which you want to add an item.
2 To set the current-time marker, click the current-time display, specify a new time, and
then click OK.
3 Drag the name of the footage item, the footage-item thumbnail, or a folder from the
Project window to one of three places:
• The Composition window.
• The Timeline window. When you drag the item into the Timeline window, a highlight
bar indicates where the layer will appear when you release the mouse button. If you
drag the item over the time graphic area, a time marker indicates where the layer’s In
point will be when you release the mouse button.
While dragging an item into the Timeline window, you can specify the layer order and In point.
• The composition name or icon in the Project window.
You can also add a footage item to a composition by selecting the name of the
footage item in the Project window and pressing Ctrl+/ (Windows) or Command+/
(Mac OS).
To add several footage items to a composition at the same time:
1 Do any of the following:
• Select multiple footage items. To select a contiguous range of items, press Shift as you
click the footage items in the Project window. To select a discontiguous set of items,
press Ctrl (Windows) or Command (Mac OS) as you select the footage item names.
Using Help | Contents | Index Back 62
Page 63

Adobe After Effects Help Building a Composition
Using Help | Contents | Index Back 63
• Move multiple footage items into a folder in the Project window. For information on
creating folders, see “Working with the Project window” on page 15.
2 Drag the names of the footage items or the folder from the Project window onto a
composition name in the Project window, into the Composition window, or into the
Timeline window. The items appear in the order in which they were selected in the Project
window.
Nesting a composition
When creating an elaborate composition, you may find it easier to organize the layers that
make up the composition by using a technique called nesting—putting one or more
compositions into another composition. You can create many levels of nesting. For further
information, see “Organizing a project using nesting” on page 265.
Using the Composition window
Use the Composition window to preview the composition and animate its contents
manually. Move a layer by dragging it; scale a layer by dragging its handle. The Composition window contains a number of features and controls to help you work with layers.
You can also change the background color of the composition.
G
H
A
B
CDE F
A. Rulers Used to align layers in the composition window. The ruler scale is in pixels. See
“Using rulers and guides” on page 19.
B. Magnification menu button Used to choose a new magnification from the menu. See
“Changing magnification in windows” on page 17. Hold down Alt (Windows) or Option
(Mac OS) as you press the mouse button to view composition information.
C. Safe zones button To ggles between viewing the title-safe and action-safe zones and
viewing just the image. To display the animator grid, hold down Alt (Windows) or Option
(Mac OS) and click this button. See “Viewing safe zones and grids” on page 17.
D. Take- and display-snapshot icons Captures a screen image of the window. Snapshots
are not saved to disk, and only the most recent snapshot can be viewed. Click and hold the
Display-snapshot icon to view the most recent snapshot instead of the active composition. See “Taking and viewing a window snapshot” on page 20.
Using Help | Contents | Index Back 63
Page 64

Adobe After Effects Help Building a Composition
Using Help | Contents | Index Back 64
E. Red, green, blue, and alpha channel icons Click one of the first three icons to view
the composition’s red, green, or blue channel. Areas with high values of that channel’s
color are displayed as white. Click the fourth icon to view the composition’s alpha channel.
Transparent and opaque areas are displayed as black and white, and degrees of opacity
appear as shades of gray. See “Viewing color and alpha channels” on page 20.
F. Region of interest Used to narrow the composition area for previewing. See
“Changing the region of interest” on page 65.
G. Composition window menu Used to display the Composition Settings dialog box,
enable frame blending and motion blur, and display effect layer controls such as handles
and paths.
H. Comp family button Displays the Timeline window for this composition.
Arranging a footage item in a composition by dragging
You can change the spatial position of a layer in a composition by selecting and dragging
the layer in the Composition window. When you want to move a layer into or out of the
frame, you can position it completely or partially outside the frame.
When you arrange a layer in the Composition window, you determine the position of the
layer at the current time, indicated by the current-time marker in the Timeline window. If
no keyframes are set for a layer, the position values you set will apply for the duration of
the layer. The layer remains in position until you set up a change over time in the Timeline
window; see “Understanding keyframes” on page 96. For information about changing the
order of layers, see “Changing the layer stacking order” on page 75.
To arrange a layer in a composition by dragging:
1 Select the selection tool from the Tools palette.
2 Click a layer in the Composition window to select it or, if the layer is obscured by
another layer, select the layer name in the Timeline window.
You can select layers behind other layers in a Composition window. Using the
selection tool, right-click (Windows) or Control-click (Mac OS) the top layer, choose
Select, and then choose a layer name.
3 Position the pointer within the layer (but not on a handle) and drag the layer to a
location within the Composition window.
After you start dragging a layer, hold down Shift to constrain the dragging to
horizontal or vertical movements, or hold down Ctrl+Shift (Windows) or
Command+Shift (Mac OS) to snap to the frame edges or center.
Setting the background color of a composition
The default background color for the Composition window is black, but you can change
the color at any time. When you add one composition to a second composition (nesting),
the second composition’s background color is preserved, and the first composition’s
background becomes transparent. If you want to preserve the first composition’s solid
background color, create a new, colored solid to use as a background layer in the first
composition. See “Creating a new solid layer” on page 73. For more information on
nesting, see “Organizing a project using nesting” on page 265.
You can also change the color of the pasteboard in the Composition window.
Using Help | Contents | Index Back 64
Page 65

Adobe After Effects Help Building a Composition
Using Help | Contents | Index Back 65
To set the background color of a composition:
1 Choose Composition > Background Color.
2 Click the color swatch to select a color, or click the eyedropper to sample a color from
anywhere on the screen. Then click OK.
To set the pasteboard color of a composition:
1 Choose Edit > Preferences > Display.
2 Click the color swatch to select a color, or click the eyedropper to sample a color from
anywhere on the screen. Then click OK.
Using checkerboard backgrounds to display transparency
You can toggle a checkerboard pattern on or off (like the checkerboard that Adobe
Photoshop uses to indicate transparency). Viewing the checkerboard pattern may slow
down window redraw.
To turn on or off the checkerboard background:
Choose Checkerboard Backgrounds from the Composition window menu.
Changing the region of interest
Use the Region of Interest button to create a rectangular preview of the composition
window. Reducing the region of interest requires less memory when previewing, thereby
improving interaction speed and increasing RAM preview duration. Changing the region
of interest does not affect file output.
To change the region of interest:
1 In the Composition window, do any of the following:
• To draw a region of interest, click the Region of Interest button ( ), and then drag the
marquee tool across the area of the composition window where you want images to
appear.
• To toggle between viewing the region of interest and the full composition area, click
the Region of Interest button again.
• To start over with the marquee tool, hold down Alt (Windows) or Option (Mac OS) and
click the Region of Interest button.
Using the Timeline window
Use the Timeline window to set up changes over time, animate layer properties numerically, and set In and Out points for a layer. The Timeline window controls are organized in
panels of related functions.
Using Help | Contents | Index Back 65
Page 66

Adobe After Effects Help Building a Composition
Using Help | Contents | Index Back 66
Default controls and panels
By default, the Timeline window contains a number of panels and controls. Optional
panels are also available. See “Optional panels” on page 66.
AB
H
C
D
E F
G
A. Composition tab Use to close or move the window. Click a tab to display its composition in the current window. Drag a tab to move its composition to another existing
window or to put it in a new window.
B. Current time Displays the current time in the project. Click to open the Go to Time
dialog box. “Viewing and setting the current time” on page 69.
C. Audio/Video Features panel Contains switches for enabling and disabling audio and
video. This panel also includes a lock switch for locking layers and a solo switch for
displaying only one layer. See “About After Effects Audio/Video switches” on page 86.
D. Layer Outline Includes a label, a number (assigned by After Effects), and a source
name for each layer. Clicking the triangle to the left of a layer lets you examine and set
properties for the masks, effects, and transform functions. See “About layer properties” on
page 95.
E. Switches panel button Displays or hides the Switches panel.
F. S witches panel Contains options for controlling a number of display and performance
features for a layer. See “About After Effects Audio/Video switches” on page 86.
G. Time graph Visually represents the values of the In/Out panel (see “Optional panels”
on page 66) and displays the positions of the keyframes and timeline for each layer. See
“Understanding the time graph” on page 68.
H. Comp Family button Opens the corresponding composition window.
Optional panels
You can display or hide several optional panels in the Timeline window.
Using Help | Contents | Index Back 66
Page 67

Adobe After Effects Help Building a Composition
Using Help | Contents | Index Back 67
To display or hide optional panels:
Right-click (Windows) or Control-click (Mac OS) a Timeline window panel heading, and
then choose the panel you want to display or hide in the Panels submenu.
A
B
C
E
D
F G H I
A. Comment panel Type comments for the layer.
B. Modes panel Specify layer modes and track mattes. See “Using layer modes” on
page 166 and “Creating track mattes and traveling mattes” on page 164.
C. Parent panel Specify a parent layer. See “Understanding parent layers” on page 113.
D. Keys panel Move the keyframe navigator controls closer to the time graph. See
“Keyframe navigator” on page 97.
E. In panel View or change the In point of a layer. See “Understanding trimming” on
page 81. You can also display or hide this panel by clicking the Optional panel button ( )
in the lower left corner of the time graph.
F. Out panel View or change the Out point of a layer. See “Understanding trimming” on
page 81.
G. Duration panel View or change the duration of a layer. See “Understanding trimming”
on page 81.
H. Stretch panel Time-stretch a layer. See “Understanding trimming” on page 81.
I. Optional panel button Display or hide the In, Out, Duration, and Stretch panels.
To rearrange panels:
Drag the panel heading to a different location along the Timeline window. When the panel
outline appears where you want the panel to appear, release the mouse.
A gray outline appears when you drag a panel (left). When you release, panels are rearranged (right).
Note: All layer switches move together—you can move the entire switch panel to a
different position between other panels, but you can’t rearrange the switches within the
panel.
Using Help | Contents | Index Back 67
Page 68

Adobe After Effects Help Building a Composition
Using Help | Contents | Index Back 68
To change the width of a panel:
Drag the raised vertical bar left or right to set the new width. If the panel does not have a
raised vertical bar at its right edge, it cannot be resized.
Understanding the time graph
The time graph portion of the Timeline window contains a time ruler, markers to indicate
specific times and current work area, and duration bars for the layers in your composition.
Use the time graph to adjust the range of time shown in the Timeline window, and to
specify a range of time to render when creating or previewing a movie.
The time graph also contains controls for adjusting time for layers and controlling motion
and changes over time. For more information on working with time for an individual layer,
see “Positioning a layer in time” on page 76.
A
B
C
D
E
F
G
H
I
A. Time graph Use to view layer durations, a time ruler, markers, and keyframes.
B. Viewing-area markers Indicate the area displayed in detail in the time graph. These
markers are part of the navigator view, described below. Drag to view a specific area. See
“Viewing and setting the current time” on page 69.
C. Navigator view Uses smaller versions of the work-area markers and current-time
marker to show their relationship to the entire composition. As you drag the viewing-area
markers to change the view, the miniature markers in the navigator view show your view
and the location of the current-time marker in the context of the full duration of the
composition.
D. Work-area markers Indicate an area of the composition for rendering or previewing.
To render only part of the composition, drag the work-area marker to specify the part of
the composition to render. See “Setting up a work area” on page 70.
E. Time ruler Indicates the part of the composition duration currently displayed in the
time graph. For information on ways to display time on the time ruler, see “Setting timedisplay options” on page 9.
F. W indow menu button Displays the Timeline window menu, which includes functions
affecting layers and keyframes, as well as providing access to the Composition Settings
dialog box.
G. Composition-time marker Used to add markers to the time ruler. Drag the marker to
a point on the time ruler. Drag it back to remove it.
H. Comp Family button Click to open the active Timeline window’s associated Composition window.
Using Help | Contents | Index Back 68
Page 69
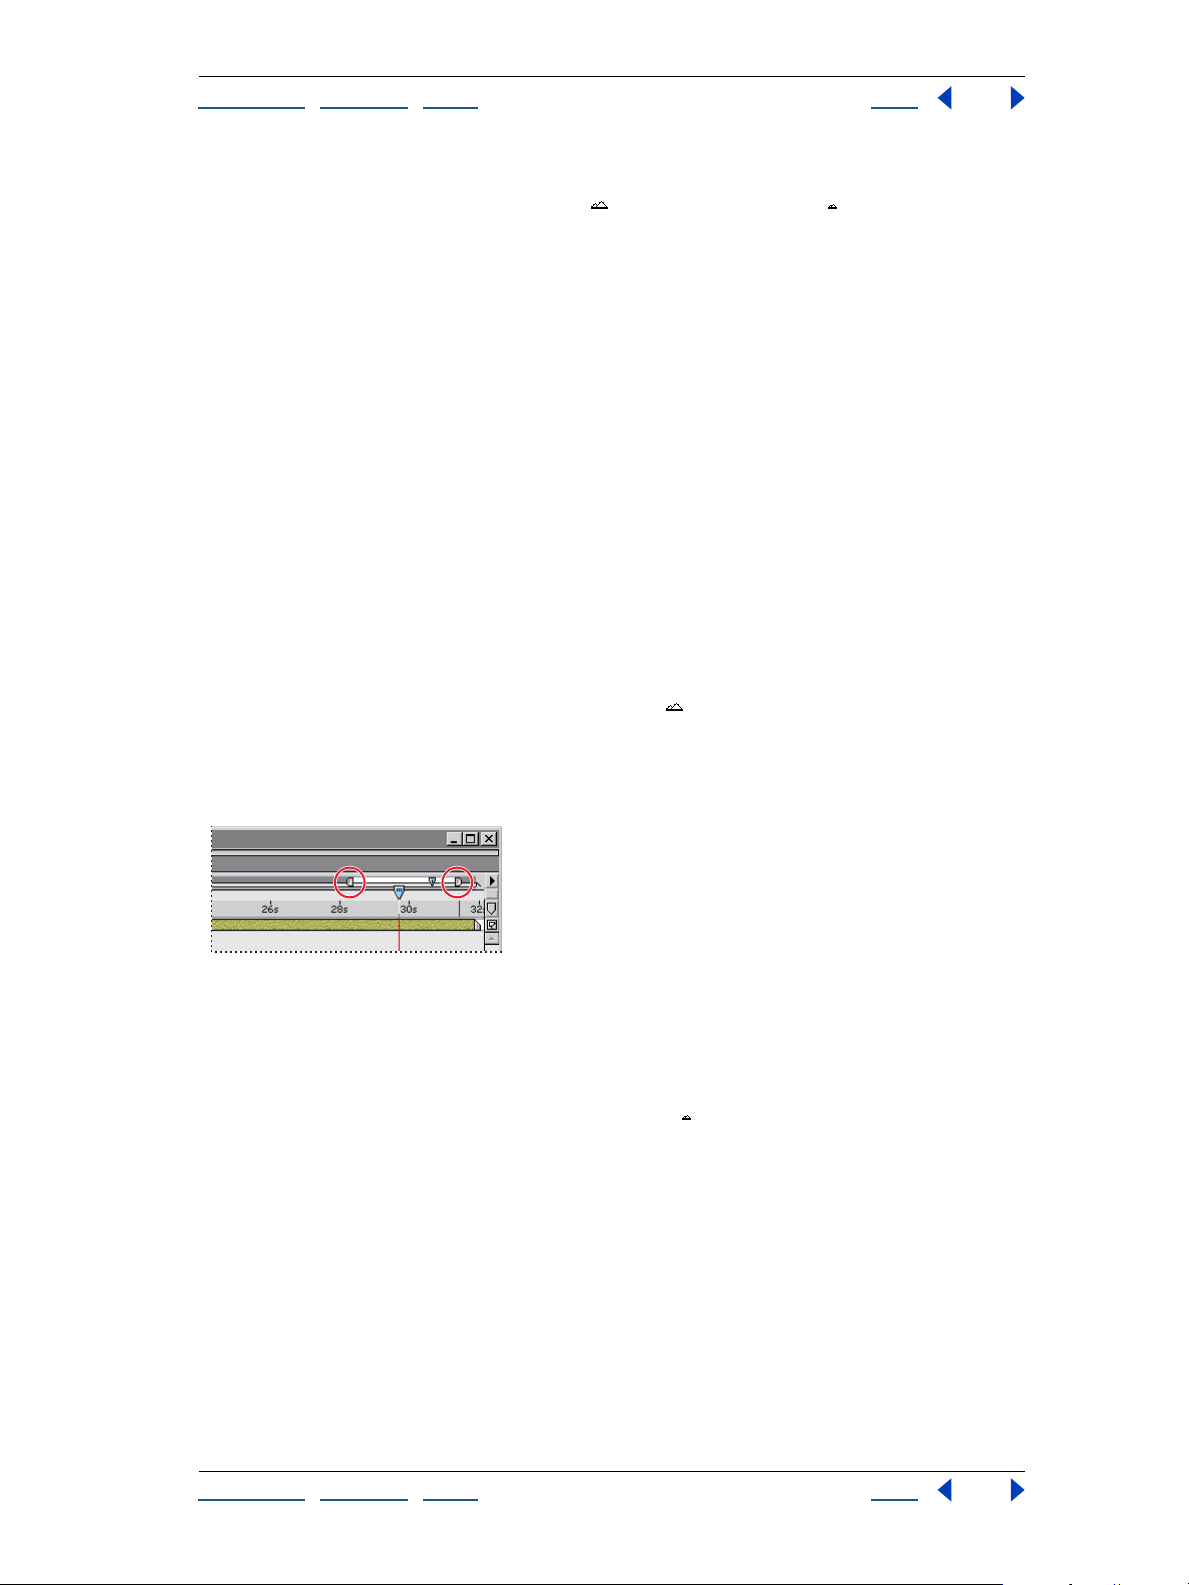
Adobe After Effects Help Building a Composition
Using Help | Contents | Index Back 69
I. Zoom slider Drag to magnify a portion of the time graph or to see more of the time
graph. You can also use the zoom-in icon ( ) or the zoom-out icon ( ).
Viewing and setting the current time
A composition’s current time is indicated by the current-time marker. For convenience,
you can view and move the current-time marker in both the navigator view and the time
ruler. The navigator view shows the complete duration of a composition. When you view
the duration of the entire composition, detailed work can be difficult. You can magnify a
portion of the time graph so as to work on only the portion you need.
To move the current-time marker by dragging:
In the navigator view or on the time ruler, drag the current-time marker to a new location
on the time graph, or click a new setting on the time ruler.
To move the current-time marker numerically:
1 Click the current time in the Timeline or Composition window.
2 Type a new time and click OK.
To magnify a portion of the time graph:
Do one of the following:
• In the Timeline window, click the zoom-in icon ( ) or drag the zoom slider.
• Press the = (equal sign) key on the main keyboard.
• In the navigator view, drag the left, right, or both viewing-area markers until the time
ruler displays the portion you want.
Drag left and right viewing-area markers to magnify
or shrink the part of the time ruler displayed.
To see more of the time graph:
Do one of the following:
• In the Timeline window, click the zoom-out icon ( ).
• Press the – (minus) key on the main keyboard.
• In the navigator view, drag the left and right viewing-area markers until the time ruler
displays the portion you want.
Using Help | Contents | Index Back 69
Page 70

Adobe After Effects Help Building a Composition
Using Help | Contents | Index Back 70
Setting up a work area
When you work on a composition, you may want to preview or render only part of the
composition. Do this by specifying a part of the composition time ruler as a work area. In
the Timeline window, the work area appears in a lighter shade of gray. For more information, see “Previewing animation” on page 118 or “Making (rendering) a movie” on
page 278.
Set the work area start and end points to the current time by pressing B (begin) or N
(end), respectively.
To set up a work area:
In the time ruler, move the left and right work-area markers until they mark the beginning
and end of the part of the composition you want to use as a work area.
The work-area markers indicate the part of the composition displayed when previewing or
rendering.
To move the work area:
In the time ruler, drag the center of the work area bar left or right.
Using Help | Contents | Index Back 70
Page 71
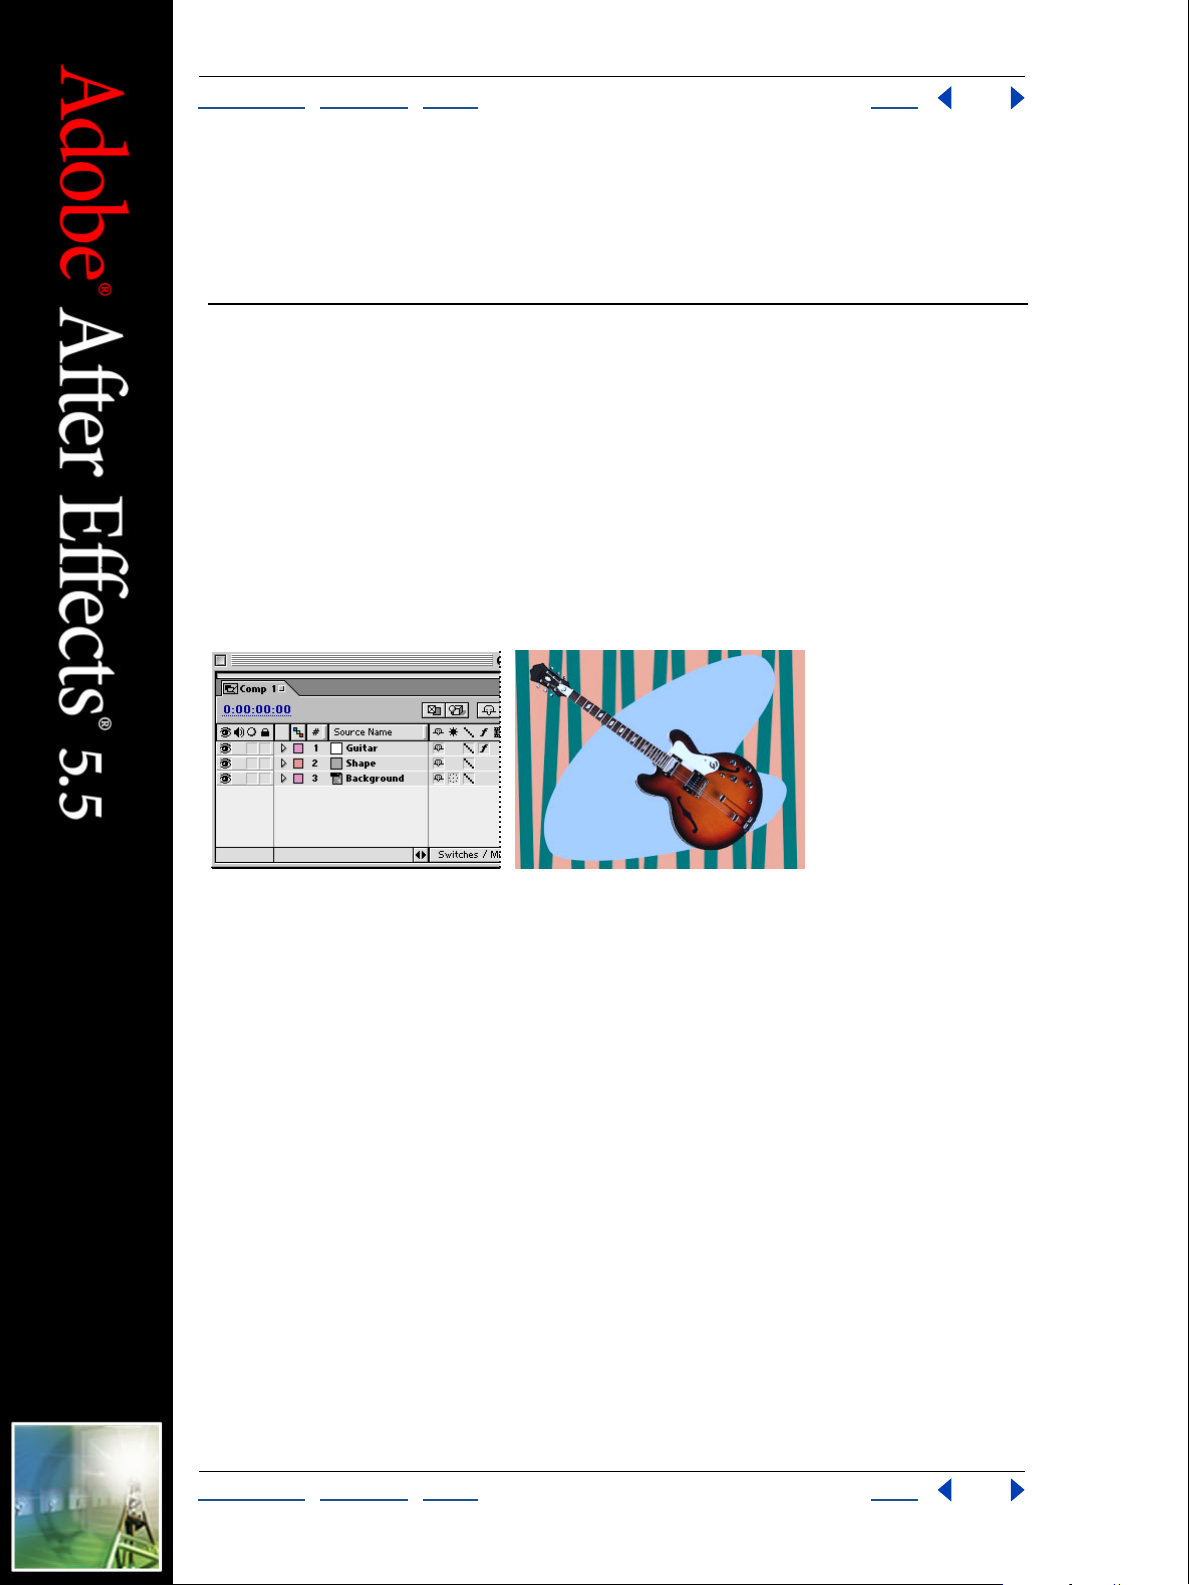
Adobe After Effects Help Managing Layers
Using Help | Contents | Index Back 71
Managing Layers
Managing layers
Layers are the components you use to build a composition. Any item you add to a composition—such as a still image, moving image file, audio file, lights and cameras, or even
another composition—becomes a new layer. Without layers, a composition consists only
of an empty frame.
Using layers, you can work with specific footage items in a composition without affecting
any other footage. For example, you can move, rotate, and draw masks for one layer
without disturbing any other layers in the composition, or you can use the same footage
in more than one layer and use it differently in each instance. For more information on
masks, see “Working with masks” on page 149.
Three layers as viewed in the Timeline window (left) and the Composition window (right)
Adding layers to compositions
When you add an item to a composition, you create a new layer for that composition. You
can duplicate layers within a composition or even copy and paste layers from one composition to another. Use as many layers as necessary to create your composition.
A composition layer can be any of the following:
• Any footage item in the Project window list (including audio)
• Another composition in the project
• A solid, camera, or light you create
• An After Effects adjustment layer, which modifies all layers below it
• A duplicate of another existing layer
• A split layer
• A null object
Using Help | Contents | Index Back 71
Page 72

Adobe After Effects Help Managing Layers
Using Help | Contents | Index Back 72
Creating new layers
Of the numerous ways to create layers in an After Effects composition, the most obvious is
to begin with a footage file you want to use. You can create a new layer from any footage
item in your Project window, including audio. After you add a footage item to a composition, you can modify and animate the resulting layer.
To create a layer from a footage item:
1 In the Project window, double-click the composition you want to work on to open its
Composition and Timeline windows.
2 In the Timeline window, move the current-time marker to the time where you want the
layer to begin playing.
3 Drag the footage item from the Project window to the Composition window.
Note: To position the new layer in a particular order among existing layers or at a specific
starting time in the composition, drag the item to the Timeline window and release it in
that layer position and starting time instead of dragging it to the Composition window.
To create multiple layers simultaneously, follow this procedure but hold down Ctrl
(Windows) or Command (Mac OS) and click to select footage files in Step 3. When you
drag them to the Timeline window, the footage files form layers in the order in which you
clicked them.
Creating layers by nesting compositions
When you add a composition to another composition, it creates a new layer in a process
called nesting. T he composition you add becomes a layer in the other (target) composition. Nested compositions can change composition structure, memory usage, and
rendering order.
For more information, see “Organizing a project using nesting” on page 265.
To create a layer from another composition:
1 Display the Composition window or Timeline window for the target composition.
2 Drag a composition from the Project window list to the target Composition window or
Timeline window.
For nested compositions, if you change certain settings in the parent composition, these
propagate through to the nested (child) compositions. These settings include the Quality
options under Layer > Quality, several options under Layer > Switches, and three options
on the Timeline window menu: Enable Motion Blur, Enable Frame Blending, and Draft 3D.
The Resolution setting for the parent composition also applies to nested compositions.
If you do not want these switch settings for the parent compositions to apply to the
individual nested compositions, you can change that at the preferences level.
To prevent switches from operating through nested compositions:
1 Choose Edit > Preferences > General.
2 Deselect the Switches Affect Nested Comps option, and click OK.
Using Help | Contents | Index Back 72
Page 73

Adobe After Effects Help Managing Layers
Using Help | Contents | Index Back 73
Creating a new solid layer
You can create solid images of any color or size (up to 32,000 x 32,000 pixels) using After
Effects. After Effects treats solids as it does any other footage item: You can modify the
mask, transform properties, and apply effects to the solid. Use solids to color a background
or create simple graphic images.
To create a solid-color layer:
1 With the Composition or Timeline window active, choose Layer > New > Solid.
2 In the Solid Settings dialog box under Size, type a name and dimensions for the solid.
3 Under Color, set the color of the layer in one of two ways:
• Use the color picker: Click the color swatch, select the color you want, and click OK.
• Use any color visible in the After Effects interface: Click the Eyedropper ( ), and then
click the color you want.
Note: In Mac OS, you can click the eyedropper in any area of your screen.
In the Timeline window, you can then drag the new solid layer to any position above or
below, as needed.
Creating a light or camera layer
Light and camera layers create interesting effects for the 3D layers in a composition. To
learn more about lights and cameras, see “Using cameras” on page 235 and “Using lights”
on page 239.
To create a light or camera layer:
1 With the Composition or Timeline window active, choose Layer > New > Camera, or
Layer > New > Light.
2 In the Camera or Light Settings dialog box, select the settings you want.
Creating an adjustment layer
When you apply an effect to an ordinary layer, the effect affects only that layer and no
others. However, an effect can exist independently if you create an adjustment layer for it.
Any effects applied to an adjustment layer affect all layers below it in the composition
stacking order. An adjustment layer at the bottom of the stacking order has no visible
effect.
Because adjustment layer effects apply to all layers beneath them, they are useful for
applying effects to many layers at once. In all other aspects, an adjustment layer behaves
exactly like other layers; for example, you can use keyframes with any adjustment layer
property, and rename the layer. You can also create masks on adjustment layers.
To create a new adjustment layer:
1 Display the Composition or Timeline window to which you want to add an adjustment
layer.
2 Choose Layer > New > Adjustment Layer. A new adjustment layer appears at the top of
the Timeline window.
3 Apply one or more effects to the adjustment layer.
Using Help | Contents | Index Back 73
Page 74

Adobe After Effects Help Managing Layers
Using Help | Contents | Index Back 74
For information about effects, see “Working with effects” on page 170.
Note: Transformations on adjustment layers behave slightly differently; they transform
only the matte but not the fill.
To change an existing layer into an adjustment layer:
1 In the Timeline window, select the name of the layer you want to make into an
adjustment layer. (Typically, this layer already has effects applied to it, but you can add
effects after making it an adjustment layer.)
2 Choose Layers > Switch > Adjustment Layer.
If you want to apply an effect to just part of an image, draw a mask on an adjustment
layer (see “Working with masks” on page 149). The mask restricts the area to which the
effect applies. You can animate the mask to follow a moving subject.
For more information about switches, see “About After Effects Audio/Video switches” on
page 86.
Duplicating a layer
When you duplicate a layer, After Effects copies all property keyframes, masks, and effects
to the duplicate. The duplicate is added above the original layer and automatically
selected. If you want to duplicate a layer without duplicating its keyframes, masks, or
effects, add the original source footage file to the composition again.
To duplicate a layer:
In a Composition or Timeline window, select the layer and choose Edit > Duplicate.
Creating new layers by splitting
You can split a layer at any point along its timeline, creating two independent layers. This is
a time-saving alternative to duplicating and trimming the layer—something you might do
when you want to change the stacking-order position of the layer in the middle of the
composition, such as an object revolving in front of and then behind another object.
When you split a layer, both resulting layers contain all the keyframes that were in the
original layer in their original positions; see “Understanding keyframes” on page 96.
To split a layer:
1 In the Timeline or Composition window, select a layer.
2 In the Timeline window, move the current-time marker to the time where you want to
split the layer.
3 Choose Edit > Split Layer.
Rearranging layers
You can change the stacking order (which layers appear above or below other layers), the
positions of layers in visual space, and the point in the play time at which different layers
appear. The Timeline window provides intuitive methods for dragging layers vertically into
different stacking orders and dragging time indicators for a layer horizontally to achieve
the results you want. The Align palette makes it easy to arrange spatial relationships
between elements on different layers.
Using Help | Contents | Index Back 74
Page 75

Adobe After Effects Help Managing Layers
Using Help | Contents | Index Back 75
Changing the layer stacking order
The Timeline window displays the layer stacking order. The uppermost layer appears at the
top of the layer outline list, the second layer is immediately below it, and so on. Changing
the order of footage layers modifies the appearance of your composition by repositioning
footage in front of or behind other footage.
Changing the position of an adjustment layer in the stacking order changes which layers it
affects (because it affects only the layers below it). For more information, see “Creating an
adjustment layer” on page 73.
Note: The stacking order of 3D layers has somewhat different implications. For information, see “Combining 2D and 3D layers” on page 233.
To rearrange layer order:
In the Timeline window, select the layers you want to move by name and drag up or down
the stacking order.
Note: As you drag a layer name up or down, a horizontal line appears between other layer
names, indicating the position to which the layer will move if you release the mouse.
For more information on 2D and 3D layers, see “Combining 2D and 3D layers” on
page 233.
To move a layer to a specific position in the order:
In the Composition or Timeline window, select the layer and do one of the following:
• To move a layer up or down one level, choose Layer > Bring Forward or Layer > Send
Backward.
• To move a layer to the top of the composition, choose Layer > Bring to Front.
• To move the layer to the bottom of the composition, choose Layer > Send to Back.
Selecting a layer by position number
After Effects automatically numbers all layers in a composition. The number reflects the
position of that layer in the stacking order. When the stacking order changes, After Effects
changes all numbers accordingly.
Select a layer by its number by pressing the layer number on the numeric keypad. If the
layer number has more than one digit, type the numbers quickly so that After Effects can
recognize them as a unit.
Aligning and distributing layers in space
Use the Align palette to line up or evenly space selected layers across a composition. You
can align or distribute layers along the vertical or horizontal axes of selected objects.
When you align and distribute selected layers, keep the following in mind:
• An alignment option aligns selected layers to the object that most closely represents
the new alignment. For example, for right-edge alignment, all selected layers align to
the selected object that is farthest to the right.
• A distribution option evenly spaces selected layers between the two most extreme
layers. For example, for a vertical distribution option, the selected layers are distributed
between the highest and lowest selected objects.
Using Help | Contents | Index Back 75
Page 76

Adobe After Effects Help Managing Layers
Using Help | Contents | Index Back 76
• When you distribute layers of different sizes, the spaces between layers may not be
uniform. For example, distributing layers by their centers will create equal space
between the centers—but different-sized layers will extend by different amounts into
the space between layers.
• Locked layers cannot be moved by alignment or distribution options.
• Text alignment is not affected by the Align palette. For information on aligning Basic
Text, see “Basic Text” on page 221.
To align or distribute layers:
1 Select the layers you want to align or distribute.
Note: To align, you must select two or more layers; to distribute, you must select three or
more layers.
2 Choose Window > Align & Distribute.
3 In the Align palette, click the icon representing the type of alignment or distribution
you want.
Positioning a layer in time
Move a layer in time by changing its In or Out point in the Timeline window. After Effects
provides two ways to view and change the In and Out points of a layer in the Timeline
window:
• The In and Out panels represent the layer duration numerically.
• The duration bar represents the layer duration visually.
To change the In and Out points of a layer numerically:
1 If the In and Out panels are not visible in the Timeline window for the composition layer
you want to change, open the Timeline menu (click the right arrow above the vertical
scroll bar) and choose Panels > In. On the same menu, choose Panels > Out.
2 Click the number in the In or Out panel of the layer you want to change.
3 In the Layer In Time or Layer Out Time dialog box, type a new time and click OK.
Note: Do not use this method to adjust the In and Out points in the Timeline window if
your aim is to trim, speed up, slow down, or distort time within layer footage. For information, see “Understanding trimming” on page 81 and “About time-remapping” on
page 142.
To move a layer in time by dragging:
In the Timeline window, drag the layer duration bar to the left or right. To snap the layer
duration bar to significant points in time (such as markers, or the start or end of the
composition), press Shift as you drag.
Before and after moving the duration bar
Using Help | Contents | Index Back 76
Page 77

Adobe After Effects Help Managing Layers
Using Help | Contents | Index Back 77
To move a layer in time by moving its In point:
1 In the Timeline window, drag the current-time marker to the time at which you want
the layer to begin playing.
2 In the Timeline window, right-click (Windows) or Control+click (Mac OS) any panel
heading, and then choose Panels > In.
3 In the In panel, press Alt (Windows) or Option (Mac OS) and click the number that
appears for that layer.
Note: To move a layer by its Out point, use the same steps with the Out point panel.
Automatically arranging layers as a sequence
Use the Sequence Layers keyframe assistant to automatically arrange layers in a sequence.
When you apply the keyframe assistant, the first layer you select remains in its initial time
position, and the other selected layers move to new positions in the Timeline window
based on the order in which you select them.
Layers selected in Timeline window (top). Layers arranged in sequence after applying the Sequence
Layers Keyframe Assistant (bottom).
You can specify whether the layers overlap or are arranged end to end. For overlapping
layers, you determine how long the layers overlap and whether they cut or crossfade from
one to the next. If you specify a crossfade, After Effects creates opacity keyframes that
control how the layers fade into each other.
Overlapping layers can have opacity keyframes set automatically to create a crossfade.
For a layer to be sequenced, its duration must be less than the length of the composition
so that it leaves time for other layers. If you plan to sequence still-image footage that you
haven’t imported yet, choose File > Preferences > Import before you import, and specify a
short Still Footage duration. If you’ve already imported still images that are the length of
the composition, you can trim all of them at once by selecting all of the still image layers,
positioning the current-time marker to set the duration you want them to have, and
pressing Alt+] (Windows) or Option+] (Mac OS).
Using Help | Contents | Index Back 77
Page 78

Adobe After Effects Help Managing Layers
Using Help | Contents | Index Back 78
To arrange layers in a sequence:
1 In the Timeline window, hold down Ctrl (Windows) or Command (Mac OS) and select
layers in sequential order, beginning with the layer you want to appear first.
2 Choose Animation > Keyframe Assistant > Sequence Layers.
3 In the Sequence Layers dialog box, do one of the following, and then click OK:
• To arrange the layers end to end, leave the Overlap option unselected.
• To overlap ends of layers, select the Overlap option and type a duration in timecode for
how long the layers should overlap.
4 If you selected the Overlap option in step 3, choose a Crossfade option to specify which
layers’ opacity After Effects adjusts to create crossfades.
• If none of the selected layers uses an alpha channel or mask, choose Front Layer Only.
• If any of the selected layers uses an alpha channel or a mask, choose Front & Back
Layers.
Creating simple cuts and transitions between layers
A simple cut (shifting view from one layer to another) is easy to create in the Timeline
window.
To cut from one layer to another:
1 Display the Timeline window containing the two layers for which you want to create the
transition.
2 Set the In point of the second layer at one frame later than the Out point of the first
layer.
For more information about setting In and Out points, see “Understanding trimming” on
page 81.
Other kinds of transitions, such as fading or dissolving one layer into another, involve
opacity settings, In and Out points, and keyframes. However, you can apply certain effects
(including transition effects) to create a different transitions instead of building them
yourself, as described in “Applying and controlling effects” on page 170. For more information about creating your own transitions, see “Setting layer opacity” on page 110,
“Understanding trimming” on page 81, and “Understanding keyframes” on page 96.
Customizing layer work and views
You can change a number of layer properties to suit the way you work. For example, you
can rename a layer, giving it a unique name. This is especially helpful when you use the
same source footage for more than one layer. You can also change color labels.
Certain settings affect both the working view and the rendered view. For more information, see “Changing the layer image quality” on page 88 and “Showing and hiding
applied effects” on page 88.
Using Help | Contents | Index Back 78
Page 79

Adobe After Effects Help Managing Layers
Using Help | Contents | Index Back 79
Renaming a layer
By default, the layer outline in the Timeline window uses the source footage names for
layers. You can rename any layer at any time. Unique layer names can help you identify
layers when you use the same source footage for more than one layer. You can switch
between displaying the original filename and the layer name you’ve specified; see
“Viewing the source name of a layer” on page 79.
After you rename a layer, all other layers in the composition display with brackets around
the names. Renamed layers display without brackets.
To rename a layer:
1 In the Timeline window’s layer outline, select the layer you want to rename.
2 Press Enter (Windows) or Return (Mac OS) and type a new name.
3 Press Enter or Return again to apply the new name.
Viewing the source name of a layer
The Timeline window can list a layer by the name of its source footage or by a name you
give the layer. You can switch between viewing source names and layer names. After
Effects can also display the source filename in the Info palette, which is useful when the
source footage is a still-frame sequence (because each still image has a different filename).
For information about renaming layers, see “Renaming a layer” on page 79.
To switch the type of layer name in the Timeline:
In the layer outline in the Timeline window, click the heading Source Name or Layer Name.
To see a layer source name in the Info palette:
1 Choose Window > Info if the Info palette is not already open.
2 In the Timeline window, select the layer.
3 Press Ctrl+Alt+E (Windows) or Command+Option+E (Mac OS). The name of the source
footage appears in the Info palette.
Changing layer color labels
The Timeline window uses different colored boxes as labels to indicate different kinds of
layers, such as compositions or source footage layers. Use the Edit > Label submenu to
select all layers of a particular type, either by a specific label color or to match the current
layer selection (using the Select Label Group command).
You can customize the label colors at any time for an individual layer, for all similarly
labeled layers in a composition, or at the default level.
To change a color label for an individual layer:
1 In the Timeline window, select the layer.
2 Choose Edit > Label > color name.
Note: To change all the similar labels in a composition, right-click (Windows) or Optionclick (Mac OS) the label and choose Select Label Group. Then, select a new color, as above.
To change the default color label and options for a source type:
1 Choose Edit > Preferences > Label Colors.
Using Help | Contents | Index Back 79
Page 80

Adobe After Effects Help Managing Layers
Using Help | Contents | Index Back 80
2 Click a color swatch or Eyedropper button, select new colors to replace the existing
colors you want to change, and type new names for the colors, as needed.
3 Click Next, or click the Label Colors pop-up menu and choose Label Defaults.
4 Using the pop-up menus for each type of composition element (Composition, Video,
Audio, and so forth), choose new default colors. When finished, click OK.
Hiding layers in the Composition window
Use the Video switch to exclude or include layers from appearing in the Composition
window. The Video switch is on by default, so the layer displays in the Composition
window. When you want to speed up redraw or exclude a layer from appearing in both the
preview and the rendered version, turn off the Video switch.
To show or hide a layer in the Composition window:
Do either of the following:
• To show or hide a layer, click the Video ( ) switch for that layer in the Timeline window.
• Select a layer, choose Layer > Switches, and make sure that the Video command is
selected (to display the layer) or deselected (to hide the layer).
To hide all layers that are not selected in the Composition window:
Choose Layer > Switches > Hide Other Video.
To show all layers in the Composition window:
Choose Layer > Switches > Show All Video.
Showing and hiding layers in the Timeline window
You can mark a layer as shy and then use the Hide Shy Layers button in the Timeline
window to hide all shy layers on the Timeline list. Making layers shy is useful when you
want to make room in the Timeline window to show the layers and layer properties you
want to adjust.
Shy layers still appear in the Composition window. If you want to hide or show layers in the
Composition window, use the eye icon (see “Hiding layers in the Composition window” on
page 80).
To mark a layer as shy or not shy:
Select the layer in the Timeline window, and choose Layer > Switches > Shy to apply or
undo shy status for that layer.
The icon in the Timeline Switches panel indicates whether a layer is shy ( ) or not shy ( ).
You can also click this Shy switch to toggle between shy and not shy status.
To hide or show all shy layers:
Click to select or deselect the Hide Shy Layers button ( ) at the top of the Timeline
window.
You can also choose Hide Shy Layers from the Timeline window menu to switch back and
forth between showing and hiding shy layers.
Using Help | Contents | Index Back 80
Page 81

Adobe After Effects Help Managing Layers
Using Help | Contents | Index Back 81
Locking and unlocking a layer
The Lock switch prevents accidental selection of layers that you do not want to alter. When
a layer is locked, you cannot select it in either the Composition or Timeline windows. If you
try to select or modify a locked layer, the layer flashes in the Timeline window.
When a layer is locked, the Lock icon ( ) appears in Features panel, which appears by
default to the left of the layer name in the Timeline window.
To lock or unlock layers:
Do one of the following:
• In the Timeline window, click the Lock switch for the layer to place (lock) or clear
(unlock) the Lock icon ( ).
• Select one or more layers in the Timeline window and choose Layer > Switches > Lock.
• To unlock all layers in the active composition, choose Layer > Switches > Unlock All
Layers.
Soloing a layer
You can isolate one or more layers for animating, previewing, or rendering by soloing.
Soloing excludes all other layers of the same type from appearing in the Composition
window. For example, if you solo a video layer, any lights and audio layers are unaffected,
so they appear when you preview or render the composition. However, the other video
layers do not appear. Soloing is useful for speeding up redraw and rendering.
To isolate a layer:
In the Timeline window, select the layers you want to isolate, and choose Layer >
Switches > Solo to add a checkmark next to the Solo command.
The Solo icon ( ) appears in the switches panel to the left of the layer names in the
Timeline window. You can also click this icon to toggle soloing off and on for a layer.
Understanding trimming
You can trim (hide) footage at the beginning or end of a layer, changing which frames are
first or last in the composition. The first frame to appear is called the In point, and the last
frame is called the Out point.
A
A. Original In point B. Original Out point C. Out point after trimming D. Underlying (trimmed)
footage or composition E. Original Out point reference
B D E
C
Using Help | Contents | Index Back 81
Page 82
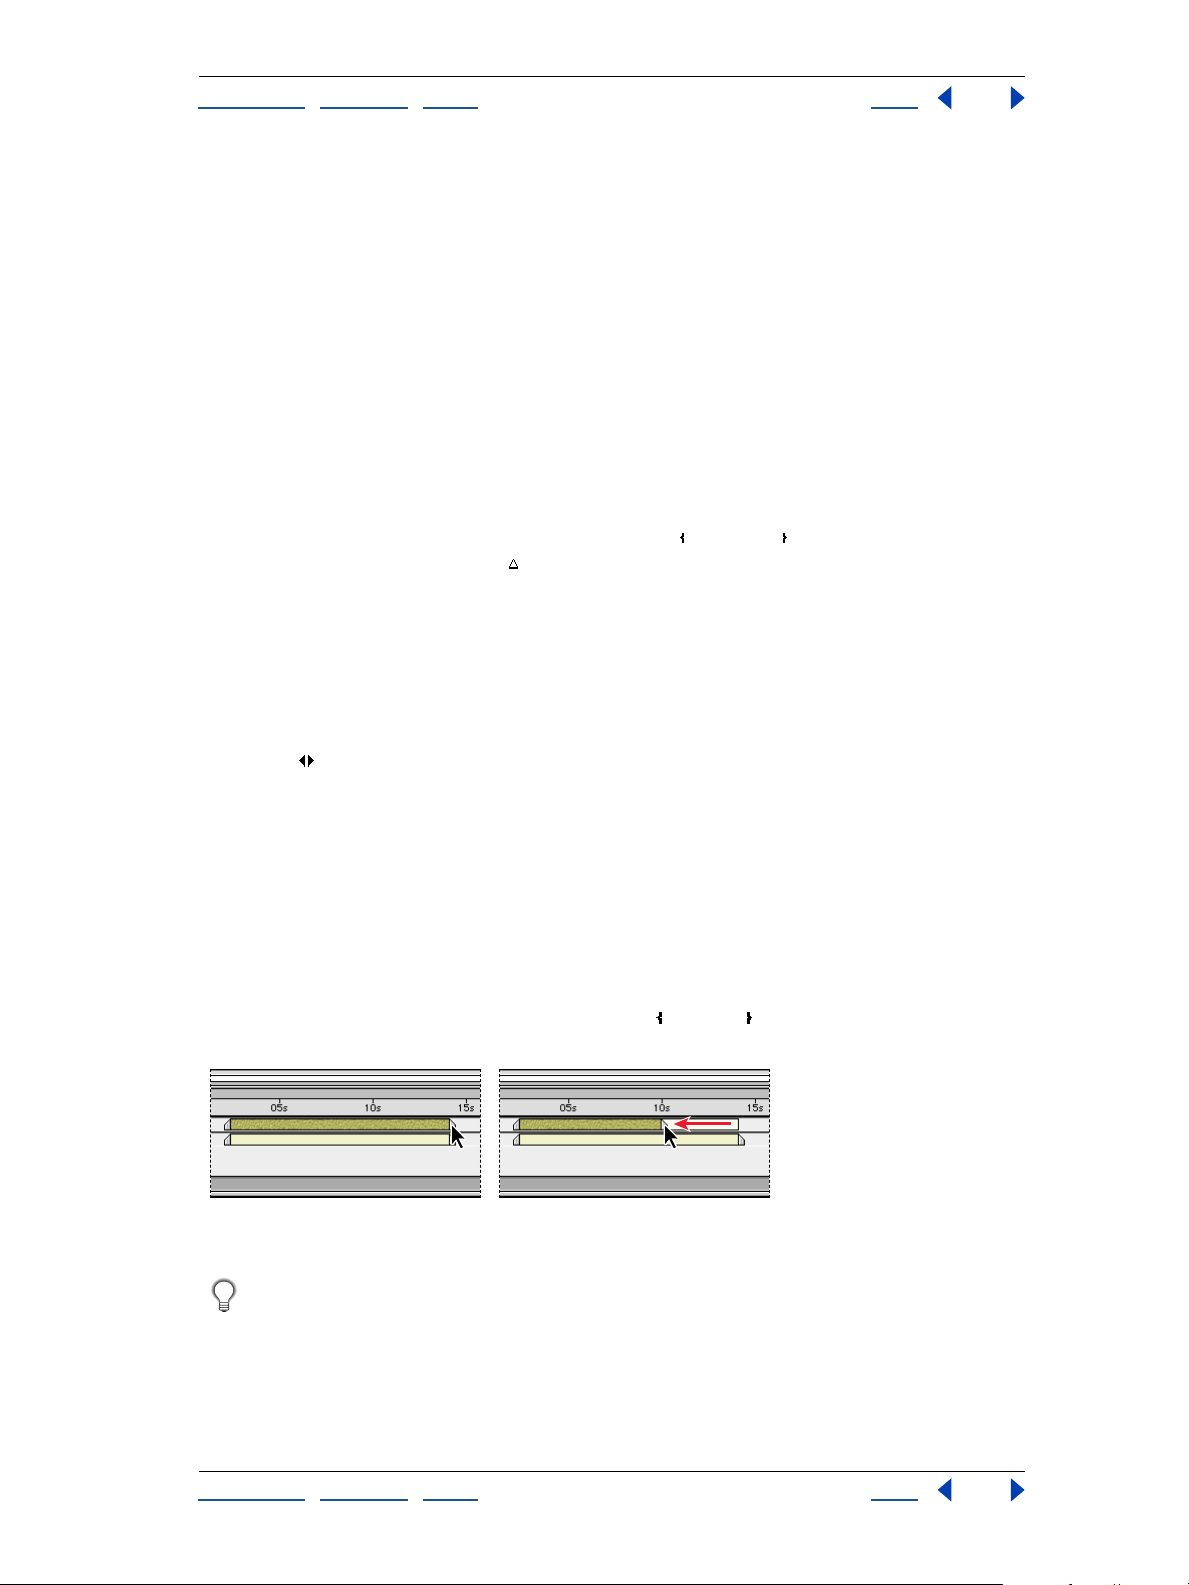
Adobe After Effects Help Managing Layers
Using Help | Contents | Index Back 82
When you use a footage item as a source for different layers, you can trim it differently in
each layer. Trimming does not alter the original source file.
Note: Trimming a still image layer changes the length of time the image appears in the
composition; it does not crop the image (affect what portion of the image appears).
Trimming layer footage
You can trim by changing the In and Out points in the Layer window or the Timeline
window, depending on what you want to change.
In the Layer window, In and Out points relate to time positions within source files, not the
time at which the layer appears in the composition. For example, if you want to show just
specific frames of a movie, trim the movie footage in the Layer window. However, if you
want to begin the movie at the first frame in the source file and then cut it at some point in
the play time, trim the Out point in either the Layer window or the Timeline window.
The numbers below the layer image indicate the In ( ) and Out ( ) times relative to running
the source file, and the duration ( ) (the difference between the In point and the Out
point).
In the Timeline window, the In and Out panels tell you at what points in the composition
the footage appears. For example, if you want a still image to appear at a specific point in
the composition and then disappear again, trim the image In and Out points in the
Timeline window.
Note: If the In and Out panels do not appear in the Timeline window, click Expand or
Collapse ( ) below the left edge of the timeline display bars panel.
To trim or restore layer footage:
Use one of the following techniques:
• Drag either end of the layer duration bar in the Timeline window.
• Move the current-time marker in the Timeline window to the time at which you want
the footage to begin or end, and press Alt+[ (Windows) or Option+[ (Mac OS) (to set the
In point) or press Alt+] (Windows) or Option+] (Mac OS) (to set the Out point).
• Move the current-time marker in the Layer window to the time at which you want the
footage to begin or end, and then click the In ( ) or Out ( ) button to set the In or Out
point.
A pale rectangle behind the layer duration bar represents the footage you trimmed.
Move the current-time marker precisely in either the Layer or Timeline window by
choosing View > Go to Time.
Note: If the entire layer duration bar moves when you drag, you’ve accidentally grabbed
the layer itself; choose Edit > Undo Layer Time Change and try again.
Using Help | Contents | Index Back 82
Page 83

Adobe After Effects Help Managing Layers
Using Help | Contents | Index Back 83
Moving a trimmed layer in time
After you trim a layer by setting In and Out points, you can adjust the duration position in
two ways that have different results.
Dragging the duration bar If you drag the colored area of the duration bar, the trimmed
footage starts and finishes playing at a different point in time. The length of the play time
and the frames that appear remain unchanged.
Dragging the dimmed outline If you drag the pale rectangle behind the duration bar,
the footage starts and ends at the same point in time as the original position, but different
frames appear. For example, if you drag the pale rectangle to the left, then the In and Out
points shift to later frames in the footage. (This is similar to a “slip edit” in common editing
applications.)
Removing a section of a layer
Remove a portion from the middle of one or more layers from the Timeline using the
following two methods:
• Lifting removes a section from the layers and leaves a gap of the same duration as the
section you remove.
• Extracting removes a section from the layers and closes the resulting gap by ripple
deletion.
To remove a section and leave a gap in time (lift):
1 In the Timeline window, adjust the work area to include only the portion of the layer or
layers that you want to remove:
• Move the time marker to the time at which you want the work area to begin and press B
on your keyboard.
• Move the time marker to the point where you want the work area to end, and press N.
2 Turn on the lock switch ( ) for any layers you do not want affected by the extraction.
3 Choose Edit > Lift Work Area to remove the section from all unlocked layers.
Note: If any layers are selected, this procedure affects only those layers.
To remove a section and close the resulting gap (extracting):
1 Follow steps 1 and 2 of the procedure for lifting (above).
2 Choose Edit > Extract Work Area.
Using markers
Use composition-time and layer-time markers to mark important points in a composition or
in a specific layer. Composition-time markers are numbered, while layer-time markers use
specified text labels. Markers also make it easier to align layers or the current-time marker
with specific points in time: You can snap items to markers when you drag them in the
Timeline window by holding down Shift as you drag.
Layer-time markers can also include a comment, a Web link, or a chapter link. Comments
appear only in the Timeline window. Web links initiate a jump to a Web page in your
browser. Chapter links initiate a jump to a chapter in a QuickTime movie or in other
formats that support chapter marks.
Using Help | Contents | Index Back 83
Page 84

Adobe After Effects Help Managing Layers
Using Help | Contents | Index Back 84
Creating composition-time markers
Composition-time markers appear on the time ruler in the Timeline window. After Effects
automatically numbers them with a single digit that reflects the order in which you add
them. You can place up to ten composition-time markers within a composition. If you
remove a marker, the other markers remain numbered as they were.
To add a composition-time marker:
Do one of the following:
• Drag from the Time-marker button ( ) above the Timeline vertical scroll bar to the
desired point in the composition.
• Move the current-time marker to the position you want to mark and press Shift+a
number key on the main keyboard (not on the numeric keypad). The new compositiontime marker appears at the current-time position, labeled with number of the key you
pressed.
Note: If the number you press is already used by another composition-time marker, After
Effects does not create a new marker. Instead, it moves the existing marker with that
number to the new position.
To move a composition-time marker:
Do one of the following:
• Drag the composition-time marker to another position on the timeline.
• Move the current-time marker to the position you want, and then press the number (on
the main keyboard, not the keypad) of the composition-time marker you want to move.
To snap the current-time marker or layer duration bars to a marker:
Press Shift as you drag the current-time marker or a layer duration bar.
To remove a composition-time marker:
Drag the marker onto the time-marker button ( ) on the Timeline window above the
vertical scroll bar.
Using Help | Contents | Index Back 84
Page 85
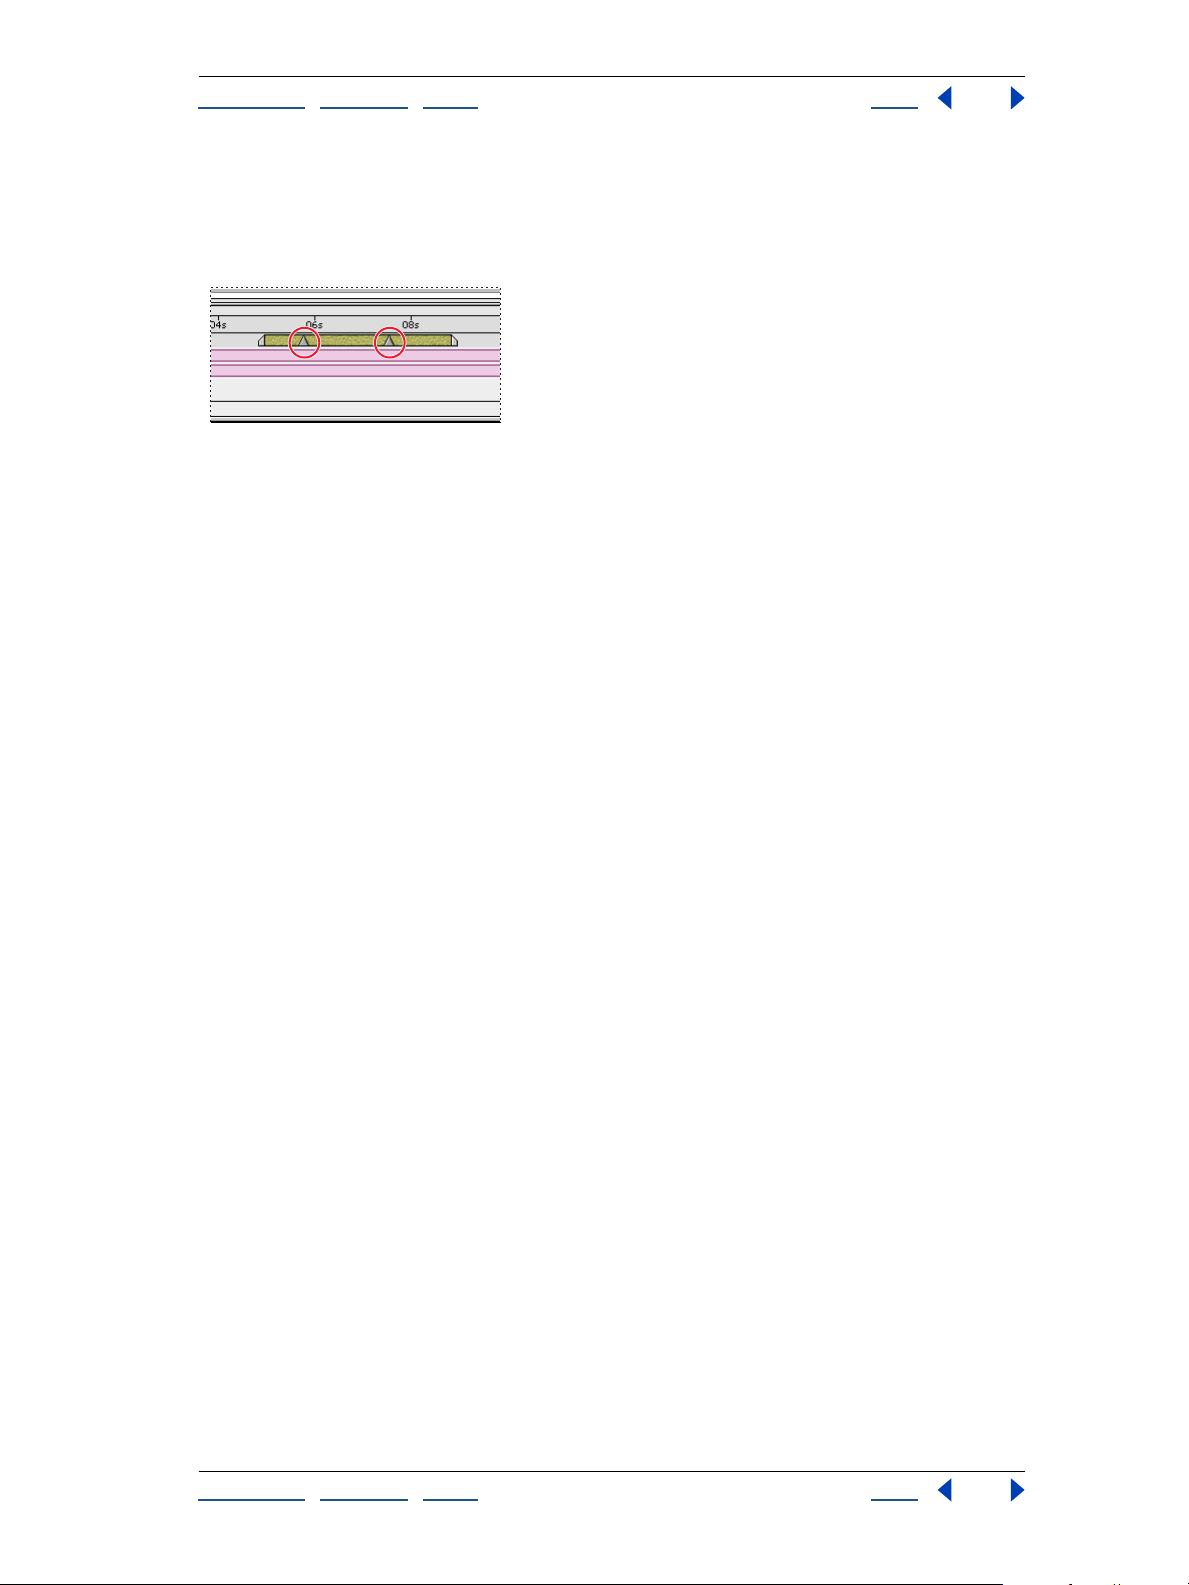
Adobe After Effects Help Managing Layers
Using Help | Contents | Index Back 85
Creating layer-time markers
Layer-time markers appear as small triangles on a layer-duration bar. You can have any
number of layer-time markers in a layer. You can also drag existing markers to new time
locations or remove them, as needed.
Layer-time markers
To add a layer-time marker:
1 With the appropriate layer selected, move the current-time marker to the frame you
want marked.
2 Choose Layer > Add Marker.
3 Double-click the layer-time marker.
4 In the Marker dialog box, type a name or comment in the Comment box and click OK.
To remove a layer-time marker:
1 Press Ctrl (Windows) or Command (Mac OS) and move the pointer near the marker you
want to remove.
2 When the pointer appears as a pair of scissors, click the layer-time marker.
Creating Web links from markers
When you create a marker, you can type a Uniform Resource Locator (URL) under Web
Links in the Marker dialog box to create an automatic link to that site. After Effects embeds
this information within movies. When these movies are included in Web pages created by
programs such as Adobe GoLive, the embedded URL is recognized at playback, initiating a
jump to the specified URL. You can even target a specific frame within the site.
Web link markers work only with layer-time markers and supported output formats, such
as QuickTime, Macromedia Flash (SWF), and others.
To create a Web link:
1 Create a layer-time marker and then double-click it to open the Marker dialog box.
2 For Web Links, type the URL for the site.
3 To activate a specific frame in a site, type the filename of the frame for Frame Target and
click OK.
To view or modify information for a Web link:
1 Double-click a layer-time marker.
2 In the Marker dialog box, view the information and make any changes you want; then
click OK.
Using Help | Contents | Index Back 85
Page 86

Adobe After Effects Help Managing Layers
Using Help | Contents | Index Back 86
Creating chapter links
You can also create a layer-time marker as a chapter reference point, similar to chapters
used in CD-ROM and DVD discs. Like the chapters of a book, a chapter link divides a movie
into segments. Chapter links are supported in QuickTime movies.
To create a chapter link:
1 Create a layer-time marker and then double-click it to open the Marker dialog box.
2 For Chapter Links, type the chapter name and number (if available), and click OK.
Nesting compositions containing layer-time markers
If you add one composition to another, the original composition becomes a layer in the
parent composition. All the nested composition’s composition-time markers become
layer-time markers in the Timeline window of the parent composition. These markers are
not linked to the original composition-time markers: Changes you make to the composition-time markers in the original composition do not affect layer-time markers in the
nested composition. For example, if you remove one of the original composition-time
markers, the corresponding layer-time marker for the nested composition remains in
place. For more information about nesting, see “Organizing a project using nesting” on
page 265.
Adding markers synchronized to audio
After Effects provides a quick way to add and label markers for significant points in a
layer’s audio track, such as a rhythmic beat in music or spoken words in dialogue. Once
markers are created, you can use them to synchronize video or other effects.
To synchronize markers to dialogue:
1 In the Time Controls window, select the Audio button ( ) and then click the RAM
preview button ( ).
2 At the points in time where you want to add a marker, press the asterisk key (*) on the
numeric keypad to create a layer marker.
3 When previewing is complete, double-click a marker you just created, type a
descriptive label in the Comment box (such as a word being spoken at that time), and click
OK. Repeat for any other markers you added.
About After Effects Audio/Video switches
The Timeline window contains the Audio/Video Features and the Switches panels. By
default, these panels appear to the left (A/V Features) and right (Switches) sides of each
layer name, but you can hide a panel or arrange panels in a different order. For general
information about using panels, see “Default controls and panels” on page 66 and
“Optional panels” on page 66.
Use the switches to adjust the balance between display performance and display quality
during your work session, clicking switch icons for individual layers to turn them off or on.
You can also control them for selected layers by choosing Layer > Switches > command.
Check marks next to commands indicate that those switches are currently turned on.
Using Help | Contents | Index Back 86
Page 87

Adobe After Effects Help Managing Layers
Using Help | Contents | Index Back 87
The A/V Features panel includes the Video ( ), Audio ( ), Solo ( ), and Lock ( ) switches.
The Switches panel contains the Shy ( ), Collapse Transformations ( ), Quality ( ), Effects
(), Frame Blending ( ), Motion Blur ( ), Adjustment Layer ( ), and 3D Layer ( ) switches.
Quickly change switches for multiple layers by clicking the switch for one layer and
dragging up or down that column for the adjacent layers.
By default, the layer Switches panel shares space in the Timeline window with the Transfer
Modes panel (see “Using layer modes” on page 166), so one or the other is visible—but
not both. You can toggle between the two panels or show both panels simultaneously.
To toggle between the layer Switches panel and the transfer Modes panel:
Click Switches/Modes at the bottom of the panel in the Timeline window.
Note: The Expand or Collapse button ( ) at the bottom of the layer names panel hides
and reshows the Switches/Modes panel. If you do not see the Switches/Modes button, click
the Expand or Collapse button.
To display both the Switches and Transfer Modes panels:
1 Click the right arrow above the Timeline window vertical scroll bar to open the Timeline
window menu.
2 Choose Panels > Modes (if Modes is not checked) or Panels > Switches (if Switches is
not checked).
When you set switches in a composition with other compositions nested within it, After
Effects also applies those switches to the subordinate compositions. These settings
include the Quality, Collapse Transformations, Motion Blur, and Frame Blending switches.
If you do not want the switch settings you add to parent compositions to apply to the
compositions nested within them, change that at the Preferences level.
To prevent switches from operating through nested compositions:
1 Choose Edit > Preferences > General.
2 Deselect the Switches Affect Nested Comps option, and click OK.
Altering appearances on the layer level
Use switches to make changes at the layer level that affect the appearance of your final
output. These switches include Collapse Transformations/Continuously Rasterize, Quality,
Motion Blur, hiding or showing effects, Frame Blending, and 3D. Using the switches, you
can specify the balance you want between the way the image looks and rendering time.
For information about changing only the appearance on your screen while you work
without changing final output, see “Customizing layer work and views” on page 78.
Collapsing transformation properties
The Collapse Transformations/Continuously Rasterize layer switch ( ) in the Timeline
window affects nested compositions and Adobe Illustrator files. However, it affects these
layers differently.
When the layer source is a composition, this switch acts as the Collapse Transformations
switch. Selecting it may improve image quality and decrease viewing and rendering time.
You cannot select this switch if a mask or effect is applied to the layer.
Using Help | Contents | Index Back 87
Page 88

Adobe After Effects Help Managing Layers
Using Help | Contents | Index Back 88
When the layer source is an Adobe Illustrator file, this switch acts as the Continuously
Rasterize switch. Selecting this switch causes After Effects to rerasterize the Illustrator file
for each frame, which improves image quality but also increases the time required for
previewing and rendering.
You cannot apply masks and some effects to a layer when the Collapse Transformations/
Continuously Rasterize switch is active. If you want to apply an effect to a layer that uses
this switch, either apply an adjustment layer higher up in the stacking order (see “Creating
an adjustment layer” on page 73), or nest or precompose the layer with the switch applied
and then apply the effect or mask. See “Importing an Adobe Illustrator, PDF, or EPS file” on
page 35.
To collapse transformations or change the rasterization method for a layer:
Do one of the following:
• In the Timeline window, click the Collapse Transformations/Continuously Rasterize
switch.
• Select a layer, choose Layer > Switches, and make sure that the Collapse command is
selected (to turn it on), or deselected (to turn it off).
Changing the layer image quality
You can select three levels of quality for the layer image: Best, Draft, and Wireframe. A
higher quality setting shows more detail at higher resolution, but at the expense of redraw
and rendering speed. The three levels of quality are as follows:
• Best quality displays and renders a layer using subpixel positioning, anti-aliasing,
3D shading, and complete calculation of any applied plug-in effects. Best provides the
slowest display and rendering time.
• Draft quality displays a layer so that you can see it, but only at rough quality. It displays
and renders a layer without anti-aliasing and subpixel positioning, and some effects
are not precisely calculated. Draft quality is often the most useful setting for general
work and for video layers (to avoid blurring when matching compositions to raw video
footage).
• Wireframe quality represents a layer as a box with an X across it. Layer wireframes
display and render faster than other settings. However, layer contents or masks are not
visible—only position and size. Because of this limitation, wireframe quality is available
only from the Layer menu.
To change the layer image quality:
With the layer selected in the Timeline window, choose Layer > Quality, and choose Best,
Draft, or Wireframe.
Showing and hiding applied effects
Using the Effect switch, you can control whether a layer’s effects appear in both previews
and rendered versions. When you deselect this switch, the layer is displayed and rendered
without its effects, saving previewing and rendering time. This switch is available only if a
layer has effects applied to it.
To show or hide all effects applied to one layer:
Do one of the following:
Using Help | Contents | Index Back 88
Page 89

Adobe After Effects Help Managing Layers
Using Help | Contents | Index Back 89
• In the Timeline window, click the Effect switch icon for a layer to toggle between
showing and hiding effects.
• Select a layer, choose Layer > Switches, and make sure that the Effect command is
selected (to show effects) or deselected (to hide effects).
You can temporarily turn on or off an individual effect applied to a layer. For more information, see “Applying and controlling effects” on page 170.
Enhancing time-altered motion by blending frames
When you time-stretch (see “Time-stretching a layer” on page 139) or time-remap (see
“About time-remapping” on page 142) footage to a slower frame rate or to a rate lower
than that of its composition, movement can appear jerky. This jerky appearance results
because the layer now has fewer frames per second than the composition. By default,
After Effects fills in the missing frames in slow-motion footage by repeating the last frame
shown. After Effects can create a more gradual transition between frames by interpolating
new frames between existing ones.
When you time-stretch or time-remap footage to a frame rate that is faster than the
original or higher than that of its composition, After Effects skips many of the original
frames to achieve the new rate and, consequently, movement can appear jerky. Frame
blending combines the remaining original frames to create smoother fast motion.
Using frame blending
Use the Frame Blending switch when motion already exists in the source footage for a
layer, such as live-action video. You can apply frame blending to a sequence of still images,
but not to a single still image. If you are animating a layer—for example, moving a layer of
type across the screen—use the motion blur switch. For more information, see “About
motion blur” on page 90.
Frame blending slows previewing and rendering. To speed things up, you can apply frame
blending without using it to redraw or render. The Quality setting you select also affects
frame blending. When the layer is set to Best quality, frame blending results in smoother
motion but may take longer to render than when set to Draft quality. You can also enable
frame blending for all compositions when you render a movie. For more information, see
“Changing render settings” on page 281.
To apply frame blending to a layer:
Select the layer in the Timeline window and choose Layer > Switches > Frame Blending.
A check mark by the Frame Blending command indicates that it is applied to the selected
layer. Also, the Frame Blending switch ( ) appears in the Timeline window Switches panel
for the layer. Remove frame blending either by clicking the Frame Blending switch or by
choosing the Frame Blending command again.
To enable or disable Frame Blending for redraw and rendering:
Select Enable Frame Blending from the Timeline window menu, or click the Enable Frame
Blending button ( ) at the top of the Timeline window.
Using three dimensions
Use the 3D switch ( ) to turn a layer into a 3D item that you can manipulate. When you use
the 3D switch for a layer, you can add camera and light layers to take full advantage of the
additional dimension.
Using Help | Contents | Index Back 89
Page 90

Adobe After Effects Help Managing Layers
Using Help | Contents | Index Back 90
For more information, see “Using cameras” on page 235 and “Using lights” on page 239.
About motion blur
When you view one frame of motion-picture film or video containing a moving object, the
image is often blurred. This is because a frame represents a sample of time (in film, a
sample is 1/24 of a second long). In that time, a moving object occupies more than one
position as it travels across the frame, so it cannot be shown as a sharp, still object. The
faster the object moves, the more it blurs. The camera shutter angle also affects the
appearance of the blur.
In contrast, in a single frame of a computer-generated animation, you may not be able to
tell which objects are moving because all moving objects may appear as sharp and clear
as nonmoving objects. Without motion blur, layer animation produces a strobe-like effect
of distinct steps instead of an appearance of continuous change. Adding motion blur to
layers you animate in After Effects makes layer motion appear smoother and more natural.
You can use motion blur when you animate a layer—for example, moving a layer of text
across the screen. You cannot add motion blur to motion that already exists within a layer,
such as live-action video. If you want to smooth live-action video where you assigned a
frame rate much lower or higher than the original, use frame blending. See “Enhancing
time-altered motion by blending frames” on page 89 and “Using frame blending” on
page 89.
Note: Previous versions of After Effects included an effect called Motion Blur. That effect is
now named Directional Blur, to avoid confusion with motion blurring applied to layers.
Applying motion blur to layers
The Motion Blur switch creates a true motion blur based on the layer’s movement in a
composition and what you specify for the shutter angle and phase (see “Adjusting the
shutter angle for motion blur” on page 91).
Note: For information about the Directional Blur effect (called “the Motion Blur effect” in
earlier versions of After Effects), see “Blur and sharpen effects” on page 186.
Motion Blur slows previewing and rendering, but you can apply motion blur without
displaying it in the Composition window. Use the Enable Motion Blur button ( ) near the
top of the Timeline window to control whether layers that use motion blur affect redraw
and rendering. You can also enable motion blur for all compositions when you render a
movie. For more information, see “Changing render settings” on page 281.
To apply motion blur to a layer:
Select the layer or composition you want to blur in the Timeline window, and choose Layer
> Switches > Motion Blur.
You can also apply motion blur by clicking the Motion Blur switch to place a checkmark for
that layer.
Note: A checkmark by the Motion Blur command indicates that motion blurring is turned
on for the selected layer or composition. The checkmark also appears in the Motion Blur
switch ( ) for that layer in the Timeline window.
Using Help | Contents | Index Back 90
Page 91

Adobe After Effects Help Managing Layers
Using Help | Contents | Index Back 91
Adjusting the shutter angle for motion blur
Adjust the intensity of motion blur by changing the shutter angle setting. The shutter
angle is measured in degrees, simulating the exposure allowed by a rotating shutter. If you
are not applying motion blur, shutter angle has no effect.
The shutter angle uses the footage frame rate to determine the simulated exposure. For
example, typing 90 degrees (12.5% of 720 degrees) for 24-fps footage creates an effective
exposure of
motion blur, and typing 720 degrees applies a high degree of blur. By default, the shutter
angle is set to 180 degrees.
To set the shutter angle and phase for motion blur:
1 Choose Composition > Composition Settings.
2 On the Advanced tab, type a value for Shutter Angle.
3 In Shutter Phase, type a number (up to 360) for when you want the shutter to open
relative to the frame start (optional) and click OK.
Note: You can also change the shutter angle for a composition in the Render Queue
window. See “Changing render settings” on page 281.
1
/96 of a second (25% of 1/24 of a second). Typing 1 degree applies almost no
Using audio layers
In After Effects, you can change volume levels of audio layers, preview them at a specified
quality, and identify and mark locations. An audio layer contains different properties than
a video layer, but you modify them the same way. You can apply special audio effects to
audio layers, and adjust the waveform values.
For information about using markers with audio, see “Adding markers synchronized to
audio” on page 86.
Previewing audio
When you preview audio, you control the quality and length of the preview. The audio
preview preferences you set do not affect rendering; the quality or audio in rendered
video is determined by the output module setting. See “Changing output module
settings” on page 284.
While previewing audio, After Effects displays clipping signals that indicate when the
audio is clipping. Clipping is a distortion that occurs when the audio signal exceeds the
maximum level that the audio device allows.
Using Help | Contents | Index Back 91
Page 92

Adobe After Effects Help Managing Layers
Using Help | Contents | Index Back 92
After Effects also displays a Volume Unit (VU) meter that actively displays audio levels
during playback. To view the VU meter and levels controls in more detail, increase the
height of the Audio palette.
DC
A
B
A. Audio clipping warning icons B. VU meter
C. Level controls D. Level units E. Audio
Options menu F. Level values
E
F
You can also preview audio synchronized with layer motion. For more information, see
“Previewing animation” on page 118.
To set display options for the Audio palette:
1 In the Audio palette, click the triangle in the upper-right corner and choose Options.
2 In the Audio Options dialog box, select one of the following:
• Decibels to display audio levels as decibels.
• Percentage to display audio levels as a percentage, where 100% equals 0 dB.
3 From the Slider Minimum menu, select the minimum decibel level you want to display
in the Audio palette, and then click OK.
To set preferences for audio preview:
1 Choose Edit > Preferences > Previews.
2 In the Audio Preview section, type a duration for the audio preview. An audio preview
begins at the current-time marker and continues for the duration you specify here. This
option is useful when you are checking short passages of a composition, although you can
interrupt an audio preview at any time.
3 Choose an audio sample rate from the first menu.
4 Choose an audio sample size from the second menu.
5 Choose Stereo or Mono playback from the third menu.
6 Click OK.
CD-quality sound is 44.1 KHz, 16-bit stereo. However, to reduce the time and memory
required to preview, you may want to choose a lower bit depth and sample rate.
To preview audio:
1 In the Composition window or Timeline window, move the current-time marker to the
time where you want the preview to begin.
2 Choose Composition > Preview > Audio Preview (Here Forward), or press the period
key (.) on the numeric keypad.
Using Help | Contents | Index Back 92
Page 93

Adobe After Effects Help Managing Layers
Using Help | Contents | Index Back 93
To preview audio and rendered images:
1 If the Time Controls palette is not open, choose Window > Time Controls. Click the
double arrow ( ) on the Time Controls tab, as needed, until you see the RAM Preview
Options, and then do one of the following:
• If the From Current Time option is selected, then move the current-time marker (in
either the Composition or Timeline window) to the time at which you want the preview
to begin.
• If From Current Time is not selected, set the work area for the area you want to preview.
For more information, see “Setting up a work area” on page 70.
2 On the Time Controls palette, select the Audio button ( ).
3 If needed, click the Loop button repeatedly to select the preview direction you want:
looping from start to finish ( ), single play (forward) ( ), or cycling forward and backward
().
4 Click the RAM Preview button ( ) or press 0 (zero) on the numeric keypad.
Dragging to preview composition audio
You can preview audio by dragging the time marker. in a composition. Use this technique
to easily identify and mark a location to synchronize audio and visual effects. Instead of
using the audio waveform, you can identify a location in the layer by moving the currenttime marker in the Timeline window and listening to audio playback.
To preview composition audio:
In the Timeline window, press Ctrl (Windows) or Command (Mac OS) while you move the
current-time marker.
As you drag across time, After Effects plays segments of the audio. You can play the audio
forward or backward. If you stop moving the current-time marker while keeping the
mouse button depressed, a short section of audio will loop.
Changing volume levels of an audio layer
When you use footage containing audio, the audio level in the footage plays at 0 db,
meaning that the level is unadjusted in After Effects. Setting a positive decibel level
increases volume, and setting a negative decibel level decreases volume.
The VU meter in the Audio palette displays the volume range for the audio as it plays. The
red blocks at the top of the meter represent the limit of what your system can handle.
When the audio volume extends past the top of the meter, After Effects makes the speaker
icons red as a warning that audio is clipping. If you don’t lower the level, the audio
playback may be distorted when rendered. Reset the warning signal to black by clicking
the red speaker icon.
Adjust the audio level and set level keyframes by dragging the level sliders as you preview
an audio layer.
To set the volume level of an audio layer in the Audio palette:
1 Select the layer in the Composition window or Timeline window.
2 If the Audio palette is not visible, choose Window > Show Audio. For greater precision
in setting levels, drag the resize icon in the lower right corner of the Audio palette to
increase its size.
Using Help | Contents | Index Back 93
Page 94

Adobe After Effects Help Managing Layers
Using Help | Contents | Index Back 94
3 In the Audio palette, adjust volume in one of the following ways:
• To set the level of the left and right channels together, drag the center slider up or
down.
• To set the level of the left channel, drag the left slider up or down, or type a new value in
the levels box at the bottom of the left slider.
• To set the level of the right channel, drag the right slider up or down, or type a new
value in the levels box at the bottom of the right slider.
Including and excluding audio
You can include or exclude audio in the preview or rendered version, applying this option
at either the composition or layer level. By default, audio is included.
To include or exclude an audio track from a composition:
Choose Layer > Switches > Audio to remove or add the checkmark by the Audio
command.
By default, a check mark appears by the Audio command to indicate that audio is included
for previews and rendering of the selected composition or layer. Audio icons ( ) in the
Features switches in the Timeline window also indicate whether or not audio is included.
Using Help | Contents | Index Back 94
Page 95

Adobe After Effects Help Animating Layers
Using Help | Contents | Index Back 95
Animating Layers
About layer properties
Each layer can contain several sets of properties. Layers that contain video or still images
have mask and transform properties, such as mask shape or layer rotation. A layer can also
include other properties, such as time remapping, video effects, and audio effects.
After Effects provides three ways to animate layer properties. You can animate a layer
graphically in a Composition or Layer window, by dragging a particular layer property
value, or by typing numbers into the selected value or a dialog box. Each method is
slightly different:
• When you animate a layer graphically, you change a value relative to the previous value.
For example, you move a layer by selecting it at its existing position and then dragging
it ten pixels to the left.
• When you animate a layer by dragging a particular layer property value, you change a
value by positioning the pointer over the underlined value and dragging to decrease or
increase the value.
• When you animate a layer numerically, you change a value by specifying an absolute
number. For example, you move a layer by typing new coordinate values for the
Position property.
Viewing layer properties in the Timeline window
As you add layers to a composition, they appear in the layer outline in the Timeline
window. You can expand the layer outline to display layer properties and change property
values.
Keyboard shortcuts can help you quickly display a layer property, hide others, and save
space in the Timeline window. For more information, see the After Effects Quick Reference
Card.
To expand a layer outline heading:
1 Click the triangle to the left of the layer name so that it points downward.
2 Click the triangle to left of Masks, Effects, or Transform to further expand the outline.
Using Help | Contents | Index Back 95
Page 96
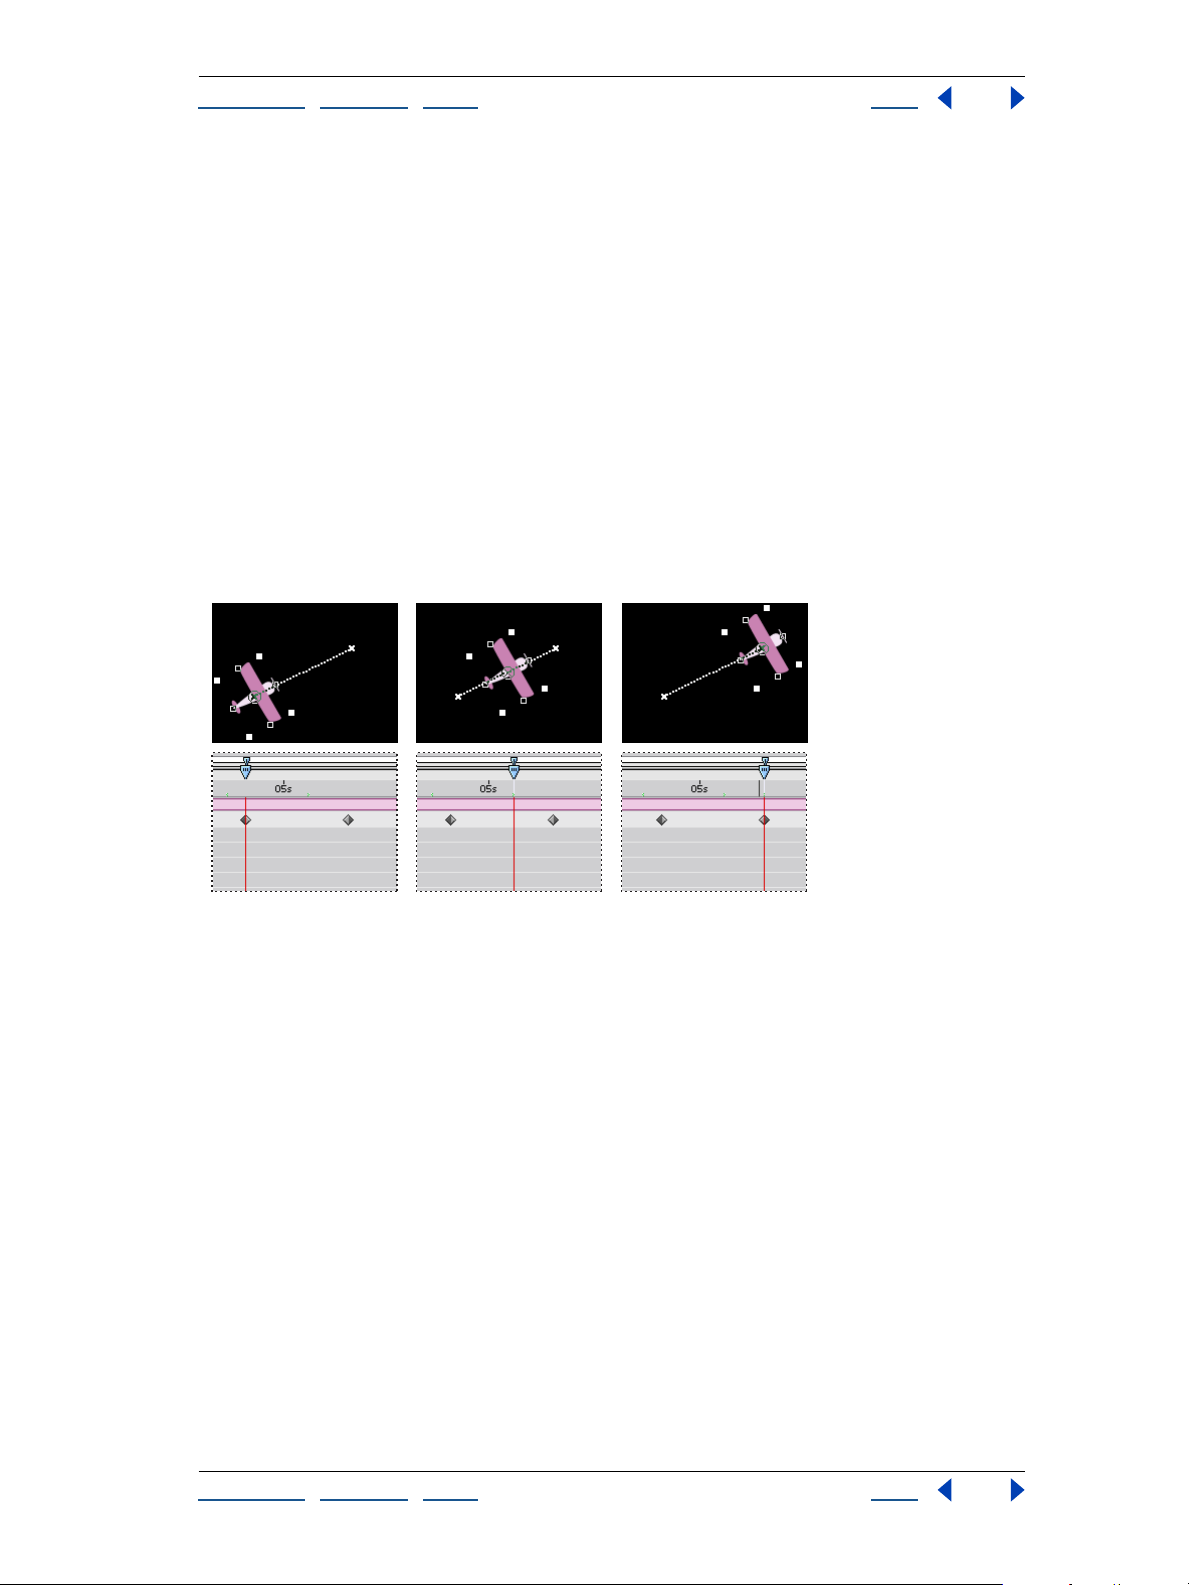
Adobe After Effects Help Animating Layers
Using Help | Contents | Index Back 96
To collapse a layer outline heading:
Click the triangle to the left of the layer name so that it points to the right.
To expand or collapse all layer outline headings:
Select the layer and then press the grave accent (`) key.
Understanding keyframes
After Effects uses keyframes to create and control animation. (After Effects can also use
expressions to create and control animation. See “Using expressions” on page 244.) A
keyframe marks the point in time in a composition where you specify a value for a layer
property. Animation using keyframes requires at least two keyframes. After Effects creates
animation between keyframes by interpolating transition frames between each keyframe
using intermediate values based on the changing property values from one keyframe to
the next. A keyframe contains information on the type and speed of change between the
adjacent intermediate values.
Two Position keyframes and the interpolated frames in between create a motion path.
You can modify layer properties with or without setting keyframes. If you do not set
keyframes, or if you set only one keyframe, changes you make to the property value
remain in effect for the duration of the layer.
Using Help | Contents | Index Back 96
Page 97
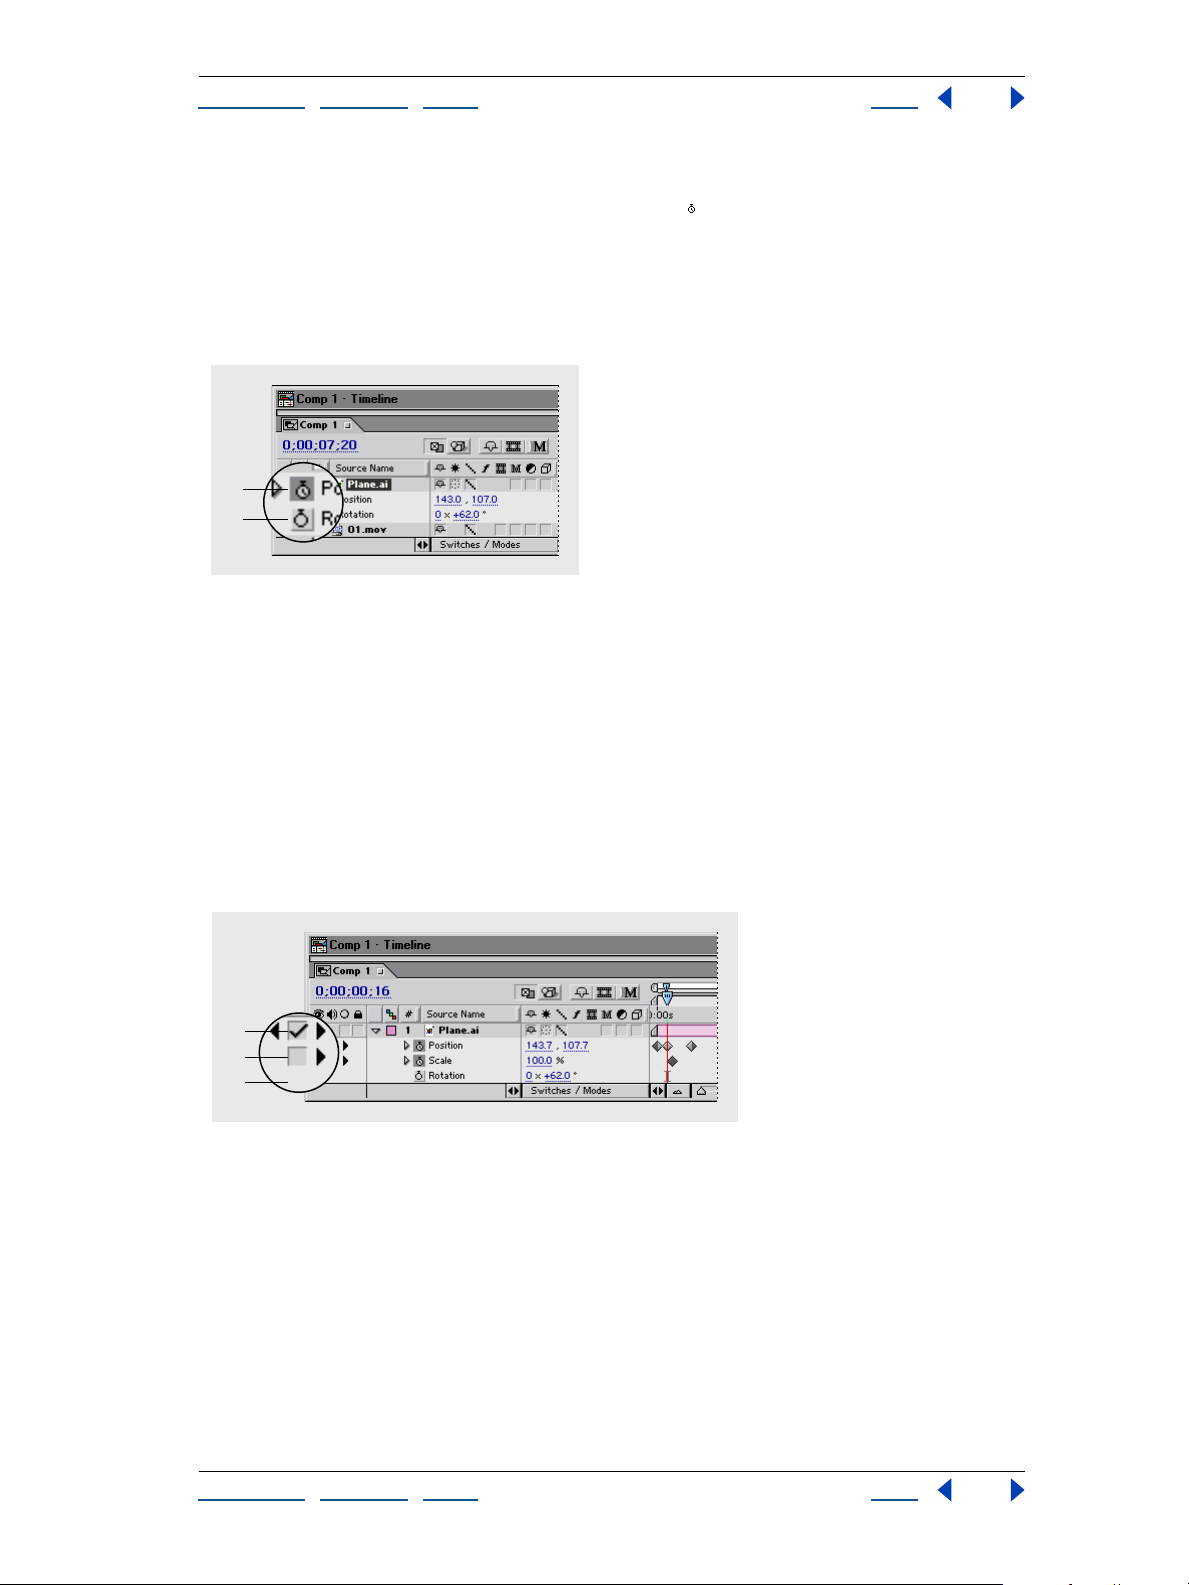
Adobe After Effects Help Animating Layers
Using Help | Contents | Index Back 97
Time-vary stopwatch
Each layer property has a time-vary stopwatch icon ( ) that you click to begin the
animation process. Once the stopwatch is active for a specific property, After Effects
automatically sets new keyframes whenever you change the current time and the
property value. When the stopwatch is inactive, no keyframes are present. If you type a
value for a layer property while the stopwatch is inactive, the value remains in effect for
the duration of the layer.
A
B
A. Selected stopwatch B. Deselected stopwatch
Keyframe navigator
After you set the initial keyframe for a property, After Effects displays the keyframe
navigator, which you can use to move from keyframe to keyframe or to set or remove
keyframes. When the keyframe navigator box is selected, the current-time marker lies
precisely at a keyframe for that layer property. When it is deselected, the current-time
marker lies between keyframes. When arrows appear on each side of the keyframe
navigator box, other keyframes for that property exist on both sides of the current time.
Click the arrows to move to the previous or next keyframe. The keyframe navigator can
be detached from the A/V Features panel to function as its own panel by choosing
Panel > Keys from the Timeline window menu.
A
B
C
A. Keyframe at current time B. No keyframe at current time C. No keyframes for layer property
Keyframe icons
The appearance of a keyframe icon depends on the interpolation method you chose for
the interval between keyframes. When half of the icon is gray, the gray half indicates that
there is no keyframe adjacent to that side, or that its interpolation is overridden by the
Hold interpolation applied to the preceding keyframe. See “Comparing interpolation
methods” on page 123 for more information on the keyframe icons.
Using Help | Contents | Index Back 97
Page 98
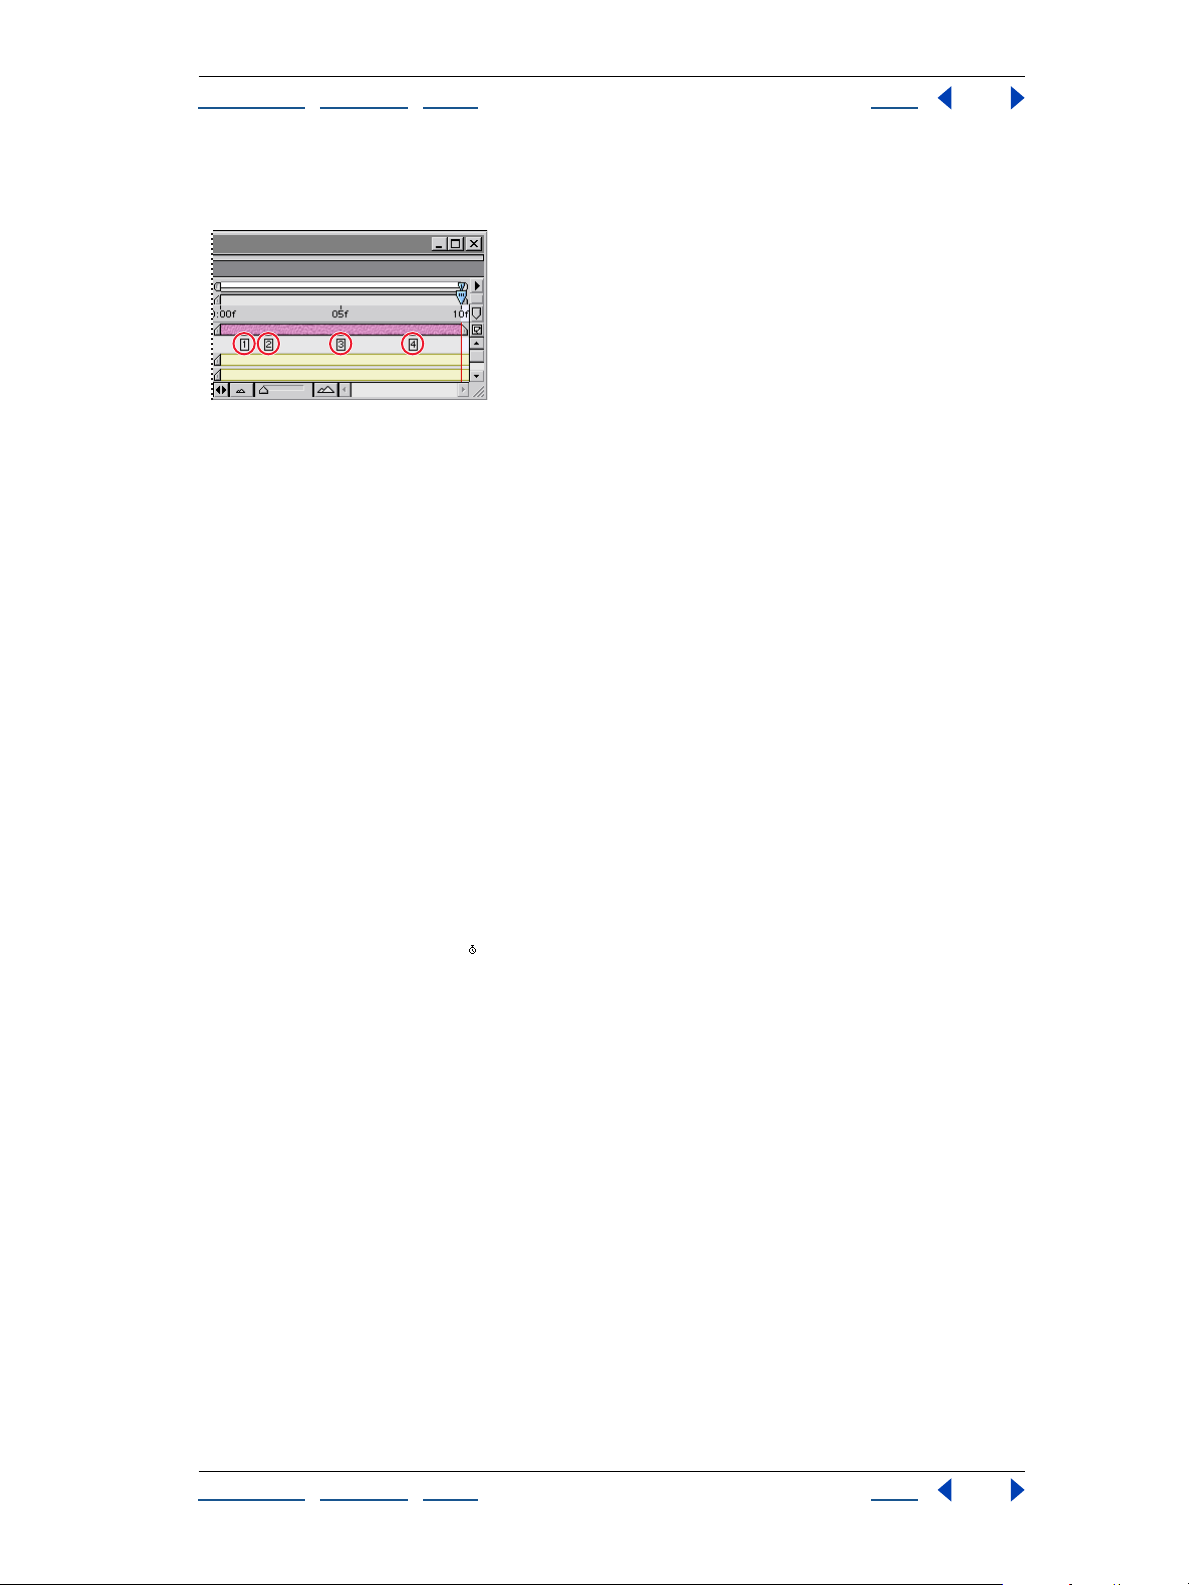
Adobe After Effects Help Animating Layers
Using Help | Contents | Index Back 98
Change the keyframe icons to numbers by choosing Use Keyframe Indices in the Timeline
window menu, located on the right side of the window.
Keyframes as indices (numbers)
Setting keyframes
You can set keyframes for any type of layer and any combination of layer properties at any
point in time. You can also move, delete, or change the value or interpolation method of a
keyframe.
This section provides an overview of setting keyframes. For details on setting or changing
individual layer properties, see the specific sections for each property, for example,
“Setting layer position” on page 103. For details on animating layer properties, see
“Setting and animating a layer property in the Timeline window” on page 114.
To set the first keyframe for a layer property:
1 In the Timeline window, select the layer you want to animate, and then display the layer
property you want to animate.
2 Move the current-time marker to a point in time where you want to add a keyframe.
3 Set the layer property to the value you want at that point in time; for example, move the
layer to a new position.
4 Do one of the following:
• Click the stopwatch icon ( ) next to the property name to activate it. After Effects
creates a keyframe at the current time for that property value.
• Choose Animation > Add x Keyframe, where x is the name of the property you are
keyframing.
To add additional keyframes for a layer property:
1 In the Timeline window, select the layer you want to animate.
2 Display the layer property for which you want to add a keyframe. It must already
contain at least one keyframe, and the stopwatch must be activated.
3 Move the current-time marker to the point where you want to add a new keyframe, and
change the value for the layer property you are animating. After Effects adds a keyframe
automatically.
To add a keyframe without changing a value:
1 Display the Timeline window for the composition containing the layer you want to
animate.
2 Display the layer property for which you want to add a keyframe. The property must
already contain at least one keyframe, and the stopwatch must be activated.
Using Help | Contents | Index Back 98
Page 99
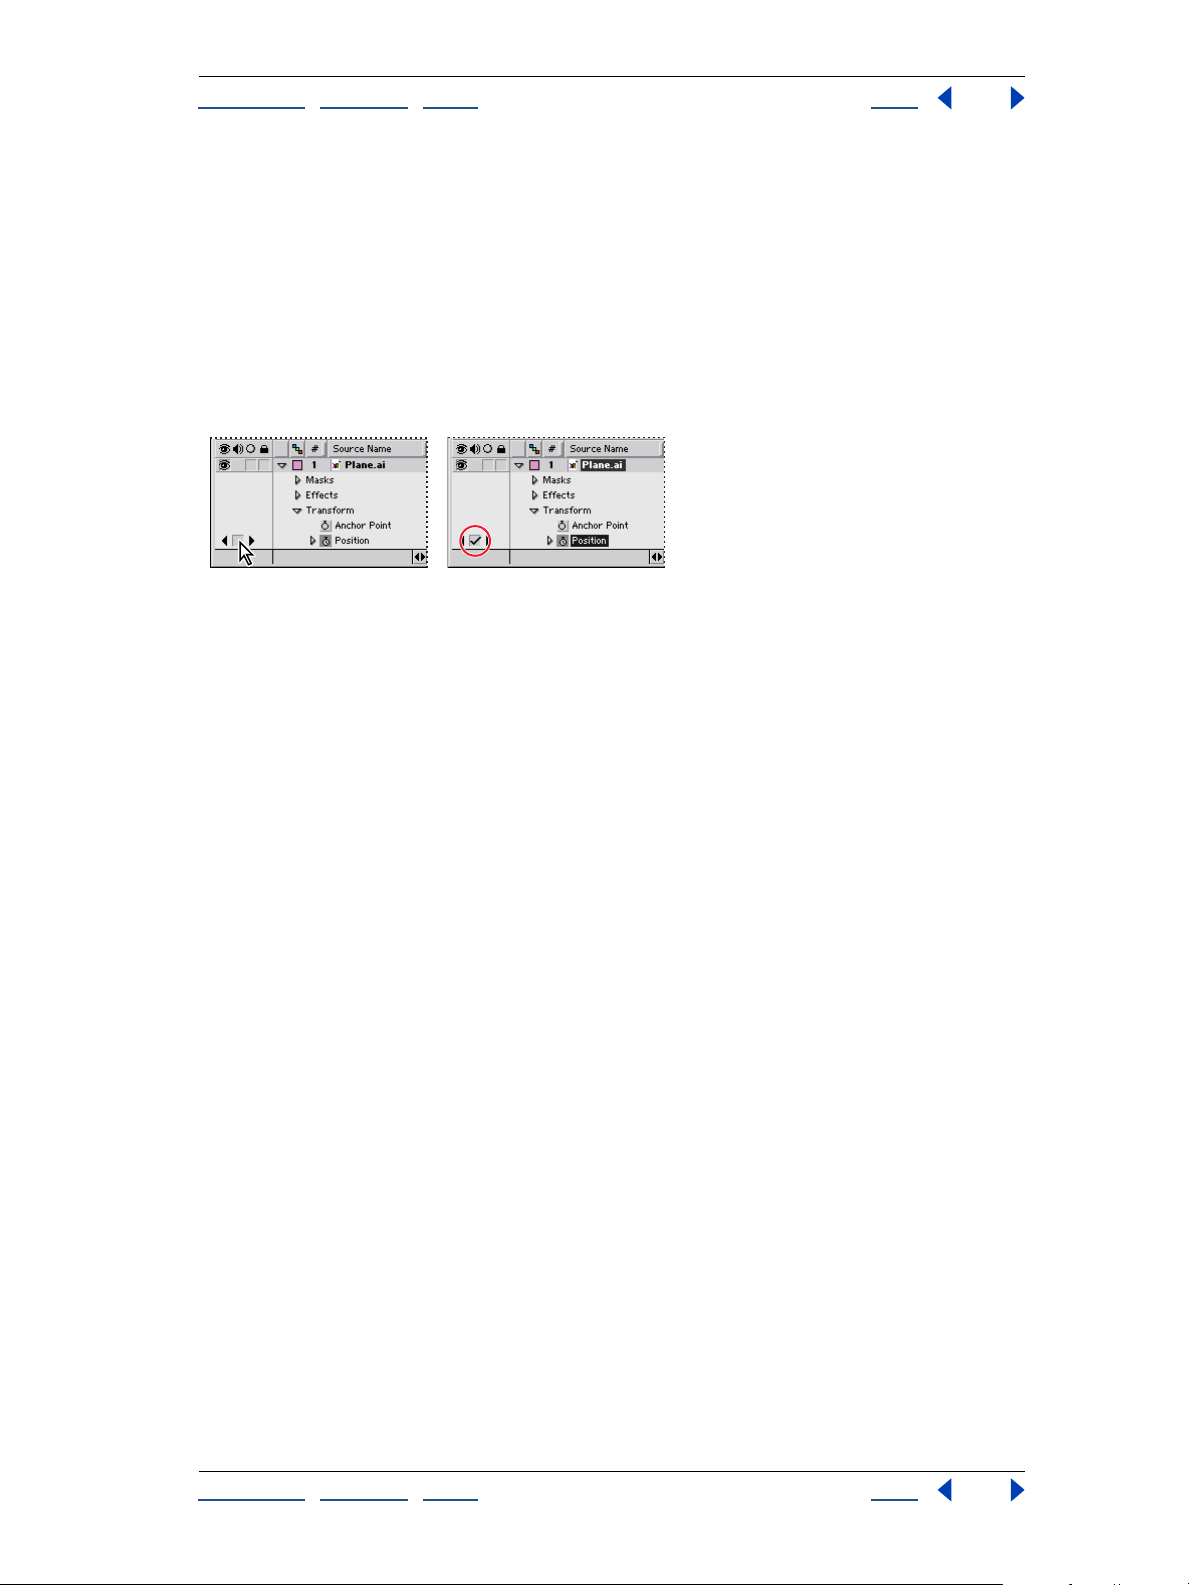
Adobe After Effects Help Animating Layers
Using Help | Contents | Index Back 99
3 Move the current-time marker to the point where you want to add a new keyframe. If
the current-time marker is after the last keyframe for that layer property, the new
keyframe will have the same value as the preceding keyframe. Otherwise, the new
keyframe’s value will be an interpolated value based on the previous and next keyframe
values.
4 Do one of the following:
• Click the keyframe check box for the layer property.
• Choose Animation > Add x Keyframe, where x is the name of the property you are
keyframing.
Navigating and selecting keyframes
If you want to modify or copy a keyframe, first select it. After Effects provides many
methods for navigating to and selecting one or more keyframes.
To move the current-time marker to the previous or next keyframe:
Click a keyframe navigator arrow. The arrow to the left moves the current-time marker to
the previous keyframe. The arrow to the right moves the current-time marker to the next
keyframe.
To snap the current-time marker to a keyframe:
Press Shift as you drag the current-time marker to a keyframe.
To select a keyframe:
Click the keyframe icon in the Timeline window’s time graph.
To select multiple keyframes:
Do one of the following:
• Press Shift as you click to select multiple contiguous or noncontiguous keyframes.
• Drag a marquee around the keyframes to select contiguous keyframes.
To select all keyframes for a layer property:
In the layer outline, click the layer property name. For example, click the word “Position” to
select all the Position keyframes for a layer.
Deleting keyframes
If you make a mistake while setting keyframes, or if you decide a keyframe is no longer
needed, you can easily delete one or more keyframes from a layer.
To delete a keyframe:
1 Select a keyframe. See “Navigating and selecting keyframes” on page 99.
2 Press Delete on the keyboard. Do not press Delete on the keypad (Windows).
Using Help | Contents | Index Back 99
Page 100

Adobe After Effects Help Animating Layers
Using Help | Contents | Index Back 100
To delete all keyframes of one layer property:
Click the stopwatch icon to the left of the name of the layer property to deactivate it.
Note: When you deselect the stopwatch icon, keyframes for that property are permanently
removed and the value of that property becomes the value at the current time. You cannot
restore deleted keyframes by reselecting the stopwatch. If you accidentally delete
keyframes, choose Edit > Undo.
Moving and copying keyframes
You can easily move keyframes to different points in time or copy them to different layers.
Moving keyframes makes it easy to change when animations occur. Copying keyframes
makes it easy to use the same property setting in different layers. You can also copy a
property value from a layer that contains no keyframes. For more information, see
“Copying a value from a layer without keyframes” on page 102.
Note: To copy an entire layer, including the source footage and keyframes, see “Duplicating a layer” on page 74.
Moving keyframes
You can move any keyframe to a different point in time. When you move keyframes, you
move the values and settings they contain.
To move a keyframe to another time:
Drag one keyframe icon to the desired time.
To move multiple keyframes to another time:
1 Select the keyframes you want to move. See “Navigating and selecting keyframes” on
page 99.
2 Drag any selected keyframe icon to the desired time. All of the other selected
keyframes maintain their relative distance from the keyframe you drag.
To expand or contract a group of keyframes:
1 Select at least three keyframes. See “Navigating and selecting keyframes” on page 99.
2 Hold down Alt (Windows) or Option (Mac OS) and drag the first or last selected
keyframe to the desired time.
To move a keyframe precisely to a different time:
1 Move the current-time marker to the desired time.
2 Hold down Shift after you begin to drag a keyframe icon to the current-time marker.
When you drag over the current-time marker, the keyframe snaps to the current-time
marker.
Copying and pasting keyframes
To use the same keyframe values at another point in time or in another layer, copy and
paste them. You can copy keyframes between layers for the same property (such as
Position) or between different properties that use the same type of data. The keyframe
properties you can copy between include the following:
Using Help | Contents | Index Back 100
 Loading...