

Page 1
Contents
• Getting Started
• Looking at the Work Area
• Converting Electronic Files to PDF
• Setting Acrobat Distiller Options
• Converting Scanned Documents to PDF
• Converting Web Pages to PDF
• Customizing PDF Navigation
• Working with PDF Documents
• Annotating PDF Documents
• Creating and Using PDF Forms
• Adding Interactive Features
• Indexing Document Collections
• Searching Catalog Indexes
• Distributing Documents in PDF
• Working with Digital Signatures
• Troubleshooting
• Index
Page 2

Page 2
How to use this online guide
The online Adobe Acrobat User Guide provides detailed information on all the
Acrobat commands and features for both Windows and Mac OS systems.
Go to the table of contents.
Go to the index.
Go to the Search command, or choose Edit > Search > Query.
How to print this online guide
Because the pages of this online guide are optimized for online viewing, you
may prefer to print them two to a page (two-up). The Acrobat CD also includes
a print-on-demand version of this online user guide (AcroHelpForPrint.pdf )
optimized for printing on 8-1/2-by-11 or A4 stock. The print-on-demand
version of the user guide is in the Help folder on your CD.
To print pages two up:
1
Choose File > Print Setup (Windows) or File > page Setup (Mac OS).
2
Follow the instruction for your platform:
■
In Windows, click Options, select 2 up on the paper tab, click OK to return to
the Print Setup dialog box, and click OK again to close it.
■
On a Macintosh, choose 2 Up from the Layout menu and click OK.
Page 3

Note
: If you can’t perform step 2 in Windows, you may not be using the Adobe
PostScript printer driver. In this case, install the Adobe printer driver from the
Acrobat CD. See the Getting Started guide for installation instructions.
3
Choose File > Print.
4
Indicate the page range.
5
Click OK (Windows) or Print (Mac OS).
Page 3
Page 4

Getting Started
Page 4
Getting Started
Welcome to the Adobe® Acrobat® program—the essential tool for universal
document exchange. You can use Acrobat to publish virtually any document in
Portable Document Format (PDF). Documents in PDF preserve the exact look
and content of the originals, complete with fonts and graphics, and they can be
distributed by e-mail or stored on the World Wide Web, an intranet, a file
system, or a CD for other users to view on Microsoft
UNIX® platforms.
What’s new in Acrobat 4.0
Version 4.0 of Adobe Acrobat includes many improvements to the interface
that streamline your work on PDF files. A tool bar and command bar give you
easy access to both new and familiar Acrobat features, while the status bar
provides quick ways to change the on-screen display. Floating palettes with
bookmarks, thumbnails, annotations, signatures, articles, and destinations
offer enhanced display, navigation, and editing functionality. And in addition
to the menu bar at the top of the screen, Acrobat now provides contextsensitive menus with commands related to the item under the pointer.
®
Windows®, Mac OS, and
Page 5

Getting Started
Page 5
Acrobat 4.0 also includes many new features:
Converting documents to PDF
You can now simply drag and drop many
popular file types to the Acrobat icon or Acrobat window to convert the files
to PDF.
Microsoft Office macros
Acrobat installs macros in the Microsoft Office applications in Windows so that you can create PDF files directly from those applications. The PDFMaker macro is installed for Microsoft Word 97, Word 2000,
PowerPoint 97, and PowerPoint 2000; it can create PDF files using Acrobat
Distiller
®
or PDFWriter, and it supports new Acrobat features such as structured
bookmarks. The PDFWriter macro works with Microsoft Word 95, PowerPoint
95, Excel 95, Excel 97, and Excel 2000.
Opening documents in Acrobat
With the Open command in Acrobat for
Windows, you can now open documents from many popular applications and
convert them automatically to PDF.
Opening Web pages
You can download HTML pages from the Web in Acrobat
and convert the pages to PDF at the same time. Any links on the pages in PDF
retain an association with the Web site so that you can click links to download
additional pages quickly.
Web Buy
You can download eBooks, reference works, technical manuals, structured business documents, newspapers, and periodicals, for example, as secure
PDF files that you can unlock to read and search on your personal computer or
reading device.
Page 6

Getting Started
Page 6
Distiller job options
Distiller now provides more options for converting
documents to PDF. You can use one of three predefined sets of job options to
optimize PDF files for different purposes, and you can customize and save your
own sets of job options. The 4.0 job options include the ability to manage color
in your documents and even embed ICC profiles to maintain accurate color in
PDF files from one ICC-aware application or output device to another.
CMYK color options
With the Prepress dialog box in Acrobat, you can bypass
any color management system and preserve the original CMYK and gray values
in a PDF document if the file is to be used to make color plates for printing.
Annotations
Acrobat provides an extensive array of annotation tools for
marking up text and attaching notes and commentaries to PDF documents.
You can create annotations in text, graphic, and audio formats, and even
embed entire files.
Structured bookmarks
You can use the new structured bookmarks to
reorganize or delete content in PDF. Acrobat generates these bookmarks when
you create PDF from a Microsoft Word file or from a Web page. You can also
use structured bookmarks generated from Web pages to download additional
pages.
Destinations
You can create custom destinations to give other users the ability
to navigate to specific named locations across PDF documents. These links are
easier to maintain than links to pages because they are not affected by the
addition or deletion of pages in the target document.
Page 7

Getting Started
Page 7
Digital signatures
You can now add a digital signature to the current version of
a PDF document in Acrobat. You can also see all the signatures that have been
added to the document, check the validity of signatures, and go back to an
earlier signed version of a document.
Document comparison
Acrobat can now show you differences between
analogous pages in two versions of a PDF document. It marks all differences on
the pages, including content revisions and even subtle formatting changes you
may not be able to see.
Page renumbering
You can renumber pages in Acrobat in a variety of ways—
for example, you can make the PDF numbering match the original document’s
numbering.
Text formatting
The table/formatted text select tool allows you to select tables
and text in a PDF document and retain the original formatting when you copy
(or import) them into other applications. You can specify vertical or horizontal
format, the type of text flow, and whether you want ANSI (simple text) or Rich
Text Format (RTF).
Support for other languages
You can now create, view, and print PDF
documents that have Japanese, Korean, Traditional Chinese, and Simplified
Chinese text, even on a non-native system, as long as you have the proper
support files installed. (The original documents must be authored on a native
system.) You can create, view, and print documents that have Cyrillic, Eastern
European, and Middle Eastern text on a native system, using the Englishlanguage version of Acrobat.
Page 8

Getting Started
Page 8
About support for Asian languages
In Acrobat 4.0, you can create, view, and print PDF documents that contain
Japanese, Korean, Traditional Chinese, and Simplified Chinese text by installing
the Asian support files. In Windows, install Acrobat with the custom installation, and select the Asian Language Support option. In Mac OS, use the
custom installation, and select the Asian Language Kit and the Asian Language
Distiller Extensions options.
All of the Acrobat features are supported for Asian-language text, with the
following exceptions:
■
In Windows, you can use Distiller to create PDF files from documents with
Asian text on any system, as long as you have the Asian language support files
installed, but you cannot use PDFWriter to create these files unless you are on a
native-language system. In Mac OS, you can use either Distiller or PDFWriter to
create files on any system, as long as you have the Asian Language Kit installed.
The original documents must be created on a native system.
■
In Windows, you can use the Web Capture command in Acrobat to download
Web pages with Japanese text, and you can use the Open command to convert
some types of Japanese documents to PDF. To take advantage of these
features, you must have the Acrobat Asian language files installed on your
system. These features are not available for the other Asian languages.
■
The Acrobat Catalog tool, the Search command, the Compare Pages,
Compare Words, and Compare Words and Fonts commands, and the Paper
Page 9

Getting Started
Page 9
Capture feature are not available for Asian text. The PDFMaker macro is
available for Japanese language files only.
■
You can use the text annotation tool to attach comments to Japanese text
and the table/formatted text select tool to select Japanese text; these features
are not supported for other Asian text. The text markup tools for highlighting,
striking through, and underlining are not available for any Asian text.
■
You can create forms that have Japanese text and fill in form fields with
Japanese text. You can also use the digital signature feature in Japanese
documents. These features are not available for other Asian text.
Note:
Asian text in bookmarks, annotations, and the Document Info dialog
boxes require support from the operating system to display correctly.
About support for Eastern European and Middle Eastern languages
You can create, view, and print PDF documents in Acrobat 4.0 that contain
Cyrillic text (including Bulgarian, Russian, and Ukrainian), Eastern European
text (including Czech, Hungarian, and Polish), and Middle Eastern text (Arabic
and Hebrew). If the fonts are embedded in the PDF documents, you can view
and print the documents on any system. However, you must have the proper
(language kit) fonts installed on a system to be able to create the documents,
or to view or print them without the fonts being embedded.
Page 10

Getting Started
Page 10
Acrobat creates bookmarks for documents with Cyrillic, Eastern European, and
Middle Eastern text, and you can use the text annotation tool to attach
comments to the text. You can use the Find command to search for Cyrillic and
Eastern European text. Other features in Acrobat 4.0 are not supported for
these languages.
Resources for learning Acrobat
Adobe provides documentation and services for learning how to use Acrobat
and for solving problems as you work with PDF files.
Acrobat documentation
The printed and online documentation in the Acrobat package get you up and
running with Acrobat and should answer most of your questions:
Adobe Acrobat Getting Started Guide
ments and features in the program, and tells how to install the software on
Windows and Mac OS systems. This guide is included in the package in printed
form and as the introductory chapter of the online user guide.
Adobe Acrobat User Guide
commands and features, for both Windows and Mac OS systems. This online
user guide is designed to be used as a reference tool in your everyday work
with Acrobat. To open the user guide, choose Acrobat Guide from the Acrobat
Help menu.
Provides detailed information on all Acrobat
Contains information on system require-
Page 11
Getting Started
Page 11
The user guide has a table of contents with links you can click to go to
particular chapters and sections. To go to the table of contents, click the First
Page button at the top of any page in the guide.
In addition, there are two indexes: a traditional book-type index and a full-text
index generated by Acrobat Catalog. To use the traditional index, click Index in
the table of contents, or click the index icon at the top of any page. Clicking
a term in the traditional index takes you to the main discussion of that subject.
To use the full-text index, choose Edit > Search > Query, or click the Search
Query button on the Acrobat command bar. When you search for a term in
the full-text index, you go to the first occurrence of the subject; you can use the
Find Again command to go to subsequent occurrences.
The Acrobat CD includes a print-on-demand version of the user guide, with the
same material but on larger pages more suitable for printing. You can print
pages from the online user guide, but if you’re printing more than a few pages,
you’ll find it quicker and more efficient to print from the print-on-demand
version. The print-on-demand version of the user guide (AcroHelpForPrint.pdf )
is in the Help folder on your Acrobat CD.
Adobe Acrobat Tour
Gives you a quick overview of Acrobat. This online tour
uses sample files to illustrate some of the most important features in the
software and includes step-by-step instructions for working with those
features yourself. To start the tour, choose Acrobat Tour from the Acrobat
Help menu.
Page 12
Getting Started
Page 12
You’ll find a print-on-demand version of the tour (AcroTourForPrint.pdf) in the
Help folder on your Acrobat CD.
The Adobe Web site
Visit the Adobe Web site for up-to-the minute information on technology
related to Acrobat, links to Acrobat plug-ins, product tips, support updates, and
much more.
In Acrobat, click the Adobe Web site button , or choose File > Adobe Online.
Use the dialog box that appears to update pages from the Web site manually,
to configure how often to update pages automatically, or to set up your
proxy service.
In your Web browser, you can go to the main page of the Adobe Web site by
entering the URL www.adobe.com.
On the Adobe Web site home page, you can click a country name in the Adobe
Sites pop-up menu to choose a language for viewing the site. The exact information in the site may vary from one language version to another.
Classroom in a Book
®
Classroom in a Book is the official training series for Adobe software developed
by experts at Adobe and published by Adobe Press. For information on
purchasing
Adobe Acrobat 4.0 Classroom in a Book
, visit the Adobe Web site
(www.adobe.com), or contact your local book distributor.
Page 13

Getting Started
Page 13
Training & Certification
The Adobe Training & Certification Programs are designed to help Adobe
customers improve and promote their product proficiency skills. The Adobe
Certified Expert (ACE) program is designed to recognize the high-level skills of
expert users. Adobe Certified Training Providers (ACTP) use only Adobe
Certified Experts to teach Adobe software classes. Available in either ACTP
classrooms or on site, the ACE program is the best way to master Adobe
products. For Adobe Certified Training Programs information, visit the
Partnering with Adobe Web site at partners.adobe.com.
About the Acrobat package
The Acrobat package includes the Adobe Acrobat CD-ROM,
Getting Started
(a printed copy of this chapter), and a printed registration card.
Adobe Acrobat
The Adobe Acrobat CD contains the following:
■
Adobe Acrobat software for your platform.
■
Adobe Acrobat Reader software for your platform.
■
Adobe PostScript® printer drivers and other utilities you may need.
■
An online user guide that provides complete documentation for Acrobat and
its plug-ins.
■
An interactive online Tour that takes you through Acrobat, with accompa-
nying sample files and step-by-step instructions.
Page 14

Getting Started
■
Sample interactive forms and related materials to help you design your own
forms in Acrobat.
■
A Security folder with information from vendors who are providing digital
signature capabilities in Acrobat.
■
A Software Development Kit (SDK) with libraries, source code, and documen-
tation for developing plug-ins that extend the functionality of Acrobat.
■
Tryout versions of Adobe flagship products.
System requirements
Acrobat requires certain hardware and software components to be able to
run properly. (See “Troubleshooting” in the online User Guide for tips on
maximizing Acrobat performance and suggestions for reducing memory
requirements.)
Windows
■
An Intel® i486™ or Pentium® processor-based personal computer (Pentium
recommended).
■
Microsoft Windows 95, Windows 98, or Windows NT® 4.0 with Service Pack 3
or later.
■
16 MB of RAM for Acrobat on Windows 95 and Windows 98, 24 MB of RAM for
Acrobat on Windows NT (32 MB recommended).
Page 14
Page 15

Getting Started
■
32 MB of RAM for the Paper Capture plug-in (64 MB recommended).
■
A hard drive with at least 80 MB of available space (150 MB for Asian font
support).
■
A CD drive.
Mac OS
■
An Apple Power Macintosh computer.
■
Apple System Software version 7.5.3 or later for Acrobat. (Version 8.6 or later
is required for Web Capture.)
■
6 MB of RAM for Acrobat (12 MB recommended).
■
16 MB of RAM for Distiller or the Paper Capture plug-in (32 MB
recommended).
■
A hard drive with at least 80 MB of available space (150 MB for Asian
font support).
■
A CD drive.
Page 15
Page 16

Getting Started
Page 16
Registration
Please register your copy of Acrobat so that Adobe can provide you with the
highest quality software, offer technical support, and keep you informed of
new Acrobat software developments. You can use the enclosed registration
card, or register online at the end of the installation process or at a later date.
Follow the on-screen instructions to register at the end of the installation
process.
To register online at a later date:
1
Follow the instructions for your platform:
■
In Windows, click the Start Menu, choose Programs > Adobe Acrobat 4.0, and
click Register Acrobat 4.0.
■
In Mac OS, open the Adobe Acrobat 4.0 folder, and double-click the Adobe
Registration Utility icon.
2
Follow the on-screen instructions to complete the registration.
Page 17

Getting Started
Page 17
Installing and starting Acrobat (Windows)
You install the Acrobat program files from the CD-ROM. Note that you cannot
run Acrobat from the CD; you must install the components onto your hard
drive and run the software from that drive.
Important:
recommends uninstalling it before installing Acrobat 4.0. See the documentation for the earlier Acrobat version for information on uninstalling.
If you have an earlier version of Acrobat on your system, Adobe
Installing Acrobat (Windows)
In addition to Adobe Acrobat, the Acrobat installer includes the AdobePS™
printer drivers and a set of Distiller PostScript Printer Description (PPD) files.
The PPD files provide information about the particular printer (such as what
fonts are on the printer’s ROM) for the AdobePS driver. Before using Distiller to
create PDF files, you may need to select a PPD file for the printer you intend to
use. (See Chapter 2, “Converting Electronic Files to PDF,” in the online User
Guide for details.)
Page 18

Getting Started
Page 18
The default installation in Windows includes macros that allow you to create
PDF files easily in Microsoft Office applications. If you have Microsoft Word 97,
Word in Microsoft Office 2000, PowerPoint 97, or PowerPoint 2000 on your
system, the PDFMaker macro is installed. If you have Word 95, PowerPoint 95,
Excel 95, Excel 97, or Excel 2000 on your system, the PDFWriter macro is
installed.
Note:
The serial number for your copy of the software is located on the printed
registration card.
To install Acrobat (Windows):
1
Restart Windows, and do not start any other applications.
2
Insert the Adobe Acrobat CD into your CD drive.
3
In the Adobe Acrobat 4.0 Setup dialog box, click Next whenever you are
ready to proceed to the next panel. Follow the on-screen instructions to move
past the introduction, to select a country, and to accept the license agreement.
4
Select the type of installation you want:
■
Typical installs the program files for Acrobat, Acrobat Catalog, Acrobat
Distiller, PDFWriter, PDFMaker, several standard plug-ins, and the online
documentation.
■
Compact installs only the Acrobat, Distiller, PDFWriter, and PDFMaker
program files.
Page 19

Getting Started
Page 19
■
Custom lets you specify what components to install. You can include any of
the components in the typical installation, plus support for PDF documents
with Asian-language text and the accessories QuickTime 3.0 and Photoshop®
5.0 PDF Plug-in.
For a description of any component that can be installed, select Custom,
and click Next. Then select the component in the list to see a description of it.
You can click Back to return to the panel for selecting a type of installation if
you do not intend to continue with the custom installation.
5
If you want to change the destination folder for the Acrobat files, click
Browse, and use the browser to locate a folder.
6
Click Next.
7
If you selected custom installation, select the components you want to
install, and click Next. The dialog box displays the amount of disk space
required to install each component and the amount of space available. You can
also select a component in the list and click Change to include or remove any
item within that component.
Note:
The Acrobat Capture® plug-in requires Acrobat and PDFWriter. If you
select the Capture plug-in, you must also select Acrobat Program Files and
PDFWriter Program Files or already have them installed.
8
Enter your name, your organization (optional), and the serial number for
your copy of the program, and then click Next.
Page 20

Getting Started
Page 20
9
Click Yes to verify the user information.
10
Click Next to begin the installation. When the process is complete, a
message tells you that Acrobat is installed. You can register as part of the installation process, or you can cancel the registration when prompted and register
at a later time.
11
Select Yes, and click Finish to restart your computer.
Configuring Adobe Photoshop and Adobe Illustrator® for image or
PDF editing in Acrobat
If you install Adobe Acrobat after installing Adobe Photoshop 5.0, Acrobat will
automatically supply Photoshop with a PDF plug-in that enables you to take an
image from a PDF document, edit it in Photoshop, save it, and return the image
to the PDF document. If you install Photoshop after installing Acrobat,
however, you may need to configure this application manually.
Adobe Illustrator 7 and Illustrator 8 install a PDF plug-in that enables you to
take a PDF page from a PDF document, edit it in Illustrator, save it, and return
the page to the PDF document. There should be no need to configure
this manually.
Page 21

Getting Started
Page 21
To configure Adobe Photoshop manually:
1
Copy the Photoshop plug-in file PDFFormat.8bi from the Program
Files\Adobe\Acrobat 4.0\Acrobat folder to the
Program Files\Adobe\Photoshop 5.0\Plug-ins\File Formats folder.
2
Quit Photoshop if it is running. The next time you start Photoshop, it should
recognize the plug-in.
Starting Acrobat (Windows)
To use Acrobat, you must have installed the files from the CD onto your local
hard drive. You cannot run Acrobat from your CD-ROM drive.
To start Acrobat (Windows):
Click the Start Menu, choose Programs > Adobe Acrobat 4.0, and click the
name of the program you want to start. You can also double-click the Adobe
Acrobat icon on your desktop to start the Acrobat program, or double-click a
PDF file icon to start the program with that file open.
Start the Adobe Acrobat 4.0 program to view, enhance, or create PDF
documents. Start Acrobat Catalog to build a searchable index for a collection of
PDF documents. Start Acrobat Distiller to customize Distiller job options,
change the Distiller preferences, set up watched folders, or convert PostScript
files to PDF.
Page 22

Getting Started
Page 22
To start Acrobat without plug-ins (Windows):
Hold down Shift immediately after starting up the Acrobat program.
Uninstalling Acrobat (Windows)
You can remove all of the Acrobat components installed on your system with
the Uninstall utility.
To uninstall Acrobat (Windows):
Click the Start Menu, choose Programs > Adobe Acrobat 4.0, and click Uninstall
Adobe Acrobat 4.0. Click Yes to confirm that you want to remove the program.
Installing and starting Acrobat (Mac OS)
You install the Acrobat program files from the CD-ROM. Note that you cannot
run Acrobat from the CD; you must install the components onto your hard
drive and run the software from that drive.
Important: If you have an earlier version of Acrobat on your system, Adobe
recommends uninstalling it before installing Acrobat 4.0. See the documentation for the earlier Acrobat version for information on uninstalling.
Page 23

Getting Started
Page 23
Installing Acrobat (Mac OS)
In addition to Adobe Acrobat, the Acrobat installer includes the AdobePS™
printer driver and a set of Distiller PostScript Printer Description (PPD) files. The
PPD files provide information about the particular printer (such as what fonts
are on the printer’s ROM) for the AdobePS driver. Before using Distiller to create
PDF files, you may need to select a PPD file for the printer you intend to use.
(See Chapter 2, “Converting Electronic Files to PDF,” in the online User Guide
for details.)
Note: The serial number for your copy of the software is located on the printed
registration card.
To install Acrobat (Mac OS):
1 Insert the Adobe Acrobat CD into your CD drive.
2 Double-click the Install Adobe Acrobat 4.0 icon.
3 In the Adobe Acrobat Installer dialog box, click Continue to move past
the introduction.
4 Specify the type of installation you want:
■
To use the standard installation, choose Easy Install from the pop-up menu.
This installs the program files for Acrobat, Acrobat Catalog, Acrobat Distiller,
PDFWriter, several standard plug-ins, and the online documentation.
Page 24

Getting Started
Page 24
■
To install only particular components, choose Custom Install, and select
the components in the list box. You can include any of the components in
Easy Install, plus support for PDF documents with Asian-language text
(Language Kit).
For a description of any component that can be installed, choose Custom
Install to see a list of the components, and click the I button to the right of the
component you want in the list.
5 Click Install, and follow the on-screen instructions to complete the installation. When the process is complete, a message tells you that Acrobat is
installed. You can register as part of the installation process, or cancel the registration when prompted and do it at a later time.
6 Click Restart to restart your computer.
Installing QuickTime (Mac OS)
You need QuickTime to be able to play QuickTime movies pointed to from PDF
files. QuickTime is installed on most Mac OS computers, but if you need it, you
can install it from the Acrobat CD.
To install QuickTime (Mac OS):
1 Insert the Adobe Acrobat CD into your CD drive.
2 Open the QuickTime folder, and open the Readme file.
3 Follow the installation instructions in the Readme file.
Page 25

Getting Started
Page 25
Starting Acrobat (Mac OS)
To use Acrobat, you must have installed the files from the CD onto your local
hard drive. You cannot run Acrobat from your CD drive.
To start Acrobat (Mac OS):
Open the Adobe Acrobat 4.0 folder, and double-click the icon for the program
you want to start. Or double-click a PDF file icon to start the program with that
file open.
Start the Adobe Acrobat 4.0 program to view, enhance, or create PDF
documents. Start Acrobat Catalog to build a searchable index for a collection of
PDF documents. Start Acrobat Distiller to customize Distiller job options,
change the Distiller preferences, set up watched folders, or convert PostScript
files to PDF.
If you installed Japanese fonts with Acrobat, the first time you start Distiller you
are asked to process the fonts for use with Distiller. Click OK to allow Distiller to
process the fonts. (See Chapter 3, “Setting Acrobat Distiller Options” in the
online User Guide for more information.)
To start Acrobat without plug-ins (Mac OS):
Hold down Shift immediately after starting up the Acrobat program.
Page 26

Getting Started
Page 26
Managing plug-ins
Acrobat uses plug-ins to add more functionality. Plug-ins increase the required
amount of memory needed to run Acrobat. To minimize the amount of
memory needed to run Acrobat, you may want to install only the plug-ins you
use with the program. A plug-in must be located in the Acrobat Plug-ins folder
to load with Acrobat. If the plug-in is moved to another location, it will not load
with the program. Alternatively, you can temporarily disable plug-ins when
starting Acrobat.
If you install Acrobat after you install Photoshop, the Acrobat installer will
automatically supply Photoshop with a PDF plug-in that enables you to edit an
image in a PDF document using Photoshop. With this plug-in, you can edit an
image in Photoshop while in the PDF document, save the changes, and
automatically return the image to the PDF document for viewing. The Acrobat
Installer puts the required Photoshop plug-in in the File Formats folder in your
Photoshop application folder. The plug-in file is named PDFFormat.8bi
(Windows) or PDFFormat (Mac OS). If you install Photoshop after you’ve
installed Acrobat, you will need to configure the application manually.
Adobe Illustrator 7.0 and 8.0 automatically install a PDF plug-in that enables
you to select a graphic object in a PDF document, edit it in Illustrator, save the
changes, and automatically return the image to the PDF document for viewing.
There should be no need to configure this manually.
Page 27

Getting Started
Page 27
To configure Adobe Photoshop to work with Acrobat:
1 Open Windows Explorer, and locate the Photoshop plug-in in Program Files
> Adobe > Acrobat 4.0 > Acrobat > Photoshop > PDFFormat.8bi.
2 Copy this file to Program Files > Adobe > Photoshop 5.0 > Plug-ins > File
Formats.
3 Shut down Photoshop if it is currently running. When you restart Photoshop,
it will recognize the new plug-in.
To disable a plug-in:
1 Open the Plug-ins folder in your Acrobat folder.
2 Select the plug-ins you do not want to load. Some of the plug-ins may be in
folders within the Plug-ins folder.
3 Move the selected plug-ins to the Optional folder in the Acrobat folder
(Windows) or the Optional Plug-ins folder in the Acrobat folder (Mac OS).
Page 28

Getting Started
To temporarily disable all plug-ins:
Hold down the Shift key immediately after starting the Acrobat program.
To increase the processing speed of the Paper Capture plug-in:
Do one of the following:
■
Add more RAM than the required 32 MB minimum.
■
In Windows, have available the required 32 MB of RAM and free disk space
equal to twice the size of the largest uncompressed image you will process.
Page 28
Page 29

Looking at the Work Area
Page 29
Looking at the Work Area
You use Acrobat to view and work in PDF documents—both your own
documents and documents created by other users. The Acrobat work area
provides a powerful set of features for navigating in PDF documents, for
adjusting the magnification and other aspects of your view, for controlling the
look of documents when they open, and for customizing interaction with them
in many other ways.
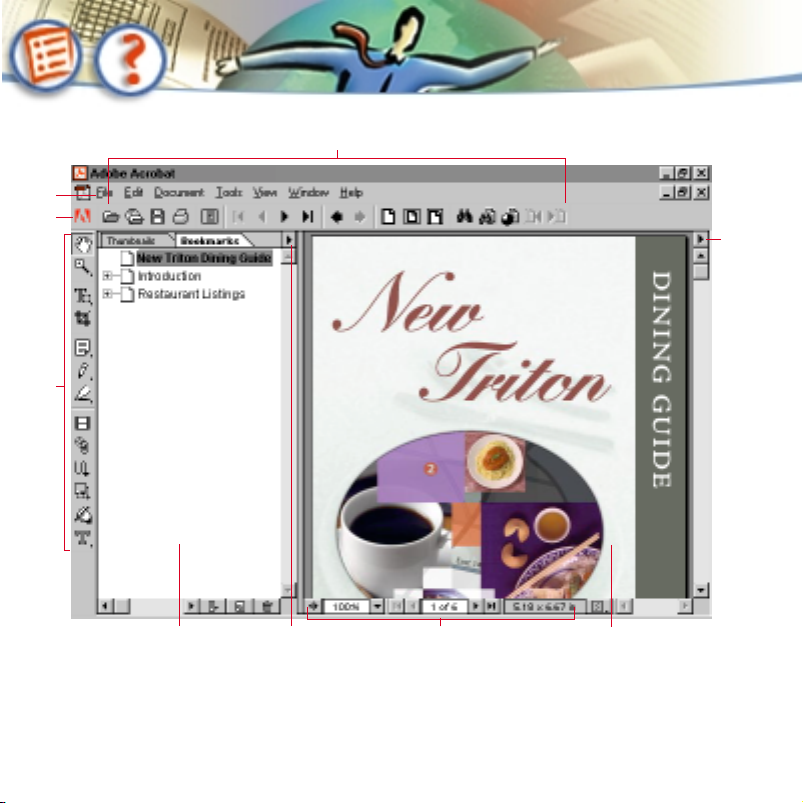
Using the work area
The Acrobat work area includes a window with a document pane for viewing
PDF documents and a navigation pane with bookmarks, thumbnails, annotations, and so on related to the current document. A menu bar, command bar,
tool bar, and status bar around the outside of the window provide everything
you need to work with documents.
Page 30
Looking at the Work Area
Page 30
A
B
C
I
D
E F
G
H
A. Command bar B. Menu bar C. Adobe Online button D. Tool bar E. Navigation pane
F. Palette menu G. Status bar H. Document pane I. Document pane menu
Page 31

Looking at the Work Area
Page 31
The buttons and menus in the status bar provide quick ways to change your
on-screen display and to navigate through documents.
ABCDEFGH I J
A. Navigation Pane button B. Magnification level C. Magnification pop-up menu D. First Page
button E. Previous Page button F. Current page G. Next Page button H. Last Page button
I. Page size J. Page Layout pop-up menu
Using commands and tools
The command bar contains buttons for many of the most commonly used
commands in Acrobat. The document pane menu contains a smaller group of
commands for setting General preferences and for getting information on the
current document.
The tool bar contains tools for scrolling and zooming; cropping pages;
changing the appearance of text; adding graphics, annotations, and signatures; and making other changes to the current PDF document. A small triangle
at the lower right of a tool indicates the presence of hidden tools.
To show or hide the command bar, menu bar, or tool bar:
Do one of the following:
■
To show or hide the command bar, choose Window > Show Command Bar or
Window > Hide Command Bar.
Page 32

Looking at the Work Area
Page 32
■
To hide the menu bar, choose Window > Hide Menu Bar. To show it again,
press F7.
■
To show or hide the tool bar, choose Window > Show Tool Bar or
Window > Hide Tool Bar.
To move the command bar or tool bar over the window (Windows):
Drag the bar by its right or bottom edge or by a separator bar between two
groups of icons. You can drag the bar back to its original location to reattach it.
To choose a command from the command bar:
Click the button.
To choose a command from the document pane menu:
Position the pointer over the triangle in the upper right corner of the
document pane, hold down the mouse button to open the menu, and drag to
the command you want.
To select a tool in the tool bar:
Do one of the following:
■
To select a visible tool, click the tool, or press the letter key shown in the
tool’s tip. (Move the pointer over a tool to see its tip.)
Page 33

Looking at the Work Area
Page 33
■
To select a visible tool for only one use, Ctrl-click (Windows) or Option-click
(Mac OS) the tool. This works for any tool except zoom, select text, select
graphic, crop, movie, and article.
■
To select a hidden tool, hold down the mouse button on the related tool with
the triangle until the additional tools appear, and then drag to the tool you
want. Or hold down Shift, and press the letter key showing in the tool’s tip to
cycle through the group of tools.
Press on a tool with a triangle to open a hidden group of tools.
■
To select the hand tool temporarily, hold down the spacebar. To select the
zoom-in tool temporarily, hold down Ctrl-space (Windows) or Command-space
(Mac OS). To select zoom-out temporarily, hold down Ctrl-Alt-space (Windows)
or Command-Option-space (Mac OS). The tools are selected as long as you hold
down the keys.
Using context menus
In addition to menus in fixed locations in the work area, Acrobat provides
context-sensitive menus that display commands for the particular item under
the pointer.
Page 34

Looking at the Work Area
Page 34
To choose a command from a context menu:
1 Position the pointer over an item in the work area, such as a thumbnail,
annotation, bookmark, or document page.
2 Hold down the right mouse button (Windows), or press Control and hold
down the mouse button (Mac OS), until the context menu appears. Then drag
to the command you want.
Using palettes
Palettes help you organize and keep track of a document’s bookmarks, thumbnails, signatures, annotations, articles, and destinations. Palettes can be docked
inside the navigation pane, or they can float in windows over the work area.
They can also be grouped with other palettes.
To show or hide the navigation pane:
Click the Navigation Pane button in the status bar, or click the left border of
the document pane.
To show or hide a palette:
Choose the palette’s Show or Hide command from the Window menu. The
palette appears in the navigation pane or in a floating window, depending on
where the palette was located the last time it was visible.
Page 35

Looking at the Work Area
Page 35
To change the display of a palette:
Do the following:
■
To change the width of the navigation pane while it is visible, drag its
right border.
■
To bring a palette to the front of its group, click the palette’s tab.
■
To move a palette to another group, drag the palette’s tab to the other group.
The other group can be in the navigation pane or in a floating window. You can
drag a palette to an existing group or drag a palette over the document pane
to create a new floating window for it.
Drag the palette’s tab to another group.
■
To move a palette to its own floating window, drag the palette’s tab to the
document pane.
Page 36

Looking at the Work Area
Page 36
■
To collapse a floating palette window to show only the tabs, double-click any
tab in the palette. Double-click a tab again to return the window to its full size.
■
To move a floating palette window, drag it by the title bar.
To choose a command from a palette menu:
Position the pointer over the triangle in the upper right corner of the palette,
hold down the mouse button to open the menu, and drag to the command
you want.
Press on the triangle in a palette to open a palette menu.
Creating PDF documents
You begin the Acrobat process by converting existing documents or source
material to PDF. Acrobat creates a copy of the source material in PDF (it does
not alter the original material). The source material can be in a variety of
formats:
Page 37

Looking at the Work Area
Page 37
Electronic files from applications To convert an electronic file to PDF, you can
drag and drop the file to Acrobat, use the Create PDF command or Acrobat
icon in a Microsoft Office application, “print” the file to PDF from another application, or (in Windows) simply open the file in Acrobat. You can also set a
variety of options that precisely control the fonts, colors, compression, and
other characteristics of your converted files. See Chapter 2, Converting
Electronic Files to PDF for details.
Web pages In Acrobat, you can collect one page or all pages from any portion
of a Web site. The Web pages are converted to one PDF document and
maintain all the original links. You can click the links to download more pages
or to go to a URL on the Web. See Chapter 5, Converting Web Pages to PDF
for details.
Printed pages You can run a scanner from Acrobat to convert printed pages to
an image-only form of PDF, which stores a bitmap picture of the pages. If you
want to be able to search, index, and correct text on the pages, you can use the
Paper Capture feature to turn the file into a full-text searchable PDF file.
Acrobat performs optical character recognition (OCR) on the pages to convert
them from PDF Image Only to searchable PDF Normal. See Chapter 4,
Converting Scanned Documents to PDF for details.
Page 38

Looking at the Work Area
Page 38
Image files Import image files into Acrobat to convert them to a PDF image.
Acrobat can import many common graphic file formats, including TIFF, BMP,
PCX, GIF, and JPEG. If the imported images have text and if you’d like to make
them full-text searchable, use the Paper Capture feature to convert the pages
from PDF Image Only to searchable PDF Normal. See Converting image files to
PDF for details.
Buying PDF documents off the Web
The Web Buy feature lets you buy and download eBooks, reference works,
technical manuals, structured business documents, newspapers, and periodicals as PDF files that have been locked with the Adobe secure PDF technology
to protect the copyrights of authors and publishers. Web Buy lets you unlock
these files so that you can read and search them on your personal computer or
reading device. A series of Web pages pops up in your browser to guide you
through the process.
Page 39

Looking at the Work Area
Page 39
Setting your Web Buy preferences
Sellers of electronic documents may require that the use of an electronic
document be tied to a particular computer or storage device. You can specify in
the Web Buy preferences dialog box what computer or storage device information you are willing to make available to sellers automatically when you
purchase a secure PDF document over the Web. An advisory page will pop up
in your Web browser if a seller seeks information other than that you have
defined in your Web Buy preferences dialog box.
To set your Web Buy preferences:
1 Select File > Preferences > Web Buy.
2 Define the information you want to make available automatically to a seller:
■
Select Internal computer ID to give the seller your computer ID. You cannot
edit your computer ID from this dialog box.
■
Select User Identifier (Logon Name) to give the seller your user ID. You
cannot edit your user identifier from this dialog box.
Page 40

Looking at the Work Area
Page 40
■
Select Storage Device for Document if you want to lock the PDF document to
the default storage device in your computer.
Note: If you lock a document to a portable device such as a Zip cartridge or Jaz
drive, the document is portable. If you lock a document to your computer, the
document can be read only on that machine.
■
Select the Other Identifier (Windows) or Alternate Identifier (Mac OS) text
box to lock the document to a storage device such as a Zip cartridge or a Jaz
drive that is visible to your computer. To add a storage device to the Other
Identifier (Windows) or Alternate Identifier (Mac OS) text box, be sure the
storage device is installed, and then click Refresh (Windows) or Refresh Device
List (Mac OS) in the dialog box. All the devices that are visible to your computer
are listed in the right panel. Select the required storage device, and click the
arrow to copy the storage device to the text box. Select the required text box.
Page 41

Looking at the Work Area
3 Click OK.
Important: You must set the Certified plug-ins only option in the General
preferences to use the Web Buy feature.
Page 41
Page 42

Looking at the Work Area
Page 42
Reading downloaded PDF files
When you install the Web Buy plug-in, Acrobat installs Rotate View buttons on
the Acrobat command bar. These buttons let you rotate pages clockwise or
counterclockwise for easier viewing. Acrobat also installs the Retain View On
Close option in the Preferences file. Select this option if you want your
electronic document to open automatically at the last page you were looking
at when you closed the document, and at the same view.
To rotate the displayed page:
Click the Rotate View 90
o
CW button or Rotate View 90o CCW button on
the command bar to rotate the displayed page clockwise or counterclockwise,
respectively. The page is rotated in 90-degree increments.
To set the Retain View On Close option:
Choose File > Preferences > Retain View On Close. (Your document will open
automatically at the same page and view when the option is selected.)
Opening PDF documents
The creator of a PDF document can set the document to open in a variety of
ways. For example, a document might open to a particular page number, at a
particular magnification, or with the bookmarks or thumbnails visible.
Page 43

Looking at the Work Area
Page 43
If a document is set to open in Full Screen view, the tool bar, command bar,
menu bar, and window controls are not visible. You can exit Full Screen view
by pressing Escape, if your preferences are set this way, or by pressing Ctrl+L
(Windows) or Command+L (Mac OS). For more on this view, see Reading
documents in Full Screen view.
To open a PDF document:
Do one of the following:
■
Click the Open button , or choose File > Open. In the Open dialog
box, select the filename, and click Open. PDF documents usually have the
extension .pdf.
■
Choose the document’s filename from the File menu. The menu lists the
four PDF documents you last opened.
■
Double-click the file icon in your file system.
Note: On Mac OS, you may not be able to open a PDF document created in
Windows by double-clicking the icon. If double-clicking the icon on Mac OS
does not open the document, use File > Open in Acrobat to open the document,
close the document, and try again. After you’ve used the Open command once
on the document, you’ll be able to open the document next time by doubleclicking.
Page 44

Looking at the Work Area
Page 44
Adjusting the view of PDF documents
You can change the magnification level of a PDF document and set a page
layout that determines whether you’ll see one page at a time or a continuous
flow of pages.
Magnifying and reducing the view
The minimum and maximum zoom levels available depend on the current
page size.
If you need to magnify a page to a size larger than the window, use the hand
tool to move the page around so that you can view all the areas on it.
Moving a PDF page with the hand tool is like moving a piece of paper on a desk
with your hand.
To increase magnification:
Do one of the following:
■
Select the zoom-in tool , and click the page.
■
Select the zoom-in tool, and drag to draw a rectangle, called a marquee,
around the area to magnify.
■
Click the Magnification button in the status bar, and choose a magnification level.
Page 45

Looking at the Work Area
Page 45
To decrease magnification:
Do one of the following:
■
Select the zoom-out tool , and click the page.
■
Select the zoom-out tool, and drag to draw a marquee the size you want the
reduced page to be.
■
Click the Magnification button in the status bar, and choose a magnification level.
Note: When the zoom-in tool is selected, you can press Ctrl (Windows) or
Option (Mac OS) while clicking or dragging to zoom out instead of in. When the
zoom-out tool is selected, press Ctrl or Option to zoom in.
To change the magnification level using a thumbnail:
Position the pointer over the lower right corner of the red page-view box in the
thumbnail until the pointer changes to a double arrow . Then drag the
corner of the box to reduce or expand the view of the page.
To resize a page to fit the window:
Do one of the following:
■
To resize the page to fit entirely in the window, click the Fit In Window button
, or choose View > Fit in Window.
■
To resize the page to fit the width of the window, click the Fit Width button
, or choose View > Fit Width. Part of the page may be out of view.
Page 46

Looking at the Work Area
Page 46
■
To resize the page so that its text and graphics fit the width of the window,
choose View > Fit Visible. Part of the page may be out of view.
To return a page to its actual size:
Click the Actual Size button , or choose View > Actual Size. The actual size for
a PDF page is typically 100%, but the document creator may have set it to
another magnification level.
Setting the page layout
You can use three page layouts when viewing PDF documents:
■
Single Page layout displays one page in the document pane at a time.
■
Continuous layout arranges the pages in a continuous vertical column.
■
Continuous - Facing layout arranges the pages side by side. This configuration accommodates a two-page spread display and multiple-page viewing in
the window. If a document has more than two pages, the first page is displayed
on the right to ensure proper display of two-page spreads.
Single Page layout, Continuous layout, Continuous - Facing layout
Page 47

Looking at the Work Area
Page 47
In Single Page layout, the Edit > Select All command selects all text on the
current page. In Continuous and Continuous - Facing layouts, it selects all text
in the PDF document.
To set page layout:
Do one of the following:
■
Click the Page Layout button in the status bar, and choose a page layout.
■
Choose Single Page, Continuous, or Continuous - Facing from the
View menu.
To see two-page spreads most efficiently, use the Continuous - Facing page
layout, and choose View > Fit Width.
Reading documents in Full Screen view
In Full Screen view, PDF pages fill the entire screen; the menu bar, command
bar, tool bar, status bar, and window controls are hidden. A document creator
can set a PDF document to open in Full Screen view, or you can set the view for
yourself. Full Screen view is often used for presentations, sometimes with
automatic page advancement and transitions.
Page 48

Looking at the Work Area
Page 48
The pointer remains active in Full Screen view so that you can click links and
open notes. You can use keyboard shortcuts for navigational and magnification
commands, even though the menus and tool bar are not visible. You can also
set preferences to define how Full Screen view appears on your system.
To read a document in Full Screen view:
Choose View > Full Screen. Press Return or the Down or Right Arrow key to
page through the document. Press Shift-Return or the Up or Left Arrow key to
page backward through the document.
Note: If you’re using Mac OS and have two monitors installed, the Full Screen
view of a page appears on only one screen. To page through the document,
click the screen displaying the page in Full Screen mode.
To exit Full Screen view:
Press Escape, if your Full Screen preferences are defined this way, or press
Ctrl+L (Windows) or Command+L (Mac OS).
To set preferences for Full Screen view:
1 Choose File > Preferences > Full Screen.
2 Select the navigation options:
■
Advance Every specifies whether to advance automatically from page to
page every set number of seconds. You can page through a document using
mouse or keyboard commands even if automatic paging is selected.
Page 49

Looking at the Work Area
Page 49
■
Advance On Any Click lets you page through a PDF document by clicking the
mouse. If this is not selected, you can page through a document by pressing
Return, Shift-Return (to go backward), or the arrow keys.
■
Loop After Last Page lets you page through a PDF document continuously,
returning to the first page after the last. This option is typically used for setting
up kiosk displays.
■
Escape Key Exits lets you exit Full Screen view by pressing the Escape key.
If this is not selected, you can exit by pressing Ctrl+L (Windows) or
Command+L (Mac OS).
3 Choose the appearance options:
■
Background Color specifies the window’s background color. If you choose
Custom, the system color palette is displayed. See your computer’s user guide
for instructions on setting a custom color.
■
Default Transition specifies the transition effect to display when you switch
pages in Full Screen view.
■
Mouse Cursor specifies whether to show or hide the cursor in Full
Screen view.
■
Zoom To (Mac OS) selects a monitor to use for Full Screen view when two
monitors are installed. You can choose Main (for the monitor with the menu
bar), Largest Intersection (for the monitor that displays the largest portion of
the document), Deepest (for the monitor with the most colors), Widest (for the
Page 50

Looking at the Work Area
Page 50
monitor with the greatest horizontal resolution), Tallest (for the monitor with
the greatest vertical resolution), or Largest Area (for the monitor with the
most pixels).
4 Click OK.
Navigating in PDF documents
You can navigate in PDF documents by paging through them or by using
navigational structures. You can also retrace your steps through documents to
return to where you started.
Paging through documents
Acrobat provides buttons, keyboard shortcuts, and menu commands for
paging through a PDF document.
Note: If you use the number keys on your keyboard’s number pad, make sure
Num Lock is off.
To go to another page:
Do one of the following:
■
To go to the next page, click the Next Page button in the command bar or
status bar, press the Right Arrow key, press Ctrl (Windows) or Option (Mac OS)
and the Down Arrow key, or choose Document > Next Page.
Page 51

Looking at the Work Area
Page 51
■
To go to the previous page, click the Previous Page button in the
command bar or status bar, press the Left Arrow key, press Ctrl (Windows) or
Option (Mac OS) and the Up Arrow key, or choose Document > Previous Page.
■
To move down one line, press the Down Arrow key.
■
To move up one line, press the Up Arrow key.
Note: The Down and Up Arrow keys move you one line at a time when you are
not in Fit in Window view. In Fit in Window view, these keys move you one page
at a time.
■
To move down one screenful, press Page Down or Return.
■
To move up one screenful, press Page Up or Shift+Return.
■
To go to the first page, click the First Page button in the command bar or
status bar, press the Home key, or choose Document > First Page.
■
To go to the last page, click the Last Page button in the command bar or
the status bar, press the End key, or choose Document > Last Page.
To jump to a page by its number:
Do one of the following:
■
Select the current page number in the status bar, type the page number to
jump to, and press Return.
Page 52

Looking at the Work Area
Page 52
If the Use Logical Page Numbers option is selected in General preferences, and
if your document’s page numbers are different from the page position in the
PDF file, the page position appears in parentheses in the status bar. For
example, if a first page is numbered “iii”, the numbering might appear as “iii(1 of
10)”. You can double-click inside the parentheses, edit the page-position
number, and press Return to go to that page.
■
Choose Document > Go To Page, type the page number, and click OK.
If the Use Logical Page Numbers option is selected in General preferences, and
your document’s page numbers are different from the page position in the PDF
file, you can enter the page-position number in parentheses in Go To Page to
go to that page.
■
Drag the vertical scroll bar until the number of the page you want to jump to
is displayed.
Browsing with navigational structures
Acrobat offers a wide range of navigational structures to help you move to
specific places in PDF documents:
■
Bookmarks provide a visual table of contents and usually represent the
chapters, sections, and other organizational items in a document.
■
Thumbnails provide miniature previews of document pages. You can use
thumbnails to edit pages, to change the display of pages, and to go to other
Page 53

Looking at the Work Area
Page 53
pages. A red page-view box in a thumbnail indicates the area of the page
currently showing in the document pane.
■
Links take you to specific locations another user (usually the document
creator) has defined; these locations can be in the current document, in other
electronic files, or in Web sites. A link usually points to a titled section or other
organizational item.
■
Articles are electronic threads that lead you through a document. An article
typically begins on one page and continues on another, just as articles do in
traditional newspapers and magazines. When you read an article, Acrobat
zooms in or out so the current part of the article fills the screen.
■
Destinations are links that take you to locations a user has defined. Generally,
these links go to other documents.
To browse with a bookmark:
1 Show the Bookmarks palette. You may need to choose Window > Show
Bookmarks to open the palette or click the Bookmarks tab to bring the palette
to the front of its group.
2 To jump to a topic using its bookmark, click the bookmark’s icon or text in
the palette.
Note: Clicking a bookmark might perform an action, such as playing a movie,
instead of taking you to another location. It depends on how the bookmark
was defined.
Page 54

Looking at the Work Area
Page 54
The bookmark for the part of the document currently showing is boldfaced.
If the navigation pane disappears when you click a bookmark, the document
creator has activated the Hide After Use command. To show the navigation
pane again, click the Show Navigation Pane button on the command bar.
Deselect Hide After Use in the navigation pane’s palette menu if you want the
navigation pane to remain open after you click a bookmark.
Bookmarks can be subordinate to other bookmarks in their hierarchy; a higher
level bookmark in this relationship is the parent, and a lower level bookmark is
the child. You can collapse a parent bookmark in the palette to hide all its
children. When a parent bookmark is collapsed, it has a plus sign (Windows) or
a triangle (Mac OS) next to it. If the bookmark you want to click is hidden in a
collapsed parent, click the plus sign or triangle next to the parent to show it.
To select the bookmark for the part of the document showing in the
document pane, choose Find Current Bookmark from the Bookmarks palette
menu, or click the find current bookmark icon at the bottom of the palette. If
the bookmark is hidden in a collapsed parent, the parent bookmark is opened
so you can see the selected bookmark.
To browse with a thumbnail:
1 Show the Thumbnails palette. You may need to choose Window > Show
Thumbnails to open the palette or click the Thumbnails tab to bring the palette
to the front of its group.
Page 55

Looking at the Work Area
Page 55
2 Do one of the following:
■
To jump to another page, double-click the page’s thumbnail.
■
To display another part of the current page, position the pointer over the
edge of the page-view box in the page’s thumbnail until the pointer changes to
a hand tool . Then drag the box to move the view area.
To follow a link:
1 Select the hand tool , a zoom tool, or a selection tool.
2 Position the pointer over the linked area on the page until the pointer
changes to a hand with a pointing finger . (The hand has a plus sign in it if
the links point to the Web.) Then click the link.
Note: Clicking a link might perform an action, such as playing a movie, instead
of taking you to another location. It depends on how the link was defined.
To read an article:
1 Do one of the following:
■
Show the Articles palette. Then double-click the article’s icon in the palette to
start reading at the beginning of the article.
■
Select the hand tool . Then click in the article to start reading it at that
point, or press Ctrl (Windows) or Option (Mac OS) and click anywhere in the
article to start reading at the beginning.
Page 56

Looking at the Work Area
Page 56
2 The pointer changes to the follow article pointer . Navigate through
the article:
■
To go to the next page in the article, press Return or click.
■
To go to the previous page, press Shift-Return, or press Shift and click.
■
To go to the beginning of the article, press Ctrl (Windows) or Option (Mac
OS) and click.
■
To exit the article before reaching the end, press Shift-Ctrl (Windows) or
Shift-Option (Mac OS) and click.
3 When you reach the end of the article, the pointer changes to the end article
pointer . Press Return or click to return to the view displayed before you
started reading the article.
To follow a destination:
1 Show the Destinations palette. You may need to choose Window > Show
Destinations to open the palette or click the Destinations tab to bring the
palette to the front of its group.
2 Choose Scan Document from the Destinations palette menu, or click the
Scan Document button at the bottom of the palette.
3 To change the sort order of names in the palette, do one of the following:
■
Click the Name bar at the top of the Destinations palette to list the destinations alphabetically by name.
Page 57

Looking at the Work Area
Page 57
■
Click the Page bar at the top of the Destinations palette to list the destinations by their order in the document.
4 To jump to a topic using its destination, right-click (Windows) or Controlclick (Mac OS) the destination in the palette, and choose Go To Destination
from the context menu.
Retracing your viewing path
After you have paged through documents or used navigational structures to
move through documents, you can retrace your path back to where you
started. You can go 64 steps back in Acrobat, or 32 steps back for documents in
external browser windows.
To retrace your viewing path:
Do one or more of the following:
■
To retrace your path within a PDF document, click the Go To Previous View
button in the command bar, or choose Document > Go Back for each step
back. Or click the Go To Next View button , or choose Document > Go
Forward for each step forward.
■
To retrace your viewing path through other PDF documents, choose
Document > Go Back Doc for each step back or Document > Go Forward Doc
for each step forward. Or hold down Shift, and click the Go Back or Go Forward
button. This command opens the other PDF documents if the documents
are closed.
Page 58

Looking at the Work Area
Page 58
Finding words in PDF documents
You can use the Find command to find a complete word or part of a word in the
current PDF document. Acrobat looks for the word by reading every word on
every page in the file, including text in form fields.
If a full-text index has been created for your PDF document, you can search the
index for a word rather than using the Find command. A full-text index is an
alphabetized list of all the words used in a document or, more typically, in a
collection of documents. Searching with an index is much faster than using the
Find command, because when Acrobat looks for a word in the index it goes
right to the word in the list rather than reading through the documents. See
Chapter 12, Searching Catalog Indexes for more information.
To find a word using the Find command:
1 Click the Find button , or choose Edit > Find.
2 Enter the text to find in the text box.
3 Select search options if necessary:
■
Match Whole Word Only finds only occurrences of the complete word you
enter in the text box. For example, if you search for the word stick, the words
tick and sticky will not be highlighted.
■
Match Case finds only words that contain exactly the same capitalization you
enter in the text box.
Page 59

Looking at the Work Area
Page 59
■
Find Backwards starts the search from the current page and goes backward
through the document.
■
Distinguish Between Full And Half Width Kana finds only those Kana
characters that exactly match the text you enter. This option is available only in
the Japanese version of Acrobat.
4 Click Find. Acrobat finds the next occurrence of the word.
To find the next occurrence of the word:
Do one of the following:
■
Choose Edit > Find Again.
■
Reopen the Find dialog box, and click Find Again. (The word must already be
in the Find text box.)
Getting information on PDF documents
When you view a PDF document, you can get information on the file, such as
the title, the fonts used, and any security settings. Some of this information is
set by the person who created the document, and some is generated by
Acrobat. You can change any of the information that can be set by the
document creator (unless the file has been saved with security settings that do
not allow you to change the document).
Page 60

Looking at the Work Area
Page 60
To get information on the current document:
Choose from the File > Document Info menu or from the document pane
menu to open an information dialog box. (You can open only the General,
Security, and Font dialog boxes from the document pane menu.)
■
General shows basic information about the document. The title, subject,
author, and keywords may have been set by the document creator and can be
changed. If you create an index in Acrobat, you can search for these items in
Acrobat to find particular documents.
Note: Acrobat Catalog and many Web search engines use the title to describe
the document in their search results list. If a PDF file does not have a title, the
filename appears in the results list instead. A file’s title is not necessarily the
same as its filename.
The binding option affects how the pages are arranged side by side when you
view pages using the Continuous - Facing page layout. This is provided so that
the arrangement of pages will match the reading direction (left to right or right
to left) of text in the document. Right Edge binding is useful for viewing Arabic
or Hebrew text or vertical Japanese text. You can change this setting.
Page 61

Looking at the Work Area
Page 61
Some information is generated by Acrobat and cannot be modified. This
includes the application that created the original document, the Acrobat utility
that produced the PDF file, the date and time the PDF file was created and last
changed, whether the file was optimized for online Web viewing, the file size,
and the PDF version number. Acrobat generates this information from
comments in the PostScript file.
■
Open describes the opening view of the PDF document. This includes the
initial window size, the opening page number and magnification level, and
whether bookmarks, thumbnails, the tool bar, and the menu bar are displayed.
You can change any of these settings to control how the document displays
the next time it is opened.
■
Fonts lists the fonts and the font types used in the original document, and
the fonts, font types, and encoding used in Acrobat to display the original
fonts. Only the fonts viewed in the document so far are listed. To see a list of all
fonts used in the entire document, click List All Fonts.
Note: You can look at this dialog box to see what fonts were used in the
original document and whether the same fonts are used in Acrobat. If
substitute fonts are used and you aren’t satisfied with their appearance, you
may want to install the original fonts on your system or ask the document
creator to recreate the document with the original fonts embedded in it.
■
Security shows whether or not the file has passwords and describes other
security settings.
Page 62

Looking at the Work Area
Page 62
■
Prepress gives information about the document that may be helpful in a
prepress workflow. The Trapping pop-up menu describes whether trapping has
been applied to the file; this information can be used by prepress software to
determine whether to apply trapping to the file at print time. The Print 4 Color
setting tells whether four-color ICC profiles should be treated as devicedependent CMYK.
■
Index gives the name of an autoindex associated with the file. Opening the
file adds the associated index to the list of indexes that can be searched. The
Browse button in this dialog box allows you to mount a different index for
the file.
■
Base URL displays the base Uniform Resource Locator (URL) set for Weblinks
in the document. Specifying a base URL makes it easy for you to manage
Weblinks to other Web sites. If the URL to the other site changes, you can
simply edit the base URL and not have to edit each individual Weblink that
refers to that site. The base URL is not used if a link already contains a complete
URL address.
Printing PDF documents
You can specify a range of pages to print in the Acrobat Print dialog box, or you
can specify noncontiguous pages or a particular page area to print before
opening the dialog box.
Page 63

Looking at the Work Area
Page 63
To print a PDF document:
1 If necessary, do one of the following:
■
To select pages to print, click thumbnails in the Thumbnails palette. You can
Ctrl-click (Windows) or Command-click (Mac OS) thumbnails to select noncontiguous pages, or Shift-click to select a contiguous range of pages. You can
also select a contiguous page range in the Print dialog box.
■
To select an area on a page to print, select the graphics select tool , and
drag on the page to draw the area you want.
2 Use File > Page Setup to set general printing options. The available options
will vary with different printers and drivers. See your printer driver documentation for details.
3 Click the Print button , or choose File > Print. Specify the printer, page
range, number of copies, and other options, and click OK. Most of the options
are the same as they are for other applications, but note the following:
■
Selected Pages Or Selected Graphic (Windows) or Selected Thumbnails/
Graphic (Mac OS) prints only the pages or page area you selected before
opening the Print dialog box.
■
Page From/To prints a range of pages. In Windows, if the Use Logical Page
Numbers option is selected in General preferences, you can enter pageposition numbers in parentheses to print those pages. For example, if the first
page of a document is numbered “iii”, you can enter (1) to print that page.
Page 64

Looking at the Work Area
Page 64
■
Annotations prints Acrobat annotation graphics on the pages. The annotations are always printed as closed, even if they are open on the pages online.
■
Fit To Page scales pages up or down (and if necessary rotates them) to fit
the paper size currently installed in your printer. This is not available in most
other applications.
■
Print As Image (Windows) prints the pages as bitmap images. (In Mac OS, this
is set in the Print Method pop-up menu.) You may want to print pages as
images if they have too many fonts to print as PostScript or if the pages use
non-embedded Asian fonts not available on your system.
■
Print Method, in Windows, specifies which level of PostScript to generate for
the pages. Choose the level of PostScript appropriate for your printer. In Mac
OS, this specifies whether to print using PostScript (without selecting level) or
to print pages as bitmap images.
■
Force Language Level 3 (Mac OS) prints the pages using LanguageLevel 3
PostScript. Select this option if you’re printing PostScript to a file rather than to
a printer and you want to use LanguageLevel 3 PostScript. (When you send
PDF to a printer, let the printer driver specify what level of PostScript to use.)
This is available only when you choose PostScript in the Print Method pop-up
menu; if you choose PostScript in the menu and do not select this option,
PostScript Level 2 is used.
■
Download Asian Fonts downloads Asian fonts to a PostScript printer. Select
this option if you want to print a PDF document with Asian fonts but do not
Page 65

Looking at the Work Area
Page 65
have the fonts installed on the printer and do not have the fonts embedded in
the document. (Embedded fonts are downloaded whether or not this option is
selected.) You can use this option with a PostScript Level 2 or higher printer, or
a Level 1 printer that supports Type 0 font extensions.
Note: Some fonts cannot be downloaded to a printer, either because the font is
a bitmap or because embedding of the font is restricted in that document. In
these cases, a substitute font is used for printing, and the printed output may
not match the screen display exactly. See Previewing substituted fonts for information on seeing what substituted fonts will look like on another system.
If Download Asian Fonts is not selected, the PDF document prints correctly
only if the referenced fonts are installed on the printer. If the fonts are not on
the printer but the printer has similar fonts, the printer substitutes the similar
fonts. If there are no suitable fonts on the printer, Courier is used for the text.
If you have a PostScript Level 1 printer that does not support Type 0 font extensions, or if Download Asian Fonts does not produce the results you want, print
the PDF document as a bitmap image. Printing a document as an image may
take longer than using a substituted printer font.
Page 66

Looking at the Work Area
Page 66
■
Use Printer Halftone Screens prints halftones using the printer’s halftone
screens. If you do not select this option, the halftones are printed using
halftone information from the PDF file.
Note: If Use Printer Halftone Screens is not selected, and if the halftone information sent to the printer from the PDF file is not appropriate for that printer,
the screens may produce “muddy” images.
Setting Acrobat preferences
You can use preferences to define a default page layout, set an author name for
annotations, select a browser for Weblinks, and customize Acrobat in many
other ways. General preferences settings are described here. For information
on other sets of preferences, see the index.
Note: These preferences control the Acrobat application on your system; they
are not associated with a particular document.
To open a preferences dialog box:
Choose a dialog box from the File > Preferences menu.
To set General preferences:
Choose File > Preferences > General, or choose Preferences from the document
pane menu. Define a default page layout, a color management system, and
other basic options, and click OK.
Page 67

Looking at the Work Area
Page 67
■
Default Page Layout sets a page layout used for scrolling when you first open
a document. You can display pages one at a time as you scroll, continuously
one above the next, or continuously side by side.
■
Page Units specifies a unit of measure for displaying page size in the status
bar and in the Crop dialog box.
■
Substitution Fonts specifies multiple master fonts that Acrobat uses to
substitute for Type 1 and TrueType
™
fonts not available on your computer. If
PDF documents do not print because of insufficient printer memory, choose
Sans from the Substitution Fonts pop-up menu. If you change this setting, the
change takes effect the next time you start Windows or your Macintosh.
■
Application Language sets a language for the Acrobat user interface. The
pop-up menu shows the languages you installed with Acrobat. If you choose a
different language, the change takes effect the next time you start the application.
■
Use Greek Text Below displays text below the designated point size as gray
lines (or greeked text) to speed display time.
■
Smooth Text And Images smooths the edges of text and monochrome
images to minimize the contrast between the background and the text or
image. This sometimes improves the quality of the display on-screen, especially
with larger text sizes.
Page 68

Looking at the Work Area
Page 68
■
Display Large Images displays images larger than 128K. If you do not select
this option, a gray box appears in place of a large image. Selecting this option
can slow down paging through a document.
■
Display Page To Edge prints PDF documents to the edge of the pages. If you
do not select this option, pages from PDF documents are printed with a white
border, as defined by the printer driver.
■
Use Logical Page Numbers allows you to set page numbering in a PDF
document using the Document > Number Pages command. You typically do
this when you want PDF page numbering to match the numbering printed on
the pages. A page’s number, followed by the page position in parentheses,
appears in the status bar and in the Go To Page, Delete Pages, and Print dialog
boxes. For example, if the first page in a document is numbered “i”, it might
appear as “i(1 of 10)”. If this option is not selected, Acrobat ignores page
numbering information in documents and numbers pages using arabic
numbers starting at 1.
■
Default Zoom sets the magnification level for PDF documents when they are
first opened. This affects only documents that have Default set for their magnification in Document Info > Open.
■
Max “Fit Visible” sets the maximum magnification level for the Fit Visible view
and for viewing articles.
■
Color chooses a color management system for interpreting color accurately
across devices. See Setting color options for information on how a color
Page 69

Looking at the Work Area
Page 69
management system works with an ICC profile tagged to an image in a PDF
document.
■
Allow Background Downloading allows a PDF document to continue
downloading from the Web, even after the first requested page displays onscreen in a Netscape Navigator-compatible browser. If you do not select this
option, only the requested page downloads to your computer, and other pages
are downloaded as you request them.
Note: You will get unexpected results from the Go Back command in your Web
browser if you do not select this option. For example, if you link to another
document from a partially downloaded PDF document and then want to
return to that document by using Go Back, you return to the first page of the
PDF document, even if you were not on the first page. This option should
alleviate most cases of unexpected Go Back behavior in your Web browser.
■
Display Splash Screen At Startup shows the splash screen each time Acrobat
is started.
■
Display Open Dialog At Startup shows the Open dialog box each time
Acrobat is started.
■
Open Cross-Doc Links In Same Window opens linked PDF documents and
views in one window to minimize the number of windows open in Acrobat. If
you do not select this option, a new window is opened for each new Go To
View link. If a linked document is open when a Go To View link to it from
Page 70

Looking at the Work Area
Page 70
another document is activated, the document remains open in a separate
window.
Note: To override this setting, either selected or deselected, you can press Ctrl
(Windows) or Option (Mac OS) when clicking a link.
■
Use Page Cache places the next page in a buffer even before you view the
page in Acrobat. This reduces the amount of time it takes to page through
a document.
■
Allow File Open Links warns you of security risks when you open a file in
another application from a link in a PDF document and gives you a chance to
cancel the operation. If this option is not selected, links to files in other applications are disabled.
■
Web Browser Integration displays PDF documents in your Web browser
when viewing PDF documents on the Web. If you do not select this option, the
documents display in Acrobat as a helper application to the Web browser. See
Configuring Web browsers for viewing PDF for more information on viewing
PDF documents on the Web.
■
Skip Editing Warnings disables warning boxes when you delete notes, links,
pages, thumbnails, bookmarks, and other items in PDF documents.
■
Certified Plug-ins Only loads only Adobe-certified third-party plug-ins. This
option must be selected if you are using the Web Buy feature. If you change
this option, you must restart Acrobat by clicking Relaunch in the General
Preferences dialog box.
Page 71

Looking at the Work Area
Page 71
Viewing PDF documents on the Web
You can view PDF documents that are on the World Wide Web or an intranet
using a Web browser. Every document on the Web is identified by a unique
address called a Uniform Resource Locator (URL). When a PDF document is
stored on the Web, you can click a URL link to it to open the document in your
Web browser. You can also read PDF documents that are embedded in HTML
pages on the Web.
Reading PDF documents in a Web browser
PDF documents can display in Web browsers compatible with Netscape
Navigator 3.0 (or later) or Internet Explorer 3.0 (or later). The necessary plug-ins
are automatically installed when you install Acrobat. For information on
getting your browser ready, see Configuring Web browsers for viewing PDF.
When you view a PDF document in a Web browser, all of the Acrobat Reader
tools are available in the browser. In Windows, you can click the two small
vertical lines (next to the Adobe icon at the left of the tool bar) to minimize or
maximize the tool bar.
Note: Many keyboard commands are mapped to the Web browser rather than
to Acrobat, so some Acrobat keyboard shortcuts may not be available in the
browser window.
Page 72

Looking at the Work Area
Page 72
Searching in a Web browser
Some Web search engines index PDF documents as well as HTML documents
on Web servers. And some search engines support PDF search highlighting,
although not all search engines that support PDF indexing support search
highlighting.
If you visit a Web site that uses a search engine that indexes PDF documents,
your search results list may include PDF documents. If the Web site uses a
search engine that supports PDF search highlighting, and if you open one of
the PDF documents in the search results list, the Highlight Next and
Highlight Previous buttons activate on the Acrobat command bar in your
Web browser. The search term is also highlighted in the document.
To go to the next search hit, click the Highlight Next button. To go to the
previous hit, click the Highlight Previous button. These two commands jump
across PDF documents, but not across HTML documents.
Reading PDF documents embedded in HTML
HTML pages can include embedded PDF documents. An embedded PDF
document normally displays an image of the first page of the document in the
HTML document. The PDF document can be configured by the HTML author to
display, when clicked, in a separate window. The document displays in a
browser window or in an Acrobat window, depending on how you have
configured your browser.
Page 73

Looking at the Work Area
Page 73
If an embedded PDF file is not configured to open in a separate window, you
can interact with the file in a browser compatible with Internet Explorer, but
not one compatible with Netscape Navigator. For example, links would not be
active in a PDF file displayed embedded in HTML in Netscape Navigator, but
they would be active in Internet Explorer. For more information, see
Embedding PDF documents in HTML using the <EMBED> tag.
Configuring Web browsers for viewing PDF
You can view PDF documents in Web browsers compatible with Netscape
Navigator 3.0 (or later) or Internet Explorer 3.0 (or later). The Web browser you
use, the Web server, and several other factors determine how your system
handles the PDF documents.
About viewing PDF documents on the Web
Here are four possible scenarios for viewing PDF on the Web:
■
The browser supports PDF viewing, the PDF file is optimized, and the Web
server supports page-at-a time downloading (byte-serving), so the PDF file
downloads a page at a time and displays in the Web browser window. This is
the fastest scenario possible for viewing PDF documents on the Web.
■
The browser supports PDF viewing, but the PDF file is not optimized or the
server does not support byte-serving, so the entire PDF file downloads to the
machine with the browser and then appears within the browser window.
Page 74

Looking at the Work Area
Page 74
■
The browser supports PDF viewing, and PDF files are embedded in an HTML
page. An ActiveX browser such as Internet Explorer supports navigating
through the document. Netscape Navigator-compatible browsers can display
the PDF document within an HTML page, but require a link to a full-window
view for navigation.
■
Acrobat or Acrobat Reader is configured as a helper application for the
browser, and the browser may support PDF viewing within the browser
window. The entire PDF file downloads to the machine with the browser,
and the Acrobat viewer launches as a separate application and displays the
PDF document.
Enabling page-at-a-time downloading
With page-at-a-time downloading (byte-serving), the Web server sends only
the requested page of information to the user, not the entire PDF document. As
a reader of the PDF document, you do not have to do anything to make this
happen; it is communicated in the background between Acrobat and the Web
server. If you want the entire PDF document to continue downloading in the
background while you view the first page of requested information, be sure
Allow Background Downloading is selected in the General preferences dialog
box (default). For more information, see Setting Acrobat preferences.
If your Web server does not support page-at-a-time downloading, you can use
a CGI application to do it.
Page 75

Looking at the Work Area
Page 75
Setting up Acrobat as a helper application
If your Web browser does not display PDF documents in the browser window,
or if you prefer not to view PDF documents in the Web browser, you can set up
Acrobat as a helper application in your browser’s preferences. Then, when you
view a PDF document on the Web, Acrobat will start and display the document.
When Acrobat works as a helper application, you cannot use page-at-a-time
downloading, form submittal in a browser, or search highlighting on the Web,
and you cannot view embedded PDF documents.
To set up your Web browser to recognize PDF files, you must define a MIME
type and a file type. The file type should be pdf. The MIME type should be
application/pdf. See your browser’s documentation for information on
configuring it.
If you are using Netscape Navigator 2.0 or later with Windows or on a
Macintosh, and if you want to use Acrobat as a helper application, rename the
PDFViewer plug-in or delete it from the Netscape plug-in folder. The plug-in is
named nppdf32.dll (Windows) or PDFViewer (Mac OS).
To use Acrobat as a helper application in Windows:
1 Choose File > Preferences > General.
2 Select Web Browser Integration, and click OK.
Note: This is not necessary in Mac OS.
Page 76

Looking at the Work Area
Page 76
Installing the Web browser plug-in
Browsers compatible with Netscape Navigator need the nppdf32.dll file
(Windows) or PDFViewer plug-in (Mac OS) to display PDF. When you install
Acrobat, this plug-in is automatically installed in the Netscape plug-in folder, if
you have Navigator on your system. If you install Navigator after installing
Acrobat, or if you’re using another browser compatible with Navigator, you can
install this plug-in yourself.
To install the Web browser plug-in (Windows):
1 Open the Browser folder in the Acrobat folder.
2 Copy the nppdf32.dll file to your Web browser’s plug-ins folder.
To install the Web browser plug-in (Mac OS):
1 Open the Web Browser Plug-in folder in the Acrobat folder.
2 Copy the PDFViewer plug-in to your Web browser’s plug-ins folder.
Page 77

Converting Electronic Files to PDF
Page 77
Converting Electronic Files to PDF
You can use Acrobat to convert an electronic file from virtually any application
to the Portable Document Format (PDF). Acrobat can use two different
utilities—PDFWriter and Acrobat Distiller—to make this conversion for you. In
general, PDFWriter converts files more quickly, but Distiller gives you more
control over the process and provides higher quality output.
About the methods of converting files
Acrobat provides several ways to convert electronic files to PDF. Use whichever
method yields the most suitable PDF output and is most convenient for your
situation:
■
In the Windows desktop, drag a file’s icon onto the Acrobat icon or a Distiller
icon or into the Acrobat application window. In the Mac OS desktop, drag a
file’s icon onto the PDFWriter icon. See Creating PDF files with PDFWriter and
Creating PDF files with Distiller for details.
■
In a Microsoft Office application in Windows, use a File menu command or an
Acrobat icon on the Microsoft tool bar to create a PDF file from the current
document in one quick step. Acrobat installs macros in Microsoft Word, Excel,
and PowerPoint on your system to enable this. See Converting files to PDF in
Microsoft applications (Windows) for details.
Page 78

Converting Electronic Files to PDF
Page 78
■
In Mac OS 7.6.1 or later, the AdobePS 8.6 driver lets you create PDF files
(using Distiller) directly from within authoring applications using Create Adobe
PDF. See Creating PDF files with Distiller for details.
■
In the Windows version of Acrobat, use the File > Open command to open a
file from another application. Acrobat converts the file to PDF and opens it in
one step. See Creating PDF files with Distiller for details.
■
In an authoring application, use the File > Print command with an Acrobat
printer driver to “print” the current document as PDF. See Creating PDF files
with PDFWriter and Creating PDF files with Distiller for details.
■
In some authoring applications, including Adobe FrameMaker® and Adobe
PageMaker
®
, use a Save or Export command to create a PDF file from the
current document. See the documentation that came with your application for
information on converting files this way.
■
Create a PostScript file from a document, and then use Distiller to convert
that file to PDF. This requires more manual steps than the other methods but
gives you better control over the conversion settings. You can also convert
PostScript files to PDF as a batch process and combine multiple PostScript files
into a single PDF file. See Converting PostScript files to PDF, Using watched
folders to convert PostScript to PDF, and Combining multiple PostScript files
into one PDF file for details.
Page 79

Converting Electronic Files to PDF
Page 79
About the Portable Document Format (PDF)
PDF is a file format that represents a document in a manner independent of the
hardware, operating system, and application software used to create the file.
Adobe Systems developed PDF to enable documents to be transferred and
shared across computer platforms. This section gives some background on how
PDF works. For more detailed information, see the Portable Document Format
Reference Manual, available from the Adobe Web site (www.adobe.com).
You do not need to understand how PDF works to be able to use Acrobat.
Properties of PDF
Here are some highlights of how documents are stored in PDF:
■
PDF represents text and graphics by using the imaging model of the
PostScript language. Like a PostScript program, a PDF page description draws
a page by placing “paint” on selected areas, which allows for device independence and resolution independence.
■
PDF files are extremely portable across diverse hardware and operatingsystem environments. PDF makes use of binary as well as ASCII-encoded data.
■
To reduce file size, PDF supports JPEG, CCITT Group 3, CCITT Group 4, ZIP, and
LZW industry-standard compression filters.
■
PDF files contain information necessary for either displaying embedded fonts
or for font substitution. A PDF file contains a font descriptor for each font used
Page 80

Converting Electronic Files to PDF
Page 80
in the document. The font descriptor includes the font name, character metrics,
and style information. If a font used in a document is available on the computer
on which the document is viewed, or if it’s embedded in the PDF file, it is used.
If the font is not available or is not embedded, a special serif or sans serif
Multiple Master font is used to simulate the font. This solution applies to Type 1
fonts and to fonts in the TrueType format. Symbol fonts and Expert fonts are
automatically embedded or converted to graphics.
■
PDF font substitution does not cause documents to reformat. Substitute
fonts created from serif and sans serif Multiple Master fonts retain the width
and height of the original characters.
■
A PDF file contains a cross-reference table that can be used to locate and
directly access pages and other important objects in the file. Because it uses
this cross-reference table (called xref), the time needed to view a given page
can be nearly independent of the total number of pages in a document.
■
PDF is designed to be extensible; that is, new features can easily be added to
the file format through the plug-in architecture. (Plug-ins are software
programs that add functionality to a base program such as Acrobat.)
PDF file construction
PDF files are constructed in layers:
■
One layer contains the text and image content of the document.
Page 81

Converting Electronic Files to PDF
Page 81
■
A second layer contains enhancements, such as bookmarks, hypertext links,
and article information.
■
A third layer contains basic information about the file, such as font information and the cross-reference table needed for navigating the PDF file.
Because of this layered construction, you can replace pages in a PDF file while
retaining established links. When you replace a page, you remove the content
layer but not the enhancement layer, so the enhancement information is
retained. This reduces the amount of work it takes to maintain the electronic
document, because you do not have to recreate the links.
About PDFWriter and Distiller
Acrobat can use either PDFWriter or Distiller to convert your files to PDF. Both
utilities are included in the default Acrobat installation. PDFWriter is a printer
driver that converts files directly to PDF from another software application.
Distiller is a tool that converts PostScript files to PDF, and in many cases it
provides higher quality output than PDFWriter. (In some installations, Distiller
can also convert the original file to PostScript and then convert the PostScript
to PDF.) PDFWriter is often quicker to use than Distiller.
Page 82

Converting Electronic Files to PDF
Page 82
Your workflow process and the file’s type and contents may determine which
utility is most suitable for your purposes. If you’re converting simple business
memos and other documents that have only text, either utility should be
acceptable. But if you need precise control over the conversion process, or if
you’re converting documents with rich graphical content, Distiller is more
appropriate than PDFWriter.
Susan Hall
A document appropriate for PDFWriter and one appropriate for Distiller
Page 83

Converting Electronic Files to PDF
Page 83
When to use PDFWriter
PDFWriter is a printer driver that converts files to PDF quickly. It is most suitable
for documents that contain mainly text. Here are a few guidelines that can help
you decide when to use PDFWriter:
■
You’re converting simple business documents, such as those created with
Microsoft Word or Excel.
■
Your documents do not contain Encapsulated PostScript (EPS) graphics.
■
Your system has a limited amount of RAM.
■
You want to produce PDF files more quickly than you can with Distiller.
For information on using PDFWriter, see Converting files to PDF in Microsoft
applications (Windows) and Creating PDF files with PDFWriter.
When to use Distiller
Distiller creates a PDF file from a PostScript version of a document. A PDF file
created by Distiller maintains all the formatting, graphics, and photographic
images from the original document, and it provides more precise control over
the conversion process than PDFWriter. Here are a few guidelines that can help
you decide when to use Distiller:
■
You’re converting documents created with desktop publishing applications
such as Adobe PageMaker, Adobe FrameMaker, Adobe Illustrator, QuarkXPress,
or Macromedia FreeHand.
Page 84

Converting Electronic Files to PDF
■
Your documents contain EPS graphics.
■
You need to choose specific resampling and compression methods for
bitmap images in the documents.
■
The documents have color management information or use deviceindependent color.
■
You need to preserve PostScript features, such as document structuring
convention (DSC) comments, in the PDF files.
■
You need to send PDF files to a prepress shop or a service provider for highend publishing.
■
You want to convert PostScript files to PDF in a batch process.
■
You’re using the Create PDF File command in Word 97 and want to include
bookmarks and links.
■
You want to embed Asian fonts in PDF files.
For information on using Distiller, see Converting files to PDF in Microsoft
applications (Windows), Creating PDF files with Distiller, and Converting
PostScript files to PDF.
Page 84
Page 85

Converting Electronic Files to PDF
Page 85
Converting files to PDF in Microsoft applications
(Windows)
The default Acrobat installation in Windows includes macros that allow you to
create PDF files quickly and easily from Microsoft Office applications. A macro
called PDFMaker works with Microsoft Word 97, Word 2000, PowerPoint 97, and
PowerPoint 2000; a PDFWriter macro works with Microsoft Word 95, PowerPoint 95, and Excel 97, 95, and 2000. These macros are installed automatically
with Acrobat if you have the Microsoft application on your system.
When you create a PDF file directly from Microsoft Word, you can set options
that control the appearance and other aspects of the PDF file. The PDFMaker
macro (with Word 97) can create PDF using either PDFWriter or Distiller, and
it supports Acrobat 4.0 features such as structured bookmarks. The PDFWriter
macro (with Word 95) is a more basic utility that uses PDFWriter to create
PDF files.
To convert a file to PDF in a Microsoft application (Windows):
Do one of the following:
■
In Microsoft Word 97 or Word 2000, choose File > Create Adobe PDF, or
click the Create Adobe PDF icon on the Microsoft application tool bar. Select
PDFWriter or Distiller, set other options if necessary, and click Create. You
can click the Help button in this dialog box to open a document with more
information.
Page 86

Converting Electronic Files to PDF
Page 86
■
In Microsoft Word 95, choose File > Create Adobe PDF > Print, or click the
Create Adobe PDF icon on the Microsoft application tool bar.
■
In PowerPoint 97 or PowerPoint 2000, click the Create Adobe PDF icon on the
Microsoft application tool bar.
■
In Excel 95, 97, or Office 2000, choose File > Create Adobe PDF, or click the
Create Adobe PDF icon on the Microsoft application tool bar.
Creating PDF files with PDFWriter
PDFWriter “prints” a document quickly in PDF. You can drag and drop to create
PDF files with PDFWriter or use the Print command in your authoring application. PDFWriter is most suitable for simple business documents that contain
mostly text. If your documents have rich graphical content, use Distiller instead.
When you create a PDF file with PDFWriter, you can provide a title, a subject, an
author name, and other keywords for the file in the Document Information
dialog box. This information can be used in searches on the file and is optional.
If you do not provide a title, the filename will be used as the title in search
results lists. For more information, see Getting information on PDF documents.
In most cases, PDFWriter’s default compression and font settings create an
acceptably small and efficient PDF file. If you want more control over file size or
image quality, see Setting PDFWriter properties for information on changing
these settings.
Page 87

Converting Electronic Files to PDF
Page 87
To create a PDF file with PDFWriter by dragging and dropping (Mac OS):
1 Drag the file’s icon onto the PDFWriter icon on the desktop.
2 In the Print dialog box for PDFWriter, enter a page range. You can also set
options if these appear in your Print dialog box:
■
View PDF File opens the new PDF file automatically in Acrobat.
■
Short (DOS) File Names truncates the filename to an 8.3 DOS filename.
■
Prompt For Document Info lets you attach search information to the PDF file.
3 Click OK.
4 If the Document Information dialog box appears, enter a title and other
search keywords, and click OK. (The information is optional.) This dialog box
appears if Prompt For Document Info is selected in the Print dialog box.
5 In the Save As dialog box, enter a filename and location, and click Save.
Note: If the PDFWriter icon is not on your Mac OS desktop, open the Chooser,
select the PDFWriter printer driver, and close the Chooser.
To create a PDF file with PDFWriter using the Print command (Windows):
1 Open the document in its authoring application.
2 Choose File > Print.
3 In the Print dialog box, choose Acrobat PDFWriter from the Printer Name
menu, enter the page range, and click Print or OK. In some applications, you
Page 88

Converting Electronic Files to PDF
Page 88
may need to click Setup in the Print dialog box to get access to the Printer
Name menu.
4 In the Save As dialog box, enter a filename and location for the PDF file, and
set other options if necessary:
■
View PDF File opens the new PDF file automatically in Acrobat.
■
Edit Document Info opens the Document Information dialog box so you can
provide search keywords for the PDF file. Enter a title and other keywords, and
click OK. (The information is optional.)
5 Click Save.
To bypass the Save As dialog box and view the document in Acrobat before
saving it in PDF, hold down the Control key, and click the Print button in the
application’s tool bar, or the Print or OK button in the Print dialog box. Then use
the Save command in Acrobat to save the file in PDF. To be able to use this
shortcut, PDFWriter must be selected as the default printer.
To create a PDF file with PDFWriter using the Print command (Mac OS):
1 Open the document in its authoring application.
2 Do one of the following:
■
Hold down the shortcut key (Control by default), and choose File > Print. This
uses PDFWriter to create a PDF file without changing your printer driver
Page 89

Converting Electronic Files to PDF
Page 89
setting. (You cannot use this shortcut with Command+P, the print shortcut in
Mac OS applications.)
■
Open the Chooser, select the PDFWriter printer driver, and close the Chooser.
Then return to the application, and choose File > Print.
3 In the Print dialog box for PDFWriter, enter a page range. You can also set
options if these appear in your Print dialog box:
■
View PDF File opens the new PDF file automatically in Acrobat.
■
Short (DOS) File Names truncates the filename to an 8.3 DOS filename.
■
Prompt For Document Info lets you attach search information to the PDF file.
4 Click OK.
5 If the Document Information dialog box appears, enter a title and other
search keywords, and click OK. (The information is optional.) This dialog box
appears if Prompt For Document Info is selected in the Print dialog box.
6 In the Save As dialog box, enter a filename and location, and click Save.
To change the shortcut key for PDFWriter (Mac OS):
Choose PDFWriter Shortcut from the Control Panel in the Apple menu, define a
new shortcut, and close the Shortcut window. You can set any combination of
Control, Option, and Shift.
Page 90

Converting Electronic Files to PDF
Page 90
Setting PDFWriter properties
The PDFWriter properties control the page setup, the compression settings,
and the font embedding of all PDF files created with PDFWriter.
Changing the page setup
The page setup for PDFWriter determines the size and orientation of pages. In
Windows, you can also set the resolution of PDF files you send to a printer.
To change the page setup:
1 Do one of the following:
■
In a Windows application, choose File > Print (Print Setup in some applications), select Acrobat PDFWriter from the Printer Name menu, and click
Properties (Setup in some applications). This will change the settings for the
open file and for other files you convert to PDF during the current session with
this application.
■
In the Windows 95 or 98 desktop, choose Settings > Control Panel > Printers
from the Start menu, right-click Acrobat PDFWriter, choose Properties, click
the Details tab, and click Setup. In the Windows NT desktop, choose Settings >
Printers from the Start menu, right-click Acrobat PDFWriter, and choose
Document Defaults. This will change the settings for all PDF files created
with PDFWriter.
Page 91

Converting Electronic Files to PDF
Page 91
■
In a Mac OS application, hold down the shortcut key (Control by default), and
choose File > Page Setup. Or open the Chooser, select the PDFWriter printer
driver, close the Chooser, and then choose File > Page Setup in an application.
This will change the settings for all PDF files created with PDFWriter.
2 To change the page size, do one of the following:
■
Select Standard, and choose a page size from the menu.
■
Select Custom, choose a unit of measure, and enter the page dimensions and
margins. The minimum page size is 1-by-1 inch; the maximum is 45-by-45
inches.
3 To change the orientation, select Portrait or Landscape.
4 To change the scaling, enter a percentage in the Scaling text box. Scaling
lets you magnify or shrink the document for printing. For example, a document
that is 8-1/2-by-14 inches can be scaled to 75% to fit on a 8-1/2-by-11-inch
page. Similarly, if an 8-1/2-by-11-inch document is scaled to 200%, you will
need to adjust the page size to 17-by-22 inches to display the entire page.
5 To change the resolution (Windows), choose a Resolution value. The
resolution setting determines the number of dots per inch (dpi) with which
a PDF file is printed and can sometimes alter character spacing. For best
results, use the resolution setting of the printer chosen when the original file
was created.
6 Click OK.
Page 92

Converting Electronic Files to PDF
Page 92
Changing the compression options
PDFWriter can compress text, line art, and bitmap images to reduce file size.
You can change the compression options for specific purposes, or remove
compression altogether if file size is not an issue. Because small files open and
display more quickly than large ones, you should normally compress a PDF file
as much as possible without noticeably degrading the quality of the images in
it. In most cases, the PDFWriter default compression settings create an
acceptably small PDF file.
PDFWriter can also downsample high-resolution bitmap images to reduce file
size. A bitmap consists of digital units called pixels. Downsampling reduces the
number of pixels in a file by averaging the color of pixels in a sample area and
replacing that area with one pixel of the averaged color. By default, PDFWriter
downsamples images to the following resolutions:
■
Color images are downsampled to 96 dpi (Windows) or 72 dpi (Mac OS).
■
Grayscale images (those that have a continuous tone of gray, such as black
and white photographs) are downsampled to 96 dpi (Windows) or 150 dpi
(Mac OS).
■
Monochrome images (those in which each pixel is either black or white, with
no shades of gray) are downsampled to 300 dpi.
Note: PDFWriter does not downsample 8-bit grayscale images, and it does
not downsample when the bitmap source rectangle is smaller than the
image rectangle.
Page 93

Converting Electronic Files to PDF
Page 93
If you need more precise control over compression and resampling, use
Distiller instead of PDFWriter. For information on the Distiller and PDFWriter
compression options and a more detailed discussion of the subject, see
Applying compression and resampling to PDF files.
You may want to try different compression settings to fine tune the
balance between image quality and file size. Create a few PDF files from your
document using different types of compression, and compare the results.
Zoom in at 200% or 400%, and look at a detail of the same image in each file.
For your final PDF file, use the compression settings that produced the smallest
file with acceptable image quality.
To change the compression options:
1 Do one of the following:
■
In a Windows application, choose File > Print (Print Setup in some applications), select Acrobat PDFWriter from the Printer Name menu, and click
Properties (Setup in some applications). This will change the settings for the
open file and for other files you convert to PDF during the current session with
this application.
■
In the Windows 95 or 98 desktop, choose Settings > Control Panel > Printers
from the Start menu, right-click Acrobat PDFWriter, choose Properties, click the
Details tab, and click Setup. In the Windows NT desktop, choose Settings >
Printers from the Start menu, right-click Acrobat PDFWriter, and choose
Page 94

Converting Electronic Files to PDF
Page 94
Document Defaults. This will change the settings for all PDF files created with
PDFWriter.
■
In a Mac OS application, hold down the shortcut key (Control by default), and
choose File > Page Setup. Or open the Chooser, select the PDFWriter printer
driver, close the Chooser, and then choose File > Page Setup in an application.
This will change the settings for all PDF files created with PDFWriter.
2 Click the Compression Options tab (Windows), or click the Compressions
button (Mac OS).
3 Select the options you want:
■
Compress Text And Line Art applies ZIP compression (a lossless method) to
all text and line art in the file.
■
ASCII Format creates PDF files in ASCII text format. This option is useful if you
want to open files in a text editor to read or edit them, but it increases file size.
■
Downsample Images downsamples bitmap images to a lower resolution.
Turn this option off if you want a specific resolution.
4 To apply compression to color or grayscale images, select the appropriate
Compress Using option, and choose a method from the pop-up menu.
PDFWriter applies the compression to all color or grayscale bitmap images in
the PDF files.
Page 95

Converting Electronic Files to PDF
Page 95
5 To apply compression to monochrome images, select the Compress Using
option, and choose a method from the pop-up menu. PDFWriter applies the
compression to all monochrome bitmap images in the PDF files.
6 To restore the original compression options, click Default.
7 Click OK.
Embedding fonts in PDF files
PDFWriter can embed Roman Type 1, TrueType, and base fonts (Windows only)
in a PDF file. This ensures that the original font is used for display and printing
on computers that do not have the font installed. Adobe Type Manager (ATM)
must be installed and loaded as a control panel for PDFWriter to be able to
embed Type 1 fonts. PDFWriter cannot embed Asian fonts.
PDFWriter embeds only the set of characters used in the file if fewer than
35% of the characters in a font are used in the file. (Standard Roman fonts
contain 256 characters; 35% of a Roman font is approximately 90 characters.)
You cannot change this threshold in PDFWriter. If you need more precise
control, see Setting the Fonts job options for information on embedding fonts
with Distiller.
Note: When you combine PDF files that have the same font subset, the subsets
are not combined. As a result, combining files with subsets of fonts may result
in a large file. To combine subsets using PostScript files, see Combining multiple
PostScript files into one PDF file.
Page 96

Converting Electronic Files to PDF
Page 96
If you do not embed fonts in a PDF file and a user opens the file on a system
that does not have the file’s fonts, Acrobat temporarily substitutes fonts. For
Roman text, Acrobat uses serif and sans serif Multiple Master fonts to simulate
the original font. For Asian text, Acrobat uses fonts from the installed Asian
Language Kit or from similar fonts on the user’s system. (See About font
embedding and substitution for an example.) If you embed a font and the user
has that font on their system, they can edit the text in the PDF file.
An embedded font typically adds about 30K to 40K to a PDF file. If it is not
important that readers see the file in its original fonts, do not embed fonts. Let
Acrobat use substitute fonts when necessary. This will produce the smallest
file possible.
To help you decide which fonts to embed in a PDF file, you can get a
preview of how the substituted fonts will look in the file. See Previewing substi-
tuted fonts.
To modify which fonts are embedded in a PDF file:
1 Do one of the following:
■
In a Windows application, choose File > Print (Print Setup in some applications), select Acrobat PDFWriter from the Printer Name menu, and click
Properties (Setup in some applications). This will change the settings for the
open file and for other files you convert to PDF during the current session with
this application.
Page 97

Converting Electronic Files to PDF
Page 97
■
In the Windows 95 or 98 desktop, choose Settings > Control Panel > Printers
from the Start menu, right-click Acrobat PDFWriter, choose Properties, click the
Details tab, and click Setup. In the Windows NT desktop, choose Settings >
Printers from the Start menu, right-click Acrobat PDFWriter, and choose
Document Defaults. This will change the settings for all PDF files created with
PDFWriter.
■
In a Mac OS application, hold down the shortcut key (Control by default), and
choose File > Page Setup. Or open the Chooser, select the PDFWriter printer
driver, close the Chooser, and then choose File > Page Setup in an application.
This will change the settings for all PDF files created with PDFWriter.
2 Click the Font Embedding tab (Windows), or click the Fonts button (Mac OS).
3 To rebuild the set of available fonts, click Rebuild (Mac OS).
4 Do one of the following:
■
To embed all fonts used in the file, select Embed All Fonts.
■
To embed only certain fonts, make sure Embed All Fonts is not selected, and
move the fonts you want embedded to the Always Embed list. You can move a
font by selecting it in the Available Fonts list and clicking the Add button
associated with the Always Embed list or by dragging the font to this list. Ctrlclick (Windows) or Command-click (Mac OS) to select multiple fonts. Shift-click
to select a contiguous range of fonts.
Page 98

Converting Electronic Files to PDF
Page 98
■
To embed all but some fonts, select Embed All Fonts, and move the fonts you
do not want embedded to the Never Embed list. You can move a font by
selecting it in the Always Embed list and clicking the Add button associated
with the Never Embed list or by dragging the font to this list. Ctrl-click
(Windows) or Command-click (Mac OS) to select multiple fonts. Shift-click to
select a contiguous range of fonts.
■
To remove a font from the Always Embed or Never Embed list, select the font,
and click Remove, or drag the font to the Available Fonts list. If you remove a
symbol font from the Never Embed list, it is added back to the list if you
reinstall PDFWriter or if you click the Default button.
Note: Some TrueType fonts cannot be embedded. You will not be able to
remove these fonts from the Never Embed list.
Font types are indicated in the font lists in the following ways:
■
Type 1 fonts have the Type 1 icon next to the font name.
■
TrueType fonts have the TrueType icon next to the name.
■
Underlined font names indicate symbol fonts, such as ITC Zapf Dingbats®.
Acrobat cannot substitute these, which is why (except for any symbol base
font) they are on the Always Embed list by default.
In Windows, the font lists show additional restrictions by color:
■
Black font names indicate normal fonts with no restrictions, except as
indicated by any underlining.
Page 99

Converting Electronic Files to PDF
Page 99
■
Blue font names indicate base fonts. These fonts are in the Never Embed list
by default.
■
Red font names indicate TrueType fonts that cannot be embedded. These
fonts will appear only in the Never Embed list.
■
Green font names are for Chinese, Japanese, and Korean fonts.
5 To restore the original font settings, click Default.
6 Click OK.
Previewing substituted fonts
When a user opens a PDF document, the text in the file appears in its original
font if that font is embedded in the file, or if the user has the font installed on
their system. If the font is not available, the text is displayed in a substitute font.
For Roman text, Acrobat uses serif and sans serif Multiple Master fonts to
simulate the original font. For Asian text, Acrobat uses fonts from the installed
Asian language kit or from similar fonts on the user’s system. Fonts from some
languages or with unknown encodings cannot be substituted; in these cases,
the text appears as bullets in the file.
You can embed fonts in a PDF file to be sure that users will see text in the right
font, but embedding fonts can dramatically increase the size of the file. You
may want to see a preview of how substituted fonts will look in your PDF file to
help you decide which fonts to embed.
Page 100

Converting Electronic Files to PDF
Page 100
To preview substituted fonts in a PDF file:
Choose View > Use Local Fonts to specify whether Acrobat should ignore the
fonts installed on your system. (The command has a check mark by it when
Acrobat is using the fonts; it has no check mark when Acrobat is not using the
fonts.) When Use Local Fonts is off (that is, it does not have a check mark by it),
Acrobat displays the PDF file using substitute fonts for all fonts that are not
embedded. If a font cannot be substituted, the text in it appears as bullets, and
Acrobat displays an error message. This enables you to see how your PDF file
will appear on a computer that doesn't have these fonts installed.
Note: For a PDF file to be portable, at a minimum you should embed the fonts
that cannot be substituted.
When Use Local Fonts is off, the PDF file also prints using substituted fonts.
Creating PDF files with Distiller
Distiller creates a PDF file from a PostScript version of a document. A PDF file
created by Distiller maintains all the formatting, graphics, and photographic
images from the original document, and it usually provides higher quality
output than PDFWriter. For more on the comparison with PDFWriter, see About
PDFWriter and Distiller.
Note: For Distiller to be able to create PDF files, you must have a PostScript
printer driver on your system set up with a Distiller PostScript printer
description (PPD) file. The default Acrobat installation includes the latest
 Loading...