


1

2
Contents
MAC PARA COMMUNITY .......................................................................................... 2
GENERAL................................................................................................................... 3
PILOT LEVEL REQUIREMENTS................................................................................ 4
DESIGN...................................................................................................................... 5
TECHNICAL DESCRIPTION ...................................................................................... 5
RISERS....................................................................................................................... 7
TRIMMING................................................................................................................ 10
MATERIALS.............................................................................................................. 11
TECHNICAL SPECIFICATIONS............................................................................... 12
GLIDER CHECKLIST................................................................................................ 12
SETTING UP THE CONTROLS................................................................................ 13
FLYING THE T-RIDE................................................................................................ 13
TOWING, JUMPS FROM AIRCRAFT, AEROBATICS.............................................. 19
GOLDEN RULES...................................................................................................... 20
CARE AND MAINTENANCE .................................................................................... 21
RESPECT NATURE ................................................................................................ 24
T-RIDE LINE PLAN................................................................................................... 24
LINE PLAN T-RIDE – SCHEME................................................................................ 25
T-RIDE RISER LENGTHS........................................................................................ 26
FULL LINE LENGTHS .............................................................................................. 26
GUIDELINES FOR PARAMOTORING GLIDER CHECKS....................................... 27
TEST FLIGHT CERTIFICATE................................................................................... 31
TECHNICAL SPECIFICATION ................................................................................. 31
MAC PARA COMMUNITY
MAC PARA
Newsletter
Facebook
Twitter
YouTube
Vimeo
Pinterest
Download
www.macpara.com/community

3
GENERAL
Dear MAC PARA pilot
We congratulate you and appreciate your purchase of the MAC PARA T-RIDE
paramotoring glider. Extensive research and deve lopment makes the T-Ride a state-ofthe-art paramotoring glider. Numerous safety tests have been made to allow you to
safely enjoy the performance of this glider. The entire Mac Para team welcomes you
and we wish you many pleasant flights. To stay safe you MUST
read this manual
carefully before flying.
T-Ride Highlights
The T-Ride is a semi reflex paramotoring glider for two-seat trikes. It was designed for
skilled advanced trike or quad pilots looking for an easy to use glider with a wide speed
range and responsive handling. Other benefits are easy launch and landing speeds,
excellent stability and efficient fuel consumption when paramotoring.
Please note the following details before you fly:
Get Proper Training
The purpose of this manual is to offer you information about the uniq ue design features
of the T-Ride for maximum enjoyment. This Manual is in no way intended to be used
as a training manual. Paragliding and paramotoring are sports which demand high
degrees of attentiveness, good judgement, and theoretical knowledge. Paramotoring
can be a dangerous sport which may lead to injury and death. Get proper instruction
before you attempt to fly with a qualified professional and accredited school.
Take Responsibility
The use of this paramotoring glider is solel y at the owner’s risk! The manufacturer and
distributor do not accept any liability. You ar e responsible for your own safety and the
gliders airworthiness. Mac Para assumes no responsibility. Mac Para recommends the
pilot is in possession of a valid paramotoring licence for the glider's category, insurance,
and training etc. for the country in which the glider is flown.
Manufacture Quality Control Checks
Before delivery, as well as during production, each paramotoring gli der goes through a
strict visual inspection. It should also be test-flown by your dealer. Stamps on the
placard with a completed test-flight certificate confirm this. It is your responsibility to
check that your new T-Ride paramotoring glider has been test-flown before your first
flight. If it has not, consult your dealer.
Minimize Your Risks
Any inadequate use or misuse of your T-Ride increases the risks considerably. Below is
a list of conditions that must be avoided.

4
GENERAL
DO NOT USE outside the manufacturers recommended weight range.
DO NOT USE during rain or snow-fall.
DO NOT USE in high or gusty wind conditions
DO NOT USE in cloud and fog.
DO NOT USE without sufficient knowledge or experience.
DO NOT USE under the influence of drugs, alcohol or sickness.
DO NOT USE for aerobatics or extreme manuvers.
NOTE: Any changes or modifications made to this paramotoring glider invalidate the
certificate of airworthiness. Please check the warranty conditions near the end of this
manual. Registration of your Mac Para T-Ride is required.
Mac Para Wants to Help
If you have read this manual and still have questions, suggestions or criticisms
regarding the T-Ride manual, please do not hesitate to contact your dealer or Mac Para
directly. Our mission is to design quality perf ormance glider s that allow yo u the freedom
of flight while keeping you as safe as possible.
PILOT LEVEL REQUIREMENTS
The T-Ride has been design for pilots that have been paramotoring for some time. It is
not intended for beginners or for pilots that la ck the necess ary piloting skills to control its
advanced performance features. We recommend you should have a minimum level of
200 flying hours in various conditi ons and have compl eted at least three f ull years flying
paramotoring gliders with adjustable trimmers before flying the T-Ride.
Various Conditions
The T-Ride can adapt to suit a full range of conditions and types of paramotoring. The
exception is acrobatic flying. In strong turbulence and gusting winds a partial or
complete collapse of the canopy can result. Never fly in such conditions.
Certification
The T-Ride is light sport aircraft with an empty weight of less than 120 kg in the
category paraglider.
Even though it is possible to use the T-Ride for free flying, please note it is not EN
certified!
5
DESIGN
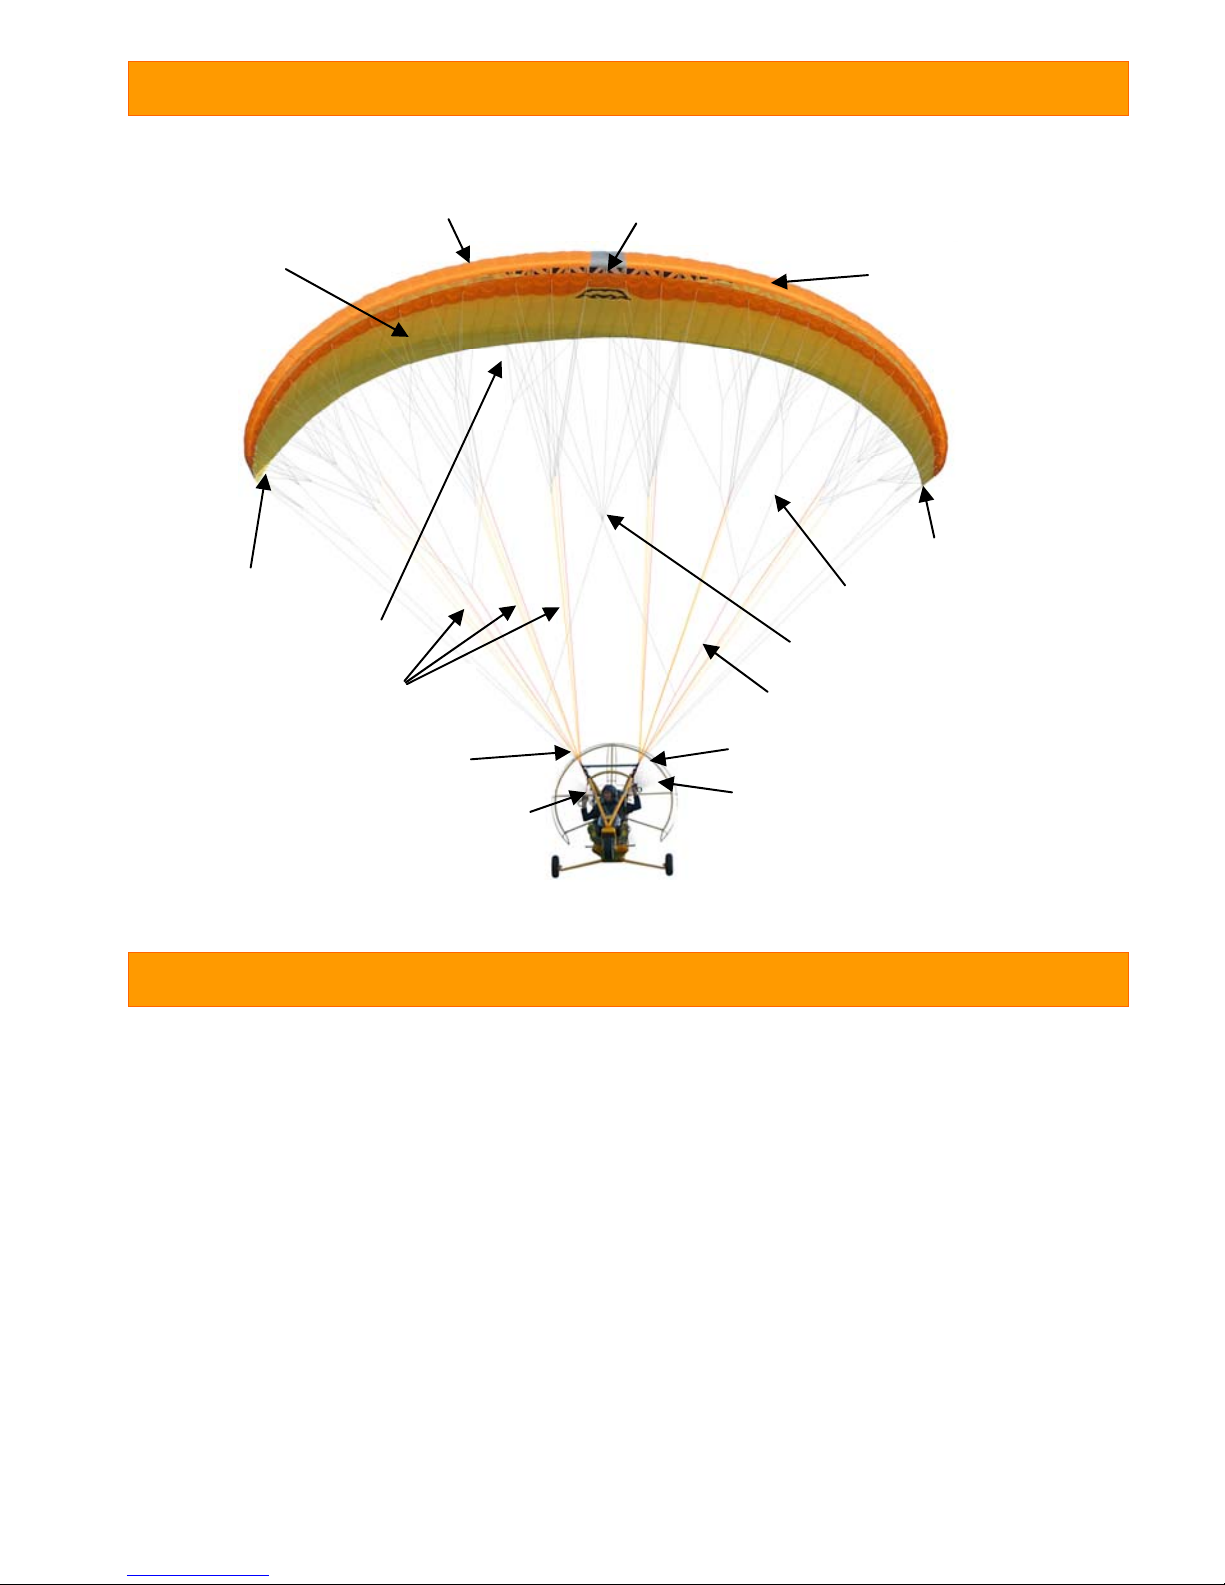
TECHNICAL DESCRIPTION
Construction of the canopy:
The canopy of the T-RIDE has a wingspan wit h 58 cells. T he wingtips are slightl y pulled
down to act as a stabilizer. The T-Ride is a second rib diagonal-construction
paramotoring glider. Every main rib is attached to 4 or 5 suspension lines. Between
these main suspension ribs, intermediate ribs are suspen ded by diagonal segments. As
complicated as this sounds, this construction ensur es a smooth top surface and precise
air foil design increasing performance and safety.
The internal reinforcements maintain the precise form of the canopy and increases
stability. The cell openings on the under-surface of the leading edge provide good
airflow into the glider. Stretch resistant support panels with diagonal ribs at the
suspension points ensure an even distribution of load throughout the canopy.
Wing tip steering
Top surface
Bottom surface
Leading edge
Brake handle
Main carabineer
Rapid links
Main lines
Risers
Main brake line
Brake line
Stabilizer
Glider's label on the
central main rib
Trailing edge
Flap Braking System

6
TECHNICAL DESCRIPTION
Stretch resistant Mylar strips on the top and bottom panels of the openings run the
length of the trailing edge defining the wingspan. This ensures optimized sail tension
and guarantees high canopy stability. L arge cross ports allo w effective airflow inside the
canopy providing good reinflation without interrupti ng the profiles shape.
The T-Ride is mainly made from proven high quality Nylon fabrics. Porcher Marine
Skytex Rip-stop 9092 E85A, 9017 E38A and 9017 E29A are the carefully selected
materials. Important care must be taken to maximize the life of your glider because lik e
any synthetic material, this can deteriorate through excessive UV exposure.
Rigging system:
The suspension lines are comprised of “cascaded top lines” (attached to the undersurface),”cascaded middle lines” (cascade 2 to 2 top lines together on middle main
lines), and “main lines”. Main lines lead to the “quick links” (a small triangle carabine er
which connects lines to the risers). The “stabilizer lines” connect the upper stabilizer
lines on the outer suspension points with the quick link. The “brake lines” are not load
carrying suspension lines. They lead from the trailing edge of the canopy to the main
brake lines and run through the pulleys on t he D-risers to the brake handles. T wo black
marks on the main brake line indicate the two possibl e positions of the brake handles.
This adjustment allows for sufficient brake to be applie d during flight a nd landing saf ety.
It also ensures that brakes are not too short causi ng permanent applied brakes during
flight (especially when fully accelerated). Having your brakes too short is dangerous!
Special attention is required before adjusting your brakes. Note! There two
options of brake line systems. First option is serial. This decrease the forces of
brakes. The second option is a single brake line.
For differentiation purposes, the A-lines are coloured red, the brake lines are orange,
and all remaining lines are yello w. The main suspension loop on the botto m of the riser
is reinforced and covered red. This is where the mai n carabineer should be hooked in
connecting the risers to the harness.
The lines of the T-Ride are made of strong and stretch resistant HMA Aramid/Kevlar
(yellow core) lines and PES/Dynema (white core) for brake lines. The entire rigging
system comprises of individual suspension lines looped and stitched at each end. This
contributes to the glider being incredibly strong.
The main Polyester sheathed ARAMID lines hav e strengths from 190 up t o 500 kg. The
unsheathed Aramid upper cascade lines have strengths of 45kg, sheathed Aramid
upper cascade lines have strengths from 60kg up to 160 kg. The Aramid middle
cascade lines have strengths from 80kg up to 190 kg. The Dynema brake lines have
strengths from 80kg up to 360 kg. Add up the strength of all the lines to understand the
design of the T-Ride provides you with safety and confidence.

7
swivel
trimmer buckle
brake
handle
lower pulley for
hight hangpoints
trimmer
handle
magnet
button
trimmer strap
upper pulley for
low hangpoints
loop for main
carabineer
A1 A
B C D
Br
color
marking
trimmer buckle
trimmer
handle
trimmer
strap
RISERS
Risers with trim system:
The serial T-Ride is equipped with 5 risers per side (A, A1,B, C, D). The two central
A-main lines per side are attached to the A-risers (red in colour) while the outermost A
main lines are attached to A1 risers. The 3 B-main lines, the stabilizer lines an d main
brake line are attached to the B-riser. The 3 C-mai n lines are attached to the C-risers
and the 3 D-main lines to the D-risers. The main brake lines attached on B riser lead
through the pulleys on galery brake lines and then lead through the pulleys on the D
risers. The higher pulleys are used when flying a lo w attachment style paramotor and
the lower one for higher attachment paramotors.
The line connections are made to triangular carabineers (q uick links) fitted with a rubber
”o- ring” in the form of a ”figure eight” which prevents any slipping of the lines on the
quick link.
Riser`s scheme

8
RISERS
Trimmers:
The T-Ride has a wide in flight speed range due to the range of different trimmer
settings. The trimmers have a deceleration r ange of 6 cm and 5cm of acceleration. On
the faster setting (trimmers fully open and extended) the T -Ride’s speed increases. T he
wing is less sensitive to turbulence and the stability improves. On slower trimmer
settings (neutral or trimmers pulled all the way down), sink rate improves and the brake
pressure becomes lighter. You will feel that the wing is more sensitive flying through
bumpy air with trimmers pulled all the way in. To help you identify the neutral
position of each trimmer, look for the white stitching. It is important to check and set
the trimmers in the same position for each riser before take-off and in flight to avoid
unwanted turns.
The back positioned trim system shortens and lengthens the C and D risers and
changes the angle of attack. In normal fl ight, all r isers are in a "neutral po sition" and are
of equal length (46 cm to the bottom edge of the rapid lin ks). This position is marked
with a white line on the trimmer straps. When you pull down the straps that run through
the trimmers, the C-risers are shortened up to 3 cm, D-straps up to 6 cm. When you
open the trims (push the trim buckles) , the C-risers are extended up to 2.5 cm, and the
D risers are extended by up to 5 cm.
The speed of the T-Ride (depends on wing loading) with closed trimmers (trimmers
pulled all the way down) is around 39-43km/h with a relatively low effort of the engine.
With additional brake pressure the cruis ing speed is around 34-37 km/h. This will give
you the best sink rate and requires the leas t amount of thrust from your engi ne for level
flight. The neutral trimmer position (marked with a white line) is the position where the
risers are level. This is the most useful configuration for navigation and for precision
ground tasks. The T-Ride still turns very well and restores plent y of energy flying around
44-47 km/h. It requires a little more RPM from your engine compared to the closed
trimmer
The front positioned trim system shortens the A risers and changes the angle of attack.
In normal flight, the A risers are in a "neutral position" and are of equal length ( 46 cm to
the bottom edge of the rapid links). When you pull down red colored lo op of the straps
that run through the trimmers, the A-risers are shortened up to 3,5 cm. Note! You can
pull straps on A-trimmers only when D-trimmers are set to neutral position or released!
The speed of the T-Ride (depends on wing loading) with fully closed A-trimmers and
fully released D-trimmers is around 50-55km/h with higher effort of the engine. It
requires a much more RPM from your engine compared to the closed trimmer
Attention!
Never fly with shortened A-trimmers in combination with shortened D-trimmers!

9
A B C D
RISERS
Brake handles:
The brake handles are equipped with swivels and neodyme magnets. Strong neodym e
magnets hold the brake handles perfectly to the D risers. Attaching and releasing the
brakes from the risers work very easily and quickly during flight. This minimises the
danger of getting them caught in a spinning propeller.
Brake lines:
As mentioned before the T-Ride has two options of brake line systems.
1) the serial version is a special main brake line system. The main brake line is
connected to the B riser then le ads through the pulley that is conn ecting middle galery
brake lines and then lead through the pulleys on the D risers. This is a pulley system,
which reduces the forces on controls. 2) the single main brake line, which is common b y
paragliders. This causes much higher forces on controls. These main brake lines are
added as serial equipment of the T-Ride.
Special bar for heavy trikes:
Depending on the design of your trik e the sp ecial T-Ride s preader b ars that replace the
risers can be used. The spreaderbar structure is composed of alloy plates with a
spacing tube. On the alloy plates are positioned O-form quick links co nnecting e ach line
row. The 3 main A-lines per side are attached to the A-quick links. The 3 B-main, the
stabilizer lines and main brake line are attac hed to the B-quick links. T he 3 C-main lines
are attached to the C-quick links and the 3 D-main lines to the D-quick li nks. The main
brake lines attached on B riser lead throug h the pulleys on galery brak e lines and then
lead through the pulleys attached on the trike frame.
The main attachment straps embrace the allo y plates and then are led through slots o n
the plates. Trike and spreaderbars must be connected with karabiners with min.
strenghts of 2400 daN.
The speed of the T-Ride (the angle of attack ) is operated from the trike. Under D-quick
links are attached other quick links. On these links are conn ected trimmer lines leading
from the trike.
Loop for main
carabineer
Distance tube
Quick link
for trimming

10
TRIMMING

11
MATERIALS
Tissue
(PORCHER SPORT, Rue du Ruisseau B.P. 710,38290 ST. QUENTIN FALLAVIER, FRANCE)
Top Sail - Leading Edge - SKYTEX 45 E85A - 100% nylon 6.6 , 33 Dtex, 45 g/m
2
Top Sail - Trailing Edge - SKYTEX 40 E38A - 100% nylon 6.6 , 33 Dtex, 40 g/m
2
Bottom Sail - SKYTEX 40 E38A - 100% nylon 6.6 , 33 Dtex, 40 g/m
2
Main ribs, Diagonals - SKYTEX 40 E29A - 100% nylon 6.6 , 33 Dtex, 40 g/m
2
Ribs - SKYTEX 40 E38A - 100% nylon 6.6 , 33 Dtex, 40 g/m
2
Reinforcement Main Ribs - Grille Polyester 200 g/m
2
Reinforcement Ribs - W382 Polyester 180 g/m
2
Lines
(EDELMAN+RIDDER+CO. Achener Weg 66, D-88316 ISNY IM ALLGEAU, GERMANY)
Upper lines - Aramid A-8000-045, Breaking Load 45 kg
Upper lines - Aramid/Polyester A-6843-060, Breaking Load 60 kg
Upper lines - Aramid/Polyester A-6843-080, Breaking Load 80 kg
Upper lines - Aramid/Polyester A-6843-120, Breaking Load 120 kg
Upper lines - Aramid/Polyester A-6843-160, Breaking Load 160 kg
Middle cascade lines - Aramid/Polyester A-7343-140, Breaking Load 140 kg
Middle cascade lines - Aramid/Polyester A-7343-190, Breaking Load 190 kg
Brake lines - Dynema/Polyester A-7850-100, Breaking Load 100 kg
Brake lines - Dynema/Polyester A-7850-130, Breaking Load 130 kg
Main brake line - Dynema/Polyester A-7850-240, Breaking Load 360 kg
Main lines A1,B1 - Aramid/Polyester A-7343-420, Breaking Load 420 kg
Main lines C2,C3 - Aramid/Polyester A-7343-280, Breaking Load 280 g
Main lines C1,D2,D3 - Aramid/Polyester A-7343-190, Breaking Load 190 kg
Main lines D1 - Aramid/Polyester A-7343-140, Breaking Load 140 kg
Wing tip line - Aramid/Polyester A-7343-140, Breaking Load 140 kg
(ROSENBERGER TAUWERK, GERMANY)
Main lines A2,A3,B2,B3 - Aramid/Polyester TSL 500 , Breaking Load 500 kg
Attachment straps
(STAP a.s., 407 80 VILEMOV, CZECH REPUBLIC)
STAP-POLYESTERBRIDLE 13 mm, Breaking Load 70 kg
Risers
(MOUKA TISNOV ltd, Koráb 133, 66601 Tišnov, Czech Republic)
Polyester 366 040 025 912 20x1,5 mm Breaking Load 900 kg
Thread
(AMANN SPONIT ltd, Dobronická 635, 148 25 PRAHA 4, CZECH REPUBLIC)
Lines-SYNTON 60, Main lines-SERABOND 60, Canopy-SYNTON 40, Riser-SYNTON 30
Rapid links
(ELAIR SERVIS, Axmanova 3913/9, 767 01 KROMERIZ, CZECH REPUBLIC)
NIRO TRIANGLE 200 - Max. Load 200 kg

12
TECHNICAL SPECIFICATIONS
Category Intermediate MPG
T-Ride
Size 39
Zoom flat [%] 125
Area flat
[m
2
]
38,88
Area projected
[m
2
]
34,09
Span flat [m] 14,21
Aspect ratio flat - 5,20
Root cord [m] 3,21
Cells [kg] 58
Weight [kg] 8,30
Weight range - PPG,MPG * [kg] 200-400
Min.speed [km/h] 25-27
Max. speed [km/h] 41-43
Top speed (accelerator) [km/h] 60-63
Glide ratio - 8,9
Min. Sink rate [m/s] 1,05
Certificate -
* powered pilot equipped = weight naked + trike + all accessoriescca
GLIDER CHECKLIST
Before delivery, as well as during production, each T-Ride paramotoring glider goes
through a strict visual inspection. Additionally, we recommend that you check your new
glider in accordance with the following point s belo w. The T-Ride is a form of aircraft and
should be treated as such. We also recommend th at you m ake these chec ks after flying
extreme manoeuvres or similar events.
Inspect the canopy for tears or damage. Pay particular attention to the seams. Look
at where the ribs join at the upper and lower surfaces and the areas of the
attachment tapes and brake-line connections.
Inspect the lines for damage and look for damaged stitching. The line lengths must
be checked after 50 hours flying time and/or whenever the flight behaviour of the
glider changes.
Inspect the attachment points for damage to the stitches. It is equall y important to
free brake-lines from tangles before each flight.
Inspect the risers for overall condition and check for frayed seams. Rapid links must
be secured.
Understand that with slight damage the glider could lose its air worthiness ! Fl y safe by
spending extra time to perform regular checks on your gear.

13
SETTING UP THE CONTROLS
Brake adjustment and brake handles:
We strongly recommend brake adjustments be su pervised by a paramotoring instructor
or done by a pilot that understands the importance of proper brake lin e length. Improper
brake line adjustment can lead to unsafe reactions of your glider. With a brake line
adjusted too short the canopy will lose its easy take off behaviour.
Before flying the T-Ride please check the setting of the brake lines and adjust them in
accordance to your hang points. On the risers diagram you can see there are two brake
line pulleys on each riser, higher and lower. The brake lines have two black marks
identifying recommended brakes positions.
Once you choose your appropriate brak e li ne lengt h that ma tches your par amotors hang
point style, check the set up by inflating the glider in an open area with a constant
breeze with the engine off. When the canopy is stabilised above your head, check that
the trailing edge of the wing is not being pulled down. When you gently pull the brakes
you should only hav e 5-10 centimetre s of movement bef ore the brakes st art to pull
down on the trailing edge of the wing. Make sure that the brake length is the same for
both sides. It is safer to have brake length a bit longer than too short.
When free flying (paragliding) the brake line should b e pulled through the top pu lley and
the brake handle tied onto the upper black ma rk on t he brak e li ne. T his makes the brake
position perfect for a paragliding harness because of their lo wer hang points.
FLYING THE T-RIDE
The following information is NOT under any circumstances a manual for
practising paramotoring. We would like to advise you of important information to
increase safer flights and security while flying the T-Ride.
Paraglider Preparation
After unpacking and laying out the paramotoring gli der in a slight horseshoe p attern, the
following checks must be made:
Checklist before every flight:
Checking and inspecting the wing:
o Canopy without any damage?
o Risers without damage?
o Maillons (quick links) closed tight?
o Stitching of the main lines near the risers o.k.?
o All main lines run free from the riser to the canopy? Brake lines free?

14
FLYING THE T-RIDE
Before putting on the trike:
o Warm up your engine and stop the engine before clipping in the risers.
o Rescue/reserve handle and deployment pins secure?
Before take-off:
Buckles (leg-, front riser) closed?
Main carabineers attached and properly clo s ed?
Check specialy cover of main lines at the place of propeller frame.
Ensure helmets are on and chin straps fastened.
Check that the risers are not twisted.
Look to see the trimmers are properly set to neutral (white stitching).
Check the brake handles and brake lines are free and not twisted.
Confirm nothing will get in propeller's way.
Centre your trike relative to the wing (all lines same tension).
Test engine to deliver full power.
Check wind direction.
Check for obstacles or tripping hazards on the ground.
Identify free airspace.
Look out for obstructions in the direction of desired flight path.
When laying out the glider, the wind direction must be obs erved for a suc cessful launc h.
The canopy should be orienta ted into the wind so both sides are load ed symmetrically.
The glider should be arranged in a semicircle (horseshoe) against the wind. This
ensures that the A-lines in the centre section of the canopy will be tensioned befor e the
wing tips. Doing this inflates the canopy evenly and allows for an easy launch in the
desired direction.
All lines and risers should be carefull y checked, untangled and arranged in a way that
they do not catch on anything. It is equall y important to untangle the brake li nes so that
they are free and clear so they do not c atch on anything during launch. The brake lin es
should run freely through the pulle ys to the trailing edge of the canopy. Make sure th e
risers are not twisted; this can prevent the brake lines from running freely through their
pulleys. It is nearly impossible to untangle lines during flight . It is important that no lines
are looped around the canopy. Also called a “line-over”, this may have disastrous
consequences during take-off. Finally, connect the risers to your harness by using the
main carabineers. Check carefully that they are closed properly.
Preparing for take-off:
As with any aircraft, a thorough pre-flight check must be made prior to each flight.
Before every launch check lines, risers and canopy for damage! Do not launch with
even the slightest damage!
Also check the maillons connecting the lines to the risers. They must be closed tight.

15
FLYING THE T-RIDE
Getting ready for Flight
Check if the handle of the reserve parachute is securely fastened to prevent accid ental
deployment. Look to see that the flaps of the outer container are fastened securel y and
correctly. The main carabineers must also be checked carefull y. Replace carabineers if
any damage is visible or if you have accum ulated 300 flying hours. Finally, connect the
paraglider risers to your harness with the main self-lockin g carabineers. Check carefully
that they are properly closed.
ATTENTION! Never fly with an open main carabineer!
ATTENTION! Do not take off if you find any damage on your equipment!
Launch Technique
The T-Ride is very easy to launch. With a very weak or zero wind it requires an
appropriate launch technique. Before take-off, recheck the cano py, trimmer setting, wind
direction and the air space around you. When you are ready to take off, hold all A-risers
and the brake handles in each hand. If there is wind pres ent then just hold the central
A risers in each hand.
The A-lines are identified by red coloured sleeves on the risers. Before take-off, plac e
the trike in the centre of the glider while holding th e A risers. Plac e the B, C and D li nes
on hooks of propeller frame. Continue holding the A risers with arms outstretched
behind you. Pull up the canopy with good forward momentum done by trikes trust. (T he
stronger the head wind the fewer trust you need to inflate your canopy). Do not pu ll too
much on the A’s.
Once the canopy is inflated up to the angle of about 80° degre es, open up the throttle to
full power. When you approach take off speed gently appl y the brakes (max 30% of the
brake range). The faster the trimmer setting is, the more brake i nput is r equired for tak eoff. Set the trimmers to neutral for easy launching. Once you have safely taken off
continue heading into the wind.
Golden rule! For any aircraft the most important thing on take-off is proper amount of
speed. High angles of attack and low speeds are more likely to cause a stall.
ATTENTION! You should always be able to land safely in case of engine failure.

16
FLYING THE T-RIDE
Wind Trim settings Launching technique & additional settings
under 1 (m/s) Released for 2-3 cm
from neutral position.
Forward launch
- start with lines under tension
- try to minimize use of the brakes.
- use of full thrust when canopy at 80°
1 - 3 (m/s)
Neutral
Forward launch
- start with lines under tension
- try to minimize use of the brakes.
- use of full thrust when canopy at 80°
over 3 (m/s)
Neutral or closed for
1-2 cm
Forward launch
- start with lines under tension
- try to minimize use of the brakes.
- use of full thrust when canopy at 80°
Flight
After take-off and applying full power the glider will be at a hig her angle of attack. Some
paramotoring configurations may have a tende ncy to roll under full power. The torque
and gyro moments produced from different engines can lift yo u to one si de develo ping a
back and forth swinging motion. This happens more often on powerful engines with
bigger propellers flying with l ower wing loadings. The safest way to dea l with this is to
throttle back and release the brakes. Do not let go of the brakes.
Always fly with sufficient clearance from the terrain.
With power off the T-Ride best glide rate is with open brakes. Flying the T-Ride with
minimal altitude loss can be reached by lightly applying brakes and having the
D-trimmers closed (pulled all the way in).
In turbulent air fly with brakes lightly applied (10-15 cm) to maintain some internal
pressure and trimmers set to neutral. This will help avoid c anopy c ollapse. If the canopy
pendulums forward correct this by promptly applying the brakes. A pendulum
movement of the canopy backwards is corrected by easing up on the br akes to let the
canopy move forward.
When you have become fully confident i n your wing try experimenting with slower and
faster trim-settings. The more time you spend on your T-Ride the more likely you will
enjoy the extra speed and security it will offer you.

17
FLYING THE T-RIDE
Different trimmer settings
NOTE: Adjusting trimmers in flight requires more pilot attention.
With the trimmers fully open (trimmer buckle over and passed the white line) the wing’s
speed increases (good for flying l ong distances). The canopy becomes stiffer and is less
sensitive to turbulence and its stability improves. On faster trimmer settings the brake
pressure increases and the handling changes.
Some pilots may have a tendency to keep t he brakes slightly applied at all times. Such
a technique is not advisable for paramotoring gliders. When you strongly apply the
brakes while fully accelerated the wing could collapse because it loses its semi-reflex
characteristic.
On the slower settings (trimmer buckle pulled below the white li ne), sink rate improves
and handling becomes lighter, giving you an improved climb rate for thermaling and
shorter and slower take-offs and landings.
Note!! If trims are not adjusted the sa me, the wing will turn. T rimmer setting is an
important part of the checklist before every flight!
Accelerated flight
Do not use the fast trimmer settings in very turbulent conditions, close to the ground or
near other airspace users. Always fly with sufficient clearance from the
ground/obstacles and always keep the brake handles i n your hands!
Steering - turns:
The T-Ride is a very respons ive paramotoring glider and r eacts directly and instantly to
any steering input.
Attention! In the event that you lose your brakes lines, it is possible to control the TRide with the D-risers to steer and land the canopy.
Attention! Pulling brake too fast or too hard can result in the canopy entering a
negative spin.

18
FLYING THE T-RIDE
Approach and Landing:
It is important to start to prepare for landing at an adequate altitude to avoid surprises.
This leaves you enough time to observe and appropriately deal with wind direction and
any other aircraft in your vicinity.
The T-Ride is very easy to land thanks to the new Mac Flap Braking System. The final
leg of the landing approach m ust be into the wind. There are t wo methods in landing a
paramotor. One without power (this minimises the risk of propeller damage in the event
of a fall) and the second with power.
Power off landing
When deciding to land your paraglider check the wind direction and your height. The
next step is to power off your engine at about 30m. Glide toward your landing like a
paraglider with trimmers set in the neutral setting with your b rakes rel eas ed . During your
final glide just before touch down, you need to decelerate the glider by pulling your
brakes converting your excess speed into lift before trike wheels touch the ground.
Proper timing and how fast to pull your brakes depends on con ditions. A general rule is
to pull down on your brakes when trike wheels are approximately 0,2-0,3 m over the
ground. If too much brake is pulled too early, the glider may climb gaining height
resulting in a sudden drop to the ground. St rong wind landings require correspondi ngly
less brake. Every pilot should pr actice landings without power because one day your
engine will fail (run out of gas etc.) and this skill could be useful.
Power on landing
Fly towards your desired landing area at a shallo w angle. Start to flare the wing before
touch down to loose speed then switch off your engine immediatel y after touchdo wn. In
no wind conditions, be prepared to turn the trike after touchdown when its ride
decreases and pull the brake of the tur n direction. The canopy still has kinetic energy
but with this turn with trike and propper use of brake you avoid t hat the canopy crash
down onto the leading edge or get tangles into the prop eller.
The advantage of the power on landing is t hat if you get it wrong you can power up t o
launch and try again. The danger is the canopy falling over with the engine running and
getting your lines caught in the propeller. Make sure you switch off the engine before the
wing deflates on top of you.
Attention! The final glide on approach during the landing should be straight and not
done with any steep or alternating turns. This can result in dangerous pendulum
movements too close to the ground.

19
FLYING THE T-RIDE
Attention! Do not allow the canopy to come crashing down onto the leadi ng edge. This
can destroy the internal structure of your glider and affects the life of the ribs at the
leading edge.
Special Notes:
If possible, get familiar with the landing field before the approach.
Check the wind direction before landing.
Landing with power off requires much more space.
Practice makes the master. Practice until you feel totally safe.
TOWING, JUMPS FROM AIRCRAFT, AEROBA TICS
WARNING!! The T-Ride is not suitable for towing.
WARNING!! The T-Ride is not suitable for jumps from aircraft.
WARNING!! The T-Ride is not designed to be used for aerobatics.
Alternative (emergency) steering:
If for some reason it becomes impossible to control the T -Ride with the brake lines, the
D-risers may be used to steer and land the canopy safely.
Attention: When using the D-risers the brake range is much shorter (15-25 cm) then
with the brakes. It is also possible to control the direction of the flight by pulling on a
stabilizer line or by weight-shifting.

20
GOLDEN RULES
Always carry out full pre-flight checks before launching.
Never place your paramotor downwind of the glider.
Check that there is no fuel leakage. Do you have enough fuel for the flight? It is
always better to have too much than too little in case of an emergency landing.
Check for any loose articles th at could trail or fall into the propeller while fl ying and
fasten them securely.
If you spot a problem, no matter how small, land and fix it at once.
Always put on and secure your helmet before getting into the harness.
Do not fly over water, between trees or power lines and other places where engine
failure will leave you helpless and i n danger.
After lan ding, control the wing facing the direction of flight to keep the li nes out of
the propeller. Turn to face your glider t o avoid fall ing backwards in high winds onc e
the engine is turned off.
Keep in your mind the turb ulence caused by other powered gliders, heav y trikes or
other aeroplanes.
Keep in mind the tur bulence cause d by you r own paramotor, especia lly when flyi ng
sharp turns, spiralling or flying low.
It is unwise to fly hands-off the brakes below 100m because of possible engine
malfunction requiring immediate attention.
Unless it is absolute ly necessary (e.g. collision avo idance), do not make tight turns
against the torque moments. During steep climbs you easil y can enter a stall under
power and increase your chances to induce a negative spin.
Never trust your engine! It can stop at any moment. Always fl y being prepared for
this especially at low altitudes by looking for safe landing areas.
Avoid low flying downwind. It drastically reduces your option s for safe landings.
Listen for change in engine performance or noise. A new engine tone or a new
vibration may indicate trouble. Do not wait for the problem to grow. Land and chec k
it out.
Be certain of your navigation
Not everyone is a friend of your paramotor noise. Keep within the rules and the
laws. Care must be taken when flying near livestock and animals.

21
CARE AND MAINTENANCE
Looking after your canopy correctly will prolong the life of your paramotoring glider a nd
enjoyment.
Deterioration: a few tips!
The canopy is mainly made of NYLON cloth which like any synthetic material,
deteriorates through excessive exposure to UV. Hence, it is recommended that you
reduce UV exposure to a minimum by keeping the paramotoring glider packed
away when not in use. Even when packed in the bag do not leave it in the sun.
Keep the canop y and lines as clean as possible. Dirt may penetrate into the fibre
and damage the lines or the cloth.
Ensure that the lines are not folded tightly. It's extremely important to avoid any
sharp bending of the lines, especially the main lines. Pay careful attention to the
lines to avoid damaging them. Any over stretching of lines apart from the strain
imposed during normal flight should be avoided as ov er stretching is irreversible.
Be careful not to allow snow, sand or stones to enter inside the canopy's cells. The
weight can change the angle of attack or even stall the glider. Additionally, the
sharp edges of foreign material can destroy the cloth!
Check line lengths after tree or water landings. They can stretch or shrink lines.
Never drag the wing over rough ground! This will damage the cloth on the wear
points. When preparing the wing on a take-off with rough ground, don' t pul l the wing
over it (i.e. by pulling the brakes). Try your best to pack the wing on soft ground.
Uncontrolled strong wind take-offs or landings can r esult in the leading edge of the
canopy hitting the ground at a high speed which may cause rips in the profile and
damage the rib material.
Clea n your glider with fresh water after contact with salt water. Salt water crystals
can reduce line strength even after rinsing in fresh water. Replace lines immediately
after contact with salt water.
Check canopy fabric after water landings with water currents. Waves can place
uneven forces and cause cloth to distort in specific areas. Always remove gliders
from the water by holding only the trailing edge.
Prevent lines from catching on an ything as they could be stretched. Do not step on
the lines. Although the lines were tested with a bending test the y can be da maged if
stepped on while on a hard surface or if they come into contact with sharp objects.
Don’t always fold the canopy symmetrically to the centre cell. This can cause
constant stress on the same centre cell over time.
Clean your paramotoring glider with only water and a soft sponge. Avoid water
hoses, pressure washers and mashing machines. It is best cleaned by hand.
Do not us e any chemic als or spirits for clean ing as these can perma nently damage
the cloth.

22
CARE AND MAINTENANCE
Storage:
Store the paramotoring glider in a dry space at ambient temperature away from
chemicals and UV light.
Never pack or store the glider wet. This shortens the life of the cloth. Always dry
glider thoroughly before any packing or storage.
Avoid subjecting your wing to high temperatures (e.g. the luggage space of a
parked car in the sun)! Take into consideration some materials of your
paramotoring glider are temperature sensitive.
Watch out for bugs. Insects such as grass-hoppers and ants will simply eat their
way out if rolled up with the wing. Grazing cattle can literally lick the coatings off the
fabric and mice love to make homes in canopies! Hang up your wing in its bag off
the ground during long term storage.
When sending your wing in the mail take extra care packag ing it.
Repairs and checks:
Tears in the canopy must be professionally sewn. Adhesive patches are only
adequate for very minor damage. Contact your d ealer or MAC PARA directly if you
are unsure.
Repairs should only be carried out by the manufacturer, distributor or authorized
workshops. Only original spare parts may be used!
The line geometry must be checked after every 50 hours flying time or whenever
the flight behaviour changes.
Any changes to the canopy lines or risers, except those approved by the
manufacturer, will void the certificate of airworthiness and warranty.
The T-Ride must be checked, after two years or after 100 flying hours by the
manufacturer or authorized workshops.
Disposal:
The synthetic materials used in a paramotoring glider need professional disposal.
Please send disused canopies back to MAC PARA for proper dismantle and
disposal.
In Conclusion:
The T-Ride is a modern paramotoring glider. You will enjoy many safe years of flying
with your T-Ride if you look after it correctly and adopt a mature and responsible
approach to the demands and dangers flying can pos e.
It must be clearly understood that all air spor ts are potentially dangerous and that you r
safety is ultimately dependent upon you. We strong ly urge you to fl y safe. T his includes
your choice of flying conditions as well as sa fety margins d uring flying ma noeuvres. We
recommend once more that you only fly with a certified harness, reserv e parac hute, and
helmet.

23
CARE AND MAINTENANCE
For some countries the certification placard must be present on the glider. Every pilot
should be suitably qualified, have a valid license and carry 3rd party insurance.
The T-Ride is delivered with a stuff-sack, Velcro compression strap, MAC PARA
backpack, repair kit and user manual.
What to do if you break a line
Breaking a line or multiple lines on your glider is unfortun ate but can be fixed. Most of
the time lines can be easily replaced with your glider being restored back to factory
settings within a short time. Depending on the e xtent of the damage, the line repair ca n
be done by you or a qualified professional MAC PARA approved facil ity. Consult your
closest MAC PARA dealer or MAC PARA directly with the type of line you may need.
Identifying which line you require to replac e the broken line can be found by laying out
your glider outside, looking at where the damage line is and referencing the line plan
guide near the end of this manual. The better you kno w what you need and how many,
the faster you will get help with the correct a dvice. Not all lines ar e made from the sam e
material or are the same thicknesses.
Damage to the Canopy
Paramotoring involves fast moving parts like a spinning propeller and hot engines.
Sometimes those parts come in contact with your glider an d can quickly cause damage
to your glider. Do not fly your glider that has sustained any damage. Any damage to
your glider needs to be professionally repaired before your next flight.
ATTENTION: Do not risk your life by flying a damaged glider.
If the rip, tear or damage is small and you ha ve consult ed with your deal er first, then the
repair may be performed by yourself with proper adhesive repair cloth. To avoid
confusion, it is recommended to send detailed pictures to your Mac Para dea ler or Mac
Para directly. Do not attempt to repair or fix the glider yourself without the pro per advic e
from a qualified professional. Failure to do so will void your warranty and put you at risk.
Warranty
MAC PARA guarantees free of charge repairs caused by the material or production
faults according to the following scheme:
For powered flying the MAC PARA warranty covers 24 months (2 years) or 200 flight
hours (whichever comes first).
Warranty does not cover:
canopy colour fading
damage caused by chemicals or salt water
damage caused by incorrect use
damage caused by emergency situations
damage resulting from accidents (airborne or not)

24
CARE AND MAINTENANCE
Warranty is only valid if:
Every flight is correctly registered in a logbook of the wing.
Conditions and temperatures of each flight are registered in the logbook
The paraglider is handled in accordance with this operating manual.
The purchaser has not carried out any modifications or repairs by him/herself
(excluding small minor repairs with self-adhesive patches)
The paraglider has been inspected according to prescribed timetable described
above.
If you have bought your paraglider second-hand, ask the previous o wner for a copy of
his/her logbook that lists total flying hours since th e date of first purchase and details of
any safety inspections.
RESPECT NATURE
Practise your sport with respect for nature, wildlife and neighbours. Not ever yone is a
friend of your paramotor noise. Follow the rules and the la ws in the country you fly in.
Extra care must be taken when flying near livestock and animals.
T-RIDE LINE PLAN
Line descriptions:
The following printed line plans show the line configurations and line lengths.
Line strengths in colours

25
LINE PLAN T-RIDE – SCHEME

26
T-RIDE RISER LENGTHS
The lengths are measured from main attachment point to the lower edge of rapid links.
Riser lengths – T-Ride
A A1 B C D
Trims in neutral position 460 460 460 460 460
Trims closed ( slower ) 460 460 460 435 410
Trims open ( faster ) 460 460 460 485 510
Accelerated + trims in neutral 425 425 460 460 460
Accelerated + trims open * 425 425 460 485 510
* Read more on the page 8
Brakeline system
1) serial brake line with
pulley system
2) single brake line
Brakeline lenght
2,50 m 1,25 m
FULL LINE LENGTHS
Full line lengths T-Ride-39
All lengths are measured from riser`s main attachment point up to the tissu e of
canopy on attachment points. Brake lines are measured from the Swivel on brake
handle up to the trailing edge.
CenterABCDEBrakes Brakes
1 8290 8194 8287 8428 8553
9789 8938
2 8231 8132 8227 8363 8487
9373 9001
3 8236 8135 8234 8372 8495
9221 9120
4 8265 8172 8256 8400 8500
9003
5 8238 8154 8236 8376 8472
8944
6 8235 8152 8235 8367 8466
8803
7 8282 8204 8273 8410 8505
8664
8 8212 8140 8263 8309 8386
8556
9 8141 8086 8147 8231 8302
8546
10 8056 8000 8039 8127 8193
8495
11 8013 7958 7938 8048 8107
8414
12 7831 7769 7882 7935 8011
8361
13 7614 7607 7778 7816 7901
8357
14
7524 8371
15
7426 7421 7437 7475 7549 8345
16
8291
17
8300
18
8316
19
8359

27
GUIDELINES FOR PARAMOTORING GLIDER CHECKS
Check-intervals
All paramotoring gliders used in flight must be checked at least every 24 months. For
paramotoring gliders used by paramotoring schoo ls the period is 12 months.
Personnel authorised to carry out checks
A valid flying license and training course by National associations are the basis for
permission to carry out paramotoring glider checks.
Identification of glider
An identity sticker with details of certification and serial number is attached to your
glider.
Components of the check
Porosity
The porosity of your gl ider sh ould b e c hecke d with a p orosit y meter (JD C). Compare th e
results with the producer's manual.
Porosity measures should be taken on at least three point s of both the top and bottom
surface. The first point should be placed 20-30 cm from leading edge in the middle of
canopy. Second and third points are placed left and right from first measure point at
25% of the span. One additional measurem ent should be made on the top surface of
the wing tip.
The identified time should be higher tha n 30 seconds (JDC). In the event of the result
being less than 30 seconds, the result of the check is a fail.
Overall strength check
The top and bottom canopy strength check should be made with a Bettsometer
(B.M.A.A approved Patent No. GB 2270768 Clive Betts Sales), a small hole with a
needle at the A-line attachment points. The exact verification should be made in
accordance with the Bettsometer user manual. Consult your local paraglider insp ection
facility.
Line strength check
Line strengths should be as specified in accordance with the certification requirements.
One main line should be taken from each array and have its strength checked with a
tension-meter.
Required strengths should be higher than:
A + B main lines x measur ed value > 8 x maximum take-off weight and higher
than 1600 kg for the A + B arrays.
C + D mean lines x measured value > 6 x maximum take-o ff weight and hi gher tha n
800 kg for the A + B arrays.

28
Replacements for damaged lines must be with ne w original lines. Lin e lengt hs are taken
from the lines data page.
GUIDELINES FOR PARAMOTORING GLIDER CHECKS
Line length measurement
Lines should be separated and each line measured under a tension of 5 kg.
Measurement is made from the line carab ineer to the canopy according to the method
of certification. Rib numbering begins in the middle of canopy and leads to the wing tip.
Measured lengths of the lines should be documented in the inspection record and
compared with certified full line lengths protocol. Lengths should not differ by more than
20 mm. The opposite side of the paraglider should be checked for symmetry.
Canopy line-attachment points check
Attachment points should be checked for damage and stretching. Defects, loops and
flares should be repaired.
Canopy fabric check
Ribs, diagonal ribs, top and bottom surface should be checked. Any damage to sewing
or tears to the fabric could influence flying characteristics and must be repaired.
Lines
All lines should be checked for tears, breaks, and any dam age to the sheath or signs of
wear. Special attention should be paid to the sewing of the line loops. Damag ed lines
must be replaced.
The results should be documented in the inspection record.
Connector check
All line carabineers, trims (if used), speed systems and pull eys should be inspected for
visible damage. Open or improperly secured connectors should be secured in
accordance with the producers recommendations.
Risers
Both risers should be checked for tears, signs of wear or any damage and measured
with a pull of 5 daN strength. Measured dat a should be documented in the inspection
record. The difference must not be higher than 5 mm when compared to specified
lengths.
Final check
The glider sticker and check sticker must be inspected f or readability and correctness.
The check must be documented with date, signature and stamp on the canopy and in
the user manual.

29

30

31
–
TEST FLIGHT CERTIFICATE
Paramotoring glider type: T-Ride – 39
Serial number: . . . . . . . .
Test flown on: _________________________________
by
MAC PARA TECHNOLOGY
Confirmation by dealer: _________________________________
TECHNICAL SPECIFICATION
Category Intermediate MPG
T-Ride
Size 39
Zoom flat [%] 125
Area flat
[m
2
]
38,88
Area projected
[m
2
]
34,09
Span flat [m] 14,21
Aspect ratio flat - 5,20
Root cord [m] 3,21
Cells [kg] 58
Weight [kg] 8,30
Weight range - PPG,MPG * [kg] 200-400
Min.speed [km/h] 25-27
Max. speed [km/h] 41-43
Top speed (accelerator) [km/h] 60-63
Glide ratio - 8,9
Min. Sink rate [m/s] 1,05
Certificate -
* powered pilot equipped = weight naked + trike + all accessoriescca

32
 Loading...