

Page 1
1
Page 2

2
Contents
GENERAL................................................................................................................... 3
OVERALL PLAN ......................................................................................................... 4
TECHNICAL DESCRIPTION ...................................................................................... 5
MATERIALS................................................................................................................ 8
TECHNICAL SPECIFICATIONS ................................................................................. 9
HARNESS................................................................................................................... 9
CHECK ON A NEW PARAGLIDER .......................................................................... 10
ADJUSTING BRAKE LINES ..................................................................................... 10
FLYING THE MUSE 4 .............................................................................................. 11
TOWING ................................................................................................................... 15
MOTORISED FLIGHT............................................................................................... 15
EXTREME FLYING MANOEUVRES ........................................................................ 15
RAPID DESCENTS................................................................................................... 19
LOOKING AFTER YOUR PARAGLIDER.................................................................. 21
FULL LINE LENGTHS .............................................................................................. 23
LINE PLANS ............................................................................................................. 24
LINE PLAN MUSE 4 ................................................................................................ 25
LENGTH OF LINE MUSE 4 ..................................................................................... 26
MANUAL FOR PARAGLIDER CHECKS................................................................... 28
TREATING NATURE WITH RESPECT .................................................................... 30
CHECKS ................................................................................................................... 30
TEST FLIGHT CERTIFICATE................................................................................... 31
TECHNICAL DATA ................................................................................................... 31
MAC PARA COMMUNITY
MAC PARA
Newsletter
Facebook
Twitter
YouTube
Vimeo
Pinterest
Download
www.macpara.com/community
Page 3

3
GENERAL
Dear MAC PARA pilot
We congratulate you on your purchase of a MACPARA glider. Extensive development
work and numerous tests make the Muse 4 a high performance paraglider with
maximum possible safety. The Muse 4 is constructed for thermal and cross-country
flying, and will enable pilots to get maximum enjoyment. The Muse 4 offers very easy
inflation and simple ground-handling characteristics by take off, excellent handling in
flight and easy landing. Please read this manual carefully before you start, this way you
will get the most out of your glider. MAC PARA wish you many enjoyable flights with
your New Muse 4.
Please read this manual carefully and note following details:
Paragliding is a sport, which demands, besides the optimum equipment, a high degree
of attentiveness, good judgment, and theoretical knowledge. Paragliding can be a
dangerous sport, which may lead to injury and death. This paraglider meets at the time
of delivery requirements of the European Norm EN-926-2 and LTF (German Certificate
of Airworthiness). Any alternations to the paraglider will render its certification invalid!
The use of this paraglider is solely at the user’s own risk! Manufacturer and distributor
do not accept any liability. Pilots are responsible for their own safety and their paraglider
airworthiness. The paraglider carries no warranty! The author assumes that the pilot is
in possession of a valid paragliding license for glider’s category, insurance etc.
Before delivery, as well as during production, each paraglider goes through a strict
visual inspection, and is test-flown by your dealer. Stamps on the placard, together with
a completed test-flight certificate, confirm this. Check that the paraglider has been testflown before your first take-off. If it has not, consult your dealer.
Any inadequate use or misuse increases the risks considerably. The Muse 4 must not
be used outside the certified weight range. The Muse 4 must not be used during rain or
snow-fall. The Muse 4 must not be used in high or gusty winds. The Muse 4 must not
be used in cloud and fog. The Muse 4 must not be used by pilots without sufficient
knowledge or experience.
If, after carefully reading this handbook, you still have questions, suggestions or
criticism regarding this product do not hesitate to contact your dealer or us. We will be
glad to help and advice.
MAC PARA wish you nice – flights with your Muse 4.
Version 1.0 Stand 20.10.2014
Page 4
4
(&(
Operating limits
The Muse 4 is light sport aircraft with an empty weight of less than 120 kg in the
category paraglider. The Muse 4 has been tested by DHV certification laboratory to ENA category. The Muse 4 is certified for solo flight. The Muse 4 has been load and shocktested and passed with a load corresponding to 8G of the maximum weight in flight 135
kg. Its flying tests have shown that the glider remains stable and controllable over a
wide range of normal and abnormal flight conditions. Nevertheless, turbulence and
gusting winds can lead to a partial or complete collapse of the canopy. Therefore never
fly in such conditions.
Any changes made to this paraglider invalidate the certificate of airworthiness.
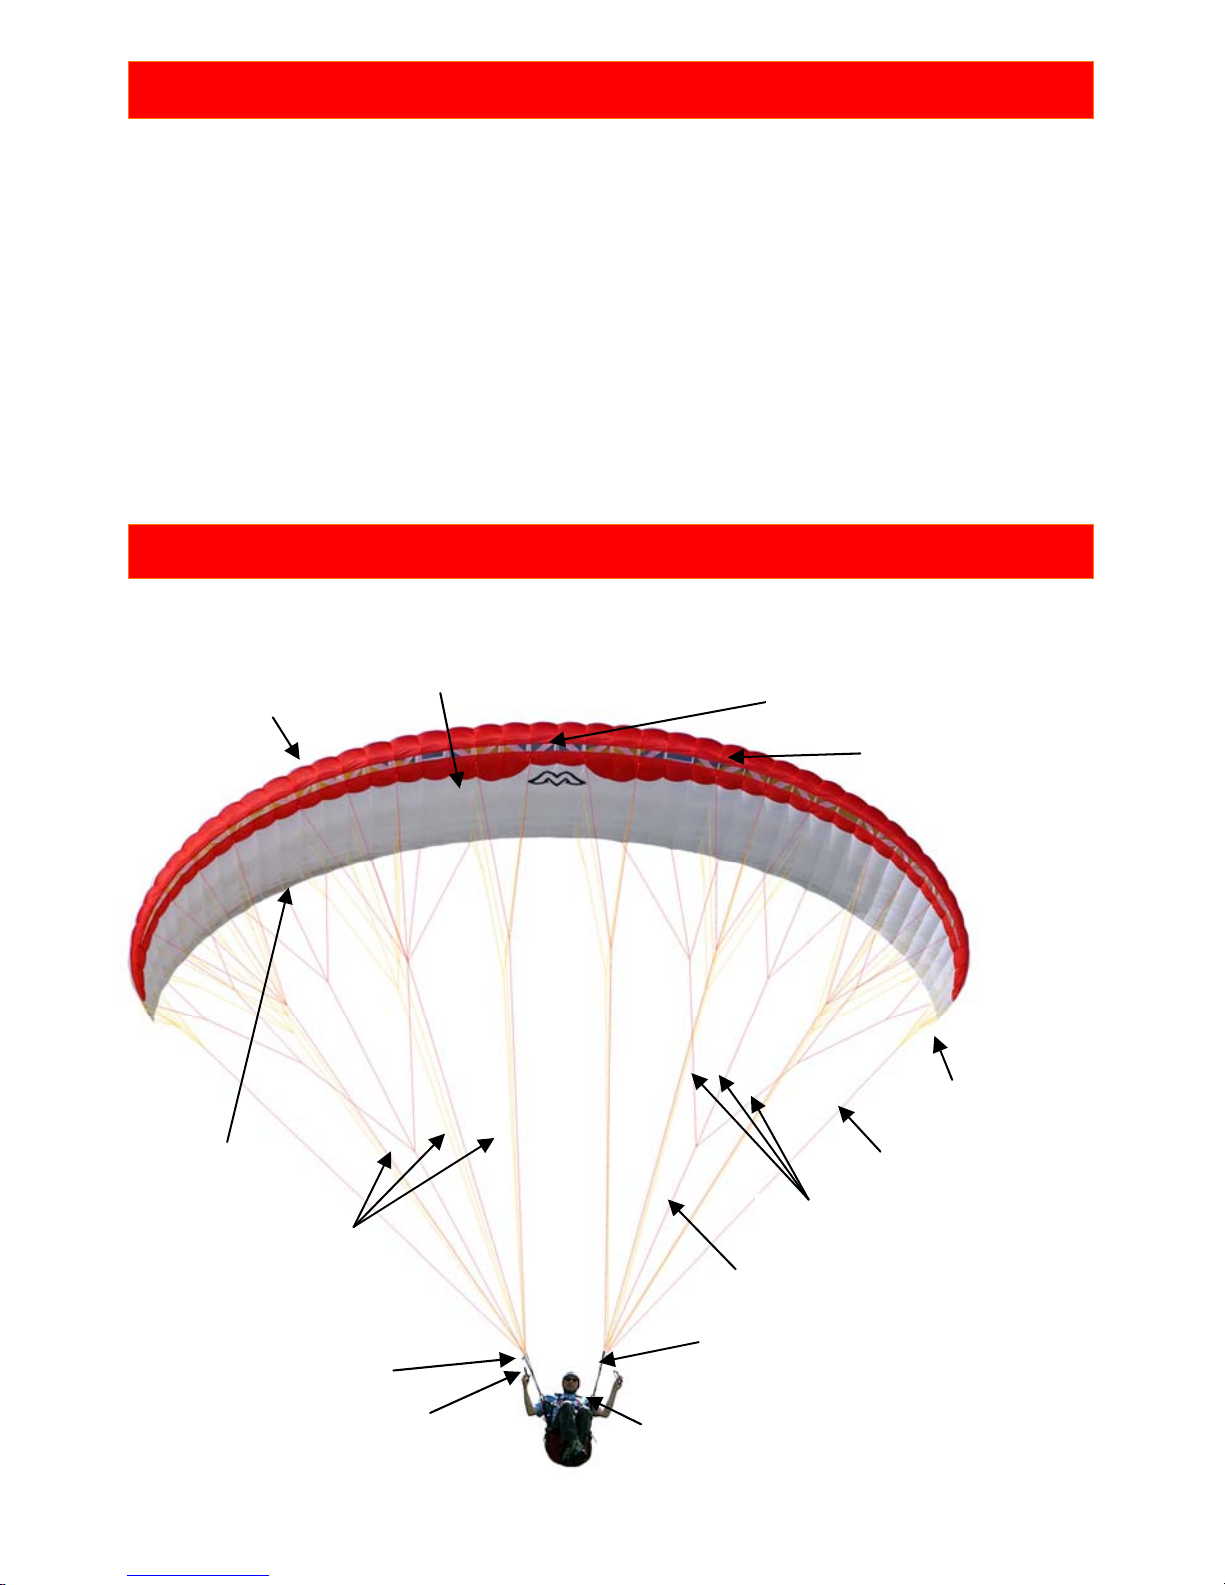
OVERALL PLAN
Trailing edge
Leading edge
Brake handle
Main karabineer
Rapid links
Main lines
Riser
Main brake line
Brake line
Stabilizer line
Top surface
Bottom surface
Glider’s label on the
central main rib
Stabilizer
Page 5
5
TECHNICAL DESCRIPTION
Construction of the canopy:
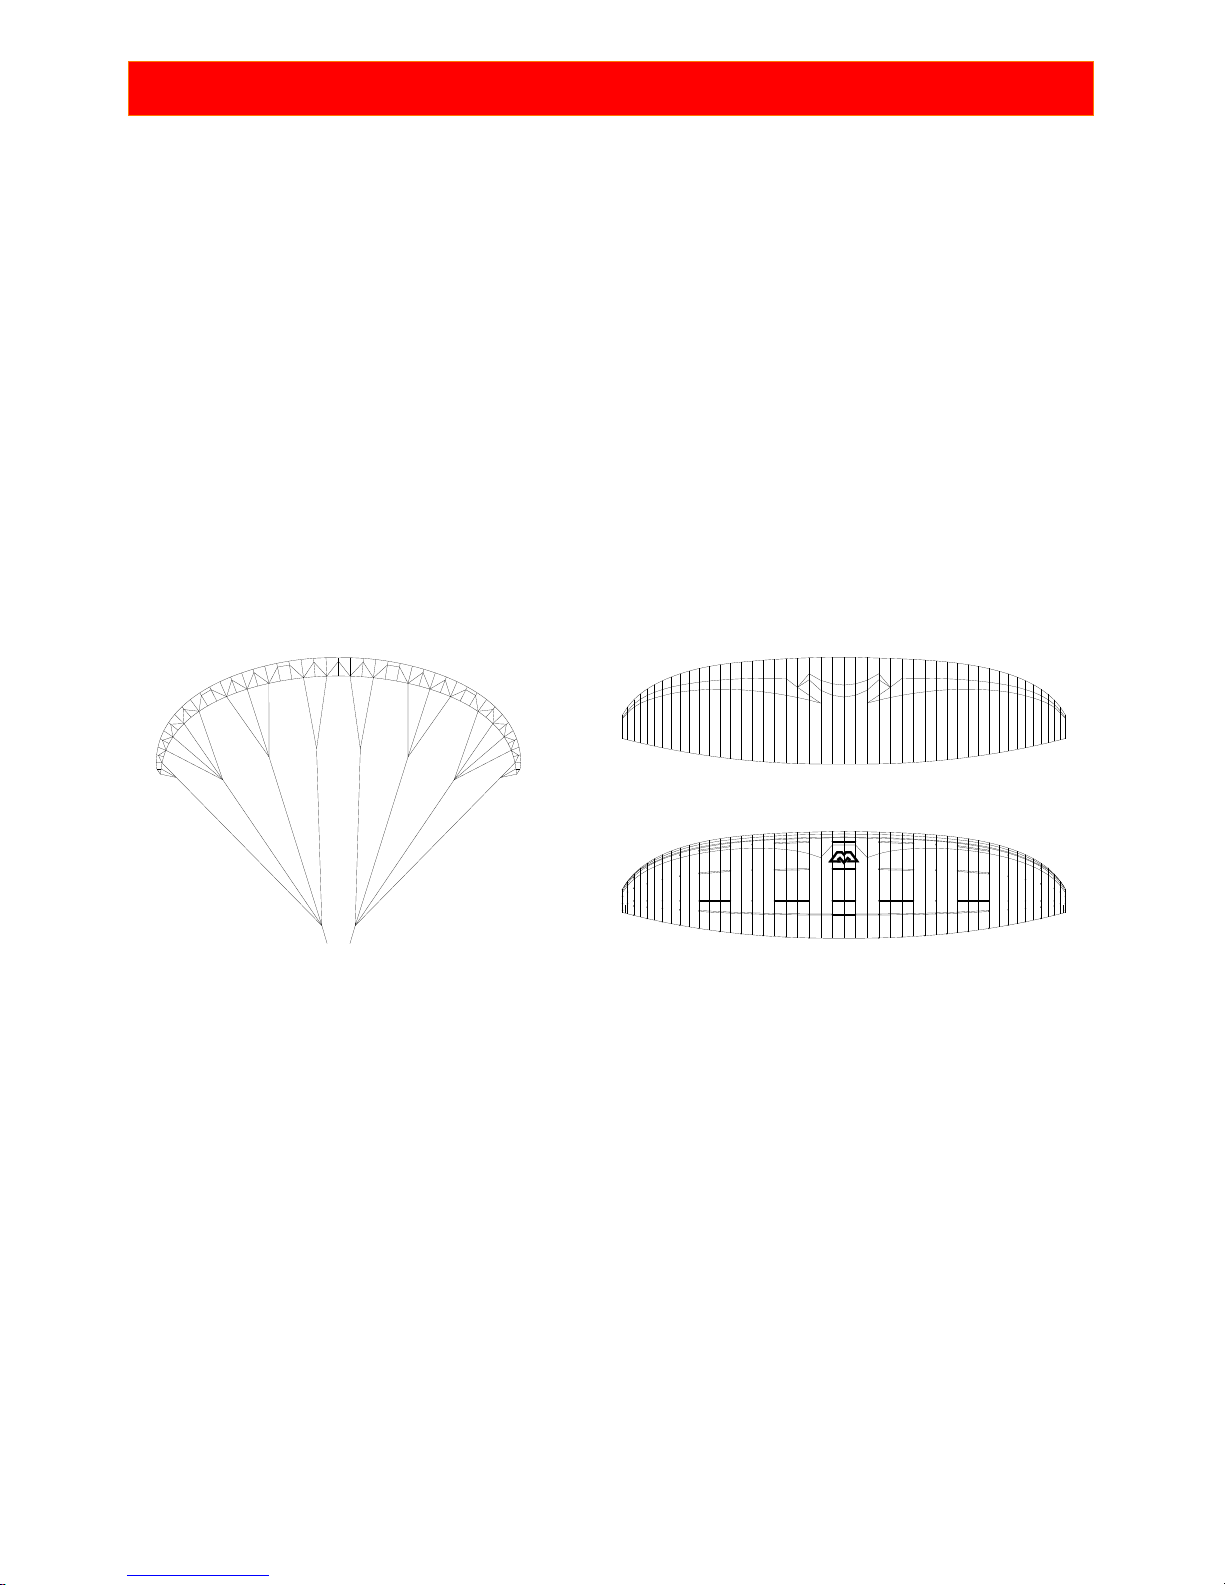
The canopy of the MUSE 4 consists of 46 cells over the wingspan. The wingtips are
slightly pulled down and this produces a kind of stabilizer. The Muse 4 is combination of
two and three rib diagonal-construction paraglider. Every main rib is attached to the 4
suspension lines. Between these main suspension ribs, intermediate ribs are
suspended by “bridge” diagonal ribs system. These diagonal ribs lead to 80% of height
of ribs. This construction ensures a smooth top surface and precise airfoil reproduction.
The internal reinforcements maintain the precise form of the canopy and provide
stability. The cell openings on the under-surface of the profile’s nose provide airflow into
the glider. Stretch resistant flares, integrated with diagonal ribs at the suspension points,
ensure an even distribution of load throughout the canopy. A stretch resistant Mylarreinforcements combined with plastic rods on the leading edge help to keep airfoils in
right shape and this guarantees a high level of stability. Large cross spots allow
effective airflow inside the canopy, providing good re-inflation without reducing the
profile accuracy. The Muse 4 is made of the proven Nylon fabrics Porcher Sport Skytex
Rip-stop 9017 E25A and 9017 E29A. Like any synthetic material, this can deteriorate
through excessive exposure to UV.
Rigging system:
The lines of the Muse 4 are made of proven strong and stretch resistant covered
Aramid/Kevlar lines. The entire rigging system comprises individual suspension lines
looped and stitched at each end. The sheathed Aramid/Kevlar lines have strengths from
60 kg up to 240 kg.
The suspension lines are comprised of “cascaded top lines” (attached to the undersurface),”cascaded middle lines” (cascade 2 to 2 top lines together on middle main
lines), and “main lines”. Main lines lead to the “quick link” (a Maillon which connects
lines and risers). The “stabilizer lines” connect the upper stabilizer lines on the outer
suspension points with the quick link. The „brake lines” are not load carrying suspension
lines. They lead from the trailing edge of the canopy to the main brake lines and run
through the pulleys on the C-risers to the brake handles.
Page 6

6
(&(
A mark on the main brake line indicates the position of the brake handle. This
adjustment, on the one hand, allows sufficient brake to be applied during extreme flying
situations and when landing, while on the other hand, this ensures that brakes are not
permanently applied to the canopy (especially when fully accelerated). This trimming
should not be altered. For differentiation purposes the main A-lines are colored red, the
main brake lines are orange, all remaining main lines are yellow. Also the main
suspension loop, on the bottom of the riser, is covered red. This is where the main
karabiner should be hooked in, which then in turn connects the risers to the harness.
The Muse 4 is equipped with 4 risers per side (A, A1, B, C). The two central A-lines per
side are attached to the main A-risers while outermost A main lines are attached to
A1 risers. The 3 B-main lines and the stabilizer lines are attached to the B-riser.
The 3 C-main lines to the C-riser. The main brake lines leads through the pulleys on the
C riser.
The line connections are made to triangular Maillons (quick links) fitted with a rubber ”oring” in the form of a ”figure eight” which prevents any slipping of the lines on the quick
link. See line plan for details.
Speed system:
The Muse 4 is equipped with a stirrup operated speed-system, which returns
automatically to normal position when the stirrup is released. The serial risers of the
Muse 4 do not have a lockable trimmer.
The speed system affects the A-, A1- and B- risers and changes the angle of attack. In
normal flight all risers have an overall length of 49,5 cm without quick links. When the
stirrup is pushed out all A-risers are shortened by up to a maximum of 14 cm,
the B-risers by up to a max. of 9 cm, the C-risers retain their original length. These
measurements influence the certification! An incorrectly fitted speed system causes
loss of certification!
Fitting the speed-system:
Most modern harnesses have pulleys attached for speed system fitting. In case not, it is
important to attach pulleys (sewn on tabs) in such a way that they allows the pilot to
maximize the power vector of his / her legs without ”pushing back” in the harness.
The Muse 4 speed system, including Brummel-hooks supplied, must be assembled as
per instructions. The speed system cord is firmly attached (use bowline or other nonslip
knot) to the foot stirrup (webbing or alloy bar). The other end of the cord is run through a
pulley on the harness and then in an upward direction to be then firmly attached to the
Brummel-hooks! The length of the cord leading to the stirrup should be adjusted so that
it is easy to put your feet into the stirrup in flight but still short enough to allow full speed
system travel. (Use of 2 stirrups in a ladder fashion can enable you to reach the full
range if your legs are not long enough.) Ensure both cords on the stirrup are of equal
length, to avoid putting a turn in the glider.
Page 7
7
(&(
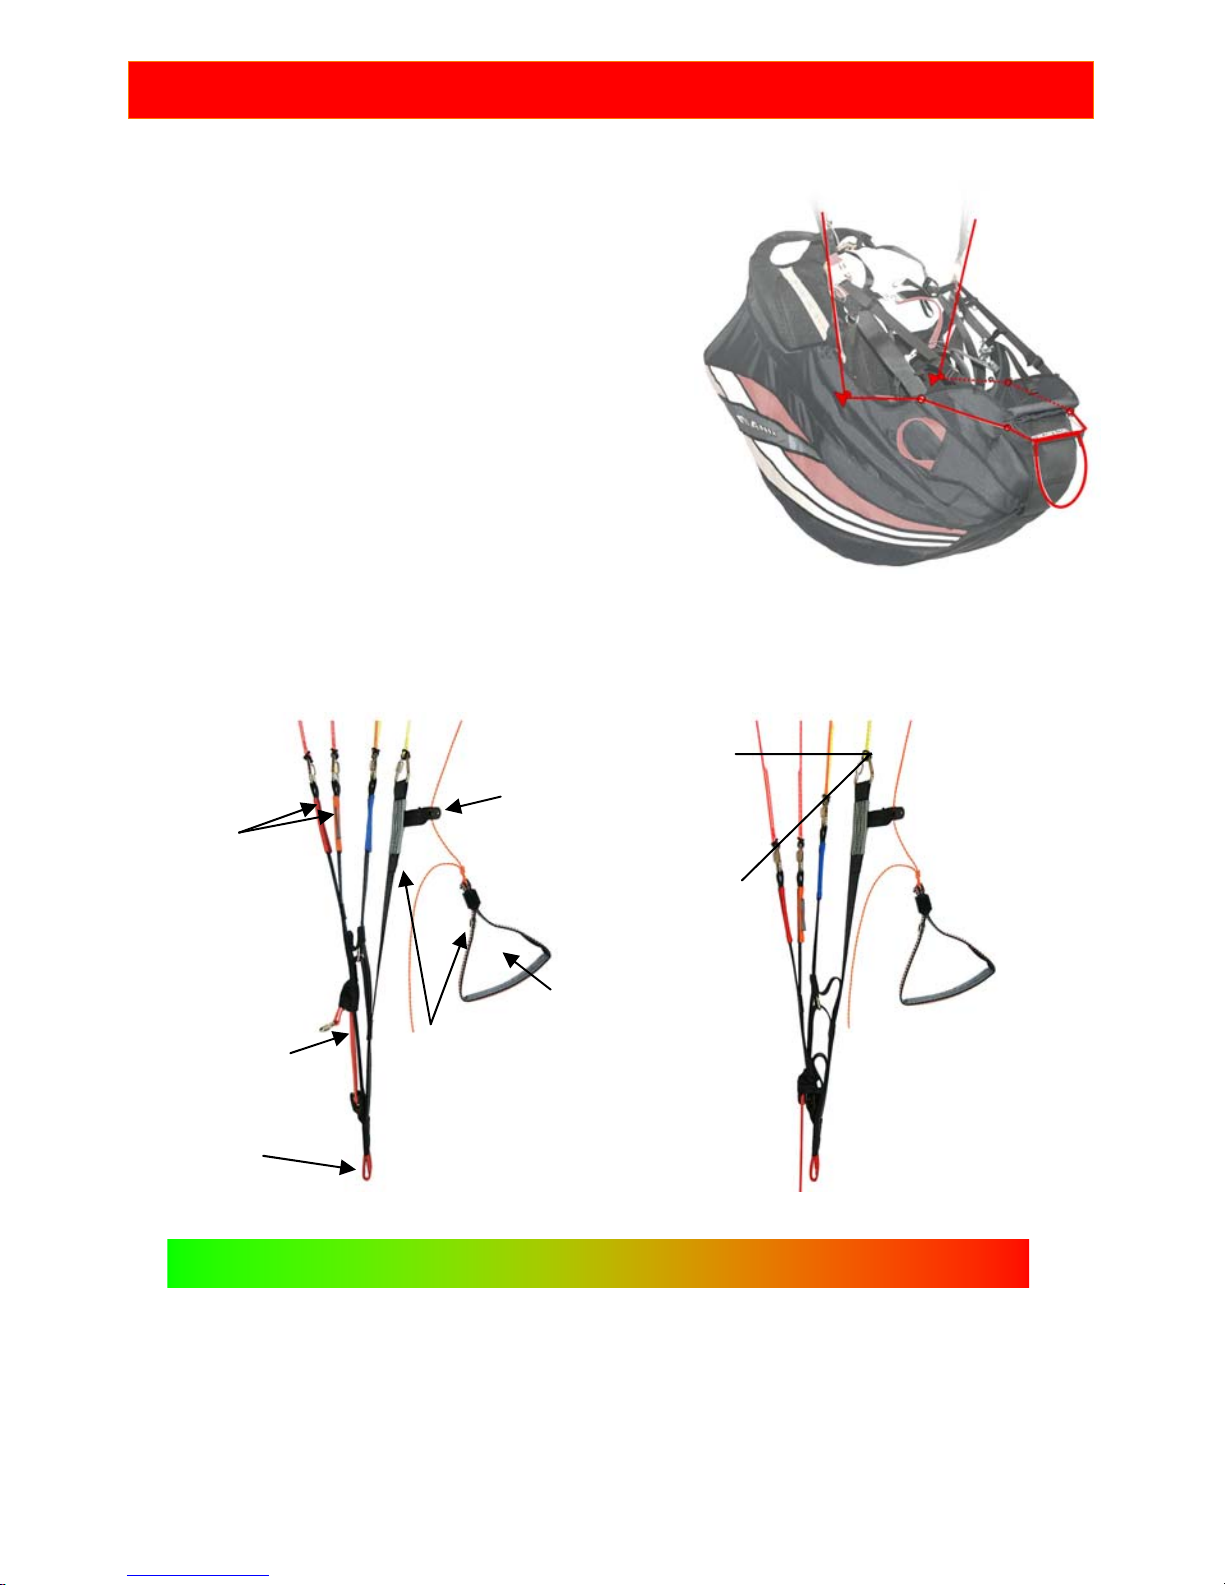
Test your speed system for the correct length of
cord on the ground first (simulating flying
position), with your harness and risers, before
flying with it! The full range is reached when the 2
pulleys join together.
Before launch, attach the paraglider’s risers to
the harness with the main karabiners. Then
attach the ”Brummel-hook” on the end of each
speed system cord to the Brummel hook on the
end of the cord which runs through the 2 pulleys
on the A risers. Ensure that the speed system is
untangled and operates freely before flying!
Riser
A A1 B C Br A A1 B C Br
Color
marking
Loop for main
karabineer
Trimm postition
Accelerated
Brake handle
Change of the
an
g
le of attack
Brakeline
pulley
Press buttons
Slower
A
ccelerator
Faster
Page 8

8
MATERIALS
Tissue
(PORCHER SPORT, Rue du Ruisseau B.P. 710,38290 ST. QUENTIN FALLAVIER, FRANCE)
Top Sail - Leading Edge - SKYTEX 38 E25A - 100% nylon 6.6 , 33 Dtex, 38 g/m
2
Top Sail - Trailing Edge - SKYTEX 38 E25A - 100% nylon 6.6 , 33 Dtex, 38 g/m
2
Bottom Sail - SKYTEX 38 E25A - 100% nylon 6.6 , 33 Dtex, 38 g/m
2
Main ribs, Diagonals - SKYTEX 40 E29A - 100% nylon 6.6 , 33 Dtex, 40 g/m
2
Ribs - SKYTEX 38 E25A - 100% nylon 6.6 , 33 Dtex, 38 g/m
2
Reinforcement main ribs - W382 Polyester 180 g/m2
Reinforcement Ribs - W382 Polyester 180 g/m
2
Lines
(EDELMAN+RIDDER+CO. Achener Weg 66, D-88316 ISNY IM ALLGEAU, GERMANY)
Upper lines - Aramid/Polyester A-6843-060, Breaking Load 60 kg
Upper lines - Aramid/Polyester A-6843-080, Breaking Load 80 kg
Main lines C1, C2, C3 - Aramid/Polyester A-7343-230, Breaking Load 230 kg
Main lines A1, A2, A3, B1, B2, B3 - Aramid/Polyester A-6843-240, Breaking Load 240 kg
Wing tip line - Aramid/Polyester A-6843-080, Breaking Load 80 kg
Brake lines - Dynema/Polyester A-7850-080, Breaking Load 80 kg,
A-7850-100, Breaking Load 100 kg
Main brake line - Dynema/Polyester A-7850-240, Breaking Load 240 kg
Attachment straps
(STUHA a.s., DOBRUSKA, Opočenská 442, 518 01 Dobruška CZECH REPUBLIC)
STAP-POLYESTERBRIDLE 13 mm, Breaking Load 70 kg
Risers
(MOUKA TISNOV, Korab 133, 66601 Tišnov, CZECH REPUBLIC)
Polyester 366040025, 25 mm Bruchlast 800 kg
Thread
(AMANN SPONIT ltd, Dobronická 635, 148 25 PRAHA 4, CZECH REPUBLIC)
Lines-Serafil 60, Canopy-Serafil 60, Riser-SYNTON 20
Rapid links
(ELAIR SERVIS, Axmanova 3913/9,767 01 KROMERIZ, CZECH REPUBLIC)
NIRO TRIANGLE 200 - Max. Load 200 kg
Rigifoils
(MERKUR SLOVAKIA s.r.o.,Kamenné pole 4554/6,031 01 Liptovský Mikuláš, SLOVAKIA)
Rigifoils - Kopolyamid 1,6 mm, 2,0 mm, 2,7 mm
Page 9
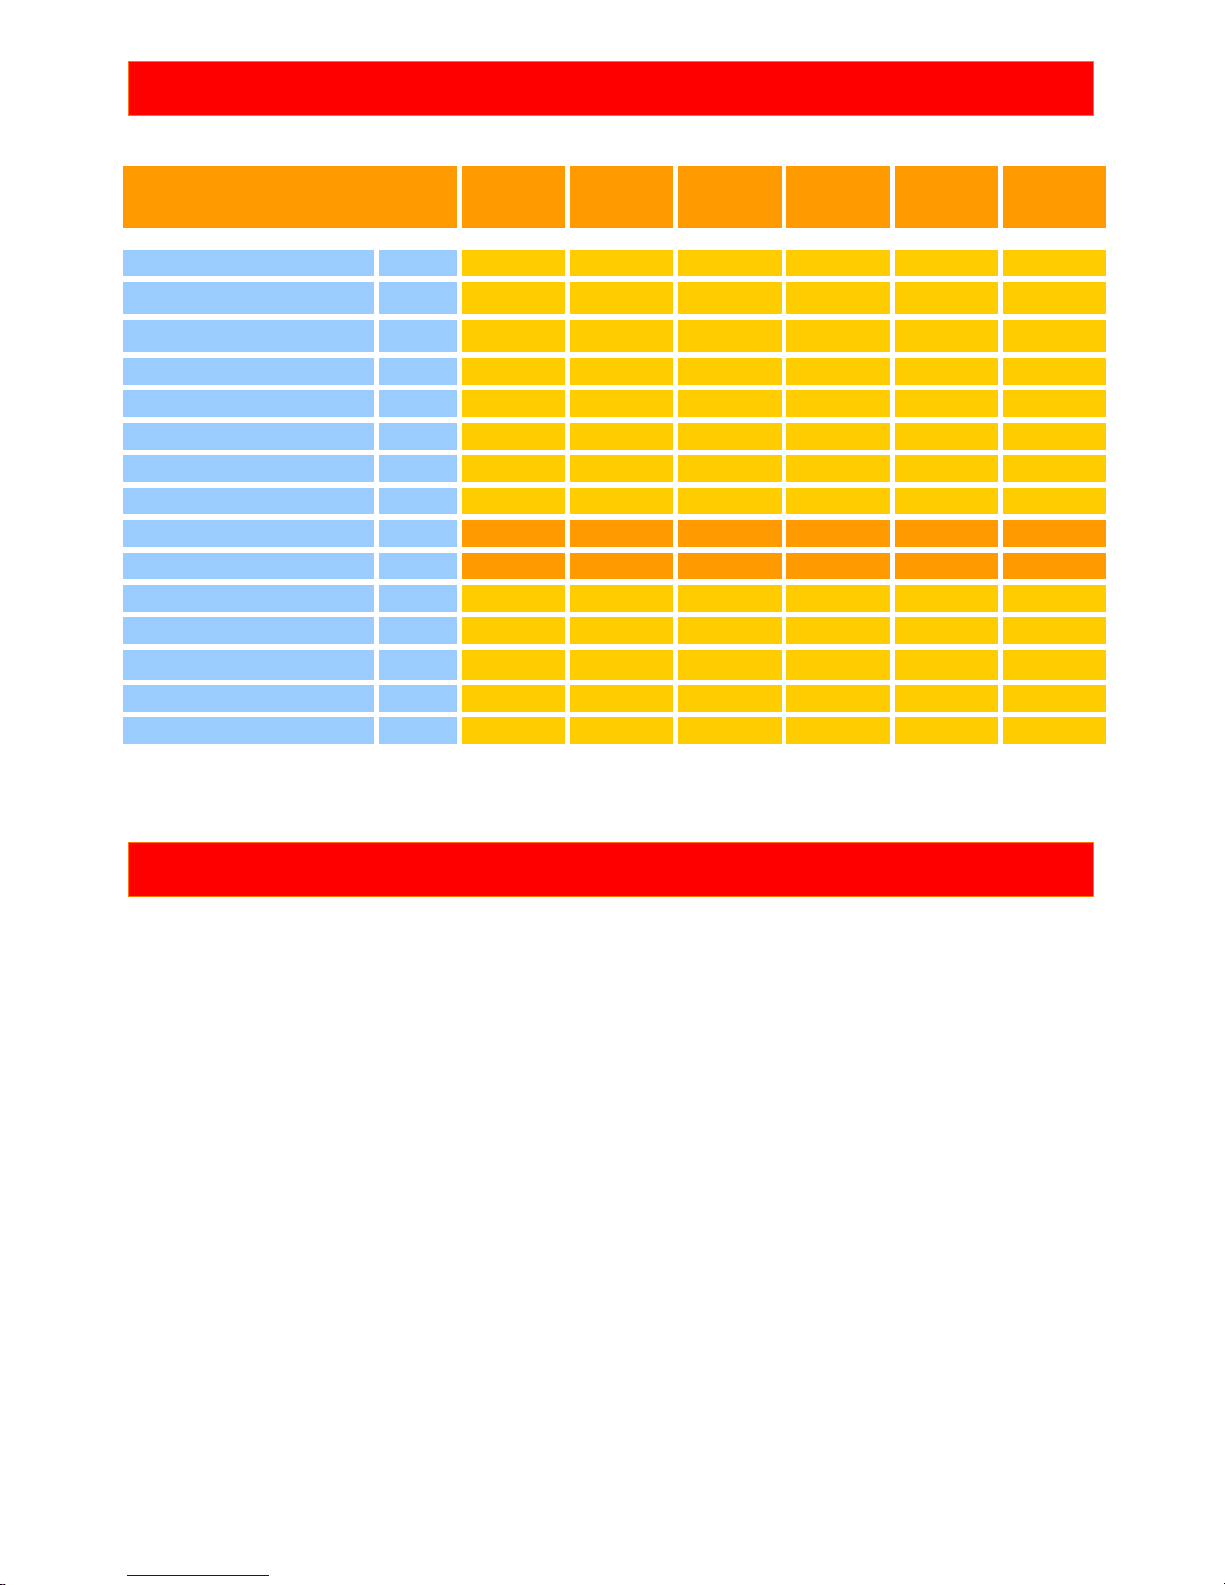
9
Intermed iate E N-A
Muse
4
Muse
4
Muse
4
Muse
4
Muse
4
Muse
4
Size
22 (XS)
24 (S) 26 (M) 28 (L) 30 (XL)
34 (XXL)
Zoom flat [%] 88 92,6 96,5 100 104 111
Area flat
[m
2
]
21,68 24,01 26,07 28,00 30,28 34,5
Area projected
[m
2
]
18,94 20,97 22,78 24,46 26,46 30,14
Span flat [m] 10,58 11,13 11,60 12,02 12,5 13,34
Aspect ratio flat -5,165,165,165,165,165,16
Root cord [m]2,482,612,722,822,933,13
Cells - 46 46 46 46 46 46
Weight [kg] 4,7 4,9 5,1 5,3 5,5 5,9
Weight range* [kg]
60-75 67-85 75-95 85-110 105-135 115-150
Weight range* [lbs] 132-165 148-187 165-209 187-243 231-298 254-331
Min.speed [km/h] 23-25 23-25 23-25 23-25 23-25 23-25
Max.speed [km/h] 36-38 36-38 36-38 36-38 36-38 36-38
Top speed (accelerator) [km/h] 44-46 45-47 45-47 45-47 45-47 45-47
Glide ratio - 9,0 9,0 9,0 9,0 9,0 9,0
M in . S in k r at e [m/s] 1 ,05 1,05 1,05 1,05 1,05 1,05
TECHNICAL SPECIFICATIONS
* pilot equipped = weight naked + cca. 20 Kg (44 lbs)
HARNESS
The Muse 4 is certified with GH type certified ABS harnesses. Nearly all harnesses
available on the market are „GH“ type. These harnesses have the distance between the
seat plate and carabineers 42-47 cm depending on the size of the harness. Please note:
the hang point position changes the position of the brakes relative to the pilot’s body.
The distance between carabineers (adjustable on chest strap) is 42 cm for the glider
sizes S and M, 44 cm for the glider size L, 46 cm for the glider sizes XL and XXL.
Differences of more than 5 cm change the basic characteristics of the glider and are
potentially dangerous.
Nearly all on the market ABS harnesses are "GH" harnesses and suitable for the Muse
4. These “GH“ harnesses are different to “GX“ harnesses, which have a lower
attachment point for the main karabiners and effective cross bracing. The Muse 4 was
not tested with harnesses with an effective cross bracing system.
MAC PARA recommends very comfortable Manix harness for your flights.
Page 10
10
CHECK ON A NEW PARAGLIDER
Before delivery, as well as during production, each paraglider goes through a strict
visual inspection. Additionally we recommend that you to check your new glider in
accordance with the following points. We recommend that you make this check after
flying extreme maneuvers or after tree landings or similar.
Inspection of the canopy for tears or damage, especially the seams which join the ribs
to the upper and lower surfaces, but also the area of the attachment tapes and brakeline connections.
Inspection of the lines for damage to the stitches. The line lengths must be checked
after 50 hours flying time and whenever the flight behavior of the glider changes.
Inspection of attachment tapes for damage to the stitches. It is also important to
check the attachment tapes and brake-lines for tangles.
Inspection of the risers for faultless condition. Rapid links must be secured.
With even slight damage the glider loses its airworthiness!
ADJUSTING BRAKE LINES
The brake lines lead from the trailing edge of the canopy to the main brake lines which
then run through pulleys on the C-risers to the brake handles. A mark on the main brake
line indicates the position of the brake handle. .
The glider is delivered with a standard set-up and its speed can reach 38 - 40 km/h
depending on the weight of the pilot. The brake-lines should always be adjusted so that
the first brake-lines just come under tension when the brake handles have been pulled
5-10 cm. The test results relate to this brake-line adjustment. This adjustment, on the
one hand, allows sufficient brake to be applied during extreme flying situations and
when landing, while on the other hand, it ensures that the canopy is not permanently
braked (especially when fully accelerated). This trim should not be altered. In extreme
situations any other settings may lead to the glider reacting differently to versions which
have been tested. .
NOTE!! If in doubt about the brake-line adjustment, it is preferable to leave them too
long, as any necessary shortening can easily be achieved by wrapping them round your
hand.
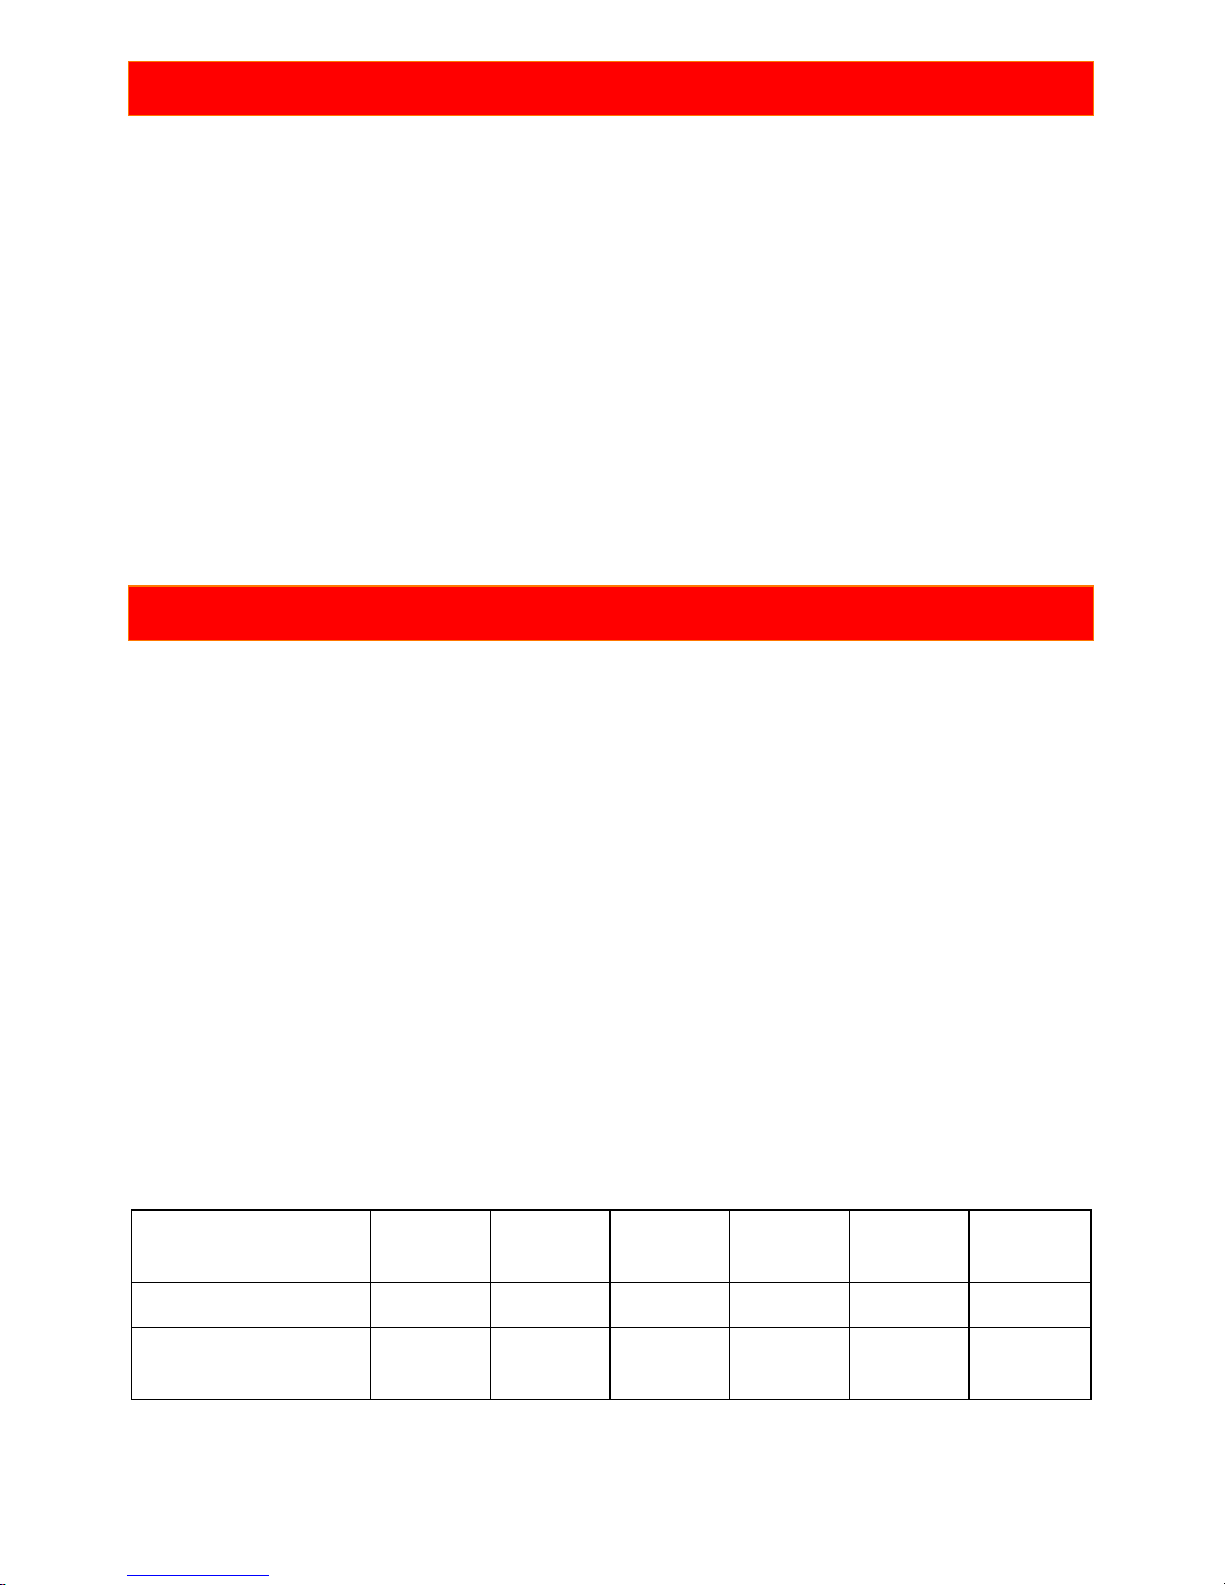
The length of the control lines measured from the first cascade line and the available
brake travel before stalling the wing depends on the size and loading. See below.
Muse 4
22
Muse 4
24
Muse 4
26
Muse 4
28
Muse 4
30
Muse 4
34
Brake line length 285 cm 300 cm 310 cm 325 cm 340 cm 360 cm
Brake range by
max. weight cca.
65 cm 70 cm 75 cm 80 cm 85 cm 85 cm
Page 11

11
FLYING THE MUSE 4
The following information must not under any circumstances be taken as a
manual for practicing paragliding. We would like to advise you of the Muse 4 ‘s
features and important information for your flying and security.
Preparing for take off:
As for any aircraft a thorough pre-flight check must be made prior to each flight on the
Muse 4! Before every launch check lines, risers and canopy for damage! Do not launch
with even the slightest damage!
Also check the maillons connecting the lines and the risers. They have to be closed
tight. Put on the harness with maximum care and check the handle of the safety system
and that all the flaps of the outer container are fastened securely and correctly. The
main karabiner must also be checked carefully. Replace it if any damage is visible, or
generally after 300 flying hours. Finally connect the risers to your harness with the main
karabiners.
Check carefully that they are properly closed. Attention! Never fly with an open main
karabiner! Do not take off if you find any damage on your equipment!
Having unpacked and laid out the paraglider in a slight horseshoe pattern the following
checks must be made:
Checklist:
Preparing the wing:
canopy without any damage
risers without damage
maillons (quick links) closed tight
stitching of the main lines near the risers is o.k.
all main lines run free from the riser to the canopy, brake lines are free
Putting on the harness:
rescue handle and deployment pins secure
buckles (leg- ,front riser) closed
main karabiners
Before take off:
speed-system mounted and connected properly
risers not twisted
brake handle in hands, brake lines free
pilot‘s position relative to the wing (centred: all lines same tension)
wind direction
obstacles on the ground
free airspace
Page 12

12
(&(
When laying out the glider, the wind direction should be observed. The canopy should
be deployed into the wind so both halves of it are loaded symmetrically. The paraglider
should be arranged in a semicircle against the wind. This ensures that the A-lines in the
centre section of the canopy will tension before the ones at the wing tips. Thus the
canopy inflates evenly and an easy launch in the desired direction is guaranteed.
All lines and risers should be carefully untangled and arranged in a way that they do not
catch on anything. It is equally important to untangle the brake lines so that they are
clear and can not catch on any thing during launch. The brake lines should run freely
through the pulleys to the trailing edge of the canopy.
Make sure the risers are not twisted; this can prevent the brake lines from running freely
through their pulleys. It is often impossible to untangle lines during flight.
It is important that no lines are looped around the canopy. Also called a “line-over”, this
may have disastrous consequences during take off. Finally connect the risers with your
harness by using the main karabiners. Check carefully that they are closed properly.
Launch
The Muse 4 is very easy to launch. This is possible in almost all wind conditions except
strong headwinds. Before take off recheck the canopy, the direction of the wind and the
air space around you! When the pilot is ready to take off he/she holds all A-risers and
the brake handles in each hand. To facilitate differentiation between the risers, the Alines, including the sleeves on the A-risers, are colored red. Before take-off, place
yourself centrally at the gliders axis. Let the B- and C-risers fall into the crook of your
arm and hold the A risers with arms outstretched behind you. Pull up the canopy
dynamically using the A-risers. (The stronger the headwind the less run-up you need to
pull the canopy up). After the initial effort of inflation, keep applying forward pressure on
the A-risers (pushing them forward, not pulling down) until the pressure on the A risers
eases. The canopy should now be directly over the pilot’s head. As soon as the glider is
above you, stop pulling on the A-risers. A good progressive run ensures your Muse 4
will inflate and come up equally and quickly. Should the canopy surge forward, control it
by braking gently. Now do a visual check upwards, to ensure the canopy is completely
open (otherwise, abort the take-off). Only then is the final decision to continue the
launch taken! If anything is not completely safe the launch should be aborted!
Now accelerate continuously until you lift off. It is easier to take-off in a light headwind if
after reaching minimum flying speed you apply the brakes slightly. After the take-off,
gently release the brakes again.
The paraglider should be braked gently to stabilize the glider and possibly correct for
drift. Moving the pilot’s body to the center of the glider is the best method of correction, if
there is sufficient room.
WARNING!! Do not use the forward launch in very strong winds. Make sure you don't
pull the risers too much towards yourself or downwards as this can result in a frontal
collapse, or in an asymmetric take-off.
Page 13

13
(&(
The Muse 4 is easy to reverse launch. When doing a reverse launch or when launching
in strong winds the paraglider can possibly surge forward more quickly or lift off sooner
than desired. To avoid this, walk uphill following the canopy during inflation. As this
launch technique can be difficult and turning the wrong way can result in the pilot taking
off with twisted risers. It is recommended to practice the reverse launch on a training hill
or slight slope first. When deflating the canopy in strong winds, or aborting a launch, use
the C- risers, not the brakes. Using the brakes in strong wind will cause more lift, lifting
the pilot up and dragging him/her much further back.
If you let the brake handles go out of your hands during take-off, take care that the
brake line is not twisted around the brake pulley!
Flight
The glider is delivered with a standard set-up and its speed can reach 38 - 40 km/h
depending on the weight of the pilot. Always fly with sufficient clearance from the terrain.
The Muse 4 glides best with open brakes, descends best with lightly applied brakes.
In turbulence fly with brakes lightly applied (10-15 cm) to avoid canopy collapse.
If the canopy pendulums forward, this should be corrected by prompt braking.
A pendulum movement of the canopy backwards is corrected by loosening the brakes in
good time.
In a calm air the Muse 4 can reach its minimum speed (depending on the wing loading)
by application of 70 cm up to 75 cm of the brake range.
Accelerated Flight:
When flying with the speed system applied the angle of attack is lower and the canopy
can collapse more easily than in normal (trim) flight. The faster the canopy is flown the
more dynamic the collapses and stalls will be and the more skill will be required for
quick recoveries. Therefore do not use speed system in turbulent conditions, close to
the ground or near other airspace users. Always fly with sufficient clearance from the
terrain and always keep the brake handles in your hands!
To use the speed system, simply place your feet on the stirrup and push forward in a
horizontal plane. If a loss of back pressure of the stirrup on your legs is noticed, this is a
warning that the canopy is probably about to collapse. Release the stirrup and thus the
speed system immediately. With this feeling you may actually prevent most collapses
from happening while using the speed system. If a collapse should still occur, release
the speed system immediately and correct the collapse as described below.
Attention: Do not apply brakes when fully accelerated! Braking increases lift near the
trailing edge. The main lift point moves backwards. Due to this the wing can loose
stability for a short time!
Page 14

14
(&(
Steering - turns:
The Muse 4 is a very responsive paraglider and reacts directly and instantly to any
steering input. Weight shift input quickens turns and ensures minimal height loss. Any
weight shift has a greater effect the more loosely the chest-strap is fastened.
A combined technique of weight shift and pulling on the inside brake line is the most
efficient turning method, whereby the radius of the turn is determined by the amount of
inside brake pulled and weight shift. A stalling wing tip announces itself by a gentle
surge backwards of the wingtip. If this occurs you will need to release the brakes
immediately.
In case it is impossible to control the Muse 4 with the brake lines the C-risers may be
used to steer and land the canopy. Attention! Pulling brake too fast or too hard can
result in the canopy entering a negative spin.
Active Flying (Thermaling and Soaring):
In turbulent conditions the glider should be flown actively with brakes lightly applied to
avoid canopy collapse. This improves stability by increasing the angle of attack of the
canopy. The canopy should not rock back or surge forward much but should remain
above the pilot. In turbulent flight, if the canopy pendulums forward, this should be
corrected by prompt braking. A pendulum movement of the canopy backwards is
corrected by releasing the brakes in good time. This is part of basic active flying.
Approach and Landing:
To avoid excessively demanding situations on the approach to landing, it is important to
initiate the process at an adequate altitude. This leaves you enough time to observe and
appropriately deal with wind direction and any other aircraft in your vicinity.
The Muse 4 is easy to land. The final leg of the landing approach must be into the wind.
During this final glide the paraglider should be decelerated slowly and at approximately
one meter above the ground, according to conditions, the pilot should flare the canopy.
The glider may climb again, gaining height, if too much brake is used too early. Strong
wind landings require correspondingly less brake. Do not apply full brake before the pilot
is safely on the ground. The final glide during the landing approach should be straight
and not marked by steep or alternating turns as these can result in a dangerous
pendulum effect near the ground.
Attention! Do not allow the canopy to fall onto the leading edge with energy. This can
destroy the material and affects the life of the ribs at the leading edge!
Page 15

15
TOWING
The Muse 4 is certified for towing. The Muse 4 has no out of the ordinary towing
characteristics, although a relatively low angle of attack and thus low tow tension should
be maintained during launch and the initial part of the tow. The Muse 4 has no
tendencies towards deep stall/parachuting. Therefore we allow tow- launched flights
with a similar technique to that described above. There is sufficient margin to countersteer the glider in a normal towing situation. Make sure you use proper equipment,
experienced personnel and all relevant safety precautions for towing.
WARNING!! Please always ensure that the brake lines are adjusted to the lengths
recommended here. Setting them shorter could lead to a tendency to stall during towed
flight. Apart from this, there are no special procedures.
MOTORISED FLIGHT
Note!! Although, motorized flight can be a great success due to the gliders very easy
take-off characteristics, stability and good handling, always use a certified combination
of engine - harness and glider. If in doubt check with your federation. Contact the
manufacturer or importer for the current legality of motorized flight.
WARNING!! The Muse 4 is not suitable for jumps from aircraft.
WARNING!! The Muse 4 is not designed to be used for aerobatics.
EXTREME FLYING MANOEUVRES
This section describes flying conditions which can be deliberately induced, or which can
develop unintentionally due to turbulence or pilot error. Any pilot who flies through
turbulence is sure to be faced with these special flight conditions at some point. So take
a good look at these flight maneuvers or prepare for them by SIV (safety training over
water). Mastering these flying conditions significantly improves your active flight safety.
Sufficient height, as well as carrying a reserve parachute, is imperative.
WARNING!! All the critical flight conditions described here require a thorough
knowledge; otherwise carrying them out may be very dangerous. Sufficient height above
the ground is imperative. Bear in mind that all deformations of the canopy can increase
the sink rate by 2 - 10 m/sec, depending on the degree of deformation. Carrying out
these maneuvers wrongly may lead to a crash.
Remember this is a glider with unspectacular reactions to disturbances in the air.
Whenever in doubt, raise the brakes and let the glider fly. The glider has a high internal
pressure, resistance to tucking and very high degree of passive safety. It is
recommended that at this stage you already practice an active flying style. The key to
active piloting is keeping the glider above your head at all times. We recommend in
principle that you hold the brake handle in your hand whenever possible, or fly with your
hands through the brake handles, to allow you to react immediately to any possible
disturbances.
Page 16

16
(&(
WARNING!! If you fly with your hands through the brake handles, you may lose valuable
time in activating the rescue system.
Asymmetric collapse:
A negative angle of attack can cause all or a part of the leading-edge of the Muse 4 to
collapse (e.g. in turbulent air). Basically the Muse 4 will re-open spontaneously from
closures of up to 70% with a change of direction of up to 90°. The time this takes, and
the associated height loss, can however be noticeably reduced by appropriate action by
the pilot. Apply opposite brake on the inflated side, the outside of the curve, to stop the
turning movement of the canopy. This should be accompanied by appropriate weightshift. If you react immediately, 30% brake on the open side should suffice to hold the
canopy on a straight course. In the event of a big collapse, this braking should be
applied very carefully to avoid stalling the remaining inflated wing. The pilot’s correction
for direction can be aided by a pumping out the deflation; a slow, long pumping action of
the brake of the deflated side of the wing helps the canopy to re-inflate. If the glider
does not self recover and the pilot does not correct the canopy can enter a stable spiral
dive!
WARNING!! The Muse 4 is a paraglider with special airfoils and with more backwards
positioned A suspension points. These airfoils and position of A suspension points give
more inherent stability and offers more resistance against collapses. It wasn’t necessary
to feature the Muse 4 with special folding lines to perform the maneuver.
But nevertheless the accelerated asymmetric collap se must be performed correctly in
a proper way and this preferably by safety trainings.
It is important to take the outermost A1-riser together with A-main riser firmly in one
hand. At the beginning of pulling the move (in the direction of pilot’s body) must be slow
and after the move of cca 5 cm, it can only be strongly pulled down. In case the A1-riser
is not properly held along with the main A-riser, it may happen that the wing tip opens
faster. The opening is then distinctive with the risk of a cravat.
“Cravat” / Line-over:
In the event of some lines becoming tangled during flight (caused by whatever), the
following action is recommended: The pilot stabilizes the glider by gently applying the
brakes. Please be aware that in this condition the brake pressure can be higher and the
brake travel shorter. Without pilot input a line-over will result in a stable spiral dive.
Here are the various options to untangle a line-over:
pumping the collapsed side.
pulling the stabilizer line or lines causing the problem.
should both measures fail, it may be possible to untangle the line-over by inducing the
deep stall or full stall. This maneuver, however, should only be carried out by
advanced pilots with experience in extreme flight situations and with sufficient altitude
available.
Attention! If these maneuvers fail or if in any doubt, the pilot should instantly use their
emergency parachute system!
Page 17

17
(&(
Front Tuck:
A front tuck can be induced by strongly pulling the A-risers or by sudden, heavy
turbulence. The entire leading edge spontaneously collapses. Gentle braking on both
sides will reduce the lateral pendulum motions and simultaneously accelerate reinflation.
The Muse 4 generally self recovers from an initiated front tuck. When having a very
large front tuck, a frontal rosette can happen (the wingtips move forwards: shaping a
horseshoe). Gentle braking can avoid this deformation.
A quick recognition of the situation and a quick reaction by braking on both sides as
long as the collapsed wing is behind the pilot helps the recovery and limits the altitude
loss.
WARNING!! As already described the Muse 4 is a paraglider with special airfoils and
with more backwards positioned A suspension points. These airfoils and position of A
suspension points give more inherent stability and offers more resistance against
collapses. It wasn’t necessary to feature the Muse 4 with special folding lines to perform
the manoeuver. But nevertheless the accelerated symmetric collapse must be
performed correctly in a proper way and this preferably by safety trainings.
It is important to take the two outermost A-lines together (approx 10 cm above the Rapid
gliders) firmly in your hands. Do not use the central A-lines! At the beginning of pulling
the move (in the direction of pilot’s body) must be slow and after the move of cca 5 cm,
it can only be strongly pulled down. By this way the leading edge collapses properly
over its span. In case you use all A risers for this maneuver and you do it without initial
pulling it may happen that the leading edge collapses over all depth in the center of the
wing. The result may be an asymmetric opening and the risk of a big cravat increases!
Parachutal stall (deep stall):
In a parachutal stall the paraglider has no forward momentum combined with a high
descent rate. A parachutal stall can be caused by, among other reasons, a too slow exit
from a B-line stall or severe turbulence. Porous canopies (UV influence) or canopies out
of trim (stretched or shrunken lines) are much more susceptible to a parachutal stall and
therefore should not be flown. These are some of the reasons regular checks should be
carried out on your glider. A wet canopy or temperatures below zero centigrade (0°C)
may also cause a stable parachutal stall. The Muse 4 will usually spontaneously recover
from a parachutal stall within 2-3 seconds. If the canopy remains in a parachutal stall, it
is sufficient to gently push both A risers forward or to push the accelerator.
Attention! If brakes are applied while in a parachutal stall, the glider may suddenly enter
a full stall!
If a parachutal stall occurs on landing approach, the pilot should prepare for a hard
landing and make a parachute roll landing. In close proximity to the ground, due to the
forward surging pendulum effect, a recovery may be more dangerous than a hard
landing in parachutal stall.
Page 18

18
(&(
Full-stall:
To induce a full stall, apply full brake on both sides. The glider slows down steadily until
it stalls completely. The canopy suddenly surges backwards a long way. In spite of this
uncomfortable reaction of the canopy, both brake lines must be consequently held down
with all your strength until the canopy is stabilized (directly overhead). This usually takes
3-6 seconds. The Muse 4 generally flies backwards during a full stall but doesn’t always
form a front rosette. A frontal rosette can be formed by entering the full stall slowly.
When entering (braking) fast, the canopy will not always form the desired front rosette.
Attention! Always apply both brakes evenly!
To recover from a full stall, smoothly release both brakes simultaneously until 90% of
leading edge reopens, then release brakes rapidly. The glider ends the full stall on its
own without surging forward.
WARNING!! If the brakes are released rapidly and asymmetrically, the glider may surge
forward and suffer an extensive asymmetric collapse.The danger of overcorrecting and
overreacting exists during all extreme flight maneuvers. Thus, any corrective action
must be gentle and steady and done with feel!
Spin (or negative spin):
Pulling brake on one side too fast or too hard can result in a negative spin. During a spin
the canopy turns relatively fast around the center section of the canopy while the inner
wing flies backwards (hence the term negative).
There are two usual reasons for an unintentional spin:
One brake line is being pulled down too far and too fast (e.g. when inducing a spiral
dive)
When flying at low speed one side is being braked too hard (e.g. when thermaling).
To recover from an unintentional spin, the pulled down brake line should be immediately
released as soon as a spin is suspected. The canopy will accelerate and return to its
normal straight and stable flying position, without losing too much height. If the spin is
allowed to develop for some time, the glider surges a long way forward on one side and
a dynamic asymmetric collapse or a line-over can occur. Gently apply the brakes to
avoid side or central collapse of the canopy and the possibility of a cravat (one of the
tips becoming entangled in the lines). See part collapses.
WARNING!! If you are LOW and are in an unintentional spin, or if the canopy is caught
in a cravat USE YOUR RESERVE.
Wingover:
To induce a wingover the pilot flies consecutive alternating turns to gradually steepen
the angle of bank. During wingovers with a high bank angle, the outside wing begins to
unload. Further increase of the angle of bank must be avoided, because any possible
resulting collapse may be quite dynamic!
Page 19
19
(&(
WARNING! Full-stall, spin and wingover (over 90 degree angle of bank) are
prohibited aerobatic maneuvers and may not be performed during normal flying.
Incorrect recovery procedures or overreacting of the pilot may have dangerous
consequences! Attention! The Muse 4 is not designed to be used for aerobatics.
Alternative (emergency) steering:
If for some reason it becomes impossible to control the Muse 4 with the brake lines
the C-risers or outermost C lines may be used to steer and land the canopy. Attention!
Of course the range is much shorter (5-10 cm) then with the brakes. It is also possible to
control the direction of the flight by pulling on a stabilizer line or by weight-shifting.
RAPID DESCENTS
Spiral dive:
A spiral dive is the fastest way to lose altitude, however, the very high G-forces make it
difficult to sustain a spiral dive for long and it can place high loads on the pilot and
glider. By tensing ones abdominal muscles and a higher body tension you can to some
extent resist the high G-forces. Don’t forget proper breathing! As soon as any, even
slight, light dizziness or impaired vision is noticed the spiral should be exited
immediately.
The Muse 4 has a very effective spiral dive. This allows rapid descent without stalling.
To enter a spiral dive the pilot should weight-shift on one side while slowly pulling the
brake gradually on the same side as weight-shifting. During a spiral dive the angle of
bank can be controlled by increasing or reducing the amount of inside brake. When
spiral diving the Muse 4 it is recommended that the outside brake is lightly applied. This
helps stabilize the wing and enables an easier and safer exit from the spiral. To exit,
release the inside brake slowly. The Muse 4 did not show a tendency to remain in a
stable spiral by sink rates up tp 10 m/s during testing. At high sink speeds or if the pilot
keeps his weight on the inside, the wing can stay in a continued deep spiral and has to
be actively exited. This is done by weight shifting to the outside and gentler braking of
the outside wing.
WARNING!! Nearly all gliders will have a tendency to stay in the spiral if the sink-rate
exceeds around 15-m/s, depending on weight-shifting, wing loading and G-force.
In fact most gliders need a counter-weight shifting or counter -input to end a turn.
Attention! Due to energy retention, the glider will climb a lot after a deep spiral-dive
release. If you apply inner brake and decelerate the glider for two or three turns, big
pendulum effects can be avoided.
WARNING!! Practice spiraling with caution and lower sink-rates to get a feel for the
gliders behavior. A pilot who is dehydrated or not accustomed to spiraling can lose
consciousness in a steep spiral dive!
Page 20

20
(&(
Big ears:
When in big-ears, the horizontal speed is higher than the sink rate, unlike a spiral dive
or a B-line stall. This rapid descent technique is used to quickly and horizontally exit a
dangerous area in the desired direction. In order to collapse the outside wing, pull the
outside A-lines.
When the pilot holds the outside A1-risers on both sides and pulls them down, the Muse
4 easily tucks the outside wings and enters a stable descent mode. The pilot keeps hold
of the brake handles along with the outside A1-risers in his hands. By braking on one
side and weight-shifting, the canopy remains steerable. In order to increase the sink rate
as well as the horizontal speed, this maneuver should be done together with use of the
speed system. Apply the speed system after big ears are induced (step into the speedbar before you grab the outer A1-risers). Big-ears substantially reduces the risk of
canopy stability problems in turbulent air. To exit this manoeuvre release the A1-risers.
The canopy does self-recover. To quicken the recovery, the pilot can dynamically pull
down and immediately release the brakes of the glider.
WARNING! Never do big-ears in spirals, as this may drastically reduce the number of
lines taking the already high loads, causing structural failure.
Attention! All rapid descent techniques should first be practiced in calm air and with
sufficient height so the pilot can use them in emergency situations! By far the best
technique is to fly correctly and safely, so you never have to descend rapidly!
B-line stalls:
To induce a B-line stall symmetrically pull down slowly on both B-risers, until the canopy
folds (parallel to its long axis). The airflow over the top surface is almost fully detached
and the canopy enters a vertical descent flight mode without forward movement. Further
pulling of the B-risers reduces the surface area more and increases the sink rate. (Up to
8 m/s) Be careful, pulling too far or too rapidly may cause a frontal horseshoe to form.
To exit from this flight mode release the B-risers at first rapidly but then gently (1 sec).
The canopy surges forward re-attaching the airflow over the top surface and resumes
normal flight. When the B-risers are released, the brakes should not be activated.
This will give the canopy the chance to gain speed and resume normal flight. On exit
from a B-line stall on no account just release the B-risers, as this can cause
overloading. If canopy does not recover apply both brakes gently to recover or pull the
A-risers, until the canopy regains forward speed.
Summary:
For all extreme maneuvers and rapid descents please note:
first practice maneuvers with an instructor during safety training!
before inducing any maneuver the pilot must check that there are no other airspace
users below him!
during the maneuver the pilot must have the canopy within his view!
Page 21

21
LOOKING AFTER YOUR PARAGLIDER
Looking after your canopy correctly will prolong the life of your paraglider.
Deterioration: a few tips!
The canopy is mainly made of NYLON, cloth which, like any synthetic material,
deteriorates through excessive exposure to UV. Hence, it is recommended that you
reduce UV exposure to a minimum by keeping the paraglider packed away when not
in use. Even when packed in the bag do not leave it in the sun.
Keep the canopy and lines clean as dirt may penetrate into the fiber and damage the
lines or the cloth.
Ensure that the lines are not folded tightly. It’s extremely important to avoid any sharp
bending of the lines, especially the main lines. Pay careful attention to the lines to
avoid damaging them. Any over stretching of lines apart from the strain imposed
during normal flight, should be avoided as over stretching is irreversible.
Be careful, not to allow snow, sand or stones to enter inside the canopy’s cells: the
weight can change the angle of attack, or even stall the glider; additionally the sharp
edges can destroy the cloth!
Check line lengths after tree or water landings. They can stretch or shrink lines.
Never drag the wing over rough ground! This will damage the cloth on the wear
points. When preparing the wing on a takeoff with rough ground, don’t pull the wing
over it (i.e. by pulling the brakes). Please try to pack the wing on soft ground.
Uncontrolled strong wind takeoffs or landings can result in the leading edge of the
canopy hitting the ground at high speed which may cause rips in the profile and
damage the rib material.
We advise you to fold the glider “accordion wise”, rib to rib. This packing procedure
takes slightly longer and is easier to do with an assistant, but it guarantees the rigidity
of the plastic profile reinforcements. This is very important for the performance of your
glider!
Prevent lines from catching on anything as they may be over stretched. Do not step
onto the lines. Although the lines were tested with a bending test they can be
damaged if stepped on whilst on a hard surface, or if they come into contact with
sharp objects.
Do not always fold the canopy symmetrically to the center cell as this can cause
constant stress on the center cell (center cell always to the outside).
Clean the paraglider with fresh water after contact with salt water. Salt water crystal
can reduce line strength, even after rinsing in fresh water. Replace lines immediately
after contact with salt water. Also check canopy material after water landings, as
waves can place uneven forces and cause cloth to distort in specific areas. Always
remove gliders from the water by holding only the trailing edge. Clean the paraglider
with water and a soft sponge. Do not use any chemicals or spirits for cleaning, as
these can permanently damage the cloth.
Page 22

22
(&(
Packing:
Pack your Muse accordion-wise rib on rib, nose wire on nose wire, so that the plastic
rods in the ribs at the leading edge lie as flat as possible on one another, all at the same
height. This will prolong your paraglider life and keep its fast and excellent filling
qualities at takeoff.
Storage:
Store the paraglider in a dry space at ambient temperature away from chemicals and
UV light.
Never pack or store the glider wet. This shortens the life of the cloth Always dry glider
thoroughly before any packing or storage.
During transport it has to be considered, that some materials of the paraglider are
temperature sensitive. Avoid subjecting your wing to high temperatures (e.g. the
luggage space of a parked car in the sun)!
Repairs and checks:
Tears in the canopy must be professionally sewn. Adhesive patches are only
adequate for very minor damage.
Repairs should only be carried out by the manufacturer, distributor or authorized
workshops. Only original spare parts may be used!
The lines must be checked after every 50 hours flying time and whenever the flight
behavior changes
Any changes to the canopy lines or risers, except those approved by the
manufacturer, will void the certificate of airworthiness.
The Muse 4 must be checked as a minimum, after two years or after 100 flying hours
by the manufacturer or authorized workshops.
Disposal:
The synthetic materials used in a paraglider need professional disposal. Please send
disused canopies back to us: we will dismantle and dispose of it.
In Conclusion:
The Muse 4 is a modern paraglider. It must be clearly understood that all air sports are
potentially dangerous and that your safety is ultimately dependent upon you. We
strongly urge you to fly safely. This includes your choice of flying conditions as well as
safety margins during flying maneuvers. We recommend once more that you only fly
with a certified harness, reserve parachute, and helmet. Also the certification placard
must be present on the glider. Every pilot should be suitably qualified, have a valid
license and 3rd party insurance. The Muse 4 is delivered with a stuff-sack, Velcro
compression strap, MAC PARA backpack, repair kit and user manual.
Page 23
23
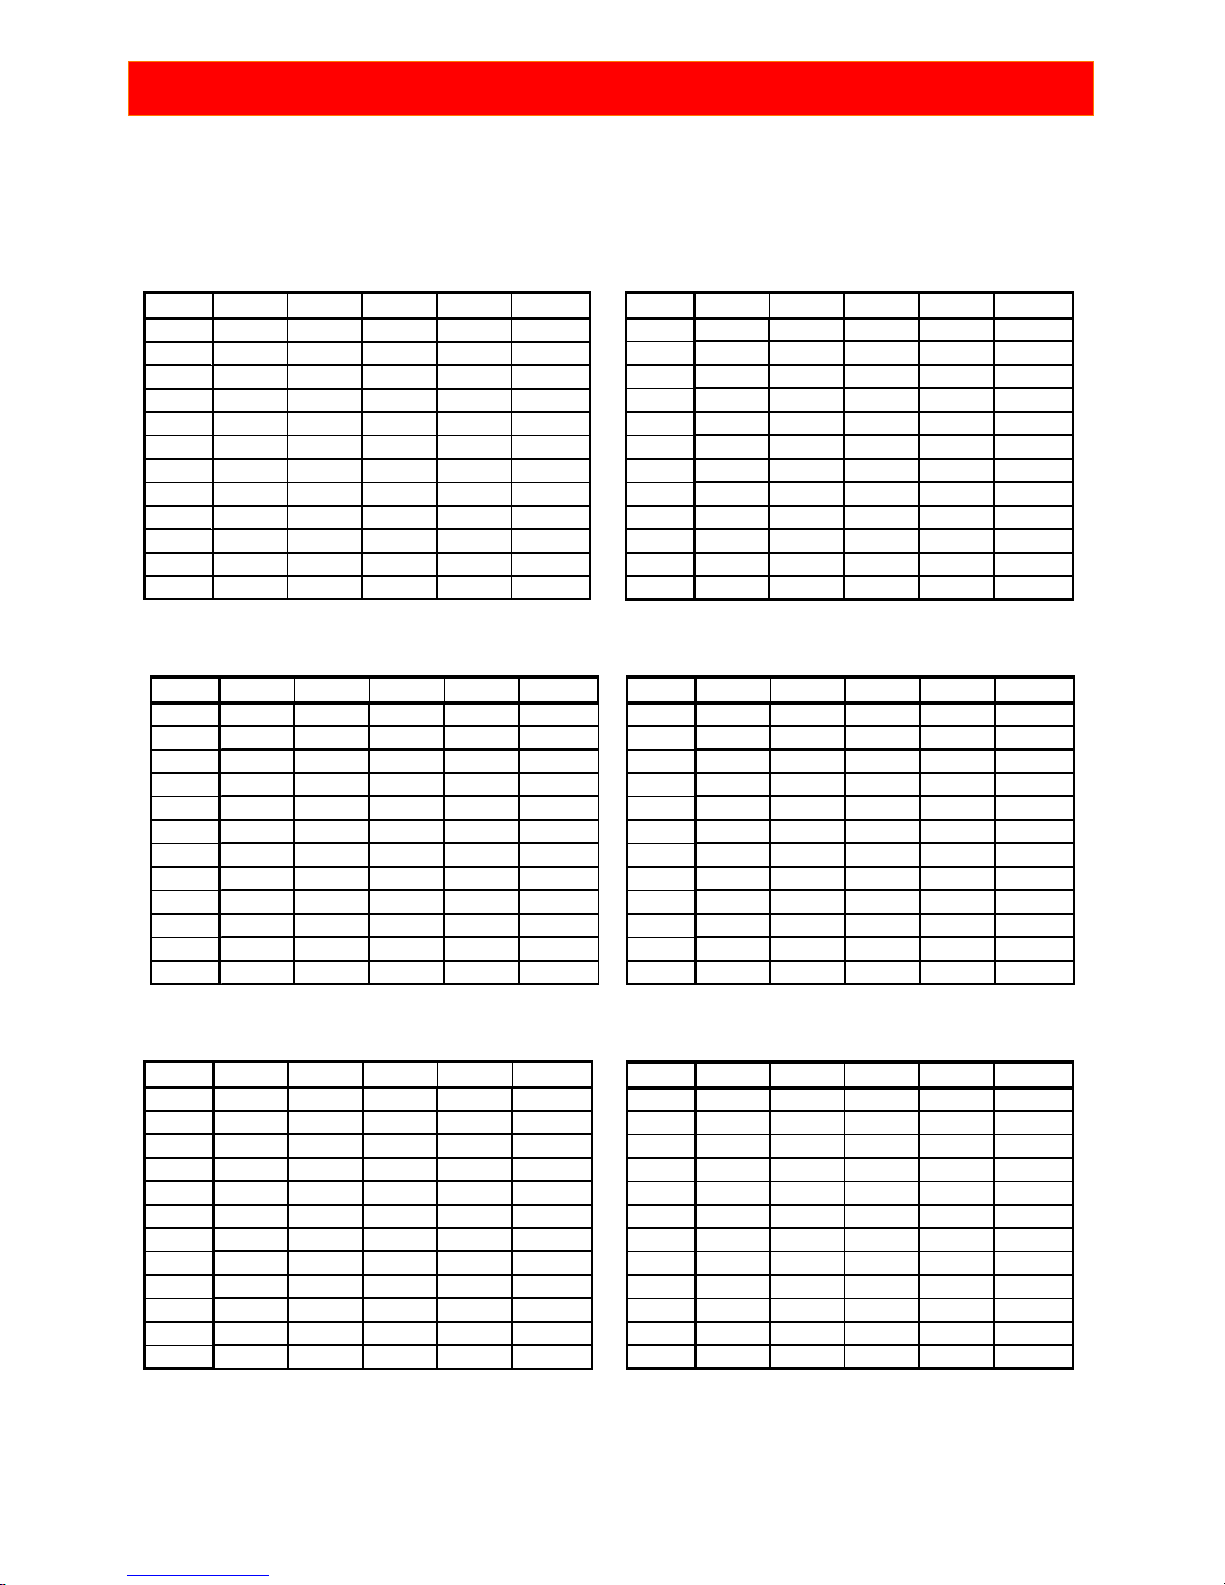
FULL LINE LENGTHS
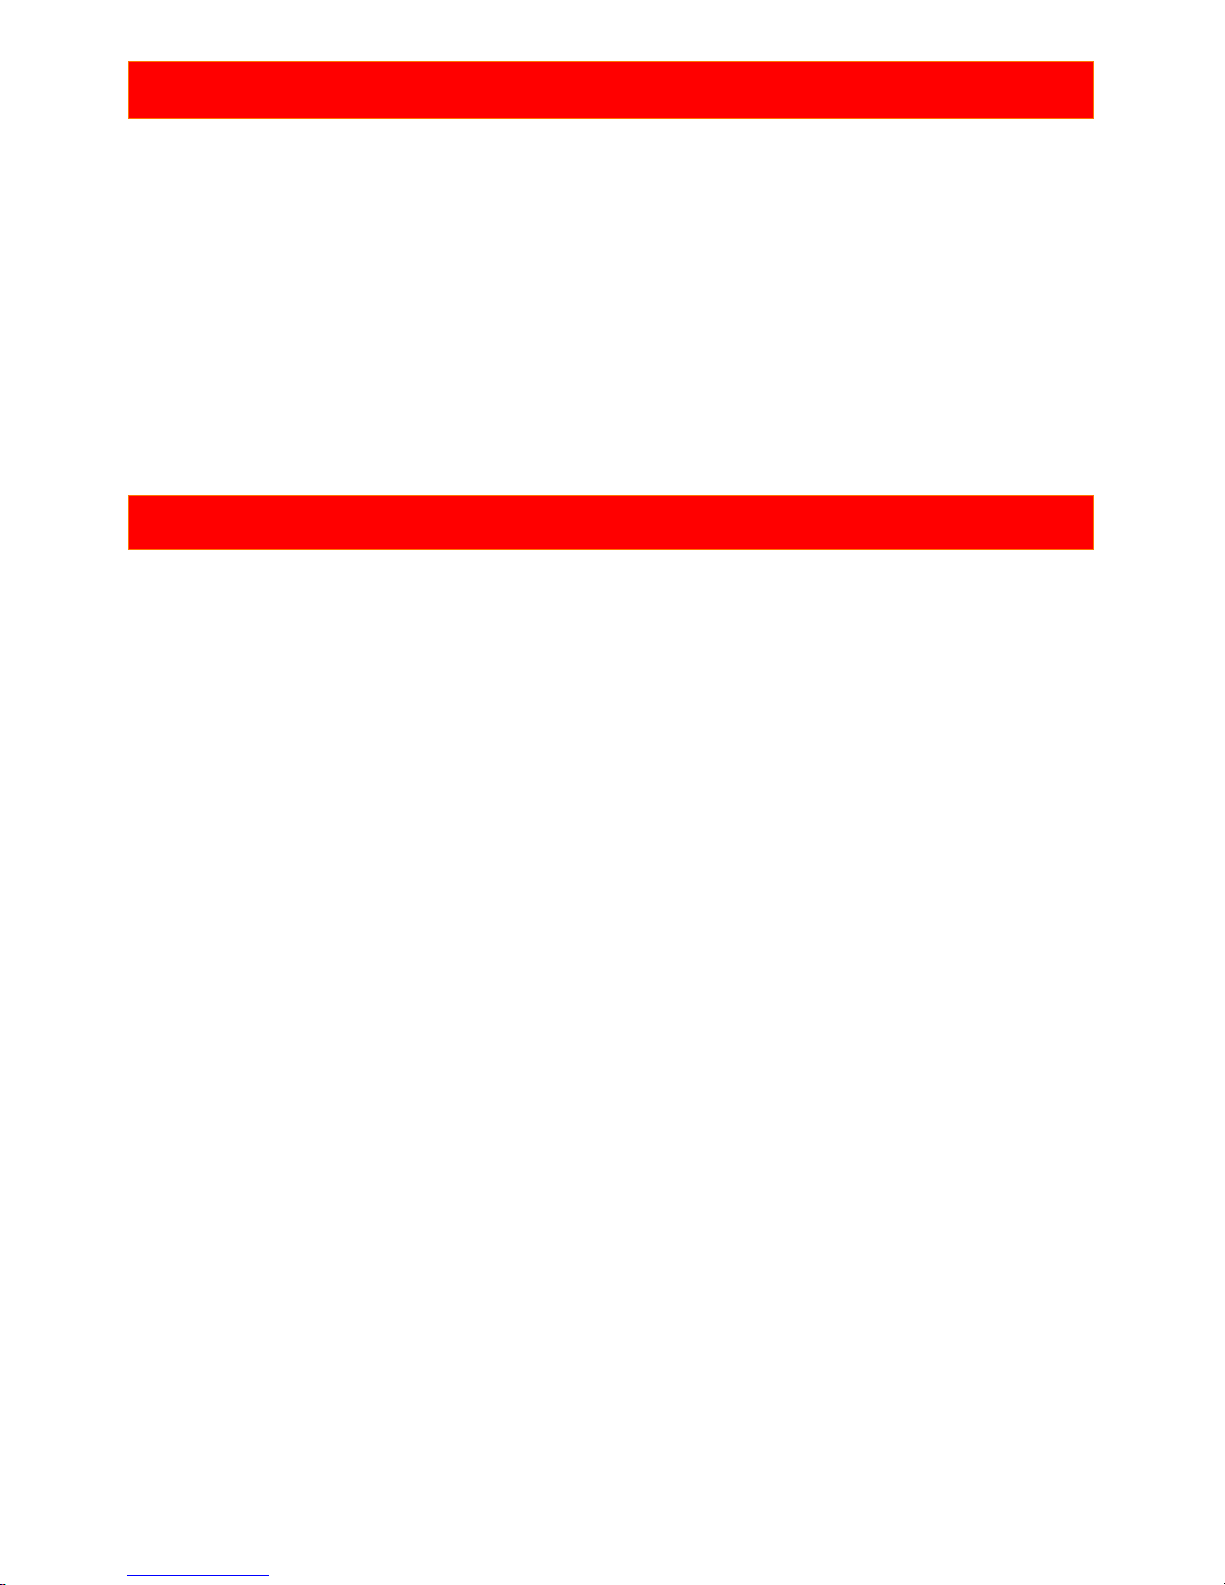
All lengths are measured from riser’s main attachment point up to the tissue of
canopy on attachment points. Brake lines are measured from the Swivel on brake
handle up to the trailing edge.
CenterABCDBrakes
1
6445 6368 6502 6593 6674
2
6411 6335 6469 6558 6432
3
6444 6374 6496 6583 6358
4
6400 6333 6438 6516 6255
5
6447 6378 6478 6548 6109
6
6401 6331 6423 6477 6113
7
6302 6238 6313 6358 6076
8
6250 6191 6253 6284 6010
9
6228 6167 6209 6234 5968
10
6003 5930 5959 5986 5962
11
5849 5833 5874 5891
12
5784 5790 5827
Muse
4
- 22 (XS)
CenterABCDBrakes
1
6763 6687 6817 6914 7115
2
6729 6653 6780 6877 6855
3
6766 6692 6810 6903 6775
4
6718 6646 6748 6831 6665
5
6767 6696 6794 6868 6515
6
6722 6653 6732 6790 6520
7
6616 6551 6620 6666 6465
8
6561 6504 6554 6589 6395
9
6538 6480 6514 6538 6350
10
6302 6223 6242 6271 6345
11
6142 6114 6155 6171
12
6056 6063 6103
Muse
4
- 24 (S )
CenterABCDBrakes
1
7026 6947 7081 7183 7375
2
6990 6911 7043 7145 7105
3
7029 6952 7075 7171 7025
4
6979 6903 7009 7096 6910
5
7030 6955 7057 7134 6750
6
6983 6910 6993 7054 6755
7
6873 6805 6878 6926 6700
8
6815 6755 6807 6843 6630
9
6791 6731 6767 6792 6580
10
6545 6463 6484 6513 6575
11
6379 6349 6393 6409
12
6290 6296 6339
Muse
4
- 26 (M)
CenterABCDBrakes
1
7262 7180 7320 7425 7685
2
7225 7143 7280 7385 7405
3
7265 7185 7312 7412 7320
4
7213 7135 7245 7335 7200
5
7266 7189 7295 7375 7035
6
7217 7142 7228 7291 7040
7
7103 7033 7108 7158 6985
8
7043 6981 7035 7073 6910
9
7018 6956 6993 7019 6860
10
6763 6678 6700 6731 6855
11
6591 6561 6606 6623
12
6499 6506 6550
Muse
4
- 28 (L )
CenterABCDBrakes
1
7531 7446 7593 7703 8015
2
7493 7408 7551 7661 7720
3
7535 7451 7584 7688 7635
4
7481 7399 7514 7608 7510
5
7536 7456 7566 7649 7335
6
7485 7407 7497 7563 7340
7
7366 7294 7372 7424 7285
8
7304 7240 7296 7336 7210
9
7278 7214 7245 7272 7155
10
7012 6924 6947 6980 7150
11
6833 6803 6850 6867
12
6738 6746 6791
Muse
4
- 30 (XL )
CenterABCDBrakes
1
7999 7907 8067 8186 8552
2
7959 7867 8024 8139 8241
3
8003 7915 8064 8173 8145
4
7946 7860 7987 8085 8017
5
8003 7917 8040 8132 7832
6
7949 7865 7966 8035 7833
7
7822 7744 7831 7888 7786
8
7754 7685 7749 7792 7704
9
7725 7655 7699 7731 7651
10
7454 7354 7382 7417 7639
11
7260 7231 7277 7294
12
7160 7169 7215
Muse
4
- 34 (XXL)
Page 24
24
LINE PLANS
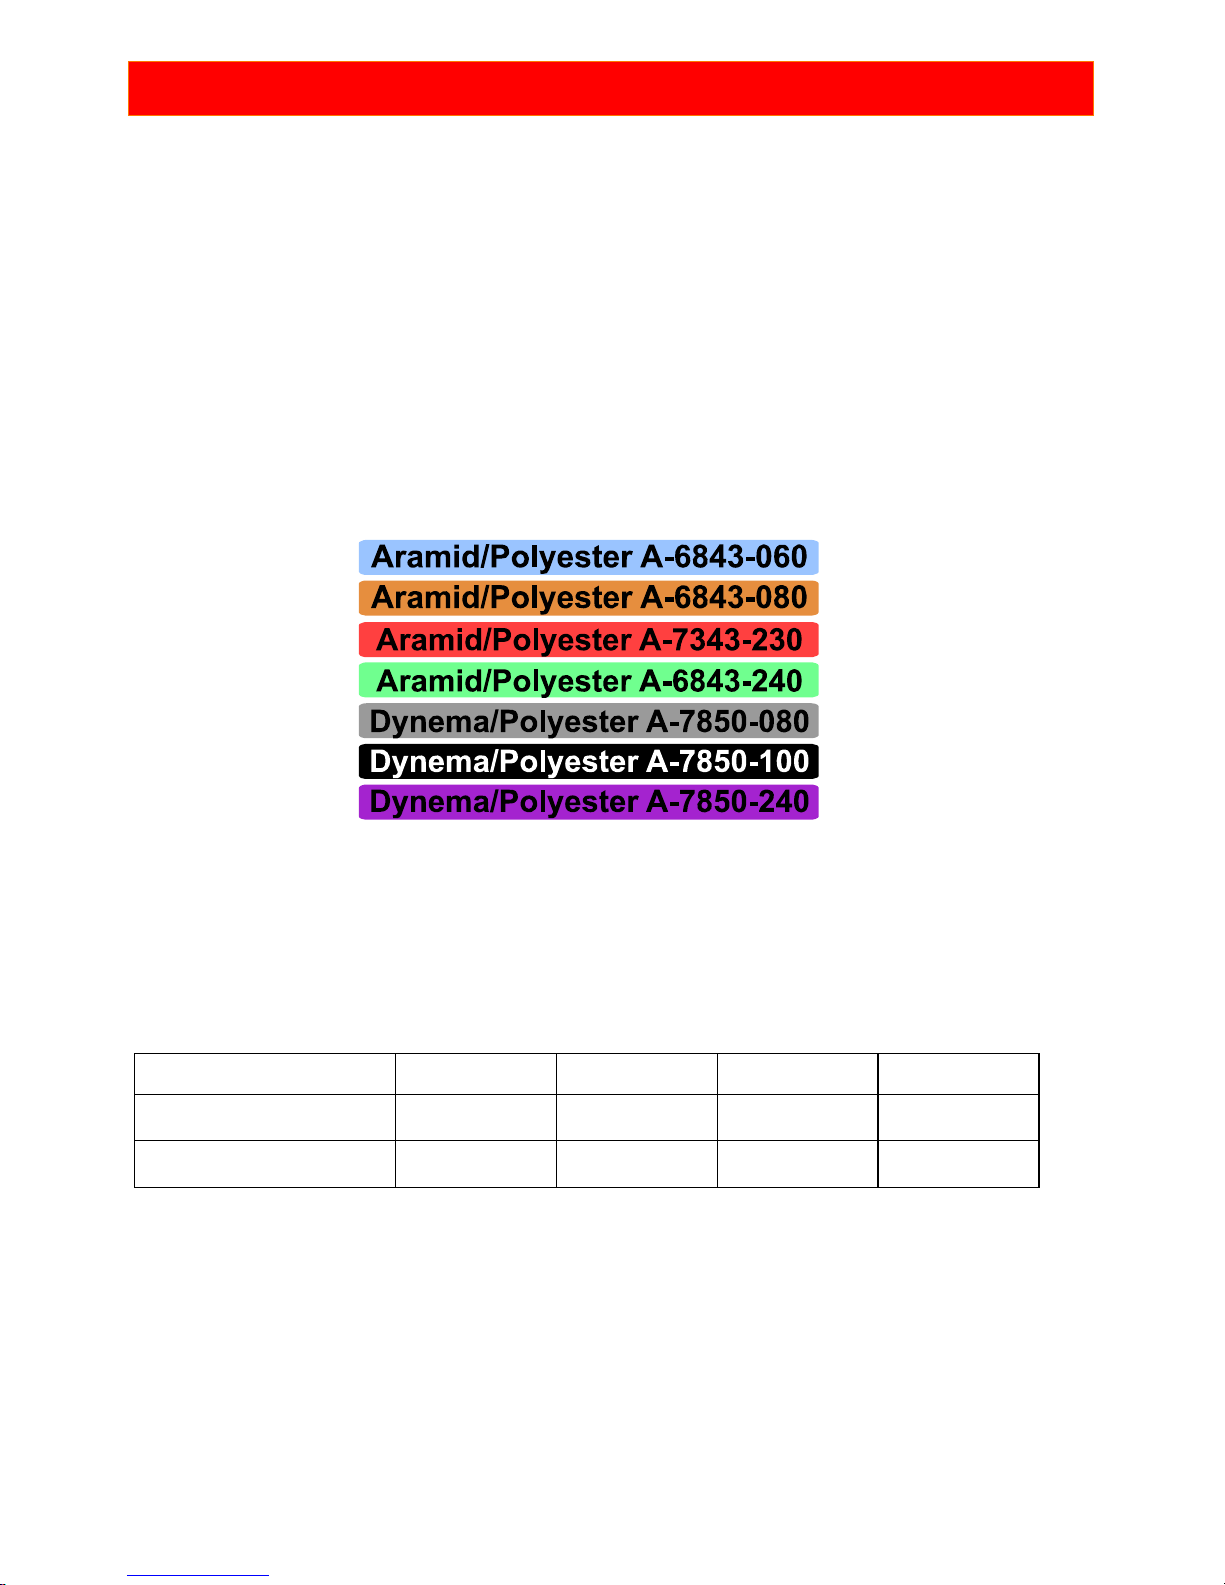
Line descriptions:
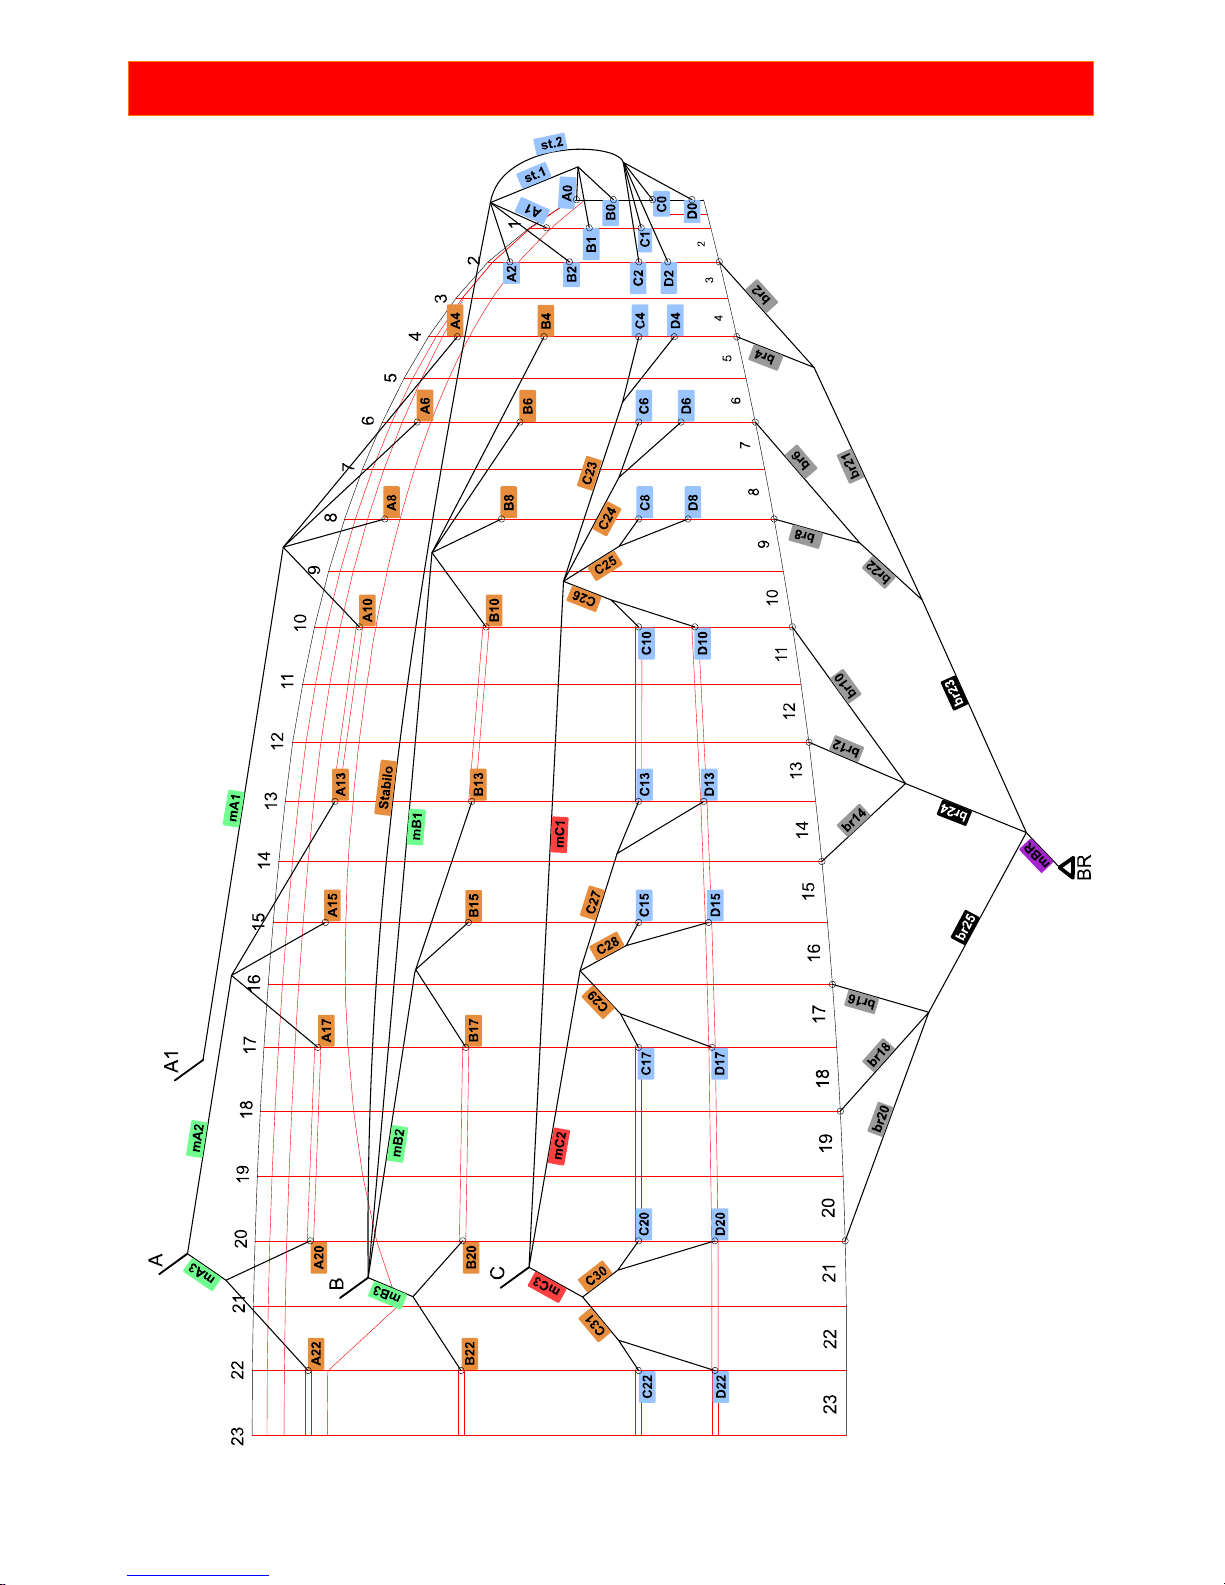
The following printed line plans show the line configurations.
Line types in colors
Riser lengths Muse 4
The lengths are measured from the main attachment point to the lower edge of rapid links.
Strap
A A1 B C
Trim-position
530 530 530 530
Accelerated
390 390 440 530
Page 25
25
LINE PLAN MUSE 4
Page 26
26
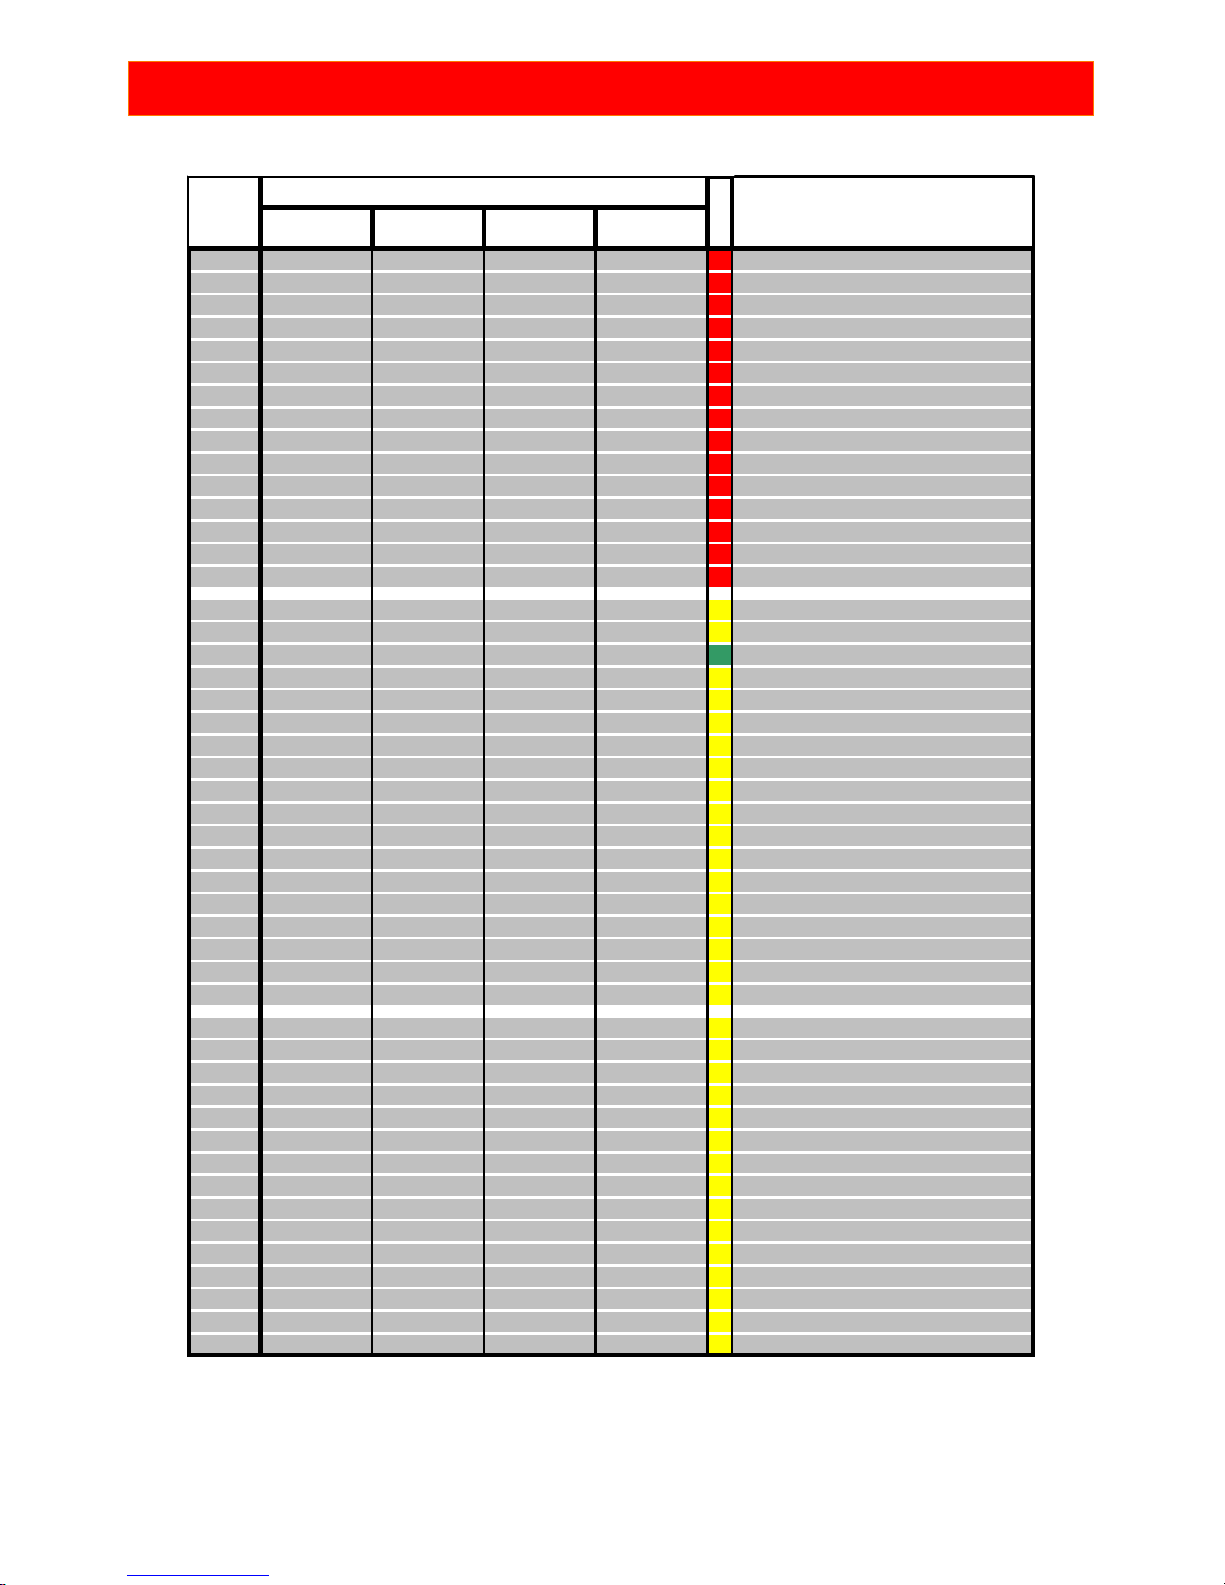
LENGTH OF LINE MUSE 4
Muse4 - 24 Muse4 - 26 Muse4 - 28 Muse4 - 30
mA1 435,0 455,0 470,0 490,0 Aramid/Polyester A-6843-240
mA2 435,0 455,0 470,0 490,0 Aramid/Polyester A-6843-240
mA3 435,0 455,0 470,0 490,0 Aramid/Polyester A-6843-240
A0 34,1 33,5 34,4 36,3 Aramid/Polyester A-6843-060
A1 91,2 94,9 96,1 100,3 Aramid/Polyester A-6843-060
A2 107,2 111,5 113,3 118,2 Aramid/Polyester A-6843-060
A4 166,3 171,6 179,3 185,3 Aramid/Polyester A-6843-080
A6 168,6 174,0 181,8 187,9 Aramid/Polyester A-6843-080
A8 174,1 179,8 187,8 194,1 Aramid/Polyester A-6843-080
A10 184,7 190,8 199,2 206,0 Aramid/Polyester A-6843-080
A13 189,2 195,5 204,1 211,1 Aramid/Polyester A-6843-080
A15 184,3 190,4 198,8 205,6 Aramid/Polyester A-6843-080
A17 189,1 195,4 204,0 211,0 Aramid/Polyester A-6843-080
A20 185,4 191,5 200,0 206,8 Aramid/Polyester A-6843-080
A22 188,8 195,1 203,7 210,6 Aramid/Polyester A-6843-080
st.1 50,0 54,0 54,0 56,0 Aramid/Polyester A-6843-060
st.2 50,0 54,0 54,0 56,0 Aramid/Polyester A-6843-060
Stabilo 470,0 490,0 510,0 530,0 Aramid/Polyester A-6843-080
mB1 435,0 455,0 470,0 490,0 Aramid/Polyester A-6843-240
mB2 435,0 455,0 470,0 490,0 Aramid/Polyester A-6843-240
mB3 435,0 455,0 470,0 490,0 Aramid/Polyester A-6843-240
B0 34,8 34,1 35,1 37,1 Aramid/Polyester A-6843-060
B1 39,9 39,4 40,6 42,8 Aramid/Polyester A-6843-060
B2 99,3 103,3 104,8 109,4 Aramid/Polyester A-6843-060
B4 160,5 165,6 173,1 178,9 Aramid/Polyester A-6843-080
B6 162,9 168,0 175,6 181,5 Aramid/Polyester A-6843-080
B8 167,6 173,0 180,8 186,9 Aramid/Polyester A-6843-080
B10 177,8 183,5 191,7 198,2 Aramid/Polyester A-6843-080
B13 182,1 188,0 196,4 203,1 Aramid/Polyester A-6843-080
B15 177,1 182,8 191,0 197,4 Aramid/Polyester A-6843-080
B17 181,7 187,7 196,0 202,6 Aramid/Polyester A-6843-080
B20 177,8 183,6 191,8 198,3 Aramid/Polyester A-6843-080
B22 181,2 187,2 195,5 202,1 Aramid/Polyester A-6843-080
mC1 435,0 455,0 470,0 490,0 Aramid/Polyester A-7343-230
mC2 435,0 455,0 470,0 490,0 Aramid/Polyester A-7343-230
mC3 435,0 455,0 470,0 490,0 Aramid/Polyester A-7343-230
C0 38,8 38,4 39,5 41,6 Aramid/Polyester A-6843-060
C1 44,0 43,8 45,1 47,5 Aramid/Polyester A-6843-060
C2 52,7 52,9 54,5 57,2 Aramid/Polyester A-6843-060
C4 46,0 48,0 50,0 52,0 Aramid/Polyester A-6843-060
C6 46,0 48,0 50,0 52,0 Aramid/Polyester A-6843-060
C8 56,0 58,0 60,0 62,0 Aramid/Polyester A-6843-060
C10 70,0 72,0 75,0 78,0 Aramid/Polyester A-6843-060
C13 70,0 72,0 75,0 78,0 Aramid/Polyester A-6843-060
C15 70,0 72,0 75,0 78,0 Aramid/Polyester A-6843-060
C17 70,0 72,0 75,0 78,0 Aramid/Polyester A-6843-060
C20 80,0 82,0 85,0 88,0 Aramid/Polyester A-6843-060
C22 80,0 82,0 85,0 88,0 Aramid/Polyester A-6843-060
Length of line [ cm ]
MaterialLine
Color
Page 27
27
(&(
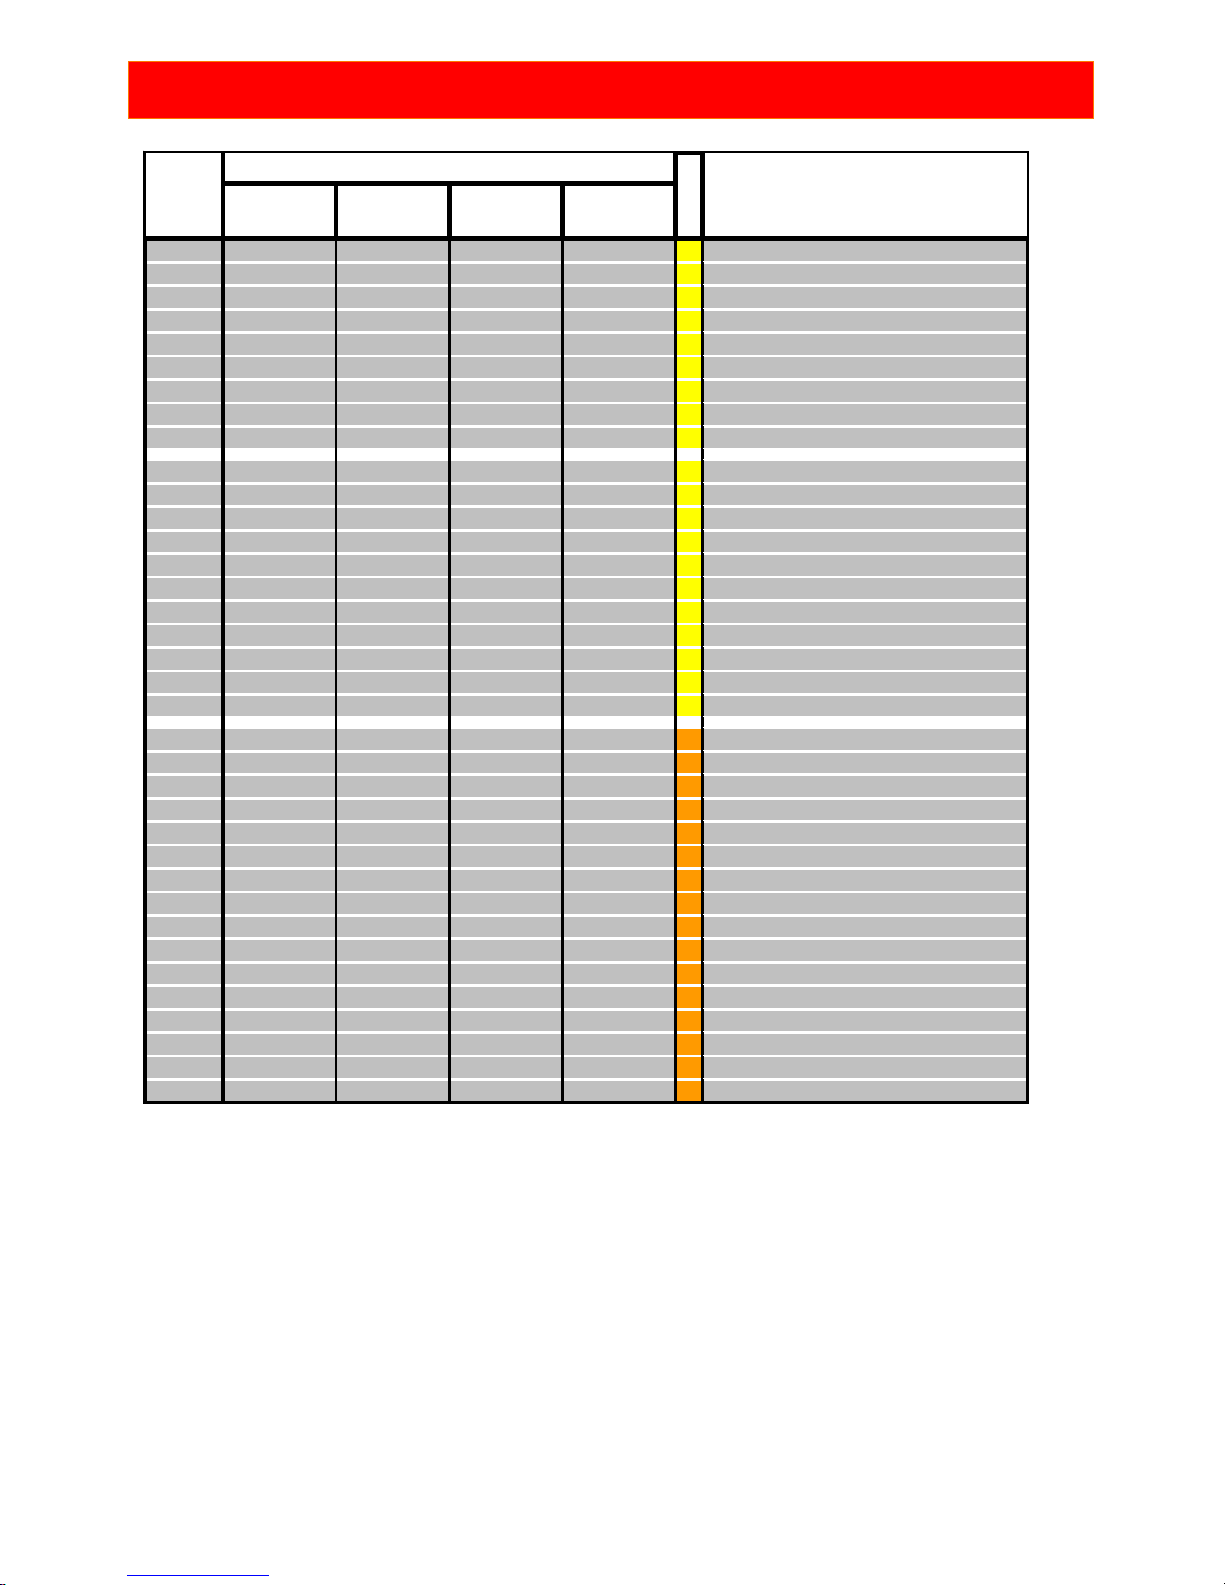
Muse4 - 24 Muse4 - 26 Muse4 - 28 Muse4 - 30
C23 118,9 122,2 127,8 131,0 Aramid/Polyester A-6843-080
C24 122,9 126,2 132,0 136,1 Aramid/Polyester A-6843-080
C25 119,5 123,3 129,3 133,7 Aramid/Pol
y
ester A-6843-080
C26 116,7 120,8 126,3 130,2 Aramid/Pol
y
ester A-6843-080
C27 122,9 127,2 133,0 137,1 Aramid/Pol
y
ester A-6843-080
C28 118,3 122,4 128,0 131,9 Aramid/Pol
y
ester A-6843-080
C29 124,5 129,0 134,7 138,9 Aramid/Pol
y
ester A-6843-080
C30 111,5 115,8 121,5 125,6 Aramid/Polyester A-6843-080
C31 115,2 119,6 125,5 129,8 Aramid/Polyester A-6843-080
D0 45,6 45,4 46,8 49,2 Aramid/Pol
y
ester A-6843-060
D2 55,6 55,8 57,6 60,5 Aramid/Polyester A-6843-060
D4 48,4 50,5 52,6 54,7 Aramid/Polyester A-6843-060
D6 49,5 51,6 53,8 56 Aramid/Polyester A-6843-060
D8 60,6 62,8 65,0 67,2 Aramid/Polyester A-6843-060
D10 75,8 78,1 81,3 84,6 Aramid/Polyester A-6843-060
D13 77,4 79,7 83,0 86,3 Aramid/Polyester A-6843-060
D15 78,3 80,7 84,0 87,4 Aramid/Pol
y
ester A-6843-060
D17 79,3 81,6 85,0 88,4 Aramid/Pol
y
ester A-6843-060
D20 89,7 92,2 95,5 99 Aramid/Pol
y
ester A-6843-060
D22 89,7 92,2 95,5 99 Aramid/Pol
y
ester A-6843-060
mBR 300 + 30 310 + 30 325 + 30 340 + 30 D
y
nema/Polyester A-7850-240
br2 54,0 57,0 59,0 61,5 D
y
nema/Polyester A-7850-80
br4 54,5 57,5 59,5 62 D
y
nema/Polyester A-7850-80
br6 59,0 62,5 64,5 67,5 Dynema/Polyester A-7850-80
br8 66,0 69,5 72,0 75 Dynema/Polyester A-7850-80
br10 123,5 127,0 130,5 135,5 Dynema/Polyester A-7850-80
br12 123,0 126,5 130,0 135 Dynema/Polyester A-7850-80
br14 138,0 142,5 146,5 152,5 Dynema/Polyester A-7850-80
br16 126,0 132,0 136,5 142 Dynema/Polyester A-7850-80
br18 134,0 140,0 145,0 150,5 D
y
nema/Polyester A-7850-80
br20 160,0 167,0 173,0 180 D
y
nema/Polyester A-7850-80
br21 116,0 120,0 125,0 130 D
y
nema/Polyester A-7850-80
br22 116,0 120,0 125,0 130 D
y
nema/Polyester A-7850-80
br23 168,0 174,0 180,0 187 D
y
nema/Polyester A-7850-100
br24 230,0 240,0 250,0 260 Dynema/Polyester A-7850-100
br25 253,0 262,0 272,0 283 Dynema/Polyester A-7850-100
Length of line [ cm ]
MaterialLine
Color
Page 28

28
MANUAL FOR PARAGLIDER CHECKS
Check-intervals
A new MAC PARA paraglider must be given a check every 24 months. With intensive
use (> 100 flying hours per year, or excessively demanding use) an annual check is
needed, after the first check.
Personnel authorized to carry out checks
A valid flying license and training course by National association are the basis for
permission to carry out paraglider checks
Identification of glider
An identity sticker with details of certification and serial number is attached to the glider.
Components of the check
Porosity
The porosity should be checked with a porosity meter (JDC). Compare the resultant
data with the producer's manual. Porosity measures should be taken on at least three
points of both the top and bottom surface. The first point should be placed 20-30 cm
from leading edge in the middle of canopy. Second and third points are placed left and
right from first measure point at 25% of the span. One additional measurement should
be made on the top surface of the wing tip.
The identified time should be higher than 30 second (JDC). In the event of the result
being less than 30 seconds, the result of the check is a fail.
Overall strength check
The check of canopy strength should be made with a Bettsometer (B.M.A.A approved
Patent No. GB 2270768 Clive Betts Sales). On the top and bottom surfaces make small
holes with a needle at the Aline attachment points. The exact verification should be
made in accordance with the Bettsometer user manual.
Line strength check
Line strengths should be as specified in accordance with the certification requirements.
One main line should be taken from each array and have its strength checked with a
tension-meter.
Required strengths should be higher than:
A + B main lines x measured value > 8 x maximum take-off weight and higher
then 800 kg for the A + B arrays.
C + D mean lines x measured value > 6 x maximum take-off weight and higher
then 600 kg for the A + B arrays.
Replacements for damaged lines must be with new original lines. Line lengths are taken
from the lines data page.
Page 29

29
(&(
Line length measurement
Lines should be separated and each line measured under a tension of 5 kg.
Measurement is made from the line karabiner to the canopy’s surface in according to
the method of certification. Measurement of brake lines is made from the knot on swivel
to upper loop of gallery line. The length of bunching line is not included. Rib numbering
begins in the middle of canopy and leads to the wing tip.
Measured full lengths should be documented in the inspection record and are compared
with certified full line lengths protocol. Lengths should not differ by more than 10 mm.
The opposite sides should be checked for symmetry.
Canopy line-attachment points check
Attachment points should be checked for damage and stretching. Defects, loops and
flares should be repaired.
Canopy fabric check
Ribs, diagonal ribs, top and bottom surface should be checked. Any damage to sewing
or tears to the fabric, which could influence flying characteristics must be repaired.
Lines
All lines should be checked for tears, breaks any damage to the sheath or signs of wear.
Special attention should be paid to the sewing of the line loops. Damaged lines must be
replaced.
The results should be documented in the inspection record.
Connector check
All line carabineers, trimmers (if used), speed systems and pulleys should be inspected
for visible damage. Open or improperly secured connectors should be secured in
accordance with the producers recommendations.
Risers
Both risers should be checked for tears, signs of wear or any damage and measured
with a pull of 5 daN strength. Measured data should be documented in the inspection
record. The difference must not be higher then 5 mm when compared to specified
lengths.
Final check
The glider sticker and check sticker must be inspected for readability and correctness.
The check must be documented with date, signature and stamp on the canopy and in
the user manual.
Page 30
30
TREATING NATURE WITH RESPECT
Finally the call to practice our sport with respect for nature and wildlife! Don't walk
outside marked routes, don't leave any waste, don't make needless noise and respect
the sensitive biological balance in the mountain eco system: especially in the take off
area!
CHECKS
Name Company Date Signature & Stamp
Page 31
31
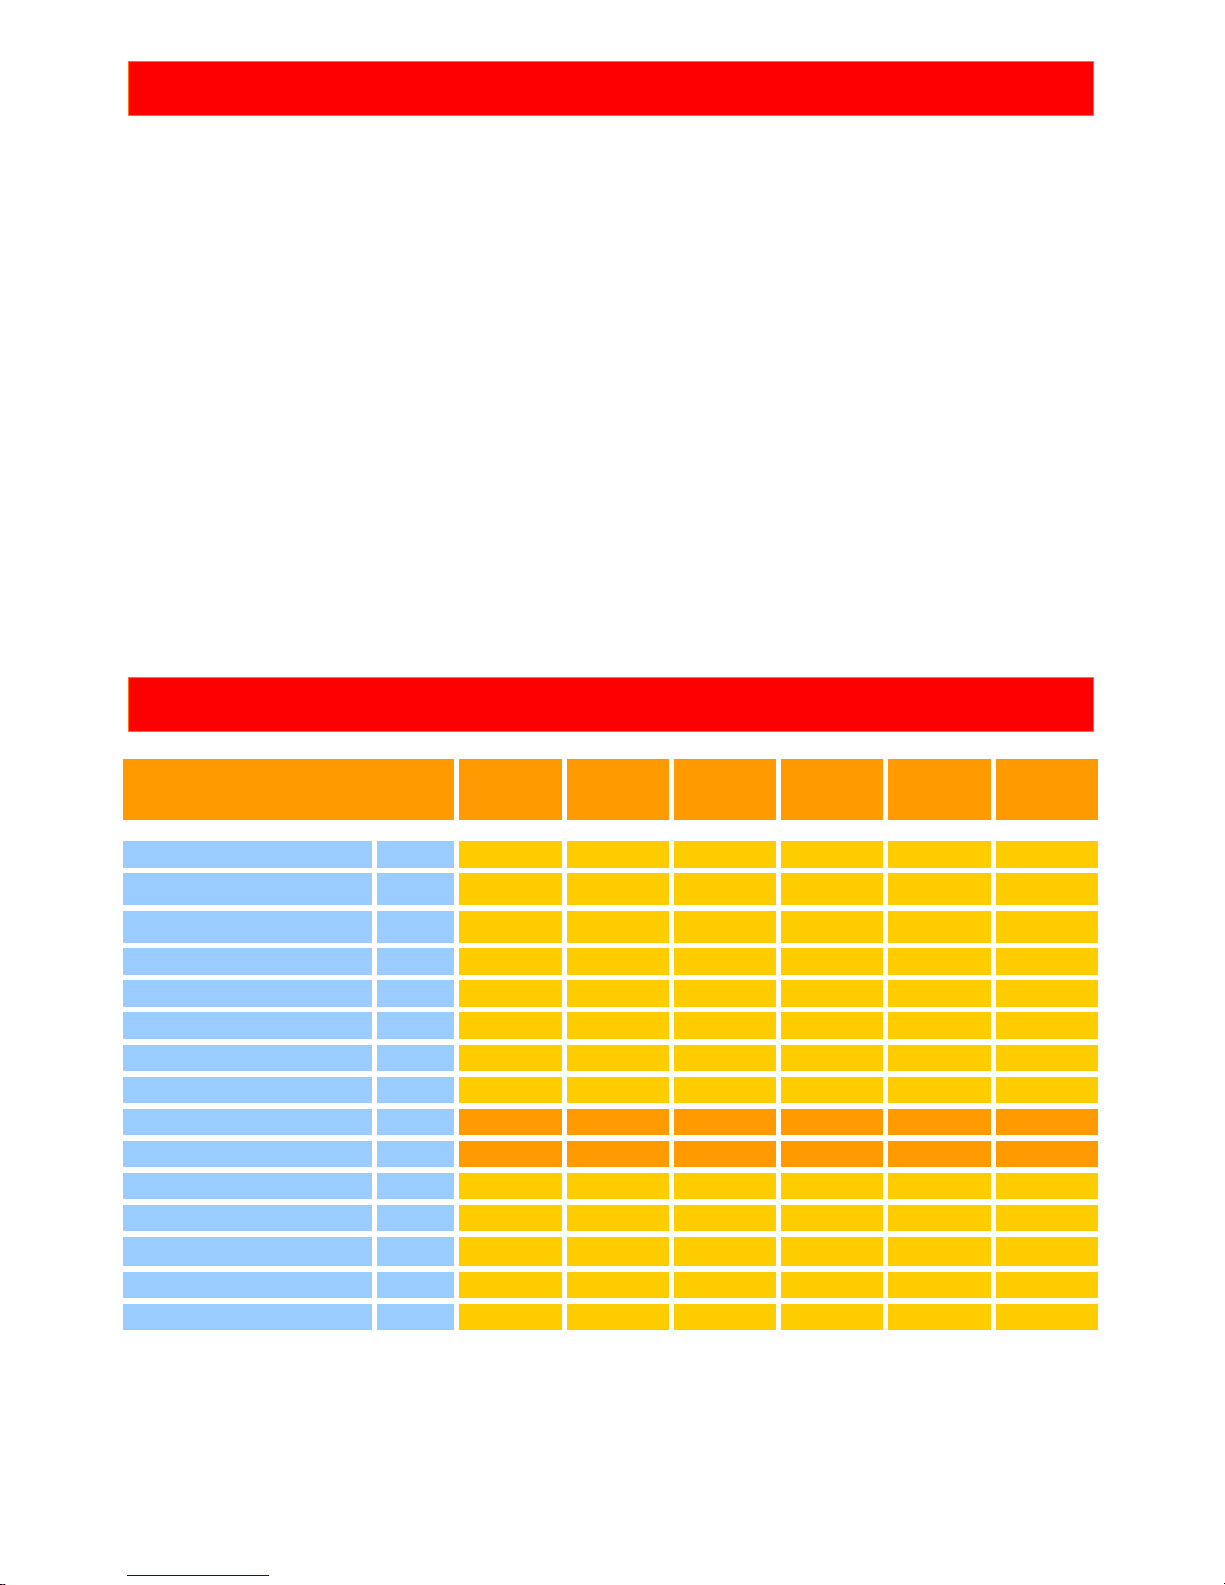
Inte rme d ia t e EN -A
Muse
4
Muse
4
Muse
4
Muse
4
Muse
4
Muse
4
Size
22 (XS)
24 (S ) 26 (M ) 28 (L) 30 (XL)
34 (XXL)
Zoom flat [%] 88 92,6 96,5 100 104 111
Area flat
[m
2
]
21,68 24,01 26,07 28,00 30,28 34,5
Area projected
[m
2
]
18,94 20,97 22,78 24,46 26,46 30,14
Span flat [m] 10,58 11,13 11,60 12,02 12,5 13,34
A s p e c t r a tio fla t - 5,16 5,16 5,16 5,16 5,16 5,16
Root c ord [m] 2,48 2,61 2,72 2,82 2,93 3,13
Cells - 46 46 46 46 46 46
Weight [kg]4,74,95,15,35,55,9
Weight range* [kg]
60-75 67-85 75-95 85-110 105-135 115-150
Weight range* [lbs] 132-165 148-187 165-209 187-243 231-298 254-331
Min.speed [km/h] 23-25 23-25 23-25 23-25 23-25 23-25
Max.speed [km/h] 36-38 36-38 36-38 36-38 36-38 36-38
Top speed (accelerator) [km/h] 44-46 45-47 45-47 45-47 45-47 45-47
Glide ratio - 9,0 9,0 9,0 9,0 9,0 9,0
M in . Sin k r a te [m/s ] 1,05 1,05 1,05 1,05 1,05 1,05
TEST FLIGHT CERTIFICATE
Paraglider type: M U S E 4 –
Serial number: . . . . . . . .
Test flown on: _________________________________
by
MAC PARA TECHNOLOGY
Confirmation by dealer: _________________________________
Technical data
*pilot equipped = weight naked + cca. 20 Kg (44 lbs)
–
Page 32
32
 Loading...