

Page 1

mx3
Page 2
1
2
34
A
B
B
C
A
CLICK
C
CLICK
B
C
5
A
A
B
C
D
C
Page 3
6
87
9
BC
A
B
C
B
A
CLICK
A
Page 4

B
A
B
10
13
11
12
A
A
D
C
B
F
C
E
Page 5

AB
CLICK
15
16
14
A
B
17
A
Page 6

18
19
17
B
C
A
A
B
D
B
C
C
C
B
Page 7

Warranty
Your Maclaren stroller is guaranteed to be free from any
manufacturing defects for a period of 1 year from the date
of purchase under normal use and provided it is used in
compliance with the operating instructions. This warranty
extends only to the original retail purchaser and is only
valid when supplied with proof of purchase. Please retain
proof of purchase with this Limited Warranty.
Should a repair be needed please contact the retailer from
whom the product was purchased, or one of the Maclaren
Authorised Service Agents.
Please note that the warranty will not be applicable if:
A fault is the cause of misuse or poor maintenance.
Please refer to this instruction leaflet for guidance on
how to maintain your stroller.
Repairs are carried out by a third party.
The stroller is faulty due to general wear and tear which
is the result of everyday use.
A stroller is damaged as a result of an accident.
Maclaren are not satisfied that the stated warranty terms
and conditions have been met.
THIS WARRANTY IS GIVEN IN ADDITION TO AND DOES NOT AFFECT
YOUR STATUTORY RIGHTS
Page 8

Contents
2
6
11
Attendant user guide
Please read this user guide fully prior to use ensuring
reference is made to the numbered diagrams on the
nal pages.
This guide also includes your warranty; please keep it
safe for future reference
Operating Illustrations
Warranty
EN
Page 9

General Information & Safety
WARNING: AVOID SERIOUS INJURY FROM FALLING OR SLIDING OUT.
ALWAYS USE THE SEAT HARNESS. NEVER LEAVE CHILD UNATTENDED.
IMPORTANT: KEEP THESE INSTRUCTIONS FOR FUTURE REFERENCE. A CHILD’S SAFETY IS
YOUR RESPONSIBILITY.
THIS VEHICLE IS SUITABLE FOR ONE CHILD.
• Follow all instructions carefully; incorrect use will cause damage to the stroller.
• The harness should be correctly fitted and adjusted. The harness and the seat belt
are not a substitute for proper adult supervision.
• For extra safety ‘D’ rings are provided for the attachment which of a separate full
harness. (to EN13210)
• The child should be clear of all moving parts while making adjustments.
IMPORTANT- DANGER: It is important that great care is taken to ensure that children
are kept well clear of the stroller when folding and unfolding the product. Finger
traps and scissoring actions are unavoidable during these operations.
• Do not carry additional goods or accessories in or on this stroller except those sold
with this product (and included in this guide) Additional weight or pressure may
cause the stroller to become unstable or place undue stress on the frame which
could lead to breakage.
WARNING: Any load attached to the handle affects the stability of the stroller.
• It may be unsafe to use accessories not supplied and approved by Maclaren such
as child seats, bag hooks, rain covers, buggy boards etc will not be covered by the
terms of our warranty.
• Overloading incorrect folding and the use of accessories other than those approved
by Maclaren may damage or break this vehicle or cause an unstable condition to
exist.
• This maclaren MX3™ is suitable for use with the maclaren MX3 carrycot.
• Never leave a child in the stroller whilst ascending or descending stairs or escalators
or when travelling on other forms of transport.
• The stroller should always open and fold easily. Do not force it, it may be necessary
to re-read the instructions.
• Negotiate curbs and rough ground carefully. Repeated impact will cause damage to
the stroller.
• Never allow children to stand on the footrest, or any other part of the stroller.
• Do not leave the stroller exposed to heat i.e. by a radiator or in direct sunlight.
• Do not place items on the top of the hood as it may cause damage to the hood.
Maintenance and Repair
• This vehicle requires regular maintenance by the user. Regularly check all
connecting rivets and screws etc for tightness and security. Inspect all brakes
wheels and tyres and replace if necessary. Check all safety devices for correct
operation in particular the primary and secondary locks which are used to secure
the stroller when open. Never continue to use a product which is broken or not
structurally sound.
• We recommend a service every 12 months (details of your nearest service centre
can be found in the accompanying leaflet)
• If wheels squeak, lubricate sparingly with Teflon or silicone based lubricant. DO
NOT use oil or grease based products, as this will attract dirt, which will clog the
movement.
• Only Maclaren parts should be used. It may be unsafe to use parts not supplied by
Maclaren.
Cleaning
• Clean frame with a damp cloth and mild detergent and dry thoroughly.
Do not use abrasives.
• The seat and other fabric can be sponge cleaned. Allow the seat to dry naturally
and thoroughly before reuse. (see care label for details)
• Do not fold or store the product whilst wet and never store in a damp environment
as this can cause mildew to form.
• If the stroller chassis parts have been exposed to salt water we recommend that
they be rinsed down with fresh (tap) water as soon as possible afterwards.
Maclaren reserve the right to make design changes to any of their products as part of
their continuous development programme.
This product is designed and manufactured to comply with BS7409:1996 (safety
requirements for wheeled chair conveyance)
EN
2
Page 10

3
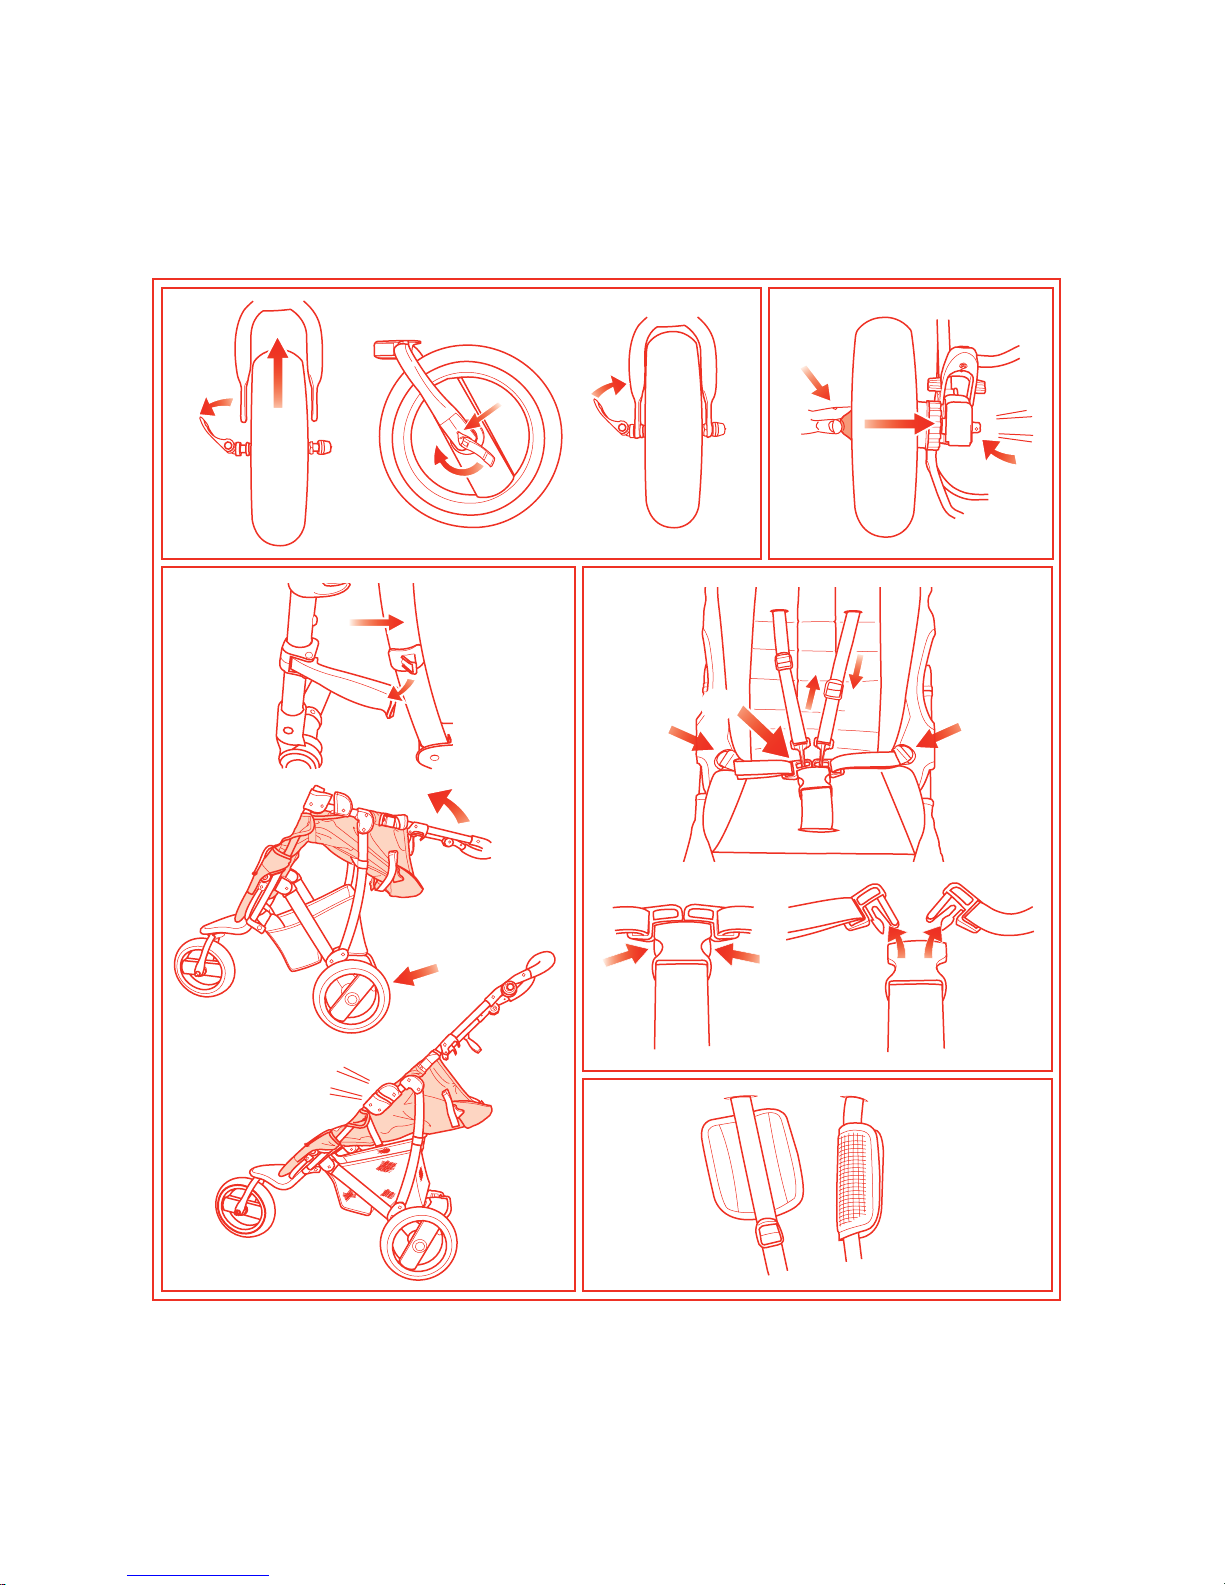
Instructions
1 To t front wheel
A Check that the locking lever is undone. Insert front wheel centrally into fork slots of the frame,
ensure wheel is central within forks and hooks are tted into the holes above the fork.
B Lightly tighten silver nut.
C Close wheel locking lever ensuring wheel is clamped securely.
If clamp is too tight slightly loosen the silver nut and try again.
D Ensure wheel is rmly xed before using the stroller.
2 To t rear wheels
A Push button in centre of wheel.
B Push pins through wheel holes at the rear of the frame ensuring that wheels are on the outside
of the frame. Pins will click into place when pushed all the way through.
Check that wheels are secure before use.
3 To open stroller
A Lift storage clip.
B It may help to hold the back tyre still with foot.
C Lift up handle, the stroller will click when in full upright position.
Locks will automatically engage when stroller is in the full upright position.
WARNING: Ensure all locking devices are engaged before use.
4 Seat belt/ shoulder harness operation
WARNING: The seat is not suitable for children under 6 months
Avoid serious injury from falling or sliding out. Always use the crotch strap in combination with
the waist belt and shoulder straps.
To t harness
A Insert both fasteners securely into clasp.
B Adjust strap lengths by sliding buckles. Belt crotch strap and harness should be snug.
C ‘D’ rings are included for an additional harness, if desired.
To release harness
D Squeeze fastener prongs and pull apart.
5 To t shoulder pads
Shoulder pads can be attached to the harness with the Velcro pads.
6 To t the seat liner
A Unfasten the waist harness, remove shoulder pads (if tted), unclip shoulder straps from seat
belt clasp.
B Lay opened liner in the stroller seat.
C Feed waist straps, crotch straps and shoulder straps through holes in the liner fabric.
Re-clip shoulder straps to seat belt clasp.
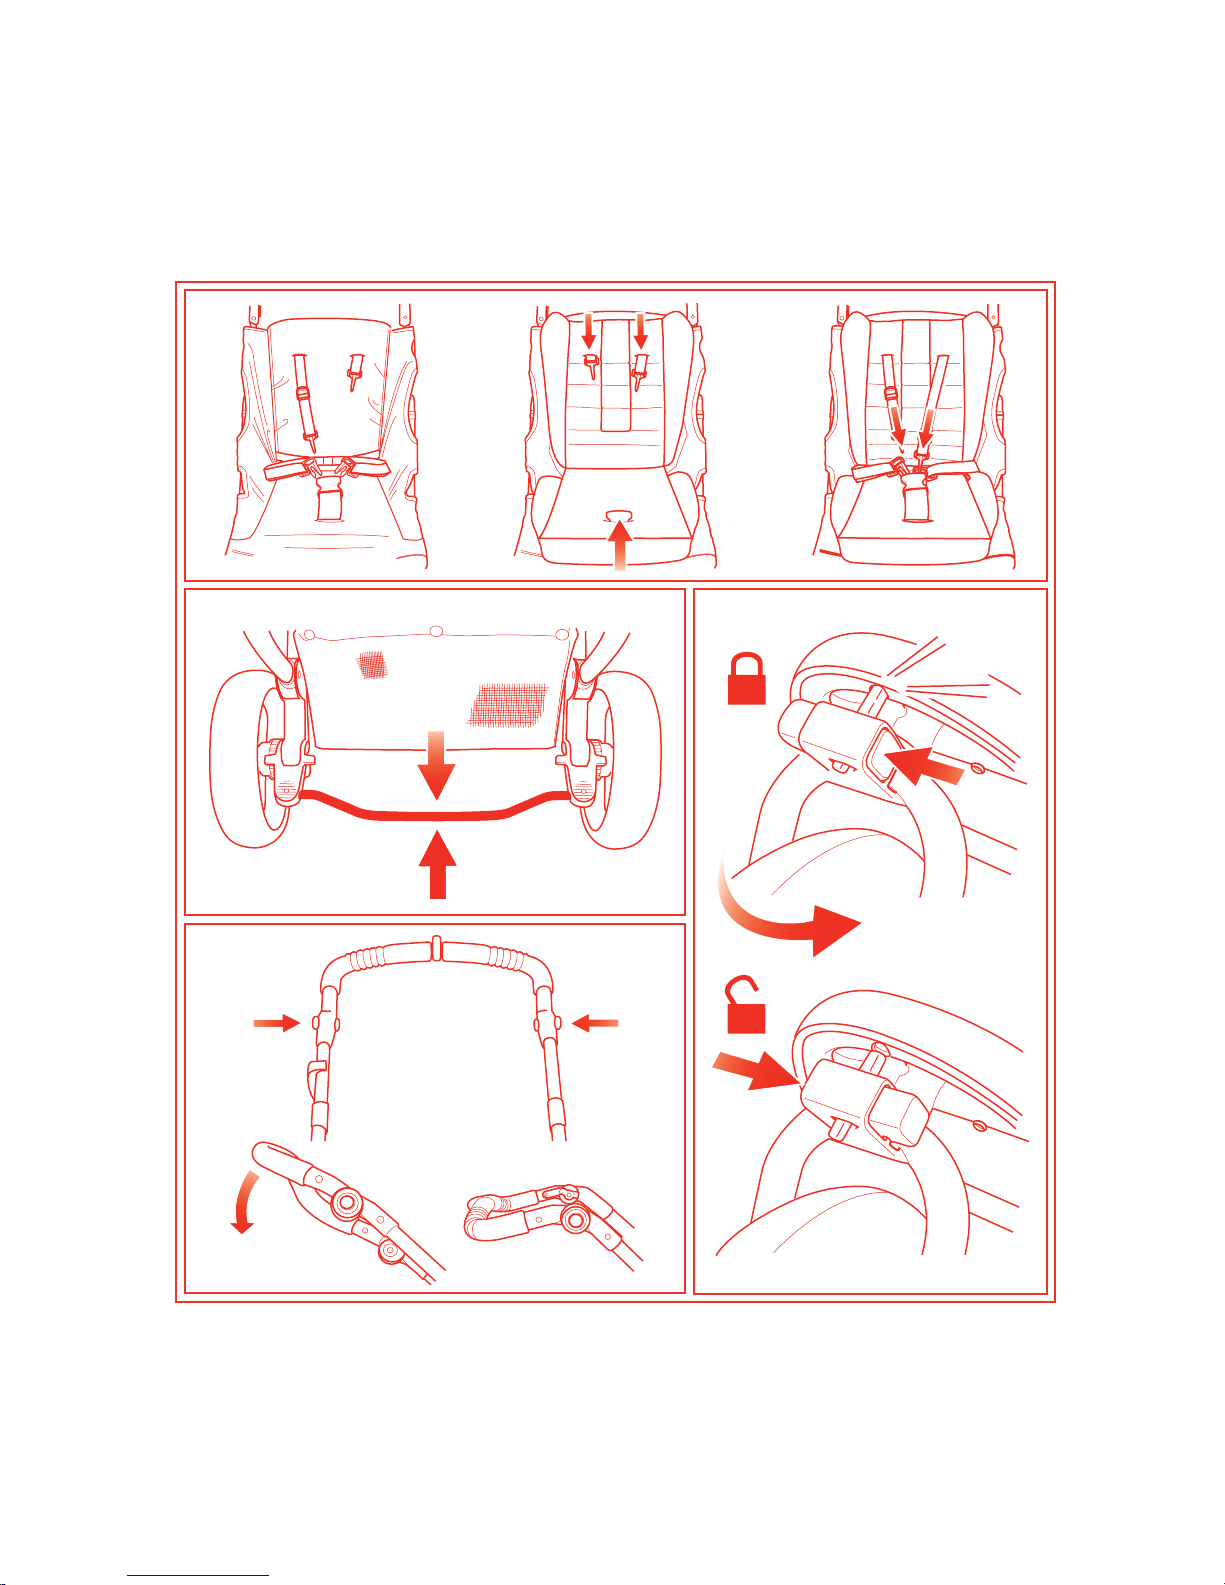
7 To operate parking brakes
A Push down on the lever bar at the rear, this will engage both brakes.
B To unlock pull the lever bar upwards with foot, this will release both brakes.
The parking brakes should be engaged during the loading and unloading of children.
8 To operate front wheel swivel lock
When engaged the swivel lock will prevent the front wheel from swivelling. The swivel lock
should be engaged when pushing stroller over rough ground.
A To engage the swivel lock, press the locking button through from right to left.
B Turn the wheel until the pin clicks into place.
C To release the swivel lock press the locking button through from left to right to release the pin
and the wheel should move freely.
9 Adjusting Handle
Simultaneously push in the buttons located on either side of the handle and move handle to the
desired position.
10 Securing Head Enclosure
A Head rest enclosure is stored at the back of the seat. Detach from storage position by undoing
poppers at side.
B Lift head enclosure towards top of the seat.
C Secure head enclosure to the top of the seat using the poppers on either side of the head
enclosure.
Important: Always use the head enclosure when the seat is in a recline position
11 Adjusting seat recline
The angle of the seat back recline can be adjusted by tightening or loosing the support strap or
unfastening the buckle at the rear of the seat.
Secure excess support strap using the Velcro on the underside of the strap.
12 Attaching shopping bag
CAUTION: Overloading may cause a hazardous unstable condition to exist. Maximum load
4.4lb (2kg) evenly distributed.
The stroller may be folded with the bag still attached but all contents must be removed.
Failure to do this could damage stroller and contents of shopping bag.
A Wrap the straps at the front of shopping bag around the side frame underneath the leg rest
and fasten poppers.
B Fold ap over the frame at the rear and secure using the poppers.
13 To attach hood
A Push clips through slots on either side of the frame.
B Extend hood and push down on side hinges to lock open.
C Ensure the hood is over the head enclosure, when the seat is in the reclined position secure
hood to seat using the Velcro tabs under the seat.
D The position of the hood can be adjusted by pushing forward or pulling backwards and clicking
into place.
E Child can be viewed by unzipping the ap on top of the hood which can then be folded and
secured with toggle.
F Lower ip down visor if required.
To Remove Hood
G
Push in clips at either side of the hood and pull upwards.
CAUTION: Overloading may cause a hazardous unstable condition to exist.
Maximum total capacity of the hood pockets- 1.1lb (0.5 kg)
14 Adjusting Leg rest
A Pull the footrest upwards and it will click into several positions.
B To return footrest to original position simultaneously push in buttons at either side and push
downwards.
15 Attaching the bumper bar
Attach the bumper bar at either side of the buggy frame and fasten clips.
IMPORTANT: Ensure that fabric is not trapped within clip when attaching the bumper bar to the
frame.
WARNING: Do not lift the product and child using the bumper bar
16 To attach rain apron
A Fit rain apron over the hood, secure the back panel to the sides of apron using the Velcro tabs
provided.
B Pull bottom of rain apron down and secure elastic over the footrest. Loop Velcro strap
underneath the footrest and fasten.
17 Removing and retting the seat
A The waist harness back strap is xed to the chassis behind the seat.
To remove, thread the strap through the buckle and pull straps through the button holes.
IMORTANT: It is important that the strap be rethreaded through the buckles to secure the
harness to the frame after the seat has been retted. Failure to do so will endanger your child.
B Undo poppers down each side of the frame, including the support straps at waist and back.
Seat should then lift easily away from the frame.
IMPORTANT: Ensure retaining and support straps at waist and back are secured when retting the
seat.
18 To fold the stroller
Stroller can be folded with the hood and bumper bar attached
A Simultaneously push in the red button on the right hand side of handle, then pull lever up
towards the handle whilst also pulling up lever on the left hand side.
B Push down on the handle.
C Compress folded stroller and secure storage buckle.
D There is a stand on the handle which allows the stroller to be stored upright without get
getting the handle dirty.
20 To adjust shoulder harness position
A Unclip the shoulder strap from the waist clasp.
B Undo the Velcro and partly remove the backboard from the seat back.
C Remove the shoulder strap and reposition in the alternative position.
D Replace backboard fully into the seat pocket and reseal Velcro strip.
EN
IMPORTANT: Read these instructions carefully before use and keep them for future reference.
Your children’s safety may be aected if you do not follow these instructions.
 Loading...