

Page 1
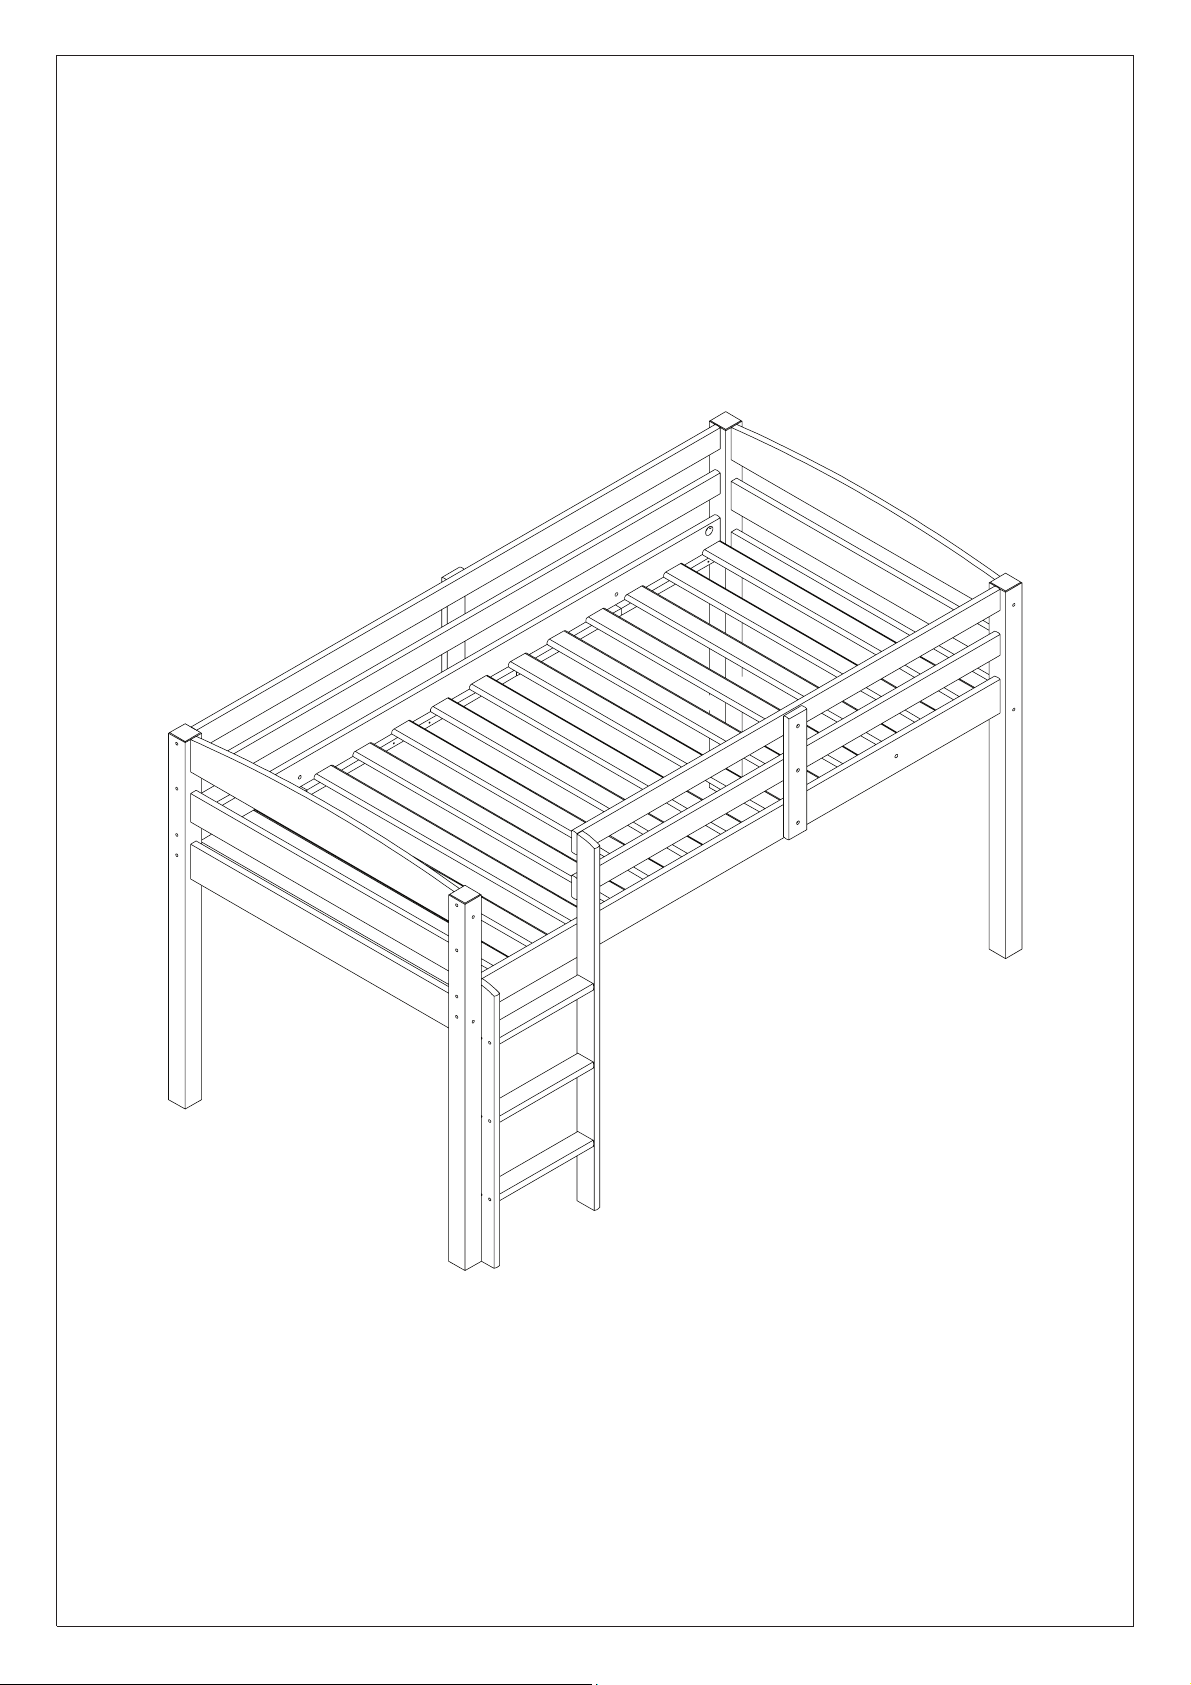
ASSEMBLY INSTRUCTIONS
LOFT BED
TWIN
W
e appreciate your choice in purchasing our furniture and strive to
deliver the highest quality. In the unlikely event that you note any
damaged or missing part please do not return to the store. Please
reach out to us or by phone so that we can expedite shipment of
replacements.
Pg 1/10
Page 2

Please read the folllowing before atemppting assembly
-Your new piece of furniture requires easy assembly. Below are some suggestions
o make it easier, minimize time and s ve you un - needed grief.
-Do not dispose of any packing material until assembly is complete.
-Be sure you assemble the item on a soft suace such as ardboard or a blanket to
protect the quality nish from scratches or indentaation."
-Separate and organiza all hardware in plastic tus, if available, for easy
identifacation
-Count all hardware and parts to make certain you received all before atemppting
assembly
-Inspect each wood part for any unlikely shipping damage or manufacturing !aws.
Please contact us, so that we canexpedite shipping of any replacement parts or
hardware if needed
-You have purchased real solid wood furniture which may present natural
imperfections such knots and minor splits and cracks. Natural wood loses and
gains moisture due to seasonal changes which over time my also affect the wood.
If the structural integrity of the piece is not compromised, we recommend applying
a touch up marker or wax llers, for any minor imperfections, which can be"
purchased at most hardware stores. Color variations are normal in real wood
furniture, due to the natural grain of the wood.
Caring for you new Wood Furniture
-Always clean with a damp cloth or furniture polish.
-Do not use alcohol or alcohol solvents for cleaning.
-Avoid placing in direct sun light to minimize damage due to UV rays.
-Try not to place furniture very near or on top of heaters.
We hope you enjoy your new piece of
for years to come!
Natural Wood Furniture
Pg 2/10
Page 3
SAFETY WARNINGS
Follow the information on the warning labels on the upper bunk bed structure and on the
cartoon. Do not remove warning label from the bed.
Always use the recommended size mattress support, or both, to help prevent the
likelihood of entrapment or falls.
The top surfaces of the mattress must be at least 5" below the upper edge of the
guardrails.
Do not allow children under 6 years of age to use the upper bunk.
Prohibit more thant one person on the upper bunk.
Periodically check and ensure that the guardrails, ladder and other components are in
their proper position, free from damage, and that all connectors are tight.
Do not allow horseplay on or under the bed. Always prohibit jumping on the bed.
Always use the ladder for entering and leaving the upper bunk.
Do not use substitute parts. Contact the manufacturer or dealer for replacement parts
Use of a night-light may provide added safety for a child using the upper bunk.
If the bunk bed will be placed next to the wall, the guardrail that runs the full length of the
be should be placed against the wall to prevent entrapment between the bed and the
wall.
Always use guardrails on both long sides of the upper bunk.
The use of a water or sleep oatation mattress is prohibited.!
Keep these instructions for future reference.
We recommend assembling your bunk bed on the shipping carton to protect your oor or!
carpet. Be certain all staples are out of the box before beginning assembly on the
shipping carton.
SIZE OF MATTRESS: Upper and lower foundation
THIS BED IS DESIGNED TO USE A MATTRESS (74" TO 75") LONG, AND (37-1/2" TO
38-1/2") IN WIDTH AND THE ENCLOSED SLAT KIT SYSTEM. THE TOTAL
THICKNESS OF MATTRESS AND FOUNDATION MUST NOT EXCEED 8"
NOTE: THERE MUST AT LEAST 5" FROM MATTRESS SLEEPING SURFACE TO TOP
EDGE OF GUARDRAIL.
Strangulation Hazard: Never attach or hang items to any part of the bunk bed that
are not designed for use with the bed for example, but not limited to hooks, belts and
jump ropes.
REPLACEMENT PARTS:
REPLACEMENT PARTS, INCLUDING ADDITIONAL GUARDRAILS, MAY BE
OBTAINED FROM OF OUR DEALERS.
Pg 3/10
Page 4
INSTRUCTIONS LOW LOFT BED
IMPORTANT:
Read all instruction rst then follow each step as numbered and described."
Two or more persons required for assembly.
Caution: These assembly steps have engineered to result in a quality product.
Failure to follow instructions may result in unsound place of furniture.
Before using furniture, make sure all connections are secured.
TOOLS REQUIRED:
Philips Screwdriver
Hammer
CARTONS REQUIRED:
-Carton 1/1 bed end structures (Headbords and Footboards, slats, ladder sides,
hardware, assembly instruction, rails. guardrails, ladder, steps).
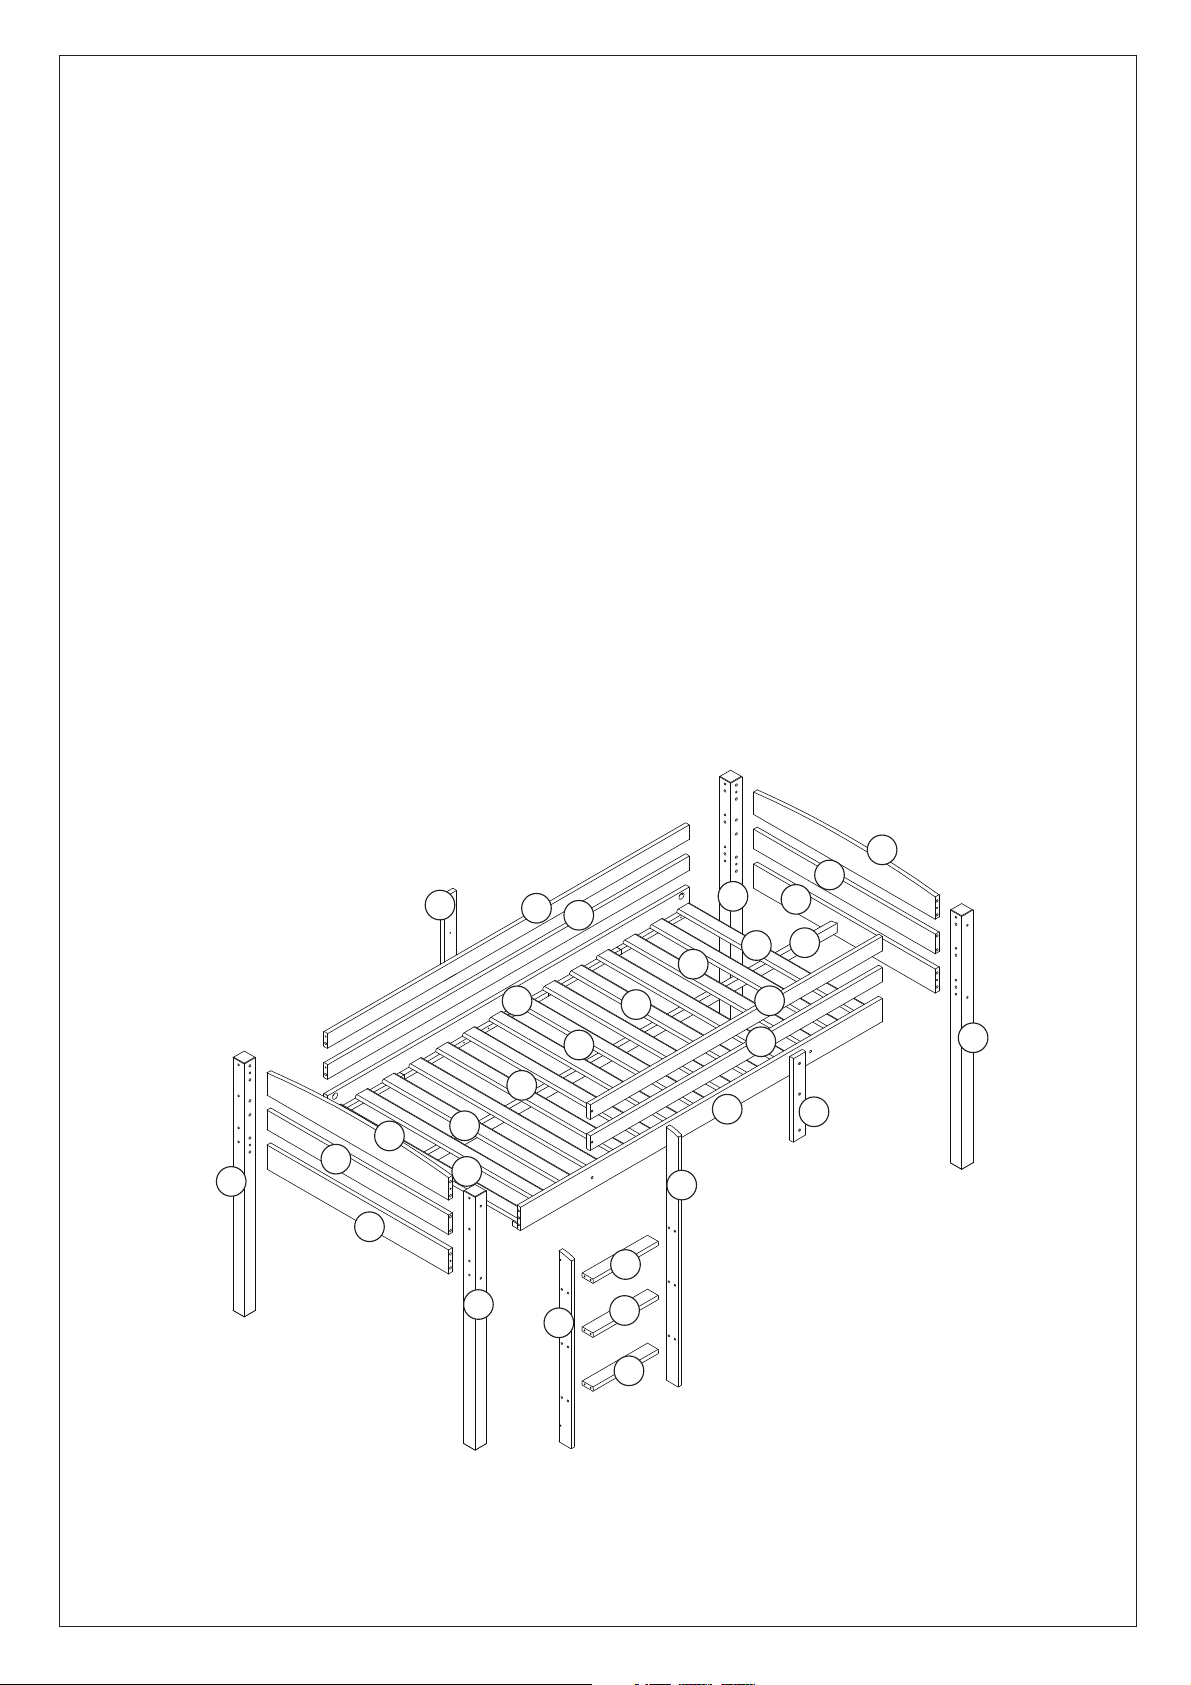
3
4
10
3
4
1
5
11
15
8
16
7
11
2
13
11
11
14
14
14
2
11
6
12
15
17
5
17
9
1
10
PARTS LIST (SEPARATE PARTS OF BUNK BED ACCORDING TO NUMBERING):
NR. (1,2,3,4,5,6,7,8,9,10,11,12,13,14) QUANTITY BOX 1 Of 1
Pg 4/10
Page 5
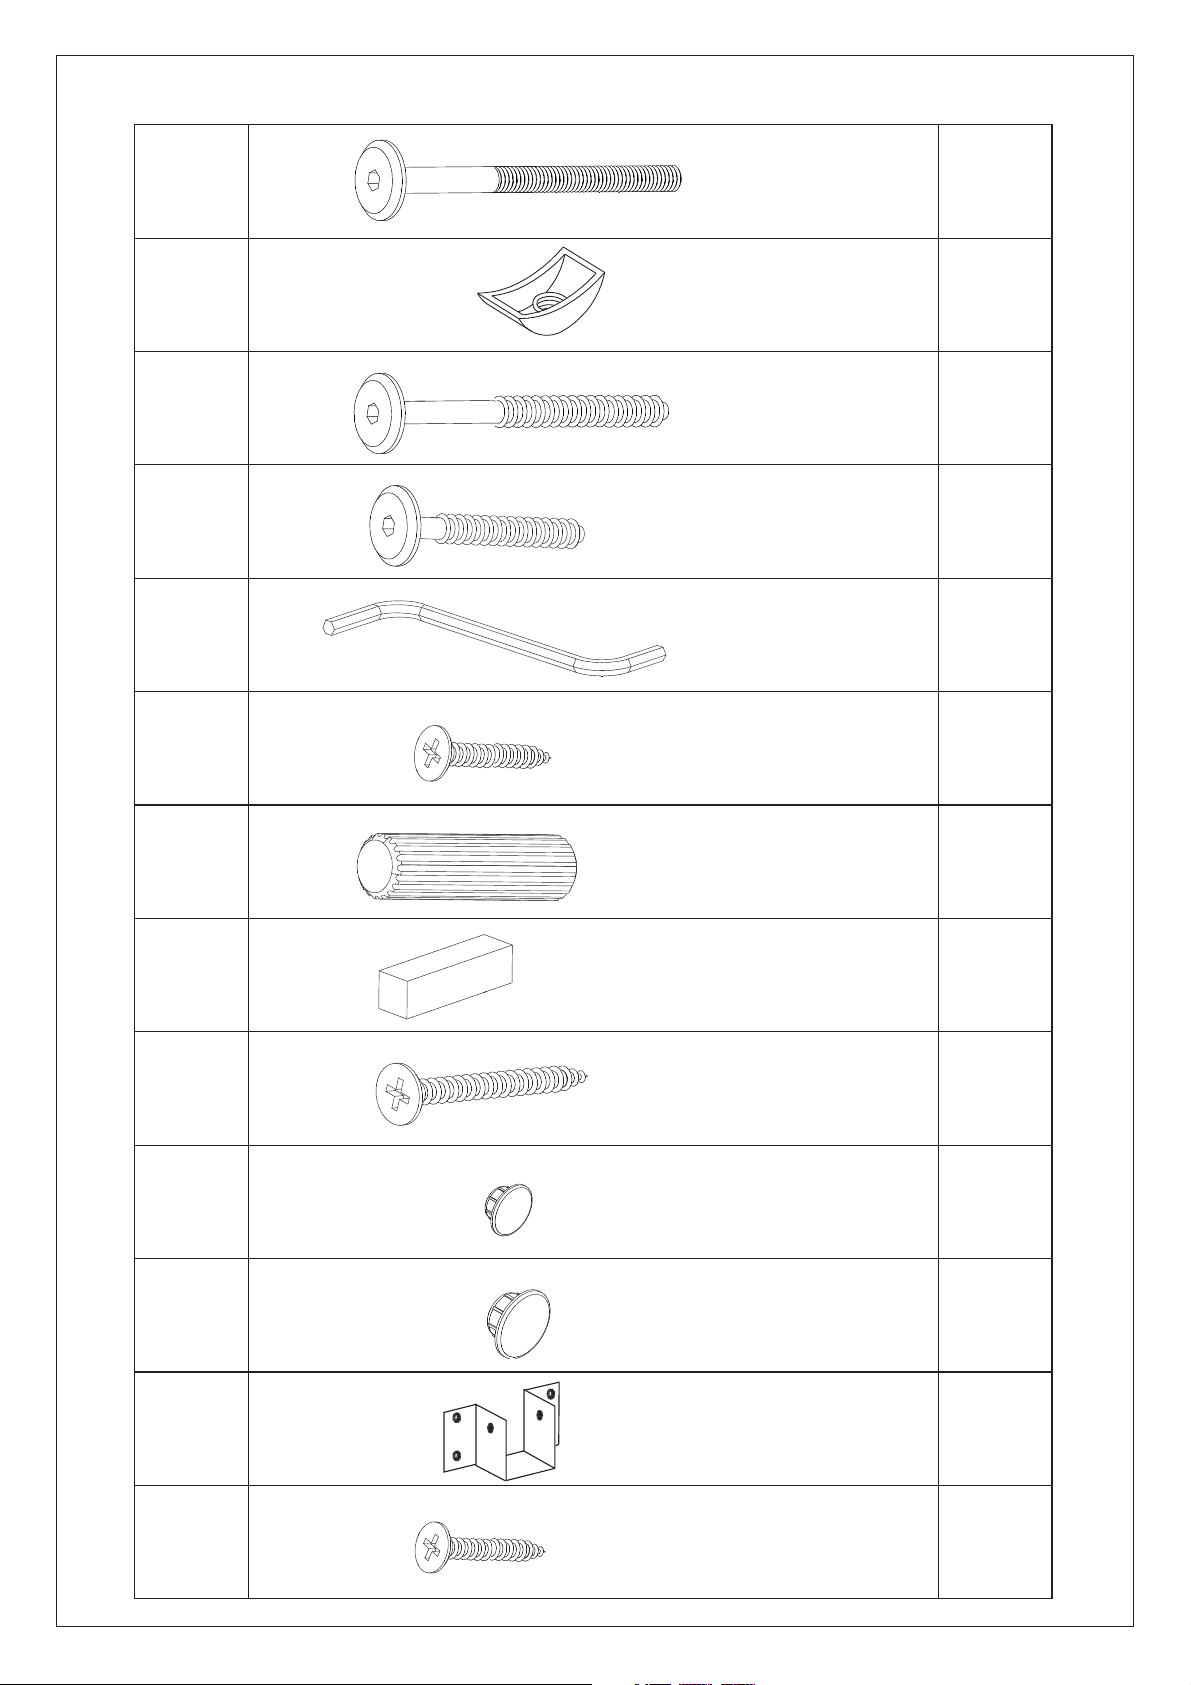
ATTENTION!!! HARDWARE BELOW (SEPARATE AND CONFER)
A
B
C
D
E
F
08
1/4" x 100
08
1/4"
14
7 100x
15
7 50x
01
34
4 x 30
G
H
I
J
K
L
Spacer
10 x 50
34
02
73mm
02
4 x 35
04
8mm
03
10mm
02
M
3/2 x 16
12
Pg 5/10
Page 6
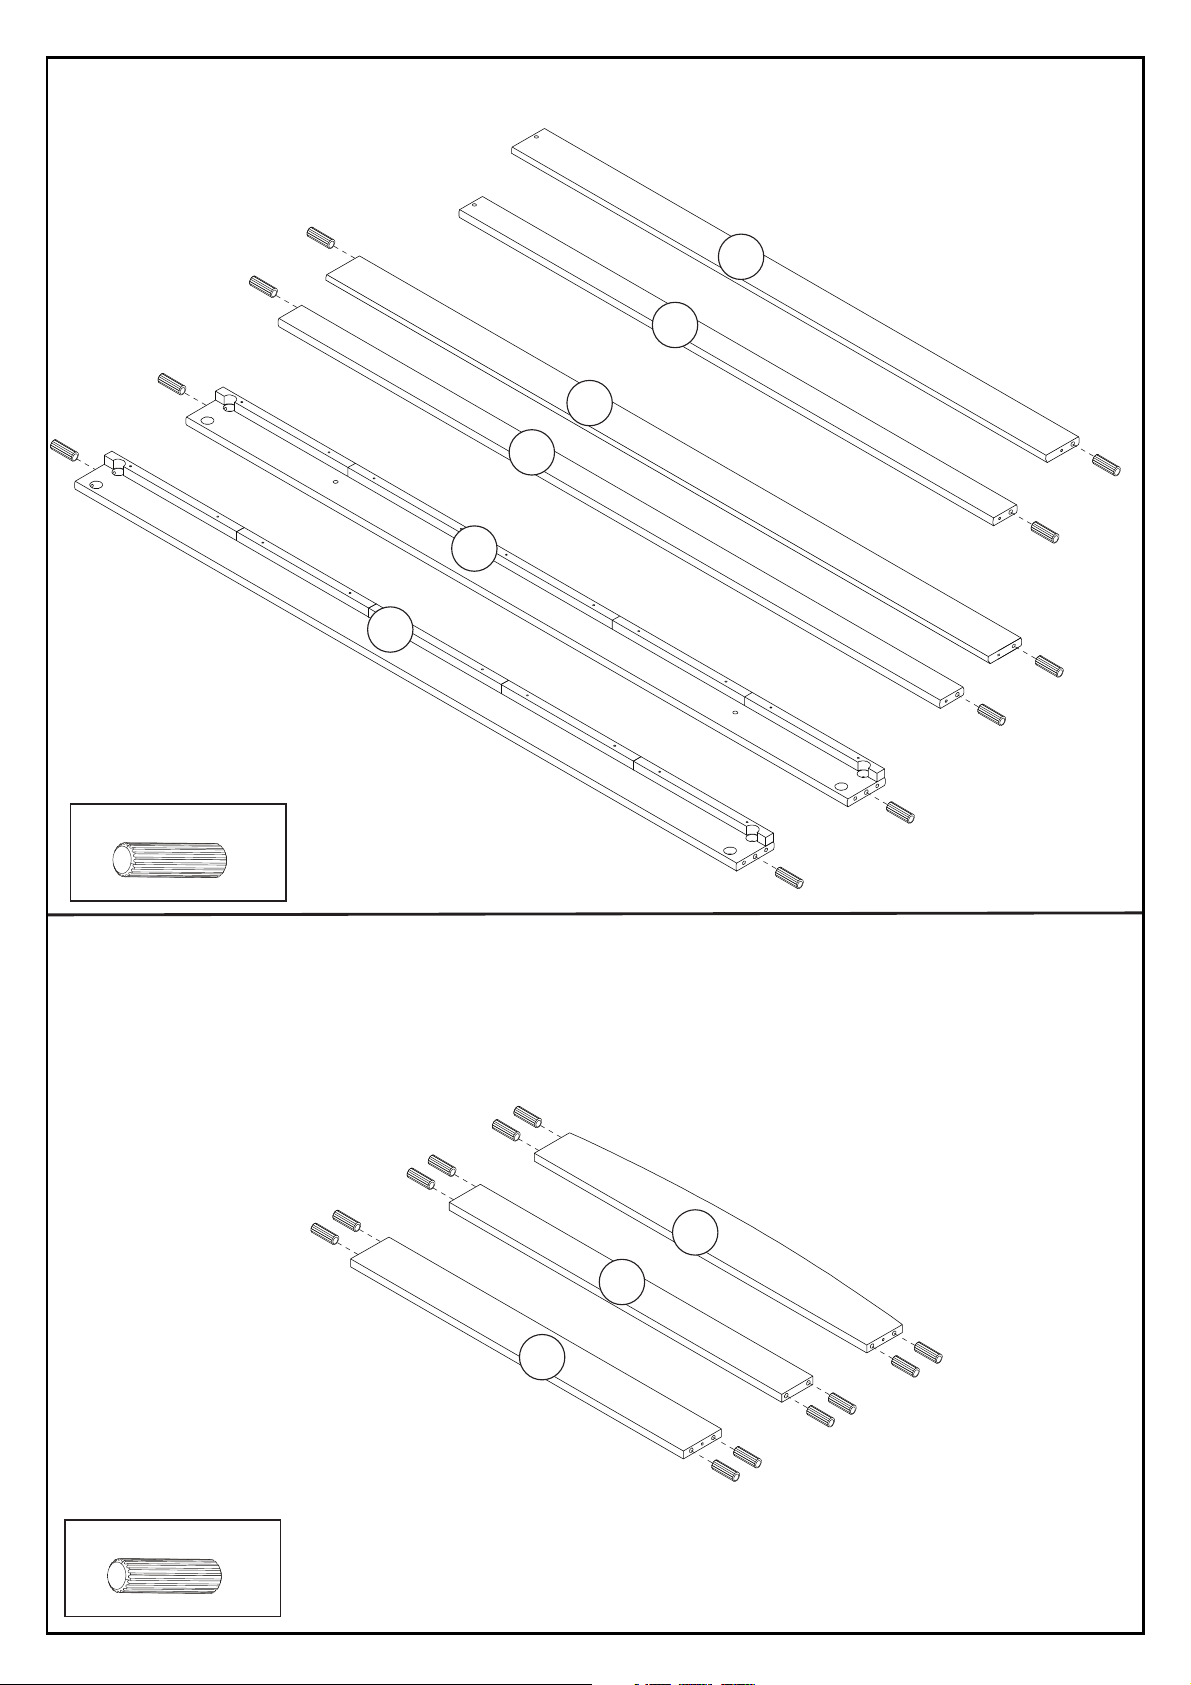
Step - 01
G
G
G
G
G
10x
07
06
08
1x
16
1x
17
1x
09
1x
G
G
G
G
G
Step - 02
G
G
G
G
G
G
05
2x
04
2x
G
03
2x
G
G
G
G
G
G
G
24x
Pg 6/10
Page 7
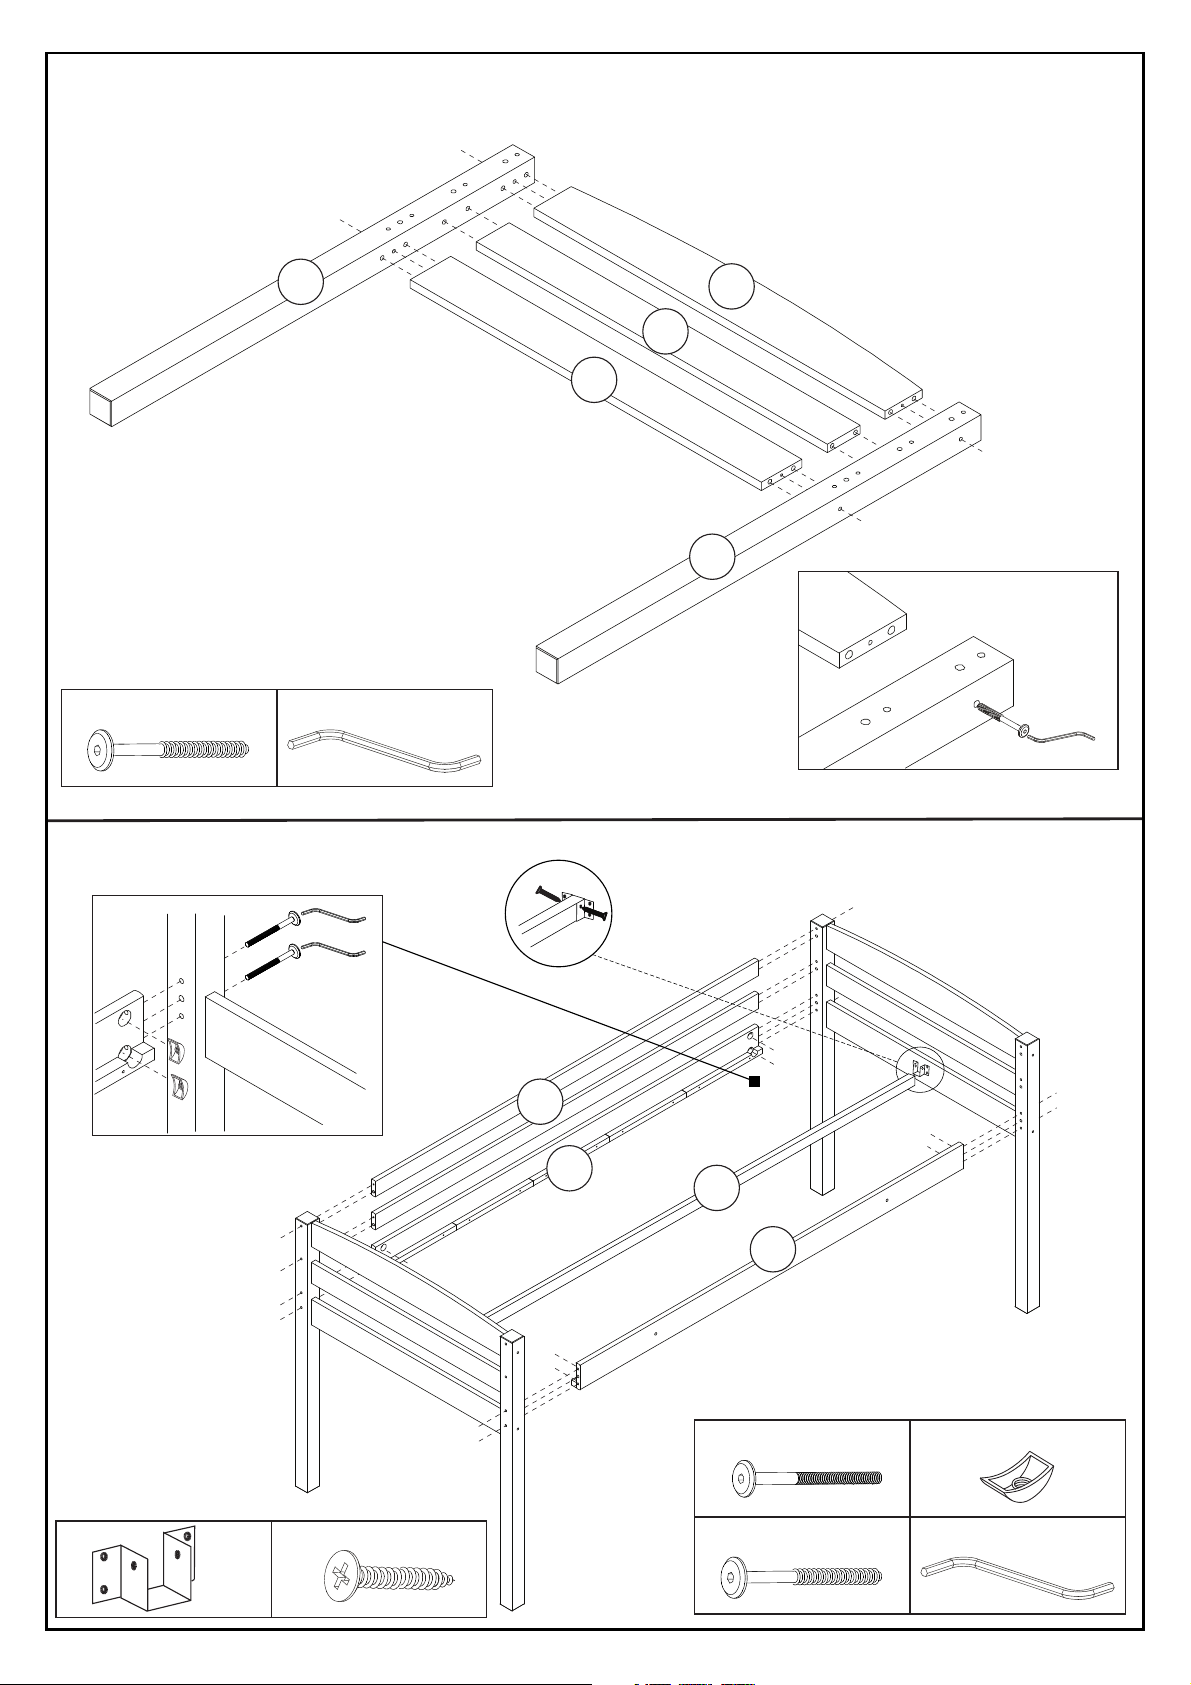
Step - 03
C+E
C+E
C
Step - 04
08x
02
E
01x
2x
05
04
03
01
C+E
C+E
C
E
B
C+E
C+E
A+E
A+E
A
E
B
A+E
A+E
M
08
B
B
07
M
17
A
B
B
06
C+E
08x
B
B
B
A+E
A+E
08x
L
02x
M
12x
C
04x
E
01x
Pg 7/10
Page 8
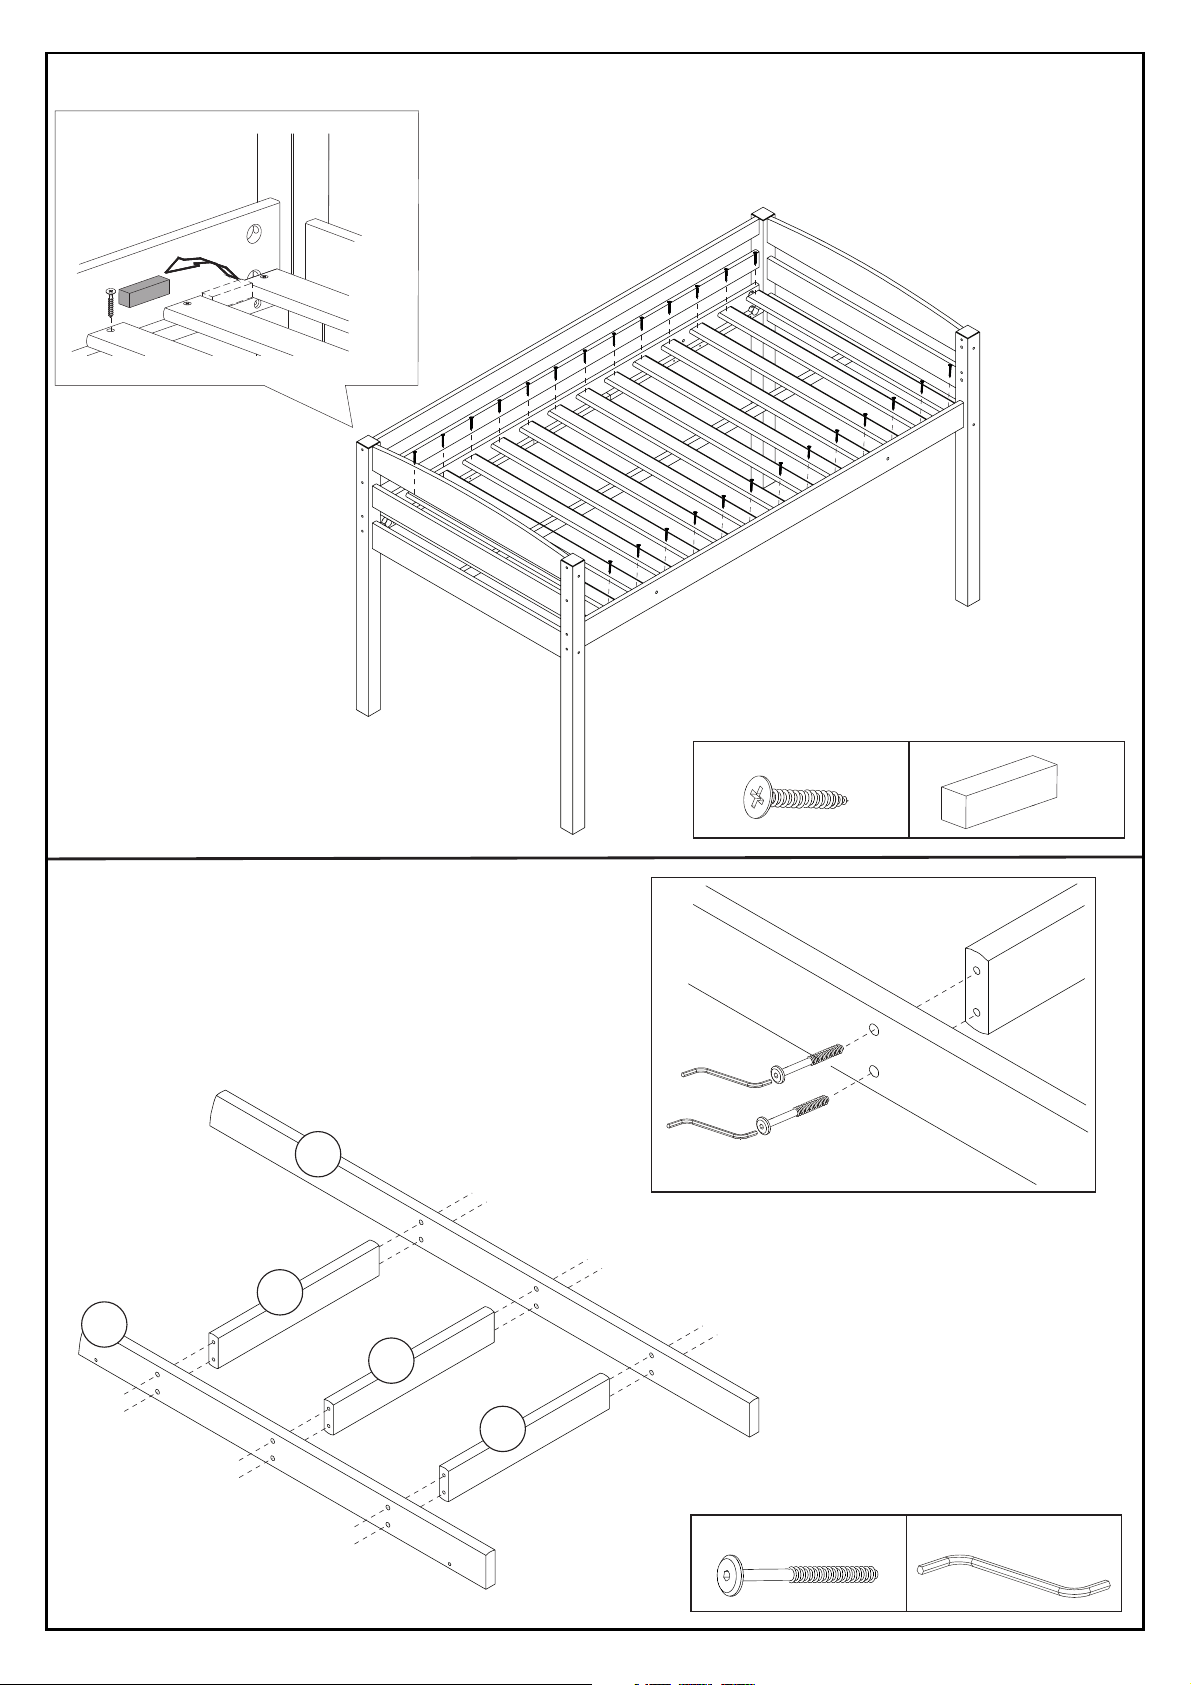
Step - 05
H
F
F
F
F
F
F
F
F
F
F
F
F
F
F
F
F
F
F
F
F
F
F
F
F
F
F
F
Step - 06
13
D
D
D
D
14
12
14
D
D
14
D
D
E
E
F
D
D
D
D
28x
H
02x
D
D
D
12x
E
01x
Pg 8/10
Page 9
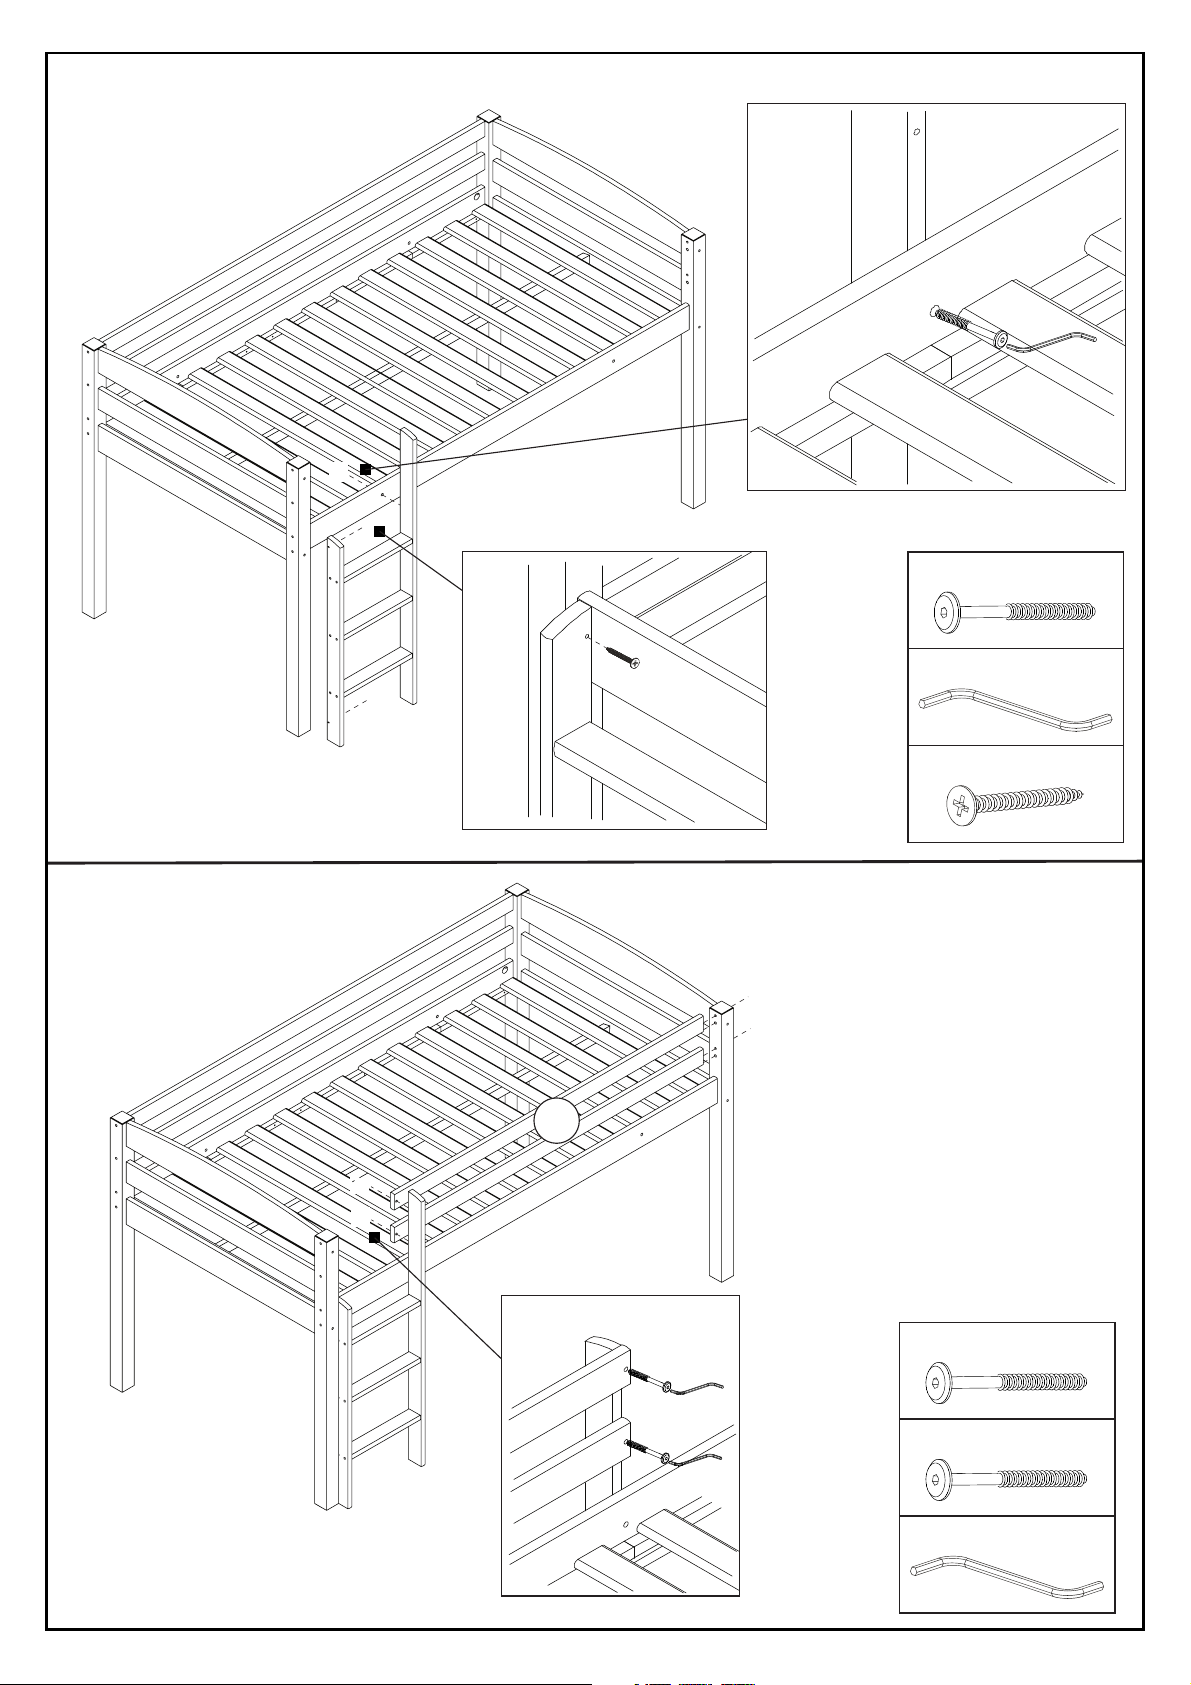
Step - 07
D
D
E
I
Step - 08
D
I
I
E
I
C+E
C+E
01x
01x
02x
09
D
D
D
D
E
E
C
D
E
02x
02x
01x
Pg 9/10
Page 10
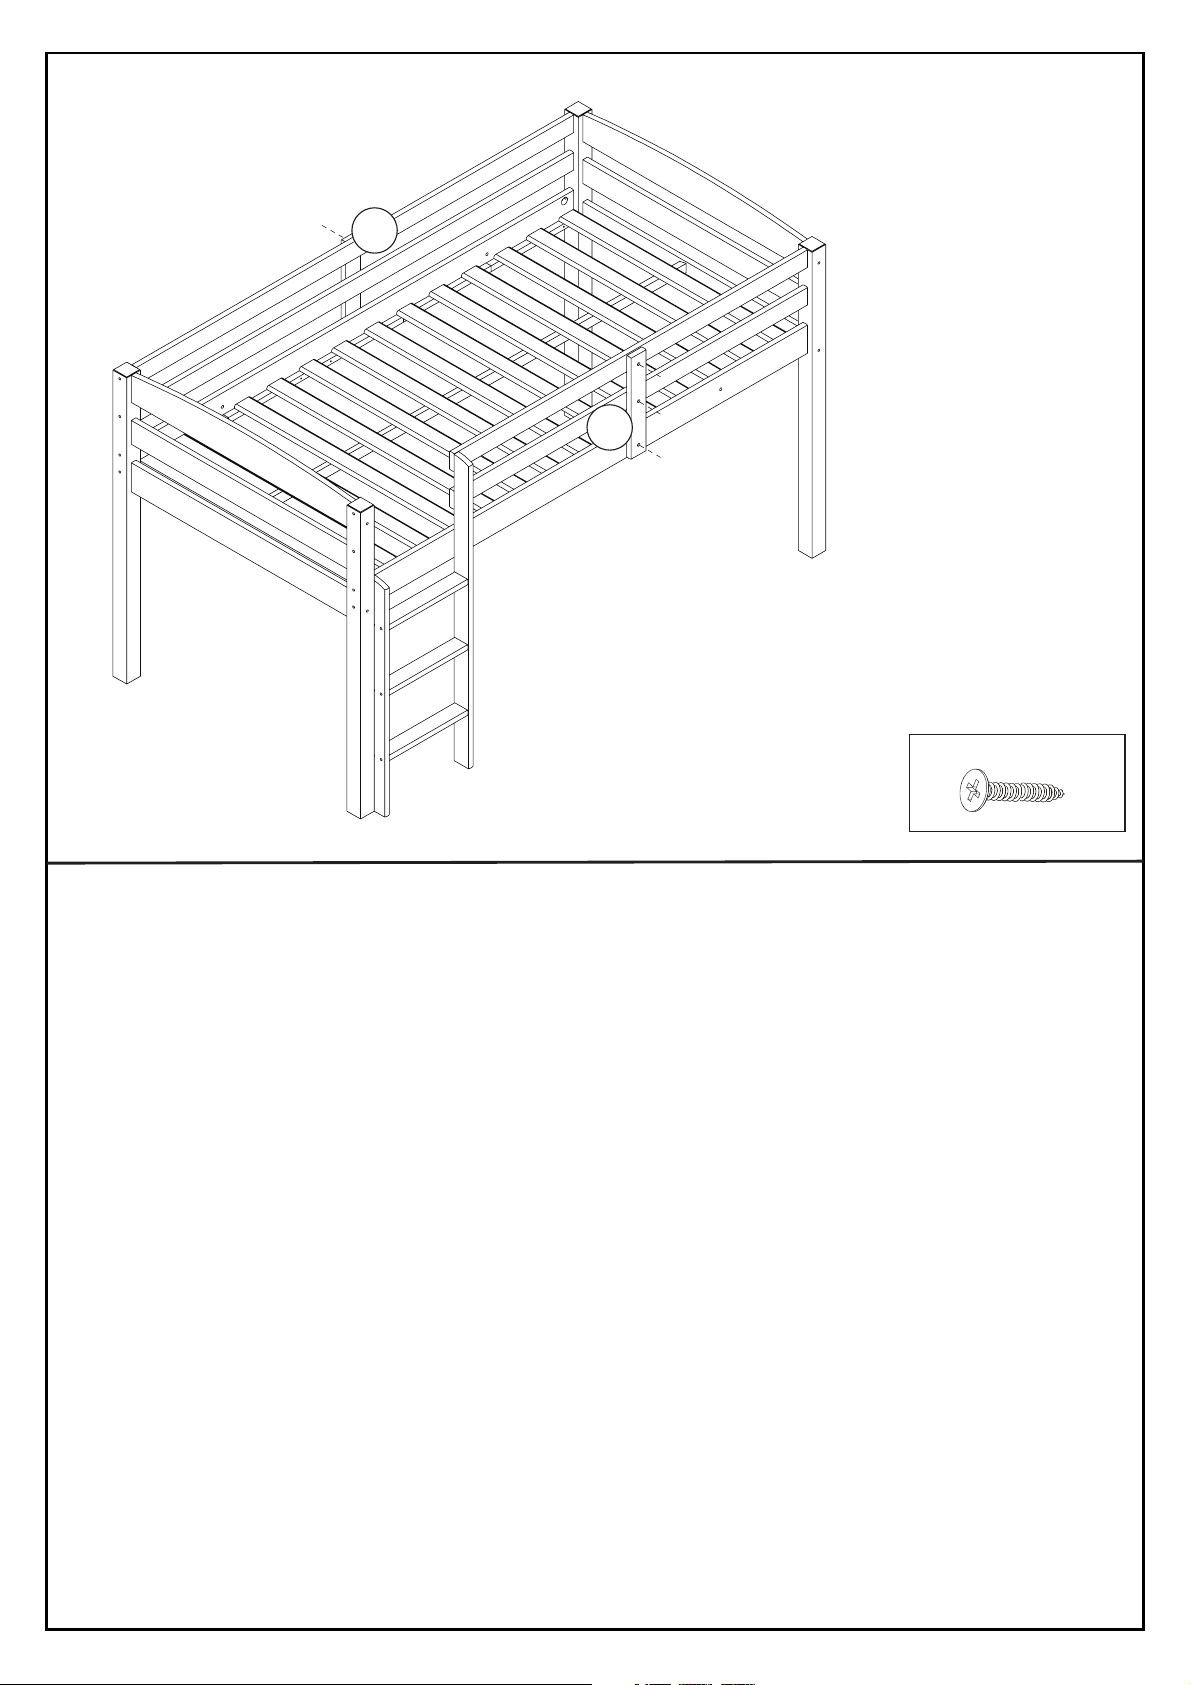
Step - 09
F
10
F
10
F
F
F
06x
Pg 9/10
Page 11
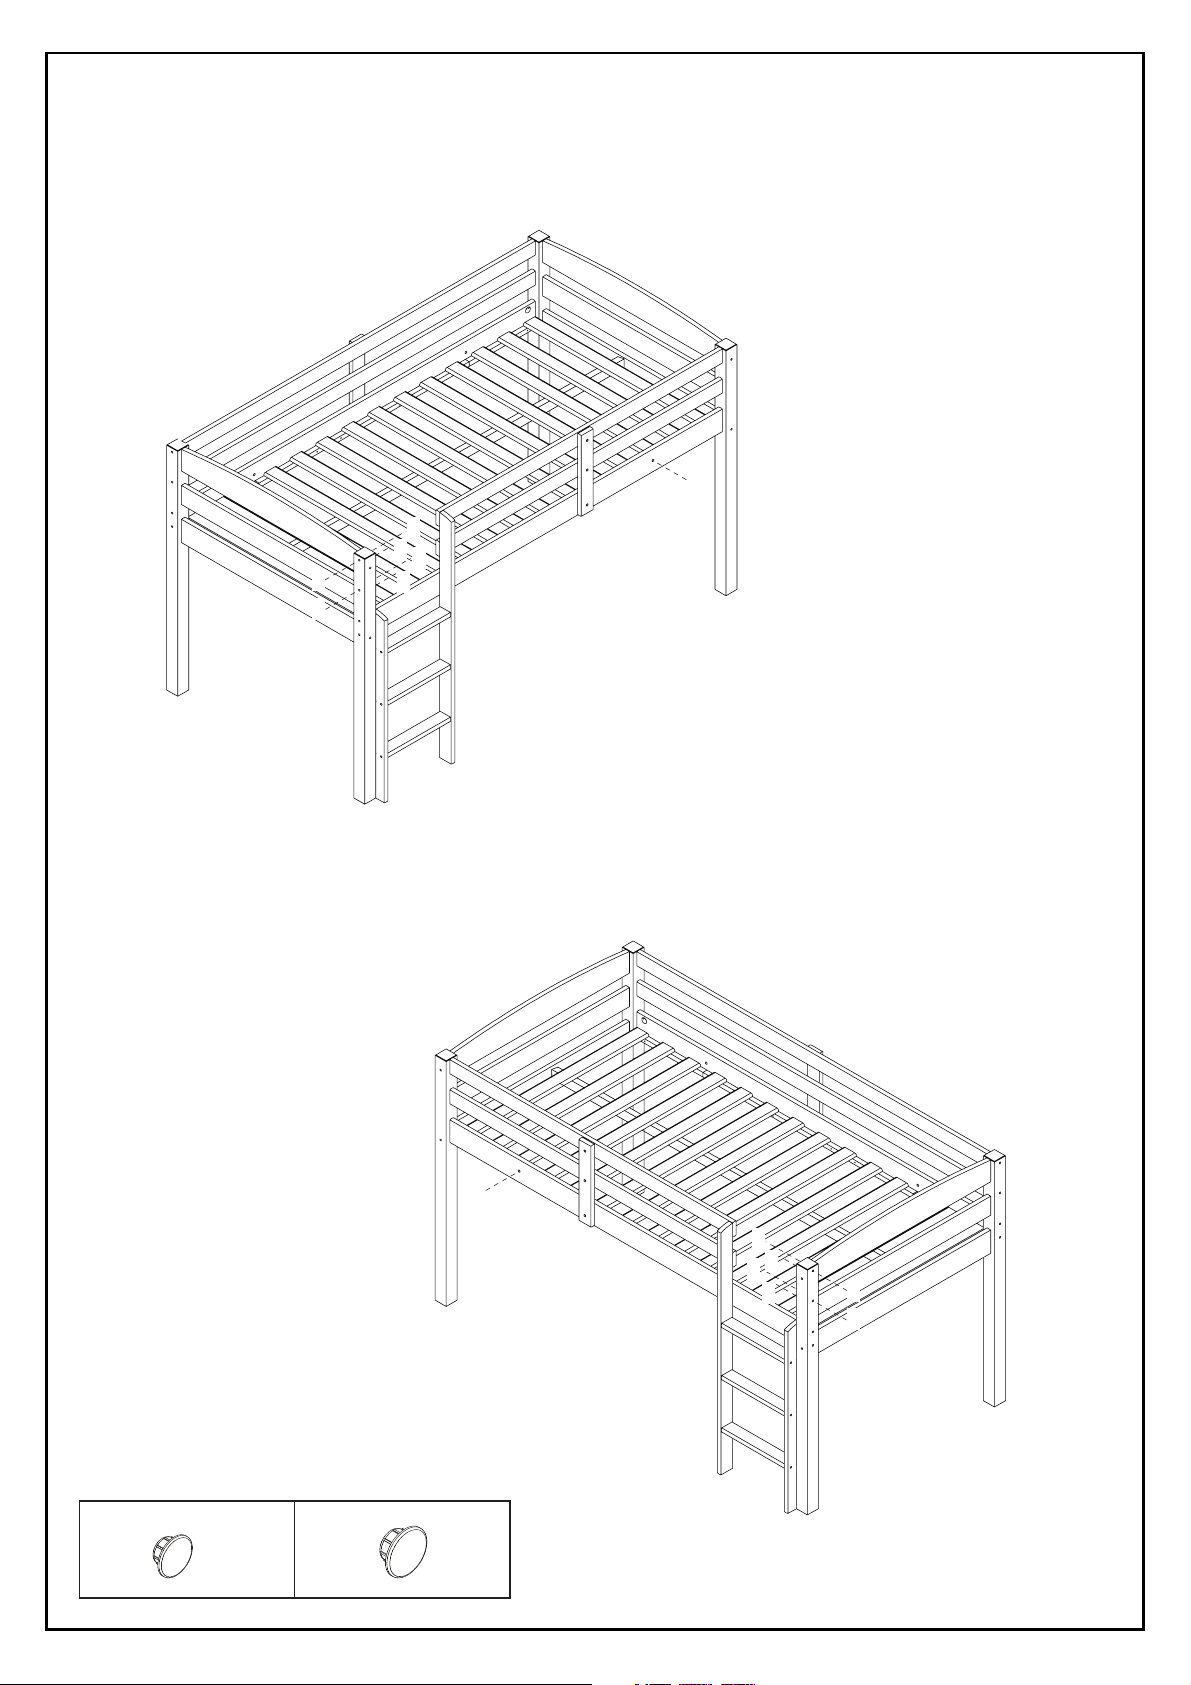
Step - 10
Option 01
J
J
K
J
J
J
K
Option 02
K
J
K
J
K
J
04x
K
03x
J
J
Pg 10/11
 Loading...