

Page 1
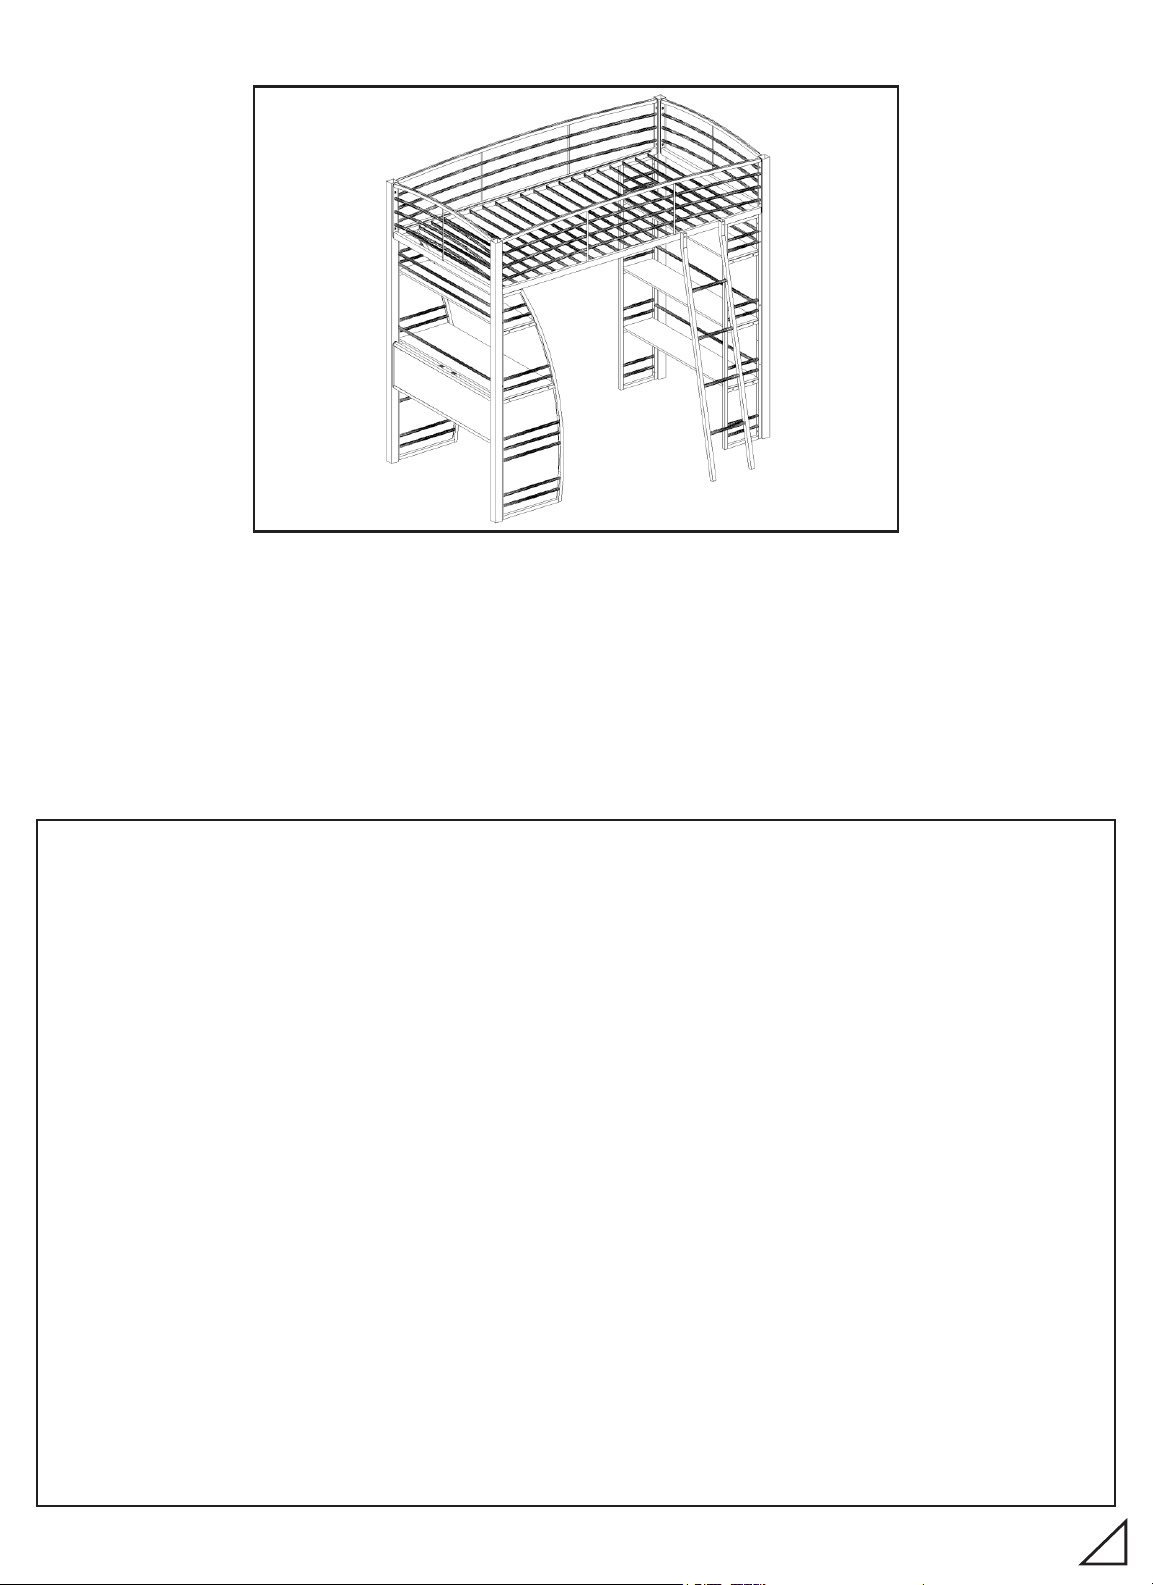
TWIN LOFT BED WHIT DESK AND SHELF
OWNER'S MANUAL
THANK YOU FOR PURCHASING THIS QUALITY PRODUCT.
BE SURE TO CHECK CAREFULLY FOR ALL PARTS FROM THE PARTS LIST, AS
SMALL PARTS MAY HAVE COME LOOSE INSIDE THE CARTON DURING SHIPMENT.
TAKE A MOMENT TO IDENTIFY, SEPARATE AND COUNT ALL THE PARTS AND
HARDWARE PRIOR TO ITS ASSEMBLY. REPLACEMENT PARTS MAY BE OBTAINED
FROM YOUR SUPPLIER.
ONLY USE PROPER MATTRESS SIZE 74”-75”(1880-1905MM) LONG BY 37½”-38½” (955-975MM)WIDE
WARNING
TO HELP PREVENT SERIOUS OR FATAL INJURIES FROM ENTRAPMENT OR FALLS:
FOLLOW THE INFORMATION ON THE WARNINGS APPEARING ON THE UPPER BUNK END
STRUCTURE AND ON THE CARTON.
DO NOT REMOVE THE WARNING LABEL FROM BED.
1. Always use the recommended size mattress or mattress support, or both, to help prevent the
likelihood of entrapment of falls.
2. Surface of mattress must be at least 5 in.(127mm) below the upper edge of guardrails.
3. Do not allow children under 6 years of age to use the upper bunk bed.
4. Periodically check and ensure that the guardrails, ladder and other components are in their proper
position, free from damage, and that all connectors are tight.
5. Do not allow horseplay on or under the bed and prohibit jumping on the bed.
6. Always use the ladder for entering and leaving the upper bunk.
7. Do not use substitute parts. Contact us for replacement parts.
8. Use of a night light may provide added safety precaution for a child using the upper bunk.
9. Always use guardrails on both long sides of the upper bunk. If the bunk bed will be placed next
to the wall, the guardrail that runs the full length of the bed should be placed against the wall to
prevent entrapment between the bed and wall.
10.The use of water or sleep flotation mattresses is prohibited.
11.STRANGULATION HAZARD---Never attach or hang items to any part of the bunk bed that are not
designed for use with the bed; for example, but not limited to, hooks, belts, and jump ropes.
PLEASE KEEP THESE INSTRUCTIONS FOR FUTURE REFERENCE
1
Page 2
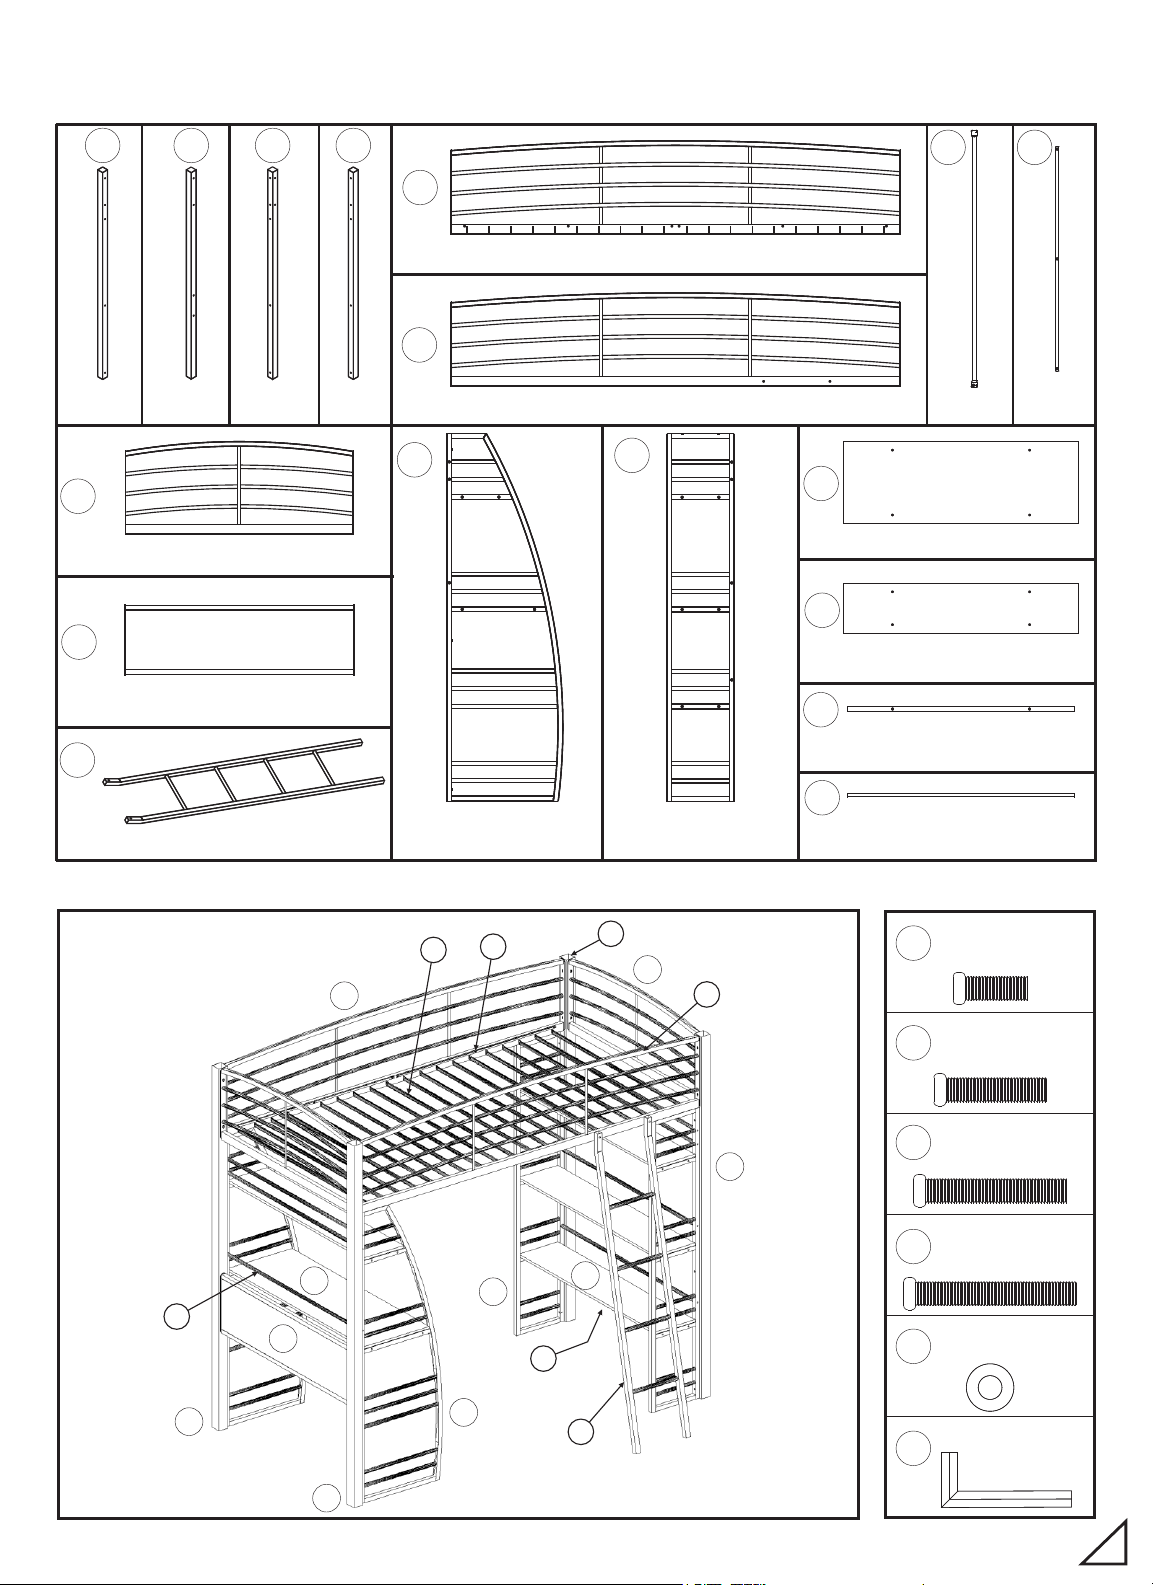
PARTS & HARDWARE LIST
(DRAWN NOT TO SCALE, SEE BELOW DIAGRAM FOR REFENCE)
A
POST
1 PC
POST
1 PC
POST
1 PC
I
SIDE GUARDRAIL 2 PCS
J
BACK PANEL 1 PC
K
CB D
POST
1 PC
L
E
F
REAR GUARDRAIL 1 PC
FRONT GUARDRAIL 1 PC
M
G
BED SLATS
20 PCS
N
DESK TOP 1 PC
O
SHELF 4 PCS
P
DESK/SHELF SU PPORT
10 PCS
H
LOC K SLATS
4 PCS
LADDER 1 PC
Q
J
N
E
DESK SIDE PANEL
2 PCS
G
H
O
M
P
SHELF SIDE PANEL
2 PCS
C
I
F
D
Q
DESK/SHELF RA IL
7 PCS
BOLT M6* 16
1
2
3
4
5
32 PCS
BOLT M6* 25
20 PCS
BOLT M6* 35
52 PCS
BOLT M6* 40
2 PCS
WASHER
2 PCS
B
A
L
K
ALLEN WRENCH
6
M5 1 PC
2
Page 3
1
1
1
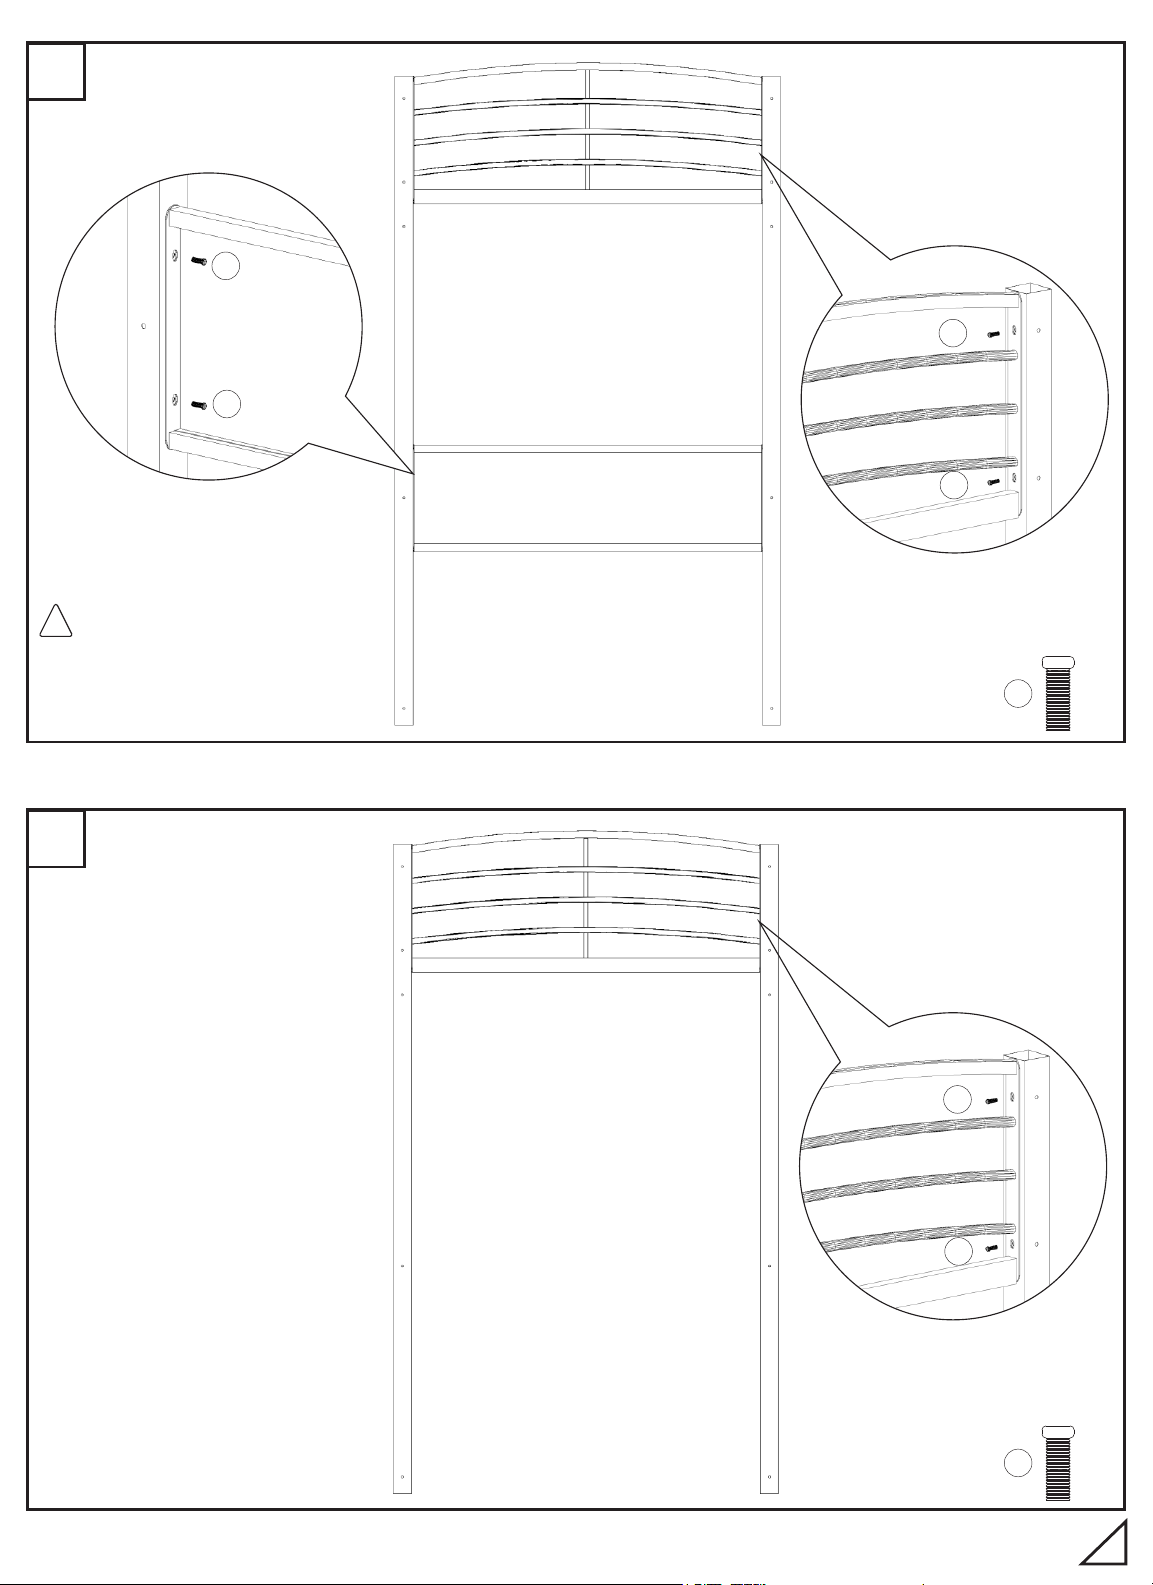
Do not tighten all bolts until
!
the product is fully assembled.
1
1
2
1
1
1
x 8
1
x 4
3
Page 4
3
1
1
4
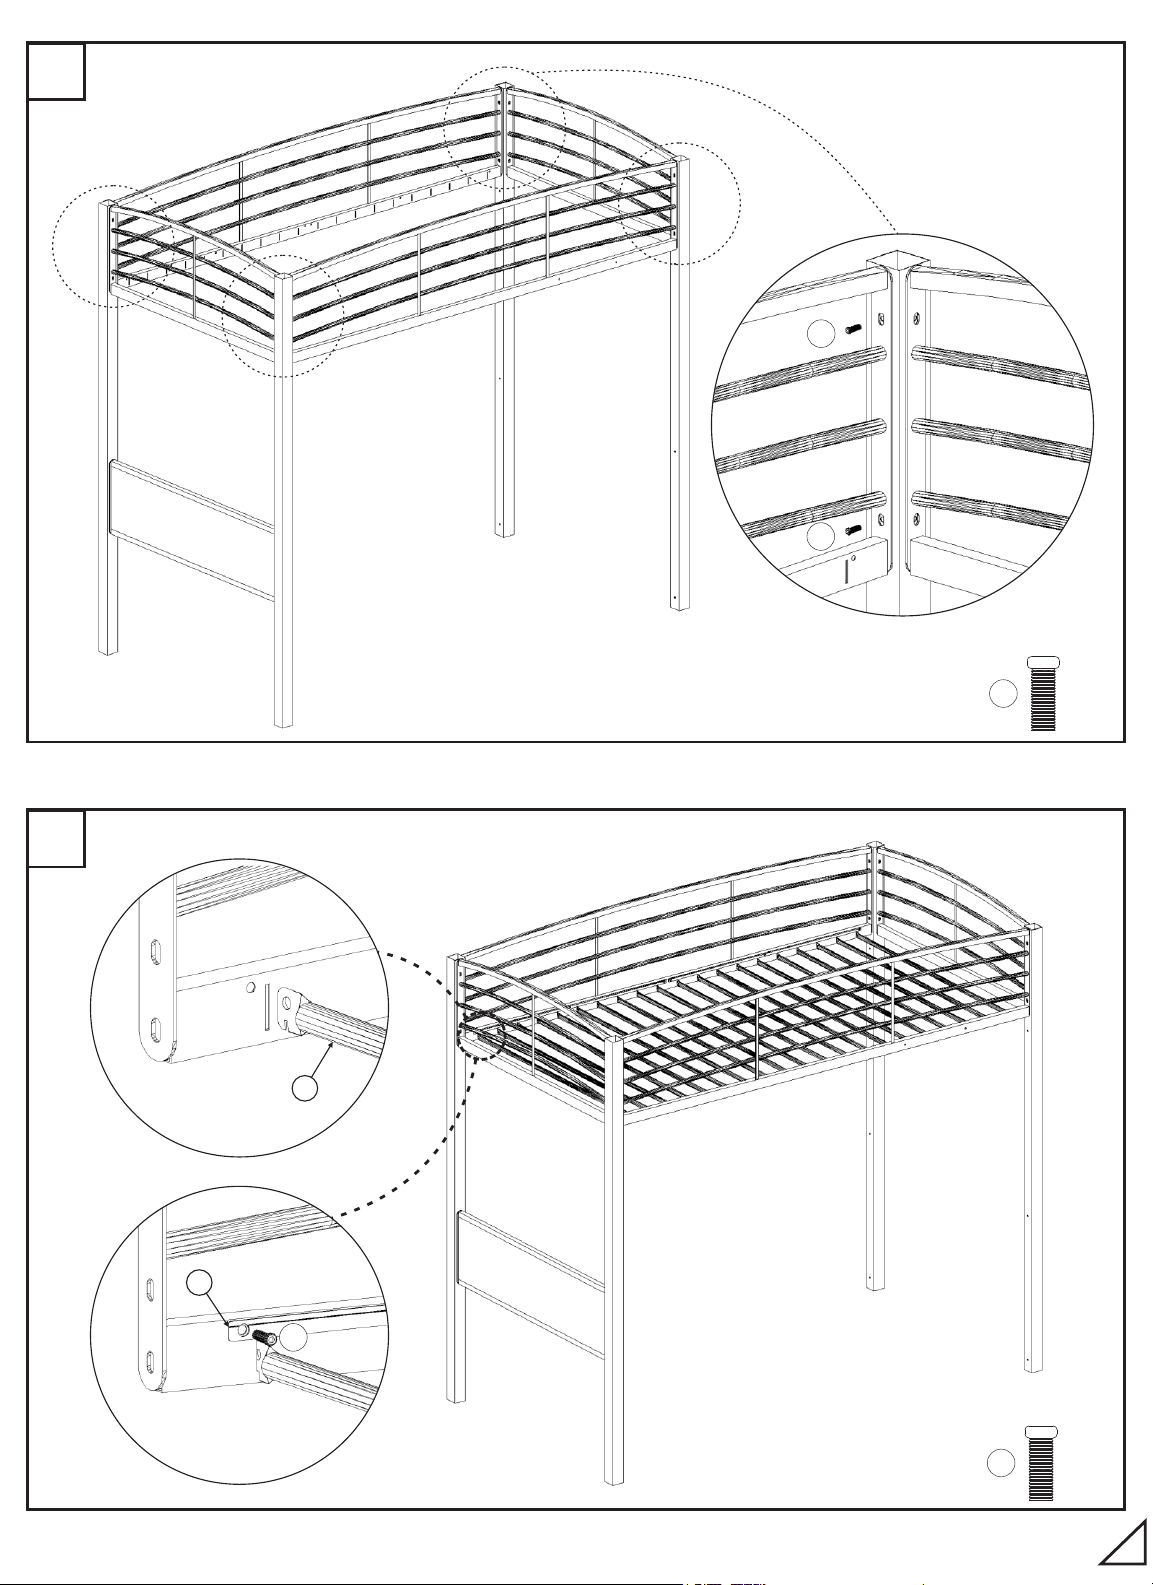
STEP 1
G
1
x 8
H
STEP 2
1
1
x 12
4
Page 5
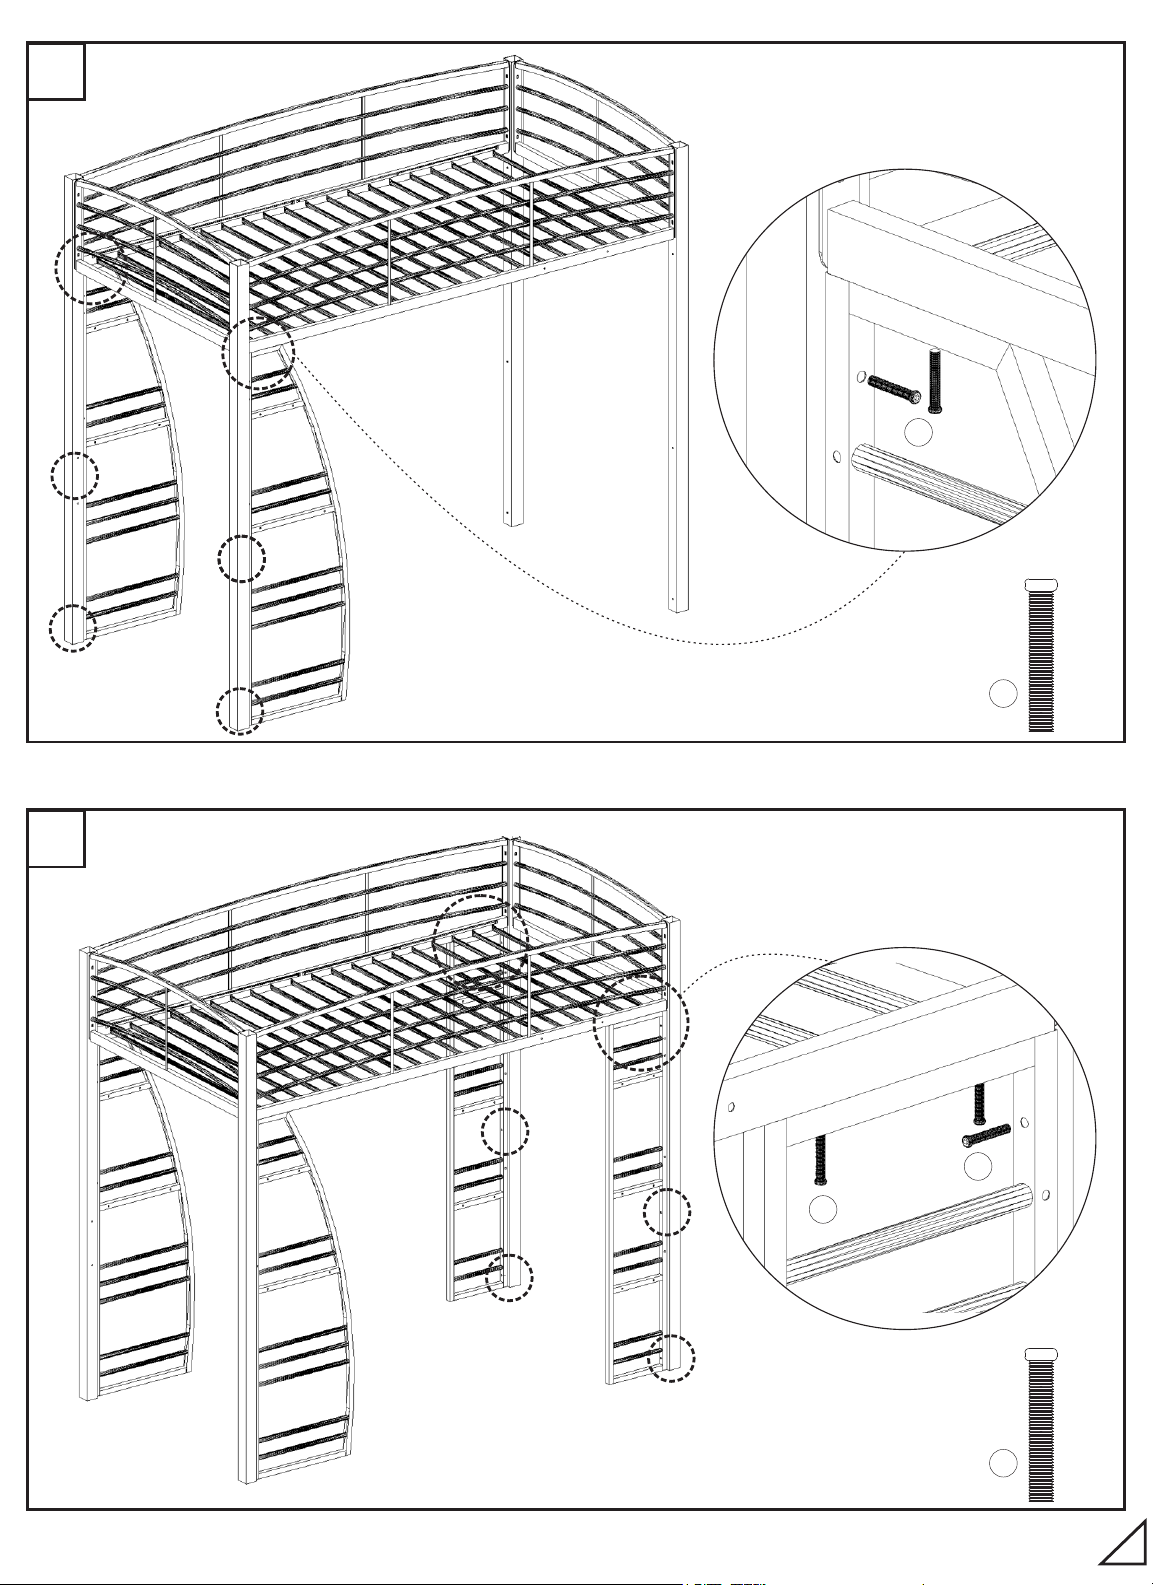
5
3
6
3
3
3
x 8
3
x 10
5
Page 6
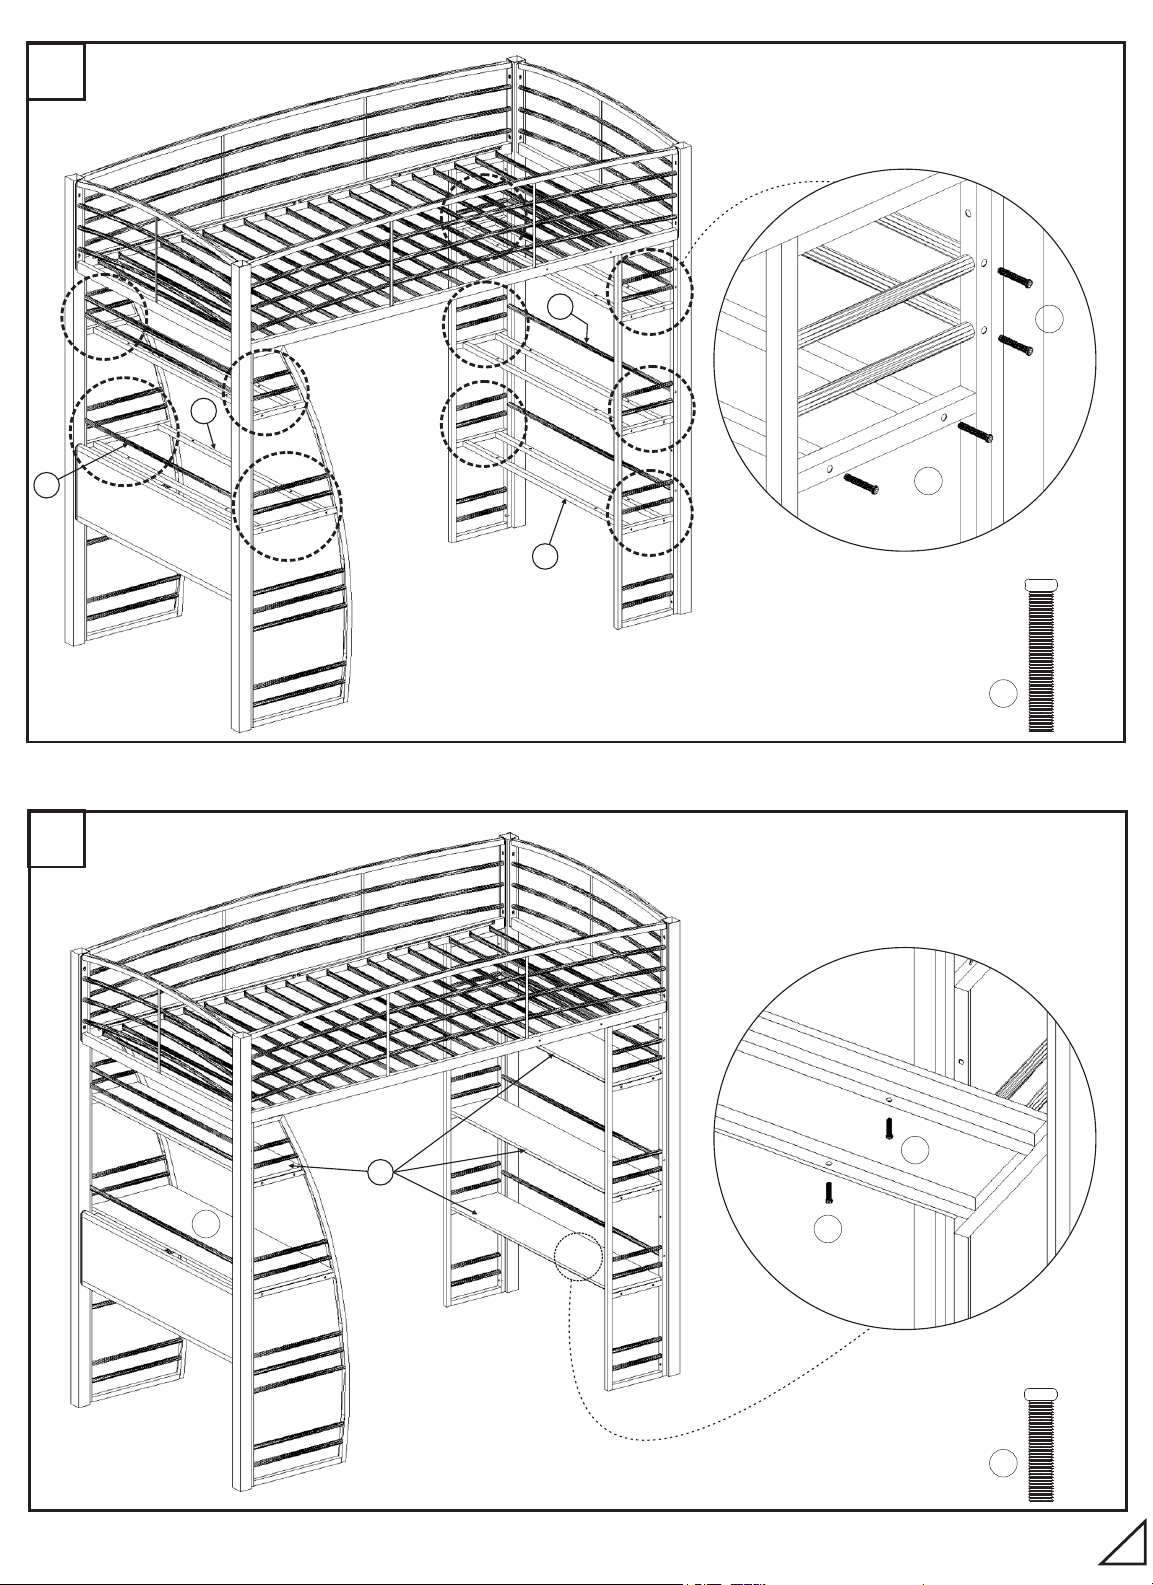
7
Q
8
P
P
Q
3
3
3
x 34
N
O
2
2
2
x 20
6
Page 7
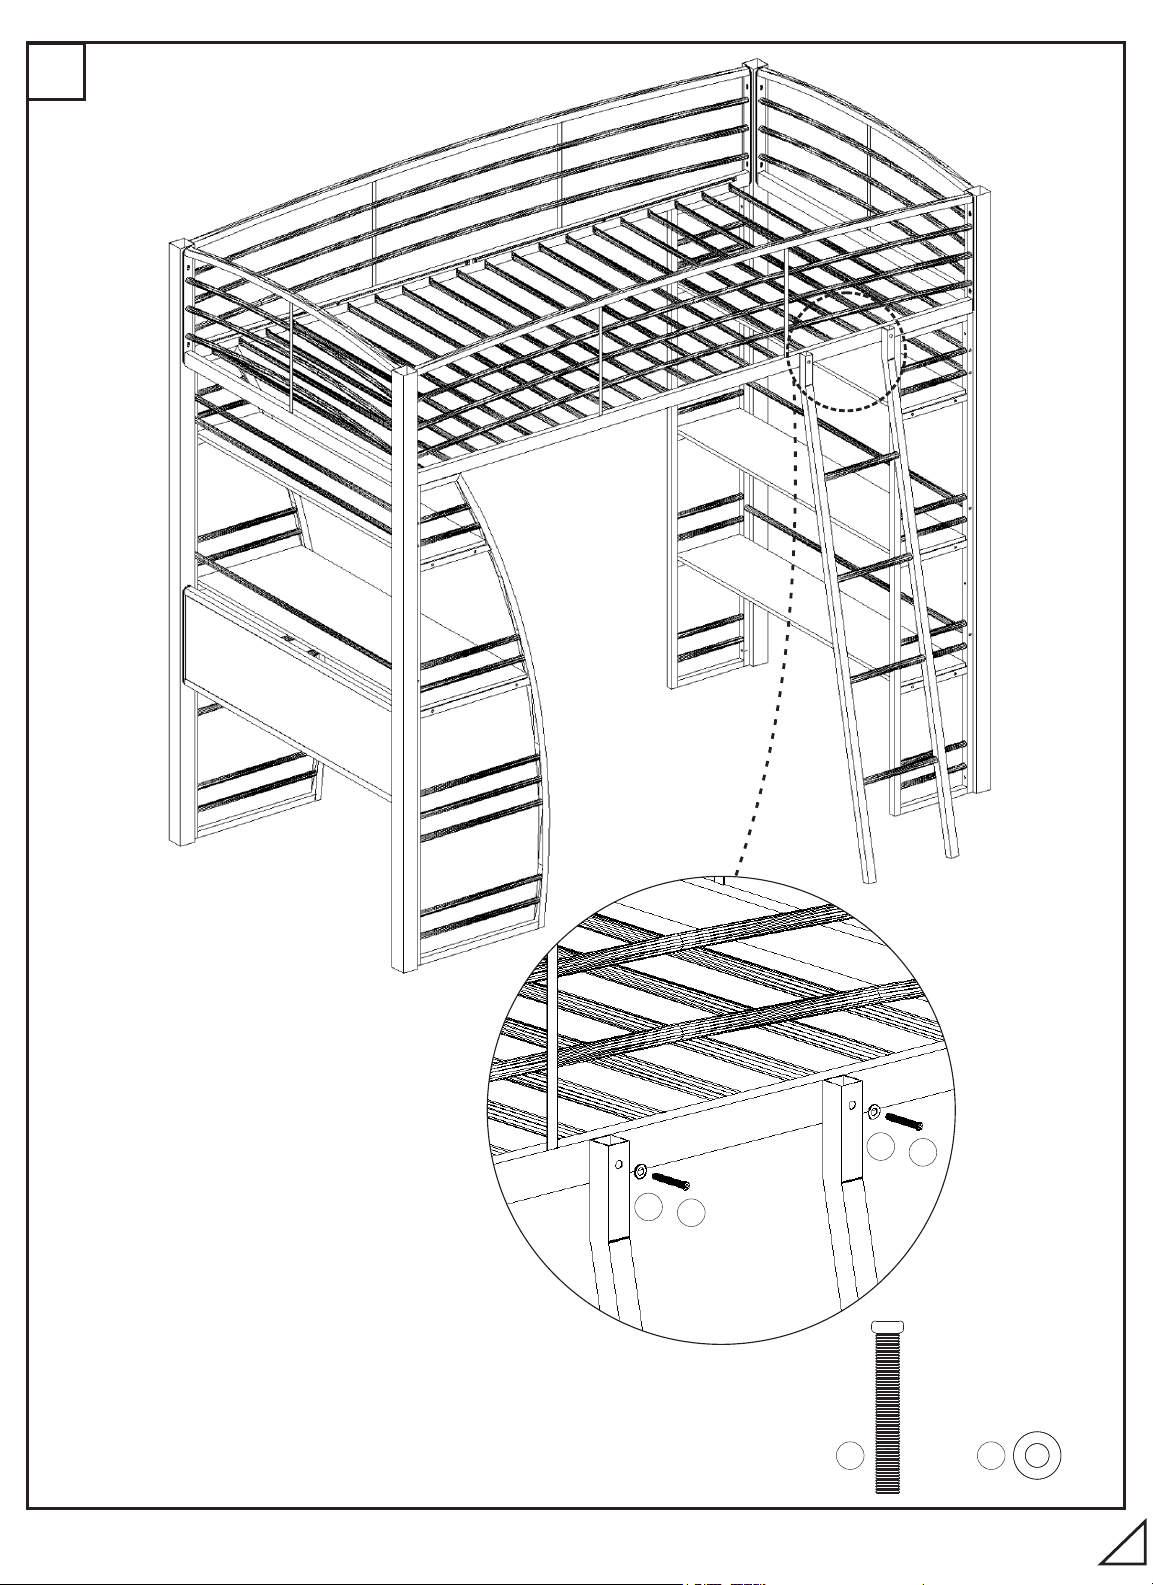
9
5
Tighten all bolts and secure all connections.
CONGRATULATION!
Your loftbed is ready for use and for your enjoyment.
5
4
4
4
x 2
5
x 2
7
 Loading...