

Page 1
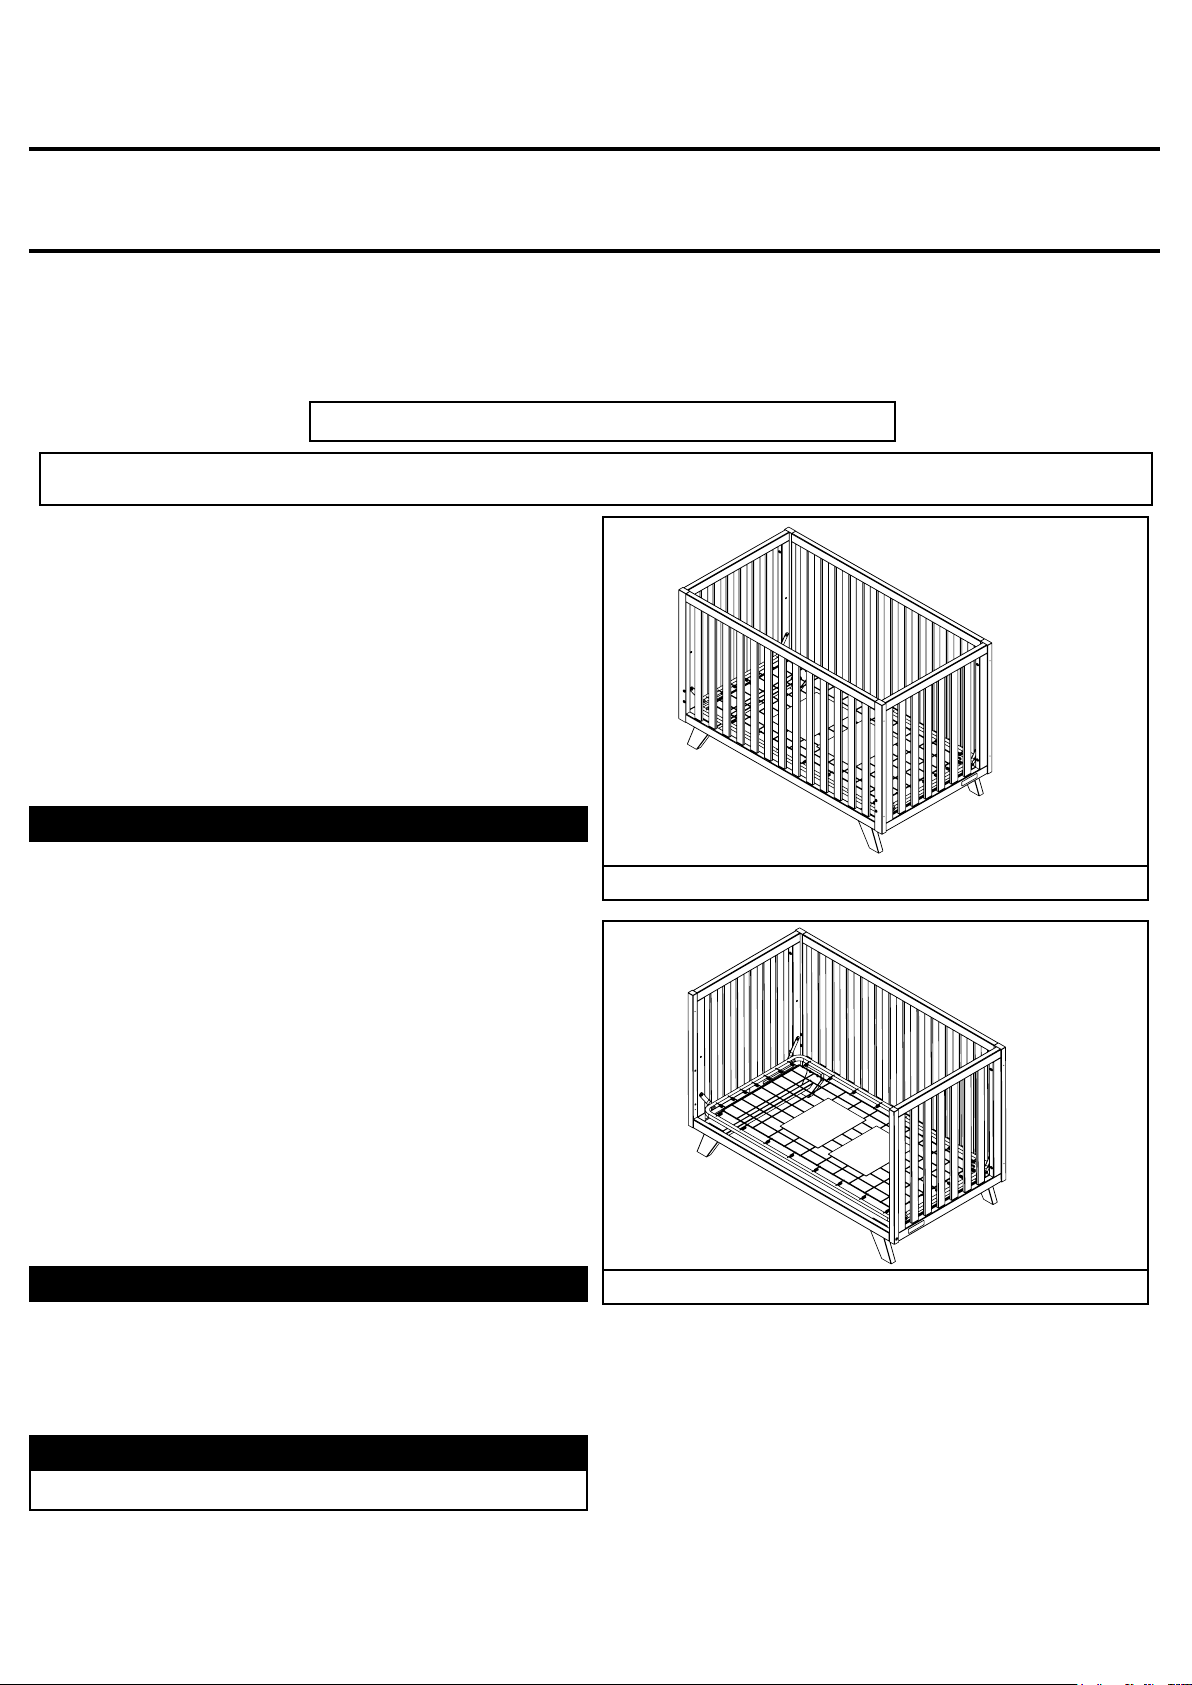
4-in-1 Convertible Crib
KEEP INSTRUCTIONS FOR FUTURE USE
THIS IS THE ASSEMBLY INSTRUCTIONS FOR CRIBS SOLD IN THE UNITED STATES
.
ASSEMBLY ASSISTANCE
Assembled as Crib
ASSEMBLY INSTRUCTIONS
• Adult assembly required.
• Read all instructions BEFORE assembly and USE
of product.
• Unpack carton, remove packing materials,
including poly bag. Identify and check all parts.
SUGGESTED TOOLS
#2 Medium Straight Screwdriver
Assembled as Toddler Bed
1
Page 2
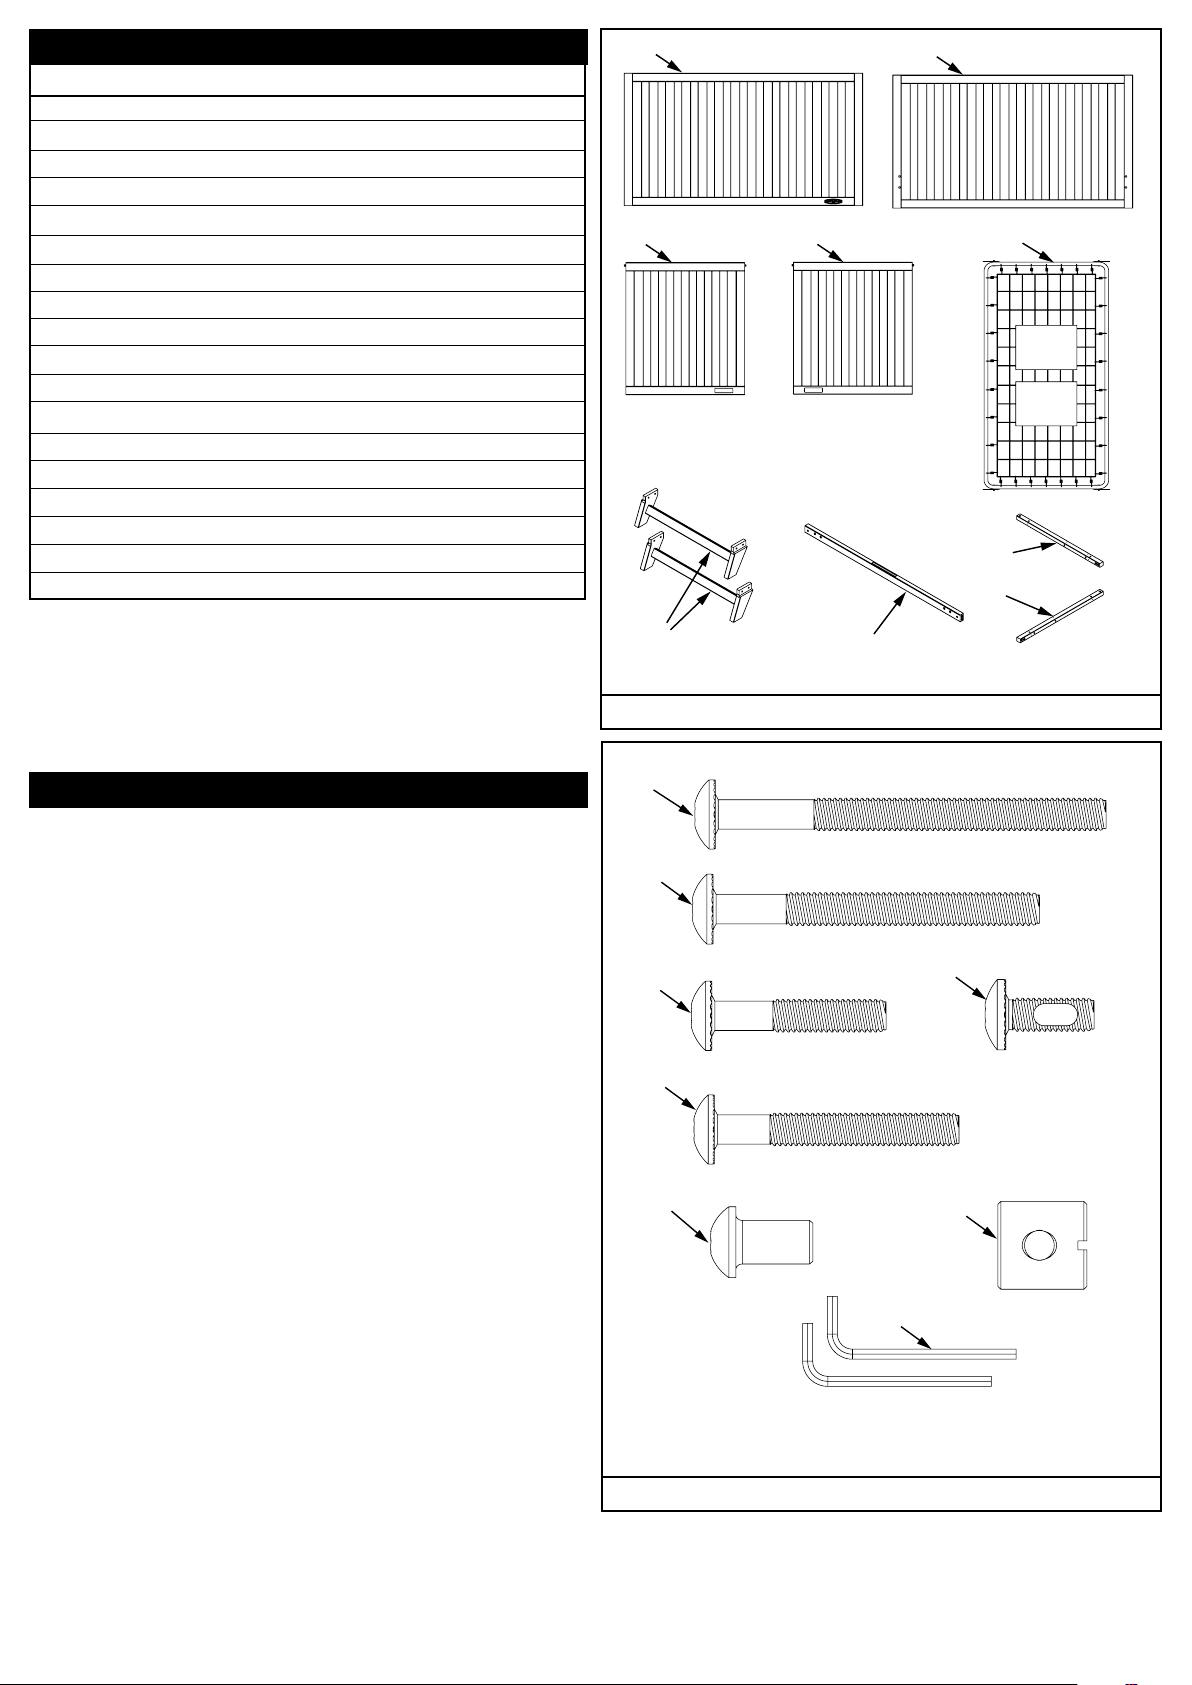
PARTS LIST
Part Description
A. Long Side Assembly
B. Long Headboard Assembly
C. Head Assembly
D. Foot Assembly
E. Spring
F. Leg Assembly
G. Toddler Bed Rail
H. Toddler Post Headboard
I. Toddler Post Footboard
Quantity
1
1
1
1
1
2
1
1
1
C
A
D
B
E
J. Allen Head Bolt 6mm x 70 mm
K. Allen head Bolt 6mm x 57mm
L. Allen Head Bolt 6mm x 32mm
M. Allen Head Bolt 6mm x 16mm
N. Allen Head Bolt 6mm x 45mm
O. Connector Nut 6mm
P. Joint Connector Nut 6mm
Q. Allen Wrench 4mm
2
8
8
8
4
4
2
2
PREPARATION
Carefully remove and lay out all hardware and parts.
Check quantities and match the parts list.
Construct crib on an even at oor.
Note: during the assembly process whenever
using screws or bolts, check each with the parts list
by letter and size identication. Place each screw
or bolt on the diagram of the item which is sketched
actual size. Be sure to use the proper size specied
in the assembly directions. If any parts are missing
or broken or you need assistance with assembly.
The Allen Head Bolt (M) has a friction enhancing
patch on the thread which may cause resistance
during tightening
DO NOT Substitute Parts!
J
K
L
F
N
H
I
G
Crib Parts
M
2
O
P
Q
Hardware Package
Page 3
STEP 1
B
C
K
O
M
M
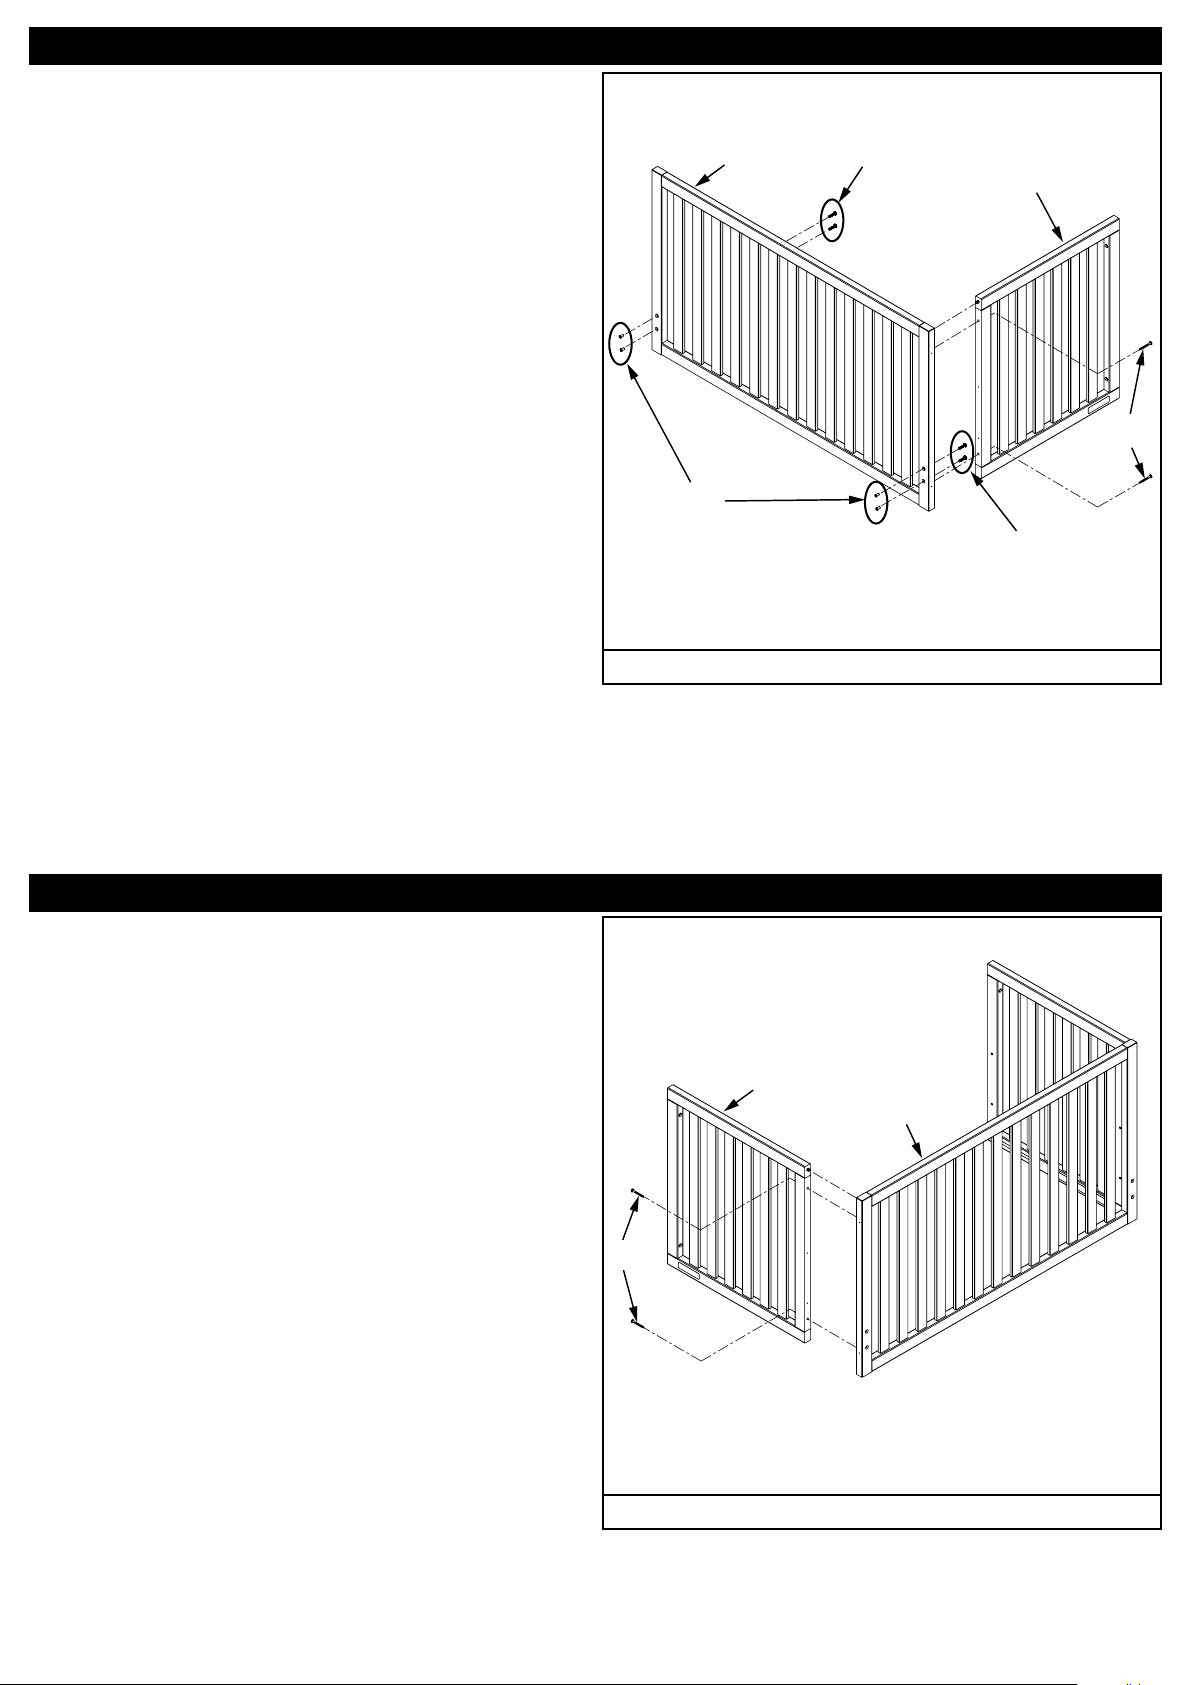
Construct Long Headboard Assembly to
Head Assembly:
Fill unused holes in Long Headboard Assembly with
Connector Nuts (O) and Allen Head Bolts (M).
Align Long Headboard Assembly (B) with Head
Assembly (C) making sure the suffocation label on
bottom rail of (C) is facing out. Insert Allen Head
Bolts (K) into Head Assembly (C). Snug bolts into
Long Headboard Assembly (B).
Tighten all Bolts securely.
See Figure 1.
STEP 2
Construct Long Headboard Assembly to
Foot Assembly:
Align Long Headboard Assembly (B) with Foot
Assembly (D) making sure that suffocation label on
bottom rail of (D) is facing out. Insert Allen Head
Bolts (K) into Foot Assembly (D). Snug bolts into
Long Headboard Assembly (B).
Tighten all Bolts securely.
See Figure 2.
Figure 1
D
B
K
Figure 2
3
Page 4
STEP 3
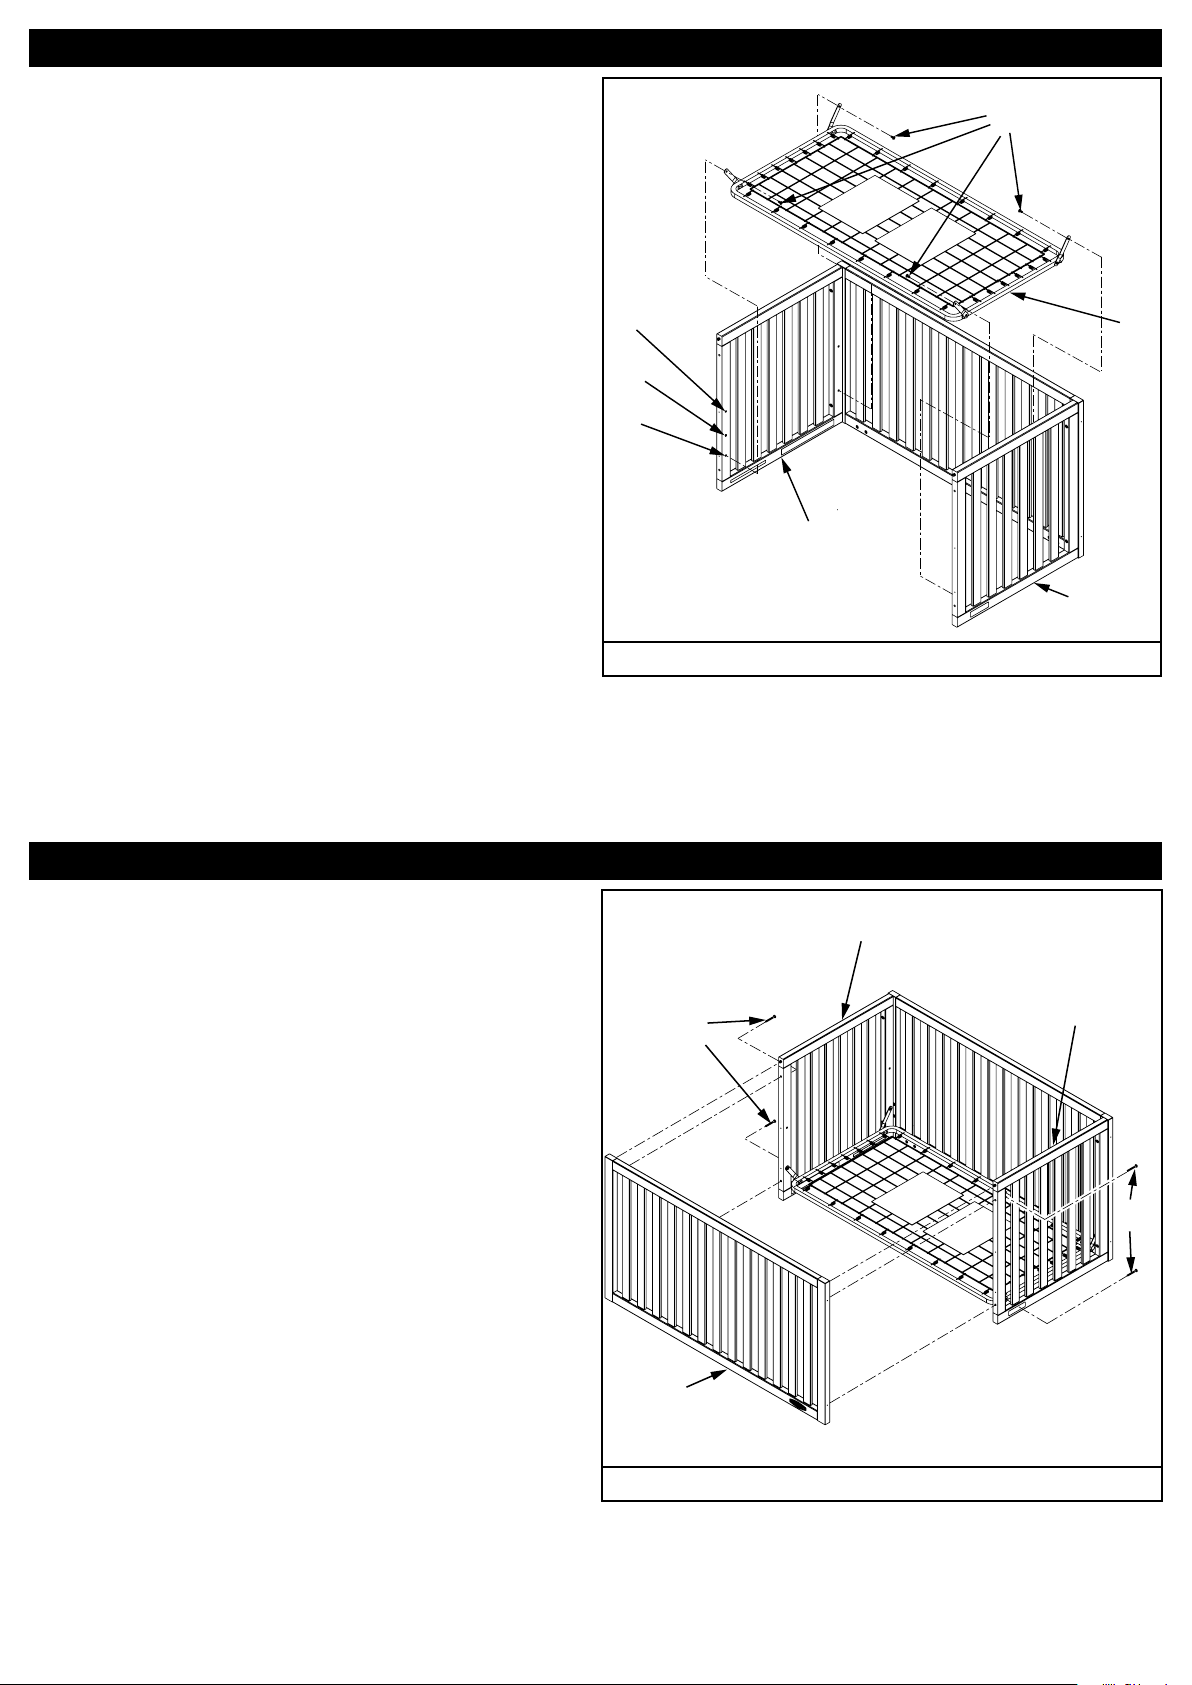
Add Mattress Spring to crib.
There are 3 positions for the Spring (E) shown as
(1), (2) and (3). Refer to warning section to
determine appropriate height for the intended child.
The position must be the same as for all the
brackets attached to the crib.
Note: Pouches containing warnings and instructions
face up on top surface of spring.
Position tabs on spring at approximately a 45
degree angle. The Spring (E) is lowered into the
crib. Take care not to scratch the wood with the
metal spring. Align the spring brackets with the
holes in the crib at the desired height. Insert
Allen Bolt (M) into hole in spring brackets from
inside of crib then into threaded insert at correct
height hole in the crib.
Tighten all bolts securely with Allen Wrenches.
To Adjust height of Spring (E) remove Bolts (M).
Then relocate Spring (E) to new height adjustment
level and install Bolts (M) as described in previous
paragraph.
1
2
3
M
E
C
D
Figure 3
See Figure 3.
STEP 4
Assemble Long Side Assembly to crib.
Align Long Side Assembly (A) with Foot
Assembly (D) and Head Assembly (C). Insert Allen
Head Bolts (K) through Head and Foot Assemblies
and snug into the Long Side Assembly (A).
Tighten all bolts securely.
See Figure 4.
C
D
K
K
4
A
Figure 4
Page 5
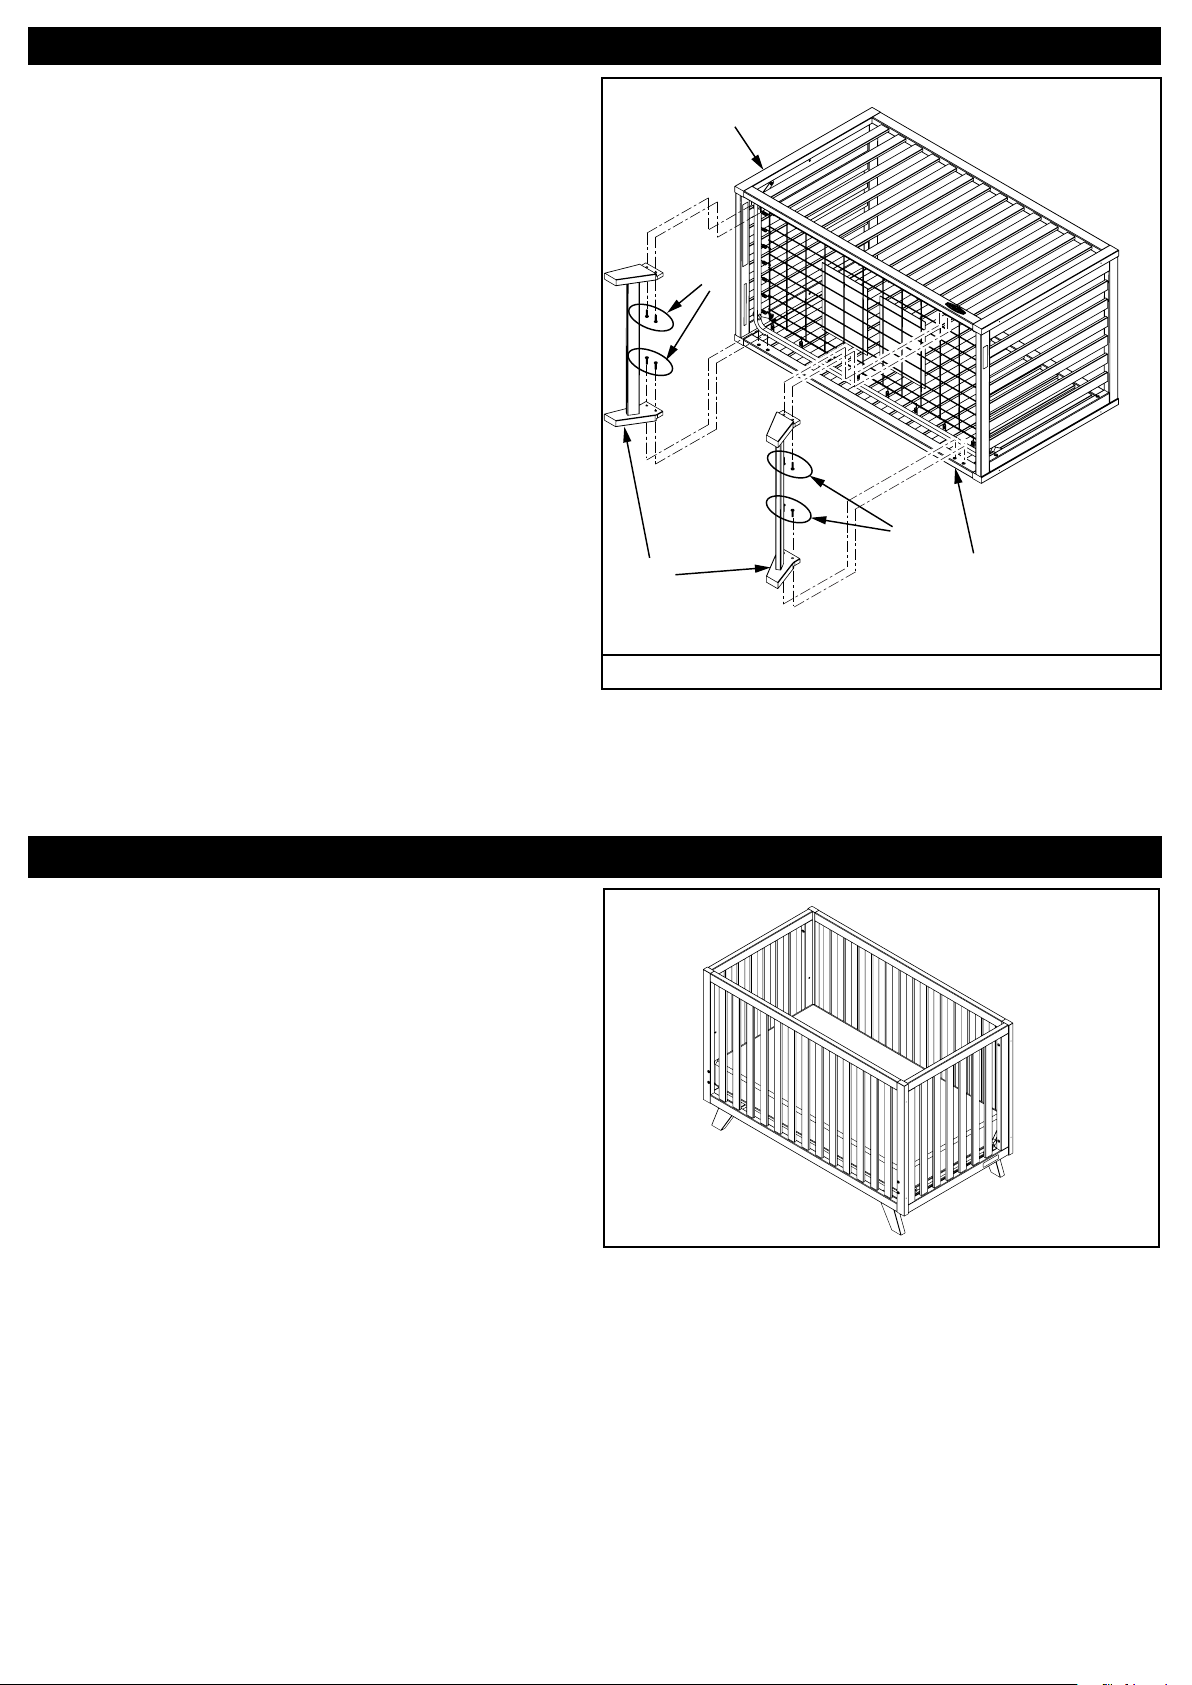
Assemble Leg Assembly to crib.
Align Leg Assemblies (F) with holes in bottom of
Long Side Assembly (A) and Long Headboard
Assembly (B). Insert Allen Head Bolts (L) through
Leg Assemblies (F) into Long Side Assembly (A)
and Long Headboard Assembly (B).
Tighten all Bolts securely.
See Figure 5.
STEP 5
A
L
L
Finishing Touches
Place a purchased full sized mattress on the spring.
After completing the crib assembly, and after
making yourself aware of WARNINGS,CAUTIONS,
CLEANING,STORAGE,USE and MAINTENANCE
of crib on pages 9 and 10, store the assembly
directions in the pouch which was preattached to
the spring. For future referral to assembly directions
you will only need to remove them from the pouch.
We caution you not to store excess hardware in
pouch as this would be a danger to child if retrieved
by him/her.
F
B
Figure 5
5
Page 6
Toddler Bed
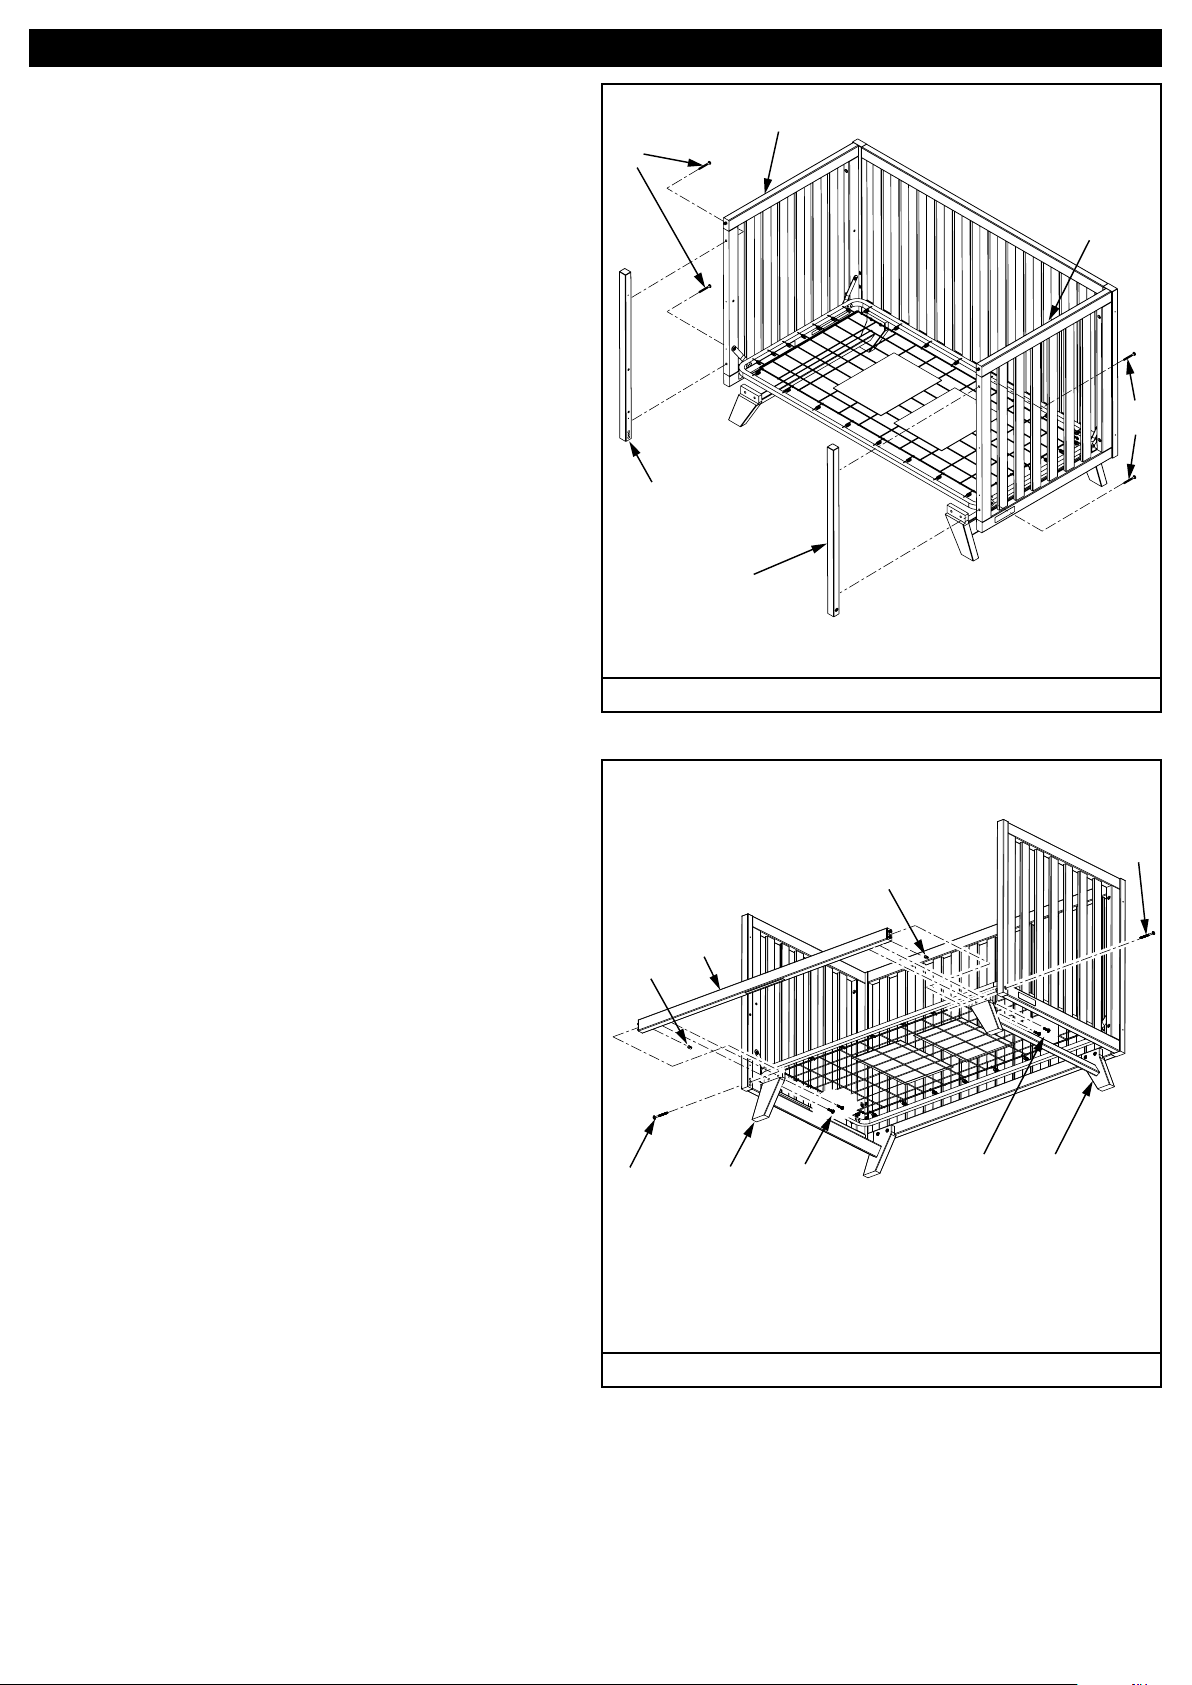
Toddler bed conversion:
Follow assembly instructions up to and including
Step 3. Spring (E) should be assembled and
installed in the lowest position as shown in Step 3.
If the Long Side Assembly (A) is in place it must
be removed. Save the hardware and assembly for
future possible use.
Align Toddler Post Footboard (I) with Foot
Assembly (D). Insert Allen Head Bolts (K) into
Foot Assembly (D) and snug into Toddler Post
Footboard (I).
Repeat assembly with Toddler Post Headboard (H)
and Head Assembly (C).
C
K
D
K
H
Tighten all Bolts securely.
See Figure 6.
Align Toddler Bed Rail (G) between (H) and (I) by
inserting dowels in ends of (G) into recieving holes
in (H) and (I). Place joint Connector Nuts (P) in back
of Toddler Bed Rail (G). Align the Nuts with
screwdriver to accept the Allen Head Bolts (J).
Snug Allen Head Bolts (J) into Toddler Bed Rail (G).
Attach leg assemblies (F) to (G) and (B) as shown
in Figure 7.
Snug Allen Head Bolts (L) through Leg Assemblies
(F) into Toddler Bed Rail (G) and Long Headboard
Assemblies (B).
Tighten all Bolts securely.
See Figure 7.
I
Figure 6
J
P
G
P
6
J
F
L
Figure 7
L
F
Page 7
WARNING
WARNING
WARNING
WARNING
WARNINGS (For Toddler Bed)
WARNING:INFANTS HAVE DIED IN TODDLER BEDS FROM
ENTRAPMENT. Openings in and between bed parts can entrap head and neck of a
small child. NEVER use bed with children younger than 15 months. ALWAYS follow
assembly instructions.
WARNING:STRANGULATION HAZARD: NEVER place bed near windows
where cords from blinds or drapes may strangle a child. NEVER suspend strings
over bed. NEVER place items with a string, cord or ribbon, such as hood strings or
pacifier cords, around a child’s neck. These items may catch on bed parts.
CAUTION:ENTRAPMENT HAZARD: To avoid dangerous gaps, any
mattress used in this bed shall be a full-sized crib mattress at least 51 5/8 in. (1310
mm) in length, 27 1/4 in. (690 mm) in width, and 4 in. (100 mm) in thickness.
• The users maximum weight shall not be greater than 50 lbs. (22.7 kg).
• Mattress MUST be moved into lowest position for proper positioning.
• This crib contains all components necessary to convert to a toddler bed. However,
a guardrail may be available for purchase to provide additional security.
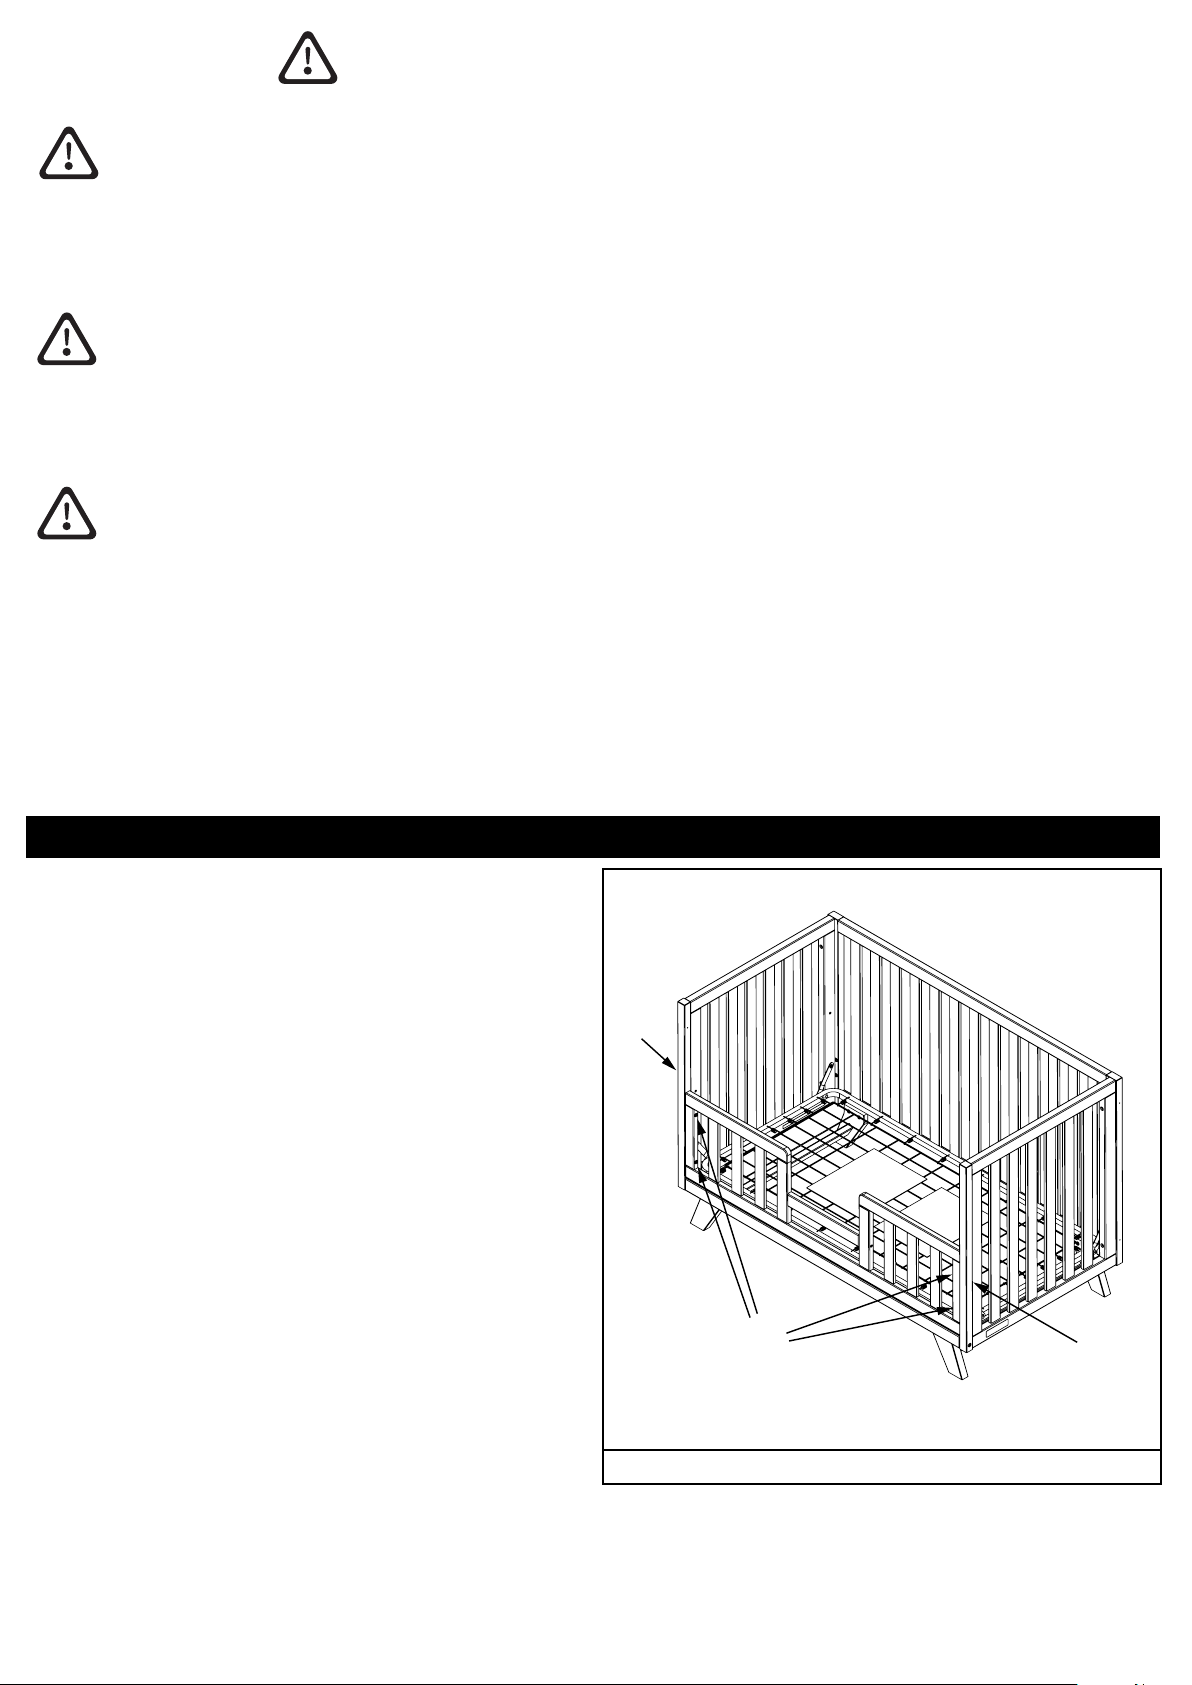
Toddler Bed Guard Rail Option and Installation
For added security, a guard rail can be purchased for
this crib. Contact Foundations or your dealer.
Follow the directions supplied with the purchased
guard rail.
Note: 4 of the Allen Head Bolts (N) and (2) Toddler
Posts (H and I) will be needed to attach the guard
rail. First, convert crib to toddler bed as described
earlier.
Guard rail must be installed between Toddler Posts
(H) and (I) for this crib. Save the hardware and
assemblies for future possible use.
General guard rail instructions will be included in the
guard rail kit.
Note: Allen Head Bolts (N) will thread into metal
inserts in Toddler Posts (H and I). Align holes in ends
of guard rail with inserts. Carefully thread in Bolts (N)
and tighten securely.
H
N
I
See Figure 8.
Figure 8
7
Page 8
Full Size Bed Conguration
B
U
S
T
U
T
S
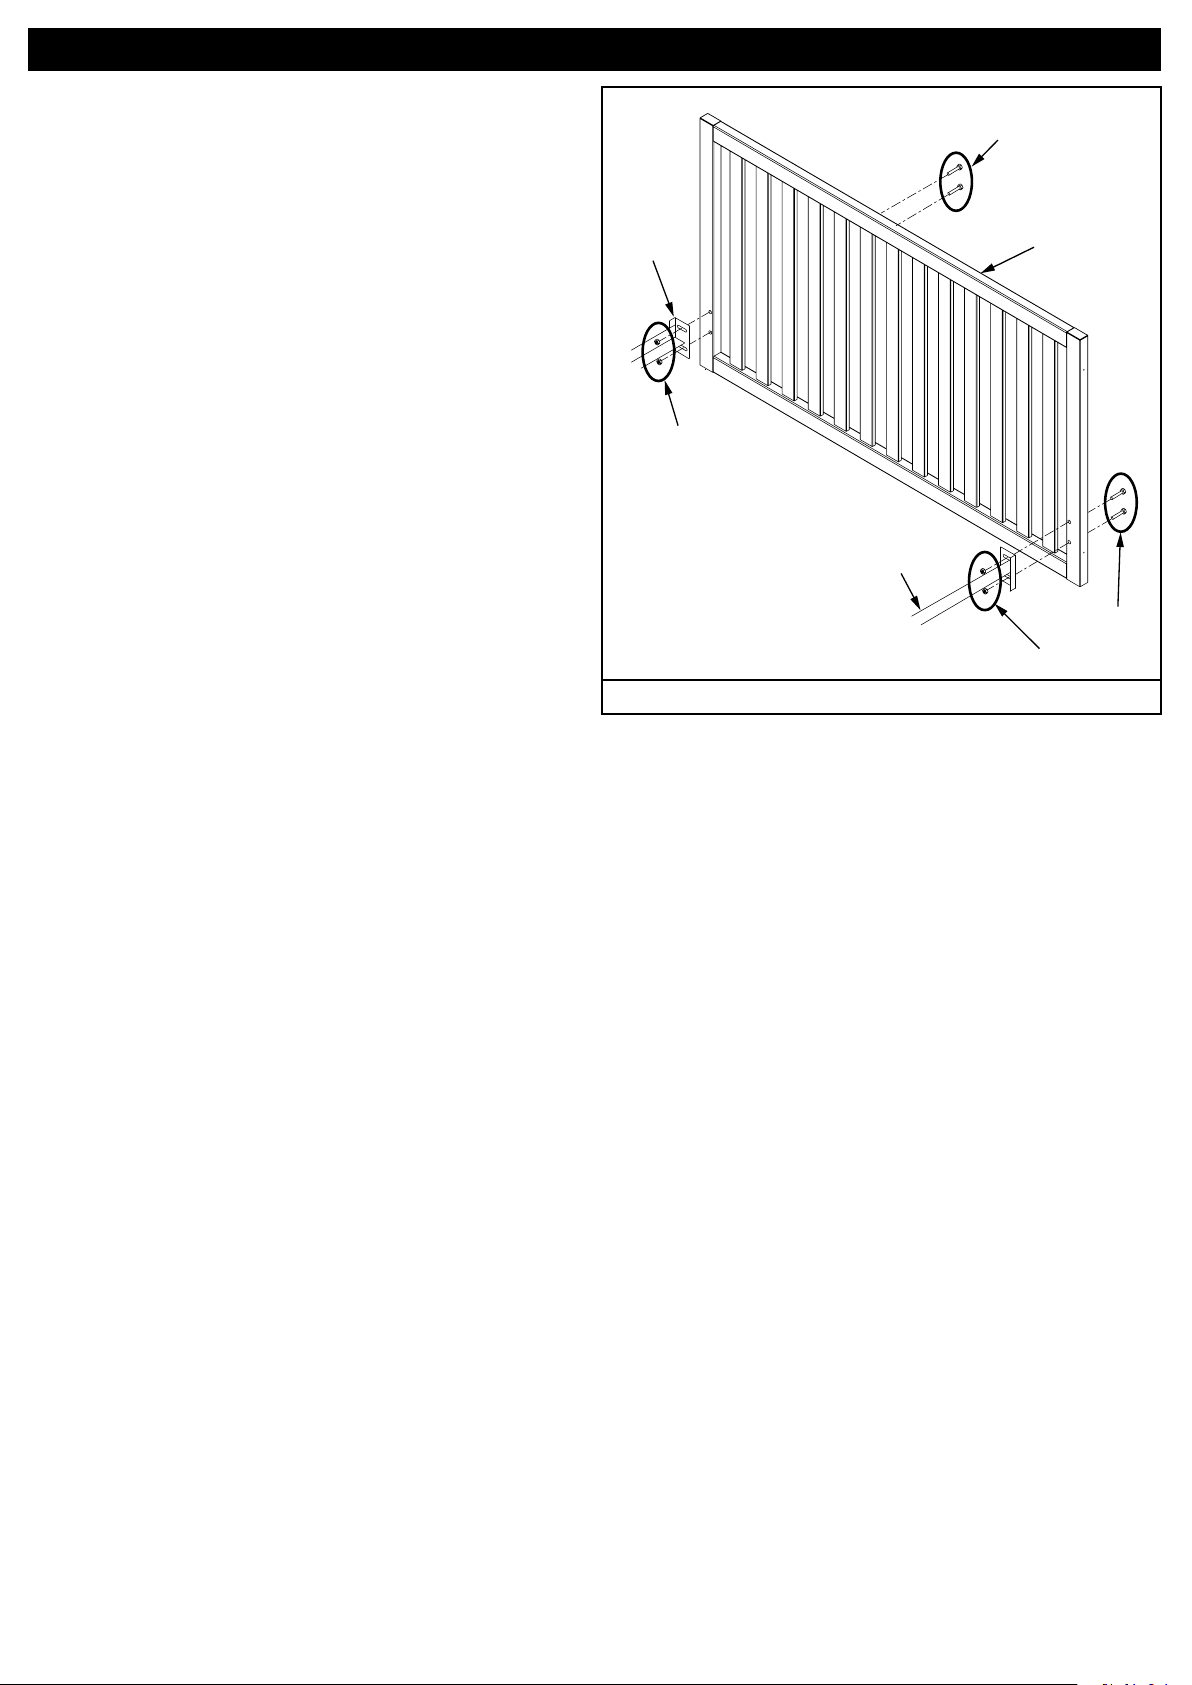
This Crib is designed to convert into a full size bed
headboard.
The following parts needed are not provided by
Foundations but may be purchased from a furniture/
bedding store and hardware store.
S. Full size Hollywood style Bed Frame.
T. 1/4” x 20 x 1 1/2” Long Bolts.
U. 1/4” x 20 Nuts.
Align Hollywood Bed Frame with holes in Long
Headboard Assembly (B). Insert Bolts (T) Through
Long Headboard Assembly (B) and frame.
Tighten Nuts and Bolts securely
See Figure 9
Figure 9
8
Page 9

CAUTION
• ANY MATTRESS USED IN THIS CRIB SHALL BE AT LEAST
27 1/4 BY 51 5/8 IN. WITH A THICKNESS NOT EXCEEDING
6 IN. IF YOUR CRIB IS DESIGNED TO CONVERT TO A
TODDLER BED, THE MATTRESS MUST BE AT LEAST 4 IN.
(100 MM ) THICK.
• UPON COMPLETION OF ASSEMBLY BE SURE ALL SCREWS, BOLTS AND
FASTENING DEVICES HAVE BEEN TIGHTENED SECURELY. A FREQUENT CHECK
SHOULD BE MADE OF ALL SCREWS, BOLTS AND FASTENING DEVICES AND
TIGHTEN IF NEEDED.
Maintenance Cleaning and Storage
MAINTENANCE:
Upon completion of the assembly, check to make sure all screws, bolts and connectors are tightened and
secure.
Periodically check crib for damaged hardware, loose joints, missing parts or sharp edges before and after
assembly and frequently during use.
CLEANING:
Mix a mild solution of gentle dishwashing soap and water, apply to surface using a clean cloth lightly
dampened in the solution. Rinse well with clear water using a soft clean cloth, then dry all surfaces with a
soft dry cloth.
DO NOT use abrasive cleaners or any cleaners with harsh chemicals that would contact a child’s
skin, scouring pads, steel wool or coarse rags. This crib should be treated the same as any fine
furniture.
STORAGE:
When storing crib use caution as extreme temperature or humidity changes could be harmful. Use
caution when a vaporizer is in use. Always aim vapor stream away from crib as well as away from
any wood furniture item.
After completing the assembly the user is advised to read and be aware of
ALL WARNINGS, CAUTIONS, CLEANING, STORAGE USE AND MAINTENANCE notices in these
directions and printed on the storage pouch on the crib spring. A printed pouch is attached to the
crib spring for the permanent storage of the assembly directions. Please place the complete set of
assembly directions into the pouch for future referral. We caution the user to not place excess
hardware in the pouches as it could present danger to the child if retrieved.
9
Page 10

WARNING
FAILURE TO FOLLOW THESE WARNINGS AND THE ASSEMBLY INSTRUCTIONS COULD RESULT
WARNING
IN SERIOUS INJURY OR DEATH.
WARNING: Infants can suffocate on soft bedding. NEVER add a pillow
or comforter. NEVER place additional padding under an infant.
• Read all instructions before assembling crib. Keep instructions for future use. A
pouch is attached to the crib for permanent storage of the instructional literature.
• To reduce the risk of SIDS, pediatricians recommend healthy infants be placed on
their backs to sleep, unless otherwise advised by your physician.
• Strings can cause strangulation! DO NOT place items with a string around a child’s
neck, such as hood strings or pacifier cords. DO NOT suspend strings over a crib
or attach strings to toys.
• To help prevent strangulation, tighten all fasteners. A child can trap parts of the body or clothing
on loose fasteners.
• DO NOT place crib near window where cords from blinds or drapes may strangle a child.
• When child is able to pull to standing position, set mattress to lowest position and remove
bumper pads, large toys and other objects that could serve as steps for climbing out.
• Stop using crib when child begins to climb out or reaches the height of 35 in. (89 cm).
• After raising side, make sure latches are secure (if your unit has a movable side).
• DO NOT leave child in crib with side lowered. Be sure side is in raised and locked position
whenever child is in crib (if your crib has a moveable side).
• Replace teething rail(s) if damaged, cracked or loose (if equipped with teething rails).
• If refinishing use a non-toxic finish specified for children’s products.
• Follow warnings on all products in a crib.
• NEVER use plastic shipping bags or other plastic film as mattress covers because they can
cause suffocation.
• Infants can suffocate in gaps between crib sides and a mattress that is too small.
• DO NOT use a water mattress with this crib.
• When disassembling this crib, DO NOT remove any item attached with wood screws.
Meets CPSC
Safety Requirements
10
 Loading...