

Page 1

Mackie Digital X Bus UAD-1 Powered Plugins Installation Guide
UAD-1™ Powered Plugins™
Installation Guide
Disclaimer:
The UAD-1 Powered Plug-ins Card and all associated software plug-ins are the sole property
of Universal Audio. Any installation of a third party software product into the Mackie Digital X
Bus mixer is entirely at the sole risk of the user. Even though the Digital X Bus has been tested
and approved for use with several third party plug-in installers, LOUD Technologies Inc. is not
liable or responsible in any way for problems or troubles that arise within the Digital X Bus as
a direct result of the installation or using such third party devices. Mackie Technical Support is
available for assistance with this procedure at +1 800.898.3211 (toll free in the USA and Canada)
or at +1 425.487.4333 from anywhere in the world.
IMPORTANT: The Digital X Bus contains static-sensitive components. Anti-static precautions
must be taken before touching anything inside the Digital X Bus. Use an anti-static wrist
strap when performing the procedures described here. These are available at most com-
puter supply stores. The use of an anti-static mat is also recommended.
Introduction
This guide will help you install, load, authorize, and use up to three UAD-1 Powered Plug-ins
Cards (hereafter referred to as “UAD-1 Cards”) into the Digital X Bus Mixer. The use of either
the UAD-1 “Project Pack” or “Studio Pack” bundle is entirely at the user’s discretion.
The Digital X Bus is a VST host running on XPE (Embedded XP), and thus will only support
the use of Windows™ VST plug-ins. The Digital X Bus does not support any other plug-ins format (including DirectX, VST for OS X, Audio Units (AU), or RTAS) and loading an un-supported
plug-in could potentially cause errors in the Digital X Bus software.
The Digital X Bus 200 does not come with any UAD-1 Cards installed. Therefore, any Digital X
Bus 200 users must purchase and install any UAD-1 Cards they wish to use. However, the Digital
X Bus 400 has one UAD-1 Card installed in the mixer, along with the ability to use the “Studio
Pack” bundle of UAD plug-ins. It is up to the Digital X Bus 400 user to register their cards with
Universal Audio (http://www.uaudio.com) so they may receive the plug-in licenses to authorize
the Studio Pack bundle.
1
Page 2

Mackie Digital X Bus UAD-1 Powered Plugins Installation Guide
3
Mackie Digital X Bus UAD-1 Powered Plugins Installation Guide
What You’ll Need
• A minimum of one and a maximum of three UAD-1 Card(s).
• At least one of the following:
1. A USB CDROM drive and at least one blank CD-R.
2. A USB Flash Drive with a minimum size of 64MB.
• A USB or PS/2 mouse attached to your Digital X Bus.
• Your UAD-1 Serial Number, located on a sticker on the UAD-1 Card itself.
• A Mac or PC connected to the Internet.
• A Digital X Bus Mixing Console (duh!).
Procedure Overview
The following is a brief summary of the steps required to use the UAD-1 Card(s) with the Digital X Bus. This guide details each step listed below in the following sections:
• Reading the “Getting Inside the Digital X Bus” Guide
• Installing the UAD-1 software
• Installing the UAD-1 hardware
• Verifying proper installation
• Registering UAD-1 Card(s)
• Software Licenses and Authorizations
• Using the UAD Plug-ins
• UAD Quick-Start Guide and User’s Manual
• Mackie Technical Support Information
Getting Inside the Digital X Bus Guide
To successfully perform this installation, you must rst download and read the “Getting Inside the Digital X Bus” Guide that can be found on the Digital X Bus page at the Mackie website
(http://www.mackie.com/products/digitalxbus/index.htm). Reading this guide will ensure that
you take all the necessary steps to open up the rear chassis assembly of the Digital X Bus, without causing any damage to the internal parts, cables, or circuit boards.
Installing UAD-1 Software
The very rst step is to load the UAD-1 software into the Digital X Bus. Although each UAD-1
Card comes with a UAD Software Installer CD, we strongly recommend that you download the
latest UAD Software from the UA website to ensure that you will be using the most updated and
recent drivers available for the UAD-1 Card. Universal Audio also makes this recommendation
to their UAD-1 customers. However, this guide will cover both procedures.
2
Page 3
Mackie Digital X Bus UAD-1 Powered Plugins Installation Guide
NOTE: If you download the UAD Software from the UA website, be sure to get any
corresponding documentation or release notes so you will be aware of any “known issues” with
that version of software.
We also recommended that you use a 64MB USB Flash Drive (also referred to as “Pen Drive”
or “Thumb Drive”) method to install any software into the Digital X Bus. USB Flash Drives are
inexpensive, widely available, are re-writable, and can also be used to back up your session
les, presets, snapshots, or any other les from your Digital X Bus. Also, using a USB Flash
Drive will prevent you from having to purchase a USB CDROM drive and blank CD-R media.
Using the UA Installer CD
If you must use the UAD Installer CD that came with your UAD-1 Card, you will need to have a
USB CDROM drive plugged into one of the USB ports located on the inside of the Motherboard
Access Area of the Digital X Bus. This step can be done with the Digital X Bus already turned
on.
You should have learned about removing the Motherboard Access Plate from the “Getting
Inside the Digital X Bus Guide,” mentioned earlier in this document. If not, discontinue reading
this guide until you have done so.
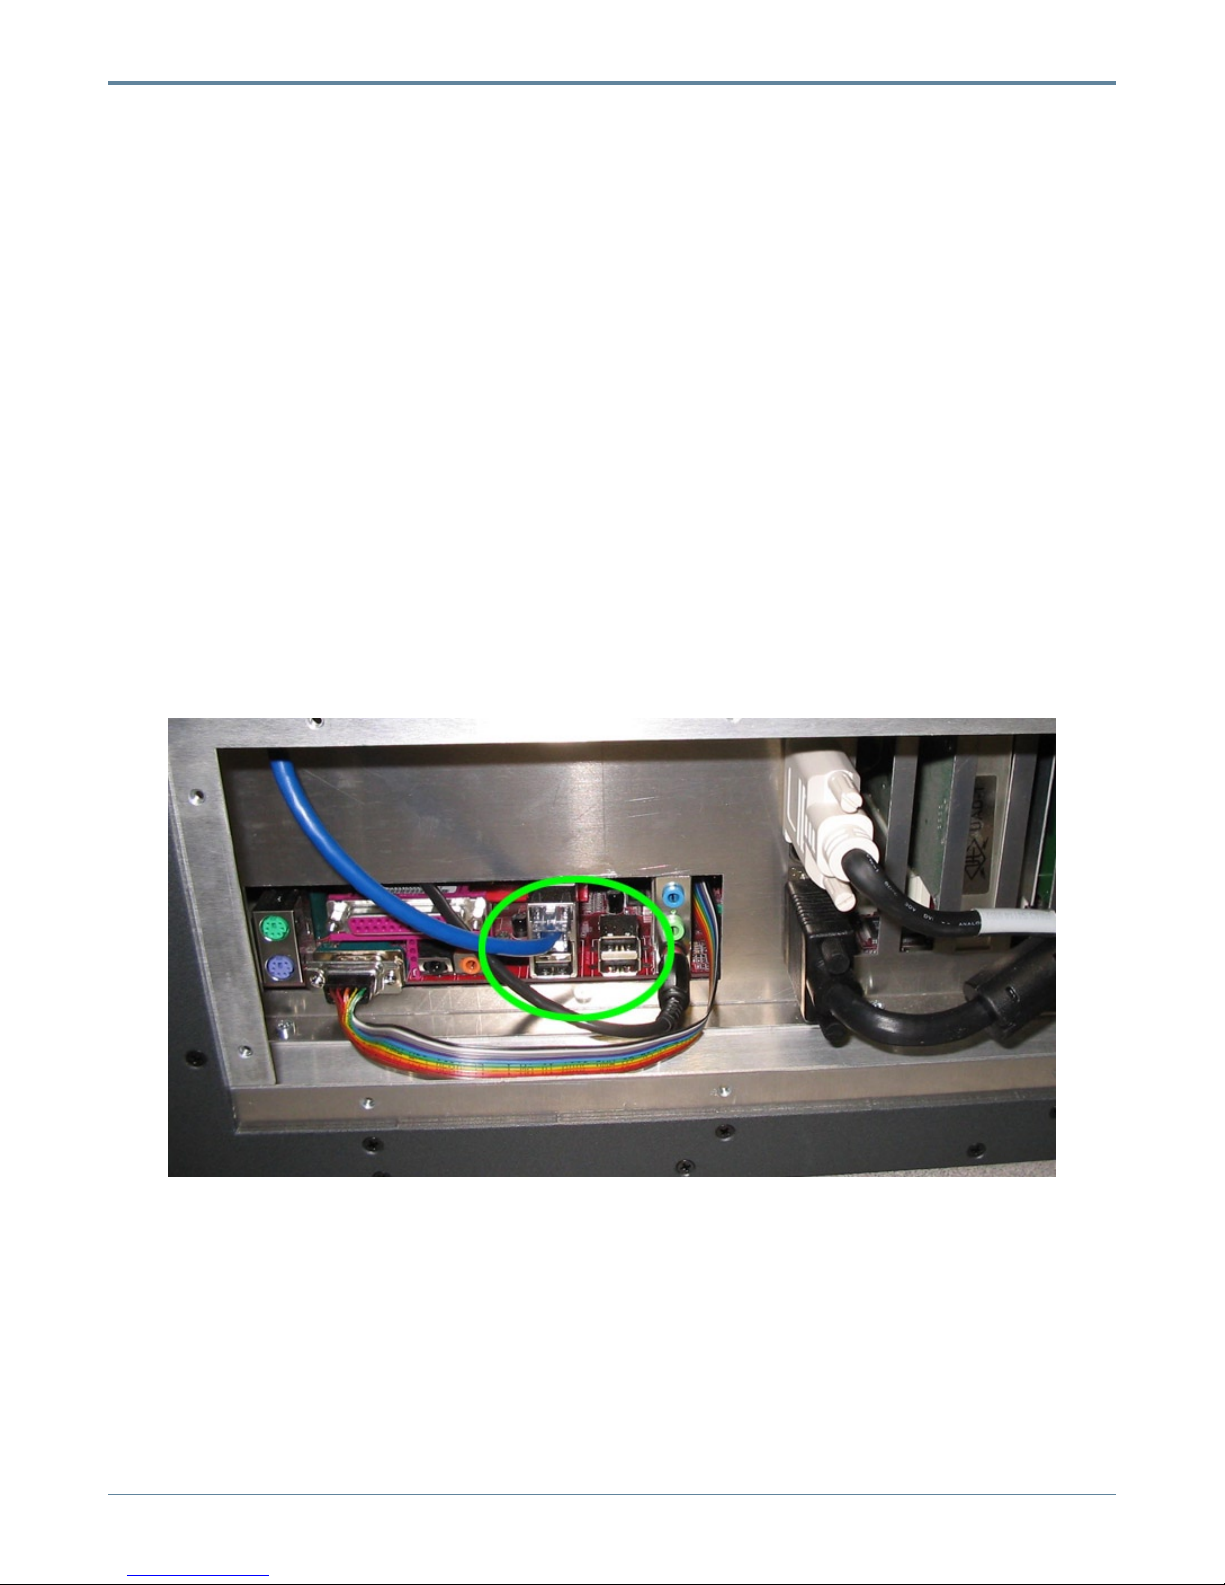
Once the Motherboard Access Plate has been removed, you will notice four USB ports on the
back of the motherboard that are now exposed (see Figure A).
Figure A
Once your CD ROM drive has been plugged into one of these USB Ports, put the UAD Installer CD into your CD ROM drive and turn on the Digital X Bus (unless it is already powered
up). Now, move ahead to the section titled “Installing the UAD Software.”
Using the Downloaded Installer and USB Flash Drive
First, download the latest VST for Windows™ version of the UAD Software from the Universal
Audio web site, which can be found at http://www.uaudio.com/products/software/index.htm.
Follow the “UAD Software – Download Now” links to the software downloads page(s).
3
Page 4

Mackie Digital X Bus UAD-1 Powered Plugins Installation Guide
5
Mackie Digital X Bus UAD-1 Powered Plugins Installation Guide
Make sure you download the Windows VST version of the UAD Software…even if
you are using a Mac to perform this download!
Windows XP Users:
The Digital X Bus does not have WinZip® or the Windows Compression Utility
installed. Therefore, you need to extract the les on your regular PC before installing the software into your Digital X Bus.
• Double click on the Self Extracting le you just downloaded.
• You will see a screen pop up shown in Figure B:
Figure B
• Select “OK” to begin the self-extraction process.
• Once everything has been extracted from the le you downloaded, you will see the UA
Splash Screen displayed in Figure C:
Figure C
At this point, make sure you select “Cancel” to quit the Installer. Otherwise, the UAD soft-
ware will be installed on your PC and not the Digital X Bus. We’d sure hate to waste your time
like that…
4
Page 5
Mackie Digital X Bus UAD-1 Powered Plugins Installation Guide
• Next, select “Yes” when asked if you’re sure you want to quit Setup.
• You will notice that there is a folder labeled “UAD1-Win-vxxx” in the same location on your
PC as the UAD software you downloaded. Copy the entire folder over to your USB Flash
Drive.
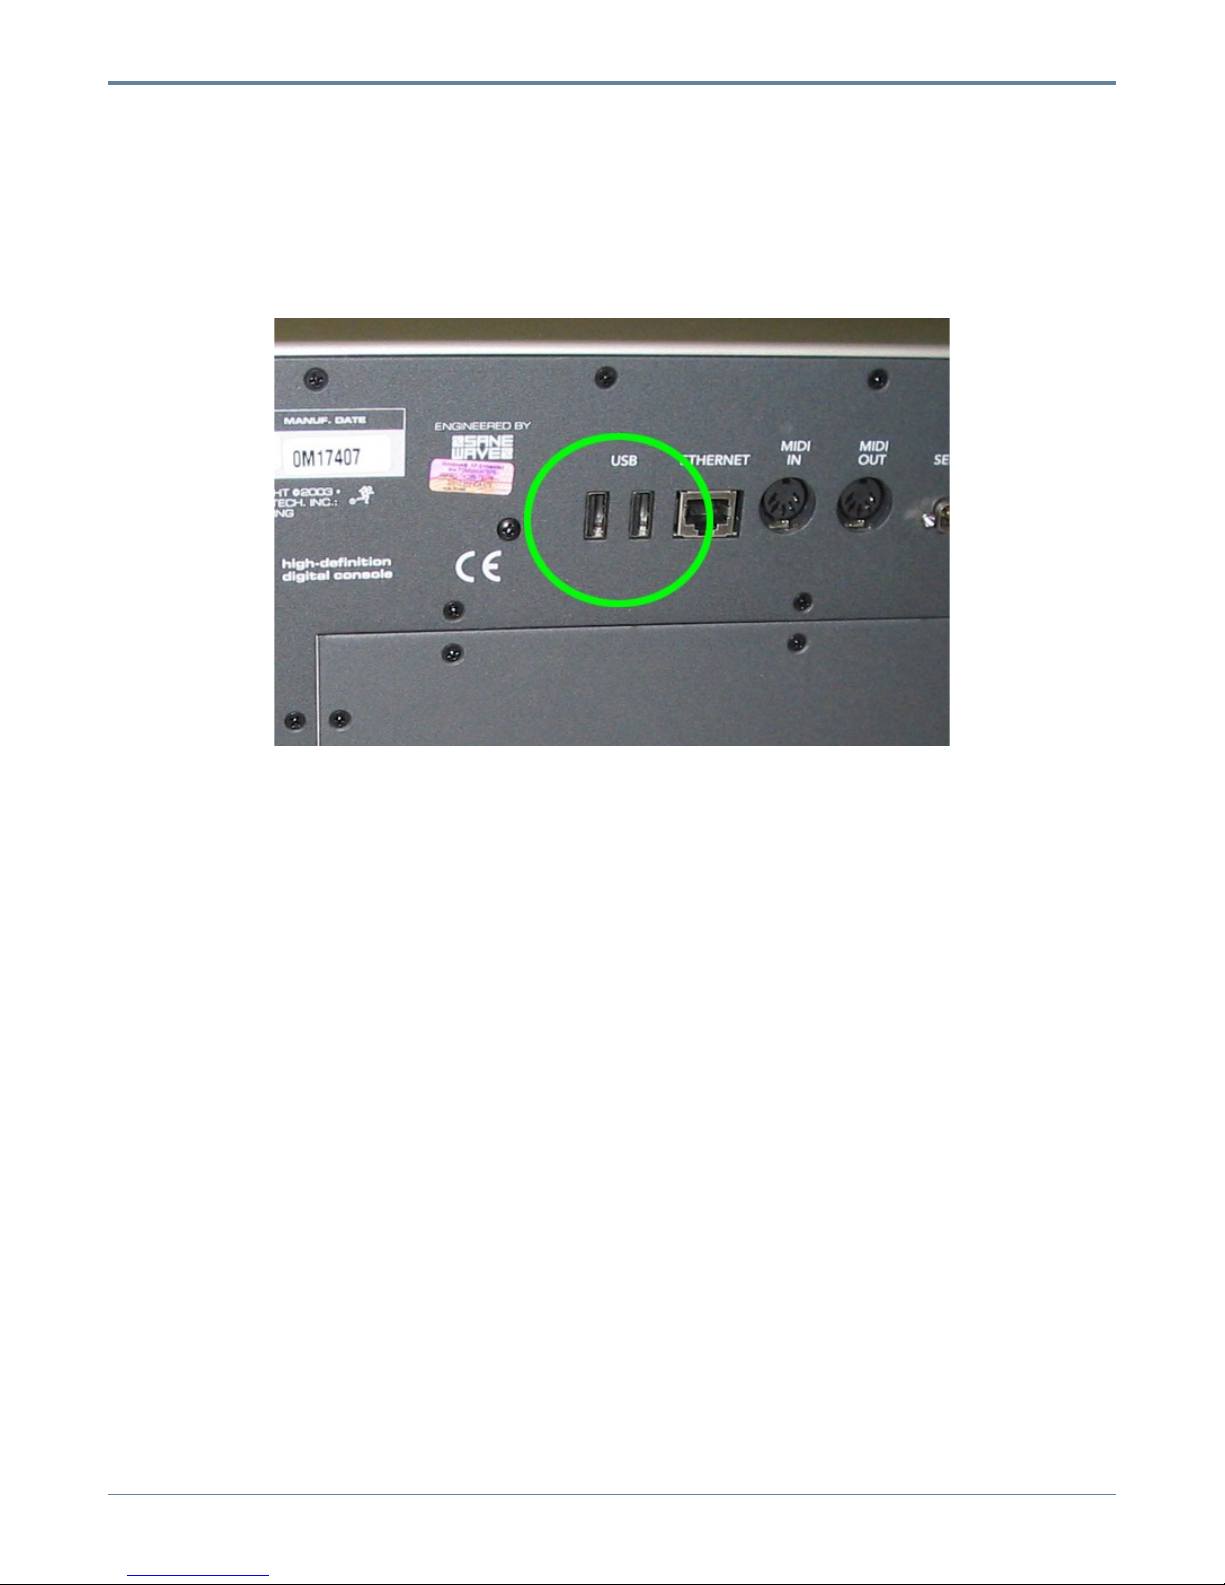
• Remove the USB Flash Drive from your PC and attach it to one of the rear chassis USB ports
on the rear panel of the Digital X Bus as shown in Figure D:
Figure D
Now, proceed to the section titled “Installing the UAD Software” to begin the installation on
the Digital X Bus.
Mac OSX Users:
• Double-click on the le you downloaded from the UA website.
• You will notice that OSX has created a folder on your desktop named “UAD1-Win-vxxx”;
copy that entire folder over to your USB Flash Drive.
• Remove the USB Flash Drive from your Mac and insert it into any of the USB ports located
on the rear panel of the Digital X Bus (as shown on the previous page).
• Proceed to the section titled “Installing the UAD Software” to begin the installation on the
Digital X Bus.
If you’re not running OSX on your Mac, it’s time to get with the program. Seriously.
Installing the UAD Software
• Go to File > Launch 3rd Party Application.
• Select “Root Directory” in the pull-down menu along the top of that window.
• Select either your CD-ROM drive (shown with a small icon of a compact disc) or your Flash
Drive, and select “Open.”
5
Page 6

Mackie Digital X Bus UAD-1 Powered Plugins Installation Guide
7
Mackie Digital X Bus UAD-1 Powered Plugins Installation Guide
Note: The “C:” and “D:” options are the two partitions for the internal hard drive. Anything else
in the Root Directory of this window is either a CD-ROM or Flash Drive.
• Browse your attached drive to nd the “Setup.exe” le, using the “Up,” “Open,” or by double-
clicking on the actual le or folder.
• Highlight “Setup.exe” and select “Open.”
• Select “OK” to agree to the terms of the Disclaimer.
• Select “Yes” when you see the “Are You Sure?” pop up window.
• Now you will see the Universal Audio splash screen window pop up, which will look the
same as the one in Figure C. Select “Next.”
• Select “Next” at the Welcome window.
• Select “Yes” to accept the UA Software License Agreement
• Make sure that only “Install VST Plugins” is checked in the Installation Type window, and
then select “Next.”
• When prompted to install mono versions of the plug-ins, make sure “No” is checked and then
“Next.”
• Specify “C:\Program Files\Steinberg\Vstplugins” as the destination directory and then select
“OK.”
Note: The Digital X Bus uses the exact same default folder as Windows™ XP when installing
VST plug-ins. This default folder should already be showing at the pervious step.
• Conrm the information and select “Next” to begin the actual installation.
• After the Installer has completed loading all the software, you will see a pop up window
shown in Figure E:
Figure E
Make sure you de-select both the “Additional Options” check boxes in this window; then,
select “Next.”
• A standard Windows folder will automatically open with all the associated pointers and les
with the UAD-1 Card. Close this window using your mouse by clicking the red colored “X” in
the upper right hand corner.
6
Page 7

Mackie Digital X Bus UAD-1 Powered Plugins Installation Guide
• You’ll then see another pop-up window shown in Figure F:
Figure F
Select “No, I will restart my computer later” and select the Close button.
• The software will automatically attempt to open the UAD QuickStart guide. Since the Digital
X Bus does not support PDF les, you will see an error message. Click “OK” and don’t worry
about it.
• Go to File > Shutdown.
• Decide whether or not you want to save your current session le, and select the appropriate
button.
• When you get the Shutdown window, select “Shutdown” and wait.
• Once both screens have powered off completely, shut off the hardware power switch that is
located right next to the power (IEC) cord on the rear panel.
• Grab a cold one (not included) and congratulate yourself on completing the rst phase of
this process. Proceed to the next section, “Installing the UAD-1 Hardware.”
Installing the UAD-1 Hardware
Here comes the fun part:
• Write down the Serial Number of each UAD-1 Card, which can be found on the white sticker
that has been stuck to the actual card itself. You will need this Serial Number in order to
register your UAD-1 Card(s) with the Universal Audio website.
• Make sure you have read completely the “Getting Inside the Digital X Bus Guide.” If not, do
it now before proceeding. We’re not kidding.
7
Page 8

Mackie Digital X Bus UAD-1 Powered Plugins Installation Guide
9
Mackie Digital X Bus UAD-1 Powered Plugins Installation Guide
Note: Accidental damage to the Digital X Bus as a result of a UAD-1 installation is not covered
under your product warranty…so be VERY careful as you do this procedure.
• Get to the point where you have direct access to the motherboard of the Digital X Bus.
• Locate the metal bracket (roughly 10-12 inches long) that covers all the PCI slots on the
motherboard. You need to remove it in order to install the UAD-1 Card(s) into the PCI
slot(s).
• (Only on some models:) If there is a black tie wrap securing any cables to the bracket,
remove it with a pair of clippers so the cables are no longer secured to the bracket before
proceeding.
Note: It is crucial that any cables that were secured by the tie wrap in the previous step are reattached and secured with a new tie wrap once this procedure has been completed.
• Using a small-pointed Philips screwdriver, remove the ve screws as indicated by the yellow
circles in Figure G:
Figure G
Make sure you only remove the screws holding the metal bracket to the side “L” shaped brack-
ets…do not remove the small, “L” shaped brackets to either side of the main metal bracket.
• Carefully remove the metal bracket as shown in Figure H:
Figure H
8
Page 9

Mackie Digital X Bus UAD-1 Powered Plugins Installation Guide
Note: As soon as you remove the metal bracket, the Digital X Bus PCI Card will lean slightly
over because it is no longer secured to that bracket. This is normal. Just make sure you avoid
bumping or touching that PCI card until you are ready to put the metal bracket back into the
console.
You should now see four empty PCI slots that lie between the seated PCI card that connects to
the I/O Card Cage, and the Video Card seated in the AGP Slot as shown in Figure I:
Figure I
Next, install your UAD-1 Card into Slot 1, 2, or 4 as shown by the “OK” designations in Figure J:
Figure J
BE VERY CAREFUL NOT TO KNOCK OR BANG AGAINST
THE DIGITAL X BUS PCI CARD DURING THIS PROCESS OR
YOU WILL POTENTIALLY DAMAGE YOUR MIXER!
The Digital X Bus can support a maximum of three UAD-1 Cards. If you install a UAD-1 into
Slot 3 (shown above), it will not show up to the Digital X Bus software, and you will have wasted your time. Don’t say we didn’t warn you.
9
Page 10

Mackie Digital X Bus UAD-1 Powered Plugins Installation Guide
11
Mackie Digital X Bus UAD-1 Powered Plugins Installation Guide
Note: Before inserting UAD-1 Card(s) into the PCI slots, be aware that YOU ASSUME ALL
RISKS FOR THIS INSTALLATION. And since we don’t want you to do anything you might
regret, please take note of the following:
• Be extremely careful of all surrounding cables and components.
• Do not touch any circuit boards directly unless you are properly grounded to the
corresponding chassis’ beforehand.
• Do not force anything…chances are, if something doesn’t seem to t, then you’re not
performing this installation correctly.
• Put everything back the way it was before you started.
Now that we’ve gotten that out of the way, let’s keep going:
• Carefully align the PCI connector of the rst UAD-1 Card with Slot 1.
• Set the UAD-1 Card perpendicular to the motherboard and press down on the card while
making sure the metal back plate on each UAD-1 Card slides vertically between the edge of
the motherboard and the rear metal panel. You should feel it lock into place.
• Visually inspect the edges of the Card and the connection to the PCI slot to be sure it isn’t
interfering with any surrounding cables or components.
• If you have a second or third UAD-1 Card, go ahead and repeat this process for the second
UAD-1 into Slot 2, and then the third UAD-1 into Slot 4 (notice you skip Slot 3).
The process should look something like Figure K:
Figure K
Notice there is another tie wrap that secures some small ribbon cables to the top of the rear
metal panel. You can cut that tie wrap with a pair of clippers if it is interfering with your UAD-1
installation, as shown in Figure L (next page):
10
Page 11

Mackie Digital X Bus UAD-1 Powered Plugins Installation Guide
Figure L
If that tie wrap is not interfering with the UAD-1 installation, leave it be. But, if you need to cut
that tie wrap, BE VERY CAREFUL not to cut any of the ribbon cables. Because that would be
bad…as bad as losing the list (private joke).
• Once all UAD-1 Cards are installed, screw back in the metal bracket you originally removed
and tie wrap the cables back to it (if you had to remove them). Make sure the bracket is
aligned exactly the same way it was before you removed it. You can tell by visually aligning
the screw hole that connects the bracket the Digital X Bus PCI Card, and screwing that
screw in rst.
Figure M below shows a completed installation of three UAD-1 Cards:
Figure M
• Following the steps in the “Getting Inside the Digital X Bus Guide” (backwards), re-assemble
the rear chassis back into the mixer and re-attach all the associated cables.
You can proceed to the next section (“Verifying Proper Installation) before screwing in all the
black Philips screws around the rear chassis, just to make sure everything went OK. It’s much
quicker to get back inside the mixer if you don’t have to go through all the screwing and un-
11
Page 12

Mackie Digital X Bus UAD-1 Powered Plugins Installation Guide
13
Mackie Digital X Bus UAD-1 Powered Plugins Installation Guide
screwing all over again. Of course, like everything else in this procedure, that is also at your
own risk.
You also have the option of leaving the Motherboard Access Plate off of the mixer, which will
give you easier accessibility to the ports in the Motherboard Access Area. That is entirely up to
you.
Verifying Proper Installation
To verify the UAD-1 installation worked OK, you need to open the UAD-1 Performance Meter
from the “Launch 3rd Party Application” dialog. You will need your mouse hooked up and working to use the UAD-1 Performance Meter.
• Select File>Launch 3rd Party Application.
• Select “Root” from the top pull down menu.
• Browse to the “C:\Program Files\Universal Audio\Powered Plugins” folder.
• Select “UADPerfMon.exe” and select “Open.”
• Select “OK” for the Disclaimer pop-up window.
• Select “Yes” for the “Are You Sure?” pop-up window.
Wait for a few seconds, and you will see the UAD Performance Meter open on your screen as
shown in Figure N:
Figure N
With your mouse, click the small icon of the folder just above the “Enabled” text and select
System Information as shown in Figure O:
Figure O
That will open the UAD-1 System Information Window, which will display all active UAD-1
cards you have installed, their DMA settings, and so on. At this point, just make sure you can
see all the cards you installed. That veries that your UAD-1 Cards are functioning properly and
they are communicating with the UAD software.
If the UAD System Information Window cannot see your UAD-1 Card(s), try fully re-booting
the mixer and checking again. As long as the card isn’t damaged or wasn’t during installation, all
should be well. Feel free to contact Mackie Technical Support if you’re still having problems.
12
Page 13

Mackie Digital X Bus UAD-1 Powered Plugins Installation Guide
Registering Your UAD-1 Card(s)
Registration of the UAD-1 Card is done between you and Universal Audio. LOUD Technologies
Inc. does not have the means to register your card with Universal Audio, so this is something
you will need to do on your own. It is not required to register your UAD-1 Card, but it is strongly
recommended so you can acquire additional software licenses as needed and receive updates
about newer versions of the UAD-1 software.
Note: Since the Digital X Bus does not have an active connection to the Internet, you will have
to write down all the numbers described below for each UAD-1 card you are using with the
Digital X Bus, and then take those numbers to go register at the Universal Audio website at http:
//www.uaudio.com
Hardware ID Number
To get your Hardware ID number(s), follow the steps listed out in the previous section (“Verifying Proper Installation”) to open the UAD Performance Meter. Once it is open, click on the
small folder icon on the right side of the Performance Monitor, and select “Authorizations” from
the pull down menu as shown in Figure P:
Figure P
That opens the UAD-1 Authorization Panel, which displays the Hardware ID Number for each
UAD-1 card you have installed in the Digital X Bus. Make sure you write down each Hardware
ID Number for each UAD-1 Card you have installed, and save it for later.
UAD-1 Serial Number
As mentioned in the “Installing the UAD-1 Hardware” section, your UAD-1 Serial Number is
located on a small barcode sticker that has been applied to the rear side of the actual UAD-1
Card. Hopefully, by this time, you have already written down that number so you don’t have to
get back inside the Digital X Bus again. If not, you will need to be able to see the actual card and
read the Serial Number from that sticker. Make sure to write down the Serial Number for each
UAD-1 Card you have installed.
We recommend you keep your Hardware ID Number(s) and your Serial Number(s) in a safe
place in case you need them again in the future.
Registering with Universal Audio
Once you have the codes described above, you need to get on a Mac or as PC connected to the
Internet.
Then, type in http://www.uaudio.com and go to Registration Page. There, you need to follow
all the instructions to register your UAD-1 Card(s). You will also have the option of purchasing
additional software licenses, depending on your needs.
13
Page 14

Mackie Digital X Bus UAD-1 Powered Plugins Installation Guide
15
Mackie Digital X Bus UAD-1 Powered Plugins Installation Guide
Note for Digital X Bus 400 Owners
As a Digital X Bus 400 owner, you have the full Universal Audio Studio Pack® of plug-in
licenses available to use. Even though the UAD-1 comes pre-loaded in the Digital X Bus 400, the
software licenses for the Studio Pack software bundle do not.
To get your free software licenses, you will need to go through this registration process and
then download your software license key le (.reg le) from the Universal Audio website.
See the next section (“Software Licenses and Authorization”) for more information in getting
your software licenses into the Digital X Bus.
Software Licenses and Authorization
You can purchase additional software licenses for your UAD-1 Card(s) at any time directly
from the Universal Audio website. Purchasing additional licenses is not required, but many
UAD-1 users have chosen to do so because of the wide variety of software plug-ins available
from Universal Audio.
It is required that you register your card(s) with Universal Audio in order to purchase additional licenses. Once you register your card(s), you will have created a personal account with
Universal Audio that helps keep track of your hardware ID numbers and serial numbers, as well
as any software licenses you have purchased. All this is located at the following URL:
http://my.uaudio.com
That is the same location for you to buy more software licenses as needed. All the instructions
to buy licenses are clearly listed out at that website, and any questions about purchasing additional software licenses for your UAD-1 Card(s) must be directed at Universal Audio.
Once you purchase more licenses, you will receive a registry le (.reg le) that you need to
copy from your Mac or PC to a USB Flash Drive (or burn it to a CD-R) in order to get it into the
Digital X Bus. Again, we recommend the use of USB Flash Drives over CD-R’s and USB CD-ROM
drives.
Once you have copied that registry le over to your Flash Drive or CD-R, simply remove it
from your Mac or PC and attach it to the Digital X Bus. As explained in the section titled “Using
the UA Installer CD,” if you decide to use a CD-R, you will need to have a USB CD-ROM drive
attached to your Digital X Bus.
Follow this procedure to add the registry le into your Digital X Bus:
• Select File>Add UAD License(s)…
• Select “Root” from the top pull down menu.
• Highlight either your USB Flash Drive or your CDROM drive and select “Open.”
• Highlight the registry le you received from the UA website, and select “Add.”
You will then see a pop-up window informing you that the UA software licenses have been
added to your registry. This completes the process.
14
Page 15

Mackie Digital X Bus UAD-1 Powered Plugins Installation Guide
To conrm that your new software licenses are functioning properly, you can open up the
UAD Performance Monitor (as explained in the section titled “Verifying Proper Installation”),
select “Authorizations”, and conrm the plug-in(s) that have been authorized. Of course, the
quick way to check is to actually load a plug-in in the Effects Rack to see if it runs or not (see
next section, “Using UAD-1 Plugins”).
Using UAD-1 Plugins
The process of using UAD-1 plugins inside the Digital X Bus is exactly the same as using any
other VST plug-in:
• Select Windows > Effects Rack (or press the Macro #1 shortcut button on the console).
• Select the “New Plugin” button on the top of the Effects Rack.
• Scroll to whichever UAD plug-in you want to use and select “OK”; that plugin will then load
into your Effects Rack.
• Patch in whatever inputs you want to feed that UAD plugin right from the Effects Rack, or
you can select that UAD plugin as an insert from any channel’s Assign Window.
• If using the UAD plugin as a parallel processor, make sure you patch in your returns from
that UAD plugin to one or two available channels on the Digital X bus...otherwise, you won’t
hear the effect.
The wonderful people at Universal Audio designed their plug-ins so they can be controlled
from third party control interfaces. This means that you have the option of using the Digital X
Bus rotary encoders to control the parameters of any UAD plugin. Some of the plugins actually
support the use of the touch screens to control them as well. However, for the most accurate
control of the plugin, we recommend using either your mouse or the hardware encoders that
are aligned underneath the Effects Rack.
UAD Quick-Start Guide and User’s Manual
Again, be aware that you cannot open PDF les directly on the Digital X Bus. If you need to
use the UAD Quick-Start Guide or User’s Manual, you need to either have the le(s) open and
visible on your Mac or PC, or you can print them out and have those papers handy when you’re
using the UAD plugins on your Digital X Bus.
For your convenience, we have posted the UAD-1 Quick-Start Guide and User’s Manual as
downloads from the Digital X Bus section of the Mackie website. You can also get this documentation directly from the Universal Audio website.
15
Page 16

Mackie Digital X Bus UAD-1 Powered Plugins Installation Guide
Mackie Technical Support Information
If you have any troubles or problems getting your UAD-1 up and running in your Digital X Bus,
please contact the Mackie Technical Support Team at:
+1 800.898.3211 (toll free in the USA and Canada)
+1 425.487.4333 (from anywhere in the world)
Or, drop us an email at techmail@mackie.com and we’ll get back to you as quickly as we can.
We’re here to help you!
“Mackie.” “Digital X Bus,” and the “Running Man” are trademarks or registered trademarks of LOUD Technologies Inc.
All other brand names mentioned are trademarks or registered trademarks of their respective holders, and are hereby
acknowledged.
Rev. A 12/04
©2004 LOUD Technologies Inc.
All Rights Reserved.
16
 Loading...