

Page 1
Page 2
Important Safety Instruction
s
ead
ese
.
3
.
b
g
excess o
1
R
th
instructions.
2
Keep these instructions
. Heed all warnings
4. Follow all instructions.
5. Do not use this apparatus near water.
6. Clean only with dry cloth.
7. Do not block any ventilation openings. Install in
accordance with the manufacturer’s instructions.
8. Do not install near any heat sources such as
radiators, heat registers, stoves, or other
apparatus (including amplifiers) that produce heat.
9. Do not defeat the safety purpose of the polarized
or grounding-type plug. A polarized plug has two
blades with one wider than the other. A groundingtype plug has two blades and a third grounding
prong. The wide blade or the third prong are
provided for your safety. If the provided plug does
not fit into your outlet, consult an electrician for
replacement of the obsolete outlet.
10. Protect the power cord from being walked on or
pinched particularly at plugs, convenience
receptacles, and the point where they exit from
the apparatus.
11. Only use attachments/accessories specified by
the manufacturer.
12. Use only with a cart, stand, tripod, bracket, or
table specified by the manufacturer, or sold with
the apparatus. When a cart is used, use caution
when moving the cart/apparatus combination to
avoid injury from tip-over.
13. Unplug this apparatus during lightning storms or
when unused for long periods of time.
14. Refer all servicing to qualified service personnel.
Servicing is required when the apparatus has
been damaged in any way, such as power-supply
cord or plug is damaged, liquid has been spilled
or objects have fallen into the apparatus, the
apparatus has been exposed to rain or moisture,
does not operate normally, or has been dropped.
15. This mixer has been designed with Class-I
construction and must be connected to a mains
socket outlet with a protective earthing connection
(the third grounding prong).
16. This mixer has been equipped with an all-pole,
rocker-style AC mains power switch. This switch is
located on the rear panel and should remain
readily accessible to the user.
17. This apparatus does not exceed the Class A/Class
B (whichever is applicable) limits for radio noise
emissions from digital apparatus as set out in the
radio interference regulations of the Canadian
Department of Communications.
ATTENTION — Le présent appareil numérique
n’émet pas de bruits radioélectriques dépassant las
limites applicables aux appareils numériques de
class A/de class B (selon le cas) prescrites dans le
réglement sur le brouillage radioélectrique édicté
par les ministere des communications du Canada.
18. Exposure to extremely high noise levels may
cause permanent hearing loss. Individuals vary
considerably in susceptibility to noise-induced
hearing loss, but nearly everyone will lose some
hearing if exposed to sufficiently intense noise for
a period of time. The U.S. Government’s
Occupational Safety and Health Administration
(OSHA) has specified the permissible noise level
exposures shown in the following chart.
According to OSHA, any exposure in excess of
these permissible limits could result in some
hearing loss. To ensure against potentially
dangerous exposure to high sound pressure
levels, it is recommended that all persons
exposed to equipment capable of producing high
sound pressure levels use hearing protectors
while the equipment is in operation. Ear plugs or
protectors in the ear canals or over the ears must
e worn when operating the equipment in order to
prevent permanent hearin
f the limits set forth here.
loss if exposure is in
Page 3

Mackie TT24 Digital Live Console Owner’s Manual
Table of Contents
Chapter 1: Introduction..................................................................................... 9
1.1 Evolution of the TT24 Console ...................................................... 9
1.2 Summary of Features .................................................................. 10
1.2.1 DSP Functionality............................................................. 10
1.3 Terminology and Conventions..................................................... 12
Chapter 2: Quickstart Tutorial ..................................................................... 13
2.1 Connect Amplifier/Speakers........................................................ 13
2.2 Connect a Mic............................................................................... 13
2.3 Connect a CD/Tape Device .......................................................... 17
2.4 Aux Functions .............................................................................. 19
2.5 Effects........................................................................................... 21
Chapter 3: Console Surface Controls .................................................... 23
3.1 Channel Strip............................................................................... 23
3.1.1 LINE .................................................................................. 24
3.1.2 48 V Phantom Power......................................................... 24
3.1.3 GAIN.................................................................................. 25
3.1.4 OL and SIG........................................................................ 25
3.1.5 V-Pot .................................................................................. 25
3.1.6 MUTE ................................................................................ 26
3.1.7 Bank/Channel Description Area ...................................... 26
3.1.8 SELECT............................................................................. 26
3.1.9 SOLO ................................................................................. 27
3.1.10 Channel Fader................................................................... 27
3.2 Bank Select Area.......................................................................... 28
3.2.1 ANALOG............................................................................ 28
3.2.2 DIGITAL............................................................................ 28
3.2.3 RETURNS ......................................................................... 28
3.2.4 MASTER............................................................................ 29
iii
Page 4

Mackie TT24 Digital Live Console Owner’s Manual
3.3 V-Pot Control Area....................................................................... 29
3.3.1 TRIM.................................................................................. 29
3.3.2 PAN.................................................................................... 30
3.3.3 HPF.................................................................................... 30
3.3.4 METERS............................................................................ 31
3.3.5 AUX SENDS 1–12............................................................. 31
3.3.6 AUX PAN........................................................................... 31
3.3.7 AUX MODE....................................................................... 32
3.4 QuickMix Area ............................................................................. 32
3.4.1 FAT .................................................................................... 34
3.4.2 EQ ...................................................................................... 34
3.4.3 DYN ................................................................................... 34
3.4.4 GRP/AUX........................................................................... 34
3.4.5 AUX MSTR........................................................................ 35
3.4.6 SNAP.................................................................................. 35
3.4.7 EFX .................................................................................... 35
3.4.8 MATRIX............................................................................. 35
3.4.9 Engineer’s Utility.............................................................. 35
3.4.10 Main Meters and RUDE SOLO LED ............................... 37
3.5 UTILITY Area.............................................................................. 38
3.5.1 TALKBACK....................................................................... 38
3.5.2 MONITOR ......................................................................... 38
3.5.3 PHONES............................................................................ 39
3.6 Snapshots ..................................................................................... 39
3.7 Group and Master Controls......................................................... 40
3.7.1 Changing the Group Bank................................................ 40
3.7.2 Group Assignment ............................................................ 41
3.7.3 Group Parameter Control................................................. 41
3.8 Solo Area....................................................................................... 41
3.8.1 CLEAR SOLO.................................................................... 41
3.8.2 PFL..................................................................................... 41
iv
Page 5

Mackie TT24 Digital Live Console Owner’s Manual
Chapter 4: Rear Panel Connectors.......................................................... 43
4.1 Analog I/O..................................................................................... 43
4.1.1 MIC Inputs 1–24 ............................................................... 43
4.1.2 LINE Inputs 1–24 ............................................................. 44
4.1.3 INSERTS 1–24 .................................................................. 44
4.1.4 AUX SENDS 1–12............................................................. 45
4.1.5 LINE INPUTS 1–8 (RETURNS) ...................................... 45
4.1.6 MONITOR ......................................................................... 46
4.1.7 CD/TAPE A IN/OUT ......................................................... 46
4.1.8 CD/TAPE B Input ............................................................. 46
4.1.9 TALKBACK MIC Input .................................................... 47
4.1.10 MAINS OUT...................................................................... 47
4.1.11 GROUP/MATRIX OUT..................................................... 47
4.2 Digital I/O..................................................................................... 48
4.2.1 ADAT DIGITAL I/O .......................................................... 48
4.2.2 AES/EBU IN/OUT............................................................. 49
4.2.3 SPDIF IN/OUT.................................................................. 49
4.2.4 WORD CLOCK IN/OUT ................................................... 50
4.2.5 MIDI IN/OUT.................................................................... 50
4.2.6 USB.................................................................................... 50
4.3 IEC Power Receptacle.................................................................. 50
4.4 POWER Switch ............................................................................ 50
Chapter 5: DSP and Internal Effect Allocation.................................. 51
5.1 Analog, Digital, and Line Inputs................................................. 51
5.2 Master L/R and C/Mono............................................................... 52
5.2.1 L/R+Mono and LCR Modes............................................... 52
5.2.2 Six-Band EQ...................................................................... 53
5.2.3 Compressor........................................................................ 53
5.2.4 Fader Position in Signal Path .......................................... 53
5.3 Aux Send ...................................................................................... 53
5.3.1 Six-Band Parametric EQ .................................................. 54
5.3.2 Compressor........................................................................ 54
v
Page 6

Mackie TT24 Digital Live Console Owner’s Manual
5.4 Flex-Group DSP ........................................................................... 54
5.4.1 Flex-Group Modes............................................................. 54
5.4.2 Group DSP Allocation....................................................... 56
5.5 Matrix Output.............................................................................. 57
5.5.1 Delay.................................................................................. 57
5.6 Internal Effects Processors.......................................................... 57
5.7 Tabular Summary of DSP and Effects........................................ 58
Chapter 6: Touchscreen and TT Control............................................... 63
6.1 TT Control Conventions .............................................................. 63
6.1.1 TT Control Knob................................................................ 64
6.1.2 TT Control Buttons ........................................................... 65
6.1.3 TT Control Menus ............................................................. 65
6.1.4 TT Control Graphs............................................................ 65
6.2 Touchscreen Conventions............................................................ 66
6.2.1 Touchscreen Knobs ........................................................... 66
6.2.2 Touchscreen Buttons......................................................... 67
6.2.3 Touchscreen Name and Channel/Function...................... 67
6.2.4 Sub Screens ....................................................................... 68
6.3 Overview Touchscreens ............................................................... 68
6.3.1 Analog................................................................................ 68
6.3.2 Digital ................................................................................ 69
6.3.3 Effect Return ..................................................................... 70
6.3.4 Line .................................................................................... 72
6.3.5 Aux..................................................................................... 73
6.3.6 Group ................................................................................. 74
6.3.7 Master................................................................................ 75
6.4 Four-Band Equalizer ................................................................... 76
6.5 Six-Band Equalizer...................................................................... 78
6.5.1 Four-Band EQ ................................................................... 78
6.5.2 Kill Filters ......................................................................... 78
6.6 Dynamics...................................................................................... 79
6.6.1 Compressor........................................................................ 79
6.6.2 Gate/Expander .................................................................. 81
vi
Page 7

Mackie TT24 Digital Live Console Owner’s Manual
6.7 Snapshots ..................................................................................... 82
6.7.1 PROTECT.......................................................................... 83
6.7.2 CLEAR............................................................................... 84
6.7.3 STORE............................................................................... 84
6.7.4 RECALL............................................................................. 84
6.7.5 Snapshot Filtering ............................................................ 84
6.8 Aux Master................................................................................... 85
6.9 Groups/Auxes ............................................................................... 86
6.9.1 GROUPS............................................................................ 86
6.9.2 AUXES............................................................................... 86
6.10 Matrix Mix.................................................................................... 87
6.10.1 Delay .................................................................................. 89
6.11 Effects ........................................................................................... 90
6.12 Setup............................................................................................. 90
6.12.1 Operation ........................................................................... 91
6.12.2 General .............................................................................. 91
6.12.3 Digital ................................................................................ 92
6.13 Utility ........................................................................................... 93
6.13.1 MONITOR SOURCE......................................................... 94
6.13.2 TALKBACK....................................................................... 95
6.13.3 STEREO INPUT ASSIGN................................................ 95
6.13.4 METERING....................................................................... 96
6.14 File Management ......................................................................... 97
6.14.1 Load and Save Venue........................................................ 97
6.14.2 DSP Preset Management.................................................. 98
Appendix A: Specifications .............................................................................. 99
Appendix B: Configurations and Block Diagrams........................... 103
Appendix C:Service Information................................................................ 107
Appendix D: Warranty Information ............................................................ 111
vii
Page 8

Mackie TT24 Digital Live Console Owner’s Manual
This manual is based on Build 41 so some screenshots and functions may differ
from the version you are using. Regular updates to the manual will be available
fromwww.mackie.com.
Web Version: SW0135 Rev. A 01/05
©2005 LOUD Technologies Inc.
All Rights Reserved.
viii
Page 9

Mackie TT24 Digital Live Console Owner’s Manual
Chapter 1: Introduction
1.1 Evolution of the TT24 Console
The professional live sound industry has been revolutionized over the past few
years by high-end digital consoles. However, mid-size digital consoles have
tended to emphasize studio applications with user interfaces encumbered by
features (i.e., DAW control) not essential for live applications. Some of these
consoles conceal their real cost by requiring the purchase of additional cards to
supplement their limited physical I/O.
The
TT24 Digital Live Console
terface optimized for live sound applications. We have used our extensive
expertise and experience designing analog mixers to produce a powerful, easy
to-use digital console for a wide range of applications and budgets
is a mid-size digital mixer with an intuitive in-
-
:
• theaters and houses of worship
• permanent concert installations
• professional live music touring companies
TT24 maintains an “analog mentality,” utilizing the engineer’s experience,
while providing all the advantages of digital functionality. With all the features
of high-end consoles, the TT24 is extremely cost effective.
The design mandate for the TT24 console user interface is simply stated
:
Provide quick, intuitive access to any primary live mixing function
with no more than two button presses, both within easy reach of the
engineer’s two hands
Make the Touchscreen menu structure flat
.
no “forward” and “back”
:
buttons or menus to wade through to access the desired function.
9
Page 10

Mackie TT24 Digital Live Console Owner’s Manual Introduction
1.2 Summary of Features
•24-bit/96 kHz mixing console designed for live applications
• 24 mic/line inputs with 4
• Eight line inputs with 4
• Instant recall of 99 snapshots with filtering
• Rear panel connections
x (8 Matrix Outputs, 3 Main Outputs, 3 Monitor Outputs, 12 Aux Sends);
28x28 digital I/O (24 ADAT optical I/O, 2 AES/EBU I/O, 2 S/PDIF I/O)
• QuickMix section with 5.5
buttons
• 29 100
•28 multi
• 12 Aux sends with 6
• Left
and compressor/limiter
• Aux Mode enables instant monitor mixing
•11x8 Matrix
• Eight user
•Dual
• TT control software to control and view console parameters via PC
mm motorized faders
function V-Pots
-
Right and CTR/Mono outputs with 6-band parametric EQ (includes dual kill filters)
-
Plus with patchable inputs
-
definable flex-groups
-
console linking for a maximum 96 input console (coming soon!)
-
band EQ/comp/gate/HPF/polarity invert (can be stereo linked)
band EQ (can be stereo linked)
-
36x28 analog I/O (24 Mic/Line Inputs, 8 Line Inputs, 4 Tape Inputs)
:
inch touch LCD, 12 push-button rotary encoders, and QuickMix
-
band parametric EQ (includes dual kill filters) and compressor/limiter
-
1.2.1 DSP Functionality
The TT24 is loaded with DSP horsepower that is distributed on inputs and
outputs in an optimal manner for live sound. The TT24 design team spent a
great deal of time implementing and allocating the TT24’s DSP to satisfy the
rigorous, real-time demands of live concert applications
24 Mic/Line Inputs
• Polarity invert
• Variable High
• Gate/Expander
• Compressor/Limiter
•4-band parametric EQ
• Stereo linking
Pass Filter
-
:
10
Page 11

Mackie TT24 Digital Live Console Owner’s Manual Introduction
8 Line Inputs
•4-band parametric EQ
• Stereo linking
Main Outputs (LEFT, RIGHT, CTR/MONO)
• Compressor/Limiter
•6-band parametric EQ (includes dual kill filters)
• L/R + Mono or LCR modes of operation
12 Aux Sends
• Compressor/Limiter
•6-band parametric EQ (includes dual kill filters)
• Stereo linking
8 Flex-Groups with 8 Assignable DSP Blocks
• Compressor/Limiter
•4-band parametric EQ
• Mono, Stereo, LCR, and VCA modes of operation
8 Matrix Outputs
• 600 ms delay is available to matrix outputs
4 Internal Stereo Effects
• Reverb
•Gated Reverb
• Mono/Stereo/Ping-Pong Delay
•Chorus
•Flanger
11
Page 12

Mackie TT24 Digital Live Console Owner’s Manual Introduction
1.3 Terminology and Conventions
The following terms and conventions are used throughout this manual.
• Touchscreen and console controls are represented in bold type using their
exact spelling and capitalization (i.e., press the ANLG bank button).
• Touchscreen and console areas are represented by capital letters in plain
type (i.e., press the PAN button in the V-POT CONTROL area).
•
Activate
means “press the button until it lights.”
•
Deactivate
means “press the button until it is not lit.”
•
ADC
pertains to switches/buttons that toggle between two values and
pertains to switches/buttons that toggle between two values and
means analog-to-digital converter
•
DAC
means digital-to-analog converter
•
Intercancel
and automatically deselects the previously selected button. One button is
always active. For example, the Bank Select buttons intercancel.
button
from the push buttons that selected radio stations in pre-1960s cars.
The Touchscreen is a new interface to most audio engineers that requires some
new terminology.
•
Touch
•
Select
allows a single instruction to describe this action without knowing the
control’s previous state. For example, if the control is
the control once selects it. If it is already selected, no action is required.
means that pushing one button simultaneously selects that button
Radio
is another term often used to describe this behavior, originating
pertains to selection on the Touchscreen (i.e., Touch the EQ button).
describes touching a button or checkbox such that it is
not
activated
selected, touching
. This
12
Page 13
Mackie TT24 Digital Live Console Owner’s Manual
A
CK
OUT
CTR/MONO
T
OUT
S
S
356
810
C
356
8
Chapter 2: Quickstart Tutorial
This Quickstart Tutorial will help you begin using the TT24 quickly and easily
by providing step-by-step instructions for its most commonly utilized tasks.
Rest assured that our team of design engineers has verified these instructions!
It may be helpful to refer to Appendix B:
Configurations and Block Diagrams
to see how several useful complete systems are interconnected.
2.1 Connect Amplifier/Speakers
1. Plug in a pair of amps/speakers into the MAINS OUT LEFT and RIGHT
XLR connectors (Figure 2-1).
2. Connect an amp/speaker to AUX SEND 1.
3. Plug in headphones.
MAINS
RIGH
Main Outputs
TALKBA
CD/Tape A
Inputs/Outputs
CD/TAPE
CD/Tape B
Inputs
Figure 2-1 Mains and Aux Sends Outputs
AUX SEND
LINE INPUT
12 Aux
Sends
MONITOR
2.2 Connect a Mic
This section describes how to connect a mic to channel 1, set the gain, route to
groups/auxes, and engage/adjust the variable high
Connect mic to channel 1
1. Plug a mic into channel 1’s XLR input (top
2. Press the ANLG bank select button (right of Figure 2-2).
3. Set the LINE switch to the up (mic) position.
13
pass filter.
-
right of rear panel).
-
Page 14
Mackie TT24 Digital Live Console Owner’s Manual Quickstart Tutorial
RETURNS
R
OG
L
OT
CO
OL
G
L
S
R
C
R
SOLO
S
5
UX
SEND
UT
SOLO
S
CT
E
Mute
button
Bank/
Channel
description
Select
button
MUT
2
INP
A
ELE
Bank Select
Clear Solo and
PFL buttons
ANAL
LEA
DIGITA
MASTE
ANL
DGT
RTN
MST
Solo
METER
V-P
NTR
button
V-Pot Control
Figure 2-2 Top of channel strip (left); Bank Select, Clear Solo, PFL, V-Pot control (right)
4. Set the 48V switch to the
down
position if the mic uses phantom power;
set it to the up position otherwise.
Set the channel gain
5. Activate the PFL button (right of Figure 2-2).
6. Activate channel 1’s SOLO button (above fader) to solo the channel.
7. Provide a representative signal to the mic, watch the meters to the right
of the Touchscreen, and listen in phones (the phones level is in the
UTILITY area).
The solo level should be between -7 and -10 dBFS.
8. Press channel 1’s SOLO button again or CLEAR SOLO (left of PFL) to
unsolo.
Route channel 1 to Main output, Group 1, and Aux 1
9. Press and hold the L/R button in the GROUP ASSIGN area (Figure 2-3)
and activate channel 1’s SELECT button.
All the channel SELECT buttons light, indicating that all channels are
routed to the Main output. You should hear your mic in the speakers
connected to MAINS OUT via the master fader.
Let's route the mic through Group 1 instead of directly to MAINS OUT
10. Press and hold the L/R button in the GROUP ASSIGN area and deactivate
channel 1’s SELECT button (so it is
not
lit).
:
Channel 1 no longer sends signal to MAINS OUT.
14
Page 15
Mackie TT24 Digital Live Console Owner’s Manual Quickstart Tutorial
RETURNS
R
OG
L
T
R
OT
CO
OL
UX
S
S
GMUTE
L
S
5
R
S
CT
SOLO
E
6
S
SOLO
E
3
S
CT
SOLO
E
8
S
CT
SOLO
/
O
/
S
CT
UX
E
6
8
0
C
R
SOLO
S
AUX
3
5
11. Press and hold the Group 1 button in the GROUP ASSIGN area and ac-
tivate channel 1’s SELECT button.
The mic is now routed to Group 1.
12. Press and hold the L/R button in the GROUP ASSIGN area and activate
Group 1’s SELECT button.
Group 1 is now assigned to LEFT and RIGHT MAINS OUT.
Use the channel, Group, and Master fader to listen to the mic signal in
the speakers connected to MAINS OUT.
Group Mute buttons
Bank Select
Clear Solo and
PFL buttons
V-Pot Control
Aux Mode
Aux Sends
METER
LEA
ANAL
DIGITA
MASTE
V-P
NTR
A
END
ANL
DGT
RTN
MST
MOD
ELE
A
1
MUT
ELECT
MUT
GROUP ASSIGN/SELEC
ELE
MUT
ELE
Figure 2-3 Aux, Group, and Master areas
CTR
MON
ELE
MASTE
Master Center/Mono Assign button
Group Assign/Select buttons
Master Left/Right Assign button
Master Select button
Group Select buttons
Group Solo buttons
13. Press AUX SENDS 1 in the V-POT CONTROL area (Figure 2-3).
14. Increase the Aux 1 level on channel 1 using the V-Pot.
15. Press the AUX MSTR QuickMix button (Figure 2-4).
16. Adjust Aux 1’s master level with its corresponding QuickMix knob (see
the Aux Master screen in Figure 2-5).
You should hear your mic in the monitor speaker attached to Aux 1.
15
Page 16
Mackie TT24 Digital Live Console Owner’s Manual Quickstart Tutorial
/
UX
SETUP
CTRL
CO
UTIL
E
STORE
L
SNAP
UX
R
S
S
y
on
Aux Master butt
GRP
A
MST
Figure 2-4 QuickMix area
A
RECAL
NAPSHOT
Utilit
tton
PY
PAST
AUX 1
Master level
Figure 2-5 AUX MASTER Touchscreen
Engage and adjust the variable high-pass filter
17. Press HPF in the V-POT CONTROL area (Figure 2-2).
This assigns the high-pass filter to the channel V-Pots.
18. Engage the high-pass filter for channel 1 by pressing its V-Pot knob so
the bottom red LED lights.
19. Rotate the V
Pot to adjust the filter in the range 20–400 Hz to remove
-
unwanted low frequencies.
20. To view the frequency range, select channel 1 and press the QuickMix
EQ button.
The Touchscreen now displays the HPF frequency range.
16
Page 17
Mackie TT24 Digital Live Console Owner’s Manual Quickstart Tutorial
2.3 Connect a CD/Tape Device
This section illustrates how to connect a CD/tape device to the dedicated CD/
TAPE A or B connectors (A = RCA, B = TRS), and to channels 23/24 to demonstrate stereo linking and channel strip processing.
Connect CD to CD/Tape input
1. Connect the CD player into CD/TAPE A or B (Figure 2-1).
2. Press the UTIL button (Figure 2-4).
Stereo
Input
Assign
Figure 2-6 Stereo Input Assign
3. Touch STEREO INPUT ASSIGN on the Touchscreen (Figure 2-6).
4. Touch TAPE/CD A or TAPE/CD B in the INPUT SELECTION area
(Figure 2-6).
5. Select L/R in the GRP ASSIGN area to route the stereo source to the
LEFT and RIGHT MAINS outputs.
6. Adjust MUTE and SOLO from the Touchscreen.
7. Adjust the stereo input fader to desired level from its QuickMix knob.
Connect CD to channels 23 and 24
1. Move the CD to the channel 23 and 24 LINE connectors.
2. Set the LINE switch to the down position (line level).
3. Press and hold channel 23
Channels dialog appears in the Touchscreen.
4. Touch OK to approve the channel linking.
and
24’s SELECT switches until the Link
5. Press the PAN button in the V-POT CONTROL area (Figure 2-3).
17
Page 18
Mackie TT24 Digital Live Console Owner’s Manual Quickstart Tutorial
6. Turn channel 23’s V-Pot hard left.
Channel 24 automatically pans in the opposite direction. Pretty cool!
7. Activate the SOLO button above the fader on either channel to solo.
Because PFL is engaged, the linked channel
does not
also solo.
8. Adjust the channel’s GAIN knob and watch the meters to the right of
the Touchscreen.
The level should be between -7 and -10 dBFS.
9. Repeat steps 7 and 8 for the other channel in the linked pair.
NOTE: Stereo linking always operates on a consecutive odd/even channel pair. The odd
channel’s parameters are copied to the even channel except Pan, which is inversely
linked (i.e., hard left on odd channel translates to hard right on even channel).
Adjust EQ, Dynamics, and channel routing
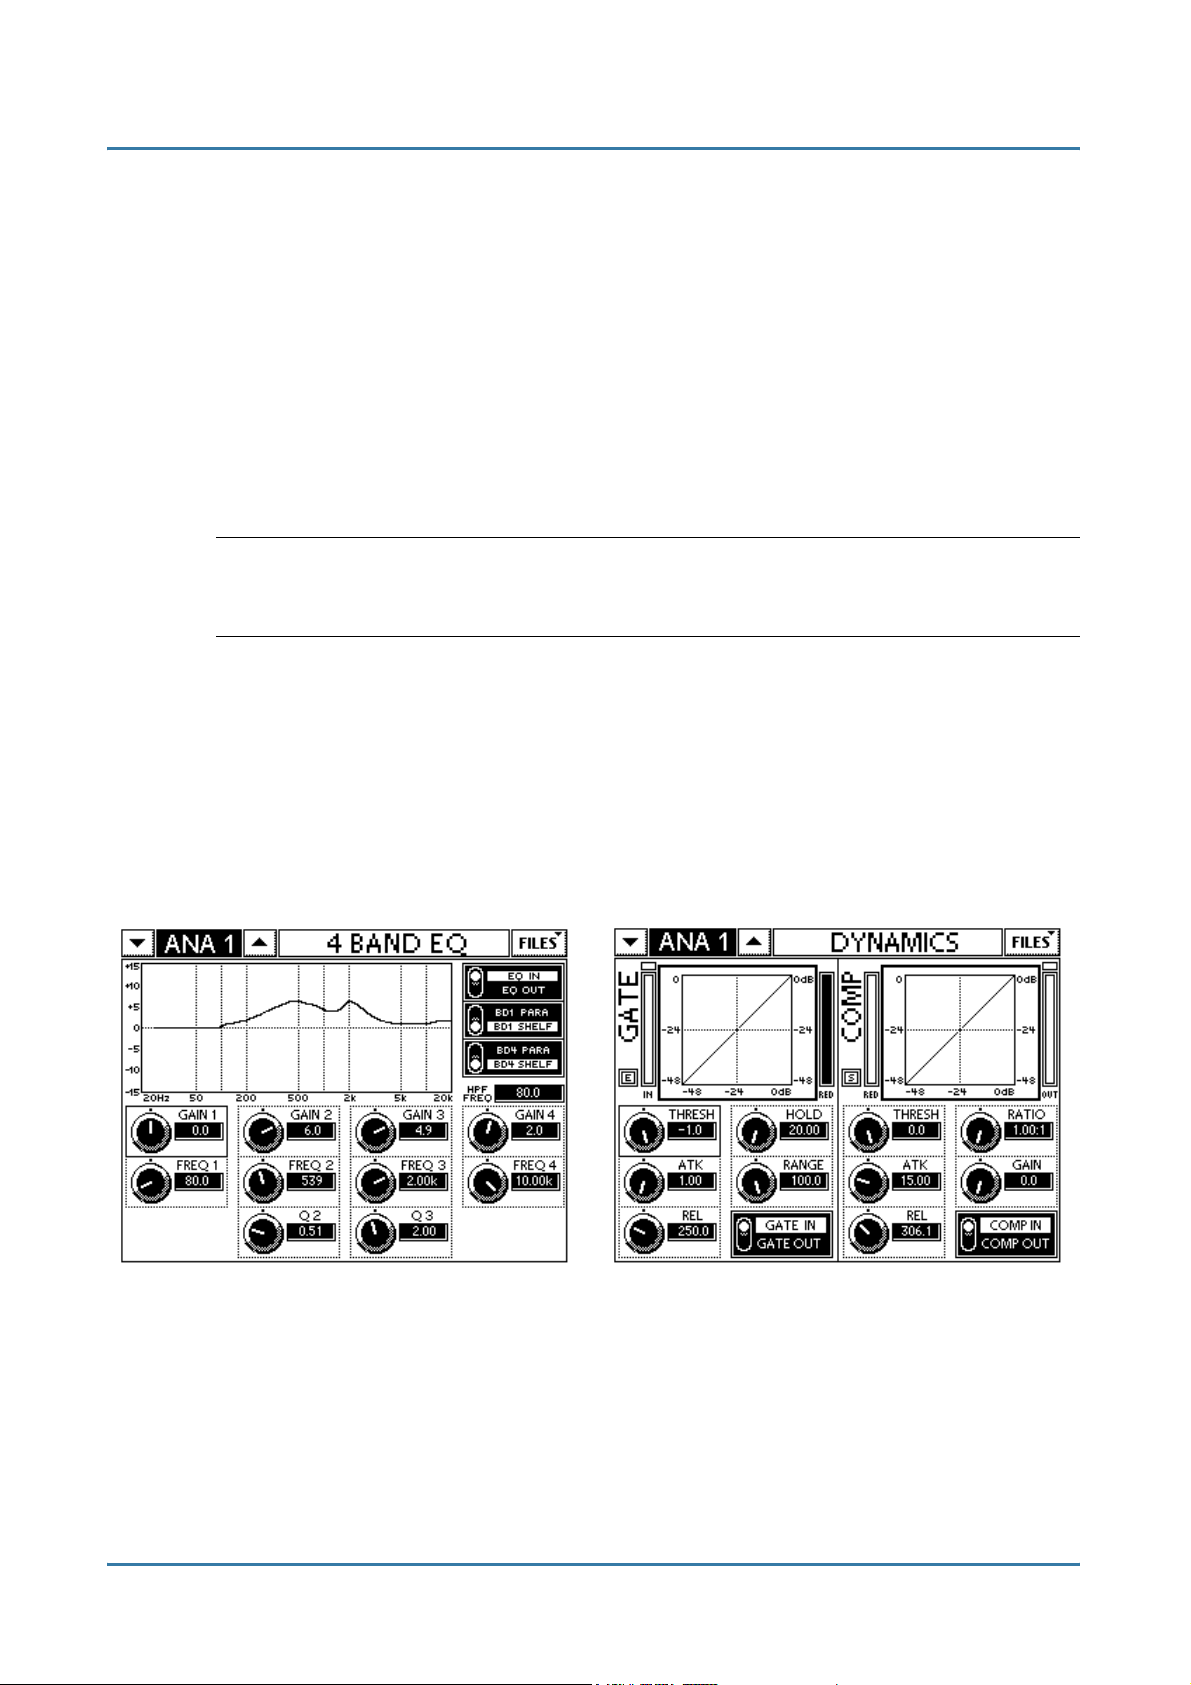
1. With channel 23 and 24 selected, press the EQ button in the QuickMix
area to display the 4-BAND EQ Touchscreen (Figure 2-7).
2. Select the EQ IN toggle switch to enable EQ.
3. Use the 12 QuickMix knobs to adjust the EQ parameters.
Figure 2-7 4-BAND EQ (left) and Dynamics Touchscreens
4. Press the DYN QuickMix button to display the DYNAMICS Touch-
screen (Figure 2-7).
5. Select the GATE IN and COMP IN toggle switches on the Touchscreen
to engage the processors.
18
Page 19
Mackie TT24 Digital Live Console Owner’s Manual Quickstart Tutorial
6. Use the 12 QuickMix knobs to adjust the dynamics parameters.
Touch the Gate or Compressor Touchscreen graph to display their more
detailed Touchscreen.
7. Press the GRP/AUX QuickMix button to display the GRPS/AUXES
Touchscreen (Figure 2-8).
8. Route the selected channel to Groups 1–8, L/R, and C/Mono by selecting
their buttons from the GROUPS area in the top-half of the Touchscreen.
9. Adjust the selected channel’s Aux send levels using the QuickMix knobs.
Figure 2-8 GRPS/AUXES Touchscreens
10. Push the QuickMix knobs to toggle each Aux send between pre- and
post-fader.
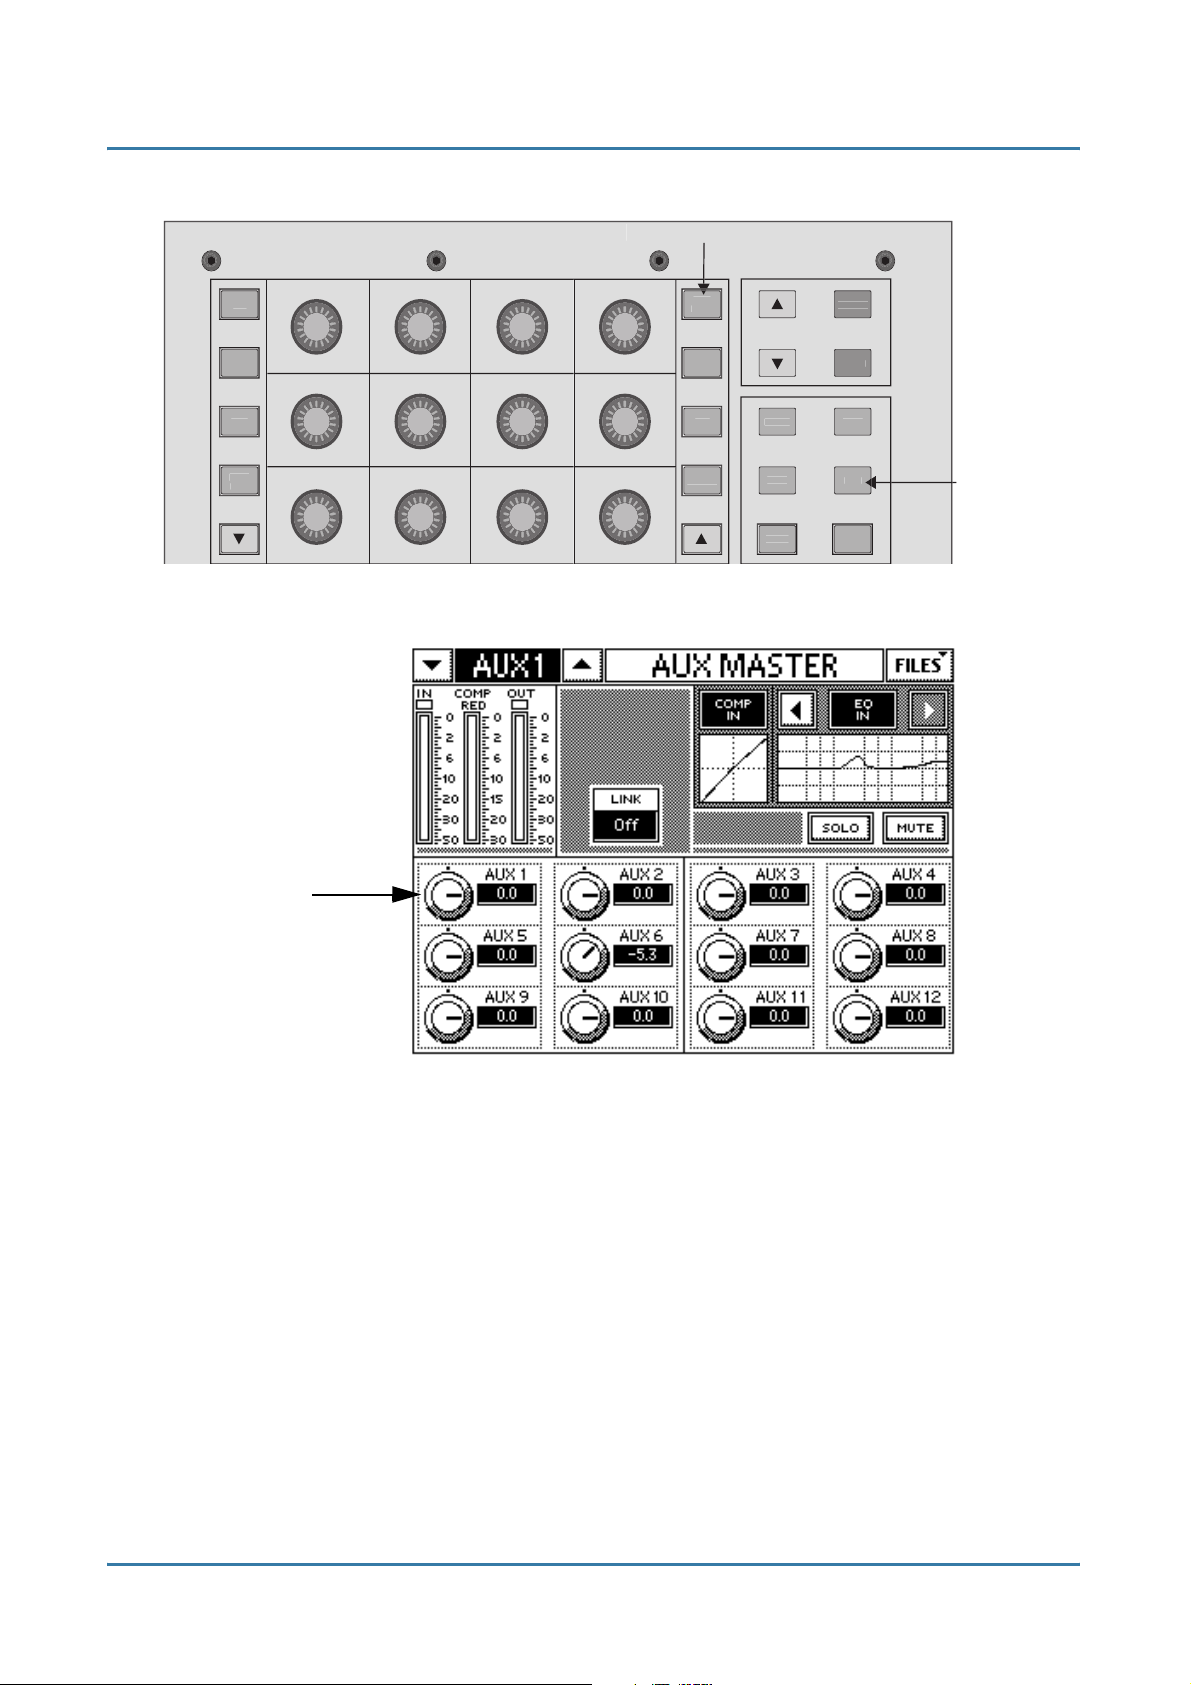
2.4 Aux Functions
This section discusses how to setup, route, and mix the Aux buses. Each of the
12 Aux masters have their own EQ and compressor/limiter.
1. Press the AUX MSTR button (Figure 2-4) to display the AUX MASTER
Touchscreen.
2. Select Aux master 1 by pressing the top-left QuickMix knob.
Figure 2-9 (left) shows Aux 1 selected.
3. Touch the EQ graph or press the EQ QuickMix button to display the
6-BAND EQ for the selected Aux send 1 (right of Figure 2-9).
The EQ IN/OUT button is located on the top-right of the Touchscreen.
19
Page 20
Mackie TT24 Digital Live Console Owner’s Manual Quickstart Tutorial
Figure 2-9 AUX MASTER (left) and 6-BAND EQ (right) Touchscreens
The six bands have the following format
• bands 2 and 3 are full parametric filters (GAIN, FREQ, Q)
• bands 1 and 4 are high- and low-shelf filters, respectively
:
;
;
• bands 5 and 6 are kill filters to remove narrow bands of unwanted
frequencies. Push the kill filter’s QuickMix knob to cycle through
6, -12, or -18 dB settings. As the amount of cut increases, the filter
Q increases (i.e., bandwidth narrows). Turn the knob to adjust the
frequency.
Press the desired Aux number in the V-POT CONTROL area and use the
channel V-Pots to set the channel Aux send levels. All 12 Aux levels for a selected
channel can be set using the Touchscreen and QuickMix knobs by pressing the
GRP/AUX QuickMix button.
Aux Routing Examples
To send mic channel 1 to all monitors:
1. Press channel 1’s SELECT button.
2. Press the GRP/AUX QuickMix button.
3. Adjust the QuickMix knobs to set each Aux level.
To set one monitor mix:
1. Press the desired Aux number button in the AUX SENDS area.
2. Use each channel’s V-Pots to set the mix.
20
Page 21
Mackie TT24 Digital Live Console Owner’s Manual Quickstart Tutorial
2.5 Effects
Four effects processors can each use one of the following effects: reverb, reverb
through gate, mono/stereo/ping pong delay, chorus, and flange. The default
effect sends are Aux sends 9–12 but any Aux or Matrix sends can be used. The
effect returns are on the Returns bank.
1. Press the ANLG bank button.
2. Press AUX SENDS 9 in the V-POT CONTROL area.
3. Turn channel 1’s V-Pot to 3:00 to set channel 1’s level to Aux 9.
4. Press the EFX QuickMix button.
The INTERNAL EFX Touchscreen opens (left of Figure 2-10).
Figure 2-10 Internal Effects and Chorus screens
5. Touch the Edit button next to Chorus to edit its parameters on its own
screen (right of Figure 2-10).
6. Press the RTRNS bank button.
7. Speak into the mic and increase the Returns levels (INT EFX 1L and
INT EFX 1R) to set the desired amount of effect.
21
Page 22

Mackie TT24 Digital Live Console Owner’s Manual Quickstart Tutorial
22
Page 23

Mackie TT24 Digital Live Console Owner’s Manual
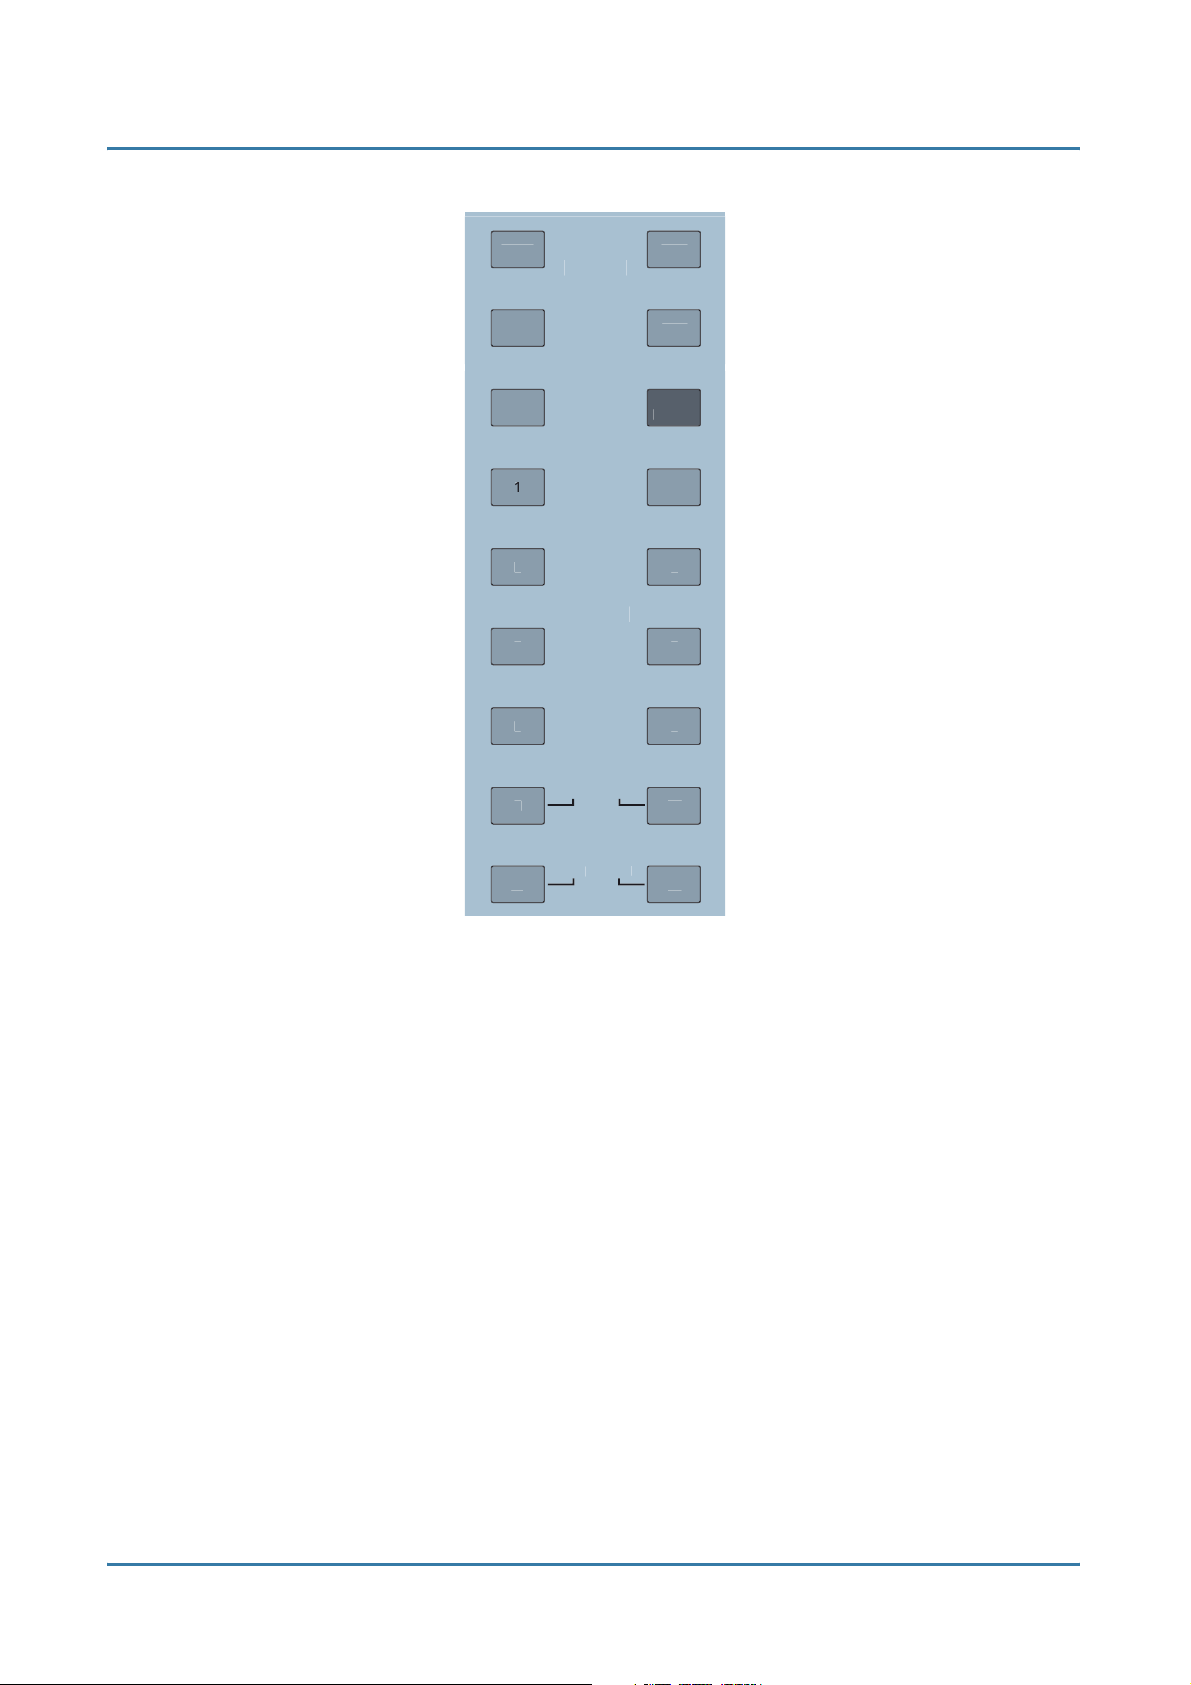
Chapter 3: Console Surface Controls
The TT24 console surface is organized into the following areas, each of which
is discussed in this chapter
• Channel Strips
•QuickMix
•Bank Select
•V-Pot Control
• Utility
•Flex-Groups and Master
• Solo
:
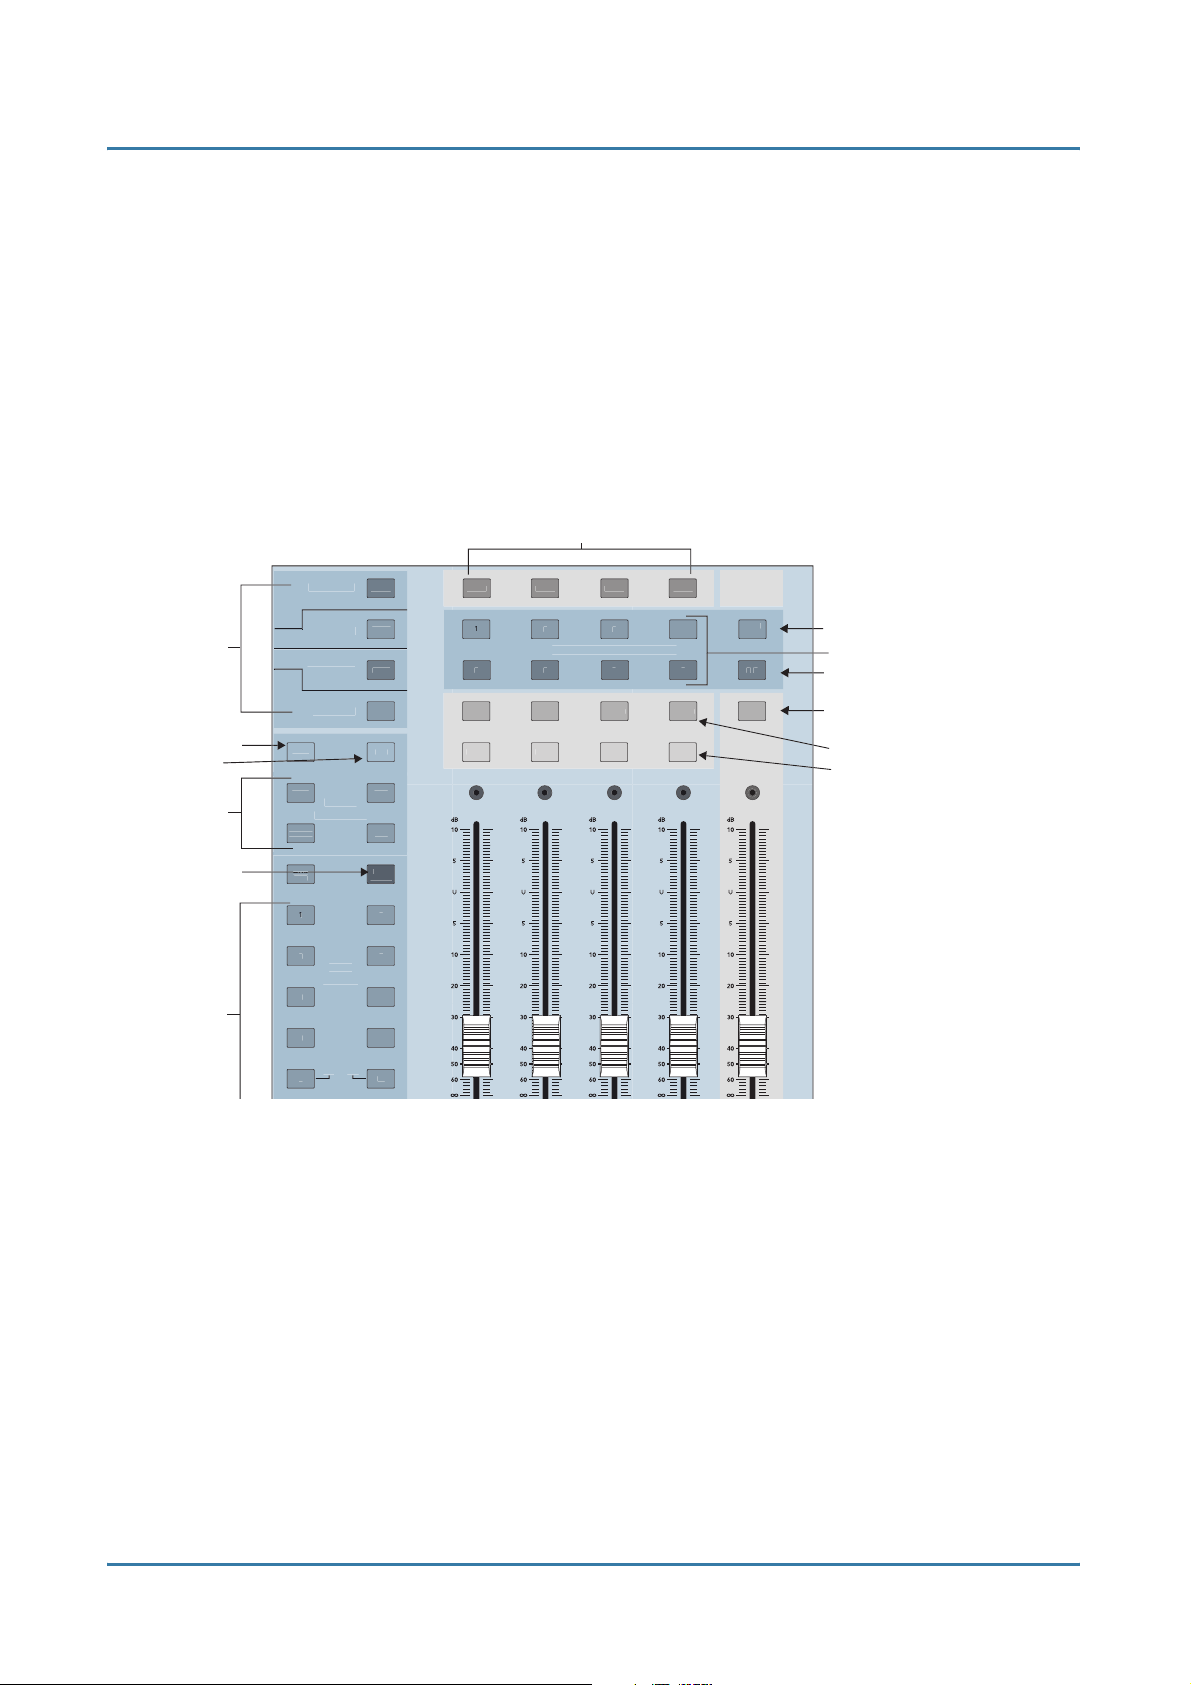
3.1 Channel Strip
The TT24 has 24
top by a LINE switch. Each channel strip can control one input at a time from
one of four banks.
The top section of each channel strip (left of Figure 3-1) has the following analog
controls that apply only to the Analog bank: LINE mic/line input switch, 48V
phantom power switch, GAIN mic/line gain control, and OL (overload) and SIG
signal LEDs.
Below that, each channel has a virtual potentiometer (V
and SOLO buttons, and a 100
The V-Pot knob, which performs multiple channel functions one at a time,
consists of a push-button rotary encoder surrounded by a 15-segment LED
ring (see
V-Pot Control Area
channel strips
bounded at the bottom by a fader and at the
Pot), MUTE, SELECT,
-
mm motorized fader (right of Figure 3-1).
-
on page 29).
23
Page 24
Mackie TT24 Digital Live Console Owner’s Manual Console Surface Controls
G
N
0
0
8V
n
5
UX
D
UT
O
CT
E
Mic/Line
level button
48 V
phantom
ower butto
Gain
knob
Overload
LED
Signal
LED
V-Pot
knob
Mute
MUT
button
4
2
4
AI
Bank/
Channel
description
Select
button
Solo
INP
2
A
EN
ELE
L
button
I
Channel
fader
Figure 3-1 Channel strip: top-half (left), bottom-half (right)
3.1.1 LINE
Push the LINE button
mic input. For permanent installations that require alternate access to mic and
line inputs in the same channel, connect both inputs and toggle between them
via the LINE button.
down
3.1.2 48 V Phantom Power
Push the 48V button
condenser mics, to the channel’s XLR mic input. The TT24 can provide phantom
power to all 24 mic inputs simultaneously. Push the button up for dynamic
mics that do not require phantom power. The line input is not affected by the
48V phantom power switch.
down
to access the ¼-inch line input and up for the XLR
to supply 48 VDC phantom power, required by most
24
Page 25

Mackie TT24 Digital Live Console Owner’s Manual Console Surface Controls
3.1.3 GAIN
The GAIN knob controls the analog amplifier that adjusts the input sensitivity
of the mic or line input signal. The gain range of the mic input is 0–60 dB; the
line’s range is -20 to +40 dB. A unity gain indication for the line input appears
at the 10:00 position (unity gain for the mic input is fully counterclockwise).
Dual-concentric labels surround the knob indicating the appropriate levels
(mic outside, line inside).
3.1.4 OL and SIG
The green SIG LED lights when the selected mic/line signal exceeds -15 dBu.
The red OL LED lights when the signal is 3 dB below clipping the ADC. The
SIG and OL LEDs remain lit only while the signal level is above their corresponding thresholds.
3.1.5 V-Pot
The V-Pot displays and controls one of the following functions at a time: pan,
HPF, Aux send levels, Aux pan (for linked Aux sends), digital trim, and channel
metering. The function is assigned from the V-POT CONTROL area.
The V-Pot has 15 LEDs in a ring from 7:00 to 5:00. They light clockwise as the
signal level increases unless otherwise noted. The V-Pot also has a bottom red
LED used to indicate different functions including meter clip, default settings,
on/off, etc. The 12:00 LED is also sometimes used to indicate a nominal setting
(i.e., pan set to center). Each function’s specific behavior is discussed in
Control Area
V-Pot
on page 29.
12:00 LED
Bottom LED
Figure 3-2 V-Pot
25
Page 26

Mackie TT24 Digital Live Console Owner’s Manual Console Surface Controls
3.1.6 MUTE
Push the MUTE button to toggle the channel between muted (button lights)
and enabled (not lit).
NOTE: Pre-fader Aux sends can be globally changed to pre- or post-mute from the SETUP-
GENERAL Touchscreen (see page 91).
3.1.7 Bank/Channel Description Area
This area indicates the audio signal currently controlled by the channel strip.
Each channel strip can control one channel from one of the four banks at any
given time. For example, Figure 3-1 illustrates channel strip 1. Four channel
names are listed in the Bank/Channel Description Area
:
• If the ANALOG bank is selected, strip 1 controls analog Channel 1.
• If the DIGITAL bank is selected, strip 1 controls digital Channel 25.
• If the RETURNS bank is selected, strip 1 controls Line Input 1.
• If the MASTERS bank is selected, strip 1 controls Aux Send 1.
3.1.8 SELECT
When lit, the SELECT button indicates this channel is selected for
• display and control of its parameters on the Touchscreen.
• assignment to groups in conjunction with the GROUP ASSIGN/SELECT
controls (see
Group and Master Controls
on page 40).
:
26
Page 27

Mackie TT24 Digital Live Console Owner’s Manual Console Surface Controls
Channel Linking
Pressing and holding the SELECT buttons on an odd/even pair of
channels for two seconds links their functions. A Touchscreen window requests
confirmation: “Link Channel X and Y?” Touch YES to link the channels or
CANCEL to abort the process. To unlink channels, press and hold both SELECT
buttons for two seconds again. A Touchscreen window requests confirmation:
“Unlink Channel X and Y?” Touch YES to unlink them or CANCEL to leave
them linked.
After linking, the odd channel’s settings are copied to the even channel; adjusting
a setting on either channel duplicates the setting on the other. The only exception
to this rule is panning. The pans are
Panning one channel fully left pans the other fully right; panning one channel
to 10:00 pans the other to 2:00.
True stereo compression applies to linked channels so the summed signal is delivered to the stereo compressor.
3.1.9 SOLO
Press the SOLO button to solo the channel. This yellow backlit button lights
when the channel is soloed. The PFL/AFL global selection is done in the Solo
master section (see
Solo Area
inversely
on page 41).
adjacent
related between linked channels:
The default Solo behavior is to allow multiple soloed channels. However, enable
EXCLUSIVE SOLO mode (in the SETUP-GENERAL Touchscreen) to have
each Solo selection deactivate the previous one. In EXCLUSIVE SOLO mode,
pressing CTRL+SOLO solos additional channels.
3.1.10 Channel Fader
The motorized 100-mm fader controls the channel level. Its function depends
on the selected Bank (see
In Aux Mode (page 32), the fader controls the level of the channel Aux sends
1–12 and depends on the Aux selection in the V-POT CONTROL area (see page
29). It is variable from
Bank Select Area
∞ to +10 dB in logarithmically scaled steps.
-
on page 28).
27
Page 28
Mackie TT24 Digital Live Console Owner’s Manual Console Surface Controls
3.2 Bank Select Area
The four Bank Select buttons (ANLG, DGTL, RTNS, MSTR) change the
mapping to the 24 channel strips (Figure 3-3). The four buttons intercancel and
one is always active. All channels retain their settings between Bank changes.
3.2.1 ANALOG
Press the ANLG button to select the ANALOG bank. The button lights red and
the 24 analog mic/line inputs are assigned to channel strips 1–24.
3.2.2 DIGITAL
Press the DGTL button to select the DIGITAL bank. The button lights green
and the DIGITAL inputs are assigned to the channel strips 1–24.
ANALOG
DIGITAL
RETURNS
MASTER
Figure 3-3 Bank Select buttons
ANLG
DGTL
RTNS
MSTR
At 44.1/48 kHz, there are 24 digital inputs from three ADAT optical connectors
on the rear panel. At 96 kHz, there are 12 digital inputs from the three built
in ADAT optical connectors.
3.2.3 RETURNS
Press the RTRN button to select the RETURNS bank. The button lights red
and the following inputs are controlled on the channel strips
1–8: Eight analog line inputs (TRS connectors on rear panel)
9–16: Four internal stereo effects returns
17–24: Return channels from expansion cards
-
:
28
Page 29

Mackie TT24 Digital Live Console Owner’s Manual Console Surface Controls
3.2.4 MASTER
Press the MSTR button to select the MASTERS bank. The button lights green
and the following inputs are controlled on the channel strips
1–12: Twelve Aux send masters
13–20: Eight Group masters
22–24: Left, Right, and Center/Mono Main outputs
NOTE: The Left and Right faders are always linked. The Left-Right and Center/Mono faders
may be linked as needed.
:
3.3 V-Pot Control Area
The buttons to the right of the channel faders assign the current function to the
channel V-Pots. These include the four V-POT CONTROL buttons (PAN,
TRIM, METERS, HPF), AUX SENDS 1–12, and AUX PAN (see Figure 3-4).
These buttons all intercancel so only one can be active at a time.
AUX PAN operates for stereo-linked Aux sends only, and does not deselect the
selected Aux send button. When selected, a single LED illuminates around the
V-Pot to indicate the pan position.
The AUX MODE button is discussed in this section because of its relevance to
the other Aux buttons.
3.3.1 TRIM
Digital Trim, available only to the ANALOG bank, is used to adjust the input
level just after the ADC, and channel meter, and before the channel DSP. This
allows setting the analog gain for the optimal A/D conversion while still having
an adjustable input level to the channel DSP. This also provides a method to
lower the level of all channel outputs and sends at once: Digital Trim is before
the Aux and Group sends in the signal flow.
However, it does not intercancel with the other buttons
.
The Digital Trim provides ±15 dB of attenuation or gain, adjustable in 0.1 dB
increments and is indicated by a single, lit LED. When the Digital Trim is set to
unity, the top LED (12:00 position) and the bottom V-Pot LED illuminate.
29
Page 30
Mackie TT24 Digital Live Console Owner’s Manual Console Surface Controls
OT
OL
UX
S
3
UX
E
0
S
UX
V-P
NTR
METER
A
A
MOD
A
END
FX
FX
1
FX
Figure 3-4 V-Pot Control Area
3.3.2 PAN
Pan position is indicated by a single, lit LED. When the pan is exactly centered,
the top LED (12:00 position)
LR or LCR panning is available on the ANALOG, DIGITAL, and RETURNS
banks and the eight groups (mode dependent) of the MASTER bank.
3.3.3 HPF
The high-pass filter can remove unwanted low frequencies from an input channel.
The filter cutoff frequency range is 20–400 Hz; the default frequency is 80 Hz.
The HPF has a fixed slope of 18 dB/octave. The approximate frequency is
indicated by a single lit V
V
Pot to toggle the HPF on/off;the bottom red LED lights when the HPF is on.
-
Press the SELECT button on an individual channel, then press the EQ QuickMix button to see the HPF frequency range as you turn the V
and
the bottom V-Pot LED illuminate.
Pot LED (frequency increases clockwise). Push the
-
Pot.
-
30
Page 31

Mackie TT24 Digital Live Console Owner’s Manual Console Surface Controls
3.3.4 METERS
The V-Pot LEDs serve as a meter (indicating left to right) for the channel’s signal
level. The bottom, red LED illuminates to indicate digital clipping (0 dBFS).
Push the V-Pot knob to toggle the meter to show compressor reduction: the
LEDs now illuminate
old setting). The bottom, red LED lights continuously to indicate the compressor
reduction mode of the meter. This can be activated individually per channel.
Press and hold the METERS button in the V-POT CONTROL area for two
seconds to toggle the meter modes for all channels between channel level and
compressor gain reduction.
counterclockwise
(the knob controls the compressor thresh-
3.3.5 AUX SENDS 1–12
The Aux send level for the channel is indicated by multiple, lit LEDs. The level
is variable from
left to right as the Aux send level increases. The maximum Aux send level is
indicated by all the V-Pot LEDs lit. When the Aux send is set to unity (approximately 3:00), the bottom V-Pot LED illuminates.
∞ to +10 dB in logarithmically scaled steps. LEDs light from
-
Rotate the V-Pot to control the selected send level for that channel. Push the
V-Pot to toggle the send pre-/post-fader.
Press and hold consecutive Aux buttons in the V-Pot Control area to link them
for stereo operation. For example, press and hold Aux 1 and 2, and the Touchscreen displays “Link Aux Sends Aux 1 and Aux 2?” Touch OK to complete the
operation. Aux levels are copied from odd to even Auxes when linking Aux
sends. After linking, adjusting one aux also adjusts the other. Pressing either
AUX SENDS button of a linked pair controls the stereo level from the V-Pots
and both AUX SENDS buttons light. All Aux send DSP is also linked.
3.3.6 AUX PAN
Aux pan is indicated for stereo-linked Aux sends by a single LED lit to illustrate
the pan position. When the Aux pan is set to center, the top (12:00 position) and
bottom V-Pot LEDs light.
Rotate the V-Pot to control the panning of stereo linked Aux sends. AUX PAN
does not intercancel with the other V-Pot control knobs. When AUX PAN is
selected, the panning function corresponds with the selected stereo Aux Sends.
The pan for linked Aux sends varies inversely: setting one to 9:00 automatically
sets the other to 3:00. If a mono Aux send is selected along with AUX PAN, then
no stereo position is displayed on the V-Pot LEDs. Press AUX PAN again to
return to normal Aux send level operation.
31
Page 32

Mackie TT24 Digital Live Console Owner’s Manual Console Surface Controls
3.3.7 AUX MODE
AUX MODE, the only blue button on the console, effectively turns the TT24
into a powerful, dedicated monitor mixer by using the 24 channel faders as
channel Aux sends and the four Group faders as Aux masters. Select an AUX
SENDS button (it flashes) and each channel fader is then used to control that
channel’s Aux send level.
In AUX MODE, the Group faders represent Aux Send masters 1–12 in three
banks:
Table 3-1 Group Faders control Aux Master Sends in AUX MODE
Group Fader 1 Group Fader 2 Group Fader 3 Group Fader 4
AUX SENDS 1–4 1234
AUX SENDS 5–8 5678
AUX SENDS 9–12 9 101112
For example, if AUX SENDS 3 is selected, it flashes while AUX SENDS 1, 2,
and 4 are lit solid to show their masters are assigned to the Group faders. For
linked Aux sends, both AUX SENDS buttons flash when either button is
pressed while the other two in that bank are lit solid.
The TRIM, METERS, HPF, PAN, and AUX PAN buttons operate normally and
still change the function of the V-Pots.
GROUP ASSIGN buttons do not light in banks of four in AUX MODE. However,
pressing and holding a GROUP ASSIGN button still allows Group assignment.
NOTE: See Group and Master Controls on page 40 for information on the normal
operation of the Group faders.
3.4 QuickMix Area
The QuickMix area (Figure 3-5) consists of the Touchscreen, 12 push-button
rotary encoders and eight buttons. It also includes Snapshot control buttons,
RUDE SOLO LED, L/R and C/MONO meters, and the Engineer’s Utilities area.
32
Page 33

Mackie TT24 Digital Live Console Owner’s Manual Console Surface Controls
/
UX
UP
L
Y
L
E
E
L
P
UX
R
S
It is important to note
:
• The only adjustable controls on the Touchscreen are buttons that toggle a
value on/off and dropdown menus that allow a selection. All knobs represented
on the Touchscreen are controlled by corresponding QuickMix knobs. If any
of the 12 knobs are missing from the Touchscreen, the corresponding QuickMix knob has no function.
• Any Touchscreen knob colored white instead of black denotes a dual function
available by pushing the corresponding QuickMix knob. The function varies
with the control.
The QuickMix buttons on the left are: FAT, EQ, DYN, and GRP/AUX.
The QuickMix buttons on the right are: AUX MSTR, SNAP, EFX, and MATRIX.
Each QuickMix button displays a Touchscreen for the selected channel. If the
selected channel does not contain the selected function (i.e., Digital Inputs
have no EQ), the Touchscreen displays “This Channel Does Not Contain XX”
until another Touchscreen is accessed. The Touchscreens are discussed in
Chapter 6:
Touchscreen and TT Control
.
QuickMix
section
A
MST
NA
GRP
A
NAPSHOT
ET
TR
P
RECAL
TOR
TI
PAST
Snapshot
section
Engineer's Utility
Area
Figure 3-5 QuickMix Section
33
Page 34

Mackie TT24 Digital Live Console Owner’s Manual Console Surface Controls
3.4.1 FAT
Press the FAT button to display the selected channel’s OVERVIEW Touchscreen
with all channel settings and meters. Although not all parameters can be adjusted from the OVERVIEW screen, touching a non-adjustable parameter opens its
dedicated screen (i.e., touch the EQ graph to open the EQ Touchscreen).
The specific information displayed and adjusted from the OVERVIEW screen
depends on the selected channel type: Analog, Digital, Line, Effect Return,
Group, Master, and Aux (see
Overview Touchscreens
on page 68).
3.4.2 EQ
Press the EQ button to display the selected channel’s EQ Touchscreen. Depending
on the channel type, it will be either
•4-BAND EQ: Four parametric EQ filters for Input Channels and Group
Masters.
:
See
Four-Band Equalizer
•6-BAND EQ: Two parametric EQ filters, high- and low-shelf filters, and two
narrow-band kill filters for Aux Masters and Main Outputs (L/R and C/Mono).
See
Six-Band Equalizer
3.4.3 DYN
Press the DYN button to display the selected channel’s DYNAMICS (Analog channel) or COMPRESSOR (Aux Send Masters, Groups, and Main Outputs) Touchscreens. The DYNAMICS Touchscreen has the Gate/Expander and Compressor
settings and their associated meters. Touch the Gate or Dynamics graphs to
open their dedicated Touchscreens (although most parameters can be accessed
from the DYNAMICS Touchscreen).
See
Dynamics
3.4.4 GRP/AUX
on page 76 for more information.
on page 78 for more information.
on page 79 for complete details.
Press the GRP/AUX button to display the GRPS/AUXES Touchscreen. Touch a
GROUPS assignment button to assign the selected channel to that Group. The
QuickMix knobs adjust the selected channel’s level to the 12 Aux Sends. Push
a QuickMix knob to toggle that Aux Send pre- or post-fader.
See
Groups/Auxes
on page 86 for more information.
34
Page 35

Mackie TT24 Digital Live Console Owner’s Manual Console Surface Controls
3.4.5 AUX MSTR
Press the AUX MSTR button to display the AUX MASTER Touchscreen. The
12 Aux Master Sends can be adjusted using the QuickMix knobs. The selected
Aux Master is listed in the top left of the screen. Change the selected Aux
Master by pressing the desired Aux’s QuickMix knob.
The top-half of the AUX MASTER Touchscreen displays the overview information for the selected Aux Master: metering, compression and EQ curves. Touch
the EQ or Compression displays to open their associated Touchscreens (or
press the EQ or DYN QuickMix buttons).
Each Aux Send Master also has an OVERVIEW Touchscreen that can be displayed by selecting an Aux Master and pressing the FAT button (see page 73).
See
Aux Master
on page 85 for more information.
3.4.6 SNAP
Press the SNAP button to display and edit the settings on the SNAPSHOTS TT
control software screen. See
See
Snapshots
3.4.7 EFX
Press the EFX button to display effects settings on the EFX Touchscreen.
There are four internal EFX processors.
See
Effects
Also see
and Effects
3.4.8 MATRIX
Press the MATRIX button to display the MATRIX Touchscreen. See
Mix
on page 87 and
Snapshots
on page 39 to learn about the console’s Snapshot controls.
on page 90 for more information about the EFX Touchscreen.
Internal Effects Processors
on page 58.
Matrix Output
on page 82 for a complete discussion.
on page 57 and
on page 57 for more information.
Tabular Summary of DSP
Matrix
3.4.9 Engineer’s Utility
The Engineer’s Utilities area consists of the clipboard buttons (COPY and
PASTE) and four green backlit buttons: HELP, SETUP, UTIL, and CTRL.
35
Page 36

Mackie TT24 Digital Live Console Owner’s Manual Console Surface Controls
HELP
This button is reserved for future use
SETUP
Press the SETUP button to open the SETUP Touchscreen, which accesses
global console parameters from the following categories: Operation, General,
and Digital. See page 90 for details.
UTIL
Press the UTIL button to open the UTIL Touchscreen, which accesses useful
console configuration functions: Monitor Source, Stereo Input Assign, Talkback,
and Meters. See page 93 for details.
CTRL
Pressing and holding the CTRL button while accessing some console controls
provides alternate functions
• Default Values: Press and hold the CTRL button and touch any console
parameter to restore its default value.
:
.
For example, press and hold CTRL and turn a Pan V-Pot to return it to its
center position or turn an EQ Gain knob to return the setting to 0.
• Multiple Solo: Press and hold the CTRL button to select multiple SOLO
buttons. This works even when EXCLUSIVE SOLO mode is active in the
GENERAL SETUP Touchscreen (see page 91).
• Special TT Control Screens: CTRL+METERS, CTRL+BANK (ANLG, DGTL,
RTNS, or MSTR), CTRL+MATRIX
COPY
Press the COPY button to copy the selected channel’s parameters to the clipboard (can only contain one channel’s parameters).
36
Page 37

Mackie TT24 Digital Live Console Owner’s Manual Console Surface Controls
O
E
O
S
0
0
5
0
PASTE
Press the PASTE button to paste the clipboard contents onto the selected
channel(s). The PASTE button has no effect until a channel is copied to the
clipboard.
The parameters copied and pasted can be restricted depending on the current
Touchscreen
:
•4- and 6-BAND EQ Touchscreens: only EQ parameters
• COMPRESSOR Touchscreen: only compressor parameters
• GATE/EXP Touchscreen: only gate/expander parameters
• DYNAMICS Touchscreen:
both
compressor and gate/expander parameters
• GRPS/AUXES Touchscreen: only Group and Aux assignments
• FAT OVERVIEW Touchscreen: all parameters
3.4.10 Main Meters and RUDE SOLO LED
The main meters display the Left, Right, and Center/Mono outputs, depending
on the console configuration. The meters receive the same signal as the Main
outputs. The first red Clip LED at the top of the meter lights when the signal
reaches -2 dBFS.
1
2
2
4
CTR/MON
RUD
L
NAPSHOT
Figure 3-6 Main Meters and RUDE SOLO
37
Page 38

Mackie TT24 Digital Live Console Owner’s Manual Console Surface Controls
G
F
S
60dB
0
0
If any channel is soloed, the RUDE SOLO LED flashes red. The L and R meters
now display the stereo solo signal instead of the main output. If the solo signal
is mono, it appears on both the L and R meters.
The CTR/MONO meter does not display anything when viewing solo levels.
This, along with the RUDE SOLO LED, indicates that the meter is displaying
a soloed signal.
When all solos are cleared either individually or by pressing the global CLEAR
SOLO button, the RUDE SOLO LED stops flashing and the three meters return
to their normal operation.
3.5 UTILITY Area
At the top of the console, the UTILITY area contains TALKBACK, MONITOR,
and PHONES controls
.
3.5.1 TALKBACK
The TALKBACK gain knob controls the input gain of the rear panel TALKBACK microphone input. The gain range is 0–60 dB. A green SIG (signal) LED
and a red OL (overload) LED behave identically to those on the channel strips
(see page 25). The talkback signal is routed via the TALKBACK Touchscreen,
accessed by pressing UTIL and then touching the TALKBACK button. The
Talkback signal can be routed to any Matrix or Aux bus.
3.5.2 MONITOR
The MONITOR gain knob controls the level of the Left, Right, and Mono monitor
outputs. The gain range is from
right, and monitor signal selected in the MON. SOURCE Touchscreen, accessed
by pressing UTIL and then touching the MONITOR SOURCE button. When a
solo button is pressed, the solo signal is sent to the monitor outputs instead.
2
I
TALKBACK
TILITY
4
+
Figure 3-7 UTILITY area
F
MONITOR
off
to +10 dB. These outputs contain the left,
FF
PHONE
38
Page 39

Mackie TT24 Digital Live Console Owner’s Manual Console Surface Controls
3.5.3 PHONES
The PHONES gain knob controls the headphone output level, a stereo output
identical to the Monitor L/R outputs. The PHONES level is independent of the
MONITOR gain control.
3.6 Snapshots
The TT24 includes a robust snapshot feature that captures and restores the state
of the console. The console snapshot controls are in the top-right of the console
beside the QuickMix buttons (Figure 3-5). These fast and intuitive surface
controls can store/recall up to 99 snapshots.
More elaborate snapshot functionality is available on the SNAPSHOTS Touchscreen (i.e., channel and parameter filtering; see page 82). This section discusses
only the console’s surface controls.
The SNAPSHOTS LCD displays the selected snapshot (bottom-right in Figure
3-6). Use the up/down arrow buttons to scroll through existing snapshots. The
current snapshot’s number is displayed in the SNAPSHOTS LCD field next to
the Touchscreen. The snapshot number blinks in the SNAPSHOTS display
before being recalled.
Press RECALL to recall the blinking snapshot number displayed in the LCD.
When the RECALL button is pressed, the snapshot parameters are loaded into
the TT24 and the LCD lights continuously. Press STORE to save the state of
the console to the current snapshot (the last snapshot recalled).
39
Page 40

Mackie TT24 Digital Live Console Owner’s Manual Console Surface Controls
T
R
E
CT
O
E
CT
O
E
CT
O
E
CT
O
/
O
/
CT
s
p
ader
3.7 Group and Master Controls
The TT24 has four Group strips and one Master strip (Figure 3-8). Each Group
has a V-Pot to control group pan and the Group Mode, MUTE, SELECT, SOLO
buttons, and a fader. The four Group strips control either Groups 1–4 or 5–8.
The currently selected Group bank is indicated by the lit GROUP ASSIGN/
SELECT buttons.
Group Mute buttons
MUT
MUT
MUT
GROUP ASSIGN/SELEC
MUT
MON
CTR
Master Center/Mono Assign button
Group Assign/Select buttons
Master Left/Right Assign button
ELE
L
ELE
L
ELE
L
ELE
L
ELE
MASTE
Master Select button
Group Select buttons
Group Solo buttons
Group Fader
Master F
Figure 3-8 Bank Select, Group, Aux and Master sections
3.7.1 Changing the Group Bank
Press any of the GROUP ASSIGN/SELECT buttons to select that Group bank.
The GROUP ASSIGN/SELECT buttons illuminate 1–4 or 5–8 and cause the
faders and buttons to snap to their previous Group bank settings.
40
Page 41

Mackie TT24 Digital Live Console Owner’s Manual Console Surface Controls
OT
OL
R
O
S
3.7.2 Group Assignment
Press and hold a GROUP ASSIGN/SELECT button and press the channel
SELECT buttons to add/subtract channels from that Group. This method is
used for all of the GROUP ASSIGN/SELECT buttons: Groups 1–8, L/R and
CTR/Mono.
The SELECT button for channels assigned to a group light when a GROUP
ASSIGN/SELECT button is held down.
A selected channel can also be assigned to groups by selecting GRP/AUX in the
QuickMix area to view the Group/Aux parameters on the Touchscreen.
3.7.3 Group Parameter Control
Press a GROUP SELECT button to access that Group’s settings and controls
from the QuickMix section just like an input channel.
3.8 Solo Area
The Solo area (Figure 3-9) has two buttons: CLEAR SOLO and PFL.
Clear Solo PFL
3.8.1 CLEAR SOLO
Press this momentary button to clear any soloed channels. It lights yellow
when any solo buttons are active as does the RUDE SOLO LED (Figure 3-5).
LEA
L
V-P
NTR
METER
Figure 3-9 Solo area
3.8.2 PFL
Activate this yellow backlit button so all soloed channels are PFL (pre-fader
listen). Solo selections are AFL (after-fader listen) when the button is not lit.
41
Page 42

Mackie TT24 Digital Live Console Owner’s Manual Console Surface Controls
42
Page 43

Mackie TT24 Digital Live Console Owner’s Manual
A
CK
T
013
T
OUT
S
S
0
Chapter 4: Rear Panel Connectors
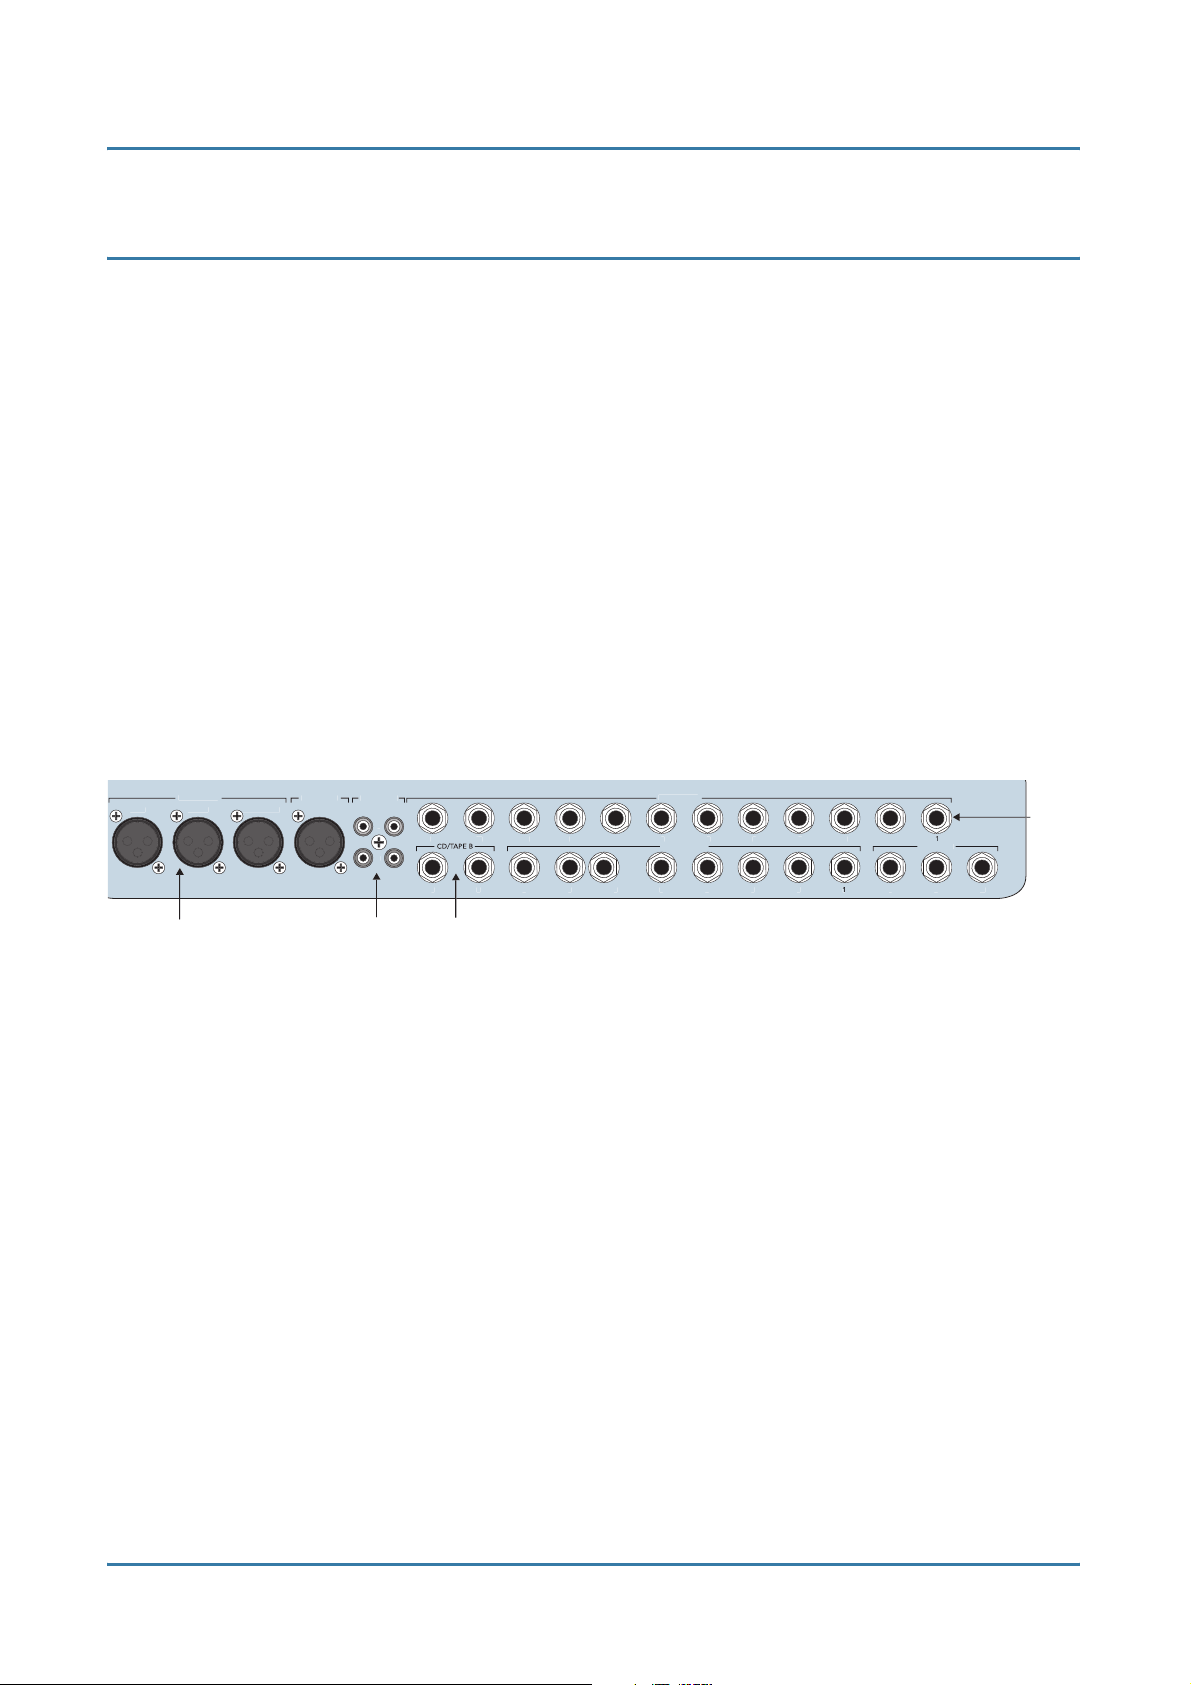
4.1 Analog I/O
Figure 4-1 shows the rear panel analog I/O connectors except for the Group/
Matrix outputs, which are shown in Figure 4-3.
1
INSERTINSERTINSERTINSERTINSERTINSERTINSERTNSERTINSERTINSERTINSERTINSERTINSERTINSERTINSER
24 Mic, Line
and Insert
Analog
Inputs
MAINS
RIGH
Main Outputs
Talkback
Input
TALK BA
CD/Tape A
Inputs/Outputs
CD/TAPE
4.1.1 MIC Inputs 1–24
The TT24 microphone preamp was based on our extensive knowledge and
experience with those used in the Digital 8•Bus, VLZ Pro, and Onyx Series
mixers, but optimized for a digital mixer.
These female XLR connectors accept a balanced microphone input from almost
any type of microphone. The LINE button on the channel strip should be in the
up
position when using these connectors. The MIC inputs appear on the ANALOG
fader bank. Phantom power (48 VDC) can be switched on for condenser mics
setting the 48V button to the
CD/Tape B
Inputs
AUX SEND
1
LINE INPUT
8 Analog Line Inputs
Figure 4-1 Analog I/O
down
position.
MONITOR
12 Aux
Sends
Monitor
Outputs
The XLR inputs are wired according to the AES standard
:
• Pin 1 = Shield or ground
• Pin 2 = Positive (+ or hot)
• Pin 3 = Negative (- or cold)
43
Page 44

Mackie TT24 Digital Live Console Owner’s Manual Rear Panel Connectors
4.1.2 LINE Inputs 1–24
These ¼-in TRS connectors accept a balanced or unbalanced line level input
signal from almost any source. The LINE button on the console surface should
be in the
on the ANALOG bank.
down
position when using these connectors. The LINE inputs appear
A balanced line level signal must be wired as follows
• Tip = Positive (+ or hot)
• Ring = Negative (- or cold)
• Sleeve = Shield or ground
An unbalanced signal must be wired as follows
• Tip = Positive (+ or hot)
• Sleeve = Shield or ground
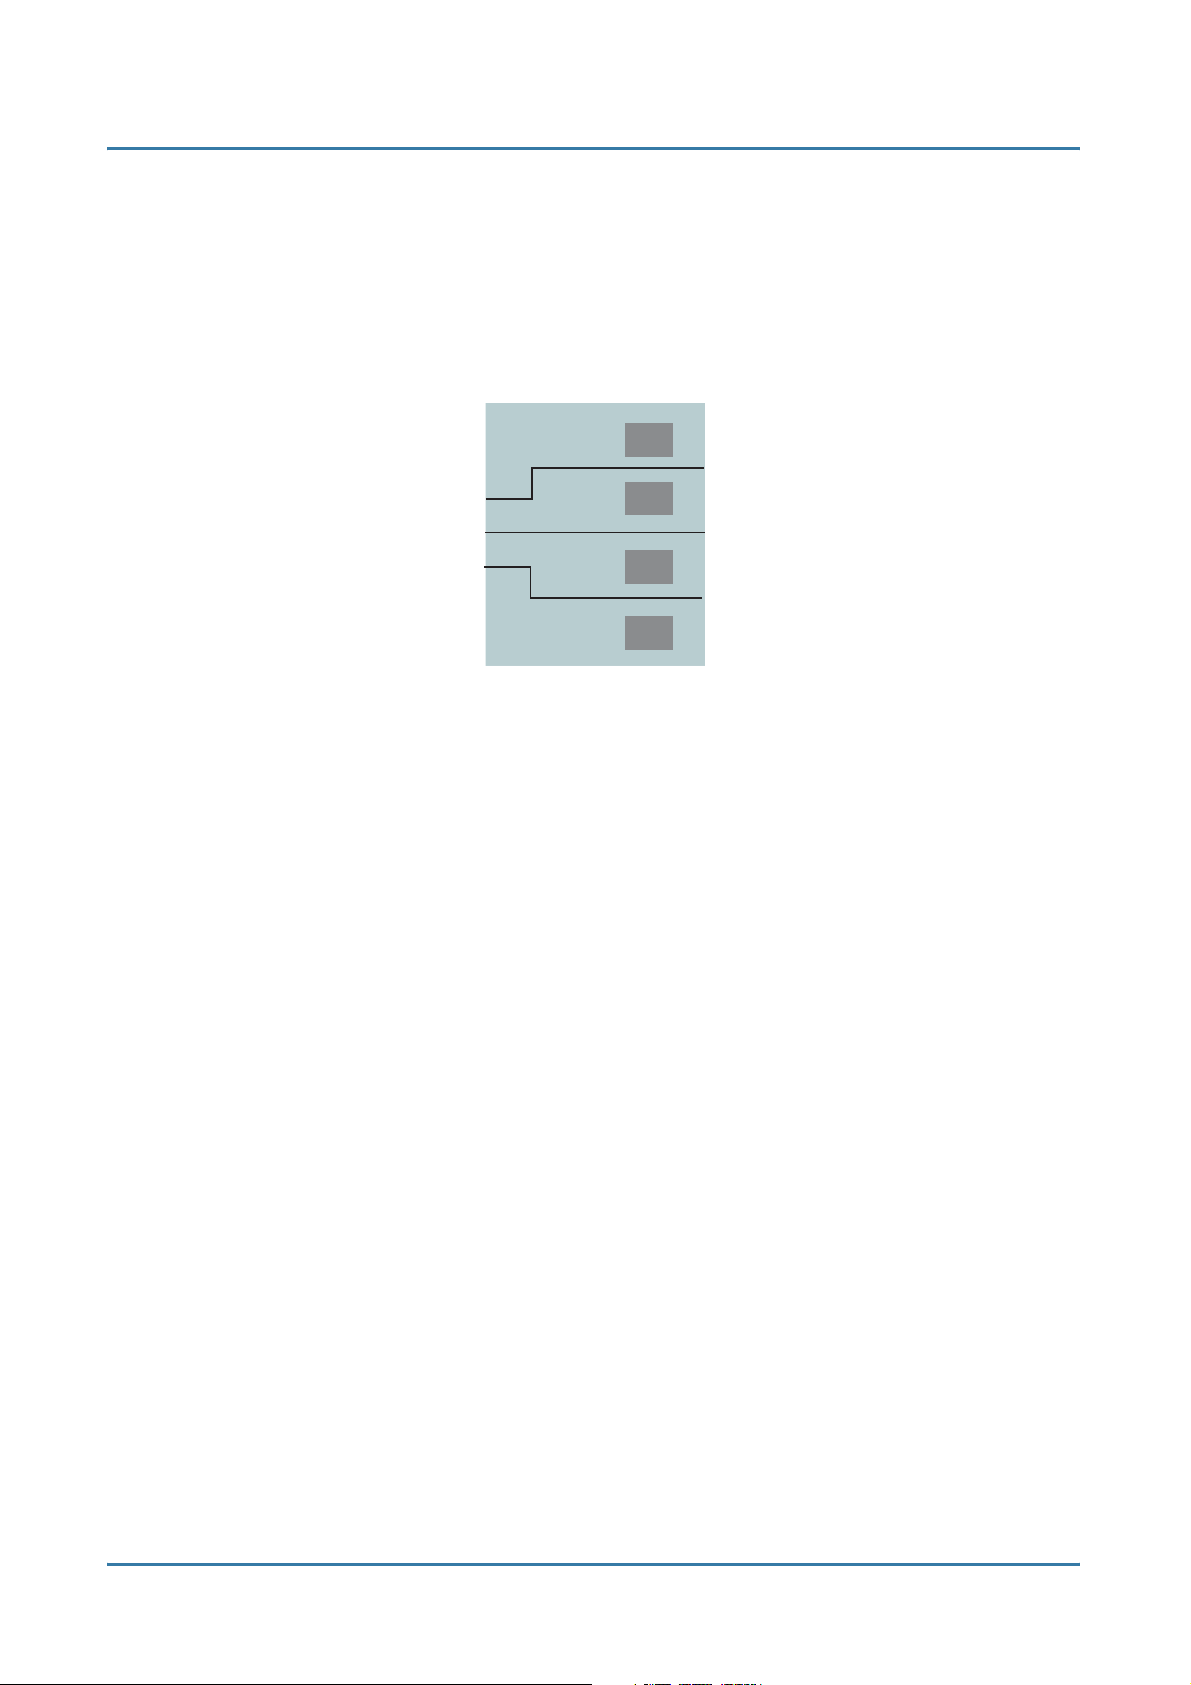
4.1.3 INSERTS 1–24
These ¼-in TRS connectors provide each channel an analog send and return
point. Use the INSERT jacks to connect external serial effects devices (i.e.,
compressors, equalizers) to an individual channel. These connectors can also be
used as post gain control, unbalanced channel direct outputs.
The INSERT points are after the GAIN control, and just before the ADC. The
send (tip) is low-impedance and the return (ring) is high-impedance, allowing
connection to virtually any device.
:
:
Cables for this type of insert send/return function must be wired as follows
• Tip = Send (output to effects device)
• Ring = Return (input from effects device)
• Sleeve = Common ground (connect shield to all three sleeves)
44
:
Page 45

Mackie TT24 Digital Live Console Owner’s Manual Rear Panel Connectors
.
k
k
.
UG
UG
UG
k
The figure below shows three ways to use the INSERT jacks
MONO PL
Channel Insert jac
irect out with no signal interruption to master.
Insert only to first click
MONO PL
Channel Insert jac
irect out with signal interruption to master.
Insert all the way in to the second click
TEREO
L
Channel Insert jac
For use as an effects loop.
(TIP = SEND to effect, RING = RETURN from effect)
:
Figure 4-2 Insert Jack
4.1.4 AUX SENDS 1–12
These ¼-in TRS output connectors provide 12 balanced or unbalanced line-level
signals for effects devices or stage monitor amplifiers.
4.1.5 LINE INPUTS 1–8 (RETURNS)
These ¼-in TRS input connectors accept eight balanced or unbalanced line-level
signals from an external processor or other device. They can be used as additional
line inputs or as aux returns. The LINE INPUTS appear on channels 1–8 on
the RETURNS bank.
45
Page 46

Mackie TT24 Digital Live Console Owner’s Manual Rear Panel Connectors
4.1.6 MONITOR
These ¼-in TRS output connectors provide three balanced line-level signals
that can be used to provide another stereo (L, R outputs) or mono (M output)
main mix output or to monitor the CD/TAPE A or CD/TAPE B inputs. See
MONITOR SOURCE
on page 94 for more information.
Connect these outputs to the inputs of an amplifier, powered speaker, or recording device. Typically, the L and R outputs are connected to active studio
monitors and the M output to an active floor wedge.
4.1.7 CD/TAPE A IN/OUT
These RCA jacks connect to the inputs and outputs of a CD/tape device. The
TAPE IN jacks accept an unbalanced signal from a tape recorder or other signal
source using standard consumer audio RCA cables. The signal can be routed to
the MONITOR outputs with CD/TAPE A selected as the source in the MON.
SOURCE Touchscreen (see page 94). This allows cueing intermission music
through the MONITOR or PHONES outputs.
The CD/TAPE A inputs can also be routed to the MAINS OUT from the STEREO
INPUT Touchscreen. This allows playing music between sets over the main PA
speakers. When engaged, the QuickMix Area provides input level adjustment
for CD/TAPE A on a rotary encoder.
WARNING: Selecting L/R in the STEREO INPUT Touchscreen for the CD/TAPE A input can cre-
ate a feedback path between TAPE IN and TAPE OUT. Make sure your tape
deck is not in record, record pause, or input monitor mode, and turn the tape
level control all the way down.
The CD/TAPE A outputs produce an unbalanced signal that is tapped off the
MAINS OUT. Normally, these are connected to the inputs of a recorder, but
they can be used as two additional main outputs (i.e., for another zone).
4.1.8 CD/TAPE B Input
These ¼-in TRS input connectors accept balanced or unbalanced line level
signals from the outputs of a CD/tape player or virtually any stereo line-level
source.
The CD/TAPE B input can be routed to the MAINS OUT from the STEREO
INPUT Touchscreen (see page 95). This allows adding the signal to the MAINS
OUT or just playing music between sets over the main PA speakers.
46
Page 47

Mackie TT24 Digital Live Console Owner’s Manual Rear Panel Connectors
T
4.1.9 TALKBACK MIC Input
This female XLR connector accepts an external talkback mic input. It requires
a dynamic microphone because it does not supply phantom power. Use the
Talkback UTILITY Touchscreen to route the signal to the desired outputs
(see page 95).
4.1.10 MAINS OUT
These male XLR connectors provide balanced, line-level signals representing
the end of the processing chain, where the fully mixed music is sent to the amps
and speakers. LEFT and RIGHT connectors output the left and right stereo
signals, respectively, while the CTR/MONO connector outputs the center
signal (in LCR mode) or the mono signal (in L/R+MONO mode).
4.1.11 GROUP/MATRIX OUT
By default, these eight male XLR connectors provide balanced, line-level outputs
for Groups 1–8. However, when the MATRIX mixer is active, each output can
provide a separate mix of virtually any input source. See
Matrix Mix
on page 87
for details.
GROUP/MATRIX OU
Group/Matrix Outputs
Figure 4-3 Group/Matrix connectors
47
Page 48

Mackie TT24 Digital Live Console Owner’s Manual Rear Panel Connectors
U
/O
F
ON
A
B
D
A
C
300W
V
4.2 Digital I/O
Power
On/Off
C Power
Inlet
This section discusses the rear panel digital I/O (Figure 4-4)
~100-240VA
-60Hz
FUSE: 6A/250
MIDI
In/Out
ARD
USB
WOR
EXPANSI
ARD
Word Clock
In/Out
ADAT Optical
I/O connectors
ADAT DIGITAL I
AES/EB
PDI
.
AES/EBU
In/Out
S/PDIF
In/Out
Figure 4-4 Digital I/O and expansion card slots
4.2.1 ADAT DIGITAL I/O
Six built-in Toslink connectors (INPUTS A–C, OUTPUTS A–C) provide 24
channels of 24-bit digital, ADAT optical lightpipe I/O at 44.1/48 kHz sample
rates. At 88.2/96 kHz, the signal is multiplexed (SMUX format), which reduces
the number of I/O channels to 12.
The optional ADAT I/O Expansion Card provides additional Toslink connectors
(Expansion INPUTS A–C, Expansion OUTPUTS A–C) for channels 13–24
when operating at 88.2/96 kHz. The following table summarizes the channels
allocated under each sample rate, with and without the expansion card.
NOTE: Expansion cards are not yet available.
Expansion
card slots
48
Page 49

Mackie TT24 Digital Live Console Owner’s Manual Rear Panel Connectors
Table 4-1 ADAT Digital I/O Channels at 44.1/48 and 88.2,/96 kHz Sample Rates
44.1/48 kHz 88.2/96 kHz
INPUT A 1–8 1–4
INPUT B 9–16 5–8
INPUT C 17–24 9–12
OUTPUT A 1–8 1–4
OUTPUT B 9–16 5–8
OUTPUT C 17–24 9–12
Expansion INPUT A N/A 13–16
Expansion INPUT B N/A 17–20
Expansion INPUT C N/A 21–24
Expansion OUTPUT A N/A 13–16
Expansion OUTPUT B N/A 17–20
Expansion OUTPUT C N/A 21–24
4.2.2 AES/EBU IN/OUT
AES/EBU IN is a female XLR connector that accepts a stereo AES/EBU digital
input. A sample-rate converter can be enabled at the AES/EBU input to convert
the incoming signal to the TT24’s current sample rate. The signal can be routed
from the STEREO INPUT Touchscreen (see page 95).
AES/EBU OUT is a male XLR connector that produces a stereo AES/EBU
digital output of the LEFT and RIGHT MAINS outputs. At 88.2/96 kHz sample
rates, the AES/EBU port uses the double-fast method, so the digital I/O port is
clocked at twice the speed to double the transmission rate (see page 92 for more
information on Digital Setup options).
4.2.3 SPDIF IN/OUT
SPDIF IN is an unbalanced RCA connector that accepts a stereo S/PDIF digital
signal. A sample-rate converter can be enabled at SPDIF IN to convert the
incoming digital signal to the TT24’s current sample rate. The signal is then
routed to the main L/R output from the STEREO INPUT Touchscreen as needed.
SPDIF OUT is an unbalanced RCA connector that produces a stereo S/PDIF
digital signal of the LEFT and RIGHT MAINS outputs.
49
Page 50

Mackie TT24 Digital Live Console Owner’s Manual Rear Panel Connectors
4.2.4 WORD CLOCK IN/OUT
WORD CLOCK IN is a BNC connector that receives a word clock signal from
another device when the Clock Source is set to Word in the DIGITAL SETUP
Touchscreen. Use this connector when multiple devices must all operate from
an external master word clock. Use 75 Ω coaxial cable to connect a word clock
signal to WORD CLOCK IN.
WORD CLOCK OUT is a BNC connector that produces a word clock signal at
the TT24’s current sample rate. Use this connector to transmit the word clock
to other devices when the TT24 is operating as the system’s master word clock.
4.2.5 MIDI IN/OUT
MIDI IN/OUT are standard 5-pin DIN connectors to connect to other MIDI devices. MIDI IN can receive MIDI Time Code (MTC) to synchronize with another
device, and MIDI Program Changes to recall snapshots. MIDI OUT can send
MIDI Machine Control (MMC) and MIDI Program Changes from snapshot recall.
NOTE: MIDI functionality is not yet implemented.
4.2.6 USB
This standard Universal Serial Bus connector allows a PC to run the TT control
software, install firmware upgrades, share files between PCs, and backup files.
4.3 IEC Power Receptacle
This is a standard three-prong IEC power connector. Connect the detachable
cord included in the TT24 shipping box to the power receptacle. Plug the other
end of the cord into an AC outlet.
The TT24 has a universal power supply that can accept any AC voltage in the
range 100–240 VAC. This feature, which alleviates the need for voltage select
switches (and setting them correctly!), allows the TT24 to operate safely virtually
anywhere in the world. Fondly nicknamed “Planet
less susceptible to voltage sags or spikes, and provides better electromagnetic
isolation and protection against AC line noise.
Earth power supply,” it is also
-
4.4 POWER Switch
When the POWER switch is turned on, AC power is supplied to the TT24. It
exercises its faders while the firmware loads and the self-test routine executes.
50
Page 51

Mackie TT24 Digital Live Console Owner’s Manual
Chapter 5: DSP and Internal Effect Allocation
TECH NOTE:The TT24 uses 12 SHARC DSP chips with embedded algorithms. This DSP approach
differs from conventional digital audio workstations in that the algorithms are
programmed as firmware on the DSP chips. The incoming audio signal is digitized
by its ADC and then routed through the DSP chip whether or not processing is
engaged. This ensures equal latency for all incoming audio sources.
This chapter discusses how the TT24 allocates its DSP and Internal Effects
resources.
See Chapter 6:
DSP and Effects Touchscreens.
See
Tabular Summary of DSP and Effects
Touchscreen and TT Control
for specific information about the
on page 58 for parameter reference.
5.1 Analog, Digital, and Line Inputs
Analog Inputs
Analog input channels 1–24 route to their DSP block immediately after the ADC
and before routing to outputs, groups, and auxes. The signal flow is
frequency high-pass filter, adjustable gate, EQ and compressor (the EQ and
compressor order can be switched for each channel), channel fader, pan and
assign sections.
Digital Inputs
The ADAT Optical digital input channels 25–48 have no DSP. Their signals
enter the board, pass through the channel meter and can be routed to the
Mains, Aux Sends, and Groups/Matrix as needed.
variable
:
-
NOTE: The UFX II expansion card provides additional DSP for these inputs.
Line Inputs
Each Line Input can access a four-band parametric EQ. Odd/even adjacent
inputs can be stereo linked (see page 27).
51
Page 52

Mackie TT24 Digital Live Console Owner’s Manual DSP and Internal Effect Allocation
5.2 Master L/R and C/Mono
The Master L/R and C/Mono bus has the following signal path: six-band
parametric EQ, compressor, and master fader.
5.2.1 L/R+Mono and LCR Modes
The TT24 has two master mix operating modes
L/R+Mono:Stereo with an independent mono output.
LCR: True LCR panning from the channels and busses.
L/R+Mono
In L/R+Mono mode, the left and right stereo signals are available at the LEFT
and RIGHT outputs, the mono signal from the CTR/MONO output. Channels
can be assigned to both outputs. The channel sends to CTR/MONO are pre-pan,
so the channel pan setting has no effect.
The L/R and Mono master levels and processing are linked by default, but they
can be independent (see page 27). When unlinked, the MASTER fader controls
the LR output and the C/Mono fader (channel 24 on the MASTERS bank)
controls the mono output (which can also be controlled on the Master OVERVIEW
Touchscreen). When linked, all processing is linked and the Master fader controls
all levels. A relative offset between LR and CTR/MONO may be set using the
Master OVERVIEW Touchscreen faders or the faders for channel strips 22–24
in the MASTERS bank.
:
LCR
In LCR mode, the LEFT, CTR/MONO, and RIGHT outputs present the LCR
signal. Channels can be assigned to LR, Center, or LCR. A channel assigned to
Center only is routed pre-pan, so the channel pan does not affect the Center
signal. Channels assigned to LR only are routed to the LEFT and RIGHT
outputs using stereo pan positioning. Channels assigned to LCR are routed to
LEFT, CTR/MONO, and RIGHT outputs using true LCR panning.
The LCR master levels and processing are linked by default but can be unlinked
and processed independently by pressing the LINK button in the Master
OVERVIEW Touchscreen. When unlinked, the MASTER fader controls the
LEFT and RIGHT outputs and the C/Mono fader (channel 24 on the MASTERS
bank) controls the Center output (which can also be controlled on the Master
OVERVIEW Touchscreen). When linked, all processing is linked and the
MASTER fader controls all levels. A relative offset between the LEFT-RIGHT
and CTR may be set using the Master OVERVIEW Touchscreen or by using the
faders for channel strips 22–24 in the MASTERS bank.
52
Page 53

Mackie TT24 Digital Live Console Owner’s Manual DSP and Internal Effect Allocation
5.2.2 Six-Band EQ
The Master outputs can each access a six-band EQ comprised of a four-band
EQ and two
EQ Linking
The Master LR and C/Mono is actually three EQs: LR is stereo linked (two
EQs) while the Mono EQ (one EQ) can also be linked with LR. To link, hold
down the LR and C/Mono channel SELECT buttons for two seconds (see
Channel Linking
When the Master LR or C/Mono fader’s SELECT button is pressed with the EQ
or OVERVIEW Touchscreen displayed, the EQ (and compressor) displayed on
the Touchscreen is LR. If the LR and C/Mono are linked, changing the LR EQ
also affects the Mono EQ. If they are not linked, the C/Mono EQ is independent.
kill filters
on page 27).
(see page 78).
5.2.3 Compressor
The Master compressor operates identically to the channel compressor (see
page 79).
The Master LR and C/Mono compressor is actually three compressors: the LR
compressors are stereo linked while the C/Mono compressor can be linked, if
desired (see page 53).
The Master compressor can be viewed from the Master OVERVIEW Touchscreen and adjusted on the COMPRESSOR Touchscreen.
5.2.4 Fader Position in Signal Path
The Master LR or LCR fader position is adjustable from post- to pre-compressor.
In the pre-compressor position, the user can ride the master fader while maintaining the output level protection of the compressor. The master fader position
can be adjusted from the Master OVERVIEW Touchscreen.
5.3 Aux Send
Each Aux Send has the following signal path: six-band parametric EQ, and
compressor. The position of the EQ and compressor can be reversed.
53
Page 54

Mackie TT24 Digital Live Console Owner’s Manual DSP and Internal Effect Allocation
5.3.1 Six-Band Parametric EQ
The Master Aux Send EQs operate identically to the Master LR and C/Mono
EQs (see page 53).
If a pair of Aux sends is linked, their EQs are also linked: adjusting the EQ of
one aux of a linked pair adjusts the other’s EQ.
The Aux Send EQ can be viewed from the AUX MASTER and Aux OVERVIEW
Touchscreens. The EQ is adjusted from the 6 BAND EQ Touchscreen.
5.3.2 Compressor
The Master Aux Send compressors operate identically to the channel compressors.
See page 53 for operational details.
If a pair of Aux sends is linked, their compressors are also linked: adjusting one
aux’s compressor parameters also adjusts those of the other aux.
The compressor for the selected Aux Send Master is displayed from the AUX
MASTER and the Aux OVERVIEW Touchscreens. Its settings are adjusted on
the Aux Master COMPRESSOR Touchscreen.
5.4 Flex-Group DSP
There are a total of eight DSP blocks available for the Flex-Groups so each of
the eight groups can use a block of DSP except VCA types (see page 56). Not all
groups can use DSP at once if they are in multichannel group mode. The Group
DSP contains a four-band EQ and compressor. The default order is EQ into the
compressor but they can be reversed.
5.4.1 Flex-Group Modes
Each group can be configured as mono, stereo, LCR (if in LCR Mode), or VCA.
The group type is set by a toggle button in the Group OVERVIEW Touchscreen.
Each group’s mode can be configured independently.
Mono Mode
If the TT24 is in L/R+Mono mode, all groups are mono by default. Mono groups
operate similarly to groups on a typical analog console: pre-pan mono signals are
routed from the channels to the Groups using the GROUP ASSIGN switches.
After group processing, the signal passes through the group MUTE switch, fader,
and can then be routed to the Mono or LR Master outputs. A group pan is available for L/R positioning. Group signals are available to the Matrix (if enabled).
54
Page 55

Mackie TT24 Digital Live Console Owner’s Manual DSP and Internal Effect Allocation
Stereo Mode
Stereo groups do not have a pan control. Signals are routed from channels to
stereo groups using the GROUP ASSIGN switches but the signal is post-pan
and the stereo image is maintained throughout the group signal path. After
any group processing, the stereo group signal can be routed to the main L/R
output after the Group’s MUTE switch and fader. Stereo groups can also be
routed to the C/Mono output but the stereo signal is summed to mono.
LCR Mode
In LCR mode, the same three group modes are available along with LCR group
mode, but they operate slightly differently. A mono group still receives its mono
signal from the assigned channel, and can be routed to Center or L/R. However,
it can also be routed to LCR by assigning it to both Center and L/R simultaneously, resulting in a true LCR pan.
In LCR mode, a stereo group receives its stereo signal such that channel pan is
interpreted as left-right. This results in a true LR group, maintaining the
stereo image throughout the signal path. After processing, the Group’s
MUTE switch, and fader, the group can only be routed to the LEFT and
RIGHT or MATRIX outputs.
If a group is configured as LCR, it receives a post-pan channel signal, such that
the pan is interpreted as LCR. The group maintains a true LCR image through
the signal path: assignable DSP, MUTE switch, and fader. The LCR group can
be routed to the LEFT, RIGHT, and CTR/MONO outputs.
NOTE: Assigning the group to LR or C automatically assigns it to the other; it cannot be
routed to just LR or C or Matrix.
VCA Mode
A VCA group allows assigning channels, each at its own relative level, to a
group whose overall level is controlled by a single fader. Any input channel can
be assigned to a VCA group.
The VCA group fader modifies the level of assigned channels
fader
. This means that all post-fader sends for these channels are also affected
at the channel
by the VCA group fader. Both the VCA and channel faders modify the channel’s
output. For example, if the channel fader is set to +5 dB and the VCA fader is
set to -15 dB, the cumulative output of the channel is -10 dB.
55
Page 56

Mackie TT24 Digital Live Console Owner’s Manual DSP and Internal Effect Allocation
However, any fader at negative infinity or muted is not affected by a VCA fader.
For example, if channel 1 is set to negative infinity, the output of the channel
is muted regardless of the VCA fader setting. Likewise, if the VCA fader is at
negative infinity or muted, the assigned channels are muted, regardless of
their fader position.
A single input can be assigned to multiple VCA groups and it will be affected
by all VCA faders. The resultant signal is the sum of the channel and its VCA
faders. The maximum gain from summation is 10 dB.
The VCA group fader has MUTE, SOLO, and SELECT buttons. When the VCA
Group is muted or soloed, the channels assigned to the VCA group are also
muted or soloed. The channel’s MUTE and SOLO buttons blink and the VCA
Group’s MUTE and SOLO buttons are lit solid.
5.4.2 Group DSP Allocation
Mono, stereo, and LCR groups can access DSP but VCA groups cannot. Eight
units of group DSP are available and each Group mode requires a different
number of units: Mono = 1, Stereo = 2, LCR = 3. Since the TT24 can have up to
8 LCR groups, there is not enough DSP to cover all group routing in all cases.
The Group OVERVIEW Touchscreen has a GRP DSP AVAILABILE meter that
displays the group DSP (in 1 unit increments) available (see page 74 for more
information).
When a group’s mode is changed, the DSP is automatically updated if necessary.
If there is insufficient DSP available to make the adjustment, a warning appears:
“There is not enough DSP to change the mode of the selected group. Change the
mode and remove group processing?” Touch REMOVE to remove group processing and change the group mode, or touch CANCEL to leave the group in its
current mode and DSP allocation.
Four-Band Parametric EQ
The Group’s four-band parametric EQ operates identically to the channel’s (see
Four-Band Equalizer
on page 76).
The Group mode setting determines the number of EQ sections: Mono = 1,
Stereo = 2, LCR = 3. Stereo and LCR groups have linked EQ sections to implement
their multichannel format. The Group EQ applies to all group channels.
The Group Parametric EQ can be viewed from the Group OVERVIEW Touchscreen and is adjustable from the Group’s 4 BAND EQ Touchscreen.
56
Page 57

Mackie TT24 Digital Live Console Owner’s Manual DSP and Internal Effect Allocation
Compressor
The Group’s compressor operates identically to the channel’s (see
on page 53).
The Group mode setting determines the number of Compressor sections and
DSP units required: Mono = 1, Stereo = 2, LCR = 3. Stereo and LCR groups
have linked Compressor sections to implement their multichannel format. The
Group Compressor applies to all group channels.
The Group Compressor can be viewed from the Group OVERVIEW Touchscreen and adjusted from the COMPRESSOR Touchscreen.
5.5 Matrix Output
Each Matrix output has an adjustable delay.
5.5.1 Delay
Each Matrix output has a 600 ms delay to allow time alignment of multiple
speaker groups in a large venue (see
Delay
Compressor
on page 89).
5.6 Internal Effects Processors
The internal EFX have four independent mono input/stereo output effects processors that are adjusted from the EFX Touchscreens, accessed by pressing the
EFX button or from their associated returns OVERVIEW Touchscreens. Each
processor can utilize one of the following effects: Reverb, Mono Delay, Stereo
Delay, Ping Pong Delay, Chorus, or Flange. Each effect has a post
with high- and low-shelf filter, and one parametric mid
The internal effects can be fed from any of the Aux Sends or the Matrix Outputs. By default, the four effects processors are fed by Aux Sends 9–12. Routing
is accomplished on the EFX Touchscreen (see
Effects
band filter.
-
on page 90).
effect EQ
-
57
Page 58

Mackie TT24 Digital Live Console Owner’s Manual DSP and Internal Effect Allocation
5.7 Tabular Summary of DSP and Effects
Table 5-1 DSP Functions and Allocation
Function Channels Parameter Value Range/Increments
Digital Trim
High Pass
Filter
Phase
Gate
Compressor
Analog 1-24,
Analog Returns 1-8
Analog 1-24
Analog 1-24 Phase Normal/Invert Normal
Analog 1-24
Analog 1-24,
Aux Sends 1-12,
Assignable Bus
DSP,
L/R-C/Mono
Digital Trim +15 dB to -15 dB (0.1 dB steps) 0 dB
On/Off On or Off Off
Frequency 20–400 Hz (scaled Steps) 80 Hz
Threshold -60 dBFS to -1 dBFS (0.2 dBFS steps) -60 dBFS
Range -100 dB to -1 dB (0.5 dB steps) -100 dB
Ratio (when
1
Expander
enabled)
Attack 0.1 ms to 2500 ms (scaled steps) 0.1 ms
Release 10 ms to 2500 ms (scaled steps) 100 ms
Hold 0 ms to 2500 ms (scaled steps) 0 ms
Gate On/Off On or Off Off
Mode Gate or Expander Gate
Threshold 60 dBFS to -1 dBFS (0.2 dBFS steps) -1 dBFS
Ratio
Attack 0.1 ms to 2500 ms (scaled steps) 4.1 ms
Release 10 ms to 2500 ms (scaled steps) 100 ms
Gain 0 dB to 20 dB (0.1 dB steps) 0 dB
Compressor
On/Off
Knee Mode Hard or Soft Hard
20 to 1:1 (scaled steps) 1:20
:
1
1 to 20:1 (scaled steps) 2.2:1
:
On or Off Off
Default
Value
58
Page 59

Mackie TT24 Digital Live Console Owner’s Manual DSP and Internal Effect Allocation
Function Channels Parameter Value Range/Increments
-15 dB to +15 dB (0.1 dB steps)
-not available when Band 1 is HP
2 octaves to 1/30 octave (scaled steps)
-not available when Band 1 is Shelf
2 octaves to 1/30 octave (scaled steps)
-not available when Band 4 is Shelf
4 Band EQ
6-Band EQ
with
2 Kill Filters
Delay
Analog 1-24,
Assignable Bus
DSP
Aux Sends 1-12,
L/R, C/Mono
Matrix Outputs
Gain 1
Freq 1 20 Hz to 20 kHz (scaled steps) 80 Hz
Bandwidth 1
Gain 2 -15 dB to +15 dB (0.1 dB steps) 0 dB
Freq 2 20 Hz to 20 kHz (scaled steps) 500 Hz
Bandwidth 2 2 octaves to 1/30 octave (scaled steps) 1/2
Gain 3 -15 dB to +15 dB (0.1 dB steps) 0 dB
Freq 3 20 Hz to 20 kHz (scaled steps) 2 kHz
Bandwidth 3 2 octaves to 1/30 octave (scaled steps) 1/2
Gain 4 -15 dB to +15 dB (0.1 dB steps) 0 dB
Freq 4 20 Hz to 20 kHz (scaled steps) 10 kHz
Bandwidth 4
EQ On/Off On or Off On
Band 1 Mode Para, Shelf Shelf
Band 4 Mode Para, Shelf Shelf
Gain 1 -15 dB to +15 dB (0.1 dB steps) 0 dB
Freq 1 20 Hz to 20 kHz (scaled steps) 80 Hz
Gain 2 -15 dB to +15 dB (0.1 dB steps) 0 dB
Freq 2 20 Hz to 20 kHz (scaled steps) 500 Hz
Bandwidth 2 2 octaves to 1/30 octave (scaled steps) 1/2
Gain 3 -15 dB to +15 dB (0.1 dB steps) 0 dB
Freq 3 20 Hz to 20 kHz (scaled steps) 2 kHz
Bandwidth 3 2 octaves to 1/30 octave (scaled steps) 1/2
Gain 4 -15 dB to +15 dB (0.1 dB steps) 0 dB
Freq 4 20 Hz to 20 kHz (scaled steps) 10 kHz
Gain 5 0 dB, -6 dB, -12 dB, -18 dB 0 dB
Freq 5 20 Hz to 20 kHz (scaled steps) 1 kHz
Bandwidth 5 1/10 octave, 1/20 octave, 1/30 octave 1/10 octave
Gain 6 0 dB, -6 dB, -12 dB, -18 dB 0 dB
Freq 6 20 Hz to 20 kHz (scaled steps) 1 kHz
Bandwidth 6 1/10 octave, 1/20 octave, 1/30 octave 1/10 octave
EQ On/Off On or Off On
Delay 0 ms to 600 ms (0.5 ms steps) 0 ms
Temperature 20–120°F (-10° to 50°C) 1° increments
Delay On/Off On or Off Off
Default
Value
0 dB
1/2
1/2
77°F
25°C
59
Page 60

Mackie TT24 Digital Live Console Owner’s Manual DSP and Internal Effect Allocation
Table 5-2 Internal Effects Parameters and Values
Function Parameter Value Range/Increments
Size 3–40 m (1 m steps) 10 m
Decay 0.1–10 s (0.1 s steps) 1.6 s
Pre Delay 0– 300 ms (1 ms steps) 0 ms
Diffusion 0–10 (1 steps) 5
Damping 0–10 (1 steps) 5
Roll Off Flat to 500 Hz (scaled steps) Flat
Reverb
EQ On/Off On/Off Off
Low Shelf Gain -15 dB to +15 dB (0.1 dB steps) 0 dB
Mid Gain -15 dB to +15 dB (0.1 dB steps) 0 dB
Mid Frequency 20 Hz – 20 kHz (scaled steps) 2 kHz
Mid Bandwidth 2 octaves to 1/30 octave (scaled steps) 1/2
High Shelf Gain -15 dB to +15 dB (0.1 dB steps) 0 dB
Size 3–40 m (1 m steps) 10 m
Pre Delay 0–300 ms (1 ms steps) 0 ms
Diffusion 0–10 (1 steps) 5
Roll Off Flat to 500 Hz (scaled steps) Flat
Type Hall, Plate, Random, Reverse Hall
Default
Value
Gated
Reverb
Damping 0–10 (1 steps) 5
Roll Off Flat to 500 Hz (scaled steps) Flat
EQ On/Off On/Off Off
Low Shelf Gain -15 dB to +15 dB (0.1 dB steps) 0 dB
Mid Gain -15 dB to +15 dB (0.1 dB steps) 0 dB
Mid Frequency 20 Hz – 20 kHz (scaled steps) 2 kHz
Mid Bandwidth 2 octaves to 1/30 octave (scaled steps) 1/2
High Shelf Gain -15 dB to +15 dB (0.1 dB steps) 0 dB
60
Page 61
Mackie TT24 Digital Live Console Owner’s Manual DSP and Internal Effect Allocation
Function Parameter Value Range/Increments
Size 3–40 m (1 m steps) 10 m
Decay 0.1–10 s (0.1 s steps) 1.6 s
Pre Delay 0–300 ms (1 ms steps) 0 ms
Diffusion 0–10 (1 steps) 5
Damping 0–10 (1 steps) 5
Roll Off Flat to 500 Hz (scaled steps) Flat
Reverb
Through
Gate
Threshold -60 dBFS to -1 dBFS (0.2 dBFS steps) -60 dBFS
Release 10–2500 ms (scaled steps) 100 ms
Hold 0–2500 ms (scaled steps) 0 ms
EQ On/Off On/Off Off
Low Shelf Gain -15 dB to +15 dB (0.1 dB steps) 0 dB
Mid Gain -15 dB to +15 dB (0.1 dB steps) 0 dB
Mid Frequency 20 Hz – 20 kHz (scaled steps) 2 kHz
Mid Bandwidth 2 octaves to 1/30 octave (scaled steps) 1/2
High Shelf Gain -15 dB to +15 dB (0.1 dB steps) 0 dB
Delay 0–1600 ms (scaled steps) 250 ms
Feedback 0% to 100% (1% steps) 20%
Damping Flat to 500 Hz (scaled steps) Flat
Default
Value
Mono
Delay
Stereo
Delay
EQ On/Off On/Off Off
Low Shelf Gain -15 dB to +15 dB (0.1 dB steps) 0 dB
Mid Gain -15 dB to +15 dB (0.1 dB steps) 0 dB
Mid Frequency 20 Hz – 20 kHz (scaled steps) 2 kHz
Mid Bandwidth 2 octaves to 1/30 octave (scaled steps) 1/2
High Shelf Gain -15 dB to +15 dB (0.1 dB steps) 0 dB
Delay Left 0–1600 ms (scaled steps) 250 ms
Delay Right 0 –1600 ms (scaled steps) 250 ms
Feedback Left 0% to 100% (1% steps) 20%
Feedback Right 0% to 100% (1% steps) 0.2
Damping Left Flat to 500 Hz (scaled steps) Flat
Damping Right Flat to 500 Hz (scaled steps) Flat
EQ On/Off On/Off Off
Low Shelf Gain -15 dB to +15 dB (0.1 dB steps) 0 dB
Mid Gain -15 dB to +15 dB (0.1 dB steps) 0 dB
Mid Frequency 20 Hz – 20 kHz (scaled steps) 2 kHz
Mid Bandwidth 2 octaves to 1/30 octave (scaled steps) 1/2
High Shelf Gain -15 dB to +15 dB (0.1 dB steps) 0 dB
61
Page 62

Mackie TT24 Digital Live Console Owner’s Manual DSP and Internal Effect Allocation
Function Parameter Value Range/Increments
Delay Left 0–1600 ms (scaled steps) 250 ms
Delay Right 0 –1600 ms (scaled steps) 250 ms
Feedback Left 0% to 100% (1% steps) 20%
Feedback Right 0% to 100% (1% steps) 0.2
Damping Left Flat to 500 Hz (scaled steps) Flat
Ping Pong
Delay
Chorus
Damping Right Flat to 500 Hz (scaled steps) Flat
EQ On/Off On/Off Off
Low Shelf Gain -15 dB to +15 dB (0.1 dB steps) 0 dB
Mid Gain -15 dB to +15 dB (0.1 dB steps) 0 dB
Mid Frequency 20 Hz – 20 kHz (scaled steps) 2 kHz
Mid Bandwidth 2 octaves to 1/30 octave (scaled steps) 1/2
High Shelf Gain -15 dB to +15 dB (0.1 dB steps) 0 dB
Depth 0–10 ms (0.1 ms steps) 3 ms
Delay 0–100 ms (1 ms steps) 0 ms
Thicken 0, 1, 2, 3 1
Speed 0.05–5 Hz (scaled steps) 1 Hz
Waveform Sine, Triangle, Random Sine
EQ On/Off On/Off Off
Low Shelf Gain -15 dB to +15 dB (0.1 dB steps) 0 dB
Mid Gain -15 dB to +15 dB (0.1 dB steps) 0 dB
Mid Frequency 20 Hz – 20 kHz (scaled steps) 2 kHz
Default
Value
Flange
Mid Bandwidth 2 octaves to 1/30 octave (scaled steps) 1/2
High Shelf Gain -15 dB to +15 dB (0.1 dB steps) 0 dB
Depth 0 ms to 10 ms (0.1 ms steps) 3 ms
Delay 0 ms to 100 ms (1 ms steps) 0 ms
Manual Sweep 20 Hz to 20 kHz (scaled steps) 1 kHz
Thicken 0, 1, 2, 3 1
Speed 0.05 Hz to 5 Hz (scaled steps) 1 Hz
Waveform Sine, Triangle, Random Sine
EQ On/Off On/Off Off
Low Shelf Gain -15 dB to +15 dB (0.1 dB steps) 0 dB
Mid Gain -15 dB to +15 dB (0.1 dB steps) 0 dB
Mid Frequency 20 Hz – 20 kHz (scaled steps) 2 kHz
Mid Bandwidth 2 octaves to 1/30 octave (scaled steps) 1/2
High Shelf Gain -15 dB to +15 dB (0.1 dB steps) 0 dB
62
Page 63

Mackie TT24 Digital Live Console Owner’s Manual
Chapter 6: Touchscreen and TT Control
Most of the TT24’s configuration occurs on the Touchscreen and/or the TT
control software. This section discusses the general conventions for both interfaces. Since the TT control software screens mirror and elaborate the Touchscreens, they will not be discussed except to define their functional differences.
In both the Touchscreen and TT control, the Ctrl key has a useful function:
Press and hold the Ctrl key and adjust any TT control parameter to restore its
default value. For example, press and hold Ctrl and adjust a Pan knob to set it
to the center position, or adjust an EQ Gain knob to set it to 0 dB.
NOTE: The Touchscreen and TT control screens can be synchronized, so displaying a new
screen on one displays the corresponding screen on the other, or independent,
allowing two engineers simultaneous access to the console. They are synchronized by default. See page 91 to toggle this setting.
6.1 TT Control Conventions
The TT control software expands the TT24’s control possibilities by providing
• Remote control of all functions from a PC connected via USB
• Improved metering and graphics than can be displayed on the Touchscreen
• Remote Venue/Preset management and console–>console backup/restore
• Console firmware upgrade capability
• Detailed Snapshot management
The TT24 connects to the PC via a USB cable (six-ft cable supplied). The
minimum PC requirements are summarized below.
Table 6-1 Minimum PC Requirements
Screen Resolution Processor Speed Operating System
1024 x 768 600 MHz Windows 2000 or XP
:
The TT control interface has knobs, buttons, graphs, and drop down menus,
each described in the following sections.
63
Page 64

Mackie TT24 Digital Live Console Owner’s Manual Touchscreen and TT Control
6.1.1 TT Control Knob
The parameter value for each knob can be adjusted using two methods
:
• Click on the knob, hold, and drag up/down to increase/decrease the value,
respectively.
In Figure 6-1, the Trim, HPF, Fader, and Pan knobs can be adjusted by this
method.
•Double-click the value below the knob to highlight the field and enter a new
value from the keyboard.
The HPF field is highlighted in Figure 6-1. High and low limits are automatically enforced for each parameter.
Figure 6-1 TT Control software screen
64
Page 65

Mackie TT24 Digital Live Console Owner’s Manual Touchscreen and TT Control
6.1.2 TT Control Buttons
The TT control software has two types of buttons:
• On/off or selected/unselected
An on/selected button has black letters over a light blue background (L/R in
the GROUPS area of Figure 6-3). An off/unselected button has light gray
letters over a dark blue background (GROUPS 1–8 in Figure 6-1). Click the
button to toggle its setting.
•Light switch
A light switch toggles between two or more values located to the right of the
switch. The selected value appears with black letters on a light blue background (GATE in Figure 6-1). The unselected value(s) has gray letters on a
black background (EXPANDER in Figure 6-1). The switch position aligns
with the selected value. Click anywhere on the light switch to toggle
through the values (circular if more than two).
6.1.3 TT Control Menus
At the top of Figure 6-1, the Ch. 1 Analog, Overview, Menu, and Files menus
all have a small downward pointing arrow indicating menu items. Click anywhere on the name or arrow to open a standard Windows menu.
In addition, the Ch. 1 Analog menu has larger up/down arrows on either side.
Click on these arrows, or press the console up/down arrow keys, to increment/
decrement through the list without opening the menu.
6.1.4 TT Control Graphs
Graphs with numbers or letters in small diamonds indicate that they can be
adjusted by clicking, holding, and dragging the points (the EQ, GATE, and
Compressor graphs in Figure 6-1).
In the EQ graph, each point behaves according to its EQ type. Since Band 1 is
a shelf filter, its point (1 in Figure 6-1) can be dragged sideways to set the cutoff
filter frequency and up/down to set the filter gain. The parametric filters can
be dragged up/down to set the filter gain and sideways to set the center frequency. Hold the Alt key down, click on the point, and drag sideways to adjust
the Q (left widens, right narrows).
Each point also corresponds to numerical fields below the graph that display
their current values. These fields can be set by double-clicking and typing in a
number from the keyboard. Upper and lower bounds are automatically enforced.
65
Page 66

Mackie TT24 Digital Live Console Owner’s Manual Touchscreen and TT Control
6.2 Touchscreen Conventions
The Touchscreen uses knobs, buttons, and sub screens, each described in the
following sections. The FILES menu is the same for all Touchscreens.
6.2.1 Touchscreen Knobs
NOTE: The Touchscreen knobs cannot be touched and adjusted directly! They corre-
spond to the QuickMix rotary encoders below the Touchscreen.
Up to 12 Touchscreen knobs each with a function label and value field are
available depending on the Touchscreen. The layout of these knobs corresponds
to the QuickMix rotary encoders below the Touchscreen. Adjusting a QuickMix
knob adjusts the corresponding knob’s parameter. If the Touchscreen has less
then 12 parameters, the bottom row of QuickMix knobs is used first, followed
by the middle and top rows. Figure 6-2 shows all three rows in use.
Each QuickMix knob can also activate a push button to toggle between two
values related to its primary parameter. For example, the push button for a
channel Aux Send toggles it between pre- and post-fader. The knob’s push button
capability (not active for all encoders) is indicated by a white Touchscreen knob
instead of the usual black (the bottom-left and right knobs in Figure 6-2).
Figure 6-2 6-Band EQ Touchscreen
66
Page 67

Mackie TT24 Digital Live Console Owner’s Manual Touchscreen and TT Control
6.2.2 Touchscreen Buttons
There are two types of Touchscreen buttons:
• On/off or selected/unselected
An off/unselected button has black letters over a white background (SOLO
in Figure 6-3). An on/selected button has white letters over a black background. Touch the button to toggle its setting.
•Light switch
A light switch toggles between the values located to the right of the switch.
The selected value appears with black letters over a white background (ALL
ACTIVE in Figure 6-3). The unselected value has white letters over a black
background (ALL OUT). The switch position aligns with the selected value.
Touch the switch to toggle the value.
Figure 6-3 MATRIX MIX Touchscreen
6.2.3 Touchscreen Name and Channel/Function
The name of the current Touchscreen is displayed in the top-center of the
screen (MATRIX MIX in Figure 6-3). Some screens are specific to the selected
channel or function. For example, the Analog and Effect Return OVERVIEW
screens are different. The currently selected channel/function appears in the
upper-left of the Touchscreen (Mtx C in Figure 6-3). Up and down arrows appear
on either side of the selected channel that can be touched to increment or
decrement the selected channel. Pressing the up/down QuickMix arrows also
increments/decrements the field.
67
Page 68

Mackie TT24 Digital Live Console Owner’s Manual Touchscreen and TT Control
6.2.4 Sub Screens
Some functions require one or more sub screens to adjust all parameters. These
screens are accessed by touching a button or an area, such as an EQ graph. After
viewing and adjusting parameters on the sub screen, return to the previous
screen by pressing the hardware button that displayed the original Touchscreen.
6.3 Overview Touchscreens
There are seven variations on the OVERVIEW Touchscreen: Analog, Digital,
Line, Effect Return, Aux, Group, and Master. To display these screens, press
the FAT QuickMix button and
• select the desired channel’s bank and press its SELECT button;
OR
:
• touch the up/down arrows next to the channel menu field to find the desired
channel.
6.3.1 Analog
Figure 6-4 Analog OVERVIEW
GROUP/AUX ASSIGNMENTS
The AUXES area displays the selected channel’s assignments, level settings,
pan settings (if Auxes are stereo linked), and pre-/post-fader status (blank =
POST). The GROUP ASSIGNMENTS area displays the selected channel’s
group assignments. Touch anywhere in the AUXES area to open the GRPS/
AUXES Touchscreen (see page 86).
68
Page 69

Mackie TT24 Digital Live Console Owner’s Manual Touchscreen and TT Control
EQ, GATE, and COMP
Touch any of the graphs to open its specific Touchscreen. Touch the arrows to
toggle the order of the EQ and compressor. Touch the EQ OUT, COMP OUT,
GATE OUT buttons to toggle their processors in/out.
DIGI TRIM
This knob adjusts Digital Trim (see page 29).
PHASE
When active, the PHASE control inverts the polarity of the incoming signal.
This is used to compensate for the distance between microphone positions (i.e.,
miking a drum set or stereo sources).
LINK
If a channel is listed below LINK, this channel has been stereo linked with the
selected channel.
6.3.2 Digital
Figure 6-5 Digital OVERVIEW
69
Page 70

Mackie TT24 Digital Live Console Owner’s Manual Touchscreen and TT Control
GROUP/AUX ASSIGNMENTS
The AUXES area displays the selected channel’s assignments, level settings,
pan settings (if Auxes are stereo linked), and pre-/post-fader status (blank =
POST). The GROUP ASSIGNMENTS area displays the selected channel’s
group assignments. Touch anywhere in the AUXES area to open the GRPS/
AUXES Touchscreen (see page 86).
LINK
If a channel is listed below LINK, this channel has been stereo linked with the
selected channel.
6.3.3 Effect Return
Figure 6-6 Effect Return OVERVIEW
GROUP/AUX ASSIGNMENTS
The AUXES area displays the selected channel’s assignments, level settings,
pan settings (if Auxes are stereo linked), and pre
/post-fader status (blank =
-
POST). The GROUP ASSIGNMENTS area displays the selected channel’s
group assignments. Touch anywhere in the AUXES area to open the GRPS/
AUXES Touchscreen (see page 86).
LINK
If a channel is listed below LINK, this channel has been stereo linked with the
selected channel.
70
Page 71

Mackie TT24 Digital Live Console Owner’s Manual Touchscreen and TT Control
RETURN
The bottom of this section lists the effect name (Chorus in Figure 6-6). Touch the
EFX EDIT button to edit and change the effect in its own Touchscreen
(Figure 6-7).
Figure 6-7 EFX Edit Touchscreen
This screen contains the editable effect parameters, IN/OUT meters, EQ IN/OUT
button, and a graph showing the EQ curve associated with this effect. Touch
the EDIT EQ button to display the EQ controls (low- and high-shelf filters and
one parametric band) instead of the effect’s.
71
Page 72

Mackie TT24 Digital Live Console Owner’s Manual Touchscreen and TT Control
6.3.4 Line
Figure 6-8 Line OVERVIEW
GROUP/AUX ASSIGNMENTS
The AUXES area displays the selected channel’s assignments, level settings,
pan settings (if Auxes are stereo linked), and pre-/post-fader status (blank =
POST). The GROUP ASSIGNMENTS area displays the selected channel’s
group assignments. Touch anywhere in the AUXES area to open the GRPS/
AUXES Touchscreen (see page 86).
EQ
Touch the EQ graph to open its Touchscreen. Touch the EQ IN button to toggle
it in/out.
LINK
If a channel is listed below LINK, this channel has been stereo linked with the
selected channel.
72
Page 73

Mackie TT24 Digital Live Console Owner’s Manual Touchscreen and TT Control
6.3.5 Aux
Figure 6-9 Aux OVERVIEW
EQ and COMP
Touch the EQ or compressor graphs to open their specific Touchscreens. Touch
the arrows to toggle the processor order. Touch the EQ IN, COMP IN buttons
to toggle their processors in/out.
LINK
If a channel is listed below LINK, this Aux has been stereo
linked with the
selected Aux.
73
Page 74

Mackie TT24 Digital Live Console Owner’s Manual Touchscreen and TT Control
6.3.6 Group
Figure 6-10 Group OVERVIEW
GRP DSP ENABLE/DISABLE
This button enables/disables the group DSP. Use this button in conjunction
with the GRP DSP AVAILABLE meter to conserve DSP for where it is most
needed. This button will only enable if DSP resources are available. When
disabled, the Compressor and EQ graphs are absent.
If there is insufficient DSP to add to the selected group, a warning message
appears stating there is not enough DSP to add to the selected group. If this
instance of DSP is deemed essential, deactivate Group DSP elsewhere to free
resources.
To remove DSP
:
1. Touch the DISABLE button in the GRP DSP area.
A warning message appears: “Are you sure? This will remove DSP and
all associated DSP settings from the selected group.”
2. Touch OK to confirm the removal of group DSP or CANCEL to leave the
DSP active on that group.
GRP DSP AVAILABLE
This meter indicates the DSP resources still available. In Figure 6-10, five of
the eight units of DSP are still available.
74
Page 75

Mackie TT24 Digital Live Console Owner’s Manual Touchscreen and TT Control
EQ and COMP
Touch the graphs to open their specific Touchscreens. Touch the arrows to
toggle the processor order. Touch the EQ IN, COMP IN buttons to toggle their
processors in/out.
GROUP MODE
Select MONO, STEREO, or VCA as the group mode from the light switch button.
See page 54 for a complete discussion of Group modes.
GRP ASSIGN
Touch the L/R and M buttons to assign the group to the Left-Right and Center/
Mono outputs, respectively.
6.3.7 Master
Figure 6-11 Master OVERVIEW
If the L/R and MONO outputs are linked, they share the same EQ and compressor
settings. If unlinked, they have independent settings. If they are unlinked and
then linked, the MONO output inherits the L/R settings.
EQ and COMP
Touch the EQ or compressor graphs to open their specific Touchscreens. Touch
the arrows to toggle the processor order. Touch the EQ IN, COMP IN buttons
to toggle their processors in/out.
75
Page 76

Mackie TT24 Digital Live Console Owner’s Manual Touchscreen and TT Control
6.4 Four-Band Equalizer
Figure 6-12 Analog Channel 4 BAND EQ
The 24 Mic/Line inputs, eight additional Line Inputs, and eight Flex-Groups
can each access a four-band EQ. The four bands can be configured in two ways
• Bands 1–4 are identical with standard parametric controls: Gain, Frequency,
and Q.
• Bands 2 and 3 are standard parametric filters while bands 1 and 4 can be
individually set to be low- and high-shelf filters, respectively. This configuration is common on many analog consoles.
The entire EQ function can be switched in/out of the DSP chain from the Touchscreen, allowing an A/B signal comparison.
Select an analog channel and press the EQ QuickMix button to display the
4 BAND EQ Touchscreen. The Band 1 and 4 types are toggled from light switch
buttons. The graph summarizes the EQ settings.
Gain
Each of the four filter's GAIN is adjustable ±15 dB in 0.1 dB increments. Each
band defaults to zero gain.
:
Frequency
The FREQ parameter determines the filter’s center frequency, at which the gain
setting is applied. FREQ is adjustable from 20 Hz to 20 kHz in scaled steps. For
shelf-filter bands, the FREQ setting designates the half-power frequency: the
frequency at which the power has decreased to half its maximum.
76
Page 77

Mackie TT24 Digital Live Console Owner’s Manual Touchscreen and TT Control
The default frequencies for each band are
:
•Band 1: 80 Hz
•Band 2: 500 Hz
•Band 3: 2 kHz
•Band 4: 10 kHz
HPF Freq
The HPF FREQ field displays the value of the HPF set from the V-POT
CONTROL area.
Q (Bandwidth)
The Q control adjusts the
width
of a parametric filter band and allows a wide
or narrow boost and cut. Q is measured from the half-power points of the filter
on both sides and is adjustable in the range 0.1–2.0 octaves in scaled steps.
NOTE: Bandwidth and Q are often used as synonyms but are a source of frequent
confusion because their values are inversely related. As the bandwidth widens
and increases in value, the Q value decreases.
77
Page 78

Mackie TT24 Digital Live Console Owner’s Manual Touchscreen and TT Control
6.5 Six-Band Equalizer
The Master LR and C/Mono outputs can each access a six-band EQ comprised
of a four-band EQ and two
6.5.1 Four-Band EQ
Bands 1–4 are identical to the four-band EQ (page 76), except bands 1 and 4
are set to low- and high-shelf filters, respectively.
6.5.2 Kill Filters
Kill filters are specialized parametric EQ bands designed to eliminate feedback
at a specific frequency without using up an entire EQ filter. Bands 5 and 6 control
the kill filter frequency. The default frequency of both kill filters is 1 kHz.
Push the bottom
states
(narrows) the bandwidth. The filters default to the
holding CTRL while adjusting the kill filter QuickMix knob resets the kill filter
to the off position. The kill filter setting is displayed beneath its frequency field.
shown in Table 6-2. Each state increases in gain reduction and decreases
Figure 6-13 6 BAND EQ
kill filters
left and right QuickMix knobs to cycle through the four
-
.
off
setting. Pressing and
kill filter
Table 6-2 Kill Filter States
Off State 1 State 2 State 3
Gain Reduction (dB) 0 6 12 18
Bandwidth (octaves) NA 1/10 1/20 1/30
78
Page 79

Mackie TT24 Digital Live Console Owner’s Manual Touchscreen and TT Control
6.6 Dynamics
Figure 6-14 DYNAMICS
Press the DYN QuickMix button to display the DYNAMICS Touchscreen.
Touch the GATE or COMP graphs to display their respective Touchscreens.
6.6.1 Compressor
Figure 6-15 COMPRESSOR Touchscreen
The IN/OUT meters show the levels coming in/out of the compressor. The inverted
REDUCTION meter displays the compressor’s gain reduction.
The graph summarizes the compressor’s parameter settings.
79
Page 80

Mackie TT24 Digital Live Console Owner’s Manual Touchscreen and TT Control
Threshold
The THRESH control adjusts the level above which attenuation begins. It is
adjustable in the range -60 to 0 dBFS in increments of 0.1 dBFS; the default
value is 0 dB.
Ratio
The RATIO control sets the rate of gain reduction applied to the signal as it
exceeds the threshold. The ratio can vary between gentle compression and
peak limiting. The ratio range is 1:1 (no gain reduction) to the maximum of ∞:1
(peak limiting). The default setting is 1:1.
Attack
The ATK control varies the time the compressor takes to begin gain reduction
after the signal exceeds the threshold. The ATK time range is 1–300 ms and the
increments are scaled such that the faster attack settings have finer adjustments.
The default setting is 15 ms.
Release
The REL controls the time the compressor takes to stop applying gain reduction
after the signal decreases below the threshold. The REL time range is 50 ms to
3 s. The default setting is 200 ms. REL is scaled such that the faster release
settings have finer adjustments.
Gain
The GAIN control sets the gain applied to the signal after the compressor. This
allows
GAIN range is 0–20 dB in increments of 0.1 dB. The default setting is 0 dB.
Hard/Soft Knee
The HARD/SOFT KNEE switch toggles the compressor
is accessible only from the COMPRESSOR Touchscreen (not from DYNAMICS).
HARD KNEE: As the signal exceeds the threshold, gain reduction is
SOFT KNEE: As the signal approaches the threshold, gain reduction is
makeup
gain to compensate for the compressor’s level reduction. The
knee
characteristic. It
immediately applied at the full ratio setting.
gradually applied up to the full ratio setting.
80
Page 81

Mackie TT24 Digital Live Console Owner’s Manual Touchscreen and TT Control
6.6.2 Gate/Expander
Figure 6-16 GATE (left) and EXP Touchscreens
The Gate/expander has five controls and an on/off switch. There is a mode
button to switch between the gate and downward expander.
The IN/OUT meters show the levels coming in/out of the gate/expander. The
inverted REDUCTION meter displays the gain reduction.
The graph summarizes the gate/expander’s parameter settings.
Threshold
The THRESH control adjusts the level below which attenuation begins. It is
adjustable in the range -60 to -1 dBFS in increments of 0.1 dBFS. The default
threshold value is
Range/Ratio
In Gate mode, the RANGE control sets the amount of attenuation that occurs
when the signal drops below the Threshold. The RANGE is variable from
100 dB to -1 dB in increments of 0.1 dB. The default is -100 dB.
-
In Expander mode, this setting is called RATIO and sets the expansion gain
reduction ratio from 1:1 to 1
Hold
1 dBFS.
-
∞. The default is 1:∞.
:
The HOLD control adjusts the time the Gate/Expander stays open after the
signal drops below the threshold before gain reduction begins. HOLD is adjustable
in the range 0–5 s; the default is 0 s.
81
Page 82

Mackie TT24 Digital Live Console Owner’s Manual Touchscreen and TT Control
Attack
The ATK control adjusts the time for the gate to open and pass the signal
through once the signal exceeds the threshold after reduction has occurred.
ATK is adjustable in the range 1–30 ms. ATK is scaled such that the faster
settings can have finer adjustments. The default ATK is 1 ms.
Release
The REL control adjusts the time for the gate to close and begin gain reduction
after the signal drops below the threshold and the hold time has passed. REL
is adjustable from 50 ms to 3 s and is scaled such that faster settings can have
finer the adjustments. The default REL time is 250 ms.
Expander/Gate Mode
The EXPANDER/GATE switch toggles from Gate to Expander. It is accessible
only from the GATE/EXP Touchscreen, not from DYNAMICS. In Expander
mode, the, HOLD, ATK and REL controls operate the same as in Gate mode
but the RANGE control is displayed as RATIO. This can produce smoother
sounding gain reduction in many situations.
In Expander Mode, RANGE is replaced by RATIO that sets the rate of gain reduction as the signal drops below the Threshold. Ratio is variable between 1:20
(maximum gain reduction) to 1:1 (no gain reduction). As RATIO approaches to
1:1, the resolution between values increases.
6.7 Snapshots
Snapshots are not presently available from the Touchscreen but can be edited
from the TT control software. This section presents the TT control screens and
instructions for their use.
Press the SNAP QuickMix button to open the SNAPSHOTS window in TT control (or choose Snapshots from the main TT control menu). The left side of the
window displays a vertical list of all snapshots with PROTECT, CLEAR,
STORE, and RECALL buttons below (Figure 6-17).
Touch a snapshot name in the SNAPSHOT TITLE field to select it. An empty
snapshot slot displays
n
is the automatically incremented snapshot number.
Empty
while a used snapshot displays
Snapshot n
where
82
Page 83

Mackie TT24 Digital Live Console Owner’s Manual Touchscreen and TT Control
6.7.1 PROTECT
The PROTECT button allows the user to prevent a snapshot from being cleared
or overwritten. To protect a snapshot
• select a snapshot then click the PROTECT button;
OR
• click in the LOCK column next to the desired snapshot.
When protected, a lock icon appears in the LOCK column to the right of the
snapshot name. The absence of an icon next to a snapshot denotes that it can
be deleted or overwritten. In Figure 6-17, snapshots 1, 2, and 5 are locked and
the rest are unlocked.
To edit or clear a locked snapshot
• select it and click the PROTECT button;
Figure 6-17 Snapshots main screen
:
:
OR
• click the lock icon.
83
Page 84

Mackie TT24 Digital Live Console Owner’s Manual Touchscreen and TT Control
6.7.2 CLEAR
Click the CLEAR button to clear the selected snapshot. The snapshot is deleted
and the name returns to
produces a warning message.
Empty
. Attempting to clear a protected snapshot
6.7.3 STORE
Click the STORE button to store the current console state (with filtering if
active) in the selected snapshot. Attempting to store over a protected snapshot
produces a warning message.
6.7.4 RECALL
Click the RECALL button to recall the selected snapshot (with filtering if active).
6.7.5 Snapshot Filtering
Snapshots can be filtered so only the desired channels and/or parameters are
stored and recalled. Snapshot filtering can be useful in a variety of situations:
• recall Fader, and Mute settings while leaving DSP settings unaffected
• recall settings on a few channels leaving the rest unchanged
• change internal effects presets through a specific order while leaving every
other console setting for live use
The Snapshots window has the following areas relevant to filtering:
• SNAPSHOT PARAMETER FILTERING
The ACTIVE button at the top of this area must be selected or filtering will
not occur. Only the selected parameters are included in the Snapshot. The
OTHERS button refers to DSP functions other than those listed. INT 1–4
are the internal effects.
• CHANNEL FILTERING SELECT
Click on the BANK 1–4 or MATRIX A–H buttons and select the desired
channels for that bank from the list on the right. Only the selected channels
are included in the Snapshot.
• CHANNELS FILTERED
Displays the selected channels for the current Snapshot.
84
Page 85

Mackie TT24 Digital Live Console Owner’s Manual Touchscreen and TT Control
6.8 Aux Master
Figure 6-18 AUX MASTER
Press the AUX MSTR QuickMix button to display the AUX MASTER Touchscreen. The 12 Master Aux Send levels are controlled by their corresponding
QuickMix knobs. Change the selected Aux Master by pressing the desired
knob. The active Aux Master is displayed on the top-left of the Touchscreen.
The overview information for the selected Aux Master is displayed on the top
half of the Touchscreen: metering, link status, compression and EQ.
Each Aux Send Master also has its own OVERVIEW Touchscreen (see page
73), which can be displayed by pressing the FAT QuickMix button.
EQ and Comp
Touch the EQ or compressor areas (or press the EQ or DYN QuickMix buttons)
to open their respective Touchscreens. See
Compressor
LINK
on page 79.
Six-Band Equalizer
on page 78 and
-
If the selected Aux Master is stereo linked, the linked Aux number is listed
below LINK; it displays OFF otherwise.
85
Page 86

Mackie TT24 Digital Live Console Owner’s Manual Touchscreen and TT Control
6.9 Groups/Auxes
From the Group or Aux OVERVIEW screen, touch in the AUXES area to open
the GRPS/AUXES Touchscreen.
6.9.1 GROUPS
Touch a GROUPS button to assign the selected channel to that Group. The
highlighted buttons indicate assignments (in Figure 6-19, no Group is assigned).
6.9.2 AUXES
Adjust the QuickMix knob corresponding to an Aux number or pair to set the
selected channel’s level to that Aux. An Aux labeled with two numbers indicates
a stereo
in the stereo Aux field. Push the QuickMix knob associated with an Aux level
to toggle it between pre- and post-fader.
linked Aux, which have a PAN control to position the selected channel
-
Figure 6-19 GRPS/AUXES
86
Page 87

Mackie TT24 Digital Live Console Owner’s Manual Touchscreen and TT Control
6.10 Matrix Mix
Display the MATRIX MIX Touchscreen by pressing the MATRIX QuickMix
button. Activate the matrix by selecting ALL ACTIVE which sends the Matrix
signals to the Group outputs.
Matrix-Plus delivers extremely flexible 11 x 8 matrix mixing. Although the
default inputs to each matrix are Groups 1–8, Left, Right, and Center, virtually
any other signal can be patched into the Matrix.
Figure 6-20 MATRIX MIX
Press one of the MATRIX MIXER SELECTION buttons A–H to select a Matrix
for editing. The knobs control the input levels to the selected Matrix. The bottom
right knob controls the master output level for the selected Matrix, which is
reflected on the meter.
Press the desired QuickMix knob to display the screen in Figure 6-21 to select
the Matrix input signals.
-
87
Page 88

Mackie TT24 Digital Live Console Owner’s Manual Touchscreen and TT Control
Figure 6-21 MATRIX MIX Selection/Assignment
The following input signals are available to the matrix
• Analog inputs 1–24 pre/post fader
• Digital inputs 25–48 pre/post fader
• Line inputs 1–8 pre/post fader
• Groups 1–8 Mono, Left/Right, Center (if available)
• Main Left, Right or CTR/Mono post fader
• Stereo inputs Left and Right pre/post fader
• Internal effects returns pre/post fader
:
88
Page 89

Mackie TT24 Digital Live Console Owner’s Manual Touchscreen and TT Control
6.10.1 Delay
Each Matrix output has a 600 ms delay to allow time alignment of multiple
speaker groups in a large venue. The Matrix Output Delay is adjusted by
touching DELAY SETUP from the MATRIX MIX Touchscreen.
Figure 6-22 MATRIX MIX DELAY SETUP Touchscreens
MATRIX DELAY TIME: 0–600 ms in 0.5 ms increments
This parameter converts a distance to a delay time. The units of measurements
for distance depend on those selected in DISPLAY UNITS.
DISPLAY UNITS: U.S. or METRIC
TEMPERATURE: Enter the present temperature.
The temperature affects the conversion between delay time and distance. The
range is 20–120°F (-10° to 50°C) in 1° increments.
89
Page 90

Mackie TT24 Digital Live Console Owner’s Manual Touchscreen and TT Control
6.11 Effects
Figure 6-23 INTERNAL EFX Touchscreens
Press the EFX QuickMix button to display the INTERNAL EFX Touchscreen
(left of Figure 6-23). Touch an Effect to change the effect. Touch an Edit button
to edit the selected effect. Touch a Source to change the source feeding the Effect;
this displays the Touchscreen on the right of Figure 6-23.
6.12 Setup
Figure 6-24 SETUP MENU SELECTION
Press the SETUP QuickMix button to display the SETUP MENU SELECTION
Touchscreen. Touch the OPERATION, GENERAL, and DIGITAL buttons to
configure those attributes.
90
Page 91

Mackie TT24 Digital Live Console Owner’s Manual Touchscreen and TT Control
6.12.1 Operation
Figure 6-25 OPERATION SETUP
Choose between the two CENTER MODE options: L/R + MONO and LCR. See
L/R+Mono and LCR Modes
on page 52 for an explanation of these modes.
6.12.2 General
Figure 6-26 GENERAL SETUP
PRE FADER AUX SENDS GLOBAL
Pre-fader Aux sends can be globally changed to pre- or post-mute. This feature
facilitates using the TT24 for both FOH and monitors. For example, the monitors
are normally fed by pre-fader Aux sends. During a set change, to reset the mics
for the next band, they must be muted in the monitors. This requires the pre
fader Aux sends to be pre-mute.
PC AUTO FOLLOW
The TT control software can be set to operate independently from the Touchscreen or to
the TT24, one from the Touchscreen and one from the PC.
follow
it. When independent, two users may simultaneously control
91
-
Page 92

Mackie TT24 Digital Live Console Owner’s Manual Touchscreen and TT Control
UNITS OF MEASUREMENT
This allows U.S. or metric units of measurement to used for console settings.
FADERS and SCREEN CALIBRATE
Touch either of these CALIBRATE buttons to follow simple instructions to calibrate the faders and Touchscreen.
EXCLUSIVE SOLO
Select EXCLUSIVE SOLO to deactivate previous SOLO selections upon a new
one. For example, if channel 1 is soloed, pressing channel 2’s SOLO button
automatically unsolos channel 1. Even with EXCLUSIVE SOLO selected, multiple channels can be soloed by holding down the Ctrl key while pressing a SOLO
button. When not selected, multiple channels can be soloed simultaneously.
6.12.3 Digital
Sample Rate
Figure 6-27 DIGITAL SETUP
Select the desired sample rate: 44.1kHz, 48kHz, 88.2kHz, or 96kHz.
Clock Source
Select the desired clock source: Internal or Word.
92
Page 93

Mackie TT24 Digital Live Console Owner’s Manual Touchscreen and TT Control
Clock Status
This field highlights Locked if the TT24 has successfully locked onto its external
Word Clock Source. It is not highlighted if the Clock Source is set to Internal
or it has not locked to a Word Clock Source.
Digital Input
Select the desired Digital Input: AES or SPDIF. Only one of these can be active
at a time.
Sample Rate Convert
Select this field to activate automatic sample rate conversion for the selected
Digital Input.
1/2 Sample Rate AES/SPDIF Output
Select this field to output a signal with half the selected sample rate to the
selected Digital Input.
6.13 Utility
Press the UTIL QuickMix button to open the UTILITY MENU SELECTION
Touchscreen. Touch the MONITOR SOURCE, STEREO INPUT ASSIGN,
TALKBACK, and METERING buttons to configure those attributes.
Figure 6-28 UTILITY MENU SELECTION
93
Page 94

Mackie TT24 Digital Live Console Owner’s Manual Touchscreen and TT Control
6.13.1 MONITOR SOURCE
Figure 6-29 UTILITY MONITOR SOURCE
The MONITOR SOURCE Touchscreen assigns a source for the monitor outputs
and the headphones. The monitor analog gain controls are located in the UTILITY
area (see page 38). Choose among these sources: L/R, C/MONO, DIGITAL,
TAPE/CD A, or TAPE/CD B.
The L, R, and C meters mirror the hardware meters and display the L, R, and
C/M Monitor outputs. Each meter has an overload LED at the top.
The SOLO LEVEL adjusts the level of the solo group. It varies ±15 dB in 0.1 dB
increments and its default level is 0 dB. The RUDE SOLO LED lights when a
channel is soloed.
94
Page 95

Mackie TT24 Digital Live Console Owner’s Manual Touchscreen and TT Control
6.13.2 TALKBACK
Figure 6-30 UTILITY TALKBACK
Select the desired Matrix and Aux channels to enable for Talkback.
6.13.3 STEREO INPUT ASSIGN
Figure 6-31 UTILITY STEREO INPUT ASSIGN
This screen routes the selected stereo input (DIGITAL, TAPE/CD A, or TAPE/
CD B) to the main mix.
95
Page 96

Mackie TT24 Digital Live Console Owner’s Manual Touchscreen and TT Control
SOLO
Activate the SOLO button to cue the signal prior to routing to the speakers.
MONO
Activate the MONO button to send the summed mono signal to
and RIGHT outputs.
GRP ASSIGN
Select L/R in the GRP ASSIGN area to route to stereo source to the LEFT and
RIGHT MAINS outputs.
INPUT METERS
The meters show the pre-fader, pre-L/R assign level of the stereo input.
6.13.4 METERING
both
the LEFT
Figure 6-32 UTILITY METERING
These meters show the levels for the Group/Matrix outputs.
96
Page 97

Mackie TT24 Digital Live Console Owner’s Manual Touchscreen and TT Control
6.14 File Management
The TT24 parameters related to the physical/acoustical space and equipment
can be saved to a Venue. These parameters are from the SETUP Touchscreens:
Operation, General, and Digital. See page 90.
6.14.1 Load and Save Venue
The FILE MGMT SELECT MENU allows loading and saving a Venue.
Figure 6-33 FILE MGMT SELECT MENU
Touch LOAD VENUE to select a venue from a list of all venues on the console.
Figure 6-34 FILE MGMT LOAD VENUE
Use the up and down Touchscreen arrows to scroll if the list is too large to fit.
Touch the name of the desired venue and touch the OK button.
Touch SAVE VENUE from Figure 6-33 to save the current venue.
97
Page 98

Mackie TT24 Digital Live Console Owner’s Manual Touchscreen and TT Control
Figure 6-35 FILE MGMT SAVE VENUE
Touch an existing name to save over this Venue or <empty> to save to a new
Venue. Touch OK to exit.
6.14.2 DSP Preset Management
Preset management is not presently available from the Touchscreen but can be
accessed from the TT control software.
The TT24 DSP settings can be saved and restored to a file by choosing Save
Preset and Load Preset, respectively, from the Files menu.
98
Page 99

Appendix A: Specifications
Analog
Mic Preamp
Frequency response +0,
Distortion (THD + N)
Noise 20 Hz to 20 kHz BW (150 Ω source impedance)
Equivalent Input Noise (EIN) –128 dBu
Residual Noise –103 dBu (Mic In to Insert Out @ 0 dB gain)
Common Mode Rejection Ratio (CMRR) >60 dB @ 1 kHz, gain @ maximum (Mic In to Insert Out)
Rise Time < 3 µs
Slew Rate 3.6 V/µs
Input Gain Control Range
Mic In 0 dB to +60 dB
Line In –20 dB to +40 dB
Phantom Power 48 VDC
2 dB, 10 Hz to 20 kHz (Mic In to Insert Out)
-
< 0.003% @ +20 dBu output, 20 Hz to 20 kHz
(Mic In to Insert Out)
Input Impedance
Mic Input 2 kΩ, balanced
Line Input 10 kΩ
Aux Returns, CD/Tape A and B 10 kΩ
Maximum Input Level
Mic Input +22 dBu
Line Input +22 dBu
Aux Returns, CD/Tape A and B +22 dBu
Output Impedance
L/R/C
Mono, Group/Matrix Out 150 Ω
-
Aux Send, Monitor Out 150 Ω
CD/Tape A and B Out 600 Ω
103
Page 100

Maximum Output Level
Insert Out +22 dBu
L/R/C
Mono, Group/Matrix Out +26 dBu
-
Aux Send, Monitor Out +21 dBu
CD/Tape A and B Out +22 dBu
Phones Out 500 mW into 100 Ω
System
Frequency Response (Gain at unity)
Mic Input to Main Output
Distortion (THD + N)
Mic Input to Main Output
AES Input with SRC to AES Output
Signal to Noise Ratio –78 dBu (ref. +4 dBu Mic In to Main Out)
Dynamic Range 101 dB (Mic In to Main Out)
Maximum Voltage Gain 96 dB (Mic In to Main Out)
Crosstalk
Adjacent Inputs –110 dB @ 1 kHz
Adjacent Main Outputs –95 dB @ 1 kHz
Adjacent Aux Outputs –115 dB @ 1 kHz
+0, –1 dB, 10 Hz to 20 kHz @ 44.1 kHz
+0, –2 dB, 10 Hz to 40 kHz @ 96 kHz
+0, –0.5 dB, 14 Hz to 27.5 kHz @ 96 kHz
< 0.02% @ +4 dBu input, 44.1 kHz, 10 Hz to 20 kHz
< 0.03% @ +4 dBu input, 96 kHz, 10 Hz to 20 kHz
< 0.0002% @ –10 dBFS input, 44.1 kHz, 10 Hz to 22.05 kHz
< 0.0006% @ –10 dBFS input, 96 kHz, 10 Hz to 48 kHz
Digital
Faders
Type 100 mm motorized, movement sensitive
Resolution 128 steps
Sampling Frequency 44.1, 48, 88.2, 96 kHz (Internal and External)
Digital Signal Processing 32
Propagation Delay (Mic In to Main Out)
bit floating point resolution
-
< 3.8 ms @ 44.1 kHz
< 1.7 ms @ 96 kHz
104
 Loading...