

Mackie Tracktion2 User's Guide

TRACKTION 2
MUSIC PRODUCTION SOFTWARE
U S E R ’ S G U I D E
User’s Guide
3
Please place your Tracktion 2.0 License Number label here
(packaged with the Tracktion 2.0 CDs):
PLACE LABEL HERE
Enter your my.mackie.com Login information here:
Login email address __________________________________________
Don’t forget to visit our website at www.mackie.com for
more information about this and other Mackie products.
Part No. SW0193 Rev. A 3/05
©2005 LOUD Technologies Inc. All Rights Reserved.
2
Tracktion 2

LOUD TECHNOLOGIES INC. END USER LICENSE AGREEMENT
Tracktion 2.0
By clicking on the “I Accept” button, installing, copying or otherwise using the Software, you
agree to be bound by the terms of this License Agreement. If you do not agree to the terms of
this License Agreement, click on the “I Do Not Accept” button and/or do not install the Software.
1. License. YOU (either as an individual or an entity) MAY: (a) use the Software on a maximum
of two (2) computers; (b) physically transfer the Software from one computer to another
provided that the Software is used on no more than two computers at a time and that you
remove any copies of the Software from the computer(s) from which the Software is being
transferred; and (c) install another copy of the Software in the event that the rst Software
installation is unusable.
YOU MAY NOT: (a) distribute copies of the Software or the documentation to others; (b)
modify, rent, lease or grant sublicenses or other rights to the Software; and (c) use the Software in a computer service business, network, time-sharing, multiple CPU or multiple user
arrangement without the prior written consent of LOUD Technologies Inc.
2. Copyright. This License is not a sale of the Software or any other copy. LOUD Technologies
Inc. and Raw Material Software retain title and ownership of the Software and documentation, including all intellectual property rights. No title to the intellectual property in the
Software is transferred to you. You will not acquire any rights to the Software except as expressly set forth above.
3. Reverse Engineering. You agree that you will not attempt, and if you are a corporation,
you will use your best efforts to prevent your employees and contractors from attempting to
reverse engineer, disassemble, compile, modify, translate, or otherwise alter the Software or
any associated LOUD Technologies Inc. hardware in whole or in part.
4. Limited Warranty. LOUD Technologies Inc. warrants that the media on which the Software
is furnished will be free from defects in materials and workmanship under normal use for a
period of ninety (90) days from the date of purchase. If a defect appears during the warranty
period, return the diskette/compact disk to LOUD Technologies Inc., and you will receive a
free replacement. This Limited Warranty is void if failure of the Software has resulted from
accident, abuse, or misapplication. Any replacement Software will be warranted for the remainder of the original warranty period. The foregoing is your sole and exclusive remedy for
breach of warranty. THIS WARRANTY GIVES YOU SPECIFIC LEGAL RIGHTS AND YOU
MAY ALSO HAVE OTHER RIGHTS THAT VARY BY JURISDICTION.
5. No Other Warranties. LOUD Technologies Inc. AND ITS LICENSOR(s) (hereafter col-
lectively referred to as “LOUD Technologies Inc.”) DO NOT WARRANT THAT THE LOUD
Technologies Inc. SOFTWARE NOR ANY THIRD-PARTY SOFTWARE AVAILABLE FOR
DOWNLOAD (collectively the “Software”) ARE ERROR FREE. YOU EXPRESSLY ACKNOWLEDGE THAT THE SOFTWARE AND DOCUMENTATION ARE PROVIDED “AS IS.”
LOUD Technologies Inc. DISCLAIMS ALL OTHER WARRANTIES, EITHER EXPRESS OR
IMPLIED, INCLUDING BUT NOT LIMITED TO IMPLIED WARRANTIES OF MERCHANTABILITY, FITNESS FOR A PARTICULAR PURPOSE AND NON-INFRINGEMENT OF THIRD
PARTY RIGHTS WITH RESPECT TO THE SOFTWARE. SHOULD THE SOFTWARE PROVE
DEFECTIVE, YOU (AND NOT LOUD Technologies Inc. OR AN AUTHORIZED REPRESENTATIVE) ASSUME THE ENTIRE COST OF ALL NECESSARY SERVICING, REPAIR OR
CORRECTION.
User’s Guide
3

User’s Guide
5
6. No Liability for Consequential Damages. IN NO EVENT SHALL LOUD Technologies Inc.
BE LIABLE TO YOU FOR ANY CONSEQUENTIAL, SPECIAL, INCIDENTAL OR INDIRECT
DAMAGES OF ANY KIND ARISING OUT OF THE USE OF THE LOUD Technologies Inc.
SOFTWARE, EVEN IF LOUD Technologies Inc. HAS BEEN ADVISED OF THE POSSIBILITY
OF SUCH DAMAGES. LOUD Technologies Inc.’S LIABILITY FOR ANY CLAIM, LOSSES,
DAMAGES OR INJURY, WHETHER CAUSED BY BREACH OF CONTRACT, TORT OR ANY
OTHER THEORY OF LIABILITY, SHALL NOT EXCEED THE LICENSE FEE PAID BY YOU.
SOME JURISDICTIONS DO NOT ALLOW THE EXCLUSION OF IMPLIED WARRANTIES OR
INCIDENTAL OR CONSEQUENTIAL DAMAGES, SO THE ABOVE LIMITATION OR EXCLUSIONS MAY NOT APPLY TO YOU.
7. Term. This Agreement is effective until terminated. You may terminate this Agreement at
any time by uninstalling the Software together with destroying any copies in any form. This
Agreement, including the license to use the Software, will terminate automatically if you fail
to comply with any term or condition
8. Upgrades. LOUD may at its discretion release upgrades to the Software. LOUD has no obli-
gation to offer free or discounted upgrades to any end user of the Software.
9. Governing Law and Severability. This Agreement will be governed by the laws of the State
of Washington and will be interpreted as if the agreement were made between Washington
residents and performed entirely within Washington. If for any reason a court nds any provision of this License unenforceable, that provision will be enforced to the maximum extent
possible, and the remainder of the License shall continue in full force and effect.
10.
Entire Agreement. This is the entire agreement between you and LOUD Technologies Inc.
AND supersedes any prior agreement, whether written or oral, relating to the subject matter
of this Agreement. No amendment or modication of this agreement will be binding unless in
writing and signed by a duly authorized representative of LOUD Technologies Inc.
4
Tracktion 2

Table of Contents
Chapter 1: Getting started with Tracktion----------------- 7
1.1 A quick overview of Tracktion’s user interface ------------------------------- 7
1.2 Setting up your audio and MIDI devices
1.3 A word on hardware requirements
1.4 Setting up your plug-ins paths
1.5 Trying the demo songs
------------------------------------------------------------14
-------------------------------------------------- 13
---------------------------------------9
---------------------------------------------12
Chapter 2: The projects page—working with projects
and items--------------------------------------------------------- 16
2.1 An overview of the projects page----------------------------------------------16
2.2 Creating a new project
2.3 The project properties
-----------------------------------------------------------18
-----------------------------------------------------------19
Chapter 3: The edit page -------------------------------------- 21
3.1 Familiarising yourself with the edit page-------------------------------------21
3.2 Tracks, clips, and the arrange area
3.3 Handy shortcuts for working with tracks
---------------------------------------------25
----------------------------------- 28
Chapter 4: Working with audio------------------------------29
4.1 A brief introduction to digital audio ----------------------------------------- 29
4.2 Recording and importing audio
4.3 Working with audio clips
4.4 Trouble-shooting audio problems
4.5 Handy audio clip and recording shortcuts
------------------------------------------------ 31
--------------------------------------------------------37
-------------------------------------------- 39
---------------------------------- 40
Chapter 5: Working with MIDI------------------------------- 42
5.1 A brief introduction to MIDI --------------------------------------------------- 42
5.2 Using external MIDI gear
5.3 Working with virtual instruments, and MIDI lters
5.4 Recording MIDI
5.5 The MIDI editor
5.6 Quantising, and working with groove templates
5.7 Troubleshooting MIDI recording problems
5.8 Handy MIDI editing shortcuts
User’s Guide
------------------------------------------------------------------- 46
------------------------------------------------------------------- 48
------------------------------------------------------- 44
---------------------- 44
---------------------------52
----------------------------------53
------------------------------------------------- 54
5

User’s Guide
7
Chapter 6: Mixing and Adding Effects---------------------- 55
6.1 Adding effects and setting levels ----------------------------------------------55
6.2 Working with sub-mixes and auxiliary sends
------------------------------- 59
Chapter 7: Automation ----------------------------------------62
7.1 Recording and editing automation-------------------------------------------- 62
7.2 Mapping MIDI controllers to automation parameters
7.3 Handy automation editing and recording shortcuts
------------------- 64
---------------------- 65
Chapter 8: Tempo, sychronisation, and the time line---66
8.1 Working with tempos and the time-line ------------------------------------ 66
8.2 Using markers
8.3 Working with the click-track
8.4 Synchronising to external hardware, and video
8.5 Handy tempo and quantise shortcuts
--------------------------------------------------------------------- 68
-------------------------------------------------- 68
--------------------------- 69
----------------------------------------71
Chapter 9: Exporting and distributing your music------- 72
9.1 Exporting your music as an audio le ---------------------------------------- 72
9.2 Burning your music to CD, or creating an MP3
9.3 A few nal words
----------------------------------------------------------------- 75
------------------------------73
Note: Tracktion originated in the mind of Julian Storer, an English programmer with a
love of audio. Stateside Tracktioneers* will notice a distinctly British avor to the user
interface. To help you understand Tracktion better, the manual was written with a British
accent (thank you to Adam Starkey). So sit back, imagine yourself overlooking an English
moor (or in an English pub if you prefer), and enjoy Tracktion!
*People who use Tracktion
6
Tracktion 2

Chapter 1: Getting started with Tracktion
1.1
A quick overview of Tracktion’s user interface
Welcome to Tracktion! Tracktion is a powerful audio and MIDI sequencer, designed with
simplicity and ease of use in mind.
Do not be fooled by Tracktion’s uncluttered interface however; ease of use in this case
does not equate to a lack of features. Tracktion is capable of delivering professional results
that only a few years back would have required a signicant investment in expensive hardware. When you open Tracktion, you have at your disposal, all of the tools needed to turn
your musical ideas into great sounding mixes.
The Tracktion interface
Tracktion is made up of three pages, each of which shares a similar look and feel.
Page tabs Hint box and window widgets
Main section
Controls Properties panel Misc. tools
Figure 1.1.1
Page tabs
Use these tabs to switch between Tracktion’s three pages: the projects page, the settings
page, and the edit page (shown above). You can use the keyboard keys F1, F2, and F3 to
switch between the three tabs.
When Tracktion is rst opened, you will see the projects page. All three pages will be
described throughout the chapters of this user guide.
User’s Guide
7

User’s Guide
9
Hint box and window widgets
When you move your mouse over a tool in Tracktion, a useful hint will be shown in the
hint box along the top of the Tracktion interface. This is a great way of learning your way
around Tracktion.
The windows widgets allow you to close, minimise, and resize the Tracktion interface.
Main section
This is where the majority of the action takes place, on each of the Tracktion pages.
Control section
The region labelled “controls” in the image below is called the control section. Here you
will nd most of the tools for working with Tracktion. The tools available depend on the
page you have selected.
Properties panel
Many items in Tracktion have a range of tools and options specic to them. When such
items are selected, these tools and options are displayed in the properties panel.
The properties panel is integral to Tracktion’s “everything in one place” design. If you
have ever used other sequencer software that requires you to work though layers of menus
and windows, thus constantly breaking your workow, you will denitely appreciate the
properties panel.
Misc. tools
This section is only used when the project and edit pages are open. When the project
page is selected, this section shows the current clipboard for copy and paste operations.
If you switch to the edit page, this section will become the transport section, where you
can control the transport and change related settings.
Page tabs Hint box and window widgets
Controls Properties panel Misc. tools
8
Tracktion 2
1.2 Setting up your audio and MIDI devices
• Click on the settings tab at the top of the Tracktion interface. This displays the settings
page with tabbed names along the left hand side.
• Select the “audio devices” tab to view and congure the audio and MIDI devices avail-
able on your computer.
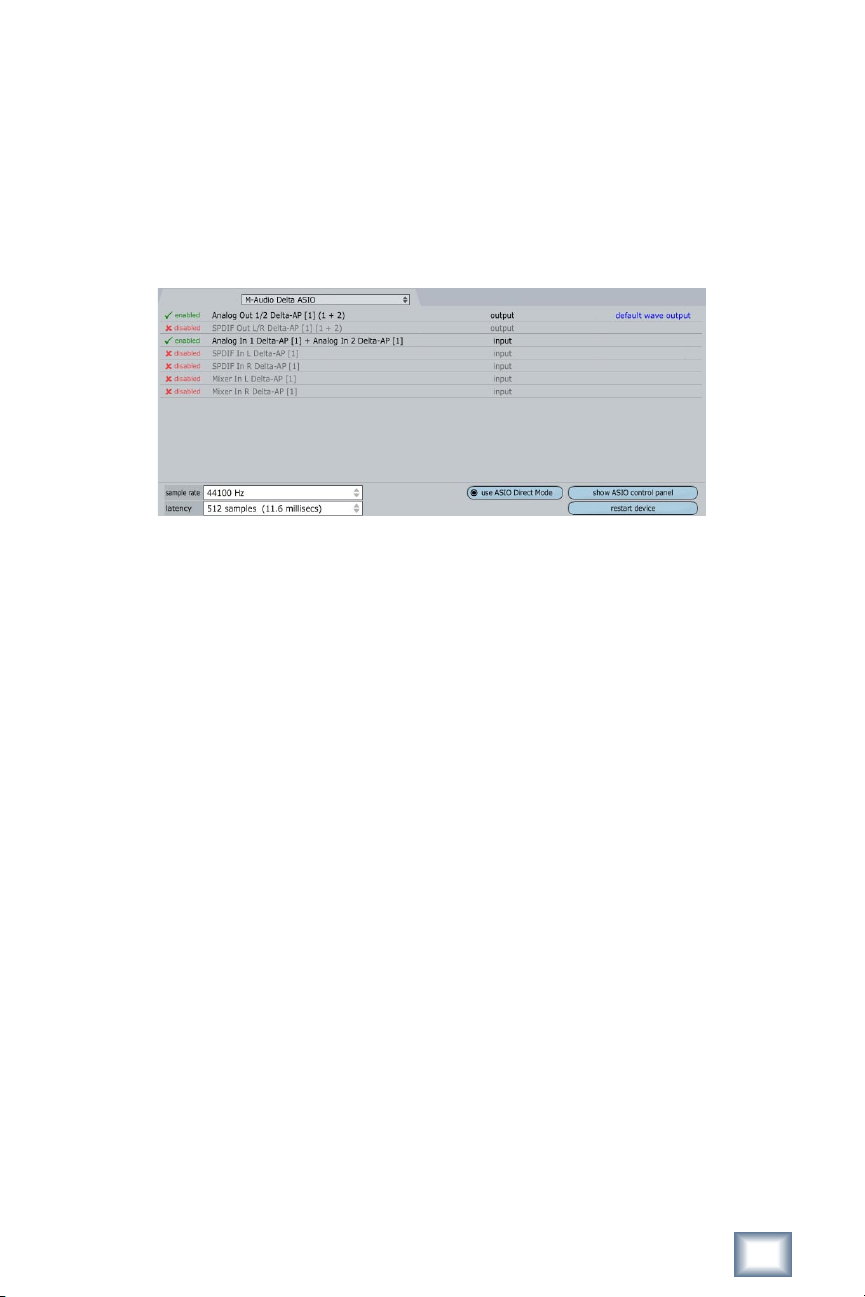
The top-most part of this page is the wave device region (Fig. 1.2.1).
Figure 1.2.1
At the top of this display, there is a drop-down list. This is where you choose your wave
device. Tracktion will normally select the correct ASIO or CoreAudio driver by default. If
for some reason it does not select the best choice, or if you have more than one sound card
installed, you may need to change this.
The entries in the wave device list refer to the available audio drivers installed on your
computer. There may be a number of entries in this list depending on the type(s) of sound
card(s) you have installed, but generally speaking, you will only be interested in the ASIO/
CoreAudio options.
PC and ASIO drivers
If you are using a PC and have no ASIO options available, then you probably don’t have an
ASIO capable audio device installed. As such, you will need to try one of the other options.
However, using Tracktion with non-ASIO drivers may have an impact on performance, and it
is worth investing in a sound card or computer audio interface with ASIO driver support.
If you know your hardware has ASIO support but you do not see it in the list, you may
need to uninstall and reinstall the drivers for this audio device. Consult the documentation
that came with the sound card for further information.
Mac and CoreAudio drivers
If you are using a Mac and some of your CoreAudio devices are not listed, this may be
because they are not currently connected to the Mac. Close Tracktion, check the connections, and try again.
User’s Guide
9

User’s Guide
11
Setting the sample rate
Select your desired sample rate from the drop down list. For audio intended for CD, you
will typically want to set this to 44100 Hz. Opinion is split on whether working at higher
rates is worthwhile, but if you like to work at higher sample rates then it is a good idea to
increase this value in xed multiples of your desired nal sample rate (e.g., 88200 Hz for
CD audio which will end up at 44100 Hz). Be aware that higher sample rates require correspondingly more processing power, so doubling the sample rate will likely halve the amount
of effects, VSTis, and tracks your computer can process.
Setting the latency
To provide an uninterrupted audio stream it is typically necessary for computers to buffer a few milliseconds of sound before sending it out to the audio devices. This buffering
causes a slight delay referred to as latency. In real terms this means that if you hit a key on
a MIDI keyboard that is controlling a virtual instrument inside Tracktion, or play a guitar
live into the software, there will be a (very) small period of time before the sound is actually
heard. For play-back and mixing purposes, latency is seldom an issue. For live performance
or recording, however, latencies above 20 ms are usually considered to be hard to work
with. Fortunately, modern computers and audio interfaces are capable of achieving extremely low latencies with no noticeable delay.
It should also be noted that for end-to-end operation, where sound is being recorded and
played back at the same time, the overall latency is double the value set in this box. So, if
you are using Tracktion to add effects to a live guitar performance, for example, you may
need to set this value a little lower than usual.
Very low latencies can have a high cost on computer performance though, and setting
the latency value too low will usually cause “glitchy” playback (characterised by pops and
clicks) if you are using an older machine.
ASIO settings
The PC version of Tracktion has a few extra options, specic to ASIO.
The “use ASIO direct mode” option may improve performance with some ASIO drivers.
Typically it is benign at worst, so it is probably worth leaving it enabled. If you are having
problems with sound in Tracktion, you should try toggling this setting.
The “show ASIO control panel” button displays the control panel for the currently selected ASIO device. Please note, the screen you see here will be specic to your hardware,
so refer to the documentation that came with your audio hardware for further information.
The “use real-time priority mode” option can help with compatibility for some ASIO
sound cards. Note, this option should only be enabled when absolutely necessary, as it can
conict with some VST plug-ins, causing Tracktion to freeze. It never hurts to try this setting to see if your performance improves and switch back if it doesn’t.
10
Tracktion 2
PC user’s note: Some ASIO drivers do not allow settings such as sample rate and latency
to be adjusted by external applications. If your ASIO driver is one of these cases, then the
sample rate and latency options will only display current values of the dedicated ASIO
control panel. In this case, you will need to set these values from the ASIO driver’s own
interface by clicking the “show ASIO control panel” button. Be sure to click the “restart de-
vice” button when you are done.
The audio input and output devices
With a suitable wave device chosen, select which audio inputs and outputs you will be
using. Be aware that all active inputs and outputs consume computing power, so disable any
I/O channels that you do not need. Equally, if you use a particular input or output only occasionally, it probably makes sense to leave it disabled. You can always enable it when needed.
At the bottom of the “audio devices” tab there is an option labeled “only show enabled
devices.” Enabling this option can be convenient if your audio interface has a large number
of inputs and/or outputs, some of which you rarely use. For now, leave it disabled so that all
of your devices are visible.
To enable or disable an audio device, just click on the enable/disable label to the left of
the entry.
You can also nominate one audio output to be the “default audio device.” The default
output will become the master output for Tracktion’s mixed stereo output from the master
fader in the lower right hand corner of the edit screen. To make a different output the default, just click on the “make this the default” label.
Setting up your MIDI devices
• Click on the settings tab at the top of the Tracktion interface. This will display the set-
tings page.
• Select the “audio devices” tab to view and congure the MIDI devices available on your
computer.
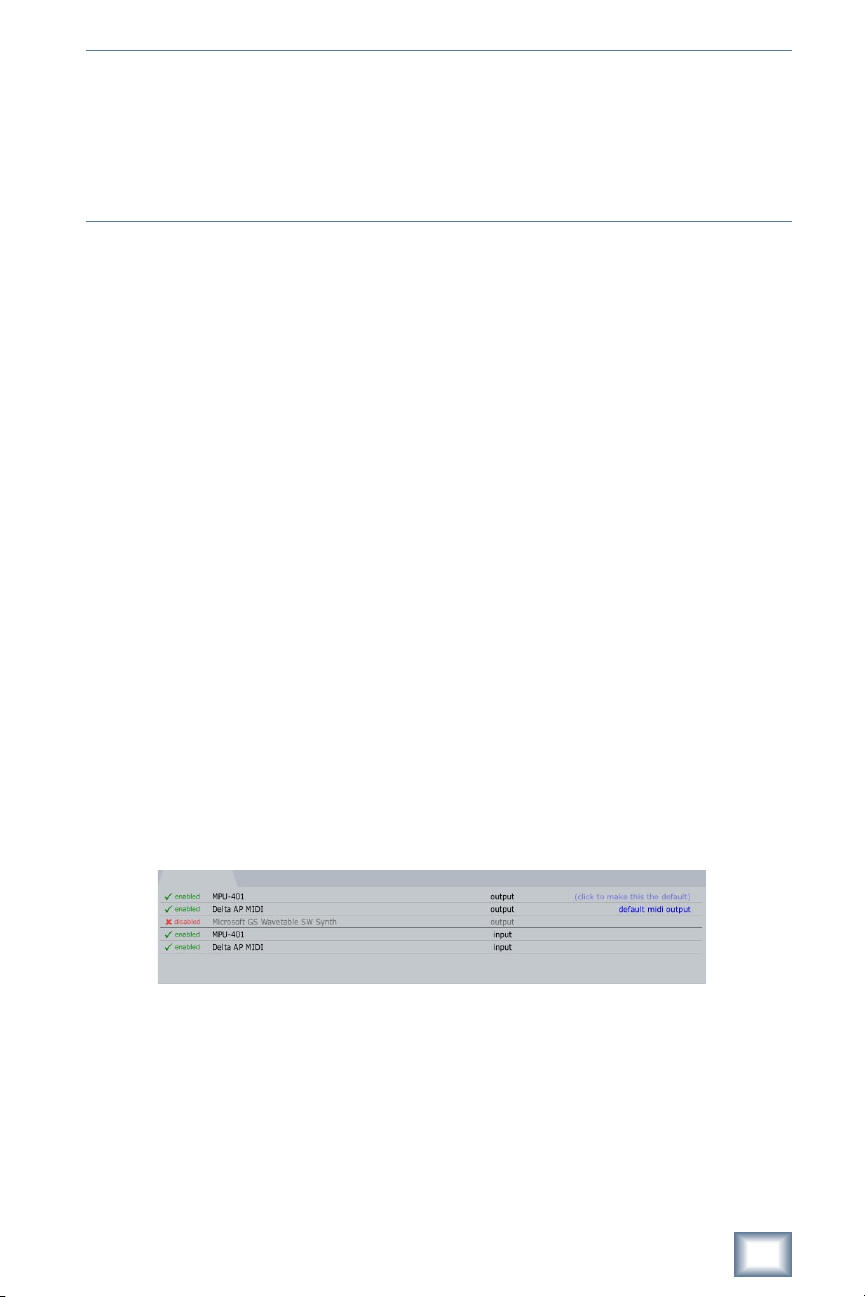
The bottom part of this page is the MIDI device region (Fig. 1.2.2).
Figure 1.2.2
At the bottom of the “audio devices” tab there is an option labelled “only show enabled
devices.” Disable this option so that all of your devices are visible.
To enable or disable a MIDI device, just click on the enable/disable label to the left of
the entry.
A default MIDI output can also be set similarly to the default audio output. Simply click
the “click here to make this the default” label to make a midi output the default.
User’s Guide
11

User’s Guide
13
1.3 A word on hardware requirements
Although Tracktion provides great results even on modest computers, the available
computing power of a machine directly affects how large a project Tracktion is capable of
playing in real-time.
Three factors go together to determine the computational resources available to Tracktion:
Processor (CPU) speed
Every track, software instrument, audio effect, and input device used by an edit requires
a chunk of your computer’s processing power. Tracktion features a CPU meter that shows
how much of your CPU resources are being used at any one time.
Software effects and instruments place especially high demands on the processor, so if
you nd your edits require too much processing power, look for ways to use these plug-ins
more efciently, including Tracktion’s “freeze” feature (explained elsewhere).
Hard drive speed
The speed at which data can be read from your hard drive denes how many audio tracks
can be played at once. Laptop computers, in particular, tend to use slower 2.5” form factor
hard drives than desktop machines, which use faster 3.5” form factor hard drives.
When using a laptop computer, if you nd that your edits consistently require more hard
drive performance, you may want to consider investing in an external hard drive, which
houses a desktop 3.5” hard drive in an external enclosure that can interface with your laptop through USB2 or Firewire.
Memory (or RAM)
If a computer has insufcient memory, processor performance and hard drive performance will both be adversely affected. Every program or plug-in that is running on your
computer will use some of your available memory. In fact, just loading the operating system
(Windows XP or OSX) will use a signicant amount of RAM.
When a computer runs out of RAM, it will attempt to create extra space by using
sections of the hard drive as a slower form of memory. These read-write operations consequently steal some of the hard drive bandwidth from your audio tracks. In addition, because
it takes many thousand times longer for your processor to read data from a hard drive than
it would do to read it in main memory, processing tasks take much longer too.
Although Tracktion and its supported OS will run on 256 megabytes of memory, 512
megabytes will deliver a much better user experience, with even higher amounts being
appropriate when using memory hungry instrument plugins (like virtual samplers for
instance). In general, the more memory you can put in your computer, the better all programs, including Tracktion, will operate.
Note: Be aware that background processes such as virus checkers, printer monitors, or
instant messengers all will use some of your precious computing power. If possible, disable
any background processes that you do not actively need.
12
Tracktion 2
1.4 Setting up your plug-ins paths
• Click on the settings tab at the top of the Tracktion interface. This will display the set-
tings page.
• Select the “plugins” tab to congure VST and ReWire plug-ins on your computer.
Tracktion can host 3rd party instrument and effects plug-ins in the form of VST plug-ins,
and ReWire slave applications.
VST plug-ins
The VST technology allows sequencers such as Tracktion to incorporate 3rd party applications called “plug-ins.” These plug-ins can be used to add new audio effects such as
reverb or delay, or complete instruments such as emulations of classic analogue synthesisers. In Tracktion, such plug-ins are referred to as “lters,” and we will see how to use them
later in this manual. This section merely describes how to tell Tracktion how to nd any
plug-ins you may have installed your computer.
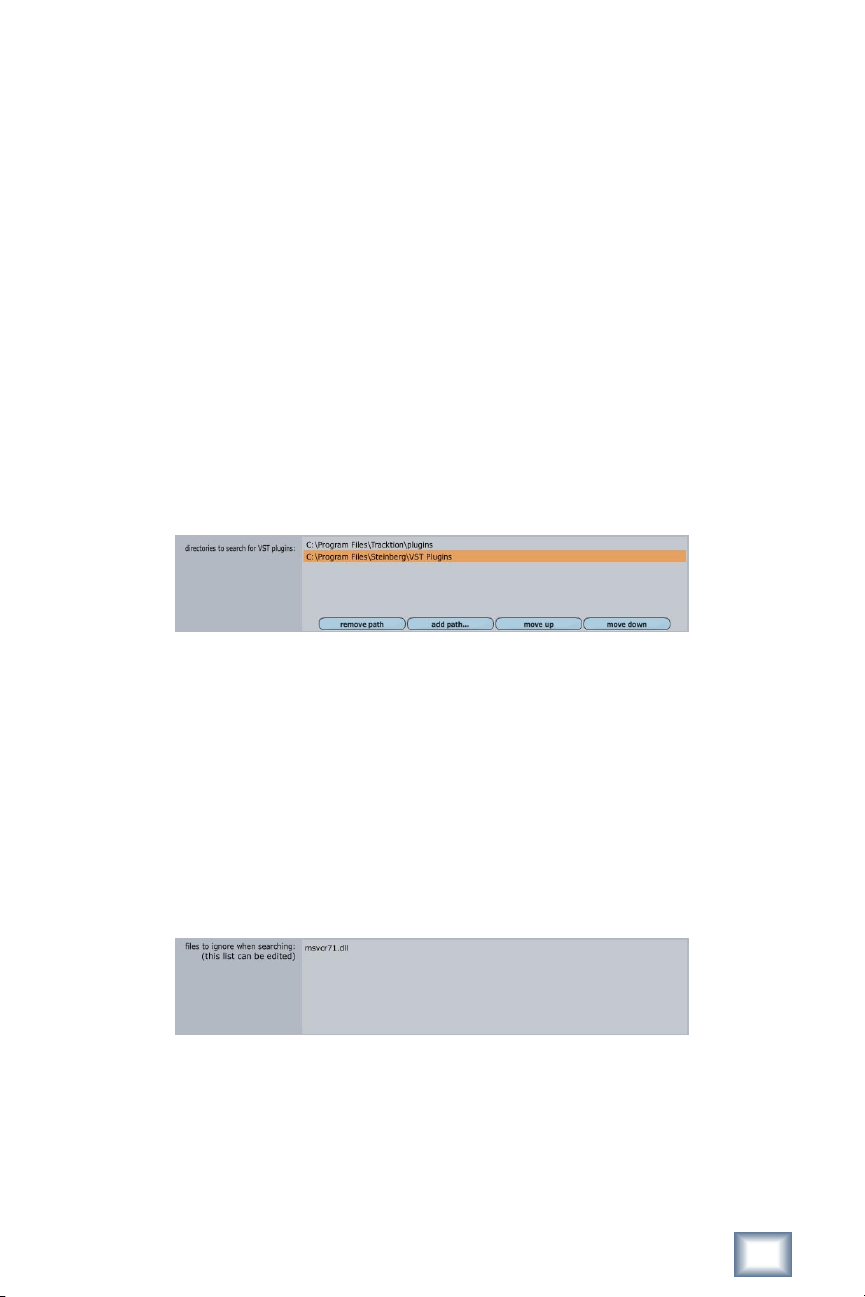
The top-most part of the plug-ins tab shows the list of directories that Tracktion searches for VST plug-ins (Fig. 1.4.1).
Figure 1.4.1
The directories listed in the large box, and all of their sub-directories, are searched for VST
plug-ins.
To add a new search path, simply click the “add path...” button and navigate to the top level
of your plug-in directory. Repeat this method for each main directory you would like searched
for VST plug-ins. A path can be removed by highlighting it, and clicking “remove path.”
The “move up” and “move down” buttons allow you to adjust the order in which directories are searched. Directories at the top of the list are searched rst.
The next box (Fig. 1.4.2) shows a list of plug-ins that Tracktion has chosen to ignore.
If a plug-in le cannot be opened as a VST plug-in, Tracktion will add it to this list.
Figure 1.4.2
Sometimes plug-ins are incorrectly added to the list because they failed to initialise correctly at some point. If you believe a plug-in should work, but it has been added to this list,
try removing it and rescanning the plug-in directories. Do this by rst highlighting the plugin in the ignore list and pressing delete to remove it from the list. Then click the “rescan
plug-in directories” button and choose “just look for plug-ins that are new or have changed”
from the pop up list.
User’s Guide
13
User’s Guide
15
Tip: The Internet is host to a huge array of free or inexpensive plug-ins, many of which easily rival
hardware you could have paid hundreds, or even thousands, of dollars for just a few years ago.
For a good resource for plug-ins of all flavours, go to the KvR Audio Website at
http://www.kvraudio.com
ReWire slaves
ReWire provides a method by which an audio application can be run as a slave to another application. It is possible to have two sequencers running on one computer, with one
essentially acting as a virtual instrument inside the other.
To congure Tracktion to host ReWire applications, just click the “enable ReWire” option.
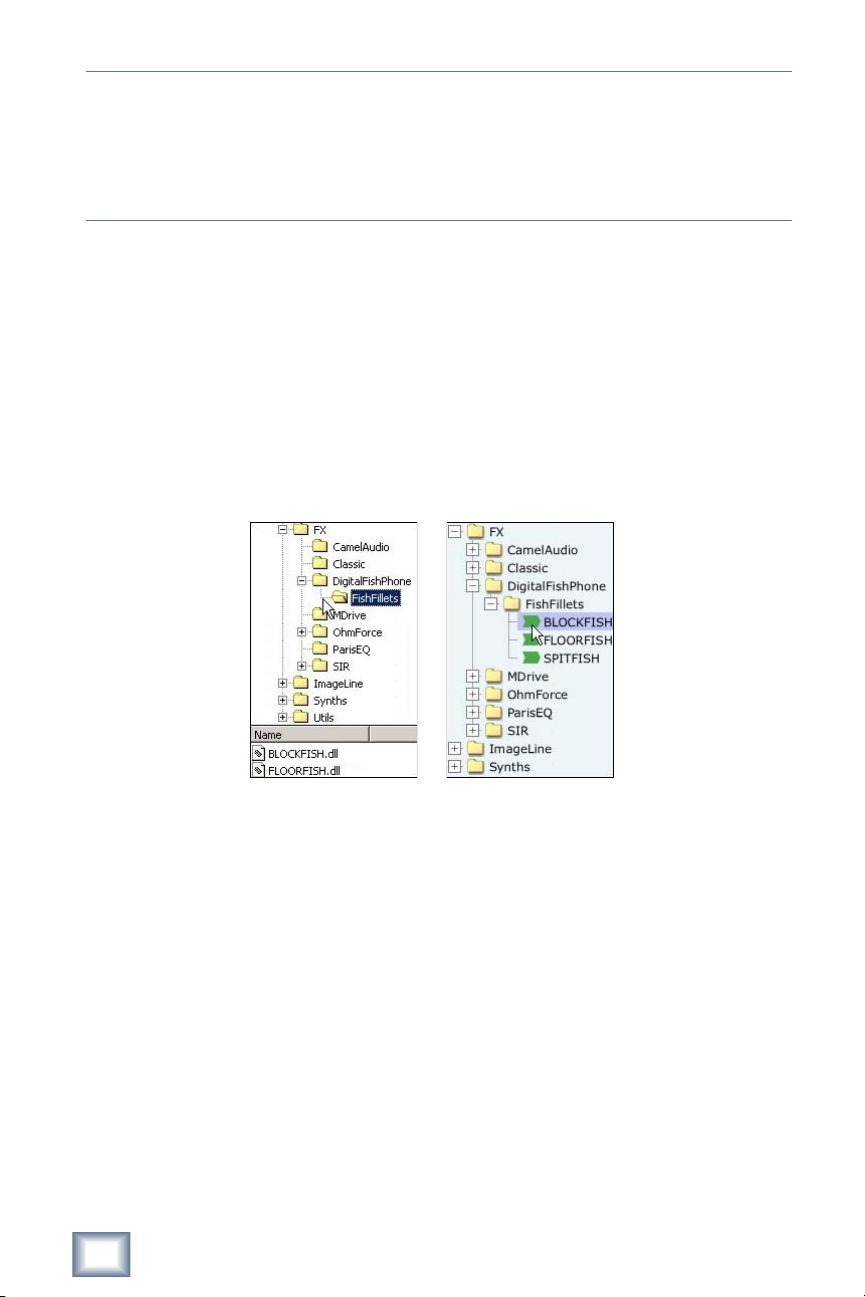
A note on plug-in organisation
The tree-structure displayed when adding new lters to tracks will correspond to the
directory structure used to organise VST plug-ins on your hard drive (Fig. 1.4.3).
Figure 1.4.3
The image on the left shows a folder-view inside Windows Explorer. The image on the
right shows Tracktion’s lter pop-up menu. If you look at the tree structure for both, you
will see that the lter list matches the VST directory structure. This can be very handy
if you have large number of VST plug-ins installed, as it allows you to organise them in a
meaningful manner. The plug-ins above have been categorised by companies.
14
Tracktion 2

1.5 Trying the demo songs
Now you have Tracktion all set up and ready to go, a good way to familiarize yourself
with your new software is to check out some of the included demo songs.
• Click on the projects page tab, to bring the projects page to the fore.
•
On the left hand side of your screen is the project list (Fig. 1.5.1). This is where all of
your active projects are shown. To start, select “Everyone Wants You” from the list.
Figure 1.5.1
• The main area to the right of the project list is called the item list; it shows all of the
edits and media associated with the currently selected project.
• Double-click on the edit named “Everyone Wants You,” or select it and click the “open
for editing” button at the bottom of the page.
After a few moments the edit will load and you will see the “edit page”. It is here that you
construct your songs. If you play this demo, you can see visually how the song is constructed by watching the vertical time-line cursor (or “play-head”) scroll through the arrangement.
• To play the song, click the “play” button in the bottom right of the screen (Fig. 1.5.2), or
hit the SPACEBAR key.
• Click the stop button again (or press the SPACEBAR key) to stop playback.
Figure 1.5.2
User’s Guide
15
User’s Guide
17
Chapter 2: The projects page—working with projects and items
2.1 An overview of the projects page
To help you organize your work, Tracktion provides a handy project manager that keeps
track of projects and their associated les (called items). In addition, the “projects” page allows you to add custom descriptions to items and projects, making it much easier for you to
keep track of your work.
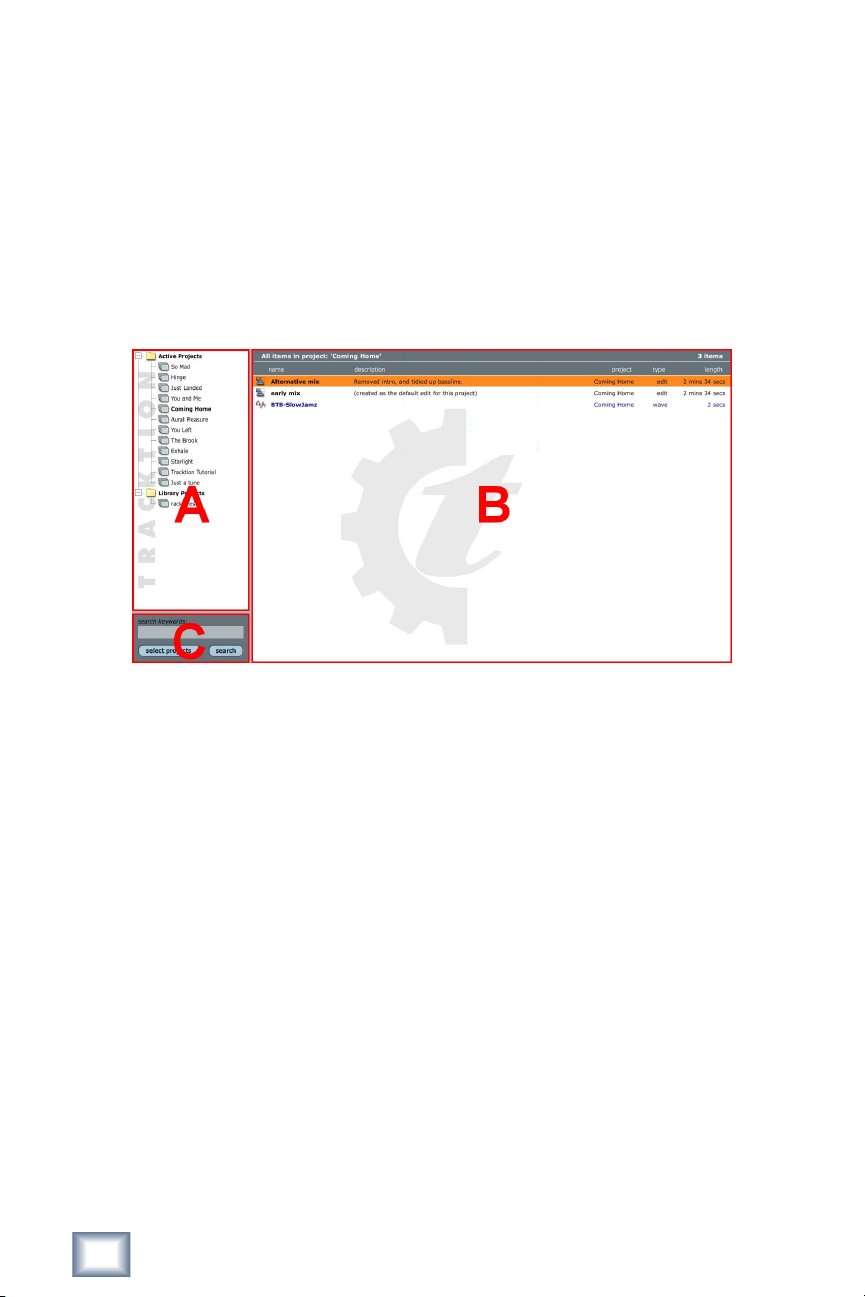
Figure 2.1.1
If you look at the projects page (Fig. 2.1.1), you will see that the main region is broken
into three panels. In the image above, these panels are labelled as A, B and C. The panel
labelled A is called the “project-list.” The panel labelled B is called the “item-list.” The nal
panel, labelled C, is the “search box.”
A: The project-list
The project-list is not, as it may at rst appear, a list of all projects on your hard drive.
Rather, it shows those projects that are currently “open.” An open project can be thought
of as a book-marked project. It isn’t open in the way that a document may be open in a
word processor; rather it is marked as being a work in progress. All newly created projects,
will be opened by default ready for you to work on them. Projects that you have previously
closed, however, will need to be re-opened before they can be edited.
To close a project, right-click on the project name, and select the “close project” option.
You can also opt to close all open projects from this menu. Closing a project does not alter
the project in any way; it simply removes the reference to the project from the project-list.
To open a previously closed project, click the “open project” button, and from the displayed
dialogue box, navigate to the project le.
When a project is selected in the list, various related options and values will appear in
the properties-panel. These options will be discussed later in this chapter.
16
Tracktion 2

If you wish to change the order in which projects are listed, you can simply drag their
names up or down to the desired location. Notice that there are two folders displayed in the
project list. These are simply for your convenience in organising your projects into “active
projects” or “library projects” that are not being worked on as regularly.
B: The item-list
The item-list shows all material associated with a project. This material may take the
form of MIDI les, audio les, and edits.
If you are used to simply placing all of the les related to a project in the project’s
folder on your hard drive, then you may be wondering what advantages the item-list offers.
Primarily the item-list is there to streamline the process of managing projects and related
media items. It does this by providing a way of storing extra information about individual
les, and a mechanism by which les can be shared between projects. In the same way, if
you have reason to keep les in different locations on your hard drive, the item-list will help
you keep track of things.
Selecting an item in the item-list, will display various related options and values in the
properties-panel. These options will be discussed later in this chapter.
Clicking on the column names just above the item-list will cause the list to be sorted
on that column. If you wish to manually change the order in which items are listed, simply
drag their names up or down to the desired location.
C: The search box
Just below the project-list, there you will see a search box (Fig. 2.1.2). You can use this
search tool to search your open projects for keywords. The search is often useful for nding
resources attached to projects. For example, if you have a hi-hat sample in a project and
you wish to use it in another, assuming the sample had “hi-hat” somewhere in its name, you
could do a search for that keyword to locate it.
Figure 2.1.2
Search keywords: Type the name, or part of the name, of the material for which you are
searching.
Select projects: If you wish to narrow the search to specic projects, click this button
and choose the projects you wish to be searched from the list.
Search: Click this button to perform the search. The results will be shown in the itemlist. Click a search result in the item-list to nd out more about it, including which project it
belongs to.
User’s Guide
17

User’s Guide
19
2.2 Creating a new project
A typical song may grow to consist of a number of edits, audio les, and MIDI clips. To
help you keep these components organized, Tracktion combines them all into projects. A
project is simply a collection of edits, and references to any audio les needed by these edits. The components of a project need not be located in the same folder as the project le on
your hard drive, which makes it easy to share media between projects.
Tip: Tracktion’s project system makes keeping track of your songs and associated les fairly
painless, but it is still good practise to keep everything related to a project in one place.
You may nd it helpful to create folders for each of your projects and place in them any les
referenced by the project.
If you try to create a new project in a folder that already contains other les, Tracktion
will ask you if you wish to create a new folder that is named after the project.
Starting a new project is simple:
• Click “new project...” (See Fig. 2.2.1).
Figure 2.2.1
• A dialogue box appears asking you where you wish to save the project. Choose a lo-
cation on your hard drive, and enter a name for the project, for example, “Tracktion
Tutorial.” (See Fig. 2.2.2).
Figure 2.2.2
18
Tracktion 2
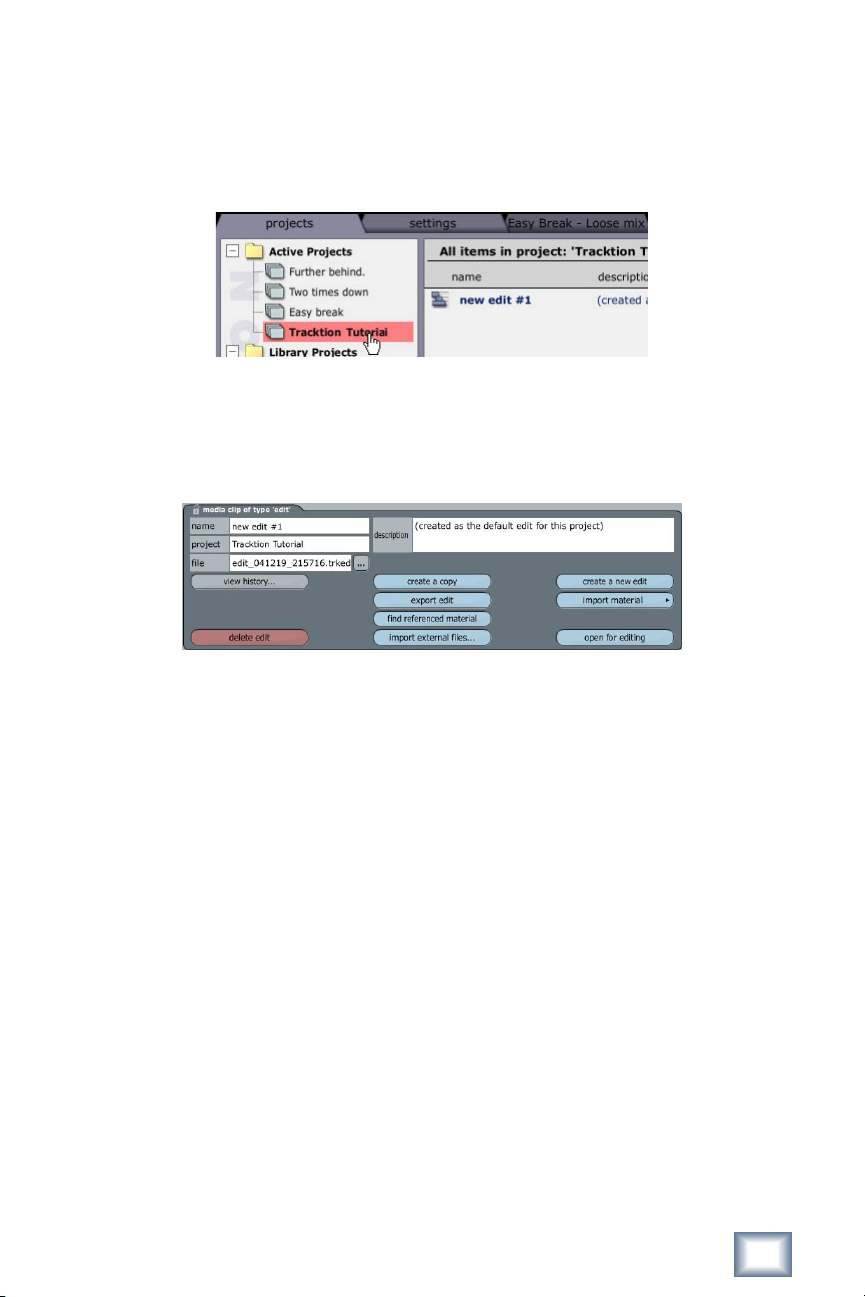
As shown in Figure 2.2.3, the new project will be now be present in the Active Projects
list. Select it and you will see that a default edit named “new edit #1” has also been created. You can think of edits as being versions of a song. As you work, you may want to save
copies of the current state of your song. This can be accomplished by simply copying your
edit and continuing with your work.
Figure 2.2.3
• Open this edit by double-clicking on it, or by selecting it, and clicking the “open for edit-
ing” button near the bottom right corner of the properties panel (Fig. 2.2.4).
Figure 2.2.4
User’s Guide
19
User’s Guide
21
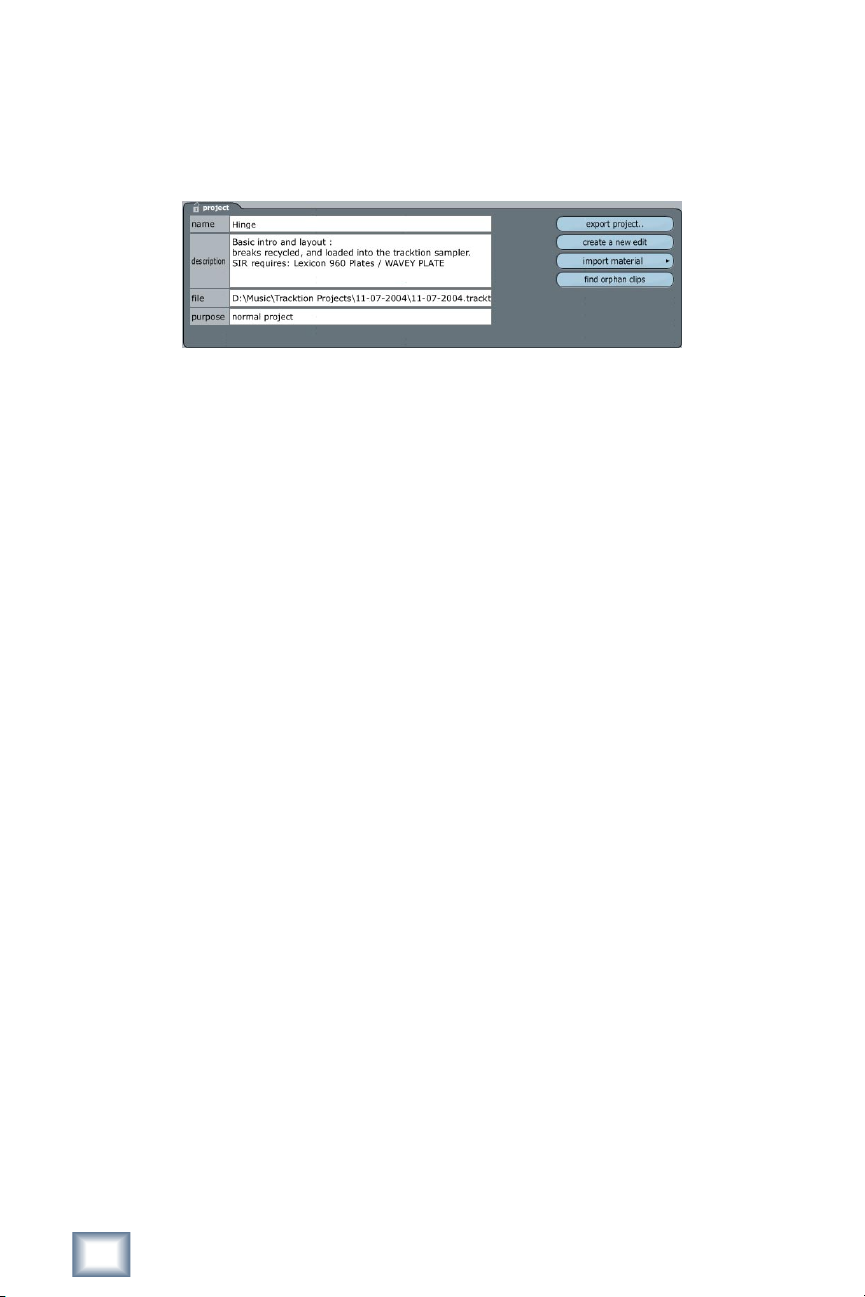
2.3 The project properties
When a project is selected, its properties are displayed in the properties-panel (Fig.
2.3.1). Various tools and options related to the project can be found on this panel.
Figure 2.3.1
Name: You can view and edit the project name from this eld. It is this name you see in the
project-list. Note that changing the name here does not affect the project le name.
Description: This eld allows you to enter a description of the project, or make notes for
future reference.
File: This eld shows the location of the project on your hard drive.
Export project: This option allows you to bundle the project and related materials into an
archive. Use this if you want back up your work, or transfer it to another computer. Exporting is discussed in the nal chapter of this guide.
Create new edit: This option creates a new empty edit in the current project.
If you wish to make a copy of an existing edit, select the edit in the item-list and click
the “make a copy of this edit” button.
20
Tracktion 2

Chapter 3: The edit page
3.1 Familiarising yourself with the edit page
The edit page is where you arrange your compositions, and is the main screen in which you
will spend most of your time in Tracktion. If you look at Figure 3.1.1, you can see there are
nine sections of note on this page. Working from the top-left hand corner notice the following:
Figure 3.1.1
A: The quick scroll tool
The blue box shows the area of the whole edit that is currently in view. At a glance you
can see how far into a song you are. By dragging the box from side to side, you can also use
this tool as a fast way to navigate through the entire length of your edit.
B: The time-line
The time-line provides a series of time divisions against which you can arrange the
components and sections of your song, in terms of bars/beats, seconds/milliseconds, or
seconds/frames.
In gure 3.1.1 you can see three vertical lines, that span the section labelled “E,” and
reach up into the time-line. The orange lines are the In and Out markers and the blue line is
the play-head cursor.
The In and Out markers are used to dene a section of an edit to be played in looped
mode. They are also used to specify record start and stop points for punch mode. Some
editing tools can also be set to work only on the region between the In and Out markers.
To move these markers, simply click and drag them left or right.
User’s Guide
21
User’s Guide
23
During playback, the play-head cursor shows the current location on the time-line. Dragging the play-head cursor left or right scrolls through the edit.
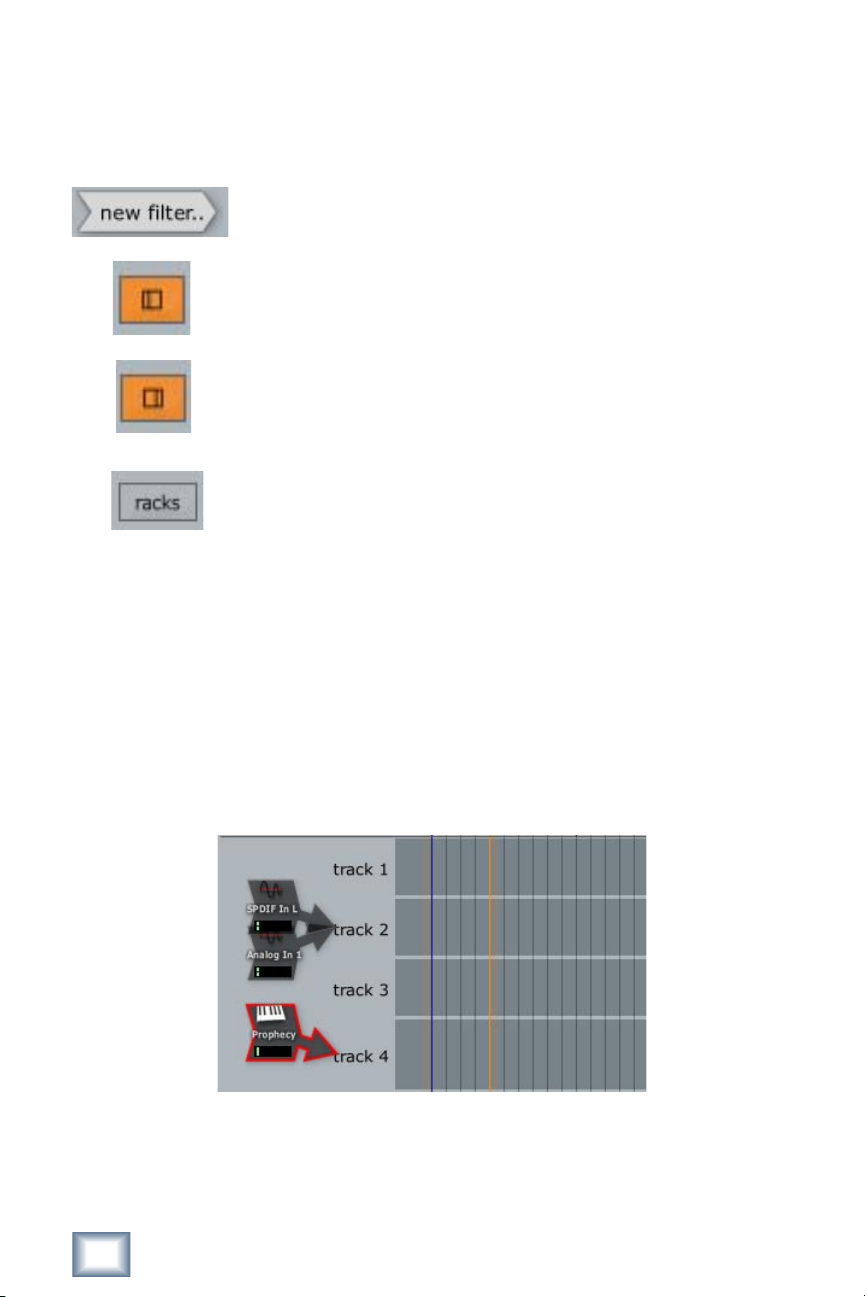
C: Miscellaneous tools
The “new lter...” icon is used to add new lters to tracks. We will
look at lters in more detail in a later chapter.
Toggle option to show/hide the input section (shown as “D” in Fig.
3.1.1). Shortcut SHIFT + CTRL + I.
Toggle option to show/hide the lter section (shown as “F” in Fig.
3.1.1). Shortcut SHIFT + CTRL + F.
Toggles the visibility of the rack editor window (not shown in Fig.
3.1.1). Shortcut CTRL + G (CMD + G for Mac users). We will look at
rack lters in a later chapter.
D: The input section
This is where you manage your input devices, the input channels of your audio interface
and MIDI interface(s). There are two display modes available for the input section. Figure
3.1.1 above shows the “per-track view” mode. The alternative display type shows all of the
inputs as draggable icons (Fig. 3.1.2). Both modes behave slightly differently, and have
their own advantages and disadvantages. The “per-track view” makes keeping track of a
large amount of inputs far easier than the icon view. The icon view allows more than one
input device to be connected to a single track, and works better when only a few input devices are present. We will look at the input devices in greater detail in the later chapters on
audio and MIDI.
Figure 3.1.2
In addition to the input devices, the input section has selectable track names which you can
use to re-order tracks, or access the track properties. We will look more closely at tracks
later in this chapter.
22
Tracktion 2
E: The arrange area
The arrange area is where you actually construct your songs. Working with the arrange
area, tracks, and clips, is described later in this chapter.
F: The lters section
The lter section can be though of as a mixer and as a plug-ins effects rack all in one
place. Another way to think of it is like a traditional “mixer”, but rotated 90 degrees on its
side, allowing it to peacefully exist as part of Tracktion’s one-screen interface. We will look
at lters in more detail in later chapters. For now, bear in mind that each track has a corresponding lter strip.
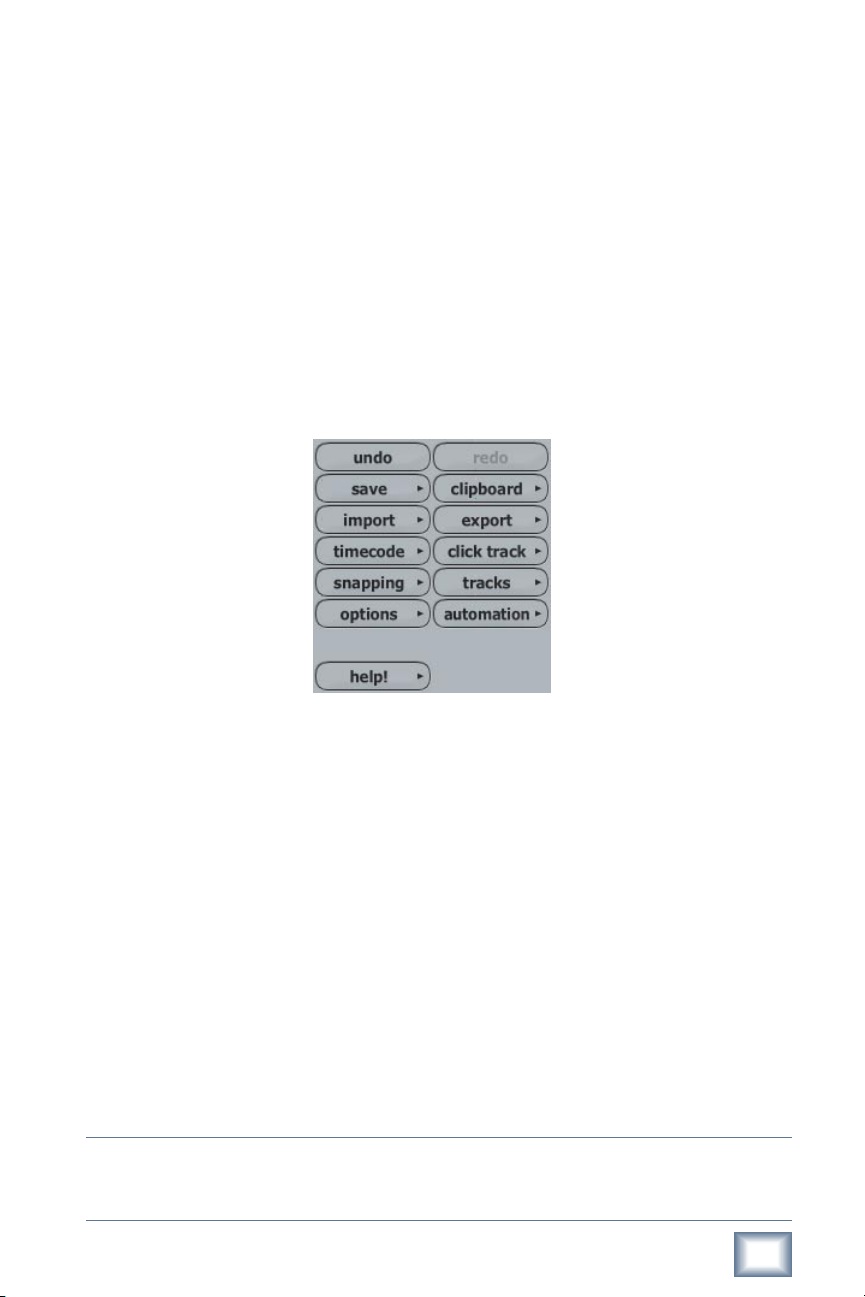
G: The control section
The control section contains various tools and options for working with Tracktion.
Figure 3.1.3
With the exception of the undo/redo buttons, when clicked, these buttons display a popup menu with various options and functions available. We will look at the options available
from the control section throughout the rest of this user guide, but let’s take a look at the
help button right now.
When you click the “help” button, you are presented with a pop-up menu showing the
following options:
• Show Tracktion help pages: This option launches the Tracktion documentation le so
you can read through it. Keyboard shortcut: F12.
• Turn on pop-up help : When this option is enabled, Tracktion displays a pop-up window
next to options. This can be handy when you are rst nding your way around Tracktion. Keyboard shortcut F11.
• Use longer delay before pop-up help appears: When this option is activated, Tracktion
will wait a few moments before displaying the pop-up help, which some users prefer.
This setting will have no effect unless the pop-up help is enabled.
Tip: If you would like to see the pop-up help for any item, simply position the mouse over the
item, and press F10 on your computer keyboard. This works even with pop-up help turned off.
User’s Guide
23
 Loading...