

Mackie TRACKTION 2 User Manual

TRACKTION 2
MUSIC PRODUCTION SOFTWARE
U S E R ’ S G U I D E A D D E N D U M
V E R S I O N 2 . 1

R
Table of Contents
Tracktion 2.1 New Features -------------------------------------3
1. Custom Control Surface Creation -------------------------------------------------3
2. MP3 Import and MP3/Ogg Export ------------------------------------------------5
3. MIDI Loop Recording ----------------------------------------------------------------7
4. Support for Frontier Design Group Tranzport ---------------------------------7
5. Filter Icon “Quick Control Parameter” -------------------------------------------8
6. File Import Improvements ---------------------------------------------------------9
7. MIDI Bank Select Messages --------------------------------------------------------10
8. Advanced Program and Bank Naming -------------------------------------------12
9. Filter Selection Menu Behaviours -----------------------------------------------16
10. Solo Isolate --------------------------------------------------------------------------17
11. Level Control on the Aux Send Filter Icon -------------------------------------18
12. Global Setting for Soloing Behaviour ------------------------------------------19
13. Improved Organization of Settings Tab ---------------------------------------19
14. Hide Control Section at Bottom Area of Edit Tab -------------------------- 20
15. Filter GUI Locked Default ---------------------------------------------------------21
16. MIDI Channel and MIDI Volume Changed for Multiple Clips ------------- 21
17. Added Support for FLAC, CAF, AU, VOC to export/import ----------------21
Don’t forget to visit our website at www.mackie.com for
more information about this and other Mackie products.
Part No. SW0295 Rev. A 1/06
©2006 LOUD Technologies Inc. All Rights Reserved.
2
Tracktion 2.1
Tracktion 2.1 New Features
This addendum to the Tracktion 2 User’s Guide highlights the new features included
with the version 2.1 software upgrade.
1. Custom Control Surface Creation
Tracktion now supports the creation of Custom Control Surfaces for control of the transport, navigation, options, and channels. You can now control many aspects of Tracktion’s
operation with your favorite low-cost hardware controller, or even the sliders, buttons, and
keys on your MIDI controller keyboard. These custom controllers support 1, 4, and 8 channel bank changes so a controller can easily be set to control track parameters for all tracks.
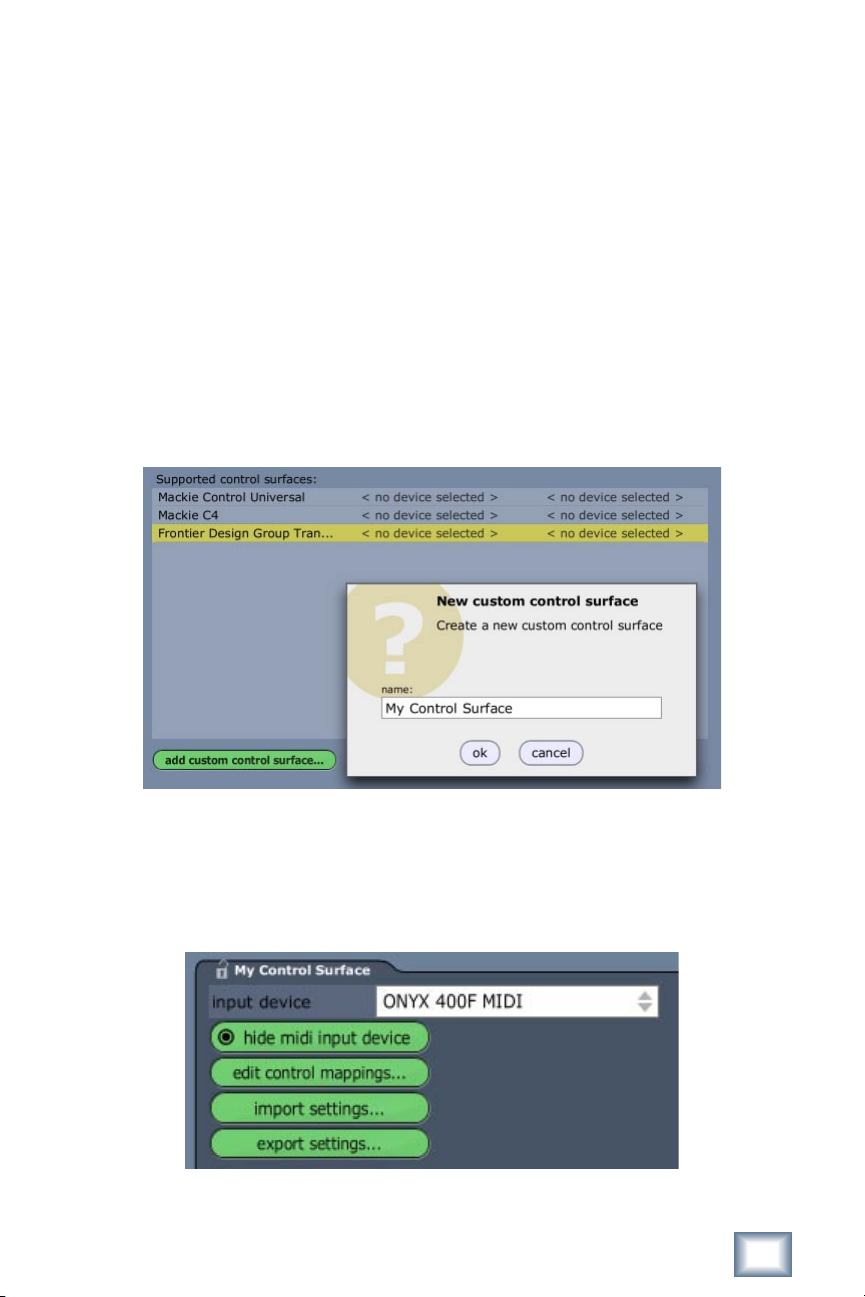
To create a Custom Control Surface, click the “add custom control surface...” button
from the control surface settings tab, type a name, and click “ok”.
Then, with the new Custom Control Surface selected, set the midi input port in the properties panel and click the “edit control mapping” button to create the custom mapping. You
can click the “hide midi input device” button to hide the associated midi input icon on the
edit screen. Finally, these Custom Control Surfaces can be exported and shared with others
using of the same controller.
User’s Guide Addendum
3
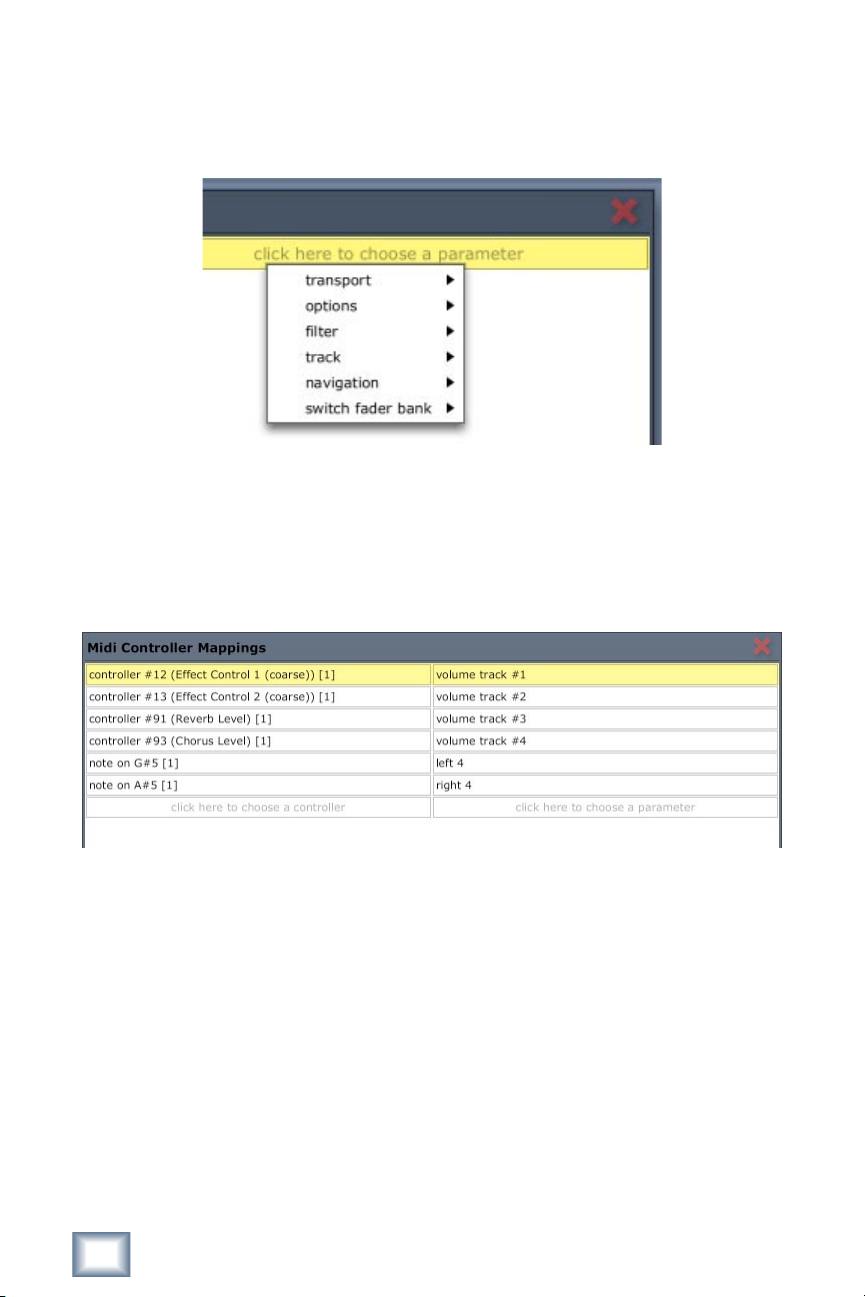
The MIDI control mappings edit panel allows you to choose parameters to map to MIDI
controllers and MIDI notes. Select a parameter to map by clicking on the right column and
choosing an item from the popup menu. Global commands such as the transport and the
master options can be mapped to MIDI Notes.
You can also create a custom control surface to control channel parameters. To do
this, choose a parameter in the “track” parameter menu for up to 8 tracks. Then from the
“switch fader banks” parameter menu, map the “left” and “right” parameters.
For example, you can control four tracks at a time by mapping volume for tracks 1-4 and
the “left 4” and “right 4” parameters to allow selection of any 4 tracks, shifting 4 at a time.
This setup is illustrated below:
See Appendix B for a list of all Master Controllers that can be mapped.
4
Tracktion 2.1
2. MP3 Import and MP3/Ogg Export
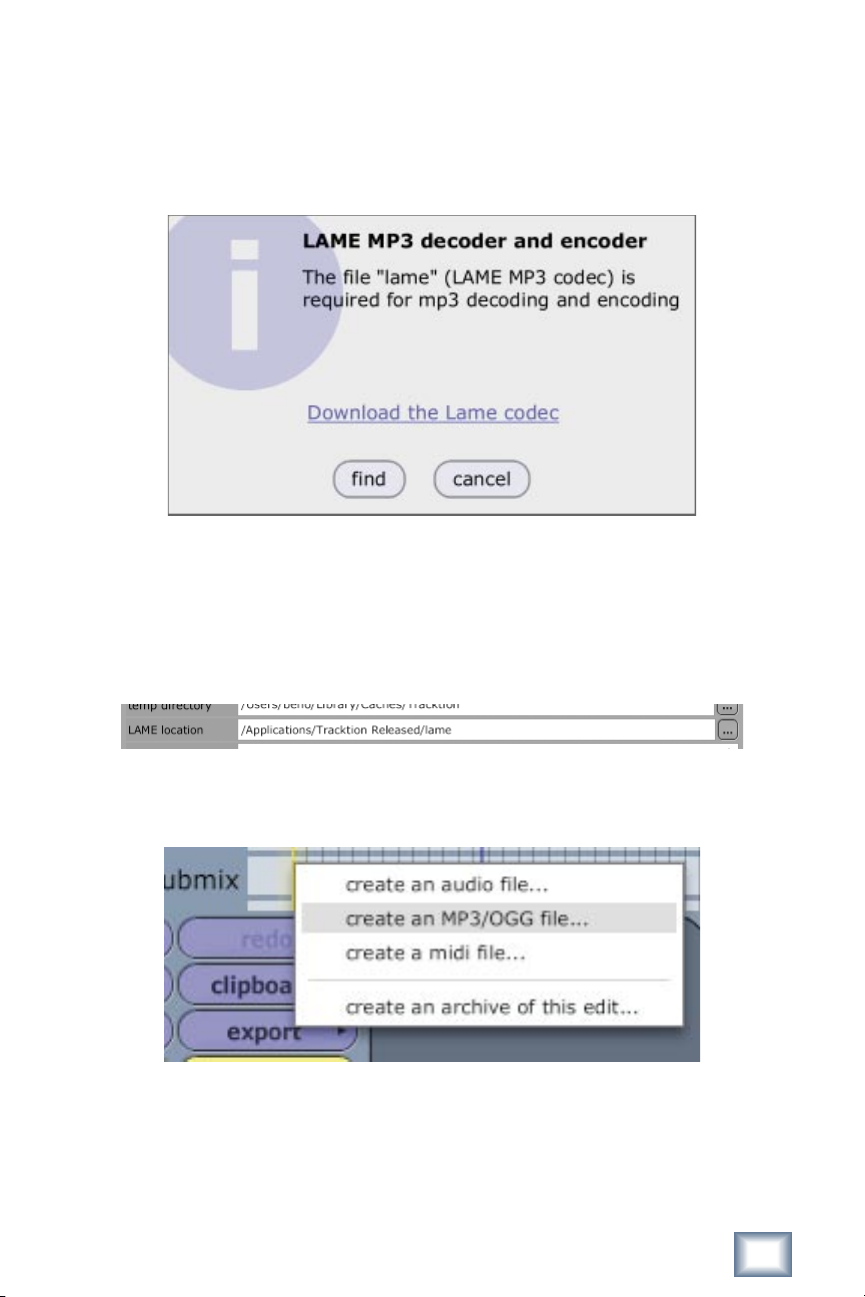
MP3 fi les can now be imported using drag and drop or the import audio fi le dialog using
the LAME codec. This codec handles the MP3 conversions. The fi rst time you try to import
or export an MP3, you will be prompted to fi nd the LAME codec on your computer.
Click the “Download the Lame codec” link to open a web browser and download the
LAME codec for the computer. Tracktion can use the Lame fi le from anywhere on your computer although other applications may require it to be in a certain location.
Once the fi le is on your computer, click the “fi nd” button to open a fi le dialog and navigate to the location of the codec. Alternately, you can set the location of the Lame codec
from the “LAME location” fi le chooser found in the fi le settings settings tab.
Similarly, both MP3 and Ogg fi les can be exported by using the new Export>Create an
MP3/OGG fi le... menu item.
User’s Guide Addendum
5
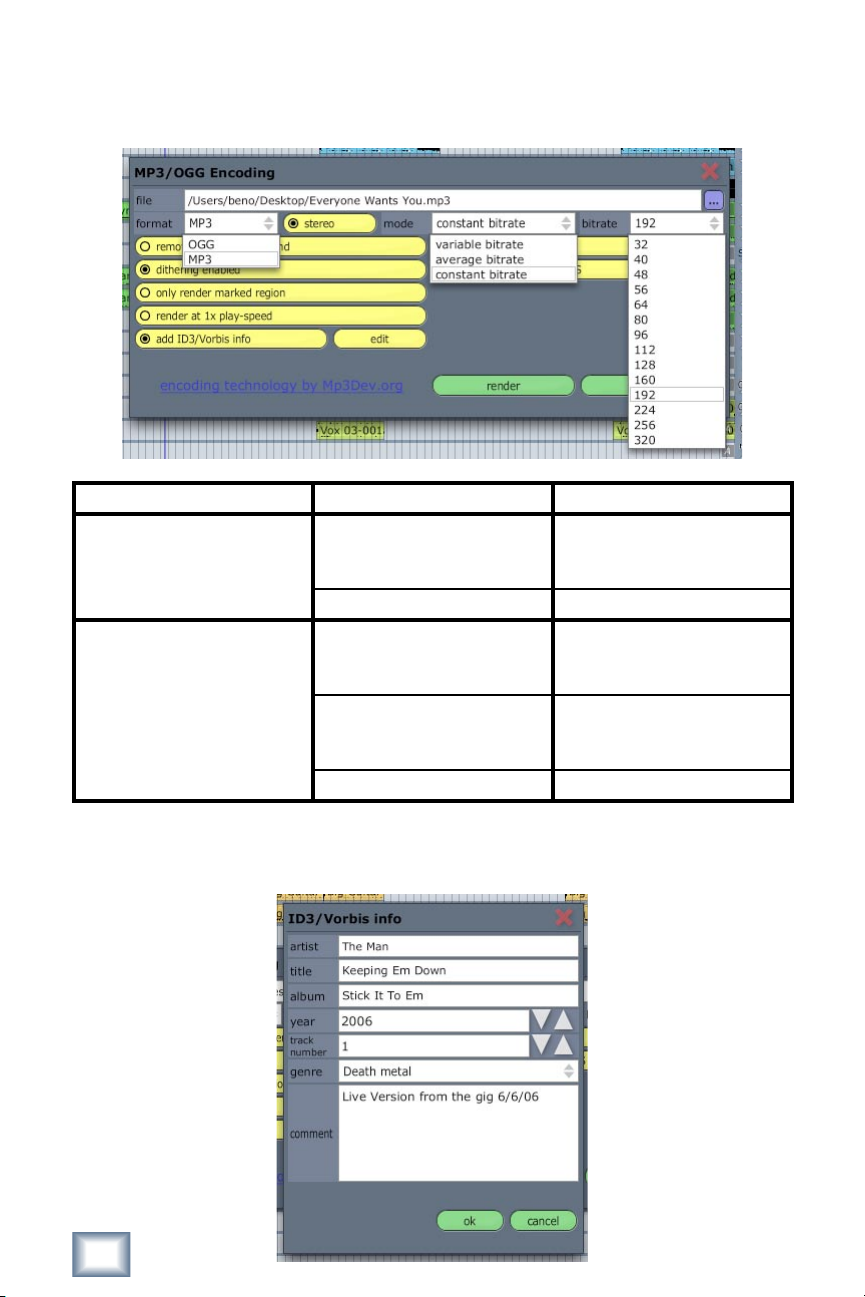
This resulting dialog allows the user to choose a file format (OGG or MP3), select a
mode (variable, average, or constant bitrate), and choose a bitrate value as described in the
table below.
Format Mode Bitrate
ogg average bitrate bitrate: 32, 40, 48, 56, 64,
80, 96, 112, 128, 160, 192,
224, 256, 320
variable bitrate quality: 1-10
mp3 average bitrate bitrate: 32, 40, 48, 56, 64,
80, 96, 112, 128, 160, 192,
224, 256, 320
constant bitrate bitrate: 32, 40, 48, 56, 64,
80, 96, 112, 128, 160, 192,
224, 256, 320
variable bitrate quality: 1-10
It also allows the creation of ID3 tabs for the exported files so when you add your newly
created mp3s to a program like iTunes or Windows Media Player, they will appear with all
the relevant information, just like your commercial audio files.
6
Tracktion 2.1
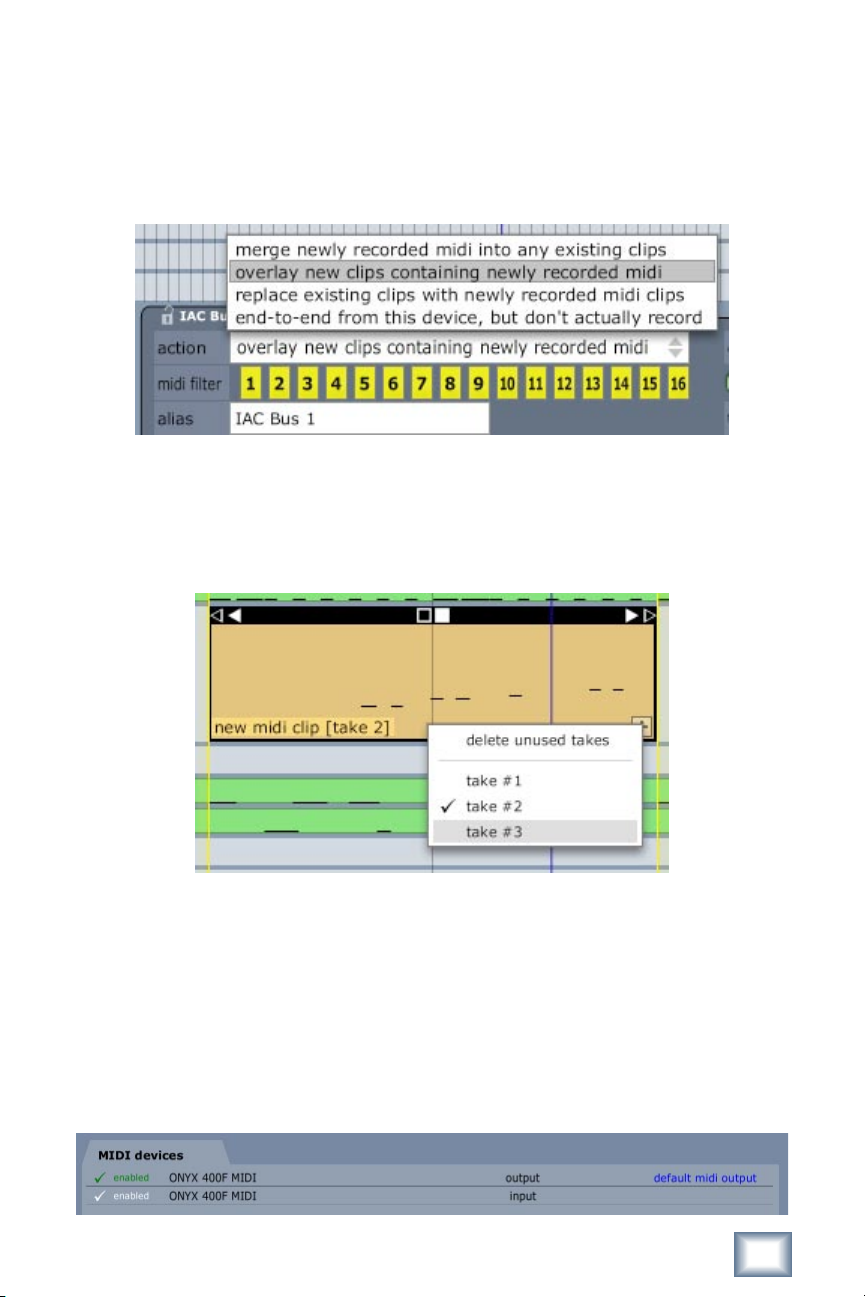
3. MIDI Loop Recording
You can now create MIDI loop clips during loop record that function the same as audio
loop clips by choosing “overlay new clips containing newly recorded MIDI” as the midi input action setting.
The “merge newly recorded midi into any existing clips” action will still merge looped
midi into one take, while the “replace existing clips with newly recorded midi clips” action
will only keep the last take during loop record.
MIDI loop clip takes can be selected from the takes pop-up list accessed by clicking the
plus sign on the clip.
Choosing “delete unused takes” from the takes pop-up list will remove all unused takes
leaving only the active take. This effectively converts the MIDI loop clip into a standard
loop clip for the selected take.
4. Support for Frontier Design Group Tranzport
Tracktion 2.1 can be controlled with the Frontier Design Group Tranzport wireless controller.
Enable the MIDI input and output pair connected to the Tranzport Hardware in the MIDI
Settings Tab.
User’s Guide Addendum
7
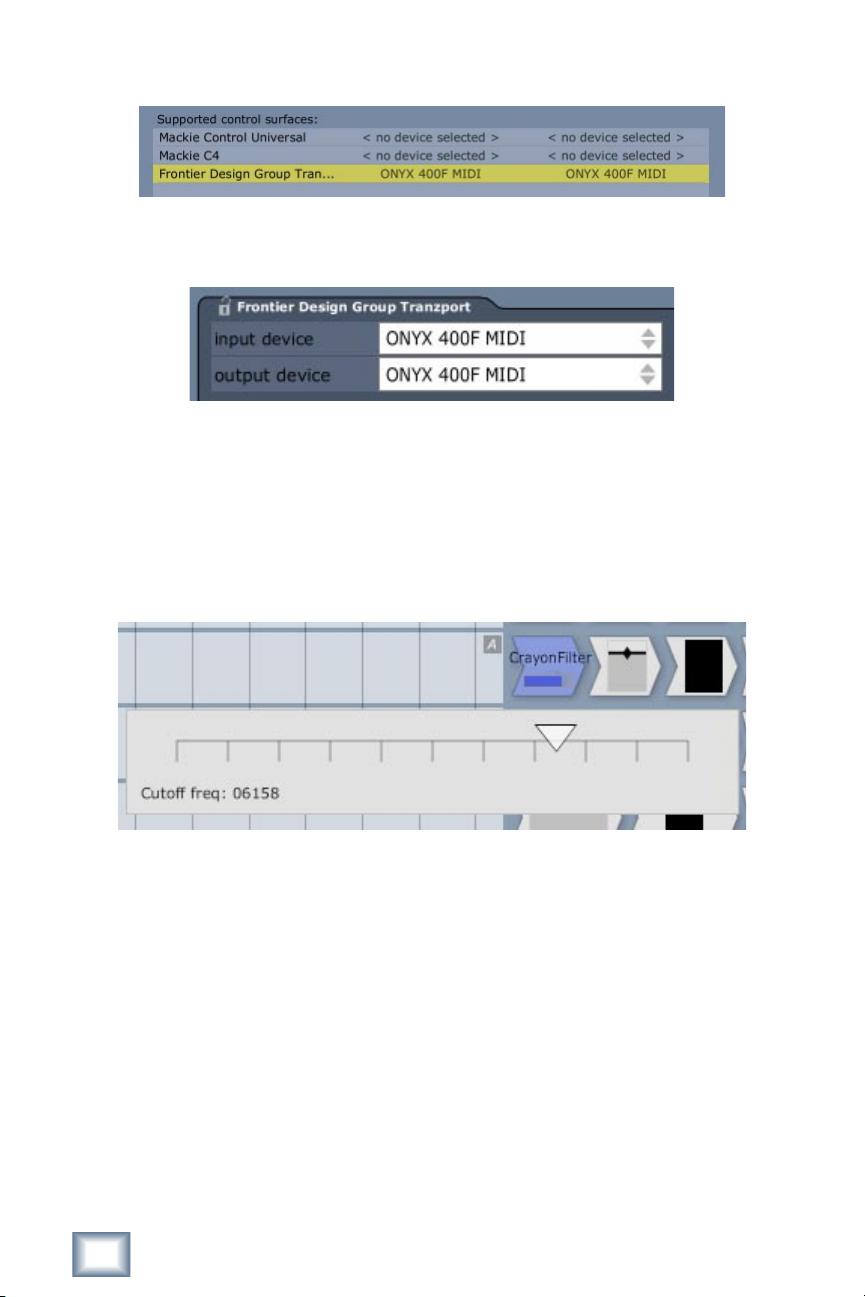
Select “Frontier Design Group Tranzport” in the External Controllers Settings Tab.
With the Tranzport control surface selected, set the corresponding MIDI Input and Output ports in the Properties panel.
See Appendix A for a list of Tranzport controls and their associated Functions.
5. Filter Icon “Quick Control Parameter”
All filter icons can display any automatable parameter as a small horizontal slider on the
filter icon for quick adjustments. This is called the Quick Control Parameter. This can be
used, for example, to quickly adjust the decay time on a reverb plug-in, without having to
open the plug-in GUI.
8
Tracktion 2.1
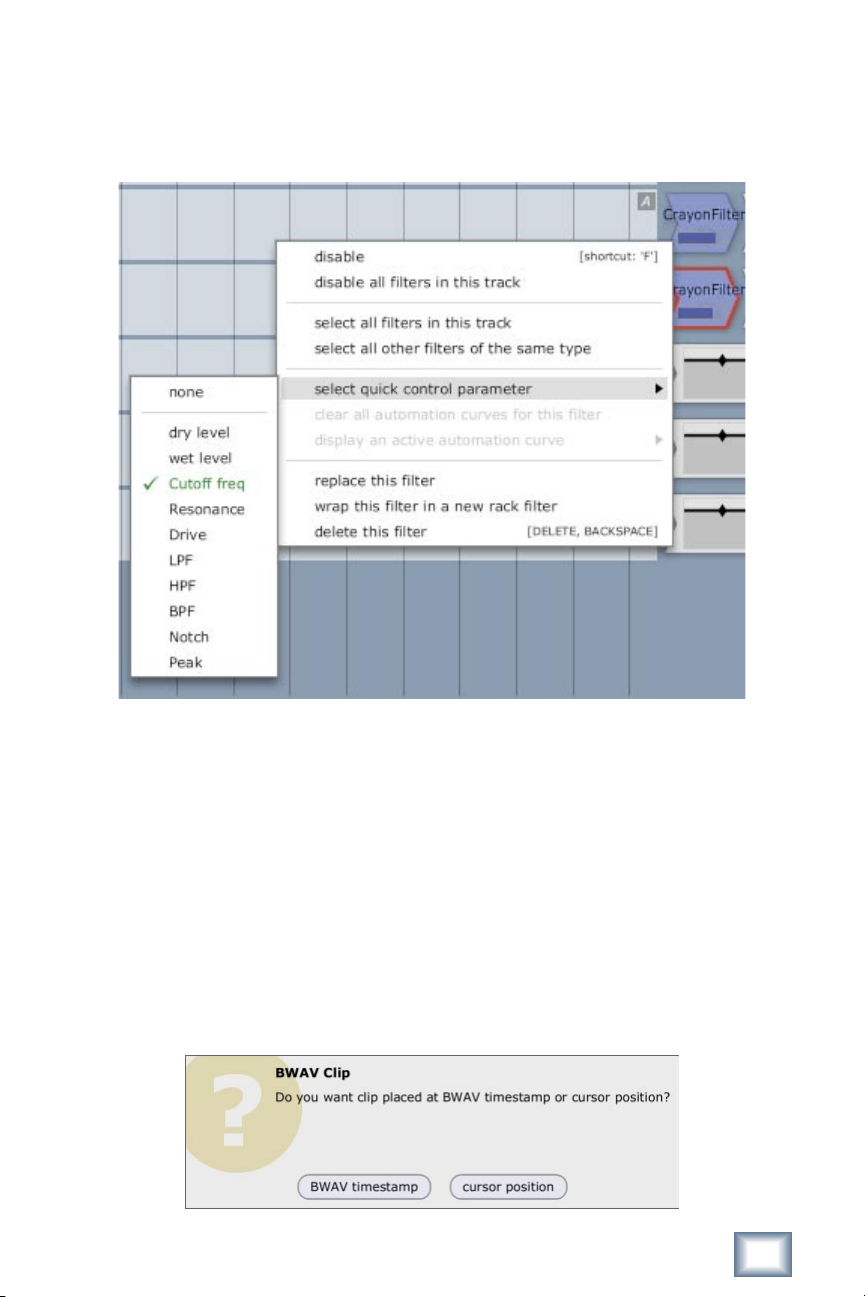
To set the Quick Control Parameter for a fi lter icon, simply right click the fi lter and
choose “select quick control parameter” from the context menu. A pop up menu will appear
allowing selection of any Automatable parameter. This parameter can then be adjusted from
the fi lter icon directly.
6. File Import Improvements
Importing multiple fi les into an edit from the import fi les dialog or via drag and drop has
been greatly improved.
You can now select multiple fi les from the edit import fi le dialog. When importing via
this dialog, drag and drop, or from a CD on the PC, you are presented with a dialog allowing
you to choose how the fi les will be placed into the edit.
For a single fi le containing a BWAV timestamp (fi le header information indicating at
what time the fi le was originally recorded), you are prompted whether to place the fi le at
the BWAV timestamp position or at the cursor position.
User’s Guide Addendum
9
 Loading...