

Page 1

MACKIE
HOOK-UP
GUIDE
ACTIVE
LOUDSPEAKERS
OUR [IN]FAMOUS PRODUCT
HOOKUPS IN BYTE-SIZED MORSELS
Copyright © 2002 Mackie Designs Inc. All Rights Reserved.
Page 2

PRINTING NOTE: These pages were built 21cm wide (8.26in) by 27.94cm (11in) tall to
accommodate the printers of both our North American users and our users around the
globe. This PDF will print at 100% on both “Letter” sized and “A4” sized paper (with room in
the left margin for hole punching).
Hello and welcome to one of many downloadable web editions of Mackie’s Product Hook-Up
Guide. Since 1992, we’ve been including these
helpful “connection maps” in our In Your Face
product guides, and we’ve been urged to continue
doing so because they’re so gosh-darned helpful. Now, we’ve split our hook-ups into product
famlies, and made them available to you over this
new-fangled “Internet” thingy that everyone is
talking about these days.
There will be documents that cover hooking
up our compact VLZ
®
PRO Series, Analog 8•Bus
Series consoles, CFX Series effects mixers, DFX
Series compact effects mixers, the D8B digital
console, the HDR24/96 hard disk recorder, PPM
Series powered mixers, the FR Series amplifi ers,
SR Series front-of-house mixers, and our Active
loudspeakers.
Inside you’ll fi nd lots of useful information
— most likely your questions will be answered
here. We realize that there’s no possible way to
cover every single question or application in so few
pages because new ways to use Mackie products
are invented every day. You may come up with
some ideas on how to do what you want by looking at the various diagrams we’ve included here.
Keep in mind that a good half of the battle in
hooking up our products is having the proper
connections. Check the cables ’n’ plugs that you
already have with the diagrams on the next
page. We know it may look boring, but one of
these drawings could save your life. Well, maybe
not your life, but probably a lot of weeping and
sorrow. And don’t forget to check out the tech
tips/FAQs document also available for download
on the web at www.mackie.com/techsupport
If you don’t fi nd the answers you’re after, then
why not give our mighty Tech Support gang a
call? These folks have tons of experience in the
real world, and they’ve got lots of equipment and
mixers at their beck and call. They’re aching to
share their knowledge with you. (And calling them
would be a very humanitarian thing to do — they’re
located in the dank sub-basement of our building
and they rarely get visitors. Your call just may be
the one that keeps their spirits alive.)
Call Mackie Tech Support toll-free (in the U.S.)
at 800-258-6883 (Monday through Friday, 7 AM
to 5 PM Pacifi c Time) with any Mackie productquestion you can conjure. Put them through the
wringer! We encourage it.
Incidentally, the Mackie Product Hook-Up Guide
(Web Editions) were put together from within the
confi nes of the Mackie Digital Mosh Pit — located
on the second fl oor near the Area Of Refuge — by
the well-meaning, super-preening Mackie Macintosh Department. We used Adobe InDesign
®
,
Illustrator®, Photoshop®, and Acrobat® on a
number of suped-up big daddy Macs.
Oh yeah: Copyright © 2002 Mackie Designs Inc.
All Rights Reserved.
The following are trademarks or registered trademarks of Mackie Designs Inc.: “MACKIE.”, the
“Running Man” fi gure, VLZ, XDR, D8B, HUI, CFX
Series, FR Series, and HR Series.
Page 3
A VISUAL
GUIDE
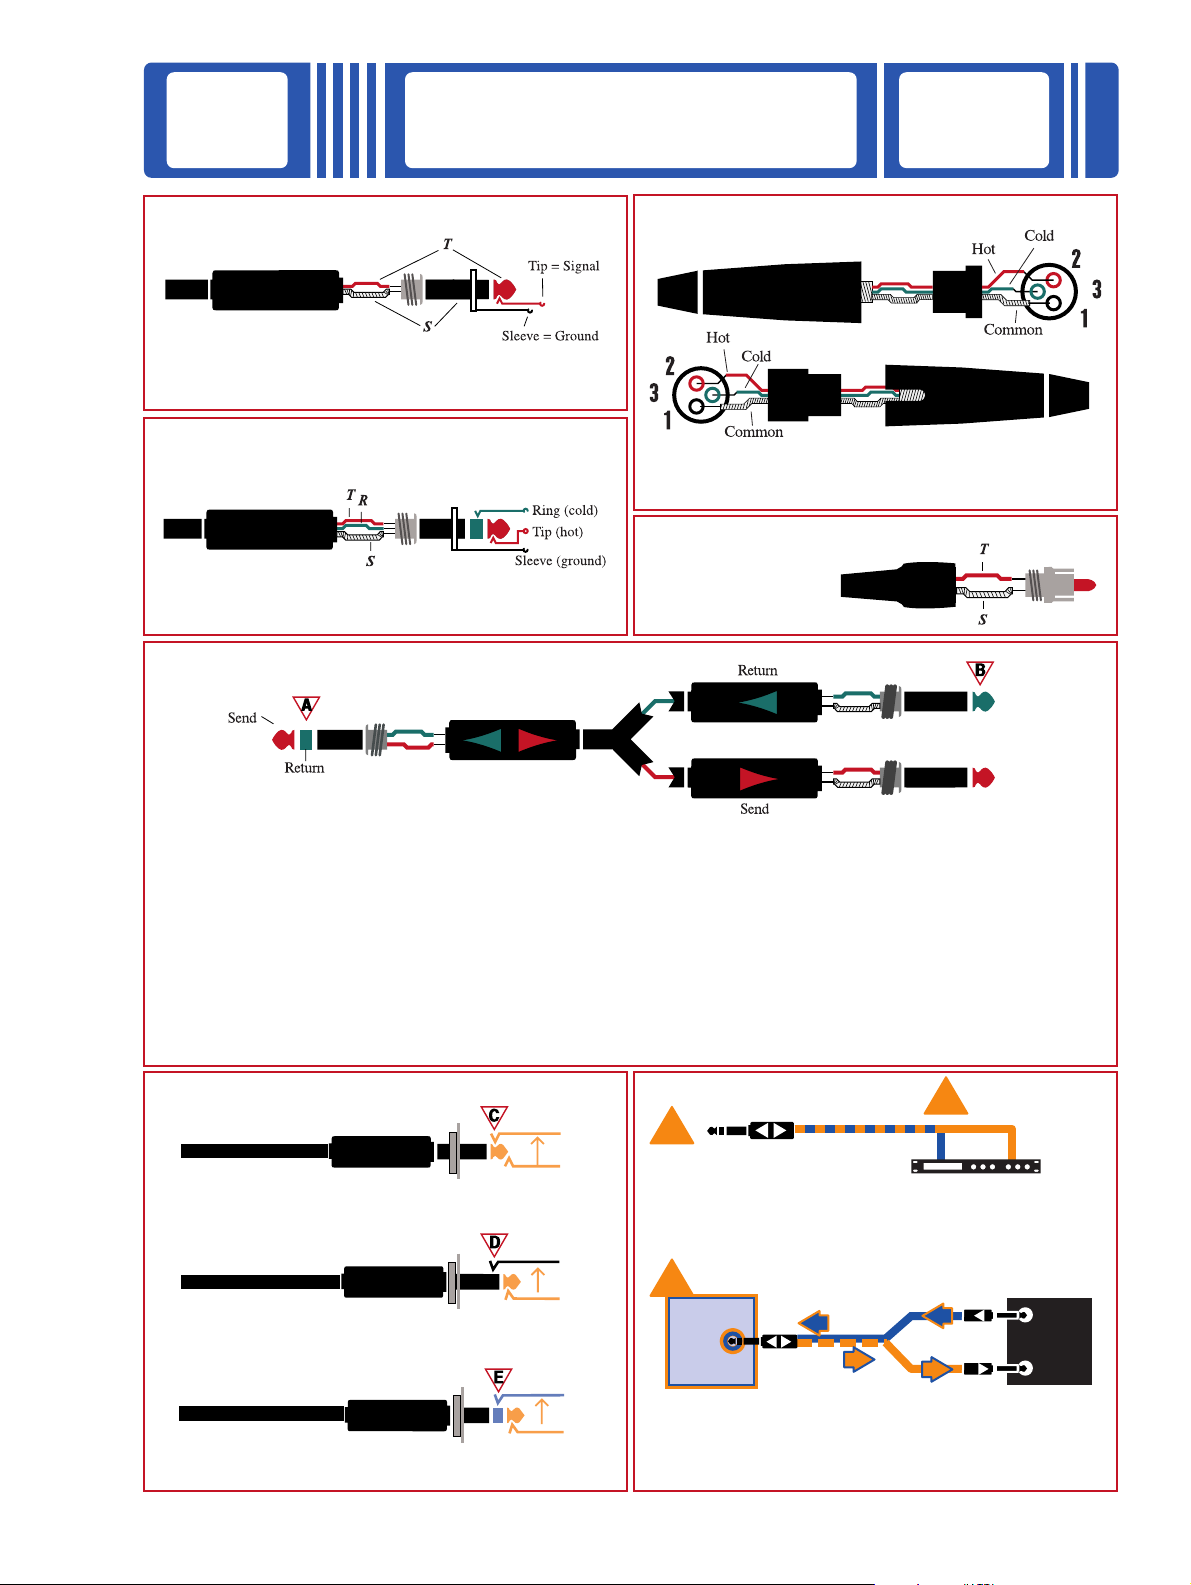
COMMON
PRO AUDIO PLUGS AND CONNECTORS
KNOW YOUR
PLUGS
SET IT UP, AND GO!
TS Plug (mono)
Standard mono/unbalanced phone
plug used for most mixer connections.
TRS Plug (stereo)
Standard stereo/balanced phone plug used for
balanced connections on Mackie mixers.
Insert “Y” Cable
Balanced XLR
Standard XLR microphone connector to be used
with mic-level.
RCA/Phono Plug
Tape deck connections
on most Mackie mixers.
The “Y” Cable is used for connecting serial effects
devices, such as graphic equalizers or compressors, to a
Mackie mixer’s Channel or Bus insert jacks. On one end is
a standard Tip-Ring-Sleeve “stereo” plug. Its tip and ring
are wired to separate mono Tip-Sleeve plugs. Note that
the RING of the TRS plug (A) is actually wired to the TIP of
one of the mono TS plugs (B). If you insert a TS (mono)
1/4" plug only partially (to the first click) into an insert
jack, the plug will not activate the jack switch and will not
break the insert connection in the circuit (thereby allowing
the channel signal to continue on its merry way through
Insert Points
TS Plug (mono)
Direct out with no signal interruption to master.
Insert only to first “click.”
TS Plug (mono)
Direct out with signal interruption to master.
Insert all the way in to the second “click.”
TRS Plug (stereo)
For use as an effects loop.
(TIP = SEND to effects
RING = RETURN from effects)
the mixer). See (C) in “Insert Points” below.
Partial insertion allows you to tap out of the channel or
bus circuit at that point in the circuit without interrupting
normal operation.
If you push the 1/4" TS plug in to the second click, you
will open the jack switch and create a direct out, which does
interrupt the signal in that channel or bus circuit. See (D) in
“Insert Points” above. Note: Do not overload or short-circuit
the signal you are tapping from the mixer. That will affect
the internal signal of the mixer.
Attention !
A
You may notice these effects unit hookups (Figure A)
throughout this applications guide. These hookups utilize
the Insert "Y" Cable (explained on the facing page).
B
MIXER INSERT
Figure B is a closeup of Figure A. The two colors
represent the input and output traveling the length of the
"Y" cable. The dotted line represents the two signals
travelling alongside one another.
COMPRESSOR
OUT
IN
Page 4

DAISY-
SRM450
SRM450 SRM450 SRM450 SRM450
Multiple SRM450 “Daisy-Chaining” using signal pass-thru connection
CHAINING
mixer
SET IT UP, AND GO!
SRM450/SWA1501
SRM450 SRM450
Stereo hook-up
with two SRM450s
and two SWA1501
subwoofers
mixer
BI AMP
Connect the Main Outs
on your mixer to the inputs
of your SWA1501 Subwoofers,
then from the Hi-Pass
Thru connector of the
subwoofers to
the SRM450 inputs.
SET IT UP, AND GO!
SWA1501 SWA1501
Page 5

SRM450/SWA1501
SRM450 SRM450
SWA1501
mixer
Stereo SRM450s with mono SWA1501 subwoofer
BASIC
SET IT UP, AND GO!
ADD TO
SWA1501/SWA1801
SWA1501 or SWA1801 added to existing passive system
BRAND X
PASSIVE
SPEAKER
SYSTEM
existing
power amp
EXISTING
BRAND X
PASSIVE
SPEAKER
SYSTEM
mixer
SET IT UP, AND GO!
SWA1501/SWA1801
Page 6

SA1521/SWA1501
SWA1501
mixer
Stereo SA1521s with mono SWA1501 subwoofer
BASIC
SA1521SA1521
SET IT UP, AND GO!
MIXER
SA1232/SWA1801
SA1232 SA1232
SWA1801SWA1801
BI AMP
Connect the Main
Outs on your mixer
to the inputs of
your SWA1801
Subwoofers, then
from the Hi-Pass
connector of the
subwoofers to
the SA1232 inputs.
SET IT UP, AND GO!
Stereo Hook-up with two SA1232s and two SWA1801 subwoofers
Page 7

SR1530
SR1530 SR1530
mixer
Two-speaker mono hook-up
using signal pass-thru connection
THROUGH
SET IT UP, AND GO!
Page 8

FULL STAGE
A
ACTIVE SPEAKER
C
B
SET UP
SET IT UP, AND GO!
A
To M i xe r
SA1232
SWA1801
B
OUTS
MAIN
INSERTS
MAIN
MAIN
OUTS
MONO
SR24•4 VLZ PRO Rear Panel
SRM450
AUX SENDS BAL/UNBAL
CTRL
RM OUT
BAL/UNBAL
SRM450
To M i xe r
C
To M i xe r
SRM450
SWA1501
 Loading...