

Page 1
POWER
24 TRACK/24 BIT DIGITAL AUDIO RECORDER
SDR 24SDR 24
SDR 24/96
SDR 24SDR 24
Operation Guide
HIGH RESOLUTION
96
NON-LINEAR RECORDER
48k
X2
24 BIT16 BIT
FAST FWD
MINUTESHOURS SECONDS FRAMES
PLAY
STOP
EXT
CLOCK
SELECTSELECTSELECTSELECT
RECORD
DELETE
LAST
TRACK PROJECT
SDR
44.1k
ERROR
VARI
TC
PROJECT: Feel the Love
AVAIL: 02:27:26 on EXT
21
2019181716151413121110987654321
EDIT
SETUP
PUNCH REHRSELOOPLOCATE STORE
242322
T-CODE
AUTO
CHASE
TAKE
ALL
INPUT
REWIND
AUTO
INPUT
24 TRACK/24 BIT DIGITAL AUDIO HARD DISK RECORDER
Page 2

CAUTION AVIS
RISK OF ELECTRIC SHOCK
DO NOT OPEN
RISQUE DE CHOC ELECTRIQUE
NE PAS OUVRIR
CAUTION: TO REDUCE THE RISK OF ELECTRIC SHOCK
DO NOT REMOVE COVER (OR BACK)
NO USER-SERVICEABLE PARTS INSIDE
REFER SERVICING TO QUALIFIED PERSONNEL
ATTENTION: POUR EVITER LES RISQUES DE CHOC
ELECTRIQUE, NE PAS ENLEVER LE COUVERCLE. AUCUN
ENTRETIEN DE PIECES INTERIEURES PAR L’USAGER. CONFIER
L’ENTRETIEN AU PERSONNEL QUALIFIE.
SDR 24/96
AVIS: POUR EVITER LES RISQUES D’INCENDIE OU
D’ELECTROCUTION, N’EXPOSEZ PAS CET ARTICLE
A LA PLUIE OU A L’HUMIDITE
The lightning flash with arrowhead symbol within an equilateral
triangle is intended to alert the user to the presence of uninsulated
"dangerous voltage" within the product’s enclosure, that may be
of sufficient magnitude to constitute a risk of electric shock to persons.
Le symbole clair avec point de fl che l’int rieur d’un triangle
quilat ral est utilis pour alerter l’utilisateur de la pr sence
l’int rieur du coffret de "voltage dangereux" non isol d’ampleur
suffisante pour constituer un risque d’ l ctrocution.
The exclamation point within an equilateral triangle is intended to
alert the user of the presence of important operating and maintenance
(servicing) instructions in the literature accompanying the appliance.
Le point d’exclamation l’int rieur d’un triangle quilat ral est
employ pour alerter les utilisateurs de la pr sence d’instructions
importantes pour le fonctionnement et l’entretien (service) dans le
livret d’instruction accompagnant l’appareil.
Important Safety Instructions
12. Servicing — Do not attempt to service the SDR24/96. All servicing
should be referred to the Mackie Service Department.
13. Lightning — Unplug the SDR 24/96 during lightning storms or when
unused for long periods of time. Note that this Mackie product is not
completely disconnected from the AC mains service when the power switch
is in the OFF position.
14. Grounding and Polarization — To prevent electric shock, do not use the
SDR24/96 polarized plug with an extension cord, receptacle or other
outlet unless the blades can be fully inserted to prevent blade exposure.
Do not defeat the SDR24/96 grounding by plugging into an ungrounded
receptacle or ground lift adapter.
This apparatus does not exceed the Class A/Class B (whichever is applicable)
limits for radio noise emissions from digital apparatus as set out in the radio
interference regulations of the Canadian Department of Communications.
ATTENTION — Le présent appareil numérique n’émet pas de bruits
radioélectriques dépassant las limites applicables aux appareils numériques de
class A/de class B (selon le cas) prescrites dans le réglement sur le brouillage
radioélectrique édicté par les ministere des communications du Canada.
1. Read instuctions — Read, understand and follow all safety and operating
instructions before using the SDR24/96.
2. Retain Instructions — Keep these safety and operating instructions for future
reference.
3. Heed Warnings — Follow all warnings on the SDR24/96 and in these
operating instructions.
4. Water and Moisture — Do not use the SDR24/96 near water – for example,
near a bathtub, kitchen sink, garden hose, incontinent poodle, sweaty
drummer, etc. – or when condensation has formed on the unit.
5. Cleaning — Clean only with a dry cloth.
6. Heat and Ventilation — Locate the SDR24/96 away from heat sources such
as radiators, campfires, compost pits, heliarc welders, magma flows, etc. Do
not block SDR24/96 ventilation openings or install in spaces that prevent
adequate air circulation to the unit.
7. Power Sources — Connect the SDR24/96 only to a power source of the type
described in these operating instructions or as marked on the SDR24/96.
8. Power Cord Protection — Route power supply cords so that they are not likely
to be walked upon, tripped over, or abraded by items placed upon or against
them. Pay particular attention to cords at plugs, convenience receptacles, and
the point where they exit the SDR24/96.
9. Object and Liquid Entry — Do not drop objects or spill liquids into the
SDR24/96. Clean only with a damp cloth; do not clean with liquid or aerosol
cleaners.
10. Attachments — Use the SDR24/96 with only the accessories specified in this
manual.
11. Damage Requiring Service — The SDR24/96 should be serviced only by
qualified service personnel when:
A. The power supply cord or the plug has been damaged; or
B. Objects have fallen onto, or liquid has spilled into the unit; or
C. The unit has been exposed to rain or water; or
D. The unit does not appear to operate normally or exhibits a marked
change in performance; or
E. The unit has been dropped, or its chassis damaged.
FCC Information
NOTE: This equipment has been tested and found to comply
with the limits for Class B digital devices, pursuant to Part 15 of
the FCC Rules. These limits are designed to provide reasonable
protection against harmful interference when the equipment is
operated in a commercial installation. This equipment generates,
uses, and can radiate radio frequency energy and, if not installed
and used in accordance with the instruction manual, may cause
harmful interference to radio communications. Operation of this
equipment in a residential area is likely to cause harmful
interference in which case the user will be required to correct
the interference at his own expense.
This product has been tested and complies with the
following standards and directives as set forth by the
European Union:
* EN 55103-1 E1-E3 Radiated and Conducted Emissions
* EN 55103-2 E1-E3 Immunity
* EN 60950/IEC 950 Electrical Safety Requirements
WARNING — To reduce the risk of fire or electric shock, do not expose this
appliance to rain or moisture.
2
SDR24/96
Page 3

Contents
Operation Guide
Introduction ----------------------------4
Save your Box!-------------------------------- 4
How To Use This Guide --------------------- 4
Conventions ---------------------------------- 5
About “Tape” --------------------------------- 5
Overview -------------------------------------- 6
Setup & Configuration----------------7
Required Equipment ------------------------ 7
Installation------------------------------------ 7
I/O Connections and Cables ------------------- 8
-------------------------------------------------------- 8
Word Clock and Digital Synchronization ---- 8
Mackie Media (Optional) ----------------------- 11
Hookups ----------------------------------------12
Analog Hookup ----------------------------------- 12
Digital Hookup ------------------------------------ 14
Remote 24/Micro Remote (Optional) ------- 16
Footswitch (Optional) --------------------------- 16
Power-Up-------------------------------------- 16
Configuration--------------------------------- 17
Track I/O Setup----------------------------------- 17
Input Type Setup --------------------------------- 18
Synchronization ---------------------------------- 19
Sample Clock -------------------------------------- 19
Sample Rate ---------------------------------------- 19
Time Code Chase ---------------------------------- 19
Time Code Source --------------------------------- 19
Frame Rate ----------------------------------------- 20
Sample Size----------------------------------------- 20
LTC Output ----------------------------------------- 20
MTC Output ---------------------------------------- 20
Varispeed ------------------------------------------- 20
SDR24/96 Operation -----------------21
Project Management------------------------ 21
Creating a New Project -------------------------- 21
Opening a Project -------------------------------- 22
Saving a Project ----------------------------------- 22
Deleting a Project -------------------------------- 23
Copying a Project--------------------------------- 24
Renaming a Project ------------------------------ 25
Purging a Project --------------------------------- 25
Basic Transport Operations ----------------26
Fast Wind------------------------------------------- 26
Stop ------------------------------------------------- 26
Scrub ------------------------------------------------ 27
Play -------------------------------------------------- 27
Record ---------------------------------------------- 27
Serial 9-Pin----------------------------------------- 27
Time Display--------------------------------------- 27
Transport Menu ----------------------------------- 27
Locate Points and Looping --------------------- 30
Recording ------------------------------------- 31
Track Options ------------------------------------- 32
Record Options ----------------------------------- 33
Monitoring ----------------------------------------- 35
Metering and Setting Record Levels---------- 36
Autopunch ----------------------------------------- 37
Rehearse-------------------------------------------- 38
Footswitch Operation --------------------------- 39
Editing ----------------------------------------- 40
Delete Last ----------------------------------------- 40
Edit Button----------------------------------------- 40
Delete ----------------------------------------------- 40
Cut --------------------------------------------------- 41
Copy ------------------------------------------------- 41
Paste ------------------------------------------------- 41
Place ------------------------------------------------- 42
Undo ------------------------------------------------- 43
Redo ------------------------------------------------- 44
Disk and System Utilities ------------------ 44
Disk Menu ------------------------------------------ 44
Mount Drive---------------------------------------- 44
Format Drive --------------------------------------- 44
Defrag Drive---------------------------------------- 45
System Menu -------------------------------------- 45
USB Mass Storage --------------------------------- 45
SDR Footswitch------------------------------------ 46
Remote Footswitch ------------------------------- 46
Load Meter ----------------------------------------- 46
Date -------------------------------------------------- 47
Time ------------------------------------------------- 47
About ------------------------------------------------ 47
Appendix A: Troubleshooting and Service ---- 48
Appendix B: Technical Info ----------------------- 50
Appendix C: Upgrading the System Software - 51
Appendix D: Analog I/O Pinout ------------------51
Appendix E: Compatible Cables ----------------- 52
Part No. 820-259-00 Rev. A1 03/02
© 2002 Mackie Designs Inc., All rights reserved.
Printed in the U.S.A.
Operation Guide
3
Page 4

SDR 24/96
Introduction
Save your Box!
Uncle Jeff’s Bottom Ten Reasons to Save the Box:
10. You think boxes grow on trees?
9. It’s actually a time capsule, packed with a biological code that can’t be
decrypted until 2043.
8. Its festive graphics will cheer up those other boxes forgotten in your
attic.
7. Impress your friends: tape it up and pretend that you actually have two
SDR24/96s.
6. If you throw it away, bad people will know you have a studio in your
house.
5. Someday, when paper costs more than steel, it could net you a fortune.
4. The SDR24/96 itself only costs $47.95. The balance is what you paid for
the box.
3. Properly sealed, it can be used as a flotation device in the unlikely event
of a water landing.
2. It’s a great place to hide your old digital 8-track recorder.
1. If you collect ten SDR24/96 boxes, Greg will come over for dinner (this
offer does not apply to dealers or distributors).
In the unlikely event that you should need to send the SDR24/96 back to Mackie
for service, please use the shipping box it came in. This box has been specially
designed to minimize damage to the SDR24/96 during shipping, so that it won’t
end up more broken than when you sent it.
How To Use This Guide
Welcome to the cutting edge of affordable multitrack recording and editing! The
first part of this guide explains how to setup and connect the SDR24/96 to an
analog or digital console. The second part describes how to start a session,
operate the basic transport and monitoring controls, and explains the terms and
conventions used to name, store, and retrieve projects on disk.
To get the most out of this guide, you’ll need to be familiar with the basic
multitrack recording process. Updated manuals and the latest software releases
can be obtained via Mackie’s website at:
Please write your serial number here for future
reference:
www.mackie.com.
Purchased at:
Date Of Purchase:
4
SDR24/96
Page 5
Conventions
The SDR24/96 Operation Guide uses the following conventions to help you find
information quickly:
Text Conventions
a) Text referring to the LCD display use medium weight
(example: SETUP MENU)
b) Text referring to hardware controls or connectors use heavy weight
(example: STOP)
Icons
This icon identifies in-depth explanations of features and practical tips. Though
not required reading, they do offer some choice tidbits of knowledge that will
leave you wiser for the reading.
This icon identifies information that is critically important to the operation of the
SDR24/96. So for your own sake, please read these sections.
Operation Guide
About “Tape”
No, you’re not reading the wrong manual. Our goal was to build a hard disk
recorder that is comfortable for someone familiar with tape recording, but that
doesn’t require you to get a brain transplant from a computer geek to use. When
familiar terms such as Tape Inputs, Tape Returns, Transport, and the like are
applied to the SDR24/96, they mean exactly what you expect them to mean.
Where the well-worn shoe fits, we continue to wear it.
Operation Guide
5
Page 6
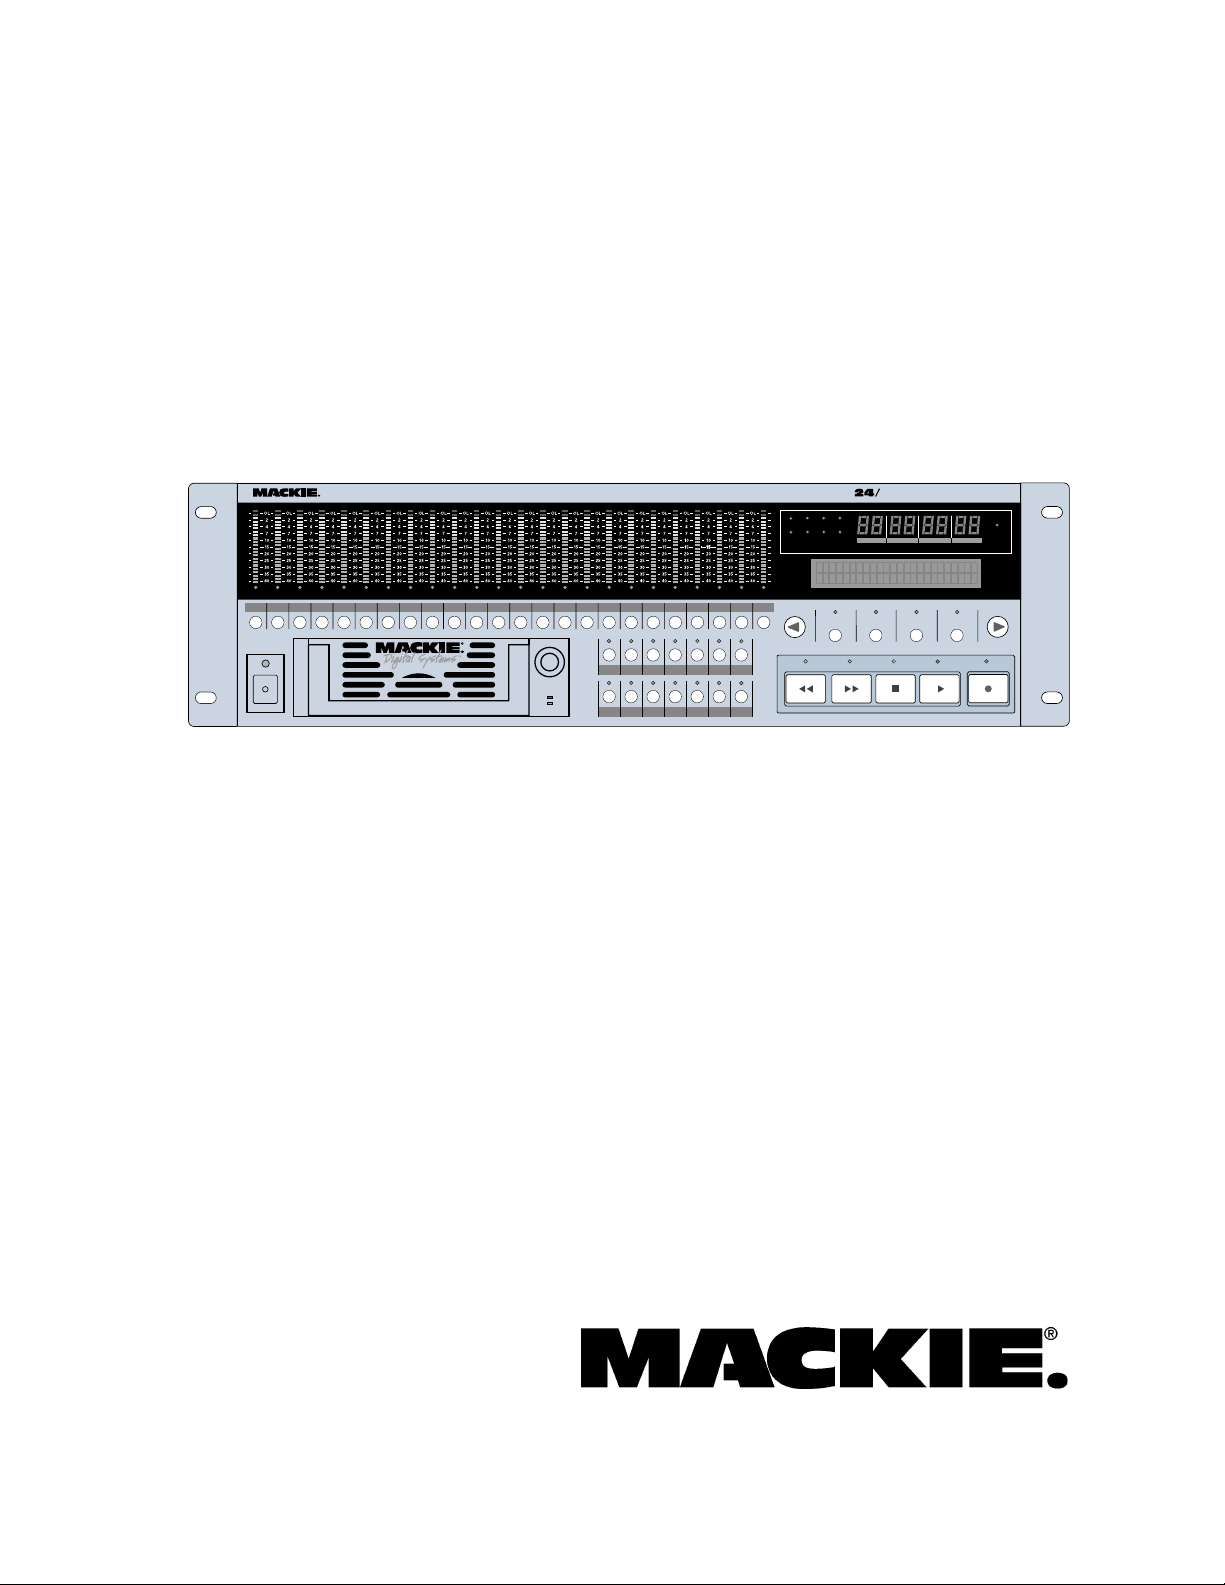
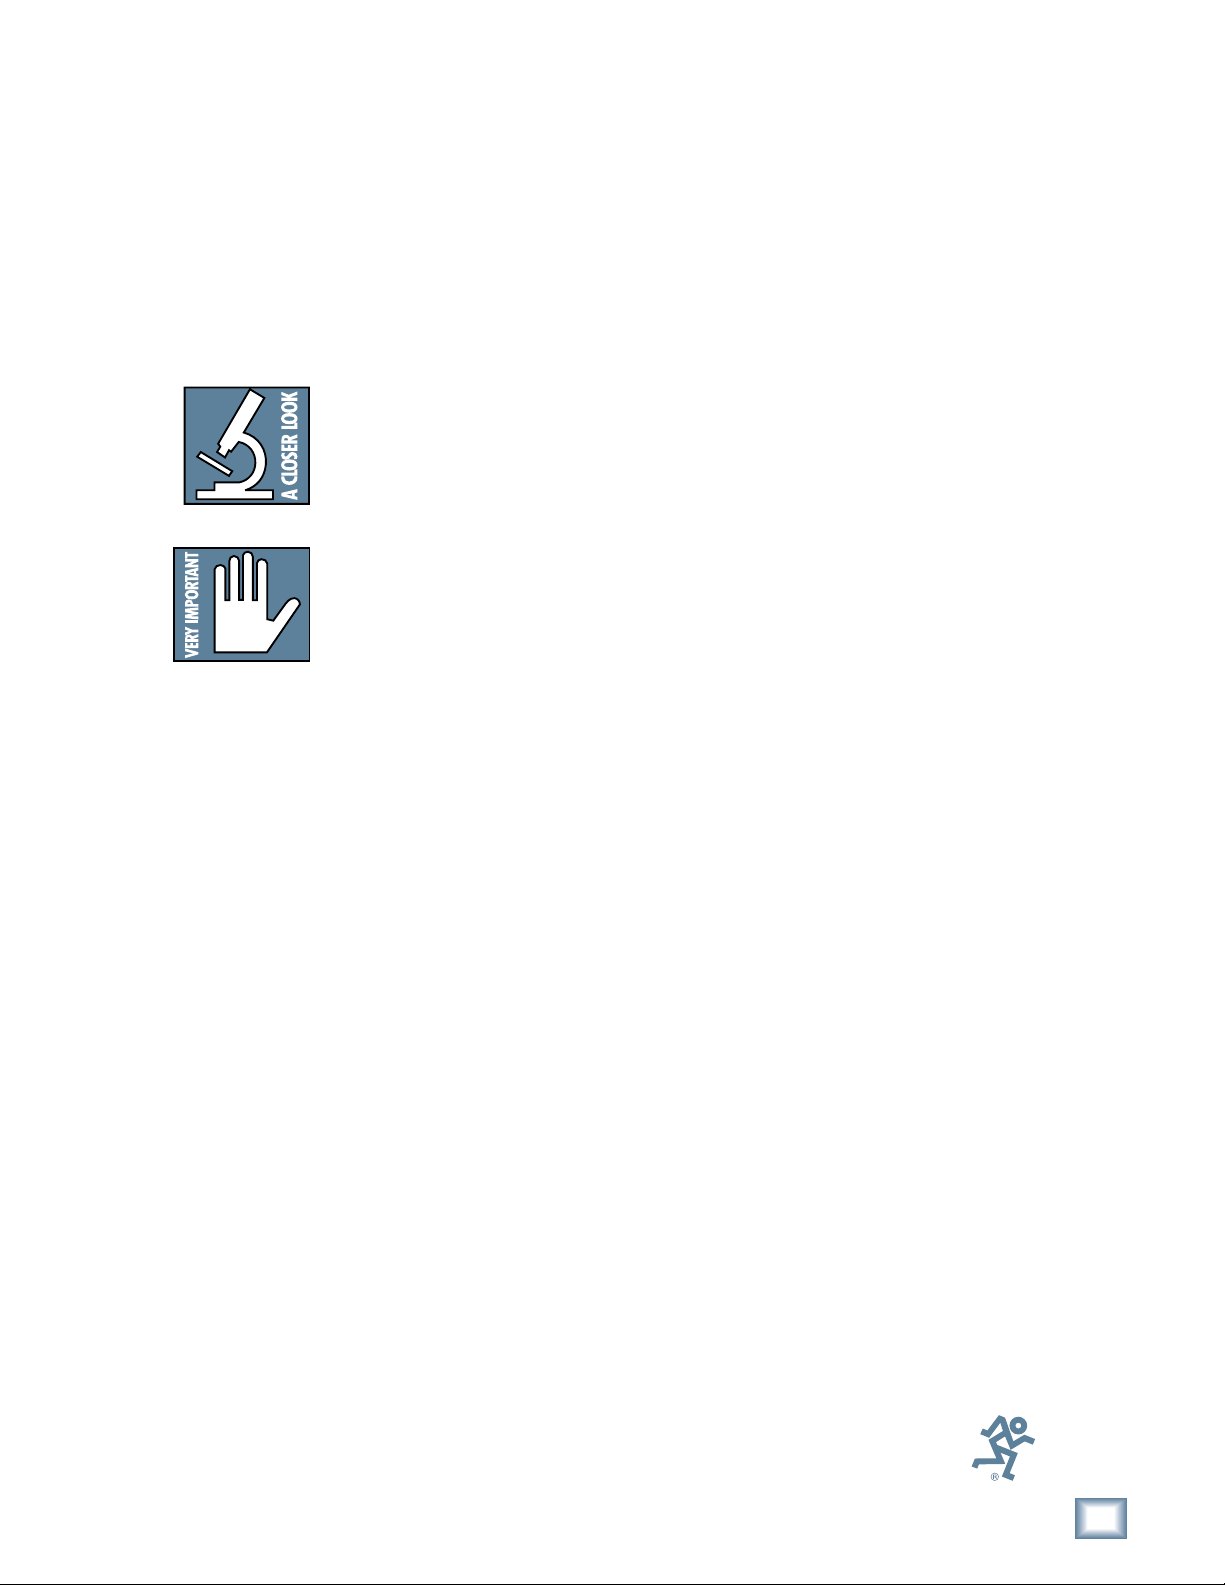
Overview
By combining traditional multitrack tape recording features with the power and
flexibility of non-linear editing, the Mackie Designs SDR24/96 takes multitrack
recording to a level never before achieved by a product in its price range. In
addition to the standard battery of traditional tape-based features, the SDR24/96:
• Combines the familiarity of a multitrack tape machine with the security of
non-destructive recording and non-degrading recording media.
SDR 24/96
• Records simultaneously on all 24 tracks at 44.1 kHz, 48 kHz, 88.2 kHz, or
96 kHz (12 tracks at 88.2 and 96 kHz when using Digital Optical inputs).
At 48 kHz the internal hard drive stores over 2200 track-minutes of 24-bit
audio (90 minutes of 24 full tracks). That’s more than six reels of 2" tape
at 30 inches per second! At 96 kHz the drive stores over 1100 trackminutes of 24-bit audio (45 minutes of 24 full tracks).
• Has eight Virtual Takes per track, allowing you to record multiple passes
without having to change routing and busing assignments or use
additional tracks.
• Projects and Tracks are compatible with the HDR24/96 and the MDR24/96.
• Audio files are saved in native Wave file format (.WAV).
• Interfaces with any analog or digital console with ADAT™ optical I/O or
analog I/O (uses 24-bit A/D and D/A converters).
• Provides three convenient methods of backup: Mackie Media M•90, a
removable hard drive (also capable of 24-track recording and playback),
Mackie Media PROJECT, a removable drive using inexpensive, removable
2.2 GB ORB™ cartridges; and data transfer to another computer through
the SDR24/96’s USB port.
• Offers two optional remote control devices – the compact Remote 24 and
the Micro Remote for smaller project studios.
Record Ready
POWER
• Other remote control interfaces include ADAT Sync, Serial 9-Pin, and MIDI
I/O for MMC (MIDI Machine Control).
Meter Display
24 TRACK/24 BIT DIGITAL AUDIO RECORDER
Media Tray SetupLocate &
Loop
DELETE
LAST
TRACK PROJECT
Status Display
21
2019181716151413121110987654321
AUTO
EDIT
SETUP
TAKE
ALL
PUNCH REHRSELOOPLOCATE STORE
INPUT
Auto Take &
Time code
Chase
T-CODE
CHASE
AUTO
INPUT
Current
Time Display
SDR
44.1k
48k
X2
ERROR
VARI
24 BIT16 BIT
TC
PROJECT: Feel the Love
AVAIL: 02:27:26 on EXT
242322
REWIND
FAST FWD
Transport
HIGH RESOLUTION
96
NON-LINEAR RECORDER
MINUTESHOURS SECONDS FRAMES
PLAY
STOP
LCD Control
SELECTSELECTSELECTSELECT
RECORD
LCD Display
EXT
CLOCK
6
SDR24/96
Page 7

Setup & Configuration
This chapter explains how to set up and configure the SDR24/96 for use in your
studio. Two application examples show how to interface the SDR24/96 with
analog and digital recording consoles.
Required Equipment
Of course, there’s more to a studio than a recorder and some musicians. At a
minimum, you’ll need the following to make the SDR24/96 feel at home:
• A console with a minimum of 24 tape sends (buses or direct outputs) and
returns (line inputs or monitor returns). If your analog console has only 8
tape sends, use Y-cord splitters to send tape out 1 to SDR24/96 Inputs 1,
9 and 17; tape out 2 to SDR24/96 Inputs 2, 10, and 18, and so forth.
• Cables to connect the SDR24/96 to the console: Up to six DB25 break-out
cables or fiber optic cables, depending on your I/O setup.
• All the stuff that typically connects to a console: microphones,
instruments, outboard equipment, control room monitors, and so on.
Installation
This section describes how to connect the SDR24/96 to your console. Before you
begin, you should choose a location for your SDR24/96 considering the following:
Operation Guide
• If you’re not using the Remote 24 or Micro Remote, position the front
panel within convenient reach of your normal recording/mixing position. If
you are using a remote controller, you might want to get the SDR24/96
out of the way. Be aware that although analog cables can be fairly long,
Remote 24 and Micro Remote cables are limited to about 10 meters.
ADAT Optical cables can reach up to about 15 meters.
• The SDR24/96 requires a reliable AC power source with a good ground.
Do not use a ground lift adapter or plug the SDR24/96 into an ungrounded
receptacle. Remember, this is a computer. Using an uninterruptible power
supply (UPS) to power the SDR24/96 is a good idea to avoid an
unexpected shutdown and protect it from transient line voltages.
Note!
The SDR24/96 has a universal-input switching power supply, so you can plug
the AC linecord into any AC outlet with a voltage between 100 and 240 VAC
without having to worry about setting any switches or using a step-up or stepdown voltage transformer.
Operation Guide
7
Page 8
SDR 24/96
,
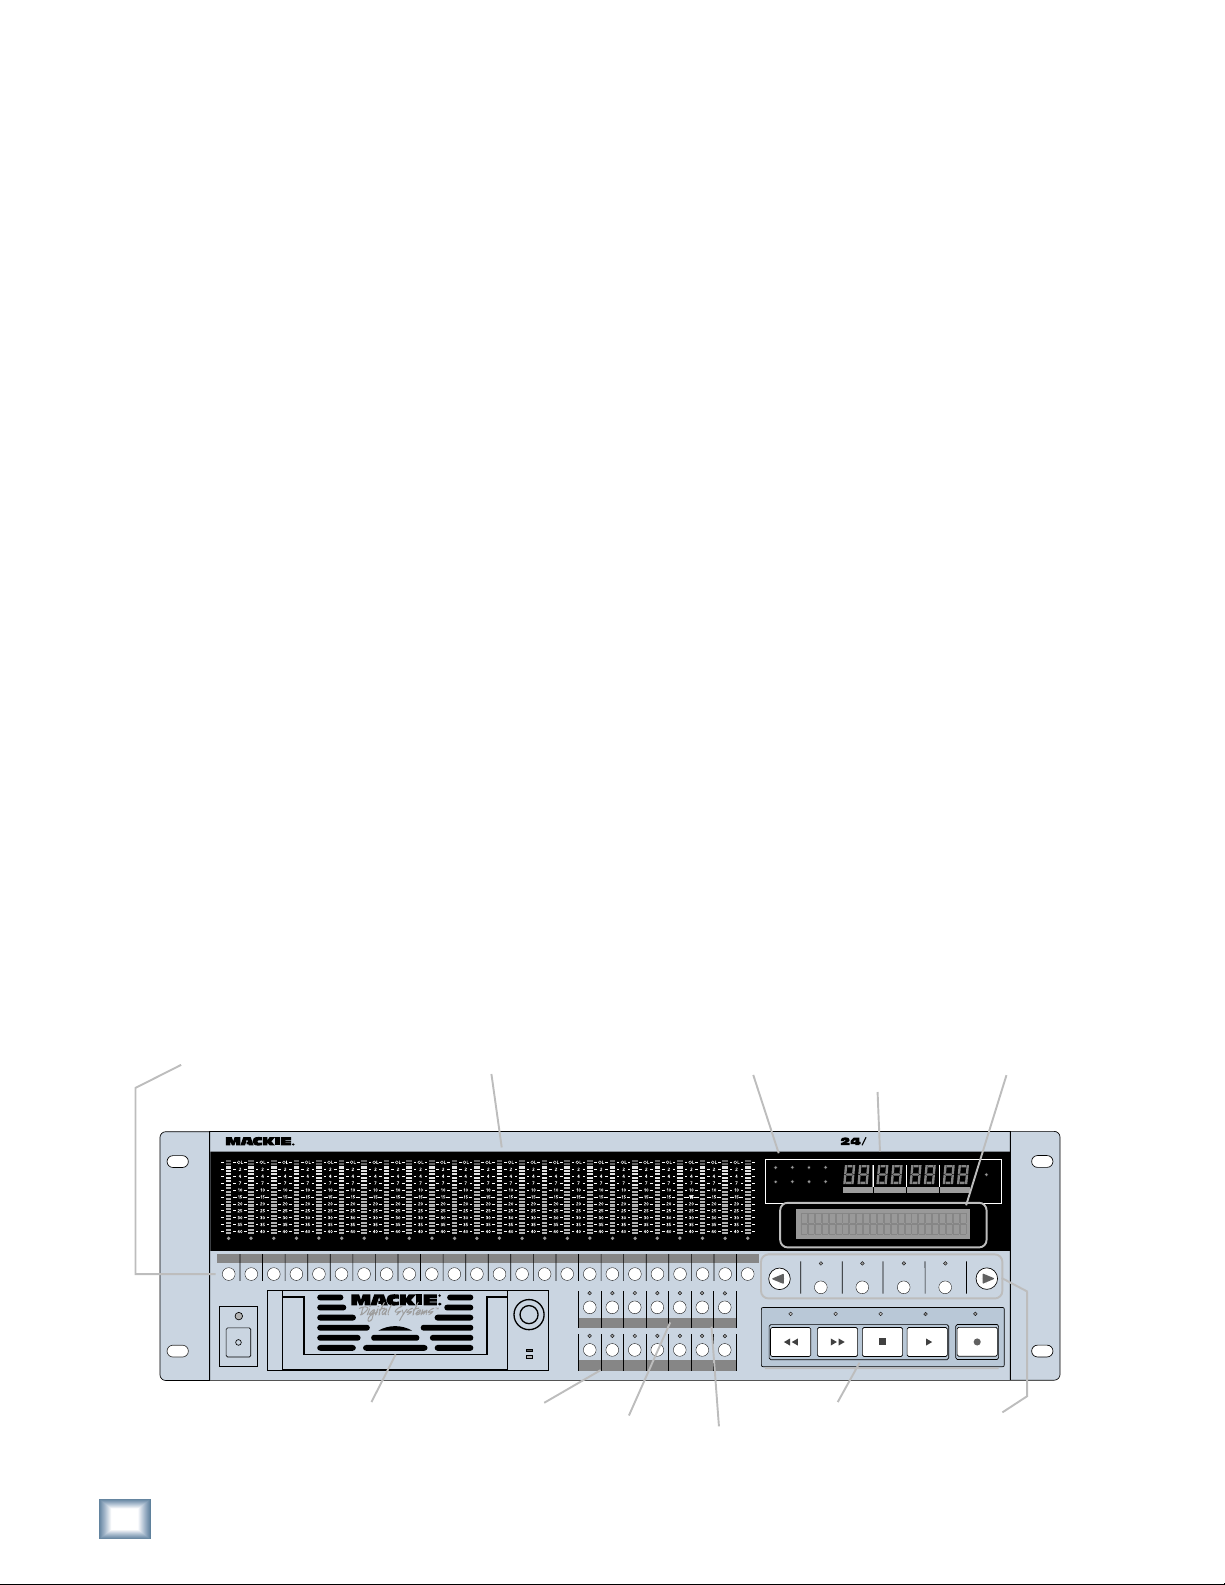
I/O Connections and Cables
I/O connections are available in either analog or digital and can be used in any
combination:
Analog
• Each 25-pin D-subminiature (DB25) connector provides eight balanced
analog line-level inputs or outputs. These connectors are pin-for-pin
compatible with the analog (not TDIF) DB25 connectors found on the
TASCAM DTRS recorders (see Appendix D: Analog I/O Pinout). DB25
cables that break out to XLR or 1/4" TRS connectors for mating with your
console are readily available (see Appendix E: Compatible Cables).
Digital
• The digital outputs are ADAT optical connections, and provide eight digital
inputs or outputs per connector (four if using 96 kHz sample rate).
Note: Different manufacturers use different wiring standards for DB25 interface cables that otherwise look the same. Make sure the cable you are
using is the correct one.
See Appendix E for a list of compatible SDR24/96 Analog I/O cables.
Word Clock and Digital Synchronization
Various methods are provided to synchronize the SDR24/96’s sample clock and
time/transport position to other equipment. The functions and connections for
each of the sync connections are as follows:
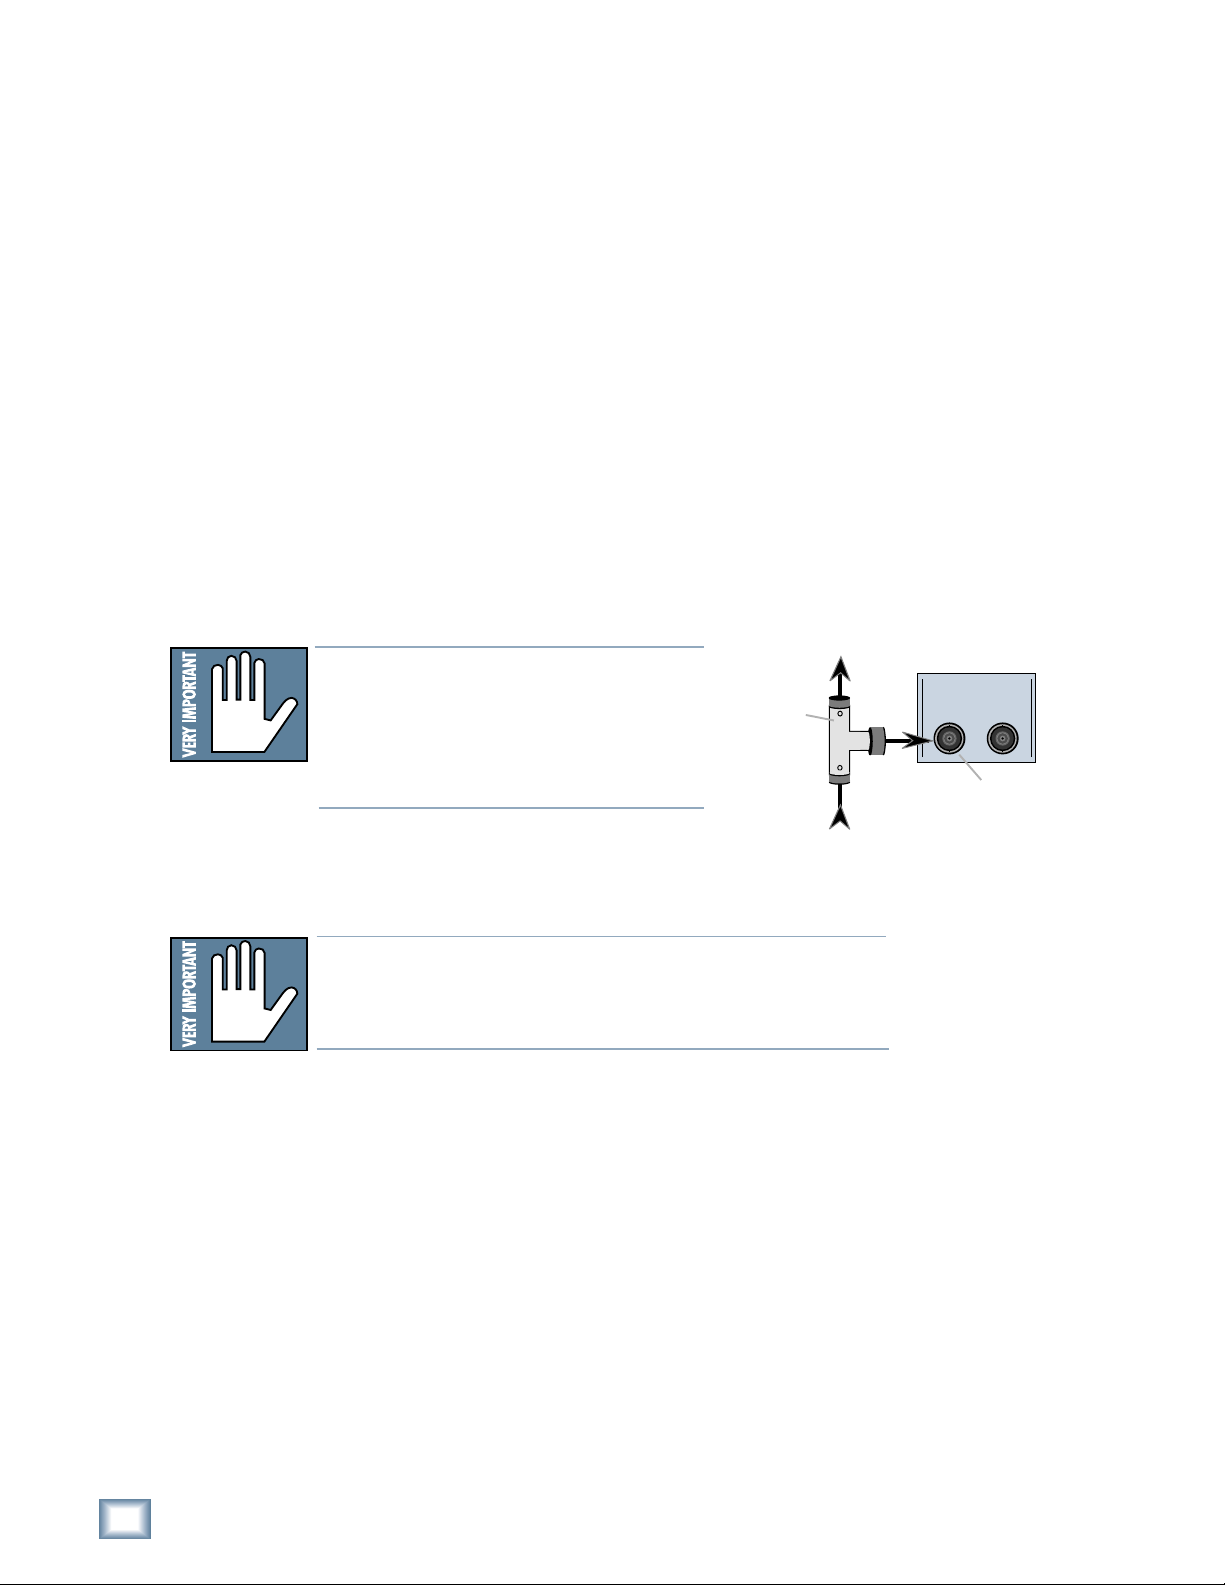
• SMPTE IN — This 1/4" jack serves as an input when slaved to incoming
SMPTE time code. Use a shielded 2-conductor cable with a 1/4" TS plug.
• SMPTE OUT — This 1/4" jack serves as an output when generating
SMPTE time code to synchronize other devices with the SDR24/96. Use a
shielded 2-conductor cable with a 1/4" TS plug.
• WORD CLOCK IN — This BNC jack receives word clock from another
device when the SDR24/96 Sample Clock is set to Word Clock. Use this
input when the SDR24/96 is operating as a word clock slave. Use 75-ohm
coaxial cable with a BNC connector.
• WORD CLOCK OUT — This BNC jack transmits word clock to other
devices in the system when the SDR24/96 is configured as the clock
master (Sample Clock set to Internal). Use 75-ohm coaxial cable with a
BNC connector.
DIGITAL WORD CLOCK I/O
1 - 8
IN OUT
X2
1-4
DESIGNED, AND MANUFACTURED BY MACKIE DESIGNS INC • WOODINVILLE • WA 98072 • USA
ABRIQUE AU USA • PATENTS PENDING COPYRIGHT ©1998 THE FOLLOWING ARE TRADEMARKS OR
RKS OF MACKIE DESIGNS INC.: "MACKIE.", MACKIE DIGITAL SYSTEMS AND THE "RUNNING MAN" FIGURE.
DIGITAL
9 - 16
IN OUT
X2
5-8
DIGITAL
17 - 24
IN OUT
X2
9-12
IN
CAUTION
RISK OF ELECTRIC SHOCK
REPLACE WITH THE SAME TYPE FUSE AND RATING.
DISCONNECT SUPPLY CORD BEFORE CHANGING FUSE
OUT
DO NOT OPEN
SMPTE
OUT
IN
WARNING:
TO REDUCE THE RISK OF FIRE OR ELECTRIC SHOCK, DO NOT
EXPOSE THIS EQUIPMENT TO RAIN OR MOISTURE. DO NOT REMOVE COVER.
NO USER SERVICEABLE PARTS INSIDE. REFER SERVICING TO QUALIFIED PERSONNEL.
AVIS :
RISQUE DE CHOC ELECTRIQUE — NE PAS OUVRIR
UTILISE UN FUSIBLE DE RECHANGE DE MÊME TYPE.
DEBRANCHER AVANT DE REMPLACER LE FUSIBLE
MIDI
IN
OUT
SERIAL NUMBER
FOOT
SWITCH
MANUFACTURING DATE
MICRO/
REMOTE 24
CNTRL
ADAT SYNC
OUT
ADAT SYNC
IN
SERIAL
9-PIN
8
SDR24/96
Page 9

• MIDI IN/OUT — These standard MIDI connectors (female 5-pin DIN) can
be used to send or receive MIDI Time Code (MTC) and MIDI Machine
Control (MMC) when connecting to equipment with transport controls and
a position display.
• ADAT SYNC OUT — This 9-pin D-subminature connector connects to the
SYNC IN connector on an ADAT multitrack recorder when the SDR24/96
is providing the master sample clock. Use male-to-male 9-pin D-sub (DB9)
cable.
• ADAT SYNC IN — This 9-pin D-subminature connector connects to the
SYNC OUT connector on an ADAT multitrack recorder when the
SDR24/96 is the slave. Use male-to-male 9-pin D-sub (DB9) cable.
Whenever digital audio connections are made between devices, the sample clock
of every device must run at exactly the same rate. This is usually accomplished by
selecting one device as the “master” clock source and distributing its word clock
signal to all the “slave” devices in the system. The master is configured to run
from its internal clock, and the slaves from external word clock. Some digital
interfaces are self-clocking (such as the AES input on many DAT machines) and
do not require a separate word clock connection. Others simply cannot be
configured as slaves. The master/slave designation must be correctly made for
each device to avoid the clicks and pops associated with asynchronous clocks.
Generally it doesn’t matter which device in a system serves as the word clock
master. For example, if your SDR24/96 Inputs and Outputs are connected to the
Tape Inputs and Outputs of a Mackie Digital 8
either the SDR24/96 or D8B can be the word clock master. (Note: The D8B must
have the Apogee Word Clock Card installed for this application.)
•Bus console using ADAT optical,
Operation Guide
Operation Guide
9
Page 10
SDR 24/96
The following is the recommended setup for establishing proper sample clock
synchronization with the devices connected to the SDR24/96.
ADAT Optical
With the SDR24/96 as a master, set the receiving device(s) to derive sample
clock from their ADAT optical ports if the ports are self-clocking. In this
case, no word clock connection is necessary. If the ADAT optical ports on the
receiving devices are not self-clocking, connect WORD CLOCK OUT of the
SDR24/96 to Word Clock In on the receiving device(s). If the receiving device
is an ADAT multitrack recorder, use ADAT SYNC OUT of the SDR24/96 to
the SYNC IN on the ADAT.
With the SDR24/96 configured as a slave, there is no need to connect the
word clock connection on the SDR24/96 (the SDR can derive its word clock
from the Digital Optical input). Make sure the sample clock
(SETUP:Sync:SClk) is set to ADAT A, ADAT B, or ADAT C (whichever is the
master ADAT).
Word Clock to
other Slaves
Note:Note:
Note: Use 75 W coaxial cables when con-
Note:Note:
necting word clock to the Word Clock
input jack. If there are more devices to connect to the Word Clock, use a BNC Tee
BNC-Tee
adaptor
WORD CLOCK I/O
IN OUT
adapter to feed the signal on to the next
device in the chain.
Word Clock
From Master
Word clock
input jack
10
SDR24/96
Note:Note:
Note: If you are using an SDR24/96 with the Mackie Digital
Note:Note:
8•Bus console, you may need to turn on the Digital 8•Bus first.
The Apogee Clock I/O on the D8B prefers not to see an active
signal at its Word Clock input when it powers up.
Page 11
Mackie Media (Optional)
PROJECT: Feel the Love
AVAIL: 02:27:26 on EXT
44.1k
VARI
48k
24 BIT16 BIT
TC
ERROR
MINUTESHOURS SECONDS FRAMES
EXT
CLOCK
SELECTSELECTSELECTSELECT
POWER
24 TRACK/24 BIT DIGITAL AUDIO RECORDER
ALL
INPUT
AUTO
INPUT
PUNCH REHRSELOOPLOCATESTORE
DELETE
LAST
SETUP
EDIT
T-CODE
CHASE
AUTO
TAKE
TRACK PROJECT
242322212019181716151413121110987654321
HIGH RESOLUTION
NON-LINEAR RECORDER
X2
96
SDR
REWIND
FAST FWD
PLAY
STOP
RECORD
The SDR24/96 emulates the tape library tradition with Mackie Media M•90 and
Mackie Media PROJECT drives. Both drives come complete with a plug-in tray for
quick removal and a nifty storage case for shelving and transporting the drives.
The SDR24/96 can record or play directly off the M
as quickly as changing tape on a 24-track—no backup time required. PROJECT
drives are for backup only and use removable 2.2GB ORB cartridges that fit in your
pocket. Each can hold a couple of 5-minute 24-track masters.
Mackie Media Tray
Mackie Media
Receiver
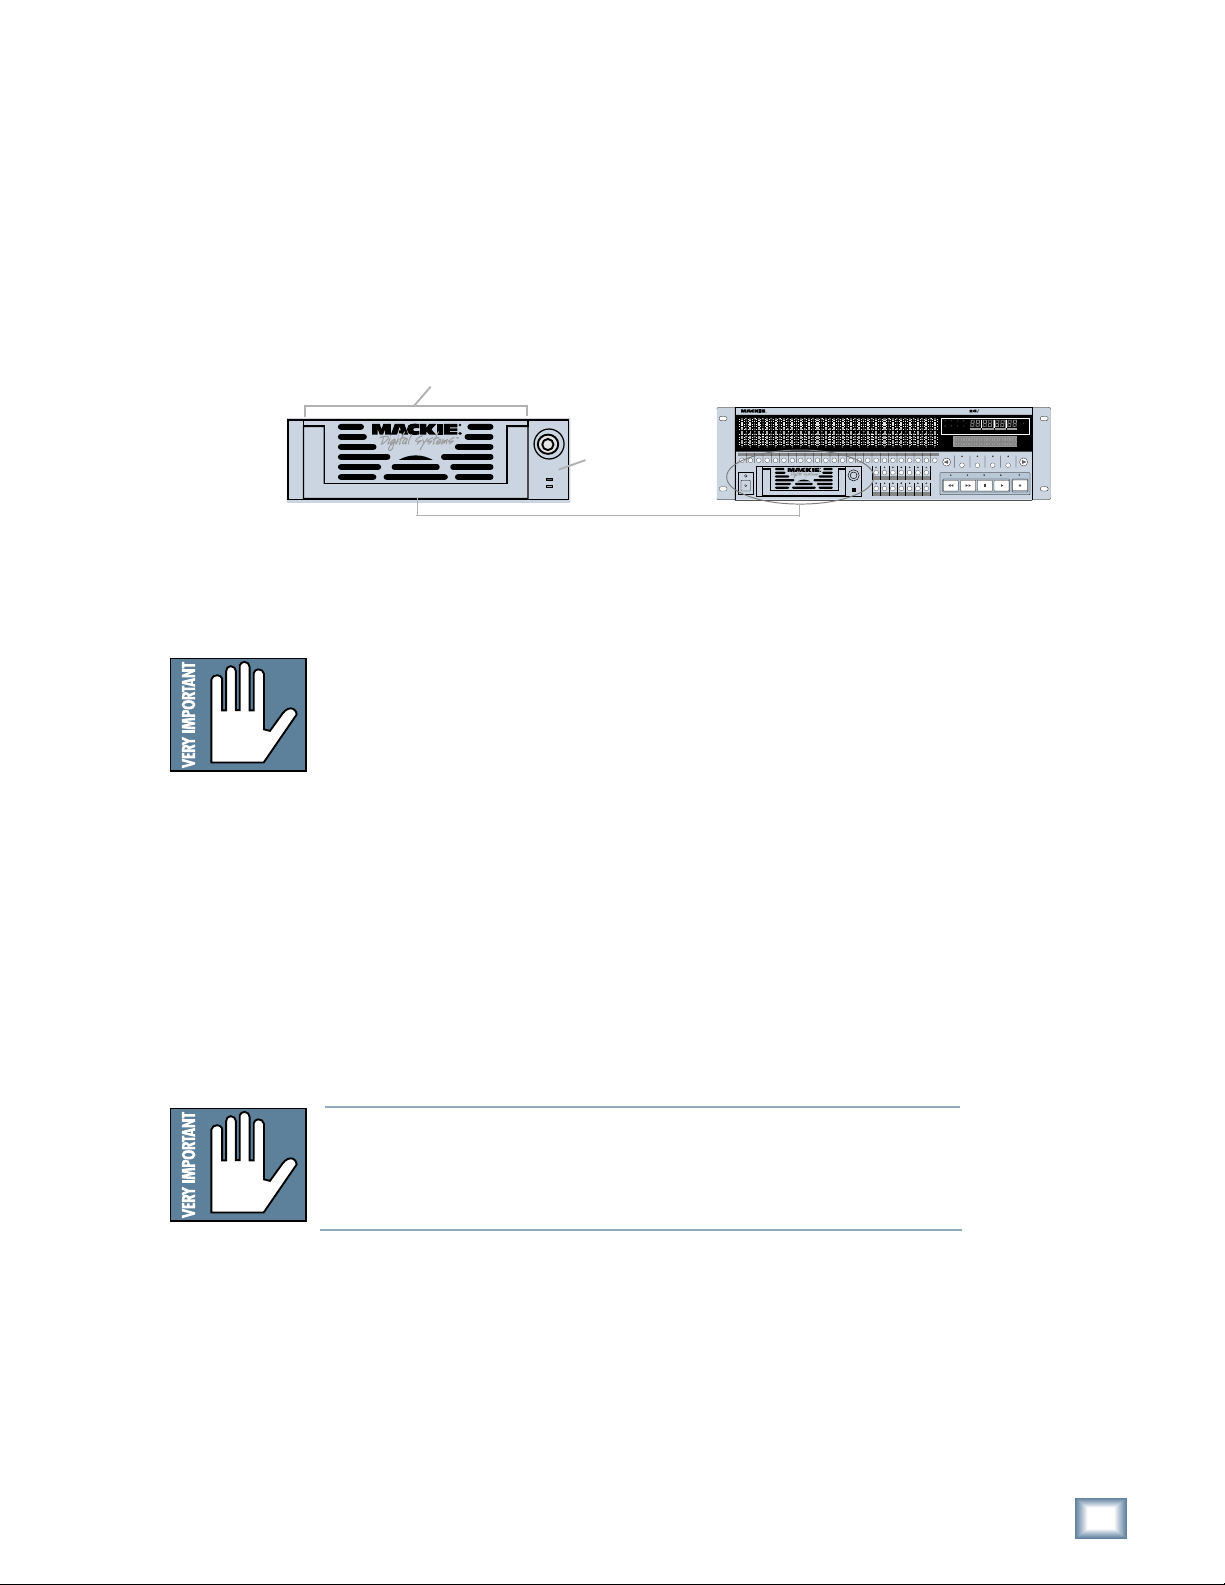
To install or remove a Mackie Media tray:
1. Power the SDR24/96 off whenever inserting or removing media trays.
If you have an active project, don’t forget to save it first!
•90 so you can change sessions
Operation Guide
2. To remove a drive, first unlock it by inserting the key and turning it a
quarter-turn counterclockwise. Two keys are packed with the recorder, and
one with each M•90 drive.
3. Lift the bail handle to release the drive, and pull it out of the drive bay.
4. To install a new M•90 or PROJECT drive, slide the media tray into the
front panel drive bay. Press it firmly into place, and latch it by pressing the
bail handle downward until it’s fully seated.
5. Insert the key into the lock and turn it a quarter-turn clockwise. The key
locks the drive into place and powers the tray.
6. The SDR24/96 will automatically detect the Mackie Media drive when you
next power it up.
Note: Note:
Note: Mackie Media are hard drives, and as we all know, hard drives
Note: Note:
involve some pretty intricate technology. So don’t shake the little
darlin’, and if a tray has just come in from a freezing car or airplane
cargo hold, do not install it until it has reached room temperature.
Operation Guide
11
Page 12
SDR 24/96
Hookups
This section shows how the SDR24/96 is typically connected to both analog and
digital consoles (using the Mackie Analog and Digital 8•Bus consoles as
examples). These examples assume that the rest of your studio equipment
(monitors, sound sources, outboard processing, etc.) is already connected, or that
you know how to connect it.
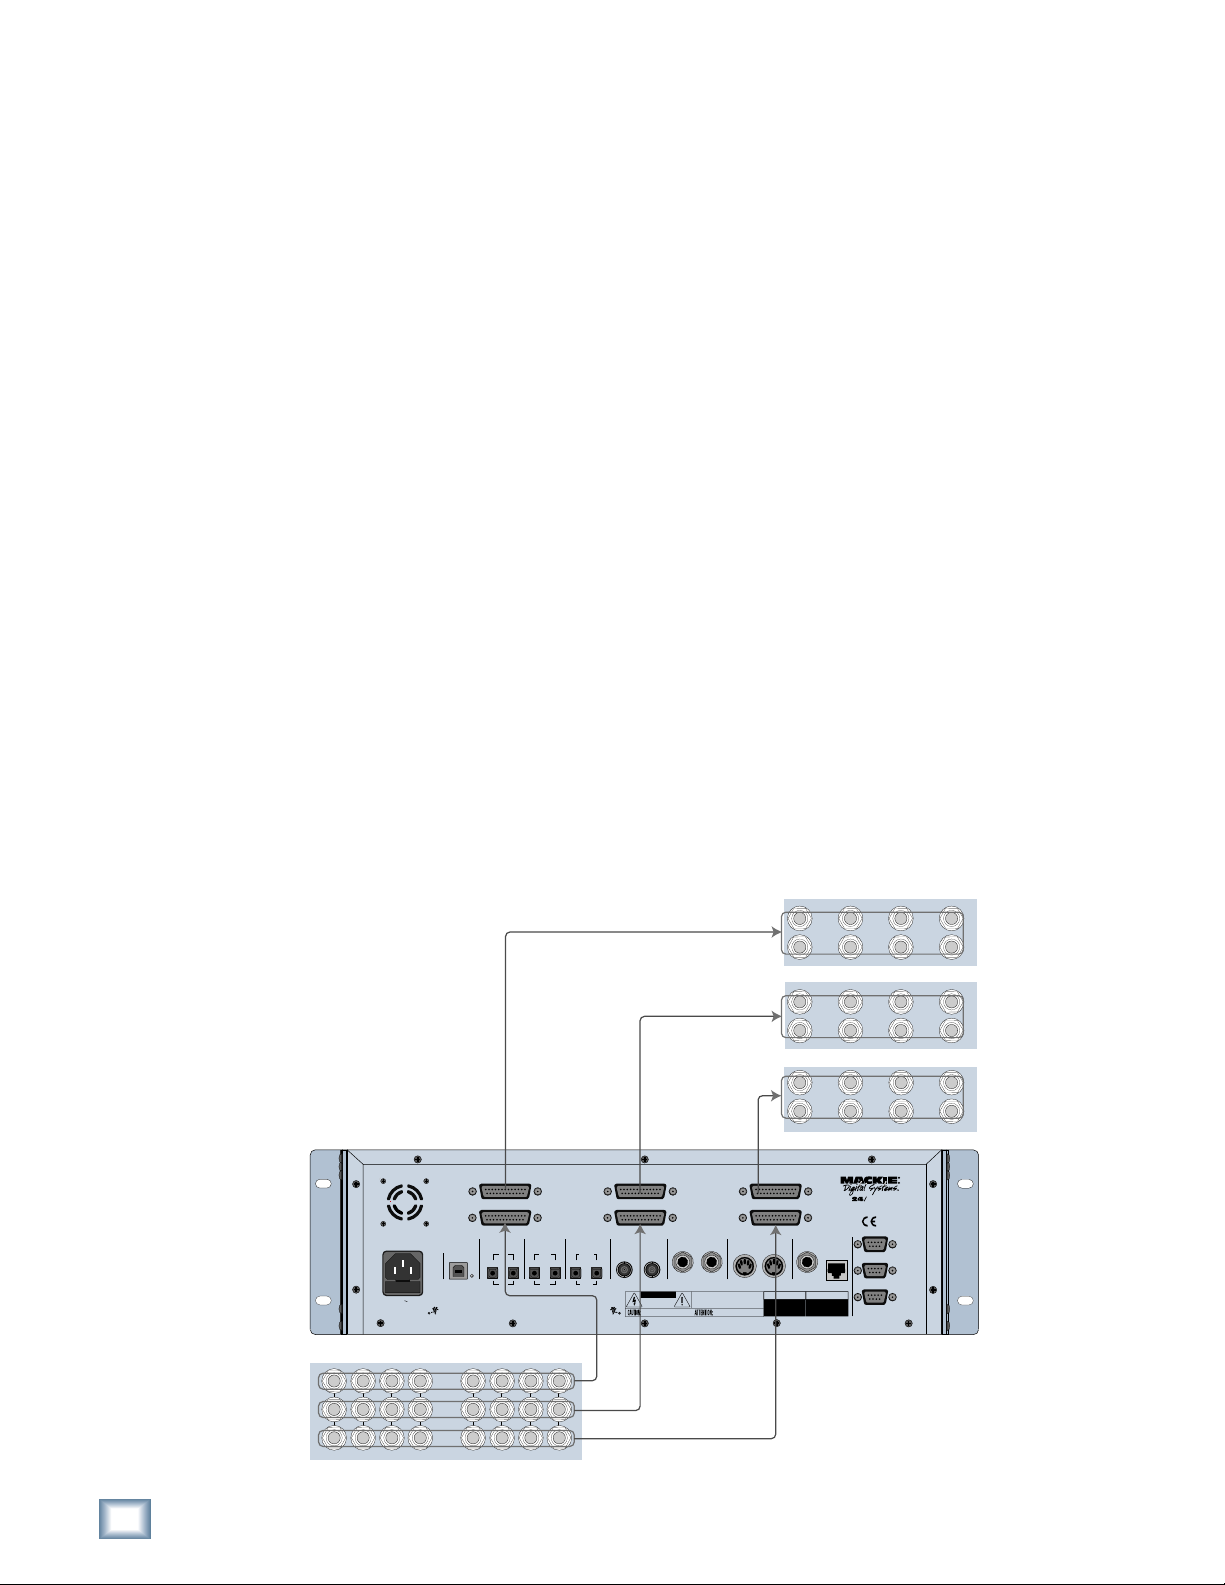
Before you begin, note how the three analog eight-channel I/O connectors are
arranged on the SDR24/96 rear panel: 1-8 is on the left, 9-16 is in the center, and
17-24 is on the right. Labeling each cable before you begin will make connecting
the SDR24/96 to your console easier.
Analog Hookup
This example describes the hookup for the 24•8 analog console.
Cables & Hardware
(6) Analog break-out cables, DB25 to eight 1/4" TRS phone plugs
Hookup
1. Connect three break-out cables to the SDR24/96 Inputs (bottom
connectors). If you want to have the ability to route any console input to
any recorder track, then connect the 1/4" plugs on each of the three breakout cables to the like-numbered Submaster/Tape Output jacks on the
8•Bus console. This works as long as you don’t record more than 8channels at a time, since the Submaster Outputs 9-16 and 17-24 are the
same as outputs 1-8.
Alternately, you can connect the console’s direct outputs to the recorder’s
inputs, so that each console channel feeds the like-numbered recorder
track. Or, you can use a combination of direct and subgroup outs. The
hookup diagram below shows the SDR24/96 inputs connected to the
Submaster Outputs.
ANALOG OUT 1 - 8 ANALOG OUT 9 - 16 ANALOG OUT 17 - 24
ANALOG IN 1 - 8 ANALOG IN 9 - 16 ANALOG IN 17 - 24
POWER
100 - 240V 250mA
50/60Hz
DIGITAL WORD CLOCK I/O MIDI
1 - 8
USB
IN OUT
X2
1-4X25-8X29-12
CONCEIVED, DESIGNED, AND MANUFACTURED BY MACKIE DESIGNS INC • WOODINVILLE • WA 98072 • USA
MADE IN USA • FABRIQUE AU USA • PATENTS PENDING COPYRIGHT ©1998 THE FOLLOWING ARE TRADEMARKS OR
REGISTERED TRADEMARKS OF MACKIE DESIGNS INC.: "MACKIE.", MACKIE DIGITAL SYSTEMS AND THE "RUNNING MAN" FIGURE.
DIGITAL
9 - 16
IN OUT
DIGITAL
17 - 24
IN OUT
OUT
CAUTION
RISK OF ELECTRIC SHOCK
DO NOT OPEN
REPLACE WITH THE SAME TYPE FUSE AND RATING.
DISCONNECT SUPPLY CORD BEFORE CHANGING FUSE
SMPTE
OUT
IN
WARNING:
TO REDUCE THE RISK OF FIRE OR ELECTRIC SHOCK, DO NOT
EXPOSE THIS EQUIPMENT TO RAIN OR MOISTURE. DO NOT REMOVE COVER.
NO USER SERVICEABLE PARTS INSIDE. REFER SERVICING TO QUALIFIED PERSONNEL.
AVIS:
RISQUE DE CHOC ELECTRIQUE — NE PAS OUVRIR
UTILISE UN FUSIBLE DE RECHANGE DE MÊME TYPE.
DEBRANCHER AVANT DE REMPLACER LE FUSIBLE
ININOUT
24•8 TAPE RETURNS 1-8
7531
6428
24•8 TAPE RETURNS 9-16
13 11 9
15
16 14 12 10
24•8 TAPE RETURNS 17-24
23
24
SDR
24 TRACK/24 BIT DIGITAL
MICRO/
FOOT
REMOTE 24
SWITCH
CNTRL
MANUFACTURING DATE
SERIAL NUMBER
AUDIO RECORDER
21
22
96
HIGH RESOLUTION
NON-LINEAR RECORDER
ADAT SYNC
OUT
ADAT SYNC
SERIAL
9-PIN
19
20
IN
17
18
12
SDR24/96
87156145
16
4123112101
13
24•8 SUBMASTER/TAPE OUTPUTS
9
171820 1921222324
Page 13
2. Connect three break-out cables to the SDR24/96 Outputs (top connectors).
Connect the plug end of the cables to the like-numbered Tape Return jacks
on the 24•8 console.
SDR24/96 Settings
1. Set the Sample Clock (SETUP:Sync:SClk) to Internal.
2. Set the Sample Rate and Sample Size according to your preference.
Console Settings
Set the 24•8 console to the nominal +4 dBu operating level by setting the five
Operating Level switches in the Sub Out and Tape Return sections to the ‘out’
position.
This example describes the hookup for the D8B console equipped for analog I/O.
SDR 24/96
Operation Guide
POWER
100 - 240V 250mA
50/60Hz
REGISTERED TRADEMARKS OF MACKIE DESIGNS INC.: "MACKIE.", MACKIE DIGITAL SYSTEMS AND THE "RUNNING MAN" FIGURE.
(6) DB25 to
DB25 Analog
Cables
Cables & Hardware
ANALOG OUT 1 - 8 ANALOG OUT 9 - 16 ANALOG OUT 17 - 24
ANALOG IN 1 - 8 ANALOG IN 9 - 16 ANALOG IN 17 - 24
DIGITAL WORD CLOCK I/O MIDI
DIGITAL
IN OUT
DIGITAL
9 - 16
17 - 24
IN OUT
1 - 8
USB
IN OUT
X2
1-4X25-8X29-12
CONCEIVED, DESIGNED, AND MANUFACTURED BY MACKIE DESIGNS INC • WOODINVILLE • WA 98072 • USA
MADE IN USA • FABRIQUE AU USA • PATENTS PENDING COPYRIGHT ©1998 THE FOLLOWING ARE TRADEMARKS OR
ANALOG I/O ANALOG I/O ANALOG I/O
OUT
CAUTION
RISK OF ELECTRIC SHOCK
DO NOT OPEN
REPLACE WITH THE SAME TYPE FUSE AND RATING.
DISCONNECT SUPPLY CORD BEFORE CHANGING FUSE
INPUT OUTPUT
TAPE IN/OUTS
SMPTE
OUT
IN
WARNING:
EXPOSE THIS EQUIPMENT TO RAIN OR MOISTURE. DO NOT REMOVE COVER.
NO USER SERVICEABLE PARTS INSIDE. REFER SERVICING TO QUALIFIED PERSONNEL.
AVIS:
RISQUE DE CHOC ELECTRIQUE — NE PAS OUVRIR
INPUT OUTPUT
Digital 8•Bus
ININOUT
TO REDUCE THE RISK OF FIRE OR ELECTRIC SHOCK, DO NOT
UTILISE UN FUSIBLE DE RECHANGE DE MÊME TYPE.
DEBRANCHER AVANT DE REMPLACER LE FUSIBLE
INPUT OUTPUT
FOOT
SWITCH
MANUFACTURING DATE
SERIAL NUMBER
AIO•8 Cards
SDR
24 TRACK/24 BIT DIGITAL
AUDIO RECORDER
MICRO/
REMOTE 24
CNTRL
96
HIGH RESOLUTION
NON-LINEAR RECORDER
ADAT SYNC
OUT
ADAT SYNC
SERIAL
9-PIN
IN
(3) AIO•8 cards for D8B
(6) DB25 to DB25 analog cables
Hookup
1. Connect three DB25 analog cables between the SDR24/96 Inputs (bottom
connector) and the corresponding D8B Tape Outputs (top connector).
2. Connect three DB25 analog cables between the SDR24/96 Outputs (top
connector) and the corresponding D8B Tape Inputs (bottom connector).
SDR24/96 Settings
1. Set the Input Type (SETUP:I/O:INPUT TYPE SELECT) to Analog for
Inputs 1-8, 9-16, and 17-24.
2. Set the Sample Clock (SETUP:Sync:SClk) to Internal.
3. Set the Sample Rate and Sample Size according to your preference. It is
not necessary to set the D8B and SDR24/96 to the same Sample Rate,
since with analog connections, the sample clocks on the two units are not
synchronized
Console Settings
1. Set the D8B Sample Clock to 44.1 k Internal or 48 k Internal according
to your preference.
Operation Guide
13
Page 14

SDR 24/96
Note: If you are using a D8B console
with OPT•8 cards
installed and the
SDR24/96 is the
clock master, then a
Clock I/O card must
also be installed in
the D8B to properly
synchronize its word
clock with the
SDR24/96.
Digital Hookup
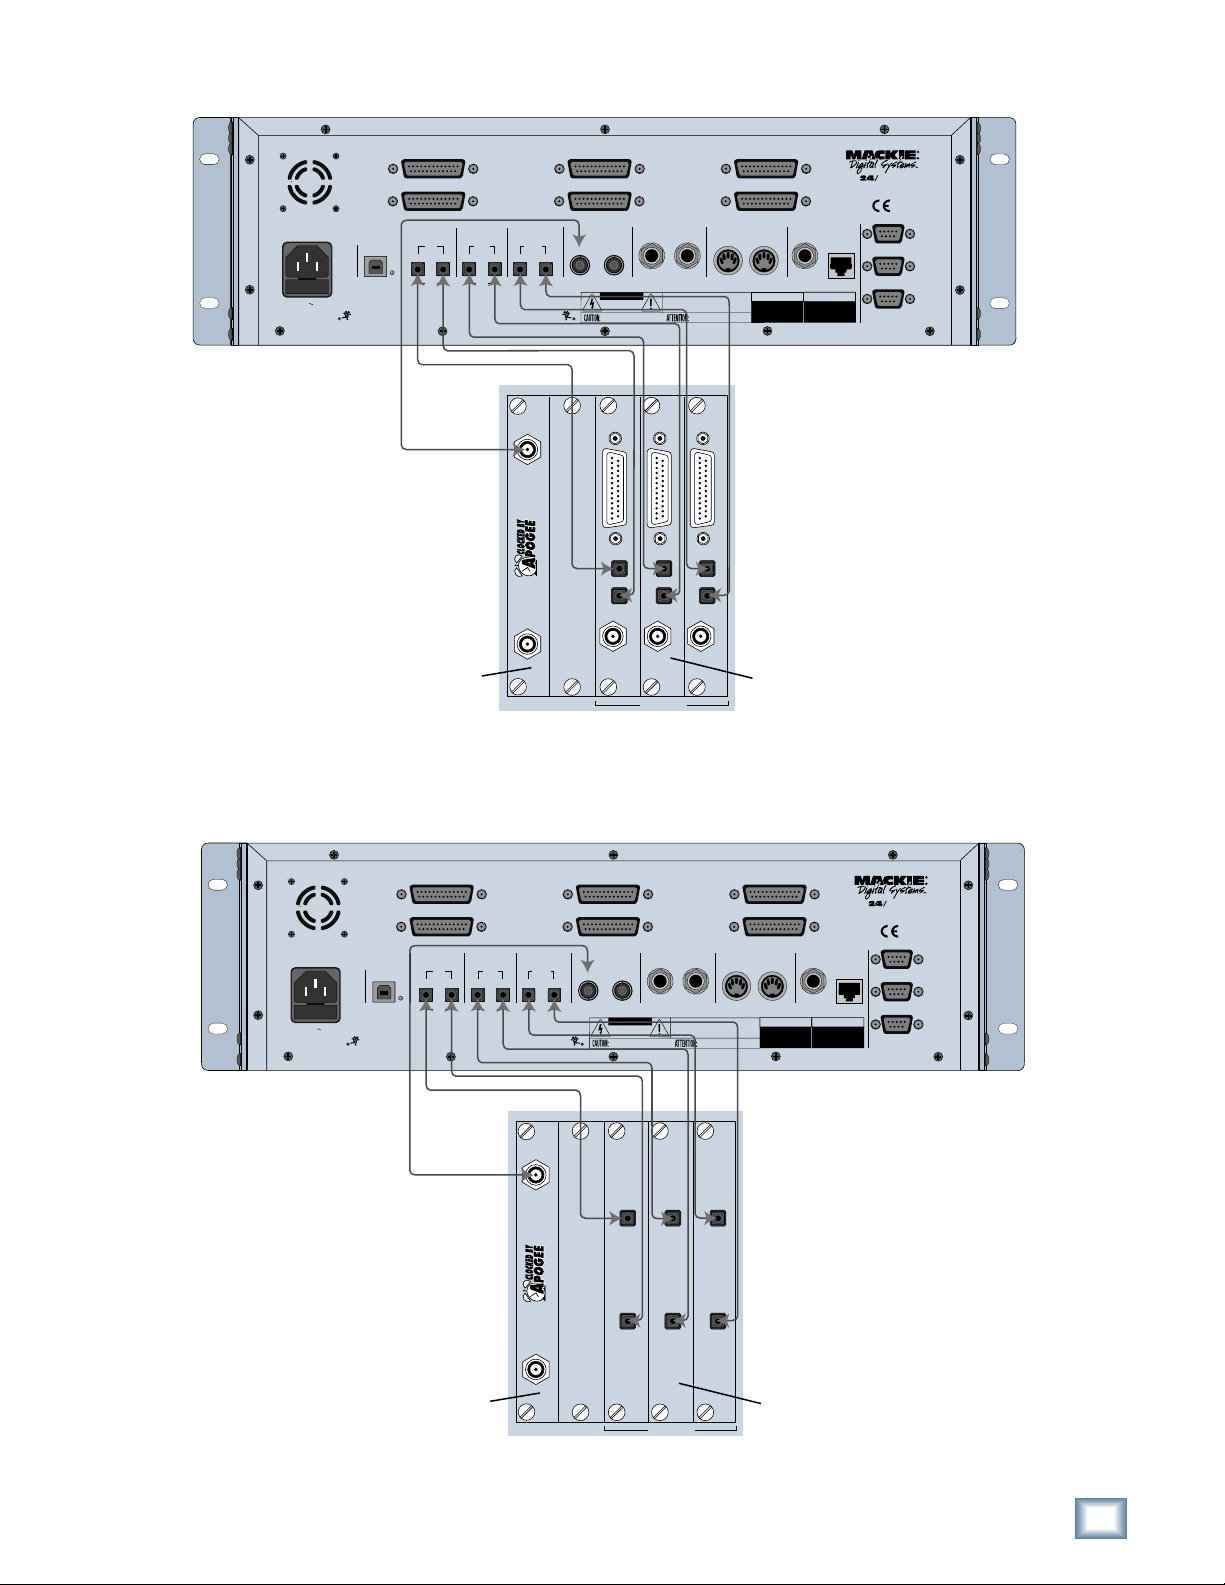
This example describes the hookup for the D8B console equipped for digital I/O
(DIO•8 or OPT•8).
Cables & Hardware
(3) DIO•8 or OPT•8 cards for D8B
(1) Apogee Clock I/O card for D8B (if D8B is the slave)
(6) ADAT optical cables
(1) 75Ω BNC word clock cable
Hookup
1. Connect three ADAT optical cables from the SDR24/96 DIGITAL optical
outputs to the optical inputs on the corresponding D8B I/O cards.
2. Connect three ADAT optical cables from the SDR24/96 DIGITAL optical
inputs to the optical outputs on the corresponding D8B I/O cards.
3. When the D8B is the clock master, the SDR24/96 can derive its clock from
the Digital Optical input. When the SDR24/96 is the clock master, connect
the WORD CLOCK OUT on the SDR24/96 to the WORD CLOCK IN on
the D8B (the D8B must have an Apogee Clock I/O card installed).
SDR24/96 Settings
1. Set the Input Type (SETUP:I/O:INPUT TYPE SELECT) to ADAT for
Inputs 1-8, 9-16, and 17-24.
2. If the SDR24/96 is the clock master, set the Sample Clock to Internal. If
the SDR24/96 is a clock slave, set the Sample Clock to ADAT A (or B or C).
(SETUP:Sync:SClk:ADAT A).
3. Set the Sample Rate to 44.1 kHz or 48 kHz according to your preference.
Console Settings
1. If you have DIO•8 cards installed, set the Tape Input and Tape Output
format for each card to ADAT. OPT
2. If the D8B is the clock master, set the Sample Clock to either 44.1 k
Internal or 48 k Internal. If it is a clock slave, then set the Sample Clock
to either 44.1 kHz or 48 kHz to match the Sample Rate selected on the
SDR24/96. Set the Apogee Clock to Word Clock.
•8 cards need no configuration.
14
SDR24/96
Page 15
ADAT Optical Hookup with DIO•8
ANALOG OUT 1 - 8 ANALOG OUT 9 - 16 ANALOG OUT 17 - 24
ANALOG IN 1 - 8 ANALOG IN 9 - 16 ANALOG IN 17 - 24
96
SDR
24 TRACK/24 BIT DIGITAL
AUDIO RECORDER
HIGH RESOLUTION
NON-LINEAR RECORDER
Operation Guide
POWER
100 - 240V 250mA
50/60Hz
USB
CONCEIVED, DESIGNED, AND MANUFACTURED BY MACKIE DESIGNS INC • WOODINVILLE • WA 98072 • USA
MADE IN USA • FABRIQUE AU USA • PATENTS PENDING COPYRIGHT ©1998 THE FOLLOWING ARE TRADEMARKS OR
REGISTERED TRADEMARKS OF MACKIE DESIGNS INC.: "MACKIE.", MACKIE DIGITAL SYSTEMS AND THE "RUNNING MAN" FIGURE.
When the SDR24/96 is
Master, connect SDR24/96
WORD CLOCK OUT to D8B
WORD CLOCK IN.
When the D8B is Master,
the SDR24/96 can derive its clock
from the Digital Optical Input.
DIGITAL WORD CLOCK I/O
DIGITAL
9 - 16
IN OUT
X2
5-8
DIGITAL
17 - 24
IN OUT
9-12
APOGEE
CLOCK I/O
WORD
CLOCK
WORD
CLOCK
X2
DIGITAL I/O
OUT
IN
1 - 8
IN OUT
X2
1-4
Clock I/O
Card
SYNC ALT I/O TAPE IN/OUTS
Digital 8•Bus
OUT
CAUTION
RISK OF ELECTRIC SHOCK
DO NOT OPEN
REPLACE WITH THE SAME TYPE FUSE AND RATING.
DISCONNECT SUPPLY CORD BEFORE CHANGING FUSE
APOGEE
APOGEE
DIGITAL I/O
TDIF
IN OUT
ADAT OPTICAL
SYNC
SMPTE
OUT
IN
WARNING:
TO REDUCE THE RISK OF FIRE OR ELECTRIC SHOCK, DO NOT
EXPOSE THIS EQUIPMENT TO RAIN OR MOISTURE. DO NOT REMOVE COVER.
NO USER SERVICEABLE PARTS INSIDE. REFER SERVICING TO QUALIFIED PERSONNEL.
AVIS:
RISQUE DE CHOC ELECTRIQUE — NE PAS OUVRIR
UTILISE UN FUSIBLE DE RECHANGE DE MÊME TYPE.
DEBRANCHER AVANT DE REMPLACER LE FUSIBLE
APOGEE
DIGITAL I/O
TDIF
IN OUT
ADAT OPTICAL
ADAT OPTICAL
SYNC
MIDI
ININOUT
TDIF
IN OUT
SYNC
SERIAL NUMBER
DIO•8
Cards
FOOT
SWITCH
MANUFACTURING DATE
MICRO/
REMOTE 24
CNTRL
ADAT SYNC
OUT
ADAT SYNC
IN
SERIAL
9-PIN
ADAT Optical Hookup with OPT•8
ANALOG OUT 1 - 8 ANALOG OUT 9 - 16 ANALOG OUT 17 - 24
ANALOG IN 1 - 8 ANALOG IN 9 - 16 ANALOG IN 17 - 24
POWER
100 - 240V 250mA
50/60Hz
REGISTERED TRADEMARKS OF MACKIE DESIGNS INC.: "MACKIE.", MACKIE DIGITAL SYSTEMS AND THE "RUNNING MAN" FIGURE.
When the SDR24/96 is
Master, connect SDR24/96
WORD CLOCK OUT to D8B
WORD CLOCK IN.
When the D8B is Master,
the SDR24/96 can derive its clock
from the Digital Optical Input.
DIGITAL WORD CLOCK I/O
DIGITAL
9 - 16
IN OUT
X2
5-8
DIGITAL
17 - 24
IN OUT
9-12
APOGEE
CLOCK I/O
WORD
CLOCK
WORD
CLOCK
X2
OUT
IN
1 - 8
USB
IN OUT
X2
1-4
CONCEIVED, DESIGNED, AND MANUFACTURED BY MACKIE DESIGNS INC • WOODINVILLE • WA 98072 • USA
MADE IN USA • FABRIQUE AU USA • PATENTS PENDING COPYRIGHT ©1998 THE FOLLOWING ARE TRADEMARKS OR
Clock I/O
Card
SYNC ALT I/O TAPE IN/OUTS
IN
OUT
CAUTION
RISK OF ELECTRIC SHOCK
DO NOT OPEN
REPLACE WITH THE SAME TYPE FUSE AND RATING.
DISCONNECT SUPPLY CORD BEFORE CHANGING FUSE
INPUT OUTPUT
INPUT OUTPUT
OPT•8
OPT•8
Digital 8•Bus
SMPTE
OUT
WARNING:
TO REDUCE THE RISK OF FIRE OR ELECTRIC SHOCK, DO NOT
EXPOSE THIS EQUIPMENT TO RAIN OR MOISTURE. DO NOT REMOVE COVER.
NO USER SERVICEABLE PARTS INSIDE. REFER SERVICING TO QUALIFIED PERSONNEL.
AVIS:
RISQUE DE CHOC ELECTRIQUE — NE PAS OUVRIR
UTILISE UN FUSIBLE DE RECHANGE DE MÊME TYPE.
DEBRANCHER AVANT DE REMPLACER LE FUSIBLE
INPUT OUTPUT
OPT•8
MIDI
ININOUT
SERIAL NUMBER
OPT•8
Cards
FOOT
SWITCH
MANUFACTURING DATE
SDR
24 TRACK/24 BIT DIGITAL
AUDIO RECORDER
MICRO/
REMOTE 24
CNTRL
96
HIGH RESOLUTION
NON-LINEAR RECORDER
ADAT SYNC
OUT
ADAT SYNC
IN
SERIAL
9-PIN
Operation Guide
15
Page 16

Note:Note:
Note: The Remotes
Note:Note:
duplicate nearly all
of the front panel
operating controls.
SDR 24/96
When we describe a
front panel operation,
you’ll probably find
it available on the
Remote also. If you
have a Remote, try it
both ways. If you don’t
have a Remote yet,
think of how convenient it would be.
Remote 24/Micro Remote (Optional)
Installing either remote is as simple as plugging in a telephone. Connect one end
of the cable (supplied with the Remote) to the MICRO/REMOTE 24 CNTRL jack
on SDR24/96 rear panel, and the other end to the TO HDR REMOTE JACK on the
Remote 24, or to the TO SDR REMOTE JACK on the Micro Remote. It’s OK to
plug or unplug either remote with the SDR24/96 powered on.
MICRO REMOTE
Back panel of the
TO SDR REMOTE JACK
FOOT
REMOTE 24
ANALOG OUT 1 - 8 ANALOG OUT 9 - 16 ANALOG OUT 17 - 24
ANALOG IN 1 - 8 ANALOG IN 9 - 16 ANALOG IN 17 - 24
WARNING
DO NOT PLUG INTO
ETHERNET
Remote
connection
TO HDR
REMOTE JACK
SWITCH
Mackie Micro Remote
Back panel of the
Mackie Remote 24
Footswitch
Footswitch
HIGH RESOLUTION
96
SDR
NON-LINEAR RECORDER
24 TRACK/24 BIT DIGITAL
AUDIO RECORDER
Note:Note:
Note: If you are
Note:Note:
using an SDR24/96
with the Mackie
Digital 8•Bus console,
you may need to
turn on the Digital
8•Bus first. The
Clock I/O on the
D8B prefers not to
see an active signal
at its Word Clock
input when it powers up.
POWER
100 - 240V 250mA
50/60Hz
DIGITAL WORD CLOCK I/O
DIGITAL
9 - 16
IN OUT
X2
5-8
DIGITAL
17 - 24
IN OUT
X2
9-12
1 - 8
USB
IN OUT
X2
1-4
CONCEIVED, DESIGNED, AND MANUFACTURED BY MACKIE DESIGNS INC • WOODINVILLE • WA 98072 • USA
MADE IN USA • FABRIQUE AU USA • PATENTS PENDING COPYRIGHT ©1998 THE FOLLOWING ARE TRADEMARKS OR
REGISTERED TRADEMARKS OF MACKIE DESIGNS INC.: "MACKIE.", MACKIE DIGITAL SYSTEMS AND THE "RUNNING MAN" FIGURE.
OUT
CAUTION
RISK OF ELECTRIC SHOCK
DO NOT OPEN
REPLACE WITH THE SAME TYPE FUSE AND RATING.
DISCONNECT SUPPLY CORD BEFORE CHANGING FUSE
SMPTE
OUT
IN
WARNING:
TO REDUCE THE RISK OF FIRE OR ELECTRIC SHOCK, DO NOT
EXPOSE THIS EQUIPMENT TO RAIN OR MOISTURE. DO NOT REMOVE COVER.
NO USER SERVICEABLE PARTS INSIDE. REFER SERVICING TO QUALIFIED PERSONNEL.
AVIS:
RISQUE DE CHOC ELECTRIQUE — NE PAS OUVRIR
UTILISE UN FUSIBLE DE RECHANGE DE MÊME TYPE.
DEBRANCHER AVANT DE REMPLACER LE FUSIBLE
MIDI
ININOUT
SERIAL NUMBER
FOOT
SWITCH
MANUFACTURING DATE
MICRO/
REMOTE 24
CNTRL
ADAT SYNC
ADAT SYNC
SERIAL
Footswitch (Optional)
For hands-free do-it-yourself punches and Play/Stop operations, connect the cable
of a momentary, normally open footswitch to the FOOT SWITCH 1/4" TS jack on
the rear panel of the SDR24/96 or the Remote 24. If you have a Remote installed
you can connect two foot switches, one to the SDR24/96 and one to the Remote.
Each footswitch functions independently of the other. Footswitch functionality is
assigned in the front panel SETUP:System menu.
Power-Up
OK, NOW you can turn it on. Assuming you have already connected the SDR24/96
to your console, power up the SDR24/96 first, then the outboard equipment and
console, and finally the power amplifiers or powered monitors. Audio equipment
tends to generate unexpected clicks and pops when you power it up, so by
powering up your monitoring system last, you’ll save your speakers and your ears.
Before you read the next section, take a quick, self-guided tour of the front panel
display and controls to get a sense of where they are.
OUT
IN
9-PIN
16
SDR24/96
Page 17
Note: When 88.2
kHz or 96 kHz sampling rate is selected
(X2 mode), each digital optical port carries
only 4 tracks instead
of 8, due to a limitation in the ADAT
Optical specification. Tracks 1-12 are
used, and tracks
13-24 are unavailable
in X2 mode. The analog inputs continue
to operate with 24
tracks in X2 mode.
Configuration
Before starting a Project, you will need to configure the SDR24/96 I/O options
and synchronization parameters. These parameters determine where the input
signal is coming from, where the sample clock is coming from, how fast the
sample clock runs, and how many bits are recorded in every sample. Some
options, like sample rate and bit depth, will become “standards” that you won’t
need to change very often. Others, like input-to-track assignments, you may
need to change frequently.
Track I/O Setup
By default, each of the physical inputs and outputs on the SDR24/96
corresponds to their track numbers when recording and playing back audio. You
can customize the inputs and outputs to go to any of the tracks using the
TRACK INPUT SELECT and TRACK OUTPUT SELECT menus. These settings
apply to both the analog and digital inputs and outputs, and are saved with the
project file.
To configure the track input mapping:
1. Press SETUP to enter the
SETUP MENU.
2. Select I/O to enter the TRACK
INPUT SELECT menu.
SETUP MENU >
Record I/O Sync Transp
TRACK INPUT SELECT >
TRK: 1-8 9-16 17-24
3. Select 1-8. The LCD display
shows you the current setting
for inputs 1-8, either Direct or
Custom.
4. Select Direct for direct input-to-track recording (i.e., Input 1 to Track 1,
Input 2 to Track 2, etc.).
5. Select Custom to route inputs to different track numbers.
♦
You can assign an input to more than one track.
♦
If an input is routed to an alternate track (i.e., Input 1 to Track 9),
the Input Type assignment doesn’t change (see “Input Type Setup” on
the next page).
6. Press the Inc (increment) and
Dec (decrement) select buttons
to change the input number
that is assigned to Track 1.
Select Apply to save the change.
TRK 1- 8 INP: Direct
Direct Custom Exit
New
Track
Setting
Current
Setting
TRK 1 INP: 1 ( 1) >
Inc Dec Apply Exit
Operation Guide
SETUP
7. Press the Page Right
for Track 2, and so on.
8. Select Exit when finished with Tracks 1-8 to return to the previous
menu. Press the Page Left
SELECT menu to edit tracks 9-16 and 17-24.
9. Select Exit when finished to exit.
To configure the track output mapping:
1. Press SETUP to enter the
SETUP MENU.
2. Select I/O. Press the Page
Right
TRACK OUTPUT SELECT menu.
button to enter the
button to scroll to the next track. Repeat step 6
button to return to the TRACK INPUT
SETUP MENU >
Record I/O Sync Transp
< TRACK OUTPUT SELECT >
TRK: 1-8 9-16 17-24
Operation Guide
17
Page 18

3. Select 1-8. The LCD display
TRK 1- 8 OUT: Direct
Direct Custom Exit
TRK 1 OUT: 1 ( 1) >
Inc Dec Apply Exit
Track
New
Setting
Current
Setting
SETUP MENU >
Record I/O Sync Transp
< INPUT TYPE SELECT
INP: 1-8 9-16 17-24
INP 1- 8 TYPE: ADAT
Analog ADAT Custom Exit
INP 1 TYPE: ADAT >
Analog ADAT Exit
shows you the current setting for
outputs 1-8, either Direct or
Custom.
Note: The front
panel display’s backlight switches off
after ten minutes of
SDR 24/96
inactivity. You can
revive it at any time
by pressing either
the Page Left [<] or
Page Right [>] button, or any Select
button below the
display.
4. Select Direct for direct track-to-output playback (i.e., Track 1 to Output 1,
Track 2 to Output 2, etc.).
5. Select Custom to route tracks to different output numbers.
6. Press the Inc (increment) and
Dec (decrement) buttons to
change the output number that is
assigned to Track 1. Select Apply
to save the change.
7. Press the Page Right
for Track 2, and so on.
8. Select Exit when finished with Tracks 1-8 to return to the previous menu.
Press the Page Left
menu to edit tracks 9-16 and 17-24.
9. Press the SETUP button when done.
Notes:
♦
You cannot route a track to more than one output.
♦
You cannot assign more than one track to a single output. Attempting to do
so will cause the output assignments to switch places for the two tracks.
button to scroll to the next track. Repeat step 6
button to return to the TRACK OUTPUT SELECT
Input Type Setup
The SDR24/96 can read only one input for each track, either analog or digital. This
must be configured in the Setup menu. Since these settings depend on how the SDR
is connected to the console, these are global settings, and are project independent.
To configure the input type format:
1. Press SETUP to enter the
SETUP MENU.
2. Select I/O.
3. Press the Page Right
two times to enter the INPUT
TYPE SELECT menu.
4. Select 1-8. The LCD display
shows you the current input
settings for the 8 inputs selected.
Select Analog when using the
DB25 Analog inputs, and ADAT when using the Digital optical inputs.
5. The SDR24/96 also provides the
option of customizing each input
individually for either analog or
digital formats. Select the Custom
button and use the Page Left
through the 8 inputs. Choose either analog or digital for each input.
18
SDR24/96
6. Repeat steps 4 and 5 for inputs 9-16 and 17-24.
button
and Page Right buttons to scroll
Page 19

Synchronization
The Sync Options menu (under SETUP) allows you to select the sample clock
source, sample rate, time code source if time code chase is enabled, frame rate,
and sample size. Sample clock source, time code source, LTC output, and MTC
output are global settings, and are project independent. Sample rate, frame rate,
and sample size are saved in the project file.
Operation Guide
You must still select
the SDR24/96’s
Sample Rate even if
it’s slaved to another
device’s clock. If you
don’t set it correctly,
the SDR24/96 time
display will run at
the wrong rate, even
though audio will
play at the right
speed.
Sample Clock
The Sample Clock setting
(SETUP:Sync:SClk) determines the
source of the SDR24/96 sample clock. If
the SDR24/96 is a clock master or is not
connected to any other digital device(s),
set it to Internal. If the SDR24/96 is a
word clock slave, set it to Word Clock.
If the SDR24/96 is a slave to a device
connected to one of the digital optical inputs, set it to either ADAT A, ADAT B, or
ADAT C, depending on which digital port the master device is connected to.
SETUP MENU >
Record I/O Sync Transp
SYNC OPTIONS >
SClk SRate TcSrc FrRate
SAMPLE CLOCK: Internal
<< >> OK
Sample Rate
The Sample Rate (SETUP:Sync:SRate)
determines how fast the SDR24/96
sample clock runs. Compact Discs use
a 44.1 kHz sample rate, while some
DVD disks use 96 kHz. The video production folks prefer 48 kHz because their
digital video recorders use 48 kHz. When 44.1 kHz or 48 kHz is selected, all 24
tracks are available at both the analog and digital inputs and outputs. When 88.2
kHz or 96 kHz is selected, only 12 tracks are available at the digital inputs and
outputs. The selected sample rate appears in the status display. If 88.2 kHz or 96
kHz is selected, the X2 LED lights. Use the same sample rate throughout a
project.
SAMPLE RATE: 44.1 kHz
<< >> OK
Time Code Chase
The T-CODE CHASE button allows the SDR24/96 to sync to an external time
code source. In Play mode, the PLAY LED blinks until the SDR begins
receiving valid time code. When valid time code is detected, the PLAY LED
lights steadily, the transport jumps to the time code position being received,
and playback begins at that point.
Note: Looping is disabled when T-CODE CHASE is enabled.
T-CODE
CHASE
Time Code Source
TC SRC: MTC-Chase
The SDR24/96 can chase time code
from either MIDI IN or SMPTE IN. Use
Time Code Source (SETUP:Sync:TcSrc) to select either MTC-Jam Contin,
MTC-Chase, LTC-Jam Contin, or LTC-Chase.
MTC (MIDI Time Code) is read at the MIDI IN connector, and LTC
(Longitudinal Time Code) is read at the SMPTE IN connector.
With Chase selected, the transport locks to the incoming time code and the
sample rate is adjusted to stay synchronized to the time code. The SDR24/96
must use its internal clock in Chase mode. A good application for using Chase
mode is when slaving to an analog tape. If there is wow and flutter from the
tape, Chase mode is self-correcting.
With Jam Contin (Jam Continuous) selected, once the transport locks to the
incoming time code, the transport is governed by the the word clock speed. It is
assumed that all devices are synchronized to the same master clock. If not, the
time code can drift between devices. Use Jam Continuous mode when the
devices are synchronized to the same master clock.
<< >> OK
Operation Guide
19
Page 20

SDR 24/96
GENERATE MTC: Off
<< >> OK
VARISPEED: +1.00 % >
Units Zero OK Cancel
VARISPEED: +1.00 sem >
Units Zero OK Cancel
< VARISPEED: +1.00 %
<< >> Inc Dec
SAMPLE SIZE: 16 bit
<< >> OK
GENERATE LTC: Off
<< >> OK
FRAME RATE: 30
<< >> OK
Frame Rate
There are four standard time code frame
rates, each developed for a specific
application. In addition, two of the frame
rates have variations called drop-frame,
mostly used by broadcasters to correct timing issues caused by the 29.97 frame
rate. Use Frame Rate (SETUP:Sync:FrRate) to set the time code frame rate to one
of the following settings: 24, 25, 29.97, 29.97 Drop, 30, 30 Drop. If you’re not
involved with video or broadcast applications, 30 frames per second is your best
choice.
Sample Size
The Sample Size setting
(SETUP:Sync:Page Right:SSize)
determines how many bits are contained
in each audio sample recorded to disk
(the bit “resolution”). While 16-Bit audio takes up 1/3 less disk space than 24-Bit
audio, 24-Bit audio offers the potential for greater dynamic range (the difference
between the softest and loudest sounds that can be recorded) and captures a more
accurate “image” of the sound. The selected sample size appears in the status display.
LTC Output
This setting turns the SMPTE LTC OUT
on or off (SETUP:Sync:Page Right:
Ltc0). Turn this on when the SDR24/96 is
generating master SMPTE time code.
MTC Output
This setting turns MIDI time code on or
off at the MIDI OUT jack
(SETUP:Sync:Page Right:Mtc0). Turn
this on when the SDR24/96 is generating
master MIDI time code (MTC).
Varispeed
The Varispeed setting (SETUP:Sync:Page
Right:VariSp) allows you to speed up or
slow down the playback speed in
percentages (an increase of 1 percent
means it only takes 0.9 seconds to play
back a second music) or semitones (an
increase of 1 semitone is a half-step on
the musical scale). It does this by varying
the sample rate speed.
Select Units to toggle between percent (%) and semitones (sem). Press the Page
Right
adjust the speed. Select Zero to return to 0% (no change in speed). The VARI LED
lights in the status display whenever varispeed is activated.
button to access the increment (Inc) and decrement (Dec) controls to
20
SDR 24/96
Page 21

SDR24/96 Operation
PROJECT
Now that you’ve finished installing and configuring the SDR24/96, you’re almost
ready to start your first Project. We still want you to read this entire guide, but we
already hear some of you shuffling and muttering. Okay, okay, okay... for the
terminally impatient, read this chapter, then you can go out and play with your friends.
This section explains all you need to know to run a basic recording session:
opening and creating Projects, operating the Transport, setting levels, and
recording and overdubbing tracks. After you’re done recording, you will learn how
to back up your project to Mackie Media M•90, Mackie Media PROJECT drives,
and an external drive via the USB port.
Project Management
The SDR24/96 organizes audio files and session information into folders called
Projects. When the SDR24/96 boots up, it automatically opens the default Startup
Project.
Operation Guide
At this point, you should see the name of
the Startup Project in the LCD display.
The display also indicates the amount of
time that is available on the selected hard
drive, based on the current sample rate, sample size, and number of armed tracks.
If no tracks are armed, it displays the amount of time available for 24-track
recording.
PROJECT: Startup
AVAIL: 02:25:40 on EXT
Creating a New Project
Now that you have a few basics down, you’re ready to start recording. First, you’ll
need to create a new Project. Typically a Project is a song, radio spot, or sound
effects stem for a 10-minute film reel, but it could also be a live concert or an
entire symphony.
To create a new Project:
1. Press PROJECT, then select
New.
PROJECT FILES MENU >
New Open Save SaveAs
2. If there is more than one hard
drive, choose the drive you want to
create the Project on by selecting
either Internal or External from the
Select Drive screen using the << / >>
buttons. The selection defaults to the drive containing the currently open
Project. Select Next.
SELECT DRIVE: Internal
<< >> Next
Note:
The maximum length of a
project name is 20
characters. Projects
with longer names
cannot be opened
or selected.
3. The NEW PROJECT NAME screen
appears. Press New to accept the
default project name, which is
Project#1. Each time a new project
is created, the project number is incremented by one (i.e., Project#2,
Project#3, etc.)
To give the project a unique name,
press the Page Right
blinking cursor appears over the first
character of the name. Use the
increment (Inc) and decrement (Dec) buttons to change the highlighted
character. It scrolls through a modified ASCII character set. Use the >>
button to move to the next character.
button. A
NEW PROJECT NAME: >
New Cancel
< Project#1
<< >> Inc Dec
Operation Guide
21
Page 22

4. Press the Page Left button when finished, and then select New.
PROJECT FILES MENU >
New Open Save SaveAs
SELECT DRIVE: Internal
<< >> Next
Feel The Love
<< >> Open Cancel
Feel The Love v1
<< >> OpenAs Cancel
PROJECT FILES MENU >
New Open Save SaveAs
Save current project?
OK Cancel
New project created appears in the display to confirm that the project
was successfully created.
Opening a Project
Once two or more projects have been created, you can switch projects easily with
the Open Project command.
SDR 24/96
To open a Project:
1. Press Project. In the
Project Files Menu, select
Open.
2. If there is more than one hard
drive, choose the drive you want
to open the Project on by
selecting either Internal or
External from the Select Drive
screen using the << / >> buttons. The selection defaults to the drive
containing the currently open Project. Select Next.
3. Use the << / >> buttons to scroll
through the Project list, then
select Open.
4. If the selected project has more
than one project file, the Open
button changes to OpenAs. Use
the << / >> buttons to scroll
through the list of project files
that are contained within the project, then press OpenAs. Project opened
appears in the display, and then the name of the project.
Note: The name of the original project appears in the display, regardless
of which version of the project (project file) is open.
PROJECT
Saving a Project
Whenever you record new audio, the audio data and project information is
automatically saved to disk. However, if you make other changes to the project,
such as edits or I/O settings, you must save the project for the changes to be
remembered.
To save a Project:
1. Press Project. In the
Project Files Menu, select
Save.
2. A message appears in the display
asking you to confirm the save.
Select OK or Cancel.
You can save a project under a new name with the Save As command. All the
project information is saved in a new project file, but in the existing project folder.
This allows you to create backup copies as you work on a project, or to create
different versions of the project.
22
SDR 24/96
PROJECT
Page 23

PROJECT
PROJECT
A project file is the part of a Project that keeps track of all your recording
and editing, and controls what you hear when you hit Play.
A project can contain any number of project files. Since the audio
referenced in one project file can be used in any project file, you can create
multiple versions of the same song without affecting the original recording.
For example, you can create dance and extended play mixes from a CD
mix. Or, you can build an entirely new song and borrow parts from other
project files.
To save a current Project As:
1. Press Project. In the
Project Files Menu,
select SaveAs.
PROJECT FILES MENU >
New Open Save SaveAs
Operation Guide
2. The SAVE PROJECT AS
screen appears. Select SaveAs
to accept the existing project
name. This works the same as
the Save command.
To give the project a unique
name, press the Page Right
button. A blinking cursor
appears over the first
character of the name. Use the increment (Inc) and decrement (Dec)
buttons to change the highlighted character. It scrolls through a modified
ASCII character set. Use the >> button to move to the next character.
3. Press the Page Left
Project saved appears in the display to confirm that the project was
successfully saved.
button when finished, and then select SaveAs.
SAVE PROJECT AS: >
SaveAs Cancel
< Feel The Love v2
<< >> Inc Dec
Deleting a Project
When you’ve finished a project and have properly backed it up and archived it, you
may need to delete the project from the hard drive to make room for your next project.
To delete a Project:
1. Press Project. Press the
Page Right
and in the Project Files
Menu, select Delete.
button,
PROJECT FILES MENU >
New Open Save SaveAs
< PROJECT FILES MENU
2. The Startup project name
appears in the display. Use the
<< / >> buttons to scroll
through the list of project
files.
Delete Copy Rename Purge
Startup
<< >> Del Cancel
3. When the project name you want to delete appears in the display, select
Del.
4. A message appears asking you
confirm the delete command.
Select OK or Cancel.
5. Deleting project... appears in the display, followed by Project deleted.
Note: The project that is currently open cannot be deleted.
Lots of Laughs
Del Project? OK Cancel
Operation Guide
23
Page 24

SDR 24/96
SOURCE DRIVE: Internal
<< >> Next
Feel The Love
<< >> Copy Cancel
DEST DRIVE: External
<< >> Next
< Feel The Love
<< >> Inc Dec
Copying a Project
The importance of backing up your files cannot be emphasized enough. Do it
often. Hopefully, you’ll never need to use a backup copy of your project, but you’ll
thank yourself a hundred times over if you ever need it.
To copy a Project:
1. Press Project. Press the
Page Right
in the Project Files Menu,
select Copy.
button, and
PROJECT
PROJECT FILES MENU >
New Open Save SaveAs
< PROJECT FILES MENU
2. If there is more than one hard
drive, choose the drive you want
to copy the project from by
selecting either Internal or
External from the Source Drive
screen using the << / >> buttons.
The selection defaults to the drive containing the currently open project.
Select Next.
3. Use the << / >> buttons to scroll
through the Project list, then
select Copy.
4. If there is more than one hard
drive, choose the drive you want
to copy the project to by selecting
either Internal or External from
the Destination Drive screen using the << / >> buttons. The selection
defaults to the drive containing the currently open Project. Select Next.
Delete Copy Rename Purge
5. The COPY PROJECT TO screen
appears. Select OK to accept the
existing project name.
To give the project a new name,
press the Page Right
blinking cursor appears over the
first character of the name. Use
the increment (Inc) and decrement (Dec) buttons to change the
highlighted character. It scrolls through a modified ASCII character set.
Use the >> button to move to the next character.
6. Press the Page Left
Project copy busy... appears in the display during the copy operation,
which may take several minutes, depending on the size of the project.
Project copy done appears in the display to confirm that the project was
successfully copied.
It is extremely important that you make backup copies of your projects at the end
of each session. While digital recording technology is highly reliable and hard disk
media is durable, sometimes stuff just happens. To reduce your risk of catastrophic
data loss (and the possible loss of $$ and clients), back up your projects on two
media before deleting them from your working drive(s).
There…. now you know better. So, don’t wait until disaster strikes to get backup
religion, and don’t complain to Mackie when your pet Rottweiler discovers that the
only copy of your client’s $20,000 project makes a superb chew toy and buries the
drive in the garden.
button. A
button when finished, and then select OK.
COPY PROJECT TO: >
OK Cancel
24
SDR 24/96
Page 25

Renaming a Project
You can give a project a new name at any time. The project cannot be open when
you rename it.
To rename a Project:
1. Press Project. Press
the Page Right
button, and in the
Project Files Menu,
select Rename.
PROJECT
PROJECT FILES MENU >
New Open Save SaveAs
< PROJECT FILES MENU
Delete Copy Rename Purge
2. If there is more than one hard
drive, choose the drive that
contains the project you want
to rename by selecting either
Internal or External from the
Select Drive screen using the << / >> buttons. The selection defaults to
the drive containing the currently open project. Select Next.
SOURCE DRIVE: Internal
<< >> Next
Operation Guide
3. Use the << / >> buttons to
scroll through the Project list,
then select Rename.
4. The RENAME PROJECT AS
screen appears. To give the
project a new name, press the
Page Right
blinking cursor appears over
the first character of the
name. Use the increment (Inc)
and decrement (Dec) buttons
to change the highlighted character. It scrolls through a modified ASCII
character set. Use the >> button to move to the next character.
5. Press the Page Left
renamed appears in the display to confirm that the project was
successfully renamed.
button. A
button when finished, and then select OK. Project
Smooth as Silk
<< >> Rename Cancel
RENAME PROJECT AS: >
OK Cancel
< Smooth as Silk
<< >> Inc Dec
Purging a Project
The purge command compares the contents of the AudioFiles subdirectories in a
project with the audio files that are referenced in the project files and history list,
and deletes any audio files that are not used.
This utility is a two-step process. The first step is to delete files not referenced by
the project files and history list. The second step is to clear the history list. The
history list contains a record of all previous edit operations and recording passes
within the project in chronological order. This allows you to undo and redo
operations, with up to 99 undo levels. Clearing the history list means you cannot
undo any previous edits or recording passes. Note that any time you open a new
project, the history list is automatically cleared.
Operation Guide
25
Page 26
SDR 24/96
PROJECT FILES MENU >
New Open Save SaveAs
< PROJECT FILES MENU
Delete Copy Rename Purge
Purge current project?
OK Cancel
PURGE: clear history?
Yes No Cancel
To purge a Project:
1. Press Project. Press the
Page Right button, and
in the Project Files Menu,
select Purge.
2. The Purge current project?
screen appears. Select OK to
delete files not referenced in the
project file, or Cancel to exit.
3. The PURGE: clear history?
screen appears. Select Yes to
clear the history list, No to leave
the history list intact and retain
files that are referenced in the history list, and Cancel to exit without
purging.
4. Purging project... appears in the display, followed by Project purged to
confirm that the project was successfully purged.
PROJECT
Basic Transport Operations
The SDR24/96 transport and recording controls are similar to those on most
multitrack tape recorders.
REWIND
FAST FWD
STOP
PLAY
RECORD
Fast Wind
REWIND and FAST FWD puts the SDR24/96 into fast wind mode from any
state. Fast Wind also punches out of record and cancels master record
standby. If there are unsaved recording passes, the recording passes and
project file are automatically saved to disk.
When pressed from stop, the “tape” rolls slowly at first, then accelerates to
20X speed in four seconds. Pressing the button a second, third, fourth, or
fifth time increases the winding speed still further.
♦
1 press: Slow wind; 20X speed after four seconds
♦
2 presses: 60X speed
♦
3 presses: 180X speed
♦
4 presses: 540X speed
♦
5 presses: 1620X speed
Stop
STOP brings the “tape” to an immediate halt. STOP also punches out of
record and cancels master record standby. If there are unsaved recording
passes, the recording passes and project file are automatically saved to disk.
When the transport is already stopped, pressing STOP twice within one
second moves the current locator to the beginning of the project.
26
SDR 24/96
Page 27

Scrub
When the transport is already stopped, pressing and holding the STOP
button for one second puts the transport into scrub mode. The STOP and
PLAY LEDs light simultaneously and Entering scrub mode appears in the
display. Use the REWIND and FAST FWD buttons to scrub the transport
forward and backward. Press STOP or PLAY to return to normal mode.
Play
PLAY puts the SDR24/96 into play from any state (as if you didn’t know).
PLAY also punches out of record and cancels master record standby while
leaving the Transport in play.
Record
The master RECORD button must be pressed along with PLAY to enter
record mode. The master record LED blinks if there are no tracks armed
(Record Ready buttons), or not within the Autopunch zone when Autopunch
is activated (see page 37). When One Button Punch is activated
(SETUP:Record:Page Right:RecBt), recording can be toggled during play by
pressing only the RECORD button.
Serial 9-Pin
The SERIAL 9-PIN connector on the rear panel of the SDR24/96 is provided
for connecting transport controllers that use the EIA RS-422 serial data
communication standard. It supports the Sony
transport functions can be controlled through the Serial 9-Pin connection:
Stop, Play, Rec, Fast Forward, Rewind, and Scrub.
®
9-Pin protocol. The following
Operation Guide
Time Display
EXT
MINUTESHOURS SECONDS FR AMES
The Current Time display shows the exact position of the SDR24/96’s “playback
head.” In the current version, the time format can be displayed only in SMPTE
time (HH:MM:SS:Frames).
CLOCK
Transport Menu
The SDR24/96 transport menu allows you to set locate points, offsets, and enable
AutoPlay.
Locate Times
The Locate option allow you to enter the time for Locates 1-4.
To set the Locate time:
1. Press SETUP to enter the
SETUP MENU.
2. Select Transp. to enter the
TRANSPORT OPTIONS menu.
SETUP
SETUP MENU >
Record I/O Sync Transp
TRANSPORT OPTIONS >
Loc1 Loc2 Loc3 Loc4
Operation Guide
27
Page 28

3. Select one of the four Locates
LOC1: 00:12:34:56 >
Zero OK Cancel
< LOC1: 00:12:34:56
<< >> Inc Dec
SETUP MENU >
Record I/O Sync Transp
TRANSPORT OPTIONS >
Loc1 Loc2 Loc3 Loc4
< TRANSPORT OPTIONS >
CurLoc TrOf RelOf RelMd
CURLOC: 00:13:57:24 >
Zero OK Cancel
< CURLOC: 00:13:57:24
<< >> Inc Dec
SETUP MENU >
Record I/O Sync Transp
TRANSPORT OPTIONS >
Loc1 Loc2 Loc3 Loc4
SETUP
(Loc1, Loc2, Loc3, Loc4). The
current locate time appears in the
display.
4. Select Zero to reset the Locate
point to zero.
SDR 24/96
5. Press Page Right
over the first numeral of the locate time. Use the increment (Inc) and
decrement (Dec) buttons to change the highlighted numeral. Use the >>
button to move to the next numeral.
6. Press the Page Left
the new locate time.
to change the locate time. A blinking cursor appears
button when finished, and then select OK to save
Current Locator Time
You can change the current locator time by pressing the PLAY, REWIND, FAST
FWD, or LOCATE buttons. You can also change it in the Transport menu.
To change the current locator time:
1. Press SETUP to enter the
SETUP MENU.
2. Select Transp. to enter the
TRANSPORT OPTIONS menu.
3. Press the Page Right
and select CurLoc. The current
transport locator time appears in
the display.
4. Select Zero to reset the current
locator time to zero.
button
SETUP
5. Press Page Right
current locator time. A blinking
cursor appears over the first
numeral of the current locator time. Use the increment (Inc) and
decrement (Dec) buttons to change the highlighted numeral. Use the >>
button to move to the next numeral.
6. Press the Page Left
the new locator time.
to change the
button when finished, and then select OK to save
Transport Offset
Transport offset is a preset amount of time that is added to the transport locator
positions displayed. For example, if the transport offset is set to 00:01:00:00, the
rewind function will stop at 00:01:00:00 instead of 00:00:00:00. The transport
offset time is added to all locates, and to incoming and outgoing LTC and MTC.
To set the transport offset time:
1. Press SETUP to enter the
SETUP MENU.
2. Select Transp. to enter the
TRANSPORT OPTIONS menu.
28
SDR 24/96
Page 29

3. Press the Page Right
button and select TrOf. The
current transport offset time
appears in the display.
4. Select Zero to reset the
transport offset time to zero.
Operation Guide
< TRANSPORT OPTIONS >
CurLoc TrOf RelOf RelMd
TRANSOF: 00:01:00:00 >
Zero OK Cancel
5. Press Page Right
the transport offset time. A
blinking cursor appears over
the first numeral of the transport offset time. Use the increment (Inc) and
decrement (Dec) buttons to change the highlighted numeral. Use the >>
button to move to the next numeral.
6. Press the Page Left
the new transport offset time.
to change
button when finished, and then select OK to save
< TRANSOF: 00:02:00:00
<< >> Inc Dec
Relative Offset
Just as transport offset adds a preset amount of time to the transport locator
positions, relative offset subtracts a preset amount of time from the transport
locator positions when relative mode is turned on (see “Relative Mode” next). For
example, if the relative offset is set to 00:01:00:00, the rewind function will stop
at 23:59:00:00 instead of 00:00:00:00 (at 44.1 kHz and 48 kHz sample rates). The
transport offset time is subtracted from all locates as well.
To set the relative offset time:
1. Press SETUP to enter
the SETUP MENU.
2. Select Transp. to enter
the TRANSPORT OPTIONS
menu.
SETUP
SETUP MENU >
Record I/O Sync Transp
TRANSPORT OPTIONS >
Loc1 Loc2 Loc3 Loc4
3. Press the Page Right
button and select RelOf. The
current relative offset time
appears in the display.
4. Select Zero to reset the
relative offset time to zero.
5. Press Page Right
the relative offset time. A
blinking cursor appears over
the first numeral of the
relative offset time. Use the increment (Inc) and decrement (Dec) buttons
to change the highlighted numeral. Use the >> button to move to the next
numeral.
6. Press the Page Left
the new relative offset time. Note that the relative mode must be turned on for
the relative offset time to affect the transport locator positions.
to change
button when finished, and then select OK to save
< TRANSPORT OPTIONS >
CurLoc TrOf RelOf RelMd
RELATOF: 00:01:00:00 >
Zero OK Cancel
< RELATOF: 00:02:00:00
<< >> Inc Dec
Relative Mode
Relative mode can be turned on and off with this command. When relative
mode is on, the decimal point in the right side of the current time display
lights. In relative mode, the relative offset time is subtracted from the
transport locator time (see previous topic). This allows you to work with time
coordinates relative to a certain position.
Operation Guide
29
Page 30

To turn on the relative mode:
SETUP MENU >
Record I/O Sync Transp
TRANSPORT OPTIONS >
Loc1 Loc2 Loc3 Loc4
< TRANSPORT OPTIONS >
CurLoc TrOf RelOf RelMd
RELATIVE MODE: On
<< >> OK
SETUP MENU >
Record I/O Sync Transp
TRANSPORT OPTIONS >
Loc1 Loc2 Loc3 Loc4
SETUP
AUTOPLAY: On
<< >> OK
< TRANSPORT OPTIONS
AuPlay
JUMP TO LOCATOR:
Loc1 Loc2 Loc3 Loc4
1. Press SETUP to enter the
SETUP MENU.
2. Select Transp. to enter the
TRANSPORT OPTIONS menu.
SETUP
SDR 24/96
3. Press the Page Right
and select RelMd. Use the << /
>> buttons to select On or Off,
then select OK to change the
relative mode.
button
AutoPlay
When AutoPlay is on, the transport automatically starts playing when you jump to
a locate point.
To turn on autoplay:
1. Press SETUP to enter the
SETUP MENU.
2. Select Transp. to enter the
TRANSPORT OPTIONS menu.
3. Press the Page Right
twice and select AuPlay. Use the
<< / >> buttons to select On or
Off, then select OK to change the
autoplay mode.
button
Locate Points and Looping
Locate points provide fast access to frequently used locations in your Project.
Looping allows you to playback or record a section of the project repeatedly, from
a preset starting time to a preset ending time.
Locate
The SDR24/96 has four numbered Locates. The numbered Locates can be set
either from the front panel or an optional remote. Storing a Locate point saves the
Current Time (Transport position) to the selected Locate. Recalling a Locate
causes the Transport to jump to the stored time.
To recall a Locate point:
1. Press LOCATE. The Locate LED lights.
2. JUMP TO LOCATOR appears in
the display. Select one of the four
Locate points in the display
(Loc1, Loc2, Loc3, Loc4). The
transport automatically jumps to the selected Locate point (and the
Locate LED goes out).
LOCATE
30
SDR 24/96
Page 31

To store numbered Locate points:
Locate points can be stored either on the
fly or when stopped.
Operation Guide
1. Press STORE. The Store LED lights.
STORE
2. STORE LOCATOR appears in
the display. Select one of the
four Locate points in the display
STORE LOCATOR:
Loc1 Loc2 Loc3 Loc4
(Loc1, Loc2, Loc3, Loc4)
when the transport is at the desired location. The Store LED goes out,
indicating that the Locate point has been stored.
Loop
Looped playback is determined by the selected locator mode (SETUP:Record:Page
Right:LocMd).
♦
With Loop1-2/Punch3-4 selected, Locates 1 and 2 double as start and end
points for looped playback. When looping is enabled, playback cycles
between the Loop Start and Loop End points. Locates 3 and 4 serve as
punch in and punch out points when Auto Punch is enabled (the PUNCH
button).
♦
The order of the Loop points does not matter.
♦
If the current locator time is before or between the Loop points when loop
is enabled, playback continues from its current position until it reaches
the Loop End point, and then jumps back to the Loop Start point.
♦
If the current locator time is after the Loop End point, looping will not
occur.
Note: Looping is
disabled when
T-CODE CHASE is
enabled.
♦
With Loc3-4 PreR/PostR selected, Locates 3 and 4 double as start and
end points for looped playback (Locates 1 and 2 do not loop). If Auto
Punch is enabled, Loc3 and Loc4 become the Punch-in and out points. The
preroll time (SETUP:Record:PreRo) is subtracted from the Punch Start
point, and the postroll time (SETUP:Record:PostRo) is added to the
Punch End point to create the looping points.
To enable Looping:
1. Press LOOP to enable looping.
Looping can be enabled during Stop,
Play, Fast Forward, or Rewind.
LOOP
Recording
All recording in the SDR24/96 is non-destructive. When you record over
existing audio, the old audio is not “erased” as it with magnetic tape;
rather, new audio files are created in addition to the existing files. Audio
files are recorded in native Wave format (.WAV).
Recording can only take place on tracks that are “armed” for recording.
To arm tracks for recording:
1. Press a track’s Record Ready button.
2. Press it again to disarm the track.
The red Record Ready LED, located at the bottom of
the meter directly above the Record Ready button,
blinks when a track is armed and ready to record, and
glows when the track is recording.
Record Ready
LED
Record Ready
Operation Guide
21
31
Page 32

To record:
TRACK MUTE (*=Muted) >
1- 2- 3- 4-
TRACK OPTIONS
Mute Virtual Name
VIRTUAL TRACK >
1=V1 2=V1 3=V1 4=V1
TRACK 1 NAME >
<< >> Save
< Bobbie's Lead
<< >> Inc Dec
1. Arm one or more tracks.
2. Press RECORD and PLAY at the same time. Record can
be activated during Stop or Play. If One Button Record is
enabled, Record can be activated during play just by
pressing the RECORD button.
PLAY
RECORD
SDR 24/96
3. Press any transport button other than RECORD to stop recording.
The Record LED glows when the SDR24/96 is recording and blinks when
RECORD is engaged with no tracks armed (master record standby mode).
Post-record processing time: After a record pass, the SDR takes a few moments to
process the recording that has just taken place and update the project file. The
longer the recording, the longer this processing time takes. For full 24-track
recording that lasts for eight or ten minutes, the post-processing time could take
up to a minute. During this time, the STOP LED blinks and all transport functions
are disabled.
Track Options
Each of the 24 tracks on the SDR24/96 has 8 virtual tracks associated with it.
Virtual tracks are used to record multiple takes, so you can compare the takes and
decide which one to keep. Only one virtual track can be active at at time. You can
give a unique name to each track to help you remember what is recorded on each
track. You can also mute individual tracks.
Mute
The Track Mute menu (TRACK:Mute)
toggles muting for each track. When
a track is muted, its corresponding
meter is also muted (no indication).
TRACK
Use the Page Right button to page through
the various tracks, and use the SELECT
buttons to toggle the mute for each track.
An asterisk (*) indicates the track is muted.
Virtual Track
The Virtual Track menu (TRACK:Virtual) lets
you select the active virtual track for each track.
Use the Page Right button to page through the various tracks, and use the SELECT
buttons to increment the virtual track number, which wraps around from 8 to 1.
Track Name
The Track Name menu (TRACK:Name)
allows you to enter a unique name for each
track. Audio files are named after the track
name. Select a track by using the <</>>
buttons to scroll through the 24 tracks. The default name assigned to each track
is Track 1, Track 2, etc.
To give a track a new name, press the Page
Right
over the first character of the name of the selected track. Use the increment (Inc)
and decrement (Dec) buttons to change the highlighted character. It scrolls through
a modified ASCII character set. Use the >> button to move to the next character.
button. A blinking cursor appears
32
SDR 24/96
Press the Page Left
button when finished, and then select Save.
Page 33

Record Options
There are a number of options available to make your recording session easier.
Safe Mode
Safe mode (SETUP:Record:Safe)
disarms all tracks and disables the
Record Ready and master Record
buttons. Use safe mode to prevent
anyone from inadvertently activating
record mode and ruining your perfect
song.
SETUP MENU >
Record I/O Sync Transp
RECORD OPTIONS >
Safe PreLoc PreRo PostRo
RECORD SAFE: Off
<< >> OK
Preroll Before Locator
Turning on the Preroll Before Locator
option (SETUP:Record:PreLoc)
causes the Preroll time (see “Preroll”
next) to be subtracted from the locate
time when jumping to a Locate point.
Preroll
Here is where you enter the preroll
offset (SETUP:Record:PreRo) in
Seconds and Frames. This value is
subtracted from Locate points when
Preroll Before Locator
(SETUP:Record:PreLoc) is turned on,
and from the Punch Start Point when
Loc3-4 PreR/PostR locator mode (SETUP:Record:Page Right:LocMd) is turned
on and both LOOP and PUNCH are active.
PREROLL BEFORE LOC: On
<< >> OK
PREROLL: 05:00 >
Zero OK Cancel
< PREROLL: 05:00
<< >> Inc Dec
Operation Guide
1. Select Zero to reset the current preroll time to zero.
2. Press Page Right
over the first numeral of the preroll time. Use the increment (Inc) and
decrement (Dec) buttons to change the highlighted numeral. Use the >>
button to move to the next numeral.
3. Press the Page Left
the new preroll time.
to change the preroll time. A blinking cursor appears
button when finished, and then select OK to save
Postroll
Here is where you enter the postroll
offset (SETUP:Record:PostRo) in
Seconds and Frames. This value is
added to the Punch End point when
Loc3-4 PreR/PostR locator mode
(SETUP:Record:Page Right:LocMd)
is turned on and both LOOP and
PUNCH are active.
1. Select Zero to reset the current postroll time to zero.
2. Press Page Right
appears over the first numeral of the postroll time. Use the increment
(Inc) and decrement (Dec) buttons to change the highlighted numeral. Use
the >> button to move to the next numeral.
3. Press the Page Left
the new postroll time.
to change the postroll time. A blinking cursor
button when finished, and then select OK to save
POSTROLL: 10:00 >
Zero OK Cancel
< POSTROLL: 10:00
<< >> Inc Dec
Operation Guide
33
Page 34

SDR 24/96
ONE BUTTON RECORD: On
<< >> OK
LOCMD: Loop1-2/Punch3-4
<< >> OK
AUTOTAKE MODE: AutoIncr
<< >> OK
AUTOTAKE MODE: AutoEdit
<< >> OK
Locator Mode
The locator mode setting
(SETUP:Record:Page Right:LocMd)
determines how looping and auto punch
work.
♦
With Loop1-2/Punch3-4 selected, Locates 1 and 2 double as start and end
points for looped playback (see “Loop” on page 31 for more info), and
Locates 3 and 4 serve as punch in and punch out points when Auto Punch
is enabled (see “Auto Punch” on page 37 for more info).
♦
With Loc3-4 PreR/PostR selected, Locates 3 and 4 double as start and
end points for looped playback (Locates 1 and 2 do not loop). If Auto
Punch is enabled (the PUNCH button), Loc3 and Loc4 become the Punchin and out points. With both LOOP and PUNCH selected, the preroll time
(SETUP:Record:PreRo) is subtracted from the Punch Start point to get
the Loop Start point, and the postroll time (SETUP:Record:PostRo) is
added to the Punch End point to get the Loop End point.
Auto Take Mode
When the AUTO TAKE button is enabled, the SDR24/96 automatically
increments the virtual tracks after each take (record pass).
There are two modes in which AutoTake (SETUP:Record:Page Right:AuTkMd)
can operate.
AUTO
TAKE
♦
With Auto Increment mode
selected, after each take, the
audio stays on the virtual track on
which it was recorded and the
virtual track selection is automatically incremented by one. After 8 takes,
virtual track 8 will continue to be re-recorded with additional passes until
you manually move to another virtual track (it does not wrap around to
virtual track 1).
♦
With Auto Edit mode selected,
after each take, the audio in the
area to be recorded is shifted to
the next highest virtual track,
beginning with the currently selected virtual track up to virtual track 8,
and the newly recorded audio is pasted into the currently selected virtual
track. The audio on virtual track 8 will be lost.
♦
Auto Increment mode provides the following advantage:
• You can record further takes to the same track without discarding
♦
Auto Edit mode provides the following advantages:
or covering up previous takes.
• If you want to keep the latest take, no further editing is needed.
• If you want to hear a previous take, you can use the undo/redo
commands.
• It keeps the current virtual track active, so audio before and after
the recorded area is always retained.
One Button Record
To enter record mode, you normally have
to press the PLAY and RECORD buttons
at the same time. When One Button
Record is enabled (SETUP:Record:Page Right:RecBt), once PLAY has been
started, you can press the RECORD button to begin recording on armed tracks.
34
SDR 24/96
Page 35

Arming tracks before pressing the RECORD button is usually the best way to
Stop Input Input Input -----Play Input Input Tape Tape
Record Input Input Input Tape
Input -----Input Tape
Input Tape
All Input ON
Armed Unarmed
Auto Input ON
Armed Unarmed
Both OFF
Armed Unarmed
work when tracking, because you can punch-in multiple tracks at the same time.
Pressing RECORD with no tracks armed and then punching with the record ready
buttons is a handy way to overdub individual tracks, because you can punch in and
out of individual tracks at different times.
Monitoring
The Monitor Mode buttons determine what you hear from the SDR24/96 Tape
Outputs. The SDR24/96 offers several familiar monitoring modes to facilitate
rehearsal, tracking, and overdubbing.
All Input
All Input is used for rehearsal and level setting. When All Input is on, both
armed and unarmed tracks monitor their inputs, and the Auto Input setting
has no effect.
To enable All Input:
♦
Press the ALL INPUT button. The LED above the button
lights to indicate that it’s on.
Auto Input
Auto Input is used for recording. Auto Input affects only tracks that are in
Record Ready (“armed”). Tracks that are not armed only monitor the
playback of previously recorded audio.
ALL
INPUT
Operation Guide
When Auto Input is on, armed tracks monitor their inputs in Stop, Fast
Forward, Rewind, and Record. In Play, you hear only what’s already recorded
on the tracks. This mode is used primarily for tracking and overdubbing,
where you want to hear what’s been previously recorded on the track before
the punch-in and after the punch-out. During the punch, you hear what is
presently being recorded.
When Auto Input (and All Input) is off, armed tracks always monitor their
inputs and unarmed tracks playback what’s been previously recorded. This
mode is used primarily for rehearsal and tracking, where you want to always
hear what you’re playing rather than what’s already recorded on that track.
To enable Auto Input:
♦
Press the AUTO INPUT button. The LED above the button
lights to indicate that it’s on.
Note: Auto Input is the default mode when the SDR24/96 is turned on.
All Input overrides Auto Input.
AUTO
INPUT
Track Monitoring Modes
Operation Guide
35
Page 36

SDR 24/96
Metering and Setting Record Levels
A professional analog recorder has meters that indicate 0 VU at a +4 dBu nominal
signal level. Generally you can record peaks 10 to 15 dB above that before
distortion becomes objectionable. This 10-15 dB range above the nominal level is
called “headroom.”
On digital recorder meters, zero represents the full-scale digital signal level, 0
dBFS for short. 0 dBFS is the hottest signal that a digital device can handle, with
no headroom to spare. When a digital signal reaches 0 dBFS for more than a
sample or two, the resulting distortion is uglier than scraping your fingernails
across a chalkboard.
24 TRACK/24 BIT DIGITAL AUDIO RECORDER
21
2019181716151413121110987654321
To get the get the best sound from the SDR24/96:
1. Turn ALL INPUT on.
ALL
INPUT
2. Ask the talent to play or sing as loud as they will be performing during the
session. While watching the SDR24/96 meters, adjust the console’s tape
outputs so that the signal peaks cause the red overload indicators to come
on occasionally. Then, back off the tape output level slightly. This insures
the best fidelity and the widest dynamic range in the recorded signal and
leaves you a little headroom to accommodate the talent’s enthusiasm.
Keep the signal levels as high as possible without overload, because
recording at lower levels reduces resolution and dynamic range.
Nonetheless it is always better to be conservative and avoid the risk of
overload than to try squeezing the last ounce of dynamic range from the
signal.
3. Alternately, if you have a tone generator or a sound source with a constant
volume (you can hold down a key on a synth), turn All Input on and send
the tone to all 24 tracks of the console. Adjust the output levels to read 0
VU on analog consoles, or around –20 dBFS on digital consoles. If the
SDR24/96 meters read –15 to –20, you’re in good shape. This leaves
enough headroom for most popular music, but if you’re recording acoustic
music, jazz, classical, or narration, you may want to leave a little more.
When the talent starts to play you may have to make some final tweaks to
get everything just right.
242322
36
SDR 24/96
4. After adjusting the tape output levels for each console channel, follow
your console manufacturer’s instructions for setting the console tape
return levels.
With analog I/O, a +22 dBu signal at the SDR24/96
inputs and outputs corresponds to 0 dBFS inside the
SDR24/96. So, if your console has a nominal output level
(0 VU) of +4 dBu, there is 18 dB of headroom before you
hit the maximum record level on the SDR24/96. It also
means that your console must be capable of putting out
at least +22 dBu without distortion so the console
dBu
equivalent
+22 dBu
OL
2
+20
4
+18
7
+15
10
+12
15
+7
20
+2
25
–3
30
–8
35
–13
40
–18
50
–28 dBu
Page 37

doesn’t clip while the recorder is still within its working range. Most professional
consoles can output +22 dBu without breaking a sweat (like the Mackie Analog
and Digital 8•Bus consoles). But beware that semi-pro consoles often operate at a
nominal output level of –10 dBV and will run out of steam before reaching a level
that can take advantage of the recorder’s full resolution.
Remember, audio levels must NEVER reach 0 dBFS... never, ever, ever. Digital
clipping is an extremely nasty sound that could only pass for music if you
like what those crazy kids listen to over and over at all hours of the night
including weekdays.
Auto Punch
Auto Punch allows you to automatically punch in and out between two predefined
points. This feature is very convenient when you need to nail a really tight punch
or need two hands to play your instrument. Numbered Locates 3 and 4 double as
the Auto Punch punch-in and punch-out points.
To enable Auto Punch:
♦
Press the PUNCH button.
To adjust the Punch-in and Punch-out points (Locates 3 and 4):
Method 1
1. Use the REHEARSE button to set the locate points (see “Rehearse” next).
PUNCH
Operation Guide
Method 2
1. Set the transport locator to the desired Punch-in point, either by using the
transport buttons (FAST FWD, REWIND, PLAY), or by entering the
exact time in the current locator time in the Transport Options Menu
(SETUP:Transp:Page Right:CurLoc).
2. Press STORE. The
Store LED lights.
STORE LOCATOR:
3. STORE LOCATOR
appears in the display.
Select Loc3. The Store LED
goes out, indicating that the locate point has been stored.
4. Repeat steps 1-2 for the Punch-out point. In step 3, select Loc4 to store
the Punch-out point in Locate 4.
Method 3
1. Press SETUP to enter
the SETUP MENU.
2. Select Transp. to enter
the TRANSPORT OPTIONS
menu.
3. Select Loc3. The current locate time appears in the display.
STORE
SETUP
Loc1 Loc2 Loc3 Loc4
SETUP MENU >
Record I/O Sync Transp
TRANSPORT OPTIONS >
Loc1 Loc2 Loc3 Loc4
4. Select Zero to reset the locate
point to zero.
5. Press Page Right
the locate time. A blinking
cursor appears over the first
numeral of the locate time.
to change
LOC1: 00:12:34:56 >
Zero OK Cancel
< LOC1: 00:12:34:56
<< >> Inc Dec
Operation Guide
37
Page 38

Use the increment (Inc) and
< LOC1: 00:12:34:56
<< >> Inc Dec
decrement (Dec) buttons to change
the highlighted numeral. Use the >>
button to move to the next numeral.
SDR 24/96
6. Press the Page Left
the new locate time.
7. Repeat steps 1-6 for Loc4.
button when finished, and then select OK to save
To perform Autopunch recording:
1. Arm one or more tracks, and park the transport comfortably before the
Punch-in point, or enable Always Preroll Before Locator
(SETUP:Record:PreLoc) to subtract the current preroll time
(SETUP:Record:PreRo) from Locate 3.
2. Press PUNCH, then PLAY and RECORD. The Record LED blinks and the
SDR24/96 plays. When Current Time reaches the Punch-in point, the
SDR24/96 begins recording on all armed tracks and the Record LED
glows. When Current Time reaches the Punch-out point, the SDR24/96
stops recording, the Record LED blinks, and the SDR24/96 continues
playing. The order of the Punch points does not matter; the Punch-in
always happens at the earlier point, and the Punch-out at the later point.
To use Autopunch and Loop together:
1. If in Loc3-4 PreR/PostR locator mode, make sure there is a value entered
in Record Preroll (SETUP:Record:PreRo) and Record Postroll
(SETUP:Record:PostRo).
If in Loop1-2/Punch3-4 locator mode, make sure Loc1 and Loc2 contain
the desired loop points.
Tip:
You can use rehearse mode to set
locate points for
editing (see “Editing” on page 40).
2. Arm one or more tracks, and park the transport comfortably before the
Punch-in point, or enable Always Preroll Before Locator
(SETUP:Record:PreLoc) to subtract the current preroll time
(SETUP:Record:PreRo) from Locate 3.
3. Press PUNCH, LOOP, PLAY, and RECORD. The Record LED blinks and
the SDR24/96 plays. When Current Time reaches the Punch-in point, the
SDR24/96 begins recording on all armed tracks and the Record LED glows.
When Current Time reaches the Punch-out point, the SDR24/96 stops
recording, the Record LED blinks, and the SDR24/96 continues playing
for the postroll amount of time. The transport loops back to the Punch-in
point minus the preroll time.
Rehearse
The REHEARSE button allows you to practice punching without actually
recording anything to disk. Rehearse automatically stores the last Punch-in and
Punch-out points to Loc 3 and Loc 4 (respectively). When the Punch points sound
correct, you can use Auto Punch (the PUNCH button) to record the take.
Using PLAY, RECORD, or STOP to engage and disengage master Record
captures the punch points, but using the Record Ready buttons to punch does not.
If multiple punch-ins and outs happen during a single pass, only the last punch points
are remembered. The Rehearse LED is lit when enabled, and off when disabled.
REHRSE
38
SDR 24/96
Page 39

Footswitch Operation
FOOT
SWITCH
TO HDR
REMOTE JACK
REMOTE 24
DO NOT PLUG INTO
ETHERNET
WARNING
Using a footswitch with the SDR24/96 gives you hands-free access to several of
the most-used SDR24/96 functions. The footswitch is extremely handy when you
want to use your hands for other tasks, like playing your instrument, working the
console, or eating pizza. Punching in and out is probably the most common use of
the footswitch, but it can stop and play as well.
Punch punches-in just like pressing PLAY + RECORD and punches-out like
pressing PLAY. When playing, hitting the footswitch punches-in all armed
tracks. When recording, hitting the footswitch again punches-out of Record,
but leaves the transport in Play.
Stop/Play toggles the transport between PLAY and STOP. When the
Transport is stopped, it puts it into play; when moving, it stops the Transport.
To assign the footswitch function:
1. The footswitch function
is assigned in the System
menu, under SDR
Footswitch
(SETUP:Page
Right:System:SDRSw).
SETUP
SETUP MENU >
Record I/O Sync Transp
< SETUP MENU
Disk System
Operation Guide
2. Use the << / >> buttons to
select Stop/Play or Punch,
then select OK to assign the
SYSTEM MENU >
USBMS SDRSw RemSw Load
footswitch function.
SDR FOOTSW: Stop/Play
<< >> OK
If you have a Remote 24 connected to
the SDR24/96, you can independently assign the remote footswitch function:
To assign the remote footswitch function:
1. The remote footswitch function is assigned in the System menu, under
Remote Footswitch (SETUP:Page Right:System:RemSw).
2. Use the << / >> buttons to
select Stop/Play or Punch,
then select OK to assign the
footswitch function.
ANALOG OUT 1 - 8 ANALOG OUT 9 - 16 ANALOG OUT 17 - 24
ANALOG IN 1 - 8 ANALOG IN 9 - 16 ANALOG IN 17 - 24
POWER
100 - 240V 250mA
50/60Hz
REGISTERED TRADEMARKS OF MACKIE DESIGNS INC.: "MACKIE.", MACKIE DIGITAL SYSTEMS AND THE "RUNNING MAN" FIGURE.
DIGITAL WORD CLOCK I/O
DIGITAL
1 - 8
USB
IN OUT
IN OUT
X2
1-4
CONCEIVED, DESIGNED, AND MANUFACTURED BY MACKIE DESIGNS INC • WOODINVILLE • WA 98072 • USA
MADE IN USA • FABRIQUE AU USA • PATENTS PENDING COPYRIGHT ©1998 THE FOLLOWING ARE TRADEMARKS OR
DIGITAL
9 - 16
17 - 24
IN OUT
X2
X2
5-8
9-12
REMOTE FOOTSW: Stop/Play
<< >> OK
HIGH RESOLUTION
96
SDR
NON-LINEAR RECORDER
24 TRACK/24 BIT DIGITAL
AUDIO RECORDER
OUT
CAUTION
RISK OF ELECTRIC SHOCK
DO NOT OPEN
REPLACE WITH THE SAME TYPE FUSE AND RATING.
DISCONNECT SUPPLY CORD BEFORE CHANGING FUSE
SMPTE
OUT
IN
WARNING:
TO REDUCE THE RISK OF FIRE OR ELECTRIC SHOCK, DO NOT
EXPOSE THIS EQUIPMENT TO RAIN OR MOISTURE. DO NOT REMOVE COVER.
NO USER SERVICEABLE PARTS INSIDE. REFER SERVICING TO QUALIFIED PERSONNEL.
AVIS:
RISQUE DE CHOC ELECTRIQUE — NE PAS OUVRIR
UTILISE UN FUSIBLE DE RECHANGE DE MÊME TYPE.
DEBRANCHER AVANT DE REMPLACER LE FUSIBLE
MIDI
ININOUT
SERIAL NUMBER
FOOT
SWITCH
MANUFACTURING DATE
MICRO/
REMOTE 24
CNTRL
ADAT SYNC
OUT
ADAT SYNC
IN
SERIAL
9-PIN
Footswitch
Operation Guide
39
Page 40

SDR 24/96
Delete last? (No undo!)
OK Cancel
EDIT MENU >
Delete Cut Copy Paste
Splice after delete?
Yes No Cancel
Editing
Delete Last
Pressing the DELETE LAST button removes the last record pass and
automatically deletes the recorded audio, but only if the record pass is the last
entry in the history list. If any other action is performed after the record pass that
is recorded in the history list, pressing the DELETE LAST button results in the
message Nothing to delete in the display.
If the last record pass consisted of multiple punches, all of the recorded audio will
be deleted, not just the final punch.
If the record pass was the last entry in
the history list, you are asked to confirm
the Delete Last command, because you
cannot undo this once it has been done.
Select OK to complete the operation. The project file is saved to disk.
Another method of deleting the last record pass is with the EDIT:Undo command.
This gives you the option of keeping the audio from the last record pass so that
you can use the Redo command if you change your mind. See “A Closer Look:
Undo, Redo, and Delete Last” on page 44 for more information.
Edit Button
The EDIT button brings up a menu of common editing functions available with the
SDR24/96. When the EDIT button is pressed, all armed tracks are unarmed and
the Record Ready buttons are used to select tracks for editing. Upon exiting edit
mode, all the Record Ready buttons are cleared.
EDIT
Edit actions are performed using a clipboard:
♦
Some edit operations move or copy selections from the arrangement to the
clipboard.
♦
Some edit operations move or copy selections from the clipboard to the
arrangement.
The edit operations can also be performed with or without splicing. Where
appropriate, the option is given to splice or not before each edit operation.
Note: Edit operations for Delete, Cut, and Copy are restricted to region
selections. The selected region consists of the audio on the selected
tracks between locators 3 and 4 (the punch area). You can use the
REHEARSE button to set the locator points exactly where you want
them before commiting to the desired edit.
Delete
This operation deletes the audio in the selected region on the selected tracks. It
does not delete the audio from the hard drive, so you can undo this action.
1. Press EDIT, select the tracks you
want to delete (Record Ready),
then select Delete.
2. You are asked whether to Splice
after delete?
If you choose to delete without splicing (No):
♦
♦
♦
♦
40
SDR 24/96
The audio in the selected area is deleted.
The audio before and after the selected area remains at its position.
The clipboard content is unchanged.
The delete action is added to the history list, and can be undone.
Page 41

If you choose to delete followed by splicing (Yes):
♦
The audio in the selected area is deleted.
♦
The audio on either side of the deleted area is joined together. The earlier
audio stays put, and the later audio slides backward in time to join it.
♦
The clipboard content is unchanged.
♦
The delete action is added to the history list, and can be undone.
Cut
This operation cuts the audio in the selected region on the selected tracks and
puts it on the clipboard.
1. Press EDIT, select the tracks
you want to cut (Record
Ready), then select Cut.
2. You are asked whether to
Splice after cut?
If you choose to cut without splicing (No):
♦
The audio in the selected area is deleted.
♦
The audio before and after the selected area remains at its position.
♦
The deleted audio is put on the clipboard, and replaces the previous
content.
♦
The cut action is added to the history list, and can be undone.
If you choose to cut followed by splicing (Yes ):
♦
The audio in the selected area is deleted.
♦
The audio on either side of the deleted area is joined together. The
earlier audio stays put, and the later audio slides backward in time to
join it.
♦
The deleted audio is put on the clipboard, and replaces the previous
content.
♦
The cut action is added to the history list, and can be undone.
EDIT MENU >
Delete Cut Copy Paste
Splice after cut?
Yes No Cancel
Operation Guide
Copy
This operation copies the audio in the selected region on the selected tracks and
puts it on the clipboard.
♦
Press EDIT, select the tracks
you want to copy (Record
Ready), then select Copy.
♦
The audio is unchanged.
♦
The selected audio is put on
the clipboard, and replaces the
previous content.
EDIT MENU >
Delete Cut Copy Paste
Copy done.
Paste
This operation pastes the audio from the clipboard to the selected tracks,
beginning at the current locator point.
1. Press EDIT, select the tracks
you want to paste audio into
(Record Ready), then select
Paste.
2. You are asked whether to
Splice before paste?
If you choose to paste without splicing (No):
♦
The audio on the clipboard is copied into the arrangement:
1. starting at the current locator, towards higher locators.
2. the tracks on the clipboard are copied to the selected tracks, track
by track, and from the lowest to the highest track. If there are more
tracks on the clipboard than selected tracks, the remaining tracks on
EDIT MENU >
Delete Cut Copy Paste
Splice before paste?
Yes No Cancel
Operation Guide
41
Page 42

SDR 24/96
< EDIT MENU
Place Undo Redo
Splice before place?
Yes No Cancel
AudioFiles1
<< >> View Cancel
Georges Guitar
<< >> Place Cancel
the clipboard are not copied. If there are less tracks on the clipboard
than selected tracks, the remaining selected tracks remain
unchanged.
♦
The audio before and after the pasted area remains at its position.
♦
Audio regions pasted from the clipboard replace any existing audio on
the selected tracks. Silence gaps pasted from the clipboard leave the
existing audio unchanged.
♦
The clipboard content is unchanged.
♦
The paste action is added to the history list, and can be undone.
If you choose to splice before pasting:
♦
The audio on the clipboard is copied into the arrangement:
1. starting at the current locator, towards higher locators.
2. the tracks on the clipboard are copied to the selected tracks, track
by track, and from the lowest to the highest track. If there are more
tracks on the clipboard than selected tracks, the remaining tracks on
the clipboard are not copied. If there are less tracks on the clipboard
than selected tracks, the remaining selected tracks remain
unchanged.
♦
Before any paste operation, the track is split at the current locator, and
the upper part slides higher to make room for the pasted-in piece.
♦
Audio regions pasted from the clipboard are pasted over silence, since
the existing audio is moved forward in time, so they do not replace any
existing audio on the selected tracks. Silence gaps pasted from the
clipboard remain silent.
♦
The clipboard content is unchanged.
♦
The paste action is added to the history list, and can be undone.
Place
This operation copies the audio from another audio file and places it into the
selected track, beginning at the current locator point. This allows you to input
files from another project or from elsewhere within the current project.
1. Press EDIT and Page Right,
select the track you want to place
audio into (Record Ready), then
select Place.
2. You are asked whether to Splice
before place?
3. Use the << / >> buttons to scroll
through the available AudioFiles
subdirectories. Select View.
4. Use the << / >> buttons to scroll
through the audio files within the
selected subdirectory.
5. Select Place to complete the
operation.
If you choose to place without splicing (No):
♦
The selected audio is copied into the arrangement:
1. starting at the current locator, towards higher locators.
2. on the first selected track. If there are no selected tracks, nothing
is copied into the arrangement. If more than one track is selected, all
tracks but the first remain unchanged.
♦
The audio before and after the placed audio remains at its position.
♦
The placed audio replaces any existing audio on the track.
♦
The clipboard content is unchanged.
♦
The place action is added to the history list, and can be undone.
EDIT
42
SDR 24/96
Page 43

If you choose to splice before placing (Yes ):
♦
The selected audio is copied into the arrangement:
1. starting at the current locator, towards higher locators.
2. on the first selected track.
If there are no selected tracks, nothing is copied into the arrangement.
If more than one track is selected, all tracks but the first remain unchanged.
♦
Before the place operation, the track is split at the current locator, and
the upper part slides higher to make room for the placed piece.
♦
The audio is placed over silence, so it does not replace any existing
audio on the track.
♦
The clipboard content is unchanged.
♦
The place action is added to the history list, and can be undone.
Undo
This operation allows you to undo the previous action. If it was a record pass,
you are asked whether or not to keep the audio. You can continue to undo
actions as you back down the history list.
1. Press EDIT, Page Right, and
select Undo.
2. You are asked to confirm the
undo operation. Select OK or
Cancel.
3. If it was a record pass, you are
asked if you want to keep the
audio.
♦
If the audio is not kept
(No), all the operations
including and beyond
(above) the recording pass disappear from the history list.
♦
If the audio is kept (Yes), the operations remain in the history list and
can be redone. The audio will remain on the disk until explicitly deleted.
4. The next action can now be undone, or press the Page Left button twice to
exit the edit mode. If there are no more actions to be undone, you’ve
reached the end of the history list and the display reads “Nothing to undo”
and exits the edit mode.
< EDIT MENU
Place Undo Redo
UNDO: Record pass
Proceed? OK Cancel
UNDO: Record pass
Keep audio? Yes No
Operation Guide
EDIT
Redo
This operation allows you to redo the previous undo action. You can continue to
redo actions as you move forward through the history list.
1. Press EDIT, Page Right, and
select Redo.
2. You are asked to confirm the
redo operation. Select OK or
Cancel.
3. The next undo action can now
be redone, or press the Page
Left button twice to exit the
edit mode. If there are no more actions to be redone, you’ve reached the
top of the history list and the display reads “Nothing to redo” and exits the
edit mode.
< EDIT MENU
Place Undo Redo
REDO: Record pass
Proceed? OK Cancel
Operation Guide
43
Page 44

SDR 24/96
< SETUP MENU
Disk System
SELECT DRIVE: External
<< >> Next
Format external drive.
Proceed? OK Cancel
Undo, Redo, and Delete Last
♦
The history list contains all edit operations and recording passes in
chronological order.
♦
The undo command moves up one entry on the history list; the redo
command moves down one entry.
♦
Performing an edit operation or record pass permanently removes the
undone actions from the history list.
♦
When a recording pass is to be undone, you are asked whether or not
to keep the audio.
♦
The DELETE LAST button removes the last record pass and
automatically deletes the recorded audio, but only if this record pass is
the most recent entry in the history list.
♦
Depending on the size of the edits, up to 99 undo levels can be supported.
♦
Opening another project or turning off the SDR24/96 purges the
history list.
Disk and System Utilities
There are several options available for managing the internal and external hard
drives, transferring files to a computer, and setting the date and time.
Disk Menu
The Disk Utility menu (under SETUP) allows you to mount, format, and
defragment a drive.
Mount Drive
Select Mount (SETUP:Page
Right:Disk:Mount) anytime you change
drives in the Mackie Media Bay. The
SDR24/96 takes a look at the internal
and external drives and checks to see if
the media has changed. When the
operation is complete, “Disk mount
complete” appears in the display.
SETUP MENU >
Record I/O Sync Transp
DISK UTILITY MENU
Mount Format Defrag
SETUP
Format Drive
The Format utility (SETUP:Page Right:Disk:Format) completely erases the data
on the hard drive and creates a new FAT32 partition, which fills the entire drive
space. All media must be formatted before it can be used with the SDR24/96.
Mackie Media M•90 drives come pre-formatted and ready to use, as do ORB disks
for the Mackie Media PROJECT drive (be sure to buy IBM formatted ORB disks).
To format a drive:
1. Press SETUP to enter the SETUP MENU.
2. Press Page Right, select Disk, and then select Format.
3. If there are multiple drives, the
Select Drive menu asks you to
select the drive to format. Select
either Internal or External using
the << / >> buttons. The selection defaults to the drive containing the
currently open Project. Select Next.
4. You are asked to confirm the
format command. Select OK to
proceed or Cancel to exit.
5. While the drive is formatting, the display indicates the progress of the
44
SDR 24/96
operation in percentages.
Page 45

Defrag Drive
The Defrag option (SETUP:Page Right:Disk:Defrag) allows you to defragment a
drive. As files are written, edited, and deleted on a disk, the files can become
fragmented. The SDR24/96 still keeps track of the data, but it can slow down
access to the files. Defragmenting a drive puts all the files back together in
contiguous streams of data.
As a precaution, we recommend backing up the data on the hard drive before running
the defrag operation.
To defragment a drive:
1. Press SETUP to enter the
SETUP MENU.
< SETUP MENU
Disk System
Operation Guide
2. Press Page Right, select Disk,
and then select Defrag.
3. If there are multiple drives,
the Select Drive menu asks
you to select the drive to
defragment. Select either
Internal or External using the << / >> buttons. The selection defaults to
the drive containing the currently open Project. Select Next.
4. You are asked to confirm the
defrag command. Select OK to
proceed or Cancel to exit.
5. While the drive is defragmenting, the display indicates the progress of the
operation in percentages.
DISK UTILITY MENU
Mount Format Defrag
SELECT DRIVE: External
<< >> Next
Defrag external drive.
Proceed? OK Cancel
System Menu
The System menu provides options for transferring files to a computer through the
USB port, for footswitch control, and for setting the date and time.
USB mass storage (USBMS)
The system USB mass storage option (SETUP:Page Right:System:USBMS) allows
you to put the SDR24/96 into USB mass storage mode. The SDR24/96 can then be
accessed as an external storage device from a computer for transferring files.
In USB mass storage mode, the SDR24/96 cannot be used as a hard disk recorder.
Upon leaving USB mass storage mode, the SDR24/96 will reboot.
To enter USB Mass Storage mode:
1. Press SETUP to enter the
SETUP MENU.
2. Press Page Right, select
System, and then select USBMS.
< SETUP MENU
Disk System
SYSTEM MENU >
USBMS SDRSw RemSw Load
3. You are asked whether or not
to save the project. Select Yes ,
No, or Cancel to exit.
4. If you select Yes or No, “USB
mass storage mode” appears
in the display.
5. To exit USB mass storage mode, select Reboot.
USBMS: save project?
Yes No Cancel
USB mass storage mode.
Reboot
Operation Guide
45
Page 46

SDR 24/96
SDR FOOTSW: Stop/Play
<< >> OK
REMOTE FOOTSW: Stop/Play
<< >> OK
SYSTEM LOAD: 15%
Cancel
Connect a USB cable between the USB port on the SDR24/96 and the USB port on
your computer. Support for USB mass storage mode varies depending on the
Operating System you are running on your computer.
Here is an overview of USB mass storage support in various operating systems:
♦
Windows NT 4.0 has no USB support at all.
♦
Windows 95 and 98 have no USB mass storage support.
Windows 98SE supports USB, but not USB mass storage.
♦
Windows 2000 has USB mass storage support, but only single LUN
(Logical Unit Number). This means that you will see only one hard
disk—the external disk, if present; otherwise the internal disk.
♦
Windows ME and XP have USB mass storage support, and support
multiple LUNs. This means that you will see both disks if they are
present.
♦
Macintosh OS 9.x has USB mass storage support, but only single LUN.
When you connect the SDR24/96 to a computer while in USB mass storage mode:
♦
If using a Windows OS, the SDR24/96 appears in Windows Explorer as
another drive in the system. You can navigate through the directories on
the drive to access project and audio files, and copy and delete files using
the standard edit (or drag and drop) functions in Explorer.
♦
If using a Mac OS, the SDR24/96 appears as a drive on the desktop. You
can open the drive, navigate through folders, and drag and drop files from
the SDR24/96 to the computer and vice versa.
SDR Footswitch
The SDR Footswitch option
(SETUP:Page Right:System:SDRSw)
allows you to select the function of a
footswitch when connected to the FOOT
SWITCH jack on the back of the SDR24/96. You can select Stop/Play or Punch.
Refer to “Footswitch Operation” on page 39 for more information.
Remote Footswitch
The Remote Footswitch option
(SETUP:Page Right:System:RemSw)
allows you to select the function of a
footswitch when connected through the
optional Remote 24. You can select Stop/Play or Punch. Refer to “Footswitch
Operation” on page 39 for more information.
Load Meter
The Load Meter (SETUP:Page
Right:System:Load) indicates the current
load on the system resources resulting
from the play/record functions. The Load
Meter mainly reflects the disk workload (I/O requests). If the system load should
ever reach 100%, the transport will stop, indicating a performance error.
46
SDR 24/96
Page 47

Date
The Date option (SETUP:Page Right:System:Page Right:Date) allows you to
enter the current date. This is used to timestamp new and updated files.
To reset the date:
1. Press SETUP to enter the SETUP MENU.
Operation Guide
2. Press Page Right, select
System, Page Right, and then
select Date.
3. Press Page Right to change
the date. A blinking cursor
appears over the first numeral
of the date. Use the increment
(Inc) and decrement (Dec) buttons to change the highlighted numeral.
Select the >> button to move to the next numeral.
4. Press the Page Left button when finished, and then select OK to save the
new date.
DATE: 02/02/02 m/d/y >
OK Cancel
< DATE: 02/02/02 m/d/y
<< >> Inc Dec
Time
The Time option (SETUP:Page Right:System:Page Right:Time) allows you to
enter the current time. This is used to timestamp new and updated files. Note that
the SDR24/96 uses military time (00:00:01 to 23:59:59).
To reset the time:
1. Press SETUP to enter the SETUP MENU.
2. Press Page Right, select
System, Page Right, and then
select Time.
TIME: 14:30:45 h:m:s >
OK Cancel
3. Press Page Right to change
the time. A blinking cursor
appears over the first numeral
of the time. Use the increment
(Inc) and decrement (Dec) buttons to change the highlighted numeral.
Select the >> button to move to the next numeral.
4. Press the Page Left button when finished, and then select OK to save the
new time.
< TIME: 15:31:22 h:m:s
<< >> Inc Dec
About
The About option shows the current
software version of the SDR24/96.
SDR-1.0-1.0.0
Continue
Operation Guide
47
Page 48

SDR 24/96
Appendix A: Troubleshooting and Service
If you think your SDR24/96 has a problem, please do everything you can to
confirm it before calling for service, including reading through the following
Troubleshooting section. Doing so might save you from the deprivation of your
Mackie Digital Audio Recorder and the associated suffering.
Of all Mackie products returned for service (which is hardly any at all), roughly
50% are coded “CND” — Could Not Duplicate, which usually means the problem
lay somewhere else in the system. These may sound obvious to you, but here are
some things you can check:
Troubleshooting
No power!
• Our favorite question: Is it plugged in? Make sure the detachable linecord
is pushed firmly into the AC socket on the back of the SDR24/96. Make
sure the AC outlet is live (check with a tester or lamp).
• Our next favorite question: Is the POWER switch on? If not, try turning it
on.
• Is the red LED above the power switch lit? If not, make sure the AC outlet
is live. If so, refer to “No Sound” below.
• The AC line fuse inside the cabinet is blown. This is not a user-serviceable
part. Refer to “Repair” on the next page to find out how to proceed.
No sound getting recorded
• Is the Input Type Select (SETUP:I/O:Page Right:Page Right:INPUT
TYPE SELECT) correctly set to the inputs you are using, analog or
digital?
• Is the signal source turned up? Make sure the signal from the mixing
console is high enough to move the meters on the SDR24/96.
No sound on playback
• Are the tracks mapped directly to the outputs? If you have customized the
track-to-output mapping (SETUP:I/O:Page Right:TRACK OUTPUT
SELECT), make sure you are monitoring the correct output to listen to the
desired track(s).
Can’t rewind to zero
• Is the transport offset (SETUP:Transp:Page Right:TrOf) set to something
other than zero? The transport locator time will be offset by whatever
value is entered in the transport offset field.
Noise/Hum
• Check the signal cable between the mixer and the recorder. Make sure all
connections are good and sound.
• Make sure the signal cable is not routed near AC cables, power
transformers, or other EMI-inducing device.
• Is there a light dimmer or other SCR-based device on the same AC circuit
as the monitor? Use an AC line filter or plug the amplifier into a different
AC circuit.
• If possible, listen to the signal source with headphones plugged into the
console. If it sounds noisy there, the problem’s not in the SDR24/96.
48
For additional up-to-date information please visit our website at www.mackie.com.
SDR 24/96
Page 49

Repair
Service for the SDR24/96 Digital Audio Recorders purchased in the USA is
available only from one of our authorized domestic service stations. It is also
available at the factory, located in sunny Woodinville, Washington. (Service for
Mackie products living outside the United States can be obtained through local
dealers or distributors.) If your SDR24/96 needs service, and it lives in the United
States, follow these instructions:
1. Review the preceding troubleshooting suggestions. Please.
2. Call Tech Support at 1-800-258-6883, 8am to 5pm PST, to explain the
problem and request an RA (Return Authorization) number. Have your
SDR’s serial number ready. You must have an RA number before you can
obtain service at the factory or an authorized service center.
3. Keep this owner’s manual. We don’t need it to repair the recorder.
4. Pack the recorder in its original package, including endcaps and box. This
is very important. When you call for the RA number, please let Tech
Support know if you need new packaging. Mackie is not responsible for
any damage that occurs due to non-factory packaging.
5. Include a legible note stating your name, shipping address (no P.O. boxes),
daytime phone number, RA number, and a detailed description of the
problem, including how we can duplicate it.
6. Write the RA number in BIG PRINT on top of the box.
7. Ship the recorder to us. We suggest insurance for all forms of cartage.
Ship to this address:
Mackie Designs
SERVICE DEPARTMENT
16140 Wood-Red Rd. NE Ste. 5
Woodinville, WA 98072
Operation Guide
8. We’ll try to fix the recorder within five business days. Ask Tech Support
for current turn-around times when you call for your RA number. We
normally send everything back prepaid using UPS ORANGE (three-day
air). However, if you rush your recorder to us by Next Day Air, we’ll ship it
back to you UPS RED (Next Day Air). This paragraph does not necessarily
apply to non-warranty service.
Please read the included warranty information, then complete and return the
Warranty Registration card, or it’s straight to bed for you with no dinner.
“Mackie,” the “Running Man” figure, “SDR24/96,” and “Digital 8•Bus” are
trademarks or registered trademarks of Mackie Designs Inc. All other brand
names mentioned are trademarks or registered trademarks of their respective
holders, and are hereby acknowledged.
Operation Guide
49
Page 50

SDR 24/96
Appendix B: Technical Info
SDR24/96 Specifications
Electronic
Frequency Response (Digital, 48 kHz sampling rate): 20 Hz to 20 kHz (+ 0 dB, – 0.5 dB)
Harmonic Distortion: 0.005% @ 1 kHz sine wave at –1 dBFS with 20 kHz
brick-wall low-pass filter
Dynamic Range: 108 dB digital (A-Weighted)
Adjacent Channel Crosstalk (+10 dBu at 1 kHz): –90 dB
Digital
Quantization: 16-bit and 24-bit, selectable
Sample Rates: 44.1 kHz, 48 kHz, 88.2 kHz, 96 kHz
Computer
Internal CPU: Hitachi H8S 2357 w/128k internal Flash memory
Internal RAM: 8 MB DRAM
Hard Disk
Internal Capacity: 20 GB (> 90 minutes, 24 tracks at 48 kHz)
Mackie M90 Media Capacity: 20 GB (> 90 minutes, 24 tracks at 48 kHz)
Hard Disk Seek Time: 9.5 ms
Hard Disk Throughput: 295 megabits/sec
I/O
Analog: Balanced, +4 dBu nominal, +22 dBu maximum,
DB25F
Digital: ADAT optical, 24-bit, 128X oversampling
MIDI: MIDI IN/MIDI OUT, 5-pin DIN
SMPTE: 1/4" TRS
Word Clock: BNC
ADAT Sync: DB9F
Serial 9-Pin: DB9F
Physical
Height: 5.25" (133 mm)(3 RU)
Width: 19.00" (483 mm)
Depth: 13.25" (337 mm)
Weight: 14 lbs. (6.4 kg)
Electrical
Operating Voltage: 100-240 VAC, 50/60Hz
Power Consumption: 30W
Optional
Remotes: Remote 24, Micro Remote
50
SDR 24/96
Page 51

Appendix C: Upgrading the System Software
From time to time, Mackie may release updated versions of the SDR24/96
operating system on our website at www.mackie.com. The file can be downloaded
easily from the SDR24/96 section of the site.
To install new software:
1. Place the SDR24/96 into USB mass storage mode (SETUP:Page
Right:System:USBMS). See “USB mass storage” on page 45 for more info.
2. Connect a USB cable between the SDR24/96 and your computer.
3. Copy the file that you downloaded from the Mackie website from your
computer to the SDR drive that appears on your desktop or in Windows
Explorer.
Operation Guide
4. Select Reboot on the SDR24/96.
You are asked to confirm the
upgrade. Select OK to proceed
SDR-1.0-1.0.0
Upgrade? OK Cancel
with the upgrade, or Cancel to
reboot without upgrading.
Upgrade in progress... appears
in the display as the new
SDR-1.0-1.0.0
Upgrade in progress...
software is installed.
Appendix D: Analog I/O Pinout
The analog inputs and outputs on the SDR24/96 are compatible with TASCAM
DB25 analog I/O. See Appendix E for a list of compatible cables.
Signal
Description
I/O 1-8
I/O 9-16
Pin 1 + Ch 8 Ch16 Ch24
Pin 2 shield Ch 8 Ch16 Ch24
Pin 3 – Ch 7 Ch15 Ch23
Pin 4 + Ch 6 Ch14 Ch22
Pin 5 shield Ch 6 Ch14 Ch22
Pin 6 – Ch 5 Ch13 Ch21
Pin 7 + Ch 4 Ch12 Ch20
Pin 8 shield Ch 4 Ch12 Ch20
Pin 9 – Ch 3 Ch11 Ch19
Pin 10 + Ch 2 Ch10 Ch18
Pin 11 shield Ch 2 Ch10 Ch18
Pin 12 – Ch 1 Ch 9 Ch17
Pin 13 N/C
I/O 17-24
Pin 14 – Ch 8 Ch16 Ch24
Pin 15 + Ch 7 Ch15 Ch23
Pin 16 shield Ch 7 Ch15 Ch23
Pin 17 – Ch 6 Ch14 Ch22
Pin 18 + Ch 5 Ch13 Ch21
Pin 19 shield Ch 5 Ch13 Ch21
Pin 20 – Ch 4 Ch12 Ch20
Pin 21 + Ch 3 Ch11 Ch19
Pin 22 shield Ch 3 Ch11 Ch19
Pin 23 – Ch 2 Ch10 Ch18
Pin 24 + Ch 1 Ch 9 Ch17
Pin 25 shield Ch 1 Ch 9 Ch17
Signal
Description
I/O 1-8
I/O 9-16
I/O 17-24
ANALOG OUT 1 - 8
12345678910111213
141516171819202122232425
Operation Guide
51
Page 52

SDR 24/96
Appendix E: Compatible Cables
Analog and Digital Multitrack Cables
The following companies supply analog and digital multitrack cables for use with
the SDR24/96 Input and Output connectors:
Horizon Music, Inc.
P.O. Box 1988, Cape Girardeau MO 63702-1988
Tel: (800) 255-9822; Fax: (800) 455-3460
http://www.horizonmusic.com
Analog Interface Cables
HDA8 Series DB25 to [specify connector]
Connector options: 8 male XLR, 8 female XLR, or 8 1/4" TRS
Standard lengths: 5, 10, 15, 20, 25 feet
Hosa Technology, Inc.
6920 Hermosa Circle, Buena Park CA 90620
Tel: (714) 736-9270; Fax (714) 522-4540
http://www.hosatech.com
Analog Interface Cables
DTP Series DB25 to 8 1/4" TRS
DTF Series DB25 to 8 female XLR’s
DTM Series DB25 to 8 male XLR’s
Standard lengths: 3, 4, 5, 7 meters
ADAT Optical Interface Cables
OPT Series Standard ADAT Optical cables
OPM Series Jacketed ADAT Optical cables w/ metal headshell
OPT lengths: 2, 3, 6, 10, 13, 17, 30, 50 feet
OPM lengths: 3, 5, 10, 15, 20, 30, 50 feet
Marshall Electronics
PO Box 2027, Culver City, CA 90231
Tel: (800) 800-6608; Fax: (310) 391-8926
http://www.mars-cam.com/cable.html
Analog Interface Cables
DC-DAXM Series DB25 to 8 male XLR’s
DC-DAXF Series DB25 to 8 female XLR’s
DC-DAS Series DB25 to 8 1/4" TRS connectors
Standard lengths: 3, 5, 10, 15, 20, 25 feet
Pro Co Sound, Inc.
135 E. Kalamazoo Ave., Kalamazoo, MI 49007
Tel: (800) 253-7360; Fax: (616) 388-9681
http://ww.procosound.com
Analog Interface Cables
DA-88 XM Series DB25 to 8 male XLR’s
DA-88 XF Series DB25 to 8 female XLR’s
DA-88 BQ Series DB25 to 8 1/4" TRS connectors
Standard lengths: 5, 10, 15, 20 feet
52
SDR 24/96
Page 53

Other Cables
In addition to the companies listed above, the following companies supply
individual 110Ω AES/EBU and/or 75Ω word clock and video cables:
Apogee Electronics Corporation
3145 Donald Douglas Loop South
Santa Monica, CA 90405-3210
Tel: (310) 915-1000; Fax: (310) 391-6262
http://www.apogeedigital.com
Canare
531 5th Street, Unit A, San Fernando, CA 91340
Tel: (818) 365-2446; Fax: (818) 365-0479
http://www.canare.com
Whirlwind
99 Ling Rd., Rochester, NY 14612
Tel: (888) 733-4396; Fax: (716) 865-8930
http://www.whirlwindusa.com
Operation Guide
© 2002 Mackie Designs Inc.
All Rights Reserved.
Printed in the U.S.A.
Operation Guide
53
Page 54

PROJECT: Feel the Love
AVAIL: 02:27:26 on EXT
44.1k
VARI
48k
24 BIT16 BIT
TC
ERROR
MINUTESHOURS SECONDS FRA MES
EXT
CLOCK
SELECTSELECTSELECTSELECT
POWER
24 TRACK/24 BIT DIGITAL AUDIO RECORDER
ALL
INPUT
AUTO
INPUT
PUNCH REHRSELOOPLOCATE STORE
DELETE
LAST
SETUP
EDIT
T-CODE
CHASE
AUTO
TAKE
TRACK PROJECT
242322
21
2019181716151413121110987654321
HIGH RESOLUTION
NON-LINEAR RECORDER
X2
96
SDR
REWIND
FAST FWD
PLAY
STOP
RECORD
OUT
IN
IN
IN
OUT
OUT
DIGITAL WORD CLOCK I/O
MIDI
ADAT SYNC
IN
ADAT SYNC
OUT
SERIAL
9-PIN
FOOT
SWITCH
SMPTE
MICRO/
REMOTE 24
CNTRL
ANALOG OUT 1 - 8 ANALOG OUT 9 - 16 ANALOG OUT 17 - 24
ANALOG IN 1 - 8 ANALOG IN 9 - 16 ANALOG IN 17 - 24
RISK OF ELECTRIC SHOCK
DO NOT OPEN
REPLACE WITH THE SAME TYPE FUSE AND RATING.
DISCONNECT SUPPLY CORD BEFORE CHANGING FUSE
UTILISE UN FUSIBLE DE RECHANGE DE MÊME TYPE.
DEBRANCHER AVANT DE REMPLACER LE FUSIBLE
WARNING:
TO REDUCE THE RISK OF FIRE OR ELECTRIC SHOCK, DO NOT
EXPOSE THIS EQUIPMENT TO RAIN OR MOISTURE. DO NOT REMOVE COVER.
NO USER SERVICEABLE PARTS INSIDE. REFER SERVICING TO QUALIFIED PERSONNEL.
CAUTION
SERIAL NUMBER
MANUFACTURING DATE
AVI S:
RISQUE DE CHOC ELECTRIQUE — NE PAS OUVRIR
CONCEIVED, DESIGNED, AND MANUFACTURED BY MACKIE DESIGNS INC • WOODINVILLE • WA 98072 • USA
MADE IN USA • FABRIQUE AU USA • PATENTS PENDING COPYRIGHT ©1998 THE FOLLOWING ARE TRADEMARKS OR
REGISTERED TRADEMARKS OF MACKIE DESIGNS INC.: "MACKIE.", MACKIE DIGITAL SYSTEMS AND THE "RUNNING MAN" FIGURE.
POWER
USB
1 - 8
IN OUT
DIGITAL
9 - 16
IN OUT
DIGITAL
17 - 24
X2
1-4
X2
5-8
X2
9-12
IN OUT
24 TRACK/24 BIT DIGITAL
AUDIO RECORDER
HIGH RESOLUTION
NON-LINEAR RECORDER
96
SDR
100 - 240V 250mA
50/60Hz
SDR 24/96
54
SDR 24/96
Page 55

Notes
________________________________________________________________________________________________
________________________________________________________________________________________________
________________________________________________________________________________________________
________________________________________________________________________________________________
________________________________________________________________________________________________
________________________________________________________________________________________________
________________________________________________________________________________________________
________________________________________________________________________________________________
________________________________________________________________________________________________
________________________________________________________________________________________________
________________________________________________________________________________________________
________________________________________________________________________________________________
________________________________________________________________________________________________
________________________________________________________________________________________________
________________________________________________________________________________________________
________________________________________________________________________________________________
________________________________________________________________________________________________
________________________________________________________________________________________________
________________________________________________________________________________________________
________________________________________________________________________________________________
________________________________________________________________________________________________
________________________________________________________________________________________________
________________________________________________________________________________________________
________________________________________________________________________________________________
________________________________________________________________________________________________
________________________________________________________________________________________________
________________________________________________________________________________________________
________________________________________________________________________________________________
________________________________________________________________________________________________
________________________________________________________________________________________________
________________________________________________________________________________________________
________________________________________________________________________________________________
________________________________________________________________________________________________
________________________________________________________________________________________________
________________________________________________________________________________________________
________________________________________________________________________________________________
________________________________________________________________________________________________
________________________________________________________________________________________________
________________________________________________________________________________________________
________________________________________________________________________________________________
________________________________________________________________________________________________
________________________________________________________________________________________________
________________________________________________________________________________________________
________________________________________________________________________________________________
________________________________________________________________________________________________
________________________________________________________________________________________________
________________________________________________________________________________________________
________________________________________________________________________________________________
________________________________________________________________________________________________
Operation Guide
Operation Guide
55
Page 56

16220 Wood-Red Rd. NE • Woodinville, WA 98072 • USA
Europe, Asia, Central & South America: 425/487-4333
US & Canada: 800/898-3211
Middle East & Africa: 31-20-654-4000
Fax: 425/487-4337 • www.mackie.com
E-mail: sales@mackie.com
 Loading...