

Page 1

REMOTE 48
USER’S GUIDE
PROFESSIONAL REMOTE CONTROL FOR THE
HDR24/96 HARD DISK RECORDER
Page 2
CAUTION AVIS
REMOTE 48
RISK OF ELECTRIC
DO NOT OPEN
RISQUE DE
NE PAS OUVRIR
CAUTION: TO REDUCE THE RISK OF ELECTRIC SHOCK
DO NOT REMOVE COVER (OR BACK)
NO USER-SERVICEABLE PARTS INSIDE
REFER SERVICING TO QUALIFIED PERSONNEL
ATTENTION: POUR EVITER LES RISQUES DE CHOC
ELECTRIQUE, NE PAS ENLEVER LE COUVERCLE. AUCUN
ENTRETIEN DE PIECES INTERIEURES PAR L’USAGER. CONFIER
L’ENTRETIEN AU PERSONNEL QUALIFIE.
AVIS: POUR EVITER LES RISQUES D’INCENDIE OU
D’ELECTROCUTION, N’EXPOSEZ PAS CET ARTICLE
A LA PLUIE OU A L’HUMIDITE
The lightning flash with arrowhead symbol within an equilateral
triangle is intended to alert the user to the presence of uninsulated
"dangerous voltage" within the product’s enclosure, that may be
of sufficient magnitude to constitute a risk of electric shock to persons.
Le symbole clair avec point de fl che l’int rieur d’un triangle
quilat ral est utilis pour alerter l’utilisateur de la pr sence
l’int rieur du coffret de "voltage dangereux" non isol d’ampleur
suffisante pour constituer un risque d’ l ctrocution.
The exclamation point within an equilateral triangle is intended to
alert the user of the presence of important operating and maintenance
(servicing) instructions in the literature accompanying the appliance.
Le point d’exclamation l’int rieur d’un triangle quilat ral est
employ pour alerter les utilisateurs de la pr sence d’instructions
importantes pour le fonctionnement et l’entretien (service) dans le
livret d’instruction accompagnant l’appareil.
CHOC
SHOCK
ELECTRIQUE
Important Safety Instructions
1. Read Instructions — Read, understand and follow all safety
and operating instructions before using the Remote 48.
2. Retain Instructions — Keep these safety and operating
instructions for future reference.
3. Heed Warnings — Follow all warnings on the Remote 48
and in these operating instructions.
4. Water and Moisture — Do not use the Remote 48 near
water – for example, near a bathtub, kitchen sink, garden
hose, incontinent poodle, sweaty drummer, etc. – or when
condensation has formed on the unit.
11. Servicing — Do not attempt to service the Remote 48. All
servicing should be referred to the Mackie Service Depart
ment.
12. Lightning — Unplug the Remote 48 during lightning storms
or when unused for long periods of time.
13. Grounding and Polarization — To prevent electric shock,
do not use the Remote 48 polarized plug with an extension
cord, receptacle or other outlet unless the blades can be
fully inserted to prevent blade exposure. Do not defeat the
Remote 48 grounding by plugging into an ungrounded
receptacle or ground lift adapter.
This apparatus does not exceed the Class A/Class B (whichever is applicable) limits for radio noise emissions from digital
apparatus as set out in the radio interference regulations of
the Canadian Department of Communications.
ATTENTION — Le présent appareil numérique n’émet pas de
bruits radioélectriques dépassant las limites applicables aux
appareils numériques de class A/de class B (selon le cas)
prescrites dans le réglement sur le brouillage radioélectrique
édicté par les ministere des communications du Canada.
FCC Information
NOTE: This equipment has been tested and found to comply
with the limits for a Class A digital devices, pursuant to Part 15
of the FCC Rules. These limits are designed to provide
reasonable protection against harmful interference when the
equipment is operated in a commercial installation. This
equipment generates, uses, and can radiate radio frequency
energy and, if not installed and used in accordance with the
instruction manual, may cause harmful interference to radio
communications. Operation of this equipment in a residential
area is likely to cause harmful interference in which case the
user will be required to correct the interference at his own
expense.
5. Heat and Ventilation — Locate the Remote 48 away from
heat sources such as radiators, campfires, compost pits,
heliarc welders, magma flows, etc.
6. Power Sources — Connect the Remote 48 only to a power
source of the type described in these operating instructions or as marked on the Remote 48.
7. Power Cord Protection — Route power supply cords so
that they are not likely to be walked upon, tripped over, or
abraded by items placed upon or against them. Pay
particular attention to cords at plugs, convenience
receptacles, and the point where they exit the Remote 48.
8. Object and Liquid Entry — Do not drop objects or spill
liquids into the Remote 48. Clean only with a damp cloth;
do not clean with liquid or aerosol cleaners.
9. Attachments — Use the Remote48 with only the accessories specified in this manual.
10. Damage Requiring Service — The Remote48 should be
serviced only by qualified service personnel when:
A. The power supply cord or the plug has been damaged;
or
B. Objects have fallen onto, or liquid has spilled into the
unit; or
C. The unit has been exposed to rain or water; or
D. The unit does not appear to operate normally or
exhibits a marked change in performance; or
E. The unit has been dropped, or its chassis damaged.
This product has been tested and complies
with the following standards and directives as
set forth by the European Union:
* EN 55022 Radiated and Conducted
Emissions
* EN 61000-4-2 Electrostatic Discharge
Immunity
* EN 61000-4-3 RF Electromagnetic Fields
Immunity
* EN 61000-4-4 Electrical Fast Transient/
Burst Immunity
* EN 60950/IEC 950 Electrical Safety
WARNING — To reduce the risk of fire or electric
shock, do not expose this appliance to rain or
moisture.
Part No. 820-209-00 Rev. A 10/01
© 2001 Mackie Designs Inc. All rights reserved.
Printed in the U.S.A.
Page 3

Contents
User’s Guide
Introduction ---------------------------------------- 4
Installation ----------------------------------------- 5
Mount on Stand (Optional) --------------- 5
Mount on Mic Stand (Optional) ---------- 5
Plug It In --------------------------------------- 6
What About The Remote 24 ?------------------ 6
Footswitch ------------------------------------ 6
Operation ------------------------------------------- 7
Transport -------------------------------------- 7
Stop ------------------------------------------------- 7
Play -------------------------------------------------- 7
Fast Forward/Rewind --------------------------- 7
Record ---------------------------------------------- 7
Transport Locate --------------------------------- 7
Numbered Locates ------------------------------- 8
Shuttle and Jog ----------------------------------- 8
Shuttle and Jog Wheel -------------------------- 8
Transport Modes ---------------------------- 9
Pre Roll --------------------------------------------- 9
Loop ------------------------------------------------- 9
Punch------------------------------------------------ 9
Rehearse-------------------------------------------- 9
Auto Play ------------------------------------------- 9
Auto Take ------------------------------------------ 9
Record/Monitor Controls ---------------- 10
Record Ready------------------------------------- 10
All Input ------------------------------------------- 10
Auto Input ---------------------------------------- 10
Record Safe --------------------------------------- 10
Lock Out------------------------------------------- 10
System Controls -----------------------------11
Deck 2 ---------------------------------------------- 11
Edit ------------------------------------------------- 11
Vari ------------------------------------------------- 11
ALT-------------------------------------------------- 11
Control -------------------------------------------- 11
Autolocator---------------------------------- 13
Numeric Keypad --------------------------------- 13
Time Entry ---------------------------------------- 13
Time Units ---------------------------------------- 14
Edit Time ------------------------------------------ 14
+Next and –Prev --------------------------------- 14
Cues ------------------------------------------------ 14
Capture -------------------------------------------- 14
Clear------------------------------------------------ 15
Enter ----------------------------------------------- 15
Store ----------------------------------------------- 15
Recall ---------------------------------------------- 16
Time Code Calculator -------------------------- 17
Other Stuff ---------------------------------------- 18
Specifications ------------------------------- 18
Troubleshooting & Warranty Service--- 18
Thank you for adding the Remote 48 to your line
of Mackie equipment. If you’re familiar with the
HDR24/96, you probably already know what most
of this remote control does, but just in case, this
guide will explain all those other buttons ... some
of which are new or a little
Remote 24 and HDR24/96
Note: When this manual refers to the HDR24/96
recorder, the MDR24/96 recorder applies as well
unless stated otherwise.
Please write your serial number here for future
reference:
different from the
front panel.
Displays--------------------------------------- 12
Tape Time ----------------------------------------- 12
Locate Time--------------------------------------- 12
Vari ------------------------------------------------- 12
Cue ------------------------------------------------- 12
Rates ----------------------------------------------- 12
Don’t forget to visit our website at www.mackie.com for updates to this manual
and additional information about this and other Mackie products.
Purchased at:
Date of Purchase:
®
Page 4

Introduction
The Remote 48 is a professional remote controller for both the Mackie
HDR24/96 and MDR24/96. It is used to control one or more HDR24/96
recorders. The Remote 48 offers all the functionality of the HDR24/96 front
panel, along with several other features not found on the HDR24/96 or
Remote 24, including:
Remote 48
Record Ready
Buttons
• Weighted wheel for Jog/Shuttle transport operations and data entry
• Autolocator with numeric keypad
• Cue display with Cue Store and Recall
• Record Ready keys for 48 tracks
• System control for two HDR24/96 recorders
• Time code Calculator
LCD Display &
Control
Status, Cue &
Time Displays
Monitoring &
Record Safe
4
Introduction
EDIT
System Control
ALT
CONTROL
Autolocator &
Numeric Keypad
Transport
Transport
Control
Jog/Shuttle
Wheel Control
Page 5
Installation
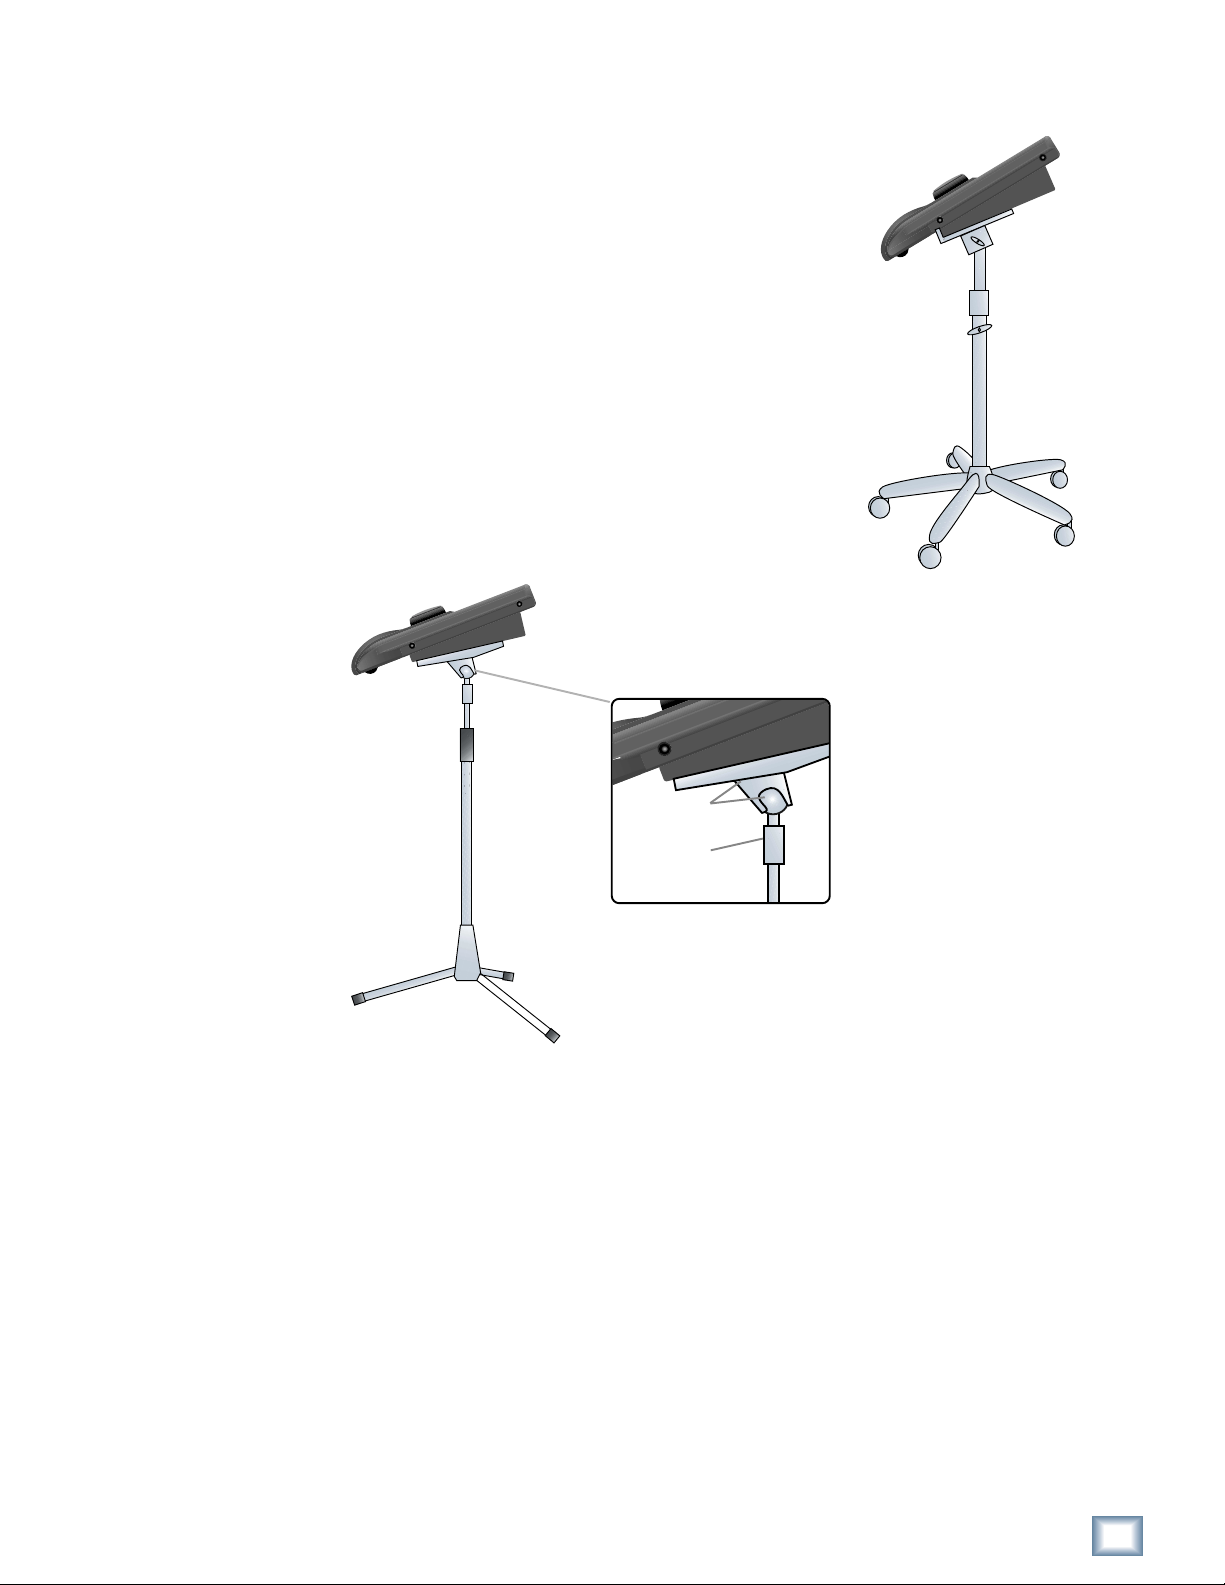
Mount on Stand (Optional)
The Remote 48 can be placed on any stable work
surface, but for optimal support we recommend the
Quik-Lok QL-406 stand. The QL-406 is a roll-around
remote stand with height and tilt adjustment made
specifically for the Remote 48. See www.quiklok.com for
specifications.
Mount on Mic Stand (Optional)
When mounting the Remote 48 on a standard 5/8”
thread mic stand, we recommend the Omnimount
50-ST mounting plate and 5000-MA stand adaptor.
Be sure the base of the stand is broad enough to
adequately support the Remote 48.
User’s Guide
Quik-Lok QL-406
Omnimount
System
Omnimount
50-ST
Omnimount
5000-MA
Adaptor
Remote 48 User’s Guide
5
Page 6
REMOTE MOUSE
FOOT
SWITCH
DO NOTNOT PLUG INTO
ETHERNET
WARNING
NOT
WARNING
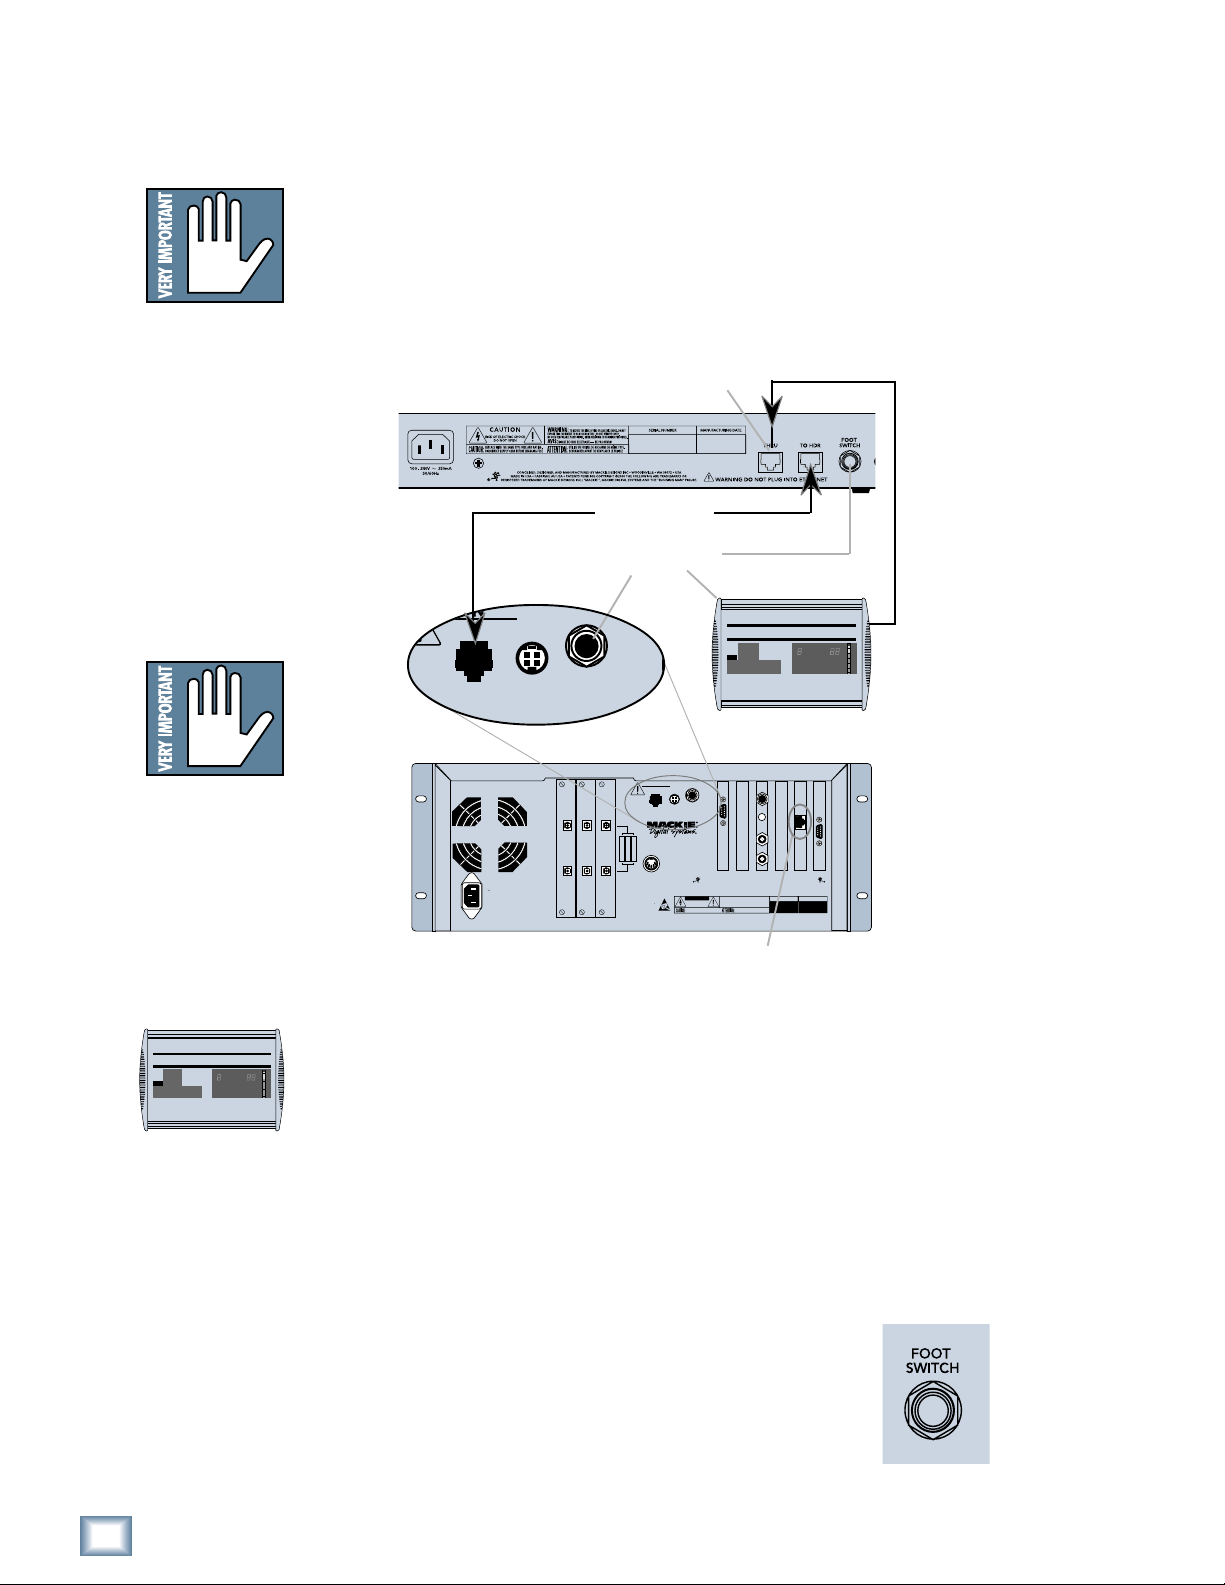
Plug It In
Setting up the Remote 48 is as easy as plugging in a telephone:
Remote 48
Note:Note:
Note: Power-up the
Note:Note:
Remote 48 before
powering the HDR 24/96 .
1. Plug the 25-foot remote cable (supplied with your unit) into the
jack on the back of the Remote 48, and the other end into the
TO HDR
REMOTE
jack on the back of the HDR24/96.
2. Plug the supplied IEC power cable into the power jack on the back of
the Remote 48.
Thru Port
Remote 48 Back Panel
Remote Cable
Foot Switch
From Remote 24
Remote 24
Note:Note:
Note: When using
Note:Note:
two HDR24/96 re-
corders in a 48-track
system, plug the Re-
mote 48 into the
Master HDR24/96
(Tracks 1-24)
WARNING
DO NOT
PLUG INTO
ETHERNET
FOOT
SWITCH
REMOTE
24
-
16
-
TAPE 9
TAPE 17
TAPE 1– 8
KEYBOARD
WARNING: SHUT OFF POWER
TO UNIT BEFORE INSTALLING
OR REMOVING CARDS!
MOUSE
HDR 24/96
24TRACK 24 BIT DIGITAL AUDIO
HARD DISK RECORDER/EDITOR
CAUTION
RISK OF ELECTRIC SHOCK
DO NOT OPEN
REPLACE WITH THE SAME TYPE FUSE AND RATING.
DISCONNECT SUPPLY CORD BEFORE CHANGING FUSE
VIDEO SYNCACC 1 ACC 2 ETHERNET MIDI
CONCEIVED, DESIGNED, AND MANUFACTURED BY MACKIE DESIGNS INC • WOODINVILLE • WA 98072 • USA
MADE IN USA • FABRIQUE AU USA • PATENTS PENDING COPYRIGHT ©1998 THE FOLLOWING ARE TRADEMARKS OR
REGISTERED TRADEMARKS OF MACKIE DESIGNS INC.: "MACKIE.", MACKIE DIGITAL SYSTEMS AND THE "RUNNING MAN" FIGURE.
WARNING:
TO REDUCE THE RISK OF FIRE OR ELECTRIC SHOCK, DO NOT
EXPOSE THIS EQUIPMENT TO RAIN OR MOISTURE. DO NOT REMOVE COVER.
NO USER SERVICEABLE PARTS INSIDE. REFER SERVICING TO QUALIFIED PERSONNEL.
AVIS:
RISQUE DE CHOC ELECTRIQUE — NE PAS OUVRIR
UTILISE UN FUSIBLE DE RECHANGE DE MÊME TYPE.
DEBRANCHER AVANT DE REMPLACER LE FUSIBLE
Ethernet
Jack
SERIAL NUMBER
MANUFACTURING DATE
120VAC
50/60 Hz 475W
HDR 24/96 Back Panel
OUTPUT
OUTPUT
OUTPUT
INPUT
INPUT
INPUT
OPT • 8
OPT • 8
OPT • 8
What About The Remote 24 ?
Good question! You can use the Remote 24 in parallel with the Remote 48. Simply
connect it to the Remote 48’s
THRU
port using the Remote 24’s supplied cable. This
is an especially useful configuration if, for example, you have an additional
workstation or sound stage/booth located away from the Remote 48. We think
there is a ‘more than remote’ possibility of you using this setup.
In this configuration the Remote 48 will remain fully operational. Of course, you
will not have access to features unique to the Remote 48 such as arming tracks
25-48, when controlling from the Remote 24.
Footswitch
A must-have for performer-engineers: use a footswitch to
punch-in and out on the fly, stop and start the transport,
jump to the next cue, create new cues, or select the next
take. The footswitch function is assigned in the HDR24/96
General Setup window. This TS 1/4" jack accepts a
momentary, normally open footswitch—available at any
reputable music store.
6
Installation
Page 7

Operation
PLAY RECORD
LOCATE
Many of the features, functions, and procedures of the Remote 48 mirror those of
the HDR24/96 and Remote 24, and are therefore already defined in the HDR24/96
and Remote 24 user’s manuals. Therefore keep your HDR24/96 Quick Start Guide,
HDR24/96 Technical Reference Manual, and Remote 24 User Guide on hand for
reference.
Transport
Stop
STOP
brings the “tape” to an
STOP
immediate halt.
also
punches out of record and
cancels master record
standby.
Play
PLAY
puts the HDR24/96 into play; it also punches out of
record and cancels master record standby.
Fast Forward/Rewind
FAST FWD
mode from any state. They behave just like a large
multitrack recorder. When
pressed, the “tape” rolls slowly at first, then accelerates to
20X speed in a few seconds. Pressing either button a
second or third time puts the transport into even faster
wind speeds.
and
REWIND
put the HDR24/96 into fast wind
REWIND
LOCATE REWIND FAST FWD PLAYSTOP RECORD
REWIND FAST FWD
or
FAST FWD
are
User’s Guide
Record
Press
PLAY
and
RECORD
simultaneously to begin
recording. Press any transport button except Record, Jog,
or Shuttle to stop recording. The Record LED glows when
recording, and blinks when
RECORD
is engaged with no
tracks armed. In a 48-track system, the Record LED
glows when either HDR24/96 is recording.
Transport Locate
Pressing the transport
button causes the transport to jump
to the time displayed in the Locate
Time window. The Locate LED glows
whenever Tape Time = Locate Time,
otherwise it is off. The Remote 48
LOCATE
LOC
button corresponds to the
button in the GUI transport.
LOCATE
TapeTime
Locate Time
TAPE
TIME
LOCATE
TIME
Remote 48 User’s Guide
7
Page 8

Remote 48
Numbered Locates
In addition to the transport locate point, there
are four numbered
LOCATE
points to give you
quick access to frequently used locations in
your Project. Press one of the four numbered
LOCATE
buttons to jump to a Locate point.
Numbered Locates are set using the store
function (see
AUTOLOCATOR
).
Shuttle and Jog
Both shuttle and jog allow you to play audio
both forwards and backwards at non real-time
speeds. Shuttle play speed is quantized to 1/32,
1/16, 1/8, 1/4, 1/2, 1, and 2x the normal play
speed, and is proportional to how far the Wheel
is rotated after
similar to shuttle, except that the play speed
varies continuously between 0x and 1x and is
proportional to how fast you rotate the wheel.
Both give you very precise control of the
transport position for cueing to edit points.
SHUTTLE
is engaged.
JOG
is
1
234
LOCATE
SHUTTLE JOG
LOCATE
Pressing
SHUTTLE
or
JOG
engages Shuttle/Jog,
and pressing any transport button except
Record disengages Shuttle/Jog. With either
SHUTTLE
or
JOG
engaged, rotating the wheel
counterclockwise produces reverse transport movement, and clockwise produces
forward movement. When the transport is not moving, the Play LED blinks; when
the transport is moving, the Play LED glows and the Fast Forward or Rewind
LED blinks to indicate the playback direction.
Note: Shuttle must be disabled to enter Record.
Shuttle and Jog Wheel
In addition to its use as a Shuttle/Jog controller, the wheel is used for data entry
in certain autolocator operations, such as scrolling through the cue list or
changing time values in edit time operations. Data entry mode is overridden
whenever
the wheel in date entry mode.
SHUTTLE
or
JOG
is enabled. See
AUTOLOCATOR
for specific uses of
8
Operation
Page 9

Transport Modes
Pre Roll
PRE ROLL
earlier than the stored Locate time by the amount of the Pre Roll
time. For example, if you wish to locate to 00:05:00:00 and you
enter a Pre Roll of 5 seconds, the transport will locate to
00:04:55:00. Pre Roll is handy for auto punching where you need to
start playback a few seconds before the Punch In point.
Loop
LOCATES 1
To enable loop play, press
to
LOCATE 2
Punch
LOCATES 3
punching. To enable automated punching, press
engage
first punch point, and punches out at the second. The order of the
punch points does not matter.
causes any Locate operation to jump to a time that is
and 2 double as start and end points for looped playback.
LOOP
. Playback will loop from
LOCATES 1
. The order of the loop points does not matter.
and 4 double as in and out points for automated
RECORD
PUNCH
, the HDR24/96 automatically punches in at the
. When you
User’s Guide
PRE ROLL
LOOP
PUNCH
Rehearse
REHEARSE
recording anything to disk. In this mode the last Punch In and
Punch Out points are automatically stored to Loc 3 and Loc 4
(respectively). If multiple punch ins and outs occur during a single
pass, only the last punch points are stored. Punch points are not
stored when punching with the track Record Ready buttons or
when
allows you to practice punching without actually
PUNCH
and
REHEARSE
are both enabled.
Auto Play
AUTO PLAY
into play immediately after
locating to a Cue or Locate point.
puts the transport
1
LOCATE
234
LOCATE
Auto Take
AUTO TAKE
number of all armed Tracks at the beginning of each record pass.
After Take 8 is recorded, the take number jumps back to Take 1.
You can set a track’s take number from the Remote 48 Track
Options menu.
automatically increments the active Virtual Take
REHEARSE
AUTO
PLAY
AUTO
TAKE
Remote 48 User’s Guide
9
Page 10

Record/Monitor Controls
Remote 48
DIGITAL AUDIO HARD DISK RECORDER REMOTE CONTROL
16
1234
25
26 27 28
56789
29 30 31 32 33
10 11 12 13 14 15
34 35 36 37 38 39
18 19 20 21
17
40 41 42 43 44 45
Record Ready
The Record Ready buttons arm tracks for recording. When
RECORD
is engaged, you can punch individual tracks in and
out using the Record Ready buttons. Their LEDs blink in
standby and glow in record. In a 48-track system, Record
Readys 1-24 arm the Master HDR24/96, and Record Readys
25-48 arm the Slave HDR24/96.
All Input
ALL INPUT
INPUT
inputs, and the Auto Input setting has no effect.
is used for rehearsal and level setting. When
ALL
is on, both armed and unarmed tracks monitor their tape
Auto Input
AUTO INPUT
When
AUTO INPUT
inputs; this mode is used for tracking. When
armed tracks monitor their tape inputs in stop, fast forward,
rewind, and record. In play, they monitor the playback of previously
recorded audio; this mode is used for overdubbing. Unarmed tracks
always monitor the playback of previously recorded audio.
is used for recording, and affects only armed tracks.
is off, armed tracks always monitor their tape
AUTO INPUT
is on,
REMOTE 48
22 23 24
46 47 48
23 24
47 48
AUTO
INPUT
ALL
INPUT
ALL
INPUT
AUTO
INPUT
REC
SAFE
LOCK
OUT
Record Safe
REC SAFE
When enabled, Record Safe prevents you from arming tracks and
entering record.
disarms all tracks and disables all recording controls.
Lock Out
LOCK OUT
controls while allowing the HDR24/96 to otherwise operate
normally. To engage or disengage lock out on the Remote 48, hold
down the
when enabled and is off when disabled. Use Lock Out to prevent
someone from disturbing the HDR24/96 during critical operations,
such as when recording live performances.
disables user input from all software and hardware
LOCK OUT
button for 1 second. The Lock Out LED blinks
REC
SAFE
LOCK
OUT
10
Record/Monitor Controls
Page 11

System Controls
The System Controls that are unique
to the Remote 48 are described below.
For more detail on System Controls
EDITDECK 2
DEC INC
that are common to both the HDR24/96
and Remote 48, see the HDR24/96
Technical Reference Manual or QuickStart Guide.
Deck 2
The
DECK 2
button toggles Remote 48 control of the LCD display,
Rates display, and System Control buttons between the Master and
Slave HDR24/96. The Remote 48 controls the Master HDR24/96
when the Deck 2 LED is off, and the Slave HDR24/96 when the
Deck 2 LED is blinking.
Edit
The Edit button is not presently implemented and is reserved for a
future software upgrade.
T-CODE
CHASE
VARI
CONTROL
ALT
DECK 2
EDIT
User’s Guide
Vari
Varispeed is not presently implemented in the HDR24/96. This
button is reserved for a future software upgrade.
ALT
The
ALT
button modifies the functionality of another button. Specific
uses of the
ALT
button are documented within the function(s) it
modifies.
Control
The
CONTROL
Specific uses of the
function(s) it modifies.
button modifies the functionality of another button.
CONTROL
button are documented within the
VARI
ALT
CONTROL
Remote 48 User’s Guide
11
Page 12

Remote 48
Displays
Tape Time
The
TAPE TIME
“play head” (Current Time). It is the same as the Current Time displays on the
HDR24/96 front panel and GUI.
Locate Time
The
LOCATE TIME
time that the Transport will locate
to when the
pressed, and corresponds to the
LOCATE TIME
Cues List. Locate Time also acts as
a scratchpad or working display from which you can preview and recall stored
time values, manually enter and store specific times to these values, or display
the result of time code addition/subtraction operations.
Vari
The
VARI
whenever
speed, the Varispeed display shows quantized values of
0.0, 0.03, 0.06, 0.12, 0.25, 0.5, 1.0, and 2.0 in Shuttle,
and contiguous values between 0.00 and 1.00 in Jog. The
blinking Rewind LED indicates reverse motion (negative
speeds).
display always shows the current position of the HDR24/96
Tape Time (Current Time)
displays the
LOCATE
(Varispeed) display shows the transport speed
SHUTTLE
button is
display in the GUI
or
JOG
is enabled. Depending on the
Locate Time
VARI
TAPE
TIME
LOCATE
TIME
Cue
The
CUE
number display shows the Cue number that was
last entered, stored, or recalled. It also shows the names
of other stored values (
length,
Loc 4, and
Recall operation.
PCH
for Auto Punch,
PLA
for the last play start position) during a
Pre
for Pre-roll,
L1 – L4
LOP
for loop
for Loc 1 through
Rates
44.1k, 48k, 96k (Sample Rate)
The Sample Rate LEDs indicate the system sample
rate setting. The 44.1k and 96k LEDS light
simultaneously to indicate a sample rate setting of
88.2kHz.
Vari (Varispeed)
When the sample clock is set to either Word Clock or
Video, the
rate differs from the sample rate setting by more
than ± 0.2%.
16 Bit, 24 Bit (Bit Depth)
The
16 BIT
VARI
LED lights when the actual sample
and
24 BIT
LEDs reflect the system bit depth setting.
44.1k
VARI
ERROR
CUE
RATES
48k
16 BIT
24 BIT
TC CLOCK
96k
12
Error
The
attention. Selecting Cancel from the LCD display clears the error message.
Locator/Time Displays
ERROR
LED blinks when there is a system error that requires user
Page 13

TC (Time Code)
The TC LED represents the status of the HDR24/96 with respect to received
time code. When
no time code is present or time code is unreadable, and glows when the
HDR24/96 is locked to time code. The
is disabled.
T-CODE CHASE
is enabled, the TC LED blinks when either
TC
LED is off when
T-CODE CHASE
Clock
The
CLOCK
clock source, and blinks when the sample clock source is not present or out
of range. The
Internal.
LED glows when the system is locked to the selected sample
CLOCK
LED always glows when the sample clock is set to
Autolocator
This section describes the Remote 48 Autolocator functions. Some
Autolocator functions have many steps associated with them. The convention
for describing an Autolocator operation is:
[<Step 1> < Step 2> < Step 3> ....<Step n>].
where you perform step 1, then step 2, then step 3, and so forth until the last
step in the sequence. Buttons presses are shown in bold, and numeric keypad
entry with pound signs (
one step, others up to four.
###…
). Some Autolocator operations require only
User’s Guide
Numeric Keypad
The numeric keypad is used to enter time values into the
Locate Time display or Cue numbers into the Cue display
(see
TIME ENTRY, EDIT TIME, STORE, RECALL,
TIME CODE CALCULATOR
).
and
78
456
123
Time Entry
With no Autolocator operations pending, typing a time
value on the Numeric Keypad clears the
display and shifts the numbers left into the display.
Pressing
functions) terminates the entry. Pressing
numbers acts as a backspace. Clearing the last digit out of the display
cancels the operation, and restores the previous Locate Time value. You do
not need to type all 8 digits each time you enter a time; the Remote 48 fills-in
the blanks with zeros after time entry is terminated. The rightmost dot in
LOCATE TIME
The Remote 48 supports two basic time entry operations:
Stores the entered time into Locate Time.
ENTER
• [
########...
########...
• [
(as well as several other Autolocator
display flashes when time entry is active.
ENTER
LOCATE
]
LOCATE TIME
CLEAR
]
anytime while entering
CLEAR
0
9
ENTER
Locate to a specific time without overwriting the current Locate Time value;
the previous value of Locate Time is restored after the operation is completed.
Remote 48 User’s Guide
13
Page 14

Remote 48
Time Units
The
TIME UNITS
between SMPTE and BBT display modes.
button toggles the time units of the HDR24/96
TIME UNITS
Edit Time
The
EDIT TIME
LOCATE TIME
Frames/Ticks field (depending on display mode), a second time the
Seconds/Beats field, and so on, until the selection wraps back
around to the Frames/Ticks field. The rightmost dot in the selected
field flashes to indicate that editing is active in that field.
Advancing the edit time field sets the value in the previous field. Pressing
sets the Locate Time and cancels Edit Time editing.
You can enter time in three different ways:
• [
Enter the desired time directly from the numeric keypad. The
button allows you to edit specific fields within the
display. Pressing EDIT TIME once selects the
EDIT TIME
EDIT TIME
(one or more times) ###...
ENTER
]
numbers shift left continually until the field value is set by
pressing
EDIT TIME
or
ENTER
.
ENTER
EDIT TIME
• [
more times)
(one or more times)
ENTER
] Press the
+NEXT
+NEXT
or
and
–PREV
–PREV
increment/decrement the value by 1.
EDIT TIME
• [
(one or more times)
Wheel
ENTER
Rotate the wheel clockwise/counterclockwise to increment/
decrement the values continuously.
+Next and –Prev
The
+NEXT
Locate Time field values in Edit Time operations, act as math
operators in time code calculator operations, and call up the next
or previous Cue in the Cue List in specific Recall and Store
operations (see
CALCULATOR
and
–PREV
EDIT TIME, STORE, RECALL,
).
buttons increment and decrement
and
TIME CODE
Cues
Cues are Locate points (not to be confused with Locates
1-4) that can be set anywhere in the Project. Up to 999
Cues can be stored and recalled from the Remote 48 (see
STORE
and
RECALL
).
(one or
buttons to
]
NEXT
PREV
14
Autolocator
Capture
CAPTURE
Tape Time can be captured when the transport is stopped or
moving.
copies the value of Tape Time into Locate Time.
CAPTURE
Page 15

Clear
CLEAR
CUE
character. When entering time into the
pressing
operation and restores the previous Locate Time value.
deletes the last value entered into the
display by shifting all of the numbers right by one
LOCATE TIME
CLEAR
after the last character is deleted cancels the
LOCATE TIME
display,
or
CLEAR
Enter
The
ENTER
when entering a time in the
completes Time Entry, new Cue and Cue Store operations. It
also completes Recall operations and acts as an “=” button in
Time Code Calculator operations (see
TIME, STORE, RECALL,
button terminates the entry of a string of numbers
LOCATE TIME
and
TIME CODE CALCULATOR
display, and
TIME ENTRY, EDIT
).
ENTER
Store
STORE
displays into Cues, Numbered Locates, Pre Roll time, and the
Loop and Punch lengths. Pressing
Locate Time, and pressing
selects the tape time for the store operation. A flashing dot in
the right of the tape or locate time display indicates the time
selected for the store operation. Pressing the last key in the
store sequence transfers the value of locate or tape time to the
destination. The
goes dim after Store is executed or canceled. In the text below, the convention
“<
Store]
stores the value of the
STORE
Store
>” is used to denote any of the following button sequences:
, or [
CTRL+Store
LOCATE TIME
STORE
STORE
LED blinks when Store is armed, and
].
twice (or CTRL+Store)
or
TAPE TIME
once selects the
STORE
[Store], [Store
User’s Guide
The Remote 48 supports the following Store operations:
• [
STORE
Stores the selected time to a Numbered Locate
STORE
• [
Stores Locate Time to the Pre Roll time.
• [
STORE
Sets the Loop End point (the later of Locates 1 and 2) by adding the
Locate Time (Loop length) to the Loop Start point (the earlier of Locates
1 and 2).
STORE
• [
Sets the Punch End point (the later of Locates 3 and 4) by adding the
Locate Time (Punch length) to the Punch Start point (the earlier of
Locates 3 and 4).
STORE
• [
Stores the selected time to the currently displayed Cue. This is a shortcut
to save you from having to type in the Cue number again.
STORE
• [
Stores the Tape Time to a New Cue. New Cues are sequentially numbered
using the lowest number available in the Cue List. Note that you do not
need to press
LOCATE
PRE ROLL
LOOP
PUNCH
ENTER
CAPTURE
STORE
n]
]
]
]
]
]
twice to store the Tape Time to a New Cue.
Remote 48 User’s Guide
15
Page 16

• [
STORE
Stores the selected time to a specific Cue.
###…
ENTER
]
Remote 48
STORE
• [
Wheel
Rotating the wheel or pressing
through the Cue List in chronological order until you find the desired cue.
STORE
• [
Cancels the store operation. You can also store a specific time to any
stored value without overwriting the current Locate Time value; the
previous value of Locate Time is restored after the operation is completed.
• [########…
to a Numbered Locate.
• [########…
of Locates 1 and 2) by adding the directly entered (Loop length) to the
Loop Start point (the earlier of Locates 1 and 2).
• [########…
later of Locates 3 and 4) by adding the directly entered time (Punch
length) to the Punch Start point (the earlier of Locates 3 and 4).
• [########…
to Pre Roll.
• [########…
entered time to a specific Cue.
+NEXT
Enter
STORE
or
–PREV
] stores the Locate Time to a cue from the Cue List.
STORE
STORE
STORE
STORE
STORE
(one or more times or hold to scroll), or
+NEXT
STORE
] or [
LOCATE
LOOP
PUNCH
PRE ROLL
###…
or
–PREV
CTRL+Store
n] Stores the directly entered time
] Stores the Loop End point (the later
] Stores the Punch End point (the
] Stores the directly entered time
ENTER
allows you to scroll
Store
] Stores the directly
]
Recall
RECALL
display. After pressing
stored values (Cues, Numbered Locates, etc.) in any order
without overwriting the current Locate Time value. At any time
while previewing, the displayed value can be committed to Locate
Time by pressing
the operation and restores the previous Locate Time value.
When
that the
the
the
TIME
The Recall LED blinks when Recall is active, and goes off after Recall is executed
or canceled.
The Remote 48 supports the following Recall operations:
calls up the value of stored values into the Locate Time
RECALL
ENTER
RECALL
CUE
display before
LOCATE TIME
displays dashes (“- - –“) until a valid cue or other stored value is selected.
• [
• [
• [
is pressed, a dot flashes in the right of the Cue display to indicate
CUE
display is available for numeric entry. If a cue number is present in
RECALL
RECALL
Locates 1 and 2) to Locate Time.
RECALL
between Locates 3 and 4) to Locate Time.
. Pressing
RECALL
display. If an non-existent cue number is entered, the
LOCATE n
LOOP
PUNCH
, you can preview any number of
RECALL
is pressed, then that cue’s value is displayed in
ENTER
ENTER
ENTER
a second time cancels
] Recalls Locate n to Locate Time.
] Recalls the Loop length (the time between
] Recalls the Punch length (the time
RECALL
LOCATE
16
Autolocator
Page 17

• [
Time.
RECALL
PRE ROLL
ENTER
User’s Guide
] Recalls the Pre Roll Time to Locate
RECALL
• [
to Locate Time.
RECALL
• [
RECALL
• [
This is a shortcut to save you from having to type the Cue number.
• [
RECALL
Wheel
pressing
chronological order until you find the desired Cue.
RECALL
• [
can also locate to any stored value without overwriting the current Locate
Time value; the previous value of Locate Time is restored after the
operation is completed.
• [
RECALL
command.
RECALL
• [
RECALL
• [
Wheel
wheel or pressing
List in chronological order until you find the desired Cue.
PLAY
###…
ENTER
+NEXT
ENTER
+NEXT
RECALL
PLAY
###…
+NEXT
LOCATE
ENTER
] Recalls the currently displayed Cue to Locate Time.
or
] Recalls a Cue from the Cue List. Rotating the wheel or
or
–PREV
] Cancels the recall operation. Using
LOCATE
or
] Locates to a Cue from the Cue List. Rotating the
+NEXT
] Recalls the time of the last Play command
ENTER
–PREV
LOCATE
–PREV
] Recalls a specific Cue to Locate Time.
(one or more times or hold to scroll), or
allows you to scroll through the Cue List in
RECALL
] Locates to the time of the last Play
] Locates to the time of the selected Cue.
(one or more times or hold to scroll), or
or
–PREV
allows you to scroll through the Cue
, you
Time Code Calculator
The Time Code Calculator adds or subtracts two time values entered into the
LOCATE TIME
like adding 00:03:23:18 to 1:58:34:22 as easy as doing first grade arithmetic. The
Time Code Calculator works in both SMPTE and BBT display modes. Using the
Calculator is similar to using a pocket calculator, except that Enter is equivalent to
the “=” button.
The Remote 48 supports the following Time Code Calculator operations:
• [
• [
• [########…
• [########…
• [########…
display and stores the result back into Locate, making operations
+NEXT
the current Locate Time value.
–PREV
from the current Locate Time value.
directly entered time values to the second.
second directly entered time value from the first.
second directly entered time value from the first.
########…
########…
+NEXT
–PREV
–PREV
########…
########…
########…
ENTER
ENTER
] Adds the directly entered time to
] Subtracts the directly entered time
ENTER
ENTER
ENTER
] Adds the first
] Subtracts the
] Subtracts the
Note: When the TC Frame rate is drop frame, the operands are first converted to
non-drop frame, the operation performed, and the result converted back to nondrop frame.
Remote 48 User’s Guide
17
Page 18

Remote 48
Other Stuff
Specifications
Dimensions:
Width = 19.25" (48.90 cm)
Depth = 12.25" (31.12 cm)
Height = 3.50" (8.89 cm)
Weight:
12.1 lbs (5.49 kg)
EDIT
Troubleshooting & Warranty Service
If you think your Remote 48 has a problem, try the following:
ALT
CONTROL
19.25”
12.25”
3.50”
Make sure the cable is plugged into the “Remote” jack on the rear panel of the
HDR24/96—the “Remote” jack is easy to confuse with the Ethernet jack.
Remove and reinstall the cable, reboot the HDR24/96, and/or replace the
Remote 48 cable (available at computer supply stores).
Be sure you are not using a CAT-5 crossover cable (usually known by its
yellow color and always labeled “Crossover”).
Put the Remote 48 into self-test mode and test the function of the switches
and LEDs.
• Place a blank floppy disk into the HDR24/96 and power up the unit
while holding down Record Ready buttons 1 and 2 on the Remote 48.
• When the unit is first powered on, all LEDs will be lit, and the Remote
48 firmware version number is shown in the LCD display.
• Pressing a button associated with an LED turns the LED off.
• Pressing a
LOCATE
button lights the LED above it in the Locator
section.
After all this, if it still doesn’t work properly please contact Mackie Designs
technical support at (800) 258-6883 (8:00 AM to 5:00 PM Pacific Time)—see the
included Warranty Card for details.
18
Other Stuff
“Mackie,” the “Running Man” figure, “HDR24/96”, “Remote 48” and
“Remote 24” are trademarks or registered trademarks of Mackie
Designs Inc. All other brand names mentioned are trademarks or
registered trademarks of their respective holders, and are hereby
acknowledged.
© 2001 Mackie Designs Inc.
All Rights Reserved.
Printed in the U.S.A.
Rev A 10/01
Page 19

Notes:
User’s Guide
Remote 48 User’s Guide
19
Page 20

 Loading...